


2-595-215-11 (1)
Tr initron Color TV
Operating Instructions
• Before operating the unit, please read this manual thoroughly and retain
it for future reference.
使用說明書
• 使用本電視機之前請先詳細閱讀此手冊﹐並妥善保存以備日後用作參考。
Panduan Pengendalian
• Sebelum mengendalikan unit, sila baca buku panduan ini dengan teliti
dan simpan untuk rujukan masa depan.
GB
CT
GB
MY
KV-SA32
© 2005 Sony Corporation
M66

WARNING
• Dangerously high voltages are present inside the TV.
• TV operating voltage: 110 – 240 V AC (for Malaysia only: 220 – 240 V AC).
• Do not plug in the power cord until you have completed making all other
connections; otherwise a minimum leakage current might flow through the antenna
and other terminals to ground.
•To avoid battery leakage and damage to the remote, remove the batteries from the
remote if you are not going to use it for several days. If any liquid leaks from the
batteries and touches your skin, immediately wash it away with water.
For your own safety, do not touch any part of the
TV, the power cord and the antenna cable during
lightning storms.
Do not place any objects on the TV. The apparatus
shall not be exposed to dripping or splashing and
that no objects filled with liquids, such as vases,
shall be placed on the apparatus.
Do not block the ventilation openings of the TV.
Do not install the TV in a confined space, such as a
bookcase or built-in cabinet.
For children’s safety, do not leave children alone
with the TV. Do not allow children to climb onto it.
Do not operate the TV if any liquid or solid object
falls into it. Have it checked immediately by
qualified personnel only.
Clean the TV with a dry and soft cloth.
Do not use benzine, thinner, or any other chemicals
to clean the TV. Do not attach anything (e.g.,
adhesive tape, cellophane tape, glue) on the painted
cabinet of the TV. Do not scratch the picture tube.
Do not open the cabinet and the rear cover of the
TV as high voltages and other hazards are present
inside the TV. Refer servicing and disposal of the
TV to qualified personnel.
2
Your TV is recommended for home use only.
Do not use the TV in any vehicle or where it may be
subject to excessive dust, heat, moisture or
vibrations.

To prevent fire or shock hazard, do not expose the
TV to rain or moisture.
Install the TV on a stable TV stand and floor which
can support the TV set weight. Ensure that the TV
stand surface is flat and its area is larger than the
bottom area of the TV.
Do not plug in too many appliances to the same
power socket. Do not damage the power cord.
Pull the power cord out by the plug. Do not pull
the power cord itself. Even if your TV is turned off,
it is still connected to the AC power source (mains)
as long as the power cord is plugged in. Unplug
the TV before moving it or if you are not going to
use it for several days.
3

x Securing the TV
To prevent the TV from falling, use the supplied screws, clamps and band to
secure the TV.
20 mm
3.8 mm
screws clamps band
Screw the band to the TV stand and to the
provided hole at the rear of your TV.
or
(1) Put a cord or chain through the clamps.
(2) Screw one clamp to a wall or pillar and
the other clamp to the provided hole at
the rear of your TV.
or
(1) Attach each end of a cord or chain to
the provided holders at the rear of
your TV.
(2) Securely fix the attached cord or chain
to a wall or pillar using an attachment
which can support the TV set weight.
Note
• Use only the supplied screws. Use of other screws may damage the TV.
4

Table of Contents
Installation
Getting Started ..................................... 6
Setting up your TV
(“Initial Setup”) .................................... 7
Overview of Controls
TV front and rear panels ..................... 9
Using the remote control and
basic functions .................................... 10
Advanced Operations
Selecting the picture and sound
modes .................................................. 12
Using the wide screen mode ............ 13
Enjoying the WEGA Theatre Mode
with center speaker ........................... 15
Watching Picture-in-Picture (PIP) ... 16
Enjoying stereo or bilingual
programs ............................................. 17
Viewing Teletext ................................. 18
Operating optional components ...... 19
Menu Adjustment
Introducing the menu system .......... 20
Changing the “Picture” setting ........ 23
Changing the “Sound” setting ......... 25
Changing the “Wide Screen”
setting .................................................. 27
Changing the Picture-in-Picture
(“PIP”) setting .................................... 28
Changing the “Channel Setup”
setting ................................................. 29
Changing the “Setup” setting .......... 31
GB
Additional Information
Connecting optional components ... 33
Troubleshooting ................................. 36
Specifications ...................... Back cover
5

Installation
x Getting Started
1
Step 1
b
b
Insert the batteries (supplied) into the remote.
Note
• Do not use old or different types of batteries together.
Step 2
Connect the antenna cable (not supplied) to 8
(antenna input) at the rear of the TV.
Tip
•You can also connect your TV to other optional components
(see page 33).
Step 3
Plug in the power cord, then press ! on the TV to
turn it on.
Note
• The 1 (standby) indicator flashes green for a few seconds
when turning on the TV. This does not indicate a
malfunction.
Step 4
6 Installation
Set up the TV by following the instructions of the
“Initial Setup” menu (see page 7).

x
AP
Program:
TV System: Auto
01
VHF Low
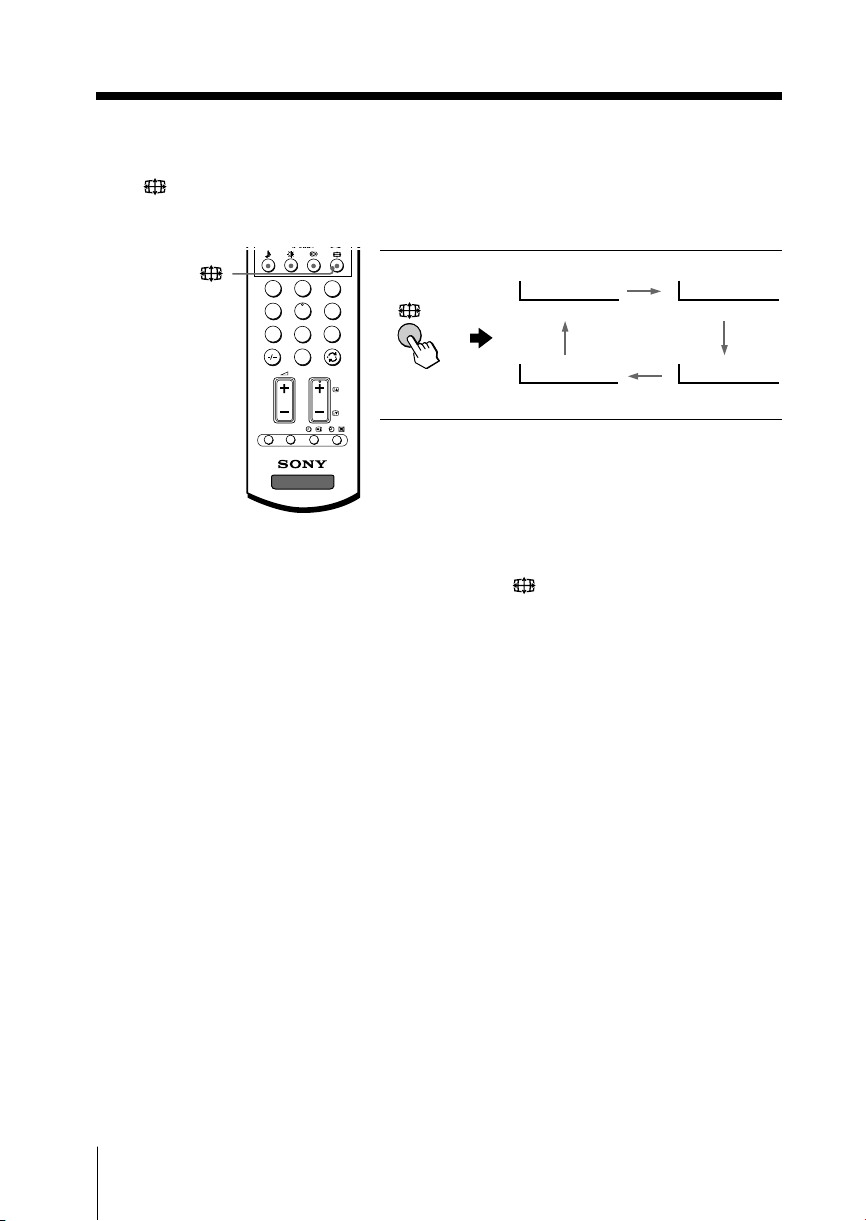
Setting up your TV
(“Initial Setup”)
When you turn on your TV for the first time, the “Initial Setup” menu will appear.
You may change the menu language, preset the TV channels automatically, change the
order of TV channels that appear on the screen and adjust the picture position using
the buttons on the TV front panel.
Tip
• The MENU, and V/v/B/b buttons on the remote control can also be used for the
operations below.
Press 2 +/– to select the desired menu
1
language, then press t.
The selected menu language appears.
Press 2 +/– to select “Yes”, then press t
2
to preset the channels automatically.
The screen will indicate automatic
presetting in progress.
After all available channels have been tuned
and stored, the “Program Sorting” menu
appears automatically on the screen.
To skip automatic channel presetting, select
“No”, then press t.
Installation
If the message “No channel found. Please
connect cable/antenna” appears, check your
TV connections, then press t.
The “Program Sorting” menu enables you
3
to change the order in which the channels
appear on the screen.
a) If you wish to keep the channels in the
b) If you wish to store the channels in a
tuned order, press MENU.
different order:
1) Press 2 +/– to select the program
number with the channel you wish to
rearrange, then press t.
Program Sorting
Program:
01
02
03
04
Select channel
Installation
continue
7

continued
The selected channel will appear on
the screen.
2) Press 2+/– to select the new
program number position for your
selected channel, then press t.
3) Repeat steps b) 1) and 2) if you wish
to change the order of the other
channels.
c) Press MENU to go to the next menu.
Press 2 +/– to adjust the bars on the top
4
and bottom of the menu if they are
slanted, then press t.
“Picture V-Position” menu appears.
If the upper and lower bars are not
5
equally positioned to the top and
bottom of the screen, press 2 +/– to
adjust them, then press t.
If no adjustment is necessary, then press t.
Press 2 +/– to select “No”, then press t.
6
This menu will not appear again the next
time you turn on the TV by pressing !.
To allow this menu to appear again, select
“Yes”, then press t.
Program Sorting
Program:
01
02
03
04
Select new position
01
Tips
•You can immediately go to the end of the ”Initial Setup” menu by pressing MENU.
•You can also set up your TV using the menu system (see page 20).
•You can also preset the channels automatically by pressing MENU (AUTO PROG) button on
the TV front panel for about five seconds.
8 Installation

Overview of Controls
x TV front and rear panels
TV rear panel
qg
c –
120W MAX 8
AUTO PROG:Press [MENU] for 5sec
L(MONO) R
MENU
SOUND
MODE
PROG
4
(AUTO PROG)
qf
qa
RLY
123
qd
C
R
C
B
qs
TV front panel
0
9
L(MONO) R
4
AUTO PROG:Press [MENU] for 5sec
MENU
SOUND
(AUTO PROG)
MODE
5876
4
PROG
3
2
1
Button/Terminal Function Page
1 ! Turn off or turn on the TV. 6
2 1 Standby indicator. 6
2 Wake Up indicator. 11
3 Remote control sensor. –
4 PROG +/– Select program number. –
5 2 +/– Adjust volume. –
6 t Select TV or video input. 33
Menu operations
5 2 +/– Select and adjust items. –
6 t Confirm selected items. –
7 MENU Display or cancel the menu. –
7 (AUTO PROG) Preset channels automatically. 8
8 SOUND MODE Select sound mode options. 12
5-Band Graphic Equalizer display will appear.
9 t4Video input terminal 4. 33
0 i Headphone jack. –
qa Component video input terminal. 34
qs T Monitor output terminal. 33
qd t1, t2, t3Video input terminal 1, 2, 3. 33
qf 8 Antenna input terminal. 33
qg Center speaker input terminal. 35
Overview of Controls
Overview of Controls
9

x Using the remote control and basic
functions
qk
ql
w;
wa
ws
wd
wf
wg
wh
wj
wk
wl
e;
ea
es
DVD
1
4
7
OPTION RESET
VIDEO
CENTERSPWEGA
2
5
8
0
PROG
TV
THEATRE
A/B
MENU
3
6
9
Button Description Page
1
2
1 ?/1 Turn off temporarily or turn –
3
3 a Display the TV program. –
4
4 t Select video input. 33
5
5 WEGA THEATRE Select WEGA Theatre Mode. 15
6
6 CENTER SP Select TV’s center speaker mode. 15
7
8
qa Change the picture size. 14
qd Select surround mode options: –
9
q;
qa
qs
qf Jump to last program number –
qd
qg PROG +/– Select program number. –
qk Mute the sound. –
qf
ql
w; DVD
qg
wj Select sound mode options. 12
qh
qj
wk Select picture mode options. 12
on the TV.
“TruSurround” (surround sound
that spreads out to the rear of a
room), “WOW” (full, deep bass
sound), “Simulated” (stereo-like
monaural sound), “Off”.
that has been watched for at
least five seconds.
Display on-screen information. –
Select component video input. 34
5-Band Graphic Equalizer
display will appear.
wl 0 – 9, - Input numbers. –
e; 2 +/– Adjust volume. –
es RESET Set TV to factory setting. 36
Menu operations
8 MENU Display or cancel the menu. 22
wg V, v, B, b Select and adjust items. 22
wh Confirm selected items. 22
Stereo/bilingual operations
7 A/B Select stereo/bilingual mode. 17
Timer operations
qh Set TV to turn off automatically
(Sleep Timer) according to the desired period
of time (max. of one hour and
30 min).
–
10 Overview of Controls

Button Description Page
qj
(Wake Up Timer)
Teletext operations (green label)
Set TV to turn on automatically according to the
desired period of time (max. of 12 hours).
The indicator on TV lights up amber once you
set the wake up timer.
If no buttons or controls are pressed for more than
one hour after the TV is turned on using the wake up
timer, the TV automatically goes into standby mode.
–
4 Stop Teletext from scrolling. 18
7 Enlarge the Teletext display. 18
q; Display Teletext broadcast. 18
qs z (red, green, Access a FASTEXT menu. 18
yellow, blue)
, Display the next or previous page. 18
qg
qh Show TV screen while waiting for Teletext page. 18
qj Display Teletext service contents. 18
ql Reveal concealed information. 18
PIP operation (yellow label)
9 PIP PROG +/ Display and change programs in the sub screen. 16
PIP PROG –
wa Adjust position of sub screen. 16
ws Swap main and sub screens. 16
wd Swap sound between main and sub screen. 16
wf Display a sub screen. 16
wh Change sub screen to main screen. 16
Optional components operations
2 VIDEO ?/1 Power. 19
qk Mute the sound. 19
wg > Fast forward/Step forward. 19
wg . Rewind/Step backward. 19
wg x Stop. 19
wg X Pause. 19
wh N Play. 19
e; 2 +/– Adjust volume. 19
ea OPTION Operate optional components. 19
Overview of Controls
WOW, TruSurround, SRS and symbol are trademarks of SRS Labs, Inc. WOW
and TruSurround technologies are incorporated under license from SRS Labs, Inc.
Licensed by BBE Sound, Inc. under USP4638258, 4482866.
“BBE” and BBE symbol are trademarks of BBE Sound, Inc.
Overview of Controls
11

Advanced Operations
x Selecting the picture and sound
modes
You can select picture and sound modes and adjust the setting to your
preference in the “Personal” option.
VIDEO
DVD
CENTERSPWEGA
Selecting the picture mode
Press to select the desired picture mode.
THEATRE
Select To view
A/B
“Dynamic” high contrast pictures.
MENU
“Standard” normal pictures.
“Soft” mild pictures.
“Personal” the last adjusted picture setting
from the “Picture Adjustment”
option in the menu (see page 24).
2
1
3
4
6
5
8
9
7
0
Selecting the sound mode
Press (or SOUND MODE on the front panel) to select the desired sound mode.
5-Band Graphic Equalizer display will appear.
Select To listen to
“Dynamic” dynamic and clear sound that emphasizes both the low
“Drama” sound that emphasizes voice and high tones.
Dynamic
and high tones.
100 300 1k 3k 8k
Drama
100 300 1k 3k 8k
“Soft” soft, natural and relaxing sounds.
“Personal” the last adjusted sound setting from the
Soft
100 300 1k 3k 8k
Personal
“Sound Adjustment” option in the menu (see page 26).
100 300 1k 3k 8k
12 Advanced Operations

x Using the wide screen mode
The wide screen mode feature allows you to watch the picture filling the 16:9
screen of the TV.
Watching the picture in wide screen mode automatically –
Auto Wide
The TV automatically selects optimum wide screen mode according to the signal
input and displays the picture to fill the 16:9 screen.
The examples in the table below show the settings preset at the factory; “Auto Wide”
is set to “On” and “4:3 Default” is set to “Wide Zoom” in the “Wide Screen” menu
(see page 27).
When receiving … Auto Wide The picture changes to
normal 4:3
aspect ratio
picture with
or without an
ID-1 or WSS
signal.
letter box
picture with an
ID-1 or WSS
signal.
squeezed
picture with
an ID-1 or WSS
signal.
* When a normal 4:3 picture is received, “Wide Zoom” mode is automatically selected with the
factory setting. You can display picture as it is without enlarging it (“Normal” mode) if you set
“4:3 Default” in the “Wide Screen” menu to “Normal” (see page 27).
Note
• The Auto Wide feature may not work correctly depending on the quality of signal. In this case,
select the wide screen mode manually using the button (see page 14).
functions to select …
Wide
Zoom*
Zoom
Black bands may appear on the
top and bottom of the screen.
Full
continue
Advanced Operations
13
continued
Watching the picture in wide screen mode manually
Press repeatedly until the mode indication you want is displayed on the screen.
3
2
1
4
5
6
8
9
7
0
PROG
OPTION RESET
TV
Notes
•You can also select the wide screen mode manually using the menu (see page 27).
• When the wide screen mode is selected by pressing the
menu, the Auto Wide feature does not work temporarily.
The Auto Wide feature functions again when:
– you change a TV channel.
– you change the video input.
– the TV is turned off and on again.
– the signal format is changed.
Wide Zoom Normal
Zoom Full
button on the remote or using the
14 Advanced Operations

x Enjoying the WEGA Theatre Mode
with center speaker
The WEGA Theatre Mode enables you to enjoy the best picture, sound and
surround effect of a cinema from a Sony DVD source. You can use your TV
speaker as the center speaker of your audio system for optimum vocal
enhancement and control its sound volume from the remote of the TV.
Setting up WEGA Theatre Mode
1. Connect the center speaker terminals of the amplifier to the center speaker
input terminal on the TV (see page 35).
2. Select the proper video input from “WEGA Theatre Setup” menu and turn on
the connected equipment (see page 31).
3. Set up the remote to work with the connected equipment (see page 19).
CENTER SP
WEGA THEATRE
DVD
VIDEO
CENTERSPWEGA
THEATRE
A/B
MENU
To Pr ess
switch to WEGA WEGA THEATRE.
Theatre Mode Be sure to aim the remote control
at the TV set and connected
equipment for about one second
after the button is pressed.
The connected equipment turns
on automatically from standby
mode and will start playing.
The “Picture Mode” and “Sound
Mode” will switch automatically
to “Personal” and you can adjust
the setting to your personal
preference (see pages 24 and 26).
To return to normal speaker
mode, press the button repeatedly
until “MAIN Speaker” appears.
2 +/–
1
4
7
OPTION RESET
3
2
6
5
9
8
0
PROG
switch to center CENTER SP repeatedly until
speaker mode “CENTER IN Speaker” appears.
adjust center 2 +/–
TV
speaker volume
Notes
• Be sure to place your TV and connected equipment adjacent to each other so that you can
control both the TV and the connected equipment by using the TV’s remote control at the
same time (see page 19).
• The WEGA Theatre and center speaker modes are automatically cancelled when you change
the program number, video input or turn the TV off and on again.
• When the TV is in the center speaker mode, you cannot use the PIP feature, change the
surround sound and the “Intelligent Volume” mode.
• Some equipment might not respond properly when WEGA THEATRE button is pressed. In
this case, use the equipment’s own remote control.
Advanced Operations
15

x Watching Picture-in-Picture (PIP)
With the PIP feature, you can display two different TV
programs or video input at the same time by using the
button.
VIDEO
DVD
CENTERSPWEGA
PIP PROG +/
PIP PROG –
To
Display a sub screen
THEATRE
A/B
Change a program number
MENU
in the sub screen
Adjust position of sub screen
Swap pictures between
Press
.
To cancel the sub screen, press
the button again.
PIP PROG + or
PIP PROG –.
.
.
the main and sub screens
1
2
4
5
8
7
0
main and sub screens
3
6
A “ ” symbol will appear
9
next to the program
number or video input
Swap sound between the
.
display to indicate which
screen you are hearing.
Selecting TV program using PIP
You can select your desired TV program directly from the PIP sub screen by using PIP
PROG +/– buttons.
1. Press PIP PROG +/– until the desired program appears in the sub screen.
2. Press
Notes
• The PIP feature is not available when the TV is in the center speaker mode (page 15) and you
cannot set the TV to the center speaker mode while viewing the PIP.
•You can only enjoy stereo sound from the main screen.
•You cannot change the picture to a video input in the sub screen. You can only display a video
input, in the sub screen by swapping the pictures when a video input is displayed in the main
screen.
• The picture and sound from the T (monitor output) terminals will always be from the main
screen, even when you select the sub screen sound by pressing
to change the sub screen program to the main screen.
(see page 33).
16 Advanced Operations

x
Enjoying stereo or bilingual programs
You can enjoy stereo sound or bilingual programs of NICAM and A2 stereo
systems by using the A/B button.
A/B
DVD
1
4
7
OPTION RESET
VIDEO
CENTERSPWEGA
2
5
8
0
PROG
When receiving a NICAM program
Broadcasting On-screen display (Selected sound)
THEATRE
NICAM
stereo
A/B
MENU
NICAM
bilingual
NICAM
monaural
3
6
9
When receiving an A2 program
NICAM
(Stereo sound)
t
NICAM Main
(Main sound)
t
NICAM Main
(Main sound)
t
Broadcasting On-screen display (Selected sound)
A2
stereo
Stereo
(Stereo sound)
t
NICAM Sub
tt
(Sub sound)
t
t
(Regular sound)
Mono
(Regular sound)
Mono
(Regular sound)
Mono
(Regular sound)
t
TV
A2
bilingual
Main
(Main sound)
t
(Sub sound)
t
Note
• If the stereo sound is noisy when receiving a stereo program, select “Mono”. The sound
becomes monaural but the noise is reduced.
Mono
Sub
Advanced Operations
17

x Viewing Teletext
Some TV stations broadcast an information service called Teletext which allows
you to receive various information, such as stock market reports and news.
You can use the buttons on the remote to view Teletext.
z (red,
green,
yellow,
blue)
,
DVD
1
4
7
OPTION RESET
VIDEO
CENTERSPWEGA
2
5
8
0
PROG
TV
THEATRE
A/B
MENU
3
6
9
To Do this
display a Teletext Press . Each time you press , the
page on the screen changes as follows:
TV picture Teletext t Teletext and TV t TV.
If there is no Teletext broadcast, “100” is
displayed at the top left corner of the
screen.
check the contents Press .
of a Teletext service An overview of the Teletext contents,
including page numbers, appears on the
screen.
select a Teletext page Press the number buttons to enter the
three-digit page number of the desired
Teletext page. If you make a mistake,
reenter the correct page number. To
access the next or previous page, press
or .
hold (pause) a Press to display the symbol “ ” at
Teletext display the top left corner of the screen. To
resume normal Teletext viewing, press
.
reveal concealed Press .
information (e.g., To conceal the information, press the
an answer to a quiz) button again.
enlarge the Teletext Press . Each time you press , the
display Teletext display changes as follows:
Enlarge upper half t Enlarge lower
half t Normal size.
stand by for a Teletext (1) Enter the Teletext page number that
page while watching you want to refer to, then press
a TV program (2) When the page number is displayed,
press to show the text.
select a FASTEXT Press z (red, green, yellow and blue)
menu or the colored that corresponds to the desired menu or
boxes page number.
turn off Teletext Press a.
.
Note
• The FASTEXT feature can be used only when the FASTEXT broadcast is available.
18 Menu Adjustment
Advanced Operations

x Operating optional components
You can use the supplied remote to operate Sony audio/video equipment.
Setting up the remote to work with other connected equipment
While keeping VIDEO ?/1 For example, to operate a
pressed, press the corresponding Sony 8 mm VCR:
number button for the desired
equipment (see the chart
below).
To control Hold down VIDEO ?/1 and press
Audio System 1, 1x, 2 or 3 0, 1, 2, or 3
DVD 1, 2 or 3 4, 5 or 6
VTR1 (Beta), VTR2 (8 mm) or VTR3 (VHS) 7, 8 or 9
Operating audio/video equipment
Press VIDEO ?/1 or while keeping OPTION pressed, press N , x , ., > ,
X , or 2 +/– (see the chart below).
To P ress
turn on/off VIDEO ?/1
play N while keeping OPTION pressed.
stop x while keeping OPTION pressed.
fast forward/ step forward or rewind/ > or . while keeping OPTION
step backward pressed.
pause X while keeping OPTION pressed.
mute the sound while keeping OPTION pressed.
(Audio System 1, 1x, 2 or 3 only)
adjust volume 2 +/– while keeping OPTION pressed.
(Audio System 1, 1x, 2 or 3 only)
VIDEO
8
+
Press again to resume normal playback.
Notes
• If the equipment does not have a certain function, the corresponding button on the remote
will not operate.
• Some equipment might not respond properly to buttons on TV’s remote. In this case, use the
equipment’s own remote control.
Advanced Operations
19

Menu Adjustment
x Introducing the menu system
The MENU button lets you open a menu and change the settings of your TV.
The following is an overview of the menu system.
Picture icon
Sound icon
Wide Screen icon
PIP icon
Channel Setup icon
Setup icon
Menu level 1
Level 1
“Picture”
“Sound”
Select
Level 2
“Mode”
“Picture Adjustment”
“Color Temperature”
“3D Intelligent
Picture”
“Mode”
“Sound Adjustment”
“Balance”
“Intelligent Volume”
“Surround”
Return icon
Setup
Language:
Picture Position
WEGA Theatre Setup
Video Label
Color System:
Confirm
End
Name of the current
menu
Menu level 3
Menu level 2
User Guidance
Level 3/Function
Select the picture mode:
“Dynamic” t “Standard” t “Soft” t “Personal”
Adjust the “Personal” option:
“Picture” t “Brightness” t “Color” t
“Hue” t “Sharpness” t “Reset”
Adjust white color tint:
“Cool” t “Neutral” t “Warm”
Optimize picture quality:
“On” t “Off”
Select the sound mode:
“Dynamic” t “Drama” t “Soft” t “Personal”
Adjust sound frequency settings of “Personal”
option:
“Adjust” t “Reset”
Select to emphasize the left and right speakers.
Adjust volume automatically:
“On” t “Off”
Select the surround mode:
“TruSurround” t “WOW” t “Simulated” t
“Off”
Page
23
25
20 Menu Adjustment

Level 1
“Wide Screen”
“PIP”
“Channel Setup”
“Setup”
Level 2
“Wide Mode”
“Auto Wide”
“4:3 Default”
“V Center”
“V Size”
“PIP”
“Swap”
“Position”
“Auto Program”
“Manual Program”
“Program Label”
“Program Block”
“Program Sorting”
“Language”
“Picture Position”
“WEGA Theatre
Setup”
“Direct Input”
“Speaker”
“Video Label”
“Color System”
Level 3/Function
Select the wide screen mode:
“Wide Zoom” t “Normal”t “Full”t “Zoom”
Select an optimum wide screen mode automatically:
“On” t “Off”
Change the picture to “Wide Zoom”or “Normal”
when the normal 4:3 picture with or without ID-1
or WSS signal is received.
Adjust the vertical position of the picture in
“Wide Zoom” or “Zoom” mode.
Adjust the vertical size of the picture in
“Wide Zoom” or “Zoom” mode.
Display a sub screen within the main picture:
“On” t “Off”
Exchange pictures between main screen and sub
screen.
Change the position of the sub screen
Preset channels automatically.
Preset channels manually.
Label the program number.
Block unwanted programs.
Change the order in which the channels appear on
the screen.
Change the menu language:
“English” t “
Adjust the picture position.
Select the WEGA Theatre Mode.
Select the input for connected equipment.
Select the speaker mode:
“MAIN” t “CENTER IN”
Label the connected equipment.
Select the color system:
“Auto” t “PAL” t “SECAM” t
“NTSC3.58” t “NTSC4.43”
” (Chinese)
Page
27
28
29
31
continue
Menu Adjustment
21

Select
End
Channel Setup
Confirm
Auto Program
Program Label
Manual Program
Program Block
Program Sorting
continued
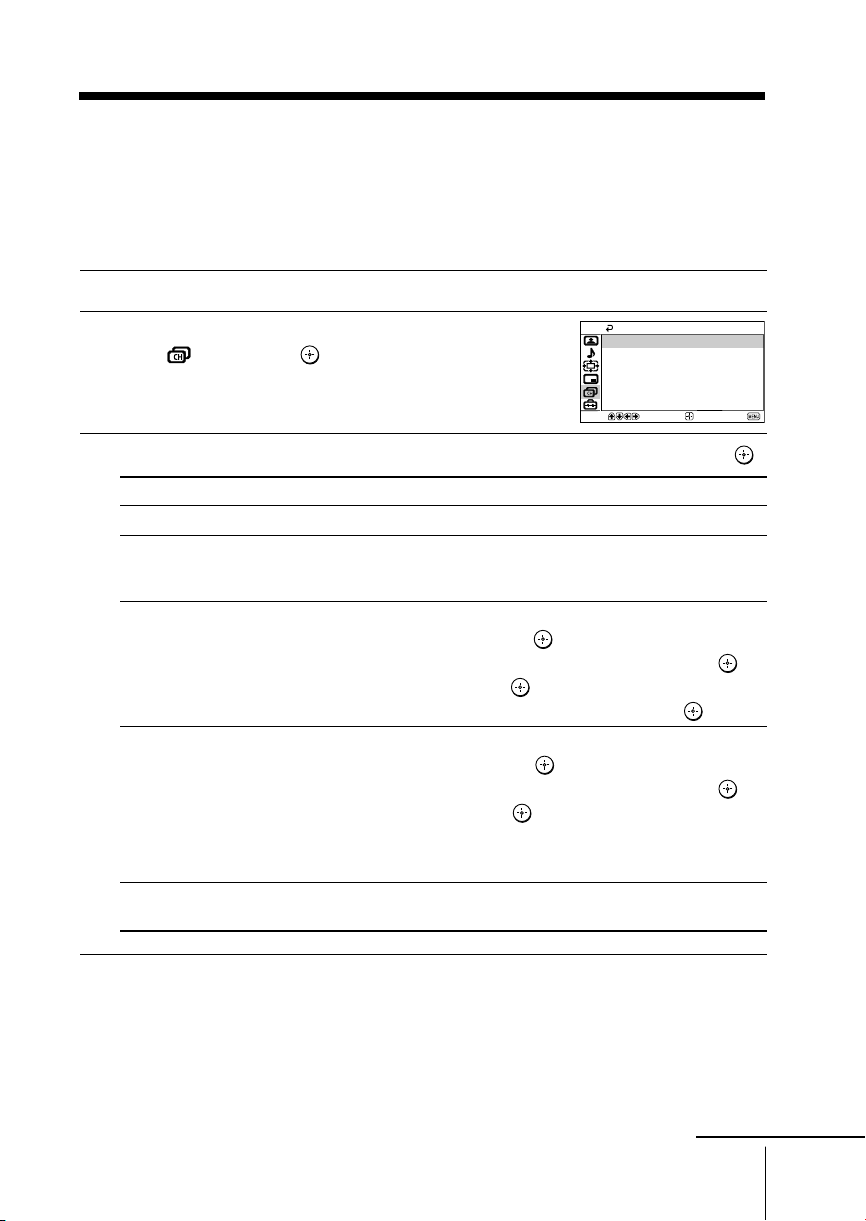
How to use the menu
MENU
Press MENU to
display the menu.
Picture
Mode: Dynamic
Picture Adjustment
Color Temperature: Cool
3D Intelligent Picture: On
End
End
1
4
7
OPTION RESET
Select
3
2
6
5
8
9
0
PROG
Press V or v to select
the desired item.
Press
(or b) to
Select
Confirm
Channel Setup
Auto Program
Manual Program
Program Label
Program Block
Program Sorting
Confirm
confirm your
TV
selection and
go to the next
level.
Other menu operations
To
Adjust the setting value
Move to the next/previous menu level
Cancel the menu
Tips
•If you want to exit from Menu level 2 to Menu level 1, press V or v until the return icon ( ) is
highlighted, then press .
• The MENU, t and 2 +/– buttons on the TV front panel can also be used for the operations
above (see page 9).
Press
V, v, B or b.
B or b.
MENU.
Note
• When a feature is dimmed in the menu, it is not selectable.
22 Menu Adjustment

x Changing the “Picture” setting
Confirm
End
Picture
Color Temperature: Cool
Picture Adjustment
Mode: Dynamic
3D Intelligent Picture: On
Select
The “Picture” menu allows you to adjust the picture settings.
Press MENU.
1
Make sure the “Picture” icon ( ) is
2
selected, then press
Press V or v to select the desired item (e.g., “Mode”), then press .
3
Select To
“Mode” choose either “Dynamic”, “Standard”, “Soft” or “Personal”*
“Color Temperature” adjust white color tint.
“3D Intelligent Picture” optimize picture quality.
*You can adjust the setting to your personal preference in the “Picture Adjustment” and
“Color Temperature” options only when the “Personal” mode is selected (see page 24).
.
(see page 12).
Choose either “Cool” (blue tint), “Neutral” (neutral tint) or
“Warm” (red tint).
Automatically, the picture will become clearer and sharper if the
signal is good and noise will be reduced if the signal is noisy.
Press V or v to select “On”, then press .
To cancel, select “Off”, then press .
Note
• For NTSC 3.58 color system, “3D Comb Filter : On” or “3D–NR : On” display will appear
when “3D Intelligent Picture” changes from one mode to the other . For PAL color system,
Digital Comb Filter and 3D-NR are also available.
continue
Menu Adjustment
23

continued
Adjusting the “Picture Adjustment” items under
“Personal” mode
Press V or v to select either “Picture” (contrast), “Brightness”, “Color”,
1
“Hue” (color tones) or “Sharpness”, then press
Selecting “Reset” will set your TV to the factory setting.
Press V,v,B or b to adjust the setting of your selected item, then press .
2
Repeat the above steps to adjust other items.
3
The adjusted settings will be received when you select “Personal”.
Notes
• “Hue” can be adjusted for the NTSC color system only.
• Reducing “Sharpness” can also reduce picture noise.
.
24 Menu Adjustment

x Changing the “Sound” setting
Balance
Intelligent Volume:
Surround:
Sound Adjustment
Dynamic
Mode:
Sound
Confirm
End
Select
Off
Off
The “Sound” menu allows you to adjust the sound settings.
Press MENU.
1
Press V or v to select the “Sound”
2
icon (
Press V or v to select the desired item (e.g., “Mode”), then press .
3
Select To
“Mode” choose either “Dynamic”, “Drama”, “Soft” or “Personal”*
“Balance” Press v or B to emphasize the left speaker.
“Intelligent Volume” adjust the volume of all program numbers and video inputs
“Surround” choose either “TruSurround”, “WOW”**, “Simulated” or “Off”
*You can adjust the setting to your personal preference in the “Sound Adjustment”
** BBE High Definition sound is fully activated maximizing the sound effect in the WOW
), then press .
(see page 12).
Press V or b to emphasize the right speaker.
automatically.
Press V or v to select “On”, then press
To cancel, select “Off”, then press .
(see page 10).
option only when the “Personal” mode is selected (see page 26).
mode.
.
Note
• “Intelligent Volume” is not selectable when “TruSurround” is selected.
continue
Menu Adjustment
25

continued
Adjusting the “Sound Adjustment” item under
“Personal” mode
The 5-Band Graphic Equalizer feature allows you to adjust sound frequency settings
of “Personal” mode in the menu.
Make sure that “Adjust” is selected,
1
then press
.
Adjustment: Personal
Adjust
Reset
Selecting “Reset” will set your TV to
the factory setting.
Select
Press B or b to select the desired sound frequency, then press V or v to
2
adjust the setting and press
.
Confirm
100 300 1k 3k 8k
End
The adjusted settings will be received when you select “Personal”.
Notes
• Adjusting higher frequency will affect higher pitched sound and adjusting lower frequency
will affect lower pitched sound.
•You may display the settings directly using the SOUND MODE button on the TV front panel
(see page 9) or
button on the remote control (see page 10).
26 Menu Adjustment

x Changing the “Wide Screen” setting
4:3 Default:
V Center:
V Size:
Auto Wide:
Wide Zoom
Wide Mode:
Wide Screen
Confirm
End
Select
00
00
On
Wide Zoom
The “Wide Screen” menu allows you to watch the picture filling the 16:9 screen
of the TV.
Press MENU.
1
Press V or v to select the “Wide Screen”
2
icon ( ), then press .
Press V or v to select the desired item (e.g., “Wide Mode”), then press .
3
Select To
“Wide Mode” select the desired wide screen mode to fit the 16:9 screen.
“Auto Wide” automatically display the picture in optimum wide screen mode.
“4:3 Default” display a 4:3 picture in “Wide Zoom” or “Normal” mode.
“V Center” adjust the vertical position of the picture in “Wide Zoom” or
“V Size” adjust the vertical size of the picture in “Wide Zoom” or “Zoom”
Press V or v to select “Wide Zoom”, “Normal”, “Full” or
“Zoom”, then press
Press V or v to select the “On”, then press .
Select “Off” if you want to display any picture in currently
selected wide screen mode.
Press V or v to select the “Wide Zoom” or “Normal”, then
press
“Zoom” mode.
Press V or v to move the picture, then press
mode.
Press V or v to adjust the vertical size, then press .
.
.
.
Tip
•You can also change to wide-mode picture size by pressing the button on the remote
control (see page 14)
Note
• “4:3 Default” does not function when “Auto Wide” is set to “Off”.
Menu Adjustment
27

PIP
Swap
PIP:
Position:
Off
Confirm
End
Select
x Changing the Picture-in-Picture
(“PIP”) setting
The “PIP” menu allows you to display a sub screen, exchange pictures between
the main and sub screens and change the sub screen position.
Press MENU.
1
Press V or v to select the “PIP” icon ( ),
2
then press
Press V or v to select the desired item (e.g., “PIP”), then press .
3
Select
“PIP”
“Swap”
“Position”
.
To
display a sub screen.
Press V or v to select “On”, then press
To cancel, press or select “Off”, then press .
exchange pictures between the main screen and sub screen.
change the position of the sub screen.
Press V or v to select the desired position, then press
.
.
28 Menu Adjustment
x C
hanging the “Channel Setup”
setting
The “Channel Setup” menu allows you to preset channels automatically,
manually preset channels, label the program number, block unwanted programs
and change the order of TV channels that appear on the screen.
Press MENU.
1
Press V or v to select the “Channel Setup”
2
icon (
Press V or v to select the desired item (e.g., “Auto Program”), then press .
3
Select To
“Auto Program” preset channels automatically.
“Manual Program” manually preset desired channels and channels that cannot be
“Program Label” label the program number.
“Program Block” block unwanted programs.
“Program Sorting” change the order in which the channels appear on the screen.
), then press .
preset automatically (see Presetting channels manually on
page 30).
(1) Select “Program” and press
(2) Select “Label” and press . Press V or v to select
(1) Select “Program” and press .
(2) Select “Block” and press , then press V or v to choose
If you preset a blocked program number, that program number
will be unblocked automatically.
(see step 3 b) of the section “Initial Setup” in page 7).
.
Press V or v to select the program number, then press .
alphanumeric characters for the label, then press .
Press V or v to select the program number, then press .
either “On” or “Off”.
Auto Program
Manual Program
Program Label
Program Block
Program Sorting
Select
Channel Setup
Confirm
End
Notes
• You may label the program numbers so that you can see the program labels in the “Program
Sorting” menu.
• If you sort a blocked program, that program will remain blocked.
continue
Menu Adjustment
29

continued
Presetting channels manually
After selecting “Manual Program”, select the program
1
number to which you want to preset a channel.
(1) Make sure “Program” is selected, then press
.
(2) Press V or v until the program number you want
to preset appears on the menu, then press
Select the desired channel.
2
.
(1) Make sure either “VHF Low”, “VHF High” or “UHF” is selected, then press
.
(2) Press V or v until the desired channel’s broadcast appears on the TV screen,
then press
If the sound of the desired channel is abnormal, select the appropriate TV
3
system.
(1) Press V or v
(2) Press V or v
If you are not satisfied with the picture and sound quality, you may be able
4
to improve them by using the “Fine” tuning feature.
(1) Press V or v
(2) Press V or v
Press V,v,B or b until the picture and sound quality are optimal, then press .
(3)
.
to select “TV System”, then press .
until the sound becomes normal, then press .
to select “Fine”, then press .
to select “Manual”, then press .
The + or – icon on the menu flashes while tuning.
Program:
Select
Manual Program
TV System:
VHF Low
Fine:
Skip:
Signal Booster:
Confirm
01
B/G
Auto
Off
Auto
End
If you want to skip this program number when using PROG +/–, you can
5
select the “Skip” feature.
(1) Press V or v
(2) Press V or v
To cancel, select “Off”, then press
If the TV signal is too strong (picture distorted; picture with lines; signal
6
interference) or weak (snowy picture), you may be able to improve the
picture quality by setting the “Signal Booster” feature.
(1) Press V or v
(2) Press V or v
signal interference) or “Auto” (for snowy picture), then press
30 Menu Adjustment
to select “Skip”, then press .
to select “On”, then press .
.
to select “Signal Booster”, then press .
to select either “Off”(for picture distorted; picture with lines;
.

x Changing the “Setup” setting
Confirm
End
Setup
WEGA Theatre Setup
Picture Position
Language: English
Video Label
Color System: Auto
Select
The “Setup” menu allows you to change the menu language, adjust the picture
position, setup WEGA Theatre Mode, label the connected equipment and select
the color system.
Press MENU.
1
Press V or v to select the “Setup” icon ( ),
2
then press
Press V or v to select the desired item (e.g., “Language”), then press .
3
Select To
“Language” change the menu language.
“Picture Position” adjust the picture position when it is not aligned with the TV screen.
“WEGA Theatre Setup” setup WEGA Theatre Mode for best picture, sound and surround
.
Press V or v to select either “English” or “ ” (Chinese), then
press
Press V or v to select “Picture Rotation” or “Picture V-Position”,
then press
Press V, v, B or b to adjust picture position, then press .
effect enjoyment of a cinema (see page 15).
Press V or v to select “Direct Input”, then press .
Select either “Video 1”, “Video 2”, “Video 3”, “Video 4” or
“DVD” for the connected equipment that you want to view with
WEGA theatre, then press
Select “Speaker” and press . Normally select “MAIN”.
When you want to use the TV’s speakers as the center speaker,
press V or v to select “CENTER IN”, then press .
.
.
.
continue
Menu Adjustment
31

continued
Select To
“Video Label” label the connected equipment.
(1) Select “Video Input” and press .
Press V or v to select the input you want to label, then press .
(2) Select “Label” and press
label options: ”Video 1/Video 2/Video 3/Video 4/ DVD”,
“VCR”, “SAT”, “Game” or “Edit”*.
*You may edit the video label. Press V or v to select
alphanumeric characters for the label, then press
, then press V or v to select the
.
“Color System” select the color system.
Press V or v to select “Auto”, “PAL”, “SECAM”, “NTSC3.58” or
“NTSC4.43”, then press
. Normally, set this to “Auto”.
32 Menu Adjustment

Additional Information
x Connecting optional components
Connecting to the video input terminal ( t )
TV front panel
S Video cable
(not supplied)
Camcorder
Audio/Video
cable
(not supplied)
Video game
equipment
TV rear panel
4
L(MONO)
R
Antenna cable
(not supplied)
Audio/Video
cable
c –
120W MAX 8
RLY
123
C
R
C
B
(not supplied)
S Video cable
(not supplied)
VCR
Notes
• If you connect a VCR to 8 (antenna input), preset the signal output from the VCR to the
program number 0 on the TV (see page 30).
• When both
(S video) and (video) for
t1
or
t4
are connected at the same time,
(S video) is automatically selected. To view (video), disconnect the S video cable.
Connecting to the monitor output terminal ( T )
TV rear panel
c –
120W MAX 8
RLY
123
C
R
C
B
Audio/Video
cable
(not supplied)
Audio system
VCR
continue
Additional Information
33

continued
Connecting to the component video input terminal ( )
TV rear panel
Component
C
R
C
B
c –
120W MAX 8
RLY
123
Notes
• If your DVD player can output interlace and progressive mode signals, select the interlace
output when connecting to
(component video input) on your TV. Your TV can receive
either 525i/60Hz or 625i/50Hz interlace signals.
• Some DVD player terminals may be labeled differently:
Connect To (on the DVD player)
Y (green) Y
CB (blue) CB, PB, Cb or B-Y
CR (red) CR, PR, Cr or R-Y
• If you select “DVD” on your TV screen, the signal from the
be output properly. This does not indicate a malfunction.
video cable
(not supplied)
DVD player
Audio cable
(not supplied)
T (monitor output) jacks will not
34 Additional Information

123
RLY
C
B
C
R
Connecting an amplifier to the center speaker input
terminal (
If you use an amplifier with a Dolby* surround decoder instead of the TV’s audio
system, you can use the TV’s speakers as the center speaker for your audio system.
Using the speaker cords supplied with the amplifier, connect the center speaker
terminals of the amplifier to the (center speaker input) terminals on the TV.
)
TV rear panel
Component
video cable
DVD player
(not supplied)
c
120W MAX 8
120W MAX 8
Audio cable
(not supplied)
C –
Optical digital
cable
(not supplied)
Amplifier
Front
speaker (L)
Rear
speaker (L)
Front
speaker (R)
Rear
speaker (R)
Woofer
Notes
•To use the TV’s speakers as the center speaker, you can press the CENTER SP button on the
remote control (see page 10) or display the “WEGA Theatre Setup” from “Setup” menu and
select “CENTER IN” for “Speaker” (see page 31).
• If your TV is set to “CENTER IN Speaker” and nothing is connected to the center speaker
input terminals on the rear of TV, or the sound source emitted from the amplifier does not
contain the center speaker channel, no sound will be heard from the TV’s speaker.
* “Dolby” is a trademark of Dolby Laboratories.
Additional Information
35

x Troubleshooting
7
8
9
If you find any problem while viewing your TV, you can either use the Reset
function or check the Troubleshooting guide below. If the problem persists,
contact your Sony dealer.
0
PROG
OPTION RESET
RESET
TV
Troubleshooting guide
Symptom
Snowy picture
Noisy sound
Distorted picture
Noisy sound
Possible cause
• The connection is loose
or the cable is
damaged.
• The antenna setup is
inappropriate.
• Channel presetting is
inappropriate or
incomplete.
• Signal transmission is
low.
•Broadcast signals are
too strong.
Reset function
Press the RESET button on your remote control.
Your TV will go blank for a few seconds
then the “Initial Setup” menu will appear.
Pressing RESET will set your TV to the factory
setting, but certain problems may be solved.
Solutions
• Check the antenna cable and connection
on the TV, VCR and at the wall.
• Check the antenna setup.
Contact a Sony dealer for advice.
• Display the “Channel Setup” menu and
select “Manual Program” to preset the
channel again.
• Display the “Channel Setup” menu and
set the “Signal Booster” to “Auto” from
“Manual Program”.
•Try using an external booster.
•Turn off or disconnect the external booster
if it is in use.
• Display the “Channel Setup” menu and
set the “Signal Booster” to “Off” from
“Manual Program”.
Page
33
–
30
30
–
–
30
Good picture
Noisy sound
36 Additional Information
• The TV system setting
is inappropriate.
• PIP sound is selected
when PIP is displayed.
• Display the “Channel Setup” menu and
select the appropriate “TV System” from
“Manual Program”.
•Press
or .
30
16

No picture
No sound
Possible causeSymptom Solutions Page
• The power cord,
antenna or VCR is not
connected.
• The TV is not turned
on.
• Check the power cord, antenna and VCR
connections.
•Press
?/1
(power).
•Press ! (main power) on the TV to turn
off the TV for about five seconds, then
turn it on again.
33
10
9
Good picture
No sound
Dotted lines or
stripes
Double images or
“ghosts”
No color
• The volume level is too
low.
• The sound is muted.
• PIP sound is selected
when PIP is displayed.
• There is local
interference from cars,
neon signs, hair dryers,
power generators, etc.
•Broadcast signals are
reflected by nearby
mountains or
buildings.
• The antenna setup is
inappropriate.
Use of an external
•
booster is inappropriate.
• The color level setting
is too low.
• The color system
setting is
inappropriate.
• The antenna setup is
inappropriate.
•Press 2 + to increase the volume level.
•Press to cancel the muting.
•Press
or .
• Do not use a hair dryer or other
equipment near the TV.
• Check the antenna setup. Contact a Sony
dealer for advice.
• Use a highly directional antenna.
• Use the fine tuning (“Fine”) function.
• Check the antenna setup. Contact a Sony
dealer for advice.
•Turn off or disconnect the external booster
if it is in use.
•
Display the “Picture” menu and select
“Personal” of “Mode”, then adjust the
“Color” level in “Picture Adjustment”.
• Display the “Setup” menu and check the
“Color System” setting (usually set this to
“Auto”).
• Check the antenna setup. Contact a Sony
dealer for advice.
10
10
16
–
–
–
30
–
–
24
32
–
continue
Additional Information
37

continued
Picture slant
Good morning!
Abnormal color
patches
TV cannot receive
stereo broadcast
sound.
or
Stereo broadcast
sound switches
on and off or
is distorted.
“100”
appears at
the top of the
screen and there
is no Teletext
display.
Teletext display is
incomplete
(snowy picture or
double image
s).
Possible causeSymptom
• The magnetic
disturbance from
external speakers or
other equipment, or
the direction of the
earth’s magnetic field
may affect the TV.
• The magnetic
disturbance from
external speakers or
other equipment, or the
direction of the earth’s
magnetic field may
affect the TV.
•
The connection is
loose or the cable is
damaged.
• The antenna setup is
inappropriate.
• The channel carries no
Teletext broadcast.
Connection is loose or
•
the cable is damaged.
• The antenna setup is
inappropriate.
• Signal transmission
is too low.
Solutions
• Keep external speakers or other electrical
equipment away from the TV.
• Display the “Picture Position” under
“Setup” menu, then adjust “Picture
Rotation” and “Picture V-Position” so that
the picture is aligned to the TV screen.
• Keep external speakers or other
equipment away from the TV. Do not
move the TV while the TV is turned on.
Press ! (main power) on the TV to turn
off the TV for about 15 minutes, then turn
it on again to demagnetize the TV.
• Check the antenna cable and connection
on the TV, VCR and at the wall.
• Check the antenna setup. Contact a Sony
dealer for advice.
—
• Check the antenna cable and connection
on the TV, VCR, and at the wall.
• Check the antenna setup. Contact a Sony
dealer for advice.
• Display the “Channel Setup” menu and
set the “Signal Booster” to “Auto” from
“Manual Program”.
•Try using an external booster.
• Use the fine tuning (“Fine”) function.
Page
–
31
–
33
–
18
33
–
30
–
30
38 Additional Information

The wide screen
mode changes
spontaneously
when “Auto Wide”
is “On”.
The 1
(standby)
indicator on
your TV flashes
red several
times after
every three
seconds.
The TV screen
sometimes goes
blank for
slightly longer
than usual
during channel
change.
TV cabinet
creaks.
A small “boom”
sound is heard
when the TV is
turned on.
Possible causeSymptom
During a transition
•
between two programs,
the TV detects the
optimum wide screen
mode. During this
period, an irregular wide
screen mode may appear.
• The wide screen mode
is switched
automatically according
to the received signal
with an ID-1 or WSS
signal.
• The Auto Wide feature
stops working
temporarily when you
have pressed , and
functions again when
the signal format
changes.
•Your TV’s selfdiagnosis function
indicates the possible
problems.
• The “Signal Booster” is
functioning to detect a
weak signal. This does
not indicate a
malfunction.
•
Changes in room
temperature sometimes
make the TV cabinet
expand or contract,
causing a noise. This
does not indicate a
malfunction.
• The TV’s demagnetizing
function is working.
This does not indicate a
malfunction.
Solutions
—
—
•To fix in the manually selected wide
screen mode, set “Auto Wide” to “Off”in
the “Wide Screen” menu.
• Count the number of times the 1
(standby) indicator flashes. Press !
(main power) to turn off your TV.
Contact your nearest Sony service center.
—
—
—
Page
13
13
27
–
–
–
–
Additional Information
39

警告
• 本電視機內存在危險性高電壓。
• 本電視機僅可在 110-240 伏特交流電壓下操作(僅於馬來西亞:220-240 伏特交流
電)。
• 若未完成所有連接程序﹐請勿插入電源線﹔否則極少量的電流可能經天線或其它端子
外泄。
• 若打算近期內不使用遙控器﹐請將電池取出﹐以避免電池泄漏而損壞遙控器。若您不
小心觸及電池所泄漏的液體﹐應立即用水洗淨。
為了個人安全起見﹐雷雨期間﹐請勿觸摸電視機的
任何部份﹐包括電源線和天線電纜。
請勿放置任何物體於電視機上。請勿使任何液體滴
濕或噴濕本電視機。請勿放置任何裝有液體的物體
(如花瓶)於電視機上。
請勿堵塞本電視機的通風口。
請勿將本電視機放置於諸如書架或嵌入式壁櫥等封
閉之處。
為了兒童安全起見﹐請勿讓他們獨自逗留在電視機
旁。千萬別讓兒童攀爬本電視機。
若有任何液體流入或固體落入本電視機內時﹐請勿
操作本電視機。應立即請合格的專業人員檢查。
請用乾的軟布清潔本電視機。請勿使用汽油、稀釋
劑或任何其它化學品清潔本電視機。請勿在電視機
殼噴塗表面貼附任何物體(例如﹐貼紙﹐透明玻璃
膠紙﹐膠合劑等)。請勿刮劃顯像管。
請勿打開本電視機的機殼和後蓋﹐因為電視機內存
在高電壓和危險性部件。須由合格的專業人員對電
視機進行檢修或棄置。
2
本電視機只適於家庭使用。請勿將本電視機放置於
任何交通工具內或多塵、高溫、潮濕或震動頻繁之
處。

為防止火災或觸電﹐請勿使本電視機被雨淋或受
潮。
放置電視機於穩定的、並足以支撐電視機重量的電
視支架及地面上。確保電視支架的表面平整且表面
積寬於電視機底面。
請勿在同一電源插座上插入太多的電器。請勿損壞
電源線。
捏住插頭將電源線拔開。請勿直接拉拔電源線。即
使電視機已斷開電源﹐但只要電源線還在插座內﹐
它仍接通至交流電源。若想移動本電視機或打算近
期內不使用本電視機時﹐請將電源線拔開。
3

x 固定電視機
為防止電視機摔落﹐請使用所提供的螺絲、夾子和帶條以固定電視機。
20 毫米
3.8 毫米
螺絲
夾子 帶條
將帶條分別固定至電視機背後提供的螺絲孔
及電視支架上。
或
(1) 將一根繩索或鏈條穿過夾子。
(2) 將其中一個夾子固定至牆上或柱子上﹐
而另一個夾子則固定至電視機背後提供
的螺絲孔上。
或
(1) 將繩索或鏈條的未端各別穿過電視機背
後提供的柄上。
(2) 用可支撐電視機重量的連接物將繩索或
鏈條固定至牆上或柱子上。
註
• 請僅使用提供的螺絲。使用其它螺絲可能會損壞本電視機。
4

目錄
設置您的電視機
準備工作 ....................... 6
設定您的電視機
(“初始化设定”) ............. 7
控制鍵總概況
電視機前面和背後的控制板 ....... 9
使用遙控器和基本功能 .......... 10
高級操作
選擇圖像和聲音模式 ............ 12
使用寬屏幕模式 ................ 13
欣賞 WEGA 影院模式和
中置揚聲器 .................... 15
觀看畫中畫(PIP) ............. 16
欣賞立體聲或雙語言節目 ........ 17
收看圖文電視 .................. 18
使用選購的裝置 ................ 19
調整您的設定(MENU)
介紹菜單系統 .................. 20
調整“图像设定” .............. 23
調整“声音设定” .............. 25
調整“屏幕显示设置” .......... 27
調整“画中画”設定 ............ 28
調整“频道设定” .............. 29
調整“设定”菜單 .............. 31
附加信息
連接選購的裝置 ................ 33
故障檢修 ...................... 36
規格 ........................ 封底
CT
5

設置您的電視機
x 準備工作
1
步驟 1
b
b
將所提供的電池裝入遙控器。
註
• 請勿使用舊電池或同時使用不同類型的電池。
步驟 2
將天線電纜(未提供)連接至電視機背後的 8(天線輸
入)端子。
提示
• 您也可將本電視機連接至其它選購的裝置(參考第 33 頁)。
步驟 3
插入電源線﹐然後按壓電視機上的 ! 鍵以接通電視機的
電源。
註
• 打開電視機時 1(待機)指示燈將閃爍為綠燈數秒鐘。這並
不表示發生故障。
步驟 4
6 設置您的電視機
按照“Initial Setup”(“初始化设定”)菜單的指示以
設定您的電視機(參考第 7 頁)。

x
01
01
02
03
04
設定您的電視機
(“初始化设定”)
當您第一次打開電視機時﹐“Initial Setup”(“初始化设定”)菜單將會顯示在
屏幕上。
您可用電視機前面控制板上的按鍵以改變菜單語言﹐自動預設電視頻道﹐改變顯
示在屏幕上的電視頻道順序和調整圖像位置。
提示
• 遙控器上的 MENU 鍵﹐ 鍵和 V/v/B/b 鍵也可用於下述操作。
按壓 2 +/– 鍵以選擇所要的菜單語言﹐
1
然後按壓 t 鍵。
被選擇的菜單語言將顯示在屏幕上。
按壓 2 +/– 鍵以選擇“是”﹐然後按壓 t
2
鍵以自動預設頻道。
屏幕將顯示自動預設頻道正在進行中。
當所有可接收的頻道已被調諧和儲存後﹐“頻
道排序”菜單將會自動顯示在屏幕上。
若要略掉自動預設頻道﹐選擇“否”﹐然後按
壓 t 鍵。
設置您的電視機
如果出現“无信号。请连接有线信号线或天线”
的訊息﹐請檢查您的電視連接﹐然後按壓 t 鍵。
“频道排序”菜單可以讓您改變顯示在屏幕上的
3
頻道順序。
a) 若您要保留已被調諧的頻道順序﹐按壓
MENU 鍵。
b) 若您要改變頻道的順序:
1) 按壓 2 +/– 鍵以選擇您要重新排序
的頻道號碼﹐然後按壓 t 鍵。
續
設置您的電視機
7

續
被選定的頻道將會顯示在屏幕上。
2) 按壓 2 +/– 鍵以選擇新的頻道
位置﹐然後按壓 t 鍵。
3) 若您要改變其他頻道的順序﹐請
重復 b) 1) 和 2) 的步驟。
c) 按壓 MENU 鍵以進入下個菜單。
若菜單頂部和底部的線條傾斜﹐按壓 2 +/–
4
鍵以作出調整﹐然後按壓 t 鍵。
“图像垂直位置调节”菜單出現。
若上下線條距離屏幕頂部和底部的位置不相等﹐
5
按壓 2 +/– 鍵以作出調整﹐然後按壓 t 鍵。
若不需作出調整﹐則按壓 t 鍵。
按壓 2 +/– 鍵以選擇“否”﹐然後按壓 t
6
鍵。則當您再次按壓 ! 鍵打開電視機時﹐這
菜單將不會再顯示在屏幕上。
若要這菜單再次顯示在屏幕上﹐選擇“是”﹐
然後按壓 t 鍵。
01
02
03
04
01
提示
• 您可按壓 MENU 鍵以進入“初始化设定”菜單最後的設定項目。
• 您也可使用菜單系統設置您的電視機(參考第 20 頁)。
• 您也可按壓電視機前面控制板的 MENU (AUTO PROG) 鍵約五秒以自動預設頻道。
8 控制鍵總概況
設置您的電視機

控制鍵總概況
x 電視機前面和背後的控制板
電視機背後的控制板
qg
c –
120W MAX 8
AUTO PROG:Press [MENU] for 5sec
L(MONO) R
MENU
SOUND
MODE
PROG
4
(AUTO PROG)
qf
qa
RLY
123
qd
C
R
C
B
qs
電視機前面的控制板
0
9
L(MONO) R
4
7
6
AUTO PROG:Press [MENU] for 5sec
MENU
SOUND
(AUTO PROG)
MODE
58
4
PROG
3
2
1
按鍵∕端子 功能 頁面
1 ! 打開或關閉電視機。 6
2 1 待機指示燈。 6
2 喚醒指示燈。 11
3 遙控傳感器。 –
4 PROG +/– 選擇頻道號碼。 –
5 2 +/– 調整音量。 –
6 t 選擇電視或視頻輸入。 33
菜單操作
5 2 +/– 選擇和調整項目。 –
6 t 確認被選項目。 –
7 MENU 顯示或取消菜單。 –
7 (AUTO PROG) 自動預設頻道。 8
8 SOUND MODE
選擇聲音模式選項。
12
“5-Band Graphic Equalizer” 顯示將出現在屏幕上。
9 t4 視頻輸入端子 4。 33
0 i 耳機插口。 –
qa DVD 分量信號輸入端子。 34
qs T 監視器輸出端子。 33
qd t1, t2, t3 視頻輸入端子 1, 2, 3。 33
qf 8 天線輸入端子。 33
qg 中置揚聲器輸入端子。 35
控制鍵總概況
控制鍵總概況
9

x 使用遙控器和基本功能
qk
ql
w;
wa
ws
wd
wf
wg
wh
wj
wk
wl
e;
ea
es
DVD
1
4
7
OPTION RESET
VIDEO
CENTERSPWEGA
2
5
8
0
PROG
TV
THEATRE
A/B
MENU
3
6
9
按鍵 說明 頁面
1
1 ?/1 打開或關閉電視機。 –
2
3
3 a 顯示電視節目。 –
4 t 選擇視頻輸入。 33
4
5 WEGA 選擇 WEGA 影院模式。 15
5
6
7
8
9
q;
qa
qs
qd
qf
qg
qh
qj
THEATRE
6 CENTER SP 選擇電視機的中置揚聲器模式。 15
qa
qd 選擇環繞聲模式: –
qf 跳回到之前收看至少五秒的頻道 –
qg PROG +/– 選擇頻道號碼。 –
qk 消除聲音。 –
ql 顯示屏幕上的信息。 –
w; DVD 選擇 DVD 分量信號輸入。 34
wj
wk 選擇圖像模式選項。 12
wl 0 – 9,- 輸入數字鍵。 –
e; 2 +/– 調整音量。 –
es RESET 使電視機恢復到工廠設定。 36
菜單操作
8 MENU 顯示或取消菜單。 22
wg V, v, B, b 選擇和調整項目。 22
wh 確認被選項目。 22
立體聲或雙語言操作
7 A/B 選擇立體聲或雙語言模式。 17
定時器操作
qh 依照您所要的時間設定電視以 –
(睡眠定時)
改變圖像尺寸
“TruSurround”(傳遍整個房間
的環繞聲)﹐“WOW 环绕声”
(豐富、深沉的低音響)﹐
“模拟立体声”(模擬立體聲的
單聲道音響)﹐“关”。
號碼。
選擇聲音模式選項。
“5-Band Graphic Equalizer”
顯示將出現在屏幕上。
自動關閉(最多 1 小時 30 分鐘)。
。 14
12
10 控制鍵總概況

按鍵 說明 頁面
qj
(喚醒定時) 一旦你已設定喚醒定時﹐電視機上的 指示燈將亮起
圖文電視操作(綠色標記)
4 保持圖文電視顯示。 18
7 放大圖文電視。 18
0 顯示圖文電視。 18
qs z (紅色﹐綠色﹐ 應用 FASTEXT 菜單。 18
黃色﹐藍色)
qg , 顯示之後或之前的頁數。 18
qh 當觀看電視機節目時﹐等待圖文電視頁。 18
qj 顯示圖文電視服務的內容。 18
ql 顯示被隱藏的信息。 18
畫中畫操作(黃色標記)
9 改變小屏幕的位置。 16
wa PIP PROG +/ 顯示和改變小屏幕的節目。 16
PIP PROG –
ws 對換主屏幕與小屏幕的圖像。 16
wd 對換主屏幕與小屏幕的聲音。 16
wf 顯示小屏幕。 16
wh 更換小屏幕為主屏幕的圖像。 16
選購裝置操作
2 VIDEO ?/1 電源。 19
qk % 消除聲音。 19
wg > 快進、向前搜索。 19
wg . 倒帶、往後搜索。 19
wg x 停止。 19
wg X 暫停。 19
wh N 播放。 19
e; 2 +/– 調整音量。 19
ea OPTION 使用選購的裝置。 19
依照您所要的時間設定電視以自動打開 (最多 12 小時)。
黃褐色。
用喚醒定時接通電視機電源並超過一小時後﹐若您不
按壓電視機或遙控器上的任何一個按鍵或控制鍵﹐則
電視機再進入待機狀態。
–
控制鍵總概況
WOW, TruSurround, SRS 及 的標誌是 SRS Labs, Inc. 登記過的商標。WOW 及
TruSurround 科技是登記在 SRS Labs, Inc. 特許證下。
注冊于 BBE 音響公司並應用了美國專利號碼 4638258, 4482866。
“BBE”與 BBE 符號是 BBE 音響公司的注冊商標。
控制鍵總概況
11

高級操作
x 選擇圖像和聲音模式
您可選擇圖像和聲音模式並使用“个人”模式來調整您所偏好的設定。
VIDEO
DVD
CENTERSPWEGA
THEATRE
A/B
MENU
2
1
4
7
3
6
5
8
9
0
選擇聲音模式
按壓 鍵(或前面控制板的 SOUND MODE 鍵)直到您所要的聲音模式被選定。
“5-Band Graphic Equalizer” 顯示將出現在屏幕上。
選擇 以收聽
“动态” 強調低音和高音的動態範圍寬而清晰的音響。
選擇圖像模式
按壓 鍵直到您所要的圖像模式被選定。
選擇 以觀看
“动态” 對比度強的圖像。
“中间”普通的圖像。
“柔和”淡色的圖像。
“个人” 菜單中的“图像个人模式设定”
項目所調整的最終圖像設定
(參考第 24 頁)。
100 300 1k 3k 8k
“戏剧” 強調人聲和高音調的聲音。
100 300 1k 3k 8k
“柔和” 柔和、自然、放鬆的聲音。
100 300 1k 3k 8k
“个人” 菜單中的“声音个人模式设定”項目所調整的最終聲音設定
(參考第 26 頁)。
100 300 1k 3k 8k
12 高級操作

x 使用寬屏幕模式
寬屏幕模式功能可讓您觀看適合電視機 16:9 屏幕的圖像。
在寬屏幕模式下自動觀看圖像—自動屏顯模式
電視機根据信號輸入自動選擇最佳的寬屏幕模式並全屏顯示 16:9 屏幕圖像。
以下的表中舉例表示出廠時的預設值;在“屏幕显示设置”菜單中“自动屏显模式”被
設為“开”﹐“4:3 默认屏显模式”被設為“智能屏显模式”(參考第 27 頁)。
當接收到....... 自動屏顯模式啟動 圖像變為......
並選擇......
帶有或不帶 ID-1 智能屏顯
或 WSS 信號的 模式*
普通圖像。
帶 ID-1 或 WSS 等比放大
信號的電影圖像。 屏顯模式
屏幕的頂部和底部可能
會出現黑邊。
帶 ID-1 或 WSS
信號的壓縮圖像。
16:9 屏顯模式
* 當接收到普通的 4:3 圖像時﹐本機會以出廠設定值自動選擇“智能屏显模式”。若將“屏幕显
示设置”菜單中的“4:3 默认屏显模式”設定為“4:3 屏显模式”﹐即可在不放大圖像的狀態
(“4:3 屏显模式”)下顯示該圖像(參考第 27 頁)。
註
• 自動屏顯模式功能根据信號質量可能無法正常工作。遇此情形時﹐請用 鍵手動選擇寬屏幕
模式(參考第 14 頁)。
續
高級操作
13

續
在寬屏幕模式下手動觀看圖像
反復按壓 鍵直到所需的顯示模式顯示在屏幕上。
3
2
1
4
5
6
8
9
7
0
PR
O
G
OPTION RESET
TV
註
• 您也可用菜單手動選擇寬屏幕模式(參考第 27 頁)。
• 按壓遙控器上的 鍵或使用菜單選擇寬屏幕模式時﹐自動屏顯模式功能會暫時不起作用。
在以下場合自動屏顯模式功能會再次啟動:
– 改變電視頻道時。
– 改變視頻輸入時。
– 關閉電視機後再次打開。
– 信號格式已改變。
14 高級操作

x 欣賞 WEGA 影院模式和中置揚聲器
WEGA 影院模式可讓您從 Sony“DVD”源享受与電影院相同的最佳圖像﹐聲音
和環繞聲效果。
您可將電視機的揚聲器用作音頻系統的中置揚聲器以強調發音﹐並通過電視機的
遙控器控制其音量。
設定 WEGA 影院模式
1. 將放大器的中置揚聲器端子連接至電視機的中置揚聲器輸入端子(參考第 35
頁)。
2. 顯示“WEGA 影院设定”菜單﹐然後選擇適當的視頻輸入並打開所連接裝置
的主電源(參考第 31 頁)。
3. 設定遙控器至与相連接的裝置一起操作(參考第 19 頁)。
CENTER SP
WEGA THEATRE
VIDEO
DVD
CENTERSPWEGA
要按壓
切換至 WEGA 影院 WEGA THEATRE
模式 當按壓此鍵後﹐務必將遙控器
THEATRE
A/B
MENU
瞄準電視機和所連接的裝置約
一秒。
所連接的裝置自動從待機狀態
打開並開始播放。
“图像模式”和“声音模式”
將自動切換至“个人”﹐您可
隨個人喜好調整設定(參考第
24 和 26 頁)。
器”顯示在屏幕上。
要切換至普通揚聲器模式時﹐
再按壓此鍵直到“主声道扬声
器”顯示在屏幕上。
2 +/–
1
4
7
OPTION RESET
3
2
5
8
0
PROG
切換至中置揚聲器模式 CENTER SP 直到“中置扬声
6
9
調整中置揚聲器的音量 2 +/–.
TV
註
• 務必將您的電視機和所連接的裝置並列放置﹐以便您能使用電視機的遙控器同時操縱它們(參
考第 19 頁)。
• 當您選擇變更頻道號碼﹐視頻輸入或關閉電視機後再打開時﹐WEGA 影院和中置揚聲器模式自
動取消。
• 當電視機處於中置揚聲器模式時﹐您無法使用畫中畫功能﹐改變環繞聲或“智能音量控制”。
• 當按壓 WEGA THEATRE 鍵後﹐某些裝置或許不能正常的嚮應。在這種情形下﹐請用裝置本身
的遙控器。
高級操作
15

x 觀看畫中畫 (PIP)
畫中畫功能可讓您使用 鍵以同時顯示兩個不同的
電視節目或視頻輸入。
PIP PROG +/
PIP PROG –
VIDEO
DVD
CENTERSPWEGA
1
2
4
5
8
7
0
要
顯示小屏幕
THEATRE
A/B
改變小屏幕的頻道號碼
MENU
改變小屏幕的位置
對換主屏幕與小屏幕的圖像
對換主屏幕與小屏幕的聲音
“ ”符號將會顯示在頻道
3
號碼或視頻輸入的旁邊以表
6
示屏幕聲音的來源。
9
按壓
.
要取消小屏幕時﹐再次按壓此
鍵。
PIP PROG + 或 PIP PROG –.
.
.
.
使用畫中畫選擇電視節目
您可使用 PIP PROG +/– 鍵以直接從小屏幕中選擇所要的電視節目。
1. 按壓 PIP PROG +/– 鍵直到您所要的電視節目顯示在小屏幕上。
2. 按壓 鍵以更換小屏幕的節目為主屏幕的。
註
• 當電視機處於中置揚聲器模式(第 15 頁)時﹐畫中畫功能將無法使用﹐而且在觀看畫中畫時﹐
電視機無法設為中置揚聲器模式。
• 您只可以在主屏幕中享受立體聲。
• 您無法在小屏幕中將圖像變為視頻輸入。您只能在視頻輸入顯示在主屏幕中時﹐通過對換圖
像﹐在小屏幕中顯示視頻輸入。
• 即使您已按壓 鍵以選擇小屏幕的聲音﹐但 T(監視器輸出)仍將會輸出主屏幕的圖像和
聲音(參考第 33 頁)。
16 高級操作

x 欣賞立體聲或雙語言節目
您可使用 A/B 鍵以欣賞麗音(NICAM)和 A2 立體聲制式的立體聲或雙語言
節目。
A/B
1
4
7
OPTION RESET
DVD
TV
VIDEO
CENTERSPWEGA
2
5
8
0
PROG
當接收麗音節目時
播送 屏幕顯示(所選擇的聲音)
THEATRE
A/B
MENU
麗音立體聲
麗音雙語言
3
6
9
麗音單聲道
當接收 A2 節目時
播送 屏幕顯示(所選擇的聲音)
A2 立體聲
A2 雙語言
t
t
tt
t
t
t
t
t
t
t
註
• 當接收立體聲節目時﹐若有噪音則請選擇“单声道”。噪音降低﹐但聲音變成單聲道聲音。
高級操作
17

x 收看圖文電視
有些電視台播出被稱作圖文電視的信息節目﹐它可使您收看各種信息﹐例如股市
行情和新聞。
您可使用遙控器上的按鍵以收看圖文電視。
z( 紅色﹐
綠色﹐
黃色﹐
藍色)
,
DVD
1
4
7
OPTION RESET
VIDEO
CENTERSPWEGA
2
5
8
0
PROG
TV
要 操作如下
將電視畫面上顯示
圖文電視頁面
THEATRE
A/B
MENU
檢查圖文電視節
目的內容
選擇圖文電視頁面
3
6
9
固定(暫停)圖文
電視顯示
顯示被隱藏的信息
(例如知識競賽答案)
放大圖文電視顯示
觀看電視節目
時使圖文電視頁面
備用
選擇 FAS TEXT 菜單
或彩色格子
取消圖文電視
按壓 鍵。
每按一次 鍵﹐屏幕按以下順序變化:
圖文電視 t 圖文電視與電視 t
電視。
若無圖文電視節目﹐“100”即顯示在屏
幕左上角。
按壓 鍵。
屏幕上出現圖文電視內容概覽﹐包括頁
碼。
按壓數字鍵以輸入所需圖文電視頁面的三
位數頁碼。
如果您輸錯﹐則請重新輸入正確的頁碼。
要進入下一頁或上一頁﹐按壓 或
鍵。
按壓 鍵以顯示“ ”標誌在屏幕的
左上角。
要恢復正常觀看圖文電視時﹐按壓
鍵。
按壓 鍵。
要隱藏信息時﹐再次按壓此鍵。
按壓 鍵。
每按一次 鍵﹐圖文電視顯示按以下
順序變化:
放大上半部 t 放大下半部 t 正常尺
寸。
(1) 輸入您要參閱的圖文電視頁碼﹐然後
按壓 鍵。
(2) 當頁碼顯示時﹐按壓 鍵以顯示
圖文內容。
按壓與所要菜單或頁碼相對應的 z
(紅色、綠色、黃色及藍色)鍵。
按壓 a 鍵。
註
•FASTEXT 功能僅可在有 FASTEXT 廣播的情況下使用。
18 高級操作

x 使用選購的裝置
您可以使用提供的遙控器操作 Sony 音頻∕視頻裝置。
將遙控功能設定至與其他相連接的裝置一起操作
按住 VIDEO ?/1 鍵的同時﹐ 例如﹐要操作一台 Sony 8 mm 盒式錄
按壓與所需裝置相對應的數位 影機時:
鍵(參考下表)。
要操作 按壓 VIDEO ?/1 鍵並按壓
音頻系統 1, 1x, 2 或 3 0, 1, 2, 或 3
DVD 1, 2 或 3 4, 5 或 6
VTR1 (Beta), VTR2 (8 mm) 或 VTR3 (VHS) 7, 8 或 9
操作音頻∕視頻裝置
按壓 VIDEO ?/1 鍵或按住 OPTION 鍵的同時﹐按壓 N, x, >, ., X,
或 2 +/– (參考下表)。
要按壓
打開∕關閉 VIDEO ?/1 鍵。
播放 OPTION 鍵的同時按壓 N 鍵。
停止 OPTION 鍵的同時按壓 x 鍵。
快進∕向前搜索或倒帶/ 往後搜索 OPTION 鍵的同時按壓 > 或 . 鍵。
暫停 OPTION 鍵的同時按壓 X 鍵。
再按壓此鍵恢復普通播放。
暫時消除聲音 OPTION 鍵的同時按壓 鍵。
(僅於音頻系統 1, 1x, 2 或 3)
調整音量 OPTION 鍵的同時按壓 2 +/– 鍵。
(僅於音頻系統 1, 1x, 2 或 3)
VIDEO
+
8
註
• 如果該裝置不具備某種功能﹐則遙控器上的相應鍵不起作用。
• 當按壓遙控器上的按鍵時﹐某些裝置或許不能正常的響應。在這種情形下﹐請用裝置本身的
遙控器。
高級操作
19

調整您的設定(MENU)
x 介紹菜單系統
MENU(菜單)鍵能讓您顯示菜單和調整電視上的設定。以下是菜單系統的總概
況。
“图像设定”符號
“声音设定”符號
“屏幕显示模式”符號
“画中画”符號
“频道设定”符號
“设定”符號
第一階段菜單
第一階段
“图像设定”
“声音设定”
第二階段
“图像模式”
“图像个人模式设
“彩色色调设定”
“3D 数码智能
图像”
“声音模式”
“声音个人模式设
定”
“平衡”
“智能音量控制”
“环绕声”
定”
回退符號
當前菜單名稱
WEGA
第三階段∕功能 頁面
選擇圖像模式﹕ 23
“动态”t “中间”t “柔和”t“个人”
調整“个人”項目﹕
“对比度”t “亮度”t “颜色”t
“色调”t “锐度”t “重新设定”
調整白色色澤:
“冷色调”t “自然色调”t “暖色调”
接收最理想的圖像效果:
“开”t “关”
選擇聲音模式:
“动态”t “戏剧”t “柔和”t “个人”
調整“个人”項目中的聲音頻率設定:
“设定”t “重新设定”
選擇以強調左右揚聲器。
自動調整音量:
“开”t “关”
選擇環繞聲模式:
“TruSurround”t“WOW 环绕声”t
“模拟立体声” t “关”
第三階段菜單
第二階段菜單
指引標記符號
25
20 調整您的設定(MENU)

第一階段
“屏幕显示设置”
“画中画”
“频道设定”
“设定”
第二階段
“屏显模式”
“自动屏显模式”
“4:3 默认屏显模
式”
“图像垂直位置调
节”
“宽荧幕垂直高度
调节”
“画中画”
“对换”
“画中画位置”
“自动调台”
“手动调台”
“频道标注”
“童锁”
“频道排序”
“语言/Language”
“图像调节”
“WEGA 影院设定”
“输入信号设定”
“扬声器输入设
定”
“视频输入标注”
“彩色制式”
第三階段∕功能 頁面
選擇屏幕顯示設置模式: 27
“智能屏显模式”t“4:3 屏显模式”t
“16:9 屏显模式”t“等比放大屏显模式”
自動選擇最佳的屏幕顯示設置模式:
“开”t“关”
當接收到有或不帶 ID-1 或 WSS 信號的普通
4:3 圖像時﹐將圖像變為“智能屏显模式”或
“4:3 屏显模式”。
在“智能屏显模式”或“等比放大屏显模式”下調
整圖像的垂直位置。
在“智能屏显模式”和“等比放大屏显模式”下調
整圖像的垂直高度。
顯示主屏幕中的小屏幕﹕
“开”t“关”
對換主屏幕與小屏幕的圖像。
改變小屏幕的位置。
自動預設頻道。
手動預設頻道。
標註頻道號碼。
鎖定不要的頻道。
改變顯示在屏幕上的頻道順序。
改變菜單語言﹕ 31
“English”(英文)t“中文”
調整圖像位置。
選擇 WEGA 影院模式。
選擇所連接裝置的輸入。
選擇揚聲器輸入設定模式:
“主声道输入”t“中置输入”
標註所連接的裝置。
選擇彩色制式﹕
“自动”t“PA L”t “SECAM”t
“NTSC3.58”t“NTSC4.43”
28
29
續
調整您的設定(MENU)
21

續
如何使用菜單
1
4
7
OPTION RESET
MENU
按壓 MENU 鍵以
顯示菜單。
3
2
6
5
8
9
0
PROG
按壓 V 或 v 鍵以
選擇所要的項目。
按壓 鍵(或
b 鍵)以確定您
所選的項目﹐然後
TV
進入下一個階段的
菜單。
其它菜單操作
要
調整設定值
回到之前或進入下一個階段的菜單
取消菜單
按壓
V﹐v﹐B 或 b 鍵。
B 或 b 鍵。
MENU 鍵。
提示
• 要從第二階段菜單回到第一階段菜單時﹐請按壓 V 或 v 鍵直到回退符號 ( ) 被選中﹐
然後按壓 鍵。
• 電視機前面控制板上的 MENU 鍵﹐t 鍵和 2 +/– 鍵也可用於上述操作(參考第 9 頁)。
註
• 當菜單顯示的功能呈暗淡色﹐您將無法選擇此功能。
22 調整您的設定(MENU)

x 調整“图像设定”
“图像设定”菜單可使您調整圖像設定。
按壓 MENU 鍵。
1
確認“图像设定”符號 ( )已被選擇﹐
2
然後按壓
按壓 V 或 v 鍵以選擇所要的項目 (例如﹐“图像模式”)﹐然後按壓 鍵。
3
選擇 以
“图像模式” 選擇“动态”、“中间”、“柔和”或“个人”*(參考第 12 頁)。
“彩色色调设定” 調整白色色澤。
“3D 数码智能图像” 接收最理想的圖像效果。
鍵。
選擇“冷色调”(藍色澤)、“自然色调”(自然色澤)或“暖色
调”(紅色澤)。
當信號完好時﹐圖像將自動變得更清晰和銳利﹐而當信號有噪聲時﹐
噪聲將自動被降低。
按壓 V 或 v 鍵以選擇“开”﹐然後按壓 鍵。
要取消時﹐選擇“关”﹐然後按壓 鍵。
* 僅當“个人”模式被選取時方可隨個人喜好調整“图像个人模式设定”和“彩色色调设
定”選項中的設定(參考第 24 頁)。
註
• 在 NTSC 彩色制式下﹐當“3D 数码智能图像”的模式轉換時﹐“3D 数码梳状滤波器:开”或
“3D 数码降噪:开”的顯示將出現在屏幕上。PA L 彩色制式也會有數碼梳狀濾波器和 3D 數碼
降噪的功能。
續
調整您的設定(MENU)
23

續
調整“个人”模式下的“图像个人模式设定”項目
按壓 V 或 v 鍵以選擇“对比度”、“亮度”、“颜色”、“色调”(顏色深
1
淺)或“锐度”﹐然後按壓 鍵。
選擇“重新设定”將會使電視機恢復到工廠設定。
按壓 V, v, B 或 b 鍵以調整您所選項目的設定﹐然後按壓 鍵。
2
重復上述步驟以調整其它項目。
3
當選擇“个人”項目時﹐您可接收已被調整的設定。
註
• 只有當彩色制式為 NTSC 時﹐您才能調整“色调”設定。
• 您也可減少“锐度”以降低圖像噪點。
24 調整您的設定(MENU)

x 調整“声音设定”
“声音设定”菜單可使您調整音響設定。
按壓 MENU 鍵。
1
按壓 V 或 v 鍵以選擇“声音设定”符號
2
( )﹐然後按壓 鍵。
按壓 V 或 v 鍵以選擇所要的項目 (例如﹐“声音模式”)﹐然後按壓 鍵。
3
選擇 以
“声音模式” 選擇“动态”、“戏剧”、“柔和”或“个人”*(參考第 12 頁)。
“平衡”按壓 v 或 B 鍵以強調左揚聲器。
按壓 V 或 b 鍵以強調右揚聲器。
“智能音量控制” 自動調整所有頻道號碼和視頻輸入的音量。
按壓 V 或 v 鍵以選擇“开”﹐然後按壓 鍵。
要取消時﹐選擇“关”﹐然後按壓 鍵。
“环绕声” 選擇“Tr uSurround”、“WOW 环绕声”**、“模拟立体声”或
* 僅當“个人”模式被選取時方可隨個人喜好調整“声音个人模式设定”選項中的設定
(參考第 26 頁)。
** BBE 高清晰聲音充分啟動使 WOW 環繞聲模式的聲音效果達到最佳。
“关”(參考第 10 頁)。
註
• 當“TruSurround”被選取時﹐您將無法選擇“智能音量控制”。
續
調整您的設定(MENU)
25

續
調整“个人”模式下的“声音个人模式设定”項目
“5-Band Graphic Equalizer”(5 波段互動音響均衡器)可使您在菜單上的“个人”模
式調整聲音頻率設定。
確認“设定”已被選定﹐然後按壓 鍵。
1
選擇“重新设定”將會使電視機恢復到工廠設定。
100 300 1k 3k 8k
按壓 B 或 b 鍵以選擇所要的聲音頻率﹐然後按壓 V 或 v 鍵以調整設定再按壓
2
註
• 調整高頻率將影響高音調聲音﹐調整低頻率將影響低音調聲音。
• 您可直接用電視機前面控制板的 SOUND MODE 鍵(參考第 9 頁)或按壓遙控器上的 鍵
鍵。
當選擇“个人”模式時﹐您可接收已被調整的設定。
(參考第 10 頁)以顯示設定。
26 調整您的設定(MENU)

x 調整“屏幕显示设置”
“屏幕显示设置”菜單可讓您觀看適合電視機 16:9 屏幕的圖像。
按壓 MENU 鍵。
1
按壓 V 或 v 鍵以選擇“屏幕显示设置”符號
2
(
)﹐然後按壓 鍵。
按壓 V 或 v 鍵以選擇所要的項目(例如﹐“屏显模式”)﹐然後按壓 鍵。
3
選擇
“屏显模式”
“自动屏显模式”
以
選擇所需的寬屏幕模式以適合 16:9 屏幕。
按壓 V 或 v 鍵以選擇“智能屏显模式”、“4:3 屏显模式”、
“16:9 屏显模式”或“等比放大屏显模式”﹐然後按壓 鍵。
自動以最佳寬屏幕模式顯示圖像。
按壓 V 或 v 鍵以選擇“开”﹐然後按壓 鍵。若要在現在
所選的寬屏幕模式下顯示任何圖像﹐則選擇“关”。
00
00
“4:3 默认屏显模式”
“图像垂直位置调节”
“宽荧幕垂直高度调节”
提示
• 您也可按壓遙控器上的 鍵變為寬屏幕模式圖像尺寸(參考第 14 頁)。
註
• 當“自动屏显模式”設為“关”時﹐“4:3 默认屏显模式”不起作用。
以“智能屏显模式”或“4:3 屏显模式”顯示 4:3 圖像。
按壓 V 或 v 鍵以選擇“智能屏显模式”或“4:3 屏显模式”﹐
然後按壓 鍵。
在“智能屏显模式”或“等比放大屏显模式”下在屏幕範圍內調
整圖像的垂直位置。
按壓 V 或 v 鍵以移動圖像﹐然後按壓 鍵。
在“智能屏显模式”或“等比放大屏显模式”下在屏幕範圍內調
整圖像的垂直高度。
按壓 V 或 v 鍵以調整垂直高度﹐然後按壓 鍵。
調整您的設定(MENU)
27

x 調整“画中画”設定
“画中画”菜單可讓您顯示小屏幕﹐對換主屏幕與小屏幕的圖像和改變小屏幕的
位置。
按壓 MENU 鍵。
1
按壓 V 或 v 鍵以選擇“画中画”符號
2
(
)﹐然後按壓 鍵。
按壓 V 或 v 鍵以選擇所要的項目 (例如﹐“画中画”)﹐然後按壓 鍵。
3
選擇
“画中画”
以
顯示小屏幕。
按壓 V 或 v 鍵以選擇“开”﹐然後按壓 鍵。
要取消時﹐按壓 鍵或選擇“关”﹐然後按壓 鍵。
“对换”
“画中画位置”
28 調整您的設定(MENU)
對換主屏幕與小屏幕的圖像。
改變小屏幕的位置。
選擇 V 或 v 鍵以選擇所要的位置﹐然後按壓 鍵。

x 調整“频道设定”
“频道设定”菜單可使您自動預設頻道﹐手動預設頻道﹐標註頻道號碼﹐鎖定不
要的頻道和改變顯示在屏幕上的頻道順序。
按壓 MENU 鍵。
1
按壓 V 或 v 鍵以選擇“频道设定”符號
2
3
)﹐然後按壓 鍵。
(
按壓 V 或 v 鍵以選擇所要的項目(例如﹐“自动调台”)﹐然後按壓 鍵。
選擇
“自动调台”
“手动调台”
“频道标注”
“童锁”
以
自動預設頻道。
手動預設所要的頻道及不能自動預設的頻道 (參考第 30 頁的手動
預設頻道)。
標註頻道號碼。
(1) 選擇“频道”並按壓 鍵。
按壓 V 或 v 鍵以選擇頻道號碼﹐然後按壓 鍵。
(2) 選擇“标注”並按壓 鍵。按壓 V 或 v 鍵以選擇英文、數
字、字符進行標註﹐然後按壓 鍵。
鎖定不要的頻道。
(1) 選擇“频道”並按壓 鍵。
按壓 V 或 v 鍵以選擇頻道號碼﹐然後按壓 鍵。
(2) 選擇“锁定设定”並按壓 鍵﹐然後按壓 V 或 v 鍵以選擇
“开”或“关”。
若您預設一個鎖定的頻道號碼﹐該頻道號碼將自動解鎖。
“频道排序”
註
• 您可標註頻道號碼以在“频道排序”菜單裡觀看頻道標註。
• 若您排序一個鎖定的頻道﹐該頻道將保留在鎖定狀態。
改變顯示在屏幕上的頻道順序(參考第 7 頁的“初始化设定”的
3 b)步驟)。
續
調整您的設定(MENU)
29

續
手動預設頻道
在選擇“手动调台”之後﹐選擇您要預設頻道
1
的頻道號碼。
(1)確認“频道”已被選定﹐然後按壓
(2)按壓 V 或 v 鍵直到您要預設的頻道號碼
顯示在菜單上﹐然後按壓
選擇所要的頻道。
2
(1)確認“VHF 低”、“VHF 高”或“UHF”已被選定﹐然後按壓
(2)按壓 V 或 v 鍵直到您所要的頻道顯示在電視屏幕上﹐然後按壓
若所要頻道的聲音失真﹐則請選擇適當的電視系統。
3
(1)按壓 V 或 v 鍵以選擇“电视系统”﹐然後按壓 鍵。
(2)按壓 V 或 v 鍵直到聲音正常為止﹐然後按壓
若您不滿意圖像和聲音質量﹐您可用“微调”來改善它。
4
(1)按壓 V 或 v 鍵以選擇“微调”﹐然後按壓
(2)按壓 V 或 v 鍵以選擇“手动”﹐然後按壓
(3)按壓 V, v, B 或 b 鍵直到圖像和聲音最佳﹐然後按壓
菜單上的 + 或 – 符號將會在調諧時閃爍。
鍵。
鍵。
鍵。
鍵。
鍵。
鍵。
01
B/G
鍵。
鍵。
若您在使用 PROG +/– 鍵時欲跳越此頻道號碼﹐您可選擇“跳越频道”功能。
5
(1)按壓 V 或 v 鍵以選擇“跳越频道”﹐然後按壓 鍵。
(2)按壓 V 或 v 鍵以選擇“开”﹐然後按壓
要取消時﹐請選擇“关”﹐然後按壓
若電視信號太強(圖像失真;圖像有線條;信號干擾)或微弱(圖像有雪花狀斑
6
點)﹐您可設定“信号增强”以改善圖像質量。
(1)按壓 V 或 v 鍵以選擇“信号增强”﹐然後按壓 鍵。
(2)按壓 V 或 v 鍵以選擇“关”(適用於圖像失真;圖像有線條;信號干擾)
或“自动”(適用於圖像有雪花狀斑點)﹐然後按壓
30 調整您的設定(MENU)
鍵。
鍵。
鍵。

x 調整“设定”菜單
“设定”菜單可使您更換菜單語言﹐調整圖像位置﹐設定 WEGA 影院模式﹐標註
所連接的裝置和選擇彩色制式。
按壓 MENU 鍵。
1
按壓 V 或 v 鍵以選擇“设定”符號
2
)﹐然後按壓 鍵。
(
WEGA
按壓 V 或 v 鍵以選擇所要的項目(例如﹐“
3
鍵。
選擇
“语言/Language”
“图像调节”
“WEGA 影院设定”
以
更換菜單語言。
按壓 V 或 v 鍵以選擇
鍵。
調整電視屏幕上傾斜的圖像。
按壓 V 或 v 鍵以選擇“图像旋转度调校”或“图像垂直位置调
节”﹐然後按壓 鍵。
按壓 V﹐v﹐B 或 b 鍵以調整圖像位置﹐然後按壓 鍵。
設定 WEGA 影院模式並享受与電影院相同的最佳圖像﹐聲音和環繞
聲效果(參考第 15 頁)。
按壓 V 或 v 鍵以選擇“输入信号设定”﹐然後按壓 鍵。
選擇“视频信号 1”、“视频信号 2”、“视频信号 3”、“视频信
号 4”或“DVD”於您所要使用 WEGA 影院的連接裝置﹐然後按壓
鍵。
選擇“扬声器输入设定”﹐然後按壓 鍵。
通常選擇“主声道输入”。需要將電視機的揚聲器作為中置揚聲器
時﹐按壓 V 或 v 鍵以選擇“中置输入”﹐然後按壓 鍵。
语言/Language
“English”
”)﹐然後按壓
(英文)或“中文”﹐然後按壓
續
調整您的設定(MENU)
31

續
選擇
“视频输入标注”
“彩色制式”
以
標註所連接的裝置。
(1) 選擇“视频输入”並按壓 鍵。
按壓 V 或 v 鍵以選擇您要標註的輸入﹐然後按壓 鍵。
(2) 選擇“标注”並按壓 鍵﹐然後按壓 V 或 v 鍵以選擇標註
選項:
“视频信号 1/视频信号 2/视频信号 3/视频信号 4/DVD”、
“录像机”、“卫星节目”、“游戏机”或“编辑”*。
* 您可編輯視頻輸入標註。按壓 V 或 v 鍵以選擇英文、數字、字
符進行標註﹐然後按壓 鍵。
改變彩色制式。
按壓 V 或 v 鍵以選擇“自动”、“PAL ”、“SECAM”、
“NTSC 3.58”或“NTSC 4.43”﹐然後按壓 鍵。
通常將此設定為“自动”。
32 調整您的設定(MENU)

附加信息
x 連接選購的裝置
連接至視頻輸入端子(t)
電視機前面的控制板
S 視頻電纜
(未提供)
攝像機
L(MONO)
4
電視機背後的控制板
R
音頻∕視頻電纜
(未提供)
電視遊戲機
音頻電纜
(未提供)
音頻∕視頻電纜
120W MAX 8
c –
RLY
123
C
R
C
B
(未提供)
S 視頻電纜
(未提供)
錄像機
註
• 若將錄像機連接至 8(天線輸入)端子﹐請將錄像機輸出的信號預設至電視機上的頻道號碼
“0”(參考第 30 頁)。
• 當 (S 視頻輸入)和 (視頻)于視頻輸入 t 1 或 t 4 同時被連接時﹐ (S 視頻輸
入)即自動被選定。要收看 (視頻)﹐請斷開 S 視頻電纜即可。
連接至監視器輸出端子(T)
電視機背後的控制板
C
C
B
c –
120W MAX 8
RLY
123
R
音頻∕視頻電纜
(未提供)
音頻系統
錄像機
續
附加信息
33

續
連接至 DVD 分量信號輸入端子( )
電視機背後的控制板
DVD 分量信號電纜
(未提供)
C
R
C
B
DVD 播放機
120W MAX 8
c –
RLY
123
音頻電纜
(未提供)
註
• 當連接 DVD 播放機至電視機上的 (分量信號輸入端子) 時﹐若您的 DVD 播放機可輸出
隔行和逐行的掃描模式信號﹐則請選擇隔行掃描輸出。您的電視機可接收 525i/60 赫茲或
625i/50 赫茲的隔行掃描信號。
• 某些 DVD 播放機的插口可能標記不同:
連接 至(DVD 播放機上)
Y (綠色) Y
CB (藍色) CB, PB, Cb 或 B-Y
CR (紅色) CR, PR, Cr 或 R-Y
• 若您在電視屏幕上選擇“DVD”﹐T(監視器輸出)將不能輸出正常的信號。這並不表示發生
故障。
34 附加信息

連接放大器至中置揚聲器輸入端子( )
123
RLY
C
B
C
R
如果使用帶 Dolby* Surround(杜比環繞)解碼器的放大器﹐而不使用電視機的音頻
系統﹐則您可以把電視機的揚聲器用作音頻系統的中置揚聲器。
使用放大器提供的揚聲器線時
﹐請將放大器的中置揚聲器端子連接至電視機的
(中置揚聲器輸入)端子。
電視機背後的控制板
DVD 分量信號電纜
(未提供)
c
120W MAX 8
音頻電纜
光學數碼電纜
(未提供)
C –
120W MAX 8
前揚聲器
(左)
註
• 若要將電視機的揚聲器用作中置揚聲器時﹐您可按壓遙控器上的 CENTER SP 鍵(參考第 10
頁)或顯示“设定”菜單並選擇“WEGA 影院设定”﹐然後在“扬声器输入设定”中選擇“中
置输入”(參考第 31 頁)。
• 如果您的電視機設為“中置扬声器”﹐但電視機後面的中置揚聲器輸入端子卻無任何連接或放
大器發出的音源無中置揚聲器聲道時﹐電視機的揚聲器將聽不到任何聲音。
DVD 播放機
(未提供)
後揚聲器
(左)
低音揚聲器
放大器
前揚聲器
(右)
後揚聲器
(右)
* Dolby 是 Dolby 實驗室的商標。
附加信息
35

x 故障檢修
7
8
9
若在觀看電視時遇見任何問題﹐您可使用重新設定功能以解決問題或參考下列故
障檢修指南。若問題仍然存在﹐請聯絡 Sony 經銷商。
OPTION RESET
RESET
故障檢修指南
圖像有雪花狀斑點
有噪聲
圖像失真
有噪聲
0
PROG
重新設定功能
按壓遙控器上的 RESET 鍵。電視屏幕即呈現空白﹐約
數秒後﹐“初始化设定”菜單將會顯示在電視屏幕
上。
TV
按壓 RESET 鍵使電視機恢復到工廠設定﹐一些電視故
障可能會消失。
可能因素癥狀
• 連接已鬆脫或電纜已損
壞。
• 天線裝置不正確。
• 頻道預設不適當或不完
整。
• 傳送信號微弱。
• 廣播信號太強。
解決方法
• 檢查天線電纜以及電視機﹐錄像機和牆上的
天線連接是否正確。
• 檢查天線的裝置。請尋求 Sony 經銷商的協
助。
• 顯示“频道设定”菜單並選擇“手动调台”
以再次預設頻道。
• 顯示“频道设定”菜單﹐並選擇“手动调
台”裡的“信号增强”為“自动”。
• 嘗試使用外部信號增強器。
• 切斷外部信號增強器的電源或拔掉其插頭以
終止其操作。
• 顯示“频道设定”菜單﹐並選擇“手动调
台”裡的“信号增强”為“关”。
頁面
33
–
30
30
–
–
30
36 附加信息
圖像良好
有噪聲
• 電視系統設定不適當。
• 畫中畫顯示的同時畫中
畫聲音也被選定。
• 請顯示“频道设定”菜單﹐並在“手动调
台”裡選擇適當的“电视系统”。
• 按壓 鍵或 鍵。
30
16

沒有圖像
沒有聲音
可能因素癥狀
• 電源線、天線或錄像機
沒有被連接。
• 電視機電源沒有被接
通。
解決方法
• 檢查電源線﹐天線和錄像機之連接是否正
確。
• 按壓 ?/1(電源)鍵。
• 按壓電視機上的 !(主電源)鍵以切斷電
視機的電源﹐五秒左右後再次接通電源。
頁面
33
10
9
圖像良好
沒有聲音
圖像有點線或條紋
圖像出現雙重影像
圖像無彩色
• 音量水平過低。
• 聲音被消除。
• 畫中畫顯示的同時畫中
畫聲音也被選定。
• 受周圍環境(如汽車、
霓虹燈、吹風機、發電
機等)影響。
• 廣播信號受周圍高山或
大廈干擾。
• 天線裝置不正確。
• 外部信號增強器的使用
不適當。
• 彩色水平設定過低
。
• 彩色制式設定不適當。
• 天線裝置不正確。
• 按壓 2 + 鍵以提高音量水平。
• 按壓 鍵以取消消音。
• 按壓 鍵或 鍵。
• 不要在電視機旁使用吹風機或其它電器。
• 檢查天線的裝置。請尋求 Sony 經銷商的
協助。
• 使用高定向天線。
• 使用“微调”功能。
• 檢查天線的裝置。請尋求 Sony 經銷商的
協助。
• 切斷外部信號增強器的電源或拔掉其插頭
以終止其操作。
• 顯示“图像设定”菜單並選擇“图像模
式”裡的“个人”﹐然後調整“图像个人
模式设定”裡的“颜色”水平。
• 顯示“设定”菜單及檢查“彩色制式”設
定(一般將此設定為“自动”)。
• 檢查天線的裝置。請尋求 Sony 經銷商的
協助。
10
10
16
–
–
–
30
–
–
24
32
–
續
附加信息
37

續
圖像傾斜
Good morning!
圖樣出現反常彩色斑
點
立體聲廣播聲音開關
失常或聲音失真。
或
聲音頻繁地轉換於單
聲道和立體聲之間。
“100
”出現在螢幕頂
部及
沒有圖文電視
顯示
圖文電視顯示不完全
(圖像有雪花狀斑點
或雙重影像)
當“自动屏显模式”
設為“开”時,寬
屏幕模式自動改變。
可能因素癥狀
• 受外部揚聲器或其它電
器電磁性的影響﹐或受
地球磁場方向的影響。
• 受外部揚聲器或其它電
器電磁性的影響﹐或受
地球磁場方向的影響。
• 連接已鬆脫或電纜已損
壞。
• 天線裝置不正確。
• 頻道沒有播送圖文電
視廣播。
•
連接已鬆脫或電纜已
損壞。
•天線裝置不正
確。
• 傳送信號微弱。
• 在兩個頻道之間過渡
時﹐電視機檢測到最佳
的寬屏幕模式。在此期
間﹐可能會出現异常的
寬屏幕模式。
• 寬屏幕模式根据接收到
帶 ID-1 或 WSS 的信
號自動切換。
• 當您按壓 鍵時自
動屏顯模式功能會暫時
停止工作﹐並在信號格
式改變時重新運行。
解決方法
• 將電視機放置在離外部揚聲器或其它電器
較遠的地方。
• 在“设定”菜單下顯示“图像调节”﹐並調
整“图像旋转度调校”和“图像垂直位置调
节”﹐以使圖像与電視屏幕對齊。
• 將外部揚聲器或其它電器放置在離電視機較
遠的地方。請勿在電視機打開時進行搬移。
按壓電視機上的 !(主電源)鍵以切斷電
視機的電源﹐約 15 分鐘後再將其打開以使
電視機消磁。
• 檢查天線電纜以及電視機﹐錄像機和牆上的
天線連接是否正確。
• 檢查天線的裝置。請尋求 Sony 經銷商的
協助。
––
• 檢查天線電纜以及電視機﹐錄像機和牆上的
天線連接是否正確。
• 檢查天線的裝置。請尋求 Sony 經銷商的
協助。
• 顯示“频道设定”菜單﹐並選擇“手动调
台”裡的“信号增强”為“自动”。
• 嘗試使用外部信號增強器。
• 使用“微调”功能。
––
––
• 要在手動選擇的寬屏幕模式下調整時﹐在
“屏幕显示设置”菜單中將“ 自动屏显模
式”設為“关”。
頁面
–
31
–
33
–
18
33
–
30
–
30
13
13
27
38 附加信息

電視機上的 1(待機)
指示燈每隔三秒閃爍
至少一次的紅色亮光。
電視屏幕有時會在更
換頻道時呈顯空白﹐
空白時間比一般略長。
電視機外殼吱嘎聲。
當您接通電視機時﹐
聽到“ ”的聲音。
可能因素癥狀
• 您的電視機的自動檢
測判斷功能表明可能
存在的原因。
• “信号增强”正在操作
以探測微弱的信號。這
並不表示發生故障。
• 室溫的變化有時會導致
電視機的外殼膨脹或縮
小﹐因此產生噪聲。這
並不表示發生故障。
• 電視機自動消磁。這並
不表示發生故障。
解決方法
• 計算 1(待機)指示燈的亮光次數。按壓
!(主電源)鍵以切斷電視機的電源。通知
您鄰近的 Sony 維修服務中心。
––
––
––
頁面
–
–
–
–
附加信息
39

AMARAN
• TV anda bervoltan tinggi yang membahayakan.
• Voltan pengendalian TV: 110 – 240 V AC (untuk Malaysia sahaja: 220-240 VAC).
• Jangan sambungkan palam wayar kuasa TV sebelum anda selesai membuat semua
sambungan yang lain; jika tidak, kebocoran arus yang minimum mungkin mengalir
menerusi antena dan terminal lain ke bumi.
• Untuk mengelakkan kebocoran bateri dan kerosakan alat kawalan jauh, keluarkan
bateri dari alat kawalan jauh jika anda tidak menggunakannya untuk beberapa hari.
Jika anda tersentuh sebarang cecair yang terbocor dari bateri, sila cuci dengan air
secepat mungkin.
Untuk keselamatan diri, jangan sentuh mana-mana
bahagian TV, wayar kuasa dan kabel antena
semasa kilat.
Jangan letak sebarang benda di atas TV anda. Jangan
dedahkan TV kepada titisan atau percikan cecair dan
jangan letak sebarang benda yang mengandungi
cecair seperti bekas bunga di atas TV anda.
Jangan halang ruang pengudaraan TV. Jangan
letakkan TV di tempat yang tertutup seperti rak
buku atau kabinet.
Untuk keselamatan kanak-kanak, jangan biarkan
mereka menghampiri TV bersendirian. Jangan
benarkan kanak-kanak memanjat TV.
Jangan pasang TV sekiranya terdapat sebarang
tumpahan cecair atau pepejal yang terjatuh ke
dalamnya. Pemeriksaan segera harus dilakukan
oleh orang yang berkelayakan sahaja.
Bersihkan TV dengan kain yang kering dan lembut.
Jangan gunakan benzina, pencair atau bahan kimia
yang lain untuk membersihkan TV. Jangan lekatkan
apa-apa (contohnya, pita pelekat, pita selofan, gam)
pada kabinet bercat TV anda. Jangan calarkan tiub
gambar.
Jangan buka kabinet dan penutup belakang TV
kerana terdapat voltan yang tinggi dan bahagian
yang merbahaya di dalam TV. Kerja membaiki
dan membuang TV hendaklah dilakukan oleh
orang yang berkelayakan sahaja.
2
TV anda hanya untuk kegunaan di rumah sahaja.
Jangan gunakan TV anda dalam sebarang
kenderaan atau di tempat yang amat berhabuk,
panas, lembap atau di tempat yang mengalami
gegaran yang melampau.

Untuk mengelakkan dari berlakunya kebakaran
atau litar pintas, jangan dedahkan TV kepada hujan
atau kelembapan.
Pasangkan TV di atas rak TV dan lantai yang stabil
serta boleh menyokong berat TV anda. Pastikan
permukaan rak TV adalah rata dan luasnya adalah
lebih besar daripada luas permukaan bawah TV.
Jangan sambungkan terlalu banyak perkakas
elektrik kepada satu soket kuasa. Jangan rosakkan
wayar.
Pegang palam untuk menarik keluar wayar kuasa
TV. Jangan terus tarik wayar kuasa. Walaupun
TV anda telah ditutup, TV anda masih
bersambung kepada sumber kuasa AC (kuasa
utama) selagi wayar kuasa TV disambungkan ke
soket. Cabut wayar kuasa TV sebelum
memindahkan TV anda atau jika anda tidak
menggunakan TV untuk beberapa hari.
3

x Keselamatan TV anda
Untuk menghindarkan TV anda daripada terjatuh, gunakan skru, pengapit dan
pita yang dibekalkan.
20 mm
3.8 mm
skru pengapit pita
Skrukan pita kepada rak TV dan lubang
yang disediakan di bahagian belakang TV
anda.
atau
(1) Masukkan wayar atau rantai menerusi
pengapit.
(2) Skrukan salah satu pengapit pada
dinding atau tiang dan skrukan satu
pengapit lagi pada lubang yang
disediakan di bahagian belakang TV
anda.
atau
(1) Pasangkan setiap hujung wayar atau
rantai kepada pemegang yang
disediakan di bahagian belakang TV
anda.
(2) Tetapkan wayar atau rantai yang telah
dipasang kepada dinding atau tiang
dengan menggunakan penghubung
yang boleh menyokong berat TV anda.
Nota
• Gunakan skru yang dibekalkan sahaja. Penggunaan skru yang berlainan jenis boleh
merosakkan TV anda.
4

Kandungan
Pemasangan
Persediaan Awal .................................. 6
Mengaturkan TV anda
(“Initial Setup”) .................................... 7
Gambaran menyeluruh
untuk kawalan
Panel hadapan dan belakang TV....... 9
Menggunakan alat kawalan jauh
dan fungsi asas ................................... 10
Operasi Lanjutan
Memilih mod gambar dan bunyi .... 12
Menggunakan mod skrin lebar ....... 13
Menikmati Mod Teater WEGA
dengan pembesar suara tengah ....... 15
Menonton “Picture-in-Picture”
(PIP) ..................................................... 16
Menikmati rancangan stereo atau
rancangan dwibahasa ....................... 17
Menonton Teleteks ............................ 18
Mengendalikan komponen
pilihan.................................................. 19
Melaraskan MENU
Memperkenalkan sistem menu ....... 20
Menukar aturan “Picture” ................ 23
Menukar aturan “Sound” ................. 25
Menukar aturan “Wide Screen” ...... 27
Menukar aturan “PIP” ...................... 28
Menukar aturan “Channel Setup” .. 29
Menukar aturan “Setup” .................. 31
Maklumat Tambahan
Menyambung komponen pilihan ... 33
Penyelesaian masalah ....................... 36
“Specifications”.....
Muka surat terakhir
MY
5

Pemasangan
x Persediaan Awal
1
Langkah 1
b
b
Masukkan bateri (dibekalkan) ke dalam alat kawalan
jauh.
Nota
• Jangan gunakan bateri lama atau bateri yang berlainan jenis
bersama-sama.
Langkah 2
Sambungkan kabel antena (tidak dibekalkan) kepada
terminal 8 (input antena) yang terdapat di belakang
TV anda.
Panduan
• Anda juga boleh menyambungkan komponen pilihan kepada
TV anda (rujuk halaman 33).
Langkah 3
Sambungkan wayar kuasa TV, kemudian tekan !
pada TV untuk memasangkan TV anda.
Nota
• Penunjuk 1 (standby) berkelip-kelip dengan warna hijau
selama beberapa saat apabila anda memasang TV anda. Ini
tidak menandakan TV anda mempunyai masalah.
Langkah 4
6 Pemasangan
Aturkan TV anda dengan mengikuti arahan menu
“Initial Setup” (rujuk halaman 7).

x
AP
Program:
TV System: Auto
01
VHF Low
Mengaturkan TV anda
(“Initial Setup”)
Apabila anda memasangkan TV pada kali pertama, menu “Initial Setup” akan muncul.
Anda boleh menukar bahasa menu, mengatur saluran TV secara automatik, menukar
susunan saluran TV yang muncul pada skrin dan melaraskan kedudukan gambar
dengan menggunakan butang pada panel hadapan TV.
Panduan
• Butang MENU,
operasi di bawah.
Tekan 2 +/– untuk memilih
1
bahasa menu yang dikehendaki,
kemudian tekan t.
Bahasa menu yang dipilih akan muncul.
Tekan 2 +/– untuk memilih “Yes”,
2
kemudian tekan t untuk mengatur
saluran secara automatik.
Skrin TV akan menunjukkan pengaturan
automatik sedang dijalankan.
Setelah semua saluran yang boleh didapati
selesai ditala dan disimpan, menu “Program
Sorting” akan muncul secara automatik pada
skrin.
Untuk melangkau pengaturan saluran secara
automatik, pilih “No”, kemudian tekan t.
Jika mesej “No channel found. Please
connect cable/antenna” muncul, periksa
sambungan TV anda, kemudian tekan t.
dan V/v/B/b pada alat kawalan jauh juga boleh digunakan untuk
Pemasangan
Menu “Program Sorting” membolehkan
3
anda menukar susunan saluran yang
muncul pada skrin.
a) Jika anda ingin simpan saluran yang
b) Jika anda ingin simpan saluran dalam
telah ditala dalam susunan yang
disediakan, tekan MENU.
susunan yang berlainan:
1) Tekan 2+/– untuk memilih nombor
rancangan dengan saluran yang anda
ingin susun semula, kemudian tekan t.
Program Sorting
Program:
01
02
03
04
Select channel
bersambung
Pemasangan
7

01
Program Sorting
Program:
01
02
03
04
Select new position
sambungan
Saluran yang dipilih akan muncul
pada skrin.
2) Tekan 2+/– untuk memilih
kedudukan nombor rancangan
yang baru untuk saluran yang
dipilih, kemudian tekan t.
3) Ulangi langkah b) 1) dan 2) jika
anda ingin menukar susunan
saluran yang lain.
c) Tekan MENU untuk pergi ke menu yang
seterusnya.
Tekan 2 +/– untuk melaraskan jaluran
4
di atas dan di bawah menu jika ia
senget, kemudian tekan t.
Menu “Picture V-Position” akan muncul.
Jika jarak jaluran atas dan bawah
5
dengan bahagian atas dan bawah skrin
tidak sejajar, tekan 2 +/– untuk
melaraskannya, kemudian tekan t.
Jika tidak perlu melaraskannya, tekan t.
8 Pemasangan
Tekan 2 +/– untuk memilih “No”,
6
kemudian tekan t. Menu ini tidak akan
muncul lagi jika anda memasangkan TV
dengan menekan !.
Untuk membolehkan menu ini muncul lagi,
pilih “Yes”, kemudian tekan t.
Panduan
•
Anda boleh terus ke paparan menu ”Initial Setup” yang terakhir dengan menekan MENU.
• Anda juga boleh mengaturkan TV anda dengan menggunakan sistem menu (rujuk halaman 20).
• Anda juga boleh mengaturkan saluran secara automatik dengan menekan MENU (AUTO
PROG) pada panel hadapan TV kira-kira lima saat.

Gambaran menyeluruh untuk kawalan
x Panel hadapan dan belakang TV
Panel belakang TV
qg
c –
120W MAX 8
AUTO PROG:Press [MENU] for 5sec
L(MONO) R
MENU
SOUND
MODE
PROG
4
(AUTO PROG)
qf
qa
RLY
123
qd
C
R
C
B
qs
Panel hadapan TV
0
9
L(MONO) R
4
AUTO PROG:Press [MENU] for 5sec
MENU
SOUND
(AUTO PROG)
MODE
5876
4
PROG
3
2
1
Butang/Terminal Fungsi Halaman
1 ! Menutup atau memasang TV. 6
2 1 Penunjuk “standby”. 6
2 Penunjuk Bangun Tidur. 11
3 Pengesan alat kawalan jauh. –
4 PROG +/– Memilih nombor rancangan. –
5 2 +/– Melaraskan paras bunyi. –
6 t Memilih input TV atau video. 33
Operasi menu
5 2 +/– Memilih dan melaraskan butiran. –
6 t Mengesahkan butiran yang dipilih. –
7 MENU Memapar atau membatalkan menu. –
7 (AUTO PROG) Mengaturkan saluran secara automatik. 8
8 SOUND MODE Memilih pilihan mod bunyi. 12
Paparan “5-Band Graphic Equalizer” akan muncul
pada skrin TV.
9 t4Terminal input video 4. 33
0 i Terminal “Headphone”. –
qa Terminal input komponen video. 34
qs T Terminal output monitor. 33
qd t1, t2, t3Terminal input video 1, 2, 3. 33
qf 8 Terminal input antenna. 33
qg Terminal pembesar suara tengah. 35
Gambaran menyeluruh untuk kawalan
Gambaran menyeluruh untuk kawalan
9

x Menggunakan alat kawalan jauh
dan fungsi asas
qk
ql
w;
wa
ws
wd
wf
wg
wh
wj
wk
wl
e;
ea
es
DVD
1
4
7
OPTION RESET
VIDEO
CENTERSPWEGA
2
5
8
0
PROG
TV
THEATRE
A/B
MENU
3
6
9
Butang Deskripsi Halaman
1
2
1 ?/1 Menutup sementara atau –
3
3 a Memaparkan input TV. –
4
4 t Memilih input video. 33
5
5 WEGA Memilih Mod Teater WEGA. 15
6
THEATRE
7
6 CENTER SP
8
memasangkan TV.
Memilih mod pembesar suara tengah.
qa Menukar saiz gambar. 14
9
qd Memilih mod bunyi keliling: –
q;
qa
qs
qf
qd
qf
qg PROG +/– Memilih nombor rancangan. –
“TruSurround” (bunyi keliling
yang tersebar ke seluruh ruang
bilik), “WOW” (bunyi yang garau
dan bernada rendah), “Simulated”
(bunyi mono dengan kesan
seakan stereo), “Off”.
Kembali kepada nombor rancangan
sebelumnya yang telah ditonton
sekurang-kurangnya lima saat.
qk Menghilangkan bunyi. –
qg
ql
w; DVD
qh
wj Memilih pilihan mod bunyi. 12
qj
Memaparkan maklumat dalam skrin.
Memilih input komponen video. 34
Paparan “5-Band Graphic Equalizer”
akan muncul pada skrin TV.
wk Memilih mod gambar. 12
wl 0 – 9, - Input nombor. –
e; 2 +/– Melaraskan paras bunyi. –
es RESET
Operasi Menu
Mengaturkan TV pada aturan kilang.
8 MENU Memaparkan atau membatalkan 22
menu.
wg V, v, B , b Memilih dan melaraskan butiran. 22
wh Mengesahkan butiran yang dipilih. 22
Operasi stereo/dwibahasa
7 A/B Memilih mod stereo/dwibahasa. 17
Operasi pemasa
qh
(pemasa
tidur)
Setkan TV supaya ditutup –
mengikut tempoh masa yang
dikehendaki secara automatik
(maksimum 1 jam 30 min.)
.
15
–
–
36
10 Gambaran menyeluruh untuk kawalan

Butang Deskripsi Halaman
qj
(pemasa bangun tidur)
Operasi Teleteks (label hijau)
Setkan TV supaya dipasang mengikut tempoh masa –
yang dikehendaki secara automatik (maksimum
12 jam).
Penunjuk
jingga apabila anda sudah mengaturkan pemasa
bangun tidur.
Jika tidak ada butang atau kawalan ditekan setelah
satu jam TV dipasang dengan menggunakan pemasa
bangun tidur, TV akan berada dalam keadaan
“standby” secara automatik.
pada TV menyala dengan warna kuning
4 Menghentikan halaman Teleteks. 18
7 Membesarkan paparan Teleteks. 18
0 Memaparkan Teleteks. 18
qs z (merah, hijau, Mendapatkan halaman Teleteks yang menggunakan 18
kuning, biru) FASTEKS.
, Memaparkan halaman Teleteks yang sebelumnya 18
qg
atau selepasnya.
qh Menunggu halaman Teleteks semasa menonton 18
rancangan TV.
qj Mengetahui kandungan paparan Teleteks. 18
ql Memaparkan maklumat yang tersembunyi. 18
Operasi PIP (label kuning)
9 PIP PROG +/ Memapar dan menukar program di skrin kecil. 16
PIP PROG –
wa Melaraskan kedudukan skrin kecil. 16
ws Menukar gambar antara skrin utama dan skrin kecil. 16
wd Menukar bunyi antara skrin utama dan skrin kecil. 16
wf Memaparkan skrin kecil. 16
wg Menukar skrin kecil kepada skrin utama. 16
Operasi komponen pilihan
2 VIDEO ?/1 Pasang/tutup. 19
qk Menghilangkan bunyi. 19
wg > Laju ke hadapan/Mencari gambar ke hadapan. 19
wg . Putar balik/Mencari gambar ke belakang. 19
wg x Berhenti. 19
wg X Berhenti seketika. 19
wh N Main. 19
e; 2 +/– Melaraskan paras bunyi. 19
ea OPTION Mengendalikan komponen pilihan. 19
Gambaran menyeluruh untuk kawalan
Perkataan “WOW”, “TruSurround”, “SRS” dan simbol adalah cap dagang SRS Labs,
Inc. Teknologi WOW dan TruSurround adalah digabungkan di bawah lesen SRS Labs, Inc.
Dilesenkan oleh BBE Sound, Inc. di bawah USP4638258, 4482866.
Perkataan “BBE” dan simbol BBE adalah cap dagang BBE Sound, Inc.
Gambaran menyeluruh untuk kawalan
11

Operasi Lanjutan
x Memilih mod gambar dan bunyi
Anda boleh memilih mod gambar dan bunyi serta melaraskan aturan mengikut
citarasa anda dalam pilihan “Personal”.
DVD
VIDEO
CENTERSPWEGA
THEATRE
A/B
MENU
Memilih mod gambar
Tekan sehingga anda menerima mod gambar
yang dikehendaki.
Pilih Untuk menonton
“Dynamic” gambar dengan beza jelas tinggi.
“Standard” gambar biasa.
“Soft” gambar yang lembut.
“Personal” aturan gambar yang terakhir
yang dilaraskan dengan
2
1
3
4
6
5
8
9
7
0
menggunakan pilihan “Picture
Adjustment” dalam menu (rujuk
halaman 24).
Memilih mod bunyi
Tekan (atau SOUND MODE pada panel hadapan) sehingga anda menerima
mod bunyi yang dikehendaki. Paparan “5-Band Graphic Equalizer” akan muncul
pada skrin TV.
Pilih Untuk mendengar
“Dynamic” bunyi yang dinamik dan jelas yang menekankan nada
“Drama” bunyi yang menekankan suara dan nada tinggi.
Dynamic
tinggi dan rendah.
100 300 1k 3k 8k
Drama
100 300 1k 3k 8k
“Soft” bunyi yang lembut, semula jadi dan menenangkan.
“Personal” aturan bunyi yang terakhir yang dilaraskan dengan
Soft
100 300 1k 3k 8k
Personal
menggunakan pilihan “Sound Adjustment” dalam menu
(rujuk halaman 26).
100 300 1k 3k 8k
12 Operasi Lanjutan

x Menggunakan mod skrin lebar
Ciri mod skrin lebar membolehkan anda menonton gambar yang memenuhi
skrin 16:9 TV.
Menonton gambar dalam mod skrin lebar secara
automatik- Auto Wide
TV akan memilih mod skrin lebar yang optimum bergantung kepada input signal dan
memaparkan gambar untuk memenuhi skrin 16:9.
Contoh-contoh dalam gambarajah di bawah menunjukkan aturan seting kilang;
“Auto Wide” diaturkan kepada “On” dan “4:3 Default” diaturkan kepada “Wide
Zoom” dalam menu “Wide Screen” (rujuk halaman 27).
Semasa penerimaan … Fungsi “Auto Wide” Gambar bertukar kepada
gambar biasa
nisbah aspek 4:3
dengan atau
tanpa isyarat
ID-1 atau WSS.
gambar sebesar
kotak surat
dengan signal
ID-1 atau WSS.
gambar yang
terhimpit
dengan signal
ID-1 atau WSS.
memilih …
Wide
Zoom*
Zoom
Jaluran lebar hitam mungkin
akan muncul pada bahagian atas
dan bawah skrin.
Full
* Apabila gambar biasa 4:3 diterima, mod “Wide Zoom” akan dipilih secara automatik dengan
aturan kilang. Anda boleh memaparkan gambar dengan saiz asal tanpa membesarkannya
(mod “Normal”) apabila anda mengaturkan “4:3 Default” dalam menu “Wide Screen” kepada
“Normal” (rujuk halaman 27).
Nota
• Ciri “Auto Wide” mungkin tidak akan berfungsi dengan betul bergantung kepada kualiti
isyarat. Dalam kes ini, pilih mod skrin lebar secara manual menggunakan butang
halaman 14).
Operasi Lanjutan
(rujuk
bersambung
13

sambungan
Menonton gambar dalam mod skrin lebar secara manual
Tekan berulang kali sehingga mod yang anda kehendaki dipaparkan pada skrin.
3
2
1
4
5
6
8
9
7
0
PROG
OPTION RESET
TV
Nota
• Anda juga boleh memilih mod skrin lebar secara manual dengan menggunakan menu (rujuk
halaman 27).
• Apabila mod skrin lebar dipilih dengan menekan
menggunakan menu, ciri “Auto Wide” tidak akan berfungsi untuk sementara waktu.
Ciri “Auto Wide” akan berfungsi semula apabila:
– anda menukar saluran TV.
– anda menukar input video.
– TV ditutup dan dipasang semula.
– format signal berubah.
Wide Zoom Normal
Zoom Full
pada alat kawalan jauh atau
14 Operasi Lanjutan

x Menikmati Mod Teater WEGA
dengan pembesar suara tengah
Mod Teater WEGA membolehkan anda menikmati kesan gambar, suara dan bunyi keliling
yang seakan-akan di teater daripada sumber “DVD” Sony. Anda boleh menggunakan
pembesar suara TV sebagai pembesar suara tengah sistem audio untuk mendengar bunyi
yang menekankan suara dan mengawal paras bunyi daripada alat kawalan jauh TV.
Mengaturkan Mod Teater WEGA
1. Sambungkan terminal pembesar suara tengah kepada input pembesar suara tengah
pada TV (rujuk halaman 35).
2. Pilih input video yang sesuai dalam menu “WEGA Theatre Setup” dan pasangkan
kuasa utama peralatan yang disambungkan (rujuk halaman 31).
3. Aturkan alat kawalan jauh untuk mengendalikan peralatan yang disambungkan (rujuk
halaman 19).
CENTER SP
WEGA THEATRE
2 +/–
DVD
1
4
7
OPTION RESET
VIDEO
CENTERSPWEGA
2
5
8
0
PROG
TV
THEATRE
A/B
MENU
3
6
9
Untuk Tekan
beralih kepada Mod WEGA THEATRE.
Teater WEGA Pastikan anda mengarahkan alat
kawalan jauh pada TV dan peralatan
yang disambung sekurang-kurangya
satu saat selepas butang ini ditekan.
Peralatan yang disambung pasang
secara automatik daripada
“Standby” dan mula main.
“Picture Mode” dan “Sound Mode”
beralih secara automatik kepada
“Personal” dan anda boleh
melaraskan aturan mengikut
citarasa
anda (rujuk halaman 24 dan 26).
beralih kepada mod CENTER SP sehingga “CENTER IN
pembesar suara Speaker” muncul.
tengah Untuk kembali semula kepada
mod pembesar suara yang
normal, tekan butang ini sehingga
“MAIN Speaker” muncul.
melaraskan paras
2 +/–.
bunyi pembesar
suara tengah
Nota
•
Pastikan anda meletakkan TV anda berdekatan dengan peralatan yang disambung supaya anda
boleh mengawal kedua-dua TV dan peralatan yang disambung dengan menggunakan alat
kawalan jauh TV dalam masa yang sama (rujuk halaman 19).
•
Mod Teater WEGA dan pembesar suara tengah akan dibatalkan secara automatik apabila anda
menukar nombor rancangan, memilih input video atau apabila TV ditutup dan dipasangkan semula.
•
Jika TV anda berada dalam mod pembesar suara tengah, anda tidak dapat menggunakan ciri
gambar “PIP”, menukar kesan bunyi keliling dan mod “Intelligent Volume”.
• Sesetengah peralatan mungkin tidak reaksi dengan betul selepas butang WEGA THEATRE
ditekan. Dalam keadaan begini, gunakan alat kawalan jauh peralatan berkenaan.
Operasi Lanjutan
15

x Menonton “Picture-in-Picture” (PIP)
Anda boleh paparkan saluran TV atau input video yang
berlainan dalam skrin kecil dan skrin utama dengan
menggunakan butang
.
PIP PROG +/
PIP PROG –
VIDEO
DVD
CENTERSPWEGA
1
2
4
5
8
7
0
Untuk
Memaparkan skrin kecil.
THEATRE
A/B
MENU
Menukar nombor rancangan
dalam skrin kecil.
Melaraskan kedudukan
skrin kecil.
Saling menukar gambar
antara skrin utama dan
3
skrin kecil.
6
Menukar bunyi antara skrin
9
utama dan skrin kecil.
Tekan
.
Untuk membatalkan skrin
kecil, tekan butang itu sekali
lagi.
PIP PROG + atau
PIP PROG –.
.
.
.
Simbol “ ” akan muncul di
sebelah paparan nombor
rancangan atau input video
untuk menunjukkan bunyi
skrin yang mana anda dengar.
Memilih rancangan TV dengan menggunakan PIP
Anda boleh terus memilih rancangan TV yang dikehendaki dari skrin kecil dengan
menggunakan butang PIP PROG +/–.
1. Tekan PIP PROG +/– sehingga rancangan yang dikehendaki muncul di skrin kecil.
2. Tekan untuk menukar rancangan skrin kecil ke skrin utama.
Nota
• Ciri gambar “PIP” tidak diaktifkan apabila TV anda berada dalam mod pembesar suara
tengah (halaman 15) dan anda tidak boleh mengatur TV anda kepada mod pembesar suara
tengah semasa menonton gambar “PIP”.
• Anda hanya boleh menikmati bunyi stereo dalam skrin utama.
• Anda tidak boleh menukar gambar kepada input video dalam skrin kecil. Anda hanya boleh
memaparkan input video, dalam skrin kecil dengan saling menukar gambar apabila input
video dipaparkan dalam skrin utama.
• Gambar dan bunyi daripada terminal T (output monitor) akan sentiasa berasal daripada
skrin utama, walaupun anda memilih bunyi skrin kecil dengan menekan
(rujuk halaman
33).
16 Operasi Lanjutan

x
Menikmati rancangan stereo atau
rancangan dwibahasa
Anda boleh menikmati bunyi stereo atau rancangan dwibahasa daripada sistem
stereo NICAM dan A2 dengan menggunakan butang A/B.
Apabila menerima rancangan NICAM
Siaran Paparan di skrin (Bunyi yang dipilih)
NICAM
THEATRE
stereo
A/B
MENU
NICAM
dwibahasa
NICAM
monaural
3
6
9
Apabila menerima rancangan A2
Siaran Paparan di skrin (Bunyi yang dipilih)
A2
stereo
NICAM
(Bunyi stereo)
t
NICAM Main
(Bunyi utama)
t
NICAM Main
(Bunyi utama)
t
Stereo
(Bunyi stereo)
t
NICAM Sub
tt
(Bunyi sub)
t
t
(Bunyi biasa)
(Bunyi biasa)
(Bunyi biasa)
(Bunyi biasa)
A/B
DVD
1
4
7
OPTION RESET
VIDEO
CENTERSPWEGA
2
5
8
0
PROG
t
TV
A2
dwibahasa
Main
(Bunyi utama)
t
t
Nota
• Jika bunyi stereo bising semasa menerima rancangan stereo, pilih “Mono”. Bunyi akan
berubah menjadi mono, tetapi bunyi bising akan berkurangan.
Mono
Mono
Mono
Mono
Sub
(Bunyi sub)
Operasi Lanjutan
17

x Menonton Teleteks
Stesen TV menyediakan perkhidmatan maklumat yang dikenali sebagai
Teleteks menerusi beberapa saluran TV. Teleteks membolehkan anda menerima
pelbagai maklumat terkini seperti pasaran saham atau berita.
Anda boleh menggunakan butang pada alat kawalan jauh untuk menonton Teleteks.
(merah,
hijau,
kuning,
biru)
VIDEO
DVD
CENTERSPWEGA
Untuk Cara
memaparkan
halaman Teleteks
THEATRE
pada gambar TV Teleteks t Teleteks dan TV t TV.
A/B
MENU
Tekan . Setiap kali anda tekan , skrin
akan berubah seperti berikut:
Jika tiada siaran Teleteks, maklumat
“100” akan dipaparkan di sudut kiri atas
skrin.
mengetahui Tekan . Gambaran menyeluruh
kandungan tentang kandungan Teleteks dan
perkhidmatan nombor halaman muncul di skrin.
Teleteks
z
2
1
4
5
8
7
,
0
PROG
memilih halaman
Teleteks nombor halaman tiga angka bagi
3
6
9
Tekan butang nombor untuk memasukkan
halaman Teleteks yang dikehendaki. Jika
anda tersilap, masukkan semula nombor
halaman yang betul. Untuk
mendapatkan halaman yang seterusnya
atau yang sebelumnya, tekan atau .
menahan Tekan untuk memaparkan simbol
OPTION RESET
TV
(menghentikan) “ ” di sudut kiri atas skrin. Untuk
paparan Teleteks menyambung semula operasi biasa
Teleteks, tekan
.
memaparkan Tekan . Untuk menyembunyikan
maklumat yang semula maklumat itu, tekan butang itu
tersembunyi(contohnya,
sekali lagi.
jawapan kuiz)
membesarkan Tekan . Setiap kali anda menekan
paparan Teleteks , paparan Teleteks akan berubah
seperti berikut:
Separuh bahagian atas dibesarkan t
Separuh bahagian bawah dibesarkan t
Saiz biasa.
menunggu halaman
Teleteks semasa
menonton rancangan
TV
(1) Masukkan nombor halaman Teleteks
yang ingin anda rujuk, kemudian
tekan .
(2) Apabila nombor halaman dipaparkan,
tekan untuk memaparkan teks itu.
pilih menu FASTEKS Tekan z (merah, hijau, kuning, biru)
atau kotak berwarna yang selaras dengan menu atau muka
surat yang dikehendaki.
menutup Teleteks Tekan a.
Nota
•
Fungsi FASTEKS hanya boleh digunakan apabila terdapat siaran FASTEKS.
18 Operasi Lanjutan

x Mengendalikan komponen pilihan
Anda boleh menggunakan alat kawalan jauh yang dibekalkan untuk
mengendalikan peralatan audio/video Sony.
Mengaturkan alat kawalan jauh untuk mengendalikan peralatan lain
yang disambungkan
Semasa menekan butang VIDEO ?/1, Sekali coantoh, untuk mengendalikan
tekan butang nombor peralatan yang perakam pita video Sony 8 mm:
dikehendaki (rujuk carta di bawah)
Untuk mengendalikan Semasa menekan VIDEO ?/1, tekan
Sistem audio 1, 1x, 2 atau 3 0, 1, 2, atau 3
DVD 1, 2 atau 3 4, 5 atau 6
VTR1 (Beta), VTR2 (8 mm) atau VTR3 (VHS) 7, 8 atau 9
Mengendalikan peralatan audio/video
Tekan VIDEO ?/1 atau semasa menekan OPTION, tekan N , x , ., > ,
X , atau 2 +/– (rujuk carta di bawah).
Untuk Tekan
pasang/tutup VIDEO ?/1
main N semasa menekan OPTION.
berhenti x semasa menekan OPTION.
laju ke hadapan/melangkau ke hadapan atau > atau . semasa menekan OPTION.
putar balik/melangkau ke belakang
berhenti seketika X semasa menekan OPTION.
Tekan sekali lagi untuk menyambung
mainan biasa.
menghilangkan bunyi semasa menekan OPTION.
(untuk Sistem Audio 1, 1x, 2 atau 3 sahaja)
melaraskan paras bunyi 2 +/– semasa menekan OPTION.
(untuk Sistem Audio 1, 1x, 2 atau 3 sahaja)
Nota
• Jika peralatan anda tidak mempunyai sesuatu fungsi, butang untuk fungsi itu pada alat
kawalan jauh tidak akan beroperasi.
• Sesetengah peralatan mungkin tidak reaksi dengan betul terhadap butang pada alat kawalan
jauh. Dalam keadaan begini, gunakan alat kawalan jauh peralatan berkenaan.
VIDEO
+
8
Operasi Lanjutan
19

Melaraskan MENU
x Memperkenalkan sistem menu
Butang MENU membolehkan anda membuka menu dan menukar aturan TV
anda. Berikut adalah gambaran menyeluruh tentang sistem menu.
Lambang Picture
Lambang Sound
Lambang PIP
Lambang Channel Setup
Lambang Setup
Menu paras 1
Paras
1
“Picture”
Paras
“Mode”
“Picture Adjustment”
“Color Temperature”
“3D Intelligent
Picture”
“Sound”
“Mode”
“Sound Adjustment”
“Balance”
“Intelligent Volume”
“Surround”
Lambang kembali
Setup
Language:
Picture Position
WEGA Theatre Setup
Video Label
Color System:
Select
2
Paras
Confirm
3/Fungsi
End
Memilih mod gambar:
Nama menu semasa
Menu paras 3
Menu paras 2
Panduan Pengguna
Halaman
23
“Dynamic” t “Standard” t “Soft” t
“Personal”
Melaraskan pilihan “Personal”:
“Picture” t “Brightness” t “Color” t
“Hue” t “Sharpness” t “Reset”
Melaraskan warna putih:
“Cool” t “Neutral” t “Warm”
Mendapatkan kualiti gambar yang optimum:
“On” t “Off”
Memilih mod bunyi:
25
“Dynamic” t “Drama” t “Soft” t “Personal”
Melaraskan seting frekuensi bunyi bagi pilihan
“Personal”:
“Adjust” t “Reset”
Memilih untuk memperkuatkan pembesar
suara kiri dan kanan.
Melaraskan paras bunyi secara automatik:
“On” t “Off”
Memilih kesan bunyi keliling:
“TruSurround” t “WOW” t “Simulated” t
“Off”
20 Melaraskan MENU

Paras
1
“Wide Screen”
“PIP”
“Channel Setup”
“Setup”
Paras
2
“Wide Mode”
“Auto Wide”
“4:3 Default”
“V Center”
“V Size”
“PIP”
“Swap”
“Position”
“Auto Program”
“Manual Program”
“Program Label”
“Program Block”
“Program Sorting”
“Language”
“Picture Position”
“WEGA Theatre
Setup”
“Direct Input”
“Speaker”
“Video Label”
“Color System”
Paras
3/Fungsi
Memilih mod skrin lebar:
“Wide Zoom” t “Normal” t “Full” t “Zoom”
Memilih mod skrin lebar optimum secara automatik:
“On”
t “Off”
Menukar gambar kepada “Wide Zoom” atau
“Normal” apabila gambar biasa 4:3 dengan atau
tanpa signal ID-1 atau WSS diterima.
Melaraskan kedudukan menegak gambar dalam
mod “Wide Zoom” atau “Zoom”.
Melaraskan saiz kedudukan menegak gambar
dalam mod “Wide Zoom”atau “Zoom”.
Memaparkan skrin kecil di dalam skrin utama:
“On” t “Off”
Menukar gambar antara skrin utama dan skrin
kecil.
Menukar kedudukan skrin kecil.
Mengatur saluran secara automatik.
Mengatur saluran secara manual.
Melabelkan nombor rancangan.
Menyekat rancangan yang tidak dikehendaki.
Menukar susunan saluran yang muncul pada
skrin.
Menukar bahasa menu:
“English” t “
Melaraskan kedudukan gambar.
Memilih Mod Teater WEGA.
Memilih input peralatan yang ingin disambungkan.
Memilih mod pembesar suara:
“MAIN” t “CENTER IN”
Melabelkan peralatan yang disambungkan.
Menukar sistem warna:
“Auto” t “PAL” t “SECAM” t
“NTSC3.58”t “NTSC4.43”
”(Bahasa Cina)
Halaman
27
28
29
31
bersambung
Melaraskan MENU
21

Select
End
Channel Setup
Confirm
Auto Program
Program Label
Manual Program
Program Block
Program Sorting
sambungan
Cara menggunakan menu
1
4
7
OPTION RESET
MENU
3
2
6
5
8
9
0
PROG
Tekan MENU untuk
memaparkan menu
Tekan V atau v
untuk memilih
butiran yang
dikehendaki.
.
Picture
Mode: Dynamic
Picture Adjustment
Color Temperature: Cool
3D Intelligent Picture: On
Select
Select
Confirm
Channel Setup
Auto Program
Manual Program
Program Label
Program Block
Program Sorting
Confirm
End
End
Tekan (atau b)
untuk mengesahkan
TV
pilihan anda dan
pergi ke paras
menu yang
seterusnya.
Operasi menu yang lain
Untuk
Melaraskan kedudukan aturan
Pergi ke paras menu yang selepas/sebelum
Membatalkan menu
Tekan
V, v, B atau b.
B atau b.
MENU.
Panduan
• Jika anda hendak keluar dari Menu paras 2 dan pergi ke Menu paras 1, tekan V atau v
sehingga lambang kembali (
) dipilih, kemudian tekan .
• Butang MENU, t dan 2 +/– pada panel hadapan TV boleh juga digunakan untuk operasi
di atas (rujuk halaman 9).
Nota
• Apabila ciri kelihatan malap di dalam menu, ia tidak boleh dipilih.
22 Melaraskan MENU

x Menukar aturan “Picture”
Confirm
End
Picture
Color Temperature: Cool
Picture Adjustment
Mode: Dynamic
3D Intelligent Picture: On
Select
Menu “Picture” membenarkan anda menukar aturan gambar.
Tekan MENU.
1
Pastikan lambang “Picture” ( ) dipilih,
2
kemudian tekan
Tekan V atau v untuk memilih butiran yang dikehendaki (contohnya,
3
“Mode”), kemudian tekan
Pilih Untuk
“Mode” memilih “Dynamic”, “Standard”, “Soft” atau “Personal”* (rujuk
“Color Temperature” melaraskan warna putih.
“3D Intelligent Picture” mengoptimumkan kualiti gambar.
* Anda boleh melaraskan aturan mengikut citarasa anda dalam pilihan “Picture
Adjustment” dan “Color Temperature” hanya apabila mod “Personal” dipilih (rujuk
halaman 24).
Nota
• Bagi sistem warna NTSC 3.58, “3D Comb Filter : On” atau “3D-NR : On” akan dipaparkan
pada skrin apabila “3D Intelligent Picture” menukar daripada satu mod kepada mod lain.
Bagi sistem warna PAL pula, fungsi “Digital Comb Filter” dan “3D-NR” juga tersedia.
.
.
halaman 12).
Memilih “Cool” (warna biru), “Neutral” (warna neutral) atau
“Warm” (warna merah).
Secara automatik, gambar akan menjadi lebih jelas dan tajam
jika signalnya baik manakala bunyi bising akan dikurangkan
jika signalnya bising.
Tekan V atau v untuk memilih “On”, kemudian tekan
Untuk membatalkannya, pilih “Off”, kemudian tekan
.
.
bersambung
Melaraskan MENU
23

sambungan
Melaraskan butiran “Picture Adjustment” di bawah mod
“Personal”
Tekan V atau v untuk memilih “Picture” (kecerahan), “Brightness”, “Color”,
1
“Hue” (keterangan warna) atau “Sharpness”, kemudian tekan
Memilih “Reset” akan mengaturkan TV anda kepada aturan kilang.
Tekan V,v,B atau b untuk melaraskan aturan butiran pilihan anda, kemudian
2
tekan
Ulangi langkah-langkah tersebut di atas untuk melaras butiran lain.
3
Anda dapat menerima aturan yang telah dilaraskan apabila anda memilih “Personal”.
Nota
• “Hue” boleh dilaras untuk sistem NTSC sahaja.
• Anda boleh mengurangkan “Sharpness” untuk mengurangkan gangguan gambar.
.
.
24 Melaraskan MENU
 Loading...