

Page 1
4-098-738-51 (2)
Trinitron Color TV
Operating Instructions
• Before operating the unit, please read this manual thoroughly and retain it
for future reference.
KV-HZ34
KV-HZ29
© 2003 Sony Corporation
M65
Page 2
WARNING
• Dangerously high voltages are present inside the TV.
• TV operating voltage: 220–240 V AC.
• Do not plug in the power cord until you have completed making all other
connections; otherwise a minimum leakage current might flow through the antenna
and other terminals to ground.
• To avoid battery leakage and damage to the remote, remove the batteries from the
remote if you are not going to use it for several days. If any liquid leaks from the
batteries and touches your skin, immediately wash it away with water.
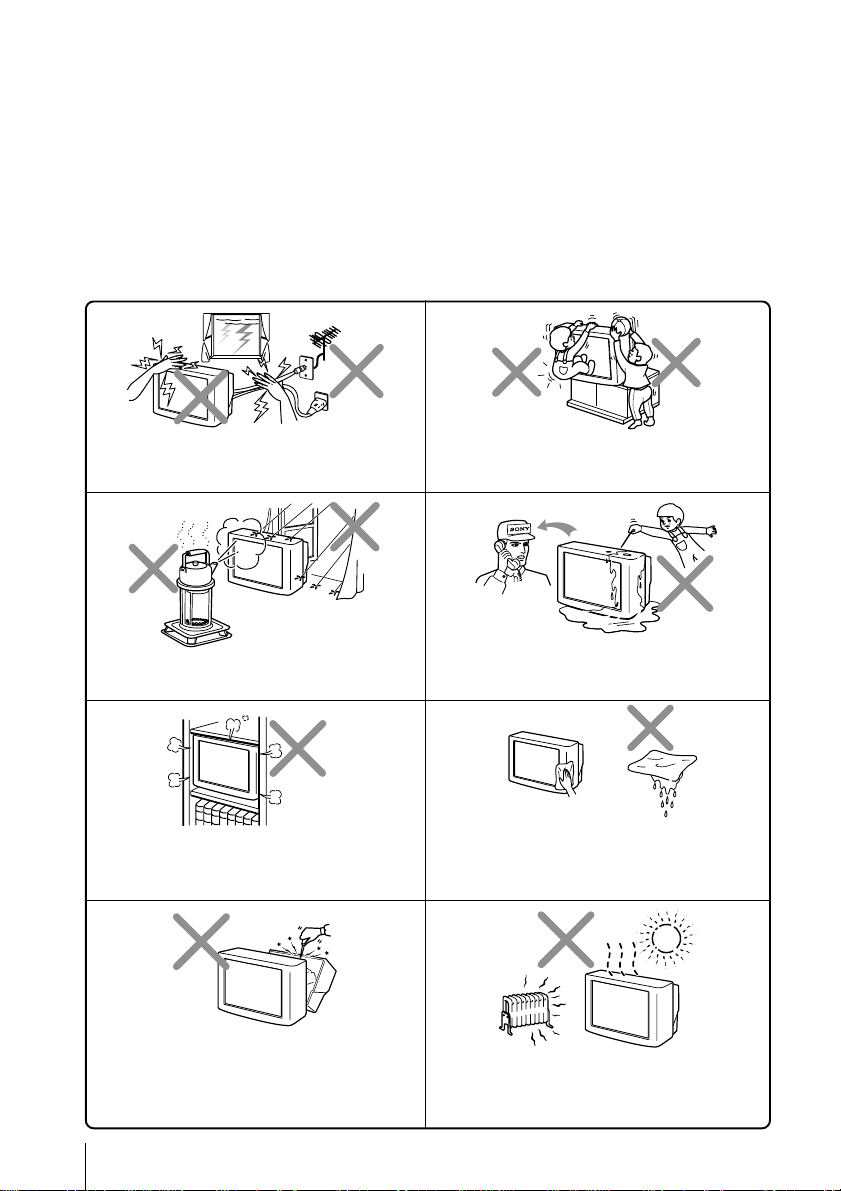
For your own safety, do not touch any part of the
TV, the power cord and the antenna cable during
lightning storms.
To prevent fire or shock hazard, do not expose the
TV to rain or moisture.
Do not block the ventilation openings of the TV.
Do not install the TV in a confined space, such as a
bookcase or built-in cabinet.
For children’s safety, do not leave children
alone with the TV. Do not allow children to
climb onto it.
Do not operate the TV if any liquid or solid object
falls into it. Have it checked immediately by
qualified personnel only.
Clean the TV with a dry and soft cloth.
Do not use benzine, thinner, or any other chemicals to
clean the TV. Do not attach anything (e.g., adhesive
tape, cellophane tape, glue) on the painted cabinet of
the TV. Do not scratch the picture tube.
Do not open the cabinet and the rear cover of the
TV as high voltages and other hazards are present
inside the TV. Refer servicing and disposal of the
TV to qualified personnel.
2
Your TV is recommended for home use only.
Do not use the TV in any vehicle or where it may
be subject to excessive dust, heat, moisture or
vibrations.
Page 3
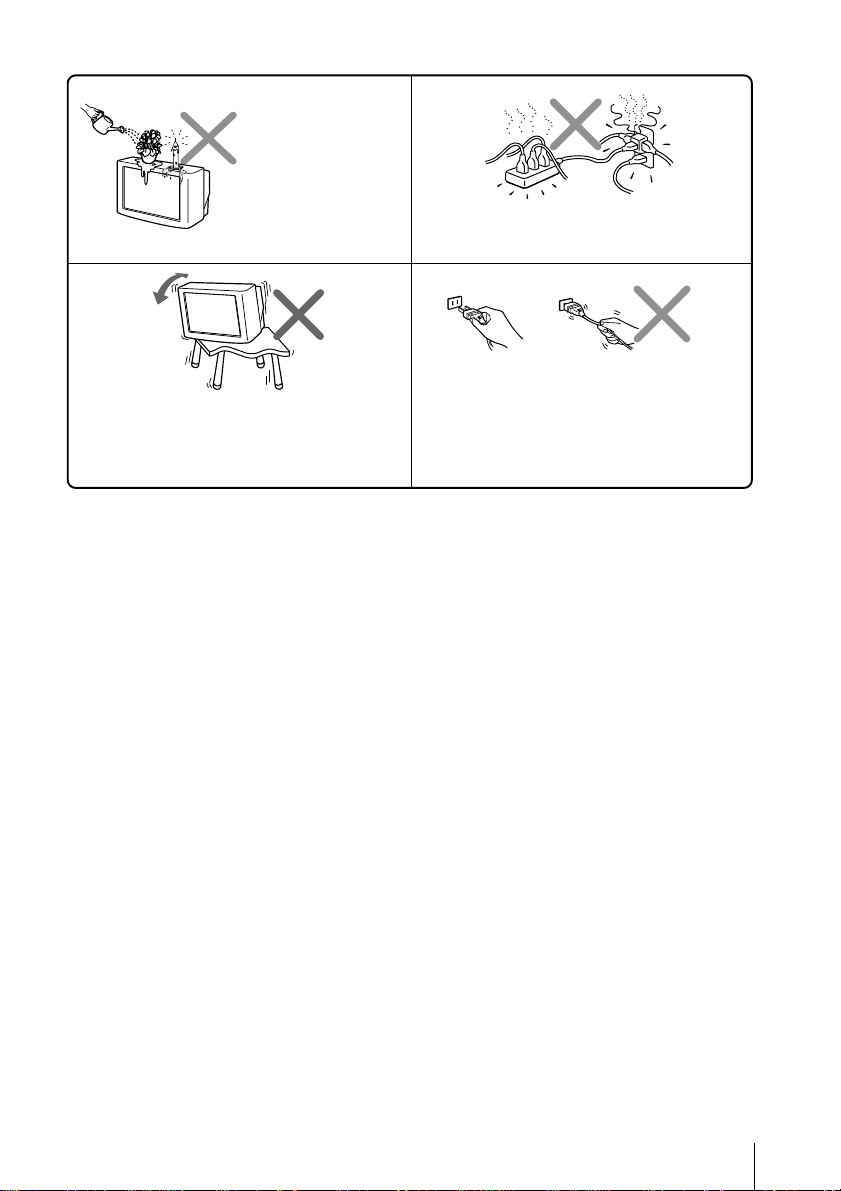
Do not place any
objects on the TV. The
apparatus shall not be
exposed to dripping or
splashing and that no
objects filled with
liquids, such as vases,
shall be placed on the
apparatus.
Install the TV on a stable TV stand and floor which
can support the TV set weight. Ensure that the TV
stand surface is flat and its area is larger than the
bottom area of the TV.
Do not plug in too many appliances to the same
power socket. Do not damage the power cord.
Pull the power cord out by the plug. Do not pull
the power cord itself. Even if your TV is turned
off, it is still connected to the AC power source
(mains) as long as the power cord is plugged in.
Unplug the TV before moving it or if you are not
going to use it for several days.
3
Page 4

The features you will enjoy include:
• “DRC-MF” for viewing higher quality
pictures (page 21)
• “Picture Mode”/“Sound Mode”/
“Surround” for customizing your TV
(pages 20 and 22)
Using Your New TV
4
Your TV also offers the following features:
• Initial Setup function for on-screen language
selection, picture position adjustment and
automatic channel presetting. (page 9)
• Menu language options
— English/Thai (page 41)
• “Program Block” for locking out specific
channels (page 50)
• “Intelligent Volume” for automatic volume
adjustment (page 39)
• “Fine” tuning feature (page 46)
• Button Joystick on the remote control for
easier operation (page 34)
• “Eco Mode” to save energy (page 43)
• “Game Mode” for video games (page 42)
Page 5

Table of Contents
WARNING
Using Your New TV
Getting Started ............................................................................................. 6
Step 1 Secure the TV.............................................................................. 6
Step 2 Connect the antenna.................................................................. 7
Step 3 Insert the batteries into the remote..........................................8
Step 4 Set up your TV automatically .................................................. 9
Connecting optional components ........................................................... 11
Watching the TV ........................................................................................17
Advanced Operations
Selecting the picture and sound
modes...............................................20
Viewing higher quality pictures ......21
Listening with surround sound.......22
Enjoying stereo or bilingual
programs ......................................... 23
Viewing Teletext.................................25
Operating optional components......27
Using the TV’s center speaker ......... 30
Additional Information
Troubleshooting .................................53
Self-diagnosis function......................57
Identifying parts and controls .........58
Specifications...................... Back cover
Adjusting Your Setup (MENU)
Introducing the menu system .......... 31
Changing the “Picture” setting........35
Changing the “Sound” setting.........38
Changing the “Setup” setting ..........41
Using Your New TV
Table of Contents
5
Page 6
Using Y our New TV
Using Y our New TV
Getting Started
Step 1
Secure the TV
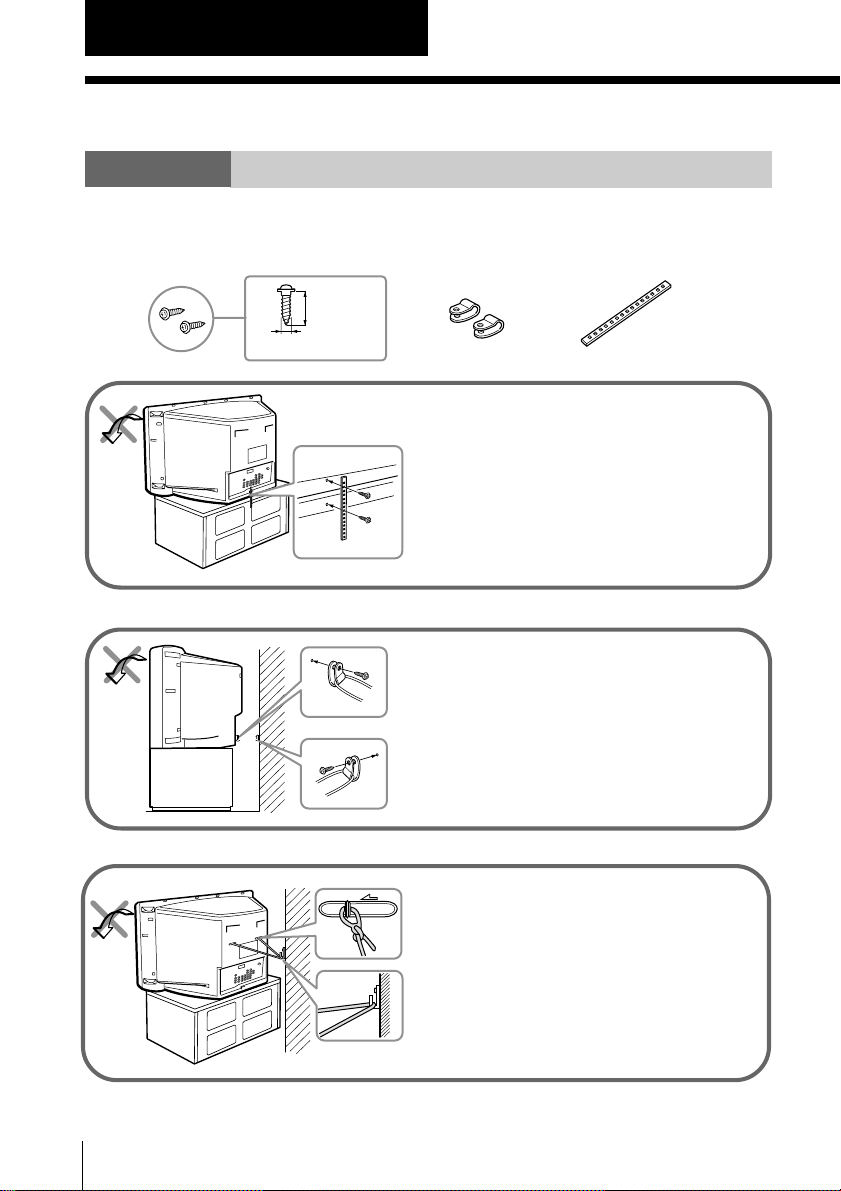
To prevent the TV from falling, use the supplied screws, clamps and band to secure
the TV.
20 mm
screws
3.8 mm
or
clamps band
Screw the band to the TV stand and to the
provided hole at the rear of your TV.
(1) Put a cord or chain through the clamps.
(2) Screw one clamp to a wall or pillar and
the other clamp to the provided hole at
the rear of your TV.
or
(1) Attach each end of a cord or chain to
the provided holders at the rear of your
TV.
(2) Securely fix the attached cord or chain
to a wall or pillar using an attachment
which can support the TV set weight.
Note
• Use only the supplied screws. Use of other screws may damage the TV.
Using Your New TV
6
Page 7
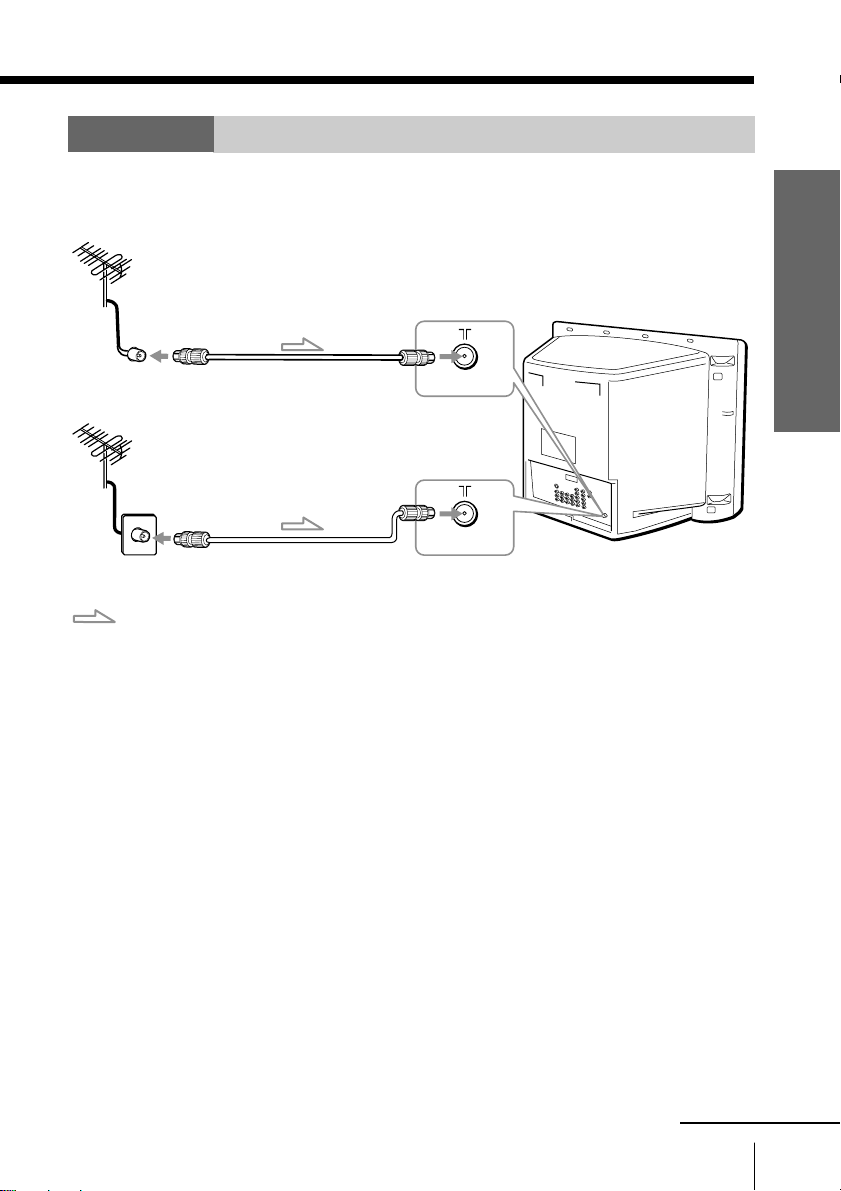
Step 2
Connect the antenna
If you wish to connect a VCR, see the “Connect a VCR” diagram on page 8.
Rear of TV
Antenna cable
(not supplied)
or
Antenna cable
(not supplied)
: Signal flow
For optimum Performance
To connect the TV to the antenna or the VCR, use a coaxial cable.
Note that one end of the cable has a male plug fitted while the other
end is fitted with a female socket. Connect the male plug to the 8
(antenna) terminal of the TV.
Using Your New TV
CAUTION
Do not connect the power cord until all other connections are complete;
otherwise, a minimal current leakage through the antenna and/or other
terminals to the ground could occur.
continued
Using Your New TV
7
Page 8
Getting Started (continued)
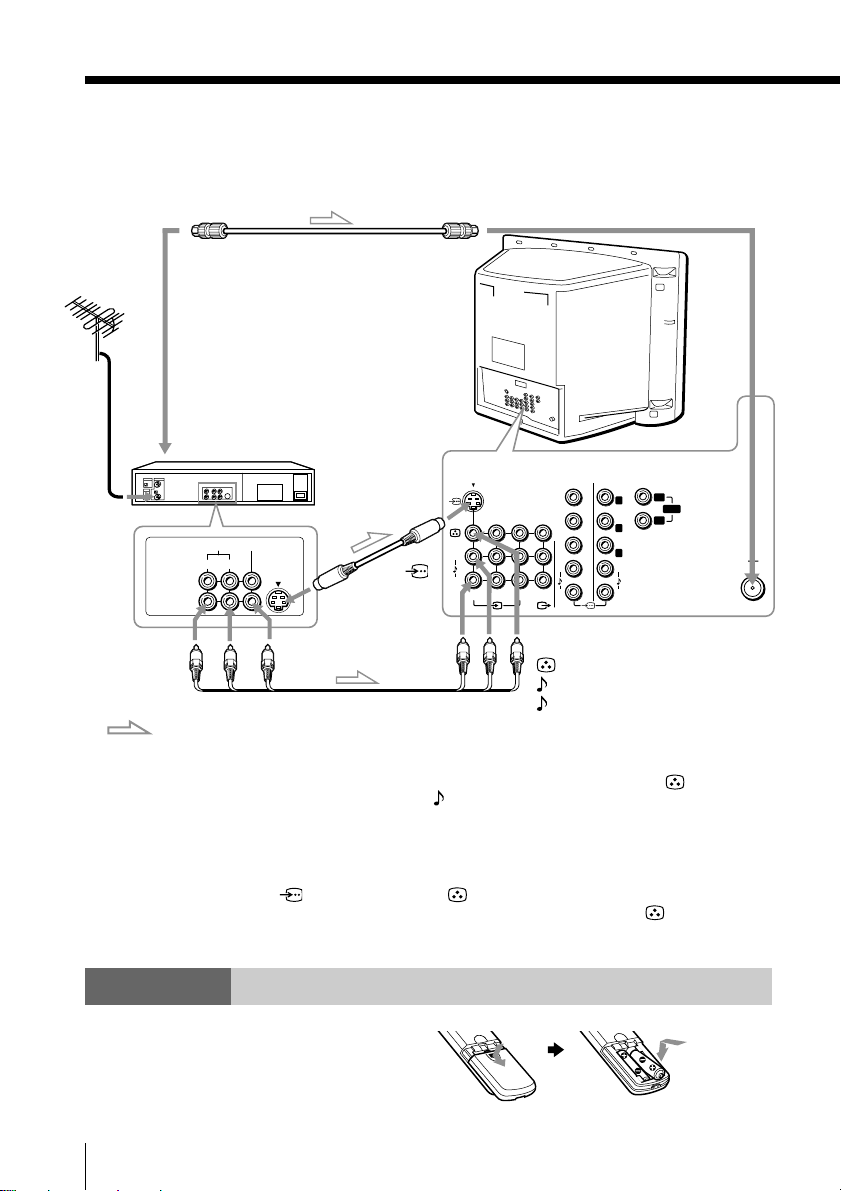
Connect a VCR
To play a video tape, press t (see page 18).
Antenna cable (not supplied)
Rear of TV
To 8 (antenna)
VIDEO IN
VIDEO OUT
To video and
audio outputs
: Signal flow
Step 3
To antenna
VIDEO
VCR
S video cable
(not supplied)
To
To S
video
(S video
input)
output
(MONO)
Y
Y
HD
G
PB/
C
B
PB/
VD
C
B
B
PR/
C
R
PR/
C
R
L
R
1
23
R
L
L
R
R
1
2
To t 1, 2 or 3 (video input)
output
AUDIO
R L
(yellow)
-L (MONO) (white)
Audio/Video cable
-R (red)
(not supplied)
Notes
• If you connect a monaural VCR, connect the yellow plug to (the yellow
jack) and the black plug to -L (MONO) (the white jack).
• If you connect a VCR to the 8 (antenna) terminal, preset the signal
output from the VCR to the program number 0 on the TV.
• When you connect a VCR to the S video input, display the “Setup” menu
and select “Auto” for “S Input” (see page 43). If the signals are input to
both (S video input) and (video input), the S video signal is
automatically selected. To view the video signal input to (video input),
select “Off” for “S Input”.
SYNC
Insert the batteries into
the remote
Note
• Do not use old batteries or different types of batteries together.
8
Using Your New TV
Page 9
Step 4
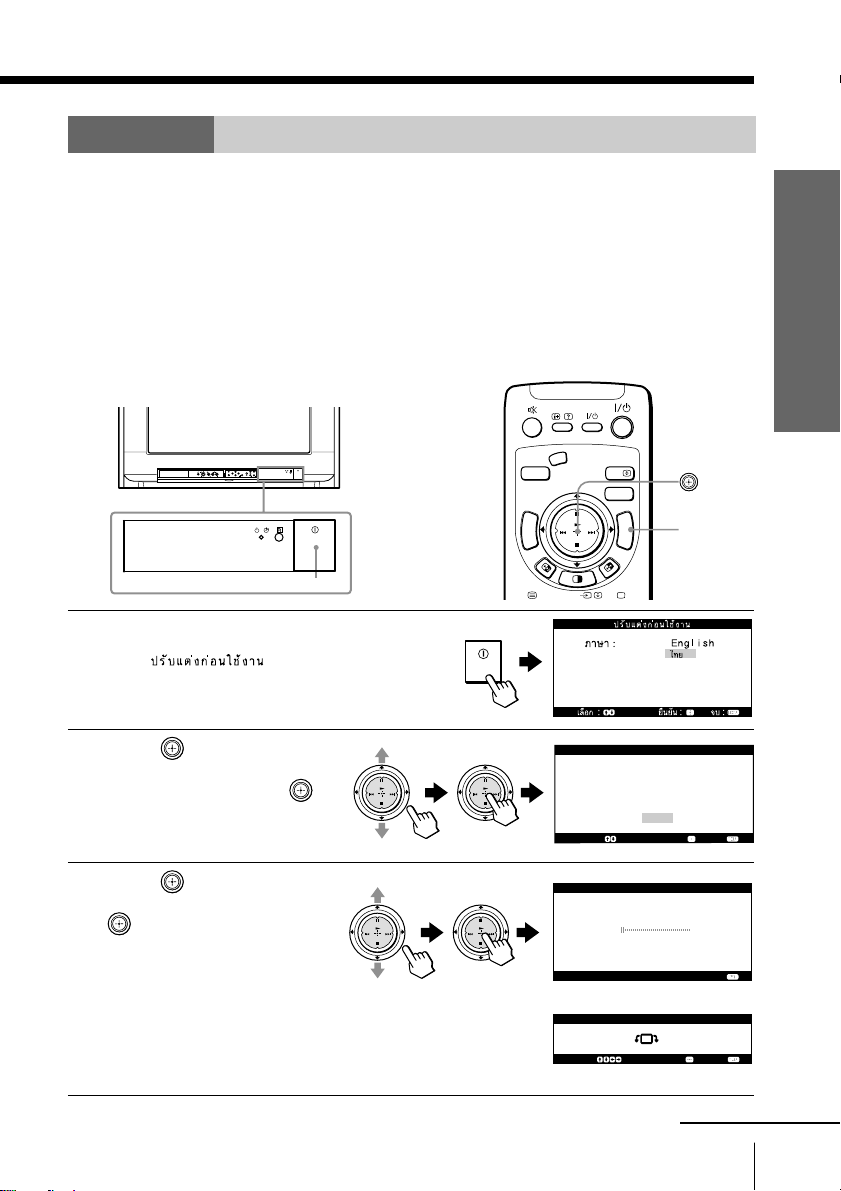
Set up your TV automatically
When you first turned on the TV, the “Picture Rotation” and “Picture V-Position”
menus will appear in the process of “Initial Setup”. These menus allow you to adjust
the inclination of picture, shift of the picture vertical position, and color patches
caused by the earth’s magnetic field. (These phenomena do not indicate the TV’s
problem.) Adjust “Picture Rotation” and “Picture V-Position” appropriately.
Tip
• When you install the TV to another location, make sure to adjust “Picture Rotation” and
“Picture V-Position” using the menu (see page 44).
VIDEO
N
E
T
C
E
R
S
T
T
HD/DVD
P
A/B
V CENTER
P
R
N
I
O
W
G
+
MENU
MENU
–
G
W
O
I
R
N
P
L(MONO) R
AUTO PROR
PROG
MENU
4
Press ! to turn on the TV.
1
The “ ” (Initial
Setup) menu appears, and you can
select the on-screen language.
DRC-MF
INDEX
PROG
!
Using Your New TV
Move up or down to
2
select the desired
language, then press
“Start auto program now?”
appears.
Move up or down to
3
select “Yes”, then press
to preset the
channels automatically.
The screen will indicate
automatic presetting is in
progress. After channel
presetting is complete, the
“Picture Rotation” menu
appears.
P
R
N
I
O
W
G
T
+
.
–
T
G
W
O
I
R
N
P
P
R
N
I
O
W
G
T
+
–
T
G
W
O
I
R
N
P
F i r s t p l e a s e
c a b l e / a n t e n n a
c o n n e c t
S t a r t a u t o p r o g r a m n o w ?
Yes
S e l e c t : C o n f i r m : E n d :
No
A u t o P r o g r a m
I n i t i a l S e t u p
P
R
N
I
O
W
G
T
+
–
T
G
W
O
I
R
N
P
P
R
N
I
O
W
G
T
+
–
T
G
W
O
I
R
N
P
P r o g r a m :
T V S y s t e m :
V H F L o w :
S e l e c t :
0 9
A u t o
C o n f i r m :
E n d :
P i c t u r e R o t a t i o n
Select : C o n f i r m : E n d :
continued
Using Your New TV
9
Page 10
Getting Started (continued)
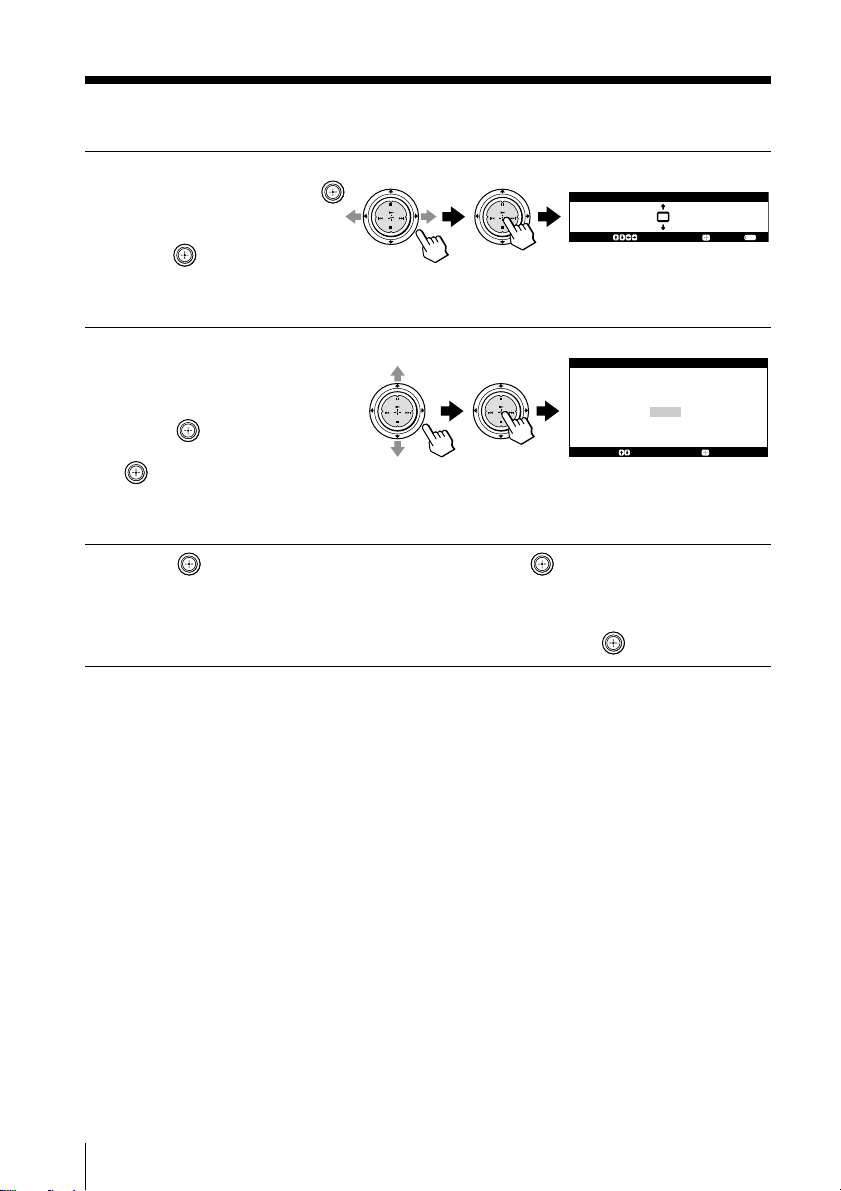
If the upper and lower
4
bars are slanted, move
left or right so that they
become horizontal, then
press
.
“Picture V-Position” menu
appears.
If the upper and lower
5
bars are not equally
positioned to the top and
bottom of the screen,
move
up or down to
adjust them, then press
.
“Display this menu next
time?” appears.
Move up or down to select “No”, then press .
6
The “Initial Setup” menu will not appear again the next time you turn on
the TV by pressing !.
To allow this menu to appear again, select “Yes”, then press
P
R
N
I
O
W
G
T
+
–
T
G
W
O
I
R
N
P
P
R
N
I
O
W
G
T
+
–
T
G
W
O
I
R
N
P
P
R
N
I
O
W
G
T
+
–
T
G
W
O
I
R
N
P
P
R
N
I
O
W
G
T
+
T
G
W
O
I
R
N
P
Select : C o n f i r m : E n d :
D i s p l a y t h i s m e n u n e x t t i m e ?
–
P i c t u r e V - P o s i t i o n
I n i t i a l S e t u p
Y e s
N o
.
E n d :S e l e c t : C o n f i r m :
10
Using Your New TV
Tips
• You can immediately go to the end of the “Initial Setup” menu by pressing
MENU.
• If your TV has preset an unwanted channel or cannot preset a particular
channel, then preset your TV manually (see page 45).
Notes
• Before adjusting “Picture Rotation” and “Picture V-Position”, keep
external speakers or other electrical equipment away from the TV. The
magnetic disturbance from these equipment or the direction of the earth’s
magnetic field may affect the TV.
• If you do not succeed in adjusting “Picture Rotation” and “Picture VPosition”, turn off the TV and change its location or direction, then try to
adjust using the menu. Do not move the TV while the TV is turned on. If
you do, abnormal color patches may appear on the picture. Press ! on
the TV to turn off the TV for about 15 minutes, then turn it on again to
demagnetize the TV.
• When adjusting “Picture Rotation”, adjust the value step by step. If you
rotate the bars largely at a time, color distortion may occur.
• You cannot adjust “Picture Rotation” and “Picture V-Position” when HD
signals are input.
Page 11
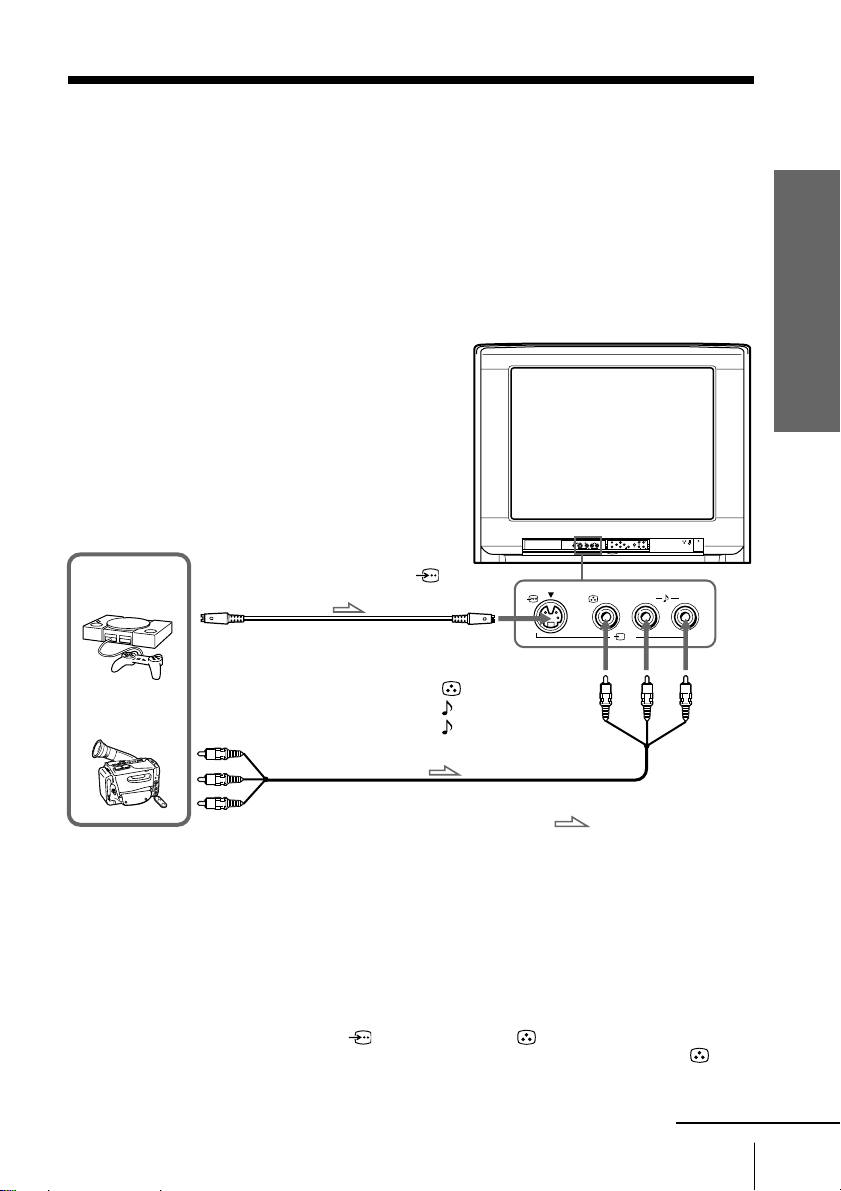
Connecting optional components
You can connect optional audio/video components, such as a VCR,
a DTV (Digital Television) receiver, multi disc player, camcorder,
video game, or stereo system. To watch and operate the connected
equipment, see pages 18 and 27.
Connecting a camcorder/video game equipment
using t 4 (video input 4) jacks
Front of TV
L(MONO) R
AUTO PROR
MENU
4
Video game
equipment
To S video
output
To
(S video input)
L(MONO) R
Using Your New TV
PROG
Camcorder
S video cable (not supplied)
4
To t 4 (video input)
(yellow)
-L (MONO) (white)
-R (red)
To video and
audio outputs
or
Audio/Video cable (not supplied)
: Signal flow
Notes
• When connecting video game equipment, display the “Setup” menu and
select “On” for “Game Mode” to adjust the picture setting that is suitable
for video games (see page 42).
•You can also connect video equipment to the t 1, 2, or 3 (video input)
jacks at the rear of your TV.
• When you connect video equipment to the S video input, display the
“Setup” menu and select “Auto” for “S Input” (see page 43). If the signals
are input to both (S video input) and (video input), the S video
signal is automatically selected. To view the video signal input to
(video input), select “Off” for “S Input”.
continued
Using Your New TV
11
Page 12
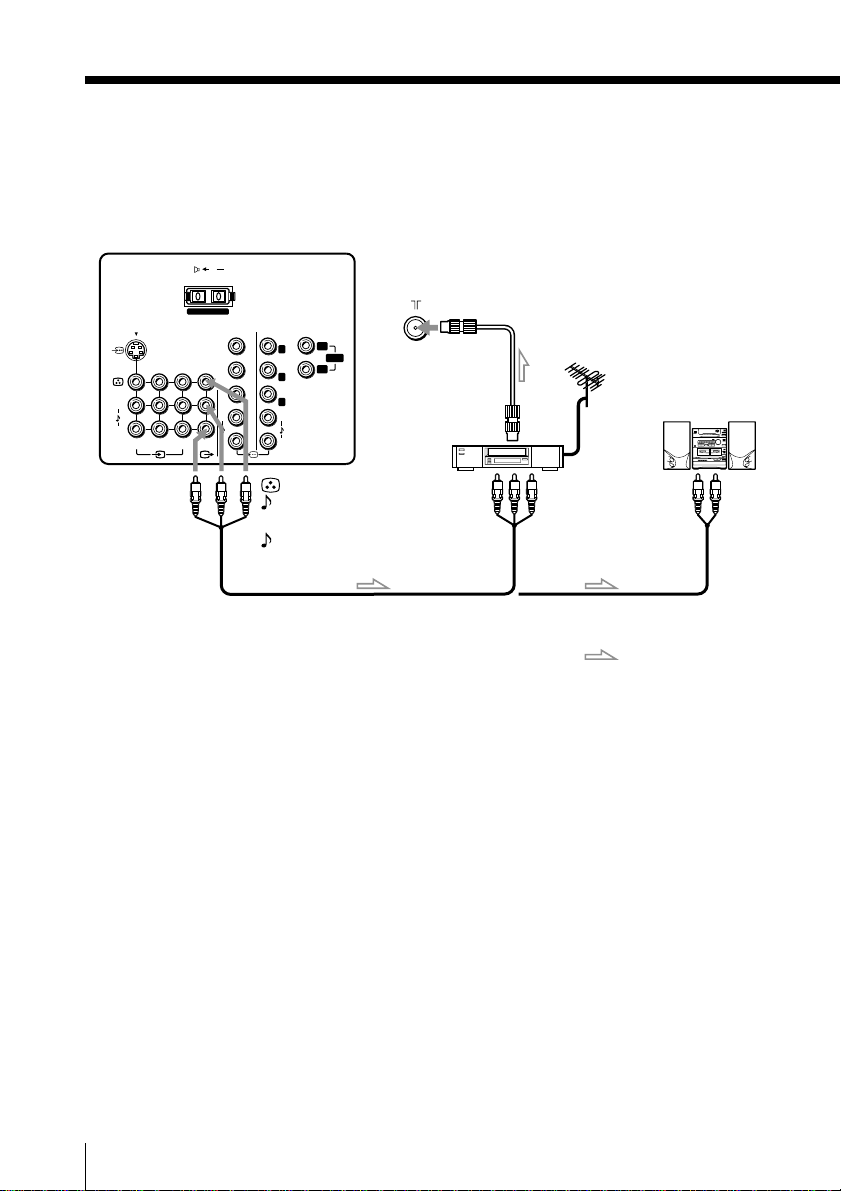
Connecting optional components (continued)
Connecting audio/video equipment using the T
(monitor output) jacks
Rear of TV
C
#3
Antenna cable (not supplied)
To antenna
output
VCR
To video
and audio
inputs
or
To
audio
inputs
(MONO)
L
R
1
To T
(monitor
output)
23
120W MAX 8Ω
Y
PB/
C
PR/
C
L
R
B
R
1
Y
HD
G
SYNC
PB/
VD
C
B
B
PR/
C
R
R
L
R
2
(yellow)
-L (MONO)
(white)
-R (red)
Audio system
12
Using Your New TV
Audio/Video cable (not supplied)
Audio cable
(not supplied)
: Signal flow
Note
• If you select “HD/DVD 1” or “HD/DVD 2” on your TV screen (see page
18), sound will be heard but no picture will be output from T (monitor
output). This does not indicate a malfunction.
Page 13
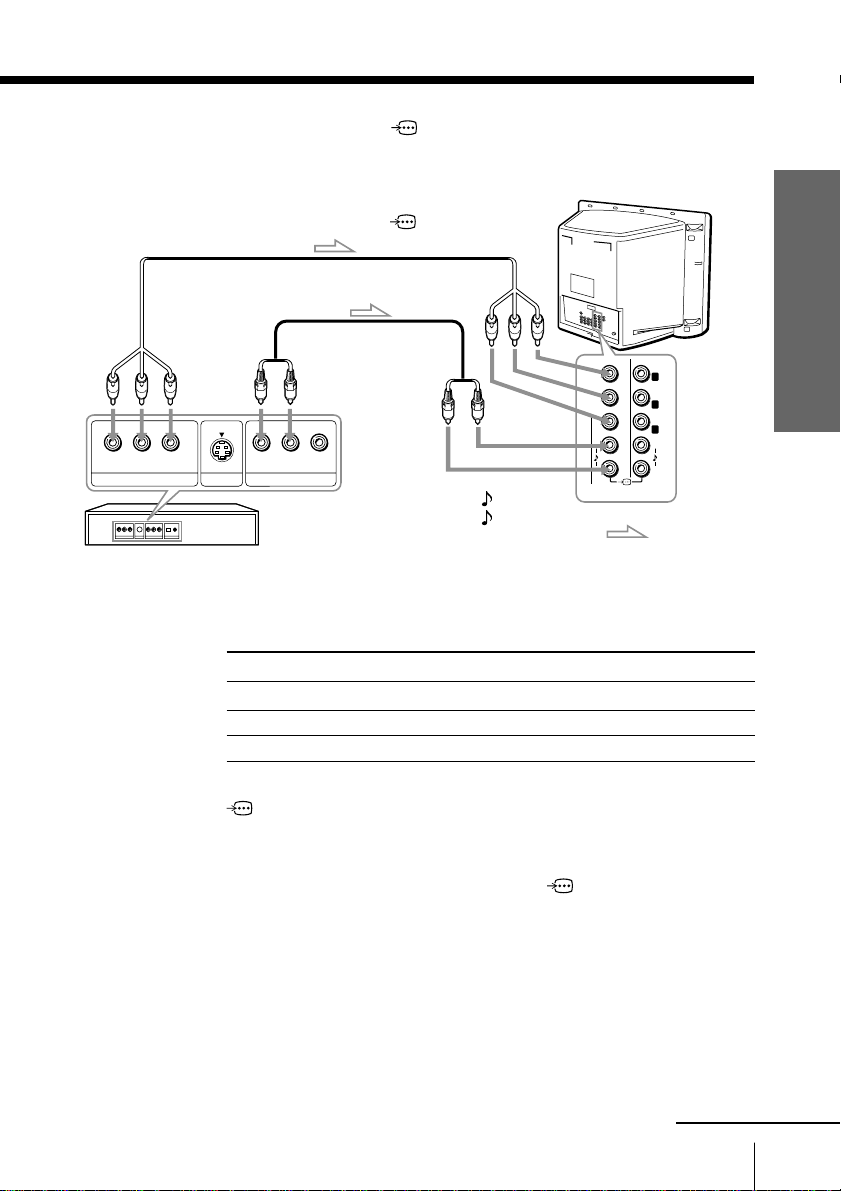
Connecting a DVD player to (component video input)
1 or 2 jacks
Rear of TV
Component video cable
(not supplied)
To component
video output
To audio
outputs
Y
CB CR
COMPONENT VIDEO OUT
S VIDEO OUT
DVD player
Notes
• Some DVD player terminals may be labeled differently:
Connect To (on the DVD player)
Y (green) Y
PB/CB (blue) Cb, B-Y or PB
PR/CR (red) Cr, R-Y or PR
R-AUDIO-L
LINE OUT
VIDEO
To 1 or 2
(component video input)
Audio cable
(not supplied)
To -L (white)
-R (red)
Y
PB/
C
B
PR/
C
R
L
R
1 2
Y
G
PB/
C
B
B
PR/
C
R
R
L
R
: Signal flow
Using Your New TV
• Connect nothing to the HD/VD jacks when connecting a DVD player to
1 or 2 (component video input).
• If you select “HD/DVD 1” or “HD/DVD 2” on your TV screen (see page
18), sound will be heard but no picture will be output from T (monitor
output). This does not indicate a malfunction.
• When receiving a progressive signal through (component video
input), “DRC-MF” and “Game Mode” are not selectable.
continued
Using Your New TV
13
Page 14
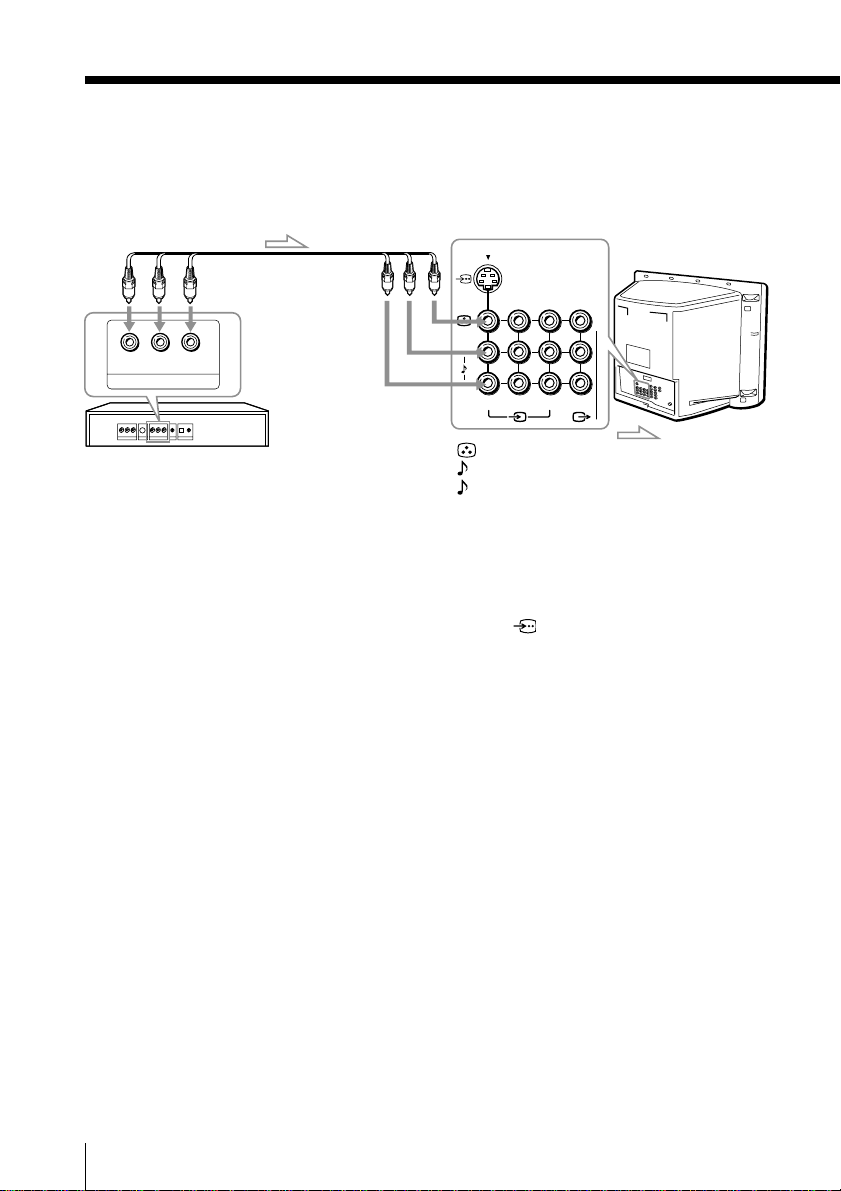
Connecting optional components (continued)
Connecting a DVD player to t (video input) 1, 2 or 3 jacks
To video and
audio outputs
Rear of TV
: Signal flow
R-AUDIO-L
VIDEO
LINE OUT
DVD player
Audio/Video cable
(not supplied)
(MONO)
L
R
To t 1, 2, or 3
12 3
(video input)
(yellow)
-L (MONO) (white)
-R (red)
Notes
• Since the high quality pictures on a DVD disc contain a lot of information,
picture noise may appear. In this case, display the “Picture” menu and
select “Personal” for “Picture Mode”, then adjust the sharpness
(“Sharpness”) under “Picture Adjustment” (see page 37).
• You can also connect a DVD player to (S video input) on the TV.
14
Using Your New TV
Page 15
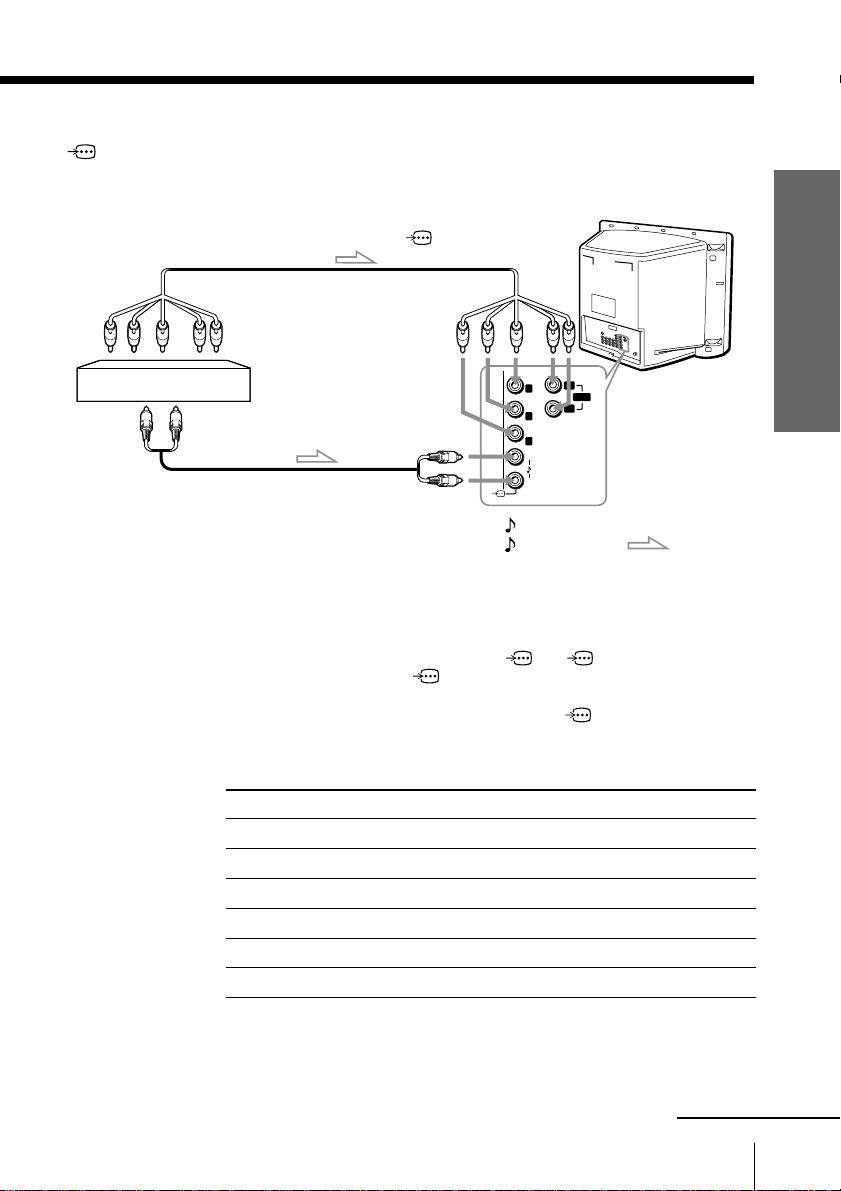
Connecting a DTV (digital television) receiver to
1 or 2 (component video input) jacks
Component video cable
(not supplied)
Digital TV receiver
To audio
outputs
Note
• The TV is equipped with the G/B/R/HD/VD inputs.
Tip
• The TV accepts the following signal formats:
Rear of TV
To 1 or 2
(Component video input)
To component
video output
Y
HD
G
SYNC
PB
/
VD
CB
B
PR
/
CR
R
L
Audio cable
(not supplied)
R
2
To -L (white)
-R (red)
: Signal flow
If your DTV receiver is equipped with the Y/PB/PR output connectors,
connect it to the Y/PB/PR connectors of 1 or 2. Connect nothing to
the HD/VD connectors of 2.
If your DTV receiver is not equipped with the Y/PB/PR output connectors,
connect it to the G/B/R/HD/VD connectors of 2.
Using Your New TV
Total scanning line Effective scanning line fV (Hz)
1125i 1080i 50/60
750p 720p 50/60
625p 576p 50
625i 576i 50
525p 480p 60
525i 480i 60
Using Your New TV
continued
15
Page 16
Connecting optional components (continued)
Connecting an amplifier
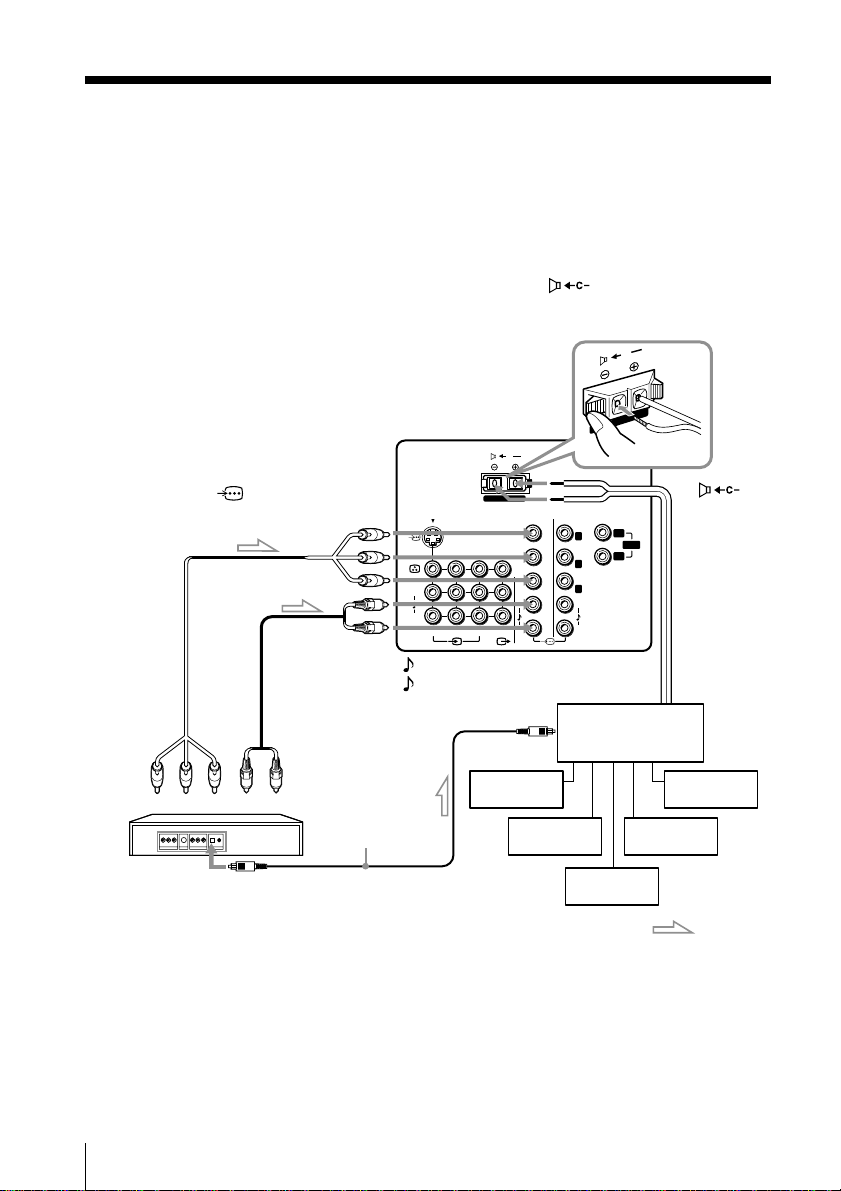
If you use an amplifier with a Dolby* surround decoder instead of
the TV’s audio system, you can use the TV’s speakers as the center
speaker for your audio system.
Using the speaker cords supplied with the amplifier, connect the
speaker terminals of the amplifier to the
terminals on the TV.
(center speaker input)
C
To component
video cable
(not supplied)
To component
video output
DVD player
To 1 or 2
(Component video input)
Audio cable
(not supplied)
To digital audio output
Note
• To use the TV’s speakers as the center speaker, display the “Sound” menu
and select “CENTER IN” for “Speaker” (see page 39).
Rear of TV
To -L (white)
To audio
outputs
Optical digital cable
(not supplied)
(MONO)
L
R
1
-R (red)
120W MAX 8Ω
23
To digital
audio input
Front
speaker (L)
C
Y
PB/
C
B
PR/
C
R
L
R
1
Rear
speaker (L)
Y
G
PB/
C
B
B
PR/
C
R
R
L
R
2
Woofer
120W MAX 8Ω
HD
SYNC
VD
Amplifier
speaker (R)
To
(center speaker
input)
Front
speaker (R)
Rear
: Signal flow
16
Using Your New TV
* “Dolby” is a trademark of Dolby Laboratories.
Page 17
Watching the TV
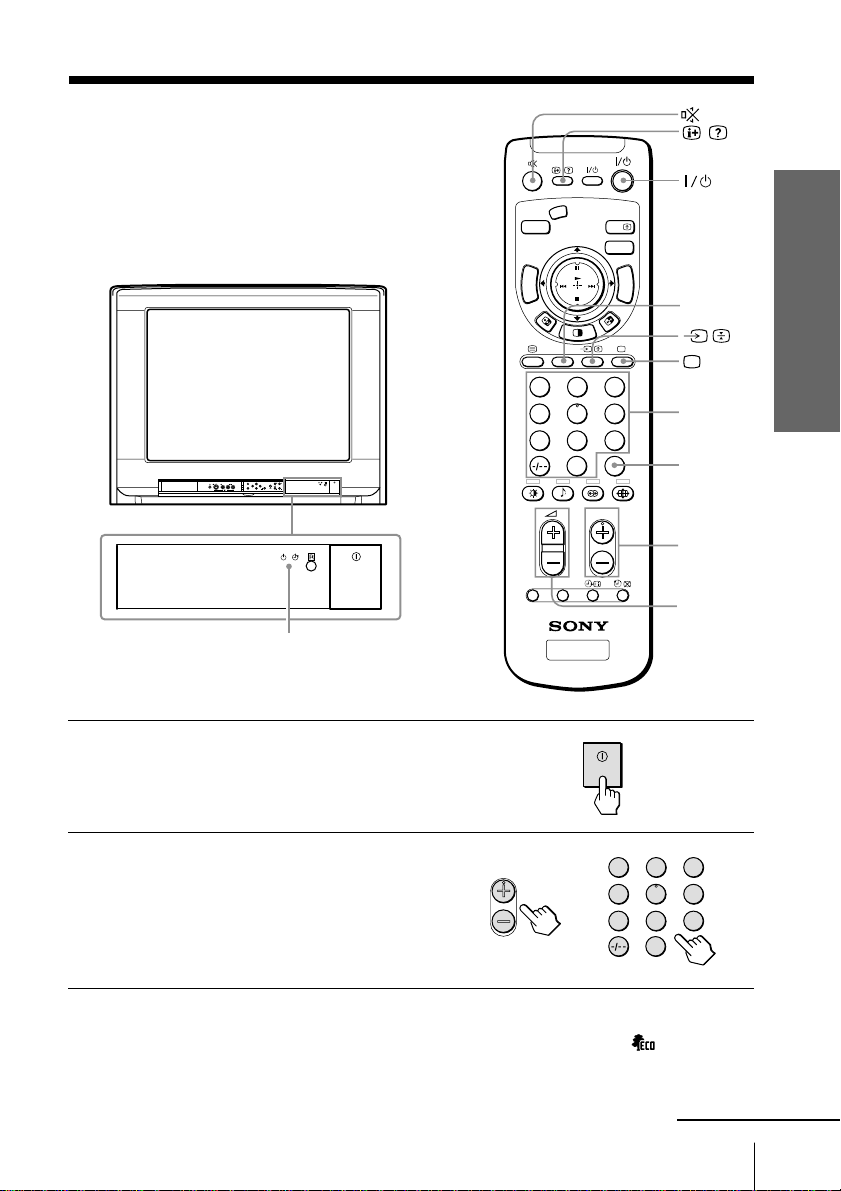
This section explains various functions
and operations used while watching the
TV. Most operations can be done using
the remote.
L(MONO) R
AUTO PROR
PROG
MENU
4
1 indicator
Press ! to turn on the TV.
1
When the TV is in standby mode (the 1
indicator on the TV is lit red), press !/1 on
the remote.
VIDEO
N
E
T
C
E
R
S
T
T
HD/DVD
P
P
R
N
I
O
W
G
+
–
G
W
O
I
R
N
P
DRC-MF
INDEX
PROG
123
456
7809
PROG
OPTION RESET
TV
A/B
V CENTER
JUMP
Using Your New TV
MENU
HD/DVD
Number
buttons
JUMP
PROG
+/–
2 +/–
Press PROG +/– or the number
2
buttons to select the TV
channel.
For double digit numbers, press
-, then the number (e.g., for 25,
press -, then 2 and 5).
Note
• When you turn on the TV, either the program number or video mode is
displayed for approximately 40 seconds. The Eco Mode ( ) icon will
also appear if “Eco Mode” in the “Setup” menu is set to “On” (see page
43).
PROG
123
456
or
78
0
Using Your New TV
9
continued
17
Page 18
Watching the TV (continued)
To select a TV program quickly
1 Press and hold PROG +/–.
2 Release PROG +/– when the desired program number appears.
Note
• When you select a TV program quickly, the picture may be disrupted.
This does not indicate a malfunction.
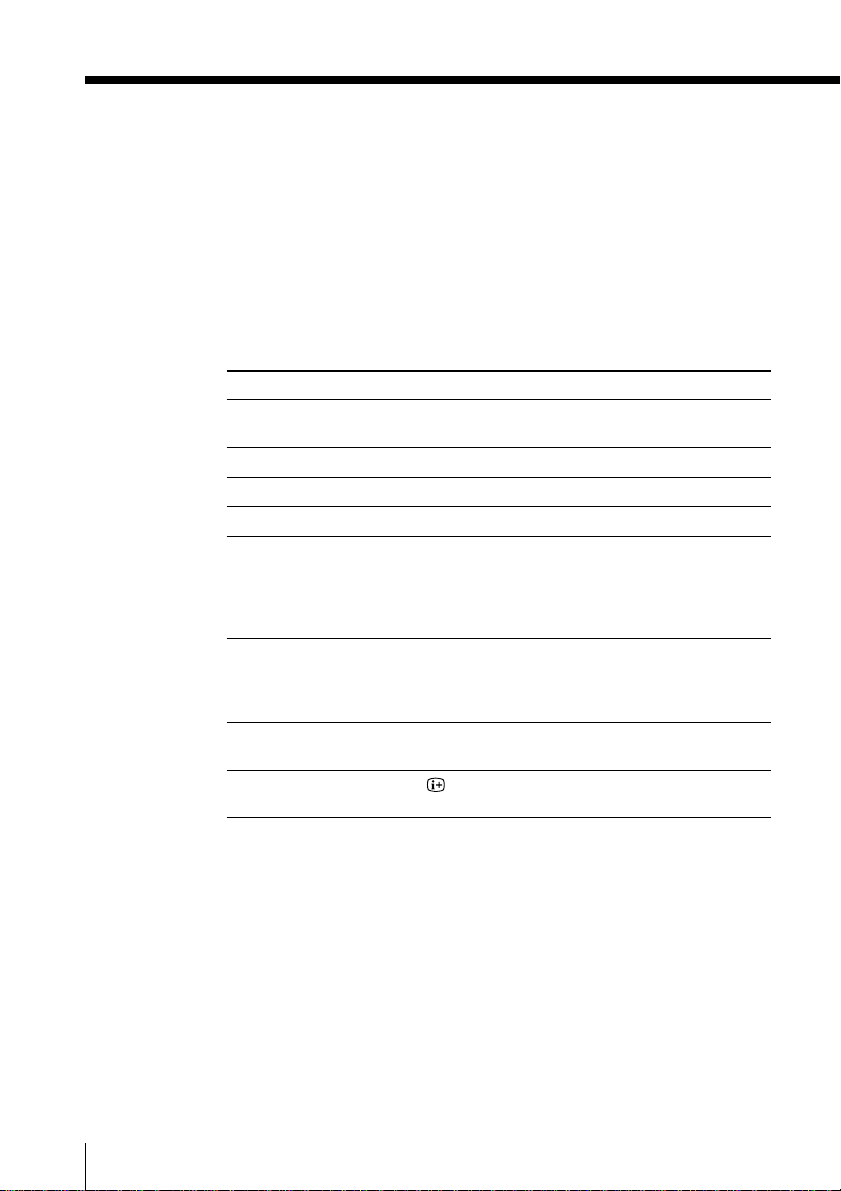
Additional tasks
To Press
Turn off temporarily
Turn off completely
Adjust the volume
Mute the sound
Watch the video input
(VCR, camcorder, etc.)
Watch the component
input
(DVD, DTV receiver)
Jump back to the
previous channel
Display the on-screen
information*
@/1.
The 1 indicator on the TV lights up red.
! on the TV.
2 +/–.
%.
t (or t on the TV) to select “VIDEO 1”,
“VIDEO 2”, “VIDEO 3”, “VIDEO 4”, “HD/DVD
1” or “HD/DVD 2”.
To return to the TV screen, press a (or t on
the TV).
HD/DVD to select “HD/DVD 1” or “HD/DVD
2”.
To return to the TV screen, press a (or t on
the TV).
JUMP.
.
18
Using Your New TV
* Some picture/sound settings, and either the program number or video
mode are displayed. The on-screen display for the picture/sound settings
disappears after about 3 seconds.
Page 19
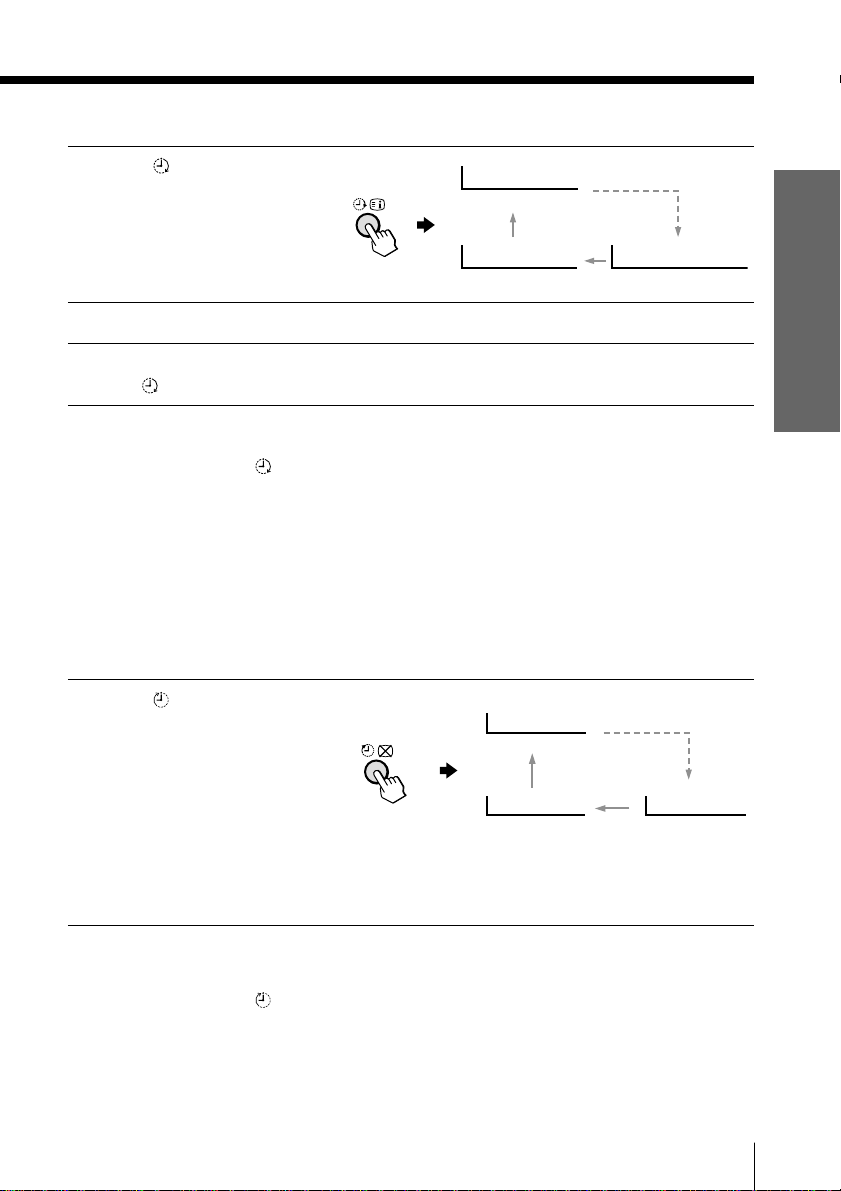
Setting the Wake Up timer
Press until the desired
1
period of time appears.
Wake Up Timer:10M
After 10 minutes
The Wake Up timer starts
immediately after you
have set it.
Select the TV channel or video mode you want to wake up to.
2
Press !/1, or set the Sleep timer if you want the TV to turn off automatically.
3
The
indicator on the TV lights up orange.
Wake Up Timer:Off
No Wake Up Timer After 12 hours
Wake Up Timer:12H00M
To cancel the Wake Up timer
Press until “Wake Up Timer: Off” appears, or press ! on the TV
to turn it off.
Note
• If no buttons or controls are pressed for more than two hours after the TV
is turned on using the Wake Up timer, the TV automatically goes into
standby mode. To resume watching the TV, press any button on the TV or
the remote.
Setting the Sleep timer
Press until the desired
period of time appears.
You can select the period of
time from among 15, 30, 45,
60, 75 and 90 minutes.
The Sleep timer starts
immediately after you
have set it.
Sleep Timer:15M
After 15 minutes
Sleep Timer:Off Sleep Timer:90M
No Sleep Timer
After 90 minutes
Using Your New TV
To cancel the Sleep timer
Press until “Sleep Timer: Off” appears, or turn the TV off.
Using Your New TV
19
Page 20
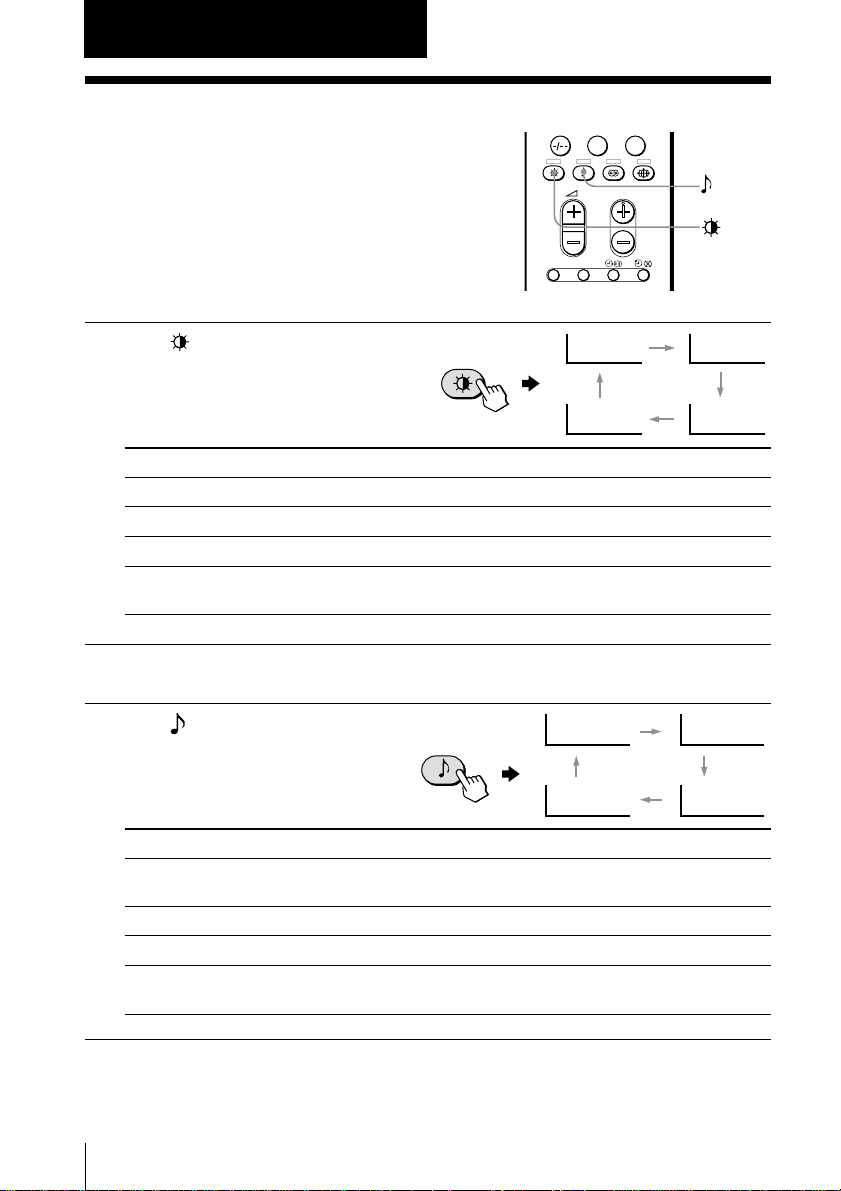
Advanced Operations
Selecting the picture and sound modes
JUMP
0
You can select picture and sound modes
and adjust the setting to your preference
in the “Personal” option.
OPTION RESET
Selecting the picture mode
Press repeatedly until
the desired picture mode
is selected.
Select To
“Dynamic” receive high contrast pictures.
“Standard” receive normal pictures.
“Hi-Fine” receive higher resolution pictures with mild contrast.
“Personal” receive the last adjusted picture setting from the “Picture
Adjustment” menu under the “Picture” menu (see page 37).
Dynamic
Personal
Selecting the sound mode
Press repeatedly until
the desired sound mode is
selected.
9
Dynamic
PROG
Standard
Hi-Fine
9
Drama
Select To
“Dynamic” listen to dynamic and clear sound that emphasizes both the low
“Drama” listen to sound that emphasizes voice and high tones.
“Soft” receive soft sound.
“Personal” receive the last adjusted sound setting from the “Sound
20
Advanced Operations
9
Personal
and high tones.
Adjustment” menu under the “Sound” menu (see page 40).
Tip
• You can also set the picture and sound modes using the menu (see
“Changing the “Picture” setting” on page 35 and “Changing the “Sound”
setting” on page 38).
9
Soft
Page 21
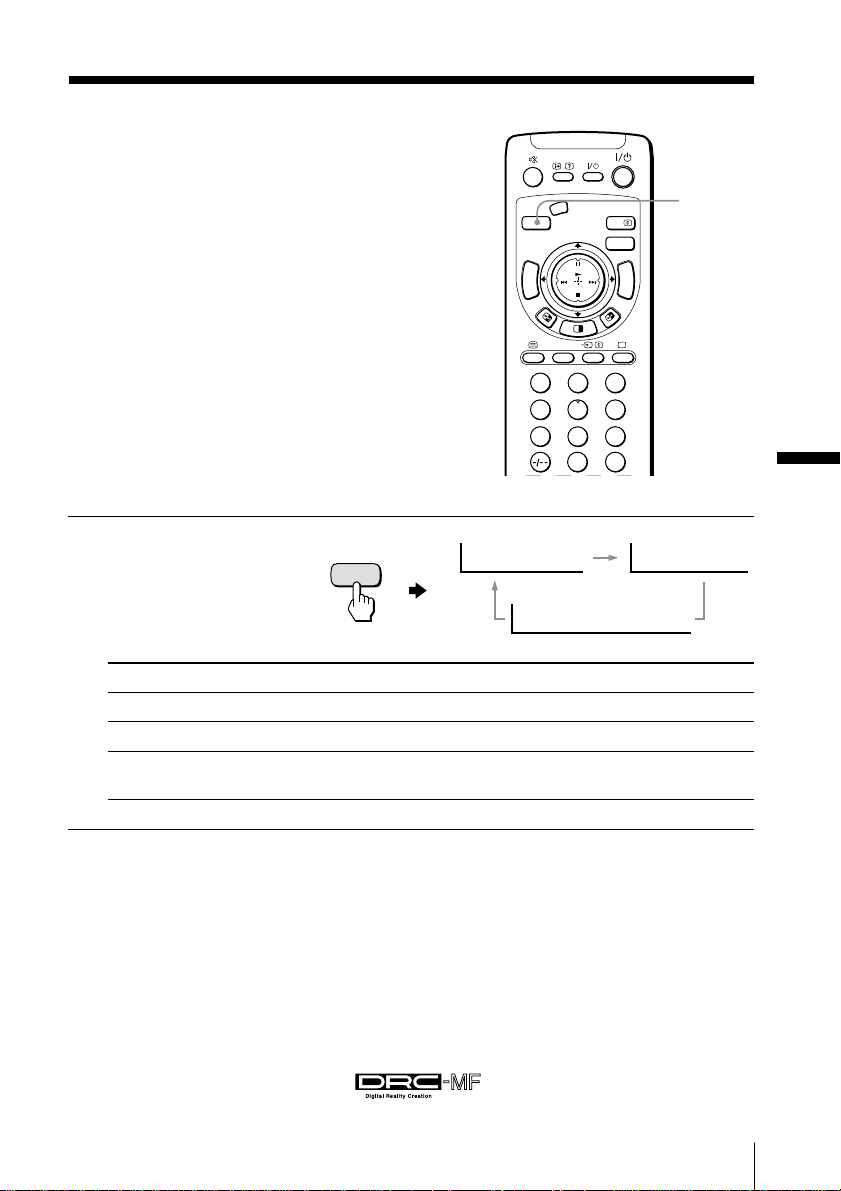
Viewing higher
quality pictures
VIDEO
— “DRC-MF”
N
E
T
C
E
R
S
P
The Digital Reality Creation-Multi
Function (DRC-MF) feature allows you
to enjoy higher quality pictures on your
TV. You can select from among three
DRC-MF modes: “DRC1250” to watch
super real (higher resolution) pictures,
DRC-MF
INDEX
PROG
T
T
HD/DVD
A/B
V CENTER
P
R
N
I
O
W
G
+
MENU
–
G
W
O
I
R
N
P
or “DRC100” for moving pictures or
“Progressive” for still pictures to reduce
flicker if necessary.
123
456
7809
JUMP
Press DRC-MF repeatedly
until you receive the
desired picture quality.
Select To
“DRC1250” select higher resolution pictures.
“DRC100” reduce flicker on the screen.
“Progressive” reduce jitter of any small areas or scanning lines (e.g., letters or the
DRC-MF
edge of objects) on the screen.
DRC-MF: DRC1250 DRC-MF: DRC100
DRC-MF: Progressive
DRC-MF
Advanced Operations
Tip
• When the broadcast signal is weak, you may see some dots or noise on the
TV screen. To reduce this interference, display the “Picture” menu and
select “Personal” for “Picture” mode, then adjust “Sharpness” under
“Picture Adjustment” to reduce the sharpness (see page 37).
Note
• The DRC-MF mode is not selectable when the “Game Mode” is turned
“On”. The mode is not available for HD (high-definition) or progressive
input signal.
The DRC-MF logo ( ) and “DRC-MF” are trademarks of
Sony Corporation.
Advanced Operations
21
Page 22
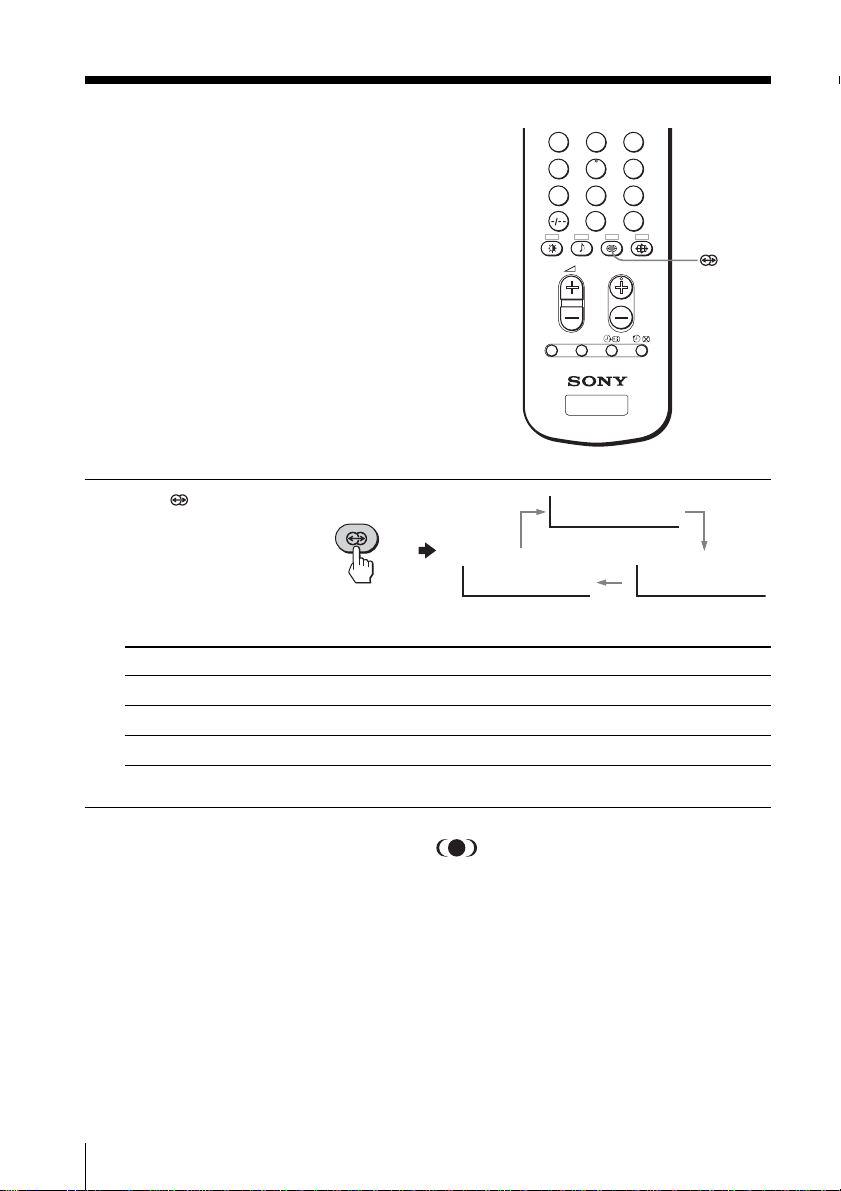
Listening with surround sound
The surround feature enables you to
enjoy the sound effects of a concert hall
or movie theater.
123
456
7809
JUMP
PROG
OPTION RESET
TV
Press repeatedly until
you receive the desired
Surround: TruSurround
surround sound.
Surround: Off
Select To
“TruSurround”* listen to the surround sound that spreads out to the rear of a room.
“Simulated” listen to monaural sound with a stereo-like effect.
“Off” turn off the surround sound.
*TruSurround, SRS and the symbol are trademarks of SRS Labs,
Inc. TruSurround technology is incorporated under license from SRS
Labs, Inc.
Note
•You cannot change the surround sound when the TV is in the center
speaker mode (page 30).
Surround: Sim u lated
22
Advanced Operations
Page 23
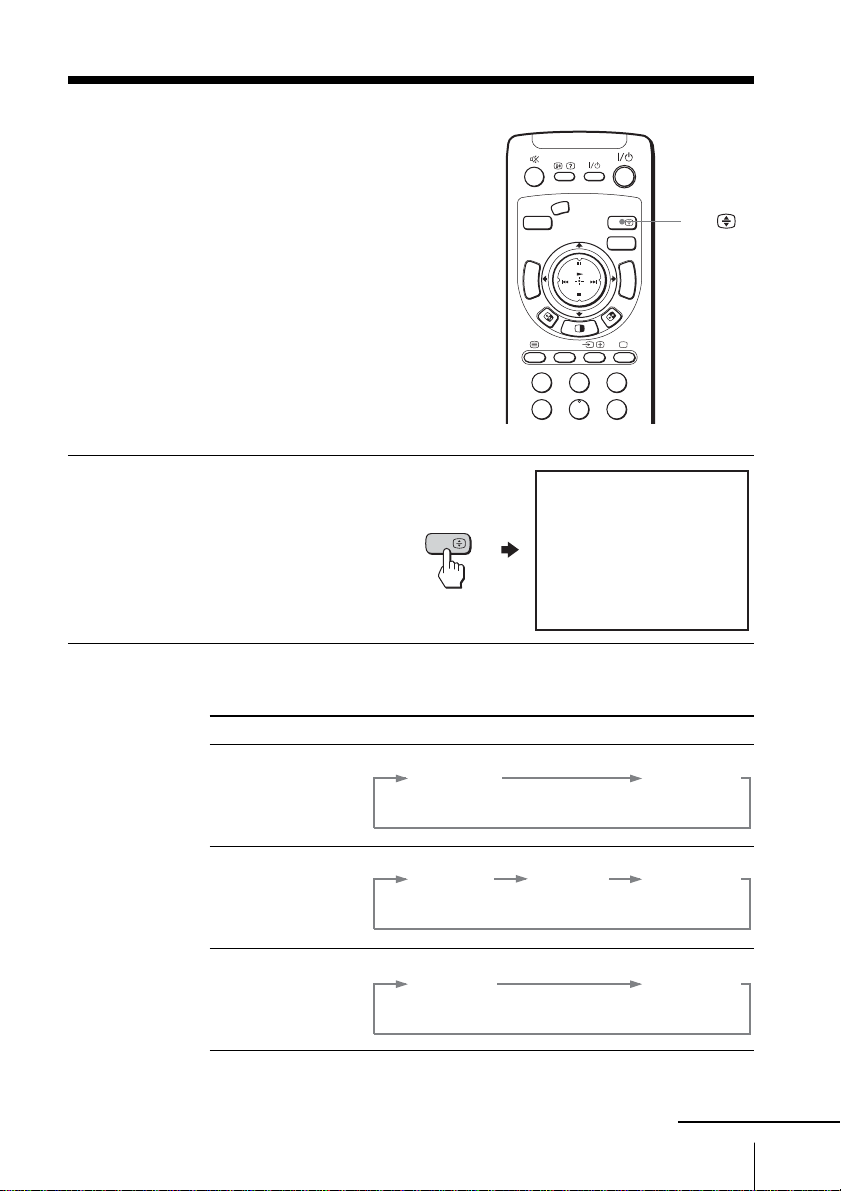
Enjoying stereo or bilingual programs
You can enjoy stereo sound or bilingual
programs of NICAM and A2 (German)
stereo systems.
Press A/B repeatedly until
you receive the sound you
want.
When receiving a NICAM program
Broadcasting On-screen display (Selected sound)
NICAM stereo
A/B
NICAM
(Stereo sound)
VIDEO
N
E
T
C
E
R
S
P
T
T
HD/DVD
A/B
V CENTER
P
R
N
I
O
W
G
+
–
G
W
O
I
R
N
P
DRC-MF
INDEX
PROG
123
456
A/B
MENU
NICAM
Mono
(Regular sound)
NICAM bilingual
NICAM monaural
NICAM
Main
(Main sound)
NICAM
Main
(Main sound)
NICAM
Sub
(Sub sound)
Advanced Operations
Mono
(Regular sound)
Mono
(Regular sound)
continued
23
Page 24
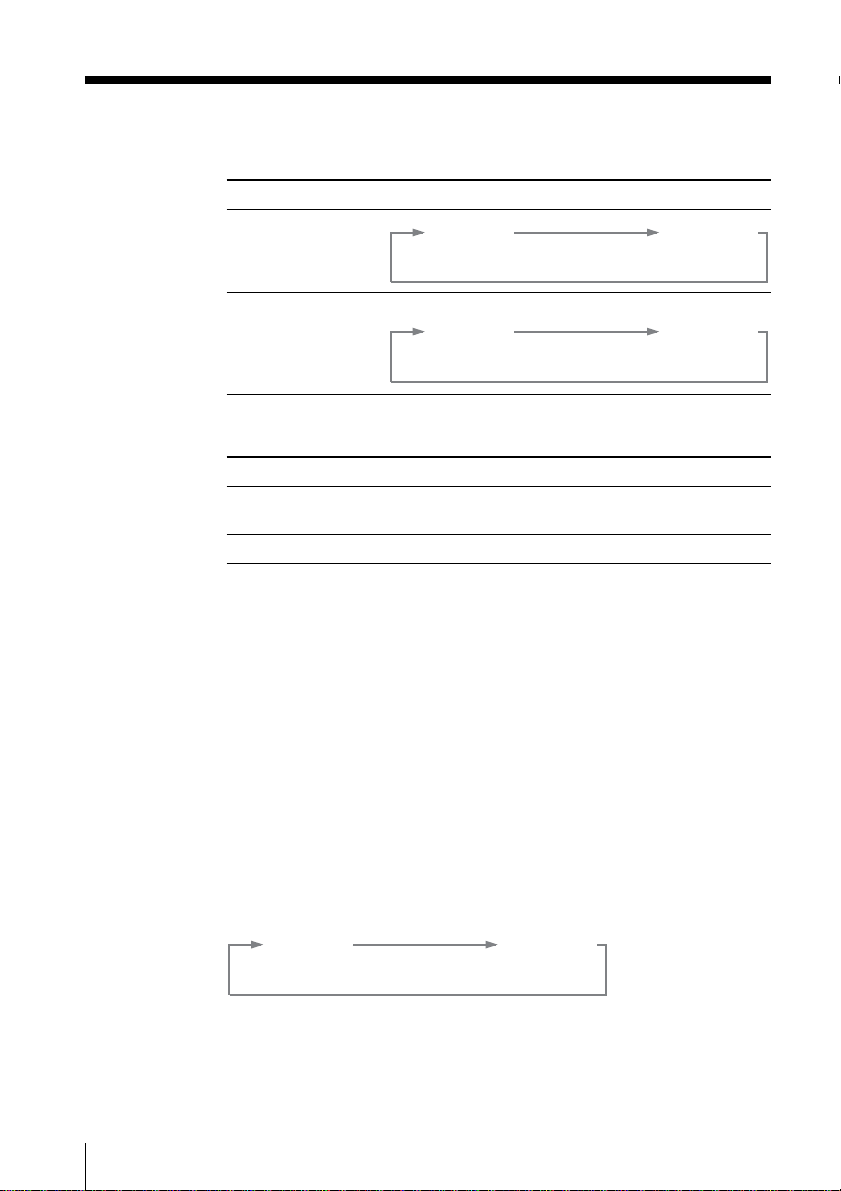
Enjoying stereo or bilingual programs (continued)
When receiving an A2 (German) program
Broadcasting On-screen display (Selected sound)
A2 (German) stereo
A2 (German) bilingual
Mono
(Regular sound)
Main
(Main sound)
Receiving area for NICAM and A2 (German) programs
System Receiving area
NICAM Hong Kong, Singapore, New Zealand, Malaysia,
A2 (German) Australia, Malaysia, Thailand, etc.
Notes
• If the signal is very weak, the sound becomes monaural automatically.
• If the stereo sound is noisy when receiving a NICAM program, select
“Mono”. The sound becomes monaural, but the noise is reduced.
• Before receiving a NICAM stereo program in China, please check the
NICAM broadcast condition at your area. When receiving a NICAM
stereo program, the receiving conditions might vary depending on area. In
addition, different strength of the NICAM broadcast signal might affect
the receiving quality.
Thailand, etc.
Stereo
(Stereo sound)
Sub
(Sub sound)
If the sound is distorted or noisy when receiving a monaural
program through the 8 (antenna) terminal
Press A/B repeatedly until “Mono” appears on the screen.
To cancel the monaural sound setting, press A/B again until “Auto”
appears on the screen.
24
Advanced Operations
Mono
Notes
• The “Mono” or “Auto” setting is memorized for each program position.
•You cannot receive a stereo broadcast signal when the TV is in the “Mono”
setting. Normally, set the TV to “Auto”.
Auto
Page 25
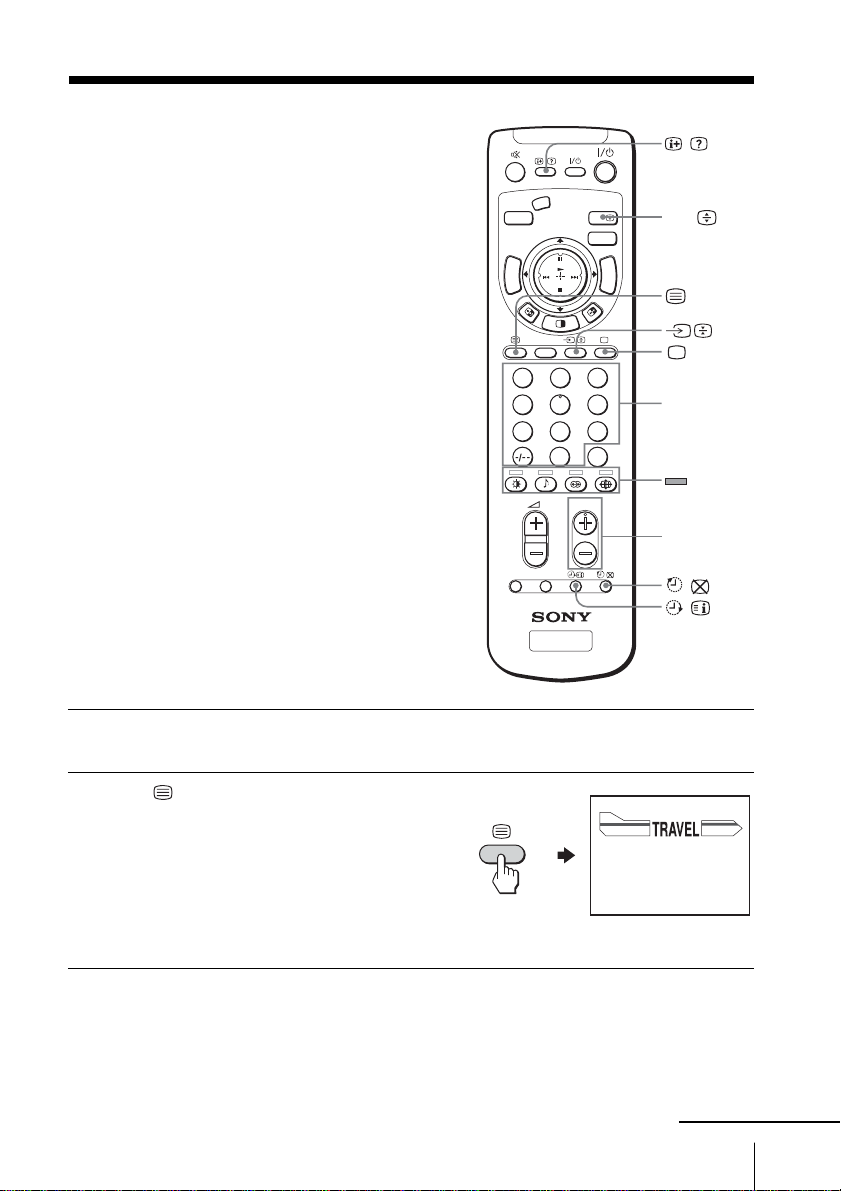
Viewing Teletext
Some TV stations broadcast an
information service called Teletext
which allows you to receive various
information, such as stock market
reports and news.
VIDEO
N
E
T
C
E
R
S
P
Y
R
S
T
O
I
C
M
K
E
M
DRC-MF
DRC-MF
PALETTE
INDEX
PROG
T
T
HD/DVD
V CENTER
P
R
N
I
O
W
G
+
–
G
W
O
I
R
N
P
123
456
7809
JUMP
A/B
A/B
MENU
Number
buttons
PROG
OPTION RESET
TV
Displaying Teletext
Select a TV channel that carries the Teletext broadcast you want to watch.
1
Press to display the
2
text.
A Teletext page (normally
the index page) is
displayed. If there is no
Teletext broadcast, “100” is
displayed at the top left
corner of the screen.
To turn off Teletext
Press a.
P166 SECTEXT 166 FR1 MAR 03:59:09
From Singapore
To PAR IS
To OSAKA
To R OMA
To SYDNEY
(red, green,
yellow, blue)
PROG +/–
Day Dep/Arr Flight Alrcraft
1.6 220/0588 SQ28 747
2 2130/1225 PA115 L15
3 2115/1330 SQ26 747
2.5 1000/1715 SQ6 747
4.6 0930/2015 CX522 L10
2.7 2130/0745 SQ24
4 2300/0915 AZ487 747
1 2210/0610 SQ21A 747
2 2100/0835 SQ21A 747
747
continued
Advanced Operations
25
Page 26
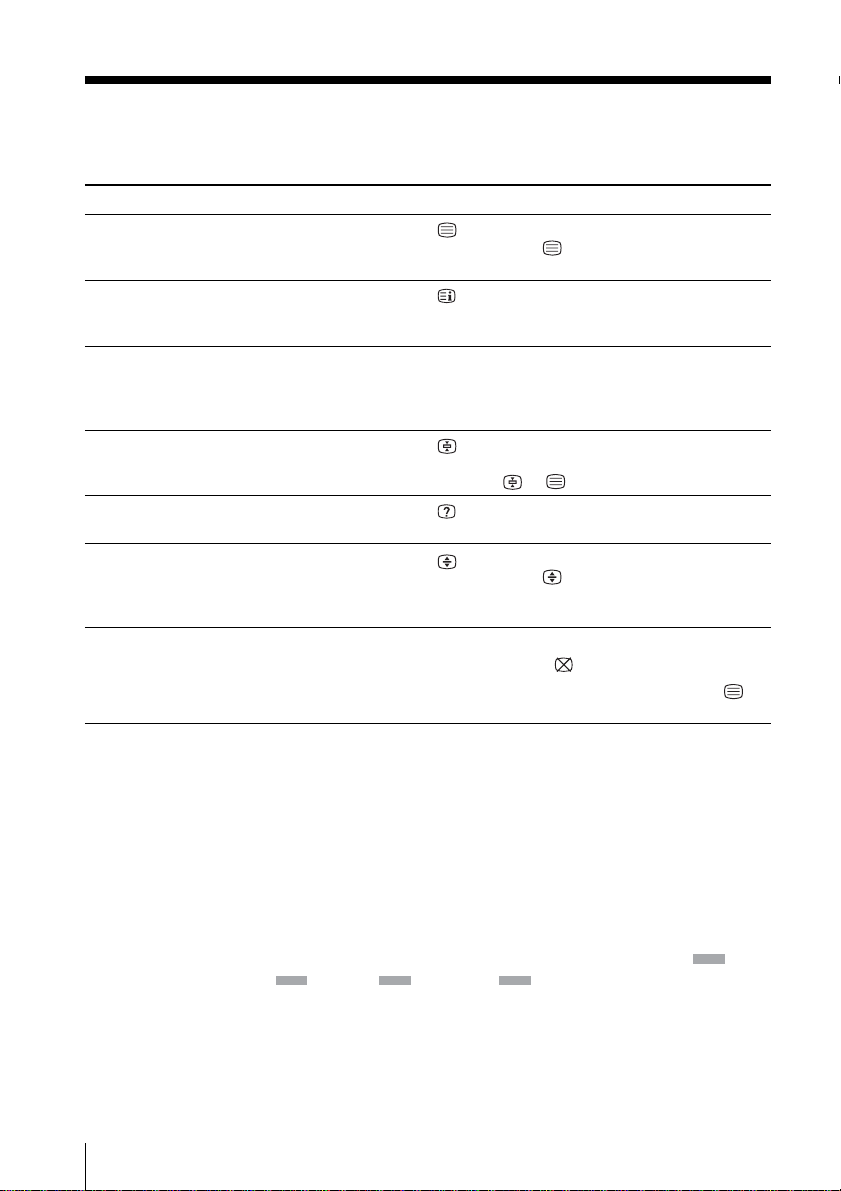
Viewing Teletext (continued)
Additional Teletext tasks
To
display a Teletext page on the TV
picture
check the contents of a Teletext service
select a Teletext page
hold (pause) a Teletext page
(stop the page from scrolling)
reveal concealed information
(e.g., an answer to a quiz)
enlarge the Teletext display
stand by for a Teletext page while
watching a TV program
*You can also select a Teletext page of any page number that appears in the
colored column at the bottom of the screen using the corresponding colorcoded button on the remote.
Do this
Press .
Each time you press , the screen changes as
follows: Teletext t Teletext and TV t TV.
Press .
An overview of the Teletext contents, including page
numbers, appears on the screen.
Press the number buttons to enter the three-digit
page number of the desired Teletext page.* If you
make a mistake, reenter the correct page number. To
access the next or previous page, press PROG +/–.
Press to display the symbol “z” at the top left
corner of the screen. To resume normal Teletext
viewing, press or .
Press .
To conceal the information, press the button again.
Press .
Each time you press , the Teletext display changes
as follows: Enlarge upper half t Enlarge lower half
t Normal size.
1 Enter the Teletext page number that you want to
refer to, then press .
2 When the page number is displayed, press to
show the text.
Using FASTEXT
This feature allows you to quickly access a Teletext page that uses
FASTEXT. When a FASTEXT program is broadcast, colored menus
appear at the bottom of the screen. The color of each menu
corresponds to the color-coded buttons on the remote (red
green
To access a FASTEXT menu
Press the color-coded button on the remote corresponding to the
menu you want. The menu page appears on the screen after a few
seconds.
26
Advanced Operations
,
, yellow , and blue ).
Page 27
Operating optional components
You can use the supplied remote to
operate Sony video equipment such as
Beta, 8 mm, VHS or DVD.
DRC-MF
INDEX
PROG
T
T
HD/DVD
VIDEO
N
E
T
C
E
R
S
P
A/B
V CENTER
P
R
N
I
O
W
G
+
–
G
W
O
I
R
N
P
VIDEO I/1
MENU
123
456
7809
JUMP
PROG
OPTION RESET
TV
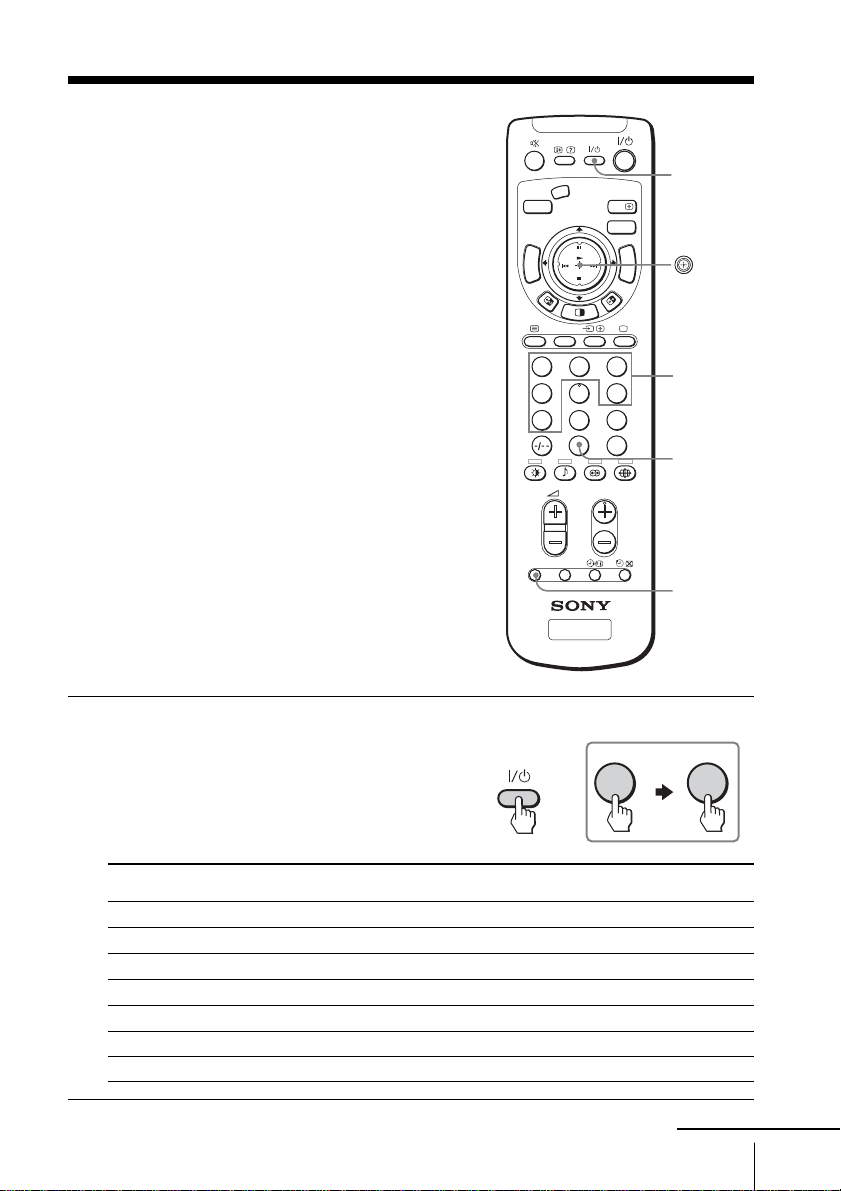
Setting up the remote to work with
other connected equipment
While keeping VIDEO @/1
pressed, press the number
button 0, then the
corresponding number
button for the desired
equipment (see the chart
below).
To control While holding First press the Next press the
down number button number button
DVD VIDEO @/1 00
VTR1 (Beta) VIDEO @/1 01
VTR2 (8 mm) VIDEO @/1 02
VTR3 (VHS) VIDEO @/1 03
MDP VIDEO @/1 04
CD VIDEO @/1 06
MD VIDEO @/1 07
For example, to operate a
Sony 8 mm VCR:
VIDEO
+
02
Number
buttons 1-7
Number
button 0
OPTION
continued
Advanced Operations
27
Page 28
Operating optional components (continued)
Note
• If the equipment does not have a certain function, the corresponding
button on the remote will not operate.
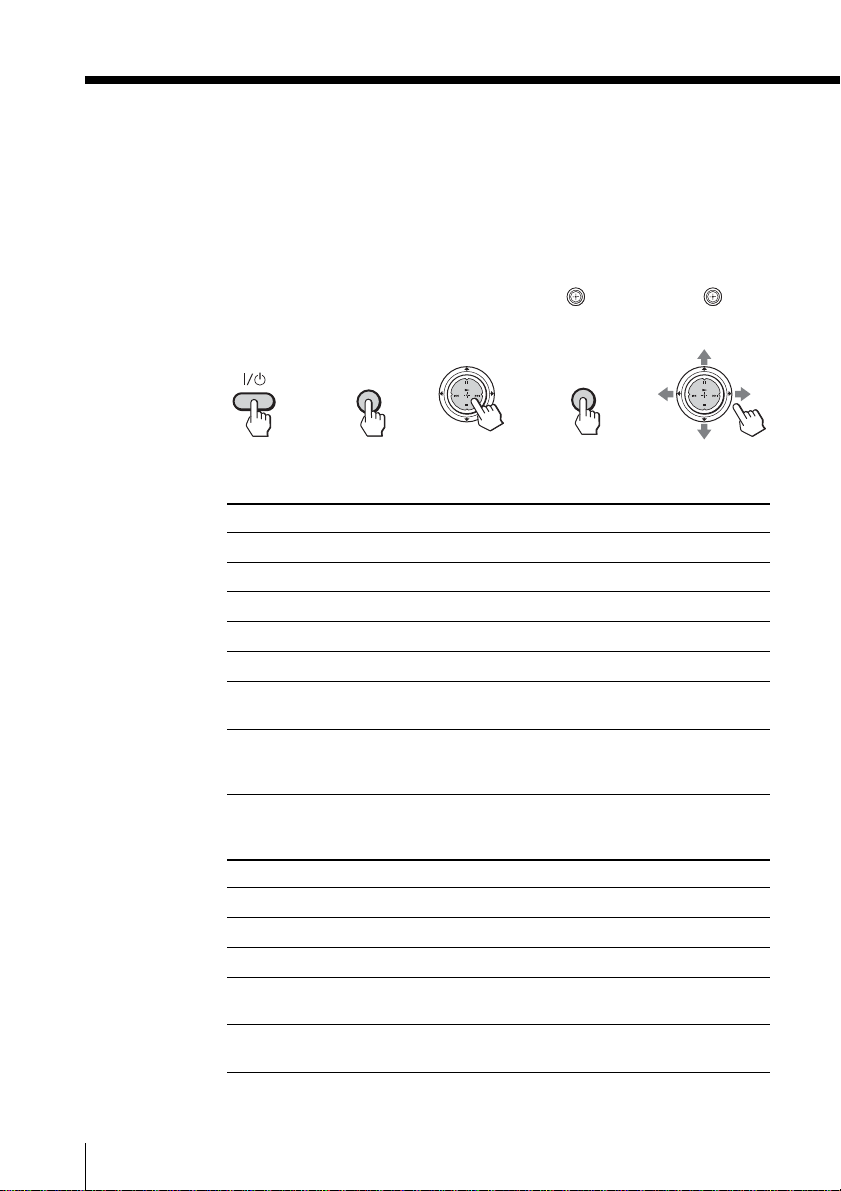
Operating video equipment
Press VIDEO @/1, or while keeping OPTION pressed, press (N) or move up
(X), down (x), left (.) or right (>) (see the chart below).
VIDEO
or
OPTION
+
N
I
W
T
T
W
I
N
Operating a VCR using the remote
To Press/Move
turn on/off VIDEO ?/1
play N while keeping OPTION pressed.
stop x while keeping OPTION pressed.
fast forward (M) > while keeping OPTION pressed.
rewind the tape (m) . while keeping OPTION pressed.
pause X while keeping OPTION pressed.
Press again to resume normal playback.
search the picture forward
(M) or backward (m)
> or . during playback while keeping
OPTION pressed.
Release to resume normal playback.
Operating a DVD player using the remote
To Press/Move
turn on/off VIDEO ?/1
play N while keeping OPTION pressed.
stop x while keeping OPTION pressed.
pause X while keeping OPTION pressed.
step through different
tracks of an audio disc
Press again to resume normal playback.
> to step forward or . to step
backward while keeping OPTION pressed.
P
R
O
G
+
–
G
O
R
P
or
OPTION
+
P
R
N
I
O
W
G
T
+
–
T
G
W
O
I
R
N
P
28
Advanced Operations
Page 29

Operating an MDP using the remote
To Press/Move
turn on/off VIDEO ?/1
play N while keeping OPTION pressed.
stop x while keeping OPTION pressed.
pause X while keeping OPTION pressed.
search the picture forward
or backward
Press again to resume normal playback.
> or . during playback while keeping
OPTION pressed.
Release to resume normal playback.
Operating a CD or MD player using the remote
To Press/Move
turn on/off VIDEO ?/1
play N while keeping OPTION pressed.
stop x while keeping OPTION pressed.
pause X while keeping OPTION pressed.
step through different tracks > to step forward or . to step
Press again to resume normal playback.
backward while keeping OPTION pressed.
Advanced Operations
29
Page 30
Using the TV’s
C
E
N
T
E
R
S
P
VIDEO
DRC-MF
HD/DVD
123
456
7809
JUMP
PROG
A/B
PROG
INDEX
MENU
V CENTER
T
W
I
N
P
R
O
G
+
T
W
I
N
P
R
O
G
–
center speaker
You can use the TV’s speakers as the
center speaker of your audio system and
control its sound volume from the
remote of the TV.
Note
• For the speaker connection, see
“Connecting an amplifier” on page 16.
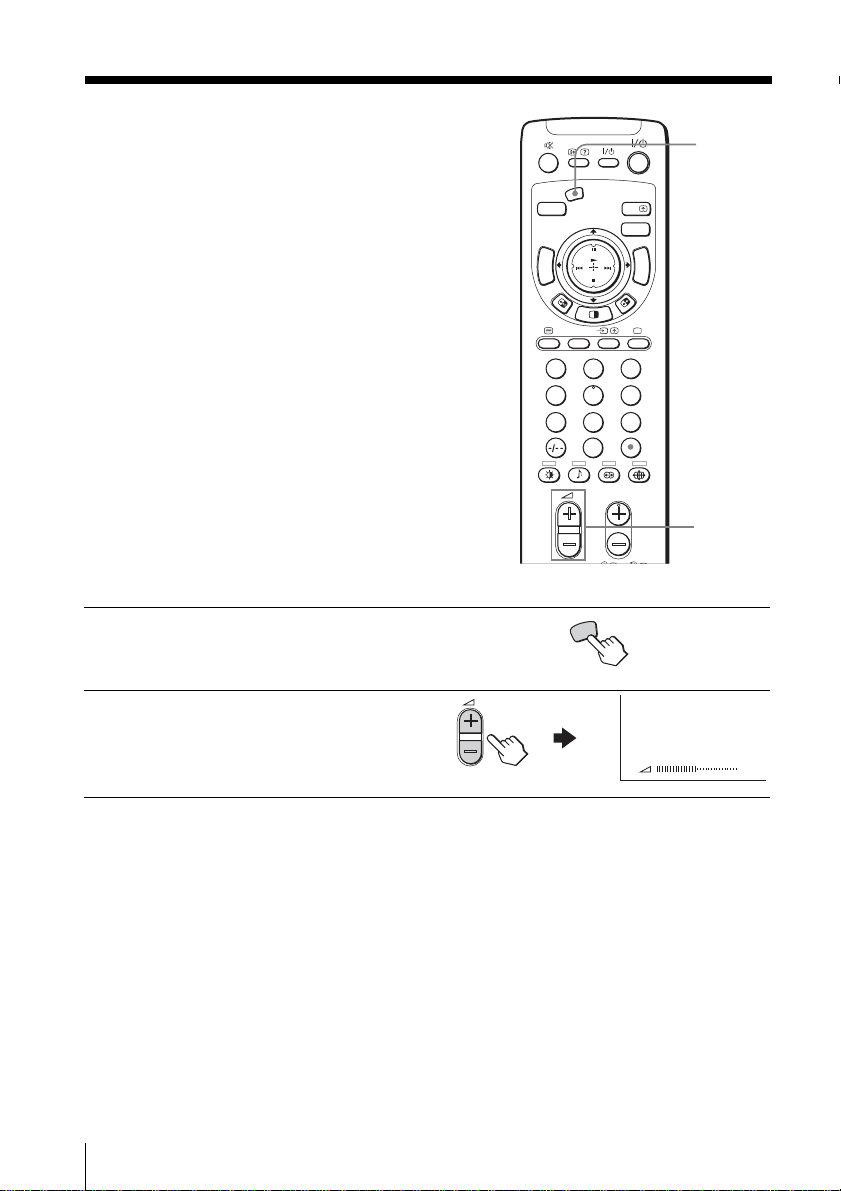
To switch to the center speaker mode
Press CENTER SP.
1
CENTER
SP
2 +/–
N
E
T
C
E
R
S
P
Press 2 +/– to adjust the
2
volume of the sound from
the TV’s center speaker.
30
To return to the normal speaker mode
Press CENTER SP again.
Tip
• The center speaker mode is automatically cancelled when you select the
video input, or turn the TV off and on again.
Notes
• If “CENTER IN” is selected for “Speaker” in the “Sound” menu and
nothing is connected to the center speaker input terminals on the rear of
the TV, no sound is heard from the TV’s speakers.
• No sound is heard from the TV’s center speakers if the sound source
emitted from the amplifier does not contain the center speaker channel.
• When the TV is in the center speaker mode, you cannot change the
surround sound, the “Intelligent Volume” mode or the “BBE” mode.
Advanced Operations
CENTER IN Speaker
0
5
Page 31
Adjusting Your Setup (MENU)
Introducing the menu system
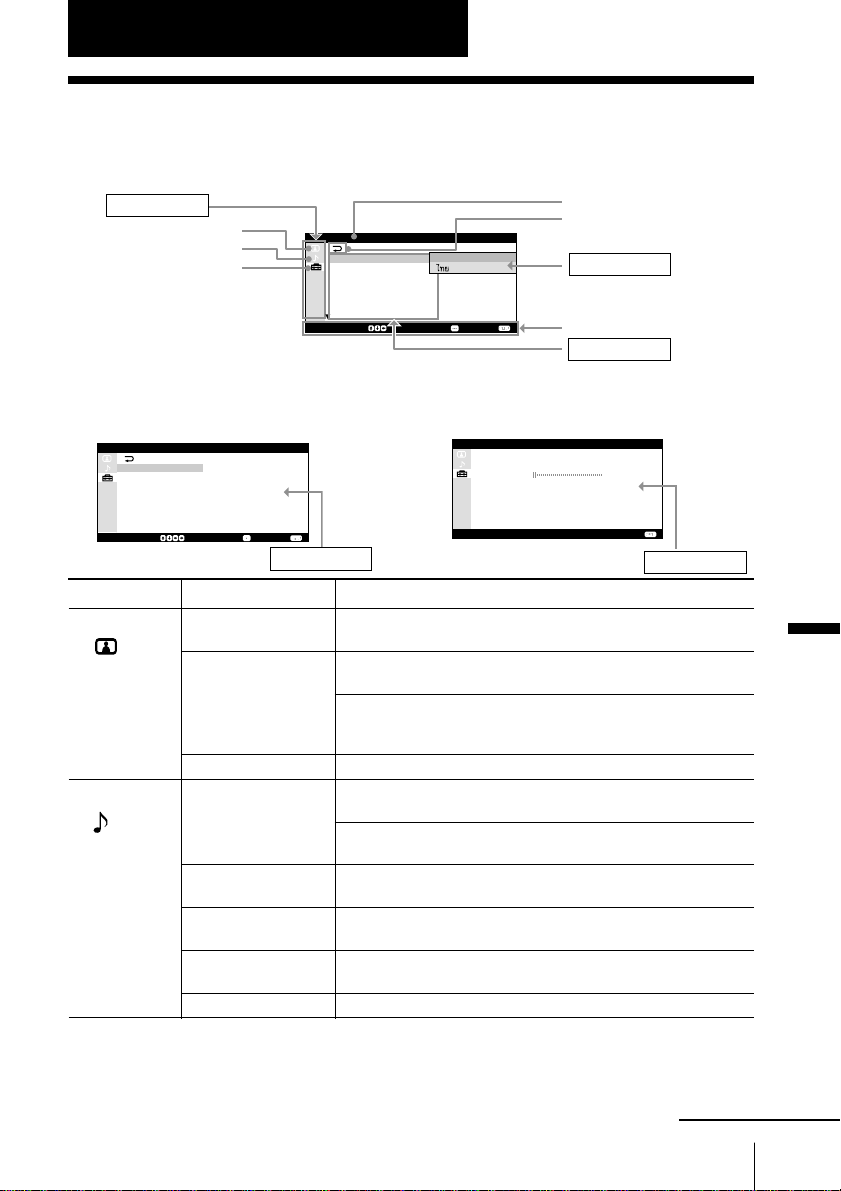
The MENU button lets you open a menu and change the settings of your TV. The
following is an overview of the menu system.
Menu level 1
Picture icon
Sound icon
Setup icon
S e t u p
O f f
A u t o
O f f
E n g l i s h
L a n g u a g e :
P i c t u r e P o s i t i o n
C h a n n e l S e t u p
Wide Mode: Auto
G a m e M o d e :
V i d e o L a b e l
C o l o r S y s t e m :
S e l e c t : C o n f i r m : E n d :
Selecting some items in Menu level 2 of Setup menu displays another menu (Menu
level 3), and selecting some options in this menu also displays the adjustment menu
(Menu level 4).
C h a n n e l S e t u p
A u t o P r o g r a m
M a n u a l P r o g r a m
T V S y s t e m : B / G
P r o g r a m L a b e l
P r o g r a m B l o c k
P r o g r a m Edit
S e l e c t : C o n f i r m : E n d :
Menu level 3
Level 1
“Picture”
Level 2/Level 3
“DRC-MF”
Level 3/Level 4/Function
Selects the “DRC-MF” mode:
“DRC1250” t “DRC100” t “Progressive”
“Picture Mode”
Selects the picture mode:
“Dynamic” t “Standard” t “Hi-Fine” t “Personal”
“Picture
Adjustment”
Adjusts the “Personal” option:
“Picture” t “Brightness” t “Color” t “Hue” t
“Sharpness” t “Color Temperature” t “Reset”
Activates or deactivates picture noise reduction mode.
Selects the sound mode:
“Sound”
“3D-NR”
“Sound Mode”
“Dynamic” t “Drama” t “Soft” t “Personal”
“Sound
Adjustment”
“Balance”
Adjusts the “Personal” option:
“Treble” t “Bass” t “BBE”* t “Reset”
Adjusts the balance between the left and right speaker
volume.
“Intelligent
Activates or deactivates the Intelligent Volume feature.
Volume”
“Surround”
Selects the “Surround” mode:
“TruSurround” t “Simulated” t “Off”
“Speaker”
Selects the speaker mode: “MAIN” or “CENTER IN”.
* Licensed by BBE Sound, Inc. under USP4638258, 4482866.
“BBE” and BBE symbol are trademarks of BBE Sound, Inc.
A u t o P r o g r a m
P r o g r a m :
T V S y s t e m :
V H F L o w :
Name of the current menu
Return icon
Menu level 3
Navigation Help
Menu level 2
0 9
Auto
C o n f i r m :S e l e c t : E n d :
Menu level 4
Adjusting Your Setup (MENU)
continued
31Adjusting Your Setup (MENU)
Page 32
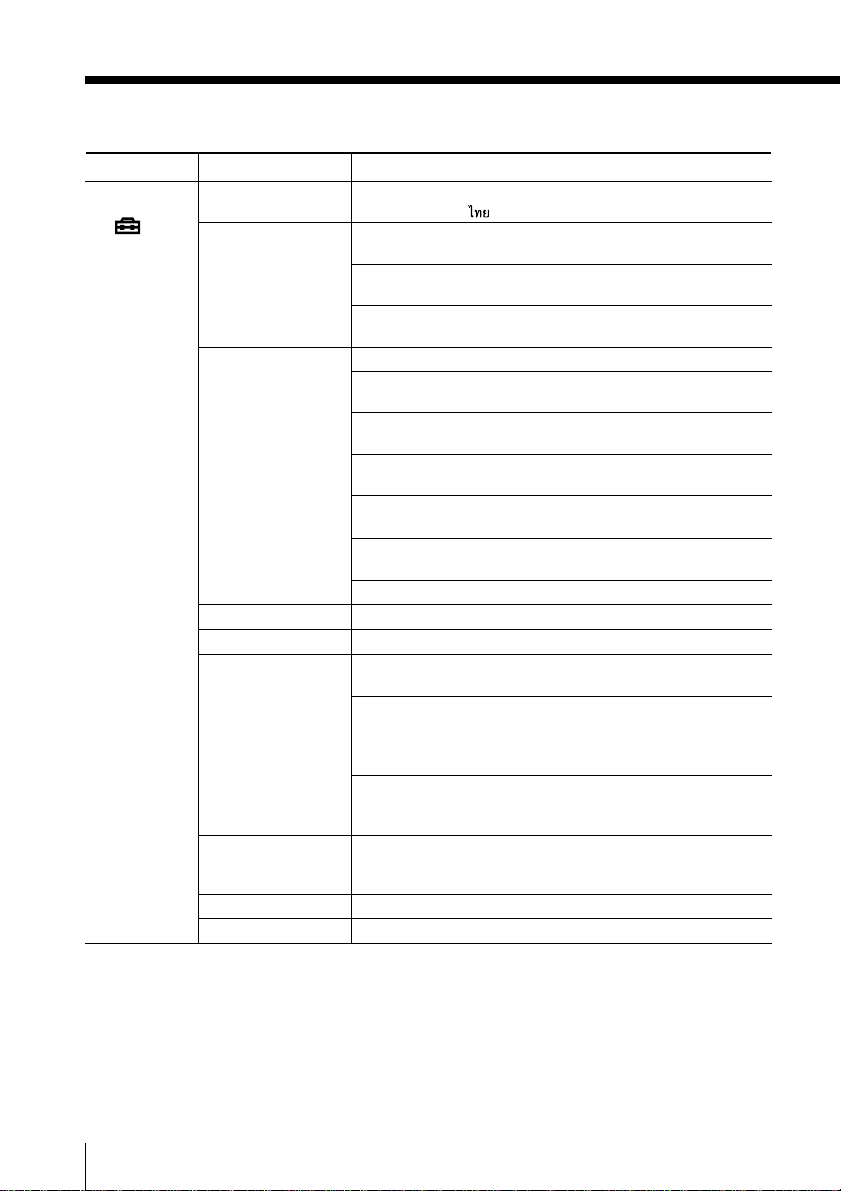
Introducing the menu system (continued)
Level 1
“Setup”
Level 2/Level 3
“Language”
“Picture Position”
“Picture
Rotation”
“Picture VPosition”
“Channel Setup”
“Auto
Program”
“Manual
Program”
“TV System”
“Program
Label”
“Program
Block”
“Program Edit”
“Wide Mode”
“Game Mode”
“Video Label”
“Video Input”
“Label”
“Color System”
“Eco Mode”
“S Input”
Level 3/Level 4/Function
Changes the menu language:
“English” t “ ” (Thai)
Adjusts the picture position if it is not aligned with the
TV screen.
Adjusts the declination of the picture.
Adjusts the vertical position of the picture.
Presets channels, or select the TV system.
The “Auto Program” menu is displayed.
Presets channels automatically.
The “Manual Program” menu is displayed.
Presets channels manually.
Selects the TV system:
“B/G” t “I” t “D/K” t “M”
Assigns labels (such as station names) to the preset
channels.
Locks out specific channels.
Changes the order of the preset channels.
Activates or desactivates “Wide Mode” feature.
Activates or deactivates GAME MODE feature.
Assigns labels to the audio/video equipment connected
to the TV.
Selects the input to which the audio/video equipment is
connected.
“Video 1” t “Video 2” t “Video 3” t “Video 4” t
“HD/DVD 1” t “HD/DVD 2”
Selects one of the prefixed labels or assign your own
label in “Edit” position.
“Video 1” t “VCR” t “SAT” t “Game” t “Edit”
Selects the color system:
“Auto” t “PAL” t “SECAM” t “NTSC3.58” t
“NTSC4.43”
Activates or deactivates ECO MODE feature.
Selects the S video input mode: “Auto” or “Off”.
32
Adjusting Your Setup (MENU)
Page 33

To restore the factory settings
Press the RESET button on the remote.
The settings other than the following items in the menu can be reset
by using the RESET button:
– “Language”
– “Program” and “Skip” in “Manual Program”
– “Fine” in “Manual Program”
– “TV System”
– “Picture Position”
– “Personal” in “Picture Mode” and “Sound Mode“
– “Program Label”
– “Video Label”
continued
33Adjusting Your Setup (MENU)
Page 34
C
E
N
T
E
R
S
P
VIDEO
DRC-MF
HD/DVD
123
456
7809
JUMP
A/B
PROG
INDEX
MENU
V CENTER
T
W
I
N
P
R
O
G
+
T
W
I
N
P
R
O
G
–
Introducing the menu system (continued)
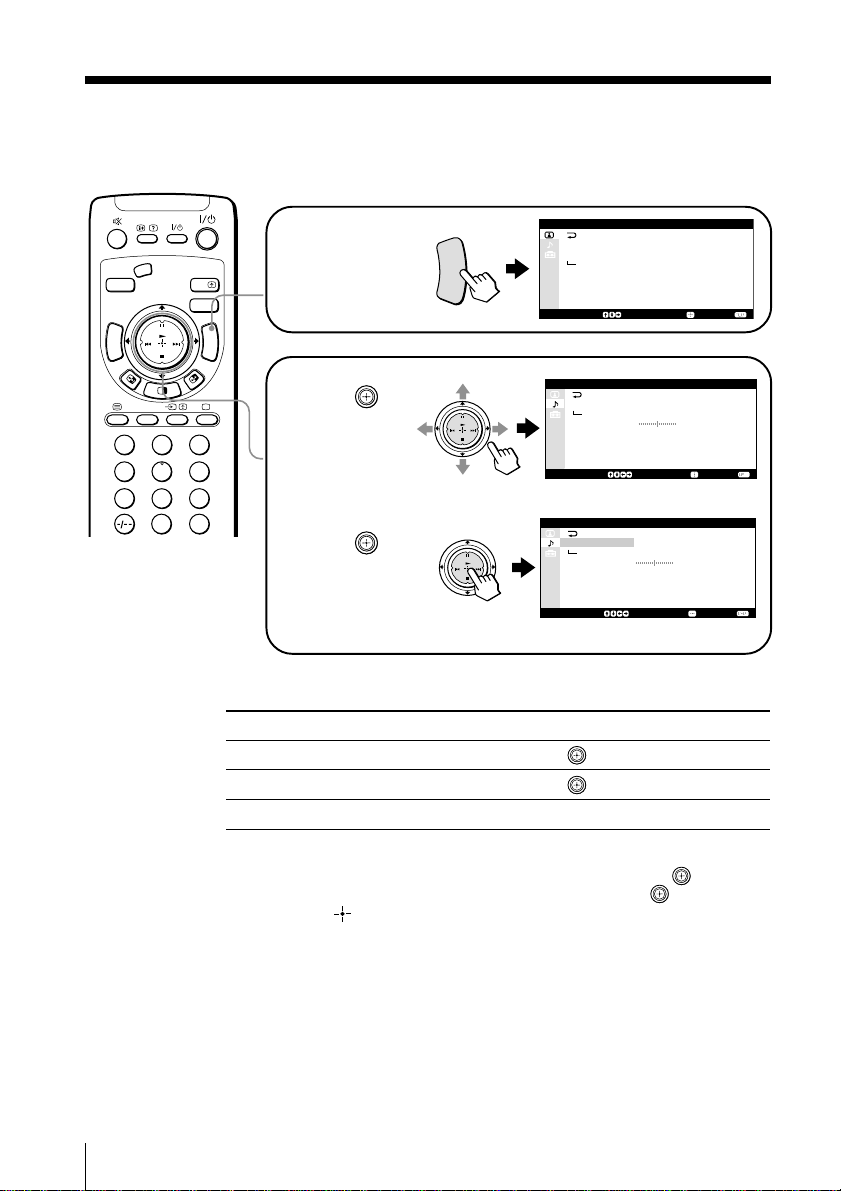
How to use the menu
Press MENU to
display the menu.
MENU
Move the button
joystick (
down, left or
right to select
the desired item.
) up,
P
R
N
I
O
W
G
T
+
–
T
G
W
O
I
R
N
P
Press the button
P
R
N
I
O
W
joystick (
) to
G
T
+
confirm the
selection and/or
–
T
G
W
O
I
R
N
P
go to the next
level.
Other menu operations
To
Adjust the setting value
Move to the next/previous menu level
Cancel the menu
P i c t u r e
D R C - M F :
P i c t u r e M o d e :
P i c t u r e A d j u s t m e n t
3 D - N R :
D R C 1 2 5 0
P e r s o n a l
Off
S e l e c t : C o n f i r m : E n d :
S o u n d
S o u n d M o d e :P e r s o n a l
S o u n d A d j u s t m e n t
B a l a n c e
I n t e l l i g e n t V o l u m e : O f f
S u r r o u n d :
S p e a k e r :
O f f
M A I N
0 0
S e l e c t : C o n f i r m : E n d :
S o u n d
S o u n d M o d e :P e r s o n a l
S o u n d A d j u s t m e n t
B a l a n c e
I n t e l l i g e n t V o l u m e : O f f
S u r r o u n d :
S p e a k e r :
O f f
M A I N
0 0
S e l e c t : C o n f i r m : E n d :
Press/Move
Move up, down, left or right.
Move left or right.
Press MENU.
34
Adjusting Your Setup (MENU)
Tips
• If you want to exit from Menu level 2 to Menu level 1, move up or
down until the return icon (3) is highlighted, then press .
• The MENU, (Enter), and F/f/G/g (up/down/left/right) buttons on
the TV can also be used for the operations above.
Note
• If more than 90 seconds elapse between entries, the menu screen
automatically disappears.
Page 35
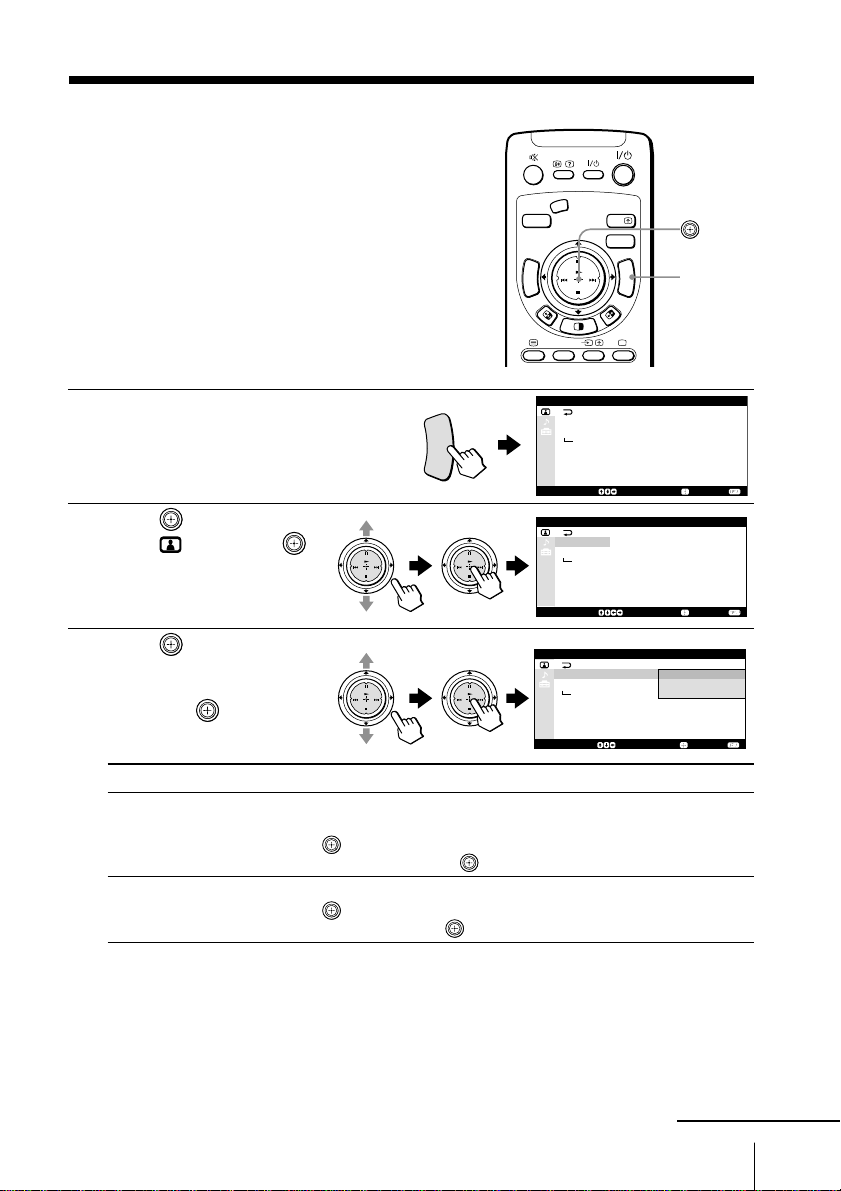
Changing the “Picture” setting
The “Picture” menu allows you to:
adjust the picture setting, view higher
quality pictures and reduce picture
noise.
Press MENU.
1
Move up or down to
2
select
Move up or down to
3
select the desired option
, then press .
(see the table below),
then press
.
T
T
T
T
VIDEO
N
E
T
C
E
R
S
P
T
T
HD/DVD
A/B
V CENTER
P
R
N
I
O
W
G
+
MENU
MENU
–
G
W
O
I
R
N
P
DRC-MF
INDEX
PROG
P i c t u r e
MENU
D R C - M F :
P i c t u r e M o d e :
P i c t u r e A d j u s t m e n t
3 D - N R :
D R C 1 2 5 0
P e r s o n a l
O ff
S e l e c t : C o n f i r m : E n d :
P i c t u r e
P
R
N
I
O
W
G
+
–
G
W
O
I
R
N
P
P
R
N
I
O
W
G
T
+
–
T
G
W
O
I
R
N
P
D R C - M F :
P i c t u r e M o d e :
P i c t u r e A d j u s t m e n t
3 D - N R :
D R C 1 2 5 0
P e r s o n a l
O ff
S e l e c t : C o n f i r m : E n d :
P i c t u r e
P
R
N
I
O
W
G
+
–
G
W
O
I
R
N
P
P
R
N
I
O
W
G
T
+
–
T
G
W
O
I
R
N
P
D R C - M F :
P i c t u r e M o d e :
P i c t u r e A d j u s t m e n t
3 D - N R :
D R C 1 2 5 0
D R C 1 0 0
P e r s o n a l
P r o g r e s s i v e
O ff
S e l e c t : C o n f i r m : E n d :
Select To
“DRC-MF” activate the Digital Reality Creation-Multi function feature to
display higher quality pictures.
Move up or down to select “DRC1250”, “DRC100” or
“Progressive”, then press .
“Picture Mode” receive suitable picture mode.
Move up or down to select “Dynamic”, “Standard”, “Hi-Fine”,
“Personal”*, then press .
* When the “Personal” mode is selected, the last adjusted picture setting in the “Picture
Adjustment” menu is received (see page 37).
continued
35Adjusting Your Setup (MENU)
Page 36
Changing the “Picture” setting (continued)
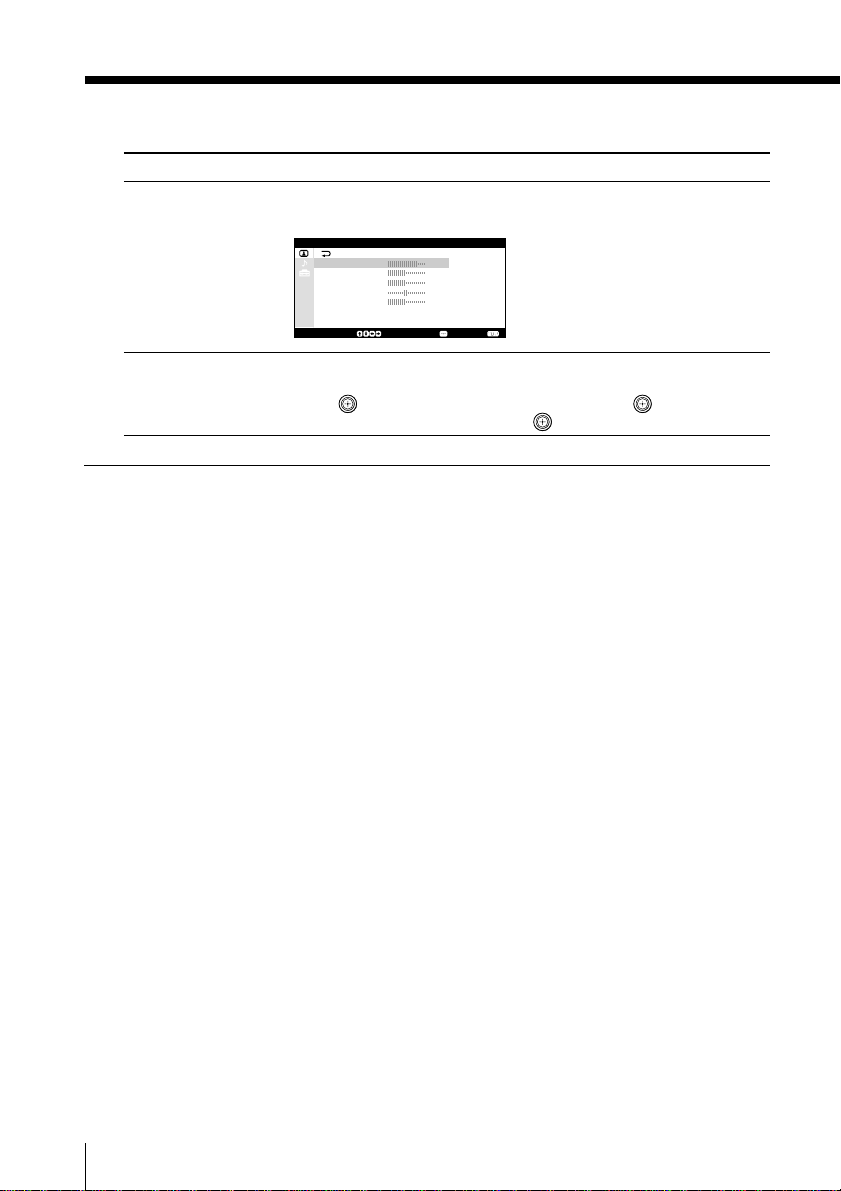
Select To
“Picture Adjustment” adjust the picture quality when “Picture Mode” is set to
“Personal”.
A d j u s t m e n t
P i c t u r e
P i c t u r e
B r i g h t n e s s
C o l o r
H u e0 0
S h a r p n e s s
C o l o r T e m p e r a t u r e :N e u t r a l
R e s e t
S e l e c t : C o n f i r m : E n d :
8 0
5 0
5 0
5 0
“3D-NR” improve the picture quality of TV or video if a signal received is
weak.
Move up or down to select “On”, then press .
To cancel, select “Off”, then press .
Tips
• For details on the options under the “DRC-MF” mode, see page 21.
• When high-definition (HD) or progressive signals are input, “DRC-MF”
does not function.
To return to the normal screen
Press MENU.
36
Adjusting Your Setup (MENU)
Page 37
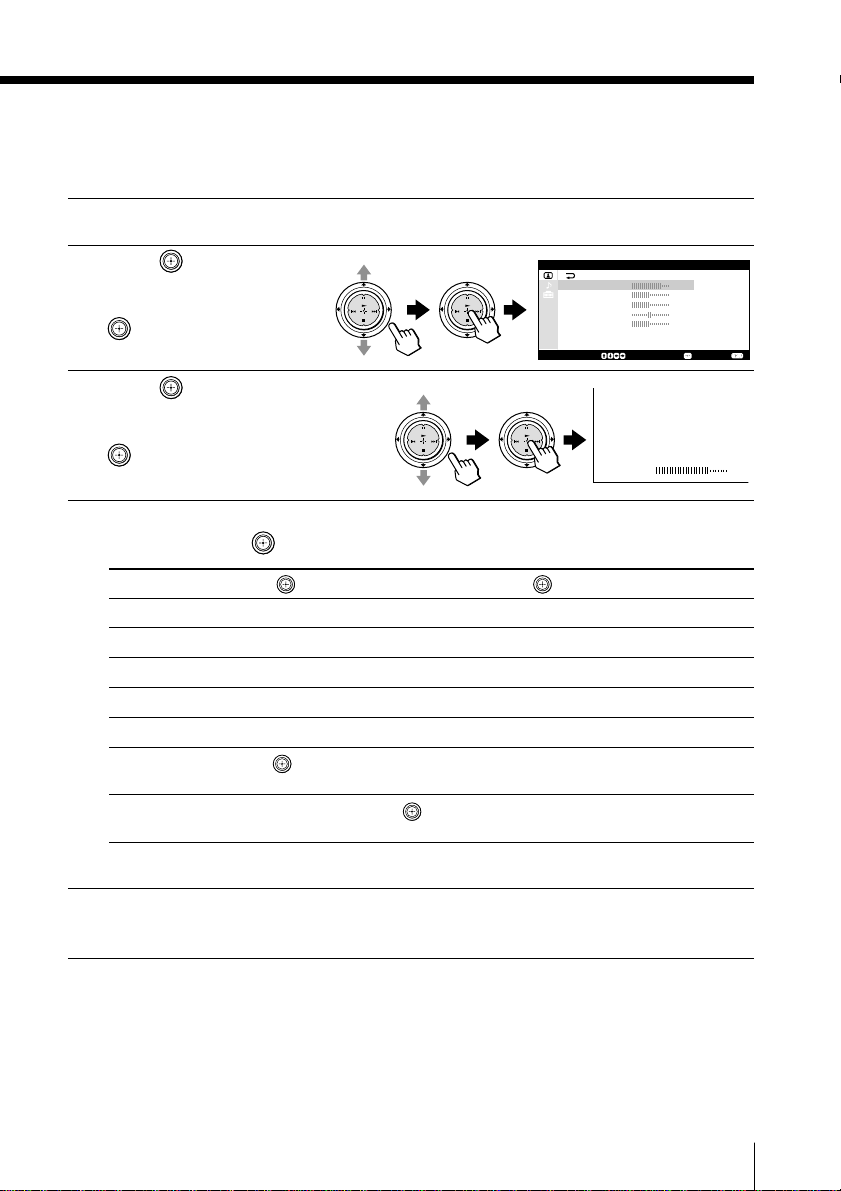
Adjusting the “Picture Adjustment” options
You can access the “Picture Adjustment” menu only when you have
selected “Personal” for “Picture Mode”.
Display the “Picture” menu and select “Personal” for “Picture Mode”.
1
A d j u s t m e n t
Move up or down to
2
select “Picture
P
R
N
I
O
W
G
T
+
P
R
N
I
O
W
G
T
+
Adjustment”, then press
.
Move up or down to
3
select the desired item
(e.g., “Color”), then press
.
Adjust the value or select the desired option according to the following
4
table, then press .
–
T
G
W
O
I
R
N
P
N
I
W
T
T
W
I
N
–
T
G
W
O
I
R
N
P
P
R
O
G
+
–
G
O
R
P
P i c t u r e
P i c t u r e
B r i g h t n e s s
C o l o r
H u e0 0
S h a r p n e s s
C o l o r T e m p e r a t u r e :N e u t r a l
R e s e t
S e l e c t : C o n f i r m : E n d :
P
R
N
I
O
W
G
T
+
–
T
G
W
O
I
R
N
P
Color
8 0
5 0
5 0
5 0
08
For
“Picture”
“Brightness”
“Color”
“Hue”*
“Sharpness”
Move down or left to
decrease picture contrast
darken the picture
decrease color intensity
increase red picture tones
soften the picture
Move up or right to
increase picture contrast
brighten the picture
increase color intensity
increase green picture tones
sharpen the picture
“Color Move up or down to select “Cool”, “Neutral” or “Warm”.
Temperature”
“Reset” Select “Reset” and press to reset the picture to the factory preset
settings.
* You can adjust “Hue” for the NTSC color system only.
Repeat steps 3 and 4 to adjust other items.
5
The adjusted settings will be received when you select “Personal”.
37Adjusting Your Setup (MENU)
Page 38
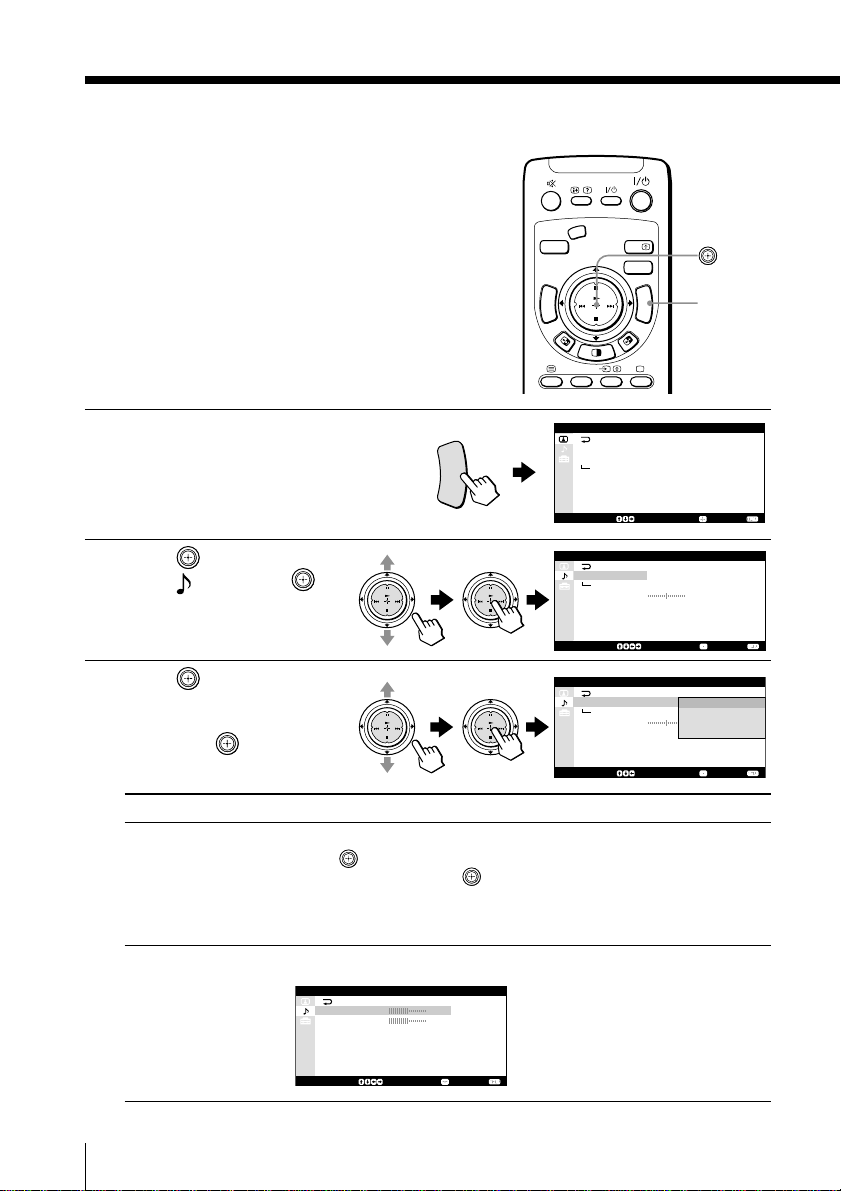
Changing the “Sound” setting
The “Sound” menu allows you to adjust
the sound setting and adjust the volume
automatically. You can also listen to the
sound with surround effect.
Press MENU.
1
Move up or down to
2
select , then press .
Move up or down to
3
select the desired option
N
I
W
T
T
W
I
N
N
I
W
T
(see the table below),
then press
.
T
W
I
N
VIDEO
N
E
T
C
E
R
S
P
DRC-MF
INDEX
PROG
HD/DVD
A/B
V CENTER
P
R
N
I
O
W
G
T
+
MENU
MENU
–
T
G
W
O
I
R
N
P
P i c t u r e
MENU
D R C - M F :
P i c t u r e M o d e :
P i c t u r e A d j u s t m e n t
3 D - N R :
D R C 1 2 5 0
P e r s o n a l
Off
S e l e c t : C o n f i r m : E n d :
S o u n d
P
R
O
G
+
–
G
O
R
P
P
R
N
I
O
W
G
T
+
–
T
G
W
O
I
R
N
P
S o u n d M o d e :P e r s o n a l
S o u n d A d j u s t m e n t
B a l a n c e
I n t e l l i g e n t V o l u m e : O f f
S u r r o u n d :
S p e a k e r :
O f f
M A I N
0 0
S e l e c t : C o n f i r m : E n d :
S o u n d
P
R
O
G
+
–
G
O
R
P
P
R
N
I
O
W
G
T
+
–
T
G
W
O
I
R
N
P
S o u n d M o d e :
S o u n d A d j u s t m e n t
B a l a n c e
I n t e l l i g e n t V o l u m e : O f f
S u r r o u n d :
S p e a k e r :
O f f
M A I N
D y n a m i c
D r a m a
5 0
S o f t
P e r s o n a l
S e l e c t : C o n f i r m : E n d :
Select To
“Sound Mode” select the suitable sound mode.
“Sound Adjustment” adjust the sound quality when “Sound Mode” is set to “Personal”.
38
Adjusting Your Setup (MENU)
Move up or down to select “Dynamic”, “Drama”, “Soft” or
“Personal”*, then press .
* When the “Personal” mode is selected, the last adjusted sound
setting in the “Sound Adjustment” menu is received (see page
40).
S o u n d A d j u s t m e n t
T r e b l e
B a s s
B B E : O f f
R e s e t
S e l e c t : C o n f i r m : E n d :
5 0
5 0
Page 39
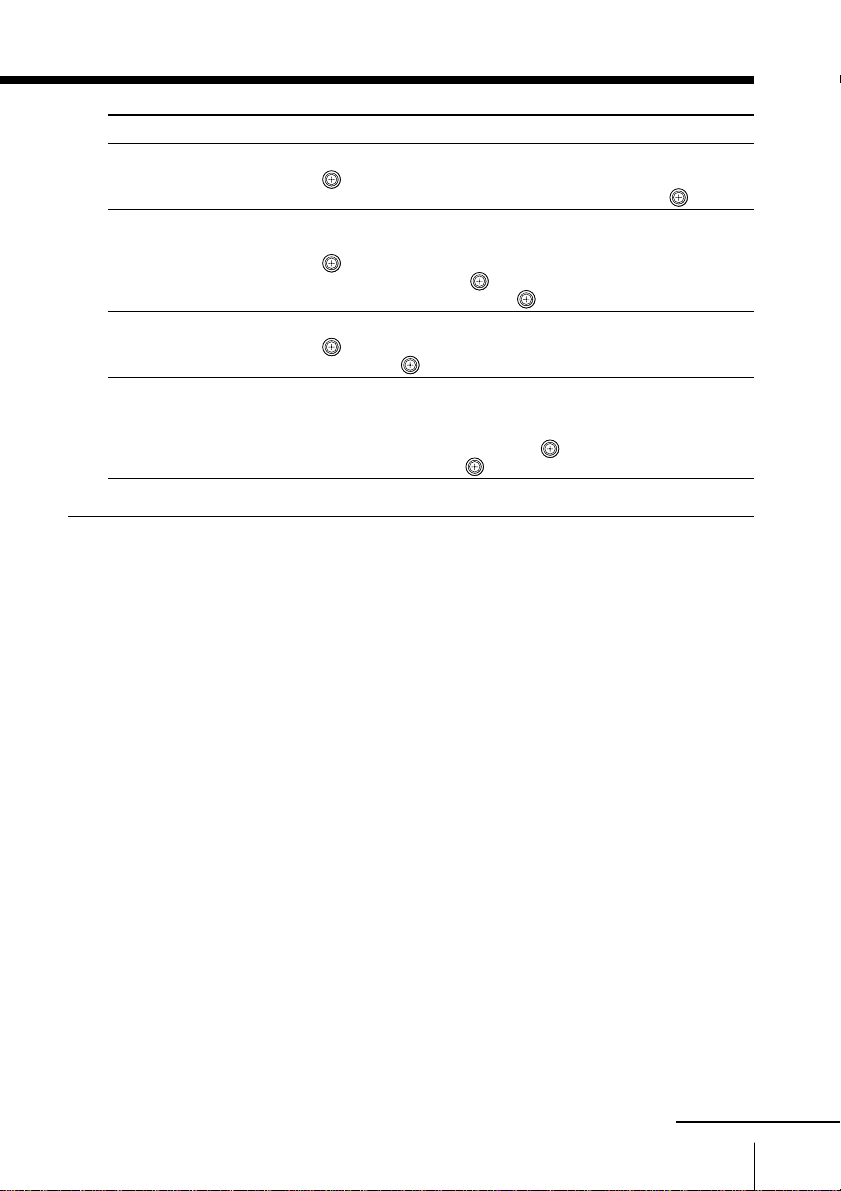
Select To
“Balance” adjust the balance between the left and right speaker volume.
“Intelligent Volume” adjust the volume of all TV programs and video inputs
“Surround” select the Surround mode.
“Speaker” select if you use the TV’s speakers as the center speaker of your
Tip
• For details on the options under the “Sound Mode” and “Surround”
Move down or left to increase the left speaker’s volume, up or
right to increase the right speaker’s volume, then press .
automatically.
Move up or down to select “On” to activate the Intelligent
Volume feature, then press .
To cancel, select “Off”, then press .
Move up or down to select “TruSurround”, “Simulated” or
“Off”, then press .
audio system.
Normally select “MAIN”. When you want to use the TV’s
speakers as the center speaker, move up or down to select
“CENTER IN”, then press .
modes, see pages 20 and 22, respectively.
To return to the normal screen
Press MENU.
continued
39Adjusting Your Setup (MENU)
Page 40
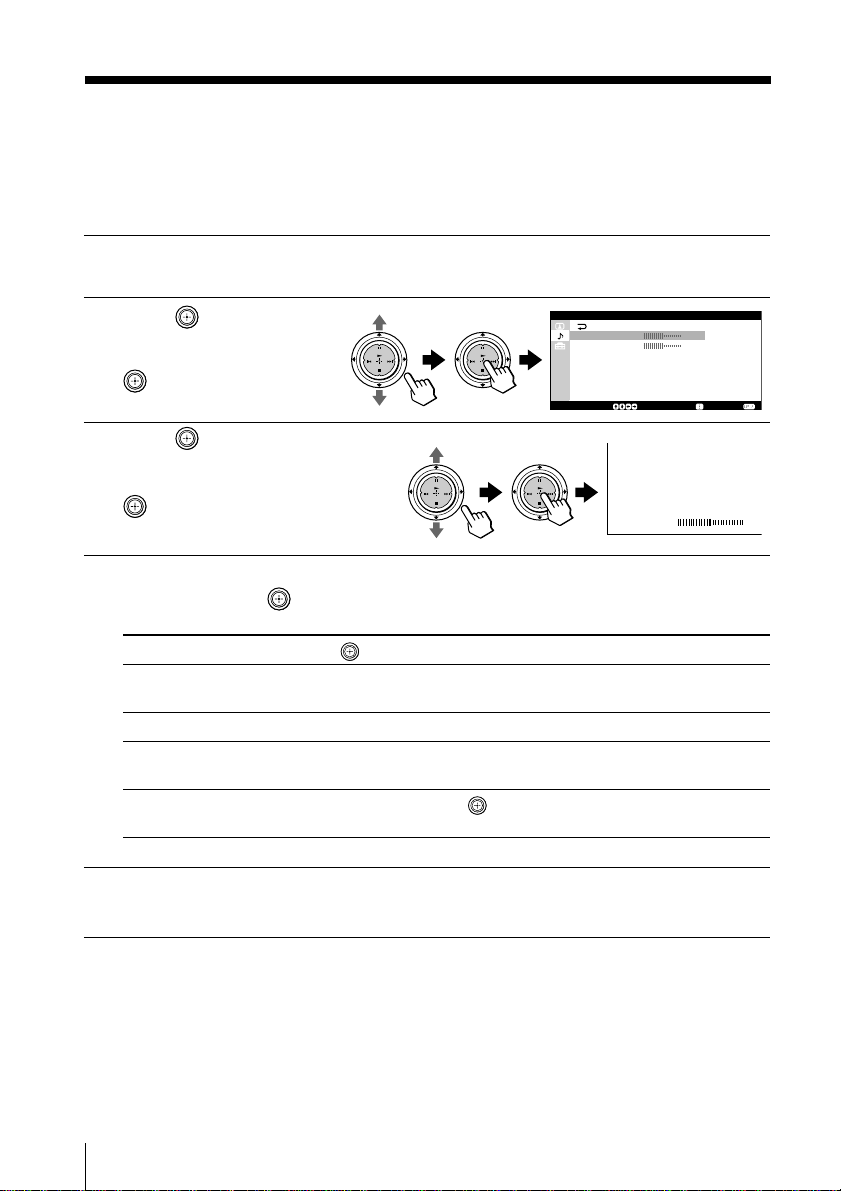
Changing the “Sound” setting (continued)
Adjusting the “Sound Adjustment” options
You can access the “Sound Adjustment” menu only when you have
selected “Personal” for “Sound Mode”.
Display the “Sound” menu and select “Personal” for “Sound Mode”.
1
Move up or down to
2
select “Sound
Adjustment”, then press
.
P
R
N
I
O
W
G
T
+
–
T
G
W
O
I
R
N
P
P
R
N
I
O
W
G
T
+
–
T
G
W
O
I
R
N
P
S o u n d A d j u s t m e n t
T r e b l e
B a s s
B B E :O f f
R e s e t
S e l e c t : C o n f i r m : E n d :
Move up or down to
3
select the desired item
(e.g., “Treble”), then press
.
Adjust the value or select the desired option according to the following
4
table, then press
.
P
R
N
I
O
W
G
T
+
–
T
G
W
O
I
R
N
P
P
R
N
I
O
W
G
T
+
–
T
G
W
O
I
R
N
P
Treble 50
For Move
“Treble” down or left to decrease the treble, up or right to increase the
treble.
“Bass” down or left to decrease the bass, up or right to increase the bass.
“BBE” up or down to select “High”, “Low” or “Off”.
“BBE” can produce clear sound.
“Reset” Select “Reset” and press
to reset the sound to the factory preset
settings.
Repeat steps 3 and 4 to adjust other items.
5
The adjusted settings will be received when you select “Personal”.
5 0
5 0
40
Adjusting Your Setup (MENU)
Note
•You cannot change the “BBE” mode when the TV is in the center speaker
mode (page 30).
Page 41
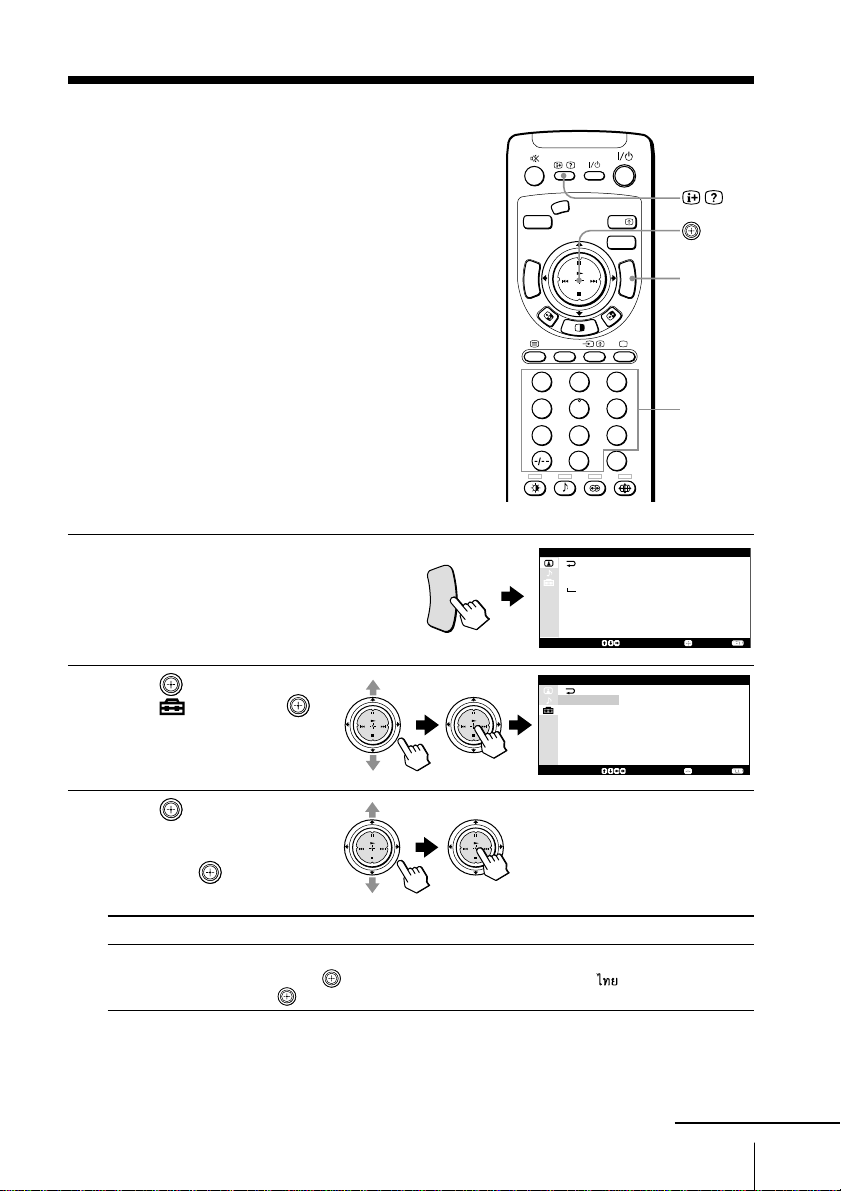
Changing the “Setup” setting
The “Setup” menu allows you to adjust
the setup of your TV. For example, you
can change the menu language, preset
channels, etc.
Press MENU.
1
Move up or down to
2
select
, then press .
W
T
T
W
VIDEO
N
E
T
C
E
R
S
P
T
T
HD/DVD
A/B
V CENTER
P
R
N
I
O
W
G
+
MENU
MENU
–
G
W
O
I
R
N
P
DRC-MF
INDEX
PROG
123
D R C 1 2 5 0
P e r s o n a l
O ff
A u t o
O f f
A u t o
Number
buttons
456
7809
JUMP
P i c t u r e
D R C - M F :
P i c t u r e M o d e :
P i c t u r e A d j u s t m e n t
MENU
P
R
N
I
O
G
+
–
G
O
I
R
N
P
P
R
N
I
O
W
G
T
+
–
T
G
W
O
I
R
N
P
3 D - N R :
S e l e c t : C o n f i r m : E n d :
S e t u p
L a n g u a g e : E n g l i s h
P i c t u r e P o s i t i o n
C h a n n e l S e t u p
Wide Mode:
G a m e M o d e :
V i d e o L a b e l
C o l o r S y s t e m :
S e l e c t : C o n f i r m : E n d :
Move up or down to
3
select the desired option
(see the table below),
then press
.
P
N
I
W
T
T
W
I
N
P
Select To
“Language” change the menu language.
Move up or down to select “English” or “ ” (Thai), then press
.
R
O
G
+
–
G
O
R
P
R
N
I
O
W
G
T
+
–
T
G
W
O
I
R
N
P
continued
41Adjusting Your Setup (MENU)
Page 42
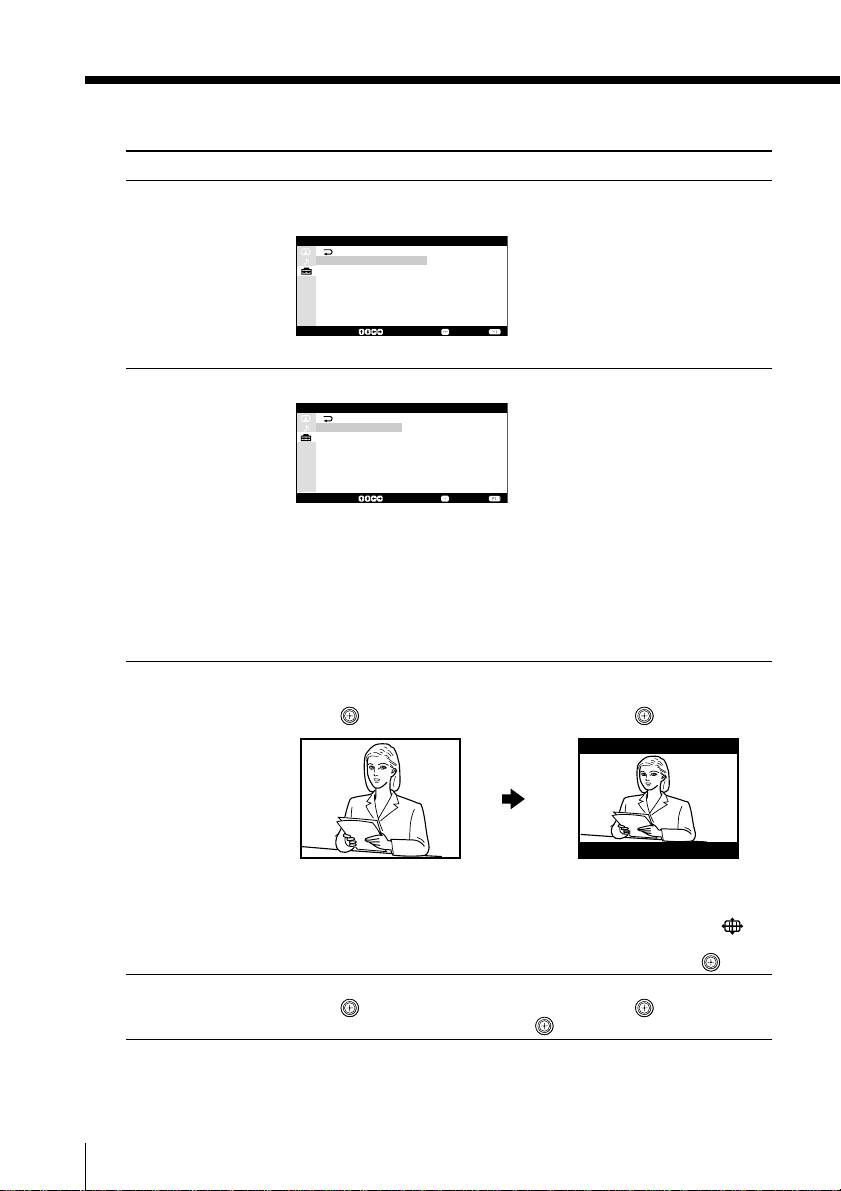
Changing the “Setup” setting (continued)
Select To
“Picture Position” adjust the position of the picture if it is not aligned with the TV
“Channel Setup” preset channels.
“Wide Mode” change the size of the picture when receiving wide-mode (16:9)
screen.
P i c t u r e P o s i t i o n
P i c t u r e R o t a t i o n
P i c t u r e V - P o s i t i o n
S e l e c t : C o n f i r m : E n d :
See “Adjusting the alignment of the picture” on page 44.
C h a n n e l S e t u p
A u t o P r o g r a m
M a n u a l P r o g r a m
T V S y s t e m : B / G
P r o g r a m L a b e l
P r o g r a m B l o c k
P r o g r a m Edit
S e l e c t : C o n f i r m : E n d :
You can select automatic or manual channel presetting.
See “Presetting channels manually” on page 45.
You can change the TV system by selecting “TV System”.
For “Program Label” and “Program Block”, see “Assigning labels
to the preset channels” on page 49 and “Blocking channels” on
page 50, respectively.
You can also change the order of the preset channels to preference.
See “Changing the order of the preset channels” on page 47.
picture signal.
Move up or down to select “On”, then press .
“Game Mode” adjust the picture setting that is suitable to view video games.
42
Adjusting Your Setup (MENU)
When you select “Auto”, the picture is displayed in optimum wide
screen automatically.
You can also change to wide-mode picture size by using the
button.
To restore the normal picture size, select “Off” then press .
Move up or down to select “On”, then press .
To cancel, select “Off”, then press .
Page 43
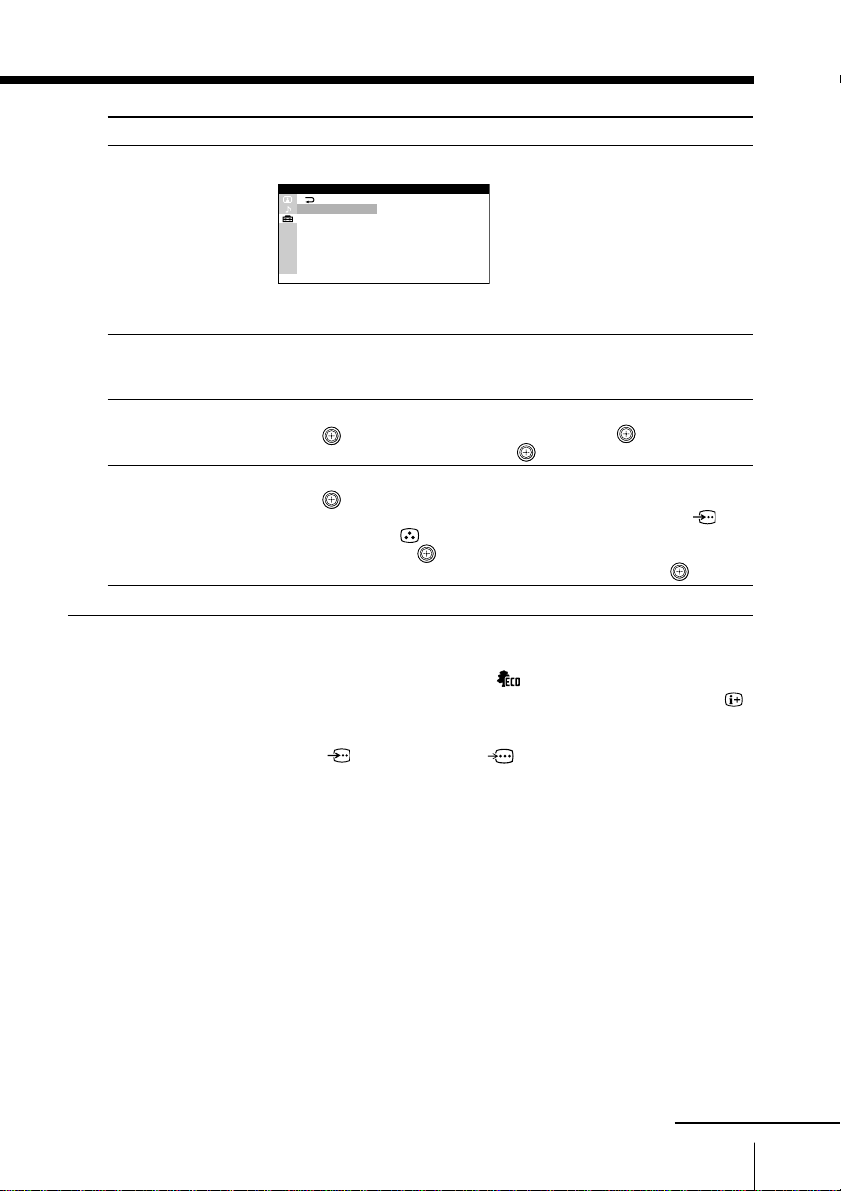
Select To
“Video Label” assign labels to the connected audio/video equipment.
V i d e o L a b e l
V i d e o I n p u t :
L a b e l :
V i d e o 1
V i d e o 1
C o n f i r m : E n d :
See “Assigning labels to the connected audio/video equipment”
on page 51.
“Color System” select the color system. Normally, set this to “Auto”.
You can select the color system for each channel or each video
input.
“Eco Mode” reduce power consumption of your TV to save energy.
Move
up or down to select “On”, then press .
To cancel, select “Off”, then press .
“S Input” select the S video input mode.
Move up or down to select “Auto” to receive the S video signal
automatically when the signals are input through both the (S
video input) and (video input) jacks of the same video input
channel, then press
.
To deactivate the S video input, select “Off”, then press .
Notes
• If “Eco Mode” is on, the ECO MODE ( ) icon will appear at the bottom
right corner of the screen when you turn on the TV or when you press
on the remote.
• “Game Mode” is available only when receiving signals through the t
(video input), (S video input), or (component video input) jacks.
• When high-definition (HD) signals are input, “Wide Mode” and “Game
Mode” do not function.
When progressive (SD) signals are input, “Game Mode” does not
function.
To return to the normal screen
Press MENU.
continued
Adjusting Your Setup (MENU)
43
Page 44
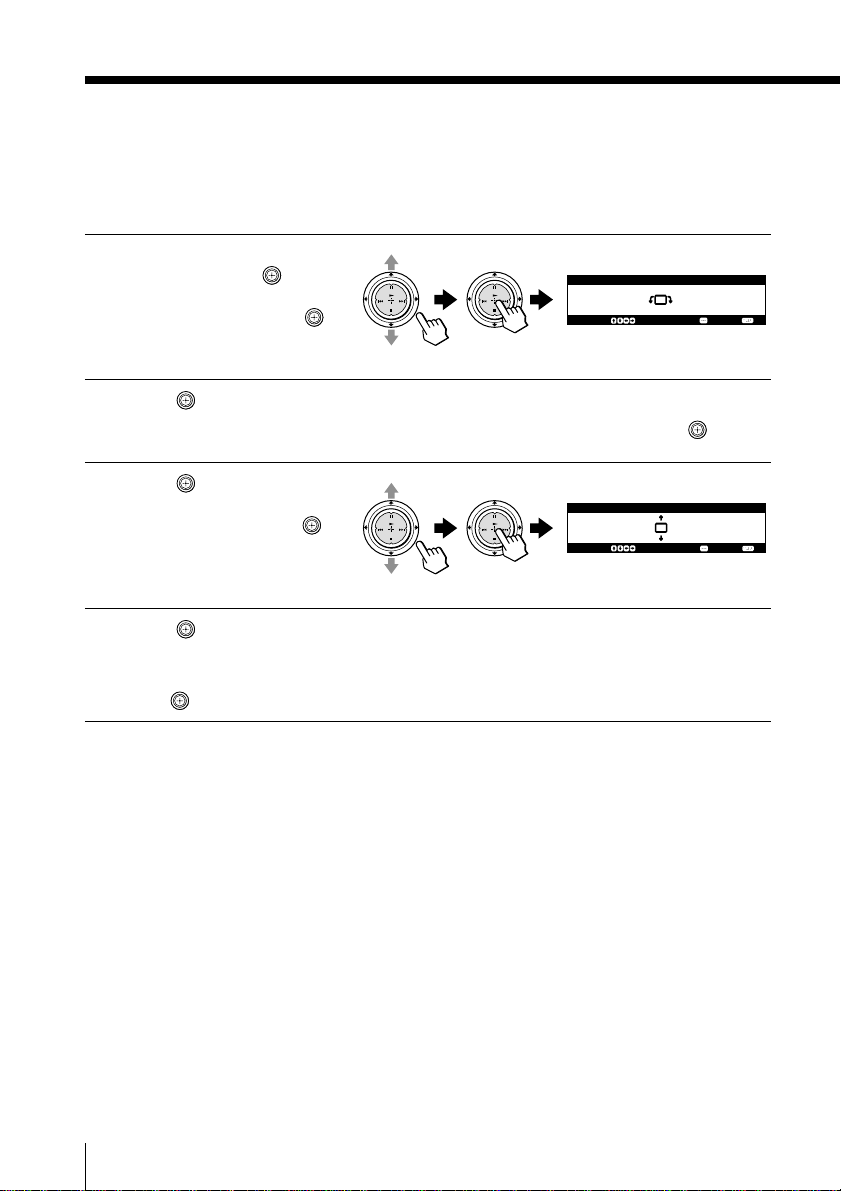
Changing the “Setup” setting (continued)
Adjusting the alignment of the picture
The picture may be out of alignment with the TV screen due to the influence of the
earth’s magnetic field. You can adjust the position of the picture if it is not aligned.
After selecting “Picture
1
Position”, move
down to select “P
Rotation”, then press
Move left or right to adjust the picture declination.
2
up or
icture
.
Adjust so that the upper and lower bars become horizontal, then press .
Move up or down to
3
select “Picture VPosition”, then press
Move up or down to adjust the picture position.
4
.
Adjust so that the distance between the upper bar and the top of the screen and
that between the lower bar and the bottom of the screen become equal, then
press
.
P
R
N
I
O
W
G
T
+
–
T
G
W
O
I
R
N
P
P
R
N
I
O
W
G
T
+
–
T
G
W
O
I
R
N
P
P
R
N
I
O
W
G
T
+
–
T
G
W
O
I
R
N
P
P
R
N
I
O
W
G
T
+
–
T
G
W
O
I
R
N
P
P i c t u r e R o t a t i o n
Select : C o n f i r m : E n d :
P i c t u r e V - P o s i t i o n
Select : C o n f i r m : E n d :
44
Adjusting Your Setup (MENU)
Notes
• If you install the TV to another location, make sure to adjust the alignment
of the picture again.
• Before adjusting “Picture Rotation” and “Picture V-Position”, keep
external speakers or other electrical equipment away from the TV. The
magnetic disturbance from these equipment or the direction of the earth’s
magnetic field may affect the TV.
• When adjusting “Picture Rotation”, adjust the value step by step. If you
rotate the bars largely at a time, color distortion may occur.
• If you do not succeed in adjusting “Picture Rotation” and “Picture V-
Position”, turn off the TV and change its location or direction, then try to
adjust using the menu. Do not move the TV while the TV is turned on. If
you do, abnormal color patches may appear on the picture. Press ! on
the TV to turn off the TV for about 15 minutes, then turn it on again to
demagnetize the TV.
• You cannot adjust “Picture Rotation” and “Picture V-Position” when HD
signals are input.
Page 45
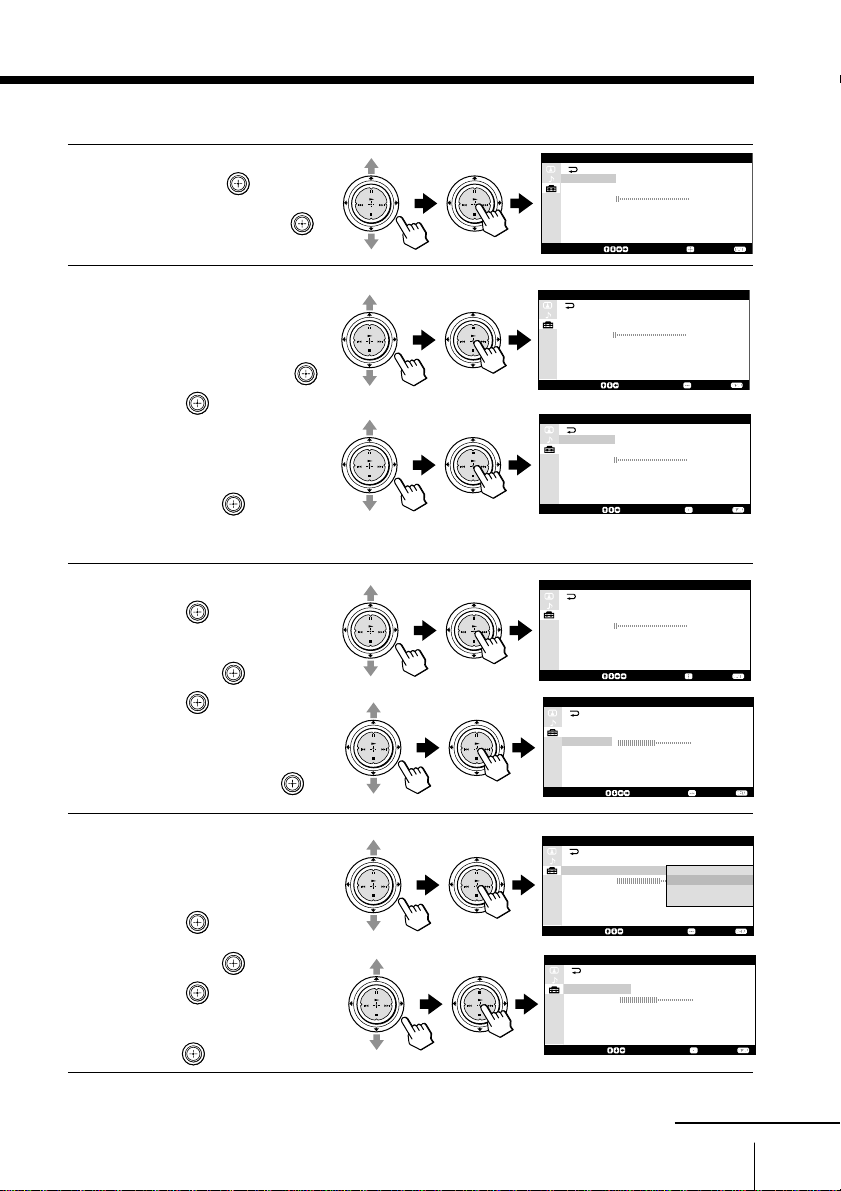
Presetting channels manually
After selecting “Channel
1
Setup”, move up or
down to select “Manual
Program”, then press
P
R
N
I
O
W
G
T
+
–
T
G
W
.
O
I
R
N
P
P
R
N
I
O
W
G
T
+
–
T
G
W
O
I
R
N
P
P r o g r a m :
T V S y s t e m :
V H F L o w
F i n e : A u t o
S k i p : O f f
S e n s i t i v i t y :
0 9
B / G
H i g h
S e l e c t : C o n f i r m : E n d :
M a n u a l P r o g r a m
Select the program
2
number to which you
want to preset a channel.
(1) Make sure “Program” is
selected, then press
(2) Move up or down until
the program number you
want to preset (e.g.,
program number “10”)
appears on the menu,
then press
Tip
• You can also select the program number with the PROG +/– or number buttons.
Select the desired channel.
3
(1) Move
.
up or down to
select either “VHF Low”,
“VHF High”, or “UHF”,
then press
.
(2) Move up or down
until the desired
channel’s broadcast
appears on the TV
screen, then press
If the sound of the
4
desired channel is
abnormal, select the
appropriate TV system.
(1) Move
up or down to
select “TV System”,
then press .
(2) Move up or down
until the sound
becomes normal, then
press
.
P
R
N
I
O
W
G
T
+
–
T
G
W
O
I
R
N
P
.
P
R
N
I
O
W
G
T
+
–
T
G
W
O
I
R
N
P
P r o g r a m :
T V S y s t e m :
V H F L o w
F i n e :
S k i p : O f f
S e n s i t i v i t y :
0 9
B / G
A u t o
H i g h
S e l e c t : C o n f i r m : E n d :
M a n u a l P r o g r a m
M a n u a l P r o g r a m
P
R
N
I
O
W
G
T
+
–
T
G
W
O
I
R
N
P
P
R
N
I
O
W
G
T
+
–
T
G
W
O
I
R
N
P
P r o g r a m :
T V S y s t e m :
V H F L o w
F i n e : A u t o
S k i p : O f f
S e n s i t i v i t y :
1 0
B / G
H i g h
S e l e c t : C o n f i r m : E n d :
M a n u a l P r o g r a m
P
R
N
I
O
W
G
T
+
–
T
G
W
O
I
R
N
P
P
R
N
I
O
W
G
T
+
–
T
G
W
O
I
R
N
P
P r o g r a m :
T V S y s t e m :
V H F L o w
F i n e : A u t o
S k i p : O f f
S e n s i t i v i t y :
1 0
B / G
H i g h
S e l e c t : C o n f i r m : E n d :
M a n u a l P r o g r a m
P
R
N
I
O
W
G
T
+
–
T
G
W
O
I
R
N
.
P
P
R
N
I
O
W
G
T
+
–
T
G
W
O
I
R
N
P
P r o g r a m :
T V S y s t e m :
V H F L o w
F i n e : A u t o
S k i p : O f f
S e n s i t i v i t y :
1 0
B / G
H i g h
S e l e c t : C o n f i r m : E n d :
M a n u a l P r o g r a m
P
R
N
I
O
W
G
T
+
–
T
G
W
O
I
R
N
P
P
R
N
I
O
W
G
T
+
–
T
G
W
O
I
R
N
P
P r o g r a m :
T V S y s t e m :
V H F L o w
F i n e :
S k i p : O f f
S e n s i t i v i t y : H i g h
1 0
A u t o
B / G
I
D / K
M
S e l e c t : C o n f i r m : E n d :
M a n u a l P r o g r a m
P
R
N
I
O
W
G
T
+
–
T
G
W
O
I
R
N
P
P
R
N
I
O
W
G
T
+
–
T
G
W
O
I
R
N
P
P r o g r a m :
T V S y s t e m :
V H F L o w
F i n e : A u t o
S k i p : O f f
S e n s i t i v i t y :
1 0
I
H i g h
S e l e c t : C o n f i r m : E n d :
continued
45Adjusting Your Setup (MENU)
Page 46
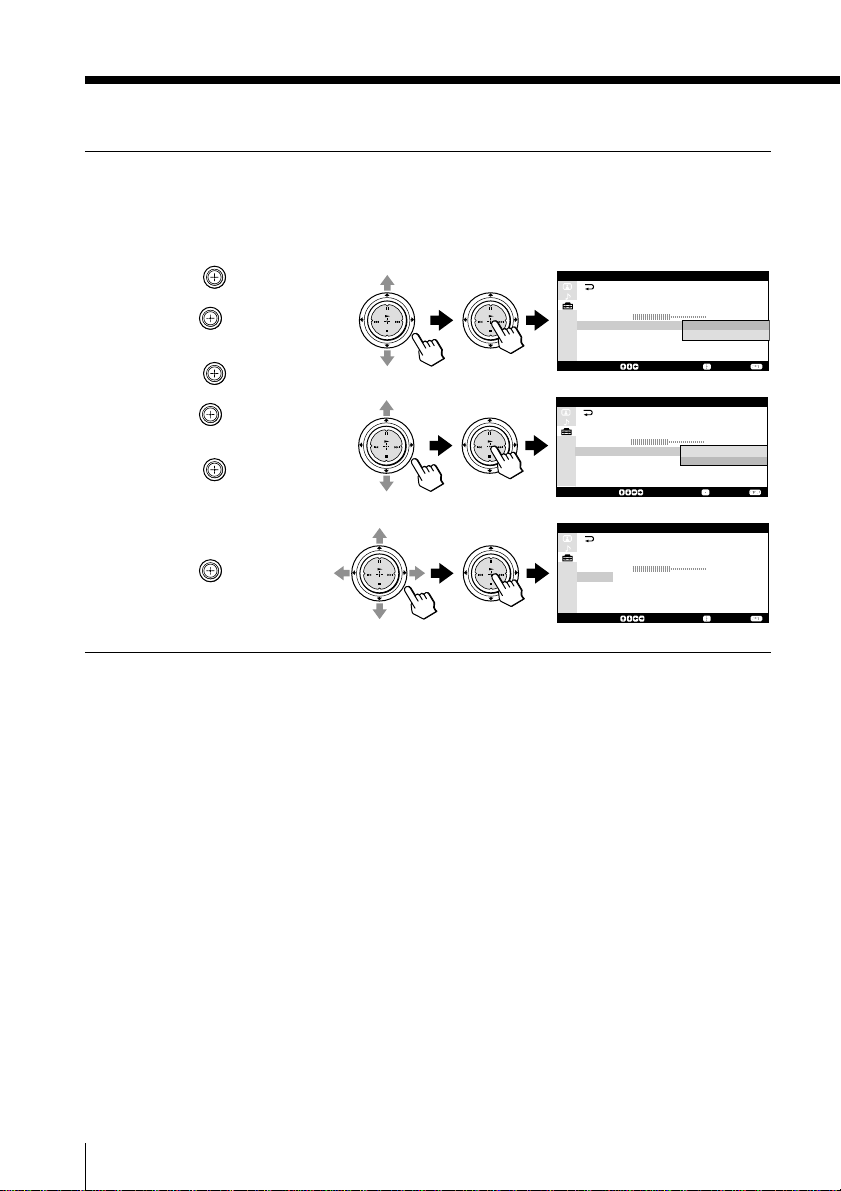
Changing the “Setup” setting (continued)
If you are not satisfied with
5
the picture and sound
quality, you may be able to
improve them by using the
“Fine” tuning feature.
(1) Move
to select “Fine”, then
press .
(2) Move
to select “Manual”, then
press .
(3) Move
down, left or right
until the picture
and sound quality
are optimal, then
press
icon on the menu
flashes while tuning.
up or down
up or down
either up,
. The + or –
P
R
N
I
O
W
G
T
+
–
T
G
W
O
I
R
N
P
P
R
N
I
O
W
G
T
+
–
T
G
W
O
I
R
N
P
P
R
N
I
O
W
G
T
+
–
T
G
W
O
I
R
N
P
P
R
N
I
W
T
T
W
I
R
N
P
P
R
N
I
O
W
T
T
W
O
I
R
N
P
P
R
N
I
O
W
T
T
W
I
R
N
P
O
G
+
–
G
O
P r o g r a m :
T V S y s t e m :
V H F L o w
F i n e :
S k i p : O f f
S e n s i t i v i t y : H i g h
1 0
I
A u t o
M a n u a l – +
S e l e c t : C o n f i r m : E n d :
M a n u a l P r o g r a m
M a n u a l P r o g r a m
G
+
–
G
P r o g r a m :
T V S y s t e m :
V H F L o w
F i n e :
S k i p : O f f
S e n s i t i v i t y : H i g h
1 0
I
A u t o
M a n u a l – +
S e l e c t : C o n f i r m : E n d :
M a n u a l P r o g r a m
G
+
–
G
O
P r o g r a m :
T V S y s t e m :
V H F L o w
F i n e :
S k i p : O f f
S e n s i t i v i t y :
1 0
I
M a n u a l
H i g h
S e l e c t : C o n f i r m : E n d :
46
Adjusting Your Setup (MENU)
Notes
• The TV system (“TV System”) setting is memorized for each program
number.
• If there is a locked channel (see page 50) while you are presetting in
“VHF-Low” and “Fine” mode, that channel will be unlocked
automatically.
Page 47
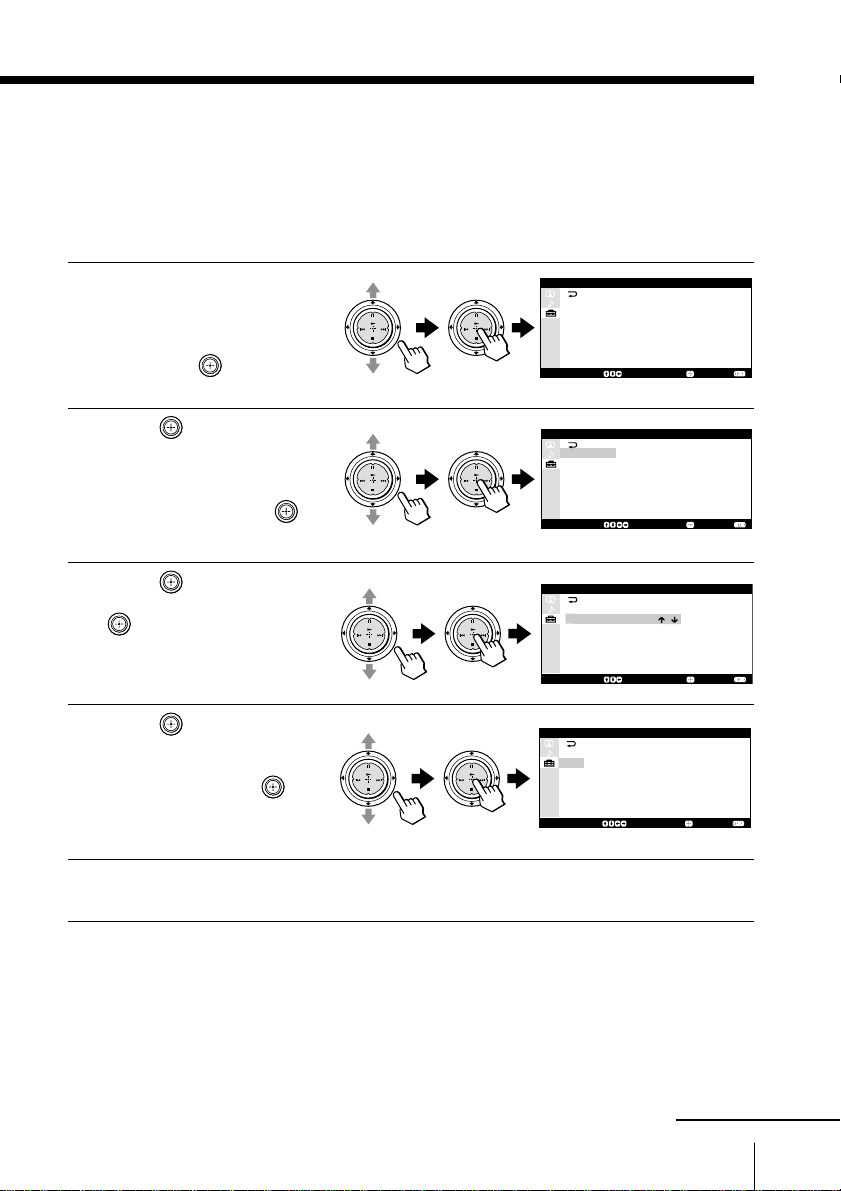
Changing the order of the preset channels
(“Program Edit”)
After performing “Auto Program” or “Manual Program”, you can
change the preset channel assigned to each program number to
preference.
After selecting “Program
1
Edit”under “Channel
Setup”, make sure
“Program” is selected,
then press
Move up or down to
2
select the program
.
number to which you
want to assign another
channel, then press
Move up or down to
3
select “Edit”, then press
.
Move up or down
4
until your preferred
program appears on the
screen, then press
confirm that channel.
to
P
R
N
I
O
W
G
T
+
–
T
G
W
O
I
R
N
P
P
R
N
I
O
W
G
T
+
–
T
G
W
O
I
R
N
P
P r o g r a m :
Edit
0 9
S e l e c t : C o n f i r m : E n d :
P r o g r a m Edit
P r o g r a m Edit
P
R
N
I
O
W
G
T
+
–
T
G
W
O
I
R
N
.
P
P
R
N
I
O
W
G
T
+
–
T
G
W
O
I
R
N
P
P r o g r a m :
Edit
1 0
S e l e c t : C o n f i r m : E n d :
P r o g r a m Edit
P
R
N
I
O
W
G
T
+
–
T
G
W
O
I
R
N
P
P
R
N
I
O
W
G
T
+
–
T
G
W
O
I
R
N
P
P r o g r a m :
Edit
1 0
S e l e c t : C o n f i r m : E n d :
P r o g r a m Edit
P
R
N
I
O
W
G
T
+
–
T
G
W
O
I
R
N
P
P
R
N
I
O
W
G
T
+
–
T
G
W
O
I
R
N
P
P r o g r a m :
Edit
1 0
S e l e c t : C o n f i r m : E n d :
To change the channels assigned to other program numbers, select
5
“Program”, then repeat steps 1 to 4.
To return to the normal screen
Press MENU.
continued
47Adjusting Your Setup (MENU)
Page 48
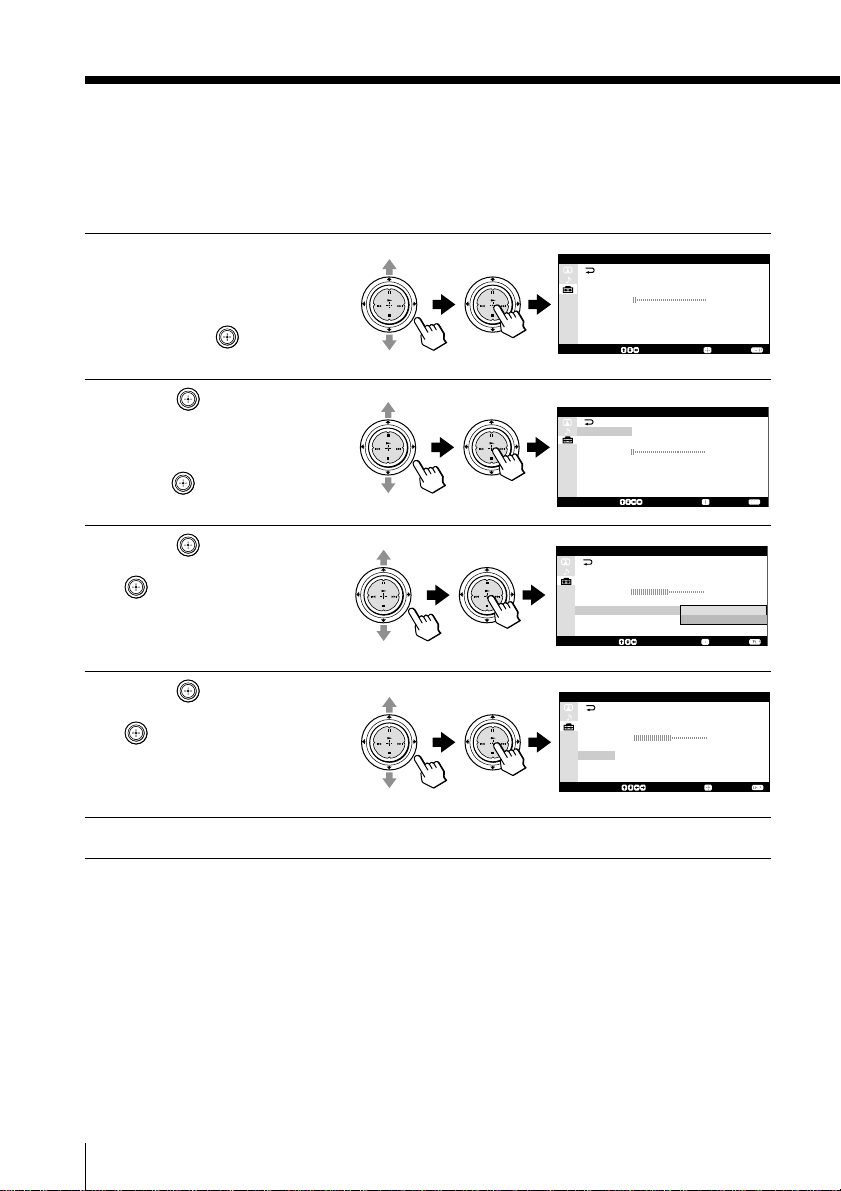
Changing the “Setup” setting (continued)
Skipping unwanted or unused channels (“Skip”)
After performing automatic channel presetting, you can erase unwanted or unused
channels.
After selecting “Manual
1
Program” under “Channel
Setup”, make sure
“Program” is selected,
then press
Move up or down
2
until the unused or
.
unwanted channel
number appears, then
press
Move up or down to
3
select “Skip”, then press
.
.
Move up or down to
4
select “On”, then press
.
P
R
N
I
O
W
G
T
+
–
T
G
W
O
I
R
N
P
P
R
N
I
O
W
G
T
+
–
T
G
W
O
I
R
N
P
P r o g r a m :
T V S y s t e m :
V H F L o w
F i n e : M a n u a l
S k i p : O f f
S e n s i t i v i t y :
0 9
B / G
H i g h
S e l e c t : C o n f i r m : E n d :
M a n u a l P r o g r a m
P
R
N
I
O
W
G
T
+
–
T
G
W
O
I
R
N
P
P
R
N
I
O
W
G
T
+
–
T
G
W
O
I
R
N
P
M a n u a l P r o g r a m
P r o g r a m :
T V S y s t e m :
V H F L o w
F i n e : M a n u a l
S k i p : O f f
S e n s i t i v i t y :
0 6
B / G
H i g h
S e l e c t : C o n f i r m :
E n d :
M a n u a l P r o g r a m
P
R
N
I
O
W
G
T
+
–
T
G
W
O
I
R
N
P
P
R
N
I
O
W
G
T
+
–
T
G
W
O
I
R
N
P
P r o g r a m :
T V S y s t e m :
V H F L o w
F i n e : M a n u a l
S k i p :
S e n s i t i v i t y :
0 6
B / G
H i g h
O n
O f f
S e l e c t : C o n f i r m : E n d :
M a n u a l P r o g r a m
P
R
N
I
O
W
G
T
+
–
T
G
W
O
I
R
N
P
P
R
N
I
O
W
G
T
+
–
T
G
W
O
I
R
N
P
P r o g r a m :
T V S y s t e m :
V H F L o w
F i n e : M a n u a l
S k i p : O n
S e n s i t i v i t y :
0 6
B / G
H i g h
S e l e c t : C o n f i r m : E n d :
To disable other channels, select “Program”, then repeat steps 2 to 4.
5
To restore the skipped channel
Select “Off” in step 4.
To return to the normal screen
Press MENU.
48
Adjusting Your Setup (MENU)
Page 49
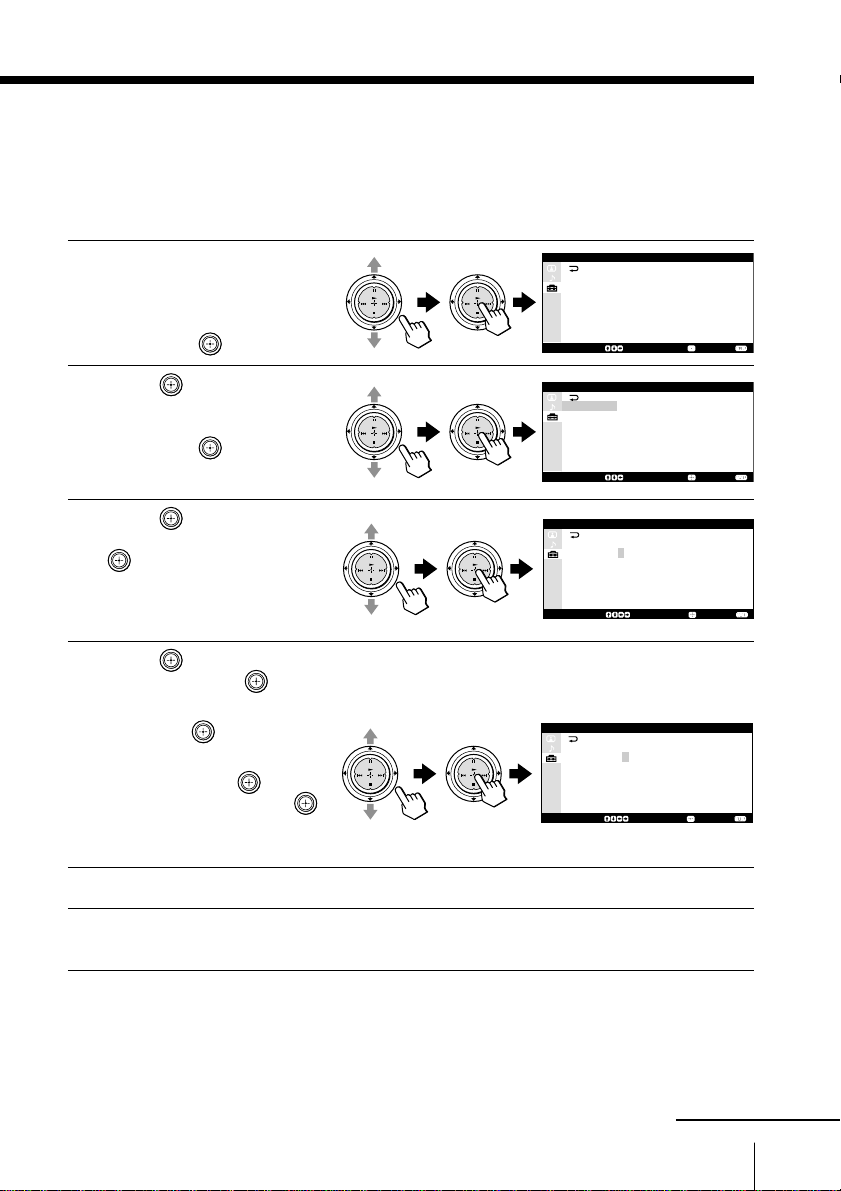
Assigning labels to the preset channels
(“Program Label”)
You can assign a label (such as station name) of up to 5 characters to
each preset channel.
After selecting “Program
1
Label”under “Channel
P
R
N
I
O
W
G
T
+
P
R
N
I
O
W
G
T
+
P r o g r a m L a b e l
P r o g r a m :
0 9
_____
L a b e l :
Setup”, make sure
–
T
G
W
O
“Program” is selected,
then press
Move up or down to
2
select the channel you
.
I
R
N
P
P
R
N
I
O
W
G
T
+
want to assign a label,
then press
Move up or down to
3
select “Label”, then press
.
Move up or down to scroll through the label characters (A to Z, 0 to 9,
4
etc.), then press
.
–
T
G
W
O
I
R
N
P
P
R
N
I
O
W
G
T
+
–
T
G
W
O
I
R
N
P
to confirm the highlighted character.
To insert a blank, leave “_”
and move right.
To change the confirmed
character, move
left to
highlight it, then move
P
R
N
I
O
W
G
T
+
–
T
G
W
O
I
R
N
P
up or down to select the
–
T
G
W
O
I
R
N
P
S e l e c t : C o n f i r m : E n d :
P r o g r a m L a b e l
P
R
N
I
O
W
G
T
+
–
T
G
W
O
I
R
N
P
P r o g r a m :
L a b e l :
1 0
_____
S e l e c t : C o n f i r m : E n d :
P r o g r a m L a b e l
P
R
N
I
O
W
G
T
+
–
T
G
W
O
I
R
N
P
P r o g r a m :
L a b e l :
1 0
_____
S e l e c t : C o n f i r m : E n d :
P r o g r a m L a b e l
P
R
N
I
O
W
G
T
+
–
T
G
W
O
I
R
N
P
P r o g r a m :
L a b e l :
1 0
A____
S e l e c t : C o n f i r m : E n d :
correct character.
Repeat step 4 to add up to 5 characters to the label.
5
To assign labels to other channels, select “Program”, then repeat steps 1 to
6
5.
To return to the normal screen
Press MENU.
continued
49Adjusting Your Setup (MENU)
Page 50
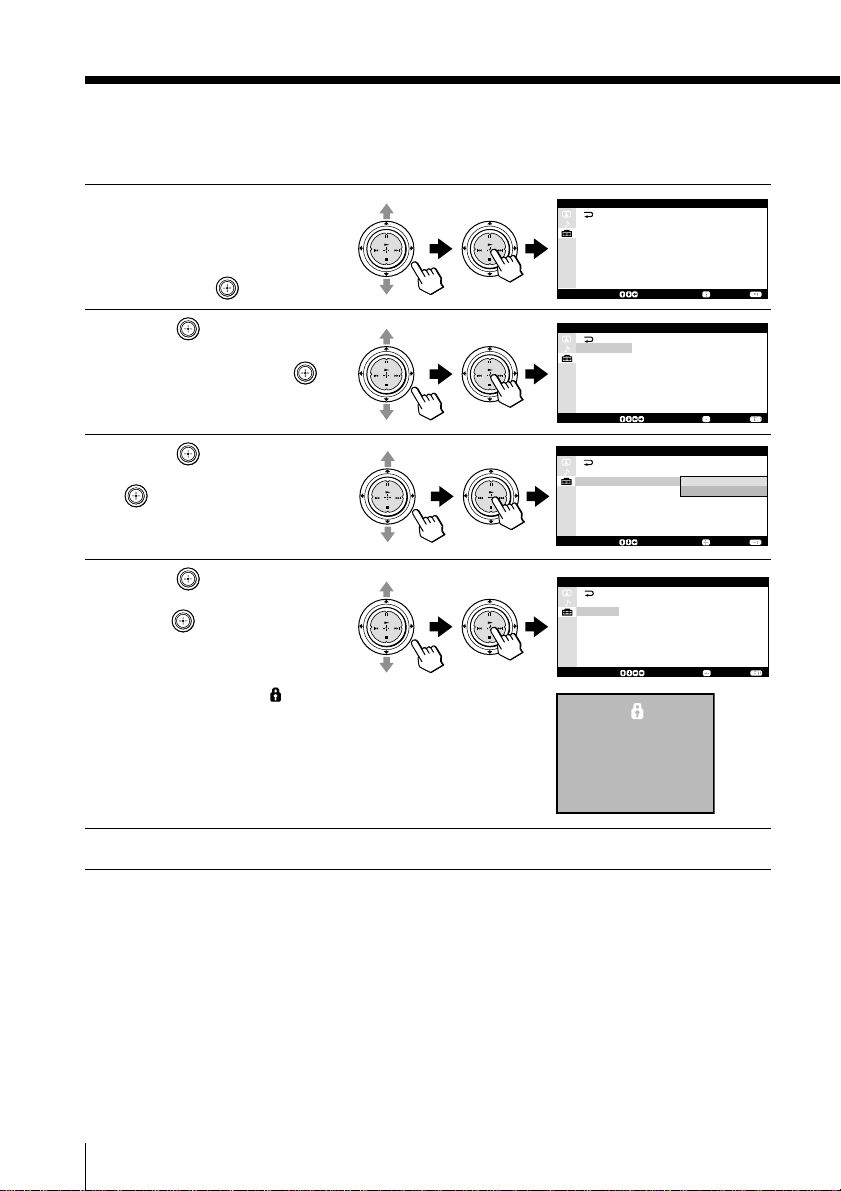
Changing the “Setup” setting (continued)
Blocking channels (“Program Block”)
After selecting “Program
1
Block” under “Channel
P
R
N
I
O
W
T
Setup”, make sure
“Program” is selected,
then press
Move up or down to
2
select the desired channel
.
(e.g. 06), then press
Move up or down to
3
select “Block”, then press
T
W
O
I
R
N
P
P
R
N
I
O
W
T
.
T
W
O
I
R
N
P
P
R
N
I
O
W
T
.
T
W
O
I
R
N
P
Move up or down to
4
select “On”, then
press
.
To unlock the channel,
select “Off”.
The lock symbol (
)
P
R
N
I
O
W
T
T
W
O
I
R
N
P
appears on the screen when
“On” is selected.
If a locked channel is selected, the lock symbol
appears on the screen.
P
R
N
I
O
G
+
–
G
W
G
T
+
–
T
G
W
O
I
R
N
P
P r o g r a m :
B l o c k :
0 9
O f f
S e l e c t : C o n f i r m : E n d :
P r o g r a m B l o c k
P r o g r a m B l o c k
P
R
N
I
O
G
+
–
G
W
G
T
+
–
T
G
W
O
I
R
N
P
P r o g r a m :
B l o c k :
0 6
O f f
S e l e c t : C o n f i r m : E n d :
P r o g r a m B l o c k
P
R
N
I
O
G
+
–
G
W
G
T
+
–
T
G
W
O
I
R
N
P
P r o g r a m :
B l o c k :
0 6
O n
O f f
S e l e c t : C o n f i r m : E n d :
P r o g r a m B l o c k
P
R
N
I
O
G
+
–
G
W
G
T
+
–
T
G
W
O
I
R
N
P
P r o g r a m :
B l o c k :
0 6
O n
S e l e c t : C o n f i r m : E n d :
6
To lock other channels, select “Program”, then repeat steps 2 to 4.
5
To return to the normal screen
Press MENU.
Note
• If you preset a locked channel manually (see page 45), that channel will be
unlocked automatically.
50
Adjusting Your Setup (MENU)
Page 51
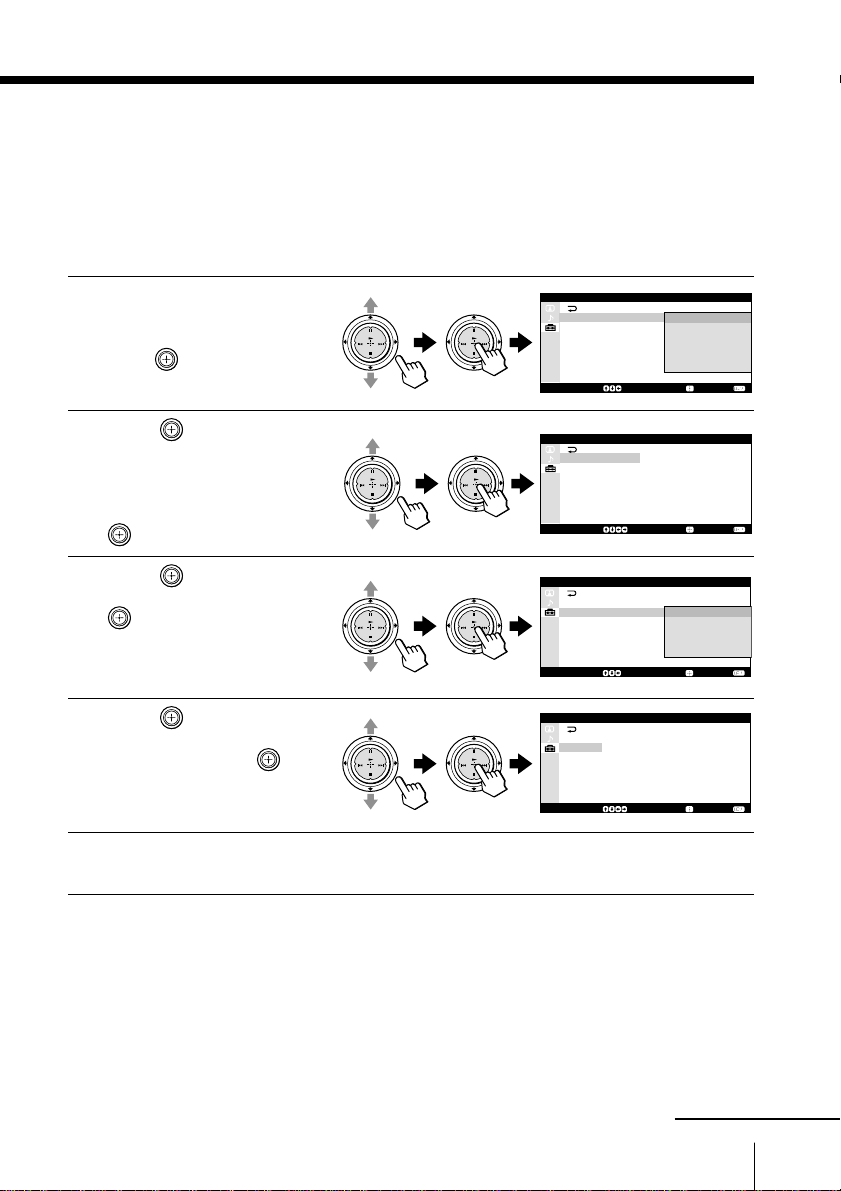
Assigning labels to the connected audio/video
equipment (“Video Label”)
You can assign one of the prefixed labels (such as VCR, SAT, etc.) or
your favorite label to the audio/video equipment connected to the
video inputs of the TV.
To assign a prefixed label
After selecting “Video
1
Label”, make sure “Video
P
R
N
I
O
W
G
T
+
P
R
N
I
O
W
G
T
+
Input” is selected, then
press
Move up or down to
2
select the video input you
.
have connected the
equipment you want to
assign a label, then press
–
T
G
W
O
I
R
N
P
P
R
N
I
O
W
G
T
+
–
T
G
W
O
I
R
N
P
–
T
G
W
O
I
R
N
P
P
R
N
I
O
W
G
T
+
–
T
G
W
O
I
R
N
P
.
Move up or down to
3
select “Label”, then press
.
Move up or down to
4
select one of the prefixed
labels, then press
To assign your favorite
.
P
R
N
I
O
W
G
T
+
–
T
G
W
O
I
R
N
P
P
R
N
I
O
W
G
T
+
–
T
G
W
O
I
R
N
P
P
R
N
I
O
W
G
T
+
–
T
G
W
O
I
R
N
P
P
R
N
I
O
W
G
T
+
–
T
G
W
O
I
R
N
P
label, see page 52.
To assign labels to other equipment, select “Video Input”,
5
then repeat steps 2 to 4.
V i d e o L a b e l
V i d e o I n p u t :
L a b e l : V i d e o 1
V i d e o 1
V i d e o 2
V i d e o 3
V i d e o 4
H D / D V D 1
H D / D V D 2
S e l e c t : C o n f i r m : E n d :
V i d e o L a b e l
V i d e o I n p u t :
L a b e l :
V i d e o 1
V i d e o 1
S e l e c t : C o n f i r m : E n d :
V i d e o L a b e l
V i d e o I n p u t :
L a b e l :
V i d e o 1
V i d e o 1
VC R
S A T
G a m e
E d i t [
_ _ _ _ _
S e l e c t : C o n f i r m : E n d :
V i d e o L a b e l
V i d e o I n p u t :
L a b e l :
V i d e o 1
V CR
S e l e c t : C o n f i r m : E n d :
]
To return to the normal screen
Press MENU.
continued
51Adjusting Your Setup (MENU)
Page 52
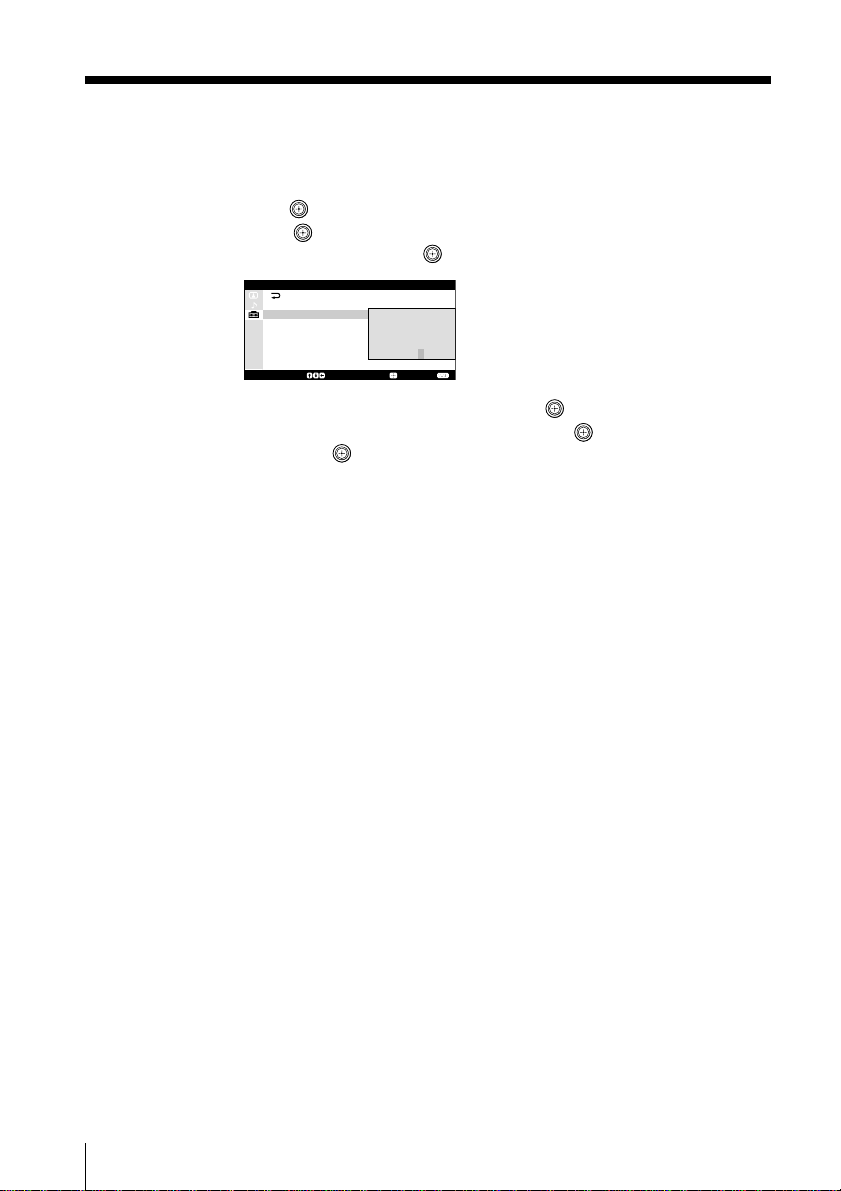
Changing the “Setup” setting (continued)
To assign your favorite label
1 Follow steps 1 to 3 on page 51 and select “Edit” in step 4, then
press .
2 Move up or down to scroll through the label characters (A to Z,
0 to 9, etc.), then press
V i d e o L a b e l
V i d e o I n p u t :
L a b e l :
S e l e c t : C o n f i r m : E n d :
V i d e o 1
V i d e o 1
VC R
S A T
G a m e
E d i t [
To insert a blank, leave “_” and move right.
To change the confirmed character, move
then move up or down to select the correct character.
3 Repeat step 2 to add up to 5 characters to the label.
to confirm the highlighted character.
V _ _ _ _
]
left to highlight it,
52
Adjusting Your Setup (MENU)
Page 53
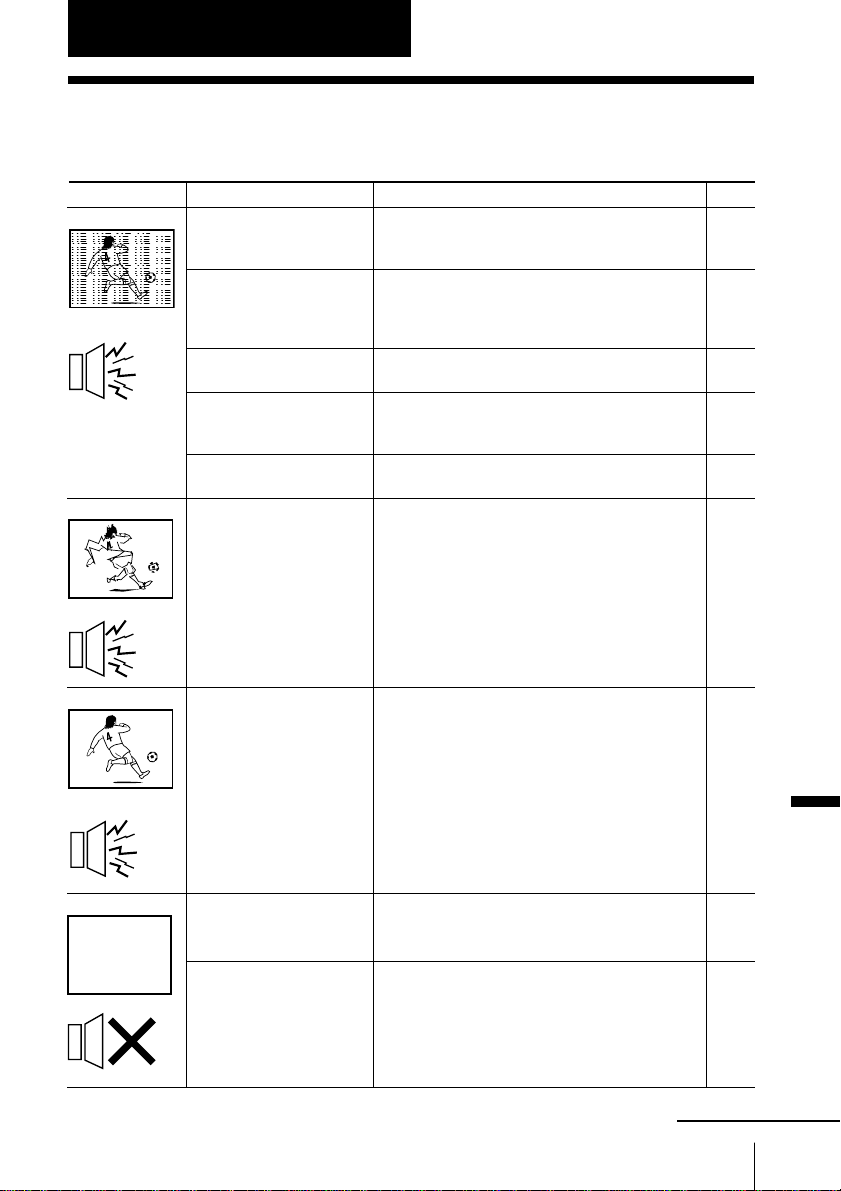
Additional Information
Troubleshooting
If you have any problem while viewing your TV, please check the following
troubleshooting guide. If the problem persists, contact your Sony dealer.
Symptom
Snowy picture
Noisy sound
Distorted picture
Noisy sound
Possible cause
• The connection is
loose or the cable is
damaged.
• Channel presetting
is inappropriate or
incomplete.
• The antenna type is
inappropriate.
• The antenna
direction needs
adjustment.
• Signal transmission
is low.
• Broadcast signals
are too strong.
• Check the antenna cable and
connection on the TV, VCR and on
the wall.
• Display the “Channel Setup” menu
under the “Setup” menu and select
“Manual Program” to preset the
channel again.
• Check the antenna type (VHF/UHF).
Contact a Sony dealer for advice.
• Adjust the antenna direction. Contact
a Sony dealer for advice.
• Try using a booster.
• Turn off or disconnect the booster if it
is in use.
Solutions
Page
7
45
–
–
–
–
Good picture
Noisy sound
No picture
No sound
• The TV system
setting is
inappropriate.
• The power cord,
antenna or VCR is
not connected.
• The TV is not turned
on.
• If the sound of all the channels are noisy,
display the “Channel Setup” menu under
the “Setup”menu and select “Auto
Program” to preset the channels again.
• If the sound of some channels is noisy,
select the channel, then display the
“Channel Setup” menu under the
“Setup”menu and select the appropriate
TV system (“TV System”).
• Check the power cord, antenna and
the VCR connections.
• Press I/1 on the remote.
• Press ! on the TV to turn off the TV
for about five seconds, then turn it on
again.
42
45
Additional Information
7
17
18
continued
53Additional Information
Page 54
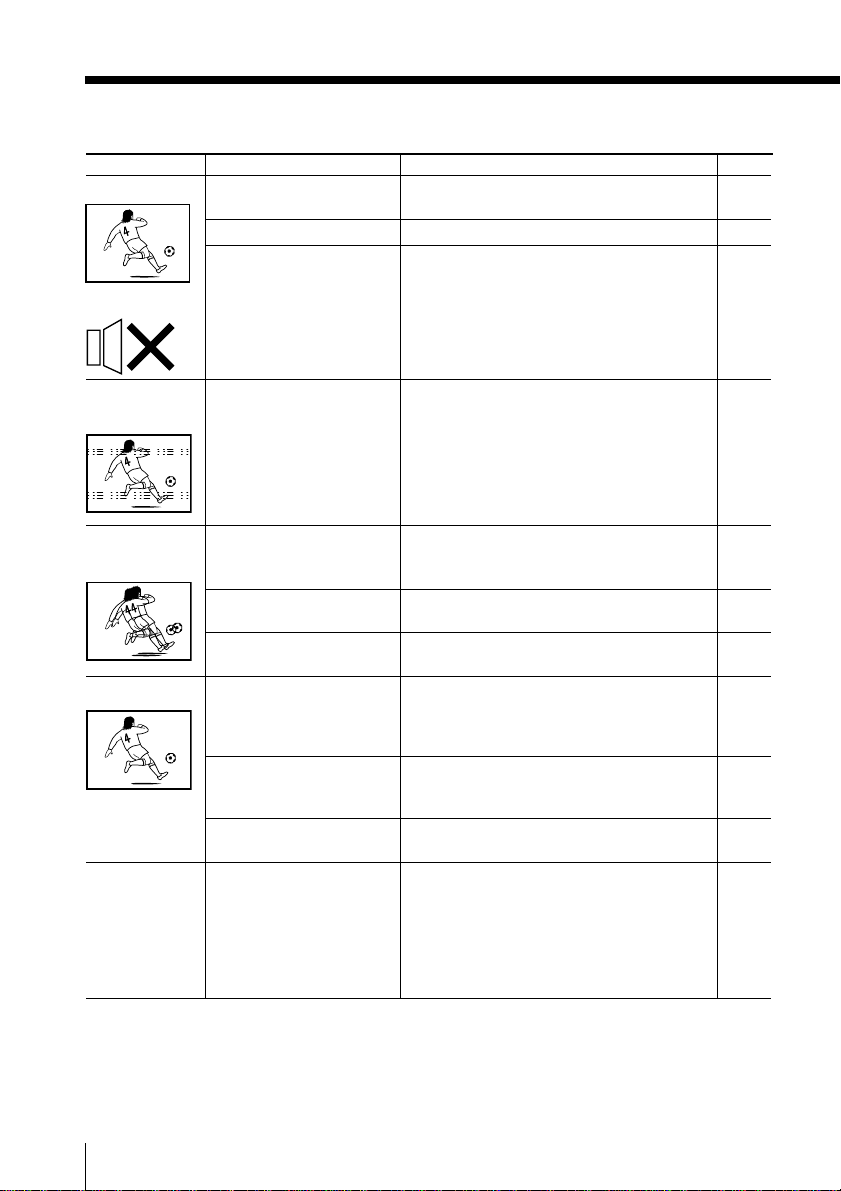
Troubleshooting (continued)
Symptom
Good picture
No sound
Dotted lines or
stripes
Double images or
“ghosts”
No color
Picture is not
aligned to the
TV screen.
Possible cause
• The volume level is too
low.
• The sound is muted.
• The broadcast signal
has a transmission
problem.
• There is local
interference from cars,
neon signs, hair dryers,
power generators, etc.
•
Broadcast signals are
reflected by nearby
mountains or buildings.
• The antenna direction
needs adjustment.
• Use of a booster is
inappropriate.
• The color level setting
is too low.
•
The color system setting is
inappropriate.
• The antenna direction
needs adjustment.
•
The magnetic disturbance
from external speakers or
other equipment, or the
direction of the earth’s
magnetic field may affect
the TV.
Solutions
• Press 2 + to increase the volume
level.
• Press % to cancel the muting.
• Press A/B until a better sound is
heard.
• Do not use a hair dryer or other
equipment near the TV.
• Adjust the antenna direction for
minimum interference. Contact a
Sony dealer for advice.
• Use a highly directional antenna.
• Use the fine tuning (“Fine”) function.
• Adjust the antenna direction. Contact
a Sony dealer for advice.
• Turn off or disconnect the booster if
it is in use.
•
Display the “Picture” menu and select
“Personal” of “Picture Mode”, then adjust
the “Color” level under “Picture
Adjustment”.
• Display the “Setup” menu and check
the color system (“Color System”)
setting (usually set this to “Auto”).
• Adjust the antenna direction. Contact
a Sony dealer for advice.
• Keep external speakers or other
electrical equipment away from the TV.
• Display the “Picture Position” menu
under the “Setup” menu and adjust
“Picture Rotation” and “Picture VPosition” so that the picture is aligned
to the TV screen.
Page
18
18
23
–
–
–
46
–
–
37
43
–
–
44
54
Additional Information
Page 55
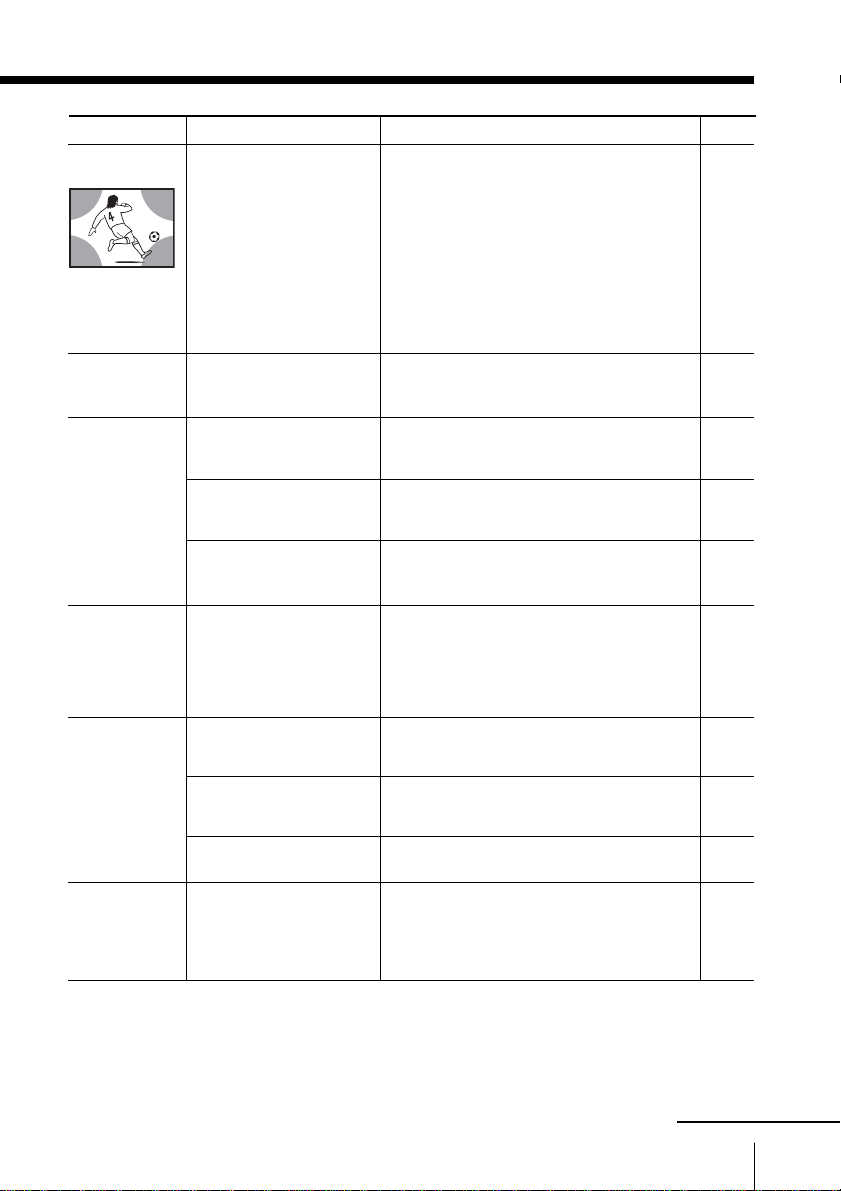
Symptom
Abnormal color
patches
TV cannot receive
stereo broadcast
signal.
Stereo broadcast
sound switches on
and off or is
distorted.
or
The sound switches
between stereo and
monaural
frequently.
“100” appears at
the top of the
screen after
approximately 10
seconds and there is
no Teletext display.
Teletext display is
incomplete
(snowy picture or
double images).
Possible cause
•
The magnetic disturbance
from external speakers or
other equipment, or the
direction of the earth’s
magnetic field may affect
the TV.
• The stereo reception
setting is
inappropriate.
•
The connection is loose
or the cable is damaged.
• The antenna direction
needs adjustment.
• The broadcast signal
has a transmission
problem.
• The channel carries
no Teletext broadcast.
• Connection is loose or
the cable is damaged.
• The antenna direction
is inappropriate.
Solutions Page
• Locate external speakers or other
equipment away from the TV. Do not
move the TV while the TV is turned
on. Press ! (main power) on the TV
to turn off the TV for about 15
minutes, then turn it on again.
• Display the “Picture Position” menu
under the “Setup” menu and adjust
“Picture Rotation” and “Picture VPosition” so that the picture is
aligned to the TV screen.
•Press A/B until “Auto” appears on
the screen.
• Check the antenna cable and
connection on the TV, VCR and on
the wall.
• Adjust the antenna direction. Contact a
Sony dealer for advice.
•Press A/B until a better sound is heard.
—
•
Check the antenna cable and connection
on the TV, VCR, and at the wall.
• Adjust the antenna direction. Contact a
Sony dealer for advice.
9
44
24
7
–
23
25
7
–
Lines moving across
the TV screen.
• Signal transmission is
too low.
• There is interference
from external sources,
e.g., heavy
machineries, nearby
broadcast station.
•Try using a booster.
• Use the fine tuning (”Fine”) function.
• Use the fine tuning (”Fine”) function.
–
46
46
continued
55Additional Information
Page 56

Troubleshooting (continued)
Symptom
Cannot play
shooting games.
TV cabinet creaks.
Static discharge is
felt when touching
the TV cabinet.
Possible cause
• Some shooting games
which involve
pointing a light beam
at the TV screen with
an electronic gun or
rifle cannot be used
with your TV. For
detail, see the
instruction manual
supplied with the
video game software.
• Changes in room
temperature
sometimes make the
TV cabinet expand or
contract, causing a
noise. This does not
indicate a malfunction.
•
This is the same static
discharge that is felt
when touching metal
door handles or car
doors especially when
the air is dry, for
example in winter.
This does not indicate
a malfunction.
Solutions
—
—
—
Page
_
_
_
56
Additional Information
Page 57
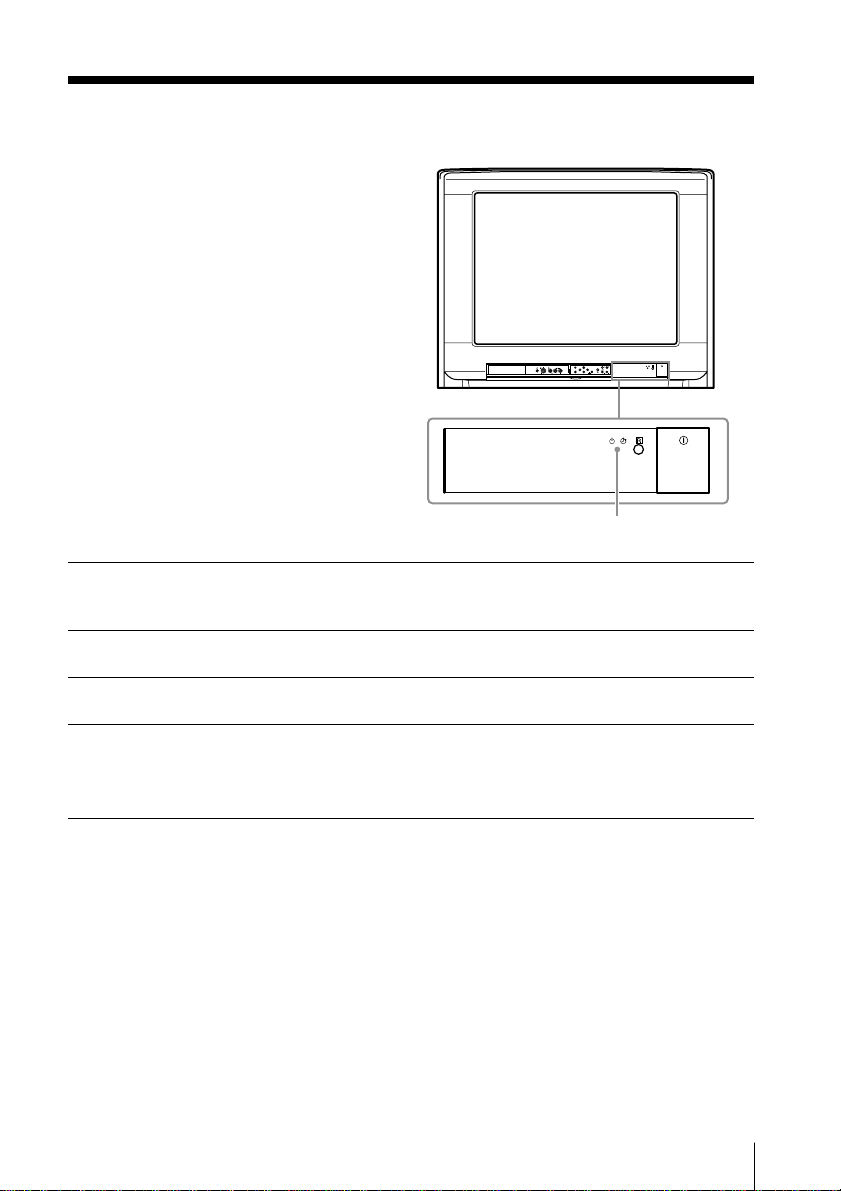
Self-diagnosis function
Your TV is equipped with a selfdiagnosis function. If there is a problem
with your TV, the 1 (standby) indicator
flashes red. The number of times the 1
indicator flashes indicates the possible
causes.
L(MONO) R
AUTO PROR
PROG
MENU
4
1 indicator
1 Check that the 1 indicator flashes red a number of times between 3-second
intervals.
2 Count the number of times the 1 indicator flashes.
3 Press ! (main power) to turn off your TV.
4 Inform your nearest Sony service center about the number of times the 1
indicator flashed.
Be sure to note the model name and serial number located on the rear of your TV.
57Additional Information
Page 58
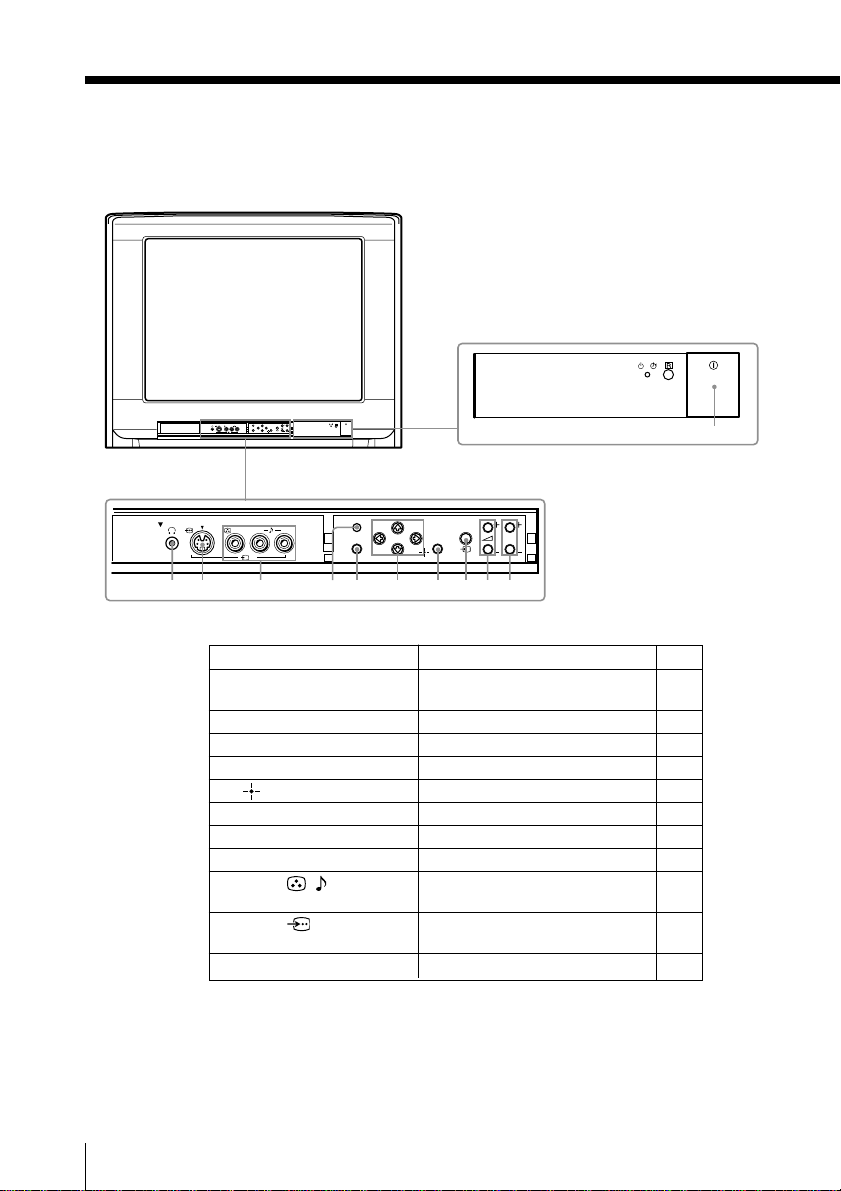
Identifying parts and controls
Front and inside the drop-down panel
L(MONO) R
AUTO PROR
PROG
MENU
4
Inside the drop-down panel
Front panel
1
L( MONO) R
4
Button/connector
AUTO PROG
MENU
PROG
645789q;qa
23
Function
Page
1 ! Turn off completely or 18
turn on the TV.
2 PROG +/– Select program number. 17
3 2 +/– Adjust volume. 18
4 t Select TV or video input. 18
5 Confirm selected items. 34
6 F/f/G/g Select items in the menu. 34
7 MENU Display the menu. 34
8 AUTO PROG Preset channels automatically. 42
9 t 4 ( , L(MONO) Connect to video/audio 11
/R) outputs of equipment.
q; t 4 ( ) Connect to S video output of 11
video equipment.
qa i Headphone jack –
58
Additional Information
Page 59
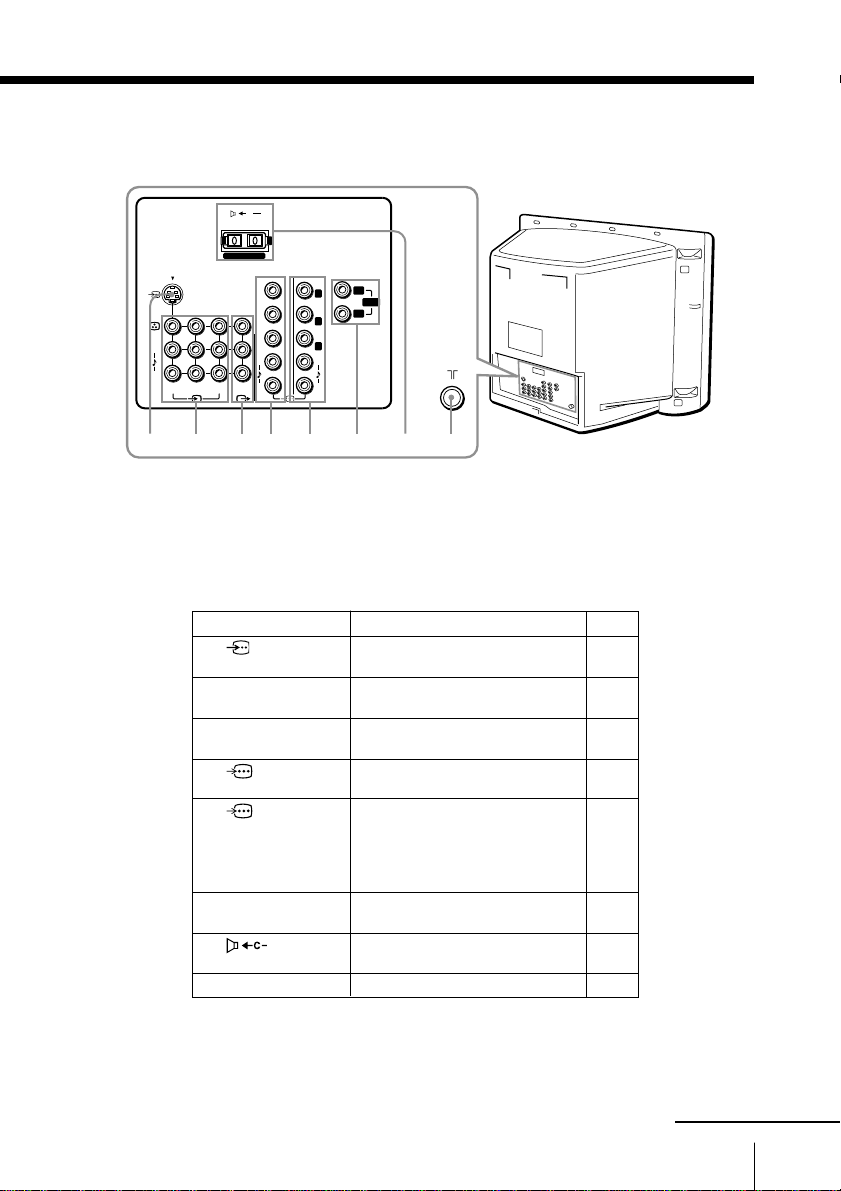
Rear
C
#3
120W MAX 8Ω
Y
PB/
C
B
PR/
C
(MONO)
L
R
1
23
R
L
R
1
2
213456 87
Y
HD
G
SYNC
PB/
VD
C
B
B
PR/
C
R
R
L
R
Connector
Function
Page
1 Connect to S video output of 8
video equipment.
2 t 1/t 2/t 3 Connect to video/audio 8
outputs of video equipment.
3 T Connect to video/audio inputs 12
of audio/video equipment.
4 1 Connect to component video 13
outputs on a DVD player.
5 2 Connect to component video 13
outputs on a DVD player.
Connect to a digital TV receiver 15
equipped with the G/B/R/HD
/VD outputs.
6 SYNC HD/VD Connect to HD/VD outputs 15
on a digital TV receiver.
7 Connect to speaker terminals 16
on an amplifier.
8 8 Connect the antenna cable. 7
continued
59Additional Information
Page 60
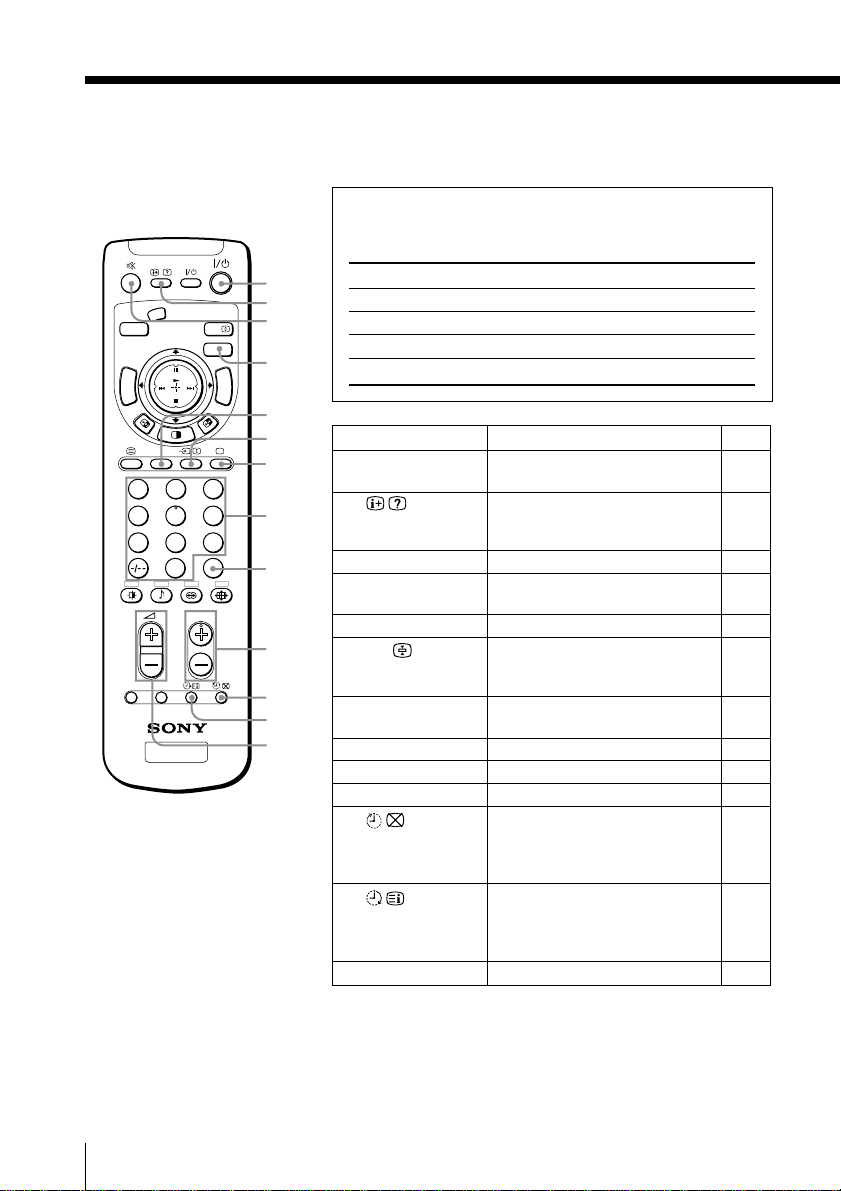
Identifying parts and controls (continued)
Remote control
The names/symbols of buttons on the remote are
indicated in different colors to represent the available
functions.
VIDEO
N
E
T
C
E
R
S
T
T
HD/DVD
P
P
R
N
I
O
W
G
+
–
G
W
O
I
R
N
P
DRC-MF
INDEX
PROG
123
456
7809
PROG
OPTION RESET
TV
A/B
V CENTER
JUMP
MENU
1
2
3
4
5
6
7
8
9
q;
qa
qs
qd
Label color
White
Green
Yellow
Pink
Button
1 ?/1 Turn off temporarily or 17
2
3 % Mute the sound. 18
4 V CENTER This button does not function –
5 HD/DVD Select component input. 18
6 t •Select TV or video input. 18
7 a •Display the TV program. 18
8 0 – 9, - Input numbers. 17
9 JUMP Jump to previous channel. 18
q; PROG +/– Select program number. 17
qa •Set the TV to turn off 19
qs •Set the TV to turn on 19
qd 2 +/– Adjust volume. 18
Button function
For general TV operations
For Teletext operations
For TWIN picture operations*
For optional components operations
turn on the TV.
•Display on-screen information.
•Reveal Teletext concealed 26
with this TV.
•Stop Teletext page from 26
scrolling.
•Turn off Teletext. 25
•Show TV screen while 26
waiting for Teletext page.
•Display Teletext service 26
contents.
Function
information.
automatically.
automatically.
Page
18
60
Additional Information
*TWIN picture operations are not available with this TV.
Page 61
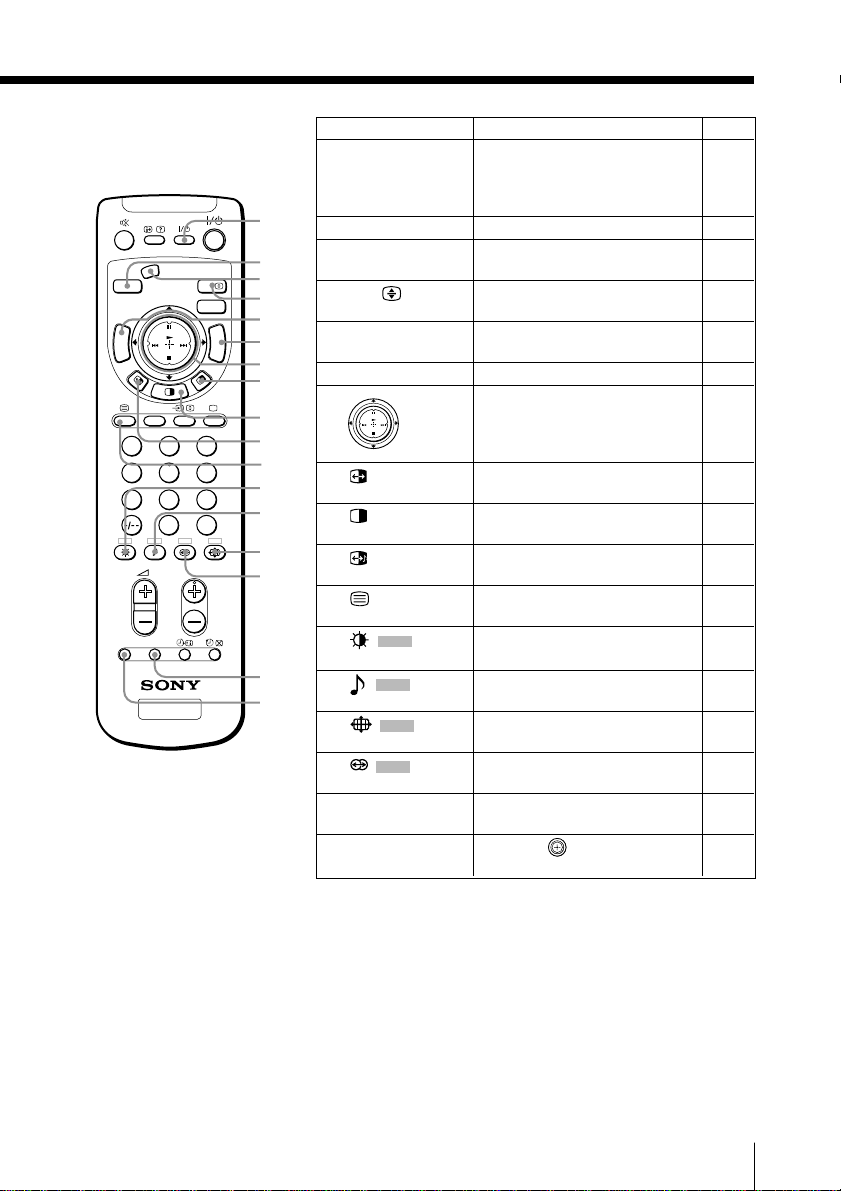
VIDEO
N
E
T
C
E
R
S
T
T
HD/DVD
P
P
R
N
I
O
W
G
+
–
G
W
O
I
R
N
P
DRC-MF
INDEX
PROG
123
456
7809
PROG
OPTION RESET
TV
A/B
V CENTER
JUMP
MENU
qf
qg
qh
qj
qk
ql
w;
wa
ws
wd
wf
wg
wh
wj
wk
wl
e;
Button
Function
Page
qf VIDEO ?/1 •Power button for video 28
equipment.
•Use with the number 27
buttons to set up the remote.
qg DRC-MF Select DRC-MF mode. 21
qh CENTER SP Select TV’s center speaker 30
mode.
qj A/B •Select stereo/bilingual mode. 24
•Enlarge the Teletext display. 26
qk PROG INDEX This button does not function –
with this TV.
ql MENU Display the menu. 34
w; •Select, adjust and confirm 34
P
R
N
I
O
W
G
T
+
–
T
G
W
O
I
R
N
P
selected items in the menu.
•Operate optional 28
components.
wa This button does not function –
with this TV.
ws This button does not function –
with this TV.
wd This button does not function –
with this TV.
wf Display Teletext page on the 25
TV picture.
wg (red) •Select picture mode. 20
•Access a FASTEXT menu. 26
wh (green) •Select sound mode. 20
•Access a FASTEXT menu. 26
wj (blue) • Select wide mode. 42
•Access a FASTEXT menu. 26
wk
(yellow)
•Select surround mode. 22
•Access a FASTEXT menu. 26
wl RESET Reset items in the menu to the 33
factory preset values.
e; OPTION Use with to operate 28
optional components.
61Additional Information
Page 62

62
Additional Information
Page 63

63Additional Information
Page 64
Specifications
Power requirements
Power consumption (W)
Television system
Color system
Available language for
Teletext
Stereo/Bilingual system
Channel coverage
B/G
I
D/K
M
8(Antenna)
Audio output (Speaker)
3D Woofer
Number of terminal
(Video)
(Audio)
(S Video)
(Component
Video)
(G/B/R/HD/
VD Video)
(Center
Speaker)
i (Headphones)
Picture tube
Tube size (cm)
(measured diagonally)
Screen size (cm)
(measured diagonally)
Dimensions (w/h/d, mm)
Mass (kg)
220–240 V AC, 50/60 Hz
Indicated on the rear of the TV.
B/G, I, D/K, M
PAL, PAL 60, SECAM, NTSC4.43, NTSC3.58
English, Farsi, French
NICAM Stereo/Bilingual B/G, I, D/K;
A2 Stereo/Bilingual (German) B/G
VHF : E2 to E12 / UHF : E21 to E69 / CATV : S01 to S03, S1 to S41
UHF : B21 to B68 / CATV : S01 to S03, S1 to S41
VHF : C1 to C12, R1 to R12 / UHF : C13 to C57, R21
to R60 / CATV : S01 to S03, S1 to S41, Z1 to Z39
VHF : A2 to A13 / UHF : A14 to A79/
CATV : A-8 to A-2, A to W+4, W+6 to W+84
75-ohm external terminal
7.5W + 7.5W
15W
Input: 4 Output: 1 Phono jacks; 1 Vp-p, 75 ohms
Input: 6 Output: 1 Phono jacks; 500 mVrms
Input: 2 Y: 1 Vp-p, 75 ohms, unbalanced, sync negative
Input: 2 Phono jacks
Input: 1 Phono jacks
Input:1 120 W max., 8 ohms
Output: 1 Stereo minijack
KV-HZ34 M65 KV-HZ29 M65
C: 0.286 Vp-p, 75 ohms
Y: 1 Vp-p, 75 ohms, sync negative
P
B/CB: 0.7 Vp-p, 75 ohms
P
R/CR: 0.7 Vp-p, 75 ohms
Audio: 500 mVrms
G: 0.7 Vp-p, 75 ohms, B: 0.7 Vp-p, 75 ohms,
R: 0.7 Vp-p, 75 ohms
HD: 0.7 Vp-p, 75 ohms, VD: 0.7 Vp-p, 75 ohms
34in. 29in.
86 72
80 68
898 × 706 × 575 775 × 617 × 506
85 58
Design and specifications are subject to change without notice.
 Loading...