

Page 1
4-095-508-41 (1)
R
Colour Television
Operating Instructions
Before operating the TV, please read the “Safety Information”
section of this manual. Retain this manual for future reference.
Инструкции за използване
Преди да използвате телевизора, прочетете раздела
"Информация за безопасността" на това ръководство.
Запазете това ръководство за бъдещи справки.
Návod k použití
Před zapnutím televizoru si prosím pozorně přečtěte část
"Bezpečnostní upozornění" v tomto návodu. Návod si uschovejte
i pro budoucí potřebu.
Kezelési utasítás
Mielőtt elkezdené használni a televíziót, kérjük, olvassa el a jelen
kézikönyv Biztonsági tudnivalók c. szakaszát. Őrizze meg a
kézikönyvet későbbi használatra.
Instrukcja obsługi
Przed przystąpieniem do eksploatacji telewizora należy zapoznać się z
rozdziałem "Informacje dotyczšce bezpieczeństwa" w niniejszej instrukcji.
Prosimy o zachowanie niniejszej instrukcji do wglądu w przyszłości.
Инструкция по эксплуатации
Перед тем как включить телевизор, просим Вас ознакомиться с
разделом "Общие правила техники безопасности" настоящей
инструкции. Сохраняйте настоящую инструкцию на будущее.
GB
BG
CZ
HU
PL
RU
KV-29FQ85K
©2003 by Sony Corporation
Page 2

Introduction
Thank you for choosing this Sony product.
Before operating the TV, please read this manual thoroughly and retain it for future reference.
• Symbols used in the manual:
• Important information.
• Information on a feature.
• 1,2... Sequence of instructions.
• Buttons shaded white on the remote control show you
the buttons you have to press to follow the sequence of
the instructions.
• Informs you of the result of the instructions.
Table of Contents
Introduction .......................................................................................................................................................... 3
Safety Information................................................................................................................................................ 4
Overview & Installation
Checking the Accessories Supplied...................................................................................................................... 5
Inserting Batteries into the Remote Control ......................................................................................................... 5
Overview of Remote Control Buttons .................................................................................................................. 6
Overview of the TV Buttons ................................................................................................................................ 7
Connecting the Aerial and VCR........................................................................................................................... 7
First Time Operation
Switching on the TV and Automatically Tuning ................................................................................................. 8
TV Functions
Introducing and Using the Menu System .......................................................................................................... 10
The Picture Adjustment menu ..................................................................................................................... 11
The Sound Adjustment menu ....................................................................................................................... 12
The Features menu........................................................................................................................................ 14
AV3 Output ............................................................................................................................................ 14
Connection Guide................................................................................................................................... 15
Picture rotation ....................................................................................................................................... 15
RGB Centring......................................................................................................................................... 15
The Set Up menu .......................................................................................................................................... 16
Language................................................................................................................................................ 16
Country................................................................................................................................................... 16
Auto Tuning ........................................................................................................................................... 16
Programme Sorting ................................................................................................................................ 16
Programme Labels ................................................................................................................................. 17
AV Preset ............................................................................................................................................... 17
Manual Programme Preset ..................................................................................................................... 18
PAP (Picture And Picture).................................................................................................................................. 19
Teletext.................................................................................................................................................................. 20
NexTView...............................................................................................................................................................21
Additional Information
Connecting Equipment to the TV ........................................................................................................................22
Viewing pictures from equipment connected to the TV......................................................................................23
Learning functions from other Remote Controls.................................................................................................24
Remote Control Configuration for VCR or DVD ...............................................................................................26
Technical Specifications ......................................................................................................................................27
Troubleshooting...................................................................................................................................................28
How to lift the TV ................................................................................................................................Back cover
GB
Table of Contents
3
Page 3

Safety Information
This set is to operate on a 220-240V AC
supply only. Take care not to connect
too many appliances to the same power
socket as this could result in fire or
electric shock.
Do not open the cabinet and the rear cover
of the TV. Refer to qualified service
personnel only.
Do not cover the ventilation openings of
the TV For ventilation, leave a space of
at least 10cm all around the set.
For environmental and safety reasons, it
is recommended that the TV set is not
left in standby mode when not in use.
Disconnect from the mains. However,
some TVs may have features which
require they are left in standby. The
instructions in this manual will inform
you if this applies.
For your own safety, do not touch any
part of the TV, power lead or aerial lead
during lightning storms.
Never place the TV in hot, humid or
excessively dusty places. Do not
install the TV where it may be
exposed to mechanical vibrations.
Never push objects of any kind into the
set as this could result in a fire or electric
shock. Never spill liquid of any kind on
the set. If any liquid or solid object does
fall into the cabinet, do not operate the
TV. Have it checked immediately by
qualified personnel.
To prevent fire or shock hazard, do not
expose the TV to rain or moisture.
To prevent fire, keep inflammable
objects or naked lights (eg candles)
away from the TV.
Clean the screen and cabinet with a soft,
lightly dampened cloth. Do not use any
type of abrasive pad, alkaline cleaner,
scouring powder or solvent, such as alcohol
or benzine, or antistatic spray. As a safety
precaution, unplug the TV before cleaning
it.
Place the TV on a secure stable stand.
Never attempt to move the TV and stand
together -always move the TV and stand
separately. Do not place the TV on its
side or face up. Do not allow children to
climb on to it.
Safety Information
4
Pull out the power lead by the plug.
Do not pull on the power lead itself.
Unplug the power lead before moving
the TV. Avoid uneven surfaces, quick
steps or excessive force. If the set has
been dropped or damaged, have it
checked immediately by qualified
service personnel.
Take care not to place heavy objects on
the power lead as this could result in
damage.
We recommend you wind any excess
lead around the holders provided on
the rear of the TV.
Do not cover the ventilation
openings of the TV with items such
as curtains or newspapers etc.
Page 4
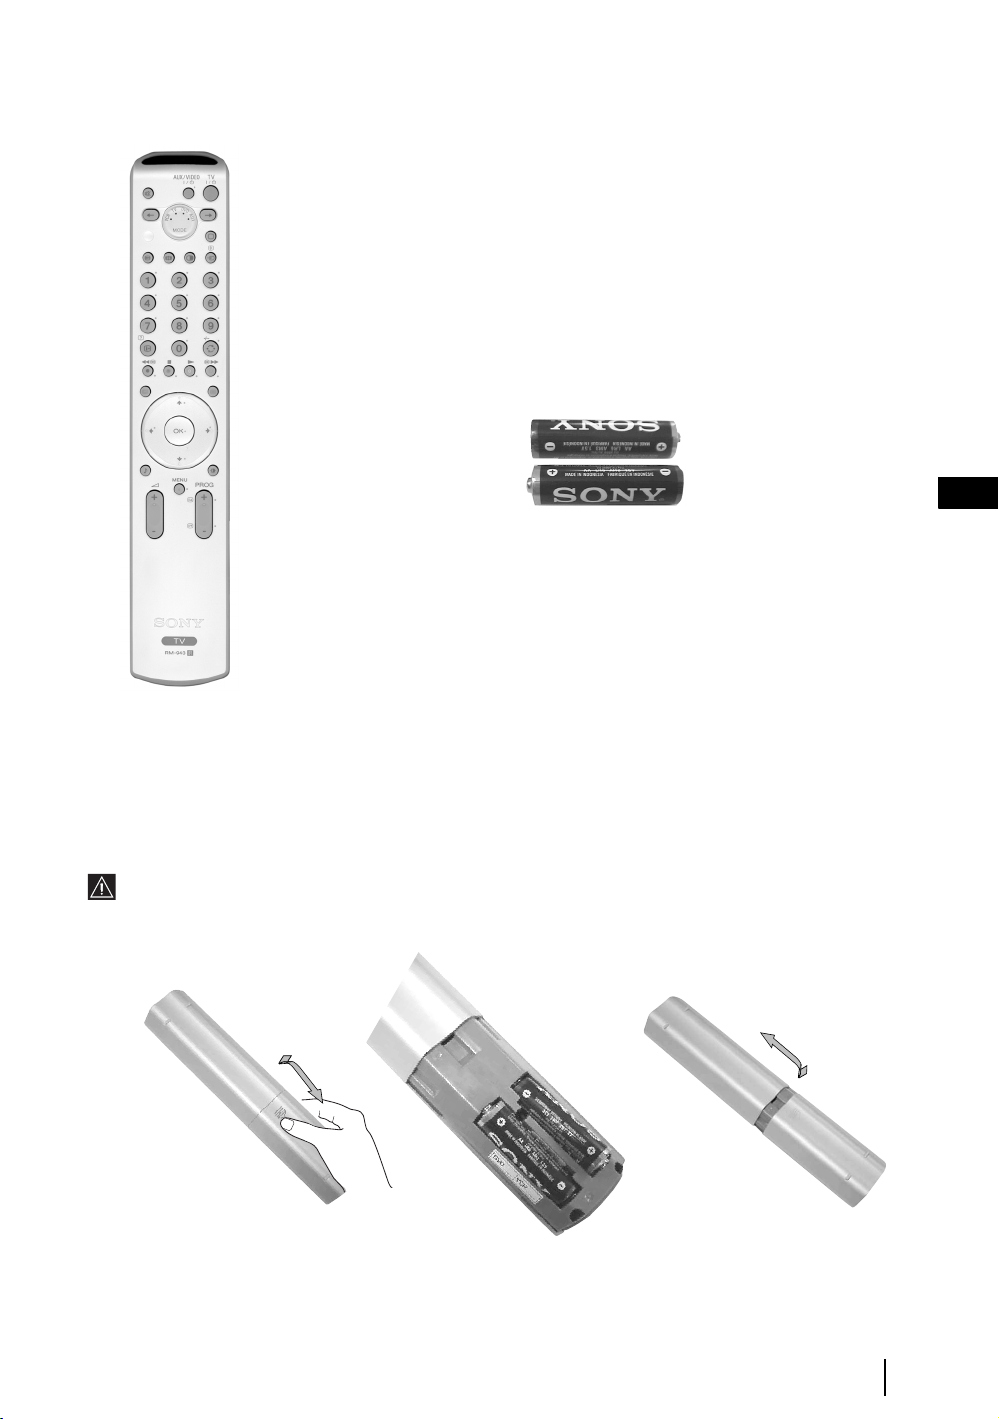
Checking the Accessories supplied
2 Batteries (AA size)
GB
1 Remote control (RM-943)
Inserting Batteries into the Remote Control
Make sure you insert the supplied batteries using the correct polarities.
Always remember to dispose of used batteries in an environmental friendly way.
Overview & Installation
5
Page 5
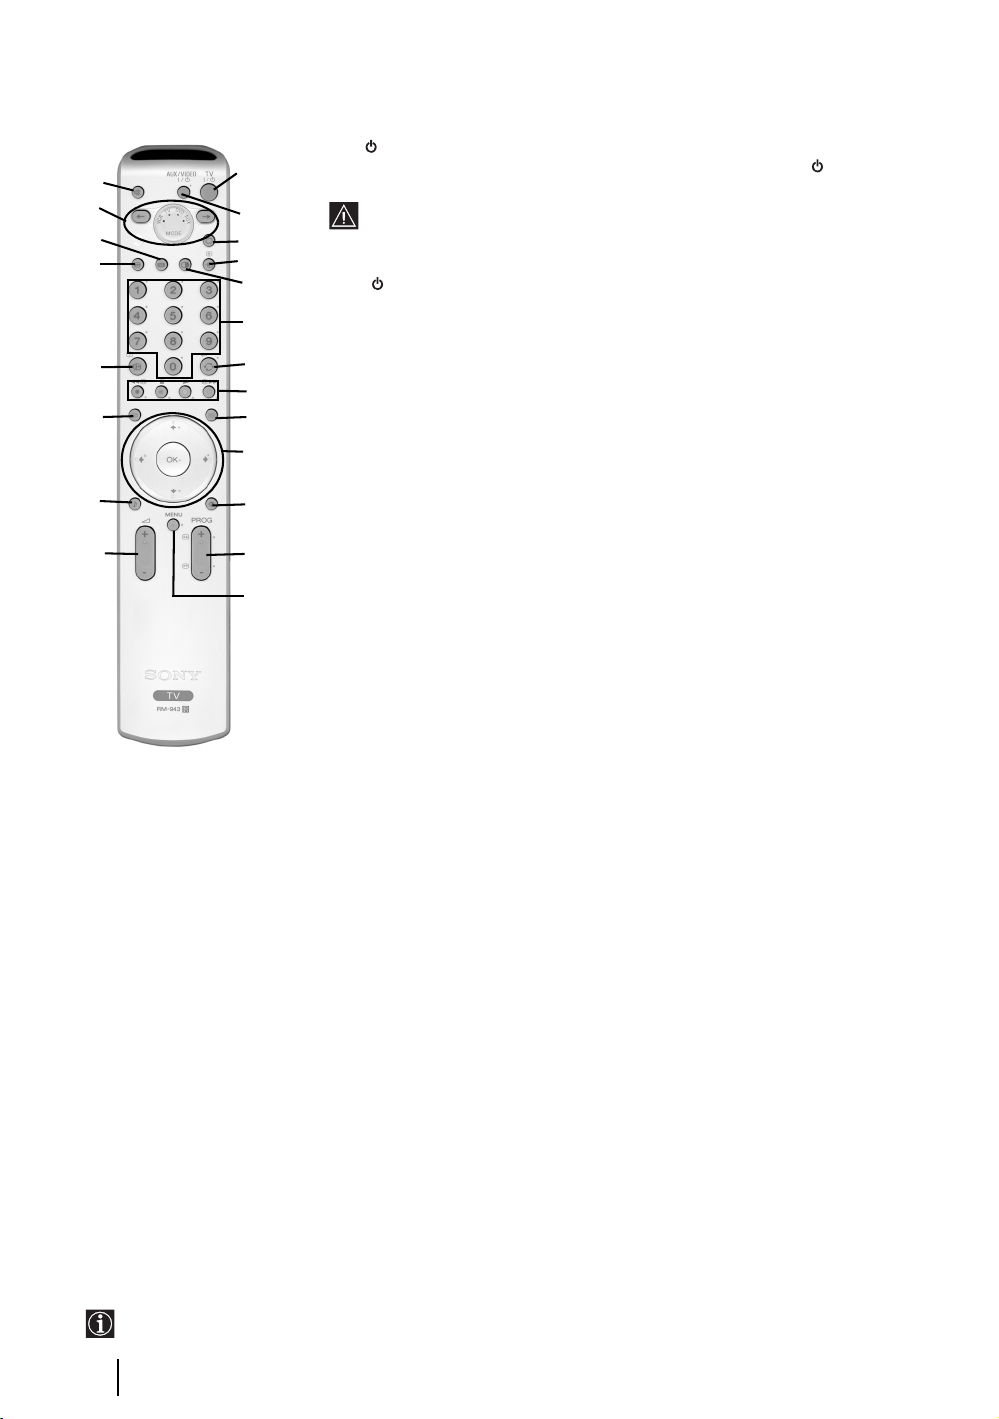
Overview of Remote Control Buttons
1 TV I/ : To Temporarily Switch Off TV (standby mode):
wa
w;
ql
qk
qj
qh
qg
qf
1
2
3
4
5
6
7
8
9
q;
qa
qs
qd
Press this button to temporarily switch off TV (the standby indicator on the TV
lights up). Press again to switch on TV from standby mode.
• To save energy we recommend switching off completely when TV is not in
use.
• After 15 minutes without TV signal and without any button being pressed,
the TV switches automatically into standby mode.
2 Aux I/ : press this button to switch your VCR or DVD on or off. For AUX function,
refer to page 24.
3 Selecting TV mode: press this button to switch off PAP, Teletext or Video input
mode.
4 Selecting input source: press this button repeatedly until the desired input
symbol of the source appears on the TV screen. Refer to page 23.
5 PAP (Picture And Picture): press this button to divide the screen into two for
watching two channels simultaneously. Refer to page 19.
6 Selecting broadcast channels: if Media Selector (w; is switched to TV, press
these buttons to select channels. For double-digit programme numbers, enter the
second digit within 2.5 seconds.
7 a) Watching last channel selected: if Media Selector (w;) is switched to TV,
press this button to return to the previous channel you were watching (provided
you watched it for at least 5 seconds).
b) Selecting VCR double-digit: if Media Selector (w;) is switched to VCR,
press this button to select double-digit channels for Sony's VCR e.g. 23, press
-/-- first and next the buttons 2 and 3.
8 a) Fastext: if Media Selector (w;) is switched to TV and whilst you are in Teletext
mode, these buttons can be used as Fastext buttons. For details see page 20.
b) Operating VCR or DVD: if Media Selector (w;) is switched to VCR or DVD,
these buttons will operate the main functions of your VCR or DVD, once the
remote control has been programmed. Refer to page 26.
9 Teletext: press this button to switch on Teletext. For
details see page 20.
q; a) Displaying a channel index: if Media Selector
(w;) is switched to TV and MENU is switched off,
press OK to display a channel overview. If you
want to select a channel, press v or V next press
again the OK button to watch the selected channel.
b) Navigator: if Media Selector (w;) is switched to
TV and MENU (qd) is switched on, use these
buttons to navigate through the menu system of the
TV. Refer to page 10.
qa Selecting picture mode: press this button
repeatedly to change the picture mode. For details on
the different picture modes. Refer to page 11.
qs Selecting broadcast channels: press these
buttons to select the next or previous broadcast
channel.
qd Menu system: press this button to enter the TV
menu system. Refer to page 10.
qf Adjusting volume: press these buttons to increase
or decrease the audio volume.
qg Selecting the sound effect:
repeatedly to change the sound effect. For details on
different sound effects. Refer to page 12.
The buttons labelled 4, qs and qj are also used for Teletext operation. For details see page 20.
6
Overview & Installation
Press this button
qh NexTView: press this button to display NexTView.
For details. Refer to page 21.
qj Displaying Info: press this button to display all on-
screen indication such as channel number, etc. Press
again to cancel.
qk Freezing the picture: Press this button to freeze
the picture. The screen is divided into two screens.
On the left with the normal picture, on the right the
picture is freezed. Press this button again to return to
the normal picture.
ql Selecting the screen format: press this button
repeatedly to change the format of the screen. 4/3 for
a conventional picture or 16/9 for a imitation of wide
screen.
w; Media Selector: press these buttons to select which
device you want to operate, TV, VCR, DVD or AUX.
A green light will be momentarily lit to show which
one you have selected. For details refer to pages 24 -
26.
wa Muting the sound: press this button to mute the
TV sound. Press again to restore the sound.
Page 6

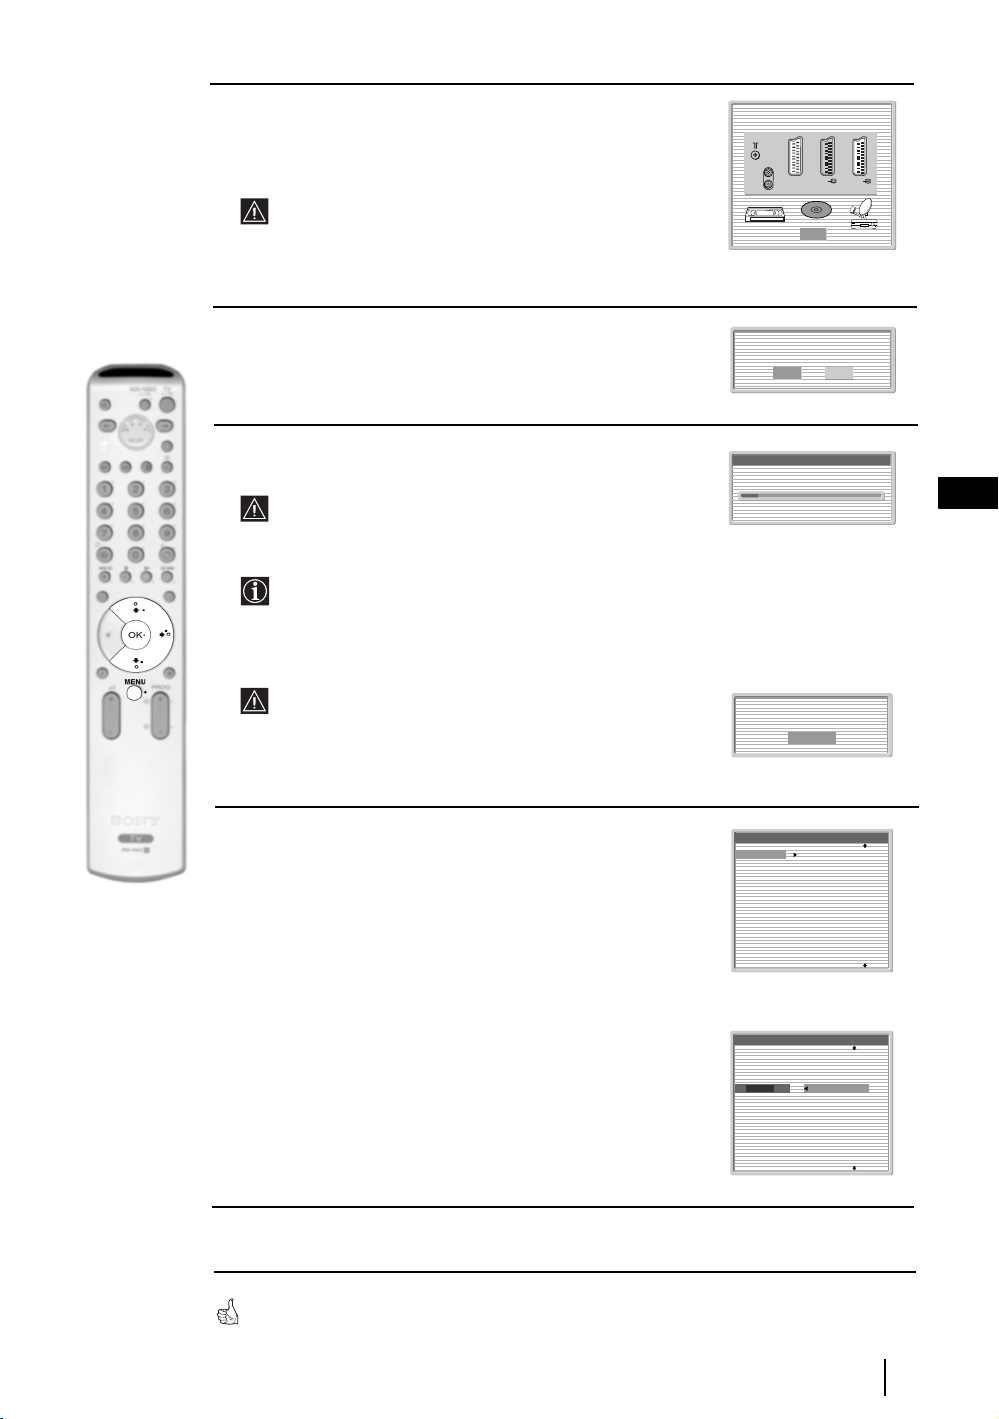
Overview of the TV Buttons
Headphones jack
S video
Input jack
Video Input jack
Standby indicator
Audio Input
jacks
Press on the mark .
Auto Start Up
Button
(starts the auto
Start Up
sequence, see
page 8)
On/Off button
Selecting
Input source
Connecting the Aerial and VCR
• Connecting cables are not supplied.
• For more details of VCR connections as well as other connections, please refer to page 22.
Programme
Up or Down
Buttons
(Selects TV
channels)
GB
Volume control
buttons
VCR
OUT IN
The Scart lead is optional. If you use this optional connection it can improve picture and sound quality when
using a VCR.
If you do not use a Scart lead, you will need to manually tune the VCR to a spare channel once the autotune
procedure has been completed. Refer to “Manual Programme Preset” on page 18. Also refer to your VCR
instruction manual to find out how to find the output channel of your VCR.
or
Overview & Installation
7
Page 7
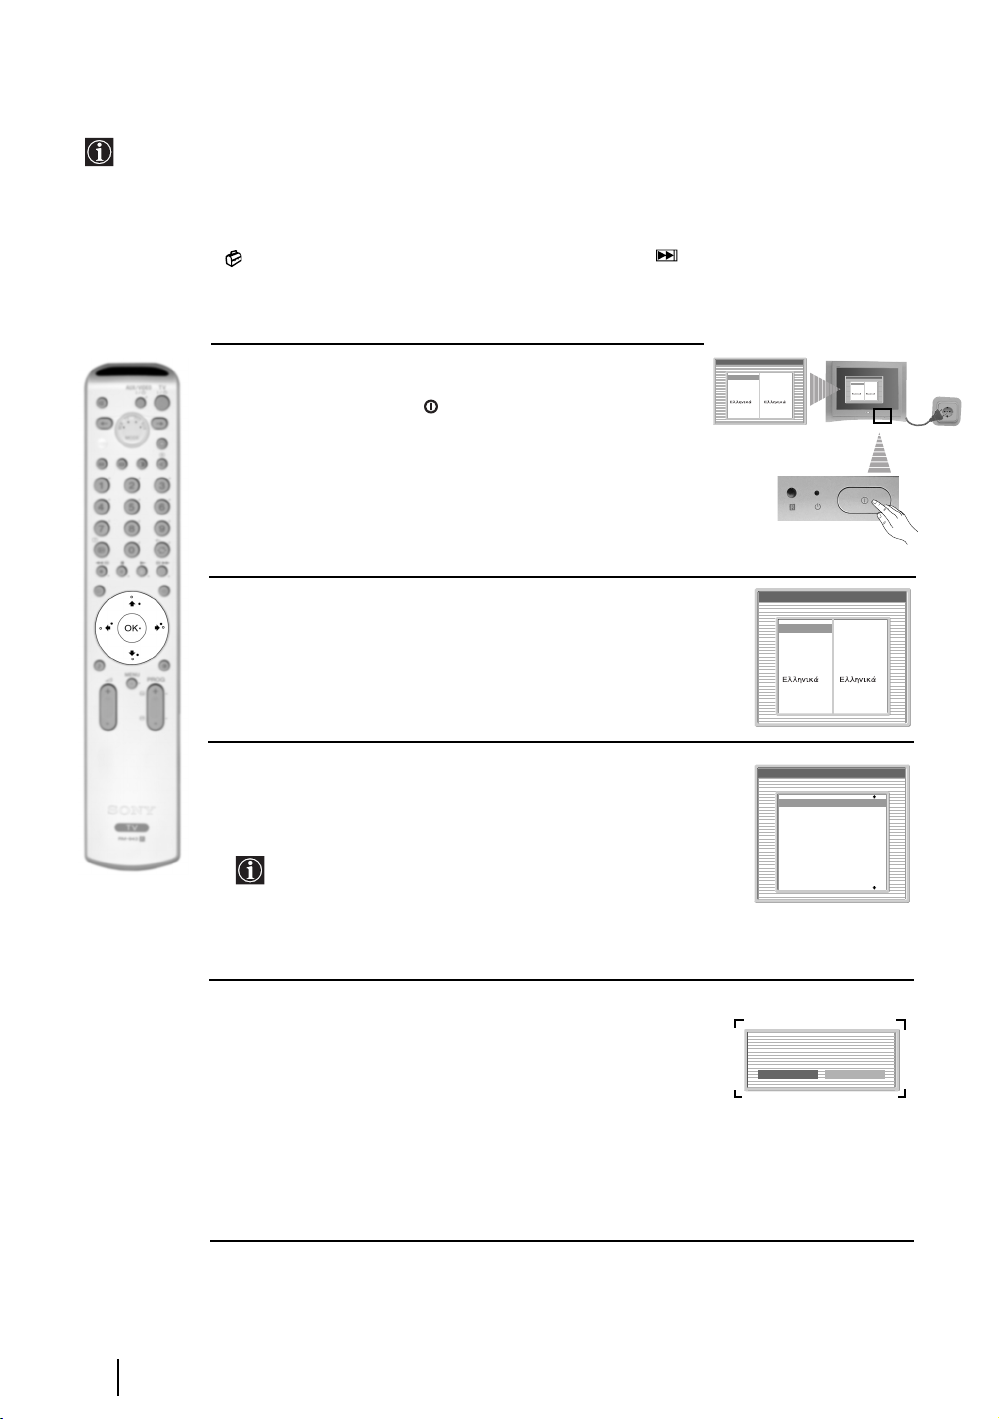
Switching On the TV and Automatically Tuning
The first time you switch on your TV, a sequence of menu screens appear on the TV enabling you to: 1) choose
the language of the menu screen 2) Choose the country in which you are going to operate the TV, 3) adjust the
picture slant, 4) check how to connect optional equipment to your TV, 5) search and store all available channels
(TV Broadcast) and 6) change the order in which the channels (TV Broadcast) appear on the screen.
However, if you need to change any of these settings at a later date, you can do that by selecting the appropriate
option in the (Set Up menu) or by pressing the Auto Start Up Button on the TV set.
Language
1 Connect the TV plug to the mains socket (220-240V AC, 50Hz)
The first time that the TV set is connected, it is usually turned on.
If the TV is off, press the on/off button on the TV set to turn
on the TV.
The first time you switch on the TV, a Language menu displays
automatically on the TV screen.
Select language
English
Nederlands
Français
Italiano
Deutsch
Türkçe
Español
Português
Polski
English
Nederlands
Français
Italiano
Deutsch
Türkçe
Español
Português
Polski
Language
Select language
English
English
Nederlands
Nederlands
Français
Français
Italiano
Italiano
Deutsch
Deutsch
Türkçe
Türkçe
Español
Español
Português
Português
Polski
Polski
2 Press the V, v, B or b buttons on the remote control to select
your language, then press the OK button to confirm your
selection. From now on all the menus will appear in your chosen
language.
3 The Country menu appears automatically. Press the v or V
button to select the country in which you are using the TV. Press
the OK button to confirm your selection.
• If the country in which you want to use the TV set
does not appear in the list, select “off” instead of a country.
• To avoid wrong teletext characters for cyrillic languages we
recommend selecting Russia country if your own country
does not appear in the list.
4 Because of the earth’s magnetism, the picture might slant. The
Picture Rotation menu allows you to correct the picture slant if
it is necessary.
a) If it is not necessary, press OK to select Not necessary.
b) If it is necessary, press B or b to select Adjust now, then press
OK and correct any slant of the picture between –5 and +5 by
pressing
v or V. Finally press OK to store.
Language
Select language
English
Nederlands
Français
Italiano
Deutsch
Türkçe
Español
Português
Polski
Country
Select country
Off
Ireland
Nederland
België/Belgique
Luxembourg
France
Italia
Schweiz/Suisse/Svizzera
If picture slants, please
adjust picture rotation.
Not necessary
English
Nederlands
Français
Italiano
Deutsch
Türkçe
Español
Português
Polski
Adjust now
First Time Operation
8
continued...
Page 8
5 A diagram will appear showing you how to connect a wide range
1
2
q
3
of equipment to your TV set. Follow the instructions and finally
press the OK button to remove the picture and continue the
automatic process.
After the automatic tuning process has finished and the
optional equipment has been connected at this stage, we
recommend you follow the instructions explained on the
section "Connection Guide" on page 15 to get the optimum
settings related with the optional equipment.
Please connect your equipment
according to this chart
::33/
q
3
::22/ 2
DVD
OK
::11/ 1
6 The Auto Tuning menu appears on the screen. Press the OK
button to select Yes.
7 The TV starts to automatically search and store all
available broadcast channels for you.
This procedure could take some minutes. Please be patient
and do not press any buttons, otherwise automatic tuning
will not be completed.
In some countries the TV Broadcaster installs the channels
automatically (ACI system). In this case, the TV
Broadcaster sends a menu in which you can select your city
by pressing the
v or V button and OK to store the
channels.
If no channels were found during the auto tune process, a
message appears automatically on the screen asking you to
connect the aerial. Check the aerial connection (refer to
page 7). Press the OK button to restart the auto tuning
process.
8 After all available channels are captured and stored,
the Programme Sorting menu automatically appears
on the screen enabling you to change the order in
which the channels are stored.
a) If you wish to keep the broadcast channels in the tuned order,
go to step 9.
Do you want to start
automatic tuning?
Yes No
Auto Tuning
Programmes found: 4
No channel found.
Please connect aerial
Confirm
Programme Sorting
01
TVE
02
TVE2
03
TV3
04
C33
05
C27
06
C58
07
S02
08
S06
GB
b) If you wish to store the channels in a different order:
1 Press the v or V button to select the programme
number with the channel (TV Broadcast) you wish
to move. Press the b button.
2 Press the v or V button to select the new
programme number position for your selected
channel (TV Broadcast). Press the OK button to store.
3 Repeat steps b)1 and b)2 if you wish to change
Programme Sorting
01
TVE
02
TVE2
03
TV3
04
C33
05
C27
06
C58
07
S02
08
S06
01 TVE
the order of the other channels.
9 Press the MENU button to remove the menu from the screen
Your TV is now ready for use
First Time Operation
9
Page 9
Introducing and Using the Menu System
Your TV uses an On-Screen menu system to guide you through the operations. Use the following buttons on
the Remote Control to operate the menu system:
1 To switch on the menu screens:
Press the MENU button to switch the first level menu on.
2 To navigate through the menus:
• To highlight and select the desired menu or option, press
• To enter the selected menu or option, press OK or
• To return to the last menu or option, press OK or
b.
B.
• To alter the settings of your selected option, press v/V/B or b.
• To confirm and store your selection, press OK.
3 To switch off the menu screens:
Press the MENU button to remove the menu from the screen.
v or V.
Picture Adjustment
Picture Mode: Live
Contrast:
Reset
Noise Reduction: Auto
Colour Tone: Cool
Select: Enter:OKExit:
Picture Adjustment
Picture Mode: Live
Contrast:
Reset
Noise Reduction: Auto
Colour Tone: Cool
MENU
Select: Enter:OKExit:
MENU
10
TV Functions
Page 10

The Picture Adjustment Menu
Picture Adjustment
Picture Mode: Live
Contrast:
Reset
Noise Reduction: Auto
Colour Tone: Cool
Select: Enter:
MENU
The “Picture Adjustment” menu allows you to
alter the picture settings.
To do this:
Picture Adjustment
Picture Mode: Live
Contrast:
Reset
Noise Reduction: Auto
,
OK
MENU
Exit:
Colour Tone: Cool
Select:Back:
Enter:
OK
Press the MENU button and then press OK to
enter this menu. Next press
v or V to select the
desired option and press OK. Finally read below
how to operate into each option.
Picture Mode This option allows you to customise the Picture Mode based on the programme
you are watching. After selecting this option press OK. Next press repeatedly
V to select:
or
Personal (for individual settings).
Live (for live broadcast programmes, DVD and Digital Set Top Box receivers)
Movie (for films).
Once you have selected your desired option, press OK to store.
"Brightness", "Colour" and "Sharpness" level of "Live" and "Movie" mode are fixed on the
factory to get the best picture quality.
Contrast Press
Brightness Press
B or b to reduce or enhance picture contrast. Next press OK to store.
B or b to darken or brighten the picture. Next press OK to store.
v
GB
This option only appears and only can be altered if "Picture Mode" is set to "Personal".
Colour Press
B or b to decrease or to increase color intensity. Next press OK to store.
This option only appears and only can be altered if "Picture Mode" is set to "Personal".
Hue Press
B or b to decrease or to increase the green tones. Next press OK to store.
This option only appears for NTSC signal (e.g. USA video tapes).
Sharpness Press
B or b to soften or to sharpen the picture. Next press OK to store.
This option only appears and only can be altered if "Picture Mode" is set to "Personal".
Reset Press OK to reset the picture to the factory preset levels.
Noise This option is set to Auto to automatically reduce the snowy picture
Reduction visible in the broadcast signal. However, it can be modified by pressing
v or V
to select Off, Low, Mid or High. Finally press OK to store.
Colour Tone This option allows you to alter the tint of the picture. After selecting this option
b. Next press repeatedly v or V to select: Warm (gives the white colours
press
a red tint), Normal (gives the white colours a neutral tint), Cold (gives the white
colours a blue tint). Next press OK to store.
TV Functions
11
Page 11
The Sound Adjustment Menu
Picture Adjustment
Picture Mode: Live
Contrast:
Reset
Noise Reduction: Auto
Colour Tone: Cool
Select: Enter:
m
Sound Adjustment
Sound Effect: Dolby Virtual
Treble:
Bass:
Balance:
Reset
Dual Sound: Stereo
Auto Volume: Off
TV Speakers: On
Headphones Set Up
Select: Enter:
MENU
The “Sound Adjustment” menu allows you to
alter the sound settings.
To do this:
Press the MENU button and press
v to select
, then press OK to enter this menu. Next
v or V to select the desired option and
press
OK
MENU
Exit:
press OK. Finally read below how to operate
into each option.
Sound Adjustment
Sound Effect: Dolby Virtual
Treble:
Bass:
Balance:
,
OK
MENU
Exit:
Reset
Dual Sound: Stereo
Auto Volume: Off
TV Speakers: On
Headphones Set Up
Select:Back:
Enter:
OK
Sound This option allows you to customise the Sound Effect. After selecting this
Effect option press OK. Next press repeatedly
v or V to select:
Off (Flat response).
Natural (Enhances clarity, detail and presence of sound by using “BBE High
Definition Sound system”*).
Dynamic (“BBE High Definition Sound system”* intensifies clarity and
presence of sound for better intelligibility and musical realism).
Dolby** (Dolby Virtual, simulates the sound effect of “Dolby Surround Pro
Virtual Logic”).
Once you have selected your desired option, press OK to store.
12
Treble Press
Bass Press
Balance Press
Reset Press OK to reset the sound to the factory preset levels. Next press OK to store.
Dual Sound • For a Stereo broadcast:
TV Functions
B or b to decrease higher-frequency sounds. Next press OK to store.
B or b to decrease or to increase the lower-frequency sounds. Next press
OK to store.
B or b to emphasise the left or the right speaker. Next press OK to store.
v or V to select Stereo or Mono. Next press OK to store.
Press
• For a bilingual broadcast:
v or V to select Mono (for mono channel if available), A (for channel 1)
Press
or B (for channel 2). Next press OK to store.
continued...
Page 12
Auto Volume Press v or V to select On (the volume level of the channels will stay the same,
independent of the broadcast signal, e.g. in the case of advertisements) or Off (the
volume level changes according to the broadcast signal). Next press OK to store.
If you select “Dolby Virtual” on the “Sound Effect” option, the “Auto Volume” option will
automatically be switched to “Off” and vice versa.
TV Speakers This option allows you to select if you want to listen the TV from the TV speakers
or from an external amplifier connected to the audio outputs on the rear of the TV.
v or
After selecting this option, press OK. Next press repeatedly
On (to listen the TV from the TV set speakers).
One time off (to listen to the TV from the external amplifier only one
time. By using this option, any time the TV is turned
off/on, it returns to the default setting "On").
Permanent off (to always listen to the TV from external amplifier).
Once you have selected your desired option, press OK to store.
If you have selected "One time off" or "Permanent off", the volume of the external equipment
can also be altered by pressing the 2 +/- buttons of the remote control. When the volume
buttons are pressed, the symbol
not the volume of the TV set speakers, it is from the external equipment.
Headphones Set Up This option allows you to customise the headphones volume and the
PAP settings (refer to page 19 for details on PAP).
After selecting this option press OK. Next press repeatedly
% will appear indicating that the volume you are altering is
V to select:
v or V to select:
GB
Volume Press
Dual Sound • For a Stereo broadcast:
Press
PAP Sound Select Frame if you want to listen to
the active screen (framed) of the PAP screen (see page
* The “BBE High Definition Sound system” is manufactured by Sony Corporation under
license from BBE Sound, Inc. It is covered by U.S. Patent No. 4,638,258 and No.
4,482,866. The word “BBE” and BBE Symbol are trademarks of BBE Sound, Inc.
**This TV has been designed to create surround sound effect by simulating the sound of four
speakers with two speakers, when the broadcast audio signal is Dolby Surround encoded.
The sound effect can also be improved by connecting a suitable external amplifier (for
details refer to page 23).
** Manufactured under license from Dolby Laboratories. “Dolby” and the double-D symbol
are trademarks of Dolby Laboratories.
B or b to decrease or increase the volume level
from the headphones.
v or V to select Stereo or Mono
• For a bilingual broadcast:
v or V to select mono (for mono channel if
Press
available), A (for channel 1) or B (for channel 2).
19), select Left picture if you want to listen to the left
screen or select Right picture if you want to listen to
the right screen.
TV Functions
13
Page 13
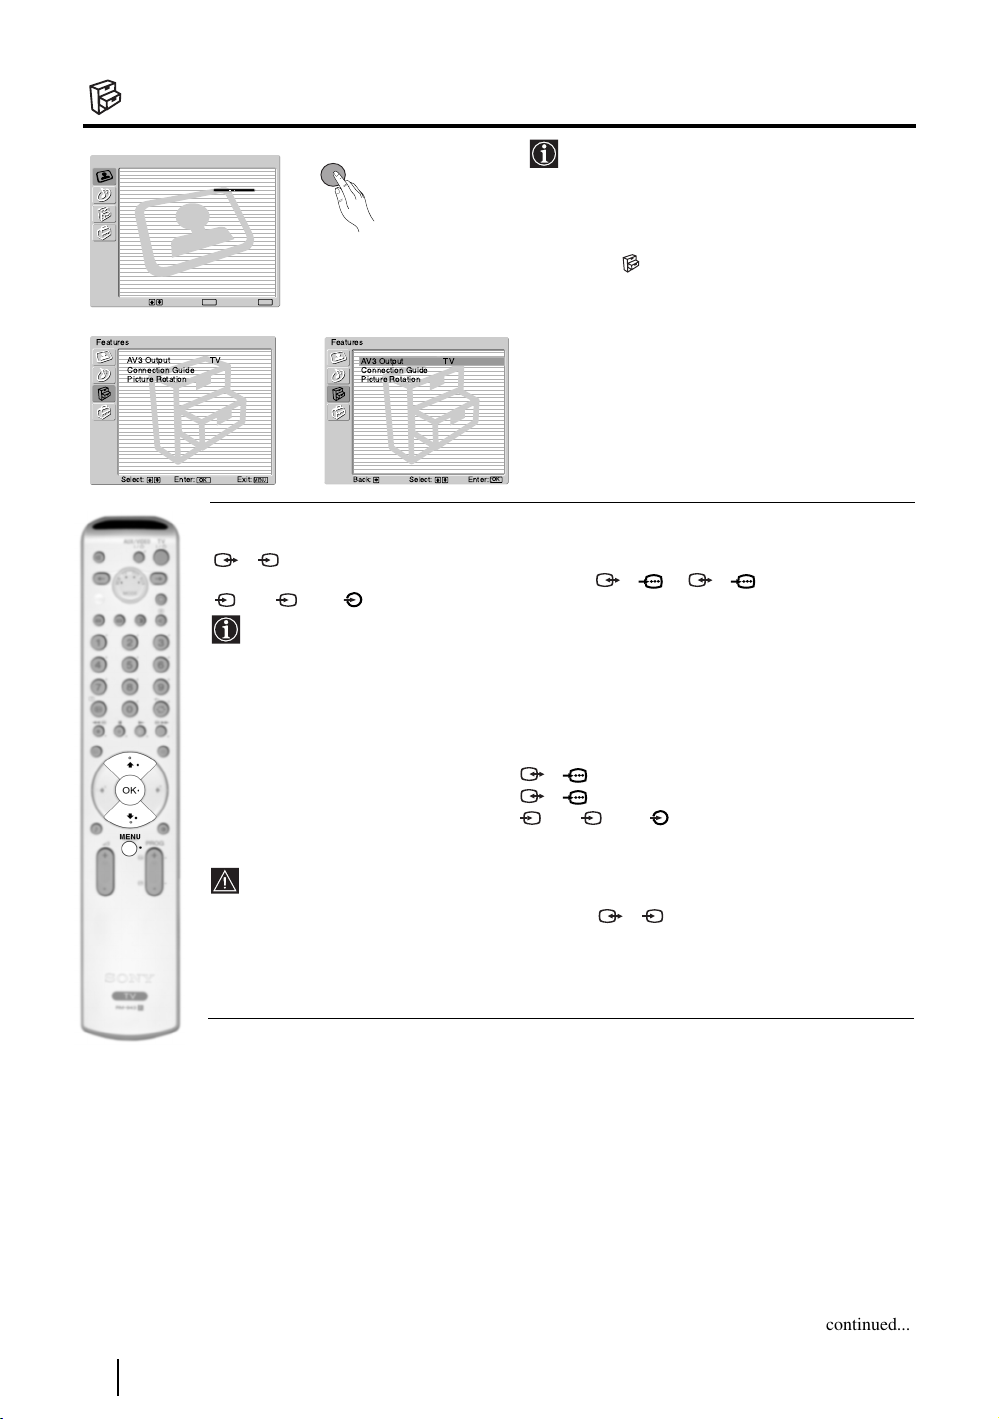
The Features Menu
Picture Adjustment
Picture Mode: Live
Contrast:
Reset
Noise Reduction: Auto
Colour Tone: Cool
Select: Enter:
Features
AV3 Output TV
Connection Guide
Picture Rotation
Select: Enter:
MENU
The “Features” menu allows you to alter
various settings of the TV.
To do this:
Press the MENU button and press
v twice to
select , then press OK to enter this menu.
v or V to select the desired option
m
OK
MENU
Exit:
Features
AV3 Output TV
Connection Guide
Picture Rotation
Next press
and press OK. Finally read below how to
operate into each option.
,
OK
MENU
Exit:
Select:Back:
AV3 OUTPUT
This option allows you to select the source to be output from the Scart connector
S
3/ 3 so that you can record from this Scart any signal coming from the TV or from an
external equipment connected to the Scart connector 1/ 1, 2/ 2 or front connectors
S
4 or 4 and 4.
If your VCR supports SmartLink, this procedure is not necessary.
To do this:
Once you have entered into the "Features" menu as it is explained in the previous page and after
selecting the option, press OK. Then press
TV to output the aerial source.
AV1 to output sources connected to 1/ 1.
AV2 to output sources connected to 2/ 2.
AV4 to output sources connected to 4 or 4 and 4.
AUTO to output the signal that is being viewed on the TV.
• If you select “AUTO”, the output signal will always be the same one that is displayed on
the screen.
• If you have connected a decoder to the Scart 3/ 3 or to a VCR connected to this
Scart, please remember to change back the “AV3 Output” to “TV” for correct
unscrambling.
OK
Enter: :
v or V to select the desired output signal:
S
S
14
TV Functions
continued...
Page 14
CONNECTION GUIDE
Even you have already connected the external equipment to the TV set, it is important for you to
follow the instructions of this menu. If you proceed in this way, you will get the optimum picture
settings related with the optional equipment.
To do this:
1 Once you have entered the "Features" menu as it is explained in the previous page and after
selecting the option, press OK. Next press
among the available: SAT (satellite), Decoder, DVD, GAME, VIDEO or DVD rec. (DVD
recorder). Next press
by pressing
select "Confirm" and press OK.
B). Once you have selected all the equipment to be connected, press v or V to
b to select the equipment chosen (equipment selected also can be deleted
v or V to chose the equipment you want to connect
2 A new menu will appear showing you on which Scart connector of the rear of the TV should be
connected each equipment. Please connect each equipment according to this information to get
the optimum picture setting of the optional equipment.
3 Once you have connected the optional equipment, press B or b to select "OK" and finally press
the OK button of the remote control.
We strongly recommend you to follow our connection proposals, but in case you do not agree press B
or b to select «No» and next press the OK button. A new menu appears on the screen in which you
can assign the connections according to your preferences.
PICTURE ROTATION
Because of the earth’s magnetism, the picture may slant. If this is the case, you can correct the
pictures slant by using this option.
To do this:
Once you have entered the "Features" menu as it is explained in the previous page and after
selecting the option, press OK. Then press
and +5.
v or V to correct any slant of the picture between -5
GB
RGB CENTRING
This option is only available if an RGB source has been connected to the TV.
This option allows you to readjust the horizontal position of the picture in case you need to do it
when connecting an RGB source.
To do this:
Once you have entered the "Features" menu as it is explained in the previous page and while
watching an RGB source select the “RGB Centring” option and press OK. Then press
adjust the centre of the picture between –5 and +5. Finally press OK to confirm and store.
v or V to
TV Functions
15
Page 15
The Set Up Menu
Picture Adjustment
Picture Mode: Live
Contrast:
Reset
Noise Reduction: Auto
Colour Tone: Cool
Select: Enter:
m
Set Up
Language
Country
Auto Tuning
Programme Sorting
Programme Labels
AV Preset
Manual Programme Preset
Select: Exit:
Enter:
MENU
The “Set Up” menu allows you to alter various
options on this TV.
To do this:
v
Press the MENU button and press
three
times to select , then press OK to enter this
v
menu. Next press
OK
MENU
Exit:
option and press OK. Finally read below how
or V to select the desired
to operate into each option.
Set Up
Language
Country
Auto Tuning
Programme Sorting
,
MENU
OK
Programme Labels
AV Preset
Manual Programme Preset
Select:Back:
Enter:
OK
LANGUAGE
This option allows you to select the language that menus are displayed in.
To do this:
After selecting the option, press OK and then proceed in the same way as in step 2 of the section
"Switching On the TV and Automatically Tuning" on page 8.
COUNTRY
This option allows you to select the country in which you wish to operate the TV set.
To do this:
After selecting the option, press OK and then proceed in the same way as in step 3 of the section
"Switching On the TV and Automatically Tuning" on page 8.
AUTO TUNING
This option allows you to automatically search for and store all available TV channels.
To do this:
After selecting the option, press OK and then proceed in the same way as in the steps 6 and 7 of
the section “Switching On the TV and Automatically Tuning” on page 9.
PROGRAMME SORTING
This option allows you to change the order in which the channels (TV Broadcast) appear on the
screen.
To do this:
After selecting the option, press OK and then proceed in the same way as in the step 8 of the section
“Switching On the TV and Automatically Tuning” on page 9.
continued...
16
TV Functions
Page 16

PROGRAMME LABELS
This option allows you to name a channel using up to five characters (letters or numbers).
To do this:
1 Once you have entered the "Set Up" menu as it is explained in the previous page and after selecting the option,
press OK, then press v or V to select the programme number with the channel you wish to name. Next press OK.
2 With the first element of the Label column highlighted, press OK and
press OK.
When you have finished, press
turn off the menu from the screen.
• To correct the letter, select "
• For a blank, select " " on the screen and press OK.
AV PRESET
This option allows you to:
a) Designate a name to the external equipment you have connected to the input sockets of the TV set.
To do this:
v, V
, B or b to select the word “End” on the screen and finally press OK to
%" on the screen to go back and press OK.
v, V
, B or b to select the letter, next
1 Once you have entered the "Set Up" menu as it is explained in the previous page and after selecting the option,
v
press OK, then press
and AV4 for front connectors. Next press OK twice.
or V to select the input source you wish to name: AV1, AV2 or AV3 for the rear Scarts
2 A label automatically appears in the label column:
a) If you want to use one of the predefined labels, press
The total predefined labels are: VIDEO, DVD, CABLE, GAME, CAM (camcorder) or SAT
(satellite).
b) If you want to set a different label, select Edit and press OK. Then, with the first element highlighted, press
v or V to select the desired label and finally press OK.
v, V, B or b to select the letter, next press OK. When you have finished, press v, V, B or b to select
the word “End” on the screen and finally press OK to turn off the menu from the screen.
GB
• To correct the letter, select "
• For a blank, select " " on the screen and press OK.
%" on the screen to go back and press OK.
b) Change the input sound level of the optional equipment connected.
To do this:
Once you have entered the "Set Up" menu as it is explained in the previous page and after selecting the option
v
press OK, then press
AV3 for the rear Scarts and AV4 for front connectors. Next press twice
Finally press OK and v or V to alter the input sound level between -9 and +9.
or V to select the input source you want to alter the input sound level: AV1, AV2 or
b to highlight the Sound Offset column.
continued...
TV Functions
17
Page 17
MANUAL PROGRAMME PRESET
This option allows you to:
a) Preset channels or the VCR channel one by one to the programme order of your choice.
To do this:
1 Once you have entered the “Set Up”menu as it is explained on page 16 and after selecting the "Manual
Programme Preset" option, press OK. Next with Programme option highlighted press OK.
Press
v or V to select which programme number you want to preset the channel on (for VCR, select
programme number “0”). Then press B.
2 The following option is only available depending on the country you have selected in the “Country”
menu.
After selecting the System option, press OK. Then press
for western European countries or D/K for eastern European countries. Then press B.
3 After selecting the Channel Number option, press OK. Next press
for terrestrial channels or "S" for cable channels). Then press the number buttons to enter directly the channel
number of the TV Broadcast or the channel of the VCR signal. If you do not know the channel number, press
v or V to select the TV Broadcast system (B/G
v
or V to select the channel tuning ("C"
b and v or V to search for it. When you have tuned the desired channel, press OK twice to store.
Repeat all the above steps to tune and store more channels.
b) Label a channel using up to five characters.
To do this:
Once you have entered the “Set Up”menu as it is explained on page 16 and after selecting the "Manual
Programme Preset" option, press OK. Next with the Programme option, highlighted press the PROG +/- button
to select the programme number with the channel you wish to name. When the programme you want to name
appears on the screen, select the Label option and press OK. Then, with the first element highlighted, press
V
, B or b to select the letter, next press OK. When you have finished, press
“End” on the screen and finally press OK to turn off the menu from the screen.
• To correct the letter, select "%" on the screen to go back and press OK.
• For a blank, select " " on the screen and press OK.
v, V
, B or b to select the word
v
,
c) Fine tune the broadcast reception. Normally the automatic fine tuning (AFT) will give the best possible picture,
however you can manually fine tune the TV to obtain a better picture reception in case the picture is distorted.
To do this:
While watching the channel (TV Broadcast) you wish to fine tune, and once you have entered the “Set Up” menu
as it is explained on page 16 and after selecting the "Manual Programme" option, press
option and press
to store.
b. Next press v
or V
to adjust the fine tuning between -15 and +15. Finally press OK twice
OK.
Then select the AFT
d) Skip any unwanted programme numbers when they are selected with the PROG +/- buttons.
To do this:
Once you have entered the "Set Up" menu as it is explained on page 16 and after selecting the "Manual
Programme Preset" option, press OK. Next with the Programme option highlighted, press the PROG +/- button
to select the programme number you want to skip. When the programme you want to skip appears on the screen,
select the Skip option and press
To cancel this function afterwards, select “Off” instead of “On” in the step above.
b. Next press v or V
to select On. Finally press OK twice to confirm and store.
e) View and record scrambled channels (e.g. from a pay TV decoder) when using a decoder connected to Scart
3/ 3 directly or through a VCR.
To do this:
Once you have entered the "Set Up" menu as it is explained on page 16 and after selecting the "Manual Programme
Preset" option, press OK. Next select the Decoder option and press
press OK twice to confirm and store.
To cancel this function afterwards, select "Off" instead of "On" in the step above.
S
This option is only available depending on the country you have selected in the “Country” menu.
b. Next press v or V to select On. Finally
18
TV Functions
Page 18

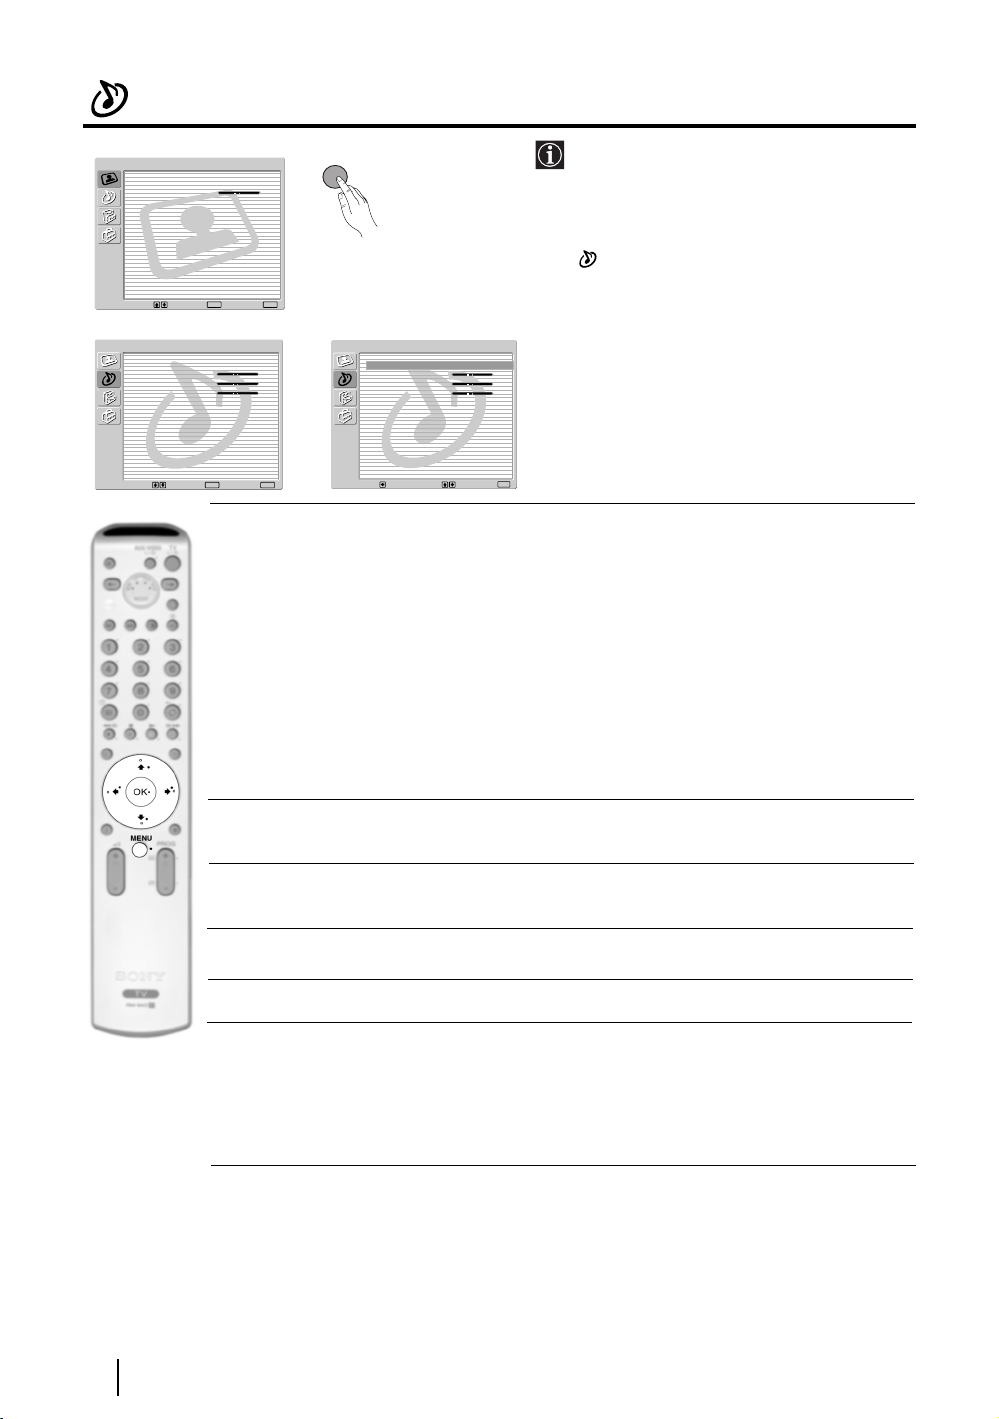
PAP (PICTURE AND PICTURE)
PAP divides the screen into two to watch two pictures in format 4:3 simultaneously.
Switching PAP on and off
1 Press to display PAP.
One of the screens will be framed to indicate that this is
the active screen. It means that when you want to select
the PAP source, you will be doing it in the active screen.
2 Press again to remove PAP.
On the screen appears a banner guiding you how to operate
PAP. This banner will disappear after some seconds but it
always can be displayed again by pressing the button.
Changing the active screen
This is only possible if Media Selector is set to TV.
To change the active screen (framed), press the B or b buttons.
Selecting PAP source
1 Selecting a TV channel:
Press the
or PROG +/- to select a TV channel.
B button to select the left screen as the active screen. Next press the number buttons
03
Navegador
Configuración del Sistema
Aceptar Versión
PROG+ PROG-
Select: Select:
MoveFrame
GB
Video input signals can not be displayed on the left screen.
2 Selecting an input source:
Press the
button to watch the input signal of a connected equipment onto the TV right screen. For more
details on which input symbol you want to choose, please see section "Viewing pictures from
equipment connected to the TV" on page 23.
RF signal (TV broadcast channels) can not be displayed on the right screen.
Selecting the sound
The sound of the active screen (framed) always comes from the TV set loudspeakers.
Besides that, you can listen to the active screen as well as the non active screen via headphones.
To do this:
With the PAP switched on, refer to the section "The Sound Adjustment Menu", select "Headphones
Set Up" and set the option " PAP Sound" according your preference. For details see page 13.
b button to select the right screen as the active screen. Next press repeatedly the
In PAP (picture and picture) mode, the output from the Scart 2/ 2 is fixed to the right
picture.
TV Functions
19
Page 19
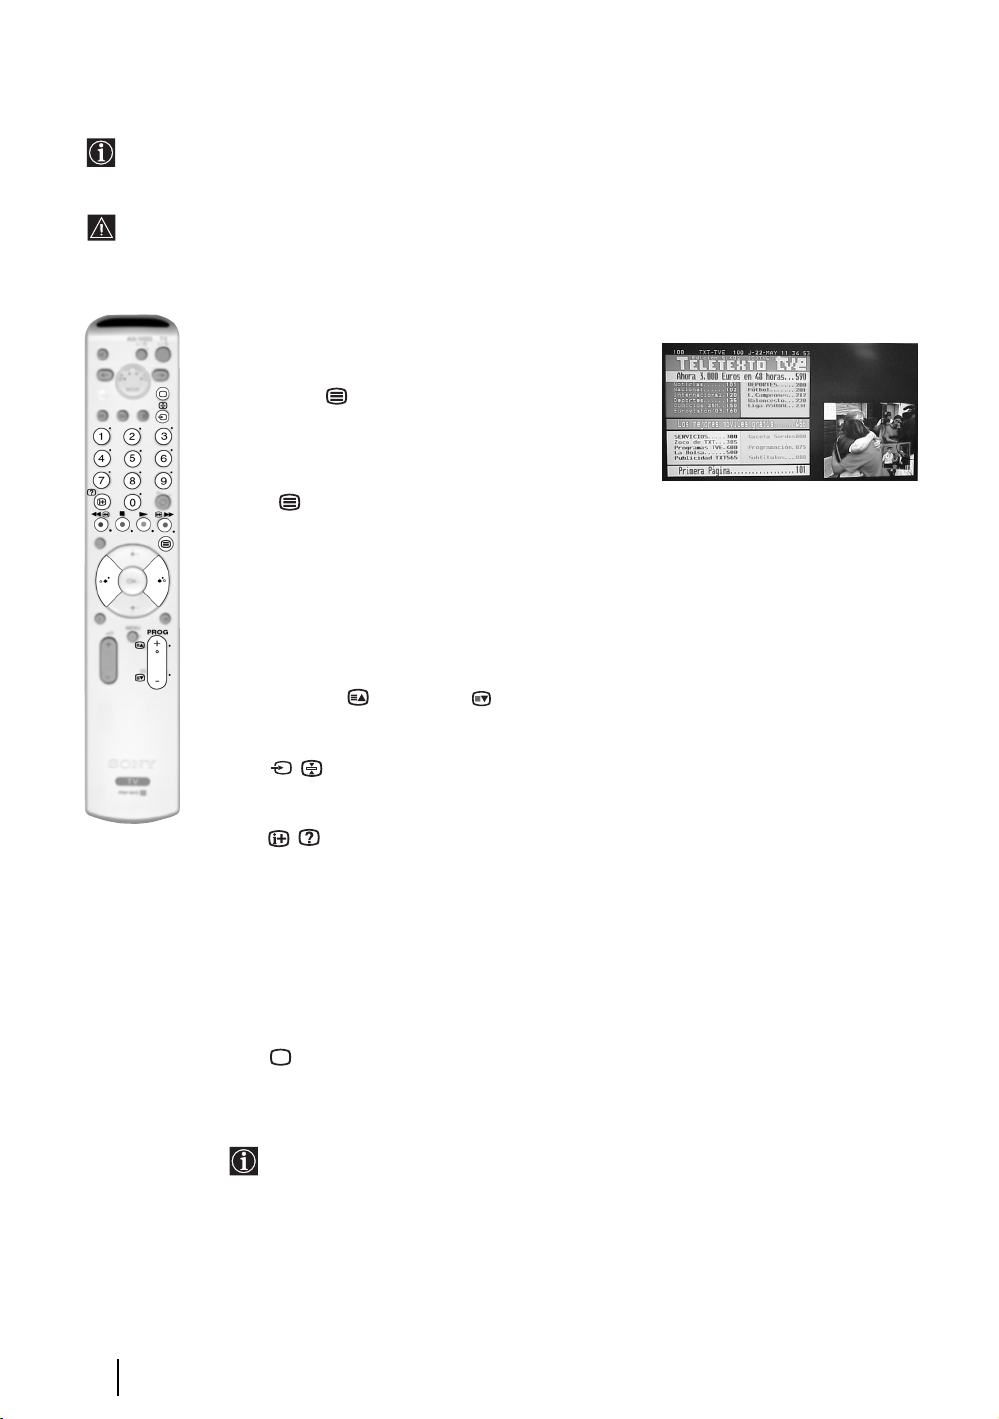
Teletext
Teletext is an information service transmitted by most TV stations. The index page of the teletext service
(usually page 100) gives you information on how to use the service. To operate teletext, use the remote control
buttons as indicated below.
Teletext errors may occur if you use a channel (TV Broadcast) with a weak signal.
To switch on Teletext :
1 Select the broadcast channel which carries the teletext
service you wish to view.
2 Press the button one time to enter Picture and
Text (P&T) mode. The screen is divided into two with
the Text display on the left and the TV channel in the
right corner.
3 If you wish to view the Text in full screen mode, press
the button a second time.
To select a Teletext page:
Input 3 digits for the page number, using the numbered buttons.
• If you make a mistake, retype the correct page number.
• If the counter on the screen continues searching, it is because the page
is not available. If this is the case, input another page number.
To access the next or preceding page:
Press PROG + ( ) or PROG - ( ).
To freeze a teletext page:
Press / . Press it again to cancel the freeze.
To reveal concealed information (e.g: answer to a quiz):
Press / . Press it again to conceal the information.
To select a sub page:
A teletext page may consist of several sub pages. In this case, one or more arrows appear next
to the page number and an information box is displayed at the bottom of the screen showing the
number of sub pages contained on this page. As soon as sub pages are available, they start to
automatically run. If you want to stop the show and select your desired sub page, press
repeatedly
To Switch Off Teletext:
Press .
B or b.
Fastext
Fastext service lets you access Teletext pages with one button push.
When you are in Teletext mode and Fastext is broadcast, a colour coded menu appears at
the bottom of the teletext page. Press the appropriate coloured button (red, green, yellow
or blue) to access the page corresponding to your menu choice.
20
Teletext
Page 20

NexTView*
n
n
e
*(depending on availability of service).
NexTView is an on-screen electronic programme guide, providing you with programme information for
different broadcasters.
When looking for information you can search by theme (sports, art, etc...) or date.
If wrong characters appear when viewing NexTView, use the menu system to enter the “Language” menu (see
page 16) and select the same language as the NexTView is broadcasted.
Displaying NexTView
1 Select a broadcast channel providing a NexTView service. In this case the indication
“NexTView” is displayed as soon as data is available.
2 To see NexTView service you have two different types of NexTView interface. These depend
on the % of available data:
a) “Programme List” interface:
Whilst you are watching TV, and after the indication “NexTView” (coloured white) is
displayed on the screen, press the button on the remote control to watch the
“Programme List” interface (see fig. 1).
b) “Overview” interface:
Whilst you are watching TV, and after more than 50% of NexTView data is available
(100% data may not be available depending on the area) the indication “NexTView”
(coloured black) is displayed on the screen. Press the button on the remote control
to watch the “Overview” interface (see fig. 2).
3 To navigate through NexTView:
B or b to move left or right.
• Press
•Press
v or V to move downwards or upwards.
• Press OK to confirm a selection.
• If you have selected a programme, press OK to get more information on the
selected programme.
GB
4 To switch NexTView off, press the button on the remote control.
“Programme List” interface (fig. 1): “Overview” interface (fig. 2):
1 Programmme list 2 3
Icons’ key:
General:
All the programme information is listed by time
and broadcast channels order.
News
Movie
Sports
Praesentiert von
Ihrer Programmzeitschr
Thu 12
AttrText
AttrText
AttrText
1
AttrText
AttrText
AttrText
Perry Mason
RTL2
Krimiserie - Der Fall mit dem mittelmass
Date
2
14:30
www.tvmovie.de
15:00
Tue 17 Jun 14:55
Select:
15:30
AttrText16
AttrText16
AttrText16
AttrText16
AttrText16
AttrText16
Thu 12 Ju
16:00
General
Categori
Date:
Press the red button of the remote
control to display the date screen,
you can select the desired date by
pressing v or V. Next press OK to
confirm.
14:36
3
1
Show
Children
Arts
Music
Praesentiert von
Ihrer Programmzeitschr
Thu 12
AttrText
AttrText
AttrText
AttrText
AttrText
AttrText
Perry Mason
RTL2
Krimiserie - Der Fall mit dem mittelmass
Date
www.tvmovie.de
15:00
14:30
Auf schlimmer undewig
Baywatch
Benny Hill
Perry Mason
The Osbournes
Segeln: Louis Vuitton Cup
Twilight Zone
Tue 17 Jun 14:55
Select:
15:30 16:00
2
Categories:
Press the blue button of the remote to
display the icons (see below the Icon’s key)
for different themes. Next press v or V to
select the desired icon and finally press the
OK button to confirm.
Thu 12 Ju
14:36
General
categorie
3
NexTView
21
Page 21
Connecting Equipment to the TV
• Using the following instructions you can connect a wide range of optional equipment to your TV set.
• Connecting cables are not supplied.
* “PlayStation” is a
product of Sony
Computer
Entertainment, Inc.
G
VCR
* “PlayStation” is a
trademark of Sony
Computer
Entertainment, Inc.
2
1
“PlayStation”*
Decoder/
Set Top Box
S VHS/Hi8/
DVC
camcorder
A
B
C
8mm/Hi8/
DVC
camcorder
E
D
F
DVD
Hi-fi
Decoder/ Set Top Box
DVD recorder
• To avoid picture distortion, do not connect external equipment to connectors A and B at the
same time.
• Do not connect a Decoder to the Scart F.
• Games that use a “GUN” attachment to point at the screen may not work correctly due to the 100Hz
technology used in this TV.
Connecting a VCR
To connect a VCR, please refer to the section “Connecting the aerial and VCR” of this instruction manual on page 7.
Connecting a VCR that supports SmartLink
SmartLink is a direct link between the TV set and the VCR. For more information on SmartLink, please refer
to the instruction manual of your VCR.
If you use a VCR that supports SmartLink, please connect the VCR to the TV using a Scart lead to the Scart 3/
S
3 E.
If you have connected a decoder or a Set Top Box to the Scart 3/ 3 E or through a
S
VCR connected to this Scart
Select the “Manual Programme Preset” option in the “Set Up” menu and after entering in the “Decoder**” option,
select “On” (refer to page 18). Repeat this option for each scrambled signal.
**This option is only available depending on the country you have selected in the “Country” menu.
22
Additional Information
continued...
Page 22

Connecting Audio Equipment to the TV
Conect your audio equipment to the audio output sockets D if you wish to amplify the audio output from TV. Next
, using the menu system, select the “Sound Adjustment” menu and set the “TV Speakers” to “One time off” or
"Permanent off" (see page 13).
The volume of the external speakers can be altered by pressing the volume buttons on the remote control. The
Treble and Bass settings can also be altered through the “Sound Adjustment” menu (see page 12).
Hi-Fi speakers
To enjoy “Dolby Virtual” sound effect through your
audio equipment
Place the speakers of your equipment in front of your listening position and
beside the TV set, keeping a distance of 50 cm between each speaker and the
TV set.
Then by using the menu system, select the menu “Sound Adjustment”. Next
select “Dolby Virtual” on the “Sound Effect” option (see page 12).
~50°
Your sitting position
Viewing pictures from equipment connected to the
TV
1 Connect your equipment to the designated TV socket, as indicated in the previous page.
2 Switch on the connected equipment.
3 To watch the picture of the connected equipment, press the button repeatedly until the correct
input symbol appears on the screen.
Symbol Input Signals
1 • Audio / video input signal through the Scart connector G
1 • RGB input signal through the Scart connector G. This symbol appears only if an
RGB source has been connected.
2 • Audio / video input signal through the Scart connector F.
2 • RGB input signal through the Scart connector F. This symbol appears only if an
RGB source has been connected.
3 • Audio/video input signal through the Scart connector E.
S
3 • S Video Input signal through the Scart connector E. This symbol appears only if
an S Video source has been connected.
4 • Video input signal through the phono socket B and Audio input signal through
C.
S
4 • S Video Input signal through the front S Video input jack A and Audio signal
through C. This symbol appears only if an S Video source has been connected.
GB
4 Press the button on the remote control to return to the normal TV picture.
For Mono Equipment
Connect the phono plug to the L/G/S/I socket on the front of the TV and select 4 or 4 input
signal using the instructions above. Next, refer to the “Sound Adjustment” section of this manual and
set “Dual Sound” option to “A” on the sound menu screen (see page 12).
Additional Information
S
23
Page 23
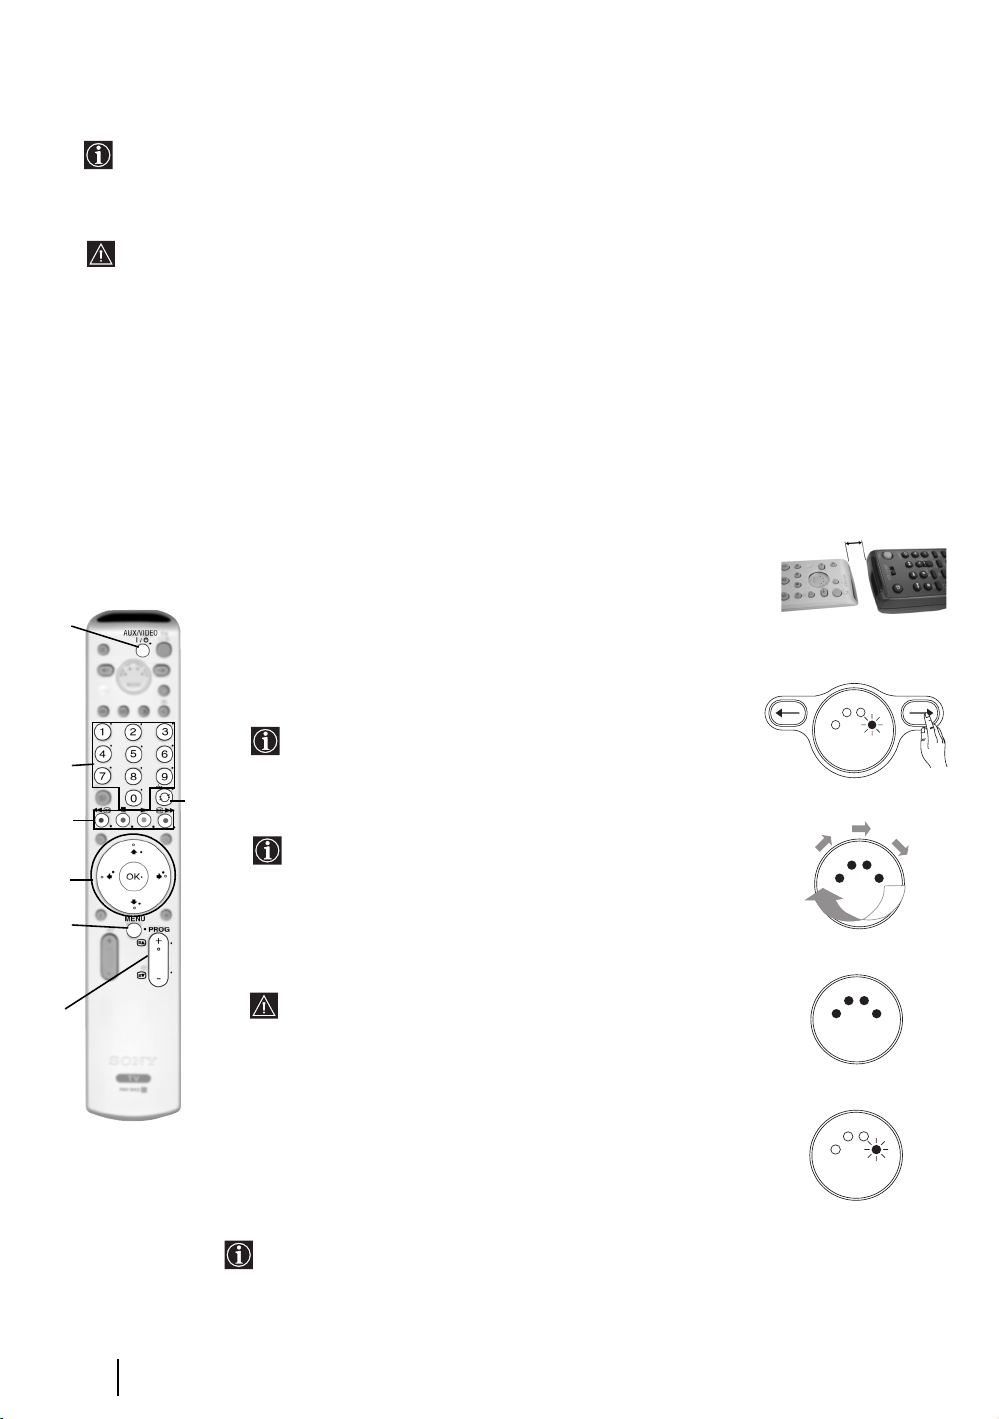
Learning functions from other Remote Controls
To eliminate the amount of remote controls you need, this remote control has a learning feature. Once set up
as explained below, it can be used in place of your other remote controls.
It is recommended that you make a note of what each button has been taught (you can use the table provided
with the remote control).
Before you start and for accurate learning, please read below instructions:
• Choose the button (a-g) you want to learn. The buttons which can learn a new function, have a blue dot. See
fig. 3 to find out the possible buttons.
• Do not move the remote units during the learning procedure.
• Be sure to keep holding down the learning button until your commander reacts as described.
• Use fresh batteries in both remote units.
• Avoid learning in places subjects to direct sunlight or a strong fluorescent light.
• Noise may interfere during the learning procedure.
• The remote control detector area may differ depending on each remote unit. If learning does not work, try
changing the positions of the two remote controls.
• It is possible that some specific remote control signals may not be learned.
• If you do not perform the learning steps within 20 seconds at any point during the process, the learning mode
ends.
1 Position both remote controls as shown (see fig. 1).
2-3 cm.
fig. 1
fig. 3
a
b
c
d
2 Press and hold the t button of this TV remote control for
approximately 6 seconds, until the AUX green light starts flashing
(see fig.2).
3 Press the button (a-g, see fig. 3) of this TV remote control on which
you wish to store a learned function.
Once the selected button has been pressed, the VCR, TV, DVD and
AUX illuminate flash in order (see fig. 4).
4 Press the button from the other remote control that you wish to teach your
g
TV remote control.
• During the data transfer process, all the four lights illuminate at the
same time (see fig. 5).
• As soon as data transfer is finished, the AUX green light starts
flashing (see fig. 6).
This TV remote
control
fig. 2
V
T
R
C
V
MODE
fig. 4
T
R
C
V
MODE
D
V
Other remote
control
V
D
A
U
X
D
V
D
A
U
X
6 sec.
e
5 If you wish to record other functions repeat steps 2-4 (read before the
warning below), otherwise go to step 6.
f
• In case you try to select one button which has been already
learned, all the four lights will momentarily flash very shortly and
the remote control automatically return to the same condition as
in the step 2 with the AUX light flashing
• In case you try to select a not-learnable button, the remote control
stay in to the same condition as in the step 2 with the AUX light
flashing.
6 Press the t button to finish the learning process.
fig. 5
T
R
C
V
MODE
fig. 6
T
R
C
V
MODE
D
V
V
D
A
U
X
D
V
V
D
A
U
X
24
Additional Information
7 Check that all the learning functions have been learned correctly.
• To use a learned function later, press the T or t buttons to select AUX and next
press the relevant button.
• Always remember to press the
according to the equipment you want to operate with this remote control: VCR, TV,
DVD or AUX.
T or t button until the green light iluminates
continued...
Page 24
Erasing a learned function
a
1 Press and hold the t button for approximately six seconds until the
AUX green light flashes (see fig. 7).
2 While pressing the % button, press the button (a - g) with the learned
function that you want to erase.
All the four lights illuminate at the same time (see fig. 8) and as
soon as the learned function is erased, the AUX green light starts
b
g
c
flashing (see fig. 9).
3 If you wish to store a new function, repeat steps 3 and 4 from the
previous page, otherwise press the t button to return to normal
R
C
V
R
C
V
fig. 7
D
V
T
MODE
fig. 8
V
T
MODE
V
D
A
U
X
6 sec.
D
V
D
A
U
X
operation.
d
Erasing all the learned functions in one time
e
1 Press and hold the t button for approximately six seconds, until the
AUX green light flashes (see fig. 7).
2 While pressing the % button, press t to erase all the learned
f
functions.
R
C
V
fig. 9
V
T
MODE
D
V
D
A
U
X
GB
All the four lights illuminate at the same time (see fig. 8) and as
soon as all the learned function are erased, the remote control
automatically returns to the normal operation.
Additional Information
25
Page 25
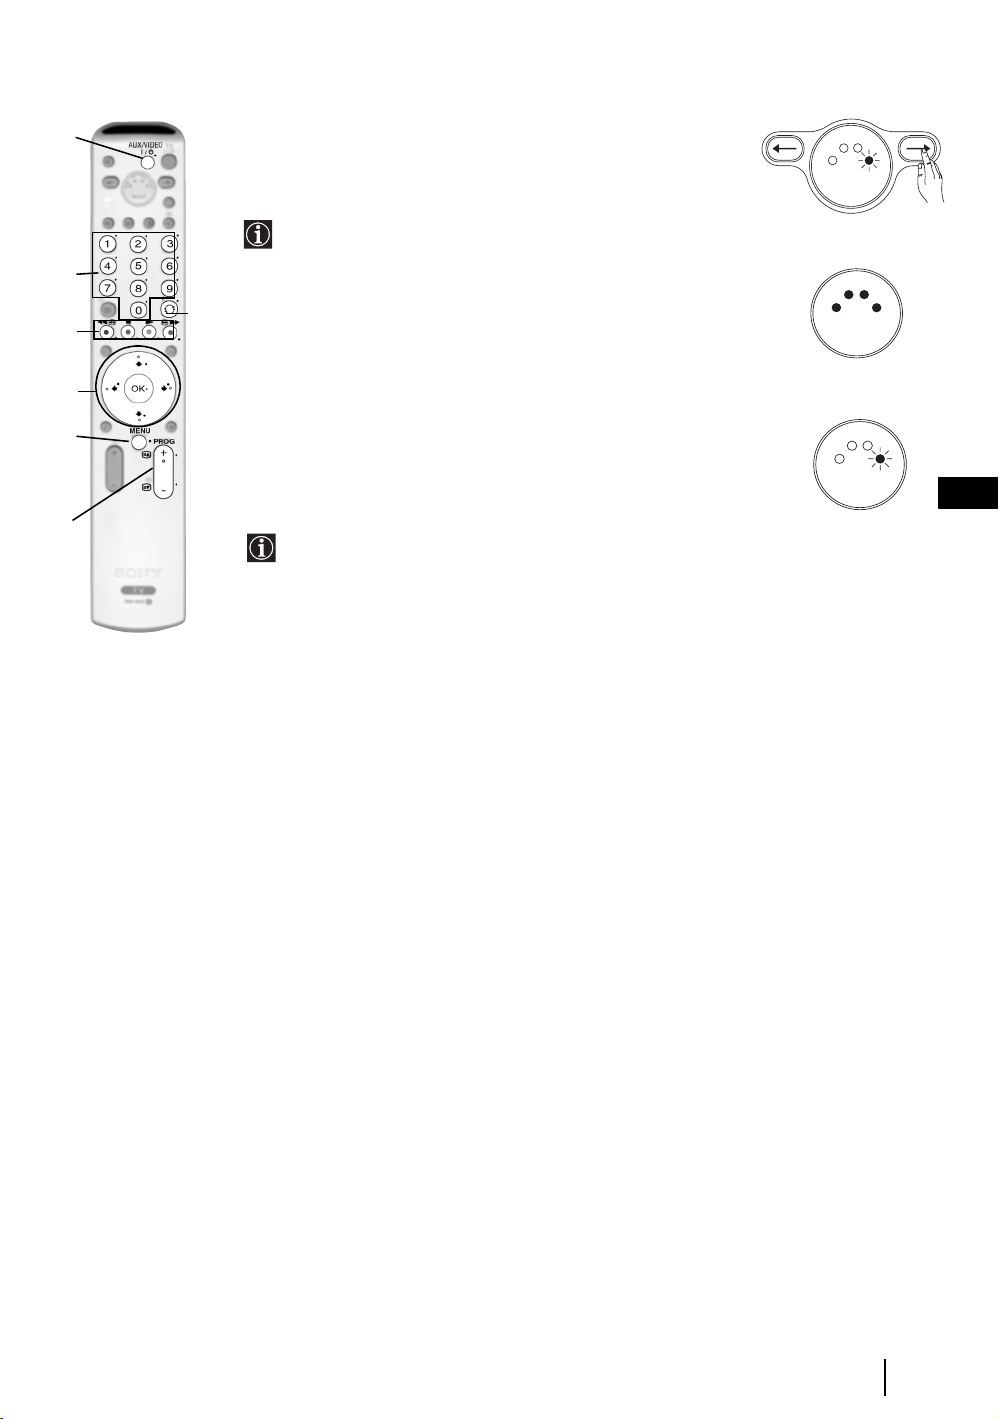
Remote Control Configuration for VCR or DVD
In it’s default condition this remote control will operate the basic functions of this Sony TV, Sony DVDs and
most Sony VCRs. To control VCRs and DVDs of other manufacturers (and some Sony VCR models), the
remote control needs to be configured.
fig. 2
To do this:
• Before you start, look up the 3 digit code for your brand of DVD or VCR from the list below.
On those brands that have more than one code, enter the first code number.
• Sony will endeavour to update the software according to market changes. Therefore, please
refer to code table included with the remote control for latest code set.
• A small label is added inside the battery door to allow you to record your brand codes.
1 Press and hold the T button of the remote control for approximately 6
seconds until the green DVD and VCR light of the Media Selector starts
flashing (see fig. 1).
2 While the VCR and DVD lights are flashing, enter all three digits of the
code for your brand of VCR or DVD (see the list below) using the number
buttons on the remote control (see fig. 2).
If your selected code is entered correctly, the green light VCR or
DVD (according to your selection) will be lit momentarily (see fig.
3), otherwise repeat all the above steps.
3 Turn on your VCR or DVD and check that the main functions work.
6 sec.
R
C
V
C
V
fig. 1
V
T
MODE
fig. 3
V
T
R
MODE
D
V
D
A
U
X
D
V
D
A
U
• If your device is not working or some of the functions do not work please check that you
entered the correct code set or try the next code listed against the brand.
• Not all brands are covered and not all models of every brand may be covered.
4 Always remember to press the T or t button until the green light iluminates according to
the equipment you want to operate with this remote control: VCR, TV or DVD. Refer to pages
24 - 25 on how to operate the AUX mode.
X
VCR Brand List DVD Brand List
Brand Code Brand Code
SONY (VHS) 301, 302, 303, 308, 309,362
SONY (BETA) 303, 307, 310
SONY (DV) 304, 305, 306
AIWA 325, 331, 351
AKAI 326, 329, 330
DAEWOO 342, 343
GRUNDIG 358, 355, 360, 361, 320, 351, 366
HITACHI 327, 333, 334
JVC 314, 315, 322, 344, 352, 353, 354, 348, 349
LG 332, 338
LOEWE 358, 355, 360, 361, 320, 351
MATSUI 356, 357
ORION 328
PANASONIC 321, 323
PHILIPS 311, 312, 313, 316, 317, 318, 358, 359,
363, 364
SAMSUNG 339, 340, 341, 345
SANYO 335, 336
SHARP 324
THOMSON 319, 350, 365
TOSHIBA 337
26
Additional Information
SONY 001, 029, 030, 036, 037, 038, 039, 040,
041, 042, 043, 044, 053, 054, 055
AIWA 021
AKAI 032
DENON 018, 027, 020, 002
GRUNDIG 009, 028, 023, 024, 016, 003
HITACHI 025, 026, 015, 004, 035
JVC 006, 017
KENWOOD 008
LG 015, 014, 034
LOEWE 009, 028, 023, 024, 016, 003
MATSUI 013, 016
ONKYO 022, 033
PANASONIC 018, 027, 020, 002, 045, 046, 047
PHILIPS 009, 028, 023, 024, 016, 003, 031
PIONEER 004, 050, 051, 052
SAMSUNG 011, 014
SANYO 007
SHARP 019, 027
THOMSON 012
TOSHIBA 003, 048, 049
YAMAHA 018, 027, 020, 002
Page 26

Technical Specifications
TV system:
Depending on your country
selection:
B/G/H, D/K
Colour system:
PAL
SECAM, NTSC 3.58, 4.43 (only
Video In)
Channel Coverage:
VHF: E2-E12
UHF: E21-E69
CATV: S1-S20
HYPER: S21-S41
D/K: R1-R12, R21-R69
Picture Tube:
Flat Display FD Trinitron:
29” (approx. 73 cm. measured
diagonally)
Rear Terminals
• AV1
1/ 1
21-pin scart connector
(CENELEC standard)
including audio/video input,
RGB input, TV audio/video
output.
• AV2
2/ 2
21-pin Scart connector
(CENELEC standard)
including audio / video input,
RGB input, monitor audio/video
output.
• AV3
3/ 3
21-pin Scart connector
(CENELEC standard)
including audio / video input,
S video input,
selectable audio / video output
and SmartLink interface.
• audio outputs (Left/Right)
Front Terminals
• 4 S Video input – 4 pin
• 4 video input – phono
• 4 audio input – phono
• headphones jack
S
- phono jacks
S
DIN
jack
jacks
Sound Output:
2 x 20 W (music power)
2 x 10 W (RMS)
Woofer:
30 W (music power)
15 W (RMS)
Power Consumption:
135 W
Standby Power Consumption:
0.5 W
Dimensions (w x h x d) :
approx. 789 x 605 x 521 mm.
Weight:
approx. 51 Kg.
Accessories supplied:
• 1 Remote Control (RM-943)
• 2 Batteries (IEC designated,
AA size)
Other features:
• 100 Hz picture, Digital Plus.
• Teletext, Fastext, TOPtext.
•NexTView.
•SmartLink.
• TV system autodetection.
• Dolby Virtual.
• BBE Digital.
•NICAM.
•PAP.
• ACI (Auto Channel
Installation).
• Halogen free flame
retardant used in cabinets.
GB
Optional accessories:
• Stand especially designed for this
TV (SU-2829FQ3).
Design and specifications are subject to change without notice.
This instruction manual is made from 100% recycled paper.
Additional Information
27
Page 27

Troubleshooting
Here are some simple solutions to problems which may affect the picture and sound.
Problem
Solution
No picture (screen is dark) and no
sound.
Poor or no picture (screen is dark), but
good sound.
No picture or no menu information
from equipment connected to the
Scart connector.
Good picture, no sound.
No colour on colour programmes.
When you switch on the TV the last
channel you were watching before
switching the TV off does not appear.
Distorted picture when changing
programmes or selecting teletext.
• Check the aerial connection.
• Plug the TV in and press the button on the front of the TV.
• If the standby indicator is on, press TV button on
the remote control.
• Using the menu system, select the “Picture Adjustment” menu and select
“Reset” to return to the factory settings (see page 11).
• Check that the optional equipment is on and press the button
repeatedly on the remote control until the correct input symbol is
displayed on the screen (see page 23).
• Press the + button on the remote control.
• Check that “TV Speakers” is “On” in the “Sound Adjustment”
menu (see page 13).
• Check that headphones are not connected.
• Using the menu system, select the “Picture Adjustment” menu and select
“Reset” to return to factory settings (see page 11).
• This is not a malfunction. Press the number buttons on the remote control
to select the desired channel.
• Turn off any equipment connected to the Scart connector on the rear of the
TV.
Wrong characters appear when
viewing teletext.
Wrong characters appear when
viewing NexTView.
Picture slanted.
Snowy picture when viewing a TV
channel.
28
Additional Information
• Use the menu system to enter the “Country” menu (see page 16) and select
the country in which you operate the TV set. For cyrillic languages, we
recommend selecting Russia country if your own country does not appear
in the list.
• Use the menu system to enter the “Language” menu (see page 16) and
select the same language that NexTView is broadcast in.
• Using the menu system, select the “Picture Rotation” option in the
“Features” menu to correct the picture slant (see page 15).
• Using the menu system, select the “Manual Programme Preset” menu and
adjust Fine Tuning (AFT) to obtain better picture reception (see page 18).
• Using the menu system, select the “Noise Reduction” option in the “Picture
Adjustment” menu and select “Auto” to reduce the noise in the picture
(see page 11).
continued...
Page 28

Problem
Solution
No unscrambled picture whilst
viewing an unscrambled channel with
a decoder or a Set Top Box connected
through the Scart connector
v, V
in PAP mode.
Images from the “Memory Stick” can
not be displayed or you can view the
image but some features are not
available (rotate..) and an error
message appears on the TV screen.
Remote control does not function.
The standby indicator on the TV
flashes.
S
3/ 3.
, B and b buttons do not work
• Using the menu system, select the “Features” menu and set “AV3 Output”
to “TV” (see page 14).
• Check that the Decoder or the Set Top Box is not connected on the
scart 2/ 2.
• PAP navigation is only possible in TV mode, please check that Media
Selector is set to TV.
• This is not a malfunction of the TV. This is because you are using a non-
Sony brand “Memory Stick” media.
• Check that the Media Selector on the remote control is set to the device
you are using (VCR, TV, DVD or AUX).
• If the remote control does not operate the VCR or DVD even when the
Media Selector has been set correctly. Enter the necessary code set as
explained on page 26.
• Replace the batteries.
• Contact your nearest Sony service centre.
GB
• If you continue to experience problems, have your TV serviced by qualified personnel.
• Never open the casing yourself.
Additional Information
29
Page 29

Въведение
Благодарим ви за избора на това изделие на Sony.
Преди да използвате този телевизор, прочетете внимателно това ръководство за употреба и го запазете за
бъдещи справки.
• Символи, използвани в ръководството:
• Важна информация.
• Информация за характеристика.
• 1,2... Последователност на инструкциите.
• Бутоните, оцветени в бяло на дистанционното
управление, са тези, които трябва да натиснете, за
да следвате последователността в инструкциите.
• Информира ви за резултата от инструкциите.
Съдържание
Въведение ................................................................................................................................................................................ 3
Информация за безопасността............................................................................................................................................ 4
Преглед и инсталиране
Проверка на доставените принадлежности ..................................................................................................................... 5
Поставяне на батериите в дистанционното управление ............................................................................................... 5
Преглед на бутоните на дистанционното управление ................................................................................................... 6
Преглед на бутоните на телевизора .................................................................................................................................. 7
Свързване на антената и видеото ....................................................................................................................................... 7
Първо включване
Включване на телевизора и автоматично захващане.................................................................................................... 8
Функции на телевизора
Въведение и използване на системата от менюта ....................................................................................................... 10
Меню "Настройка на картината" .............................................................................................................................. 11
Меню "Настройка на звука"........................................................................................................................................ 12
Меню "Характеристики".............................................................................................................................................. 14
AV3 Изход ............................................................................................................................................................... 14
Ръководство за свързване .................................................................................................................................... 15
Въртене на картината ........................................................................................................................................... 15
RGB център............................................................................................................................................................. 15
Меню "Инсталиране".................................................................................................................................................... 16
Език........................................................................................................................................................................... 16
Държава ................................................................................................................................................................... 16
Автоматично захващане ...................................................................................................................................... 16
Подреждане на програми ..................................................................................................................................... 16
Надписване на програмите .................................................................................................................................. 17
Запаметени AV настройки .................................................................................................................................. 17
Програмa ръчeн избop.......................................................................................................................................... 18
Картина и картина (КИК) ................................................................................................................................................. 19
Телетекст .................................................................................................................................................................................. 20
NexTView..................................................................................................................................................................................... 21
Допълнителна информация
Включване на апаратура към телевизора ....................................................................................................................... 22
Гледане на картина от апаратура, свързана към телевизора ..................................................................................... 23
Научаване на функциите от други дистанционни бутони............................................................................................ 24
Конфигуриране на дистанционното управление за видео или DVD.........................................................................26
Технически спецификации.................................................................................................................................................. 27
Отстраняване на неизправности ........................................................................................................................................ 28
Как да се повдига телевизорът .................................................................................................................... Задна корица
BG
Съдържание
3
Page 30
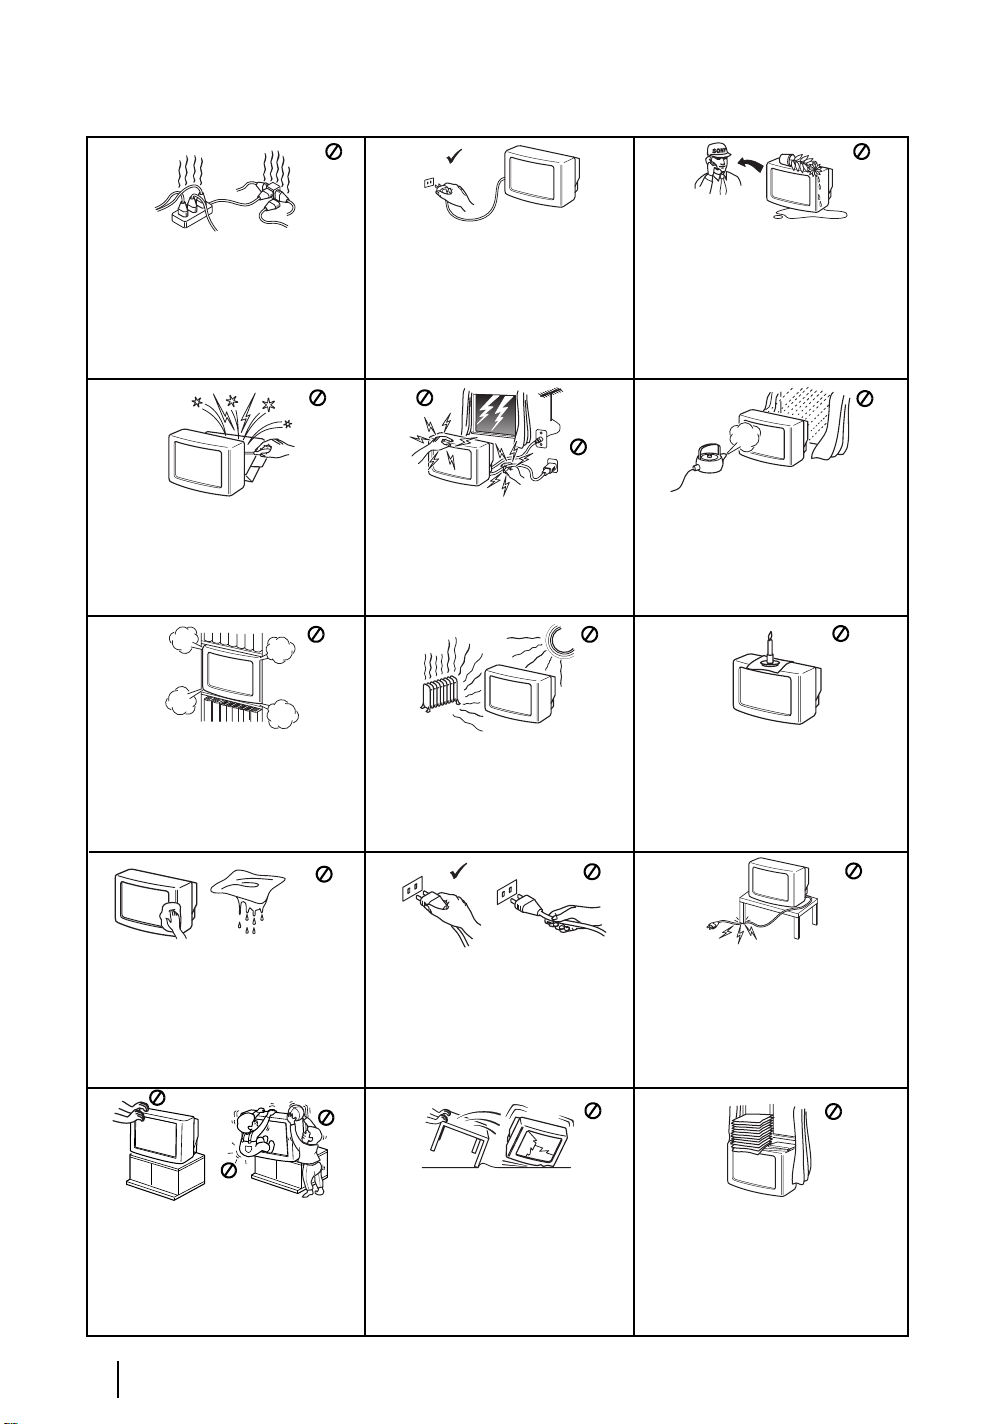
Инструкции за безопасност
Н
к
и
р
В
п
и
к
Този телевизор може да работи само
на захранващо напрежение 220- 240V.
Внимавайте да не включвате твърде
много уреди в един контакт, тъй
като това може да причини токов
удар.
Не отваряйте кутията и задния к апак
на телевизора. Обръщайте се само
към квалифициран сервизен
персонал.
Не покривайте вентилационните
отвори на телевизора. Оставете наймалко 10 см. разтояние около
телевизора за вентилация.
По причини за безопасност и предпазване от
въздействие от природни явления е
препоръчително да не оставяте телевизора в
режим “stand by” когато не се използва.
Изключвайте от електрическата мрежа.
Някои телевизори имат функции, които за да
бъдат използвани, изискват уреда да бъде
оставен в режим “stand by”. Инструкциите в
това ръководство ще Ви информират дали
това е необходимо.
За Ваша собствена безопасност не
пипайте телевизора, кабела или
антената му по време на
гръмотевични бури.
Никога не поставяйте телевизора
на горещи, влажни или
изключително прашни места. Не
инсталирайте телевизора на места
където може да бъде изложен на
механични вибрации.
икога не пъхайте каквито и да
било предмети в телевизора, тъй
ато това може да причини пожар
ли токов удар. Никога не
азливайте течности по телевизора.
случай, че течност или твърд
редмет попаднат в телевизора го
зключете. Свържете се незабавно с
валифицирани служители на Сони.
За да предотвратите риска от токо в
удар, не излагайте телевизора на
дъжд или влага.
За да избегнете пожар, дръжте
настрана от телевизора
възпламеними предмети и открити
източници на светлина /например
свещи/.
Почиствайте екрана и кутията с
мека, влажна кърпа. Не използвайте
абразивни кърпи, алкални
почистващи средства, изстъргващи
препарати или разтворители като
спирт или бензин, както и
антистатичен спрей.
Когато изключвате телевизора,
дърпайте щепсела, а не кабелa.
Не поставяйте тежки предмети
върху кабела, тъй като това може
да го повреди.
Препоръчваме ви да навиете
излишния захранващ кабел около
предназначените за целта
приспособления на задната страна
на телевизора.
Изключвайте кабела на
Поставяйте телевизора на сигурна,
стабилна поставка. Никога не се
опитвайте да премествате телевизора и
поставката едновременно – винаги
премествайте телевизора и поставката
отделно. Не обръщайте телевизора
настрани или по “гръб”. Не позволявайте
на деца да се катерят по него.
Инструкции за безопасност
4
телевизора преди да го местите.
При преместването избягвайте
неравни повърхности и не правете
бързи крачки. Ако изпуснете или
нараните телевизора, незабавно се
консултирайте с квалифицирани
сервизни служители на Сони.
Не покривайте вентилационните
отвори на телевизора с предмети
като пердета, вестници и др.
Page 31

Проверка на принадлежностите, включени в
комплекта
2 Батерии
(размер AA)
BG
1 Дистанционно управление
(RM-943)
Поставяне на батериите в дистанционното управление
Внимавайте, за да поставите предоставените батерии с правилно ориентирани полюси.
Не забравяйте, че трябва да изхвърляте батериите с опазване на околната среда.
Преглед и инсталиране
5
Page 32

Преглед на бутоните на дистанционното управление
1 TV I/ : За временно изключване на телевизора (режим на готовност):
wa
w;
ql
qk
1
2
3
4
5
6
qj
7
8
qh
9
q;
qg
qf
qa
qs
qd
9 Телетекст: натиснете този бутон, за да включите
телетекста. За подробности, вж. 20.
q; a) Показване на индекс на каналите: ако
Медийният селектор (
MENU е изключено, натиснете OK, за да
покажете преглед на каналите. Ако искате да
изберете канал, натиснете
натиснете отново бутона OK, за да гледате
избрания канал.
b) Навигатор:
ако Медийният селектор (w;) е
включен на TV и MENU (qd
тези бутони се използват за придвижване по
системата от менюта на телевизора. Вж. стр. 10.
qa Избиране на режим на картината: натискайте
последователно този бутон, за да промените
режима на картината. За подробности по
различните режими на картината, Вж. стр. 11.
qs Избиране на канали на предаване: натискайте
тези бутони за избиране на следващия или
предишния канал на предаване.
qd Система от менюта: натиснете този бутон, за да
влезете в системата от менюта на телевизора. Вж.
стр. 10.
qf Регулиране на силата на звука: натиснете тези
бутони, за да увеличите или намалите силата на
звука.
Натиснете този бутон, за да изключите временно телевизора (индикаторът за
готовност на телевизора светва). Натиснете отново, за да включите телевизора
от режим на готовност.
• За икономия на електроенергия ние препоръчваме телевизорът да се
изключва напълно, когато не се използва.
• След 15 минути без телевизионен сигнал и ако няма натискане на бутон,
телевизорът преминава автоматично в режим на готовност.
2 Aux I/ : натиснете този бутон, за да включите или изключите вашето видео или
DVD. За функцията AUX вж. стр. 24.
3 Избиране на телевизионен режим: натиснете този бутон, за да изключите
режима на КИК, телетекст или вход от видео.
4 Избиране на входен източник: натиснете този бутон неколкократно, докато
желаният символ на източника се появи върху телевизионния екран. Вж. стр. 23.
5 КИК (картина и картина): натиснете този бутон, за да разделите екрана на две,
така че да гледате два канала едновременно. Вж. стр. 26.
6 Избиране на канали на предаване: ако Медийният селектор (w;) е включен
на TV, с натискането на тези бутони се избират канали. За програмите с
двуцифрени номера въведете втората цифра в рамките на 2,5 секунди.
7 а) Гледане на последния избран канал: ако Медийният селектор (w;) е
включен на TV, при натискане на този бутон се връща предишният канал,
който сте гледали (при условие, че сте го гледали поне 5 секунди).
b) Избиране на двуцифрено видео:
на VCR, с натискането на този бутон се избират двуцифрени канали за
видеото на Sony, например за 23 натиснете
първо -/--, а след това бутони 2 и 3.
ако Медийният селектор (w;) е включен
8 а) Фастекст: Ако Медийният селектор (w;) е включен на TV и сте в режим на
телетекст, тези бутони може да се използват като бутони за Фастекст. За
подробности, вж. 20.
b) Работа с видео или DVD:
или DVD, тези бутони ще действат като основните функции на вашето видео
или DVD, след като дистанционното управление се програмира. Вж. стр. 26.
w;) е включен на TV и
ако Медийният селектор (w;) е включен на видео
qg Избиране на звуков ефект:
бутон последователно, за да промените звуковия
ефект. За подробности по различните звукови
ефекти, вж. стр. 12.
Натискайте този
qh NexTView: натиснете този бутон за показване на
v или V и след това
) е включено,
NexTView. За подробности, вж. стр. 21.
qj Показване на информация: натиснете този
бутон, за да покажете всички индикации на екрана,
например номер на канал и др. Натиснете отново,
за да прекратите.
qk Стопиране на картината: Натиснете този бутон,
за да стопирате картината. Екранът се разделя на
два екрана. Отляво е нормалната картина, а
отдясно картината е стопирана. Натиснете бутона
отново, за да се върнете към нормалната картина.
ql Избиране на формата на канала: натискайте
последователно този бутон, за промяна на
формата на екрана. 4/3 за обикновена картина или
16/9 за имитация на широк екран.
w; Медиен селектор: натиснете тези бутони, за да
изберете с кое устройство искате да работите - TV,
VCR (за видео), DVD или AUX. За момент ще
светне зелена лампичка, за да покаже кое
устройство сте избрали. За подробности, вж. стр.
24 - 26.
wa Заглушаване на звука: натиснете този бутон, за
да заглушите звука на телевизора. Натиснете
отново, за да върнете звука.
Бутоните с надписи 4, qs и qj се използват и за работа с телетекст. За подробности, вж. 20.
Преглед и инсталиране
6
Page 33

Преглед на бутоните на телевизора
Гнездо за слушалки
Входно гнездо
на S video
Гнездо на видео вход
Индикатор за готовност
Натиснете върху маркировката .
Гнезда за
аудио входове
Бутон за
автоматично
стартиране
(включва
поредицата за
автоматично
стартиране, вж.
стр. 8)
Бутон Вкл/Изкл
Избиране на
Входен източник
Свързване на антената и видеото
• Свързващите кабели не са включени в комплекта.
• За повече подробности за свързване на видео, както и други свързвания, вж. стр. 22.
Бутони за
програми
нагоре или
надолу (Избира
канали на
предаване)
Бутони за регулиране
на звука
BG
Видео
OUT IN
или
SCART проводникът не е задължителен. Ако използвате тази допълнителна връзка, това може да подобри
качеството на картината и звука, когато използвате видео.
Ако нямате свързване със SCART кабел, ще трябва ръчно да настройвате видеото на резервен канал след
завършване на процедурата на автоматично захващане. Вж. "Програмa ръчeн избop" на стр. 18. Освен това
проверете в инструкциите за употреба на вашето видео, за да разберете как да намерите канала за гледане
на видео.
Преглед и инсталиране
7
Page 34

Включване на телевизора и автоматично захващане
Когато включите телевизора за пръв път, на екрана на телевизора се появява поредица от екрани с менюта,
които ви дават възможност да направите следното: 1) да изберете езика на екрана с менюта 2) да изберете
страната, в която ще работи телевизорът, 3) да регулирате наклона на картината, 4) да проверите как се
свързва допълнителна апаратура към телевизора, 6) да търсите и запаметявате всички налични канали
(телевизионно предаване) и 7) да променяте реда, в който каналите (телевизионни програми) се появяват на
екрана.
Ако обаче трябва да промените някоя от тези настройки по-късно, можете да го направите, като изберете
съответната опция в (меню "Инсталиране") или с натискане на бутона "Автоматично стартиране"
на телевизора.
Language
1 Включете щепсела на телевизора в контакт на мрежата (220-
240V AC, 50Hz)
Когато телевизорът се свърже към мрежата за пръв път, той
обикновено е включен. Ако телевизорът е изключен,
натиснете бутона за включване/изключване, за да го
включите.
Когато включите телевизора за пръв път, на екрана
автоматично се показва меню Language (Език).
Select language
English
Nederlands
Français
Italiano
Deutsch
Türkçe
Español
Português
Polski
English
Nederlands
Français
Italiano
Deutsch
Türkçe
Español
Português
Polski
Language
Select language
English
English
Nederlands
Nederlands
Français
Français
Italiano
Italiano
Deutsch
Deutsch
Türkçe
Türkçe
Español
Español
Português
Português
Polski
Polski
2 С натискане на бутоните V, v, B или b на дистанционното
управление, изберете своя език, а след това натиснете бутона
OK, за да потвърдите избора си. Оттук насетне всички менюта
се появяват на избрания от вас език.
3 Менюто Държава се появява автоматично. С натискане на
v или V изберете държавата, в която използвате
бутона
телевизора. Натиснете бутона OK, за да потвърдите избора си.
• Ако държавата, в която искате да използвате телевизора,
не е показана в списъка, изберете вместо държава "Изкл".
• За да избегнете неправилни знаци на телетекста за
езиците на кирилица, препоръчваме да изберете Русия,
ако вашата страна не се появи в списъка.
4 Поради земния магнетизъм картината може да се наклони.
Менюто Въртене на карт. ви позволява да коригирате наклона
на картината, ако е необходимо.
a) Ако това не е необходимо, натиснете OK, за да изберете Не е
необходимо.
b) Ако това е необходимо, натиснете B или b, за да изберете
Регулирай сега, след което натиснете OK и коригирайте
наклона на картината между –5 и +5 с натискане на
Накрая натиснете OK за запаметяване.
v или V.
Language
Select language
English
Nederlands
Français
Italiano
Deutsch
Türkçe
Español
Português
Polski
If picture slants, please
adjust picture rotation.
Not necessary
English
Nederlands
Français
Italiano
Deutsch
Türkçe
Español
Português
Polski
Adjust now
Първо включване
8
продължава...
Page 35

5 Ще се появи диаграма, която ви показва как да свържете
широка гама апарати към вашия телевизор. Следвайте
инструкциите и накрая натиснете бутона OK, за да премахнете
картината и продължите автоматичния процес.
След като процесът на автоматично захващане е
завършил и допълнителната апаратура е свързана на
този етап, препоръчваме да следвате инструкциите,
обяснени в раздела "Ръководство за свързване" на стр. 17,
за да получите оптималните настройки, свързани с
допълнителното оборудване.
6 На екрана се появява менюто Автом. захващане. Натиснете
бутона OK, за да изберете Да.
7 Телевизорът започва автоматично търсене и запаметяване на
всички налични предаващи канали вместо вас.
Този процес може да отнеме няколко минути. Проявете
търпение и не натискайте никакви бутони, защото в
противен случай автоматичното захващане няма да
завърши.
В някои страни излъчващите телевизионни програми
инсталират каналите автоматично (система ACI). В този
случай, излъчващата програма изпраща меню, в което
можете да изберете своя град, като натиснете бутона
или V и OK, за да съхраните каналите.
Ако през време на процеса на автоматично захващане
няма намерени канали, на екрана автоматично се появява
съобщение, с което се иска да включите антената.
Проверете свързването на антената (вж. стр. 7).
Натиснете бутона OK, за да рестартирате процеса на
автоматично захващане.
v
8 След като са захванати и съхранени всички налични канали,
менюто Подреждане на програми автоматично се появява
на екрана, което ви дава възможност да променяте реда, в
който са съхранени каналите.
a) Ако желаете да запазите каналите на предаванията в реда,
в който са настроени, преминете към стъпка 9.
b) Ако желаете да запаметите каналите в друг ред:
1 Натиснете бутона
да преместите. Натиснете бутона
канал (излъчвана програма). За запаметяване натиснете
програма за канала (излъчвана програма), който желаете
2 Натиснете бутона
позиция на номера на програма, за избрания от вас
бутона OK.
3 Повторете стъпки б)1 и б)2, ако желаете да промените
реда на другите канали.
v или V, за да изберете номера на
b.
v или V, за да изберете новата
BG
9 Натиснете бутона MENU, за да премахнете менюто от екрана
Вашият телевизор е готов за използване
Първо включване
9
Page 36

Въведение и използване на системата от менюта
Във вашия телевизор се използва система от екранни менюта, която ви води през операциите на работа.
Използвайте следните бутони на дистанционното управление за работа със системата от менюта:
1 За включване на екраните на менютата:
Натиснете бутона MENU, за да включите менюто от първо
ниво.
2 За придвижване по менютата:
• За да осветите желаното меню или опция, натиснете
• За да влезете в избраното меню или опция, натиснете OK или
• За да се върнете към последното меню или опция, натиснете OK или
• За да промените настройките на вашата избрана опция, натиснете
• За да потвърдите и запаметите избора си, натиснете OK.
v или V.
3 За да изключите екраните на менютата:
Натиснете бутона MENU, за да премахнете менюто от екрана.
b.
B.
v/V/B или b.
Функции на телевизора
10
Page 37

Меню "Настройка на картината"
MENU
,
Режим на картината Тази опция ви позволява да нагласите по избор режима на картината въз
основа на програмата, която гледате. След като изберете тази опция,
натиснете OK. След това натискайте последователно
изберете:
Менюто "Настройка на картината" ви
позволява да променяте параметрите на
картината.
За да направите това:
Натиснете бутона MENU и след това
натиснете OK, за да влезете в това меню. След
това натиснете
желаната опция, и натиснете OK. Накрая,
прочетете по-долу как да работите във всяка
опция.
v или V, за да изберете
v или V, за да
Личен (за индивидуални настройки).
На живо (за програми с излъчване на живо, DVD и цифрови приемници
Set Top Box).
Филм (за филми).
След като изберете желаната опция, натиснете OK, за да я съхраните.
Нивата на "Яркост", "Цветност" и "Острота" са фиксирани фабрично за получаване на
най-доброто качество на картината.
Контраст Натиснете
След това натиснете OK за запаметяване.
Яркост Натиснете
това натиснете OK за запаметяване.
Тази опция се появява и може да се променя само когато режимът на картината е настроен
на "Личен".
B или b, за да намалите или увеличите контраста на картината.
B или b, за да направите картината по-тъмна или по-светла. След
BG
Цветност Натиснете
След това натиснете OK за запаметяване.
Тази опция се появява и може да се променя само когато режимът на картината е настроен
на "Личен".
Тоналност Натиснете
натиснете OK за запаметяване.
Тази опция се появява само за сигнал NTSC (напр. видеокасети от САЩ).
Острота Натиснете
натиснете OK за запаметяване.
Тази опция се появява и може да се променя само когато режимът на картината е
настроен на "Личен".
Нулиране Натиснете OK, за да върнете картината до фабрично настроените нива.
Потискане Тази опция се задава на Auto за автоматично намаляване на "снега" по
на шума картината, който се вижда в предавания сигнал. Тя обаче може да се променя с
натискане на
натиснете OK за запаметяване.
Тон на цвета Тази опция ви позволява да промените оттенъка на цвета. След като изберете
тази опция, натиснете
изберете: Топъл (дава на белите цветове червен оттенък), Нормален (дава на
белите цветове неутрален оттенък), Студен (дава на белите цветове син
оттенък). След това натиснете OK за запаметяване.
B или b, за да намалите или увеличите интензивността на цвета.
B или b, за да намалите или увеличите зелените тонове. След това
B или b, за да смекчите или изострите картината. След това
v или V за избиране на Изкл, Нисък, Среден или Висок. Накрая
b. След това натиснете последователно v или V, за да
Функции на телевизора
11
Page 38

Меню "Настройка на звука"
MENU
m
Менюто "Настройка на звука" позволява да
се променят параметрите на звука.
За да направите това:
Натиснете бутона MENU и натиснете
изберете , а след това натиснете OK, за да
влезете в това меню. След това натиснете
или V, за да изберете желаната опция, и
натиснете OK. Накрая, прочетете по-долу как
да работите във всяка опция.
,
Звук Тази опция позволява да нагласите звуковия ефект по ваш избор. След като
Ефект изберете тази опция, натиснете OK. След това натиснете последователно
v или V, за да изберете:
Изкл (Плосък отговор).
Естествен (Усилва яснотата, детайлите и присъствието на звука, като
Динамичен ("BBE High Definition Sound system"* интензифицира яснотата и
Dolby** (Dolby Virtual, симулира звуковия ефект на "Dolby Surround Pro
Virtual Logic").
След като изберете желаната опция, натиснете OK за запаметяване.
използва системата "BBE High Definition Sound system"*).
присъствието на звука за по-добра различимост и реалистична
музика).
v, за да
v
Функции на телевизора
12
Високи Натиснете
След това натиснете OK за запаметяване.
Ниски Натиснете B или b, за да намалите или увеличите звуците с ниска честота. След
това натиснете OK за запаметяване.
Баланс Натиснете
След това натиснете OK за запаметяване.
Нулиране Натиснете OK, за да върнете звука на нивата, настроени фабрично. След това
натиснете OK за запаметяване.
Стерео-ефект • За стерео предаване:
Натиснете
за запаметяване.
• За двуезично предаване:
Натиснете
канал 1) или B (за канал 2). След това натиснете OK за запаметяване.
B или b, за да намалите или увеличите звуците с висока честота.
B или b, за да усилите звука от левия или десния високоговорител.
v или V, за да изберете Стерео или Моно. След това натиснете OK
v или V, за да изберете Моно (за моно канал, ако е наличен), A (за
продължава...
Page 39

Авт. ниво звук Натиснете v или V, за да изберете Вкл (силата на звука на каналите остава
Ако изберете "Dolby Virtual" в опцията "Звуков ефект", опцията "Авт. ниво звук"
автоматично ще се изключи, и обратно.
същата, независимо от сигнала на предаване, напр. при излъчване на реклами)
или Изкл (силата на звука се променя в зависимост от сигнала на предаване).
След това натиснете OK за запаметяване.
Телев. говорител Тази опция ви позволява да изберете дали искате да слушате телевизора от
Вкл (за да слушате телевизора от високоговорителите на
Ако сте избрали "Еднократно изключен" или "Постоянно изключен", силата на звука от
външната апаратура може също да се променя, като натискате бутоните
дистанционното управление. Когато се натиснат бутоните за сила на звука, ще се появи
символът
високоговорителите на телевизора, а тази на външната апаратура.
Настройка на слушалки Тази опция ви позволява да нагласяте по избор силата на звука в
активния екран (в рамка) на екрана КИК (вж. стр.
телевизионните високоговорители, или от външен усилвател, свързан към
аудио изходите на гърба на телевизора.
След като изберете тази опция, натиснете OK. След това натиснете
последователно
Еднократно (за да слушате телевизора от външния усилвател сам
изключен веднъж. Като използвате тази опция, след всяко
Непрекъснато (за да слушате телевизора винаги от външен
изключен усилвател).
След като изберете желаната опция, натиснете OK за запаметяване.
v
или
V
, за да изберете:
апарата).
изключване и включване на телевизора той ще се връща
към настройката по подразбиране "Вкл").
2 +/- на
%, което показва, че силата на звука, която променяте, не е силата на
слушалките и настройките на КИК (картина и картина) (за
подробности по КИК вж. стр. 19).
След като изберете тази опция, натиснете OK. След това натиснете
последователно
сила на звука Натиснете
Стерео-ефект • За стерео предаване:
Натиснете
КИК Звук Изберете Рамка, ако искате да слушате
v или V, за да изберете:
силата на звука от слушалките.
B или b, за да намалите или увеличите
v или V, за да изберете Стерео или
Моно.
• За двуезично предаване:
Натиснете
моно канал, ако е наличен), A (за канал 1) или B
(за канал 2).
19), изберете Лява картина, ако искате да слушате
лявата картина, и Дясна картина, ако искате да
слушате десния екран.
v или V, за да изберете Mоно (за
BG
* Системата "BBE High Definition Sound system" е произведена от Sony Corporation по
лиценз на BBE Sound, Inc. Тя се предмет на Патент на САЩ № 4 638 258 и № 4 482 866.
Думата "BBE" и символът на BBE са търговски марки на BBE Sound, Inc.
** Този телевизор е има възможност да създава ефект на съраунд звук, като симулира звука
от четири високоговорителя чрез два високоговорителя, когато предаваният аудио
сигнал е кодиран за Dolby Surround. Звуковият ефект може да се подобри и чрез
свързване на подходящ външен усилвател (за подробности вж. стр. 23).
** Произведено по лиценз от Dolby Laboratories. "Dolby" и символът "двойно D" са
търговски марки на Dolby Laboratories.
Функции на телевизора
13
Page 40

Меню "Характеристики"
MENU
m
Менюто "Характеристики" ви позволява да
променяте различни настройки на телевизора.
За да направите това:
Натиснете бутона MENU и след това
двукратно, за да изберете , а след това
натиснете OK, за да влезете в това меню. След
това натиснете
желаната опция и натиснете OK. Накрая,
прочетете по-долу как да работите във всяка
опция.
v или V, за да изберете
,
AV3 ИЗХОД
Тази опция позволява да изберете източника, който да се извежда от SCART съединителя
S
3/ 3 така че да може да записвате от SCART всеки сигнал, идващ от телевизора или от
външна апаратура, свързана към SCART съединителя 1/ 1, 2/ 2 или от
съединителите 4 или 4 и 4.
Ако вашето видео поддържа SmartLink, тази процедура не е необходима.
За да направите това:
След като влезете в менюто "Характеристики", както е обяснено на предишната страница, и
след избиране на опцията натиснете OK. След това натиснете
изходен сигнал:
TV за извеждане на източника от антената.
AV1 за извеждане на източници, свързани към 1/ 1.
AV2 за извеждане на източници, свързани към 2/ 2.
AV4 за извеждане на източници, свързани към 4 или 4 и 4.
AUTO за извеждане на сигнала, който в момента се гледа на телевизора.
• Ако изберете "AUTO", изходният сигнал винаги ще бъде същия като този, показван на
екрана.
• Ако свържете декодер към SCART 3/ 3 или към видео, свързано към този
SCART, не забравяйте да върнете обратно "AV3 изход" на "TV", за да има правилно
декодиране.
S
v
или
V
, за да изберете желания
S
S
v
Функции на телевизора
14
продължава...
Page 41

РЪКОВОДСТВО ЗА СВЪРЗВАНЕ
Дори и вече да сте свързали външна апаратура към телевизора, е важно да следвате
инструкциите от това меню. Ако постъпите по този начин, ще получите оптимални параметри
на картината, свързана с допълнителната апаратура.
За да направите това:
1 След като сте влезли в менюто "Характеристики", както е обяснено на предишната страница,
и след като изберете тази опция, натиснете OK. След това натиснете
апаратурата, която искате да свържете, измежду наличните: SAT (сателит), декод., DVD,
Игра, VCR (видео) или DVD rec. (DVD записващо). След това натиснете
тази апаратура (избраната апаратура може и да се изтрива с натискане на
изберете цялата апаратура, която трябва да се свърже, натиснете
"Потвърждение" и натиснете OK.
v или V, за да изберете
b, за да изберете
B). След като
v или V, за да изберете
2 Ще се появи ново меню, което ви показва към кой SCART съединител на гърба на телевизора
трябва да се свърже всеки апарат. Избирайте всеки апарат в съответствие с информацията
тук, за да получите оптимална настройка на картината от допълнителната апаратура.
3 След като свържете допълнителната апаратура, натиснете B или b, за да изберете "OK" и
накрай натиснете бутона OK на дистанционното управление.
Силно в препоръчваме да следвате нашите съвети за свързване, но ако не сте съгласни,
натиснете
ново меню на екрана, в което можете да назначите връзките според предпочитанията си.
B или b, за да изберете “Не” и след това натиснете бутона “ОК”. Ще се покаже
ВЪРТЕНЕ НА КАРТИНАТА
Поради земния магнетизъм картината може да се наклони. Ако това стане, може да коригирате
картината, като използвате тази опция.
За да направите това:
След като влезете в менюто "Характеристики", както е обяснено на предишната страница, и
изберете тази опция, натиснете OK. След това натиснете
картината между -5 and +5.
v или V, за да регулирате наклона на
RGB ЦЕНТЪР
Тази опция е налична само ако към телевизора има свързан източник на RGB сигнал.
Тази опция ви позволява да пренастроите хоризонталната позиция на картината в случай че
трябва да го направите при връзка с RGB източник.
За да направите това:
След като влезете в менюто "Характеристики", както е обяснено на предишната страница, и
докато гледате избран източник на RGB сигнал, изберете опцията "RGB център" и натиснете
OK. След това натиснете
Накрая, натиснете OK за потвърждение и запаметяване.
v или V, за да регулирате центъра на картината между –5 и +5.
BG
Функции на телевизора
15
Page 42

Меню "Инсталиране"
MENU
m
Менюто "Инсталиране" позволява да
променяте различни опции на телевизора.
За да направите това:
Натиснете бутона MENU и натиснете
пъти, за да изберете , а след това натиснете
OK, за да влезете в менюто. След това
натиснете
опция и натиснете OK. Накрая, прочетете подолу как да работите във всяка опция.
v
или
V
, за да изберете желаната
,
ЕЗИК
Тази опция позволява да изберете езика, на който се показват менютата.
За да направите това:
След като изберете опцията, натиснете OK и продължете по същия начин, както в стъпка 2 на
раздела "Включване на телевизора и автоматично захващане" на стр. 8.
ДЪРЖАВА
Тази опция позволява да изберете страната, в която желаете да работи телевизорът.
v три
За да направите това:
След като изберете опцията, натиснете OK и продължете по същия начин, както в стъпка 3 на
раздела "Включване на телевизора и автоматично захващане" на стр. 8.
АВТОМАТИЧНО ЗАХВАЩАНЕ
Тази опция позволява автоматично да търсите и запаметявате всички налични телевизионни
програми.
За да направите това:
След като изберете опцията, натиснете OK и продължете по същия начин, както в стъпки 6 и 7
на раздела "Включване на телевизора и автоматично захващане" на стр. 9.
ПОДРЕЖДАНЕ НА ПРОГРАМИ
Тази опция ви позволява да променяте реда, в който каналите (с телевизионни програми) се
появяват на екрана.
За да направите това:
След като изберете опцията, натиснете OK и продължете по същия начин, както в стъпка 8 на
раздела "Включване на телевизора и автоматично захващане" на стр. 9.
продължава...
Функции на телевизора
16
Page 43

НАДПИСВАНЕ НА ПРОГРАМИ
Тази опция позволява да дадете име на програма, като използвате до 5 знака (букви или цифри).
За да направите това:
1 След като влезете в менюто "Инсталиране", както е обяснено на предишната страница, и след като изберете
опцията, натиснете OK, след това натиснете
искате да наименувате. След това натиснете OK.
v или V, за да изберете номера на програма с канала, който
2 Когато е осветен първият елемент от колоната Име, натиснете OK и
а след това натиснете OK.
Когато завършите, натиснете
OK, за да изключите менюто от екрана.
• За да коригирате буквата, изберете "
• За въвеждане на интервал изберете " " на екрана и натиснете OK.
ЗАПАМЕТЕНИ AV НАСТРОЙКИ
Тази опция позволява да направите следното:
a) Да дадете име на външна апаратура, която сте свързали към входните гнезда на телевизора.
За да направите това:
v,
V
, B или b, за да изберете думата "Край" на екрана и накрая натиснете
%" на екрана, за да се върнете, и натиснете OK.
v, V
, B или b, за да изберете буквата,
1След като влезете в менюто "Настройка", както е обяснено на предишната страница, и след като изберете
опцията, натиснете OK, след това натиснете
наименувате: AV1, AV2 или AV3 за SCART на гърба и AV4 за предните съединители. След това натиснете
двукратно OK.
v
или
V, за да изберете входния източник, който желаете да
2 В колоната за име автоматично се появява име:
а) Ако искате да използвате някое от предварително настроените имена, натиснете v или V, за да
изберете желаното име, и накрая натиснете OK.
Предварително дефинираните имена са следните: VIDEO, DVD, CABLE (кабел), Игpа, CAM
(камкордер) или SAT (сателит).
b) Ако искате да зададете друго име, изберете Редакт. и натиснете OK. След това, докато е осветен първият
елемент, натиснете
натиснете
изключите менюто от екрана.
v, V, B или b, за да изберете думата "Край" на екрана, и накрая натиснете OK, за да
v, V, B или, за да изберете буквата, а след това натиснете OK. Когато завършите,
BG
• За да коригирате буквата, изберете "
• За въвеждане на интервал изберете " " на екрана и натиснете OK.
b) Да промените нивото на входния звук на свързаната допълнителна апаратура.
За да направите това:
След като влезете в менюто "Инсталиране", както е обяснено на предишната страница, и след избиране на
опцията натиснете OK, натиснете
нивото на входния звук: AV1, AV2 или AV3 за SCART на гърба и AV4 за предните съединители. След това
натиснете два пъти
да промените нивото на входния звуков сигнал от -9 до +9.
b, за да осветите колоната Компенсация на звука. Накрая, натиснете OK и
v или V, за да изберете входния източник, на който искате да промените
%" на екрана, за да се върнете, и натиснете OK.
v
продължава...
Функции на телевизора
или
V
, за
17
Page 44

ПРОГРАМА РЪЧЕН ИЗБOP
Тази опция позволява да направите следното:
а) Да зададете предварително каналите или видео каналът един по един с избран от вас ред на програмите.
За да направите това:
1 След като влезете в менюто "Инсталиране", както е обяснено на стр. 16, и след като изберете опцията
"Програма ръчен избор", натиснете OK. След това, докато е осветена опцията Програма, натиснете OK.
Натиснете
(за видео изберете програма номер "0"). След това натиснете
v или V, за да изберете кой номер на програма искате да зададете предварително на канала
B.
2 Следващата опция е налична само в зависимост от страната, която сте избрали в менюто
"Държава".
След като изберете опцията Система, натиснете OK. След това натиснете
телевизионната система на излъчване (B/G за западноевропейските страни или D/K за
източноевропейските страни). След това натиснете
B.
3 След като изберете опцията Номер на канала, натиснете OK. След това натиснете
настройката на канала ("C" за ефирни канали или "S" за кабелни канали). След това натиснете
цифровите бутони, за да въведете директно номера на канал на телевизионното предаване или канала на
видео сигнала. Ако не знаете номера на канала, натиснете
настроили желания канал, натиснете OK два пъти за запаметяване.
Повторете всички стъпки по-горе, за да захванете и запаметите още канали.
б) Да дадете име на канал, като използвате до пет знака.
За да направите това:
След като влезете в менюто "Инсталиране", както е обяснено на стр. 16, и след като изберете опцията
"Програма ръчен избор", натиснете OK. След това, когато е осветена опцията Програма, натиснете бутона
PROG +/-, за да изберете номера на програма за канала, който искате да наименувате. Когато програмата,
която искате да наименувате, се появи на екрана, изберете опцията "Име" и натиснете OK. След това, когато
е избран първият елемент, натиснете
завършите, натиснете v,
изключите менюто от екрана.
• За да коригирате буквата, изберете "
• За въвеждане на интервал изберете " " на екрана и натиснете OK.
V
, B или b, за да изберете думата "Край" на екрана и накрая натиснете OK, за да
v, V
, B или b, за да изберете буквата, а след това натиснете OK. Когато
%" на екрана, за да се върнете, и натиснете OK.
b и v или V, за да го търсите. Когато сте
v
или
V
, за да изберете
v
или
V
, за да изберете
в) Да настроите фино приемането на програмата. Обикновено Ф. Настр. (на английски "Automatic Fine Tuning
= автоматична фина настройка) ще ви даде най-добрата възможна картина, но можете да настроите фино
ръчно телевизора, за да получите по-добро приемане на картината в случай на изкривяване на картината.
За да направите това:
Докато гледате канала (телевизионно предаване), който желаете да настроите фино, и след като влезете в
менюто "Инсталиране", както е обяснено на стр. 16 и след като изберете опцията "Програма ръчен избор",
натиснете
нагласите фината настройка от -15 до +15. Накрая, натиснете OK два пъти за запаметяване.
OK.
След това изберете опцията Ф. Настр. и натиснете b. След това натиснете
v
или
V
,
за да
г) Да пропуснете всички номера на програми, които не желаете, когато те се избират с бутоните PROG +/-.
За да направите това:
След като влезете в менюто "Инсталиране", както е обяснено на стр. 16 и след като изберете опцията
"Програма ръчен избор", натиснете OK. След това, когато е осветена опцията Програма, натиснете бутона
PROG +/-, за да изберете номера на програмата, която искате да пропускате. Когато програмата, която
искате да пропускате, се появи на екрана, изберете опцията Пропусни и натиснете
или
V
,
за да изберете Вкл. Накрая, натиснете OK два пъти, за да потвърдите и запаметите.
За да отмените тази функция по-късно, в стъпката по-горе изберете "Изкл", вместо "Вкл".
b. След това натиснете
v
д) Показване и записване на кодирани канали (напр. от декодер на платена телевизия), когато използвате
декодер, свързан към SCART 3/ 3 директно или през видео.
Тази опция е налична само в зависимост от страната, която сте избрали в менюто "Държава".
За да направите това:
След като влезете в менюто "Инсталиране", както е обяснено на стр. 16 и след като изберете опцията
"Програмa ръчeн избop", натиснете OK. След това изберете опцията Декодер и натиснете
натиснете
За да отмените тази функция по-късно, в стъпката по-горе изберете "Изкл", вместо "Вкл".
v или V, за да изберете Вкл. Накрая, натиснете OK два пъти, за да потвърдите и запаметите.
S
b. След това
18
Функции на телевизора
Page 45

КИК (КАРТИНА И КАРТИНА)
Тази функция (на английски PAP - Picture And Picture) разделя екрана на две за гледане на две картини във
формат 4:3 едновременно.
Включване и изключване на КИК
1 Натиснете , за да покажете КИК.
Един от екраните ще бъде в рамка, което показва, че
това е активният екран. Това означава, че когато
искате да изберете източника на КИК, ще правите
това в активния екран.
2 Натиснете отново, за да премахнете режима КИК.
На екрана се появява лента, която ви указва как да
работите с КИК. Тази лента ще изчезне след няколко
секунди, но винаги ще се показва отново, като натиснете
бутона .
Смяна на активния екран
Това е възможно само ако Медийният селектор е нагласен на TV.
За да смените активния екран (в рамка), натиснете бутоните
B или b.
Избиране на източник за КИК
1 Избиране на телевизионен канал:
Натиснете бутона
цифровите клавиши или PROG +/-, за да изберете телевизионен канал.
Входни сигнали от видео не могат да се показват на левия екран.
B, за да изберете левия екран като активен екран. След това натиснете
2 Избиране на входен източник:
Натиснете бутона
натиснете последователно бутона , за да гледате входен сигнал от свързана апаратура на
десния екран на телевизора. За повече подробности кой символ на вход искате да изберете
вж. раздел "Гледане на картина от апаратура, свързана към телевизора" на стр. 23.
RF сигнал (канали с телевизионно предаване) не може да се показва на десния екран.
Смяна на активния екран
За да смените активния екран (в рамка), натиснете бутоните B или b.
Избиране на звука
Звукът от активния екран (в рамка) винаги излиза от високоговорителите на телевизора.
Освен това, можете да слушате през слушалки както активния екран, така и неактивния екран.
За да направите това:
Когато КИК е включено, вж. раздела "Меню "Настройка на звука"", изберете "Настройка на
слушалки" и задайте опцията " КИК звук" според предпочитанията си. За подробности вж.
стр. 13.
B режим KBK (картина в картина), изходът от Scart 2/ 2 се фиксира на правилната
картина.
b, за да изберете десният екран да бъде активен екран. След това
BG
Функции на телевизора
19
Page 46

Телетекст
Телетекстът е информационна услуга, предавана от повечето телевизионни станции. Индексната страница
на услугата телетекст (обикновено страница 100) предлага информация как се използва услугата. За да
работите с телетекст, използвайте дистанционното управление, както е показано по-долу.
В телетекста може да възникват грешки, ако използвате канал (телевизионно предаване) със слаб сигнал.
За да включите телетекст:
1 Изберете канала на предаване, който съдържа
услугата телетекст, която искате да гледате.
2 Натиснете бутона един път, за да влезете в
режим "Картина и телетекст". Екранът се разделя на
две, като изображението на телетекст е отляво, а
телевизионният канал е отдясно.
3 Ако желаете да гледате телетекст на пълен екран,
натиснете бутона втори път.
За да изберете страница от телетекст:
Въведете 3 цифри за номера на страница, като използвате цифровите бутони.
• Ако направите грешка, въведете отново номера на страница.
• Ако броячът на екрана продължава да търси, това е защото тази
страница не е налична. Ако е така, въведете друг номер на
страница.
За да отворите следващата или предишната страница:
Натиснете PROG + ( ) или PROG - ( ).
За да стопирате страница от телетекст:
Натиснете / . Натиснете го отново, за да прекратите стопирането.
За разкриване на скрита информация (напр.: отговор на тест):
Натиснете / . Натиснете го отново, за да скриете информацията.
За да изберете подстраница:
Една страница от телетекст може да се състои от няколко подстраници. В този случай до
номера на страницата се появява една стрелка или повече, а долу на екрана се показва
правоъгълник, който показва броя страници, съдържащи се на тази страница. Когато
подстраниците се получат, те започват да текат автоматично. Ако искате да спрете поредното
показване и да изберете желаната от вас подстраница, натиснете последователно
B или b.
За да изключите телетекста:
Натиснете .
Фастекст
Фастекст ви позволява да извиквате страниците от телетекст бързо и лесно.
Когато сте в режим на телетекст и се излъчва фастекст, се повява цветово кодирано
меню в долната част на страницата от телетекст. Натиснете съответния цветен бутон
(червен, зелен, жълт или син), за да отворите страницата, отговаряща на вашия избор
от менюто.
20
Телетекст
Page 47

NexTView*
*(в зависимост от предлагането на услугата).
NexTView е екранен електронен наръчник на програмите, който ви дава информация за програмите на
различните канали.
Когато търсите информация, можете да търсите по тема (спорт, изкуство и т. н....) или по дата.
Ако при гледането на NexTView се появят неправилни букви, използвайте системата на менютата, за да
влезете в менюто "Език" (вж. стр. 16) и изберете същия език като този, на който се излъчва NexTView.
Показване на NexTView
1 Изберете програмен канал, който предлага услугата NexTView. В този случай индикацията
"NexTView" се показва веднага, след като има налични данни.
2 За да видите услугата NexTView, имате два различни типа интерфейс за NexTView. Те
зависят от процента на налични данни:
a) Интерфейс "Списък програми":
Докато гледате телевизия и след като на екрана се показва "NexTView" (оцветено в
бяло), натиснете бутона на дистанционното управление, за да гледате
интерфейса "Списък на програмите" (вж. фиг. 1).
b) Интерфейс "Преглед":
Докато гледате телевизия и след като на екрана се покажат повече от 50% от данните
на NexTView (100% от данните може да не са налични, в зависимост от областта),
индикацията "NexTView" (оцветена в черно) се показва на екрана. Натиснете бутона
на дистанционното управление, за да гледате интерфейса "Преглед" (вж. фиг. 2).
3 За да се придвижвате в NexTView:
• Натиснете
• Натиснете
• Натиснете OK, за да потвърдите избор.
• Ако сте избрали програма, натиснете OK, за да получите повече информация за
избраната програма.
B или b, за да се придвижите наляво или надясно.
v или V, за да се придвижвате надолу или нагоре.
BG
4 За да изключите NexTView, натиснете бутона на дистанционното управление.
Интерфейс "Списък на програмите (фиг. 1): Интерфейс "Преглед" (фиг. 2):
1
2
1 Списък на програмите 2 3
Легенда на иконите:
Общо:
Цялата информация за програмите е дадена в
списък по теми и ред на програмите.
Новини
Кино
Спорт
Дата:
Натиснете червения бутон на
дистанционното управление, за да
покажете екрана за дата, като
можете да изберете желаната дата,
като натиснете v или V. След това
натиснете OK за потвърждение.
3
Шоу
Детски
Изкуство
Музика
1
2
Категории:
Натиснете синия бутон на дистанционното
управление, за да покажете иконите (вж.
по-долу легендата на иконите) за различни
теми. След това натиснете v или V, за да
изберете желаната икона, и накрая
натиснете бутона OK за потвърждение.
NexTView
3
21
Page 48

Включване на апаратура към телевизора
• Като следвате инструкциите по-долу, може да свързвате широка гама допълнителна апаратура към вашия
телевизор.
• Свързващите кабели не са включени в комплекта.
* PlayStation е
продукт на Sony
Computer
Entertainment, Inc.
G
Видео
* PlayStation е
търговска марка на
Sony
Computer
Entertainment, Inc.
2
1
PlayStation*
Декодер/
Set Top Box
S VHS/Hi8/
DVC
камкордер
A
B
C
8mm/Hi8/
DVC
камкордер
E
D
F
DVD
HI-FI
Декодер/ Set Top Box
DVD записващо устройство
• За да избегнете изкривяване на картината, не свързвайте външна апаратура към съединителите A и B
в един и същ момент.
• Не свързвайте декодер към гнездото SCART F.
• Игри, които използват приставка "ПИСТОЛЕТ" за посочване по екрана, може да не работят правилно
поради технологията 100Hz, използвана в този телевизор.
Свързване на видео
За да свържете видеокасетофон, вж. раздел "Свързване на антената и видеото" в това ръководство за употреба
на стр. 7.
Свързване на видео, което поддържа SmartLink
SmartLink е пряка връзка между телевизора и видеото. За повече информация по SmartLink вж.
ръководството за употреба на видеокасетофона.
Ако използвате видео, което поддържа SmartLink, свържете видеото към телевизора, като използвате SCART
кабел към гнездото SCART 3/ 3 E.
Ако сте включили декодер или Set Top Box към гнездото SCART 3/ 3 E или през
S
S
видео, свързано към това гнездо SCART
Изберете опцията "Програмa ръчeн избop" в менюто "Инсталиране" и, след като влезете в опцията
"Декодер**", изберете "Вкл" (вж. стр. 18). Повторете тези действия за всеки кодиран канал.
**Тази опция е налична в зависимост от страната, която сте избрали в менюто "Държава".
22
Допълнителна информация
продължава...
Page 49

Свързване на аудио апаратура към телевизора
В
Свържете вашата аудио апаратура към гнездата аудио изход D, ако желаете да усилвате аудио изхода от
телевизора. След това, като използвате системата от менюта, изберете менюто "Настройка на звука" и задайте
"Телев. говорител" на "Еднократно изключен" или "Непрекъснато изключен" (вж. стр. 13).
Силата на звука на външните високоговорители може да се променя, като натиснете бутоните за сила на
звука на дистанционното управление. Настройките "Високи" и "Ниски" може също да се променят
посредством менюто "Настройка на звука" (вж. стр. 12).
Hi-Fi високоговорители
За да се радвате на звуковия ефект "Dolby Virtual" през
вашата аудио апаратура
Поставете високоговорителите на вашата апаратура пред вашето
положение на слушане и встрани от телевизора, като поддържате
разстояние от 50 см между всеки от високоговорителите и телевизора.
След това, като използвате системата от менюта, изберете менюто
"Настройка на звука". След това изберете "Dolby Virtual" от опцията
"Звуков ефект" (вж. стр. 12).
ашето положение на седене
~50°
Гледане на картина от апаратура, свързана към
телевизора
1 Свържете апаратурата си към определеното за това гнездо на телевизора, както е указано на
предишната страница.
2 Включете свързаната апаратура.
3 За да гледате картина от свързаната апаратура, натиснете бутона последователно, докато
на екрана се появи правилният символ на вход.
BG
Символ Входни сигнали
1 • Аудио / видео входен сигнал през SCART съединителя G.
1 • RGB входен сигнал през SCART съединителя G. Този символ се появява само
2 • Аудио / видео входен сигнал през SCART съединителя F.
2 • RGB входен сигнал през SCART съединителя F. Този символ се появява само
3 • Аудио / видео входен сигнал през SCART съединителя E.
S
3 • S Video входен сигнал през SCART съединителя E. Този символ се появява
4 • Видео входен сигнал през звуковото гнездо B и аудио входен сигнал през C.
S
4 • S Video входен сигнал през предното входно S Video гнездо A и аудио сигнал
ако е свързан RGB източник.
ако е свързан RGB източник.
само ако е свързан S Video източник.
през C. Този символ се появява само ако е свързан S Video източник.
4 Натиснете бутона на дистанционното управление, за да се върнете към нормална
телевизионна картина.
За моно апаратура
Свържете звуковия жак към гнездото L/G/S/I отпред на телевизора и изберете 4 или 4
входен сигнал, като следвате инструкциите по-горе. След това, вж. раздела "Настройка на звука"
в това ръководство и опцията "Стерео-ефект" на "A" на екрана за звуково меню (вж. стр. 12).
S
Допълнителна информация
23
Page 50

Обучение на функции от други дистанционни
управления
За премахване на нуждата от много дистанционни управления, това дистанционно управление има
функцията обучение. След като се инсталира, както е обяснено по-долу, то може да се използва вместо
другите дистанционни управления.
Препоръчва се да си отбележите на какво е обучен всеки бутон (можете да използвате таблицата,
предоставена с дистанционното управление).
Преди да започнете и за по-точно обучение, прочетете инструкциите по-долу:
• Изберете бутона (a-g), който искате да обучите. Бутоните, които могат да се обучават на нова функция,
са отбелязани със синя точка. На фиг. 3 са показани възможните бутони.
• Не премествайте дистанционните управления по време на процедурата на обучение.
• Непременно задръжте натиснат бутона за обучение, докато вашето устройство реагира, както е описано.
• Използвайте нови батерии и в двете дистанционни управления.
• Избягвайте обучението на места, на които попада пряка слънчева светлина или силно флуоресцентно
осветление.
• Шумът може да внесе смущения в процедурата на обучение.
• Областта на откриване на дистанционно управление може да се различава, в зависимост от конкретното
устройство. Ако обучението не работи, опитайте се да смените позициите на двете дистанционни
управления.
• Възможно е някои специфични сигнали на дистанционното управление да не могат да бъдат обучени.
• Ако не изпълните стъпките на обучение в рамките на 20 секунди за всяка точка по време на процеса,
режимът на обучение завършва.
1 Разположете и двете дистанционни управления, както е показано (вж. фиг. 1).
фиг. 1
2-3 см.
фиг. 3
a
2 Натиснете и задръжте бутона t на това дистанционно
управление за приблизително 6 секунди, докато зелената лампичка
AUX започне да мига (вж. фиг. 2).
Дистанционно
управление на
Друго
дистанционн
фиг. 2
3 Натиснете бутона (a-g, вж. фиг. 3) на дистанционното управление на
този телевизор, на което искате да искате да запаметите обучената
функция.
b
g
c
4 Натиснете бутона от другото дистанционно управление, на който желаете
d
След като избраният бутон е натиснат, поред започват да се
осветяват и мигат VCR, TV, DVD и AUX (вж. фиг. 4).
да обучите дистанционното управление на вашия телевизор.
• По време на процеса на предаване на данни, всичките четири
лампички светят едновременно (вж. фиг. 5).
• Веднага след завършване на предаването на данни, зелената
лампичка AUX започва да мига (вж. фиг. 6).
V
T
R
C
V
MODE
фиг. 4
T
R
C
V
MODE
D
V
D
A
U
X
6 сек.
D
V
V
D
A
U
X
e
5 Ако желаете да запишете други функции, повторете стъпки 2-4
(прочетете преди предупреждението по-долу), а в противен случай
преминете към стъпка 6.
f
• В случай че се опитате да изберете бутон, който вече е обучен,
всичките четири лампички ще мигнат за много кратко и
дистанционното управление автоматично ще се върне в
състоянието от стъпка 2, като лампичката AUX мига.
• В случай че се опитате да изберете бутон, който не може да се
обучава, дистанционното управление остава в същото
състояние, както в стъпка 2, като лампичката AUX мига.
6 Натиснете бутона t, за да завършите процеса на обучение.
фиг. 5
V
T
R
C
V
MODE
фиг. 6
V
T
R
C
V
MODE
D
V
D
A
U
X
D
V
D
A
U
X
7 Проверете дали всички функции на обучението са обучени по правилен начин.
• За да използвате по-късно обучена функция, натиснете бутона
изберете AUX, а след това натиснете съответния бутон.
• Винаги помнете, че трябва да натиснете бутона
T или t, докато зелената
лампичка светне в съответствие с апаратурата, която се опитвате да управлявате с
това дистанционно управление: VCR (Зa видeo), TV, DVD или AUX.
T или t, за да
24
Допълнителна информация
продължава...
Page 51

Изтриване на обучена функция
a
1 Натиснете и задръжте бутона t за около шест секунди, докато
зелената лампичка AUX започне да мига (вж. фиг. 7).
2 Като държите натиснат бутона %, натиснете бутона (a - g) с
обучената функция, която искате да изтриете.
Всичките четири лампички светват едновременно (вж. фиг. 8)
и веднага след изтриването на обучената функция зелената
b
g
c
лампичка AUX започва да мига (вж. фиг. 9).
3 Ако желаете да запаметите нова функция, повторете стъпки 3 и 4
от предишната страница, а в противен случай натиснете бутона
за да се върнете към нормална работа.
t,
V
T
R
C
V
MODE
фиг. 8
T
R
C
V
MODE
фиг. 7
D
V
D
D
V
V
A
U
X
6 сек.
D
A
U
X
d
e
f
Изтриване на всички обучени функции едновременно
1 Натиснете и задръжте бутона t за около шест секунди, докато
зелената лампичка AUX започне да мига (вж. фиг. 7).
2 Като държите натиснат бутона %, натиснете t, за да изтриете
всички обучени функции.
R
C
V
T
MODE
фиг. 9
D
V
V
D
A
U
X
Всичките четири лампички светват едновременно (вж. фиг. 8)
и веднага след изтриването на обучените функции
дистанционното управление автоматично се връща към
нормална работа.
BG
Допълнителна информация
25
Page 52

Конфигуриране с дистанционното управление за
видео или DVD
В стандартното му състояние, това дистанционно управление може да изпълнява основните функции на този
телевизор Sony, DVD устройства Sony и повечето видеокасетофони Sony. За да управлявате видеокасетофони и
DVD от други производители (и някои модели видеокасетофони Sony), дистанционното управление трябва да
се конфигурира:
фиг. 2
За да направите това:
• Преди да започнете, потърсете 3-цифрения код за вашата марка DVD или видео в списъка
по-долу. За марките, от които има повече от един код, въведете първия кодов номер.
• Sony се старае да актуализира софтуера в съответствие с измененията на пазара. Затова
проверете в кодовата таблица, включена с дистанционното управление, за най-новия
набор кодове.
• От вътрешната страна на капачето за батериите има залепено етикетче, на което да си
отбележите кодовете за вашите марки.
1 Натиснете и задръжте бутона T на дистанционното управление за
около 6 секунди, докато зелената лампичка DVD или VCR на Медийния
селектор започне да мига (вж. фиг. 1).
2 Докато лампичките VCR и DVD мигат, въведете трите цифри на кода за
вашата марка видео или DVD (вж. списъка по-долу), като използвате
цифровите бутони на дистанционното управление (вж. фиг. 2).
Ако избраният от вас код е въведен коректно, зелената лампичка
VCR или DVD (в съответствие с вашия избор) ще светне за
момент (вж. фиг. 3), а в противен случай повторете всички стъпки
по-горе.
3 Включете своето видео или DVD и проверете дали основните функции
работят.
• Ако вашето устройство не работи или някои от функциите не работят, проверете
дали сте въвели правилния код или опитайте следващия код от списъка за тази марка.
• Не всички марки се съдържат в този списък и не всички модели от всяка марка може
да са в него.
6 сек.
фиг. 1
T
R
C
V
MODE
R
C
V
D
V
V
D
фиг. 3
D
V
V
T
MODE
A
U
X
D
A
U
X
4 Винаги помнете, че трябва да натиснете бутона T или t, докато зелената лампичка
светне в съответствие с апаратурата, която искате да работи с това дистанционно управление:
VCR (видео), TV или DVD. За начина на работа в режим AUX вж. стр. 24-25.
Списък на марки видео Списък на марки DVD
Марка Код Марка Код
SONY (VHS) 301, 302, 303, 308, 309,362
SONY (BETA) 303, 307, 310
SONY (DV) 304, 305, 306
AIWA 325, 331, 351
AKAI 326, 329, 330
DAEWOO 342, 343
GRUNDIG 358, 355, 360, 361, 320, 351, 366
HITACHI 327, 333, 334
JVC 314, 315, 322, 344, 352, 353, 354, 348, 349
LG 332, 338
LOEWE 358, 355, 360, 361, 320, 351
MATSUI 356, 357
ORION 328
PANASONIC 321, 323
PHILIPS 311, 312, 313, 316, 317, 318, 358, 359,
363, 364
SAMSUNG 339, 340, 341, 345
SANYO 335, 336
SHARP 324
THOMSON 319, 350, 365
TOSHIBA 337
SONY 001, 029, 030, 036, 037, 038, 039, 040,
041, 042, 043, 044, 053, 054, 055
AIWA 021
AKAI 032
DENON 018, 027, 020, 002
GRUNDIG 009, 028, 023, 024, 016, 003
HITACHI 025, 026, 015, 004, 035
JVC 006, 017
KENWOOD 008
LG 015, 014, 034
LOEWE 009, 028, 023, 024, 016, 003
MATSUI 013, 016
ONKYO 022, 033
PANASONIC 018, 027, 020, 002, 045, 046, 047
PHILIPS 009, 028, 023, 024, 016, 003, 031
PIONEER 004, 050, 051, 052
SAMSUNG 011, 014
SANYO 007
SHARP 019, 027
THOMSON 012
TOSHIBA 003, 048, 049
YAMAHA 018, 027, 020, 002
26
Допълнителна информация
Page 53

Технически спецификации
Телевизионна система:
В зависимост от избора на
държава:
B/G/H, D/K
Цветова система:
PAL
SECAM, NTSC 3.58, 4.43 (само
вход на видео)
Диапазон на каналите:
VHF: E2-E12
UHF: E21-E69
CATV: S1-S20
HYPER: S21-S41
D/K: R1-R12, R21-R69
Електроннолъчева тръба:
Плосък дисплей FD Trinitron:
29" (прибл. 73 см по диагонал)
Задни клеми
• AV1
1/ 1
21-изводен SCART съединител
(CENELEC стандарт)
включително аудио/виде о вход,
RGB вход, TV аудио/видео
изход.
• AV2
2/ 2
21-изводен SCART съединител
(CENELEC стандарт)
включително аудио/виде о вход,
RGB вход, аудио/видео изход.
• AV3
3/ 3
• аудио изходи (Ляв/Десен) -
Предни клеми
• 4 S Video вход – 4-
• 4 видео вход – звуково
• 4 аудио вход – звукови
• гнездо за слушалки
S
21-изводен SCART съединител
(CENELEC стандарт)
включително аудио/видео
вход, S Video вход,
избираем аудио/видео изход
и SmartLink интерфейс.
звукови гнезда
S
изводен DIN
гнездо
гнезда
Звуков изход:
2 x 20 W (музикална мощност)
2 x 10 W (RMS)
Събуфер:
30 W (музикална мощност)
15 W (RMS)
Мощност на потребление:
135 W
Мощност на потребление в
готовност:
0,5 W
Размери (ширина x височина x
дълбочина):
прибл. 789 x 605 x 521 мм
Тегло:
прибл. 51 кг
Принадлежности в комплекта:
• 1 Дистанционно управление
(RM-943)
• 2 батерии (с IEC обозначение,
AA размер)
Други функции:
• 100 Hz картина, Digital Plus.
• Телетекст, Фастекст, ТОПтекст.
•NexTView
•SmartLink.
• Автоматично откриване на
телевизионната система.
• Dolby Virtual
• BBE Digital
•NICAM
• КИК (картина и картина, на
английски PAP = Picture And
Picture)
• ACI (от английското "Auto
Channel Installation" =
автоматично инсталиране на
канали).
• В кутиите е използван
забавител на огън, свободен от
халогени.
BG
Допълнителни аксесоари:
• Поставка, проектирана
специално за този телевизор
(SU-2829FQ3).
Дизайнът и спецификациите подлежат на промяна без предизвестие.
Това ръководство за употреба е направено от 100% рециклирана хартия.
Допълнителна информация
27
Page 54

Отстраняване на неизправности
Ето някои прости решения на проблеми, които се отнасят до картината и звука.
Проблем
Няма картина (екранът е тъмен),
няма звук.
Лоша или липса на картина (екранът
е тъмен), но добър звук.
Няма картина или няма информация
в менюто от апаратура, свързана със
SCART съединител.
Добра картина, няма звук.
Няма цвят или цветни програми.
Когато включите телевизора,
последният канал, който сте гледали,
преди изключване на телевизора, не
се появява.
Изкривяване на картината при смяна
на програмите или избор на
телетекст.
Решение
• Проверете свързването на антената.
• Включете щепсела в контакта и натиснете бутона отпред на
телевизора.
• Ако индикаторът за готовност е включен, натиснете бутона TV
на дистанционното управление.
• Като използвате системата от менюта, изберете менют "Настройка на
картината" и изберете "Нулиране", за да се върнете към фабричните
настройки (вж. стр. 11).
• Уверете се, че допълнителната апаратура е включена, и натиснете
бутона последователно на дистанционното управление, докато на
екрана се покаже на екрана (вж. стр. 23).
• Натиснете бутона + на дистанционното управление.
• Уверете се, че "Телев. говорител" е "Вкл" в менюто "Настройка на
звука" (вж. стр. 13).
• Уверете се, че слушалките не са свързани.
• Като използвате системата от менюта, изберете менюто "Настройка на
картината" и изберете "Нулиране", за да се върнете към фабричните
настройки (вж. стр. 11).
• Това не е неизправност. Натиснете цифровите бутони на
дистанционното управление, за да изберете желания канал.
• Изключете всяка апаратура, включена в съединителя SCART на гърба
на телевизора.
При гледане на телетекст се
появяват неправилни знаци.
При гледане на NexTView се
появяват неправилни знаци.
Картината е наклонена.
Когато гледате телевизионен канал,
се появява картина със сняг.
28
Допълнителна информация
• Като използвате системата от менюта, влезте в менюто "Държава" (вж.
стр. 16) и изберете страната, в която работи телевизорът. За езиците с
кирилица, ако вашата страна я няма в списъка, препоръчваме да се
избере Русия.
• Като използвате системата от менюта, влезте в менюто "Език" (вж. стр.
16) и изберете същия език, на който се излъчва NexTView.
• Като използвате системата от менюта, изберете опцията "Завъртане на
картината" от менюто "Характеристики", за да коригирате наклона на
картината (вж. стр. 15).
• Като използвате системата от менюта, изберете менюто "Програмa
ръчeн избop" и настройте фината настройка (Ф. Настр.), за да получите
по-добро приемане на картината (вж. стр. 18).
• Като използвате системата от менюта, изберете опцията "Потискане на
шума" от менюто "Настройка на картината" и изберете "Auto", за да
намалите шума в картината (вж. стр. 11).
продължава...
Page 55

Проблем
Решение
Няма декодирана картина при
гледане на кодиран канал с декодер
или Set Top Box, свързан през
SCART съединител
S
3/ 3.
v, V
Бутоните
режим КИК
Дистанционното управление не
работи.
Индикаторът за готовност на
телевизора мига.
• Ако продължавате да изпитвате същите проблеми, телевизорът трябва да бъде прегледан и
ремонтиран от квалифициран персонал.
• Не опитвайте да отваряте кутията сами.
, B и b не работат в
• Като използвате системата от менюта, изберете менюто
"Характеристики" и задайте "AV3 изход" на "TV" (вж. стр. 14).
• Проверете дали декодерът или Set Top Box не е свързан към
SCART 2/ 2.
• Придвижването в режим КИК (картина и картина) е възможно само в
режим телевизор; уверете се, че Медийният селектор е нагласен на TV.
• Уверете се, че Медийният селектор на дистанционното управление е
зададен на устройството, което използвате (VCR (за видео), TV или
DVD).
• Ако дистанционното управление не управлява вашите видео или DVD,
дори и когато Медийният селектор е зададен правилно. Въведете
необходимия набор кодове, както е обяснено на стр. 26.
• Заменете батериите.
• Обърнете се към най-близкия сервиз на Sony.
BG
Допълнителна информация
29
Page 56

Úvod
Děkujeme vám, že jste si vybrali tento výrobek Sony.
Než televizor začnete používat, přečtěte si prosím pozorně tento návod a uschovejte si ho pro budoucí potřebu.
• Symboly použité v tomto návodu:
• Důležitá informace.
• Informace o funkci.
• 1, 2... Pořadí pokynů.
• Na dálkovém ovladači jsou bíle zvýrazněna tlačítka,
která je nutné stisknout při postupu podle pokynů.
• Tento symbol uvádí, k jakému výsledku se má podle
pokynů dojít.
Obsah
Úvod .................................................................................................................................................................... 3
Bezpečnostní upozornění .................................................................................................................................. 4
Přehled a instalace
Kontrola dodávaného příslušenství ................................................................................................................. 5
Vložení baterií do dálkového ovladače ........................................................................................................... 5
Přehled tlačítek dálkového ovladače ............................................................................................................... 6
Přehled tlačítek televizoru ................................................................................................................................ 7
Připojení antény a videorekordéru .................................................................................................................. 7
První kroky
Zapnutí televizoru a automatické ladění......................................................................................................... 8
Funkce televizoru
Jak používat nabídkový systém televizoru .................................................................................................... 10
Nabídka nastavení obrazu......................................................................................................................... 11
Nabídka nastavení zvuku .......................................................................................................................... 12
Nabídka Funkce ......................................................................................................................................... 14
Výstup AV3.......................................................................................................................................... 14
Průvodce propojením .......................................................................................................................... 15
Otočení obrazu..................................................................................................................................... 15
RGB centrování ................................................................................................................................... 15
Nabídka instalace ....................................................................................................................................... 16
Jazyk...................................................................................................................................................... 16
Země ..................................................................................................................................................... 16
Automatické ladění .............................................................................................................................16
Třídění programů................................................................................................................................. 16
Označení programů ............................................................................................................................. 17
AV předvolby....................................................................................................................................... 17
Ruční ladění.......................................................................................................................................... 18
PAP (dva programy na obrazovce)................................................................................................................ 19
Teletext.................................................................................................................................................................. 20
NexTView...............................................................................................................................................................21
Doplňující údaje
Jak připojit zařízení k televizoru .....................................................................................................................22
Sledování obrazu ze zařízení připojeného k televizoru ................................................................................23
Funkce učení od jiných dálkových ovladačů..................................................................................................24
Konfigurace dálkového ovladače pro videorekordér nebo DVD...............................................................26
Technické údaje.................................................................................................................................................27
Jak odstranit závadu .........................................................................................................................................28
Jak televizor zdvihnout ..................................................................................................................Zadní strana
CZ
Obsah
3
Page 57

Bezpečnostní informace
Z bezpečnostních důvodů a důvodu
Tento televizor pracuje pouze s napětím
220-240V. V případě zapojení příliš
mnoha spotřebičů do jedné el. zásuvky
může dojít k úrazu el. proudem či požáru.
ochrany ivotního prostředí
doporučujeme nenechávat TV v
pohotovostním stavu (standby) kdy ji
nesledujete. Přesto by některé typy TV
měly být, vzhledem ke správné činnosti
svých funkcí, zapnuty v pohotovostním
stavu I kdy TV nesledujete. O
takovýchto případech jste informováni v
návodu k obsluze.
Nevkládejte žádné předměty do
televizoru, rovněž do televizoru nelijte
jakoukoliv tekutinu. V případě, že se
tak stane a již úmyslně či neúmyslně
televizor nezapínejte a sdělte tuto
skutečnost nejbliž ímu
autorizovanému servisu SONY, který
odborně televizor prověří.
Neotevírejte zadní kryt televizoru.
Toto přenechte pouze kvalifikovaným
odborníkům z autorizovaných servisů
SONY.
Nezakrývejte ventilační otvory
televizoru. Nechte kolem televizoru
alespoň 10 cm prostoru pro ventilaci
vzduchu.
Čistěte obrazovku a plastový kryt televize
pouze jemnou, lehce navlhčenou látkou.
Nepoužívejte žádné materiály s
povrchovou úpravou určenou k broušení,
nepoužívejte alkalické čističe, čistící a
brusné pasty, rozpouštědla jako je líh,
benzín, či ředidlo. Rovněž
nedoporučujeme používat antistatický
spray. Z bezpečnostních důvodů, před
mytím odpojte TV od el. proudu.
Nedotýkejte se během bouřky
jakékoliv části el. přívodního kabelu
ani anténního kabelu.
Neumis ujte televizor na horká,
mokrá či extrémně pra ná místa.
Televizor by neměl být vystaven
mechanickým vibracím.
Při vytahování el. přívodního kabelu
tahejte pouze za zástrčku, netahejte
za kabel.
Nevystavujte televizor de ti a vlhku,
předejdete tak případnému úrazu el.
proudem.
Hořlavé látky, či otevřený oheň
(svíčka) neumis ujte v těsné blízkosti
televizoru.
Abyste nepo kodili el. přívodní kabel
nepokládejte na něj žádné těžké
předměty. Doporučujeme
přebytečnou část el. přívodního
kabelu navinout kolem háčků na
zadní straně televizoru.
Postavte TV na bazpečný a stabilní
stolek. Nepřesunujte TV a stolek
najednou, v dy přesunujte TV a stolek
zvláš. TV nikdy nepokládejte na bok
či na zadní stranu přístroje. Nedovolte
dětem aby na TV lezly, sedaly, či si na
ní lehaly.
Bezpečnostní informace
4
Před manipulací vypojte televiz or z el.
sítě. Při manipulaci postupujte
opatrně abyste televizor nepo kodili.
Pokud vám televizor upadl, či byl
jiným způsobem po kozen nechte ho
prověřit odborným pracovníkem
autorizovaného servisu SONY.
Nezakrývejte ventilační otvory
televizoru novinami, časopisy ani
záclonami a závěsy.
Page 58

Kontrola dodávaného příslušenství
2 baterie
(velikost AA)
1 dálkový ovladač (RM-943)
Vložení baterií do dálkového ovladače
Zkontrolujte, zda jste baterie vložili se správnou polaritou.
Baterie likvidujte způsobem, který neškodí životnímu prostředí.
CZ
Přehled a instalace
5
Page 59

Přehled tlačítek dálkového ovladače
1 TV I/ : Jak televizor dočasně vypnout (klidový stav):
wa
w;
ql
qk
qj
qh
qg
qf
9 Teletext: tímto tlačítkem zapnete Teletext.
Podrobnosti viz strana 20.
q; a) Zobrazení seznamu kanálů: je-li Media
Selector (w;) přepnutý na TV a MENU je
vypnuté, stisknutím OK se zobrazí přehled
kanálů. Chcete-li vybrat kanál, stiskněte v
nebo V, a pak stiskněte opět OK ke sledování
vybraného programu.
b) Navigator: je-li Media Selector (w;) přepnutý
na TV a MENU (qd) je zapnuté, těmito tlačítky
můžete procházet nabídkovým systémem
1
2
3
4
5
6
7
8
9
q;
qa
qs
qd
televizoru. Podrobnosti viz strana 10.
qa Výběr režimu obrazu: opakovaným stiskem
tohoto tlačítka změníte režim obrazu. Další
podrobnosti o různých obrazových režimech viz
strana 11.
qs Výběr vysílacích kanálů: těmito tlačítky zvolíte
následující nebo předchozí vysílací kanál.
qd Nabídkový systém: tímto tlačítkem otevřete
nabídkový systém
qf Nastavení hlasitosti: těmito tlačítky zvýšíte
nebo snížíte hlasitost.
qg Výběr zvukového efektu:
stiskem změníte zvukový efekt. Další
podrobnosti o různých zvukových efektech viz
strana 12.
televizoru. Viz strana 10.
Tímto tlačítkem televizor dočasně vypnete (kontrolka klidového stavu na
televizoru se rozsvítí). Chcete-li televizor v klidovém stavu opět zapnout,
stiskněte tlačítko znovu.
• Pokud televizor nesledujete, doporučujeme ho kvůli úspoře energie
úplně vypnout.
• Není-li na vstupu 15 minut televizní signál a nestiskne se žádné tlačítko,
televizor se uvede automaticky do klidového stavu.
2 Aux I/ : tímto tlačítkem zapnete nebo vypnete videorekordér nebo DVD.
Podrobnosti o funkci AUX viz strana 24.
3 Volba televizního režimu: tímto tlačítkem vypnete režim PAP, teletextu
nebo vstupní režim videorekordéru.
4 Volba zdroje signálu: opakovaným stiskem tohoto tlačítka se na televizní
obrazovce objeví symbol požadovaného zdroje. Podrobnosti viz strana 23.
5 PAP (dva programy na obrazovce): tímto tlačítkem rozdělíte obrazovku na
dvě poloviny a můžete současně sledovat dva kanály. Podrobnosti viz strana 19.
6 Výběr vysílacích kanálů: je-li Media Selector (w;) přepnutý na televizor,
těmito tlačítky vyberete kanály. U programů označených dvěma číslicemi je
nutné stisknout druhou číslici do 2,5 vteřin.
7 a) Sledování posledního zvoleného programu: je-li Media Selector (w;)
přepnutý na TV, tímto tlačítkem se vrátíte k předchozímu programu, který
jste sledovali (pokud byl nastaven po dobu alespoň 5 vteřin).
b) Výběr dvouciferného programu videorekordéru: je-li Media Selector
(w;) přepnutý na VCR, tímto tlačítkem zvolíte pro videorekordér Sony
kanály s dvouciferným číslem, např. 23, nejprve stiskněte -/-- a pak tlačítka 2
a 3.
8 a) Fastext: je-li Media Selector (w;) přepnutý na TV a vy jste v teletextovém
režimu, lze tato tlačítka použít jako tlačítka Fastextu. Podrobnosti viz
strana 20.
b) Provoz videorekordéru nebo DVD: je-li Media Selector (w;) zapnutý na
videorekordér nebo DVD, tato tlačítka ovládají po naprogramování
dálkového ovladače hlavní funkce videorekordéru nebo DVD.
Podrobnosti viz strana 26.
qh NexTView: tímto tlačítkem zobrazíte
NexTView. Podrobnosti viz strana 21.
qj Zobrazení Info: po stisknutí tlačítka se na
obrazovce objeví např. údaje o číslu kanálu.
Dalším stiskem se funkce zruší.
qk Zastavení obrazu: Stisknutím tohoto tlačítka se
obraz zastaví. Obrazovka je rozdělena na dvě
části. Vlevo je normální obraz, zastavený obraz je
vpravo. Opětovným stiskem tlačítka se vrátíte do
normálního obrazu.
ql Výběr formátu obrazovky: opakovaným
stiskem tohoto tlačítka změníte formát
obrazovky. 4:3 pro a klasickou velikost obrazu
nebo 16:9 pro napodobení širokoúhlého formátu.
w; Media Selector: těmito tlačítky zvolíte, jaké
zařízení chcete zapnout - TV, VCR
(videorekordér), DVD nebo AUX. Zvolené
zařízení se na okamžik označí rozsvícením zelené
kontrolky. Podrobnosti najdete na stranách 24 -
26.
wa Vypnutí zvuku: tímto tlačítkem vypnete zvuk
televizoru. Dalším stiskem zvuk opět zapnete.
Opakovaným
Tlačítka označená 4, qs a qj se používají i pro teletext. Podrobnosti viz strana 20.
6
Přehled a instalace
Page 60

Přehled tlačítek televizoru
Zdířka pro sluchátka
Zdířka vstupu
S-video
Konektor vstupu videa
Zdířky vstupu
zvuku
Kontrolka klidového stavu
Stiskněte na značce .
Tlačítko automatického spuštění
(stiskem tlačítka se
vyvolá automatické
spuštění, viz strana
8)
Tlačítkovypínače
Volba
vstupního
zdroje
Připojení antény a videorekordéru
• Spojovací kabely nejsou součástí příslušenství.
• Podrobnější údaje o připojení videorekordéru a dalším připojení najdete na straně 22.
Tlačítka
procházení
programů
dopředu a
dozadu
(volba
vysílacích
kanálů)
Tlačítka regulace
hlasitosti
CZ
Videorekordér
OUT IN
Můžete použít kabel scart. Rozhodnete-li se pro toto volitelné připojení, získáte lepší kvalitu obrazu a
zvuku videorekordéru.
Jestliže nepoužijete kabel scart, budete muset po skončení automatického ladění ručně naladit
videorekordér na volný kanál. Viz "Ruční ladění" na straně 18. Řite se rovněž pokyny v návodu k
videorekordéru, kde se dozvíte, jak najít výstupní kanál videorekordéru.
nebo
Přehled a instalace
7
Page 61

Zapnutí televizoru a automatické ladění
Při prvním zapnutí televizoru se na obrazovce objeví sled nabídek, které umožňují: 1) výběr jazyka
nabídky na obrazovce 2) výběr země, ve které televizor používáte 3) seřízení sklonu obrazu 4) ověřit
si, jak se k televizoru připojuje volitelné zařízení 5) nalezení a uložení všech dostupných kanálů
(televizních stanic) a 6) změnu pořadí, ve kterém se kanály (televizní stanice) objevují na obrazovce.
Budete-li později chtít některé nastavení změnit, můžete tak učinit volbou příslušné funkce v
(Nabídka instalace) nebo stisknutím tlačítka automatického spuštění na televizoru.
Language
1 Přívodní kabel televizoru zasuňte do zásuvky (220-240 V ~,
50 Hz).
Při prvním připojení je televizor obvykle zapnutý. Je-li
vypnutý, zapněte ho vypínačem na televizoru.
Když televizi zapnete poprvé, objeví se na obrazovce
automaticky nabídka Language (Jazyk).
Select language
English
Nederlands
Français
Italiano
Deutsch
Türkçe
Español
Português
Polski
English
Nederlands
Français
Italiano
Deutsch
Türkçe
Español
Português
Polski
Language
Select language
English
English
Nederlands
Nederlands
Français
Français
Italiano
Italiano
Deutsch
Deutsch
Türkçe
Türkçe
Español
Español
Português
Português
Polski
Polski
2 Tlačítky V, v, B nebo b na dálkovém ovladači vyberte
požadovaný jazyk, a pak potvrte volbu tlačítkem OK. Od
této chvíle se budou všechny nabídky zobrazovat ve
zvoleném jazyku.
3 Automaticky se objeví nabídka Země. Tlačítky v nebo V
vyberte zemi, ve které televizor používáte. Volbu potvrte
tlačítkem OK.
• Jestliže země, ve které budete televizor používat,
není na seznamu, zvolte místo země "vyp".
• Není-li vaše země na seznamu, doporučujeme zvolit
Rusko, aby u jazyků psaných azbukou nedošlo ke
špatné volbě písma v teletextu.
4 Přirozené zemské magnetické pole někdy způsobuje, že se
obraz trochu sklání k jedné straně. Nabídkanastavení obrazu
umožňuje popřípadě opravit sklon obrazu.
a) Není-li to nutné, stisknutím OK vyberte Není potřeba.
b) Je-li to nutné, stiskněte B nebo b a vyberte Upravit teď,
pak stiskněte OK a upravte sklon obrazu v rozmezí od 5 a
+5 stisknutím v nebo V. Uložte tlačítkem OK.
Language
Select language
English
Nederlands
Français
Italiano
Deutsch
Türkçe
Español
Português
Polski
Země
Vyberte zemi
Vyp
Ireland
Nederland
België/Belgique
Luxembourg
France
Italia
Schweiz/Suisse/Svizzera
ž ě
č
ř
English
Nederlands
Français
Italiano
Deutsch
Türkçe
Español
Português
Polski
8
pokračování...
První kroky
Page 62

5 Objeví se schéma, které ukazuje, jak připojit k televizoru
nejrůznější zařízení. Řite se pokyny a pak stisknutím OK
obraz odstraňte a pokračujte v automatickém postupu.
Po automatickém naladění a připojení volitelného
zařízení nyní doporučujeme řídit se pokyny uvedenými
v části "Průvodce propojením" na straně 15, tak bude
volitelné zařízení nastaveno optimálně.
Propojte zarízení
v souladu s tímto návodem.
DVD
OK
6 Na obrazovce se objeví nabídka Automatické ladění.
Tlačítkem OK zvolte možnost Ano.
7 Televizor automaticky začne vyhledávat a ukládat všechny
dostupné vysílací kanály.
Tento postup trvá obvykle několik minut. Bute
prosím trpěliví, jinak se automatické ladění nedokončí.
V některých zemích naladí televizní vysílač kanály
automaticky (systém ACI). V tomto případě televizní
vysílač vysílá nabídku, ve které můžete vybrat své
město tlačítkem v nebo V a tlačítkem OK pak kanály
uložit.
Pokud se během automatického ladění nenajdou žádné
kanály, na obrazovce se automaticky objeví žádost o
připojení antény. Zkontrolujte připojení antény
(podrobnosti viz strana 7). Tlačítkem OK opět spust'te
proces automatického ladění.
8 Po nalezení a uložení všech dostupných kanálů
se na obrazovce automaticky objeví nabídka Třídění,
programů která umožňuje změnit pořadí, ve kterém jsou
kanály uloženy.
a) Pokud si přejete pořadí vysílaných kanálů ponechat,
přejděte ke kroku 9.
Potvrte
Přejete si spustit?
Ano Ne
Automatické ladění
Nalezené programy: 4
Program nenalezen
Připojte prosím anténu
Potvrte
Třídění programů
01
TVE
02
TVE2
03
TV3
04
C33
05
C27
06
C58
07
S02
08
S06
CZ
b) Pokud si přejete kanály uložit v jiném pořadí:
1 Tlačítkem v nebo V vyberte číslo programu a
kanál (televizní stanici), který si přejete změnit.
Stiskněte tlačítko b.
2 Tlačítkem v nebo V vyberte nové pořadí
programu pro vámi zvolený kanál (televizní stanici).
Nastavení uložte tlačítkem OK.
3 Přejete-li si změnit pořadí dalších kanálů, opakujte
kroky b)1 a b)2.
9 Tlačítkem MENU nabídku na obrazovce uzavřete.
Váš televizor je nyní připraven k použití.
Třídění programů
01
TVE
02
TVE2
03
TV3
04
C33
05
C27
06
C58
07
S02
08
S06
První kroky
01 TVE
9
Page 63

Jak používat nabídkový systém televizoru
Váš televizor je vybaven systémem nabídek, které se objevují na obrazovce a pomáhají vám při
nastavení. K ovládání systému nabídek použijte následující tlačítka na dálkovém ovladači:
1 K zapnutí nabídky na obrazovce:
Tlačítkem MENU na dálkovém ovladači zobrazíte první
úroveň nabídky.
2 K procházení nabídek:
• Ke zvýraznění a výběru požadované nabídky nebo funkce stiskněte
• K otevření vybrané nabídky nebo funkce stiskněte OK nebo
• K návratu do předcházející nabídky nebo funkce stiskněte OK nebo
• K úpravě nastavení vybrané funkce stiskněte v/V/B nebo b.
• K potvrzení a uložení svého výběru stiskněte OK.
3 K vypnutí nabídky na obrazovce:
Nabídku na obrazovce ukončíte tlačítkem MENU.
Nastavení obrazu
Režim obrazu: Přímý přenos
Kontrast:
Reset
Redukce šumu: Auto
Barevný tón: Studený
Výběr: Zadat Menu:OKKonec:
b.
MENU
v nebo V.
B.
Nastavení obrazu
Režim obrazu: Přímý přenos
Kontrast:
Reset
Redukce šumu: Auto
Barevný tón: Studený
Výběr: Zadat Menu:OKKonec:
MENU
10
Funkce televizoru
Page 64

Nabídka nastavení obrazu
MENU
Nastavení obrazu
Režim obrazu: Přímý přenos
Kontrast:
Reset
Redukce šumu: Auto
Barevný tón: Studený
Výběr: Zadat Menu:OKKonec:
Nabídka "Nastavení obrazu" umožňuje
změnit nastavení obrazu.
Postupujte takto:
Stiskněte tlačítko MENU a pak stisknutím
OK tuto nabídku otevřete. Pak tlačítky
v
nebo V vyberte požadovanou funkci a
stiskněte OK. Dále se dozvíte, jak jednotlivé
,
Nastavení obrazu
Režim obrazu: Přímý přenos
Kontrast:
Reset
Redukce šumu: Auto
Barevný tón: Studený
funkce používat.
MENU
Výběr:Zpet:
OK
Zadat Menu:
Režim obrazu Tato volba umožňuje upravit režim obrazu podle programu, který právě
sledujete. Po výběru této funkce stiskněte OK. Opakovaným stiskem
tlačítka
v nebo V vyberte:
Osobní (pro individuální nastavení).
Přímý přenos (pro přímý přenos programů, DVD a digitální přijímače
Set Top Box).
Film (pro filmy).
Po volbě požadované funkce ji tlačítkem OK uložte.
Úroveň "Jas", "Barevná sytost" a "Ostrost" u režimů " Přímý přenos" a "Film" je
nastavena již ve výrobě a zaručuje nejlepší kvalitu obrazu.
Kontrast Stisknutím
B nebo b zeslabíte nebo zesílíte kontrast obrazu. Uložte
tlačítkem OK.
Jas Stisknutím B nebo b obraz ztmavíte nebo vyjasníte. Uložte tlačítkem OK.
Tato funkce se objeví a je možné je opravit, jen je-li "Režim obrazu" nastavený na
"Osobní".
Barevná sytost Stisknutím
B nebo b zeslabíte nebo zesílíte barevnou sytost. Uložte
tlačítkem OK.
Tato funkce se objeví a je možné je opravit, jen je-li "Režim obrazu" nastavený na
"Osobní".
CZ
Odstín Stisknutím
B nebo b zeslabíte nebo zesílíte zelené tóny. Uložte tlačítkem OK.
Tato funkce se objeví jen pro signál NTSC (např. videokazety ze Spojených států).
Ostrost Stisknutím
B nebo b zeslabíte nebo zesílíte ostrost obrazu. Uložte
tlačítkem OK.
Tato funkce se objeví a je možné je opravit, jen je-li "Režim obrazu" nastavený na
"Osobní".
Reset Stisknutím OK obnovíte výchozí hodnoty obrazu od výrobce.
Redukce Tato funkce je nastavená na Auto k automatickému snížení obrazového
šumu šumu (v obrazu jakoby sněží). Můžete ji ale upravit stisknutím v nebo V k
výběru Vyp, Nízký, Střední nebo Vysoký. Uložte tlačítkem OK.
Barevný tón Tato volba umožňuje upravit barevný odstín obrazu. Po výběru této funkce
stiskněte s
b. Opakovaným stiskem tlačítka v nebo V vyberte: Teplý (dává
světlým barvám červený nádech), Normální (nechává světlé barvy v
neutrálním odstínu), Studený (dává světlým barvám modrý nádech). Uložte
tlačítkem OK.
Funkce televizoru
11
Page 65

Nabídka nastavení zvuku
Nastavení obrazu
Režim obrazu: Přímý přenos
Kontrast:
Reset
Redukce šumu: Auto
Barevný tón: Studený
Výběr: Zadat Menu:OKKonec:
m
Nastavení zvuku
Zvukový efekt: Dolby Virtual
Výšky:
Hloubky:
Vyvážení:
Reset
Dvoukanál.zvuk: Stereo
Aut. hlasitost: Vyp
TV reproduktory: Zap
Nastavení sluchátek
Výběr: Zadat Menu:OKKonec:
MENU
Nabídka "Nastavení zvuku" umožňuje
změnu zvukového nastavení.
Postupujte takto:
Tlačítkem MENU a tlačítkem
v vyberte
a pak stisknutím OK tuto nabídku otevřete.
MENU
požadovanou funkci a stiskněte OK. Dále
Pak tlačítky
v nebo V vyberte
se dozvíte, jak jednotlivé funkce používat.
Nastavení zvuku
Zvukový efekt: Dolby Virtual
Výšky:
Hloubky:
Vyvážení:
,
MENU
Reset
Dvoukanál.zvuk: Stereo
Aut. hlasitost: Vyp
TV reproduktory: Zap
Nastavení sluchátek
Zadat Menu:
Výběr:Zpet:
OK
Zvukový Tato volba umožňuje upravit zvukový efekt. Po této volbě
efekt stiskněte OK. Nyní opakovaným stiskem tlačítka
v nebo V vyberte:
Vyp (vypnuto).
Přirozený (zlepšuje průzračnost, věrnost a barvu zvuku použitím
systému "BBE High Definition Sound system"*).
Dynamický ("BBE High Definition Sound system"* zesiluje průzračnost a
barvu zvuku pro lepší srozumitelnost a věrnější hudební
dojem).
Dolby** (Dolby Virtual, televizor simuluje zvukový efekt "Dolby
Virtual Surround Pro Logic").
Po volbě požadované funkce ji tlačítkem OK uložte.
12
Funkce televizoru
Vý
šky Stisknutím B nebo b zeslabíte nebo zesílíte vysoké tóny. Uložte tlačítkem
OK.
Hloubky Stisknutím B nebo b zeslabíte nebo zesílíte hluboké tóny. Uložte tlačítkem
OK.
Vyvážení Stisknutím
B nebo b zdůrazníte levý nebo pravý reproduktor. Uložte
tlačítkem OK.
Reset Stisknutím OK obnovíte úrovně výchozích hodnot od výrobce. Uložte
tlačítkem OK.
Dvoukanál. • Pro stereofonní vysílání:
zvuk Tlačítky
v nebo V vyberte Stereo nebo Mono. Uložte tlačítkem OK.
• Při příjmu dvoujazyčného vysílání:
Tlačítky
v nebo V vyberte Mono (je-li k dispozici jeden kanál), A (pro
kanál 1) nebo B (pro kanál 2). Uložte tlačítkem OK.
pokračování...
Page 66

Aut. hlasitost Tlačítky v nebo V vyberte Zap (hlasitost programu bude stejná nezávisle na
vysílacím signálu, např. reklamy bývají hlasitější než ostatní programy) nebo
Vyp (hlasitost se bude měnit podle vysílacího signálu). Uložte tlačítkem OK.
Zvolíte-li "Dolby Virtual" ve funkci "Zvukový efekt", funkce "Aut. hlasitost" se
automaticky přepne na "Vyp" a naopak.
TV Tato funkce umožňuje volbu mezi poslechem televizoru z televizních
reproduktory reproduktorů nebo z externího zesilovače připojeného k audio výstupům na
zadní straně televizoru.
Po výběru této funkce stiskněte OK. Nyní opakovaným stiskem tlačítka
nebo
V vyberte:
Zap (k poslechu televizoru z televizních reproduktorů).
Dočasně vypnutý (k jednorázovému poslechu televizoru z externího
zesilovače. Při použití této funkce se po vypnutí/
zapnutí televizoru obnoví výchozí nastavení "Zap").
Trvale vypnutý (k poslechu televizoru vždy z externího zesilovače).
Po volbě požadované funkce ji tlačítkem OK uložte.
Zvolíte-li "Dočasně vypnutý" nebo "Trvale vypnutý", můžete také měnit hlasitost
externího zařízení tlačítky 2 +/- na dálkovém ovládači. Při stisknutí tlačítek hlasitosti
se objeví symbol % označující, že hlasitost, kterou upravujete, není hlasitost televizních
reproduktorů, ale hlasitost externího zařízení.
Nastavení sluchátek Tato funkce umožňuje nastavit hlasitost sluchátek a PAP (dva
programy na obrazovce) (podrobnosti o PAP viz strana 19).
Po výběru této funkce stiskněte OK. Opakovaným stiskem
v
v nebo V vyberte:
Hlasitost Stisknutím
úroveň hlasitosti sluchátek.
Dvoukanál. Pro stereofonní vysílání:
zvuk Stisknutím
Při příjmu dvoujazyčného vysílání:
Tlačítky
jeden kanál), A (pro kanál 1) nebo B (pro kanál 2).
PAP zvuk Vyberte Okno, jestliže chcete poslouchat
aktivní obrazovku (v rámečku) na obrazovce
PAP (viz strana 19), vyberte Levý obraz, jestliže
chcete poslouchat program na levé obrazovce,
nebo vyberte Pravý obraz, jestliže chcete
poslouchat program na pravé obrazovce.
B nebo b zesílíte nebo zeslabíte
v nebo V vyberte Stereo nebo Mono
v nebo V vyberte Mono (je-li k dispozici
CZ
* "BBE High Definition Sound system" vyrábí společnost Sony Corporation v licenci
BBE Sound, Inc. Je patentován v USA pod č. 4.638.258 a č. 4.482.866. Slova "BBE"
a symbol BBE jsou ochranné známky společnosti BBE Sound, Inc.
**Tento televizor umožňuje při poslechu zvukového signálu zakódovaného v Dolby
Surround dosahovat efektu zvuku ze všech stran simulací zvuku čtyř reproduktorů
dvěma reproduktory. Zvukový efekt lze také zlepšit připojením vhodného externího
zesilovače (podrobnosti viz strana 23).
** Vyrobeno v licenci Dolby Laboratories. "Dolby" a symbol dvojitého D jsou
ochranné známky společnosti Dolby Laboratories.
Funkce televizoru
13
Page 67

Nabídka funkce
Nastavení obrazu
Režim obrazu: Přímý přenos
Kontrast:
Reset
Redukce šumu: Auto
Barevný tón: Studený
Výběr: Zadat Menu:OKKonec:
m
Funkce
Výstup AV3 TV
Pruvodce propojením
Otočení obrazu
Výběr: Zadat Menu:OKKonec:
MENU
Nabídka "Funkce" umožňuje měnit různá
nastavení televizoru.
Postupujte takto:
Tlačítkem MENU a dvojím stisknutím
tlačítka
MENU
Funkce
Výstup AV3 TV
Pruvodce propojením
Otočení obrazu
tuto nabídku zadejte. Pak tlačítky v nebo
V vyberte požadovanou funkci a stiskněte
OK. Dále se dozvíte, jak jednotlivé funkce
používat.
v vyberte , pak stisknutím OK
,
OK
Zadat Menu:
MENU
VÝSTUP AV3
Tato funkce umožňuje zvolit, z jakého zdroje pochází výstupní signál na zdířce scart,
S
3/ 3, takže z ní pak můžete nahrávat libovolný signál z televizoru nebo z externího
zařízení připojeného ke zdířce scart, 1/ 1, 2/ 2 nebo k předním konektorům
S
4 nebo 4 a 4.
Jestliže váš videorekordér podporuje Smartlink, tento postup není nutný.
Postupujte takto:
Po otevření nabídky "Funkce" podle popisu na předchozí straně a po výběru funkce
stiskněte OK. Pak tlačítky v
TV pro výstup signálu z antény.
AV1 pro výstup zdrojů připojených do zdířky 1/ 1.
AV2 pro výstup zdrojů připojených do zdířky 2/ 2.
AV4 pro výstup zdrojů připojených do zdířky 4 nebo 4 a 4.
AUTO pro výstup signálu zobrazeného na televizoru.
Výběr:Zpet:
nebo
V vyberte požadovaný výstupní signál:
S
14
Funkce televizoru
• Zvolíte-li "AUTO", výstupní signál bude vždy signál zobrazený na obrazovce.
• Máte-li dekodér připojený ke zdířce scart 3/ 3 nebo k videorekordéru
S
připojenému k této zdířce scart, nezapomeňte kvůli dekódování změnit "Výstup
AV3" zpět na "TV".
pokračování...
Page 68

PRŮVODCE PROPOJENÍM
I když jste již připojili k televizoru externí zařízení, dodržujte prosím pokyny této nabídky.
Dosáhnete tak nejlepšího možného nastavení obrazu pro volitelné zařízení.
Postupujte takto:
1 Po otevření nabídky "Funkce" podle popisu na předchozí straně a po výběru funkce
stiskněte OK. Nyní tlačítky
připojit: SAT (satelit), Dekoder, DVD, GAME, VIDEO (videorekordér) nebo DVD rec
(přehrávač DVD). Nyní tlačítkem b vyberte zvolené zařízení (zvolené zařízení můžete
také vymazat stiskem
nebo V, vyberte "Potvrďte" a stiskněte OK.
v, nebo V vyberte jedno z dostupných zařízení, které chcete
B). Po výběru všech zařízení, která chcete připojit, stiskněte v
2 Objeví se nová nabídka, ve které je uvedeno, do které zdířky scart na zadní straně
televizoru se má připojit určité zařízení. Tímto postupem připojte všechna zařízení,
dosáhnete tak u nich nejlepšího možného nastavení obrazu.
3 Po připojení volitelného zařízení vyberte tlačítky B nebo b "OK" a nakonec stiskněte
tlačítko OK na dálkovém ovladači.
Rozhodně doporučujeme, abyste se řídili uvedenými nabídkami připojení. V případě, že vám
nevyhovují, vyberte stisknutím
objeví nová nabídka, ve které můžete zadat připojení podle svých požadavků.
OTOČENÍ OBRAZU
Přirozené zemské magnetické pole někdy způsobuje, že se obraz trochu sklání k jedné
straně. V tomto případě můžete sklon obrazu touto funkcí upravit.
Postupujte takto:
Po otevření nabídky "Funkce" podle popisu na předchozí straně a po výběru funkce
stiskněte OK. Pak tlačítky
B nebo b "Ne", a pak stiskněte tlačítko OK. Na obrazovce se
v nebo V upravte střed obrazu na obrazovce v rozmezí -5 a +5.
CZ
RGB CENTROVÁNÍ
Tuto možnost lze použít jen v případě, že k televizoru je připojen zdroj RGB.
Tato volba umo ňuje seřízení horizontální polohy obrazu v případě, e je nutné ji upravit
kvůli připojení zdroje RGB.
Postupujte takto:
Po otevření nabídky "Funkce" podle popisu na předchozí straně a po zobrazení zdroje RGB
vyberte funkci "RGB centrování" a stiskněte OK. Pak tlačítky
obrazu na obrazovce v rozmezí 5 až +5. Volbu potvrte OK a uložte.
v nebo V upravte střed
Funkce televizoru
15
Page 69

Nabídka instalace
Nastavení obrazu
Režim obrazu: Přímý přenos
Kontrast:
Reset
Redukce šumu: Auto
Barevný tón: Studený
Výběr: Zadat Menu:OKKonec:
m
Instalace
Jazyk
Zem
ě
Automatické ladění
Třídění program
Označení program
AV předvolby
Ruční ladění
Výběr: Zadat Menu:OKKonec:
MENU
Nabídka "Instalace" umožňuje upravovat
různé funkce televizoru.
Postupujte takto:
Tlačítkem MENU a trojím stisknutím
v
tlačítka
tuto nabídku otevřete. Pak tlačítky
MENU
V
vyberte požadovanou funkci a stiskněte
vyberte , pak stisknutím OK
v
OK. Dále se dozvíte, jak jednotlivé funkce
Instalace
Jazyk
Zem
ě
ů
ů
,
MENU
Automatické ladění
Třídění program
Označení program
AV předvolby
Ruční ladění
Výběr:Zpet:
ů
ů
Zadat Menu:
OK
používat.
JAZYK
Tato funkce umožňuje zvolit jazyk nabídek na obrazovce.
Postupujte takto:
Po výběru této funkce stiskněte OK a pak postupujte stejně jako v kroku 2 v části "Zapnutí
televizoru a automatické ladění" na straně 8.
ZEMĚ
Tato volba umožňuje vybrat zemi, ve které budete televizor používat.
nebo
Postupujte takto:
Po výběru této funkce stiskněte OK a pak postupujte stejně jako v kroku 3 v části "Zapnutí
televizoru a automatické ladění" na straně 8.
AUTOMATICKÉ LADĚNÍ
Tato volba umožňuje automatické vyhledání a uložení dostupných televizních kanálů.
Postupujte takto:
Po výběru této funkce stiskněte OK a pak postupujte stejně jako v kroku 6 a 7 v části
"Zapnutí televizoru a automatické ladění" na straně 9.
TŘÍDĚNÍ PROGRAMŮ
Tato funkce umožňuje změnit pořadí, ve kterém se kanály (televizní stanice) objevují na
obrazovce.
Postupujte takto:
Po výběru funkce stiskněte OK a pak postupujte stejně jako v kroku 8 a části "Zapnutí
televizoru a automatické ladění" na straně 9.
pokračování...
Funkce televizoru
16
Page 70

OZNAČENÍ PROGRAMŮ
Tato volba umožňuje pojmenovat kanál řetězcem až pěti znaků (písmena nebo číslice).
Postupujte takto:
1 Po otevření nabídky "Instalace" podle popisu na předchozí straně a po výběru funkce stiskněte OK, pak
tlačítky v nebo V vyberte číslo programu pro kanál, který si přejete pojmenovat. Potvrte tlačítkem OK.
2 Při zvýrazněném prvním slově ve sloupci Název stiskněte OK a tlačítky
pak potvrte OK.
Po skončení výběru tlačítky
OK nabídku na obrazovce ukončete.
• Písmeno můžete opravit tak, že se na obrazovce vrátíte o znak zpět stisknutím "
potvrdíte tlačítkem OK.
• Mezeru vložíte výběrem " " na obrazovce a potvrzením OK.
AV PŘEDVOLBY
Tato volba umožňuje:
a) Přidělit název externímu zařízení, které jste připojili ke vstupním zdířkám na televizoru.
Postupujte takto:
v, V
, B nebo b vyberte na obrazovce slovo "Konec" a nakonec stisknutím
v, V
, B nebo b zvolte písmeno,
%" a volbu
1 Po otevření nabídky "Instalace" podle popisu na předchozí straně a po výběru funkce stiskněte OK,
pak tlačítky v
zadní scart a AV4 pro přední konektory. Nyní dvakrát stiskněte OK.
nebo
V vyberte zdroj signálu, který si přejete pojmenovat: AV1, AV2 nebo AV3 pro
2 Název se automaticky objeví ve sloupci s názvy:
a) Jestliže chcete použít některý z předem určených názvů, tlačítky
název a nakonec potvrte OK.
Předem určené názvy jsou tyto: VIDEO, DVD, CABLE (kabel), GAME, CAM (kamera) nebo
SAT (satelit).
b) Jestliže chcete použít jiný název, vyberte Změnit a stiskněte OK. Pak při zvýrazněném prvním názvu
tlačítky v, V, B nebo b vyberte písmeno a stiskněte OK. Po skončení tlačítky v,V, B nebo b
vyberte na obrazovce slovo "Konec" a nabídku na obrazovce uzavřete stiskem OK.
v nebo V vyberte požadovaný
CZ
• Písmeno můžete opravit tak, že se na obrazovce vrátíte o znak zpět stisknutím "
potvrdíte tlačítkem OK.
• Mezeru vložíte výběrem " " na obrazovce a potvrzením OK.
%" a volbu
b) Změnit úroveň zvukového vstupu připojeného volitelného zařízení.
Postupujte takto:
Po otevření nabídky "Instalace" podle popisu na předchozí straně a po výběru funkce stiskněte OK, pak
v
stisknutím
AV2 nebo AV3 pro zadní scart a AV4 pro přední konektory. Dvojím stisknutím b zvýrazněte sloupec
korekce zvuku. Nakonec tlačítky OK a v nebo V změňte úroveň zvukového vstupu v rozmezí od -9 a +9.
nebo V vyberte zdroj signálu, u kterého si přejete změnit úroveň zvukového vstupu: AV1,
pokračování...
Funkce televizoru
17
Page 71

RUČNÍ LADĚNÍ
Tato volba umožňuje:
a) Postupné přiřazení pořadových čísel kanálům nebo videokanálům v pořadí podle vaší volby.
Postupujte takto:
1 Po otevření nabídky "Instalace" podle popisu na straně 16 a po výběru funkce "Ruční ladění"
stiskněte OK. Nyní při zvýrazněné funkci Program stiskněte OK.
Tlačítky
Pak stiskněte
v nebo V vyberte číslo programu, které chcete kanálu přiřadit (pro video zvolte číslo "0").
B.
2 Dostupnost následující funkce závisí na tom, jakou zemi jste vybrali v nabídce
"Země".
v
nebo
Po výběru funkce Systém stiskněte OK. Pak tlačítky
vysílání (B/G pro západoevropské země nebo D/K pro východoevropské země L pro Francii nebo I
pro Velkou Británii). Pak stiskněte
B.
3 Po výběru funkce Číslo kanálu stiskněte OK. Nyní tlačítky
pozemní vysílání nebo "S" pro kabelové kanály). Pak rovnou číselnými tlačítky zadejte číslo kanálu
televizního vysílání nebo videosignálu. Neznáte-li číslo kanálu, vyhledejte ho tlačítky
. Po naladění požadovaný kanál uložte dvojím stisknutím OK.
Další kanály naladíte a uložíte opakováním výše popsaných kroků.
b) Pojmenovat kanál s použitím až pěti znaků.
Postupujte takto:
Po otevření nabídky "Instalace" podle popisu na straně 16 a po výběru funkce "Ruční ladění" stiskněte
OK. Dále při zvýrazněné funkci Program stiskněte tlačítko PROG +/- a vyberte číslo programu pro
kanál, který si přejete pojmenovat. Jakmile se program, který si přejete pojmenovat, objeví na
obrazovce, výberte funkci Název a potvrte tlačítkem OK. Pak při zvýrazněném prvním názvu tlačítky
v, V
, B nebo b vyberte písmeno a potvrte ho tlačítkem OK. Po skončení volby tlačítky
b vyberte na obrazovce slovo "Konec" a nabídku na obrazovce ukončete tlačítkem OK.
V zvolte jeden ze systémů televizního
v
nebo
V vyberte ladění kanálu ("C" pro
b a v nebo V
v, V
, B nebo
• Písmeno můžete opravit tak, že se na obrazovce vrátíte o znak zpět stisknutím "%" a volbu
potvrdíte tlačítkem OK.
• Mezeru vložíte výběrem " " na obrazovce a potvrzením OK.
c) Doladit příjem signálu Systém AFT (z anglického "Automatic Fine Tuning" = automatické doladění )
obvykle zaručuje ten nejlepší obraz, ale je-li obraz přesto obraz zkreslený, můžete ještě zkusit doladit
televizor ručně a dosáhnout tak lepšího příjmu.
Postupujte takto:
Při sledování kanálu (televizní stanice), který si přejete doladit, a po otevření nabídky "Instalace" podle
popisu na straně 16 a výběru funkce "Ruční ladění" stiskněte
b. Nyní tlačítky
OK.
v
nebo V
provete doladění v rozmezí od -15 do +15. Uložte dvojím stiskem tlačítka
OK.
Pak vyberte funkci AFT a stiskněte
d) Přeskočit čísla programů vybraných tlačítky PROG +/-, která nechcete použít.
Postupujte takto:
Po otevření nabídky "Instalace" podle popisu na straně 16 a po výběru funkce "Ruční ladění" stiskněte
OK
. Nyní
přeskočit. Jakmile se program, který si přejete přeskočit, objeví na obrazovce, vyberte funkci Přeskočit
a stiskněte
tlačítka OK.
Tuto funkci pak zrušíte výběrem "Vyp" místo "Zap" ve výše popsaném kroku.
při zvýrazněné funkci Program vyberte stiskem tlačítka PROG +/- číslo programu, které chcete
b. Nyní tlačítky v
nebo
V
vyberte Zap. Nakonec volbu potvrte a uložte dvojím stisknutím
e) Sledovat a nahrávat zakódované kanály (např. z placeného televizního dekodéru) "Ruční ladění" stiskněte
OK. Nyní při použití dekodéru připojeného ke zdířce scart 3/ 3 přímo nebo přes videorekordér.
Dostupnost této funkce závisí na tom, jakou zemi jste vybrali v nabídce "Země".
Postupujte takto:
Po otevření nabídky "Instalace" podle popisu na straně 16 a po výběru funkce "Ruční ladění" stiskněte
OK. Nyní zvolte funkci Dekodér a stiskněte
potvrte a uložte dvojím stisknutím tlačítka OK.
Tuto funkci pak zrušíte výběrem "Vyp" místo "Zap" ve výše popsaném kroku.
b. Pak tlačítky v nebo V vyberte Zap. Nakonec volbu
S
18
Funkce televizoru
Page 72

PAP (DVA PROGRAMY NA OBRAZOVCE)
Funkce PAP (z anglického "Picture And Picture" - dva programy na obrazovce) rozdělí obrazovku na
dvě poloviny k současnému sledování dvou obrazů ve formátu 4:3.
Zapnutí a vypnutí funkce PAP
1 Zobrazte PAP stisknutím .
Jedna z obrazovek bude orámovaná a tedy aktivní.
To znamená, že budete-li chtít vybrat zdroj PAP,
provede se výběr v aktivní obrazovce.
2 Dalším stisknutím PAP odstraníte.
Na obrazovce se objeví pruh, který vás povede při ovládání
PAP. Pruh po několika vteřinách zmizí, ale můžete ho opět
zobrazit stiskem tlačítka .
Zmina aktivní obrazovky
To je možné pouze tehdy, je-li Media Selector nastavený na TV.
Chcete-li zminit aktivní obrazovku (orámovanou), stisknite tlaeítko
Výběr zdroje PAP:
1 Výběr televizního kanálu:
Stiskem tlačítka B vyberte levou obrazovku jako aktivní. Nyní číselnými tlačítky nebo
PROG +/- vyberte televizní kanál.
03
PROG+ PROG-
Výběr: Výběr:
Posunout okno
B nebo b.
Navegador
Configuración del Sistema
Aceptar Versión
CZ
Na levé obrazovce není možné zobrazit vstupní signály videa.
2 Výběr zdroje signálu:
Stisknutím tlačítka b vyberte pravou obrazovku jako aktivní. Nyní tiskněte opakovaně
tlačítko k zobrazení vstupního signálu připojeného zařízení na pravé obrazovce.
Podrobnější informace o vstupních symbolech, které si můžete vybrat, najdete v části
"Sledování obrazu ze zařízení připojených k televizoru" na straně 23.
Na pravé obrazovce není možné zobrazit vysokofrekvenční signál (kanály
televizního vysílání).
Změna aktivní obrazovky
Aktivní obrazovku (orámovanou) změníte tlačítky
Výběr zvuku
Zvuk aktivní obrazovky (orámované) se vždy ozývá hlasitě z reproduktorů.
Mimoto můžete poslouchat zvuk aktivní i neaktivní obrazovky ze sluchátek.
Postupujte takto:
S televizorem v režimu PAP, viz část "Nabídka nastavení zvuku", vyberte "Nastavení
sluchátek" a nastavte funkci " PAP zvuk" podle přání. Podrobnosti viz strana 13.
V režimu PAP (dva programy na obrazovce) se výstup ze zdířky Scart 2/ 2
objevuje vždy v pravé polovině obrazovky.
B nebo b.
Funkce televizoru
19
Page 73

Teletext
Teletext je informační služba, kterou vysílá většina televizních stanic. Jak tuto službu využívat se
dozvíte na stránce s obsahem teletextové služby (obvykle stránka 100). Ke sledování teletextu použijte
tlačítka dálkového ovladače podle níže uvedených pokynů.
Signál kanálu (televizní stanice) musí být dostatečně silný, jinak může v teletextu docházet k chybám.
Zapnutí teletextu:
1 Zvolte televizní kanál s teletextem, který chcete
sledovat.
2 Jedním stiskem tlačítka otevřete režim obrazu
a teletextu. Obrazovka je rozdělena na dvě části s
teletextem vlevo a televizním kanálem vpravo.
3 Jestliže si přejete zobrazit teletext přes celou
obrazovku, stiskněte tlačítko podruhé.
Výběr teletextové stránky:
Trojmístné číslo stránky zadejte pomocí číselných tlačítek.
• Jestliže uděláte chybu, znovu zadejte správné číslo stránky.
• Jestliže počitadlo na obrazovce pokračuje v hledání, znamená to,
že stránka není dostupná. V tomto případě zadejte jiné číslo
stránky.
Přístup k následující nebo předchozí stránce:
Stiskněte PROG + ( ) nebo PROG - ( ).
Zastavení teletextové stránky:
Stiskněte / . Dalším stiskem se zastavení stránky zruší.
K odkrytí skrytých údajů (např: při odpovědi na hádanky):
Stiskněte / . Stiskněte ještě jednou ke skrytí údajů.
Volba podstránky:
Textová stránka se může skládat z několika podstránek. V tomto případě se vedle čísla
stránky objeví jedna nebo více šipek a dole na obrazovce se objeví rámeček s počtem
podstránek, které tato stránka obsahuje. Jakmile jsou podstránky dostupné, začnou se
postupně zobrazovat. Jestliže je chcete zastavit a vybrat požadovanou podstránku,
stiskněte opakovaně
Vypnutí teletextu:
Stiskněte .
B nebo b.
Fastext
Funkce Fastext umožňuje vyhledávat teletextové stránky jedním stiskem tlačítka.
Máte-li nastavený režim teletextu a fastext je k dispozici, dole na teletextové
stránce se objeví barevná kódovaná nabídka. Tlačítkem příslušné barvy (červená,
zelená, žlutá nebo modrá) otevřete stránku podle nabídky.
20
Teletext
Page 74

NexTView*
*(závisí na dostupnosti služby).
NexTView je elektronický přehled pořadů na obrazovce, který vás informuje o programech různých
televizních stanic.
Informace můžete vyhledávat i podle tématu (sport, umění apod.) nebo data.
Jestliže se při sledování NexTView objeví chybné znaky, otevřete pomocí nabídky Systém nabídku
Jazyk (viz strana 16) a vyberte jazyk, ve kterém se NexTView vysílá.
Zobrazení NexTView
1 Vyberte vysílací kanál poskytující službu NexTView. Jakmile jsou údaje dostupné, na
obrazovce se objeví označení "NexTView".
2 K zobrazení NexTView slouží dva různé typy rozhraní. Tyto typy souvisí s tím, kolik
procent dat je dostupných:
a) Rozhraní "Seznam programů":
Sledujete-li televizor, stiskněte po oznámení "NexTView" (bíle) na obrazovce
tlačítko na dálkovém ovladači k zobrazení rozhraní "Seznam programů" (viz
obr. 1).
b) Rozhraní "Přehled":
Sledujete-li televizor a více než 50 % dat NexTView je již dostupných (v
některých oblastech není možné získat 100 % dat), na obrazovce se objeví
oznámení "NexTView" (černě). Tlačítkem na dálkovém ovladači zobrazíte
rozhraní "Přehled" (viz obr. 2).
3 Procházení NexTView:
• Tlačítky
• Tlačítky
• Výběr potvrte tlačítkem OK.
• Po výběru programu získáte stiskem tlačítka OK další informace o
vybraném programu.
B nebo b se posunete doleva nebo doprava.
v nebo V se posunete nahoru nebo dolů.
4 Chcete-li NexTView vypnout, stiskněte tlačítko na dálkovém ovladači.
Rozhraní "Seznam programů" (obr. 1): Rozhraní "Přehled" (obr. 2):
1
Praesentiert von
Ihrer Programmzeitschr
Čt 12
AttrText
AttrText
AttrText
AttrText
AttrText
AttrText
Perry Mason
RTL2
Krimiserie - Der Fall mit dem mittelmass
14:30
www.tvmovie.de
15:00
Út 17 Cvn 14:55 - 16:30
Výběr:
2
1 Seznam programů 2 3
Datum:
Stisknutím červeného tlačítka na
dálkovém ovladači zobrazíte
obrazovku s daty a můžete vybrat
požadované datum tlačítky
15:30
AttrText16
AttrText16
AttrText16
AttrText16
AttrText16
AttrText16
Čt 12 Cvn
16:00
Všeobecné
KategorieDatum
14:36
3
v nebo
V. Potvrte tlačítkem OK.
Ikony:
Obecné:
Všechny informace o programu jsou seřazeny
podle času a vysílacích kanálů:
Zprávy
Film
Sport
Show
Dětské
Umění
Hudba
1
Praesentiert von
Ihrer Programmzeitschr
Čt 12
AttrText
AttrText
AttrText
AttrText
AttrText
AttrText
Perry Mason
RTL2
Krimiserie - Der Fall mit dem mittelmass
Datum
14:30
Auf schlimmer undewig
Baywatch
Benny Hill
The Osbournes
Segeln: Louis Vuitton Cup
Twilight Zone
www.tvmovie.de
15:00
Perry Mason
Út 17 Cvn 14:55 - 16:30
Výběr:
15:30 16:00
2
Kategorie:
Stisknutím modrého tlačítka na dálkovém
ovladači zobrazíte ikony (viz seznam ikon
níže) pro různá témata. Tlačítky
vyberte požadovanou ikonu a nakonec
potvrte tlačítkem OK.
Čt 12 Haz
14:36
Všeobecné
Kategorie
3
v nebo V
CZ
NexTView
21
Page 75

Jak připojit zařízení k televizoru
*
• Podle následujících pokynů můžete k televizoru připojit různá volitelná zařízení.
• Spojovací kabely nejsou součástí příslušenství.
S VHS/Hi8/
DVC
videokamera
A
B
C
8mm/Hi8/
DVC
videokamera
E
D
F
G
DVD
"PlayStation" je
výrobkem
společnosti Sony
Computer
Entertainment, Inc.
* "PlayStation" je
obchodní značka
společnosti Sony
2
1
"PlayStation"*
Dekodér/
Set Top Box
Videorekordér
Hi-fi
Dekodér/ Set Top Box
Přehrávač DVD
• Abyste předešli deformacím obrazu, nezapojujte externí zařízení současně do zdířek A a B.
• Dekodér nezapojujte do zdířky scart F.
• Hry, při kterých se jako ukazovací zařízení používá nástavec "PISTOLE", možná nebudou správně
fungovat kvůli technologii 100 Hz použité u tohoto televizoru.
Připojení videorekordéru
Pokyny k připojení videorekordéru najdete v části "Připojení antény a videorekordéru" tohoto návodu na
stránce 7.
Připojení videorekordéru, který podporuje Smartlink
Smartlink je přímé propojení televizoru a videorekordéru. Více informací o Smartlinku najdete v
návodu k videorekordéru.
Máte-li videorekordér, který podporuje Smartlink, připojte videorekordér k televizoru pomocí kabelu scart
do zdířky 3/ 3 E.
Jestliže jste připojili dekodér nebo Set Top Box ke zdířce scart 3/ 3 E nebo přes
S
S
videorekordér připojený ke zdířce scart
Vyberte funkci "Ruční ladění" v nabídce "Instalace" a po otevření funkce "Dekodér"**" vyberte "Zap"
(podrobnosti viz strana 18). Tuto funkci použijte pro každý zakódovaný signál.
**Dostupnost této funkce závisí na tom, jakou zemi jste vybrali v nabídce "Země".
pokračování...
22
Doplňující údaje
Page 76

Připojení zvukového zařízení k televizoru
Chcete-li zesílit zvukový výstup televizoru, zapojte zvukové zařízení do zdířek zvukového výstupu D. Dále
vyberte v systémové nabídce nabídku "Nastavení zvuku" a nastavte "TV reproduktory" na "Dočasně
vypnutý" nebo "Trvale vypnutý" (viz strana 13).
Hlasitost externích reproduktorů můžete upravit tlačítky hlasitosti na dálkovém ovladači. Výšky a
hloubky můžete upravit i pomocí nabídky "Nastavení zvuku" (viz strana 12).
Hi-fi reproduktory
Jak využít zvukový efekt "Dolby Virtual" pro
zvukové zařízení
Reproduktory umístěte před místo, kde budete poslouchat, a po
stranách televizoru, mezi každým reproduktorem a televizorem
ponechte vzdálenost asi 50 cm.
V nabídkovém systému otevřete nabídku "Nastavení zvuku". Nyní
vyberte ve funkci "Zvukový efekt" "Dolby Virtual" (viz strana 12).
~50˚
místo, kde sedíte
Sledování obrazu ze zařízení připojených k
televizoru
1 Zařízení připojte k určené zdířce televizoru, jak je uvedeno na předchozí stránce.
2 Připojené zařízení zapněte.
3 Chcete-li sledovat obraz z připojeného zařízení, opakovaně tiskněte tlačítko , až se na
obrazovce objeví symbol vstupu.
Symbol Vstupní signály
1 • Vstupní signál audio/video přes konektor scart G.
1 • Vstupní signál RGB přes konektor scart G. Tento symbol se objeví jen
tehdy, je-li zdroj RGB připojený.
2 • Vstupní signál audio/video přes konektor scart F.
2 • Vstupní signál RGB přes konektor scart F. Tento symbol se objeví jen
tehdy, je-li zdroj RGB připojený.
3 • Vstupní signál audio/video přes konektor scart E.
S
3 • Vstupní signál S-video přes konektor scart E. Tento symbol se objeví jen
tehdy, je-li zdroj S-video připojený.
4 • Vstup video signálu přes zdířku phono B a vstup audio signálu přes zdířku
C.
S
4 • Vstup signálu S-video přes zdířku vstupu S- video A a audio signálu přes
zdířku C. Tento symbol se objeví jen tehdy, je-li zdroj S-video připojený.
4 Tlačítkem na dálkovém ovladači se vrátíte k normálnímu televiznímu obrazu.
Pro zařízení mono
Konektor phono zapojte do zdířky L/G/S/I na přední straně televizoru a zvolte vstupní signál
4 nebo 4 podle výše uvedených pokynů. Dále se řite částí "Nastavení zvuku" v tomto
návodu a ve zvukové nabídce na obrazovce nastavte funkci "Dvoukanál. zvuk" na "A" (viz
strana 12).
S
CZ
Doplňující údaje
23
Page 77

Funkce učení od jiných dálkových ovladačů
Abyste nepotřebovali několik dálkových ovladačů, je tento dálkový ovladač vybaven funkcí učení.
Když ho nastavíte dále popsaným způsobem, můžete ho použít místo jiných dálkových ovladačů.
Doporučujeme vám, abyste si poznamenali, co jste určité tlačítko naučili (můžete použít tabulku
přiloženou k dálkovému ovladači).
Než začnete, přečtěte si prosím dále uvedené pokyny, abyste při učení správně postupovali:
• Vyberte tlačítko (a-g), které se má učit. Tlačítka, která se mohou naučit novou funkci, mají modrý
puntík. Možná tlačítka jsou na obr. 3.
• Při učení s dálkovými ovládači nehýbejte.
• Dbejte na to, abyste příslušné tlačítko tiskli tak dlouho, až ovladač zareaguje podle popisu.
• Do obou dálkových ovladačů použijte nové baterie.
• "Neučte" na místech vystavených přímému slunečnímu světlu nebo silnému světelnému zdroji.
• Hluk může při učení rušit.
• Detekční prostor dálkového ovladače se může lišit podle typu ovladače. Jestliže učení nefunguje,
zkuste změnit polohy obou dálkových ovladačů.
• Je možné, že určité specifické signály dálkového ovladače není možné naučit.
• Jestliže neprovedete učební kroky během postupu vždy do 20 vteřin, režim učení skončí.
1 Umístěte oba dálkové ovladače podle obr. 1.
obr. 1
2-3 cm.
obr. 3
a
b
c
d
2 Stiskněte a podržte tlačítko t tohoto dálkového ovladače
televizoru asi na 6 vteřin, dokud zelená kontrolka AUX nezačne
blikat (viz obr. 2).
3 Stiskněte tlačítko (a-g, viz obr. 3) tohoto dálkového ovladače
televizoru, do kterého chcete uložit naučenou funkci.
Jakmile stisknete vybrané tlačítko, kontrolky TV, DVD a
AUX začnou postupně blikat (viz obr. 4).
4 Stiskněte tlačítko druhého dálkového ovladače, který má učit váš
g
televizní ovladač.
• Během přenosu dat se současně rozsvítí všechny čtyři
kontrolky (viz obr. 5).
• Jakmile přenos dat skončí, zelená kontrolka AUX začne blikat
(viz obr. 6).
Tento televizní
ovladač
obr. 2
V
T
R
C
V
MODE
obr. 4
T
R
C
V
MODE
D
V
jiný dálkový
ovladač
V
D
A
U
X
D
V
D
A
U
X
6 s
e
5 Chcete-li nahrát další funkce, opakujte kroky 2-4 (přečtěte si
upozornění níže), jinak přejděte k bodu 6.
f
• Jestliže vyberete tlačítko, které se již učilo, všechny čtyři
kontrolky velmi krátce zablikají, dálkový ovladač se
automaticky vrátí do stejného stavu, v jakém byl v bodě 2, a
kontrolka AUX bude blikat.
• Jestliže vyberete tlačítko, které se nemůže učit, zůstane
dálkový ovladač ve stejném stavu, v jakém byl v bodě 2, a
kontrolka AUX bude blikat.
6 Tlačítkem t dokončete proces učení.
obr. 5
V
T
R
C
V
MODE
obr. 6
V
T
R
C
V
MODE
D
V
D
A
U
X
D
V
D
A
U
X
24
Doplňující údaje
7 Zkontrolujte, zda učení všech funkcí proběhlo správně.
• Chcete-li použít funkci učení později, stiskněte tlačítka T nebo t k výběru
AUX a pak stiskněte příslušné tlačítko.
• Nezapomeňte vždy stisknout tlačítko
zařízení, které si přejete tímto dálkovým ovladačem ovládat. VCR
(videorekordér), TV, DVD nebo AUX.
T nebo t až se rozsvítí zelená kontrolka
pokračování...
Page 78

Vymazání naučené funkce
a
1 Stiskněte a asi na šest vteřin podržte tlačítko t, až začne blikat
zelená kontrolka AUX (viz obr. 7).
2 Zatímco tisknete tlačítko %, stiskněte tlačítko (a - g) s naučenou
funkcí, kterou si přejete vymazat.
Všechny čtyři kontrolky se současně rozsvítí (viz obr. 8) a
jakmile je naučená funkce vymazaná, zelená kontrolka
b
g
c
AUX začne blikat (viz obr. 9).
3 Chcete-li uložit novou funkci, opakujte kroky 3 a 4 z předchozí
strany, jinak tlačítkem t vyberte návrat do normálního
V
T
R
C
V
MODE
obr. 8
T
R
C
V
MODE
obr. 7
D
V
D
D
V
V
A
U
X
6 s
D
A
U
X
provozu.
d
Vymazání všech naučených funkcí současně
e
1 Stiskněte a asi na šest vteřin podržte tlačítko t, až začne blikat
zelená kontrolka AUX (viz obr. 7).
2 Zatímco tisknete tlačítko % stiskněte t k vymazání všech
f
naučených funkcí.
R
C
V
T
MODE
obr. 9
D
V
V
D
A
U
X
Všechny čtyři kontrolky se současně rozsvítí (viz obr. 8) a
jakmile jsou všechny naučené funkce vymazané, vrátí se
dálkový ovladač do normálního provozu.
CZ
Doplňující údaje
25
Page 79

Konfigurace dálkového ovladače pro videorekordér
nebo DVD
Při výchozím nastavení ovládá tento dálkový ovladač základní funkce televizoru Sony, DVD
přehrávačů Sony a většiny videorekordérů Sony. K ovládání videorekordérů a DVD přehrávače jiných
výrobců (a některých modelů videorekordérů Sony), je nutné dálkový ovladač nakonfigurovat.
Postupujte takto:
obr. 2
• Než začnete, najděte si v níže uvedeném seznamu třímístný kód značky svého
přehrávače DVD nebo videorekordéru. Pokud je u vaší značky uveden víc než jeden
kód, poznamenejte si jen první z nich.
• Společnost Sony se snaží software pravidelně aktualizovat podle změn na trhu.
Nejnovější soupis kódů najdete v tabulce kódů přiložené k dálkovému ovladači.
• Na vnitřní straně krytu baterií je přilepen štítek, na nějž si můžete kódy vašich zařízení
poznamenat.
1 Stiskněte a podržte tlačítko T dálkového ovladače televizoru asi na
6 vteřin, dokud zelená kontrolka DVD a VCR na voliči Media
Selector nezačne blikat (viz obr. 1).
2 Zatímco kontrolka videorekordéru a DVD bliká, zadejte všechny tři
obr. 1
T
R
C
V
MODE
V
číslice kódu značky videorekordéru nebo DVD (viz seznam níže)
pomocí číselných tlačítek na dálkovém ovladači (viz obr. 2).
Jestliže je vybraný kód zadaný správně, zelená kontrolka
videorekordéru nebo DVD (podle vašeho výběru) se krátce
rozsvítí (viz obr. 3), jinak musíte výše uvedené kroky opakovat,
3 Zapněte videorekordér nebo DVD a zkontrolujte, zda hlavní funkce
fungují.
6 s
obr. 3
T
R
C
V
MODE
• Jestliže zařízení nebo některé funkce nefungují, nepokračujte,
ale zkontrolujte, zda jste zadali správný kód, nebo zkuste zadat
další kód uvedený vedle značky.
• V tomto seznamu nejsou uvedeny všechny značky a všechny modely těchto značek.
4 Nezapomeňte vždy stisknout tlačítko T nebo t až se rozsvítí zelená kontrolka
zařízení, které si přejete tímto dálkovým ovladačem ovládat. VCR (videorekordér), TV
nebo DVD. O provozu režimu AUX se dočtete na stranách 24 - 25.
D
V
D
A
U
X
D
V
V
D
A
U
X
Seznam značek videorekordérů Seznam značek DVD přehrávačů
Značka Kód Značka Kód
SONY (VHS) 301, 302, 303, 308, 309,362
SONY (BETA) 303, 307, 310
SONY (DV) 304, 305, 306
AIWA 325, 331, 351
AKAI 326, 329, 330
DAEWOO 342, 343
GRUNDIG 358, 355, 360, 361, 320, 351, 366
HITACHI 327, 333, 334
JVC 314, 315, 322, 344, 352, 353, 354, 348, 349
LG 332, 338
LOEWE 358, 355, 360, 361, 320, 351
MATSUI 356, 357
ORION 328
PANASONIC 321, 323
PHILIPS 311, 312, 313, 316, 317, 318, 358, 359,
SAMSUNG 339, 340, 341, 345
SANYO 335, 336
SHARP 324
THOMSON 319, 350, 365
TOSHIBA 337
26
Doplňující údaje
363, 364
SONY 001, 029, 030, 036, 037, 038, 039, 040,
041, 042, 043, 044, 053, 054, 055
AIWA 021
AKAI 032
DENON 018, 027, 020, 002
GRUNDIG 009, 028, 023, 024, 016, 003
HITACHI 025, 026, 015, 004, 035
JVC 006, 017
KENWOOD 008
LG 015, 014, 034
LOEWE 009, 028, 023, 024, 016, 003
MATSUI 013, 016
ONKYO 022, 033
PANASONIC 018, 027, 020, 002, 045, 046, 047
PHILIPS 009, 028, 023, 024, 016, 003, 031
PIONEER 004, 050, 051, 052
SAMSUNG 011, 014
SANYO 007
SHARP 019, 027
THOMSON 012
TOSHIBA 003, 048, 049
YAMAHA 018, 027, 020, 002
Page 80

Technické údaje
Televizní systém:
V závislosti na volbě země:
B/G/H, D/K
Barevný systém:
PAL
SECAM, NTSC 3.58, 4.43
(pouze video vstup)
Výběr kanálů:
VHF: E2-E12
UHF: E21-E69
CATV: S1-S20
HYPER: S21-S41
D/K: R1-R12, R21-R69
Obrazovka:
FD Trinitron, plochá
obrazovka:
29 palců (úhlopříčka přibl. 73
cm)
Zadní konektory
• AV1
1/ 1
21-kolíkový konektor scart
(norma CENELEC )
včetně vstupu audio/video,
vstupu RGB, výstupu TV
audio/video.
• AV2
2/ 2
21-kolíkový konektor scart
(norma CENELEC)
včetně vstupu audio/video,
vstupu RGB, výstupu
monitoru audio/video.
• AV3
3/ 3
21-kolíkový konektor scart
(norma CENELEC)
včetně vstupu audio / video,
vstupu S-video,
volitelného výstupu audio /
video a rozhraní SmartLink.
• výstupy audio (levý/
Konektory vpředu
• 4 vstup S-video 4-
• 4 vstup video zdířka
• 4 vstup audio zdířky
• zdířka pro sluchátka
S
pravý) - zdířky phono jacks
S
kolíkový DIN
phono jack
phono jack
Zvukový výstup:
2x20 W (hudební výkon)
2x10 W (sinus. výkon)
Hloubkový reproduktor:
30 W (hudební výkon)
15 W (sinus. výkon)
Příkon:
135 W
Příkon v klidovém stavu:
0,5 W
Rozměry (šířka x výška x
hloubka):
přibl. 789 x 605 x 521 mm.
Váha:
přibl. 51 kg.
Dodávané příslušenství:
• 1 dálkový ovladač (RM-943)
• 2 baterie (označené IEC,
velikost AA)
CZ
Další funkce:
• obraz 100 Hz, Digital Plus
• teletext, fastext, TOPtext
• NexTView
• Smartlink
• autodetekční televizní systém
• Dolby Virtual
• digitální BBE
• NICAM
• PAP (from English "Picture
And Picture" = dva programy
na obrazovce)
• ACI (z anglického "Auto
Channel Installation" =
automatická instalace kanálu)
• skříňka z nehořlavého
materiálu bez halogenů
Volitelné příslušenství:
• stojan speciálně navržený pro
tyto televizory (SU-2829FQ3)
Konstrukce a technické údaje mohou být změněny bez předchozího upozornění.
Tato uživatelská příručka byla vytištěna na 100 % recyklovaném papíře.
Doplňující údaje
27
Page 81

Jak odstranit závadu
Zde je uvedeno několik jednoduchých řešení problémů, které mohou ovlivnit obraz a zvuk.
Problém
Řešení
Žádný obraz (tmavá obrazovka),
žádný zvuk.
Špatný nebo žádný obraz (tmavá
obrazovka), ale dobrý zvuk.
Žádný obraz nebo žádné
informace o nabídce ze zařízení
připojených ke konektoru scart.
Dobrý obraz, žádný zvuk.
Barevné pořady jsou černobílé.
Při zapnutí televizoru se neobjeví
poslední kanál, který jste sledovali
před vypnutím televizoru.
Při přepínání kanálů nebo volbě
teletextu je obraz zkreslený.
• Zkontrolujte připojení antény.
• Zasuňte zástrčku do zásuvky a stiskněte tlačítko vpředu na
televizoru.
• Jestliže kontrolka klidového stavu svítí, stiskněte tlačítko TV
na dálkovém ovladači.
• V systému nabídek vyberte nabídku "Nastavení obrazu" a pak
"Reset" k návratu do výrobního nastavení (viz strana 11).
• Zkontrolujte, zda je volitelné zařízení zapnuté a opakovaně stiskněte
tlačítko na dálkovém ovladači, dokud se na obrazovce televizoru
neobjeví správný vstupní symbol (viz strana 23).
• Stiskněte tlačítko + na dálkovém ovladači.
• Zkontrolujte, zda jsou "TV reproduktory" v nabídce "Nastavení
zvuku" nastaveny na "Zap" (viz strana 13).
• Zkontrolujte, zda nejsou připojená sluchátka.
• V systému nabídek otevřete nabídku "Nastavení obrazu" a pak
"Reset" k návratu do výrobního nastavení (viz strana 11).
• Nejde o závadu. Číselnými tlačítky na dálkovém ovladači vyberte
požadovaný kanál.
• Vypněte všechna zařízení zapojená do konektoru scart na zadní
straně televizoru.
Při sledování teletextu se zobrazí
nesprávné písmo.
Při sledování NexTView se zobrazí
nesprávné písmo.
Nakloněný obraz.
Při sledování televizního kanálu
jakoby sněží.
28
Doplňující údaje
• V systému nabídek otevřete nabídku "Země" (viz strana 16) a
vyberte zemi, ve které televizor používáte. V případě jazyků psaných
azbukou doporučujeme zvolit Rusko, jestliže vaše země není na
seznamu.
• V systému nabídek otevřete nabídku "Jazyk" (viz strana 16) a
vyberte jazyk, ve kterém se NexTView vysílá.
• V systému nabídek vyberte "Otočení obrazu" v nabídce "Funkce" a
opravte sklon (viz strana 15).
• V systému nabídek otevřete nabídku "Ruční ladění" a nastavte
doladění (AFT) k vylepšení příjmu obrazu (viz strana 18).
• V systému nabídek otevřete nabídku "Redukce šumu" v nabídce
"Nastavení obrazu" a vyberte "Auto" k odstranění šumu obrazu (viz
strana 11).
pokračování...
Page 82

Problém
Řešení
Při nastavení kódovaného kanálu s
dekodérem nebo zařízením Set
Top Box připojeným ke konektoru
scart se neobjeví obraz.
S
3/ 3.
Tlaeítka
v, V
, B a b v režimu PAP
(dva programy na obrazovce)
nefungují.
Dálkový ovladač nefunguje.
• V systému nabídek otevřete nabídku " Funkce" a "Výstup AV3"
nastavte na "TV" (viz strana 14).
• Zkontrolujte, zda nejsou dekodér nebo zařízení Set Top Box
zapojené do zdířky scart 2/ 2.
• Navigace v PAP (dva programy na obrazovce) je možné pouze v
televizním režimu, zkontrolujte prosím, zda je Media selector
nastavený na TV.
• Zkontrolujte, zda je Media Selector na dálkovém ovladači nastaven
na zařízení, které právě používáte (VCR - videorekordér, TV, DVD
nebo AUX).
• Pokud dálkový ovladač nespolupracuje s videorekordérem nebo
DVD přehrávačem i přesto, že Media Selector je správně nastavený.
Zadejte potřebný kód podle popisu na straně 26.
• Vyměňte baterie.
Kontrolka klidového stavu na
• Obrat'te se na nejbližší servisní středisko Sony.
televizoru bliká.
• Pokud problémy přetrvávají, nechte si televizor prohlédnout odborníkem.
• Skříň televizoru nikdy sami neotvírejte.
CZ
Doplňující údaje
29
Page 83

Bevezető
Köszönjük, hogy ezt a Sony terméket választotta.
Kérjük, hogy a kézikönyvet a televízió használata előtt figyelmesen olvassa el, és későbbi tájékozódás céljából
őrizze meg.
• A kézikönyvben használt szimbólumok:
• Fontos információ.
• Tulajdonságra vonatkozó információ.
• 1,2... Utasítások sorrendje.
• A távvezérlőn fehérrel kiemelt gombokat kell
megnyomnia az utasítássor elvégzéséhez.
• Az utasítások eredményéről tájékoztatja Önt.
Tartalomjegyzék
Bevezető.............................................................................................................................................................. 3
Biztonsági előírzások ......................................................................................................................................... 4
Áttekintés és üzembe helyezés
A mellékelt tartozékok ellenőrzése ................................................................................................................. 5
Az elemek behelyezés a távvezérlőbe ............................................................................................................. 5
A távvezérlő gombjainak áttekintése ..............................................................................................................6
A televízió gombjainak áttekintése.................................................................................................................. 7
Az antenna és videomagnó csatlakoztatása .................................................................................................... 7
Első használat
A televízió bekapcsolása és automatikus hangolása...................................................................................... 8
A televízió funkciói
A menürendszer bemutatása és használata .................................................................................................. 10
A Képbeállítás menü ................................................................................................................................. 11
A Hangszabályozás menü ......................................................................................................................... 12
A Jellemzők menü...................................................................................................................................... 14
AV3 kimenet ........................................................................................................................................ 14
Tájékoztató a csatlakozásokhoz......................................................................................................... 15
Képelforgatás ....................................................................................................................................... 15
RGB pozicionálás ................................................................................................................................ 15
A Beállítás menü ........................................................................................................................................ 16
Nyelv ..................................................................................................................................................... 16
Ország ................................................................................................................................................... 16
Automatikus hangolás ........................................................................................................................ 16
Programhely-átrendezés ..................................................................................................................... 16
Programnevek ...................................................................................................................................... 17
AV beállítás.......................................................................................................................................... 17
Kézi hangolás ....................................................................................................................................... 18
PAP (Kettős kép)............................................................................................................................................. 19
Teletext.................................................................................................................................................................. 20
NexTView...............................................................................................................................................................21
További tudnivalók
Készülékek csatlakoztatása a televízióhoz.....................................................................................................22
A televízióhoz csatlakoztatott készülék képének megjelenítése.................................................................23
Funkciók tanulása más távvezérlőktől............................................................................................................24
A távvezérlő konfigurálása videomagnóhoz vagy DVD-hez ......................................................................26
Műszaki adatok..................................................................................................................................................27
Hibaelhárítás......................................................................................................................................................28
Hogyan emeljük fel a televíziót ....................................................................................................Hátsó borító
HU
Tartalomjegyzék
3
Page 84

Biztonsági előírások
Energiatakarékossági és biztonsági okok
Kizárólag 220-240 V-os hálózati váltakozó
feszültséggel üzemeltesse a készüléket.
Ne csatlakoztasson túl sok készüléket
ugyanahhoz az aljzathoz, mert a
túlterhelés tüzet okozhat.
miatt ne hagyja a készüléket készenléti
üzemmódban, amikor nem használja.
Hosszabb távollét esetén húzza ki a
hálózati csatlakozó vezetéket a fali
konnektorból. Ügyelni kell viszont arra,
hogy egyes készülékek bizonyos funkciói
csak a készenléti állapotban működnek. A
használati útmutató erről egyértelműen
tájékoztatást nyújt a későbbi fejezetekben.
Ne dugjon semmilyen tárgyat a
készülékbe, mert ezzel tüzet és
áramütést okozhat. Ha a szellőző
nyílásokon keresztül bármilyen szilárd
test, vagy folyadék kerül a készülék
belsejébe, húzza ki a hálózati
csatlakozó vezetéket. Azonnal
ellenőriztesse szakemberrel!
Soha ne nyissa ki a készülék hátsó
burkolatát. A javítást bízza
szakemberre.
A készülék szellőzőnyílásait hagyja
szabadon. A megfelelő szellőzés
érdekében a készülék minden
oldalánál hagyjon legalább 10 cm-es
szabad területet.
A tv készüléket puha, enyhén
megnedvesített ruhával tisztítsa. Ne
használjon karcoló eszközt, alkáli
anyagot tartalmazó tisztítószert,
súrolóport vagy oldószereket (hígitót
vagy benzint). Óvja a képernyőt a
karcolásoktól. Biztonsági okokból
húzza ki a készülék hálózati vezetékét,
mielőtt a tisztítást elkezdi.
Viharos időjárás, villámlás idején saját
biztonsága érdekében ne érintse meg
a készüléket, a hálózati csatlakozó
vezetéket és az antennakábelt.
Ne állítsa a készüléket szélsőségesen
meleg, párás vagy poros helyre, vagy
olyan helyre, ahol mechanikai
vibrációnak lehet kitéve.
A hálózati csatlakozó kihúzásánál a
csatlakozó dugót fogja meg, és ne a
vezetéket.
Az áramütés és a tűz veszélyének
elkerülése érdekében óvja a TV
készüléket esőtől és nedvességtől.
A tűz veszélyének elkerülése
érdekében ne tegyen a készülék
közelébe gyúlékony tárgyakat, ne
gyújtson nyílt lángot (ne égessen pl.
gyertyát).
Ne tegyen nehéz tárgyat a hálózati
vezetékre, mert megsérülhet.
Javasoljuk, hogy a felesleges
vezetéket csévélje fel a tv készülék
hátulján lévő tartóra.
A TV készüléket stabil állványra
helyezze. Soha se próbálja a
készüléket az állvánnyal együtt
mozgatni mindig külön mozgassa a
tévét és az állványt. Ne engedje, hogy a
gyerek felmásszon a TV-re. Ne
fordítsa a TV készüléket az oldalára,
vagy a képernyővel felfelé.
Biztonsági előírások
4
Mozgatás előtt húzza ki a hálózati
csatlakozót a konnektorból. A
készüléket óvatosan szállítsa, kerülje
a zötykölődős utcákat, óvja a
készüléket ütéstől, rázkódástól.
Ne takarja le a készülék
szellőzőnyílásait pl. függönnyel,
újsággal, stb.
Page 85

A mellékelt tartozékok ellenőrzése
2 elem (AA méret)
1 távvezérlő (RM-943)
Az elemek behelyezése a távvezérlőbe
A mellékelt elemek behelyezésekor ügyeljen a helyes polaritásra.
A használt elemek hulladékba helyezéséről mindig környezetbarát módon gondoskodjon.
HU
Áttekintés és üzembe helyezés
5
Page 86

A távvezérlő gombjainak áttekintése
1 TV I/ : A televízió átmeneti kikapcsolása (készenléti üzemmód):
Megnyomásával ideiglenesen kikapcsolhatja a TV-t (kigyullad a készenléti
jelzőfény a TV-n). Készenléti üzemmódból szintén ezzel a gombbal
kapcsolhatja be a televíziót.
• Energiatakarékossági okokból javasoljuk, hogy használaton kívül
teljesen kapcsolja ki a készüléket.
• Ha 15 percig nincs televíziós jel és gombnyomás, a televízió
automatikusan készenléti üzemmódba lép.
2 Aux I/ : Megnyomásával kapcsolhatja be vagy ki a videót vagy DVD-t. Az
AUX funkcióra vonatkozóan lásd a 24. oldalt.
3 Televízió üzemmód kiválasztása: megnyomásával kapcsolhatja ki a PAP,
Teletext vagy Videó bemeneti üzemmódot.
4 Bemenetválasztás: a gombot addig nyomogassa, míg a kívánt bemeneti forrás
jele meg nem jelenik a televízió képernyőjén. Lásd a 23. oldalon.
5 PAP (kettős kép): megnyomásával a képernyőt két részre osztja fel, így
egyszerre két csatorna műsorát nézheti. Lásd a 19. oldalt.
6 Műsorközvetítő csatorna választása: ha a médiaválasztót (w;) TV-re
kapcsolta, ezekkel a gombokkal választhat csatornát. Kétjegyű
programszámoknál a második számjegyet 2,5 másodpercen belül adja be.
7 a) Előző csatorna: ha a médiaválasztót (w;) TV-re kapcsolta, ezzel a gombbal
térhet vissza az előzőleg nézett csatornához (amennyiben azt legalább 5
másodpercig nézte).
b) Kétjegyű videocsatorna választása: ha a médiaválasztót (w;) VCR-re
kapcsolta, ezzel a gombbal választhat, két számjegyű csatornákat Sony
videón, pl. 23-hoz először nyomja meg a -/-- gombot, majd pedig a 2 és a 3
gombokat.
8 a) Fastext: ha a médiaválasztót (w;) TV-re kapcsolta, Teletext üzemmódban
ezek a gombok Fastext gombokként használhatók. A részleteket lásd a 20.
oldalon.
b) Videómagnó vagy DVD működtetése: ha a médiaválasztót (w;) VCR-re
vagy DVD-re kapcsolta, ezekkel a gombokkal videója vagy DVD-je főbb
funkcióit kezelheti, amennyiben a távvezérlőt beprogramozta. Lásd a 26.
oldalt.
wa
w;
ql
qk
qj
qh
qg
qf
1
2
3
4
5
6
7
8
9
q;
qa
qs
qd
9 Teletext: ezzel a gombbal kapcsolhatja be a
Teletextet. A részleteket lásd a 20. oldalon.
q; a) Csatornamutató megjelenítése: ha a
médiaválasztót (w;) TV-re kapcsolta, és a MENU
gombot kikapcsolta, az OK gombot lenyomva
megjeleníti a csatornák áttekintését. Ha egy
csatornát ki szeretne választani, nyomja meg a v
vagy V gombot, majd ismét az OK gombot, így
megjeleníti a kívánt csatorna programját.
b) Vezérlőgomb: ha a médiaválasztót (w;) TV-re
kapcsolta, és a MENU (qs) gombot bekapcsolta,
ezekkel a gombokkal navigálhat a televízió
menürendszerében. Lásd a 10. oldalt.
qa Képüzemmód kiválasztása: többszöri
lenyomásával változtathatja meg a kép üzemmódot.
A különböző kép üzemmódokra vonatkozó
részleteket. Lásd a 11. oldalt.
qs Műsorközvetítő csatorna választása: ezekkel a
gombokkal választhatja ki a következő vagy az előző
műsorközvetítő csatornát.
qd Menürendszer: megnyomásával a televízió
menürendszerébe lép. Lásd a 10. oldalt.
qf Hangerő-szabályozás: ezekkel a gombokkal
növelheti vagy csökkentheti a hangerőt.
qg Hangeffektus kiválasztása:
lenyomásával változtathatja meg a hangeffektust. A
hangeffektusokra vonatkozó részleteket lásd a 12.
oldalon.
qh NexTView: a NexTView megjelenítéséhez nyomja
meg a gombot. A részleteket lásd a 21. oldalon.
qj Info: megnyomásával jelenítheti meg az összes
képernyőn megjelenő jelzést, úgymint csatornaszám,
stb. A megjelenítés visszavonásához nyomja meg újra.
qk A kép kimerevítése: Nyomja meg ezt a gombot a kép
kimerevítéséhez. A képernyő két képernyőre oszlik.
A bal oldali a normál képet, a jobb oldali képernyő
pedig a kimerevített képet mutatja. A normál képhez
való visszatéréshez nyomja meg ismét ezt a gombot.
ql Képernyőformátum kiválasztása: többszöri
lenyomásával változtathatja meg a képernyő
formátumát. 4/3 a hagyományos képhez vagy 16/9 a
széles képernyős hatás imitálásához.
w; Médiaválasztó: ezeket a gombokat megnyomva
válassza ki, melyik készüléket kívánja használni: TV,
VCR (videó), DVD vagy AUX. Egy zöld fény rövid
felvillanása jelzi, melyiket választotta. A részleteket
lásd a 24-26. oldalon.
wa Némítás: megnyomásával a televízió hangját
kikapcsolhatja. A hang visszaállításához nyomja meg
újra.
Többszöri
A 4, qs és qj jelű gombok szintén a Teletext használatára szolgálnak. A részleteket lásd a 20. oldalon.
6
Áttekintés és üzembe helyezés
Page 87

A televízió gombjainak áttekintése
Fejhallgató aljzat
S videó
bemeneti aljzat
Videó bemeneti aljzat
Készenlét jelzőlámpa
Nyomja meg a jelet.
Audio
bemeneti
aljzatok
Automatikus
indítás gomb
(elindítja az
automatikus
indítási
műveletsort,
lásd 8. oldal)
Be/Ki gomb
Bemeneti
forrás
kiválasztása
Hangerőszabályozó
gombok
Az antenna és videomagnó csatlakoztatása
• A csatlakozókábelek nem tartoznak a televízió felszereléséhez.
• A videó- és egyéb csatlakoztatásokról részletesebben tájékozódhat a 22. oldalon.
Program
Fel vagy Le
gombok
(Műsorközvetítő
csatorna
kiválasztása)
Videó
OUT IN
A Scart csatlakozókábel külön beszerezhető tartozék. Ezzel az alternatív csatlakozóval videó
használatánál javíthatja a kép- és hangminőséget.
Ha nem használ Scart csatlakozókábelt, a videót manuálisan kell behangolnia egy szabad csatornára,
miután az automatikus hangolás befejeződött. Lásd: "Kézi hangolás", 18. oldal. A videomagnó
kimeneti csatornájának megkereséséhez vegye igénybe a videó kezelési utasítását is.
vagy
Áttekintés és üzembe helyezés
HU
7
Page 88

A televízió bekapcsolása és automatikusa hangolása
Amikor televízióját először bekapcsolja, a képernyőn egy menüsor jelenik meg, amelynek segítségével:
1) megválaszthatja a menüképernyő nyelvét 2) kiválaszthatja az országot, ahol használni fogja a TV-t,
3) beállíthatja a kép ferdeségét 4) ellenőrizheti, hogyan kell külön berendezéseket csatlakoztatni
televíziójához, 5) kikeresheti és tárolhatja az összes elérhető csatornát (televíziós műsorszóró állomást)
és 6) megváltoztathatja a csatornák (televíziós műsorszóró állomások) képernyőn való megjelenésének
sorrendjét.
Ha azonban ezek közül bármelyik beállításon később módosítania kell, azt a
megfelelő opciójának kiválasztásával vagy a TV-készüléken az Automatikus indítás gomb
megnyomásával teheti meg.
1 Dugja be a televízió csatlakozódugaszát a konnektorba
(220-240V AC, 50 Hz)
Amikor televízióját első ízben csatlakoztatja az
áramforráshoz, az rendszerint bekapcsolt állapotban lesz.
Ha kikapcsolt állapotban van, a készüléken lévő be/ki
gombbal kapcsolja be.
Amikor első alkalommal bekapcsolja a televíziót, a
képernyőn automatikusan megjelenik egy Language (Nyelv)
menü.
(Beállítás menü)
Language
Select language
English
English
Nederlands
Nederlands
Français
Français
Italiano
Italiano
Deutsch
Deutsch
Türkçe
Türkçe
Español
Español
Português
Português
Polski
Polski
Language
Select language
English
English
Nederlands
Nederlands
Français
Français
Italiano
Italiano
Deutsch
Deutsch
Türkçe
Türkçe
Español
Español
Português
Português
Polski
Polski
2 A nyelv kiválasztásához nyomja meg a távvezérlő V, v, B
vagy
b gombját, majd választását az OK gombbal erősítse
meg. Ettől kezdve az összes menü a kijelölt nyelven jelenik
meg.
3 Automatikusan megjelenik az Ország menü. A v vagy V
gombbal válassza ki az országot, ahol a TV-t üzemeltetni
fogja. Választását az OK gombbal erősítse meg.
• Amennyiben a keresett ország nem jelenik meg a
listán, az ország helyett válassza a "Ki" megjelölést.
• A Teletext helytelen szövegének elkerülése
érdekében cirill írást használó nyelv esetén, ha a saját
ország nem látható a listán, javasoljuk, hogy
Oroszországot válassza.
4 A Föld mágnesessége miatt lehetséges, hogy a kép ferde. A
Képelforgatás menü szükség esetén lehetővé teszi a kép
ferdeségének kiigazítását.
a) Ha erre nincs szükség, az OK gomb megnyomásával
válassza ki a nem szükséges opciót.
b) Ha szükséges, a B vagy a b gomb megnyomásával
válassza ki a beállítás opciót, majd nyomja meg az OK
gombot, és a kép esetleges ferdeségét a 5 és +5 közötti
tartományban a
korrigálja. Végül az OK gombbal tárolja.
v vagy a V gomb megnyomásával
Language
Select language
English
Nederlands
Français
Italiano
Deutsch
Türkçe
Español
Português
Polski
Ország
Országkiválasztás
Ki
Ireland
Nederland
België/Belgique
Luxembourg
France
Italia
Schweiz/Suisse/Svizzera
Ha a kép ferde, kérjük
állítsa be a kellő pozíciót.
nem szükséges
English
Nederlands
Français
Italiano
Deutsch
Türkçe
Español
Português
Polski
beállítás
Első használat
8
folytatás...
Page 89

5 Megjelenik egy ábra, amely bemutatja, hogyan csatlakoztathat
egy sor különböző készüléket televíziójához. Kövesse az
utasításokat, végül az OK gombbal távolítsa el a képet, hogy
folytatódhasson az automatikus eljárás.
Kérjük, csatlakoztassa a készülékét
az ábra szerint
Ha az automatikus hangolási eljárás befejeződött, és ezen
a ponton csatlakoztatta a külön berendezést, a külön
berendezéssel kapcsolatos optimális beállítások
érdekében javasoljuk, hogy kövesse a "Tájékoztató a
csatlakozásokhoz" c. fejezetben (15. oldal) leírt
utasításokat.
6 A képernyőn megjelenik az Automatikus hangolás menü. Az
OK gombbal válassza az Igen-t.
7 A készülék megkezdi az összes elérhető műsorszóró csatorna
automatikus kikeresését és tárolását.
Ez eltarthat néhány percig. Kérjük, legyen türelemmel, és
ne nyomjon meg semmilyen gombot, különben az
automatikus hangolás nem fog befejeződni.
Egyes országokban a televíziós műsorszóró
automatikusan telepíti a csatornákat (ACI rendszer =
automata csatornatelepítő rendszer). Ebben az esetben a
televíziós műsorszóró egy menüt küld Önnek, amelyben a
v vagy V és az OK gombbal kiválaszthatja az Ön városát
a csatornák tárolásához.
Ha az automatikus hangolás során nem sikerült csatornát
találni, automatikusan megjelenik a képernyőn egy
üzenet, amely az antenna csatlakoztatását kéri.
Ellenőrizze az antennacsatlakozást (lásd 7. oldal). Az
automatikus hangolási eljárás újraindításához nyomja
OK gombot.
meg az
DVD
OK
Szeretné elindítani az
automatikus hangolást?
Igen Nem
Automatikus hangolás
A talált csatornák: 4
Csatorna nem található.
Csatlakoztatta az antennát?
Megerősít
8 Miután az összes elérhető csatornát sikerült megkeresni és
tárolni, automatikusan megjelenik a képernyőn a Programhelyátrendezés menü, amelynek segítségével megváltoztathatja a
csatornák tárolási sorrendjét.
a) Ha a műsorszóró csatornákat a behangolás sorrendjében
kívánja megtartani, ugorjon a 9. lépésre.
Programhely-átrendezés
01
02
03
04
05
06
07
08
b) Ha a csatornákat más sorrendben kívánja tárolni:
v vagy V gombbal jelölje ki az áthelyezni kívánt
1 A
csatorna (tévéadó) programszámát. Nyomja meg a
gombot.
v vagy V gombbal válassza ki a kiválasztott csatorna
2 A
(tévéadás) új programszámát. Az OK gombbal tárolja.
3 Ha más csatornák sorrendjét is szeretné megváltoztatni,
ismételje a b)1 és b)2 lépéseket.
b
Programhely-átrendezés
01
02
03
04
05
06
07
08
9 A menü képernyőről való eltávolításához nyomja meg a MENU gombot
A televízió használatra kész
TVE
TVE2
TV3
C33
C27
C58
S02
S06
TVE
TVE2
TV3
01 TVE
C33
C27
C58
S02
S06
Első használat
HU
9
Page 90

A menürendszer bemutatása és használata
A televízió a képernyőn látható menürendszer segítségével ad útmutatást a kezeléshez. A
menürendszer kezeléséhez a távvezérlő következő gombjait használja:
1 A menüképernyők bekapcsolása:
Az első szintű menü bekapcsolásához nyomja meg a MENU
Képbeállítás
Kép üzemmód
Kontraszt
Törlés
Zajcsökkentő: Auto
Színárnyalat: Hideg
: Élő
:
gombot.
Kiválasztás: Beírás:OKKilépés:
2 Navigáció a menük között:
• A kívánt menü vagy opció kiemeléséhez és kiválasztásához nyomja meg a
gombot.
• A kiválasztott menü vagy opció beírásához nyomja meg az OK vagy a
b gombot.
• Az utolsó menühöz vagy opcióhoz való visszatéréshez nyomja meg az OK vagy a
gombot.
• A kiválasztott opció beállításainak módosításához nyomja meg a
v/V/B vagy b gombot.
• Választásának megerősítéséhez és tárolásához nyomja meg az OK gombot.
3 A menüképernyők kikapcsolása:
A menü képernyőről való eltávolításához nyomja meg a MENU gombot.
MENU
v vagy V
B
Képbeállítás
Kép üzemmód
Kontraszt
Törlés
Zajcsökkentő: Auto
Színárnyalat: Hideg
Kiválasztás: Beírás:OKKilépés:
:Élő
:
MENU
10
A televízió funkciói
Page 91

A Képbeállítás menü
MENU
Képbeállítás
Kép üzemmód
: Élő
Kontraszt
:
Törlés
Zajcsökkentő: Auto
Színárnyalat: Hideg
Kiválasztás: Beírás:OKKilépés:
A "Képbeállítás" menüben módosíthatja a
képbeállításokat.
Ehhez:
,
Képbeállítás
Kép üzemmód
Kontraszt
Törlés
Zajcsökkentő: Auto
Színárnyalat: Hideg
:
: Élő
A menübe való belépéshez nyomja meg a
MENU, majd az OK gombot. Ezután a
v
vagy V gombbal válassza ki a kívánt opciót,
és nyomja meg az OK gombot. Végül olvassa
el az egyes opciók kezeléséről szóló alábbi
tudnivalókat.
OK
MENU
Kiválasztás:Vissza:
Beírás:
Kép üzemmód Ez az opció lehetővé teszi, hogy a kép üzemmódot a tévén nézett programhoz
igazítsa. Az opció kiválasztása után nyomja meg az OK gombot. Ezután a
v
vagy V gomb többszöri lenyomásával válasszon az alábbiak közül:
Egyéni (egyéni beállításokhoz).
Élő (élő adásokhoz, DVD-hez és digitális topbox vevőkhöz).
Mozi (filmekhez).
Ha kijelölte a kívánt opciót, az OK gombbal tárolja.
Az "Élő" és "Mozi" üzemmód "Fényerő", "Színtelítettség" és "Képélesség" szintjeit a
legjobb képminőség érdekében gyárilag rögzítették.
Kontraszt A kép kontrasztjának csökkentéséhez vagy növeléséhez nyomja meg a
B vagy
b gombot. Az OK gombbal tárolja.
Fényerő A kép sötétítéséhez vagy világosításához nyomja meg a
OK gombbal tárolja.
Ez az opció csak akkor jelenik meg és módosítható, ha a "Kép üzemmódot" "Egyéni"-re
állította.
Színtelítettség A színek intenzitásának csökkentéséhez vagy növeléséhez nyomja meg a
B vagy b gombot. Az
B vagy
b gombot. Az OK gombbal tárolja.
Ez az opció csak akkor jelenik meg és módosítható, ha a "Kép üzemmódot" "Egyéni"-re
állította.
Színárnyalat A zöld tónusok csökkentéséhez vagy növeléséhez nyomja meg a
gombot. Az OK gombbal tárolja.
Ez az opció csak NTSC jel esetén jelenik meg (pl. USA videokazetták).
Képélesség A kép lágyításához vagy élesítéséhez nyomja meg a
B vagy b gombot. Az OK
gombbal tárolja.
Ez az opció csak akkor jelenik meg és módosítható, ha a "Kép üzemmódot" "Egyéni"-re
állította.
Törlés A képet az OK gombbal állíthatja vissza a gyári szintekre.
B vagy b
HU
Zajcsökkentő Ez az opció
Auto állásban van, és automatikusan csökkenti a gyenge sugárzási
jel miatti szemcsésséget. Azonban ez módosítható, ha a v vagy a V gomb
lenyomásával kiválasztja a Ki, Alacsony, Közepes vagy Magas beállítást. Végül
az OK gombbal tárolja.
Színárnyalat Ez az opció lehetővé teszi a kép színárnyalatának módosítását. Az opció
kiválasztása után nyomja meg a
b gombot. Ezután a v vagy V gomb többszöri
lenyomásával válasszon az alábbiak közül: Meleg (a fehér színeknek piros tónust
ad), Normál (a fehér színeknek semleges tónust ad), Hideg (a fehér színeknek
kék tónust ad). Az OK gombbal tárolja.
A televízió funkciói
11
Page 92

A Hangszabályozás menü
Képbeállítás
Kép üzemmód
: Élő
Kontraszt
:
Törlés
Zajcsökkentő: Auto
Színárnyalat: Hideg
Kiválasztás: Beírás:OKKilépés:
m
Hangszabályozás
Hang effektusok: Dolby Virtual
Magas hangszín:
Mély hangszín:
Balansz:
Törlés
Kettős hang: Stereo
Auto hangerőszab: Ki
TV hangszóró: Be
Fejhallgató beállítás
Kiválasztás: Beírás:OKKilépés:
MENU
A "Hangszabályozás" menü segítségével
módosíthatja a hangbeállításokat.
Ehhez:
Nyomja meg a MENU gombot, és a
v
gombbal válassza ki a szimbólumot,
majd az OK gombbal lépjen be a menübe.
MENU
Ezután a
v vagy V gombbal válassza ki a
kívánt opciót, és nyomja meg az OK
MENU
,
Hangszabályozás
Hang effektusok: Dolby Virtual
Magas hangszín:
Mély hangszín:
Balansz:
Törlés
Kettős hang: Stereo
Auto hangerőszab: Ki
TV hangszóró: Be
Fejhallgató beállítás
Kiválasztás:Vissza:
Beírás:
OK
gombot. Végül olvassa el az egyes opciók
kezeléséről szóló alábbi tudnivalókat.
Hang Ez az opció lehetővé teszi, hogy a hangeffektusokat saját igényeihez
effektusok igazíthassa. Miután kiválasztotta ezt az opciót, nyomja meg az OK gombot.
Ezután a
v vagy V gomb többszöri lenyomásával válasszon az alábbiak
közül:
Ki (Egyenletes reakció).
Természetes (A "BBE High Definition Sound system"* alkalmazása
révén fokozza a hang tisztaságát, részletgazdagságát és
megjelenését).
Dinamikus (A "BBE High Definition Sound system"* felerősíti a hang
tisztaságát és megjelenését a jobb érthetőség és a zenei
valószerűség érdekében).
Dolby** (Dolby Virtual, a "Dolby Surround Pro
Virtual Logic" hangeffektust szimulálja).
Ha kiválasztotta a kívánt opciót, az OK gombbal tárolja.
12
A televízió funkciói
Magas A
B vagy b gombbal csökkentheti ill. növelheti a magasabb frekvenciájú
hangszín hangokat. Az OK gombbal tárolja.
Mély hangszín A
B vagy b gombbal csökkentheti ill. növelheti az alacsonyabb frekvenciájú
hangokat. Az OK gombbal tárolja.
Balansz A
B vagy b gombbal kiemelheti a bal, ill. jobb hangszórót. Az OK gombbal
tárolja.
Törlés Az OK gomb megnyomásával a hangot visszaállítja a gyári alapértékekre. Az
OK gombbal tárolja.
Kettős hang • Sztereo adáshoz:
v vagy V gombbal választhatja ki a Stereo ill. Mono üzemmódot. Az OK
A
gombbal tárolja.
• Kétnyelvű adáshoz:
A
v vagy V gombbal választhat a Mono (mono csatorna, ha elérhető), A
(1. csatorna), vagy B (2. csatorna) közül. Az OK gombbal tárolja.
folytatás...
Page 93

Auto A v vagy V gombbal válassza ki a Be (a csatornák hangereje a sugárzott
hangerőszab jeltől függetlenül azonos marad, pl. reklámoknál is), ill. Ki (a hangerő a sugárzott
jelnek megfelelően változik) beállítást. Az OK gombbal tárolja.
Ha a "Hangeffektus" opcióban a "Dolby Virtual"-t választja, az "Auto hangerőszab" opció
automatikusan kikapcsol, és viszont.
TV hangszóró Ezzel az opcióval kiválaszthatja, hogy a televíziót a TV hangszórójából vagy a
televízió hátoldalán található audio kimenetekhez csatlakoztatott külső
erősítőről kívánja hallgatni.
Miután kiválasztotta az opciót, nyomja meg az OK gombot. Ezután a
gomb többszöri lenyomásával válasszon az alábbiak közül:
Be (ha a televíziót a TV hangszórójából kívánja hallgatni).
Egyszeri (ha a televíziót csak egy alkalommal kívánja külső
ki erősítőről hallgatni. Ha ezt a lehetőséget választja, a
televízió minden ki- és bekapcsoláskor a "Be"
alapbeállításra tér vissza).
Folymatos (ha a televíziót mindig külső erősítőről szeretné
ki hallgatni).
Ha kiválasztotta a kívánt opciót, az OK gombbal tárolja.
Ha a "Egyszeri ki" vagy a "Folymatos ki" opciót választotta, a külső berendezés hangerejét
a távvezérlő 2 +/- gombjaival is szabályozhatja. Ha a hangerőszabályzó gombokat
használja, megjelenik a % szimbólum, amely azt jelzi, hogy nem a televízió hangszórójának,
hanem a külső berendezésnek a hangerejét szabályozza.
Fejhallgató beállítás Ezzel az opcióval a fejhallgató hangerejét és a PAP (kettős kép)
beállításokat szabhatja egyéni igényeihez (a PAP-ra vonatkozó
részleteket lásd a 19. oldalon).
Miután kiválasztotta az opciót, nyomja meg az OK gombot. Ezután a
v
vagy
V
v vagy V gomb többszöri lenyomásával válasszon az alábbiak közül:
hangerő A fejhallgató hangerejét a
csökkentheti, ill. növelheti.
Kettős hang • Sztereó adásnál:
A
Hang kettős Válassza a Keret beállítást, ha a kettős képernyő
kép esetén aktív (keretes) képét kívánja hallgatni (lásd 19. old-
* A BBE nagy felbontású hangrendszert ("BBE High Definition Sound system") a Sony
Corporation a BBE Sound, Inc. engedélye alapján állítja elő. A 4,638,258 és 4,482,866
számú egyesült államokbeli szabadalmakkal védett. A "BBE" szó és a BBE szimbólum a
BBE Sound, Inc. védjegyei.
**A televíziót konstrukciója folytán azáltal, hogy két hangszóróval négy hangszóró hangját
szimulálja, képes surround hanghatást kiváltani, ha az adás audio jelét Dolby Surround
kóddal látták el. A hangeffektus megfelelő külső erősítő csatlakoztatásával is fokozható
(a részleteket lásd a 23. oldalon).
** Gyártva a Dolby Laboratories engedélye alapján. A "Dolby" és a dupla D szimbólum
a Dolby Laboratories védjegyei.
v vagy V gomb lenyomásával választhatja ki a
Stereo vagy Mono üzemmódot
• Kétnyelvű adásnál:
A
v vagy V gombbal választhat a Mono (mono
csatorna, ha elérhető), A (1. csatorna), vagy B
(2. csatorna) közül.
al), a Bal oldali kép beállítást, ha a bal oldali képet,
illetve a Jobb oldali kép beállítást, ha a jobb oldali
képet szeretné hallgatni.
B vagy b gombbal
A televízió funkciói
13
HU
Page 94

A Jellemzők menü
Képbeállítás
Kép üzemmód
: Élő
Kontraszt
:
Törlés
Zajcsökkentő: Auto
Színárnyalat: Hideg
Kiválasztás: Beírás:OKKilépés:
m
Jellemzők
AV3 kimenet TV
Tájékoztató a csatlakoztatásokhoz
Képelforgatás
Kiválasztás: Beírás:OKKilépés:
MENU
A "Jellemzők" menü segítségével
módosíthatja a televízió különféle
beállításait.
Ehhez:
v
MENU
MENU
,
Jellemzők
AV3 kimenet TV
Tájékoztató a csatlakoztatásokhoz
Képelforgatás
Kiválasztás:Vissza:
Beírás:
Nyomja meg a MENU gombot, majd a
kétszeri lenyomásával válassza ki a jelet,
ezután az OK gombbal lépjen be a menübe.
Ezután a
v vagy V gombbal válassza ki a
kívánt opciót, majd nyomja meg az OK
gombot. Végül olvassa el az egyes opciók
kezeléséről szóló alábbi tudnivalókat.
OK
AV3 KIMENET
Ez az opció lehetővé teszi annak kiválasztását, hogy melyik jelforrás jele kerüljön leadásra
a Scart aljzatból, 3/ 3 így a televízióból, vagy a 1/ 1, 2/ 2 Scart aljzathoz,
illetve a 4 vagy 4 és 4 elülső aljzathoz csatlakoztatott külső berendezésből érkező
S
S
bármilyen jelet felveheti.
Ha videomagnója támogatja a SmartLink-et, ez az eljárás nem szükséges.
Ehhez:
Miután az előző oldalon leírt módon belépett a "Jellemzők" menübe és kiválasztotta az
opciót, nyomja meg az OK gombot. Ezután a v vagy
V gombbal válassza ki a kívánt
kimeneti jelet:
TV az antennából érkező jel leadása.
AV1 a 1/ 1 aljzathoz csatlakoztatott forrásból érkező jel leadása.
AV2 a 2/ 2 aljzathoz csatlakoztatott forrásból érkező jel leadása.
AV4 a 4, vagy 4 és 4 aljzathoz csatlakoztatott forrásból érkező jel leadása.
S
AUTO a televízión megjelenített jel leadása.
• Ha az "AUTO" beállítást választja, a leadott jel mindig azonos lesz a képernyőn
megjelenített jellel.
• Ha a 3/ 3 Scarthoz, vagy egy ehhez a Scarthoz kapcsolt videóhoz dekódert
S
csatlakoztatott, a megfelelő dekódolás érdekében ne feledje az "AV3 kimenetet"
"TV"-re visszaállítani.
14
A televízió funkciói
folytatás...
Page 95

TÁJÉKOZTATÓ A CSATLAKOZTATÁSOKHOZ
Még akkor is fontos, hogy kövesse ennek a menünek az utasításait, ha már csatlakoztatta a
külső berendezést a televízióhoz. Ilyen módon lesznek optimálisak a külső berendezéssel
kapcsolatos képbeállítások.
Ehhez:
1 Miután az előző oldalon ismertetett módon belépett a "Jellemzők" menübe és
kiválasztotta az opciót, nyomja meg az OK gombot. Ezután nyomja meg a
gombot, hogy az elérhető berendezések közül kiválaszthassa, melyiket kívánja
csatlakoztatni: SAT (műhold), Dekóder, DVD, JÁTÉK, VIDEO vagy DVD rec. (DVD
író). Ezután a
gombbal törölheti is). Miután kiválasztotta az összes csatlakoztatni kívánt berendezést, a
b gombbal jelölje ki a kiválasztott berendezést (a kijelölt berendezést a B
v vagy V
v vagy V gombbal válassza ki a "Megerősít" parancsot, és nyomja meg az OK gombot.
2 Ezután egy új menü jelenik meg, amely megmutatja, hogy az egyes berendezéseket a
televízió hátlapján találhatók közül melyik Scart aljzathoz kell kötni. A külön berendezés
optimális képbeállítása érdekében mindegyik berendezést ennek megfelelően
csatlakoztassa.
3 Miután csatlakoztatta a külön berendezést, a B vagy b gombbal válassza ki az "OK"
parancsot, végül nyomja meg a távvezérlő OK gombját.
Amennyiben nem fogadja el ezt a csatlakoztatási javaslatot, a B vagy b gombbal válassza ki
a "Nem" opciót, és nyomja meg az OK gombot. Majd ismételje meg az összes fenti lépést.
Csatlakoztatási javaslataink betartását nyomatékosan ajánljuk, de ha ezekkel nem ért egyet, a B
vagy b gombbal válassza a “Nem” pontot, majd nyomja meg az OK gombot. A képernyőn egy
új menü jelenik meg, melyben saját igényei szerint jelölheti ki a csatlakozásokat.
KÉPELFORGATÁS
A Föld mágnesessége miatt lehetséges, hogy a kép ferde. Ilyen esetben a kép ferdeségét
ennek az opciónak a segítségével korrigálhatja.
Ehhez:
Miután az előző oldalon leírt módon belépett a "Jellemzők" menübe és kiválasztotta az
opciót, nyomja meg az OK gombot. Ezután a
ferdeségét a -5 és +5 közötti tartományban.
RGB POZICIONÁLÁS
Ez az opció csak akkor elérhető, ha a televízióhoz egy RGB forrást csatlakoztatott.
Ez az opció lehetővé teszi, hogy amennyiben RGB forrás csatlakoztatásakor szükséges,
kiigazítsa a kép vízszintes helyzetét.
Ehhez:
Miután az előző lapon leírt módon belépett a "Jellemzők" menübe és RGB forrást néz,
válassza ki az "RGB pozicionálás" opciót, és nyomja meg az OK gombot. Ezután a
v vagy a V gombbal korrigálja a kép esetleges
v vagy
V gombbal igazítsa a kép közepét 5 és +5 között. Végül az OK gombbal erősítse meg és
tárolja.
HU
A televízió funkciói
15
Page 96

A Beállítás menü
Képbeállítás
Kép üzemmód
: Élő
Kontraszt
:
Törlés
Zajcsökkentő: Auto
Színárnyalat: Hideg
Kiválasztás: Beírás:OKKilépés:
m
Beállítás
Nyelv
Ország
Automatikus hangolás
Programhely-átrendezés
Programnevek
AV beállítás
Kézi hangolás
Kiválasztás: Beírás:OKKilépés:
MENU
A "Beállítás" menü lehetővé teszi, hogy a
televízión különféle opciókat módosítson.
Ehhez:
v
Nyomja meg a MENU gombot, és a
gomb
háromszori megnyomásával válassza ki a
szimbólumot, majd az OK gombbal
MENU
lépjen be a menübe. Ezután a
v
vagy
V
gombbal válassza ki a kívánt opciót, majd
MENU
,
Beállítás
Nyelv
Ország
Automatikus hangolás
Programhely-átrendezés
Programnevek
AV beállítás
Kézi hangolás
OK
Kiválasztás:Vissza:
Beírás:
nyomja meg az OK gombot. Végül olvassa
el az egyes opciók kezeléséről szóló alábbi
tudnivalókat.
NYELV
Ezzel az opcióval kiválaszthatja, hogy a menük milyen nyelven jelenjenek meg.
Ehhez:
Miután kiválasztotta az opciót, nyomja meg az OK gombot, és a 8. oldalon, "A televízió
bekapcsolása és automatikus hangolása" c. fejezet 2. lépésében leírtak szerint járjon el.
ORSZÁG
Ezzel az opcióval kiválaszthatja, melyik országban kívánja üzemeltetni a televíziót.
Ehhez:
Miután kiválasztotta az opciót, nyomja meg az OK gombot, és a 8. oldalon, "A televízió
bekapcsolása és automatikus hangolása" c. fejezet 3. lépésében leírtak szerint járjon el.
AUTOMATIKUS HANGOLÁS
Ez az opció lehetővé teszi az összes elérhető tévécsatorna automatikus kikeresését és
tárolását.
Ehhez:
Miután kiválasztotta az opciót, nyomja meg az OK gombot, és a 9. oldalon, "A televízió
bekapcsolása és automatikus hangolása" c. fejezet 6. és 7. lépésében leírtak szerint járjon el.
PROGRAMHELY-ÁTRENDEZÉS
Ezzel az opcióval megváltoztathatja a csatornák (tévéadások) képernyőn való
megjelenésének sorrendjét.
Ehhez:
Miután kiválasztotta az opciót, nyomja meg az OK gombot, és a 9. oldalon, "A televízió
bekapcsolása és automatikus hangolása" c. fejezet 8. lépésében leírtak szerint járjon el.
folytatás...
A televízió funkciói
16
Page 97

PROGRAMNEVEK
Ez az opció lehetővé teszi, hogy egy csatornának maximum 5 karakterből (betűkből vagy számokból) álló
nevet adjon.
Ehhez:
1 Miután az előző oldalon leírtak szerint belépett a "Beállítás" menübe és kiválasztotta az opciót, nyomja
meg az OK gombot, majd a
Ezután nyomja meg az OK gombot.
v vagy V gombbal válassza ki az elnevezni kívánt csatorna programszámát.
2 Miközben a Címke hasáb első eleme kiemelten látható, a betű kiválasztásához nyomja meg az OK és a
v, V
, B vagy b gombokat, majd nyomja meg az OK gombot.
Ha készen van, as
zárja be a menüt.
v, V
, B vagy b gombbal válassza ki a képernyőn a "Vég" szót, végül az OK gombbal
• A betű javításához a képernyőn a "
gombot.
• Üres karakterhez a képernyőn válassza a " " jelet, és nyomja meg az OK gombot.
AV BEÁLLÍTÁS
Ez a menü az alábbi lehetőségeket biztosítja:
a) A televízió bemeneti aljzathoz csatlakoztatott külső berendezéshez elnevezése.
Ehhez:
%" jelet választva menjen vissza, és nyomja meg az OK
1 Miután az előző oldalon leírt módon belépett a "Beállítás" menübe és kiválasztotta az opciót, nyomja
v
vagy
meg az OK gombot, majd a
AV2 vagy AV3 a hátsó Scart aljzatokhoz és AV4 az elülső aljzatokhoz. Ezután nyomja meg kétszer az
OK gombot.
V gombbal válassza ki az elnevezni kívánt bemeneti forrást: AV1,
2 A címke hasábban automatikusan megjelenik egy címke:
a) Ha az előre meghatározott címkék egyikét kívánja felhasználni, a
azt, végül nyomja meg az OK gombot.
Az előre meghatározott címkék a következők: VIDEO, DVD, CABLE (kábel), JÁTÉK, CAM
(kamkorder) vagy SAT (műhold).
b) Ha más címkét szeretne, válassza a Módosít parancsot, és nyomja meg az OK gombot. Ezután,
miközben az első elem kiemelten látható, a v, V, B vagy b gombbal válassza ki a betűt, majd
nyomja meg az OK gombot. Ha készen van, a
"Vég" szót, végül az OK gombbal zárja be a menüt.
• A betű javításához a képernyőn a "
gombot.
• Üres karakterhez a képernyőn válassza ki a " " jelet, és nyomja meg az OK gombot.
v, V, B vagy b gombbal válassza ki a képernyőn a
%" jelet választva menjen vissza, és nyomja meg az OK
v vagy V gombbal válassza ki
HU
b) A csatlakoztatott külső berendezés bemeneti hangszintjének megváltoztatása.
Ehhez:
Miután az előző oldalon leírt módon belépett a "Beállítás" menübe és kiválasztotta az opciót, nyomja
v
meg az OK gombot, majd a
hangszintjét módosítani kívánja: AV1, AV2 vagy AV3 a hátsó Scart aljzatokhoz és AV4 az elülső
aljzatokhoz. Ezután a
v
vagy V gombok lenyomásával módosítsa a bemeneti hangszintet -9 és +9 között.
vagy V gombbal válassza ki azt a bemeneti forrást, amelynek a bemeneti
b gombot kétszer lenyomva emelje ki a Hangbeállítás hasábot. Végül az OK és a
folytatás...
A televízió funkciói
17
Page 98

KÉZI HANGOLÁS
Ez a menü az alábbi lehetőségeket biztosítja:
a) A csatornák, illetve a videó csatorna egyenkénti beállítása tetszés szerinti programsorrendbe.
Ehhez a következőket tegye:
1 Miután a 16. oldalon leírtak szerint belépett a "Beállítás" menübe és kiválasztotta "Kézi hangolás"
opciót, nyomja meg az OK gombot. Ezután, miközben a Hangolás opció kiemelten látható, nyomja meg
az OK gombot.
A
v vagy V gombbal válassza ki, melyik programszám alá kívánja behangolni a csatornát (videóhoz
a "0" programszámot válassza). Majd nyomja meg a
B gombot.
2 A következő opció az "Ország" menüben kiválasztott országtól függően érhető el.
v
vagy
A Rendszer opció kiválasztása után nyomja meg az OK gombot. Ezután a
válassza ki a televíziós műsorszóró rendszert (B/G: nyugat-európai országok és a magyarországi
csatornák többsége vagy D/K kelet-európai és a magyarországi csatornák egy része). Ezután nyomja
meg a
B gombot.
V gombbal
3 Miután kiválasztotta a Csatorna száma opciót, nyomja meg az OK gombot. Következő lépésként a
v
vagy
V gombbal válassza ki a csatornahangolást ("C" a földi sugárzású csatornákhoz, vagy "S" a
kábelcsatornákhoz). Majd a számbillentyűkkel írja be a televízióadó, vagy a videó csatornaszámát.
Ha nem tudja a csatorna számát, a kereséshez nyomja meg a
a kívánt csatornát, a OK gomb kétszeri lenyomásával tárolja.
A többi csatorna behangolásához és tárolásához ismételje meg az összes fenti lépést.
b) Csatorna maximum 5 karakterből álló elnevezése.
Ehhez a következőket tegye:
Miután a 16. oldalon leírt módon belépett a "Beállítás" menübe és kiválasztotta "Kézi hangolás" opciót,
nyomja meg az OK gombot. Majd, miközben a Hangolás opció kiemelten látható, a PROG +/- gombbal
válassza ki az elnevezni kívánt csatorna programszámát. Amikor az elnevezni kívánt program megjelenik a
képernyőn, válassza ki a Címke opciót, és nyomja meg az OK gombot. Ezután, miközben az első elem látható
kiemelten, a
a
v, V
v, V
, B vagy b gombbal válassza ki a képernyőn a "Vég" szót, végül az OK gombbal zárja be a menüt.
• Betű javításához a képernyőn a "%" jelet kiválasztva menjen vissza, és nyomja meg az OK gombot.
• Üres karakterhez a képernyőn válassza ki a " " jelet, és nyomja meg az OK gombot.
, B vagy b gombbal válassza ki a betűt, majd nyomja meg az OK gombot. Ha készen van,
b és v vagy V gombot. Ha behangolta
c) A műsorvétel finomhangolása. Az AFT (az angol "Automatic Fine Tuning = automatikus
finomhangolás kifejezésből) rendszerint a lehető legjobb képet biztosítja, torzított kép esetén azonban
lehetséges, hogy kézi finomhangolással javítani tudja a vételt.
Ehhez a következőket tegye:
Miközben a finomhangolásra kijelölt csatornát (tévéműsort) nézi, és a 16. oldalon leírtak szerint belépett
a "Beállítás" menübe, valamint kiválasztotta "Kézi hangolás" opciót, nyomja meg a
válassza ki az AFT opciót, és nyomja meg a
finomhangolás -15 és +15 között. Végül az OK gomb kétszeri lenyomásával tárolja.
b gombot. Majd a v
vagy
V
gombbal állítsa be a
OK
gombot. Ezután
d) Nem kívánt programszámok átugrása a PROG +/- gombokkal való kiválasztáskor.
Ehhez a következőket tegye:
Miután a 16. oldalon leírt módon belépett a "Beállítás" menübe, kiválasztotta "Kézi hangolás" opciót,
nyomja meg az OK gombot. Ezután, miközben a Hangolás opció kiemelten látható, a PROG +/- gombbal
válassza ki azt a programszámot, amelyet át kíván ugrani. Amikor az átugrandó program megjelenik a
képernyőn, válassza ki az Ugrás opciót, és nyomja meg a
válassza ki a Be opciót. Végül az OK gomb kétszeri lenyomásával erősítse meg és tárolja.
b gombot. Ezután a v
vagy
V
gombbal
Ha később törölni szeretné a funkciót, a fenti lépésben a "Be" helyett válassza a "Ki" beállítást.
e) Kódolt programok (pl. fizető TV-dekóderről érkező jel) megtekintése és felvétele közvetlenül vagy egy
videón keresztül a Scart 3/ 3 aljzathoz csatlakoztatott dekóder használatával.
Ez az opció csak az "Ország" menüben kiválasztott országtól függően érhető el.
Ehhez a következőket tegye:
Miután a 16. oldalon leírtak szerint belépett a "Beállítás" menübe és kiválasztotta a "Kézi hangolás"
opciót, nyomja meg a OK
v vagy V gombbal válassza ki a Be opciót. Végül az OK gomb kétszeri lenyomásával erősítse
Majd a
meg és tárolja.
S
gombot. Ezután válassza ki a Dekóder opciót, és nyomja meg a b gombot.
Ha később törölni szeretné ezt a funkciót, a fenti lépésben a "Be" helyett a "Ki" beállítást válassza.
18
A televízió funkciói
Page 99

PAP (KETTŐS KÉP)
Ez a funkció (az angol "Picture And Picture" = kép és kép kifejezésből) a képernyőt kettéosztva
lehetővé teszi két 4:3 formátumú kép egyidejű megjelenítését.
A PAP be- és kikapcsolása
1 A PAP megjelenítéséhez nyomja meg a gombot.
Az egyik képernyő kerettel ellátva jelenik meg, ami
azt jelzi, hogy ez az aktív képernyő. Ez azt jelenti,
hogy ha ki akarja választani a PAP forrást, azt az
aktív képernyőn végzi el.
2 A PAP megszüntetéséhez nyomja meg újra a gombot.
A képernyőn megjelenik egy vezérsor, amely útbaigazítást
ad a PAP kezelésére vonatkozóan. Ez néhány másodperc
után eltűnik, de a gombbal bármikor újra előhívható.
Az aktív képernyő váltása
Ez csak akkor lehetséges, ha a médiaválasztó TV-re van állítva.
Az aktív (keretes) képernyõ váltásához nyomja meg a
A PAP forrás kiválasztása
B vagy b gombot.
1 TV csatorna kiválasztása:
Nyomja meg a
használni. Ezután a számbillentyűkkel vagy a PROG +/- gombbal válasszon ki egy TV
csatornát.
B gombot, ha a bal oldali képernyőt szeretné aktív képernyőként
03
PROG+ PROG-
Kiválasztás: Kiválasztás:
Keret mozgatása
Navegador
Configuración del Sistema
Aceptar Versión
Videó bemeneti jelek a bal oldali képernyőn nem jeleníthetők meg.
2 Bemeneti forrás kiválasztása:
Nyomja meg a
használni. Ezután a csatlakoztatott berendezés bemeneti jelét a gomb többszöri
lenyomásával jelenítheti meg a TV jobb oldali képernyőjén. A kiválasztandó bemeneti
jelre vonatkozó bővebb részleteket lásd "A televízióhoz csatlakoztatott készülék
képének megjelenítése" c. fejezet, 23. oldal.
RF jel (televíziós műsorközvetítő csatorna) a jobb oldali képernyőn nem
jeleníthető meg.
Az aktív képernyő megváltoztatása
Az aktív (keretes) képernyő megváltoztatásához nyomja meg a
A hang kiválasztása
Az aktív (keretes) képernyő hangja mindig a televízió hangszórójából érkezik.
Emellett az aktív, valamint a nem aktív képernyő hangját is hallgathatja fejhallgatón
keresztül.
Ehhez a következőket tegye:
Bekapcsolt PAP funkció mellett "A Hangszabályozás menü" c. fejezetben leírtak szerint
válassza ki a "Fejhallgató beállítás"-t, és a " Hang kettős kép esetén" opciót állítsa be
tetszés szerint. A részleteket lásd a 13. oldalon.
PAP (k e t t ős kép) üzemmódban a Scart 2/ 2 kimenete a jobb oldali képre kerül.
b gombot, ha a jobb oldali képernyőn kívánja aktív képernyőként
B vagy b gombot.
HU
A televízió funkciói
19
Page 100

Teletext
A Teletext a legtöbb tévéállomás által közvetített információs szolgáltatás. A szolgáltatás
használatáról a Teletext indexoldala (rendszerint a 100. oldal) ad tájékoztatást. A Teletext
kezeléséhez a távvezérlő alábbi gombjait használja.
Ha gyenge jelet sugárzó csatornát (tévéadót) használ, a Teletextben hibák fordulhatnak elő.
A Teletext bekapcsolása:
1 Válassza ki a TV-csatornát, amely a nézni kívánt
Teletext szolgáltatást közvetíti.
2 A Kép és Teletext üzemmódba lépéshez egyszer
nyomja meg a gombot. A képernyő
kettéosztva látható, bal oldalán a Teletext, jobb
oldalán a TV-csatorna programja.
3 Ha a teljes képernyőn a Teletextet kívánja nézni, a
gombot nyomja meg még egyszer.
Teletext oldal kiválasztása:
Az oldalszámot háromjegyű számban adja meg a számbillentyűkkel.
• Ha hibázik, írja be ismét a helyes oldalszámot.
• Ha a képernyőn a számláló folytatja a keresést, ez azt jelenti,
hogy az oldal nem elérhető. Ebben az esetben írjon be egy
másik oldalszámot.
A következő vagy előző oldal előhívásához:
Nyomja meg a PROG + ( ) vagy PROG - ( ) gombot.
Teletext oldal kimerevítéséhez:
Nyomja meg a / gombot. A kimerevítés feloldásához nyomja meg még egyszer.
Rejtett információ felfedéséhez (pl. rejtvény megfejtése):
Nyomja meg a / gombot. Az információ elrejtéséhez nyomja meg ismét a gombot.
Aloldal kiválasztása:
Egy Teletext oldal több aloldalt tartalmazhat. Ilyen esetben az oldalszám mellett egy vagy
több nyíl jelenik meg, a képernyő alján pedig egy tájékoztató ablak mutatja az oldalhoz
tartozó aloldalak számát. Amint az aloldalak elérhetőek, automatikusan megjelennek a
képernyőn. A bemutató megállításához és a kívánt aloldal kiválasztásához többször
nyomja meg a
A Teletext kikapcsolása:
Nyomja meg a gombot.
B vagy bgombot.
Fastext
A Fastext (gyors Teletext) szolgáltatás lehetővé teszi, hogy Teletext oldalakat
egyetlen gombnyomással érjen el.
Ha Teletext üzemmódban van és Fastext sugárzás rendelkezésre áll, a Teletext
oldal alján egy színkódolt menü jelenik meg. A menüválasztékból a megfelelő
színű gomb (piros, zöld, sárga vagy kék) lenyomásával érheti el a keresett oldalt.
20
Teletext
 Loading...