

Sony KV-29CL10B User Manual

R
4-093-786-
51
(1)
FD Trinitron
Colour Television
Instruction Manual
KV-29CL10B
© 2003 by Sony Corporation
GB

NOTICE FOR CUSTOMERS
A moulded plug complying with BS1363 is fitted to this equipment for your safety and
convenience.
Should the fuse in the plug supplied need to be replaced, a 5 AMP fuse approved by ASTA or
BSI to BS 1362 (i.e. marked with 2 or @) must be used.
When an alternative type of plug is used it should be fitted with a 5 AMP FUSE, otherwise the
circuit should be protected by a 5 AMP FUSE at the distribution board.
If the plug supplied with this equipment has a detachable fuse cover, be sure to attach the fuse
cover after you change the fuse. Never use the plug without the fuse cover. If you should lose
the fuse cover, please contact your nearest Sony service station.
How to replace the fuse
Open the fuse compartment with a blade screwdriver, and replace the fuse.
•
IMPORTANT
If the plug supplied is not suitable for the socket outlets in your home, it should be cut off and
an appropriate plug fitted in accordance with the following instructions:
The wires in this mains lead are coloured in accordance with the following code:
Blue Neutral
Brown Live
As the colours of the wires in the mains lead of this apparatus may not correspond with the
coloured markings identifying the terminals in your plug, proceed as follows:
The wire which is coloured blue must be connected to the terminal which is marked with the
letter N or coloured black. The wire which is coloured brown must be connected to the
terminal which is marked with the letter L or coloured red. Do not connect either wire to the
earth terminal in the plug which is marked by the letter E or by the safety earth symbol Y
or coloured green or green and yellow.
WARNING
• To prevent the risk of electric shock, do not insert the plug cut off from the mains lead into a
socket outlet. This plug cannot be used and should be destroyed.
• To prevent the risk of fire or electric shock, do not expose the unit to rain or moisture.
• Dangerously high voltages are present inside the set. Do not open the cabinet. Refer servicing
to qualified personnel only.
2

Introduction
Thank you for choosing this Sony FD Trinitron Colour Television.
Before operating the TV, please read this manual thoroughly and retain it for future
reference.
• Symbols used in the manual:
• Important information
• Information on a feature.
•
1,2...
Sequence of instructions.
• Shaded buttons on the remote control
show you the buttons you have to
press to follow the sequence of the
instructions.
• Informs you of the result of
instructions.
Table of Contents
Notice for Customers ..............................................................................................................................2
Introduction.............................................................................................................................................. 3
Safety Information................................................................................................................................... 4
Overview
Overview of Remote Control Buttons .................................................................................................. 5
Overview of TV Buttons ........................................................................................................................6
Installation
Connecting the Aerial and VCR............................................................................................................7
Inserting Batteries into the Remote Control ........................................................................................ 7
First Time Operation
Switching On the TV and Automatically Tuning...............................................................................8
Menu system
Introducing and Using the Menu System..........................................................................................10
Menu Guide:
Picture Adjustment ...........................................................................................................................10
Sound Adjustment............................................................................................................................. 11
Sleep Timer.........................................................................................................................................12
Language/Country ........................................................................................................................... 12
Auto Tuning ....................................................................................................................................... 12
Programme Sorting ........................................................................................................................... 12
Programme Labels............................................................................................................................. 13
AV Preset ............................................................................................................................................13
Manual Programme Preset............................................................................................................... 14
Noise Reduction................................................................................................................................. 15
AV2 Output ........................................................................................................................................15
RGB Centring ..................................................................................................................................... 16
Picture Rotation .................................................................................................................................16
Teletext
Additional Information
Connecting Optional Equipment ........................................................................................................ 18
Using Optional Equipment ..................................................................................................................19
Specifications.......................................................................................................................................... 20
Troubleshooting..................................................................................................................................... 21
...............................................................................................................................................17
GB
Table of Contents
3

Safety Information
This set is to operate on a 220240V AC supply only. Take care
not to connect too many
appliances to the same power
socket as this could result in fire
or electric shock.
Do not open the cabinet and the rear
cover of the TV. Refer to qualified
service personnel only.
Do not cover the
ventilation openings of the TV For
ventilation, leave a space of at
least 10cm all around the set.
For environmental and safety
reasons, it is recommended that
the TV set is not left in standby
mode when not in use. Disconnect
from the mains.
For your own safety, do not touch
any part of the TV, power lead or
aerial lead during lightning
storms.
Never place
the TV in hot, humid or
excessively dusty places. Do not
install the TV where it may be
exposed to mechanical vibrations.
Never push objects of any kind into
the set as this could result in a fire
or electric shock. Never spill liquid
of any kind on the set. If any liquid
or solid object does fall through, do
not operate the TV. Have it checked
immediately by qualified
personnel.
To prevent fire or shock
hazard, do not expose the TV
to rain or moisture.
To prevent fire, keep inflammable
objects or naked lights (eg
candles) away from the TV.
Clean the screen and cabinet with a
soft, lightly dampened cloth. Do
not use any type of abrasive pad,
alkaline cleaner, scouring powder
or solvent, such as alcohol or
benzine, or antistatic spray. As a
safety precaution, unplug the TV
before cleaning it.
Place the TV on a secure stable
stand. Do not allow children to
climb on to it. Do not place the TV
on its side or face up.
4
Safety Information
Pull out the power lead by the
plug. Do not pull on the power
lead itself.
Unplug the power lead before
moving the TV. Avoid uneven
surfaces, quick steps or excessive
force. If the set has been dropped
or damaged, have it checked
immediately by qualified service
personnel.
Take care not to place heavy
objects on the power lead as this
could result in damage.
We recommend you wind any
excess lead around the holders
provided on the rear of the TV.
Do not cover the ventilation
openings of the TV with items
such as curtains or newspapers
etc.
Overview of Remote Control Buttons
!§
!∞
!¢ 2
!£
!™ 9
!¡
6
!¶
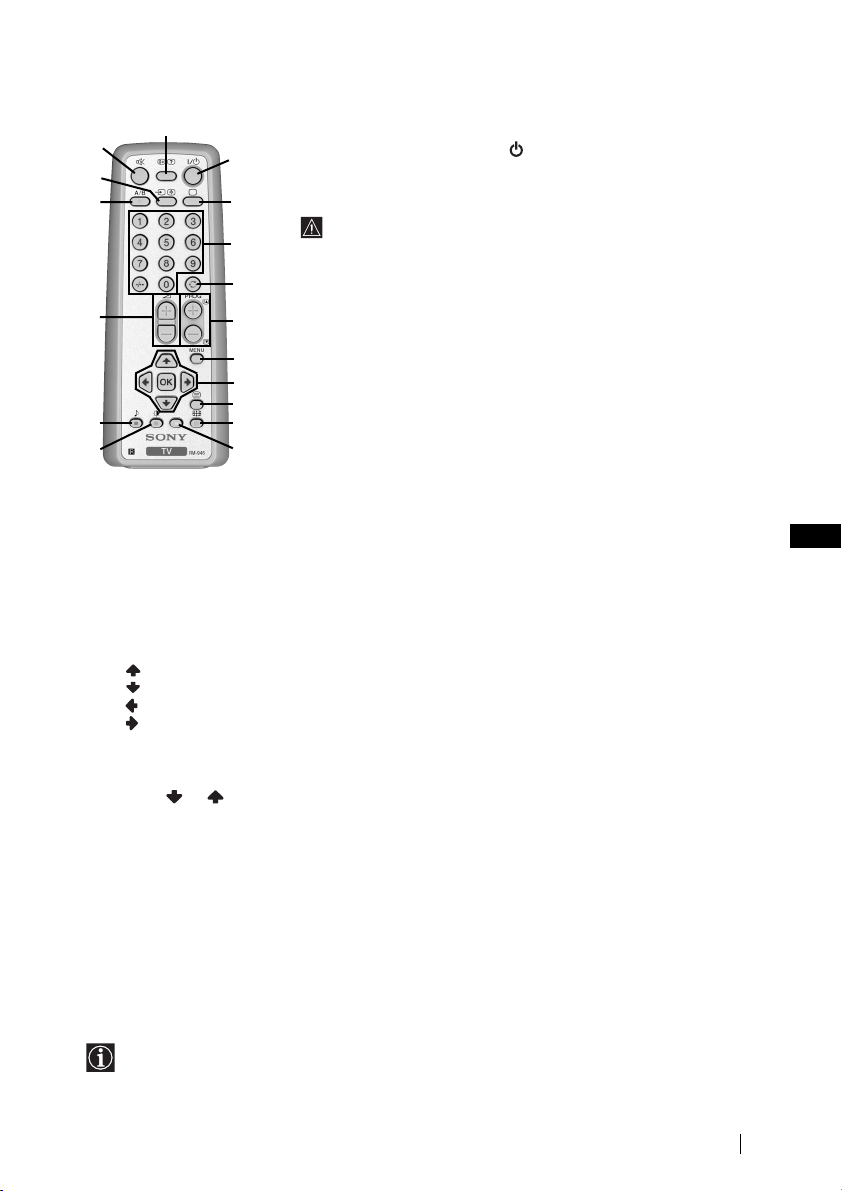
Displaying the menu system:
to display the menu on the TV screen.
Press again to remove the menu display
from the TV screen.
7
Menu selection
•
When MENU is switched on:
Scroll Up.
Scroll Down.
Previous menu or selection.
Next menu or selection
confirms your selection.
•
When MENU is switched off:
OK Shows a channel overview.
Press or to select the channel and
then, press again the OK button to
watch the selected channel.
8
Selecting Teletext:
teletext.
9
Selecting Screen format:
view programmes in 16:9 mode. Press
again to return to 4:3 mode.
1
To Temporarily Switch Off TV:
1
off TV (the standby indicator on TV lights up). Press again to
switch on TV from standby mode.
To save energy we recommend switching off completely when TV is not
in use.
3
4
2
Selecting TV mode:
3
5
6
7
8
!º
Selecting channels:
For double-digit programme numbers, enter the second digit
within 2.5 seconds, or press -/-- and then the first and second
digit.
If you enter an incorrect first digit, this should be corrected by
entering another digit (0-9) and then selecting -/-- button again
to enter the programme number of your choice.
4
Back to the channel last watched:
channel selected (watched for at least 5 seconds).
5
Selecting channels:
channel.
Press to switch on
Press to temporarily switch
After 15 minutes without a signal and without any button
being pressed, the TV switches automatically into standby
mode.
Press to switch off teletext or video input.
Press to select channels.
Press to watch the last
Press to select the next or previous
Press
!º
This button only works in Teletext mode.
!¡
Selecting Picture mode:
repeatedly to change the picture mode.
!™
Selecting sound mode:
repeatedly to change the sound mode.
!£
Adjusting TV volume:
the volume of the TV.
!¢
OK
Choosing the Sound Channel:
of a bilingual broadcast, press this button
repeatedly to select sound channel 1 or
sound channel 2.
!∞
Selecting input source:
repeatedly until the desired input symbol
of the source appears on the TV screen.
!§
Muting the Sound:
sound. Press again to restore the sound.
Press to
!¶
Displaying on Screen information:
Press to display all on-screen indications.
Press again to cancel.
GB
Press
Press
Press to adjust
In case
Press
Press to mute TV
Besides TV functions, all coloured buttons as well as green symbols are also used for
Teletext operation. For more details, please refer to “Teletext” section of this instruction
manual on page 17.
Overview
5
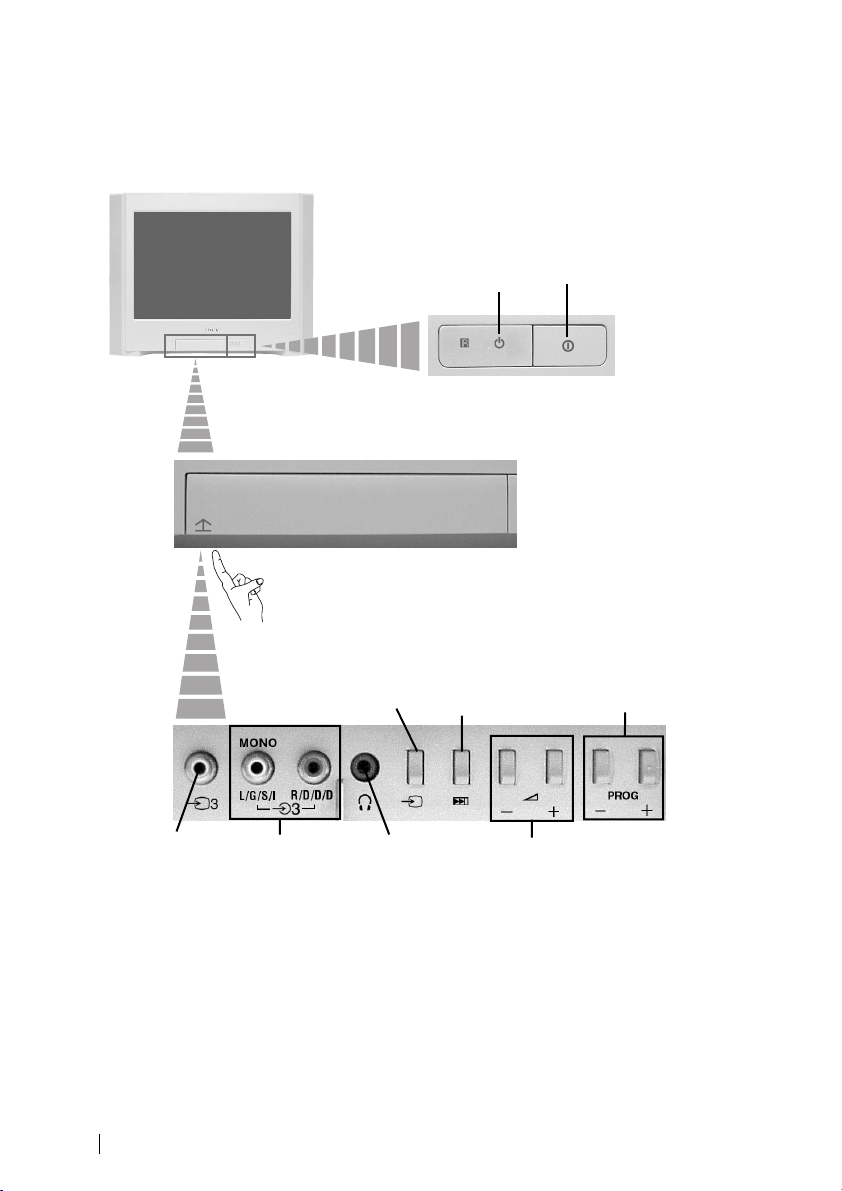
Overview of TV Buttons
Standby
indicator
Push up the flap on the front
of the TV to reveral the front
control panel.
Selecting
Input source
Auto Start
Up Button
On/Off switch
Programme Up
or Down
Buttons (Selects
TV channels)
6
Video
Input jack
Overview
Audio Input
jacks
Headphones
jack
Volume control
buttons
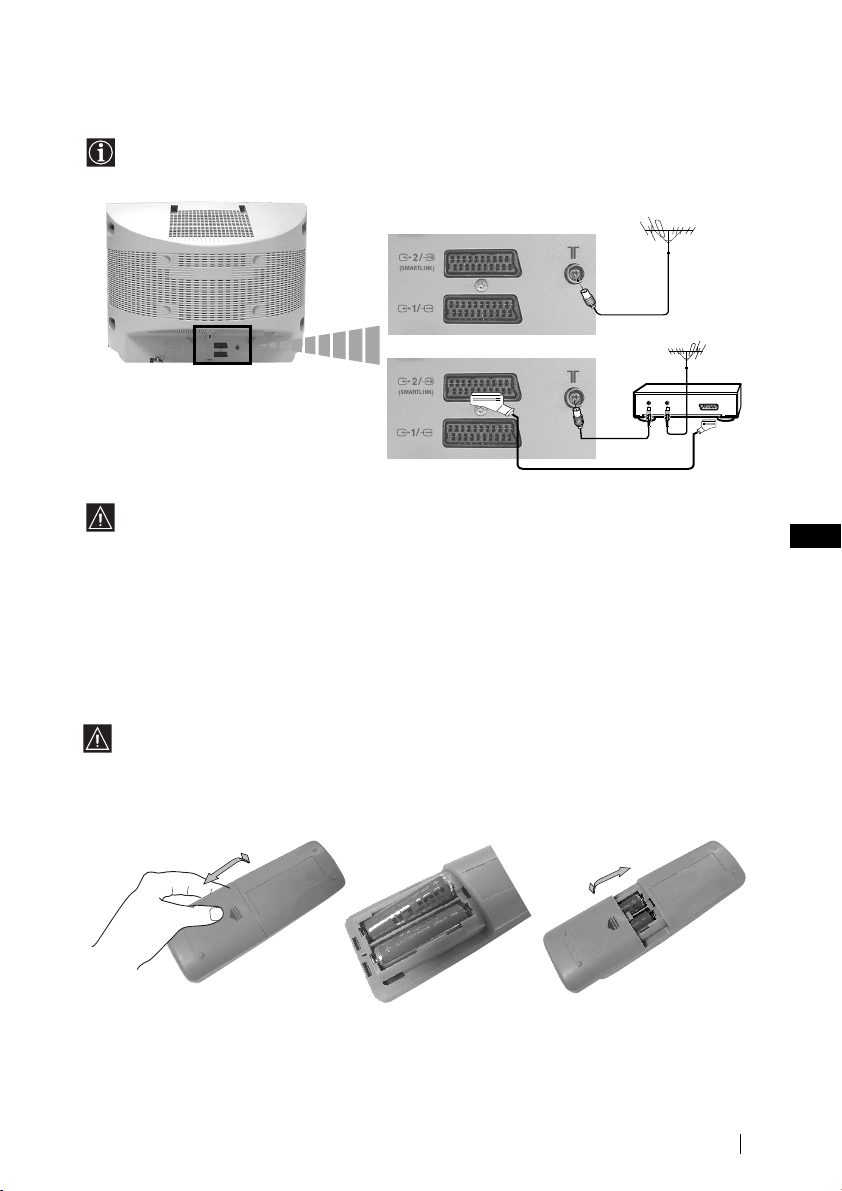
Connecting the Aerial and VCR
Connecting cables are not supplied.
or
For more details of VCR connection, please refer to the
section “Connecting Optional Equipment” of this
instruction manual on page 18.
VCR
OUT IN
Scart lead is optional.
GB
Inserting Batteries into the Remote Control
Make sure you insert the supplied batteries using the correct polarities.
Always remember to dispose of used batteries in an environmental friendly way.
Installation
7
 Loading...