

Sony KV-27V66 User Manual

Trinitmrf
Color TV
Operating Instructions
1
3-866-074-21
KV-27S42
KV-27S46
KV-27S66
KV-27V42
KV-27V66
L
© 1999 by Sony Corporation

Introduction
Congratulations on your purchase of the Sony Trinitron® Color TV.
Before you begin using this manual, please check the model number
located on the front cover of this instruction manual.
The menu and illustrations used in these instructions are for KV-27S46.
Differences in operation or features will be indicated in the text, for
example, "KV-27S46 only."
Trinitron® Color TV Features
Depending on your TV, some of the features you will enjoy include:
□ PARENTAL CONTROL— A tool for parents to help monitor what their
children watch on TV by establishing rating limits.
□ FAVORITE CHANNEL — Instant access to your favorite channels with
the touch of a button.
□ Picture in Picture (PIP) — Allows you to view two channels
simultaneously, (KV-27S46,27S66,27V66 only).
□ Universal Remote Control — Program your remote control to operate
your connected cable box, VCR, digital satellite receiver or DVD
player.
□ Energy Star — A recognized symbol of energy efficiency.
□ S VIDEO — A video input that offers enhanced picture quality.
□ Direct MTS — Allows direct access to changing your Multi-Channel
TV Sound: STEREO, SAP (Second Audio Program) or MONO, with
the touch of a button.
□ Front A/V inputs — A quick connection for video games, camcorders
or stereo equipment, (KV-27V42, 27V66 only).
User Guide
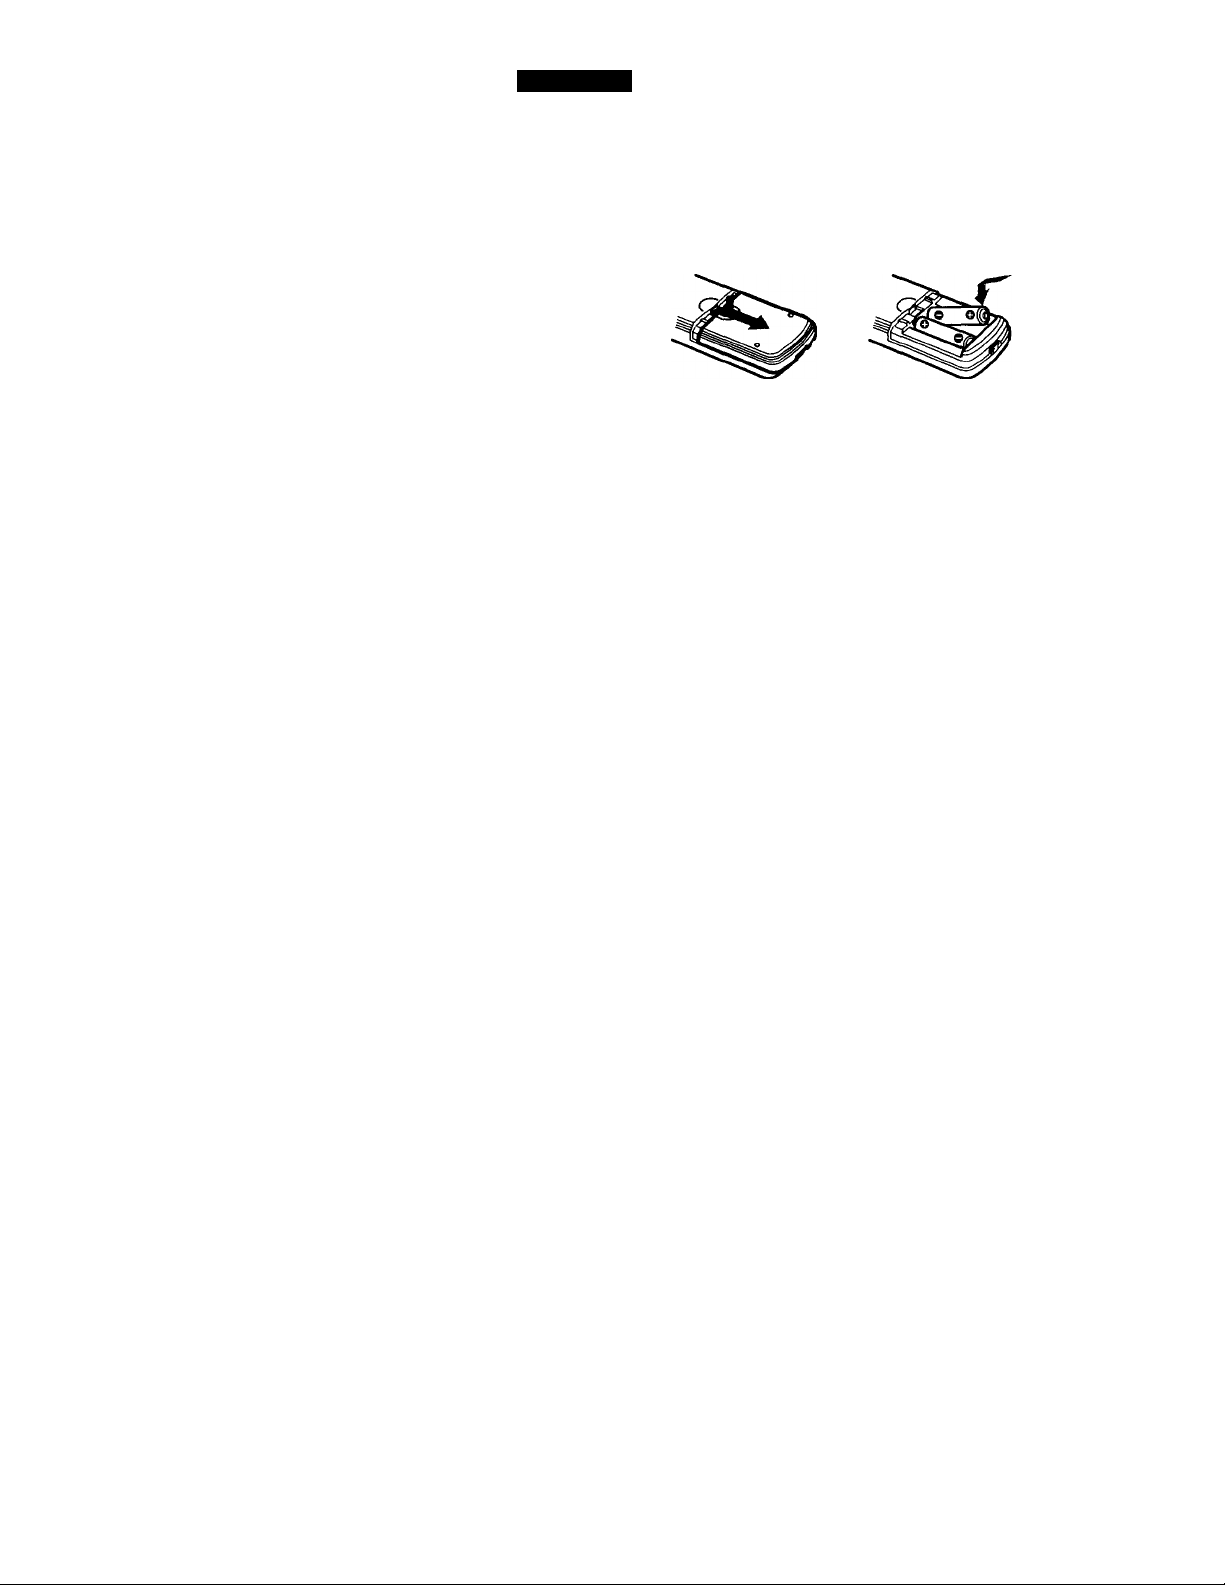
Batteries for the Remote Control
Insert two AA (R6) batteries (supplied) into the remote control using the
following illustration as a guide.
Under normal conditions, batteries will last up to six months. If the remote
control does not operate properly, the batteries might be worn out.
^ Remove the batteries to avoid possible damage from battery leakage if you
will not be using the remote control for an extended period of time.
^ Your remote control can be programmed to operate most video equipment,
(see page 31).
About this Manual
This manual provides instructions to help you enjoy your new TV. It
shows you how to connect to an antenna or cable, cable box, VCR, DVD,
satellite receiver, stereo system or camcorder. Once you're connected,
follow the instructions to learn how to use the remote control to access
the on-screen menus.

Connecting Your TV
This section covers basic connections in addition to any optional
equipment you may be connecting.
Basic Connections
TV with indoor or outdoor antenna, or CATV cable
Depending on the cable available in your home, choose one of the
connections below:
A VHFonly 75.ohm
VHFAIHF coaxial cable
or
Cable
B VHFonly 300K)hmtwin
or lead cable
UHF only
or
VHF/UHF
^ If you are connecting to an indoor or outdoor antenna, it will be necessary to
adjust the orientation of the antenna for best reception.
—VHF/UHF
Antenna connector
onnector^^
(Rear of n/)
VHF/UHF
C VHF 75-ohm
and coaxial cable
UHF
-----
300-ohm twin
lead cable
=CD—«1
EAC-66U/V mixer
(not supplied)
(Rear of TV)
VHF/UHF
Cable and antenna
KV-27S66, 27V66 only
If your cable provider does not feature local channels, you may find this
set up convenient.
CATV calile
(No connection “TO
CONVERTER" in this case)
Antenna cable
^ Select CABLE or ANT mode % pressing ® on the remote control.
d!I]P=—-<1) VHF/UHF
,6g] (Rear of TV)
AUX
I TO CONVERTER
User Guide
Connecting Additional Equipment
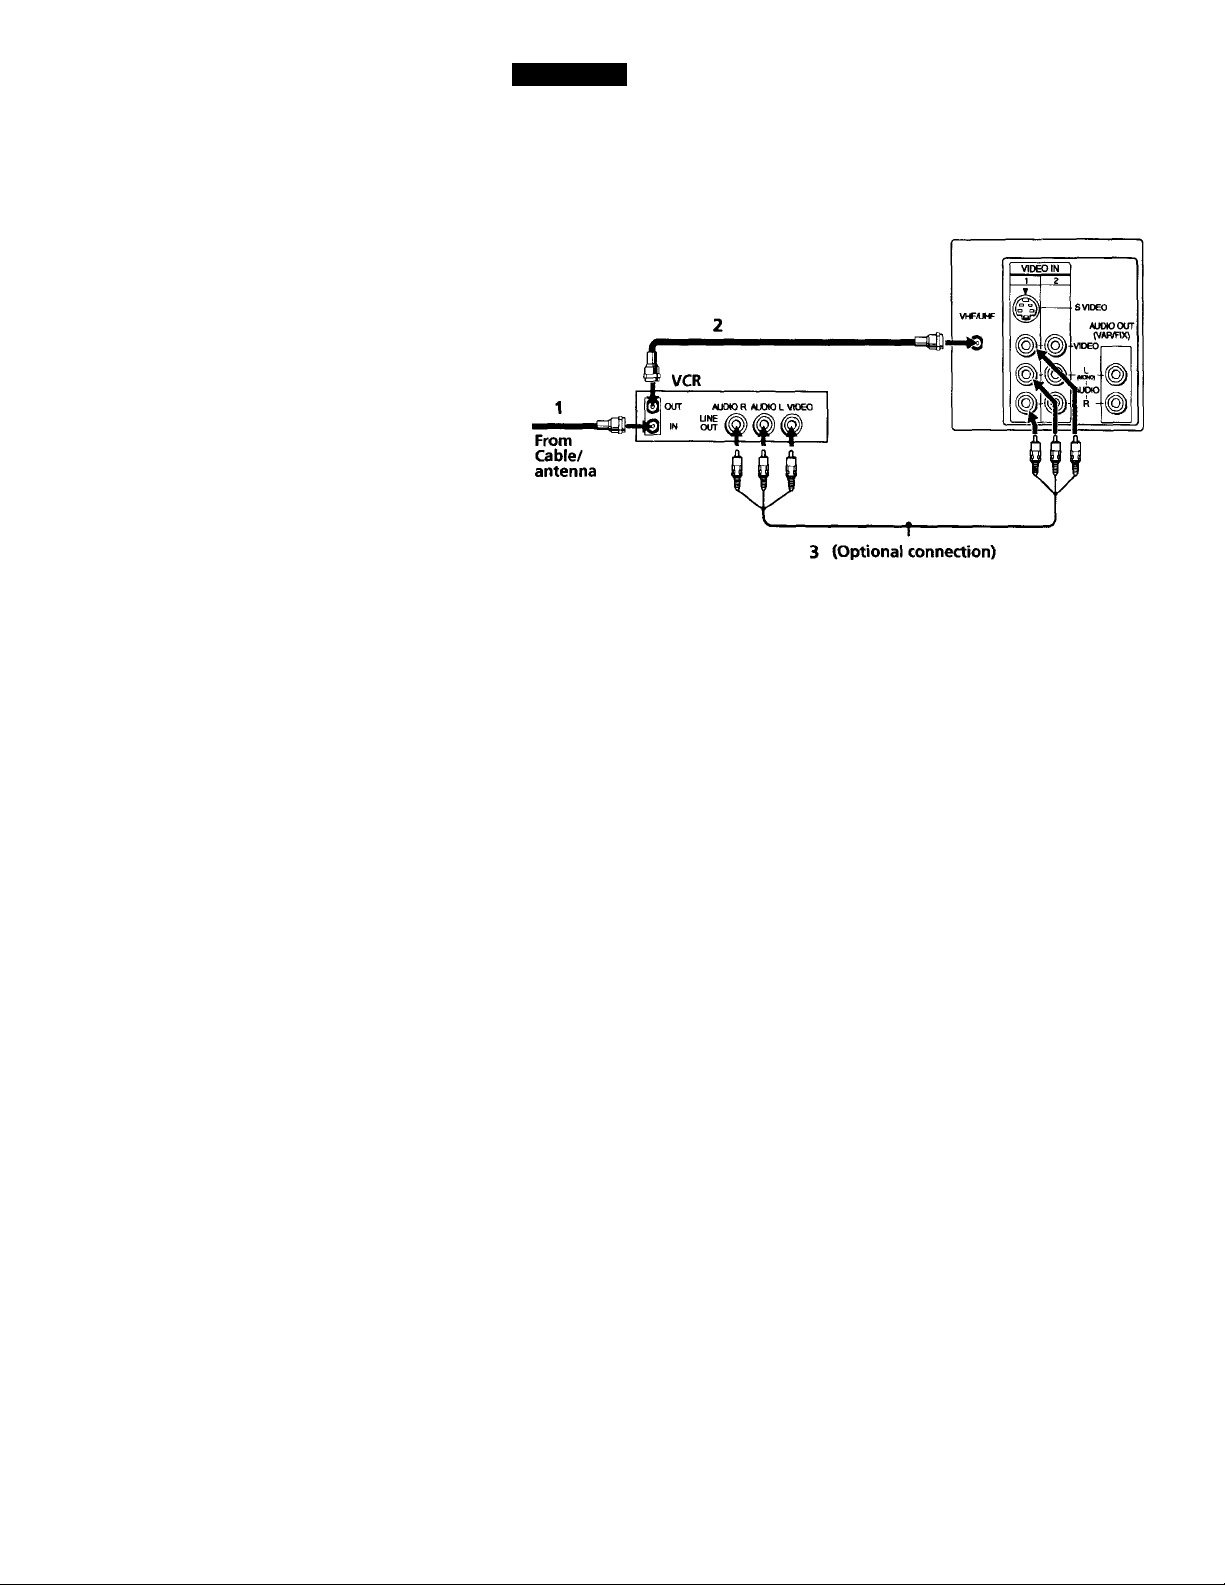
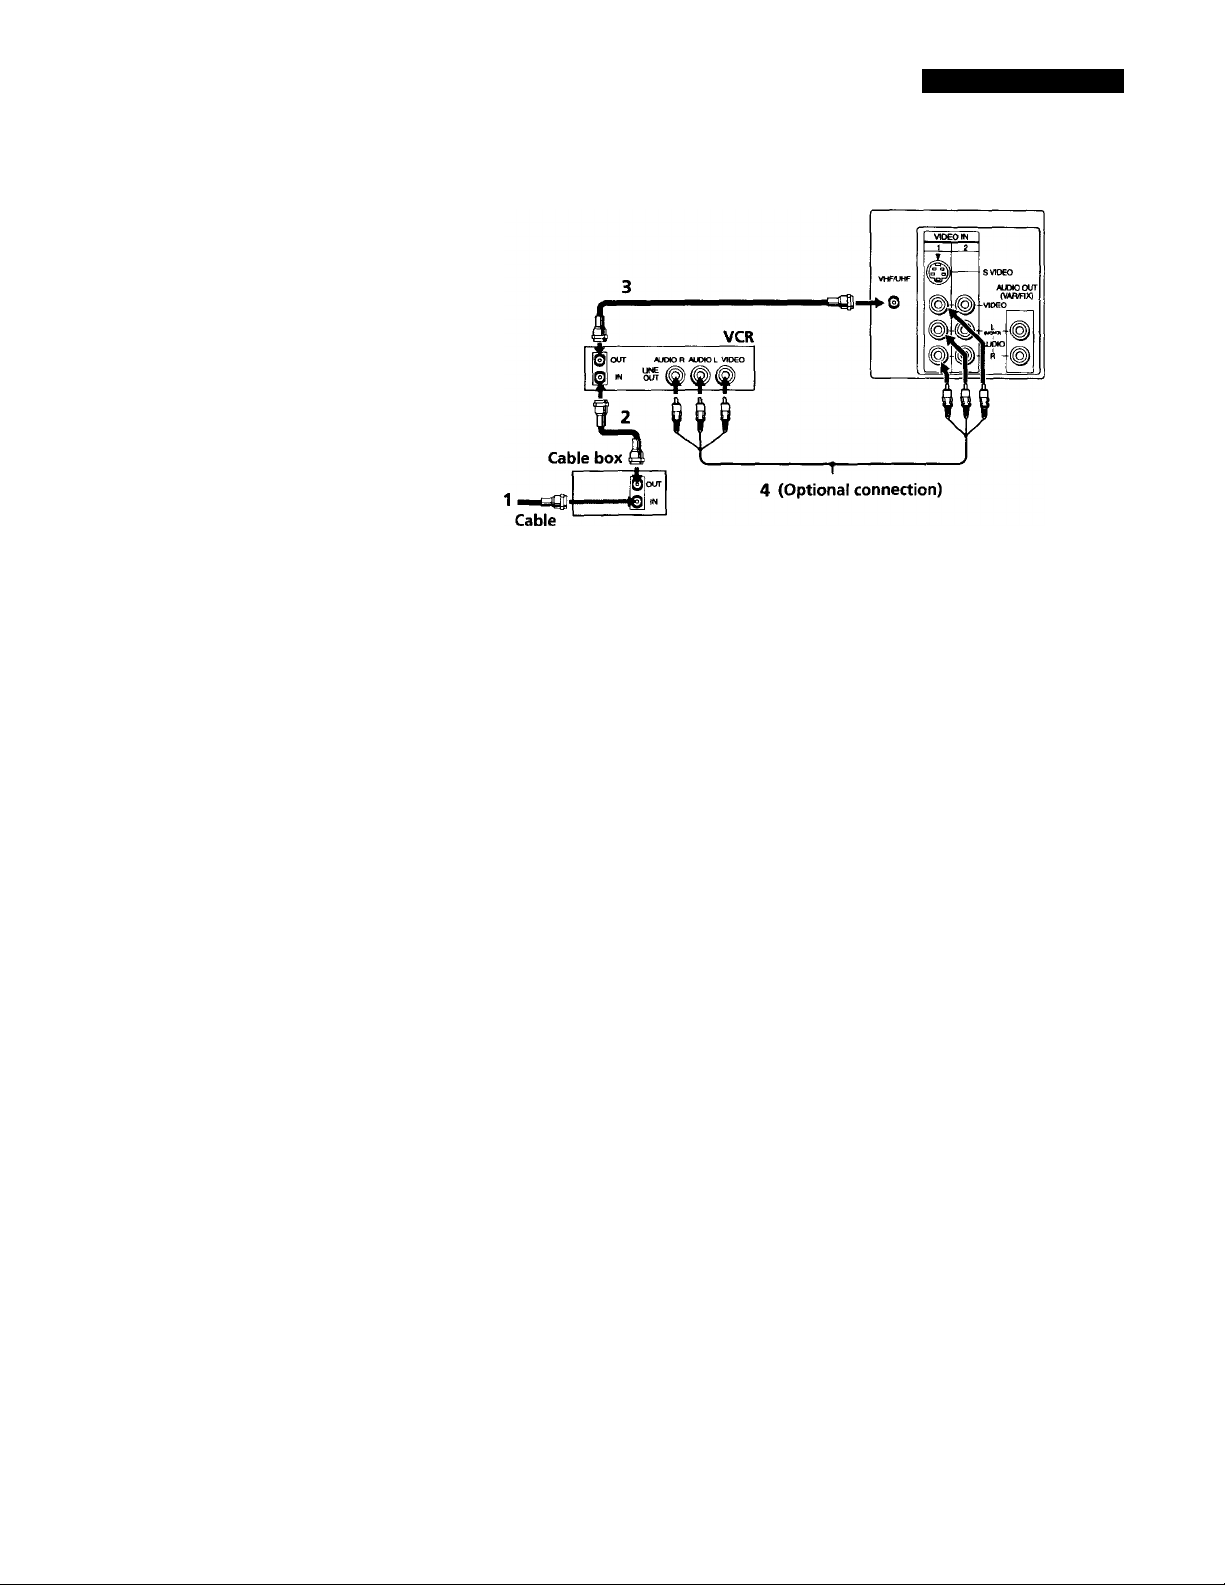
TV and VCR
! VCR must be connected and turned on to operate PIP. (KV-27S46 only)
TV
1 Connect the coaxial cable from your TV antenna or cable TV to the IN
jack on your VCR.
2 Connect a coaxial cable (not supplied) from the OUT jack on your
VCR to the VHF/UHF IN jack on the TV.
To watch video programs from your VCR, tune your TV to channel 3 or 4 (as
set on the rear of your VCR).
(Optional connection)
3 If your VCR is equipped with video inputs, for better picture quality
you should connect A/V cables to AUDIO and VIDEO OUT on your
VCR to AUDIO/VIDEO IN on your TV. You can use the button
to switch between the TV and VCR inputs.
For optimum picture quality, use S VIDEO instead of the yellow A/V cable.
S VIDEO does not provide sound, the audio cables must still be connected.
Connecting Your TV
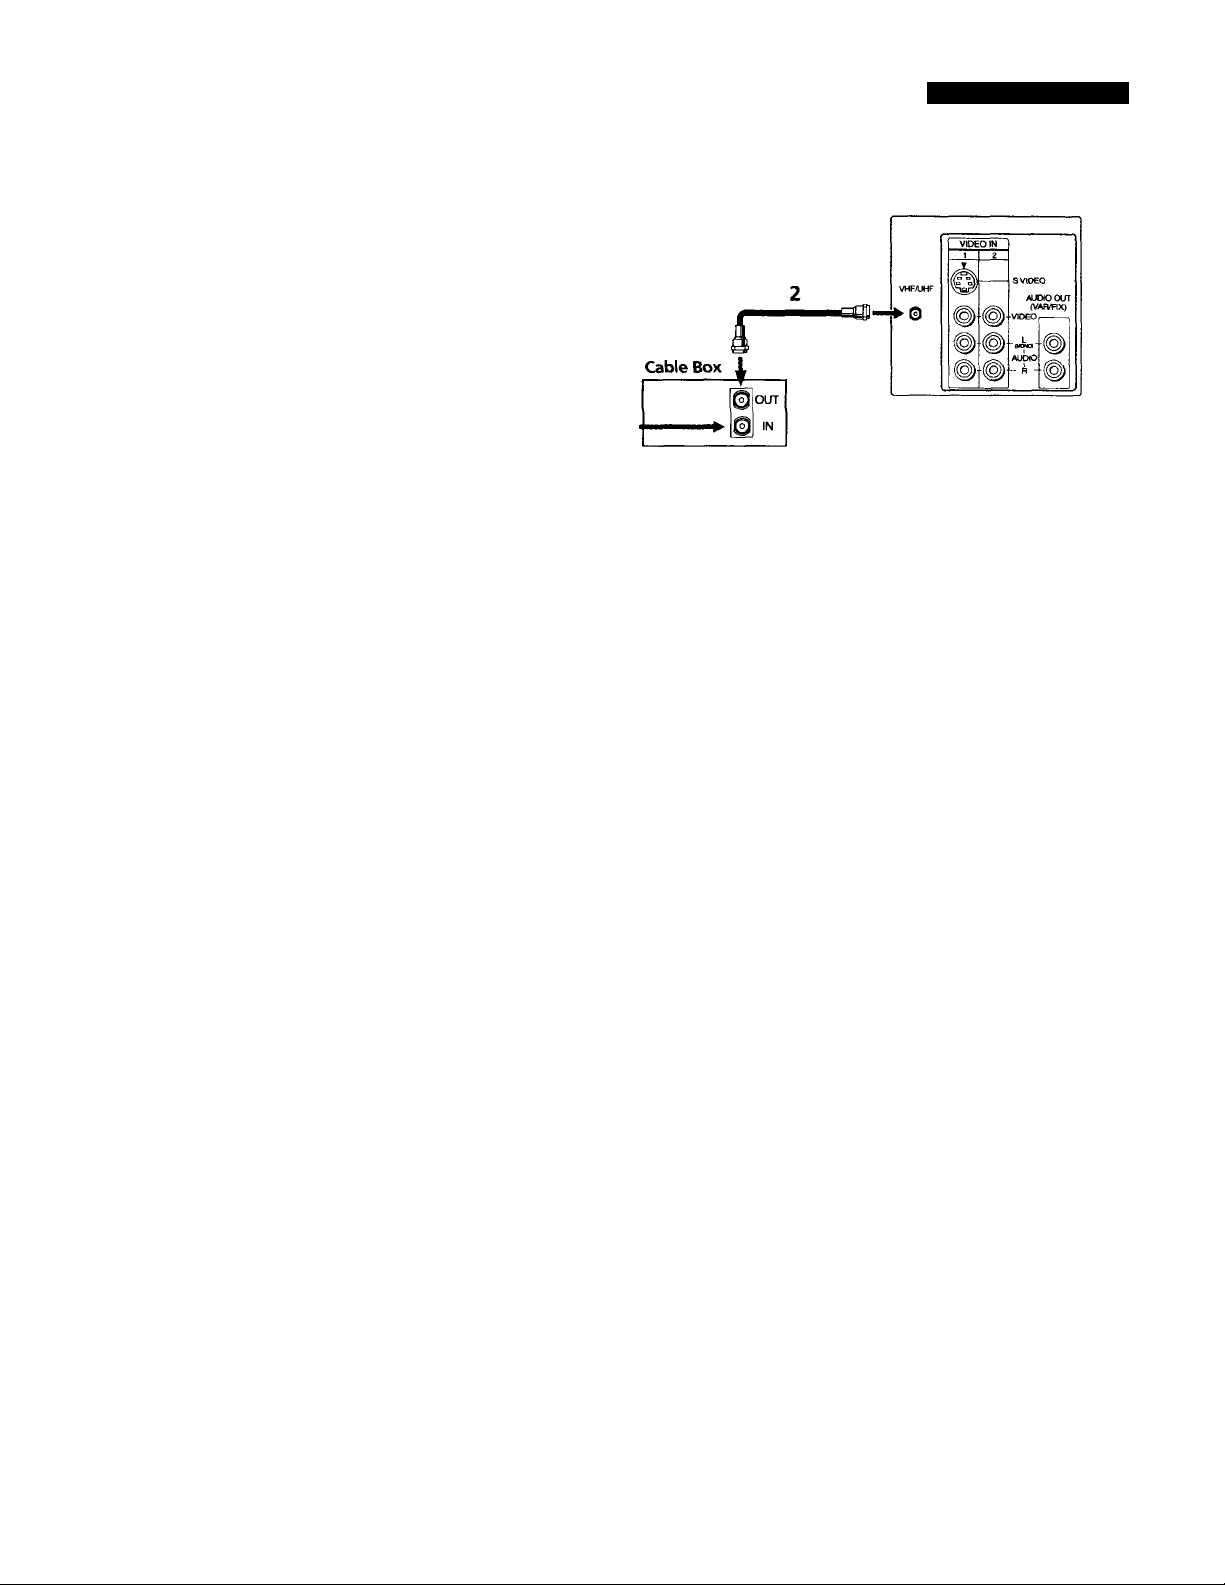
TV and Cable Box
TV
From
Cable
1 Connect the coaxial cable from the wall to the IN jack on your cable
box.
2 Connect a coaxial cable (not supplied) from the OUT jack on your
cable box to the VHF/UHF IN jack on the TV.
^ To view channels from your cable box, tune your TV to channel 3 or 4 (as set
on the rear panel of your cable box).
^ If you will be controlling all channel selection through your cable box, you
should consider using the CHANNEL FIX feature on page 24.
User Guide
TV, Cable box and Cable
KV-27S66, 27V66 only
For this set up, you can switch between scrambled channels (through
your cable box), and normal (CATV) channels by pressing q on your
remote control.
(Rear panel KV-27V66 only)
0
TO
___
MVBTTEI
0
Cable Box
^ When using PIP, the AUX input cannot be viewed in the window picture.
1
É
OOT
IN
J7
^■H0
From
Cable
IN OUT
VKW01vwcoj
•OflO* Aucao
©
<§)
<§)
}
Connecting Your TV
TV, VCR, and Cable box
TV
1 Connect the coaxial cable from the wall to the IN jack on your cable
box.
2 Connect a coaxial cable (not supplied) from the OUT jack on your
cable box to the IN jack on your VCR.
3 Connect a coaxial cable (not supplied) from the OUT jack on your
VCR to the VHF/UHF IN jack on the TV.
If you will be controlling all channel selection through your cable box, you
should consider using the CHANNEL FIX feature on page 24.
(Optional connection)
4 If your VCR is equipped with video inputs, for better picture quality
you should connect A/V cables to AUDIO and VIDEO OUT on your
VCR to AUDIO/VIDEO IN on your TV. You can use the T5"° button
to switch between the TV and VCR inputs.
^ For optimum picture quality, use S VIDEO instead of the yellow AA/ cable.
S VIDEO does not provide sound, the audio cables must stilt be connected.
User Guide
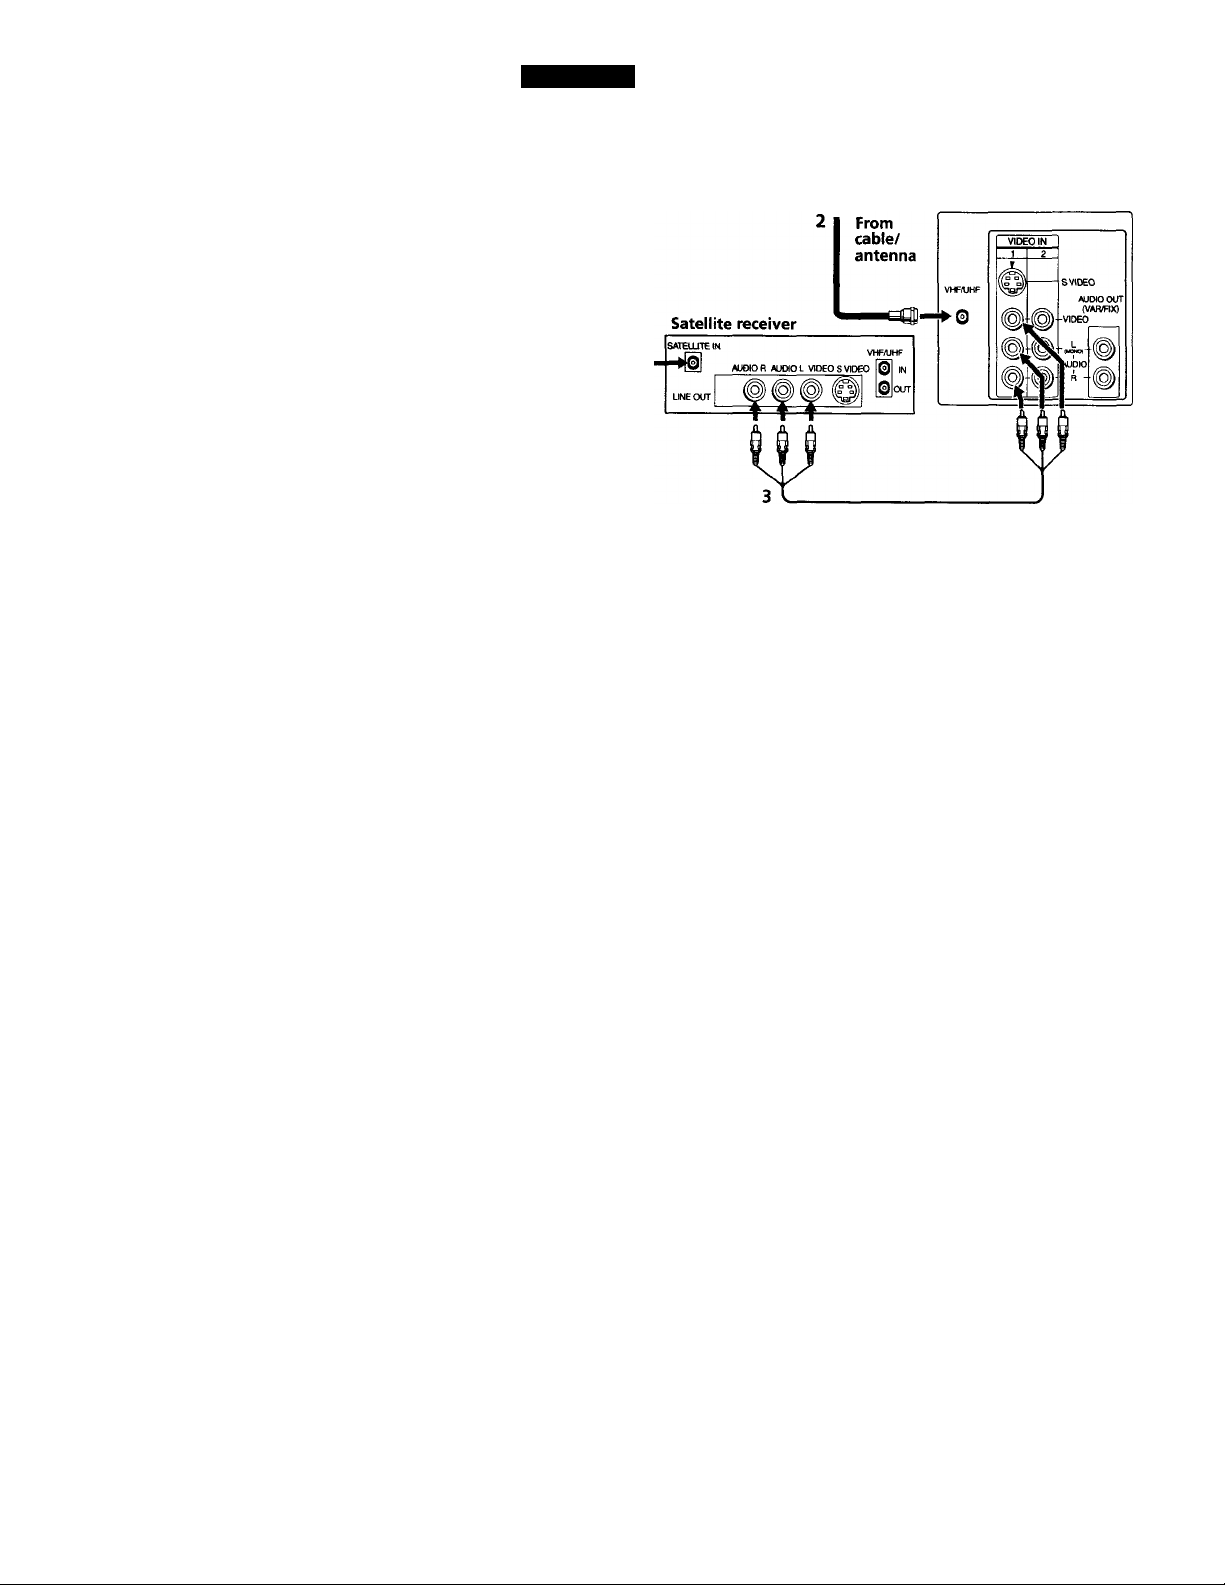
TV and Digital Satellite Receiver
Satellite
antenna
cable
1
Connect the cable from your satellite antenna to SATELLITE IN on
the satellite receiver.
TV
2
Attach the coaxial connector from your cable or antenna to
VHF/UHF IN on your TV.
3
Using A/V connectors, connect AUDIO and VIDEO OUT on your
satellite receiver to AUDIO and VIDEO IN on your TV. You can use
the button to switch between the satellite receiver and the TV.
^ For optimum picture quality, use S VIDEO instead of the yellow AA/ cable.
S VIDEO does not provide sound, your audio connectors must still be
connected.
8
Connecting Your TV
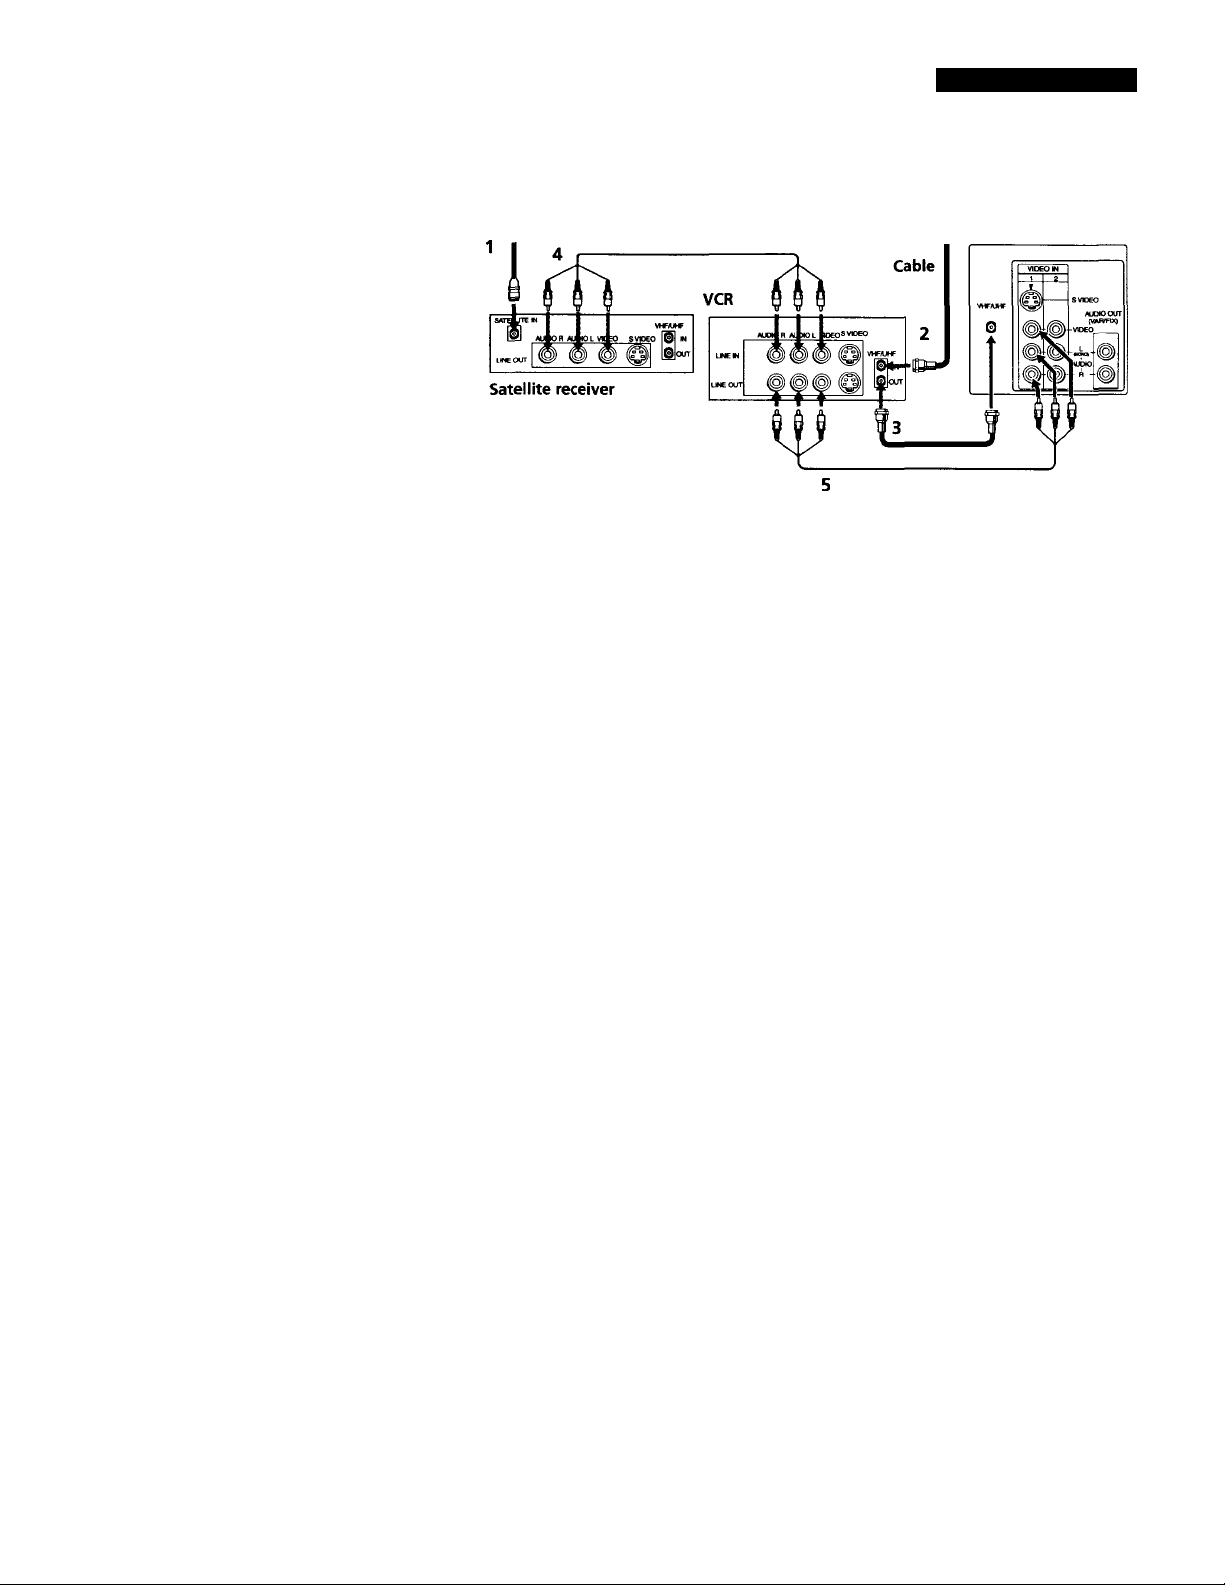
TV, Digital Satellite Receiver and VCR
Satellite
antenna
1 Connect the cable from your satellite antenna to SATELLITE IN on
the satellite receiver.
2 Attach the coaxial connector from your cable or antenna to
VHF/UHF IN on your VCR.
TV
3 Using a coaxial cable, connect VHF/UHF OUT on your VCR to
VHF/UHF IN on your TV.
4 Using A/V connectors, connect AUDIO and VIDEO OUT on your
satellite receiver to AUDIO and VIDEO IN on your VCR.
5 Using A/V connectors, connect AUDIO and VIDEO OUT on your
VCR to AUDIO and VIDEO IN on your TV.
^ To view from the satellite or VCR, select the video input to which your
satellite receiver or VCR is connected by pressing on the remote
control. • -
User Guide
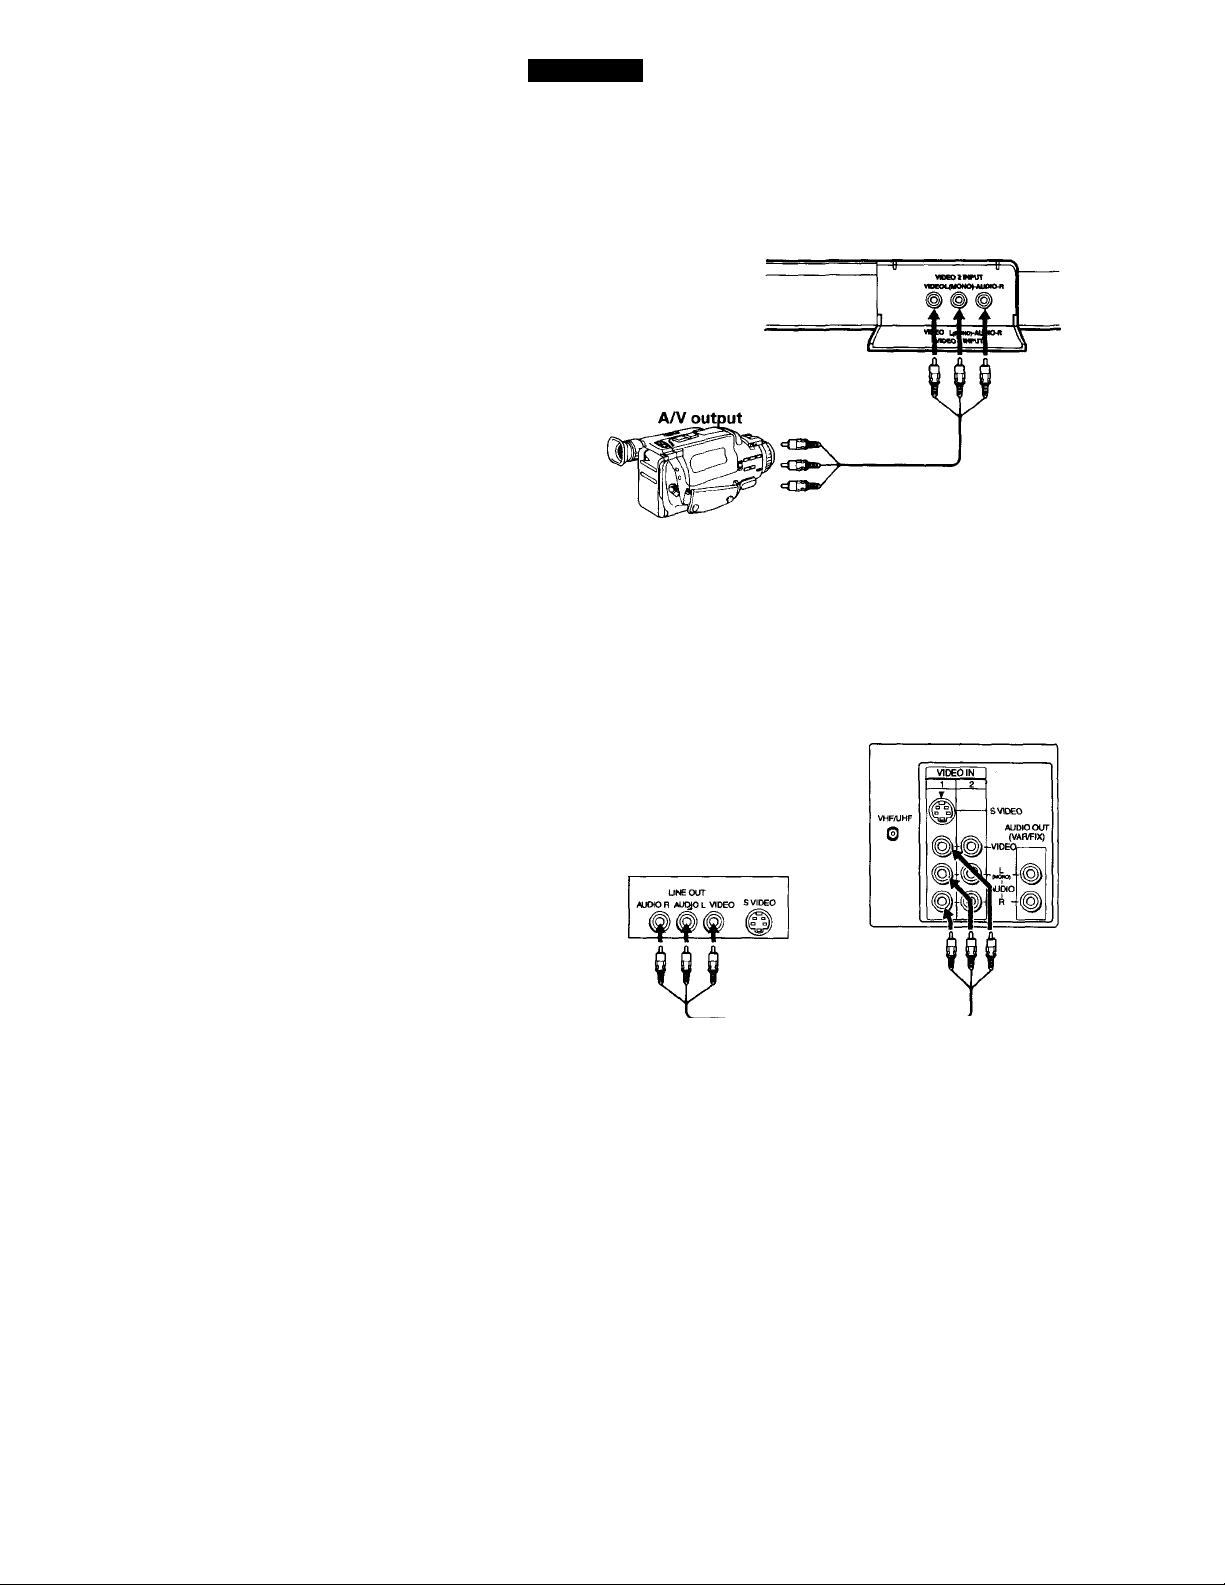
Connecting a Camcorder
Using A/V cables, connect AUDIO and VIDEO OUT on your camcorder
to AUDIO and VIDEO IN on your TV.
(Front A/V Panel KV-27V42, 27V66 only)
^ Connection can also be made to the rear /W panel of your TV.
Connecting a DVD Player
Using A/V connectors, connect LINE OUT on your DVD to VIDEO IN
on your TV.
(Rear of TV)
(Rear of DVD player)
A/V outputs
^ For optimum picture quality, use S VIDEO instead of the yellow A/V cable.
S VIDEO does not provide sound, your audio connectors must still be
connected.
10
I
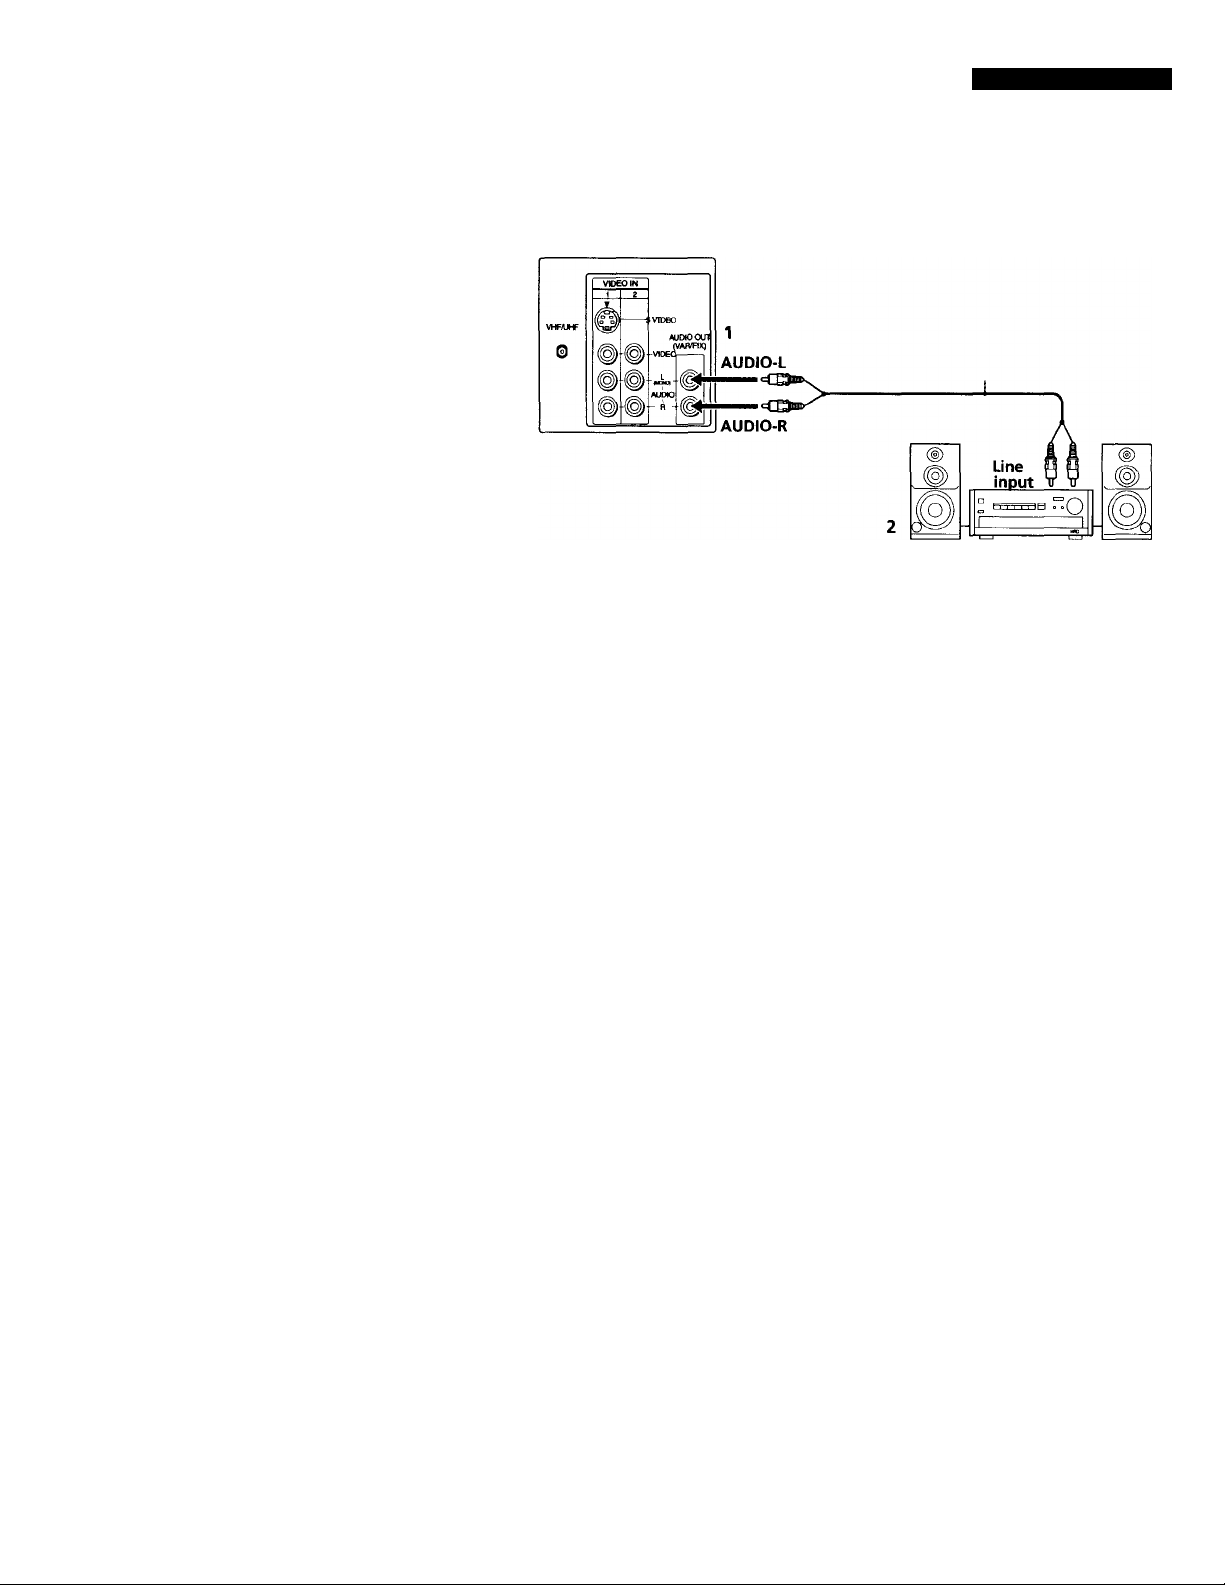
Connecting an audio system
Using audio connectors, connect AUDIO OUT on your TV to one of the
unused line inputs (e.g. TV, AUX, TAPE 2) on your stereo.
Set your stereo to the chosen line input. (See page 20 for additional audio
setup instructions.)
Connecting Your TV
11
 Loading...