

Page 1

4-205-400-71(1)
R
FD Trinitron
Colour Television
Instruction Manual
KV-21FT1B
2000 by Sony Corporation Printed in Spain
GB
Page 2
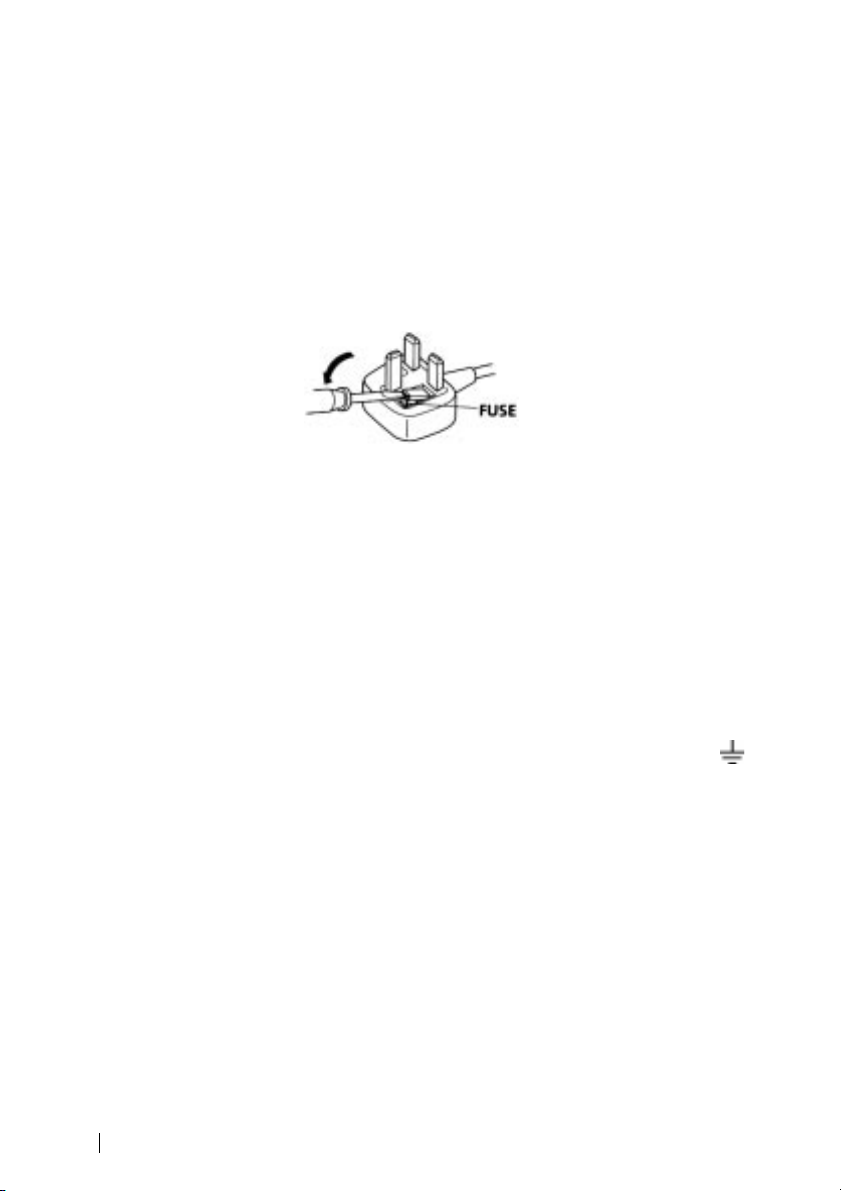
NOTICE
A moulded plug complying with BS1363 is fitted to this equipment for your safety and
convenience.
Should the fuse in the plug supplied need to be replaced, a 5 AMP fuse approved by ASTA or
BSI to BS 1362 (i.e. marked with 2 or @) must be used.
When an alternative type of plug is used it should be fitted with a 5 AMP FUSE, otherwise the
circuit should be protected by a 5 AMP FUSE at the distribution board.
If the plug supplied with this equipment has a detachable fuse cover, be sure to attach the fuse
cover after you change the fuse. Never use the plug without the fuse cover. If you should lose
the fuse cover, please contact your nearest Sony service station.
How to replace the fuse
Open the fuse compartment with a blade screwdriver, and replace the fuse.
•
IMPORTANT
If the plug supplied is not suitable for the socket outlets in your home, it should be cut off and
an appropriate plug fitted in accordance with the following instructions:
The wires in this mains lead are coloured in accordance with the following code:
Blue Neutral
Brown Live
As the colours of the wires in the mains lead of this apparatus may not correspond with the
coloured markings identifying the terminals in your plug, proceed as follows:
The wire which is coloured blue must be connected to the terminal which is marked with the
letter N or coloured black. The wire which is coloured brown must be connected to the
terminal which is marked with the letter L or coloured red. Do not connect either wire to the
earth terminal in the plug which is marked by the letter E or by the safety earth symbol
or coloured green or green and yellow.
WARNING
• To prevent shock hazard, do not insert the plug cut off from the mains lead into a socket
outlet. This plug cannot be used and should be destroyed.
• To prevent fire or shock hazard, do not expose the unit to rain or moisture.
• Dangerously high voltages are present inside the set. Do not open the cabinet. Refer servicing
to qualified personnel only.
2
Page 3

Introduction
Thank you for choosing this Sony FD Trinitron Colour Television.
Before operating the TV, please read this manual thoroughly and retain it for future
reference.
• Symbols used in the manual:
• Informs you of possible hazards.
• Important information
• Information on a feature.
•
1,2...
Sequence of instructions.
MENU
• Shaded buttons on the remote control show you the buttons you have to press to follow
K
the sequence of the instructions.
• Informs you of the result of instructions.
Safety Information
All TV’s operate on extremely high voltages. To prevent fire or electric shock, please follow
the safety guidelines indicated in the blue sheet supplied.
In case of problems, have your TV serviced by qualified personnel. Never open the casing
yourself.
GB
Table of Contents
Introduction..............................................................................................................................................3
Safety Information................................................................................................................................... 3
Overview
Overview of Remote Control Buttons..................................................................................................4
Overview of TV Buttons ........................................................................................................................5
Installation
Inserting Batteries into the Remote Control........................................................................................5
Connecting the Aerial and VCR ...........................................................................................................5
First Time Operation
Switching On the TV and Automatically Tuning ..............................................................................6
Menu system
Introducing and Using the Menu System............................................................................................8
Menu Guide .............................................................................................................................................8
Teletext
Additional Information
Connecting Optional Equipment........................................................................................................15
Using Optional Equipment..................................................................................................................15
Specifications..........................................................................................................................................16
Troubleshooting.....................................................................................................................................17
...............................................................................................................................................14
Table of Contents
3
Page 4
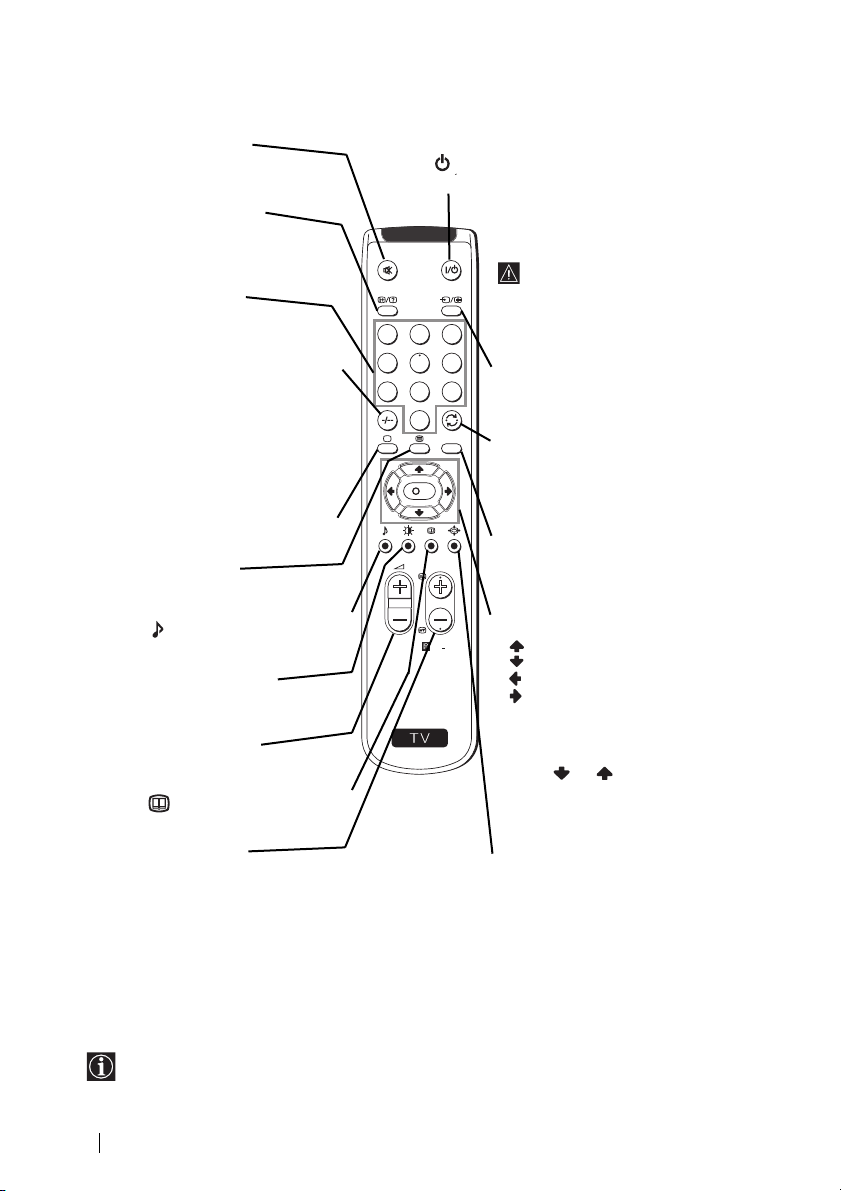
Overview of Remote Control Buttons
Muting the Sound
Press to mute TV sound. press again
to restore the sound.
Displaying on Screen
information
Press to display all on-screen
indications. Press again to cancel.
Selecting channels
Press to select channels.
For double-digit programme
numbers, e.g. 23, press -/-- first, then
the buttons 2 and 3.
If you enter an incorrect first digit,
this should be corrected by entering
another digit (0-9) and then selecting
-/-- button again to enter the
programme number of your choice.
Selecting TV mode
Press to switch off teletext or video
input.
Selecting Teletext
Press to switch on teletext.
This button only works in Teletext mode.
Function associated to this button
does not work with this TV.
Selecting Picture mode
Press repeatedly to change the
picture mode.
Adjusting TV volume
Press to adjust the volume of the TV.
This button only works in Teletext mode.
Function associated to this button
does not work with this TV.
Selecting channels
Press to select the next or previous
channel.
To Temporarily Switch Off TV
Press to temporarily switch off TV (the standby
indicator on TV lights up). Press again to switch on
TV from standby mode.
To save energy we recommend
switching off completely when TV is not
in use.
After 15 minutes without a
signal and without any button
being pressed, the TV switches
automatically into standby
1
2
3
mode.
4
5
7
8
0
Selecting input source
6
Press repeatedly until the desired
9
input symbol of the source appears
on the TV screen.
MENU
Back to the channel last
watched
Press to watch the last channel
K
selected (watched for at least 5
seconds).
Displaying the menu system
PROGR
Press to display the menu on the TV
screen. Press again to remove the
menu display from the TV screen.
Menu selection
•
RM
887
When MENU is switched on:
Scroll Up
Scroll Down
Previous menu or selection
S
Next menu or selection
OK
confirms your selection
•
When MENU is switched off:
OK
Shows a channel overview.
Press or to select the
channel and then, press again the
OK button to watch the selected
channel.
Selecting Screen format
Press to view programmes in 16:9
mode. Press again to return to 4:3
mode.
Besides TV functions, all coloured buttons as well as green symbols are also used for
Teletext operation. For more details, please refer to "“Teletext” section of this instruction
manual.
4
Overview
Page 5
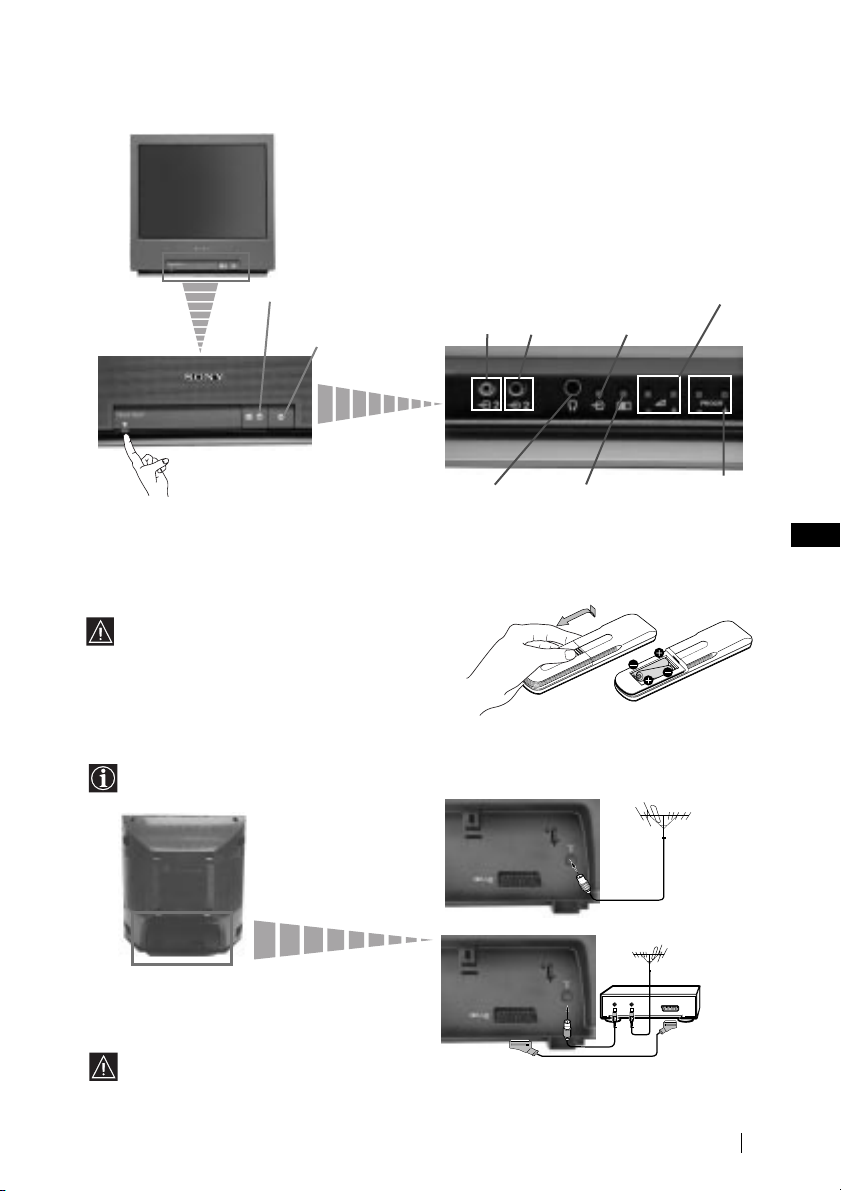
Programme Up or
Down Buttons (Selects
TV channels)
Scart lead is optional.
Overview of TV Buttons
Standby indicator
On/Off switch
Push up the flap on the
front of the TV to reveal
the front control panel.
Video
Input jack
Headphone
jack
Audio
Input
jack
Auto Start
Up Button
Selecting
Input source
Volume
control
buttons
GB
Inserting Batteries into the Remote Control
Make sure to insert the supplied batteries
using the correct polarities.
Always remember you dispose of used
batteries in an environmental friendly way.
Connecting the Aerial and VCR
Connecting cables are not supplied
For more details of VCR connection, please
refer to the section “Connecting Optional
Equipment” of this instruction manual.
or
VCR
OUT IN
Overview-Installation
5
Page 6
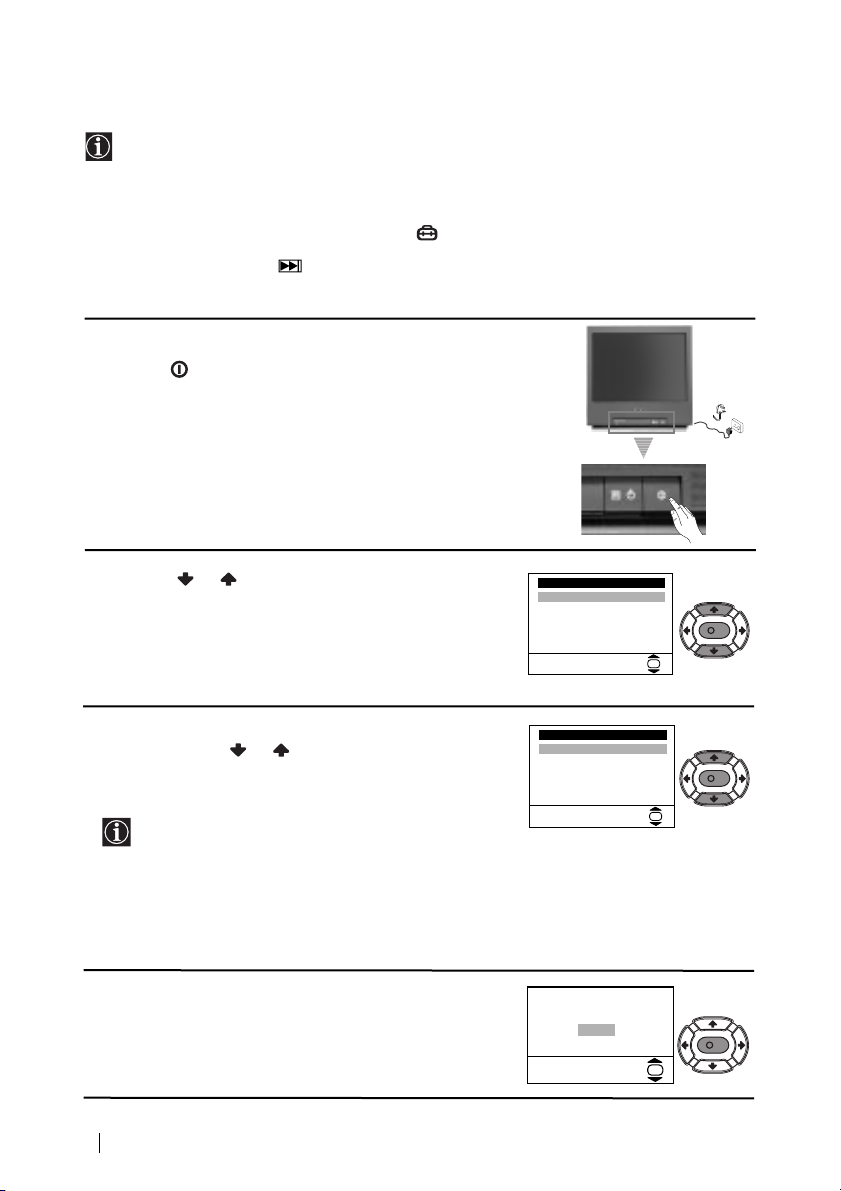
Switching On the TV and Automatically Tuning
The first time you switch on your TV, a sequence of menu screen appear on the TV enabling
you to: 1) choose the language of the menu screen, 2) choose the country in which you wish
to operate the TV, 3) search and store all available channels (TV Broadcast) and 4) change
the order in which the channels (TV Broadcast) appear on the screen.
However, if you need to change the language menu, change or repeat the tuning (e.g. when
you move house) or rearrange again the order of the channels afterwards, you can do that
by selecting the appropriate menu in the (Set Up). For more information, refer to the
“Menu Guide” section of this instruction manual. You can also do that by pressing the
Auto Start Up Button on the TV set.
1
Connect the TV plug to the mains socket (220-240V AC,
50Hz)
Press the on/off button on the TV set to turn on the TV.
The first time you press this button, a
displays automatically on the TV screen.
Language
menu
2
Press the or button on the remote control to select
the language, then press the OK button to confirm your
selection. From now on all the menus will appear in the
selected language.
3
The Country menu appears automatically on the TV
screen. Press the or button to select the country in
which you will operate the TV set, then press the OK
button to confirm your selection.
Select “-“ instead of a country
• If the country in which you want to use the TV set
does not appear in the list.
• If you do not want your channels (TV Broadcast)
stored in a given channel sequence starting from
programme position 1.
4
The Auto Tuning menu appears on the screen. Press the
OK button to select Yes .
6
First Time Operation
Language
English
Español
Français
Italiano
Magyar
Nederlands
Select Language:
Country
-
België/Belgique
France
Ireland
Luxembourg
Nederland
Select country:
Do you want to start
automatic tuning?
Yes
No
K
OK
K
OK
K
OK
continued...
Page 7

5
Please confirm that
aerial is connected
Confirm
OK
Programme: 01
System: B/G
Channel: C21
Auto Tuning
Searching...
Programme Sorting
Select channel:
Exit: MENU
Programme:
01 TVE
02 TVE2
03 TV3
04 C33
05 C27
06 C58
OK
Programme Sorting
Select new position:
Exit:
MENU
Programme:
01 TVE
02 TVE2
03 TV3
04 C33
05 C27
06 C58 05 C27
OK
K
K
K
A new menu appears on the screen asking you to check
that the aerial is connected. Ensure the aerial is connected
and then press the OK button to start the automatic
tuning.
available channels (TV Broadcast) for you.
patient and do not press any button. Otherwise the
automatic tuning will not be completed.
6
the
on the screen enabling you to change the order in
which the channels appear on the screen.
a)
step 7.
b)
to rearrange, then press the button.
channel (TV Broadcast), then press .
Press the MENU button to remove the menu from the
7
screen.
The TV starts to automatically search and store all
This procedure could take some minutes. Please be
After all available channels are captioned and stored,
Programme Sorting
menu appears automatically
If you do not wish to change the channel order, go to
If you wish to change the channel order:
Press the or button to select the programme
number with the channel (TV Broadcast) you wish
2
Press the or button to select the new
programme number position for your selected
3
Repeat steps b)1 and b)2 if you wish to change
the order of the other channels.
MENU
1
GB
Your TV is now ready for use
First Time Operation
7
Page 8

Introducing and Using the Menu System
Your TV uses an on-screen menu system to guide you through the operations. Use the
following buttons on the Remote Control to operate the menu system:
1
Press the
MENU
button to switch the first level menu on.
MENU
• To highlight the desired menu or option, press or
2
.
• To enter to the selected menu or option, press .
• To return to the last menu or option, press
.
• To alter settings of your selected option, press //or.
• To confirm and store your selection, press
OK.
3Press the MENU button to remove the menu from the screen.
Menu Guide
Level 1 Level 2 Level 3 / Function
Picture Adjustment
Mode: Personal
Contrast
Brightness
Colour
Sharpness
Hue
Reset
Picture Adjustment
Mode: Personal
Contrast
Brightness
Colour
Sharpness
Hue
OK
Reset
PICTURE ADJUSTMENT
The “Picture Adjustment” menu allows you to
alter the picture adjustments.
To do that: after selecting the item you want to
OK
alter press , then press repeatedly / /
or to adjust it and finally press OK to
store the new adjustment.
This menu also allows you to customise the
picture mode based on the programme you are
watching:
Personal (for individual settings).
Live (for live broadcast programmes).
Movie (for films).
K
MENU
• Brightness, Colour and Sharpness can only be alterated if “Personal” mode is selected.
• Hue is only available for NTSC colour signal (e.g: USA video tapes).
• Select Reset and press OK to reset the picture to the factory preset levels.
8
Menu System
continued...
Page 9

Level 1 Level 2 Level 3 / Function
Picture Adjustment
Mode: Personal
Contrast
Brightness
Colour
Sharpness
Hue
Reset
OK
SLEEP TIMER
The “Sleep Timer” option in the “Timer” menu
allows you to select a time period for the TV to
switch itself automatically into the standby
mode.
Timer
Sleep Timer: Off
On Timer: Off
Picture Adjustment
Mode: Personal
Contrast
Brightness
Colour
Sharpness
Hue
Reset
Timer
Sleep Timer: Off
On Timer: Off
Timer
Sleep Timer: Off
On Timer: i Off
To do that: after selecting the option press ,
then press or to set the time period delay
(max. of 4 hours) and finally press OK to store.
• While watching the TV, you can press the
OK
OK
button on the remote control to display the
time remaining.
• One minute before the TV switches itself into
standby mode, the time remaining is displayed on
the TV screen automatically.
ON TIMER
The “On Timer” option in the “Timer” menu
allows you to select a time period for the TV to
switch itself automatically on from standby
OK
mode.
To do that: after selecting the option press ,
GB
then press or to set the time period delay
Timer
Sleep Timer: Off
On Timer: Off
(max. 12 hours) and press OK to store. Finally
press the standby button
on the remote
control. After the selected length of time the TV
switches on automatically.
OK
OK
• The standby indicator on the TV set flashes
regularly to indicate that “On Timer” is active.
• Any loss of power will cause these settings to be
cleared.
Picture Adjustment
Mode: Personal
Contrast
Brightness
Colour
Sharpness
Hue
Reset
Set Up
Language/Country
Auto Tuning
Programme Sorting
Manual Programme Preset
Advanced Features
LANGUAGE / COUNTRY
The “Language/Country” option in the “Set
Up” menu allows you to select the language
that the menus are displayed in. It also allows
OK
Set Up
Language/Country
Auto Tuning
Programme Sorting
Manual Programme Preset
Advanced Features
OK
you to select the country in which you wish to
operate the TV set.
To do that: after selecting the option, press
and then proceed in the same way as in the
steps 2 and 3 of the section “Switching On the
TV and Automatically Tuning”.
OK
continued...
Menu System
9
Page 10

Level 1 Level 2 Level 3 / Function
Picture Adjustment
Mode: Personal
Contrast
Brightness
Colour
Sharpness
Hue
Reset
Set Up
Language/Country
Auto Tuning
Programme Sorting
Manual Programme Preset
Advanced Features
OK
Set Up
Language/Country
Auto Tuning
Programme Sorting
Manual Programme Preset
Advanced Features
OK
AUTO TUNING
The “Auto Tuning” option in the “Set Up”
menu allows you to automatically search for
and store all available TV channels.
To do that: after selecting the option, press
and then proceed in the same way as in TV
steps 4 and 5 of the section “Switching On the
TV and Automatically Tuning”.
OK
Picture Adjustment
Mode: Personal
Contrast
Brightness
Colour
Sharpness
Hue
Reset
Set Up
Language/Country
Auto Tuning
Programme Sorting
Manual Programme Preset
Advanced Features
Picture Adjustment
Mode: Personal
Contrast
Brightness
Colour
Sharpness
Hue
Reset
Set Up
Language/Country
Auto Tuning
Programme Sorting
Manual Programme Preset
Advanced Features
PROGRAMME SORTING
The “Programme Sorting” option in the “Set
Up” menu allows you to change the order in
which the channels (TV Broadcast) appear on
OK
the screen.
To do that: after selecting the option, press
Set Up
Language/Country
Auto Tuning
Programme Sorting
Manual Programme Preset
Advanced Features
OK
and then proceed in the same way as in step 6 b)
of the section “Switching On the TV and
Automatically Tuning”.
OK
MANUAL PROGRAMME PRESET
The “Manual Programme Preset” option in the
“Set Up” menu allows you to:
OK
a) Preset channels or a video input source one
by one to the programme order of your
choice. To do that:
Set Up
Language/Country
Auto Tuning
Programme Sorting
Manual Programme Preset
Advanced Features
OK
Manual Programme Preset
Programme:
System:
Channel:
Label:
AFT:
Skip:
Decoder:
Confirm
1 After selecting the ”Manual Programme
Preset” option, press then with
Programme option highlighted press .
Press or to select on which
OK
programme number you want to preset the
channel (for VCR, select programme number
“0”). Then press .
01
B/G
C 21
--TVE
On
No
2 After selecting the System option, press .
Off
Then press or to select the TV
OK
Broadcast system (B/G for western European
countries, L for France, I for United
Kingdom or D/K for eastern European
countries). Then press .
10
Menu System
continued...
Page 11

Level 1 Level 2 Level 3 / Function
3 After selecting the Channel option, press .
Then press or to select the channel
tuning (“C” for terrestrial channels or “S” for
cable channels). Next press . After that,
press the number buttons to enter directly the
channel number of the TV Broadcast or the
channel of the VCR signal. If you do not
know the channel number, press or to
search for it. When you tune the desired
channel, press OK twice to store.
Repeat all the above steps to tune and store more
channels.
b)Normally the automatic fine tuning (AFT) is
operating, however you can manually fine
tune the TV to obtain a better picture
reception in the case that the picture is
distorted.
To do that: while watching the channel (TV
Broadcast) you wish to fine tune, select the
AFT option and press . Next press
or to adjust the fine tuning between -15
and +15. Finally press OK twice to store.
c) Skip any unwanted programme numbers
when they are selected with the PROGR +/-
buttons.
To do that: Highlighting the Programme
option, press the PROGR +/- button to select
the programme number you want to skip.
When the programme you want to skip
appears on the screen, select the Skip option
and press . Next press or to select
Yes. Finally press OK twice to confirm and
store.
To cancel this function afterwards, select “No”
instead of “Yes” in the step above.
d) Label a channel using up to five characters.
To do that: Highlighting the Programme
option, press the PROGR +/- button to select
the programme number with the channel
you wish to name. When the programme you
want to name appears on the screen, select
the Label option and press . Next
press o
“-“ for a blank. Press to confirm this
character. Select the other four characters in
the same way. After selecting all the
characters, press OK twice to store.
r to select a letter, number or
GB
continued...
Menu System
11
Page 12

Level 1 Level 2 Level 3 / Function
Picture Adjustment
Mode: Personal
Contrast
Brightness
Colour
Sharpness
Hue
Reset
Set Up
Language/Country
Auto Tuning
Programme Sorting
Manual Programme Preset
Advanced Features
OK
Advanced Features
Parental Lock:
Noise Reduction:
Auto Volume Ctrl.:
RGB Centring:
Picture Rotation:
OK
PARENTAL LOCK
The “Parental Lock” option in the “Advanced
Features” menu allows you to lock the buttons
of the TV set. In this way after this option is
selected and the TV set is switched off, the
buttons on the TV do not work and the TV only
works by using the remote control buttons.
Off
On
On
0
To do that: after selecting the option, press .
0
Then press or to select On. Press OK to
OK
confirm and store and finally press on the
remote control.
To cancel this function afterwards, select “Off”
instead of “On” in the step above.
Picture Adjustment
Mode: Personal
Contrast
Brightness
Colour
Sharpness
Hue
Reset
Set Up
Language/Country
Auto Tuning
Programme Sorting
Manual Programme Preset
Advanced Features
Picture Adjustment
Mode: Personal
Contrast
Brightness
Colour
Sharpness
Hue
Reset
Set Up
Language/Country
Auto Tuning
Programme Sorting
Manual Programme Preset
Advanced Features
NOISE REDUCTION
The “Noise Reduction” option in the
“Advanced Features” menu allows you to
reduce the picture noise in case of a weak
OK
Advanced Features
Parental Lock:
Noise Reduction:
Auto Volume Ctrl.:
RGB Centring:
Picture Rotation:
OK
broadcasting signal.
To do that: after selecting the option, press .
Off
Then press or to select On. Finally press
On
On
0
OK to confirm and store.
0
To cancel this function afterwards, select “Off”
OK
instead of “On” in the step above.
AUTO VOLUME CONTROL
The “Auto Volume Ctrl.” option in the
“Advanced Features” menu allows you to keep
the same volume level of the channels,
OK
Advanced Features
Parental Lock:
Noise Reduction:
Auto Volume Ctrl.:
RGB Centring:
Picture Rotation:
OK
independent of the broadcast signal (e.g. in case
of advertisement).
Off
To do that: after selecting the option, press .
On
On
0
Then press o
0
OK to confirm and store.
OK
To cancel this function afterwards, select “Off”
r to select On. Finally press
instead of “On” in the step above.
12
Menu System
continued...
Page 13

Level 1 Level 2 Level 3 / Function
Picture Adjustment
Mode: Personal
Contrast
Brightness
Colour
Sharpness
Hue
Reset
Set Up
Language/Country
Auto Tuning
Programme Sorting
Manual Programme Preset
Advanced Features
OK
Advanced Features
Parental Lock:
Noise Reduction:
Auto Volume Ctrl.:
RGB Centring:
Picture Rotation:
OK
RGB CENTRING
When connecting an RGB source, such as a
“PlayStation”, you may need to readjust the
geometry of the picture. In that case, you can
readjust it through the “RGB Centring” option
in the “Advanced Features”.
Off
On
To do that: while watching an RGB source select
On
0
the “RGB Centring” option and press . Then
0
press or to adjust the centre of the
OK
picture between –10 and +10. Finally press OK
to confirm and store.
Picture Adjustment
Mode: Personal
Contrast
Brightness
Colour
Sharpness
Hue
Reset
Set Up
Language/Country
Auto Tuning
Programme Sorting
Manual Programme Preset
Advanced Features
PICTURE ROTATION
Because of the earth’s magnetism, the picture
might slant. In this case, you can correct the
pictures slant by using the option “Picture
OK
Advanced Features
Parental Lock:
Noise Reduction:
Auto Volume Ctrl.:
RGB Centring:
Picture Rotation:
OK
Rotation” in the “Advanced Features” menu.
To do that: after selecting the option, press .
Off
Then press or to correct any slant of the
On
On
0
picture between -5 and +5 and finally press OK
0
to store.
OK
GB
Menu System
13
Page 14

Teletext
Teletext is an information service transmitted by most TV stations. The index page of the
teletext service (usually page 100) gives you information on how to use the service. To
operate teletext, use the remote control buttons as indicated below.
Make sure to use a channel (TV Broadcast) with a strong signal, otherwise teletext errors
may occur.
To Switch On Teletext :
After select the channel (TV Broadcast) which carries the teletext you wish
to view, press .
To Select a Teletext page:
Input 3 digits for the page number, using the numbered buttons.
• If you have made a mistake, retype the correct page number.
• If the counter on the screen continues searching, it is because this page is not available. In that case,
input another page number
To access the next or preceding page:
Press PROGR + ( ) or PROGR - ().
To superimpose teletext on to the TV:
Whilst you are viewing teletext, press . Press it again to cancel teletext mode.
To freeze a teletext page:
Some teletext pages have sub-pages which follow on automatically. To stop them, press
/ . Press it again to cancel the freeze.
To reveal concealed information (e.g: answer to a quiz):
Press / . Press it again to conceal the information.
TELETEXT
TELETEXT
TELETEXT
TELETEXT
TELETEXT
TELETEXT
TELETEXT
TELETEXT
Index
Index
Index
Index
Index
Index
Index
Index
Programme
Programme
Programme
Programme
Programme
Programme
Programme
Programme
News
News
News
News
News
News
News
News
Sport
Sport
Sport
Sport
Sport
Sport
Sport
Sport
Weather
Weather
Weather
Weather
Weather
Weather
Weather
Weather
25
25
25
25
25
25
25
25
153
153
153
153
153
153
153
153
101
101
101
101
101
101
101
101
98
98
98
98
98
98
98
98
To Switch Off Teletext:
Press .
Fastext
Fastext service lets you access pages with one button push.
While you are in Teletext mode and Fastext is broadcast, a colour coded menu appears at
the bottom of the teletext page. Press the colour button (red, green, yellow or blue) to access
the corresponding page.
Teletext
14
Page 15

Connecting Optional Equipment
Decoder
Using the following instructions, you can connect a wide range of optional equipment to
your TV set. (Connecting cables are not supplied).
Connecting a VCR:
To connect a VCR, please refer to
the section “Connecting the
aerial and VCR” of this instruction
manual. We recommend you
connect your VCR using a scart
lead. If you do not have a scart
lead, tune in the VCR test signal
to TV programme number “0”.
by using “Manual Programme
Preset” option. (for details how
to manual programme, see page
10, step a).
Also refer to your VCR
instruction manual to find out
how to find the output channel
of your VCR.
If you have connected a decoder
to a VCR which supports
Smartlink feature:
Select the “Manual Programme Preset” option in the “Set Up” menu and after entering in the
“Decoder” option, select “On” (by using or ) to each scrambled channel.
* “PlayStation” is a product of Sony Computer Entertainment, Inc.
* “PlayStation” is a trademark of Sony Computer Entertainment, Inc.
AB
8mm/Hi8/DVC
camcorder
2
1
“PlayStation”*
VCR
C
GB
Using Optional Equipment
1 Connect your equipment to the designated TV socket, as indicated above.
2 To watch the picture of the connected equipment, press the button repeatedly until the
correct input symbol appears on the screen.
Symbol Input Signals
1 •Audio / video input signal through the Scart connector C
•RGB input signal through the Scart connector C. This symbol appears only
if a RGB source has been connected.
2 •Video input signal through the phono socket A and Audio input signal
through B.
3 Switch on the connected equipment.
4 Press button on the remote control to return to the normal TV picture.
Additional Information
15
Page 16

Specifications
TV system:
B/G/H, L, I, D/K
Colour system:
PAL, SECAM
NTSC 3.58, 4.43 (only Video In)
Channel Coverage:
VHF: E2-E12
UHF: E21-E69
CATV: S1-S20
HYPER: S21-S41
L: F2-F10, B-Q, F21-F69
I: UHF B21-B69
D/K: R1-R12, R21-R69
Picture Tube:
Flat Display FD Trinitron
Rear Terminals
:1/ 21-pin scart connector
(CENELEC standard)
including audio/video
Front Terminals
…2 video input – phono jack
2 audio input – phono jack
headphones jack
input, RGB input, TV audio/
video output.
Sound Output:
1 x 8 W (music power)
1 x 4 W (RMS Mono)
Power Consumption:
55 W
Standby Power Consumption:
≤ 0.55 W
Dimensions (w x h x d) :
Approx. 488 x 480 x 477 mm.
Weight:
Approx. 24 Kg.
Accessories supplied:
1 Remote Control (RM-887)
2 Batteries (IEC designated)
Other features:
•Teletext, Fastext, TOPtext
•Sleep Timer
•Wake UP Timer
•Smartlink (direct link between your TV set
and a compatible VCR. For more
information on Smartlink, please refer to
the Instruction Manual of your VCR).
•TV system Autodetection.
Design and specifications are subject to change without notice.
Ecological Paper- Totally Chlorine Free
16
Additional Information
Page 17

Troubleshooting
Here are some simple solutions to the problems which may affect the picture and sound.
Problem
No picture (screen is dark) and no
sound.
Poor or no picture (screen is dark),
but good sound.
No picture or no menu information
from the equipment connected to the
Scart connector.
Good picture, no sound.
No colour on colour programmes.
Distorted picture when changing
programmes or selecting teletext.
Picture slanted
Noisy picture when viewing a TV
channel.
Remote control does not function.
The standby indicator on the TV
flashes even though the “On Timer”
Solution
•Check the aerial connection.
• Plug the TV in and press the button on the front of
TV.
•If the standby indicator is on, press button on
the remote control.
•Using the menu system, select the “Picture
Adjustment” menu and select “Reset” to return to the
factory settings.
•Check that the optional equipment is on and press the
button repeatedly on the remote control until the
correct input symbol is displayed on the screen.
• Press the +/- button on the remote control.
• Using the menu system, select the “Picture
Adjustment” menu and select “Reset” to return to
factory settings.
• Turn off any equipment connected to the Scart
connector on the rear of the TV.
• Using the menu system, select the “Picture Rotation”
option in the “Advanced Features” menu to correct the
picture slant.
• Using the menu system, select the “Manual
Programme Preset” menu and adjust Fine Tuning
(AFT) to obtain better picture reception.
• Using the menu system, select the “Noise Reduction”
option in the “Advanced Features” menu and select
“On” to reduce the noise in the picture.
• Replace the batteries.
• Contact to your nearest Sony service centre.
GB
In case of problems, have your TV serviced by qualified personnel. Never open the
casing yourself.
Additional Information
17
Page 18

Sony España, S.A.
 Loading...