

Page 1

3-800-707-12 (2)
English
Español
I
I
Color Rear Video
Projector
Operating Instructions
Manual de instrucciones.
_____________________________________
KP-53XBR45
KP-61XBR48
■ hv Sonv CornorRtion
Page 2

WARNING
To prevent fire or shock hazard, do not
expose the unit to rain or moisture.
RISK OF ELECTRIC SHOCK
DO NOT OPEN
NOTIFICATION
This equipment has been tested and found to complv with the
limits for a Class B digital device pursuant to Part 15 of the
FCC Rules. These limits are designed to provide reasonable
protection against harmful interference in a residential
installation. This equipment generates, uses, and can radiate
radio frequency energy and, if not installed and used in
accordance with the instructions, may cause harmful
interference with radio communications. How'ever, there is
no guarantee that interference whll not occur in a particular
installation. If this equipment does cause harmful
interference to radio or television reception, which can be
determined by turning the equipment off and on, the user is
encouraged to try to correct the interference by one or more of
the following measures;
- Reorient or relocate the receiving antennas.
- Increase the separation between the equipment and
receiver.
- Connect the equipment into an outlet on a circuit different
from that to which the receiver is connected.
- Consult the dealer or an experienced radio/TV technician
for help.
CAUTION: TO REDUCE THE RISK OF ELECTRIC SHOCK,
DO NOT REMOVE COVER (OR BACK).
NO USER-SERVICEABLE PARTS INSIDE.
REFER SERVICING TO QUALIFIED SERVICE PERSONNEL.
This symbol is intended to alert the user to the
presence of uninsulated "dangerous voltage"
within the product's.enclosure that may be of
sufficient magnitude to constitute a risk of
electric shock to persons.
This symbol is intended to alert the user to the
presence of important operating and
maintenance (servicing) instructions in the
literature accompanying the appliance.
CAUTION
TO PREVENT ELECTRIC SHOCK, DO NOT USE THIS
POLARIZED AC PLUG WITH AN EXTENSION CORD,
RECEPTACLE OR OTHER OUTLET UNLESS THE BLADES
CAN BE FULLY INSERTED TO PREVENT BLADE
EXPOSURE.
CAUTION
When using projection TV games, computers, and similar
products with your projection TV, keep the brightness and
contrast functions at low settings. If a fixed (non-moving)
pattern is left on the screen for long periods of time at a high
brightness or contrast setting, the image can be permanently
imprinted onto the screen. These types of imprints are not
covered by your warranty because they are the result of
misuse.
You are cautioned that any changes or modifications not
expressly approved in this manual could void your
authority to operate this equipment.
This document is for the remote commander RM-Y128.
MODELS; KP-53XBR45/61XBR48
Please keep this notice with the instruction manual.
Note on Closed Caption (Caption Vision)
This television receiver provides display of television closed
captioning in accordance with §15.119 of the FCC rules.
Note on CATV system installer
This reminder is provided to call the CATV system installer's
attention to Article 820-40 of the NEC that provides
guidelines for proper grounding and, in particular, specifies
that the cable ground shall be connected to the grounding
system of the building, as close to the point of cable entry as
practical.
Use of this television receiver for other than private viewing
of programs broadcast on UHF or VHF or transmitted by
cable companies for the use of the general public may require
authorization from the broadcaster/cable company and/or
program owner.
Trademark
DSS® is a registered trademark of DIRECTV, Inc., a unit
of Hughes Electronics Corporation.
Owner's Record
The model and serial numbers are located at the rear of the
projection TV. Record these numbers in the spaces provided
below. Refer to them whenever you call upon your Sony
dealer regarding this product.
Model No.
Serial No.
________________
_________________
-EN
Page 3

Table of contents
4 Welcome!
4 Precautions
Getting Started
5 Step 1: Installing the projection TV
6 Step 2; Connections
6 Connecting an antenna
6 Connecting an antenna / cable TV system without a
VCR
7 Connecting an antenna/cable TV system with a VCR
9 Connecting a DSS® receiver
10 Connecting a camcorder
10 Connecting two VCRs for tape editing
11 Connecting an audio system
11 Connecting a Dolby Pro Logic amplifier
12 Connecting an AV receiver
12 Connecting other Sony equipment with the
CONTROLS jacks
13 Step 3: Setting up the remote commander
13 Inserting batteries .
13 Using the joystick remote commander for menu
operation
14 Step 4: Setting up the projection TV automatically
(AUTO SET UP)
15 Erasing or adding channels
16 Adjusting convergence (CONVERGENCE)
16 Setting cable TV on or off
17 Presetting channels
17 Changing the menu language
18 Selecting the cable box output channel (TV INPUT)
22 Changing the position of the window picture
22 Swapping the main/right and window/left pictures
22 Freezing the pictures
22 Watching eight TV channels at one time (CH INDEX)
Using the VIDEO menu
23
23 Adjusting the picture (VIDEO)
24 Adjusting the color temperature (TRINITONE)
24 Reducing picture noise (NR)
24 Enhancing the picture contrast (DYNAMIC
PICTURE)
25 Correcting the color (COLOR CORRECTION)
25 Using the AUDIO menu
25 Adjusting the sound (AUDIO)
26 Selecting stereo or bilingual programs (MTS)
27 Setting the speaker switch (SPEAKER)
27 Selecting the surround mode
28 Adjusting the speaker volume
29 Using the PROGRAM PALETTE menu
29 Selecting picture effect (PROGRAM PALETTE)
29 Adjusting the picture in PROGRAM PALETTE
30 Using the INPUT/OUTPUT menu
30 Selecting an output signal (INPUT/OUTPUT)
31 Setting video labels (VIDEO LABEL)
31 Using the TIMER menu
31 Setting the clock (CURRENT TIME)
33 Setting your daylight saving time (DS TIME)
33 Setting the timer to turn the projection TV on and off
(ON/OFF TIMER)
34 Blocking out a channel (CHANNEL BLOCK)
35 Using the SET UP menu
35 Customizing the channel names (CH CAPTION/
LOGO)
Setting your favorite channels (FAVORITE
37
CHANNEL)
Selecting a favorite channel
37
Selecting a VCR input directly (DIRECT PLAY)
38
Customizing the pointer (CUSTOMIZED POINTER)
38
39 Displaying Caption Vision/XDS (CAPTION VISION)
40 Operating video equipment
42 Operating a cable box or DSS receiver
43 Operating non-preprogrammed equipment—Learning
function
[
Operations
19 Watching the TV
19 Switching quickly between two channels
20 Muting the sound
20 Displaying on-screen information
20 Setting the Sleep Timer
20 Watching a video input picture
20 Changing the VHF/UHF input to the AUX input
21 Watching two programs at one time-PIP/P8iP (Twin
View''^“)
21 Displaying a window picture (PIP)
21 Displaying a left picture (P&P)
21 Changing the window/left picture input mode
21 Changing TV channels in the window/left picture
22 Listening to the sound of the window/left picture
Additional Information
44 Troubleshooting
46 Specifications
47 Index
The captions in parentheses indicate menu names.
-EN
Page 4

Welcome!
Precautions
Thank you for purchasing the Sony Color Rear Video Projection
TV. Here are some of the features you will enjoy with your
projection TV;
• AUTO SET UP feature that allows you to set up your TV
easily by pressing the SET UP button.
• On-screen graphic menus that let you visually set various
settings.
• Two tuner Picture-in-Picture or Picture & Picture (Twin
View'''“) that allows you to watch another channel, video or
cable image as a window or left picture.
• On/off timer that allows you to display the TV program of
your choice on the screen for a specified duration.
• Built-in center speaker incorporated and supplied rear
speakers that let you enjoy true dolby Pro Logic surround
sound without complicated setup procedures.
• Dynamic Focus circuitry that automatically focuses the
scanning electron beam for enhanced sharpness, especially
at the comers.
• The supplied joystick remote commander that allows you to
operate Sony and other manufacturers' video equipment,
cable box and DSS receiver.
The Learning function of the commander allows
you to program the remqte coipmander to operate the
equipment of manufacturers whose codes are not pre
programmed.
• 3-Dimensional Comb Filter for NTSC signals that improve
picture quality by reducing rainbow noise on a striped
image and flicker which may be caused by color variation.
• XDS (Extended Data Service) display that allows you to
receive various information which a broadcaster offers with
a program.
• Favorite channel feature that allows you to watch eight
channels as well as the currently selected channel at the
same time and lets you select your favorite channel among
them.
About this manual
The instructions in this manual are for models KP-53XBR45 and
BCP-61XBR48. Before you start reading this manual, please
check your model number, located at the rear of the projection
TV. Model KP-61XBR48 is used for illustration purposes in this
manual. The differences in specifications are indicated in the
text.
Instructions in this manual are based on use of the remote
commander. You can also use the controls on the projection TV
if they have the same name as those on the remote commander.
I-EN
This projection TV operates on extremely high voltage. To
prevent fire or electric shock, please follow the precautions
below.
Safety
• Operate the projection TV only on 120 V AC.
• One blade of the plug is wider than the other for safety
purposes and will fit into the power outlet only one way.
If you are unable to insert the plug fully into the outlet,
contact your dealer.
• Should any liquid or solid object fall into the cabinet,
unplug the projection TV and have it checked by
qualified personnel before operating it further.
• Unplug the projection TV from the wall outlet if you are
not going to use it for several days or more. To
disconnect the cord, pull it out by the plug. Never pull
the cord itself.
For details concerning safety precautions, see the supplied
leaflet "IMPORTANT SAFEGUARDS."
Installing
• To prevent internal heat build-up, do not block the
ventilation openings.
• Do not install the projection TV in a hot or humid place,
or in a place subject to excessive dust or mechanical
vibration.
• Avoid operating the projection TV at temperatures below
5°C (41 °F).
• If the projection TV is transported directly from a cold to
a warm location, or if the room temperature has changed
suddenly, the picture may be blurred or show poor color.
This is because moisture has condensed on the mirror or
lenses inside. If this happens, let the moisture evaporate
before using the projection TV.
• To obtain the best picture, do not expose the screen to
direct illumination or direct sunlight. It is recommended
to use spot lighting directed down from the ceiling or to
cover the windows that face the screen with opaque
drapery. It is desirable to install the projection TV in a
room where the floor and walls are not of reflecting
material. If necessary, cover them with dark carpeting or
wall paper.
Note on cleaning
Clean the cabinet of the projection TV with a dry soft cloth.
To remove dust from the screen, wipe it gently with a soft
cloth. Stubborn stains may be removed with a cloth slightly
dampened with a solution of mild soap and warm water.
Never use strong solvents such as thirmer or benzine for
cleaning.
If the picture becomes dark after using the projection TV for a
long period of time, it may be necessary to clean the inside of
the projection TV. Consult qualified service personnel.
Page 5

step 1: Installing
the projection TV
For the best picture quality, install the projection TV
within the areas shown below.
Optimum viewing area (Horizontal)
Connecting the supplied rear speakers
To enhance the surround effect, connect the supplied
rear speakers to the REAR SPEAKER OUT terminals on
the projection TV. Use the supplied speaker cords.
Connect one rear speaker to the REAR
SPEAKER OUT R terminal and the other
speaker to the REAR SPEAKER OUT L
terminal.
(Rear of projection TV)
(supplied)
(supplied)
Place the rear speakers as shown below to
obtain optimum surround effect.
If possible, mount the speakers on the wall to the
sides of the viewing area 60-90 cm (2-3 feet) above.
Projection TV Rear speaker
Projection TV
/
Left rear
speaker
0
Right rear
speaker
Preparing for your projection TV
Before you use your projection TV, adjust convergence.
For the procedure, see "Adjusting convergence
(CONVERGENCE)" on page 16.
Note
• Be sure to match the speaker cord to the terminal colors. If the
cords are reversed, the sound will be distorted.
Getting Started
:-EN
Page 6
step 2:
Connecting an antenna/cable TV
system without a VCR
Connections
Although you can use either an indoor antenna or
outdoor antenna with your projection TV, we
recommend connecting to an outdoor antenna or a
cable TV system for improved picture quality.
For the customers who connect a cable box, skip "Step
4: Setting up the projection TV automatically (AUTO
SET UP)" (page 14) and proceed to "Selecting the cable
box output channel (TV INPUT)" (page 18).
Connecting an antenna
Connect your anterma cable to the VHF/UHF anterma
terminal. If you cannot connect your antenna cable
directly to the terminal, follow one of the instructions
below depending on your cable type.
To cable or antenna
(Rear of projection TV)
Cable
VHF/UHF
To cable box
If your cable company requires you to connect a cable
box, make the connection as follows:
Cable
IN
Cable box
(Rear of projection TV)
OUT
VHF/UHF
To cable box and cable
(Rear of projection TV)
AUX
Cable box
--------------------------------------<
75-ohm coaxial cable
(not supplied)
' ' ' <
. VHF only
■ VHF/UHF
' Cable
B
.VHF only
> UHFonly
.VHF/UHF
> VHF
and
. UHF
or
or
or
or
75-ohm coaxial cable
300-ohm twin lead cable
75-ohm coaxial cable
300-ohm twin lead cable
""■1 -
Antenna connector
(Rear of projection TV)
VHF/UHF
(Rear of projection TV)
___________
EAC-66 U/V mixer
(not supplied)
VHF/UHF
(Rear of projection TV)
VHF/UHF
Notes
• Most VHF/UHF combination antennas have a signal splitter.
Remove the splitter before attaching the appropriate
connector.
• For better picture quality, connect an anterma by using a 75ohm coaxial cable.
VHF/UHF
CATV cable
Some cable TV systems use scrambled or encoded
signals requiring a cable box* in addition to the normal
cable connection.
* The cable box will be supplied by the cable company.
To cable and antenna
(Rear of projection TV)
AUX
CATV cable
VHF/UHF
Antenna cable
:-EN
Getting Started
Page 7

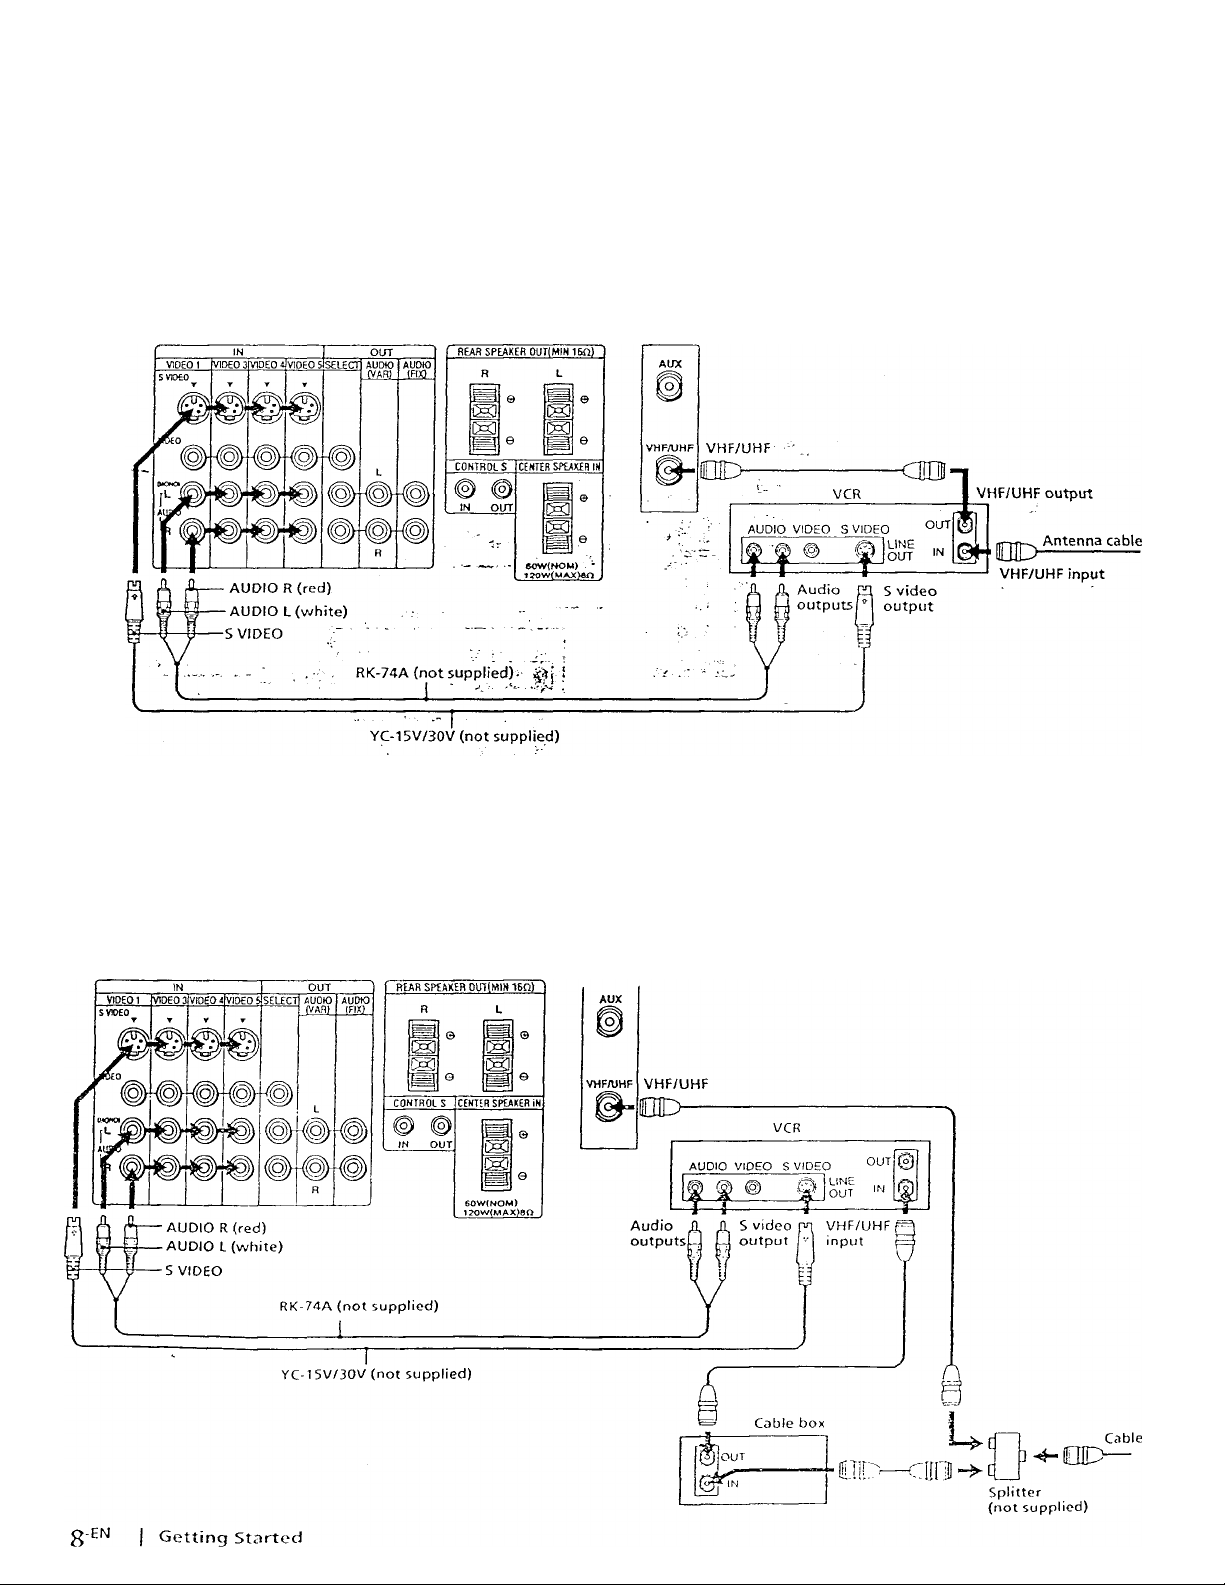
Connecting an antenna/cable TV system with a VCR
For connection details, see the instruction manual of
your VCR. Before connecting, disconnect the AC
power cords of the equipment to be connected.
To a conventional VCR
Without a cable box
(Rear of projection TV)
After making these connections, you will be able to do
the following:
• View the playback of video tapes
• Record one TV program while viewing another
program
Notes
• To connect a monaural VCR, connect the audio output of the
VCR to AUDIO L (MONO) of VIDEO 1 /3/4/5 IN on the
projection TV.
With a cable box
(Rear of projection TV)
AUDIO R (red)
AUDIO L (white)
VIDEO (yellow)
VMC-810S/820S (not supplied)
Do not connect a cable to the S VIDEO connector on the
projection TV.
iHI>
VHFAJHF
VHF/UHF
OD—
OLfT
AUDIO VIDEO
iff
1 f T T
UNE
OUT
m
IN
i
VHF/UHF
input
Splitter
(not supplied)
Cable
•CUD—
Getting Started
F-EN
Page 8
To an S video equipped VCR
If your VCR has an S video output jack, make me
connection as follows. Whenever you connect a cable
to the S VIDEO connector, the projection TV
automatically receives S video signals.
Without a cable box
(Rear of projection TV)
Note
• Video signals are composed of Y (luminance) and C (chroma)
signals. The S connection sends the hvo signals separately
preventing degradation, and gives belter picture quality..
compared to conventional connection.
With a cable box
(Rear of projection TV)
Page 9

Connecting a DSS® receiver
For connection details, see the instruction manual of
the DSS receiver.
To a TV
---------------------------------------------------------
Antenna
cable or cable box
cm
DSS receiver
—cm
SATELLITE
ANTENNA IN
Audio
outputs
Note
• You can use the S VIDEO jack or the composite video jack for
video connection.
To a TV and VCR
Cable or cable box
AUDIO R (red)
AUDIO L (white)
VIDEO (yellow)
Getting Started
i-EN
Page 10
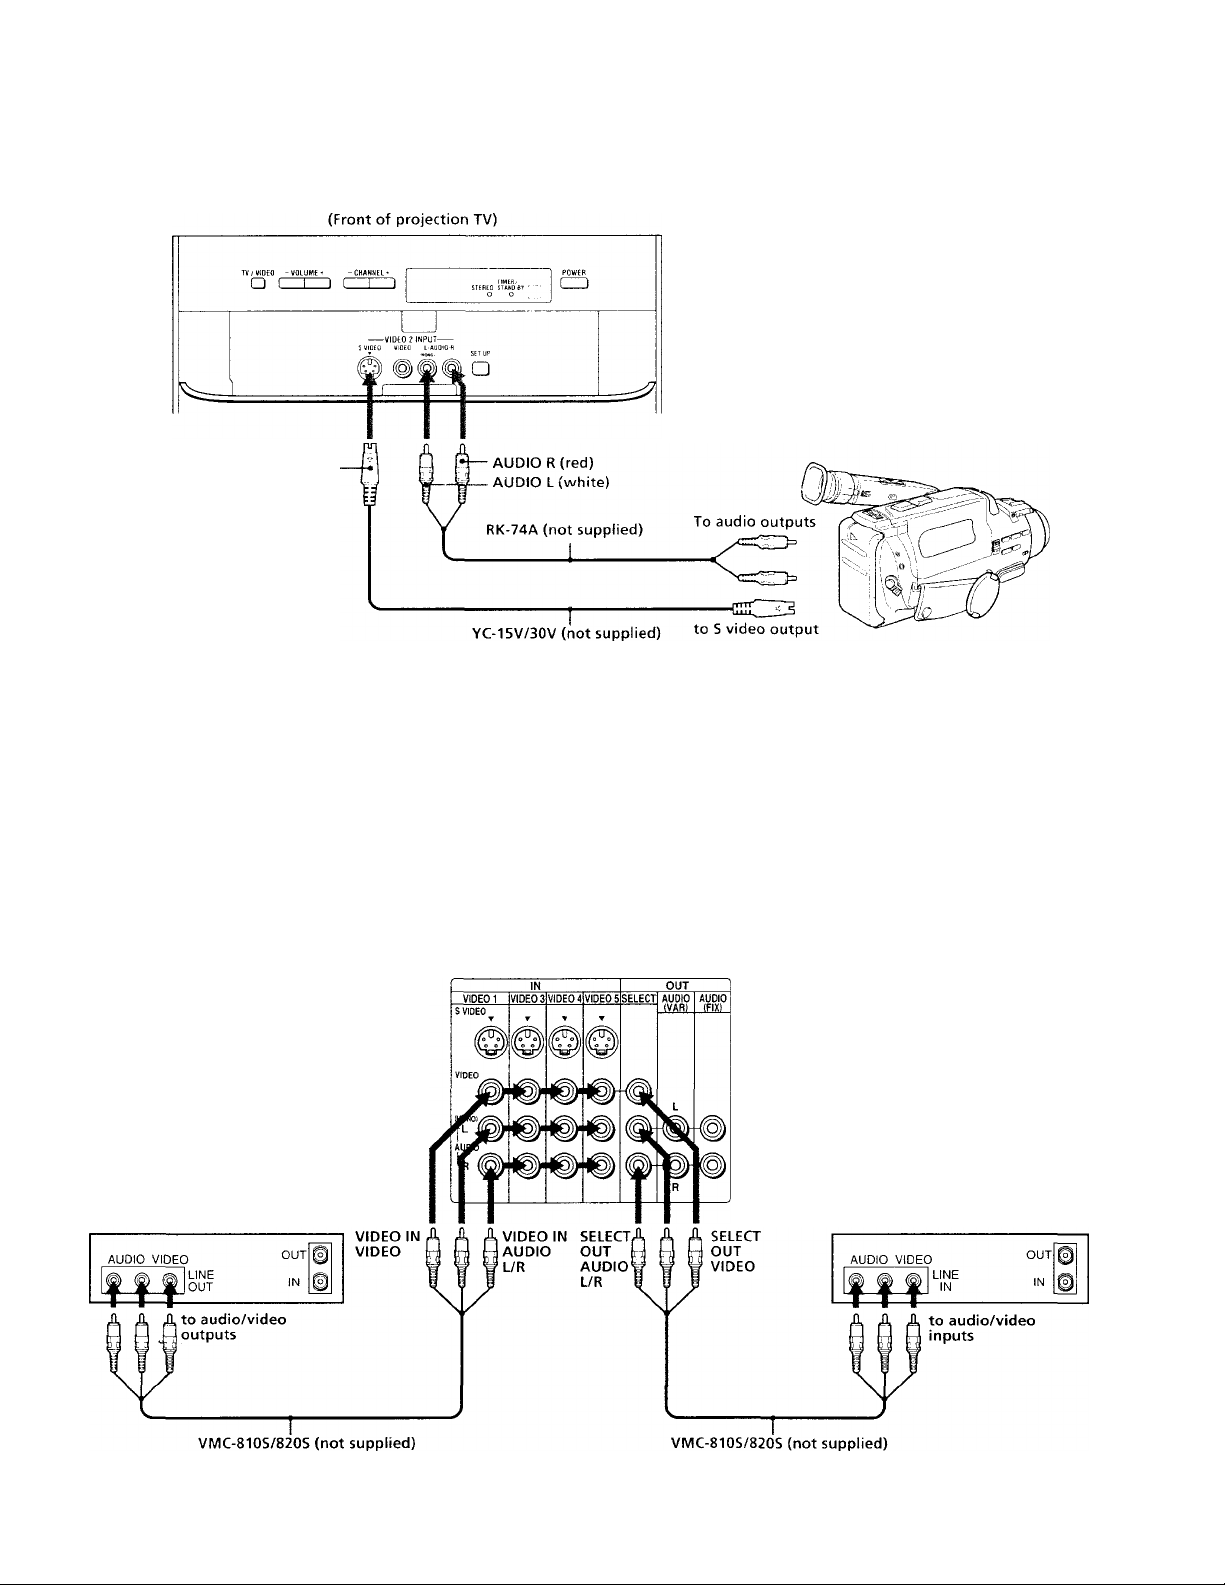
Connecting a camcorder
This connection is convenient for watching a picture
from a camcorder.
S VIDEO
Notes
• To connect a monaural camcorder, connect the audio output of
the camcorder to AUDIO L (MONO) of VIDEO 2 INPUT of the
projection TV.
• To connect a camcorder not equipped with the S video output,
connect the video output of the camcorder to VIDEO INPUT of
the projection TV.
Connecting two VCRs-for tape editing
You can select the output signal from the SELECT OUT
jacks. For detailed information, see page 30.
VCR (for playback) VCR (for recording)
(Rear of projection TV)
Q-EN Getting Started
Page 11

Connecting an audio system
If vou want to use the left and riglit speakers of a stereo
amplifier, use AUDIO (VAR) OUT as shown below and
switch off the projection TV speakers. (See “Setting the
speaker switch (SPEAKER)" on page 27.)
See page 27 and 28 for more information.
(Rear of projection TV)
Note
• You can adjust the bass, treble and balance, or select an MTS
(Multichannel TV Sound) mode with the supplied remote
commander.
Connecting an amplifier with Dolby Pro Logic decoder
If you use an amplifier with Dolby Pro Logic decoder
instead of the projection TV's audio system, you can
still use the projection TV's center speaker. See
"Setting the speaker switch (SPEAKER)" on page 27.
Stereo amplifier
Manufactured under license from Dolby Laboratories
Licensing Corporation. Additionally licensed under Canadian
patent number 1,037,877. "Dolby," the double-D symbol □□
and "Pro Logic" are trademarks of Dolby Laboratories
Licensing Corporation.
CENTER SPEAKER IN +
CENTER SPEAKER IN -
RK-74A (not supplied)
Rear
speaker
(L)
Amplifier with Dolby* Pro
Logic decoder
Front
speaker
(L)
Front
speaker
(R)
Getting Started
Rear
speaker
(R)
11
-EN
Page 12

Connecting an AV receiver
Connect an optional AV receiver to the VIDEO 1 IN
jacks. For detailed information, see "Using the INPUT/
OUTPUT menu" on page 30.
Connecting other Sony equipment with the CONTROL S jacks
This feature allows you to control your projection TV
and other Sony equipment with one remote commander.
Notes
• To control other Sony equipment with the projection TV's
remote commander, connect the CONTROL S input of the
equipment to the CONTROL S OUT jack on the projection TV.
• To control the projection TV with the remote commander of
other Sony equipment, cormect the CONTROL S output of the
equipment to the CONTROL S IN jack on the projection TV.
•EN
12
Getting Started
(Rear of projection TV)
Page 13
step 3: Setting up
the remote
commander
How to use the menus
1 Press the MENU button to display the main
menu.
□ MODE:STANDARD
1^
7 PICTURE
MENU
□ HUE ......................................1
El
□ COLOR ■■■'"•'..............................
□ BRIGHT
.............................................
□ SHARP ...............................................
□ TRINITONE : HIGH
n NR : OFF
” DYNAMIC PICTURE : OFF
□ COLOR CORRECTION: OFF
[scTty
^ □ RESET
Use (y RETURN® Exit ®
.........
.
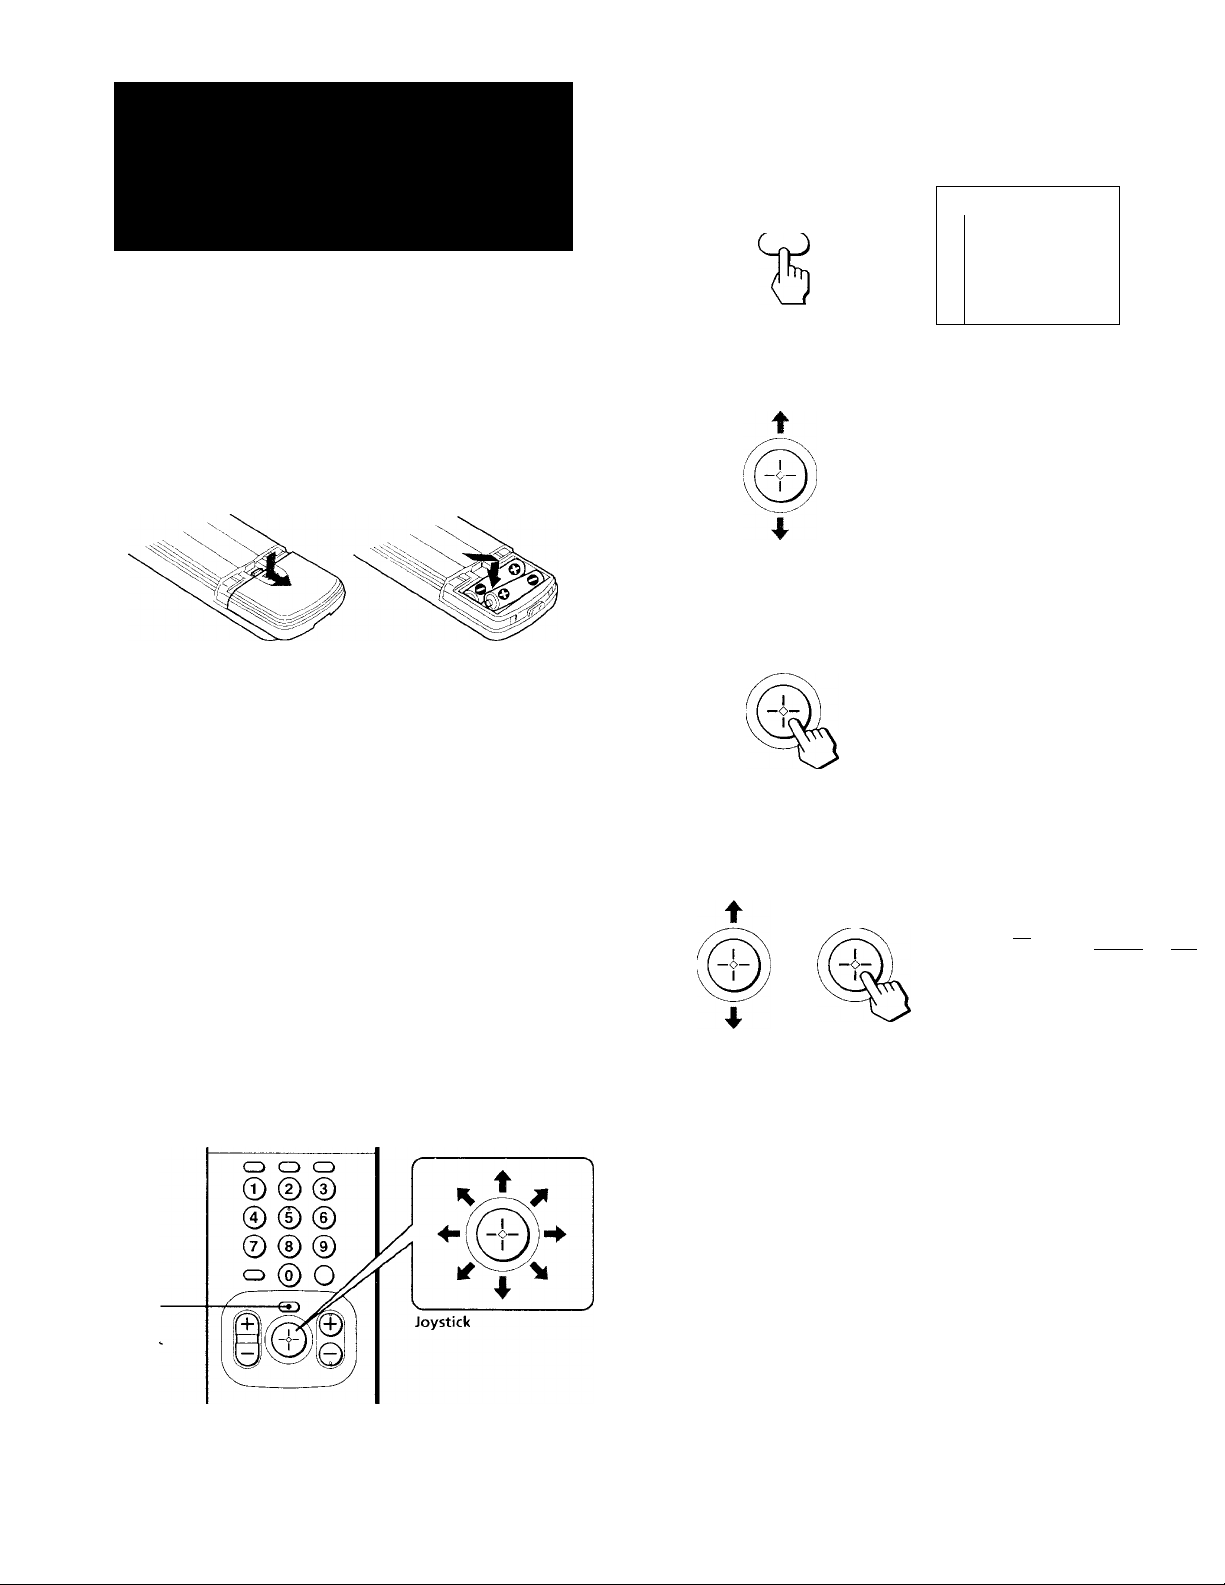
Inserting batteries
Insert two size AA (R6) batteries (supplied) by
matching the + and - on the batteries to the diagram
inside the battery compartment.
Notes
• With normal use, the batteries should last for approximately
six months.
• If vou do not use the remote commander for an extended
period of time, remove the batteries to avoid possible damage
from battery leakage.
• Do not handle the remote commander roughly. Do not drop it,
step on it or let it get wet.
• Do not place the remote commander in direct sunlight, near a
heater, or where the humidity is high.
Using the joystick remote commander
for menu operation
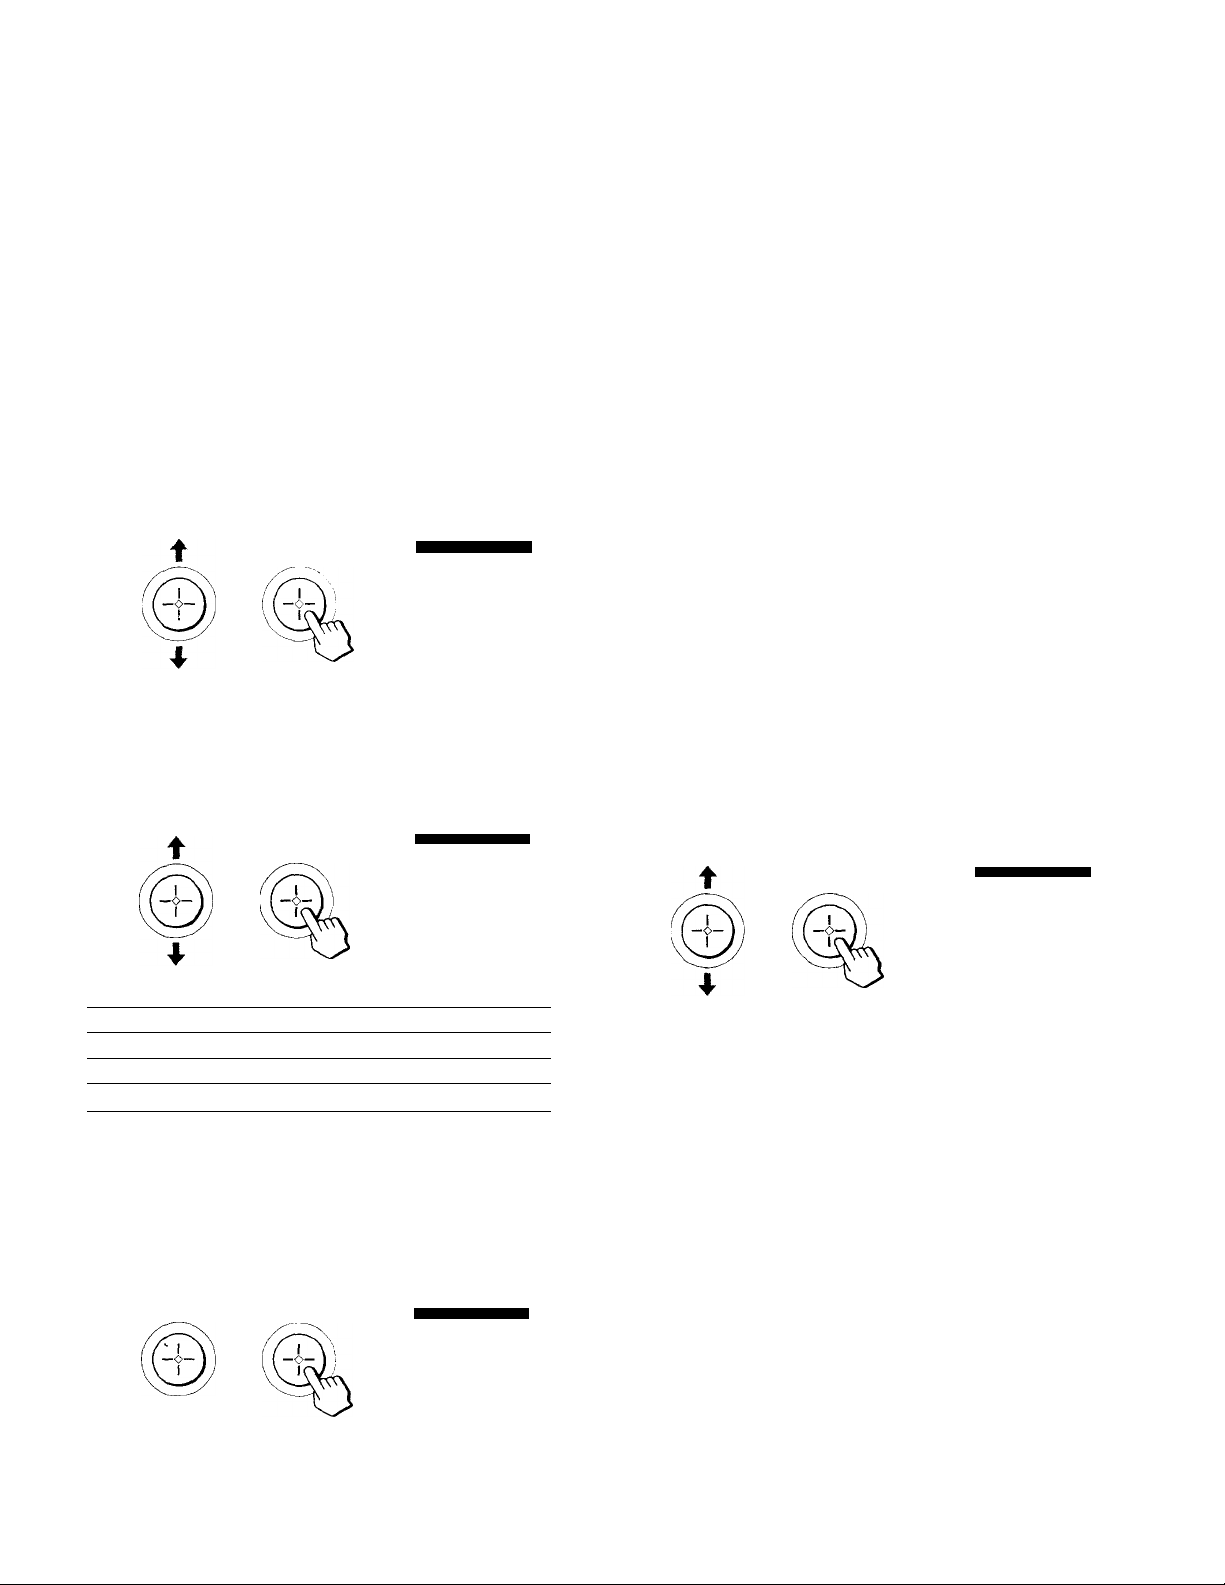
Press the joystick up or down to move the
cursor (b ) to the desired item.
CHANNEL ERASE/ADD
CHANNEL CAPTION/LOGO
n FAVORITE CHANNEL
I]CONVERGENCE
DIRECT PLAY
i I
TV INPUT : OFF
I I
CABLE: ON
□ AUTO PROGRAM
LJ CUSTOMIZED POINTER
□ LANGUAGE : ENGLISH
□ -J
Use (t) RETURN® Exd
Click the joystick to display the selected
menu.
Ml in CHANNEL ERASE/ADD
I%CHANNEL CAPTION/LOGO
7] □ FAVORITE CHANNEL
□ CONVERGENCE
□ DIRECT PLAY
□ TV INPUT: OFF
□ CABLE : ON
EAUTO PROGRAM
□ CUSTOMIZED POINTER
□ LANGUAGE : ENGLISH
O
Use {•) RETURN®Exit®
Press the joystick up or down to select the
item, then click the joystick to go to the
next menu.
rnpwaÉMgBigaîM
aaLOGO nCAPTÏON cr) nRESET
nSSPn □■jgJg □•OT □ iif
□ yv n6NBC DgSI
□ at) OS DO DHBe □ G3
□ E3 Dovc -r—acs GO
□ □ □
□ i
Use 0 - 9 to select
the channel. Then select
the LOGO or CAPTION.
Use®-RETURN ©Exit®
23
The supplied remote commander has a joystick with
motion in eight directions, as illustrated, to easily select
the items in the menu.
MENU
For further operations, you can select the item by
pressing the joystick in some of eight directions that
vary according to the selected menu. Then click the
joystick to store the setting.
To erase the main menu
Press MENU. The original screen is displayed.
To return to the previous menu
Press the joystick up, down, right or left to move the
cursor (W ) to TD of each menu, and click the joystick.
Note
• You can select one of various kinds of cursors (page 38).
Getting Started
13
-EN
Page 14

step 4: Setting up
the projection TV
3 Press CHANNEL+.
If you prefer Spanish or French to English, you can
change the on-screen menu language. Press
CHANNEL- for Spanish or VOLUME+ for French.
automatically
(AUTO SET UP)
For customers who connect a cable box, skip this step
and proceed to "Selecting the cable box output channel
(TV INPUT)" (page 18).
You can sct up your projection TV easily by using
AUTO SET UP feature. It changes the on-screen menu
language and presets all the receivable channels
automatically. To set up the projection TV manually,
see "Changing the menu language" (page 17) "Setting
cable TV on or off" (page 16) and "Presetting channels"
(page 17).
If the projection TV is set to a video input, you cannot
execute AUTO SET UP. Press TV/VIDEO so that a
channel number appears.
VOLUIVIE+
CONTINUE TO
AUTO PROGRAM?
YES
[CEOn
NO :
All of the menus will be set to the factory preset
condition in the selected language.
Press CHANNEL+.
"AUTO PROGRAM" appears on the screen and the
projection TV starts scanning and presetting
channels automatically. When all the receivable
channels are stored, "AUTO PROGRAM"
disappears and the lowest numbered channel is
displayed. If the projection TV receives cable TV
channels, CABLE is set to ON automatically.
SETUP
1 Press POWER to turn the projection TV on.
2 Press SET UP on the front of the projection
TV.
AUTO SET UP; iCH I
AUTO AJUSTES : CH - i
RÉGLAGE AUTO : fWLVj
DEMO :
Press f^TUP~l to Exit
Notes
• If more than 90 seconds elapse after you press a button, the
menu disappears automatically.
• In case of using the AUX connector, press the ANT/AUX
button on the remote commander first so that "AUX" is
displayed beside the channel number on the screen. Then
follow steps 2 to 4 above to perform AUTO SET UP.
To preview the main functions (DEMO)
Press VOLUME- in step 2. The functions and menus
are displayed one by one. To cancel the DEMO
fuiTction, press VOLUME - again.
14
EN
Getting Started
Page 15
Erasing or adding channels
After AUTO SET UP von can erase unnecessary
channels or add the channels you want. Preset
channels during the dav rather than late at night, when
some channels mav not be broadcasting.
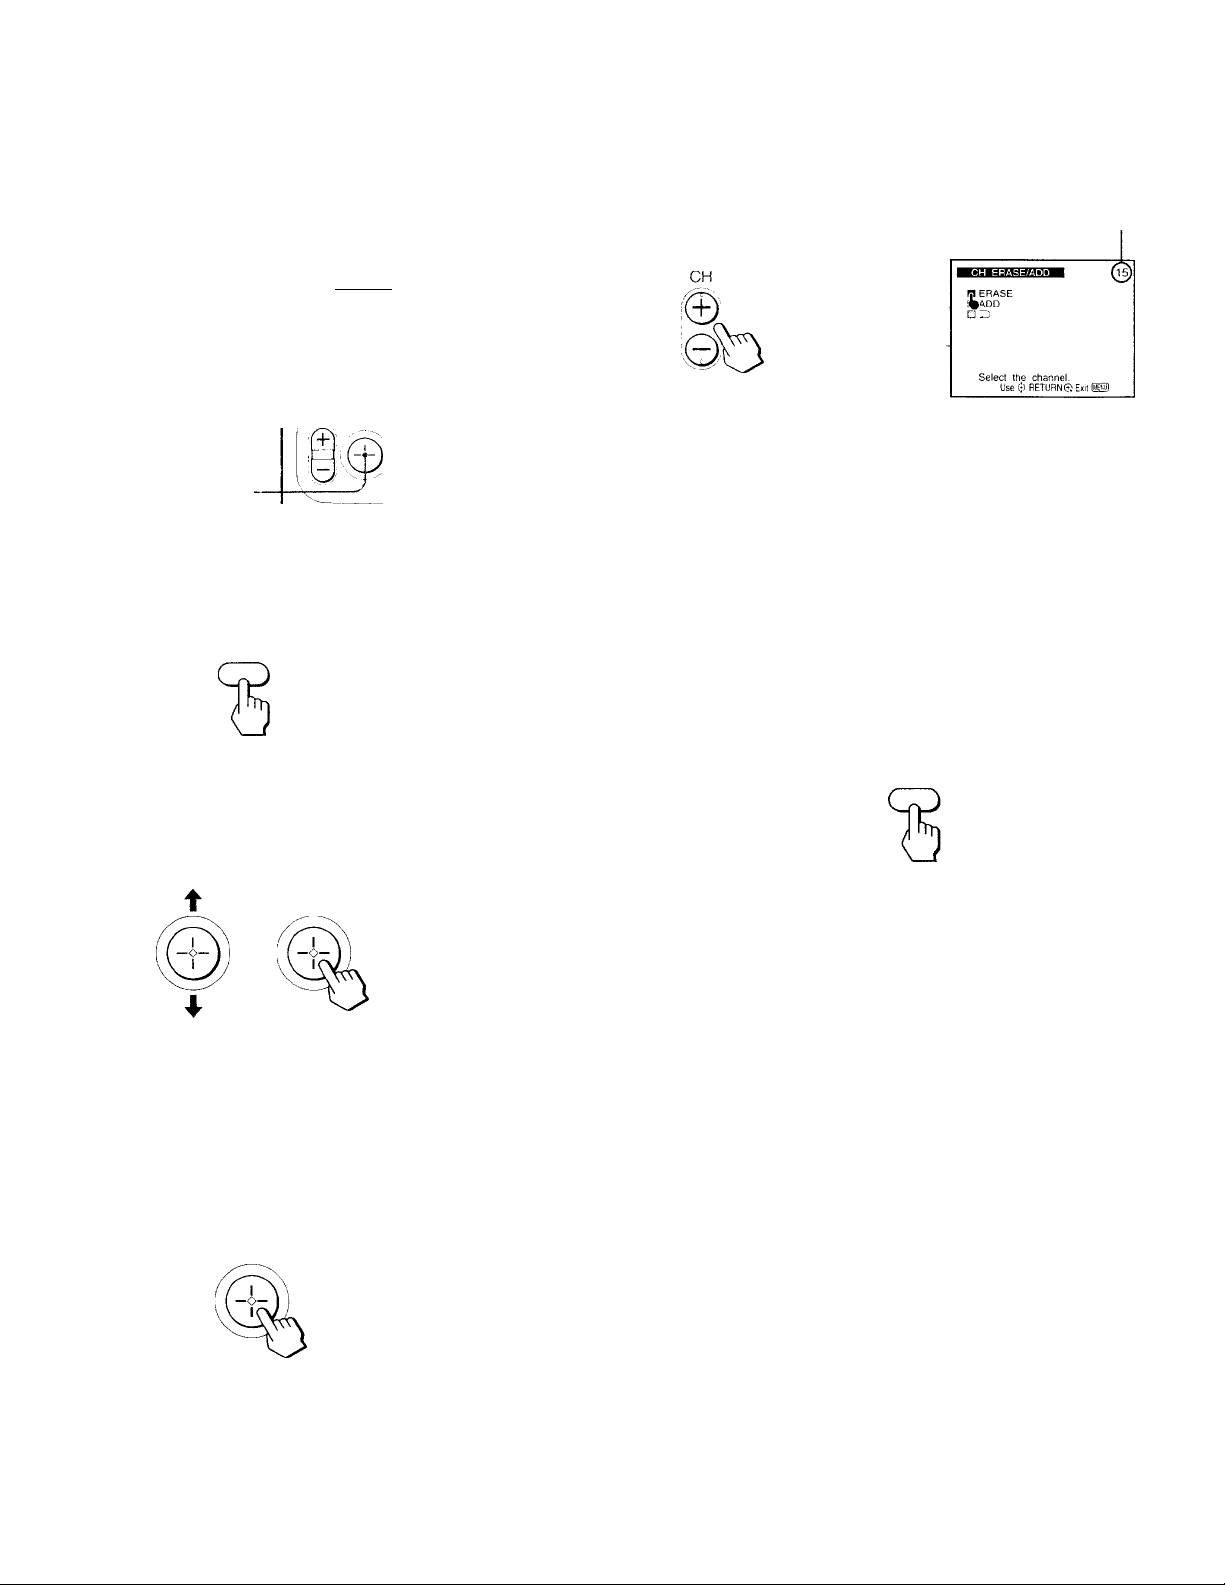
4 Erase or add the channel you want:
(]) Press the joystick up or dow'n to select ERASE or
ADD.
(2) Press CH +/- or 0-9 buttons to select the
channel you want to erase or add.
Selected channel number
Q CD CD
© © ©
® © ©
@ © ©
CD
l©JO
MENU ■
Joystick
e
1 Press MENU.
The main menu appears.
MENU
2 Press the joystick up or down to move the
cursor (b) to SET UP and click the joystick.
The SET UP menu appears.
*0-9 buttons
-CH+/-
ID MODE:STANDARD
]□ PICTURE
dDHUE I"
ya COLOR HH'"
BRIGHT ■■■'"
ya SHARP
^□TRINITONE : HIGH
NR : OFF
]□ DYNAMIC PICTURE : OFF
U □ COLOR CORRECTION: OFF
qaz) □ RESET
Use (j) RETURN© Exit
© © ©
0 0 0
© ® ©^
©O^
(3) Click the joystick.
• If you select ERASE in step (1), appears
beside the channel number, showing that the
channel is erased from the preset memory.
• If you select ADD in step (1), "+" appears
beside the channel number, showing that the
channel is added to the preset memory.
5 To erase and/or add other channels, repeat
step 4.
6 When you finish, press MENU.
MENU
ffl CHANNEL ERASE/ADD
[^CHANNEL CAPTION/LOGO
□ FAVORITE CHANNEL
□ CONVERGENCE
□ DIRECT PLAY
□ TV INPUT : OFF
Q CABLE ; ON
□ AUTO PROGRAM
□ CUSTOMIZED POINTER
□ LANGUAGE : ENGLISH
□ ID
Use (j) RETURN© Exit IMMI
Make sure the cursor (b ) is beside
CHANNEL ERASE/ADD and click the joystick.
If the cursor is not beside CHANNEL ERASE/
ADD, press the joystick up or down to move the
cursor and click the joystick.
The CH ERASE/ADD menu appears.
ERASE
%ADD
Select the channel.
Use (il RETURN© Exit UnD
Notes
• If vou erase or add a VHP or UHF channel, the cable TV
channel with the same number is also erased or added.
• If more than 90 seconds elapse after you press a button, the
menu disappears automatically.
• Erasing and adding channels is also available for the AUX
input.
Getting Started
15
EN
Page 16

Adjusting convergence
(CONVERGENCE)
The projection tube image appears on the screen in
three layers (red, green and blue). If they do not
converge, the color is poor and the picture blurs. To
correct this, adjust convergence.
Setting cable TV on or off
If vou ha\'e connected the projection TV to a cable TV
system, set CABLE to ON, the factory setting. If not, set
CABLE to OFF. You do not have to do this procedure
if you execute AUTO SET UP (page 14). Do this
procedure only when you want to set it manually.
1 Press MENU.
2 Press the joystick up or down to move the
cursor (W) to SET UP and click the joystick.
3 Press the joystick up or down to move the
cursor (b) to CONVERGENCE and click the
joystick.
The CONVERGE.NCE adjustment screen appears.
G=green
R=red
B=blue
4 Press the joystick up or down to move the
cursor (b) to RED or BLUE, and click the
joystick.
1 Press MENU.
2 Press the joystick up or down to move the
cursor (W ) to SET UP and click the joystick.
3 Press the joystick up or down to move the
cursor (^ ) to CABLE and click the joystick.
4 Press the joystick up or down to select ON
or OFF and click the joystick.
■¡¡g
E CHANNEL ERASE/ADD
m CHANNEL CAPTION/LOGO
S FAVORITE CHANNEL
nCONVERGENCE
0 DIRECT PLAY
HTV INPUT; OFF
m
fn CABLE : OFF
%<\UTO PROGRAM
m CUSTOMIZED POINTER
m LANGUAGE : ENGLISH
O Z)
Use (j) RETURN® Exit H$)
5 Press the joystick up, down, left or right to
move the line until it converges with the
center green line, and click the joystick.
6 Repeat steps 4 and 5 to adjust the other
lines until all three lines converge and are
seen as a white cross.
7 Press MENU to return to the original screen.
Note
• Convergence can be adjusted only left, right, up and down.
-EN
16
Getting Started
5 Press MENU to return to the original screen.
Note
• If CABLE appears in grey, the projection TV is set to a video
input and you cannot select CABLE. Press TV/VIDEO on the
remote commander so that a channel number appears.
Page 17

Presetting channels
Changing the menu language
You can preset TV channels easily by AUTO
PROGRAM feature. You do not have to do this
procedure if you execute AUTO SET UP (page 14). Do
this procedure only when you want to set it manually.
Press MENU.
2 Press the joystick up or down to move the
cursor (b ) to SET UP and click the joystick.
QH] n CHANNEL ERASE/ADD
!12^%CHANNEL CAPTION./LOGO
J' □ FAVORITE CHANNEL
□ CONVERGENCE
[y] □ DIRECT PLAY
^SDTV INPUT ; OFF
'rO □ CABLE : ON
MlDFUTO PROGRAM
10 D CUSTOMIZED POINTER
n LANGUAGE : ENGLISH
i Use RETURN 0 Exit ii:'!:
Press the joystick up or down to move the
cursor (li) to AUTO PROGRAM and click the
joystick.
If you prefer Spanish or French to English, you can
change the menu language. You do not have to do this
procedure if you execute AUTO SET UP (page 14). Do
this procedure only when you want to set it manually.
1 Press MENU.
2 Press the joystick up or down to move the
cursor (^ ) to SET UP and click the joystick.
3 Press the joystick up or down to move the
cursor (b ) to LANGUAGE and click the
joystick.
vieo
ii’
tipto
^ENGLISH I
¡^ESPAÑOL '
mLANGUAGE
Press the joystick up or down to select the
language and click the joystick.
The menu in the selected language appears.
□ FRANÇAIS ■
Use (Î) R£TURN0£xit mi:
"AUTO PROGRAM" appears on the screen and the
projection TV starts scanning and presetting
channels automatically. When all the receivable
channels are stored, "AUTO PROGRAM"
disappears and the lowest numbered channel is
displayed.
4 Press MENU to return to the original screen.
Notes
• If AUTO PROGRAM appears in grey in the SET UP menu, the
projection TV is set to a video input and you cannot select
AUTO PROGRAM. Press TV/VIDEO on the remote
commander so that a channel number appears.
• If more than 90 seconds elapse after you press a button, the
menu disappears automatically.
• Presetting channels is also available for the AUX input.
' n BORRAR/AÑADIR CANAL
dm NOMBRE DEL CANAL
I □ CANAL FAVORITO
a □ CONVERGENCIA
y □ ENCENDIDO DIRECTO
qOTV INPUT ;N0
jm CABLE: SI
I □ AUTO PROGRAMMACION
I n CUSTOMIZED POINTER
¡1 LANGUAJE : ESPAÑOL
Usarli) RETURN©Salir®
^
5 Press MENU to return to the original screen.
Note
• Even when you select Spanish or French language, certain
parts of the menus remain in English.
Operations
17
-EN
Page 18

Selecting the cable
box output channel
(TV INPUT)
If you use a cable box, you can select the cable box
output channel on your projection TV. It is
recommended that you set up your projection TV as
follows when you use a cable box.
•MENU
-Joystick
Notes
• If you set TV INPUT to any option other than OFF, you cannot
u.se the favorite channel and CH INDEX features.
• If you set TV INPUT to VIDEO 1 INPUT mode, you cannot
select TV INPUT again. Press the TV/VIDEO button to select
and return to TV INPUT mode. If you are unable to return to
the TV INPUT mode by using the TV/ VIDEO button, select TV
OUT in "Using the INPUT/OUTPUT menu" on page 30, and
enter NO.
• If TV INPUT is set to OFF and you cannot receive any
channeLs, press the ANT/AUX button on your remote
commander.
2 Press the joystick up or down to select SET
UP and click the joystick.
3 Press the joystick up oridown to select TV
INPUT and click the joystick.
The cable box output channel options are
displayed.
W
use (j) REU
4 Press the joystick up or down to select the
cable box output channel and click the
joystick.
USTIQ CHANNEL ERASE/ADD
□ CHANNEL CAPTION/LOGO
Tin FAVORITE CHANNEL
□ CONVERGENCE
□ DIRECT PLAY
R| TV INPUT ; 2
(%CABLE ; ON
□ AUTO PROGRAM
□ CUSTOMIZED POINTER
Q LANGUAGE ; ENGUSH
□ O
Use (j) RETURN'S Exit ®
02
□3
04
□ 5
□6
OVIDEOT
□AUX2
□AUX3
□AUX4
OAUX5
□AUX6
^OFF
You can select the cable output channel among 2-6
channels, VIDEO 1 and AUX 2-6 channels.
EN
18
Operations
Page 19
Watching the TV
T
MUTING ■
SLEEP •
TV/VIDEO .
CD CD
?
O (DO®
CD CD CD CD GO
CD Q
CD C&
0 © ©
® © ©
® ® ®
^©[Q
0
VOL +/- ■
iiR'
[y
0]
■ TV POWER
■ TV FUNCTION
JUMP
■ 0-9 buttons
■ CH +/-
Select the channel you want to watch:
To select a channel directly
Press the 0-9 buttons.
For example, to select channel 10, press 1 and 0.
You may press ENTER to immediately change the
channel.
© © ©
© © ©„
© ® ©
© o
To scan through channels
Press CH +/- until the channel you want to watch
appears.
CH
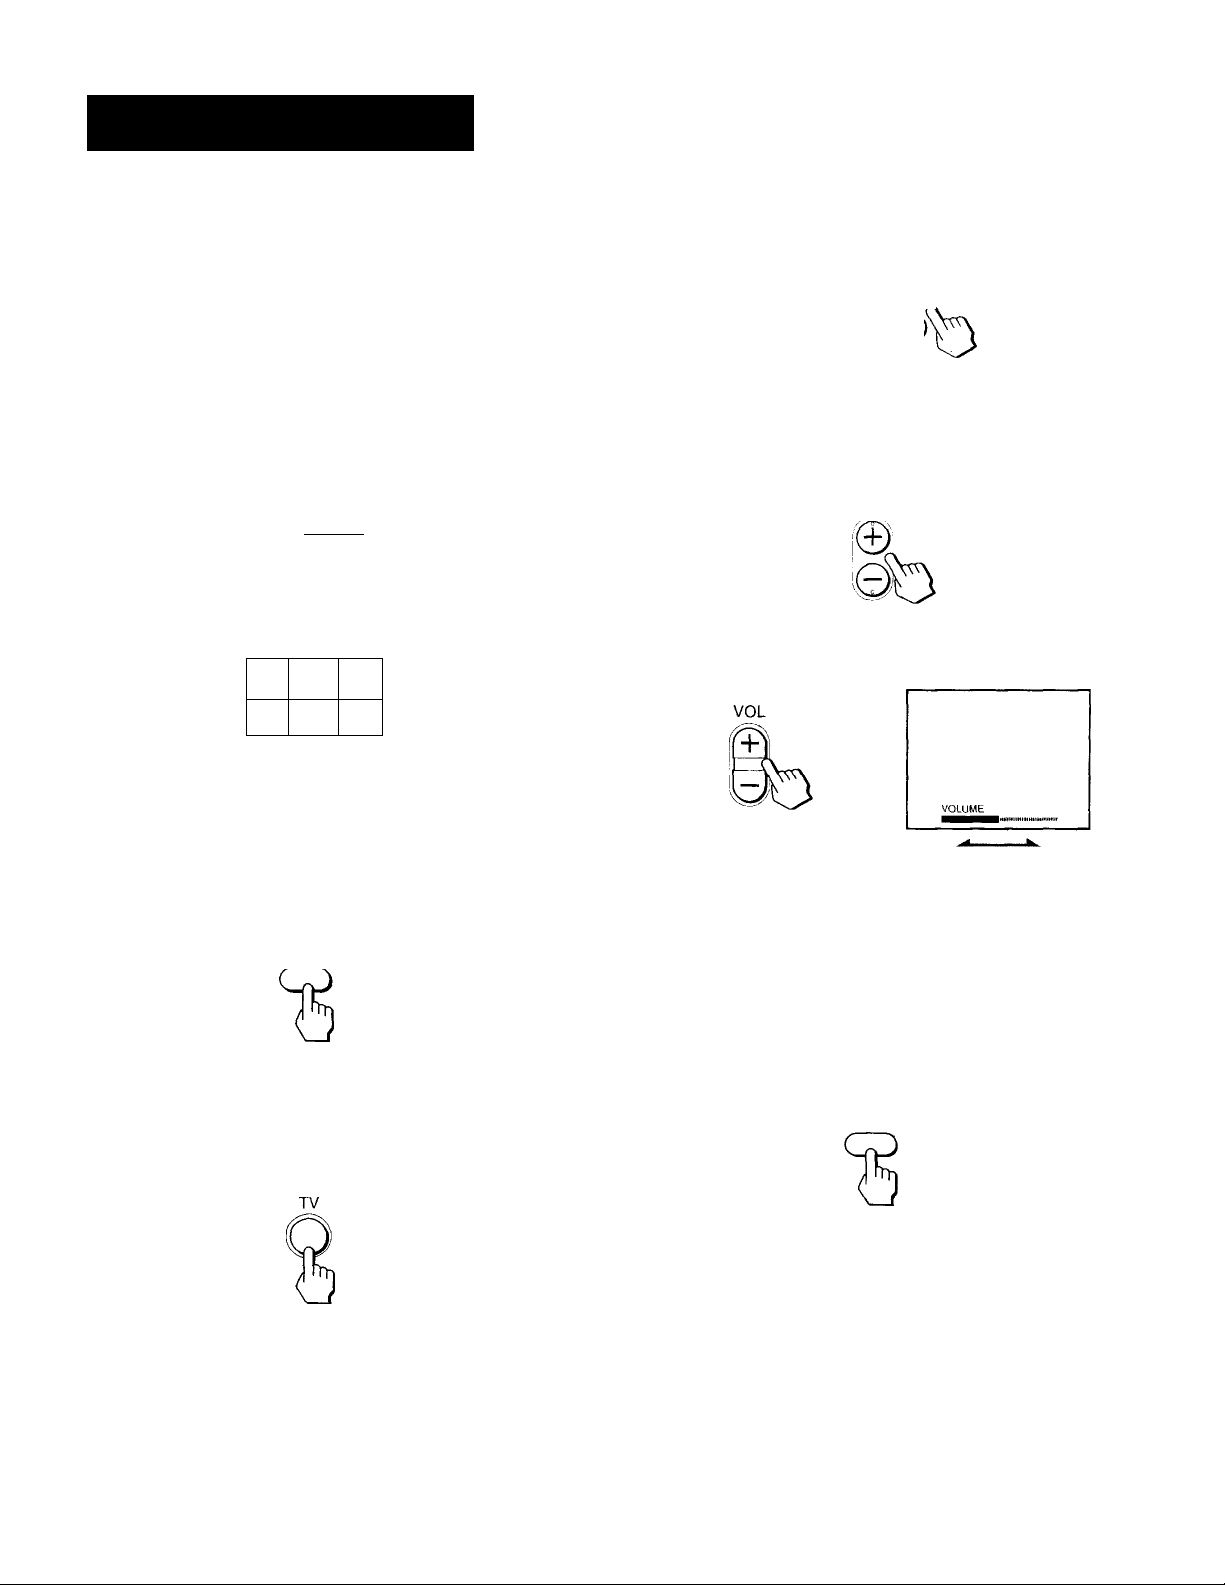
4 Press VOL +/- to adjust the volume.
Press TV FUNCTION on the remote
commander.
The red indicator flashes once on the remote
commander, indicating that the buttons function
for the projection TV.
TV
2 Press TV POWER to turn on the projection
TV.
The POWER indicator lights on the projection TV.
-- --
POWER
-------
If any of "VIDEOl to VIDEOS" appears on the
screen, press the TV/VIDEO button until a channel
number appears.
Switching quickly between two
channels
You can use the JUMP button to switch or "jump" back
and forth between two channels.
Press JUMP.
JUMP
Pressing JUMP again switches back to the original
channel.
Note
• You cannot jump to channels you scanned through using the
CH + /- buttons.
Operations
19
•EN
Page 20

Muting the sound
Setting the Sleep Tinner
Press MUTING.
"MUTING" appears on the screen.
MUTING
To restore the sound, press MUTING again, or press
VOL+.
Displaying on-screen information
1 Press DISPLAY.
Channel number, the current time (if set), channel
caption or logo (if set), and MTS mode (if SAP is
selected) are displayed. SAP indication disappears
after 4 seconds. DISPLAY
Press DISPLAY again.
XDS (Extended Data Service) is turned on. If the
station provides this service, program information,
program type and program length are displayed.
DISPLAY
Press DISPLAY again.
Caption Vision (if set) is displayed. (See page 39.)
DISPLAY
The projection TV stays on for the length of time you
specify and then shuts off automatically.
Press SLEEP repeatedly until the time (in
minutes) you want appears.
Each time you press SLEEP, the time changes as
follows: 30 -> 60 —► 90 —► OFF.
SLEEP
"SLEEP" appears about one minute before the
projection TV shuts off.
To cancel the Sleep Timer, press SLEEP repeatedly
until "SLEEP OFF" appears, or turn off the projection
TV.
The sleep timer is also canceled when you select AUTO
PROGRAM under the SET UP menu.
Watching a video input picture
Press TV/VIDEO repeatedly until the desired
video input appears.
Each time you press TV/VIDEO, the display changes
as follows: TV -*• VIDEO 1 -*■ VIDEO 2 -♦ VIDEO 3
-►VIDEO 4-► VIDEO 5.
TV/VIDEO
To cancel the display, press DISPLAY again.
Freezing the picture
You can freeze the picture.
Press FREEZE. FREEZE
This feature is useful when you want to write down a
recipe from a cooking program, a displayed address or
phone number or the like.
To restore the normal screen, press PIP OFF.
Note
• This feature is also available for PIP/P&P mode. See page 22.
20'EN Operations
To return to TV picture, press TV/VIDEO until a
channel number appears.
Changing the VHF/UHF input to the
AUX input
Press ANT/AUX.
"AUX" appears beside the channel number.
ANT/AUX
Pressing ANT/AUX again switches back to VHF/UHF
input.
Page 21
Watching two
programs at one
time — PIP/P&P
(IWin View^")
You can watch two programs simultaneously using the
Picture-in-Picture (PIP) or the Picture-and-Picture
(Twin View'^') feature.
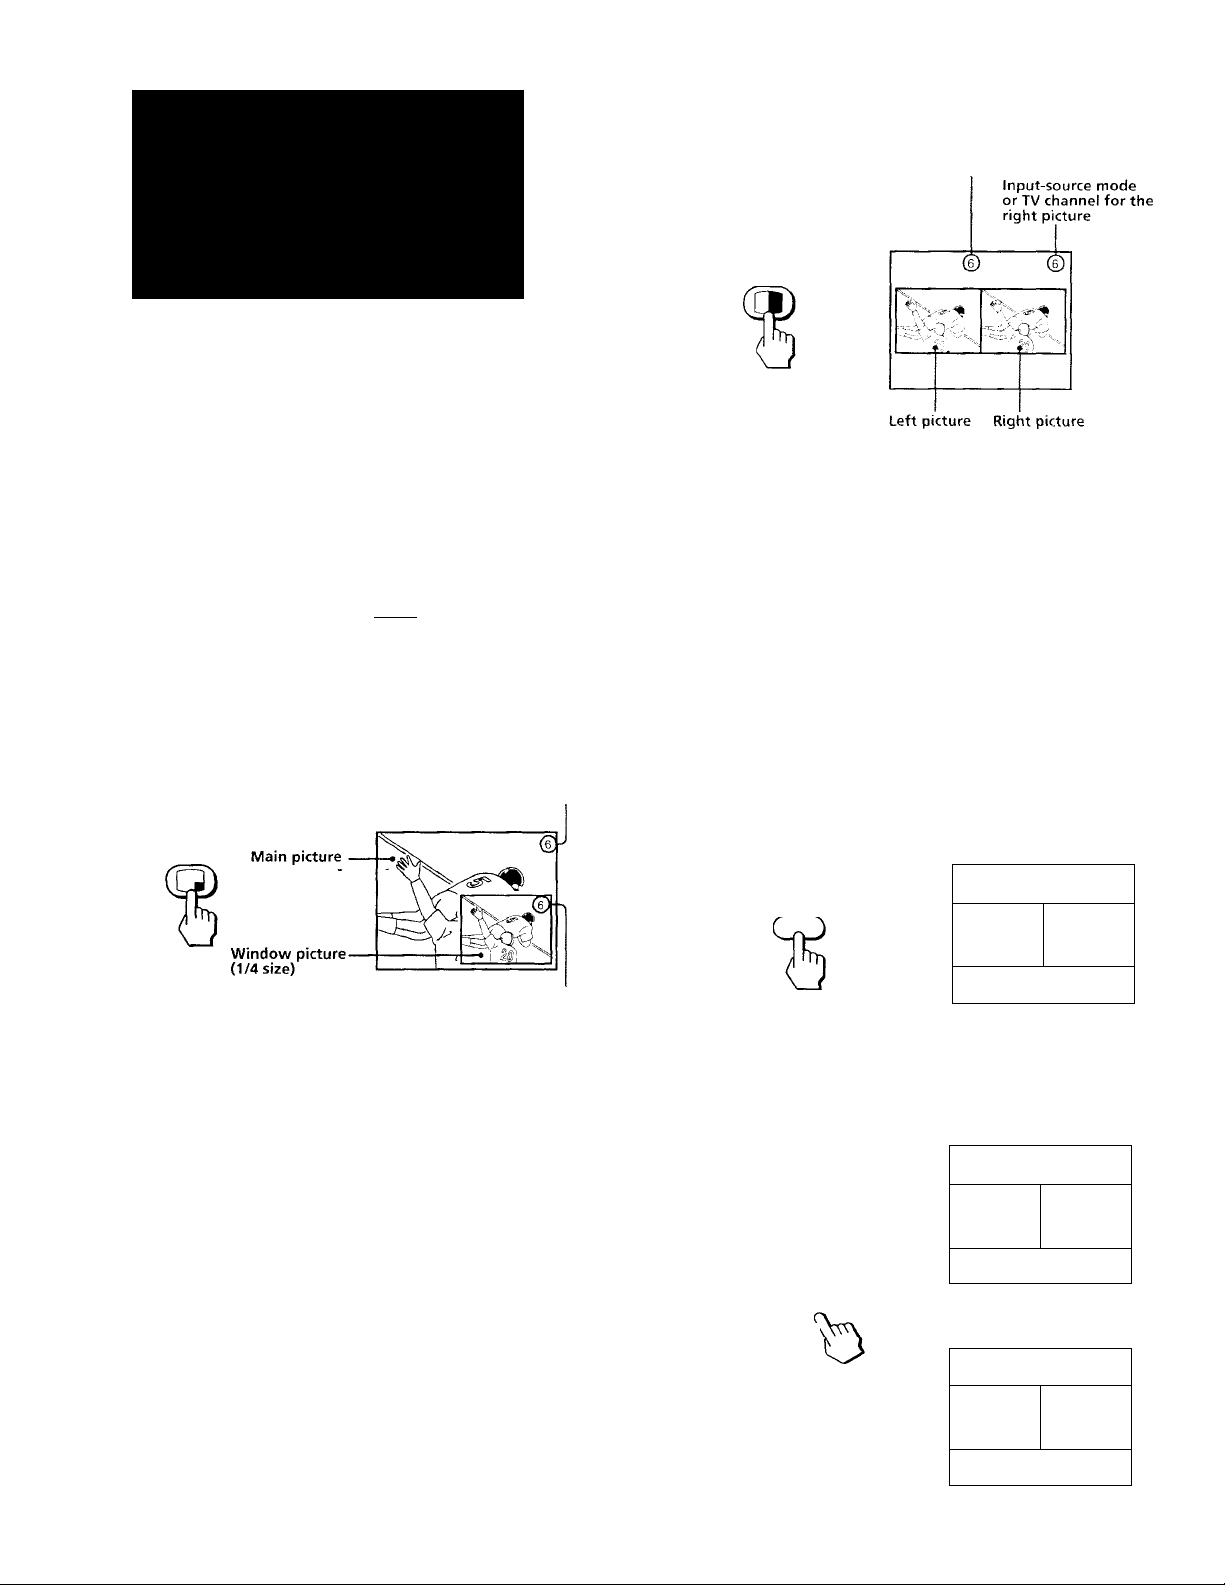
Displaying a left picture (P&P)
Input-source mode
Press [ i-
or TV channel for
the left picture
t:
Ooool
*■
PIP OFF-
AUDIO-
FREEZE-
SWAP -
-SDCpCS
cn
T
CD CD
© @ ©
Displaying a window picture (PIP)
Press Q.
Input-source mode or TV
channel for the main picture
Input-source mode or TV channel for
the window picture
-c:í
j
- PIP CH +/-
-PIPTV/VIDEO
-POSITION
The main picture is on the right and the window
picture is on the left.
To restore the normal picture, press PIP OFF.
Notes
• If the main/right picture is not receiving an image, the
window'/left picture may become a noisy picture.
• The window/left picture sound is also output from the
AUDIO (VAR) OUT jacks when you listen to it.
Changing the window/left picture
input mode
Press PIP TV/VIDEO to select the input mode.
Each time you press PIP TV/VIDEO, "TV," "VIDEO
1," "VIDEO 2," "VIDEO 3," "VIDEO 4" and "VIDEO 5"
appear in sequence.
VIDEO 1 r 6
TV/VIDEO
1 * ^
Press repeatedly to display a smaller
window picture.
Each time you press Q, the size of the window picture
changes as follows; 1/4 size —►1/9 size —► 1/16 size.
To remove the window picture, press PIP OFF.
Changing TV channels in the window/
left picture
Press PIP CH +i~.
CH
6
/'VIDEO 1
i
7
/VIDEO 1
%
Operations 21’^'''
Page 22

Listening to the sound of the window/
left picture
Press AUDIO.
appears for a few seconds on the window/left
picture, indicating that the window/left picture sound
is being received.
AUDIO
O'
To restore the main/right picture sound, press AUDIO
again.
Freezing the pictures
You can freeze both the right and left pictures.
This feature is useful when you want to write down a
recipe from a cooking program, a displayed address, a
phone number, etc.
Press FREEZE.
6
/VIDEO 1
FREEZE
eSsSv-
To restore the normal screen, press PIP OFF.
■ ^ ^
p
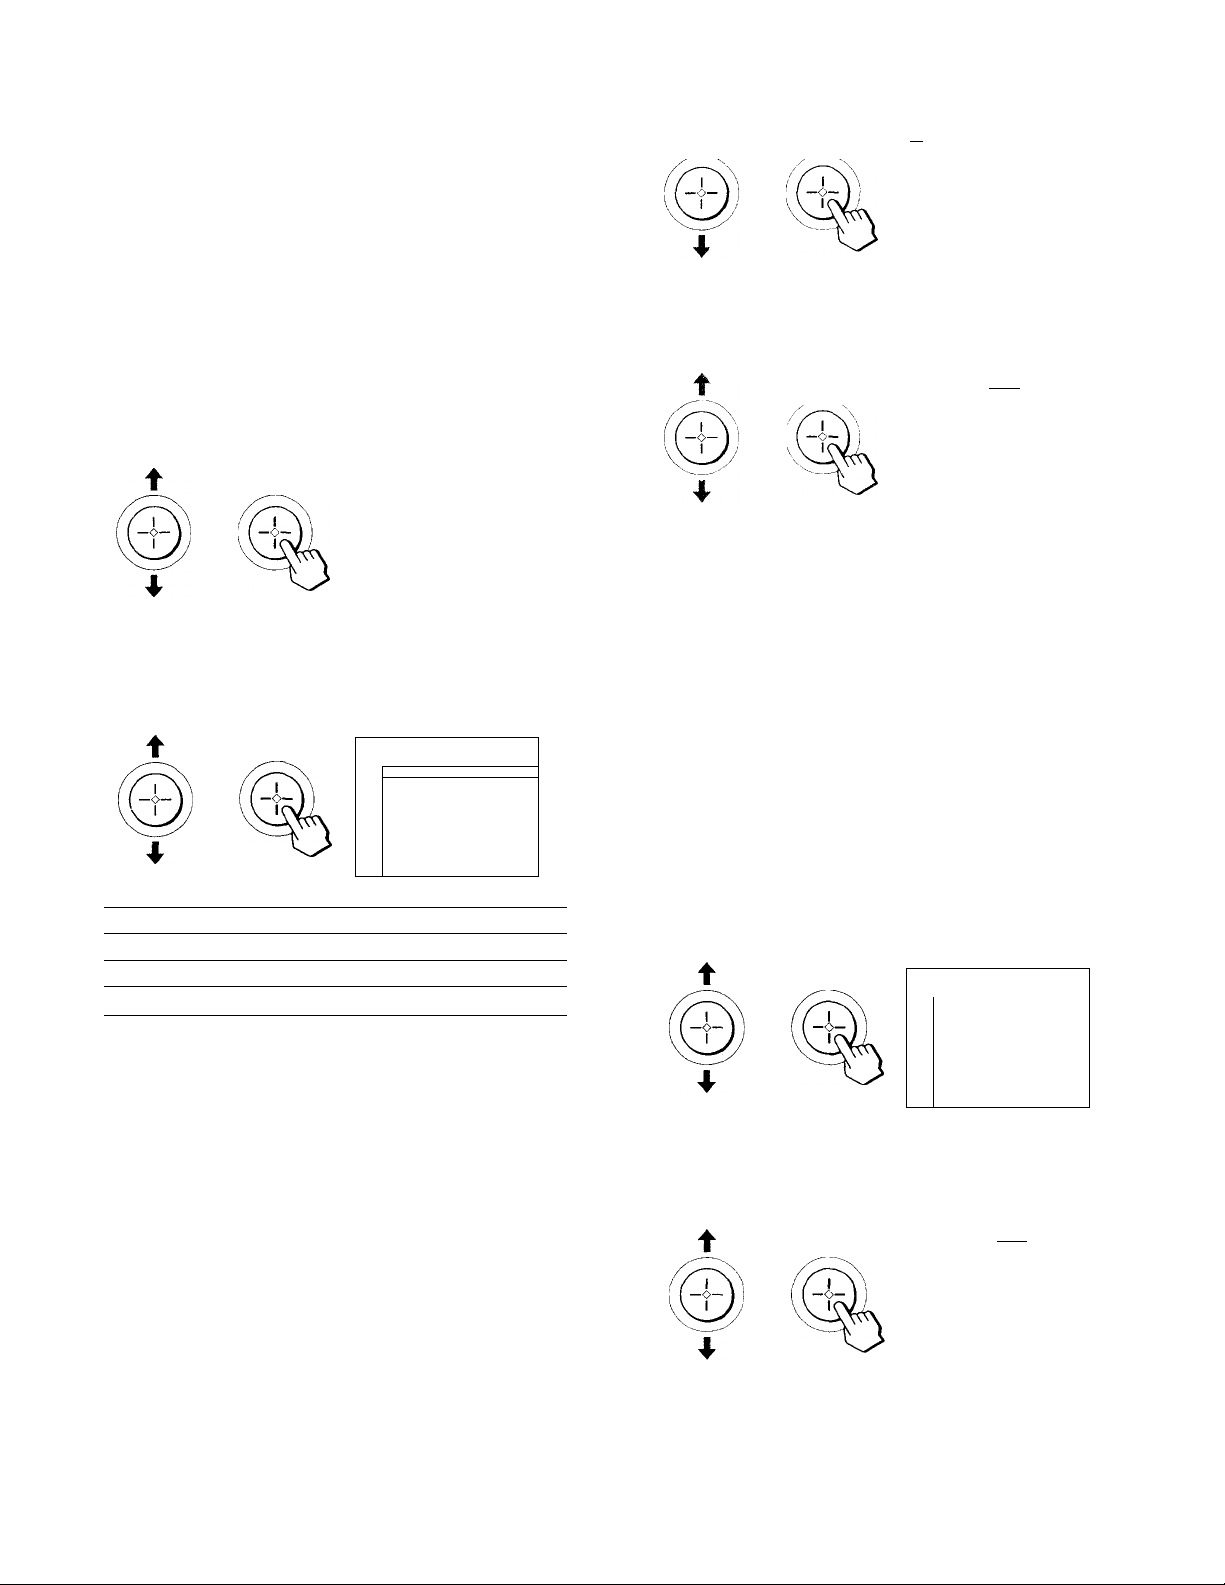
Changing the position of the window
picture
Press POSITION.
Each time you press POSITION, the window picture
will move as illustrated.
POSITION
Note
• POSITION is not a P&P feature.
Swapping the main/right and window/
left pictures
Press SWAP.
Each time you press SWAP, the images and sound
from the main/right and window/left pictures switch
places.
VIDEO 1
-V
Watching eight TV channels at one
time (CH INDEX)
You can display all the preset channels in sequence.
Press [■.
A main picture and seven window pictures are
displayed.
Each time you press or PIP C1T+/-, the next seven
sequential channels appear.
S'S
a
To return to the normal picture, press PIP OFF.
Note
• If you set TV INPUT to any option other than OFF, you cannot
use the CH INDEX feature.
1' 6
SWAP
22'^^ Operations
C V', ' 1
■"vA VT,
' 1st N
6
I
rVIDEO 1
Page 23

Using the VIDEO
menu
Adjusting the picture (VIDEO)
When watching TV programs, you can adjust picture,
hue, color, brightness and sharpness to suit your taste.
The adjusted level is stored in PROGRAM PALETTE.
CD CD CD
© © ©
© © ®
© © ®
о © о
MENU
Joystick
1 Press MENU.
(2) Click the joystick.
mm STANDARD
4 Adjust the selected item:
(1) Press the joystick up, down, right or left to
adjust the item.
mm STANDARD
(2) Click the joystick.
The new setting appears in the VIDEO menu,
and is stored in the displayed PROGRAM
PALETTE mode.
Шс MODE . STANDARD
SISSId PICTURE
J' □ HUE
u_^DID О RESET
S_ Use i RETURN® Exit Ш
BRIGHTNESS
BRIGHTNESS
□ COLOR
n BRIGHT mmmmm»'»
»SHARP ■■■
□ TRINITONE : HIGH
Q NR : OFF
□ DYNAMIC PICTURE • OFF
□ COLOR CORRECTION: OFF
.......
.....................................
.......
2 Make sure the cursor is beside VIDEO and
click the joystick..
If the cursor is not beside VIDEO, press the joystick
up or down to move the cursor.
The VIDEO adjustment menu appears.
O MODE:STANDARD
m PICTURE mmm
».HUE
0 COLOR mmm»'
□ BRIGHT HIH"'
□ SHARP I^H'"
□ TRlNtTONE -. HIGH
□ NR: OFF
□ DYNAMIC PICTURE : OFF
□ COLOR CORRECTION: OFF
or:: □ RESET
Select the item you want to adjust.
For example:
(1) To adjust brightness, press the joystick up or
down to select BRIGHT.
□ MODE:STANDARD
o PICTURE mmmm
□ HUE
□ COLOR
n BRIGHT W^m
»SHARP ■■■
OTRINITONE : HIGH
D NR : OFF
□ DYNAMIC PICTURE : ON
□ COLOR CORRECTION; ON
□ ID □ RESET
.
.............1«
Use (•) RETURN® Exit (!d£^
..........
“'•I"«
.........................
...........................
Use (f) RETURN® Exrl S
For details on each item, see "Description of
adjustable items" below.
5 To adjust other items, repeat steps 3 and 4.
Description of adjustable items
Item
Press the joystick
up or right to
PICTURE Increase picture
contrast for vivid
color.
HUE Make overall picture
greenish.
COLOR
Increase color
intensity.
BRIGHT
SHARP
....
To restore the factory setting
Brighten the picture.
Sharpen the picture.
While the VIDEO menu is displayed, press the joystick
up, down, right or left to select RESET and click the
joystick.
The Trinitone, NR, dynamic picture and color
correction are also reset to the factory settings.
Press the Joystick
down or left to
Decrease picture
contrast for soft color.
Make overall picture
purplish.
Decrease color
intensity.
Darken the picture.
Soften the picture.
Operations
23
-EN
Page 24
Adjusting the color temperature
(TRINITONE)
The TRINITONE feature controls the color
temperature, permitting white balance preference
adjustment without affecting skin tones.
1 Press MENU.
3 Press the Joystick up or down to select NR
and click the Joystick.
t
IMI STANDARD
I NR QON
Use (*) RETURN© Exit®
IJOFF
2 Press the joystick up or down to select
VIDEO and click the Joystick.
3 Press the Joystick up or down to select
TRINITONE and click the Joystick.
STANDARD
Vi
m
I TRINITONE fpHIGH
Use (f) RETURN© Exit®
Press the Joystick up or down to select
HIGH, MEDIUM or NTSC STD and click the
Joystick.
O MODE;STANDARD
□ PICTURE
[*UD»0
□ COLOR
□ BRIGHT
□ SHARP
Rl TRINITONE : MEDIUM
l»NR ; OFF
□ DYNAMIC PICTURE ; OFF
{nan
O COLOR CORRECTION; OFF
kKraw
OTD S RESET
Use (|) RETURN® Exit ®
[«MEDIUM
DNTSC STD
...........................................
..................
...................
Press the Joystick up or down to select ON
and click the Joystick.
Q MODE;STANDARD
C PICTURE ■■■
Q HUE
G COLOR
□ BRIGHT ^mm
□ SHARP mmB
Q TRINITONE : HIGH
mNR:ON
l%OYNAMIC PICTURE : OFF
G COLOR CORRECTION: OFF
QZ) □ RESET
............
..
Use (') RETURN© Exit ®
Enhancing the picture contrast
(DYNAMIC PICTURE)
The DYNAMIC PICTURE feature enhances the contrast
of the picture, providing a dynamic image.
.
..
1 Press MENU.
2 Press the Joystick up or down to select
VIDEO and click the Joystick.
Choose
For
HIGH a cool (bluish) white
MEDIUM
NTSC STD
a neutral white
a warm (reddish) white
Reducing picture noise (NR)
You can improve a weak or snowy picture when NR is
set to ON.
1 Press MENU.
2 Press the Joystick up or down to select
VIDEO and click the Joystick.
3 Press the Joystick up or down to select
DYNAMIC PICTURE and click the Joystick.
STANDARD
IQ
■ DYNAMIC PICTURE ®ON
Use (♦) RETURN ©Exit®
Press the Joystick up or down to select ON
and click the Joystick.
□ MODE : STANDARD
□ PICTURE
□ HUE
□ COLOR
□ BRIGHT
□ SHARP
n TRINITONE : MEDIUM
DNR:OFF
m DYNAMIC PICTURE : ON
»COLOR CORRECTION; OFF
mZD m RESET
..............
....................
....................
......................
Use (+) RETURN© Exit ®
........................
......................
........................
^OFF
.
.
24
-EN
Operations
Page 25

Correcting the color (COLOR
CORRECTION)
Using the AUDIO
The COLOR CORRECTION feature emphasizes red
and blue to make skin tones vivid.
1 Press MENU.
2 Press the joystick up or down to select
VIDEO and click the joystick.
3 Press the joystick up or down to select
COLOR CORRECTION and click the joystick.
■ COLOR CORRECTIONQON
i nOFF
J Use itJ RETURN® Exil
Press the joystick up or down to select ON
and click the joystick.
□ MODE:STANDARD
□ PICTURE
□ HUE »..»«».III..
□ COLOR mam«'««'
□ BRIGHT
....................................
□ SHARP
.......................................
□ TRINITONE : MEDIUM
□ NR:OFF
□ DYNAMIC PICTURE : OFF
m COLOR CORRECTION: ON
□ RESET
Use (t) RETURN ©Exit®
menu
Adjusting the sound (AUDIO)
You can adjust the treble, bass and balance to suit your
taste. You can adjust the sound of video input(s) as
well.
o CD o
© © ®
© © ©
© © ©
Q © O
-MENU
©
.
Press MENU.
2 Press the joystick up or down to select
AUDIO and click the joystick.
-Joystick
n TREBLE BH"»"
(%3ASS ■■■
□ BALANCE
□ MTS : MAIN
□ SPEAKER; ALL ON
□
□
□ ID O RESET
Use (*) RETURN® Exit ES)
Select the item you want to adjust.
For example;
(1) To adjust bass, press the joystick up or down, to
select BASS.
□ TREBLE m m t '« '
rn BASS m m ' « <
IMBALANCE
.........................
.
(continued)
Operations 25’^^
(2) Click the joystick.
!□ MTS : MAIN
¡□SPEAKER; ALL ON
- □
__
jD
© O ID O RESET
Use tr) RETURN® Exit
Page 26

4 Adjust the selected item:
(1) Press the joystick up, down, right or left to
adjust the item.
Selecting stereo or bilingual programs
(MTS)
The Multichannel TV Sound (MTS) feature gives you
the choice to enjoy stereo sound or Second Audio
Programs (SAP) when available. The initial setting is
stereo sound (MAIN).
1
Press MENU.
(2) Click the joystick.
The new setting appears in the AUDIO menu.
KI^BASS ■■■■
;%3ALANCE
□ MTS : MAIN
□ SPEAKER: ALL ON
S> □
□
□ □ RESET
TRPRl F —
..........................
I"
Use (•; RETURNS Exit 1?^^
For details on each item, see "Description of
adjustable items" below.
5 To adjust other items, repeat steps 3 and 4
above.
Description of adjustable items
Item
Press the joystick
up or right to
TREBLE
Increase the treble
response.
BASS
Increase the bass
response.
BALANCE
Emphasize the right
speaker's volume.
To restore the factory settings
While the AUDIO menu is displayed, press the joystick
up, down, right or left to select RESET and then click
the joystick. All the settings in the AUDIO menu are
reset to the factory settings.
Press the joystick
down or left to
Decrease the treble
response.
Decrease the bass
response.
Emphasize the left
speaker's volume.
Press the joystick up or down to select
2
AUDIO and click the joystick.
Press the joystick up or down to select MTS
and click the joystick.
IMTS:lriMAIN |
Use (f: RETURN (?) Exit SS
4 Press the joystick up or down to select
MAIN, SAP or MONO and click the joystick.
□ TREBLE ■■■"•
□ BASS ■■■"•
O BALANCE
a MTS: SAP
[^SPEAKER : ALL ON
D
□
□ Z) B RESET
Use (♦) RETURN® Exit 6
Choose To
MAIN Listen to stereo sound.
The STEREO indicator on the projection TV
lights up while a stereo broadcast is
received.
SAP Listen to bilingual programs.
The sound of non-SAP programs will be
muted when SAP is selected.
MONO
Reduce noise during stereo broadcasts.
I iVAP [
□MONO!
..............
...........
4«
26
■EN
Note
• Stereo and SAP sounds are subject to program sources.
Operations
Page 27

Setting the speaker switch (SPEAKER)
Selecting the surround mode
You may switch off the projection TV speakers when,
for example, you want to listen to the sc'iund through a
stereo system.
If you connect an amplifier with Dolby Pro Logic
decoder to the CENTER SPEAKER IN terminal, you
can use the projection TV speakers as center speaker.
1 Press MENU.
2 Press the joystick up or down to select
AUDIO and click the joystick.
3 Press the joystick up or down to select
SPEAKER and click the joystick.
■ SPEAKER l!!ALL ON
»-i
№
.%./R OFF
□ ALL OFF
□ CENTER IN
Use (f) RETURN® Exit (M3
4 Press the joystick up or down to select ALL
ON, L/R OFF, ALL OFF or CENTER IN and click
the joystick.
This projection TV incorporates center speakers and
can be connected to the supplied rear speakers. You
can take advantage of surround sound simply by
selecting a surround mode according to the type of
program you are w'atching. You can select the
surround mode when the SPEAKER mode is set to ALL
ON or L/R OFF.
1 Press MENU.
2 Press the joystick up or down to select
AUDIO and click the joystick.
3 Press the joystick up or down to select
SURROUND MODE and click the joystick.
fflOD PRO-LOGIC
%X3 STEREO
□ SIMULATED
□LIVE
□ GAME
□OFF
Use (:) RETURN (51 Exit ®
4 Press the joystick up or down to select the
surround mode you want.
Choose To
ALL ON
Listen to the sound from the projection
TV.
L/R OFF
Turn off only the projection TV left and
right speaker sound and listen to the
projection TV's front left and right
channel sound through the audio
system speakers.
ALL OFF
Turn off the projection TV speaker
sound and listen to the projection TV's
sound solely through the audio system
speakers.
CENTER IN
Use the projection TV center speakers as
the center speaker in another surround
audio system.
a TREBLE
□ BASS
a BALANCE
0 MTS •• MAIN
SB SPEAKER : ALL OFF
I#
ID
dOD
Use (•) RETURN (51 Exil I®
SURROUND : UVE
m
Use (*) RETURN(51 Exit®
Choose To
□□ PRO-LOGIC Obtain superb theater-like surround
effects. This mode is most effective
with programs encoded in Dolby
surround.
□D 3 STEREO Obtain the surround sound without
using rear speakers. The sound of the
rear channel is output from the front
speakers. Use this mode if you don't
want to use the rear speakers.
SIMULATED
Create a simulated stereo sound. Use
this mode for program in monaural.
LIVE
Obtain the surround sound with the
atmosphere of a concert hall. Use this
mode for music programs.
GAME
Obtain maximum audio impact from
video game software.
OFF
Turn off the surround effects.
(continued)
Operations 27’^*^
Page 28
Adjusting the speaker volume
After selecting the surround mixie, adjust the volume
of each speaker to the same level so that the selected
surround sound will be even and natural. For OOPROLOGIC and ODS STEREO modes, adjust the speaker
volume using the test tone feature.
1 Press MENU.
b Repeat steps 4 and 5 to adjust other
speakers so that you hear the sound from
each speaker at the same volume.
To restore the factory settings
While the volume setting screen is displayed, press the
joystick up, down, right or left to select RESET then
click the joystick. All of the speaker levels of the
selected mode are reset to the factory setting.
2 Press the joystick up or down to select
AUDIO and click the joystick.
3 Press the joystick up or down to select
SURROUND LEVEL and click the joystick.
The speaker volume setting screen appears.
DOMYfmO-LOGIC
ESI
l|^ CENTER HUM
_REAR
□ BALANCE
□ TEST TONE
□ TC □ RESET
Use ii) RETURN (?:; Exit liS
4 Press the joystick up or down to select
CENTER, REAR or BALANCE and click the
joystick.
The selected speaker(s) in the menu is(are)
highlighted.
DOLBY PRO - LOGIC
IMBALANCE
Use®RETURN® Eli! S
...............
A. Ji. JL
te «
Hi Ih
Adjusting the speaker volume using
the test tone
In □□ PRO LOGIC or DU3 STEREO mode, the test tone
feature makes it easy to adjust the volume level of each
speaker to the same level.
After step 3 in "Adjusting the speaker volume", follow
.
the procedure below;
1 Press the joystick up or down to select TEST
TONE and click the joystick.
You can hear the test tone output from each
speaker in sequence.
The test tone is output:
Front left —► Center—*- Front right —► Rear
t
__________________________
I
DOLBY PRO-LOGIC
0 CENTER
IB REAR
Zi BALANCE
HTEST TONE
Use (tl RETURN® Extl
O RESET
Choose
CENTER*
To adjust
The level of center speaker.
REAR** The level of rear speakers.
BALANCE Tire level betw^een the right and left speakers.
* The center level cannot be adjusted in the SIMULATED
mode.
** The rear level cannot be adjusted in the 0D3 STEREO
mode.
5 Press the joystick right or left to adjust
the volume level and click the joystick.
DOLBY PRO-LOGIC
¡□CENTER ■■■">'
II □ REAR ■■■'>•
[jin BALANCE ..............................
y:%TEST TONE
* Q RESET
Use-T-RETURN® Exit (S
■EN
28
Operations
2 Follow steps 4 to 6 in "Adjusting the
speaker volume".
3 Click the joystick to turn off the test tone.
Page 29

Using the PROGRAM
For details on each item, see "Effect of picture
settings" below.
PALETTE menu
Selecting picture effect (PROGRAM
PALETTE)
You can select one of five modes for picture effect that
best suits the different programs.
You can also adjust the picture for each setting to suit
your taste.
■MENU
-Joystick
Effect of picture settings
Item
STANDARD Standard
MOVIE Finely detailed picture
SPORTS Vivid, bright picture
NEWS
GAME Softer picture
Picture effect
Reduced noise in picture
Adjusting the picture in PROGRAM
PALETTE
1 Press MENU.
2 Press the joystick up or down to select
VIDEO and click the joystick.
□ MODE:STANDARD
rnpiCTURE
»HUE
□ COLOR ■■■
Q BRIGHT
m SHARP
OTRINITONE ; HIGH
Q NR:OFF
Q DYNAMIC PICTURE : OFF
P COLOR CORRECTION; OFF
or) P RESET
Use (•) RETURN© Exit I®
........................
.........
..
...............
2 Press the joystick up or down to select
PROG PALETTE and click the joystick.
Ira STANDARD
j WV10VI6
I0SPORTS
I (D NEWS
• 0GAME
He ^
Use ti) RETURNeExits®
Select the item you want.
For example:
(1) To select MOVIE, press the joystick up or down
to move the cursor to MOVIE.
mSTANDARD
ra MOVIE
[%3PORTS
P NEWS
G GAME
B D
Use (f) RETURN© Exit S®
(2) Click the joystick.
3 Press the joystick up or down to select
MODE and click the joystick.
pi ■ MODE ra STANDARD
«
• ■■
L*.
‘(-Ì
iggfi
«MOVIE
mSPORTS
QNEWS
□ GAME
Use (+) RETURN© Exit ffil
Press the joystick up or down to select the
item you want to adjust and click the
joystick.
|r|! MODE : MOVIE
|[•^ICTURE mam
|PHUE "'I
uo COLOR m^m
!1P BRIGHT
iQ SHARP ■■■
leTRINITONE : HIGH
iONRrOFF
E3 DYNAMIC PICTURE ; OFF
i|E3 COLOR CORRECTION; OFF
10 Z) 0 RESET
Use (f) RETURN© Exit
5 Adjust the picture according to the steps 3
to 5 in "Adjusting the picture" on page 23.
To restore the factory setting
While the VIDEO menu is displayed, press the joystick
up, down, right or left to select RESET and click the
joystick.
Operations
29
-EN
Page 30

Using the INPUT/
OUTPUT menu
To select MONITOR OUT:
(1) Make sure the cursor is beside MONITOR OUT
and click the joystick.
(2) Press TV/VIDEO to select the input to the
projection TV and click the joystick.
Selecting an output signal (INPUT/
OUTPUT)
You can select an output signal from the SELECT OUT
jacks at the rear of the projection TV.
•MENU
-Joystick
TVA/IDEO
yj
IP]
^ VCR
D :
!£!Lin VIDEO LABEL □ 10
ij Use i RETURN© Exit (VFtj]
VIDEO 2 OUT
jyOJT ^
-----
--------
To select EDIT OUT:
(1) Press the joystick up or down to select EDIT
OUT and click the joystick.
(2) Press the joystick up or down to select the input
to be edited and click the joystick.
To select TV OUT:
(1) Press the joystick up or dov/n to select TV OUT
and click the joystick.
"Set up using only VIDEOl input?" appears.
Z Press the joystick up or down to select
INPUT/OUTPUT and click thè joystick.
VIDEO LABEL D D
] Use (+1 RETURN© Exit
3 Select MONITOR OUT, EDIT OUT or TV OUT.
Select To
MONITOR OUT Output the signal of the picture
displayed on the projection TV screen.
Use this option to edit tapes while
monitoring.
EDIT OUT Output the signal input to the
projection TV regardless of the
displayed picture on the screen.
Use this option to edit tapes while
watching an input image different
from that being recorder"!.
TV OUT Output the TV signal.
Use this option when you connect an
AV receiver to the VIDEO 1 IN jacks.
OUT
Set up using
only VIDEOl
input?
BJYES
[%NO
Use (*) RETURN© Exit®
tl
(2) If you connect only an AV receiver to your
projection TV, press the joystick up or down to
select YES. Then click the joystick. You can
always select the signal from the receiver by
pressing TV /VIDEO once.
If you connect your audio/video equipment to
the projection TV, select NO. You can select any
of the VIDEO 1 to VIDEO 5 inputs with the TV/
VIDEO button.
Notes
• When you set INPUT/OUTPUT to TV OUT, you cannot swap
the main/right and window/left pictures.
• The SELECT OUT signal is only available when the projection
TV is on.
30
■EN
Operations
Page 31

Setting video labels (VIDEO LABEL)
This feature allows you to label each input mode so
that you can easily identify the connected equipment.
For example, you can label VIDEO 2 IN as VHS.
1 Press MENU.
2 Press the joystick up or down to select
INPUT/OUTPUT and click the joystick.
3 Press the joystick up, down, right or left to
select VIDEO LABEL and click the joystick.
[Ml
vffleol
VIDEO
1
VIDEO 3. fimm
rrn 1
VIDEO 4 1 BETA ;
VIDEO si
=■9
1
VIDEO LABEL
Use It) RETURN® Exit
Press the joystick up or down to select the
input mode you want to label and click the
joystick.
VIDEO 1 1
R VIDFOI
„ Hi-8
VMS !
DRR 1
Using the TIMER
menu
Setting the clock (CURRENT TIME)
Setting the clock enables you to check the time, turn the
projection TV on and off with the timer, or to block a
TV channel from being watched at a certain time.
CD CD CD
© © ©
© © ©
@ © ©
o ® O
VIDEO 1
QiasE
VIDEO 3
VIDEO 4
VIDEO S
[=■9 S VIDEO,
b^B VIDEO LABEL
Use (j) RETURN® Exit SE3
VHS £
8mm ”
BETA
LD
Hi-R
AVFiCEWFR
____DSS
5 Press the joystick up or down to select the
label and click the joystick.
B7D
VIDEO LABEL
Use (*) RETURN® Exit ES
Repeat steps 4 and 5 to label other input
modes.
Note
• If more than 90 seconds elapse after you press a button, the
menu disappears automatically.
DSS
1 Press MENU.
2 Press the joystick up or down to select
TIMER and click the joystick.
,____affl CURRENT TIME
SUN
Use (♦) RETURN® Exit e
3 Make sure the cursor (W) is beside CURRENT
TIME, and click the joystick.
If the cursor is not beside CURRENT TIME, press
the joystick up or down to move the cursor.
m DS TIME ; NO
W3UN • - AM
Use (!l RETURN® E»t BBl
(continued)
Operations 31'^*^
Page 32

4 Set the current time.
(1) Press the joystick up or down to select time
display and click the joystick. The item to be set
is highlighted.
CURRENT TIME
Set the day,
Useti) RETURN0E«1®)
Choose
YES
To
Set for daylight saving start (set after the first
Sunday in April).
Current time automatically moves one hour
ahead.
NO
Set for daylight saving end (set after the last
Sunday in October).
NONE
Set if your area does not use daylight saving
time.
____
(2) Press the joystick up or down to set the day and
click the joystick.
(3) Set the hour and minute in the same way as in
step (2). When you click the joystick after
setting the minute, the clock starts.
CURRENT TIME
□ DS TIME : YES
niMON 1:15 PM
□ RESET
Set the day.
Use (}) RETURN® Exit
5 Press the Joystick up or down to select DS
(Daylight Saving) TIME, and click the
joystick.
To correct the time
While the CURRENT TIME menu is displayed, press
the joystick up, down, right or left to select RESET, and
then click the joystick.
To display the current time on the projection
TV screen
Press DISPLAY.
Notes
• If you unplug the projection TV or a power interruption
occurs, the clock setting will be erased. Reset the current time.
• If you connect a VCR using an RF cable, the projection TV may
not set up the correct current time information.
¡Ml CURRENT riME
9 HDS TIME:
^ DMON 1:2
H □
Press the joystick up or down to select YES,
NO or NONE and click the joystick.
fn DS TIME : YES
»MON 1:2S PM
O Z) E] RESET
■EN
32
Operations
E3YES
□NO
»(ONE
Use RETURN® Exit 6
Use $ RETURN® Exit SEID
Page 33

Setting your daylight saving time (DS
TIME)
Make sure to set the clock before setting daylight
saving time.
1 Press MENU.
2 Press the joystick up or down to select
TIMER and click the joystick.
3 Press the joystick up or down to select DS
TIME and click the joystick.
■ OS TIME □YES
raNO
[%^CNE
SUN 12:00 AM
Use (}) RETURN 0 Exit 5
Setting the timer to turn the
projection TV on and off (ON/OFF
TIMER)
You can set the projection TV to turn on and off at the
time you specify. Make sure the clock is set correctly.
If it is not, set the clock first (page 31).
-MENU
-Joystick
4 Press the joystick up or down to select YES,
NO or NONE and click the joystick.
I □ CURRENT TIME
^RIDS TIME: YES
t%TIME ZONE : EASTERN
QON/OFF TIMER
□ CHANNEL BLOCK
i
‘ E3Z)
SUN 12:00 AM
Use (j) RETURN e Exit Ei51
Choose To
YES Set for daylight saving start (set after the first
Sunday in April).
Current time automatically moves one hour
ahead.
NO Set for daylight saving end (set after the last
Sunday in October).
NONE Set if your area does not use daylight saving
time.
2 Press the joystick up or down to select
TIMER and click the joystick.
3 Press the joystick up or down to select ON/
OFF TIMER and click the joystick.
t
iai EVERY SUN-SAT SRESET
% 12:00 AM Oh CHO
12<M 6 6 12*M
E3 2 EVERY SUN-SAT BRESET
12:00AM Oh CHO
............
Select a program.
Use 4* return® Exit
4 Enter the ON/OFF TIMER setting.
(1) Press the joystick up or down to select program
1 or 2 and click the joystick.
(2) Press the joystick up or down to set the day(s)
and click the joystick. Each time you press the
joystick up or down, the days cycle as shown
below.
EVERY SUN-SAT-^EVERY MON-FRI->
SUNDAY-f...-»SATURDAY—»-EVERY
SUNDAY-^...->EVERY SATURDAY
levsw MONOAy'
^□2EVERY SUN-SAT DRESET
12:00AM Oh CHO
12w 6 12m 6
¡□O
..................
Set Oie time.
Use (t) RETURN® Exit gl
(continued)
Operations
Page 34

(3) Press the joystick up or down to set the time
(hour then minute) that you want to turn on the
projection TV and dick the joystick.
Blocking out a channel (CHANNEL
BLOCK)
The
i
indicator appears indicating the turn-on
time.
ON/OFF TIMER
imil
viwo
TIb EVERY MONDAY
1:05 PM 03 CHO
12»« 6 I2p« 6 12»'.'
SUN-SAT IMRESET
Set the du:'cition
dsr- RETURNCd Ex'
(4) Press the joystick up or down to set the time
duration and click the joystick.
Each time you click the joystick, the time
duration increases by one hour up to a
maximum of six hours. The bar indicator shows
how long the projection TV is on.
&D2EVERY SUN-SAT GRESET
12:00 AM Oh CH 0
in :d
Select the channel.
Use i RETURN® Exit @0
(5) Press the joystick up or down to select the
channel and click the joystick.
ffl 1 EVERY MONDAY DRESET
% 1:05 PM 4h CH 23
12a« 6 6 12*M
□ 2EVERY Sun-sat oreset
12:00 AM Oh CH 0
12»« 6 12pm 6 I2MI
...........
Select a program.
UseRETURN® Exit
This feature allows vou to prevent children from
w'atching unsuitable programs. Make sure the clock is
set correctly. If it is not, set the clock first (page 31).
CD CD
© © @
© © ©
© © ©
0_(^0
ce----©
f+), /C^F|©i
-MENU
-Joystick
©
Press MENU.
2 Press the joystick up or down to select
TIMER and click the joystick.
3 Press the joystick up or down to select
CHANNEL BLOCK and click the joystick.
CHANNEL BLOCK
ffll EVERY SUN-SAT @ RESET
% 12:00 AM Oh CH 0
_*0 2EVERY SUN-SAT E3RESET
ISI 12:00 AM Oh CHO
Select a program.
Use RETURN® Exit®
4 Enter a CHANNEL BLOCK setting.
(1) Press the joystick up or down to select program
1 or 2 and click the joystick.
The TIMER indicator on the projection TV lights.
5 To set another program, click the joystick
and repeat step 4.
One minute before the projection TV turns off, a
message "TV will turn off." is displayed on the screen.
To cancel the timer
While the ON/OFF TIMER is displayed, press the
joystick right or left to select RESET besides the
program to be reset. Then click the joystick.
Note
• If you unplug the projection TV or a power interruption occurs,
ON/OFF TIMER settings will be erased. Reset the current
time, then set the timer.
34
■EN
Operations
(2) Press the joystick up or down to set the day(s)
and click the joystick. Each time you press the
joystick up or down, the days cycle as shown
below.
EVERY SUN-SAT-*-EVERY MON-FRI-*
SUNDA Y—».. .—»SATURDAY—»EVERY
SUNDAY-»...-»EVERY SATURDAY
Set the time.
Use t*; RETURN® Exrt®)
Page 35

(3) Press the joystick up or down to set the time
(hour then minute) that you want to start
blocking the channel and click the joystick.
The i indicator appears indicating the time to
start blocking.
—
{US
CHANNEL BLOCK 1
/
' ■ EVERY MONDAY
AUCHO
m
':.]2EVERY SUN-SAT PRESET
E
1 0
■d Z)
[sgrup
Set the duration.
Use (;i RETURN® Exit imal
10:00 PM Ea CHO
I2w 6 12«
12:00 AM Oh CH 0
I2*v € 12cM 6 I2w
(4) Press the joystick up or down to select the time
duration you want to block and click the
joystick.
Each time you click the joystick, the time
duration increases by one hour up to a
maximum of 12 hours. The bar indicator shows
how long the projection TV is blocked out.
CHANNEL BLOCK
■ EVERY MONDAY_
i 50:00 PM “
□ 2 EVERY SUN-SAT DRESET
12:00 AM Oh CH 0
12w 6 '2'v 6 t2*ii'
...........
Select the channel.
Use (j) RETURN® Exild®
(5) Press the joystick up or down to select the
channel and click the joystick.
CHANNEL BLOCK
RI1 EVERY SUN-SAT SRESET
• 10:00 PM 2h CH23
0 2 EVERY SUN-SAT E3RESET
12:00 AM Oh CH 0
I2w_..6 _ 12PU 6 12au
0 z)
.................
Select a program-
use*:?-RETURN® Exit ®
5 To set another program, click the joystick
and repeat step 4.
If you select the blocked channel during the time you
set, the message "BLOCKED" appears and the picture
is blocked and the sound is muted.
Using the SET UP
menu
Customizing the channel names (CH
CAPTION/LOGO)
You can add a caption to up to 20 channels. This
feature allows you to easily identify which channel you
are watching. You can choose a broadcaster's logo
(LOGO) or make your own four-letter caption
(CAPTION).
CD CD CD
© © ©
© © ©
-0-9 buttons
© © ©
©JO
-MENU
- Joystick
e
1 Press MENU.
2 Press the Joystick up or down to select SET
UP and click the joystick.
3 Press the joystick up or down to select CH
CAPTION/LOGO and click the joystick.
t
tiiyoeo'siBiwwN assaw»
rnUA
DSSPrt □«OT □ »•
neNBc apg □—oDCa
o i-Y
□ S DCa DHee □ 0
□ «>
□ ovc
□ !S
U CM !
Use 0 - 9 to select
the channel. Then select
the LOGO or CAPTION.
□
Use-2-RETURN ©Exit IS
23
To cancel a CHANNEL BLOCK setting
While the CHANNEL BLOCK menu is displayed, press
the joystick right or left to select RESET besides the
program to be reset. Then dick the joystick.
Note'
• If the CHANNEL BLOCK and ON/OLF TIMER settings are
ov'erlapped, the later time setting has priority over the earlier
setting.
4 Press the 0-9 buttons to select the channel
that you want to caption.
© © ©
0 0 0
© © d
___
ENTE..
© o
iBLOGOaCAPnON OZ>Qi«SEr
OcSPr, □•or O ili
□ jttt neNBc asya f □
G f> □ e no □ HBe □ 0
IS Dovc □•-=-~fDca dq
□ □ □
Use 0 - 9 to select
the channel. Then select
the LOGO or CAPTION.
Use-2-RETURN® Exit ®
(continued)
Operations 35'^^
Page 36

5 Select LOGO or CAPTION.
To select LOGO:
(1) Make sure that the cursor is beside LOGO, and
click the joystick.
CH CAPTION/LOGO
LOGO □ CAPTION □ Z:- n RESET
aESfn □■¡.'.'-■s D*QT □ i*i
T ®
nCNBC DiSJ
□ @ □ □ □ HB® □ @
a f>
D m
□ pvc □ Ci □ O
□ OM □ □
Use 0 - 9 to select
the channel
Then select the LOGO. __
Use -:t; RETURN ® Exit ikwl
(2) Press the joystick in any of eight directions to
select the broadcaster's logo and click the
joystick.
(4) Repeat steps (2j and lo sensi ihl- leiu
letters.
23
l.j LOGO ■ CAPTION ;J .0 C RESET
OA DB DC DD DE OF DG DH
nl i.:ij □KGLCMDNOOnP
DC OR DS OT PU trV OW OX
19
D Y O Z □& D / G - □ 1 □2
□ 3 0 4 05 D6 0 7 a a as a _
Use 0 - 9 to select
the Channel.
Select the 4th letter.
Use-“RETURNe Ex<(
MTV-
If you select fewer than three letters, move the
cursor (k ) to after entering the letters, and
click the joystick.
Repeat steps 4 and 5 to caption other
channels.
i.':t<r«ua»«icTa
ea
Bl 1030 D'CAPTiON. O IS □ RESET
z%tl CaSEn D«a^ □ III
Gits rtfefiK GS) c—=GC3
G □ S GO □ MB© G 0
□ !3 novc G*«~'~iDC3i l: Q
G QM :i U G o
Use 0 - 9 to select
the channel Then select
the LOGO or CAPTION.
Use-3-RETURN© Exit (S
To select CAPTION
(1) Press the joystick right or left to select
CAPTION and click the joystick.
CH CAPTION/LOGO
□ LOGO ■ CAPTION □ IG □ RESET
BA OB DC OD OE Dp DG DH
QOdR DS DT DU DV DW DX
□ YOZ0&D / O' O0O1 D2
03 04 Q5 D6 07 DS D9 D_
Use 0 - 9 to select
the channel.
Select the 1st letter.
BJ DK DL DM ON DO DP
Use iif RETURN © Exit ®
(2) Press the joystick in any of eight directions to
select the first letter.
□ LOGO ■ CAPTION ODD RESET
OA DB 0C 0D EE Dp OG QH
El 0JDKOLTMSN0O0P
□qqrosdt^jdv ow ex
□ YBZO&D / Q - Q0O1 D2
03 04 QS 06 07 D8 09 □_
Use 0 - 9 to select
the channel.
Select the 1st letter.
Use RETURN © Exit IS
G«9
19
To erase a caption
While the CH CAPTION/LOGO menu is displayed,
press the joystick in any of eight directions to select
RESET, then dick the joystick.
Notes
• If the CH CAPTION/LOGO menu appears in grey, the
projection TV is set to a video input, and you cannot select CH
CAPTION/LOGO. Press TV /VIDEO so that a channel
number appears.
19
• If more than 90 seconds elapse after you press a button, the
menu disappears automatically.
• The CH CAPTION/LOGO feature is also available for the
AUX input.
• If you move the cursor to the blank spaces at the bottom of the
CH CAPTION/LOGO menu when you are selecting a logo,
you cannot select any logo.
19
(3) Click the joystick.
-EN
36
Operations
CH CAPTION/LOGO
□ LOGO ■ CAPTION □ Z) □ RESET
DA DB DC EDDE DP DQSH
OI EJDKQLffMONDODP
SO 0R S3 DT DV DW DX
OYDZO&D / O' Q0B1 02
Q3 04 eS 06 07 08 09 Q.
Use 0 - 9 10 select
(he channel.
Select the 2st letter.
Use-if RETURN ©Exit IS
M-
19
Page 37

Setting your favorite channels
(FAVORITE CHANNEL)
This feature allows you to select your favorite channels
(up to eight channels) easily while displaying them on
the screen at the same time.
6 Repeat steps 4 and 5 to set other favorite
channels.
Note
• If you set TV INPUT to an)- option other than OFF, you cannot
use the FAVORITE CHANNEL feature.
O CD o
© © ©
® © ©
© © ®
Q ® O
-MENU
-Joystick
Press MENU.
©
W
<s-
r©i
©
2 Press the joystick up or down to select SET
UP and click the Joystick.
3 Press the joystick up or down to select
FAVORITE CHANNEL and click the joystick.
IW
OmE CHAN
l]^;3
ct a position
Press the joystick in any of eight directions
to select the position in the FAVORITE
CHANNEL screen, then click the joystick.
The current channel is displayed in the selected
position.
>RfTE
mm
ct
Selecting a favorite channel
After you set your favorite channels, you can select a
channel you want while displaying all your favorite
channels on the projection TV screen at the same time.
1 Click the joystick.
Eight window pictures of your favorite channels
appear on the screen with the full-motion picture of
the currently selected channel in the center.
23
8
r
jg)
2 Press the joystick to move the cursor to the
2
NEL
M«
channel you want to watch.
The joystick of the remote commander lets you
select any picture with a press.
8
J
ill''
»J
1
A.
2
m.
3 Click the joystick.
The picture of the selected channel is displayed on
the screen.
23
5 Press the joystick up or down to select the
desired channel and click the joystick.
The new channel is stored in the FAVORITE
CHANNEL screen in the selected position.
23
b
rmv
>pm CHAf
NEL
□ ID
- ct'-a'posjtidi
•^eETUHN®B*®
Operations
37
■EN
Page 38

Selecting a VCR input directly (DIRECT
PLAY)
Customizing the pointer (CUSTOMIZED
POINTER)
The DIRECT PLAY feature allows you to switch from
TV input to VCR input mode by pressing the ►
(playback) button on the supplied remote commander.
For example, connect your VCR to the VIDEO 1 IN
jacks and set the VTRl 2 3 MDP selector located
beneath the lid of the remote commander to VTR2.
After completing the procedure below, the input mode
is switched to the VCR connected to the VIDEO 1 IN
jacks when you press the ► button.
1 Press MENU.
2 Press the joystick up or down to select SET
UP, and click the joystick.
3 Press the joystick up or down to select
DIRECT PLAY and click the joystick.
in VIDEO! : OFF
!%VIDE02 : OFF
O VIDEOS : OFF
D V1DE04; OFF
D VIDEOS ; OFF
□ Z)
Use (t) RETURN e Exit
You can choose the desired cursor (pointer) from
among eight different designs and/or colors.
1 Press MENU.
2 Press the joystick up or down to select SET
UP and click the joystick.
3 Press the joystick up or down to select
CUSTOMIZED POINTER and click the joystick.
□ CHANNEL ERASE/ADD
□ CHANNEL CAPTION/LOGO
□ FAVORITE CHANNEL
□ CONVERGENCE
□ DIRECT PLAY
□ TV INPUT , OFF
□ CABLE:ON
□ AUTO PROGRAM
n CUSTOMIZED POINTER
[^LANGUAGE : ENGLISH
DZ)
Use(:> RETURN© Exit
Press the joystick in any of eight directions
to select the desired cursor and click the
joystick.
Press the joystick up or down to select the
input to which the video equipment is
connected and click th& joystick.
DIRECT =LAY 1
(W
■ VIDEO! :□OFF
□
VTRl
1
!
R1VTR2
!
%/TR3 1
□
MDP
VTRl
!
» 3 MOP
Use
(j)
RETURN© Exit
! ’
' ' ’:)
S'
|
TM-
H
5 Press the joystick up or down to select the
position of the VTR1 2 3 MDP selector and
click the joystick.
n VI0E01 : VTR 2
;%VIDE02 : OFF
□ VIDEOS; OFF
. SVIDE04:0FF
■ O VIDEOS ; OFF
: OZ!
r~n~
Use (f) RETURN© Exit ®
38
EN
Operations
Page 39

Displaying Caption
Vision/XDS
(CAPTION VISION/XDS)
Some programs are broadcast with Caption Vision. To
display Caption Vision, select either CCl, CC2, CC3,
CC4, TEXTl, TEXT2, TEXTS or TEXT4 from the menu.
CCl, CC2, CCS or CC4 shows you a caption, that is a
printed version of the dialog or sound effects of a
program. (The mode should be set to CCl for most
programs.) TEXTl, TEXT2, TEXTS or TEXT4 shows you
text, that is information presented using either half or
the whole screen. It is not usually related to the
program.
3 Press the joystick up or down to select the
caption type and click the joystick.
The selected caption type is colored green.
□ ^:Si 1
d ^ 2
w
itoio
□ 3
n CQ 4
fcTEXn
£fTEXT2
mTEXTS
E3TEKT4
□ r.j
Use (j) RETURN® Exit g®
To turn off the caption, text or XDS
Press DISPLAY on the remote commander until
"DISPLAY OFF" appears on the screen. Each time you
press DISPLAY, the display changes as follows:
on-screen information —XDS —► Caption Vision or Text
^
-------------
"DISPLAY OFF" turns off after three seconds.
DISPLAY OFF
--------------
—I
Some programs are broadcast with XDS (Extended
Data Service) which shows a network name, program
name, program length, call letters and time of the
show. When you select XDS with the DISPLAY button,
this information will be displayed on the screen if the
broadcaster offers this service.
-MENU
-Joystick
1
2
Press the joystick up or down to select
and click the joystick.
Notes
• Poor reception of TV programs can cause errors in Caption
Vision and XDS.
• Captions may appear with a white box or other errors instead
of a certain word.
• Caption Vision and the channel display cannot be used at the
same time.
Use<|) RETURN® Exit i
Operations
39
-EN
Page 40

Operating video
equipment
You can program the supplied remote commander to
operate video equipment that have an infrared remote
sensor. For programming, set the manufacturer's code
number. You can set the manufacturer's code to each
of four positions of the VTRl 2 3 MDP selector, so that
you can"operate four different pieces of equipment.
Setting the manufacturer's code
The following Sony video equipment is assigned to
each position of the VTRl 2 3 MDP selector at its
factory preset:
VTRl Beta, ED Beta VCRs
VTR2 8 mm VCR
VTR3 VHSVCR
MDP Multi-disc player
t:
VTRl 2 3
MDP selector ■
CODE SET-
Note
• To use another manufacturer's equipment besides a Sony VCR,
set the selector to a position not being used for your Sony VCR.
1 Turn off the equipment you want to set up.
2 Open the lid, then set the VTR1 2 3 MDP
selector to the position you want to set the
code.
QqqqC
CD CD CD
CSO 1 ( о 1 f 1
( i СЮ CeD co~i r+~i
-SiCD-o CDCE3
CD О CD
© © ©
® © ©
© © ©
©I©
(with the lid open)
VTRl 2 3MDP
o o o o
- 0-9 buttons
-ENTER
S
Press CODE SET, then press 0 - 9 to enter
the manufacturer's code number (see the
chart below) and press ENTER. For
example, to operate a Sony 8 mm VCR,
press CODE SET, 3, 0, 2 and ENTER.
CODE SET
ENTER
VCR manufacturer code numbers
Manufacturer Code number
Sony
Aiwa
.Audio Dynamic
Bell & Howell (M. Wards) 330, 343
Brocsonic
Canon
Citizen 332
Craig 315, 302, 332
Curtis Mathis
Daewoo
DBX 314, 336, 337
Dimensia 304
Emerson 319, 320, 316, 317, 318
Fisher
Funai 338
General Electric 329, 304, 309
Goldstar
Hitachi 306, 304, 305
Instant Replay
JC Penny
JVC 314, 336, 337
Kenwood 314, 336, 332, 337
FXI (Sears) 332, 305, 333, 334, 330,
Magnavox
Marantz 314,336, 337
Marta
Memorex
Minolta 305, 304
Mitsubishi/MGA
Multitech 325, 338, 321
NEC
Olympic
Panasonic 308, 309, 306, 307
Pentax 305, 304
Philco
Philips
Pioneer 308
Quasar 308,309
RCA/PROSCAN 304, 305, 308, 309, 310,
301, 302, 303
338
314, 337
319
309, 308
304, 338, 309
341, 312, 309
330,334,335, 333
332
309, 308
309, 305,304, 330,314,
336,337
335
310, 308, 309
332
309, 335
323, 324, 325, 326
314, 336, 337
309, 308
308, 309
310, 308,309
311,312, 313
40
•EN
CD
(continued)
Operations
Page 41

VCR manufacturer code numbers
Manufacturer Code number
Realistic
Sansui
Singer 315
Samsung
Sanyo
Scott
Sharp
Shintom
Signature 2000 (M, Wards)
Sylvania 310, 308, 309, 338
Symphonic
Tashiro
Tatung
Teac
Technics
Toshiba
Wards
Yamaha
Zenith 331
309, 330, 328, 335, 324,
338
314
322, 313, 321
330, 335
312, 313, 321, 335, 323,
324, 325, 326
327, 328
315
338, 327
338
332
314, 336, 337
314, 336, 338, 337
309, 308
312, 311
327, 328, 335, 331, 332
330, 314, 336, 337
Operating video equipment
(with the lid open)
Set the VTR1 2 3 MDP selector to the
position you set for the video equipment.
VTR1 2 3 MDP
O O O Q
Use the video operating buttons on the
remote commander to operate the video
equipment.
Video operating
buttons
MDP manufacturer code numbers
Manufacturer
Sony 701
Kenwood
Magnavox
Maranz
Mitsubishi 702
Panasonic
Philips
Pioneer 702
RCA
Sanyo
Sharp 705
Yamaha 703
Code number
707
703
702
704
703
702
706
Notes
• If more than one code number is listed, try entering them one
by one, until you come to the correct code for your equipment.
• In some rare cases, you may not be able to operate your nonSony video equipment with this remote commander. This is
because your equipment may use a code that is not provided
with this remote commander. In this case, please use the
equipment's own remote control unit or use the learning
function (page 43).
• The code numbers for Sony equipment are assigned at the
factory as follows:
VHS VCR
8 mm VCR
Beta, ED Beta VCRs
Multi-disc player
301
302
303
701
Caution
• Whenever you remove the batteries — to replace them, for
example — if too much time is taken, the code numbers revert
to the factory settings and must be reset.
Operating a VCR Buttons on the remote
To turn on or off
To change channels
To record
To play
To stop
To fast forward
To rewind the tape
To pause
To search the picture
forward or backward
To change input mode Press TV/VTR
To eject a cassette
Operating a multi
disc player
To turn on or off
To play Press ►To stop Press ■
To pause Press II
To search the picture
forward or backward
To search the chapter
forward and backward
To eject a disc
commander
Press POWER
Press CH +/Press C and REC simultaneously
Press ►-
Press ■
Press ►►
Press
Press II
To resume normal playback, press again.
Press ►► or during playback
To resume normal playback, release the
button.
Press ± (Used only with Sony brand
products)
Buttons on the remote
commander
Press POWER
To resume normal playback, press again.
Keep pressing ►► or ◄◄ during playback
To resume normal playback, release the
button.
Press CH +/-
Press ^ (Used only with Sony brand
products)
Note
• If the video equipment does not have a certain function, the
corresponding button on this remote commander will not
operate.
Operations
4^-EN
Page 42

Operating a cable
box or DSS receiver
You can program the supplied remote commander to
operate a cable box or DSS receiver. Follow the
procedures below to set the manufacturer's code
number to operate it.
-DSS POWER
-DSS FUNCTION
-TV FUNCTION
-0-9 buttons
-ENTER
-CH -t/-
1 Turn off the equipment you want to set up
and press FUNCTION of the equipment you
want to set up (CABLE or DSS).
- FUNCTION-
CABLE DSS
CD CD
b
2 Press CODE SET, then press 0 - 9 to enter
the manufacturer's code number (see the
chart below) and press ENTER. For
example, to program your remote
commander to operate a Zenith cable box,
press CODE SET, 2, 1, 2 and ENTER.
CODE SET
ENTER
3 Press CABLE POWER to turn on a cable box
or DSS POWER when you use a DSS receiver.
POWER
DSSCABLE
O CD
4 Use the pojection TV control buttons to
check if your code number works.
For example, to operate a cable box, vou can use the
CABLE POWER, JUMP, CH +/-, 0-9 and ENTER
buttons.
To operate a DSS receiver, you can use the DSS
POWER, JUMP, DISPLAY, MENU and 0-9 buttons,
and the joystick.
To operate the projection TV
Press TV FUNCTION. Then use the projection TV
control buttons to control the projection TV.
For more details on operating the cable box or
DSS receiver
Refer to the operating instructions that come with the
equipment.
If the remote commander doesn't work
• First, try repeating the setup procedures using the other codes
listed for your equipment.
• If — after trying all the codes listed for your equipment — you still
cannot get the remote commander to work properly, try the
learning function described on page 43.
Manufacturer code numbers (cable box)
Manufacturer Code number
Hamlin/Regal
Jerrold/G. I.
Oak
Panasonic
Pioneer
Scientific Atlanta
Tocom
Zenith
Manufacturer code numbers (DSS receiver)
Manufacturer Code number
Sony
RCA
Notes
• If more than one code number is listed, try entering them one by
one until you come to the correct code for your equipment.
• If you enter a new code number, the code number you previously
entered at that setting is erased.
• In some rare cases, your equipment may use a code that is not
provdded with this remote commander and you may not be able to
operate your equipment with the supplied remote commander. In
this case, use the equipment's own remote control unit or use the
learning function (page 43).
• Whenever you remove the batteries — to replace them, for
example — if too much time is taken, the code numbers revert to
the factory settings and must be reset.
222, 223, 224, 225, 226
201, 202, 203, 204, 205, 206,207,208,
218
227, 228, 229
219, 220, 221
214,215
209,210, 211
216,217
212,213
801
802
42
-EN
Page 43

Operating a cable
box or DSS receiver
You can program the supplied remote commander to
operate a cable box or DSS receiver. Follow the
procedures below to set the manufacturer's code
number to operate it.
CABLE POWER ■
CABLE FUNCTION
axD ^ q6~cç)
CêD ŒD Ci
CODE SET
CD C3D QD Œ) (S
0-0 O O
O CD Q
© © @
© © ©.
© © ®
(with the lid open)
1 Turn off the equipment you want to set up
and press FUNCTION of the equipment you
want to set up (CABLE or DSS).
----
FUNCTION-
CABLE DSS
CD CD
DSS POWER
-DSS FUNCTION
-TV FUNCTION
-0-9 buttons
-ENTER
-CH
3 Press CABLE POWER to turn on a cable box
or DSS POWER when you use a DSS receiver.
----- POWER
CABLE DSS
-------
-
CD O
c
4 Use the pojection TV control buttons to
check if your code number works.
For example, to operate a cable box, you can use the
CABLE POWER, JUMP, CH +/-, 0-9 and ENTER
buttons.
To operate a DSS receiver, you can use the DSS
POWER, JUMP, DISPLAY, MENU and 0-9 buttons,
and the joystick.
To operate the projection TV
Press TV FUNCTION. Then use the projection TV
control buttons to control the projection TV.
For more details on operating the cable box or
DSS receiver
Refer to the operating instructions that come with the
equipment.
If the remote commander doesn't work
• First, try repeating the setup procedures using the other codes
listed for your equipment.
• If — after trying all the codes listed for your equipment — you still
cannot get the remote commander to work properly, try the
teaming function described on page 43.
Manufacturer code numbers (cable box)
Manufacturer Code number
Hamlin/Regal
Jerrold/G. 1. 201, 202, 203, 204, 205, 206, 207, 208,
Oak 227, 228, 229
Panasonic
Pioneer 214,215
Scientific Atlanta
Tocom 216,217
Zenith
Manufacturer code numbers (DSS receiver)
222, 223, 224, 225, 226
218
219, 220, 221
209, 210, 211
212,213
2 Press CODE SET, then press 0 - 9 to enter
the manufacturer's code number (see the
chart below) and press ENTER. For
example, to program your remote
comrnander to operate a Zenith cable box,
press CODE SET, 2, 1, 2 and ENTER.
ENTER
Manufacturer Code number
Sony
RCA
801
802
Notes
• If more than one code number is listed, try entering them one by
one until you come to the correct code for your equipment.
• If you enter a new code number, the code number you previously
entered at that setting is erased.
• In some rare cases, vour equipment may use a code that is not
provided with this remote commander and you may not be able to
operate your equipment with the supplied remote commander. In
this case, use the equipment's own remote control unit or use the
learning function (page 43).
• Whenever you remove the batteries — to replace them, for
example — if too much time is taken, the code numbers revert to
the factory settings and must be reset.
Page 44

Operating nonpreprogrammed
equipment —
^ Press and release the button on the
supplied remote commander that will learn
the function.
The LEARN indicator flashes off and then on again,
indicating that the remote commander is ready to
learn.
Learning function
You can program the supplied remote commander to
learn the functions of another remote commander. Use
this function to operate equipment whose
manufacturer's code is not preprogrammed, such as
Sony or other manufacturers' audio equipment or other
eqi+ipment whose manufacturer's code is not listed on
pages 40-42.
VIRI 2 3 MDP
selector
■ LEARN indicator
■LEARN
(with the lid open)
1 Set the VTR1 2 3 MDP selector to VTR3 or
MDP.
VTR1 2 3MDP
o o o o
CE»
5 Hold down the corresponding button on
the other remote commander and release
the button when the LEARN indicator
flashes off then on again-
When the LEARN indicator flashes off and then on
again, this indicates that learning is complete. If
not, repeat steps 4 and 5.
6 Repeat steps 4 and 5 to learn other
functions.
7 Press LEARN.
The LEARN indicator goes off, indicating that
learning is complete.
Notes
• The LEARNING function does not work in VTRl or VTR2
setting.
• Do not move the remote commanders during learning.
• If you press a button of the supplied remote commander that
cannot be used for learning in learning mode, the LEARN
indicator flashes four times.
• If the other remote commander's signal cannot be learned, the
LEARN indicator flashes four times.
• To clear all learned signals from memory, set the VTRl 2 3
MDP selector to MDP, press LEARN, then press TV POWER
while holding down VOL -. Then press LEARN again.
Place the supplied remote commander and
the other equipment's remote commander
directly facing each other, approximately
5 cm (2 inches) apart.
3 Press and release the LEARN button.
Tl\e LEARN indicator lights up.
LEARN
o
Caution
• Whenever you remove the batteries — to replace them, for
example — if too much time is taken, the code numbers revert
to the factory settings and must be reset.
Operations
43
-EN
Page 45

After trying tlie methods below, if the problem persists,
contact your nearest Sony dealer.
No picture (screen not lit), no sound
__^Make sure the power cord is connected
securely.
^Check to see if the TV/VIDEO setting is
correct: when watching TV, set to TV, and
when watching video tapes, set to VIDEO,
(pages 19, 20)
“►Before you use the projection TV, cable box
or DSS receiver, make sure to press the
corresponding FUNCTION button on the
remote commander, (pages 19, 42)
^Try another channel. It could be station
trouble.
Dotted lines or stripes
■►•Adjust the antenna.
^Move the projection TV away from noise
sources such as cars, neon signs, and hair
dryers.
Double images or ghosts
^Use a highly directional outdoor antenna
or a cable (when the problem is caused by
reflections from nearby mountains or tall
buildings.)
Cannot operate menu
^If the item you want to choose appears in
grey, you cannot select it. Press TV /VIDEO
correctly.
•►Check the CABLE setting in the SET UP
menu. (page 16)
Cannot receive upper channels (UHF) when
using an antenna
^ Check if CABLE is OFF in the SET UP
menu, (page 16)
^Use AUTO PROGRAM to add receivable
channels that are not presently in the
memory, (page 17)
Poor or no picture (screen lit), good sound
^Adjust PICTURE in the VIDEO menu, (page
23)
^Adjust BRIGHTNESS in the VIDEO menu,
(page 23)
“►Adjust the convergence, (page 16)
“►Check antenna/cable connections, (page 6)
Good picture, no sound
“►Press MUTING so that "MUTING"
disappears from the screen, (page 20)
■^Check the MTS setting in the AUDIO menu,
(page 26)
^Make sure SPEAKER is set to ALL ON or L/
R OFF in the AUDIO menu, (page 27)
No color
►Adjust COLOR in the VIDEO menu, (page
23)
►Confirm that a black and white program is
not being broadcast.
Only snow and noise appear on the screen
^ Check the CABLE setting in the SET UP
menu, (page 16)
^Check the antenna/cable connections,
(page 6)
■►Make sure the channel is broadcasting
programs.
^^-EN Additional Information
Cannot receive any channels when using cable
TV
-►Check if CABLE is ON in the SET UP
menu, (page 16)
^Use AUTO PROGRAM to add receivable
channels that are not presently in the
memory, (pages 17)
Remote commander does not operate
^Battery could be weak. Replace the
battery, (page 13)
■► Make sure the projection TV's power cord
is connected securely to wall outlet.
■►Press TV FUNCTION when operating your
projection TV.
“►Are fluorescent lights too close to the
projection TV? Move lights at least 3-4
feet away from the projection TV.
Page 46

Some of the remote commander's buttons do
not function
^Press the correct FUNCTION button
according to the ecjuipment you operate,
(pages 19, 42)
Cannot gain enough volume when using a
cable box
■^Increase the volume at the cable box. Then
press TV FUNCTION and adjust the
projection TV's volume, (page 42)
The current time resets whenever the
projection TV is turned on
^Connect the projection TV's and the cable
box's AV power cords to separate wall
outlets.
Cannot operate the 0-9 buttons, CH +/-, TV/
VIDEO and ANT/AUX buttons on the remote
commander.
^ Select TV OUT in the INPUT/OUTPUT
menu and enter NO. (page 30)
Additional information
45
-EN
Page 47

Specifications
AUDIO (VAR) OUT (phono
jacks): 760 mVrms (100%
modulation)
AUDIO (FIX) OUT (phono
jacks): 500 mVrms (100%
modulation)
CONTROLS IN/OUT
mini jacks
Speaker
Projection system 3 picture tubes, 3 lenses,
horizontal in-line system
Picture tube 7-inch high-brightness
monochrome tubes (6.3 raster
size), with optical coupling
and liquidcooling system
Projection lenses High performance, large
diameter hybrid lens Fl.O
Screen size (measured diagonally)
KP-53XBR45
KP-61XBR48
Screen brightness
KP-53XBR45 900 cd / m^
KP-61XBR48
Television system
Channel coverage
American TV standard
VHF: 2^13/UHF; 14-69/CATV;
1-125
Antenna
75-ohm external antenna
terminal for VHF/UHF
Inputs/outputs
VIDEO 1/3/4/5 IN andVIDEO 2
INPUT
S VIDEO IN (4-pin mini DIN):
Y; 1 Vp-p, 75-ohms
unbalanced, sync negative
C: 0.286 Vp-p (Burst signal),
75 ohms
VIDEO (phono jack): 1 Vp-p,
75-ohms unbalanced, sync
negative
AUDIO (phono jacks):
500 mVrms (100%
modulation). Impedance: 47
kilohms
SELECT OUT
VIDEO (phono jack): 1 Vp-p,
75 ohms unbalanced, sync
negative
AUDIO (phono jacks):
470 mVrms (100%
modulation). Impedance: 75
kilohms
53 inches
61 inches
700 cd/m^
Front
(Tweeter) (Woofer)
KP-53XBR45 25mm(l") x 2 ]30mm(5") x 2
KP-61XBR48 50mm(2") x 4
160mm(ó ^/m") X
Center Rear
100 nim(4") X 2 75mm(3’‘) x 2
2 100 mm(4") x 2 75mm(3") x 2
Speaker output Front: 20 W x 2
Center: 20 W x 1
Rear: 10 W x2
Power requirement
120 V, 60 Hz
Power consumption
300 w
Standby mode: 4 W
Dimensions (W/H/D) Mass
KP-53XBR45 1,238 X 1,442 X 647 mm 116 kg
(48V4 X 56'/ 8 X 2572 inches) (255 lbs 12 oz)
KP-61XBR48 1,520 x 1,550 x 778 mm 180 kg
(59'/« x 617« X 30^/4 inches) (396 lbs 13 oz)
Supplied accessories
Remote commander RM-Y128 (1)
Size AA (R6) battery (2)
Rear speakers (2)
Speaker cord(2)
Optional accessories
AV rack SU-XBRl
Bottom base for AV rack
SU-61BASE
(For KP-61XBR48 only)
U/V mixer E AC-66
Connecting cables RK-74A,
VMC-810S/820S, YC-15V/30V
Design and specifications are subject to change without
notice.
46
-EN
Additional Information
Page 48

Index
Adjusting
convergence 16
the picture 23
the sound 25
Antenna 6
Auto program 14, 17
Battery 13
Cable box
Cable TV 15
Caption Vision 39
Changing the menu language 17
Channel block 34
Channel Caption 35
Connection
DEMO 14
□□Dolby Pro-Logic 11,27
DSS receiver 9, 42
Erase/add 15
GAME mode 27
Joystick 13
Jump 19
LIVE mode 27
MTS (Multichannel TV Sound) 26
Muting 20
P&P (Picture-and-Picture) 21
PIP (Picture-in-picture) 21
Presetting channels 14,17
PROGRAM PALETTE 29
Remote commander 13
S video 8
SAP (Second Audio Program) 26
Setting
SIMULATED mode 27
Sleep timer 20
STEREO indicator 26
Test tone 28
□□3 STEREO mode 27
42
with a DSS receiver 9
with a VCR 7, 8
with an antenna 6
without a VCR 6
daylight saving time 32, 33
the clock 31
1 liVJhK indiCcUor i4
Twin View''' 21
Video label 31
Watching
TV 19
video tapes 20
XDS 39
Names of controls
■i (channel index) button 22
I (P&P) button 21
Q (PIP) button 21
ANT/AUX button 20
AUDIO button 22
AUDIO L(MONO)/R IN jacks 7-10, 12
AUDIO (FIX) OUT jacks 11
AUDIO (VAR) OUT jacks 11
CENTER SPEAKER IN terminals 11
CH(channel) +/-buttons 15,
CODE SET button 40
CONTROLSjacks 12
DISPLAY button 20, 39
ENTER button 19,40
FREEZE button 22
FUNCTION (CABLE) button 42
FUNCTION (DSS) button 42
FUNCTION (TV) button 19
Joystick 13
JUMP button 19
MENU button 13
MUTING button 20
REAR SPEAKER OUT terminals 15
PIP CH (channel) +/ - buttons 21
PIP OFF button 21
PIP TV/VIDEO button 21
POSITION button 22
POWER (CABLE) button 42
POWER (DSS) button 42
POWER (TV) button 19
S VIDEO input jack 8
SELECT OUT jacks 10,12
SLEEP button 20
SWAP button 22
TV/VIDEO button 14,20
VTR (POWER,CH +/-
REC, TV/VTR) buttons 41
VHF/UITF antenna terminal 6, 7
VIDEO 1/3/4/5 IN jack 7-10
VIDEO 2 INPUT jack 10
VOL (volume) +/-buttons 19
19
Additional Information
47
EN
Page 49

4 ¡Bienvenido!
4 Precauciones
Procedimientos iniciales
5 Paso 1: Instalación del TV de proyección
6 Paso 2: Conexiones
6 Conexión de una antena
6 Conexión de un sistema de antena/TV por cable
sin videograbadora
7 Conexión de un sistema de antena/TV por cable a
una videograbadora
9 Conexión de un receptor DSS®
10 Conexión de una videocámara
10 Conexión de dos videograbadoras para editar
cintas
11 Conexión de un sistema de audio
11 Conexión de un amplificador Dolby Pro Logic
12 Conexión de un receptor AV
12 Conexión de otro equipo Sony con las tomas
CONTROL S
13 Paso 3: Ajuste del control remoto
13 Inserción de las pilas
13 Uso del control remoto'acciofiado por control
universal para utilizar los mentís
14 Paso 4: Ajuste del TV de proyección automáticamente
(AUTO AJUSTES)
15 Borrado o adición de canales
16 Cambio del idioma de menú
16 Ajuste de la convergencia (CONVERGENCIA)
17 Activación o desactivación del sistema de TV por cable
17 Programación de canales
18 Selección del canal de salida del decodificador (TV
INPUT)
Operaciones
Utilización del TV
19
19 Cómo pasar rápidamente de un canal a otro
Cancelación del sonido
20
Visualización de la información en pantalla
20
20
Ajuste del cronodesconectador
Visualización de una imagen de entrada de vídeo
20
Cambio de la entrada VHF/UHF a la entrada AUX
20
Visualización de dos programas al mismo tiempo-PIP/
21
P&P (Twin View™)
21
Visualización de una imagen de ventana (PIP)
Visualización de una imagen izquierda (P&P)
21
Cambio del modo de entrada de la imagen de
21
ventana / izquierda
21 Cambio de los canales de TV de la imagen de
venta na / i zq u i erd a
22 Recepción del sonido de la imagen de ventana/
izquierda
22 Cambio de la posición de la imagen de ventana
22 Cambit' de las imágenes principal/derecha y de
\ entana/izquierda
22 C iongelación de imágenes
22 Visualización de ocho canales de TV
simultáneamente (CH INDEX)
23 Uso del menú VIDEO
23 Ajuste de la imagen (VIDEO)
24 Ajuste de la temperatura del color (TRINITONE)
24 Red ucción del ruido de imagen (NR)
24 Mejora del contraste de la imagen (DYNAMIC
PICTURE)
25 Corrección del color (CORRECCION DE COLOR)
25 Uso del menú AUDIO
25 Ajuste del sonido (AUDIO)
26 Selección de programas en estéreo o bilingües (MTS)
27 Definición del interruptor de bocinas (BOCINAS)
27 Se lección del modo de sonido periférico
28 Ajuste del volumen de las bocinas
Uso del menú SELECCION VIDEO
29
29 Selección de los efectos de imagen (SELECCION
VIDEO)
29 Ajuste de la imagen en SELECCION VIDEO
Uso del menú INPUT/OUTPUT
30
30 Selección de una señal de salida (INPUT/OUTPUT)
31 Ajuste de las etiquetas de vídeo (ETIQUETA DE
VIDEO)
Uso del menú HORA
31
31 Ajuste del reloj (FIJAR HORA ACTUAL)
33 Ajuste de la hora de verano (DS TIME)
33 Ajuste del temporizador para activar y desactivar el
TV de proyección (RELOJ)
34 Bloqueo de un canal (BLOQUEAR CANAL)
35 Uso del menú AJUSTES
35 Personalización de los nombres de los canales
(NOMBRE DEL CANAL)
37 Ajuste de los canales preferidos (CANAL
FAVORITO)
37 Seleccicín de un canal preferido
38 Selección de una entrada de la videograbadora
directamente (ENCENDIDO DIRECTO)
38 Personalización del puntero (INDICADOR
ESPECIAL)
39 Visualización de subtítulos/XDS (CAPTION VISION/
XDS)
40 Utilización del equipo de vídeo
42 Utilización de un decodificador o receptor DSS
43 Uso de la función de control de equipos no
preprogramados
Información adicional
44 Solución de problemas
46 Especificaciones
47 Indice alfabético
Los títulos entre paréntesis indican nombres de menús.
-ES
Page 50

Precauciones
Gradas por adquirir ei T\' do x ideoproyección posterior en
color Sony. A continuación, se indican algunas de las funciones
que ofrece este televisor;
• Función ALTO A]US I FS, que permite configurar el TV de
proyección fácilmente; para ello, basta oprimir el botón
SET UP.
• Menus gráficos en pantalla que permiten realizar distintos
ajustes de forma visual.
• Función PIP (Picture-in-picture) o P&P (Picture-andpicture) (Ttvin View'") que permite visualizar como
imagen de ventana o iz.quierda imágenes de otro canal, de
vídeo o de TV por cable.
• Temporizado!' de activación/desactivación, que permite
visualizar el programa de TV que desee durante un
periodo de tiempo determinado.
• Bocina central incorporada y las bocinas posteriores
suministradas para disfrutar del auténtico sonido periférico
Dolby Pro Logic sin necesidad de realizar complicados
procedimientos de ajuste.
• Circuitería de enfoque dinámico que enfoca
automáticamente el haz electrónico explorador para
conseguir mayor nitidez, principalmente en las esquinas.
• Control remoto universal suministrado, que permite
controlar equipos de vídeo Sony y de otras marcas,
decodificador y receptor DSS.
La función de control, permite programar el control remoto
para utilizar los equipos de fabricantes cuyos códigos no
estén preprogramados.
• Filtro de peine tridimensional para señales NTSC, que
mejora la calidad de imagen mediante la reducción del
ruido iridiscente de una imagen con estrías, así como el
parpadeo que puede producirse a consecuencia de una
variación del color.
• Indicación del XDS (Extended Data Service), que permite
recibir distintos tipos de información que se ofrece con
algunos programas.
• La función de selección de canal preferido permite ver ocho
canales, así como el seleccionado actualmente al mismo
tiempo; igualmente, permite seleccionar el canal que desee
de entre los ocho canales.
Acerca de este manual
Las instrucciones de este manual hacen referencia a los
modelos KP-53XBR45 y KP-61XBR48. Antes de leer este
manual, compruebe el número de modelo que se encuentra en
la parte posterior del TV de proyección. Para las ilustraciones
de este manual, se ha utilizado el modelo KP-61XBR48. Las
diferencias referentes a las especificaciones se indican en el
texto.
Las instrucciones de este manual están basadas en el uso del
control remoto. Asimismo, es posible utilizar los controles del
TV de proyección si tienen el mismo nombre que en el control
remoto.
Este TV de proyección emplea un voltaje extremadamente
alto. Para evitar incendios o descargas eléctricas, siga
cuidadosamente las indicaciones que se indican a
continuación:
Seguridad
• Asegúrese de que la unidad funciona sólo a 120 V CA.
• Una clavija del enchufe es más ancha que la otra por
razones de seguridad y sólo podrá enchufarse en una
posición. Si no consigue insertar completamente el
enchufe en la salida, póngase en contacto con el
proveedor Sony'.
• Si dentro de la unidad cae algún objeto o se vierte
líquido, desenchúfela de la red y haga que sea revisada
por personal especializado antes de utilizarla
nuevamente.
• Cuando no vaya a emplear la unidad durante varios días,
desenchúfela de la toma de corriente. Para desconectar el
cable de alimentación, tire del enchufe, nunca del propio
cable.
Para obtener información detallada acerca de las medidas de
seguridad, consulte el folleto suministrado "NORMAS
IMPORTANTES SOBRE SEGURIDAD".
instalación
• No bloquee los orificios de ventilación para evitar el
recalentamiento interno.
• No sitúe la unidad en lugares muy cálidos o húmedos, ni
la exponga a un exceso de polvo o de vibración mecánica.
• Evite utilizar la unidad a temperaturas por debajo de los
5°C (41°F).
• Si el TV de proyección pasa directamente de un ambiente
frío a uno cálido, o si la temperatura de la habitación
cambia repentinamente, la nitidez de la imagen puede
desaparecer o los colores pueden perder intensidad. Esto
se debe a una condensación de humedad en el espejo o
lentes interiores. Si ocurre esto, deje que se evapore la
humedad antes de utilizar el TV de proyección.
• Para obtener una mejor calidad de imagen, no exponga la
pantalla a la luz directa del sol. Se recomienda utilizar
una luz fija dirigida hacia abajo desde el techo o cubrir
las ventanas situadas frente a la pantalla con tela opaca.
Asimismo, se recomienda instalar el TV de proyección en
una habitación cuyo suelo y paredes no sean de material
reflectante. Si es necesario, cubra el suelo con moqueta
oscura o empapele las paredes.
-ES
Page 51

Para obtener la mejor calidad de imagen, instale el TV
de proyección en las zonas que se muestran a
continuación:
Zona de visualización óptima
Conexión de las bocinas posteriores
suministradas
Para mejorar el efecto de sonido periférico, conecte las
bocinas posteriores suministradas a los terminales
REAR SPEAKER OUT del TV de proyección. Utilice los
cables de bocinas suministradas.
1 Conecte una de las bocinas posteriores al
terminal REAR SPEAKER OUT R y la otra
bocina al terminal REAR SPEAKER OUT L.
(Parte posterior del TV de proyección)
Zona de visualización óptima (vertical)
Preparación del TV de proyección
Antes de utilizar el TV de proyección, ajuste la
convergencia. Para conocer el procedimiento, consulte
el "Ajuste de la convergencia (CONVERGENCIA)" en
la página 16.
Bocina (suministrada)
Bocina (suministrada)
Coloque las bocinas posteriores como se
indica a continuación para obtener un
efecto de sonido periférico óptimo.
Si es posible, monte las bocinas en la pared a los
lados del área de visualización de 60 a 90 cm (2 a 3
pies) por encima de ésta.
TV de proyección Bocina posterior
Bocina pv
posterior UJ
izquierda
0
Bocina
posterior
derecha
Nota
• Compruebe que los colores del cable de bocina coinciden con
los del terminal. Si los cables no se conectan adecuadamente, se
recibirá sonido distorsionado.
Procedimientos iniciales
-ES
Page 52

Aunque es posible utilizar una antena interior o exterior
con el TV de proyección, recomendamos conectar una
antena exterior o un sistema de TV de proyección por
cable para obtener una mejor calidad de imagen.
Para los clientes que conecten un decodificador, omitan
el apartado "Paso 4: Ajuste del TV de proyección
automáticamente (AUTO AJUSTES)" (página 14) y
realicen el procedimiento del apartado "Selección del
canal de salida de! decodificador (TV INPUT)" (página
18).
Conexión de un sistema de antena/TV
por cable sin videograbadora
Al cable o antena
(Parte posterior
del TV de proyección)
Cable
VHF/UHF
Al decodificador
Si para recibir la TV por cable precisa un decodificador,
realice la siguiente conexión:
(Parte posterior
del TV de proyección)
Cable
OUT
Decodificador
VHF/UHF
Al decodificador y cable
Conexión de una antena
Conecte el cable de antena al terminal de antena VHP/
UHF. Si no puede conectar el cable de antena
directamente al terminal, siga las instrucciones que se
indican a continuación en función del tipo de cable de
que disponga.
Sólo VHF
VHF/UHF
cable
Cable coaxial de 75
o
ohmios
o
B
• Sólo VHF
o
• Sólo UHF
. VHF/UHF
■ VHF
i UHF
Notas'
• La mayoría de las antenas VHF/UHF disponen de un
separador de señal. Retire el separador antes de conectar el
conector adecuado.
• Para mejor calidad de imagen, conecte una antena usando un
cable coaxial de 75 ohmios.
Cable bifilar de 300 ohmios
o
Conector de antena
Cable coaxial de 75 ohmios
Cable bifilar de 300 ohmios
(Parte posterior
del TV de proyección)
(Parte posterior
del TV de proyección)
L-i:
(Parte posterior
del TV de proyección)
Mezclador EAC-66 U/V
(no suministrado)
VHF/UHF
VHF/UHF
VHF/UHF
(Parte posterior
del TV de proyección)
Cable coaxial de 75 ohmios
(no suministrado)
VHF/UHF
Cable CATV
Algunos sistemas de TV por cable emplean señales
codificadas que requieren un decodificador’^ además de
la conexión habitual mediante cable.
* La empresa de TV por cable suministrará el decodificador.
Al cable y antena
(Parte posterior
del TV de proyección)
AUX
Cable CATV
VHF/UHF
Cable de antena
AUX
-ES
Procedimientos iniciales
Page 53

Conexión de un sistema de antena/TV por cable a una videograbadora
Para obtener más información acerca de la conexión,
consulte e! manual de instrucciones de la
videograbadora. Antes de realizar la conexión,
desconecte los cables de alimentación de CA del equipo
que va a conectar.
A una videograbadora convencional
Sin decodíficador
(Parte posterior del TV de proyección)
Una vez realizadas las conexiones, podrá hacer lo
siguiente:
• Ver la reproducción de cintas de vídeo.
• Grabar un programa de TV mientras ve otro
programa.
Notas
• Para conectar una videograbadora monofònica, conecte la
salida de audio de la videog'rabadora a AUDIO L (MONO) de
VIDEO 1/3/4/5 IN del TV de proyección.
Con decodíficador
(Parte posterior del TV de proyección)
No conecte el cable al conector S VIDEO del TV de proyección.
Page 54

A una videograbadora equipada con S vídeo
Si la \ideograbadora dispone de una toma de salida
S vídeo, realice la siguiente conexión. Siempre que
conecte el cable al conector S VIDEO, el TV de
proyección recibe automáticamente señales S vídeo.
Sin decodificador
(Parte posterior del TV de proyección)
Nota:
• Las señales de vídeo están formadas de señales Y
(luminancia) y C (crominancia). La conexión S envía y las
dos señales separadas que evitan la degradación y
proporcionan una mejor calidad de imagen si se compara
con la conexión convencional.
Con decodificador
(Parte posterior del TV de proyección)
Page 55

Conexión de un receptor DSS®
Si desea detalles sobre la conexión, vea el manual de
instrucciones en el receptor DSS.
Salidas
ds audio
Nota
Puede utilizar la clavija de VIDEO S o la de video compuesto
para la conexión de video.
A un televisor y VCR
Cable o caja de cable
Procedimientos iniciales
-ES
Page 56

Conexión de una videocámara
Esta conexión es adecuada para visualizar la imagen
desde una videocámara.
S VIDEO
Notas
• Para conectar una videocámara monofònica, conecte la salida
de audio de la videocámara a AUDIO L (MONO) de VIDEO 2
INPUT en el TV de proyección.
• Para conectar una videocámara no equipada con la salida S
vídeo, conecte la salida de vídeo de la videocámara a VIDEO
INPUT en el TV de proyección.
Conexión de dos videograbadoras para editar cintas
Es posible seleccionar la señal de salida de las tomas
SELECT OUT. Para obtener información detallada,
consulte la página 30.
(Parte posterior del TV de proyección)
10
•ES
Procedimientos iniciales
Page 57

Conexión de un sistema de audio
Para utilizar las bocinas derecha e izquierda del
amplificador estereofónico, utilice la toma AUDIO
(VAR) OUT corno se muestra a continuación y
el apartado "Definición del interruptor de bocinas
(BOCINAS)" de la página 27).
Consulte las páginas 27 y 28 para más información.
desactive las bocinas del TV de proyección (consulte
(Parte posterior del TV de proyección)
Conexión de un amplificador con el decodificador Dolby Pro Logic
Si utiliza un amplificador con el decodificador Dolby
Pro Logic en vez del sistema de audio del TV de
proyección, también es posible utilizar la bocina central
del TV de proyección. Consulte el apartado "Definición
del interruptor de bocinas (BOCINAS)" de la página
27.
(Parte posterior del TV de proyección)
REAR SPEAKER 0UT(MIN16a)
R
N
CONTROLS
AUDIO (FIX)
OUT R (rojo)
RK-74A (no suministrado)
L
® ©
e ©
CENTER SPEAKER IN
60W(NOM)
120WÍMAX)BQ
* Fabricado bajo licencia de Dolby Laboratories Licensing
Corporation.
DOLBY, el símbolo de la doble D p y PRO LOGIC son marcas
de Dolby Laboratories Licensing Corporation.
CENTER SPEAKER IN +
CENTER SPEAKER IN ■
Amplificador con el
decodificador Dolby*
Pro Logic
Bocina
posterior
(L)
Bocina
frontal (L) frontal (R)
Bocina
Procedimientos iniciales 11"^^
Bocina
posterior
(R)
Page 58

Conexión de un receptor AV
Conecte un receptor AV opcional a las tomas VIDEO 1IN.
Para obtener información detallada, consulte “Uso del
menú INPUT/OUTPUT" en la página 30.
Conexión de otro equipo Sony con las tomas CONTROL S
Esta función permite controlar el TV de proyección y otro equipo
Sony con un control remoto.
Notas
• Para controlar otro equipo Sony con el control remoto del
TV de proyección, conecte la entrada CONTROL S del equipo a la toma
CONTROL S OUT del TV de proyección.
• Para controlar el TV de proyección con el control remoto de otro
equipo Sony, conecte la salida CONTROL S del equipo a la toma
CONTROL S IN del TV de proyección.
•ES
12
Procedimientos iniciales
(Parte posterior del TV de proyección)
Page 59

Paso 3: Ajuste del
control remoto
Cómo utilizar los menus
1 Oprima el botón MENU para mostrar el
menú principal.
MENU
fml
□ MODO : ESTANDAR
D CONTRASTEHMHMI
n TINTE
rw
.............................
□ COLOR ■■■
□ BRILLO mam«
□ NITIDEZ
□ TRINITONE : ALTO
□ NR : NO
□ DYNAMIC PICTURE : NO
□ CORRECCIÓN DE COLOR : NO
□ D) □ RESET
Usar (f) RETURN® Salir^SD
.....................
""'I-"-
...........................
..........................
........
.
.
..
Inserción de las pilas
Inserte dos pilas R6 (tamaño AA) (suministradas), de
forma que las indicaciones + y - de las pilas coincidan
con las del diagrama del interior del compartimiento
de pilas.
Notas
• En condiciones normales de uso, las pilas deben durar seis
meses aproximadamente.
• Si no va utilizar el control remoto durante un plazo de tiempo
prolongado, retire las pilas para evitar que se produzcan daños
derivados de fugas.
• Utilice el control remoto con cuidado. No lo deje caer, ni lo pise
ni deje que se moje.
• No exponga el control remoto a la luz directa del sol, no lo deje
cerca de fuentes de calor ni en lugares con un alto nivel de
humedad.
Uso del control remoto accionado por
control universal para utilizar los
menus
El control remoto suministrado dispone de un control
universal que puede dirigirse en ocho direcciones,
como se muestra en la ilustración, de forma que resulte
fácil seleccionar las opciones del menú.
Oprima el control universal arriba o abajo
para desplazar el cursor (b ) hasta la opción
que desee.
w □ BORRAR/AÑADIR CANAL
u NOMBRE DEL CANAL
□ CANAL FAVORITO
J-
«wo
LI CONVERGENCIA
□ ENCENDIDO DIRECTO
■] TV INPUT : NO
□ CABLE ; SI
] AUTO PROGRAMMACION
□ CUSTOMIZED POINTER
©
□ Ü^NGUAJE : ESPAÑOL
□ D5
sp
Usarí*) RETURN® Salir®
3 Haga clic en el control universal para
visualizar el menú seleccionado.
í n BORRAR/AÑADIR CANAL
!](*N|OMBRE DEL CANAL
ID CANAL FAVORITO
y □CONVERGENCIA
ya ENCENDIDO DIRECTO
qOTV INPUT; NO
3d CABLE: SI
10 AUTO PROGRAMMACION
!□ CUSTOMIZED POINTER
3C LANGUAJE ; ESPAÑOL
iOTO
Usar (|) RETURN (?) Salir^S
Oprima el control universal arriba o abajo
para seleccionar la opción y, a continuación,
haga clic en el control universal para ir al
siguiente menú.
NOMBRE DEL CANAL
OESrn Dmuna DMT □ ni
□ nc№c nísg
□ f) os DO DHee
□ M nove □—>^DCS OQ
□ □ □
Use 0-9 para seleccionar
el canal. Después selec done LOGO ó ETIQUETA.
Usar-2- RETURN ® Salir®
Para realizar otras operaciones, es posible seleccionar la
opción oprimiendo el control universal en alguna de
las ocho direcciones que varían en función de la opción
seleccionada. A continuación, haga clic en el control
universal para almacenar el ajuste.
MENU
O o C3
© ® @
© © ©
© © ©
o © O
Control universal
Para salir del menú principal
Oprima MENU. Se mostrará la pantalla original.
Para volver al menú anterior
Oprima el control universal arriba, abajo, a la derecha o
a la izquierda para desplazar el cursor (W ) hacia Z5 de
cada menú y, a continuación, haga clic en el control
universal.
Nota
• Es posible seleccionar distintos tipos de cursor (página 38).
Procedimientos iniciales 3'^^
Page 60

Paso 4: Ajuste del
TV de proyección
automáticamente
(AUTO AJUSTES)
Los clientes que conecten un decodificador deberán
omitir este paso y realizar el procedimiento del
apartado "Selección del canal de salida del
decodificador (TV INPUT)" (página
18).
2 Oprima SET UP en la parte frontal del TV de
proyección.
AUTO SET UP
AUTO AJUSTES;
RÉGLAGE AUTO :
DEMO :
Press [SETUP 1 !o
Oprima CHANNEL+.
Si prefiere utilizar el idioma español o francés en
lugar del inglés para los menús en pantalla, puede
cambiarlo. Oprima CHANNEL- para español o
VOLUME+ para francés.
Exit
iCH -r'ì
[chED
[уоГП
[yÓL^
Es-posible ajusfar el TV de proyección fácilmente
mediante la función AUTO AJLESTES, ya que permite
cambiar el idioma de menús en pantalla y programar
todos los canales que se reciben automáticamente. Para
ajustar el TV de proyección manualmente, consulte
"Cambio del idioma de menú" (página 16),
"Activación o desactivación del sistema de TV por
cable" y "Programación de canales" (página 17).
Si el TV de proyección está ajustado en la posición de
entrada de vídeo, no es posible ejecutar AUTO
AJUSTES. Oprima TV/VIDEO de forma que aparezca
el número de canal.
VOLUME+
de proyección)
SET UP
¿CONTINUA EN
AUTO PROGRAMACION?
SI ■ iCH I
NO : ¡CH - I
Todos los menús presentarán los valores
predefinidos de fábrica en el idioma seleccionado.
4 Oprima CHANNEL+.
"AUTO PROGRAMACION" aparece en la pantalla
y el TV de proyección inicia la exploración y la
programación de los canales automáticamente.
Después de almacenar todos los canales que se
reciben, "AUTO PROGRAMACION" desaparece y
se muestra el canal de número inferior. Si el
televisor recibe canales de TV por cable, la opción
CABLE se ajusta en la posición SI automáticamente.
1 Oprima POWER para activar el TV de
proyección.
-ES
14
Procedimientos iniciales
Notas
• Si transcurren más de 90 segundos después de oprimir el
botón, el menú desaparece automáticamente.
• En caso de utilizar el conectar AUX, oprima el botón ANT/
AUX del control remoto en primer lugar, de forma que se
muestre en pantalla "AUX" junto al número de canal. A
continuación, realice los pasos 2 a 4 anteriores para realizar la
función AUTO AJUSTES.
Para visualizar previamente las funciones
principales (DEMO)
Oprima VOLUME- en el paso 2. Las funciones y
menús se muestran de uno en uno. Para cancelar la
función DEMO, vuelva a oprimir VOLUME-.
Page 61

Borrado o adición de canales
Después de realizar la función AUTO AJUSTES, es
posible borrar los canales innecesarios o añadir los que
desee. Realice la programación durante el día en lugar
de por la noche, ya que algunos canales no emiten a
estas horas.
Para borrar o añadir el canal que desee:
(1) Oprima el control universal arriba o abajo para
seleccionar BORRAR o AÑADIR.
(2) Oprima CH+/- o los botones de 0 a 9 para
seleccionar el canal que desee borrar o añadir.
Número de cana!
seleccionado i
MENU
Control universal
Oprima MENU.
Aparece el menú principal.
"' MODO : ESTANDAR
□ CONTRASTE
MENU
S
ip TINTE
íÍD COLOR
¡□BRILLO HHI"
] NITIDEZ
^□TRINITONE : ALTO
!□ NR: NO
I □ DYNAMIC PICTURE : ^
y □ CORRECCIÓN DE COLOR
¡□□) □ RESET
Usar (f) RETURN® SaltriS
Oprima el control universal arriba o abajo
para desplazar el cursor (b) hasta AJUSTES
y, a continuación, haga clic en el control
universal.
Aparece el menú AJUSTES.
r¡1 BORRAR/AÑADIR CANAL
a[%NOMBRE DEL CANAL
lo CANAL FAVORITO
ya CONVERGENCIA
[ÌD ENCENDIDO DIRECTO
SO TV INPUT; NO
ja CABLE: SI
i a AUTO PROGRAMMACiON
{□CUSTOMIZED POINTER
jOLANGUAJE ; ESPAÑOL
Usar (|) RETURN ® SalirlÜ)
Compruebe que el cursor ( W ) se encuentra
Junto a BORRAR/AÑADIR CANAL y, a
continuación, haga clic en el control
universal.
Si el cursor no se encuentra junto a BORRAR/
AÑADIR CANAL, oprima el control universal
arriba o abajo para desplazarlo y, a continuación,
haga clic en el control universal.
Aparece el menú BORRAR/AÑADIR CANAL.
..........
CH
©00
©00
la BORRAR
'^AÑADIR
□ □)
\0 0 0^
©c
^ © o
Seleccione el canal. _
Usar (f) RETURN® SslirídLí:
(3) Haga clic en el control universal.
• Si selecciona BORRAR en el paso (1),
aparece junto al número de canal para indicar
que el canal se ha borrado de la memoria
programada.
• Si selecciona AÑADIR en el paso (1), "+"
aparece junto al número de canal para indicar
I'
que el canal se ha añadido a la memoria
programada.
5 Para borrar y/o añadir otros canales, repita
el paso 4.
6 Cuando termine, oprima MENU.
MENU
Notas
• Si borra o añade un canal VHP o UHF, el canal de TV por cable
con el mismo número también se borrará o añadirá.
• Si transcurren más de 90 segundos después de oprimir un
botón, el menú desaparecerá automáticamente.
• La función de borrado y adición de canales también está
disponible para la entrada AUX.
RI BORRAR
;%AÑAOIR
a 3
Seleccione el cana!.
Usar Cí) RETURN® Salir®)
Procedimientos iniciales
15
-ES
Page 62

Cambio del idioma de menù
Si prefiere el español o el francés al inglés, puede
cambiar el idioma de memi. No es preciso realizar este
procedimiento si ejecuta AUTO AJUSTES (página 14).
Utilice esta funciém sólo si realiza el ajuste
manualmente.
1
Oprima MENU.
Oprima el control universal arriba o abajo
2
para desplazar el cursor (b ) hasta SET UP y
haga clic en el control universal.
Ajuste de la convergencia
(CONVERGENCIA)
El tubo de imagen de proyeccittn se muestra en la
pantalla en tres capas (roja, verde y azul). Si no
convergen, la calidad del color es pobre y la imagen
aparece borrosa. Para corregir estos defectos, ajuste la
1
Oprima MENU.
2
Oprima el control universal arriba o abajo
para desplazar el cursor (W ) hasta AJUSTE:
haga clic en el control universal.
Oprima el control universal arriba o abajo
para desplazar el cursor (W ) hasta
LANGUAGE y haga clic en el control
universal.
\ BENGLISH
I LANGUAGE! DFRANÇAIS
I [#TSPAÑOL
Use (*) RETURN 0 Exil ivçvj
Oprima el control universal arriba o abajo
para seleccionar el idioma y haga clic en el
control universal.
Aparece el menú en el idioma seleccionado.
nnír
o BORRAR/AÑADíR CANAL
1WJ60
□ NOMBRE DEL CANAL
nr
O CANAL FAVORITO
□ CONVERGENCIA
□ ENCENDIDO DIRECTO
□ TV IMPUTINO
n CABLE : SI
□ AUTO PROGRAMMACION
□ CUSTOMIZED POINTER
|hof«
a LANGUAJE : ESPAÑOL
Usar(l) RETURN 0 Salir®®]
5 Oprima MENU para volver a la pantalla
original.
Nota
• Aunque seleccione el idioma español o francés, algunas partes
de los menus se mostrarán en inglés.
Oprima el control universal arriba o abajo
para desplazar el cursor (W ) hasta
CONVERGENCIA y haga clic en el control
universal.
Aparece el menú CONVERGENCIA.
R=rojo
V=verde
A=azul
Oprima el control universal arriba o abajo
para desplazar el cursor (k ) hasta ROJO o
AZUL y haga clic en el control universal.
Oprima el control universal arriba, abajo,
izquierda o a derecha para desplazar la lír
hasta que converja con la línea verde
central. A continuación, haga clic en el
control universal.
16
ES
Procedimientos inicíales
6 Repita los pasos 4 y 5 para ajustar las den
hasta que las tres líneas converjan y se
visualicen como una cruz blanca.
Oprima MENU para volver a la pantalla
original.
Nota
• Sólo es posible ajustar la convergencia a la izquierda, a la
derecha y arriba y abajo.
Page 63

Activación o desactivación del sistema
de TV por cable
Si ha conectado el televisor a un sistema de TV de
proyección por cable, sitúe CABLE en la posición SI,
que es el valor de fábrica. En caso contrario, ajuste
CABLE en la posición NO. No es necesario realizar este
procedimiento si ejecuta AUTO AJUSTES (página 14).
Utilice esta función sólo cuando realice el ajuste
manualmente.
1 Oprima MENU.
2 ,Oprima el control universal arriba o abajo
para desplazar el cursor (^ ) hasta AJUSTES
y, a continuación, haga clic en el control
universal.
3 Oprima el control universal arriba o abajo
para desplazar el cursor (b ) hasta CABLE, y
haga clic en el control universal.
Programación de canales
Es posible programar canales de TV fácilmente con la
función AUTO PROGRAM ACION. No es preciso
realizar este procedimiento si ejecuta AUTO AJUSTES
(página 14). Utilice esta función sólo cuando realice el
ajuste manualmente.
1 Oprima MENU.
2 Oprima el control universal arriba o abajo
para desplazar el cursor (b ) hasta AJUSTES
y, a continuación, haga clic en el control
universal.
Oprima el control universal arriba o abajo
para desplazar el cursor ) hasta AUTO
PROGRAMACION, y haga clic en el control
universal.
flu
n BORRAR/ANADIR CANAL
[^NOMBRE DEL CANAL
L CANAL FAVOR! rO
T"
□ CONVERGENCIA
□ ENCENDIDO DIRECTO
□ TV INPUT ; NO
'W
□ CABLE : SI
w
□ AUTO PROGRAMMACION
□ CUSTOMIZED POINTER
□ LANGUAJE . ESPAÑOL
STD
Usât Cj) RETURN® Salir®
■ CABLE fflSI I
m^o \
Usar (+1 RETURN e SalirísM)
Oprima el control universal arriba o abajo
para seleccionar SI o NO, y haga clic en el
control universal.
m BORRAR/AÑADIR CANAL
Q NOMBRE DEL CANAL
O CANAL FAVORITO
a CONVERGENCIA
□ ENCENDIDO DIRECTO
□ TV INPUT; NO
n CABLE ;N0
[%AUTO PROGRAMMACION
a CUSTOMIZED POINTER
a LANGUAJE: ESPAÑOL
È ZD
Usar (j) RETURN® Salir®
5 Oprima MENU para volver a la pantalla
original.
Nota
• Si CABLE aparece en color gris, significa que el TV de
proyección está ajustado a una entrada de vídeo y no es
posible seleccionar CABLE. Oprima TV/VIDEO en el control
remoto de forma que aparezca un número de canal.
"AUTO PROGRAMACION" aparece en la pantalla
y el TV de proyección inicia la exploración y la
programación de los canales automáticamente.
Después de almacenar todos los canales que se
reciben, "AUTO PROGRAMACION" desaparece y
se muestra el canal de número inferior.
4 Oprima MENU para volver a la pantalla
original.
Notas
• Si AUTO PROGRAMACION aparece en color gris en el menú
AJUSTES, significa que el televisor está ajustado a una entrada
de vídeo y no es posible seleccionar AUTO
PROGRAMACION. Oprima TV/VIDEO en el control remoto
para que se muestre un número de canal.
• Si transcurren más de 90 segundos después de oprimir el
botón, el menú desaparece automáticamente.
• La programación de canales también está disponible para la
entrada AUX.
Operaciones
17
-ES
Page 64

Selección del canal
Es posible seleccionar un canal de salida entre los
canales 2-6 y los canales VIDEO 1 y AUX 2-6.
de salida del
decodificador
(TV INPUT)
Si conecta un decodificador, es posible seleccionar el
canal de salida del decodifícador en el televisor. Se
recomienda que configure el TV de proyección como se
indica a continuación al conectar un decodificador.
-MENU
• Control
universal
Notas
• Si ajusta TV INPUT en una opción que no sea OFF, no es
posible utilizar las funciones de selección de canal preferido ni
CH INDEX.
• Si ajusta TV INPUT al modo VIDEO 1 INPUT, no puede volver
a seleccionar TV INPUT. Para seleccionar y regresar a este
modo, oprima el botón TV/VIDEO. Si mediante este botón
tampoco puede volver al modo TV INPUT, seleccione TV OUT
en la sección "Uso del menú INPUT/OUTPUT" que aparece
en la pagina 30 e introduzca NO.
• Si se ajusta TV INPUT en OFF y no recibe ningún canal, pulse
el botón de ANT /'AUX en el control remoto.
1 Oprima MENU.
2 Oprima ei control universal arriba o abajo
para seleccionar AJUSTES y haga clic en el
control universal.
Oprima el control universal arriba o abajo
para seleccionar TV INPUT y haga clic en el
control universal.
Se muestran las opciones de canal de salida del
decodificador.
□2
03
04
05
06
OVIDE01
OAUX2
□AUX3
□AUX4
□AUX5
□AUX6
^N0
Oprima el control universal arriba o abajo
para seleccionar ei canal de salida del
decodificador y haga clic en el control
universal.
o BORRAR/AÑADIR CANAL
□ NOMBRE DEL CANAL
D CANAL FAVORITO
te
□ CONVERGENCIA
□ ENCENDIDO DIRECTO
ra TV INPUT : 2
[%3ABLE : SI
□ AUTO PROGRAMMACION
□ CUSTOMIZED POINTER
□ LANGUAJE ; ESPAÑOL
□ 3
Usar (í) F£TURN® SalirEl)
18
ES
Operaciones
Page 65

utilización del TV
t:
MUTING •
SLEEP .
TV/VIDEO .
VOL+/-
CD CD
?
QCDC^
O (S)©®
OOCDCDŒ3
CD CDi
-g» CD
0 @ ©
© © ©
© © ©
q1®ÍQ
o
ís
©
©ll
©
-TV POWER
-TV FUNCTION
-JUMP
- Botones 0-9
- CH +/-
3 Seleccione el canal que desee ver:
Para seleccionar un canal directamente
Oprima los botones de 0 a 9.
Por ejemplo, para seleccionar el canal 10, oprima 1 y
0.
Puede oprimir ENTER para cambiar de canal
inmediatamente.
O © @
© © ©
© © (9
___ ENlfe
© O
Para explorar los canales
Oprima CH+/- hasta que aparezca el canal que
desee ver.
4 Oprima VOL+/- para ajustar el volumen.
CH
Oprima TV FUNCTION en el control remoto.
El indicador rojo parpadea una vez en el control
remoto para indicar que los botones están activados
para el TV de proyección..
TV
2 Oprima TV POWER para activar el TV de
proyección.
El indicador POWER se ilumina en el TV de
proyección.
-POWER-
Si aparece en pantalla alguna de las indicaciones de
VIDEOl a VIDEOS, oprima el botón TV/VIDEO
hasta que aparezca un número de canal.
Cómo pasar rápidamente de un canal a
otro
Puede utilizar el botón JUMP para pasar o “saltar" de
un canal a otro.
Oprima JUMP.
JUMP
Si vuelve a oprimir JUMP, volverá al canal de origen.
Nota
• No puede pasar a los canales que ha explorado mediante los
botones CH+/-.
Operaciones
19
-ES
Page 66

Cancelación del sonido
Oprima MUTING.
"MUTING" aparece en la pantalla.
MUTING
Para restaurar el sonido., vuelva a oprimir MUTING o
oprima VOL +.
Visualización de la información en
pantalla
1 Oprima DISPLAY.
Aparecen en pantalla el número de canal, la hora
actual (si se ha ajustado), el nombre o logotipo de
canal (si se ha ajustado), así como el modo MTS (si
se ha seleccionado SAP). La indicación SAP
desaparece transcurridos 4 segundos.
DISPLAY
Vuelva a oprimir DISPLAY.
La opción XDS (Extended Data'Service) está
activada. Si la emisora dispone de este servicio,
aparecen en pantalla información sobre el
programa, tipo de programa y su duración.
DISPUtY
Vuelva a oprimir DiSPLAY.
Se muestran los subtítulos (si se ha ajustado).
(Consulte la página 39.)
DISPLAY
Nota
• Esta fundón también se encuentra disponible para el modo
PIP/P&P. Consulte la página 22.
Ajuste del cronodesconectador
El TV de proyección permanece activado durante el
periodo de tiempo que especifique y después se
desactiva automáticamente.
Oprima SLEEP varias veces hasta que aparezca
la hora (en minutos) que desee.
Cada vez que oprima SLEEP, la hora cambiará como se
muestra a continuación: 30 —► 60 —*■ 90 —»■ OFF.
SLEEP
"SLEEP" aparece durante un minuto aproximadamente
antes de que el TV de proyección se desactive.
Para cancelar el cronodesconectador, oprima SLEEP
varias veces hasta que aparezca "SLEEP OFF", о
desactive el TV de proyección.
El cronodesconectador también puede cancelarse
seleccionando AUTO PROGRAMACION en el menú
AJUSTES.
Visualización de una imagen de
entrada de vídeo
Oprima TVA/IDEO varias veces hasta que
aparezca la entrada de vídeo que desee.
Cada vez que oprima TV/VroEO, la indicación
cambiará como sigue: TV —► VIDEO 1 —*■ УГОЕО 2 —*•
VroEO 3 —*■ VIDEO 4 —*• УГОЕО 5.
TV/VIDEO
Para cancelar la pantalla, vuelva a oprimir DISPLAY.
Congelación de la imagen
Es posible congelar la imagen.
Oprima FREEZE. FREEZE
Esta función resulta útil para anotar una receta de un
programa de cocina, una dirección o un número de
teléfono mostrados en pantalla, etc.
Para restaurar la pantalla normal, oprima PIP OFF.
20-^^ Operaciones
Para volver a la imagen de TV, oprima TV/VIDEO
hasta que aparezca un número de canal.
Cambio de la entrada VHF/UHF a la
entrada AUX
Oprima ANT/AUX.
"AUX" aparece junto al número de canal.
ANT/AUX
Si vuelve a oprimir ANT/AUX, volverá a la entrada de
VHF/UHF.
Page 67

Visual ización de dos
programas al mismo
tiempo — PIP/P&P
Visualización de una imagen izquierda
(P&P)
Oprima :
Modo de fuente de
entrada o canal de TV
para la imagen izquierda
de entrada o canal
de TV para la
imagen derecha
(TWin View™)
Es posible \'isualizar Es posible visualizar dos
programas simultáneamente mediante la función PIP
(Picture-in-Picture) o la función Twin Viewd“ (Picture-
and-Piefure).
PIP OFF-
AUDIO-
FREEZE-
SWAP-
-Q3 C4D
® ^
'T
U> C±LJZ2_
© © ©
Visualización de una imagen de
ventana (PIP)
Modo de fuente de
entrada o canal de TV
-a
¿M
- PIP CH +/-
- PIP TV/VIDEO
- POSITION
d) ©
Imagen izquierda Imagen derecha
La imagen principal está a la derecha y la imagen de
ventana está a la izquierda.
Para restaurar la imagen normal, oprima PIP OFF.
Notas
• Si la pantalla principal/derecha no recibe ninguna imagen, es
posible que la imagen de ventana/izquierda presente ruido.
• El sonido de la imagen de ventana/izquierda también se emite
desde las tomas AUDIO (VAR) OUT al escucharlo.
Cambio del modo de entrada de la
imagen de ventana/izquierda
Oprima PIP TVA/IDEO para seleccionar el modo
de entrada.
Cada vez que oprima PIP TV/VIDEO, "TV", "VIDEO
1", "VIDEO 2", "VIDEO 3", "VIDEO 4" y "VIDEO 5"
aparecerán secuencialmente.
VIDEO 1
TVA/IDEO
-p 6
canal de TV para la imagen de
ventana
Oprima varias veces para mostrar una
imagen de ventana más pequeña.
Cada vez que oprima Q, el tamaño de la imagen de
ventana cambia como se indica a continuación: tamaño
1/4 —► tamaño 1/9 —*■ tamaño 1/16.
Para eliminar la imagen de ventana, oprima PIP OFF.
Cambio de los canales de TV de la
imagen de ventana/izquierda
Oprima PIP CH+/-.
CID
CH
cu
6 J'VIDEOI
i
Page 68

Recepción del sonido de la imagen de
ventana/izquierda
Oprima AUDIO.
">" aparece durante unos segundos en la imagen de
ventana/izquierda indicando que se está recibiendcr el
sonido de la imagen de ventana/izquierda.
AUDIO
Para restaurar el sonido de la imagen principal, vuelva
a oprrñáir AUDIO.
Congelación de imágenes
Es posible congelar ambas imágenes la derecha y la
izquierda.
Esta función resulta útil para anotar una receta de un
programa de cocina, una dirección o un número de
teléfono mostrados en pantalla, etc.
Oprima FREEZE.
8
J'VIDEO 1
FREEZE
A
VA >A
Cambio de la posición de la imagen de
ventana
Oprima POSITION.
Cada vez que oprima POSITION, la imagen de ventana
se desplazará como se indica en la ilustración.
POSITION
NOTA
• POSITION no es una función PcfeP.
Cambio de las imágenes principal/
derecha y de ventana/izquierda
Oprima SWAP.
Cada vez que oprima SWAP, las imágenes y el sonido
de las pantallas principal y de ventana/izquierda se
intercambian.
VIDEO 1
S' 6
Para restaurar la pantalla normal, oprima PIP OFF.
Visualización de ocho canales de TV
simultáneamente (CH INDEX)
Es posible visualizar todos los canales programados
secuencialmente.
Oprima
Se muestra una imagen principal y siete imágenes de
ventana.
Cada vez que oprima ® o PIP CH + /-, aparecen los
siete canales siguientes de forma secuencial.
Para volver a la pantalla normal, oprima PIP OFF.
Nota
• Si ajusta TV INPUT en una opción que no sea OFF, no es
posible utilizar la función CH INDEX.
SWAP
22 -ES I Operaciones
1
6
J'VIDEO 1
; W N
^>^ VA
Page 69

Ajuste de la imagen (VIDEO)
Mientras ve un programa de TV, es posible ajustar la
imagen, la tonalidad, el color, el brillo y la nitidez
S€.gún sus preferencias. El nivel ajustado se almacena
en SELECCION VIDEO.
C3 o o
© © ©
© © ©
© © ©
o © O
MENU
Control
universal
1 Oprima MENU.
(2) Haga clic en el control universal.
4 Ajuste la opción seleccionada:
(1) Oprima el control universal arriba, abajo, a la
derecha o la izquierda para ajustar la opción.
(2) Haga clic en el control universal.
El nuevo ajuste aparece en el menú VIDEO y se
almacena en el modo SELECCION VIDEO
mostrado.
IQIll ESTANDAR
|№|
□ MODO: ESTANDAR
BiJs
□ CONTRASTE MHaai........................
J' O TINTE ............................
AUOJO
O COLOR ...........................................
iuj
rn BRILLO mimmm'»"
»NITIDEZ
........................
o TRINITONE : ALTO
□ NR:N0
□ DYNAMIC PICTURE : NO
NORA
□ CORRECCIÓN DE COLOR : NO
□ Z> O RESET
Usarti) RETURN©Salir®
S
......1......
................
..
....
2 Asegúrese de que el cursor se encuentra
junto a VIDEO y haga clic en el control
universal.
Si il cursor no se encuentra junto a VIDEO, oprima
el control universal arriba o abajo para desplazarlo.
Aparece el menú de ajuste VIDEO.
la MODO: ESTANDAR
llffl CONTRASTE
[#TINTE
COLOR ■■■»
¡□BRILLO
^□NITIDEZ wmm»
■ JTRlNITONE;ALTO
lo NR:N0
ID DYNAMIC PICTURE : N
y o CORRECCIÓN DE COLOR ; N
Seleccione la opción que desee ajustar.
Por ejemplo:
(1) Para ajustar el brillo, oprima el control universal
arriba o abajo para seleccionar BRILLO.
10 MODO : ESTANDAR
a a CONTRASTE
1 □ COLOR
1LVNITIOEZ HM"
- O TRINITONE ; ALTO
I □ NR: NO
L D COBRÉCDÓN DE COLOR : N
¡□Z) □ RESET
Z Usar (') RETURN© Salir®
□ RESET
Usarltl RETURN© Sal'f®)
□ TINTE
...........................
^BRILLO
□ DYNAMIC PICTURE : N
.
Para obtener información detallada sobre cada
opción, consulte "Descripción de las opciones
ajustables" más adelante.
5 Para ajustar otras opciones, repita los pasos
3 y 4.
Descripción de las opciones ajustables
.
''I-
Opción
CONTRASTE
TINTE
COLOR
BRILLO
NITIDEZ
Oprima el control
universal arriba o
a la derecha para
Aumentar el
contraste de la
imagen e intensificar
el color.
Que toda la imagen
adquiera un color
V'erdoso.
Aumentar la
intensidad del color.
Dar más brillo a la
imagen.
Conseguir una
imagen más nítida
Oprima el control
universal abajo o a
la izquierda para
Reducir el contraste
de la imagen y la
intensidad del color.
Que toda la imagen
adquiera un color
violeta.
Reducir la intensidad
del color.
Oscurecer la imagen.
Conseguir una imagen
más suave.
(continúa)
Operaciones 23'^^
Page 70

Ajuste de la imagen (VIDEO)
Mientras ve un programa de TV, es posible ajustar la
imagen, la tonalidad, el color, el brillo y la nitidez
según.sus preferencias. El nivel ajustado se almacena
en SELECCION VIDEO.
O o o
© © ©
© 0 ©
® © ©
Q © O
MENU
Control
universal
1 Oprima MENU.
(2) Haga die en el control universal.
4 Ajuste la opción seleccionada:
(1) Oprima el control unix ersal arriba, abajo, a la
derecha o la izquierda para ajustar la opción.
(2) Haga clic en el control universal.
El nuevo ajuste aparece en el menú VIDEO y se
almacena en el modo SELECCION VIDEO
mostrado.
SESi □ CONTRASTE MÊmmÊ
lÒBl ESTANDAR
Imi ESTANDAR
[Sal □ MODO : ESTANDAR
G TINTE -
^^BRiLLO mimmm
jL%NITlDEZ MBi"
SJA o TRINITONE • ALTO
MO NR : NO
0 j O DYNAMIC PICTURE
□ CORRECCION DE COLOR
íí^aZD Q RESET
~í Usarli) RETURN®SalirS
.......
4^ □ COLOR ■■■'—
.
..................
t
2 Asegúrese de que el cursor.se encuentra
junto a VIDEO y haga clic en el control
universal.
Si il cursor no se encuentra junto a VIDEO, oprima
el control universal arriba o abajo para desplazarlo.
Aparece el menú de ajuste VIDEO.
■ □MODO : ESTANDAR
IIR! CONTRASTE ■■■■■"•
h^TlNTE .....•I-I-................
COLOR ■■■"» '□ BRILLO ■■■—•
^□NITIDEZ
..............
jD TRINITONE : ALTO
lo NR : NO
]□ DYNAMIC PICTURE ;N
y □CORRECCIÓN DE COLOR :N
saz: O RESET
0 Usarli! RETURN®SalirffiíU»
Seleccione la opción que desee ajustar.
Por ejemplo:
(1) Para ajustar el brillo, oprima el control universal
arriba o abajo para seleccionar BRILLO.
D MODO ; ESTANDAR
□ CONTRASTE aaM
□ TINTE
□ COLOR
rnBRILLO ■■■<•
[•NITIDEZ ■■■"
DTRtN!TONE:ALTO
O NR: NO
O DYNAMIC PICTURE : N
□ CORRECCIÓN DE COLOR : h
□ ZO □ RESET
Usar (f) RETURN® SalirE®
................
.........
Para obtener información detallada sobre cada
opción, consulte "Descripción de las opciones
ajustables" más adelante.
5 Para ajustar otras opciones, repita ios pasos
3 y 4.
Descripción de las opciones ajustables
Oprima el control
Opción
CONTRASTE
universal arriba o
a la derecha para
Aumentar el
contraste de la
imagen e intensificar
el color.
TINTE
Que toda la imagen
adquiera un color
verdoso.
COLOR
.
BRILLO
Aumentar la
intensidad del color.
Dar más brillò a la
imagen.
NITIDEZ
Conseguir una
imagen más nítida
Oprima el control
universal abajo o a
la izquierda para
Reducir el contraste
de la imagen y la
intensidad del color.
Que toda la imagen
adquiera un color
violeta.
Reducir la intensidad
del color.
Oscurecer la imagen.
Conseguir una imagen
más suave.
(continúa)
Operaciones 23’^^
Page 71

Para restaurar los ajustes de fábrica
Mientras \'isualiza el menú VIIDEO, oprima el control
unic'crsal arriba, abajo, a la derecha o la izquierda para
seleccionar RESET y haga clic en el control universal.
La imagen dinámica Trinitone, NR v la corrección del
color también muestran los ajustes de fábrica.
Ajuste de la temperatura del color
(TRINITONE)
Reducción del ruido de imagen (NR)
Es posible mejorar la calidad de una imagen débil o
borrosa ajustando NR en la posición SI.
1 Oprima MENU.
2 Oprima el control universal arriba o abajo
para seleccionar VIDEO y haga clic en el
control universal.
La función TRINITONE controla la temperatura del
color permitiendo ajustar el balance de blancos según
su preferencia sin que ello afecte a los tonos de la piel.
1 Oprima MENU.
2 Oprima el control universal arriba o abajo
para seleccionar VIDEO y haga clic en el
control universal.
3 Oprima el control universal arriba o abajo
para seleccionar TRINITONE y haga clic en el
control universal.
IP
ESTANDAR
ry
:¿ooio
■ TRINITONE RIALTO
E
S
Oprima el control universal arriba o abajo
para seleccionar ALTO, MEDIO o NTSC STD y
haga clic en el control universal.
O MODO ; ESTANDAR
1^
□ CONTRASTE
□ TINTE ...................................
P
□ COLOR
□ BRILLO
□ NITIDEZ
RI TRINITONE ; MEDIO
[%NR : N0
□ DYNAMIC PICTURE : NO
□ CORRECCIÓN DE COLOR
□ □ RESET
Seleccione
ALTO
MEDIO
NTSC STD
Para
un blanco azulado
un blanco neutro
un blanco rojizo
[%dEDIO
ONTSC STD
Usarti) RETURN © Salirdÿù)
......................................
Usar tf) RETURN© SalífMay
3 Oprima el control universal arriba o abajo
para seleccionar NR y haga clic en el control
universal.
^ ESTANDAR
/1
a>
NR asi
ijr-jo
wyisj
usarpi'RETURN© sai-rt¿
4 Oprima el control universal arriba o abajo
para seleccionar SI y haga clic en el control
universal.
Imi
O MODO . ESTANDAR
□ CONTRASTE m Ê Ê Ê m m
□ TINTE
ríf
¡AUnO
□ COLOR
□ BRILLO .......................
□ NITIDEZ ...................................
& □ TRINITONE: ALTO
ri NR ; SI
[^DYNAMIC PICTURE : NO
Û CORRECCIÓN DE COLOR : NO
□ IO □ RESET
Usarti) RETURN® Salirà
.....................
..................................1..........
........................................
....................
.
.
.
.......
.
Mejora del contraste de la imagen
(DYNAMIC PICTURE)
|m«
Ilium
..
.....
Il
III
...
IIIIIIM
: NO
La función DYNAMIC PICTURE mejora el contraste de
la imagen de forma que ofrece una imagen dinámica.
1 Oprima MENU.
2 Oprima el control universal arriba o abajo
para seleccionar VIDEO y haga clic en el
control universal.
3 Oprima el control universal arriba o abajo
para seleccionar DYNAMIC PICTURE y haga
clic en el control universal.
24
ES
Operaciones
■ÍB DYNAMIC PICTURE OSI
Usar (I) RETURN© SalirÎLÇ,
^N0
Page 72

4 Oprima el control universal arriba o abajo
para seleccionar SI y haga clic en el control
universal.
Itnil^ MODO ESTANOAR
tSm [j CONTRASTEBBMi
/ i:.: TINTE
□ COLOR
rj8RILL0
^jDNlTfDEZ MH'"
SO- DTRINITONE - ALTO
NR ; NO
© ra DYNAMIC PICTURE ; SI
Ì%:0RRECCIÓN DE COLOR . NO
□ RESET
osai (;) RETUPK0 Sa'irfffiC;
..............
Uso del menù
AUDIO
.
Ajuste del sonido (AUDIO)
Corrección del color (CORRECCION DE
COLOR)
La^Tinción CORRECCION DE COLOR permite
enfatizar los colores rojo y azul para proporcionar un
tono de piel más intenso.
1 Oprima MENU.
2 Oprima el control universal arriba o abajo
para seleccionar VIDEO y haga clic en el
control universal.
3 Oprima el control universal arriba o abajo
para seleccionar CORRECCION DE COLOR y
haga clic en el control universal.
CORRECCION DE COLOR OSI
Usar í*) RETURN® SalirlíF%
Oprima el control universal arriba o abajo
para seleccionar SI y haga clic en el control
universal.
ГЯМО
Es posible ajustar los agudos, los bajos y el balance
según sus preferencias. También puede ajustar el
sonido de la entrada o entradas de vídeo.
CZ3 СЭ cz>
© © (D
© © ©
© © ®
Q ® O
MENU
j/ffú®....
rnntrni
universal
1 Oprima MENU.
2 Oprima el control universal arriba o abajo
para seleccionar AUDIO y haga clic en el
control universal.
dm AGUOOS MM'
j vBAjos mam
i □ BALANCE
I D MTS ; MAIN
l 0 BOCINAS ; TODO ON
ím
ÜZD □ RESET
Usar (|) RETURN ® Salir®
............................
......
‘••O'
.
□ MODO : ESTANDAR
□ CONTRASTEME
□ TINTE
□ COLOR
□ BRILLO
□ NITIDEZ
□ TRINITONE : ALTO
□ NR;N0
□ DYNAMIC PICTURE ; N
n CORRECCIÓN DECOLOR :S
0 RESET
Usar $ RETURN ® Salir®]
3 Seleccione la opción que desee ajustar.
Por ejemplo:
(1) Para ajustar los graves, oprima el control
universal arriba o abajo para seleccionar BAJOS.
AGUDOS
ШШ ГЯ BAJOS
|ffl[%3ALANCE
^ O MTS : MAIN
□ BOCINAS : TODO ON
ЯЗЬ D
Ш G
^□30 a RESET
Usar (•) RETURN © Salir®
Operaciones 25'^^
.........................................
...........................
..........................
.......................
...
..................
(continúa)
.
Page 73

(2) Haga clic en cl control uni\'crsal.
I^BAJOS
RETJRMftS
Selección de programas en estéreo o
bilingües (MTS)
La función M IS (Multichannel d V Sound) permite
disfrutar de sonido estéreo o escuchar programas SAP
(Second Audio Programs) cuando se reciban. El ajuste
inicial corresponde a sonido estéreo (MAIN).
4 Ajuste la opción seleccionada:
(1) Oprima el control universal arriba, abajo, a la
derecha o la izejuierda para ajustar la opción.
r®i
¡m
Usai REI URN (S Sal(f'Æ‘'U
(2) Haga clic en el control universal.
El nue\'o ajuste aparece en el menú AUDIO.
□ AGUDOS —........................
rp BAJOS
1%3ALANCE
............
□ MTS . MAIN
n BOCINAS ' TODO ON
I
□
IZ) □ RESET
Usar (:) RETURNeSaliríMÍ
Para obtener información detallada, consulte a
continuación "Descripción de las opciones
ajustables"
5 Para ajustar otras opciones, repita los pasos
3 y 4 anteriores.
Descripción de las opciones ajustables
.........
1 Oprima MENU.
2 Oprima el control universal arriba o abajo
para seleccionar AUDIO y haga clic en el
control universal.
3 Oprima el control universal arriba o abajo
para seleccionar MTS y haga clic en el
control universal.
lilHl
nMAIN
l%>AP
□ MONO
.......
""I
........
Usarli) RETURN® SaiirdÑj]
4 Oprima el control universal arriba o abajo
para seleccionar MAIN, SAP o MONO y haga
clic en el control universal.
D AGUDOS ■■HmiM.ii
□ BAJOS ■■■
□ BALANCE ....................
la MTS : SAP
»BOCINAS : TODO ON
□ . • .
□ Z2 □ RESET
Usar lì) RETURN ® SalifdÜ
....
I'»-«
Opción
Oprima el control
universal arriba o
a la derecha para
AGUDOS Aumentar los agudos.
BAJOS Aumentar los graves.
BALANCE
Dar más intensidad al
volumen de la bocina
derecha.
Oprima el control
universal abajo o
a la izquierda para
Reducir los agudos.
Reducir los graves.
Dar más intensidad al
volumen de la bocina
izquierda.
Para restaurar los ajustes de fábrica
Con el menú AUDIO en pantalla, oprima el control
universal arriba, abajo a la derecha o la izquierda para
seleccionar RESET y, a continuación, haga clic en el
control universal. Se restauran los valores de fábrica de
todos los ajustes del menú AUDIO.
-ES
26
Operaciones
Seleccione
Para
MAIN Escuchar sonido en estéreo.
El indicador STEREO del TV de
proyección se ilumina mientras se recibe
una emisión en estéreo.
SAP
Escuchar programas bilingües.
El sonido de programas no SAP
desaparecerá si se selecciona SAP.
MONO
Reducir el ruido durante emisiones en
estéreo.
Nota
• Los sonidos estéreo y SAP dependen de las fuentes de
programa.
Page 74

Definición dei interruptor de bocinas
(BOCINAS)
Selección del modo de sonido
periférico
Es posible desactivar las bocinas del TV de pun ección
si, por ejemplo, desea recibir el sonido a tra\ és de iin
sistema estereofónico.
Si conecta un amplificador con el decodificador Dolby
Pro Logic al terminal CENTER SPEAKER IN, puede
utilizar los altavoces del TV cié proyección como bocina
central.
1
Oprima MENU.
2
Oprima el control universal arriba o abajo
para seleccionar AUDIO y haga clic en el
control universal.
Oprima el control universal arriba o abajo
para seleccionar BOCINAS y haga clic en el
control universal.
ÍW
■ BOCINAS B1TODO ON
Ph
Is.
:%Z'DR OFF
□TODO OFF
□CENTRO ON ,
te Usar Ф RETURN© Saiií&I®
Este TV de proyección incorpora bocinas centrales que
pueden conectarse a las bocinas posteriores
suministracias. También es posible disfrutar del efecto
de sonido periférico con sólo seleccionar un modo de
sonido periférico correspondiente al tipo de programa
que esté \óendo. Este modo puede seleccionarse
cuando el modo BOCINAS se encuentre en la posición
TODO ON o IZ/DR OFF.
1
Oprima MENU.
2
Oprima el control universal arriba o abajo
para seleccionar AUDIO y haga clic en el
control universal.
Oprima el control universal arriba o abajo
para seleccionar SURROUND MODE y haga
clic en el control universal.
rimij
non PRO-LOGIC
^SeSUPROL
1 (¿) ;
s
йвЖ Usar Ф RETURN © Salir®®
STEREO
□ SIMULADO
□ EN VIVO
□JUEGOS
□ OFF
Oprima el control universal arriba o abajo
para seleccionar TODO ON, IZ/DR OFF, TODO
OFF o CENTRO IN y haga clic en el control
universal.
Seleccione Para
TODO ON Recibir el sonido por el TV de proyección.
IZ/DR OFF
TODO OFF Cancelar el sonido de las bocinas del TV de
CENTRO IN
'
Cancelar el sonido de las bocinas derecha e
izquierda del TV de proyección y recibir el
sonido de los canales derecho e izquierdo
frontales del TV de proyección a través de
las bocinas del sistema de audio.
proyección y recibir el sonido del TV de
proyección únicamente a través de las
bocinas del sistema de audio.
Cancelar el sonido de las bocinas izquierda/
derecha y posteriores del TV de proyección
y utilizar las bocinas centrales del TV de
proyección como bocina central en otro
sistema periférico aidop.
H □ AGUDOS
!□ BALANCE
................
□ MTS - MAIN
i rn BOCINAS : TODO OFF
........................
Usar Ij) RETURN©Salirà
....
.
Oprima ei control universal arriba o abajo
para seleccionar el modo de sonido
periférico que desee y haga clic en ei
control universal.
Seleccione Para
p PRO LOGIC
p 3 STEREO
SIMULADO
EN VIVO
JOEGOS
OFF
Obtener un extraordinario efecto de sonido
periférico semejante al de un teatro. Este
modo es más efectivo con programas
codificados en sonido periférico Dolby.
Obtener un efecto parcial de sonido
periférico sin utilizar las bocinas posteriores.
El sonido del canal posterior se emite desde
las bocinas frontales. Seleccione este modo si
no desea utilizar las bocinas posteriores.
Crear un efecto de sonido estéreo simulado.
Utilice este modo para programas
monofónicos.
Obtener un efecto de sonido periférico
semejante al de una sala de conciertos.
Utilice este modo para escuchar programas
musicales.
Aumentar al máximo el impacto acústico del
.software de videojuegos.
Desactivar los efectos de sonido periférico.
Operaciones
□ Î
O . , i
□
□ □ , • . fu
П SURROUND :
□ , □
Usar Ф RETURN© Salir®®
27ES
Page 75

Ajuste del volumen de las bocinas
Después de seleccionar el modo de sonido periférico,
ajuste el volumen de cada bocina al mismo nivel para
recibir un sonido equilibrado y natural. Para los modos
p PRO-LOGIC y p 3 STEREO, ajuste el volumen de
las bocinas con la función de tono cié prueba.
1 Oprima MENU.
2 Oprima el control universal arriba o abajo
para seleccionar AUDIO y haga clic en el
control universal.
3 Oprima el control universal arriba o abajo
para seleccionar SURROUND LEVEL y haga
clic en el control universal.
Aparece la pantalla de ajuste del volumen de las
bocinas.
DOLBY PfiO-LOGIC
imi
ip CENTRO WBH
POSTERIOR ■■■
d BALANCE ....................
□ TONO DE PRUEBA
□ Z:' □ RESET
.......
.
5 Oprima el control universal a derecha o
izquierda para ajustar el nivel de volumen y
haga clic en el control universal.
0 Repita los pasos 4 y 5 para ajustar otras
bocinas, de forma que reciba el sonido de
cada bocina al mismo volumen.
Para restaurar los ajustes de fábrica
Cuando se muestre la pantalla de ajuste del volumen,
oprima el control unix'ersal arriba, abajo, a derecha o a
izquierda para seleccionar RESET y haga clic en el
control universal. Se restaurarán los ajustes de fábrica
de todos los niveles de bocina del modó seleccionado.
Ajuste del volumen de bocina con la
función de tono de prueba
Usarci) RETURN® SalirÜÑS
Oprima el control universal arriba o abajo
para seleccionar CENTRO, POSTERIOR o
BALANCE y haga clic en el control universal.
La opción y la bocina o bocinas seleccionadas del
menú aparecen resaltados.
DOLBY PRO - LOGIC
^ ^BALANCE
Usare*) RETURN®Salir®;
Seleccione
CENTRO*
POSTERIOR**
BALANCE El nivel entre las bocinas derecha e
* El nivel central no puede ajustarse en el modo
SIMULADO.
El nivel posterior no puede ajustarse en el modo
p 3STEREO.
Para ajustar
El nivel de las bocinas centrales.
El nivel de las bocinas posteriores.
izquierda.
En el modo p PRO-LOGIC o p 3 STEREO, la función
del fono de prueba permife ajustar fácilmente el
volumen de cada bocina al mismo nivel.
Después de realizar el paso 3 de "Ajuste del volumen
de las bocinas", realice el siguiente procedimiento:
1 Oprima el control universal arriba o abajo
para seleccionar TEST TONE y haga clic en el
mando universal.
Es posible recibir la salida del tono de prueba de
cada bocina secuencialmente.
Salida del tono de prueba:
Izquierdo frontal «-Central «-Derecho frontal
■ * i
—
------------
Posterior *
-----------------
lo CENTRO
]□ POSTERIOR
B BALANCE
..............
I a TONO DE PRUEBA
• l%Z) □ RESET
............
HI Ih
Usar(f: RETURN® Salir®
2 Realice los pasos de 4 a 6 de "Ajuste del
volumen de las bocinas".
'
'I
28
■ES
3 Haga clic en el control universal para
desactivar el tono de prueba.
Operaciones
Page 76

Uso del menú
SELECCION VIDEO
Selección de los efectos de imagen
(SELECCION VIDEO)
Para obtener información detallada acerca de cada
opción, consulte "Efecto del ajuste de imagen" a
continuación.
Efecto del ajuste de imagen
Opción Efecto de imagen
ESTANDAR
PELICULAS
DEPORTES Imagen brillante v dinámica
NOTICIAS Reduccióin de ruido de imagen
JUEGOS Imagen más suave
Estándar
Imagen de gran precisión
Es posible seleccionar uno de los cinco modos de efecto
de iiiíagen que mejor se adecúe a los distintos
programas. También puede definir cada uno de los
ajustes de la imagen según sus preferencias.
o C3 CD
© © @
® © ©
© © ©
O © O
es-
-MENU
- Control
universal
1 Oprima MENU.
2 Oprima el control universal arriba o abajo
para seleccionar SELECCION VIDEO y haga
clic en el control universal.
MOCO
jJirp ESTANDAR
»'PELÍCULAS
Seleccione la opción que desee ajustar.
Por ejemplo:
(1) Para seleccionar PELICULAS, oprima el control
universal arriba o abajo con el fin de desplazar
el cursor hasta PELICULAS.
(2) Haga clic en el control universal.
ISJ^: roRTFS
□ NOTICIAS
JUEGOS
Usar(+) RETURN© Salir®
«oeo
I jo ESTANDAR
PELICULAS
[^DEPORTES
□ NOTICIAS
^MO JUEGOS
1D
Usar (•) RETURN 0 Salifl®)
Ajuste de la imagen en SELECCION
VIDEO
1 Oprima MENU.
2 Oprima el control universal arriba o abajo
para seleccionar VIDEO y haga clic en el
control universal.
Imi
□ MODO ESTANDAR
ixidi
t
n CONTRASTE ■■■■■i
INTINTE .................................................
AUW
□ COLOR HBI
io|
□ BRILLO ................................................
□ NITIDEZ ■■■
'S®
□ TRINITONE : ALTO
□ NR: NO
□ DYNAMIC PICTURE : NO
WHU
□ CORRECCION DE COLOR : NO
□ ED □ RESET
Usar (p RETURN® Salir®
...............
...................................
.................................
...
3 Oprima el control universal arriba o abajo
para seleccionar MODO y haga clic en el
control universal.
Imi ■ MODO n ESTANDAR
1%'"EL!CUlAS
□ DEPORTES
□ N0’ ICIAS
□ JUEGOS
SDH
Usar (•) RETURN® Salir®
Oprima el control universal arriba o abajo
para seleccionar la opción que desee ajustar
y haga clic en el control universal.
r¡1 MODO : PELICULAS
_ lONTRASTE^^H
□ TINTE
G COLOR ■■■
□ BRILLO ■■■
□ NITIDEZ
□ TRINITONE : ALTO
□ NR:N0
□ DYNAMIC PICTURE : N
□ CORRECCIÓN DE COLOR ;N
□ -O □ RESET
Usar (•; RETURN e Salir®!
5 Ajuste la imagen siguiendo los pasos de 3 a
5 del apartado "Ajuste de la imagen" en la
página 23.
Para restaurar los ajustes de fábrica
Con el menú VIDEO en pantalla, oprima el control
universal arriba, abajo, a la derecha o la izquierda para
seleccionar RESET y, a continuación, haga clic en el
control universal.
Operaciones 29'^^
Page 77

Uso d
OUTPU
INPUT/
Para seleccionar MONITOR OUT:
(1) Compruebe que el cursor se encuentra junto a
MONITOR OUT y haga clic en el control
universal.
(2) Oprima TV/VIDEO para seleccionar la entrada
del TV de proyección y haga clic en el control
universal.
VIDEO 2 OLfT
TVA/IDEO
¡ESEiEüJÍ"
EDiTaf L
wn/T ”
Selección de una señal de salida
(INPUT/OUTPUT)
Es posible seleccionar una señal de salida desde las
tomas SELECT OUT situadas en la parte posterior del
TV de proyección.
-MENU
-Control
universal
2 Oprima el control universal arriba o abajo
para seleccionar INPUT/OUTPUT y haga clic
en el control universal.
t
- VCR -----
□ ETIQUETA DE VIDEO □ Z)
Usar (+) RETURN® SalirUS
□ ETIQUETA DE VIDEO □ I
Usar (;) RETURN® Sa"r'
Para seleccionar EDIT OUT:
(1) Oprima el control universal arriba o abajo para
seleccionar EDIT OUT y haga clic en el control
universal.
(2) Oprima el control universal arriba o abajo para
seleccionar la entrada que vaya a editar y haga
clic en el control universal.
IN . .
Para seleccionar TV OUT:
'ViDÉdT
□13^-,
VIDEO 3 W
VIDEO 4
VIDEO 5
□ ETIQUETA DE VIDEO □ Z)
^li Usar (fl RETURN ®Salir5Eb
»mroñcuTi
■si'tMiiü.-
TVntT ^
(1) Oprima el control universal arriba o abajo para
seleccionar TV OUT y haga clic en el control
universal.
Aparece "Set up using only VIDEOl input?"
II
ftm
6 utilizando
Solamente la
entrada de
VIDE01?
Usare*} RETURN® SalirlMÜl
[WMimaiT!
fasi
OUT
3 Seleccione MONITOR OUT, EDIT OUT o TV
OUT.
Seleccione Para
MONITOR OUT Enviar la señal de la imagen
visualizada en la pantalla del TV de
proyección. Utilice esta opción para
editar cintas mientras controla la
imagen visualizada.
EDIT OUT
TV OUT
ES
30
Operaciones
Enviar la entrada de señal del TV de
proyección independientemente de la
imagen visualizada en pantalla.
Utilice esta opción para editar cintas
mientras ve una imagen de entrada
distinta de la que se está grabando.
Enviar la señal de TV.
Emplee esta opción cuando conecte un
receptor AV a las tomas VIDEO 1IN.
(2) Si sólo conecta un receptor de AV la toma del
TV de proyección, oprima el control universal
arriba o abajo para seleccionar SI. A
continuación, haga clic en el control universal.
Siempre es posible seleccionar la señal del
receptor oprimiendo TV /VIDEO una vez.
Si conecta el equipo de audio/vídeo al TV de
proyección, seleccione NO. Es posible
seleccionar cualquiera de las entradas de
VIDEOl a VIDEOS con el botón TV/VIDEO.
Notas
• Si ajusta INPUT/OUTPUT en la posición TV OUT, no podrá
pasar de la imagen principal/derecha a la de ventana/
izquierda.
• La señal SELECT OUT sólo está disponible cuando el TV de
proyección está activado.
Page 78

Ajuste de las etiquetas de vídeo
(ETIQUETA DE VIDEO)
Esta funcióia permite etiquetar cada modo de entrada
para identificar con facilidad el equipo conectado. Por
ejemplo, es posible etiquetar VIDEO 2 IN como VHS.
1 Oprima MENU.
2 Oprima ei control universal arriba o abajo
para seleccionar INPUT/OUTPUT y haga clic
en ei control universal.
3 Oprima el control universal arriba o abajo,
a la derecha o la izquierda para seleccionar
ETIQUETA DE VIDEO y haga clic en el control
universal.
,S VIDEO'
i
AVRECEIV'É^
etiqueta ce VID¿ DSS i
Usa.' RETURNÇî Salirgli.'
Uso del menú HORA
Ajuste del reloj (FIJAR HORA ACTUAL)
Al ajustar el reloj, es posible comprobar la hora, activar
y desactivar el televisor con el temporizador o bloquear
un canal del TV de proyección para que no pueda
recibirse durante un periodo de tiempo.
CD CD
© © ©
© © ©
® © ®
O © O
MENU
■
■
L.
4
Oprima el control universal arriba o abajo
para seleccionar ei modo de entrada que
desee etiquetar y haga clic en el control
universal.
VIDEO 1
VIDEO R
VIDEO 4
VIDEO S
I ETIQUETA DE VIDR -DSS
Usar (;) RETURN0 Salir®
Oprima el control universal arriba o abajo
para seleccionar la etiqueta y haga clic en
ei control universal.
□
AVREœvgRJ
ETIOUETACEVIOÉ.
Usarti: RETURN® Sale®
Repita ios pasos 4 y 5 para etiquetar otros
modos de entrada.
BE®*!
r VHsTC
j 8mm ”
1 BETA
1 LD
_
Hi-8
'av RECEIVER:
S VIDEO I
Hi-B
DSS 1
__
1 Oprima MENU.
2 Oprima el control universal arriba o abajo
para seleccionar HORA y haga clic en el
control universal.
ffl FIJAR HORA ACTUAL
K¡
a
BID
DOM - - AM
Usanti RETURN 0SaliTÍd
Asegúrese de que el cursor (b ) se
encuentra junto a FIJAR HORA ACTUAL y
haga clic en ei control universal.
Si el cursor no se encuentra junto a FIJAR HORA
ACTUAL, oprima el control universal arriba o
abajo para desplazarlo.
FIJAR HORA ACTUAL
Nota
• Si transcurren más de 90 segundos después de oprimir un
botón, el menú desaparecerá automáticamente.
R1 OS TIME : NO
L%.UN - - AM
□ RESET
Usar (♦) RETURN® Saiirl®)
(continua)
Operaciones 31
Page 79

4 Ajuste la hora actual.
(1) Oprima el control universal arriba o abajo para
seleccionar la indicación de la hora y haga clic
en el control universal. La opción que vaya a
ajustarse aparece resaltada.
Set the day.
use í\) RETURNQExJt
(2) Oprima el control universal arriba o abajo para
ajustar el día y haga clic en el control universal.
Ajuste la hora.
Usar (;) RETURN© Satif®}
Oprima el control universal arriba o abajo
para seleccionar SI, NO o NON y haga clic en
el control universal.
FIJAR HORA ACTUAL
m DS TIME : SI
t»-UN 1:25 PM
Q 13 O RESET
Usar {i) RETURN © Saiirgïïûl
Seleccione Para
SI
NO
NONE
Ajustar el reloj a la hora de verano
(después del primer domingo de abril).
La hora actual se adelanta una hora
automáticamente.
Cancelar el ajuste del reloj a la hora de
verano (después del último domingo de
octubre).
Ajustar el reloj si en su zona no se
utiliza la hora de vera no.
(3) Ajuste la hora y los minutos de la misma forma
que en el paso (2). Al hacer clic en el control
universal después de ajustar los minutos, el reloj
se pone en marcha.
FIJAR HORA ACTUAL
□ DS TIME : NO
RILUN 1;15PM
[%Z) O RESET
Ajuste el dia.
Usar (j) RETURN© S^irEP
____
5 Oprima el control universal arriba o abajo
para seleccionar DS (Daylight Saving) TIME
y haga clic en el control universal.
FIJAR HORA ACTUAL
□SI
■ DS TIME :
BINO
□ LUN 1:2
%10NE
□ O □
1
Usar (i) RETURN© Salir®)
Para corregir la hora
Con el menú FIJAR HORA ACTUAL en pantalla,
oprima el control universal arriba o abajo, a la derecha
o a la izquierda para seleccionar RESET y, a
continuación, haga clic en el control universal.
Para mostrar la hora actual en la pantalla del
TV de proyección
Oprima DISPLAY.
Notas
• Si desenchufa el TV de proyección o se produce un corte del
suministro eléctrico, el reloj se desactivará. Reajuste la hora
actual.
♦ Si conecta la videograbadora mediante un cable RF, es posible
que el TV de proyección no esté ajustado con la información de
hora actual correcta.
32
-ES
Operaciones
Page 80

Ajuste de la hora de verano (DS TIME)
Asegúrese de sincronizar el reloj antes de ajustar la
hora de verano.
1 Oprima MENU.
2 Oprima el control universal arriba o abajo
para seleccionar HORA y haga clic en el
control universal.
3 Oprima el control universal arriba o abajo
para seleccionar DS TIME y haga clic en el
control universal.
7
□ SI
BINO
%NONE
Ajuste del temporizador para activar y
desactivar el TV de proyección (RELOJ)
Es posible activar y desactivar el TV de proyección a la
hora que especifique. Asegúrese de que el reloj está
correctamente sincronizado. En caso contrario,
sincronícelo en primer lugar (página 31).
O o o
© © ©
© © ©
© © ®
o © O
MENU
Control
universal
DOM 12:00 AM
Us» ({! RETURN® Salit®
4 Oprima el control universal arriba o abajo
para seleccionar SI, NO o NON y haga clic en
el control universal.
□ FIJAR HORA ACTUAL
■J
m DS TIME ; SI
[%REL0J
□ BLOQUEAR CANAL
□ 3
OOM 12:00 AM
Usar {}) RETURN ® Salir®
Seleccione
SI
NO
NONE
Para
Ajustar el reloj a la hora de verano
(después del primer domingo de abril).
La hora actual se adelanta una hora
automáticamente.
Cancelar el ajuste del reloj a la hora de
verano (después del último domingo
de octubre).
Ajustar el reloj si en su zona no se
utiliza la hora de vera no.
1 Oprima MENU.
2 Oprima el control universal arriba o abajo
para seleccionar HORA y haga clic en el
control universal.
3 Oprima el control universal arriba o abajo
para seleccionar RELOJ y haga clic en el
control universal.
n 1 CADA DOM-SAB ORESET
% 12:00 AM Oh CHO
^2мt 6 12№ 6 ^‘гмi
□ 2 CADA DOM-SAB DRESET
12:00 AM Oh CHO
I 12iu 6 12ph 6 Muí
IeZJ
.................
3 Selección la programa.
S Us»(j) RETURN® Salir®
4 Introduzca el ajuste RELOJ.
(1) Oprima el control universal arriba o abajo para
seleccionar el programa 1 o 2 y haga clic en el
control universal.
(2) Oprima el control universal arriba o abajo para
definir el día o días y, a continuación, haga clic
en el control universal. Cada vez que lo oprima,
los días se sucederán cíclicamente como se
muestra a continuación.
CADA DOM-SAB—»CADA LUN-VIE->
DOMINGO-»...-»SABADO->CADA
DOMINGO-»...-*-CADA SABADO
ICADA LUNES
□ 2CADA DOM-SAB GRESET
12:00 AM Oh CHO
12am 6 6 Muá
□ 3
..................
Ajuste la hora.
_______________
Us» 0 F^ETURNQSaliríSi]
(continúa)
Operaciones 33'^^
Page 81

(3) Oprima cl control universal arriba o abajo para
ajustar la hora (hora v minutos) de activación del
TV de proyección y haga clic en el control
uni\'crsal.
El indicador i aparece mostrando la hora de
activación.
voeo
J-
■ CADA LUNES :
1:05PMEaCH0
I2íu 6 1^» 6 I2w
.............j
0
w.
ri2CADA DOM-SAB DRESET
SD-
Ajuste la duración.
Usar (•) RETURN® Salir)
12;00 AM Oh CH 0
.........
(4) Oprima el control universal arriba o abajo para
ajustar la duración y haga clic en el control
universal.
Cada vez que haga clic en el control universal, la
duración aumenta en intervalos de una hora
hasta un máximo de seis. El indicador de barra
también muestra cuánto tiempo lleva activado el
TV de proyección.
■ pADA LUNES
..........
Bloqueo de un canal (BLOQUEAR
CANAL)
Esta función permite e\ itar qne los niños vean
programas no adecuados para ellos. Compruebe que el
reloj esté correctamente ajustado. En caso contrario,
sincronícelo en primer lugar (página 31).
CD CD CD
© © ®
© © ©
© © ®
Q ® O
en
0i i
universa
1 Oprima MENU.
2 Oprima el control universal arriba o abajo
para seleccionar HORA y haga clic en el
control universal.
•JÜ2CADA DOM-SAB PRESET
12.00 AM Oh CHO
seleccione el canal.
Usart-) RETURN e SaiirSKl
(5) Oprima el control universal arriba o abajo para
seleccionar el canal y haga clic en el control
universal.
ra 1 CADA LUNES E3RESET
^ • 1:05 PM 4h CH23
-Q2CADA DOM-SAB QRESET
I 12:00 AM Oh CHO
i Seleccione la programa.
1 Usar ¡t) RETURN© Salirív®
El indicador TIMER se ilumina.
5 Para ajustar el otro programa, haga clic en
el control universal y repita el paso 4.
Un minuto antes de que el TV de proyección se
desactive, el mensaje "TV will turn off" aparecerá en
pantalla.
Para cancelar el temporizador
Con la opción RELOJ en pantalla, oprima el control
universal a la derecha o la izquierda para seleccionar
RESET además del programa que va a restaurar. A
continuación, haga clic en el control universal.
Nota
• Si desenchufa el TV de proyección o se produce un corte del
suministro eléctrico, los ajustes RELOJ se borrarán. Restaure la
hora actual y, a continuación, ajuste el temporizador.
3 Oprima el control universal arriba o abajo
para seleccionar BLOQUEAR CANAL y haga
clic en el control universal.
BLOQUEAR CANAL
m 1 CADA DOM-SAB PRESET
• 12:00 AM Oh CHO
□ 2CADA DOM-SAB PRESET
12:00AM Oh CHO
lo Pi
i Seleccione la programa
Ü Usaf-:f'RETURN©SaiirHS'
Introduzca un ajuste BLOQUEAR CANAL.
(1) Oprima el control universal arriba o abajo para
seleccionar el programa 1 o 2 y haga clic en el
control universal.
(2) Oprima el control universal arriba o abajo para
definir el día o días y haga clic en el control
universal. Cada vez que lo oprima, los días se
sucederán cíclicamente como se muestra a
continuación.
CADA DOM-SAB—►CADA LUN-VIE-»
DOMINGO-*-...-►SABADO-» CADA
DOMINGO—...-►CADA SABADO
BLOQUEAR CANAL
■ :CADAl,|LÚN^Á
:jD2CADA DOM-SAB PRESET
12:00 AM Oh CHO
Ajuste la hora.
Usar (►) RETURN© Salir&'EAÍ
34
ES
Operaciones
Page 82

(3) Oprima el control universal arriba o abajo para
ajustar la hora (hora y minutos) de activación
del bloqueo del canal y haga clic en el control
uni\-ersal.
El indicador É aparece mostrando la hora de
acti\’ación del bloqueo.
BLOQUEAR CANAL
LUNES 3
PM E“
]2CADA DOM-SAB DRESET
12:00 AM Oh CH 0
Ajuste ia hora.
ÜsSf (•) RETURN® SalirCwF:i.ÿl
SO del menú
AJUSTES
Personalización de los nombres de los
canales (NOMBRE DEL CANAL)
(4) Oprima el control universal arriba o abajo para
aj'ustar la duración del bloqueo y haga clic en el
control universal.
Cada \ ez que haga clic en el control universal, la
duración aumenta en intervalos de una hora
hasta un máximo de 12. El indicador de barra
también muestra cuánto tiempo lleva bloqueado
el TV de proyección.
BLOQUEAR CANAL
■ CADAV-lffiNESó|3O02:"'
-
□ 2CADA DOM-SAB DRESET
12:00 AM Oh CH 0
IDID
á seleccione el canal.
Usarti) RETURN® Salir®]
(5) Oprima el control universal arriba o abajo para
seleccionar el canal y haga clic en el control
universal.
BLOQUEAR CANAL
raí CADA LUNES BRESET
% ,.10:00 PM 2h CH 23
□ 2CADA DOM-SAB EDRESET
12:00 AM Oh CH 0
Selección la programa.
Usarti) RETURN ©Salir®
Puede añadir subtítulos a un máximo de 20 canales.
Esta función permite identificar fácilmente el canal que
esté viendo. También puede seleccionar un logotipo de
la compañía emisora (LOGO) o crear sus propios
nombres de cuatro letras (ETIQUETA).
Q Q Q
© d) ©
© © ©
-Botones 0-9
® ® ®
®jO
A'
_______________
IX
MENU
©i
universal
©
1 Oprima MENU.
2 Oprima el control universal arriba o abajo
para seleccionar AJUSTES y haga clic en el
control universal.
3 Oprima el control universal arriba o abajo
para seleccionar NOMBRE DEL CANAL y
haga clic en el control universal.
5 Para ajustar el otro programa, haga clic en
el control universal y repita el paso 4.
Si selecciona el canal bloqueado durante el tiempo
definido, el mensaje "BLOCKED" aparece y la imagen
y el sonido se cancelan.
Para cancelar un ajuste BLOQUEAR CANAL
Con el menú BLOQUEAR CANAL en pantalla, oprima
el control universal a la derecha o la izquierda para
seleccionar RESET además del programa que va a
restaurar. A continuación, haga clic en el control
universal.
Nota
• Si los ajustes BLOQUEAR CANAL y RELOJ se superponen, el
ajuste de hora posterior tendrá prioridad sobre el otro.
NOMBRE DEL CANAL
iÇLOGO ОетЮиеТАОО QRESET
Til cu
аазрп □®ov o i?i
o
□ CNBC D—Mziaca
□
□ QVC
□ E3
□ OW □ □ o □
Use 0-9 para seleccionar
el canal. Después selec done LOGO ó ETIQUETA.
□ a □ нее □ 0
- □ са
Usar ©-RETURN® Salir®
Oprima los botones 0-9 para seleccionar el
canal ai que desee asignar nombre.
O 0 ©
0 0 0
0 0 d
© Ô
1 NOMBRE DEL CANAL
Ш L0G0-QJETK3ü£TAa 3 QÍÍESEÍ
DcSan □■srr.'E
nCNBC »
□ Л
□ S □□ GHBe
□
□ ea □ QVC Q«-™- □ CÎ
□ □ □ □
□ ОИ
- 9 para seleccionar
Use 0
el canal. Después selec •
LOGO ó ETIQUETA.1 done
Usar-S-RETURN®Sahr® j
(continúa)
Operaciones
□ О
□ •!?!
□ 0
□ O
35
23
1
19
ES
Page 83

5 Seleccione LOGO o ETIQUETA.
Para seleccionar LOGO:
(1) Compruebe que el cursor se encuentra junto a
LOGO y haga clic en el control unic’crsal.
1
----------------
1 NOMBRE DEL CANAL
■ LOGO ETIQUETA!'! 3 , : RESET
V (l) Z£Jr.1 □■••rr.i G®QT
^.”4 ncNBc oE33
n ♦.■ fj S □ o □ HB© □ o
r; 1^ z Qvc □ o cs □ O
Z Oft! Z G G
Use 0 - 9 pa'a seleccionar
el canal Después
seleccione un tuuio
bsar-q-RETURN 0 Salir!
(2) Oprima el control universal en cualquiera de las
crcho direcciones de que dispone para
-seleccionar el logotipo de la compañía de
emisión y haga clic en el control uni\ ersal.
n LOGO O ETIQUETAD tT O RESET
: Zc5l=ñ □■TV-r 0®OT .. ííi
C Gira O—a» zea
: ■ j e Zl a □ H8© z ©
Z t?3 ZQVC Z'->^-n!S¡ ZO
z c: z □ z
Use 0-9 para seleccionar
el canal. Después selec oone LOGO ó ETIQUETA.
Usaf-:*:-RETURN 0 Salirí^
Para seleccionar ETIQUETA
(1) Oprima el control universal a la derecha o la
izquierda para seleccionar ETIQUETA y haga
clic en el control universal.
'J LOGO ■ ETIQUETAD 13 □ RESET
VA üB ÜC OD GE OF üG OH
□JQKGLOMONQOOP
DCTdR os OT OU OV 0WQX
GYOZO&O / □ - B0B1 E2
C3 G4 05 06 07 08 09
Use 0-9 para seleccionar
el canal. Después
seleccione la
V‘ letra.
Usar-:+:-RETURN0 Satird®
(4) Repita ¡os pasos (2) v (3) para seleccionar las
letras restantes.
■ 19
MTV -
. LOGO ■ ETIQUETA' j .2
ZA ljB oc cd OE PF □ G PH
ZIPJÛKÜLZMPN DO DP
CO zn OS GT GU vv
Z Y □ Z n 8, C G - %)
T““
- oca
□ !l)
□
19
Si selecciona menos de tres letras, desplace el
Z3 P4 D5 a 6 07 P8 □ 9 C
Use 0-9 para selecciona
pi canal. Después
seleccione la 4'’ letra.
Usar-7cRE’URN0 Saiir[2É!i¿
n RESET
cw c X
O 1 □ 2
cursor ( b ) hasta después de introducir las
letras V haga clic en el control universal.
6 Repita los pasos 4 y 5 para asignar nombre
a otro canales.
19
19
Para borrar un nombre
Con el menú NOMBRE DEL CANAL en pantalla,
oprima el control unix'crsal en cualquiera de las ocho
direcciones de que dispone para seleccionar RESET y, a
continuación, haga clic en el control universal.
Notas
• Si el menú .NOMBRE DEL CANAL aparece en gris, significa
que se ha seleccionado una entrada de video en el TV de
proyección V no es posible seleccionar NOMBRE DEL CANAL.
Oprima TV/VIDEO de forma que aparezca el número de
canal.
• Si transcurren más de 90 segundos después de oprimir un
botón, el menú desaparecerá automáticamente,
• La función NOMBRE DEL CANAL está disponible para la
entrada AUX.
• Si desplaza el cursor a los espacios en blanco de la parte
inferior del menú NOMBRE DEL CANAL, no puede
seleccionar ningún logotipo.
(2) Oprima el control universal en cualquiera de las
ocho direcciones de que dispone para
seleccionar la primera letra.
D LOGO ■ ETIQUETAD D) □ RESET
OA GB GC OO OE OF QG QH
□ I □JGKGLVMüNOOGP
□ O GR OS OT %J GV OWOX
□ YGZO&O / D - GO OI Ü2
□ 3 G4 05 G6 07 G8 09 G_
Use 0-9 para seleccionar
el canal. Después
seleccione la letra
Usar-í- RETURN 0 SalirSEil
(3) Haga clic en el control universal.
□ LOGO ■ ETIQUETAD 3 D RESET
□ A OB QC GD DE OF GG DH
G| DJGKGLVMQNGOOP
DQ QR GS OT QV OW OX
QYOZG&a / □ - OO OI 02
G3 G4 05 06 Q7 08 D9 0_
Use 0-9 para seleccionar
el canal. Después
seleccione la 2“ letra.
Usar-t;- RETURN 0 SalirÜNu)
-ES
36
Operaciones
M • • •
19
ig
Page 84

Ajuste de los canales preferidos
(CANAL FAVORITO)
Esta función permite seleccionar sus canales preferidos
(hasta ocho canales) con facilidad mientras los muestra
en pantalla al mismo tiempo.
© © ©
® © ©
© ® ®
o © o
MFMII
universal
1 Oprima MENU.
2 Oprima el control universal arriba o abajo
para seleccionar AJUSTES y haga clic en el
control universal.
3 Oprima el control universal arriba o abajo
para seleccionar CANAL FAVORITO y haga
clic en el control universal.
6 Repita los pasos 4 y 5 para ajustar otros
canales preferidos.
Nota
• Si ajusta TV INPUT en una opción que no sea OFF, no es
posible utilizar la función de selección de canal preferido
(CANAL FAVORITO).
Selección de un canal preferido
Después de ajustar los canales preferidos, es posible
seleccionar un canal que desee mientras se muestran
todos los canales preferidos en la pantalla de TV
simultáneamente.
1 Haga clic en el control universal.
La pantalla muestra ocho imágenes de ventana que
contienen los canales preferidos con la imagen en
movimiento del canal actualmente seleccionado en
el centro.
8
r
^lAL FAVOR
icdone. posic
r^jRETÜRN®
2
TO
fóri.
", .Séh
; U"sa
CA
Oprima el control universal en cualquiera
de las ocho direcciones de que dispone para
seleccionar la posición en la pantalla CANAL
FAVORITO y, a continuación, haga clic en el
control universal.
El canal en uso se muestra en la posición
seleccionada.
2
W
'ííRETURN®
TO
nal.
CA 'JAL FAVOR
»cck>n© el ca
Sel
Usa
Oprima el control universal arriba o abajo
para seleccionar el canal que desee y haga
clic en el control universal.
El canal nuevo se almacena en la pantalla CANAL
FAVORITO en la posición seleccionada.
2 Oprima el control universal para desplazar
el cursor hasta el canal que desee ver.
El control universal del mando remoto permite
seleccionar cualquier imagen con sólo oprimir este
control.
8
A
3 Haga clic en el control universal.
La imagen del canal seleccionado se muestra en la
pantalla.
CANAL FAVORITO
Usar-:i;HETURNSS3lifl>;
Operaciones | 37
■ES
Page 85

Selección de una entrada de la
videograbadora directamente
(ENCENDIDO DIRECTO)
La función ENCENDIDO DIRECTO permite cambiar del
modo de entrada de TV al modo de entrada de
\ádeograbadora oprimiendo el botón (reproducción)
en el control remoto suministrado. Por ejemplo, conecte
la x'ideograbadora a las tomas VIDEO 1 IN y ajuste el
selector VTRl 2 3 MDP situado debajo de la tapa del
control remoto en la posición VTR2, Después de
completar el procedimiento siguiente, el modo de
entrada cambia a la videograbadora conectada a las
tomas VIDEO 1 IN al oprimir el botón ►".
1 Oprima MENU.
2 Oprima el control universal arriba o abajo
para seleccionar AJUSTES y haga clic en el
control universal.
3 Oprima el control universal arriba o abajo
para seleccionar ENCENDIDO DIRECTO y
haga clic en el control universal.
ENCENDIDO DIRECTO 1
S«E0
ra VIDE01 : N0
AUDIO
'[%VIDE02 : N0
|D VIDEOS : NO
□ VIDE04 ; NO
'□VIDEOS : N0
0
HOftA
m i
Oprima el control universal arriba o abajo
para seleccionar la entrada a la que está
conectada el equipo de vídeo y haga clic en
el control universal.
[DB! ENCENDIDO DIRECTO 1
kroo
&
B
r ' )
Usar (}) RETURN® SaliriMENül
—
■ VIDE01 :1□ NO
□ VTRl
BVTR2
:®/TR3
1 DMDP
; 3 MDP
(~
’ T ’)
Usar 1+) RETURN® SalirÍM^ |
Personalización del puntero
(INDICADOR ESPECIAL)
Puede seleccionar el cursor deseado (puntero) entre
ocho diseños y colores distintos.
1 Oprima MENU.
2 Oprima el control universal arriba o abajo
para seleccionar AJUSTES y baga clic en el
control universal.
3 Oprima el control universal arriba o abajo
para seleccionar INDICADOR ESPECIAL y
haga clic en el control universal.
¡Tnr
o BORRAR/AÑADIR CANAL
□ NOMBRE DEL CANAL
□ CANAL FAVORITO
Auolo
□ CONVERGENCIA
□ ENCENDIDO DIRECTO
□ TV INPUT : N0
□ CABLE : SI
□ AUTO PROGRAMMACION
0
1? CUSTOMIZED POINTER
HÒBA
»' ANGUAJE: ESPAÑOL
□ -0
Usar (j) RETURN® SaliríVfÑÍÍ
Oprima el control universal en cualquiera
de las ocho direcciones de que dispone para
seleccionar el cursor que desee y haga clic
en el control universal.
w
t
♦
INDICADOR ESPECIAL
ÍiWgO
g \ «V
[hoha-
B
Usar-t> RETURN ® Saliti
® '•
«A
y V
Oprima el control universal arriba o abajo
para seleccionar la posición del selector
VTR1 2 3 MDP y haga clic en el control
universal.
ES
38
Operaciones
ENCENDIDO DlgiECTO
fflVIDEOl ; VTR 2
l^VIDE02 : N0
□ VIDEOS : N0
□ VIDE04 : N0
□ VIDEOS : NO
□ Z)
Usar (f) RETURN eSahrlMÍ
Page 86

isualizc
btitulos/
-'^Hàs^FÌU
• r V < • »
.! : í
Oprima el control universal arriba o abajo
para seleccionar el tipo de subtítulo y haga
clic en el control universal.
El tipo de subtítulo seleccionado se muestra en
color verde.
(CAPTION VISION/XDS)
Algunos programas se emiten con subtítulos. Para
visualizarlos, seleccione CCl, CC2, CCS, CC4, TEXTl,
TEXT2, TEXIS o TEXT4 en el menú. Con CCl, CC2,
CCS o CC4 se mostrarán subtítulos correspondientes al
diálogo o a los efectos sonoros de un programa. (Debe
seleccionarse CCl para la mayoría de los programas.)
Con TEXTl, TEXT2, TEXIS o TEXT4 se muestra texto
correspondiente a una serie de información que puede
ocupar la mitad de la pantalla o la pantalla completa.
Generalmente, esto no depende del programa.
Algunos programas se emiten con el servicio XDS
(Servicio extendido de datos) que muestra un nombre
de red, nombre de programa, longitud de programa,
letras de llamada y hora de la muestra de datos. Al
seleccionar XDS con el botón DISPLAY, esta
información aparecerá en la pantalla si el emisor ofrece
este servicio.
O CZ) O
© © ©
® © ©
© © ©
Q © o
-MENU
-Control
universal
D •
□ ^
UOr
Q í'4
n Ëiü 4
O
(%T-P.XTi
O TE>:T2
□ TtXTo
□ Tír'XT4
□ : :•
Usa; (j) RETURN ® Saggimi)
Para desactivar los subtítulo, texto o XDS
Oprima DISPLAY en el control remoto hasta que
"DISPLAY OFF" aparezca en la pantalla. Cada vez que
oprima DISPLAY, la indicación cambia como se
muestra a continuación:
Información en pantalla - —XDS —Subtítulo o texto
t ' 1
■
------------
DISPLAY OFF
---
-----------------
'
"DISPLAY OFF" se desactiva después de tres
segundos.
Notas
• Una recepción de baja calidad de los programas de TV puede
causar errores en los subtítulos y en XDS. Los subtítulos
pueden aparecer con un recuadro blanco u otros errores en
lugar de una palabra determinada.
• Los subtítulos y la indicación de canal no pueden utilizarse
simultáneamente.
1 Oprima MENU.
Oprima el control universal arriba o abajo
para seleccionaras y haga clic en el control
universal.
Usa 0 RETURN® SalidlÑEl
Operaciones
39
-ES
Page 87

utilización del
equipo de vídeo
Es posible programar el control remoto suministrado
para controlar un equipo de vídeo que disponga de
sensor remoto infrarrojo. Para program.arlo, ajuste el
número de código del fabricante. Puede ajustar el
código del fabricante para cada una de las cuatro
posiciones del selector VTRl 2 3 MDP de forma que sea
posible controlar cuatro componentes distintos del
equipo.
Ajuste del código del fabricante
El siguiente equipo de vídeo Sony viene ajustado de
fábrica para cada posición del selector VTRl 2 3 MDP:
VTRl Videograbadoras Beta, ED Beta
VTR2 Videograbadora de 8 mm
VTR3 Videograbadora VHS
MDP Reproductor de múltiples discos
t:
OCDOCZOl
Selector VTR
1 2 3 MDP
CODE SET-
-ÆD C3 CD CD
CD CD CD CD
CD O CD CD QD
^0-0 CDŒ)
CD CD CD
0
© ©
® © ®
Botones 0-9
© © ®
CD
©J®
(con la tapa abierta)
Nota
Para utilizar un equipo de otro fabricante además de una
v'ideograbadora Sont', ajuste el selector en una posición que no
esté utilizando para la videograbadora Sony.
Desconecte el componente que quiere
1
ajustar.
Abra la tapa y ajuste el selector VTRl 2 3
2
MDP en la posición en la que desee definir
el código
VTRl 2 3 MDP
■ENTER
3 Oprima CODE SET y, a continuación, oprima
los botones 0-9 para introducir el número
de código del fabricante (consulte la tabla
siguiente) y oprima ENTER. Por ejemplo,
para utilizar una videograbadora Sony de 8
mm, oprima CODE SET, 3, O, 2 y ENTER.
CODE SET
Números de código de fabricantes de
videograbadoras
Fabricante
Sony
Aiwa
Audio Dynamic
Bell & Howell (M. Wards)
Brocsonic
Canon
Citizen
Craig
Curtis Mathis
Daewoo
DBX
Dimensia
Emerson
Fisher
Funai
General Electric
Goldstar
Hitachi
Instant Replay
JC Penny
JVC
Kenwood
LXl (Sears)
jVlagnavox
Marantz
Marta
Memorex
Minolta
Mitsubishi/MGA
Multitech
NEC
Olympic
Panasonic
Peittax
Philco
Philips
Pioneer
Quasar
RCA/PROSCAN
Número de código
301, 302,
338
314, 337
330,343
319
309, 308
332
315, 302,
304, 338,
341,312,
314, 336,
304
319, 320,
330, 334,
338
329, 304,
332
306, 304,
309, 308
309, 305,
336, 337
314, 336,
314, 336,
332, 305,
335
310, 308,
314, 336,
332
309, 333
305, 304
323, 324,
325, 338,
314, 336,
309, 308
,308, 309,
.305, 304
308, 309
310, 308,
308
308, 309
3t)4, 305,
311, 312.
303
332
309
309
337
316, 317, 318
335, 333
309
305
304, 330, 314,
337
332, 337
333, 334, 330,
109
137
.325, 326
321
337
306,
.309
.308, .305, 310,
313
I
ENTER
40
-ES
OD‘
Operaciones
Page 88

Números de código de fabricantes de
videograbadoras
Fabricante Número de código
Realistic
309, 330, 328, 335, 324,
338
Sansui
Singer
Samsung
Sanv(t
Scott
314
315
322,313,321
330, 335
312, 313, 321, 335, 323,
324, 325, 326
Sharp
Shintom
Signature 2000 (M. Wards)
Sylvania
Symphonic
Tashiro
Tatung
Teac
Technics
327, 328
315
338, 327
310, 308, 309, 338
338
332
314, 336, 337
314, 336, 338, 337
309, 308
Toshiba 312, 311
Wards
Yamaha
Zenith
327, 328, 335, 331, 332
330, 314, 336, 337
331
Números de código de fabricantes de MDP
Fabricante
Sony
Kenwood
Magnat'ox
Maranz
Mitsubishi
Panasonic
Philips
Pioneer
RCA
Sanyo
Sharp
Yamaha
Notas
• Si se ofrece más de un código, introdúzcalos uno a uno hasta
que obtenga el código correcto para su equipo.
• En un número reducido de casos, no podrá controlar un
equipo de vídeo Sony con este control remoto. Esto se debe a
que el equipo puede utilizar un ccídigo que no se proporcione
con este control remoto. En este caso, utilice el control remoto
del propio equipo o la función de equipos no preprogramados
(página 43).
• Los números de código de los equipos Son)' vienen
predefinidos de fábrica como se indica a continuación:
Videograbadora VHS 301
Videograbadora de 8 mm 302
Videograbadoras Beta, ED Beta 303
Reproductor de múltiples discos 701
Precaución
Si al extraer las pilas, por ejemplo para cambiarlas, tarda
demasiado tiempo, los números de código cambiarán a los
predefinidos en fábrica y será necesario realizar una puesta a
cero.
Número de código
701
707
703
702
702
. 704.
703
702
702
706
705
703
Utilización del equipo de vídeo
-T T~
^OcdcdcdO, -
dSl) C3 CD CD
Ü
C£3 CD СЕЗ CD CD
CD CD GD Œ3 Œ>
CDQ-o ICDCD
O CD O
(con la tapa abierta)
1
Botones de
control de vídeo
Ajuste el selector VTR1 2 3 MDP en la
posición seleccionada para el equipo de
vídeo. VTR12 3MDP
OD)
Utilice ios botones de control de vídeo del
control remoto para utilizar el equipo de
vídeo.
Empleo de una
videograbadora
Para acti\'arla y desacti\'arla
Para cambiar los canales
Para grabar
Para reproducir
Para detención
Para avanzar rápidamente
Para rebobinar la cinta
Para realizar una pausa
Para buscar una imagen hacia
delante o hacia atrás
Para cambiar el modo de entrada Oprima TV/VTR
Para expulsar un cassette
Empleo de un
reproductor de distancia
múltiples discos
Para activarlo o desactivarlo Oprima POWER
Para reproducir Oprima
Para detención
Para realizar una pausa
Para buscar una imagen hacia
delante o hacia atrás
Para buscar el capítulo hacia delante
o hacia atrás
Para expulsar un disco
Nota
• Si el equipo de vídeo no dispone de una función determinada,
el botón correspondiente del control remoto no funcionará.
Botones del control remote
Oprima POWER
Oprima CH +/-
Oprima • y REC
simul tá nca m en te
Oprima ►
Oprima ■
Oprima ►►
Oprima
Oprima II
Para reanudar la reproducción normal,
vuelva a pulsarlo.
Oprima ►► o ^^4 durante la
reproducción.
Para reanudar la reproducción normal,
suelte el botón.
Oprima —
(Uso exiusivo con productos de la marca
Sony)
Botones del control remote
Oprima ■
Oprima II
Para reanudar la reproducción normal,
vuelva a pulsarlo.
Mantenga pulsado ►► o durante la
reproducción.
Para reanudar la reproducción normal,
suelte el botón.
Oprima CH +/-
Oprima —
(Uso exiusivo con productos de la marca
Sony)
Operaciones 41’^^
Page 89

utilización de un
decodificador о
receptor DSS
Es posible programar el control remoto suministrado
para utilizar un decodificador o un receptor DSS.
Realice los procedimientos siguientes para ajustar el
número de código del fabricante que permita utilizar
estos dispositivos.
CABLE POWER -
CABLE FUNCTION
CODE SET-
_______________
Oo
cCt:
СЗСЮСЮСЭСЮ
^O-O OQ
CD O СЭ
© © ©
© © ©
© ® ©
-DSS POWER
■DSS FUNCTION
-TV FUNCTION
- Botones 0-9
■ENTER
4 Utilice los botones de control del TV de
proyección para verificar si su número de
código funciona.
Por ejemplo, para que el decodificador funcione
puede utilizar los bt)tones CABLE POWER, JUMP,
CH+/-, 0-9 y ENTER.
Para que el receptor DSS funcione, puede utilizar los
botones DSS POWER, JUMP, DISPLAY, MENU y
0-9, así como el control universal.
Para controlar el TV de proyección
Oprima TV FUNCTION y, a continuación, los botones
de control del TV de proyección.
Para obtener información detallada acerca del
uso del decodificador o del receptor DSS
Consulte el manual de instrucciones que se suministra
con el equipo.
Si el control remoto no funciona
• En primer lugar, repita los procedimientos de ajuste utilizando
los otros códigos incluidos en su equipo.
• Si tras probar todos los códigos, no puede conseguir que el
control funcione correctamente, utilice la función de control de
equipos no preprogramados de la página 43.
Números de código de fabricantes
(decodificador)
- СН -t/-
(con la tapa abierta)
1 Apague el equipo que x|uiere ajustar y oprima
el botón FUNCTION del mismo (CABLE o DSS).
-----
FUNCTION
CABLE DSS
------
C© CD
. Oprima CODE SET y, a continuación, los
botones 0-9 para introducir el número de
código del fabricante (consulte la tabla
siguiente) y oprima ENTER. Por ejemplo, para
programar el control remoto para que
funcione con un decodificador Zenith, oprima
CODE SET, 2, 1, 2 y, a continuación, ENTER.
CODE SET
2)+(1)+(2
3 Oprima CABLE POWER para activar un
decodificador o DSS POWER cuando utilice un
receptor DSS.
---------- ------------------
CABLE DSS
O CO
42'^^ Operaciones
ENTER
Fabricante
Hamlin/Rega! 222, 223, 224, 225, 226
jerrold/G. 1.
Oak 227, 228, 229
Panasonic
Pioneer
Scientific Atlanta
Tocom
Zenith
Número de código
201, 202, 203, 204, 205, 206, 207,
208, 218
219, 220, 221
214, 215
209, 210, 211
216, 217
212, 213
Números de código de fabricantes (receptor
DSS)
Fabricante Número de código
Sony
RCA
Notas
• Si se ofrece más de un código, introdúzcalos uno a uno hasta
que obtenga el código correcto para su equipo.
• Si introduce un código nuevo, el introducido anteriormente se
borrará.
• En un número reducido de casos, no podrá controlar su equipo
con este control remoto.
Esto se debe a que el equipo puede utilizar un código que no se
proporcione con este control remoto. En este caso, utilice el
control remoto del propio equipo o la función de equipos no
preprogramados (página 43).
• Si tarda al extraer las pilas, por ejemplo para cambiarlas, tarde
demasiado tiempo, los números de código cambiarán a los
predefinidos en fábrica y será necesario realizar una puesta a
cero.
801
802
Page 90

Es posible programar el control remoto suministrado
para utilizar un decodificador o un receptor DSS.
Realice los procedimientos siguientes para ajustar el
número de código del fabricante que permita utilizar
estos dispositi\'os.
CABLE POWER
-DSS POWER
Oo
CABLE EUNCTION •
CODE SET •
Cfí' : á) (£~(.
CO CEO '3) CB
CO CD CD CD QO
■S3CD-0 CDCO
I
SS
-DSS EUNCTION
-TV FUNCTION
co co CD
© © @
® © © ■
© © ©
- Botones 0-9
-ENTER
4 utilice los botones de control del TV de
proyección para verificar si su número de
código funciona.
Poi' 0|umplc>, p<iiTi que el decodificador funcione
piK'de utili/ar los botones CABLH POWbR, lUMP,
CU ()-') V PNTPR.
Para que el rc'ceptor DSS ftincione, puede utilizar К
botoi-R's DSS 1T3VVPR, JUMP, DISPLAY, MENU \-
asi como el control universal.
Para controlar el TV de proyección
Oprima TV PU.NCTIO.N v, a continuación, los botones
de aintrol del 1 \' de proveccu'in.
Para obtener información detallada acerca del
uso del decodificador o del receptor DSS
Consulte el manual de instrucciones que se suministra
con el r'quipo.
Si el control remoto no funciona
• En primer iiipar, repita los procedimientos de ajuste utilizando
los otros eódipos incluidos en su equipo.
• Si tras probar lodon los códigos, no puede coii'-eguir que el
control funcione correctamente, utilice la función de control de
equipos no preprogramados de la página 43.
Números de código de fabricantes
(decodificador)
■ СН +/-
(con la tapa abierta)
1 Apague el equipo que quiere ajustar y oprima
el botón FUNCTION dél mismo (CABLE o DSS).
-----FUNCTION-
CABLE DSS
CD CD
. Oprima CODE SET y, a continuación, los
botones 0-9 para introducir el número de
código del fabricante (consulte la tabla
siguiente) y oprima ENTER. Por ejemplo, para
programar el control remoto para que
funcione con un decodificador Zenith, oprima
CODE SET, 2, 1, 2 y, a continuación, ENTER.
CODE SET
2) + (l) + {2
Oprima CABLE POWER para activar un
decodificador o DSS POWER cuando utilice un
receptor DSS.
----------
CABLE DSS
------------------
O CD
ES
42
Operaciones
ENTER
Fabricante Número de código
Hamlin,/Regal 222, 223, 224, 225, 226
Jerroid/G. 1. 201,202, 203, 204, 205, 206, 207,
208, 218
Oak 227, 228, 229
Panasianic
Pioneer 214,215
Scientific Atlanta 209, 210, 211
Tocom 216, 217
Zenith 212, 213
219, 220, 221
Números de código de fabricantes (receptor
DSS)
Fabricante
Sony
RCA
Número de código
801
802
Notas
• Si se ofrece más de un código, introdúzcalos uno a uno hasta
que obtenga el código correcto para su equipo.
• Si introduce un código nuevo, el introducido anteriormente se
borrará.
• En un número reducido de casos, no podrá controlar su equipo
con este control remoto.
Esto se debe a que el equipo puede utilizar un código que no se
proporcione con este control remoto. En este caso, utilice el
control remoto del propalo equipao o la fundón de equipos no
pareparogramados (paágina 43).
• Si tarda al extraer las pailas, por ejemplo para cambiarlas, tarde
demasiado tiempo, los números de código cambiarán a los
paredefinidos en fábrica y será necesario realizar una puesta a
cero.
Page 91

Información adicional
Solución de
problemas
Si después de realizar los procedimientos siguientes no
se resuelve el problema, póngase en contacto con su
proveedor local Sony.
Ausencia de color
■► Ajuste COLOR en el menú VIDEO (página
23).
^Confirme que el programa no se está
emitiendo en blanco y negro.
Sólo aparece nieve y ruido en la pantalla
■►Compruebe el ajuste CABLE en el menú
AJUSTES (página 17).
■►Compruebe las conexiones de antena/
cables (página 6).
■^Asegúrese de que el canal está emitiendo
programas.
Ausencia de imagen (pantalla no iluminada) y
de sonido
^Asegúrese de que el cable de alimentación
esté conectado firmemente.
^Compruebe que el ajuste TV /VIDEO sea el
correcto: para ver la televisión, seleccione la
posición TV y para ver cintas de vídeo,
seleccione la posición VIDEO (páginas 19,
20
).
Antes de utilizar el TV de proyección, el
decodificador o el receptor DSS, asegúrese
de oprimir el botón FUNCTION
correspondiente en el control remoto
(páginas 19, 42).
“►Seleccione otro canal. Puede ser problema
de la emisión.
Ausencia de imagen o imagen de mala calidad
(pantalla iluminada) y buena recepción de
sonido
“►Ajuste PICTURE en el menú VIDEO (página
23). >
“►Ajuste BRILLO en el menú VIDEO (página
23).
^Ajuste la convergencia (página 16).
“►Compruebe las conexiones de la antena/
cables (página 6).
Líneas de puntos o estrías
“►Ajuste la antena.
^ Aleje el TV de proyección de fuentes de
ruido, como automóviles, señales de neón
y secadores de pelo.
Imágenes dobles o secundarias
^ Emplee una antena exterior de alta
direccionalidad o un cable (si el problema
se produce debido a reflejos de montañas o
edificios altos cercanos).
No es posible utilizar el menú
^Si la opción que desea seleccionar aparece
en gris, no podrá seleccionarla. Oprima
TV/VIDEO correctamente.
■►Compruebe el ajuste CABLE en el menú
AJUSTES (página 17).
No es posible recibir canales superiores (UHF)
si utiliza una antena
^Compruebe que CABLE se encuentra en la
posición NO en el menú AJUSTES (página
17).
■^Utilice AUTO PROGRAMACION para
añadir canales que no están incluidos en la
memoria actualmente (página 17).
Buena calidad de imagen y ausencia de sonido
■►Oprima MUTING para que “MUTING"
desaparezca de la pantalla (página 20).
^Compruebe el ajuste MTS en el menú
AUDIO (página 25).
^Compruebe que BOCINAS esté en la
' posición TODO ON o IZ/DR OFF en el
menú AUDIO (página 27).
44-Es I
Operaciones
No es posible recibir ningún canal si utiliza un
sistema de TV por cable
■►Compruebe que CABLE se encuentra en la
posición SI en el menú AJUSTES (página
17).
^Emplee AUTO PROGRAMACION para
añadir canales que no están incluidos en la
memoria actualmente (página 17).
Page 92

Uso de la función de
control de equipos
no preprogramados
Es posible programar el control remoto suministrado
para que utilice las funciones de otro control remoto.
Emplee esta función para controlar un equipo cuyo
código de fabricante no esté preprogramado, como un
equipo de audio Sony o de otro fabricante u otro equipo
cuyO'ródigo de fabricante no esté incluido en las listas
de las páginas 40-42.
Selector VTR1 2
3 MDP
-ero CD CD CD
dD (Ш) (3)
QD ПП СсП ГГ)
CDQp-í O CZ)
I '-p~*
CD CD CD
(con la tapa abierta)
■ Indicador LEARN
-LEARN
Ajuste el selector VTR1 2 3 MDP en la
posición VTR3 o MDP.
VTR1 2 3 MDP
O O O O
Ш)
2 Oriente el control remoto suministrado
frente al control remoto del otro equipo
con una separación aproximada de 5 cm (2
pulgadas).
Control remoto
Ч- Oprima y libere el botón en el control
remoto suministrado en el que va a
programarse la función.
El indicador LEARN se apaga y se enciende de
nuevo para indicar que la función ya se ha
programado.
5 Mantenga oprimido el botón
correspondiente en el otro control remoto y
suéltelo cuando el indicador LEARN se
apague y se vuelva a encender.
Cuando el indicador LEARN se apaga y se vuelve
a encender significa c]ue la programackin ha
finalizado. En caso contrario, repita los pasos 4 y 5.
6 Repita los pasos 4 y 5 para programar otras
funciones.
7 Oprima LEARN.
El indicador LEARN se apaga para indicar que la
programación ha finalizado.
Notas
• La función LEARNING no está operativa en el ajuste VIRI o
VTR2.
• No mueva los controles remotos durante la programación.
• Si oprime un botón del control remoto suministrado que no se
puede emplear para la programación en el modo de
programación, el indicador LEARN parpadeará cuatro veces.
• Si la señal del otro control remoto no puede detectarse, el
indicador LEARN parpadeará cuatro veces.
• Para borrar todas las memorias programadas, ajuste el selector
VTRl 2 3 MDP en la posición MDP y oprima LEARN, a
continuación, oprima TV POWER mientras mantiene oprimido
VOL-. Finalmente, vuelva a oprimir LEARN.
Precaución
• Si tarda al extraer las pilas, por ejemplo para cambiarlas, tarde
demasiado tiempo, los números de código cambiarán a los
predefinidos en fábrica y será necesario realizar una puesta a
cero.
3 Oprima y libere el botón LEARN.
El indicador LEARN se ilumina.
LEARN
Operaciones
43
-ES
Page 93

El control remoto no funciona
"♦La pila puede estar agotándose. Sustitúyala
(página 13).
^Asegúrese de que el cable del alimentación
del TV de proyección está firmemente
conectado a la toma mural.
-►Oprima TV FUNCTION al utilizar el TV de
proyección.
■^¿Se encuentra el TV de proyección cerca de
luces fluorescentes? Aleje las luces de 3 a 4
pies como mínimo del TV de proyección.
Algunos botones del control remoto no
funcionan
'■^Oprima el botón FUNCTION correcto en
función del equipo que utilice (páginas 19,
42).
No es posible aumentar el volumen hasta un
nivel adecuado al utilizar un decodificador
^Aumente el volumen del decodificador. A
continuación, oprima TV FUNCTION y
ajuste el volumen del TV de proyección
(página 42).
La hora actual se reajusta cada vez que se
activa el TV de proyección
^Conecte los cables de alimentación AV del
TV de proyección y del decodificador a
distintas tomas murales.
Los botones 0-9, CH +/-, TVAAIDEO y ANT/AUX
del control remoto no funcionan.
^ Seleccione TV OUT en el menú INPUT /
OUTPUT e introduzca NO (página 30).
Operaciones 45'^^
Page 94

Especificaciones
Sistema de proyección
3 tubos de imagen, 3 objetivos,
sistema de 3 líneas
horizontales
Tubo de imagen Tubos monocromos de alto
nivel de brillo de 7 pulgadas
(tamaño de trama de 6,3) con
acoplamiento óptico y sistema
de refrigeración
Objetivos de proyección
Objetivo híbrido de diámetro
largo y alto rendimiento F1,0
Impedancia: 47 kiloOhmios
SELECT OUT
VIDEO (toma de entrada de
línea): 1 Vp-p, 75 Ohmios
descompensada,
sincronización negativa
AUDIO (tomas de entrada de
línea):
470 mVrms (modulación del
100%)
Impedancia: 75 kiloOhmios
AUDIO (VAR) OUT (tomas de
entrada de línea): 760 mVrms
(modulación del 100%)
AUDIO (FIX) OUT (tomas de
entrada de línea: 500 mVrms
(modulación del 100%)
CONTROL S IN/OUT
minitomas
Bocina
Frontal
(Agjudos)
KP-53XBR45 25mm{l")x2 130mm(5")x2 100mm(4")x2 75mm(3")x2
KP-61XBR48 50mm (2") X 4 lóOmm {6 ^/s") x 2 lO Omm (4") x 2 75m m{3")x2
(Graves)
Centro Posterior
Tamaño de pantalla (medida en diagonal)
KP-53XBR45 53 pulgadas
KP-61XBR48 61 pulgadas
Brillo de pantalla
KP-53XBR45 900 cd/m^
KP-61XBR48 700 cd/m"
Basado en las normas de TV
americanas
Cobertura de canales
VHF; 2^13/UHF; 14-69/CATV;
1-125
Antena
Terminal de antena exterior de
75 Ohmios para VHF/UHF
Entradas/Salidas
VIDEO 1 /3/4/5 IN y VIDEO 2
INPUT
S VIDEO IN (mini DIN de 4
pines):
Y: 1 Vp-p, 75 Ohmios,
descompensada,
sincronización negativa
C; 0,286 Vp-p (Señal de
sincronización de
crominancia), 75 Ohmios
VIDEO (toma de entrada de
línea):
1 Vp-p, 75 Ohmios
descompensada,
sincronización negativa
AUDIO (tomas de entrada de
línea);
500 mVrms (modulación del
100% )
46
■ES
Operaciones
Salida de bocina Frontal: 20 W x 2
Centro: 20 W x 2
Posterior: 10 W x 2
Requisitos de alimentación
120 V, 60 Hz
Consumo de alimentación
300 w
Modo en espera; 4 W
Dimensiones (al/an/f)
KP-53XBR45 1,238 X 1,442 X 647 mm
{48 V4X 56 '/» X 25 ’/2 pulgadas) (255 Ibs 12 oz)
Peso
116 kg
KP-61XBR48 1,520 X 1,550 X 778 mm 180 kg
(59 ^ / 8 X 61 7 8 X 30 V4 pulgadas) (396 Ibs 13 oz)
Accesorios suministrados
Control remoto RM-Y128 (1)
Pilas R6 (tamaño AA) (2)
Bocinas posteriores (2)
Cable de bocina (2)
Accesorios opcionales
Soporte SU-XBR-1 de AV
Base inferior para el soporte
SU-61BASE- de AV
(Solo para el modelo KP61XBR48)
Mezclador U/VEAC-66
Cables de conexión RK-74A,
VMC-810S/820S, YC-I5V/30V
Diseño y especificaciones sujetos a cambio sin previo
aviso.
Page 95

é , f ' í-’I «?j *i-i
«si- ' . 1 t' 1- 'í' ,- •-.: ^'í'
-íi'.’" i .'■'ifS
si
Subtítulo 39
S vídeo 8
Tono de prueba 28
TV por cable 17
Tvvin View'^' 21
Visualización
cintas de vídeo 20
TV 19
XDS 39
Ajuste
convergencia 16
imagen 23
sonido 25
Antena__6
Nomble del canal 35
Bloqueo de canales 34
Borrado/adición 15
Cambio del idioma de menú 17
Cancelación 20
Conexión
con una antena 6
con una videograbadora 7, 8
con un receptor DSS 9
sin una videograbadora 6
Control remoto 13
Control universal 13
Cronodesconectador 20
Decodificador 42
Etiqueta de vídeo 31
Ajuste
hora de verano 32, 33
reloj 31
DEMO 14
Dolby Pro Logic 11, 27
Indicador STEREO 26
Indicador TIMER 34
Modo GAME 27
Modo LIVE 27
Modo SIMULATED 27
Modo Q03 STEREO 27
MTS (Multichannel TV Sound) 26
Pila 13
P&P (Picture-and-Picture) 21
PIP (Picture-in-picture) 21
Programación automática 14,17
Programación de canales 14,17
Receptor DSS 9, 42
Salto 19
SAP (Second Audio Program) 26
SELECCION VIDEO 29
Sonido periférico 27
Nombres de controles
Botón »(í ndice de canales) 22
Botón [J (P&P) 21
Botón Q (PIP) 21
Botón ANT/AUX 20
Botón AUDIO 22
Botón CODE SET 40
Botón DISPLAY 20, 39
Botón ENTER 19,40
Botón FREEZE 22
Botón FUNCTION (CABLE) 42
Botón FUNCTION (DSS) 42
Botón FUNCTION (TV) 19
Botón JUMP 19
Botón MENU 13
Botón MUTING 20
Botón PIP OFF 21
Botón PIP TV/VIDEO 21
Botón POSITION 22
Botón POWER (CABLE) 42
Botón POWER (DSS) 42
Botón POWER (TV) 19
Botón SLEEP 20
Botón SWAP 22
Botón TV/VIDEO 14,20
Botones CH (canal) + /- 15,19
Botones PIP CH (canal) +/- 21
Botones VTR (POWER, CH +/-, ►, I
•, REC, TV/VTR) 41
Botones VOL (volumen) +/- 19
Control universal 13
Terminal de antena VHF/UHF 5, 7
Terminales CENTER SPEAKER IN 11
Terminales REAR SPEAKER OUT 5
Toma de entrada S VIDEO 8
Toma VIDEO 1/3/4/5 IN 7-10
Toma VIDEO 2 INPUT 10
Tomas AUDIO L(MONO)/R IN 7-10, 12
Tomas AUDIO (FIX) OUT 11
Tomas AUDIO (VAR) OUT 11
Tomas CONTROL S 12
Tomas SELECT OUT 10, 12
II,
Operaciones
47
-ES
 Loading...