

Page 1
2-897-332-03(1)
KLH-W26/KLH-W32
Flat Wide Display
Monitor
取扱説明書
Operating Instructions
Mode d’emploi
Bedienungsanleitung
Manual de instrucciones
Istruzioni per l’uso
JP
GB
FR
DE
ES
IT
CS
Sony Corporation Printed in China
お買い上げいただきありがとうございます。
電気製品は安全のための注意事項を守らないと、
火災や人身事故になることがあります。
この取扱説明書には、事故を防ぐための重要な注意事項と製品の取
り扱いかたを示してあります。この取扱説明書をよくお読みのうえ、
製品を安全にお使いください。お読みになったあとは、いつでも見
られるところに必ず保管してください。
KLH-W26/KLH-W32
© 2006 Sony Corporation
Page 2
安全のために
ソニー製品は安全に充分配慮して設計されています。しかし、電気
製品は、まちがった使いかたをすると、火災や感電などにより死亡
や大けがなど人身事故につながることがあり、危険です。
事故を防ぐために次のことを必ずお守りください。
安全のための注意事項を守る
4 〜 7 ページの注意事項をよくお読みください。
8 ページの「本機の性能を保持するために」もあわせてお読みくだ
さい。
定期点検をする
5 年に 1 度は、内部の点検を、お買い上げ店またはソニーのサービ
ス窓口にご依頼ください(有料)。
故障したら使わない
すぐに、お買い上げ店またはソニーのサービス窓口にご連絡くださ
い。
万一、異常が起きたら
・ 煙が出たら
・ 異常な音、におい
がしたら
・ 内部に水、異物が
入ったら
・ 製品を落としたり
キャビネットを破
損したときは
1 ディスプレイの電源を切る。
2 ディスプレイの電源コードや
,
接続コードを抜く。
3 お買い上げ店またはソニーの
サービス窓口に連絡する。
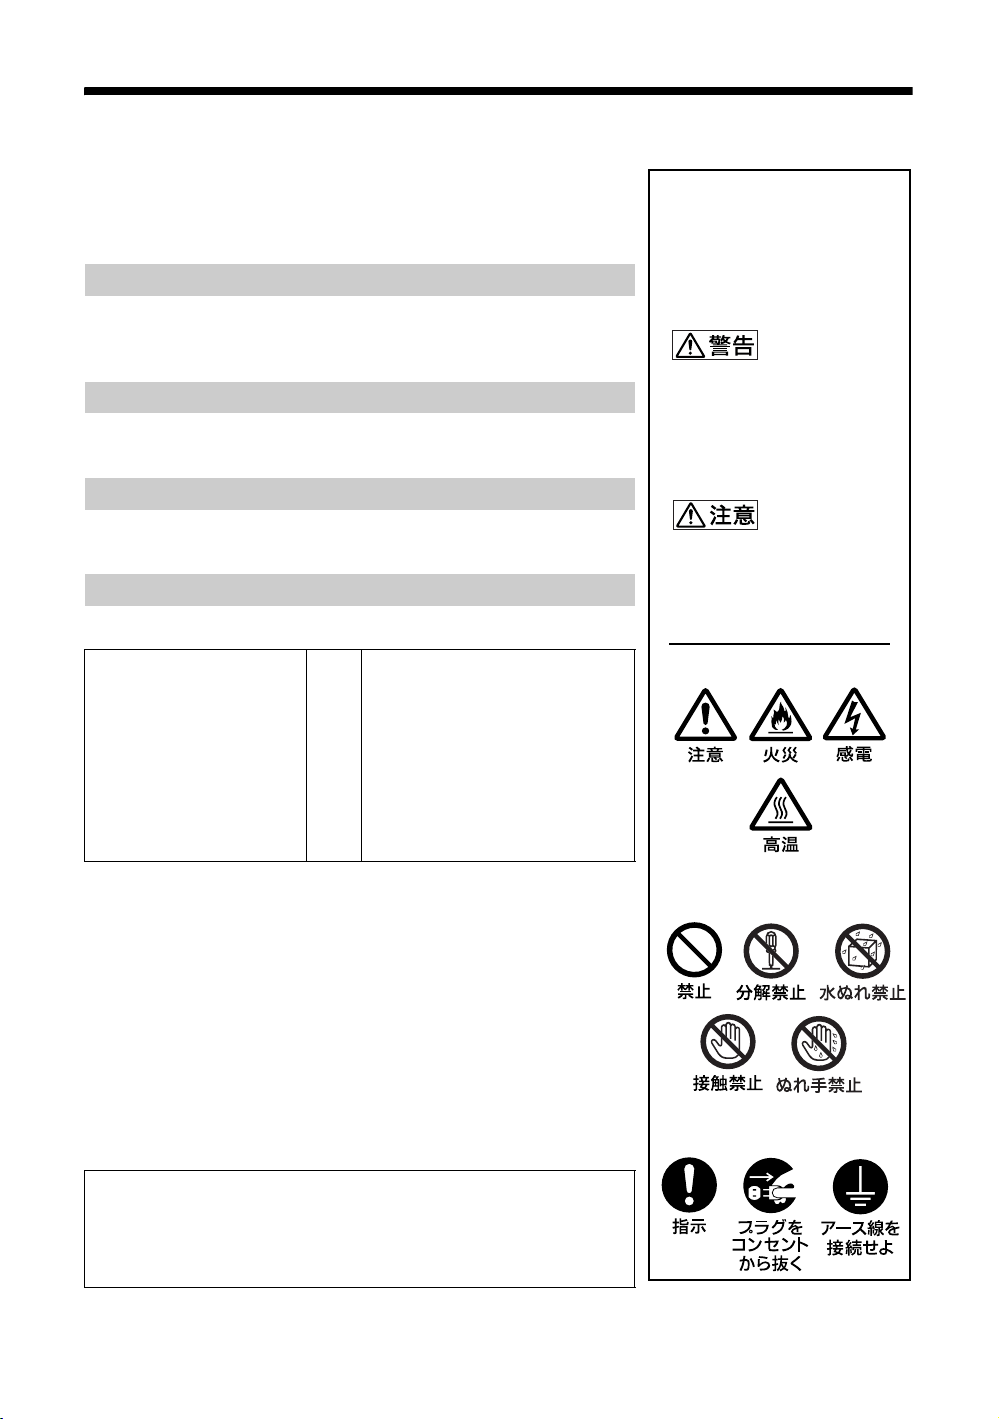
警告表示の意味
取扱説明書および製品で
は、次のような表示をして
います。表示の内容をよく
理解してから本文をお読み
ください。
この表示の注意事項を守ら
ないと、火災や感電などに
より死亡や大けがなど人身
事故につながることがあり
ます。
この表示の注意事項を守ら
ないと、感電やその他の事
故によりけがをしたり周辺
の物品に損害を与えたりす
ることがあります。
注意を促す記号
行為を禁止する記号
この装置は、情報処理装置等電波障害自主規制協議会(VCCI)の基準
に基づくクラス B 情報技術装置です。この装置は、家庭環境で使用す
ることを目的としていますが、この装置がラジオやテレビジョン受信
機に近接して使用されると、受信障害を引き起こすことがあります。
取扱説明書に従って正しい取り扱いをしてください。
JP
2
行為を指示する記号
Page 3
目次
警告..............................................................................................................................................4
注意..............................................................................................................................................5
電池についての安全上のご注意......................................................................................................7
本機の性能を保持するために..........................................................................................................8
設置するときのご注意 .....................................................................................................................9
各部の名称と働き
前面パネル......................................................................................................................................10
サイドパネル..................................................................................................................................11
オプションアダプター ..................................................................................................................12
後面パネル......................................................................................................................................13
リモコン..........................................................................................................................................14
ボタンの機能 ............................................................................................................................14
リモコンの特別ボタン.............................................................................................................16
ワイド切換を使う ...............................................................................................................16
スリープタイマー機能を使う............................................................................................17
ECO モード機能を使う......................................................................................................17
JP
接続
電源コードを接続して信号ケーブルを処理する........................................................................18
メニューの設定
メニュー一覧..................................................................................................................................19
画質メニュー..................................................................................................................................21
音質メニュー..................................................................................................................................23
画面調整メニュー ..........................................................................................................................24
設定メニュー..................................................................................................................................27
その他の情報
故障かな?と思ったら ..................................................................................................................29
入力信号一覧表..............................................................................................................................30
仕様 .................................................................................................................................................31
索引 .................................................................................................................................................33
JP
3
Page 4
警告
下記の注意を守らないと、火災や感
電
により死亡や大けがにつながる
ことがあります。
内部に水や異物をいれない
水や異物が入ると火災や感電の
原因となることがあります。
万一、水や異物が入ったときは、
すぐに電源を切り、電源コード
や接続コードを抜いて、お買い
上げ店またはソニーのサービス
窓口にご相談ください。
規定の電源電圧で使う
この取扱説明書に記されている
電源電圧でお使いください。
規定外の電源電圧での使用は、
火災や感電の原因となります。
油煙、湯気、湿気、ほこりの多い場
所では設置・使用しない
上記のような場所に設置すると、
火災や感電の原因となります。
この取扱説明書に記されている
仕様条件以外の環境での使用は、
火災や感電の原因となります。
分解や改造をしない
分解や改造をすると、火災や感
電、けがの原因となることがあ
ります。
内部の点検や修理は、お買い上
げ店またはソニーのサービス窓
口にご依頼ください。
電源コードを傷つけない
電源コードを傷つけると、火災や
感電の原因となります。次の項目
を必ずお守りください。
・設置時に、本機と壁やラック、
棚などの間に、はさみ込まな
い。
・電源コードを加工したり、傷つ
けたりしない。
・重いものをのせたり、引っ張っ
たりしない。
・熱器具に近づけたり、加熱した
りしない。
・電源コードを抜くときは、必ず
プラグを持って抜く。
万一、電源コードが傷んだら、お
買い上げ店またはソニーのサービ
ス窓口に交換をご依頼ください。
設置・取り付けは確実に
不確実な設置を行うと、ディス
プレイが転倒してけがや火災・
感電の原因となります。設置の
際は、以下の注意事項を必ずお
守りください。
壁面・天井・台上への設置、ま
たは転倒防止のためディスプレ
イを固定するなど、特殊な設置
を行う場合には、必ずお買い上
げ店に工事を依頼してください。
安全アースを接続する
安全アースを接続しないと、感
電の原因となることがあります。
次の方法でアースを接続してく
ださい。
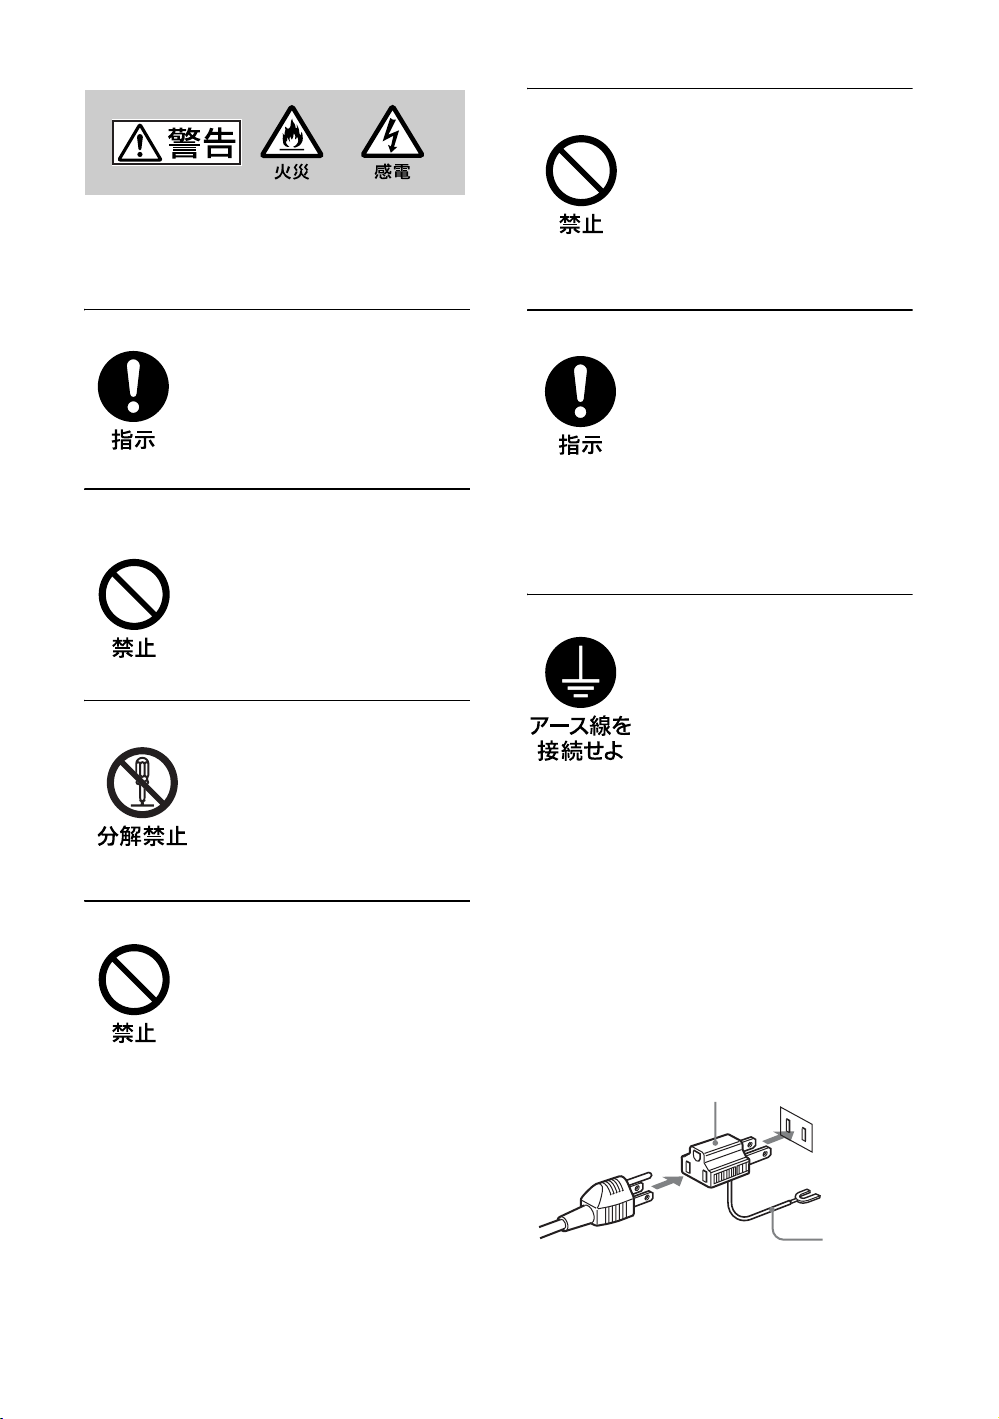
・電源コンセントが 3 極の場合
付属の電源コードを使用するこ
とで、安全アースが接続されま
す。
・電源コンセントが 2 極の場合
付属の 3 極→2 極の変換プラグ
アダプターを使用し、変換プラ
グアダプターから出ている緑色
のアースを、建物に備えられて
いるアース端子に接続する。
・アース接続は、必ず電源プラグ
を電源につなぐ前に行ってくだ
さい。また、アース接続をはず
す場合は、必ず電源プラグを電
源から切り離してから行ってく
ださい。
変換プラグアダプター
アース線
不明な点はお買い上げ店またはソ
ニーのサービス窓口にご相談くだ
さい。
JP
4
Page 5
高温部分に触れない
機器を使用中または使用直後に
は上面や側面が高温になってい
るため、やけどをすることがあ
ります。
使用中および電源を切るまたは
スタンバイした状態から 10 分間
は触れないでください。
注意
下記の注意を守らないと、けがをし
たり周辺の物品に
があります。
重いディスプレイは、2 人以上で開
梱・運搬する
損害を与えること
ディスプレイは見た目より重量
があります。開梱・運搬は、け
がや事故を防ぐため、必ず 2 人
以上で行ってください。1 人で行
うと腰を痛めることがあります。
不安定な場所に設置しない
ぐらついた台の上や傾いたとこ
ろなどに設置すると、ディスプ
レイが落ちたり、倒れたりして、
けがの原因となることがありま
す。
また、設置・取り付け場所の強
度を充分にお確かめください。
接続の際は電源を切る
電源コードや接続ケーブルを接
続するときは、電源を切ってく
ださい。感電や故障の原因とな
ることがあります。
指定された電源コード、接続ケーブ
ルを使う
付属の、あるいは取扱説明書に
記されている電源コード、接続
ケーブルを使わないと、感電や
故障の原因となることがありま
す。
ほかの電源コードや接続ケーブ
ルを使用する場合は、お買い上
げ店またはソニーのサービス窓
口にご相談ください。
JP
ぬれた手で電源プラグをさわらない
ぬれた手で電源プラグを抜き差
しすると、感電の原因となるこ
とがあります。
水のある場所に設置しない
水が入ったり、ぬれたりすると、
火災や感電の原因となることが
あります。雨天や降雪中、海岸
や水辺での使用は特にご注意く
ださい。
通風孔をふさがない
通風孔をふさぐと内部に熱がこ
もり、火災や故障の原因となる
ことがあります。風通しをよく
するために次の項目をお守りく
ださい。
・ 設置の項(9ページ)に従って
設置してください。
・ 密閉された狭い場所に押し込
めない。
・ 毛足の長い敷物(じゅうたん
や布団など)の上に設置しな
い。
・ 布などで包まない。
・ あお向けや横倒し、逆さまに
しない。
JP
5
Page 6
設置時には転倒防止処置を行う
本機を据え置きする際には、万
一の場合に備え、転倒防止処置
を行ってください。
直射日光の当たる場所や熱器具の近
くに設置・保管しない
内部の温度が上がり、火災や故
障の原因となることがあります。
電源コードのプラグおよびコネク
ターは突き当たるまで差し込む
まっすぐに突き当たるまで差し
込まないと、火災や感電の原因
となります。
お手入れの際は、電源を切って電源
プラグを抜く
電源を接続したままお手入れを
すると、感電の原因となること
があります。
定期的に内部の掃除を依頼する
長い間、掃除をしないと内部に
ホコリがたまり、火災や感電の
原因となることがあります。1 年
に 1 度は、内部の掃除をお買い
上げ店またはソニーのサービス
窓口にご依頼ください(有料)。
特に、湿気の多くなる梅雨の前
に掃除をすると、より効果的で
す。
人が通行するような場所に置かない
コード類は正しく配置する
電源コードや接続ケーブルは、
足に引っかけると本機の落下や
転倒などによりけがの原因とな
ることがあります。人が踏んだ
り、引っかけたりするような恐
れのある場所を避け、充分注意
して接続・配置してください。
コード類は正しく配置する
電源コードや接続ケーブルは、
足に引っかけると本機の落下や
転倒などによりけがの原因とな
ることがあります。
充分注意して接続・配置してく
ださい。
変換プラグアダプターのアース
キャップは幼児の手の届かないとこ
ろに保管する
万一、誤って飲み込んだときは、
窒息する恐れがありますので、
ただちに医師にご相談ください。
移動させるときは電源コード、接続
ケーブルを抜く
接続したまま移動させると、電
源コードや接続ケーブルが傷つ
き、火災や感電の原因となるこ
とがあります。
JP
6
Page 7
電池についての安全
上のご注意
液漏れ・破裂・発熱による大けがや
失明を避けるため、下記の注意事項
を必ずお守りください。
下記の注意事項を
守らないと、破
裂・発熱・液漏れ
により、死亡や大けがなどの人身事
故になることがあります。
電池の液が漏れたときは
素手で液をさわらない
電池の液が目に入ったり、身体や
衣服につくと、失明やけが、皮膚
の炎症の原因となることがありま
す。液の化学変化により、時間が
たってから症状が現れることがあ
ります。
必ず次の処理をする
液が目に入ったときは、目をこす
らず、すぐに水道水などのきれい
な水で充分洗い、ただちに医師の
治療を受けてください。
液が身体や衣服についたときは、
すぐにきれいな水で充分洗い流し
てください。皮膚の炎症やけがの
症状があるときは、医師に相談し
てください。
電池は乳幼児の手の届か
ない所に置く
電池は飲み込むと、窒息や胃など
への障害の原因となることがあり
ます。
万一、飲み込んだときは、ただち
に医師に相談してください。
下記の注意事項を
守らないと、破
裂・液漏れによ
り、けがをしたり周辺の物品に損害
を与えたりすることがあります。
指定以外の電池を使わな
い、新しい電池と使用し
た電池または種類の違う
電池を混ぜて使わない
電池の性能の違いにより、破裂し
たり、液が漏れたりして、けがや
やけどの原因となることがありま
す。
マンガン電池をお使いください。
電池の品番を確かめ、お使いくだ
さい。
+と−の向きを正しく入
れる
+と−を逆に入れると、ショート
して電池が発熱や破裂をしたり、
液が漏れたりして、けがややけど
の原因となることがあります。
機器の表示に合わせて、正しく入
れてください。
JP
使用済みの電池は、地域
のルールに従って処分し
てください。
電池を火の中に入れない、
加熱・分解・改造・充電
しない、水でぬらさない
破裂したり、液が漏れたりして、
けがややけどの原因となることが
あります。
使い切ったときや、長時
間使用しないときは、電
池を取り出す
電池を入れたままにしておくと、
過放電により液が漏れ、けがやや
けどの原因となることがあります。
リモコンのフタを開けて
使用しない
リモコンのフタを開けたまま使用
すると、漏液、発熱、発火、破裂
などの原因となることがあります。
マンガン電池を使用し、フタを閉
めて使用してください。
7
JP
Page 8
本機の性能を保持す
るために
液晶パネルについて
・ 画面上に赤や青、緑の点(輝点)が消えな
かったり、黒い点(滅点)がある場合があり
ますが、故障ではありません。パネルは非常
に精密な技術で作られており、ごくわずかの
画素欠けや常時点灯する画素がある場合があ
ります。ご了承ください。
・ 液晶画面を太陽に向けたままにすると、液晶
画面を傷めてしまいます。窓際や室外に置く
ときなどはご注意ください。
・ 前面のフィルターを強く押したり、ひっかい
たり、上にものを置いたりしないでくださ
い。画面にムラが出たり、液晶パネルの故障
の原因になります。
・ 寒い所でご使用になると、画像が尾を引いて
見えたり、画面が暗く見えたりすることがあ
りますが、故障ではありません。温度が上が
ると元に戻ります。
・ 静止画を継続的に表示した場合、残像を生じ
ることがありますが、表示内容を変えたり、
画面全体を白表示にすることで徐々に解消さ
れます。なお、長期にわたり同じ表示を続け
た場合は、元に戻らなくなることがあります
ので、ご注意ください。
・ 使用中に画面やキャビネットが温かくなるこ
とがありますが、故障ではありません。
設置についてのご注意
ほかの機器と組み合わせて設置する場合、各機
器の設置位置などにより、リモコンの誤動作や
映像の乱れ、雑音などが起こることがありま
す。この場合は、お買い上げ店、またはソニー
のサービス窓口にご連絡ください。
ディスプレイのお手入れについて
スクリーン面の汚れは
・ お手入れをする前に、必ず電源プラグをコン
セントから抜いてください。
・ 液晶の画面は特殊加工がされていますので、
なるべく画面に触れないようにしてくださ
い。また画面の汚れを拭きとるときは、乾い
た柔らかい布で拭きとってください。
・ アルコールやシンナー、ベンジンなどは使わ
ないでください。変質したり、塗装がはげた
りすることがあります。
・ 化学ぞうきんをご使用の際は、その注意書き
に従ってください。
・ 殺虫剤のような揮発性のものをかけたり、ゴ
ムやビニール製品に長時間接触させると、変
質したり、塗装がはげたりすることがありま
す。
外装の汚れは
・ 乾いた柔らかい布で軽く拭いてください。汚
れがひどいときは、薄い中性洗剤溶液を少し
含ませた布で拭きとり、乾いた布でから拭き
してください。
・ アルコールやベンジン、シンナー、殺虫剤な
どは使わないでください。表面の仕上げを傷
めたり、表示が消えてしまうことがありま
す。
ディスプレイ表面の取扱いについて
のご注意
ディスプレイの表面は傷つきやすいので、硬い
ものでこすったり、たたいたり、ものをぶつけ
たりしないでください。
電源接続時のご注意
それぞれの地域に合った電源コードをお使いください。
アメリカ合衆国、
カナダ
プラグ型名 VM0233 COX-07 636
コネクタ型名 VM0089 COX-02 VM0310B VM0303B VM1313
コード型名 SVT H05VV-F CEE(13)53rd(O.C) HVCTF
定格電圧・電流 10A/125V 10A/250V 10A/250V 10A/125V
安全規格 UL/CSA VDE VDE 電安法
1)プラグに関しては各国・地域規制に適合し、使用に適した定格のものを使用してください。
JP
8
ヨーロッパ諸国
イギリス、アイルランド、オー
ストラリア、ニュージーランド
1)
–
日本
VM1296
Page 9
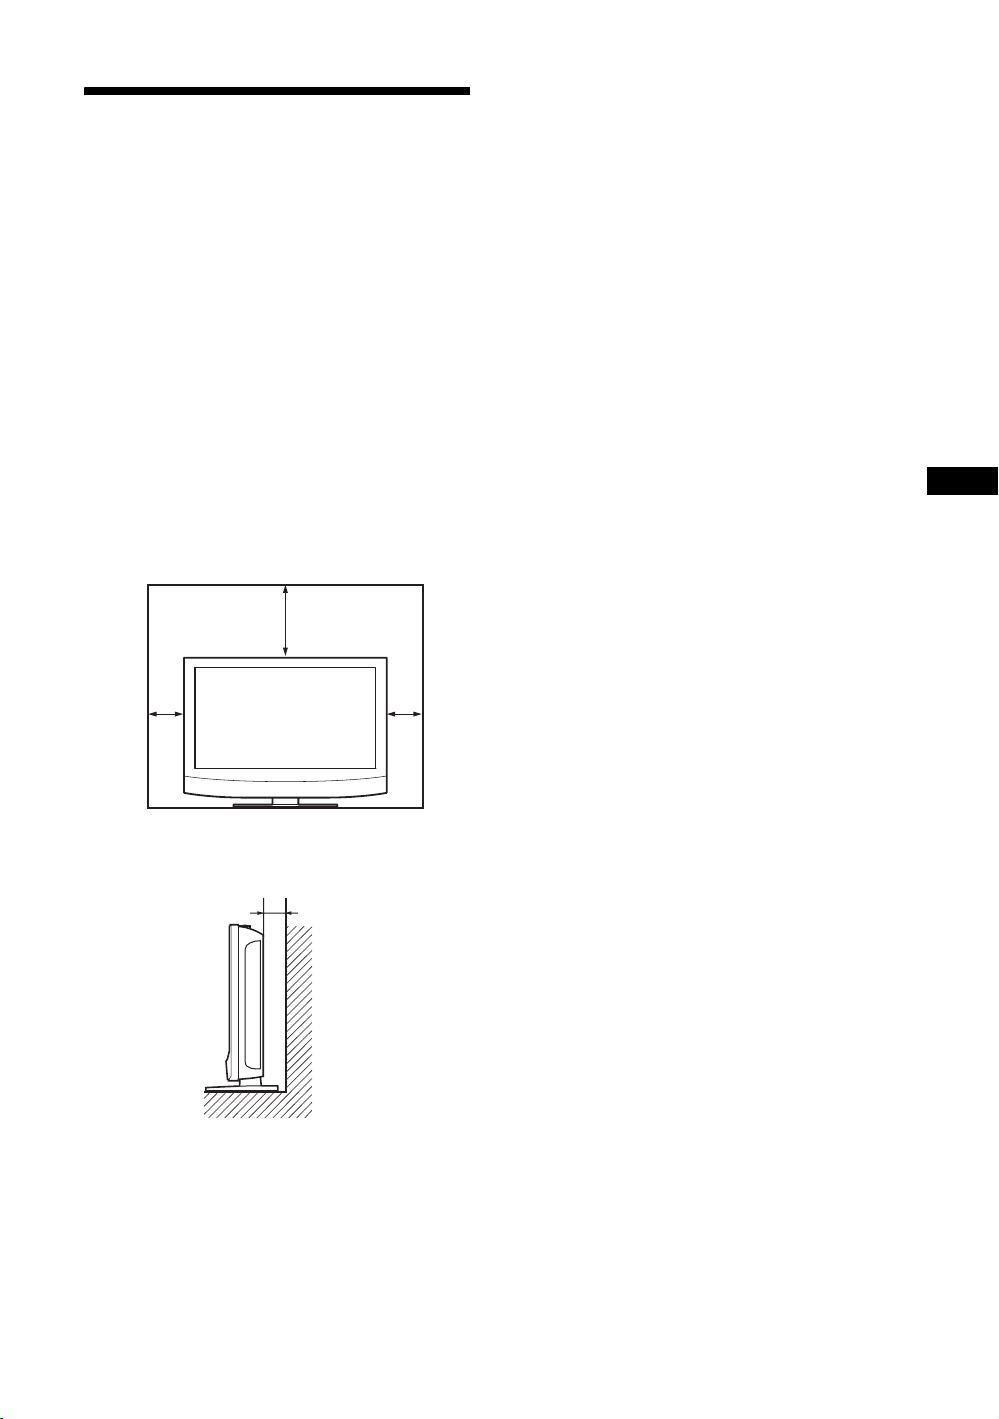
設置するときのご注
意
周囲に充分なスペースをとる
・ 内部の温度上昇を防ぐため、密閉状態にならないよ
うにディスプレイの周囲に少なくとも下図に示す距
離をあけて、通風を確保してください。
・ 周囲の温度は 0℃〜 35℃の範囲でご使用ください。
・ ブラケットやネジ、ボルトなどの設置機材について
特定の製品を指定することはできません。実際の設
置は、お買い上げ店またはソニーのサービス窓口に
ご依頼ください。設置についてはソニーのサービス
窓口にご相談ください。
・ 通電中は高温になる部分があり、やけどの原因とな
ります。通電中やスタンバイにした直後は、本機の
上面、後面には手を触れないでください。
前面
20
JP
側面
10
10
10
単位:cm
JP
9
Page 10
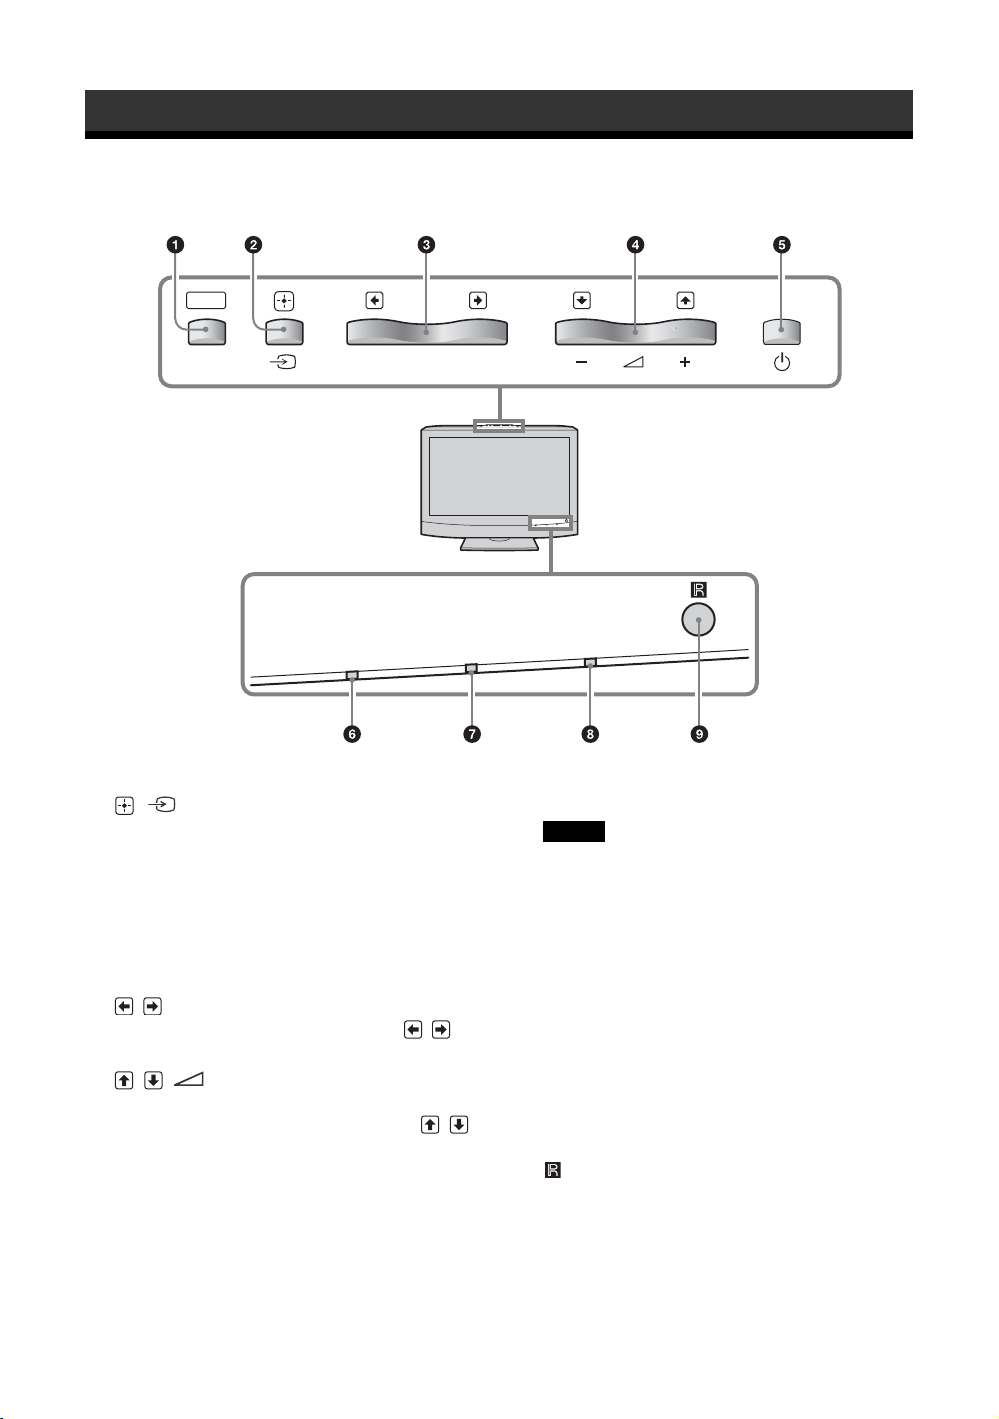
各部の名称と働き
前面パネル
MENU
PIC OFF/TIMER
1 MENU(19 ページ)
2 /(INPUT)
・ メニュー画面で、「決定」ボタンとして使いま
す。
・ メニュー画面以外では、入力信号を切り換え
るために使います。
HD15/HDMI1/HDMI2/OPTION 端子からの
入力信号を選びます。
OPTION スロットにオプションアダプターが
ないときは、OPTION をスキップします。
3 /
メニュー画面で、左右の移動ボタン( / )
として使います。
4 //
・(+)と(−)で音量を調整します。
・ メニュー画面で、上下の移動ボタン( / )
として使います。
STANDBY
POWER
5 1
本機の電源を入/切(スタンバイ)します。
ご注意
パネル保護のため、電源の入/切(スタンバイ)
に時間がかかります。再度、電源を入れる場合
は約 5 秒待ってから行ってください。
6 PICOFF/TIMER インジケーター
・「ECO モード」の「消画」機能を使用してい
るとき、緑色に点灯します。
・「スリープタイマー」機能を使用していると
き、オレンジ色に点灯します。
7 STANDBY インジケーター
本機がスタンバイ状態のとき、赤色に点灯しま
す。
8 POWER インジケーター
本機の電源を入れると緑色に点灯します。
9 リモコンセンサー
10
JP
Page 11
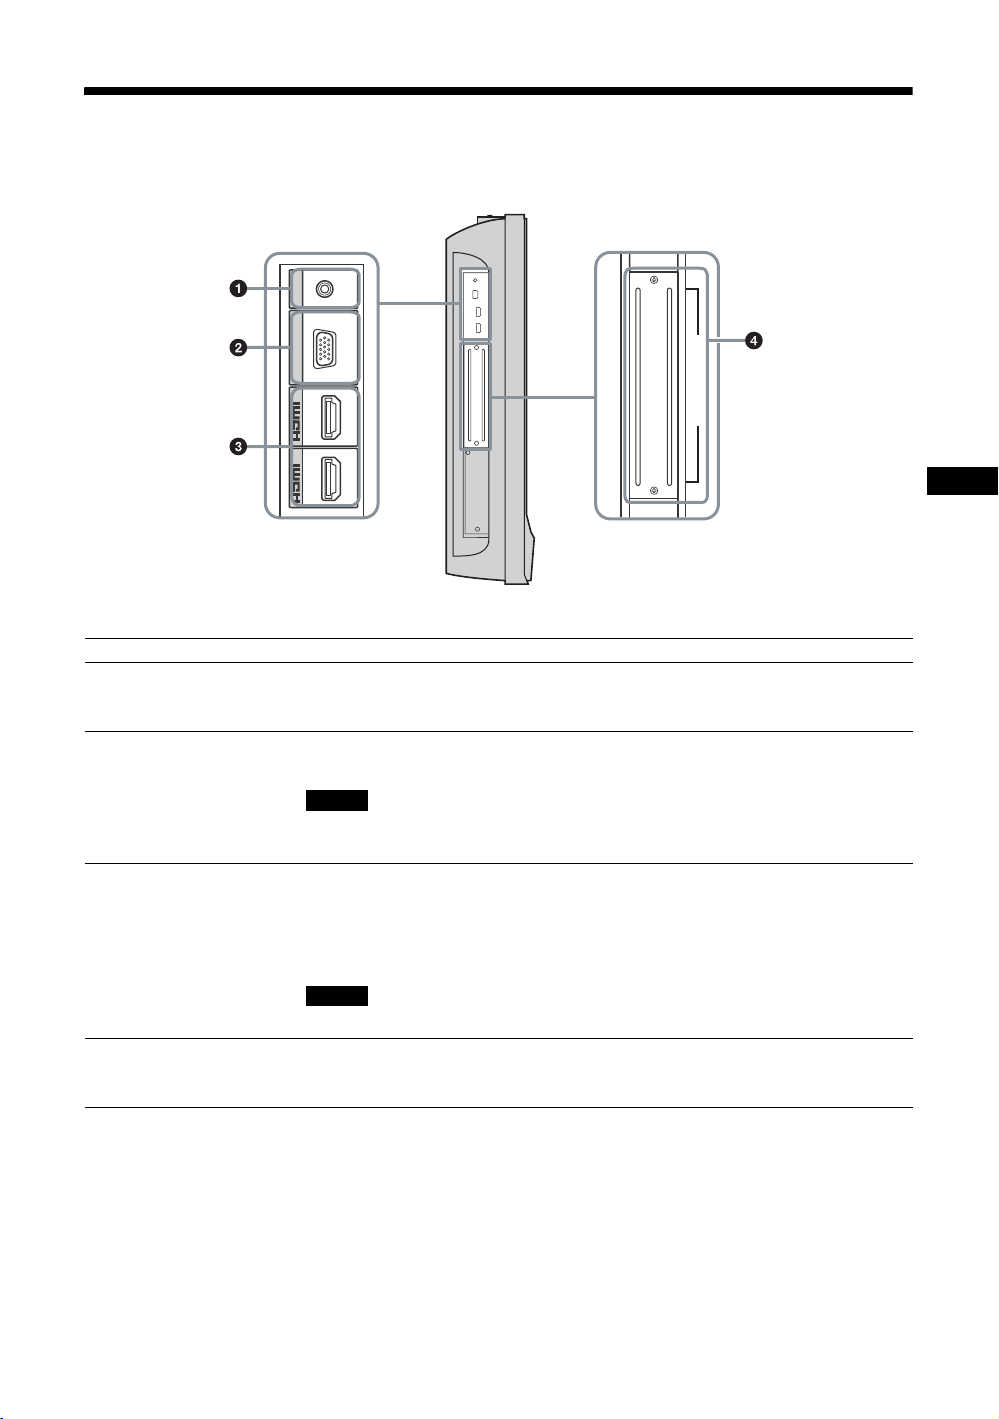
サイドパネル
AUDIO
COM MON
AUDIO IN
HD 15
RGB/COMPONENT IN
1
IN
2
IN
端子 説明
1AUDIO(COMMON
AUDIOIN)(ステレオミ
音声信号を入力します。映像機器や PC の音声出力端子と接続します。2 と 3
の音声入力に対応しています。
ニジャック)
2HD15(RGB/
COMPONENTIN)
(D-sub15 ピン)
映像機器や PC のアナログ RGB 信号出力端子、またはコンポーネント信号出力
端子と接続します。32 ページをご覧ください。
ご注意
コンポーネント信号を入力する際は 13、14 ピンに同期信号を入力しないでくだ
さい。画像が正しく表示されない場合があります。
3HDMI1/HDMI2IN HDMI(High-DefinitionMultimediaInterface)端子は、本機と HDMI 対応の音
声/映像機器や PC とのインターフェースを提供します。高精細な映像と 2 チャ
ンネルのデジタル音声をお楽しみいただけます。また、DVI 対応機器を HDMIDVI ケーブル(市販品)で接続することもできます。接続された機器によって、
音声/映像機器または PC の適切なモードが自動選択されます。
OPTION (VIDEO/COM)
JP
4OPTION スロット
(VIDEO/COM ポート)
ご注意
HDMI ケーブルは、必ず HDMI ロゴの付いたケーブルをご使用ください。
映像信号および通信機能に対応したスロットです。オプションアダプター
(BKM-FW シリーズなど)を装着すると、入力信号端子を拡張したり、ネット
ワーク経由でディスプレイ制御を行うことができます。
11
JP
Page 12
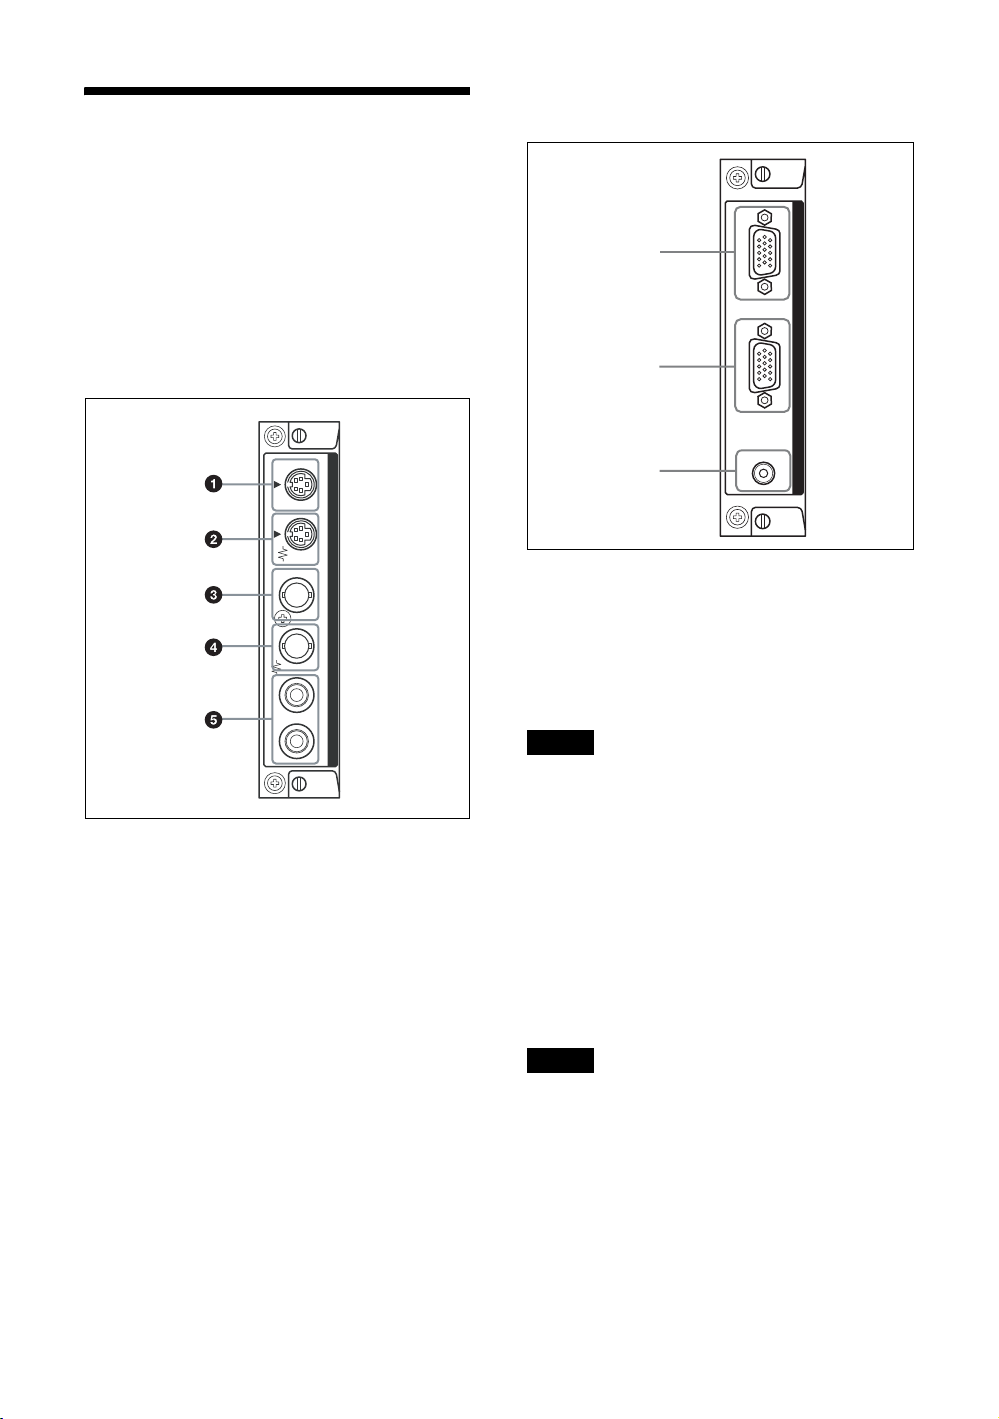
オプションアダプ
ター
サイドパネル 4 の端子部はスロットイン方式
になっていて、オプションアダプター(別売)
を取り付けることができます。
各アダプターの取り付けかたについては、お買
い上げ店またはソニーのサービス窓口にご相談
ください。
RGB/ コンポーネントアクティブス
ルーアダプターBKM-FW12
1
ビデオ入力アダプター BKM-FW10
INOUTINOUTRL
S VIDEO
VIDEO
VIDEO INPUT ADAPTOR
AUDI O IN
1 SVIDEOIN(ミニ DIN4 ピン):映像機器
の S ビデオ信号出力端子と接続します。
2 SVIDEOOUT(ミニ DIN4 ピン):映像機
器の S ビデオ信号入力端子と接続します。
3 VIDEOIN(BNC 型):映像機器のビデオ信
号出力端子と接続します。
4 VIDEOOUT(BNC 型):映像機器のビデオ
信号入力端子と接続します。
5 AUDIOINL/R(ピンジャック):映像機器
の音声出力端子と接続します。
2
3
AUDI O
OUT IN
RGB/COMPONENT ACTIVE THROUGH
IN
1 RGB/COMPONENTIN(RGB/ コンポー
ネント信号入力)端子(D-sub15 ピン):
映像機器やPCのアナログ RGB 信号出力端子
またはコンポーネント信号出力端子と接続し
ます。コンポーネント信号をこの端子へ入力
する場合には、32 ページのピン配列を参考に
してください。
ご注意
コンポーネント信号を入力する際は 13、14 ピンに同
期信号を入力しないでください。画像が正しく表示さ
れない場合があります。
2 RGB/COMPONENTOUT(RGB/ コンポー
ネント信号出力)端子(D-sub15 ピン):
映像機器や PC のアナログ RGB 信号入力端
子またはコンポーネント信号入力端子と接
続します。
3 AUDIOIN(音声入力)端子(ステレオミ
ニジャック):
音声信号を入力します。映像機器や PC の音
声出力端子と接続します。
ご注意
本機がスタンバイ状態のときや AC 電源が接続されて
いないときは、RGB/COMPONENTOUT 端子からは
出力されません。
12
その他、機能拡張用オプションアダプター
BKM-FW シリーズについては、それぞれの取
扱説明書をご覧ください。
JP
Page 13
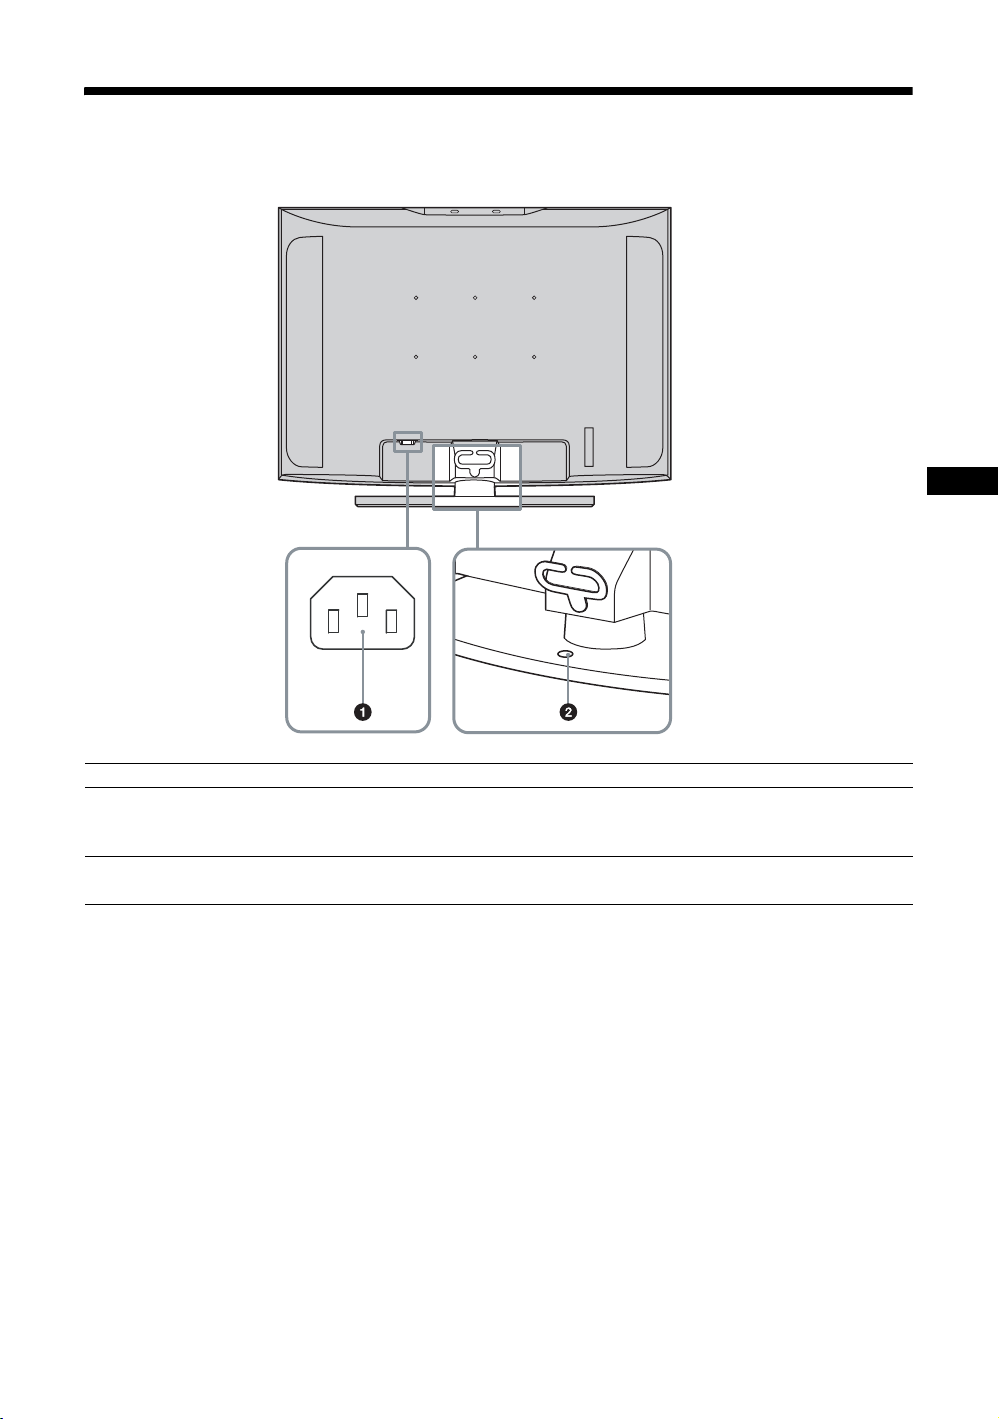
後面パネル
JP
各部 説明
1ACIN(電源入力)ソ
ケット
2スタンド固定穴 ディスプレイをテーブルなどに固定するときに使用します。ネジ(M6)を使用
付属の電源コードをこのソケットとコンセントに接続します。電源コードを接
続すると、STANDBY インジケーターが赤色に点灯し、本機はスタンバイ状態
になります。18 ページをご覧ください。
してください。
13
JP
Page 14
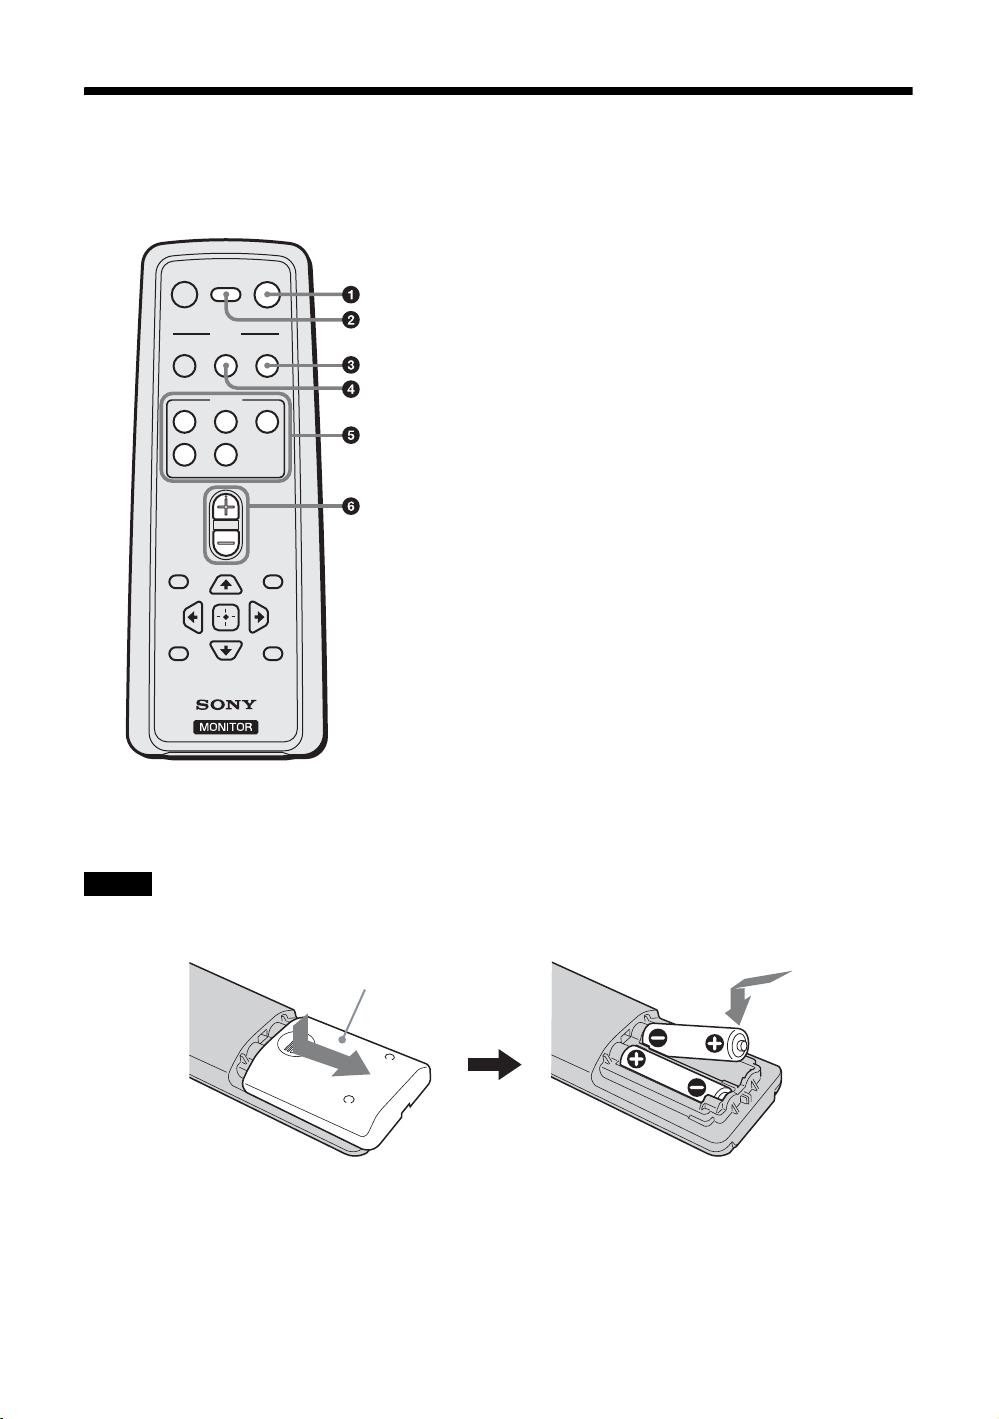
リモコン
ボタンの機能
MUTING DISPLAY
MODE
PICTURE
SOUND
INPUT
V2 V3
V1
V4 V5
VOL
POWER
SAVING
POWER
WIDE
MENU
SLEEPFREEZE
1 POWER(電源)ボタン
押すと電源の入/切(スタンバイ)ができます。
2 DISPLAY ボタン
現在選択されている入力信号の種類および「ワイド切換」の
設定を画面に表示します。もう一度押すと表示は消えます。
表示された状態でしばらくたつと自動的に表示は消えます。
「スリープタイマー」機能使用時は、DISPLAY ボタンを押す
と、電源が切れるまでの残り時間も表示されます。
3 WIDE ボタン
「ワイド切換」で画面のアスペクト比を変更します。16 ペー
ジをご覧ください。
4 PICTURE ボタン
「画質モード」を切り換えます。ボタンを押すごとに、「ダイ
ナミック」、「スタンダード」、「カスタム」の順に切り替わり
ます。
5 INPUTV1 〜 V5 ボタン
それぞれのボタンを押すと、以下の端子に接続した機器から
の入力信号を選びます。
・ V1 ボタン:HD15(接続した機器によって RGB 信号また
はコンポーネント信号が自動選択されます)
・ V2 ボタン:HDMI1
・ V3 ボタン:HDMI2
・ V4 ボタン:OPTION(オプションアダプター装着時)
・ V5 ボタン:使用しません。
6 VOL+/–ボタン
音量を調整します。
ちょっと一言
VOL +ボタンには、凸部(突起)が付いています。操作の目印としてお使いください。
ご注意
付属の単 3 形乾電池 2 本を、リモコンの電池挿入部内部の図を確認しながら、3 極と # 極を正しく入れてくださ
い。
押してスライドさせて開ける
JP
14
Page 15
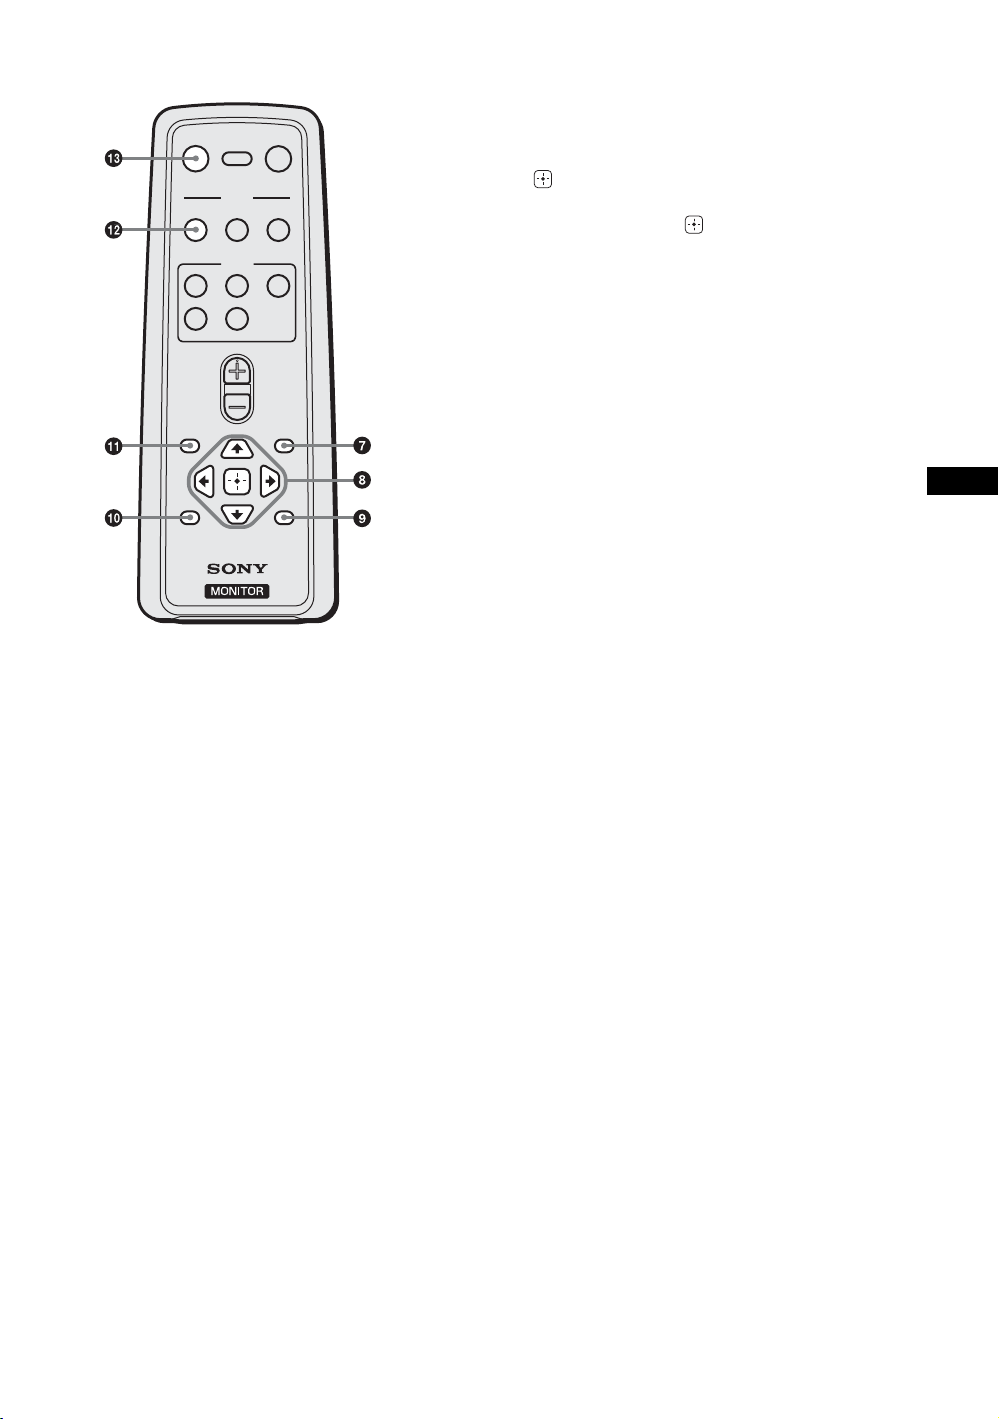
MUTING DISPLAY
MODE
PICTURE
SOUND
INPUT
V1
V4 V5
VOL
POWER
SAVING
POWER
WIDE
V2 V3
MENU
SLEEPFREEZE
7 MENU ボタン
画面にメニューを出すときに使用します。もう一度押すとメ
ニューが消えます。19 ページをご覧ください。
8 V/v/B/b/ ボタン
V/v/B/bボタンでメニューのカーソル(黄色)を移動させ
たり、数値などを設定します。 ボタンを押すと、選んだメ
ニューや設定した内容を確定します。
9 SLEEP ボタン
本機の電源が切れるまでのお好みの時間(15 分、30 分、45
分、60 分、90 分、120 分)が表示されるまで、ボタンを繰り
返し押してください。「スリープタイマー」機能を解除する
ときは、「スリープタイマー:切」が表示されるまで SLEEP
ボタンを繰り返し押してください。
0 FREEZE ボタン
使用しません。
qa POWERSAVING ボタン
「ECO モード」の設定を切り換えます。バックライトの明る
さを変化させて、消費電力を抑えます。「切」、「低」、「高」、
「消画」から選びます。17 ページをご覧ください。
qs SOUND ボタン
「音質モード」を切り換えます。ボタンを押すごとに、「ダイ
ナミック」、「スタンダード」、「SRSWOW」、「カスタム」の
順に切り替わります。
qd MUTING ボタン
音を消します。もう一度押すと、音が出ます。
JP
15
JP
Page 16
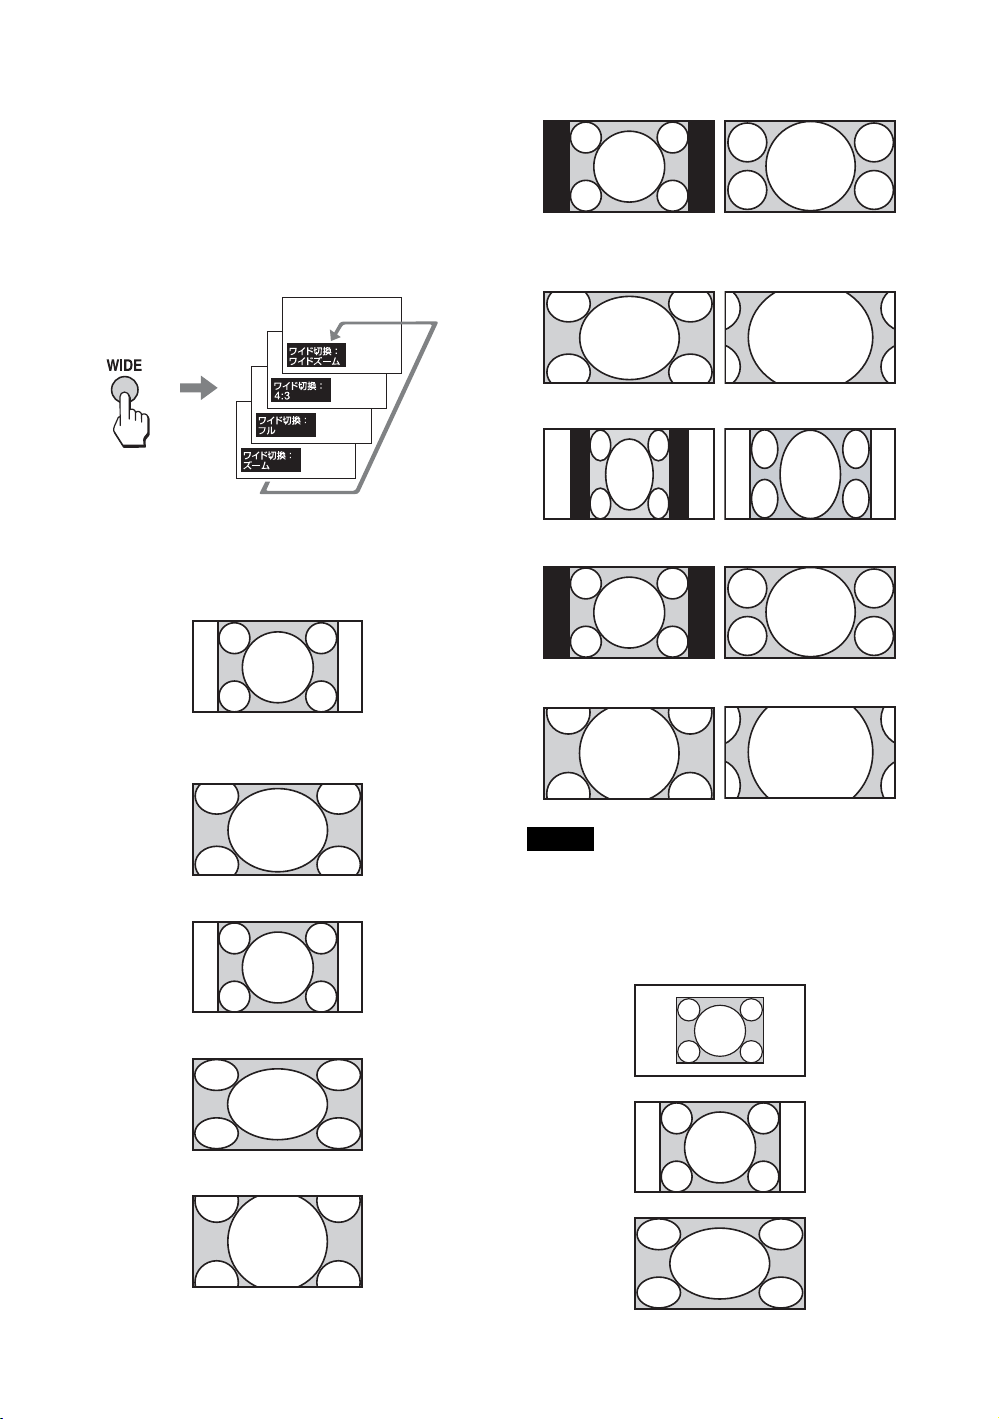
リモコンの特別ボタン
ワイド切換を使う
「ワイド切換」で画面のアスペクト比を変更する
ことができます。
ちょっと一言
「画面調整」メニューからも「ワイド切換」を設定す
ることができます。24、26 ページをご覧ください。
ビデオ、DVD、HDMI 入力の場合(PC 入力以
外)
4:3 の映像ソース
16:9 の映像ソース
m
ワイドズーム
4:3
フル
ワイド
ズーム
4:3
フル
ズーム
ズーム
m
ご注意
入力信号が 1080i、720p、1080p のときは、「ワイド
ズーム」および「4:3」は選択できません。24 ページ
をご覧ください。
PC 入力の場合
ノーマル
フル 1
フル 2
16
JP
Page 17
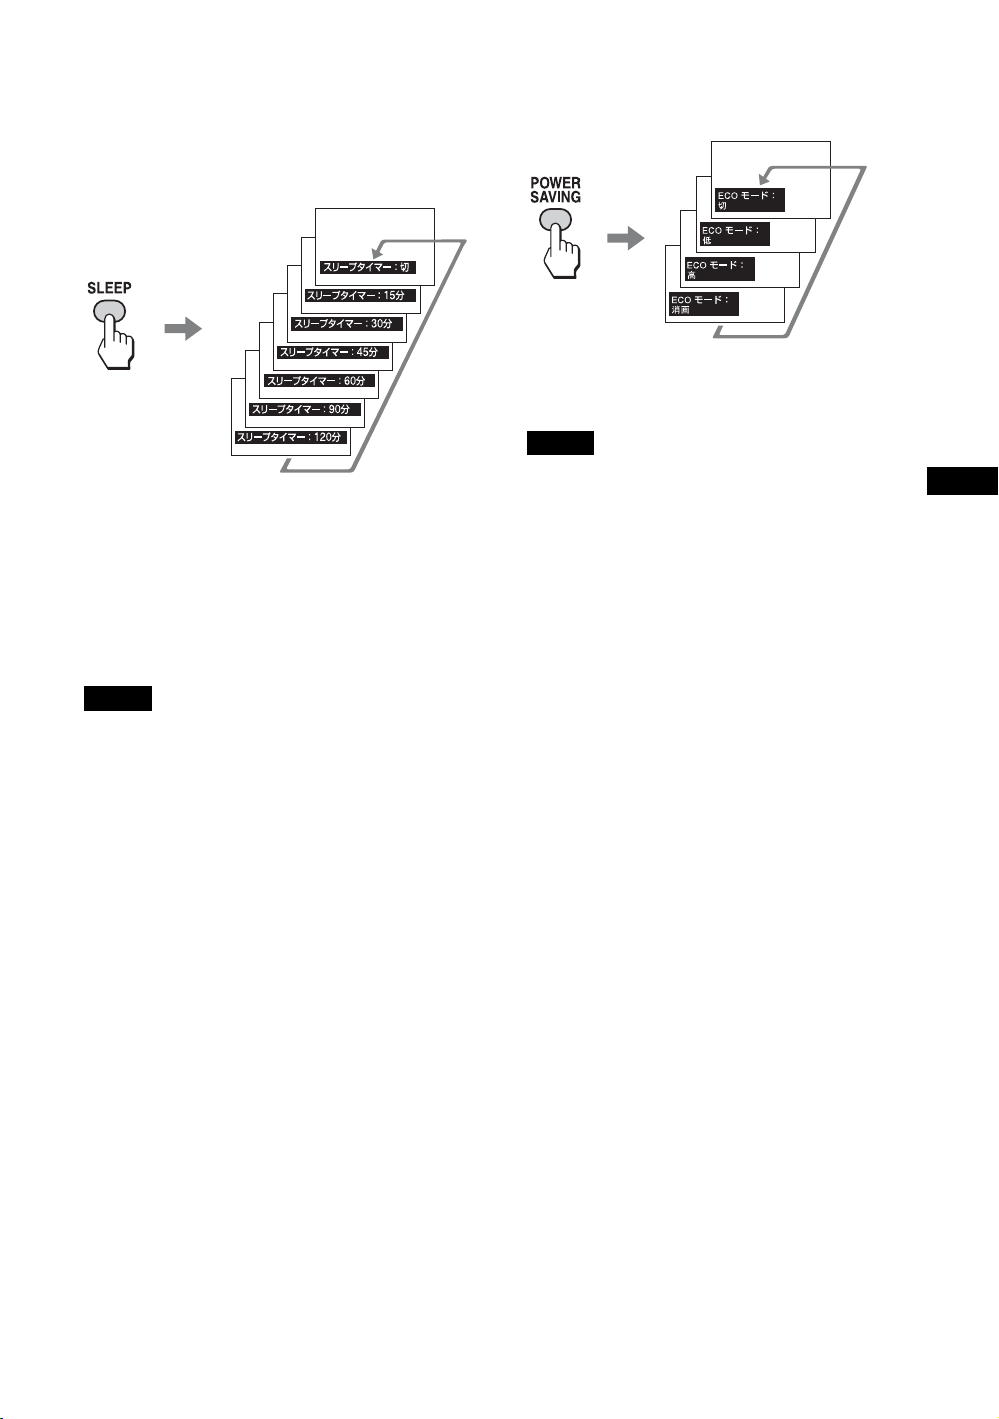
スリープタイマー機能を使う
あらかじめ設定した時間(15 分、30 分、45 分、
60 分、90 分、120 分)が経過すると、本機の電
源が自動的に切れるように設定することができ
ます。
「スリープタイマー」機能が働いているとき、
本機の PICOFF/TIMER インジケーターがオ
レンジ色に点灯します。
スリープタイマー機能を解除するには
「スリープタイマー:切」が表示されるまで
SLEEP ボタンを繰り返し押すか、本機の電源
を一度切ってから、再度電源を入れてくださ
い。
ECO モード機能を使う
本機の消費電力を減らすことができます。
ECO モードを解除するには
「ECO モード:切」が表示されるまで POWER
SAVING ボタンを繰り返し押してください。
ご注意
・「ECO モード」を有効にしたまま本機の電源を切る
と、次回に本機の電源を入れたときも設定された
モードが保持されます(「消画」の場合を除く)。
・「設定」メニューで「ECO モード」を設定すること
ができます。「設定」メニューから「ECO モード」
を選び、「切」、「低」、「高」、「消画」のいずれかに
設定してください。
JP
ご注意
・ 本機の電源を一度切ってから、再度電源を入れる
と、「スリープタイマー:切」に戻ります。
・ 本機の電源が切れる 1 分前に「スリープタイマー‐
まもなく電源が切れます。」が表示されます。ほか
のメニュー操作をしているときは、このメッセージ
は表示されないことがあります。
・「設定」メニューで「スリープタイマー」機能を設
定することができます。「設定」メニューから「ス
リープタイマー」を選び、「15 分」、「30 分」、「45
分」、「60 分」、「90 分」、または「120 分」を選んで
ください。
・「スリープタイマー」機能が働いているとき、
SLEEP ボタンを一度押すと、本機の電源が切れる
までの残り時間が表示されます。
17
JP
Page 18
接続
接続上のご注意
・ 各機器の電源を切ってから接続を行ってください。
・ 接続ケーブルはそれぞれの端子の形状に合った正し
いものをお選びください。
・ 接続ケーブルは端子にしっかり差し込んでくださ
い。接続が悪いとノイズの原因となります。
・ ケーブルを抜くときは必ずプラグを持って抜いてく
ださい。決してケーブルそのものを引っ張らないで
ください。
・ 接続の詳細については、各機器の取扱説明書をご覧
ください。
・ 電源コードのプラグは、ACIN ソケットに、まっ
すぐ突き当たるまで差し込んでください。
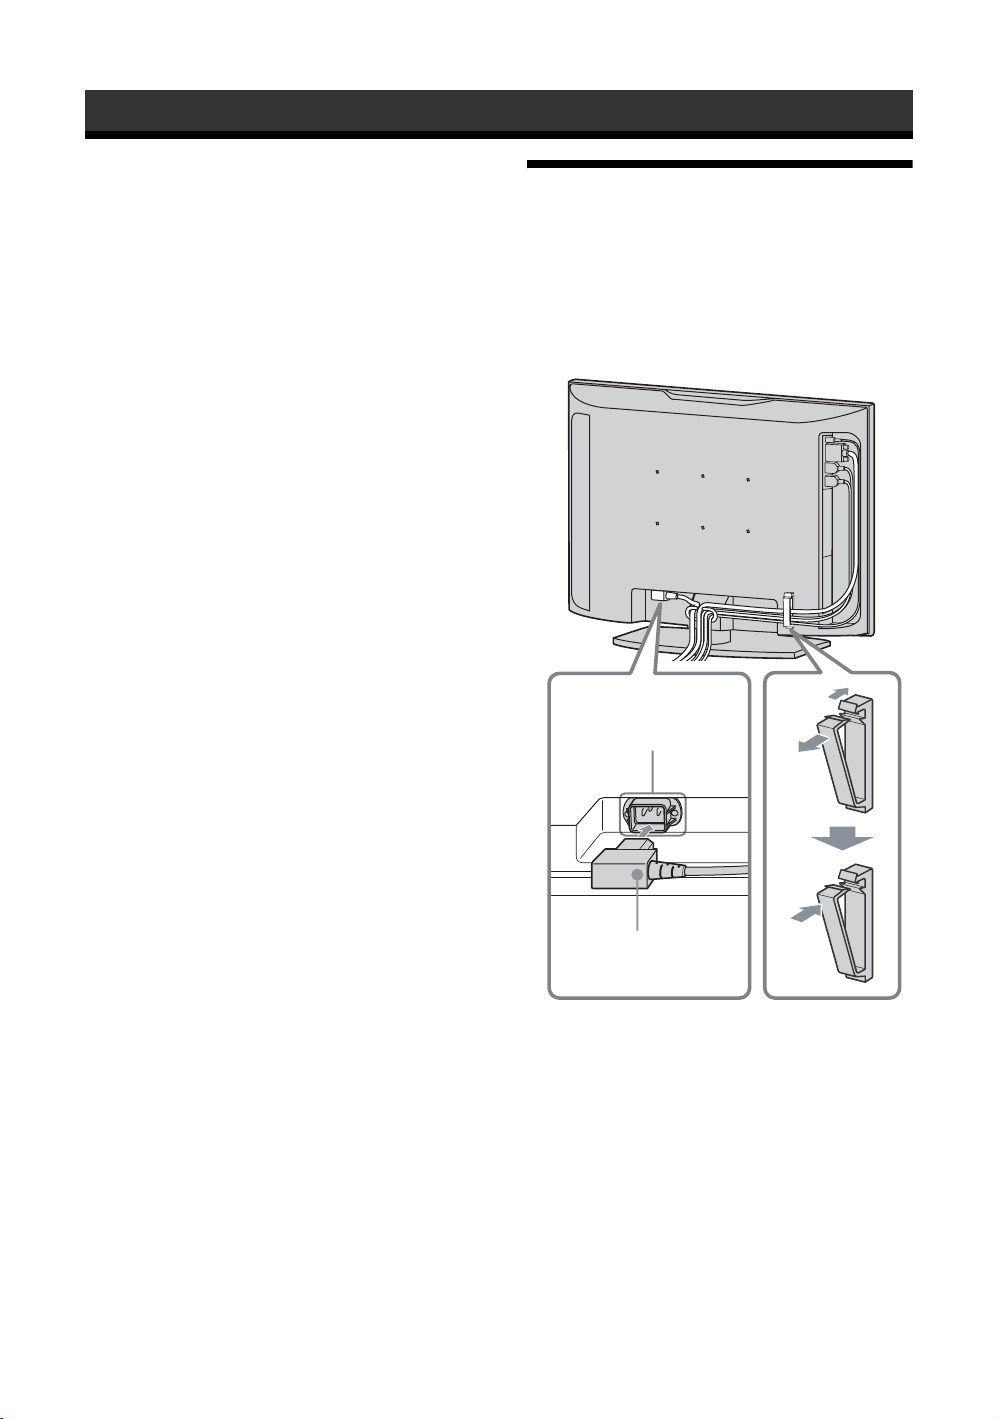
電源コードを接続し
て信号ケーブルを処
理する
1
ACIN
ソケット
電源コード
2
1 電源コードを底部の ACIN ソケットに差
し込む。
2 ケーブルホルダーを使って、図のように
接続したケーブル類を処理する。
18
JP
Page 19
メニューの設定
POWER
SAVING
MENU
VOL
SLEEPFREEZE
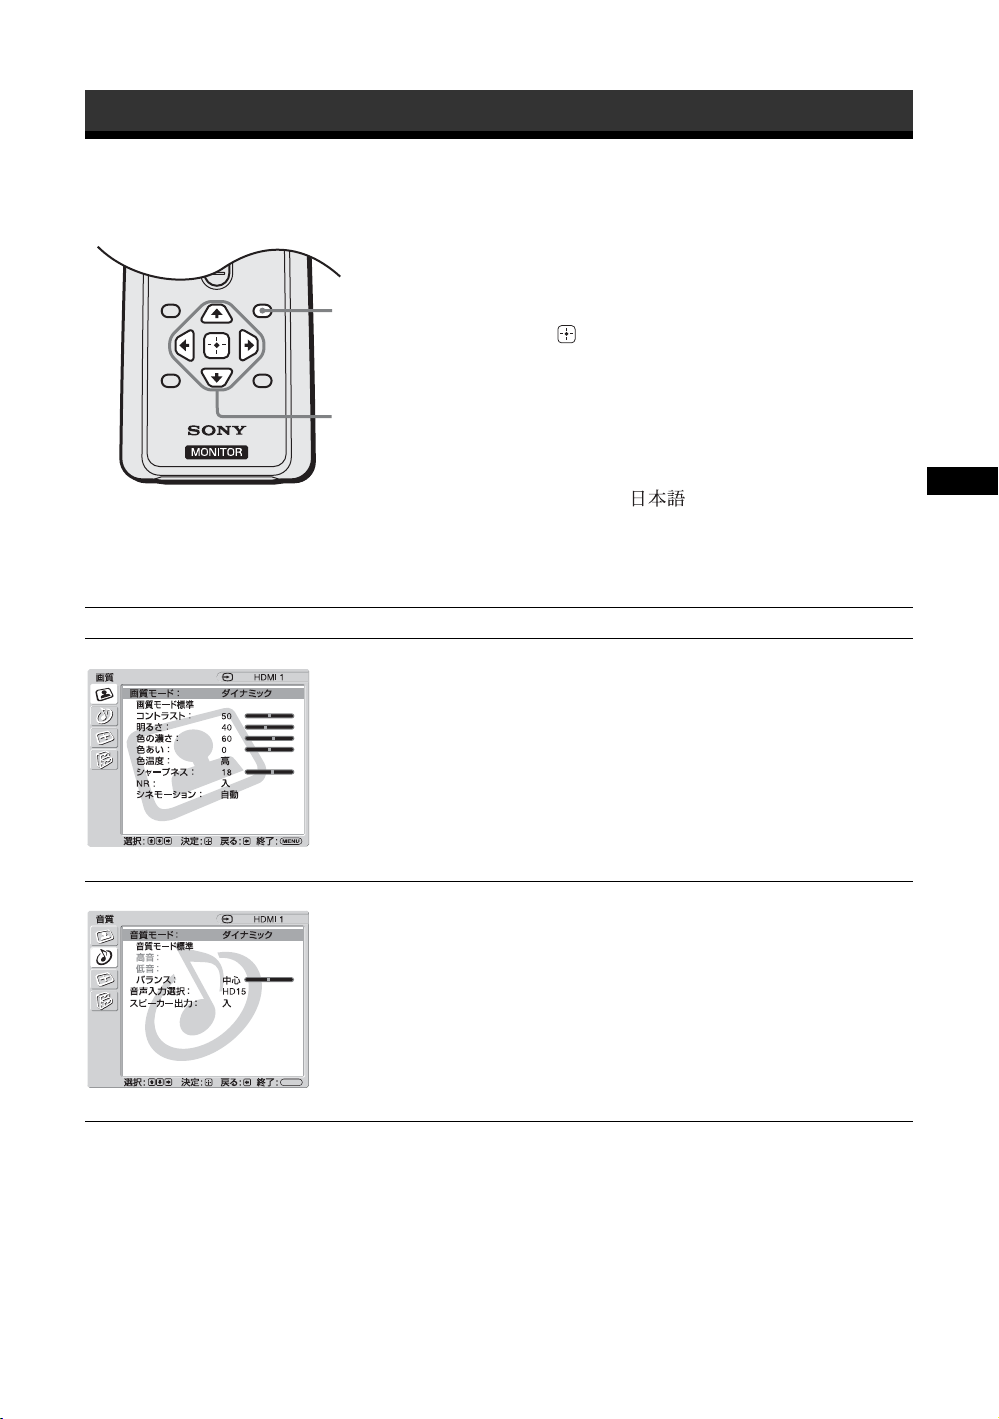
メニュー一覧
1 MENU ボタンを押す。
2 V/vボタンで設定したいメニューのアイ
1
コンを選ぶ。
3 ボタンまたはb ボタンを押す。
メニューの操作を終了するには、MENU ボ
タンを押します。
2,3
メニュー表示の言語を変更する
メニュー表示とメッセージの言語を、
「English」、「Español」、「Français」、「Italiano」、
「Deutsch」、「 」から選びます。
初期設定では「English」(英語)に設定されて
います。27 ページをご覧ください。
メニュー画面から以下の項目を設定することができます。
メニュー画面 設定/変更できる項目
画質
画質モード(21、22 ページ)
画質モード標準(21、22 ページ )
コントラスト(21、22 ページ )
明るさ(21、22 ページ )
色の濃さ(21 ページ )
色あい(21 ページ )
色温度(21、22 ページ )
シャープネス(21 ページ )
NR(21 ページ )
シネモーション (21 ページ )
音質
音質モード(23 ページ )
音質モード標準(23 ページ )
高音(23 ページ )
低音(23 ページ )
バランス(23 ページ )
音声入力選択(23 ページ )
スピーカー出力(23 ページ )
JP
MENU
JP
19
Page 20
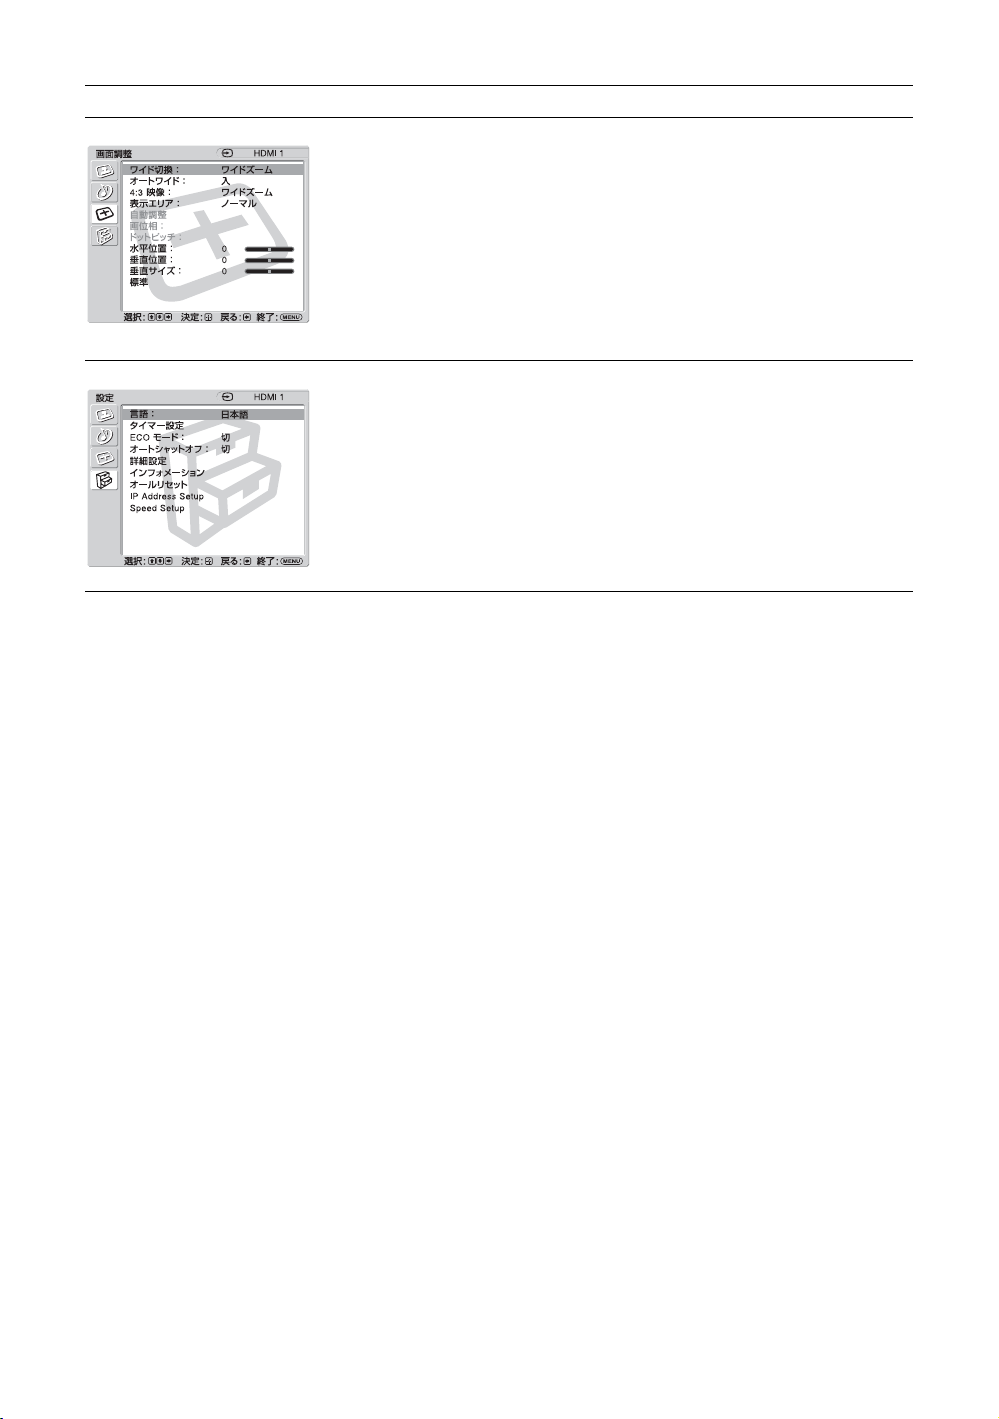
メニュー画面 設定/変更できる項目
画面調整
ワイド切換(24、26 ページ )
オートワイド(24 ページ )
4:3映像(25 ページ )
表示エリア(25 ページ )
自動調整(26 ページ )
画位相(26 ページ )
ドットピッチ(26 ページ )
水平位置(25、26 ページ )
垂直位置(25、26 ページ )
垂直サイズ(25 ページ )
標準(25、26 ページ )
設定
言語(27 ページ )
タイマー設定(27 ページ )
ECO モード(27 ページ )
オートシャットオフ(27 ページ)
詳細設定(27 ページ )
インフォメーション(28 ページ )
オールリセット(28 ページ )
IPAddressSetup(28 ページ )
SpeedSetup(28 ページ )
* メニュー画面の下の行に表示されているアイコンは、設定項目によっては、働かないことがあります。
20
JP
Page 21
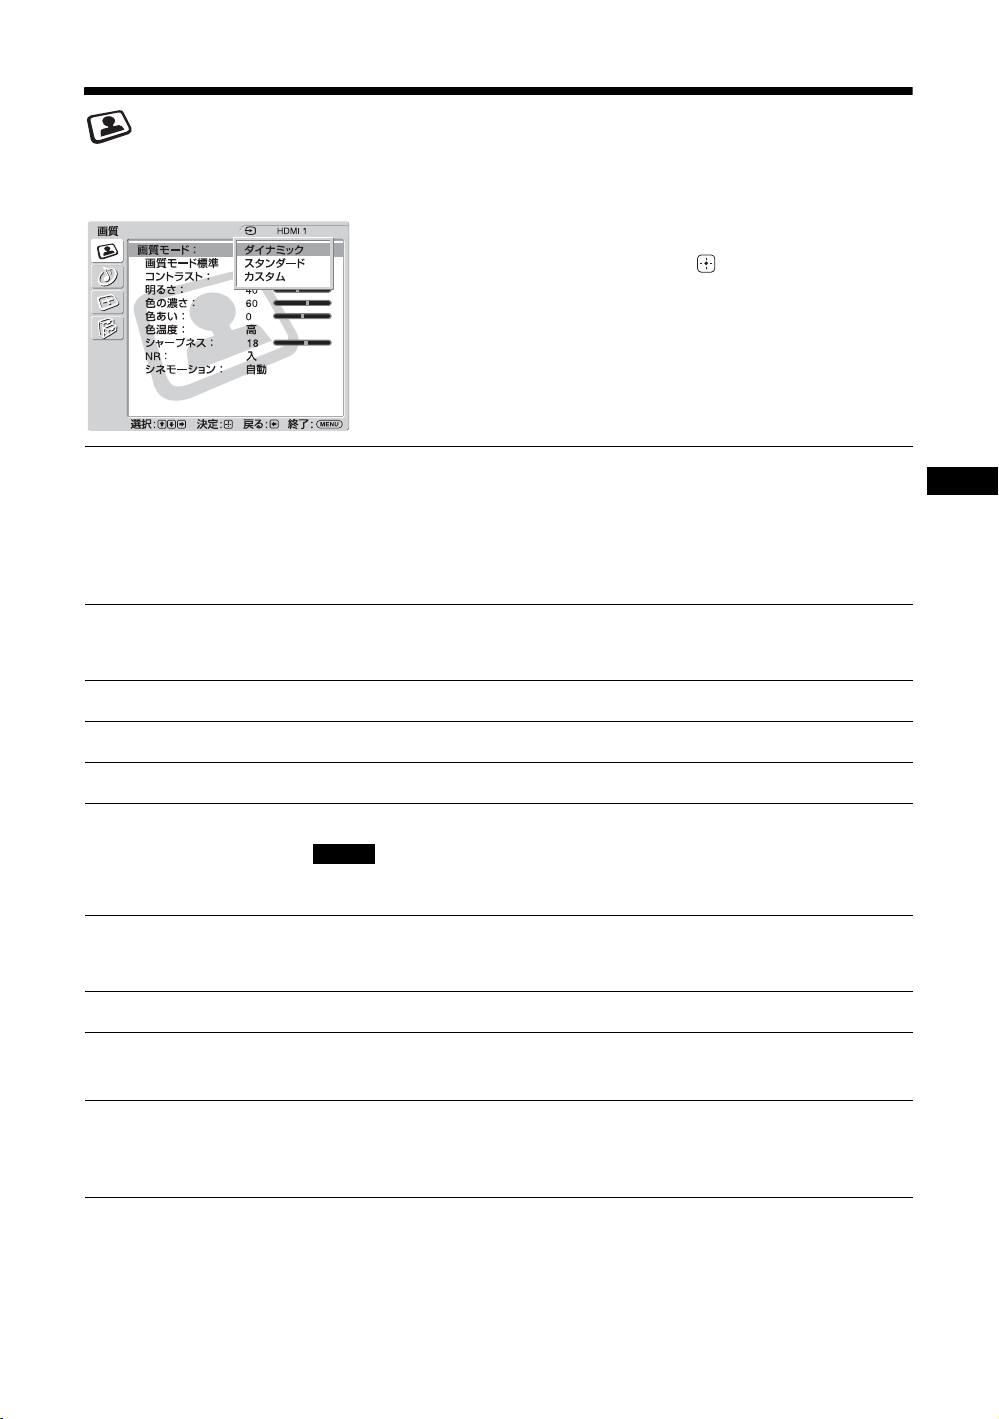
画質メニュー
ビデオ入力の場合
項目を選んで設定を変えるには、V/v/B/b ボ
タンを押します。
設定を確定するには ボタンを押します。
「画質」メニューには、以下の項目が含まれま
す。
画質モード
画質モード標準
コントラスト
明るさ
色の濃さ
色あい
色温度
シャープネス
「ダイナミック」:映像の輪郭を強調しコントラストを最大限に上げます。
「スタンダード」:標準的な設定です。
「カスタム」:お好みに合わせて細かく調整します。
ちょっと一言
・ リモコンの PICTURE ボタンでも「画質モード」の設定を切り換えることができま
す。
・ 各入力ごとに「画質モード」を設定することができます。
現在選択されている「画質モード」(「ダイナミック」、「スタンダード」、
「カスタム」)に対するすべての設定や調整値を初期設定に戻します(グレ
イアウトしている項目を除く
コントラストの強弱を調整します。
映像の明るさを調整します。
色の濃淡を調整します。
映像の色調を調整します。
ご注意
入力信号がビデオまたは S ビデオで、映像信号のカラー方式が NTSC でない場合、
「色あい」は調整できません。
「高」:青みがかった白色になります。
「中」:中間の白色になります。
「低」:赤みがかった白色になります。
映像の輪郭の強弱を調整します。
)。
JP
NR
(ノイズリダクション)
シネモーション
ちょっと一言
個別の「画質モード」ごとに、「画質」メニュー(「コントラスト」、「明るさ」、「色の濃さ」など)を設定すること
ができます。
接続した機器からのノイズを軽減します。「入」または「切」を選んでく
ださい。
「自動」を選ぶと、映画の映像素材を検知し、リバース 3-2 プルダウンまた
はリバース 2-2 プルダウン処理によって画面表示を自動的に最適化します。
動画がより鮮明かつ自然に見えます。「切」を選ぶと、この検知を行いま
せん。
21
JP
Page 22
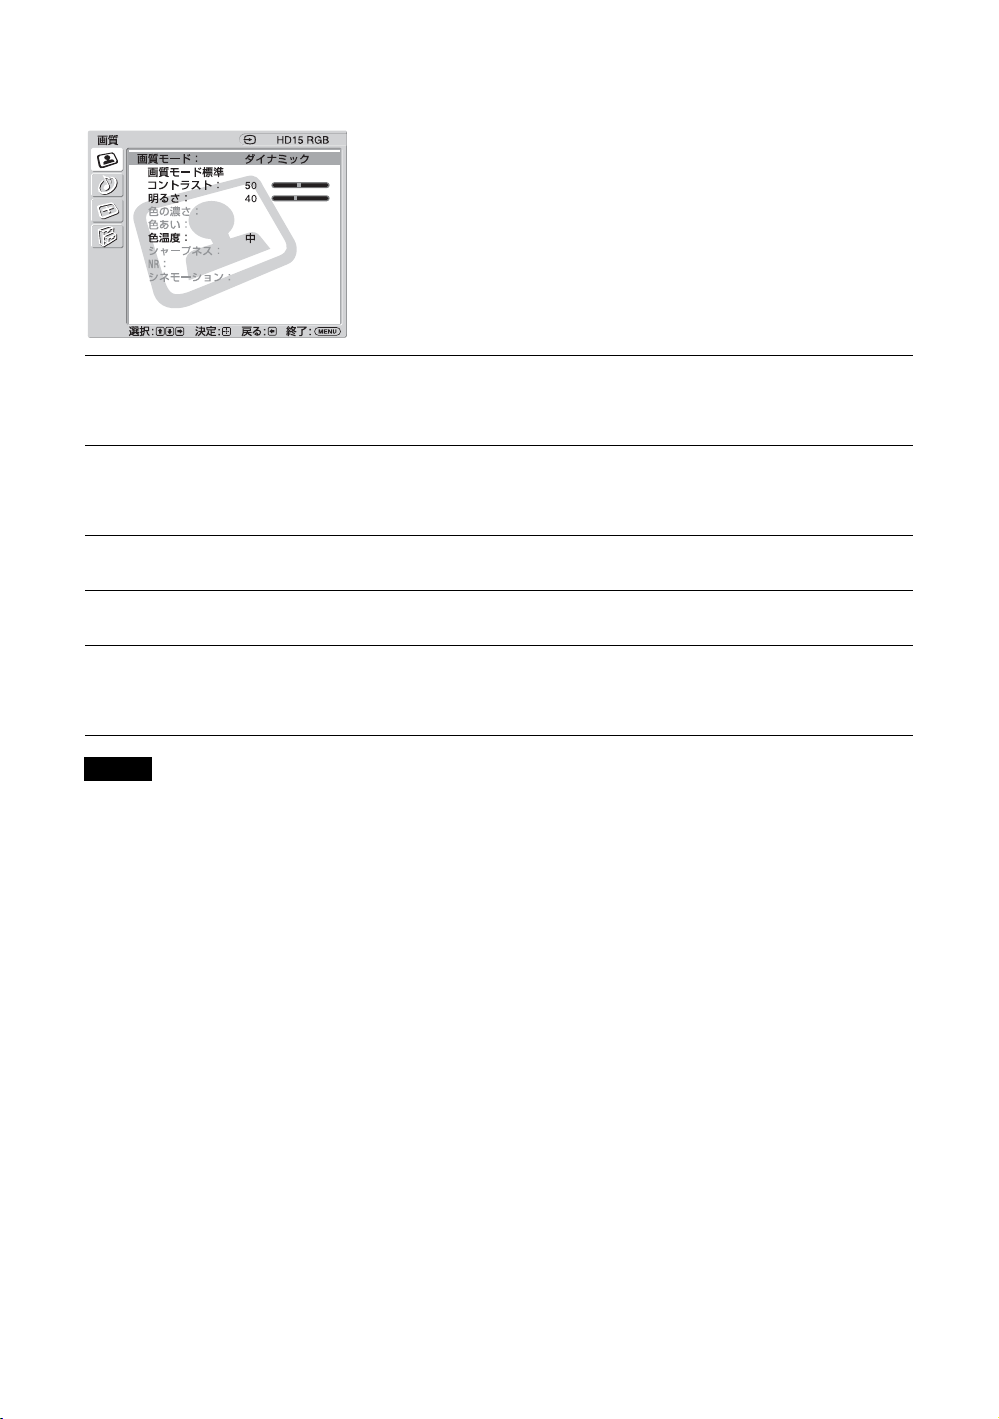
PC 入力の場合
入力を PC 入力に切り換えた場合、PC 用の「画
質」メニューとなります。
PC「画質」メニューには、以下の項目が含まれ
ます。
画質モード
「ダイナミック」:映像の輪郭とコントラストを最大限に上げます。
「スタンダード」:標準的な設定です。
「カスタム」:お好みに合わせて細かく調整します。
画質モード標準
現在選択されている「画質モード」(「ダイナミック」、「スタンダード」、
「カスタム」)に対するすべての設定や調整値を初期設定に戻します(グレ
イアウトしている項目を除く)。
コントラスト
明るさ
色温度
コントラストの強弱を調整します。
映像の明るさを調整します。
「高」:青みがかった白色になります。
「中」:中間の白色になります。
「低」:赤みがかった白色になります。
ご注意
・「色の濃さ」、「色あい」、「シャープネス」、「NR」、「シネモーション」は、PC 入力時は調整できません。
・ 現在の入力が無信号の場合、「画質」メニューの項目はすべて選択不可能となります。
22
JP
Page 23
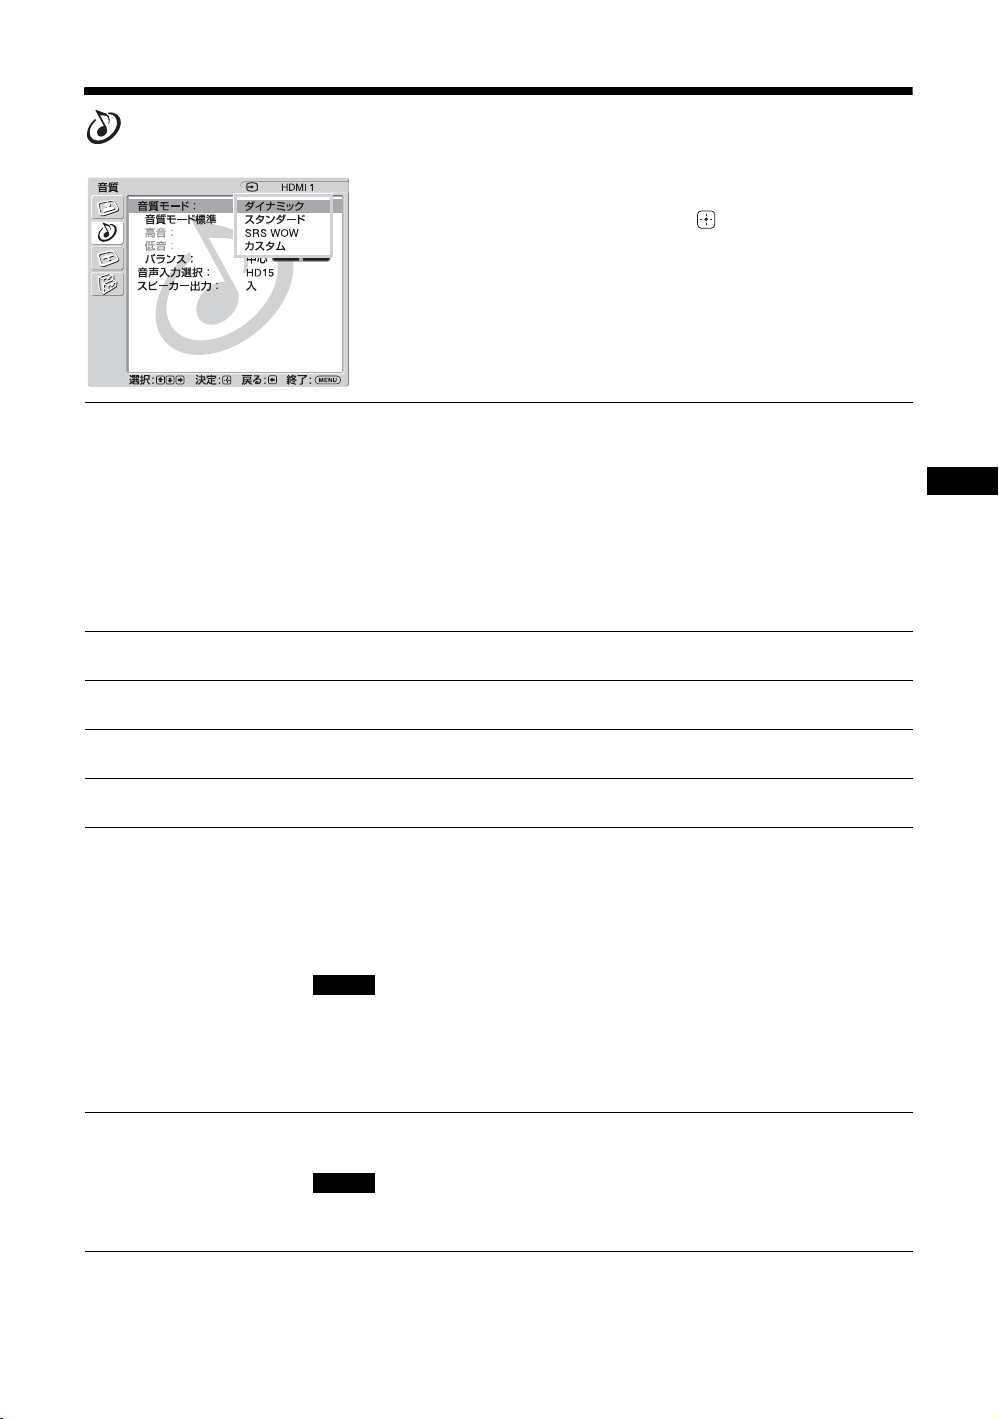
音質メニュー
項目を選んで設定を変えるには、V/v/B/b ボ
タンを押します。
設定を確定するには ボタンを押します。
「音質」メニューには、以下の項目が含まれま
す。
音質モード
音質モード標準
高音
低音
バランス
音声入力選択
「ダイナミック」:高音と低音を強調します。
「スタンダード」:標準的な設定です。
「SRSWOW」:ふくよかな重低音とクリアな高音によって、立体感のある
ステレオ音声を提供します。映画館のような迫力のある音響を楽しむこと
ができます。
「カスタム」:お好みに合わせて細かく調整します。
ちょっと一言
・ リモコンの SOUND ボタンでも「音質モード」の設定を切り換えることができま
す。
・「ダイナミック」と「スタンダード」に BBE の技術が使用されています。
「高音」、「低音」、「バランス」の設定を初期設定に戻します。
高音の強弱を調整します。
低音の強弱を調整します。
スピーカーの左右出力バランスを調整します。
「HD15」:HD15(RGB/COMPONENTIN)端子と AUDIO(COMMON
AUDIOIN)端子に接続された映像機器や PC からの音声を出力します。
「HDMI1」/「HDMI2」:HDMI ケーブル(別売)またはHDMI-DVI
ケーブル(市販品)を接続し、さらに別途、対応するオーディオケーブル
を同時に接続する場合に選択します。
11 ページをご覧ください。
ご注意
・ HDMI-DVI ケーブルをご使用の場合は、オーディオケーブルを AUDIO
(COMMONAUDIOIN)端子に接続してください。
・「HDMI1」または「HDMI2」を選択すると HDMI 端子からのデジタル音声が出力
されません。HDMI 端子搭載の映像機器を HDMI1/HDMI2端子に接続するとき
は、「HD15」に設定してください(デフォルトは「HD15」に設定されています)。
JP
スピーカー出力
ちょっと一言
「音質モード」で「カスタム」を選択しているときは、「音質」メニュー(「高音」、「低音」)を設定することができ
ます。
「入」:本体スピーカーから音声を出力します。
「切」:本体スピーカーから音声を出力しません。
ご注意
「スピーカー出力」が「切」のときは、「音質モード」、「音質モード標準」、「高音」、
「低音」、「バランス」は選択できません。
23
JP
Page 24
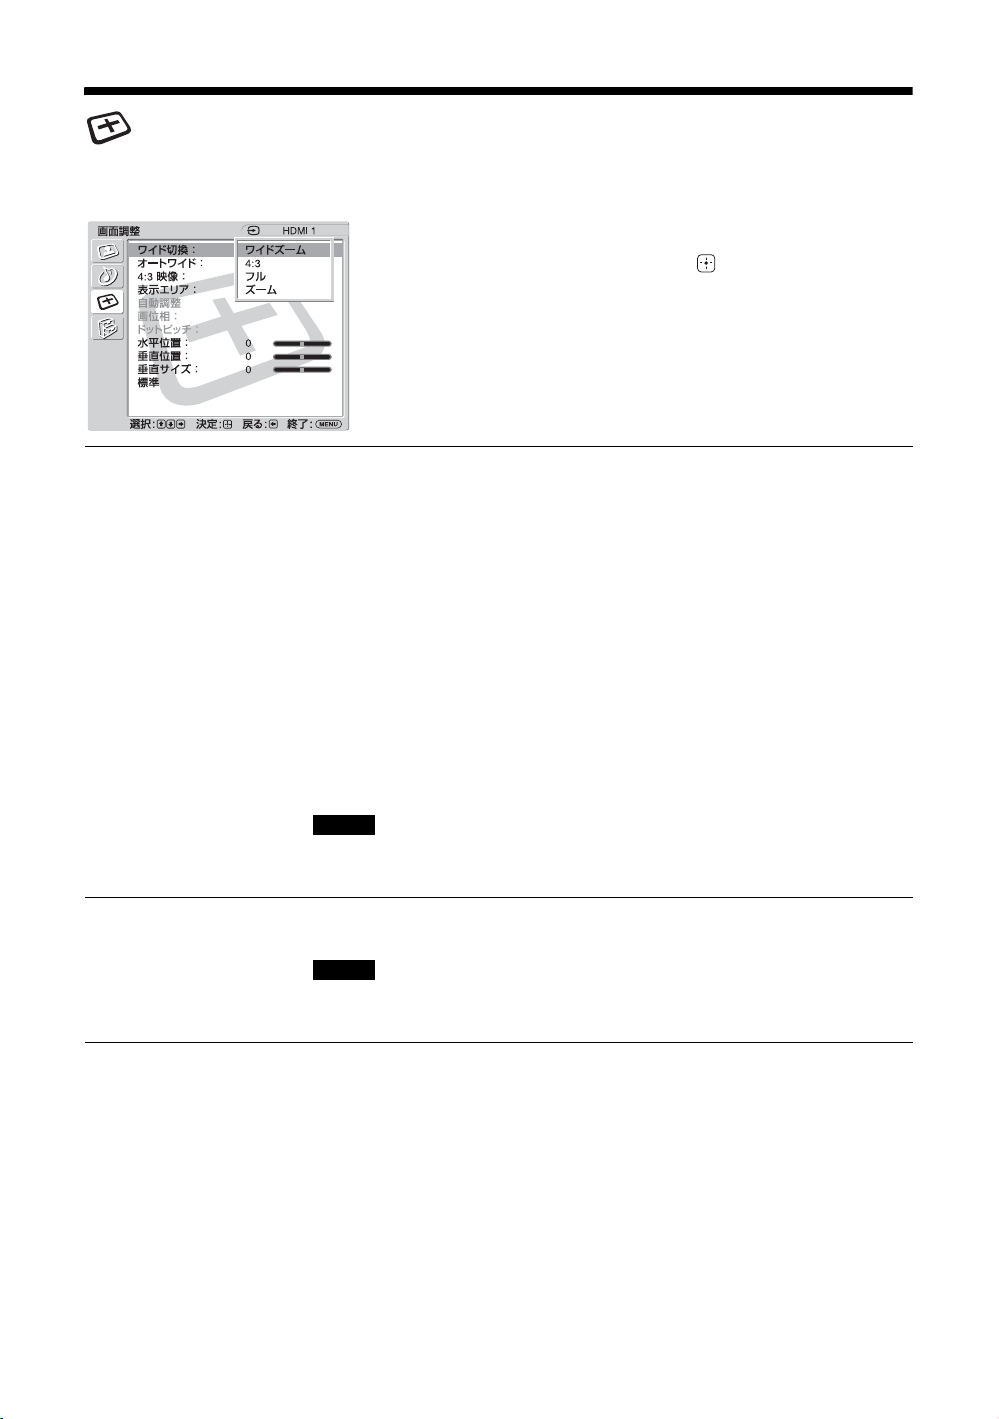
画面調整メニュー
ビデオ入力の場合
項目を選んで設定を変えるには、V/v/B/b ボ
タンを押します。
設定を確定するには ボタンを押します。
「画面調整」メニューには、以下の項目が含ま
れます。
ワイド切換
オートワイド
「ワイドズーム」:ゆがみを最低限に抑えて映像を拡大し、画面いっぱいに
表示します。
「4:3」:4:3 の映像ソース(標準画質)を、そのままのアスペクト比で表示
します。
「フル」:4:3 の映像ソース(標準画質)を水平方向に拡大し、画面いっぱ
いに表示します。16:9 の映像ソース(高画質)の場合は、そのままのアス
ペクト比で表示します。
「ズーム」:アスペクト比を保ったまま、映像を拡大します。
16 ページをご覧ください。
ちょっと一言
・ リモコンの WIDE ボタンでも「ワイド切換」の設定を切り換えることができま
す。
・ 映画などの DVD 映像で、黒帯のある映像を画面いっぱいに映して楽しみたいと
きは、「ズーム」を選んでください。
・「ワイドズーム」または「ズーム」が選ばれているときは、映像の「水平位置」、
「垂直位置」、「垂直サイズ」を調整することができます。25 ページをご覧くださ
い。
ご注意
コンポーネント端子または HDMI 端子に入力された 1080i、720p、1080p の信号に
対しては、「ワイドズーム」と「4:3」は選択できません。
「入」:映像を検知して、自動的に適切な画面設定に変更します。
「切」:画面設定を自動で変更しません。
ご注意
入力信号がデジタルおよびアナログ RGB のときは、「オートワイド」は働かないの
で使用できません。
24
JP
Page 25
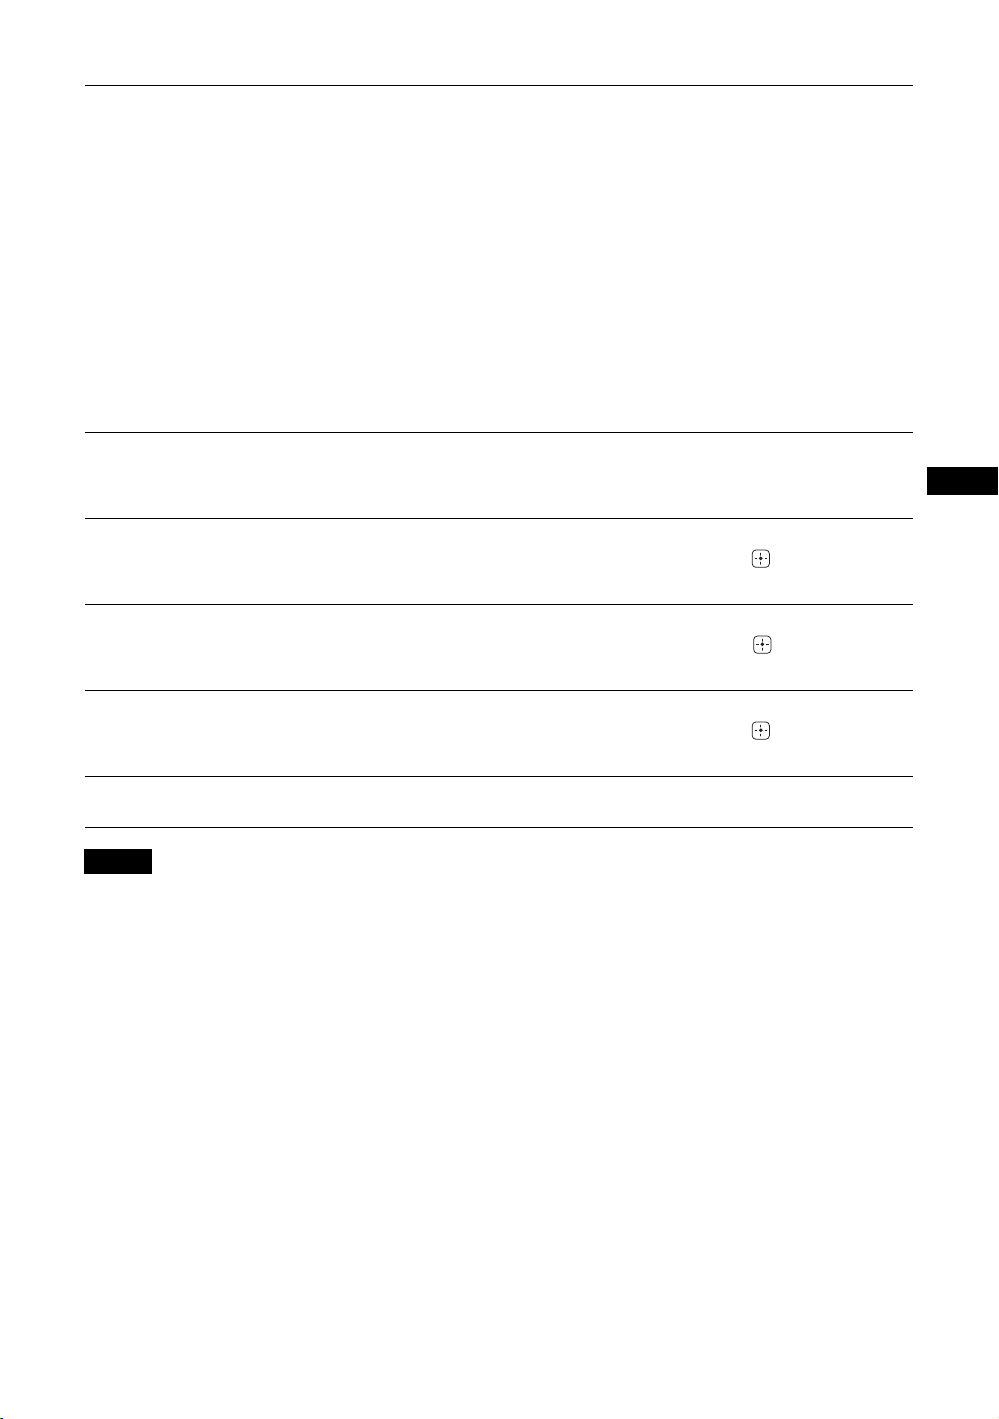
4:3映像
「ワイドズーム」:4:3 の映像ソースを、元のイメージを可能な限り保った
まま、16:9 に拡大します。
「4:3」:4:3 の映像ソースをそのままのアスペクト比で表示します。
「フル」:4:3 の映像ソースを水平方向にのみ拡大し、16:9 にします。
「ズーム」:4:3 の映像ソースを、アスペクト比を保ったまま画面全体に映
るように拡大します。
「切」:入力信号が切り替わっても、現在の「ワイド切換」を保ちます。
ちょっと一言
・「4:3 映像」は、「オートワイド」が「入」のときにのみ選択可能です。
・「4:3映像」は、入力信号が NTSC、PAL、SECAM、480i、480p、575i、または
576p のときにのみ、働きます。
・「4:3 映像」を設定したあとで「ワイド切換」の設定を変更すると、その設定が有
効になり、アスペクト比が変わります。この「ワイド切換」による後からの設定
変更は入力信号ごとに有効なため、入力信号切換時には、元の「4:3 映像」の設定
に戻ります。入力信号を切り換えても現在のアスペクト比のままにするには、
「4:3 映像」を「切」に設定してください。
表示エリア
水平位置
垂直位置
垂直サイズ
標準
ご注意
現在の入力が無信号の場合、「画面調整」メニューの項目はすべて選択不可能となります。
「ノーマル」:標準サイズの映像を表示します。
「− 1」/「− 2」:映像の見える領域を調整します。画面の外側にノイズ
が見える場合に選択すると、ノイズを隠すことができます。
映像の左右の位置を調整します。「ワイドズーム」または「ズーム」が選
ばれているときにのみ、調整できます。B/bボタンと ボタンで調整結
果を確定します。
映像の上下の位置を調整します。「ワイドズーム」または「ズーム」が選
ばれているときにのみ、調整できます。V/v ボタンと ボタンで調整結
果を確定します。
映像の垂直サイズを調整します。「ワイドズーム」または「ズーム」が選
ばれているときにのみ、調整できます。V/vボタンと ボタンで調整結
果を確定します。
「水平位置」、「垂直位置」、「垂直サイズ」の設定を初期設定に戻します。
JP
25
JP
Page 26
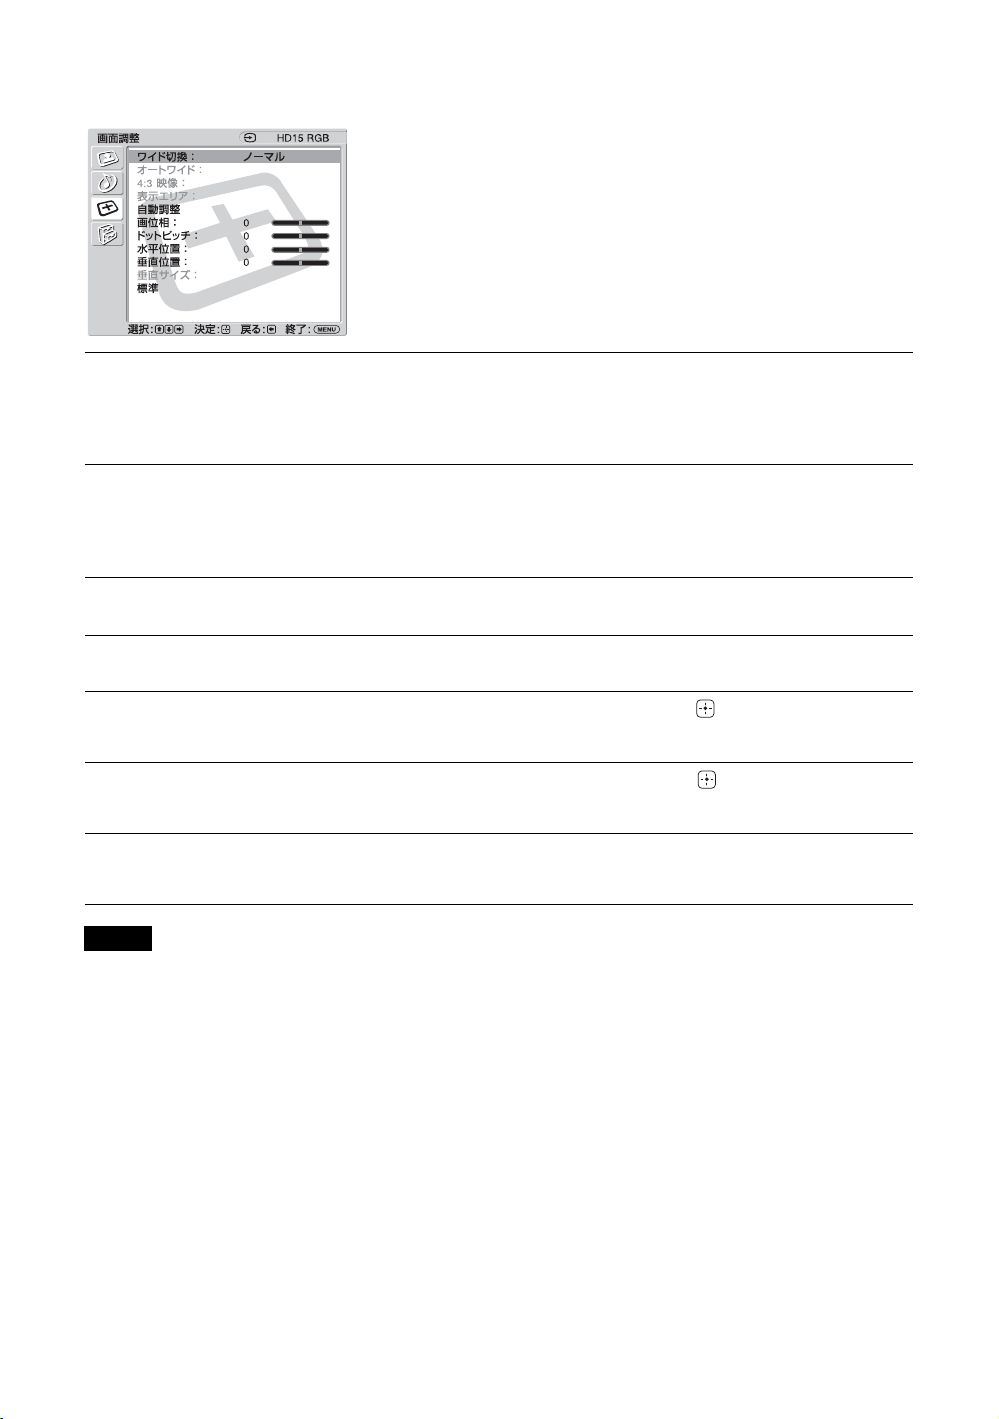
PC 入力の場合
入力を PC 入力に切り換えた場合、PC 用の「画
面調整」メニューとなります。
PC「画面調整」メニューには、以下の項目が含
まれます。
ワイド切換
自動調整
画位相
ドットピッチ
水平位置
垂直位置
標準
ご注意
・「オートワイド」、「4:3映像」、「表示エリア」、「垂直サイズ」は、PC 入力では設定できません。
・ 現在の入力が HDMI1/HDMI2 のデジタル信号の場合、「自動調整」、「画位相」、「ドットピッチ」は PC 入力に対
しては設定できません。
・ 現在の入力が無信号の場合、「画面調整」メニューの項目はすべて選択不可能となります。
「ノーマル」:映像を元のままのサイズで表示します。
「フル 1」:アスペクト比を保ったまま、映像を画面垂直方向いっぱいに拡
大します。映像の周囲に黒い帯が出ることがあります。
「フル 2」:映像を画面いっぱいに拡大します。
接続した PC からの入力信号を受けたとき、自動的に映像の位置や位相を
調整します。
入力信号の種類によっては、「自動調整」がうまく働かないことがありま
す。その場合は、下記の項目を手動で調整してください。
画面がちらちらしているとき、位相を調整します。
映像におかしな縞模様が出るとき、ピッチを調整します。
映像の左右の位置を調整します。B/b ボタンと ボタンで調整結果を確
定します。
映像の上下の位置を調整します。V/vボタンと ボタンで調整結果を確
定します。
「画位相」、「ドットピッチ」、「水平位置」、「垂直位置」の設定を初期設定
に戻します。
26
JP
Page 27
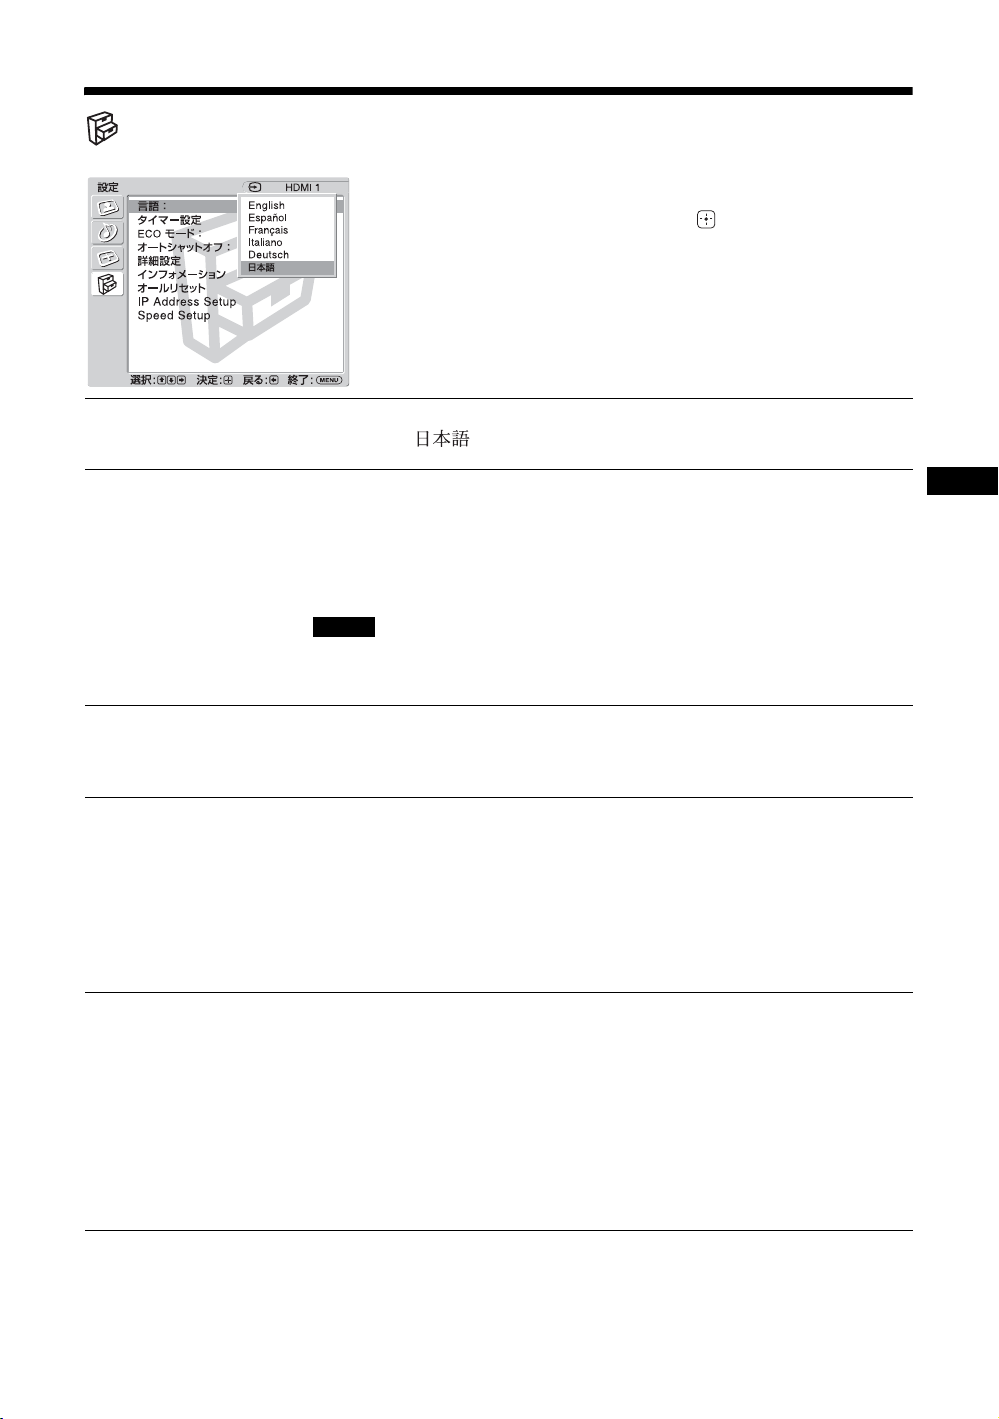
設定メニュー
項目を選んで設定を変えるには、V/v/B/b ボ
タンを押します。
設定を確定するには ボタンを押します。
「設定」メニューには、以下の項目が含まれま
す。
言語
タイマー設定
ECO モード
オートシャット
オフ
メニュー表示の言語を、「English」、「Español」、「Français」、「Italiano」、
「Deutsch」、「 」のなかから選びます。
時刻合わせ、内蔵時計の表示、および電源を自動的に切る機能の設定をす
ることができます。
「時刻設定」:曜日と時刻を設定します。
「時計表示」:「入」を選ぶと、設定された現在時刻を表示します。
「スリープタイマー」:本機の電源が自動的に切れるまでの、お好みの時間
(15 分、30 分、45 分、60 分、90 分、または 120 分)を設定します。
ご注意
時刻が大幅にずれたりするときは、内蔵電池の消耗が考えられます。お買い上げ店
またはソニーのサービス窓口に電池の交換をご依頼ください(有料)。
「切」:省電力機能を使用しません。
「低」/「高」:明るさを変化させて、消費電力を減らします。
「消画」:映像を消します。音声はそのままの音量で流れます。
「入」:ビデオ入力に無信号の状態が約 5 分続くと、本機は自動的にスタンバ
イ状態になります。また、その他の入力に無信号の状態が約 30 秒続くと、自
動的にパワーセービング状態になります。
「切」:各入力に無信号の状態が続いても、本機の電源は切れません。
ちょっと一言
スタンバイ状態のときは、本機の 1(電源)ボタンまたはリモコンの POWER ボタ
ンを押すと、電源が入ります。またパワーセービング状態のときは、信号が入力さ
れると自動的に電源が入ります。
JP
詳細設定
「カラー方式」:「NTSC」、「PAL」、「SECAM」、「NTSC4.43」、「PAL-M」、
「PAL-N」、「PAL60」から映像信号の「カラー方式」を設定します。「自
動」を選ぶと、「カラー方式」が自動的に設定されます。
「ステータス表示」:「入」を選ぶと、電源を入れたときに入力信号と「ワ
イド切換」の情報が、画面に約 20 秒間表示されます。また、入力信号を
切り換えると、約 5 秒間表示されます。「切」を選ぶと、情報は表示され
ません。
ちょっと一言
リモコンの DISPLAY ボタンで、「ステータス表示」の設定にかかわらず入力信号と
「ワイド切換」の情報を表示させることができます。
27
JP
Page 28
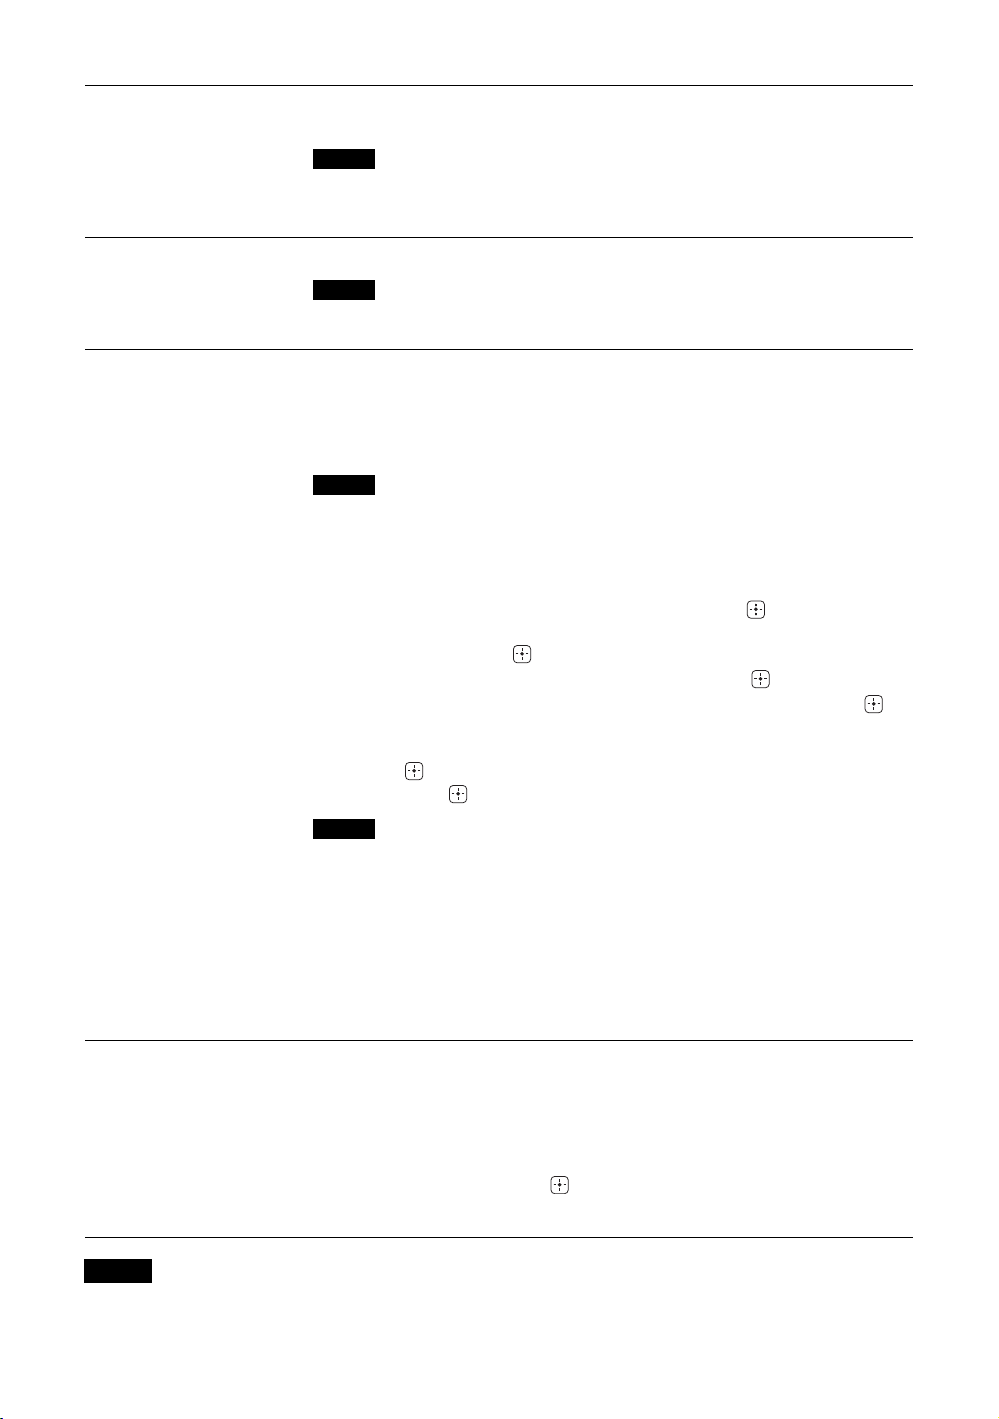
インフォメーショ
ン
「機種名」、「シリアル番号」、「累積通電時間」、「ソフトウェアバージョ
ン」、および「IPAddress」を表示します。
ご注意
通信機能を持つオプションアダプターがインストールされていないと、「IP
Address」は表示されません。
オールリセット
IPAddress
Setup
すべての「設定」メニューを初期設定に戻します。
ご注意
「インフォメーション」に含まれる内容はリセットされません。
本機に装着した通信機能を持つオプションアダプター(BKM-FW32/
FW50 など)と、LAN ケーブルで接続された PC などの機器とが通信でき
るように IP アドレスを設定します。
「DHCP」:「OK」を選ぶと、自動的に IP アドレスを設定します。「Cancel」
を選ぶと、自動設定を中止します。
ご注意
「DHCP」で IP アドレスを自動取得したときは、電源の入/切をすると、IP アドレ
スが変わることがあります。
「Manual」:IP アドレスを手動で設定します。
1 「IPAddress」、「SubnetMask」、「DefaultGateway」、「Primary
DNS」、「SecondaryDNS」を
2 本機の
(0 〜 255)を入力し、 ボタンまたは
3 4 つの枠にそれぞれ 3 桁の値(0 〜 255)を入力し、 ボタンを押す。
4
5 設定したいすべての項目に値を入力したら、
「OK」を選んで、 ボタンを押すと、IP アドレスが手動で設定されます。
ご注意
IP アドレスが正しく設定されていないと、原因に応じて、次のようなエラーコード
が表示されます。
Error1:本機と BKM-FW シリーズなどの間の通信エラー
Error2:IPaddress がほかで使われている
Error3:IPaddress の設定不備
Error4:Gatewayaddress の設定不備
Error5:PrimaryDNS の設定不備
Error6:SecondaryDNS の設定不備
Error7:Subnetmask の設定不備
V/vボタンまたはリモコンの数字ボタンで、最初の枠に 3 桁の値
V/v ボタンで次に設定したい項目を選び、同じ手順をくり返し、 ボ
タンを押す。
を選び、 ボタンを押す。
V/v ボタンで選び、 ボタンを押す。
b ボタンを押す。
V/v ボタンで「Execute」
SpeedSetup
ご注意
通信機能を持つオプションアダプターがインストールされていないと、「IPAddressSetup」と「SpeedSetup」は
設定できません。
JP
28
本機に装着した通信機能を持つオプションアダプター(BKM-FW32/
FW50 など)と、LAN ケーブルで接続された PC などの機器との間の通信
速度を設定します。
「Speed」:「Auto」を選ぶと、ネットワーク構成に適切な通信速度が自動
的に設定されます。また、「10MbpsHalf」、「10MbpsFull」、「100Mbps
Half」、「100MbpsFull」のいずれかの通信速度を選ぶこともできます。
「Execute」:「OK」を選んで、 ボタンを押すと、通信速度が設定されま
す。
Page 29
その他の情報
故障かな?と思ったら
STANDBY インジケーターが赤く点滅していないか確認する。
点滅している場合
自己診断機能が働いています。
1 STANDBY インジケーターの点滅回数および消灯時間をはかる。
たとえば、3 回点滅→ 3 秒消灯→3 回点滅となります。
2 本機の電源を切り、電源コードを抜く。
お買い上げ店またはソニーサービス窓口にインジケーターの点滅状態(点滅回数および消灯時間)
をお知らせください。
点滅していない場合
1 以下の表の項目を点検する。
2 それでも正常に動作しないときは、お買い上げ店またはソニーサービス窓口に修理を依頼する。
こんなときは 原因と対処のしかた
画像が出ない。
画像が出ない。
本機の電源が自動的に切れる。
特定の入力からの画像が出な
い。
画像が見にくい。
色がつかない/画像が暗い/画
像が明るすぎる/色がおかしい
音が出ない/音にノイズが混じる。
画像はきれいだが、音声が出な
い。
「ワイド切換」の設定が自動的に変わ
る。
リモコンが動かない。
・「ECO モード」の設定を確認してください(27 ページ)。
・「スリープタイマー」が有効になっていないか確認してくださ
い(27 ページ)。
・ 映像機器と本機の接続を確認してください。
・ 本機またはリモコンの INPUT ボタンで入力を切り換えてみて
ください(10、14 ページ)。
・ PICTURE ボタンを押してご希望の「画質モード」に切り換え
てください(14 ページ)。
・「画質」メニューで「画質モード」の項目を調整してください
(21 ページ)。
・ 接続ケーブルの状態を点検してください。
・ 音量を確認してください。
・ リモコンの MUTING ボタンまたは VOL +ボタンを押して
「消音」を画面から消してください(14、15 ページ)。
・「音声入力選択」の設定を確認してください(23 ページ)。
・「スピーカー出力」の設定を確認してください(23 ページ)。
・「画面調整」メニューの「オートワイド」が「入」に設定され
ているとき、入力を切り換えると、現在の「ワイド切換」設
定は、自動的に入力信号に合わせた設定に変わります。入力
を切り換えても現在の「ワイド切換」設定を保ちたいときは、
「画面調整」メニューの「オートワイド」を「切」に設定して
ください(24 ページ)。
・ 電池の+/−が正しく挿入されているか確認してください。
もしくは電池を交換してください。
・ リモコンを本機のリモコンセンサーに向けてください。
・ リモコンセンサーのまわりに障害物を置かないようにしてく
ださい。
・ CONTROLSIN 端子を持つオプションアダプターを使用して
いる場合、この端子にケーブルが接続されていないか確認し
てください。本機が CONTROLS 接続によって制御されてい
るとき、リモコンはご使用になれません。
・ 蛍光灯によってリモコンの操作に障害が出る場合があります。
蛍光灯を消してみてください。
JP
29
JP
Page 30
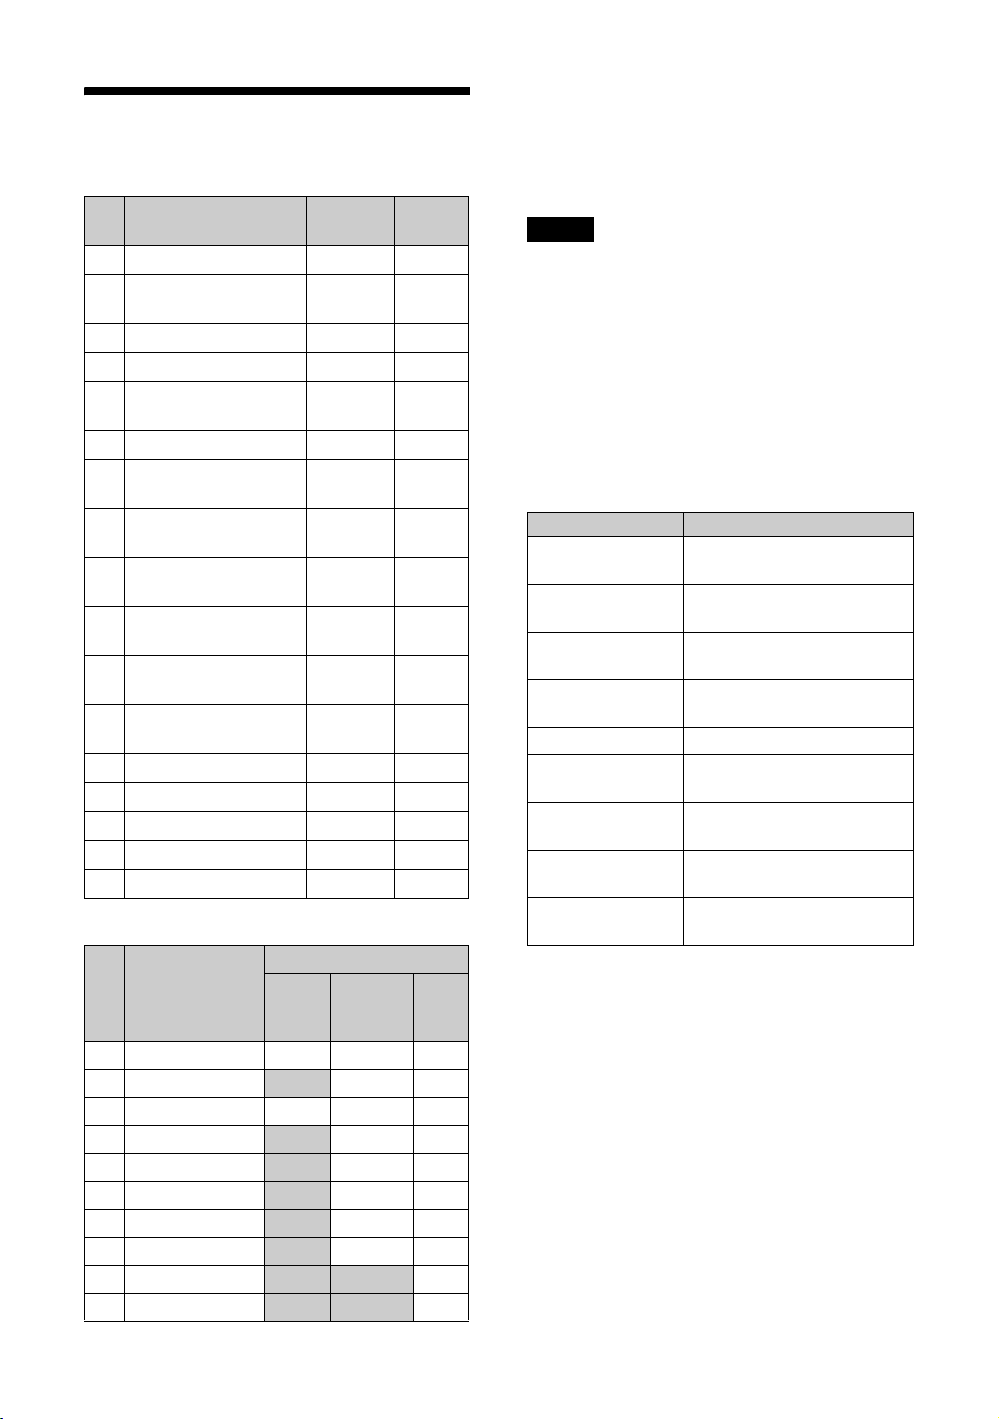
入力信号一覧表
PC 信号
解像度
VGAa)-1(VGA350) 31.5 70
1
2
640ー480@60Hz
b)
(VESA
3
Macc)13" 35.0 67
4
VGA(VGATEXT) 31.5 70
5
800×600@60Hz
(VESASTD)
6
Mac16" 49.7 75
7
1024×768@60Hz
(VESASTD)
8
1024×768@75Hz
(VESASTD)
9
1024×768@85Hz
(VESASTD)
10
1280×1024@60Hz
(VESASTD)
11
848×480@60Hz
(VESASTD)
12
848×480@60Hz
(VESASTD)
13
848×480@75Hz 37.7 75
14
1280×768@60Hz 47.8 60
15
1280×768@60Hz 47.4 60
16
1360×768@60Hz 47.7 60
17
1360×768@60Hz 47.4 60
STD)
水平周波数
(kHz)
31.5 60
37.9 60
48.4 60
60.0 75
68.7 85
64.0 60
29.8 60
29.5 60
TV/ ビデオ信号
利用可能な入力
解像度
1480/60i
2 480/60p
3575/50i aaa
4 576/50p
5 720/50p
6 720/60p
7 1080/50i
8 1080/60i
9 1080/50p
10 1080/60p
ビデオ コンポー
a
垂直周波
数(Hz)
HDMI
ネント /
RGB
aa
aa
aa
aa
aa
aa
aa
a
a
a) VGA は米国 InternationalBusinessMachines
Corporation の登録商標です。
b) VESA は VideoElectronicsStandardsAssociation
の登録商標です。
c)Mac(Macintosh)は AppleComputer,Inc. の登録
商標です。
ご注意
・ HDTV信号を入力する場合、同期信号は 3 値同期信
号を HD15 端子または BKM-FW シリーズ(オプ
ションアダプター)などの RGB/COMPONENT 端
子(D-sub15 ピンコネクター)の 2番ピンに入力し
てください。
・ 本機で DVD 信号を入力した場合、画像の色を薄く
感じたら、「画質」メニューの「色の濃さ」でお好
みの色の濃さに調整してください。
・ 位相を再調整すると解像度が低下します。
入力信号/ディスプレイ設定情報の画
面表示
画面表示 意味
640×480/60
(例)
480/60I(例) コンポーネント信号が入力さ
NTSC(例) NTSC 信号が入力されていま
標準信号ではあり
ません。
信号がありません 入力信号がありません。
HD15 HD15 入力が選択されてい
HDMI1 HDMI1 入力が選択されてい
HDMI2 HDMI2 入力が選択されてい
Option OPTION 入力が選択されて
PC 信号が入力されています。
れています。
す。
標準信号でない信号が入力さ
れています。
ます。
ます。
ます。
います。
30
JP
Page 31
仕様
映像処理系
パネル方式 a-SiTFTActiveMatrixLCDPanel
解像度 1,366 ドット(水平)× 768 ライン
サンプリング周波数
カラー方式 NTSC,PAL,SECAM,NTSC4.43,
入力信号 30 ページをご覧ください。
KLH-W26
ピクセルピッチ 0.421(水平)× 0.421(垂直)mm
有効表示寸法 576(水平)× 324(垂直)mm
画面サイズ 26(V)型(対角 660mm)
KLH-W32
ピクセルピッチ 0.510(水平)× 0.510(垂直)mm
有効表示寸法 698(水平)× 392(垂直)mm
画面サイズ 32(V)型(対角 801mm)
入出力
HD15(RGB/COMPONENTIN)
AUDIO(COMMONAUDIOIN)
HDMI1/HDMI2IN HDMI(HDMI 規格 1.1 準拠)
(垂直)
13.5MHz〜140MHz
PAL-M,PAL-N,PAL60
D-sub15 ピン(メス)(× 1)
32 ページをご覧ください。
ステレオミニジャック(× 1)
500mVrms、ハイインピー
ダンス
質量
KLH-W26:13.5kg
KLH-W32:16.6kg
付属品
電源コード(1)
リモコン RM-YA004(1)
単 3 形乾電池(2)
ケーブルホルダー(1)
変換プラグアダプター(1)
取扱説明書(1)
保証書(ソニー業務用製品ご相談窓
口のご案内)(1)
別売アクセサリー
機能拡張用オプションアダプター
BKM-FW シリーズ
本機の仕様および外観は、改良のため予告なく
変更することがありますが、ご了承ください。
WOW、SRS と( )記号は SRSLabs,Inc. の
商標です。
WOW 技術は SRSLabs,Inc. からのライセンス
に基づき製品化されています。
この製品はBBESound,Inc.からの実施権に基
づき製造されています。
この製品は米国BBESound,Inc.の所有する特
許 USP5510752 及び5736897 を使用していま
す。BBEとBBEのシンボルは、BBESound,
Inc. の登録商標です。
JP
その他
電源 AC
消費電力
スピーカー出力
動作条件
保存・輸送条件
外形寸法
100V 〜 240V、50/60Hz、
KLH-W26:1.2A
KLH-W32:1.3A
KLH-W26:110W
KLH-W32:120W
10W + 10W(6Ω)
適合負荷インピーダンス 6 〜 16Ω
温度:0 〜 35℃
湿度:20 〜 90%
(結露のないこと)
温度:− 10 〜+ 40℃
湿度:20〜90%
(結露のないこと)
KLH-W26:663×505×220mm
KLH-W32:798×581×220mm
(幅/高さ/奥行き、最大突起部
含まず)
31
JP
Page 32
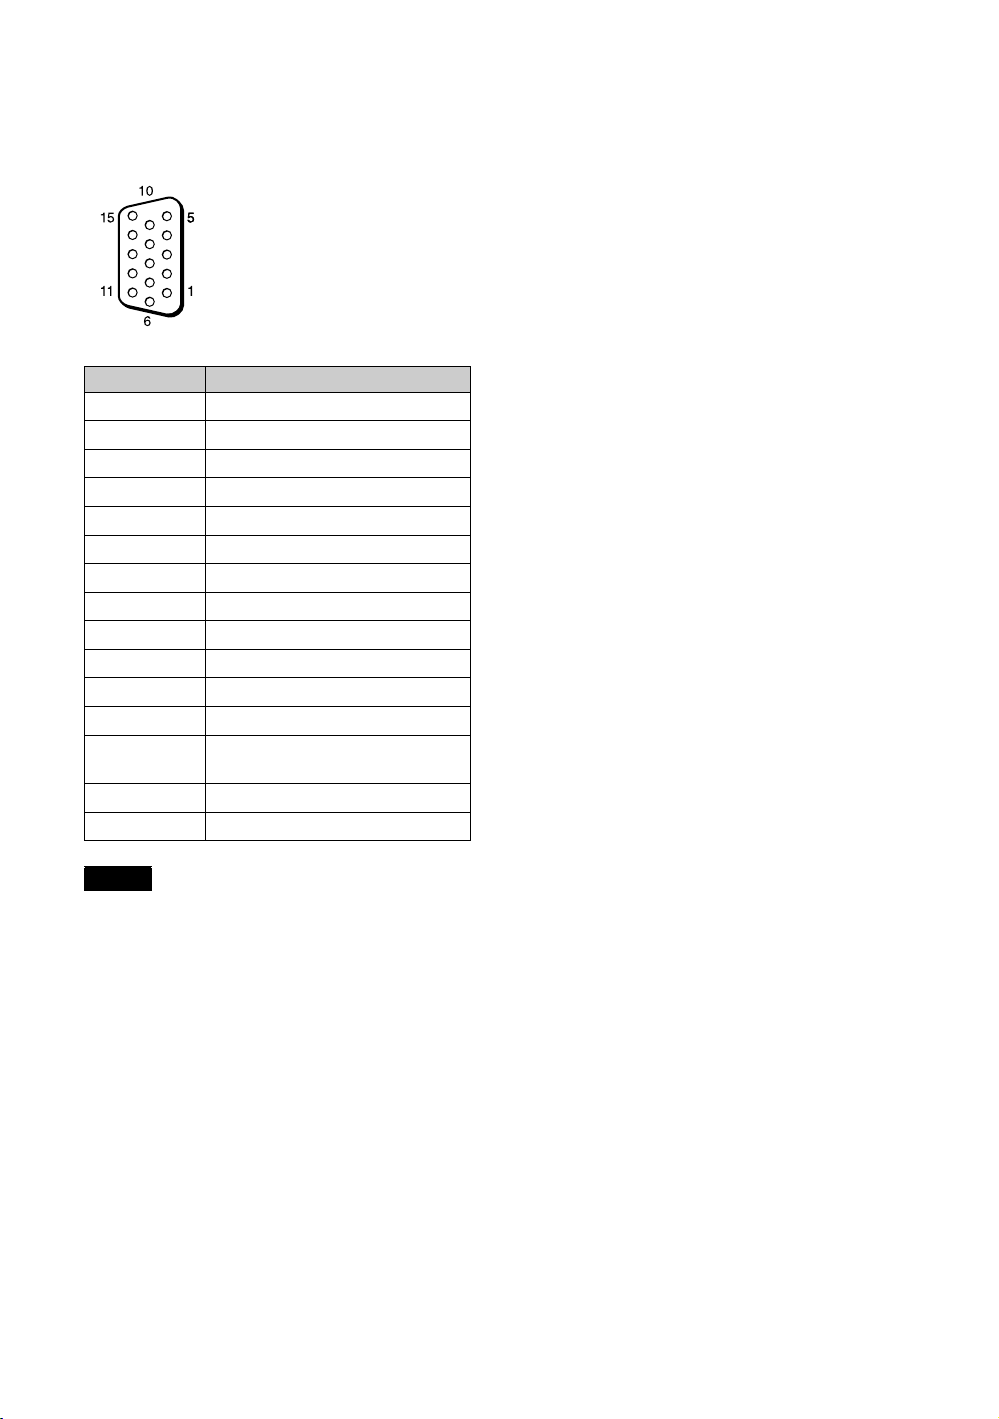
ピン配列
HD15(RGB/COMPONENT)端子(D-sub
15 ピン)
ピンNo. 信号
1 赤映像信号または CR/PR信号
2 緑映像信号または Y信号
3 青映像信号または C
4 接地(GND)
5 接地(GND)
6 赤接地(GND)
7 緑接地(GND)
8 青接地(GND)
9未使用
10 接地(GND)
11 接地(GND)
12 SDA
13 水平同期信号または Composite
Video
14 垂直同期信号
15 SCL
B/PB
信号
ご注意
コンポーネント信号を入力する際は 13、14 ピンに同
期信号を入力しないでください。画像が正しく表示さ
れない場合があります。
安全規格 電安法、VCCI クラス B
JP
32
本機は「JISC61000-3-2適合品」で
す。
JISC61000-3-2適合品とは、日本工
業規格「電磁両立性 - 第 3-2部:
限度値-高調波電流発生限度値
(1 相当たりの入力電流が 20A 以
下の機器)」に基づき、商用電力
系統の高調波環境目標レベルに適
合して設計・製造した製品です。
Page 33
索引
数字
4:316,24
4:3映像25
あ
明るさ21,22
色あい21
色温度21,22
色の濃さ21
インフォメーション28
オートシャットオフ27
オートワイド24
オールリセット28
音質メニュー19,23
音質モード23
音質モード標準23
音声入力選択23
か
画位相26
画質メニュー19,21
画質モード21,22
画質モード標準21,22
カスタム21,22,23
画面調整メニュー20,24
カラー方式27
ケーブルホルダー18
言語27
高音23
コントラスト21,22
さ
時刻設定27
自動調整26
シネモーション21
シャープネス21
詳細設定27
垂直位置25,26
垂直サイズ25
水平位置25,26
ズーム16,24
スタンダード21,22,23
スタンド固定穴13
ステータス表示27
スピーカー出力23
スリープタイマー17,27
設定メニュー20,27
た
ダイナミック21,22,23
タイマー設定27
低音23
時計表示27
ドットピッチ26
な
入力信号30
ノーマル16,25,26
は
バランス23
ビデオ入力アダプター12
表示エリア25
標準25,26
フル16,24
フル 1/ フル 216,26
ら
リモコンセンサー10
わ
ワイド切換16,24,26
ワイドズーム16,24
A
ACIN ソケット13,18
AUDIO(COMMONAUDIO
IN)端子11
D
DHCP28
DISPLAY ボタン14
E
ECO モード17,27
H
HD15(RGB/COMPONENT
IN)端子11
HDMI1/HDMI2IN 端子11
I
INPUT ボタン10
INPUTV1 〜 V5 ボタン14
IPAddressSetup28
M
Manual(IPAddressSetup)
28
MENU ボタン10,15
MUTING ボタン15
N
NR(ノイズリダクション)21
O
OPTION スロット11,12
P
PICOFF/TIMER インジ
ケーター10
PICTURE ボタン14
POWER インジケーター10
POWER ボタン10,14
POWERSAVING ボタン15,
17
R
RGB/ コンポーネントアク
ティブスルーアダプター12
S
SLEEP ボタン15,17
SOUNDボタン15
SpeedSetup28
SRSWOW23
STANDBY インジケーター
10
V
VOL ボタン10,14
W
WIDE ボタン14,16
JP
33
JP
Page 34
WARNING
Owner’s Record
The model and serial numbers are located on the rear.
Record the model and serial numbers in the spaces
provided below. Refer to these numbers whenever you
call upon your Sony dealer regarding this product.
Model No.
To reduce the risk of fire or electric shock,
do not expose this apparatus to rain or
moisture.
To avoid electrical shock, do not open the
cabinet. Refer servicing to qualified
personnel only.
On transportation
When you carry the display unit, hold the unit itself,
not the speakers. If you fail to do so, the speakers may
come out of the unit and the unit may fall. This can
cause injury.
For customers in the U.S.A.
If you have any questions about this product, you may
call; Sony Customer Information Services Center
1-800-222-7669 or http://www.sony.com/
Serial No.
harmful interference to radio or television reception,
which can be determined by turning the equipment off
and on, the user is encouraged to try to correct the
interference by one or more of the following
measures:
• Reorient or relocate the receiving antenna.
• Increase the separation between the equipment and
receiver.
• Connect the equipment into an outlet on a circuit different
from that to which the receiver is connected.
• Consult the dealer or an experienced radio/TV technician
for help.
You are cautioned that any changes or modifications
not expressly approved in this manual could void your
authority to operate this equipment.
For customers in Canada
This class B digital apparatus complies with Canadian
ICES-003.
Voor de klanten in Nederland
• Dit apparaat bevat een vast ingebouwde batterij die niet
vervangen hoeft te worden tijdens de levensduur van het
apparaat.
• Raadpleeg uw leverancier indien de batterij toch
vervangen moet worden. De batterij mag alle en vervangen
worden door vakbekwaam servicepersoneel.
• Gooi de batterij niet weg maar lever deze in als klein
chemisch afval (KCA).
• Lever het apparaat aan het einde van
de levensduur in voor recycling, de
batterij zal dan op correcte wijze
verwerkt worden.
NL
Declaration of Conformity
Trade Name: SONY
Model: KLH-W26/KLH-W32
Responsible Party: Sony Electronics Inc.
Address: 16530 Via Esprillo, San
Diego, CA 92127 U.S.A.
Telephone Number: 858-942-2230
This device complies with Part 15 of the FCC Rules.
Operation is subject to the following two conditions:
(1) This device may not cause harmful interference,
and (2) this device must accept any interference
received, including interference that may cause
undesired operation.
This equipment has been tested and found to comply
with the limits for a Class B digital device, pursuant to
Part 15 of the FCC Rules. These limits are designed to
provide reasonable protection against harmful
interference in a residential installation. This
equipment generates, uses, and can radiate radio
frequency energy and, if not installed and used in
accordance with the instructions, may cause harmful
interference to radio communications. However, there
is no guarantee that interference will not occur in a
particular installation. If this equipment does cause
The socket-outlet should be installed near the
equipment and be easily accessible.
CAUTION
RISK OF EXPLOSION IF BATTERY IS REPLACED
BY AN INCORRECT TYPE. DISPOSE OF USED
BATTERIES ACCORDING TO THE LOCAL RULES.
Trademark Information
WOW, SRS and ( ) symbol are trademarks of SRS
Labs, Inc. WOW technology is incorporated under
license from SRS Labs, Inc.
Manufactured under license from BBE Sound, Inc.
Licensed by BBE Sound, Inc. under one or more of the
following US patents: 5510752, 5736897. BBE and
BBE symbol are registered trademarks of BBE Sound,
Inc.
GB
2
Page 35
Table of Contents
Introduction
Precautions ...............................................................................................................................4
Recommendations on Installation.............................................................................................6
Location and Function of Parts and Controls
Front Panel................................................................................................................................7
Side Panel.................................................................................................................................8
Optional Adaptors .....................................................................................................................9
Rear Panel ..............................................................................................................................10
Remote Control .......................................................................................................................11
Button Description..............................................................................................................11
Special Buttons on the Remote Control.............................................................................13
Using the Wide Mode....................................................................................................13
Using the Sleep Function..............................................................................................14
Using the ECO Mode Function .....................................................................................14
Connections
GB
Connecting the AC Power Cord and Arranging the Input Cables ...........................................15
Using the Settings
Overview of the Menus ...........................................................................................................16
Picture Settings .......................................................................................................................18
Sound Settings........................................................................................................................20
Screen Settings.......................................................................................................................21
Setup Settings.........................................................................................................................24
Other Information
Troubleshooting ......................................................................................................................26
Input Signal Reference Chart..................................................................................................27
Specifications ..........................................................................................................................28
Index .......................................................................................................................................30
GB
3
Page 36

Introduction
Precautions
On safety
• A nameplate indicating operating voltage, power
consumption, etc. is located on the rear of the unit.
• Should any solid object or liquid fall into the cabinet,
unplug the unit and have it checked by qualified personnel
before operating it any further.
• Unplug the unit from the wall outlet if it is not to be used
for several days or more.
• To disconnect the AC power cord, pull it out by grasping
the plug. Never pull the cord itself.
• When you install the unit on the floor, be sure to use the
optional display stand.
On installation
• Allow adequate air circulation to prevent internal heat
build-up. Do not place the unit on surfaces (rugs, blankets,
etc.) or near materials (curtains, draperies) that may block
the ventilation holes.
• Do not install the unit in a location near heat sources such
as radiators or air ducts, or in a place subject to direct
sunlight, excessive dust, mechanical vibration or shock.
• When you install multiple equipment with the unit, the
following problems, such as malfunction of the remote
control, noisy picture, noisy sound, may occur depending
on the position of the unit and other equipment.
On the LCD panel
• You may see some bright spots of red, blue or green, or
dark spots appearing on the screen. These do not indicate
a malfunction. Although the LCD panel is manufactured
with extremely high precision technology, it can generate
a few dark or bright pixels.
• Keeping the LCD panel facing toward the sun for a long
time will damage the panel. Take this into account when
you install the unit outdoor or by a window.
• Do not push, scratch or put a heavy weight on the panel.
These can cause irregularities in the screen or a
malfunction of the LCD panel.
• You may find the screen looks darker or an afterimage
occurs when using the unit in a colder environment. These
do not indicate a malfunction. The screen will return to
normal operation as the temperature rises.
• If you display a still image continuously, a ghosting may
occur. This symptom will be gradually resolved by
changing the image or making the whole screen display in
white. In addition, if you display the same still image for
a long period of time, the ghosting may not be resolved.
• The panel surface or the cabinet may warm up during use.
This does not indicate a malfunction.
On cleaning the display
The panel surface
• Be sure to unplug the power cord before cleaning the
display.
• The LCD panel surface has been given a special finish.
Avoid touching the LCD screen. When cleaning the panel
face, wipe off stains using a dry, soft cloth.
• Never use rubbing alcohol, benzine or thinner for
cleaning. They may damage the finish of the panel face.
• When using a chemically t reated cloth for cleaning, follow
the directions.
• Spraying the unit with volatile solvents (such as an
insecticide) or allowing the unit come into prolonged
contact with rubber or plastic products may remove the
coating or spoil the unit.
The cabinet
• Gently wipe off stains using a dry, soft cloth. Wipe off
grimy stains using a cloth slightly moistened with a mild
detergent, then wipe the area again using a dry, soft cloth.
• Never use rubbing alcohol, benzine or thinner for
cleaning. They may damage the finish of the cabinet or
can remove the markings on it.
Notes on handling and cleaning the display panel
The display panel’s special surface finish should be
treated with care when cleaning or handling the
display. When cleaning it, use a soft cleaning cloth to
avoid touching the panel directly.
On repacking
Do not throw away the carton and packing materials.
They make an ideal container in which to transport the
unit. When shipping the unit, repack it as illustrated on
the carton.
If you have any questions on this unit, contact your
authorized Sony dealers.
GB
4
Page 37
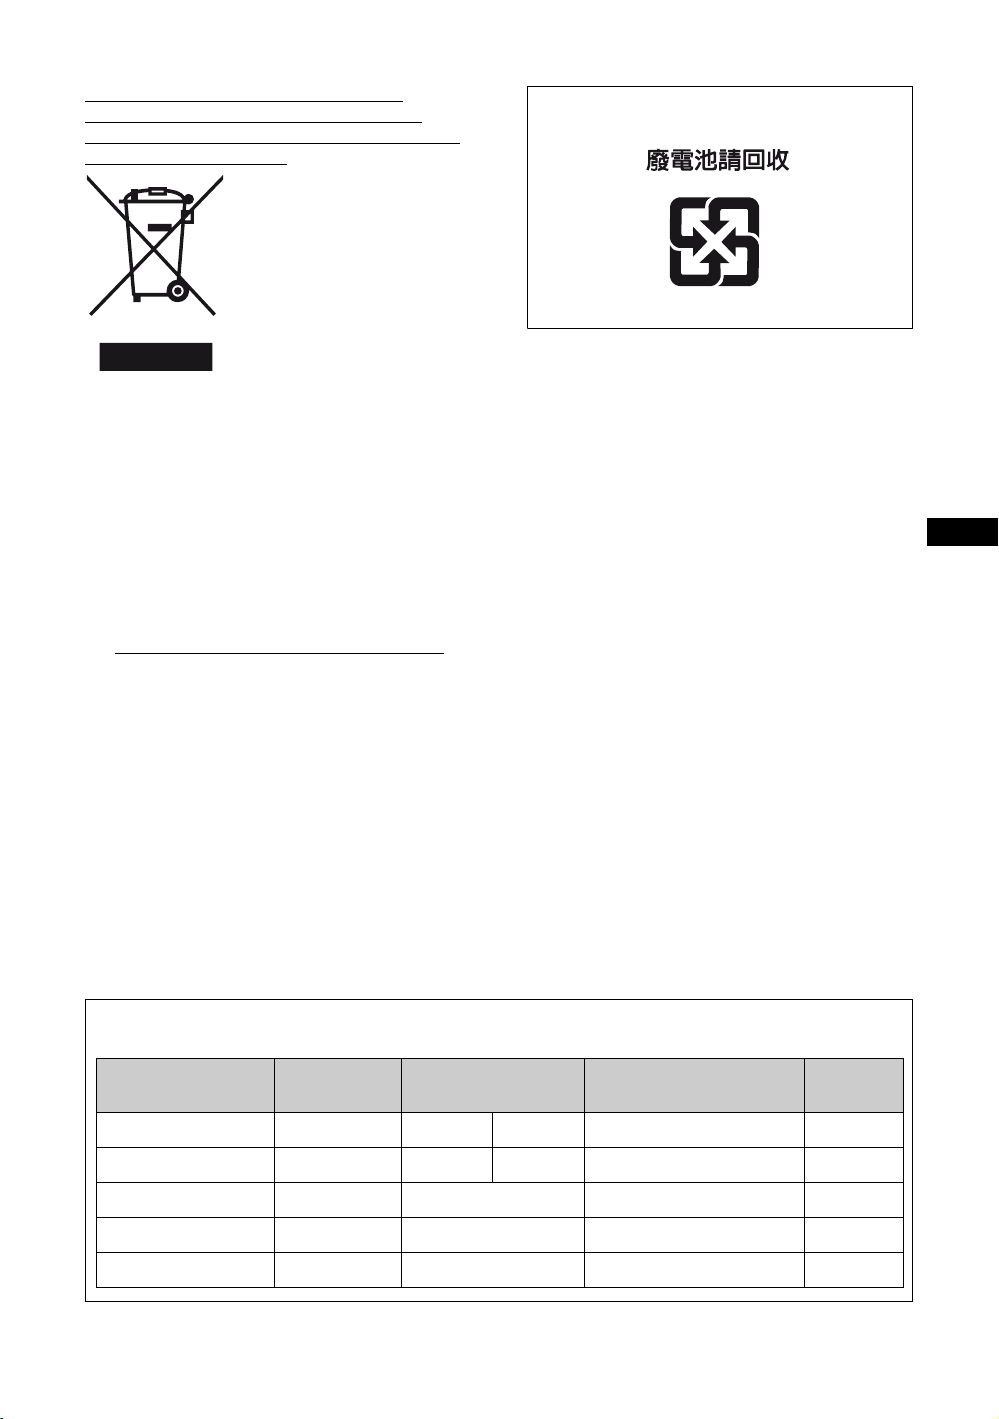
Disposal of Waste Electrical and Electronic
Equipment for business use (Applicable in the
European Union and other European countries with
separate collection systems)
This symbol on the product or
on its packaging indicates that
this product shall not be treated
as household waste. Instead it
shall be handed over to the
applicable take-back scheme
for the recycling of electrical
and electronic equipment. By
ensuring this product is
disposed of correctly, you will
help prevent potential negative
consequences for the environment and human health,
which could otherwise be caused by inappropriate
waste handling of this product. The recycling of
materials will help to conserve natural resources. For
more detailed information about recycling of this
product, please contact your local Sony office or visit
Sony Europe’s web site for business customers:
http://www.sonybiz.net/environment
For the State of California, USA only
Perchlorate Material - special handling may apply,
See www.dtsc.ca.gov/hazardouswaste/perchlorate
Perchlorate Material : Lithium battery contains
perchlorate.
For Customers in Taiwan only
GB
For Customers in the United States
Lamp in this product contains mercury. Disposal
of these materials may be regulated due to
environmental considerations. For disposal or
recycling information, please contact your local
authorities or the Electronic Industries Alliance
(www.eiae.org).
Warning on power connection
Use the proper power cord for your local power supply.
United States,
Canada
Plug type VM0233 COX-07 636 —
Female end VM0089 COX-02 VM0310B VM0303B VM1313
Cord type SVT H05VV-F CEE (13) 53rd (O.C) HVCTF
Minimum cord set rating 10A/125V 10A/250V 10A/250V 10A/125V
Safety approval UL/CSA VDE VDE DENAN-HO
Continental Europe
United Kingdom, Ireland,
Australia, New Zealand
a)
Japan
VM1296
a) Note: Use an appropriate rating plug which complies with local regulations.
GB
5
Page 38
Recommendations on
Installation
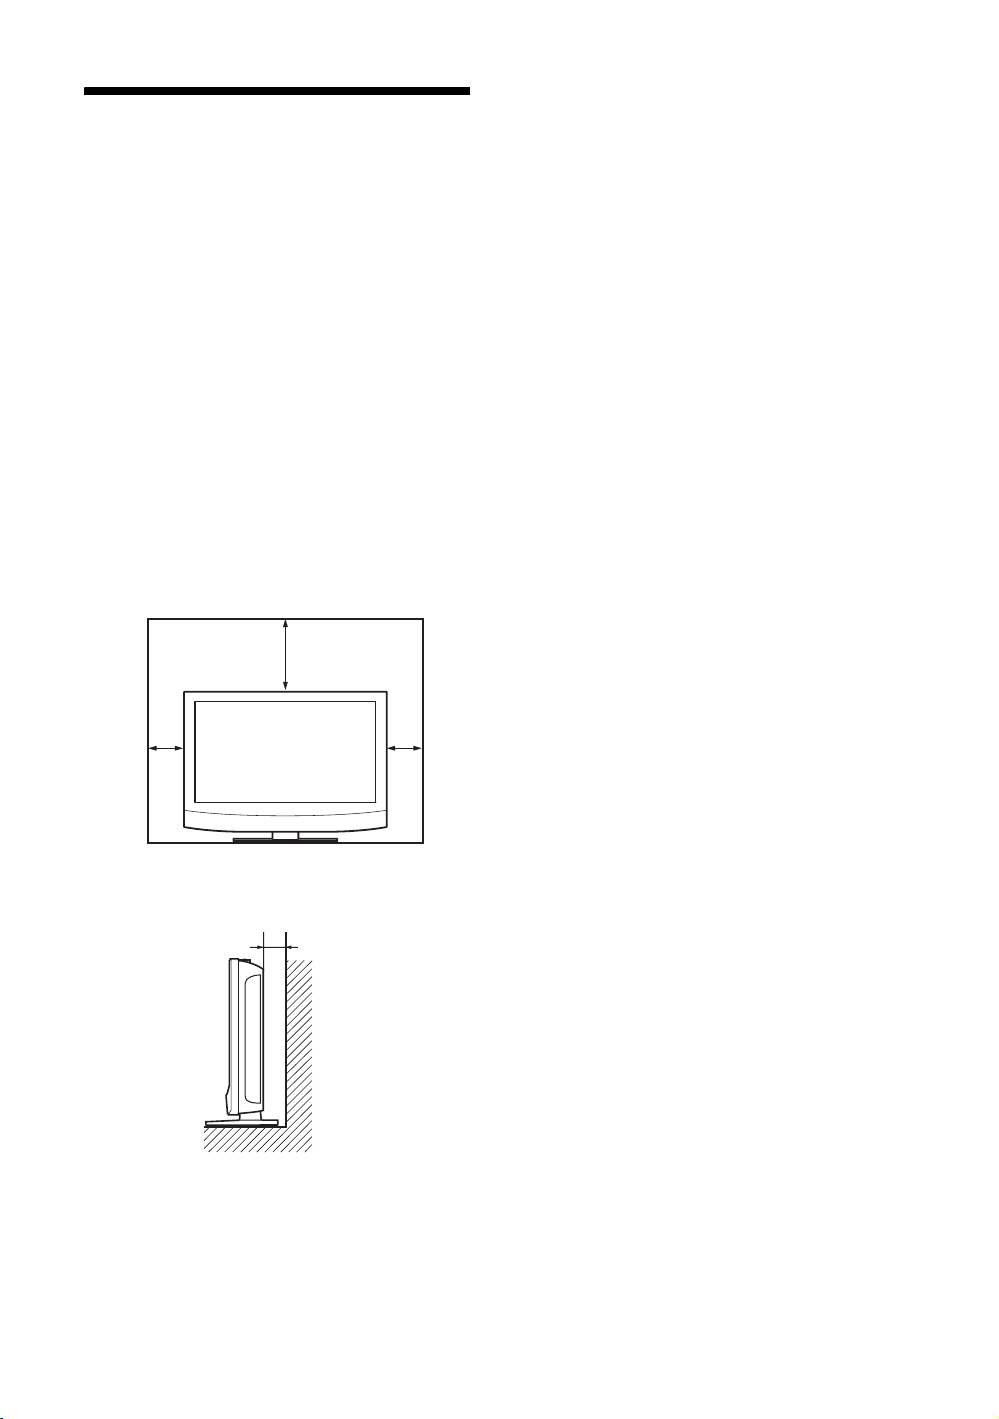
Provide an ample amount of space around
the display
• To prevent internal heat buildup from sealing off the
display, make sure to ensure proper ventilation by leaving
open the minimum amount of space around the display, as
illustrated below.
• The ambient temperature must be 0
°F).
95
• Regarding the installation of hardware such as brackets,
screws, or bolts, we cannot specify the products. Actual
installation is up to the authorized local dealers. Consult
with qualified Sony personnel for installation.
• While the display is on, a certain amount of heat builds up
inside. This can cause burns. Avoid touching the top or
rear of the display when it is powered on or just after it has
entered standby mode.
Front
°C to 35 °C (32 °F to
20 (7 7/8)
Side
10
(4
)
10 (4)
10
)
(4
Units: cm (inches)
GB
6
Page 39
Location and Function of Parts and Controls
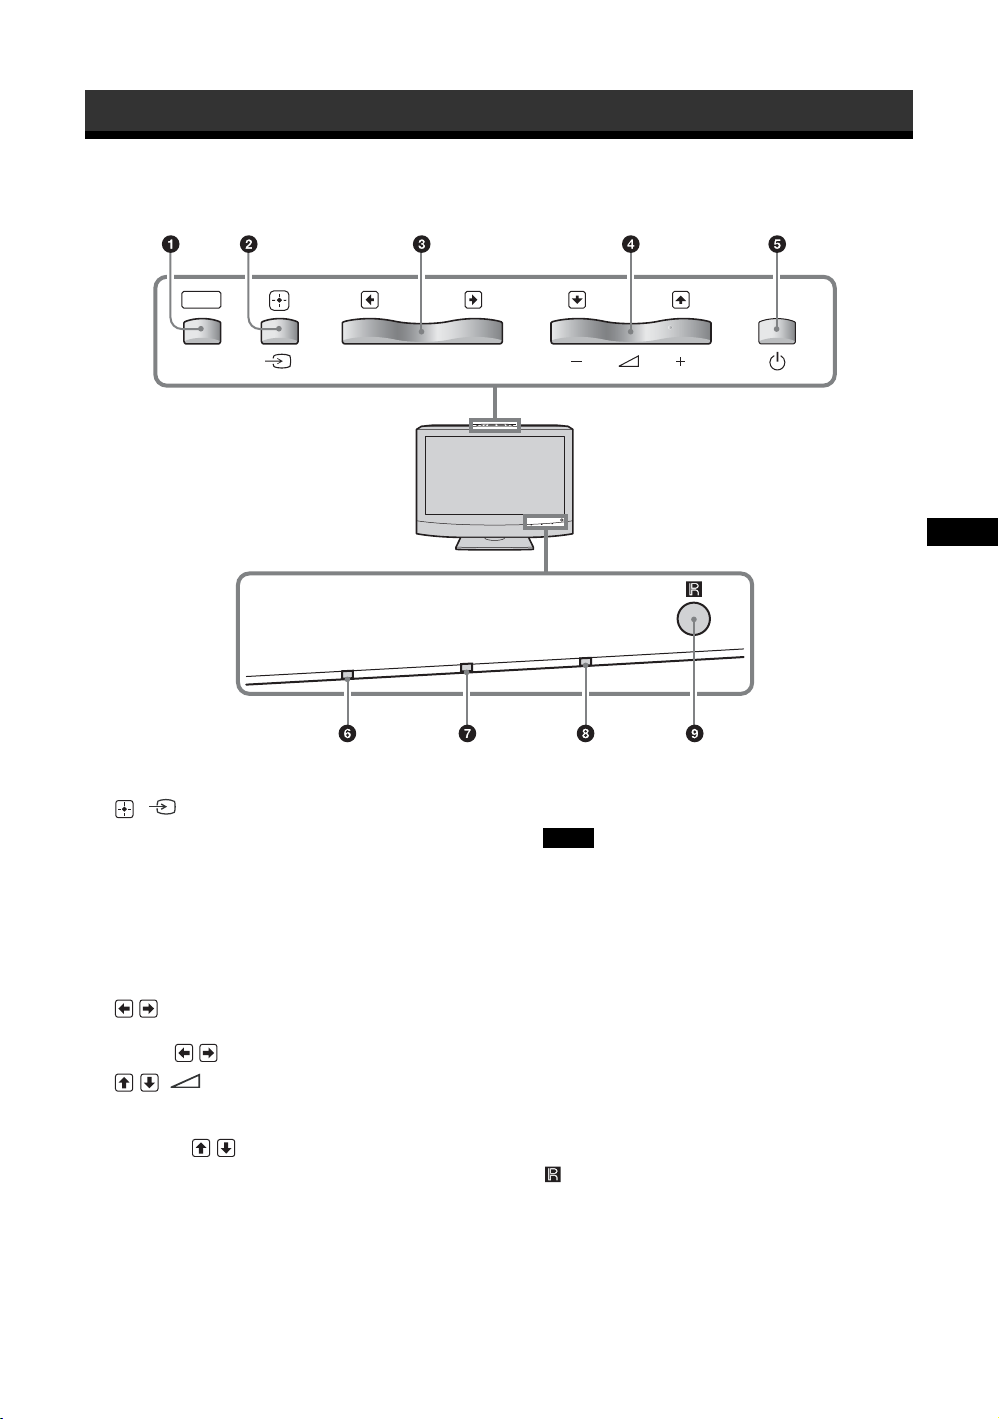
Front Panel
MENU
GB
PIC OFF/TIMER
1 MENU (page 16)
2 / (INPUT)
• In the menu screen, this button works as the “Set”
button.
• This button works to switch the input signal when it
is not in the menu screen.
Selects an input signal from among the HD15/
HDMI 1/HDMI 2/OPTION connectors.
When an optional adaptor is not installed in the
OPTION slot, OPTION will be skipped.
3 /
In the menu screen, these buttons work as left/right
buttons (
/ ).
4 //
• Increases (+) or decreases (–) the volume.
• In the menu screen, these buttons work as up/down
buttons ( / ).
STANDBY
POWER
5 1
Switches the display on/off (standby).
Note
To protect the panel, a certain amount of time is
required to turn the display to on/off (standby). When
you turn the display on again, soon after turning it off,
wait about 5 seconds before you turn it on again.
6 PIC OFF/TIMER indicator
• Lights up in green when “Picture Off” function of
“ECO Mode” is selected.
• Lights up in orange when “Sleep Timer” function is
activated.
7 STANDBY indicator
Lights up in red when the display is in standby mode.
8 POWER indicator
Lights up in green when the display is switched on.
9 Remote control sensor
GB
7
Page 40
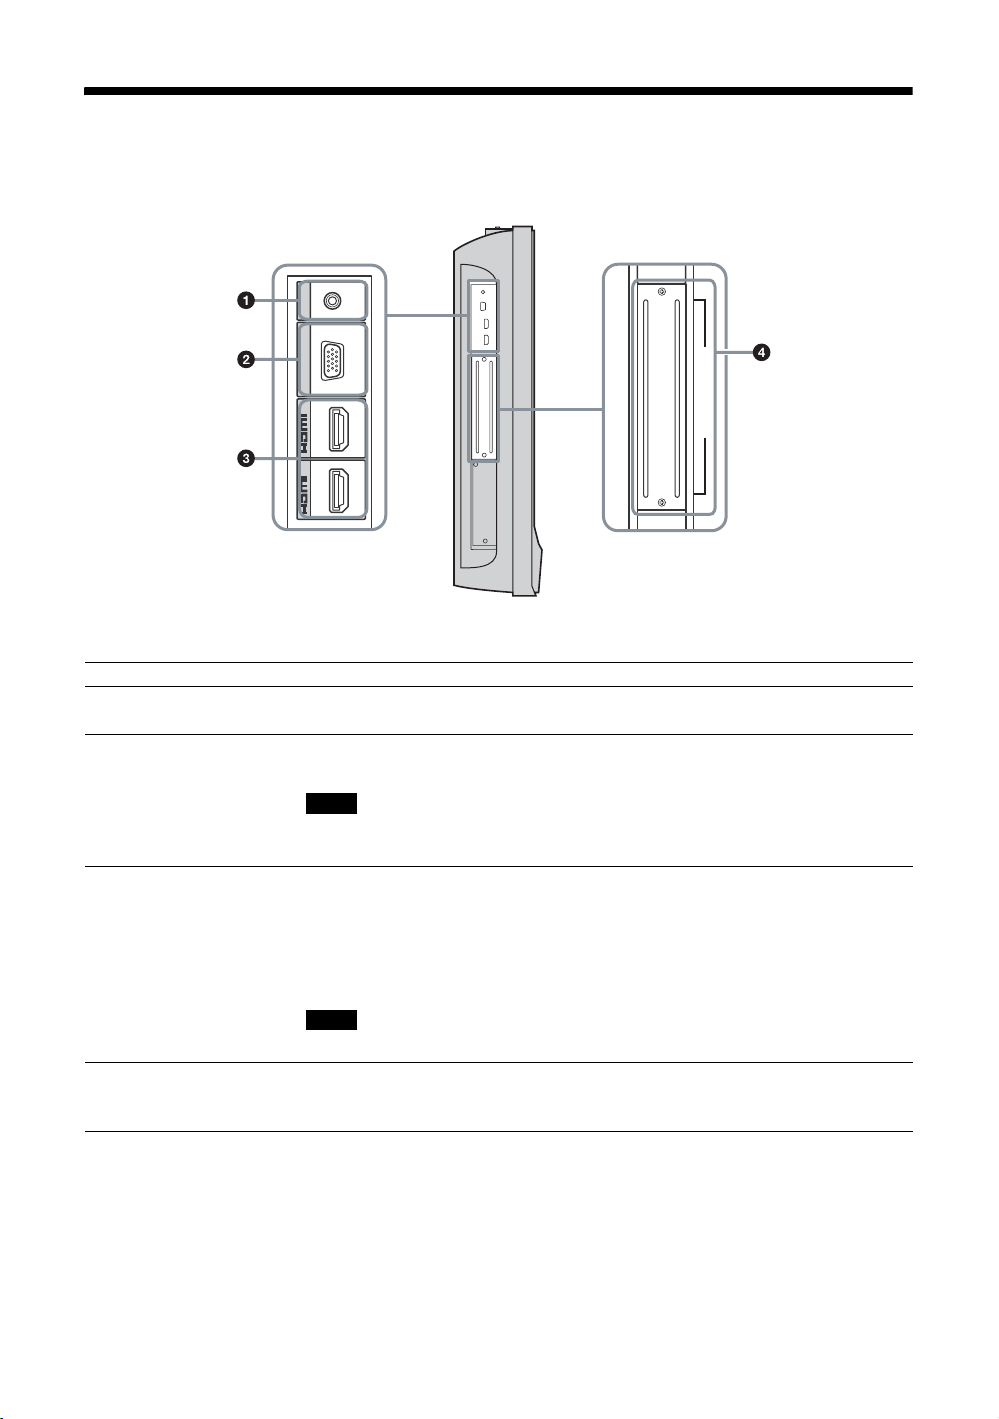
Side Panel
AUDIO
COM MON
AUDIO IN
HD 15
RGB/COMPONENT IN
1
IN
2
IN
Connector Description
1
AUDIO (COMMON
)
AUDIO IN
(Stereo mini jack)
2 HD15 (RGB/
COMPONENT IN)
(D-sub 15-pin)
Inputs an audio signal. Connects to the audio signal output of a piece of video equipment
or PC. Supports audio signals corresponding to 2 and 3.
Connects to the analog RGB signal or component signal output of a piece of video
equipment or PC. See page 29.
Note
When inputting a component signal, be sure not to input sync signals to pins 13 and 14. If
you do so, the picture may not be displayed properly.
3 HDMI 1/HDMI 2 IN HDMI (High-Definition Multimedia Interface) provides an interface between the display
and any HDMI-equipped audio/video equipment, as well as PC. You can enjoy enhanced
or high-definition video, and two-channel digital audio. You can also connect a piece of
DVI-equipped equipment to your display by using an HDMI-to-DVI cable (not supplied).
The appropriate mode for a piece of audio/video equipment or PC is automatically
selected in accordance with the connected equipment.
OPTION (VIDEO/COM)
4 OPTION slot
(VIDEO/COM port)
GB
8
Note
Be sure to use only an HDMI cable that bears the HDMI logo.
This slot supports video signals and communication functions. By installing an optional
adaptor (the BKM-FW series) in this slot, you can expand the input signal connectors or
control the display via the network.
Page 41
Optional Adaptors
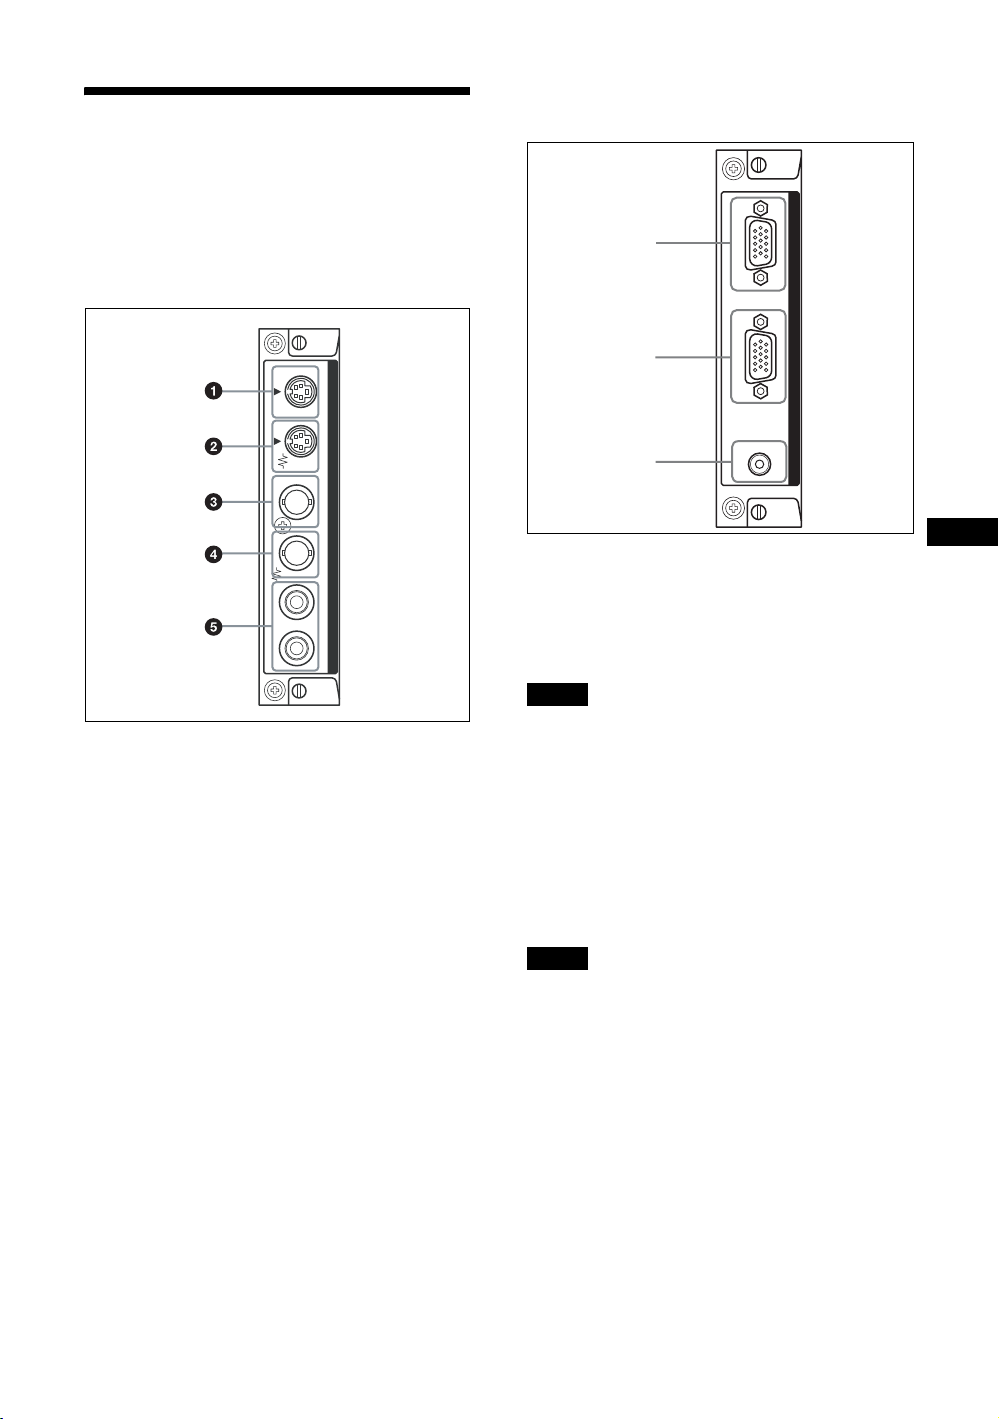
The connectors marked with 4 on the side panel are
slot-in type and can be installed with any of the
optional adaptors (not supplied).
For details on installation, consult your Sony dealers.
VIDEO INPUT Adaptor BKM-FW10
RGB/COMPONENT ACTIVE THROUGH
Adaptor BKM-FW12
1
INOUTINOUTRL
S VIDEO
VIDEO
VIDEO INPUT ADAPTOR
AUDI O IN
1 S VIDEO IN (Mini DIN 4-pin): Connects to the
S Video signal output of a piece of video
equipment.
2 S VIDEO OUT (Mini DIN 4-pin): Connects to
the S Video signal input of a piece of video
equipment.
3 VIDEO IN (BNC): Connects to the video signal
output of a piece of video equipment.
4 VIDEO OUT (BNC): Connects to the video
signal input of a piece of video equipment.
5 AUDIO IN L/R (Pin jack): Connects to the audio
output of a piece of video equipment.
2
3
AUDI O
OUT IN
RGB/COMPONENT ACTIVE THROUGH
IN
1 RGB/COMPONENT IN (D-sub 15-pin):
Connects to the component signal output or
analog RGB signal output of a piece of video
equipment or PC. For details on inputting a
component signal to the connector, see Pin
assignment on page 29 .
Note
When inputting a component signal, be sure not to input sync
signals to pins 13 and 14. If you do so, the picture may not be
displayed properly.
2 RGB/COMPONENT OUT (D-sub 15-pin):
Connects to the component signal input or analog
RGB signal input of a piece of video equipment or
PC.
3 AUDIO IN (Stereo mini jack):
Inputs an audio signal. Connects to the audio
signal output of a piece of video equipment or PC.
Note
When the display is not connected to an AC power or is in
the standby mode, no signal is output from the RGB/
COMPONENT OUT.
GB
For details on the optional adaptors for system
expansion, BKM-FW series, see each instruction
manual.
GB
9
Page 42
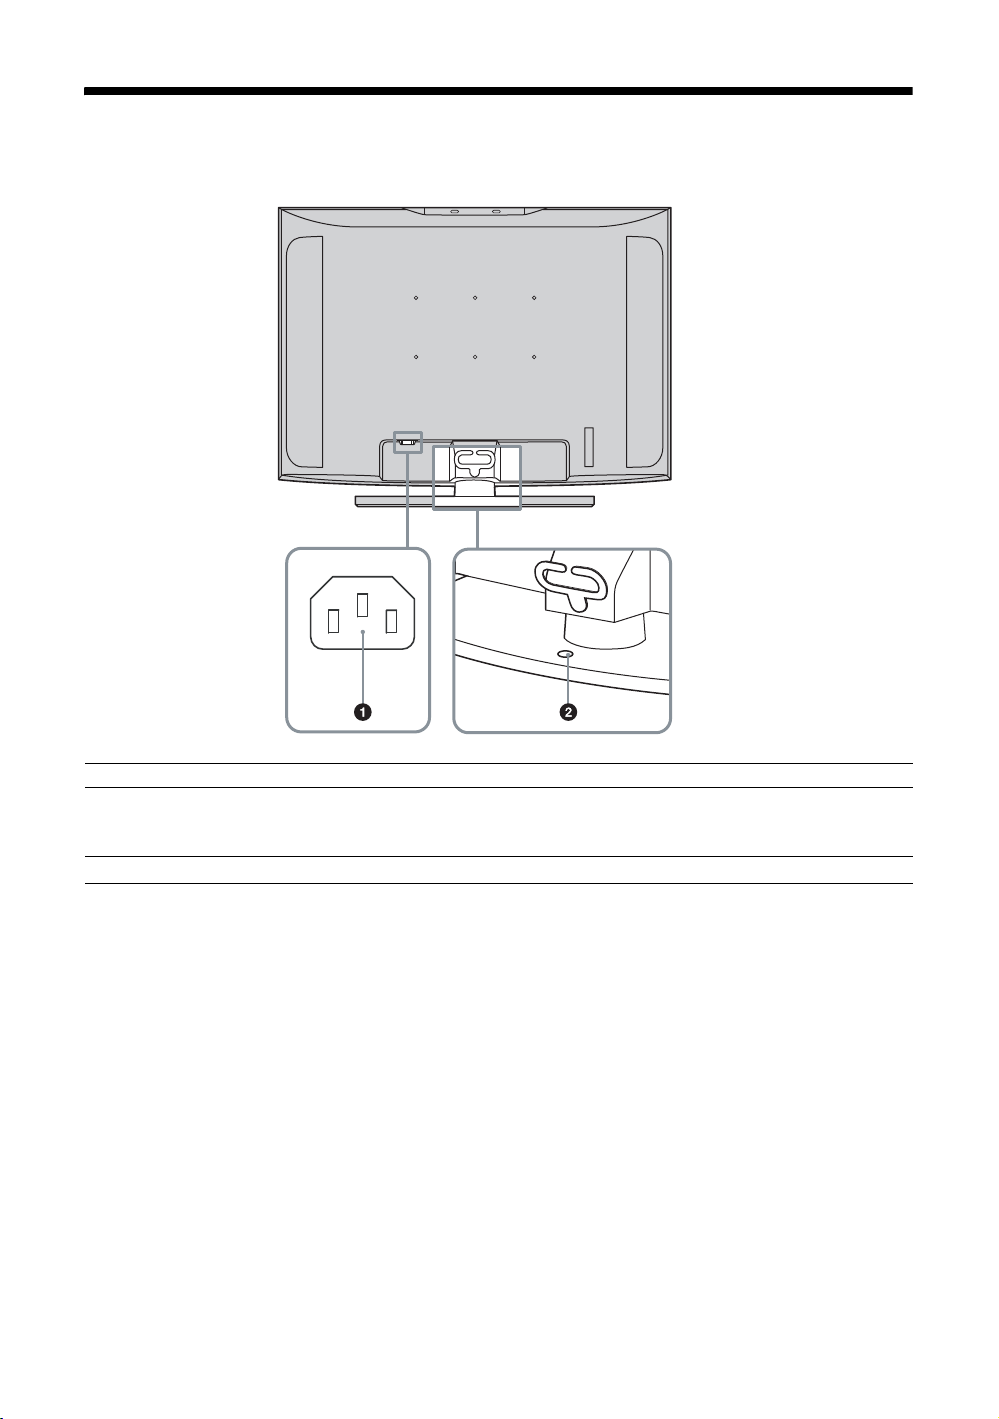
Rear Panel
Parts Description
1 AC I N socket Connect the supplied AC power cord to this socket and to a wall outlet. Once you connect
the AC power cord, the STANDBY indicator lights up in red and the display goes into the
standby mode. See page 15.
2 Stand attachment hole Use this hole to secure the display on a table, etc. using an M6 screw.
10
GB
Page 43
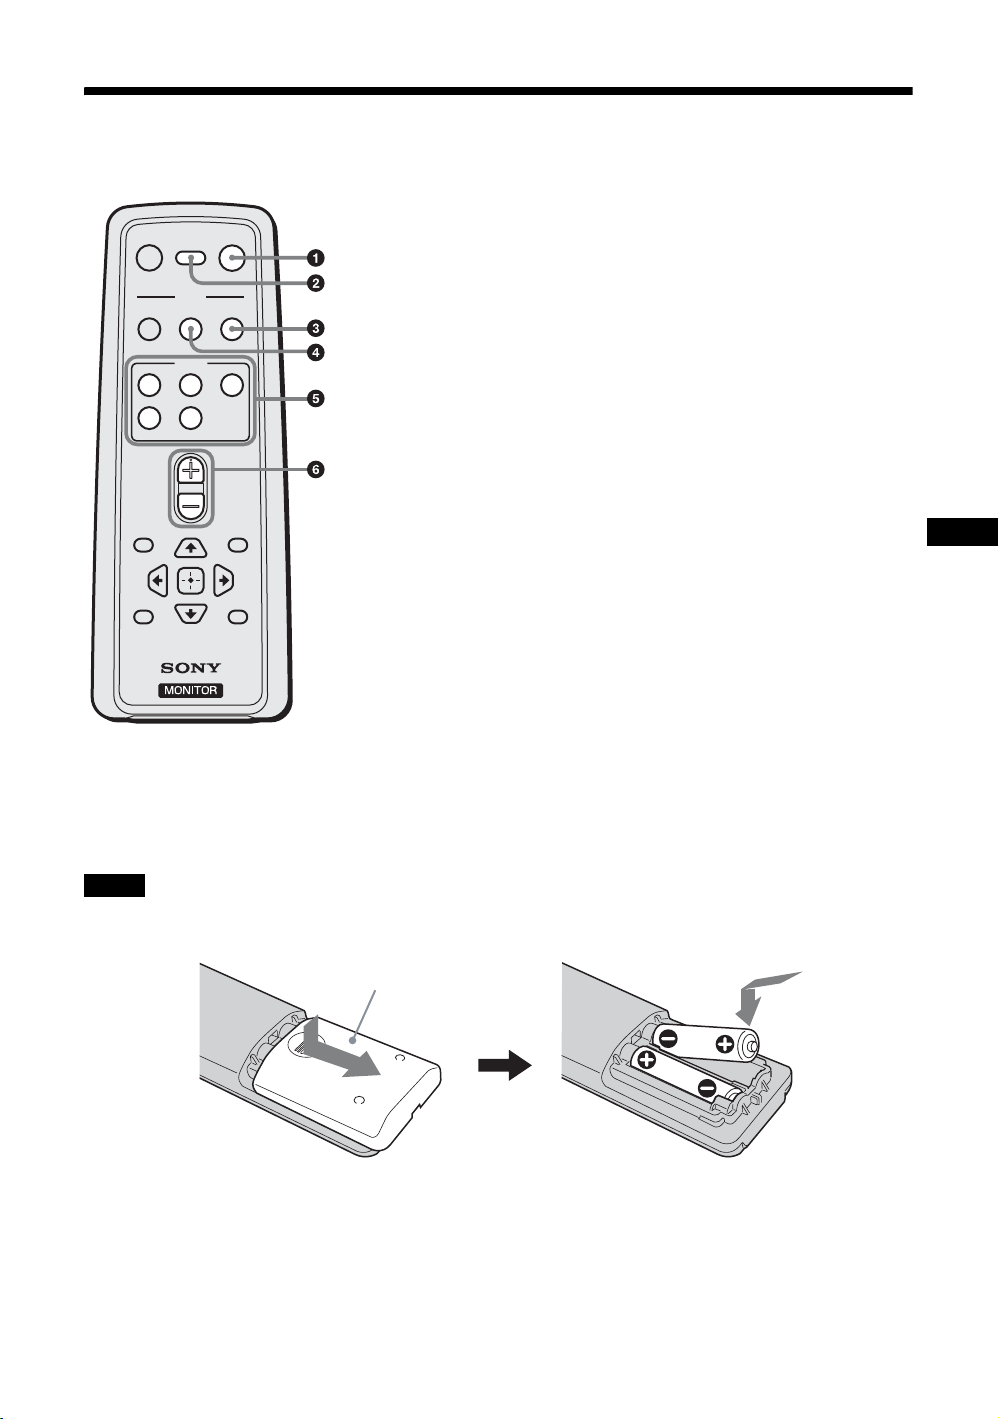
Remote Control
Button Description
MUTING DISPLAY
SOUND
V1
V4 V5
VOL
POWER
SAVING
MODE
PICTURE
INPUT
V2 V3
POWER
WIDE
MENU
SLEEPFREEZE
1 POWER button
Press to switch the display on/off (standby).
2 DISPLAY button
Press to display the currently selected input signal information and
the “Wide Mode” setting on the screen. Press again to hide them. If
this displayed information is left undisturbed for a short time, it will
disappear automatically. If “Sleep Timer” is set, the remaining time
for “Sleep Timer” can be displayed by pressing DISPLAY button.
3 WIDE button
Press to change the aspect ratio in “Wide Mode”. See page 13.
4 PICTURE button
Selects “Picture Mode”. Each press toggles between “Vivid”,
“Standard”, and “Custom”.
5 INPUT V1-V5 buttons
Press the following buttons to select an input signal from the
equipment connected to input connectors.
• V1 button: HD15 (The RGB signal or component signal is selected
automatically in accordance with the connected equipment.)
• V2 button: HDMI 1
• V3 button: HDMI 2
• V4 button: OPTION (When an optional adaptor is installed.)
• V5 button: Not for use.
6 VOL +/– button
Press to adjust the volume.
GB
Tip
The VOL + button has a tactile dot. Use it as a reference when operating the display.
Note
Insert two size AA (R6) batteries (supplied) by matching the 3 and # on the batteries to the diagram inside the remote control’s
battery compartment.
Push and slide to open
11
GB
Page 44
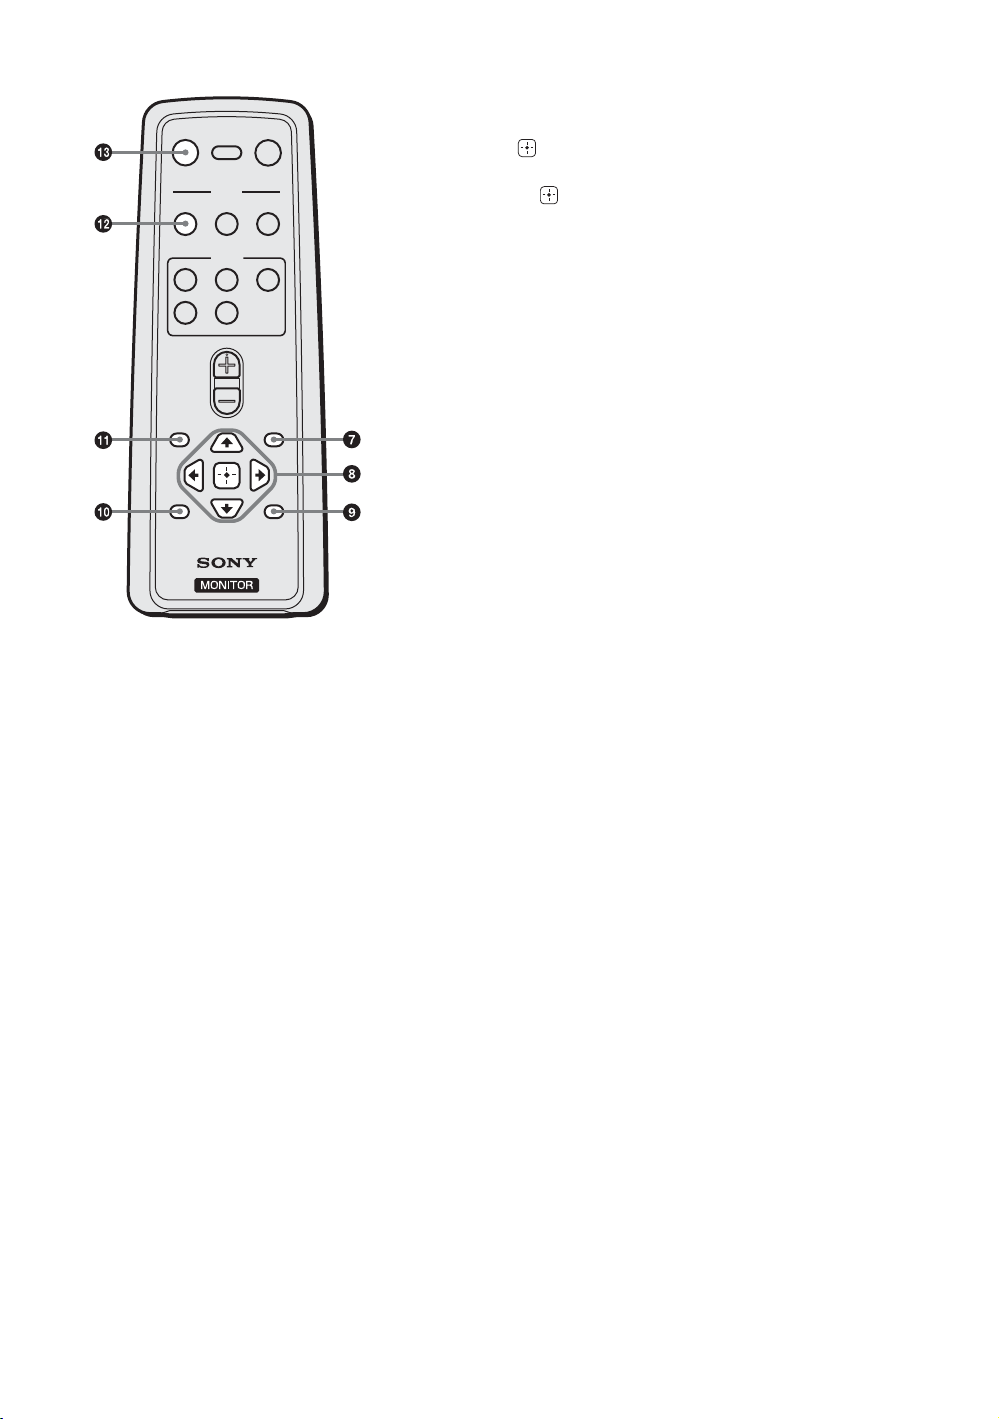
MUTING DISPLAY
MODE
PICTURE
SOUND
INPUT
V1
V4 V5
VOL
POWER
SAVING
POWER
WIDE
V2 V3
MENU
SLEEPFREEZE
7 MENU button
Press to show menus. Press again to hide them. See page 16.
8 V/v/B/b/ buttons
The V/v/B/b buttons move the menu cursor (yellow) and set values,
etc. Pressing sets the selected menu or setting items.
9 SLEEP button
Press repeatedly until the display shows the time in minutes (15, 30,
45, 60, 90 or 120) that you want the display to remain on before
shutting off. To cancel “Sleep Timer”, press SLEEP button
repeatedly until “Sleep Timer : Off” appears.
0 FREEZE button
Not for use.
qa POWER SAVING button
Changes the options of “ECO Mode”. Press to save the power
consumption by changing the backlight brightness. Select from
“Off”, “Low”, “High” or “Picture Off”. See page 14.
qs SOUND button
Selects “Sound Mode”. Each press toggles between “Dynamic”,
“Standard”, “SRS WOW”, and “Custom”.
qd MUTING button
Press to mute the sound. Press again to restore sound.
12
GB
Page 45
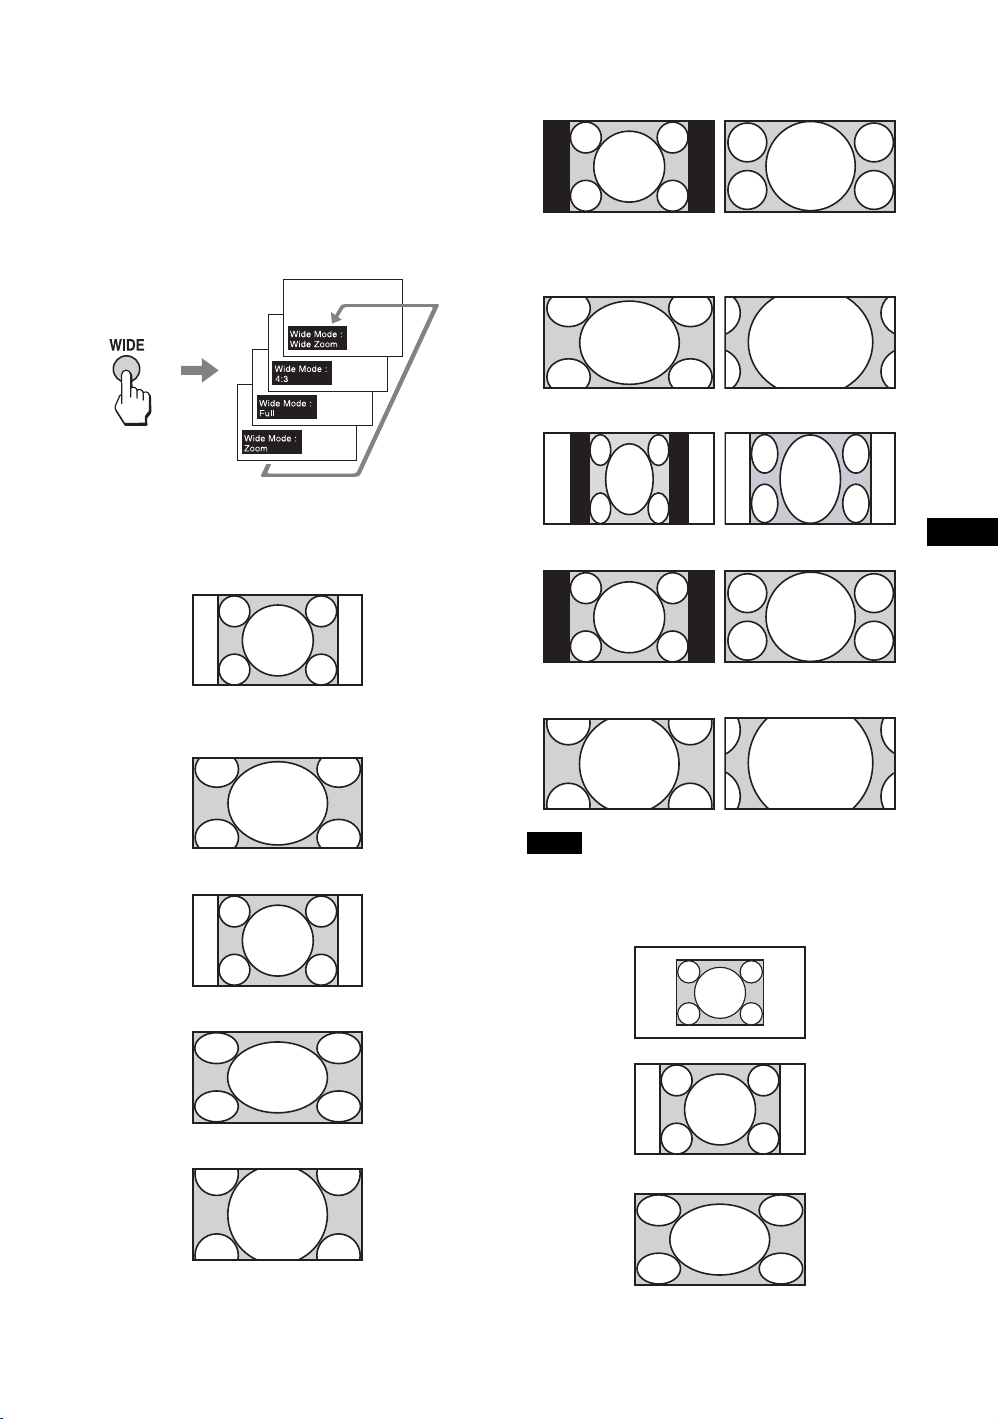
Special Buttons on the Remote Control
Using the Wide Mode
You can change the aspect ratio of the screen by using
the “Wide Mode”.
Tip
You can also access the “Wide Mode” settings in the
“Screen” settings. See page 21, 23.
16:9 Original Source
m
Wide Zoom
4:3
For Video, DVD or HDMI Input (other than PC input)
4:3 Original Source
m
Wide
Zoom
4:3
Full
Full
GB
Zoom
Note
When the input signal is 1080i, 720p, or 1080p, “Wide
Zoom” and “4:3” cannot be selected. See page 21.
For PC Input
Normal
Full 1
Zoom
Full 2
13
GB
Page 46
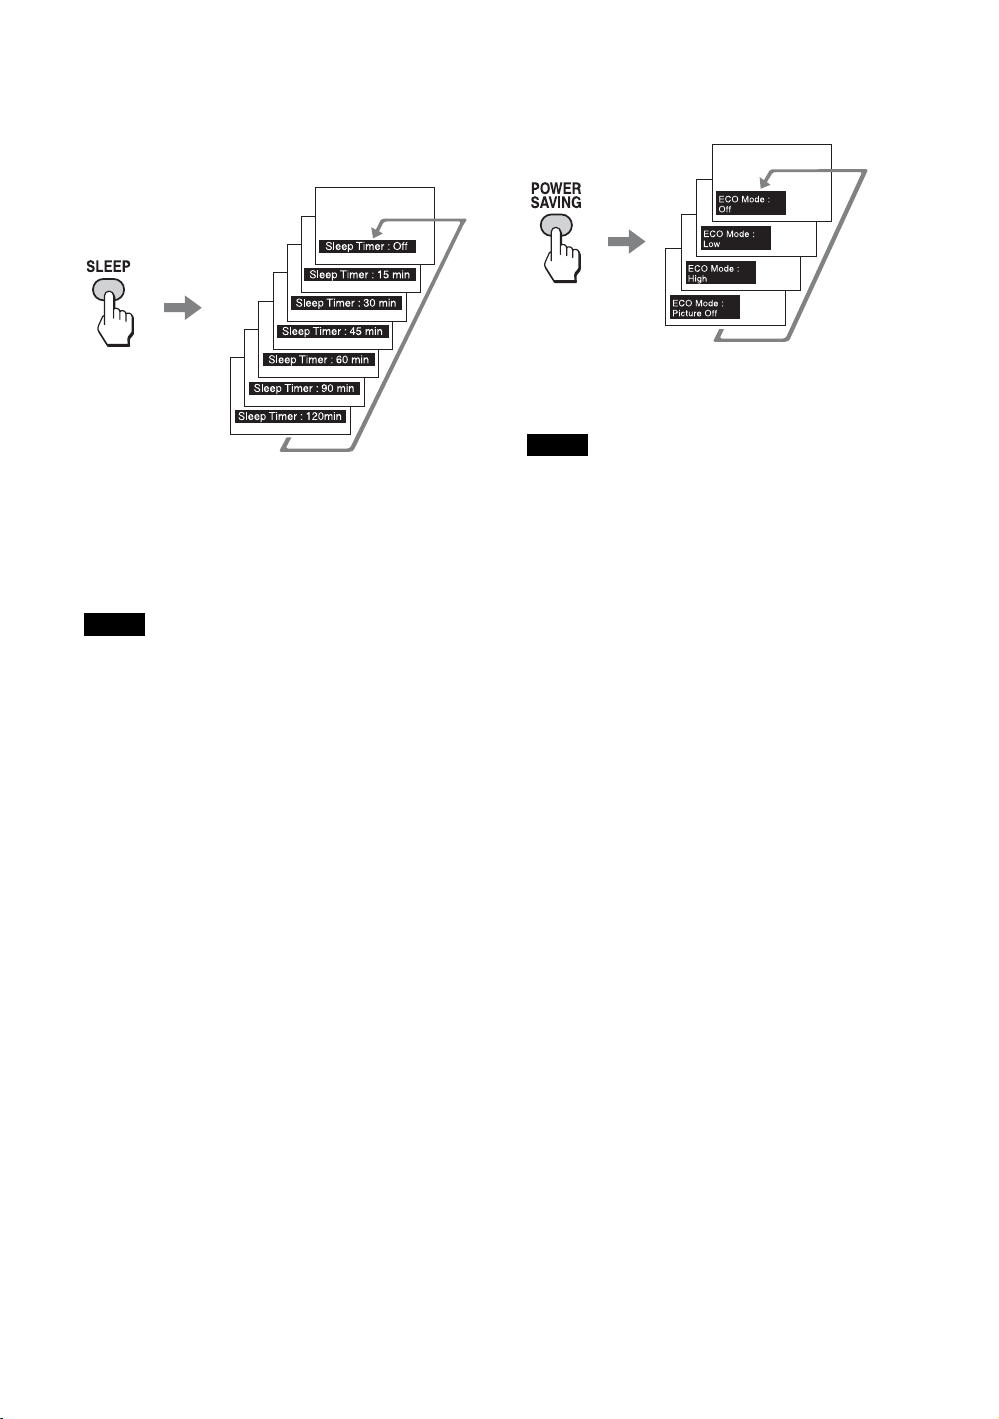
Using the Sleep Function
You can set the display to turn off automatically after
a predetermined period of time (15, 30, 45, 60, 90 or
120 minutes).
While “Sleep Timer” is activated, the PIC OFF/
TIMER indicator on the display lights up in orange.
To cancel Sleep Timer
Press SLEEP repeatedly until “Sleep Timer : Off”
appears or turn the display power to off then turn on
the display again.
Notes
• If you turn the display off, and then turn it on again, “Sleep
Timer” returns to “Sleep Timer : Off”.
• “Sleep Timer - power down” appears one minute before
the display shuts off. This message may not appear if you
are performing other operations in the settings.
• You can set “Sleep Timer” to on using the “Setup”
settings. Select “Sleep Timer” in the “Setup” settings, then
set it to “15 min”, “30 min”, “45 min”, “60 min”, “90
min”, or “120min”.
• While “Sleep Timer” is activated, if you press SLEEP
once, the time remaining until the display shuts off will be
displayed.
Using the ECO Mode Function
You can reduce the power consumption of the display.
To cancel the ECO Mode
Press POWER SAVING button repeatedly until
“ECO Mode : Off” appears.
Notes
• If you turn off the display when the “ECO Mode” is
activated, the mode stays on next time you turn on the
display except “Picture Off”.
• You can set the “ECO Mode” using the “Setup” settings.
Select “ECO Mode” in the “Setup” settings, then set it to
“Off”, “Low”, “High”, or “Picture Off”.
14
GB
Page 47
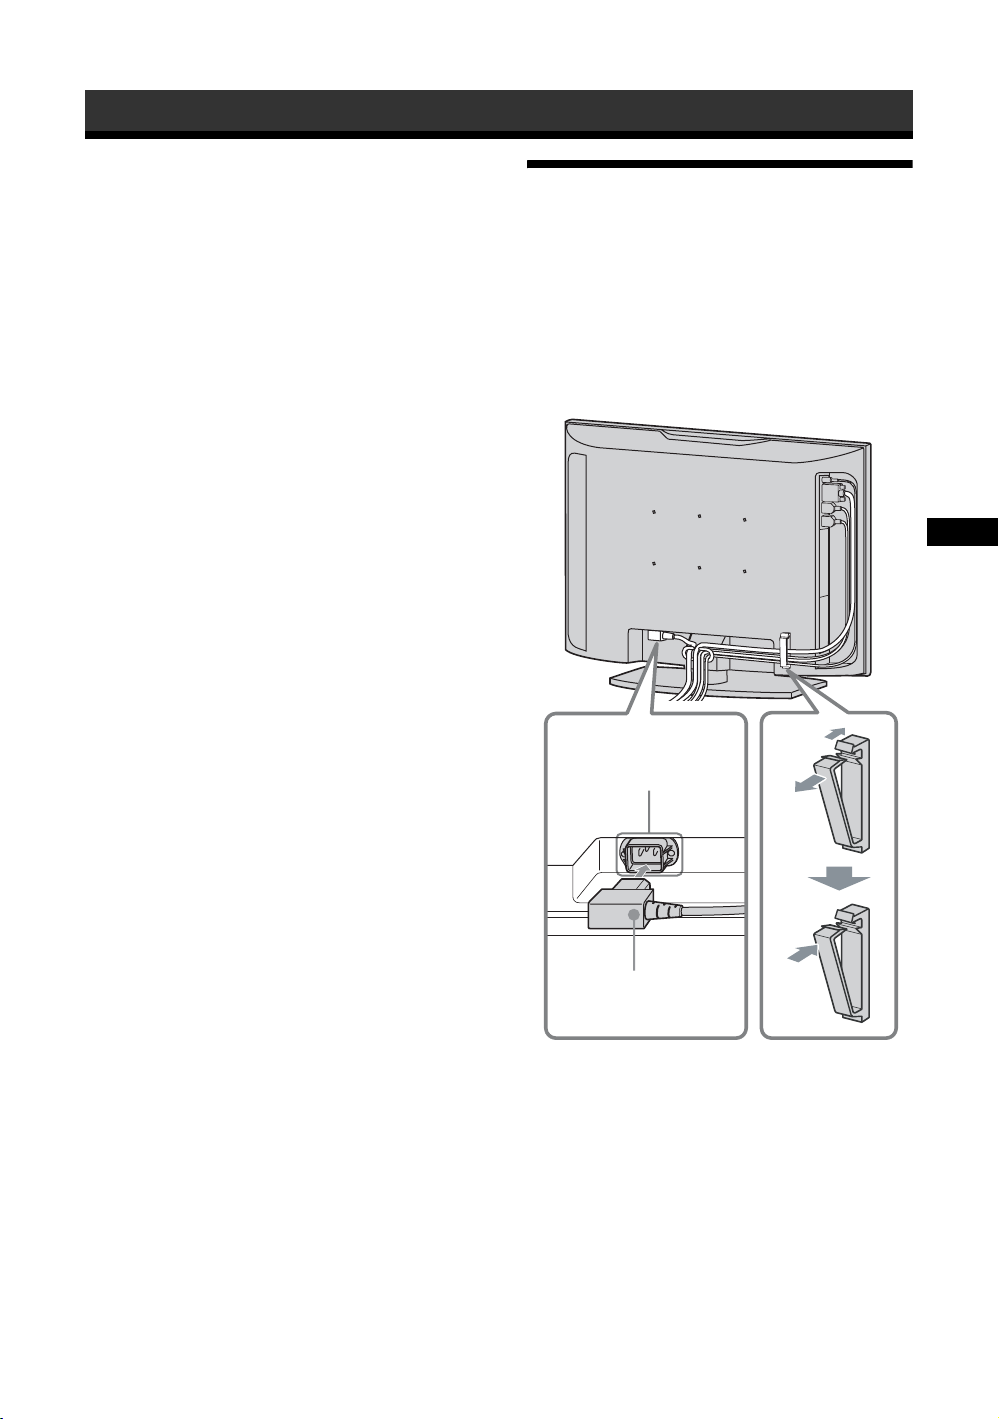
Connections
Before you start
• First make sure that the power of each piece of equipment
is turned off.
• Use cables suitable for the equipment to be connected.
• Connect the cables, fully inserting them into the
connectors or jacks. A loose connection may cause hum
and other noise.
• To disconnect the cable, pull it out by grasping the plug.
Never pull the cable itself.
• See the instruction manual of the equipment to be
connected, too.
• Insert the plug securely into the AC IN socket.
Connecting the AC
Power Cord and
Arranging the Input
Cables
GB
1
AC power cord
AC IN
socket
2
1 Insert the AC power cord into the AC IN
socket on the bottom.
2 Use the cable holder to arrange the
connected cables, as shown in the figure.
15
GB
Page 48
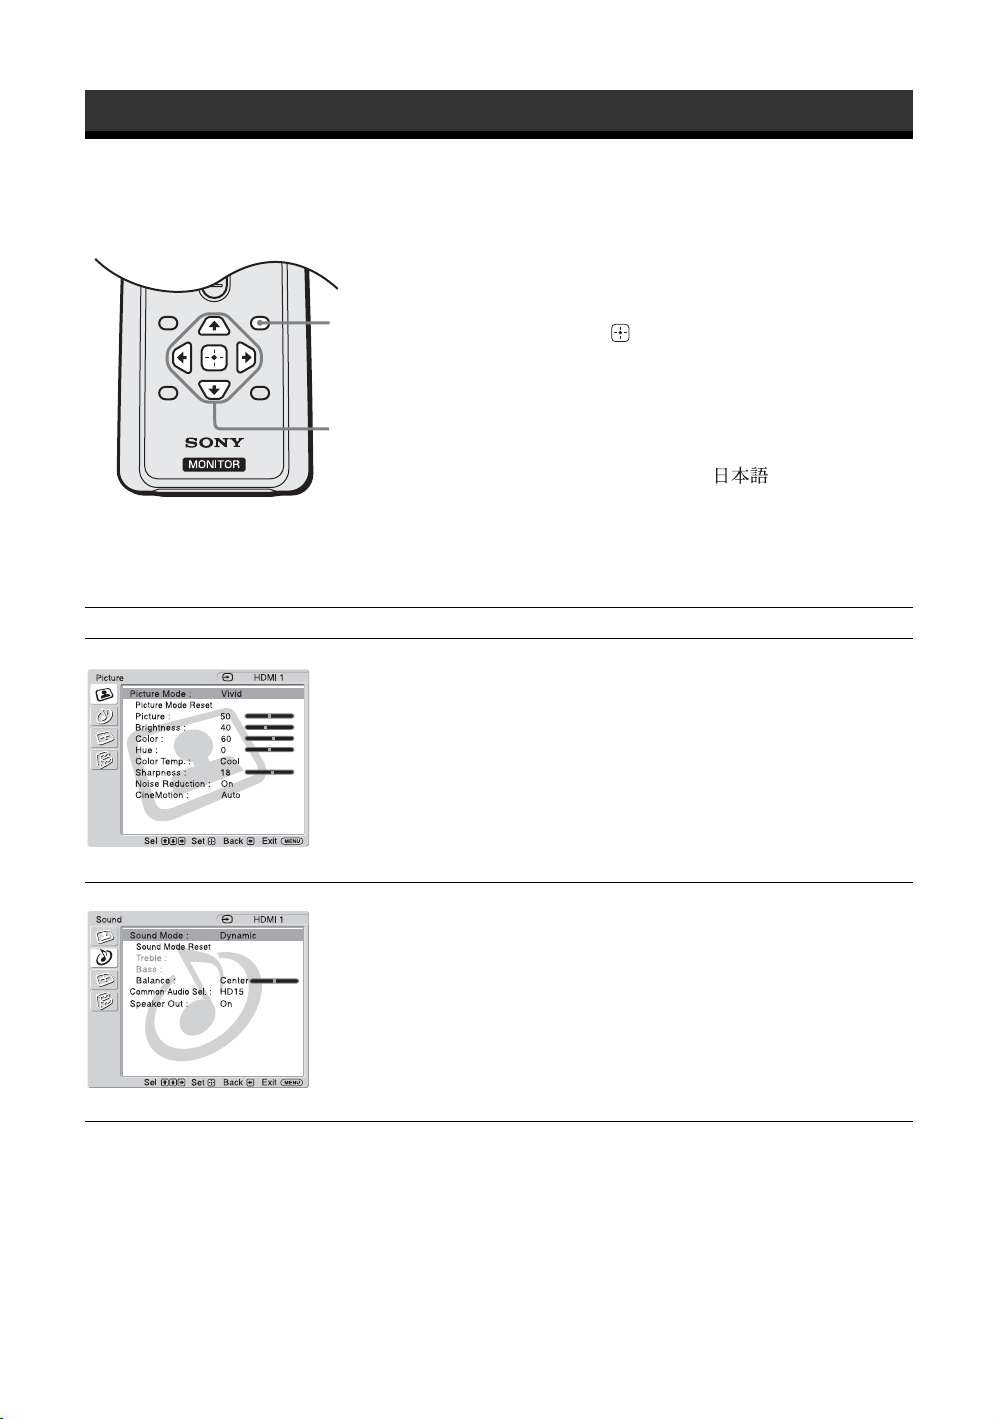
Using the Settings
POWER
SAVING
MENU
VOL
SLEEPFREEZE
Overview of the Menus
1 Press MENU button.
2 Press V/v to highlight the desired menu
icon.
1
2,3
The settings provide you access to the following features:
Settings Allows you to set/change
Picture
: :
:
:
Picture Mode (page 18, 19)
Picture Mode Reset (page 18, 19)
Picture (page 18, 19)
Brightness (page 18, 19)
Color (page 18)
Hue (page 18)
Color Temp. (page 18, 19)
Sharpness (page 18)
Noise Reduction (page 18)
CineMotion (page 18)
3 Press or b.
To exit the menu, press MENU button.
To change the on-screen language
Select the desired language for on-screen settings and
messages from “English”, “Español”, “Français”,
“Italiano”, “Deutsch” or “ ”.
“English” (English) is set for the default setting.
See page 24.
16
Sound
: :
GB
Sound Mode (page 20)
Sound Mode Reset (page 20)
Treble (page 20)
Bass (page 20)
Balance (page 20)
Common Audio Sel. (page 20)
Speaker Out (page 20)
:
:
Page 49
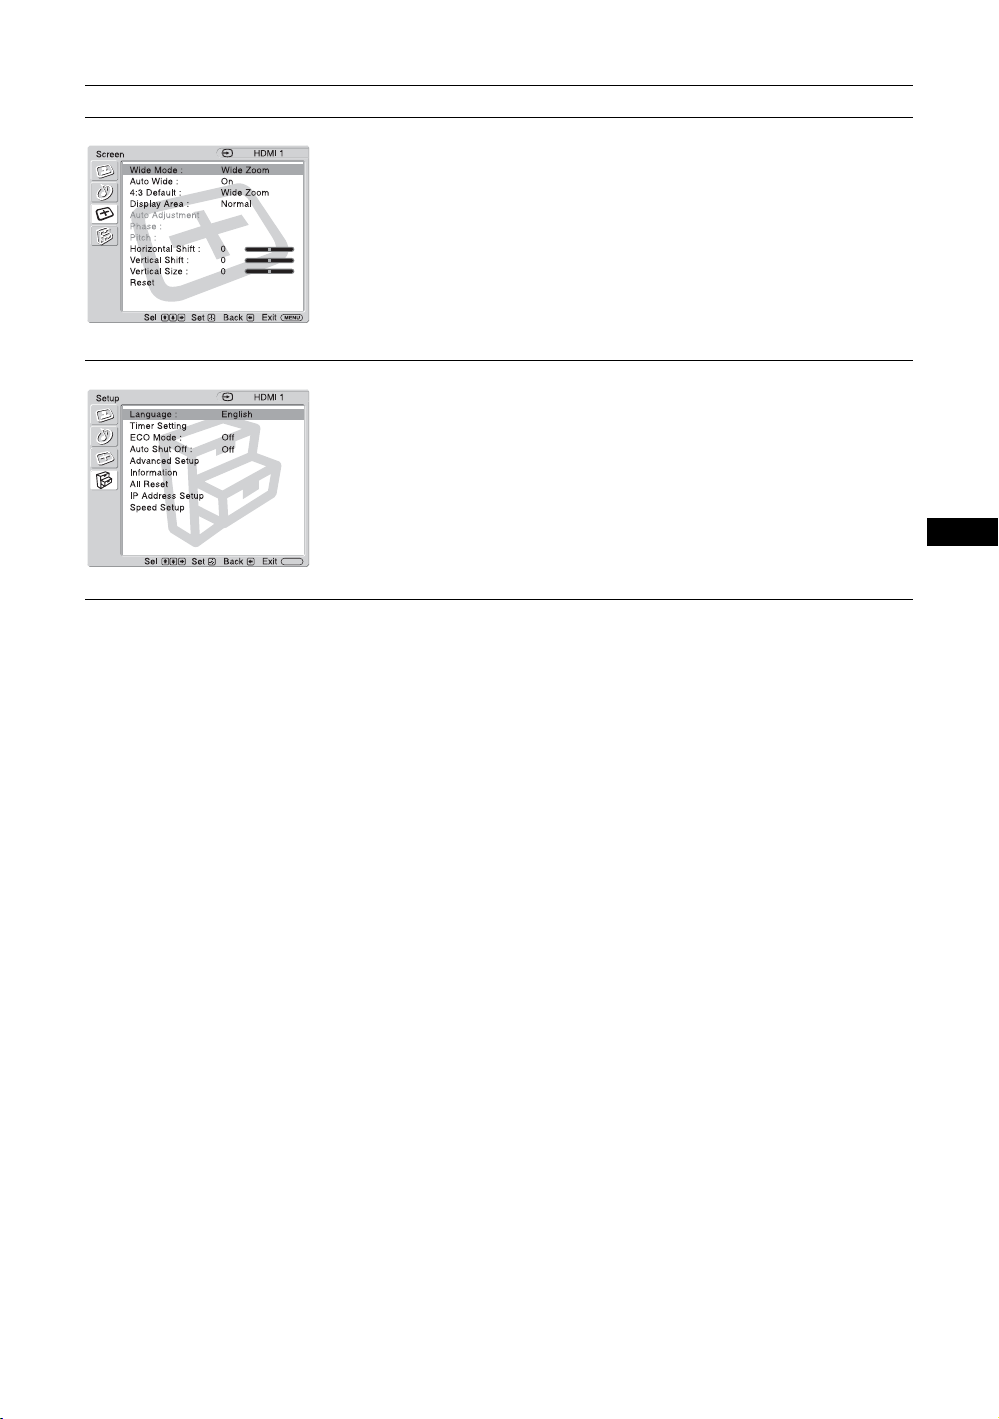
Settings Allows you to set/change
Screen
Wide Mode (page 21, 23)
Auto Wide (page 21)
4:3 Default (page 22)
Display Area (page 22)
Auto Adjustment (page 23)
Phase (page 23)
Pitch (page 23)
Horizontal Shift (page 22, 23)
Vertical Shift (page 22, 23)
: :
:
:
Vertical Size (page 22)
Reset (page 22, 23)
Setup
Language (page 24)
Timer Setting (page 24)
ECO Mode (page 24)
Auto Shut Off (page 24)
Advanced Setup (page 24)
Information (page 25)
All Reset (page 25)
IP Address Setup (page 25)
: :
:
:
MENU
Speed Setup (page 25)
* Menu icons displayed at the bottom of the screen may not work, depending on the settings.
GB
17
GB
Page 50
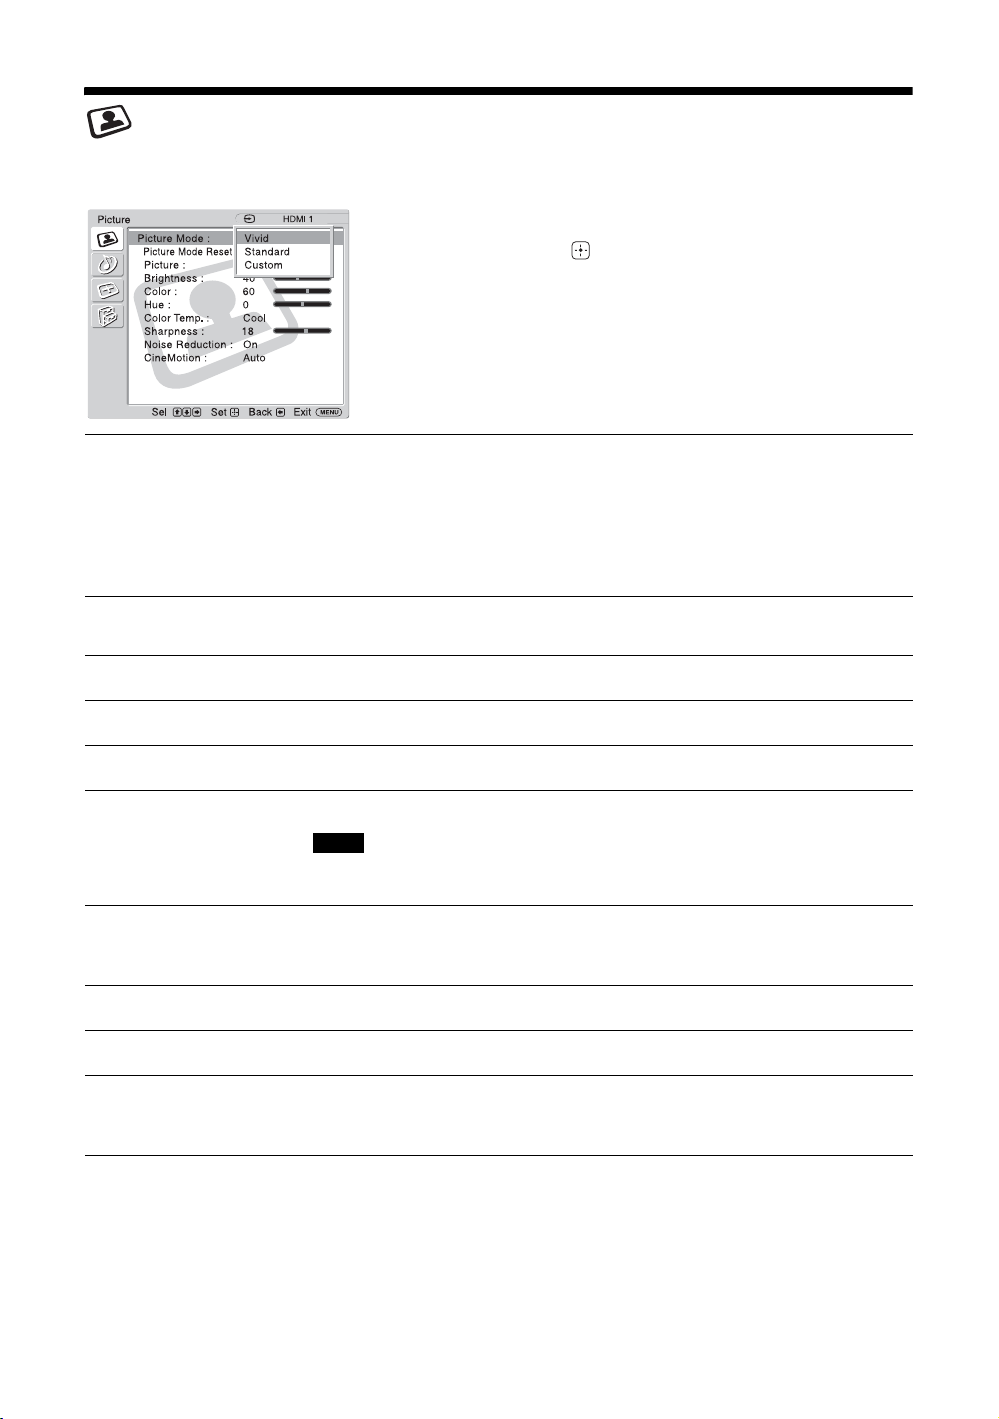
Picture Settings
For Video Input
To highlight an option and to change settings, press
V/v/B/b.
Press to confirm the selection.
The “Picture” settings include the following options:
: :
:
:
Picture Mode
Picture Mode Reset
Picture
Brightness
Color
Hue
Color Temp.
“Vivid”: Select for enhanced picture contrast and sharpness.
“Standard”: Select for standard picture settings.
“Custom”: Allows you to store preferred settings.
Tips
• To change from one “Picture Mode” option to another, you can also use PICTURE on the
remote control instead.
• You can alter the “Picture Mode” options for each input.
Resets all settings and adjustments currently selected in “Picture Mode” (“Vivid”,
“Standard”, “Custom”) to the default setting (except for the options grayed out).
Adjust to increase or decrease picture contrast.
Adjust to brighten or darken the picture.
Adjust to increase or decrease color intensity.
Adjusts the color tones of the picture.
Note
“Hue” is not available when the input is Video or S Video and the color system of video signal
is not NTSC.
“Cool”: Select to give the white colors a blue tint.
“Neutral”: Select to give the white colors a neutral tint.
“Warm”: Select to give the white colors a red tint.
Sharpness
Noise Reduction
CineMotion
Tip
You can alter the “Picture” settings (“Picture”, “Brightness”, “Color”, etc.) for each “Picture Mode”.
GB
18
Adjust to sharpen or soften the picture.
Select to reduce the noise level of connected equipment. Select from “On” or “Off”.
Select “Auto” to optimize the screen display automatically detecting film content
and applying a reverse 3-2 pull down or 2-2 pull down process. Moving picture will
appear clearer and more natural looking. Select “Off” to disable the detection.
Page 51
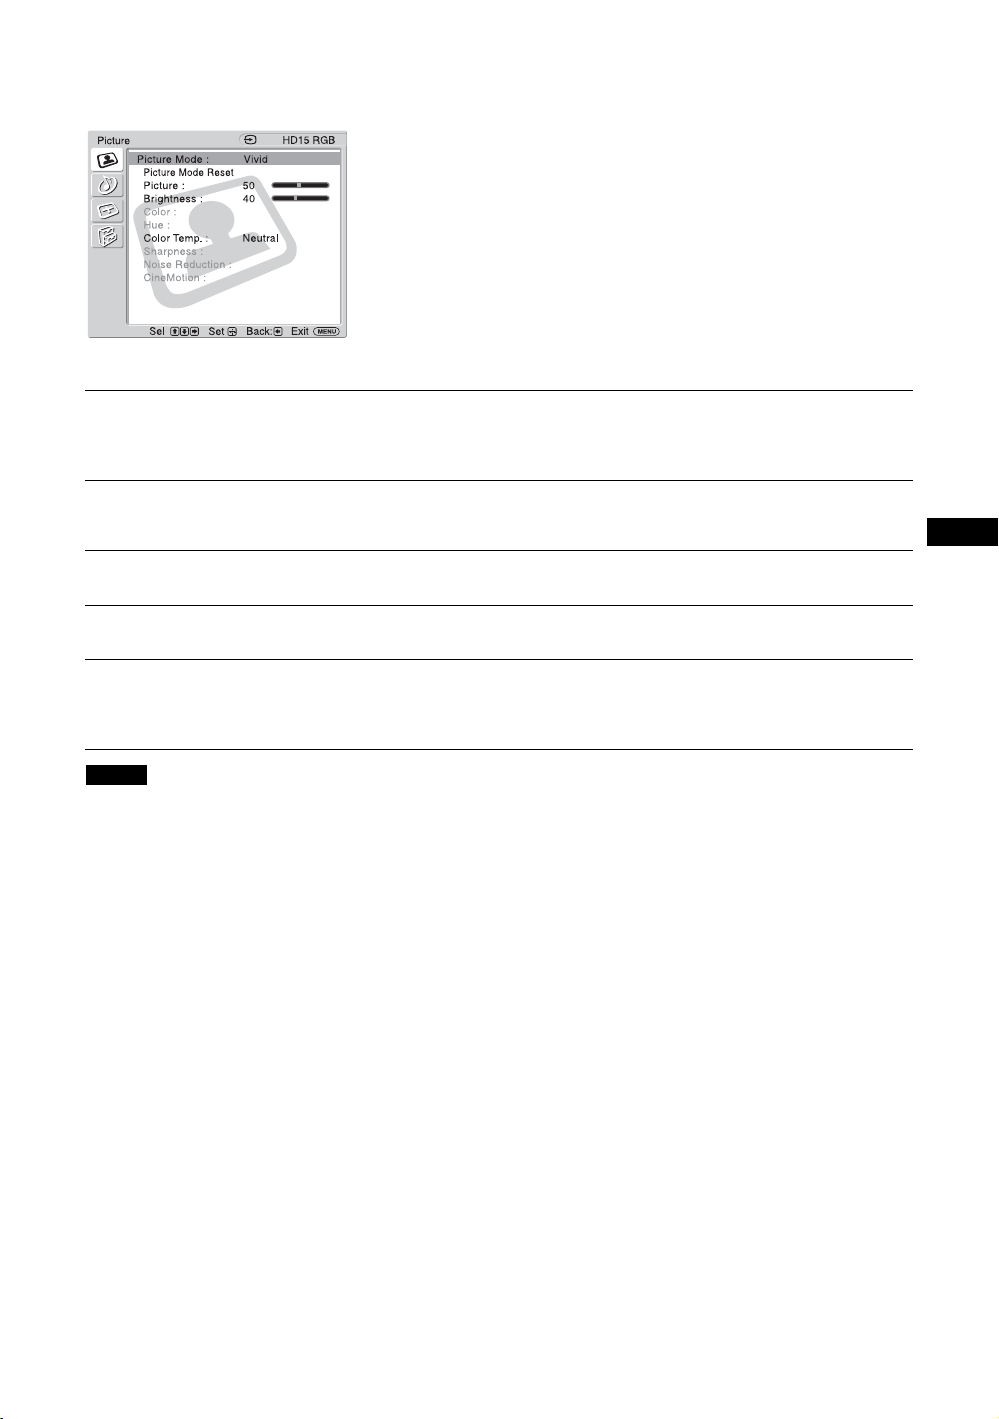
For PC Input
: :
When input is switched to a PC input source, the
:
“Picture” settings specific to PC input are applied.
The PC “Picture” settings include the following
options:
Picture Mode
“Vivid”: Select for enhanced picture contrast and sharpness.
“Standard”: Select for standard picture settings.
“Custom”: Allows you to store preferred settings.
Picture Mode Reset
Resets all settings and adjustments currently selected in “Picture Mode” (“Vivid”,
“Standard”, “Custom”) to the default setting (except for the options grayed out).
Picture
Brightness
Color Temp.
Adjust to increase or decrease picture contrast.
Adjust to brighten or darken the picture.
“Cool”: Select to give the white colors a blue tint.
“Neutral”: Select to give the white colors a neutral tint.
“Warm”: Select to give the white colors a red tint.
Notes
• “Color”, “Hue”, “Sharpness”, “Noise Reduction” and “CineMotion” are not available for PC input.
• If there is no signal currently being input, none of the options of the “Picture” setting can be selected.
GB
19
GB
Page 52
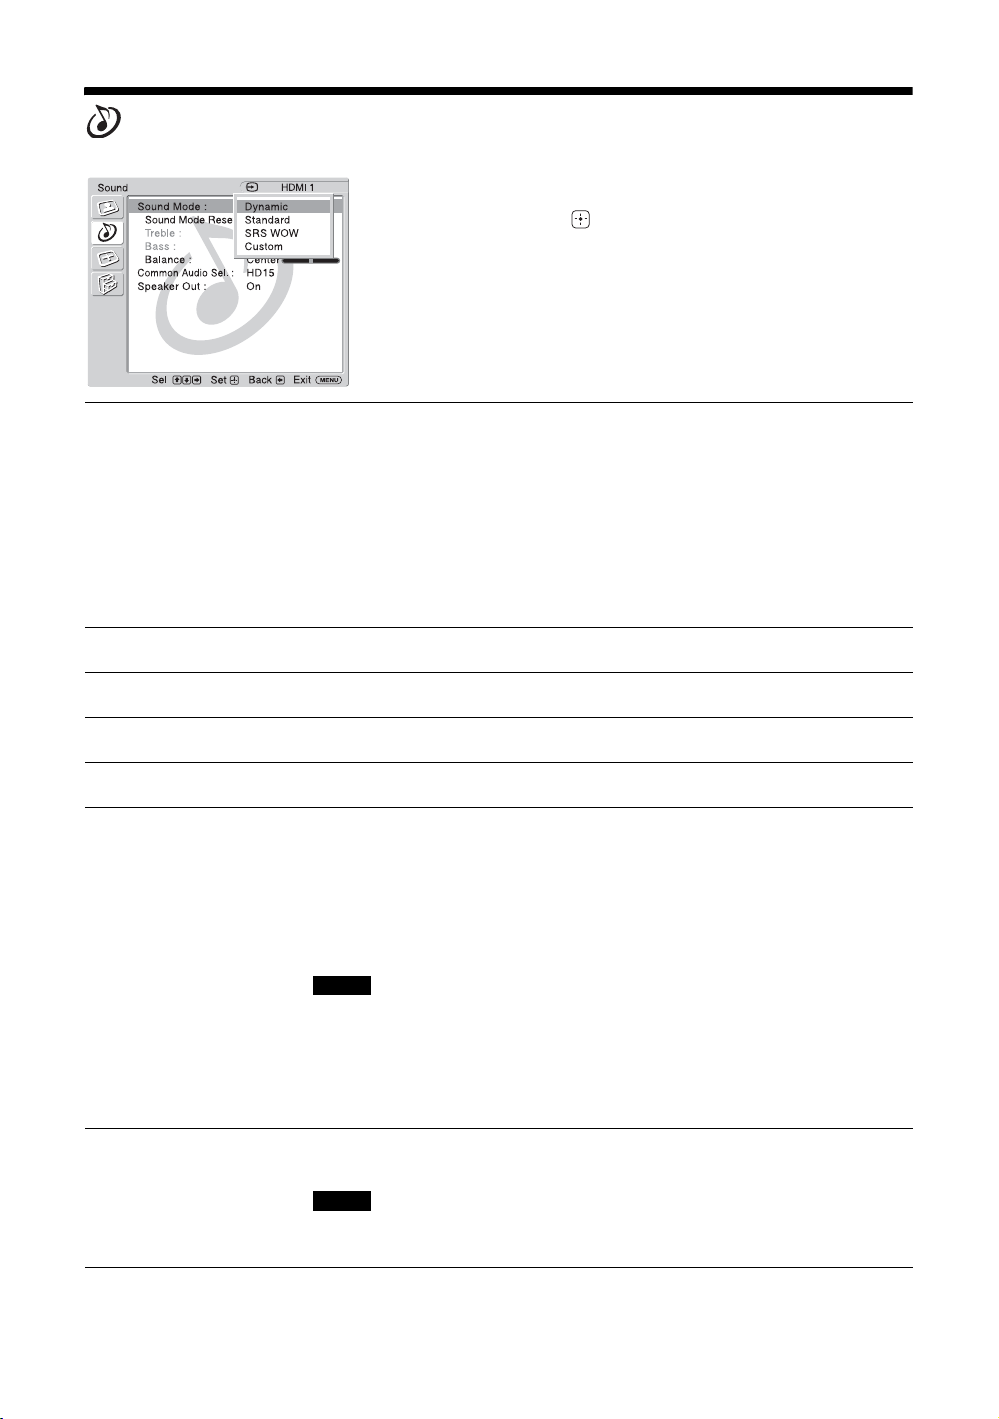
Sound Settings
To highlight an option and to change settings, press
V/v/B/b.
Press to confirm the selection.
The “Sound” settings include the following options:
: :
:
:
Sound Mode
Sound Mode Reset
Treble
Bass
Balance
Common Audio Sel.
“Dynamic”: Select to enhance treble and bass.
“Standard”: Flat setting.
“SRS WOW”: Provides a panoramic stereo audio image by producing deep and rich
bass tones and clear treble tones, enabling you to enjoy powerful sound effects like
those in a movie theater.
“Custom”: Allows you to store preferred settings.
Tips
• To change from one “Sound Mode” option to another, you can also use SOUND on the
remote control instead.
• The proprietary technologies of BBE Sound, Inc. are applied for “Dynamic” and “Standard”.
Resets the following settings; “Treble”, “Bass” and “Balance” to the default settings.
Adjust to increase or decrease higher-pitched sounds.
Adjust to increase or decrease lower-pitched sounds.
Adjust to emphasize left or right speaker balance.
“HD15”: Outputs audio from a piece of video equipment or PC connected to the
HD15 (RGB/COMPONENT IN) connector and the AUDIO (COMMON AUDIO
IN) connector.
“HDMI 1”/ “HDMI 2”: Select to connect a piece of equipment using an HDMI cable
(not supplied) or an HDMI-to-DVI cable (not supplied), and the corresponding audio
cable at the same time.
See page 8.
Notes
• When using an HDMI-to-DVI cable, connect the audio cable to the AUDIO (COMMON
AUDIO IN) connector.
• When “HDMI 1”/ “HDMI 2” is selected, digital audio is not output from the HDMI
connectors. When a piece of video equipment equipped with an HDMI connector is
connected to the HDMI 1/HDMI 2 connectors, set “Common Audio Sel.” to “HD15”. (The
default setting is “HD15”.)
Speaker Out
“On”: Enables sound to be emitted from the display speaker.
“Off”: Disables sound to be emitted from the display speaker.
Note
When “Speaker Out” is set to “Off”, “Sound Mode”, “Sound Mode Reset”, “Treble”, “Bass”,
and “Balance” cannot be selected.
Tip
You can adjust the “Sound” settings (“Treble” and “Bass”) when the “Sound Mode” is set to “Custom”.
GB
20
Page 53
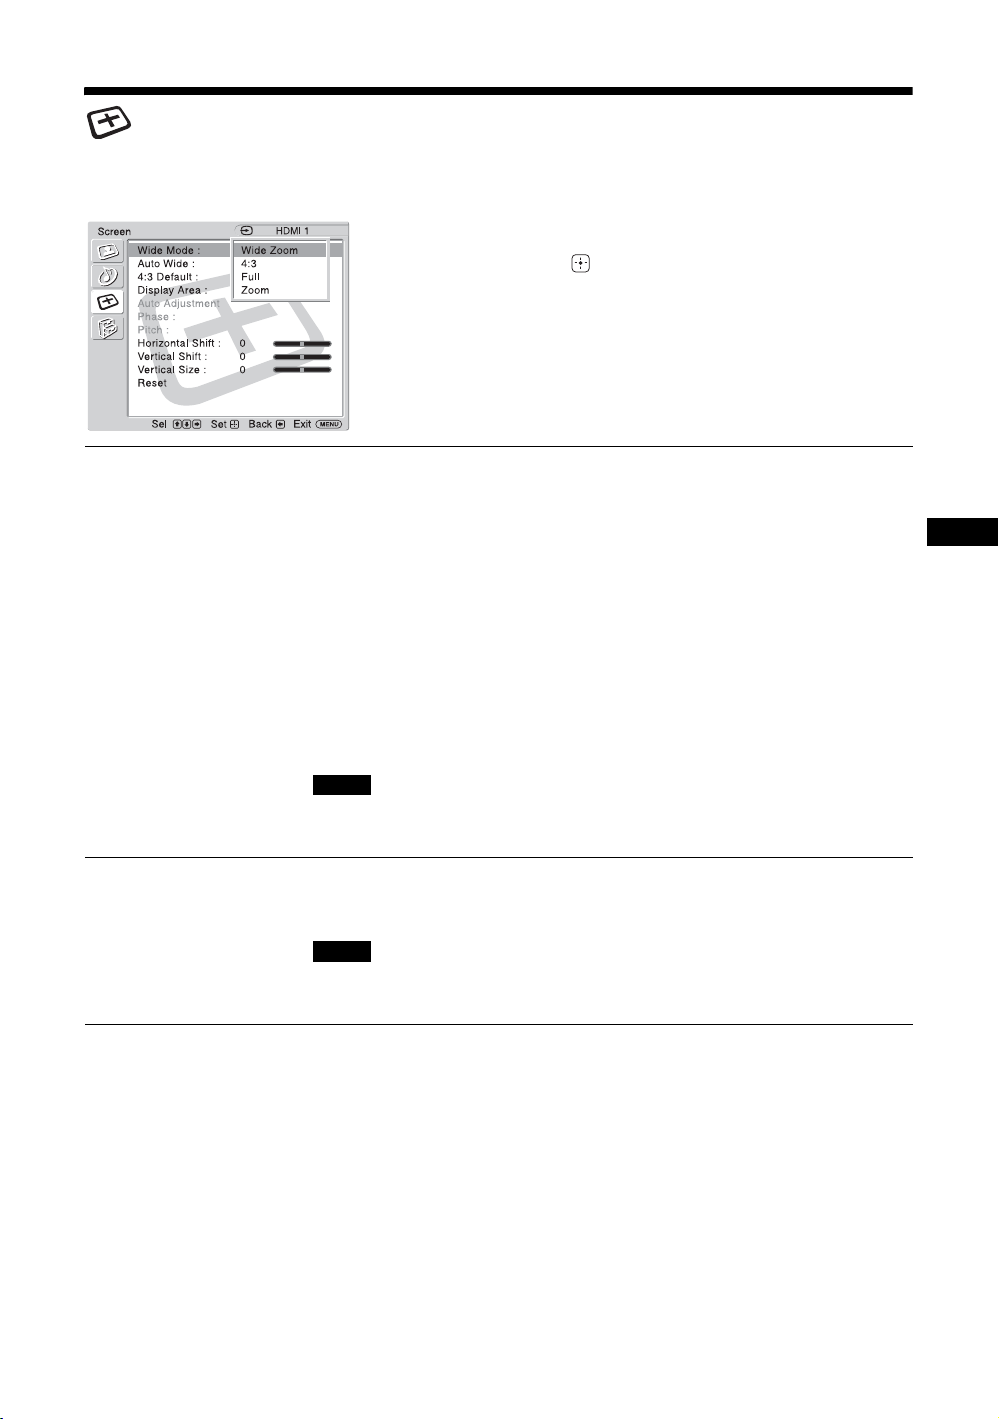
Screen Settings
For Video Input
To highlight an option and to change settings, press
V/v/B/b.
Press to confirm the selection.
The “Screen” settings include the following options:
: :
Wide Mode
Auto Wide
:
:
“Wide Zoom”: Select to enlarge to fill screen with minimum distortion.
“4:3”: Select to display 4:3 picture in original size when the original source is 4:3
(Standard definition source).
“Full”: Select to enlarge the original picture horizontally to fill the screen when the
original source is 4:3 (Standard definition source). When the original source is 16:9
GB
(High definition source), select this mode to display 16:9 picture in original size.
“Zoom”: Select to enlarge the original picture without distorting the aspect ratio.
See page 13.
Tips
• To change from one “Wide Mode” option to another, you can also use WIDE on the remote
control instead.
• Select “Zoom” to display movies and other DVD content with black bands, using the entire
viewable area of the screen.
• For “Wide Zoom” and “Zoom” modes, you can adjust “Horizontal Shift”, “Vertical Shift”,
and “Vertical Size” of the picture. See page 22.
Note
“Wide Zoom” and “4:3” cannot be selected for 1080i, 720p, or 1080p signals input to the
component or HDMI connectors.
“On”: Select to detect the image and change it automatically to the appropriate
screen mode.
“Off”: The screen mode does not change automatically.
Note
While inputting digital and analog RGB signals, you cannot set the “Auto Wide” because the
“Auto Wide” function does not work.
21
GB
Page 54
4:3 Default
“Wide Zoom”: Select to enlarge the 4:3 picture to fill the 16:9 screen, keeping the
original image as much as possible.
“4:3”: Select to display the 4:3 picture without changing its aspect ratio.
“Full”: Select to enlarge the 4:3 picture horizontally only, to fill the 16:9 screen.
“Zoom”: Select to enlarge the 4:3 picture to fill the screen while keeping its aspect
ratio.
“Off”: Select to continue using the current “Wide Mode” setting when the input is
changed.
Tips
• You can select “4:3 Default” only when “Auto Wide” is set to “On”.
• “4:3 Default” functions only when the display receives NTSC, PAL, SECAM, 480i, 480p,
575i or 576p signals.
• If “Wide Mode” setting is changed after “4:3 Default” is set, the “Wide Mode” setting will
become effective and the aspect ratio of the screen will change. This setting change that was
made afterward by “Wide Mode” will be effective only when each signal is input. Therefore,
when the input signal is changed, the screen will return to the original “4:3 Default” setting.
To keep the current aspect ratio even after the input signal is changed, set “4:3 Default” to
“Off”.
Display Area
Horizontal Shift
Vertical Shift
Vertical Size
Reset
Note
If there is no signal currently being input, none of the “Screen” settings options can be selected.
“Normal”: Displays a standard size picture.
“-1”/“-2”: Allows you to adjust the viewable picture area size. When noises appear
around the picture, select this to hide the noises.
Allows you to move the position of the picture left and right in the window.
Available only in “Wide Zoom” and “Zoom” modes. Press B/b and press to
choose a correction.
Allows you to move the position of the picture up and down in the window.
Available only in “Wide Zoom” and “Zoom” modes. Press V/v and press to
choose a correction.
Allows you to adjust the vertical size of the picture. Available only in “Wide Zoom”
and “Zoom” modes. Press V/v and press to choose a correction.
Resets the following settings; “Horizontal Shift”, “Vertical Shift” and “Vertical
Size” to the default settings.
22
GB
Page 55
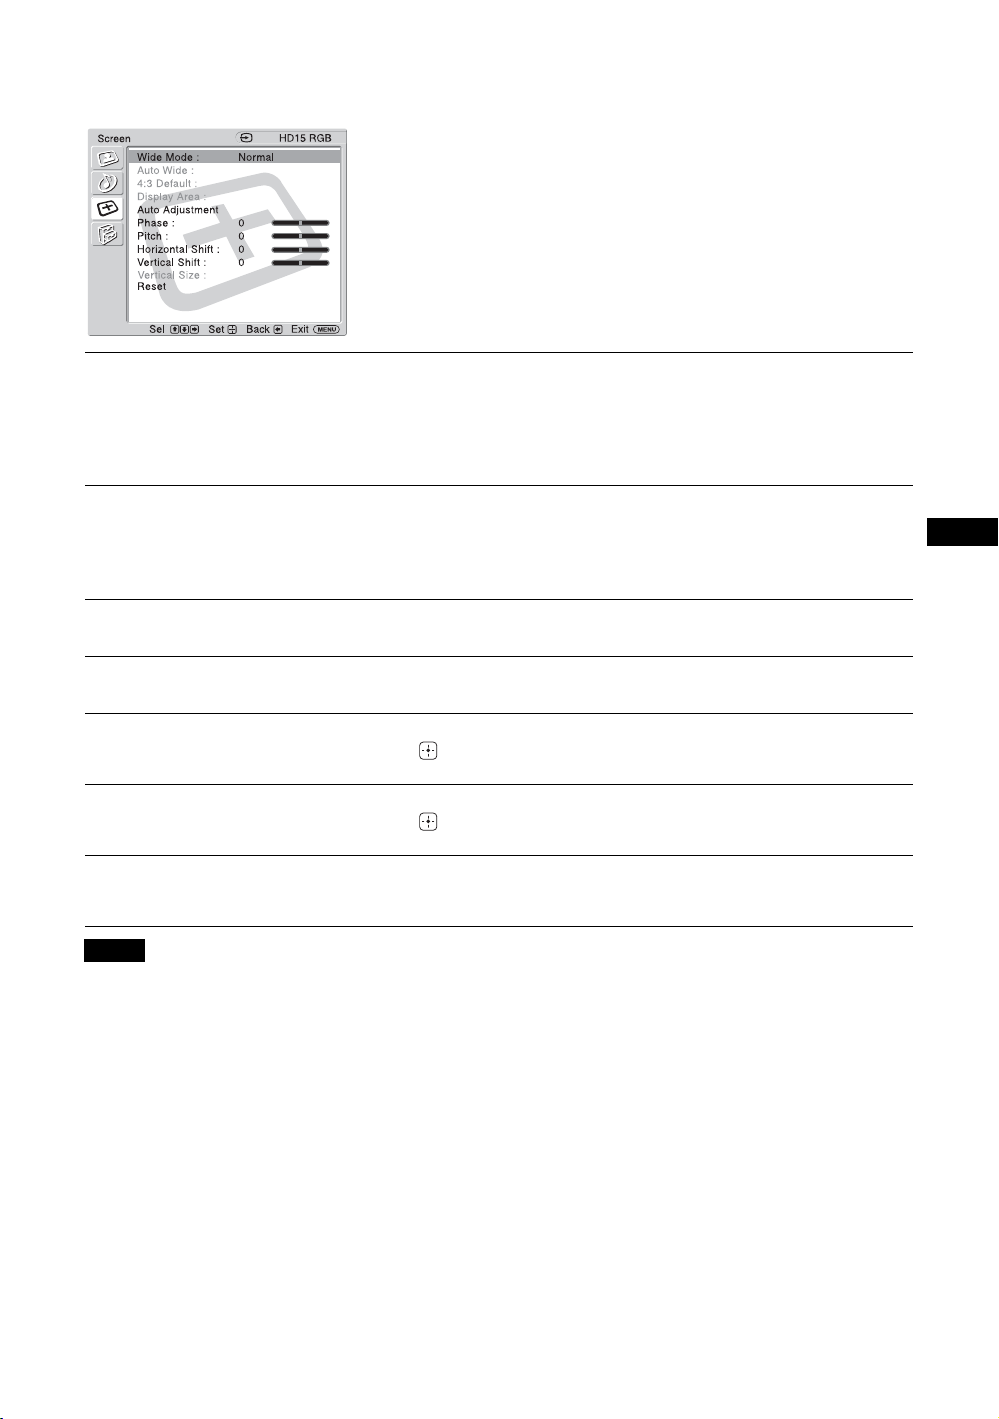
For PC Input
When input is switched to PC input source, the
“Screen” settings specific for PC input are applied.
The PC “Screen” settings include the following
options:
: :
:
Wide Mode
Auto Adjustment
Phase
Pitch
Horizontal Shift
Vertical Shift
Reset
:
“Normal”: Select to display the picture in its original size.
“Full 1”: Select to enlarge the picture to fill the display area in the vertical direction
while keeping its original aspect ratio. A black frame will appear on the surrounding
of the picture.
“Full 2”: Select to enlarge the picture to fill the display area.
Select to automatically adjust the display position and phase of the picture when the
display receives an input signal from the connected PC.
Note that “Auto Adjustment” may not work well with certain input signals. In such
cases, manually adjust the options below.
Select to adjust the phase when the screen flickers.
Select to adjust the pitch when the picture has unwanted vertical stripes.
Allows you to move the position of the picture left and right in the window. Press
B/b and press to choose a correction.
Allows you to move the position of the picture up and down in the window. Press
V/v and press to choose a correction.
Resets the following settings; “Phase”, “Pitch”, “Horizontal Shift” and “Vertical
Shift” to the default settings.
GB
Notes
• “Auto Wide”, “4:3 Default”, “Display Area” and “Vertical Size” are not available for PC input.
• When the input is digital signal via HDMI 1/HDMI 2, “Auto Adjustment”, “Phase” and “Pitch” are not available for PC input.
• If there is no signal currently being input, none of the “Screen” settings options can be selected.
23
GB
Page 56
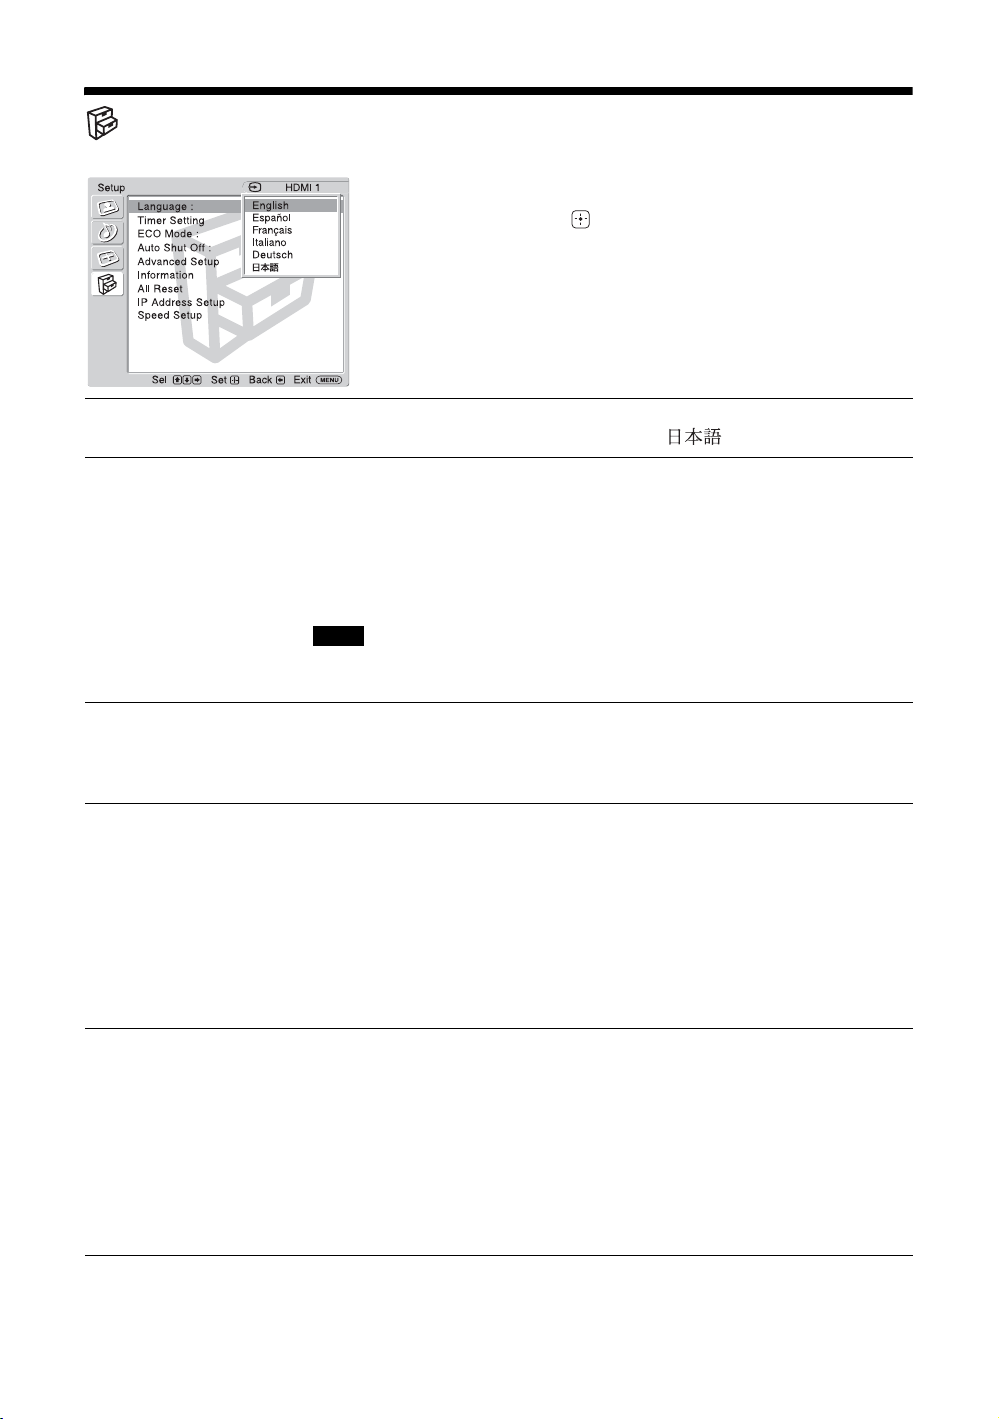
Setup Settings
To highlight an option and to change settings, press
V/v/B/b.
Press to confirm the selection.
The “Setup” settings include the following options:
: :
Language
Timer Setting
ECO Mode
Auto Shut Off
:
:
Select to display all on-screen settings in your language of choice: “English”,
“Español”, “Français”, “Italiano”, “Deutsch” or “ ”.
You can adjust time, display the built-in clock, or make the power go off
automatically.
“Clock Set”: Sets the day of the week and the hour of the day.
“Clock Display”: Displays the currently set time on the screen when set to “On”.
“Sleep Timer”: Set the time in minutes (15 minutes, 30 minutes, 45 minutes, 60
minutes, 90 minutes, or 120 minutes) that you want the display to remain on before
shutting off automatically.
Note
If the built-in clock tends to lose time, the internal battery may be exhausted. Please contact
your authorized Sony dealer to have the battery replaced.
“Off”: Select to view picture without the benefit of power saving.
“Low”/“High”: Select to change brightness and reduce power consumption.
“Picture Off”: Select to turn off the picture. Audio stays on with your selected
volume setting.
“On”: The display automatically enters the standby mode when a signal is not input
to the video input connectors for more than about 5 minutes. The display
automatically enters the power saving mode when a signal is not input to the other
input connectors for more than about 30 seconds.
“Off”: The display is not turned off automatically even when no signal is input to any
connector.
Tip
While in the standby mode, press the 1 (POWER) button on the display or the POWER button
on the remote control to turn the display on. In the power saving mode, the display is turned on
automatically when a signal is input.
Advanced Setup
GB
24
“Color System”: Select the “Color System” of video signals from “NTSC”, “PAL”,
“SECAM”, “NTSC4.43”, “PAL-M”, “PAL-N”, “PAL60”, or select “Auto” to set the
“Color System” automatically.
“Status Display”: “On” makes input signal and “Wide Mode” information appear on
the screen for about 20 seconds when the display is turned on, and for about 5
seconds when the input signal is switched, while “Off” disables display of status
information.
Tip
You can display the input signal and “Wide Mode” information by using DISPLAY on the
remote control regardless of the “Status Display” setting.
Page 57
Information
Displays the “Model Name”, “Serial Number”, “Operation Time”, “Software
Version” and “IP Address” of your display.
Note
The “IP Address” is not shown if the optional adaptor with communication functions is not
installed.
All Reset
IP Address Setup
Resets all the “Setup” settings to the default settings.
Note
The items included in the “Information” option will not be reset.
Sets an IP address to enable the communication between the optional adaptor with
communication functions, such as the BKM-FW32/FW50, installed in the display,
and the equipment such as a PC connected with the LAN cable.
“DHCP”: “OK” allows you to set an IP address automatically, and “Cancel” aborts
automatic configuration.
Note
When you obtain an IP address automatically using “DHCP”, an IP address may differ every
time you turn the power of the display off and on.
“Manual”: Select to set an IP address manually.
1 Select an “IP Address”, “Subnet Mask”, “Default Gateway”, “Primary DNS”
“Secondary DNS” to be set manually with
2 Set the three digit value (0 to 255) for the first box with V/v on the display or
numeric keys on the remote control and press or
3 Set the three digit value (0 to 255) for each of the four boxes and press .
4 Select the next item to be set manually with
procedure and press .
5 After values are set for all the desired items, select “Execute” with
press .
Select “OK” and press . An IP address is set manually.
V/v and press .
.
b
V/v and repeat the same
V/v, then
GB
NoteNote
When an IP address is not set properly, the following error codes will be displayed in
accordance with the error cause.
Error 1: Communication error between the display and the optional adaptor such as the BKMFW series
Error 2: The specified IP address is already used for other equipment
Error 3: IP address error
Error 4: Gateway address error
Error 5: Primary DNS address error
Error 6: Secondary DNS address error
Error 7: Subnet mask error
Speed Setup
Note
“IP Address Setup” and “Speed Setup” are not available if the optional adaptor with communication functions is not installed.
Sets a communication speed between the optional adaptor with communication
functions, such as the BKM-FW32/FW50, installed in the display, and the
equipment such as a PC connected with the LAN cable.
“Speed”: Select “Auto” when you want to set an appropriate communication speed
for your network configuration automatically. You can also select either of “10Mbps
Half”, “10Mbps Full”, “100Mbps Half”, “100Mbps Full” manually.
“Execute”: Select “OK” and press . A communication speed has been set.
25
GB
Page 58
Other Information
Troubleshooting
Check whether the STANDBY indicator is flashing red.
When it is flashing
The self-diagnosis function is activated.
1 Check how many times the STANDBY indicator flashes and how long it stops flashing.
For example, the indicator flashes 3 times, stops flashing for 3 seconds, and flashes 3 times.
2 Switch the display off, and disconnect the power cord.
Inform your dealer or Sony service center of how the indicator flashes (the number of flashes and the duration
of light out).
When it is not flashing
1 Check the items in the table below.
2 If the problem still persists, have your display serviced by qualified personnel.
Problem Possible Remedies
No picture.
No picture.
The display turns off
automatically.
No picture from some video
sources.
Poor picture.
No color/Dark picture/The
picture is too bright/Color is not
correct
No sound/Noisy sound.
Good picture, no sound.
“Wide Mode” setting changes
automatically.
Remote control does not operate.
• Check “ECO Mode” options (page 24).
• Check if “Sleep Timer” is activated (page 24).
• Check the connection between the video equipment and the display.
• Try switching input using the INPUT button of the display or the
remote control (page 7, 11).
• Press PICTURE to select the desired “Picture Mode” (page 11).
• Adjust the “Picture Mode” options in the “Picture” settings
(page 18).
• Check the condition of the signal cable.
• Check the volume control.
• Press MUTING or VOL + on the remote control so that “Muting”
disappears from the screen (page 11, 12).
• Check “Common Audio Sel.” settings (page 20).
• Check “Speaker Out” settings (page 20).
• The current “Wide Mode” setting automatically changes to the
appropriate setting for the current input if “Auto Wide” in the
“Screen” settings is set to “On”. If you want to retain the current
“Wide Mode” setting as inputs are changed, set “Auto Wide” to
“Off” in the “Screen” settings (page 21).
• Check the polarity of the batteries or replace the batteries.
• Point the remote control at the remote control sensor of the display.
• Keep the remote control sensor area clear from obstacles.
• Check whether a cable is connected to the CONTROL S IN
connector when using an optional adaptor with CONTROL S IN
connector. The remote control cannot be used while the display is
controlled via a CONTROL S connection.
• Fluorescent lamps can interfere with remote control operation; try
turning off the fluorescent lamps.
26
GB
Page 59
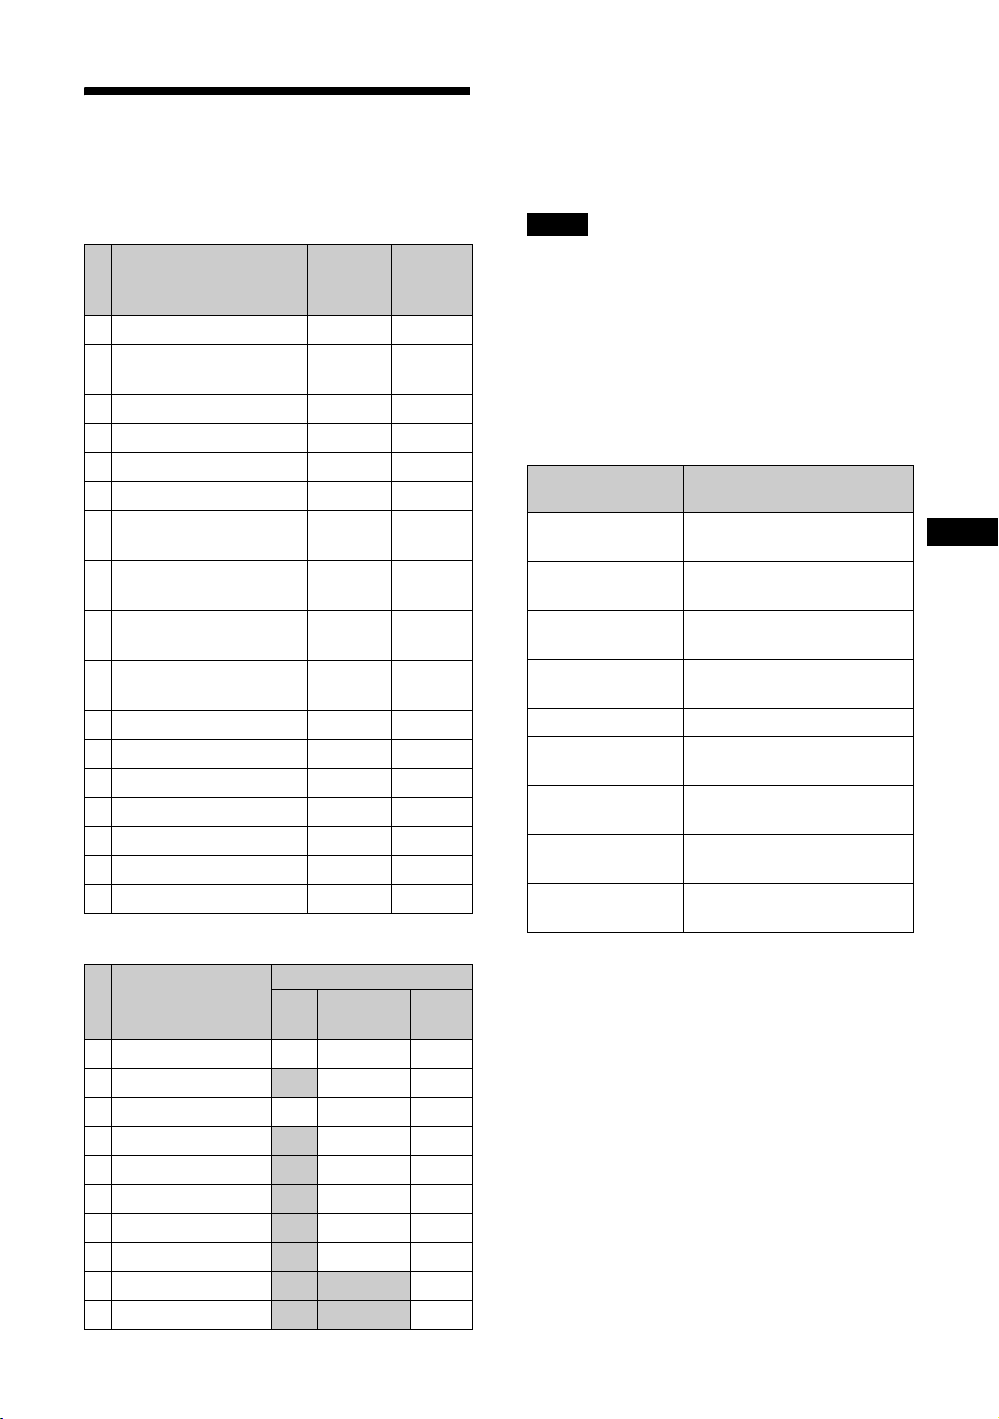
Input Signal Reference
Chart
a) VGA is a registered trademark of International Business
Machines Corporation, U.S.A.
b) VESA is a registered trademark of the Video Electronics
Standards Association.
c) Mac (Macintosh) is a registered trademark of Apple
Computer, Inc.
PC signals
horizontal
Resolution
a)
-1 (VGA 350) 31.5 70
1VGA
640 × 480@60 Hz
2
b)
STD)
(VESA
c)
3Mac
13" 35.0 67
4 VGA (VGA TEXT) 31.5 70
800 × 600@60 Hz (VESA STD)
5
6 Mac 16" 49.7 75
1024 × 768@60 Hz
7
(VESA STD)
8
1024 × 768@75 Hz
(VESA STD)
9
1024 × 768@85 Hz
(VESA STD)
10
1280 × 1024@60 Hz
(VESA STD)
11
848 × 480@60 Hz (VESA STD)
848 × 480@60 Hz (VESA STD)
12
13 848 × 480@75 Hz 37.7 75
14 1280 × 768@60 Hz 47.8 60
15 1280 × 768@60 Hz 47.4 60
16 1360 × 768@60 Hz 47.7 60
17 1360 × 768@60 Hz 47.4 60
frequency
(kHz)
31.5 60
37.9 60
48.4 60
60.0 75
68.7 85
64.0 60
29.8 60
29.5 60
vertical
frequency
(Hz)
Notes
• For HDTV signals, input the tri-level sync signal to the
2nd pin of RGB/COMPONENT (D-sub 15 pin) on the
HD15 connector or the BKM-FW12 (optional adaptor).
• If colors appear too light after input of a DVD signal to the
display, adjust “Color” in the “Picture” settings.
• When the phase is readjusted, the resolution will be
reduced.
Actual on-screen display of the input signal
and the display’s status
On-screen
display
640
×
480 / 60 (e.g.) The selected input signal is a PC
480 / 60I (e.g.) The selected input signal is
NTSC (e.g.) The selected input signal is
Not Supported Signal The selected input signal is non-
No Signal There is no input signal.
HD15 The selected input signal is
HDMI 1 The selected input signal is
HDMI 2 The selected input signal is
Option The selected input signal is
Significance
signal.
component video.
NTSC.
supported signal.
HD15.
HDMI 1.
HDMI 2.
OPTION.
GB
TV/Video signals
Available Inputs
Resolution
1 480/60i aa a
2 480/60p aa
3 575/50i aa a
4 576/50p
5 720/50p
6 720/60p
7 1080/50i
8 1080/60i
9 1080/50p
10 1080/60p
Video Component/
RGB
aa
aa
aa
aa
aa
HDMI
a
a
27
GB
Page 60

Specifications
Video processing
Panel system a-Si TFT Active Matrix LCD Panel
Display resolution 1,366 dots (horizontal) × 768 lines
Sampling rate 13.5 MHz to 140 MHz
Color system NTSC, PAL, SECAM, NTSC4.43,
Input signal See page 27.
KLH-W26
Pixel pitch 0.421 (horizontal) × 0.421 (vertical) mm
Picture size 576 (horizontal) × 324 (vertical) mm
Panel size 26-inch (diagonal 660 mm)
KLH-W32
Pixel pitch 0.510 (horizontal) × 0.510 (vertical) mm
Picture size 698 (horizontal) × 392 (vertical) mm
Panel size 32-inch (diagonal 801 mm)
Inputs and Outputs
HD15 (RGB/COMPONENT IN)
AUDIO (COMMON AUDIO IN)
HDMI 1/HDMI 2 IN HDMI (compliant with HDMI
(vertical)
PAL-M, PAL-N, PAL60
1
(
/32 × 1/32 inches)
3
/4 × 12 7/8 inches)
(22
1
(
/32 × 1/32 inches)
1
/2 × 15 1/2 inches)
(27
D-sub 15-pin (female) (× 1) (See
page 29.)
Stereo mini jack (× 1)
500 mVrms, high impedance
specifications 1.1)
Dimensions KLH-W26:
Mass KLH-W26: 13.5 kg (29 lb 12 oz)
Supplied accessories
Optional accessories
Safety regulations
663 × 505 × 220 mm
1
/8 × 20 × 8 3/4 inches)
(26
KLH-W32:
798 × 581 × 220 mm
1
/2 × 22 7/8 × 8 3/4 inches)
(31
(w/h/d, excluding projections)
KLH-W32: 16.6 kg (36 lb 10 oz)
AC power cord (1)
Remote Control RM-YA004 (1)
Size AA (R6) batteries (2)
Cable holder (1)
Operating instructions (1)
Optional adaptors for system expansion,
BKM-FW series
UL 60950-1, CSA No. 60950-1-03 (c-UL),
FCC Class B, IC Class B,
EN 60950-1 (NEMKO), CE, C-Tick
Design and specifications are subject to change
without notice.
General
Power requirements
100 V to 240 V AC, 50/60 Hz,
KLH-W26: 1.2 A
KLH-W32: 1.3 A
Power consumption
Speaker output
Operating conditions
Storing/transporting conditions
GB
28
KLH-W26: 110 W
KLH-W32: 120 W
10 W + 10 W (6 ohms)
Adequate load impedance, 6 to 16 ohms
Temperature: 0
(32
Humidity: 20% to 90%
(no condensation)
Temperature: –10
(14
Humidity: 20% to 90%
(no condensation)
°C to 35 °C
°F to 95 °F)
°C to +40 °C
°F to 104 °F)
Page 61
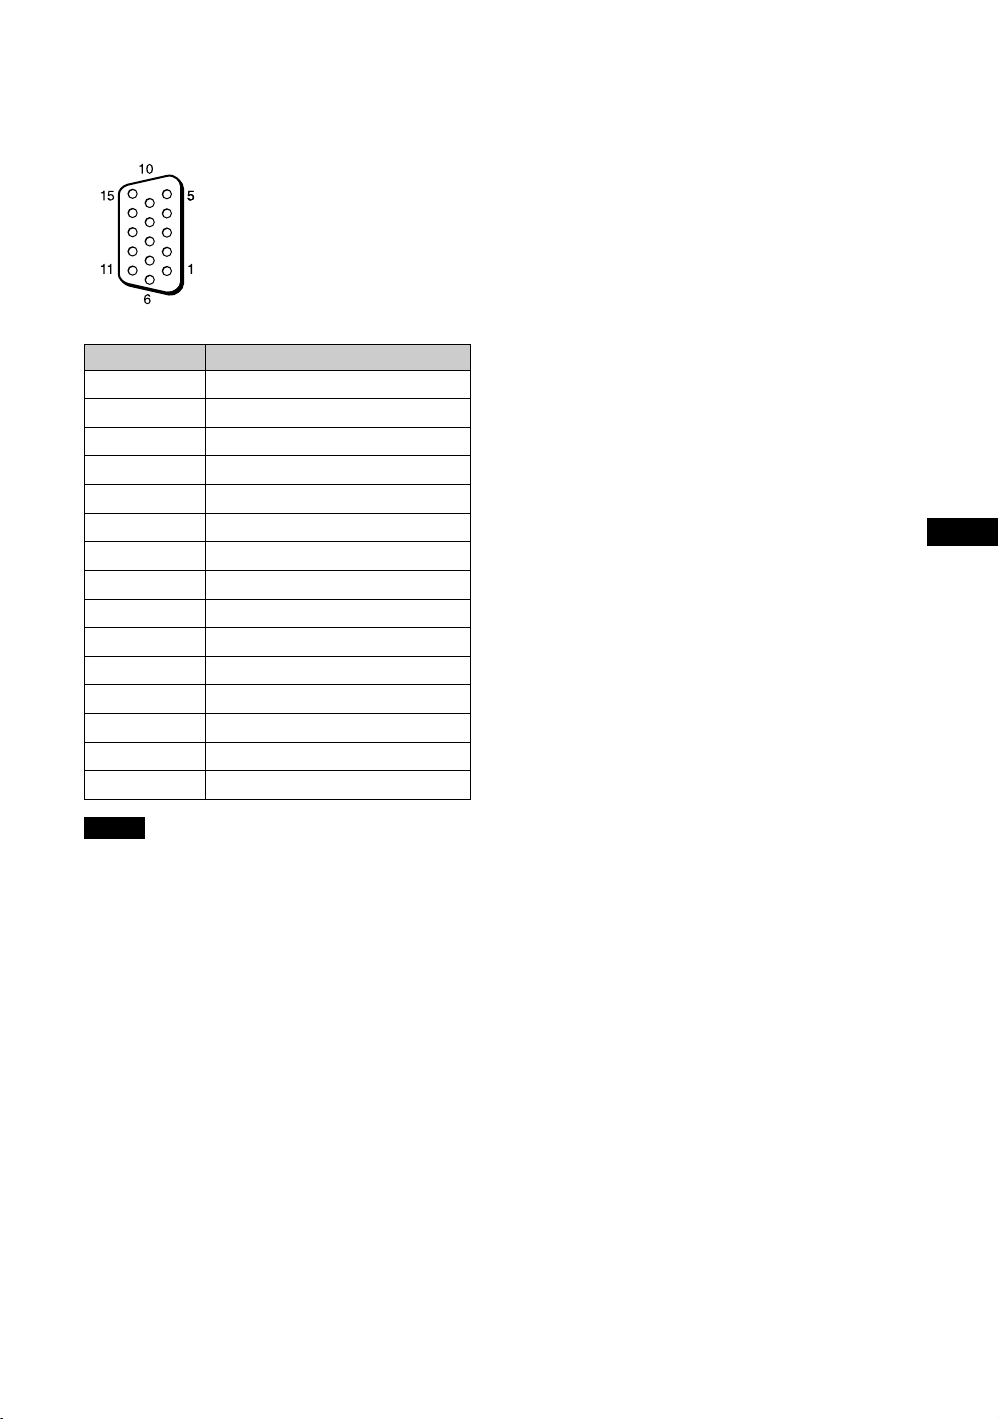
Pin assignment
HD15 (RGB/COMPONENT) connector (D-sub 15-pin)
Pin No. Signal
1 Red video or CR/P
2 Green video or Y
3 Blue video or CB/P
4 Ground
5 Ground
6 Red ground
7 Green ground
8 Blue ground
9 Not used
10 Ground
11 Ground
12 SDA
13 H sync or Composite Video
14 V sync
15 SCL
R
B
GB
Note
When inputting a component signal, be sure not to input sync
signals to pins 13 and 14. If you do so, the picture may not be
displayed properly.
29
GB
Page 62

Index
Numerics
4:3 13, 21
4:3 Default
A
AC IN socket 10, 15
Advanced Setup
All Reset
AUDIO (COMMON AUDIO IN)
connector
Auto Adjustment
Auto Shut Off
Auto Wide
B
Balance 20
Bass
Brightness
C
Cable holder 15
CineMotion
Clock Display
Clock Set
Color
Color System
Color Temp.
Common Audio Sel.
Custom
D
DHCP 25
Display Area
DISPLAY button
Dynamic
E
ECO Mode 14, 24
F
Full 13, 21
Full 1/Full 2
H
HD15 (RGB/COMPONENT IN)
connector
HDMI 1/HDMI 2 IN connector
Horizontal Shift
Hue
I
Information 25
INPUT button
INPUT V1-V5 buttons
Input signal
IP Address Setup
L
Language 24
22
24
25
8
23
24
21
20
18, 19
18
24
24
18
24
18, 19
20
18, 19, 20
22
11
20
13, 23
8
8
22, 23
18
7
11
27
25
M
Manual (IP Address Setup) 25
MENU button
MUTING button
N
Noise Reduction 18
Normal
O
OPTION slot 8, 9
P
Phase 23
PIC OFF/TIMER indicator
Picture
PICTURE button
Picture Mode
Picture Mode Reset
Picture Settings
Pitch
POWER button
POWER indicator
POWER SAVING button
R
Remote control sensor 7
Reset
RGB/COMPONENT ACTIVE
THROUGH Adaptor
S
Screen Settings 17, 21
Setup Settings
Sharpness
SLEEP button
Sleep Timer
SOUND button
Sound Mode
Sound Mode Reset
Sound Settings
Speaker Out
Speed Setup
SRS WOW
Stand attachment hole
Standard
STANDBY indicator
Status Display
T
Timer Setting 24
Treble
V
Vertical Shift 22, 23
Vertical Size
VIDEO INPUT Adaptor
Vivid
VOL button
7, 12
12
13, 22, 23
7
18, 19
11
18, 19
18, 19
16, 18
23
7, 11
7
12, 14
22, 23
9
17, 24
18
12, 14
14, 24
12
20
20
16, 20
20
25
20
10
18, 19, 20
7
24
20
22
9
18, 19
7, 11
W
WIDE button 11, 13
Wide Mode
Wide Zoom
Z
Zoom 13, 21
13, 21, 23
13, 21
30
GB
Page 63

Page 64
AVERTISSEMENT
Pour réduire le risque d’incendie ou
d’électrocution, placez cet appareil à l’abri
de la pluie et de l’humidité.
De dangereuses hautes tensions circulent à
l’intérieur de cet appareil. N’ouvrez pas le
châssis. Confiez-en l’entretien
exclusivement à un personnel qualifié.
Transport
Lorsque que vous transportez l’écran, tenez le par
l’appareil lui même et non par les haut parleurs. Dans
le cas contraire, ces derniers peuvent se détacher et
l’appareil risque de tomber. Ceci pourrait entraîner
des blessures.
Pour les utilisateurs au Canada
Cet appareil est numérique de la classe B est conforme
à la norme NMB-003 du Canada.
La prise doit être près de l’appareil et facile d’accès.
ATTENTION
RISQUE D’EXPLOSION SI LA PILE EST
REMPLACEE PAR UNE PILE DE TYPE
INCORRECT. DEBARRASSEZ-VOUS DES PILES
USAGEES EN RESPECTANT LES
REGLEMENTATIONS.
Informations relatives aux marques
WOW, SRS et le ( ) symbole sont des marques
déposées de SRS Labs, Inc. WOW technologie est
incorporé sous licence de SRS Labs, Inc.
Fabriqué sous licence de BBE Sound, Inc.
Sous licence de BBE Sound, Inc., sous les brevets
USP5510752 et 5736897. BBE et le symbole BBE
sont des marques déposées de BBE Sound, Inc.
FR
2
Page 65
Table des matières
Introduction
Précautions ...............................................................................................................................4
Recommandations pour l’installation ........................................................................................6
Emplacement et fonction des pièces et commandes
Panneau avant ..........................................................................................................................7
Panneau latéral .........................................................................................................................8
Adaptateurs en option ...............................................................................................................9
Panneau arrière ......................................................................................................................10
Télécommande .......................................................................................................................11
Description des touches.....................................................................................................11
Touches spéciales de la télécommande............................................................................13
Utilisation du Mode cinéma...........................................................................................13
Utilisation de la fonction Veille .....................................................................................14
Utilisation de la fonction Mode ECO .............................................................................14
Raccordements
FR
Raccordement de la prise d’alimentation secteur et rangement des câbles d’entrée.............15
Utilisation des réglages
Description générale des menus.............................................................................................16
Réglages Image ......................................................................................................................18
Réglages Son..........................................................................................................................20
Réglages Ecran.......................................................................................................................21
Réglages Réglage...................................................................................................................24
Informations supplémentaires
Dépannage..............................................................................................................................26
Tableau de référence des signaux d’entrée............................................................................28
Spécifications ..........................................................................................................................29
Index .......................................................................................................................................31
FR
3
Page 66

Introduction
Précautions
Sécurité
• Une plaque signalétique indiquant la tension de service, la
consommation électrique, etc. est située à l’arrière de
l’appareil.
• Si des solides ou des liquides pénètrent à l’intérieur du
châssis, débranchez le moniteur et faites-le vérifier par un
technicien qualifié avant de le remettre en service.
• Débranchez le cordon de la prise si vous prévoyez de ne
plus utiliser le moniteur pendant quelques jours.
• Pour débrancher le cordon, tirez-le par la fiche. Ne tirez
jamais sur le cordon lui-même.
• Lorsque vous installez l’appareil sur le sol, veillez à
utiliser le support d’écran en option.
Installation
• Veillez à assurer une circulation d’air adéquate pour éviter
une surchauffe interne de l’appareil. Ne placez pas
l’appareil sur d es surfaces textiles (tapis, couvertures, etc.)
ni à proximité de rideaux ou de draperies susceptibles
d’obstruer les orifices de ventilation.
• N’installez pas l’appareil à proximité de sources de
chaleur comme un radiateur ou une bouche d’air chaud, ni
dans un endroit exposé au rayonnement solaire direct, à
des poussières excessives, à des vibrations ou à des chocs
mécaniques.
• Lorsque vous installez plusieurs équipements avec cet
appareil, des problèmes tels qu’un dysfonctionnement de
la télécommande, une image parasitée ou un son parasité
peuvent se produire en fonction de la position de l’appareil
et des autres équipements.
Panneau d’affichage à cristaux liquides
(LCD)
• Des points lumineux (rouges, bleus ou verts) ou des points
sombres peuvent apparaître à l’écran. Ce phén omène n’est
pas le signe d’un problème de fonctionnement. Bien que
le panneau LCD soit le produit d’une technologie de haute
précision, il est possible qu’il génère quelques pixels
sombres ou lumineux.
• Maintenir le panneau LCD face au soleil pendant une
période prolongée peut l’endommager. Ne l’oubliez pas
lorsque vous installez l’appareil à l’extérieur ou à
proximité d’une fenêtre.
• N’appuyez pas ou n’exercez pas de forte pression sur le
panneau et ne le rayez pas. Ceci pourrait provoquer des
irrégularités au niveau de l’écran ou un
dysfonctionnement du panneau LCD.
• L’écran peut s’assombrir ou une image rémanente peut
apparaître lorsque vous utilisez cet appareil dans un
environnement plus froid. Ce phénomène n’est pas le
signe d’un problème de fonctionnement. Il disparaît dès
que la température augmente.
• Si vous affichez une image fixe de façon continue, une
image fantôme peut apparaître. Ce phénomène disparaît
progressivement si vous changez d’image ou si vous
réglez l’écran afin qu’il soit entièrement blanc. En outre,
si vous affichez la même image fixe pendant une période
prolongée, l’image fantôme restera apparente.
• La surface du panneau ou du boîtier peut chauffer pendant
l’utilisation. Ce phénomène n’est pas le signe d’un
problème de fonctionnement.
Nettoyage de l’écran
Surface du panneau
• Veillez à débrancher le cordon d’alimentation avant de
nettoyer l’écran.
• La surface du panneau LCD est recouverte d’un fini
spécial. Evitez de toucher l’écran LCD. Lorsque vous
nettoyez la face du panneau, éliminez les taches à l’aide
d’un chiffon doux et sec.
• N’utilisez jamais d’alcool, d’essence ou de dissolvant.
Cela risquerait d’endommager le fini de la face du
panneau.
• Lorsque vous utilisez une lingette nettoyante, suivez les
instructions.
• La pulvérisation sur l’appareil de solvants volatiles
(comme des insecticides) ou le contact prolongé de
l’appareil avec des produits en caoutchouc ou en plastique
risque d’enlever le revêtement ou d’abîmer l’appareil.
Boîtier
• Eliminez doucement les taches à l’aide d’un chiffon doux
et sec. Eliminez les taches tenaces avec un chiffon
légèrement imprégné d’un détergent doux, puis essuyez
de nouveau la zone avec un chiffon doux et sec.
• N’utilisez jamais d’alcool, d’essence ou de dissolvant.
Cela risquerait d’endommager le fini du boîtier ou
d’effacer les inscriptions y figurant.
Remarques sur la manipulation et l’entretien de
l’écran
La surface spéciale de cet écran exige des précautions
spéciales lors de la manipulation et de l’entretien du
téléviseur. Pour le nettoyer, utilisez un chiffon de
nettoyage doux et évitez de toucher directement la
surface de l’écran.
Remballage
Conservez les cartons ainsi que les matériaux
d’emballage. Vous pourrez en avoir de nouveau
besoin en cas de déplacement et de transport de
l’appareil. Lors du transport de l’appareil, remballezle
comme illustré sur le carton.
Pour toute question au sujet de cet appareil, consultez
un distributeur Sony agréé.
FR
4
Page 67
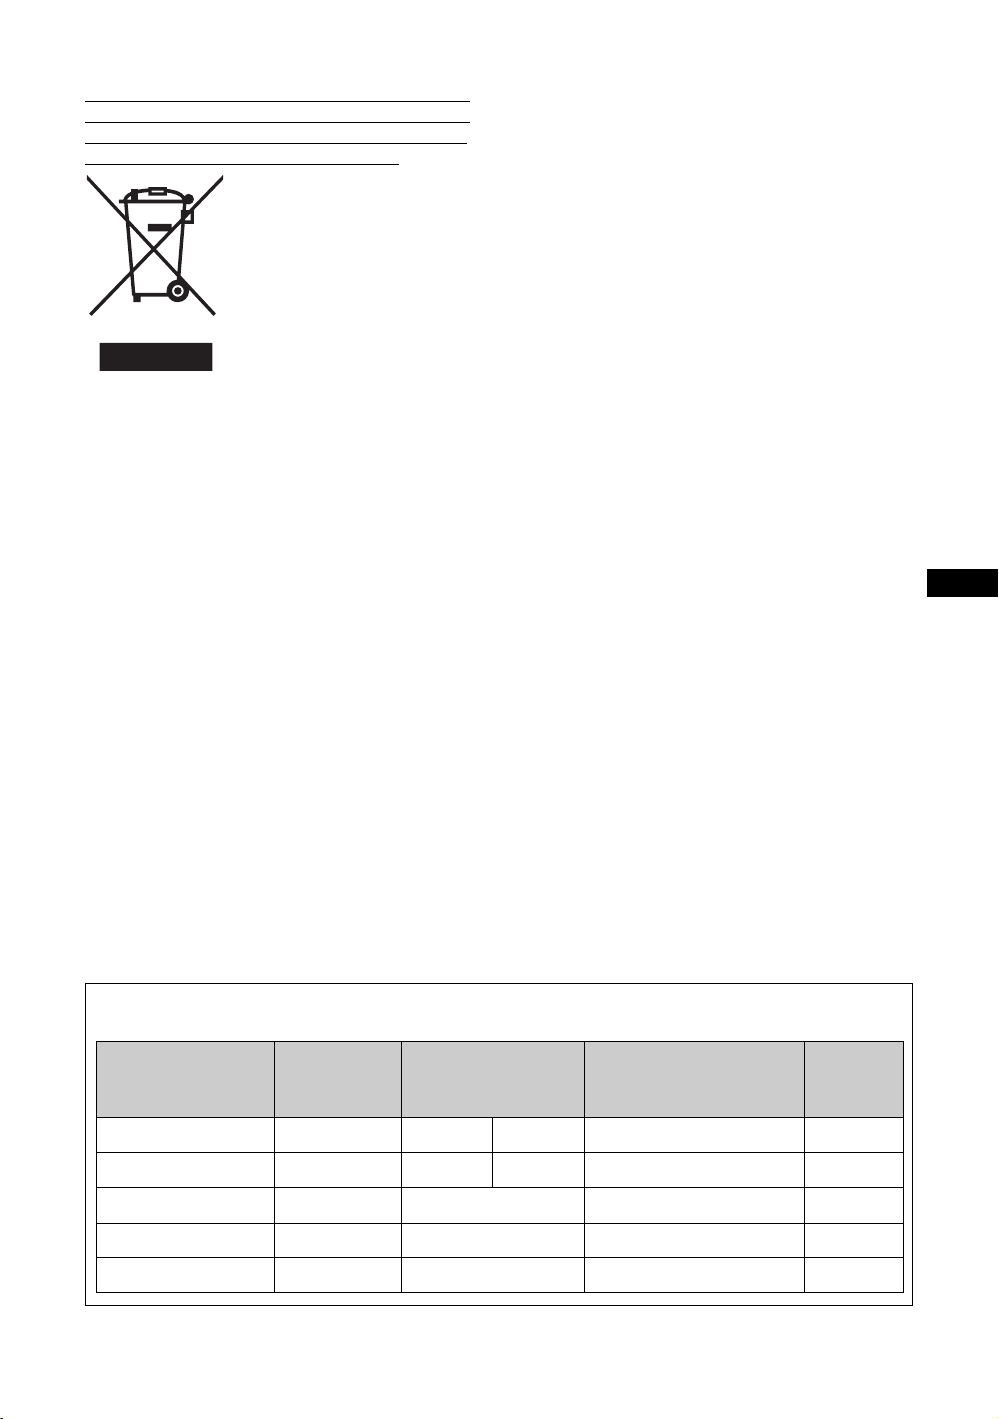
Elimination des appareils électriques et électroniques
professionnels en fin de vie (Applicable dans les pays
de l’Union Européenne et aux autres pays européens
disposant de systèmes de collecte sélective)
Ce symbole, apposé sur le
produit ou sur son emballage,
indique que ce produit ne doit
pas être traité avec les déchets
ménagers. Il doit être déposé
dans un point de collecte
spécialisé dans le rec yclage des
équipements électriques et
électroniques. En s’assurant
que ce produit est bien mis au
rebut de manière appropriée,
vous aiderez à prévenir les conséquences négatives
potentielles pour l’environnement et la santé humaine.
Le recyclage des matériaux aidera à conserver les
ressources naturelles. Pour toute information
supplémentaire concernant le recyclage de ce produit,
contactez votre centre Sony local ou consultez le site
web de Sony pour l’Europe destiné aux
professionnels :
http://www.sonybiz.net/environment
FR
Avertissement sur le raccordement électrique
Utilisez un cordon d’alimentation approprié à votre tension secteur locale.
Etats-Unis,
Canada
Type de fiche VM0233 COX-07 636 —
Extrémité femelle VM0089 COX-02 VM0310B VM0303B VM1313
Type de cordon SVT H05VV-F CEE (13) 53rd (O.C) HVCTF
Tension et courant minimum
Homologation de sécurité
10A/125V 10A/250V 10A/250V 10A/125V
UL/CSA VDE VDE DENAN-HO
Europe continentale
Royaume-Uni, Irlande,
Australie, NouvelleZélande
a)
Japon
VM1296
a) Remarque : Utilisez une fiche appropriée conforme à la réglementation locale.
FR
5
Page 68
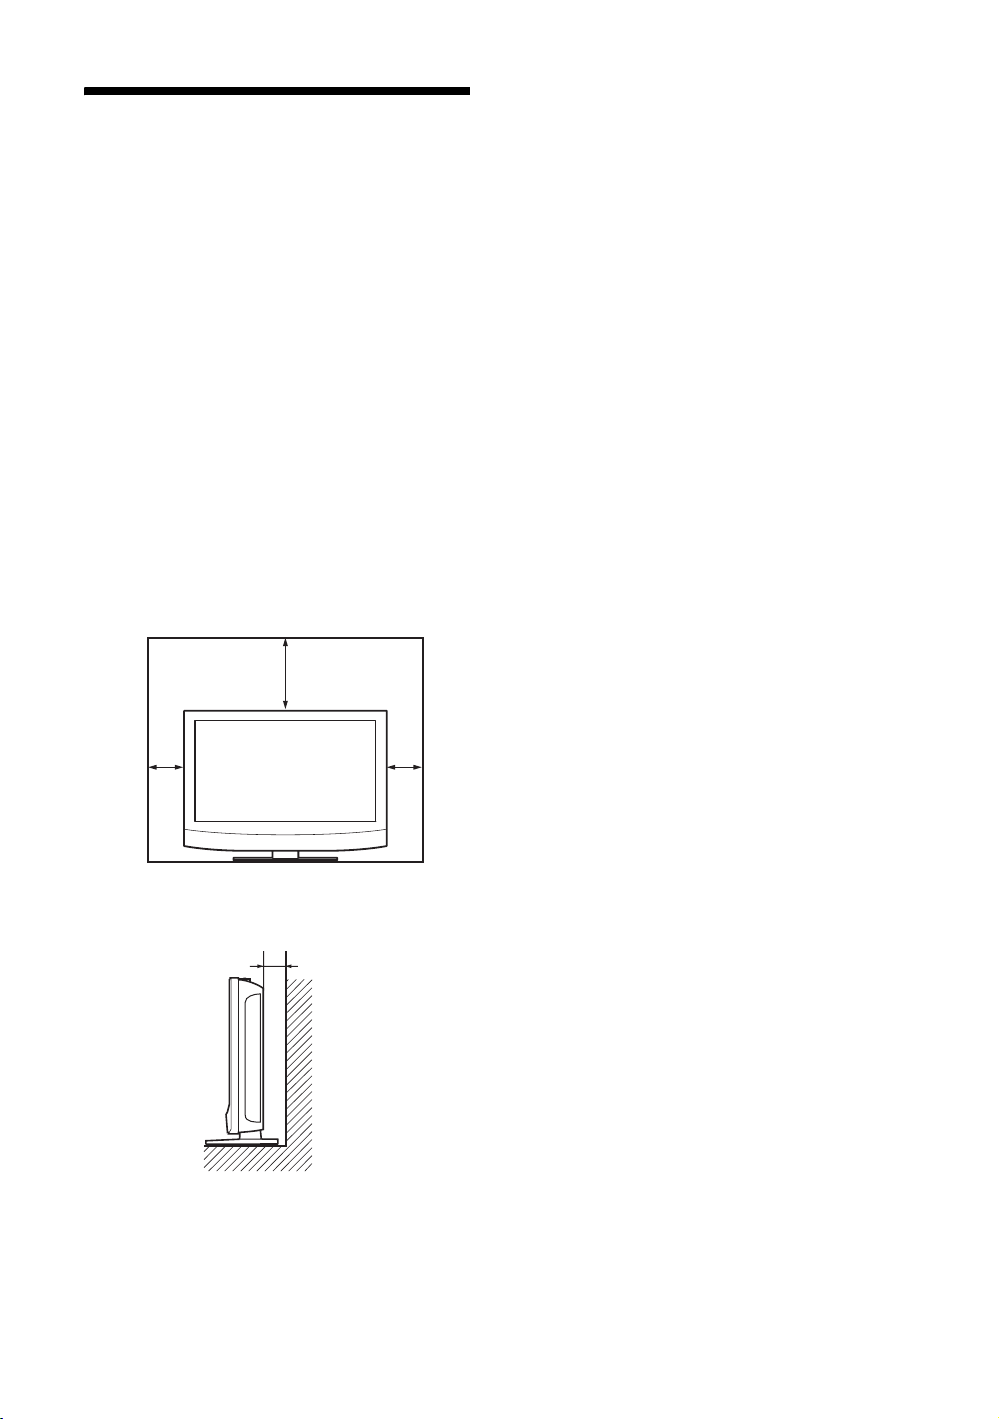
Recommandations pour
l’installation
Laissez un espace suffisant autour de
l’écran.
• Veillez à assurer une ventilation adaptée en laissant un
espace suffisant autour de l’écran comme illustré
ci-dessous afin d’éviter toute surchauffe interne.
• La température ambiante doit être comprise entre 0
°C (32 °F à 95 °F).
35
• Nous ne pouvons pas spécifier les produits utilisés en ce
qui concerne l’installation du matériel tel que les supports
de fixation, les vis ou les boulons. L’installation
proprement dite est réservée aux revendeurs locaux
agréés. Consultez un technicien Sony qualifié pour
l’installation.
• Lorsque l’écran est sous tension, il chauffe à l’intérieur.
Ceci peut provoquer des brûlures. Evitez de toucher le
dessus ou l’arrière de l’écran lorsqu’il est sous tension ou
juste après qu’il son passage en mode de veille.
Avant
7
20 (7
/8)
°C et
Côté
10
(4
)
10 (4)
Unités : cm (pouces)
10
(4
)
FR
6
Page 69
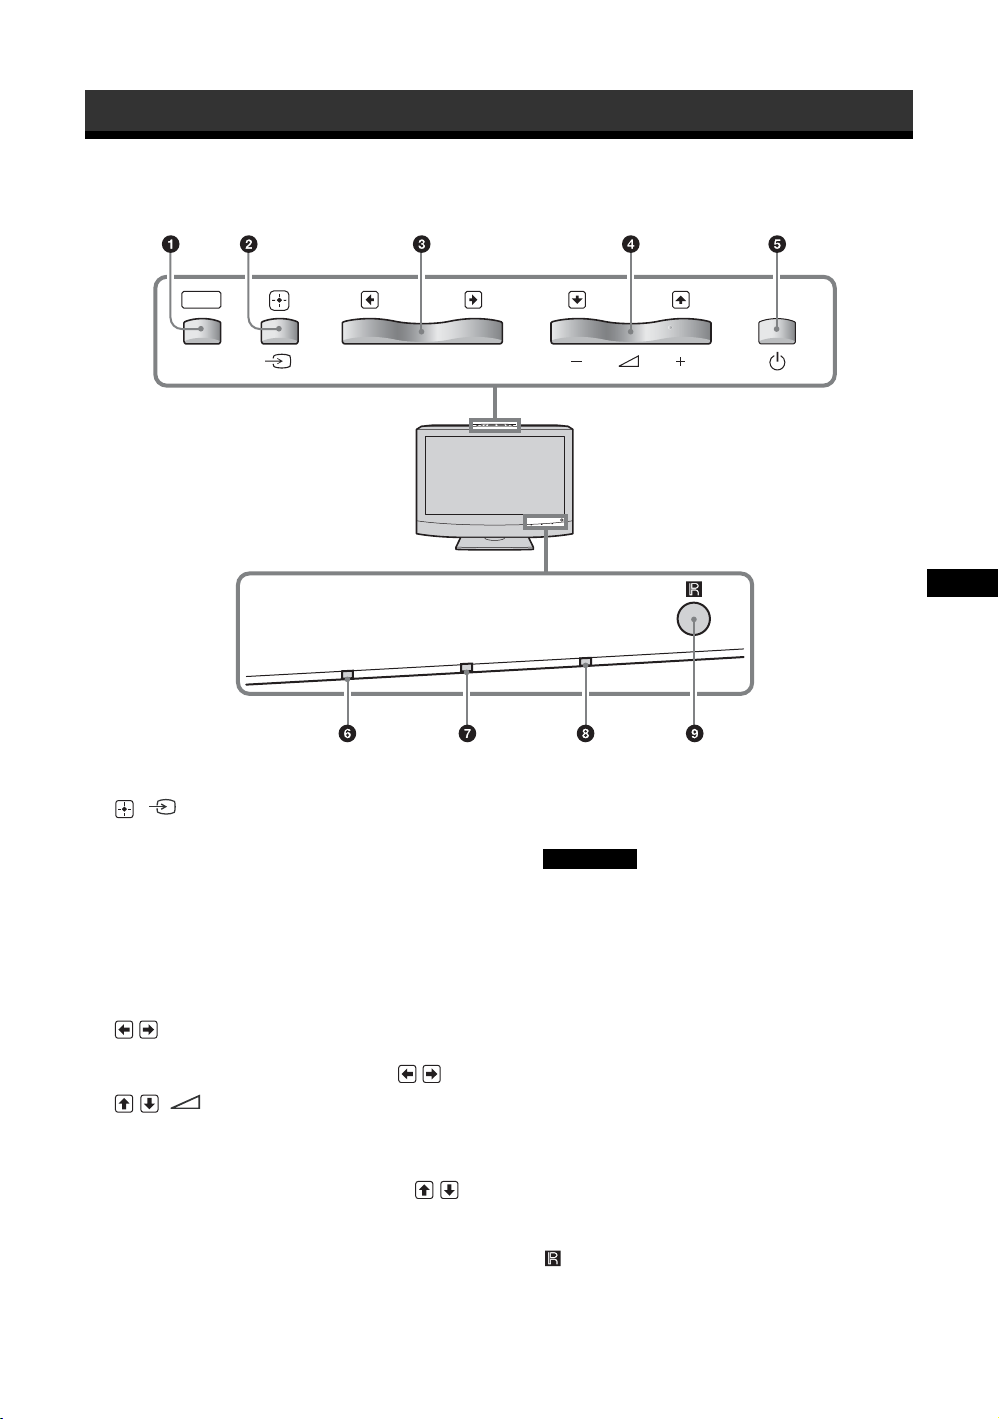
Emplacement et fonction des pièces et commandes
Panneau avant
MENU
FR
PIC OFF/TIMER
1 MENU (page 16)
2 / (INPUT)
• Dans l’écran menu, cette touche fonctionne comme
la touche « Régl ».
• Elle permet de commuter le signal émis en dehors de
l’écran menu.
Permet de sélectionner un signal d’entrée à partir des
connecteurs HD15/HDMI 1/HDMI 2/OPTION.
Si aucun adaptateur en option n’est inséré dans
l’emplacement OPTION, OPTION n’est pas
disponible
3 /
Dans l’écran menu, ces touches permettent de se
déplacer vers la gauche ou vers la droite (
4 //
• Permet d’augmenter (+) ou de diminuer (–) le
volume.
• Dans l’écran de menu, ces touches permettent de se
déplacer vers la gauche ou vers la droite ( / ).
STANDBY
/ ).
POWER
5 1
Permet de mettre l’écran sous tension/hors tension
(veille).
Remarque
Pour protéger le panneau, un certain temps est
nécessaire pour mettre l’écran sous tension/hors
tension (veille). Si vous mettez de nouveau l’écran
sous tension peu après l’avoir mis hors tension,
attendez environ 5 secondes avant de le mettre de
nouveau sous tension.
6 Indicateur PIC OFF/TIMER
• S’allume en vert lorsque la fonction « Image
désactivée » du « Mode ECO » est sélectionnée.
• S’allume en orange lorsque la fonction « Veille » est
activée.
7 Indicateur STANDBY
S’allume en rouge lorsque l’écran est en mode de
veille.
8 Indicateur POWER
S’allume en vert lorsque l’écran est mis sous tension.
9 Capteur de télécommande
FR
7
Page 70
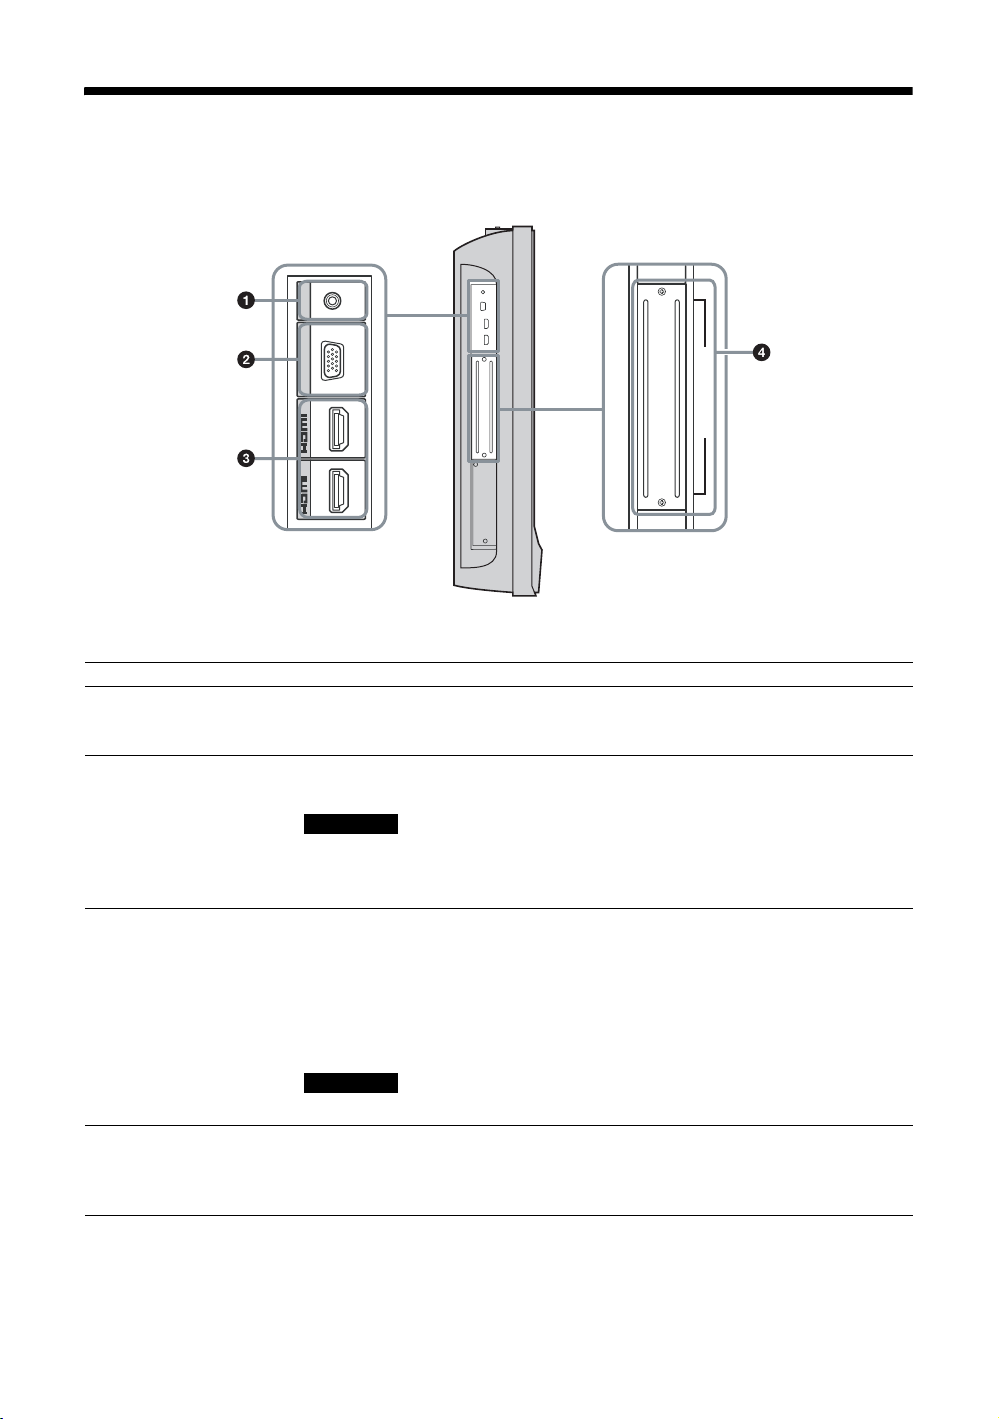
Panneau latéral
AUDIO
COM MON
AUDIO IN
HD 15
RGB/COMPONENT IN
1
IN
2
IN
Connecteur Description
1
AUDIO (COMMON
)
AUDIO IN
(mini-prise
stéréo)
2 HD15 (RGB/
COMPONENT IN)
(D-sub à 15 broches)
Permet de recevoir un signal audio. Se raccorde à la sortie du signal audio d’un
équipement vidéo ou d’un ordinateur. Prend en charge les signaux audio correspondant à
2 et 3.
Se raccorde à la sortie du signal analogique RGB ou du signal composante d’un
équipement vidéo ou d’un ordinateur. Voir page 30.
Remarque
Lors de la transmission d’un signal composante, veillez à ne pas transmettre de signaux
de synchronisation aux broches 13 et 14. Sinon, il est possible que l’image ne s’affiche
pas correctement.
3 HDMI 1/HDMI 2 IN L’interface HDMI (High-Definition Multimedia Interface) fournit une interface entre
l’écran et tout appareil audio/vidéo ou ordinateur compatible HDMI. Vous pouvez profiter
d’images vidéo de qualité supérieure ou de haute définition, ainsi que d’un son numérique
deux canaux. Vous pouvez également raccorder un appareil compatible DVI à votre écran
à l’aide d’un câble HDMI-DVI (non fourni).
Le mode adapté à un équipement audio/vidéo ou un ordinateur est automatiquement
sélectionné en fonction de l’appareil raccordé.
OPTION (VIDEO/COM)
4 Emplacement OPTION
(port VIDEO/COM)
FR
8
Remarque
Utilisez uniquement un câble HDMI portant le symbole HDMI.
Cet emplacement prend en charge les signaux vidéo et la fonction communication.
Lorsque vous insérez un adaptateur en option (de la série BKM-FW) dans cet
emplacement, vous pouvez augmenter les connecteurs de signaux d’entrée ou commander
l’écran via le réseau.
Page 71
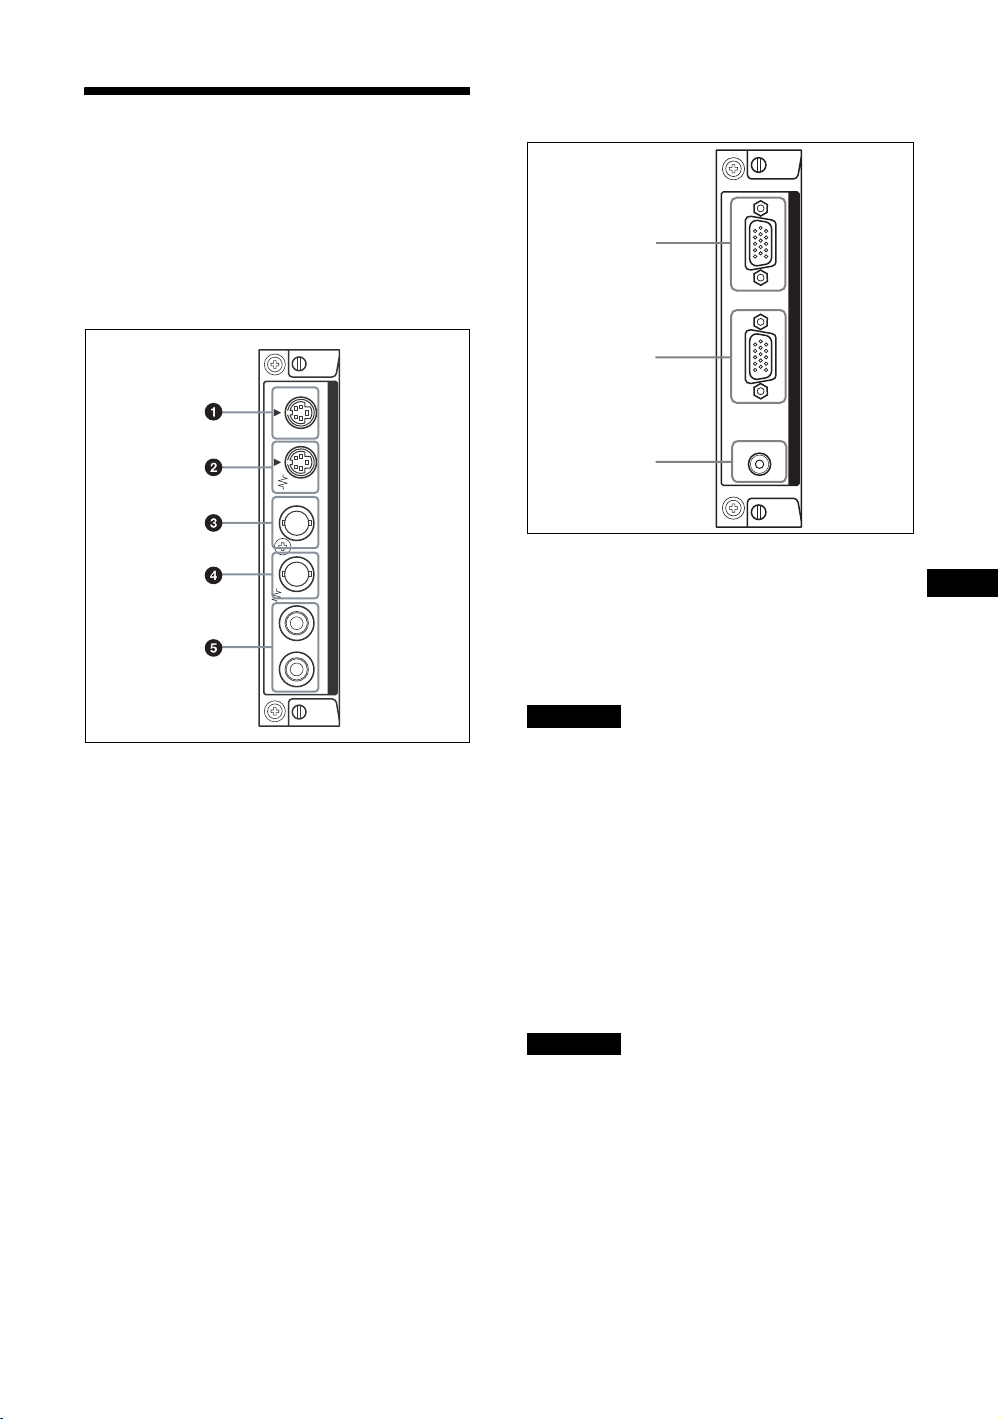
Adaptateurs en option
Les connecteurs repérés par 4 sur le panneau latéral
sont enfichables et peuvent être utilisés avec
n’importe quel adaptateur en option (non fourni).
Pour plus d’informations sur l’installation, consultez
votre revendeur Sony.
Adaptateur D’ENTRÉE VIDEO BKM-FW10
Adaptateur ACTIF RVB/COMPOSANT
BKM-FW12
1
INOUTINOUTRL
S VIDEO
VIDEO
VIDEO INPUT ADAPTOR
AUDI O IN
1 S VIDEO IN (mini DIN à 4 broches) : Se
raccorde à la sortie du signal S Vidéo d’un
équipement vidéo.
2 S VIDEO OUT (mini DIN à 4 broches) : Se
raccorde à l’entrée du signal S Vidéo d’un
équipement vidéo.
3 VIDEO IN (BNC) : Se raccorde à la sortie du
signal vidéo d’un équipement vidéo.
4 VIDEO OUT (BNC) : Se raccorde à l’entrée du
signal vidéo d’un équipement vidéo.
5 AUDIO IN L/R (prise à broches) : Se raccorde à
la sortie audio d’un équipement vidéo.
2
3
AUDI O
OUT IN
RGB/COMPONENT ACTIVE THROUGH
IN
1 RGB/COMPONENT IN (D-sub à 15 broches) :
Se raccorde à la sortie du signal composante ou du
signal analogique RGB d’un équipement vidéo ou
d’un ordinateur. Pour plus de détails sur la
transmission d’un signal composante au
connecteur, voir Affectation des broches à la
page 30.
Remarque
Lors de la transmission d’un signal composante, veillez à ne
pas transmettre de signaux de synchronisation aux broches
13 et 14. Sinon, il est possible que l’image ne s’affiche pas
correctement.
2 RGB/COMPONENT OUT
(D-sub à 15 broches) :
Se raccorde à l’entrée du signal composante ou du
signal analogique RGB d’un équipement vidéo ou
d’un ordinateur.
3 AUDIO IN (mini-prise stéréo) :
Permet de recevoir un signal audio. Se raccorde à
la sortie audio d’un équipement vidéo ou d’un
ordinateur.
Remarque
Si l’écran n’est pas raccordé à l’alimentation secteur ou s’il
est en mode de veille, aucun signal n’est émis via RGB/
COMPONENT OUT.
FR
Pour plus de détails sur les adaptateurs en option pour
l’extension du système, pour la série BKM-FW,
reportez-vous au mode d’emploi correspondant.
9
FR
Page 72
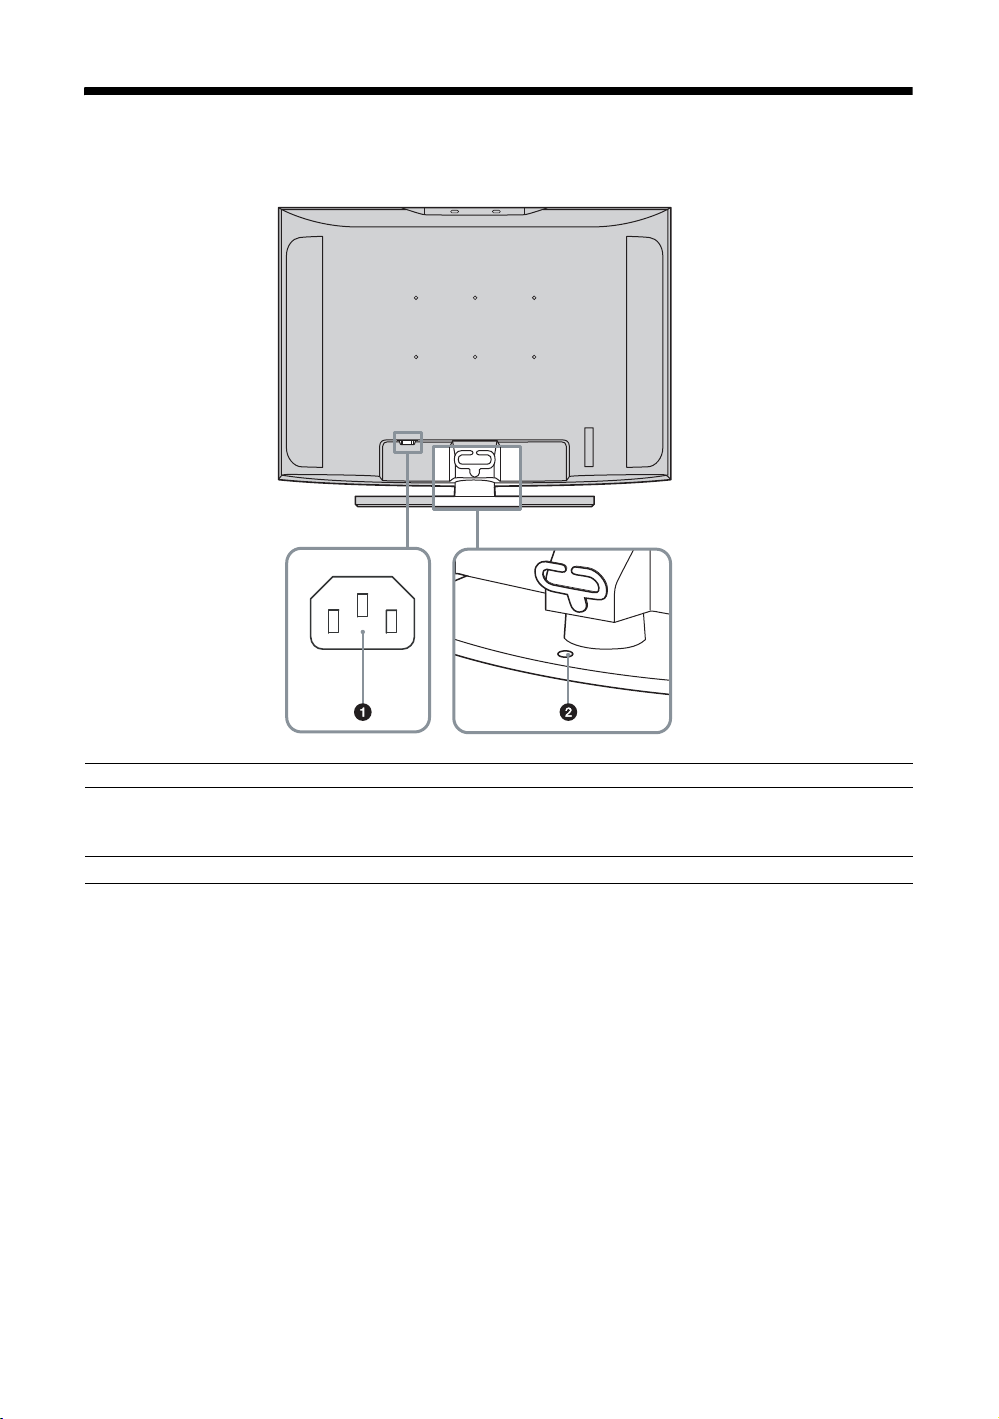
Panneau arrière
Pièces Description
1 Prise AC IN Permet de raccorder le cordon d’alimentation fourni à cette prise et à une prise murale.
Une fois le cordon d’alimentation raccordé, l’indicateur STANDBY s’allume en rouge et
l’écran passe en mode de veille. Voir page 15.
2 Trou de fixation du support Permet de fixer l’écran sur une table, etc. à l’aide d’une vis M6.
10
FR
Page 73
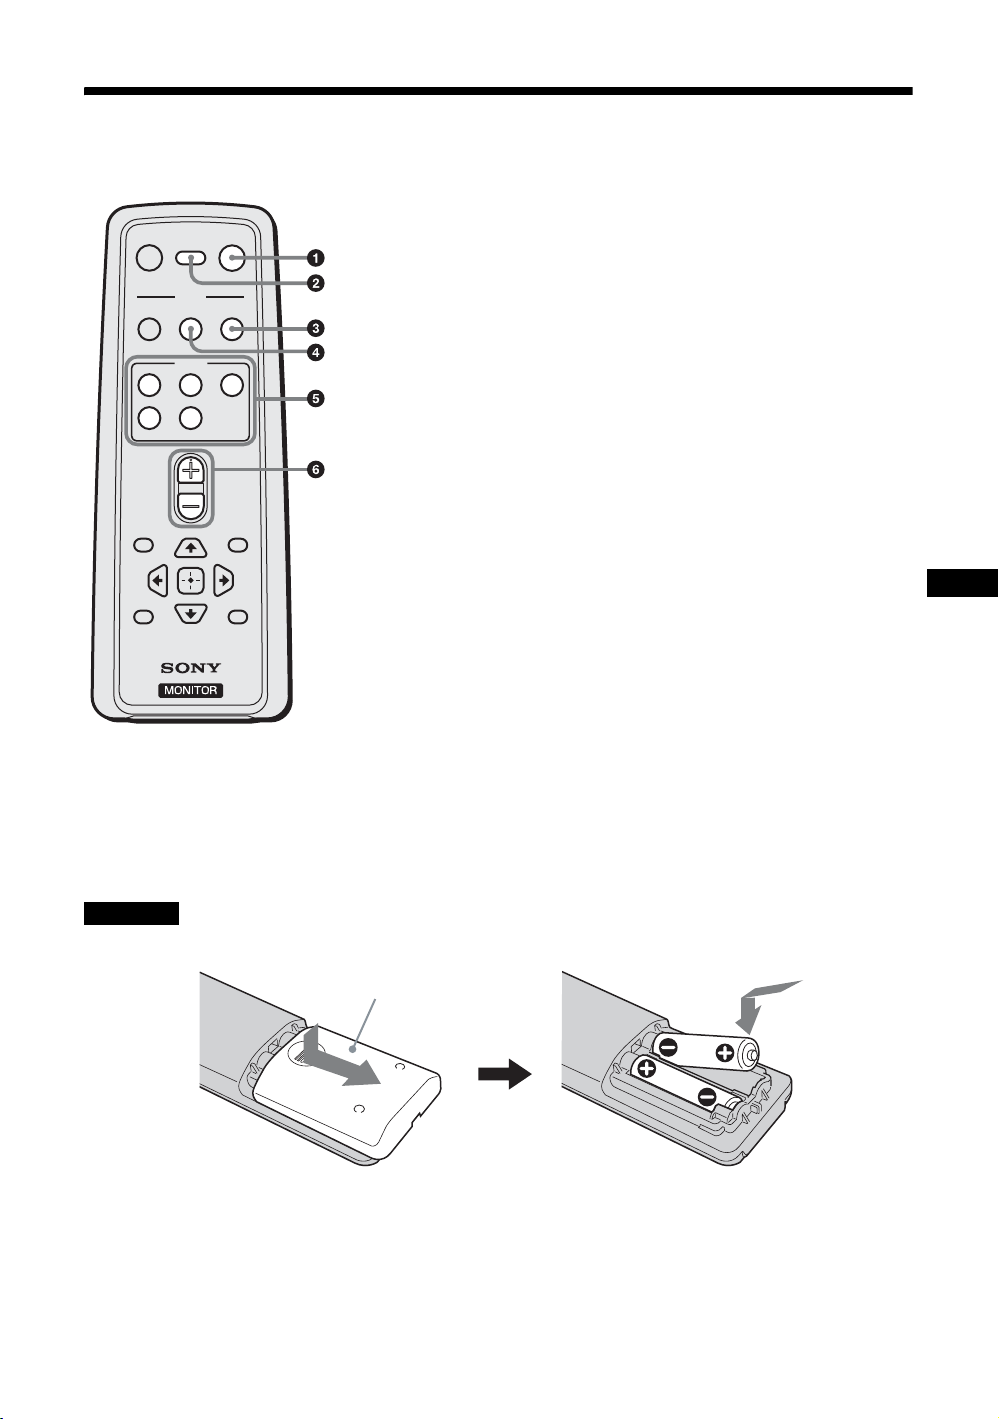
Télécommande
Description des touches
1 Touche POWER
MUTING DISPLAY
SOUND
V1
V4 V5
VOL
POWER
SAVING
MODE
PICTURE
INPUT
V2 V3
POWER
WIDE
MENU
SLEEPFREEZE
Conseil
La touche VOL + possède un point tactile. Utilisez-le comme repère lors de l’utilisation de l’écran.
Appuyez sur cette touche pour mettre l’écran sous/hors tension
(veille).
2 Touche DISPLAY
Appuyez sur cette touche pour afficher les informations sur le signal
d’entrée actuel et le réglage « Mode cinéma » sur l’écran. Appuyez
de nouveau pour les masquer. Si les informations restent affichées
pendant quelques instants, elles disparaissent automatiquement. Si
« Veille » est réglé, vous pouvez afficher le temps restant de
« Veille » en appuyant sur la touche DISPLAY.
3 Touche WIDE
Appuyez sur cette touche pour modifier le format en « Mode
cinéma ». Voir page 13.
4 Touche PICTURE
Permet de sélectionner « Mode de l'image ». Chaque pression sur
cette touche permet de basculer entre « Éclatant », « Standard » et
« Personnalisé ».
5 Touches INPUT V1-V5
Appuyez sur les touches suivantes pour sélectionner un signal à
émettre de l’appareil raccordé vers les connecteurs d’entrée.
• Touche V1 : HD15 (Le signal RGB ou composante est
automatiquement sélectionné en fonction de l’appareil raccordé.)
• Touche V2 : HDMI 1
• Touche V3 : HDMI 2
• Touche V4 : OPTION (Lorsqu’un adaptateur en option est inséré.)
• Touche V5 : Inactive.
6 Touche VOL +/–
Appuyez sur cette touche pour régler le volume.
FR
Remarque
Introduisez deux piles AA (R6) (fournies) en faisant correspondre la polarité 3 et # des piles avec celle du logement des piles.
Pour ouvrir, appuyez et
faites glisser
11
FR
Page 74
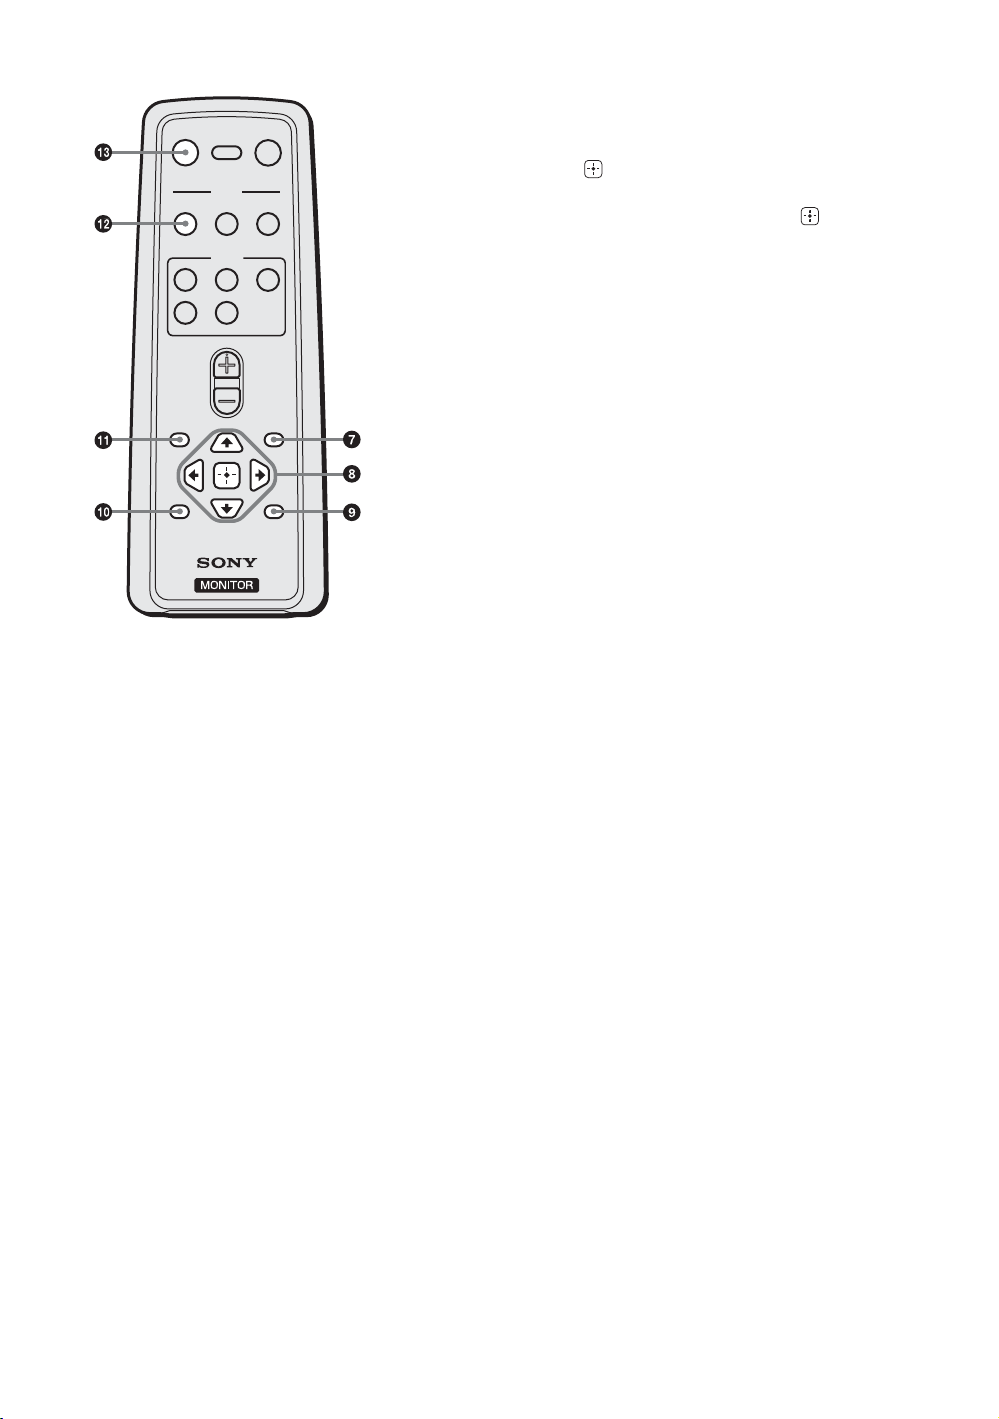
MUTING DISPLAY
MODE
PICTURE
SOUND
INPUT
V1
V4 V5
VOL
POWER
SAVING
POWER
WIDE
V2 V3
MENU
SLEEPFREEZE
7 Touche MENU
Appuyez sur cette touche pour afficher les menus. Appuyez de
nouveau pour les masquer. Voir page 16.
8 Touches V/v/B/b/
Les touches V/v/B/b permettent de déplacer le curseur (jaune) du
menu et de régler des paramètres, etc. Appuyez sur pour valider
le menu ou le réglage sélectionné.
9 Touche SLEEP
Appuyez plusieurs fois sur cette touche jusqu’à ce que l’écran
affiche, en minutes (15, 30, 45, 60, 90 ou 120), la durée avant
extinction de l’écran. Pour annuler « Veille », appuyez plusieurs fois
sur la touche SLEEP jusqu’à ce que « Veille : Non » apparaisse.
0 Touche FREEZE
Inactive.
qa Touche POWER SAVING
Permet de modifier les options du « Mode ECO ». Appuyez sur cette
touche pour réduire la consommation d’énergie en modifiant la
luminosité de l’écran. Choisissez entre « Non », « Bas », « Haut » ou
« Image désactivée ». Voir page 14.
qs Touche SOUND
Permet de sélectionner « Mode du son ». Chaque pression sur cette
touche permet de basculer entre « Dynamique », « Standard », « SRS
WOW » et « Personnalisé ».
qd Touche MUTING
Appuyez sur cette touche pour couper le son. Appuyez de nouveau
pour restaurer le son.
12
FR
Page 75
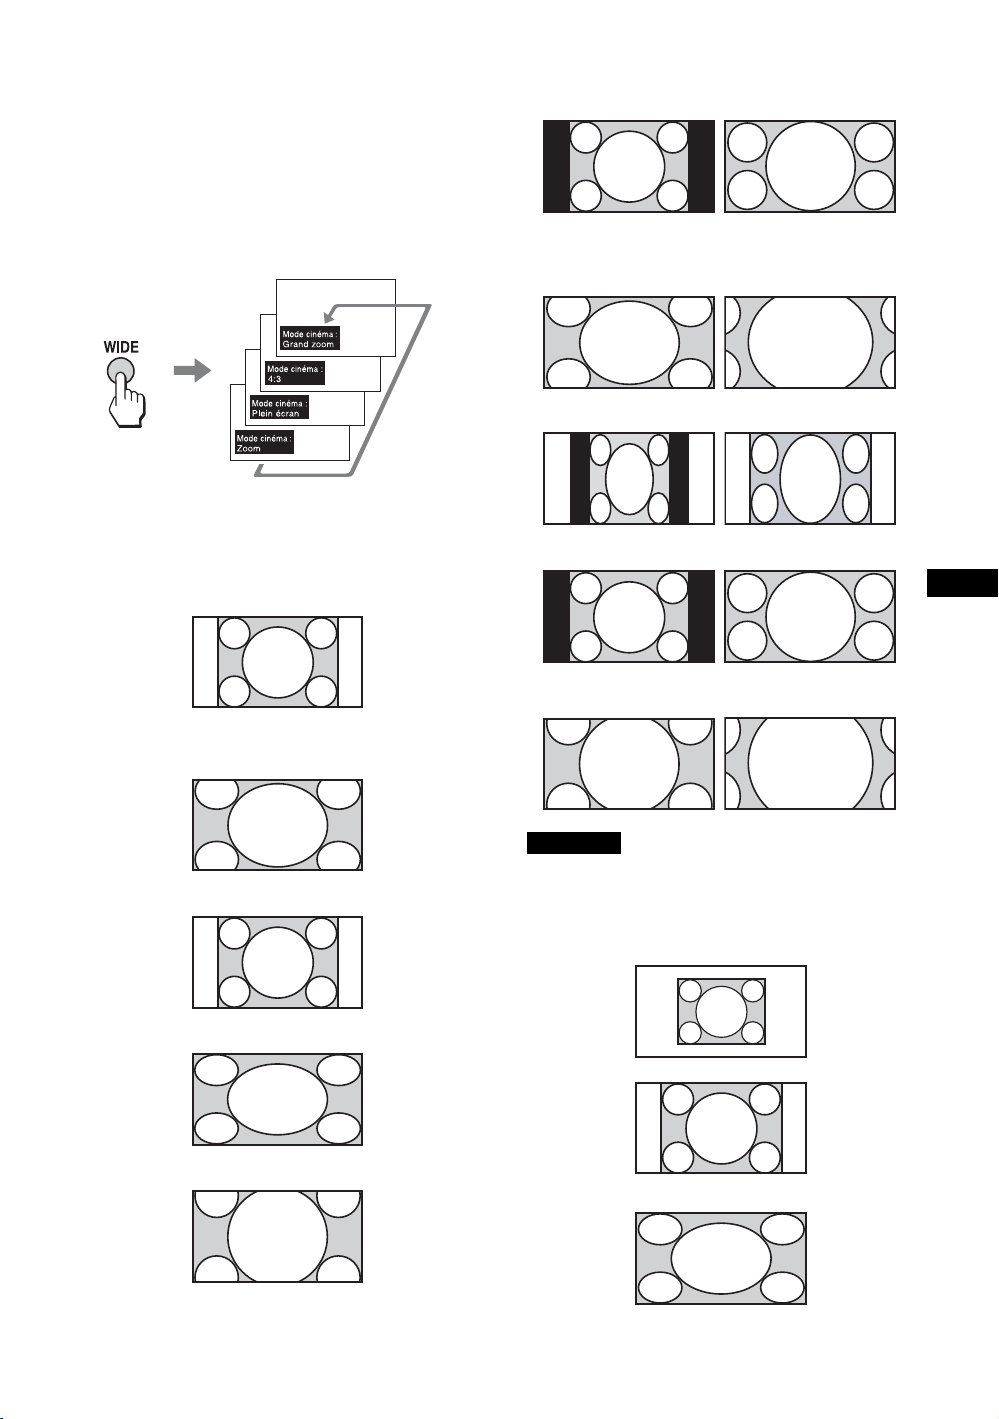
Touches spéciales de la télécommande
Utilisation du Mode cinéma
Vous pouvez modifier le format de l’écran à l’aide du
« Mode cinéma ».
Conseil
Vous pouvez également accéder aux réglages « Mode
cinéma » dans les réglages « Écran ». Voir page 21, 23.
Pour l’entrée Vidéo, DVD ou HDMI (autre que l’entrée
d’ordinateur)
Source d’origine 4:3
Source d’origine 16:9
m
Grand zoom
4:3
Plein écran
FR
Grand
zoom
4:3
Plein écran
Zoom
Zoom
m
Remarque
Lorsque le signal émis est 1080i, 720p ou 1080p, « Grand
zoom » et « 4:3 » ne peuvent pas être sélectionnés.
Voir page 21.
Pour une entrée d’ordinateur
Normal
Plein écran 1
Plein écran 2
13
FR
Page 76
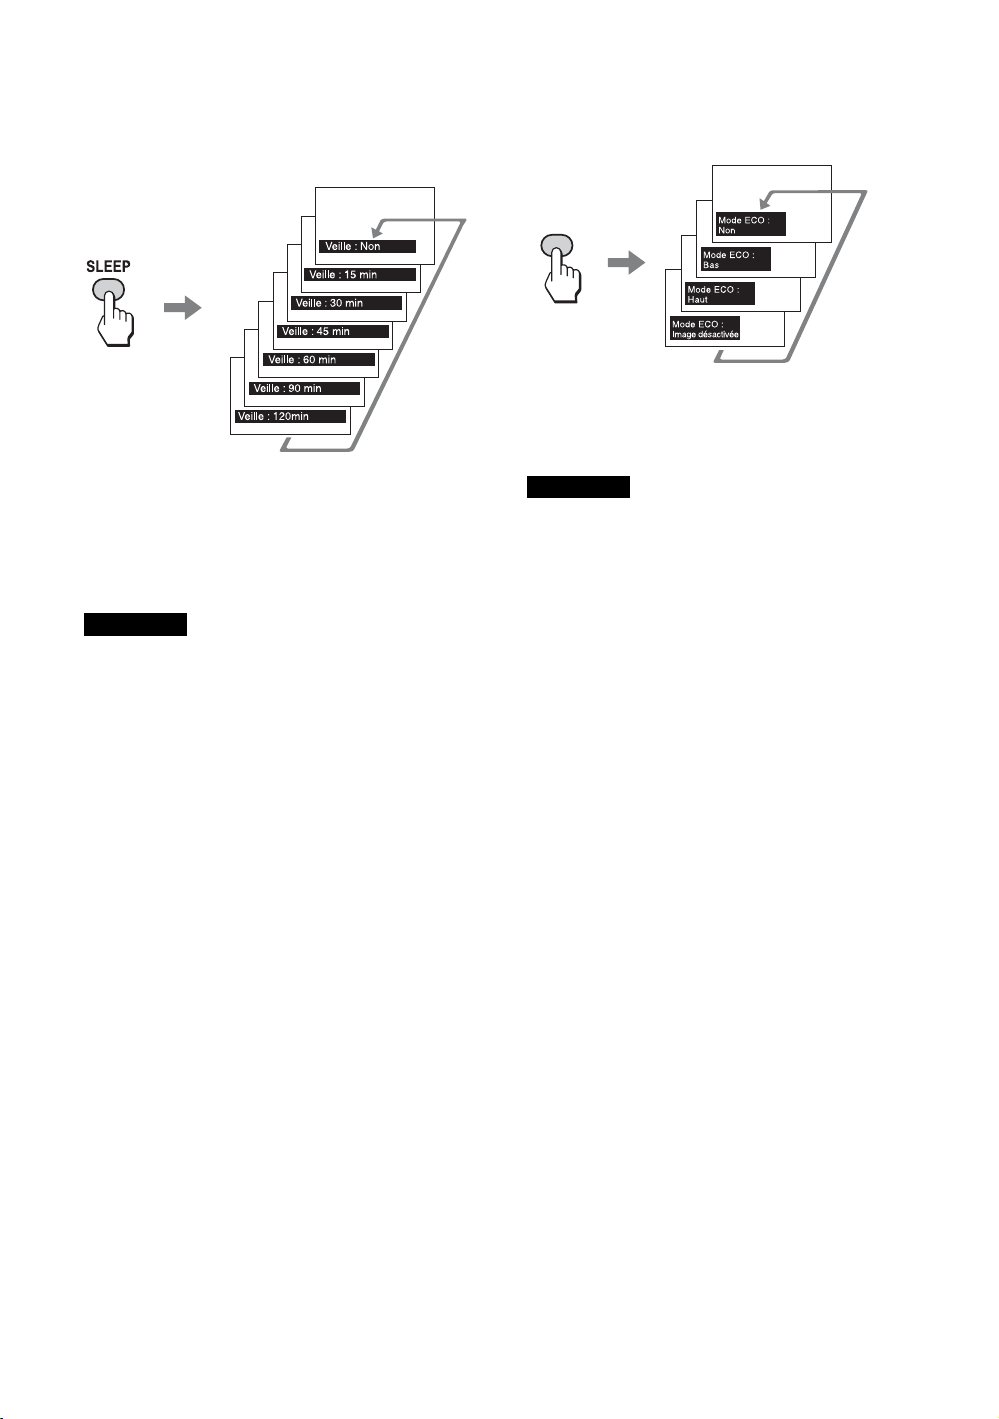
Utilisation de la fonction Veille
Vous pouvez régler l’écran afin qu’il se mette
automatiquement hors tension après une durée
déterminée (15, 30, 45, 60, 90 ou 120 minutes).
Lorsque « Veille » est activé, l’indicateur PIC OFF/
TIMER de l’écran s’allume en orange.
Annulation de Veille
Appuyez plusieurs fois sur SLEEP jusqu’à ce que
« Veille : Non » apparaisse, ou mettez l’écran hors
tension, puis de nouveau sous tension.
Remarques
• Si vous mettez l’écran hors tension, puis de nouveau sous
tension, « Veille » revient en position « Veille : Non ».
• L’indication « Veille - alim.coupée » s’affiche une minute
avant l’extinction de l’écran. Ce message peut ne pas
s’afficher si vous effectuez d’autres opérations dans les
réglages.
• Vous pouvez activer « Veille » à l’aide des réglages
« Réglage ». Sélectionnez « Veille » dans les réglages
« Réglage », puis réglez-le sur « 15 min », « 30 min »,
«45 min», «60 min», «90 min» ou «120min».
• Lorsque « Veille » est activé, une pression sur SLEEP
permet d’afficher le temps restant avant l’extinction de
l’écran.
Utilisation de la fonction Mode ECO
Vous pouvez réduire la consommation d’énergie de
l’écran.
POWER
SAVING
Annulation du Mode ECO
Appuyez plusieurs fois sur la touche POWER
SAVING jusqu’à ce que « Mode ECO : Non »
apparaisse.
Remarques
• Si vous mettez l’écran hors tension lorsque le « Mode
ECO » est activé, il est activé lors de la prochaine mise
sous tension de l’écran, sauf « Image désactivée ».
• Vous pouvez activer « Mode ECO » à l’aide des réglages
« Réglage ». Sélectionnez « Mode ECO » dans les
réglages « Réglage », puis réglez-le sur « Non », « Bas »,
« Haut » ou « Image désactivée ».
14
FR
Page 77
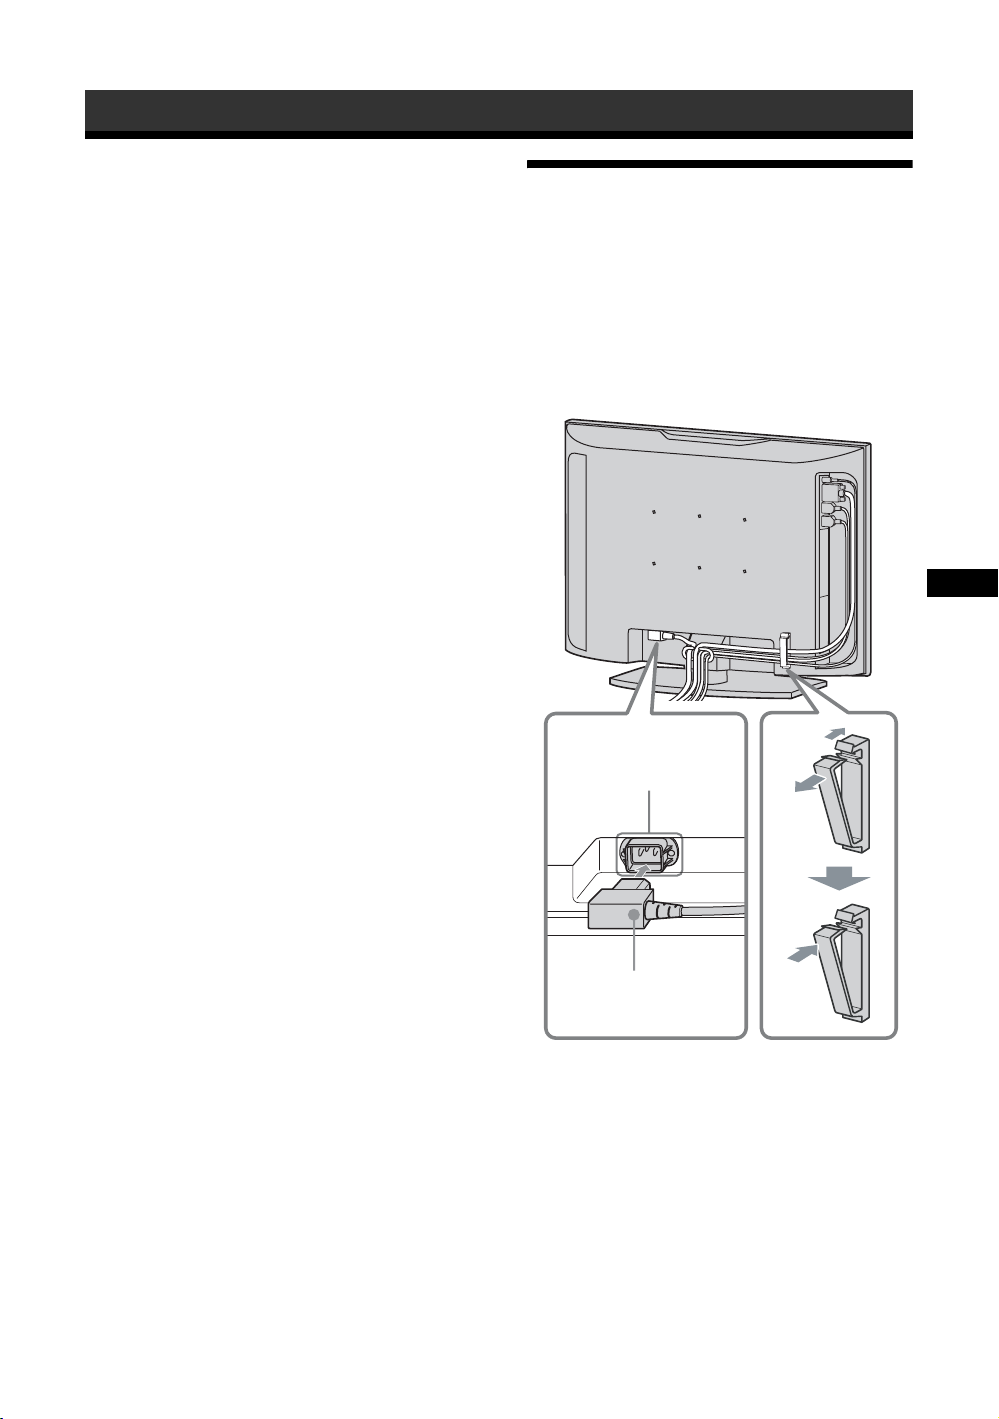
Raccordements
Avant de commencer
• Assurez-vous dans un premier temps que tous les
appareils sont hors tension.
• Utilisez des câbles adaptés aux appareils à raccorder.
• Insérez les câbles à fond dans les connecteurs ou les
prises. Une connexion lâche risque de provoquer du
souffle ou d’autres parasites.
• Pour débrancher le câble, saisissez-le par la fiche. Ne tirez
jamais sur le câble lui-même.
• Consultez également le mode d’emploi de l’appareil à
raccorder.
• Insérez bien la fiche dans la prise AC IN.
Raccordement de la
prise d’alimentation
secteur et rangement
des câbles d’entrée
FR
1
Cordon d’alimentation
secteur
Prise
AC IN
2
1 Branchez le cordon d’alimentation secteur
dans la prise AC IN située sur la partie
inférieure de l’appareil.
2 Utilisez le support de câbles pour ranger
les câbles raccordés, comme indiqué dans
l’illustration.
15
FR
Page 78
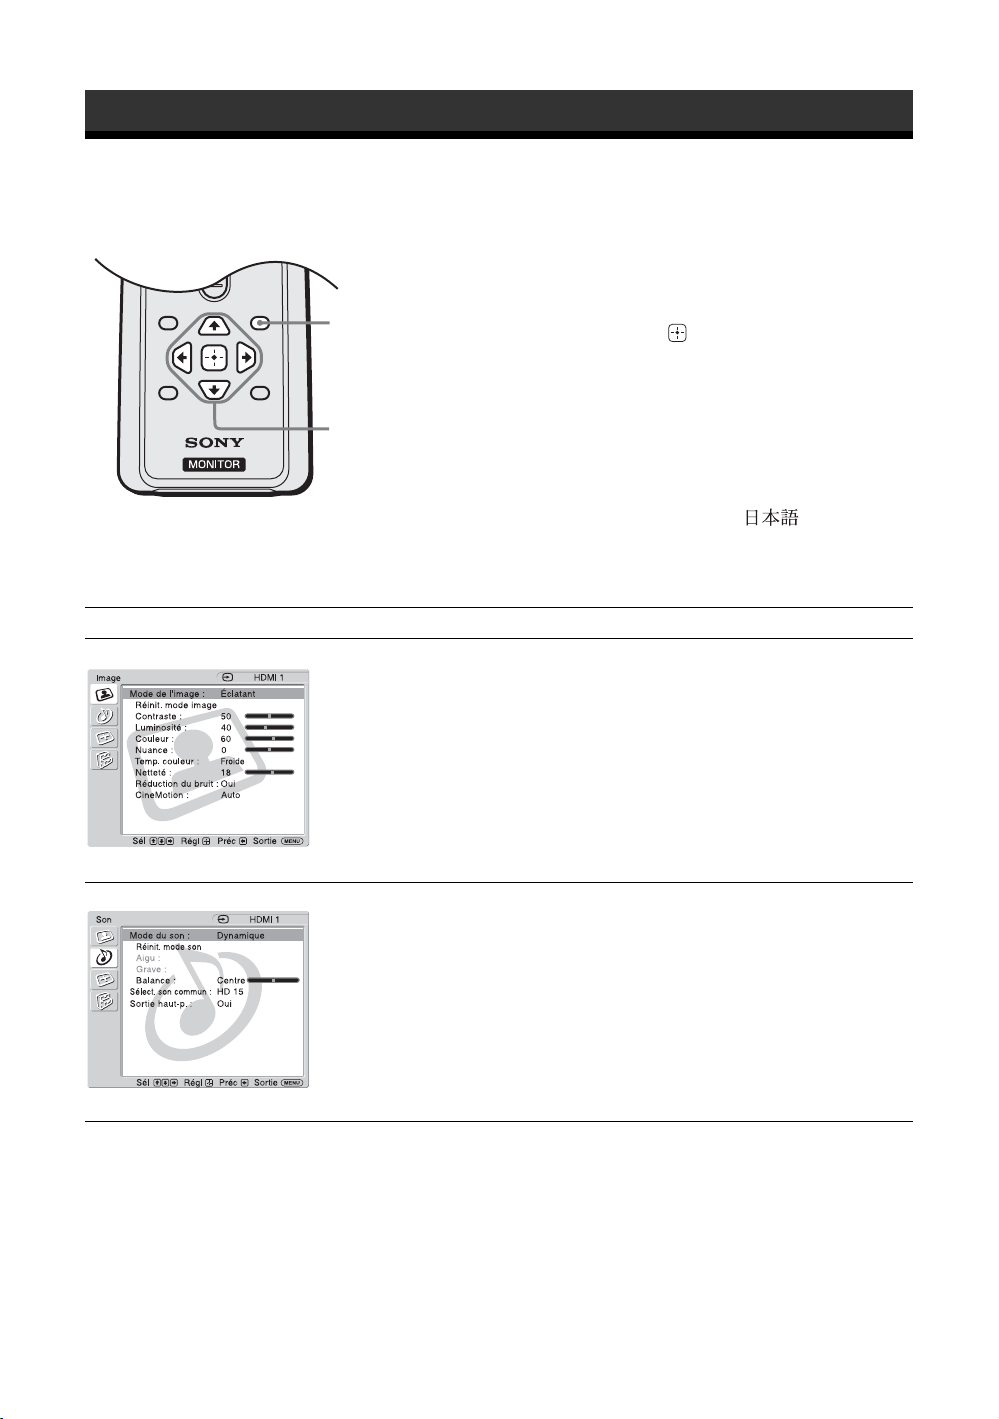
Utilisation des réglages
POWER
SAVING
MENU
VOL
SLEEPFREEZE
Description générale des menus
1 Appuyez sur la touche MENU.
2 Appuyez sur V/v pour sélectionner l’icône
du menu de votre choix.
1
3 Appuyez sur ou b.
Pour quitter le menu, appuyez sur la touche
MENU.
2,3
Pour modifier la langue affichée à l’écran
Sélectionnez la langue d’affichage souhaitée pour les
messages et les réglages à l’écran parmi les langues
suivantes : « English », « Español », « Français »,
« Italiano », « Deutsch » ou « ».
« English » (l’anglais) est la langue par défaut.
Voir page 24.
Les réglages vous permettent d’accéder aux paramètres suivants :
Réglages Pour effectuer des réglages ou des modifications
Image
Mode de l'image (page 18, 19)
Réinit. mode image (page 18, 19)
Contraste (page 18, 19)
Luminosité (page 18, 19)
Couleur (page 18)
Nuance (page 18)
Temp. couleur (page 18, 19)
Netteté (page 18)
Réduction du bruit (page 18)
::
Son
:
:
CineMotion (page 18)
Mode du son (page 20)
Réinit. mode son (page 20)
Aigu (page 20)
Grave (page 20)
Balance (page 20)
Sélect. son commun (page 20)
Sortie haut-p. (page 20)
16
FR
:
:
:
:
Page 79
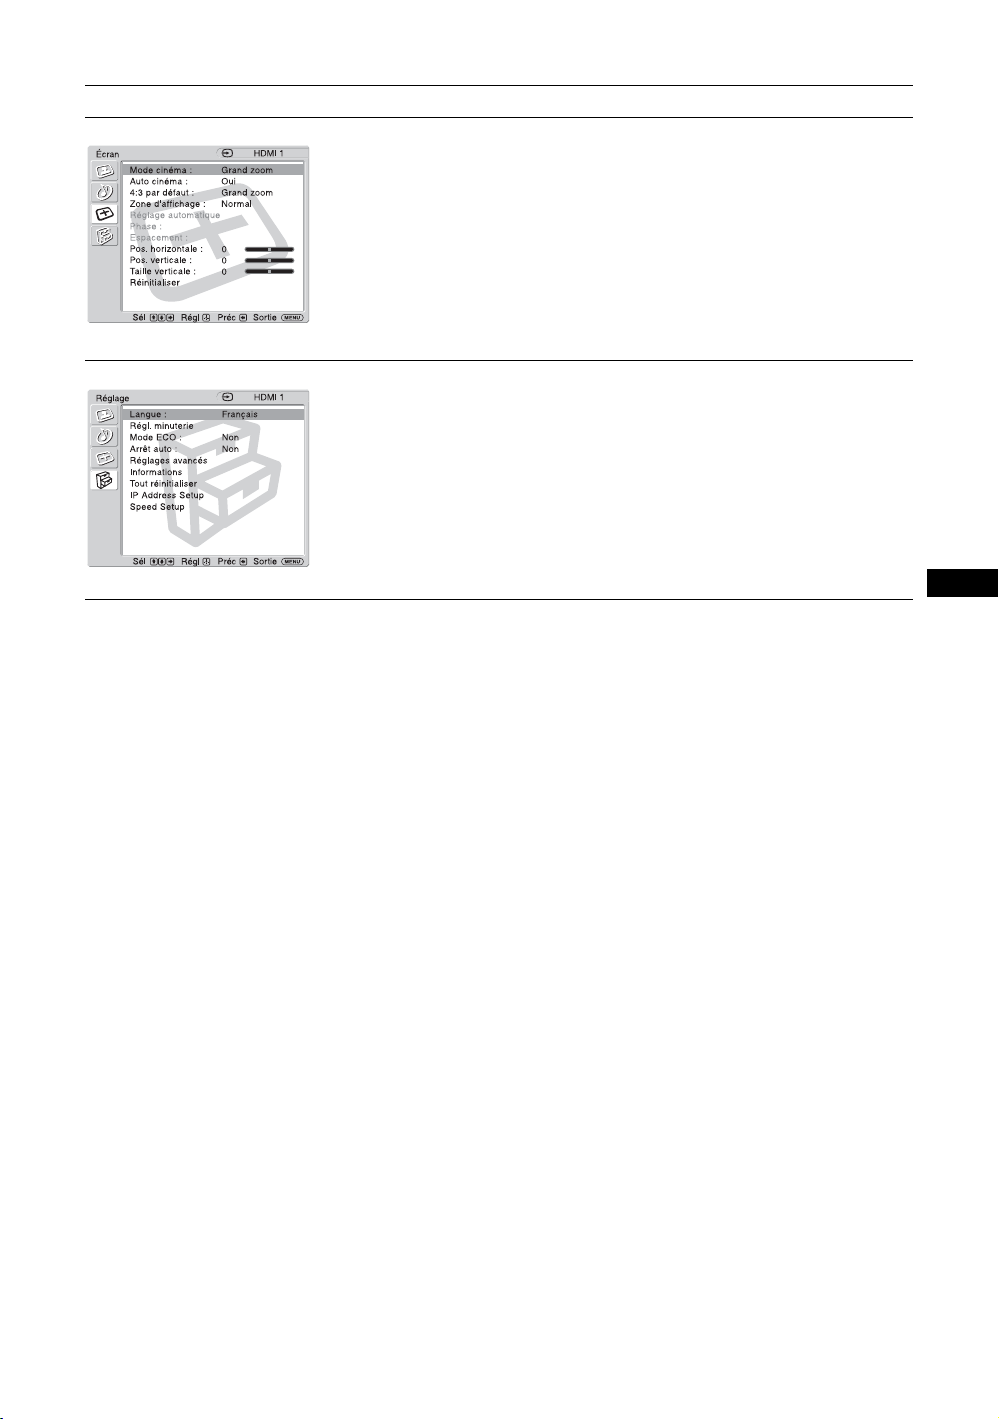
Réglages Pour effectuer des réglages ou des modifications
Écran
Mode cinéma (page 21, 23)
Auto cinéma (page 21)
4:3 par défaut (page 22)
Zone d'affichage (page 22)
Réglage automatique (page 23)
Phase (page 23)
Espacement (page 23)
Pos. horizontale (page 22, 23)
Pos. verticale (page 22, 23)
::
:
:
Taille verticale (page 22)
Réinitialiser (page 22, 23)
Réglage
Langue (page 24)
Régl. minuterie (page 24)
Mode ECO (page 24)
Arrêt auto (page 24)
Réglages avancés (page 24)
Informations (page 25)
Tout réinitialiser (page 25)
IP Address Setup (page 25)
Speed Setup (page 25)
::
:
:
* Selon les réglages, il est possible que les icônes de menu affichées en bas de l’écran ne fonctionnent pas.
FR
17
FR
Page 80
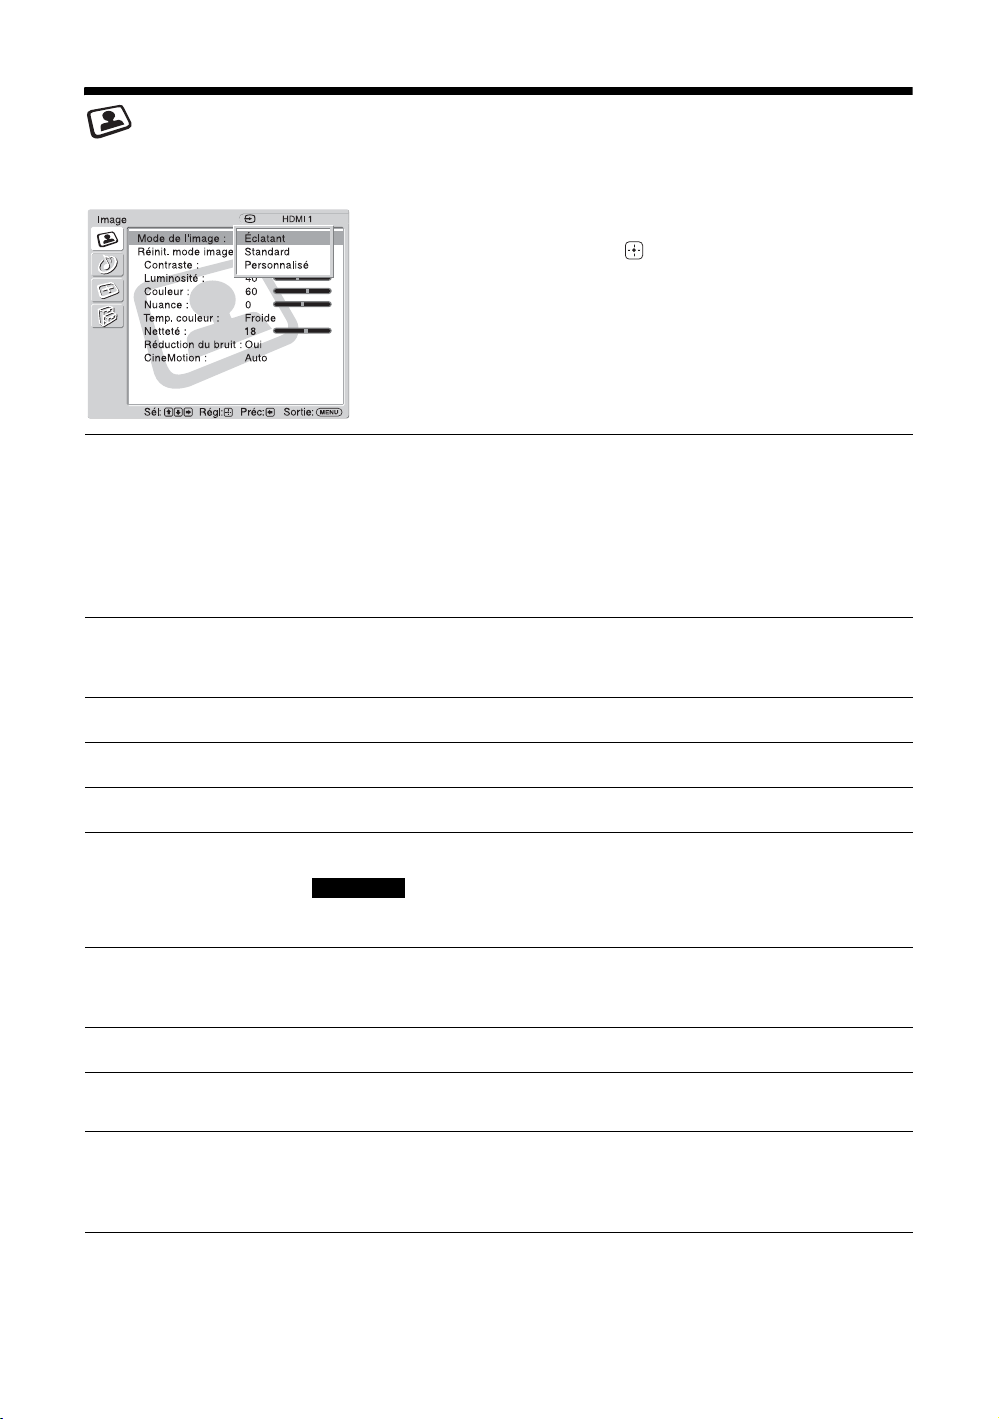
Réglages Image
Pour l’entrée vidéo
Pour sélectionner une option et changer le réglage,
appuyez sur
Appuyez sur pour confirmer votre choix.
Les réglages « Image » comprennent les options
suivantes :
V/v/B/b.
Mode de l'image
Réinit. mode image
Contraste
Luminosité
Couleur
Nuance
Temp. couleur
« Éclatant » : pour sélectionner un réglage maximal des contrastes et de la netteté de
l’image.
« Standard » : pour sélectionner un réglage standard de l’image.
« Personnalisé » : pour mémoriser vos réglages personnels.
Conseils
• Pour passer de l’option « Mode de l'image » à une autre, vous pouvez également utiliser la
touche PICTURE de la télécommande.
• Vous pouvez modifier les options « Mode de l'image » pour chaque entrée.
Permet de restaurer les réglages actuellement sélectionnés dans « Mode de l'image »
(« Éclatant », « Standard », « Personnalisé ») aux réglages par défaut (sauf pour les
options grisées).
A utiliser pour augmenter ou diminuer le contraste de l’image.
A utiliser pour augmenter ou diminuer la luminosité de l’image.
A utiliser pour augmenter ou diminuer l’intensité des couleurs.
A utiliser pour régler les tons des couleurs de l’image.
Remarque
L’option « Nuance » n’est pas disponible lorsque l’entrée est de type Vidéo ou S Vidéo et que
le standard couleur du signal vidéo n’est pas de type NTSC.
« Froide » : sélectionnez pour donner une teinte bleuâtre aux couleurs blanches.
« Neutre » : sélectionnez pour donner une teinte neutre aux couleurs blanches.
« Chaude » : sélectionnez pour donner une teinte rougeâtre aux couleurs blanches.
Netteté
Réduction du bruit
CineMotion
Conseil
Vous pouvez modifier les réglages « Image » (« Contraste », « Luminosité », « Couleur », etc.) pour chaque « Mode de l'image ».
FR
18
A utiliser pour augmenter ou diminuer la netteté de l’image.
Sélectionnez pour réduire le niveau de bruit de l’appareil raccordé. Choisissez entre
« Oui » ou « Non ».
Sélectionnez « Auto » pour optimiser la lecture de l’image filmée qui est
automatiquement détectée et réglée selon un processus de réglage 3-2 ou 2-2. Les
images dynamiques apparaîtront alors plus nettes et naturelles. Sélectionnez « Non »
pour désactiver la détection.
Page 81
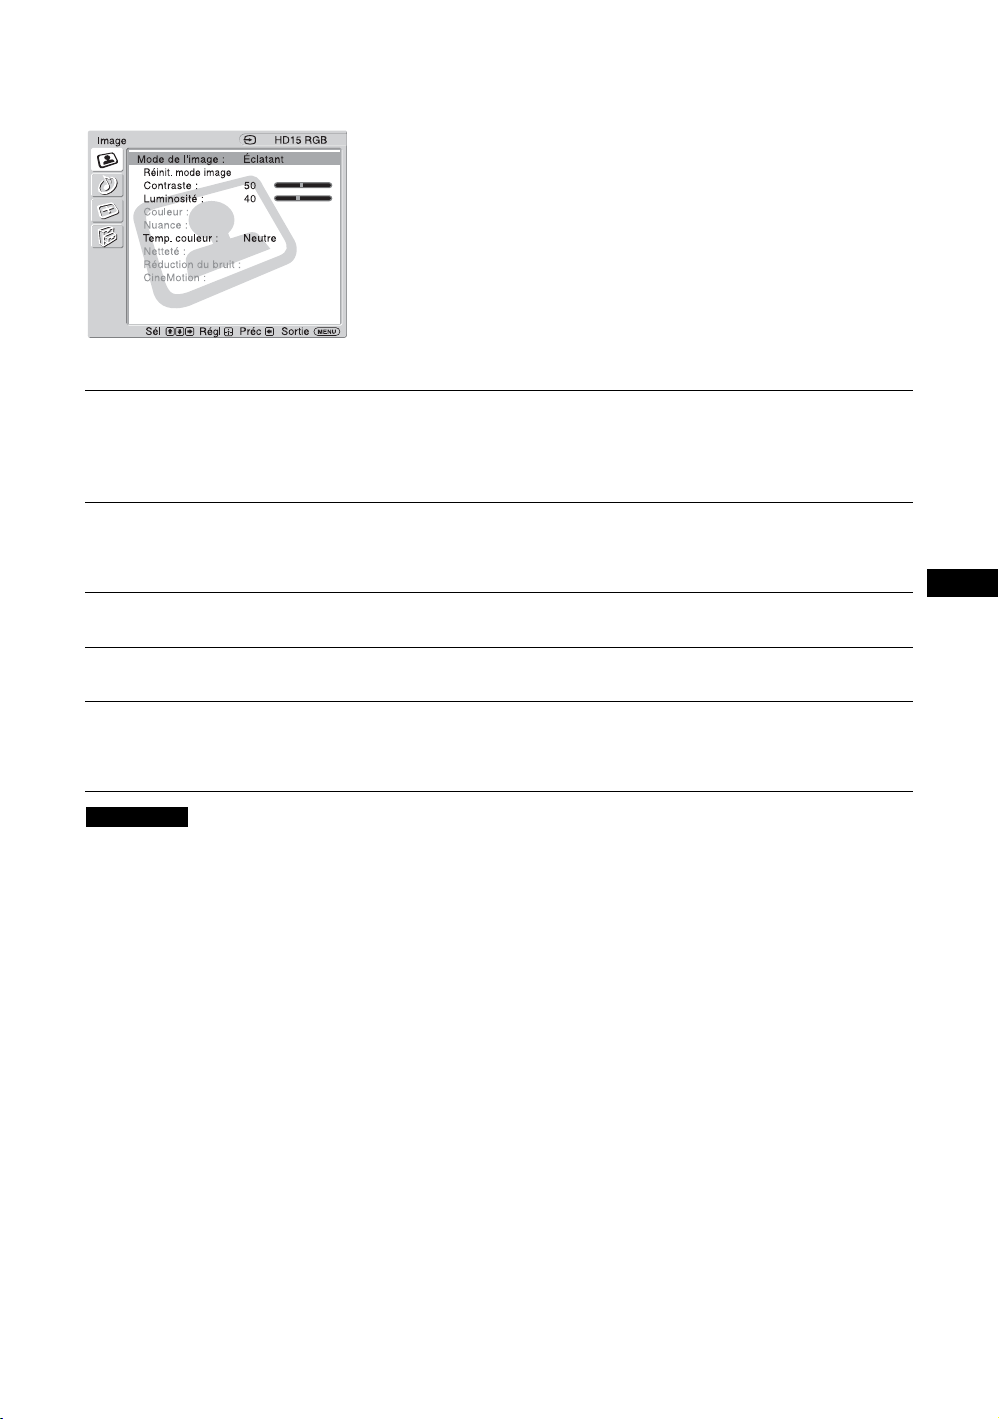
Pour une entrée d’ordinateur
Image
Mode de l'image : Éclatant
Contraste : 50
Luminosité : 40
Couleur :
Nuance :
Tem p. c ou leur : Neutre
Netteté :
Réduction du br uit :
CineMotion :
HD15 RGB
Quand l’entrée est raccordée à une source d’entrée
d’ordinateur, les réglages « Image » s’adaptent pour
devenir spécifiques à une entrée d’ordinateur.
Les réglages « Image » de l’ordinateur comprennent
les options suivantes :
: :
Sél Sortie
Régl
Préc
:
Mode de l'image
MENU
:
« Éclatant » : pour sélectionner un réglage maximal des contrastes et de la netteté de
l’image.
« Standard » : pour sélectionner un réglage moyen de l’image.
« Personnalisé » : pour mémoriser vos réglages personnels.
Réinit. mode image
Pour restaurer les réglages actuellement sélectionnés dans « Mode de l'image »
(« Éclatant », « Standard », « Personnalisé ») aux réglages par défaut (sauf pour les
options grisées).
Contraste
Luminosité
Temp. couleur
A utiliser pour augmenter ou diminuer le contraste de l’image.
A utiliser pour augmenter ou diminuer la luminosité de l’image.
« Froide » : sélectionnez pour donner une teinte bleuâtre aux couleurs blanches.
« Neutre » : sélectionnez pour donner une teinte neutre aux couleurs blanches.
« Chaude » : sélectionnez pour donner une teinte rougeâtre aux couleurs blanches.
Remarques
• « Couleur », « Nuance », « Netteté », « Réduction du bruit » et « CineMotion » ne sont pas disponibles pour une entrée
d’ordinateur.
• Si aucun signal n’est en cours de transmission, aucune option du réglage « Image » ne peut être sélectionnée.
FR
19
FR
Page 82
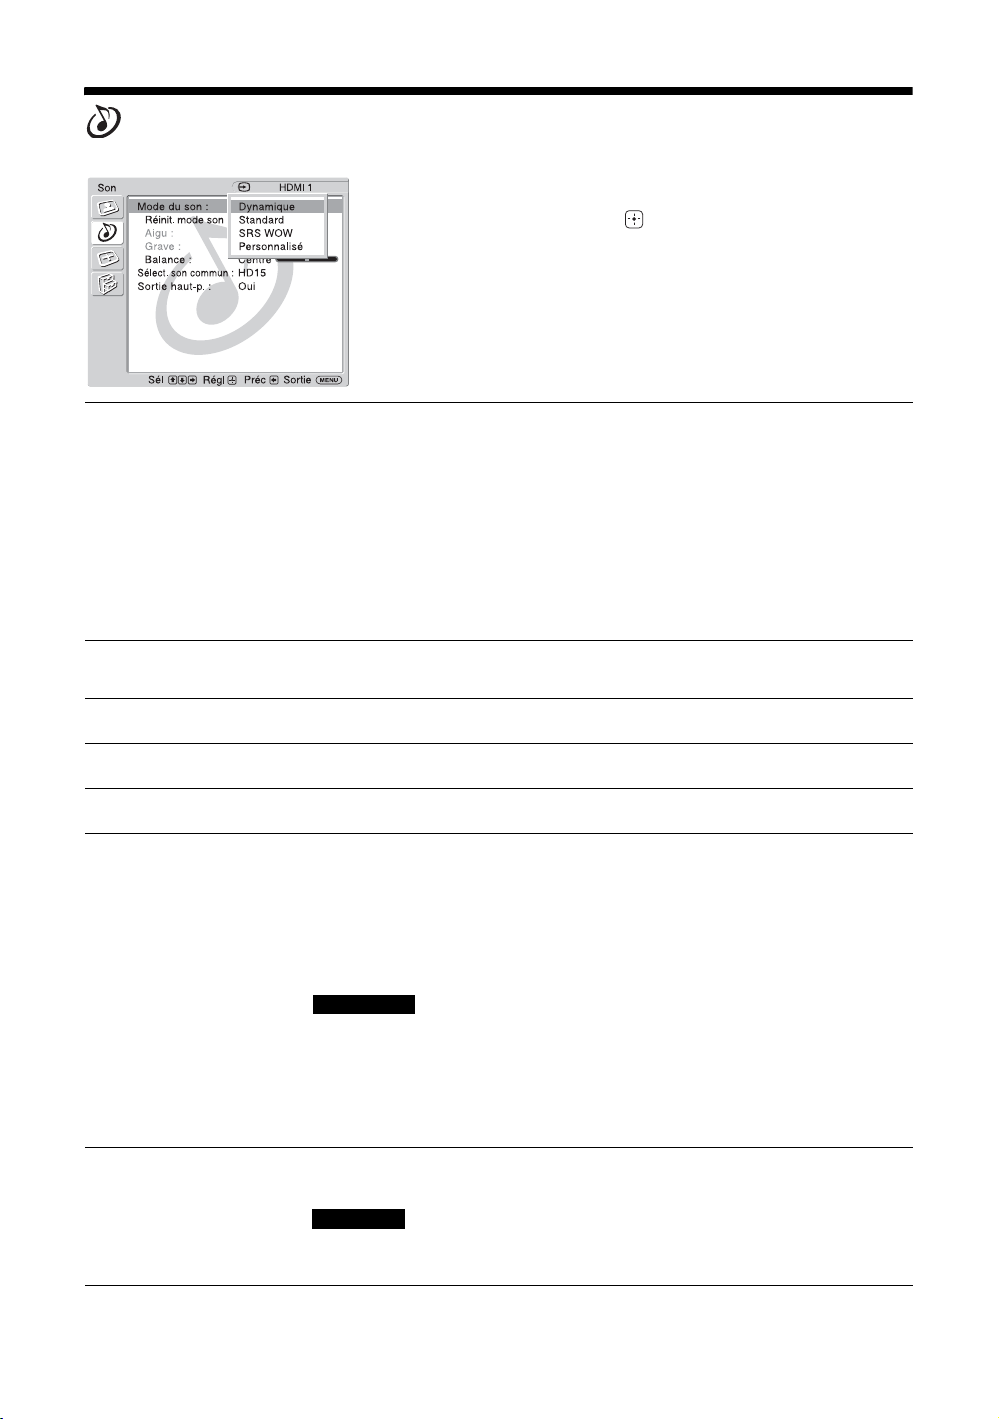
Réglages Son
Pour sélectionner une option et changer le réglage,
appuyez sur
V/v/B/b.
Appuyez sur pour confirmer votre choix.
Les réglages « Son » comprennent les options
suivantes :
: :
:
:
Mode du son
Réinit. mode son
Aigu
Grave
Balance
Sélect. son commun
« Dynamique » : sélectionnez pour augmenter les aigus et les graves.
« Standard » : réglage plat.
« SRS WOW » : procure une image audio et stéréo panoramique en produisant une
qualité sonore (pour les aigus et les graves) riche et intense. Ainsi, vous pouvez
profiter de puissants effets sonores identiques à ceux d’une salle de cinéma.
« Personnalisé » : pour mémoriser vos réglages personnels.
Conseils
• Pour passer de l’option « Mode du son » à une autre, vous pouvez également utiliser la
touche SOUND de la télécommande.
• Les technologies propriétaires de BBE Sound, Inc. sont appliquées pour les types
«Dynamique» et «Standard».
Réinitialise les réglages suivants : « Aigu », « Grave » et « Balance » afin de revenir
aux réglages par défaut.
A utiliser pour augmenter ou réduire le niveau des sons plus aigus.
A utiliser pour augmenter ou réduire le niveau des sons plus graves.
A utiliser pour accentuer la balance de l’enceinte droite ou gauche.
« HD15 » : pour émettre l’audio à partir d’un appareil vidéo ou d’un ordinateur
raccordé au connecteur HD15 (RGB/COMPONENT IN) et au connecteur AUDIO
(COMMON AUDIO IN).
« HDMI 1 »/« HDMI 2 » : sélectionnez pour raccorder un appareil à l’aide d’un câble
HDMI (non fourni) ou d’un câble HDMI-DVI (non fourni) et le câble audio
correspondant en même temps.
Voir page 8.
Remarques
• Si vous utilisez un câble HDMI-DVI, raccordez le câble audio au connecteur AUDIO
(COMMON AUDIO IN).
• Si « HDMI 1 »/ « HDMI 2 » est sélectionné, l’audio numérique n’est pas émis à partir des
connecteurs HDMI. Lorsqu’un équipement vidéo doté d’un connecteur HDMI est raccordé
aux connecteurs HDMI 1/HDMI 2, réglez « Sélect. son commun » sur « HD15 ». (Le réglage
par défaut est « HD15 ».)
Sortie haut-p.
« Oui » : permet au son d’être émis à partir des enceintes de l’écran.
« Non » : désactive le son émis à partir des enceintes de l’écran.
Remarque
Si « Sortie haut-p. » est réglé sur « Non », « Mode du son », « Réinit. mode son », « Aigu »,
« Grave » et « Balance » ne peuvent pas être sélectionnés.
Conseil
Vous pouvez régler les réglages « Son » (« Aigu » et « Grave ») lorsque « Mode du son » est réglé sur « Personnalisé ».
FR
20
Page 83
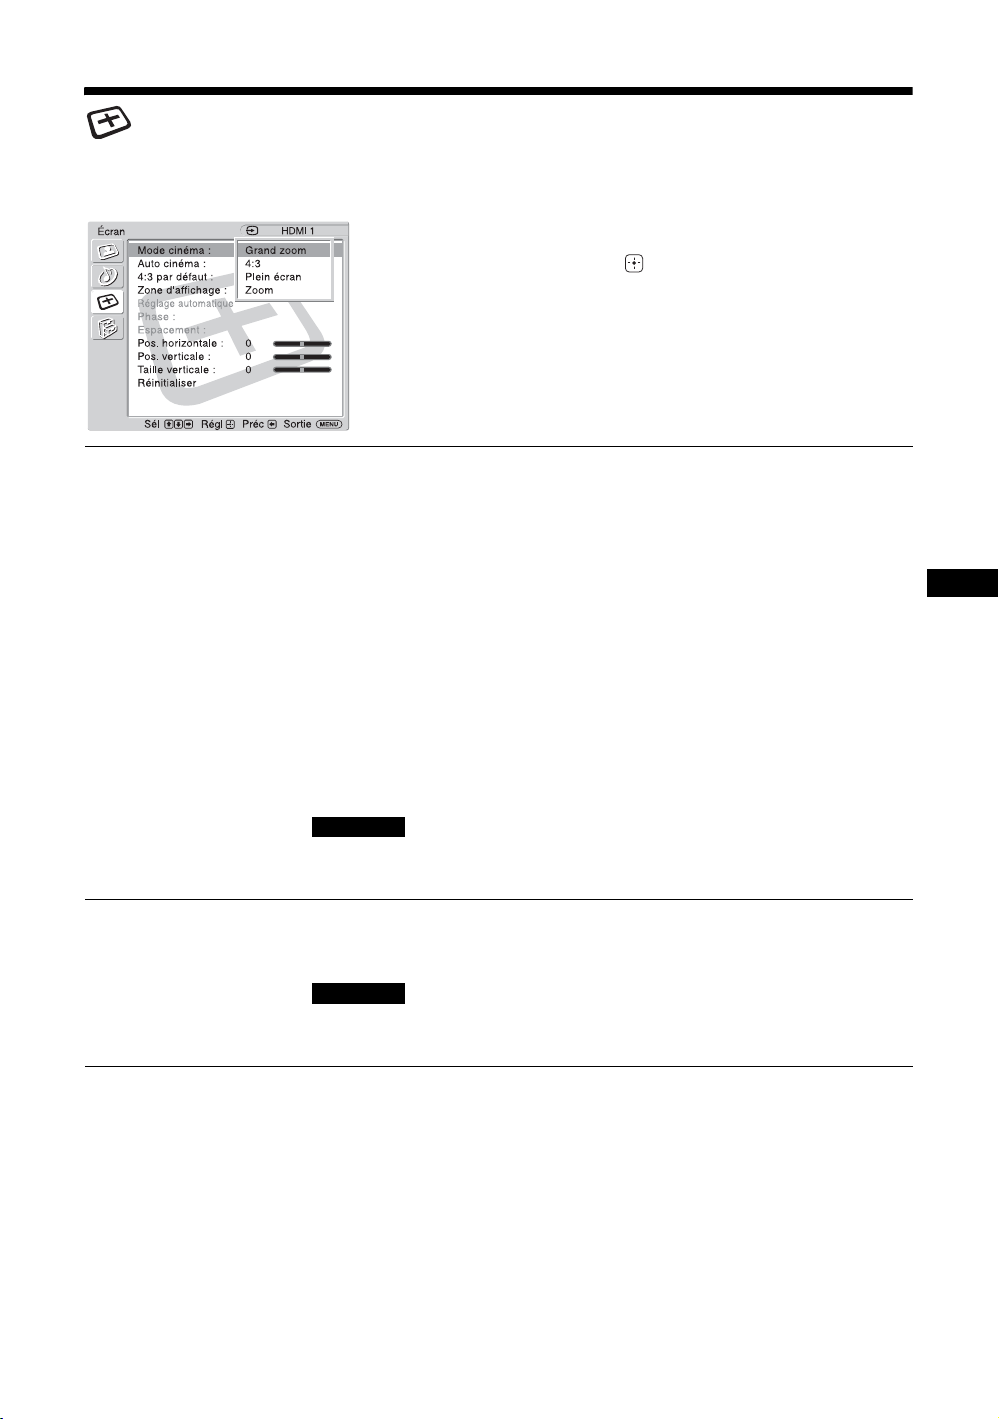
Réglages Ecran
Pour l’entrée vidéo
Pour sélectionner une option et changer le réglage,
appuyez sur V/v/B/b.
Appuyez sur pour confirmer votre choix.
Les réglages « Écran » comprennent les options
suivantes :
: :
Mode cinéma
Auto cinéma
:
:
« Grand zoom » : sélectionnez pour agrandir l’image en plein écran avec un
minimum de distorsions.
« 4:3 » : sélectionnez pour afficher une image 4:3 dans sa taille d’origine si la source
d’origine est 4:3 (source en définition standard).
« Plein écran » : sélectionnez pour agrandir horizontalement l’image d’origine en
plein écran si la source d’origine est 4:3 (source en définition standard). Si la source
d’origine est 16:9 (source en haute définition), sélectionnez ce mode pour afficher
FR
l’image 16:9 dans son format d’origine.
« Zoom » : sélectionnez pour agrandir l’image d’origine sans générer de distorsions
du format de l’image. Voir page 13.
Conseils
• Pour passer de l’option « Mode cinéma » à une autre, vous pouvez également utiliser la
touche WIDE de la télécommande.
• Sélectionnez « Zoom » pour lire les films ou toute autre information et toute autre donnée
du DVD avec des bandes noires en utilisant la totalité de la surface utile de l’écran.
• Pour les modes « Grand zoom » et « Zoom », vous pouvez régler la « Pos. horizontale », la
« Pos. verticale » et la « Taille verticale » de l’image. Voir page 22.
Remarque
Les options « Grand zoom » et « 4:3 » ne peuvent pas être sélectionnés pour les signaux 1080i,
720p ou 1080p émis vers les connecteurs HDMI ou composante.
« Oui » : sélectionnez pour détecter l’image et la modifier automatiquement afin
d’obtenir le mode écran approprié.
« Non » : la modification du mode écran n’est pas automatique.
Remarque
Lors de l’émission de signaux numériques et analogiques RGB, vous ne pouvez pas régler
« Auto cinéma » car la fonction « Auto cinéma » est inopérante.
21
FR
Page 84
4:3 par défaut
« Grand zoom » : sélectionnez pour agrandir l’image 4:3 afin d’obtenir une image
plein écran 16:9 tout en respectant l’image d’origine autant que possible.
« 4:3 » : sélectionnez pour afficher une image 4:3 à son format d’origine.
« Plein écran » : sélectionnez pour agrandir une image 4:3 horizontalement
uniquement afin d’obtenir un plein écran 16:9.
« Zoom » : sélectionnez pour agrandir une image 4:3 tout en conservant son format.
« Non » : sélectionnez pour continuer à utiliser le réglage « Mode cinéma » alors que
l’entrée a changé.
Conseils
• Vous pouvez sélectionner « 4:3 par défaut » uniquement si « Auto cinéma » est réglé sur
«Oui».
• Les fonctions « 4:3 par défaut » sont disponibles uniquement lorsque l’écran reçoit des
signaux NTSC, PAL, SECAM, 480i, 480p, 575i ou 576p.
• Si l’option « Mode cinéma » est modifiée après avoir réglé « 4:3 par défaut », elle est activée
et le format de l’écran est ajusté. Cette modification effectuée après coup avec « Mode
cinéma » est effective uniquement lorsqu’un signal donné est émis. Par conséquent, si le
signal d’entrée est modifié, l’écran revient au réglage « 4:3 par défaut » initial. Pour
conserver le format actuel même après avoir modifié le signal d’entrée, réglez « 4:3 par
défaut » sur « Non ».
Zone d'affichage
Pos. horizontale
Pos. verticale
Taille verticale
Réinitialiser
Remarque
Si aucun signal n’est en cours de transmission, aucune option du réglage « Écran » ne peut être sélectionnée.
« Normal » : affiche une image au format standard.
« -1 »/« -2 » : vous permet de régler la taille de l’image à visualiser. Si des parasites
apparaissent autour de l’image, sélectionnez cette option pour les masquer.
Vous permet de bouger l’image vers la gauche ou la droite de l’écran. Disponible
uniquement en modes « Grand zoom » et « Zoom ». Appuyez sur B/b puis sur
pour choisir une correction.
Vous permet de bouger l’image vers le haut ou le bas de l’écran. Disponible
uniquement en modes « Grand zoom » et « Zoom ». Appuyez sur V/v puis sur
pour choisir une correction.
Vous permet de régler la taille de l’image verticalement. Disponible uniquement en
modes « Grand zoom » et « Zoom ». Appuyez sur V/v puis sur pour choisir une
correction.
Réinitialise les réglages suivants : « Pos. horizontale », « Pos. verticale » et « Taille
verticale » afin de revenir aux réglages par défaut.
22
FR
Page 85
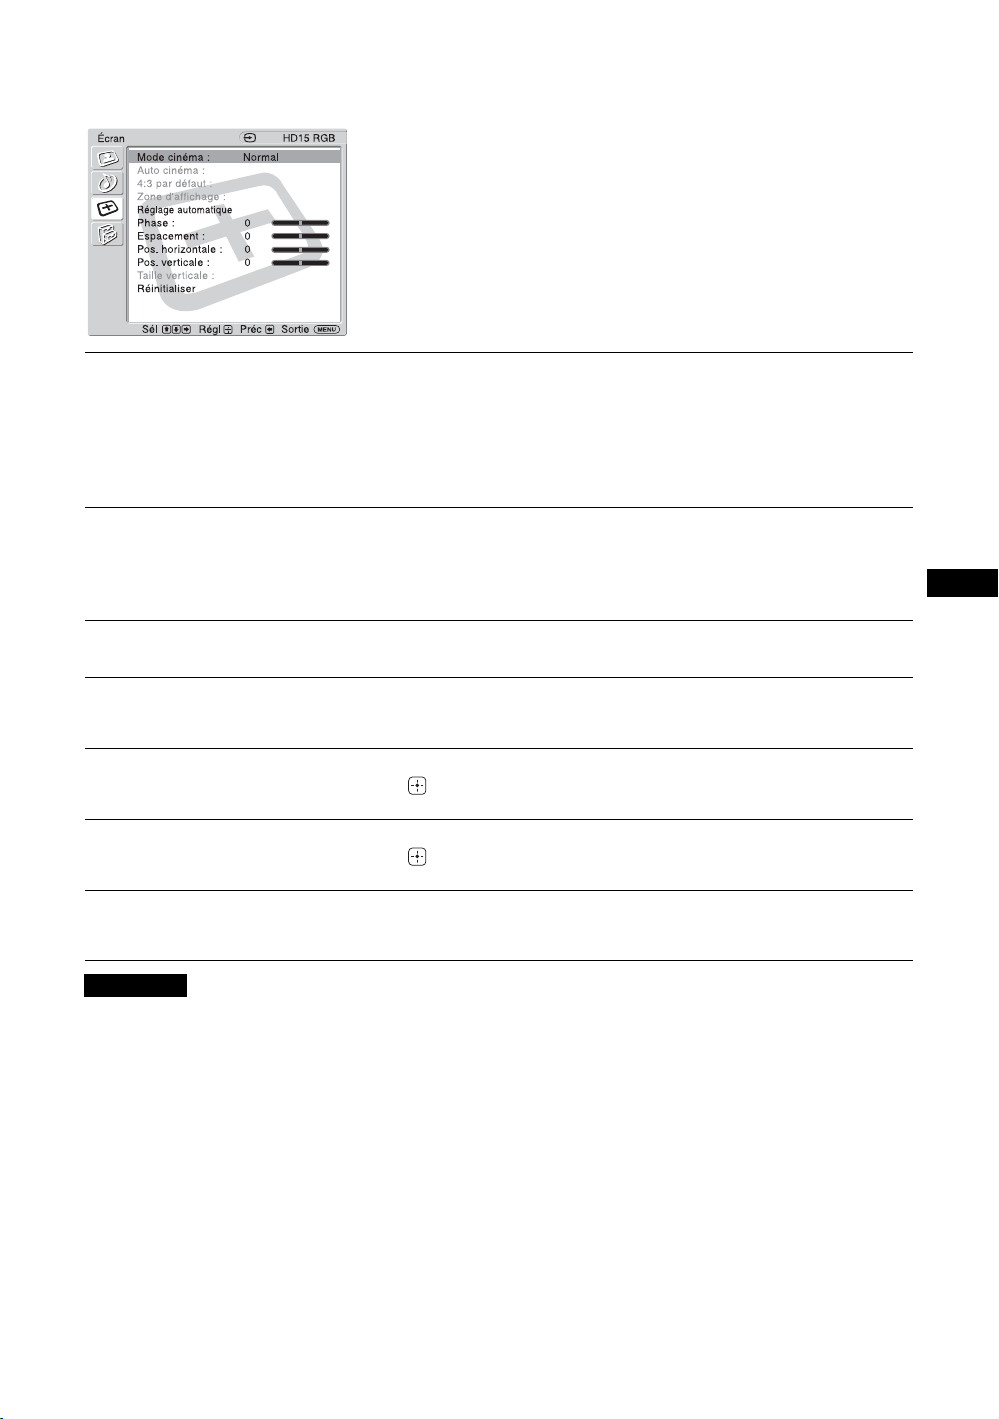
Pour une entrée d’ordinateur
Quand l’entrée est raccordée à une source d’entrée
d’ordinateur, les réglages « Écran » s’adaptent pour
devenir spécifiques à une entrée d’ordinateur.
Les réglages « Écran » pour ordinateur comprennent
les options suivantes :
: :
:
Mode cinéma
Réglage
automatique
Phase
Espacement
Pos. horizontale
Pos. verticale
Réinitialiser
:
« Normal » : sélectionnez pour afficher l’image dans sa taille originale.
« Plein écran 1 » : Sélectionnez cette option pour agrandir l’image de sorte à remplir
la zone d’affichage verticalement, tout en conservant le format d’origine. Un cadre
noir apparaît autour de l’image.
« Plein écran 2 » : sélectionnez pour agrandir l’image jusqu’à ce qu’elle remplisse la
zone d’affichage.
Sélectionnez pour régler automatiquement la position et la phase d’affichage de
l’image quand l’écran reçoit un signal d’entrée à partir de l’ordinateur raccordé.
Notez que « Réglage automatique » peut ne pas fonctionner correctement avec
certains signaux d’entrée. Si c’est le cas, réglez manuellement les options suivantes.
Sélectionnez pour régler la phase quand l’écran émet des papillotements.
Sélectionnez pour régler l’espacement lorsque des bandes verticales indésirables
apparaissent sur l’image.
Vous permet de bouger l’image vers la gauche ou la droite de l’écran. Appuyez sur
B/b puis sur pour choisir une correction.
Vous permet de bouger l’image vers le haut ou le bas de l’écran. Appuyez sur
V/v puis sur pour choisir une correction.
Réinitialise les réglages suivants : « Phase », « Espacement », « Pos. horizontale » et
« Pos. verticale » afin de revenir aux réglages par défaut.
FR
Remarques
• « Auto cinéma », « 4:3 par défaut », « Zone d'affichage » et « Taille verticale » ne sont pas disponibles pour une entrée
d’ordinateur.
• Lorsqu’un signal numérique est reçu via la prise HDMI 1/HDMI 2, les options « Réglage automatique », « Phase » et
« Espacement » ne sont pas disponibles pour une entrée d’ordinateur.
• Si aucun signal n’est en cours de transmission, aucune option du réglage « Écran » ne peut être sélectionnée.
23
FR
Page 86
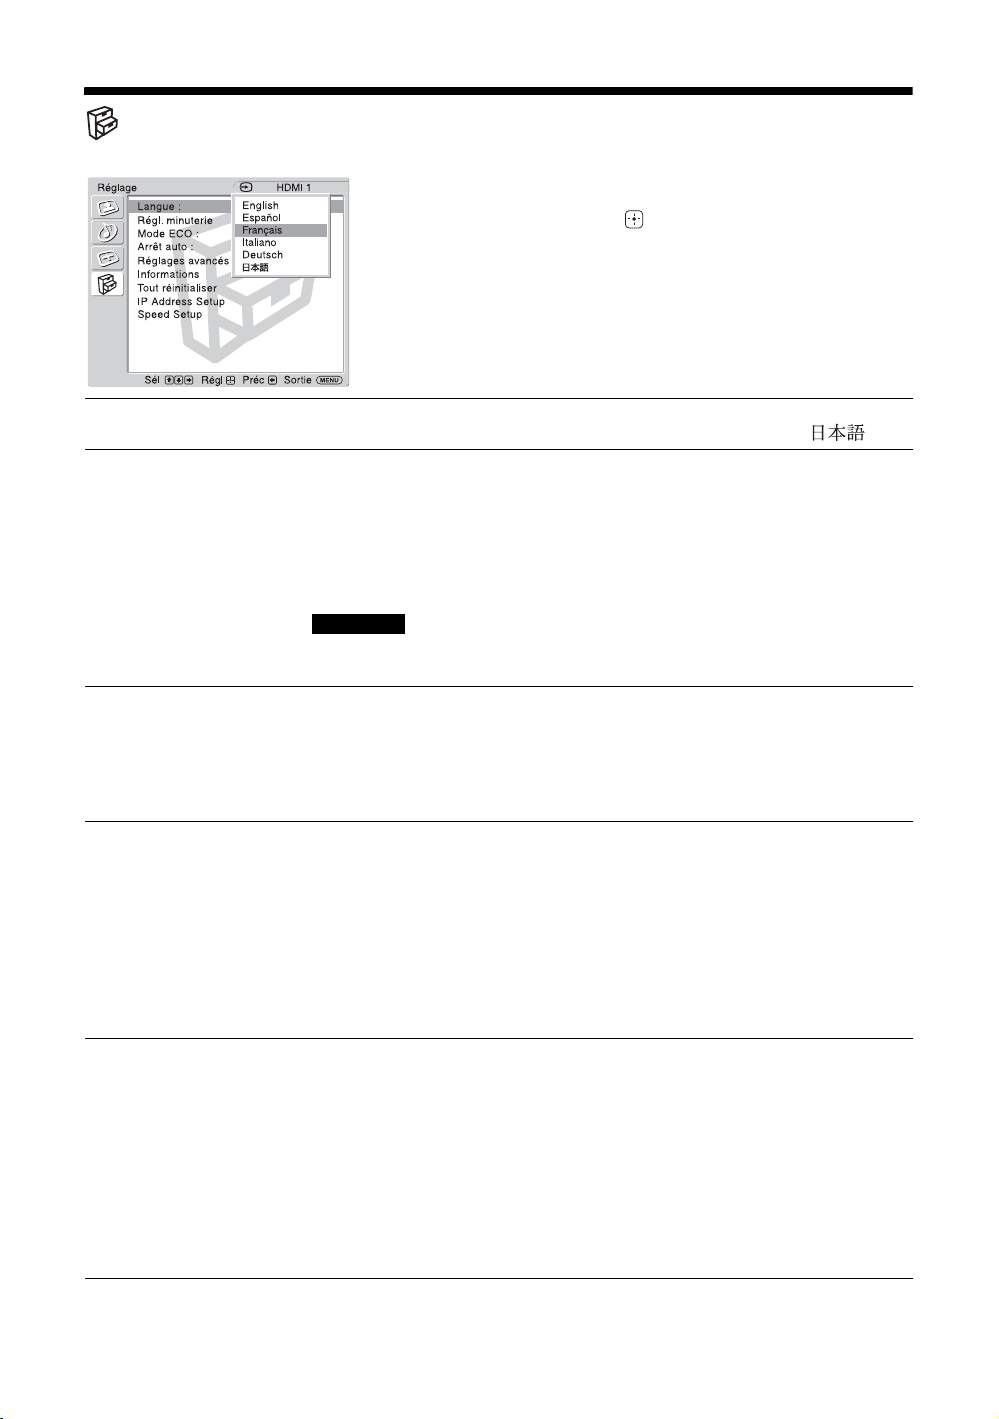
Réglages Réglage
English
Off
Pour sélectionner une option et changer le réglage,
appuyez sur
V/v/B/b.
Appuyez sur pour confirmer votre choix.
Les réglages « Réglage » comprennent les options
suivantes :
: :
:
Langue
Régl. minuterie
Mode ECO
Arrêt auto
Réglages avancés
:
Sélectionnez pour afficher tous les réglages à l’écran dans la langue de votre choix :
« English », « Español », « Français », « Italiano », « Deutsch » ou « ».
Vous pouvez régler l’heure, afficher l’horloge intégrée ou régler la minuterie de mise
hors tension automatique.
« Régl. horloge » : règle le jour et l’heure.
« Aff. horloge » : affiche l’heure qui a été réglée à l’écran lorsque « Oui » est
sélectionné.
« Veille » : permet de régler la durée en minutes (15 minutes, 30 minutes, 45 minutes,
60 minutes, 90 minutes ou 120 minutes) avant extinction automatique de l’écran.
Remarque
Si l’horloge intégrée retarde, il est possible que la batterie interne soit faible. Contactez votre
revendeur Sony agréé pour remplacer la batterie.
« Non » : sélectionnez pour visualiser l’image sans bénéficier du mode d’économie
d’énergie.
« Bas »/« Haut » : sélectionnez ce réglage pour modifier la luminosité et réduire la
consommation d’énergie.
« Image désactivée » : sélectionnez pour faire disparaître l’image. Le son reste
allumé et le réglage du volume reste tel que vous l’avez sélectionné.
« Oui » : l’écran passe automatiquement en mode de veille si aucun signal n’est
transmis aux connecteurs d’entrée vidéo pendant plus de 5 minutes environ. L’écran
passe automatiquement en mode d’économie d’énergie si aucun signal n’est transmis
aux autres connecteurs d’entrée pendant plus de 30 secondes environ.
« Non » : l’écran n’est pas mis hors tension automatiquement même si aucun signal
n’est transmis à un connecteur.
Conseil
En mode de veille, appuyez sur la touche 1 (POWER) de l’écran ou sur la touche POWER de
la télécommande pour mettre l’écran sous tension. En mode d’économie d’énergie, l’écran
s’allume automatiquement lorsqu’un signal est transmis.
« Standard couler » : choisissez le « Standard couler » des signaux vidéo entre
«NTSC», «PAL», «SECAM», «NTSC4.43», «PAL-M», «PAL-N»,
« PAL60 », ou sélectionnez « Automatique » pour régler le « Standard couler »
automatiquement.
« Affichage statut » : « Oui » émet un signal d’entrée et les informations « Mode
cinéma » apparaissent sur l’écran pendant environ 20 secondes lorsque l’écran est
mis sous tension et pendant environ 5 secondes lorsque le signal d’entrée est
commuté. « Non » désactive l’affichage des informations sur le statut.
Conseil
Pour afficher les informations concernant le signal d’entrée et les données « Mode cinéma »,
utilisez la touche DISPLAY de la télécommande, quel que soit le réglage « Affichage statut ».
24
FR
Page 87
Informations
Tout réinitialiser
IP Address Setup
Permet d’afficher le « Nom modèle », le « Numéro de série », le « Temps de fonct. »,
la « Vers. logiciel » et « l’IP Address » de votre écran.
Remarque
« IP Address » n’apparaît pas si l’adaptateur en option doté de fonctions de communication n’est
pas installé.
Réinitialise toutes les options « Réglage » aux réglages par défaut.
Remarque
Les éléments inclus dans l’option « Informations » ne sont pas réinitialisés.
Permet de définir une adresse IP afin d’établir une communication entre l’adaptateur
en option doté de fonctions de communication, tel que le BKM-FW32/FW50, installé
sur l’écran, et un appareil, tel qu’un ordinateur raccordé à l’aide d’un câble LAN.
« DHCP » : « OK » vous permet de définir automatiquement une adresse IP et
« Cancel » annule la configuration automatique.
Remarque
Lorsque vous obtenez une adresse IP automatiquement à l’aide de « DHCP », il est possible
que l’adresse IP change à chaque fois que vous mettez l’écran sous ou hors tension.
« Manual » : sélectionnez pour définir manuellement une adresse IP.
1 Sélectionnez « IP Address », « Subnet Mask », « Default Gateway », « Primary
DNS » ou « Secondary DNS » à régler manuellement à l’aide de V/v puis
appuyez sur .
2 Définissez une valeur à trois chiffres (comprise entre 0 et 255) pour la première
zone à l’aide des touches
télécommande, puis appuyez sur ou
3 Réglez la valeur à trois chiffres (0 à 255) pour chacune des quatre boîtes et
appuyez sur .
4 Sélectionnez le paramètre suivant qui doit être réglé manuellement au moyen de
V/v de l’écran ou des touches numériques de la
.
b
V/v, puis répétez la même procédure et appuyez sur .
5 Une fois les valeurs réglées pour tous les paramètres souhaités, sélectionnez
« Execute » au moyen de
Sélectionnez « OK » puis appuyez sur . Une adresse IP est alors définie
manuellement.
V/v, puis appuyez sur .
FR
Remarque
Si une adresse IP n’est pas correctement définie, les codes d’erreur suivants apparaissent en
fonction de la source de l’erreur.
Erreur 1 : Erreur de communication entre l’écran et un adaptateur en option tel qu’un adaptateur
de la série BKM-FW
Erreur 2 : L’adresse IP spécifiée est déjà utilisée pour un autre appareil
Erreur 3 : Erreur adresse IP
Erreur 4 : Erreur adresse Gateway
Erreur 5 : Erreur adresse Primary DNS
Erreur 6 : Erreur adresse Secondary DNS
Erreur 7 : Erreur Subnet mask
Speed Setup
Remarque
Les options « IP Address Setup » et « Speed Setup » ne sont pas disponibles si l’adaptateur en option doté de fonctions de
communication n’est pas installé.
Permet de définir une vitesse de communication entre l’adaptateur en option doté de
fonctions de communication, tel que le BKM-FW32/FW50, installé sur l’écran, et un
appareil, tel qu’un ordinateur raccordé à l’aide d’un câble LAN.
« Speed » : sélectionnez « Auto » si vous souhaitez régler automatiquement une
vitesse de communication adapté à votre configuration réseau. Vous pouvez
également sélectionner « 10Mbps Half », « 10Mbps Full », « 100Mbps Half » ou
« 100Mbps Full » manuellement.
« Execute » : sélectionnez « OK » puis appuyez sur . Une vitesse de
communication est définie.
25
FR
Page 88
Informations supplémentaires
Dépannage
Vérifiez si l’indicateur STANDBY clignote en rouge.
Lorsqu’il clignote
La fonction d’auto-diagnostic est activée.
1 Comptez le nombre de fois où l’indicateur STANDBY clignote et mesurez la durée pendant laquelle il
s’arrête de clignoter.
Par exemple, l’indicateur clignote 3 fois, s’arrête pendant trois secondes, puis clignote de nouveau 3 fois.
2 Mettez l’écran hors tension, puis débranchez le cordon d’alimentation.
Contactez votre revendeur ou un centre de service Sony et indiquez la séquence de clignotement (nombre de
clignotements et durée déxtinction).
Lorsqu’il ne clignote pas
1 Vérifiez les éléments dans le tableau ci-dessous.
2 Si le problème persiste, confiez votre écran à un personnel qualifié.
Problème Solution possible
Pas d’image.
Pas d’image.
L’écran se met
automatiquement hors tension.
Aucune image n’est émise à
partir de certaines sources
vidéo.
Image de mauvaise qualité.
Aucune couleur/Image sombre/
Image trop lumineuse/Couleurs
incorrectes
• Vérifiez les options « Mode ECO » (page 24).
• Vérifiez si « Veille » est activé (page 24).
• Vérifiez le raccordement entre l’équipement vidéo et l’écran.
• Commutez l’entrée à l’aide de la touche INPUT de l’écran ou de la
télécommande (page 7, 11).
• Appuyez sur PICTURE pour sélectionner le « Mode de l'image » de
votre choix (page 11).
• Réglez les options « Mode de l'image » dans les réglages « Image »
(page 18).
• Vérifiez l’état du câble de signal.
Pas de son/Son parasité.
Image correcte, pas de son.
Le « Mode cinéma » change
automatiquement.
FR
26
• Vérifiez la commande du volume.
• Appuyez sur MUTING ou VOL + sur la télécommande jusqu’à ce
que « Sourdine » disparaisse de l’écran (page 11, 12).
• Vérifiez les réglages « Sélect. son commun » (page 20).
• Vérifiez les réglages « Sortie haut-p. » (page 20).
• Le réglage actuel « Mode cinéma » passe automatiquement au
réglage approprié pour l’entrée actuelle si l’option « Auto cinéma »
des réglages « Écran » est réglée sur « Oui ». Lors de la modification
des entrées, réglez l’option « Auto cinéma » sur « Non » dans les
réglages « Écran » pour conserver le réglage « Mode cinéma » actuel
(page 21).
Page 89
Problème Solution possible
La télécommande ne fonctionne
pas.
• Vérifiez la polarité des piles ou changez les piles.
• Dirigez la télécommande vers le capteur de télécommande de
l’écran.
• Ne placez pas d’obstacles dans la portée du capteur de
télécommande.
• Vérifiez si un câble est raccordé au connecteur CONTROL S IN
lorsque vous utilisez un adaptateur en option doté d’un connecteur
CONTROL S IN. La télécommande est inopérante si l’écran est
commandé via un raccordement CONTROL S.
• Des lampes fluorescentes peuvent interférer avec le fonctionnement
de la télécommande. Eteignez les lampes fluorescentes.
FR
27
FR
Page 90
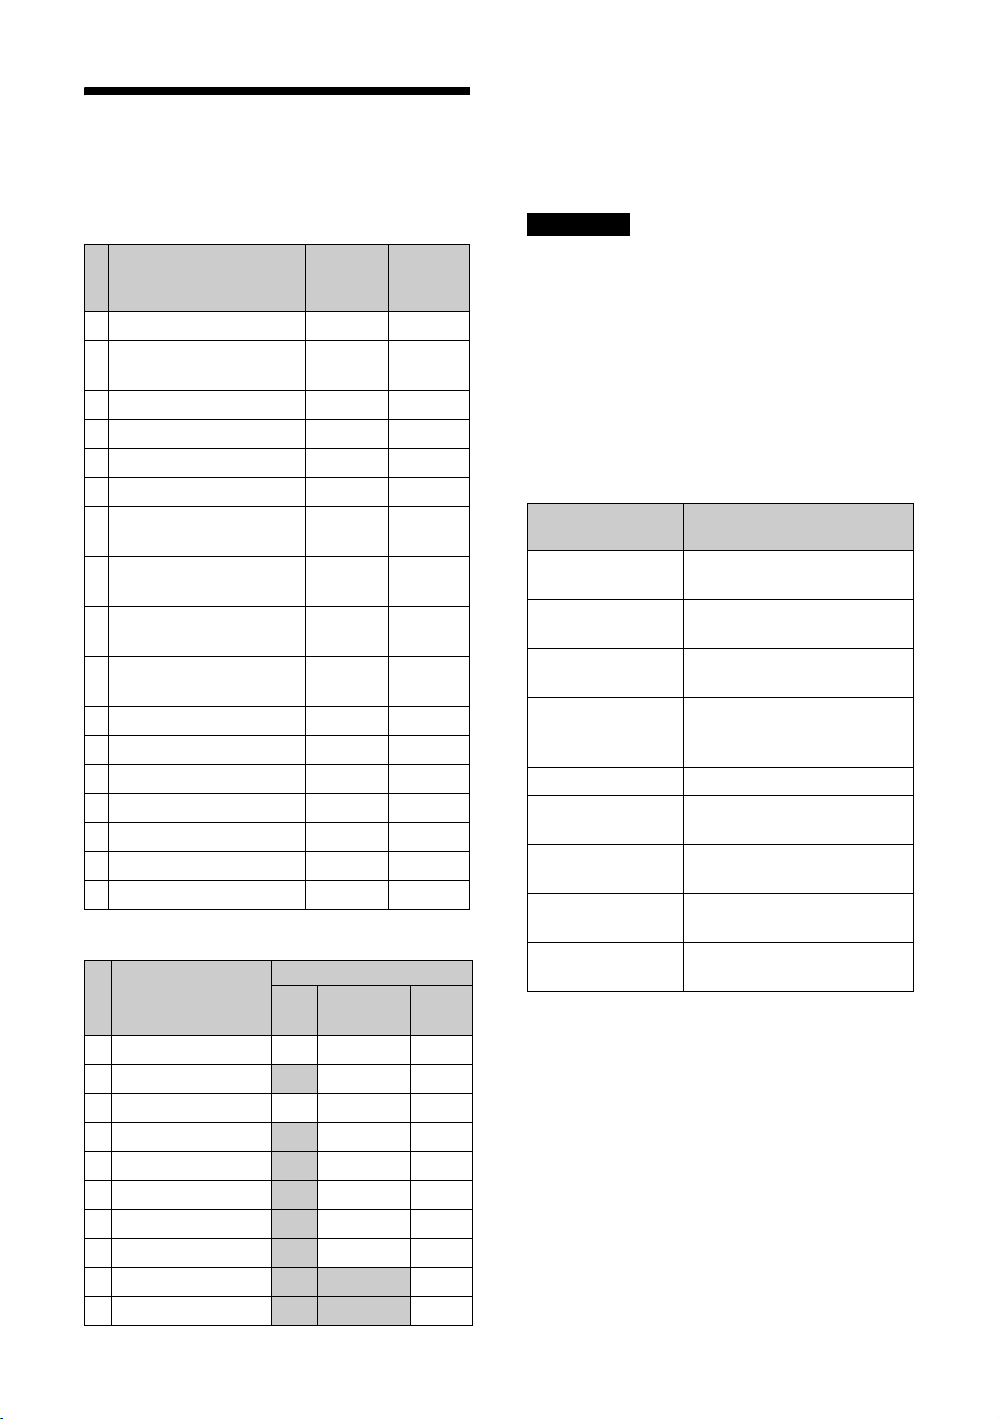
Tableau de référence
des signaux d’entrée
a) VGA est une marque déposée de International Business
Machines Corporation, Etats-Unis.
b) VESA est une marque déposée de la Video Electronics
Standards Association.
c) Mac (Macintosh) est une marque déposée de Apple
Computer, Inc.
Signaux d’ordinateur
Fréquence
Résolution
1VGAa)-1 (VGA 350) 31,5 70
640 × 480@60 Hz
2
b)
STD)
(VESA
c)
3Mac
13" 35,0 67
4 VGA (VGA TEXT) 31,5 70
800 × 600@60 Hz (VESA STD)
5
6 Mac 16" 49,7 75
1024 × 768@60 Hz
7
(VESA STD)
8
1024 × 768@75 Hz
(VESA STD)
9
1024 × 768@85 Hz
(VESA STD)
10
1280 × 1 024@60 Hz
(VESA STD)
11
848 × 480@60 Hz (VESA STD)
848 × 480@60 Hz (VESA STD)
12
13 848 × 480@75 Hz 37,7 75
14 1280 × 768@60 Hz 47,8 60
15 1280 × 768@60 Hz 47,4 60
16 1360 × 768@60 Hz 47,7 60
17 1360 × 768@60 Hz 47,4 60
Signaux TV/Vidéo
Résolution
1 480/60i aa a
2 480/60p
3 575/50i aa a
4 576/50p
5 720/50p
6 720/60p
7 1080/50i
8 1080/60i
9 1080/50p
10 1080/60p
horizontale
(kHz)
Entrées disponibles
Vidéo Composante/
Fréquence
verticale
(Hz)
31,5 60
37,9 60
48,4 60
60,0 75
68,7 85
64,0 60
29,8 60
29,5 60
HDMI
RGB
aa
aa
aa
aa
aa
aa
a
a
Remarques
• Pour les signaux HDTV, émettez le signal de
synchronisation à trois niveaux vers la deuxième broche
du connecteur RGB/COMPONENT (D-sub à 15 broches)
sur le connecteur HD15 ou le BKM-FW12 (adaptateur en
option).
• Si les couleurs sont très claires après avoir émis un signal
DVD vers l’écran, réglez « Couleur » dans les réglages
« Image ».
• Lorsque la phase est réajustée, la résolution diminue.
Affichage à l’écran du signal d’entrée et du
statut de l’écran
Affichage à
l’écran
640
×
480 / 60
(exemple)
480 / 60I (exemple) Le signal d’entrée sélectionné est
NTSC (exemple) Le signal d’entrée sélectionné est
Signal non pris en
charge
Pas de signal Il n’y a pas de signal d’entrée.
HD15 Le signal d’entrée sélectionné est
HDMI 1 Le signal d’entrée sélectionné est
HDMI 2 Le signal d’entrée sélectionné est
Option Le signal d’entrée sélectionné est
Signification
Le signal d’entrée sélectionné est
un signal d’ordinateur.
un signal vidéo composante.
un signal NTSC.
Le signal d’entrée sélectionné
n’est pas un signal pris en
charge.
HD15.
HDMI 1.
HDMI 2.
OPTION.
28
FR
Page 91
Spécifications
Traitement du signal vidéo
Système écran Ecran LCD a-Si TFT Active Matrix
Résolution de l’écran
Taux d’échantillonnage
Standard couleur NTSC, PAL, SECAM, NTSC4.43,
Signal d’entrée Voir page 28.
KLH-W26
Profondeur de pixels
Taille d’image 576 (horizontale) ×
Taille de l’écran 26 pouces (diagonale 660 mm)
KLH-W32
Profondeur de pixels
Taille d’image 698 (horizontale) ×
Taille de l’écran 32 pouces (diagonale 801 mm)
Entrées et sorties
HD15 (RGB/COMPONENT IN)
AUDIO (COMMON AUDIO IN)
HDMI 1/HDMI 2 IN HDMI (compatible avec les
1 366 points (horizontale) × 768 lignes
(verticale)
13,5 MHz à 140 MHz
PAL-M, PAL-N, PAL60
0,421 (horizontale) ×
0,421 (verticale) mm (
324 (verticale) mm (22
0,510 (horizontale) ×
0,510 (verticale) mm (
392 (verticale) mm (27
D-sub à 15 broches (femelle)
(× 1) (Voir page 30.)
Mini-prise stéréo (× 1)
500 mVrms, haute impédance
spécifications HDMI 1.1)
1
/32 × 1/32 po)
3
/4 × 12 7/8 po)
1
/32 × 1/32 po)
1
/2 × 15 1/2 po)
Conditions de stockage/transport
Dimensions KLH-W26 :
Poids KLH-W26 : 13,5 kg (29 lb 12 oz)
Accessoires fournis
Accessoires en option
Réglementations de sécurité
Température : – 10
(14 °F à 104 °F)
Humidité : 20 % à 90 %
(sans condensation)
663 × 505 × 220 mm
1
/8 × 20 × 8 3/4 po)
(26
KLH-W32:
798 × 581 × 220 mm
1
/2 × 22 7/8 × 8 3/4 po)
(31
(l/h/p, parties saillantes non
comprises)
KLH-W32 : 16,6 kg (36 lb 10 oz)
Cordon d’alimentation secteur (1)
Télécommande RM-YA004 (1)
Piles AA (R6) (2)
Support de câbles (1)
Mode d’emploi (1)
Adaptateurs en option pour l’extension
du système, série BKM-FW
UL 60950-1, CSA No. 60950-1-03 (c-UL),
FCC Class B, IC Class B,
EN 60950-1 (NEMKO), CE, C-Tick
°C à + 40 °C
La conception et les spécifications sont sujettes à
modification sans préavis.
FR
Caractéristiques générales
Alimentation requise
Consommation électrique
Sortie enceintes 10 W + 10 W (6 ohms)
Conditions d’utilisation
100 V à 240 V AC, 50/60 Hz,
KLH-W26 : 1,2 A
KLH-W32 : 1,3 A
KLH-W26 : 110 W
KLH-W32 : 120 W
Impédance de charge adaptée, de 6 à
16 ohms
Température : 0
(32 °F à 95 °F)
Humidité : 20 % à 90 %
(sans condensation)
°C à 35 °C
29
FR
Page 92
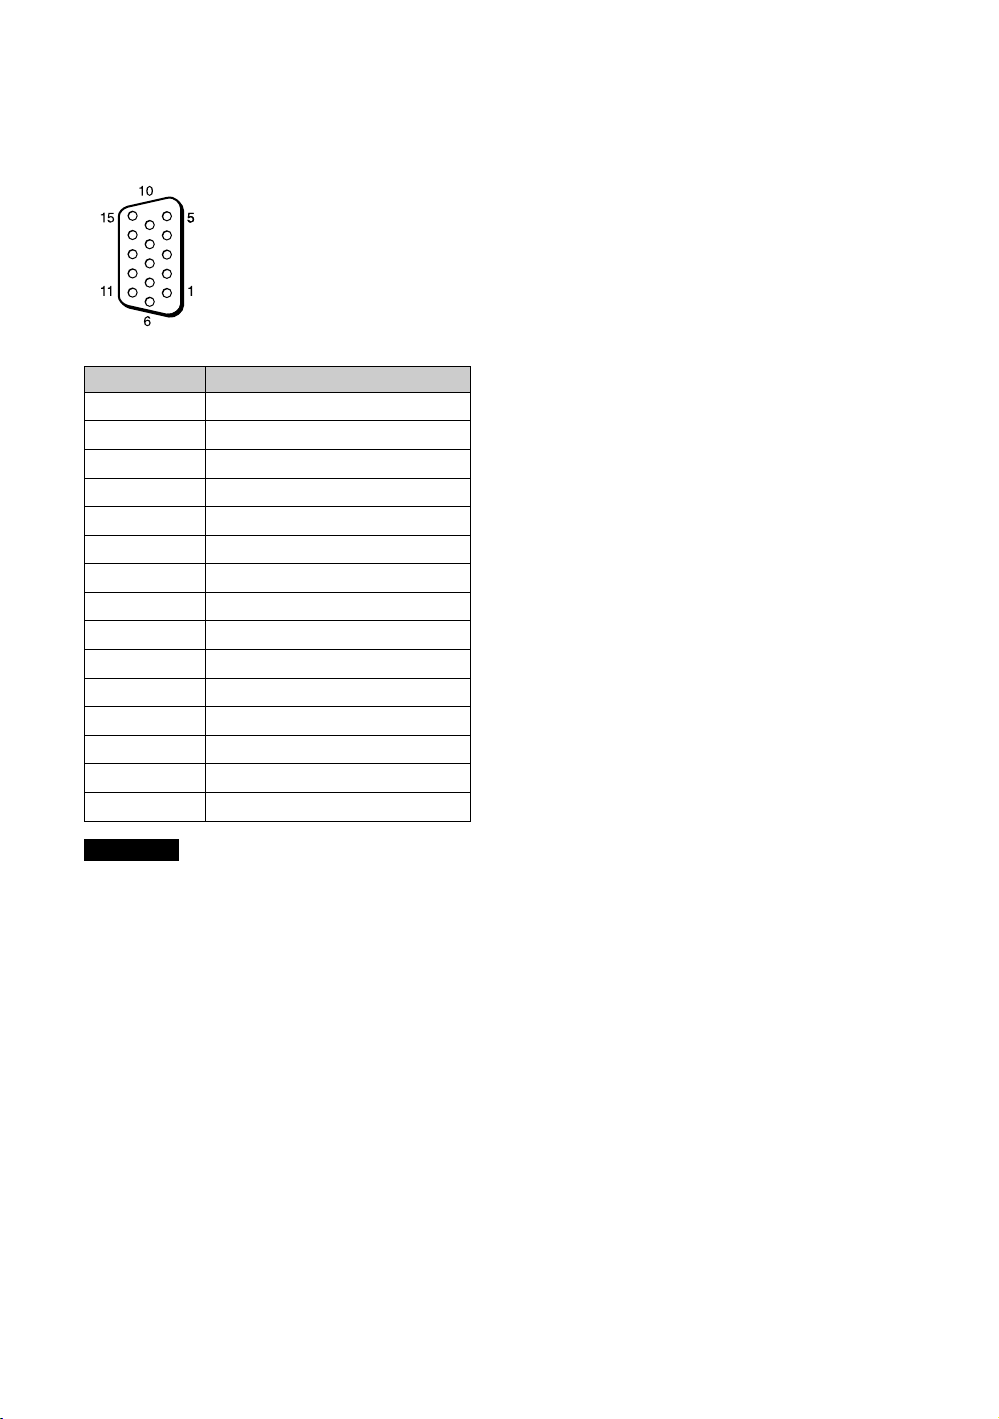
Affectation des broches
Connecteur HD15 (RGB/COMPONENT) (D-sub à 15
broches)
N° de broche Signal
1 Vidéo rouge ou CR/P
2 Vidéo verte ou Y
3 Vidéo bleue ou C
4Masse
5Masse
6 Masse du rouge
7Masse du vert
8 Masse du bleu
9 Non utilisé
10 Masse
11 Masse
12 SDA
13 Sync H ou Vidéo composite
14 Sync V
15 SCL
R
B/PB
Remarque
Lors de la transmission d’un signal composante, veillez à ne
pas transmettre de signaux de synchronisation aux broches
13 et 14. Sinon, il est possible que l’image ne s’affiche pas
correctement.
FR
30
Page 93
Index
Chiffres
4:3 13, 21
4:3 par défaut
A
Adaptateur ACTIF RVB/
COMPOSANT
Adaptateur D’ENTRÉE VIDEO
Aff. horloge
Affichage statut
Aigu
Arrêt auto
Auto cinéma
B
Balance 20
C
Capteur de télécommande 7
CineMotion
Couleur
Connecteur AUDIO (COMMON
AUDIO IN)
Connecteur HD15 (RGB/
COMPONENT IN)
Connecteur HDMI 1/HDMI 2 IN
Contraste
D
DHCP 25
Dynamique
E
Éclatant 18, 19
Emplacement OPTION
Espacement
G
Grand zoom 13, 21
Grave
I
Indicateur PIC OFF/TIMER 7
Indicateur POWER
Indicateur STANDBY
Informations
IP Address Setup
L
Langue 24
Luminosité
M
Manual (IP Address Setup) 25
Mode cinéma
Mode de l’image
Mode du son
Mode ECO
N
Netteté 18
Normal
22
9
24
24
20
24
21
18
18
8
8
18, 19
20
8, 9
23
20
7
7
25
25
18, 19
13, 21, 23
18, 19
20
14, 24
13, 22, 23
Nuance
18
P
Personnalisé 18, 19, 20
Phase
23
Plein écran
Plein écran 1/Plein écran 2
9
8
Pos. horizontale
Pos. verticale
Prise AC IN
R
Réduction du bruit 18
Régl. horloge
Régl. minuterie
Réglage automatique
Réglages avancés
Réglages Ecran
Réglages Image
Réglages Réglage
Réglages Son
Réinit. mode image
Réinit. mode son
Réinitialiser
S
Sélect. son commun 20
Signal d’entrée
Sortie haut-p.
Speed Setup
SRS WOW
Standard
Standard couler
Support de câble
T
Taille verticale 22
Temp. couleur
Touche DISPLAY
Touche INPUT
Touche MENU
Touche MUTING
Touche PICTURE
Touche POWER
Touche POWER SAVING
Touche SLEEP
Touche SOUND
Touche VOL
Touche WIDE
Touches INPUT V1-V5
Tout réinitialiser
Trou de fixation du support
V
Veille 14, 24
Z
Zone d’affichage 22
Zoom
13, 21
10, 15
22, 23
25
20
18, 19, 20
13, 21
22, 23
22, 23
24
24
24
17, 21
16, 18
17, 24
16, 20
20
28
20
24
15
18, 19
7
7, 12
12
7, 11
12, 14
12
7, 11
11, 13
25
23
18, 19
11
11
13, 23
FR
12, 14
11
10
31
FR
Page 94
ACHTUNG
Um Feuergefahr und die Gefahr eines
elektrischen Schlags zu vermeiden, setzen
Sie das Gerät weder Regen noch sonstiger
Feuchtigkeit aus.
Im Inneren des Geräts liegen gefährlich
hohe Spannungen an. Öffnen Sie daher das
Gehäuse nicht.
Überlassen Sie Wartungsarbeiten stets nur
qualifiziertem Fachpersonal.
Transport
Wenn Sie den Bildschirm transportieren, halten Sie
ihn nicht an den Lautsprechern, sondern halten Sie das
Gerät selbst. Andernfalls könnten sich die
Lautsprecher vom Gerät lösen und das Gerät könnte
herunterfallen. Dadurch kann es zu Verletzungen
kommen.
Die Netzsteckdose sollte sich in der Nähe des Geräts
befinden und leicht zugänglich sein.
VORSICHT
WIRD DIE BATTERIE DURCH EINEN
FALSCHEN TYP ERSETZT, BESTEHT
EXPLOSIONSGEFAHR. ENTSORGEN SIE
VERBRAUCHTE BATTERIEN GEMÄSS DEN
ÖRTLICHEN VORSCHRIFTEN.
Markenzeichen
WOW, SRS und das ( ) Symbol sind Warenzeichen
von SRS Labs, Inc. WOW Technologie wird unter
Lizenz von SRS Labs, Inc. mit eingeschlossen.
Hergestellt unter der Lizenz von BBE Sound, Inc.
Lizensiert von BBE Sound, Inc. unter USP5510752
und 5736897. BBE und das BBE-logo sind
eingetragene Warenzeichen der BBE Sound, Inc.
DE
2
Page 95
Inhalt
Einführung
Sicherheitsmaßnahmen ............................................................................................................4
Empfehlungen zur Aufstellung ..................................................................................................6
Lage und Funktion der Teile und Bedienelemente
Vorderseite................................................................................................................................7
Seitlicher Anschlussbereich ......................................................................................................8
Zusatzadapter ...........................................................................................................................9
Rückseite ................................................................................................................................10
Fernbedienung ........................................................................................................................11
Beschreibung der Tasten ...................................................................................................11
Sondertasten auf der Fernbedienung ................................................................................13
Im Breitbildmodus .........................................................................................................13
Der Ausschalttimer........................................................................................................14
Die Funktion ECO-Modus.............................................................................................14
Anschlüsse
DE
Anschließen des Netzkabels und Bündeln der Eingangskabel...............................................15
Arbeiten mit den Menüeinstellungen
Übersicht über die Menüs .......................................................................................................16
Bildeinstellungen .....................................................................................................................18
Toneinstellungen.....................................................................................................................20
Bildschirmeinstellungen ..........................................................................................................21
Grundeinstellungen .................................................................................................................24
Weitere Informationen
Störungsbehebung..................................................................................................................26
Diagramm der Eingangssignale..............................................................................................28
Technische Daten ...................................................................................................................29
Index .......................................................................................................................................31
DE
3
Page 96

Einführung
Sicherheitsmaßnahmen
Sicherheit
• Ein Typenschild mit Betriebsspannung,
Leistungsaufnahme usw. befindet sich an der
Geräterückseite.
• Sollten Fremdkörper oder Flüssigkeiten in das Gehäuse
gelangen, trennen Sie das Gerät von der Netzsteckdose.
Lassen Sie das Gerät von qualifiziertem Fachpersonal
überprüfen, bevor Sie es wieder benutzen.
• Wollen Sie das Gerät einige Tage oder länger nicht
benutzen, ziehen Sie den Netzstecker aus der Steckdose.
• Um das Gerät vom Netzstrom zu trennen, ziehen Sie den
Netzstecker aus der Netzsteckdose. Ziehen Sie nicht am
Kabel.
• Wenn das Gerät auf dem Fußboden aufgestellt werden
soll, verwenden Sie bitte unbedingt den gesondert
erhältlichen Monitorständer.
Aufstellung
• Achten Sie auf ausreichende Luftzufuhr, damit sich im
Gerät kein Wärmestau bildet. Stellen Sie das Gerät nicht
auf Oberflächen wie Teppichen oder Decken oder in der
Nähe von Materialien wie Gardinen und Wandbehängen
auf, die die Lüftungsöffnungen blockieren könnten.
• Stellen Sie das Gerät nicht in der Nähe von Wärmequellen
wie Heizkörpern oder Warmluftauslässen oder an Orten
auf, an denen es direktem Sonnenlicht, außergewöhnlich
viel Staub, mechanischen Vibrationen oder Stößen
ausgesetzt ist.
• Wenn Sie mehrere andere Geräte an dieses Gerät
anschließen, kann es je nach Standort dieses Geräts und
der anderen Geräte zu folgenden Problemen kommen:
Fehlfunktionen der Fernbedienung, Bildstörungen und
Tonstörungen.
LCD-Bildschirm
• Möglicherweise sind einige helle Lichtpunkte (rot, blau
oder grün) oder schwarze Punkte auf dem Bildschirm zu
sehen. Dabei handelt es sich nicht um eine Fehlfunktion.
Der LCD-Bildschirm wird mit einer
Hochpräzisionstechnologie hergestellt. Dennoch können
einige wenige dunkle oder helle Pixel auftreten.
• Wenn der LCD-Bildschirm längere Zeit auf die Sonne
gerichtet ist, wird der Bildschirm beschädigt.
Berücksichtigen Sie dies bitte, wenn Sie das Gerät im
Freien oder in der Nähe eines Fensters installieren.
• Stoßen Sie nicht gegen den Bildschirm, zerkratzen Sie ihn
nicht und stellen Sie keine schweren Gegenstände darauf.
Andernfalls kann es zu Unregelmäßigkeiten in der
Bildanzeige oder zu einer Fehlfunktion des LCDBildschirms kommen.
• Wenn Sie das Gerät in kalter Umgebung verwenden,
erscheint die Anzeige möglicherweise dunkler oder ein
Nachbild ist zu sehen. Dabei handelt es sich nicht um eine
Fehlfunktion. Die Anzeige auf dem Bildschirm erscheint
wieder normal, sobald die Umgebungstemperatur steigt.
• Wenn Sie längere Zeit ein Standbild anzeigen lassen, kann
ein Nachbild zu sehen sein. Dieses verschwindet im Laufe
der Zeit wieder, wenn Sie das Bild wechseln oder den
ganzen Bildschirm weiß anzeigen. Wenn Sie ein und
dasselbe Standbild jedoch sehr lange Zeit anzeigen lassen,
lässt sich das Problem möglicherweise nicht mehr beheben.
• Die Anzeigeoberfläche oder das Gehäuse kann sich
während des Betriebs erwärmen. Dabei handelt es sich
nicht um eine Fehlfunktion.
Reinigen des Bildschirms
Anzeigeoberfläche
• Ziehen Sie vor dem Reinigen des Bildschirms unbedingt
das Netzkabel aus der Netzsteckdose.
• Die Oberfläche des LCD-Bildschirms ist mit einer
Spezialbeschichtung überzogen. Berühren Sie den LCDBildschirm möglichst nicht. Wenn Sie die
Anzeigeoberfläche reinigen, wischen Sie
Verunreinigungen mit einem trockenen, weichen Tuch ab.
• Verwenden Sie zum Reinigen auf keinen Fall
Reinigungsalkohol, Benzin oder Verdünner. Andernfalls
kann die Beschichtung der Anzeigeoberfläche beschädigt
werden.
• Wenn Sie ein chemisch behandeltes Reinigungstuch
verwenden, beachten Sie bitte die entsprechenden
Anweisungen.
• Sprühen Sie keine flüchtigen Lösungsmittel (wie z. B.
Insektizide) auf das Gerät und legen Sie nicht längere Zeit
Gummi- oder Kunststoffprodukte darauf. Andernfalls
kann sich die Beschichtung lösen oder die
Anzeigeoberfläche angegriffen werden.
Gehäuse
• Wischen Sie Flecken behutsam mit einem trockenen,
weichen Tuch ab. Bei stärkerer Verschmutzung
verwenden Sie ein leicht mit einem milden
Reinigungsmittel angefeuchtetes Tuch und wischen den
Bereich anschließend mit einem trockenen, weichen Tuch
trocken.
• Verwenden Sie zum Reinigen auf keinen Fall
Reinigungsalkohol, Benzin oder Verdünner. Andernfalls
kann die Oberfläche des Gehäuses angegriffen werden
oder die Markierungen darauf werden entfernt.
Hinweise zur Handhabung und Reinigung des
Bildschirms
Die spezielle Bildschirmoberfläche sollte mit
entsprechender Sorgfalt beim Tragen und Reinigen
behandelt werden. Verwenden Sie zum Reinigen ein
weiches Reinigungstuch, um ein direktes Berühren
des Bildschirms zu vermeiden.
Verpacken
Werfen Sie den Karton und die
Verpackungsmaterialien nicht weg. Sie sind ideal für
den Transport des Geräts geeignet. Wenn Sie das
Gerät transportieren müssen, verpacken Sie es wie auf
dem Karton abgebildet.
Wenn Sie Fragen zu dem Gerät haben, wenden Sie
sich bitte an einen autorisierten Sony-Händler.
DE
4
Page 97
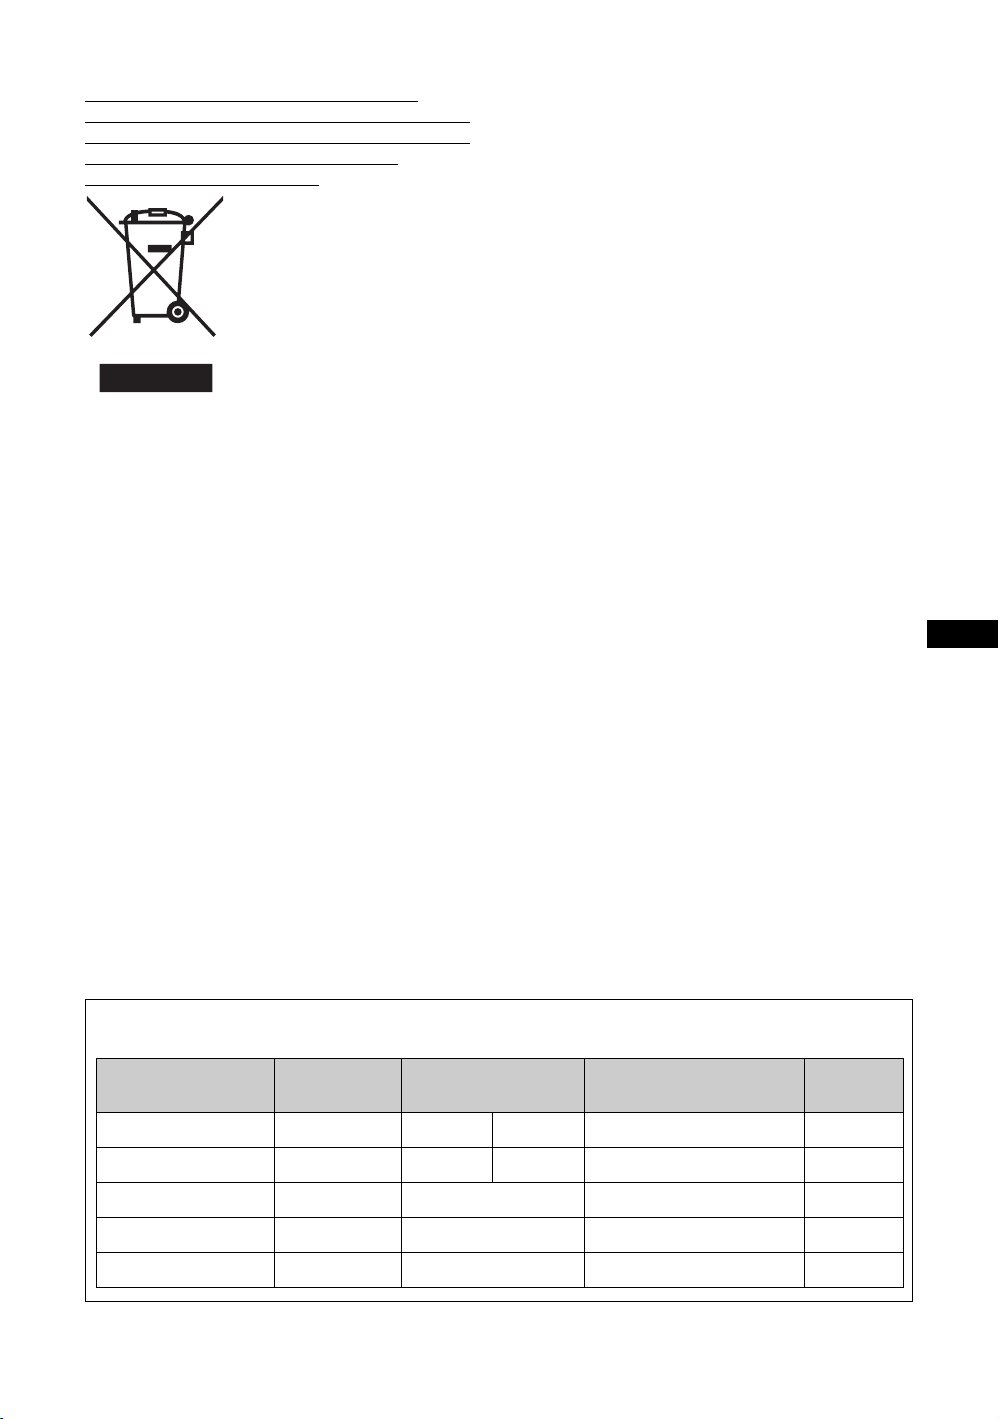
Entsorgung von als Industriemüll anfallenden
elektrischen und elektronischen Geräten (anzuwenden
in den Ländern der Europäischen Union und anderen
europäischen Ländern mit einem separaten
Sammelsystem für diese Geräte)
Das Symbol auf dem Produkt
oder seiner Verpackung weist
darauf hin, dass dieses Produkt
nicht als normaler
Haushaltsabfall zu behandeln
ist, sondern im Rahmen des
entsprechenden
Rücknahmeprogramms für das
Recycling von elektrischen
und elektronischen Geräten
abgegeben werden muss.
Durch Ihren Beitrag zum korrekten Entsorgen dieses
Produkts schützen Sie die Umwelt und die Gesundheit
Ihrer Mitmenschen. Umwelt und Gesundheit werden
durch falsches Entsorgen gefährdet. Materialrecycling
hilft, den Verbrauch von Rohstoffen zu verringern.
Weitere Informationen über das Recycling dieses
Produkts erhalten Sie von der örtlichen SonyNiederlassung oder auf der für Firmenkunden
eingerichteten Website von Sony Europe:
http://www.sonybiz.net/environment
DE
Warnhinweis zum Netzanschluss
Verwenden Sie das für die Stromversorgung in Ihrem Land geeignete Netzkabel.
USA, Kanada Kontinentaleuropa
Steckertyp VM0233 COX-07 636 —
Weibliches Ende VM0089 COX-02 VM0310B VM0303B VM1313
Kabeltyp SVT H05VV-F CEE (13) 53rd (O.C) HVCTF
Mindestwerte (Kabel) 10A/125V 10A/250V 10A/250V 10A/125V
Sicherheitszertifizierung UL/CSA VDE VDE DENAN-HO
Großbritannien, Irland,
Australien, Neuseeland
a)
Japan
VM1296
a) Hinweis: Verwenden Sie einen geeigneten Netzstecker, der die örtlichen Bestimmungen erfüllt.
DE
5
Page 98
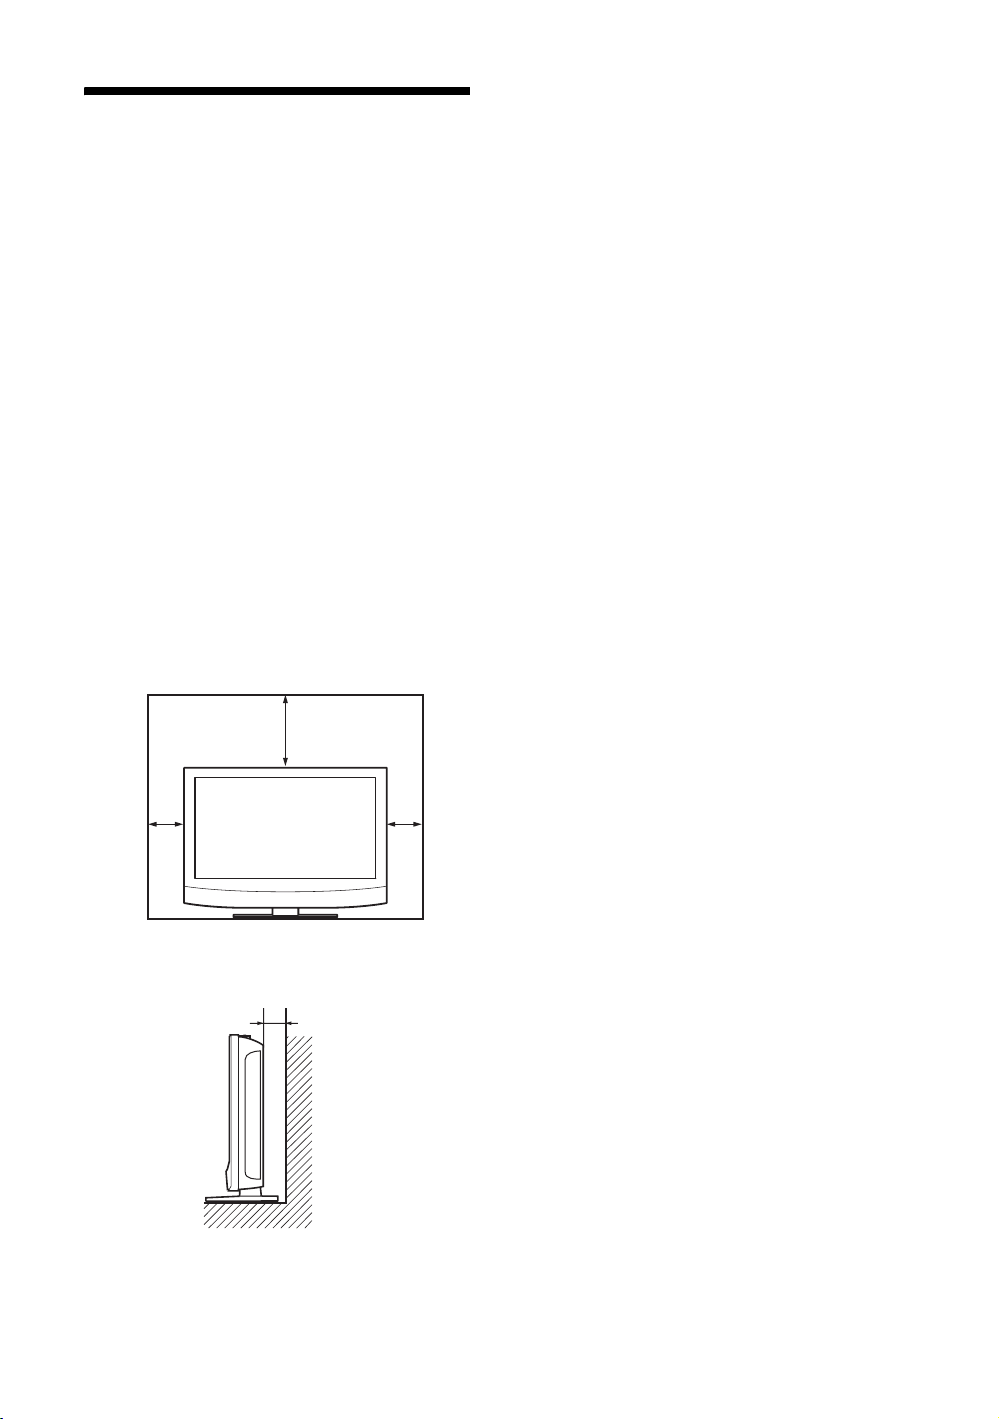
Empfehlungen zur
Aufstellung
Lassen Sie um den Monitor herum viel
Platz
• Um einen internen Wärmestau durch Zustellen des
Monitors zu verhindern, achten Sie auf ausreichende
Luftzufuhr, indem Sie mindestens so viel Platz wie in der
Abbildung unten dargestellt um den Monitor herum frei
lassen.
• Die Umgebungstemperatur muss zwischen 0
°C betragen.
35
• Zu Metallteilen für die Montage wie Halterungen,
Schrauben oder Bolzen können wir keine genauen
Produktangaben machen. Die Montage ist Aufgabe der
autorisierten Händler vor Ort. Wenden Sie sich für die
Montage bitte an qualifiziertes Personal von Sony.
• Bei eingeschaltetem Monitor kommt es im Inneren zu
einer gewissen Wärmeentwicklung. Dadurch kann es zu
Verbrennungen kommen. Berühren Sie den Monitor nicht
an der Ober- oder Rückseite, wenn er eingeschaltet ist
oder gerade erst in den Bereitschaftsmodus geschaltet
wurde.
Vorderseite
°C und
Seite
20
10 10
10
Einheit: cm
DE
6
Page 99
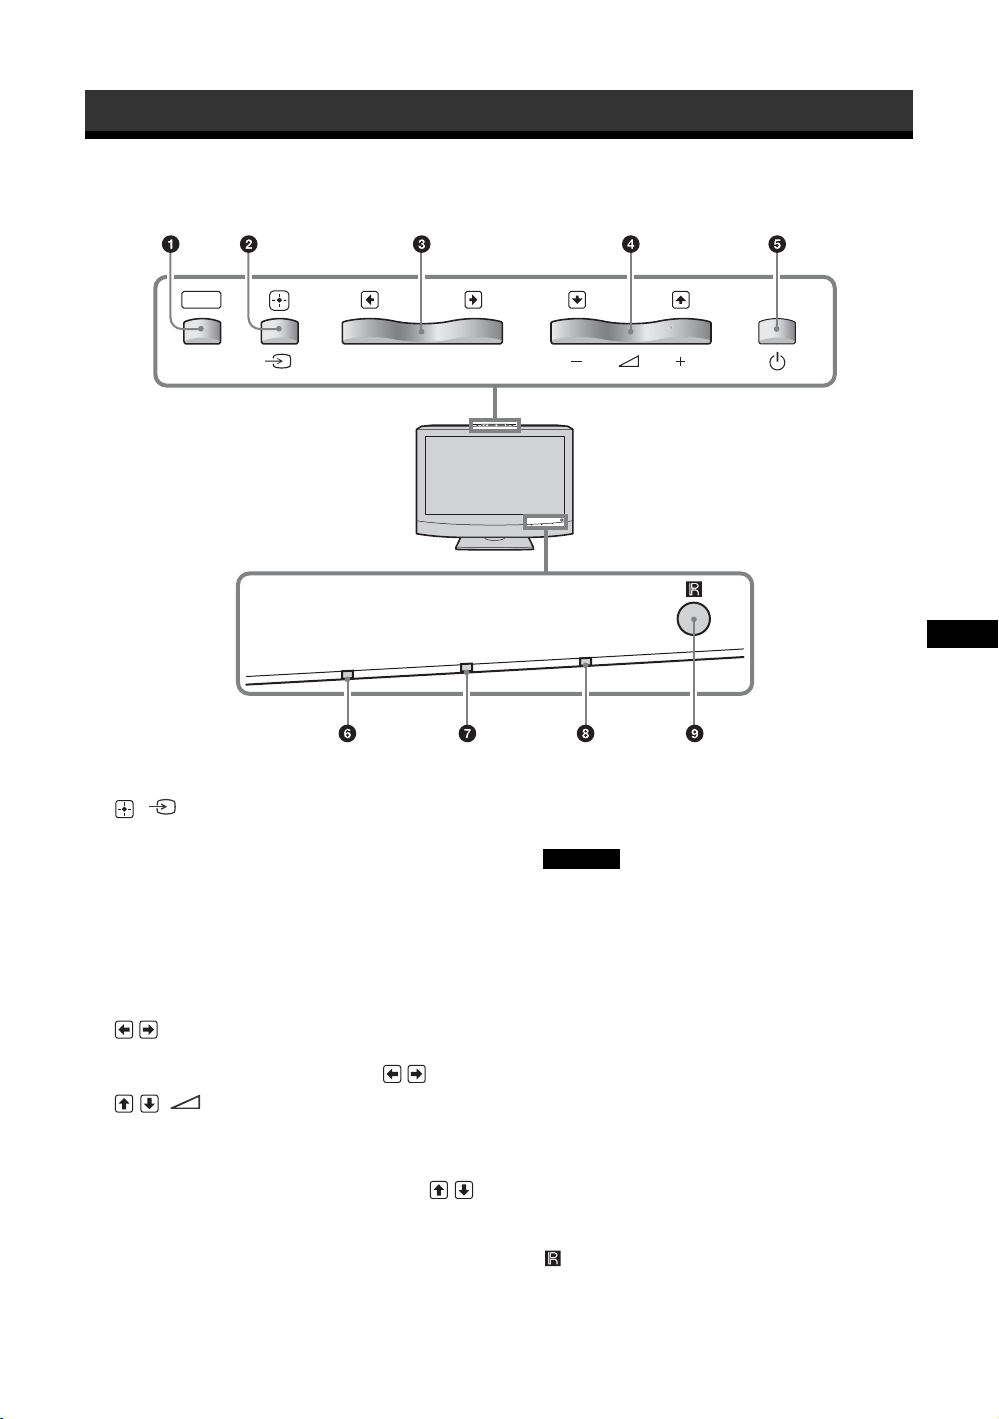
Lage und Funktion der Teile und Bedienelemente
Vorderseite
MENU
PIC OFF/TIMER
1 MENU (Seite 16)
2 / (INPUT)
• Wenn ein Menübildschirm angezeigt wird, fungiert
diese Taste als Taste „Reg“.
• Wenn kein Menübildschirm angezeigt wird, dient
diese Taste zum Umschalten des Eingangssignals.
Dient zum Auswählen eines Eingangssignals vom
Anschluss HD15/HDMI 1/HDMI 2/OPTION.
Wenn im OPTION-Anschlussbereich kein
Zusatzadapter installiert ist, wird OPTION
übersprungen.
3 /
Wenn ein Menübildschirm angezeigt wird, fungieren
diese Tasten als Links-/Rechts-Tasten (
/ ).
4 //
• Dienen zum Erhöhen (+) oder Verringern (–) der
Lautstärke.
• Wenn ein Menübildschirm angezeigt wird,
fungieren diese Tasten als Auf-/Ab-Tasten ( / ).
STANDBY
POWER
5 1
Dient zum Ein-/Ausschalten (Bereitschaftsmodus) des
Bildschirms.
Hinweis
Zum Schutz des Bildschirms dauert es einige
Sekunden, bis der Monitor ein- bzw. ausgeschaltet
wird (Bereitschaftsmodus). Wenn Sie den Monitor
gleich nach dem Ausschalten wieder einschalten
wollen, warten Sie vor dem erneuten Einschalten etwa
5 Sekunden.
6 Anzeige PIC OFF/TIMER
• Leuchtet grün, wenn unter „ECO-Modus“ die
Funktion „Bild aus“ ausgewählt ist.
• Leuchtet orange, wenn die Funktion
„Ausschalttimer“ aktiviert ist.
7 Anzeige STANDBY
Leuchtet rot, wenn sich der Monitor im
Bereitschaftsmodus befindet.
8 Anzeige POWER
Leuchtet grün, wenn der Monitor eingeschaltet ist.
9 Fernbedienungssensor
DE
DE
7
Page 100
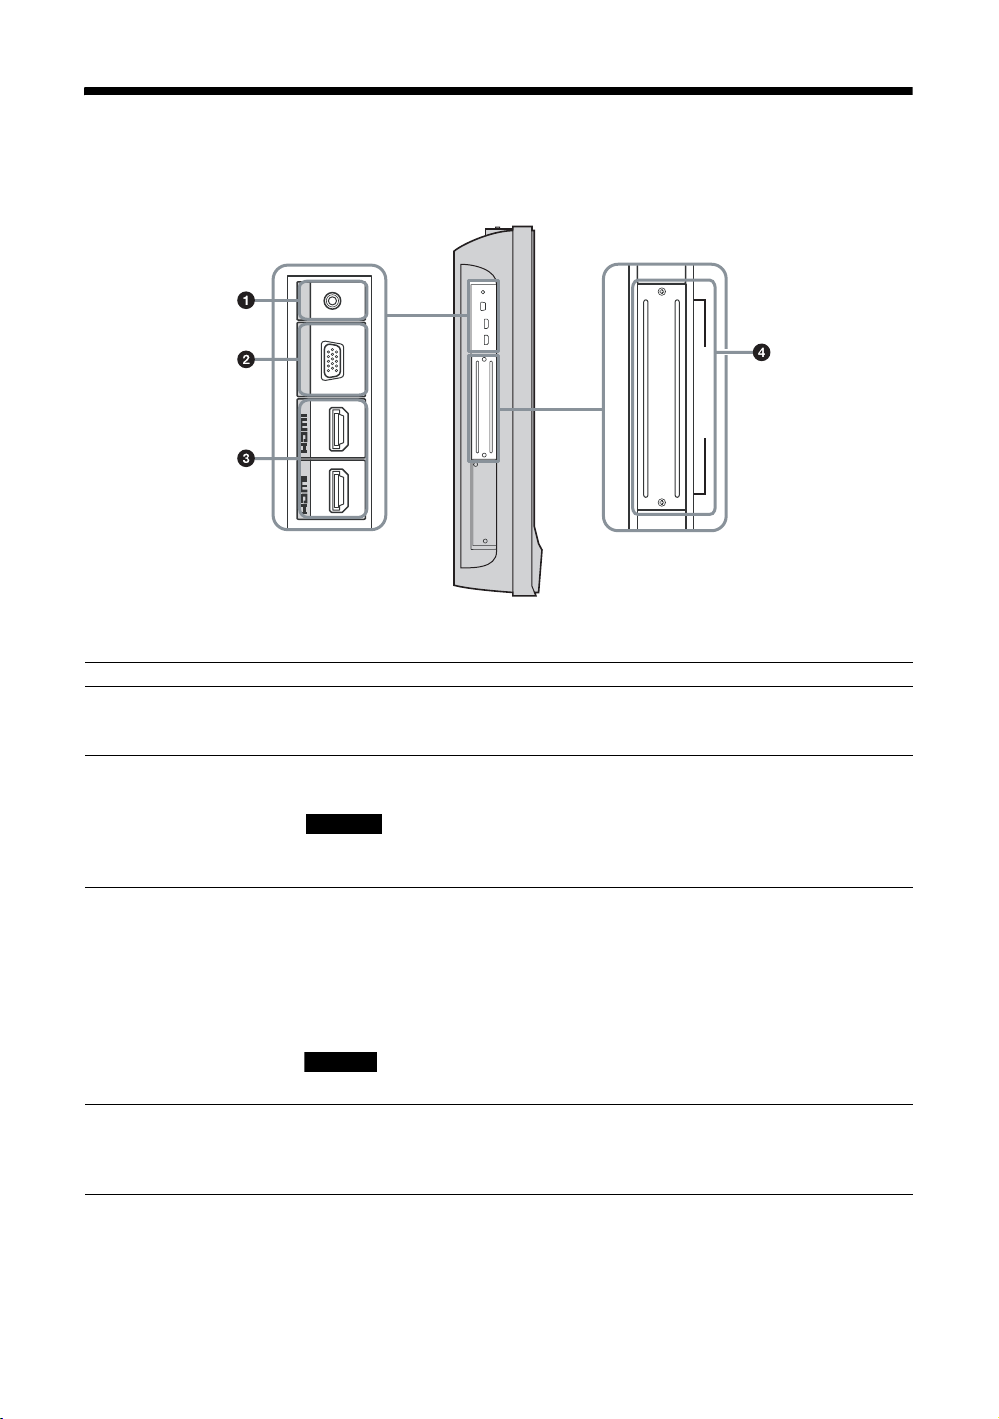
Seitlicher Anschlussbereich
AUDIO
COM MON
AUDIO IN
HD 15
RGB/COMPONENT IN
1
IN
2
IN
Anschluss Beschreibung
1
AUDIO (COMMON
)
AUDIO IN
Eingang für das Audiosignal. Zum Anschließen an den Audiosignalausgang eines
Videogeräts oder PCs. Unterstützt Audiosignale entsprechend 2 und 3.
(Stereominibuchse)
2 HD15 (RGB/
COMPONENT IN)
(D-Sub, 15-polig)
Zum Anschließen an den analogen RGB- oder Farbdifferenzsignalausgang eines
Videogeräts oder PCs. Siehe Seite 30.
Hinweis
Bei Farbdifferenzsignalen dürfen Sie keine Synchronisationssignale an den Stiften 13 und
14 einspeisen. Andernfalls wird das Bild unter Umständen nicht einwandfrei angezeigt.
3 HDMI 1/HDMI 2 IN HDMI (High-Definition Multimedia Interface) bietet eine Schnittstelle zwischen dem
Monitor und einem HDMI-fähigen Audio/Video-Gerät oder PC. Sie können Videos in
verbesserter bzw. HD-Qualität und zweikanaligen Digitalton wiedergeben lassen.
Darüber hinaus können Sie mit einem HDMI-zu-DVI-Kabel (nicht mitgeliefert) auch ein
DVI-fähiges Gerät an den Monitor anschließen.
Der geeignete Modus für das angeschlossene Audio/Video-Gerät bzw. den PC wird
automatisch ausgewählt.
OPTION (VIDEO/COM)
4 OPTIONAnschlussbereich
(VIDEO/COM-Anschluss)
DE
8
Hinweis
Verwenden Sie ausschließlich HDMI-Kabel mit HDMI-Logo.
Dieser Anschlussbereich unterstützt Videosignale und Kommunikationsfunktionen. Wenn
Sie einen Zusatzadapter (der BKM-FW-Serie) in diesem Anschlussbereich installieren,
können Sie die Eingangssignalanschlüsse erweitern oder den Bildschirm über das
Netzwerk steuern.
 Loading...