

Page 1
R
LCD Colour TV
4-096-858-42 (1)
Operating Instructions
Before operating the TV, please read the “Safety Information”
section of this manual. Retain this manual fo r future reference.
Инструкции за използване
Преди да използвате телевизора, прочетете раздела
"Информация за безопасността" на това ръководство.
Запазете това ръководство за бъдещи справки.
Návod k použití
Před zapnutím televizoru si prosím pozorně přečtěte část
"Bezpečnostní upozornění" v tomto návodu. Návod si uschovejte
i pro budoucí potřebu.
Kezelési utasítás
Mielőtt elkezdené használni a televíziót, kérjük, olvassa el a jelen
kézikönyv "Biztonsági tudnivalók" c. szakaszát. Őrizze meg a
kézikönyvet későbbi használatra.
Instrukcja obsługi
Przed przystąpieniem do eksploatacji telewizora należy
zapoznać się z rozdziałem "Informacje dotyczące bezpieczeństwa"
w niniejszej instrukcji. Prosimy o zachowanie niniejszej instrukcji
do wglądu w przyszłości.
Инструкция по эксплуатации
Перед тем как включить телевизор, просим Вас ознакомиться с
разделом "Общие правила техники безопасности" настоящей
инструкции. Сохраняйте настоящую инструкцию на будущее.
GB
BG
CZ
HU
PL
RU
KF-42SX300K
KF-50SX300K
KF-60SX300K
©2003 by Sony Corporation
Page 2
Introduction
Thank you for choosing this Sony product.
Before operating the TV, please read this manual thoroughly and retain it for fu ture reference.
• Symbols used in the manual:
• Important information.
• Information on a feature.
• 1,2... Sequence of instructions.
• Buttons shaded white on the remote control show you
the buttons you have to press to follow the sequence
of the instructions.
• Informs you of the result of the instructions.
Table of Contents
Introduction .......................................................................................................................................................... 3
Safety Information....................................................................... ......................................................................... 4
Overview & Installation
Checking the Accessories Supplied...................................................................................................................... 6
Inserting Batteries into the Remote Control......................................................................................................... 6
Overview of Remote Control Buttons.............................. ....................................................... .............................7
Overview of the TV Buttons ......................................... ....................................................................................... 8
Connecting the Aerial and VCR........................................................................................................................... 9
Stabilizing the TV set ........................................................................................................................................... 9
First Time Operation
Switching on the TV and Automatically Tuning ............................................................................................... 10
TV Functions
Introducing and Using the Menu System .......................................................................................................... 12
The Picture Adjustment menu .....................................................................................................................13
The Sound Adjustment menu....................................................................................................................... 14
The Features menu.............. ..................................................... ..................................................................... 16
Autoformat .............................................................................................................................................16
AV3 Output.............................................................. ............................. ................................................. 17
Connection Guide...................................................................................................................................17
RGB Centring......................................................................................................................................... 17
The Set Up menu................................................. ......................................................................................... 18
Language................................................................................................................................................18
Country................................................................................................................................................... 18
Auto Tuning.............................................. ............................................................................................. 18
Programme Sorting .............................................................................................................. .................. 18
Programme Labels .................................................................................................. ...............................19
AV Preset............................................................................................................................................... 19
Manual Programme Preset..................................................................................................................... 20
PAP (Picture And Picture).................................................................................................................................. 21
Teletext..................................................................................................................................................................22
NexTView...............................................................................................................................................................23
Additional Information
Connecting Equipment to the TV.................................................................. ......................................................24
Viewing pictures from equipment connected to the TV......................................................................................25
Remote Control Configuration for VCR or DVD ...............................................................................................26
Optimum Viewing area .......................................................................................................................................27
Replacing the lamp............................................. ............................. ....................................................................28
Technical Specifications..................................... .................................................................................................30
PC Input Specifications.......................................................................................................................................31
Troubleshooting...................................................................................................................................................32
How to lift the TV ..................................................................................................................... ...........Back cover
GB
Table of Contents
3
Page 3
Safety Information
This set is to operate on a 220-240V AC
supply only. Take care not to connect
too many appliances to the same power
socket as this could result in fire or
electric shock.
Do not open the cabinet and the rear cover
of the TV. Refer to qualified service
personnel only.
Do not cover the ventilation openings of
the TV For ventilation, leave a space of
at least 10cm all around the set.
For environmental and safety reasons , it
is recommended that the TV set is not
left in standby mode when not in use.
Disconnect from the mains. However,
some TVs may have features which
require they are left in standby. The
instructions in this manual will inform
you if this applies.
For your own safety, do not touch any
part of the TV , po wer lead or aerial lead
during lightning storms.
Never place the TV in hot, humid or
excessively dusty places. Do not
install the TV where it may be
exposed to mechanical vibrations.
Never push objects of any kind into the
set as this could result in a fire or electric
shock. Never spill liquid of an y k ind on
the set. If any liquid or solid object does
fall into the cabinet, do not operate the
TV. Have it checked immediately by
qualified personnel.
To prevent f ire or shock hazard, do not
expose the TV to rain or moisture.
To prevent fire, keep inflammable
objects or naked lights (eg candles)
away from the TV.
Clean the screen and cabinet with a soft,
lightly dampened cloth. Do not use any
type of abrasive pad, alkaline cleaner,
scouring powder or solvent, such as alcoho l
or benzine, or antistatic spray. As a safety
precaution, unplug the TV before cleaning
it.
Place the TV on a secure stable stand.
Never attempt to move the TV and stand
together -always move the TV and stand
separately. Do not place the TV on its
side or face up. Do not allow children to
climb on to it.
Safety Information
4
Pull out the power lead by the plug.
Do not pull on the power lead itself.
Unplug the power lead before moving
the TV. Avoid uneven surfaces, quick
steps or excessive force. If the set has
been dropped or damaged, have it
checked immediately by qualified
service personnel.
Tak e care not to place heavy objects on
the power lead as this could result in
damage.
We recomm end you wind any excess
lead around the holders provided on
the rear of the TV.
Do not cover the ventilation
openings of the TV with items such
as curtains or newspapers etc.
Page 4
Additional Safety Information
• Do not block or cover the ventilation opening situated on the bottom rear of the left hand side of the TV set.
For ventilation, leave a space of at least 10 cm from the wall.
• If after transporting the TV set, directly from a cold to a warm location, or if the room temperature has
changed suddenly, pictures may be blurred or show poor colour over portions of the picture. This is because
condensation has formed on the mirrors or lenses inside the TV set. Let the moisture evaporate before using
the TV set.
• To obtain a clear picture, do not expose the screen to direct illumination or direct sunlight. If possible, use
spot lighting directed down from the ceiling.
• This TV set incorporates the latest high-precision LCD technology. Even though the highest standards are
applied in manufacture it is still possible that a few black dots or bright points (r ed, green or b lue) may be
visible on the screen under certain picture conditions. It is not possible to remove them and this is not a fault
condition.
• The screen of this TV set has an anti-reflection screen coating. To avoid screen degradation, follow the
advice given below:
• To remove dust from the surface of the screen, wipe with the supplied cleaning cloth or a soft cloth.
• Clean the screen and cabinet with a soft, lightly dampened cloth. Do not use any type of abrasive pad,
alkaline cleaner, scouring powder or solvent, such as alcohol or benzine, or antistatic spray. As a safety
precaution, unplug the TV before cleaning it.
• Avoid touching the screen, and take care not to scratch the surface with hard objects.
GB
Safety Information
5
Page 5
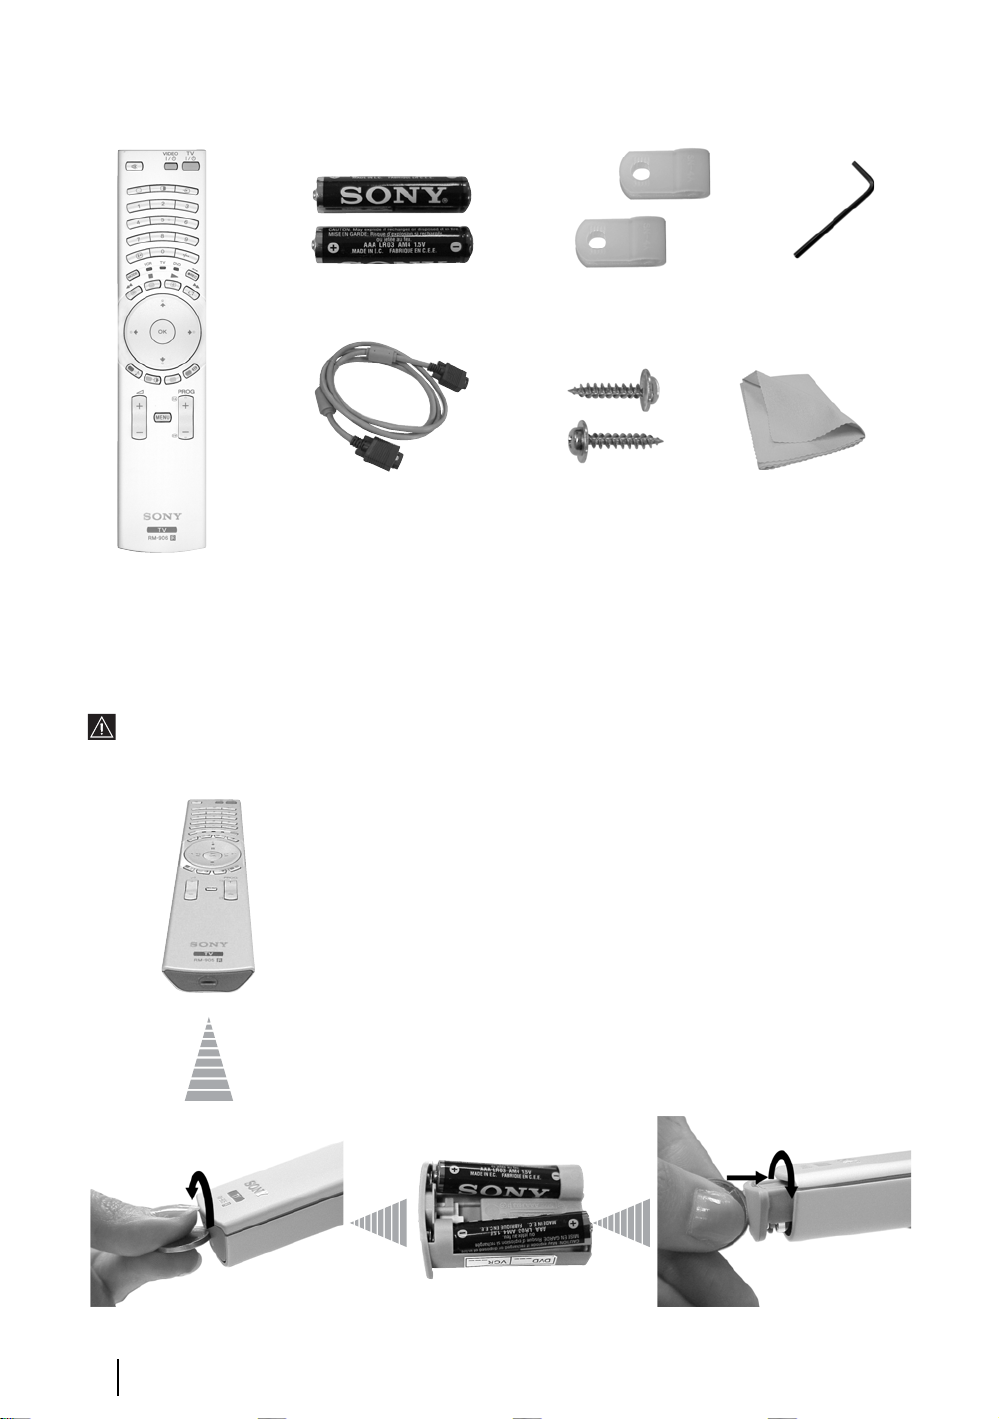
Checking the Accessories supplied
2 Batteries (AAA size)
1 PC input cable
1 Remote control (RM-906)
2 Brackets
2 Screws
1 Cleaning cloth
Inserting Batteries into the Remote Control
Make sure you insert the supplied batteries using the correct polarities.
Always remember to dispose of used batteries in an environmental friendly way.
1 Hexagon key
6
Overview & Installation
Page 6

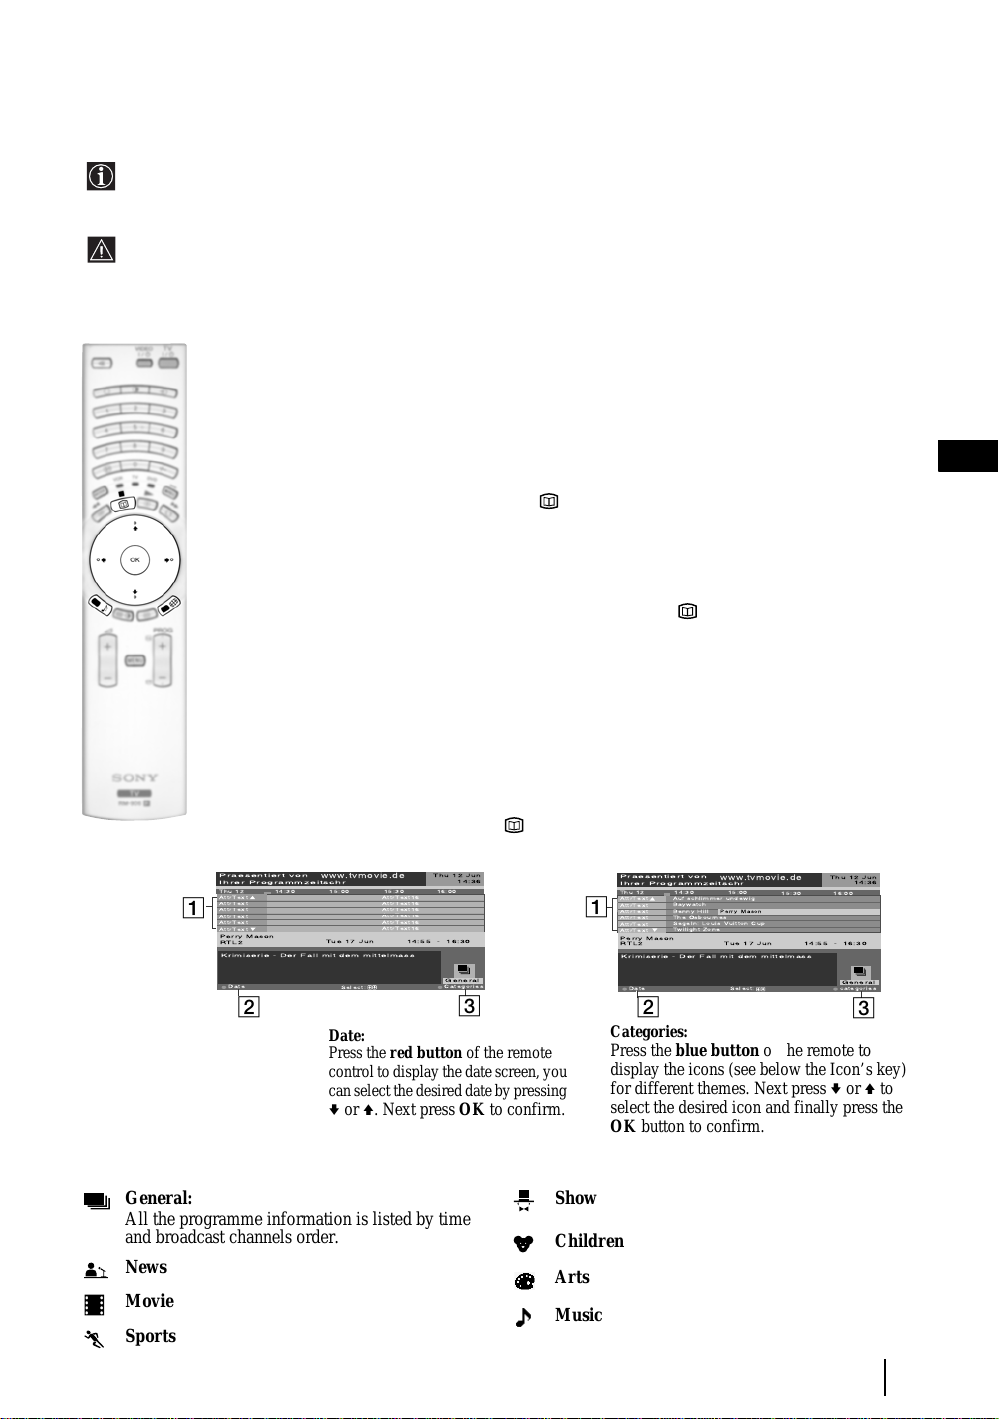
Overview of Remote Control Buttons
1 TV I/ : To Temporarily Switch Off TV (standby mode):
wf
wd
ws
wa
w;
ql
qk
qj
qh
qg
qf
qd
1
Press this button to temporarily switch off TV (the standby indicator on the TV
2
3
4
lights up). Press again to switch on TV from standby mode.
• To save energy we recommend switching off completely when TV is not in
use.
• After 15 minutes without TV signal and without any button being pressed,
the TV switches automatically into standby mode.
5
2 VCR or DVD on/off: press this button to switch your VCR or DVD on or off.
3 Selecting input source: press this button repeatedly until the desired input symbol
6
7
8
9
q;
qa
qs
of the source appears on the TV screen. Refer to page 25.
4 Selecting broadcast channe ls: if Media Selector (w; is switched to TV, press
these buttons to select channels. For double-digit programme numbers, enter the
second digit within 2.5 seconds.
5 Selecting VCR double-digit: if Media Selector (w;) is switched to VCR, press this
button to select double-digit channels for Sony's VCR e.g. 23, press -/-- first and next
the buttons 2 and 3.
6 a) Recording button:
If Media Selector (w;) is switched to VCR, press this button to record programmes.
b) Resetting to factory set levels:
Press, for a minimum of 3 seconds, to return the picture and sound settings to the
factory default levels. This will also return the set to the install condition and the
“Auto Tuning” menu will appear on the screen. If this is the case refer to the
section “Switching on the TV set and automatically Tuning” (page 11, step 5) of
this manual.
7 Watching last channel selected: if Media Selector (w;) is switched to TV, press
this button to return to the previous channel you were watching (provided you
watched it for at least 5 seconds).
8 Freezing a teletext page: in teletext mode, press this button to freeze a teletext
page. Press it again to cancel the freeze.
GB
9 a) Displa ying a channel index: if Media Selector
(w;) is switched to TV and MENU is switched off,
press OK to display a channel overview. If you
want to select a channel, press
again the OK button to watch the selected channel.
b) Navigator: if Media Selector (w;
TV and MENU (
buttons to navigate through the menu system of the
TV. Refer to page 12.
q; Selecting the screen format: press this button
repeatedly to change the format of the screen. Refer
to page 16.
qa Selecting broadcast chan ne ls:
qs) is switched on, use these
v or V next press
) is switched to
press these
buttons to select the next or previous broadcast
channel.
qs Menu system: press this button to enter the TV
menu system. Refer to page 12.
qd Adjusting volume: press these buttons to increase
or decrease the audio volume.
qf Selecting picture mode: press this button
repeatedly to change the picture mode. For details on
the different picture modes. Refer to page 13.
qg Selecting the sound effect:
repeatedly to change the sound effect. For details on
different sound effects. Refer to page 14.
qh Fastext: In Teletext mode, these buttons can be
used as Fastext buttons. For details see page 22.
Press this button
qj NexTView: press this button to display NexTView.
For details. Refer to page 23.
qk
Teletext: press this button to switch on Teletext. For
details see page 22.
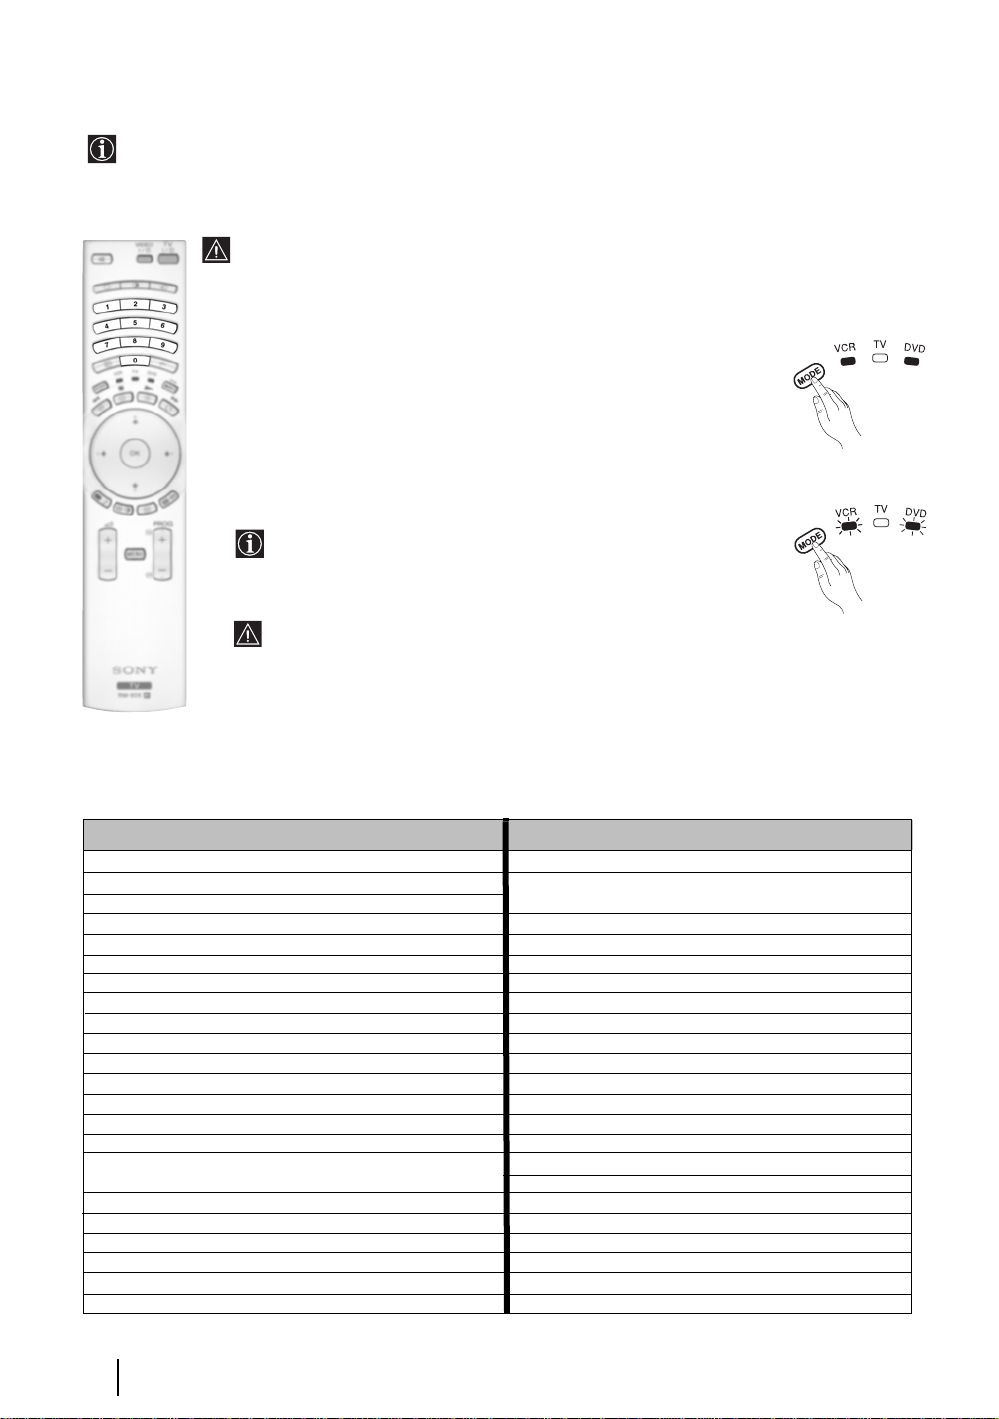
ql Operating VCR or DVD: if Media Selector (w;) is
switched to VCR or DVD, these buttons will operate
the main functions of your VCR or DVD, once the
remote control has been programmed. Refer to page
26.
w; Media Selector: press this button to select which
device you want to operate, TV, VCR or DVD. A
green light will be momentarily lit to show which one
you have selected. For details refer to page 26.
wa Displaying Info: press this button to display all on-
screen indication such as channel number, etc. Press
again to cancel.
ws Selecting TV mode: press this button to switch off
PAP, Teletext or Video input mode.
wd
PAP (Picture And Picture): press this button to
divide the screen into two for watching two channels
simultaneously. Refer to page 21.
wf Muting the sound: press this button to mute the
TV sound. Press again to restore the sound.
Overview & Installation
7
Page 7
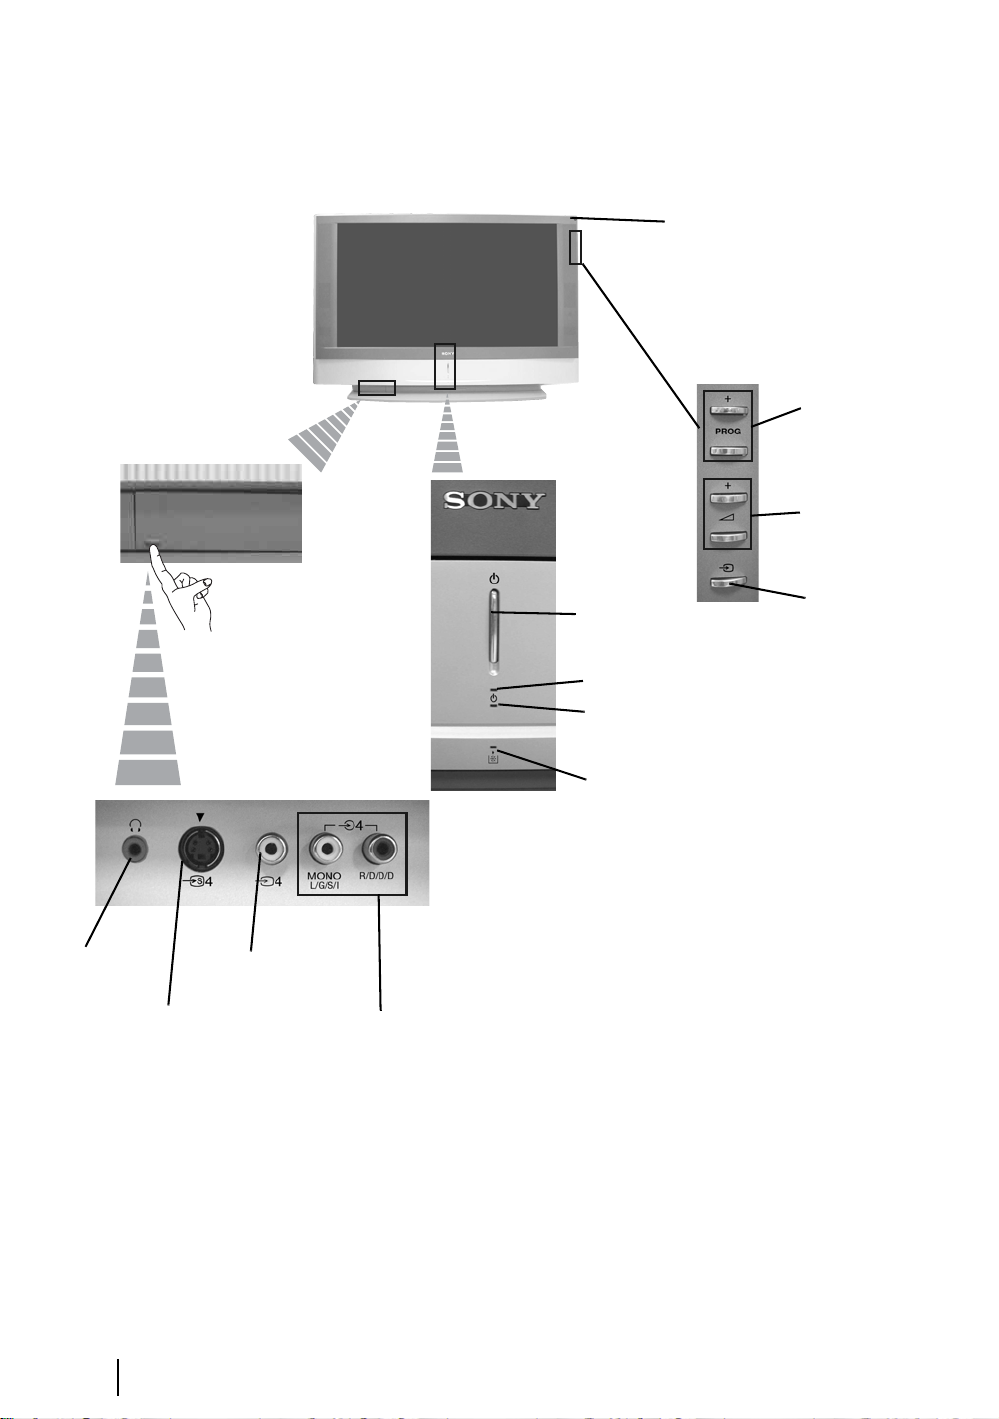
Overview of the TV Buttons
Remote control receiver
To operate the remote control,
pont it towards this receiver.
Programme
Up or Down
Buttons
(Selects TV
channels)
Volume control
buttons
Headphones jack
S video
Input jack
Push up the flap
on the front left
corner of the
TV.
Video Input jack
Audio Input
jacks
On/Off
button
Power on indicator (green colour).
• Standby indicator (red colour).
• Power off indicator (amber colour).
Lamp indicator (see page 28).
Selecting
Input source
Overview & Installation
8
Page 8
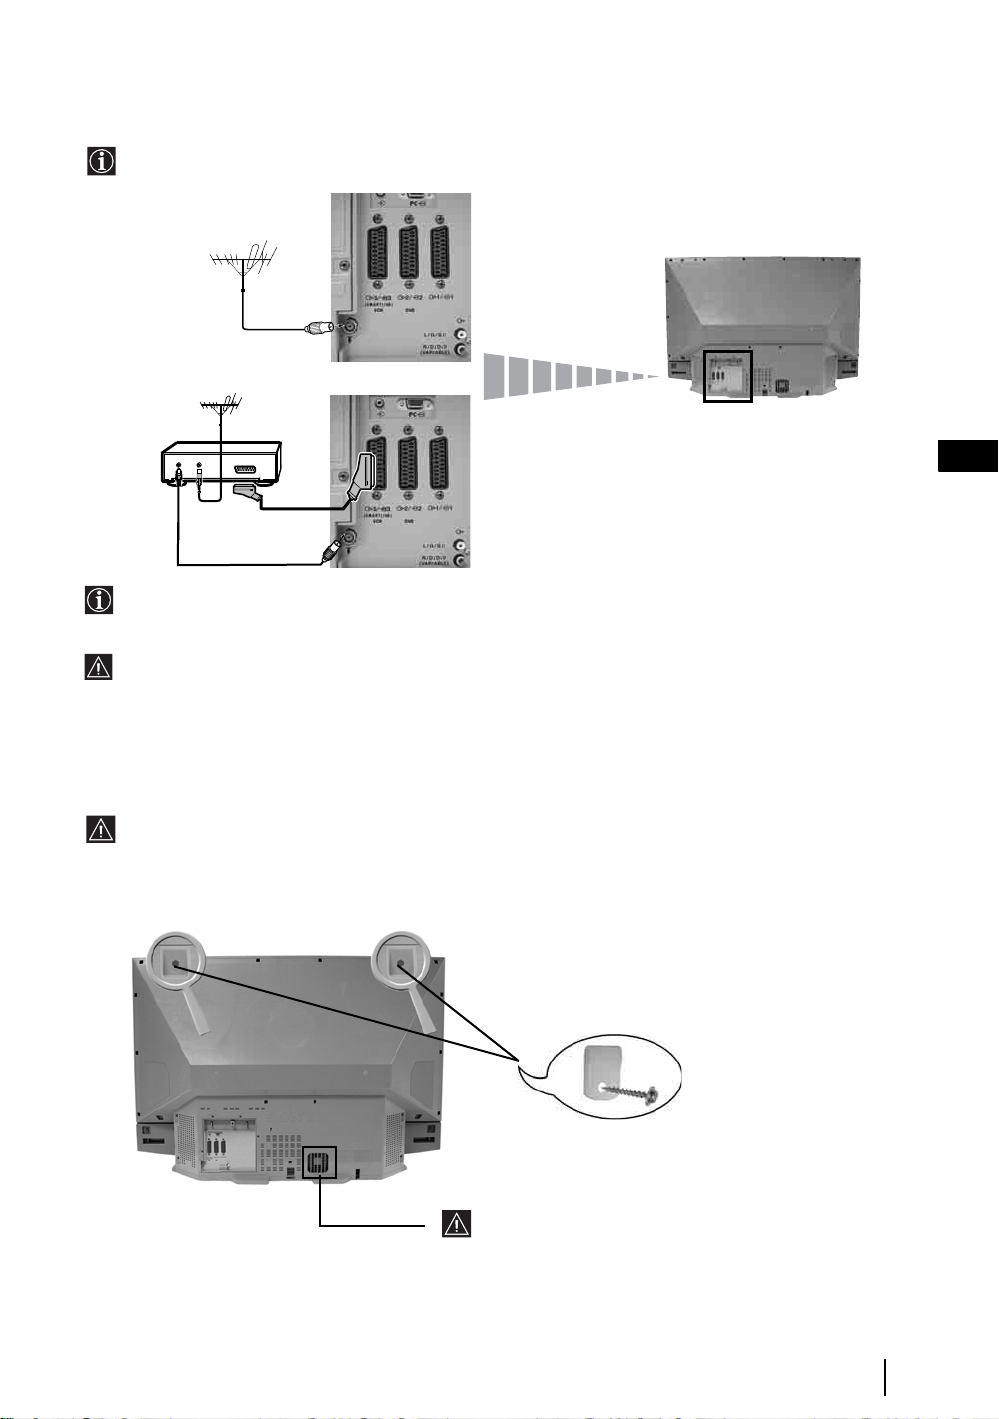
Connecting the Aerial and VCR
• Connecting cables are not supplied.
• For more details of VCR connections as well as other connections, please refer to page 24.
or
VCR
OUT IN
The Scart lead is optional. If you use this optional connection it can improve picture and sound quality when
using a VCR.
If you do not use a Scart lead, you will need to manually tune the VCR to a spare channel once the autotune
procedure has been completed. Refer to “Manual Programme Preset” on page 20. Also refer to your VCR
instruction manual to find out how to find the output channel of your VCR.
Stabilizing the TV set
After setting up, secure the TV set to a wall, etc., using the supplied brackets and screws, for safety purposes.
1 Mount the two supplied brackets with the screws provided to the upper rear side of the TV set.
GB
Do not block or cover this ventilation opening. For
ventilation, leave a space of at least 1 0 cm from the
wall.
2 Pass a strong cord or a chain through each bracket, and then secure to a wall or a pillar, etc.
Overview & Installation
9
Page 9
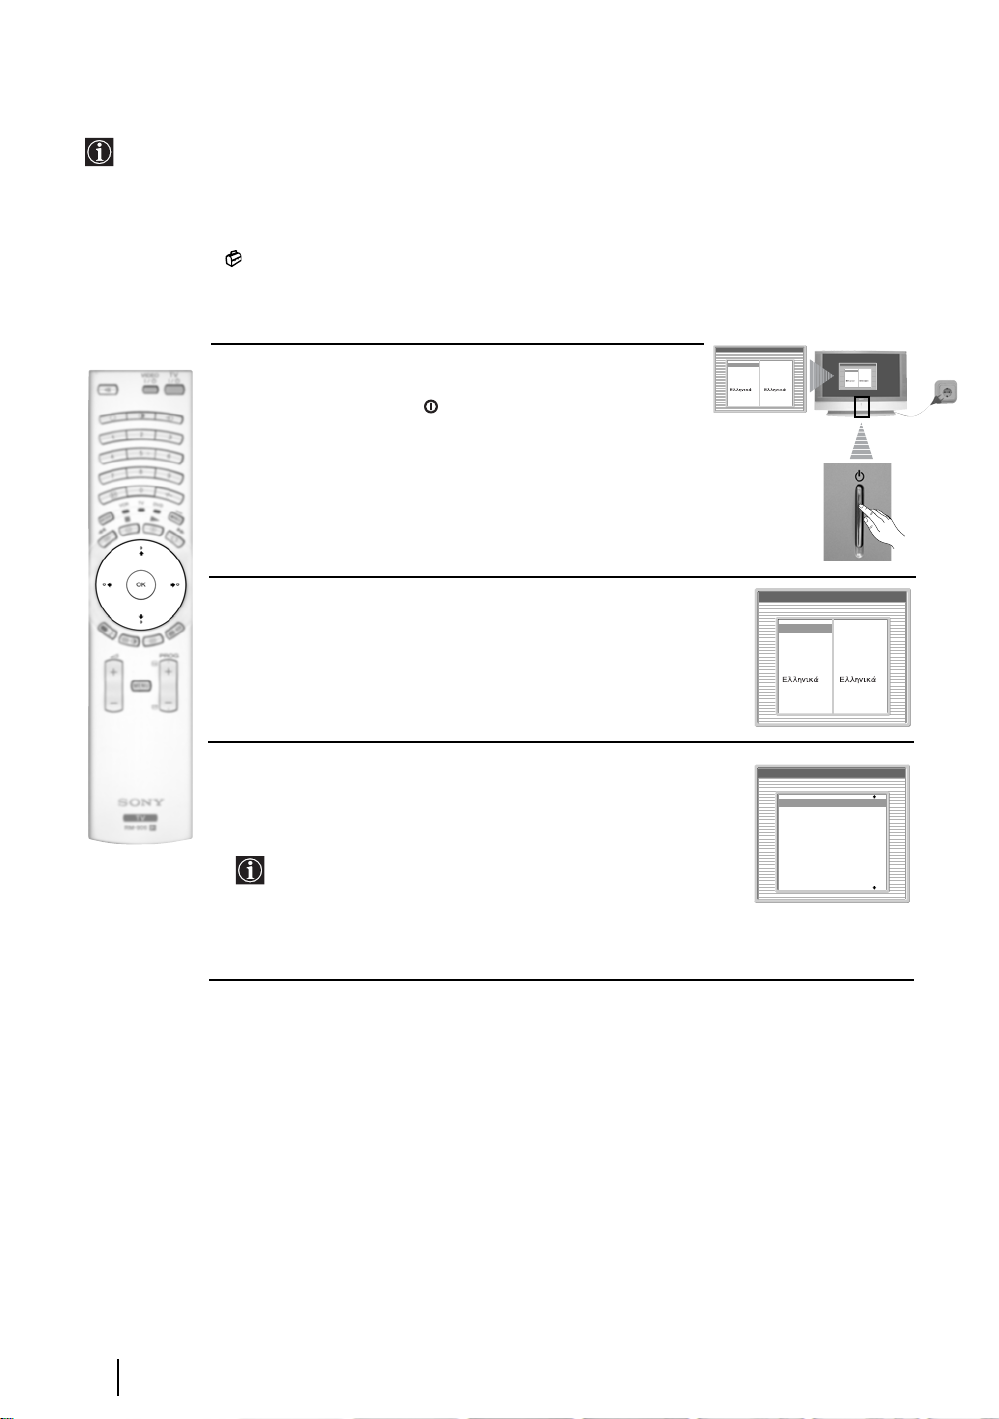
Switching On the TV and Automatically Tuning
The first time you switch on your TV, a sequence of menu screens appear on the TV enabling you to: 1) choose
the language of the menu screen 2) Choose the country in which you are going to operate the TV, 3) check how
to connect optional equipment to your TV, 4) search and store all available channels (TV Broadcast) and 5)
change the order in which the channels (TV Broadcast) appear on the screen.
However, if you need to change any of these settings at a later date, you can do that by selecting the appropriate
option in the (Set Up menu).
Language
Select language
English
English
Nederlands
1 Connect the TV plug to the mains socket (220-240V AC, 50Hz)
The first time that the TV set is connected, it is usually turned on.
If the TV is off, press the on/off button on the TV set to turn
on the TV.
The first time you switch on the TV, a Language menu displays
automatically on the TV screen.
Nederlands
Français
Italiano
Deutsch
Türkçe
Español
Português
Polski
Français
Italiano
Deutsch
Türkçe
Español
Português
Polski
Language
Select language
English
English
Nederlands
Nederlands
Français
Français
Italiano
Italiano
Deutsch
Deutsch
Türkçe
Türkçe
Español
Español
Português
Português
Polski
Polski
2 Press the V, v, B or b buttons on the remote control to select
your language, then press the OK button to confirm your
selection. From now on all the menus will appear in your chosen
language.
3 The Country menu appears automatically. Press the v or V
button to select the country in which you are using the TV. Press
the OK button to confirm your selection.
• If the country in which you want to use the TV set
does not appear in the list, select “off” instead of a country.
• To avoid wrong teletext characters for cyrillic languages we
recommend selecting Russia country if your own country
does not appear in the list.
Language
Select language
English
Nederlands
Français
Italiano
Deutsch
Türkçe
Español
Português
Polski
Country
Select country
Off
Ireland
Nederland
België/Belgique
Luxembourg
France
Italia
Schweiz/Suisse/Svizzera
English
Nederlands
Français
Italiano
Deutsch
Türkçe
Español
Português
Polski
First Time Operation
10
continued...
Page 10
4 A diagram will appear showing you how to connect a wide range
of equipment to your TV set. Follow the instructions and finally
press the OK button to remove the picture and continue the
automatic process.
Please connect your equipment
according to this chart
After the automatic tuning process has finished and the
optional equipment has been connected at this stage, we
recommend you follow the instructions explained on the
section "Connection Guide" on page 17 to get the optimum
settings related with the optional equipment.
5 The Auto Tuning menu appears on the screen. Press the OK
button to select Yes.
6 The TV starts to automatically search and store all
available broadcast channels for you.
This procedure could take some minutes. Please be patient
and do not press any buttons, otherwise automatic tuning
will not be completed.
In some countries the TV Broadcaster installs the channels
automatically (ACI system). In this case, the TV
Broadcaster sends a menu in which you can select your city
by pressing the
channels.
If no channels were found during the auto tune process, a
message appears automatically on the screen asking you to
connect the aerial. Check the aerial connection (refer to
page 9). Press the OK button to restart the auto tuning
process.
v or V button and OK to store the
DVD
OK
Do you want to start
automatic tuning?
Yes No
Auto Tuning
Programmes found: 4
No channel found.
Please connect aerial
Confirm
GB
7 After all available channels are captured and stored,
the Programme Sorting menu automatically appears
on the screen enabling you to change the order in
which the channels are stored.
a) If you wish to keep the broadcast channels in the tuned order,
go to step 8.
b) If you wish to store the channels in a different order:
1 Press the v or V button to select the programme
number with the channel (TV Broadcast) you wish
to move. Press the b button.
2 Press the v or V button to select the new
programme number position for your selected
channel (TV Broadcast). Press the OK button to store.
3 Repeat steps b)1 and b)2 if you wish to change
the order of the other channels.
8 Press the MENU button to remove the menu from the screen
Your LCD TV is now ready for use
Programme Sorting
01
TVE
02
TVE2
03
TV3
04
C33
05
C27
06
C58
07
S02
08
S06
Programme Sorting
01
TVE
02
TVE2
03
TV3
04
05
06
07
08
01 TVE
C33
C27
C58
S02
S06
First Time Operation
11
Page 11
Introducing and Using the Menu System
Your LCD TV uses an On-Screen menu system to guide you through the operations. Use the following buttons
on the Remote Control to operate the menu system:
1 To switch on the menu screens:
Press the MENU button to switch the first level menu on.
2 To navigate through the menus:
• To highlight and select the desired menu or option, press
• To enter the selected menu or option, press OK or
• To return to the last menu or option, press OK or
b.
B.
• To alter the settings of your selected option, press v/V/B or b.
• To confirm and store your selection, press OK.
3 To switch off the menu screens:
Press the MENU button to remove the menu from the screen.
v or V.
Picture Adjustment
Picture Mode: Live
Contrast:
Reset
Noise Reduction: On
ColourTone: Cool
Select: Enter:OKExit:
PictureAdjustment
PictureMode: Live
Contrast:
Reset
NoiseReduction: On
ColourTone: Cool
MENU
Select: Enter:OKExit:
MENU
12
TV Functions
Page 12

The Picture Adjustment Menu
The “Picture Adjustment” menu allows you to
alter the picture settings.
Picture Adjustment
Picture Mode: Live
Contrast:
Reset
Noise Reduction: On
Colour Tone: Cool
Select: Enter:
Picture Adjustment
Picture Mode: Live
Contrast:
Reset
Noise Reduction: On
,
OK
MENU
Exit:
Colour Tone: Cool
Select:Back:
Enter:
OK
Press the MENU button and then press OK to
enter this menu. Next press
v or V to select the
desired option and press OK. Finally read below
how to operate into each option.
Picture Mode This option allows you to customise the Picture Mode based on the programme
you are watching. After selecting this option press OK. Next press repeatedly
To do this:
V to select:
or
Personal (for individual settings).
Live (for live broadcast programmes, DVD and Digital Set Top Box receivers).
Movie (for films).
Once you have selected your desired option, press OK to store.
"Brightness", "Colour" and "Sharpness" level of "Live" and "Movie" mode are fixed on the
factory to get the best picture quality.
Contrast Press
Brightness Press
Colour Press
B or b to reduce or enhance picture contrast. Next press OK to store.
B or b to darken or brighten the picture. Next press OK to store.
B or b to decrease or to increase color intensity. Next press OK to store.
v
GB
Hue Press
Sharpness Press
B or b to decrease or to increase the green tones. Next press OK to store.
B or b to soften or to sharpen the picture. Next press OK to store.
Reset Press OK to reset the picture to the factory preset levels.
Noise This option is set to On to automatically reduce the snowy picture
Reduction visible in the broadcast signal. To cancel this function, pr ess
v or V to select Off.
Colour Tone This option allows you to alter the tint of the picture. After selecting this option
press b. Next press repeatedly v or V to select: Warm (gives the white colours
a red tint), Normal (gives the white colours a neutral tint), Cold (gives the white
colours a blue tint). Next press OK to store.
Lines While viewing an RGB input signal from the PC connector, some picture
Correction lines may be not correctly displayed. To correct this problem, select this option
and press
b. Next press repeatedly v or V to correct it berween -20 and +20.
Finally press OK to store.
• "Brightness" "Colour" and "Sharpness" only appears and only can be altered if "Picture
mode" is set to "Personal".
• "Hue" only appears and only can be altered for NTSC signal (e.g. USA video tapes).
• For an RGB input signal connected to the PC connector, only appear and only can be
altered: "Contrast", "Brightness" and "Lines Correction".
.
TV Functions
13
Page 13
The Sound Adjustment Menu
Picture Adjustment
Picture Mode: Live
Contrast:
Reset
Noise Reduction: On
Colour Tone: Cool
Select: Enter:
m
Sound Adjustment
Sound Effect: Dolby Virtual
Treble:
Bass:
Balance:
Reset
Dual Sound: Stereo
Auto Volume: Off
TV Speakers: On
Headphones Set Up
Select: Enter:
The “Sound Adjustment” menu allows you to
alter the sound settings.
To do this:
Press the MENU button and press
v to select
, then press OK to enter this menu. Next
v or V to select the desired option and
press
OK
MENU
Exit:
press OK. Finally read below how to operate
into each option.
Sound Adjustment
Sound Effect: Dolby Virtual
Treble:
Bass:
Balance:
,
OK
MENU
Exit:
Reset
Dual Sound: Stereo
Auto Volume: Off
TV Speakers: On
Headphones Set Up
Select:Back:
Enter:
OK
Sound This option allows you to customise the Sound Effect. After selecting this
Effect option press OK. Next press repeatedly
v or V to select:
Off (Flat response).
Natural (Enhances clarity, detail and presence of sound by using “BBE High
Definition Sound system”*).
Dynamic (“BBE High Definition Sound system”* intensifies clarity and
presence of sound for better intelligibility and musical realism).
Dolby** (Dolby Virtual, simulates the sound effect of “Dolby Surround Pro
Virtual Logic”).
Once you have selected your desired option, press OK to store.
14
Treble Press
Bass Press
Balance Press
Reset Press OK to reset the sound to the factory preset levels. Next press OK to store.
Dual Sound • For a Stereo broadcast:
TV Functions
B or b to decrease higher-frequency sounds. Next press OK to store.
B or b to decrease or to increase the lower-frequency sounds. Next press
OK to store.
B or b to emphasise the left or the right speaker. Next press OK to store .
v or V to select Stereo or Mono. Next press OK to store.
Press
• For a bilingual broadcast:
v or V to select Mono (for mono chan nel if availab le), A (for channel 1)
Press
or B (for channel 2). Next press OK to store.
continued...
Page 14
Auto Volume Press v or V to select On (the volume level of the channels will stay the same,
independent of the broadcast signal, e.g. in the case of advertisements) or Off (the
volume level changes according to the broadcast signal). Next press OK to store.
If you select “Dolby Virtual” on the “Sound Effect” option, the “Auto Volume” option will
automatically be switched to “Off” and vice versa.
TV Speakers This option allows you to select if you want to listen the TV from the TV speakers
or from an external amplifier connected to the audio outputs on the rear of the TV.
v or
After selecting this option, press OK. Next press repeatedly
On (to listen the TV from the TV set speakers).
One time off (to listen to the TV from the external amplifier only one
time. By using this option, any time the TV is turned
off/on, it returns to the default setting "On").
Permanent off (to always listen to the TV from external amplifier).
Once you have selected your desired option, press OK to store.
If you have selected "One time off" or "Permanent off", the volume of the external equipment
can also be altered by pressing the 2 +/- buttons of the remote control. When the volume
buttons are pressed, the symbol
not the volume of the TV set speakers, it is from the external equipment.
Headphones Set Up This option allows you to customise the headphones volume and the
PAP settings (refer to page 21 for details on PAP).
After selecting this option press OK. Next press repeatedly
% will appear indicating that the volume you are altering is
V to select:
v or V to select:
GB
volume Press
Dual Sound • For a Stereo broadcast:
Press
PAP Sound Select Frame if you want to listen to
the active screen (framed) of the PAP screen (see page
* The “BBE High Definition Sound system” is manufactured by Sony Corporation under
license from BBE Sound, Inc. It is covered by U.S. Patent No. 4,638,258 and No.
4,482,866. The word “BBE” and BBE Symbol are trademarks of BBE Sound, Inc.
**This TV has been designed to create surround sound effect by simulating the sound of four
speakers with two speakers, when the broadcast audio signal is Dolby Surround encoded.
The sound effect can also be improved by connecting a suitable external amplifier (for
details refer to page 25).
**Manufactured under license from Dolby Laboratories. “Dolby” and the double-D symbol
are trademarks of Dolby Laboratories.
B or b to decrease or increase the volume level
from the headphones.
v or V to select Stereo or Mono
• For a bilingual broadcast:
v or V to select Mono (for mono channel if
Press
available), A (for channel 1) or B (for channel 2).
21), select Left picture if you want to listen to the left
screen or select Right picture if you want to listen to
the right screen.
TV Functions
15
Page 15

The Features Menu
Picture Adjustment
Picture Mode: Live
Contrast:
Reset
Noise Reduction: On
Colour Tone: Cool
Select: Enter:OKExit:
m
Features
Auto Format On
AV3 Output TV
Connection Guide
Select: Enter:
The “Features” menu allows you to alter various settings of the TV.
To do this:
Press the MENU button and press
v twice to
select , then press OK to enter this menu.
MENU
Features
Auto Format On
AV3 Output TV
Connection Guide
Next press
and press OK. Finally read below how to
operate into each option.
v or V to select the desired option
,
OK
MENU
Exit:
Select:Back:
AUTO FORMAT
This option allows you to automatically change the aspec t ratio of the screen.
To do this:
After selecting the option, press OK. Then press
automatically switch the screen format according to the broadcast signal) or Off (if you wish to
keep your preference). Finally press OK to store.
Even if you have selected “On” or “Off”, you can always modify the format of the screen by
pressing repeatedly on the remote control to select one of the following formats:
Enter: :
OK
v or V to select On (if you wish the TV set to
16
TV Functions
SMART: Imitation of wide screen effect for 4:3 broadcast.
SMART
4/3: Conventional 4:3 picture size, full picture
information.
4:3
14/9: Compromise between 4:3 and 16:9 picture size.
14:9
ZOOM: Widescreen format for letterbox movies.
ZOOM
WIDE: For 16:9 broadcast. Full picture information.
WIDE
• In “SMART”, “ZOOM” and “14/9” modes, parts of the top and bottom of the screen are
cut off. Press
v or V to adjust the position of the image on th e screen (e.g. to read subtitle s).
• Only "WIDE" and "4/3" modes can be selected for an RGB signal connected to the PC
connector.
• According to the format of diffussion, black bands can always appear whatever the selected
mode.
continued...
Page 16
AV3 OUTPUT
This option allows you to select the source to be output from the Scart connector
S
3/ 3 so that you can record from this Scart any signal coming from the TV or from an
external equipment connected to the Scart connector 1/ 1, 2/ 2 or front connectors
S
4 or 4 and 4.
If your VCR supports SmartLink, this procedure is not necessary.
To do this:
Once you have entered into the "Features" menu as it is explained in the previous page and after
selecting the option, press OK. Then press
TV to output the aerial source.
AV1 to output sources connected to 1/ 1.
AV2 to output sources connected to 2/ 2.
AV4 to output sources connected to 4 or 4 and 4.
AUTO to output the signal that is being viewed on the TV.
• If you select “AUTO”, the output signal will always be the same one that is displayed on
the screen.
• If you have connected a decoder to the Scart 3/ 3 or to a VCR connected to this
Scart, please remember to change back the “AV3 Output” to “TV” for correct
unscrambling.
CONNECTION GUIDE
Even you have already connected the external equipment to the TV set, it is important for you to
follow the instructions of this menu. If you proceed in this way, you will get the optimum picture
settings related with the optional equipment.
To do this:
v or V to select the desired output signal:
S
S
1 Once you have entered the "Features" menu as it is explained in the previous page and after
selecting the option, press OK. Next press
among the available: SAT (satellit), Decoder, DVD, GAME, VIDEO or DVD rec. (DVD
recorder). Next press
by pressing
select "Confirm" and press OK.
B). Once you have selected all the equipment to be connected, press v or V to
b to select the equipment chosen (equipment selected also can be deleted
v or V to chose the equipment you want to connect
2 A new menu will appear showing you on which Scart connector of the rear of the TV should be
connected each equipment. Please connect each equipment according to this information to get
the optimum picture setting of the optional equipment.
3 Once you have connected the optional equipment, press B or b to select "OK" and finally press
the OK button of the remote control.
We strongly recommend you to follow our connection proposals, but in case you do not agree press B
or b to select «No» and next press the OK button. A new menu appears on the screen in which you
can assign the connections according to your preferences.
GB
RGB CENTRING
This option is only available if an RGB source has been connected to the TV.
This option allows you to readjust the horizontal position of the picture in case you need to do it
when connecting an RGB source.
To do this:
Once you have entered the "Features" menu as it is explained in the previous page and while
watching an RGB source select the “RGB Centring” option and press OK. Then press
adjust the centre of the picture between –5 and +5. Finally press OK to confirm and store.
v or V to
TV Functions
17
Page 17
The Set Up Menu
Picture Adjustment
Picture Mode: Live
Contrast:
Reset
Noise Reduction: On
Colour Tone: Cool
Select: Enter:
m
Set Up
Language
Country
Auto Tuning
Programme Sorting
Programme Labels
AV Preset
Manual Programme Preset
Select: Exit:
Enter:
The “Set Up” menu allows you to alter various
options on this TV.
To do this:
v
Press the MENU button and press
three
times to select , then press OK to enter this
v
menu. Next press
OK
MENU
Exit:
option and press OK. Finally read below how
or V to select the desired
to operate into each option.
Set Up
Language
Country
Auto Tuning
Programme Sorting
,
MENU
OK
Programme Labels
AV Preset
Manual Programme Preset
Select:Back:
Enter:
OK
LANGUAGE
This option allows you to select the language that menus are displayed in.
To do this:
After selecting the option, press OK and then proceed in the same way as in step 2 of the section
"Switching On the TV and Automatically Tuning" on page 10.
COUNTRY
This option allows you to select the country in which you wish to operate the TV set.
To do this:
After selecting the option, press OK and then proceed in the same way as in step 3 of the section
"Switching On the TV and Automatically Tuning" on page 10.
AUTO TUNING
This option allows you to automatically search for and store all available TV channels.
To do this:
After selecting the option, press OK and then proceed in the same way as in the steps 5 and 6 of
the section “Switching On the TV and Automatically Tuning” on page 11.
PROGRAMME SORTING
This option allows you to change the order in which the channels (TV Broadcast) appear on the
screen.
To do this:
After selecting the option, press OK and then proceed in the same way as in the st ep 7 of the section
“Switching On the TV and Automatically Tuning” on page 11.
continued...
18
TV Functions
Page 18

PROGRAMME LABELS
This option allows you to name a channel using up to five characters (letters or numbers).
To do this:
1 Once you have entered the "Set Up" menu as it is explained in the previous page and after selecting the option,
press OK, then press v or V to select the programme number with the channel yo u wish to name. Next press OK.
2 With the first element of the Label column highlighted, press OK and
press OK.
When you have finished, press
turn off the menu from the screen.
• To correct the letter, select "
• For a blank, select " " on the screen and press OK.
AV PRESET
This option allows you to:
a) Designate a name to the external equipment you have connected to the input sockets of the TV set.
To do this:
v, V
, B or b to select the word “End” on the screen and finally press OK to
%" on the screen to go back and press OK.
v, V
, B or b to select the letter, next
1 Once you have entered the "Set Up" me nu as it is explained in the previous page and after selecting the option,
v
press OK, then press
Scarts, AV4 for front connectors and AV5 for the PC input connector. Next press OK twice.
or V to select the input source you wish to name: AV1, AV2 or AV3 for the rear
2 A label automatically appears in the label column:
a) If you want to use one of the predefined labels, press
The total predefined labels are: VIDEO, DVD, CABLE, GAME, CAM (ca mcorder), SAT (satellite)
or PC (only for the AV5).
b) If you want to set a different label, select Edit and press OK. Then, with the first element highlighted, press
v or V to select the desired label and finally press OK.
v, V, B or b to select the le tter, next p ress OK. When you have finished, press v, V, B or b to select
the word “End” on the screen and finally press OK to turn off the menu from the screen.
GB
• To correct the letter, select "
• For a blank, select " " on the screen and press OK.
%" on the screen to go back and press OK.
b) Change the input sound level of the optional equipment connected.
To do this:
Once you have entered the "Set Up" menu as it is explained in the previous page and after selecting the option
v
press OK, then press
AV3 for the rear Scarts, AV4 for front connectors and AV5 for the PC input connector. Next press twice
highlight the Sound Offset column. Finally press OK and v or V to alter the input sound level between -9 and
+9.
or V to select the input source you want to alter the input sound level: AV1, AV2 or
continued...
TV Functions
b to
19
Page 19
MANUAL PROGRAMME PRESET
This option allows you to:
a) Preset channels or the VCR channel one by one to the programme order of your choice.
To do this:
1 Once you have entered the “Set Up”menu as it is explained on page 18 and after selecting the "Manual
Programme Preset" option, press OK. Next with Programme option highlighted press OK.
Press
v or V to select which programme number you want to preset the channel on (for VCR, select
programme number “0”). Then press B.
2 The following option is only available depending on the country you have selected in the “Country”
menu.
After selecting the System option, press OK. Then press
for western European countries, D/K for eastern European countries, L for France or I for United Kingdom).
Then press
B.
3 After selecting the Channel Number option, press OK. Next press
for terrestrial channels or "S" for cable channels). Then press the number buttons to enter directly the channel
number of the TV Broadcast or the channel of the VC R signal. If you do not know the channel number, press
v or V to select the TV Broadcast system (B/G
v
or V to select the channel tuning ("C"
b and v or V to search for it. When you have tuned the desired channel, press OK twice to store.
Repeat all the above steps to tune and store more channels.
b) Label a channel using up to five characters.
To do this:
Once you have entered the “Set Up”menu as it is explained on page 18 and after selecting the "Manual
Programme Preset" option, press OK. Next with the Programme option, highlighted press the PROG +/- button
to select the programme number with the channel you wish to name. When the programme you want to name
appears on the screen, select the Label option and press OK. Then, with the first element highlighted, press
V
, B or b to select the letter, next press OK. When you have finished, press v, V, B or b to select the word
“End” on the screen and finally press OK to turn off the menu from the screen.
• To correct the letter, select "
• For a blank, select " " on the screen and press OK.
%" on the screen to go back and press OK.
v
,
c) Fine tune the broadcast reception. Normally the automatic fine tuning (AFT) will give the best possible picture,
however you can manually fine tune the TV to obtain a better picture reception in case the picture is distorted.
To do this:
While watching the channel (TV Broadcast) you wish to fine tune, and once you have entered the “Set Up” menu
as it is explained on page 18 and after selecting the "Manual Programme" option, press
option and press
to store.
b. Next press v
or V
to adjust the fine tuning between -15 and +15. Finally press OK twice
OK.
Then select the AFT
d) Skip any unwanted programme numbers when they are selected with the PROG +/- buttons.
To do this:
Once you have entered the "Set Up" menu as it is explained on page 18 and after selecting the "Manual
Programme Preset" option, press OK. Next with the Programme option highlighted, press the PROG +/- button
to select the programme number you want to skip. When the programme you want to skip appears on the screen,
select the Skip option and press
To cancel this function afterwards, select “Off” instead of “On” in the step above.
b. Next press v or V
to select On. Finally press OK twice to confirm and store.
e) View and record scrambled channels (e.g. from a pay TV decoder) when using a decoder connected to Scart
3/ 3 directly or through a VCR.
To do this:
Once you have entered the "Set Up" menu as it is explained on page 18 and after selecting the "Manual Programme
Preset" option, press OK. Next select the Decoder option and press
press OK twice to confirm and store.
To cancel this function afterwards, select "Off" instead of "On" in the step above.
S
This option is only available depending on the country you have selected in the “Country” menu.
b. Next press v or V to select On. Finally
20
TV Functions
Page 20
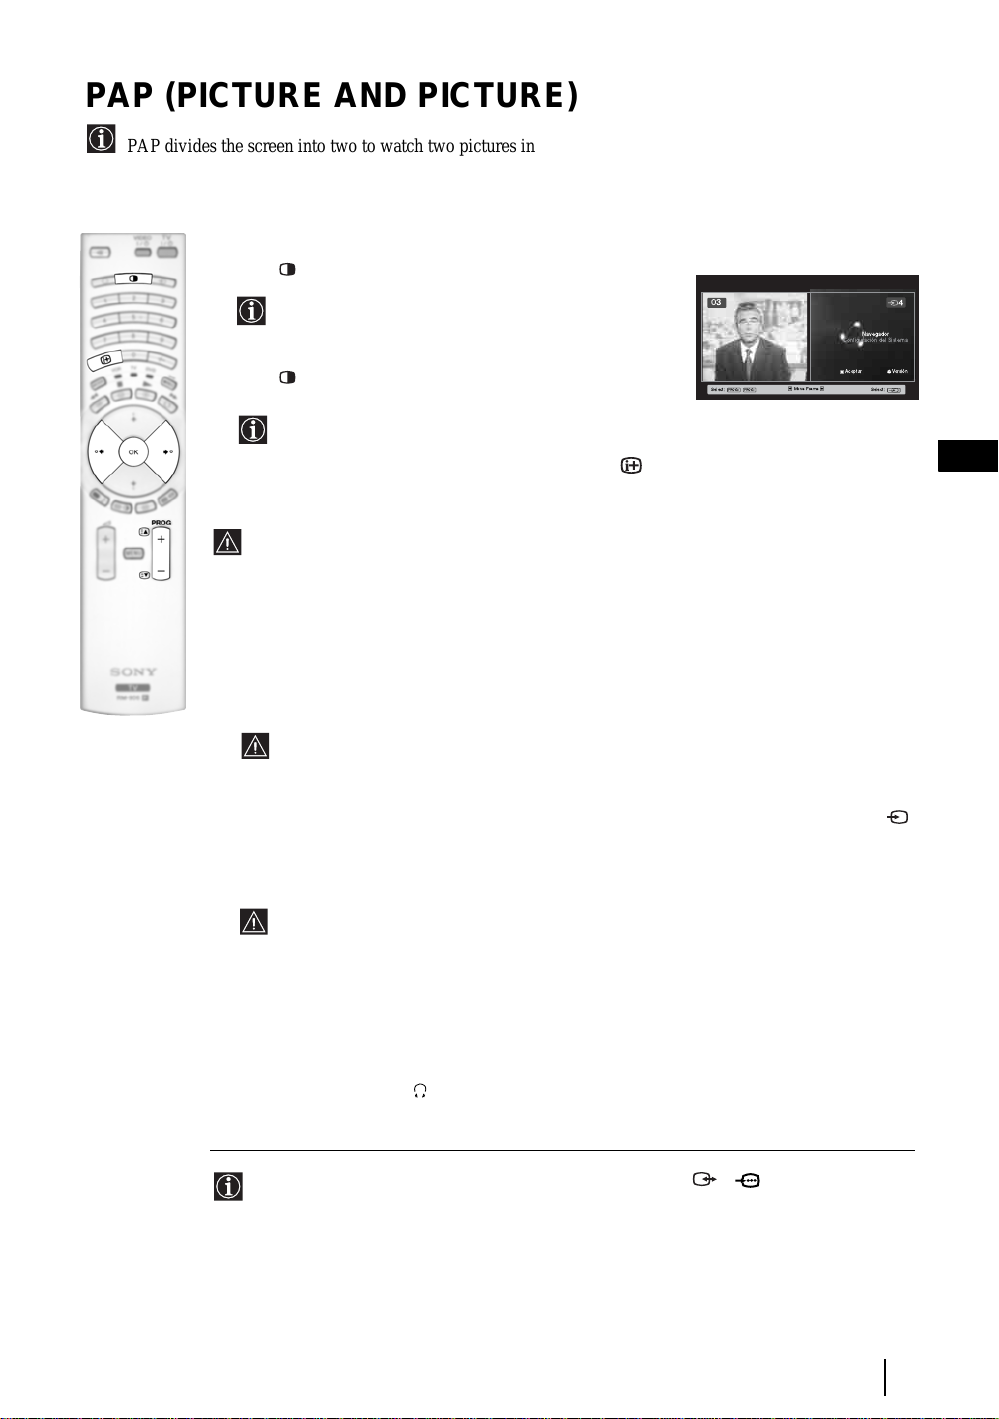
PAP (PICTURE AND PICTURE)
PAP divides the screen into two to watch two pictures in format 4:3 simultaneously.
Switching PAP on and off
1 Press to display PAP.
One of the screens will be framed to indi cate th at t his is
the active screen. It means that when you want to select
the PAP source, you will be doing it in the active screen.
2 Press again to remove PAP.
On the screen appears a banner guiding you how to operate
PAP. This banner will disappear after some seconds but it
always can be displayed again by pressing the button.
Changing the active screen
This is only possible if Media Selector is set to TV.
To change the active screen (framed), press the B or b buttons.
Selecting PAP source
1 Selecting a TV ch annel:
Press the
or PROG +/- to select a TV channel.
B button to select the left screen as the active screen. Next press the number buttons
03
Navegador
Configuración del Sistema
Aceptar Versión
PROG+ PROG-
Select: Select:
MoveFrame
GB
Video input signals can not be displayed on the left screen.
2 Selecting an input source:
Press the
button to watch the input signal of a connected equipment onto the TV right screen. For more
details on which input symbol you want to choose, please see section "Viewing pictures from
equipment connected to the TV" on page 25.
RF signal (TV broadcast channels) can not be displayed on the right screen.
Selecting the sound
The sound of the active screen (framed) always comes from the TV set loudspeakers.
Besides that, you can listen to the active screen as well as the non active screen via headphones.
To do this:
With the PAP switched on, refer to the section "The Sound Adjustment Menu", select "Headphones
Set Up" and set the option " PAP Sound" according your preference. For details see page 15.
b button to select the right screen as the active scree n. Next press repea tedly the
In PAP (picture and picture) mode, the output from the Scart 2/ 2 is fixed to the right
picture.
TV Functions
21
Page 21
Teletext
Teletext is an information service transmitted by most TV stations. The index page of the teletext service
(usually page 100) gives you information on how to use the service. To operate teletext, use the remote control
buttons as indicated below.
Teletext errors may occur if you use a channel (TV Broadcast) with a weak signal.
To switch on Teletext :
1 Select the broadcast channel which carries the teletex t
service you wish to view.
2 Press the button one time to enter Picture and
Text (P&T) mode. The screen is divided into two with
the Text display on the left and the TV channel in the
right corner.
3 If you wish to view the Text in full screen mode, press
the button a second time.
To select a Teletext page:
Input 3 digits for the page number, using the numbered buttons.
• If you make a mistake, retype the correct page number.
• If the counter on the screen continues searching, it is because the page
is not available. If this is the case, input another page number.
To access the next or preceding page:
Press PROG + ( ) or PROG - ( ) .
To freeze a teletext page:
Press . Press it again to cancel the freeze.
To select a sub page:
A teletext page may consist of several sub pages. In this case, one or more arrows appear next
to the page number and an information box is displayed at the bottom of the screen showing the
number of sub pages contained on this page. As soon as sub pages are available, they start to
automatically run. If you want to stop the show and select your desired sub page, press repeatedly
B or b.
To Switch Off Teletext:
Press .
Fastext
Fastext service lets you access Teletext pages with one button push.
When you are in Teletext mode and Fastext is broadcast, a colour coded menu appears at
the bottom of the teletext page. Press the appropriate coloured button (red, green, yellow
or blue) to access the page corresponding to your menu choice.
22
Teletext
Page 22
NexTView*
*(depending on availability of service).
NexTView is an on-screen electronic programme guide, providing you with programme information for
different broadcasters.
When looking for information you can search by theme (sports, art, etc...) or date.
If wrong characters appear when viewing NexTView, use the menu system to enter the “Language” menu (see
page 18) and select the same language as the NexTView is broadcasted.
Displaying NexTView
1 Select a broadcast channel providing a NexTView service. In this case the indication
“NexTView” is displayed as soon as data is available.
2 To see NexTView service you have two different types of NexTView interface. These depend
on the % of available data:
a) “Programme List” interface:
Whilst you are watching TV, and after the indication “NexTView” (coloured white) is
displayed on the screen, press the button on the remote control to watch the
“Programme List” interface (see fig. 1).
b) “Overview” interface:
Whilst you are watching TV, and after more than 50% of NexTView data is available
(100% data may not be available depending on the area) the indication “NexTView”
(coloured black) is displayed on the screen. Press the button on the remote control
to watch the “Overview” interface (see fig. 2).
3 To navigate through NexTView:
B or b to move left or right.
• Press
•Press
v or V to move downwards or upwards.
• Press OK to confirm a selection.
• If you have selected a programme, press OK to get more information on the
selected programme.
GB
4 To switch NexTView off, press the button on the remote control.
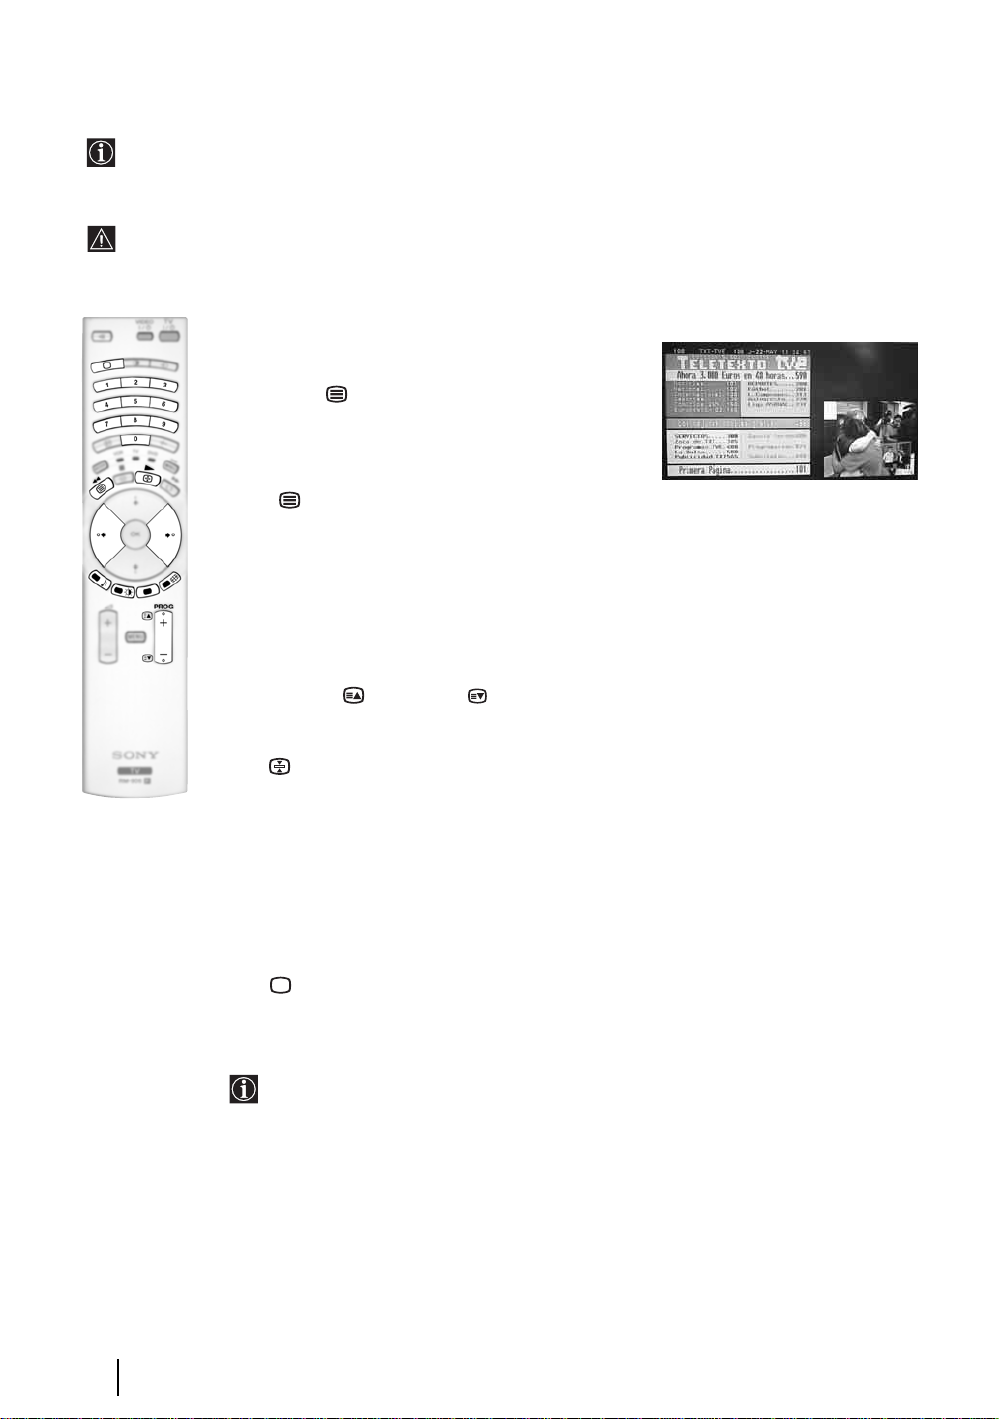
“Programme List” interface (fig. 1): “Overview” interface (fig. 2):
1 Programmme list 2 3
Icons’ key:
General:
All the programme information is listed by time
and broadcast channels order.
News
Movie
Sports
Praesentiert von
Ihrer Programmzeitschr
Thu 12
14:30
AttrText
AttrText
AttrText
1
AttrText
AttrText
AttrText
Perry Mason
RTL2
Krimiserie - DerFall mit dem mittelmass
2
www.tvmovie.de
15:00
Tue 17 Jun 14:55 - 16:30
Select:
15:30
AttrText16
AttrText16
AttrText16
AttrText16
AttrText16
AttrText16
Thu 12 Jun
14:36
16:00
General
CategoriesDate
3
Date:
Press the red button of the remote
control to display the date screen, you
can select the desired date by pressing
v or V. Next press OK to confirm.
Show
Children
Arts
Praesentiert von
Ihrer Programmzeitschr
Thu 12
AttrText
AttrText
AttrText
1
AttrText
AttrText
AttrText
Perry Mason
RTL2
Krimiserie - DerFall mit dem mittelmass
Date
www.tvmovie.de
15:00
14:30
Auf schlimmer undewig
Baywatch
Benny Hill
Perry Mason
The Osbournes
Segeln: Louis VuittonCup
Twilight Zone
Tue 17 Jun 14:55 - 16:30
Select:
2
Categories:
Press the blue button of the remote to
display the icons (see below the Icon’s key)
for different themes. Next press v or V to
select the desired icon and finally press the
OK button to confirm.
Music
15:30 16:00
NexTView
Thu 12 Jun
14:36
General
categories
3
23
Page 23
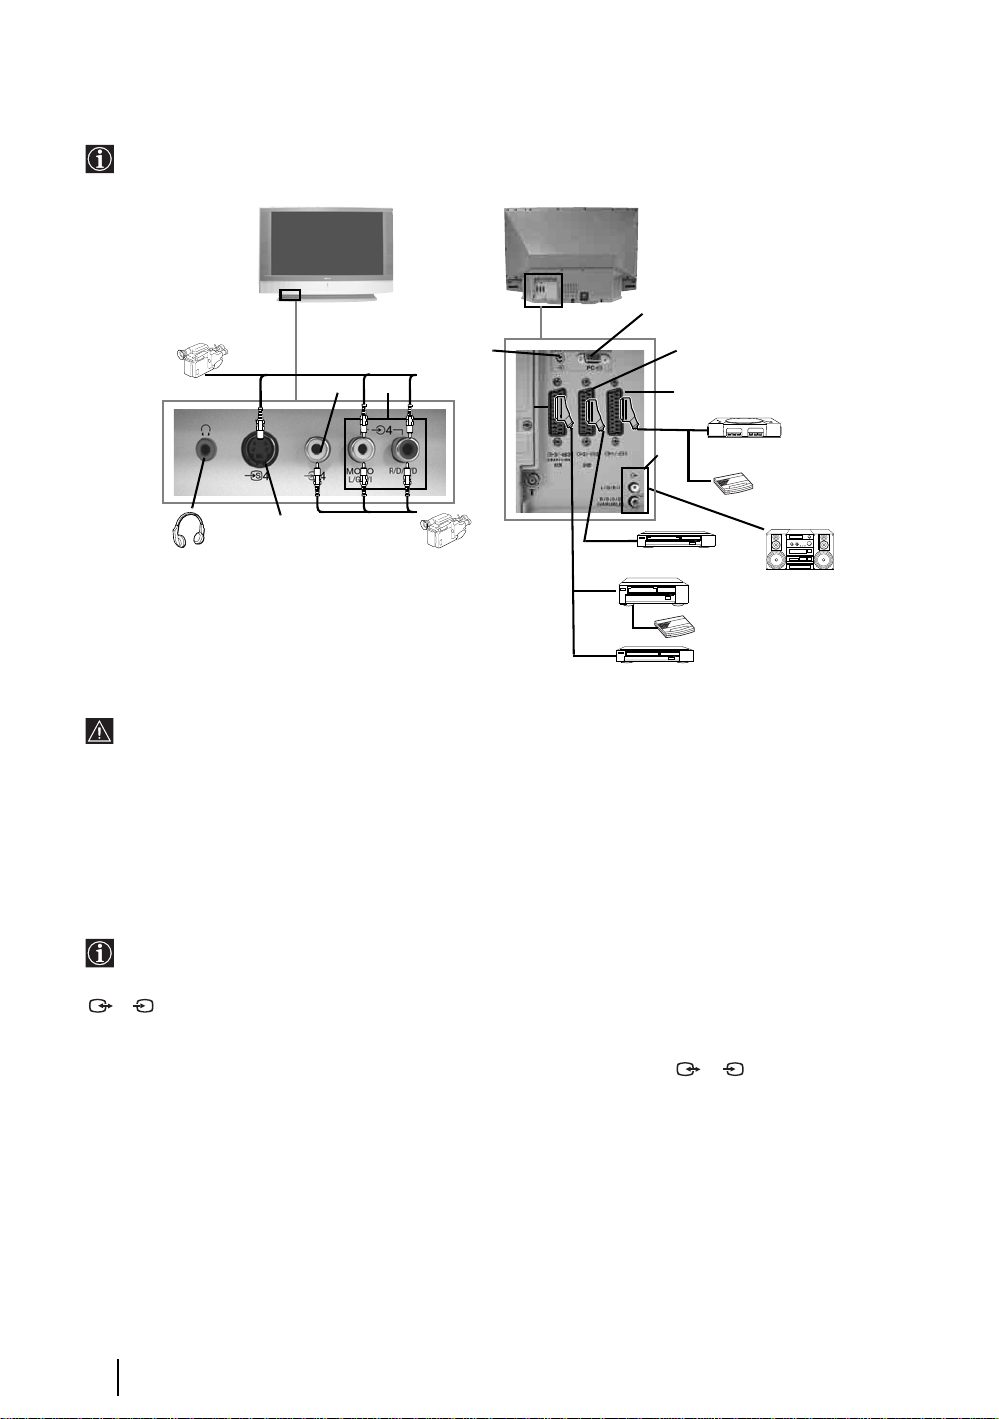
Connecting Equipment to the TV
• Using the following instructions you can connect a wide range of optional equipment to your TV set.
• Connecting cables are not supplied.
* “PlayStation” is a
product of Sony
Computer
S VHS/Hi8/
DVC
camcorder
A
B
C
I
E
H
F
G
D
Entertainment, Inc.
* “PlayStation” is a
trademark of Sony
Computer
Entertainment, Inc.
2
1
“PlayStation”*
Decoder/
Set Top Box
8mm/Hi8/
DVC
camcorder
DVD
Hi-fi
VCR
Decoder/ Set Top Box
DVD recorder
• To avoid picture distortion, do not connect external equipment to connectors A and B at the
same time.
• Do not connect a Decoder to the Scart F.
Connecting a VCR
To connect a VCR, please refer to the section “Connecting the aerial and VCR” of this instruction manual on page 9.
Connecting a VCR that supports SmartLink
SmartLink is a direct link between the TV set and the VCR. For more information on SmartLink, please refer
to the instruction manual of your VCR.
If you use a VCR that supports SmartLink, please connect the VCR to the TV using a Scart lead to the Scart
S
3/ 3 E.
If you have connected a decoder or a Set Top Box t o the Scart 3/ 3 E or through a
S
VCR connected to this Scart
Select the “Manual Programme Preset” option in the “Set Up” menu and afte r entering in the “Decoder**” option,
select “On” (refer to page 20). Repeat this option for each scrambled signal.
**This option is only available depending on the country you have selected in the “Country” menu.
24
Additional Information
continued...
Page 24
Connecting Audio Equipment to the TV
Conect your audio equipment to the audio output sockets D if you wish to amplify the audio output from TV. Next
, using the menu system, select the “Sound Adjustment” menu and set the “TV Speakers” to “One time off” or
"Permanent off" (see page 15).
The volume of the external speakers can be altered by pressing the volume buttons on the remote control. The
Treble and Bass settings can also be altered through the “Sound Adjustment” menu (see page 14).
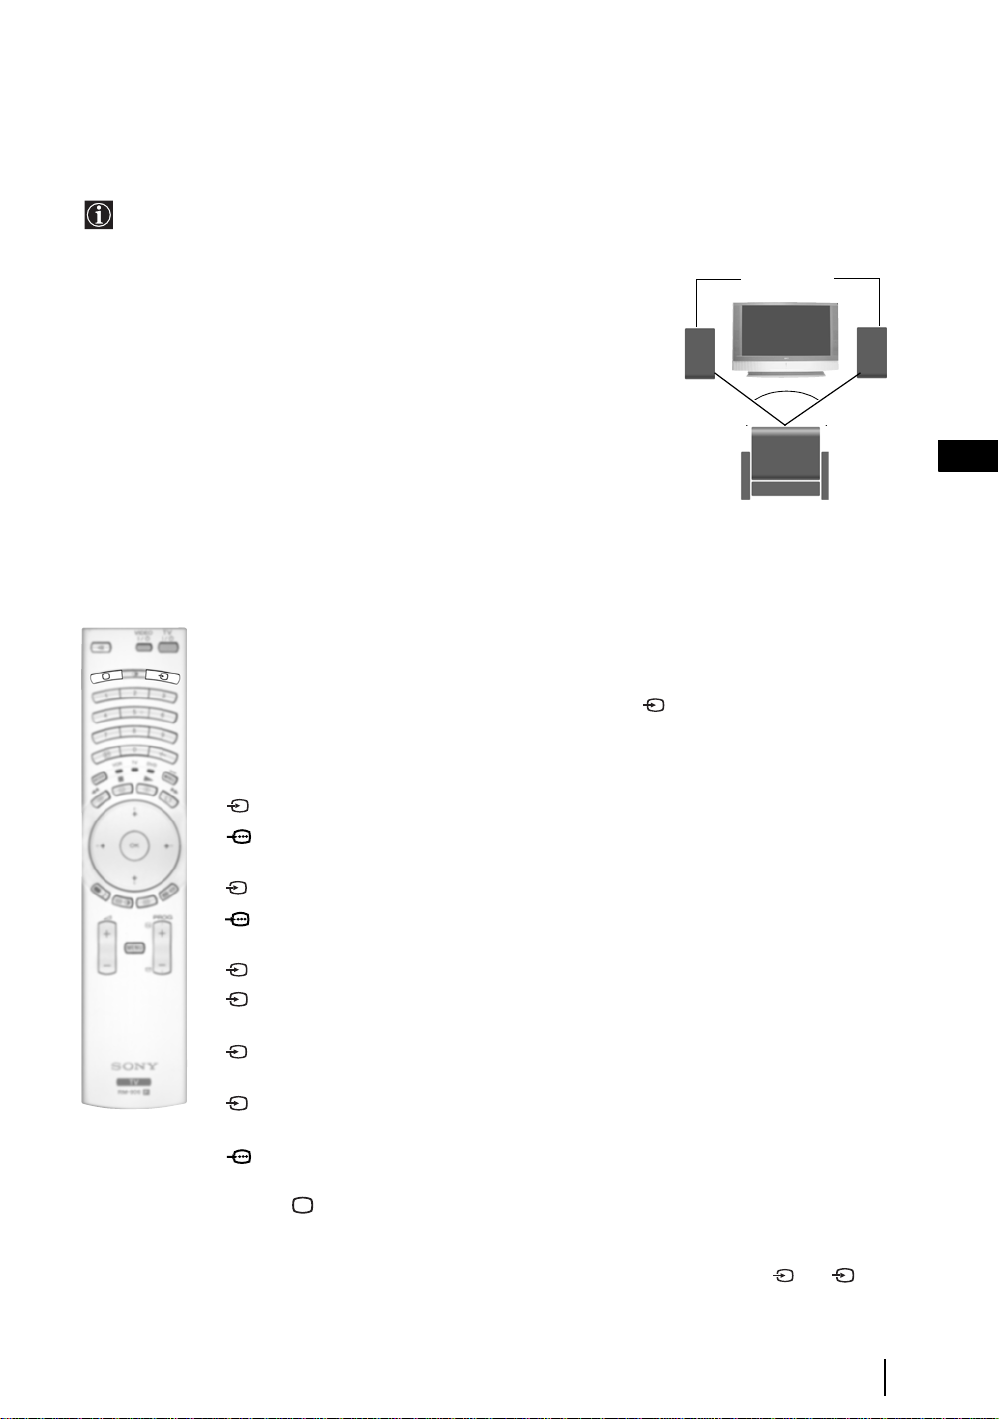
Hi-Fi speakers
To enjoy “Dolby Virtual” sound effect through your
audio equipment
Place the speakers of your equipment in front of your listening position and
beside the TV set, keeping a distance of 50 cm between each speaker and the
TV set.
Then by using the menu system, select the menu “Sound Adjustment”. Next
select “Dolby Virtual” on the “Sound Effect” option (see page 14).
~50°
Your sitting position
Viewing pictures from equipment connected to the
TV
1 Connect your equipment to the designated TV socket, as indicated in the previous page.
GB
2 Switch on the connected equipment.
3 To watch the picture of the connected equipment, press the button repeatedly until the correct
input symbol appears on the screen.
Symbol Input Signals
1 • Audio / video input signal through the Scart connector G
1 • RGB input signal through the Scart connector G. This symbol appears only if an
RGB source has been connected.
2 • Audio / video input signal through the Scart connector F.
2 • RGB input signal through the Scart connector F. This symbol appears only if an
RGB source has been connected.
3 • Audio/video input signal through the Scart connector E.
S
3 • S Video Input signal through the Scart connector E. This symbol appears only if
an S Video source has been connected.
4 • Video input signal through the phono socket B and Audio input signal through
C.
S
4 • S Video Input signal through the front S Video input jack A and Audio signal
through C. This symbol appears only if an S Video source has been connected.
5 • RGB input signal through the PC connector H and I.
4 Press the button on the remote control to return to the normal TV picture.
For Mono Equipment
Connect the phono plug to the L/G/S/I socket on the front of the TV and select 4 or 4 input
signal using the instructions above. Next, refer to the “Sound Adjustment” section of this manual and
set “Dual Sound” option to “A” on the sound menu screen (see page 14).
S
Additional Information
25
Page 25
Remote Control Configuration for VCR or DVD
In it’s default condition this remote control will operate the basic functions of this Sony TV, Sony DVDs and
most Sony VCRs. To control VCRs and DVDs of other manufacturers (and some Sony VCR models), the
remote control needs to be configured.
fig. 3
To do this:
• Before you start, look up the 3 digit code for your brand of DVD or VCR from the list below.
On those brands that have more than one code, enter the first code number.
• A small label is added inside the battery door to allow you to record your brand codes.
1 Press the Media Selector button until the required green light (VCR or
DVD) is lit (see fig. 1).
fig. 1
2 Before the green light goes out, press and hold the yellow button for
approximately 6 seconds until the green light (VCR or DVD) starts
flashing (see fig. 2.).
3 While the VCR and DVD lights are flashing, enter all three digits of the
code for your brand of VCR or DVD (see the list below) using the number
buttons on the remote control (see fig. 3).
If your selected code is entered correctly, the three green lights will
be lit momentarily. Otherwise repeat all the above steps.
fig. 2
4 Turn on your VCR or DVD and check that the main functions work.
• If your device is not working or some of the functions do not
work please check that you entered the correct code set or try
the next code listed against the brand.
• Not all brands are covered and not all models of every brand may be covered.
6 sec.
5 Always remember to press Media Selector button until the green light iluminates according to
the equipment you want to operate with this remote control: VCR, TV or DVD.
VCR Brand List DVD Brand List
Brand Code Brand Code
SONY (VHS) 301, 302, 303, 308, 309,362
SONY (BETA) 303, 307, 310
SONY (DV) 304, 305, 306
AIWA 325, 331, 351
AKAI 326, 329, 330
DAEWOO 342, 343
GRUNDIG 358, 355, 360, 361, 320, 351, 366
HITACHI 327, 33 3, 334
JVC 314, 315, 322, 344, 352, 353, 354, 348, 349
LG 332, 338
LOEWE 358, 355, 360, 361, 320, 351
MATSUI 356, 357
ORION 328
PANASONIC 321, 323
PHILIPS 311, 312, 313, 316, 317, 318, 358, 359,
363, 364
SAMSUNG 339, 340, 341, 345
SANYO 335, 336
SHARP 324
THOMSON 319, 350, 365
TOSHIBA 337
26
Additional Information
SONY 001, 029, 030, 036, 037, 038, 039, 040,
041, 042, 043, 044, 053, 054, 055
AIWA 021
AKAI 032
DENON 018, 027, 020, 002
GRUNDIG 009, 028, 023, 024, 016, 003
HITACHI 025, 026, 015, 004, 035
JVC 006, 017
KENWOOD 008
LG 015, 014, 034
LOEWE 009, 028, 023, 024, 016, 003
MATSUI 013, 016
ONKYO 022, 033
PANASONIC 018, 027, 020, 002, 045, 046, 047
PHILIPS 009, 028, 023, 024, 016, 003, 031
PIONEER 004, 050, 051, 052
SAMSUNG 011, 014
SANYO 007
SHARP 019, 027
THOMSON 012
TOSHIBA 003, 048, 049
YAMAHA 018, 027, 020, 002
Page 26
Optimum Viewing Area
For the best picture quality, try to position the TV set so that you can view the screen from within the areas
shown below.
Horizontal viewing area
K
F
-
4
2
S
X
3
0
0
K
:
5
0
S
0
S
X
1
X
3
0
0
K
:
1
.
3
8
0
0
K
:
2
.
2
65º
K
F
-
K
F
-
6
.
8
m
a
n
d
m
o
r
m
m
a
e
a
n
d
m
o
r
e
n
d
m
o
r
e
Vertical viewing area
65º
(Optimum viewing position)
K
F
-
4
2
S
X
3
0
K
F
K
F
-
6
0
K
-
5
0
S
0
S
:
1
.
8
X
3
0
X
3
0
0
m
a
0
K
:
K
:
2
30º
n
d
1
.
8
.
2
m
o
r
m
m
a
e
a
n
d
m
o
r
e
n
d
m
o
r
e
GB
30º
(Optimum viewing position)
Additional Information
27
Page 27
Replacing the lamp
When the lamp becomes dark or the picture colour is not normal or the lamp indicator on the TV set flashes,
replace with a new lamp.
• Only use the lamp XL-2100E for replacement. If you use another lamp, it may cause damage to the TV set.
• Do not remove the lamp except when replacing it.
• Before replacing the lamp, turn off the power and disconnect the power cord.
• Replace the lamp only after it becomes cool. The front glass of the lamp remains at least 100 °C (212 °F) even
after the power has been turned off for 30 minutes.
• Do not place the old lamp in proximity to children or flammable material.
• Do not get the old lamp wet, or insert objects inside the lamp. It may cause the lamp to explode.
• Do not place the old lamp near easily flammable objects, as this may cause fire. Also, do not put your hand inside
the lamp compartment, as you may be burned.
• Attach the new lamp securely. If it is not securely attached, the picture may become dark.
• Do not touch or stain the front glass of the new lamp or the glass of the lamp compartment. If the glass become
dirty, the picture quality may deteriorate or the lamp life may shorten.
• Attach the lamp cover firmly. If it is not firmly attached, the power will not turn on.
• When the lamp burns out, a noise is audible. This does not indicate damage to the TV set.
• Consult your nearest Sony service center to obtain a new lamp.
• Always remember to dispose of used lamps in an evironmentally friendly way.
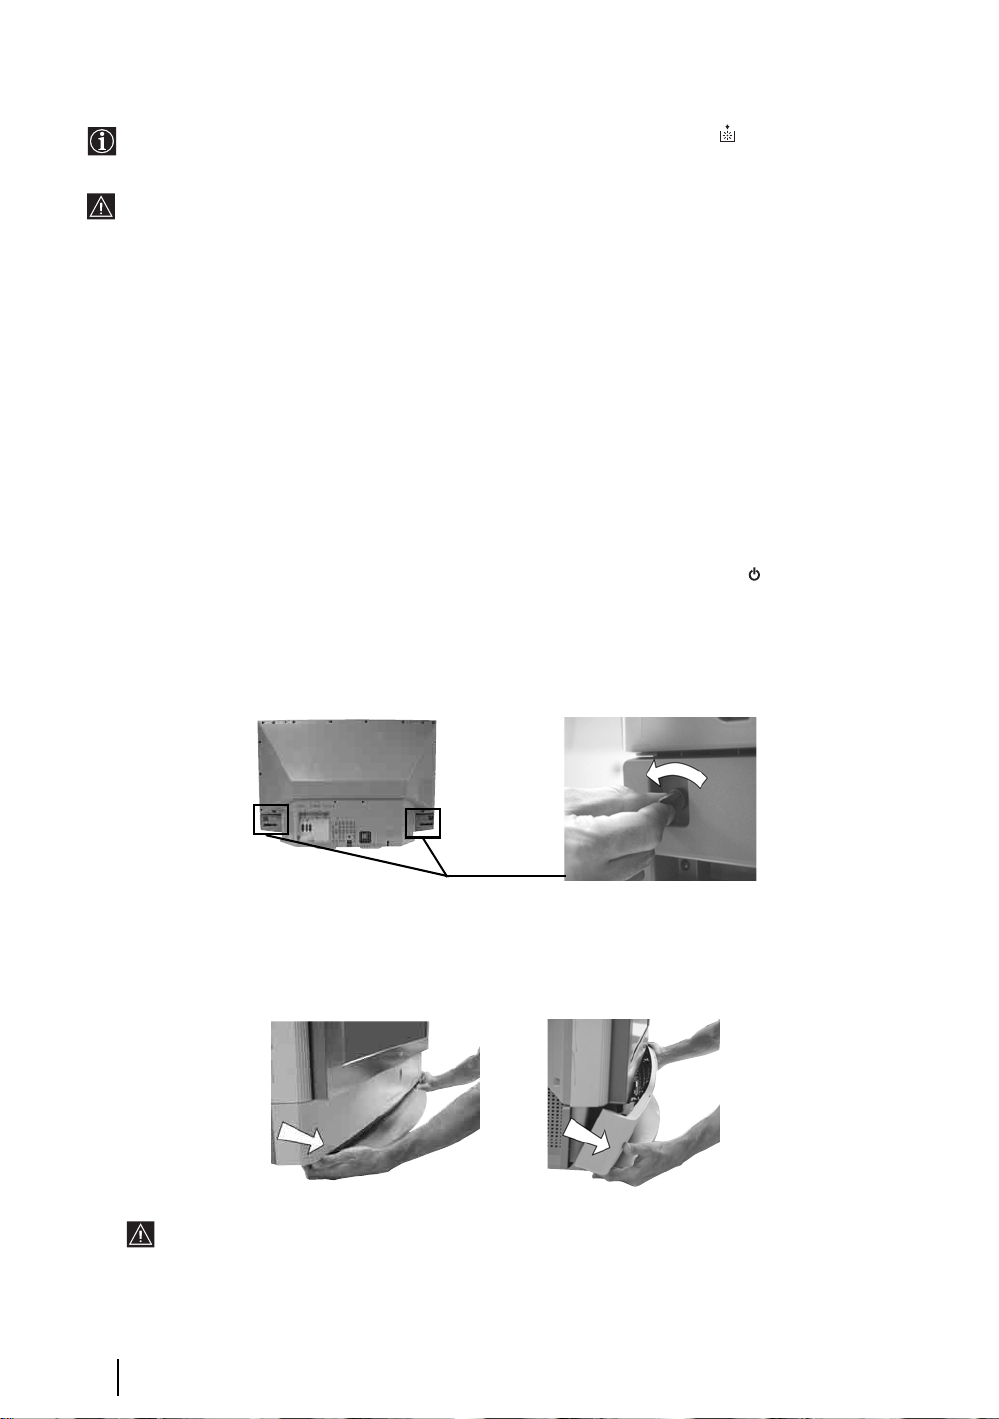
1 Turn off the power and disconnect the power cord.
• If you start changing the lamp without disconnecting the power c ord, the standby indicator
Disconnect the power cord to continue changing the lamp.
• Replace the lamp 30 minutes or more after the power is turned off to allow it to cool.
• Prepare the new lamp.
2 Loosen the two screws placed on the left and right corner of the rear of the TV with an object such as a coin.
on the TV set flashes.
3 Remove the front panel.
Remove the front panel without moving the TV set
Grasp the left and right side of the front panel with your fingers and pull it forward. Be careful not to catch
your fingernails.
28
Additional Information
Page 28
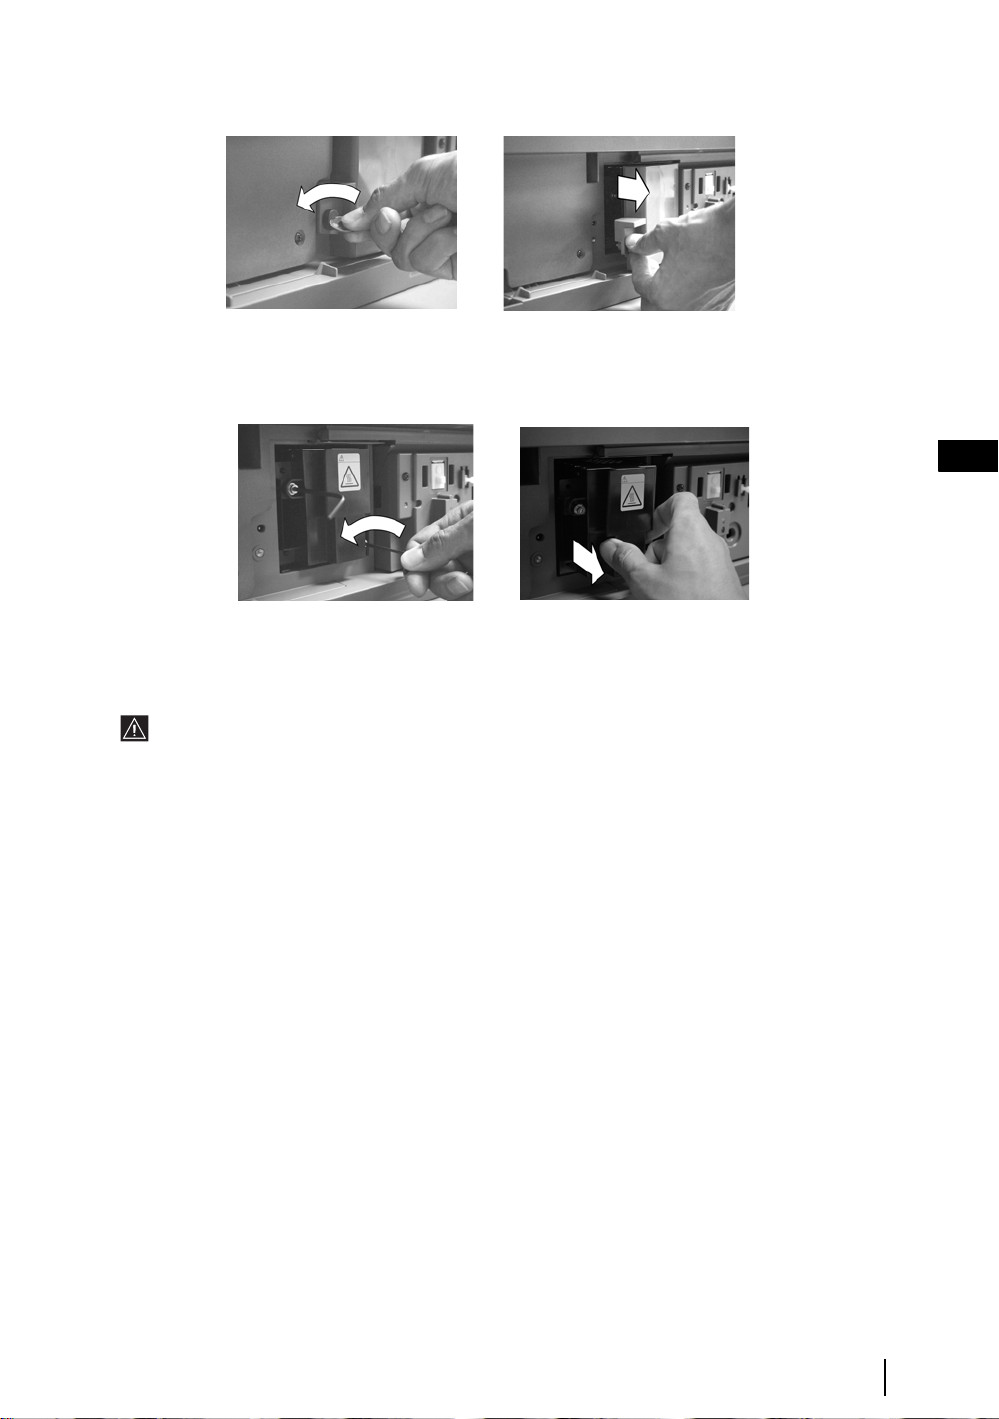
4 Loosen the screw with an object such as a coin and remove the lamp cover.
5 Loosen the two screws and pull out the lamp.
Loosen two screws with the Pull out the lamp by the handle.
hexagon key supplied.
GB
The lamp is still extremely hot immediately after the power is turned off. Be careful that you don’t touch the
front glass or surrounding area of the lamp or the glass of the lamp compartment.
6 Attach the new lamp.
Replace the new lamp securely in the lamp receptacle and fasten the screws tightly using the hexagon key supplied.
7 Attach the lamp cover.
Fasten the screw tightly with an object such as a coin.
8 Attach the front panel.
Attach the front panel by pushing left and right side into place. Next, fast again the two screws plaeed on the left and
right corner of the rear of the TV.
Additional Information
29
Page 29
Technical Specifications
TV system:
Depending on your country
selection:
B/G/H, D/K, L, I
Colour system:
PAL
SECAM, NTSC 3.58, 4.43 (only
Video In)
Channel Coverage:
VHF: E2-E12
UHF: E21-E69
CATV: S1-S20
HYPER: S21-S41
D/K: R1-R12, R21-R69
L: F2-F10, B-Q, F21-F69
I: UHF B21-B69
Panel System:
LCD (Liquid Crystal Display)
panel.
Projected picture size:
• KF-42SX300K: 42 inches (approx.
107 cm measured diagonally).
• KF-50SX300K: 50 inches (approx.
127 cm measured diagonally).
• KF-60SX300K: 60 inches (approx.
153 cm measured diagonally).
Rear Terminals
• AV1
1/ 1
21-pin scart connector
(CENELEC standard)
including audio/video input,
RGB input, TV audio/video
output.
• AV2
2/ 2
21-pin Scart connector
(CENELEC standard)
including audio / video input,
RGB input, monitor audio/video
output.
• AV3
3/ 3
S
21-pin Scart connector
(CENELEC standard)
including audio / video input, S
video input, selectable audio /
video output and SmartLink
interface.
• audio outputs (Left/Right)
- phono jacks
• PC audio input - minijack.
• PC PC input.
Front Terminals
S
• 4 S Video input – 4 pin
DIN
• 4 video input – phono
jack
• 4 audio input – phono
jacks
• headphones jack
Sound Output:
2 x 20 W (music power)
2 x 10 W (RMS)
Woofer:
30 W (music power)
15 W (RMS)
Power Consumption:
210 W
Standby Power Consumption:
≤ 1 W
Dimensions (w x h x d) :
• KF-42SX300K:
approx. 1200 x 820 x 370 mm.
• KF-50SX300K:
approx. 1376 x 923 x 442 mm.
• KF-60SX300K:
approx. 1618 x 1062 x 542 mm.
Weight:
• KF-42SX300K: approx. 29.5 kg.
• KF-50SX300K: approx. 37.5 kg.
• KF-60SX300K: approx. 48.5 kg.
Accessories supplied:
• 1 Remote Control (RM-906)
• 2 Batteries (IEC designated,
AAA size).
• 1 PC input cable.
• 1 Hexagon key.
• 2 Brackets.
• 2 Screews.
• 1 Cleaning Cloth.
Other features:
• Digital Comb Filter (High
resolution).
• Teletext, Fastext, TOPtext.
•NexTView.
•SmartLink.
• TV system autodetection.
• Dolby Virtual.
• BBE Digital.
•NICAM.
•PAP.
• ACI (Auto Channel
Installation).
• Auto Format.
30
Additional Information
Design and specifications are subject to change without notice.
This instruction manual has been printed on:
Ecological Paper - Totally Chlorine Free
Page 30
PC Input Specifications
PC Input Timing
Input signal frequency:
Horizontal: 31,4 - 48,4 KHz.
Vertical: 59 - 61 Hz.
Maximum Resolution: 1024 dots x -768 lines.
Preset mode timing table for PC
Nº Resolution Graphic mode Horizontal Vertical
(dots x lines) frequency frequency
(kHz) (Hz)
1 640 x 480 VESA 60 31.469 59.940
2 800 x 600 VESA 60 37.879 60.317
3 1024 x 768 VESA 60 48.363 60.004
GB
Additional Information
31
Page 31

Troubleshooting
Here are some simple solutions to problems which may affect the picture and sound.
TV
Problem
No picture (screen is dark) and no
sound.
Poor or no picture (screen is dark), but
good sound.
No picture or no menu information
from equipment connected to the
Scart connector.
Good picture, no sound.
No colour on colour programmes.
When you switch on the TV the last
channel you were watching before
switching the TV off does not appear.
Solution
• Check the aerial connection.
• Plug the TV in and press the button on the front of the TV.
• If the standby indicator is on, press TV button on
the remote control.
• Using the menu system, select the “Picture Adjust ment” menu and select
“Reset” to return to the factory settings (see page 13).
• Check that the optional equipment is on and press the button
repeatedly on the remote control until the correct input symbol is
displayed on the screen (see page 25).
• Press the + button on the remote control.
• Check that “TV Speakers” is “On” in the “Sound Adjustment”
menu (see page 14).
• Check that headphones are not connected.
• Using the menu system, select the “Picture Adjustment” menu and select
“Reset” to return to factory settings (see page 13).
• This is not a malfunction. Press the number buttons on the remote control
to select the desired channel.
Distorted picture when changing
programmes or selecting teletext.
Wrong characters appear when
viewing teletext.
Wrong characters appear when
viewing NexTView.
Snowy picture when viewing a TV
channel.
No unscrambled picture whilst
viewing an unscrambled channel with
a decoder or a Set Top Box connected
through the Scart connector
S
3/ 3
32
Additional Information
• Turn off any equipment connected to the Scart connector on the rear of the
TV.
• Use the menu system to enter the “C ountry” menu (see page 18) and select
the country in which you operate the TV set. For cyrillic languages, we
recommend selecting Russia country if your own country does not appear
in the list.
• Use the menu system to enter the “Language” menu (see page 18) and
select the same language that NexTView is broadcast in.
• Using the menu system, select the “Manual Programme Preset” menu and
adjust Fine Tuning (AFT) to obtain better picture reception (see page 20).
• Using the menu system, select the “Noise Reduction” option in the “Picture
Adjustment” menu and select “On” to reduce the noise in the picture (see
page 13).
• Using the menu system, select the “Features” menu and set “AV3 Output”
to “TV” (see page 17).
• Check that the Decoder or the Set Top Box is not connected on the
scart 2/ 2.
continued...
Page 32

Problem
Solution
v, V
, B and b buttons do not work
in PAP mode.
Remote control does not function.
The standby indicator on the TV
flashes.
The lamp indicator
TV set is lit.
on front of the
Personal Computer
Problem
If no picture is displayed and the NO
SYNC message appears on the
screen.
• PAP navigation is only possible in TV mode, please check that Media
Selector is set to TV.
• Be sure you are ponting it towards the remote control receiver (see page 8).
• Check that the Media Selector on the remote control is set to the device
you are using (VCR, TV or DVD).
• If the remote control does not operate the VCR or DVD even when the
Media Selector has been set correctly. Enter the necessary code set as
explained on page 26.
• Replace the batteries.
• Contact your nearest Sony service centre.
• Turn the TV off. Turn the TV on again, if the lamp indicator is still lit the n
replace the internal lamp. For details refer to pages 28 and 29.
Solution
• Check that the video signal cable is properly connected and all plugs are
firmly seated in their sockets.
• Check that the 15-Dsub video input connector’s pins are not bent or pushed
in.
Personal Computer output format
• Check that the output signal format of the Personal computer is set to the
corresponding format for the television. In case it is not, adjust the
resolution and refresh rate to the corresponding signal (refer to page 31).
Problems caused by the connected computer
• The computer is in power saving mode. Try pressing any key on the
computer keyboard.
• Check that the computer’s power is "on".
• Check that the computer’s keyboard is properly connected.
• Check that the graphic board is completely seated in the proper bus slot.
• In case of a notebook PC, check that the monitor signal is set to the external
output, and the signal is correctly output to the television.
GB
Some picture lines are not correctly
displayed.
Blurred letters or vertical lines or
shade or noise is visible in detailed
patterns.
The Startup or the Setting screens of
the Personal Computer cannot be
displayed.
• If you continue to experience problems, have your TV serviced by qualified personnel.
• Never open the casing yourself.
• Using the menu system, select the "Picture Adjustment" menu and adjust
the "Lines Correction" option between -20 and +20 (see page 13).
• Small letters, check or mesh patterns cannot be accurately displayed. In
this case, increase the size of the fonts and/or reduce the mesh pattern
brightness.
• Depending on the PC, the Startup or Setting screens may not be displayed
due to the output format of the image. These screens can be displayed on
the monitor of the Personal Computer.
Additional Information
33
Page 33

Page 34

Въведение
Благодарим ви за избора на това изделие на Sony.
Преди да използвате този телевизор, прочетете внимателно това ръководство за употреба и го запазете за бъдещи
справки.
• Символи, използвани в ръководството:
• Важна информация.
• Информация за характеристика.
• 1,2... Последователност на
инструкциите.
• Бутоните, оцветени в бяло на дистанционното
управление, са тези, които трябва да натиснете, за
да следвате последователността в инструкциите.
• Информира ви за резултата от инструкциите.
Съдържание
Въведение......................................................................................................................................................................3
Информация за безопасността ................................................................................................................................. 4
Преглед и инсталиране
Проверка на доставените принадлежности ...........................................................................................................6
Поставяне на батериите в дистанционното управление.....................................................................................6
Преглед на бутоните на дистанционното управление......................................................................................... 7
Преглед на бутоните на телевизора ........................................................................................................................8
Свързване на антената и видеото ............................................................................................................................9
Стабилизиране на телевизора ..................................................................................................................................9
Използване за пръв път
Включване на телевизора и автоматично захващане .......................................................................................10
Функции на телевизора
Въведение и използване на системата от менюта 12
Меню "Настройка на картината" ................................................................................................................... 13
Меню "Настройка на звука"............................................................................................................................. 14
Меню "Характеристики"...................................................................................................................................16
Автоформат ...............................................................................................................................................................16
Изход AV3 ..................................................................................................................................................................17
Свързване ................................................................................................................................................................... 17
RGB центриране ....................................................................................................................................................... 17
Меню "Настройка" ............................................................................................................................................. 18
Език......................................................................................................................................................................... 18
Страна ....................................................................................................................................................................18
Автоматично захващане ....................................................................................................................................18
Сортиране на програмите ..................................................................................................................................18
Означения на програмите ..................................................................................................................................19
AV настройка ....................................................................................................................................................... 19
Ръчна настройка на програми...........................................................................................................................20
Картина и картина (КИК) ....................................................................................................................................... 21
BG
Телетекст................................................................................................................................................................................ 22
NexTView...................................................................................................................................................................................23
Допълнителна информация
Включване на апаратура към телевизора ........................................................................................................... 24
Гледане на картина от апаратура, свързана към телевизора.......................................................................... 25
Конфигуриране на дистанционното управление за видео или DVD ............................................................. 26
Зона на оптимално гледане..................................................................................................................................... 27
Смяна на лампичката ......................................................................................................................................28
Технически спецификации ...................................................................................................................................... 30
Спецификации за вход от персонален компютър.............................................................................................. 31
Отстраняване на неизправности............................................................................................................................. 32
Как да се повдига телевизорът ......................................................................................................... Задна корица
Съдържание
3
Page 35

Инструкции за безопасност
Този телевизор може да работи само
на захранващо напрежение 220- 240V.
Внимавайте да не включвате твърде
много уреди в един контакт, тъй
като това може да причини токов
удар.
Не отваряйте кутията и задния к апак
на телевизора. Обръщайте се само
към квалифициран сервизен
персонал.
Не покривайте вентилационните
отвори на телевизора. Оставете наймалко 10 см. разтояние около
телевизора за вентилация.
По причини за безопасност и предпазване от
въздействие от природни явления е
препоръчително да не оставяте телевизора в
режим “stand by” когато не се използва.
Изключвайте от електрическата мрежа.
Някои телевизори имат функции, които за да
бъдат използвани, изискват уреда да бъде
оставен в режим “stand by”. Инструкциите в
това ръководство ще Ви информират дали
това е необходимо.
За Ваша собствена безопасност не
пипайте телевизора, кабела или
антената му по време на
гръмотевични бури.
Никога не поставяйте телевизора
на горещи, влажни или
изключително прашни места. Не
инсталирайте телевизора на места
където може да бъде изложен на
механични вибрации.
Никога не пъхайте каквито и да
било предмети в телевизора, тъй
като това може да причини пожар
или токов удар. Никога не
разливайте течности по телевизора.
В случай, че течност или твърд
предмет попаднат в телевизора го
изключете. Свържете се незабавно с
квалифицирани служители на Сони.
За да предотвратите риска от токо в
удар, не излагайте телевизора на
дъжд или влага.
За да избегнете пожар, дръжте
настрана от телевизора
възпламеними предмети и открити
източници на светлина /например
свещи/.
Почиствайте екрана и кутията с
мека, влажна кърпа. Не използвайте
абразивни кърпи, алкални
почистващи средства, изстъргващи
препарати или разтворители като
спирт или бензин, както и
антистатичен спрей.
Поставяйте телевизора на сигурна,
стабилна поставка. Никога не се
опитвайте да премествате телевизора и
поставката едновременно – винаги
премествайте телевизора и поставката
отделно. Не обръщайте телевизора
настрани или по “гръб”. Не позволявайте
на деца да се катерят по него.
Инструкции за безопасност
4
Когато изключвате телевизора,
дърпайте щепсела, а не кабелa.
Изключвайте кабела на
телевизора преди да го местите.
При преместването избягвайте
неравни повърхности и не правете
бързи крачки. Ако изпуснете или
нараните телевизора, незабавно се
консултирайте с квалифицирани
сервизни служители на Сони.
Не поставяйте тежки предмети
върху кабела, тъй като това може
да го повреди.
Препоръчваме ви да навиете
излишния захранващ кабел около
предназначените за целта
приспособления на задната страна
на телевизора.
Не покривайте вентилационните
отвори на телевизора с предмети
като пердета, вестници и др.
Page 36

Допълнителна информация за безопасността
• Не препречвайте и не закривайте вентилационния отвор, който се намира ниско отзад на лявата страна
на телевизора. За добра вентилация оставете място поне по 10 см от всички страни на апарата.
• Ако след транспортиране на телевизора направо от студено на топло място или ако има внезапна смяна
на температурата в помещението, картината може да е размазана или цветовете на части от картината
да са лоши. Това се дължи на образуването на кондензация върху огледалата и лещите вътре в
телевизора. Преди включване на телевизора оставете влагата да се изпари.
• За да получите ясна картина, екранът не трябва да е под въздействие на пряко осветление или пряка
слънчева светлина. Ако е възможно, използвайте насочено осветление надолу от тавана.
• В този телевизор е използван последната технология тип LCD (от английското "Liquid Crystal Display"
= течнокристален дисплей). Въпреки че производството е в съответствие с най-високите стандарти, все
пак е възможно при някои състояния на картината на екрана да се виждат няколко черни или ярки точки
(червени, зелени или сини). Не е възможно да ги премахнете и това не е състояние на неизправност.
• Екранът на този телевизор има екранно покритие против отражения. За да избегнете влошаване на
показателите на екрана, следвайте препоръките, дадени по-долу:
• За да се отстрани прахта от повърхността на екрана, то избърсвайте с предоставена почистваща кърпа
или с мека кърпа.
• Почиствайте екрана и кутията с мека, леко навлажнена кърпа. Не използвайте никакви стържещи
кърпички, почистващи апарати на алкална база, почистващ прах или разтворител като спирт или
бензин, нито антистатичен спрей. Като мярка за безопасност, преди почистване извадете щепсела
на телевизора от контакта.
• Избягвайте докосване на екрана и внимавайте да не надраскате повърхността с твърди предмети.
BG
Информация за безопасността
5
Page 37

Проверка на принадлежностите, включени в
комплекта
2 батерии
(размер AAA)
Кабел за персонален
компютър
1 Дистанционно управление (RM-906)
2 конзоли
2 винта
1 шестостенен ключ
1 кърпичка за
Поставяне на батериите в дистанционното
управление
Внимавайте, за да поставите предоставените батерии с правилно ориентирани полюси.
Не забравяйте, че трябва да изхвърляте батериите с опазване на околната среда.
почистване
6
Преглед и инсталиране
Page 38

Преглед на бутоните на дистанционното управление
1 TV I/ : За временно изключване на телевизора (режим на готовност):
wf
wd
ws
wa
w;
ql
qk
qj
qh
qg
qf
qd
1
2
3
4
5
6
7
8
9
q;
Натиснете този бутон, за да изключите временно телевизора(индикаторът за
готовност на телевизора светва). Натиснете отново, за да включите
телевизора от режим на готовност.
• За икономия на електроенергия ние препоръчваме телевизорът да се
изключва напълно, когато не се използва.
• След 15 минути без телевизионен сигнал и ако няма натискане на бутон,
телевизорът преминава автоматично в режим на готовност.
2 Включване/изключване на видео или DVD: натиснете този бутон, за да
включите или изключите вашето видео или DVD.
3 Избиране на входен източник: натиснете този бутон неколкократно, докато
желаният символ на източника се появи върху телевизионния екран. Вж. стр. 25.
4 Избиране на канали на предаване: ако Медийният селектор (w;) е включен
на TV, с натискането на тези бутони се избират канали. За програмите с
двуцифрени номера въведете втората цифра в рамките на 2,5 секунди.
5 Избиране на двуцифрено видео: ако Медийният селектор (w;) е включен
на VCR, с натискането на този бутон се избират двуцифрени канали за видеото на
Sony, например за 23 натиснете първо -/--, а след това бутони 2 и 3.
6 а) Бутон за запис:
Ако Медийният селектор (
qa
qs
се записват програми.
б) Връщане към фабрично зададените нива:
Натиснете за минимум 3 секунди, за да върнете настройките на картината и
звука на нивата, зададени като стандарт фабрично. Това ще върне и апарата
към състояние за инсталиране и на екрана ще се появи "Автом. захващане".
Ако това стане, вж. раздел "Включване на телевизора и автоматично
захващане" (стр. 11, стъпка 5) в това ръководство.
7 Гледане на последния избран канал: ако Медийният селектор (w;) е
включен на TV, при натискане на този бутон се връща предишният канал, който
сте гледали (при условие, че сте го гледали поне 5 секунди).
w;) е включен на VCR, с натискането на този бутон
8 Стопиране на страница от телетекст: в режим на телетекст при натискане
на този бутон се стопира страница от телетекст. Натиснете го отново, за да
прекратите стопирането.
BG
9 a) Показване на индекс на каналите: ако
Медийният селектор (w;) е включен на TV и
MENU е изключено, натиснете OK, за да
покажете преглед на каналите. Ако искате да
изберете канал, натиснете
натиснете отново бутона OK, за да гледате
избрания канал.
б) Навигатор: ако Медийният селектор (w;) е
включен на TV и MENU (
бутони се използват за придвижване по
системата от менюта на телевизора. Вж. стр. 12.
v или V и след това
qs) е включено, тези
q; Избиране на формата на канала: натискайте
последователно този бутон, за промяна на
формата на екрана. Вж. стр. 16.
qa Избиране на канали на предаване:
натискайте тези бутони за избиране на следващия
или предишния канал на предаване.
qs Система от менюта: натиснете този бутон, за
да влезете в системата от менюта на телевизора.
Вж. стр. 12.
qd Регулиране на силата на звука: натиснете
тези бутони, за да увеличите или намалите силата
на звука.
qf Избиране на режим на картината:
натискайте последователно този бутон, за да
промените режима на картината. За подробности
по различните режими на картината, вж. стр. 13.
qg Избиране на звуков ефект:
бутон последователно, за да промените звуковия
ефект. За подробности по различните звукови
ефекти, вж. стр. 14.
Натискайте този
qh Фастекст: Â режим на телетекст тези бутони
може да се използват като бутони на фастекст. За
подробности вж. стр. 22.
qj NexTView: натиснете този бутон за показване на
NexTView. За подробности, вж. стр. 23.
qk Телетекст: натиснете този бутон, за да включите
телетекста. За подробности, вж. 22.
ql Работа с видео или DVD: ако Медийният
селектор (
тези бутони ще действат като основните функции
на вашето видео или DVD, след като
дистанционното управление се програмира. Вж.
стр. 26.
w; Медиен селектор: натиснете този бутон, за да
изберете с кое устройство искате да работите - TV,
VCR (видео) или DVD. За момент ще светне
зелена лампичка, за да покаже кое устройство сте
избрали. За подробности вж. стр. 26.
wa Показване на информация: натиснете този
бутон, за да покажете всички индикации на екрана,
например номер на канал и др. Натиснете отново,
за да прекратите.
ws Избиране на телевизионен режим:
натиснете този бутон, за да изключите режима на
КИК, телетекст или вход от видео.
wd КИК (картина и картина): натиснете този
бутон, за да разделите екрана на две, така че да
гледате два канала едновременно. Вж. стр. 21.
w;) е включен на видео (VCR) или DVD,
wf Заглушаване на звука: натиснете този бутон,
за да заглушите звука на телевизора. Натиснете
отново, за да върнете звука.
Преглед и инсталиране
7
Page 39

Преглед на бутоните на телевизора
Натиснете
нагоре
капачето в
предния ляв
ъгъл на
телевизора.
Бутон
Вкл/Изкл
Индикатор за захранване (зелен цвят)
Приемник на дистанционното
управление
За да работите с
дистанционното управление, го
насочете към този приемник.
Бутони за
програми
нагоре или надолу
(Избира канали на
предаване)
Бутони за
регулиране
на звука
Избиране
навходен
източник
Гнездо за слушалки
Входно гнездо
на S video
Гнездо на видео вход
Гнезда за аудио
входове
• Индикатор за готовност (червен цвят).
• Индикатор за изключено захранване
(оранжев цвят)
Индикаторна лампичка (вж. стр. 28).
Преглед и инсталиране
8
Page 40

Свързване на антена и видеокасетофон
• Свързващите кабели не са включени в комплекта.
• За повече подробности за свързване на видео, както и други свързвания, вж. стр. 24.
или
видео
OUT IN
SCART проводникът не е задължителен. Ако използвате тази допълнителна връзка, това може да подобри
качеството на картината и звука, когато използвате видео.
Ако нямате свързване със SCART кабел, ще трябва ръчно да настройвате видеото на резервен канал след
завършване на процедурата на автоматично захващане. Вж. "Програмa ръчeн избop" на стр. 20. Освен това
проверете в инструкциите за употреба на вашето видео, за да разберете как да намерите канала за гледане
на видео.
Стабилизиране на телевизора
След инсталирането, фиксирайте телевизора към стена или подобни, като използвайте предоставените
конзоли и винтове, за целите на безопасността.
1 Монтирайте двете предоставени конзоли с предоставените винтове към задната страна на телевизора.
BG
Не препречвайте и не покривайте
вентилационния отвор. За добра вентилация
оставете място поне по 10 см от стената.
2 Прокарайте издръжливо въже или верига през всяка конзола, а след това я закрепете към стена, колона и др.
Преглед и инсталиране
9
Page 41

Включване на телевизора и автоматично захващане
Когато включите телевизора за пръв път, на екрана на телевизора се появява поредица от екрани с менюта,
които ви дават възможност да направите следното: 1) да изберете езика на екрана с менюта 2) да изберете
страната, в която ще работи телевизорът, 3) да проверите как се свързва допълнителна апаратура към
телевизора, 4) да търсите и запаметявате всички налични канали (телевизионно предаване) и 5) да
променяте реда, в който каналите (телевизионни програми) се появяват на екрана.
Ако обаче трябва да промените някоя от тези настройки по-късно, можете да го направите, като изберете
съответната опция в (меню "Инсталиране").
Language
1 Включете щепсела на телевизора в контакт на мрежата (220-
240V AC, 50Hz).
Когато телевизорът се свърже към мрежата за пръв път, той
обикновено е включен. Ако телевизорът е изключен,
натиснете бутона за включване/изключване, за да го
включите.
Когато включите телевизора за пръв път, на екрана
автоматично се показва меню Language (Език).
Select language
English
Nederlands
Français
Italiano
Deutsch
Türkçe
Español
Português
Polski
English
Nederlands
Français
Italiano
Deutsch
Türkçe
Español
Português
Polski
Language
Select language
English
English
Nederlands
Nederlands
Français
Français
Italiano
Italiano
Deutsch
Deutsch
Türkçe
Türkçe
Español
Español
Português
Português
Polski
Polski
2 С натискане на бутоните V, v, B или b на дистанционното
управление, изберете своя език, а след това натиснете бутона
OK, за да потвърдите избора си. Оттук насетне всички менюта
се появяват на избрания от вас език.
3 Менюто Държава се появява автоматично. С натискане на
v или V изберете държавата, в която използвате
бутона
телевизора. Натиснете бутона OK, за да потвърдите избора си.
• Ако държавата, в която искате да използвате
телевизора, не е показана в списъка, изберете вместо
държава "Изкл".
• За да избегнете неправилни знаци на телетекста за
езиците на кирилица, препоръчваме да изберете Русия,
ако вашата страна не се появи в списъка.
Language
Select language
English
Nederlands
Français
Italiano
Deutsch
Türkçe
Español
Português
Polski
English
Nederlands
Français
Italiano
Deutsch
Türkçe
Español
Português
Polski
Първо включване
10
продължава.
Page 42

4 Ще се появи диаграма, която ви показва как да свържете
широка гама апарати към вашия телевизор. Следвайте
инструкциите и накрая натиснете бутона OK, за да премахнете
картината и продължите автоматичния процес.
След като процесът на автоматично захващане е
завършил и допълнителната апаратура е свързана на
този етап, препоръчваме да следвате инструкциите,
обяснени в раздела "Ръководство за свързване" на стр. 17,
за да получите оптималните настройки, свързани с
допълнителното оборудване.
5 На екрана се появява менюто Автом. захващане. Натиснете
бутона OK, за да изберете Да.
6 Телевизорът започва автоматично търсене и запаметяване
на всички налични предаващи канали вместо вас.
Този процес може да отнеме няколко минути. Проявете
търпение и не натискайте никакви бутони, защото в
противен случай автоматичното захващане няма да
завърши.
В някои страни излъчващите телевизионни програми
инсталират каналите автоматично (система ACI). В този
случай, излъчващата програма изпраща меню, в което
можете да изберете своя град, като натиснете бутона
или V и OK, за да съхраните каналите.
Ако през време на процеса на автоматично захващане
няма намерени канали, на екрана автоматично се появява
съобщение, с което се иска да включите антената.
Проверете свързването на антената (вж. стр. 9).
Натиснете бутона OK, за да рестартирате процеса на
автоматично захващане.
BG
v
7 След като са захванати и съхранени всички налични канали,
менюто Подреждане на програми автоматично се появява
на екрана, което ви дава възможност да променяте реда, в
който са съхранени каналите.
а) Ако желаете да запазите каналите на предаванията в реда,
в който са настроени, преминете към стъпка 8.
б) Ако желаете да запаметите каналите в друг ред:
1 Натиснете бутона v или V, за да изберете номера на
програма за канала (излъчвана програма), който желаете
да преместите. Натиснете бутона
2 Натиснете бутона v или V, за да изберете новата
позиция на номера на програма, за избрания от вас
канал (излъчвана програма). За запаметяване
натиснете бутона OK.
3 Повторете стъпки б)1 и б)2, ако желаете да промените
реда на другите канали.
b.
8 Натиснете бутона MENU, за да премахнете менюто от екрана
Вашият LCD (от английското "Liquid Crystal Display" = течнокристален дисплей)
телевизор вече е готов за използване
Първо включване
11
Page 43

Въведение и използване на системата от менюта
Във вашия течнокристален телевизор се използва система от екранни менюта, която ви води през
операциите на работа. Използвайт следните бутони на дистанционното управление за работа със системата
от менюта:
1 За включване на екраните на менютата:
Натиснете бутона MENU, за да включите менюто от първо
ниво.
2 За придвижване по менютата:
• За да осветите желаното меню или опция, натиснете
• За да влезете в избраното меню или опция, натиснете OK или
• За да се върнете към последното меню или опция, натиснете OK или
• За да промените настройките на вашата избрана опция, натиснете
• За да потвърдите и запаметите избора си, натиснете OK.
v или V.
b.
B.
v/V/B или b.
12
Функции на телевизора
3 За да изключите екраните на менютата:
Натиснете бутона MENU, за да премахнете менюто от екрана.
Page 44

Меню "Настройка на картината"
Менюто "Настройка на картината" ви
позволява да променяте параметрите на
картината.
За да направите това:
Натиснете бутона MENU и след това натиснете
OK, за да влезете в това меню. След това
,
натиснете
опция, и натиснете OK. Накрая, прочетете подолу как да работите във всяка опция.
v или V, за да изберете желаната
Режим на картината Тази опция ви позволява да нагласите по избор режима на картината въз
основа на програмата, която гледате. След като изберете тази опция,
натиснете OK. След това натискайте последователно
изберете:
v или V, за да
Личен (за индивидуални настройки).
На живо (за програми с излъчване на живо, DVD и цифрови сателитни
приемници).
Филм (за филми).
След като изберете желаната опция, натиснете OK, за да я съхраните.
Нивата на "Яркост", "Цветност" и "Острота" са фиксирани фабрично за получаване на
най-доброто качество на картината.
Контраст Натиснете
След това натиснете OK за запаметяване.
Яркост Натиснете
това натиснете OK за запаметяване.
Цветност Натиснете
След това натиснете OK за запаметяване.
Тоналност Натиснете
натиснете OK за запаметяване.
Острота Натиснете
натиснете OK за запаметяване.
Нулиране Натиснете OK, за да върнете картината до фабрично настроените нива.
Потискане Тази опция се задава на Вкл за автоматично намаляване на "снега" по
на шума картината, който се вижда в предавания сигнал. За да прекратите тази функция,
натиснете
Тон на цвета Тази опция ви позволява да промените оттенъка на цвета. След като изберете
тази опция, натиснете
изберете: Топъл (дава на белите цветове червен оттенък), Нормален (дава на
белите цветове неутрален оттенък), Студен (дава на белите цветове син
оттенък). Накрая натиснете OK за запаметяване.
Lines Когато гледате входен сигнал тип RGB от съединителя PC, някои линии
Correction на картината може да не се показват правилно. За да поправите този проблем,
изберете тази опция и натиснете
B или b, за да намалите или увеличите контраста на картината.
B или b, за да направите картината по-тъмна или по-светла. След
B или b, за да намалите или увеличите интензивността на цвета.
B или b, за да намалите или увеличите зелените тонове. След това
B или b, за да смекчите или изострите картината. След това
v или V, за да изберете Изкл.
b. След това натиснете последователно v или V, за да
b. След това натиснете последователно v или
V, за да го коригирате между -20 и +20. Накрай натиснете OK за запаметяване.
• "Яркост", "Цвят" и "Острота" могат да се регулират само когато се появят и когато
режимът на картината е настроен на "Личен".
• "Тоналност" се появява и може да се променя само за сигнал тип NTSC (напр.
видеокасети от САЩ).
• За RGB входен сигнал, подаден към съединителя PC , се появява и може да бъде
променено само следното: "Контраст", "Яркост" и "Lines Correction".
BG
Функции на телевизора
13
Page 45

Меню "Настройка на звука"
m
,
Звук Тази опция позволява да нагласите звуковия ефект по ваш избор. След като
Ефект изберете тази опция натиснете OK. След това натиснете последователно
Изкл (Плосък отговор).
Dolby** (Dolby Virtual, симулира звуковия ефект на "Dolby Surround Pro
V, за да изберете:
Естествен (Усилва яснотата, детайлите и присъствието на звука, като
Динамичен ("BBE High Definition Sound system"* интензифицира яснотата и
Virtual Logic").
След като изберете желаната опция, натиснете OK за запаметяване.
използва системата "BBE High Definition Sound system"*).
присъствието на звука за по-добра различимост и реалистична
музика).
Менюто "Настройка на звука" позволява да
се променят параметрите на звука.
За да направите това:
Натиснете бутона MENU и натиснете
изберете , а след това натиснете OK, за да
влезете в това меню. След това натиснете
или V , за да изберете желаната опция, и
натиснете OK. Накрая, прочетете по-долу как
работи всяка от опциите.
v, за да
v
v или
Високи Натиснете
Ниски Натиснете
Баланс Натиснете
Нулиране Натиснете OK, за да върнете звука на нивата, настроени фабрично. След това
Стерео-ефект • За стерео предаване:
14
Функции на телевизора
След това натиснете OK за запаметяване.
B или b, за да намалите или увеличите звуците с ниска честота. След
B или b, за да намалите или увеличите звуците с висока честота.
това натиснете OK за запаметяване.
B или b, за да усилите звука от левия или десния високоговорител.
След това натиснете OK за запаметяване.
натиснете OK за запаметяване.
Натиснете
за запаметяване.
• За двуезично предаване:
Натиснете
канал 1) или B (за канал 2). След това натиснете OK за запаметяване.
v или V, за да изберете Стерео или Моно. След това натиснете OK
v или V, за да изберете Моно (за моно канал, ако е наличен), A (за
продължава...
Page 46

Авт. ниво звук Натиснете v или V, за да изберете Вкл (силата на звука на каналите остава
Ако изберете "Dolby Virtual" в опцията "Звуков ефект", опцията "Авт. ниво звук"
автоматично ще се изключи, и обратно.
същата, независимо от сигнала на предаване, напр. при излъчване на реклами)
или Изкл (силата на звука се променя в зависимост от сигнала на предаване).
След това натиснете OK за запаметяване.
Телев. говорител Тази опция ви позволява да изберете дали искате да слушате телевизора от
Вкл (за да слушате телевизора от високоговорителите на
Ако сте избрали "Еднократно изключен" или "Постоянно изключен", силата на звука от
външната апаратура може също да се променя, като натискате бутоните
дистанционното управление. Когато се натиснат бутоните за сила на звука, ще се появи
символът
високоговорителите на телевизора, а тази на външната апаратура.
Настройка на слушалки Тази опция ви позволява да нагласяте по избор силата на звука в
Натиснете v или V, за да изберете Стерео или
активния екран (в рамка) на екрана КИК (вж. стр.
телевизионните високоговорители, или от външен усилвател, свързан към
аудио изходите на гърба на телевизора.
След като изберете тази опция, натиснете OK. След това натиснете
последователно
Еднократно (за да слушате телевизора от външния усилвател
изключен само веднъж. Като използвате тази опция, след всяко
Непрекъснато (за да слушате телевизора винаги от външен
изключен високоговорител).
След като изберете желаната опция, натиснете OK за запаметяване.
v или
V, за да изберете:
апарата).
изключване и включване на телевизора той ще се връща
към настройката по подразбиране "Вкл").
2 +/- на
%, което показва, че силата на звука, която променяте, не е силата на
слушалките и настройките на КИК (картина и картина) (за
подробности по КИК вж. стр. 21).
След като изберете тази опция, натиснете OK. След това натиснете
последователно
сила на звука Натиснете
Стерео-ефект • За стерео предаване:
КИК Звук Изберете Рамка, ако искате да слушате
v или V, за да изберете:
силата на звука от слушалките.
Моно.
• За двуезично предаване:
Натиснете
канал, ако е наличен), A (за канал 1) или B (за
канал 2).
21), изберете Лява картина, ако искате да слушате
лявата картина, и Дясна картина, ако искате да
слушате десния екран.
B или b, за да намалите или увеличите
v или V, за да изберете моно (за моно
BG
* Системата "BBE High Definition Sound system" е произведена от Sony Corporation по
лиценз на BBE Sound, Inc. Тя се предмет на Патент на САЩ № 4 638 258 и № 4 482 866.
Думата "BBE" и символът на BBE са търговски марки на BBE Sound, Inc.
** Този телевизор е има възможност да създава ефект на съраунд звук, като симулира звука
от четири високоговорителя чрез два високоговорителя, когато предаваният аудио
сигнал е кодиран за Dolby Surround. Звуковият ефект може да се подобри и чрез
свързване на подходящ външен усилвател (за подробности вж. стр. 25).
** Произведено по лиценз от Dolby Laboratories. "Dolby" и символът "двойно D" са
търговски марки на Dolby Laboratories.
Функции на телевизора
15
Page 47

Меню "Характеристики"
m
,
АВТОМАТ. ФОРМАТ
Тази опция позволява автоматично да променяте съотношението на размерите на екрана.
За да направите това:
След като изберете опцията, натиснете OK. След това натиснете
(ако желаете телевизорът автоматично да превключва формата на екрана в съответствие с
предавания сигнал) или Изкл (ако желаете да запазите предпочитанието си). Накрая, натиснете
OK за запаметяване.
Дори и ако сте избрали "Вкл" или "Изкл", можете винаги да промените формата на
екрана, като натиснете последователно бутона на дистанционното управление, за да
изберете един от следните формати:
Менюто "Характеристики" ви позволява да
променяте различни настройки на телевизора.
За да направите това:
Натиснете бутона MENU и след това
двукратно, за да изберете , а след това
натиснете OK, за да влезете в това меню. След
това натиснете
желаната опция, и натиснете OK. Накрая,
прочетете по-долу как да действате при всяка
опция.
v или V, за да изберете
v
v или V, за да изберете Вкл
16
Функции на телевизора
SMART: Имитация на ефекта широк екран за предаване 4:3.
SMART
4/3: Обикновен размер на картината 4:3, пълна
14/9: Компромис между размер на картината 4:3 и 16:9
Лупа: Широкоекранен формат за филми с формат
Широк: За предаване 16:9. Пълна информация от картината.
• В режимите "SMART", "Лупа" и "14/9" части отгоре и отдолу на екрана се губят.
Натиснете
четете субтитрите).
• При RGB сигнал, свързан към съединителя PC, може да се избира само режим
"Широк"и "4/3".
• В съответствие с формата на разпръскването, независимо от избрания режим, може
винаги да се появят черни ивици.
информация от картината.
4:3
14:9
"пощенска кутия".
Лупа
Широк
v или V, за да регулирате положението на образа на екрана (напр. за да
продължава...
Page 48

AV3 ИЗХОД
Тази опция позволява да изберете източника, който да се извежда от SCART съединителя
S
3/ 3 така че да може да записвате от SCART всеки сигнал, идващ от телевизора или от
външна апаратура, свързана към SCART съединителя 1/ 1, 2/ 2 или от
съединителите 4 или 4 и 4.
Ако вашето видео поддържа SmartLink, тази процедура не е необходима.
За да направите това:
След като влезете в менюто "Характеристики", както е обяснено на предишната страница, и
след избиране на опцията натиснете OK. След това натиснете
изходен сигнал:
TV за извеждане на източника от антената.
AV1 за извеждане на източници, свързани към 1/ 1.
AV2 за извеждане на източници, свързани към 2/ 2.
AV4 за извеждане на източници, свързани към 4 или 4 и 4.
AUTO за извеждане на сигнала, който в момента се гледа на телевизора.
• Ако изберете "АUТО", изходният сигнал винаги ще бъде същия като този, показван на
екрана.
• Ако свържете декодер към SCART 3/ 3 или към видео, свързано към този
SCART, не забравяйте да върнете обратно "AV3 изход" на "TV", за да има правилно
декодиране.
S
v
или
V
, за да изберете желания
S
S
РЪКОВОДСТВО ЗА СВЪРЗВАНЕ
Дори и вече да сте свързали външна апаратура към телевизора, е важно да следвате
инструкциите от това меню. Ако постъпите по този начин, ще получите оптимални параметри
на картината, свързана с допълнителната апаратура.
За да направите това:
1 След като сте влезли в менюто "Характеристики", както е обяснено на предишната страница,
и след като изберете тази опция, натиснете OK. След това натиснете
апаратурата, която искате да свържете, измежду наличните: SAT (сателит), Декод. (декодер),
DVD, Игра, VIDEO (видео) или DVD rec. (DVD записващо). След това натиснете
изберете тази апаратура (избраната апаратура може и да се изтрива с натискане на
като изберете цялата апаратура, която трябва да се свърже, натиснете
изберете "Потвърждени" и натиснете OK.
v или V, за да изберете
b, за да
B). След
v или V, за да
2 Ще се появи ново меню, което ви показва към кой SCART съединител на гърба на телевизора
трябва да се свърже всеки апарат. Избирайте всеки апарат в съответствие с информацията
тук, за да получите оптимална настройка на картината от допълнителната апаратура.
3 След като свържете допълнителната апаратура, натиснете B или b, за да изберете "OK" и
накрай натиснете бутона OK на дистанционното управление.
Силно в препоръчваме да следвате нашите съвети за свързване, но ако не сте съгласни,
натиснете
ново меню на екрана, в което можете да назначите връзките според предпочитанията си.
B или b, за да изберете “Не” и след това натиснете бутона “ОК”. Ще се покаже
BG
RGB ЦЕНТЪР
Тази опция е налична само ако към телевизора има свързан източник на RGB сигнал.
Тази опция ви позволява да пренастроите хоризонталната позиция на картината в случай че
трябва да го направите при връзка с RGB източник.
За да направите това:
След като влезете в менюто "Характеристики", както е обяснено на предишната страница, и
докато гледате избран източник на RGB сигнал, изберете опцията "RGB център" и натиснете
OK. След това натиснете
натиснете OK за потвърждение и запаметяване.
v или V, за да регулирате центъра на картината между –5 и +5. Накрая,
Функции на телевизора
17
Page 49

Меню "Инсталиране"
m
,
ЕЗИК
Тази опция позволява да изберете езика, на който се показват менютата.
За да направите това:
След като изберете опцията, натиснете OK и продължете по същия начин, както в стъпка 2 на
раздела "Включване на телевизора и автоматично захващане" на стр. 10.
ДЪРЖАВА
Тази опция позволява да изберете страната, в която желаете да работи телевизорът.
Менюто "Инсталиране" позволява да
променяте различни опции на телевизора.
За да направите това:
Натиснете бутона MENU и натиснете
пъти, за да изберете , а след това натиснете
OK, за да влезете в менюто. След това
натиснете
опция и натиснете OK. Накрая, прочетете подолу как да работите във всяка опция.
v
или
V
, за да изберете желаната
v три
За да направите това:
След като изберете опцията, натиснете OK и продължете по същия начин, както в стъпка 3 на
раздела "Включване на телевизора и автоматично захващане" на стр. 10.
АВТОМАТИЧНО ЗАХВАЩАНЕ
Тази опция позволява автоматично да търсите и запаметявате всички налични телевизионни
програми.
За да направите това:
След като изберете опцията, натиснете OK и продължете по същия начин, както в стъпки 5 и 6
на раздела "Включване на телевизора и автоматично захващане" на стр. 11.
ПОДРЕЖДАНЕ НА ПРОГРАМИ
Тази опция ви позволява да променяте реда, в който каналите (с телевизионни програми) се
появяват на екрана.
За да направите това:
След като изберете опцията, натиснете OK и продължете по същия начин, както в стъпка 7 на
раздела "Включване на телевизора и автоматично захващане" на стр. 11.
продължава...
Функции на телевизора
18
Page 50

НАДПИСВАНЕ НА ПРОГРАМИ
Тази опция позволява да дадете име на програма, като използвате до 5 знака (букви или цифри).
За да направите това:
1 След като влезете в менюто "Инсталиране", както е обяснено на предишната страница, и след като изберете
опцията, натиснете OK, след това натиснете v или V, за да изберете номера на програма с канала, който искате
да наименувате. След това натиснете OK.
2 Когато е осветен първият елемент от колоната Име, натиснете OK и
а след това натиснете OK.
Когато завършите, натиснете
за да изключите менюто от екрана.
• За да коригирате буквата, изберете "
• За въвеждане на интервал изберете " " на екрана и натиснете OK.
v, V, B или b, за да изберете думата "Край" на екрана и накрая натиснете OK,
%" на екрана, за да се върнете, и натиснете OK.
v, V
, B или b, за да изберете буквата,
ЗАПАМЕТЕНИ AV НАСТРОЙКИ
Тази опция позволява:
a) Да дадете име на външна апаратура, която сте свързали към входните гнезда на телевизора.
За да направите това:
1 След като влезете в менюто "Настройка", както е обяснено на предишната страница, и след като изберете
опцията, натиснете OK, след това натиснете
наименувате: AV1, AV2 или AV3 за SCART на гърба, AV4 за предните съединители и AV5 за съединителя за
вход от компютър. След това натиснете двукратно OK.
v
или
V
, за да изберете входния източник, който желаете да
2 В колоната за име автоматично се появява име:
а) Ако искате да използвате някое от предварително настроените имена, натиснете v или V, за да
изберете желаното име, и накрая натиснете OK.
Предварително дефинираните имена са следните: VIDEO, DVD, CABLE (kaъeл), Игра, CAM
(камкордер), SAT (сателит) или PC (персонален компютър, само за AV5).
б) Ако искате да зададете друго име, изберете Редакт. и натиснете OK. След това, докато е осветен първият
елемент, натиснете
завършите, натиснете
за да изключите менюто от екрана.
• За да коригирате буквата, изберете "
• За въвеждане на интервал изберете " " на екрана и натиснете OK.
v, V, B или b, за да изберете буквата, а след това натиснете OK. Когато
v, V, B или b, за да изберете думата "Край" на екрана, и накрая натиснете OK,
%" на екрана, за да се върнете, и натиснете OK.
BG
б) Да промените нивото на входния звук на свързаната допълнителна апаратура.
За да направите това:
След като влезете в менюто "Инсталиране", както е обяснено на предишната страница, и след избиране на
опцията натиснете OK, натиснете
нивото на входния звук: AV1, AV2 или AV3 за SCART на гърба, AV4 за предните съединители и AV5 за
входния съединител за компютър. След това натиснете два пъти
звука. Накрая, натиснете OK и
v или V, за да изберете входния източник, на който искате да промените
b, за да осветите колоната Компенсация на
v или
V
, за да промените нивото на входния звуков сигнал от -9 до +9.
продължава...
Функции на телевизора
19
Page 51

ПРОГРАМА РЪЧЕН ИЗБOP
Тази опция позволява да направите следното:
а) Да зададете предварително каналите или видео каналът един по един с избран от вас ред на програмите.
За да направите това:
1 След като влезете в менюто "Инсталиране", както е обяснено на стр. 18, и след като изберете опцията
"Програма ръчен избор", натиснете OK. След това, докато е осветена опцията Програма, натиснете OK.
Натиснете
(за видео изберете програма номер "0"). След това натиснете
v или V, за да изберете кой номер на програма искате да зададете предварително на канала
B.
2 Следващата опция е налична само в зависимост от страната, която сте избрали в менюто
"Държава".
След като изберете опцията Система, натиснете OK. След това натиснете
телевизионната система на излъчване (B/G за западноевропейските страни, D/K за източноевропейските
страни, L за Франция или I за Великобритания). След това натиснете
3 След като изберете опцията Номер на канала, натиснете OK. След това натиснете
настройката на канала ("C" за ефирни канали или "S" за кабелни канали). След това натиснете
цифровите бутони, за да въведете директно номера на канал на телевизионното предаване или канала на
видео сигнала. Ако не знаете номера на канала, натиснете
настроили желания канал, натиснете OK два пъти за запаметяване.
Повторете всички стъпки по-горе, за да захванете и запаметите още канали.
б) Да дадете име на канал, като използвате до пет знака.
За да направите това:
След като влезете в менюто "Инсталиране", както е обяснено на стр. 18, и след като изберете опцията
"Програма ръчен избор", натиснете OK. След това, когато е осветена опцията Програма, натиснете бутона
PROG +/-, за да изберете номера на програма за канала, който искате да наименувате. Когато програмата,
която искате да наименувате, се появи на екрана, изберете опцията "Име" и натиснете OK. След това, когато
е избран първият елемент, натиснете
завършите, натиснете
изключите менюто от екрана.
• За да коригирате буквата, изберете "
• За въвеждане на интервал изберете " " на екрана и натиснете OK.
v, V
, B или b, за да изберете думата "Край" на екрана и накрая натиснете OK, за да
v, V
, B или b, за да изберете буквата, а след това натиснете OK. Когато
%" на екрана, за да се върнете, и натиснете OK.
b и v или V, за да го търсите. Когато сте
B.
v
или
V
, за да изберете
v
или
V
, за да изберете
в) Да настроите фино приемането на програмата. Обикновено "Ф. Настр." (на английски "Automatic Fine Tun-
ing = автоматична фина настройка) ще ви даде най-добрата възможна картина, но можете да настроите фино
ръчно телевизора, за да получите по-добро приемане на картината в случай на изкривяване на картината.
За да направите това:
Докато гледате канала (телевизионно предаване), който желаете да настроите фино, и след като влезете в
менюто "Инсталиране", както е обяснено на стр. 18 и след като изберете опцията "Програма ръчен избор",
натиснете
нагласите фината настройка от -15 до +15. Накрая, натиснете OK два пъти за запаметяване.
OK.
След това изберете опцията Ф. Настр. и натиснете b. След това натиснете
v
или
V
,
за да
г) Да пропуснете всички номера на програми, които не желаете, когато те се избират с бутоните PROG +/-.
За да направите това:
След като влезете в менюто "Инсталиране", както е обяснено на стр. 18 и след като изберете опцията
"Програма ръчен избор", натиснете OK. След това, когато е осветена опцията Програма, натиснете бутона
PROG +/-, за да изберете номера на програмата, която искате да пропускате. Когато програмата, която искате
да пропускате, се появи на екрана, изберете опцията Пропусни и натиснете
за да изберете Вкл. Накрая, натиснете OK два пъти, за да потвърдите и запаметите.
За да отмените тази функция по-късно, в стъпката по-горе изберете "Изкл", вместо "Вкл".
b. След това натиснете
v
или
V
д) Показване и записване на кодирани канали (напр. от декодер на платена телевизия), когато използвате
декодер, свързан към SCART 3/ 3 директно или през видео.
Тази опция е налична само в зависимост от страната, която сте избрали в менюто "Държава".
За да направите това:
След като влезете в менюто "Инсталиране", както е обяснено на стр. 18 и след като изберете опцията
"Програмa ръчeн избop", натиснете OK. След това изберете опцията Декодер и натиснете
натиснете
За да отмените тази функция по-късно, в стъпката по-горе изберете "Изкл", вместо "Вкл".
v или V, за да изберете Вкл. Накрая, натиснете OK два пъти, за да потвърдите и запаметите.
S
b. След това
,
20
Функции на телевизора
Page 52

КИК (КАРТИНА И КАРТИНА)
Функцията КИК (картина и картина) разделя екрана на две за гледане на две картини във формат 4:3
едновременно.
Включване и изключване на КИК
1 Натиснете , за да покажете КИК.
Един от екраните ще бъде в рамка, което показва, че
това е активният екран. Това означава, че когато
искате да изберете източника на КИК, ще правите
това в активния екран.
2 Натиснете отново, за да премахнете режима КИК.
На екрана се появява лента, която ви указва как да
работите с КИК. Тази лента ще изчезне след няколко
секунди, но винаги ще се показва отново, като натиснете
бутона .
Смяна на активния екран
Това е възможно само ако Медийният селектор е нагласен на TV.
За да смените активния екран (в рамка), натиснете бутоните
B или b.
Избиране на източник за КИК
1 Избиране на телевизионен канал:
Натиснете бутона
цифровите клавиши или PROG +/-, за да изберете телевизионен канал.
Входни сигнали от видео не могат да се показват на левия екран.
B, за да изберете левия екран като активен екран. След това натиснете
2 Избиране на входен източник:
Натиснете бутона
натиснете последователно бутона , за да гледате входен сигнал от свързана апаратура на
десния екран на телевизора. За повече подробности кой символ на вход искате да изберете
вж. раздел "Гледане на картина от апаратура, свързана към телевизора" на стр. 25.
RF сигнал (канали с телевизионно предаване) не може да се показва на десния екран.
Смяна на активния екран
За да смените активния екран (в рамка), натиснете бутоните B или b.
Избиране на звука
Звукът от активния екран (в рамка) винаги излиза от високоговорителите на телевизора.
Освен това, можете да слушате през слушалки както активния екран, така и неактивния екран.
За да направите това:
Когато КИК е включено, вж. раздела "Меню "Настройка на звука"", изберете "Настройка на
слушалки" и задайте опцията " КИК звук" според предпочитанията си. За подробности вж.
стр. 15.
B режим KBK (картина в картина), изходът от Scart 2/ 2 се фиксира на правилната
картина.
b, за да изберете десният екран да бъде активен екран. След това
BG
Функции на телевизора
21
Page 53

Телетекст
Телетекстът е информационна услуга, предавана от повечето телевизионни станции. Индексната страница
на услугата телетекст (обикновено страница 100) предлага информация как се използва услугата. За да
работите с телетекст, използвайте дистанционното управление, както е показано по-долу.
В телетекста може да възникват грешки, ако използвате канал (телевизионно предаване) със слаб сигнал.
За да включите телетекст:
1 Изберете канала на предаване, който съдържа
услугата телетекст, която искате да гледате.
2 Натиснете бутона един път, за да влезете в
режим "Картина и телетекст". Екранът се разделя на
две, като изображението на телетекст е отляво, а
телевизионният канал е отдясно.
3 Ако желаете да гледате телетекст на пълен екран,
натиснете бутона втори път.
За да изберете страница от телетекст:
Въведете 3 цифри за номера на страница, като използвате цифровите бутони.
• Ако направите грешка, въведете отново номера на страница.
• Ако броячът на екрана продължава да търси, това е защото тази
страница не е налична. Ако е така, въведете друг номер на страница.
За да отворите следващата или предишната страница:
Натиснете PROG + ( ) или PROG - ( ) .
За да стопирате страница от телетекст:
Натиснете . Натиснете го отново, за да прекратите стопирането.
За да изберете подстраница:
Една страница от телетекст може да се състои от няколко подстраници. В този случай до
номера на страницата се появява една стрелка или повече, а долу на екрана се показва
правоъгълник, който показва броя страници, съдържащи се на тази страница. Когато
подстраниците се получат, те започват да текат автоматично. Ако искате да спрете поредното
показване и да изберете желаната от вас подстраница, натиснете последователно
B или b.
За да изключите телетекста:
Натиснете .
Фастекст
Фастекст ви позволява да извиквате страниците от телетекст бързо и лесно.
Когато сте в режим на телетекст и се излъчва фастекст, се повява цветово кодирано
меню в долната част на страницата от телетекст. Натиснете съответния цветен бутон
(червен, зелен, жълт или син), за да отворите страницата, отговаряща на вашия избор
от менюто.
22
Телетекст
Page 54

NexTView*
*(в зависимост от предлагането на услугата).
NexTView е екранен електронен наръчник на програмите, който ви дава информация за програмите на
различните канали.
Когато търсите информация, можете да търсите по тема (спорт, изкуство и т. н....) или по дата.
Ако при гледането на NexTView се появят неправилни букви, използвайте системата на менютата, за да
влезете в менюто "Език" (вж. стр. 18) и изберете същия език като този, на който се излъчва NexTView.
Показване на NexTView
1 Изберете програмен канал, който предлага услугата NexTView. В този случай индикацията
"NexTView" се показва веднага, след като има налични данни.
2 За да видите услугата NexTView, имате два различни типа интерфейс за NexTView. Те
зависят от процента на налични данни:
a) Интерфейс "Списък програми":
Докато гледате телевизия и след като на екрана се показва "NexTView" (оцветено в
бяло), натиснете бутона на дистанционното управление, за да гледате
интерфейса "Списък на програмите" (вж. фиг. 1).
б) Интерфейс "Преглед":
Докато гледате телевизия и след като на екрана се покажат повече от 50% от данните
на NexTView (100% от данните може да не са налични, в зависимост от областта),
индикацията "NexTView" (оцветена в черно) се показва на екрана. Натиснете бутона
на дистанционното управление, за да гледате интерфейса "Преглед" (вж. фиг. 2).
3 За да се придвижвате в NexTView:
• Натиснете
• Натиснете
• Натиснете OK, за да потвърдите избор.
• Ако сте избрали програма, натиснете OK, за да получите повече информация за
избраната програма.
B или b, за да се придвижите наляво или надясно.
v или V, за да се придвижвате надолу или нагоре.
BG
4 За да изключите NexTView, натиснете бутона на дистанционното управление.
Интерфейс "Списък на програмите" (фиг. 1): Интерфейс "Преглед" (фиг. 2):
1
2
1 Списък на програмите 2 3
Дата:
Натиснете червения бутон на
дистанционното управление, за
да покажете екрана за дата, като
можете да изберете желаната
дата, като натиснете
След това натиснете OK за
потвърждение.
3
v или V.
Легенда на иконите:
Общо:
Цялата информация за програмите е дадена в
списък по теми и ред на програмите.
Новини
Кино
Спорт
1
Шоу
Детски
Изкуство
Музика
2
Категории:
Натиснете синия бутон на
дистанционното управление, за да
покажете иконите (вж. по-долу
легендата на иконите) за различни теми.
След това натиснете
изберете желаната икона, и накрая
натиснете бутона OK за потвърждение.
v или V, за да
NexTView
3
23
Page 55

Включване на апаратура към телевизора
*
S
/
• Като следвате инструкциите по-долу, може да свързвате широка гама допълнителна апаратура към
вашия телевизор.
• Свързващите кабели не са включени в комплекта.
Play
tation е
продукт на Sony
Computer
S VHS/Hi8
DVC
камкордер
A
B
C
I
E
H
F
G
D
Entertainment, Inc.
* PlayStation е
търговска марка на
Sony Computer
Entertainment, Inc.
2
1
PlayStation*
Декодер/
Set Top Box
8mm/Hi8/DVC
камкордер
DVD
HI-FI
видео
Декодер/ Set Top Box
DVD записващо
• За да избегнете изкривяване на картината, не свързвайте външна апаратура към съединителите
A и B в
един и същ момент.
• Не свързвайте декодер към гнездото SCART
F.
Свързване на видео
За да свържете видеокасетофон, вж. раздел "Свързване на антената и видеото" в това ръководство за употреба
на стр. 9.
Свързване на видео, което поддържа SmartLink
SmartLink е пряка връзка между телевизора и видеото. За повече информация по SmartLink вж.
ръководството за употреба на видеокасетофона.
Ако използвате видео, което поддържа SmartLink, свържете видеото към телевизора, като използвате SCART
кабел към гнездото SCART 3/ 3
Ако сте включили декодер или Set Top Box към гнездото SCART 3/ 3 E или
S
E.
S
през видео, свързано към това гнездо SCART
Изберете опцията "Програмa ръчeн избop" в менюто "Инсталиране" и, след като влезете в опцията
"Декодер**", изберете "Вкл" (вж. стр. 20). Повторете тези действия за всеки кодиран канал.
**Тази опция е налична в зависимост от страната, която сте избрали в менюто "Държава".
продължава...
24
Допълнителна информация
Page 56

Свързване на аудио апаратура към телевизора
Свържете вашата аудио апаратура към гнездата аудио изход D, ако желаете да усилвате аудио изхода от
телевизора. След това , като използвате системата от менюта, изберете менюто "Настройка на звука" и задайте
"Телев. говорител" на "Еднократно изключен" или "Непрекъснато изключен" (вж. стр. 15).
Силата на звука на външните високоговорители може да се променя, като натиснете бутоните за сила на
звука на дистанционното управление. Настройките "Високи" и "Ниски" може също да се променят
посредством менюто "Настройка на звука" (вж. стр. 14).
За да се радвате на звуковия ефект "Dolby Virtual" през
Hi-Fi високоговорители
вашата аудио апаратура
Поставете високоговорителите на вашата апаратура пред вашето
положение на слушане и встрани от телевизора, като поддържате
разстояние от 50 см между всеки от високоговорителите и телевизора.
След това, като използвате системата от менюта, изберете менюто
"Настройка на звука". След това изберете "Dolby Virtual" от опцията
"Звуков ефект (вж. стр. 14).
ашето положение на седене
~50°
Гледане на картина от апаратура, свързана към
телевизора
1 Свържете апаратурата си към определеното за това гнездо на телевизора, както е указано на
предишната страница.
2 Включете свързаната апаратура.
3 За да гледате картина от свързаната апаратура, натиснете бутона последователно, докато
на екрана се появи правилният символ на вход.
Символ Входни сигнали
1 • Аудио / видео входен сигнал през SCART съединителя G.
1 • RGB входен сигнал през SCART съединителя G. Този символ се появява само
2 • Аудио / видео входен сигнал през SCART съединителя F.
2 • RGB входен сигнал през SCART съединителя F. Този символ се появява само
3 • Аудио / видео входен сигнал през SCART съединителя E.
S
3 • S Video входен сигнал през SCART съединителя E. Този символ се появява
4 • Видео входен сигнал през звуковото гнездо B и аудио входен сигнал през C.
S
4 • S Video звуков сигнал през предното входно S Video гнездо A и аудио сигнал
5 • RGB входен сигнал през PC съединителя H и I.
ако е свързан RGB източник.
ако е свързан RGB източник.
само ако е свързан S Video източник.
през C. Този символ се появява само ако е свързан S Video източник.
BG
4 Натиснете бутона на дистанционното управление, за да се върнете към нормална
телевизионна картина.
За моно апаратура
Свържете звуковия жак към гнездото L/G/S/I отпред на телевизора и изберете 4 или 4
входен сигнал, като следвате инструкциите по-горе. След това, вж. раздела "Настройка на звука"
в това ръководство и опцията "Стерео-ефект" на "A" на екрана за звуково меню (вж. стр. 14).
Допълнителна информация
S
25
Page 57

Конфигуриране с дистанционното управление за
видео или DVD
В стандартното му състояние, това дистанционно управление може да изпълнява основните функции на
този телевизор Sony, DVD устройства Sony и повечето видеокасетофони Sony. За да управлявате
видеокасетофони и DVD от други производители (и някои модели видеокасетофони Sony), дистанционното
управление трябва да се конфигурира.
фиг. 3
За да направите това:
• Преди да започнете, потърсете 3-цифрения код за вашата марка DVD или видео в списъка
по-долу. За марките, от които има повече от един код, въведете първия кодов номер.
• От вътрешната страна на капачето за батериите има залепено етикетче, на което да си
отбележите кодовете за вашите марки.
1 Натиснете бутона на Медийния селектор, докато светне зелената
лампичка (VCR (за видео) или DVD) (вж. фиг. 1).
2 Преди да изгасне зелената лампичка, натиснете и задръжте жълтия
бутон за около 6 секунди, докато зелената лампичка (VCR или DVD)
започне да мига (вж. фиг. 2).
3 Докато лампичките VCR и DVD мигат, въведете трите цифри на кода за
вашата марка видео или DVD (вж. списъка по-долу), като използвате
цифровите бутони на дистанционното управление (вж. фиг. 3).
Ако вашият избран код е въведен правилно, трите зелени
лампички светват за момент. В противен случай, повторете всички
стъпки по-горе.
фиг. 1
фиг. 2
4 Включете своето видео или DVD и проверете дали основните
функции работят.
• Ако вашето устройство не работи или някои от функциите не
работят, проверете дали сте въвели правилния код или
опитайте следващия код от списъка за тази марка.
• Не всички марки се съдържат в този списък и не всички модели от всяка
марка може да са в него.
5 Не забравяйте да натиснете бутона на Медийния селектор, докато светне зелената лампичка,
съответстваща на апаратурата, която искате да управлявате с това дистанционно управление:
VCR (за видео), TV или DVD.
Списък на марки видео Списък на марки DVD
Марка Код Марка Код
SONY (VHS) 301, 302, 303, 308, 309,362
SONY (BETA) 303, 307, 310
SONY (DV) 304, 305, 306
AIWA 325, 331, 351
AKAI 326, 329, 330
DAEWOO 342, 343
GRUNDIG 358, 355, 360, 361, 320, 351, 366
HITACHI 327, 333, 334
JVC 314, 315, 322, 344, 352, 353, 354, 348, 349
LG 332, 338
LOEWE 358, 355, 360, 361, 320, 351
MATSUI 356, 357
ORION 328
PANASONIC 321, 323
PHILIPS 311, 312, 313, 316, 317, 318, 358, 359,
363, 364
SAMSUNG 339, 340, 341, 345
SANYO 335, 336
SHARP 324
THOMSON 319, 350, 365
TOSHIBA 337
SONY 001, 029, 030, 036, 037, 038, 039, 040,
041, 042, 043, 044, 053, 054, 055
AIWA 021
AKAI 032
DENON 018, 027, 020, 002
GRUNDIG 009, 028, 023, 024, 016, 003
HITACHI 025, 026, 015, 004, 035
JVC 006, 017
KENWOOD 008
LG 015, 014, 034
LOEWE 009, 028, 023, 024, 016, 003
MATSUI 013, 016
ONKYO 022, 033
PANASONIC 018, 027, 020, 002, 045, 046, 047
PHILIPS 009, 028, 023, 024, 016, 003, 031
PIONEER 004, 050, 051, 052
SAMSUNG 011, 014
SANYO 007
SHARP 019, 027
THOMSON 012
TOSHIBA 003, 048, 049
YAMAHA 018, 027, 020, 002
6 сек.
26
Допълнителна информация
Page 58

Зона на оптимално гледане
За най-добро качество на картината се опитайте да разположите телевизора така че да можете да гледате
екрана от зоните, показани по-долу.
Хоризонтална зона на гледане
K
F
-
4
2
S
X
65°
K
65°
(Оптимално положение на гледане)
K
3
F
F
0
-
-
6
0
5
0
K
0
S
X
3
0
0
K
:
S
X
3
0
0
K
:
:
1
,
8
м
и
п
2
о
1
,
2
в
,
8
е
м
м
ч
и
е
и
п
о
в
е
ч
е
п
о
в
е
ч
е
BG
Вертикална зона на гледане
K
F
-
4
2
S
X
K
K
3
F
F
0
-
-
6
0
5
0
K
0
S
S
:
1
X
X
,
8
3
0
3
0
м
0
0
K
K
и
п
:
1
:
2
о
,
,
2
в
8
е
м
м
ч
и
е
и
п
о
в
е
ч
е
п
о
в
е
ч
е
30°
30°
(Оптимално положение на гледане)
Допълнителна информация
27
Page 59

Смяна на лампата
Когато лампата отслабне или цветът на картината не е нормален или индикаторът за лампата на
телевизора започне да мига, заменете я с нова лампа.
• Използвайте за замяна само лампата XL-2100E. Ако използвате друга лампа, това може да повреди
телевизора.
• Не сваляйте лампата, освен ако я заменяте.
• Преди смяна на лампата изключете телевизора и извадете щепсела от контакта.
• Сменете лампата чак когато изстине. Предното стъкло на лампата остава с температура поне
100°C (212°F), дори и когато захранването е изключено от 30 минути.
• Не поставяйте старата лампа в близост до деца или запалителни материали.
• Не намокряйте старата лампа и не пъхайте в нея предмети. Така лампата може да се пръсне.
• Не поставяйте старата лампа върху лесно възпламеними предмети, тъй като това може да
предизвика пожар. Освен това, не пъхайте ръката си в отделението на лампата, защото може да се
изгорите.
• Поставете здраво новата лампа. Ако тя не е закрепена здраво, картината може да потъмнее.
• Не докосвайте и не зацапвайте предното стъкло на новата лампа или стъклото на отделението на
лампата. Ако стъклото на лампата се замърси, качеството на картината може да се влоши или
животът на лампата да се скъси.
• Поставете здраво капачето на лампата. Ако то не е здраво закрепено, захранването може да не се
включи.
• Когато лампата изгори, се чува звук. Това не показва повреда на телевизора.
• За да получите нова лампа, се обърнете към най-близкия сервиз на Sony.
• Не забравяйте, че лампата трябва да се изхвърля по начин, безопасен за околната среда.
1 Изключете захранването и извадете щепсела от контакта.
• Ако започнете да сменяте лампата, без да извадите щепсела от контакта, индикаторът за готовност
на телевизоразапочва да мига. Извадете щепсела от контакта, за да продължите да сменяте
лампата.
• Заменете лампата 30 минути или повече след изключване на захранването, за да й позволите да се
охлади.
• Подгответе новата лампа.
2 Разхлабете винта, поставен в левия и десния ъгъл на гърба на телевизора, например с монета.
3 Свалете лицевия панел.
Свалете лицевия панел, без да местите телевизора
Хванете лявата и дясната страна на лицевия панел с пръсти и го дръпнете напред. Внимавайте
да не закачите ноктите си.
28
Допълнителна информация
Page 60

4 Разхлабете винта, например с монета, и свалете капака на лампата.
5 Разхлабете двата винта и извадете лампата.
Разхлабете двата винта с Издърпайте лампата с ръка.
предоставения шестостенен ключ.
BG
Непосредствено след изключване на захранването лампата е все още изключително гореща.
Внимавайте да не докосвате предното стъкло или околната зона на лампата, както и стъклото на
отделението на лампата.
6 Поставете новата лампа.
Поставете здраво новата лампа в цокъла й и затегнете винтовете здраво, като използвате
предоставения шестостенен ключ.
7 Поставете капачето на лампата.
Затегнете винта здраво, например с монета.
8 Поставете лицевия панел.
Прикачете лицевия панел, като натиснете лявата и дясната страна на място. След това затегнете
отново двата винта, разположени в левия и десния ъгъл на гърба на телевизора.
Допълнителна информация
29
Page 61

Технически спецификации
Телевизионна система:
В зависимост от избора на
държава:
B/G/H, D/K, L, I
Цветова система:
PAL
SECAM, NTSC 3.58, 4.43 (само
вход на видео)
Диапазон на каналите:
VHF: E2-E12
UHF: E21-E69
CATV: S1-S20
HYPER: S21-S41
D/K: R1-R12, R21-R69
L: F2-F10, B-Q, F21-F69
I: UHF B21-B69
Система на плоскостта на екрана:
LCD (течнокристален дисплей)
плоскост на екрана.
Прожектиран размер на
картината:
• KF-42SX300K: 42 инча (прибл.
107 см диагонал).
• KF-50SX300K: 50 инча (прибл.
127 см диагонал).
• KF-60SX300K: 60 инча (прибл.
153 см диагонал).
Задни клеми
• AV1
1/ 1
21-изводен SCART съединител
(CENELEC стандарт)
включително аудио/видео вх од,
RGB вход, TV аудио/видео
изход.
• AV2
2/ 2
21-изводен SCART
съединител (CENELEC
стандарт)
включително аудио/видео вх од,
RGB вход, аудио/видео изход.
• AV3
3/ 3
• аудио изходи (Ляв/Десен)
• PC аудио вход - мини
• PC PC вход.
Предни клеми
• 4 S Video вход – 4-
• 4 видео вход – звуково
• 4 аудио вход – звукови
• гнездо за слушалки
Звуков изход:
2 x 20 W (музикална мощност)
2 x 10 W (RMS)
Събуфер:
30 W (музикална мощност)
15 W (RMS)
S
21-изводен SCART съединител
(CENELEC стандарт)
включително аудио/видео вход,
S video вход, избираем аудио/
видео изход и SmartLink
интерфейс.
- звукови гнезда
гнездо.
S
изводен DIN
гнездо
гнезда
Мощност на потребление:
210 W
Мощност на потребление в
готовност:
≤ 1 W
Размери (ширина x височина x
дълбочина):
• KF-42SX300K:
прибл. 1200 x 820 x 370 мм
• KF-50SX300K:
прибл. 1376 x 923 x 442 мм
• KF-60SX300K:
прибл. 1618 x 1062 x 542 мм
Тегло:
• KF-42SX300K: прибл. 29,5 кг
• KF-50SX300K: прибл. 37,5 кг
• KF-60SX300K: прибл. 48,5 кг
Принадлежности в комплекта:
• 1 Дистанционно управление
(RM-906)
• 2 батерии (с IEC обозначение,
AAA размер)
• Кабел за персонален компютър
• 1 шестостенен ключ
• 2 конзоли
• 2 винта
• 1 кърпичка за почистване
Други функции:
• Цифров гребенов филтър
(висока разделителна
способност)
• Телетекст, Фастекст,
ТОПтекст.
•NexTView
•SmartLink.
• Автоматично откриване на
телевизионната система.
• Dolby Virtual
• BBE Digital
•NICAM
• КИК (картина и картина, на
английски PAP = Picture And
Picture)
• ACI (от английското "Auto
Channel Installation" =
автоматично инсталиране на
канали).
• Авто формат.
Дизайнът и спецификациите подлежат на промяна без предизвестие.
30
Допълнителна информация
Това ръководство за употреба е отпечатано на:
Екологична хартия - напълно свободна от хлор
Page 62

Входни спецификации на персоналния компютър
Характеристики на сигнала от компютъра
Честота на входния сигнал:
Хоризонтална: 31,4 - 48,4 kHz.
Вертикална: 59 - 61 Hz.
Максимална разделителна способност: 1024 точки x 768 линии.
Таблица на предварително настроените за компютър
№ Разделителна Графичен режим Хоризонтална Вертикална
способност честота честота
(точки x линии) (kHz) (Hz)
1 640 x 480 VESA 60 31,469 59,(940
2 800 x 600 VESA 60 37,879 60,317
3 1024 x 768 VESA 60 48,363 60,004
BG
Допълнителна информация
31
Page 63

Отстраняване на неизправности
Ето някои прости решения на проблеми, които се отнасят до картината и звука.
Телевизор
Проблем
Няма картина (екранът е тъмен),
няма звук.
Лоша или липса на картина (екранът
е тъмен), но добър звук.
Няма картина или няма информация
в менюто от апаратура, свързана със
SCART съединител.
Добра картина, няма звук.
Няма цвят или цветни програми.
Когато включите телевизора,
последният канал, който сте гледали,
преди изключване на телевизора, не
се появява.
Изкривяване на картината при смяна
на програмите или избор на
телетекст.
Решение
• Проверете свързването на антената.
• Включете щепсела в контакта и натиснете бутона отпред на
телевизора.
• Ако индикаторът за готовност е включен, натиснете бутона TV
на дистанционното управление.
• Като използвате системата от менюта, изберете менюто "Настройка на
картината" и изберете "Нулиране", за да се върнете към фабричните
настройки (вж. стр. 13).
• Уверете се, че допълнителната апаратура е включена, и натиснете
бутона последователно на дистанционното управление, докато на
екрана се покажена екрана (вж. стр. 25).
• Натиснете бутона + на дистанционното управление.
• Уверете се, че "Телев. говорител" е "Вкл" в менюто "Настройка на
звука" (вж. стр. 14).
• Уверете се, че слушалките не са свързани.
• Като използвате системата от менюта, изберете менюто "Настройка на
картината" и изберете "Нулиране", за да се върнете към фабричните
настройки (вж. стр. 13).
• Това не е неизправност. Натиснете цифровите бутони на
дистанционното управление, за да изберете желания канал.
• Изключете всяка апаратура, включена в съединителите SCART на
гърба на телевизора.
При гледане на телетекст се
появяват неправилни знаци.
При гледане на NexTView се
появяват неправилни знаци.
Когато гледате телевизионен канал,
се появява картина със сняг.
Няма декодирана картина при
гледане на кодиран канал с декодер
или Set Top Box, свързан през
SCART съединител
S
3/ 3.
32
Допълнителна информация
• Като използвате системата от менюта, влезте в менюто "Държава" (вж.
стр. 18) и изберете страната, в която работи телевизорът. За езиците с
кирилица, ако вашата страна я няма в списъка, препоръчваме да се
избере Русия.
• Като използвате системата от менюта, влезте в менюто "Език" (вж. стр.
18) и изберете същия език, на който се излъчва NexTView.
• Като използвате системата от менюта, изберете менюто "Програмa
ръчeн избop" и настройте фината настройка (Ф. Настр.), за да получите
по-добро приемане на картината (вж. стр. 20).
• Като използвате системата от менюта, изберете опцията "Потискане на
шума" от менюто "Настройка на картината" и изберете "Bкл", за да
намалите шума в картината (вж. стр. 13).
• Като използвате системата от менюта, изберете менюто
"Характеристики" и задайте "AV3 изход" на "TV" (вж. стр. 17).
• Проверете дали декодерът или Set Top Box не е свързан към SCART
2/ 2.
продължава...
Page 64

Проблем
Бутоните v,
режим КИК
V
, B и b не работат в
Решение
• Придвижването в режим КИК (картина и картина) е възможно само в
режим телевизор; уверете се, че Медийният селектор е нагласен на TV.
Дистанционното управление не
работи.
Индикаторът за готовност на
телевизора мига.
Индикаторът на лампата
телевизора свети.
на
Персонален компютър
Проблем
Не се показва картина и на екрана се
появява съобщението НЯМА
СИГНАЛ.
• Уверете се, че дистанционното управление е насочено към приемника
на дистанционното управление (вж. стр. 8).
• Уверете се, че Медийният селектор на дистанционното управление е
зададен на устройството, което използвате (VCR (за видео), TV или
DVD).
• Ако дистанционното управление не управлява вашите видео или DVD,
дори и когато Медийният селектор е зададен правилно. Въведете
необходимия набор кодове, както е обяснено на стр. 26.
• Заменете батериите.
• Обърнете се към най-близкия сервиз на Sony.
• Изключете телевизора. Включете го отново - ако индикаторът на
лампата все още свети, заменете вътрешната лампа. За подробности вж.
стр. 28 и 29.
Решение
• Уверете се, че кабелът на видео сигнала е правилно свързан и всички
съединители са здраво поставени в гнездата им.
• Уверете се, че крачетата на входния съединител за видео 15-Dsub не са
прегънати или смачкани.
Изходен формат на персонален компютър
• Проверете дали формата на изходния сигнал на персоналния компютър
е настроен според съответния формат за телевизора. Ако не е,
настройте разделителната способност и скоростта на опресняване
според съответния сигнал (вж. стр. 31)
Проблеми, предизвикани от свързания компютър
• Компютърът е в режим на икономия на енергия. Опитайте да натиснете
произволен клавиш на клавиатурата на компютъра.
• Уверете се, че захранването на компютъра е включено.
• Проверете дали клавиатурата е правилно свързана.
• Уверете се, че графичната платка е плътно вкарана в подходящ слот на
шината.
• Ако използвате преносим компютър, проверете дали сигнала за
монитора е настроен за външен изход и дали сигнала излиза правилно
на телевизора.
BG
Някои линии от картината не се
показват правилно.
В по-подробните модели се виждат
замазани букви или вертикални
линии, сенки или шум.
Екраните за начало и настройка на
персоналния компютър не могат да
се покажат.
• Ако продължавате да изпитвате същите проблеми, телевизорът трябва да бъде прегледан и ремонтиран
от квалифициран персонал.
• Не опитвайте да отваряте кутията сами.
• Като използвате системата от менюта, изберете менюто "Картина и
картина" и настройте опцията "Lines Correction" от -20 до +20 (вж. стр.
13).
•
Малките букви и модели с тирета не могат да се показват точно. В
този случай, увеличете размера на шрифтовете и/или намалете
яркостта на моделите с тирета.
• В зависимост от персоналния компютър, екраните за начало и
настройка може да не се покажат поради изходния формат на
изображението. Тези екрани могат да се покажат на монитора на
персоналния компютър.
Допълнителна информация
33
Page 65

Page 66

Úvod
Děkujeme vám, že jste si vybrali tento výrobek Sony.
Než televizor začnete používat, přečtěte si prosím pozorně tento návod a uschovejte si ho pro budoucí potřebu.
• Symboly použité v tomto návodu:
• Důležitá informace.
• Informace o funkci.
• 1, 2... Pořadí pokynů.
• Na dálkovém ovladači jsou bíle zvýrazněna tlačítka,
která je nutné stisknout při postupu podle pokynů.
• Tento symbol uvádí, k jakému výsledku se má podle
pokynů dojít.
Obsah
Úvod .................................................................................................................................................................... 3
Bezpečnostní upozornění .................................................................................................................................. 4
Pøehled a instalace
Kontrola dodávaného příslušenství ................................................................................................................. 6
Vložení baterií do dálkového ovladače ........................................................................................................... 6
Přehled tlačítek dálkového ovladače ............................................................................................................... 7
Přehled tlačítek televizoru ................................................................................................................................ 8
Připojení antény a videorekordéru .................................................................................................................. 9
Stabilizace televizoru ........................................................................................................................................ 9
První kroky
Zapnutí televizoru a automatické ladění....................................................................................................... 10
Funkce televizoru
Jak používat nabídkový systém televizoru ................................................................................................... 12
Nabídka nastavení obrazu ........................................................................................................................ 13
Nabídka nastavení zvuku .......................................................................................................................... 14
Nabídka speciálních funkcí ....................................................................................................................... 16
Auto formát.......................................................................................................................................... 16
Výstup AV3.......................................................................................................................................... 17
Průvodce připojením ........................................................................................................................... 17
RGB Centrování.................................................................................................................................. 17
Nabídka instalace ....................................................................................................................................... 18
Jazyk...................................................................................................................................................... 18
Země ..................................................................................................................................................... 18
Automatické ladění .............................................................................................................................18
Třídění programů................................................................................................................................. 18
Označení programů ............................................................................................................................. 19
AV předvolby....................................................................................................................................... 19
Ruční ladění.......................................................................................................................................... 20
PAP (dva programy na obrazovce)................................................................................................................ 21
Teletext.................................................................................................................................................................. 22
NexTView...............................................................................................................................................................23
Doplňující údaje
Jak připojit k televizoru jiná zařízení..............................................................................................................24
Sledování obrazu ze zařízení připojeného k televizoru ...............................................................................25
Konfigurace dálkového ovladače pro videorekordér nebo DVD...............................................................26
Optimální místo sledování ...............................................................................................................................27
Výměna světelného zdroje...............................................................................................................................28
Technické údaje.................................................................................................................................................30
Technické údaje vstupu počítače.....................................................................................................................31
Jak odstranit závadu .........................................................................................................................................32
Jak televizor zdvihnout ...................................................................................................................zadní strana
CZ
Obsah
3
Page 67

Bezpečnostní informace
Z bezpečnostních důvodů a důvodu
Tento televizor pracuje pouze s napětím
220-240V. V případě zapojení příliš
mnoha spotřebičů do jedné el. zásuvky
může dojít k úrazu el. proudem či požáru.
ochrany ivotního prostředí
doporučujeme nenechávat TV v
pohotovostním stavu (standby) kdy ji
nesledujete. Přesto by některé typy TV
měly být, vzhledem ke správné činnosti
svých funkcí, zapnuty v pohotovostním
stavu I kdy TV nesledujete. O
takovýchto případech jste informováni v
návodu k obsluze.
Nevkládejte žádné předměty do
televizoru, rovněž do televizoru nelijte
jakoukoliv tekutinu. V případě, že se
tak stane a již úmyslně či neúmyslně
televizor nezapínejte a sdělte tuto
skutečnost nejbliž ímu
autorizovanému servisu SONY, který
odborně televizor prověří.
Neotevírejte zadní kryt televizoru.
Toto přenechte pouze kvalifikovaným
odborníkům z autorizovaných servisů
SONY.
Nezakrývejte ventilační otvory
televizoru. Nechte kolem televizoru
alespoň 10 cm prostoru pro ventilaci
vzduchu.
Čistěte obrazovku a plastový kryt televize
pouze jemnou, lehce navlhčenou látkou.
Nepoužívejte žádné materiály s
povrchovou úpravou určenou k broušení,
nepoužívejte alkalické čističe, čistící a
brusné pasty, rozpouštědla jako je líh,
benzín, či ředidlo. Rovněž
nedoporučujeme používat antistatický
spray. Z bezpečnostních důvodů, před
mytím odpojte TV od el. proudu.
Nedotýkejte se během bouřky
jakékoliv části el. přívodního kabelu
ani anténního kabelu.
Neumis ujte televizor na horká,
mokrá či extrémně pra ná místa.
Televizor by neměl být vystaven
mechanickým vibracím.
Při vytahování el. přívodního kabelu
tahejte pouze za zástrčku, netahejte
za kabel.
Nevystavujte televizor de ti a vlhku,
předejdete tak případnému úrazu el.
proudem.
Hořlavé látky, či otevřený oheň
(svíčka) neumis ujte v těsné blízkosti
televizoru.
Abyste nepo kodili el. přívodní kabel
nepokládejte na něj žádné těžké
předměty. Doporučujeme
přebytečnou část el. přívodního
kabelu navinout kolem háčků na
zadní straně televizoru.
Postavte TV na bazpečný a stabilní
stolek. Nepřesunujte TV a stolek
najednou, v dy přesunujte TV a stolek
zvláš. TV nikdy nepokládejte na bok
či na zadní stranu přístroje. Nedovolte
dětem aby na TV lezly, sedaly, či si na
ní lehaly.
4
Bezpečnostní informace
Před manipulací vypojte televiz or z el.
sítě. Při manipulaci postupujte
opatrně abyste televizor nepo kodili.
Pokud vám televizor upadl, či byl
jiným způsobem po kozen nechte ho
prověřit odborným pracovníkem
autorizovaného servisu SONY.
Nezakrývejte ventilační otvory
televizoru novinami, časopisy ani
záclonami a závěsy.
Page 68

Další bezpečnostní informace
• Neblokujte ani nezakrývejte větrací otvory umístěné dole vzadu na levé straně televizoru. K větrání
televizoru je nutné ponechat od stěny asi 10 cm volného místa.
• Po přemístění televizoru přímo z chladné místnosti do teplé místnosti, nebo po náhlé změně teploty
v místnosti se může stát, že obraz bude rozmazaný nebo barvy budou v některých částech obrazu
málo intenzivní. To je způsobeno kondenzací vzniklou na zrcadlových plochách nebo čočkách uvnitř
televizoru. Před použitím televizoru nechte vlhkost odpařit.
• Chcete-li mít jasný obraz, nevystavujte obrazovku přímému osvětlení nebo slunečnímu svitu. Je-li to
možné, umístěte na strop bodové světlo nasměrované dolů.
• Tento televizor je vybaven nejnovější vysoce přesnou technologií LCD (z anglického "Liquid
Crystal Display" = displej z tekutých krystalů). I přes nejpřísnější normy použité při výrobě se může
stát, že na obrazovce mohou být za určitých obrazových podmínek viditelné černé tečky nebo jasné
body (červené, zelené nebo modré). Není možné je odstranit a neznamenají závadu.
• Obrazovka tohoto televizoru je potažena antireflexní vrstvou. Jejímu poškození zabráníte
následujícím způsobem:
• Prach z obrazovky stírejte přiloženou textilní utěrkou nebo měkkým hadříkem.
• Obrazovku i skříňku čistěte lehce navlhčeným měkkým hadříkem. Nepoužívejte žádné drsné
houbičky, zásadité čisticí prostředky, čisticí prášky ani rozpouštědla jako alkohol, benzín nebo
antistatické spreje. Před čištěním vytáhněte z bezpečnostních důvodů přívodní kabel televizoru
ze zásuvky.
• Obrazovky se nedotýkejte a dbejte na to, abyste ji nepoškrábali tvrdými předměty.
CZ
Bezpečnostní upozornění
5
Page 69

Kontrola dodávaného příslušenství
2 baterie
(velikost AAA)
Vstupní kabel
počítače
1 dálkový ovladač (RM-906)
2 držáky
2 šrouby
Vložení baterií do dálkového ovladače
Zkontrolujte, zda jste baterie vložili se správnou polaritou.
Baterie likvidujte způsobem, který neškodí životnímu prostředí.
1 šestihranný klíč
1 utěrka
6
Přehled a instalace
Page 70

Přehled tlačítek dálkového ovladače
1 TV I/ : Jak televizor dočasně vypnout (klidový stav):
wf
wd
ws
wa
w;
ql
qk
qj
qh
qg
qf
qd
9 a) Zobrazení seznamu kanálů: je-li Media
Selector (w;) přepnutý na TV a MENU je
vypnuté, stisknutím OK se zobrazí přehled
kanálů. Chcete-li vybrat kanál, stiskněte
nebo V, a pak stiskněte opět OK ke sledování
vybraného programu.
b) Navigator: je-li Media Selector (w;
na TV a MENU (qs) je zapnuté, můžete
těmito tlačítky procházet nabídkovým
systémem
12.
q; Výběr formátu obrazovky: opakovaným
stiskem tohoto tlačítka změníte formát
obrazovky. Podrobnosti viz strana 16.
qa Výběr vysílacích kanálů:
zvolíte následující nebo předchozí vysílací
kanál.
qs Nabídkový systém: tímto tlačítkem otevřete
nabídkový systém
strana 12.
qd Nastavení hlasitosti: těmito tlačítky zvýšíte
nebo snížíte hlasitost.
qf Výběr režimu obrazu: opakovaným stiskem
tohoto tlačítka změníte režim obrazu. Další
podrobnosti o různých obrazových režimech viz
strana 13.
qg Výběr zvukového efektu:
stiskem změníte zvukový efekt. Další
podrobnosti o různých zvukových efektech viz
strana 14.
1
Tímto tlačítkem televizor dočasně vypnete (kontrolka klidového stavu na
2
3
4
5
6
7
8
9
q;
qa
qs
televizoru se rozsvítí). Chcete-li televizor v klidovém stavu opět zapnout,
stiskněte tlačítko znovu.
• Pokud televizor nesledujete, doporučujeme ho kvůli úspoře energie
úplně vypnout.
• Není-li na vstupu 15 minut televizní signál a nestiskne se žádné
tlačítko, televizor se uvede automaticky do klidového stavu.
2 Zapnutí a vypnutí videorekordéru nebo DVD: tímto tlačítkem zapnete nebo
vypnete videorekordér nebo DVD.
3 Volba zdroje signálu: opakovaným stiskem tohoto tlačítka se na televizní
obrazovce objeví symbol požadovaného zdroje. Podrobnosti viz strana 25.
4 Výběr vysílacích kanálů: je-li Media Selector (w;) přepnutý na televizor,
těmito tlačítky zvolíte kanál. U programů označených dvěma číslicemi je nutné
stisknout druhou číslici do 2,5 vteřin.
5 Výběr dvouciferného kanálu videorekordéru: je-li Media Selector (w;)
přepnutý na VCR, tímto tlačítkem zvolíte pro videorekordér Sony kanály s
dvouciferným číslem, např. 23, nejprve stiskněte -/-- a pak tlačítka 2 a 3.
6 a) Nahrávací tlačítko:
je-li Media Selector (w;) přepnutý na VCR, tímto tlačítkem můžete nahrávat
programy.
b) Obnovení výrobního nastavení:
Stisknutím na minimálně 3 vteřiny se vrátíte na úroveň výrobního nastavení
obrazu a zvuku. Tímto způsobem také obnovíte stav instalace televizoru a
na obrazovce se objeví nabídka "Automatické ladění". Další podrobnosti
najdete v části "Zapnutí televizoru a
5) v tomto návodu.
7 Sledování posledního zvoleného programu: je-li Media Selector (w;)
přepnutý na TV, tímto tlačítkem se vrátíte k programu, který jste sledovali
předtím (pokud byl nastaven po dobu alespoň 5 vteřin).
8 Udržení teletextové stránky: v teletextovém režimu tímto tlačítkem udržíte
teletextovou stránku. Dalším stiskem se toto udržení zruší.
v
) přepnutý
televizoru. Podrobnosti viz strana
těmito tlačítky
televizoru. Podrobnosti viz
Opakovaným
automatické ladění" (strana 11, krok
qh Fastext: V teletextovém režimu lze tato tlačítka
použít jako tlačítka Fastextu. Podrobnosti viz
strana 22.
qj NexTView: tímto tlačítkem zobrazíte NexTView.
Podrobnosti viz strana 23.
qk Teletext: tímto tlačítkem zapnete Teletext.
Podrobnosti viz strana 22.
ql Provoz VCR nebo DVD: je-li Media Selector
(w;) přepnutý na VCR nebo DVD, tato tlačítka
ovládají po naprogramování dálkového ovladače
hlavní funkce videorekordéru nebo DVD.
Podrobnosti viz strana 26.
w; Media Selector: tímto tlačítkem zvolíte, jaké
zařízení chcete zapnout: TV, VCR
(videorekordér) nebo DVD. Zvolené zařízení se
na okamžik označí rozsvícením zelené kontrolky.
Podrobnosti viz strana 26.
wa Zobrazení Info: po stisknutí tlačítka se na
obrazovce objeví např. údaje o číslu kanálu.
Dalším stiskem se funkce zruší.
ws Volba televizního režimu: tímto tlačítkem
vypnete režim PAP, teletextu nebo vstupní režim
videorekordéru.
wd PAP (dva programy na obrazovce): tímto
tlačítkem rozdělíte obrazovku na dvě poloviny a
můžete současně sledovat dva kanály.
Podrobnosti viz strana 21.
wf Vypnutí zvuku: tímto tlačítkem vypnete
televizoru. Dalším stiskem zvuk opět zapnete.
zvuk
Přehled a instalace
CZ
7
Page 71

Přehled tlačítek televizoru
Přijímač dálkového ovladače
Chcete-li použít dálkový
ovladač, nasměrujte ho
směrem na přijímač signálu.
Tlačítka
procházení
programů
dopředu a dozadu (volba
vysílacích kanálů)
Tlačítka
regulace hlasitosti
Zdířka pro
sluchátka
Kryt na
televizoru
vlevo vpředu
posuňte
nahoru.
Zdířka vstupu videa
Zdířka vstupu
S-video
Zdířky vstupu zvuku
Tlačítko
ypínače
Indikátor zapnutí (zelená barva)
• Kontrolka klidového stavu (červená)
• Kontrolka napájení (žlutá)
Kontrolka světelného zdroje (viz strana 28).
Volba zdroje
signálu
Přehled a instalace
8
Page 72

Připojení antény a videorekordéru
• Spojovací kabely nejsou součástí příslušenství.
• Podrobnější údaje o připojení videorekordéru a dalším připojení najdete na straně 24.
nebo
videorekordér
OUT IN
Můžete použít kabel scart. Rozhodnete-li se pro toto volitelné připojení, získáte lepší kvalitu obrazu a
zvuku videa.
Jestliže nepoužijete kabel scart, budete muset po skončení automatického ladění ručně naladit
videorekordér na volný kanál. Viz "Ruční ladění" na straně 20. Řite se rovněž pokyny v návodu k
videorekordéru, kde se dozvíte, jak najít výstupní kanál videorekordéru.
CZ
Stabilizace televizoru
Po nastavení upevněte televizor pomocí přiložených držáků a šroubů z bezpečnostních důvodů např.
ke stěně.
1 Dva přiložené držáky přišroubujte dvěma přiloženými šrouby nahoře na zadní stranu televizoru.
Neblokujte ani nezakrývejte větrací otvory.
K větrání televizoru je nutné ponechat od stěny
asi 10 cm volného místa.
2 Každým držákem provlékněte silnou šňůru nebo řetěz a připevněte je např. ke stěně nebo sloupu.
Přehled a instalace
9
Page 73

Zapnutí televizoru a automatické ladění
Při prvním zapnutí televizoru se na obrazovce objeví sled nabídek, které umožňují: 1) výběr jazyka
nabídky na obrazovce 2) výběr země, ve které televizor používáte 3) ověřit si, jak se k televizoru
připojuje volitelné zařízení 4) nalezení a uložení všech dostupných kanálů (televizních stanic) a 5)
změnu pořadí, ve kterém se kanály (televizní stanice) objevují na obrazovce.
Budete-li později chtít některé nastavení změnit, můžete tak učinit volbou příslušné funkce
v (Nabídka instalace).
Language
Select language
English
English
Nederlands
1 Přívodní kabel televizoru zasuňte do zásuvky (220-240 V ~,
50 Hz).
Při prvním připojení je televizor obvykle zapnutý. Je-li
vypnutý, zapněte ho vypínačem .
Když televizor zapnete poprvé, objeví se na obrazovce
automaticky nabídka Language (Jazyk).
Français
Italiano
Deutsch
Türkçe
Español
Português
Polski
Nederlands
Français
Italiano
Deutsch
Türkçe
Español
Português
Polski
Language
Select language
English
English
Nederlands
Nederlands
Français
Français
Italiano
Italiano
Deutsch
Deutsch
Türkçe
Türkçe
Español
Español
Português
Português
Polski
Polski
2 Tlačítky V, v, B nebo b na dálkovém ovladači vyberte
požadovaný jazyk, a pak potvrte volbu tlačítkem OK. Od
této chvíle se budou všechny nabídky zobrazovat ve
zvoleném jazyku.
3 Automaticky se objeví nabídka Země. Tlačítky v nebo V
vyberte zemi, ve které televizor používáte. Volbu potvrte
tlačítkem OK.
• Jestliže země, ve které budete televizor používat, není
na seznamu, zvolte místo země "vyp".
• Není-li se vaše země na seznamu, doporučujeme zvolit
Rusko, aby u jazyků psaných azbukou nedošlo ke
špatné volbě písma v teletextu.
Language
Select language
English
Nederlands
Français
Italiano
Deutsch
Türkçe
Español
Português
Polski
Země
Vyberte zemi
Vyp
Ireland
Nederland
België/Belgique
Luxembourg
France
Italia
Schweiz/Suisse/Svizzera
English
Nederlands
Français
Italiano
Deutsch
Türkçe
Español
Português
Polski
10
pokračování
První kroky
Page 74

4 Objeví se schéma, které ukazuje, jak připojit k televizoru
nejrůznější zařízení. Řite se pokyny a pak stisknutím OK
obraz odstraňte a pokračujte v automatickém postupu.
Po automatickém naladění a připojení volitelného
zařízení nyní doporučujeme řídit se pokyny uvedenými
v části "Průvodce připojením" na straně 17, tak bude
volitelné zařízení nastaveno optimálně.
Propojte zarízení
v souladu s tímto návodem.
DVD
OK
5 Na obrazovce se objeví nabídka Automatické ladění.
Tlačítkem OK zvolte možnost Ano.
6 Televizor automaticky začne vyhledávat a ukládat všechny
dostupné vysílací kanály.
Tento postup trvá obvykle několik minut. Bute
prosím trpěliví, jinak se automatické ladění nedokončí.
V některých zemích naladí televizní vysílač kanály
automaticky (systém ACI). V tomto případě televizní
vysílač vysílá nabídku, ve které můžete vybrat své
město tlačítkem
v nebo V a tlačítkem OK pak kanály
uložit.
Pokud se během automatického ladění nenajdou žádné
kanály, na obrazovce se automaticky objeví žádost o
připojení antény. Zkontrolujte připojení antény
(podrobnosti viz strana 9). Tlačítkem OK opět spust'te
proces automatického ladění.
7 Po nalezení a uložení všech dostupných kanálů se na
obrazovce automaticky objeví nabídka Třídění programů,
která umožňuje změnit pořadí, ve-kterém jsou kanály
vuloženy.
a) Pokud si přejete pořadí vysílaných kanálů ponechat,
přejděte ke kroku 8.
Potvrte
Přejete si spustit?
Ano Ne
Automatické ladění
Nalezené programy: 4
Program nenalezen
Připojte prosím anténu
Potvrte
Třídění programů
01
TVE
02
TVE2
03
TV3
04
C33
05
C27
06
C58
07
S02
08
S06
CZ
b) Pokud si přejete kanály uložit v jiném pořadí:
1 Tlačítkem v nebo V vyberte číslo programu a kanál
(televizní stanici), který si přejete
změnit. Stiskněte tlačítko b.
2 Tlačítkem v nebo V vyberte nové
pořadí programu pro vámi zvolený
kanál (televizní stanici). Nastavení uložte tlačítkem
OK.
3 Přejete-li si změnit pořadí dalších kanálů, opakujte
kroky b)1 a b)2.
Třídění programů
01
TVE
02
TVE2
03
TV3
04
C33
05
C27
06
C58
07
S02
08
S06
8 Tlačítkem MENU nabídku na obrazovce uzavřete.
Váš LCD televizor (z anglického "Liquid Crystal Display" = displej z tekutých
krystalů) je nyní připraven k použití.
01 TVE
První kroky
11
Page 75

Jak používat nabídkový systém televizoru
Váš LCD televizor je vybaven systémem nabídek, které se objevují na obrazovce a pomáhají vám při
nastavení. K ovládání systému nabídek použijte následující tlačítka na dálkovém ovladači:
1 K zapnutí nabídky na obrazovce:
Tlačítkem MENU na dálkovém ovladači zobrazíte první
Nastavení obrazu
Režim obrazu: Přímý přenos
Kontrast:
Reset
Redukce šumu: Zap
Barevný tón: Studený
úroveň nabídky.
Výběr: Zadat Menu:OKKonec:
2 K procházení nabídek:
• Ke zvýraznění a výběru požadované nabídky nebo funkce stiskněte v nebo V.
• K otevření vybrané nabídky nebo funkce stiskněte OK nebo b.
• K návratu do předcházející nabídky nebo funkce stiskněte OK nebo B.
• K úpravě nastavení vybrané funkce stiskněte v/V/B nebo b.
• K potvrzení a uložení svého výběru stiskněte OK.
3 K vypnutí nabídky na obrazovce:
Nabídku na obrazovce ukončíte tlačítkem MENU.
Nastavení obrazu
Režim obrazu: Přímý přenos
Kontrast:
Reset
Redukce šumu: Zap
Barevný tón: Studený
MENU
Výběr: Zadat Menu:OKKonec:
MENU
12
Funkce televizoru
Page 76

Nabídka nastavení obrazu
,
Nastavení obrazu
Režim obrazu: Přímý přenos
Kontrast:
Reset
Redukce šumu: Zap
Barevný tón: Studený
Výběr:Zpet:
Zadat Menu:
Nastavení obrazu
Režim obrazu: Přímý přenos
Kontrast:
Reset
Redukce šumu: Zap
Barevný tón: Studený
Výběr: Zadat Menu:OKKonec:
MENU
Nabídka "Nastavení obrazu" umožňuje
změnit nastavení obrazu.
Postupujte takto:
Stiskněte tlačítko MENU a pak stisknutím
OK tuto nabídku otevřete. Tlačítky
v nebo
V vyberte požadovanou funkci a stiskněte
OK. Dále se dozvíte, jak jednotlivé funkce
používat.
OK
Režim obrazu Tato volba umožňuje upravit režim obrazu podle programu, který právě
sledujete. Po výběru této funkce stiskněte OK. Opakovaným stiskem
tlačítka v nebo V vyberte:
Osobní (pro individuální nastavení).
Přímý přenos (pro přímý přenos programů, DVD a digitální přijímače
Set Top Box).
Film (pro filmy).
Po volbě požadované funkce ji tlačítkem OK uložte.
Úroveň "Jas", "Barevná sytost" a "Ostrost" u režimů "Přímý přenos" a "Film" je
nastavena již ve výrobě a zaručuje nejlepší kvalitu obrazu.
Kontrast Stisknutím
B nebo b zeslabíte nebo zesílíte kontrast obrazu. Uložte
tlačítkem OK.
Jas Stisknutím
Barevná sytost Stisknutím
B nebo b obraz ztmavíte nebo vyjasníte. Uložte tlačítkem OK.
B nebo b zeslabíte nebo zesílíte barevnou sytost. Uložte
tlačítkem OK.
Odstín Stisknutím
B nebo b zeslabíte nebo zesílíte zelené tóny. Uložte tlačítkem
OK.
Ostrost Stisknutím
B nebo b zeslabíte nebo zesílíte ostrost obrazu. Uložte
tlačítkem OK.
Reset Stisknutím OK obnovíte výchozí hodnoty obrazu od výrobce.
Redukce Tato funkce je automaticky nastavená zapnutá (Zap) ke snížení
šumu obrazového šumu (v obrazu jakoby sněží). Tuto funkci zrušíte stisknutím v
V a výběrem Vyp.
nebo
Barevný tón Tato volba umožňuje upravit barevný odstín obrazu. Po výběru této funkce
stiskněte s
b. Opakovaným stiskem tlačítka v nebo V vyberte: Teplý (dává
světlým barvám červený nádech), Normální (nechává světlé barvy v
neutrálním odstínu), Studený (dává světlým barvám modrý nádech). Uložte
tlačítkem OK.
Lines Při sledování vstupního signálu RGB z konektoru počítače nejsou
Correction některé linie v obrazu správně zobrazeny. Problém vyřešíte volbou této
funkce a stisknutím
b. Opakovaným stiskem tlačítka v nebo V provete
opravu v rozmezí -20 a +20. Uložte tlačítkem OK.
CZ
• Volby "Jas", "Barevná sytost" a "Ostrost" se objevují a je možné je opravit, jen je-
li "Režim obrazu" nastavený na "Osobní".
• "Odstín" se objeví a je možné ho upravit jen pro signál NTSC (např. videokazety ze
Spojených států).
• Pro vstupní signál RGB připojený ke konektoru počítače se objevují a je možné
upravit pouze volby: "Kontrast", "Jas" a "Lines Correction".
Funkce televizoru
13
Page 77

Nabídka nastavení zvuku
Nastavení obrazu
Režim obrazu: Přímý přenos
Kontrast:
Reset
Redukce šumu: Zap
Barevný tón: Studený
Výběr: Zadat Menu:OKKonec:
m
Nastavení zvuku
Zvukový efekt: Dolby Virtual
Výšky:
Hloubky:
Vyvážení:
Reset
Dvoukanál.zvuk: Stereo
Aut. hlasitost: Vyp
TV reproduktory: Zap
Nastavení sluchátek
Výběr: Zadat Menu:OKKonec:
Nabídka "Nastavení zvuku" umožňuje
změnu zvukového nastavení.
Postupujte takto:
Tlačítkem MENU a tlačítkem
v vyberte
a pak stisknutím OK tuto nabídku otevřete.
MENU
Nyní tlačítky
požadovanou funkci a stiskněte OK. Dále
v nebo V vyberte
se dozvíte, jak jednotlivé funkce používat.
Nastavení zvuku
Zvukový efekt: Dolby Virtual
Výšky:
Hloubky:
Vyvážení:
,
MENU
Reset
Dvoukanál.zvuk: Stereo
Aut. hlasitost: Vyp
TV reproduktory: Zap
Nastavení sluchátek
Zadat Menu:
Výběr:Zpet:
OK
Zvukový Tato volba umožňuje upravit zvukový efekt. Po této volbě
efekt stiskněte OK. Nyní opakovaným stiskem tlačítka
v nebo V vyberte:
Vyp (vypnuto).
Přirozený (zlepšuje průzračnost, věrnost a barvu zvuku použitím
systému "BBE High Definition Sound system"*).
Dynamický ("BBE High Definition Sound system"* zesiluje průzračnost
a barvu zvuku pro lepší srozumitelnost a věrnější hudební
dojem).
Dolby** (Dolby Virtual, televizor simuluje zvukový efekt "Dolby
Virtual Surround Pro Logic").
Po volbě požadované funkce ji tlačítkem OK uložte.
14
Funkce televizoru
Vý
šky Stisknutím B nebo b zeslabíte nebo zesílíte vysoké tóny. Uložte tlačítkem
OK.
Hloubky Stisknutím
B nebo b zeslabíte nebo zesílíte hluboké tóny. Uložte tlačítkem
OK.
Vyvážení Stisknutím B nebo b zdůrazníte levý nebo pravý reproduktor. Uložte
tlačítkem OK.
Reset Stisknutím OK obnovíte úrovně výchozích hodnot od výrobce. Uložte
tlačítkem OK.
Dvoukanál. Pro stereofonní vysílání:
zvuk Tlačítky
v nebo V vyberte Stereo nebo Mono. Uložte tlačítkem OK.
Při příjmu dvoujazyčného vysílání:
Tlačítky
v nebo V vyberte Mono (je-li k dispozici jeden kanál), A (pro
kanál 1) nebo B (pro kanál 2). Uložte tlačítkem OK.
pokračování...
Page 78

Aut. hlasitost Tlačítky vnebo V vyberte Zap (hlasitost programu bude stejná nezávisle na
vysílacím signálu, např. reklamy bývají hlasitější než ostatní programy) nebo
Vyp (hlasitost se bude měnit podle vysílacího signálu). Uložte tlačítkem OK.
Zvolíte-li "Dolby Virtual" ve funkci "Zvukový efekt", funkce "Aut. hlasitost" se
automaticky přepne na "Vyp" a naopak.
TV reproduktory Tato funkce umožňuje volbu mezi poslechem televizoru z televizních
Zap (k poslechu televizoru z televizních reproduktorů).
Zvolíte-li "Dočasně vypnutý" nebo "Trvale vypnutý", můžete také měnit hlasitost
externího zařízení tlačítky 2 +/- na dálkovém ovládači. Při stisknutí tlačítek hlasitosti
se objeví symbol
reproduktorů, ale hlasitost externího zařízení.
Nastavení sluchátek Tato funkce umožňuje nastavit hlasitost sluchátek a PAP (dva
reproduktorů nebo z externího zesilovače připojeného k audio
výstupům na zadní straně televizoru.
Po výběru této funkce stiskněte OK. Nyní opakovaným stiskem tlačítka
v
nebo
V vyberte:
Dočasně vypnutý (k jednorázovému poslechu televizoru z externího
Trvale vypnutý (k poslechu televizoru vždy z externího zesilovače).
Po volbě požadované funkce ji tlačítkem OK uložte.
zesilovače. Při použití této funkce se po vypnutí/
zapnutí televizoru obnoví výchozí nastavení
"Zap").
% označující, že hlasitost, kterou upravujete, není hlasitost televizních
programy na obrazovce) (podrobnosti o PAP viz strana 21).
Po výběru této funkce stiskněte OK. Opakovaným stiskem
v nebo V vyberte:
Hlasitost Stisknutím B nebo b zesílíte nebo zeslabíte
úroveň hlasitosti sluchátek.
Dvoukanál.zvuk • Pro stereofonní vysílání:
Stisknutím
Mono
• Při příjmu dvoujazyčného vysílání:
Tlačítky
dispozici jeden kanál), A (pro kanál 1) nebo
B (pro kanál 2).
PAP zvuk Vyberte Okno, jestliže chcete poslouchat
aktivní obrazovku (v rámečku) na obrazovce
PAP (viz strana 21), vyberte Levý obraz,
jestliže chcete poslouchat program na levé
obrazovce, nebo vyberte Pravý obraz, jestliže
chcete poslouchat program na pravé
obrazovce.
v nebo V vyberte Stereo nebo
v nebo V vyberte Mono (je-li k
CZ
* "BBE High Definition Sound system" vyrábí společnost Sony Corporation v licenci
BBE Sound, Inc. Je patentován v USA pod č. 4.638.258 a č. 4.482.866. Slova "BBE"
a symbol BBE jsou ochranné známky společnosti BBE Sound, Inc.
**Tento televizor umožňuje při poslechu zvukového signálu zakódovaného v Dolby
Surround dosahovat efektu zvuku ze všech stran simulací zvuku čtyř reproduktorů
dvěma reproduktory. Zvukový efekt lze také zlepšit připojením vhodného externího
zesilovače (podrobnosti viz strana 25).
** Vyrobeno v licenci Dolby Laboratories. "Dolby" a symbol dvojitého D jsou
ochranné známky společnosti Dolby Laboratories.
Funkce televizoru
15
Page 79

Nabídka funkce
Nastavení obrazu
Režim obrazu: Přímý přenos
Kontrast:
Reset
Redukce šumu: Zap
Barevný tón: Studený
Výběr: Zadat Menu:OKKonec:
m
Funkce
Auto formát Zap
Výstup AV3 TV
Pruvodce propojením
Výběr: Zadat Menu:OKKonec:
Nabídka "Funkce" umožňuje měnit různá
nastavení televizoru.
Postupujte takto:
Tlačítkem MENU a dvojím stisknutím
tlačítka
MENU
tuto nabídku zadejte. Pak tlačítky v nebo V
v vyberte , pak stisknutím OK
vyberte požadovanou funkci a stiskněte
Funkce
Auto formát Zap
Výstup AV3 TV
Pruvodce propojením
OK. Dále se dozvíte, jak jednotlivé funkce
používat.
,
OK
Zadat Menu:
MENU
AUTO FORMÁT
Tato volba umožňuje automaticky změnit poměr stran obrazovky.
Postupujte takto:
Po výběru funkce stiskněte OK. Pak tlačítky
automatické přepínání formátu obrazovky podle vysílacího signálu) nebo Vyp (chcete-li to
zachovat své vlastní nastavení). Uložte tlačítkem OK.
I když jste zvolili "Zap" nebo "Vyp", můžete stále měnit formát obrazovky
opakovaným stiskem na dálkovém ovladači a vybrat jeden z následujících
formátů:
Výběr:Zpet:
v nebo V vyberte Zap (chcete-li nastavit
SMART: Napodobení širokoúhlého formátu pro vysílání
ve formátu 4:3.
SMART
4/3: Klasická velikost obrazu 4:3, obraz
přes celou obrazovku.
4:3
14/9: Kompromis mezi formátem obrazu 4:3 a 16:9.
14:9
ZOOM: Širokoúhlý formát pro filmy ve formátu
"poštovní schránky".
ZOOM
WIDE: Pro formát 16:9. Obraz přes celou obrazovku.
WIDE
• V režimech "SMART", "ZOOM" a "14:9" jsou horní a dolní okraje obrazovky
oříznuty. Tlačítky
v nebo V lze upravit umístění obrazu na obrazovce (např. ke
sledování titulků).
• U signálu RGB z konektoru počítače lze vybrat pouze režim "WIDE" a "4/3".
• V závislosti na vysílacím formátu se na obrazovce vždy mohou objevovat černé
pruhy bez ohledu na zvolený režim.
16
Funkce televizoru
pokračování...
Page 80

VÝSTUP AV3
Tato funkce umožňuje zvolit, z jakého zdroje pochází výstupní signál na zdířce scart,
S
3/ 3, takže z ní pak můžete nahrávat libovolný signál z televizoru nebo z externího
zařízení připojeného ke zdířce scart, 1/ 1, 2/ 2 nebo k předním konektorům
S
4 nebo 4 a 4.
Jestliže váš videorekordér podporuje Smartlink, tento postup není nutný.
Postupujte takto:
Po otevření nabídky "Funkce" podle popisu na předchozí straně a po výběru funkce
stiskněte OK. Pak tlačítky
TV pro výstup signálu z antény.
AV1 pro výstup zdrojů připojených do zdířky 1/ 1.
AV2 pro výstup zdrojů připojených do zdířky 2/ 2.
AV4 pro výstup zdrojů připojených do zdířky 4 nebo 4 a 4.
AUTO pro výstup signálu zobrazeného na televizoru.
Zvolíte-li "AUTO", výstupní signál bude vždy signál zobrazený na obrazovce.
Máte-li dekodér připojený ke zdířce scart 3/ 3 nebo k videorekordéru
připojenému k této zdířce scart, nezapomeňte kvůli dekódování změnit "Výstup
AV3" zpět na "TV".
PRŮVODCE PROPOJENÍM
Jestliže jste již připojili k televizoru externí zařízení, dodržujte prosím pokyny této nabídky.
Dosáhnete tak nejlepšího možného nastavení obrazu pro volitelné zařízení.
Postupujte takto:
v
nebo
V vyberte požadovaný výstupní signál:
S
S
1 Po otevření nabídky "Funkce" podle popisu na předchozí straně a po výběru funkce
stiskněte OK. Nyní tlačítky
připojit: SAT (satelit), Dekodér, DVD, GAME, VIDEO (videorekordér) nebo DVD rec
(přehrávač DVD). Nyní tlačítkem b vyberte zvolené zařízení (zvolené zařízení můžete
také vymazat stiskem
nebo V, vyberte "Potvrďte" a stiskněte OK.
v nebo V vyberte jedno z dostupných zařízení, které chcete
B). Po výběru všech zařízení, která chcete připojit, stiskněte v
2 Objeví se nová nabídka, ve které je uvedeno, do které zdířky scart na zadní straně
televizoru se má připojit určité zařízení. Tímto postupem připojte všechna zařízení,
dosáhnete tak u nich nejlepšího možného nastavení obrazu.
3 Po připojení volitelného zařízení vyberte tlačítky B nebo b "OK" a nakonec stiskněte
tlačítko OK na dálkovém ovladači.
Rozhodně doporučujeme, abyste se řídili uvedenými nabídkami připojení. V případě, že vám
nevyhovují, vyberte stisknutím
nová nabídka, ve které můžete zadat připojení podle svých požadavků.
B nebo b "Ne", a pak stiskněte tlačítko OK. Na obrazovce se objeví
CZ
RGB CENTROVÁNÍ
Tuto možnost lze použít jen v případě, že k televizoru je připojen zdroj RGB.
Tato volba umo ňuje seřízení horizontální polohy obrazu v případě, e je nutné ji upravit
kvůli připojení zdroje RGB.
Postupujte takto:
Po otevření nabídky "Funkce" podle popisu na předchozí straně a po zobrazení zdroje RGB
vyberte funkci "RGB centrování" a stiskněte OK. Pak tlačítky
obrazu na obrazovce v rozmezí 5 až +5. Volbu potvrte OK a uložte.
v nebo V upravte střed
Funkce televizoru
17
Page 81

Nabídka instalace
Nastavení obrazu
Režim obrazu: Přímý přenos
Kontrast:
Reset
Redukce šumu: Zap
Barevný tón: Studený
Výběr: Zadat Menu:OKKonec:
m
Instalace
Jazyk
Zem
ě
Automatické ladění
Třídění program
Označení program
AV předvolby
Ruční ladění
Výběr: Zadat Menu:OKKonec:
"Nabídka Instalace" umožňuje upravovat
různé funkce televizoru.
Postupujte takto:
Tlačítkem MENU a trojím stisknutím
v
tlačítka
MENU
tuto nabídku otevřete. Pak tlačítky
V
vyberte požadovanou funkci a stiskněte
vyberte , pak stisknutím OK
v
OK. Dále se dozvíte, jak jednotlivé funkce
Instalace
Jazyk
Zem
ě
ů
ů
,
MENU
Automatické ladění
Třídění program
Označení program
AV předvolby
Ruční ladění
Výběr:Zpet:
ů
ů
Zadat Menu:
OK
používat.
JAZYK
Tato funkce umožňuje zvolit jazyk nabídek na obrazovce.
Postupujte takto:
Po výběru této funkce stiskněte OK a pak postupujte stejně jako v kroku 2 v části "Zapnutí
televizoru a automatické ladění" na straně 10.
ZEMĚ
Tato volba umožňuje vybrat zemi, ve které budete televizor používat.
nebo
Postupujte takto:
Po výběru této funkce stiskněte OK a pak postupujte stejně jako v kroku 3 v části "Zapnutí
televizoru a automatické ladění" na straně 10.
AUTOMATICKÉ LADĚNÍ
Tato volba umožňuje automatické vyhledání a uložení dostupných televizních kanálů.
Postupujte takto:
Po výběru této funkce stiskněte OK a pak postupujte stejně jako v kroku 5 a 6 v části
"Zapnutí televizoru a automatické ladění" na straně 11.
TŘÍDĚNÍ PROGRAMŮ
Tato funkce umožňuje změnit pořadí, ve kterém se kanály (televizní stanice) objevují na
obrazovce.
Postupujte takto:
Po výběru funkce stiskněte OK a pak postupujte stejně jako v kroku 7 a části "Zapnutí
televizoru a automatické ladění" na straně 11.
pokračování
Funkce televizoru
18
Page 82

OZNAČENÍ PROGRAMŮ
Tato volba umožňuje pojmenovat kanál řetězcem až pěti znaků (písmena nebo číslice).
Postupujte takto:
1 Po otevření nabídky "Instalace" podle popisu na předchozí straně a po výběru funkce stiskněte OK, pak
tlačítky v nebo V vyberte číslo programu pro kanál, který si přejete pojmenovat. Potvrte tlačítkem OK.
2 Při zvýrazněném prvním slově ve sloupci Název stiskněte OK a tlačítky
pak potvrte OK.
Po skončení výběru tlačítky
OK nabídku na obrazovce ukončete.
• Písmeno můžete opravit tak, že se na obrazovce vrátíte o znak zpět stisknutím "%" a volbu
potvrdíte tlačítkem OK.
• Mezeru vložíte výběrem " " na obrazovce a potvrzením OK.
AV PŘEDVOLBY
Tato volba umožňuje:
a) Přidělit název externímu zařízení, které jste připojili ke vstupním zdířkám na televizoru.
Postupujte takto:
v, V
, B nebo b vyberte na obrazovce slovo "Konec" a nakonec stisknutím
v, V
, B nebo b zvolte písmeno,
1 Po otevření nabídky "Instalace" podle popisu na předchozí straně a po výběru funkce stiskněte OK,
pak tlačítky v
zadní scart, AV4 pro přední konektory a AV5 pro konektor vstupu počítače. Nyní dvakrát stiskněte
OK.
nebo
V vyberte zdroj signálu, který si přejete pojmenovat: AV1, AV2 nebo AV3 pro
2 Název se automaticky objeví ve sloupci s názvy:
a) Jestliže chcete použít některý z předem určených názvů, tlačítky
název a nakonec potvrte OK.
Předem určené názvy jsou tyto: VIDEO, DVD, CABLE (kabel), GAME, CAM (kamera), SAT
(satelit) nebo PC (počítač pouze pro AV5).
b) Jestliže chcete použít jiný název, vyberte Změnit a stiskněte OK. Pak při zvýrazněném prvním
názvu tlačítky v, V, B nebo b vyberte písmeno a stiskněte OK. Po skončení tlačítky v,V, B nebo
b vyberte na obrazovce slovo "Konec" a nabídku na obrazovce uzavřete stiskem OK.
v nebo V vyberte požadovaný
CZ
• Písmeno můžete opravit tak, že se na obrazovce vrátíte o znak zpět stisknutím "%" a
volbu potvrdíte tlačítkem OK.
• Mezeru vložíte výběrem " " na obrazovce a potvrzením OK.
b) Změnit úroveň zvukového vstupu připojeného volitelného zařízení.
Postupujte takto:
Po otevření nabídky "Instalace" podle popisu na předchozí straně a po výběru funkce stiskněte OK, pak
v
stisknutím
AV2 nebo AV3 pro zadní scart, AV4 pro přední konektory a AV5 pro konektor vstupu počítače. Dvojím
stisknutím
zvukového vstupu v rozmezí od -9 do +9.
nebo V vyberte zdroj signálu, u kterého si přejete změnit úroveň zvukového vstupu: AV1,
b zvýrazněte sloupec Korekce zvuku. Nakonec tlačítky OK a
v
nebo V změňte úroveň
pokračování...
Funkce televizoru
19
Page 83

RUČNÍ LADĚNÍ
Tato volba umožňuje:
a) Postupné přiřazení pořadových čísel kanálům nebo videokanálům v pořadí podle vaší volby.
Postupujte takto:
1 Po otevření nabídky "Instalace" podle popisu na straně 18 a po výběru funkce "Ruční ladění"
stiskněte OK. Nyní při zvýrazněné funkci Program stiskněte OK.
Tlačítky
Pak stiskněte
v nebo V vyberte číslo programu, které chcete kanálu přiřadit (pro video zvolte číslo "0").
B.
2 Dostupnost následující funkce závisí na tom, jakou zemi jste vybrali v nabídce
"Země".
v
nebo
Po výběru funkce Systém stiskněte OK. Pak tlačítky
vysílání (B/G pro západoevropské země, D/K pro východoevropské země, L pro Francii nebo I pro
Velkou Británii). Pak stiskněte
B.
3 Po výběru funkce Číslo kanálu stiskněte OK. Nyní tlačítky
pozemní vysílání nebo "S" pro kabelové kanály). Pak rovnou číselnými tlačítky zadejte číslo kanálu
televizního vysílání nebo videosignálu. Neznáte-li číslo kanálu, vyhledejte ho tlačítky
. Po naladění požadovaný kanál uložte dvojím stisknutím OK.
Další kanály naladíte a uložíte opakováním výše popsaných kroků.
b) Pojmenovat kanál s použitím až pěti znaků.
Postupujte takto:
Po otevření nabídky "Instalace" podle popisu na straně 18 a po výběru funkce "Ruční ladění" stiskněte
OK. Dále při zvýrazněné funkci Program stiskněte tlačítko PROG +/- a vyberte číslo programu pro
kanál, který si přejete pojmenovat. Jakmile se program, který si přejete pojmenovat, objeví na
obrazovce, výberte funkci Název a potvrte tlačítkem OK. Pak při zvýrazněném prvním názvu tlačítky
v, V
, B nebo b vyberte písmeno a potvrte ho tlačítkem OK. Po skončení volby tlačítky v, V, B nebo
b vyberte na obrazovce slovo "Konec" a nabídku na obrazovce ukončete tlačítkem OK.
• Písmeno můžete opravit tak, že se na obrazovce vrátíte o znak zpět stisknutím "%" a volbu
potvrdíte tlačítkem OK.
• Mezeru vložíte výběrem " " na obrazovce a potvrzením OK.
V zvolte jeden ze systémů televizního
v
nebo
V vyberte ladění kanálu ("C" pro
b a v nebo V
c) Doladit příjem signálu Systém AFT (z anglického "Automatic Fine Tuning" = automatické doladění )
obvykle zaručuje ten nejlepší obraz, ale je-li obraz přesto obraz zkreslený, můžete ještě zkusit doladit
televizor ručně a dosáhnout tak lepšího příjmu.
Postupujte takto:
Při sledování kanálu (televizní stanice), který si přejete doladit, a po otevření nabídky "Instalace" podle
popisu na straně 18 a výběru funkce "Ruční ladění" stiskněte
b. Nyní tlačítky
OK.
v
nebo V
provete doladění v rozmezí od -15 do +15. Uložte dvojím stiskem tlačítka
OK.
Pak vyberte funkci AFT a stiskněte
d) Přeskočit čísla programů vybraných tlačítky PROG +/-, která nechcete použít.
Postupujte takto:
Po otevření nabídky "Instalace" podle popisu na straně 18 a po výběru funkce "Ruční ladění" stiskněte
OK
. Nyní
přeskočit. Jakmile se program, který si přejete přeskočit, objeví na obrazovce, vyberte funkci Přeskočit
a stiskněte
tlačítka OK.
při zvýrazněné funkci Program vyberte stiskem tlačítka PROG +/- číslo programu, které chcete
b. Nyní tlačítky v
nebo
V
vyberte Zap. Nakonec volbu potvrte a uložte dvojím stisknutím
Tuto funkci pak zrušíte výběrem "Vyp" místo "Zap" ve výše popsaném kroku.
e) Sledovat a nahrávat zakódované kanály (např. z placeného televizního dekodéru) "Ruční ladění" stiskněte
OK. Nyní
Postupujte takto:
Po otevření nabídky "Instalace" podle popisu na straně 18 a po výběru funkce "Ruční ladění" stiskněte
OK. Nyní zvolte funkci Dekodér a stiskněte
potvrte a uložte dvojím stisknutím tlačítka OK.
při použití dekodéru připojeného ke zdířce scart 3/ 3 přímo nebo přes videorekordér.
Dostupnost této funkce závisí na tom, jakou zemi jste vybrali v nabídce "Země".
b. Pak tlačítky v nebo V vyberte Zap. Nakonec volbu
S
Tuto funkci pak zrušíte výběrem "Vyp" místo "Zap" ve výše popsaném kroku.
20
Funkce televizoru
Page 84

PAP (DVA PROGRAMY NA OBRAZOVCE)
Funkce PAP (z anglického "Picture And Picture" - dva programy na obrazovce) rozdělí obrazovku na
dvě poloviny k současnému sledování dvou obrazů ve formátu 4:3.
Zapnutí a vypnutí funkce PAP
1 Zobrazte PAP stisknutím .
Jedna z obrazovek bude orámovaná a tedy aktivní.
To znamená, že budete-li chtít vybrat zdroj PAP,
provede se výběr v aktivní obrazovce.
2 Dalším stisknutím PAP odstraníte.
Na obrazovce se objeví pruh, který vás povede při ovládání
PAP. Pruh po několika vteřinách zmizí, ale můžete ho opět
zobrazit stiskem tlačítka .
Zmina aktivní obrazovky
To je možné pouze tehdy, je-li Media Selector nastavený na TV.
Chcete-li zminit aktivní obrazovku (orámovanou), stisknite tlaeítko
Výběr zdroje PAP:
1 Výběr televizního kanálu:
Stiskem tlačítka B vyberte levou obrazovku jako aktivní. Nyní číselnými tlačítky nebo
PROG +/- vyberte televizní kanál.
03
PROG+ PROG-
Výběr: Výběr:
Posunout okno
B nebo b.
Navegador
Configuración del Sistema
Aceptar Versión
CZ
Na levé obrazovce není možné zobrazit vstupní signály videa.
2 Výběr zdroje signálu:
Stisknutím tlačítka b vyberte pravou obrazovku jako aktivní. Nyní tiskněte opakovaně
tlačítko k zobrazení vstupního signálu připojeného zařízení na pravé obrazovce.
Podrobnější informace o vstupních symbolech, které si můžete vybrat, najdete v části
"Sledování obrazu ze zařízení připojených k televizoru" na straně 25.
Na pravé obrazovce není možné zobrazit vysokofrekvenční signál (kanály
televizního vysílání).
Změna aktivní obrazovky
Aktivní obrazovku (orámovanou) změníte tlačítky
Výběr zvuku
Zvuk aktivní obrazovky (orámované) se vždy ozývá hlasitě z reproduktorů.
Mimoto můžete poslouchat zvuk aktivní i neaktivní obrazovky ze sluchátek.
Postupujte takto:
S televizorem v režimu PAP, viz část "Nabídka nastavení zvuku", vyberte "Nastavení
sluchátek" a nastavte funkci " PAP zvuk" podle přání. Podrobnosti viz strana 15.
V režimu PAP (dva programy na obrazovce) se výstup ze zdířky Scart 2/ 2
objevuje vždy v pravé polovině obrazovky.
B nebo b.
Funkce televizoru
21
Page 85

Teletext
Teletext je informační služba, kterou vysílá většina televizních stanic. Jak tuto službu využívat se
dozvíte na stránce s obsahem teletextové služby (obvykle stránka 100). Ke sledování teletextu použijte
tlačítka dálkového ovladače podle níže uvedených pokynů.
Signál kanálu (televizní stanice) musí být dostatečně silný, jinak může v teletextu docházet k chybám.
Zapnutí teletextu:
1 Zvolte televizní kanál s teletextem, který chcete
sledovat.
2 Jedním stiskem tlačítka otevřete režim obrazu
a teletextu. Obrazovka je rozdělena na dvě části s
teletextem vlevo a televizním kanálem vpravo.
3 Jestliže si přejete zobrazit teletext přes celou
obrazovku, stiskněte tlačítko podruhé.
Výběr teletextové stránky:
Trojmístné číslo stránky zadejte pomocí číselných tlačítek.
•
Jestliže uděláte chybu, znovu zadejte správné číslo stránky.
•
Jestliže počitadlo na obrazovce pokračuje v hledání, znamená
to, že stránka není dostupná. V tomto případě zadejte jiné číslo
stránky.
Přístup k následující nebo předchozí stránce:
Stiskněte PROG + ( ) nebo PROG - ( ).
Zastavení teletextové stránky:
Stiskněte . Dalším stiskem se zastavení stránky zruší.
Volba podstránky:
Textová stránka se může skládat z několika podstránek. V tomto případě se vedle čísla
stránky objeví jedna nebo více šipek a dole na obrazovce se objeví rámeček s počtem
podstránek, které tato stránka obsahuje. Jakmile jsou podstránky dostupné, začnou se
postupně zobrazovat. Jestliže je chcete zastavit a vybrat požadovanou podstránku,
stiskněte opakovaně
Vypnutí teletextu:
Stiskněte .
B nebo b.
Fastext
Funkce Fastext umožňuje vyhledávat stránky jedním stiskem tlačítka.
Máte-li nastavený režim teletextu a fastext je k dispozici, dole na teletextové
stránce se objeví barevná kódovaná nabídka. Tlačítkem příslušné barvy (červená,
zelená, žlutá nebo modrá) otevřete stránku podle nabídky.
22
Teletext
Page 86

NexTView*
*(závisí na dostupnosti služby).
NexTView je elektronický přehled pořadů na obrazovce, který vás informuje o programech různých
televizních stanic.
Informace můžete vyhledávat i podle tématu (sport, umění apod.) nebo data.
Jestliže se při sledování NexTView objeví chybné znaky, otevřete pomocí nabídky Systém nabídku
Jazyk (viz strana 18) a vyberte jazyk, ve kterém se NexTView vysílá.
Zobrazení NexTView
1 Vyberte vysílací kanál poskytující službu NexTView. Jakmile jsou údaje dostupné, na
obrazovce se objeví označení "NexTView".
2 K zobrazení NexTView slouží dva různé typy rozhraní. Tyto typy souvisí s tím, kolik
procent dat je dostupných:
a) Rozhraní "Seznam programů":
Sledujete-li televizor, stiskněte po oznámení "NexTView" (bíle) na obrazovce
tlačítko na dálkovém ovladači k zobrazení rozhraní "Seznam programů" (viz
obr. 1).
b) Rozhraní "Přehled":
Sledujete-li televizor a více než 50 % dat NexTView je již dostupných (v
některých oblastech není možné získat 100 % dat), na obrazovce se objeví
oznámení "NexTView" (černě). Tlačítkem na dálkovém ovladači zobrazíte
rozhraní "Přehled" (viz obr. 2).
3 Procházení NexTView:
Tlačítky
Tlačítky
Výběr potvrte tlačítkem OK.
Po výběru programu získáte stiskem tlačítka OK další informace o
vybraném programu.
B nebo b se posunete doleva nebo doprava.
v nebo V se posunete nahoru nebo dolů.
4 Chcete-li NexTView vypnout, stiskněte tlačítko na dálkovém ovladači.
Rozhraní "Seznam programů" (obr. 1): Rozhraní "Přehled" (obr. 2):
1 Seznam programů 2 3
1
Praesentiert von
Ihrer Programmzeitschr
Čt 12
14:30
AttrText
AttrText
AttrText
AttrText
AttrText
AttrText
Perry Mason
RTL2
Krimiserie - Der Fall mit dem mittelmass
2
15:30
AttrText16
AttrText16
AttrText16
AttrText16
AttrText16
AttrText16
Čt 12 Cvn
16:00
Všeobecné
KategorieDatum
14:36
www.tvmovie.de
15:00
Út 17 Cvn 14:55 - 16:30
Výběr:
3
Datum:
Stisknutím červeného tlačítka na
dálkovém ovladači zobrazíte
obrazovku s daty a můžete vybrat
požadované datum tlačítky v nebo
V. Potvrte tlačítkem
OK.
Ikony:
Obecné:
Všechny informace o programu jsou seřazeny
podle času a vysílacích kanálů:
Zprávy
Film
Sport
Show
Dětské
Umění
Hudba
1
Praesentiert von
Ihrer Programmzeitschr
Čt 12
AttrText
AttrText
AttrText
AttrText
AttrText
AttrText
Perry Mason
RTL2
Krimiserie - Der Fall mit dem mittelmass
Datum
14:30
Auf schlimmer undewig
Baywatch
Benny Hill
The Osbournes
Segeln: Louis Vuitton Cup
Twilight Zone
www.tvmovie.de
15:00
Perry Mason
Út 17 Cvn 14:55 - 16:30
Výběr:
2
Kategorie:
Stisknutím
ovladači zobrazíte ikony (viz seznam ikon
níže) pro různá témata. Tlačítky v nebo V
vyberte požadovanou ikonu a nakonec
potvrte tlačítkem
modrého tlačítka na dálkovém
OK.
15:30 16:00
Čt 12 Haz
Všeobecné
Kategorie
CZ
14:36
3
NexTView
23
Page 87

Jak připojit zařízení k televizoru
*
p
Podle následujících pokynů můžete k televizoru připojit různá volitelná zařízení.
Spojovací kabely nejsou součástí příslušenství.
S VHS/Hi8/
DVC
videokamera
A
B
I
C
E
H
D
F
G
"PlayStation" je
výrobkem
společnosti Sony
Computer
Entertainment, Inc.
* "PlayStation" je
obchodní značka
společnosti Sony
Entertainment, Inc..
2
1
"PlayStation"*
Dekodér/
Set Top Box
8mm/Hi8/
DVC
videokamera
DVD
Hi-fi
videorekordér
Dekodér/ Set Top Box
řehrávač DVD
• Abyste předešli deformacím obrazu, nezapojujte externí zařízení současně do zdířek A a B.
• Dekodér nezapojujte do zdířky scart F.
Připojení videorekordéru
Pokyny k připojení videorekordéru najdete v části "Připojení antény a videorekordéru" tohoto návodu na
stránce 9.
Připojení videorekordéru, který podporuje Smartlink
Smartlink je přímé propojení televizoru a videorekordéru. Více informací o Smartlinku najdete v
návodu k videorekordéru.
Máte-li videorekordér, který podporuje Smartlink, připojte videorekordér k televizoru pomocí kabelu scart
do zdířky 3/ 3
Jestliže jste připojili dekodér nebo Set Top Box ke zdířce scart 3/ 3 E nebo přes
S
E.
S
videorekordér připojený ke zdířce scart
Vyberte funkci "Ruční ladění" v nabídce "Instalace" a po otevření funkce "Dekodér"**" vyberte "Zap"
(podrobnosti viz strana 20). Tuto funkci použijte pro každý zakódovaný signál.
**Dostupnost této funkce závisí na tom, jakou zemi jste vybrali v nabídce "Země".
pokračování...
24
Doplňující údaje
Page 88

Připojení zvukového zařízení k televizoru
Chcete-li zesílit zvukový výstup televizoru, zapojte zvukové zařízení do zdířek zvukového výstupu D. Dále
vyberte v systémové nabídce nabídku "Nastavení zvuku" a nastavte "TV reproduktory" na "Dočasně
vypnutý" nebo "Trvale vypnutý" (viz strana 15).
Hlasitost externích reproduktorů můžete upravit tlačítky hlasitosti na dálkovém ovladači. Výšky a
Hloubky můžete upravit i pomocí nabídky "Nastavení zvuku" (viz strana 14).
Hi-fi reproduktory
Jak využít zvukový efekt "Dolby Virtual" pro
zvukové zařízení
Reproduktory umístěte před místo, kde budete poslouchat, a po
stranách televizoru, mezi každým reproduktorem a televizorem
ponechte vzdálenost asi 50 cm.
V nabídkovém systému otevřete nabídku "Nastavení zvuku". Nyní
vyberte ve funkci "Zvukový efekt" "Dolby Virtual" (viz strana 14).
~50°
místo, kde sedíte
Sledování obrazu ze zařízení připojených k
televizoru
1 Zařízení připojte k určené zdířce televizoru, jak je uvedeno na předchozí stránce.
2 Připojené zařízení zapněte.
3 Chcete-li sledovat obraz z připojeného zařízení, opakovaně tiskněte tlačítko , až se na
obrazovce objeví symbol vstupu.
Symbol Vstupní signály
1 Vstupní signál audio/video přes konektor scart G.
1 Vstupní signál RGB přes konektor scart G. Tento symbol se objeví jen
tehdy, je-li zdroj RGB připojený.
2 Vstupní signál audio/video přes konektor scart F .
2 Vstupní signál RGB přes konektor scart F. Tento symbol se objeví jen
tehdy, je-li zdroj RGB připojený.
3 Vstupní signál audio/video přes konektor scart E.
S
3 Vstupní signál S-video přes konektor scart E. Tento symbol se objeví jen
tehdy, je-li zdroj S-video připojený.
4 Vstup video signálu přes zdířku phono B a vstup audio signálu přes
zdířku C.
S
4 Vstup signálu S-video přes zdířku vstupu S- video A a audio signálu přes
zdířku C. Tento symbol se objeví jen tehdy, je-li zdroj S-video připojený.
5 Vstup signálu RGB přes konektor počítače H a I.
4 Tlačítkem na dálkovém ovladači se vrátíte k normálnímu televiznímu obrazu.
Pro zařízení mono
Konektor phono zapojte do zdířky L/G/S/I na přední straně televizoru a zvolte vstupní signál
4 nebo 4 podle výše uvedených pokynů. Dále se řite částí "Nastavení zvuku" v tomto
návodu a ve zvukové nabídce na obrazovce nastavte funkci "Dvoukanál. zvuk" na "A" (viz
strana 14).
S
CZ
Doplňující údaje
25
Page 89

Konfigurace dálkového ovladače pro videorekordér
nebo DVD
Při výchozím nastavení ovládá tento dálkový ovladač základní funkce televizoru Sony, DVD
přehrávačů Sony a většiny videorekordérů Sony. K ovládání videorekordérů a DVD přehrávače jiných
výrobců (a některých modelů videorekordérů Sony) je nutné dálkový ovladač nakonfigurovat.
Postupujte takto:
obr. 3
Než začnete, najděte si v níže uvedeném seznamu třímístný kód značky svého
přehrávače DVD nebo videorekordéru. Pokud je u vaší značky uveden víc než jeden
kód, poznamenejte si jen první z nich.
Na vnitřní straně krytu baterií je přilepen štítek, na nějž si
můžete kódy vašich zařízení poznamenat.
1 Stiskněte tlačítko Media Selector, až se rozsvítí příslušná zelená
kontrolka (VCR - videorekordér, nebo DVD) (viz obr. 1).
2 Než zelená kontrolka zhasne, asi na 6 vteřin stiskněte a podržte žluté
tlačítko, až začne zelená kontrolka blikat (videorekordér nebo DVD)
(viz obr. 2).
3 Zatímco kontrolka videorekordéru a DVD bliká, zadejte všechny tři
číslice kódu značky videorekordéru nebo DVD (viz seznam níže)
pomocí číselných tlačítek na dálkovém ovladači (viz obr. 3).
Jestliže je kód zadaný správně, zelená kontrolka se krátce
rozsvítí. Není-li tomu tak, výše uvedené kroky zopakujte.
4 Zapněte videorekordér nebo DVD a zkontrolujte hlavní funkce.
Jestliže zařízení nebo některé funkce nefungují,
nepokračujte, ale zkontrolujte, zda jste zadali správný kód,
nebo zkuste zadat další kód uvedený vedle značky.
V tomto seznamu nejsou uvedeny všechny značky a všechny modely
těchto značek.
obr. 1
obr. 2
6 s
5 Nezapomeňte vždy stisknout tlačítko Media Selector, až se rozsvítí zelená kontrolka
odpovídající zařízení, které chcete ovládat dálkovým ovladačem. VCR (videorekordér),
TV nebo DVD.
Seznam značek videorekordérů Seznam značek DVD přehrávačů
Značka Kód Značka Kód
SONY (VHS) 301, 302, 303, 308, 309, 362
SONY (BETA) 303, 307, 310
SONY (DV) 304, 305, 306
AIWA 325, 331, 351
AKAI 326, 329, 330
DAEWOO 342, 343
GRUNDIG 358, 355, 360, 361, 320, 351, 366
HITACHI 327, 33 3, 334
JVC 314, 315, 322, 344, 352, 353, 354, 348, 349
LG 332, 338
LOEWE 358, 355, 360, 361, 320, 351
MATSUI 356, 357
ORION 328
PANASONIC 321, 323
PHILIPS 311, 312, 313, 316, 317, 318, 358, 359,
SAMSUNG 339, 340, 341, 345
SANYO 335, 336
SHARP 324
THOMSON 319, 350, 365
TOSHIBA 337
26
Doplňující údaje
363, 364
SONY 001, 029, 030, 036, 037, 038, 039, 040,
041, 042, 043, 044, 053, 054, 055
AIWA 021
AKAI 032
DENON 018, 027, 020, 002
GRUNDIG 009, 028, 023, 024, 016, 003
HITACHI 025, 026, 015, 004, 035
JVC 006, 017
KENWOOD 008
LG 015, 014, 034
LOEWE 009, 028, 023, 024, 016, 003
MATSUI 013, 016
ONKYO 022, 033
PANASONIC 018, 027, 020, 002, 045, 046, 047
PHILIPS 009, 028, 023, 024, 016, 003, 031
PIONEER 004, 050, 051, 052
SAMSUNG 011, 014
SANYO 007
SHARP 019, 027
THOMSON 012
TOSHIBA 003, 048, 049
YAMAHA 018, 027, 020, 002
Page 90

Optimální místo sledování
Pokuste se umístit televizor tak, abyste ho mohli sledovat z míst uvedených níže na obrázku. Obraz pak
bude mít optimální kvalitu.
Sledovací oblast vodorovně
Sledovací oblast svisle
K
KF
KF
F
K
F
-
4
2
S
X3
0
0
S
X3
K
:
n
X
3
0
e
j
m
0
0
K:
0
K
é
n
ě
n
e
:
n
e
j
1
,
8
j
m
é
m
é
m
n
ě
1
,
8
m
n
ě
2
,
2
m
5
0
0
S
65º
65º
K
F
-
KF
-
6
(Optimální místo sledování)
CZ
-
4
2
S
X
3
0
0
-
5
0
-
6
0
S
K:
S
X3
X
n
e
jm
0
0
K
3
0
0
K:
é
n
ě
:
n
e
n
e
j
1
,
8
j
m
é
m
é
n
m
n
ě
1
,
8
m
ě
2
,
2
m
30º
30º
(Optimální místo sledování)
Doplňující údaje
27
Page 91

Výměna světelného zdroje
Když obrazovka ztmavne, barva obrazu není normální, nebo kontrolka světelného zdroje na televizoru
začne blikat, vyměňte světelný zdroj za nový.
• K výměně použijte pouze světelný zdroj XL-2100E. Použijete-li jiný zdroj, televizor se může poškodit.
• Světelný zdroj vyjímejte z televizoru pouze při výměně.
• Před výměnou vypněte přívod proudu a vytáhněte přívodní kabel ze zásuvky.
• Světelný zdroj vyměňujte, až když vychladne. I po 30 minutách od vypnutí proudu je přední sklo zdroje
zahřáté na nejméně 100 ˚C .
• Starý světelný zdroj nenechávejte v dosahu dětí nebo v blízkosti hořlavého materiálu.
• Starý světelný zdroj chraňte před vlhkostí a nic do něj nezasunujte. Mohl by totiž vybuchnout.
• Starý světelný zdroj nenechávejte v blízkosti hořlavého materiálu, mohl by způsobit požár. Do prostoru
pro světelný zdroj nesahejte, mohli byste se spálit.
• Nový světelný zdroj pevně nasate. Jestliže ho správně nenasadíte, obraz by mohl být tmavý.
• Nedotýkejte se předního skla nového zdroje ani skla prostoru pro zdroj a zabraňte jejich znečištění.
Znečištěné sklo může způsobit zhoršení kvality obrazu nebo zkrácení životnosti zdroje.
• Kryt světelného zdroje dobře zavřete. Není-li správně zavřený, přívod proudu se neobnoví.
• Při spálení zdroje je slyšet typický zvuk. K poškození televizoru však nedojde.
• Obrat'te na nejbližší servisní středisko Sony, kde můžete koupit nový zdroj.
• Použité zdroje likvidujte způsobem, který neškodí životnímu prostředí.
1 Vypněte proud a vytáhněte přívodní kabel ze zásuvky.
• Jestliže začnete vyměňovat světelný zdroj bez odpojení přívodního kabelu, kontrolka klidového stavu
na televizoru začne blikat. Přívodní kabel odpojte a teprve pak pokračujte ve výměně zdroje.
• Zdroj vyměňujte, až když vychladne, tedy nejdříve za 30 minut od vypnutí proudu nebo později.
• Připravte si nový světelný zdroj.
2 Uvolněte šrouby v levém a pravém zadním rohu televizoru pomocí mince apod.
3 Odstraňte přední panel.
Odstraňte přední panel bez přesunutí televizoru.
Levou a pravou stranu předního panelu uchopte prsty a vytáhněte dopředu. Dejte pozor, abyste si
neporanili nehty.
28
Doplňující údaje
Page 92

4 Uvolněte šrouby pomocí mince apod. a sejměte kryt zdroje.
5 Uvolněte oba šrouby a vytáhněte zdroj.
Uvolněte dva šrouby Vytáhněte zdroj za držadlo.
přiloženým šestihranným klíčem.
Zdroj je ihned po vypnutí proudu velmi horký. Dbejte na to, abyste se nedotkli předního skla nebo
míst kolem zdroje, ani skla prostoru na zdroj.
6 Upevněte nový zdroj.
Do prostoru zdroje umístěte nový zdroj a šrouby pevně utáhněte přiloženým šestihranným klíčem.
7 Kryt světelného zdroje dobře zavřete.
Šrouby pevně utáhněte např. pomocí mince.
8 Zavřete přední panel.
Přední panel zavřete zatlačením na jeho pravou i levou stranu. Pak opět utáhněte oba rouby umístěné vpravo
a vlevo na zadní stěně televizoru.
CZ
Doplňující údaje
29
Page 93

Technické údaje
Televizní systém:
V závislosti na volbě země:
B/G/H, D/K, L, I
Barevný systém:
PAL
SECAM, NTSC 3.58, 4.43
(pouze video vstup)
Výběr kanálů:
VHF: E2-E12
UHF: E21-E69
CATV: S1-S20
HYPER: S21-S41
D/K: R1-R12, R21-R69
L: F2-F10, B-Q, F21-F69
I: UHF B21-B69
Zobrazovací panel:
LCD panel (displej z tekutých
krystalů).
Velikost obrazu:
• KF-42SX300K: 42 palců
(úhlopříčka přibl. 107 cm)
• KF-50SX300K: 50 palců
(úhlopříčka přibl. 127 cm)
• KF-60SX300K: 60 palců
(úhlopříčka přibl. 153 cm)
Zadní konektory
• AV1
1/ 1
21-kolíkový konektor scart
(norma CENELEC )
včetně vstupu audio/video,
vstupu RGB, výstupu TV
audio/video.
• AV2
2/ 2
21-kolíkový konektor scart
(norma CENELEC)
včetně vstupu audio/video,
vstupu RGB, výstupu
monitoru audio/video.
• AV3
3/ 3
S
21-kolíkový konektor scart
(norma CENELEC)
včetně vstupu audio/video,
vstupu S-video, volitelného
vstupu audio/video a rozhraní
Smartlink.
• výstupy audio (levý/
pravý) - zdířky phono jacks
• vstup audio počítače -
zdířka minijack.
• PC vstup počítače.
Konektory vpředu
S
• 4 vstup S-video 4-
kolíkový DIN
• 4 vstup video zdířka
phono jack
• 4 vstup audio zdířky
phono jack
• konektor pro
sluchátka
Zvukový výstup:
2x20 W (hudební výkon)
2x10 W (sinus. výkon)
Hloubkový reproduktor:
30 W (hudební výkon)
15 W (sinus. výkon)
Příkon:
210 W
Příkon v klidovém stavu:
≤1 W
Rozměry (šířka x výška x
hloubka):
• KF-42SX300K:
přibl. 1200 x 820 x 370 mm.
• KF-50SX300K:
přibl. 1376 x 923 x 442 mm.
• KF-60SX300K:
přibl. 1618 x 1062 x 542 mm.
Váha:
• KF-42SX300K: přibl. 29,5 kg
• KF-50SX300K: přibl. 37,5 kg
• KF-60SX300K: přibl. 48,5 kg
Dodávané příslušenství:
• 1 dálkový ovladač (RM-906)
• 2 baterie (označené IEC,
velikosti AAA)
• Vstupní kabel počítače
• 1 šestihranný klíč
• 2 držáky
• 2 šrouby
• 1 utěrka
Další funkce:
• Digitální hřebenový filtr
(vysoké rozlišení)
• Teletext, fastext, TOPtext
• NexTView
• Smartlink
• Autodetekční televizní systém
• Dolby Virtual
• Digitální BBE
• NICAM
• PAP (z anglického "Picture
And Picture" = dva programy
na obrazovce)
• ACI (z anglického "Auto
Channel Installation" =
automatická instalace kanálu)
• Auto formát
30
Doplňující údaje
Konstrukce a technické údaje mohou být změněny bez předchozího upozornění.
Tato uživatelská příručka byla vytištěna na:
ekologickém papíru - zcela bez chlóru
Page 94

Technické údaje vstupu počítače
Časování vstupu počítače
Kmitočet vstupního signálu:
Horizontální: 31,4 - 48,4 kHz
Vertikální: 59 - 61 Hz
Maximální rozlišení: 1024 bodů x -768 řádků
Tabulka předem nastavených režimů pro počítač
Č. Rozlišení Grafický režim Horizontální Vertikální
(body x řádky) kmitočet kmitočet
(kHz) (Hz)
1 640 x 480 VESA 60 31 469 59 940
2 800 x 600 VESA 60 37 879 60 317
3 1024 x 768 VESA 60 48 363 60 004
CZ
Doplňující údaje
31
Page 95

Jak odstranit závadu
Zde je uvedeno několik jednoduchých řešení problémů, které mohou ovlivnit obraz a zvuk.
TV
Problém
Žádný obraz (tmavá obrazovka),
žádný zvuk.
Špatný nebo žádný obraz (tmavá
obrazovka), ale dobrý zvuk.
Žádný obraz nebo žádné
informace o nabídce ze zařízení
připojených ke konektoru scart.
Dobrý obraz, žádný zvuk.
Barevné pořady jsou černobílé.
Při zapnutí televizoru se neobjeví
poslední kanál, který jste sledovali
před vypnutím televizoru.
Řešení
• Zkontrolujte připojení antény.
• Zasuňte zástrčku do zásuvky a stiskněte tlačítko vpředu na
televizoru.
• Jestliže kontrolka klidového stavu svítí, stiskněte tlačítko TV
na dálkovém ovladači.
• V systému nabídek vyberte nabídku "Nastavení obrazu" a pak
"Reset" k návratu do výrobního nastavení (viz strana 13).
• Zkontrolujte, zda je volitelné zařízení zapnuté a opakovaně stiskněte
tlačítko na dálkovém ovladači, dokud se na obrazovce televizoru
neobjeví správný vstupní symbol (viz strana 25).
• Stiskněte tlačítko + na dálkovém ovladači.
• Zkontrolujte, zda jsou "TV reproduktory" v nabídce "Nastavení
zvuku" nastaveny na "Zap" (viz strana 14).
• Zkontrolujte, zda nejsou připojená sluchátka.
• V systému nabídek otevřete nabídku "Nastavení obrazu" a pak
"Reset" k návratu do výrobního nastavení (viz strana 13).
• Nejde o závadu. Číselnými tlačítky na dálkovém ovladači vyberte
požadovaný kanál.
Při přepínání kanálů nebo volbě
teletextu je obraz zkreslený.
Při sledování teletextu se zobrazí
nesprávné písmo.
Při sledování NexTViewu se
zobrazí nesprávné písmo.
Při sledování televizního kanálu
jakoby sněží.
Při nastavení kódovaného kanálu s
dekodérem nebo zařízením Set
Top Box připojeným ke konektoru
scart se neobjeví obraz.
S
3/ 3.
32
Doplňující údaje
• Vypněte všechna zařízení zapojená do konektoru scart na zadní
straně televize.
• V systému nabídek otevřete nabídku "Země" (viz strana 18) a
vyberte zemi, ve které televizor používáte. V případě jazyků psaných
azbukou doporučujeme zvolit Rusko, jestliže vaše země není na
seznamu.
• V systému nabídek otevřete nabídku "Jazyk" (viz strana 18) a
vyberte jazyk, ve kterém se NexTView vysílá.
• V systému nabídek otevřete nabídku "Ruční ladění" a nastavte
doladění (AFT) k vylepšení příjmu obrazu (viz strana 20).
• V systému nabídek otevřete nabídku "Redukce šumu" v nabídce
"Nastavení obrazu" a vyberte "Zap" k odstranění šumu obrazu (viz
strana 13).
• V systému nabídek otevřete nabídku " Funkce" a "Výstup AV3"
nastavte na "TV" (viz strana 17).
• Zkontrolujte, zda nejsou dekodér nebo zařízení Set Top Box
zapojené do zdířky scart 2/ 2.
pokračování...
Page 96

Problém
Řešení
Tlaeítka
v, V
, B a b v režimu PAP
(dva programy na obrazovce)
nefungují.
Dálkový ovladač nefunguje.
Kontrolka klidového stavu na
televizoru bliká.
Kontrolka zdroje
na televizoru
svítí.
Počítač
Problém
Na obrazovce se neobjeví obraz a
zobrazí se hlášení "Není
synchronizace".
• Navigace v PAP (dva programy na obrazovce) je možné pouze v
televizním režimu, zkontrolujte prosím, zda je Media selector
nastavený na TV.
• Zkontrolujte, zda míříte na přijímač dálkového ovladače (viz stranu 8).
• Zkontrolujte, zda je Media Selector na dálkovém ovladači nastaven
na zařízení, které právě používáte (VCR - videorekordér, TV nebo
DVD).
• Pokud dálkový ovladač nespolupracuje s videorekordérem nebo
DVD přehrávačem i přesto, že Media Selector je správně nastavený.
Zadejte potřebný kód podle popisu na straně 26.
Vyměňte baterie.
• Obrat'te se na nejbližší servisní středisko Sony.
• Vypněte televizor. Opět televizor zapněte, jestliže kontrolka
světelného zdroje stále svítí, zdroj vyměňte. Podrobnosti najdete na
stranách 28 a 29.
Řešení
• Zkontrolujte, zda je kabel pro přenos obrazového signálu řádně
připojený a všechny vidlice jsou pevně zasunuty v příslušných zdířkách.
• Zkontrolujte, zda nejsou kolíky konektoru pro vstup obrazového
signálu 15-Dsub ohnuté nebo vtlačené dovnitř.
Formát výstupu z počítače
• Zkontrolujte, zda je formát výstupního signálu z počítače nastavený
na příslu ný formát televizoru. Jestli e není, upravte rozli ení a
obnovovací frekvenci na příslu ný signál (viz stranu 31).
Problémy způsobené připojeným počítačem
• Počítač je v úsporném režimu. Zkuste stisknout libovolnou klávesu
na klávesnici počítače.
• Zkontrolujte, zda je napájení počítače v poloze "zap".
• Zkontrolujte, zda je klávesnice počítače správně připojená.
• Zkontrolujte, zda je grafická karta zasunutá až na doraz ve slotu
patřičné sběrnice.
• Pou ijete-li notebook, zkontrolujte, zda na video výstupu je signál
pro monitor a zda do televizoru přichází správný signál.
CZ
Některé linie obrazu nejsou
správně zobrazeny.
Při pohledu zblízka jsou písmena
nebo svislé čáry rozmazané,
případně jsou vidět stíny nebo um.
Nelze zobrazit úvodní nebo
nastavovací obrazovku počítače.
• V systému nabídek otevřete nabídku "Nastavení obrazu" a upravte
funci "Lines Correction" v rozmezí -20 a +20 (viz stranu 13).
• Nelze dosáhnout přesného zobrazení malých písmen, kontrolních
obrazců nebo mří ky. V takovém případě zvět te velikost písma a/
nebo sni te jas mří ky.
• V závislosti počítači mů e dojít k tomu, e se úvodní nebo nastavovací
obrazovka nezobrazí, a to kvůli výstupnímu formátu obrazu. Tyto
obrazovky lze zobrazit na monitoru počítače.
• Pokud problémy přetrvávají, nechte si televizor prohlédnout odborníkem.
• Skříň televizoru nikdy sami neotvírejte.
Doplňující údaje
33
Page 97

Page 98

Bevezető
Köszönjük, hogy ezt a Sony terméket választotta.
Kérjük, hogy a kézikönyvet a televízió használata előtt figyelmesen olvassa el, és későbbi tájékozódás céljából
őrizze meg.
• A kézikönyvben használt szimbólumok:
• Fontos információ.
• Tulajdonságra vonatkozó információ.
• 1,2... Utasítások sorrendje.
• A távvezérlőn fehérrel kiemelt gombokat kell
megnyomnia az utasítássor elvégzéséhez.
• Az utasítások eredményéről tájékoztatja Önt.
Tartalomjegyzék
Bevezető.............................................................................................................................................................. 3
Biztonsági előírások ........................................................................................................................................... 4
Áttekintés és üzembe helyezés
A mellékelt tartozékok ellenőrzése ................................................................................................................. 6
Az elemek behelyezés a távvezérlőbe ............................................................................................................. 6
A távvezérlő gombjainak áttekintése ..............................................................................................................7
A televízió gombjainak áttekintése.................................................................................................................. 8
Az antenna és videomagnó csatlakoztatása .................................................................................................... 9
A televízió stabilizálása ..................................................................................................................................... 9
Első használat
A televízió bekapcsolása és automatikus hangolása.................................................................................... 10
A televízió funkciói
A menürendszer bemutatása és használata ................................................................................................. 12
A Képbeállítás menü ................................................................................................................................ 13
A Hangszabályozás menü ......................................................................................................................... 14
A Jellemzők menü...................................................................................................................................... 16
Auto formátum .................................................................................................................................... 16
AV3 kimenet ........................................................................................................................................ 17
Tájékoztató a csatlakozásokhoz......................................................................................................... 17
RGB pozicionálás ................................................................................................................................ 17
A Beállítás menü ........................................................................................................................................ 18
Nyelv ..................................................................................................................................................... 18
Ország ................................................................................................................................................... 18
Automatikus hangolás ........................................................................................................................ 18
Programhely-átrendezés ..................................................................................................................... 18
Programnevek ...................................................................................................................................... 19
AV beállítás.......................................................................................................................................... 19
Kézi hangolás ....................................................................................................................................... 20
PAP (Kettős kép)............................................................................................................................................. 21
Teletext.................................................................................................................................................................. 22
NexTView...............................................................................................................................................................23
További tudnivalók
Készülékek csatlakoztatása a televízióhoz.....................................................................................................24
A televízióhoz csatlakoztatott készülék képének megjelenítése.................................................................25
A távvezérlő konfigurálása videomagnóhoz vagy DVD-hez ......................................................................26
Optimális nézéstávolság ...................................................................................................................................27
Az izzó cseréje ...................................................................................................................................................28
Műszaki adatok..................................................................................................................................................30
Személyi számítógép bemeneti előírások ......................................................................................................31
Hibaelhárítás......................................................................................................................................................32
Hogyan emeljük fel a televíziót ....................................................................................................Hátsó borító
HU
Tartalomjegyzék
3
Page 99

Biztonsági előírások
Kizárólag 220-240 V-os hálózati váltakozó
feszültséggel üzemeltesse a készüléket.
Ne csatlakoztasson túl sok készüléket
ugyanahhoz az aljzathoz, mert a
túlterhelés tüzet okozhat.
Soha ne nyissa ki a készülék hátsó
burkolatát. A javítást bízza
szakemberre.
A készülék szellőzőnyílásait hagyja
szabadon. A megfelelő szellőzés
érdekében a készülék minden
oldalánál hagyjon legalább 10 cm-es
szabad területet.
Energiatakarékossági és biztonsági okok
miatt ne hagyja a készüléket készenléti
üzemmódban, amikor nem használja.
Hosszabb távollét esetén húzza ki a
hálózati csatlakozó vezetéket a fali
konnektorból. Ügyelni kell viszont arra,
hogy egyes készülékek bizonyos funkciói
csak a készenléti állapotban működnek. A
használati útmutató erről egyértelműen
tájékoztatást nyújt a későbbi fejezetekben.
Viharos időjárás, villámlás idején saját
biztonsága érdekében ne érintse meg
a készüléket, a hálózati csatlakozó
vezetéket és az antennakábelt.
Ne állítsa a készüléket szélsőségesen
meleg, párás vagy poros helyre, vagy
olyan helyre, ahol mechanikai
vibrációnak lehet kitéve.
Ne dugjon semmilyen tárgyat a
készülékbe, mert ezzel tüzet és
áramütést okozhat. Ha a szellőző
nyílásokon keresztül bármilyen szilárd
test, vagy folyadék kerül a készülék
belsejébe, húzza ki a hálózati
csatlakozó vezetéket. Azonnal
ellenőriztesse szakemberrel!
Az áramütés és a tűz veszélyének
elkerülése érdekében óvja a TV
készüléket esőtől és nedvességtől.
A tűz veszélyének elkerülése
érdekében ne tegyen a készülék
közelébe gyúlékony tárgyakat, ne
gyújtson nyílt lángot (ne égessen pl.
gyertyát).
A tv készüléket puha, enyhén
megnedvesített ruhával tisztítsa. Ne
használjon karcoló eszközt, alkáli
anyagot tartalmazó tisztítószert,
súrolóport vagy oldószereket (hígitót
vagy benzint). Óvja a képernyőt a
karcolásoktól. Biztonsági okokból
húzza ki a készülék hálózati vezetékét,
mielőtt a tisztítást elkezdi.
A TV készüléket stabil állványra
helyezze. Soha se próbálja a
készüléket az állvánnyal együtt
mozgatni mindig külön mozgassa a
tévét és az állványt. Ne engedje, hogy a
gyerek felmásszon a TV-re. Ne
fordítsa a TV készüléket az oldalára,
vagy a képernyővel felfelé.
Biztonsági előírások
4
A hálózati csatlakozó kihúzásánál a
csatlakozó dugót fogja meg, és ne a
vezetéket.
Mozgatás előtt húzza ki a hálózati
csatlakozót a konnektorból. A
készüléket óvatosan szállítsa, kerülje
a zötykölődős utcákat, óvja a
készüléket ütéstől, rázkódástól.
Ne tegyen nehéz tárgyat a hálózati
vezetékre, mert megsérülhet.
Javasoljuk, hogy a felesleges
vezetéket csévélje fel a tv készülék
hátulján lévő tartóra.
Ne takarja le a készülék
szellőzőnyílásait pl. függönnyel,
újsággal, stb.
Page 100

További biztonsági tudnivalók
• A készülék bal hátsó oldalának alján található szellőzőnyílást ne takarja el. A szellőzéshez a faltól
legalább 10 cm térközt hagyjon.
• Ha a készüléket hideg helyről egyenesen meleg helyre viszik át, vagy a helyiség hőmérséklete
hirtelen megváltozik, a kép homályos lehet, vagy a kép egyes részein gyenge lehet a színminőség.
Ennek oka, hogy a pára lecsapódott a készülékben található tükrökre vagy lencsékre. Mielőtt a
készüléket használatba venné, várja meg, hogy a nedvesség elpárologjon.
• A tiszta kép érdekében a képernyőt ne tegye ki közvetlen megvilágításnak vagy napfénynek.
Lehetőség szerint a mennyezetről lefelé irányított spotlámpát használjon.
•A televízió a legújabb, nagy finomságú LCD technológia felhasználásával készült (az angol "Liquid
Crystal Display" = folyadékkristályos kijelző kifejezésből). Jóllehet a gyártásban a legmagasabb
normákat alkalmazták, mégis előfordulhat, hogy a képernyőn bizonyos képviszonyok mellett
néhány fekete folt vagy fényes (piros, zöld vagy kék) pont látható. Ezeket nem lehet eltávolítani, és
nem jelentenek hibát.
• A televízió képernyőjét tükrözésgátló réteggel látták el. A képernyő minőségromlásának elkerülése
érdekében kövesse az alábbi tanácsokat:
• A képernyő felületéről a port a mellékelt törlőruhával, vagy egy puha ruhával törölheti le.
• A képernyőt és a készülékházat puha, enyhén benedvesített ruhával tisztítsa. Ne használjon
semmilyen csiszolópárnát, lúgos tisztítószert, súrolóport, vagy oldószert, úgymint alkohol vagy
benzin, illetve antisztatikus sprayt. Biztonsági óvintézkedésként tisztítás előtt húzza ki a
készülék csatlakozózsinórját.
• Kerülje a képernyő érintését, és ügyeljen arra, hogy kemény tárgyakkal meg ne karcolja a
felületét.
Biztonsági tudnivalók
HU
5
 Loading...