

Sony KE-V42A10E, KLV-V40A10E, KLV-S40A10E Installation Manual
KE-V42A10E
KLV-V40A10E
KLV-S40A10E
KDL-V40A11E
KDL-S40A11E
Installing the Wall-Mount Bracket
Installation du support de fixation mural
Instalación del soporte de montaje mural
Installieren der Wandhalterung
De wandmontagesteun installeren
Installazione della staffa di montaggio a parete
Instalar o Suporte de Montagem na Parede
Montering af beslaget til vægmontering
Installera väggfästet
Seinäasennuskiinnittimen asentaminen
Montere veggmonteringskonsollen
Τοποθέτηση του στηρίγµατος τοίχου
GB
FR
ES
DE
NL
IT
PT
DK
SE
FI
NO
GR
Instalacja uchwytu ściennego
Поpядок ycтaновки нacтeнного монтaжного кpонштeйнa
© 2005 Sony Corporation 2-635-540-12(2)
PL
RU

English
Before installation
To Customers
For product protection and safety reasons, Sony
strongly recommends that wall-mounting of your
Display Unit be performed by a reliable licensed
contractor. Do not attempt to install it yourself.
Your KE-V42A10E/KLV-V40A10E/KLV-S40A10E/
KDL-V40A11E/KDL-S40A11E can be wallmounted using SU-PW2 Wall-Mount Bracket (sold
separately). Please provide your contractor with
this installation supplement as well as the
Instructions (supplied with SU-PW2 Wall-Mount
Bracket). Read these documents carefully for safety
and proper installation.
To Sony Dealers and Contractors
Provide full attention to safety during the
installation, periodic maintenance and
examination of this product.
Installing the Display Unit
on a wall
The Display Unit can be installed on a wall by
attaching a Wall-Mount Bracket (sold separately).
Verify your TV’s model number and be sure to use
the bracket specified for your model only. Refer to
the Steps on this leaflet along with the Instructions
supplied with SU-PW2 Wall-Mount Bracket, to
properly carry out the installation.
Sufficient expertise is required for installing
this product. Be sure to subcontract the
installation to Sony dealers or licensed
contractors and pay special attention to safety
during the installation.
Sony is not liable for any damages or injury
caused by mishandling or improper
installation. Your Statutory Rights (if any) are
not affected.
Step 1: Check the parts
required for the
installation
Open the Wall-Mount Bracket package and check
the contents for all required parts along with the
Instructions.
Step 2: Decide on the
installation location
Decide where you want to install your Display
Unit. Turn to the back cover or inside the back
cover for the display installation dimensions and
determine the location.
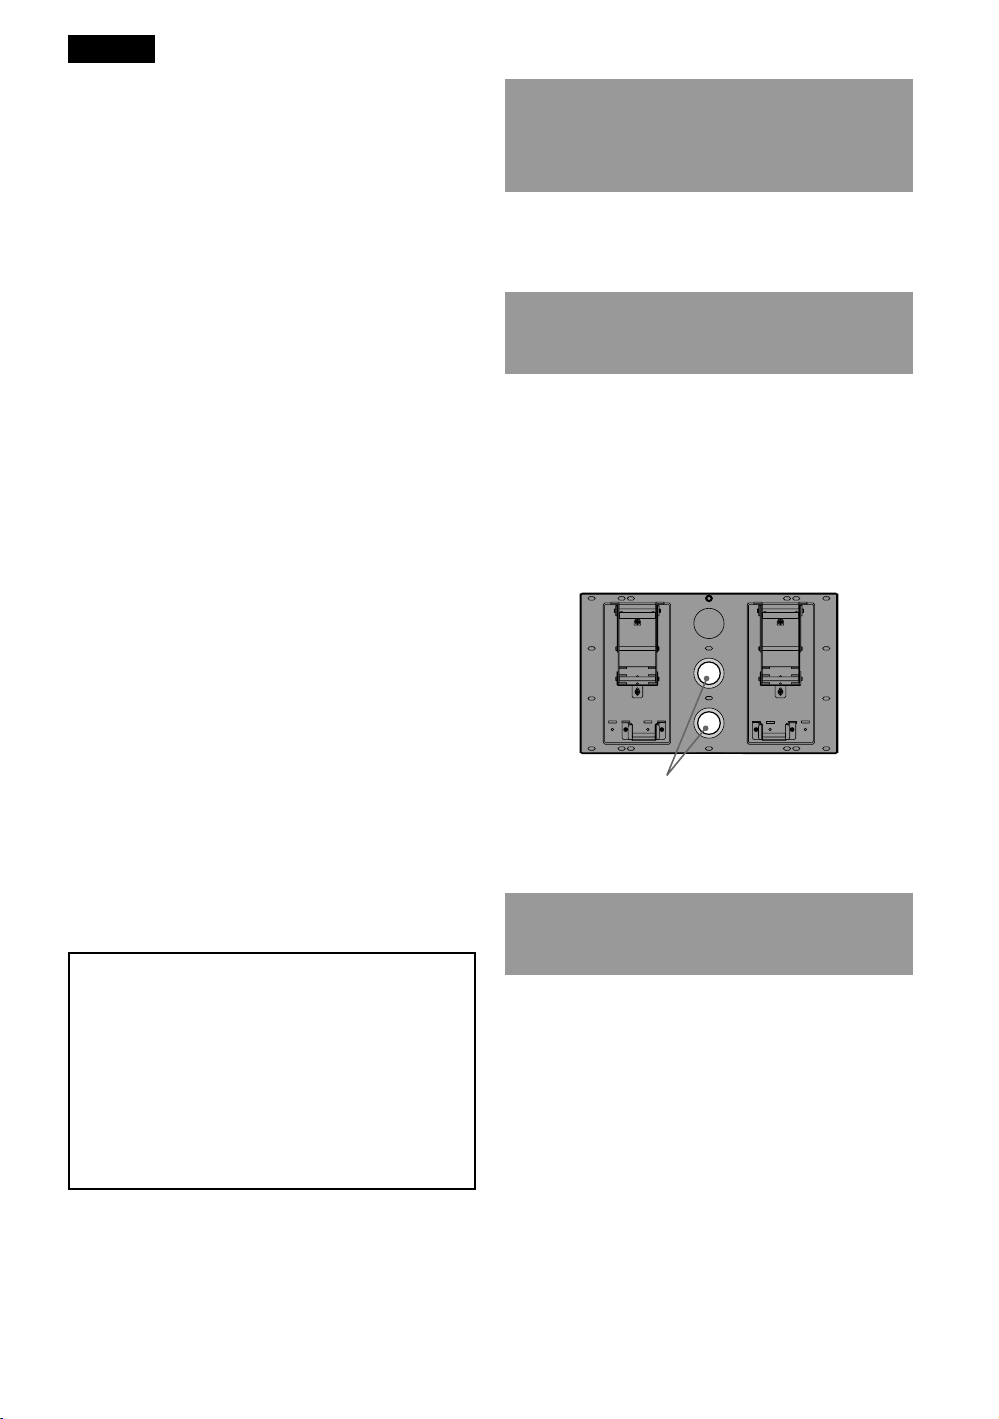
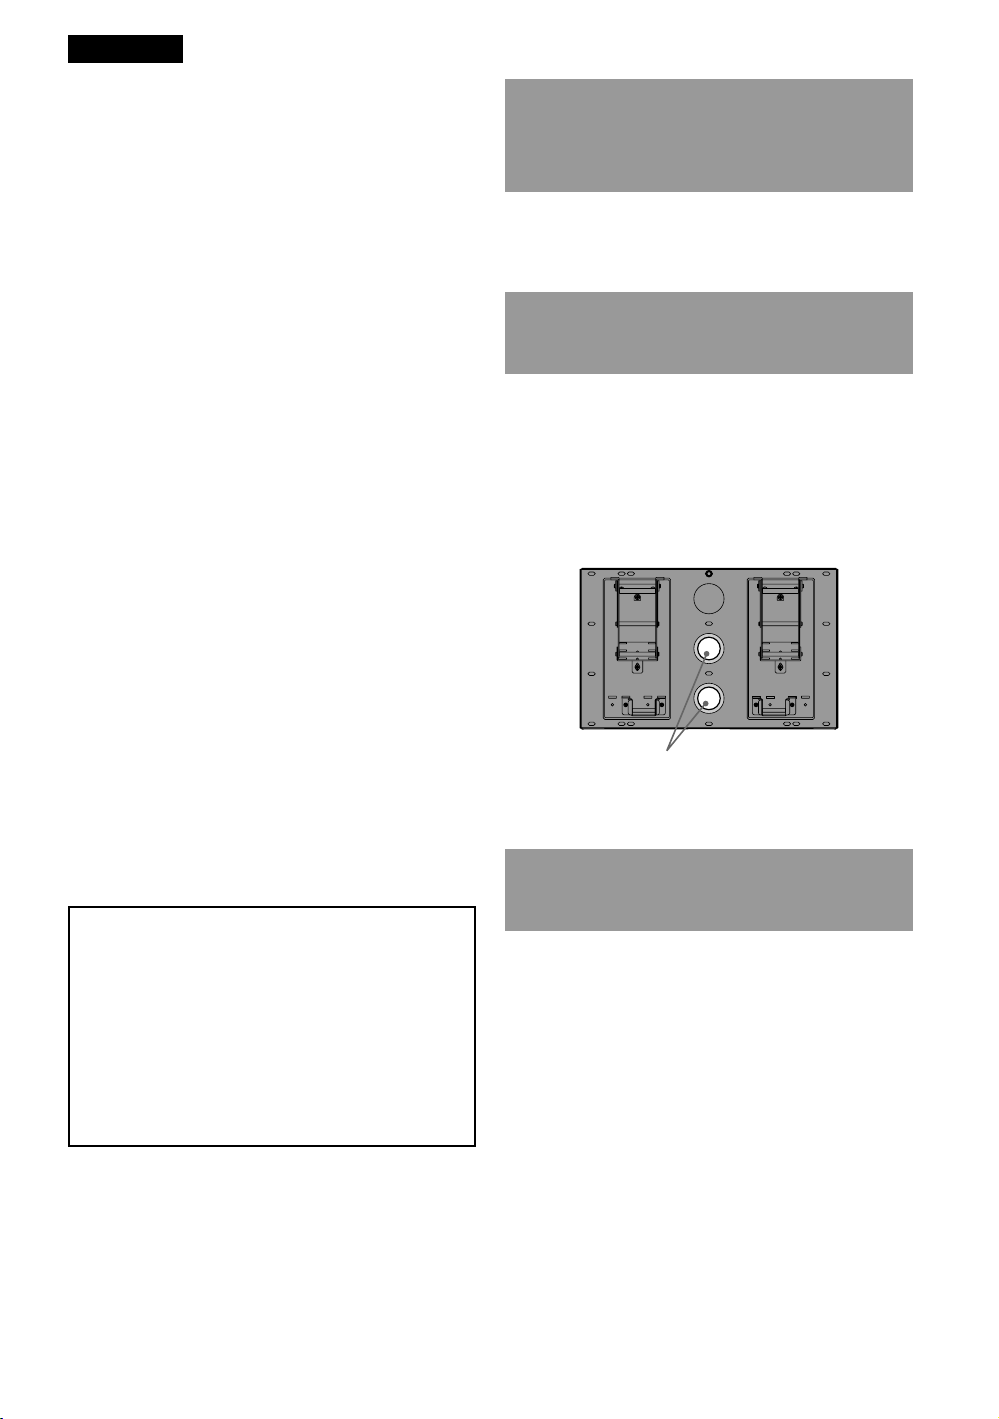
If you intend to route the cables in the wall, also
determine the position of the cable hole and bore a
hole in the wall.
Hole for cable routing (One of two)
Refer to the Instructions for the SU-PW2.
Step 3: Install the Plate Unit on
the wall
Change the position of the Mounting Hook Unit
supported shafts.
Refer to the Instructions for the SU-PW2.
2 (GB)
Prepare for the installation of
the Display Unit
Before removing the Table-Top Stand, disconnect
all the cables from the Display Unit.
Refer to the Instructions for the SU-PW2.
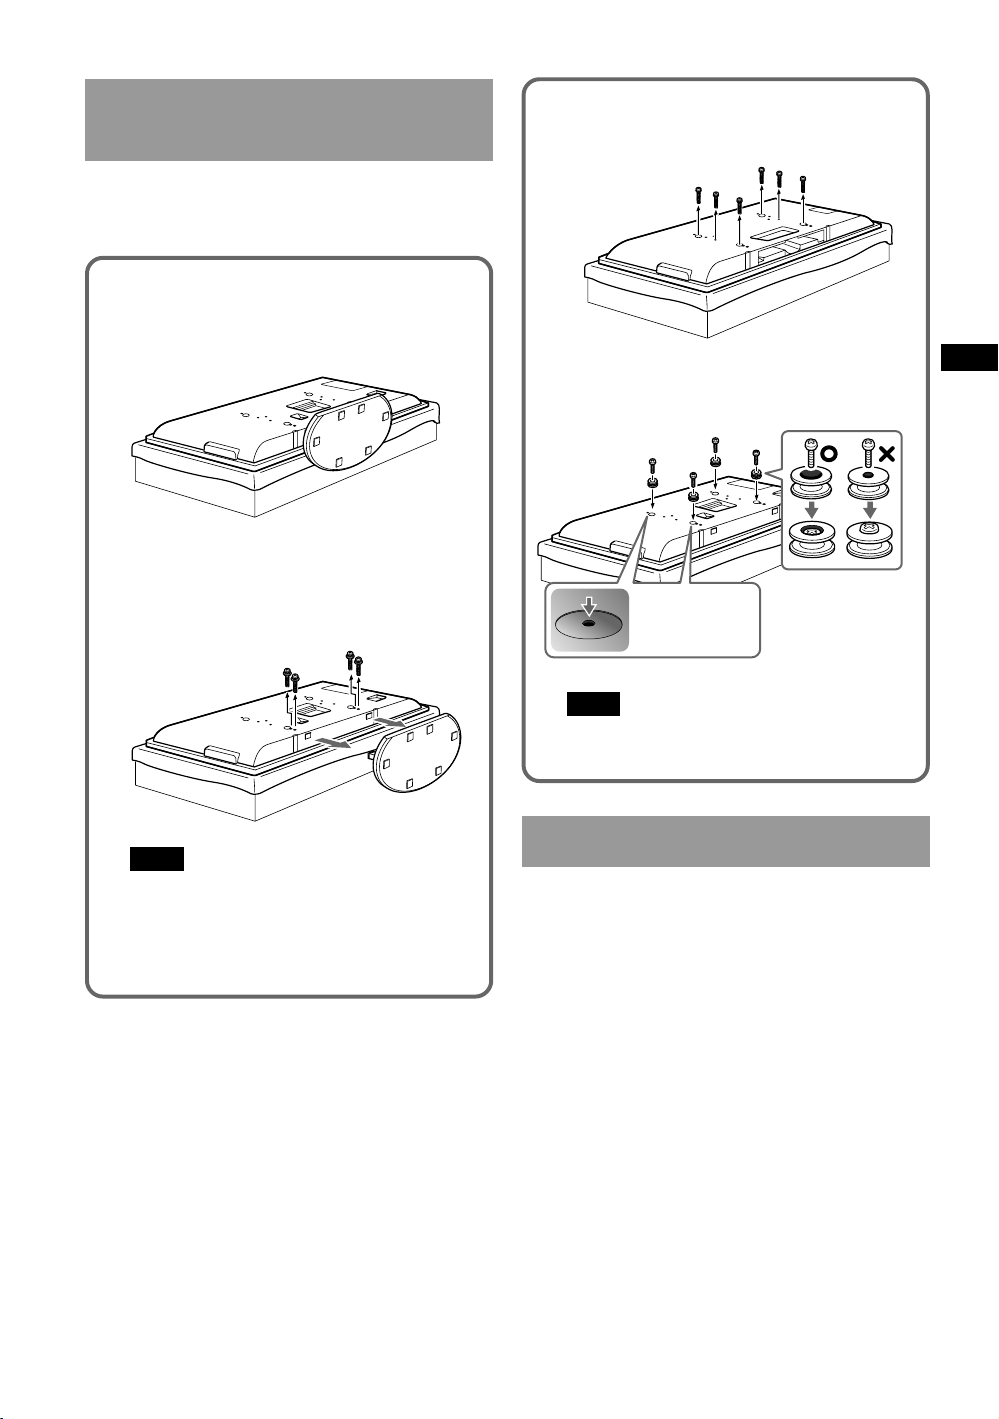
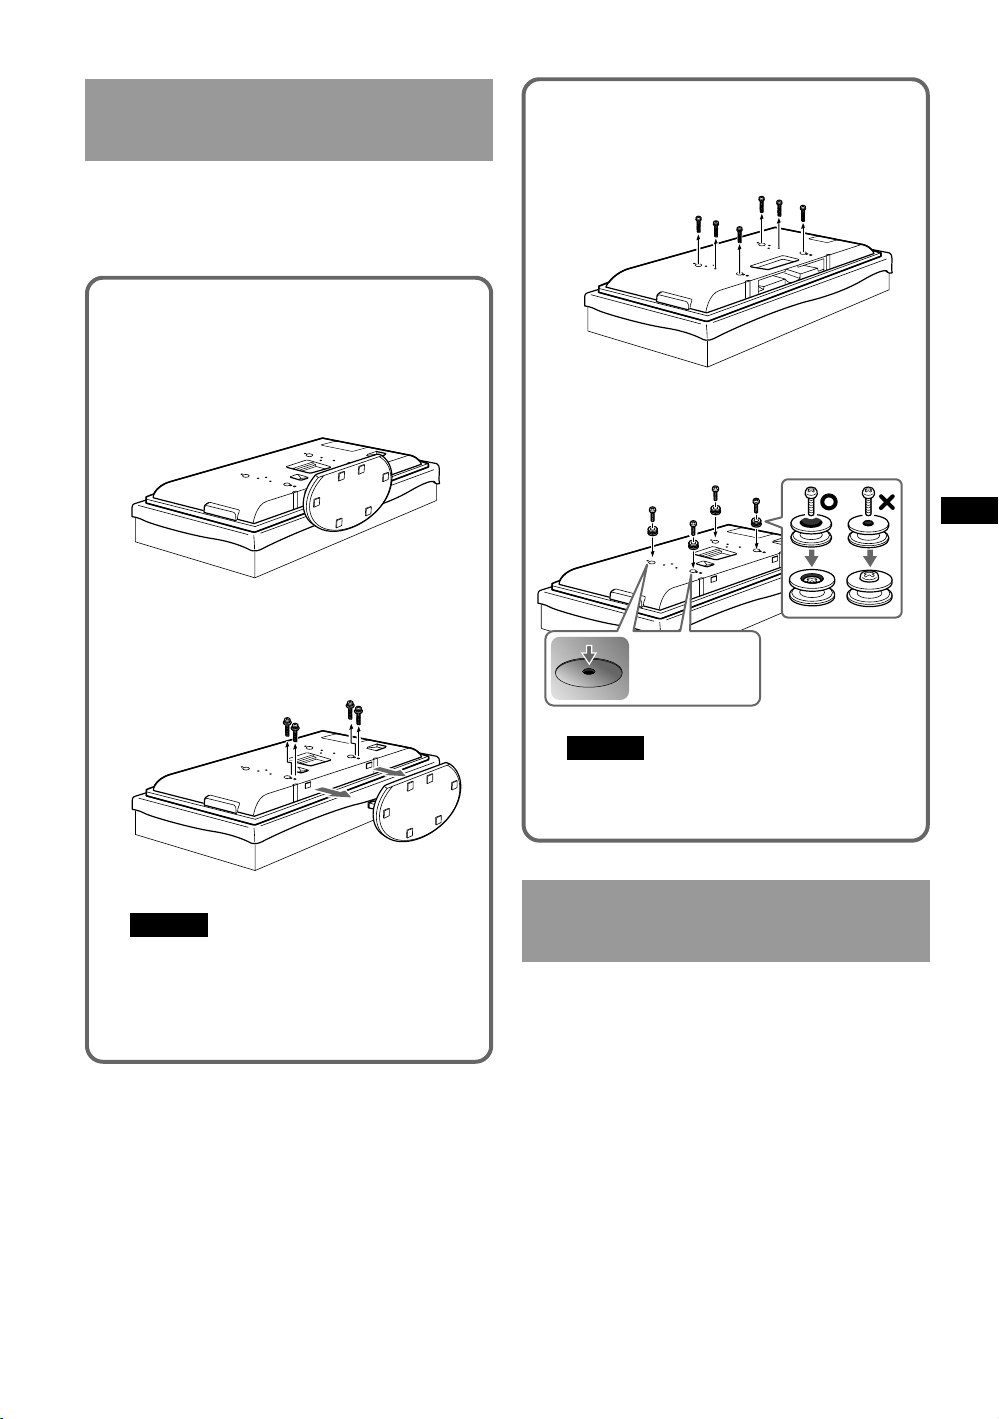
1 Place the Display Unit, with its screen
facing down, on a stable, cloth-covered
work surface, at least 20 cm off the floor.
2 Remove the screws that hold the Display
Unit to the Table-Top Stand and detach the
Table-Top Stand from the Display Unit.
3 Remove six screws on the rear side of the
Display Unit (for KE-V42A10E only).
4 Attach the supplied four hooks with the
supplied four screws (+PSW5 × L16).
Screw into the
recessed screw
holes.
GB
Note
Remove the cable holder beforehand when it is
attached to the Display Unit. For details on the
cable holder, refer to the instruction manual of
the Display Unit (for KE-V42A10E/KLVV40A10E/KDL-V40A11E only).
Note
When using an electric screwdriver, set the
torque setting to approximately 2 N·m.
Step 4: Install the Display Unit
Refer to the Instructions for the SU-PW2.
(GB) 3

Français
Avant l’installation
A l’attention des clients
Pour protéger le produit et pour des raisons de
sécurité, Sony conseille vivement de confier la
fixation de l’écran au mur à un installateur agréé
compétent. N’essayez pas de l’installer vousmême.
Votre KE-V42A10E/KLV-V40A10E/KLV-S40A10E/
KDL-V40A11E/KDL-S40A11E peut être fixé au
mur à l’aide du support de fixation mural SU-PW2
(vendu séparément). Remettez ces consignes
d’installation supplémentaires à votre installateur
ainsi que les Instructions (fournies avec le support
de fixation mural SU-PW2). Lisez soigneusement
ces documents pour une installation sûre et
correcte.
A l’attention des installateurs et revendeurs
Sony
Soyez particulièrement attentif à la sécurité
pendant l’installation, l’entretien périodique et
l’examen du produit.
Installation de l’écran au
Etape 1 : Vérification des
pièces nécessaires à
l’installation
Ouvrez l’emballage du support de fixation mural
et vérifiez s’il renferme bien toutes les pièces
requises ainsi que les Instructions.
Etape 2 : Choix de
l’emplacement
d’installation
Déterminez l’emplacement d’installation de votre
écran. A la dernière ou l’avant-dernière page de
cette brochure, vous trouverez les dimensions
d’installation de l’écran qui vous permettront de
choisir son emplacement.
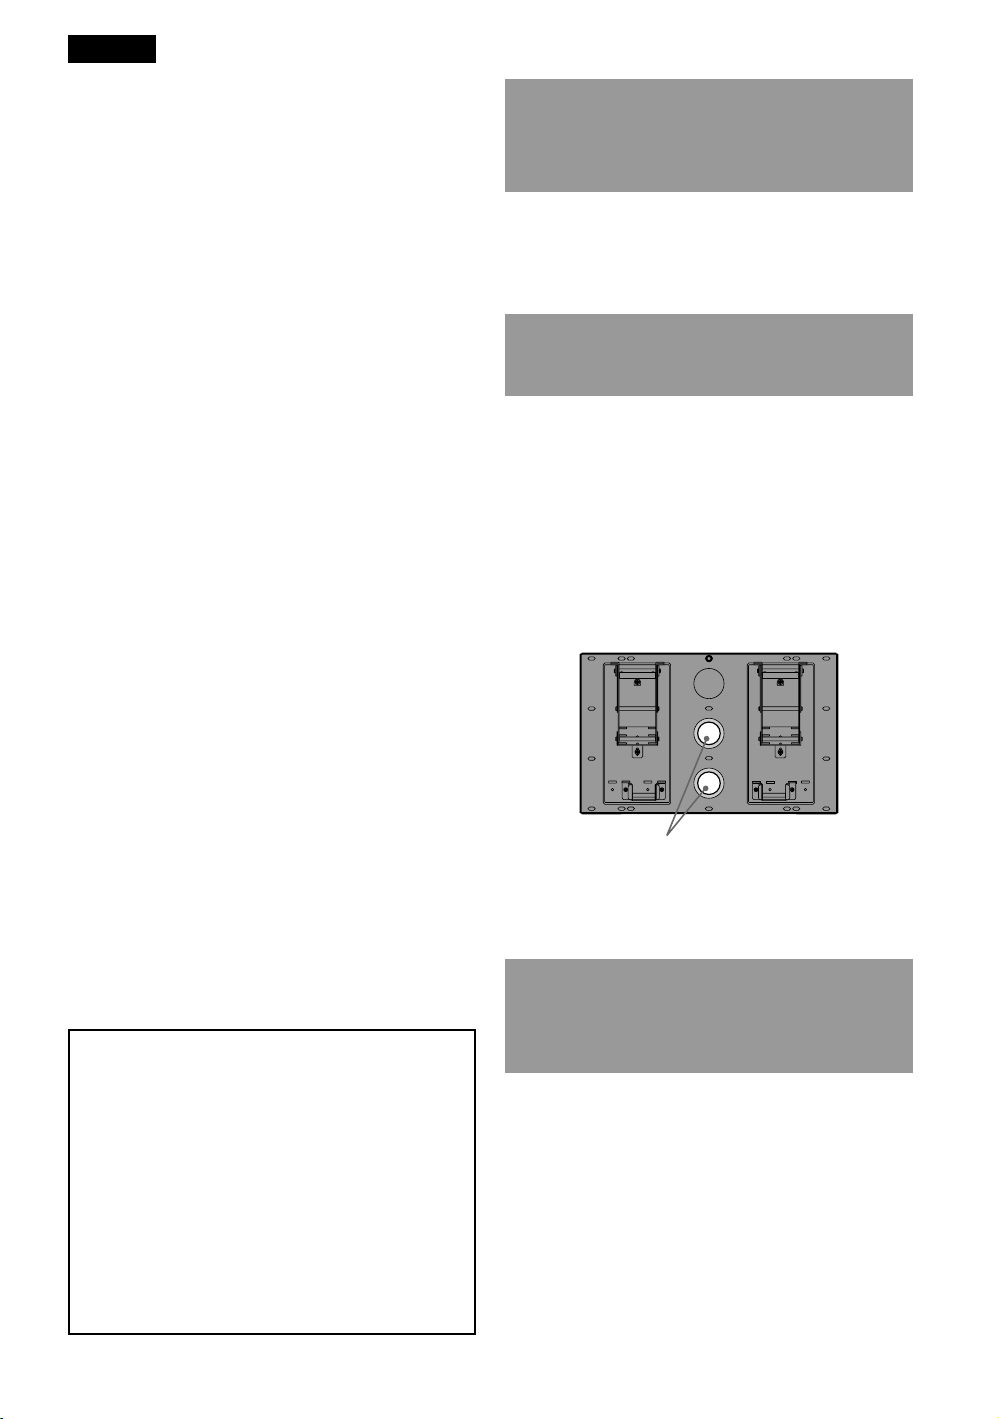
Si vous envisagez d’acheminer les câbles à travers
la paroi murale, déterminez la position du trou et
percez-le.
mur
L’écran peut être accroché au mur en fixant un
support de fixation mural (vendu séparément).
Vérifiez le numéro de modèle du téléviseur pour
être certain d’utiliser le support qui lui est
exclusivement destiné. Reportez-vous à la
procédure de ce feuillet ainsi qu’aux Instructions
fournies avec le support de fixation mural SU-PW2
pour procéder correctement à l’installation.
Une certaine expérience est requise pour
installer ce produit. Veillez à confier
l’installation à des revendeurs Sony ou à des
installateurs agréés et portez une attention
particulière aux consignes de sécurité pendant
l'installation.
Sony ne saurait être tenue responsable de tout
dommage ou de toute blessure découlant
d’une mauvaise utilisation ou d’une
installation incorrecte. Vos droits légaux
(éventuels) ne sont pas affectés.
Trou pour le passage des câbles (un des deux)
Reportez-vous aux Instructions du SU-PW2.
Etape 3 : Installation de la
plaque sur le mur
Changez les emplacements des axes de l’équerre
de fixation.
Reportez-vous aux Instructions du SU-PW2.
4 (FR)

Préparation pour l’installation
de l’écran
Avant de retirer le support table, débranchez tous
les câbles de l’écran.
Reportez-vous aux Instructions du SU-PW2.
1 Installez l’écran tourné vers le bas sur une
surface stable et recouverte d’un drap, à au
moins 20 cm du sol.
2 Retirez les vis qui maintiennent l’écran sur
le support table et détachez le support
table de l’écran.
3 Retirez les six vis à l’arrière de l’écran
(pour le KE-V42A10E uniquement).
4 Fixez les quatre crochets fournis avec les
quatre vis fournies (+PSW5 × L16).
Vissez dans les
trous pour vis
renfoncés.
FR
Remarque
Retirez préalablement le support de câble s’il est
fixé à l’écran. Pour plus d’informations sur le
support de câble, reportez-vous au mode
d’emploi de l’écran (pour le KE-V42A10E/KLVV40A10E/KDL-V40A11E uniquement).
Remarque
Si vous utilisez un tournevis électrique, réglez le
couple sur 2 N·m environ.
Etape 4 : Installation de l’écran
Reportez-vous aux Instructions du SU-PW2.
(FR) 5
Español
Antes de la instalación
Información para los clientes
Por razones de protección del producto y de
seguridad, Sony recomienda que el montaje mural
del monitor sea realizado por un contratista
autorizado de confianza. No intente instalarlo
usted mismo.
El modelo KE-V42A10E/KLV-V40A10E/KLVS40A10E/KDL-V40A11E/KDL-S40A11E puede
instalarse en una pared mediante el soporte de
montaje mural SU-PW2 (se vende por separado).
Muestre al contratista este suplemento para la
instalación, así como el manual de instrucciones
(suministrado con el soporte de montaje mural SUPW2). Lea atentamente estos documentos para
realizar la instalación correctamente y de manera
segura.
Para distribuidores y contratistas de Sony
Preste especial atención a la seguridad durante la
instalación, mantenimiento periódico y
comprobación de este producto.
Instalación del monitor en
Paso 1: Comprobar las piezas
necesarias para la
instalación
Abra el embalaje del soporte de montaje mural y
compruebe que contiene todas las piezas
necesarias, así como el manual de instrucciones.
Paso 2: Decidir la ubicación de
instalación
Decida dónde desea instalar el monitor. Consulte
en la contraportada o en el interior de la
contraportada de este folleto las dimensiones de
instalación del monitor y determine la ubicación
de instalación.
Si desea pasar los cables por la pared, determine
también la posición del orificio para el cable y
taladre un orificio en la pared.
la pared
El monitor puede instalarse en una pared mediante
un soporte de montaje mural (se vende por
separado).
Compruebe el número de modelo del televisor y
asegúrese de utilizar solamente el soporte
especificado para dicho modelo. Consulte los
pasos especificados en este folleto junto con el
manual de instrucciones suministrado con el
soporte de montaje mural SU-PW2 para realizar la
instalación correctamente.
Para instalar este producto se requieren
suficientes conocimientos técnicos. Asegúrese
de contratar la instalación a un distribuidor o a
un contratista Sony autorizado y preste
especial atención a la seguridad durante la
instalación.
Sony no se responsabiliza de ningún daño o
lesión provocados por una manipulación o
instalación incorrectas. Esto no afecta a sus
derechos legales (en caso de haberlos).
Orificio para colocar el cable (uno de dos)
Consulte el manual de instrucciones del soporte
SU-PW2.
Paso 3: Instalar la placa en la
pared
Cambie las posiciones de los ejes de soporte de los
ganchos de montaje.
Consulte el manual de instrucciones del soporte
SU-PW2.
6 (ES)

Preparación para la instalación
del monitor
Antes de extraer el soporte de sobremesa,
desconecte todos los cables del monitor.
Consulte el manual de instrucciones del soporte
SU-PW2.
1 Coloque el monitor con la pantalla
mirando hacia abajo encima de una
superficie de trabajo estable, cubierta con
un paño y situada, como mínimo, a 20 cm
del suelo.
2 Retire los tornillos que sujetan el monitor
al soporte de sobremesa y separe este
soporte del monitor.
3 Retire los seis tornillos de la parte
posterior del monitor (sólo para el modelo
KE-V42A10E).
4 Monte los cuatro ganchos suministrados
con los cuatro tornillos suministrados
(+PSW5 × L16).
Atorníllelos en los
orificios para
tornillos
ahuecados.
ES
Nota
Extraiga previamente el portacables si está fijado
al monitor. Para obtener más información acerca
del portacables, consulte el manual de
instrucciones del monitor (sólo para los modelos
KE-V42A10E/KLV-V40A10E/KDL-V40A11E).
Nota
Si utiliza un destornillador eléctrico, establezca
el ajuste de par en 2 N·m aproximadamente.
Paso 4: Instalar el monitor
Consulte el manual de instrucciones del soporte
SU-PW2.
(ES) 7
Deutsch
Vorbereitungen für die
Installation
Für den Kunden
Zum Schutz des Produkts und aus
Sicherheitsgründen empfiehlt Sony dringend, die
Montage des Displays an der Wand von
zuverlässigen lizenzierten Fachleuten ausführen
zu lassen. Versuchen Sie nicht, das Display selbst
an der Wand zu installieren.
Das KE-V42A10E/KLV-V40A10E/KLV-S40A10E/
KDL-V40A11E/KDL-S40A11E kann mit der
Wandhalterung SU-PW2 (gesondert erhältlich) an
der Wand angebracht werden. Bitte geben Sie den
Montagefachleuten diese Installationsanleitung
sowie die Gebrauchsanweisung (mit der
Wandhalterung SU-PW2 mitgeliefert). Lesen Sie
diese Unterlagen aus Sicherheitsgründen und zum
Zweck einer ordnungsgemäßen Installation
sorgfältig durch.
Für Sony-Händler und Montagefachleute
Achten Sie bei der Installation, der regelmäßigen
Wartung und der Überprüfung des Produkts in
erster Linie auf Sicherheit.
Schritt 1: Überprüfen der für
die Installation
benötigten Teile
Öffnen Sie das Paket mit der Wandhalterung und
überprüfen Sie, ob alle erforderlichen Teile
zusammen mit der Gebrauchsanweisung geliefert
wurden.
Schritt 2: Festlegen der
Montageposition
Legen Sie fest, wo Sie das Display installieren
wollen. Auf der hinteren Umschlagseite bzw. der
Innenseite der hinteren Umschlagseite finden Sie
die Installationsabmessungen des Displays,
anhand derer Sie die Montageposition festlegen
können.
Wenn Sie die Kabel in der Wand verlegen möchten,
legen Sie auch die Position der Aussparung für die
Verkabelung fest und bohren Sie ein Loch in die
Wand.
Installieren des Displays an
der Wand
Das Display lässt sich an der Wand installieren,
wenn Sie eine Wandhalterung (gesondert
erhältlich) daran anbringen.
Sehen Sie nach, welche Modellnummer Ihr
Fernsehgerät hat, und verwenden Sie
ausschließlich die für Ihr Modell angegebene
Halterung. Halten Sie sich an die Anweisungen in
diesem Infoblatt und an die mit der
Wandhalterung SU-PW2 gelieferte
Gebrauchsanweisung, um die Installation
ordnungsgemäß auszuführen.
Zur Installation dieses Produkts sind
Fachkenntnisse erforderlich. Lassen Sie die
Installationsarbeiten unbedingt von Ihrem
Sony-Händler oder lizenzierten Fachleuten
ausführen und beachten Sie bei der
Installation die nötigen
Sicherheitsvorkehrungen.
Sony übernimmt keine Haftung für
Verletzungen bzw. Sachschäden, die durch
unsachgemäßen Umgang mit dem Produkt
oder eine fehlerhafte Montage entstehen. Ihre
gesetzlich vorgeschriebenen Rechte (sofern
vorhanden) bleiben davon unberührt.
Aussparung zum Verlegen der Kabel (eine von zweien)
Schlagen Sie in der Gebrauchsanweisung zur
SU-PW2 nach.
Schritt 3: Installieren der
Montageplatte an der
Wand
Versetzen Sie die Trageschäfte der
Befestigungsstreben.
Schlagen Sie in der Gebrauchsanweisung zur
SU-PW2 nach.
8 (DE)
Vorbereitungen für die
Installation des Displays
Lösen Sie vor dem Abnehmen des Tischständers
alle Kabel vom Display.
Schlagen Sie in der Gebrauchsanweisung zur
SU-PW2 nach.
1 Legen Sie das Display mit dem Bildschirm
nach unten in einem Abstand von
mindestens 20 cm zum Fußboden auf eine
stabile, mit einem Tuch bedeckte
Arbeitsfläche.
2 Entfernen Sie die Schrauben, mit denen der
Ständer am Display befestigt ist, und
nehmen Sie den Ständer vom Display ab.
3 Entfernen Sie die sechs Schrauben an der
Rückseite des Displays (nur beim KEV42A10E).
4 Bringen Sie die vier mitgelieferten Haken
mit den vier mitgelieferten Schrauben
(+PSW5 × L16) an.
In die tiefer
liegenden
Bohrungen
schrauben.
DE
Hinweis
Nehmen Sie zuvor den Kabelhalter ab, wenn
einer am Display angebracht ist. Einzelheiten
zum Kabelhalter finden Sie in der
Bedienungsanleitung zum Display (nur beim
KE-V42A10E/KLV-V40A10E/KDL-V40A11E).
Hinweis
Wenn Sie einen elektrischen Schraubenzieher
verwenden, stellen Sie ein Drehmoment von
etwa 2 N·m ein.
Schritt 4: Installieren des
Displays
Schlagen Sie in der Gebrauchsanweisung zur
SU-PW2 nach.
(DE) 9
Nederlands
Voor de installatie
Voor klanten
Om uw product te beschermen en uit
veiligheidsoverwegingen raadt Sony u ten
stelligste aan om uw beeldscherm enkel door een
erkende vakman tegen de wand te laten
bevestigen. Probeer dit niet zelf te doen.
Uw KE-V42A10E/KLV-V40A10E/KLV-S40A10E/
KDL-V40A11E/KDL-S40A11E kan tegen de wand
bevestigd worden met SU-PW2
wandmontagesteunen (niet meegeleverd). Bezorg
uw vakman deze bijlage en de handleiding
(meegeleverd met de SU-PW2
wandmontagesteun). Lees deze documenten
aandachtig om uw veiligheid en een correcte
installatie te waarborgen.
Aan een Sony-handelaar of installateur
Besteed steeds de nodige aandacht aan uw
veiligheid tijdens de installatie, onderhoud en
controle van dit product.
Het beeldscherm tegen
een muur bevestigen
Stap 1: De vereiste onderdelen
voor de installatie
controleren
Open de verpakking van de wandmontagesteun
en controleer of ze alle benodigde onderdelen en
een handleiding bevat.
Stap 2: De installatieplaats
bepalen
Kies waar u uw beeldscherm wilt installeren.
Raadpleeg de achterflap of de binnenkant van de
achterflap voor de afmetingen van de installatie en
bepaal de plaats.
Als u de kabels door de muur wilt leiden, bepaal
dan ook de plaats van de kabelopening en boor
een gat in de muur.
Het beeldscherm kan tegen een muur bevestigd
worden door middel van de wandmontagesteunen
(niet meegeleverd).
Controleer het modelnummer van uw televisie en
let erop dat u enkel een steun gebruikt die geschikt
is voor uw toestel. Volg de stappen in dit boekje en
respecteer ook de handleiding die met de SU-PW2
wandmontagesteun worden meegeleverd. Zo bent
u zeker dat de installatie correct verloopt.
Voldoende ervaring is vereist voor het
installeren van dit product. Besteed de
installatie uit aan uw Sony-handelaar of een
bevoegde installateur en houd voldoende
rekening met de veiligheid tijdens de
installatie.
Sony is niet aansprakelijk voor schade of letsel
als gevolg van onjuist handelen of een onjuiste
installatie. Uw wettelijke rechten (indien van
toepassing) worden niet aangetast.
Opening voor kabels (één of twee)
Raadpleeg de handleiding van de SU-PW2.
Stap 3: De plaat aan de muur
bevestigen
Verplaats de steunen voor de montagehaken.
Raadpleeg de handleiding van de SU-PW2.
10 (NL)
 Loading...