

Page 1
3-219-178-54(1)
LCD Digital Colour TV
KDL-70X3500
KDL-52X3500
KDL-46X3500
KDL-40X3500
KDL-46X3000
KDL-40X3000
Operating Instructions
Before operating the TV, please read the “Safety
information” section of this manual.
Retain this manual for future reference.
Instrukcja obsługi
Przed rozpoczęciem eksploatacji telewizora należy
zapoznać się z treścią rozdziału „Informacje dotyczące
bezpieczeństwa” niniejszej instrukcji.
Zachować instrukcję do wykorzystania w przyszłości.
Инструкция по эксплуатации
Перед включением телевизора прочтите раздел “Сведения
по безопасности” этого руководства.
Сохраняйте данное руководство для справок в будущем.
GB
PL
RU
© 2007 Sony Corporation
For useful information about Sony products
Szczegółowe informacje o produktach Sony
Для получения полезной информации о продукции Сони
Page 2
Introduction
Thank you for choosing this Sony product.
Before operating the TV, please read this manual
thoroughly and retain it for future reference.
For KDL-70X3500 Users
Refer to “KDL-70X3500 Start-up Guide” for details
about the installation.
Disposal of the TV set
Disposal of Old Electrical &
Electronic Equipment
(Applicable in the European
Union and other European
countries with separate
collection systems)
This symbol on the product or on
its packaging indicates that this
product shall not be treated as
household waste. Instead it shall
be handed over to the applicable
collection point for the recycling
of electrical and electronic
equipment. By ensuring this product is disposed of correctly,
you will help pr event potential negative consequen ces for the
environment and human health, which could otherwise be
caused by inappropriate waste handling of this product. The
recycling of materials will help to conserve natural
resources. For more detailed information about recycling of
this product, please contact your local Civic Office, your
household waste disposal service or the shop where you
purchased the product.
Notice for Digital TV function
• Any functions related to Digital TV ( ) will only work
in countries or areas where DVB-T (MPEG2 and MPEG4
AVC) digital terrestrial signals are broadcast or where you
have access to a compatible DVB-C (MPEG2 and
MPEG4 AVC) cable service. Please confirm with your
local dealer if you can receive a DVB-T signal where you
live or ask your cable provider if their DVB-C cable
service is suitable for integrated operation with this TV.
• The cable provider may charge an additional fee for such
services and you may be required to agree to their terms
and conditions of business.
• Although this TV set follows DVB-T and DVB-C
specifications, compatibility with future DVB-T digital
terrestrial and DVB-C digital cable broadcasts cannot be
guaranteed.
• Some Digital TV functions may not be available in some
countries/regions and DVB-C cable may not operate
correctly with some providers.
For a list of compatible cable providers, refer to the support
web site:
http://support.sony-europe.com/TV/DVBC/
Trademark information
• is a registered trademark of the DVB Project
• HDMI, the HDMI logo and High-Definition Multimedia
Interface are trademarks or registered trademarks of
HDMI Licensing LLC.
• Adobe is a registered trademark or a trademark of Adobe
Systems Incorporated in the United States and/or other
countries.
• Manufactured under license from Dolby Laboratories.
“Dolby” and the double-D symbol are trademarks of
Dolby Laboratories.
The manufacturer of this product is Sony
Corporation, 1-7-1 Konan Minato-ku Tokyo, 1080075 Japan. The Authorized Representative for
EMC and product safety is Sony Deutschland
GmbH, Hedelfinger Strasse 61, 70327 Stuttgart,
Germany. For any service or guarantee matters
please refer to the addresses given in separate
service or guarantee documents.
GB
2
The illustrations used in this manual are of the KDL40X3500 unless otherwise stated.
Page 3
Table of Contents
Start-up Guide 4
Safety information .....................................................................................................................9
Precautions .............................................................................................................................11
Overview of the remote ........................................................................................................12
Overview of the TV buttons and indicators ........................................................................14
Watching TV
Watching TV............................................................................................................................ 15
Using the Digital Electronic Programme Guide (EPG) ....................................................17
Using the Digital Favourite list ........................................................................................19
Using Optional Equipment
Connecting optional equipment............................................................................................... 20
Viewing pictures from the connected equipment ....................................................................22
Using the remote ..................................................................................................................... 23
Using USB photo viewer .........................................................................................................26
Using HDMI control ................................................................................................................. 26
GB
Using Menu Functions
Navigating through menus ......................................................................................................27
Picture menu ...........................................................................................................................28
Sound menu............................................................................................................................ 30
Screen menu (except for PC input)......................................................................................... 32
Screen menu (for PC input) ....................................................................................................33
Video Settings menu ............................................................................................................... 34
Audio Settings menu ............................................................................................................... 36
Set-up menu............................................................................................................................ 37
Analogue Set-up menu ...........................................................................................................40
Digital Set-up menu ........................................................................................................ 43
Additional Information
Specifications ..........................................................................................................................46
Cleaning .................................................................................................................................. 48
Troubleshooting ......................................................................................................................48
: for digital channels only
GB
3
Page 4
Start-up Guide
1: Checking the
accessories
Mains lead (Type C-6)* (1)
Coaxial cable* (1)
PC cable* (1)
Support belt (1) and screws (2)
Stand (1) and screws (4) (only for KDL-46X3500/
40X3500/46X3000/40X3000)
Remote RM-ED010 (1)
Size AA batteries (R6 type) (2)
* Do not remove the ferrite cores.
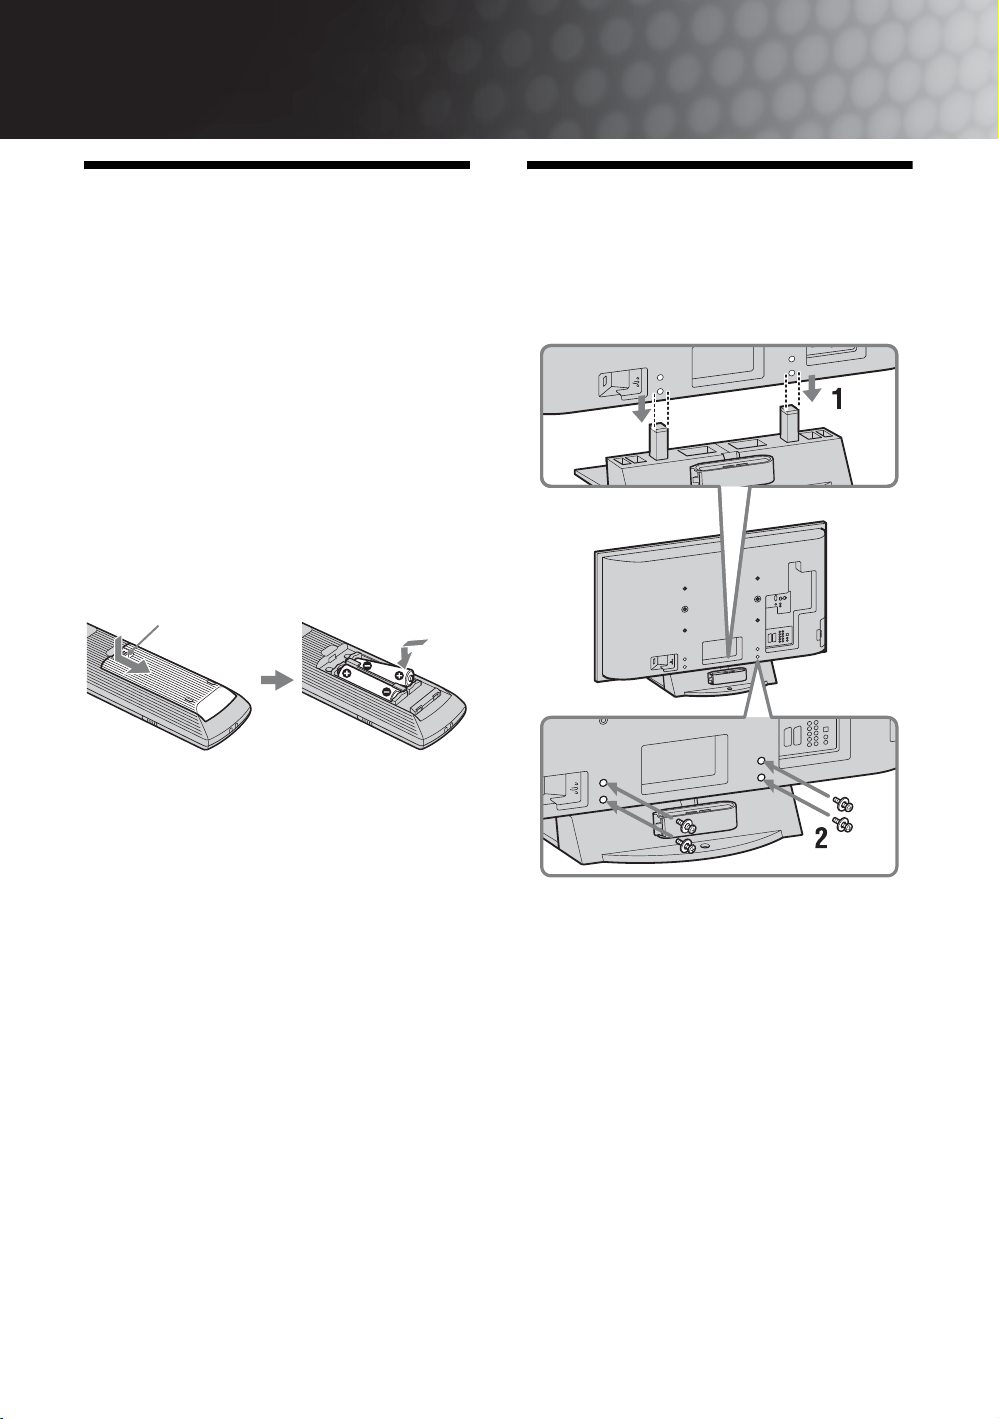
To insert batteries into the remote
Push and slide to open.
~
• Observe the correct polarity when inserting batteries.
• Do not use different types of batteries together or mix old
and new batteries.
• Dispose of batteries in an environmentally friendly way.
Certain regions may regulate the disposal of batteries.
Please consult your local authority.
• Handle the remote with care. Do not drop or step on it, or
spill liquid of any kind onto it.
• Do not place the remote in a location near a heat source, a
place subject to direct sunlight, or a damp room.
To replace the bezel unit
(only for KDL-46X3000/40X3000)
The bezel unit can be replaced with others that are sold
separately. However, do not remove the unit except to
replace it. For details, see the instructions supplied
with bezel units.
2: Attaching the stand
(except for KDL70X3500/52X3500)
1 Place the TV onto the stand by aligning the
screw hole alignment lines over the stand
as shown.
2 Fix the TV to the stand using the supplied
screws.
~
• This TV is very heavy, so two or more people should place
the TV on the stand.
• If using an electric screwdriver, set the tightening torque
at approximately 1.5 N·m (15 kgf·cm).
GB
4
Page 5
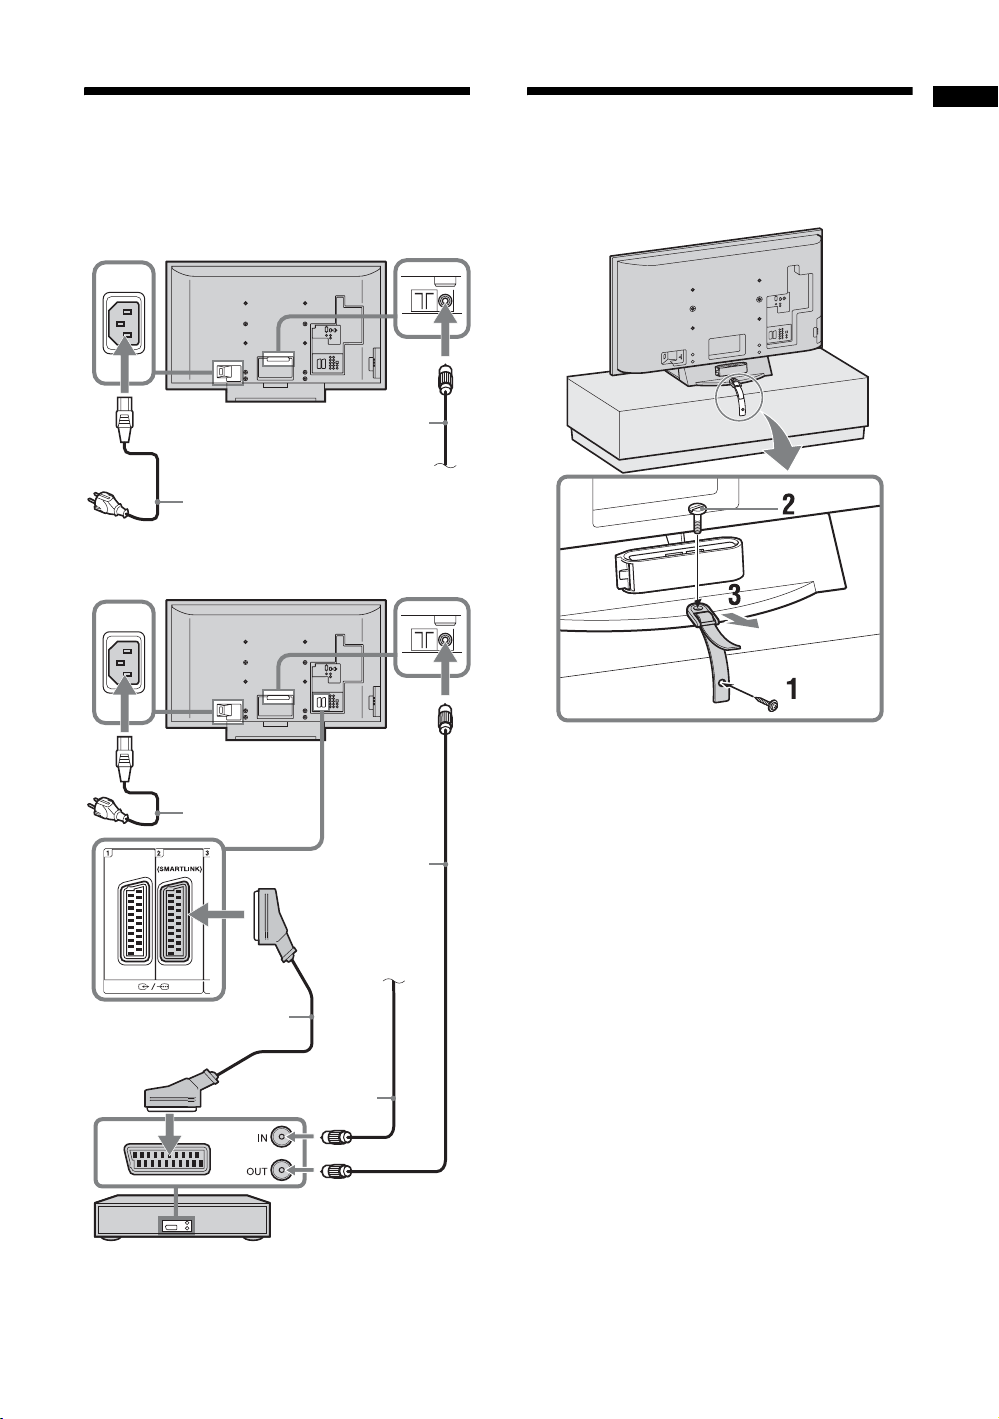
3: Connecting an aerial/
4: Preventing the TV
Start-up Guide
cable/VCR
Connecting an aerial/cable
Coaxial cable (supplied)
Mains lead
(supplied)
Connecting an aerial/cable and VCR
from toppling over
Terrestrial signal
or cable
Mains lead
(supplied)
Scart lead (not supplied)
Coaxial cable
(not supplied)
Coaxial cable
(supplied)
Terrestrial signal
VCR
or cable
GB
5
Page 6
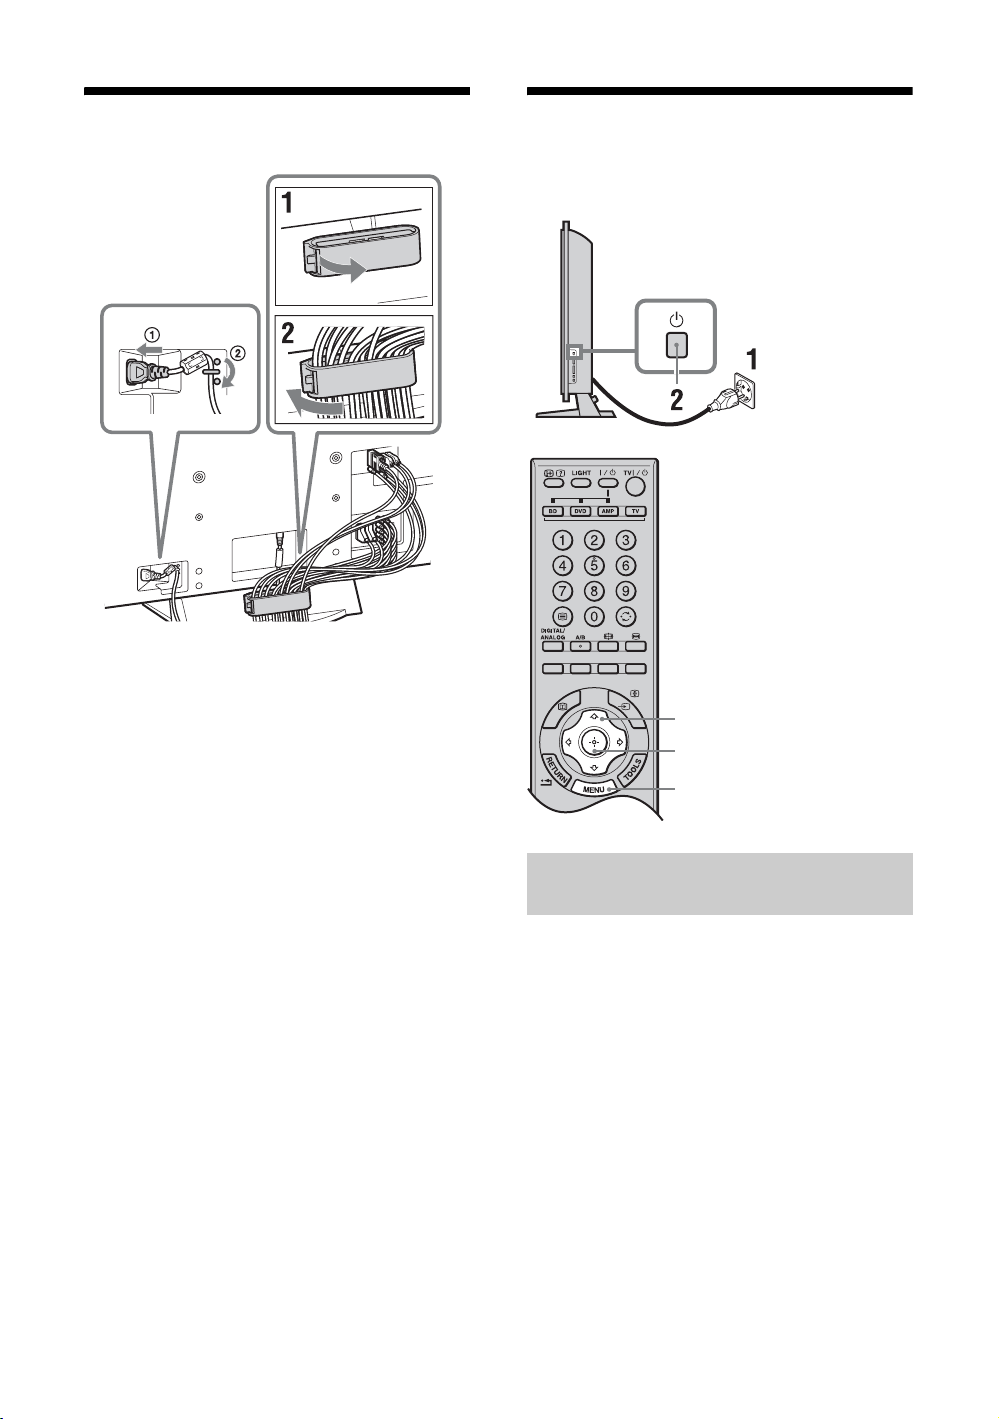
5: Bundling the cables
~
The hook of the cable holder can be opened from either sides
depending on attaching position.
6: Performing the initial
set-up
3, 4, 6, 7
3, 4, 6, 7
9
Selecting the language and country/
region
1 Connect the TV to your mains socket
(220–240 V AC, 50 Hz).
2 Press 1 on the right side of the TV.
When you turn on the TV for the first time, the
Language menu appears on the screen.
GB
6
Page 7
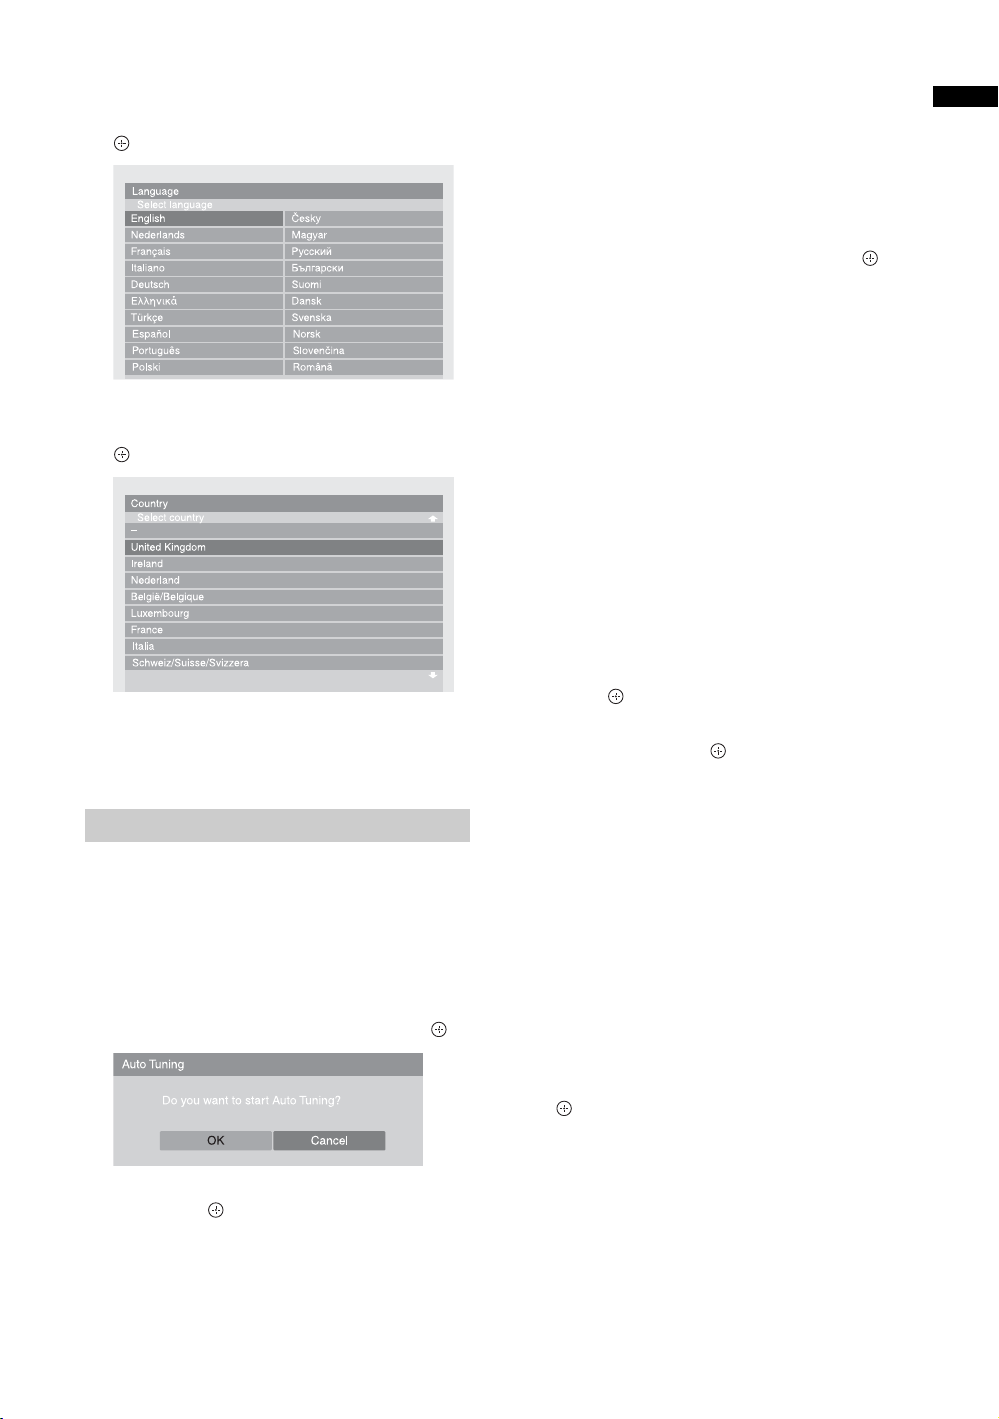
3 Press F/f/G/g to select the language
displayed on the menu screens, then press
.
4 Press F/f to select the country/region in
which you will operate the TV, then press
.
The TV starts searching for all available digital
channels, followed by all available analogue
channels. This may take some time, so do not
press any buttons on the TV or remote while
proceeding.
If a message appears for you to confirm the aerial
connection
No digital or analogue channels were found.
Check all the aerial connections and press to
start auto tuning again.
8 When the Programme Sorting menu
appears on the screen, follow the steps of
“Programme Sorting” on page 40.
If you do not wish to change the order in which the
analogue channels are stored on the TV, go to next
step.
9 Press MENU to exit.
The TV has now tuned in all the available
channels.
~
When a digital broadcast channel cannot be received, or
when selecting a country/region in which there are no digital
broadcasts in step 4 (page 7), the time must be set after
performing step 9.
To tune the TV for digital cable connection
Start-up Guide
If the country/region which you want to use on the
TV does not appear in the list, select “–” instead
of a country/region.
Auto tuning the TV
5 Before you start auto tuning the TV, insert
a pre-recorded tape into the VCR
connected to the TV (page 5) and start play
back.
The video channel will be located and stored on
the TV during auto tuning.
If no VCR is connected to the TV, skip this step.
6 Press G/g to select “OK”, then press .
7 Press F/f to select “Antenna” or “Cable”,
then press .
If you select “Cable”, the screen for selecting the
scan type appears. See “To tune the TV for digital
cable connection” on page 7.
1 Press F/f to select “Scan Type”, then
press .
2 Press F/f to select “Quick Scan” or “Full
Scan”, then press .
“Quick Scan”: Channels are tuned according to
the cable provider’s information within the
broadcast signal. The recommended setting for
“Frequency”, “Network ID” and “Symbol Rate” is
“Auto” unless your cable provider has supplied
actual values to use. “Quick Scan” is
recommended for fast tuning when this is
supported by your cable provider.
“Full Scan”: All available channels are tuned and
stored. This procedure may take some time. This
option is recommended when “Quick Scan” is not
supported by your cable provider.
For further information about supported cable
providers, refer to the support web site:
http://support.sony-europe.com/TV/DVBC/
3 Press G/g/f to select “Start”, then press
.
The TV starts searching for channels. Do not press
any buttons on the TV or remote.
~
Some cable providers do not support “Quick Scan”. If no
channels are detected using “Quick Scan”, perform “Full
Scan”.
GB
7
Page 8
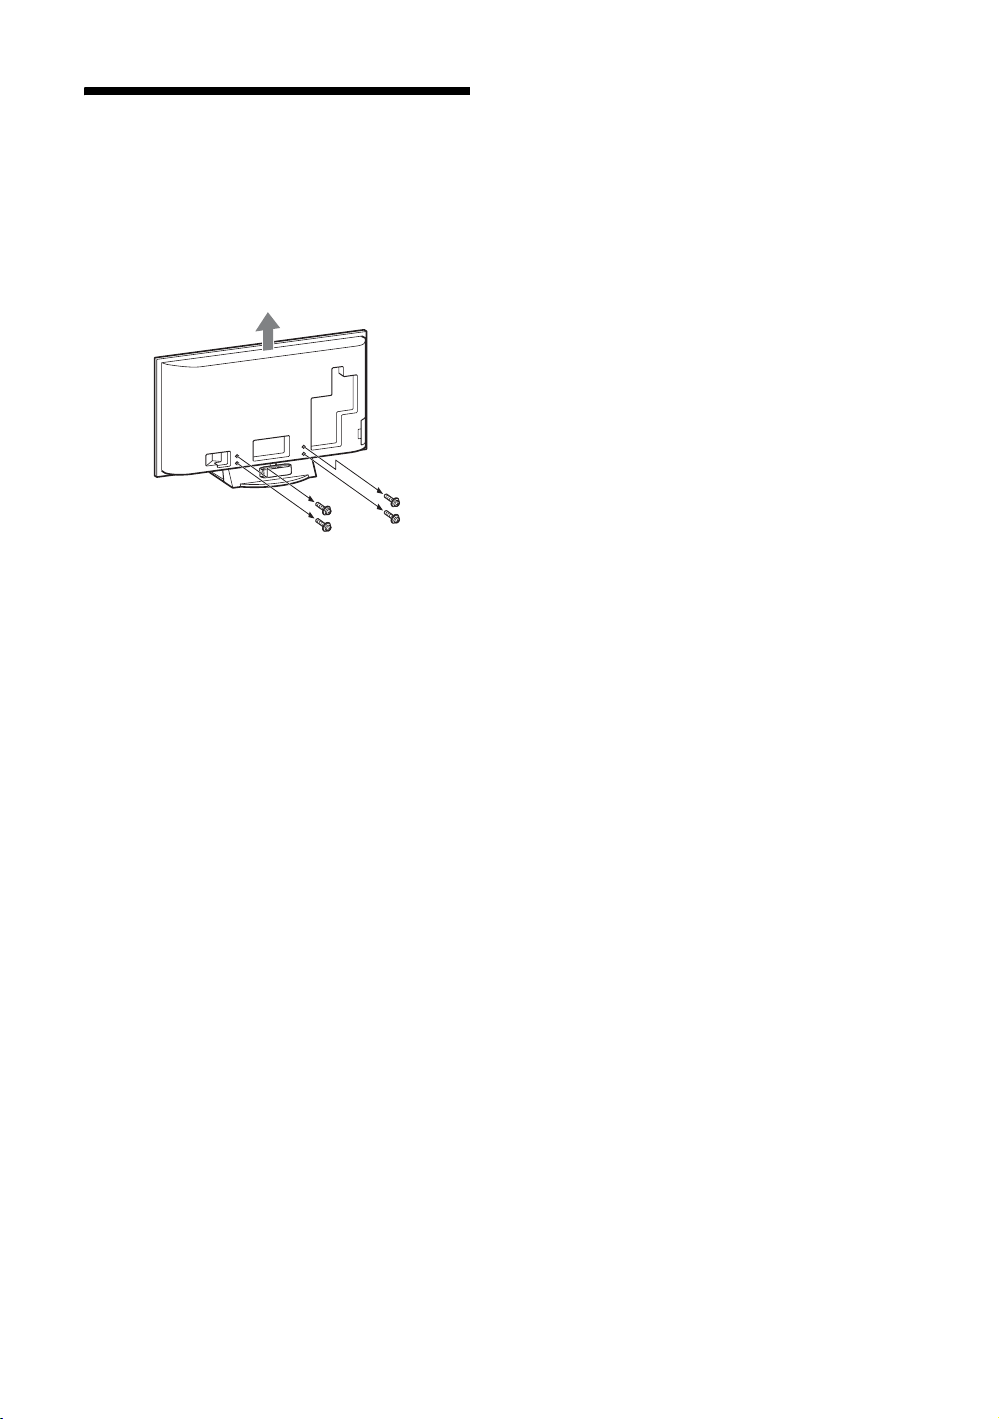
Detaching the TableTop Stand from the TV
~
Do not remove the Table-Top Stand for any reason other than
to wall-mount the TV or to attach the optional TV stand.
GB
8
Page 9
Safety information
Installation/Set-up
Install and use the TV set in accordance with the
instructions below in order to avoid any risk of fire,
electrical shock or damage and/or injuries.
Installation
• The TV set should be installed near an easily accessible
mains socket.
• Place the TV set on a stable, level surface.
• Only qualified service personnel should carry out wall
installations.
• For safety reasons, it is strongly recommended that you
use Sony accessories, including:
KDL-52X3500/46X3500/40X3500/46X3000/40X3000:
– Wall-mount bracket SU-WL500
KDL-52X3500/46X3500/40X3500/46X3000/40X3000:
– Floor stand SU-FL62
Transporting
• Before transporting the
TV set, disconnect all
cables.
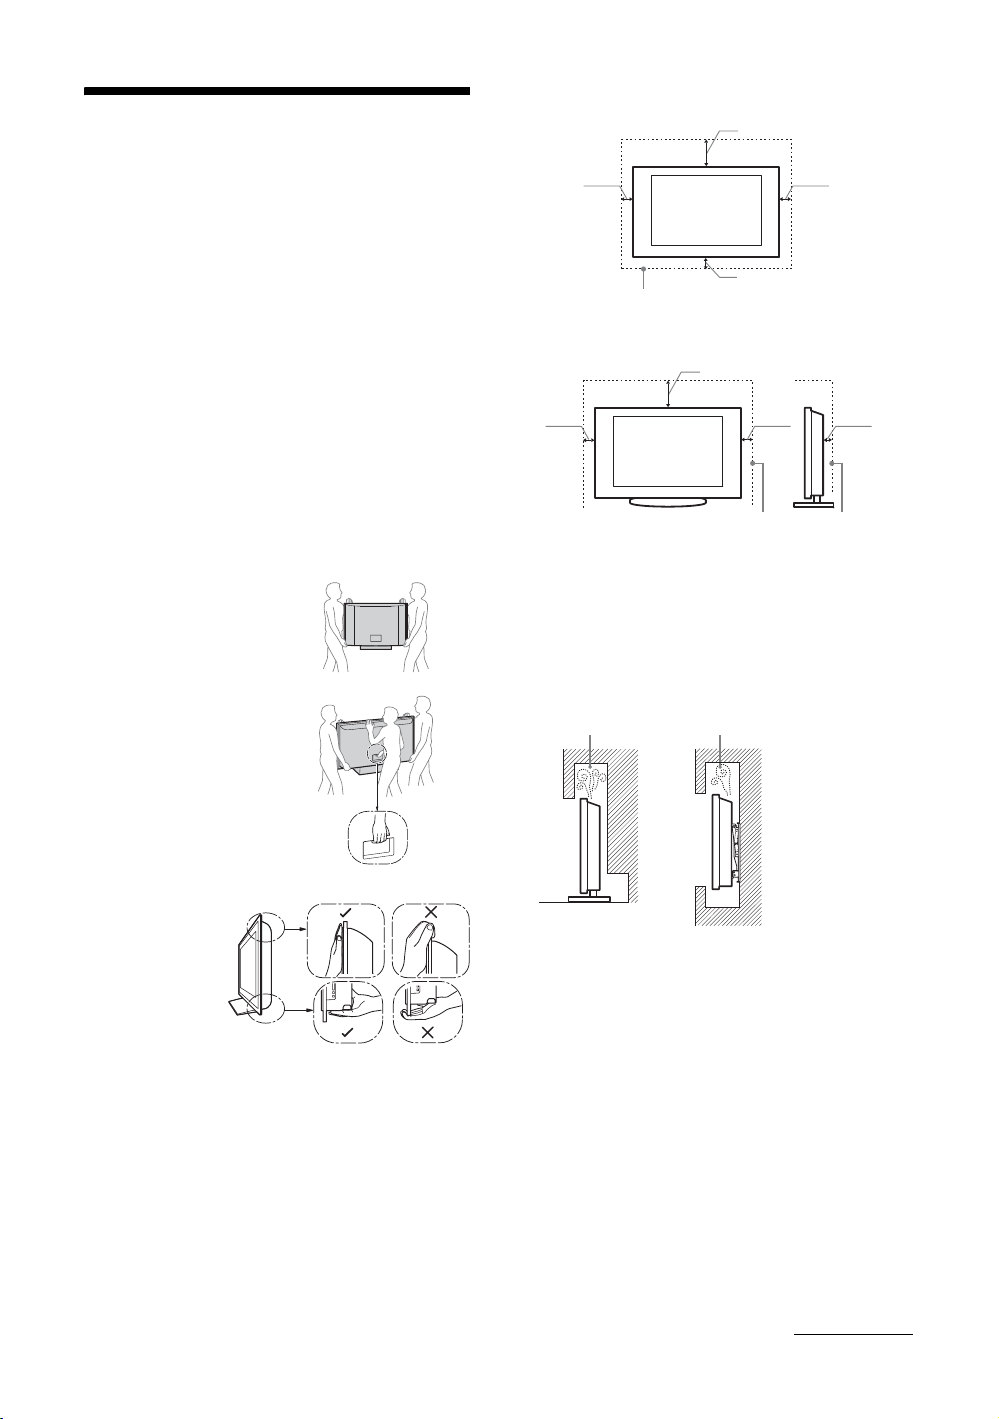
• Two or three people are
needed to transport a large
TV set.
• When transporting the TV
set by hand, hold it as
shown on the right. Do not
put stress on the LCD
panel and frame around
the screen.
• When lifting or moving
the TV set, hold it firmly
from the bottom.
• When transporting the TV
set, do not subject it to
jolts or excessive
vibration.
• When
transporting the
TV set for repairs
or when moving,
pack it using the
original carton
and packing
material.
Ventilation
• Never cover the ventilation holes or insert anything in the
cabinet.
• Leave space around the TV set as shown below.
• It is strongly recommended that you use a Sony wallmount bracket in order to provide adequate air-circulation.
except for KDL-52X3500
KDL-52X3500
Installed on the wall
30 cm
10 cm 10 cm
10 cm
Leave at least this space around the set.
Installed with stand
30 cm
10 cm 10 cm 6 cm
Leave at least this space around the set.
• To ensure proper ventilation and prevent the collection of
dirt or dust:
– Do not lay the TV set flat, install upside down,
backwards, or sideways.
– Do not place the TV set on a shelf, rug, bed or in a
closet.
– Do not cover the TV set with a cloth, such as curtains,
or items such as newspapers, etc.
– Do not install the TV set as shown below.
Air circulation is blocked.
Wall Wall
Mains lead
Handle the mains lead and socket as follows in order
to avoid any risk of fire, electrical shock or damage
and/or injuries:
– Connect the TV set using a three-wire grounding type
mains plug to a mains socket with a protective earthing
connection.
– Use only Sony mains leads, not those of other brands.
– Insert the plug fully into the mains socket.
– Operate the TV set on a 220–240 V AC supply only.
– When wiring cables, be sure to unplug the mains lead
for your safety and take care not to catch your feet on
the cables.
– Disconnect the mains lead from the mains socket before
working on or moving the TV set.
– Keep the mains lead away from heat sources.
Continued
GB
9
Page 10

– Unplug the mains plug and clean it regularly. If the plug
is covered with dust and it picks up moisture, its
insulation may deteriorate, which could result in a fire.
Notes
• Do not use the supplied mains lead on any other
equipment.
• Do not pinch, bend, or twist the mains lead excessively.
The core conductors may be exposed or broken.
• Do not modify the mains lead.
• Do not put anything heavy on the mains lead.
• Do not pull on the mains lead itself when disconnecting
the mains lead.
• Do not connect too many appliances to the same mains
socket.
• Do not use a poor fitting mains socket.
Prohibited Usage
Do not install/use the TV set in locations,
environments or situations such as those listed below,
or the TV set may malfunction and cause a fire,
electrical shock, damage and/or injuries.
Location:
Outdoors (in direct sunlight), at the seashore, on a ship or
other vessel, inside a vehicle, in medical institutions,
unstable locations, near water, rain, moisture or smoke.
Environment:
Places that are hot, humid, or excessively dusty; where
insects may enter; where it might be exposed to mechanical
vibration, near flammable objects (candles, etc). The TV set
shall not be exposed to dripping or splashing and no objects
filled with liquids, such as vases, shall be placed on the TV.
For children
• Do not allow children to climb on the TV set.
• Keep small accessories out of the reach of children, so that
they are not mistakenly swallowed.
If the following problems occur...
Turn off the TV set and unplug the mains lead
immediately if any of the following problems occur.
Ask your dealer or Sony service centre to have it
checked by qualified service personnel.
When:
– Mains lead is damaged.
– Poor fitting of mains socket.
– TV set is damaged by being dropped, hit or having
something thrown at it.
– Any liquid or solid object falls through openings in the
cabinet.
Situation:
Do not use when your hands are wet, with the cabinet
removed, or with attachments not recommended by the
manufacturer. Disconnect the TV set from mains socket and
aerial during lightning storms.
Broken pieces:
• Do not throw anything at the TV set. The screen glass may
break by the impact and cause serious injury.
• If the surface of the TV set cracks, do not touch it until you
have unplugged the mains lead. Otherwise electric shock
may result.
When not in use
• If you will not be using the TV set for several days, the TV
set should be disconnected from the mains for
environmental and safety reasons.
• As the TV set is not disconnected from the mains when the
TV set is just turned off, pull the plug from the mains to
disconnect the TV set completely.
• However, some TV sets may have features that require the
TV set to be left in standby to work correctly. The
instructions in this manual will inform you if this applies.
10
GB
Page 11

Precautions
Viewing the TV
• View the TV in moderate light, as viewing the TV in poor
light or during long period of time, strains your eyes.
• When using headphones, adjust the volume so as to avoid
excessive levels, as hearing damage may result.
LCD Screen
• Although the LCD screen is made with high-precision
technology and 99.99% or more of the pixels are effective,
black dots may appear or bright points of light (red, blue,
or green) may appear constantly on the LCD screen. This
is a structural property of the LCD screen and is not a
malfunction.
• Do not push or scratch the front filter, or place objects on
top of this TV set. The image may be uneven or the LCD
screen may be damaged.
• If this TV set is used in a cold place, a smear may occur in
the picture or the picture may become dark. This does not
indicate a failure. These phenomena disappear as the
temperature rises.
• Ghosting may occur when still pictures are displayed
continuously. It may disappear after a few moments.
• The screen and cabinet get warm when this TV set is in
use. This is not a malfunction.
• The LCD screen contains a small amount of liquid crystal
and mercury. The fluorescent tubes used in this TV set
also contain mercury. Follow your local ordinances and
regulations for disposal.
Handling and cleaning the screen surface/cabinet of
the TV set
Be sure to unplug the mains lead connected to the TV set
from mains socket before cleaning.
To avoid material degradation or screen coating degradation,
observe the following precautions.
• To remove dust from the screen surface/cabinet, wipe
gently with a soft cloth. If dust is persistent, wipe with a
soft cloth slightly moistened with a diluted mild detergent
solution.
• Never use any type of abrasive pad, alkaline/acid cleaner,
scouring powder, or volatile solvent, such as alcohol,
benzene, thinner or insecticide. Using such materials or
maintaining prolonged contact with rubber or vinyl
materials may result in damage to the screen surface and
cabinet material.
• When adjusting the angle of the TV set, move it slowly so
as to prevent the TV set from moving or slipping off from
its table stand.
Optional Equipment
Keep optional components or any equipment emitting
electromagnetic radiation away from the TV set. Otherwise
picture distortion and/or noisy sound may occur.
11
GB
Page 12
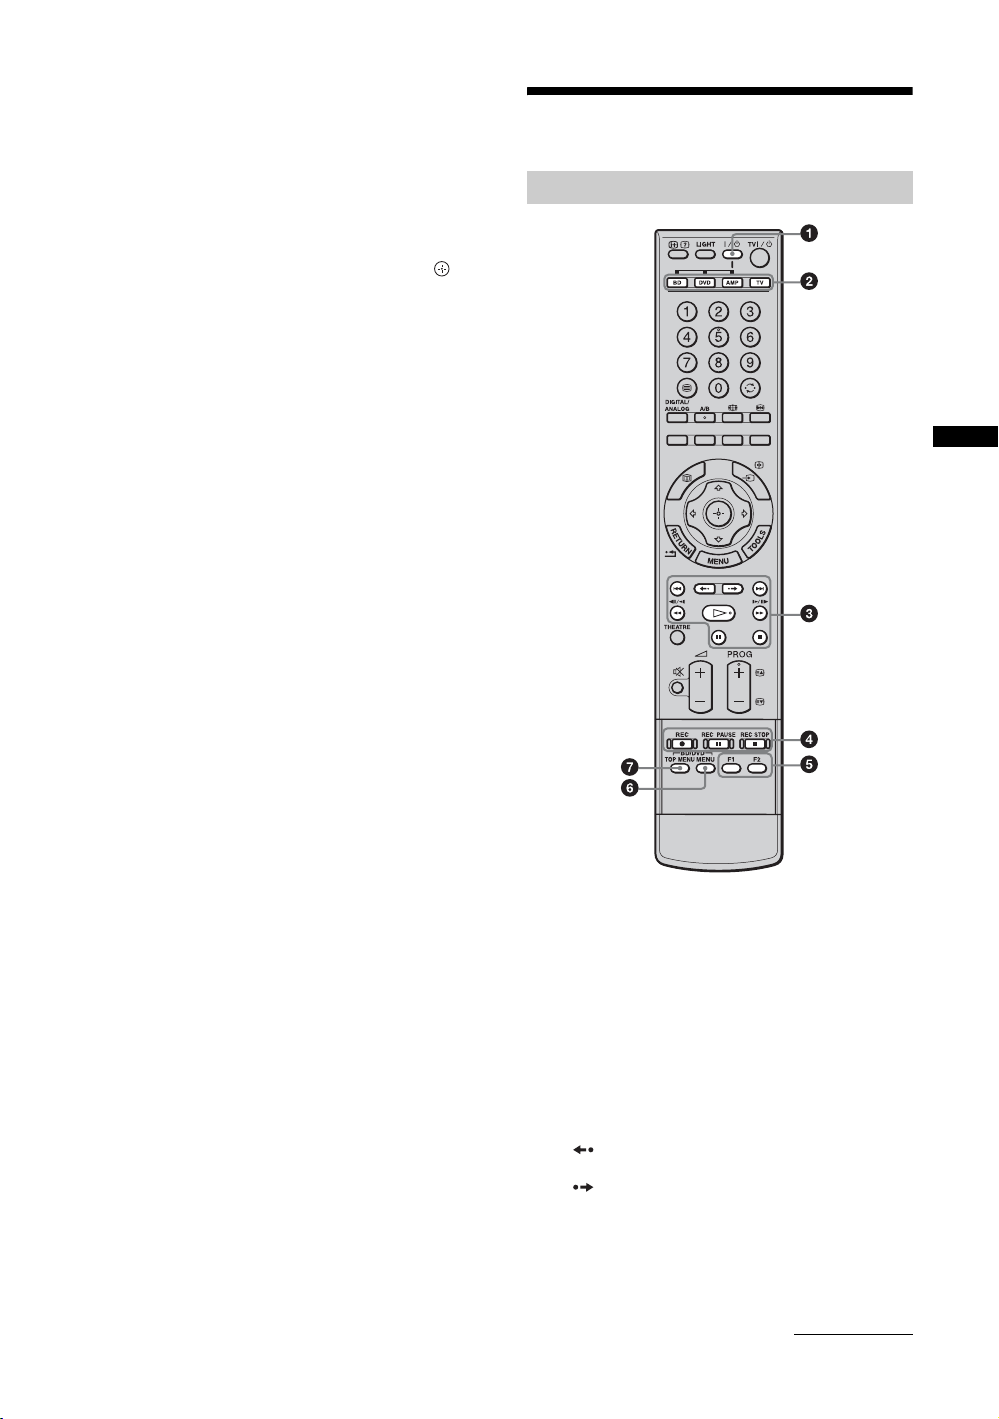
Overview of the remote
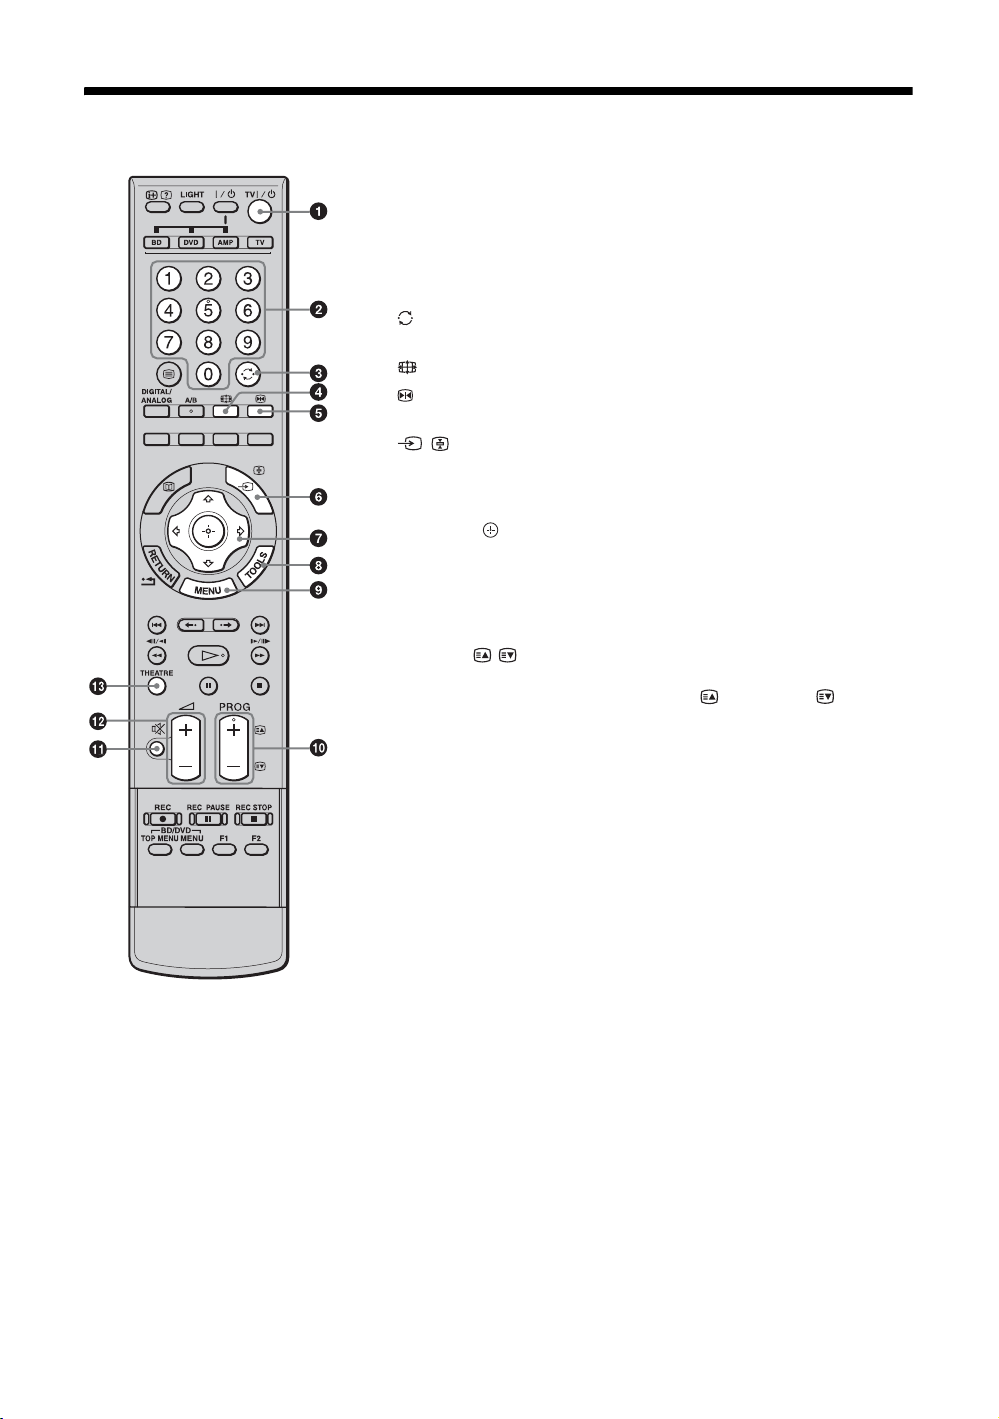
1 TV "/1 — TV standby
Turns the TV on and off from standby mode.
2 Number buttons
• In TV mode: Selects channels. For channel numbers 10 and above, enter
the second and third digit quickly.
• In Text mode: Enters the page number to select the page.
3 — Previous channel
Returns to the previous channel watched (for more than five seconds).
4 — Screen mode (page 16)
5 — Picture freeze (page 15)
Freezes the TV picture.
6 / — Input select / Text hold
• In TV mode (page 22): Selects the input source from equipment connected
to the TV sockets.
• In Text mode (page 16): Holds the current page.
7 F/f/G/g/ (page 15, 27)
8 TOOLS (page 16, 22)
Enables you to access various viewing options and change/make adjustments
according to the source and screen format.
9 MENU (page 27)
0 PROG +/–/ /
• In TV mode (page 15): Selects the next (+) or previous (–) channel.
• In Text mode (page 16): Selects the next ( ) or previous ( ) page.
qa % — Mute (page 15, 22)
qs 2 +/– — Volume (page 22)
qd THEATRE
You can set Theatre Mode on or off. When Theatre Mode is set to on, the
optimum audio output (if the TV is connected with an audio system using an
HDMI cable) and picture quality for film-based contents are automatically
set.
z
If you turn the TV off, Theatre Mode is also turned off.
12
GB
Page 13

qf RETURN /
Returns to the previous screen of any displayed menu.
qg — EPG (Digital Electronic Programme Guide) (page 17)
qh Coloured buttons (page 16, 17, 19)
qj DIGITAL/ANALOG — TV mode (page 15)
qk A/B — Dual Sound (page 31)
ql / — Text (page 16)
w; LIGHT
Illuminates the buttons on the remote so that you can see them easily even if
the room is dark.
wa / — Info / Text reveal
• In digital mode: Displays brief details of the programme currently being
watched.
• In analogue mode: Displays information such as current channel number
and screen format.
• In Text mode (page 16): Reveals hidden information (e.g. answers to a
quiz).
ws Buttons for using optional equipment
See page 23.
z
The number 5, H, PROG + and A/B buttons have tactile dots. Use the tactile dots as
references when operating the TV.
13
GB
Page 14
Overview of the TV buttons and indicators
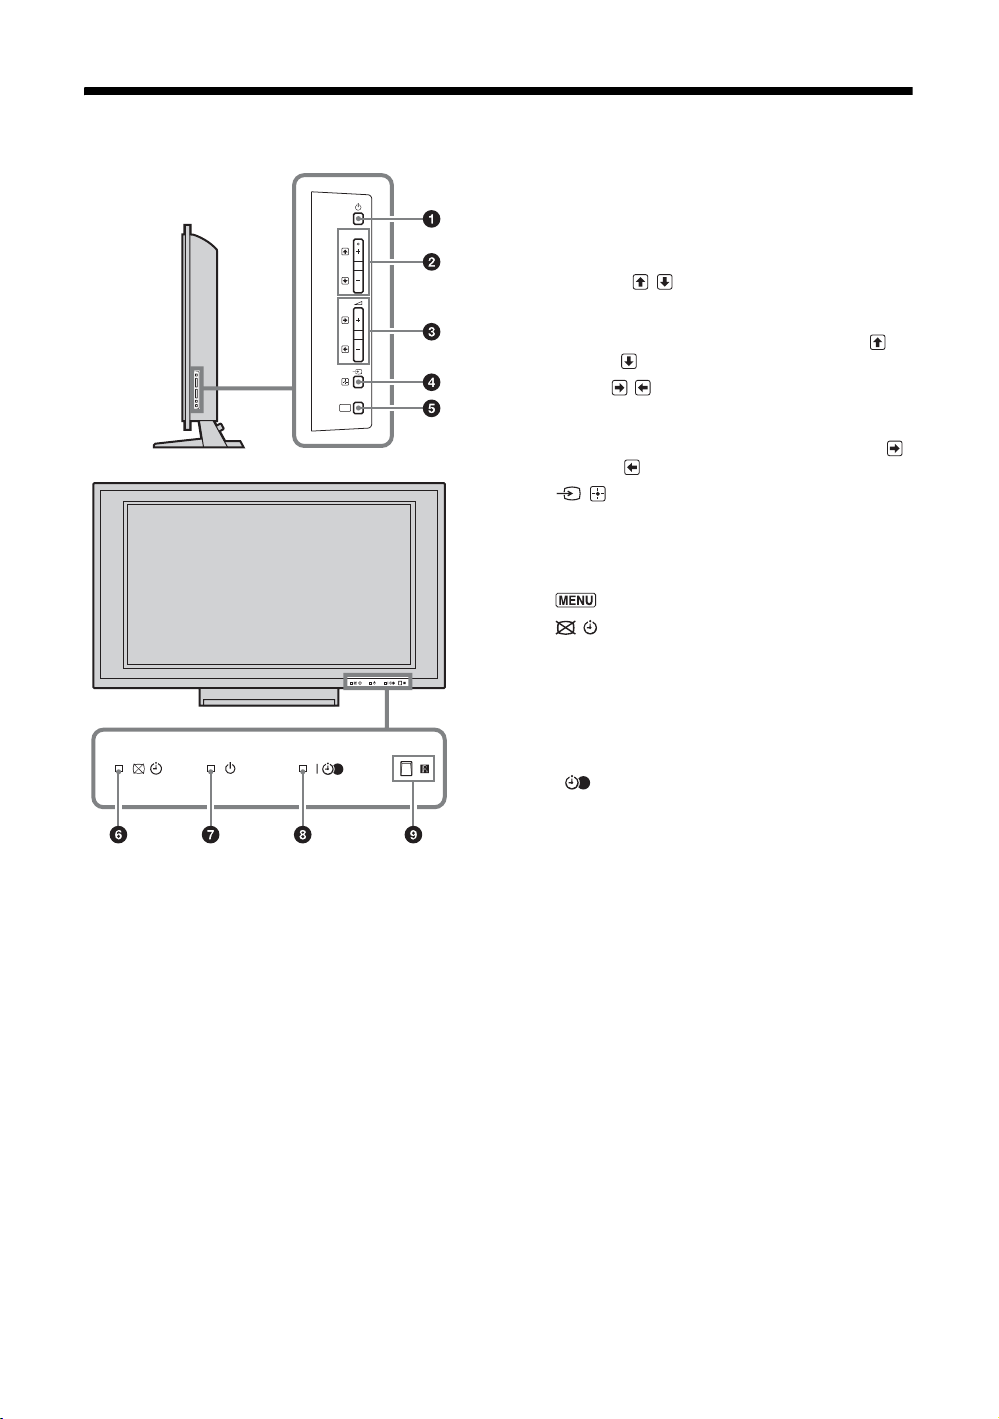
1 1 — Power
Turns the TV on or off.
PROG
MENU
~
To disconnect the TV completely, pull the plug from the
mains.
2 PROG +/–/ /
• In TV mode: Selects the next (+) or previous (–)
channel.
• In TV menu: Moves through the options up ( ) or
down ( ).
3 2 +/–/ /
• In TV mode: Increases (+) or decreases (–) the
volume.
• In TV menu: Moves through the options right ( )
or left ( ).
4 / — Input select / OK
• In TV mode (page 22): Selects the input source
from equipment connected to the TV sockets.
• In TV menu: Selects the menu or option, and
confirms the setting.
5 (page 27)
6 — Picture Off / Timer indicator
• Lights up in green when the picture is switched off
(page 38).
• Lights up in orange when the timer is set
(page 37).
7 1 — Standby indicator
Lights up in red when the TV is in standby mode.
8 " — Power / Timer REC programme indicator
• Lights up in green when the TV is turned on.
• Lights up in orange when the timer recording is set
(page 17).
• Lights up in red during the timer recording.
9 Remote control sensor / Light sensor (page 38)
• Receives IR signals from the remote.
• Do not put anything over the sensor, as its function
may be affected.
~
Make sure that the TV is completely turned off before
unplugging the mains lead. Unplugging the mains lead while
the TV is turned on may cause the indicator to remain lit or
may cause the TV to malfunction.
14
GB
Page 15
Watching TV
Watching TV
1
3
2
3
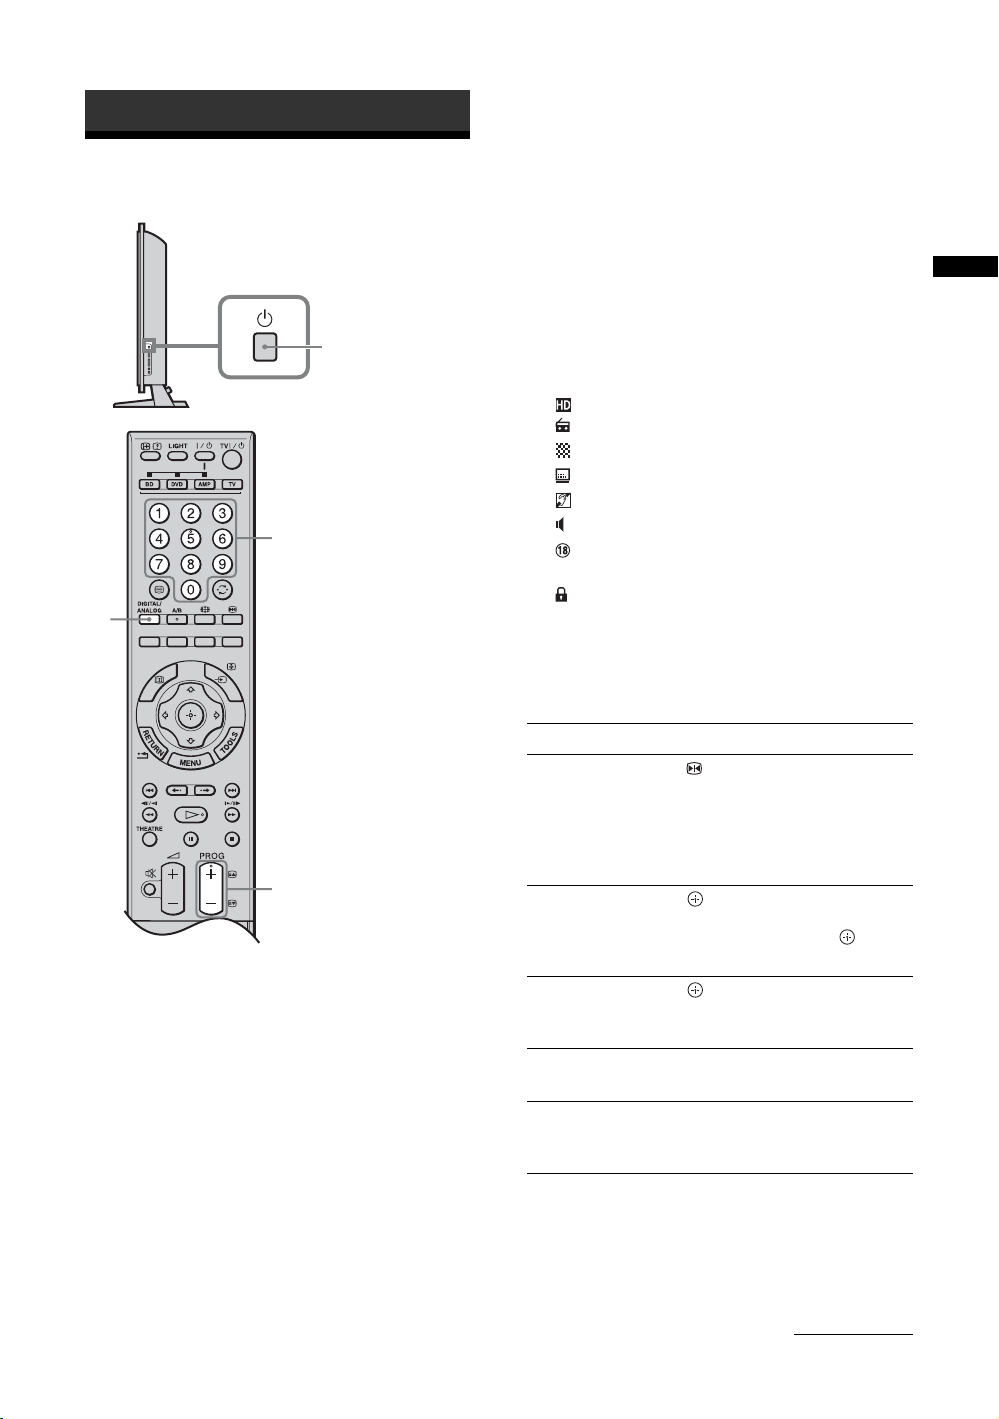
1 Press 1 on the right side of the TV to turn
on the TV.
When the TV is in standby mode (the 1 (standby)
indicator on the TV front panel is red), press
TV "/1 on the remote to turn on the TV.
2 Press DIGITAL/ANALOG to switch
between digital and analogue modes.
The channels available vary depending on the
mode.
3 Press the number buttons or PROG +/– to
select a TV channel.
To select channel numbers 10 and above using the
number buttons, enter the second and third digits
quickly.
To select a digital channel using the Digital
Electronic Programme Guide (EPG), see page 17.
In digital mode
An information banner appears briefly. The
following icons may be indicated on the banner.
: HD service
: Radio service
: Scrambled/Subscription service
: Subtitles available
: Subtitles available for the hearing impaired
: Multiple audio languages available
: Recommended minimum age for current
programme (from 4 to 18 years)
: Parental Lock
c (in red):
Current programme is being recorded
Additional operations
To Press
Freeze the picture
(Picture freeze)
Access the
Programme index
table (in analogue
mode only)
Access the Digital
Favourites (in digital
mode only)
Mute the sound %.
Turn on the TV
without sound from
standby mode
.
Press again to return to normal
TV mode.
~
This function is not available for a
PC input source.
.
To select an analogue channel,
F/f, then press .
press
.
For details, see page 19.
Press again to restore.
%.
Watching TV
Continued
15
GB
Page 16
To access Text
Press /. Each time you press /, the display changes
cyclically as follows:
Text and TV picture t Text t No Text (exit the
Text service)
To select a page, press the number buttons or / .
To hold a page, press / .
To reveal hidden information, press / .
z
• You can also jump directly to a page by selecting the page
number displayed on the screen. Press and
to select the page number, then press .
• When four coloured items appear at the bottom of the Text
page, Fastext is available. Fastext allows you to access
pages quickly and easily. Press the corresponding
coloured button to access the page.
F/f/G/g
To change the screen format manually to
suit the broadcast
Press repeatedly to select the desired screen
format.
14:9*
Displays 14:9
broadcasts in the
correct proportions. As
a result, black border
areas are visible on the
screen.
* Parts of the top and bottom of the picture may be cut off.
~
Some characters and/or letters at the top and the bottom of
the picture may not be visible in “Smart”. In such a case, you
can select “Vertical Size” using the “Screen” menu and
adjust vertical size to make it visible.
z
• When “Auto Format” is set to “On”, the TV will
automatically select the best mode to suit the broadcast
(page 32).
• You can adjust the position of the picture when selecting
“Smart” (50Hz), “Zoom” or “14:9”. Press
up or down (e.g. to read subtitles).
• Select “Smart” or “Zoom” to adjust for 720p, 1080i or
1080p source pictures with edge portions cut off.
F/f to move
Smart*
4:3
Wide
Zoom*
Displays conventional
4:3 broadcasts with an
imitation wide screen
effect. The 4:3 picture
is stretched to fill the
screen.
Displays conventional
4:3 broadcasts (e.g.
non-wide screen TV) in
the correct proportions.
Displays wide screen
(16:9) broadcasts in the
correct proportions.
Displays cinemascopic
(letter box format)
broadcasts in the
correct proportions.
Using the Tools menu
Press TOOLS to display the following options when
viewing a TV programme.
Options Description
Close Closes the Tools menu.
Picture Mode See page 28.
Sound Mode See page 30.
Motion Enhancer See page 34.
Speaker See page 36.
PAP See page 22.
Audio Language (in
digital mode only)
Subtitle Setting (in
digital mode only)
Digital Favourites (in
digital mode only)
i Volume See page 36.
Sleep Timer See page 37.
Power Saving See page 38.
Auto Clock Set (in
analogue mode only)
System Information (in
digital mode only)
See page 44.
See page 43.
See page 19.
Allows you to switch to digital
mode and obtain the time.
Displays the system
information screen.
16
GB
Page 17
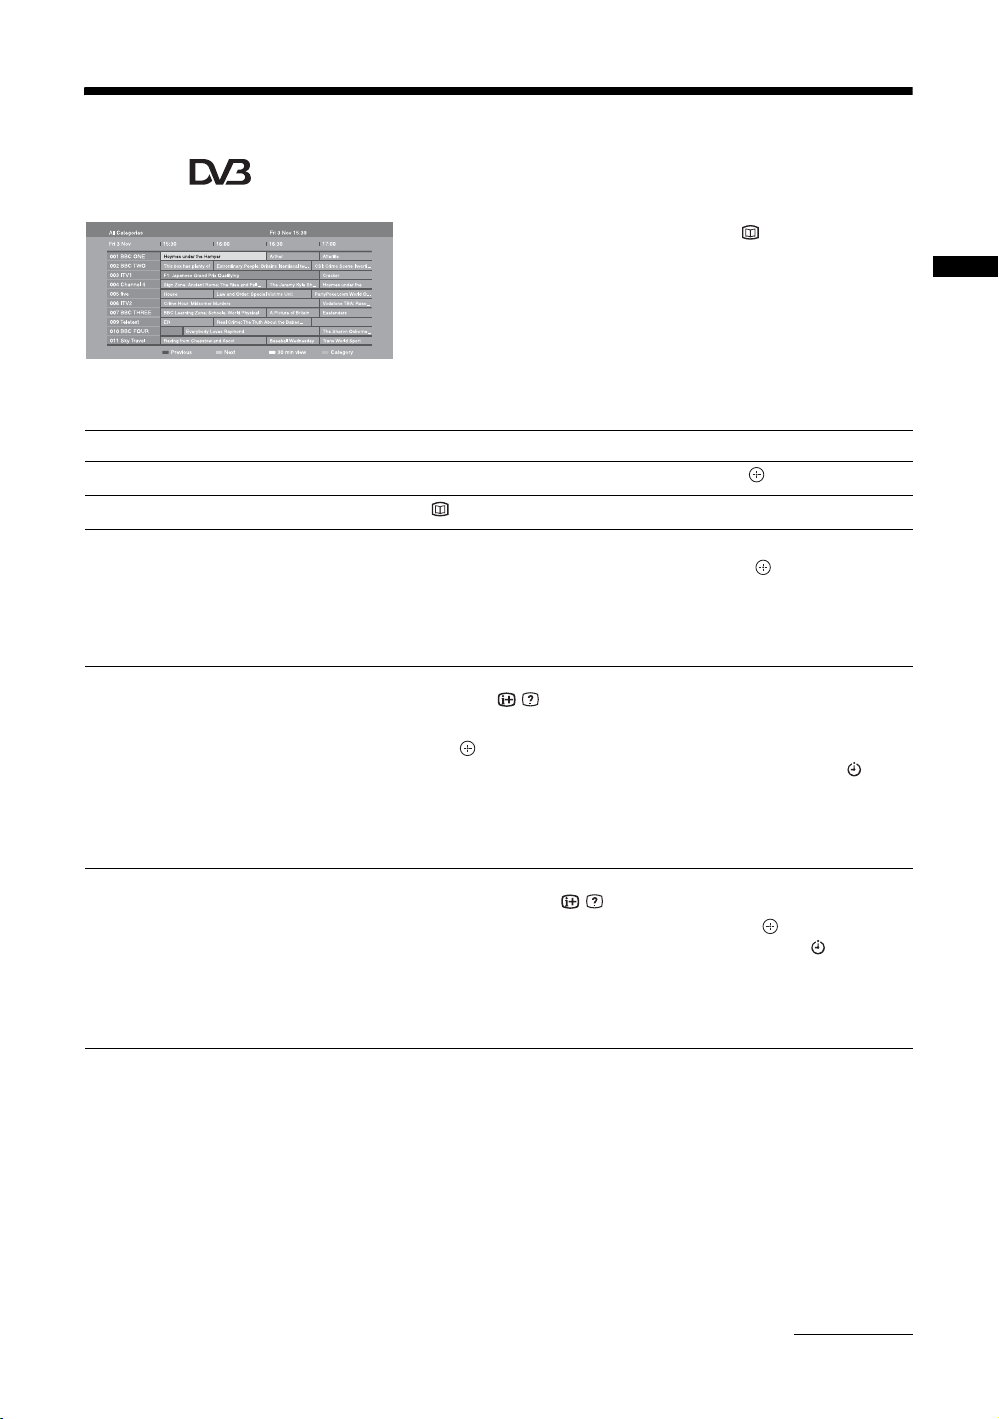
Using the Digital Electronic Programme Guide
(EPG) *
1 In digital mode, press .
2 Perform the desired operation as shown in
the following table or displayed on the
screen.
Digital Electronic Programme Guide (EPG)
* This function may not be available in some countries/regions.
To Do t h i s
Watch a programme Press F/f/G/g to select the programme, then press .
Turn off the EPG Press .
Watching TV
Sort the programme information by
category
– Category list
Set a programme to be recorded
– Timer REC
Set a programme to be displayed
automatically on the screen when it
starts
– Reminder
1 Press the blue button.
2 Press
1 Press F/f/G/g to select the programme you want to record,
2 Press
3 Press to set the TV and your VCR timers.
z
The above procedure can be used even if the programme to be recorded has already
started.
1 Press F/f/G/g to select the future programme you want to
2 Press
~
If you switch the TV to standby mode, it will automatically turn itself on
when the programme is about to start.
F/f to select a category, then press .
The categories available include:
“All Categories”, “Radio”: Contains all available channels.
Other category name (e.g. “News”): Contains all programmes
corresponding to the selected category.
then press
/ .
F/f to select “Timer REC”.
A red c symbol appears by that programme’s information. The
indicator on the TV front panel lights up in orange.
display, then press / .
F/f to select “Reminder”, then press .
A c symbol appears by that programme’s information. The indicator on
the TV front panel lights up in orange.
Continued
17
GB
Page 18
To Do t h i s
Set the time and date of a programme
you want to record
– Manual timer REC
1 Press / .
2 Press
3 Press
4 Set the start and stop time in the same way as in step 3.
5 Press
6 Press to set the TV and your VCR timers.
The indicator on the TV front panel lights up in orange.
F/f to select “Manual timer REC”, then press .
F/f to select the date, then press g.
F/f to select the programme, then press .
Cancel a recording/reminder
– Timer list
~
• You can set VCR timer recording on the TV only for SmartLink compatible VCRs. If your VCR is not SmartLink compatible,
a message will be displayed to remind you to set your VCR timer.
• Once a recording has begun, you can switch the TV to standby mode, but do not turn off the TV completely or the recording
will be cancelled.
• If an age restriction for programmes has been selected, a message asking for a PIN code will appear on the screen. For details,
see “Parental Lock” on page 44.
1 Press / .
2 Press
3 Press
4 Press
5 Press G/g to select “Yes”, then press to confirm.
F/f to select “Timer list”, then press .
F/f to select the programme you want to cancel, then
press .
F/f to select “Cancel Timer”, then press .
A display appears to confirm that you want to cancel the programme.
18
GB
Page 19
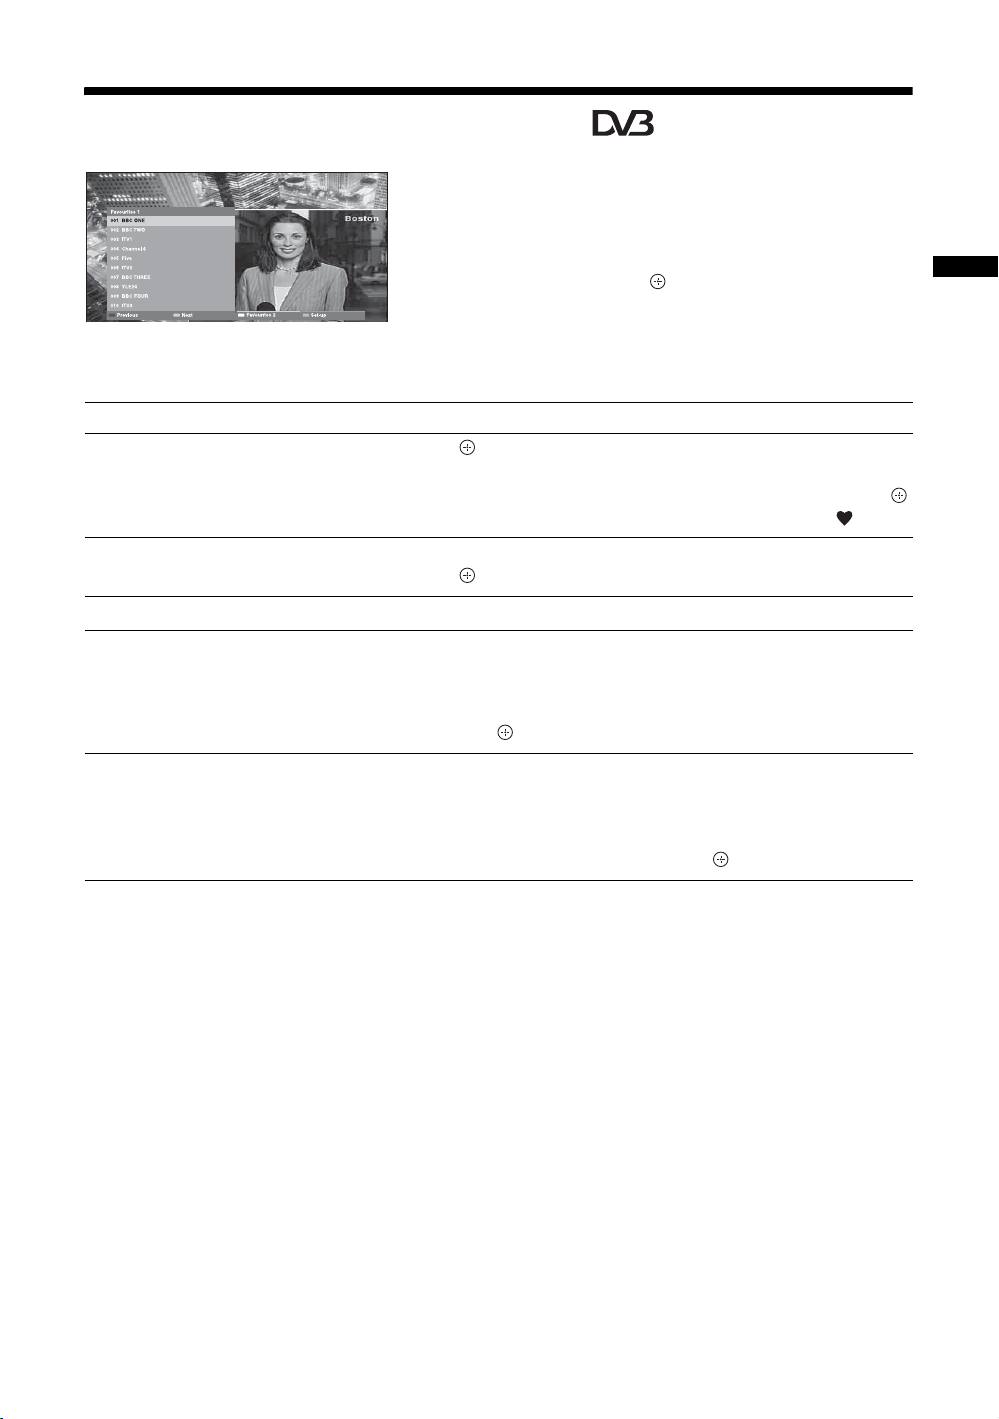
Using the Digital Favourite list *
The Favourite feature allows you to specify up to four
lists of your favourite programmes.
1 Press MENU.
2 Press F/f to select “Digital Favourites”,
then press .
3 Perform the desired operation as shown in
Digital Favourite list
* This function may not be available in some countries/regions.
To Do t h i s
Create your Favourite list for the first
time
1 Press to select “Yes”.
2 Press the yellow button to select the Favourite list.
3 Press
F/f to select the channel you want to add, then press .
Channels that are stored in the Favourite list are indicated by a symbol.
the following table or displayed on the
screen.
Watching TV
Watch a channel
Turn off the Favourite list Press RETURN.
Add or remove channels in the currently
edited Favourite list
Remove all channels from the current
Favourite list
1 Press the yellow button to navigate through your Favourite lists.
2 Press while selecting a channel.
1 Press the blue button.
2 Press the yellow button to select the Favourite list you want to
edit.
3 Press
1 Press the blue button.
2 Press the yellow button to select the Favourite list you want to
3 Press the blue button.
4 Press
F/f to select the channel you want to add or remove,
then press .
edit.
G/g to select “Yes”, then press to confirm.
19
GB
Page 20
Using Optional Equipment
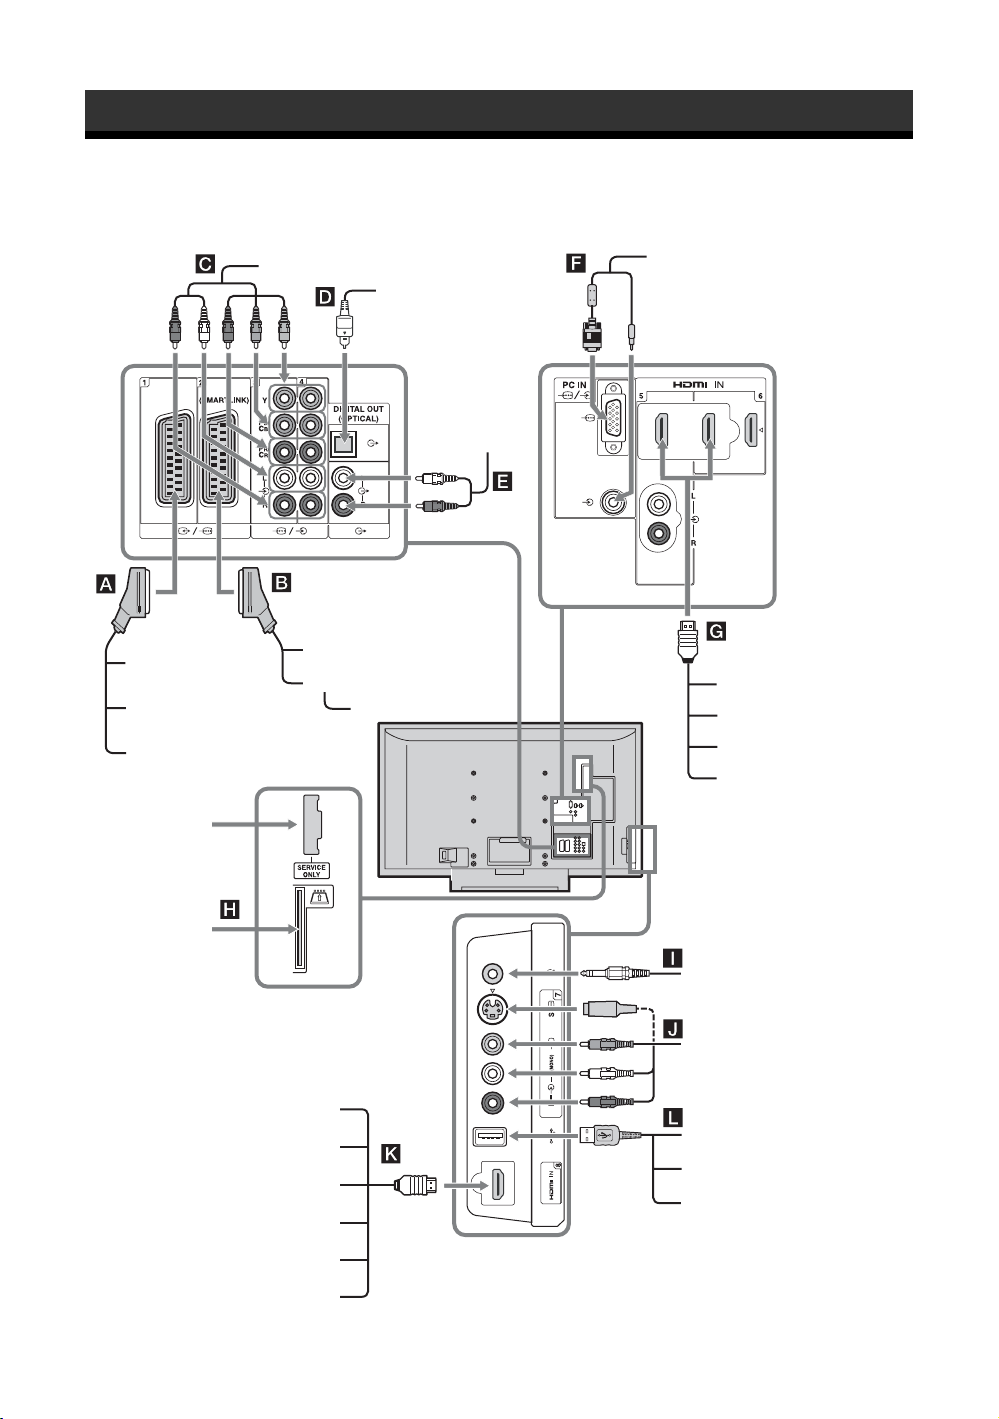
Connecting optional equipment
You can connect a wide range of optional equipment to your TV.
DVD player with component output
Digital audio component
PC IN
Hi-Fi audio
equipment
PC
Video game
equipment
DVD player
Decoder
For service
use only
CAM Card
Camcorder
Digital still camera (HDMI output)
PC (HDMI output)
DVD player
DVD recorder
VCR
Decoder
DVD player
Blu-ray disc player
Audio system
PC (HDMI output)
Headphones
Camcorder
Digital still camera
Camcorder
USB storage media
20
Blu-ray disc player
Audio system
GB
Page 21
Connect to Input symbol on
Description
screen
A / 1 AV1 or AV1 When you connect the decoder, the scrambled signal from the
TV tuner is output to the decoder, then the unscrambled signal
is output from the decoder.
B / 2 AV2 or AV2 SmartLink is a direct link between the TV and a VCR/DVD
C / 3 or
/4
D DIGITAL OUT
(OPTICAL)
E You can listen to the sound from the TV on Hi-Fi audio
F PC IN / PC It is recommended to use the supplied PC cable with ferrite
G HDMI IN 5 or 6
K HDMI IN 8
H CAM
(Conditional Access
Module)
I Headphones You can listen to sound from the TV on headphones.
AV3 or AV4
AV5, AV6 or
AV 8
recorder.
Use an Optical audio cable.
equipment.
cores.
The digital video and audio signals are input from the
equipment.
In addition, when HDMI control compatible equipment is
connected, communication with the connected equipment is
supported. Refer to page 38 to set up this communication.
If the equipment has a DVI socket, connect the DVI socket to
the HDMI IN 5 socket through a DVI - HDMI adaptor interface
(not supplied), and connect the equipment’s audio out sockets
to the audio in the HDMI IN 5 sockets.
~
• The HDMI sockets only support the following video inputs: 480i,
480p, 576i, 576p, 720p, 1080i, 1080p and 1080/24p. For PC
video inputs, see page 47.
• Be sure to use only an HDMI cable that bears the HDMI logo.
• When connecting an HDMI control compatible audio system, be
sure to also connect to the DIGITAL OUT (OPTICAL) socket.
To use pay TV services. For details, refer to the instruction
manual supplied with your CAM.
To use the CAM, remove the “dummy” card from the CAM
slot. Turn off the TV when inserting your CAM into the CAM
slot. When you do not use the CAM, we recommend that the
“dummy” card be inserted and kept in the CAM slot.
~
CAM is not supported in some countries/regions. Check with your
authorized dealer.
Using Optional Equipment
J 7 or 7, and
7
L USB You can view photographs on a Sony digital still camera,
AV7 or AV7 To avoid picture noise, do not connect the camcorder to the
video 7 socket and the S video 7 socket at the same
time. If you connect mono equipment, connect to the 7 L
socket.
camcorder or USB storage media connected to the TV. For
details, see page 26.
21
GB
Page 22

Viewing pictures from
Using the Tools menu
Press TOOLS to display the following options when
viewing pictures from connected equipment.
the connected
equipment
Turn on the connected equipment, then
perform one of the following operation.
For equipment connected to the scart sockets using a
fully-wired 21-pin scart lead (page 20)
Start playback on the connected equipment.
The picture from the connected equipment appears on
the screen.
For an auto-tuned VCR (page 7)
In analogue mode, press PROG +/–, or the number
buttons, to select the video channel.
For other connected equipment (page 20)
Press / to display the connected equipment list.
F/f to select the desired input source, then press
Press
. (The highlighted item is selected if 2 seconds pass
without any operation after pressing
When the input source is set to “Skip” in the “AV
Preset” menu under the “Set-up” menu (page 37), that
input does not appear in the list.
Additional operations
F/f.)
Options Description
Close Closes the Tools menu.
Picture Mode See page 28.
Sound Mode See page 30.
Motion Enhancer See page 34.
Speaker See page 36.
PAP (except PC input
mode)
PIP (in PC input
mode only)
Auto Adjustment (in
PC input mode only)
Horizontal Shift (in
PC input mode only)
i Volume See page 36.
Sleep Timer (except
PC input mode)
Power Saving See page 38.
Auto Clock Set Allows you to switch to digital
See page 22.
See page 23.
See page 33.
See page 33.
See page 37.
mode and obtain the time.
To Do t h i s
Return to normal TV
mode
Access the In put signal
index table (except
analogue mode)
Change the volume of
the connected HDMI
control compatible
audio system
Mute the sound of the
connected HDMI
control compatible
audio system
GB
22
Press DIGITAL/ANALOG.
Press to access the Input
signal index table. To select an
input source, press
press .
Press
Press
Press again to restore.
2 +/–.
%.
F/f, then
To view two pictures simultaneously
– PAP (Picture and Picture)
You can view two pictures (external input and TV
programme) on the screen simultaneously.
Connect the optional equipment (page 20), and make
sure that images from the equipment appear on the
screen (page 22).
~
• This function is not available for a PC input source.
• You cannot change the size of the pictures.
1 Press TOOLS to display the Tools menu.
2 Press F/f to select “PAP”, then press .
The picture from connected equipment is
displayed on the left and the TV programme is
displayed on the right.
3 Press number buttons or PROG +/– to
select the TV channel.
To return to single picture mode
Press or RETURN.
z
The picture framed in green is audible. You can switch the
audible picture by pressing
G/g.
Page 23
To view two pictures simultaneously
– PIP (Picture in Picture)
You can view two pictures (PC input and TV
programme) on the screen simultaneously.
Connect a PC (page 20), and make sure that images
from a PC appear on the screen.
1 Press TOOLS to display the Tools menu.
2 Press F/f to select “PIP”, then press .
The picture from the connected PC is displayed with
full size and the TV programme is displayed on the
right corner.
You can use
screen position.
F/f/G/g to move the TV programme
3 Press number buttons or PROG +/– to
select the TV channel.
To return to single picture mode
Press RETURN.
z
You can switch the audible picture by selecting “TV Sound /
PC Sound” from the Tools menu.
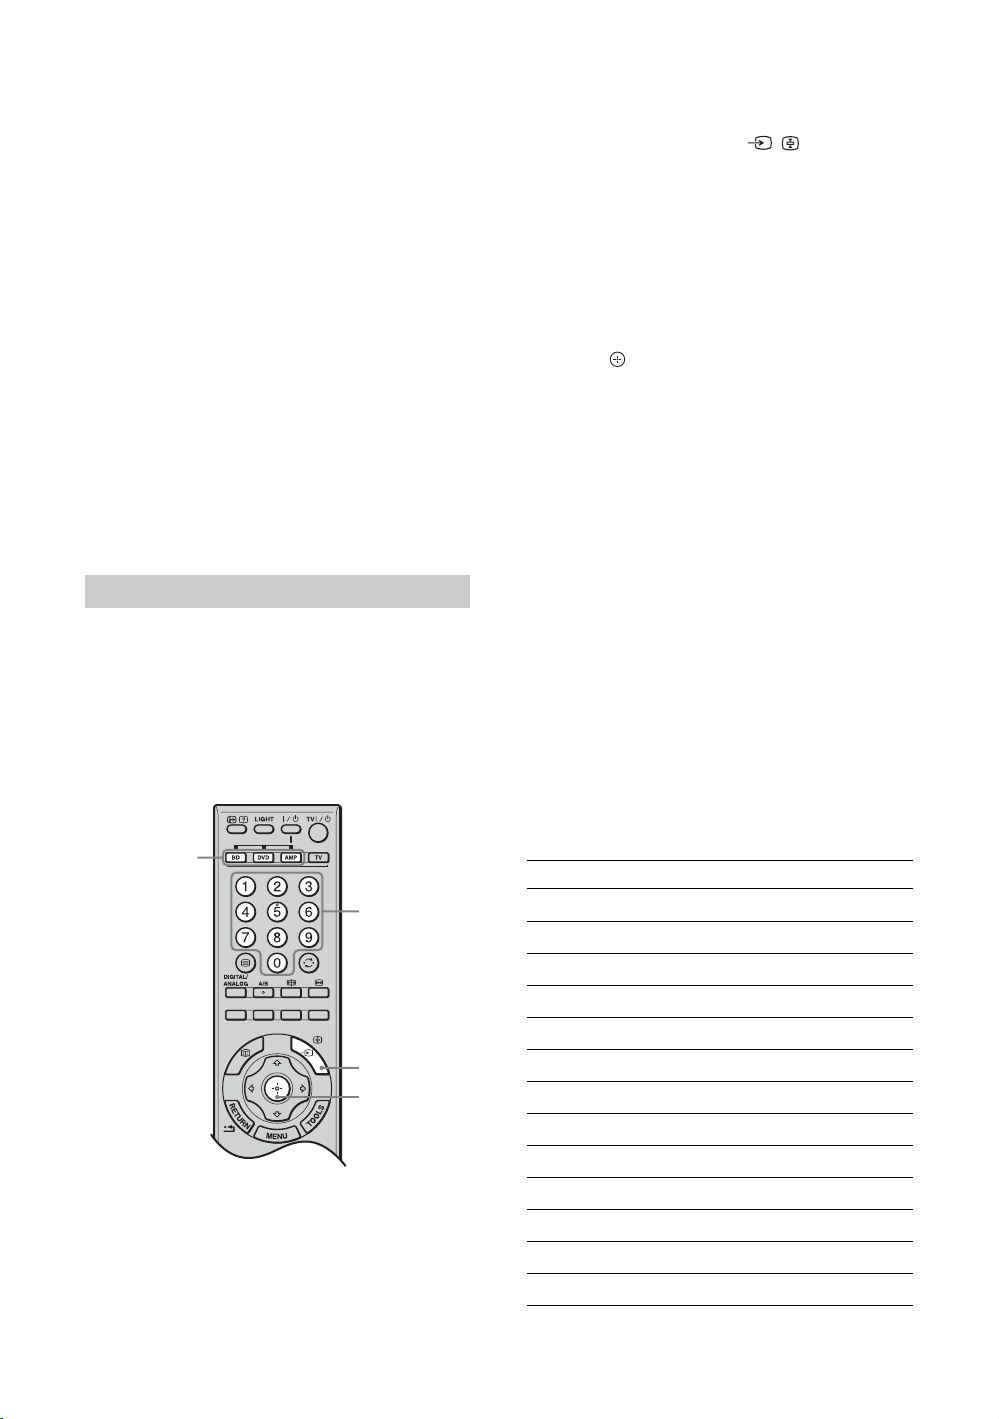
Using the remote
Buttons for using optional equipment
Using Optional Equipment
1 "/1
Turns on or off the optional equipment selected from
the function buttons.
2 Function buttons
Enables you to operate the corresponding equipment.
For details, see “Programming the remote” on
page 24.
3 BD/DVD operating buttons
• . : Replays the current programme from the
previous chapter mark (if any).
• > : Advances forward to the next chapter mark
(if any).
• : Replays the current programme for a set
period of time.
• : Advances forward a set period of time.
• m : Plays a programme in fast reverse mode.
• M : Plays a programme in fast forward mode.
• H : Plays a programme at a normal speed.
• X : Pauses playback.
• x : Stops the playback.
Continued
23
GB
Page 24
4 DVD record buttons
• z REC: Starts recording.
• X REC PAUSE: Pauses the recording.
• x REC STOP: Stops the recording.
5 F1/F2
• Selects a disc when using a DVD changer.
• Selects a function when using a combination unit
(e.g. a BD/DVD).
For details, see the operating instructions supplied
with the DVD changer or combination unit.
6 BD/DVD MENU
Displays the DVD disc menu. For details, see the
operating instructions supplied with the connected
equipment.
7 BD/DVD TOP MENU
Displays the top menu of the DVD disc. For details,
see the operating instructions supplied with the
connected equipment.
z
The H button has a tactile dot. Use the tactile dot as a
reference when operating other equipment.
Programming the remote
This remote is preset to operate Sony TVs, most Sony
BDs, DVDs and AMPs (Home Theatre, etc.).
To control BDs and DVDs of other manufacturers
(and some other Sony BD, DVD and AMP models),
do the following procedure to programme the remote.
~
Before you start, look up the three-digit code for your brand
of BD, DVD or AMP from the “Manufacturer’s codes” on
page 24.
1
2
1
3
1 Press and hold the BD, DVD or AMP
function button you want to programme on
the remote, then press / , keeping the
function button pressed down.
The selected function button (BD, DVD or AMP)
will flash.
2 Press the number buttons to enter the
three-digit manufacturer’s code number
when the button flashes.
If code is not entered within 10 seconds, you must
perform the step 1 again.
3 Press .
When the programming is correct, the selected
function button will flash twice, and when not, it
will flash five times.
4 Turn on your equipment and check that the
following main functions work.
H (playback), x (stop), m (rewind), M (fast
forward), channel selection for both BDs and
DVDs, TOP MENU/MENU and
for DVDs.
If your equipment is not working, or some of the
functions do not work
Enter the correct code or try the next code listed
for the brand. However, not all models of every
brand may be covered.
To return to normal TV operation
Press the TV function button.
Manufacturer’s codes
DVD brand list
DVD Player
Brand Code
SONY 001, 029, 030, 036 – 044, 053 – 055
AIWA 021
AKAI 032
DENON 018, 027, 020, 002
GRUNDIG 009, 028, 023, 024, 016, 003
HITACHI 025, 026, 015, 004, 035
JVC 006, 017
KENWOOD 008
LG 015, 014, 034
LOEWE 009, 028, 023, 024, 016, 003
MATSUI 013, 016
ONKYO 022, 033
PANASONIC 018, 027, 020, 002, 045 – 047
F/f/G/g only
24
GB
Page 25

Brand Code
PHILIPS 009, 028, 023, 024, 016, 003, 031
PIONEER 004, 050, 051, 052
SAMSUNG 011, 014
SANYO 007
SHARP 019, 027
THOMSON 012
TOSHIBA 003, 048, 049
YAMAHA 018, 027, 020, 002
Brand Code
SHARP 324
THOMSON 319, 350, 365
TOSHIBA 337
AUX Sony systems brand list
DAV Home Theatre System
Brand Code
SONY (DAV) 401 – 404
BD (Blu-ray Disc) Player
Brand Code
SONY 101 – 103
DVD/VCR Player
Brand Code
SONY 251
DVD recorder
Brand Code
SONY 201 – 203
VCR brand list
Brand Code
SONY 301 – 310, 362
AIWA 325, 331, 351
AKAI 326, 329, 330
DAEWOO 342, 343
GRUNDIG 358, 355, 360, 361, 320, 351, 366
HITACHI 327, 333, 334
JVC 314, 315, 322, 344, 352 – 354, 348, 349
LG 332, 338
LOEWE 358, 355, 360, 361, 320, 351
MATSUI 356, 357
ORION 328
PANASONIC
PHILIPS 311 – 313, 316 – 318, 358, 359, 363,
SAMSUNG 339 – 341, 345
SANYO 335, 336
321, 323
364
AV receiver
Brand Code
SONY 451 – 454
Digital terrestrial receiver
Brand Code
SONY 501 – 503
Using Optional Equipment
25
GB
Page 26

Using USB photo viewer
Using HDMI control
You can view photographs (in JPEG format) stored in
a Sony digital still camera, camcorder or USB storage
media on your TV.
1 Connect a supported USB device to the
TV.
2 Press MENU.
3 Press F/f to select “Photo”, then press .
The thumbnail screen appears.
4 Press F/f/G/g to select the photograph or
folder you want to view, and then press .
If you want to view a slide show, press G/f to
select “Slide Show”, then press .
Advanced operations
Press G/f to select an option, then press .
Options Description
Device Selection Select the device if multiple
devices are connected.
Picture Settings You can make “Backlight”
(page 28), “Contrast” (page 28)
and “Colour Temperature”
settings.
The HDMI control function allows equipment to
control each other using HDMI CEC (Consumer
Electronics Control) specified by HDMI.
You can connect Sony HDMI control compatible
equipment such as TVs, hard disk DVD recorders and
audio systems (with HDMI cables) to let them work
integratedly.
Be sure to correctly connect and set the compatible
equipment to use the HDMI control function.
To connect the HDMI control compatible
equipment
Connect the compatible equipment and the TV with an
HDMI cable. When connecting an audio system, in
addition to the HDMI cable, be sure to also connect
the DIGITAL OUT (OPTICAL) socket of the TV and
the audio system using an optical audio cable. For
details, see page 20.
To make the HDMI control settings
HDMI control must be set on both the TV side and the
connected equipment side. See “HDMI Set-up” on
page 38 for the TV side settings. See the operating
instructions of the connected equipment for setting
details.
Set-up You can make advanced settings
for the slide show and set the
display sequence for the
thumbnails.
~
• USB photo viewer only supports DCF-compliant JPEG
photographs.
• Set the camera’s USB connection mode to Auto or “Mass
Storage” mode when you are connecting Sony digital still
camera. For more information about USB connection
mode, see the instructions supplied with the device that
you use.
• Do not turn off the TV or connected USB device, or
disconnect the USB cable or remove the recording media
while the data on the recording media is being accessed.
The data on the recording media may be damaged.
• Using unsupported USB device is not guaranteed and may
cause malfunctions.
• Sony cannot be held liable for any damage to or loss of
data on the recording media due to a malfunction of any
connected devices or the TV.
• Check the website below for the up to date information
about compatible USB devices.
http://support.sony-europe.com/TV/compatibility/
HDMI control functions
• Turns the connected equipment automatically off
when you turn the TV off.
• Turns the TV on and automatically switches the
input to the connected equipment when the
equipment starts to play.
• If you turn on a connected audio system while the
TV is on, the sound output switches from the TV
speaker to the audio system.
• Adjusts the volume and mutes the sound of a
connected audio system.
26
GB
Page 27
Using Menu Functions
Navigating through
menus
Menu functions allow you to enjoy various convenient
features of this TV. You can easily select channels or
inputs sources and change the settings for your TV.
2
2
1
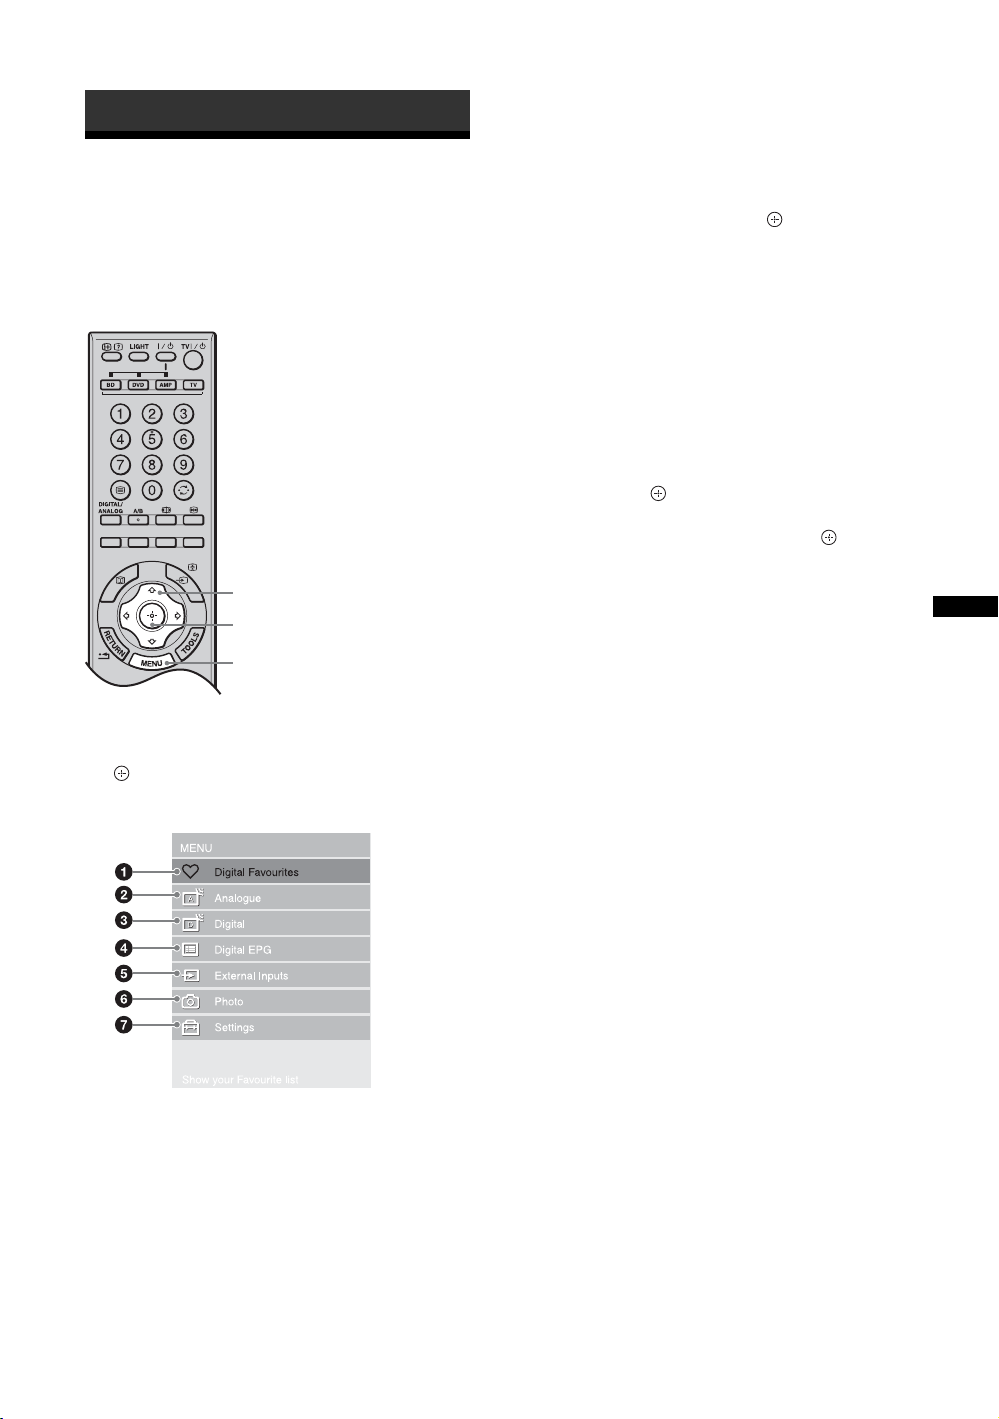
4 Digital EPG*
Displays the Digital Electronic Programme
Guide (EPG) (page 17).
5 External Inputs
Selects equipment connected to your TV.
• To watch the desired external input, select the
input source, then press .
• To assign a label to an external input, select
“Edit AV Labels” (page 37).
• To select the connected HDMI control
compatible equipment, select “HDMI Device
Selection”.
6 Photo
The thumbnail screen appears (page 26).
7 Settings
Displays the “Settings” menu where most of the
advanced settings and adjustments are
performed.
1 Press F/f to select a menu icon, then
press .
2 Press
For details about settings, see pages 28 to 45.
~
The options you can adjust vary depending on the
situation. Unavailable options are greyed out or not
displayed.
* This function may not be available in some countries/
regions.
F/f/G/g to select an option or
adjust a setting, then press .
Using Menu Functions
1 Press MENU.
2 Press F/f to select an option, then press
.
To exit the menu, press MENU.
1 Digital Favourites*
Displays the Favourite list (page 19).
2 Analogue
Returns to the last viewed analogue channel.
3 Digital*
Returns to the last viewed digital channel.
27
GB
Page 28
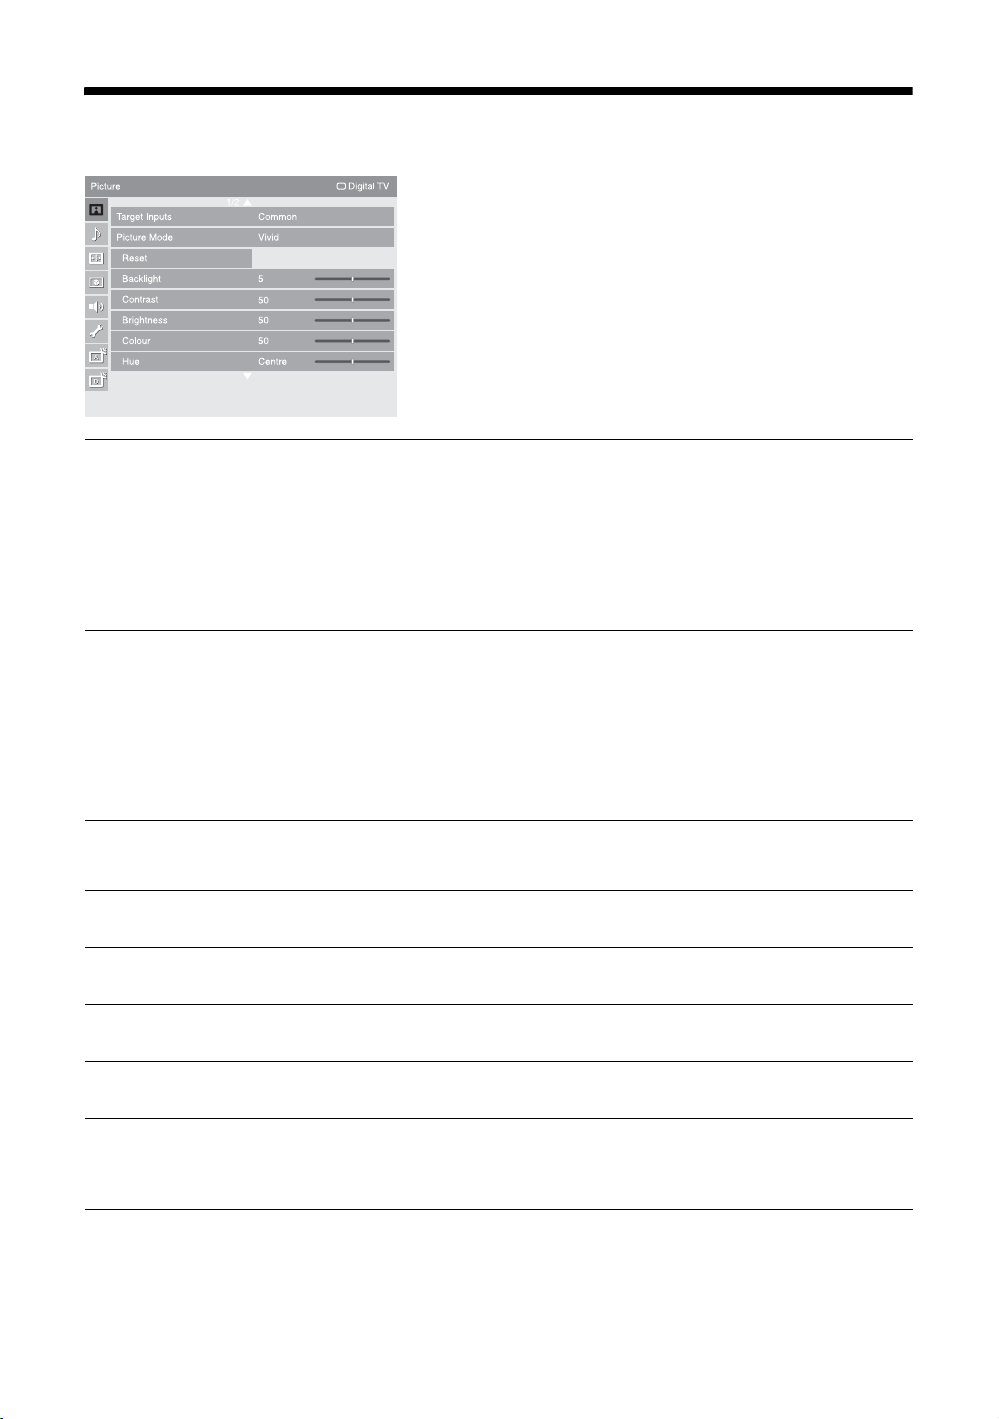
Picture menu
You can select the options listed below on the
“Picture” menu. To select options in “Settings”, refer
to “Navigating through menus” (page 27).
Target Inputs
Picture Mode
Reset
Backlight
Contrast
Brightness
For the input currently being viewed, select whether to use the common setting or to
set each item separately.
“Common”: Applies common settings whose adjustments are shared with other
inputs in which “Target Inputs” is set to “Common”.
Current input name (e.g. AV1): Allows you to set each option separately for the
current input.
z
Set each input to “Common” if you require the same settings to apply to each input.
Selects the picture mode. The options for “Picture Mode” may differ depending on
the “Video/Photo” setting (page 34).
“Vivid”: For enhanced picture contrast and sharpness.
“Standard”: For standard picture. Recommended for home entertainment.
“Cinema”: For viewing film-based content. Most suitable for viewing in a theatre-
like environment.
“Photo”: Sets the optimum picture quality for photographs.
“Custom”: Allows you to store your preferred settings.
Resets all the “Picture” settings except “Target Inputs”, “Picture Mode” and
“Advanced Settings” to the factory settings.
Adjusts the brightness of the backlight.
Increases or decreases picture contrast.
Brightens or darkens the picture.
Colour
Hue
GB
28
Increases or decreases colour intensity.
Increases or decreases the green tones and red tones.
~
“Hue” can only be adjusted for an NTSC colour signal (e.g. U.S.A. video tapes).
Page 29

Colour Temperature
Adjusts the whiteness of the picture.
“Cool”: Gives the white colours a blue tint.
“Neutral”: Gives the white colours a neutral tint.
“Warm 1”/“Warm 2”: Gives the white colours a red tint. “Warm 2” gives a redder
tint than “Warm 1”.
z
“Warm 1” and “Warm 2” are not available when “Picture Mode” is set to “Vivid”.
Sharpness
Noise Reduction
MPEG Noise Reduction
DRC Mode
DRC Palette
Sharpens or softens the picture.
Reduces the picture noise (snowy picture) in a weak broadcast signal.
“Auto”: Automatically reduces the picture noise (in analogue TV mode or
composite signals only).
“High”/“Medium”/“Low”: Modifies the effect of the noise reduction.
“Off”: Turns off the “Noise Reduction” feature.
Reduces the picture noise in MPEG-compressed video.
Produces a high-resolution picture for high-density sources (e.g., Blu-ray disc
player, DVD player, satellite receiver).
“Mode 1”: Recommended mode.
“Mode 2”: Only available for 1080i format. “Mode 2” is especially effective when
original standard-definition signals have been up-converted to 1080i format.
“Off”: Turns off the “DRC Mode” feature.
Customizes the level of detail (“Reality”) and smoothness (“Clarity”) for each input
signal. For example, you can create a custom setting for your cable input’s picture,
and create another for your DVD player’s pictures.
The “DRC Palette” appears. Press
As you move the z higher along the “Reality” axis, the picture becomes more
detailed. As you move the z to the right along the “Clarity” axis, the picture
becomes smoother.
F/f/G/g to adjust the position of the marker (z).
Using Menu Functions
Advanced Settings
Customizes the Picture function in more detail. When you set “Picture Mode” to
“Vivid”, you cannot set/change these settings.
“Reset”: Resets all the advanced settings to the factory settings.
“Black Corrector”: Enhances black areas of the picture for stronger contrast.
“Adv. Contrast Enhancer”: Automatically adjusts “Backlight” and “Contrast” to
the most suitable settings judging from the brightness of the screen. This setting is
especially effective for dark images scenes. It will increase the contrast distinction
of the darker picture scenes.
“Gamma”: Adjusts the balance between bright and dark areas of the picture.
“Clear White”: Emphasizes white colours.
“Colour Space”: Changes the colour reproduction gamut. “Wide” reproduces the
vivid colour and “Standard” reproduces the standard colour.
“Live Colour”: Makes colours more vivid.
“White Balance”: Adjusts the colour temperature colour by colour.
“Detail Enhancer”: Enhances the details of the picture.
“Edge Enhancer”: Enhances the outline of the picture.
29
GB
Page 30
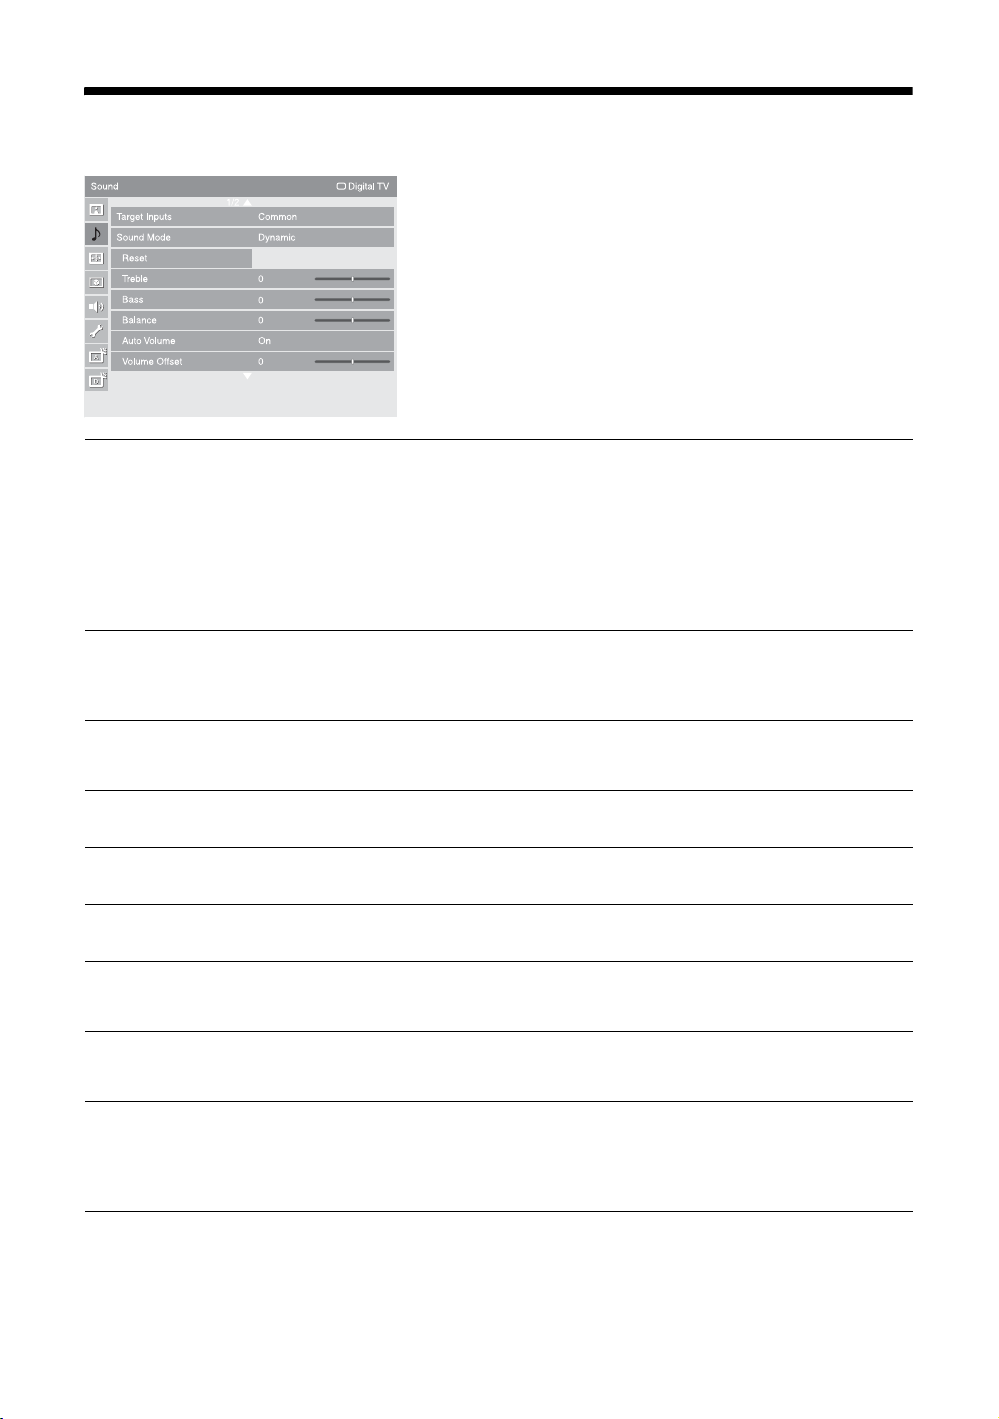
Sound menu
You can select the options listed below on the
“Sound” menu. To select options in “Settings”, refer
to “Navigating through menus” (page 27).
Target Inputs
Sound Mode
Reset
Treble
Bass
Balance
Auto Volume
For the input currently being viewed, select whether to use the common setting or to
set each item separately.
“Common”: Applies common settings whose adjustments are shared with other
inputs in which “Target Inputs” is set to “Common”.
Current input name (e.g. AV1): Allows you to set each option separately for the
current input.
z
Set each input to “Common” if you require the same settings to apply to each input.
“Dynamic”: Enhances treble and bass.
“Standard”: For standard sound. Recommended for home entertainment.
“Custom”: Flat response. Also allows you to store your preferred settings.
Resets all the “Sound” settings except “Target Inputs”, “Sound Mode” and “Dual
Sound” to the factory settings.
Adjusts higher-pitched sounds.
Adjusts lower-pitched sounds.
Emphasizes left or right speaker balance.
Keeps a constant volume level even when volume level gaps occur (e.g. adverts tend
to be louder than programmes).
Volume Offset
Surround
GB
30
Adjusts the volume level of the current input relative to other inputs, when “Target
Inputs” is set to the current input name (e.g. AV1).
“S-FORCE Front Surround”: Available for normal stereo broadcast and 5.1ch
digital broadcast surround audio, and the audio input from connected equipment.
“Off”: Converts and reproduces 5.1ch and other digital broadcast surround audio as
normal stereo audio (2ch). Reproduces the original audio of other broadcasts as is.
Page 31

Voice Zoom
Adjusts the clarity of human voices. For example, if the voice of a news announcer
is indistinct, you can turn up this setting to make the voice clearer. Conversely, if you
are watching a sports programme, you can turn down this setting to soften the voice
of the commentator.
Sound Booster
Dual Sound
Gives sound more impact by compensating for phase effects in speakers.
Selects the sound from the speaker for a stereo or bilingual broadcast.
“Stereo”/“Mono”: For a stereo broadcast.
“A”/“B”/“Mono”: For a bilingual broadcast, select “A” for sound channel 1, “B”
for sound channel 2, or “Mono” for a mono channel, if available.
~
If you select other equipment connected to the TV, set “Dual Sound” to “Stereo”, “A” or “B”.
However, when the external equipment connected to the HDMI socket is selected, this is fixed
to “Stereo” (except when using the audio in sockets).
Using Menu Functions
31
GB
Page 32

Screen menu (except for PC input)
You can select the options listed below on the
“Screen” menu. To select options in “Settings”, refer
to “Navigating through menus” (page 27).
Target Inputs
Screen Format
Auto Format
4:3 Default
Display Area
For the input currently being viewed, select whether to use the common setting or to
set each item separately.
“Common”: Applies common settings whose adjustments are shared with other
inputs in which “Target Inputs” is set to “Common”.
Current input name (e.g. AV1): Allows you to set each option separately for the
current input.
~
The selectable items are “Screen Format”, “Display Area”, “Vertical Shift” and “Vertical
Size”.
z
Set each input to “Common” if you require the same settings to apply to each input.
For details about the screen format, see “To change the screen format manually to
suit the broadcast” on page 16.
Automatically changes the screen format according to the broadcast signal. To keep
your setting, select “Off”.
Selects the default screen format for use with 4:3 broadcasts.
“Smart”: Displays conventional 4:3 broadcasts with an imitation wide screen effect.
“4:3”: Displays conventional 4:3 broadcasts in the correct proportions.
“Off”: Keeps the current “Screen Format” setting when the channel or input is
changed.
Adjusts the screen area for displaying the picture.
“Full Pixel”: Displays the picture for 1080i or 1080p sources in the original size
when parts of the picture are cut off.
“+1”: Displays the original picture area. This setting can be selected for HDMI video
input signals, except for 1080i or 1080p signals.
“Normal”: Displays the recommended picture area.
“-1”/“-2”: Enlarges the picture to hide the edge of the picture.
Horizontal Shift
Vertical Shift
Vertical Size
GB
32
Adjusts the horizontal position of the picture.
Adjusts the vertical position of the picture when “Screen Format” is set to “Smart”,
“Zoom” or “14:9”.
Adjusts the vertical size of the picture when “Screen Format” is set to “Smart”.
Page 33

Screen menu (for PC input)
When you select the PC input, you can select the
options listed below on the “Screen” menu. To select
options in “Settings”, refer to “Navigating through
menus” (page 27).
Auto Adjustment
Reset
Phase
Pitch
Horizontal Shift
Vertical Shift
Screen Format
Automatically adjusts the display position, phase and pitch of the picture when the
TV receives an input signal from the connected PC.
z
“Auto Adjustment” may not work well with certain input signals. In such cases, manually
adjust “Phase”, “Pitch”, “Horizontal Shift” and “Vertical Shift”.
Resets the PC screen settings to the factory settings.
Adjusts the phase when the screen flickers.
Adjusts the pitch when the picture has unwanted vertical stripes.
Adjusts the horizontal position of the picture.
Adjusts the vertical position of the picture.
Selects a screen format for displaying input from your PC.
“Normal”: Displays the picture in its original size.
“Full 1”: Enlarges the picture to fill the vertical display area, keeping its original
horizontal-to-vertical aspect ratio.
“Full 2”: Enlarges the picture to fill the display area.
Using Menu Functions
33
GB
Page 34

Video Settings menu
You can select the options listed below on the “Video
Settings” menu. To select options in “Settings”, refer
to “Navigating through menus” (page 27).
Motion Enhancer
Film Mode
Game/Text Mode
Video/Photo
Provides smoother picture movement and reduces picture blur.
“High”: Provides smoother picture movement such as for film-based contents.
“Standard”: Provides smooth picture movement. Use this setting for standard use.
“Off”: Use this setting when the “High” and “Standard” settings result in noise.
~
Depending on the video, you may not see the effect visually, even if you have changed the
setting.
Provides improved picture movement when playing DVD or VCR images taken on
film, reducing picture blur and graininess.
“Auto 1”: Provides smoother picture movement than the original film-based
content. Use this setting for standard use.
“Auto 2”: Provides the original film-based content as is.
“Off”: Turns off the “Film Mode” feature.
~
If the image contains irregular signals or too much noise, “Film Mode” will be automatically
turned off even if “Auto 1” or “Auto 2” is selected.
Provides the optimum screen for viewing images with fine lines and characters that
are input from video game equipment and PCs. Set to “On” for the sharp display of
fine lines or characters.
Provides suitable image quality by selecting the option depending on the input
source (video or photograph data).
“Video-A”: Sets suitable image quality, depending on the input source, video data
or photograph data when directly connecting Sony HDMI output-capable equipment
that supports “Video-A” mode.
“Video”: Produces suitable image quality for moving pictures.
“Photo”: Produces suitable image quality for still images.
~
The setting is fixed to “Video” when Video-A mode is not supported on the connected
equipment, even if “Video-A” is selected.
x.v.Colour
GB
34
Displays moving pictures that is more faithful to the original source by matching the
colour space of source.
~
The setting is fixed to “Normal” when the input signal is HDMI (RGB), even if “x.v.Colour”
is selected.
Page 35

Photo Colour Space
Selects the option (sRGB, sYCC, Adobe RGB) to match the output colour space
within the output signal from the equipment connected to the HDMI or component
input jacks.
~
• Select “sYCC” when using the equipment that supports “x.v.Colour”.
• The setting is fixed to “sRGB” when the input signal is HDMI (RGB), even if “sYCC” is
selected.
Colour Matrix
RGB Dynamic Range
Colour System
Usually used in the factory setting (AV1/2/7 (Composite and S video input signal) is
set to “ITU601”, and AV3/4/5/6/8 (Component input signal) is set to “Auto”). If the
colour tone of the picture from the input source does not match the colour standard
and looks unnatural, select either “ITU601” or “ITU709”, which normalizes the
colour tone.
Produces natural colour by changing the luminance tone reproduction of HDMI
input colour signals (RGB). Set to “Auto” for standard use. Change the settings only
when the luminance tone of the display is unnatural.
Selects the colour system (“Auto”, “PAL”, “SECAM”, “NTSC3.58” or
“NTSC4.43”) according to the input signal from the input source.
Using Menu Functions
35
GB
Page 36

Audio Settings menu
Variable
You can select the options listed below on the “Audio
Settings” menu. To select options in “Settings”, refer
to “Navigating through menus” (page 27).
Speaker
Headphone Settings
Audio Out
Turns on/off the TV’s internal speakers.
“TV Speaker”: The TV speakers are turned on in order to listen to the TV’s sound
through the TV speakers.
“Audio System”: The TV speakers are turned off in order to listen to the TV’s sound
only through your external audio equipment connected to the audio output sockets.
When HDMI control compatible equipment is connected, you can turn on the
equipment whose operations are linked to the TV. This setting must be made after
connecting the equipment.
i Speaker Link
Switches the TV’s internal speakers on/off when headphones are connected.
“On”: Sound is output only from headphones.
“Off”: Sound is output from both the TV and headphones.
i Volume
Adjusts the volume of the headphones when “i Speaker Link” is set to “Off”.
i Dual Sound
Selects the sound from the headphone for a stereo or bilingual broadcast.
“Variable”: The audio output from your audio system can be controlled by the TV’s
remote.
“Fixed”: The audio output of the TV is fixed. Use your audio receiver’s volume
control to adjust the volume (and other audio settings) through your audio system.
36
GB
Page 37

Set-up menu
You can select the options listed below on the “Setup” menu. To select options in “Settings”, refer to
“Navigating through menus” (page 27).
Timer Settings
AV Preset
Sets the timer to turn on/off the TV.
Sleep Timer
Sets a period of time after which the TV automatically switches itself into standby
mode.
When “Sleep Timer” is activated, the (Timer) indicator on the TV front panel
lights up in orange.
z
• If you turn off the TV and turn it on again, “Sleep Timer” is reset to “Off”.
• A notification message appears on the screen one minute before the TV switches to standby
mode.
On Timer
Sets the timer to turn on the TV from standby mode.
“Day”: Selects the day on which you want to activate the “On Timer”.
“Time”: Sets the time to turn on the TV.
“Duration”: Selects the time period after which the TV automatically switches to
standby mode again.
“Volume Set-up”: Sets the volume for when the timer turns on the TV.
Clock Set
Allows you to adjust the clock manually. When the TV is receiving digital channels,
the clock cannot be adjusted manually since it is set to the time code of the broadcast
signal.
Assigns a name to any equipment connected to the side and rear sockets. The name
will be displayed briefly on the screen when the equipment is selected. You can skip
input signals from connected equipment that you do not want displayed on the
screen.
1 Press
2 Press
F/f to select the desired input source, then press .
F/f to select the desired option below, then press .
Equipment labels: Uses one of the preset labels to assign a name to connected
equipment.
“Edit:”: Creates your own label. Follow steps 2 to 4 of “Programme Labels”
(page 40).
“Skip”: Skips an unnecessary input source.
Using Menu Functions
Auto S Video
Selects the input signal from S video sockets 7 when / 7 sockets are both
connected.
Continued
37
GB
Page 38

AV2 Output
Sets a signal to be output through the socket labelled / 2 on the rear of the TV.
If you connect a VCR or other recording equipment to the / 2 socket, you can
then record from the equipment connected to other sockets of the TV.
“TV”: Outputs a broadcast.
“AV1”: Outputs signals from equipment connected to the / 1 socket.
“AV7”: Outputs signals from equipment connected to the
“Auto”: Outputs whatever is being viewed on the screen (except signals from the
/ 3, / 4, HDMI IN 5, HDMI IN 6, HDMI IN 8 and PC IN /
sockets).
/ 7 socket.
HDMI Set-up
Auto Start-up
This is used to set the HDMI control compatible equipment connected to the HDMI
sockets. Note that the link setting must also be made on the side of the HDMI control
compatible equipment that is connected.
HDMI Control
Sets whether or not to link the operations of the HDMI control compatible equipment
and the TV. When set to “On”, the following menu items can be performed.
Auto Devices Off
When this is set to “On”, any connected HDMI control compatible equipment will
be turned off with the TV.
Auto TV On
When this is set to “On”, and if the connected HDMI control compatible equipment
is turned on, the TV automatically turns on, and then displays the HDMI input from
the connected equipment.
HDMI Device List
Displays the connected HDMI control compatible equipment.
~
You cannot use “HDMI Control” if the TV operations are linked to the operations of an audio
system that is compatible with HDMI control.
Starts the initial set-up to select the language and country/region, and tune in all
available digital and analogue channels.
Usually, you do not need to do this operation because the language and country/
region will have been selected and channels already tuned when the TV was first
installed (page 6).
However, this option allows you to repeat the process (e.g. to retune the TV after
moving house, or to search for new channels that have been launched by
broadcasters).
Power Saving
Light Sensor
Logo Illumination
PC Power Management
GB
38
Selects the power saving mode to reduce the power consumption of the TV.
When “Picture Off” is selected, the picture is switched off and the (Picture Off)
indicator on the TV front panel lights up in green. The sound remains unchanged.
“On”: Automatically optimises the picture settings according to the ambient light in
the room.
“Off”: Turns off the “Light Sensor” feature.
~
Be sure not to put anything over the sensor, as its function may be affected. See page 14 for
further information on the sensor.
Lights up and turns off the Sony logo on the front of the TV.
Switches the TV to standby mode if no signal is received for 30 seconds in the PC
input.
Page 39

Language
Selects the language in which the menus are displayed.
Product Information
All Reset
Displays your TV’s product information.
Resets all settings to the factory settings and then displays the “Auto Start-up”
screen.
~
• Be sure not to turn the TV off during this period (it takes about 30 seconds) or press any
buttons.
• All settings, including Digital Favourite list, country/region, language, auto tuned channels,
etc. will be reset.
Using Menu Functions
39
GB
Page 40

Analogue Set-up menu
You can select the options listed below on the
“Analogue Set-up” menu. To select options in
“Settings”, refer to “Navigating through menus”
(page 27).
1 Digit Direct
Auto Tuning
Programme Sorting
Programme Labels
When “1 Digit Direct” is set to “On”, you can select an analogue channel using one
preset number button (0 – 9) on the remote.
~
When “1 Digit Direct” is set to “On”, you cannot select channel numbers 10 and above entering
two digits using the remote.
Tunes in all the available analogue channels.
This option allows you to retune the TV after moving house, or to search for new
channels that have been launched by broadcasters.
Changes the order in which the analogue channels are stored on the TV.
1 Press
2 Press
Assigns a channel name of your choice up to five letters or numbers. The name will
be displayed briefly on the screen when the channel is selected. (Names for channels
are usually taken automatically from Text (if available).)
1 Press F/f to select the channel you want to name, then press .
2 Press
3 Repeat the procedure in step 2 until the name is completed.
4 Select “OK”, then press .
F/f to select the channel you want to move to a new position, then
press .
F/f to select the new position for your channel, then press .
F/f to select the desired letter or number (“_” for a blank space),
then press
If you input a wrong character
Press G/g to select the wrong character. Then, press F/f to select the correct
character.
To delete all the characters
Select “Reset”, then press .
g.
40
GB
Page 41

Manual Programme
Preset
Before selecting “Label”/“AFT”/“Audio Filter”/“Skip”/“Decoder”/“LNA”, press
PROG +/– to select the programme number with the channel. You cannot select a
programme number that is set to “Skip” (page 41).
Programme/System/Channel
Presets programme channels manually.
1 Press
2 Press
3 Press F/f to select “System”, then press .
4 Press
5 Press F/f to select “Channel”, then press .
6 Press
7 Tune the channels as follows:
8 Press to jump to “Confirm”, then press .
9 Press
Repeat the procedure above to preset other channels manually.
F/f to select “Programme”, then press .
F/f to select the programme number you want to manually tune (if
tuning a VCR, select channel 00), then press RETURN.
F/f to select one of the following TV broadcast systems, then
press RETURN.
B/G: For western European countries/regions
I: For the United Kingdom
D/K: For eastern European countries/regions
L: For France
F/f to select “S” (for cable channels) or “C” (for terrestrial
channels), then press
If you do not know the channel number (frequency)
Press F/f to search for the next available channel. When a channel has been found,
the search will stop. To continue searching, press
If you know the channel number (frequency)
Press the number buttons to enter the channel number of the broadcast you want or your
VCR channel number.
g.
F/f.
f to select “OK”, then press .
Using Menu Functions
Label
Assigns a name of your choice, up to five letters or numbers, to the selected channel.
This name will be displayed briefly on the screen when the channel is selected.
To input characters, follow steps 2 to 4 of “Programme Labels” (page 40).
AFT
Allows you to fine-tune the selected programme number manually if you feel that a
slight tuning adjustment will improve the picture quality.
You can adjust the fine tuning over a range of –15 to +15. When “On” is selected,
the fine tuning is performed automatically.
Audio Filter
Improves the sound for individual channels in the case of distortion in mono
broadcasts. Sometimes a non-standard broadcast signal can cause sound distortion or
intermittent sound muting when watching mono programmes.
If you do not experience any sound distortion, we recommend that you leave this
option set to the factory setting “Off”.
~
You cannot receive stereo or dual sound when “Low” or “High” is selected.
Skip
Skips unused analogue channels when you press PROG +/– to select channels. (You
can still select a skipped channel using the number buttons.)
Continued
41
GB
Page 42

Decoder
Shows and records the scrambled channel selected when using a decoder connected
directly to scart connector / 1, or to scart connector / 2 via a VCR.
~
Depending on the country/region selected for “Country” (page 7), this option may not be
available.
LNA
Improves the picture quality for individual channels in the case of very weak
broadcast signals (noisy picture).
If you cannot see any improvement in the picture quality even if you set to “On”, set
this option to “Off” (factory setting).
Confirm
Saves changes made to the “Manual Programme Preset” settings.
42
GB
Page 43

Digital Set-up menu
You can select the options listed below on the “Digital
Set-up” menu. To select options in “Settings”, refer to
“Navigating through menus” (page 27).
~
Some functions may not be available in some countries/
regions.
Digital Tuning
Digital Auto Tuning
Tunes in the available digital channels.
This option allows you to retune the TV after moving house, or to search for new
channels that have been launched by broadcasters. For details, see “Auto tuning the
TV” on page 7.
Programme List Edit
Removes any unwanted digital channels stored on the TV, and changes the order of
the digital channels stored on the TV.
1 Press
2 Remove or change the order of the digital channels as follows:
3 Press RETURN.
Digital Manual Tuning
Tunes the digital channels manually. This feature is available when “Digital Auto
Tuning” is set to “Antenna”.
1 Press the number button to select the channel number you want to
2 When the available channels are found, press
3 Press F/f to select the programme number where you want to store the
Repeat the above procedure to manually tune other channels.
F/f to select the channel you want to remove or move to a new
position.
Press the number buttons to enter the known three-digit programme number of the
broadcast you want.
To remove the digital channel
Press . After a confirmation message appears, press G to select “Yes”, then press .
To change the order of the digital channels
Press g, then press F/f to select the new position for the channel and press G.
manually tune, then press
F/f to tune the channel.
F/f to select the channel
you want to store, then press .
new channel, then press .
Using Menu Functions
Subtitle Set-up
“Subtitle Setting”: When “For Hard Of Hearing” is selected, some visual aids may
also be displayed with the subtitles (if TV channels broadcast such information).
“Subtitle Language”: Selects which language subtitles are displayed in.
Continued
43
GB
Page 44

Audio Set-up
“Audio Type”: Switches to broadcast for the hearing impaired when “For Hard Of
Hearing” is selected.
“Audio Language”: Selects the language used for a programme. Some digital
channels may broadcast several audio languages for a programme.
“Audio Description”: Provides audio description (narration) of visual information,
if TV channels broadcast such information.
“Mixing Level”: Adjusts the TV main audio and Audio Description output levels.
“Dynamic Range”: Compensates for differences in the audio level between
different channels. Note that this function may have no effect for some channels.
“Optical Out”: Selects the audio signal that is output from the DIGITAL OUT
(OPTICAL) terminal on the rear of the TV. Set to “Auto” when equipment
compatible with Dolby Digital is connected, and set to “PCM” when non-compatible
equipment is connected.
Banner Mode
Radio Display
Parental Lock
PIN Code
“Basic”: Displays programme information with a digital banner.
“Full”: Displays programme information with a digital banner, and displays detailed
programme information below that banner.
The screen wallpaper is displayed when listening to a radio broadcast. You can select
the screen wallpaper colour, or display a random colour. To cancel the screen
wallpaper display temporarily, press any button.
Sets an age restriction for programmes. Any programme that exceeds the age
restriction can only be watched after a PIN Code is entered correctly.
1 Press the number buttons to enter your existing PIN code.
If you have not previously set a PIN, a PIN code entry screen appears. Follow the
instructions of “PIN Code” below.
2 Press F/f to select the age restriction or “None” (for unrestricted
watching), then press .
3 Press RETURN.
To set your PIN for the first time
1 Press the number buttons to enter the new PIN code.
2 Press RETURN.
To change your PIN
1 Press the number buttons to enter your existing PIN code.
2 Press the number buttons to enter the new PIN code.
3 Press RETURN.
z
PIN code 9999 is always accepted.
44
GB
Page 45

Technical Set-up
“Auto Service Update”: Enables the TV to detect and store new digital services as
they become available.
“Software Download”: Enables the TV to automatically receive software updates
free through your existing aerial/cable (when issued). It is recommended that this
option be set to “On” at all times. If you do not want your software to be updated, set
this option to “Off”.
“System Information”: Displays the current software version and the signal level.
“Time Zone”: Allows you to manually select the time zone you are in, if it is not the
same as the default time zone setting for your country/region.
“Auto DST”: Sets whether or not to automatically switch between summer time and
winter time.
• “Off”: The time is displayed according to the time difference set by “Time Zone”.
• “On”: Automatically switches between summer time and winter time according to the
calendar.
CA Module Set-up
Allows you to access a pay TV service once you obtain a Conditional Access Module
(CAM) and a view card. See page 20 for the location of the (PCMCIA) socket.
Using Menu Functions
45
GB
Page 46

Additional Information
Specifications
Model name KDL-40X3500/
40X3000
System
Panel System
TV System
Colour/Video System
Channel Coverage
Sound Output
LCD (Liquid Crystal Display) Panel
Analogue: Depending on your country/region selection: B/G/H, D/K, L, I
Digital: DVB-T/DVB-C
Analogue: PAL, SECAM, NTSC 3.58, 4.43 (only Video In)
Digital: MPEG-2 MP@ML/HL, MPEG-4 HP@L3/L4
Analogue: VHF: E2–E12/UHF: E21–E69/CATV: S1–S20/HYPER: S21–S41
Digital: VHF/UHF
11 W + 11 W
D/K: R1–R12, R21–R69/L: F2–F10, B–Q, F21–F69/I: UHF B21–B69
Input/Output jacks
Aerial/Cable
/1
/2 (SmartLink)
3/ 4
3/ 4
HDMI IN 5, 6, 8
7
7
7
PC IN
i
75 ohm external terminal for VHF/UHF
21-pin scart connector (CENELEC standard) including audio/video input, RGB input, and TV audio/video
output.
21-pin scart connector (CENELEC standard) including audio/video input, RGB input, selectable audio/video
output, and SmartLink interface.
Supported formats: 1080p, 1080i, 720p, 576p, 576i, 480p, 480i
Y: 1 Vp-p, 75 ohms, 0.3V negative sync/P
R/CR: 0.7 Vp-p, 75 ohms
P
Audio input (phono jacks): 500 mVrms, Impedance: 47 kilohms
Video: 1080/24p, 1080p, 1080i, 720p, 576p, 576i, 480p, 480i
Audio: Two channel linear PCM
32, 44.1 and 48 kHz, 16, 20 and 24 bits
Analogue audio input (phono jacks): 500 mVrms, Impedance: 47 kilohms (HDMI IN 5 only)
PC Input (see page 47)
S video input (4-pin mini DIN)
Video input (phono jack)
Audio input (phono jacks)
DIGITAL OUT (OPTICAL) (digital optical jack)/Audio output (phono jacks)
PC Input (D-sub 15-pin) (see page 47)
G: 0.7 Vp-p, 75 ohms, non Sync on Green/B: 0.7 Vp-p, 75 ohms/
R: 0.7 Vp-p, 75 ohms/HD: 1-5 Vp-p/VD: 1-5 Vp-p
PC audio input (minijack)
Headphones jack
CAM (Conditional Access Module) slot
USB port
Power and others
Power Requirements
Screen Size
Display Resolution
Power Consumption
Standby Power Consumption*
Dimensions
(with stand)
(w × h × d)
(without stand)
Mass (with stand)
(without stand)
Supplied Accessories
220–240 V AC, 50 Hz
40 inches (Approx.
101.6 cm measured
diagonally)
1,920 dots (horizontal) × 1,080 lines (vertical)
240 W 285 W 320 W 630 W
0.3 W
Approx. 1,111 × 717 ×
322 mm
Approx. 1,111 × 657 ×
123 mm (KDL-40X3500)
Approx. 1,111 × 657 ×
121 mm (KDL-40X3000)
Approx. 31.0 kg Approx. 38.0 kg Approx. 49.0 kg Approx. 93.5 kg
Approx. 26.0 kg Approx. 33.0 kg Approx. 42.0 kg Approx. 80.5 kg
Refer to “1: Checking the accessories” on page 4.
KDL-46X3500/
46X3000
B/CB: 0.7 Vp-p, 75 ohms/
46 inches (Approx.
116.8 cm measured
diagonally)
Approx. 1,262 × 795 ×
322 mm
Approx. 1,262 × 734 ×
123 mm (KDL-46X3500)
Approx. 1,262 × 734 ×
121 mm (KDL-46X3000)
KDL-52X3500 KDL-70X3500
52 inches (Approx.
132.2 cm measured
diagonally)
Approx. 1,415 × 890 ×
384 mm
Approx. 1,415 × 827 ×
125 mm
70 inches (Approx.
177.8 cm measured
diagonally)
0.4 W
Approx. 1,842 × 1,131 ×
422 mm
Approx. 1,842 × 1,073 ×
150 mm
Refer to “KDL-70X3500
Start-up Guide”.
46
GB
Page 47

Model name KDL-40X3500/
Optional Accessories
* Specified standby power is reached after the TV finishes necessary internal processes.
40X3000
Wall-Mount Bracket SU-WL500
Floor stand SU-FL62
Colour Variation Unit
CRU-40X1
(KDL-40X3000 only)
KDL-46X3500/
46X3000
Colour Variation Unit
CRU-46X1
(KDL-46X3000 only)
KDL-52X3500 KDL-70X3500
Design and specifications are subject to change without notice.
PC Input Signal Reference Chart
Signals Horizontal (Pixel) Vertical (Line)
Horizontal
frequency
(kHz)
Ver tical
frequency (Hz)
Standard
VGA 640 480 31.5 60 VGA
640 480 37.5 75 VESA
720 400 31.5 70 VGA-T
SVGA 800 600 37.9 60 VESA Guidelines
800 600 46.9 75 VESA
XGA 1024 768 48.4 60 VESA Guidelines
1024 768 56.5 70 VESA
1024 768 60.0 75 VESA
WXGA 1280 768 47.4 60 VESA
1280 768 47.8 60 VESA
1280 768 60.3 75
1360 768 47.7 60 VESA
SXGA 1280 1024 64.0 60 VESA
1280 1024 80.0 75 VESA
HDTV 1920 1080 67.5 60
Additional Information
• This TV’s PC input does not support Sync on Green or Composite Sync.
• This TV’s PC input does not support interlaced signals.
• For the best picture quality, it is recommended to use the signals (boldfaced) in the above chart with a 60 Hz vertical frequency
from a personal computer. In plug and play, signals with a 60 Hz vertical frequency will be selected automatically.
47
GB
Page 48

Cleaning
Troubleshooting
Clean the ventilation holes of this TV set regularly
(once a month). If dust accumulates, the cooling fan
may not operate properly.
Ventilation holes
Check whether the 1 (standby) indicator is
flashing in red.
When it is flashing
The self-diagnosis function is activated.
1 Count how many 1 (standby) indicator
flashes between each two second break.
For example, the indicator flashes three times, then
there is a two second break, followed by another
three flashes, etc.
2 Press 1 on the right side of the TV to turn it
off, disconnect the mains lead, and inform
your dealer or Sony service centre of how
the indicator flashes (number of flashes).
When it is not flashing
1 Check the items in the tables below.
2 If the problem still persists, have your TV
serviced by qualified service personnel.
Picture
No picture (screen is dark) and no sound
• Check the aerial/cable connection.
• Connect the TV to the mains, and press 1 on the right side
of the TV.
• If the 1 (standby) indicator lights up in red, press TV "/1.
No picture or no menu information from equipment
connected to the scart connector
• Press / to display the connected equipment list,
then select the desired input.
• Check the conn ection between the optional equipment and
the TV.
Double images or ghosting
• Check the aerial/cable connection.
• Check the aerial location and direction.
Only snow and noise appear on the screen
• Check if the aerial is broken or bent.
• Check if the aerial has reached the end of its serviceable
life (three to five years in normal use, one to two years at
the seaside).
Distorted picture (dotted lines or stripes)
• Keep the TV away from electrical noise sources such as
cars, motorcycles, hair-dryers or optical equipment.
• When installing optional equipment, leave some space
between the optional equipment and the TV.
• Make sure that the aerial/cable is connected using the
supplied coaxial cable.
• Keep the aerial/cable TV cable away from other
connecting cables.
Picture or sound noise when viewing a TV channel
• Adjust “AFT” (Automatic Fine Tuning) to obtain better
picture reception (page 41).
48
GB
Page 49

Some tiny black points and/or bright points appear
on the screen
• The picture of a display unit is composed of pixels. Tiny
black points and/or bright points (pixels) on the screen do
not indicate a malfunction.
No colour on programmes
• Select “Reset” (page 28).
No colour or irregular colour when viewing a
signal from the 3 or 4 sockets
• Check the connection of the 3 or 4 sockets and check
if each sockets are firmly seated in their respective
sockets.
Sound
No sound, but good picture
• Press 2 +/– or % (Mute).
• Check if the “Speaker” is set to “TV Speaker” (page 36).
• When using HDMI input with Super Audio CD or DVDAudio, DIGITAL OUT (Optical) may not provide audio
signal.
There is a whirring sound
• This is the sound of the internal fans of the TV (except for
KDL-52X3500). This is not a malfunction.
Channels
The desired channel cannot be selected
• Switch between digital and analogue mode and select the
desired digital/analogue channel.
Some channels are blank
• Scrambled/Subscription only channel. Subscribe to the
pay TV service.
• Channel is used only for data (no picture or sound).
• Contact the broadcaster for transmission details.
Digital channels are not displayed
• Contact a local installer to find out if digital transmissions
are provided in your area.
• Upgrade to a higher gain aerial.
The “Store Display Mode: On” message appears
on the screen
• Select “All Reset” in the “Set-up” menu (page 39).
Not all channels are tuned for cable
• Check support website for cable provide information.
http://support.sony-europe.com/TV/DVBC/
The picture contours are disrupted
• Select “Standard” or “Off” in “Motion Enhancer”
(page 34).
You cannot select “Off” in “HDMI Control”.
• If any HDMI control compatible audio equipment is
connected to the TV, you cannot select “Off” in this menu.
If you want to change the audio output to the TV speaker,
select “TV Speaker” in the “Speaker” menu (page 36).
Additional Information
General
The TV turns off automatically (the TV enters
standby mode)
• Check if the “Sleep Timer” is activated, or confirm the
“Duration” setting of “On Timer” (page 37).
• If no signal is received and no operation is performed in
the TV mode for 10 minutes, the TV automatically
switches to standby mode.
The TV turns on automatically
• Check if the “On Timer” is activated (page 37).
Some input sources cannot be selected
• Select “AV Preset” and cancel “Skip” of the input source
(page 37).
The remote does not function
• Replace the batteries.
A channel cannot be added to the Favourite list
• Up to 999 channels can be stored in the Favourite list.
49
GB
Page 50

Wprowadzenie
Dziękujemy, że wybrali Państwo produkt firmy
Sony.
Przed rozpoczęciem eksploatacji tego telewizora
należy dokładnie zapoznać się z treścią niniejszej
instrukcji oraz zachować ją do wykorzystania w
przyszłości.
Dla Użytkowników KDL-70X3500
Szczegółowe informacje dotyczące instalacji,
zobacz „KDL-70X3500 Informacje i czynności
wstępne”.
Utylizacja telewizora
Pozbycie się zużytego
sprzętu (stosowane w
krajach Unii Europejskiej
i w pozostałych krajach
europejskich
stosujących własne
systemy zbiórki)
Ten symbol na produkcie lub
jego opakowaniu oznacza, że
produkt nie może być
traktowany jako odpad
komunalny, lecz powinno się go
dostarczyć do odpowiedniego
punktu zbiórki sprzętu elektrycznego i elektronicznego,
w celu recyklingu. Odpowiednie zadysponowanie
zużytego produktu zapobiega potencjalnym
negatywnym wpływom na środowisko oraz zdrowie
ludzi, jakie mogłyby wystąpić w przypadku
niewłaściwego zagospodarowania odpadów. Recykling
materiałów pomoże w ochronie środowiska
naturalnego. W celu uzyskania bardziej szczegółowych
informacji na temat recyklingu tego produktu, należy
skontaktować się z lokalną jednostką samorządu
terytorialnego, ze służbami zagospodarowywania
odpadów lub ze sklepem, w którym zakupiony został ten
produkt.
Producentem tego produktu jest Sony
Corporation, 1-7-1 Konan Minato-ku Tokyo,
108-0075 Japonia. Upoważnionym
przedstawicielem producenta w Unii
Europejskiej, uprawnionym do dokonywania i
potwierdzania oceny zgodności z wymaganiami
zasadniczymi, jest Sony Deutschland GmbH,
Hedelfinger Strasse 61, 70327 Stuttgart,
Niemcy. Nadzór nad dystrybucją na terytorium
Rzeczypospolitej Polskiej sprawuje Sony
Poland, 00-876 Warszawa, ul. Ogrodowa 58. W
sprawach serwisowych i gwarancyjnych należy
kontaktować się z podmiotami, których adresy
podano w osobnych dokumentach
gwarancyjnych lub serwisowych, lub z
najbliższym sprzedawcą produktów Sony.
Uwaga dotycząca funkcji TV
cyfrowej
• Wszystkie funkcje dotyczące telewizji cyfrowej
( ) są dostępne tylko w krajach lub regionach, w
których nadawane są cyfrowe sygnały naziemne
DVB-T (MPEG2 i MPEG4 AVC) lub gdzie dostępna
jest kompatybilna usługa DVB-C (MPEG2 i MPEG4
AVC) sieci kablowej. Należy dowiedzieć się u
sprzedawcy sprzętu, czy na danym terenie odbierany
jest sygnał DVB-T, lub zapytać operatora sieci
kablowej czy oferowana usługa DVB-C jest
odpowiednia dla zintegrowanych operacji z tym
odbiornikiem TV.
• Operator sieci kablowej może żądać dodatkowej
opłaty za takie usługi i może wystąpić konieczność
wyrażenia zgody na ich warunki i postanowienia
umowy.
• Ten odbiornik TV jest wykonany według specyfikacji
DVB-T i DVB-C, jednak nie gwarantuje się jego
kompatybilności z przyszłymi programami cyfrowej
naziemnej telewizji DVB-T i cyfrowej kablowej
telewizji DVB-C.
• Niektóre funkcje telewizji cyfrowej mogą być
niedostępne w niektórych krajach/regionach, a kabel
DVB-C może działać nieprawidłowo w wypadku
niektórych operatorów.
Wykaz kompatybilnych operatorów sieci kablowych
znajduje się w witrynie pomocy technicznej;
http://support.sony-europe.com/TV/DVBC/
Informacje dotyczące znaków
towarowych
• is a registered trademark of the DVB Project
• HDMI, logo HDMI i High-Definition Multimedia
Interface są znakami towarowymi lub zastrzeżonymi
znakami towarowymi firmy HDMI Licensing LLC.
• Adobe jest zastrzeżonym znakiem towarowym lub
znakiem towarowym Adobe Systems Incorporated w
USA i/lub w innych krajach.
• Wyprodukowano na licencji firmy Dolby
Laboratories.
„Dolby” oraz symbol podwójnego D są znakami
handlowymi firmy Dolby Laboratories.
Ilustracje używane w tej instrukcji obsługi
przedstawiają model KDL-40X3500, jeżeli nie
stwierdzono inaczej.
PL
2
Page 51

Spis treści
Informacje i czynności wstępne 4
Informacje dotyczące bezpieczeństwa.....................................................................................9
Środki ostrożności ..................................................................................................................11
Przegląd pilota ......................................................................................................................13
Przegląd przycisków i wskaźników odbiornika TV............................................................15
Odbiór audycji telewizyjnych
Odbiór audycji telewizyjnych ..................................................................................................16
Używanie Cyfrowego elektronicznego informatora programowego (EPG) .....................19
Używanie cyfrowej listy Ulubionych ................................................................................21
Korzystanie z dodatkowego sprzętu
Podłączanie dodatkowego sprzętu.........................................................................................22
Oglądanie obrazów z podłączonych urządzeń ....................................................................... 24
Używanie pilota.......................................................................................................................25
Używanie przeglądarki grafiki na USB....................................................................................28
Używanie sterowania HDMI ....................................................................................................29
Używanie funkcji menu
Nawigacja w menu..................................................................................................................30
Menu Obrazu ..........................................................................................................................31
Menu Dźwięku.........................................................................................................................34
Menu Ustawień ekranu (oprócz wejścia PC) ..........................................................................36
Menu Ustawień ekranu (dla wejścia PC).................................................................................38
Menu Ustawień wideo.............................................................................................................39
Menu Ustawień audio .............................................................................................................41
Menu Ustawień .......................................................................................................................42
Menu Ustawień analogowych .................................................................................................45
Menu Ustawień cyfrowych ..............................................................................................48
Informacje dodatkowe
Dane techniczne .....................................................................................................................51
Czyszczenie ............................................................................................................................54
Rozwiązywanie problemów ....................................................................................................54
: tylko dla kanałów cyfrowych
PL
PL
3
Page 52

Informacje i czynności wstępne
1: Sprawdzanie
wyposażenia
Przewód zasilający (typu C-6)* (1)
Kabel koncentryczny* (1)
Kabel komputerowy* (1)
Pas podtrzymujący (1) i wkręty (2)
Stojak (1) i wkręty (4) (tylko dla KDL-46X3500/
40X3500/46X3000/40X3000)
Pilot RM-ED010 (1)
Baterie AA (typu R6) (2)
* Nie należy zdejmować rdzeni ferrytowych.
Wkładanie baterii do pilota
Nacisnąć i przesunąć, aby otworzyć.
~
• Baterie należy wkładać do pilota z zachowaniem
odpowiedniej biegunowości.
• W pilocie nie należy stosować baterii różnego typu
lub używać starych baterii łącznie z nowymi.
• Zużyte baterie należy utylizować w sposób
bezpieczny dla środowiska. W niektórych krajach
mogą obowiązywać lokalne przepisy dot. utylizacji
baterii. W takim przypadku należy skontaktować się z
odpowiednimi władzami.
• Z pilotem należy odpowiednio postępować. Nie
wolno nim rzucać, stawać na niego lub rozlewać na
nim żadnych płynów.
• Pilota nie należy kłaść w pobliżu źródeł ciepła, w
miejscach narażonych na bezpośrednie działanie
promieni słonecznych lub w miejscach wilgotnych.
Wymiana ramki
(tylko dla KDL-46X3000/40X3000)
Ramka może być wymieniona na inną,
sprzedawaną oddzielnie. Nie należy zdejmować
ramki z wyjątkiem wymiany ramki. W celu
uzyskania szczegółowych informacji prosimy
zapoznać się z instrukcją dolączoną do ramki.
2: Zamocowanie
stojaka (oprócz KDL70X3500/52X3500)
1 Umieścić odbiornik TV na stojaku,
dopasowując linie przyłożenia otworów na
wkręty do stojaka, jak pokazano.
2 Przymocować odbiornik TV do stojaka za
pomocą dostarczonych wkrętów.
~
• Odbiornik TV jest bardzo ciężki, więc do
umieszczenia go na stojaku potrzebne są co najmniej
dwie osoby.
• Gdy używany jest elektryczny śrubokręt, należy
nastawić moment obrotowy na okolo 1,5 N·m
(15 kgf·cm).
PL
4
Page 53

3: Podłączanie anteny/
4: Zabezpieczenie
Informacje i czynności wstępne
sieci kablowej/
magnetowidu
Podłączanie anteny/sieci
kablowej
Kabel koncentryczny
Przewód
zasilający
(w zestawie)
Podłączanie anteny/sieci kablowej i
magnetowidu
(w zestawie)
Sygnał naziemny
lub kablowy
odbiornika TV przed
przewróceniem
Przewód
zasilający
(w zestawie)
Kabel scart
(brak w zestawie)
koncentryczny
(brak w zestawie)
koncentryczny
(w zestawie)
Sygnał naziemny
lub kablowy
Kabel
Magnetowid
Kabel
PL
5
Page 54

5: Zebranie kabli w
6: Wykonanie
wiązkę
~
Zaczep uchwytu na kable może zostać otwarty z
dowolnej strony, zależnie od pozycji przymocowania.
początkowej
konfiguracji
3, 4, 6, 7
3, 4, 6, 7
9
Wybieranie języka i kraju/
regionu
1 Podłączyć odbiornik TV do gniazdka
sieciowego (220–240 V prądu
zmiennego, 50 Hz).
2 Nacisnąć 1 po prawej stronie odbiornika
TV.
Przy pierwszym włączeniu odbiornika TV na
ekranie pojawia się menu wyboru języka.
PL
6
Page 55

3 Nacisnąć F/f/G/g aby wybrać język
wyświetlany na ekranach menu, po czym
nacisnąć .
4 Nacisnąć F/f aby wybrać kraj/region w
którym odbiornik TV będzie używany, po
czym nacisnąć .
Jeżeli żądanego kraju/regionu nie ma na liście,
należy wybrać „–” zamiast kraju/regionu.
Autoprogramowanie
odbiornika TV
7 Nacisnąć F/f, aby wybrać „Naziemna”
lub „Kablowa”, po czym nacisnąć .
Jeżeli wybrano „Kablowa”, pojawi się ekran
wyboru rodzaju skanowania. Zobacz „Aby
zaprogramować odbiornik TV na cyfrowe
połączenie kablowe” na stronie 7.
Odbiornik TV zaczyna wyszukiwanie
wszystkich dostępnych kanałów cyfrowych, a
następnie wszystkich dostępnych kanałów
analogowych. Procedura ta zajmuje nieco
czasu, więc nie należy w jej trakcie naciskać
żadnych przycisków ani na odbiorniku TV, ani
na pilocie.
Jeżeli pojawi się komunikat z prośbą o
sprawdzenie podłączenia anteny
Nie zostały znalezione żadne kanały cyfrowe,
ani analogowe. Sprawdzić wszystkie
połączenia antenowe i nacisnąć , aby
ponownie rozpocząć autoprogramowanie.
8 Gdy na ekranie pojawi się menu
sortowania programu, wykonaj kroki
opisane w „Sortowanie programów” na
stronie 45.
Jeżeli użytkownik nie chce zmienić kolejności,
w jakiej kanały analogowe zostają zapisane w
pamięci odbiornika TV, należy przejść do
następnego kroku.
9 Nacisnąć MENU aby wyjść z tego menu.
Odbiornik TV jest teraz dostrojony do
wszystkich dostępnych kanałów.
~
Gdy nie można odbierać kanału nadawanego cyfrowo
lub gdy w kroku 4 (strona 7) wybrany został kraj/region,
w którym nie są nadawane cyfrowe programy, po
wykonaniu kroku 9 należy nastawić czas.
Informacje i czynności wstępne
5 Przed rozpoczęciem autoprogramowania
odbiornika TV należy włożyć nagraną
taśmę do magnetowidu podłączonego do
odbiornika TV (strona 5) i zacząć
odtwarzanie.
Kanał wideo zostanie zlokalizowany i
zapisany w pamięci odbiornika TV podczas
autoprogramowania.
Jeżeli do odbiornika TV nie jest podłączony
magnetowid, pominąć ten krok.
6 Nacisnąć G/g, aby wybrać „OK”, po czym
nacisnąć .
Aby zaprogramować odbiornik TV na
cyfrowe połączenie kablowe
1 Nacisnąć F/f, aby wybrać „Rodzaj
przeszukiwania”, po czym nacisnąć .
2 Nacisnąć F/f, aby wybrać
„Przeszukiwanie szybkie” lub
„Przeszukiwanie pełne”, po czym nacisnąć
.
„Przeszukiwanie szybkie”: Kanały są strojone
zgodnie z informacjami zawartymi w sygnale
nadawczym operatora kablowego. Zalecanym
nastawieniem dla „Częstotliwość”,
„Identyfikator sieci” i „Szybkość transmisji
symb.” jest „Automat.”, chyba że operator
kablowy dostarczył informacji o konkretnych
wartościach, które należy użyć.
„Przeszukiwanie szybkie” jest zalecane w celu
szybkiego strojenia, jeżeli jest obsługiwane
przez operatora kablowego.
ciąg dalszy
7
PL
Page 56

„Przeszukiwanie pełne”: Wszystkie dostępne
kanały zostaną zaprogramowane i zapisane w
pamięci odbiornika TV. Ta procedura zajmuje
nieco czasu. Ta opcja jest zalecana, jeżeli
„Przeszukiwanie szybkie” nie jest
obsługiwane przez operatora kablowego.
Dalsze informacje dotyczące obsługiwanych
operatorów sieci kablowych znajdują się w
witrynie pomocy technicznej;
http://support.sony-europe.com/TV/DVBC/
3 Nacisnąć G/g/f aby wybrać
„Rozpocznij”, po czym nacisnąć .
Odbiornik TV zaczyna szukać kanałów. Nie
naciskać żadnych przycisków ani na
odbiorniku TV, ani na pilocie.
~
Niektórzy operatorzy kablowi nie obsługują
„Przeszukiwanie szybkie”. Jeżeli przy użyciu
„Przeszukiwanie szybkie” nie zostana odnalezione
żadne kanały, należy wykonać „Przeszukiwanie pełne”.
Odłączanie
podstawy od
odbiornika TV
~
Nie odłączać podstawy w innych celach niż w celu
instalacji odbiornika na ścianie lub przymocowania
opcjonalnej podstawy.
PL
8
Page 57

Informacje
dotyczące
• Wokół odbiornika TV należy pozostawić trochę
wolnej przestrzeni, tak jak to pokazano na rysunku
poniżej.
• Zaleca się stosowanie oryginalnego ściennego
uchwytu mocującego Sony, aby zapewnić
odpowiednią wentylację.
bezpieczeństwa
Montaż i instalacja
Aby uniknąć ryzyka wybuchu pożaru, porażenia
prądem elektrycznym, uszkodzenia sprzętu i/lub
ewentualnych obrażeń ciała, odbiornik TV należy
zainstalować zgodnie z instrukcjami podanymi
poniżej.
Instalacja
• Telewizor powinien być zainstalowany w pobliżu
łatwo dostępnego gniazdka.
• Odbiornik należy ustawić na stabilnej, poziomej
powierzchni.
• Montaż odbiornika na ścianie należy zlecić
wykwalifikowanemu instalatorowi.
• Ze względów bezpieczeństwa zaleca się stosowanie
akcesoriów Sony:
KDL-52X3500/46X3500/40X3500/46X3000/40X3000:
– Ściennego uchwytu mocującego SU-WL500
KDL-52X3500/46X3500/40X3500/46X3000/40X3000:
– Stojaka pod telewizor SU-FL62
Transport
• Przed rozpoczęciem
przenoszenia odbiornika
należy odłączyć od niego
wszystkie kable.
• Do przenoszenia dużego
odbiornika TV potrzeba
dwóch lub trzech osób.
• Odbiornik należy przenosić
w sposób pokazany na
ilustracji po prawej stronie.
Nie wolno naciskać ekranu
ciekłokrystalicznego ani
ramy dookoła ekranu.
• Podnosząc lub przesuwając
odbiornik, należy mocno
chwycić go od dołu.
• Podczas transportu
odbiornik nie powinien być
narażony na wstrząsy
mechaniczne i nadmierne wibracje.
• Na czas
transportu
odbiornika do
naprawy lub
podczas
przeprowadzki,
należy
zapakować go w
oryginalny
karton i elementy opakowania.
oprócz KDL-52X3500
KDL-52X3500
Instalacja na ścianie
30 cm
10 cm 10 cm
10 cm
Pozostawić co najmniej tyle miejsca
wokół odbiornika TV.
Instalacja na podstawie
30 cm
10 cm 10 cm 6 cm
Pozostawić co najmniej tyle miejsca
wokół odbiornika TV.
• Aby zapewnić właściwą wentylację i zapobiec
osiadaniu brudu lub kurzu:
– Nie należy ustawiać odbiornika TV ekranem do
góry, montować go do góry nogami, odwróconego
tyłem lub bokiem.
– Nie należy ustawiać odbiornika TV na półce,
dywanie, łóżku lub w szafce.
– Nie należy przykrywać odbiornika TV materiałami,
np. zasłonami lub innymi przedmiotami, takimi jak
gazety itp.
– Nie należy instalować odbiornika jak pokazano na
rysunkach poniżej.
Obieg powietrza jest zablokowany.
Ściana Ściana
Wentylacja
• Nie wolno zasłaniać otworów wentylacyjnych ani
wkładać żadnych rzeczy do obudowy.
ciąg dalszy
PL
9
Page 58

Przewód zasilający
Aby uniknąć ryzyka wybuchu pożaru, porażenia
prądem elektrycznym, uszkodzenia sprzętu i/lub
ewentualnych obrażeń ciała, z przewodem
zasilającym i gniazdem sieciowym należy
postępować w następujący sposób:
– Telewizor należy podłączyć za pomocą wtyczki z
bolcem uziemiającym do gniazdka z uziemieniem.
– Należy używać wyłącznie oryginalnych przewodów
firmy Sony, a nie przewodów innych producentów.
– Wtyczka powinna być całkowicie włożona do
gniazda sieciowego.
– Odbiornik TV jest przystosowany do zasilania
wyłącznie napięciem 220-240 V AC.
– W celu zachowania bezpieczeństwa, podczas
dokonywania połączeń, należy wyjąć wtyczkę
przewodu zasilającego z gniazdka oraz uważać, aby
nie nadepnąć na przewód.
– Przed przystąpieniem do serwisowania lub
przesuwania odbiornika TV, należy wyjąć wtyczkę
przewodu zasilającego z gniazdka.
– Przewód zasilający powinien znajdować się z dala
od źródeł ciepła.
– Należy regularnie wyjmować wtyczkę z gniazdka i
czyścić ją. Jeśli wtyczka jest pokryta kurzem i
gromadzi wilgoć, jej własności izolujące mogą ulec
pogorszeniu, co może być przyczyną pożaru.
Uwagi
• Dostarczonego w zestawie przewodu zasilającego nie
należy używać do jakichkolwiek innych urządzeń.
• Należy uważać, aby nie przycisnąć, nie zgiąć ani nie
skręcić nadmiernie przewodu zasilającego. Może to
spowodować uszkodzenie izolacji lub urwanie żył
przewodu.
• Nie należy przerabiać przewodu zasilającego.
• Na przewodzie zasilającym nie należy kłaść ciężkich
przedmiotów.
• Podczas odłączania nie wolno ciągnąć za sam
przewód.
• Nie należy podłączać zbyt wielu urządzeń do tego
samego gniazda sieciowego.
• Nie należy używać gniazd sieciowych słabo
trzymających wtyczkę.
Niedozwolone użycie
Odbiornika TV nie należy instalować oraz
eksploatować w miejscach, warunkach lub
okolicznościach, jakie opisano poniżej.
Niezastosowanie się do poniższych zaleceń może
prowadzić do wadliwej pracy odbiornika, a nawet
pożaru, porażenia prądem elektrycznym,
uszkodzenia sprzętu i/lub obrażeń ciała.
Miejsce:
Odbiornika TV nie należy montować na zewnątrz
pomieszczeń (w miejscach narażonych na bezpośrednie
działanie promieni słonecznych), nad morzem, na statku
lub innej jednostce pływającej, w pojeździe, w
instytucjach ochrony zdrowia, w miejscach niestabilnych
lub narażonych na działanie wody, deszczu, wilgoci lub
dymu.
Warunki:
Nie należy umieszczać telewizora w miejscach gorących,
wilgotnych lub nadmiernie zapylonych; w miejscach, w
których do wnętrza mogą dostawać się owady; w
miejscach,w których może być narażony na działanie
wibracji mechanicznych lub w pobliżu przedmiotów
palnych (świeczek, itp.). Odbiornik TV należy chronić
przed zalaniem i nie stawiać na nim żadnych
przedmiotów wypełnionych wodą, np. wazonów.
Okoliczności:
Odbiornika TV nie należy dotykać mokrymi rękoma,
przy zdjętej obudowie lub z akcesoriami, które nie są
zalecane przez producenta. W czasie burz z
wyładowaniami atmosferycznymi należy wyjąć wtyczkę
przewodu zasilającego telewizora z gniazdka i odłączyć
przewód antenowy.
Kawałki szkła lub uszkodzenia:
• W odbiornik nie należy rzucać żadnymi
przedmiotami. Może to spowodować uszkodzenie
szkła ekranu i, w efekcie, prowadzić do poważnych
obrażeń ciała.
• W przypadku pęknięcia powierzchni ekranu lub
obudowy telewizora, przed dotknięciem odbiornika
należy wyjąć wtyczkę przewodu zasilającego z
gniazdka. Niezastosowanie się do powyższego
zalecenia może spowodować porażenie prądem
elektrycznym.
Gdy odbiornik TV nie jest używany
• Mając na uwadze kwestie ochrony środowiska
i bezpieczeństwa, zaleca się odłączenie odbiornika od
źródła zasilania, jeśli nie będzie on używany przez
kilka dni.
• Ponieważ wyłączenie odbiornika telewizyjnego nie
powoduje odcięcia zasilania, w celu całkowitego
wyłączenia urządzenia należy wyciągnąć wtyczkę
przewodu zasilającego z gniazda sieciowego.
• Niektóre odbiorniki mogą być jednak wyposażone
w funkcje wymagające pozostawienia ich w trybie
gotowości. W przypadku konieczności pozostawienia
telewizora w trybie czuwania, w nininiejszej instrukcji
znajdą się stosowne informacje.
Zalecenia dot. bezpieczeństwa
dzieci
• Nie należy pozwalać, aby na odbiornik TV wspinały
się dzieci.
• Małe akcesoria należy przechowywać z dala od dzieci
tak, aby uniknąć ryzyka ich przypadkowego
połknięcia.
10
PL
Page 59

Co robić w przypadku wystąpienia
problemów...
W przypadku wystąpienia jednego z poniższych
problemów należy bezzwłocznie wyłączyć
odbiornik TV oraz wyjąć wtyczkę zasilającą z
gniazdka sieciowego.
Należy zwrócić się do punktu sprzedaży lub
punktu serwisowego firmy Sony z prośbą o
sprawdzenie odbiornika przez
wykwalifikowanego serwisanta.
W przypadku:
– Uszkodzenia przewodu zasilającego.
– Gniazd sieciowych słabo trzymających wtyczkę.
– Uszkodzenia odbiornika w wyniku jego
upuszczenia lub uderzenia przez obiekt obcy.
– Dostania się do wnętrza odbiornika cieczy lub
przedmiotów obcych.
Środki ostrożności
Oglądanie telewizji
• Program telewizyjny powinien być oglądany
w pomieszczeniu o umiarkowanym oświetleniu,
ponieważ oglądanie go w słabym świetle lub przez
dłuższy czas jest męczące dla oczu.
• Podczas korzystania ze słuchawek należy unikać
nadmiernego poziomu głośności ze względu na
ryzyko uszkodzenia słuchu.
Ekran LCD
• Chociaż ekran LCD został wykonany z
wykorzystaniem technologii wysokiej precyzji, dzięki
której aktywnych jest ponad 99,99% pikseli, na
ekranie mogą pojawiać się czarne plamki lub jasne
kropki (w kolorze czerwonym, niebieskim lub
zielonym). Jest to jednak właściwość wynikająca z
konstrukcji ekranu LCD i nie jest objawem usterki.
• Nie wolno naciskać ani drapać przedniego filtru, a
także kłaść na odbiorniku TV żadnych przedmiotów.
Może to spowodować zakłócenia obrazu lub
uszkodzenie ekranu LCD.
• Jeśli odbiornik TV jest używany w zimnym miejscu,
na obrazie mogą wystąpić plamy lub obraz może stać
się ciemny. Nie jest to oznaką uszkodzenia te lewizora.
Zjawiska te zanikają w miarę wzrostu temperatury.
• Długotrwałe wyświetlanie obrazów nieruchomych
może spowodować wystąpienie obrazów wtórnych
(tzw. zjawy). Mogą one zniknąć po krótkiej chwili.
• Ekran i obudowa nagrzewają się podczas pracy
telewizora. Nie jest to oznaką uszkodzenia
urządzenia.
• Ekran LCD zawiera niewielką ilość ciekłych
kryształów i rtęci. Lampy fluorescencyjne
umieszczone w odbiorniku TV także zawierają rtęć.
Podczas utylizacji należy przestrzegać lokalnych
zaleceń i przepisów.
Obchodzenie się z powierzchnią ekranu/
obudową odbiornika TV i ich czyszczenie
Przed przystąpieniem do czyszczenia należy wyjąć
wtyczkę przewodu zasilającego z gniazdka.
Aby uniknąć pogorszenia stanu materiału lub powłoki
ekranu odbiornika, należy postępować zgodnie z
poniższymi środkami ostrożności.
• Aby usunąć kurz z powierzchni ekranu/obudowy,
należy wytrzeć go delikatnie za pomocą miękkiej
ściereczki. Jeśli nie można usunąć kurzu, należy
wytrzeć ekran za pomocą miękkiej ściereczki lekko
zwilżonej rozcieńczonym roztworem delikatnego
detergentu.
• Nie należy używać szorstkich gąbek, środków
czyszczących na bazie zasad lub kwasów, proszków do
czyszczenia ani lotnych rozpuszczalników, takich jak
alkohol, benzyna, rozcieńczalnik czy środek
owadobójczy. Używanie takich środków lub
długotrwały kontakt z gumą lub winylem może
spowodować uszkodzenie powierzchni ekranu lub
obudowy.
• Regulację kąta nachylenia odbiornika należy
wykonywać powolnym ruchem tak, aby odbiornik nie
spadł lub nie zsunął się z podstawy na telewizor.
ciąg dalszy
11
PL
Page 60

Urządzenia dodatkowe
W pobliżu odbiornika TV nie należy umieszczać
urządzeń dodatkowych lub urządzeń emitujących
promieniowanie elektromagnetyczne. Może to
spowodować zakłócenia obrazu i/lub dźwięku.
12
PL
Page 61

Przegląd pilota
1 TV "/1 — Stan oczekiwania odbiornika TV
Włączenie i wyłączenie odbiornika TV z trybu czuwania.
2 Przyciski numeryczne
• W trybie TV: Wybór kanałów. W przypadku kanału 10 i powyżej,
drugą i trzecią cyfrę należy wcisnąć szybko.
• W trybie tekstowym: Wprowadza numer strony, aby wybrać stronę.
3 — Poprzedni kanał
Wraca do kanału poprzednio oglądanego (przez ponad pięć sekund).
4 — Tryb ekranowy (strona 17)
5 — Zatrzymanie obrazu (strona 16)
Zatrzymuje obraz TV.
6 / — Wybieranie wejścia / Zatrzymanie tekstu
• W trybie TV (strona 24): Wybiera sygnał wejściowy z urządzenia
przyłączonego do gniazd TV.
• W trybie tekstowym (strona 17): Zatrzymuje aktualną stronę
tekstową.
7 F/f/G/g/ (strona16, 30)
8 TOOLS (strona 17, 24)
Umożliwia dostęp do różnych opcji oglądania i do wykonania zmian/
nastawień, zależnie od źródła i formatu ekranu.
9 MENU (strona 30)
0 PROG +/–/ /
• W trybie TV (strona 16): Wybiera następny (+) lub poprzedni (–)
kanał.
• W trybie tekstowym (strona 17): Wybiera następną ( ) lub
poprzednią ( ) stronę.
qa % — Wyciszenie (strona 16, 24)
qs 2 +/– — Głośność (strona 24)
qd THEATRE
Można włączać lub wyłączać tryb kinowy. Gdy tryb kinowy jest
włączony, automatycznie zostaje nastawione optymalne wyjście audio
(jeżeli odbiornik TV jest podłączony do systemu audio kablem
HDMI), a jakość obrazu zostaje nastawiona na program w technologii
filmowej.
z
Gdy odbiornik TV zostanie wyłączony, tryb kinowy również się wyłączy.
ciąg dalszy
13
PL
Page 62

qf RETURN /
Powraca do poprzedniego ekranu każdego wyświetlanego menu.
qg — EPG (Cyfrowy elektroniczny informator programowy)
(strona 19)
qh Przyciski kolorowe (strona 17, 19, 21)
qj DIGITAL/ANALOG — Tryb TV (strona 16)
qk A/B — Podwójny dźwięk (strona 35)
ql / — Tekst (strona 17)
w; LIGHT
Podświetla przyciski na pilocie, aby były z łatwością widoczne nawet w
ciemnym pomieszczeniu.
wa / — Pokazywanie Informacji / Tekstu
• W trybie cyfrowym: Wyświetla krótkie informacje o aktualnie
oglądanym programie.
• W trybie analogowym: Wyświetla takie informacje, jak aktualny
numer kanału i format ekranu.
• W trybie tekstowym (strona 17): Wywołuje ukryte informacje (na
przykład odpowiedzi do quizu).
ws Przyciski obsługujące opcjonalne urządzenie
Zobacz strona 25.
z
Przycisk numeryczny 5, H, PROG + i A/B mają kropki wyczuwane dotykiem.
Kropki wyczuwane dotykiem ułatwiają orientację przy obsłudze odbiornika
TV.
14
PL
Page 63

Przegląd przycisków i wskaźników
odbiornika TV
1 1 — Zasilanie
Włącza lub wyłącza odbiornik TV.
PROG
MENU
~
W celu zupełnego odłączenia odbiornika TV, należy
wyjąć wtyczkę z gniazda zasilającego.
2 PROG +/–/ /
• W trybie TV: Wybiera następny (+) lub
poprzedni (–) kanał.
• W menu TV: Przewija opcje w górę ( ) lub w
dół ( ).
3 2 +/–/ /
• W trybie TV: Zwiększa (+) lub zmniejsza (–)
głośność.
• W menu TV: Przewija opcje w prawo ( ) lub
w lewo ( ).
4 / — Wybieranie wejścia / OK
• W trybie TV (strona 24): Wybiera sygnał
wejściowy z urządzenia przyłączonego do
gniazd TV.
• W menu TV: Wybiera menu lub opcję i
potwierdza ustawienie.
5 (strona 30)
6 — Wskaźnik obrazu wyłączonego /
Timera
• Świeci na zielono, gdy obraz jest wyłączony
(strona 43).
• Świeci się na pomarańczowo gdy Timer jest
nastawiony (strona 42).
7 1 — Wskaźnik oczekiwania
Świeci na czerwono, gdy odbiornik TV jest w
trybie oczekiwania.
8 " — Wskaźnik zasilania / Nagrywania
REC Timera
• Świeci się na zielono, gdy odbiornik TV jest
włączony.
• Świeci się na pomarańczowo, gdy nastawione
jest nagrywanie z Timerem (strona 19).
• Świeci się na czerwono podczas nagrywania z
Timerem.
9 Czujnik zdalnego sterowania / Czujnik
światła (strona 44)
• Odbiera sygnały IR z pilota.
• Nie zasłaniać niczym czujnika, ponieważ może
to mieć wpływ na jego działanie.
~
Przed odłączeniem przewodu zasilającego należy
upewnić się, że telewizor jest zupełnie wyłączony.
Odłączenie przewodu zasilającego gdy telewizor jest
włączony może spowodować, że wskaźnik pozostanie
zapalony lub być przyczyną usterki telewizora.
15
PL
Page 64

Odbiór audycji telewizyjnych
Odbiór audycji
telewizyjnych
1
3
2
3 Naciskać przyciski numeryczne lub PROG
+/–, aby wybrać kanał TV.
Aby wybrać kanały numer 10 i powyżej za
pomocą przycisków numerycznych, należy
wprowadzić drugą i trzecią cyfrę szybko.
Aby wybrać cyfrowy kanał za pomocą
Cyfrowego elektronicznego informatora
programowego (EPG), zobacz strona 19.
W trybie cyfrowym
Na chwilę pojawi się baner z informacją. Na
banerze mogą znajdować się następujące
ikony.
: Program HD
: Program radiowy
: Program kodowany/płatny
: Dostępne napisy
: Dostępne napisy dla słabo słyszących
: Dostępne różne języki audio
: Zalecany wiek minimalny dla aktualnego
programu (od 4 do 18 lat)
: Blokada rodzicielska
c (czerwony):
Aktualny program jest nagrywany
Dodatkowe czynności
3
1 Nacisnąć 1 po prawej stronie odbiornika
TV, aby włączyć telewizję.
Gdy odbiornik TV jest w trybie oczekiwania
(wskaźnik 1 (oczekiwanie) na przednim
panelu odbiornika TV jest czerwony),
nacisnąć TV "/1 na pilocie, aby włączyć
odbiornik.
2 Nacisnąć DIGITAL/ANALOG, aby
przełączyć tryb cyfrowy na analogowy i
odwrotnie.
Dostępne kanały są różne, zależnie od trybu.
PL
16
Aby Nacisnąć
Zamrozić obraz
(Zamrażanie
obrazu)
Uzyskać dostęp do
tabeli indeksu
programów (tylko
w trybie
analogowym)
Uzyskać dostęp do
cyfrowej listy
Ulubionych (tylko
w trybie cyfrowym)
Wyciszyć dźwięk %.
Włączyć TV bez
dźwięku z trybu
oczekiwania
.
Nacisnąć ponownie, aby
wrócić do normalnego trybu
TV.
~
Ta funkcja nie jest dostępna gdy
źródłem wejścia jest komputer.
.
Aby wybrać kanał analogowy,
nacisnąć
nacisnąć .
.
Szczegółowe informacje,
zobacz strona 21.
Aby przywrócić dźwięk,
należy ponownie nacisnąć ten
przycisk.
%.
F/f, po czym
Page 65

Aby wejść na strony teletekstu
Nacisnąć /. Po każdorazowym naciśnięciu /,
ekran zmienia się cyklicznie w następujący
sposób:
Tekst i obraz TV t Tekst t Bez tekstu (wyjście
z funkcji teletekstu)
Aby wybrać stronę, nacisnąć przyciski
numeryczne lub / .
Aby zatrzymać stronę, nacisnąć / .
Aby wywołać ukrytą informację, nacisnąć / .
z
• Można także przejść bezpośrednio do strony,
wybierając wyświetlony na ekranie numer strony.
Nacisnąć i
czym nacisnąć .
• Jeśli u dołu strony tekstowej pojawiają się opcje w
czterech kolorach, dostępna jest usługa szybkiego
dostępu Fastext. Usługa Fastext umożliwia szybki i
łatwy dostęp do stron. Aby wejść na stronę, nacisnąć
przycisk w odpowiadającym jej kolorze.
F/f/G/g, aby wybrać numer strony, po
Aby ręcznie zmienić format ekranu,
dostosowując go do programu
Nacisnąć kilkakrotnie , aby wybrać żądany
format ekranu.
Smart*
Wyświetla
konwencjonalny
obraz telewizyjny 4:3
z imitacją efektu
szerokoekranowego.
Obraz w formacie 4:3
wypełnia cały ekran.
4:3
Wyświetla audycje
TV w
konwencjonalnym
formacie 4:3 (np. nieszerokoekranowa
telewizja) w
prawidłowych
proporcjach.
Wide
Wyświetla
panoramiczny obraz
telewizyjny (16:9) w
prawidłowych
proporcjach.
Zoom*
Wyświetla obrazy
telewizyjne w
formacie
Cinemascope (format
Letterbox) w
prawidłowych
proporcjach.
14:9*
Wyświetla audycje
TV formatu 14:9 w
prawidłowych
proporcjach.
Wskutek tego, na
ekranie widoczne są
czarne obszary na
brzegach.
* Obraz może być częściowo obcięty od góry i od dołu.
~
Niektóre znaki i/lub litery na górze i na dole obrazu
mogą być niewidoczne w trybie „Smart”. W takim
wypadku można wybrać „Rozmiar pionowy” za pomocą
menu „Ustawienia ekranu” i nastawić rozmiar pionowy
tak, aby były widoczne.
z
• Gdy „Autoformatowanie” jest nastawione na „Wł.”,
odbiornik TV automatycznie wybierze najlepszy tryb
dla danego programu (strona 36).
• Można nastawić pozycję obrazu po wybraniu „Smart”
(50Hz), „Zoom” lub „14:9”. Aby przesuwać w górę
lub w dół, należy naciskać
napisy dialogowe).
• Wybrać „Smart” lub „Zoom”, aby wykonać
nastawienie dla obrazów ze źródeł 720p, 1080i lub
1080p, z obciętymi krawędziami.
F/f (np. by uwidocznić
Używanie menu Narzędzi
Nacisnąć TOOLS podczas oglądania programu
TV, aby wyświetlić następujące opcje.
Opcje Opis
Zamknij Zamyka menu Narzędzi.
Tryb obrazu Zobacz strona 31.
Tryb dźwięku Zobacz strona 34.
Polepszanie ruchu Zobacz strona 39.
Głośnik Zobacz strona 41.
PAP Zobacz strona 25.
Język audio (tylko w
trybie cyfrowym)
Tryb napisów (tylko w
trybie cyfrowym)
Ulubione cyfrowe
(tylko w trybie
cyfrowym)
i Głośność Zobacz strona 41.
Timer wyłączania Zobacz strona 42.
Oszczędzanie energii Zobacz strona 43.
Zobacz strona 49.
Zobacz strona 49.
Zobacz strona 21.
ciąg dalszy
Odbiór audycji telewizyjnych
17
PL
Page 66

Opcje Opis
Automat. ustawianie
zegara (tylko w trybie
analogowym)
Informacje o systemie
(tylko w trybie
cyfrowym)
Umożliwia przełączenie na
tryb cyfrowy i uzyskanie
aktualnego czasu.
Wyświetla ekran informacji
systemu.
18
PL
Page 67

Używanie Cyfrowego elektronicznego
informatora programowego (EPG) *
1 W trybie cyfrowym nacisnąć .
2 Wykonać żądaną operację, jak pokazano
w następującej tabeli lub na wyświetleniu
na ekranie.
Cyfrowy elektroniczny informator programowy
(EPG)
* Ta funkcja może być niedostępna w niektórych krajach/regionach.
Aby Należy
Oglądać program Nacisnąć F/f/G/g, aby wybrać program, po czym nacisnąć .
Wyłączyć EPG Nacisnąć .
Sortować informacje o programach
według kategorii
– Lista kategorii
1 Nacisnąć niebieski przycisk.
2 Nacisnąć
Dostępne kategorie to:
„Wszystkie”, „Radio”: Zawiera wszystkie dostępne kanały.
Inna nazwa kategorii (np. „Wiadomości”): Zawiera wszystkie
programy odpowiadające wybranej kategorii.
F/f, aby wybrać kategorię, po czym nacisnąć .
Odbiór audycji telewizyjnych
Nastawić nagrywanie programu
– Programator nagrywania
Nastawić program na automatyczne
wyświetlenie na ekranie w momencie
rozpoczęcia
– Przypomnienie
1 Nacisnąć F/f/G/g, aby wybrać program przeznaczony do
nagrania, następnie nacisnąć
2 Nacisnąć
3 Nacisnąć , aby nastawić Timer odbiornika TV i Timer
magnetowidu.
Przy informacji o tym programie pojawi się czerwony symbol c.
Wskaźnik na przednim panelu odbiornika TV zapali się na
pomarańczowo.
z
Powyższa procedura może być używana, nawet jeśli zaczął się już program
przeznaczony do nagrania.
1 Nacisnąć F/f/G/g, aby wybrać przyszły program, który ma
zostać wyświetlony, po czym nacisnąć / .
2 Nacisnąć F/f, aby wybrać „Przypomnienie”, po czym
nacisnąć .
Przy informacji o tym programie pojawi się symbol c. Wskaźnik
na przednim panelu odbiornika TV zapali się na pomarańczowo.
~
Jeżeli odbiornik TV zostanie przełączony na tryb oczekiwania, włączy
się automatycznie na chwilę przed rozpoczęciem programu.
F/f aby wybrać „Programator nagrywania”.
/ .
ciąg dalszy
19
PL
Page 68

Aby Należy
Nastawić czas i datę dla programu
przeznaczonego do nagrania
– Ręczny programator nagrywania
1 Nacisnąć / .
2 Nacisnąć
po czym nacisnąć .
3 Nacisnąć
4 Nastawić czas rozpoczęcia i czas zakończenia w taki sam
sposób, jak w kroku 3.
5 Nacisnąć
6 Nacisnąć , aby nastawić Timer odbiornika TV i Timer
magnetowidu.
Wskaźnik na przednim panelu odbiornika TV zapali się na
pomarańczowo.
F/f, aby wybrać „Ręczny programator nagrywania”,
F/f, aby wybrać datę, po czym nacisnąć g.
F/f, aby wybrać program, po czym nacisnąć .
Anulować nagrywanie/
przypomnienie
– Lista programatora
1 Nacisnąć / .
2 Nacisnąć
F/f, aby wybrać „Lista programatora”, po czym
nacisnąć .
3 Nacisnąć F/f, aby wybrać program przeznaczony do
anulowania, po czym nacisnąć .
4 Nacisnąć F/f, aby wybrać „Wykasuj ustaw. programatora”,
po czym nacisnąć .
Pojawi się wyświetlenie potwierdzenia, że program ma być
anulowany.
5 Nacisnąć G/g, aby wybrać „Tak”, po czym nacisnąć , aby
potwierdzić.
~
• Można nastawić Timer nagrywania magnetowidu na odbiorniku TV tylko w wypadku magnetowidów zgodnych z
funkcją SmartLink. Jeżeli magnetowid nie jest zgodny ze SmartLink, pojawi się komunikat przypominający o
konieczności nastawienia Timera magnetowidu.
• Gdy zacznie się nagrywanie, można przełączyć odbiornik TV na tryb oczekiwania, ale nie należy zupełnie go wyłączać,
bo nagrywanie zostanie anulowane.
• Jeżeli wybrane zostało ograniczenie wiekowe dla programów, na ekranie pojawi się komunikat, aby podać kod PIN.
Szczegółowe informacje, zobacz „Ochrona przed dziećmi” na stronie 49.
20
PL
Page 69

Używanie cyfrowej listy Ulubionych *
Funkcja Ulubionych umożliwia podanie nawet
czterech list ulubionych programów użytkownika.
1 Nacisnąć MENU.
2 Nacisnąć F/f, aby wybrać „Ulubione
cyfrowe”, po czym nacisnąć .
3 Wykonać żądaną operację, jak pokazano
Cyfrowa Lista Ulubionych
* Ta funkcja może być niedostępna w niektórych krajach/regionach.
Aby Należy
Stworzyć listę Ulubionych po raz
pierwszy
1 Nacisnąć , aby wybrać „Tak”.
2 Nacisnąć żółty przycisk, aby wybrać listę Ulubionych.
3 Nacisnąć
czym nacisnąć .
Kanały, które są zapisane na liście Ulubionych, są oznaczone
symbolem .
F/f, aby wybrać kanał, który będzie dodany, po
w następującej tabeli lub na wyświetleniu
na ekranie.
Odbiór audycji telewizyjnych
Oglądać kanał
Wyłączyć listę Ulubionych Nacisnąć RETURN.
Dodać lub usunąć kanały na
aktualnie edytowanej liście
Ulubionych
Usunąć wszystkie kanały z aktualnej
listy Ulubionych
1 Nacisnąć żółty przycisk, aby poruszać się po liście Ulubionych.
2 Nacisnąć podczas wybierania kanału.
1 Nacisnąć niebieski przycisk.
2 Nacisnąć żółty przycisk, aby wybrać przeznaczoną do
edytowania listę Ulubionych.
3 Nacisnąć
usunięty, po czym nacisnąć .
1 Nacisnąć niebieski przycisk.
2 Nacisnąć żółty przycisk, aby wybrać przeznaczoną do
edytowania listę Ulubionych.
3 Nacisnąć niebieski przycisk.
4 Nacisnąć
potwierdzić.
F/f, aby wybrać kanał, który będzie dodany lub
G/g, aby wybrać „Tak”, po czym nacisnąć , aby
21
PL
Page 70

Korzystanie z dodatkowego sprzętu
Podłączanie dodatkowego sprzętu
Do odbiornika TV można podłączyć cały szereg dodatkowych urządzeń.
Odtwarzacz DVD z wyjściem
komponentowym
Cyfrowe urządzenie
audio
PC IN
Sprzęt
audio Hi-Fi
Komputer
Konsola gier
wideo
Odtwarzacz DVD
Dekoder
Tylko do użycia
przez serwis
Karta CAM
Kamera wideo
Cyfrowy aparat fotograficzny
(wyjście HDMI)
Komputer (wyjście HDMI)
Odtwarzacz DVD
Odtwarzacz płyt w technologii
Blu-ray
System audio
Nagrywarka DVD
Magnetowid
Dekoder
Odtwarzacz DVD
Odtwarzacz płyt w
technologii Blu-ray
System audio
Komputer (wyjście
HDMI)
Słuchawki
Kamera wideo
Cyfrowy aparat fotograficzny
Kamera wideo
Nośnik danych USB
22
PL
Page 71

Podłączyć do Symbol wejścia na
Opis
ekranie
A / 1 AV1 lub AV1 Przy podłączeniu dekodera, kodowany sygnał z tunera TV
jest wysyłany do dekodera, a następnie dekoder wysyła
sygnał rozkodowany.
B / 2 AV2 lub AV2 SmartLink stanowi bezpośrednie łącze między
C /3 lub
/4
D DIGITAL OUT
(OPTICAL)
E Można słuchać dźwięku odbiornika TV na urządzeniu
F PC IN / PC Zalecane jest użycie dostarczonego kabla komputerowego
G HDMI IN 5 lub 6
K HDMI IN 8
H CAM (Moduł
warunkowego
dostępu)
I Słuchawki Można słuchać przez słuchawki dźwięk z odbiornika TV.
AV3 lu b AV 4
AV5 , AV6 l ub
AV 8
odbiornikiem TV a magnetowidem/nagrywarką DVD.
Użyć optycznego kabla audio.
audio Hi-Fi.
z rdzeniami ferrytowymi.
Cyfrowe sygnały wideo i audio są wprowadzane z
urządzenia.
W dodatku, gdy podłączone jest urządzenie kompatybilne
ze sterowaniem HDMI, obsługiwana jest komunikacja z
podłączonym urządzeniem. Aby nastawić tę komunikację,
zobacz strona 43.
Jeżeli urządzenie posiada gniazdo DVI, podłączyć gniazdo
DVI do gniazda HDMI IN 5 przez interfejs adaptera DVI HDMI (brak w wyposażeniu), a gniazda wyjścia audio
urządzenia podłączyć do gniazd wejścia audio HDMI IN 5.
~
• Gniazda HDMI współpracują tylko z następującymi
wejściami wideo: 480i, 480p, 576i, 576p, 720p, 1080i, 1080p i
1080/24p. Wejścia wideo komputera, zobacz strona 53.
• Należy pamiętać, aby używać tylko kabla HDMI, na którym
jest logo HDMI.
• Gdy podłączany jest system audio kompatybilny ze
sterowaniem HDMI, należy pamiętać, aby podłączyć go
także do gniazda DIGITAL OUT (OPTICAL).
Aby korzystać z Pay TV. Szczegółowe informacje, zobacz w
instrukcji obsługi dostarczonej razem z CAM.
Aby używać CAM, wyjąć
CAM. Należy wyłączyć odbiornik TV przed
umieszczeniem CAM w szczelinie CAM. Gdy CAM nie
jest używany, zalecane jest, aby „atrapa” karty była na stałe
włożona do otworu CAM.
~
Moduł CAM nie jest obsługiwany w niektórych krajach/
regionach. Należy sprawdzić u autoryzowanego sprzedawcy.
„atrapę” karty ze szczeliny
Korzystanie z dodatkowego sprzętu
J 7 lub 7, i
7
L USB Można oglądać zdjęcia z cyfrowego aparatu
AV7 lub AV7 Aby uniknąć zakłóceń obrazu, nie podłączać kamery
wideo jednocześnie do gniazda wideo 7 i do gniazda
S wideo 7. W wypadku podłączenia urządzenia
monofonicznego, należy podłączyć do gniazda 7 L.
fotograficznego Sony, kamery wideo lub nośnika danych
USB, podłączonych do odbiornika TV. Szczegółowe
informacje, zobacz strona 28.
23
PL
Page 72

Oglądanie obrazów
z podłączonych
urządzeń
Włączyć podłączone urządzenie i wykonać
jedną z następujących czynności.
W przypadku urządzenia podłączonego do
złączy 21-stykowym przewodem SCART
(strona 22)
Rozpocząć odtwarzanie na podłączonym
urządzeniu.
Na ekranie pojawi się obraz z podłączonego
urządzenia.
W przypadku samoprogramującego się
magnetowidu (strona 7)
W trybie analogowym nacisnąć PROG +/– lub
przyciski numeryczne, aby wybrać kanał wideo.
W przypadku innego podłączonego
urządzenia (strona 22)
Nacisnąć / aby wyświetlić listę
podłączonych urządzeń. Nacisnąć
wybrać żądane źródło wejścia, po czym nacisnąć
. (Podświetlona pozycja zostanie wybrana,
jeżeli przez 2 sekundy po naciśnięciu
będzie wykonana żadna operacja.)
Gdy źródło wejścia jest nastawione na „Pomiń” w
menu „Ustawienia A/V” pod menu „Ustawienia”
(strona 42), takie wejście nie pojawi się na liście.
Dodatkowe czynności
F/f, aby
F/f nie
Używanie menu Narzędzi
Nacisnąć TOOLS, aby wyświetlić następujące
opcje podczas oglądania obrazów z podłączonego
urządzenia.
Opcje Opis
Zamknij Zamyka menu Narzędzi.
Tryb obrazu Zobacz strona 31.
Tryb dźwięku Zobacz strona 34.
Polepszanie ruchu Zobacz strona 39.
Głośnik Zobacz strona 41.
PAP (z wyjątkiem
trybu wejścia PC)
PIP (tylko w trybie
wejścia PC)
Regulacja
automatyczna (tylko
w trybie wejścia PC)
Przesunięcie
poziome (tylko w
trybie wejścia PC)
i Głośność Zobacz strona 41.
Timer wyłączania (z
wyjątkiem trybu
wejścia PC)
Oszczędzanie
energii
Automat.
ustawianie zegara
Zobacz strona 25.
Zobacz strona 25.
Zobacz strona 38.
Zobacz strona 38.
Zobacz strona 42.
Zobacz strona 43.
Umożliwia przełączenie na
tryb cyfrowy i uzyskanie
aktualnego czasu.
Aby Należy
Wrócić do
normalnego trybu
TV
Uzyskać dostęp do
tabeli indeksów
sygnałów wejścia (z
wyjątkiem trybu
analogowego)
Zmienić głośność
podłączonego
systemu audio,
kompatybilnego ze
sterowaniem HDMI
Wyciszyć dźwięk
podłączonego
systemu audio,
kompatybilnego ze
sterowaniem HDMI
PL
24
Nacisnąć DIGITAL/
ANALOG.
Nacisnąć , aby przejść do
tabeli indeksów sygnałów
wejścia. Aby wybrać źródło
wejścia, nacisnąć
czym nacisnąć .
Nacisnąć
Nacisnąć
Aby przywrócić dźwięk,
należy ponownie nacisnąć
ten przycisk.
F/f, po
2 +/–.
%.
Page 73

Aby oglądać jednocześnie dwa
obrazy
– PAP (Obraz i Obraz)
Można oglądać na ekranie jednocześnie dwa
obrazy (wejście zewnętrzne i program TV).
Podłączyć urządzenie opcjonalne (strona 22) i
upewnić się, że obraz z podłączonego urządzenia
pojawia się na ekranie (strona 24).
~
• Ta funkcja nie jest dostępna gdy źródłem wejścia jest
komputer.
• Nie jest możliwa zmiana rozmiaru obrazów.
1 Nacisnąć TOOLS, aby wyświetlić menu
Narzędzi.
2 Nacisnąć F/f, aby wybrać „PAP”, po
czym nacisnąć .
Obraz z podłączonego urządzenia jest
wyświetlany po lewej stronie, a program TV
jest wyświetlany po prawej.
3 Nacisnąć przyciski numeryczne lub PROG
+/–, aby wybrać kanał TV.
Aby wrócić do trybu jednego obrazu
Nacisnąć lub RETURN.
z
Obraz w zielonej ramce jest słyszalny. Można zmienić
słyszalny obraz, naciskając
G/g.
Używanie pilota
Przyciski obsługujące
opcjonalne urządzenie
Korzystanie z dodatkowego sprzętu
Aby oglądać jednocześnie dwa
obrazy
– PIP (Obraz w Obrazie)
Możliwe jest oglądanie na ekranie dwóch
obrazów (wejście PC i program TV) jednocześnie.
Podłączyć komputer (strona 22) i upewnić się, że
obrazy z komputera pojawiły się na ekranie.
1 Nacisnąć TOOLS, aby wyświetlić menu
Narzędzi.
2 Nacisnąć F/f, aby wybrać „PIP”, po czym
nacisnąć .
Obraz z podłączonego komputera jest
wyświetlany w pełnym rozmiarze, a program TV
jest wyświetlany w prawym rogu.
Aby zmienić pozycję programu TV na ekranie,
można użyć
F/f/G/g.
3 Nacisnąć przyciski numeryczne lub PROG
+/–, aby wybrać kanał TV.
Aby wrócić do trybu jednego obrazu
Nacisnąć RETURN.
z
Można przełączyć słyszalny obraz, wybierając „Dźwięk
TV/Dźwięk PC” z menu Narzędzi.
1 "/1
Włącza i wyłącza opcjonalne urządzenia wybrane
przyciskami funkcji.
2 Przyciski funkcji
Umożliwiają operowanie odpowiednim
urządzeniem. Szczegółowe informacje, zobacz
„Programowanie pilota” na stronie 26.
3 Przyciski obsługujące BD/DVD
• . : Ponownie odtwarza bieżący program,
począwszy od znacznika poprzedniego
rozdziału (jeśli jest).
• > : Przejście do przodu, do znacznika
następnego rozdziału (jeśli jest).
• : Ponownie odtwarza aktualny program
przez wyznaczony czas.
• : Przejście do przodu o wyznaczony czas.
• m : Odtwarza program w trybie szybkiego
przewijania do tyłu.
ciąg dalszy
25
PL
Page 74

• M : Odtwarza program w trybie szybkiego
przewijania do przodu.
• H : Odtwarza program z normalną
prędkością.
• X : Pauza w odtwarzaniu.
• x : Zatrzymuje odtwarzanie.
4 Przyciski nagrywania DVD
• z REC: Zaczyna nagrywanie.
• X REC PAUSE: Pauza w nagrywaniu.
• x REC STOP: Zatrzymuje nagrywanie.
5 F1/F2
• Wybiera płyty gdy używany jest zmieniacz płyt
DVD.
• Wybiera funkcje gdy używane jest urządzenie
kombo (na przykład BD/DVD).
Szczegółowe informacje, zobacz instrukcja
obsługi dostarczona ze zmieniaczem DVD lub
urządzeniem kombo.
6 BD/DVD MENU
Wyświetla menu płyty DVD. Szczegółowe
informacje znajdują się w instrukcji obsługi,
dostarczonej razem z podłączonym urządzeniem.
7 BD/DVD TOP MENU
Wyświetla menu główne płyty DVD.
Szczegółowe informacje znajdują się w instrukcji
obsługi, dostarczonej razem z podłączonym
urządzeniem.
z
Przycisk H ma wyczuwaną dotykiem kropkę. Kropka
wyczuwana dotykiem ułatwia orientację podczas
operowania innym urządzeniem.
Programowanie pilota
Ten pilot jest zaprogramowany na obsługę
odbiorników TV Sony, większości odtwarzaczy
BD, DVD i AMP (kino domowe itp.) Sony.
Aby sterować BD i odtwarzaczami DVD innych
producentów (oraz niektórymi modelami BD,
odtwarzaczy DVD i AMP Sony), należy wykonać
następującą procedurę programowania pilota.
~
Przed rozpoczęciem należy sprawdzić trzycyfrowy kod
producenta odtwarzacza BD, DVD lub AMP w „Kody
producenta” na stronie 27.
1
2
1
3
1 Nacisnąć i przytrzymać przycisk funkcji
BD, DVD lub AMP, który będzie
zaprogramowany na pilocie i nacisnąć
/ , utrzymując wciśnięty przycisk
funkcji.
Wybrany przycisk funkcji (BD, DVD lub
AMP) zacznie migać.
2 Nacisnąć przyciski numeryczne, aby
wprowadzić trzycyfrowy kod producenta
gdy przycisk miga.
Jeżeli kod nie zostanie wpisany w ciągu
10 sekund, należy ponownie wykonać krok 1.
3 Nacisnąć .
Jeżeli programowanie jest prawidłowe,
wybrany przycisk funkcji mignie dwa razy, a
jeżeli nie, mignie pięć razy.
4 Włączyć urządzenie i sprawdzić, czy
działają następujące główne funkcje.
H (odtwarzanie), x (zatrzymanie), m
(przewijanie do tyłu), M (przewijanie do
przodu), wybieranie kanału zarówno
odtwarzacza BD jak i DVD, TOP MENU/
MENU i
DVD.
Jeżeli urządzenie lub niektóre funkcje nie
działają
Wpisać prawidłowy kod lub wypróbować
następny kod podany dla tej marki. Należy
pamiętać, że nie wszystkie modele każdej
marki mogą być obsługiwane.
Aby wrócić do normalnego odbioru TV
Nacisnąć przycisk funkcji TV.
F/f/G/g tylko dla odtwarzaczy
26
PL
Page 75

Kody producenta
Lista producentów magnetowidów
Lista producentów odtwarzaczy DVD
Odtwarzacz DVD
Marka Kod
SONY 001, 029, 030, 036 – 044, 053 – 055
AIWA 021
AKAI 032
DENON 018, 027, 020, 002
GRUNDIG 009, 028, 023, 024, 016, 003
HITACHI 025, 026, 015, 004, 035
JVC 006, 017
KENWOOD 008
LG 015, 014, 034
LOEWE 009, 028, 023, 024, 016, 003
MATSUI 013, 016
ONKYO 022, 033
PANASONIC 018, 027, 020, 002, 045 – 047
PHILIPS 009, 028, 023, 024, 016, 003, 031
PIONEER 004, 050, 051, 052
SAMSUNG 011, 014
SANYO 007
SHARP 019, 027
THOMSON 012
TOSHIBA 003, 048, 049
YAMAHA 018, 027, 020, 002
Marka Kod
SONY 301 – 310, 362
AIWA 325, 331, 351
AKAI 326, 329, 330
DAEWOO 342, 343
GRUNDIG 358, 355, 360, 361, 320, 351, 366
HITACHI 327, 333, 334
JVC 314, 315, 322, 344, 352 – 354, 348, 349
LG 332, 338
LOEWE 358, 355, 360, 361, 320, 351
MATSUI 356, 357
ORION 328
PANASONIC
PHILIPS 311 – 313, 316 – 318, 358, 359, 363,
SAMSUNG 339 – 341, 345
SANYO 335, 336
SHARP 324
THOMSON 319, 350, 365
TOSHIBA 337
321, 323
364
Lista modeli systemów AUX Sony
System kina domowego DAV
Marka Kod
SONY (DAV) 401 – 404
Korzystanie z dodatkowego sprzętu
Odtwarzacz BD (Dysk Blu-ray)
Marka Kod
SONY 101 – 103
Odtwarzacz DVD/Magnetowid
Marka Kod
SONY 251
Nagrywarka DVD
Marka Kod
SONY 201 – 203
Amplituner AV
Marka Kod
SONY 451 – 454
Tuner naziemnej TV cyfrowej
Marka Kod
SONY 501 – 503
27
PL
Page 76

Używanie
przeglądarki grafiki
na USB
Na ekranie odbiornika TV można oglądać zdjęcia
(w formacie JPEG), zarejestrowane cyfrowym
aparatem fotograficznym Sony, kamerą wideo lub
znajdujące się na nośniku danych USB.
1 Podłączyć obsługiwane urządzenie USB
do odbiornika TV.
2 Nacisnąć MENU.
3 Nacisnąć F/f, aby wybrać „Zdjęcia”, po
czym nacisnąć .
Pojawi się ekran miniaturek.
4 Nacisnąć F/f/G/g, aby wybrać zdjęcie
lub katalog do obejrzenia i nacisnąć .
Aby obejrzeć pokaz zdjęć, nacisnąć G/f i
wybrać „Pokaz slajdów”, po czym nacisnąć .
Zaawansowane operacje
Nacisnąć G/f, aby wybrać opcję, po czym
nacisnąć .
~
• Przeglądarka grafiki na USB obsługuje tylko zdjęcia
JPEG zgodne z DCF.
• Podłączając cyfrowy aparat fotograficzny Sony,
nastawić tryb połączenia USB aparatu na Auto lub
„Mass Storage”. Więcej informacji o trybie
połączenia USB znajduje się w instrukcji dosta rczonej
razem z używanym urządzeniem.
• W trakcie dostępu do nośnika zawierającego dane nie
wyłączać odbiornika TV ani podłączonego
urządzenia USB, nie odłączać kabla USB, ani nie
wyjmować nośnika zawierającego dane. Dane na
nośniku mogą ulec uszkodzeniu.
• Użycie nieobsługiwanego urządzenia USB nie jest
gwarantowane i może powodować występowanie
usterek.
• Sony nie może ponosić odpowiedzialności za szkody
lub utratę danych na nośniku, spowodowane przez
wadliwe działanie któregokolwiek z podłączonych
urządzeń lub odbiornika TV.
• Na stronie internetowej podanej poniżej można
znaleźć najnowsze informacje o kompatybilnych
urządzeniach USB.
http://support.sony-europe.com/TV/compatibility/
Opcje Opis
Wybór urządzenia Wybrać urządzenie, jeśli
Ustawienia
obrazu
Ustawienia Można wykonać
podłączono wiele urządzeń.
Można wykonać nastawienia
„Podświetlenie” (strona 31),
„Kontrast” (strona 31) i
„Temperatura barw”.
zaawansowane nastawienia dla
pokazu zdjęć i nastawić
sekwencję wyświetlania dla
miniaturek.
28
PL
Page 77

Używanie
sterowania HDMI
Funkcja HDMI umożliwia wzajemne sterowanie
przez urządzenia za pomocą HDMI CEC
(Consumer Electronics Control), określonego
przez HDMI.
Można podłączyć urządzenia Sony kompatybilne
ze sterowaniem HDMI, na przykład odbiorniki
TV, nagrywarki DVD z twardym dyskiem i
systemy audio (z kablami HDMI), aby umożliwić
ich zintegrowaną współpracę.
Aby używać funkcji sterowania HDMI, należy
pamiętać o prawidłowym podłączeniu i
ustawieniu kompatybilnych urządzeń.
Aby podłączyć urządzenie
kompatybilne ze sterowaniem HDMI
Połączyć kompatybilne urządzenie i odbiornik TV
kablem HDMI. Podłączając system audio, oprócz
kabla HDMI należy pamiętać o połączeniu
gniazda DIGITAL OUT (OPTICAL) odbiornika
TV i systemu audio optycznym kablem audio.
Szczegółowe informacje, zobacz strona 22.
Korzystanie z dodatkowego sprzętu
Aby wykonać ustawienia sterowania
HDMI
Sterowanie HDMI należy ustawić zarówno po
stronie odbiornika TV, jak i po stronie
podłączonego urządzenia. Zobacz „Ustawienia
HDMI” na stronie 43 dla ustawień po stronie
odbiornika TV. Szczegółowe informacje o
ustawieniach znajdują się w instrukcji obsługi
podłączonego urządzenia.
Funkcje sterowania HDMI
• Automatycznie wyłącza podłączone
urządzenia, gdy odbiornik TV zostanie
wyłączony.
• Włącza odbiornik TV i automatycznie przełącza
wejście na podłączone urządzenie, gdy zaczyna
ono odtwarzać.
• Jeśli podłączony system audio zostanie
włączony gdy włączony jest odbiornik TV,
wyjście dźwięku przełączy się z głośnika TV na
system audio.
• Nastawia głośność i wycisza dźwięk
podłączonego systemu audio.
29
PL
Page 78

Używanie funkcji menu
Nawigacja w menu
Funkcje menu umożliwiają korzystanie z różnych
wygodnych właściwości odbiornika TV. Można z
łatwością wybierać kanały lub źródła wejścia oraz
zmieniać nastawienia odbiornika TV.
2
2
1
1 Nacisnąć MENU.
2 Nacisnąć F/f, aby wybrać opcję, po
czym nacisnąć .
Aby wyjść z menu, nacisnąć MENU.
4 Cyfrowy EPG*
Wyświetla Cyfrowy elektroniczny
informator programowy (EPG) (strona 19).
5 Wejścia zewnętrzne
Wybiera urządzenie podłączone do
odbiornika TV.
• Aby oglądać program z żądanego,
zewnętrznego wejścia, wybrać źródło
wejścia, po czym nacisnąć .
• Aby wyznaczyć etykietę dla zewnętrznego
wejścia, wybrać „Edycja nazw AV”
(strona 42).
• Aby wybrać podłączone urządzenie
kompatybilne ze sterowaniem HDMI,
wybrać „Wybór urządzeń HDMI”.
6 Zdjęcia
Pojawi się ekran miniaturek (strona 28).
7 Ustawienia
Wyświetla menu „Ustawienia”, gdzie
wykonywane są najbardziej zaawansowane
nastawienia i regulacje.
1 Nacisnąć F/f aby wybrać ikonę
menu, po czym nacisnąć .
2 Nacisnąć F/f/G/g aby wybrać opcję
lub wyregulować ustawienie, po czym
nacisnąć .
Szczegółowe informacje o ustawieniach,
zobacz strony od 31 do 50.
~
Opcje, które można regulować są różne,
zależnie od sytuacji. Niedostępne opcje są
wyszarzałe lub nie są wyświetlane.
* Ta funkcja może być niedostępna w niektórych
krajach/regionach.
1 Ulubione cyfrowe*
Wyświetla listę Ulubionych (strona 21).
2 Analogowy
Powraca do ostatniego oglądanego kanału
analogowego.
3 Cyfrowy*
Powraca do ostatniego oglądanego kanału
cyfrowego.
PL
30
Page 79

Menu Obrazu
W menu „Obraz” można wybrać podane niżej
opcje. Aby wybrać opcje w „Ustawienia”, należy
sprawdzić w „Nawigacja w menu” (strona 30).
Wejścia docelowe
Tryb obrazu
Zerowanie
Podświetlenie
Kontrast
W wypadku wejścia aktualnie oglądanego, wybrać używanie zwykłych
nastawień lub nastawianie osobno każdej pozycji.
„Zwykłe”: Stosuje zwykłe nastawienia, których regulacje są wspólne z tymi
dla innych wejść, w których „Wejścia docelowe” są nastawione na „Zwykłe”.
Nazwa aktualnego wejścia (np. AV1): Umożliwia osobne nastawienie każdej
pozycji dla aktualnego wejścia.
z
Jeżeli potrzebne jest to same nastawienie dla każdego wejścia, należy nastawić każde
wejście na „Zwykłe”.
Używanie funkcji menu
Wybiera tryb obrazu. Opcje „Tryb obrazu” mogą się różnić, zależnie od
nastawienia „Wideo/Zdjęcia” (strona 39).
„Żywy”: Dla zwiększonego kontrastu i ostrości obrazu.
„Standardowy”: Dla standardowego obrazu. Ustawienie zalecane przy
korzystaniu z kina domowego.
„Kinowy”: Do oglądania filmów. Przynosi najlepsze efekty przy oglądaniu
filmów w warunkach kina domowego.
„Zdjęcia”: Nastawia optymalną jakość obrazu dla zdjęć.
„Własny”: Umożliwia zapisanie preferowanych ustawień w pamięci.
Sprowadza wszystkie nastawienia „Obraz” z wyjątkiem „Wejścia docelowe”,
„Tryb obrazu” i „Zaawansowane ustawienia” do nastawień domyślnych.
Reguluje jasność światła.
Zwiększa lub zmniejsza kontrast obrazu.
Jasność
Nasycenie
Odcień
Rozjaśnia lub przyciemnia obraz.
Zwiększa lub zmniejsza intensywność koloru.
Zwiększa lub zmniejsza zielony odcień i czerwony odcień.
~
„Odcień” można zmieniać tylko w przypadku kolorowego sygnału NTSC (np.
amerykańskie taśmy wideo).
ciąg dalszy
31
PL
Page 80

Temperatura barw
Reguluje biel obrazu.
„Zimne”: Nadaje bieli niebieski odcień.
„Neutralne”: Nadaje bieli neutralny odcień.
„Ciepłe 1”/„Ciepłe 2”: Nadaje bieli czerwony odcień. „Ciepłe 2” nadaje
czerwieńszy odcień niż „Ciepłe 1”.
z
„Ciepłe 1” i „Ciepłe 2” nie są dostępne, gdy „Tryb obrazu” jest nastawiony na „Żywy”.
Ostrość
Redukcja zakłóceń
Redukcja zakłóceń
MPEG
Tr yb D RC
Paleta ustawień
DRC
Wyostrza lub zmiękcza obraz.
Zmniejsza zakłócenia obrazu (obraz zaśnieżony) w przypadku słabego
sygnału nadajnika TV.
„Automat.”: Automatycznie zmniejsza zakłócenia obrazu (tylko w trybie
analogowym lub dla sygnałów kompozytowych).
„Duża”/„Średnia”/„Mała”: Zmienia wpływ redukcji zakłóceń.
„Wył.”: Wyłącza funkcję „Redukcja zakłóceń”.
Redukuje zakłócenia obrazu w wideo z kompresją MPEG.
Wytwarza obraz o wysokiej rozdzielczości w wypadku źródeł wysokiej gęstości
(np. odtwarzacz Blu-ray, odtwarzacz DVD, odbiornik satelitarny).
„Tryb 1”: Tryb zalecany.
„Tryb 2”: Dostępny tylko dla formatu 1080i. „Tryb 2” jest szczególnie
efektywny, gdy oryginalne sygnały o standardowej rozdzielczości zostały
przetworzone na wyższy standard formatu 1080i.
„Wył.”: Wyłącza funkcję „Tryb DRC”.
Indywidualizuje poziom szczegółowości („Realizm”) i gładkości („Czystość”)
dla sygnału każdego wejścia. Na przykład można stworzyć jedno indywidualne
nastawienie dla obrazu z wejścia kablowego, a drugie dla obrazu z
odtwarzacza DVD.
Pojawi się „Paleta ustawień DRC”. Nacisnąć
znacznika (z).
Gdy z przesuwany jest wyżej wzdłuż osi „Realizm”, obraz staje się bardziej
nasycony detalami. Gdy z przesuwany jest wyżej wzdłuż osi „Czystość”, obraz
staje się gładszy.
F/f/G/g aby nastawić pozycję
32
PL
Page 81

Zaawansowane
ustawienia
Dokładniej dostosowuje funkcję Obrazu do indywidualnych wymagań. Gdy
„Tryb obrazu” zostanie nastawiony na „Żywy”, nie będzie można nastawić/
zmienić tych ustawień.
„Zerowanie”: Sprowadza wszystkie zaawansowane nastawienia do nastawień
fabrycznych.
„Korekta czerni”: Podkreśla obszary czerni na obrazie dla silniejszego
kontrastu.
„Zaaw. zwiększ. kontrastu”: Automatycznie nastawia „Podświetlenie” i
„Kontrast” na najbardziej odpowiednie wartości, zgodnie z oceną jasności
ekranu. To nastawienie jest szczególnie skuteczne dla ciemnych obrazów.
Zwiększy ono kontrast ciemnych scen.
„Gamma”: Ustawia proporcje między jasnymi a ciemnymi partiami obrazu.
„Czystość bieli”: Wzmacnia białe kolory.
„Przestrzeń barw”: Zmienia gamę reprodukcji koloru. „Rozszerzona”
reprodukuje żywe kolory, a „Standardowa” reprodukuje standardowe kolory.
„Żywy kolor”: Powoduje, że kolory są żywsze.
„Balans bieli”: Nastawia temperaturę barwy dla każdego koloru.
„Uwydatnianie szczegółów”: Uwydatnia detale obrazu.
„Uwydatnianie krawędzi”: Uwydatnia kontury obrazu.
Używanie funkcji menu
33
PL
Page 82

Menu Dźwięku
W menu „Dźwięk” można wybrać podane niżej
opcje. Aby wybrać opcje w „Ustawienia”, należy
sprawdzić w „Nawigacja w menu” (strona 30).
Wejścia docelowe
Tryb dźwięku
Zerowanie
To ny wy sok ie
To ny ni skie
Balans
Automat. głośność
W wypadku wejścia aktualnie oglądanego, wybrać używanie zwykłych
nastawień lub nastawianie osobno każdej pozycji.
„Zwykłe”: Stosuje zwykłe nastawienia, których regulacje są wspólne z tymi
dla innych wejść, w których „Wejścia docelowe” są nastawione na „Zwykłe”.
Nazwa aktualnego wejścia (np. AV1): Umożliwia osobne nastawienie każdej
pozycji dla aktualnego wejścia.
z
Jeżeli potrzebne jest to same nastawienie dla każdego wejścia, należy nastawić każde
wejście na „Zwykłe”.
„Dynamiczny”: Wzmacnia tony wysokie i niskie.
„Standardowy”: Dla standardowego dźwięku. Ustawienie zalecane przy
korzystaniu z kina domowego.
„Własny”: Płaska charakterystyka. Umożliwia także zapisanie w pamięci
preferowanych ustawień.
Sprowadza wszystkie nastawienia „Dźwięk” z wyjątkiem „Wejścia docelowe”,
„Tryb dźwięku” i „Podwójny dźwięk” do nastawień domyślnych.
Reguluje dźwięki zawierające wysokie tony.
Reguluje dźwięki zawierające niskie tony.
Wzmacnia balans lewego lub prawego głośnika.
Utrzymuje stały poziom głośności, nawet gdy występują zmiany poziomu
nadawanego sygnału (np. reklamy są zazwyczaj głośniejsze od programów).
Korekta głośności
PL
34
Reguluje głośność aktualnego wejścia relatywnie do innych wejść, gdy
„Wejścia docelowe” jest nastawione na nazwę aktualnego wejścia (np. AV1).
Page 83

Dźwięk
przestrzenny
„S-FORCE Front Surround”: Dostępny dla normalnych programów
stereofonicznych i dla programów cyfrowych z 5.1-kanałowym dźwiękiem
przestrzennym oraz dla wejścia audio z podłączonych urządzeń.
„Wył.”: Przekształca i odtwarza 5.1-kanałowy dźwięk przestrzenny i dźwięk
przestrzenny innych programów cyfrowych na normalny dźwięk
stereofoniczny (2-kanałowy). Reprodukuje oryginalne audio innych
programów w niezmienionej postaci.
Uwydatnienie głosu
Wzmacnianie
dźwięku
Podwójny dźwięk
Reguluje czystość ludzkich głosów. Na przykład, jeśli głos spikera czytającego
wiadomości jest niewyraźny, można zwiększyć to ustawienie, aby głos stał się
bardziej wyraźny. Odwrotnie, podczas oglądania transmisji sportowej można
zmniejszyć to ustawienie, aby głos komentatora brzmiał bardziej miękko.
Dzięki kompensacji efektu fazowego w głośnikach sprawia, że dźwięk jest
bardziej efektowny.
Wybiera dźwięk z głośnika dla programu stereofonicznego lub
dwujęzycznego.
„Stereo”/„Mono”: Dla programu stereofonicznego.
„A”/„B”/„Mono”: Dla programu dwujęzycznego wybrać „A” dla kanału
dźwiękowego 1, „B” dla kanału dźwiękowego 2 lub „Mono” dla kanału
monofonicznego, jeśli dostępny.
~
Jeżeli zostało wybrane inne urządzenie, podłączone do odbiornika TV, nastawić
„Podwójny dźwięk” na „Stereo”, „A” lub „B”. Kiedy jednak wybrane zostanie
zewnętrzne urządzenie podłączone do gniazda HDMI, ustawienie będzie stałe na
„Stereo” (z wyjątkiem, gdy używane są gniazda wejścia audio).
Używanie funkcji menu
35
PL
Page 84

Menu Ustawień ekranu (oprócz wejścia PC)
W menu „Ustawienia ekranu” można wybrać
podane niżej opcje. Aby wybrać opcje w
„Ustawienia”, należy sprawdzić w „Nawigacja w
menu” (strona 30).
Wejścia docelowe
Format ekranu
Autoformatowanie
Domyślny tryb 4:3
W wypadku wejścia aktualnie oglądanego, wybrać używanie zwykłych
nastawień lub nastawianie osobno każdej pozycji.
„Zwykłe”: Stosuje zwykłe nastawienia, których regulacje są wspólne z tymi
dla innych wejść, w których „Wejścia docelowe” są nastawione na „Zwykłe”.
Nazwa aktualnego wejścia (np. AV1): Umożliwia osobne nastawienie każdej
pozycji dla aktualnego wejścia.
~
Pozycje do wyboru są następujące: „Format ekranu”, „Pole wyświetlania”,
„Przesunięcie pionowe” i „Rozmiar pionowy”.
z
Jeżeli potrzebne jest to same nastawienie dla każdego wejścia, należy nastawić każde
wejście na „Zwykłe”.
Szczegółowe informacje o formacie ekranu, zobacz „Aby ręcznie zmienić
format ekranu, dostosowując go do programu” na stronie 17.
Automatycznie zmienia format ekranu, zgodnie z sygnałem programu. Aby
zachować ustawienia własne, wybrać „Wył.”.
Wybiera domyślny format ekranu, do użycia z programami nadawanymi w
formacie 4:3.
„Smart”: Wyświetla konwencjonalny obraz telewizyjny 4:3 z imitacją efektu
szerokoekranowego.
„4:3”: Wyświetla programy nadawane w zwykłym formacie 4:3 w
prawidłowych proporcjach.
„Wył.”: Utrzymuje aktualne nastawienie „Format ekranu”, gdy zostanie
zmieniony kanał lub wejście.
Pole wyświetlania
Przesunięcie
poziome
PL
36
Reguluje obszar ekranu, na którym wyświetlany jest obraz.
„Wszystkie piksele”: Wyświetlają obraz ze źródeł 1080i lub 1080p w
oryginalnych rozmiarach, gdy części obrazu są obcięte.
„+1”: Wyświetla oryginalne pole obrazu. To nastawienie można wybrać dla
sygnałów wejścia HDMI, z wyjątkiem sygnałów 1080i lub 1080p.
„Normalne”: Wyświetla rekomendowane pole obrazu.
„-1”/„-2”: Powiększa obraz, aby ukryć krawędzie obrazu.
Nastawia poziomą pozycję obrazu.
Page 85

Przesunięcie
pionowe
Nastawia pionową pozycję obrazu, gdy „Format ekranu” jest nastawiony na
„Smart”, „Zoom” lub „14:9”.
Rozmiar pionowy
Nastawia rozmiar obrazu w pionie, gdy „Format ekranu” jest nastawiony na
„Smart”.
Używanie funkcji menu
37
PL
Page 86

Menu Ustawień ekranu (dla wejścia PC)
Po wybraniu wejścia PC można wybrać podane
niżej opcje w menu „Ustawienia ekranu”. Aby
wybrać opcje w „Ustawienia”, należy sprawdzić w
„Nawigacja w menu” (strona 30).
Regulacja
automatyczna
Zerowanie
Faza
Wielkość piksela
Przesunięcie
poziome
Przesunięcie
pionowe
Format ekranu
Automatycznie reguluje pozycję wyświetlenia, fazę i wielkość piksela gdy
odbiornik TV otrzymuje sygnał wejścia z podłączonego komputera.
z
„Regulacja automatyczna” może nie działać dobrze z niektórymi sygnałami wejścia. W
takich wypadkach należy ręcznie nastawić „Faza”, „Wielkość piksela”, „Przesunięcie
poziome” i „Przesunięcie pionowe”.
Sprowadza ustawienia ekranu PC do ustawień fabrycznych.
Wyregulować fazę w razie migotania ekranu.
Wyregulować wielkość piksela, gdy na obrazie występują niepożądane
pionowe pasy.
Nastawia poziomą pozycję obrazu.
Nastawia pionową pozycję obrazu.
Wybiera format ekranu do wyświetlania wejścia z komputera.
„Normalny”: Wyświetla obraz w oryginalnym rozmiarze.
„Pełny 1”: Powiększa obraz, aby wypełnić pionowy obszar wyświetlenia,
zachowując oryginalne proporcje pionu do poziomu.
„Pełny 2”: Powiększa obraz, aby wypełnić obszar wyświetlenia.
38
PL
Page 87

Menu Ustawień wideo
W menu „Ustawienia wideo” można wybrać
podane niżej opcje. Aby wybrać opcje w
„Ustawienia”, należy sprawdzić w „Nawigacja w
menu” (strona 30).
Polepszanie ruchu
Tr yb f ilmu
Tryb Gra/Tekst
Zapewnia bardziej płynny ruch obrazu i redukuje rozmazanie obrazu.
„Wysokie”: Zapewnia bardziej płynny ruch obrazu, jak w programie w
technologii filmowej.
„Standardowe”: Zapewnia płynny ruch obrazu. To nastawienie służy do
normalnego użytku.
„Wył.”: Użyć tego nastawienia, gdy w rezultacie nastawień „Wysokie” i
„Standardowe” występują zakłócenia.
~
Zależnie od wideo, efekt może nie być widoczny, nawet po zmianie nastawienia.
Zapewnia płynniejszy ruch obrazu podczas odtwarzania obrazów DVD lub
magnetowidu zarejestrowanych na taśmie filmowej, redukując rozmazanie i
ziarnistość obrazu.
„Automat. 1”: Zapewnia bardziej płynny ruch obrazu niż w oryginalnym
programie w technologii filmowej. To nastawienie służy do normalnego
użytku.
„Automat. 2”: Zapewnia wyświetlenie bez zmian oryginalnego programu w
technologii filmowej.
„Wył.”: Wyłącza funkcję „Tryb filmu”.
~
Jeżeli obraz zawiera niejednolite sygnały lub za dużo zakłóceń, „Tryb filmu” zostanie
automatycznie wyłączony, nawet jeśli wybrana będzie opcja „Automat. 1” lub
„Automat. 2”.
Zapewnia optymalny ekran dla oglądania obrazów zawierających drobne linie
i znaki, wprowadzanych z urządzeń do gier wideo i z komputerów. Nastawić
na „Wł.” dla wyraźnego wyświetlenia drobnych linii lub znaków.
Używanie funkcji menu
Wideo/Zdjęcia
Zapewnia odpowiednią jakość obrazu za pomocą wyboru opcji zależnie od
źródła wejścia (wideo lub dane zdjęciowe).
„Wideo-A”: Nastawia odpowiednią jakość obrazu, zależnie od źródła wejścia,
danych wideo lub danych zdjęciowych, przy bezpośrednim podłączeniu
sprzętu Sony, umożliwiającego wyjście HDMI i obsługującego tryb „WideoA”.
„Wideo”: Wytwarza odpowiednią jakość obrazu dla ruchomych obrazów.
„Zdjęcia”: Wytwarza odpowiednią jakość obrazu dla obrazów nieruchomych.
~
Nastawienie jest ustalone na „Wideo” gdy tryb Wideo-A nie jest obsługiwany na
podłączonym sprzęcie, nawet gdy wybrane jest nastawienie „Wideo-A”.
ciąg dalszy
39
PL
Page 88

x.v.Colour
Wyświetla ruchome obrazy, które są bardziej podobne do oryginalnego
źródła, dzięki dopasowaniu do przestrzeni barw źródła.
~
Nastawienie jest stałe- „Normalne”, gdy sygnałem wejścia jest sygnał HDMI (RGB),
nawet gdy wybrano „x.v.Colour”.
Przestrzeń barw dla
zdjęć
Matryca kolorów
Zakres dynamiki
RGB
System kolorów
Wybiera opcję (sRGB, sYCC, Adobe RGB) odpowiadającą przestrzeni barw
wyprowadzanej sygnałem wyjścia, z urządzenia podłączonego do gniazd
wejścia HDMI lub komponentowego.
~
• Wybiera „sYCC”, gdy używane jest urządzenie obsługujące „x.v.Colour”.
• Gdy sygnałem wejścia jest HDMI (RGB), nastawienie jest stałe, na „sRGB”, nawet
jeśli wybrano „sYCC”.
Zwykle stosowana w ustawieniu fabrycznym (AV1/2/7 (Kompozytowy i S
wideo sygnał wejścia) jest nastawiony na „ITU601”, a AV3/4/5/6/8
(Komponentowy sygnał wejścia) jest nastawiony na „Automat.”). Jeżeli
tonacja barw obrazu ze źródła wejścia nie odpowiada standardowi barw i
wygląda nienaturalnie, wybrać „ITU601” lub „ITU709”, co znormalizuje
tonację barw.
Wytwarza naturalny kolor, zmieniając reprodukcję tonacji luminancji
kolorowych sygnałów wejścia HDMI (RGB). Nastawić na „Automat.” do
standardowego użytku. Zmienić nastawienie tylko wtedy, gdy tonacja
luminancji wyświetlenia jest nienaturalna.
Wybiera system kolorystyczny („Automat.”, „PAL”, „SECAM”,
„NTSC3.58” lub „NTSC4.43”), zależnie od sygnału wprowadzanego ze źródła
wejścia.
40
PL
Page 89

Menu Ustawień audio
W menu „Ustawienia audio” można wybrać
podane niżej opcje. Aby wybrać opcje w
„Ustawienia”, należy sprawdzić w „Nawigacja w
menu” (strona 30).
Głośnik
Ustawienia
słuchawek
Wyjście audio
Włącza/wyłącza wewnętrzne głośniki odbiornika TV.
„Głośnik TV”: Głośniki odbiornika TV są włączone, aby słuchać dźwięku TV
przez głośniki odbiornika.
„System audio”: Głośniki odbiornika TV zostają wyłączone, aby słuchać
dźwięku programu TV tylko przez zewnętrzne urządzenie audio, podłączone
do gniazd wyjścia audio.
Gdy podłączone jest urządzenie kompatybilne ze sterowaniem HDMI, można
włączyć to urządzenie, jeśli jego operacje są sprzężone z odbiornikiem TV. To
nastawienie powinno być wykonane po podłączeniu urządzenia.
Używanie funkcji menu
i Wyłączanie głośników
Włącza/wyłącza wbudowane głośniki odbiornika TV, gdy słuchawki zostają
podłączone.
„Wł.”: Dźwięk jest wyprowadzany tylko ze słuchawek.
„Wył.”: Dźwięk jest wyprowadzany zarówno ze słuchawek, jak i odbiornika
TV.
i Głośność
Nastawia głośność słuchawek gdy „i Wyłączanie głośników” jest nastawione
na „Wył.”.
i Podwójny dźwięk
Wybiera dźwięk ze słuchawek dla programu stereofonicznego lub
dwujęzycznego.
„Regulowane”: Wyjście audio z systemu audio może być sterowane pilotem
telewizora.
„Stałe”: Wyjście audio z odbiornika TV jest stałe. Należy użyć regulatora
głośności odbiornika audio aby nastawić głośność (i wykonać inne nastawienia
audio) za pomocą systemu audio.
41
PL
Page 90

Menu Ustawień
W menu „Ustawienia” można wybrać podane
niżej opcje. Aby wybrać opcje w „Ustawienia”,
należy sprawdzić w „Nawigacja w menu”
(strona 30).
Ustawienia timera
Ustawienia A/V
Nastawia Timer na włączanie/wyłączanie odbiornika TV.
Timer wyłączania
Ustawia okres czasu, po upływie którego odbiornik TV automatycznie
przełącza się na tryb oczekiwania.
Gdy włączony jest „Timer wyłączania”, wskaźnik (Timer) na przednim
panelu odbiornika TV świeci się na pomarańczowo.
z
• Gdy odbiornik TV zostanie wyłączony i ponownie włączony, „Timer wyłączania”
zostanie przywrócony do stanu „Wył.”.
• Na minutę przed przełączeniem się odbiornika TV na tryb oczekiwania, na ekranie
pojawi się uprzedzający o tym komunikat.
Timer włączania
Nastawia Timer na włączenie odbiornika TV z trybu oczekiwania.
„Dzień”: Wybiera dzień, w którym „Timer włączania” ma zostać
uruchomiony.
„Czas”: Nastawia czas włączenia odbiornika TV.
„Czas trwania”: Wybiera czas, po którym automatycznie odbiornik TV
ponownie przełączy się na tryb oczekiwania.
„Ustawienia głośności”: Wybiera głośność w momencie włączenia odbiornika
TV przez Timer.
Ustawianie zegara
Umożliwia ręczne nastawienie zegara. Gdy odbiornik TV odbiera kanały
cyfrowe, zegar nie może być ręcznie nastawiony, ponieważ jest nastawiany
zgodnie z kodem czasu nadawanym razem z sygnałem.
Przypisuje nazwę każdemu urządzeniu podłączonemu do bocznych i tylnych
gniazd. Po wybraniu urządzenia, nazwa ta będzie przez chwilę wyświetlana na
ekranie. Można pominąć te sygnały wejścia z podłączonego urządzenia,
których nie chcemy wyświetlać na ekranie.
1 Nacisnąć
2 Nacisnąć
Nazwy urządzeń: Wykorzystuje jedną z zaprogramowanych etykiet do nadania
nazwy podłączonemu urządzeniu.
„Edycja:”: Tworzy własną nazwę. Wykonać kroki od 2 do 4 z „Nazwy
programów” (strona 45).
„Pomiń”: Pomija niepotrzebne źródło wejścia.
F/f, aby wybrać żądane źródło wejścia, po czym nacisnąć .
F/f, aby wybrać żądaną opcję poniżej, po czym nacisnąć .
42
PL
Page 91

Automat. S Video
Wybiera sygnał wejścia z gniazd S wideo 7, gdy oba gniazda / 7 są
podłączone.
Wyjście AV2
Ustawienia HDMI
Nastawia wysyłanie sygnału przez gniazdo oznaczone / 2, znajdujące się
z tyłu odbiornika TV. Po podłączeniu magnetowidu lub innego urządzenia
nagrywającego do gniazda / 2, można nagrywać z urządzenia
podłączonego do innych gniazd odbiornika TV.
„TV”: Wyprowadza sygnały programu TV.
„AV1”: Wyprowadza sygnały z urządzenia podłączonego do gniazda
/1.
„AV7”: Wyprowadza sygnały z urządzenia podłączonego do gniazda
/ 7 .
„Automat.”: Wyprowadza to, co jest oglądane na ekranie (z wyjątkiem
sygnałów z gniazd / 3, / 4, HDMI IN 5, HDMI IN 6, HDMI IN 8 i
PC IN / ).
Ta opcja jest używana do konfiguracji urządzenia kompatybilnego ze
sterowaniem HDMI i podłączonego do gniazd HDMI. Należy pamiętać, że
ustawienie sprzężenia powinno być także wykonane po stronie podłączonego
urządzenia kompatybilnego ze sterowaniem HDMI.
Sterowanie HDMI
Wybiera sprzężenie lub brak sprzężenia operacji urządzenia kompatybilnego
ze sterowaniem HDMI i odbiornika TV. Przy nastawieniu na „Wł.”, można
wykonać nastawienia poniższych pozycji menu.
Automat. wyłącz. urządzeń
Przy nastawieniu tej opcji na „Wł.”, każde podłączone urządzenie
kompatybilne ze sterowaniem HDMI wyłączy się razem z odbiornikiem TV.
Automat. włączenie TV
Po ustawieniu tej opcji na „Wł.”, w momencie włączenia podłączonego
sprzętu, zgodnego ze sterowaniem HDMI, odbiornik telewizyjny włączy się
automatycznie i rozpocznie wyświetlanie sygnału wejściowego HDMI
wysyłanego przez podłączony sprzęt.
Używanie funkcji menu
Automat.
inicjalizacja
Oszczędzanie
energii
Lista urządzeń HDMI
Wyświetla podłączone urządzenia kompatybilne ze sterowaniem HDMI.
~
Nie można używać „Sterowanie HDMI”, jeśli operacje odbiornika TV są sprzężone z
operacjami systemu audio, który jest kompatybilny ze sterowaniem HDMI.
Rozpoczyna początkową konfigurację, aby wybrać język i kraj/region oraz
zaprogramować wszystkie dostępne kanały cyfrowe i analogowe.
Zazwyczaj nie ma potrzeby wykonywania tej operacji, ponieważ język i kraj/
region zostają wybrane, a kanały dostrojone już przy pierwszej instalacji
odbiornika TV (strona 6).
Opcja ta jednak umożliwia powtórzenie tego procesu (np. w celu ponownego
dostrojenia odbiornika po przeprowadzce lub w celu wyszukania nowych
kanałów uruchomionych przez stacje telewizyjne).
Wybiera tryb oszczędzania energii, aby zmniejszyć zużycie energii przez
odbiornik TV.
Gdy wybrana jest opcja „Obraz wyłączony”, obraz zostanie wyłączony i
wskaźnik (Obraz wyłączony) na przednim panelu odbiornika TV będzie
się świecić na zielono. Dźwięk zostaje bez zmiany.
ciąg dalszy
43
PL
Page 92

Czujnik światła
„Wł.”: Automatycznie optymalizuje ustawienia obrazu, zależnie od
oświetlenia pokoju.
„Wył.”: Wyłącza funkcję „Czujnik światła”.
~
Należy pamiętać, aby nie zasłaniać niczym czujnika, ponieważ może to mieć wpływ na
jego działanie. Dalsze informacje dotyczące czujnika, zobacz strona 15.
Podświetlenie logo
Zarządzanie energią
PC
Język
Informacje o
produkcie
Zerowanie
wszystkiego
Zapala i wyłącza logo Sony na przodzie odbiornika TV.
Przełącza odbiornik TV na tryb oczekiwania, jeżeli przez 30 sekund nie
zostanie otrzymany żaden sygnał z wejścia PC.
Wybiera język wyświetlanych menu.
Wyświetla informacje o odbiorniku TV.
Sprowadza wszystkie ustawienia do ustawień fabrycznych, po czym wyświetla
ekran „Automat. inicjalizacja”.
~
• Nie należy w tym czasie (trwa około 30 sekund) wyłączać odbiornika TV ani naciskać
przycisków.
• Wszystkie ustawienia, włączając Cyfrową Listę Ulubionych, kraj/region, język,
automatycznie zaprogramowane kanały, itp. zostaną wyzerowane.
44
PL
Page 93

Menu Ustawień analogowych
W menu „Ustawienia analogowe” można wybrać
podane niżej opcje. Aby wybrać opcje w
„Ustawienia”, należy sprawdzić w „Nawigacja w
menu” (strona 30).
Przyciski
jednocyfrowe
Autoprogramowanie
Sortowanie
programów
Nazwy programów
Gdy „Przyciski jednocyfrowe” jest nastawione na „Wł.”, można wybrać kanał
analogowy używając jednego z zaprogramowanych przycisków numerycznych
(0 – 9) na pilocie.
~
Gdy „Przyciski jednocyfrowe” jest nastawione na „Wł.”, nie można wybrać kanałów o
numerze 10 i wyższym przez wprowadzenie dwóch cyfr za pomocą pilota.
Wyszukuje wszystkie dostępne kanały analogowe.
Opcja ta umożliwia ponowne dostrojenie odbiornika TV po przeprowadzce
lub wyszukanie nowych kanałów uruchomionych przez stacje telewizyjne.
Zmienia kolejność, w jakiej kanały analogowe są zapisane w pamięci
odbiornika TV.
1 Nacisnąć
pozycję, po czym nacisnąć .
2 Nacisnąć F/f, aby wybrać nową pozycję dla kanału, po czym nacisnąć
.
Nadaje kanałowi dowolną nazwę, zawierającą maksymalnie pięć liter lub cyfr.
Po wybraniu kanału, nazwa będzie przez chwilę wyświetlana na ekranie.
(Nazwy kanałów są zazwyczaj pobierane automatycznie z teletekstu (jeśli
dostępny).)
1 Nacisnąć
nacisnąć .
2 Nacisnąć F/f, aby wybrać żądaną literę lub cyfrę („_” dla spacji), po
czym nacisnąć
Jeśli wpisany został niewłaściwy znak
Nacisnąć G/g, aby wybrać nieprawidłowy znak. Następnie nacisnąć F/f, aby
wybrać prawidłowy znak.
Aby skasować wszystkie znaki
Wybrać „Zerow.”, po czym nacisnąć .
3 Powtarzać procedurę kroku 2, aż wpisana zostanie cała nazwa.
4 Wybrać „OK”, po czym nacisnąć .
F/f, aby wybrać kanał, który ma być przeniesiony na nową
F/f, aby wybrać kanał, który ma być nazwany, po czym
g.
Używanie funkcji menu
ciąg dalszy
45
PL
Page 94

Programowanie
ręczne
Przed wybraniem „Nazwa”/„ARC”/„Filtracja dźwięku”/„Pomiń”/
„Dekoder”/„LNA”, nacisnąć PROG +/–, aby wybrać numer programu, na
którym jest kanał. Nie można wybrać numeru programu nastawionego na
„Pomiń” (strona 47).
Program/System/Kanał
Programuje ręcznie kanały programów.
1 Nacisnąć
2 Nacisnąć
strojony (w wypadku strojenia magnetowidu, wybrać kanał 00), po czym
nacisnąć RETURN.
3 Nacisnąć F/f, aby wybrać „System”, po czym nacisnąć .
4 Nacisnąć
telewizyjnych, po czym nacisnąć RETURN.
B/G: Dla krajów/regionów Europy zachodniej
I: Dla Wielkiej Brytanii
D/K: Dla krajów/regionów Europy wschodniej
L: Dla Francji
5 Nacisnąć F/f, aby wybrać „Kanał”, po czym nacisnąć .
6 Nacisnąć
kanałów TV naziemnej), po czym nacisnąć
7 Wykonać strojenie kanałów w następujący sposób:
Jeśli nie jest znany numer kanału (częstotliwość)
Nacisnąć F/f, aby szukać kolejnego dostępnego kanału. Z chwilą znalezienia
kanału, przeszukiwanie zatrzyma się. Aby kontynuować szukanie, nacisnąć
Jeśli znany jest numer kanału (częstotliwość)
Przyciskami numerycznymi wpisać numer żądanego kanału stacji telewizyjnej
lub numer kanału magnetowidu.
8 Nacisnąć , aby przejść do „Potwierdź”, po czym nacisnąć .
9 Nacisnąć
Powtórzyć powyższą procedurę, aby zaprogramować ręcznie inne kanały.
F/f, aby wybrać „Program”, po czym nacisnąć .
F/f, aby wybrać numer programu, który ma być ręcznie
F/f, aby wybrać jeden z następujących systemów
F/f, aby wybrać „S” (dla kanałów TV kablowej) lub „C” (dla
g.
F/f.
f, aby wybrać „OK”, po czym nacisnąć .
Nazwa
Nadać wybranemu kanałowi nazwę zawierającą maksymalnie pięć liter lub
cyfr. Po wybraniu kanału, nazwa ta będzie przez chwilę wyświetlana na
ekranie.
Aby wprowadzać znaki, wykonać kroki od 2 do 4 z „Nazwy programów”
(strona 45).
ARC
Umożliwia precyzyjne, ręczne dostrojenie wybranego numeru programu,
jeżeli spodziewamy się, że niewielkie dostrojenie poprawi jakość obrazu.
Można nastawić dostrajanie w zakresie od –15 do +15. Po wybraniu „Wł.”
dostrajanie wykonywane jest automatycznie.
Filtracja dźwięku
Polepsza jakość dźwięku w poszczególnych kanałach w przypadku
zniekształceń w programach monofonicznych. Czasami niestandardowy
sygnał transmisji podczas oglądania programów monofonicznych może
powodować zniekształcenia dźwięku lub też jego okresowe wyciszanie.
Jeśli nie występują zniekształcenia dźwięku, zalecane jest pozostawienie
ustawienia fabrycznego „Wył.”.
~
Nie można odbierać dźwięku stereofonicznego lub podwójnego, gdy wybrane jest
„Słaba” lub „Mocna”.
46
PL
Page 95

Pomiń
Gdy naciskane jest PROG +/–, aby wybierać kanały, pomija analogowe kanały
niewykorzystane. (Można wybrać pominięty kanał przyciskami
numerycznymi.)
Dekoder
Pokazuje i nagrywa wybrane kodowane kanały, gdy używany jest dekoder
podłączony bezpośrednio do złącza scart / 1 lub do złącza scart
/ 2 przez magnetowid.
~
Zależnie od kraju/regionu wybranego w „Kraj” (strona 7), ta opcja może nie być
dostępna.
LNA
Poprawia jakość obrazu dla indywidualnych kanałów w wypadku bardzo
słabego sygnału (obraz z zakłóceniami).
Jeżeli nie będzie poprawy jakości obrazu nawet po nastawieniu „Wł.”, należy
nastawić tę opcję na „Wył.” (fabryczne nastawienie).
Potwierdź
Zapisuje w pamięci zmiany, wykonane w nastawieniach „Programowanie
ręczne”.
Używanie funkcji menu
47
PL
Page 96

Menu Ustawień cyfrowych
W menu „Ustawienia cyfrowe” można wybrać
podane niżej opcje. Aby wybrać opcje w
„Ustawienia”, należy sprawdzić w „Nawigacja w
menu” (strona 30).
~
Niektóre funkcje mogą być niedostępne w niektórych
krajach/regionach.
Programowanie
cyfrowe
Autoprogramowanie cyfrowe
Stroi dostępne kanały cyfrowe.
Opcja ta umożliwia ponowne dostrojenie odbiornika TV po przeprowadzce
lub wyszukanie nowych kanałów uruchomionych przez stacje telewizyjne.
Szczegółowe informacje, zobacz „Autoprogramowanie odbiornika TV” na
stronie 7.
Edycja listy programów
Usuwa wszystkie niechciane kanały cyfrowe zapisane w pamięci odbiornika
TV i zmienia kolejność cyfrowych kanałów zapisanych w pamięci odbiornika
TV.
1 Nacisnąć
przeniesiony na nową pozycję.
Nacisnąć przyciski numeryczne, aby wprowadzić znany trzycyfrowy numer
programu żądanej stacji.
2 Należy usuwać lub zmieniać kolejność cyfrowych kanałów w następujący
sposób:
Aby usunąć cyfrowy kanał
Nacisnąć . Po pojawieniu się komunikatu potwierdzającego nacisnąć G, aby
wybrać „Tak”, po czym nacisnąć .
Aby zmienić kolejność cyfrowych kanałów
Nacisnąć g, po czym nacisnąć F/f, aby wybrać nową pozycję dla kanału i
nacisnąć
3 Nacisnąć RETURN.
Cyfrowe programow. ręczne
Ręcznie stroi kanały cyfrowe. Ta funkcja jest dostępna, gdy opcja
„Autoprogramowanie cyfrowe” jest nastawiona na „Naziemna”.
1 Nacisnąć przycisk numeryczny, aby wybrać numer kanału, który ma być
ręcznie nastrojony, po czym nacisnąć
2 Gdy znalezione zostaną dostępne kanały, nacisnąć
kanał który chcemy zapisać w pamięci, po czym nacisnąć .
3 Nacisnąć
zapisany nowy kanał, po czym nacisnąć .
Powtórzyć powyższą procedurę, aby nastroić ręcznie inne kanały.
F/f, aby wybrać kanał, który ma być usunięty lub
G.
F/f, aby nastroić kanał.
F/f, aby wybrać
F/f, aby wybrać numer programu, pod którym ma być
48
PL
Page 97

Ustawienia napisów
„Tryb napisów ”: Gdy wybrane zostanie „Dla słabo słyszących”, wizualna
pomoc może być także wyświetlana na ekranie, razem z napisami (jeżeli kanał
TV nadaje takie informacje).
„Język napisów”: Wybiera język, w którym wyświetlane są napisy.
Ustawienia audio
Tr yb n agł ówków
Radio - wyświetlanie
Ochrona przed
dziećmi
„Typ audio”: Gdy wybrana zostanie opcja „Dla słabo słyszących”, przełącza
na program dla słabo słyszących.
„Język audio”: Wybiera język używany dla programu. Niektóre kanały
cyfrowe mogą nadawać kilka rodzajów audio, z różnymi językami dla
programu.
„Opis audio”: Zapewnia opis audio (narrację) dla informacji wizualnych,
jeżeli kanały TV nadają takie informacje.
„Poziom miksowania”: Nastawia poziomy głośności głównego dźwięku TV i
Opisu Audio.
„Zakres dynamiki”: Kompensuje różnice w poziomie audio między różnymi
kanałami. Ta funkcja może nie przynosić rezultatów w wypadku niektórych
kanałów.
„Wyjście optyczne”: Wybiera sygnał audio wyprowadzany ze złącza
DIGITAL OUT (OPTICAL) z tyłu odbiornika TV. Nastawić na „Automat.”,
gdy podłączone jest urządzenie kompatybilne z Dolby Digital, a gdy
podłączone jest niekompatybilne urządzenie, nastawić na „PCM”.
„Podstawowy”: Wyświetla informacje o programie z cyfrowym banerem.
„Pełny”: Wyświetla informacje o programie z cyfrowym banerem, a poniżej
banera wyświetla szczegółowe informacje o programie.
Używanie funkcji menu
Tapeta ekranu jest wyświetlana podczas odbioru programu radiowego. Można
wybrać kolor tapety ekranu lub wyświetlić kolor losowo. Aby tymczasowo
anulować wyświetlenie tapety ekranu, nacisnąć dowolny przycisk.
Nastawia ograniczenie wiekowe dla programów. Każdy program, który
przekracza ograniczenie wiekowe, może być oglądany tylko po prawidłowym
wprowadzeniu kodu PIN.
1 Nacisnąć przyciski numeryczne, aby wprowadzić swój istniejący kod
PIN.
Jeżeli kod PIN nie został przedtem nastawiony, pojawi się ekran wprowadzania
kodu PIN. Postępować według instrukcji „Kod PIN” poniżej.
2 Nacisnąć F/f, aby wybrać ograniczenie wiekowe lub „Brak” (oglądanie
bez ograniczenia), po czym nacisnąć .
3 Nacisnąć RETURN.
Kod PIN
Aby nastawić PIN po raz pierwszy
1 Nacisnąć przyciski numeryczne, aby wprowadzić nowy kod PIN.
2 Nacisnąć RETURN.
Aby zmienić PIN
1 Nacisnąć przyciski numeryczne, aby wprowadzić swój istniejący kod
PIN.
2 Nacisnąć przyciski numeryczne, aby wprowadzić nowy kod PIN.
3 Nacisnąć RETURN.
z
Kod PIN 9999 jest zawsze akceptowany.
ciąg dalszy
49
PL
Page 98

Ustawienia
techniczne
„Automat. info. dot. usług”: Umożliwia wykrywanie i zapisywanie w pamięci
odbiornika TV nowych cyfrowych usług, w miarę jak stają się dostępne.
„Pobier. oprogramowania”: Umożliwia automatyczne otrzymywanie przez
odbiornik TV aktualizacji oprogramowania (gdy są udostępniane), bezpłatnie
przez używaną antenę/sieć kablową. Zalecane jest stałe nastawienie tej opcji
na „Wł.”. Jeżeli nie chcemy aktualizować oprogramowania, należy nastawić tę
opcję na „Wył.”.
„Informacje o systemie”: Wyświetla aktualną wersję oprogramowania i
poziom sygnału.
„Strefa czasu”: Umożliwia ręczny wybór strefy czasowej, w której znajduje się
odbiorca, jeżeli jest ona inna niż domyślne nastawienie strefy czasowej dla
kraju/regionu odbiorcy.
„Automat. czas letni/zimowy”: Wybiera, czy automatycznie przełączać czas na
letni i na zimowy.
• „Wył.”: Czas jest wyświetlany zgodnie z różnicą czasu nastawioną przez „Strefa
czasu”.
• „Wł.”: Automatycznie przełącza czas na letni i na zimowy, zgodnie z kalendarzem.
Ustawienia modułu
CA
Umożliwia dostęp do Pay TV, po otrzymaniu modułu warunkowego dostępu
(CAM) oraz karty widza. Lokalizacja gniazda (PCMCIA), zobacz stronę
22.
50
PL
Page 99

Informacje dodatkowe
Dane techniczne
Nazwa modelu KDL-40X3500/
40X3000
System
System monitora
System TV
System kolorystyczny/
Wideo
Zakres kanałów
Moc dźwięku
Panel LCD (wyświetlacz ciekłokrystaliczny)
Analogowy: Zależy od wybranego kraju/regionu: B/G/H, D/K, L, I
Cyfrowy: DVB-T/DVB-C
Analogowy: PAL, SECAM, NTSC 3.58, 4.43 (tylko wejście Video In)
Cyfrowy: MPEG-2 MP@ML/HL, MPEG-4 HP@L3/L4
Analogowy: VHF: E2–E12/UHF: E21–E69/CATV: S1–S20/HYPER: S21–S41
Cyfrowe: VHF/UHF
11 W + 11 W
D/K: R1–R12, R21–R69/L: F2–F10, B–Q, F21–F69/I: UHF B21–B69
Złącza wejścia/wyjścia
Antena/Sieć kablowa
/1
/ 2 (SmartLink)
3/ 4
3/ 4
HDMI IN 5, 6, 8
7
7
7
PC IN
i
75 omów zewnętrzne złącze VHF/UHF
21-stykowe złącze SCART (standard CENELEC), w tym wejście audio/wideo, wejście RGB, wyjście
audio/wideo TV.
21-stykowe złącze SCART (standard CENELEC), w tym wejście audio/wideo, wejście RGB,
wybieralne wyjście audio/wideo oraz interfejs SmartLink.
Obsługiwane formaty: 1080p, 1080i, 720p, 576p, 576i, 480p, 480i
Y: 1 Vp-p, 75 omów, synchronizacja ujemna 0,3 V/P
P
R/CR: 0,7 Vp-p, 75 omów
Wejście audio (gniazdka uniwersalne typu phono): 500 mVrms, Impedancja: 47 kiloomów
Wideo: 1080/24p, 1080p, 1080i, 720p, 576p, 576i, 480p, 480i
Audio: Dwukanałowy liniowy PCM
32, 44,1 i 48 kHz, 16, 20 i 24 bity
Analogowe wejście audio (gniazdka uniwersalne typu phono): 500 mVrms,
Impedancja: 47 kiloomów (tylko HDMI IN 5)
Wejście PC (zobacz strona 53)
Wejście S-video (4-stykowe typu mini DIN)
Wejście wideo (gniazdko uniwersalne typu phono)
Wejście audio (gniazdka uniwersalne typu phono)
DIGITAL OUT (OPTICAL) (cyfrowe gniazdo optyczne)/Wyjście audio (gniazdka uniwersalne typu
phono)
Wejście PC (D-sub 15-stykowe) (zobacz strona 53)
G: 0,7 Vp-p, 75 omów, non Sync on Green/B: 0,7 Vp-p, 75 omów/
R: 0,7 Vp-p, 75 omów/HD: 1-5 Vp-p/VD: 1-5 Vp-p
Wejście PC audio (złącze miniaturowe)
Złącze słuchawek
Szczelina CAM (Moduł warunkowego dostępu)
Port USB
KDL-46X3500/
46X3000
KDL-52X3500 KDL-70X3500
B/CB: 0,7 Vp-p, 75 omów/
Informacje dodatkowe
ciąg dalszy
51
PL
Page 100

Nazwa modelu KDL-40X3500/
40X3000
KDL-46X3500/
46X3000
KDL-52X3500 KDL-70X3500
Zasilanie i inne
Zasilanie
Rozmiar ekranu
Rozdzielczość ekranu
Pobór mocy
Pobór mocy w trybie
oczekiwania*
Wymiary
(szer. × wys. ×
gł.)
(razem z
podstawą)
(bez
podstawy)
Waga (razem z
podstawą)
(bez
podstawy)
Dostarczone wyposażenie
Wyposażenie dodatkowe
220–240 V prądu zmiennego, 50 Hz
40 cali (W przybliż.
101,6 cm mierzone po
przekątnej)
1 920 punktów (w poziomie) × 1 080 linii (w pionie)
240 W 285 W 320 W 630 W
0,3 W 0,4 W
W przybliż. 1 111 × 717
× 322 mm
W przybliż. 1 111 × 657
× 123 mm (KDL40X3500)
W przybliż. 1 111 × 657
× 121 mm (KDL40X3000)
W przybliż. 31,0 kg W przybliż. 38,0 kg W przybliż. 49,0 kg W przybliż. 93,5 kg
W przybliż. 26,0 kg W przybliż. 33,0 kg W przybliż. 42,0 kg W przybliż. 80,5 kg
Zobacz „1: Sprawdzanie wyposażenia” na stronie 4.
Uchwyt do montażu naściennego SU-WL500
Stojak pod telewizor SU-FL62
Kolorowa ramka CRU-
40X1 (tylko KDL40X3000)
46 cali (W przybliż.
116,8 cm mierzone po
przekątnej)
W przybliż. 1 262 × 795
× 322 mm
W przybliż. 1 262 × 734
× 123 mm (KDL46X3500)
W przybliż. 1 262 × 734
× 121 mm (KDL46X3000)
Kolorowa ramka CRU46X1 (tylko KDL46X3000)
52 cali (W przybliż.
132,2 cm mierzone po
przekątnej)
W przybliż. 1 415 × 890
× 384 mm
W przybliż. 1 415 × 827
× 125 mm
70 cali (W przybliż.
177,8 cm mierzone po
przekątnej)
W przybliż. 1 842 ×
1 131 × 422 mm
W przybliż. 1 842 ×
1 073 × 150 mm
Zobacz w „KDL70X3500 Informacje i
czynności wstępne”.
* Podana moc pobierana w trybie oczekiwania jest osiągana, gdy odbiornik TV zakończy wymagane procesy
wewnętrzne.
Konstrukcja oraz dane techniczne mogą ulec zmianie bez powiadomienia.
52
PL
 Loading...