

Page 1
i-Manual
1
Basic Operations
Parts Description
Print
Font Size
Top Page
Watching TV
Enjoying
Movies/Music/Photos
Using Internet
Services and
Applications
Watching TV with
Friends Far and
Near
Using Other
Devices
Using BRAVIA
Sync Devices
Useful Functions
Connecting to the
Internet
KDL-48W605B/40W605B
Using Home
Network
Configuring
Various Settings
Troubleshooting
How to Use
Bookmarks
List of Contents© 2014 Sony Corporation
Page 2
i-Manual
2
Basic Operations
Basic Operations
Print
Top Page > Basic Operations
Font Size
Parts Description
Watching TV
Enjoying
Movies/Music/Photos
Using Internet
Services and
Applications
Watching TV with
Friends Far and
Near
Using Other
Devices
Using BRAVIA
Sync Devices
Useful Functions
How to Use Remote
Enjoy “Discover”
Home Menu Screen
Picture Adjustment
How to Use the i - Manual
Watch Connected Device
Enjoy Social Viewing
Using Applications
Connecting to the
Internet
Using Home
Network
Configuring
Various Settings
Troubleshooting
How to Use
Bookmarks
Top of Page
List of Contents© 2014 Sony Corporation
Page 3
i-Manual
3
Basic Operations
Parts Description
Print
Top Page > Parts Description
Font Size
Parts Description
Watching TV
Enjoying
Movies/Music/Photos
Using Internet
Services and
Applications
Watching TV with
Friends Far and
Near
Using Other
Devices
Using BRAVIA
Sync Devices
Useful Functions
Connecting to the
Internet
TV Set
Front
Control buttons on the rear
Terminals on the rear (bottom)
Terminals on the rear (center)
Terminals on the rear (right)
Remote Control
Top
Upper
Middle
Lower
Bottom
Finding Contents More Easily (“Discover” Screen)
Home Menu Screen
Using Home
Network
Configuring
Various Settings
Troubleshooting
How to Use
Bookmarks
Top of Page
List of Contents© 2014 Sony Corporation
Page 4
i-Manual
4
Basic Operations
Watching TV
Print
Top Page > Watching TV
Font Size
Parts Description
Watching TV
Enjoying
Movies/Music/Photos
Using Internet
Services and
Applications
Watching TV with
Friends Far and
Near
Using Other
Devices
Using BRAVIA
Sync Devices
Useful Functions
Selecting Channels
Enjoying Football More
Using the Program Guide
Using the TV Guide Search Function
Watching Twin Picture
Displaying picture- in- picture (PIP)
Displaying left- and-right pictures (P&P)
Changing Display Info/Pic. Size/Audio
Display information
Subtitles/Closed captions
Screen format/Wide mode
Audio (for analog mode)
Connecting to the
Internet
Using Home
Network
Configuring
Various Settings
Troubleshooting
How to Use
Bookmarks
Top of Page
List of Contents© 2014 Sony Corporation
Page 5
i-Manual
5
Basic Operations
Top Page > Enjoying Movies/Music/Photos
Enjoying Movies/Music/Photos
Print
Font Size
Parts Description
Watching TV
Enjoying
Movies/Music/Photos
Using Internet
Services and
Applications
Watching TV with
Friends Far and
Near
Using Other
Devices
Using BRAVIA
Sync Devices
Useful Functions
Enjoying Movies
Enjoying Music
Enjoying Photos
Connecting to the
Internet
Using Home
Network
Configuring
Various Settings
Troubleshooting
How to Use
Bookmarks
Top of Page
List of Contents© 2014 Sony Corporation
Page 6
i-Manual
6
Basic Operations
Print
Top Page > Using Internet Services and Applications
Font Size
Using Internet Services and Applications
Parts Description
Watching TV
Enjoying
Movies/Music/Photos
Using Internet
Services and
Applications
Watching TV with
Friends Far and
Near
Using Other
Devices
Using BRAVIA
Sync Devices
Useful Functions
Using Applications
Browsing Websites
Watching Internet Videos
Using Skype
Performing initial setup
Making a call
Connecting to the
Internet
Using Home
Network
Configuring
Various Settings
Troubleshooting
How to Use
Bookmarks
Top of Page
List of Contents© 2014 Sony Corporation
Page 7

i-Manual
7
Basic Operations
Print
Top Page > Watching TV with Friends Far and Near
Watching TV with Friends Far and Near
Font Size
Parts Description
Watching TV
Enjoying
Movies/Music/Photos
Using Internet
Services and
Applications
Watching TV with
Friends Far and
Near
Using Other
Devices
Using BRAVIA
Sync Devices
Useful Functions
Enjoying a Chat with Your Friends while Watching TV
Connecting to the
Internet
Using Home
Network
Configuring
Various Settings
Troubleshooting
How to Use
Bookmarks
Top of Page
List of Contents© 2014 Sony Corporation
Page 8
i-Manual
8
Basic Operations
Using Other Devices
Print
Top Page > Using Other Devices
Font Size
Parts Description
Watching TV
Enjoying
Movies/Music/Photos
Using Internet
Services and
Applications
Watching TV with
Friends Far and
Near
Using Other
Devices
Using BRAVIA
Sync Devices
Useful Functions
Connecting to the
Internet
BD/DVD Player
HDMI connection
Component video connection
Composite connection
Digital Still Camera/Camcorder
USB Device
PC
Audio System
HDMI connection
Optical audio connection
Audio cable connection
MHL Device (Smartphone, Tablet, etc.)
Wireless Subwoofer (Optional)
Playable File Formats (DLNA, USB devices, etc.)
Using Home
Network
Configuring
Various Settings
Troubleshooting
How to Use
Bookmarks
Top of Page
List of Contents© 2014 Sony Corporation
Page 9
i-Manual
9
Basic Operations
Top Page > Using BRAVIA Sync Devices
Using BRAVIA Sync Devices
Print
Font Size
Parts Description
Watching TV
Enjoying
Movies/Music/Photos
Using Internet
Services and
Applications
Watching TV with
Friends Far and
Near
Using Other
Devices
Using BRAVIA
Sync Devices
Useful Functions
Setting BRAVIA Sync
Using the Sync Menu
Setting Buttons to Control an HDMI/MHL Device
Displaying the BRAVIA Sync Device List
Connecting to the
Internet
Using Home
Network
Configuring
Various Settings
Troubleshooting
How to Use
Bookmarks
Top of Page
List of Contents© 2014 Sony Corporation
Page 10

i-Manual
10
Basic Operations
Useful Functions
Print
Top Page > Useful Functions
Font Size
Parts Description
Watching TV
Enjoying
Movies/Music/Photos
Using Internet
Services and
Applications
Watching TV with
Friends Far and
Near
Using Other
Devices
Using BRAVIA
Sync Devices
Useful Functions
Picture/Sound Auto Adjustment
Selecting a picture and sound setting suitable for the
content
Adding Favorite Applications
Using Search Function
Current View Information Search
Keyword Search
Saving Power Consumption
Saving power by picture brightness
Turning the TV off by monitoring idle time
Using Clock/Timers
Setting the current time manually
Setting the on timer
Connecting to the
Internet
Using Home
Network
Configuring
Various Settings
Troubleshooting
How to Use
Bookmarks
Setting the sleep timer
Top of Page
List of Contents© 2014 Sony Corporation
Page 11
i-Manual
11
Basic Operations
Connecting to the Internet
Print
Top Page > Connecting to the Internet
Font Size
Parts Description
Watching TV
Enjoying
Movies/Music/Photos
Using Internet
Services and
Applications
Watching TV with
Friends Far and
Near
Using Other
Devices
Using BRAVIA
Sync Devices
Useful Functions
Wireless Connection (Built- in Wireless LAN)
Wired Connection (with a LAN Cable)
Setting IPv6
Connecting to the
Internet
Using Home
Network
Configuring
Various Settings
Troubleshooting
How to Use
Bookmarks
Top of Page
List of Contents© 2014 Sony Corporation
Page 12
i-Manual
12
Basic Operations
Using Home Network
Print
Top Page > Using Home Network
Font Size
Parts Description
Watching TV
Enjoying
Movies/Music/Photos
Using Internet
Services and
Applications
Watching TV with
Friends Far and
Near
Using Other
Devices
Using BRAVIA
Sync Devices
Useful Functions
Playing Content on a PC
Home Network Settings
Enabling the renderer function
Allowing/blocking access from controller
Making advanced renderer settings
Selecting servers to display
Checking the server connection
Connecting via Wi - Fi Direct (without a wireless router)
Playing Content with the Renderer Function
Using a Smartphone/Tablet as a Remote
Displaying the Smartphone’s Screen on the TV (Screen
mirroring)
Sharing Photos
Connecting to the
Internet
Using Home
Network
Configuring
Various Settings
Troubleshooting
How to Use
Bookmarks
Top of Page
List of Contents© 2014 Sony Corporation
Page 13
i-Manual
13
Basic Operations
Top Page > Configuring Various Settings
Configuring Various Settings
Print
Font Size
Parts Description
Watching TV
Enjoying
Movies/Music/Photos
Using Internet
Services and
Applications
Watching TV with
Friends Far and
Near
Using Other
Devices
Using BRAVIA
Sync Devices
Useful Functions
Connecting to the
Internet
Using Home
Network
Picture/Screen Settings
Selecting picture mode
Adjusting various picture settings (e.g. picture
brightness/color)
Setting the screen size/position
Sound Settings
Adjusting various sound settings (e.g.
bass/treble/balance)
Setting the sound according to the TV position
Channel Settings
Checking digital signal information
Checking analog signal information
Selecting the cable/antenna signal
Tuning channels automatically
Adding digital channels
Setting channels to surf with the CH +/- buttons
Configuring
Various Settings
Troubleshooting
How to Use
Bookmarks
Editing analog channel labels
Fine adjusting analog channels
Reducing digital signal noise
Setting the digital channel tuning mode
Program Information & Service Settings
Setting the information banner
Setting closed captions
Setting Parental Control
Setting the parental lock password
Page 14

Setting a viewing restriction
Blocking specific channels
14
General Settings
Turning off the key tone of remote control operations
Turning off the start-up logo
Setting the menu language
External Sound Output Settings
Selecting speakers to output sound
Outputting sound from headphones or another audio
system
Controlling the volume of an audio system with the
TV’s remote control
Setting the headphone speaker link
Setting sound for Home Theater Control
Running Initial Set - up
Support
Checking Sony contact information
Uploading operation history
Software Update
Updating broadcast/service software
Updating the TV’s software
Top of Page
List of Contents© 2014 Sony Corporation
Page 15
i-Manual
15
Basic Operations
Troubleshooting
Print
Top Page > Troubleshooting
Font Size
Parts Description
Watching TV
Enjoying
Movies/Music/Photos
Using Internet
Services and
Applications
Watching TV with
Friends Far and
Near
Using Other
Devices
Using BRAVIA
Sync Devices
Useful Functions
Connecting to the
Internet
Self Diagnostics
Power Symptoms
Picture/Screen Symptoms
Broadcast Reception Symptoms
Sound Symptoms
Connected Device Symptoms
Network Connectivity Test Results
Network/Application Symptoms
Home Network Symptoms
Remote Control Symptoms
Screen mirroring Symptoms
TV SideView Symptoms
Photo Share Symptoms
Notes
Using Home
Network
Configuring
Various Settings
Troubleshooting
How to Use
Bookmarks
Top of Page
List of Contents© 2014 Sony Corporation
Page 16
i-Manual
16
Basic Operations
How to Use Bookmarks
Print
Top Page > How to Use Bookmarks
Font Size
Parts Description
Watching TV
Enjoying
Movies/Music/Photos
Using Internet
Services and
Applications
Watching TV with
Friends Far and
Near
Using Other
Devices
Using BRAVIA
Sync Devices
Useful Functions
Connecting to the
Internet
Using Home
Network
Configuring
Various Settings
You can save frequently viewed pages in this manual. Use the color
buttons indicated at the bottom of the screen.
To save a page
In the page to bookmark, press the yellow button that corresponds to
[Add Bookmark] at the bottom of the screen.
(When using the Touchpad Remote Control, press the Control Bar (
slide to highlight the yellow button, then press the touchpad to select.)
To access the bookmarked page
Press the green button that corresponds to [Show Bookmark] at the
bottom of the screen to display the bookmark list. (When using the
Touchpad Remote Control, press the Control Bar (
), slide the
touchpad to highlight the green button, then press the touchpad to
select.) Select the desired title.
To return to the previous screen
),
Troubleshooting
How to Use
Bookmarks
Press the RETURN button.
To remove a bookmark
In a bookmarked page, press the yellow button that corresponds to
[Remove Bookmark] at the bottom of the screen.
(When using the Touchpad Remote Control, press the Control Bar ( ),
slide to highlight the yellow button, then press the touchpad to select.)
Top of Page
List of Contents© 2014 Sony Corporation
Page 17
i-Manual
17
Basic Operations
How to Use Remote
Enjoy “Discover”
Home Menu Screen
Picture Adjustment
How to Use the i-Manual
Watch Connected Device
Enjoy Social Viewing
Using Applications
Parts Description
Print
Top Page > List of Contents
Font Size
Top of Page
TV Set
Front
Control buttons on the rear
Terminals on the rear (bottom)
Terminals on the rear (center)
Terminals on the rear (right)
Remote Control
Top
Upper
Middle
Lower
Bottom
Finding Contents More Easily (“Discover” Screen)
Home Menu Screen
Top of Page
Watching TV
Page 18

Selecting Channels
Enjoying Football More
18
Using the Program Guide
Using the TV Guide Search Function
Watching Twin Picture
Displaying picture -in-picture (PIP)
Displaying left -and-right pictures (P&P)
Changing Display Info/Pic. Size/Audio
Display information
Subtitles/Closed captions
Screen format/Wide mode
Audio (for analog mode)
Enjoying Movies/Music/Photos
Enjoying Movies
Top of Page
Enjoying Music
Enjoying Photos
Using Internet Services and Applications
Using Applications
Browsing Websites
Watching Internet Videos
Using Skype
Performing initial setup
Making a call
Watching TV with Friends Far and Near
Enjoying a Chat with Your Friends while Watching TV
Top of Page
Top of Page
Using Other Devices
BD/DVD Player
HDMI connection
Top of Page
Page 19

Component video connection
Composite connection
19
Digital Still Camera/Camcorder
USB Device
PC
Audio System
HDMI connection
Optical audio connection
Audio cable connection
MHL Device (Smartphone, Tablet, etc.)
Wireless Subwoofer (Optional)
Playable File Formats (DLNA, USB devices, etc.)
Using BRAVIA Sync Devices
Setting BRAVIA Sync
Top of Page
Using the Sync Menu
Setting Buttons to Control an HDMI/MHL Device
Displaying the BRAVIA Sync Device List
Useful Functions
Picture/Sound Auto Adjustment
Selecting a picture and sound setting suitable for the content
Adding Favorite Applications
Using Search Function
Current View Information Search
Keyword Search
Saving Power Consumption
Saving power by picture brightness
Turning the TV off by monitoring idle time
Top of Page
Using Clock/Timers
Setting the current time manually
Setting the on timer
Setting the sleep timer
Top of Page
Page 20

Connecting to the Internet
20
Wireless Connection (Built-in Wireless LAN)
Wired Connection (with a LAN Cable)
Setting IPv6
Using Home Network
Playing Content on a PC
Home Network Settings
Enabling the renderer function
Allowing/blocking access from controller
Making advanced renderer settings
Selecting servers to display
Checking the server connection
Connecting via Wi-Fi Direct (without a wireless router)
Top of Page
Playing Content with the Renderer Function
Using a Smartphone/Tablet as a Remote
Displaying the Smartphone’s Screen on the TV (Screen mirroring)
Sharing Photos
Configuring Various Settings
Picture/Screen Settings
Selecting picture mode
Adjusting various picture settings (e.g. picture brightness/color)
Setting the screen size/position
Sound Settings
Adjusting various sound settings (e.g. bass/treble/balance)
Setting the sound according to the TV position
Channel Settings
Top of Page
Checking digital signal information
Checking analog signal information
Selecting the cable/antenna signal
Tuning channels automatically
Adding digital channels
Page 21

Setting channels to surf with the CH +/- buttons
Editing analog channel labels
21
Fine adjusting analog channels
Reducing digital signal noise
Setting the digital channel tuning mode
Program Information & Service Settings
Setting the information banner
Setting closed captions
Setting Parental Control
Setting the parental lock password
Setting a viewing restriction
Blocking specific channels
General Settings
Turning off the key tone of remote control operations
Turning off the start-up logo
Setting the menu language
External Sound Output Settings
Selecting speakers to output sound
Outputting sound from headphones or another audio system
Controlling the volume of an audio system with the TV’s remote control
Setting the headphone speaker link
Setting sound for Home Theater Control
Running Initial Set-up
Support
Checking Sony contact information
Uploading operation history
Software Update
Updating broadcast/service software
Updating the TV’s software
Top of Page
Troubleshooting
Self Diagnostics
Power Symptoms
Picture/Screen Symptoms
Broadcast Reception Symptoms
Page 22

Sound Symptoms
Connected Device Symptoms
22
Network Connectivity Test Results
Network/Application Symptoms
Home Network Symptoms
Remote Control Symptoms
Screen mirroring Symptoms
TV SideView Symptoms
Photo Share Symptoms
Notes
Top of Page
List of Contents© 2014 Sony Corporation
Page 23
i-Manual
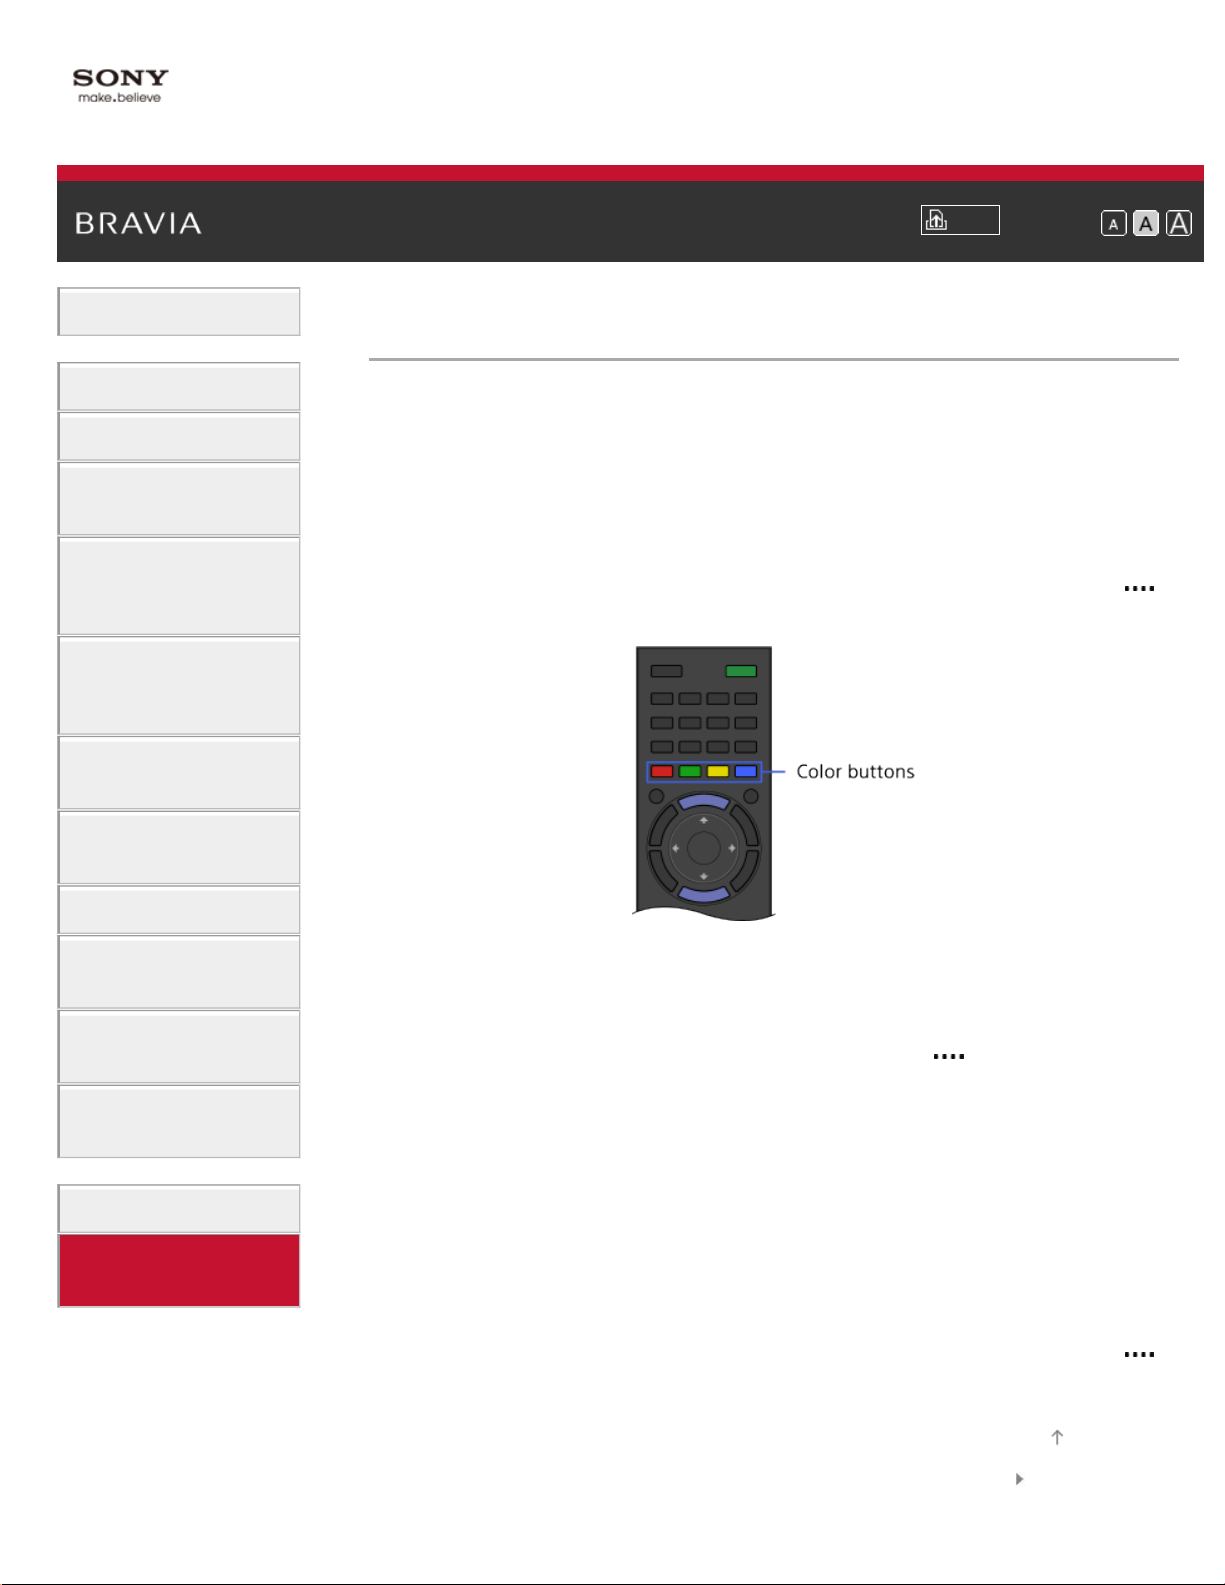
Press the color button that corresponds to the function you want to use.
23
Basic Operations
Parts Description
How to Use Remote
Print
Top Page > Basic Operations > How to Use Remote
Font Size
Watching TV
Enjoying
Movies/Music/Photos
Using Internet
Services and
Applications
Watching TV with
Friends Far and
Near
Using Other
Devices
Using BRAVIA
Sync Devices
Useful Functions
Connecting to the
Internet
Using Home
Network
Configuring
Various Settings
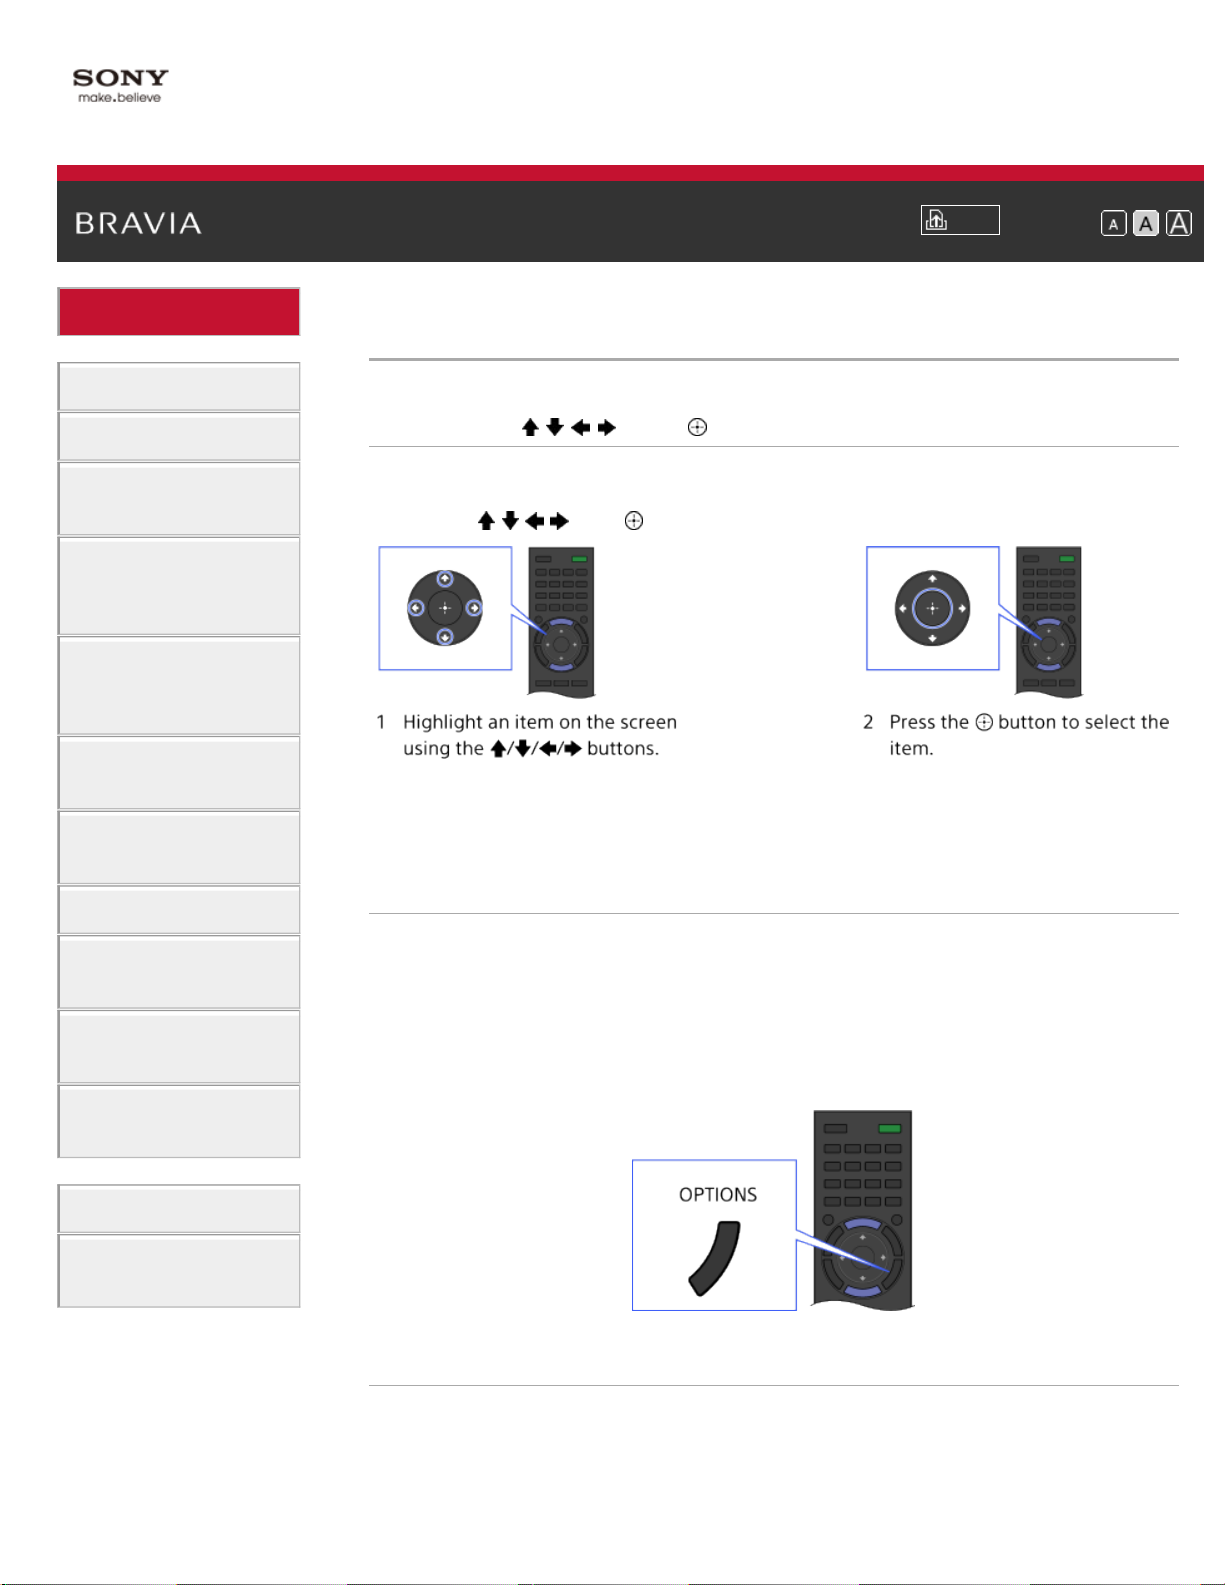
Using the / / / and Buttons
Basic operation of this TV’s functions and settings can be made by
using the
/ / / and buttons.
To return to the previous screen
Press the RETURN button.
OPTIONS button
By pressing the OPTIONS button, the Options Menu appears and
provides quick access to the functions that are available for the currently
displayed screen. (The items in the Options Menu differ depending on
the selected screen.) This provides faster access to functions than from
the Home Menu.
Troubleshooting
How to Use
Bookmarks
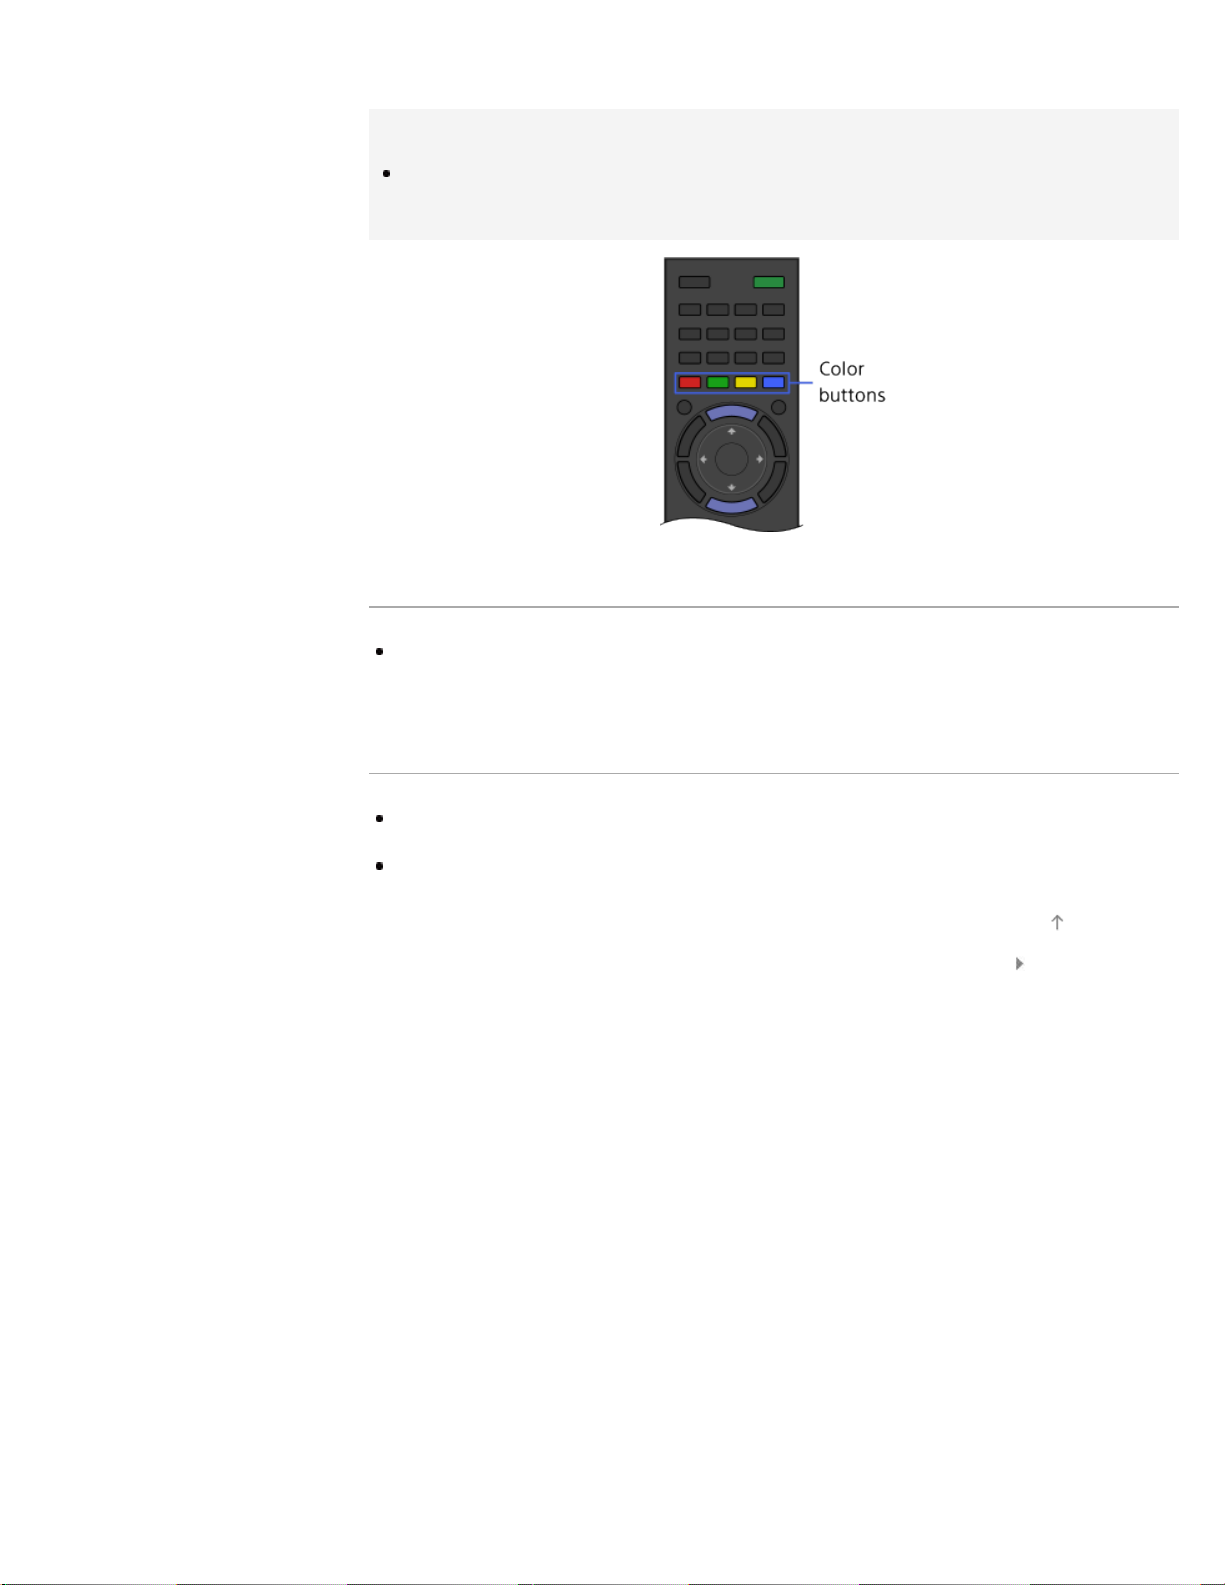
Operating Functions by the Color Buttons
The color buttons and available functions are indicated at the bottom of
the screen.
Page 24
The available functions differ depending on the screen.
24
Tips
The illustration to the right is an example. The order of the color buttons
varies depending on your region/country.
Notes
Your TV does not support Touchpad Remote Control operations described
in this i-Manual.
Related Information
Home Menu Screen
How to Use the i-Manual
Top of Page
List of Contents© 2014 Sony Corporation
Page 25
i-Manual
25
Basic Operations
Parts Description
Print
Top Page > Parts Description > Finding Contents More Easily (“Discover” Screen)
Font Size
Finding Contents More Easily (“Discover” Screen)
Watching TV
Enjoying
Movies/Music/Photos
Using Internet
Services and
Applications
Watching TV with
Friends Far and
Near
Using Other
Devices
Using BRAVIA
Sync Devices
Useful Functions
Connecting to the
Internet
Overview
You can use Discover to search for content (such as TV programs,
Internet contents, etc.). Contents that appear in Discover vary
depending on your model/region/country.
Steps
1.
Press the DISCOVER button to launch the Discover app.
(When using the Touchpad Remote Control, touch and slide up your
finger from the bottom area.)
Using Home
Network
Configuring
Various Settings
Troubleshooting
How to Use
Bookmarks
2. Highlight the desired category using the / buttons.
(When using the Touchpad Remote Control, flick up/down.)
3. Highlight the desired item using the / buttons, then press the
button to select.
(When using the Touchpad Remote Control, slide left/right to
highlight the item, then press the touchpad to select.)
The selected content is displayed.
To change the Discover settings
To change the Discover settings, press the OPTIONS button while
Discover is displayed, then select the desired item (e.g. [Customize
Discover] and [Category Setup]).
Page 26

Tips
26
Some option settings require the TV’s clock to be set.
Top of Page
List of Contents© 2014 Sony Corporation
Page 27
i-Manual
27
Basic Operations
Parts Description
Home Menu Screen
Print
Top Page > Parts Description > Home Menu Screen
Font Size
Watching TV
Enjoying
Movies/Music/Photos
Using Internet
Services and
Applications
Watching TV with
Friends Far and
Near
Using Other
Devices
Using BRAVIA
Sync Devices
Useful Functions
Connecting to the
Internet
Using Home
Network
Overview
The Home Menu can be displayed by pressing the HOME button.
Categories such as
[Channel], [Movies] and [Apps] are
displayed at the top of the Home Menu. You can play back content by
selecting its thumbnail in a subcategory. You can also use functions
(such as setting change) by selecting its icon. The number of categories
and available items vary depending on your region/country.
Steps
1.
Press the HOME button.
2. Select the desired category using the / buttons.
(When using the Touchpad Remote Control, slide left/right.)
Configuring
Various Settings
Troubleshooting
How to Use
Bookmarks
3. Press the button, then select the desired subcategory using the /
buttons.
(When using the Touchpad Remote Control, slide down, then slide
left/right.)
When you move the cursor beyond the left/right edge of the
subcategory, the next subcategory is displayed.
Page 28
4. Select the thumbnail of the desired content.
28
The content is played back.
Categories in the Home Menu
[Channel]
You can view thumbnails of live and future broadcasts and recorded
content. Select the desired subcategory to change the source. You can
also change the broadcast system by using [Channel List] at the bottom
of the Home Menu.
[Movies]
You can watch movies from online movie service providers, connected
USB devices, or your home network. Select the desired subcategory to
change the source.
[Album]
You can view photos from online service providers, connected USB
devices, or your home network. Select the desired subcategory to
change the source.
[Music]
You can play back music content from online music service providers,
connected USB devices, or your home network. Select the desired
subcategory to change the source.
[Apps]
You can launch applications. Thumbnails of featured applications
([Featured]) and your favorite applications ([My Apps]) are displayed. To
view all applications, select [All Apps] at the bottom of the Home Menu.
Tips
Sub categories may be subject to change without notice.
Icons in the Home Menu
[Search]
You can input a keyword to search for content. You can also select
keywords searched in the past.
(The availability of this function depends on your region/country.)
Page 29
[Inputs]
You can select an input device connected to the TV.
29
[Media Server]
You can select a media server (e.g. USB flash drive, home network) to
browse its content using the Media Player.
[Settings]
You can change TV settings (e.g. Picture & Display, Sound, Channel).
[Help]
You can view information about self diagnostics and customer support.
You can also view this i-Manual.
/ / [Network Status]
You can view the network connection status.
You can view a description of the network connection status by selecting
the icon.
: Connected to a wired LAN.
: Connected to a wireless LAN. The number of wave lines indicates the
signal strength.
: Connected to a mobile network. The number of bars indicates the
signal strength. (This function is available depending on your
region/country.)
The following marks are added to the icon to indicate a specific status.
: This mark indicates a network connection error. This mark also
appears when the network setup was not completed. (In this case, the
tooltip shows [No network setup].)
: This mark indicates that the TV is connected to your home network
but cannot connect to the Internet.
: This mark indicates that the TV is temporarily disconnected from your
network, or currently trying to connect to the network. If the network is
correctly set up, the connection will recover automatically.
If
or is displayed, check your network settings and status. Press the
HOME button, then select
[Settings] → [Network] → [Network
Setup] → [View Network settings and status].
Related Information
Enjoying Movies
Enjoying Music
Enjoying Photos
Using Applications
Top of Page
List of Contents© 2014 Sony Corporation
Page 30
i-Manual
30
Basic Operations
Print
Top Page > Configuring Various Settings > Adjusting various picture settings (e.g. picture
Font Size
brightness/color)
Parts Description
Watching TV
Enjoying
Movies/Music/Photos
Using Internet
Services and
Applications
Watching TV with
Friends Far and
Near
Using Other
Devices
Using BRAVIA
Sync Devices
Useful Functions
Adjusting various picture settings (e.g. picture
brightness/color)
Overview
You can adjust various picture settings, such as picture
brightness/color, etc.
Steps
1.
Press the HOME button, then select [Settings].
Connecting to the
Internet
Using Home
Network
Configuring
Various Settings
Troubleshooting
How to Use
Bookmarks
2. Select [Picture & Display] → [Picture Adjustments] → the desired
option.
Available Options
[Setting Memory]
Applies custom picture settings to the current input or to common
memory shared by other inputs. To use the same picture settings for
more than one input, select [Common] and adjust the picture settings.
[Picture Mode]
Enables selection of a picture mode according to your preference.
Press the
Control) to jump to “Selecting picture mode” for details.
button (or press the touchpad on the Touchpad Remote
Page 31

Jump to the page
[Reset]
31
Resets all the [Picture Adjustments] settings to the factory settings
excluding [Setting Memory], [Picture Mode] and [Advanced Settings].
[Backlight]
Adjusts the brightness of the backlight. Reducing the brightness of the
screen will reduce the power consumption.
[Picture]
Adjusts picture contrast.
[Brightness]
Adjusts the brightness of the picture.
[Color]
Adjusts color intensity.
[Hue]
Adjusts green and red tones.
([Hue] is available depending on the color system.)
[Color Temperature]
Adjusts the whiteness of the picture.
[Cool]: Gives white colors a bluish tint.
[Neutral]: Gives white colors a neutral tint.
[Warm 1]/[Warm 2]: Gives white colors a reddish tint. [Warm 2] gives a
redder tint than [Warm 1].
[Sharpness]
Adjusts the sharpness of the picture.
[Noise Reduction]
[Auto]: Automatically reduces picture noise.
[High]/[Medium]/[Low]: Modifies the effect of noise reduction.
[Intelligent]: Automatically optimizes picture quality with noise reduction.
(This function is available only for the analog RF input and the
composite video input.)
It is recommended to select [Intelligent] for a low quality analog input
signal.
[Off]: Turns off the function.
[MPEG Noise Reduction]
[Auto]: Automatically reduces noise in MPEG-compressed videos.
[High]/[Medium]/[Low]: Reduces noise in MPEG-compressed videos.
[Off]: Turns off the function.
[Dot Noise Reduction]
Page 32

[Auto]: Automatically reduces dot noise.
[Off]: Turns off the function.
32
[Reality Creation]
Adjusts detail and noise for a realistic picture.
[Resolution]
Adjusts the detail and clarity of the picture.
[Noise Filtering]
Adjusts to reduce noise of the picture.
[Smooth Gradation]
Creates smooth gradations on flat surfaces of the picture.
[CineMotion]
[Auto]: Displays film-based content with picture expression close to the
original by applying a film-specific process.
[Off]: Turns off the function.
(If the image contains irregular signals or too much noise, this setting is
automatically turned off even if [Auto] is selected.)
[Advanced Settings]
[Reset]: Resets all [Advanced Settings] to the default values (except for
[White Balance]).
[Black Corrector]: Enhances black areas of the picture for stronger
contrast.
[Adv. Contrast Enhancer]: Automatically optimizes [Backlight] and
[Picture] according to the brightness of the screen. This setting is
effective for dark images and scenes.
[Gamma]: Adjusts the balance between light and dark areas of the
picture.
[Auto Light Limiter]: Reduces glare such as in scenes where the entire
screen is white.
[Clear White]: Emphasizes whiteness in the picture.
[Live Color]: Makes colors more vivid.
[White Balance]: Adjusts the red, green and blue level of the picture.
[Detail Enhancer]: Enhances the details of the picture.
[Edge Enhancer]: Enhances the edges of the picture.
[Skin Naturalizer]: Detects faces and reproduces natural skin tone.
[Display Speed Preference]: Reduces the picture delay to optimize the
response to game controllers/PC mouse operation by selecting [On].
[LED Motion Mode]: Reduces motion blur.
Top of Page
List of Contents© 2014 Sony Corporation
Page 33

i-Manual
highlight a title, then press the touchpad to select.)
33
Basic Operations
Parts Description
Top Page > Basic Operations > How to Use the i-Manual
How to Use the i - Manual
Print
Font Size
Watching TV
Enjoying
Movies/Music/Photos
Using Internet
Services and
Applications
Watching TV with
Friends Far and
Near
Using Other
Devices
Using BRAVIA
Sync Devices
Useful Functions
Connecting to the
Internet
Searching for Information
This i- Manual explains how to use the TV's functions. On the main page
of the i -Manual, you can select the desired method to search for
information.
Table of Contents: Searches from a title list.
Troubleshooting: Searches for solutions to
problems.
Index: Searches by function/feature name.
Select from the
/ / tabs.
Tips
Using Home
Network
Configuring
Various Settings
Troubleshooting
How to Use
Bookmarks
The supplied paper manual contains important information such as
cautions and operating instructions to prevent accidents. Read the
supplied paper manual thoroughly for safe use.
Steps
Procedure example: “Table of Contents” search
1. In the main page of this manual, highlight the “Table of Contents” tab
using the
(When using the Touchpad Remote Control, slide left/right.)
/ buttons.
2. Highlight a title on the left of the screen using the / buttons, then
press the
(When using the Touchpad Remote Control, slide up/down to
button to select.
Page 34

The titles on the right side of the screen change according to the title
34
selected on the left side of the screen.
3. Highlight a title on the right side of the screen using the / buttons,
then press the
(When using the Touchpad Remote Control, slide up/down to
highlight a title, then press the touchpad to select.)
The page of the selected title appears.
button to select.
4. Press the button to proceed to the next page.
To return to the previous page, press the
(When using the Touchpad Remote Control, slide left/right.)
button.
To go to the main page
Press the corresponding color button indicated at the bottom of the
screen.
(When using the Touchpad Remote Control, press the Control Bar ( )
to open the Screen Key Pad, then select the corresponding color
button.)
To close the i-Manual
Press the i - MANUAL button.
(When using the Touchpad Remote Control, press the Control Bar (
to open the Screen Key Pad, then select the i-MANUAL button.)
)
If you press the i -MANUAL button again, the previously displayed page
reappears. If you press the i -MANUAL button after the TV is turned off
and on again, the main page appears.
Displaying the Page Again While Operating the TV
Press the i - MANUAL button repeatedly to toggle between the TV screen
and the previously displayed page of the i - Manual. In this way, you can
refer to the i-Manual while operating the TV.
(When using the Touchpad Remote Control, press the Control Bar (
slide the touchpad to highlight the i - MANUAL button, then press the
touchpad to select.)
),
Page 35

Saving Frequently Viewed Pages (Bookmark)
35
You can save frequently viewed pages in this manual using a color
button. For details on how to bookmark, press the color button that
corresponds to [Show Bookmark] at the bottom of the screen.
(When using the Touchpad Remote Control, press the Control Bar (
slide the touchpad to highlight the color button that corresponds to
[Show Bookmark], then press the touchpad to select.)
Top of Page
List of Contents© 2014 Sony Corporation
),
Page 36

i-Manual
36
Basic Operations
Parts Description
Top Page > Basic Operations > Watch Connected Device
Watch Connected Device
Print
Font Size
Watching TV
Enjoying
Movies/Music/Photos
Using Internet
Services and
Applications
Watching TV with
Friends Far and
Near
Using Other
Devices
Using BRAVIA
Sync Devices
Useful Functions
Connecting to the
Internet
Overview
Connect various devices (e.g. BD recorder, digital still camera, PC,
smartphone, tablet) to the TV. You can enjoy playing content such as
pictures and music on the connected device.
There are two ways to connect.
Using Home
Network
Configuring
Various Settings
Troubleshooting
How to Use
Bookmarks
Top of Page
List of Contents© 2014 Sony Corporation
Page 37

i-Manual
37
Basic Operations
Print
Top Page > Watching TV with Friends Far and Near > Enjoying a Chat with Your Friends
Font Size
while Watching TV
Parts Description
Watching TV
Enjoying
Movies/Music/Photos
Using Internet
Services and
Applications
Watching TV with
Friends Far and
Near
Using Other
Devices
Using BRAVIA
Sync Devices
Useful Functions
Enjoying a Chat with Your Friends while Watching
TV
Overview
Social Viewing allows you to use your social network services while
watching content on your TV. Enjoy chatting with your friends and check
what others are saying about the show from on - screen comments.
(Features that can be used with Social Viewing vary depending on your
model/region/country.)
Steps
Connecting to the
Internet
Using Home
Network
Configuring
Various Settings
Troubleshooting
How to Use
Bookmarks
1.
Connect to a broadband Internet connection.
Press the
button to jump to the title list. Then, press the button
again to go to “Connecting to the Internet” for details.
(When using the Touchpad Remote Control, press the touchpad.
Then, press the touchpad again to go to “Connecting to the Internet”
for details.)
2. Press the SOCIAL VIEW button to start Social Viewing.
The Social Viewing screen appears. (The image size of the program
you are watching is reduced and the tweets area appears.)
3. Press the SOCIAL VIEW button again to open the menu screen,
then log in to the desired social network service.
Page 38

After logging in, your account name is displayed next to the service
name in the menu screen.
38
To stop Social Viewing, while the Social Viewing screen is displayed,
press the SOCIAL VIEW button to open the menu screen, then press
the SOCIAL VIEW button again.
To view the program in full screen
Press the SOCIAL VIEW button to open the menu screen, then select
[Layout] → [Screen:] → [Overlay].
To enter a search keyword
The social network service area shows tweets related to the program
you are watching. You can also enter a search keyword. While the
Social Viewing screen is displayed, press the SOCIAL VIEW button to
open the menu screen, select [Set Twitter Search Keyword], then enter
the desired keyword.
Tips
You can enjoy Twitter without logging in; however, you can use
additional features of Twitter and enjoy it more if you log in to it.
Notes
If you do not have a social network service account, create one using a
computer.
3D images cannot be displayed during Social Viewing.
[Wide Mode] is changed to [Full] during Social Viewing.
When you launch the Discover app during Social Viewing, some
categories will not be displayed.
A BRAVIA Sync device cannot be controlled via the TV’s remote control
during Social Viewing. Use the device’s own remote control to control it.
Top of Page
List of Contents© 2014 Sony Corporation
Page 39

i-Manual
39
Basic Operations
Parts Description
Top Page > Using Internet Services and Applications > Using Applications
Using Applications
Print
Font Size
Watching TV
Enjoying
Movies/Music/Photos
Using Internet
Services and
Applications
Watching TV with
Friends Far and
Near
Using Other
Devices
Using BRAVIA
Sync Devices
Useful Functions
Connecting to the
Internet
Using Home
Network
Configuring
Various Settings
Troubleshooting
How to Use
Bookmarks
Overview
Press the SEN/APPS button or select [Apps] from the Home Menu to
open the Apps category, which serves as a gateway to Internet content.
From this screen, you can access various services and applications.
The items on the Apps category differ depending on your
region/country, and are subject to change.
Steps
1.
Connect to a broadband Internet connection.
Press the
button to jump to the title list. Then, press the button
again to go to “Connecting to the Internet” for details.
(When using the Touchpad Remote Control, press the touchpad.
Then, press the touchpad again to go to “Connecting to the Internet”
for details.)
2. Press the SEN/APPS button or select [Apps] from the Home Menu
to open the Apps category.
3. Select the desired thumbnail to run the application.
You can select [All Apps] at the bottom of the Home Menu to view all
applications.
Tips
Depending on the service, registration may be required before use.
To add an application to [My Apps]
Page 40

Select the + icon to view all applications, select the desired application,
40
then select [Add to My Apps]. Or, select [All Apps] at the bottom of the
Home Menu to view all applications, select the desired application, then
select [Add to My Apps].
Top of Page
List of Contents© 2014 Sony Corporation
Page 41

i-Manual
41
Basic Operations
Parts Description
Watching TV
Enjoying
Movies/Music/Photos
Using Internet
Services and
Applications
Watching TV with
Friends Far and
Near
Using Other
Devices
Using BRAVIA
Sync Devices
Useful Functions
Print
Top Page > Parts Description > Front
Font Size
Front
Sensors and Illumination
Remote control sensor
Receives signals from the remote control.
Point the remote control at the Sony logo to operate the TV.
Do not place anything near the sensor. Doing so may affect its
function.
Illumination LED
The Illumination LED lights up or blinks in different colors according to
the status of the TV.
Connecting to the
Internet
Using Home
Network
Configuring
Various Settings
Troubleshooting
How to Use
Bookmarks
Blinking
(Blinking speed depends on status)
The TV is receiving an incoming call *2
The TV is in Picture off mode
Software update is in progress
Blinking
When the TV and a mobile device (e.g. smartphone) are connected
wirelessly
*1
During recording (including SCART REC) or TV is in pause mode *2
*1
The following Timer functions are set:
Page 42

On Timer, Sleep Timer, Reminder (*2), REC Timer (*2)
42
The TV is turned on
For simultaneous conditions, the upper condition in the table has priority.
The Illumination LED does not light up when the TV is in standby mode,
except when a recording is in progress or the timer is set.
*1: If [Simple Response] is selected in [Illumination LED], the
illumination LED does not light continuously but blinks as feedback for
operations.
*2: This function is available depending on your region/country.
Top of Page
List of Contents© 2014 Sony Corporation
Page 43

i-Manual
43
Basic Operations
Parts Description
Watching TV
Enjoying
Movies/Music/Photos
Using Internet
Services and
Applications
Top Page > Parts Description > Control buttons on the rear
Control buttons on the rear
Print
Font Size
Watching TV with
Friends Far and
Near
Using Other
Devices
Using BRAVIA
Sync Devices
Useful Functions
Connecting to the
Internet
Using Home
Network
Configuring
Various Settings
Troubleshooting
(Power)
Press to turn on the TV or to enter standby mode.
CH +/– (Channel)/ / , +/– (Volume)/ /
Press to select the next (+) or previous (–) channel.
Press to adjust the volume.
In the TV Home Menu, these buttons will work as
.
(Input select)/ (Select/Confirm)
Press to display a list of inputs.
To select a connected device input, press this button
repeatedly.
In the TV Home Menu, this button will work as
(select/confirm).
HOME
Press to display the TV Home Menu.
/ / /
How to Use
Bookmarks
Top of Page
List of Contents© 2014 Sony Corporation
Page 44

i-Manual
44
Basic Operations
Parts Description
Watching TV
Enjoying
Movies/Music/Photos
Using Internet
Services and
Applications
Watching TV with
Friends Far and
Near
Using Other
Devices
Using BRAVIA
Sync Devices
Useful Functions
Connecting to the
Internet
Using Home
Network
Configuring
Various Settings
Top Page > Parts Description > Terminals on the rear (bottom)
Terminals on the rear (bottom)
RF input that connects to your cable or antenna.
HDMI IN 2/3/4
HDMI (High-Definition Multimedia Interface) provides an
uncompressed, all-digital audio/video interface between this
TV and an HDMI-equipped audio/video device. In addition,
when you connect a BRAVIA Sync-compatible device,
communication with the connected device is supported.
Be sure to use an authorized HIGH SPEED HDMI cable
bearing the HDMI logo.
If connecting a digital audio system that is compatible with
Audio Return Channel (ARC) technology, use HDMI IN 2. If
not, an additional connection with DIGITAL AUDIO OUT
(OPTICAL) is necessary.
Print
Font Size
Troubleshooting
How to Use
Bookmarks
Top of Page
List of Contents© 2014 Sony Corporation
Page 45

i-Manual
45
Basic Operations
Parts Description
Watching TV
Enjoying
Movies/Music/Photos
Using Internet
Services and
Applications
Watching TV with
Friends Far and
Near
Top Page > Parts Description > Terminals on the rear (center)
Terminals on the rear (center)
Print
Font Size
Using Other
Devices
Using BRAVIA
Sync Devices
Useful Functions
Connecting to the
Internet
Using Home
Network
Configuring
Various Settings
Troubleshooting
How to Use
Bookmarks
DC IN 19.5 V
Connects the supplied mains adapter.
Depending on the model of your TV, it may not be equipped
with this jack. In this case, the mains adaptor will also not be
supplied.
DIGITAL AUDIO OUT (OPTICAL)
You can listen to the TV’s sound on a connected home theater
system with digital audio input (optical).
VIDEO IN 2, / COMPONENT IN
This input can be used as a composite video input or as a
component video input. When connecting a mono device,
connect to the
For composite connection, use
signals, and also connect to
IN for audio signals.
For component connection, use Y, PB, PR for video signals,
and also connect to
The TV will automatically detect and switch between
VIDEO IN 2 and / COMPONENT IN. To manually set
the input type, press the HOME button, then select
[Settings] → [Channels & Inputs]/[Channels,
Inputs & Ginga] → [Video 2/Component Selection].
L (MONO) audio jack.
VIDEO IN 2 for video
(L/R) of / COMPONENT
(L/R) for audio signals.
Page 46

/ VIDEO IN 1
Connect with a composite video cable. When connecting mono
46
equipment, connect to the L (MONO) audio jack.
LAN
Connects to an existing network using an Ethernet cable.
Top of Page
List of Contents© 2014 Sony Corporation
Page 47

i-Manual
47
Basic Operations
Parts Description
Watching TV
Enjoying
Movies/Music/Photos
Using Internet
Services and
Applications
Watching TV with
Friends Far and
Near
Using Other
Devices
Using BRAVIA
Sync Devices
Useful Functions
Print
Top Page > Parts Description > Terminals on the rear (right)
Terminals on the rear (right)
HDMI IN 1/MHL
HDMI (High-Definition Multimedia Interface) provides an
uncompressed, all-digital audio/video interface between this
TV and an HDMI-equipped audio/video device. You can also
connect your MHL (Mobile High-definition Link) device using
an MHL cable. In addition, when you connect a BRAVIA Synccompatible device, communication with the connected device
is supported.
Be sure to use an authorized HIGH SPEED HDMI cable
bearing the HDMI logo.
Font Size
Connecting to the
Internet
Using Home
Network
Configuring
Various Settings
Troubleshooting
How to Use
Bookmarks
If connecting a digital audio system that is compatible with
Audio Return Channel (ARC) technology, use HDMI IN 2
on the bottom of the TV. If not, an additional connection
with DIGITAL AUDIO OUT (OPTICAL) is necessary.
AUDIO OUT/
Connect your headphones or stereo system to listen to the
TV’s sound through the connected equipment.
To listen to the TV’s sound through the connected equipment,
press the HOME button, then select
→ [Headphone/Audio Out] → [Headphone] or [Audio Out].
When you set [Audio Out] in [Headphone/Audio Out],
select [Fixed] or [Variable], press the HOME button, then
select
[Settings] → [Sound] → [Audio Out].
[Settings] → [Sound]
USB 1/2
You can enjoy photo, music and video files stored on a USB
device.
Page 48

i-Manual
48
Basic Operations
Parts Description
Watching TV
Top
Top Page > Parts Description > Top
INPUT
Press to display a list of inputs.
Print
Font Size
Enjoying
Movies/Music/Photos
Using Internet
Services and
Applications
Watching TV with
Friends Far and
Near
Using Other
Devices
Using BRAVIA
Sync Devices
Useful Functions
Connecting to the
Internet
Using Home
Network
POWER
Press to turn on or to turn off the TV (standby mode).
DISPLAY
Press once to display information about the
channel/program/input you are viewing. Press again to
exit.
SYNC MENU
Press to display the BRAVIA Sync Menu to operate a
connected BRAVIA Sync-compatible device.
RELATED SEARCH
When the TV is connected to the Internet, you can search
for related content while watching various content on the
TV. (What you can search depends on your
region/country or other circumstances.)
Configuring
Various Settings
Troubleshooting
How to Use
Bookmarks
Top of Page
List of Contents© 2014 Sony Corporation
Page 49

i-Manual
49
Basic Operations
Parts Description
Watching TV
Enjoying
Movies/Music/Photos
Using Internet
Services and
Applications
Watching TV with
Friends Far and
Near
Using Other
Devices
Upper
Print
Top Page > Parts Description > Upper
Buttons for connected devices
Use these buttons to operate a connected BRAVIA Synccompatible device.
Color buttons
When the color buttons are available, an operation guide
appears on the screen.
Follow the operation guide to perform a selected
operation.
SOCIAL VIEW
You can enjoy watching TV with friends far and near,
using social network services.
Font Size
Using BRAVIA
Sync Devices
Useful Functions
Connecting to the
Internet
Using Home
Network
Configuring
Various Settings
Troubleshooting
How to Use
Bookmarks
FOOTBALL
Press to change the Live Football Mode.
Top of Page
List of Contents© 2014 Sony Corporation
Page 50

i-Manual
50
Basic Operations
Parts Description
Watching TV
Middle
Print
Top Page > Parts Description > Middle
DISCOVER
Press to bring up Discover to search for content.
Font Size
Enjoying
Movies/Music/Photos
Using Internet
Services and
Applications
Watching TV with
Friends Far and
Near
Using Other
Devices
Using BRAVIA
Sync Devices
Useful Functions
Connecting to the
Internet
Using Home
Network
SEN/APPS
Press to open the Apps category of the Home Menu.
NETFLIX
Press to access the “NETFLIX” online service.
This feature (button) may not be available in some
regions/countries.
/ / / / /RETURN
Press to select/confirm a highlighted item and return to
the previous screen, or exit from a menu.
OPTIONS
Press to display a list of convenient functions and menu
shortcuts. The menu items vary based on the current
input and/or content.
HOME
Press to display the TV Home Menu.
Configuring
Various Settings
Troubleshooting
How to Use
Bookmarks
Top of Page
List of Contents© 2014 Sony Corporation
Page 51

i-Manual
51
Basic Operations
Parts Description
Watching TV
Enjoying
Movies/Music/Photos
Lower
Print
Top Page > Parts Description > Lower
DIGITAL/ANALOG, ANT
Press to switch between digital and analog channels, or
between the CABLE and ANTENNA input (when both are
connected).
Font Size
Using Internet
Services and
Applications
Watching TV with
Friends Far and
Near
Using Other
Devices
Using BRAVIA
Sync Devices
Useful Functions
Connecting to the
Internet
Using Home
Network
Configuring
Various Settings
EXIT
Press to exit from the Ginga application when available.
GUIDE
Press to display the program guide.
The Guide feature may not be available in some
regions/countries.
i-MANUAL
Press to display the on-screen instruction manual (this
manual).
0-9
Press the 0-9 buttons to select a channel.
Use with the 0-9 buttons to select digital channels. For
example, to enter 2.1, press 2,
CC/SUBTITLE
Press to turn closed captions/subtitles on or off (when the
feature is available).
, 1.
Troubleshooting
How to Use
Bookmarks
Top of Page
List of Contents© 2014 Sony Corporation
Page 52

i-Manual
52
Basic Operations
Parts Description
Watching TV
Bottom
Top Page > Parts Description > Bottom
VOL +/–
Press to adjust the volume.
Print
Font Size
Enjoying
Movies/Music/Photos
Using Internet
Services and
Applications
Watching TV with
Friends Far and
Near
Using Other
Devices
Using BRAVIA
Sync Devices
Useful Functions
Connecting to the
Internet
Using Home
Network
MUTING
Press to mute the sound. Press again to restore the
sound.
CH +/–
Press to select the next (+) or previous (–) channel.
JUMP
Press to jump back and forth between two channels or
inputs. The TV alternates between the current channel or
input and the last channel or input that was selected.
Configuring
Various Settings
Troubleshooting
How to Use
Bookmarks
Top of Page
List of Contents© 2014 Sony Corporation
Page 53

i-Manual
Selecting channels using the number buttons
53
Basic Operations
Parts Description
Selecting Channels
Print
Top Page > Watching TV > Selecting Channels
Font Size
Watching TV
Enjoying
Movies/Music/Photos
Using Internet
Services and
Applications
Watching TV with
Friends Far and
Near
Using Other
Devices
Using BRAVIA
Sync Devices
Useful Functions
Connecting to the
Internet
Overview
You can select channels using Discover, the Home Menu, or number
buttons.
Selecting channels using Discover
1.
Press the DISCOVER button to launch the Discover app.
(When using the Touchpad Remote Control, touch and slide up your
finger from the bottom area.)
2. Use the / buttons to select the desired TV broadcast system.
(When using the Touchpad Remote Control, flick up/down.)
Using Home
Network
Configuring
Various Settings
Troubleshooting
How to Use
Bookmarks
3. Use the / buttons to select the desired thumbnail, then press the
button.
(When using the Touchpad Remote Control, slide left/right to
highlight the thumbnail, then press the touchpad to select.)
Selecting channels using the Home Menu
1.
Press the HOME button.
2. Select [Channel] at the top of the Home Menu.
3. Select the desired broadcast system using [Channel List] at the
bottom of the Home Menu.
4. Select the desired channel.
Page 54

1. Press the number button(s) to select a channel.
54
For channel numbers 10 and above, press the second digit number
button quickly after the first digit.
List of Contents© 2014 Sony Corporation
Top of Page
Page 55

i-Manual
55
Basic Operations
Parts Description
Enjoying Football More
Print
Top Page > Watching TV > Enjoying Football More
Font Size
Watching TV
Enjoying
Movies/Music/Photos
Using Internet
Services and
Applications
Watching TV with
Friends Far and
Near
Using Other
Devices
Using BRAVIA
Sync Devices
Useful Functions
Connecting to the
Internet
Using Home
Network
Overview
You can obtain more realistic picture and audio, as though you are
watching from the stands of the stadium.
Steps
1.
Press the FOOTBALL button, then select [On].
(When using the Touchpad Remote Control, press the Control Bar (
), slide the touchpad to highlight the FOOTBALL button, then
press the touchpad to select.)
The roar of the crowd is emphasized, and [Picture Mode] is set to
[Sports].
Configuring
Various Settings
Troubleshooting
How to Use
Bookmarks
To turn off the Live Football Mode, press the FOOTBALL button, then
select [Off].
(When using the Touchpad Remote Control, press the Control Bar (
slide the touchpad to highlight the FOOTBALL button, then press the
touchpad to select.)
Top of Page
List of Contents© 2014 Sony Corporation
),
Page 56

i-Manual
56
Basic Operations
Parts Description
Top Page > Watching TV > Using the Program Guide
Using the Program Guide
Print
Font Size
Watching TV
Enjoying
Movies/Music/Photos
Using Internet
Services and
Applications
Watching TV with
Friends Far and
Near
Using Other
Devices
Using BRAVIA
Sync Devices
Useful Functions
Connecting to the
Internet
Using Home
Network
Configuring
Various Settings
Overview
You can quickly find your preferred programs and the detailed program
information. The current program information and weekly program
guides for the next eight days are provided. (This function is available
only for digital broadcasts, and depends on your region/country. In some
countries, it is available only on the setting of
[Settings] →
[Preferences] → [GUIDE Key Behavior] → [Launch Guide].)
Steps
1.
Press the GUIDE button to display the digital program guide
(current).
(When using the Touchpad Remote Control, press the Control Bar (
), slide the touchpad to highlight the GUIDE button, then press the
touchpad to select.)
2. Select the program to watch.
Troubleshooting
How to Use
Bookmarks
To close the digital program guide, press the GUIDE button.
(When using the Touchpad Remote Control, press the Control Bar (
slide the touchpad to highlight the GUIDE button, then press the
touchpad to select.)
),
Page 57

To use the weekly program guide
While watching a program, press the OPTIONS button, then select
57
[Program Guide].
About the Program Guide (Current) Screen
Program guide screen name
Displays the current program guide.
Channel information
Displays a channel number and title for a broadcaster.
Current program list
Displays a listing of currently broadcast programs. You can
view a selected program by highlighting it and pressing the
button (or pressing the touchpad on the Touchpad Remote
Control).
Next program list
Displays a listing of subsequent programs.
About the Program Guide Screen
Program guide screen name
Displays the weekly program guide service.
Channel information
Displays a channel number and title for a broadcaster. A
weekly listing for the highlighted channel appears on the
program list.
Page 58

Program list
58
Displays a program schedule for the selected channel. You
can display program information by highlighting a program and
pressing the
Touchpad Remote Control).
button (or pressing the touchpad on the
Top of Page
List of Contents© 2014 Sony Corporation
Page 59

i-Manual
59
Basic Operations
Parts Description
Top Page > Watching TV > Using the TV Guide Search Function
Using the TV Guide Search Function
Print
Font Size
Watching TV
Enjoying
Movies/Music/Photos
Using Internet
Services and
Applications
Watching TV with
Friends Far and
Near
Using Other
Devices
Using BRAVIA
Sync Devices
Useful Functions
Connecting to the
Internet
Overview
You can search for information on TV programs, and cast/crew details.
Tips
As of March 2014, this function is available in the following
regions/countries.
Czech Rep. / Denmark / Germany / Switzerland / Austria / United
Kingdom / Ireland / Spain / France / Italy / Netherlands / Belgium /
Luxembourg / Norway / Poland / Russia / Slovakia / Finland /
Sweden / New Zealand / Australia / United States / Canada / Brazil
Using Home
Network
Configuring
Various Settings
Troubleshooting
How to Use
Bookmarks
Steps
1.
Connect to a broadband Internet connection.
Press the
button to jump to the title list. Then, press the button
again to go to “Connecting to the Internet” for details.
(When using the Touchpad Remote Control, press the touchpad.
Then, press the touchpad again to go to “Connecting to the Internet”
for details.)
2. Press the HOME button, then select [Channel].
3. Select [Guide].
Displays detailed information about TV programs.
To return to the last viewed source, press the RETURN button a few
times.
Page 60

Notes
Guide and Search can launch only when [Cable/Antenna] is set to
60
[Antenna] or a set-top box via an IR Blaster is ready.
To search for TV programs by entering a keyword.
You can select [Program Search] from the Options menu to search for
TV programs by entering a keyword (title, etc.).
Tips
If the displayed channel differs from the selected channel, select [Assign
Channel] by pressing the OPTIONS button, then select the desired
channel from the channel list. If the desired channel is not in the list,
search by entering a keyword (broadcaster name). This function is not
available on channels on a set-top box.
While displaying the Program guide, by pressing the OPTIONS button,
you can switch between the Digital/Set-top box program guides.
Digital/Set-top box program guide switching is only available on IR
Blaster compatible models.
Notes
A TV program will appear blank if no data is contained in a channel.
Channel information may not be displayed correctly.
List of Contents© 2014 Sony Corporation
Top of Page
Page 61

i-Manual
61
Basic Operations
Parts Description
Top Page > Watching TV > Displaying picture-in-picture (PIP)
Displaying picture - in- picture (PIP)
Print
Font Size
Watching TV
Enjoying
Movies/Music/Photos
Using Internet
Services and
Applications
Watching TV with
Friends Far and
Near
Using Other
Devices
Using BRAVIA
Sync Devices
Useful Functions
Connecting to the
Internet
Overview
You can watch two pictures (main and sub) simultaneously. The main
picture can be displayed in full screen, and the sub picture can be
displayed in an inset window (e.g. HDMI input (PC format) and TV
program).
Steps
1.
Press the OPTIONS button, then select [Twin Picture].
If the displayed source is other than a PC, select [PIP].
Using Home
Network
Configuring
Various Settings
Troubleshooting
How to Use
Bookmarks
2. Press the / buttons to switch the audio output between the two
pictures.
(When using the Touchpad Remote Control, slide left/right to switch
the audio output.)
To exit the PIP mode, press the RETURN button.
To move the inset window
Press the / buttons.
(When using the Touchpad Remote Control, slide up/down.)
Available Combinations of Two Pictures
When the main picture source is a TV program or video input, the sub
Page 62

picture source can be:
- HDMI input (video format)
62
When the main picture source is an HDMI input (video format or PC
format), the sub picture source can be:
- TV program
- Video input
Notes
If two pictures with different vertical frequency signals (e.g. a picture in full
screen with 24p and a picture in an inset window with 60i) are displayed
simultaneously, the smooth movement of the picture in the inset window
may be lost.
If [Motionflow] is set to other than [Impulse]/[Off], the smooth movement of
the picture in an inset window may be lost. (For [Motionflow] compatible
models only.) To remedy this, set to [Off]. Press the OPTIONS button,
then select [Picture Adjustments] → [Motionflow] → [Off].
Top of Page
List of Contents© 2014 Sony Corporation
Page 63

i-Manual
63
Basic Operations
Parts Description
Print
Top Page > Watching TV > Displaying left-and-right pictures (P&P)
Displaying left-and-right pictures (P&P)
Font Size
Watching TV
Enjoying
Movies/Music/Photos
Using Internet
Services and
Applications
Watching TV with
Friends Far and
Near
Using Other
Devices
Using BRAVIA
Sync Devices
Useful Functions
Connecting to the
Internet
Using Home
Network
Overview
You can watch two pictures (left and right) simultaneously (e.g.
connected device and TV program).
Steps
1.
Press the OPTIONS button, then select [Twin Picture] → [P&P].
2. Press the / buttons to switch the audio output between the two
pictures.
(When using the Touchpad Remote Control, slide left/right to switch
the audio output.)
The highlighted picture is audible.
To exit the P&P mode, press the RETURN button.
To change the picture size
Configuring
Various Settings
Troubleshooting
How to Use
Bookmarks
Press the / buttons repeatedly to change the size.
(When using the Touchpad Remote Control, slide up/down repeatedly to
change the size.)
Available Combinations of Two Pictures
(Left and right, or vice versa)
TV program and HDMI input (video format)
Video input and HDMI input (video format)
Notes
Page 64

This function is not available with PC format signals.
If two pictures with different vertical frequency signals (e.g. a left picture
64
with 24p and a right picture with 60i) are displayed side-by-side, the
smooth movement of the right picture may be lost.
Top of Page
List of Contents© 2014 Sony Corporation
Page 65

i-Manual
65
Basic Operations
Parts Description
Display information
Print
Top Page > Watching TV > Display information
Font Size
Watching TV
Enjoying
Movies/Music/Photos
Using Internet
Services and
Applications
Watching TV with
Friends Far and
Near
Using Other
Devices
Using BRAVIA
Sync Devices
Useful Functions
Connecting to the
Internet
Steps
While watching a program, press the DISPLAY button.
(When using the Touchpad Remote Control, press the Control Bar (
slide the touchpad to highlight the DISPLAY button, then press the
touchpad to select.)
The information about the current channel/program/input appears. The
information will time out in a few seconds or press the DISPLAY button
again to exit.
(When using the Touchpad Remote Control, press the Control Bar (
slide the touchpad to highlight the DISPLAY button, then press the
touchpad to select.)
),
),
Using Home
Network
Configuring
Various Settings
Troubleshooting
How to Use
Bookmarks
Top of Page
List of Contents© 2014 Sony Corporation
Page 66

i-Manual
66
Basic Operations
Parts Description
Top Page > Watching TV > Subtitles/Closed captions
Subtitles/Closed captions
Print
Font Size
Watching TV
Enjoying
Movies/Music/Photos
Using Internet
Services and
Applications
Watching TV with
Friends Far and
Near
Using Other
Devices
Using BRAVIA
Sync Devices
Useful Functions
Connecting to the
Internet
Steps
While watching a program with subtitles/closed captions, press the
CC/SUBTITLE button to turn the subtitles/closed captions on or off.
(When using the Touchpad Remote Control, press the Control Bar ( ),
slide the touchpad to highlight the CC/SUBTITLE button, then press the
touchpad to select.)
Using Home
Network
Configuring
Various Settings
Troubleshooting
How to Use
Bookmarks
Top of Page
List of Contents© 2014 Sony Corporation
Page 67

i-Manual
67
Basic Operations
Parts Description
Top Page > Watching TV > Screen format/Wide mode
Screen format/Wide mode
Print
Font Size
Watching TV
Enjoying
Movies/Music/Photos
Using Internet
Services and
Applications
Watching TV with
Friends Far and
Near
Using Other
Devices
Using BRAVIA
Sync Devices
Useful Functions
Connecting to the
Internet
Using Home
Network
Steps
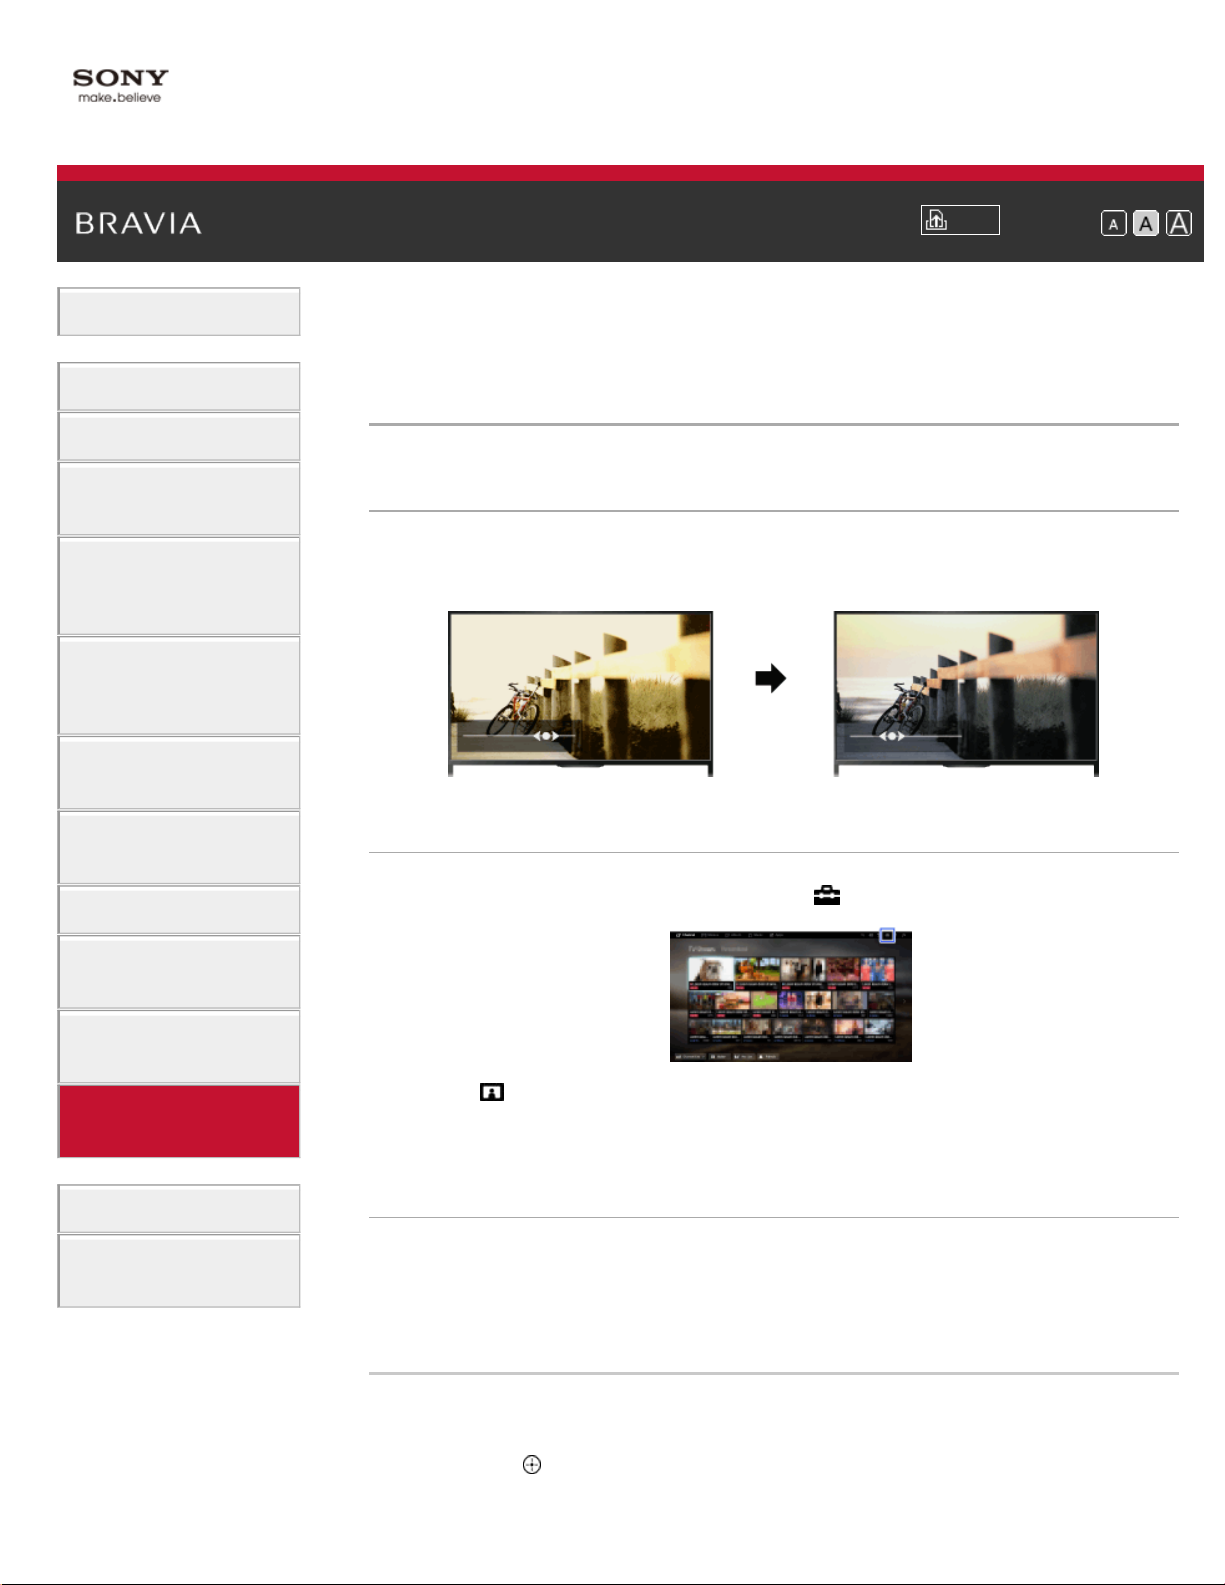
Press the HOME button, then select [Settings] →
[Picture & Display] → [Screen] → [Wide Mode] → the desired option.
Tips
Based on the original signal source, a black frame or black bars may
surround the picture.
Available Options (4:3 Original Source)
[Wide Zoom]
Enlarges the picture to fill a 16:9 screen, preserving the original picture
as much as possible.
[Normal]
Displays a 4:3 picture in its original size. Side bars are shown to fill the
16:9 screen.
Configuring
Various Settings
Troubleshooting
How to Use
Bookmarks
[Full]
Stretches a 4:3 picture horizontally, to fill the 16:9 screen.
[Zoom]
Displays a 16:9 picture that has been converted into 4:3 letter box
format, in the correct aspect ratio.
Page 68

[Captions]
68
Stretches the picture horizontally to fill a 16:9 screen, while fitting
captions in the screen.
If component input (480p) is selected and [Scene Select] is set to
[Game] or [Graphics], the available options change to [Fine Normal]/[Fine- Full]/[Portable Game 1]/[Portable Game 2].
[Fine-Normal]
Displays a 4:3 picture in its original size. Side bars are shown to fill the
16:9 screen.
[Fine-Full]
Stretches a 4:3 picture horizontally, to fill the 16:9 screen.
[Portable Game 1]
Stretches a black-framed game picture from PlayStation®Portable.
[Portable Game 2]
Stretches a black-framed picture (e.g. browser) from
PlayStation®Portable.
Available Options (16:9 Original Source)
[Wide Zoom]
Enlarges the picture, preserving the original picture as much as
possible.
[Normal]
Displays a 4:3 picture that has been horizontally stretched to 16:9, in 4:3
format.
[Full]
Displays a 16:9 picture in its original size.
Page 69

[Zoom]
69
Displays a 16:9 picture that has been converted into 4:3 letter box
format, in the correct aspect ratio.
[Captions]
Stretches the picture horizontally, while fitting captions in the screen.
Available Options (PC Timing)
Top of Page
List of Contents© 2014 Sony Corporation
Page 70

i-Manual
70
Basic Operations
Parts Description
Top Page > Watching TV > Audio (for analog mode)
Audio (for analog mode)
Print
Font Size
Watching TV
Enjoying
Movies/Music/Photos
Using Internet
Services and
Applications
Watching TV with
Friends Far and
Near
Using Other
Devices
Using BRAVIA
Sync Devices
Useful Functions
Connecting to the
Internet
Steps
1.
Press the HOME button, then select [Settings].
2. Select [Sound] → [MTS Audio] → the desired option.
To return to the last viewed source, press the HOME button twice.
Tips
To select sound on digital channels, press the OPTIONS button, then
select [Alternate Audio].
To adjust sound for bilingual broadcasts, press the HOME button, then
select
or [Main + Sub].
[Settings] → [Sound] → [Digital Dual Mono] → [Main], [Sub]
Using Home
Network
Configuring
Various Settings
Troubleshooting
How to Use
Bookmarks
Available Options
[Stereo]
Adjusts sound for stereo reception.
[Auto SAP]
Adjusts sound for second channel audio of programs such as bilingual.
[Mono]
Adjusts sound for monaural reception. Use this option when the stereo
signal is unstable.
Top of Page
List of Contents© 2014 Sony Corporation
Page 71

i-Manual
71
Basic Operations
Parts Description
Enjoying Movies
Print
Top Page > Enjoying Movies/Music/Photos > Enjoying Movies
Font Size
Watching TV
Enjoying
Movies/Music/Photos
Using Internet
Services and
Applications
Watching TV with
Friends Far and
Near
Using Other
Devices
Using BRAVIA
Sync Devices
Useful Functions
Connecting to the
Internet
Overview
You can watch movies from online service providers, connected USB
devices or your home network.
Steps
1.
Press the HOME button, then select [Movies].
2. Select the desired subcategory.
3. Select the desired thumbnail to watch the movie.
Using Home
Network
Configuring
Various Settings
Troubleshooting
How to Use
Bookmarks
Top of Page
List of Contents© 2014 Sony Corporation
Page 72

i-Manual
72
Basic Operations
Parts Description
Enjoying Music
Print
Top Page > Enjoying Movies/Music/Photos > Enjoying Music
Font Size
Watching TV
Enjoying
Movies/Music/Photos
Using Internet
Services and
Applications
Watching TV with
Friends Far and
Near
Using Other
Devices
Using BRAVIA
Sync Devices
Useful Functions
Connecting to the
Internet
Overview
You can play back music content from online music service providers,
connected USB devices, or your home network.
Steps
1.
Press the HOME button, then select [Music].
2. Select the desired subcategory.
3. Select the desired thumbnail to play back the music content.
Using Home
Network
Configuring
Various Settings
Troubleshooting
How to Use
Bookmarks
Top of Page
List of Contents© 2014 Sony Corporation
Page 73

i-Manual
73
Basic Operations
Parts Description
Enjoying Photos
Print
Top Page > Enjoying Movies/Music/Photos > Enjoying Photos
Font Size
Watching TV
Enjoying
Movies/Music/Photos
Using Internet
Services and
Applications
Watching TV with
Friends Far and
Near
Using Other
Devices
Using BRAVIA
Sync Devices
Useful Functions
Connecting to the
Internet
Overview
You can view photos from online service providers, connected USB
devices or your home network.
Steps
1.
Press the HOME button, then select [Album].
2. Select the desired subcategory.
3. Select the desired thumbnail to view the content.
Using Home
Network
Configuring
Various Settings
Troubleshooting
How to Use
Bookmarks
Top of Page
List of Contents© 2014 Sony Corporation
Page 74

i-Manual
74
Basic Operations
Parts Description
Top Page > Using Internet Services and Applications > Browsing Websites
Browsing Websites
Print
Font Size
Watching TV
Enjoying
Movies/Music/Photos
Using Internet
Services and
Applications
Watching TV with
Friends Far and
Near
Using Other
Devices
Using BRAVIA
Sync Devices
Useful Functions
Connecting to the
Internet
Using Home
Network
Overview
When the TV is connected to the Internet, you can browse websites.
Steps
1.
Connect to a broadband Internet connection.
Press the
button to jump to the title list. Then, press the button
again to go to “Connecting to the Internet” for details.
(When using the Touchpad Remote Control, press the touchpad.
Then, press the touchpad again to go to “Connecting to the Internet”
for details.)
2. Press the HOME button, then select [Apps].
Configuring
Various Settings
Troubleshooting
How to Use
Bookmarks
3. Select [All Apps] → [Internet Browser].
To return to the last viewed source, press the HOME button.
To change the character size
Press the OPTIONS button, select [Zoom], then the desired option.
Notes
If the TV does not support the functions provided by certain Internet
Page 75

services (e.g. Adobe Flash Player, PDF viewer), web content may not be
displayed correctly, or some functions may not work properly. Also, the TV
75
may not support functions developed in the future.
In no event shall Sony be liable for any damage caused or associated with
the use of the Internet browser, malfunction (including software) or
communication failure.
Top of Page
List of Contents© 2014 Sony Corporation
Page 76

i-Manual
76
Basic Operations
Parts Description
Top Page > Using Internet Services and Applications > Watching Internet Videos
Watching Internet Videos
Print
Font Size
Watching TV
Enjoying
Movies/Music/Photos
Using Internet
Services and
Applications
Watching TV with
Friends Far and
Near
Using Other
Devices
Using BRAVIA
Sync Devices
Useful Functions
Connecting to the
Internet
Using Home
Network
Configuring
Various Settings
Overview
You can enjoy Internet video content, including movies and cartoons, by
accessing a gateway that delivers a variety of on-demand
entertainment.
Steps
1.
Connect to a broadband Internet connection.
Press the
button to jump to the title list. Then, press the button
again to go to “Connecting to the Internet” for details.
(When using the Touchpad Remote Control, press the touchpad.
Then, press the touchpad again to go to “Connecting to the Internet”
for details.)
2. Press the HOME button, then select [Apps].
3. Select [All Apps] → the desired service → the desired content.
Troubleshooting
How to Use
Bookmarks
To return to the last viewed source, press the HOME button twice.
To seek forward/backward in video content
Press the buttons on the remote control that correspond with the control
indications on the screen.
(When using the Touchpad Remote Control, press the Control Bar (
),
slide the touchpad to highlight the buttons that correspond with the
control indications on the screen, then press the touchpad to select.)
To avoid video/sound interruption
Depending on your network environment or the data size of content,
video or sound interruption may occur.
Page 77

The interruption can be avoided by temporarily storing the content on a
77
USB device (not supplied), and you can enjoy smooth video playback.
This function is available with services that are indicated by the icon
when you select them.
Perform the following to use this function.
USB device connection
Connect a USB device that supports USB 2.0 or higher to the TV’s USB
port.
USB device registration
Press the HOME button, then select
[Seamless Streaming Setting] → [Register USB device].
Note that a USB device will be formatted once registered, and all the
stored data will be deleted.
To deregister a USB device, select [Deregister USB device].
[Settings] → [Preferences] →
When you view content of an available service, connect a registered
USB device to the TV’s USB port. The content will be stored temporarily
on the USB device should an interruption occur during playback.
This registered USB device will not appear in the list of devices
connected to the TV.
To update Internet Video content services
Press the HOME button, then select [Settings] → [Network] →
[Refresh Internet Content].
Tips
Information about the highlighted icon appears in the information banner.
The interface to Internet content depends on the Internet content
providers.
Notes
If you experience difficulties, check that the Internet connection is set up
properly.
Services block video content based on the [Parental Lock] setting of the
TV. Some service providers do not support this function.
Top of Page
Page 78

i-Manual
Tips
78
Basic Operations
Parts Description
Top Page > Using Internet Services and Applications > Performing initial setup
Performing initial setup
Print
Font Size
Watching TV
Enjoying
Movies/Music/Photos
Using Internet
Services and
Applications
Watching TV with
Friends Far and
Near
Using Other
Devices
Using BRAVIA
Sync Devices
Useful Functions
Connecting to the
Internet
Using Home
Network
Configuring
Various Settings
Making a Connection
Enjoy widescreen video calls by connecting the optional Camera and
Microphone Unit CMU - BR200/CMU-BR100.
Attach the camera to the TV, then connect the USB cable to the TV’s
USB port. For details on how to attach the camera, refer to the
instruction manual supplied with the camera.
Steps
1.
Connect to a broadband Internet connection.
Press the
button to jump to the title list. Then, press the button
again to go to “Connecting to the Internet” for details.
(When using the Touchpad Remote Control, press the touchpad.
Then, press the touchpad again to go to “Connecting to the Internet”
for details.)
2. Press the HOME button, then select [Apps].
Troubleshooting
How to Use
Bookmarks
3. Select [All Apps] → [Skype].
4. Follow the on - screen instructions to create your account.
To return to the last viewed source, press the HOME button twice.
Page 79

Although you can create a new account using the TV, it is recommended
79
that you use a computer to create a new account.
Tips
For more information on Skype, please visit
http://www.Skype.com/
This product includes SkypeKit 4.5.1
(c) 2003-2014, Skype
Patents Pending
Skype, associated trade marks and logos and the “S” logo are trade
marks of Skype.
Although this product has been tested and met our certification
standards for audio and video quality, it is not endorsed by Skype, Skype
Communications S.a.r.l. or any of their related companies.
Notes
You can only use the optional Camera and Microphone Unit CMUBR200/CMU-BR100. Other models are not supported.
No emergency calls. Skype is not a replacement for your telephone and
cannot be used for emergency calling.
Skype may not be available while some other applications are being used.
Use of a wireless network connection may cause audio/video degradation.
Connect the optional Camera and Microphone Unit directly to the TV’s
USB port. Do not connect it via a USB hub.
Audio and video calls are free to other people on Skype. For other Skype
services such as low cost calls to mobile phones and landlines, Skype
Credit or a subscription is required.
The sound quality of the microphone may deteriorate in a noisy
environment.
A ringtone does not sound from the HDMI Audio Return Channel (ARC)
and optical digital audio output. To sound a ringtone, press the HOME
button, then select
[Settings] → [Sound] → [Speakers] → [TV
Speakers].
Top of Page
List of Contents© 2014 Sony Corporation
Page 80

i-Manual
80
Basic Operations
Parts Description
Making a call
Print
Top Page > Using Internet Services and Applications > Making a call
Font Size
Watching TV
Enjoying
Movies/Music/Photos
Using Internet
Services and
Applications
Watching TV with
Friends Far and
Near
Using Other
Devices
Using BRAVIA
Sync Devices
Useful Functions
Connecting to the
Internet
Using Home
Network
Configuring
Various Settings
Overview
You can make free video and voice calls to friends and family anywhere
in the world from the comfort of your living room. If you want to call a
friend who is not on Skype, you can call them on their landline or mobile
using Skype. CMU-BR200/CMU - BR100 (not supplied) cannot be used
with a built - in camera model.
Steps
1.
Connect to a broadband Internet connection.
Press the
again to go to “Connecting to the Internet” for details.
(When using the Touchpad Remote Control, press the touchpad.
Then, press the touchpad again to go to “Connecting to the Internet”
for details.)
button to jump to the title list. Then, press the button
2. Press the HOME button, then select [Apps].
Troubleshooting
How to Use
Bookmarks
3. Select [All Apps] → [Skype] → [Contacts] or [History].
Select [Contacts] to use your Skype contact list. Select [History] to
use the call history list.
4. Select the contact or phone number to call → (Video Call) or
Page 81

(Voice Call).
To return to the last viewed source, press the HOME button twice.
81
About the status icons in the contact list
A status icon is displayed next to your contacts, so you know if they are
available to have a conversation.
The list below indicates their availability:
: Online, : Away, : Do Not Disturb, : Offline, : Offline (with call
forwarding enabled),
: Phone contact, : Offline (with voice mail
enabled)
About the status icons in the call history list
The icons in the history list indicate the following:
: Missed Call, : Incoming Call..., : Outgoing Call..., : Voice
message,
: Contact Request
To call by entering a phone number
Press the HOME button, then select [Apps] → [All Apps] → [Skype] →
[Tools] → [Call Phone Number]. Enter a phone number, then select
[Call].
To add contacts to the contact list
You can add contacts in the following ways:
Press the HOME button, then select [Apps] → [All Apps] → [Skype] →
[Tools] → [Find Contacts]. Enter a Skype name, full name or e-mail
address, select [Search], the Skype name/full name to call, then select
[Add to Contacts].
From the call history list, select the contact or phone number, then [Add to
Contacts].
After entering a phone number, select [Save], then the desired option.
To receive a call
You can receive a call while watching TV or using other applications.
When the illumination LED on the front of the TV blinks and/or the
incoming call notification appears, select
(Video Call) or (Voice
Page 82

Call) to answer.
(While using another application, an incoming call notification is
82
displayed full screen.)
To use call options during a call
Use the menu bar at the bottom of the screen.
When the other party is displayed in full screen, you can show/hide the
menu bar by pressing the DISPLAY button.
(When using the Touchpad Remote Control, press the Control Bar ( ),
slide the touchpad to highlight the DISPLAY button, then press the
touchpad to select.)
To end a call
Press the DISPLAY button to open the menu bar, then select [End
Call].
Tips
For the best audio quality during a Skype call, use the speakers that are
built into the TV instead of using an external audio system. To use the
TV speakers, press the OPTIONS button, then select [Speakers] → [TV
Speakers].
Top of Page
List of Contents© 2014 Sony Corporation
Page 83

i-Manual
83
Basic Operations
Parts Description
HDMI connection
Print
Top Page > Using Other Devices > HDMI connection
Font Size
Watching TV
Enjoying
Movies/Music/Photos
Using Internet
Services and
Applications
Watching TV with
Friends Far and
Near
Using Other
Devices
Using BRAVIA
Sync Devices
Useful Functions
Connecting to the
Internet
Making a Connection
HDMI connection is recommended for optimum picture quality. If your
BD/DVD player has an HDMI jack, connect it using an HDMI cable.
* Be sure to use an authorized HIGH SPEED HDMI cable bearing the
HDMI logo.
Steps
1.
After making a connection, turn on the connected BD/DVD player.
2. Press the INPUT button repeatedly to select the connected BD/DVD
player.
Using Home
Network
Configuring
Various Settings
Troubleshooting
How to Use
Bookmarks
(When using the Touchpad Remote Control, press the Control Bar (
), slide the touchpad to highlight the INPUT button, press the
touchpad, slide the touchpad to highlight the connected BD/DVD
player, then press the touchpad.)
3. Start playback on the connected BD/DVD player.
Tips
If you connect a BRAVIA Sync-compatible device, you can control it by
simply using the TV’s remote control.
Top of Page
List of Contents© 2014 Sony Corporation
Page 84

i-Manual
84
Basic Operations
Parts Description
Top Page > Using Other Devices > Component video connection
Component video connection
Print
Font Size
Watching TV
Enjoying
Movies/Music/Photos
Using Internet
Services and
Applications
Watching TV with
Friends Far and
Near
Using Other
Devices
Using BRAVIA
Sync Devices
Useful Functions
Connecting to the
Internet
Using Home
Network
Making a Connection
If your BD/DVD player has component video jacks, connect it to the TV,
using a component video cable and an audio cable.
Steps
1.
After making a connection, turn on the connected BD/DVD player.
2. Press the INPUT button repeatedly to select the connected BD/DVD
player.
(When using the Touchpad Remote Control, press the Control Bar (
), slide the touchpad to highlight the INPUT button, press the
touchpad, slide the touchpad to highlight the connected BD/DVD
player, then press the touchpad.)
Configuring
Various Settings
Troubleshooting
How to Use
Bookmarks
3. Start playback on the connected BD/DVD player.
Top of Page
List of Contents© 2014 Sony Corporation
Page 85

i-Manual
85
Basic Operations
Parts Description
Top Page > Using Other Devices > Composite connection
Composite connection
Print
Font Size
Watching TV
Enjoying
Movies/Music/Photos
Using Internet
Services and
Applications
Watching TV with
Friends Far and
Near
Using Other
Devices
Using BRAVIA
Sync Devices
Useful Functions
Connecting to the
Internet
Using Home
Network
Configuring
Various Settings
Making a Connection
If your BD/DVD player has composite jacks, connect it using a
composite video/audio cable.
Steps
1.
After making a connection, turn on the connected BD/DVD player.
2. Press the INPUT button repeatedly to select the connected BD/DVD
player.
(When using the Touchpad Remote Control, press the Control Bar (
), slide the touchpad to highlight the INPUT button, press the
touchpad, slide the touchpad to highlight the connected BD/DVD
player, then press the touchpad.)
3. Start playback on the connected BD/DVD player.
Troubleshooting
How to Use
Bookmarks
Top of Page
List of Contents© 2014 Sony Corporation
Page 86

i-Manual
86
Basic Operations
Parts Description
Top Page > Using Other Devices > Digital Still Camera/Camcorder
Digital Still Camera/Camcorder
Print
Font Size
Watching TV
Enjoying
Movies/Music/Photos
Using Internet
Services and
Applications
Watching TV with
Friends Far and
Near
Using Other
Devices
Using BRAVIA
Sync Devices
Useful Functions
Connecting to the
Internet
Making a Connection
Connect your Sony digital still camera or camcorder using an HDMI
cable. Use a cable that has an HDMI mini jack for digital still
camera/camcorder end, and a standard HDMI jack for the TV end.
* Be sure to use an authorized HIGH SPEED HDMI cable bearing the
HDMI logo.
Steps
1.
After making a connection, turn on the connected digital still
camera/camcorder.
Using Home
Network
Configuring
Various Settings
Troubleshooting
How to Use
Bookmarks
2. Press the INPUT button repeatedly to select the connected digital
still camera/camcorder.
(When using the Touchpad Remote Control, press the Control Bar (
), slide the touchpad to highlight the INPUT button, press the
touchpad, slide the touchpad to highlight the connected digital still
camera/camcorder, then press the touchpad.)
3. Start playback on the connected digital still camera/camcorder.
Tips
If you connect a BRAVIA Sync-compatible device, you can control it by
simply using the TV’s remote control. Make sure that the device is
BRAVIA Sync-compatible. Some devices may not be compatible with
BRAVIA Sync even though they have an HDMI jack.
Page 87

i-Manual
If your digital still camera does not work with your TV, try the following:
87
Basic Operations
Parts Description
USB Device
Print
Top Page > Using Other Devices > USB Device
Font Size
Watching TV
Enjoying
Movies/Music/Photos
Using Internet
Services and
Applications
Watching TV with
Friends Far and
Near
Using Other
Devices
Using BRAVIA
Sync Devices
Useful Functions
Connecting to the
Internet
Making a Connection
Connect a USB storage device to enjoy photo, music and video files
stored in the device.
Steps
1.
After making a connection, turn on the connected USB device.
2. Press the HOME button, then select [Media Server].
Using Home
Network
Configuring
Various Settings
Troubleshooting
How to Use
Bookmarks
3. Select [USB] → the folder or file from the list.
If you select a folder, select the desired file.
Playback starts.
To return to the last viewed source, press the HOME button twice.
To check the supported file formats
Codec List
Notes
USB viewer supports FAT16, FAT32 and exFAT file systems.
When connecting a Sony digital still camera to the TV with a USB cable,
USB connection settings on your camera need to be set to [Auto] or [Mass
Storage] mode.
Page 88

Set the USB connection settings on your camera to [Mass Storage].
88
Copy the files from the camera to a USB flash drive, then connect the
drive to the TV.
[Face Zoom] and [Expanded] in the option menu of [Display Size] may not
work for some image files.
Only panoramic JPEG files in the following horizontal/vertical sizes can be
scrolled. (If the JPEG file is edited on a PC, etc., scrolling may not be
possible.)
- For horizontal scroll: 4912/1080, 7152/1080, 3424/1920, 4912/1920,
12416/1856, 8192/1856, 5536/2160, 3872/2160, 10480/4096, 11520/1080
- For vertical scroll: 1080/4912, 1080/7152, 1920/3424, 1920/4912,
1856/12416, 1856/8192, 2160/5536, 2160/3872, 4096/10480, 1080/11520
Video files are located in the following folder structure (hierarchal position):
/AVCHD/BDMV/STREAM/00000.MTS
/PRIVATE/AVCHD/BDMV/STREAM/00000.MTS
/MP_ROOT/100ANV01/MAHA0001.MP4
Avoid losing your files by backing up all your media files stored on a USB
device. Sony cannot accept responsibility for lost or damaged data stored
on a USB device.
Depending on the file, playback may not be possible even when using the
supported formats.
Top of Page
List of Contents© 2014 Sony Corporation
Page 89

i-Manual
89
Basic Operations
Parts Description
PC
Print
Top Page > Using Other Devices > PC
Font Size
Watching TV
Enjoying
Movies/Music/Photos
Using Internet
Services and
Applications
Watching TV with
Friends Far and
Near
Using Other
Devices
Using BRAVIA
Sync Devices
Useful Functions
Connecting to the
Internet
Making a Connection
Connect your PC with an HDMI cable to enjoy music, pictures and other
content stored in it.
* Be sure to use an authorized HIGH SPEED HDMI cable bearing the
HDMI logo.
Corresponding PC input signal
(Resolution, Horizontal frequency/Vertical frequency)
640 x 480, 31.5 kHz/60 Hz
800 x 600, 37.9 kHz/60 Hz
Using Home
Network
Configuring
Various Settings
Troubleshooting
How to Use
Bookmarks
1024 x 768, 48.4 kHz/60 Hz
1280 x 768, 47.4 kHz/60 Hz and 47.8 kHz/60 Hz
1360 x 768, 47.7 kHz/60 Hz
1280 x 1024, 64.0 kHz/60 Hz (Full HD model only)
1920 x 1080, 67.5 kHz/60 Hz (Full HD model only)*
* The 1080p timing, when applied to the HDMI input, will be treated as a
video timing and not a PC timing. This will affect the [Preferences] and
[Picture & Display] settings. To view PC content, set [Scene Select] to
[Graphics], [Wide Mode] to [Full], and [Display Area] to [Full Pixel].
([Display Area] is configurable only when [Auto Display Area] is set to
[Off].)
Notes
Page 90

This TV does not support interlaced signals.
90
For optimum picture quality, it is recommended that you use the signals in
the chart. In plug and play, signals with a 60 Hz vertical frequency will be
detected automatically. (PC reboot may be necessary.)
Depending on the connection status, the image may be blurred or
smeared. In this case, change the PC’s settings, then select another input
signal in “Corresponding PC input signal”.
1920 pixel x 1080 line/60Hz output may not be available, depending on
your PC. Even if 1920 pixel x 1080 line/60Hz output is selected, the actual
output signal may differ. In this case, change the PC’s settings, then select
another input signal in “Corresponding PC input signal”.
Top of Page
List of Contents© 2014 Sony Corporation
Page 91

i-Manual
91
Basic Operations
Parts Description
HDMI connection
Print
Top Page > Using Other Devices > HDMI connection
Font Size
Watching TV
Enjoying
Movies/Music/Photos
Using Internet
Services and
Applications
Watching TV with
Friends Far and
Near
Using Other
Devices
Using BRAVIA
Sync Devices
Useful Functions
Connecting to the
Internet
Using Home
Network
Making a Connection
Connect an audio system (e.g. home theater system) with HDMI output
to the TV, using an HDMI cable.
* Be sure to use an authorized HIGH SPEED HDMI cable bearing the
HDMI logo.
Tips
When connecting a BRAVIA Sync-compatible digital audio system with
Audio Return Channel (ARC) technology, connect to HDMI IN 2 with an
HDMI cable. However, if connecting a system that is not BRAVIA Synccompatible or Audio Return Channel capable, an additional audio
connection via DIGITAL AUDIO OUT (OPTICAL) is necessary.
Configuring
Various Settings
Troubleshooting
How to Use
Bookmarks
Steps
1.
After making a connection, press the HOME button, then select
[Settings].
2. Select [Sound] → [Speakers] → [Audio System].
The connected audio system is turned on automatically. The volume
can be controlled using the TV’s remote control.
To return to the last viewed source, press the HOME button twice.
Tips
If you connect a BRAVIA Sync-compatible device, you can control it by
simply using the TV’s remote control.
Page 92

i-Manual
92
Basic Operations
Parts Description
Top Page > Using Other Devices > Optical audio connection
Optical audio connection
Print
Font Size
Watching TV
Enjoying
Movies/Music/Photos
Using Internet
Services and
Applications
Watching TV with
Friends Far and
Near
Using Other
Devices
Using BRAVIA
Sync Devices
Useful Functions
Connecting to the
Internet
Making a Connection
Connect an audio system (e.g. home theater system) with digital input
to the TV, using an optical audio cable.
Steps
1.
After making a connection, press the HOME button, then select
[Settings].
2. Select [Sound] → [Speakers] → [Audio System].
3. Press the HOME button twice to return to the last viewed source.
4. Turn on the connected audio system, then adjust the volume.
Using Home
Network
Configuring
Various Settings
Troubleshooting
How to Use
Bookmarks
Top of Page
List of Contents© 2014 Sony Corporation
Page 93

i-Manual
Top of Page
93
Basic Operations
Parts Description
Top Page > Using Other Devices > Audio cable connection
Audio cable connection
Print
Font Size
Watching TV
Enjoying
Movies/Music/Photos
Using Internet
Services and
Applications
Watching TV with
Friends Far and
Near
Using Other
Devices
Using BRAVIA
Sync Devices
Useful Functions
Connecting to the
Internet
Using Home
Network
Making a Connection
Connect an audio system (e.g. amplifier) to the TV, using an audio
cable.
Tips
See the instruction manual of the audio system for details on connection
of other devices and for the setup before use.
Steps
1.
After making a connection, press the HOME button, then select
[Settings].
2. Select [Sound] → [Headphone/Audio Out] → [Audio Out].
Configuring
Various Settings
Troubleshooting
How to Use
Bookmarks
3. Press the HOME button twice to return to the last viewed source.
4. Turn on the connected audio system, then adjust the volume.
Tips
When using an external audio system, the audio out of the TV can be
controlled using the TV’s remote control if [Audio Out] is set to [Variable].
Press the HOME button, then select
Out] → [Variable].
When connecting a subwoofer, press the HOME button, then select
[Settings] → [Sound] → [Headphone/Audio Out] → [Subwoofer].
[Settings] → [Sound] → [Audio
Page 94

i-Manual
94
Basic Operations
Parts Description
Print
Top Page > Using Other Devices > MHL Device (Smartphone, Tablet, etc.)
MHL Device (Smartphone, Tablet, etc.)
Font Size
Watching TV
Enjoying
Movies/Music/Photos
Using Internet
Services and
Applications
Watching TV with
Friends Far and
Near
Using Other
Devices
Using BRAVIA
Sync Devices
Useful Functions
Connecting to the
Internet
Making a Connection
Connect your MHL device (e.g. smartphone, tablet) with MHL output to
the TV's HDMI IN 1/MHL port, using an MHL cable.
* Be sure to use an authorized MHL 2 cable bearing the MHL logo.
Steps
1.
After making a connection, press the HOME button, then select
[Inputs].
2. Select [HDMI 1/MHL].
To switch to the MHL input automatically
Using Home
Network
Configuring
Various Settings
Troubleshooting
How to Use
Bookmarks
Press the HOME button, then select [Settings] →
[Channels & Inputs]/[Channels, Inputs & Ginga] → [BRAVIA Sync
Settings] → [Auto Input Change(MHL)] → [On]. (Depending on the MHL
device, input may not be switched.) If the TV is in standby mode, it will
not switch automatically.
To charge an MHL device
When the TV is on, an MHL device can be charged from the TV, using
an MHL cable.
Tips
When the TV is in standby mode, if [Charge MHL during Power Off] is set
to [On], an MHL device can also be charged from the TV, using an MHL
cable.
Press the HOME button, then select
[Settings] →
Page 95

[Channels & Inputs]/[Channels, Inputs & Ginga] → [Charge MHL during
Power Off] → [On].
95
Top of Page
List of Contents© 2014 Sony Corporation
Page 96

i-Manual
96
Basic Operations
Parts Description
Top Page > Using Other Devices > Wireless Subwoofer (Optional)
Wireless Subwoofer (Optional)
Print
Font Size
Watching TV
Enjoying
Movies/Music/Photos
Using Internet
Services and
Applications
Watching TV with
Friends Far and
Near
Using Other
Devices
Using BRAVIA
Sync Devices
Useful Functions
Connecting to the
Internet
Overview
You can use the optional Wireless Subwoofer SWF - BR100 to extend
the bass response of the TV’s sound.
Connect the Wireless Transceiver supplied with the Wireless Subwoofer
SWF-BR100 to use the Wireless Subwoofer.
Making a Connection
Using Home
Network
Configuring
Various Settings
Troubleshooting
How to Use
Bookmarks
1. Connect the audio cable (supplied) to the Wireless Transceiver.
2. Connect the other end of the audio cable to the AUDIO OUT/ jack
of the TV.
3. Connect the Wireless Transceiver to the USB port of the TV.
[Headphone/Audio Out] is automatically set to [Subwoofer].
4. Position the Wireless Subwoofer and connect it to the AC power.
It is recommended that the Wireless Subwoofer be placed as close
as possible to the TV.
Tips
When the Wireless Transceiver is disconnected, [Headphone/Audio Out]
is automatically restored to its original setting.
Page 97

For details on how to set up the Wireless Subwoofer, refer to the
instruction manual supplied with the Wireless Subwoofer.
97
Steps
1.
Press the HOME button, then select [Settings].
2. Select [Sound] → [Wireless Subwoofer].
Available Options
The recommended values for your TV have already been set.
[Subwoofer Level]
Adjusts the volume level of the Wireless Subwoofer.
[Cut Off Frequency]
Adjusts the cutoff frequency of the Wireless Subwoofer.
[Phase]
Sets the phase polarity.
Select the setting based on your preference.
[Power]
Sets the power control method of the Wireless Subwoofer.
When you do not use the Wireless Subwoofer, select [Off].
You can also set this option using the Options menu.
[Reset]
Resets the Wireless Subwoofer settings to their initial values.
Top of Page
List of Contents© 2014 Sony Corporation
Page 98

i-Manual
98
Basic Operations
Parts Description
Print
Top Page > Using Other Devices > Playable File Formats (DLNA, USB devices, etc.)
Font Size
Playable File Formats (DLNA, USB devices, etc.)
Watching TV
Enjoying
Movies/Music/Photos
Using Internet
Services and
Applications
Watching TV with
Friends Far and
Near
Using Other
Devices
Using BRAVIA
Sync Devices
Useful Functions
Connecting to the
Internet
Checking supported file formats
Codec List
Using Home
Network
Configuring
Various Settings
Troubleshooting
How to Use
Bookmarks
Top of Page
List of Contents© 2014 Sony Corporation
Page 99

i-Manual
99
Basic Operations
Parts Description
Top Page > Using BRAVIA Sync Devices > Setting BRAVIA Sync
Setting BRAVIA Sync
Print
Font Size
Watching TV
Enjoying
Movies/Music/Photos
Using Internet
Services and
Applications
Watching TV with
Friends Far and
Near
Using Other
Devices
Using BRAVIA
Sync Devices
Useful Functions
Connecting to the
Internet
Overview
If a BRAVIA Sync-compatible device (e.g. BD player, AV amplifier) is
connected with an HDMI cable, or a BRAVIA Sync - compatible device
(e.g. smartphone, tablet) is connected with an MHL cable, this TV
allows you to control the device with the TV’s remote control.
Steps
1.
Turn on the connected device.
2. Press the HOME button, then select [Settings].
Using Home
Network
Configuring
Various Settings
Troubleshooting
How to Use
Bookmarks
3. Select [Channels & Inputs]/[Channels, Inputs & Ginga]* →
[BRAVIA Sync Settings] → [BRAVIA Sync Control] → [On].
4. Activate BRAVIA Sync on the connected device.
When a specific Sony BRAVIA Sync- compatible device is connected
and powered on, and [BRAVIA Sync Control] is set to [On], BRAVIA
Sync is automatically activated on that device.
For details, refer to the instruction manual of the connected device.
* Option name differs depending on your region/country.
To not turn off the connected device automatically
when turning off the TV
Page 100

Press the HOME button, then select [Settings] →
[Channels & Inputs]/[Channels, Inputs & Ginga]* → [BRAVIA Sync
100
Settings] → [Device Auto Power Off] → [Off].
* Option name differs depending on your region/country.
To not turn on the TV automatically when turning on
the connected device
Press the HOME button, then select [Settings] →
[Channels & Inputs]/[Channels, Inputs & Ginga]* → [BRAVIA Sync
Settings] → [TV Auto Power On] → [Off].
* Option name differs depending on your region/country.
To switch the TV input to the corresponding device
connected with an MHL cable
Press the HOME button, then select [Settings] →
[Channels & Inputs]/[Channels, Inputs & Ginga]* → [BRAVIA Sync
Settings] → [Auto Input Change(MHL)] → [On].
* Option name differs depending on your region/country.
Available BRAVIA Sync Operations
BD/DVD player
Automatically turns the BRAVIA Sync-compatible device on and switches
the input to that device when you select it from the Home Menu or Sync
Menu.
Automatically turns the TV on and switches the input to the connected
device when the device starts to play.
Automatically turns the connected device off when you turn the TV off.
Controls menu operation (
channel selection of the connected device through the TV’s remote
control.
/ / / buttons), playback (e.g. button) and
AV amplifier
Automatically turns the connected AV amplifier on and switches the sound
output from the TV speaker to the audio system when you turn the TV on.
This function is only available if you have previously used the AV amplifier
to output the TV’s sound.
Automatically switches the sound output to the AV amplifier by turning the
AV amplifier on when the TV is turned on.
Automatically turns the connected AV amplifier off when you turn the TV
off.
Adjusts the volume (VOL +/– buttons) and mutes the sound (MUTING
button) of the connected AV amplifier through the TV’s remote control.
 Loading...