

Page 1
2-678-258-12(3)
LCD Digital Colour TV
KDL-46X2000
Operating Instructions
Before operating the TV, please read the “Safety
information” section of this manual.
Retain this manual for future reference.
Инструкция по эксплуатации
Перед включением телевизора прочтите раздел “Сведения
по безопасности” этого руководства.
Сохраняйте данное руководство для справок в будущем.
Instrukcja obsługi
Przed rozpoczęciem eksploatacji telewizora należy
zapoznać się z treścią rozdziału „Informacje dotyczące
bezpieczeństwa” niniejszej instrukcji.
Zachować instrukcję do wykorzystania w przyszłości.
GB
RU
PL
© 2006 Sony Corporation
For useful information about Sony products
Для получения полезной информации о продукции Сони
Szczegółowe informacje o produktach Sony
Page 2

Introduction
Thank you for choosing this Sony product.
Before operating the TV, please read this manual
thoroughly and retain it for future reference.
Notice for Digital TV function
• Any functions related to Digital TV (with logo) will
only work in countries or areas where DVB-T (MPEG2)
digital terrestrial signals are broadcasted. Please confirm
with your local dealer if you can receive a DVB-T signal
where you live.
• Although this TV set follows DVB-T specifications,
compatibility with future DVB-T digital terrestrial
broadcasts cannot be guaranteed.
• Some Digital TV functions may not be available in some
countries.
Trademark information
• is a registered trademark of the DVB Project
• Manufactured under license from BBE Sound, Inc.
Licensed by BBE Sound, Inc. under one or more of the
following US patents: 5510752, 5736897. BBE and BBE
symbol are registered trademarks of BBE Sound, Inc.
• “Dolby”, “Pro Logic”, and the double-D symbol are
trademarks of Dolby Laboratories.
• Manufactured under license from Dolby Laboratories.
• TruSurround technology is used as a virtualizer for Dolby
Virtual Surround.
• TruSurround, SRS and (
Labs, Inc.
TruSurround technology is incorporated under license
from SRS Labs, Inc.
• HDMI, the HDMI logo and
Interface are trademarks or registered trademarks of
HDMI Licensing, LLC.
z) symbol are trademarks of SRS
High-Definition Multimedia
GB
2
Page 3
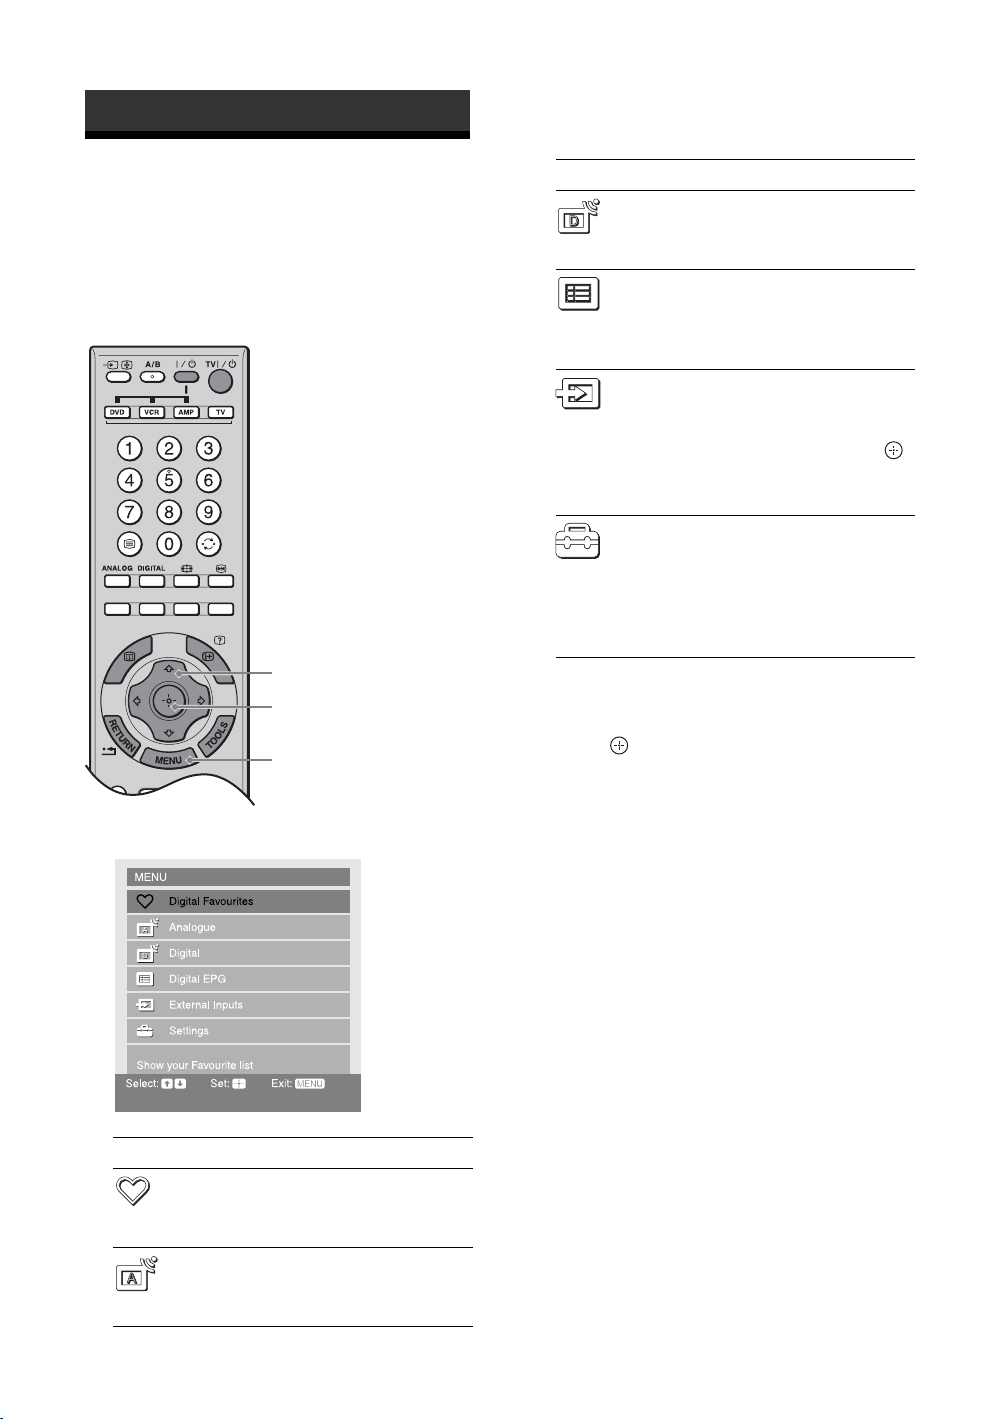
Table of Contents
Start-up Guide 4
Safety information ..................................................................................................................... 8
Precautions .............................................................................................................................11
Overview of the remote ........................................................................................................12
Overview of the TV buttons and indicators ........................................................................ 14
Watching TV
Watching TV............................................................................................................................15
Checking the Digital Electronic Programme Guide (EPG) .............................................18
Using the Digital Favourite list .......................................................................................20
Viewing pictures from connected equipment ..........................................................................21
Using MENU Functions
Navigating through menus ......................................................................................................22
Picture menu ........................................................................................................................... 23
Sound menu............................................................................................................................26
Screen menu........................................................................................................................... 27
Set-up menu............................................................................................................................ 29
AV Set-up menu ...................................................................................................................... 31
Analogue Set-up menu ...........................................................................................................32
Digital Set-up menu .......................................................................................................35
PC Settings menu ................................................................................................................... 37
GB
Using Optional Equipment
Connecting optional equipment............................................................................................... 39
Programming the remote ........................................................................................................41
Additional Information
Specifications ..........................................................................................................................43
Troubleshooting ......................................................................................................................45
Index .......................................................................................................................................47
: for digital channels only
3
GB
Page 4

Start-up Guide
1: Checking the
accessories
Remote RM-ED006 (1)
Size AA batteries (R6 type) (2)
Mains lead (Type C-6) (1)
Coaxial cable (1)
Do not remove these ferrite cores.
PC cable (1)
To insert batteries into the remote
Notes
• Observe the correct polarity when inserting batteries.
• Dispose of batteries in an environmentally friendly way.
Certain regions may regulate disposal of the battery.
Please consult your local authority.
• Do not use different types of batteries together or mix old
and new batteries.
• Handle the remote with care. Do not drop or step on it, or
spill liquid of any kind onto it.
• Do not place the remote in a location near a heat source, or
in a place subject to direct sunlight, or in a damp room.
Do not remove these ferrite cores.
Cable holder (1)
Support belt (1) and screws (2)
GB
4
Page 5
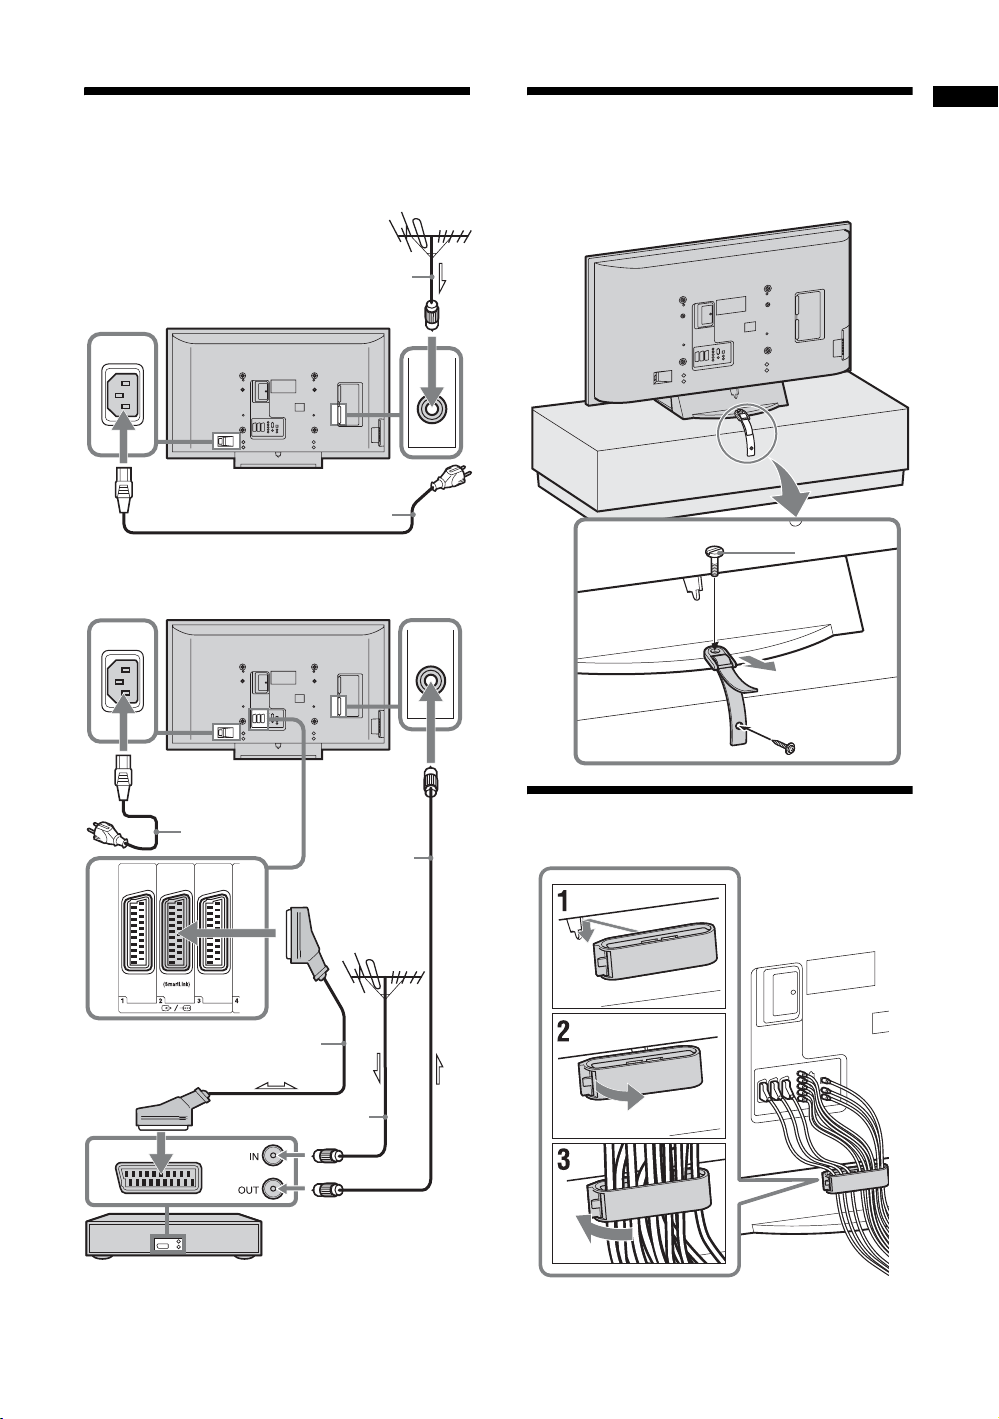
2: Connecting an aerial/
3: Preventing the TV
Start-up Guide
VCR
Connecting an aerial only
Mains lead (supplied)
Connecting an aerial and VCR
from toppling over
Coaxial cable
(supplied)
2
3
1
Mains lead
(supplied)
Scart lead (not supplied)
Coaxial cable
(not supplied)
VCR
Coaxial cable
(supplied)
4: Bundling the cables
GB
5
Page 6
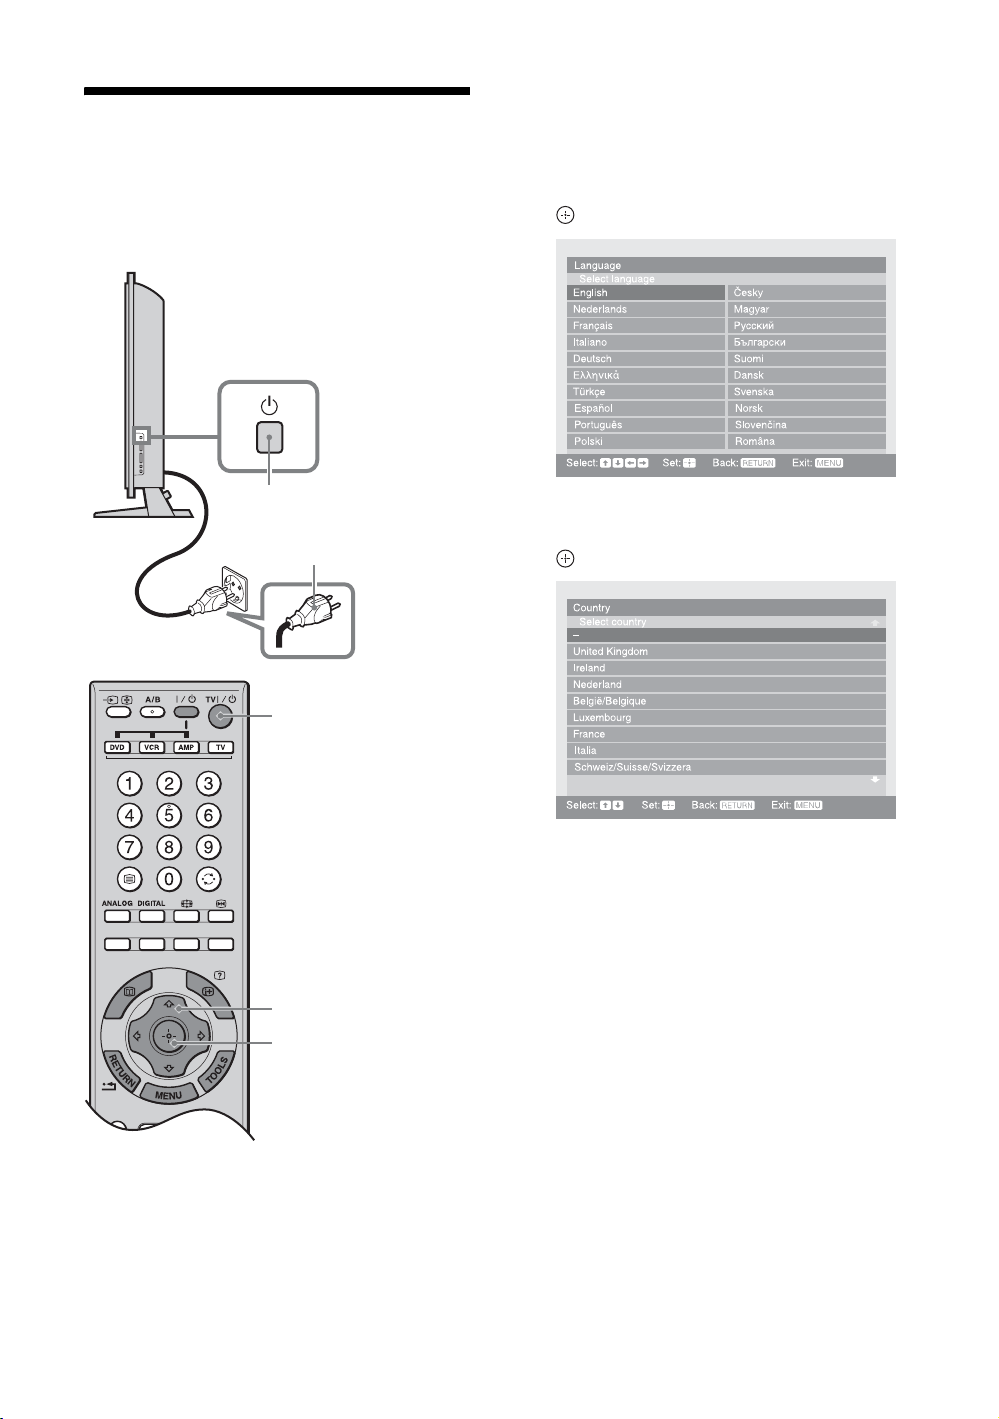
5: Selecting the
When the TV is in standby mode (the
indicator on the TV (front) is red), press TV "/1
on the remote to switch on the TV.
1 (standby)
language and country/
region
2
1
2
3 Press F/f/G/g to select the language
displayed on the menu screens, then press
.
4 Press F/f to select the country/region in
which you will operate the TV, then press
.
3,4
3,4
1 Connect the TV to your mains socket
(220-240 V AC, 50 Hz).
2 Press 1 on the TV (right side).
When you switch on the TV for the first time, the
Language menu appears on the screen.
GB
6
If the country/region in which you want to use the
TV does not appear in the list, select “-” instead of
a country/region.
The message confirming the TV start auto-tuning
appears on the screen, then go to “6: Auto-tuning
the TV”.
Page 7
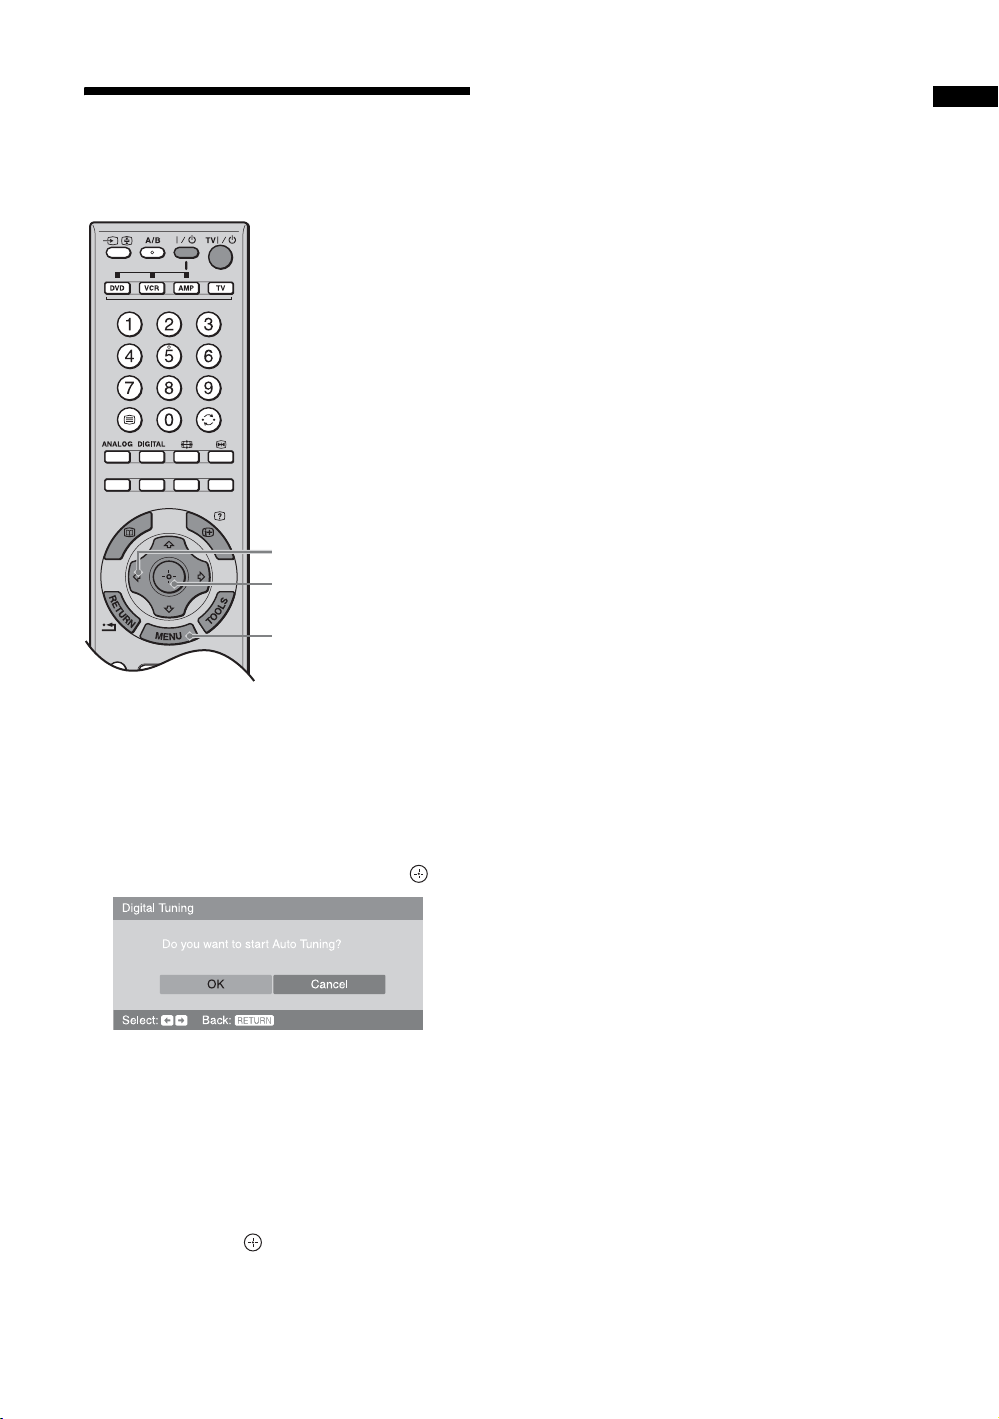
6: Auto-tuning the TV
The TV will search for and store all available TV
channels.
2
2
4
3 When the Programme Sorting menu
appears on the screen, follow the steps of
“Programme Sorting” (page 32).
If you do not change the order in which the analogue
channels are stored on the TV, go to step 4.
4 Press MENU to exit.
The TV has now tuned in all the available channels.
Note
When a digital broadcast channel cannot be received, or
when selecting a region in which there are no digital
broadcasts in step 4 (page 6) under “5: Selecting the
language and country/region”, the time must be set after
performing step 3.
Start-up Guide
1 Before you start auto-tuning the TV, insert
a pre-recorded tape into the VCR
connected to the TV (page 5) and start play
back.
The video channel will be located and stored on
the TV during auto-tuning.
If no VCR is connected to the TV, skip this step.
2 Press G to select “OK”, then press .
The TV starts searching for all available digital
channels, followed by all available analogue
channels. This may take some time, please be
patient and do not press any buttons on the TV or
remote.
If a message appears for you to confirm the aerial
connection
No digital or analogue channels were found.
Check the aerial connection and press G to select
“Yes”, then press to start auto-tuning again.
GB
7
Page 8
Safety information
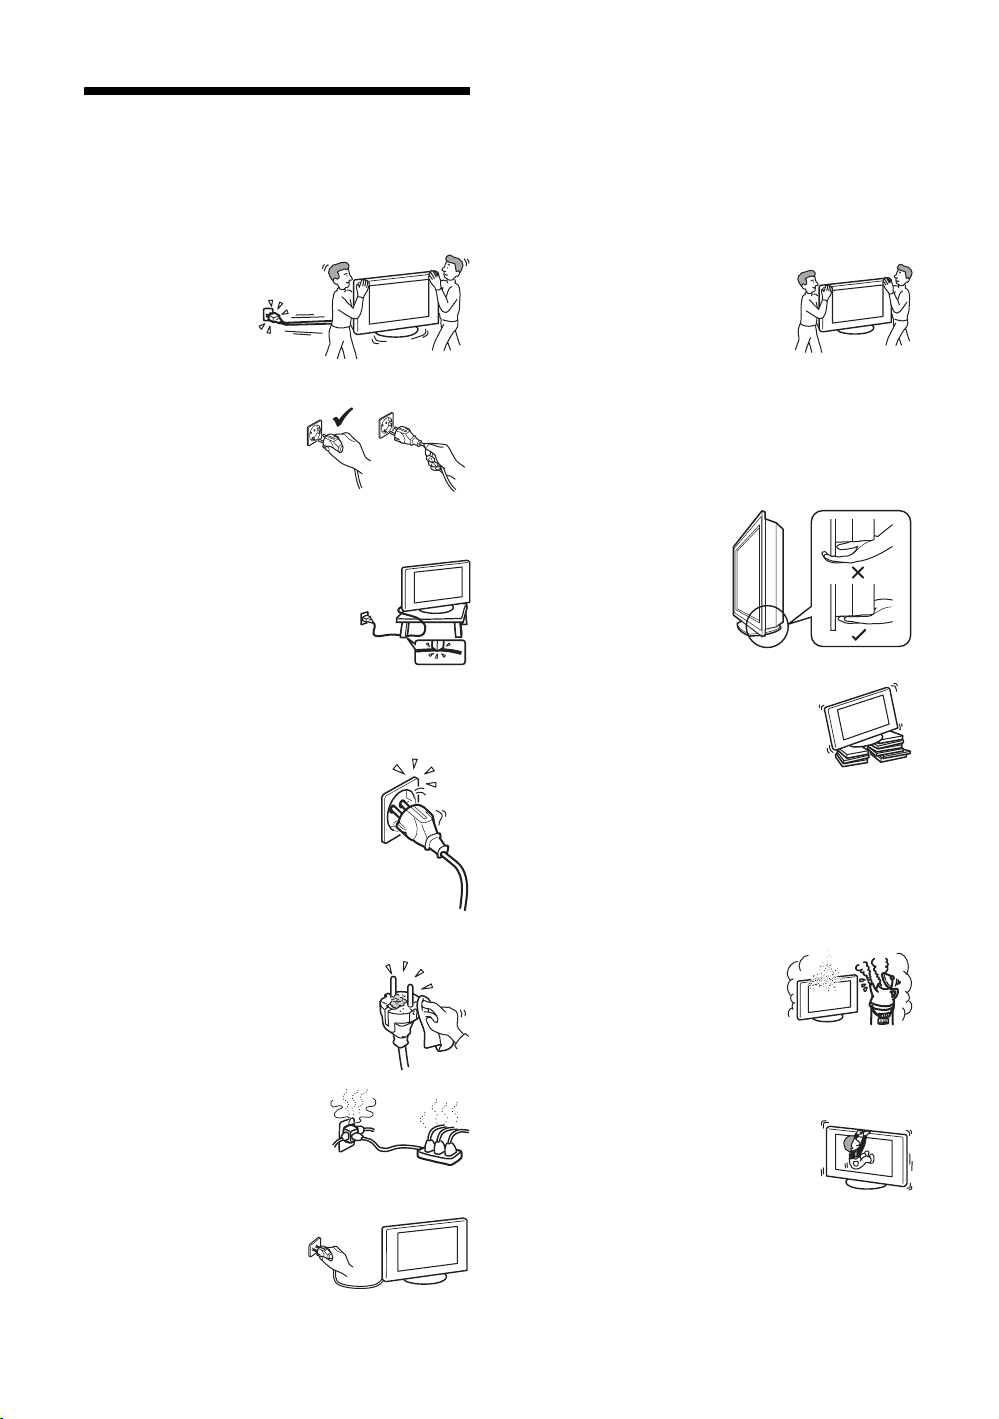
Mains lead
• Observe the followings to prevent the mains lead being
damaged. If the mains lead is damaged, it may result in a
fire or an electric shock.
– Unplug the mains
lead when moving
the TV set.
– When you
disconnect the mains
lead, disconnect it
from the mains
socket first.
– Be sure to grasp the plug
when disconnecting the
mains lead. Do not pull on
the mains lead itself.
– Do not pinch, bend, or twist
the mains lead excessively.
The core conductors may be exposed or broken.
– Do not modify the mains lead.
– Do not put anything heavy on the
mains lead.
– Keep the mains lead away from heat
sources.
• If you damage the mains lead, stop
using it and ask your dealer or Sony
service centre to exchange it.
• Do not use the supplied mains lead on any other
equipment.
• Use only an original Sony mains lead, not other brands.
Mains socket
• The TV set with a three-wire grounding
type mains plug must be connected to a
mains socket with a protective earthing
connection.
• Do not use a poor fitting mains socket.
Insert the plug fully into the mains socket.
A poor fit may cause arcing and result in a
fire. Contact your electrician to have the
mains socket changed.
Cleaning the mains plug
Unplug the mains plug and clean it
regularly. If the plug is covered with dust
and it picks up moisture, its insulation may
deteriorate and result in a fire.
Overloading
This TV set is designed to operate on
a 220–240 V AC supply only. Take
care not to connect too many
appliances to the same mains socket
as this could result in a fire or an electric shock.
When not in use
If you will not be using the TV set
for several days, the TV set
should be disconnected from the
mains for environmental and
safety reasons. However, some TV sets may have features
which need the TV set to be left in standby to work correctly.
The instructions in this manual will inform you if this
applies.
Carrying
• Before carrying the TV set, disconnect all the cables from
the TV set.
• Carrying the large size TV set requires two or more
people.
• When you carry the TV set by hand,
hold the TV set as illustrated on the
right. If you do not do so, the TV set
may fall and be damaged or cause
serious injury.
• When transporting it, do not subject
the TV set to jolts or excessive
vibration. The TV set may fall and be damaged or cause
serious injury.
• If the TV set has been dropped or damaged, have it
checked immediately by qualified service personnel.
• When you carry the TV set in for repair or when you move
it, pack it using the original carton and packing material.
Handling
When lifting the TV set or
moving the panel of the TV set,
hold it firmly as illustrated on
the right.
Placement
• The TV set should be
installed near an easily accessible mains socket.
• Place the TV set on a stable, level surface.
Do not hang anything on the TV set. If
you do, the TV set may fall from the
stand, causing damage or serious injury.
• Do not install the TV set in places subject
to extreme temperature, for example in
direct sunlight, or near a radiator, or heating vent. If the
TV set is exposed to extreme temperature, the TV set may
overheat and cause deformation of the casing or cause the
TV set to malfunction.
• Do not install the TV set in a place exposed to direct air
conditioning. If the TV set is installed in such a location,
moisture may condense inside and may cause a
malfunction.
• Never place the TV set in hot, humid
or excessively dusty places.
• Do not install the TV set where
insects may enter.
• Do not install the TV set where it
may be exposed to mechanical vibration.
• Do not install the TV set in a location where it may
protrude, such as on or behind a pillar, or where you might
bump your head on it. Otherwise, it may result in injury.
• Do not allow children to climb on the TV
set.
• If you use the TV set near the seashore,
salt may corrode metal parts of the TV set
and cause internal damage or fire.
GB
8
Page 9
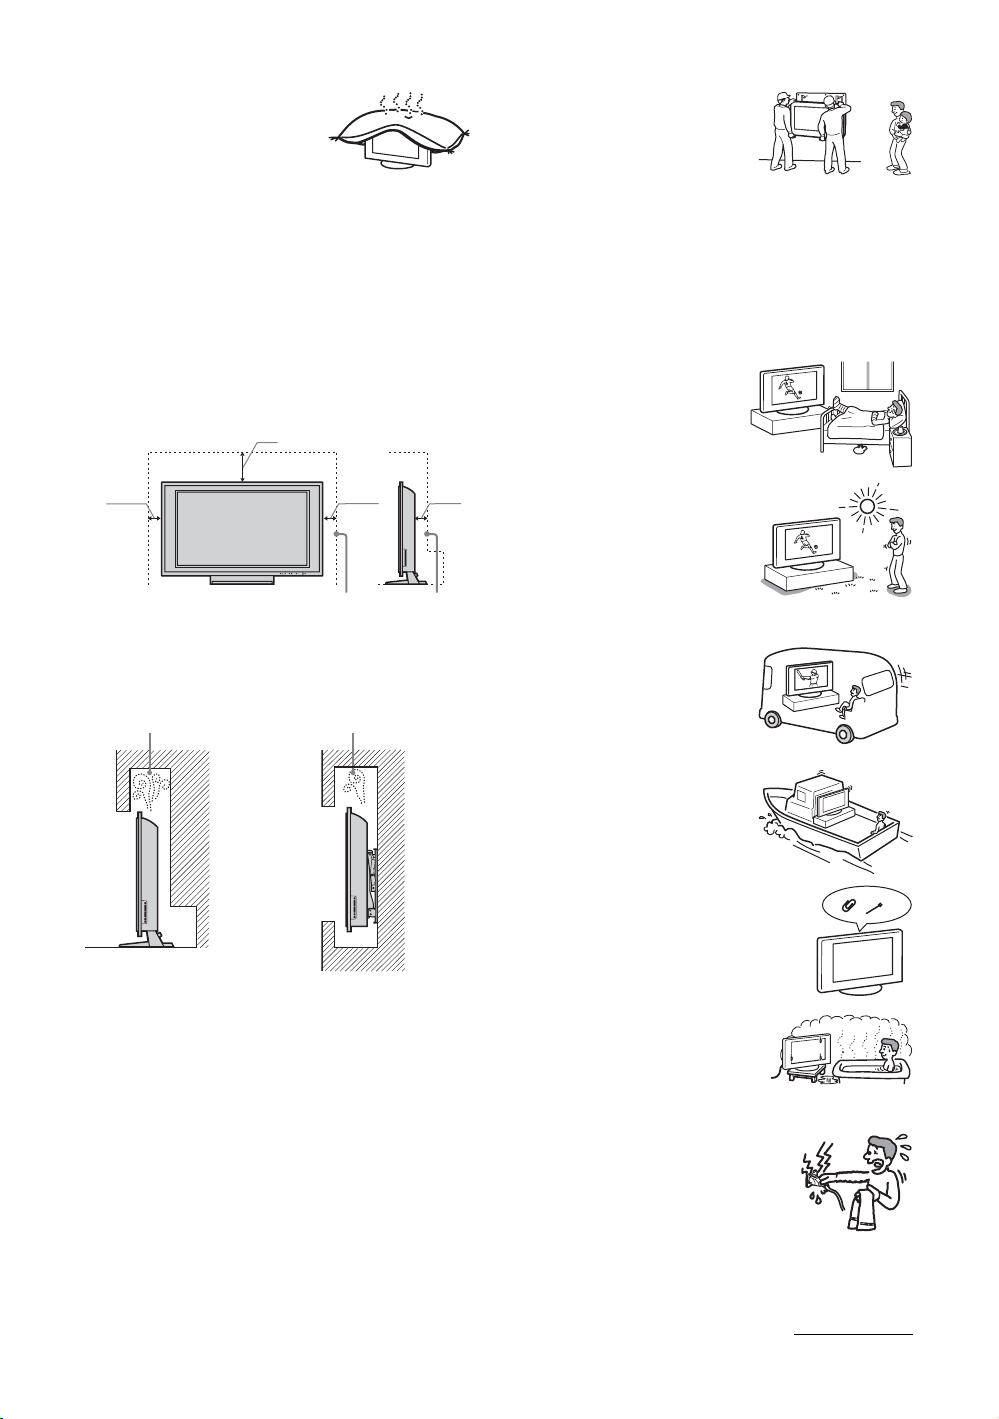
Ventilation
• Never cover the ventilation
holes in the cabinet. It may
cause overheating and result in a
fire.
• Unless proper ventilation is provided, the TV set may
gather dust and get dirty. For proper ventilation, observe
the following:
– Do not install the TV set turned backwards or sideways.
– Do not install the TV set turned over or upside down.
– Do not install the TV set on a shelf or in a closet.
– Do not place the TV set on a rug or bed.
– Do not cover the TV set with cloth, such as curtains, or
items such as newspapers, etc.
• Leave some space around the TV set. Otherwise, aircirculation may be inadequate and cause overheating,
which may cause a fire or damage to the TV set.
30 cm
• If the TV set is to be installed on
a wall, have the installation
carried out by qualified service
personnel. Improper installation
may render the TV set unsafe.
Wiring
• When hooking up, be sure to unplug the mains lead for
your safety.
• The TV set is not disconnected from the mains when the
TV set is switched off. To disconnect the TV set
completely, pull the plug from the mains.
• Take care not to catch your feet on the cables. It may
damage the TV set.
Medical institutions
Do not place this TV set in a place
where medical equipment is in
use. It may cause a malfunction of
medical instruments.
10 cm 10 cm
6 cm
Leave at least this much space.
• When installing the TV set on the wall, leave at least
10 cm space from the bottom.
• Never install the TV set as follows:
Air circulation
is blocked.
Air circulation
is blocked.
Wall Wall
Optional accessories
Observe the following when installing the TV set using a
stand or wall-mount bracket. If you do not do so, the TV set
may fall and cause serious injury.
• It is strongly recommended that you use Sony accessories
for safety reasons:
– Wall-mount bracket SU-WL51
– TV stand SU-FL61
• It is strongly recommended that you use the official Sony
wall-mount bracket to allow adequate air circulation and
to avoid dust build up around the TV, wall and ceiling.
• Secure the TV set properly, following the instructions
supplied with your stand or wall-mount bracket when
installing the TV set.
• Be sure to attach the brackets supplied with your stand.
Outdoor use
• Do not install this TV set
outdoors. If the TV set is
exposed to rain, it may result in a
fire or an electric shock.
• If this TV set is exposed to direct
sunlight, the TV set may heat up
and it may damage the TV set.
Vehicle, Ships and other
vessels
• Do not install this TV set in a
vehicle. The motion of the
vehicle may cause the TV set to
fall down and cause injury.
• Do not install this TV set on a
ship or other vessel. If the TV set
is exposed to seawater, it may
cause a fire or damage the TV
set.
Ventilation holes
Do not insert anything in the ventilation
holes. If metal or liquid is inserted in these
holes, it may result in a fire or an electric
shock.
Water and moisture
• Do not use this TV set near water
– for example, near a bathtub or
shower room. Also do not expose
to rain, moisture or smoke. This
may result in a fire or an electric shock.
• Do not touch the mains lead and the TV
set with wet hands. D oing so may cause
an electric shock or damage to the TV
set.
Continued
GB
9
Page 10
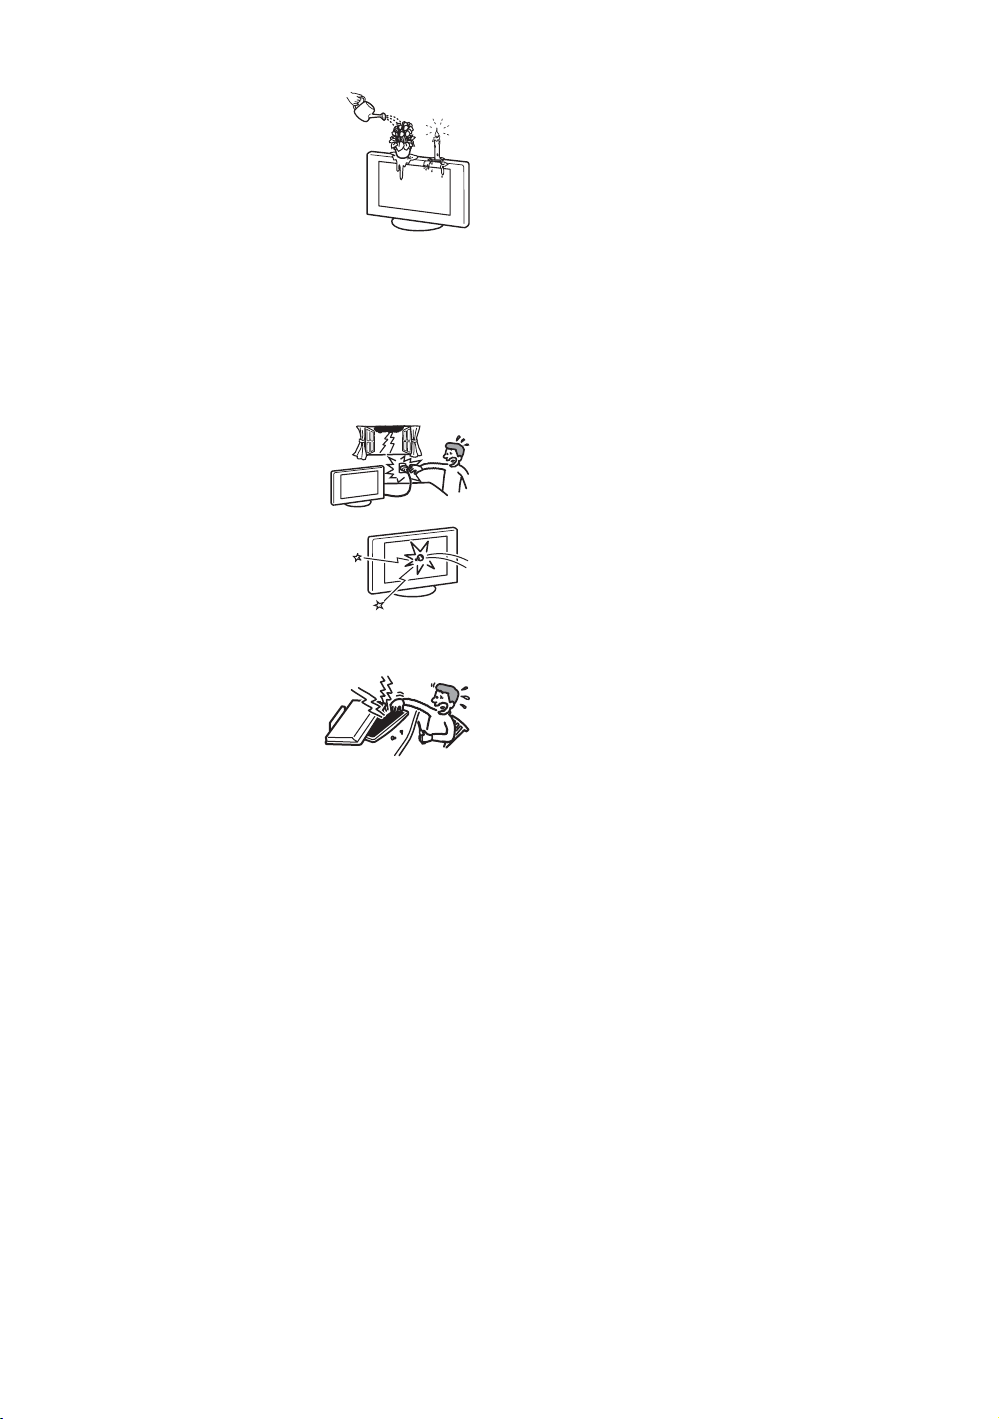
Moisture and flammable objects
• Do not place any objects on the TV
set. The TV set shall not be exposed to
dripping or splashing and that no
objects filled with liquid, such as
vases, shall be placed on the TV set.
• To prevent fire, keep flammable
objects or naked lights (e.g. candles)
away from the TV set.
• If any liquid or solid object does fall through openings in
the cabinet, do not operate the TV set. It may result in an
electric shock or damage to the TV set. Have it checked
immediately by qualified service personnel.
Oils
Do not install this TV set in restaurants that use oil. Dust
absorbing oil may enter and damage the TV set.
Lightning storms
For your own safety, do not touch any
part of the TV set, mains lead, or
aerial lead during lightning storms.
Broken pieces
• Do not throw anything at the TV set.
The screen glass may break by the
impact and cause serious injury.
• If the surface of the TV set cracks, do
not touch it until you have unplugged the mains lead.
Otherwise electric shock may result.
Servicing
Dangerously high voltages are
present inside the TV set.
Do not open the cabinet. Entrust the
TV set to qualified serv ice personnel
only.
Small accessories removal and fittable
Keep accessories out of children’s reach. If they are
swallowed, choking or suffocation may occur. Call a doctor
immediately.
Replacing the bezel unit
The bezel unit can be replaced with others that are sold
separately. However, do not remove the unit except to
replace it. For details, see the instructions supplied with bezel
units.
10
GB
Page 11

Precautions
Viewing the TV
• To view the TV comfortably, the recommended viewing
position is from four to seven times the screen’s vertical
length away from the TV set.
• To obtain a clear picture, do not expose the screen to direct
illumination or direct sunlight. If possible, use spot
lighting directed down from the ceiling.
• View the TV in moderate light, as viewing the TV in poor
light strains your eyes. Watching the screen continuously
for long periods of time can also strain your eyes.
• If the angle of the TV set is to be adjusted, steady the base
of the stand with your hand to prevent the TV set from
becoming separated from the stand. Be careful not to get
your fingers caught between the TV set and the stand.
Volume adjustment
• Adjust the volume so as not to trouble your neighbours.
Sound carries very easily at night time. Therefore, closing
the windows or using headphones is suggested.
• When using headphones, adjust the volume so as to avoid
excessive levels, as hearing damage may result.
LCD Screen
• Although the LCD screen is made with high-precision
technology and 99.99% or more of the pixels are effective,
black dots may appear or bright points of light (red, blue,
or green) may appear constantly on the LCD screen. This
is a structural property of the LCD screen and is not a
malfunction.
• Do not expose the LCD screen surface to the sun. Doing
so may damage the screen surface.
• Do not push or scratch the front filter, or place objects on
top of this TV set. The image may be uneven or the LCD
screen may be damaged.
• If this TV set is used in a cold place, a smear may occur in
the picture or the picture may become dark. This does not
indicate a failure. These phenomena disappear as the
temperature rises.
• Ghosting may occur when still pictures are displayed
continuously. It may disappear after a few moments.
• The screen and cabinet get warm when this TV set is in
use. This is not a malfunction.
• The LCD screen contains a small amount of liquid crystal
and mercury. The fluorescent tube used in this TV set also
contains mercury. Follow your local ordinances and
regulations for disposal.
Handling and cleaning the screen surface/cabinet of
the TV set
Be sure to unplug the mains lead connected to the TV set
from AC mains socket before cleaning.
To avoid material degradation or screen coating degradation,
observe the following precautions.
• Do not push on the screen, scratch it with a hard object, or
throw anything at it. The screen may be damaged.
• Do not touch the display panel after operating the TV set
continuously for a long period as the display panel
becomes hot.
• We recommend that the screen surface be touched as little
as possible.
• To remove dust from the screen surface/cabinet, wipe
gently with a soft cloth. If dust is persistent, wipe with a
soft cloth slightly moistened with a diluted mild detergent
solution.
• Never use any type of abrasive pad, alkaline/acid cleaner,
scouring powder, or volatile solvent, such as alcohol,
benzene, thinner or insecticide. Using such materials or
maintaining prolonged contact with rubber or vinyl
materials may result in damage to the screen surface and
cabinet material.
• The ventilation holes can accumulate dust over time. To
ensure proper ventilation, we recommend removing the
dust periodically (once a month) using a vacuum cleaner.
Optional Equipments
• Do not install optional components too close to the TV set.
Keep optional components at least 30 cm away from the
TV set. If a VCR is installed in front of the TV set or
beside the TV set, the picture may become distorted.
• Picture distortion and/or noisy sound may occur if the TV
set is positioned in close proximity to any equipment
emitting electromagnetic radiation.
Disposal of the TV set
Disposal of Old Electrical &
Electronic Equipment
(Applicable in the European
Union and other European
countries with separate
collection systems)
This symbol on the product or on
its packaging indicates that this
product shall not be treated as
household waste. Instead it shall
be handed over to the applicable
collection point for the recycling
of electrical and electronic equipment. By ensuring this
product is disposed of correctly, you will help prevent
potential negative consequences for the environment and
human health, which could otherwise be caused by
inappropriate waste handling of this product. The recycling
of materials will help to conserve natural resources. For more
detailed information about recycling of this product, please
contact your local Civic Office, your household waste
disposal service or the shop where you purchased the
product.
11
GB
Page 12
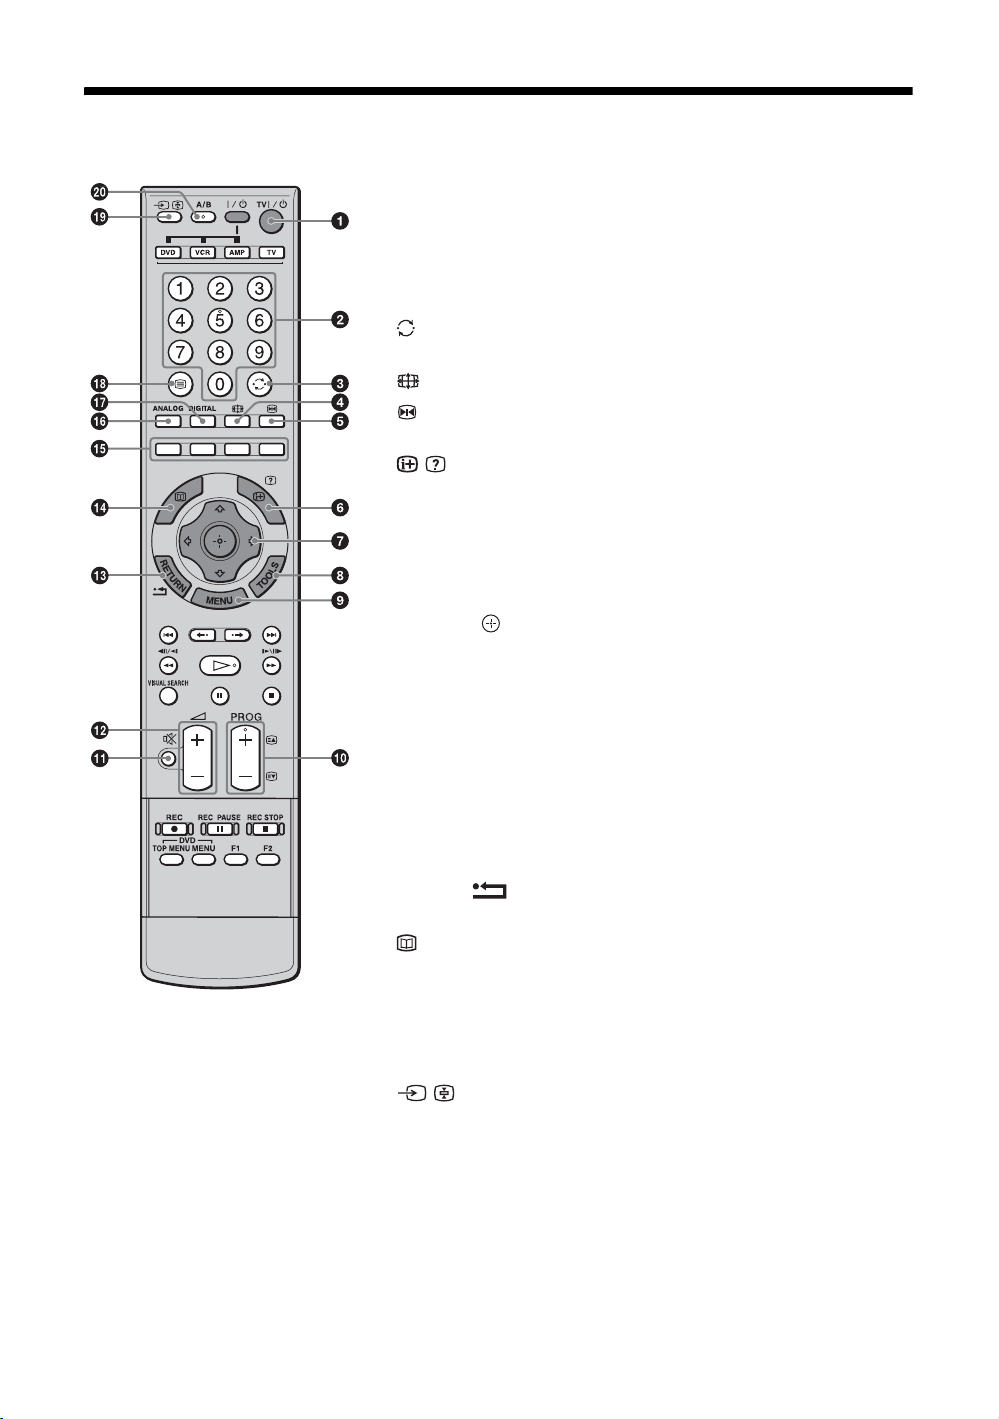
Overview of the remote
1 TV "/1 – TV standby
Switches off the TV temporarily and on from standby mode.
2 Number buttons
• In TV mode: Selects channels. For channel numbers 10 and above, enter
the second and third digit within two seconds.
• In Text mode: Enters the three digit page number to select the page.
3 – Previous channel
Returns to the previous channel watched (for more than five seconds).
4 – Screen mode (page 16)
5 – Picture freeze (page 16)
Freezes the TV picture.
6 / – Info / Text reveal
• In digital mode: Displays brief details of the programme currently being
watched.
• In analogue mode: Displays information such as current channel number
and screen mode.
• In Text mode (page 16): Reveals hidden information (e.g. answers to a
quiz).
7 F/f/G/g/ (page 15, 22)
8 TOOLS (page 17, 21)
Enables you to access various viewing options and change/make adjustments
according to the source and screen mode.
9 MENU (page 22)
0 PROG +/- (page 15)
• In TV mode: Selects the next (+) or previous (-) channel.
• In Text mode: Selects the next (+) or previous (-) page.
qa % – Mute (page 15)
qs 2 +/- – Volume
qd RETURN /
Returns to the previous screen of any displayed menu.
qf – EPG (Digital Electronic Programme Guide) (page 18)
qg Coloured buttons (page 16, 18, 20)
qh ANALOG – Analogue mode (page 15)
qj DIGITAL – Digital mode (page 15)
/ – Text (page 16)
qk
ql / – Input select / Text hold
• In TV mode (page 21): Selects the input source from equipment connected
to the TV sockets.
• In Text mode (page 16): Holds the current page.
w; A/B – Dual Sound (page 26)
12
GB
Page 13

wa "/1
Switches on or off the optional equipment selected from the function buttons.
ws Function buttons
Enables you to operate the corresponding equipment. For details, see
“Programming the remote” on page 41.
wd DVD/VCR operating buttons
• . : Replays the current programme from the previous chapter mark (if
any).
• > : Advances forward to the next chapter mark (if any).
• : Replays the current programme for a set period of time.
• : Advances forward a set period of time.
• m : Plays a programme in fast reverse mode.
• M : Plays a programme in fast forward mode.
• H : Plays a programme at a normal speed.
• X : Pauses playback.
• x : Stops the playback.
• VISUAL SEARCH : Only for Sony DVD recorders with the visual search
function. For details, see the operating instructions supplied with the DVD
recorder.
wf DVD/VCR record buttons
• z REC: Starts recording.
• X REC PAUSE: Pauses the recording.
• x REC STOP: Stops the recording.
X REC PAUSE and x REC STOP are available only on DVD recorders.
wg F1/F2
• Selects a disc when using a DVD changer.
• Selects a function when using a combination unit (e.g. a DVD/VCR).
For details, see the operating instructions supplied with the DVD changer or
combination unit.
wh DVD MENU
Displays the DVD disc menu.
wj DVD TOP MENU
Displays the top menu of the DVD disc.
Tip
The number 5, H, PROG + and A/B buttons have tactile dots. Use the tactile dots as
references when operating the TV.
13
GB
Page 14
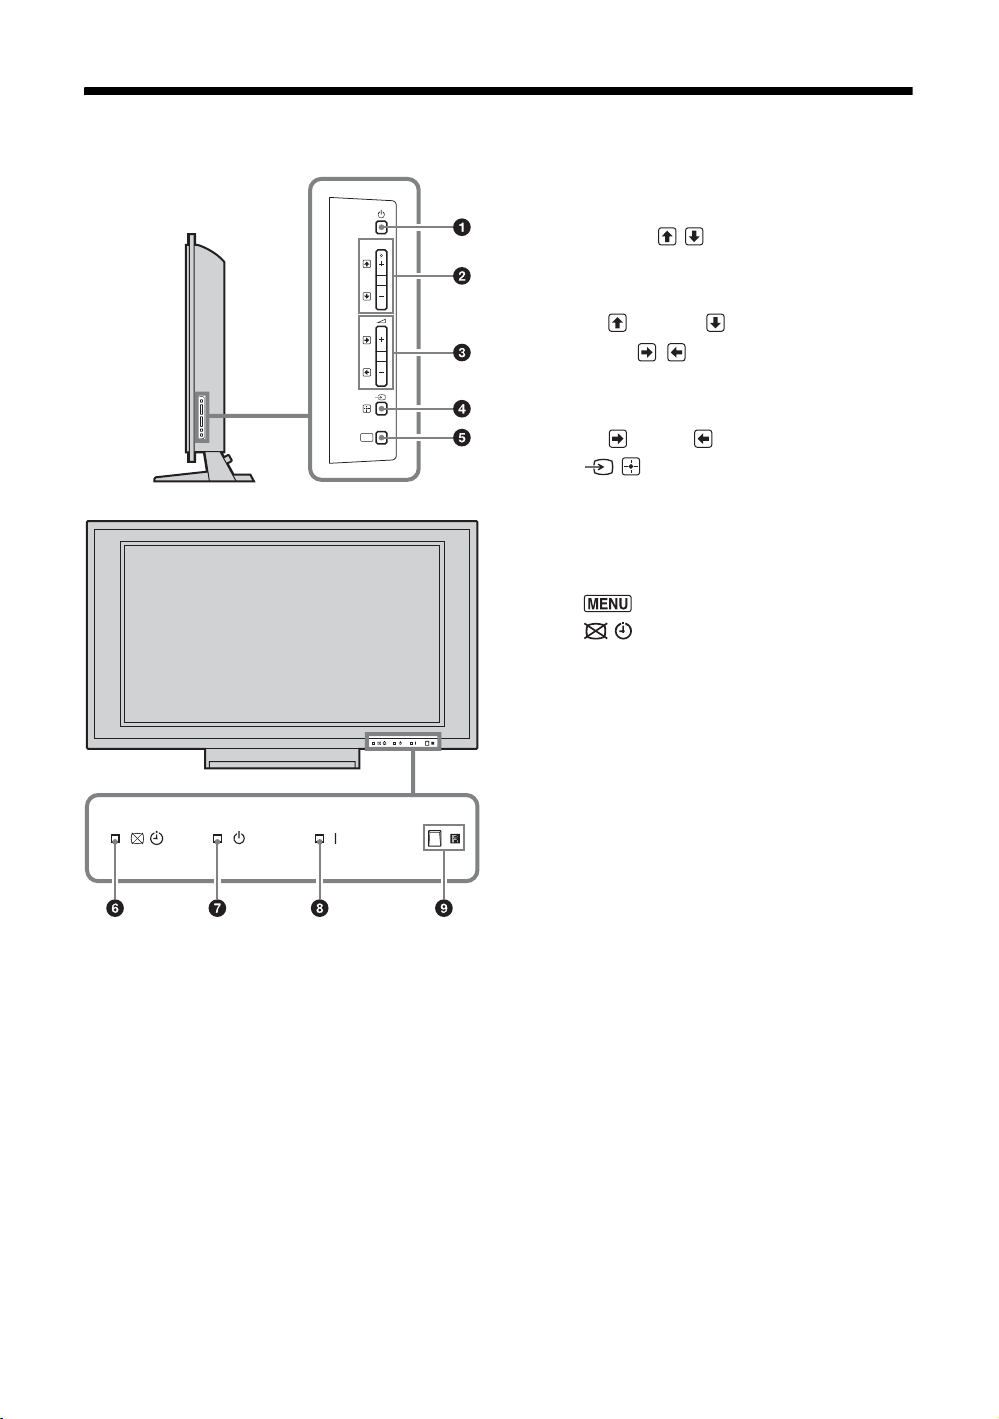
Overview of the TV buttons and indicators
1 1 – Power
Switches the TV on or off.
PROG
MENU
2 PROG +/-/ /
• In TV mode: Selects the next (+) or previous
(-) channel.
• In TV menu: Moves through the options up
( ) or down ( ).
3 2 +/-/ /
• In TV mode: Increases (+) or decreases (-) the
volume.
• In TV menu: Moves through the options right
( ) or left ( ).
4 / – Input select/OK
• In TV mode (page 21): Selects the input
source from equipment connected to the TV
sockets.
• In TV menu: Selects the menu or option, and
confirms the setting.
5 (page 22)
6 – Picture Off/Timer indicator
• Lights up in green when the picture is
switched off (page 29).
• Lights up in orange when the timer is set
(page 29).
7 1 – Standby indicator
Lights up in red when the TV is in standby mode.
8 " – Power indicator
Lights up in green when the TV is switched on.
9 Remote control sensor
Note
Make sure that the TV is completely switched off before unplugging the mains lead. Unplugging the mains lead while the TV is
turned on may cause the indicator to remain lit or may cause the TV to malfunction.
GB
14
Page 15
Watching TV
Watching TV
2
3 Press the number buttons or PROG +/- to
select a TV channel.
To select channel numbers 10 and above using the
number buttons, enter the second and third digits
within two seconds.
To select a digital channel using the Digital
Electronic Programme Guide (EPG), see page 18.
In digital mode
1
3
An information banner appears briefly. The
following icons may be indicated on the banner.
: Radio service
: Scrambled/Subscription service
: Multiple audio languages available
: Subtitles available
: Subtitles available for the hearing impaired
: Recommended minimum age for current
programme (from 4 to 18 years)
: Parental Lock
: Current programme is being recorded
Additional operations
To Do this
Switch off the TV
temporarily
(standby mode)
Press TV "/1.
Watching TV
3
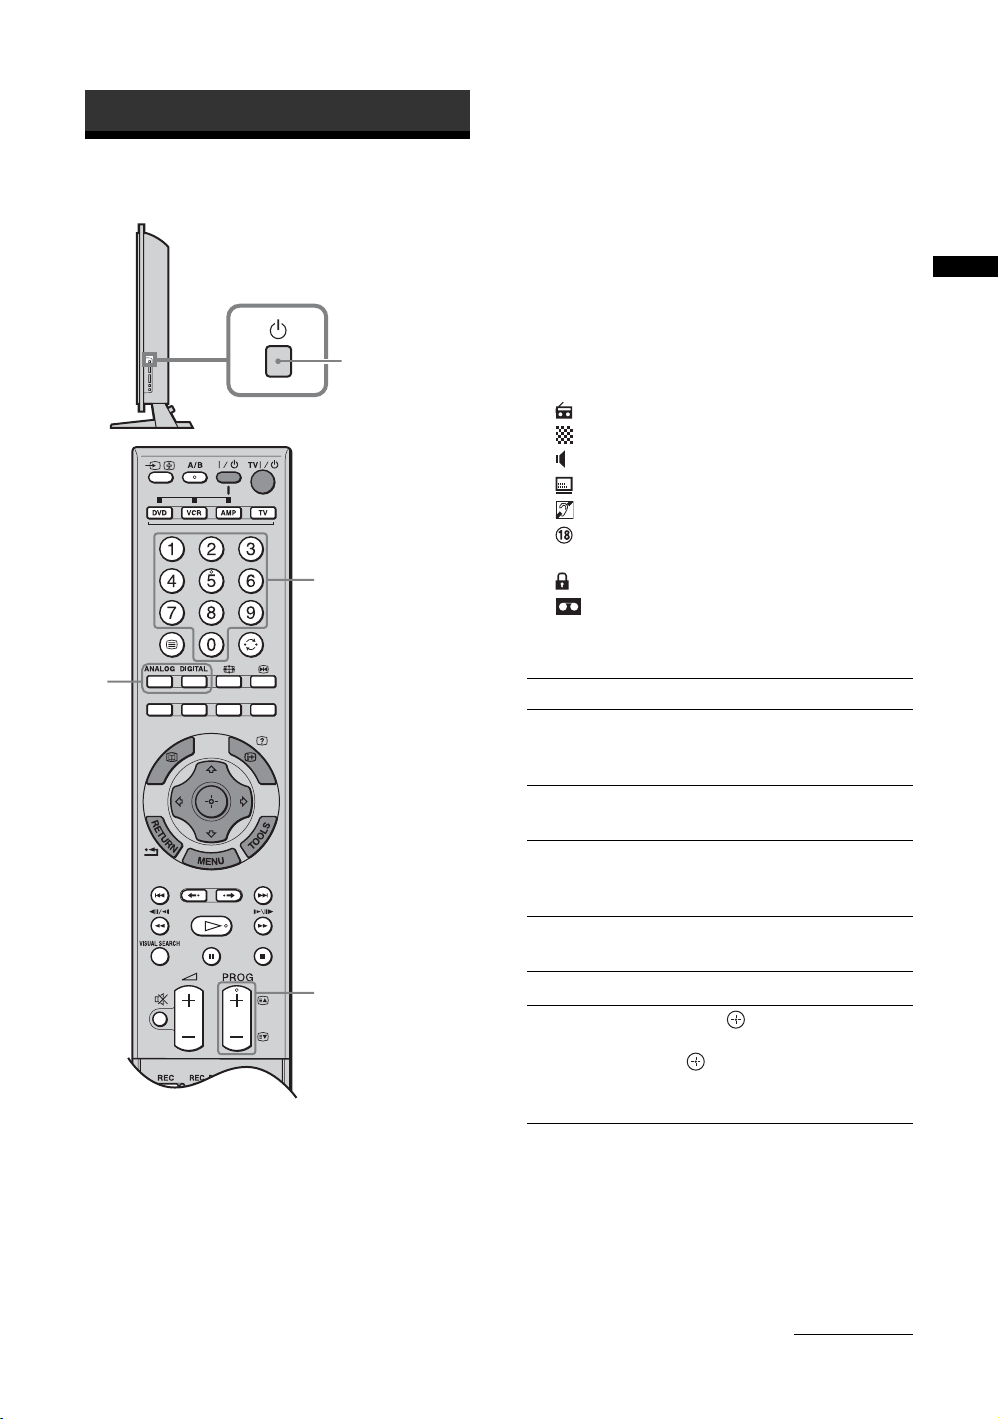
1 Press 1 on the TV (right side) to switch on
the TV.
When the TV is in standby mode (the 1 (standby)
indicator on the TV (front) is red), press TV "/1
on the remote to switch on the TV.
2 Press DIGITAL to switch to digital mode or
ANALOG to switch to analogue mode.
The channels available vary depending on the
mode.
Switch off the TV
completely
Switch on the TV
without sound from
standby mode
Adjust the volume Press 2 + (increase)/
Mute the sound Press %. Press again to restore.
Access the
Programme index
table (in analogue
mode only)
Press 1 on the TV (right side).
Press %. Press 2 +/- to adjust
the volume.
- (decrease).
Press . To select an analogue
channel, press
.
To access the Input signal index
table, see page 21.
F/f, then press
Continued
15
GB
Page 16
To access Text
Press /. Each time you press /, the display changes
cyclically as follows:
Text and TV picture t Text t No Text (exit the
Text service)
To select a page, press the number buttons or PROG
+/-.
To hold a page, press / .
To reveal hidden information, press / .
To jump a page, press and
three digit pages).
Tips
• Ensure that the TV is receiving a good signal, or some text
errors may occur.
• Most TV channels broadcast a Text service. For
information on the use of the service, select the index
page.
• When four coloured items appear at the bottom of the Text
page, Fastext is available. Fastext allows you to access
pages quickly and easily. Press the corresponding
coloured button to access the page.
F/f, then press (for
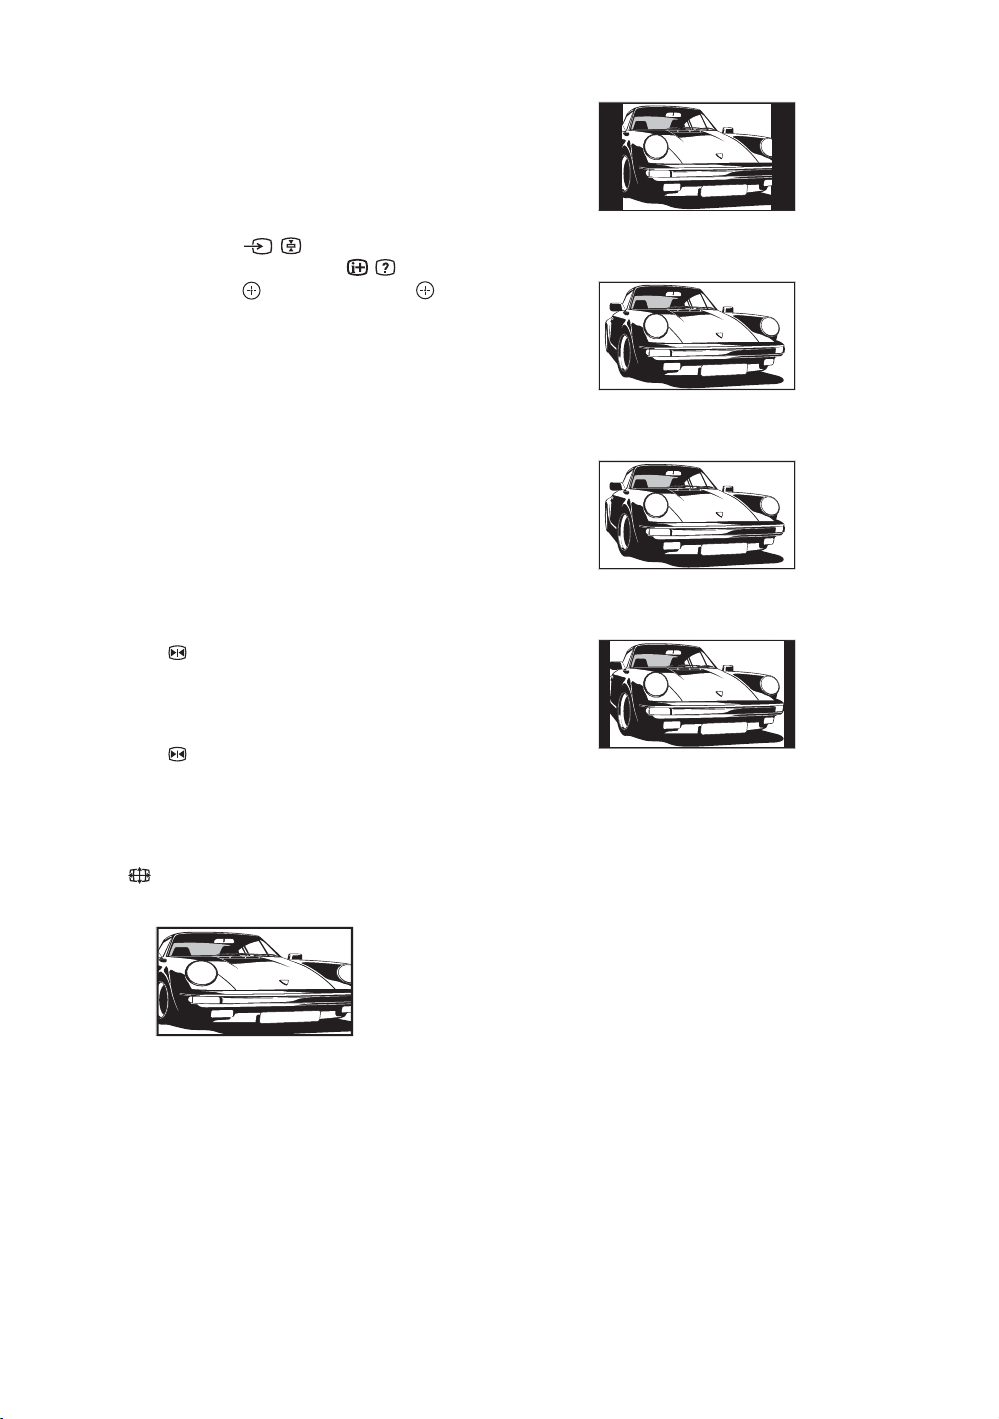
4:3
Displays conventional 4:3 broadcasts (e.g. non-wide
screen TV) in the correct proportions.
Wide
Displays wide screen (16:9) broadcasts in the correct
proportions.
Zoom*
To freeze the picture – Picture freeze
You can freeze the current picture to make a note of a
telephone number or recipe.
1 Press .
The frozen picture is displayed on the right of the
screen. You can watch a moving picture on the
left.
2 Press again to return to normal TV
mode.
To change the screen mode manually to
suit the broadcast
Press repeatedly to select Smart, 4:3, Wide,
Zoom, or 14:9.
Smart*
Displays conventional 4:3 broadcasts with an
imitation wide screen effect. The 4:3 picture is
stretched to fill the screen.
Displays cinemascopic (letter box format) broadcasts
in the correct proportions.
14:9*
Displays 14:9 broadcasts in the correct proportions.
As a result, black border areas are visible on the
screen.
* Parts of the top and bottom of the picture may be cut off.
Tips
• Alternatively, you can set “Auto Format” to “On”. The TV
will automatically select the best mode to suit the
broadcast (page 27).
• You can adjust the position of the picture when selecting
Smart, 14:9 or Zoom. Press
(e.g. to read subtitles).
F/f to move up or down
16
GB
Page 17

To use the Tools menu
Press TOOLS to display the following options when
viewing a TV programme.
Options Description
Close Closes the Tools menu.
PAP (or Single Picture) See page 17.
Picture Mode See page 23.
Sound Mode See page 26.
Subtitle Setting (in
digital mode only)
Digital Favourites (in
digital mode only)
Power Saving See page 29.
Sleep Timer See page 29.
i Volume* See page 30.
Auto Clock Set (in
analogue mode only)
* This option appears only if “i Speaker Link” is set to
“Off” (page 30).
See page 35.
See page 20.
Allows you to switch to digital
mode and obtain the time.
To view two pictures simultaneously – PAP
(Picture and Picture)
You can view two pictures (external input and TV
programme) on the screen simultaneously.
Connect the optional equipment (page 39), and make
sure that images from the equipment appear on the
screen (page 21).
Notes
• This function is not available for a PC input source.
• You cannot change the size of the pictures.
Watching TV
Press F/f to select “PAP” from the Tools menu, then
press . The picture from the connected equipment
is displayed on the left and the TV programme is
displayed on the right.
To return to normal TV mode, press or RETURN.
Tips
• You can also return to normal TV mode by selecting
“Single Picture” from the Tools menu.
• The picture framed in green is audible. You can switch the
audible picture by pressing
G/g.
17
GB
Page 18
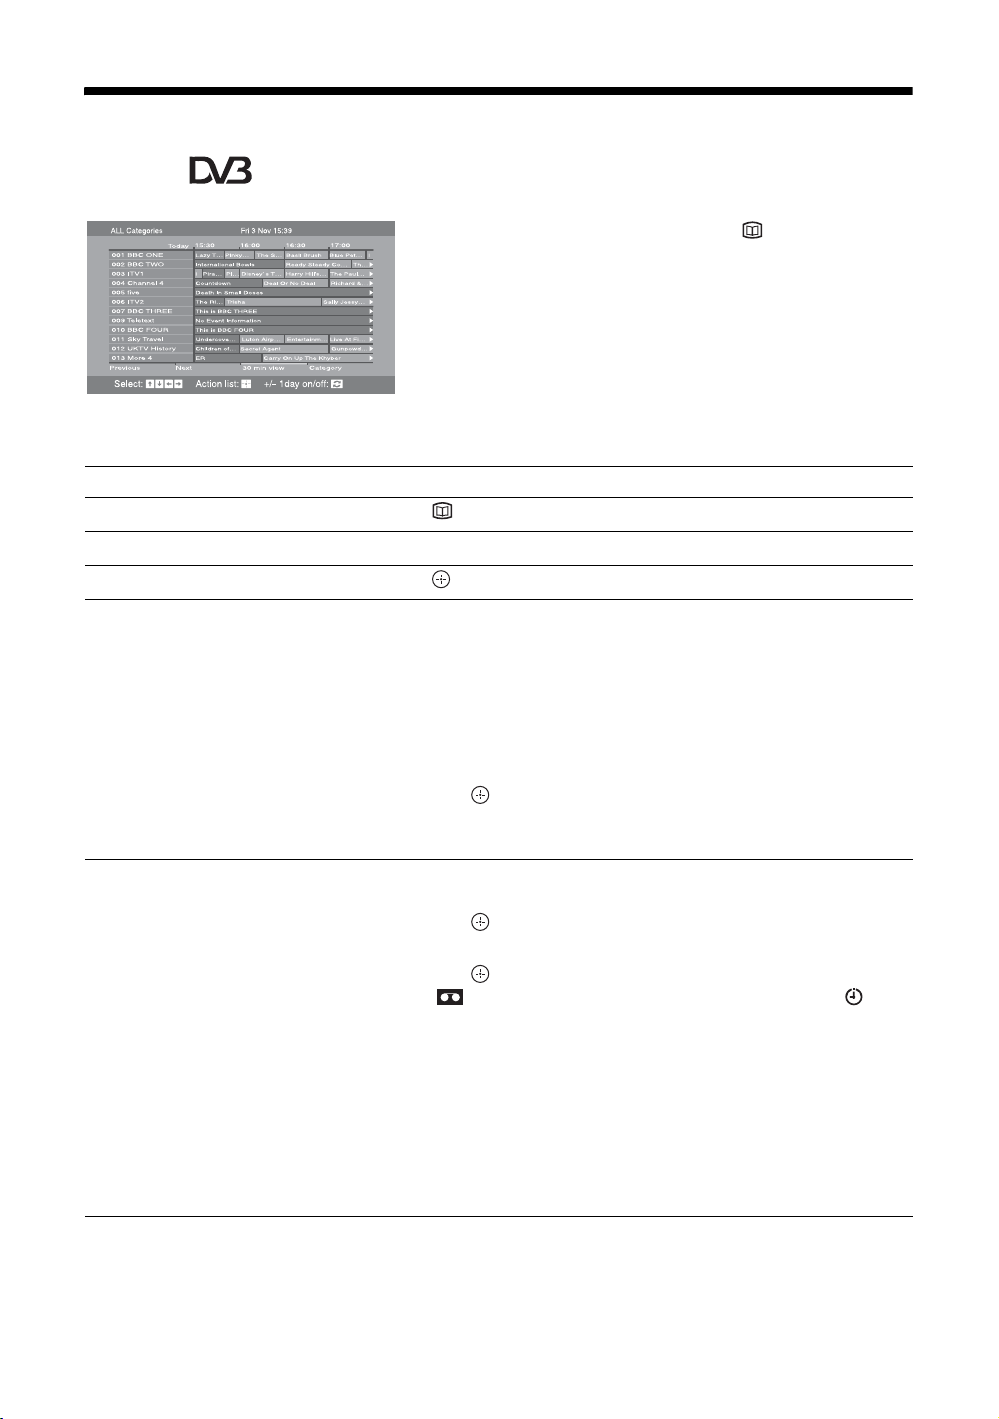
Checking the Digital Electronic Programme Guide
(EPG) *
1 In digital mode, press to display the
Digital Electronic Programme Guide
(EPG).
2 Perform the desired operation, as shown in
the following table.
Note
Programme information will only be displayed if the TV
Digital Electronic Programme Guide (EPG)
* This function may not be available in some countries.
To Do this
Turn off the EPG Press .
station is transmitting it.
Move through the EPG Press
Watch a current programme Press while the current programme is selected.
Sort the programme information by
category – Category list
Set a programme to be recorded – Timer
REC
F/f/G/g.
1 Press the blue button.
2 Press
3 Press .
1 Press F/f/G/g to select the future programme you want to
2 Press .
3 Press
4 Press to set the TV and your VCR timers.
Notes
• You can set VCR timer recording on the TV only for Smartlink compatible
VCRs. If your VCR is not Smartlink compatible, a message will be displayed to
remind you to set your VCR timer.
• Once a recording has begun, you can switch the TV to standby mode, but do not
switch off the TV completely or the recording may be cancelled.
• If an age restriction for programmes has been selected, a message asking for a
PIN code will appear on the screen. For more details refer to “Parental Lock”
on page 35.
F/f/G/g to select a category. The category name is
displayed on the side.
The categories available include:
“Favourite”: Contains all the channels that have been stored in the
Favourite list (page 20).
“All Categories”: Contains all available channels.
“News”: Contains all news channels.
The Digital Electronic Programme Guide (EPG) now only displays the
current programmes from the category selected.
record.
F/f to select “Timer REC”.
A symbol appears by that programme’s information. The
indicator on the TV (front) lights up.
18
GB
Page 19
To Do this
Set a programme to be displayed
automatically on the screen when it starts
– Reminder
1 Press F/f/G/g to select the future programme you want to
display.
2 Press .
3 Press
4 Press to automatically display the selected programme
when the programme starts.
A c symbol appears by that programme’s information.
Note
If you switch the TV to standby mode, it will automatically turn itself on
when the programme is about to start.
Set the time and date of a programme you
want to record – Manual timer REC
1 Press .
2 Press
3 Press F/f to select the date, then press g.
4 Set the start and stop time in the same way as in step 3.
5 Press
TV and your VCR timers.
A symbol appears by that programme’s information. The
indicator on the TV (front) lights up.
Notes
• You can set VCR timer recording on the TV only for Smartlink compatible
VCRs. If your VCR is not Smartlink compatible, a message will be displayed to
remind you to set your VCR timer.
• Once a recording has begun, you can switch the TV to standby mode, but do not
switch off the TV completely or the recording may be cancelled.
• If an age restriction for programmes has been selected, a message asking for a
PIN code will appear on the screen. For more details refer to “Parental Lock”
on page 35.
Cancel a recording/reminder – Timer list
1 Press .
2 Press F/f to select “Timer list”.
3 Press
press .
A display appears to confirm that you want to cancel the programme.
4 Press G to select “Yes”, then press to confirm.
F/f to select “Reminder”.
Watching TV
F/f to select “Manual timer REC”, then press .
F/f to select the programme, then press to set the
F/f to select the programme you want to cancel, then
Tip
You can also display the Digital Electronic Programme Guide (EPG) by selecting “Digital EPG” in the “MENU” (page 22).
19
GB
Page 20
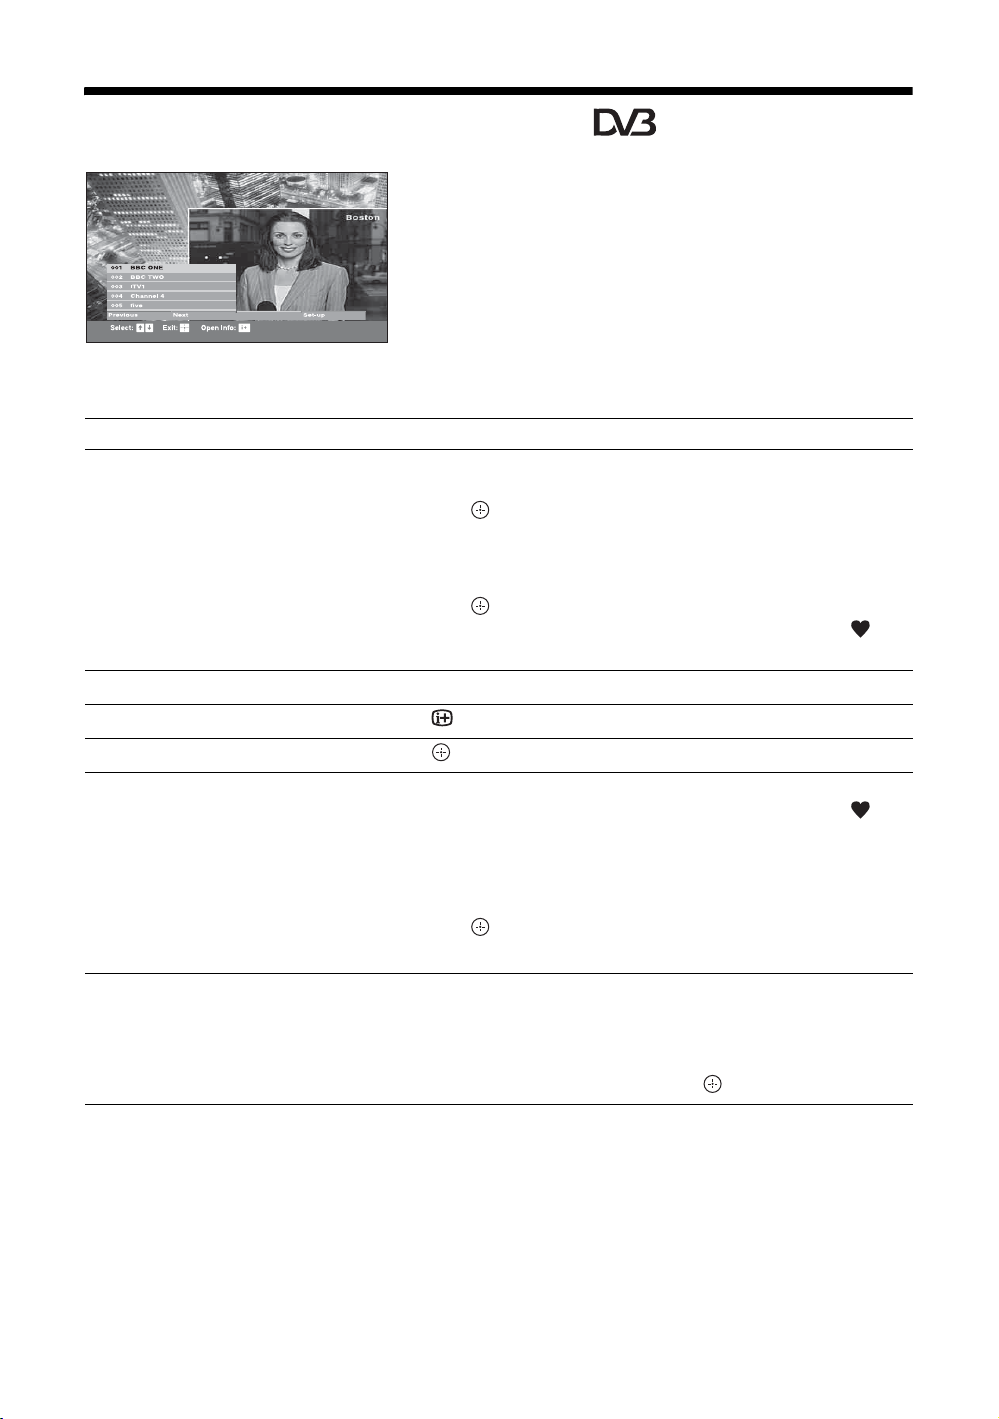
Using the Digital Favourite list *
The Favourite feature allows you to select
programmes from a list of up to 20 channels you
specify. To display the Favourite list, see “Navigating
through menus” (page 22).
Digital Favourite list
* This function may not be available in some countries.
To Do this
Create your Favourite list for the first time A message appears asking if you want to add channels to the Favourite list
when you select “Digital Favourites” in the “MENU” for the first time.
1 Press to select “Yes”.
2 Press
3 Press .
Turn off the Favourite list Press RETURN.
F/f to select the channel you want to add.
If you know the channel number, you can use the number buttons to
directly select a channel.
Channels that are stored in the Favourite list are indicated by a
symbol.
See brief details on current programmes Press while selecting a channel. Press again to cancel.
Watch a channel Press while selecting a channel.
Add or remove channels in the Favourite
list
Remove all channels from the Favourite list
1 Press the blue button.
Channels that are stored in the Favourite list are indicated by a
symbol.
2 Press F/f to select the channel you want to add or remove.
If you know the channel number, you can use the number buttons to
directly select a channel.
3 Press .
4 Press the blue button to return to the Favourite list.
1 Press the blue button.
2 Press the yellow button.
A display appears to confirm that you want to delete all channels from the
Favourite list.
3 Press G to select “Yes”, then press to confirm.
20
GB
Page 21
Additional operations
Viewing pictures from
connected equipment
Switch on the connected equipment, then
perform one of the following operation.
For equipment connected to the scart sockets using a
fully-wired 21-pin scart lead (page 40)
Start playback on the connected equipment.
The picture from the connected equipment appears on
the screen.
For an auto-tuned VCR (page 7)
In analogue mode, press PROG +/-, or the number
buttons, to select the video channel.
For other connected equipment (page 39)
Press / repeatedly until the correct input
symbol (see below) appears on the screen.
AV 1 / AV 1 , AV 2 / AV 2 , AV 3 /
AV3:
Audio/video or RGB input signal through the scart
socket / 1, 2 or 3. appears only if an RGB
source has been connected.
AV4:
Component input signal through the Y, P
sockets / 4, and audio input signal through the
L (MONO), R sockets / 4.
AV5:
Digital audio/video input signal through the HDMI IN 5
socket.
B/CB, PR/CR
To Do this
Return to normal TV
operation
Access the Input
signal index table
(except for PC video
input signal)
Press the TV function button,
DIGITAL or ANALOG.
Press to access the Input signal
index table. (Then, only in
analogue mode, press
select an input source, press
then press .
g.) To
F/f,
To use the Tools menu
Press TOOLS to display the following options when
viewing pictures from connected equipment other
than a PC.
Options Description
Close
PAP (or Single Picture)
Picture Mode See page 23.
Sound Mode See page 26.
Power Saving See page 29.
Sleep Timer See page 29.
i Volume* See page 30.
Auto Clock Set Allows you to switch to digital
* This option appears only if “i Speaker Link” is set to
“Off” (page 30).
Closes the Tools menu.
See page 17.
mode and obtain the time.
Watching TV
AV6:
Digital audio/video input signal through the HDMI IN 6
socket. Audio input signal is analogue only if the
equipment has been connected using the DVI and audio
out socket.
AV 7 / AV 7 / AV 7 :
Input symbols appear depending on the connected
equipment and the “AV7 Input” setting in the “AV Setup” menu (page 31).
AV7: Component input signal through the Y, P
R/CR sockets 7, and audio input signal through the
P
audio L (MONO)/R sockets 7.
AV7: Composite input signal through the video
socket 7, and audio input signal through the audio L
(MONO)/R sockets 7.
AV7: S video input signal through the S video
socket 7, and audio input signal through the audio
L (MONO)/R sockets 7.
PC:
PC video input signal through the PC socket, and
audio input signal through the PC audio socket .
B/CB,
21
GB
Page 22
Using MENU Functions
Navigating through
menus
“MENU” allows you to enjoy various convenient
features of this TV. You can easily select channels or
inputs sources and change the settings for your TV.
2
3
1
Icon Description
Digital*
Returns to the last viewed digital
channel.
Digital EPG*
Displays the Digital Electronic
Programme Guide (EPG).
For details about settings, see page 18.
External Inputs
Selects equipment connected to your TV.
• To watch the desired external input,
select the input source, then press .
• To assign a label to an external input,
see page 31.
Settings
Displays the Settings menu where most
of the advanced settings and adjustments
are performed.
For details about settings, see page 23 to
36.
* This function may not be available in some countries.
2 Press F/f to select an option.
3 Press to confirm a selected option.
To exit the menu, press MENU.
1 Press MENU to display the menu.
Icon Description
Digital Favourites*
Displays the Favourite list. For details
about settings, see page 20.
Analogue
Returns to the last viewed analogue
channel.
GB
22
Page 23
Picture menu
You can select the options listed below on the Picture
menu.
1 Press F/f to select “Settings” on MENU,
then press .
2 Press F/f to select a menu icon, then
press .
3 Press F/f/G/g to select an option.
Target Inputs
Picture Mode
Reset
Backlight
Contrast
Brightness
Colour
For the input currently being viewed, select whether to use the common setting or to
set each item separately.
“Common”: Applies common settings whose adjustments are shared with other
inputs in which “Target Inputs” is set to “Common”.
Current input name (e.g. AV1): Allows you to set each option separately for the
current input.
Selects the picture mode.
“Vivid”: For enhanced picture contrast and sharpness.
“Standard”: For standard picture. Recommended for home entertainment.
“Custom”: Allows you to store your preferred settings.
Resets all the “Picture” settings except “Target Inputs” and “Picture Mode” to the
factory settings.
Tip
“Advanced Settings” (page 25) is also not reset. Select “Reset” in “Advanced Settings” to reset
items in “Advanced Settings”.
Adjusts the brightness of the backlight.
Increases or decreases picture contrast.
Brightens or darkens the picture.
Increases or decreases colour intensity.
Using MENU Functions
Hue
Increases or decreases the green tones and red tones.
Tip
“Hue” can only be adjusted for an NTSC colour signal (e.g. U.S.A. video tapes).
Continued
23
GB
Page 24

Colour Temperature
Adjusts the whiteness of the picture.
“Cool”: Gives the white colours a blue tint.
“Neutral”: Gives the white colours a neutral tint.
“Warm 1”/“Warm 2”: Gives the white colours a red tint. “Warm 2” gives a redder
tint than “Warm 1”.
Tip
“Warm 1” and “Warm 2” can only be selected when you set “Picture Mode” to “Custom”.
Sharpness
Noise Reduction
DRC Mode
DRC Palette
Sharpens or softens the picture.
Reduces the picture noise (snowy picture).
“Auto”: Automatically reduces the picture noise.
“High”/“Medium”/“Low”: Modifies the effect of the noise reduction.
“Off”: Turns off the Noise Reduction feature.
“BNR”: Reduces the block picture noise. This is effective for digital channels, or a
connected DVD player/digital satellite receiver with MPEG playback.
Tips
• “Auto” is not available when watching component, HDMI or digital RF inputs.
• “Noise Reduction” is not available when using Freeze or PAP features.
Selects a high-resolution picture with 4x density, for high quality sources (e.g. DVD
players, satellite receivers).
“Mode 1”: Recommended for moving pictures.
“Mode 2”: Recommended for still images and text.
“Off”: Turns off the DRC Mode.
Tip
“DRC Mode” is not available when “Game Mode” is set to “On” or when using Freeze or PAP
features; also not available when watching 480p, 576p, 720p, 1080i or 1080p sources.
Customizes the level of detail (“Reality”) and smoothness (“Clarity”) for each input
signal. For example, you can create one custom setting to optimize your cable input
picture, and create another to optimize your DVD player’s picture.
The DRC palette appears.
24
GB
1 Press
2 To save the settings, press .
Tip
“DRC Palette” is not available when “Game Mode” is set to “On”, “DRC Mode” is set to “Off”
or when using Freeze or PAP features; also not available when watching 480p, 576p, 720p,
1080i or 1080p sources.
F/f/G/g to adjust the position of the marker (z).
As you move the z higher along the “Reality” axis, the picture becomes more
detailed. As you move the z to the right along the “Clarity” axis, the picture becomes
smoother.
Page 25

Advanced Settings
Customizes the Picture function in more detail. When you set “Picture Mode” to
“Custom”, you can set/change these settings.
“Reset”: Resets all the advanced settings to the factory settings.
“Black Corrector”: Enhances black areas of the picture for stronger contrast.
“Adv. Contrast Enhancer”: Automatically adjusts “Backlight” and “Contrast” to the
most suitable settings judging from the brightness of the screen. This setting is
especially effective for dark images, increasing vibrancy in the picture.
“Gamma”: Adjusts the balance between bright and dark areas of the picture.
“Clear White”: Emphasizes white colours.
“Live Colour”: Makes colours more vivid.
“Colour Space”: Changes the colour reproduction gamut. “Wide” reproduces the
vivid colour and “Normal” reproduces the standard colour.
“White Balance”: Adjusts the colour temperature colour by colour.
“Detail Enhancer”: Enhances the details of the picture.
“Edge Enhancer”: Enhances the outline of the picture.
Tips
• “Adv. Contrast Enhancer” and “Detail Enhancer” are not available when using Freeze or
PAP features.
• “Live Colour” is not available when “Colour Space” is set to “Normal”.
Using MENU Functions
25
GB
Page 26
Sound menu
You can select the options listed below on the Sound
menu. To select options in “Settings”, refer to “Picture
menu” (page 23).
Target Inputs
Sound Mode
Reset
Treble
Bass
Balance
Auto Volume
Volume Offset
Surround
For the input currently being viewed, select whether to use the common setting or to
set each item separately.
“Common”: Applies common settings whose adjustments are shared with other
inputs in which “Target Inputs” is set to “Common”.
Current input name (e.g. AV1): Allows you to set each option separately for the
current input.
Selects the sound mode.
“Dynamic”: Enhances treble and bass.
“Standard”: For standard sound. Recommended for home entertainment.
“Custom”: Flat response. Also allows you to store your preferred settings.
Resets all the “Sound” settings except “Target Inputs”, “Sound Mode” and “Dual
Sound” to the factory settings.
Adjusts higher-pitched sounds.
Adjusts lower-pitched sounds.
Emphasizes left or right speaker balance.
Keeps a constant volume level even when volume level gaps occur (e.g. adverts tend
to be louder than programmes).
Adjusts the volume level of the current input relative to other inputs, when “Target
Inputs” is set to the current input name (e.g. AV1).
Selects the surround mode.
“Dolby Virtual”: Uses the TV speakers to simulate the surround effect produced by
a multi channel system.
“Off”: For normal stereo or mono reception.
BBE
Dual Sound
Tip
Sound menu options other than “Dual Sound” cannot be used for headphones and audio output sockets.
GB
26
Gives sound more impact by compensating for phase effects in speakers using the
“BBE High Definition Sound System”.
Selects the sound from the speaker for a stereo or bilingual broadcast.
“Stereo”, “Mono”: For a stereo broadcast.
“A”/“B”/“Mono”: For a bilingual broadcast, select “A” for sound channel 1, “B” for
sound channel 2, or “Mono” for a mono channel, if available.
Tip
If you select other equipment connected to the TV, set “Dual Sound” to “Stereo”, “A” or “B”.
Page 27
Screen menu
You can select the options listed below on the Screen
menu. To select options in “Settings”, refer to “Picture
menu” (page 23).
Target Inputs
Screen Format
Auto Format
4:3 Default
Display Area
For the input currently being viewed, select whether to use the common setting or to
set each item separately.
“Common”: Applies common settings whose adjustments are shared with other
inputs in which “Target Inputs” is set to “Common”.
Current input name (e.g. AV1): Allows you to set each option separately for the
current input.
For details about the screen format, see “To change the screen mode manually to suit
the broadcast” (page 16).
Automatically changes the screen format according to the broadcast signal. To keep
your setting, select “Off”.
Tip
Even if “Auto Format” is set to “On” or “Off”, you can always modify the format of the screen
by pressing repeatedly.
Selects the default screen mode for use with 4:3 broadcasts.
“Smart”: Displays conventional 4:3 broadcasts with an imitation wide screen effect.
“4:3”: Displays conventional 4:3 broadcasts in the correct proportions.
“Off”: Keeps the current “Screen Format” setting when the channel or input is
changed.
Tip
This option is available only if “Auto Format” is set to “On”.
Adjusts the screen area displaying the picture.
“Full Pixel”: Displays the picture for 1080i or 1080p sources in the original size
when parts of the picture are cut off.
“Normal”: Displays the picture in the original size.
“-1”/“-2”: Enlarges the picture to hide the edge of the picture.
Tip
“Full Pixel” is available only when Screen Format is set to “Wide”.
Using MENU Functions
Horizontal Shift
Adjusts the horizontal position of the picture for each screen format.
Tip
This option is not available when “Display Area” is set to “Full Pixel”.
Continued
27
GB
Page 28

Vertical Shift
Adjusts the vertical position of the picture when the screen format is set to Smart,
Zoom or 14:9.
Vertical Size
Adjusts the vertical size of the picture when the screen format is set to Smart.
28
GB
Page 29

Set-up menu
You can select the options listed below on the Set-up
menu. To select options in “Settings”, refer to “Picture
menu” (page 23).
Timer Settings
Auto Start-up
Sets the timer to switch on/off the TV.
Sleep Timer
Sets a period of time after which the TV automatically switches itself into standby
mode.
When the Sleep Timer is activated, the (Timer) indicator on the TV (front) lights
up in orange.
Tips
• If you switch off the TV and switch it on again, “Sleep Timer” is reset to “Off”.
• “TV will soon turn off by Sleep Timer” appears on the screen one minute before the TV
switches to standby mode.
On Timer
Sets the timer to switch on the TV from standby mode.
“Day”: Selects the day on which you want to activate the On Timer.
“Time”: Sets the time to switch on the TV.
“Duration”: Selects the time period after which the TV automatically switches to
standby mode again.
“Volume Set-up”: Sets the volume for when the timer switches on the TV.
Clock Set
Allows you to adjust the clock manually. When the TV is receiving digital channels,
the clock cannot be adjusted manually since it is set to the time code of the
broadcasted signal.
Starts the “first time operation menu” to select the language and country/region, tune
in all available digital and analogue channels, and set the time (only when no digital
channels are received). Usually, you do not need to do this operation because the
language and country/region will have been selected and channels already tuned
when the TV was first installed (page 6, 7). However, this option allows you to
repeat the process (e.g. to retune the TV after moving house, or to search for new
channels that have been launched by broadcasters).
Using MENU Functions
Power Saving
Selects the power saving mode to reduce the power consumption of the TV.
When “Picture Off” is selected, the picture is switched off and the (Picture Off)
indicator on the TV (front) lights up in green. The sound remains unchanged.
Continued
29
GB
Page 30

Film Mode
Provides smoother picture movement when playing DVD or VCR images taken on
film, reducing picture blur and graininess.
“Auto 1”: For a stable picture with minimal noise. Set to “Auto 2” if the screen is
partially degraded.
“Auto 2”: Use this setting for standard use.
“Off”: Turns off the Film mode.
Notes
• Even if “Auto 1” or “Auto 2” is selected, “Film Mode” will be automatically turned off and
a moving image will not be played smoothly if the image contains irregular signals or too
much noise.
• Film Mode is not available when using Freeze or PAP features, or when watching 480p,
576p, 720p or 1080p sources.
i Volume
(headphone volume)
i Speaker Link
(headphone speaker
link)
Speaker
Audio Out
Light Sensor
Logo Illumination
Adjusts the volume of the headphones when “i Speaker Link” is set to “Off”.
Switches the TV’s internal speakers on/off when headphones are connected.
“On”: Sound is output only from headphones.
“Off”: Sound is output from both the TV and headphones.
Switches on/off the TV’s internal speakers.
“On”: The TV speakers are turned on in order to listen to the TV’s sound through the
TV speakers.
“Off”: The TV speakers are turned off in order to listen to the TV’s sound only
through your external audio equipment connected to the audio output sockets.
“Variable”: The audio output from your audio system can be controlled by the TV’s
remote.
“Fixed”: The audio output of the TV is fixed. Use your audio receiver’s volume
control to adjust the volume (and other audio settings) through your audio system.
“On”: Automatically optimizes the picture settings according to the ambient light in
the room.
“Off”: Turns off the “Light Sensor” feature.
Lights up and turns off the Sony logo on the front of the TV.
Language
Information
All Reset
GB
30
Selects the language in which the menus are displayed.
Displays your TV’s product information.
Resets all settings to the factory settings and then displays the Auto Start-up screen.
Note
All settings, including Digital Favourite list, country, language, auto tuned channels, etc. will
be reset.
Page 31

AV Set-up menu
You can select the options listed below on the AV Setup menu. To select options in “Settings”, refer to
“Picture menu” (page 23).
AV Preset
AV7 Input
AV2 Output
Assigns a name to any equipment connected to the side and rear sockets. The name
will be displayed briefly on the screen when the equipment is selected. You can skip
an input source that is not connected to any equipment.
1 Press
2 Press
“Auto”: Switches automatically between the component video sockets, S Video
socket, and the composite video sockets on the left side of the TV depending on the
cable connection.
“Component”: Activates the component video sockets on the left side of the TV.
“S Video”: Activates the S Video socket on the left side of the TV.
“Composite”: Activates the composite video sockets on the left side of the TV.
Tip
When multiple cables are connected and “Auto” is selected, “Component”, “S
Video”, “Composite” will be activated in that order.
Sets a signal to be output through the socket labelled / 2 on the rear of the
TV. If you connect a VCR or other recording equipment to the / 2 socket,
you can then record from the equipment connected to other sockets of the TV.
“TV”: Outputs a broadcast.
“AV1”: Outputs signals from equipment connected to the / 1 socket.
“AV3”: Outputs signals from equipment connected to the / 3 socket.
“AV7”: Outputs signals from equipment connected to the / 7 socket.
“Auto”: Outputs whatever is being viewed on the screen (except signals from the
F/f to select the desired input source, then press .
F/f to select the desired option below, then press .
Equipment labels: Uses one of the preset labels to assign a name to connected
equipment.
“Edit”: Creates your own label. Follow steps 2 to 4 of “Programme Labels” (page 32).
“Skip”: Skips an unnecessary input source.
/ 4, HDMI IN 5, HDMI IN 6 and PC sockets).
Using MENU Functions
Colour System
Game Mode
Colour Matrix
Selects the colour system (“Auto”, “PAL”, “SECAM”, “NTSC3.58” or
“NTSC4.43”) according to the input signal from the input source.
Depending on the game software, reaction times may slow during fast-moving
scenes, etc. Select “On” to improve the reaction times.
Usually used in the factory setting (AV1/2/3/7 (Composite and S video input signal)
is set to “ITU601”, and AV4/5/6/7 (Component input signal) is set to “Auto”). If the
tone of the picture from the input source is unnatural, select either “ITU601” or
“ITU709”, which normalizes the tone.
31
GB
Page 32

Analogue Set-up menu
You can select the options listed below on the
Analogue Set-up menu. To select options in
“Settings”, refer to “Picture menu” (page 23).
1 Digit Direct
Auto Tuning
Programme Sorting
Programme Labels
When “1 Digit Direct” is set to “On”, you can select an analogue channel using one
preset number button (0 - 9) on the remote.
Note
When “1 Digit Direct” is set to “On”, you cannot select channel numbers 10 and above entering
two digits using the remote.
Tunes in all the available analogue channels.
Usually you do not need to do this operation because the channels are already tuned
when the TV was first installed (page 7). However, this option allows you to repeat
the process (e.g. to retune the TV after moving house, or to search for new channels
that have been launched by broadcasters).
Changes the order in which the analogue channels are stored on the TV.
1 Press
2 Press
Assigns a channel name of your choice up to five letters or numbers. The name will
be displayed briefly on the screen when the channel is selected. (Names for channels
are usually taken automatically from Text (if available).)
1 Press F/f to select the channel you want to name, then press .
2 Press F/f to select the desired letter or number (“_” for a blank space),
3 Repeat the procedure in step 2 until the name is complete.
4 Select “OK”, then press .
F/f to select the channel you want to move to a new position,
then press .
F/f to select the new position for your channel, then press .
then press
If you input a wrong character
Press G/g to select the wrong character. Then, press F/f to select the correct
character.
To delete all the characters
Select “Reset”, then press .
g.
32
GB
Page 33

Manual Programme
Preset
Before selecting “Label”/“AFT”/“Audio Filter”/“Skip”/“Decoder”, press PROG +/to select the programme number with the channel. You cannot select a programme
number that is set to skip (page 34).
Programme
Presets programme channels manually.
1 Press
2 Press
3 Press
4 Press F/f to select one of the following TV broadcast systems, then
5 Press F/f to select “Channel”, then press .
6 Press
7 Tune the channels as follows:
8 Press to jump to “Confirm”, then press .
9 Press f to select “OK”, then press .
Repeat the procedure above to preset other channels manually.
Label
Assigns a name of your choice, up to five letters or numbers, to the selected channel.
This name will be displayed briefly on the screen when the channel is selected.
To input characters, follow steps 2 to 4 of “Programme Labels” (page 32).
AFT
Allows you to fine-tune the selected programme number manually if you feel that a
slight tuning adjustment will improve the picture quality.
You can adjust the fine tuning over a range of -15 to +15. When “On” is selected, the
fine tuning is performed automatically.
Audio Filter
Improves the sound for individual channels in the case of distortion in mono
broadcasts. Sometimes a non-standard broadcast signal can cause sound distortion or
intermittent sound muting when watching mono programmes.
If you do not experience any sound distortion, we recommend that you leave this
option set to the factory setting “Off”.
Notes
• You cannot receive stereo or dual sound when “Low” or “High” is selected.
• “Audio Filter” is not available when “System” is set to “L”.
/System/Channel
F/f to select “Programme”, then press .
F/f to select the programme number you want to manually tune
(if tuning a VCR, select channel 00), then press RETURN.
F/f to select “System”, then press .
G.
press
B/G: For western European countries/regions
I: For the United Kingdom
D/K: For eastern European countries/regions
L: For France
F/f to select “S” (for cable channels) or “C” (for terrestrial
channels), then press
If you do not know the channel number (frequency)
Press F/f to search for the next available channel. When a channel has been found,
the search will stop. To continue searching, press
If you know the channel number (frequency)
Press the number buttons to enter the channel number of the broadcast you want or
your VCR channel number.
g.
F/f.
Using MENU Functions
Continued
33
GB
Page 34

Skip
Skips unused analogue channels when you press PROG +/- to select channels. (You
can still select a skipped channel using the number buttons.)
Decoder
Views and records the scrambled channel selected when using a decoder connected
directly to scart connector / 1, or to scart connector / 2 via a VCR.
Note
Depending on the country/region selected for “Country” (page 6), this option may not be
available.
Confirm
Saves changes made to the “Manual Programme Preset” settings.
34
GB
Page 35

Digital Set-up menu
You can select the options listed below on the Digital
Set-up menu. To select options in “Settings”, refer to
“Picture menu” (page 23).
Note
Some functions may not be available in some countries.
Digital Settings
Displays the “Digital Settings” menu.
Subtitle Setting
Displays digital subtitles on the screen.
When “For Hard Of Hearing” is selected, some visual aids may also be displayed
with the subtitles (if TV channels broadcast such information).
Subtitle Language
Selects which language subtitles are displayed in.
Audio Language
Selects the language used for a programme. Some digital channels may broadcast
several audio languages for a programme.
Audio Type
Increases the sound level when “For Hard Of Hearing” is selected.
Parental Lock
Sets an age restriction for programmes. Any programme that exceeds the age
restriction can only be watched after a PIN Code is entered correctly.
1 Press the number buttons to enter your existing PIN code.
If you have not previously set a PIN, a PIN code entry screen appears. Follow the
instructions of “PIN Code” below.
2 Press F/f to select the age restriction or “None” (for unrestricted
watching), then press .
3 Press RETURN.
PIN Code
Sets a PIN code for the first time, or allows you to change your PIN code.
1 Enter a PIN as follows:
If you have previously set a PIN
Press the number buttons to enter your existing PIN.
If you have not set a PIN
Press the number buttons to enter the factory setting PIN of 9999.
2 Press the number buttons to enter the new PIN code.
A message appears to inform you that the new PIN has been accepted.
3 Press RETURN.
Tip
PIN code 9999 is always accepted.
Using MENU Functions
Continued
35
GB
Page 36

Technical Set-up
Displays the Technical Set-up menu.
“Auto Service Update”: Enables the TV to detect and store new digital services as
they become available.
“Software Download”: Enables the TV to automatically receive software updates
free through your existing aerial (when issued). It is recommended that this option
be set to “On” at all times. If you do not want your software to be updated, set this
option to “Off”.
“System Information”: Displays the current software version and the signal level.
“Time Zone”: Allows you to manually select the time zone you are in, if it is not the
same as the default time zone setting for your country.
CA Module Set-up
Allows you to access a Pay Per View service once you obtain a Conditional Access
Module (CAM) and a view card. See page 39 for the location of the (PCMCIA)
socket.
Notes
• CAM is not supported in all countries. Check with your authorized dealer.
• “CA Module Set-up” is available only when a CAM is inserted.
Digital Tuning
Displays the “Digital Tuning” menu.
Digital Auto Tuning
Tunes in all the available digital channels.
Usually you do not need to do this operation because the channels were already tuned
when the TV was first installed (page 7). However, this option allows you to repeat
the process (e.g. to retune the TV after moving house, or to search for new channels
that have been launched by broadcasters).
Programme List Edit
Removes any unwanted digital channels stored on the TV, and changes the order of
the digital channels stored on the TV.
1 Press
2 Remove or change the order of the digital channels as follows:
3 Press RETURN.
Digital Manual Tuning
Tunes the digital channels manually.
1 Press the number button to select the channel number you want to
2 When the available channels are found, press
3 Press
Repeat the above procedure to manually tune other channels.
F/f to select the channel you want to remove or move to a new
position.
If you know the programme number
Press the number buttons to enter the three-digit programme number of the broadcast
you want.
To remove the digital channel
Press . A message that confirms whether the selected digital channel is to be
deleted appears. Press
To change the order of the digital channels
Press g, then press F/f to select the new position for the channel and press G.
Repeat the procedure in steps 1 and 2 to move other channels if required.
manually tune, then press
G to select “Yes”, then press .
F/f to tune the channel.
F/f to select the channel
you want to store, then press .
F/f to select the programme number where you want to store the
new channel, then press .
36
GB
Page 37

PC Settings menu
Picture
Display Mode
Selects the display mode.
“Video”: Select to view video images.
“Text”: Select to view text, charts or tables.
You can select the options listed below on the PC
Settings menu when the TV is connected to a PC.
1 Press / repeatedly until PC
appears on the screen.
2 Press MENU to display the PC settings
menu.
Using MENU Functions
Reset
Backlight
Contrast
Brightness
Colour Temperature
Sound
Sound Mode
Resets all the “Picture” settings except “Display Mode” to the factory settings.
Adjusts the brightness of the backlight.
Increases or decreases picture contrast.
Brightens or darkens the picture.
Adjusts the whiteness of the picture.
“Cool”: Gives the white colours a blue tint.
“Neutral”: Gives the white colours a neutral tint.
“Warm 1”/“Warm 2”: Gives the white colours a red tint. “Warm 2” gives a redder
tint than “Warm 1”.
Selects the sound mode.
“Dynamic”: Enhances treble and bass.
“Standard”: For standard sound. Recommended for home entertainment.
“Custom”: Flat response. Also allows you to store your preferred settings.
Continued
37
GB
Page 38

Others
Auto Adjustment
Reset
Phase
Pitch
Horizontal Shift
Vertical Shift
Screen Format
Power Management
Automatically adjusts the display position, phase and pitch of the picture when the
TV receives an input signal from a connected PC.
Tip
Auto Adjustment may not work well with some input signals. In such cases, manually adjust
“Phase”, “Pitch”, “Horizontal Shift” and “Vertical Shift”.
Resets all the “Others” settings to the factory settings.
Adjusts the phase when the screen flickers.
Adjusts the pitch when the picture has unwanted vertical stripes.
Adjusts the horizontal position of the picture for each screen format.
Adjusts the vertical position of the picture for each screen format.
Selects the screen mode.
“Normal”: Displays the picture in its original size.
“Full1”: Enlarges the picture to fill the display area, keeping its original horizontalto-vertical aspect ratio.
“Full2”: Enlarges the picture to fill the display area.
Switches the TV to standby mode if no signal is received for 30 seconds.
38
GB
Page 39

Using Optional Equipment
Connecting optional equipment
You can connect a wide range of optional equipment to your TV. Connecting cables are not supplied.
Connecting to the TV (side)
To connect Do this
DVD player with
component output
A
Connect to the component Y, PB/
B, PR/CR sockets 7 and
C
audio L (MONO), R sockets 7.
DVD player
with component
output
S VHS/Hi8/DVC
camcorder
For service use only
Headphones
S VHS/Hi8/DVC
camcorder B
Headphones C Connect to the i socket to listen to
Conditional Access
Module (CAM) D
Connect to the S video socket
7 or the video socket 7,
and the audio sockets 7. To
avoid picture noise, do not connect
the camcorder to the video socket
7 and the S video socket
7 at the same time. If you
connect mono equipment, connect
to the L socket 7.
Tip
You can select the input signal by
setting “AV7 Input” in the “AV Setup” menu (page 31).
sound from the TV on headphones.
To use Pay Per View services. For
details, refer to the instruction
manual supplied with your CAM.
To use the CAM, press the eject
button and remove the “dummy”
card. Switch off the TV when
inserting your CAM into the CAM
slot. When you do not use the
CAM, we recommend that the
“dummy” card be inserted and
kept in the CAM slot.
Note
CAM is not supported in all
countries. Check with your
authorized dealer.
Using Optional Equipment
Continued
39
GB
Page 40

Connecting to the TV (rear)
IN
5
IN
6
To connect Do this
Digital satellite
receiver or DVD
player E
Connect to the HDMI IN 5 or 6
socket if the equipment has a
HDMI socket. The digital video
and audio signals are input from
L
R
Digital satellite
receiver
DVD player
the equipment. If the equipment
has a DVI socket, connect the DVI
socket to the HDMI IN 6 socket
through a DVI - HDMI adaptor
interface (not supplied), and
connect the equipment’s audio out
sockets to the audio in the HDMI
IN 6 sockets.
Note
The HDMI sockets only support the
following video inputs: 480i, 480p,
576i, 576p, 720p, 1080i and 1080p.
To connect a PC, use the PC
PC
socket.
PC F Connect to the PC sockets. It
OPTICAL OUT
Digital audio
(PCM) component
Digital audio
(PCM) component
L
R
PC
Hi-Fi audio
equipment
DVD player with
component output
G
Hi-Fi audio
equipment H
is recommended to use a PC cable
with ferrites.
Connect to the OPTICAL OUT
socket using the Optical audio
cable.
Note
The OPTICAL OUT socket only
supports digital terrestrial signals.
Connect to the audio output
sockets to listen to the sound
from the TV on Hi-Fi audio
equipment.
40
Video game
equipment
DVD player
Decoder
GB
VCR
DVD player
DVD recorder
VCR
Decoder
DVD player with
component output
I
Video game
equipment, DVD
player or decoder
J
DVD recorder or
VCR that supports
SmartLink K
VCR or DVD
player L
Connect to the component sockets
and the audio sockets / 4.
Connect to the scart socket /
1. When you connect the
decoder, the scrambled signal from
the TV tuner is output to the
decoder, then the unscrambled
signal is output from the decoder.
Connect to the scart socket /
2. SmartLink is a direct link
between the TV and a VCR/DVD
recorder.
For details, see page 5.
Page 41

Programming the
remote
This remote is preset to operate Sony TVs, most Sony
DVDs, VCRs and AMPs (Home Theatre, etc.).
To control VCRs and DVDs of other manufacturers
(and some other Sony VCR, DVD and AMP models),
do the following procedure to programme the remote.
Note
Before you start, look up the three-digit code for your brand
of DVD, VCR or AMP from the “Manufacturer’s codes” on
page 41.
1
2
1
3
1 Press and hold the DVD, VCR or AMP
function button you want to programme on
the remote, then press
function button pressed down.
The selected function button (DVD, VCR or
AMP) will flash.
2 Press the number buttons to enter the
three-digit manufacturer’s code number
while the button is lit. If code is not entered
within 10 seconds, you must perform the
step 1 again.
, keeping the
4 Switch on your equipment and check that
the following main functions work.
H (playback), x (stop), m (rewind), M (fast
forward), channel selection for both VCR and
DVDs, TOP MENU/MENU and
for DVDs.
If your equipment is not working, or some of the
functions do not work
Enter the correct code or try the next code listed
for the brand. However, not all models of every
brand may be covered.
To return to normal TV operation
Press the TV function button, DIGITAL or
ANALOG.
Manufacturer’s codes
VCR brand list
Brand Code
SONY 301, 302, 303, 304, 305, 306, 307, 308,
309, 310, 362
AIWA 325, 331, 351
AKAI 326, 329, 330
DAEWOO 342, 343
GRUNDIG 358, 355, 360, 361, 320, 351, 366
HITACHI 327, 333, 334
JVC 314, 315, 322, 344, 352, 353, 354, 348,
349
LG 332, 338
LOEWE 358, 355, 360, 361, 320, 351
MATSUI 356, 357
ORION 328
PANASONIC 321, 323
PHILIPS 311, 312, 313, 316, 317, 318, 358, 359,
363, 364
SAMSUNG 339, 340, 341, 345
SANYO 335, 336
SHARP 324
THOMSON 319, 350, 365
TOSHIBA 337
F/f/G/g only
Using Optional Equipment
3 Press .
When the programming is correct, the selected
function button will flash twice, and when not, it
will flash five times.
Continued
41
GB
Page 42

DVD brand list
DVD Player
Brand Code
SONY 001, 029, 030, 036, 037, 038, 039, 040,
041, 042, 043, 044, 053, 054, 055
AIWA 021
AKAI 032
DENON 018, 027, 020, 002
GRUNDIG 009, 028, 023, 024, 016, 003
HITACHI 025, 026, 015, 004, 035
JVC 006, 017
KENWOOD 008
LG 015, 014, 034
LOEWE 009, 028, 023, 024, 016, 003
MATSUI 013, 016
ONKYO 022, 033
PANASONIC 018, 027, 020, 002, 045, 046, 047
PHILIPS 009, 028, 023, 024, 016, 003, 031
PIONEER 004, 050, 051, 052
SAMSUNG 011, 014
SANYO 007
SHARP 019, 027
THOMSON 012
TOSHIBA 003, 048, 049
YAMAHA 018, 027, 020, 002
AV receiver
Brand Code
SONY 451, 452, 453, 454
Digital terrestrial receiver
Brand Code
SONY 501, 502, 503
DVD/VCR Player
Brand Code
SONY 101
DVD recorder
Brand Code
SONY 201, 202, 203
AUX Sony systems brand list
DAV Home Theatre System
Brand Code
SONY (DAV) 401, 402, 403, 404
GB
42
Page 43

Additional Information
Specifications
Display Unit
Power Requirements:
220–240 V AC, 50 Hz
Screen Size:
46 inches (Approx. 116.8 cm measured diagonally)
Display Resolution:
1,920 dots (horizontal) × 1,080 lines (vertical)
Power Consumption:
249 W
Standby Power Consumption:
0.3 W
Dimensions (w × h × d):
Approx. 1,262 × 795 × 322 mm (with stand)
Approx. 1,262 × 734 × 121 mm (without stand)
Mass:
Approx. 41 kg (with stand)
Approx. 36 kg (without stand)
Panel System
LCD (Liquid Crystal Display) Panel
TV System
Analogue: Depending on your country/region selection:
B/G/H, D/K, L, I
Digital: DVB-T
Colour/Video System
Analogue: PAL, SECAM
NTSC 3.58, 4.43 (only Video In)
Digital: MPEG-2 MP@ML
Aerial
75 ohm external terminal for VHF/UHF
Channel Coverage
Analogue: VHF: E2–E12
UHF: E21–E69
CATV: S1–S20
HYPER: S21–S41
D/K: R1–R12, R21–R69
L: F2–F10, B–Q, F21–F69
I: UHF B21–B69
Digital: VHF/UHF
Terminals
/1
21-pin scart connector (CENELEC standard) including
audio/video input, RGB input, and TV audio/video
output.
/ 2 (SmartLink)
21-pin scart connector (CENELEC standard) including
audio/video input, RGB input, selectable audio/video
output, and SmartLink interface.
/3
21-pin scart connector (CENELEC standard) including
audio/video input, RGB input, and audio/video output
which currently appears on the screen.
4
Supported formats: 1080i, 720p, 576p, 576i, 480p, 480i
Y: 1 Vp-p, 75 ohms, 0.3V negative sync
B/CB: 0.7 Vp-p, 75 ohms
P
P
R/CR: 0.7 Vp-p, 75 ohms
4
Audio input (phono jacks)
500 mVrms
Impedance: 47 kilo ohms
HDMI IN 5, 6
Video: 1080p, 1080i, 720p, 576p, 576i, 480p, 480i
Audio: Two channel linear PCM
32, 44.1 and 48 kHz, 16, 20 and 24 bits, or
analogue audio input (phono jacks)
(HDMI IN 6)
7
Supported formats: 1080i, 720p, 576p, 576i, 480p, 480i
Y: 1 Vp-p, 75 ohms, 0.3V negative sync
B/CB: 0.7 Vp-p, 75 ohms
P
P
R/CR: 0.7 Vp-p, 75 ohms
7 S video input (4-pin mini DIN)
7 Video input (phono jack)
7 Audio input (phono jacks)
OPTICAL OUT (OPTICAL OUT jack)
Audio output (Left/Right) (phono jacks)
PC PC Input (15 Dsub) (see page 44)
G: 0.7 Vp-p, 75 ohms, non Sync on Green
B: 0.7 Vp-p, 75 ohms, non Sync on Green
R: 0.7 Vp-p, 75 ohms, non Sync on Green
HD: 1-5 Vp-p
VD: 1-5 Vp-p
PC audio input (minijack)
i Headphones jack
CAM (Conditional Access Module) slot
Sound Output
11 W + 11 W
Supplied Accessories
Refer to “1: Checking the accessories” on page 4.
Optional Accessories
• Wall-Mount Bracket SU-WL51
•TV stand SU-FL61
• Colour Variation Unit CRU-46X1
Design and specifications are subject to change
without notice.
Additional Information
Continued
43
GB
Page 44

PC Input Signal Reference Chart
Horizontal
Signals Horizontal (Pixel) Vertical (Line)
frequency
(kHz)
VGA 640 480 31.5 60 VGA
640 480 37.5 75 VESA
720 400 31.5 70 VGA-T
SVGA 800 600 37.9 60 VESA Guidelines
800 600 46.9 75 VESA
XGA 1024 768 48.4 60 VESA Guidelines
1024 768 56.5 70 VESA
1024 768 60 75 VESA
WXGA 1280 768 47.4 60 VESA
1280 768 47.8 60 VESA
1360 768 47.7 60 VESA
• This TV’s PC input does not support Sync on Green or Composite Sync.
• This TV’s PC input does not support interlaced signals.
• For the best picture quality, it is recommended to use the signals (boldfaced) in the above chart with a 60 Hz vertical frequency
from a personal computer. In plug and play, signals with a 60 Hz vertical frequency will be selected automatically.
Ver tical
frequency (Hz)
Standard
44
GB
Page 45

Troubleshooting
Check whether the 1 (standby) indicator is flashing in red.
When it is flashing
The self-diagnosis function is activated.
1 Count how many 1 (standby) indicator flashes between each two second break.
For example, the indicator flashes three times, then there is a two second break, followed by another three flashes, etc.
2 Press 1 on the TV (right side) to switch it off, disconnect the mains lead, and inform your dealer or
Sony service centre of how the indicator flashes (number of flashes).
When it is not flashing
1 Check the items in the tables below.
2 If the problem still persists, have your TV serviced by qualified service personnel.
Picture
Problem Cause/Remedy
No picture (screen is dark) and
no sound
• Check the aerial connection.
• Connect the TV to the mains, and press 1 on the TV (right side).
• If the 1 (standby) indicator lights up in red, press TV "/1.
No picture or no menu
information from equipment
connected to the scart
connector
Double images or ghosting
Only snow and noise appear
on the screen
Distorted picture (dotted lines
or stripes)
Picture noise when viewing a
TV channel
Some tiny black points and/or
bright points appear on the
screen
No colour on programmes
No colour or irregular colour
when viewing a signal from the
Y, P B/CB, PR/CR sockets 4
or 7
• Check that the optional equipment is on and press / repeatedly until
the correct input symbol is displayed on the screen.
• Check the connection between the optional equipment and the TV.
• Check aerial/cable connections.
• Check the aerial location and direction.
• Check if the aerial is broken or bent.
• Check if the aerial has reached the end of its serviceable life (three to five
years in normal use, one to two years at the seaside).
• Keep the TV away from electrical noise sources such as cars, motorcycles,
hair-dryers or optical equipment.
• When installing optional equipment, leave some space between the optional
equipment and the TV.
• Make sure that the aerial is connected using the supplied coaxial cable.
• Keep the aerial cable away from other connecting cables.
• Select “Manual Programme Preset” in the “Analogue Set-up” menu and
adjust “AFT” (Automatic Fine Tuning) to obtain better picture reception
(page 33).
• The picture of a display unit is composed of pixels. Tiny black points and/or
bright points (pixels) on the screen do not indicate a malfunction.
• Select “Reset” in the “Picture” menu to return to the factory settings
(page 23).
• Check the connection of the Y, PB/CB, PR/CR sockets 4 or 7.
• Make sure that the Y, P
their respective sockets.
B/CB, PR/CR sockets 4 or 7 are firmly seated in
Additional Information
Continued
45
GB
Page 46

Sound
Problem Cause/Remedy
No sound, but good picture
• Press 2 +/– or % (Mute).
• Check that “Speaker” is set to “On” in the “Set-up” menu (page 30).
Noisy sound
• See “Picture noise” causes/remedies on page 45.
Channels
Problem Cause/Remedy
The desired channel cannot be
selected
Some channels are blank
Digital channels are not
displayed
• Switch between digital and analogue mode and select the desired digital/
analogue channel.
• Scrambled/Subscription only channel. Subscribe to the Pay Per View
service.
• Channel is used only for data (no picture or sound).
• Contact the broadcaster for transmission details.
• Contact a local installer to find out if digital transmissions are provided in
your area.
• Upgrade to a higher gain aerial.
General
Problem Cause/Remedy
The TV turns off automatically
(the TV enters standby mode)
The TV turns on automatically
• Check if the “Sleep Timer” is activated, or confirm the “Duration” setting of
“On Timer” (page 29).
• If no signal is received and no operation is performed in the TV mode for
10 minutes, the TV automatically switches to standby mode.
• Check if the “On Timer” is activated (page 29).
Some input sources cannot be
selected
The remote does not function
GB
46
• Select “AV Preset” in the “AV Set-up” menu and cancel “Skip” of the input
source (page 31).
• Check that the remote is set correctly for the equipment you are using.
• Check whether the equipment you want to use corresponds to the function
button being pressed (page 13).
• If the remote does not operate the equipment even when the remote has been
set correctly to the equipment, enter the necessary code as explained in
“Programming the remote” (page 41).
• Replace the batteries.
Page 47

Index
Numerics
1 Digit Direct 32
16
14:9
4:3 Default
4:3
A
Advanced Settings 25
Aerial, connecting
AFT
All Reset
Analogue Set-up menu
Audio Filter
Audio Language
Audio Out
Audio Type
Auto Adjustment
Auto Clock Set
Auto Format
Auto Start-up
Auto Tuning
Auto Volume
AV Preset
AV Set-up menu
AV2 Output
AV7 Input
B
Backlight 23, 37
Balance
Bass
Batteries, inserting into the remote
BBE
Black Corrector
Brightness
C
CA Module Set-up 36
Category list
Channels
Clear White
Clock Set
Colour
Colour Matrix
Colour System
Colour Temperature
Confirm
Connecting
Contrast Enhancer
Contrast
Country
27
16
5
33
30
32
33
35
30
35
38
17, 21
27
29
analogue and digital channels
analogue channels only
digital channels only
36
26
31
31
31
31
26
26
26
25
23, 37
18
auto-tuning
selecting
Skip
7
15
34
25
29
23
31
31
24, 37
34
an aerial/VCR
optional equipment
5
39
25
23, 37
6
32
D
Digital Auto Tuning 36
Digital Manual Tuning
Digital Set-up
Digital Set-up menu
Digital Tuning
Display Area
Display Mode
DRC Mode
DRC Palette
Dual Sound
E
EPG (Digital Electronic Programme
Guide)
Equipment labels
F
Fastext 16
Favourite list
Film mode
7
4
G
Game Mode 31
Gamma
H
Headphones
Horizontal Shift
Hue
I
Information 30
Input signal index table
L
Label 33
Language
Light Sensor
Live Colour
Logo Illumination
M
Manual Programme Preset 33
Manual timer REC
MENU
N
Noise Reduction 24
O
On Timer 29
27
24
24
26
18
20
30
25
connecting
Speaker Link
Volume
23
6, 30
30
25
22
36
35
35
36
37
31
39
30
30
27, 38
21
30
19
P
PAP 17
Parental Lock
PC Settings menu
Phase
Picture Freeze
Picture menu
Picture Mode
Picture Off ( ) indicator
PIN Code
Pitch
Power (") indicator
Power (1) switch
Power Management
Power Saving
Programme index table
Programme Labels
Programme List Edit
Programme Sorting
R
Reminder 19
Remote control
Reset
S
Screen Format 27, 38
Screen menu
Screen mode
Set-up menu
Sharpness
Skip
31, 34
Sleep Timer
Smart
Sound menu
Sound Mode
Speaker
Specifications
Standby (1) indicator
Subtitle Language
Subtitle Setting
Surround
35
37
38
16
23
23
35
38
14
14
29
32
32
inserting batteries
12
overview
programming
sensor
PC settings
picture
sound
41
14
38
23, 37
26
27
16
29
24
29
16
26
26, 37
30
43
35
35
26
Continued
38
15
36
4
14
14
Additional Information
47
GB
Page 48

T
Target Inputs
Technical Set-up
Text
Timer ( ) indicator
Timer list
Timer REC
Timer Settings
Tools
Treble
V
VCR
Vertical Shift
Vertical Size
Volume Offset
W
Wide 16
Z
Zoom 16
picture
screen
26
sound
16
19
18
17, 21
26
connecting
recording
23
27
36
29
5
18
28, 38
28
26
14
48
GB
Page 49

49
Additional Information
GB
Page 50

Введение
Благодарим вас за то, что выбрали данный продукт
компании Sony.
Перед началом работы с телевизором внимательно
прочитайте настоящее руководство и сохраните его
на случай, если оно Вам понадобится.
Предупреждение
относительно функции
цифрового телевидения
• Функции, связанные с цифровым телевидением (с
логотипом ) доступны только в странах или
регионах, использующих цифровой стандарт
наземного телевещания DVB-T (MPEG2).
Пожалуйста, выясните у специалиста своей
дилерской компании, находитесь ли вы в зоне
приема сигнала DVB-T.
• Несмотря на то, что данный телевизор
соответствует требованиям DVB-T,
совместимость с будущими стандартами
наземного телевещания DVB-T не гарантируется.
• В некоторых странах могут отсутствовать
некоторые функции цифрового телевидения.
Информация о товарных знаках
• is a registered trademark of the DVB Project
• Изготовлено по лицензии компании BBE Sound,
Inc. Предоставлено по лицензии компании BBE
Sound, Inc. согласно одному или более из
перечисленных патентов США: 5510752, 5736897.
BBE и символ BBE являются
зарегистрированными товарными знаками
компании BBE Sound, Inc.
• “Долби”, “Pro Logic” и знак в виде двойной буквы
D являются товарными знаками компании Dolby
Laboratories.
• Изготовлено по лицензии компании Dolby
Laboratories.
• Технология TruSurround используется в качестве
виртуализатора для системы Dolby Virtual
Surround.
• TruSurround, SRS и обозначение (
знаки SRS, Labs, Inc.
Технология TruSurround используется по
лицензии от SRS, Labs, Inc.
• HDMI, логотип HDMI и
High-Definition Multimedia
Interface являются товарными знаками или
зарегистрированными товарными знаками
компании HDMI Licensing, LLC.
z) – товарные
RU
2
Page 51

Содержание
Руководство по вводу в эксплуатацию 4
Сведения по безопасности ....................................................................................................8
Меры предосторожности .....................................................................................................11
Обзор пульта ДУ..................................................................................................................12
Обзор кнопок и индикаторов на телевизоре ................................................................14
Просмотр телепрограмм
Просмотр телепрограмм....................................................................................................... 15
Проверка Цифрового электронного руководства по программам (EPG) ..............18
Использование цифрового списка Избранное ..........................................................21
Просмотр изображений с подсоединенного оборудования.............................................. 22
Использование функций MENU
Навигация по пунктам меню ................................................................................................ 23
Меню Изображение ..............................................................................................................24
Меню Звук .............................................................................................................................27
Меню Управление экраном.................................................................................................. 29
Меню Начальная настройка ................................................................................................31
Меню Настройка AV .............................................................................................................33
Меню Настройка аналоговых каналов ............................................................................... 35
Меню Настройка цифровых каналов .........................................................................38
Меню Установки ПК .............................................................................................................40
RU
Использование дополнительного оборудования
Подключение дополнительного оборудования .................................................................42
Программирование пульта ДУ .............................................................................................44
Дополнительная информация
Технические характеристики .............................................................................................. 46
Поиск и устранение неисправностей ..................................................................................48
Указатель ..............................................................................................................................51
: только для цифровых каналов
3
RU
Page 52

Руководство по вводу в эксплуатацию
Установка батареек в пульт ДУ
1: Проверка
принадлежностей
Пульт ДУ RM-ED006 (1)
Батарейки размера АА (тип R6) (2)
Шнур питания (тип C-6) (1)
Примечания
• Вставляя батарейки, соблюдайте полярность.
• При утилизации батареек всегда помните правила
Коаксиальный кабель (1)
Не отсоединяйте ферритовые сердечники.
Кабель для ПК (1)
защиты окружающей среды. В некоторых
регионах правила утилизации батареек могут
быть регламентированы. Просьба обращаться по
этому поводы в местные органы власти.
• Не используйте одновременно батарейки
различных типов или старые и новые батарейки.
• Бережно обращайтесь с пультом ДУ. Не бросайте
его, не становитесь на него и не лейте на него
никаких жидкостей.
• Не оставляйте пульт ДУ вблизи источников тепла
или в месте, подверженном прямому воздействию
солнечных лучей, или во влажном помещении.
Не отсоединяйте ферритовые сердечники.
Держатель для кабелей (1)
Поддерживающий ремень (1) и винты (2)
RU
4
Page 53

2: Подсоединение антенны/
3: Защита телевизора
Руководство по вводу в эксплуатацию
видеомагнитофона
Подсоединение только антенны
Коаксиальный кабель
(прилагается)
Кабель питания (прилагается)
Подсоединение антенны и
видеомагнитофона
от опрокидывания
2
3
1
Кабель
питания
(прилагается)
Кабель Scart
(приобретается отдельно)
Коаксиальный кабель
(приобретается отдельно)
Видеомагнитофон
Коаксиальный
кабель
(прилагается)
4: Укладка кабелей
RU
5
Page 54

5: Выбор языка и
страны/региона
2
1
2 Нажмите кнопку 1 на телевизоре
(справа).
При первом включении телевизора на
экран будет выведено меню “Язык”.
Если телевизор находится в режиме
ожидания (индикатор
на телевизоре (спереди) горит красным
cветом), то для его включения нажмите на
пульте ДУ кнопку TV"/1.
1 (режим ожидания)
3 Для выбора языка, отображаемого на
экранах меню, нажмите кнопку
g, затем нажмите кнопку .
F/f/G/
2
3,4
3,4
1 Подключите телевизор к розетке
электросети переменного тока
(220-240 В переменного тока, 50 Гц).
4 Для выбора страны/региона, где будет
использоваться телевизор нажмите
кнопку
Если название страны/региона, где будет
использоваться телевизор, отсутствует в
списке, выберите “-”.
При появлении на экране сообщения о
запуске автоматической настройки
телевизора обратитесь к разделу “6:
Автоматическая настройка телевизора”.
F/f, затем нажмите кнопку .
RU
6
Page 55

6: Автоматическая
настройка телевизора
Теперь телевизор будет выполнять поиск и
сохранять в памяти все доступные
телевизионные каналы.
2
2
Если появится сообщение о
необходимости проверить
подключение антенны
Не было найдено ни цифровых, ни
аналоговых каналов. Проверьте,
правильно ли подключена антенна, и
нажмите кнопку G для выбора “Да”, а
затем нажмите кнопку , чтобы запустить
автоматическую настройку повторно.
3 Когда на экране появится меню
Сортировка программ, выполните шаги
раздела “Сортировка прогр.” (стр. 35).
Если Вы не хотите менять порядок, в
котором сохранены в памяти телевизора
аналоговые каналы, переходите к пункту 4.
4 Для выхода нажмите кнопку MENU.
Телевизор настроен на прием всех доступных
каналов.
Примечание
Если канал цифрового телевещания не
принимается, или если в пункте 4 (стр. 6) подраздела
“5: Выбор языка и страны/региона” выбирается
регион, в котором отсутствует цифровое
телевещание, время должно быть установлено после
выполнения пункта 3.
Руководство по вводу в эксплуатацию
4
1 Перед началом автоматической
настройки телевизора вставьте
кассету с записью в видеомагнитофон,
подсоединенный к телевизору (стр. 5) и
начните воспроизведение.
Во время автоматической настройки
телевизора будет обнаружен и сохранен в
памяти телевизора видеоканал.
Если видеомагнитофон не подключен к
телевизору, пропустите этот пункт.
2 Для выбора опции “OK” нажмите
кнопку
Телевизор начнет искать все доступные
цифровые каналы, затем все доступные
аналоговые каналы. Это может занять
некоторое время, пожалуйста, подождите и
не нажимайте никакие кнопки ни на
телевизоре, ни на пульте ДУ.
G, затем нажмите кнопку .
RU
7
Page 56

Сведения по
безопасности
Кабель питания
• Для предотвращения повреждения кабеля питания
соблюдайте следующее. Повреждение кабеля
питания может привести к возгоранию или
поражению электрическим током.
– Прежде чем
передвинуть
телевизор,
отсоедините его от
сети.
– При отсоединении
кабеля питания
следует сначала
отсоединить его от сетевой розетки.
– При выключении кабеля
питания из
электророзетки следует
браться за штепсельную
вилку. Не тяните за сам
шнур питания.
– Не пережимайте, не
перегибайте и не перекручивайте кабель питания,
прилагая излишние усилия. Центральные провода
могут оголиться или переломиться.
– Не видоизменяйте кабель
питания.
– Не ставьте и не кладите никакие
тяжелые предметы на кабель
питания.
– Кабель питания не должен
находиться рядом с источниками
тепла.
• В случае повреждения кабеля питания немедленно
прекратите пользоваться им и обратитесь к своему
дилеру или в сервисный центр Sony для его замены.
• Не используйте входящий в комплект поставки
кабель питания с другим оборудованием.
• Используйте только кабели питания Sony, не
пользуйтесь другими марками.
Сетевая розетка
• Телевизор с трехпроводной
штепсельной вилкой с заземлением
должен быть подсоединен к сетевой
розетке с защитным заземляющим
контактом.
• Не пользуйтесь электророзеткой с
плохими контактами. Вставляйте
вилку в розетку до конца. Плохой
контакт может привести к перегреву и,
как следствие, к возгоранию.
Обратитесь к электрику с просьбой заменить
электророзетку.
Чистка штепсельной вилки
Отсоединяйте штепсельную вилку от
сети и чистите ее регулярно. Если на
вилке имеется пыль, в которой
скапливается влага, это может привести
к повреждению изоляции и, как
следствие, к возгоранию.
Перегрузка
Телевизор предназначен для
работы только от сети
переменного тока с напряжением
220–240 В. Не подключайте
слишком много приборов к одной
электророзетке. Это может привести к возгоранию или
поражению электрическим током.
Если устройство не
используется
Если Вы не будете
пользоваться телевизором в
течение нескольких дней,
отсоедините его от сети в целях
соблюдения техники безопасности и для защиты
окружающей среды. Однако в некоторых моделях
правильная работа функций возможна только если
телевизор остается в режиме готовности. Такие случаи
описаны в данном руководстве.
Переноска
• Перед перемещением телевизора отсоедините от
него все кабели.
• Для переноски телевизора большого размера
требуется два человека или более.
• Если телевизор переносится
вручную, держите его, как
показано на рисунке справа. Если
этого не сделать, он может упасть и
получить повреждения или нанести
серьезную травму.
• При перевозке берегите телевизор
от ударов и сильной вибрации. Он может упасть и
получить повреждения или стать причиной серьезной
травмы.
• В случае падения или повреждения телевизора
немедленно обратитесь к квалифицированному
специалисту по обслуживанию для его проверки.
• Если необходимо доставить телевизор в ремонтную
мастерскую или перевезти в другое место, упакуйте
его в картонную коробку и упаковочный материал, в
которых он поставлялся изначально.
Перемещение
При поднятии телевизора
или переносе панели
телевизора крепко держите
его, как показано на рисунке
справа.
Размещение
• Телевизор следует
установить возле
легкодоступной сетевой розетки.
• Установите телевизор на ровную
устойчивую поверхность. Не вешайте
ничего на телевизор. Если Вы это го не
сделаете, телевизор может упасть с
подставки и повредиться или нанести
серьезную травму.
• Не устанавливайте т елевизор в местах
с повышенной температурой, например, под
прямыми солнечными лучами, рядом с
отопительными приборами или тепловентиляторами.
В противном случае телевизор может перегреться,
его корпус может деформироваться, и могут
возникнуть неполадки в его работе.
• Не устанавливайте телевизор в месте, подверженном
непосредственному воздействию кондиционирования
воздуха. Если телевизор установить в таком месте,
внутри может конденсироваться влага, что может
привести к неисправности.
RU
8
Page 57

• Не устанавливайте телевизор в
жарких, влажных или слишком
пыльных местах.
• Не устанавливайте телевизор в
местах, где могут быть
насекомые.
• Не устанавливайте телевизор в таких местах, где он
может быть подвержен механической вибрации.
• Не устанавливайте телевизор в таких местах, где о
него можно случайно удариться, например, на
колонне или за ней, или на небольшой высоте, где его
можно задеть головой. Это может стать причиной
травмы.
• Не позволяйте детям влезать на
телевизор.
• Если телевизор используется рядом с
морским побережьем, соль может
вызвать коррозию металлических
частей и привести внутреннему
повреждению или возгоранию телевизора.
Вентиляция
• Никогда не перекрывайте
вентиляционные отверстия в
корпусе. Это может привести
к перегреву и последующему
возгоранию.
• Если не обеспечить надлежащую вентиляцию, в
телевизоре может скапливаться пыль и грязь. Для
обеспечения надлежащей вентиляции соблюдайте
следующие рекомендации:
– Не устанавливайте телевизор задом наперед и
боком;
– Не ставьте телевизор на бок и нижней стороной
вверх;
– Не устанавливайте телевизор на полке или в нише;
– Не ставьте телевизор на ковер или на кровать;
– Не накрывайте телевизор тканью, например,
занавесками, а также газетами и т.п.
• Обеспечьте свободное пространство вокруг
телевизора. В противном случае может быть
нарушена нормальная циркуляция воздуха, что
приведет к перегреву и, как следствие, к возгоранию
или перегреву телевизора.
30
см
10 см 10 см
6 см
Обеспечьте расстояние не
меньше указанного.
• При установке телевизора на стене оставьте
пространство не менее 10 см снизу.
• Никогда не устанавливайте телевизор следующим
образом:
Циркуляция воздуха
нарушена.
Циркуляция воздуха
нарушена.
Стена Стена
Дополнительные принадлежности
При установке телевизора с помощью подставки или
настенного монтажного кронштейна соблюдайте
следующие правила. Если этого не сделать, телевизор
может упасть и стать причиной серьезной травмы.
• В целях безопасности рекомендуется использовать
аксессуары фирмы Sony:
– Настенный монтажный кронштейн SU-WL51
– Подставка для телевизора SU-FL61
• Для обеспечения адекватной циркуляции воздуха и
избежания накапливания пыли вокруг телевизора, на
стене и потолке рекомендуется использовать
настенный монтажный кронштейн фирмы Sony.
• При установке телевизора надежно закрепите его,
следуя инструкциям, прилагаемым к настенному
монтажному кронштейну.
• Не забудьте прикрепить кронштейны, прилагаемые к
подставке.
• Если телевизор будет
укрепляться на стене,
вызовите для этого
квалифицированного
мастера. Неправильная
установка может поставить
сохранность телевизора под
угрозу.
Прокладка кабелей
• Выполняя соединения между устройствами, в целях
безопасности извлеките кабель питания из
электророзетки.
• Телевизор не отключен полностью от электрической
сети, даже если он выключен. Чтобы полностью
выключить телевизор, извлеките штепсельную
вилку из электророзетки.
• Будьте осторожны, чтобы не споткнуться о кабели.
Иначе можно повредить телевизор.
Медицинские
учреждения
Не ставьте телевизор в местах,
где работает медицинское
оборудование. Это может
привести к неисправной работе
медицинского оборудования.
Продолжение
9
RU
Page 58

Использование вне
помещения
• Не устанавливайте телевизор
вне помещения. Если
телевизор попадет под дождь,
это может привести к
возгоранию или поражению
электрическим током.
• При воздействии на телевизор прямых солнечных
лучей он может перегреться, и это может привести к
его повреждению.
Автомобили, корабли и
другие суда
• Не устанавливайте телевизор
в транспортном средстве. Во
время движения он может
упасть и причинить травму.
• Не устанавливайте это
телевизор на кораблях и
других судах. Попадание на
него морской воды может
привести к возгоранию или
повреждению телевизора.
Вентиляционные
отверстия
Не вставляйте никакие предметы в
вентиляционные отверстия. При
попадании в эти отверстия
металлических предметов или жидкости
существует опасность возгорания или
поражения электрическим током.
Вода и влага
• Не используйте телевизор
рядом с водой, например, рядом
с ванной или душевой
комнатой. Следите за тем,
чтобы он не попадал под дождь
и не находился во влажном или задымленном
помещении. В противном случае возможно
возгорание и поражение электрическим током.
• Не прикасайтесь к кабелю питания
и к телевизору влажными руками. В
противном случае существует
опасность поражения
электрическим током или
повреждения телевизора.
Грозы
В целях безопасности во время
грозы не прикасайтесь ни к каким
частям телевизора, а также к
кабелям питания и антенны.
Разбитые куски
• Не кидайте в телевизор никакие
предметы. В результате такого
воздействия экранное стекло
может разбиться и нанести
серьезную травму.
• Если на поверхности телевизора появилась трещина,
не прикасайтесь к нему, пока кабель питания не будет
отсоединен от электросети. В противном случае
существует опасность поражения электрическим
током.
Обслуживание
Внутри телевизора имеются
опасные высокие напряжения.
Не снимайте корпус.
Обращайтесь только к
квалифицированному
специалисту по обслуживанию.
Демонтаж и установка мелких деталей
Храните дополнительные аксессуары вне досягаемости
детей. В случае проглатывания мелкой детали ребенок
подавиться или задохнуться. Немедленно обратитесь к
врачу.
Замена элемента рамки
Элемент рамки можно заменить другими,
приобретенными отдельно. Тем не менее, не снимайте
элемент рамки, кроме случаев его замены. Для
получения более подробной информации см.
инструкции, прилагаемые к элементам рамки.
Влага и
легковоспламеняющиеся
предметы
• Не ставьте никаких предметов на
телевизор. Нельзя допускать
капания или проливания жидкости
на телевизор, поэтому предметы,
наполненные жидкостью, такие,
как вазы, не следует ставить на
телевизор.
• Во избежание возгорания не ставьте рядом с
телевизором легковоспламеняющиеся предметы или
открытые источники света (например, свечи).
• Если жидкость или какой-либо предмет все же
попадет внутрь корпуса телевизора через отверстия,
немедленно выключите его. В противном случае
существует опасность поражения электрическим
током или повреждения телевизора. Немедленно
обратитесь к квалифицированному специалисту по
обслуживанию для его проверки.
Маслянистые вещества
Не устанавливайте телевизор в ресторанах, где
используется масло. Смесь пыли и масла может попасть
внутрь телевизора и повредить его.
RU
10
Page 59

Меры
предосторожности
Просмотр телевизора
• Для удобства просмотра рекомендуется
располагаться от телевизора на расстоянии, в четыресемь раз превышающем вертикальный размер
экрана.
• Для получения четкого изображения не направляйте
непосредственно на экран источники света и не
допускайте воздействия на него прямых солнечных
лучей. По возможности используйте точечное
освещение потолочных светильников.
• Смотрите телевизор при достаточном освещении,
чтобы не уставали глаза. Непрерывный длительный
просмотр также может привести к перенапряжению
глаз.
• При регулировке угла наклона телевизора
придерживайте основание подставки рукой, чтобы
предотвратить отсоединение экрана от подставки.
Старайтесь, чтобы пальцы не попали в зазор между
экраном и подставкой.
Регулировка громкости
• Отрегулируйте громкость так, чтобы не беспокоить
соседей. Звуки очень сильно распространяются в
ночное время. Поэтому рекомендуется закрывать
окна или пользоваться наушниками.
• При пользовании наушниками не устанавливайте
слишком большую громкость, чтобы не повредить
слух.
ЖК- экран
• Хотя ЖК-экран изготовлен по высокоточной
технологии и число эффективных точек достигает
99,99 % и выше, на нем могут появляться постоянные
черные или яркие цветные (красные, синие или
зеленые) точки. Это структурное свойство ЖКэкрана, оно не является признаком неисправности.
• Берегите ЖК- экран от попадания прямых солнечных
лучей. Это может привести к повреждению
поверхности экрана.
• Не нажимайте на защитный фильтр, не скребите по
нему и ничего не ставьте на телевизор. Изображение
может стать неравномерным или будет поврежден
ЖК-экран.
• Если телевизор работает в холодном месте,
изображение может оказаться размытым или
слишком темным. Это не является признаком
неисправности. Эти явления исчезнут с повышением
температуры.
• При продолжительной демонстрации неподвижного
изображения могут появляться остаточные
изображения. Через несколько секунд они могут
исчезнуть.
• Во время работы телевизора экран и корпус
нагреваются. Это не является признаком
неисправности.
• ЖК-экран содержит небольшое количество жидких
кристаллов и ртути. Люминесцентная лампа в
телевизоре также содержит ртуть. При утилизации
соблюдайте соответствующие местные положения и
инструкции.
Уход за поверхностью экрана, корпусом
телевизора и их чистка
Перед чисткой следует отсоединить кабель питания
телевизора от сетевой розетки переменного тока.
Для обеспечения сохранности конструкционных
материалов и покрытия экрана телевизора соблюдайте
следующие меры предосторожности.
• Не нажимайте на экран, не скребите по нему
твердыми предметами, и ничего в него не кидайте. В
противном случае экран можно повредить.
• Если телевизор непрерывно работает в течение
продолжительного времени, не прикасайтесь к
панели дисплея, так как она нагревается.
• К поверхности экрана рекомендуется прикасаться
как можно реже.
• Для удаления пыли с поверхности экрана/корпуса
телевизора осторожно протирайте его мягкой
тканью. Если пыль не удаляется полностью,
протрите экран мягкой тканью, слегка смоченной в
слабом растворе мягкого моющего средства.
• Ни в коем случае не используйте никакие абразивные
материалы, щелочные/кислотные очистители,
чистящие порошки и такие летучие растворители,
как спирт, бензин, разбавитель или инсектициды.
Применение этих веществ или длительный контакт с
изделиями из резины/винила могут повредить
покрытие корпуса или поверхность экрана.
• В вентиляционных отверстиях со временем может
скапливаться пыль. Для обеспечения надлежащей
вентиляции рекомендуется периодически (раз в
месяц) удалять пыль с помощью пылесоса.
Дополнительное оборудование
• Не устанавливайте дополнительные компоненты
слишком близко к телевизору. Расстояние от
телевизора до дополнительных компонентов должно
быть не менее 30 см. В случае установки
видеомагнитофона перед телевизором или рядом с
ним изображение может искажаться.
• В случае установки телевизора в непосредственной
близости от устройств, испускающих
электромагнитное излучение, возможны искажение
изображения или аудио помехи.
Утилизация телевизора
Утилизация
электрического и
электронного
оборудования
(директива применяется
в странах Евросоюза и
других европейских
странах, где действуют
системы раздельного
сбора отходов)
Данный знак на устройстве или
его упаковке обозначает, что
утилизировать вместе с прочими бытовыми отходами.
Его следует сдать в соответствующий приемный пункт
переработки электрического и электронного
оборудования. Неправильная утилизация данного
изделия может привести к потенциально негативному
влиянию на окружающую среду и здоровье людей,
поэтому для предотвращения подобных последствий
необходимо выполнять специальные требования по
утилизации этого изделия. Переработка данных
материалов поможет сохранить природные ресурсы.
Для получения более подробной информации о
переработке этого изделия обратитесь в местные
органы городского управления, службу сбора бытовых
отходов или в магазин, где было приобретено изделие.
данное устройство нельзя
11
RU
Page 60

Обзор пульта ДУ
1 TV "/1 – Режим ожидания телевизора
Временное отключение телевизора и включение его из режима
ожидания.
2 Цифровые кнопки
• В режиме ТВ: Выбор каналов. Для номеров программ, начиная с 10
• В режиме Текст: Ввод трехзначных номеров страниц для выбора
3 – Предыдущий канал
Возврат к каналу, который был включен до этого (дольше пяти
секунд).
4 – Режим экрана (стр. 16)
5 – Остановка изображения (стр. 16)
Остановка телевизионного изображения.
6 / – Информация / Включение показа текста
• В цифровом режиме: Вызов краткой информации о программе,
• В аналоговом режиме: Вывод на экран информации, например,
• В режиме Текст (стр. 16): Включение показа скрытой информации
7 F/f/G/g/ (стр. 16, 23)
8 TOOLS (стр. 17, 22)
Доступ к различным функциям просмотра и возможность изменения/
установки настроек в соответствии с источником и режимом экрана.
9 MENU (стр. 23)
0 PROG +/- (стр. 15)
• В режиме ТВ: Выбор следующего (+) или предыдущего (-) канала.
• В режиме Текст: Выбор следующей (+) или предыдущей (-)
qa % – Отключение звука (стр. 16)
qs 2 +/- – Громкость
qd RETURN /
Возврат к предыдущему экрану любого отображаемого меню.
qf – EPG (Digital Electronic Programme Guide (Цифровое
электронное руководство по программам)) (стр. 18)
qg Цветные кнопки (стр. 16, 18, 21)
qh ANALOG – Аналоговый режим (стр. 15)
qj DIGITAL – Цифровой режим (стр. 15)
/ – Текст (стр. 16)
qk
ql / – Выбор входного сигнала / Удержание текста
• В режиме ТВ (стр. 22): Выбор источника входного сигнала от
• В режиме Текст (стр. 16): Удержание текущей страницы.
w; A/B – Двойной звук (стр. 28)
и выше, введите вторую и третью цифру в течение двух секунд.
страницы.
просматриваемой в данный момент.
номера текущего канала и режима экрана.
(например, ответа на вопрос викторины).
страницы.
оборудования, подключенного к разъемам телевизора.
12
RU
Page 61

wa "/1
Включение или выключение дополнительного оборудования,
выбранного функциональными кнопками.
ws Функциональные кнопки
Позволяют управлять соответствующим оборудованием. За более
подробной информацией обратитесь к разделу. “Программирование
пульта ДУ” на стр. 44.
wd Кнопки управления DVD/видеомагнитофон
• . : Повторное воспроизведение текущей программы от
предыдущей метки главы (если имеются).
• > : Продвижение вперед к следующей метке главы (если
имеются).
• : Повторное воспроизведение текущей программы за
установленный период времени.
• : Продвижение вперед на установленный период времени.
• m : Воспроизведение программы в режиме ускоренной перемотки
назад.
• M : Воспроизведение программы в режиме ускоренной перемотки
вперед.
• H : Воспроизведение программы с нормальной скоростью.
• X : Пауза воспроизведения.
• x : Остановка воспроизведения.
• VISUAL SEARCH : Только для DVD-магнитофонов Sony с
функцией визуального поиска. Для получения более подробной
информации см. инструкцию по эксплуатации, прилагаемую к
DVD-магнитофону.
wf Кнопки записи DVD/видеомагнитофон
• z REC: Начало записи.
• X REC PAUSE: Пауза записи.
• x REC STOP: Остановка записи.
Кнопки X REC PAUSE и x REC STOP доступны только на DVDмагнитофонах.
wg F1/F2
• Выбор диска при использовании DVD-чейнджера.
• Выбор функции при использовании комбинированного устройства
(например, DVD/видеомагнитофон).
Для получения более подробной информации см. инструкцию по
эксплуатации, прилагаемую к DVD-чейнджеру или
комбинированному устройству.
wh DVD MENU
Отображение меню диска DVD.
wj DVD TOP MENU
Отображение верхнего меню диска DVD.
К сведению
На кнопках 5, H, PROG + и A/B имеются выпуклые точки. По ним
удобно ориентироваться при управлении телевизором.
13
RU
Page 62

Обзор кнопок и индикаторов на
телевизоре
1 1 – Питание
Включение/выключение телевизора.
2 PROG +/-/ /
PROG
MENU
• В режиме ТВ: Выбор следующего (+) или
предыдущего (-) канала.
• В меню телевизора: Переход по списку
вверх ( ) или вниз ( ).
3 2 +/-/ /
• В режиме ТВ: Увеличение (+) или
уменьшение (-) громкости.
• В меню телевизора: Переход по списку
вправо ( ) или влево ( ).
4 / – Выбор входного сигнала/
OK
• В режиме ТВ (стр. 22): Выбор источника
входного сигнала от оборудования,
подключенного к разъемам телевизора.
• В меню телевизора: Выбор меню или
параметра и подтверждение установки.
5 (стр. 23)
6 – Индикатор отключения
изображения/таймера
• Загорается зеленым светом при
отключении изображения (стр. 31).
• Если таймер установлен, загорается
оранжевым светом (стр. 31).
7 1 – Индикатор режима ожидания
Загорается красным светом при
переключении телевизора в режим
ожидания.
8 " – Индикатор питания
Загорается зеленым светом при включении
телевизора.
9 Датчик пульта ДУ
Примечание
Прежде чем отсоединить вилку из розетки, убедитесь в том, что телевизор выключен. Отсоединение вилки из
розетки при включенном телевизоре может привести к его неисправности, или к тому, что индикатор останется
гореть.
RU
14
Page 63

Просмотр телепрограмм
Просмотр
телепрограмм
1
3
2
1 Нажмите кнопку 1 на телевизоре
(справа) для его включения.
Если телевизор находится в режиме
ожидания (индика тор 1 (режим ожидания) на
телевизоре (спереди) горит красным cветом),
то для его включения нажмите на пульте ДУ
кнопку TV "/1.
2 Нажмите кнопку DIGITAL для
переключения в цифровой режим или
ANALOG для переключения в аналоговый
режим.
Список доступных каналов изменяется в
зависимости от режима.
3 Выберите телеканал с помощью
цифровых кнопок или PROG +/-.
Для выбора номеров каналов 10 и выше с
помощью цифровых кнопок, вторую и
третью цифры следует вводить в течени е двух
секунд.
Для выбора цифрового канала при помощи
Цифрового электронного руководства по
программам (EPG) см. стр. 18.
В цифровом режиме
На некоторое время появится
информационное сообщение. В сообщении
могут быть показаны следующие значки.
: Радиосервис
: Кодировка/Подписка
: Доступны несколько языков звукового
сопровождения
: Доступны субтитры
: Доступны субтитры для людей с плохим
слухом
: Рекомендованный минимальный
возраст для текущей программы (от 4 до
18 лет)
: Замок от детей
: Текущая программа записывается
Просмотр телепрограмм
3
Продолжение
RU
15
Page 64

Дополнительные операции
Чтобы Необходимо
Временно
выключить
телевизор
(перевести его в
режим ожидания)
Полностью
выключить
телевизор
Включить
телевизор без
звука из режима
ожидания
Отрегулировать
громкость
Отключить звук Нажать кнопку %. Чтобы
Нажать кнопку TV "/1.
Нажать кнопку 1 на
телевизоре (справа).
Нажать кнопку %. Нажать
кнопку 2 +/- для
регулировки уровня
громкости.
Нажать кнопку 2 + (для
увеличения)/- (для
уменьшения).
снова включить звук,
нажмите эту кнопку еще раз.
Для фиксации изображения –
остановка изображения
Вы можете зафиксировать текущее изображение
для записи номера телефона или рецепта.
1 Нажать кнопку .
Стоп-кадр отображается в правой части
экрана. Вы можете просматривать
кинофильм в левой части.
2 Для возврата к нормальному режиму
телевизора нажмите еще раз кнопку .
Переключение режимов экрана
вручную в зависимости от типа
трансляции
Для переключения между режимами Оптимальн.,
4:3, Широкоэкр., Увелич. и 14:9 нажмите несколько
раз кнопку .
Оптимальн.
*
Получить доступ к
Таблице программ
(только в
аналоговом
режиме)
Нажать кнопку . Для
выбора аналогового канала
нажимайте кнопку
затем нажмите кнопку .
О доступе к таблице
входных сигналов см. стр. 22.
F/f,
Получение доступа к функции
Текст
Нажмите кнопку /. При каждом нажатии кнопки
/ изображение на экране циклически меняется
следующим образом:
Текст и телевизионное изображение t Текст t
Текст выкл. (выход из режима текста)
Для выбора страницы нажимайте цифровые кнопки
или PROG +/-.
Чтобы зафиксировать страницу, нажмите / .
Чтобы включить показ скрытой информации,
нажмите / .
Для пропуска страницы нажмите кнопку и F /f, а
затем нажмите кнопку (для трехзначных
страниц).
К сведению
• Убедитесь в том, что телевизор принимает
качественный сигнал, иначе возможны ошибки в
тексте.
• Большинство телеканалов вещают и в режиме
телетекста. Чтобы узнать о том, как пользоваться
этой услугой, откройте страницу с индексом.
• Если внизу страницы с текстом появились
четырехцветные обозначения, значит, доступен
режим Fastext. Режим Fastext обеспечивает
быстрый и простой доступ к страницам. Чтобы
перейти на ту или иную страницу, нажмите кнопку
соответствующего цвета.
Вывод изображения в обычном формате, 4:3, с
имитацией эффекта широкого экрана.
Изображение формата 4:3 растягивается и
заполняет весь экран.
4:3
Вывод изображения обычного формата 4:3
(например, неширокоэкранного телевидения) в
правильных пропорциях.
Широкоэкр.
Вывод широкоэкранных программ (16:9) в
правильных пропорциях.
Увелич.*
Вывод изображения формата синемаскопа
(формата “почтового ящика”) в правильных
пропорциях.
16
RU
Page 65

14:9*
Вывод изображения формата 14:9 в правильных
пропорциях. На экране по краям изображения
появляются черные полосы.
* Верхняя и нижняя части изображения могут быть
обрезаны.
К сведению
• Кроме того, Вы можете установить опцию
“Автомат. формат” в положение “Вкл.”.
Телевизор будет автоматически выбирать
наиболее подходящий для трансляции режим
(стр. 29).
• В режимах Оптимальн., 14:9 и Увелич. можно
отрегулировать положение изображения.
Сдвиньте его вверх или вниз (например, чтобы
прочитать субтитры) кнопками
F/f.
Для использования меню Tools
Нажмите кнопку TOOLS для отображения
следующих опций меню во время просмотра
телевизионной программы.
Опции Описание
Закрыть Выход из меню Tools.
PAP (или Одна
картинка)
См. стр. 17.
Для одновременного просмотра
двух изображений – функция PAP
(картинка и картинка)
Вы можете просматривать на экране одновременно
два изображения (внешний вход и телевизионная
программа).
Подсоедините дополнительное оборудование
(стр. 42) и убедитесь, что изображение от
оборудования появилось на экране (стр. 22).
Примечания
• Данная функция недоступна источника входа с
ПК.
• Вы не можете изменить размер изображений.
Нажмите кнопку F/f для выбора функции “PAP” в
меню Tools, а затем нажмите кнопку .
Изображение от подсоединенного оборудования
отобразится слева, а текущая телевизионная
программа отобразится справа.
Для возврата к обычному режиму ТВ нажмите
кнопку или RETURN.
К сведению
• Вы можете также вернуться к обычному режиму
ТВ путем выбора опции “Одна картинка” в меню
Tools.
• Изображение в зеленой рамке сопровождается
звуком. Вы можете переключать изображение,
сопровождаемое звуком, нажимая кнопку
G/g.
Просмотр телепрограмм
Режим изобр. См. стр. 24.
Режим звука См. стр. 27.
Установка субтитров
(только в цифровом
режиме)
Цифр. Избранные
(только в цифровом
режиме)
Энергосбережение См. стр. 31.
Таймер сна См. стр. 31.
Громк. наушн.* См. стр. 32.
Автоустановка часов
(только в аналоговом
режиме)
* Данная опция появляется только в том случае,
если функция “Связь наушн.-АС” установлена в
положение “Выкл.” (стр. 32).
См. стр. 38.
См. стр. 21.
Переключение в
цифровой режим и
установка времени.
17
RU
Page 66

Проверка Цифрового электронного
руководства по программам (EPG) *
1 Для отображения Цифрового
электронного руководства по
программам (EPG) в цифровом режиме
нажмите кнопку .
2 Выполните нужную операцию, как
показано в следующей таблице.
Примечание
Digital Electronic Programme Guide (Цифровое
электронное руководство по программам) (EPG)
* Данная функция может быть недоступна в некоторых странах.
Чтобы Необходимо
Выключить EPG Нажать кнопку .
Информация о программе будет отображена только
в том случае, если телевизионная станция передает
ее.
Перемещаться по EPG Нажать кнопку
Просмотреть текущую программу Нажать кнопку в тот момент, когда выбрана текущая
программа.
Сортировать информацию о
программах по категориям – Список
категорий
1 Нажать синюю кнопку.
2 Для выбора категории нажимайте кнопку
Сбоку будет показано название категории.
Доступны следующие категории:
“Избранные”: Содержит все каналы, сохраненные в списке
Избранное (стр. 21).
“Все категории”: Содержит все доступные каналы.
“Новости”: Содержит все каналы новостей.
3 Нажать кнопку .
Теперь Цифровое электронное руководство по программам
(EPG) показывает только текущие программы из выбранной
категории.
F/f/G/g.
F/f/G/g.
18
RU
Page 67

Чтобы Необходимо
Установить программу для записи –
Запись по таймеру
1 Для выбора предстоящей программы, которую Вы хотите
записать нажимайте кнопку
2 Нажать кнопку .
3 Нажать кнопку F/f для выбора функции “Запись по
таймеру”.
4 Для установки таймеров телевизора и Вашего
видеомагнитофона нажмите кнопку .
В информации о программе появится символ . На
телевизоре (спереди) загорится индикатор .
Примечания
• Для видеомагнитофона, совместимого с функцией Smartlink, Вы
можете установить запись по таймеру видеомагнитофона только на
телевизоре. Если Ваш видеомагнитофон не совместим с функцией
Smartlink, появится сообщение, напоминающее Вам, что необходимо
установить таймер Вашего видеомагнитофона.
• Как только запись начнется, Вы можете переключить телевизор в
режим ожидания. Однако не выключайте телевизор полностью, так
как запись может быть прервана.
• Если для программ было выбрано ограничение по возрасту, на
экране появится сообщение о вводе PIN-кода. За более подробной
информацией обратитесь к разделу “Замок от детей” на стр. 38.
Установить программу, которая
будет автоматически появляться на
экране во время ее начала
– Напоминание
1 Для выбора предстоящей программы, которую Вы хотите
показать, нажимайте кнопку
2 Нажать кнопку .
3 Нажать кнопку
4 Для автоматического отображения выбранной программы
во время ее начала нажмите кнопку .
В информации о программе появится символ c.
Примечание
Если Вы переключите телевизор в режим ожидания, он
автоматически включится, когда начнется эта программа.
F/f/G/g.
Просмотр телепрограмм
F/f/G/g.
F/f для выбора функции “Напоминание”.
Продолжение
19
RU
Page 68

Чтобы Необходимо
Установить время и дату программы,
которую Вы хотите записать –
Ручная запись по таймеру
1 Нажать кнопку .
2 Для выбора опции “Ручная запись по таймеру” нажмите
кнопку
F/f, затем нажмите кнопку .
3 Для выбора даты нажмите кнопку
кнопку
g.
4 Установите время начала и окончания записи таким же
образом, как в пункте 3.
5 Для выбора программы нажмите кнопку
нажмите кнопку для установки таймеров телевизора и
Вашего видеомагнитофона.
В информации о программе появится символ . На
телевизоре (спереди) загорится индикатор .
Примечания
• Для видеомагнитофона, совместимого с функцией Smartlink, Вы
можете установить запись по таймеру видеомагнитофона только на
телевизоре. Если Ваш видеомагнитофон не совместим с функцией
Smartlink, появится сообщение, напоминающее Вам, что необходимо
установить таймер Вашего видеомагнитофона.
• Как только запись начнется, Вы можете переключить телевизор в
режим ожидания. Однако не выключайте телевизор полностью, так
как запись может быть прервана.
• Если для программ было выбрано ограничение по возрасту, на
экране появится сообщение о вводе PIN-кода. За более подробной
информацией обратитесь к разделу “Замок от детей” на стр. 38.
Отменить запись/напоминание –
Список таймеров
1 Нажать кнопку .
2 Нажать кнопку
таймеров”.
3 Для выбора программы, которую Вы хотите отменить,
нажимайте кнопку
Появится экран для подтверждения отмены программы.
4 Нажать кнопку G для выбора опции “Да”, затем нажмите
кнопку для подтверждения.
F/f, затем нажмите
F/f, затем
F/f для выбора функции “Список
F/f, затем нажмите кнопку .
К сведению
Вы также можете вывести на экран Цифровое электронное руководство по программам (EPG), выбрав опцию
“Цифровые EPG” в “MENU” (стр. 23).
RU
20
Page 69

Использование цифрового списка
Избранное *
Функция Избранное позволяет Вам выбирать
программы из списка, включающего до 20
выбранных Вами каналов. Для отображения списка
Избранное, см. раздел “Навигация по пунктам
меню” (стр. 23).
Цифровой список Избранное
* Данная функция может быть недоступна в некоторых странах.
Чтобы Необходимо
Создать Ваш список Избранное в
первый раз
Если Вы выберете в первый раз опцию “Цифр. Избранные” в
“MENU”, на экране появится вопрос, хотите ли Вы добавить
каналы в список Избранное.
1 Для выбора опции “Да” нажмите кнопку .
2 Для выбора канала, который Вы хотите добавить
нажимайте кнопку
Если Вам известен номер канала, Вы можете использовать
цифровые кнопки для прямого выбора канала.
3 Нажать кнопку .
Каналы, сохран енные в списке Избранное, от мечены символом
.
F/f.
Просмотр телепрограмм
Выключить список Избранное Нажать кнопку RETURN.
Просмотреть краткую информацию
о текущих программах
Смотреть канал Нажать кнопку в тот момент, когда выбрана текущая
Добавить или удалить каналы в
списке Избранное
Удалить все каналы из списка
Избранное
Нажать кнопку в тот момент, когда выбрана текущая
программа. Чтобы отменить команду, нажмите кнопку еще раз.
программа.
1 Нажать синюю кнопку.
Каналы, сохран енные в списке Избранное, от мечены символом
.
2 Для выбора канала, который Вы хотите добавить или
удалить, нажимайте кнопку
Если Вам известен номер канала, Вы можете использовать
цифровые кнопки для прямого выбора канала.
3 Нажать кнопку .
4 Для возврата к списку Избранное нажмите синюю кнопку.
1 Нажать синюю кнопку.
2 Нажать желтую кнопку.
Появится экран для подтверждения удаления всех каналов из
списка Избранное.
3 Нажать кнопку G для выбора опции “Да”, затем нажмите
кнопку для подтверждения.
F/f.
21
RU
Page 70

Просмотр
изображений с
подсоединенного
оборудования
Включите подсоединенное
оборудование и выполните одно из
перечисленных ниже действий.
Оборудование, подключенное к гнездам Scart с
помощью полностью смонтированного
провода с 21-штырьковыми разъемами Scart
(стр. 43)
Включите воспроизведение на подключенном
устройстве.
На экране появится изображение, передаваемое
подключенным устройством.
Видеомагнитофон с автоматической
настройкой (стр. 7)
Для выбора видеоканала в аналоговом режиме
нажмите кнопку PROG +/- или цифровые кнопки.
Другое подключенное оборудование (стр. 42)
Нажмите кнопку / несколько раз, пока на
экране не появится значок соответствующего
источника сигнала (см. ниже).
AV1 / AV 1 , AV 2/ AV2 , AV 3 /
AV3:
Входной аудио/видеосигнал или RGB-сигнал
через разъем Scart / 1, 2 или 3. Значок
появляется только при подсоединении
источника RGB.
AV4:
Входной компонентный сигнал через гнезда Y,
B/CB, PR/CR / 4 и входной аудиосигнал
P
через гнезда L (MONO), R / 4.
AV5:
Входной цифровой аудио/видеосигнал через
разъем HDMI IN 5.
AV6:
Входной цифровой аудио/видеосигнал через
разъем HDMI IN 6. Входной аудиосигнал
является аналоговым только в том случае, если
оборудование подключено через DVI и гнездо
аудиовыхода.
AV7/ AV7/ AV7:
Значки источников сигнала будут появляться в
зависимости от подсоединенного оборудования и
установки “Вход AV7” в меню “Настройка AV”
(стр. 33).
AV7: Входной компонентный сигнал через
разъемы Y, P
аудиосигнал через аудиоразъемы L (MONO)/R
7.
AV7: Входной композитный сигнал через
видеоразъем 7 и входной аудиосигнал через
аудиоразъемы L (MONO)/R 7.
AV7: Входной сигнал S-видео через разъем
S video 7 и входной аудиосигнал через
аудиоразъемы L (MONO)/R 7.
PC:
Входной видеосигнал ПК через разъем PC , и
входной аудиосигнал через аудиоразъем ПК .
B/CB, PR/CR 7 и входной
Дополнительные операции
Чтобы Необходимо
Вернуться к
обычному режиму
ТВ
Получить доступ к
Таблице входных
сигналов
(кроме входного
видеосигнала ПК)
Нажать функциональную
кнопку TV, DIGITAL или
ANALOG.
Для доступа к таблице входных
сигналов нажмите кнопку .
(Затем, только в аналоговом
режиме, нажмите кнопку
Для выбора входного сигнала
нажимайте кнопку F/f, затем
нажмите кнопку .
g
.)
Для использования меню Tools
Нажмите кнопку TOOLS для отображения
следующих опций при просмотре изображений с
подсоединенного устройства, отличного от ПК.
Опции Описание
Закрыть
PAP (или Одна
картинка)
Режим изобр. См. стр. 24.
Режим звука См. стр. 27.
Энергосбережение См. стр. 31.
Таймер сна См. стр. 31.
Громк. наушн.* См. стр. 32.
Выход из меню Tools.
См. стр. 17.
22
RU
Автоустановка
часов
* Данная опция появляется только в том случае,
если функция “Связь наушн.-АС” установлена в
положение “Выкл.” (стр. 32).
Переключение в цифровой
режим и установка времени.
Page 71

Использование функций MENU
Навигация по
пунктам меню
“MENU” позволяет вам наслаждаться различными
удобными функциями данного телевизора. Вы
можете легко выбирать каналы или источники
входного сигнала и изменять установки для вашего
телевизора.
2
3
Значок Описание
Аналоговые
Возврат к последнему
просматриваемому аналоговому
каналу.
Цифровые*
Возврат к последнему
просматриваемому цифровому
каналу.
Цифровые EPG*
Отображение Цифрового
электронного руководства по
программам (EPG).
За более подробной информацией
обратитесь к стр. 18.
Внешние входы
Выбор устройства, подсоединенного
к Вашему телевизору.
• Для просмотра желаемого
внешнего источника входного
сигнала, выберите источник
входного сигнала, затем
нажмите кнопку .
• Для назначения метки
внешнему источнику входного
сигнала, см. стр. 33.
Использование функций MENU
1
1 Для отображения меню нажмите
кнопку MENU.
Значок Описание
Цифр. Избранные*
Отображение списка Избранное. За
более подробной информацией
обратитесь к стр. 21.
Установки
Отображение меню Установки, где
выполняется большинство
расширенных установок и
регулировок.
За более подробной информацией
обратитесь к стр. 24 - 39.
* Данная функция может быть недоступна в
некоторых странах.
2 Для выбора опции меню нажмите
кнопку
F/f.
3 Для подтверждения выбранной опции
меню нажмите кнопку .
Для выхода из меню нажмите кнопку
MENU.
23
RU
Page 72

Меню Изображение
Параметры, перечисленные ниже, можно
установить в меню Изображение.
1 Нажмите кнопку F/f для выбора
“Установки” в MENU, затем нажмите
кнопку .
2 Нажмите кнопку F/f для выбора
значка меню, затем нажмите кнопку .
3 Нажимайте кнопки F/f/G/g для
выбора опции меню.
Заданные входы
Режим изобр.
Сброс
Подсветка
Контраст
Яркость
Для источника входного сигнала, отображаемого в данный момент на экране,
выбирается, применять ли общие установки или устанавливать каждый параметр
отдельно.
“Общий”: Применяются общие установки, совместно используемые с
источниками входного сигнала, в которых параметры “Заданные входы”
установлены положение “Общий”.
Название текущего источника входного сигнала (например, AV1): Позволяет для
текущего источника входного сигнала устанавливать каждую опцию отдельно.
Выбор режима изображения.
“Яркий”: Для улучшения контраста и резкости изображения.
“Стандартный”: Для стандартного изображения. Рекомендуется для
использования в домашних условиях.
“Индивидуальный”: Позволяет Вам сохранять сделанные Вами настройки.
Возврат к заводским установкам настроек “Изображение”, за исключением
“Заданные входы” и “Режим изобр.”.
К сведению
Настройки “Доп. установки” (стр. 26) будут также не возвращены к заводским
установкам. Выберите параметр “Сброс” в настройках “Доп. установки” для возврата к
заводским установкам параметров “Доп. установки”.
Регулировка яркости фона.
Повышает или понижает контрастность изображения.
Повышает или понижает яркость изображения.
Цветность
Оттенок
RU
24
Повышает или понижает интенсивность цветов.
Повышает или понижает оттенки зеленого и оттенки красного.
К сведению
“Оттенок” можно настроить только для цветного сигнала NTSC (например, для
видеокассет из США).
Page 73

Цветовой тон
Регулирует баланс белого для изображения.
“Холодный”: Придает белому цвету голубоватый оттенок.
“Нейтральный”: Придает белому цвету нейтральный оттенок.
“Теплый 1”/“Теплый 2”: Придает белому цвету красноватый оттенок. “Теплый 2”
придает более красный оттенок, чем “Теплый 1”.
К сведению
Опции “Теплый 1” и “Теплый 2” можно выбрать, только если Вы установили опцию
“Режим изобр.” в положение “Индивидуальный”.
Резкость
Шумопонижение
Режим DRC
Палитра DRC
Делает изображение более резким или мягким.
Частичная корректировка помех (“заснеженного” изображения).
“Авто”: Автоматическое шумопонижение.
“Сильное”/“Среднее”/“Слабое”: Корректировка эффекта шумопонижения.
“Выкл.”: Выключение функции Шумопонижение.
“BNR”: Подавление ступенчатого шума. Эта функция эффективна для цифровых
каналов или подсоединенных DVD-проигрывателя/цифрового спутникового
ресивера с воспроизведением в формате MPEG.
К сведению
• Опция “Авто” недоступна при просмотре изображения от компонентного источника
входного сигнала, а также от HDMI или цифрового РЧ входного сигнала.
• Опция “Шумопонижение” недоступна при использовании функций остановки
изображения или PAP.
Выбирается изображение высокого разрешения с 4-кратной плотностью для
высококачественных источников (например, DVD-проигрыватели, спутниковые
ресиверы).
“Режим 1”: Рекомендуется для просмотра фильмов.
“Режим 2”: Рекомендуется для просмотра неподвижных изображений и текста.
“Выкл.”: Выключение режима DRC.
К сведению
“Режим DRC” недоступен, если параметр “Режим Игра” установлен в положение
“Вкл.”, или при использовании функций остановки изображения и PAP; также
недоступен при просмотре изображения от источников 480p, 576p, 720p, 1080i или 1080p.
Настраивается уровень детализации (“Реалист.”) и плавности (“Четкость”) для
каждого входного сигнала. Например, Вы можете создать один набор
пользовательских настроек для оптимизации изображения от кабельного
источника входного сигнала, а второй для оптимизации изображения Вашего
DVD-проигрывателя.
Использование функций MENU
Появляется палитра DRC.
1 Нажимайте кнопки F/f/G/g для регулировки положения маркера
(z).
При перемещении z выше вдоль оси “Реалист.” детализация
изображения будет возрастать. При перемещении z вправо вдоль оси
“Четкость” изображение будет становиться более плавным.
2 Для сохранения настроек нажмите кнопку .
К сведению
“Палитра DRC” недоступна, если параметр “Режим Игра” установлен в положение
“Вкл.”, параметр “Режим DRC” установлен в положение “Выкл.” или при
использовании функций остановки изображения и PAP; также недоступен при
просмотре изображения от источников 480p, 576p, 720p, 1080i или 1080p.
Продолжение
25
RU
Page 74

Доп. установки
Индивидуальная регулировка функции Изображение. Если Вы установите
“Режим изобр.” в “Индивидуальный”, Вы сможете устанавливать/изменять
данные установки.
“Сброс”: Возврат всех расширенных настроек к заводским установкам.
“Корректор черного”: Усиление черных участков изображения для увеличения
контраста.
“Доп. улучш. контраста”: Автоматическая регулировка “Подсветка” и
“Контраст” к наиболее подходящим установкам на основании яркости экрана.
Данная функция особенно эффективна для темных изображений, увеличивая
глубину изображения.
“Гамма”: Настройка баланса между яркими и темными областями изображения.
“Чистый белый”: Подчеркивает белые цвета.
“Живые цвета”: Делает цвета более живыми.
“Цветовое пространство”: Изменение гаммы цветового воспроизведения.
“Расширенное” воспроизводятся яркие цвета, а “Нормальное” воспроизводятся
стандартные цвета.
“Баланс белого”: Регулируется цветовая температура цвета за цветом.
“Оптимизатор деталей”: Усиливаются детали изображения.
“Выделение границ”: Усиливаются контуры изображения.
К сведению
• Опции “Доп. улучш. контраста” и “Оптимизатор деталей” недоступны при
использовании функций остановки изображения и PAP.
• Режим “Живые цвета” недоступен, если опция “Цветовое пространство”
установлена в положение “Нормальное”.
26
RU
Page 75

Меню Звук
Вы можете выбрать перечисленные ниже опции в
меню Звук. Для выбора опций меню в разделе
“Установки” обратитесь к “Меню Изображение”
(стр. 24).
Заданные входы
Режим звука
Сброс
Тембр ВЧ
Тембр НЧ
Баланс
Авторег. громк.
Коррекция
громкости
Окруж. звук
BBE
Для источника входного сигнала, отображаемого в данный момент на экране,
выбирается, применять ли общие установки или устанавливать каждый параметр
отдельно.
“Общий”: Применяются общие установки, совместно используемые с
источниками входного сигнала, в которых параметры “Заданные входы”
установлены положение “Общий”.
Название текущего источника входного сигнала (например, AV1): Позволяет для
текущего источника входного сигнала устанавливать каждую опцию отдельно.
Выбор режима звука.
“Динамичный”: Усиление тембра ВЧ и НЧ.
“Стандартный”: Для воспроизведения стандартного звука. Рекомендуется для
использования в домашних условиях.
“Индивидуальный”: Плоская частотная характеристика. Также позволяет Вам
сохранять сделанные вами настройки.
Возврат к заводским установкам настроек “Звук”, за исключением “Заданные
входы”, “Режим звука” и “Двойной звук”.
Регулировка высоких звуков.
Регулировка низких звуков.
Регулировка баланса между левым или правым громкоговорителями.
Поддержка постоянного уровня громкости, даже когда в нем случаются резкие
изменения (например, звук в рекламных роликах обычно бывает громче, чем в
других передачах).
Регулируется уровень громкости текущего источника входного сигнала
относительно других источников, когда опция “Заданные входы” установлена на
название текущего источника входного сигнала (напр. AV1).
Выбор окружающего звука.
“Dolby Virtual”: Используются громкоговорители телевизора для имитации
эффекта окружающего звука, создаваемого многоканальной системой.
“Выкл.”: Для обычного стерео- или монофонического приема.
Придает звуку большую силу путем компенсации фазового эффекта в
громкоговорителях при помощи функции “BBE High Definition Sound System”.
Использование функций MENU
Продолжение
27
RU
Page 76

Двойной звук
Выбор звука, который должен воспроизводиться через громкоговоритель при
стереотрансляции или трансляции на двух языках.
“Стерео”, “Моно”: Для стереотрансляции.
“A”/“B”/“Моно”: Для двуязычной трансляции выберите “A” для звукового
канала 1, “B” для звукового канала 2 или “Моно” для монофонического канала,
если это возможно.
К сведению
Если Вы выберете другое устройство, подсоединенное к телевизору, установите опцию
“Двойной звук” в положение “Стерео”, “A” или “B”.
К сведению
Опции меню Звук, кроме опции “Двойной звук”, не могут быть использованы для наушников и выходных аудиогнезд.
28
RU
Page 77

Меню Управление экраном
Вы можете выбрать перечисленные ниже опции в
меню Управление экраном. Для выбора опций меню
в разделе “Установки” обратитесь к “Меню
Изображение” (стр. 24).
Заданные входы
Формат экрана
Автомат.
формат
4:3 по умолч.
Для источника входного сигнала, отображаемого в данный момент на экране,
выбирается, применять ли общие установки или устанавливать каждый параметр
отдельно.
“Общий”: Применяются общие установки, совместно используемые с
источниками входного сигнала, в которых параметры “Заданные входы”
установлены положение “Общий”.
Название текущего источника входного сигнала (например, AV1): Позволяет для
текущего источника входного сигнала устанавливать каждую опцию отдельно.
За более подробной информацией о формате экрана обратитесь к см.
“Переключение режимов экрана вручную в зависимости от типа трансляции”
(стр. 16).
Автоматическое изменение формата экрана в зависимости от транслируемого
сигнала. Для сохранения вашей установки выберите опцию “Выкл.”.
К сведению
Даже если опция “Автомат. формат” установлена в положение “Вкл.” или “Выкл.”, Вы
всегда можете изменить формат экрана, нажимая повторно кнопку .
Выбор режима экрана по умолчанию для использования с трансляцией 4:3.
“Оптимальн.”: Воспроизведение изображения в обычном формате, 4: 3, с имитацией
эффекта широкого экрана.
“4:3”: Отображение изображения стандартной трансляции 4:3 в правильных
пропорциях.
“Выкл.”: Сохранение текущей установки “Формат экрана” при изменении канала
или входного сигнала.
К сведению
Данная опция имеется в наличии только в том случае, если функция “Автомат. формат”
установлена в положение “Вкл.”.
Использование функций MENU
Область
отображ.
Регулировка области экрана для показа изображения.
“Макс.разрешение”: Отображается изображение для источников 1080i или 1080p
с оригинальным размером, когда части изображения обрезаны.
“Нормальная”: Отображение изображения с оригинальным размером.
“-1”/“-2”: Увеличение изображения для сокрытия края изображения.
К сведению
Режим “Макс.разрешение” доступен только тогда, когда опция Формат экрана
установлена в положение “Широкоэкр.”.
Продолжение
29
RU
Page 78

Сдвиг по
горизонт.
Регулировка горизонтального положения изображения для каждого формата
экрана.
К сведению
Данная опция недоступна, если параметр “Область отображ.” установлен в положение
“Макс.разрешение”.
Сдвиг по
вертик.
Размер по
вертикали
Регулировка вертикального положения изображения в режиме формата экрана
Оптимальн., Увелич. или 14:9.
Регулировка вертикального размера изображения в режиме формата экрана
Оптимальн.
30
RU
Page 79

Меню Начальная настройка
Параметры, перечисленные ниже, можно
установить в меню Начальная настройка. Для
выбора опций меню в разделе “Установки”
обратитесь к “Меню Изображение” (стр. 24).
Настройки
таймера
Автозапуск
Установка Таймера включения/выключения телевизора.
Таймер сна
Установка периода времени, по истечении которого телевизор должен
автоматически переключаться в режим ожидания.
Если активирован Таймер сна, индикатор (Таймер) на телевизоре (спереди)
загорается оранжевым цветом.
К сведению
• Если Вы выключите телевизор и снова его включите, опция “Таймер сна” будет
установлена в положение “Выкл.”.
• За одну минуту до перек лючения телевизора в режим ожидания на экране появляется
надпись “ТВ скоро будет выключен по Таймеру сна”.
Таймер включения
Установка Таймера включения телевизора из режима ожидания.
“День”: Выбор дня, в который Вы хотите активировать Таймер включения.
“Время”: Установка времени включения телевизора.
“Продолжительность”: Выбор периода времени, после которого телевизор
автоматически опять переключится в режим ожидания.
“Настройка громк.”: Установка громкости телевизора при включении с помощью
таймера.
Устан. часов
Позволяет Вам вручную установить часы. Если телевизор принимает цифровые
каналы, часы нельзя отрегулировать вручную, поскольку они установлены на
временной код принимаемого сигнала.
Запуск “меню первого включения” для выбора языка и страны/региона,
настройки всех доступных цифровых и аналоговых каналов, а также установки
времени (только когда принимаются нецифровые каналы). Обычно этого делать
не требуется, потому что язык и страна/регион уже выбраны и все каналы уже
настроены при установке телевизора (стр. 6, 7). Тем не менее, этот параметр
позволяет повторить процедуру (например, заново настроить телевизор после
переезда или найти новые каналы, появившиеся в эфире).
Использование функций MENU
Энергосбережение
Выбор режима энергосбережения для уменьшения потребления электроэнергии
телевизором.
Если выбрана опция “Откл. изобр.”, изображение будет отключено, а индикатор
(Откл. изобр.) на телевизоре (спереди) загорится зеленым цветом. Звук
останется без изменений.
Продолжение
31
RU
Page 80

Режим Фильм
Обеспечивается более плавное движение изображения при воспроизведении
изображений DVD или видеомагнитофона, снятых на пленку, уменьшая
размытость и зернистость изображения.
“Aвто 1”: Для устойчивого изображения с минимальными помехами. Если
изображение на экране частично ухудшится, установите в положение “Aвто 2”.
“Aвто 2”: Используйте эту установку в качестве стандартной настройки.
“Выкл.”: Выключение режима Фильм.
Примечания
• Даже при выборе опций “Aвто 1” или “Aвто 2” “Режим Фильм” будет автоматически
отключен, и фильм не будет воспроизводиться плавно, если изображение содержит
искаженные сигналы или слишком много помех.
• Режим Фильм недоступен при использовании функций остановки изображения или
PAP, или же при просмотре изображения от источников 480p, 576p, 720p или 1080p.
Громк. наушн.
(громкость
наушников)
Связь наушн.-АС
(канал
громкоговорителей
наушников)
Динамик
Аудиовыход
Световой
сенсор
Регулируется громкость наушников при опции “Связь наушн.-АС”,
установленной в положение “Выкл.”.
Включение/выключение встроенных громкоговорителей телевизора при
подсоединенных наушниках.
“Вкл.”: Звук выводится только через наушники.
“Выкл.”: Звук выводится через телевизор и через наушники.
Включение/выключение встроенных громкоговорителей телевизора.
“Вкл.”: Громкоговорители телевизора включены для прослушивания звука через
громкоговорители телевизора.
“Выкл.”: Громкоговорители телевизора выключены для прослушивания звука
только через внешние аудиоустройства, подсоединенные к разъемам
аудиовыхода.
“Переменный”: Звуковым выводом из вашей аудиосистемы можно по-прежнему
управлять с помощью пульта ДУ телевизора.
“Постоянный”: Звуковой вывод телевизора зафиксирован. Используйте
регулятор громкости Вашего аудиоресивера для регулировки громкости (и других
звуковых настроек) Вашей аудиосистемы.
“Вкл.”: Автоматическая оптимизация установок изображения в соответствии с
освещением в комнате.
“Выкл.”: Выключение функции “Световой сенсор”.
Подсветка
логотипа
Язык
Информация
Сброс всех
настроек
RU
32
Включается и выключается подсветка логотипа компании Sony на передней
панели телевизора.
Выбор языка, на котором отображаются меню.
Вызов информации о Вашем телевизоре.
Возврат всех регулировок к заводским установкам и последующий вызов экрана
Автозапуск.
Примечание
Будут переустановлены все установки, включая цифровой список Избранное, страну,
язык, каналы автоматической настройки и т.п.
Page 81

Меню Настройка AV
Параметры, перечисленные ниже, можно
установить в меню Настройка AV. Для выбора
опций меню в разделе “Установки” обратитесь к
“Меню Изображение” (стр. 24).
Предустановка
AV
Вход AV7
Выход AV2
Присвоение имени любому устройству, подсоединенному к разъему на боковой
или задней панели. Это имя будет ненадолго выводиться на экран при
переключении на соответствующее устройство. Вы можете пропустить источник
входного сигнала, не подключенный ни к какому устройству.
1 Для выбора желаемого источника входного сигнала нажмите кнопку
F/f, затем нажмите кнопку .
2 Для выбора желаемого пункта меню внизу нажмите кнопку F/f, затем
нажмите кнопку .
Метки устройств: Используйте одну из предустановленных меток для
присвоения названия подсоединяемому устройству.
“Изм.”: Создание Вашей собственной метки. Выполните шаги с 2 по 4
раздела “Метки программ” (стр. 35).
“Пропуск”: Будет пропущен ненужный источник входного сигнала.
“Авто”: Автоматическое переключение между компонентными видеоразъемами,
разъемом S Video и композитными видеоразъемами на левой стороне телевизора
в зависимости от подсоединения кабеля.
“Компонентный”: Активируются компонентные видеоразъемы на левой стороне
телевизора.
“S Video”: Активируется разъем S Video на левой стороне телевизора.
“Композитный”: Активируются композитные видеоразъемы на левой стороне
телевизора.
К сведению
При подсоединении многофункциональных кабелей и выборе параметра “Авто”
будут активированы опции “Компонентный”, “S Video”, “Композитный” в
указанной последовательности.
Вывод сигнала через разъем с меткой / 2 на задней панели телевизора.
Если подключить видеомагнитофон или другое записывающее устройство к
разъему / 2, можно записывать сигнал, поступающий с устройств,
подключенных к другим разъемам телевизора.
“TV”: Вывод телевизионной трансляции.
“AV1”: Вывод сигналов с устройств, подсоединенных к разъему / 1.
“AV3”: Вывод сигналов с устройств, подсоединенных к разъему / 3.
“AV7”: Вывод сигналов с устройств, подсоединенных к разъему / 7.
“Авто”: Вывод всего, что воспроизводится на экране (за исключением сигналов с
разъемов
/ 4, HDMI IN 5, HDMI IN 6 и PC ).
Использование функций MENU
Система цвета
Выбор системы цветности (“Авто”, “PAL”, “SECAM”, “NTSC3.58” или
“NTSC4.43”) в соответствии с входным сигналом с источника входного сигнала.
Продолжение
33
RU
Page 82

Режим Игра
В зависимости от игрового программного обеспечен ия время реакции может быть
замедлено во время быстрых сцен и т.п. Выберите “Вкл.” для ускорения времени
реакции.
Цветовая
матрица
Обычно используется заводская настройка (AV1/2/3/7(входной композитный
сигнал и входной сигнал S-видео) установлен в положение “ITU601”, а AV4/5/6/7
(входной компонентный сигнал) установлен в положение “Авто”). Если оттенок
изображения от источника входного сигнала является неестественным, выберите
разъемы “ITU601” или “ITU709”, позволяющие нормализовать оттенок
изображения.
34
RU
Page 83

Меню Настройка аналоговых каналов
Параметры, перечисленные ниже, можно
установить в меню Настройка аналоговых каналов.
Для выбора опций меню в разделе “Установки”
обратитесь к “Меню Изображение” (стр. 24).
Режим 1 цифры
Автонастройка
Сортировка
прогр.
Метки программ
Если опция “Режим 1 цифры” установлена в положение “Вкл.”, Вы можете
выбрать аналоговый канал при помощи одной цифровой кнопки (0 - 9) на пульте
ДУ.
Примечание
Если опция “Режим 1 цифры” установлена в положение “Вкл.”, Вы не можете выбрать
каналы с номерами 10 и выше, вводя две цифры при помощи пульта ДУ.
Настройка всех доступных аналоговых каналов.
Обычно этого делать не требуется, потому что все каналы уже настроены при
установке телевизора (стр. 7). Тем не менее, этот параметр позволяет повторить
процедуру (например, заново настроить телевизор после переезда или найти
новые каналы, появившиеся в эфире).
Изменение порядка расположения аналоговых каналов, сохраненного в памяти
телевизора.
1 Для выбора канала, который Вы хотите переместить на новую
позицию, нажмите кнопку
2 Для выбора новой позиции для Вашего канала нажмите кнопку F/f,
затем нажмите кнопку .
Присвоение каналу любого имени, содержащего не более пяти букв или цифр.
Данное имя будет ненадолго выводиться на экран при переключении на этот
канал. (Обычно названия каналов берутся автоматически из режима телетекста,
если он предусмотрен.)
1 Для выбора канала, которому Вы хотите присвоить название, нажмите
кнопку
2 Нажмите кнопку F/f для выбора нужной буквы или цифры (“_” для
пробела), затем нажмите кнопку
Исправление символа, введенного ошибочно
Для выбора неправильной буквы нажмите кнопку G/g. Затем нажмите
кнопку F/f для выбора правильной буквы.
Удаление всех символов
Выберите опцию “Сброс”, затем нажмите кнопку .
3 Повторяйте шаг 2, пока не введете имя целиком.
4 Выберите опцию “OK”, затем нажмите кнопку .
F/f, затем нажмите кнопку .
F/f, затем нажмите кнопку .
g.
Использование функций MENU
Продолжение
35
RU
Page 84

Руч. настр.
прогр.
Перед выбором опций “Метка”/“АПЧ”/“Аудиофильтр”/“Пропуск”/“Декодер”
нажмите кнопку PROG +/- для выбора номера программы с каналом. Нельзя
выбрать номер программы, настроенной на пропуск (стр. 37).
Программа/Система/Канал
Ручная настройка каналов программ.
1 Для выбора опции “Программа” нажмите кнопку F/f, затем нажмите
кнопку .
2 Для выбора номера программы, которую Вы хотите настроить вручную
(при настройке видеомагнитофона выберите канал 00), нажмите
кнопку F/f, затем нажмите кнопку RETURN.
3 Для выбора опции “Система” нажмите кнопку F/f, затем нажмите
кнопку .
4 Для выбора одной из следующих систем телетрансляции нажмите
кнопку
B/G: Для стран/регионов Западной Европы
I: Для Великобритании
D/K: Для стран/регионов Восточной Европы
L: Для Франции
F/f, затем нажмите кнопку G.
5 Для выбора опции “Канал” нажмите кнопку F/f, затем нажмите
кнопку .
6 Нажмите кнопку F/f для выбора опции “S” (для кабельных каналов)
или “C” (для наземных каналов), затем нажмите кнопку
g.
7 Настройте каналы следующим образом:
Если номер (частота) канала неизвестен
Для поиска следующего доступного канала нажмите кнопку F/f. Когда
канал будет найден, поиск остановится. Для продолжения поиска
нажмите кнопку F/f.
Если номер (частота) канала известен
Введите номер телеканала или канала видеомагнитофона с помощью
цифровых кнопок.
8 Для перехода к команде “Подтверд.” нажмите кнопку , затем
нажмите кнопку .
9 Для выбора опции “OK” нажмите кнопку f, затем нажмите кнопку .
Повторите процедуру, чтобы установить вручную другие каналы.
Метка
Присвоение выбранному каналу любого имени, содержащего не более пяти букв
или цифр. Данное имя будет ненадолго выводиться на экран при переключении на
этот канал.
Для ввода символов выполните шаги с 2 по 4 раздела “Метки программ” (стр. 35).
АПЧ
Предоставляет вам возможность точной настройки выбранного номера
программы вручную, если Вам кажется, что небольшая регулировка настройки
улучшит качество изображения.
Вы можете выполнить точную настройку в диапазоне от -15 до +15. Если будет
выбрана опция “Вкл.”, точная настройка выполнится автоматически.
Аудиофиль тр
Повышение качества звука на отдельных каналах в случае искажения при
монотрансляции. Иногда, если транслируется нестандартный сигнал, возможны
искажения или периодическое пропадание звука при просмотре монопрограмм.
Если искажений звука нет, рекомендуется оставить заводскую настройку
“Выкл.”.
Примечания
• Вы не можете принимать стереофонические или двуязычные программы, если
выбрана опция “Слаб.” или “Сильн.”.
• Режим “Аудиофильтр” недоступен, если опция “Система” установлена в положение
“L”.
36
RU
Page 85

Пропуск
Пропуск неиспользуемых аналоговых каналов при выборе каналов с помощью
кнопок PROG+/-. (Пропущенный канал можно выбрать с помощью цифровых
кнопок.)
Декодер
Просмотр и запись кодированных каналов при использовании декодера,
подсоединенного напрямую к разъему Scart / 1 или к разъему Scart
/ 2 через видеомагнитофон.
Примечание
В зависимости от страны/региона, выбранных для пункта “Страна” (стр. 6), данная
опция меню может быть недоступна.
Подтверд.
Сохранение изменений в установках, сделанных в разделе “Руч. настр. прогр.”.
Использование функций MENU
37
RU
Page 86

Меню Настройка цифровых каналов
Параметры, перечисленные ниже, можно
установить в меню Настройка цифровых каналов.
Для выбора опций меню в разделе “Установки”
обратитесь к “Меню Изображение” (стр. 24).
Примечание
Некоторые функции могут быть недоступны в
некоторых странах.
Цифровые
параметры
Вызов меню “Цифровые параметры”.
Установка субтитров
Отображение на экране цифровых субтитров.
При выборе опции “Плохая слышимость” некоторые визуальные
вспомогательные средства могут быть выведены с субтитрами (если телеканалы
транслируют такую информацию).
Язык субтитров
Выбор языка отображаемых на экране субтитров.
Язык аудио
Выбор языка, используемого для программы. Некоторые цифровые каналы
могут транслировать звук для программы на нескольких языках.
Тип аудио
Увеличение громкости звука, если выбрана опция “Плохая слышимость”.
Замок от детей
Установка для программ ограничения по возрасту. Любую программу, для
которой установлено ограничение по возрасту, можно просмотреть только после
правильно введенного PIN-кода.
1 Нажимайте цифровые кнопки для ввода Вашего установленного PIN-
кода.
Если Вы не установили предварительно PIN-код, появится экран ввода
PIN-кода. Следуйте указаниям раздела “PIN код” ниже.
2 Нажмите кнопку F/f для выбора ограничения по возрасту или “Нет”
(для просмотра без ограничения), затем нажмите кнопку .
3 Нажмите кнопку RETURN.
PIN код
Установка PIN-кода в первый раз или изменение вашего PIN-кода.
1 Введите PIN-код следующим образом:
Если Вы перед этим уже установили PIN-код
Нажимайте цифровые кнопки для ввода Вашего установленного PINкода.
Если Вы не устанавливали PIN-код
Нажимайте цифровые кнопки для ввода установленного на заводе PINкода 9999.
2 Нажимайте цифровые кнопки для ввода нового PIN-кода.
Появится сообщение с информацией о том, что новый PIN-код принят.
3 Нажмите кнопку RETURN.
К сведению
PIN-код 9999 принимается всегда.
38
RU
Page 87

Техн. конфигурация
Вывод меню Техническая настройка.
“Авт. обновление станций”: Позволяет телевизору находить и сохранять новые
цифровые услуги по мере их появления.
“Загрузка программы”: Позволяет телевизору автоматически получать
обновления программного обеспечения бесплатно через Вашу существующую
антенну (по мере их появления). Рекомендуется все время устанавливать эту
опцию в положение “Вкл.”. Если Вы не хотите, чтобы Ваше программное
обеспечение обновлялось, установите этот пункт меню в положение “Выкл.”.
“Системная информация”: Отображение версии текущего программного
обеспечения и уровня сигнала.
“Часовой пояс”: Позволяет Вам вручную выбирать часовой пояс, в котором Вы
находитесь, если заводская установка не соответствует Вашей стране.
Настройка модуля СА
Предоставляет доступ к сервису Pay Per View (Плата за просмотр) после
приобретения Модуля условного доступа (Conditional Access Module (CAM)) и
карты просмотра. Для получения информации о расположении разъема
(PCMCIA) обратитесь к стр. 42.
Примечания
• CAM поддерживается не во всех странах. Пожалуйста, выясните у специалиста своей
дилерской компании.
• “Настройка модуля СА” доступна только когда вставлен модуль CAM.
Использование функций MENU
Цифровая
настройка
Вызов меню “Цифровая настройка”.
Автопоиск цифр. станций
Настройка всех доступных цифровых каналов.
Обычно этого делать не требуется, потому что все каналы уже настроены при
установке телевизора (стр. 7). Тем не менее, этот параметр позволяет повторить
процедуру (например, заново настроить телевизор после переезда или найти
новые каналы, появившиеся в эфире).
Редакт. списка программ
Удаление любых нежелательных цифровых каналов, сохраненных в памяти
телевизора и изменение порядка цифровых каналов, сохраненного в памяти
телевизора.
1 Для выбора канала, который Вы хотите удалить или переместить на
новую позицию, нажмите кнопку
F/f.
Если Вы знаете номер программы
Нажимайте цифровые кнопки для ввода трехзначного номера
программы желаемой вами трансляции.
2
Удалите или измените порядок цифровых каналов следующим образом:
Для удаления цифрового канала
Нажмите кнопку . Появится сообщение с просьбой подтвердить
удаление выбранного цифрового канала. Для выбора опции “Да”
нажмите кнопку G, затем нажмите кнопку .
Для изменения порядка цифровых каналов
Нажмите кнопку g, затем нажмите кнопку F/f для выбора новой
позиции для канала и нажмите кнопку
другие каналы, повторите шаги 1 и 2.
G. Если необходимо переместить
3 Нажмите кнопку RETURN.
Руч. поиск цифр. cтанций
Настройка цифровых каналов вручную.
1
Нажмите цифровую кнопку для выбора номера канала, который Вы хотите
настроить вручную, затем нажмите кнопку
2
Когда доступные каналы будут найдены, нажмите кнопку F/f для выбора
канала, который Вы хотите сохранить, затем нажмите кнопку .
F/f
для настройки канала.
3 Нажмите кнопку F/f для выбора номера программы, под которым Вы
хотите сохранить новый канал, затем нажмите кнопку .
Повторите процедуру для настройки других каналов вручную.
39
RU
Page 88

Меню Установки ПК
Изображение
Параметры, перечисленные ниже, можно
установить в меню Установки ПК, если телевизор
подсоединен к ПК.
1 Нажмите кнопку / несколько раз,
пока на экране не появится значок
PC.
2 Нажмите кнопку MENU для
отображения меню Установки ПК.
Режим дисплея
Сброс
Подсветка
Контраст
Яркость
Цветовой тон
Звук
Режим звука
Выбор режима дисплея.
“Video”: Выбирается для просмотра видеоизображений.
“Текст”: Выбирается для просмотра текста, диаграмм или таблиц.
Возврат к заводским установкам настроек “Изображение”, за исключением
“Режим дисплея”.
Регулировка яркости фона.
Повышает или понижает контрастность изображения.
Повышает или понижает яркость изображения.
Регулирует баланс белого для изображения.
“Холодный”: Придает белому цвету голубоватый оттенок.
“Нейтральный”: Придает белому цвету нейтральный оттенок.
“Теплый 1”/“Теплый 2”: Придает белому цвету красноватый оттенок. “Теплый 2”
придает более красный оттенок, чем “Теплый 1”.
Выбор режима звука.
“Динамичный”: Усиление тембра ВЧ и НЧ.
“Стандартный”: Для воспроизведения стандартного звука. Рекомендуется для
использования в домашних условиях.
“Индивидуальный”: Плоская частотная характеристика. Также позволяет Вам
сохранять сделанные вами настройки.
40
RU
Page 89

Прочее
Автоподстройка
Сброс
Фаза
Шаг
Сдвиг по
горизонт.
Сдвиг по
вертик.
Фоpмaт экpaнa
Автоматическая регулировка положения, фазы и интервала изображения при
получении телевизором входного сигнала с подсоединенного ПК.
К сведению
Функция Автоподстройка может не работать должным образом с некоторыми
входными сигналами. В таких случаях вручную отрегулируйте опции “Фаза”, “Шаг”,
“Сдвиг по горизонт.” и “Сдвиг по вертик.”.
Возврат всех регулировок “Прочее” к заводским установкам.
Регулировка фазы в случае мерцания экрана.
Регулировка шага в случае, если на изображении есть нежелательные
вертикальные полосы.
Регулировка горизонтального положения изображения для каждого формата
экрана.
Регулировка вертикального положения изображения для каждого формата
экрана.
Выбор режима экрана.
“Нормальн.”: Отображение изображения с оригинальным размером.
“Полн. 1”: Увеличение изображения для заполнения области отображения с
сохранением оригинального соотношения горизонтали к вертикали.
“Полн. 2”: Увеличение изображения для заполнения области отображения.
Использование функций MENU
Управление
питанием
Переключение телевизора в режим ожидания, если в течение 30 секунд не
поступает никакого сигнала.
41
RU
Page 90

Использование дополнительного оборудования
Подключение дополнительного оборудования
К телевизору можно подключить широкий спектр дополнительного оборудования. Соединительные
кабели в комплект поставки не входят.
Подключение к телевизору (на боковой панели)
DVDпроигрыватель
с компонентным
выходом
Только для
обслуживания
S VHS/Hi8/DVC
видеокамера
Наушники
Чтобы
подключить
DVDпроигрыватель с
компонентным
выходом A
S VHS/Hi8/DVC
видеокамеру B
Необходимо
Подключить к компонентным
разъемам Y, P
аудиоразъемам L (MONO), R
7.
Подсоединить к разъему S Video
к аудиоразъемам 7. Чтобы
избежать появления помех на
изображении, не подключайте
камеру к видеоразъему 7 и
разъему S Video 7
одновременно. Если Вы не
можете подсоединить
монофоническое оборудование,
подсоедините его к разъему
L7.
B/CB, PR/CR 7 и
7 или видеоразъему 7 и
К сведению
Вы можете выбрать источник
входного сигнала с помощью
установки “Вход AV7” в меню
“Настройка AV” (стр. 33).
Наушники C Подсоедините к разъему i, чтобы
Модуль условного
доступа
(Conditional Access
Module (CAM)) D
слушать звук с телевизора через
наушники.
Для использования сервиса Pay
Per View (Плата за просмотр). За
более подробной информацией
обратитесь к руководству по
эксплуатации, прилагаемой к
вашему модулю CAM.
Для использования модуля CAM
нажмите кнопку выталкивания и
извлеките “бутафорную” карту.
Выключите телевизор при
установке модуля CAM в слот
CAM. Если вы не используете
модуль CAM, рекомендуется
вставить “бутафорную” карту в
слот CAM и хранить ее там.
Примечание
CAM поддерживается не во всех
странах. Пожалуйста, выясните у
специалиста своей дилерской
компании.
42
RU
Page 91

Подключение к телевизоре (на задней панели)
IN
5
IN
6
L
R
PC
Видеоигровые
устройства
DVDпроигрыватель
Декодер
Цифровой
спутниковый
ресивер
DVD-проигрыватель
OPTICAL OUT
Цифровой
аудиокомпонент
(PCM)
L
R
Аудиоустройство
Hi-Fi
DVD-проигрыватель с
компонентным выходом
Видеомагнитофон
DVD-
проигрыватель
DVD-магнитофон
Видеомагнитофон
Декодер
ПК
Чтобы
подключить
Цифровой
спутниковый
ресивер или DVDпроигрыватель E
ПК F Подсоединить к разъемам PC
Цифровой
аудиокомпонент
(PCM) G
Аудиоустройство
Hi-Fi H
DVDпроигрыватель с
компонентным
выходом I
Видеоигровое
устройство, DVDпроигрыватель или
декодер J
DVD-магнитофон
или
видеомагнитофон,
поддерживающий
функцию
SmartLink K
Видеомагнитофон
или DVDпроигрыватель L
Необходимо
Подсоединить к разъему HDMI
IN 5 или 6, если в устройстве
имеется разъем HDMI. С
устройства будут поступать
цифровые видео- и аудиосигналы.
Если в устройстве имеется разъем
DVI, соедините разъем DVI с
разъемом HDMI IN 6 через
адаптер DVI - HDMI
(приобретается отдельно) и
подсоедините выходные
аудиоразъемы устройства к
разъемам HDMI IN 6.
Примечание
Разъемы HDMI поддерживают
только следующие входные
видеосигналы: 480i, 480p, 576i,
576p, 720p, 1080i и 1080p. Для
подсоединения к ПК, пожалуйста,
используйте разъем PC .
. Рекомендуется
использовать кабели ПК с
ферритовыми сердечниками.
Подсоединить к разъему
OPTICAL OUT с помощью
оптического аудиокабеля.
Примечание
Разъем OPTICAL OUT
поддерживает только цифровые
сигналы наземного телевещания.
Чтобы прослушивать звук с
телевизора на оборудовании
класса Hi-Fi, подсоедините его к
разъемам аудиовыхода .
Подсоедините к разъемам
компонентного сигнала и
аудиоразъемам / 4.
Подсоедините к разъему Scart
/ 1. Если подключен
декодер, то кодированный сигнал
с тюнера телевизора выводится на
декодер, а декодированный си гнал
затем выводится с декодера.
Подсоедините к разъему Scart
/ 2. SmartLink – это
прямое соединение между
телевизором и
видеомагнитофоном/DVDмагнитофоном.
За более подробной информацией
обратитесь к стр. 5.
Использование дополнительного оборудования
43
RU
Page 92

Программирование
пульта ДУ
Данный пульт ДУ предварительно установлен
для управления телевизорами Sony,
большинством DVD, видеомагнитофонов и
усилителей (домашних кинотеатров и т.п.) Sony.
Для управления видеомагнитофонами и DVD
других производителей (и некоторыми другими
моделями видеомагнитофонов, DVD и
усилителей Sony), выполните следующую
процедуру для программирования пульта ДУ.
Примечание
Прежде чем начать, найдите трехзначный код Вашей
марки DVD, видеомагнитофона или усилителя в
разделе “Коды производителей” на стр. 44.
1
2
3 Нажмите кнопку .
Если программирование выполнено
правильно, выбранная функциональная
кнопка мигнет дважды, а если
неправильно, она мигнет пять раз.
4 Включите Ваше устройство и
проверьте работу следующих основных
функций.
H (воспроизведение), x (остановка), m
(перемотка назад), M (ускоренная
перемотка вперед), настройка каналов для
видеомагнитофонов и DVD, TOP MENU/
MENU и
Если Ваше устройство не работает или
не работают некоторые функции.
Введите правильный код или попробуйте
ввести следующий код из списка для этой
марки. Однако не все модели каждой марки
могут быть охвачены.
Для возврата к обычному режиму ТВ
Нажмите функциональную кнопку TV,
DIGITAL или ANALOG.
Коды производителей
Список марок видеомагнитофонов
F/f/G/g только для DVD.
1
3
1 Нажмите и держите нажатой
функциональную кнопку DVD, VCR или
AMP, которую Вы хотите
запрограммировать на пульте ДУ, а
затем нажмите кнопку , не отпуская
функциональную кнопку.
Выбранная функциональная кнопка (DVD,
VCR или AMP) будет мигать.
2 Нажмите цифровые кнопки для ввода
трехзначного кодового номера
производителя, пока кнопка
подсвечивается. Если код не будет
введен в течение 10 секунд, Вам нужно
будет снова выполнить пункта 1.
Марка Код
SONY 301, 302, 303, 304, 305, 306, 307, 308,
309, 310, 362
AIWA 325, 331, 351
AKAI 326, 329, 330
DAEWOO 342, 343
GRUNDIG 358, 355, 360, 361, 320, 351, 366
HITACHI 327, 333, 334
JVC 314, 315, 322, 344, 352, 353, 354, 348, 349
LG 332, 338
LOEWE 358, 355, 360, 361, 320, 351
MATSUI 356, 357
ORION 328
PANASONIC 321, 323
PHILIPS 311, 312, 313, 316, 317, 318, 358, 359, 363,
364
SAMSUNG 339, 340, 341, 345
SANYO 335, 336
SHARP 324
THOMSON 319, 350, 365
TOSHIBA 337
44
RU
Page 93

Список марок DVD
DVD-проигрыватель
Марка Код
SONY 001, 029, 030, 036, 037, 038, 039, 040, 041,
042, 043, 044, 053, 054, 055
AIWA 021
AKAI 032
DENON 018, 027, 020, 002
GRUNDIG 009, 028, 023, 024, 016, 003
HITACHI 025, 026, 015, 004, 035
JVC 006, 017
KENWOOD 008
LG 015, 014, 034
LOEWE 009, 028, 023, 024, 016, 003
MATSUI 013, 016
ONKYO 022, 033
PANASONIC 018, 027, 020, 002, 045, 046, 047
PHILIPS 009, 028, 023, 024, 016, 003, 031
PIONEER 004, 050, 051, 052
SAMSUNG 011, 014
SANYO 007
SHARP 019, 027
THOMSON 012
TOSHIBA 003, 048, 049
YAMAHA 018, 027, 020, 002
Список марок дополнительных систем
Sony
Система домашнего кинотеатра DAV
Марка Код
SONY (DAV) 401, 402, 403, 404
Аудио-видео ресивер
Марка Код
SONY 451, 452, 453, 454
Ресивер цифрового наземного вещания
Марка Код
SONY 501, 502, 503
Использование дополнительного оборудования
DVD-проигрыватель/видеомагнитофон
Марка Код
SONY 101
DVD-магнитофон
Марка Код
SONY 201, 202, 203
45
RU
Page 94

Дополнительная информация
Технические
характеристики
Дисплей
Требования к источнику питания:
220–240 В переменного тока, 50 Гц
Размер экрана:
46 дюймов (Приблиз. 116,8 см по диагонали)
Разрешение экрана:
1920 точек (по горизонтали) × 1080 строк (по
вертикали)
Потребляемая мощность:
249 Вт
Потребляемая мощность в режиме ожидания:
0,3 Вт
Габариты (Ш × В × Г):
Приблиз. 1262 × 795 × 322 мм (с подставкой)
Приблиз. 1262 × 734 × 121 мм (без подставки)
Масса:
Приблиз. 41 кг (с подставкой)
Приблиз. 36 кг (без подставки)
Система панели управления
ЖК-панель (жидкокристаллический дисплей)
ТВ система
Аналоговая:В зависимости от Вашего выбора
страны/региона:
B/G/H, D/K, L, I
Цифровая: DVB-T
Система цветности/видеосистема
Аналоговая:PAL, SECAM
NTSC 3.58, 4.43 (только в режиме Video
In)
Цифровая: MPEG-2 MP@ML
Антенна
Внешний разъем для VHF/UHF (75 Ом)
Диапазон каналов
Аналоговый: VHF: E2–E12
UHF: E21–E69
CATV: S1–S20
HYPER: S21–S41
D/K: R1–R12, R21–R69
L: F2–F10, B–Q, F21–F69
I: UHF B21–B69
Цифровой: VHF/UHF
Разъемы
/1
21-штырьковый разъем scart (стандарта
CENELEC), включающий аудио-/видеовход,
вход RGB-сигнала и телевизионный аудио-/
видеовыход.
/ 2 (SmartLink)
21-штырьковый разъем scart (стандарта
CENELEC), включающий аудио-/видеовход,
вход RGB-сигнала, выбираемый аудио-/
видеовыход и интерфейс SmartLink.
/3
21-штырьковый разъем Scart (стандарта
CENELEC), включающий аудио/видеовход,
вход RGB-сигнала и аудио/видеовыход сигнала,
отображаемого в настоящий момент на экране.
4
Поддерживаемые форматы: 1080i, 720p, 576p,
Y: Размах 1 В, 75 Ом, 0,3 В с отрицательной
синхронизацией
B/CB: Размах 0,7 В, 75 Ом
P
R/CR: Размах 0,7 В, 75 Ом
P
4
Аудиовходы (линейные разъемы)
500 мВ среднеквадратическое значение
Полное сопротивление: 47 кОм
HDMI IN 5, 6
Видео: 1080p, 1080i, 720p, 576p, 576i, 480p, 480i
Аудио: Двухканальный линейный PCM
32, 44,1 и 48 кГц, 16, 20 и 24 разряда, либо
аналоговый аудиовход (линейные
разъемы) (HDMI IN 6)
7
Поддерживаемые форматы: 1080i, 720p, 576p,
Y: Размах 1 В, 75 Ом, 0,3 В с отрицательной
синхронизацией
B/CB: Размах 0,7 В, 75 Ом
P
R/CR: Размах 0,7 В, 75 Ом
P
7 Вход S-видео (4-штырьковый мини-разъем
DIN)
7 Видеовход (линейный разъем)
7 Аудиовходы (линейные разъемы)
ОПТИЧЕСКИЙ ВЫХОД (гнездо OPTICAL
OUT)
Аудиовыход (левый/правый) (линейные
PC Вход с ПК (15 Dsub) (см. стр. 47)
i Гнездо наушников
разъемы)
G: Размах 0,7 В, 75 Ом, без синхронизации по
зеленому каналу
B: Размах 0,7 В, 75 Ом, без синхронизации по
зеленому каналу
R: Размах 0,7 В, 75 Ом, без синхронизации по
зеленому каналу
HD: Размах 1-5 В
VD: Размах 1-5 В
аудиовход ПК (мини-гнездо)
Слот модуля условного доступа
(Conditional Access Module (CAM))
576i, 480p, 480i
576i, 480p, 480i
Выходная мощность звука
11 Вт +11 Вт
Прилагаемые принадлежности
Обратитесь к разделу “1: Проверка
принадлежностей” на стр. 4.
Дополнительные принадлежности
• Настенный монтажный кронштейн SU-WL51
• Подставка для телевизора SU-FL61
• Сменные цветные элементы CRU-46X1
Конструкция и технические характеристики
могут быть изменены без уведомления.
46
RU
Page 95

Справочная таблица входных сигналов ПК
Частота
Сигналы
По горизонтали
(пикселы)
По вертикали
(строки)
горизонтальной
развертки
(кГц)
VGA 640 480 31,5 60 VGA
640 480 37,5 75 VESA
720 400 31,5 70 VGA-T
SVGA 800 600 37,9 60 Стандарты
800 600 46,9 75 VESA
XGA 1024 768 48,4 60 Стандарты
1024 768 56,5 70 VESA
1024 768 60 75 VESA
WXGA 1280 768 47,4 60 VESA
1280 768 47,8 60 VESA
1360 768 47,7 60 VESA
• Вход ПК на данном телевизоре не поддерживает синхронизацию по зеленому каналу и композитную
синхронизацию.
• Вход ПК на данном телевизоре не поддерживает чересстрочные сигналы.
• Для наилучшего качества изображения рекомендуется использовать сигналы (мощные) в приведенной выше
таблице с частотой вертикальной развертки 60 Гц с персонального компьютера. В режиме простого
подключения сигналы с частотой вертикальной развертки 60 Гц будут выбираться автоматически.
Частота
вертикальной
развертки
(кГц)
Стандарт
VESA
VESA
47
Дополнительная информация
RU
Page 96

Поиск и устранение неисправностей
Проверьте, не мигает ли индикатор 1 (режим ожидания) красным светом.
Если мигает
Включена функция самодиагностики.
1 Посчитайте, сколько раз мигнет индикатор 1 (режим ожидания) между каждыми
двухсекундными перерывами.
Например, индикатор мигает три раза, перестает мигать на две секунды, затем снова мигает три раза
и т.д.
2 Нажмите кнопку 1 на телевизоре (справа) для его выключения, отсоедините шнур питания
от сети и сообщите специалистам дилерской компании или сервисного центра Sony характер
миганий индикатора (количество миганий).
Если не мигает
1 См. таблицы ниже.
2 Если проблему устранить не удалось, дальнейшее техническое обслуживание и ремонт
телевизора должны производиться квалифицированным персоналом в сервисном центре.
Изображение
Проблема Причина/Способ устранения
Нет ни изображения
(темный экран), ни звука
• Проверьте подсоединение антенны.
• Подсоедините телевизор к электросети и нажмите кнопку 1 на
телевизоре (справа).
• Если индикатор 1 (режим ожидания) горит красным cветом,
нажмите кнопку TV "/1.
Нет изображения или
информации в меню от
оборудования,
подключенного к разъему
Scart
Раздвоение или
многоконтурность
изображения
На экране виден только
“снег” и помехи
Помехи на изображении
(пунктирные линии или
полосы)
• Проверьте, включено ли дополнительное оборудование, и
нажимайте кнопку / до тех пор, пока на экране не
отобразится нужный значок входа.
• Проверьте соединение между дополнительным оборудованием и
телевизором.
• Проверьте подсоединения антенны/кабелей.
• Проверьте расположение антенны и ее направленность.
• Проверьте, не сломана и не погнута ли антенна.
• Проверьте, не закончился ли срок эксплуатации антенны (от трех
до пяти лет в обычных условиях, от одного года до двух лет на
морском побережье).
• Установите телевизор подальше от таких источников
электрических помех, как автомобили, мотоциклы, фены или
оптические устройства.
• Дополнительное оборудование следует устанавливать на
некотором расстоянии от телевизора.
• Убедитесь, что антенна подсоединена с помощью прилагаемого
коаксиального кабеля.
• Антенный кабель не должен находиться рядом с другими
соединительными кабелями.
48
RU
Page 97

Проблема Причина/Способ устранения
При просмотре телеканала
на изображении имеются
помехи
• Выберите опцию “Руч. настр. прогр.” в меню “Настр. аналоговых
каналов” и выполните точную настройку “АПЧ”
(автоматическую подстройку частоты) для повышения качества
принимаемого изображения (стр. 36).
На экране появляются
отдельные маленькие
темные и/или яркие точки
Отсутствует цветность при
просмотре программ
Отсутствует цветность или
цветность искажена при
просмотре сигнала через
разъемы Y, P
ввода 4 или 7
B/CB, PR/CR
• Изображение на экране состоит из точек. Маленькие темные и/
или яркие точки (пикселы) на экране не являются признаком
неисправности.
• Выберите опцию “Сброс” в меню “Изображение” для возврата к
заводским установкам (стр. 24).
• Проверьте соединение разъемов Y, PB/CB, PR/CR ввода 4 или 7.
• Убедитесь в том, что разъемы Y, P
надежно зафиксированы в соответствующих гнездах.
Звук
Проблема Причина/Способ устранения
Нет звука, но изображение
нормальное
• Нажмите кнопку 2 +/– или % (отключение звука).
• Убедитесь, что опция “Динамик” установлена в положение
“Вкл.” в меню “Начальная настройка” (стр. 32).
Звук с помехами
• См. причины/способ устранения в разделе “Помехи
изображения” на стр. 48.
Каналы
Проблема Причина/Способ устранения
Невозможно выбрать
желаемый канал
• Переключаясь в цифровой или аналоговый режим, выберите
желаемый цифровой/аналоговый канал.
B/CB, PR/CR ввода 4 или 7
Дополнительная информация
Некоторые каналы
являются пустыми
Не появляются цифровые
каналы
• Закодированный канал/Канал, доступный только по подписке.
Подпишитесь на сервис Pay Per View (Плата за просмотр).
• Канал используется только для передачи данных (нет
изображения или звука).
• Свяжитесь с телевещательной компанией для получения
подробной информации о трансляции.
• Свяжитесь с местным установщиком, чтобы выяснить,
предоставляется ли цифровое вещание в Вашей местности.
• Приобретите более мощную антенну.
Продолжение
49
RU
Page 98

Общие неисправности
Проблема Причина/Способ устранения
Телевизор автоматически
отключается (телевизор
переходит в режим
ожидания)
• Проверьте, не активирована ли функция “Таймер сна” и
проверьте установку “Продолжительность” в меню “Таймер
включения” (стр. 31).
• Если сигнал принимается, и в режиме телевизора не
выполняются никакие операции в течение 10 минут, телевизор
автоматически переключается в режим ожидания.
Телевизор автоматически
включается
Не удается выбрать
некоторые источники
входного сигнала
Не работает пульт
дистанционного управления
• Проверьте, не активирована ли функция “Таймер включения”
(стр. 31).
• Выберите опцию “Предустановка AV” в меню “Настройка AV” и
отмените функцию “Пропуск” для источника входного сигнала
(стр. 33).
• Проверьте правильность установки пульта ДУ для используемого
оборудования.
• Проверьте, соответствует ли оборудование, которое Вы хотите
использовать, нажимаемой функциональной кнопке (стр. 13).
• Если пульт ДУ не управляет устройством даже в случае
правильной установки пульта ДУ на устройство, введите нужный
код в соответствии с пояснениями раздела “Программирование
пульта ДУ” (стр. 44).
• Замените батарейки.
50
RU
Page 99

Указатель
Символы
( ) Индикатор отключения
изображения
(") Индикатор питания
(1) Индикатор режима
ожидания
( ) Индикатор таймера
(1) Переключатель питания
ЧИСЛЕННЫЕ ЗНАЧЕНИЯ
14:9 17
4:3
16
4:3 по умолч.
B
BBE 27
E
EPG (Digital Electronic
Programme Guide (Цифровое
электронное руководство по
программам))
F
Fastext 16
M
MENU 23
P
PAP 17
PIN-код
T
Tools 17, 22
А
Автозапуск 31
Автомат. формат
Автонастройка
аналоговые и цифровые
каналы
только аналоговые каналы
35
только для цифровых
каналов
Автоподстройка
Автопоиск цифр. станций
Авторег. громк.
Автоустановка часов
Антенна, подсоединение
36
АПЧ
Аудиофильтр
Б
Баланс 27
Батарейки, установка в пульт
ДУ
4
14
14
14
14
29
18
38
29
7
39
41
39
27
17, 22
5
36
14
В
Видеомагнитофон
Вход AV7
Выход AV2
Г
Гамма 26
Д
Двойной звук 28
Динамик
Доп. установки
Ж
Живые цвета 26
З
Заданные входы
Замок от детей
Запись по таймеру
Звуковой вывод
И
Информация 32
К
Каналы
Контраст
Корректор черного
М
Меню Звук 27
Меню Изображение
Меню Настройка AV
Меню Настройка аналоговых
каналов
Меню Настройка цифровых
каналов
Меню Начальная настройка
Меню Управление экраном
Меню Установки ПК
Метка
Метки программ
Метки устройств
19
Запись
подсоединение
5
33
33
32
26
звук
27
изображение
экран
24
29
38
19
32
автоматическая настройка
7
15
выбор
Пропуск
37
24, 40
26
24
33
35
38
31
29
40
36
35
33
Н
Напоминание 19
Настройка модуля СА
Настройки таймера
Наушники
Громк. наушн.
подсоединение
Связь наушн.-АС
О
Область отображ. 29
Окруж. звук
Оптимальн.
Остановка изображения
Оттенок
П
Палитра DRC 25
Подсветка
Подсветка логотипа
Подсоединение
Подтверд.
Предустановка AV
Пропуск
Пульт ДУ
Р
Размер по вертикали 30
Редакт. списка программ
Режим 1 цифры
Режим DRC
Режим дисплея
Режим звука
Режим Игра
Режим изобр.
Режим Фильм
Режим экрана
Резкость
Руч. настр. прогр.
Руч. поиск цифр. Станций
Ручная запись по таймеру
27
16
24
24, 40
антенны/
видеомагнитофона
дополнительного
оборудования
37
33, 37
датчик
14
12
обзор
программирование
установка батареек
25
27, 40
34
24
32
16
25
39
31
32
42
32
32
42
33
35
40
36
16
5
44
4
Дополнительная информация
39
39
20
Продолжение
51
RU
Page 100

С
Сброс
Сброс всех настроек
Световой сенсор
Сдвиг по вертик.
Сдвиг по горизонт.
Система цвета
Смещение громкости
Сортировка прогр.
Список Избранное
Список категорий
Список таймеров
Страна
Т
Таблица входных сигналов 22
Таблица программ
Таймер включения
Таймер сна
Текст
Тембр ВЧ
Тембр НЧ
Техн. конфигурация
Технические характеристики
Тип аудио
У
Увелич. 16
Улучш. контраста
Управление питанием
Устан. часов
Установка субтитров
Ф
Фаза 41
Фоpмaт экpaнa
Формат экрана
Ц
Цветность 24
Цветовая матрица
Цветовой тон
Цифровая настройка
Цифровые параметры
Ч
Чистый белый 26
Ш
Шаг 41
Широкоэкр.
Шумопонижение
Э
Энергосбережение 31
Я
Язык 6, 32
Язык аудио
Язык субтитров
Яркость
27
звук
изображение
регулировок ПК
24, 40
32
30, 41
30, 41
33
35
21
18
20
6
16
31
31
16
27
27
38
26
31
41
29
34
25, 40
16
25
38
38
24, 40
41
32
27
39
41
38
39
38
46
52
RU
 Loading...