

Sony KDL-42XBR950 User Manual
IN OUT
KDL32XBR950
BLACK
WHITE
DISPLAY SIGNAL IN
SONY EXCLUSIVE CABLE ONLY
Checking the Supplied
Connecting the
Connecting a Cable or
KDL42XBR950
Thank you for purchasing this
Sony product.
After following this step by step
guide you will be able to:
– Insert batteries into the
remote control.
– Connect the display unit to
the media receiver unit.
– Connect a cable or antenna to
your TV .
–Tune your TV .
–Program your remote control
Now you are ready for viewing
TV programs.
Accessories
1
Remote Control
(RM-Y1000):
Antenna Cable: Two AC power
• Speaker jack covers
(KDL42XBR950 only)
• Operating Instructions
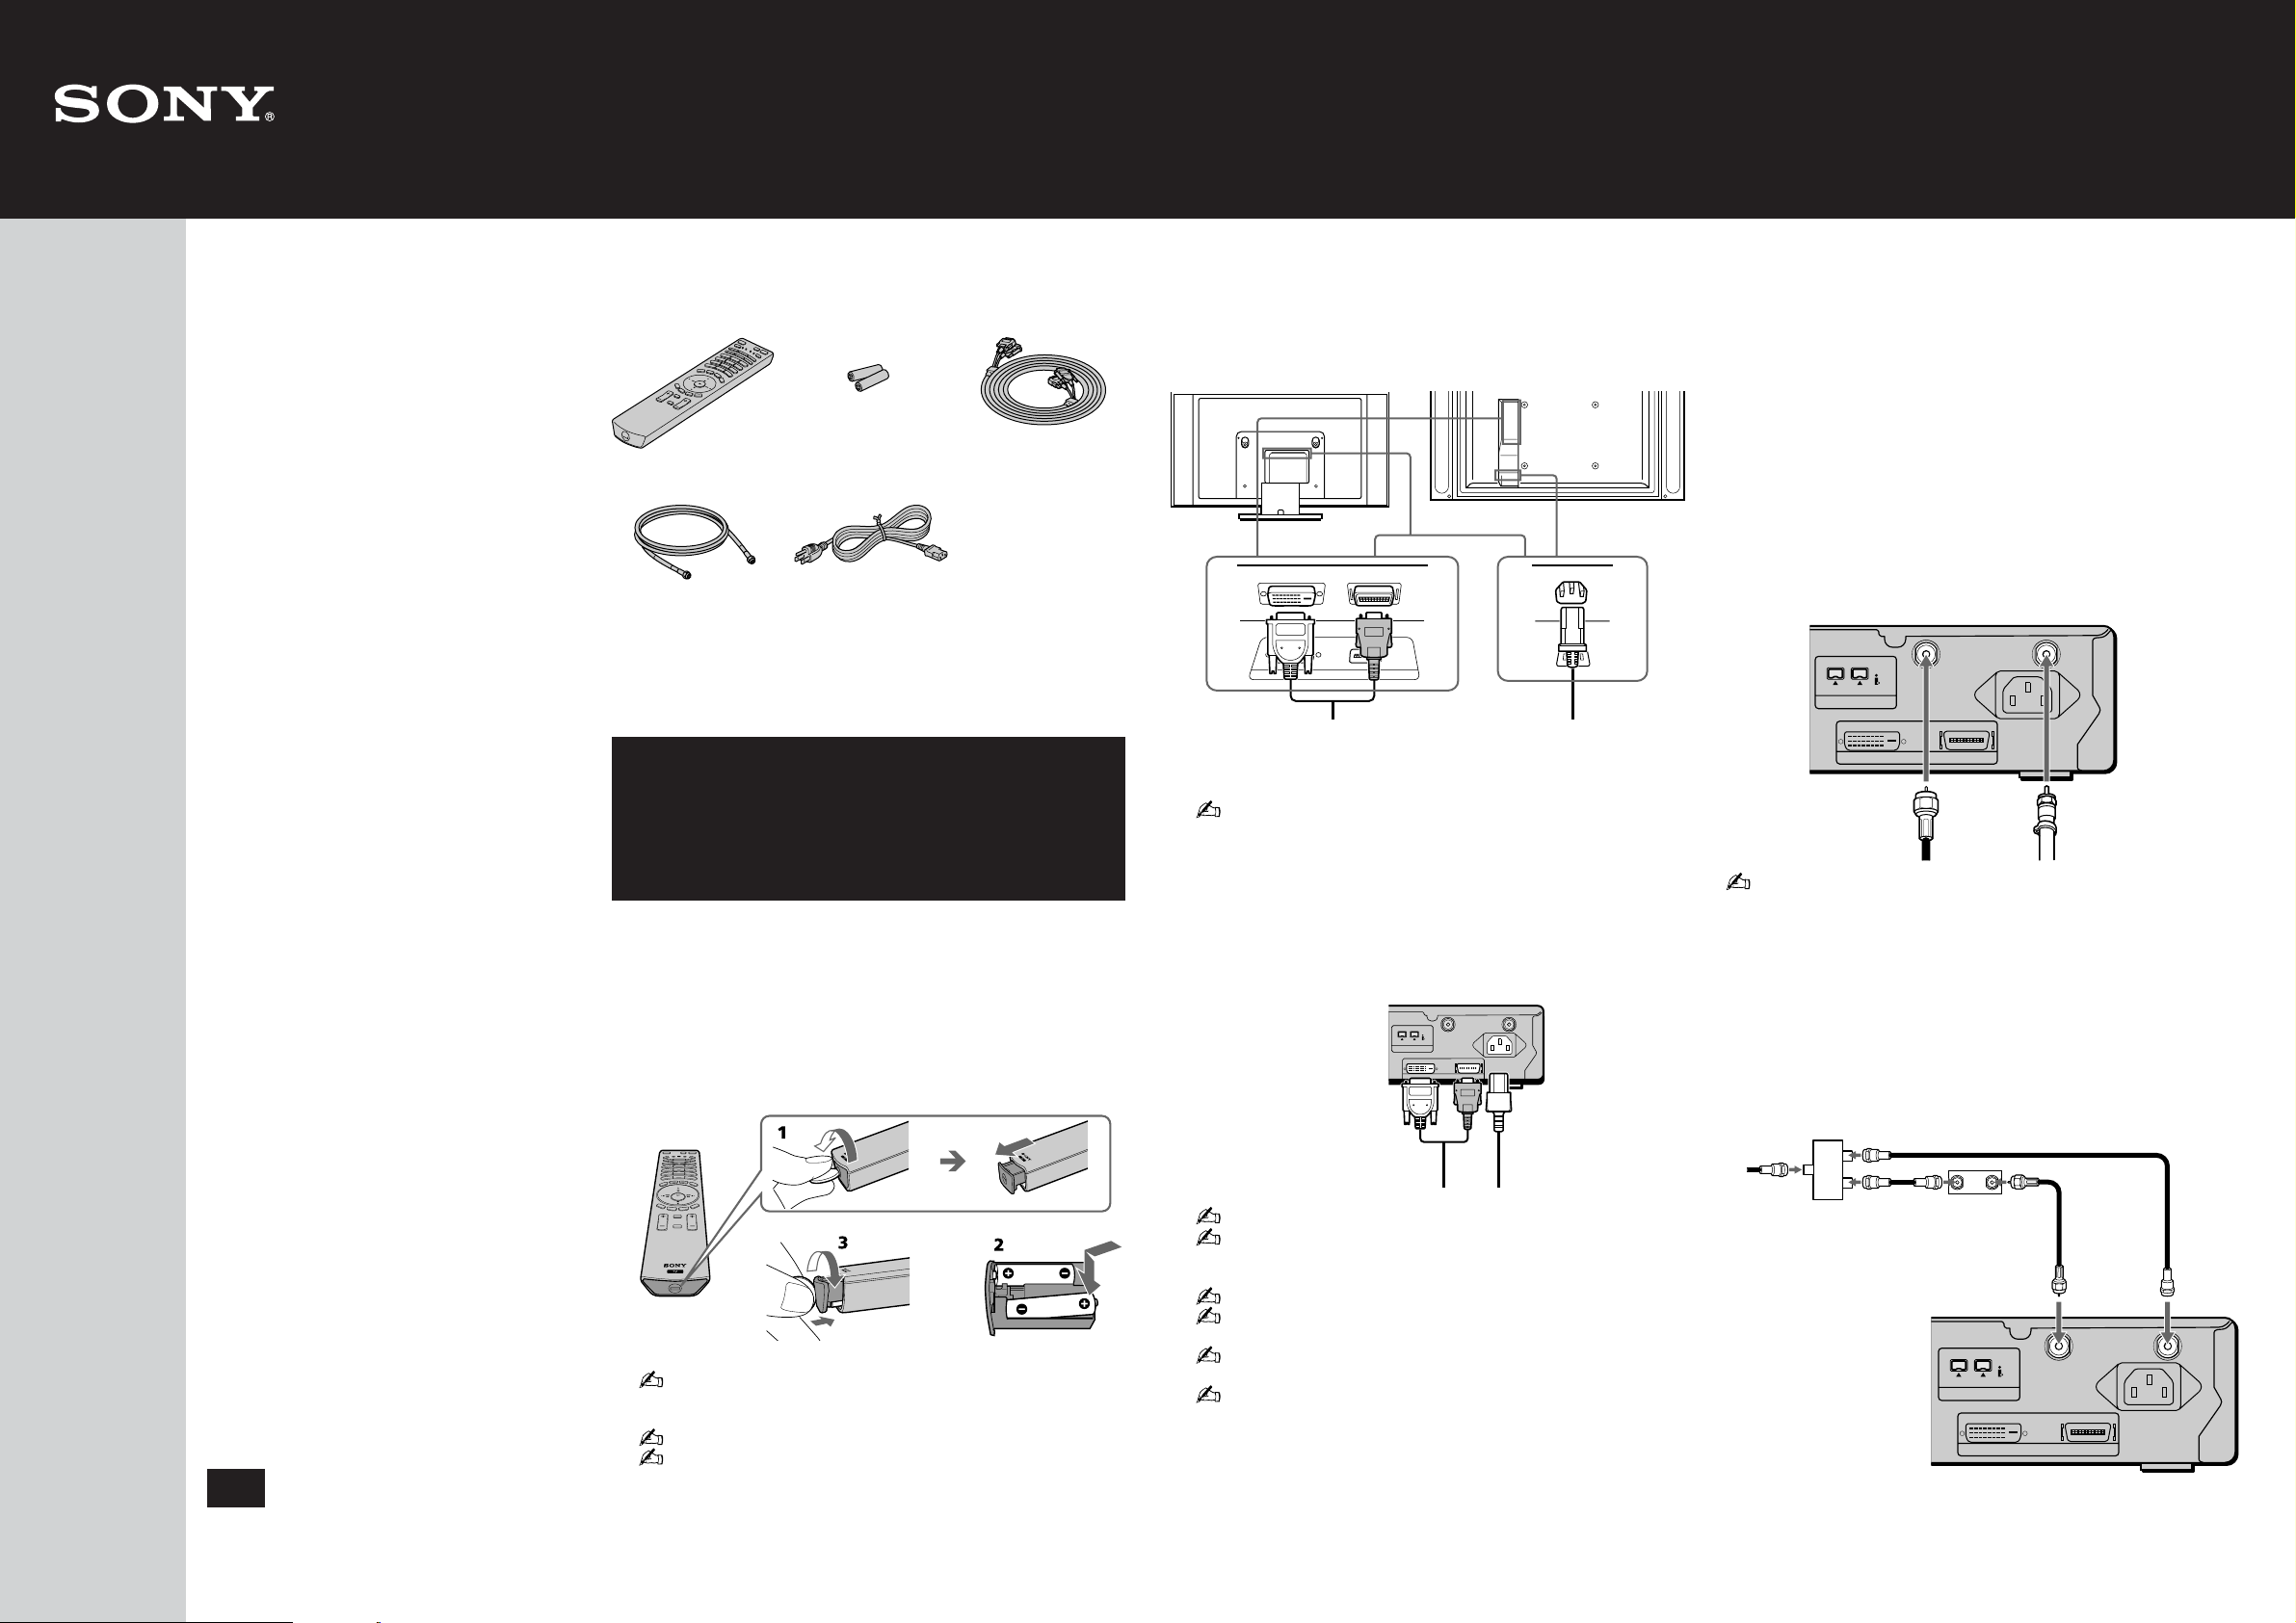
Inserting Batteries into
the Remote Control
Two size AA
batteries (R06 Type):
cords:
• Quick Start Guide
•Warranty Card
Display Interface
Cable:
2
1 Open the battery compartment as illustrated below.
2 Insert two size AA batteries (supplied) by matching the e and E
terminals on the batteries to the diagram inside the battery
compartment.
3 Close the battery compartment.
Display Unit to the
Media Receiver Unit
3
1 Connect the display interface cable (supplied) to the DISPLAY
SIGNAL IN jacks, and the AC power cord (supplied) to the AC IN jack
of the unit.
KDL32XBR950
Tighten the screw
slowly until the
screw is stabilized.
When you install KDL42XBR950, use the optional accessories as
follows:
• SONY T ABLE T OP STAND: SU-P42T2
• SONY WALL-MOUNT BRACKET: SU-PW2
• SONY FLOATING STAND: SU-PF1
2 Connect the other end of display interface cable to the media receiver
unit’s DISPLAY SIGNAL OUT jacks, and connect the media receiver
unit’s AC power cord (supplied) to the AC IN jack .
Display Interface cable
(supplied)
Display Interface
cable (supplied)
KDL42XBR950
VHF/UHF
S400
(TS/DV/MICROMV)
i.LINK
WHITE BLACK
DISPLAY SIGNAL OUT
CABLE
~
AC IN
AC power cord
(supplied)
AC power cord
(supplied)
Antenna
4
The way in which you will connect your TV varies, depending on how
your home receives a signal (cable, cable box, antenna) and whether or
not you plan to connect a VCR or other optional AV equipment.
See examples A, B or C to connect your TV. For details on other
connection examples, see pages 31 to 54 of the operating instructions.
A
Cable or Antenna
For best results, use this connection if you are connecting a
cable or an antenna and you;
• Do not need a cable box to unscramble channels.
• Do not intend to connect a VCR.
For antenna connection, use the supplied antenna cable.
Rear of Media Receiver Unit
CABLE
VHF/UHF
(TS/DV/MICROMV)
Antenna cable
(supplied)
When using an indoor antenna, such as rabbit-ear or dipole-antenna,
keep the antenna away from the display unit. If not, noise may appear
on the screen.
B
Cable Box and Cable
For best results, use this connection if;
•Your cable company scrambles some channels, such as premium
channels (which requires you to use a cable box), but does not
scramble all channels.
•You do not have a VCR.
S400
i.LINK
WHITE BLACK
DISPLAY SIGNAL OUT
or
~ AC IN
75-ohm coaxial cable
(not supplied)
Quick Start Guide
Remove the batteries to avoid damage from possible battery leakage
whenever you anticipate that the remote control will not be used for
an extended period.
Handle the remote control with care.
Avoid dropping it, getting it wet, placing it in direct sunlight, near a
heater, or where the humidity is high.
US
© 2003 Sony Corporation
Printed in Japan
4-102-399-01(1)
Tighten the screw slowly
until the screw is stabilized.
Be sure to use the supplied AC power cords.
When connecting optional components, do not connect the AC
power cords to wall outlets until you have completed making all
connections.
Do not tighten the screws too much. It may damage the screws.
Do not use damaged cables, such as cables whose connectors are
deformed.
Handle the display interface cable with care. This unit may fall and
cause injury if accidently knocked or pulled by the connected cable.
To store the AC power cord and the display interface cable in the
stand;
(KDL32XBR950)
See “Storing the AC power cord and the display interface cable
into the stand (KDL32XBR950 only)” on page 28 of the
operating instructions.
(KDL42XBR950)
See the operating instructions for the optional tabletop stand.
CATV
cable
75-ohm
Splitter
coaxial cable
(not supplied)
Rear of Media Receiver Unit
Cable Box
Antenna cable
(supplied)
(TS/DV/MICROMV)
S400
i.LINK
WHITE BLACK
DISPLAY SIGNAL OUT
75-ohm
coaxial cable
(not supplied)
VHF/UHF
CABLE
~
AC IN
Connecting a Cable or
Tuning Y our TV
Programming Y our
Antenna
4
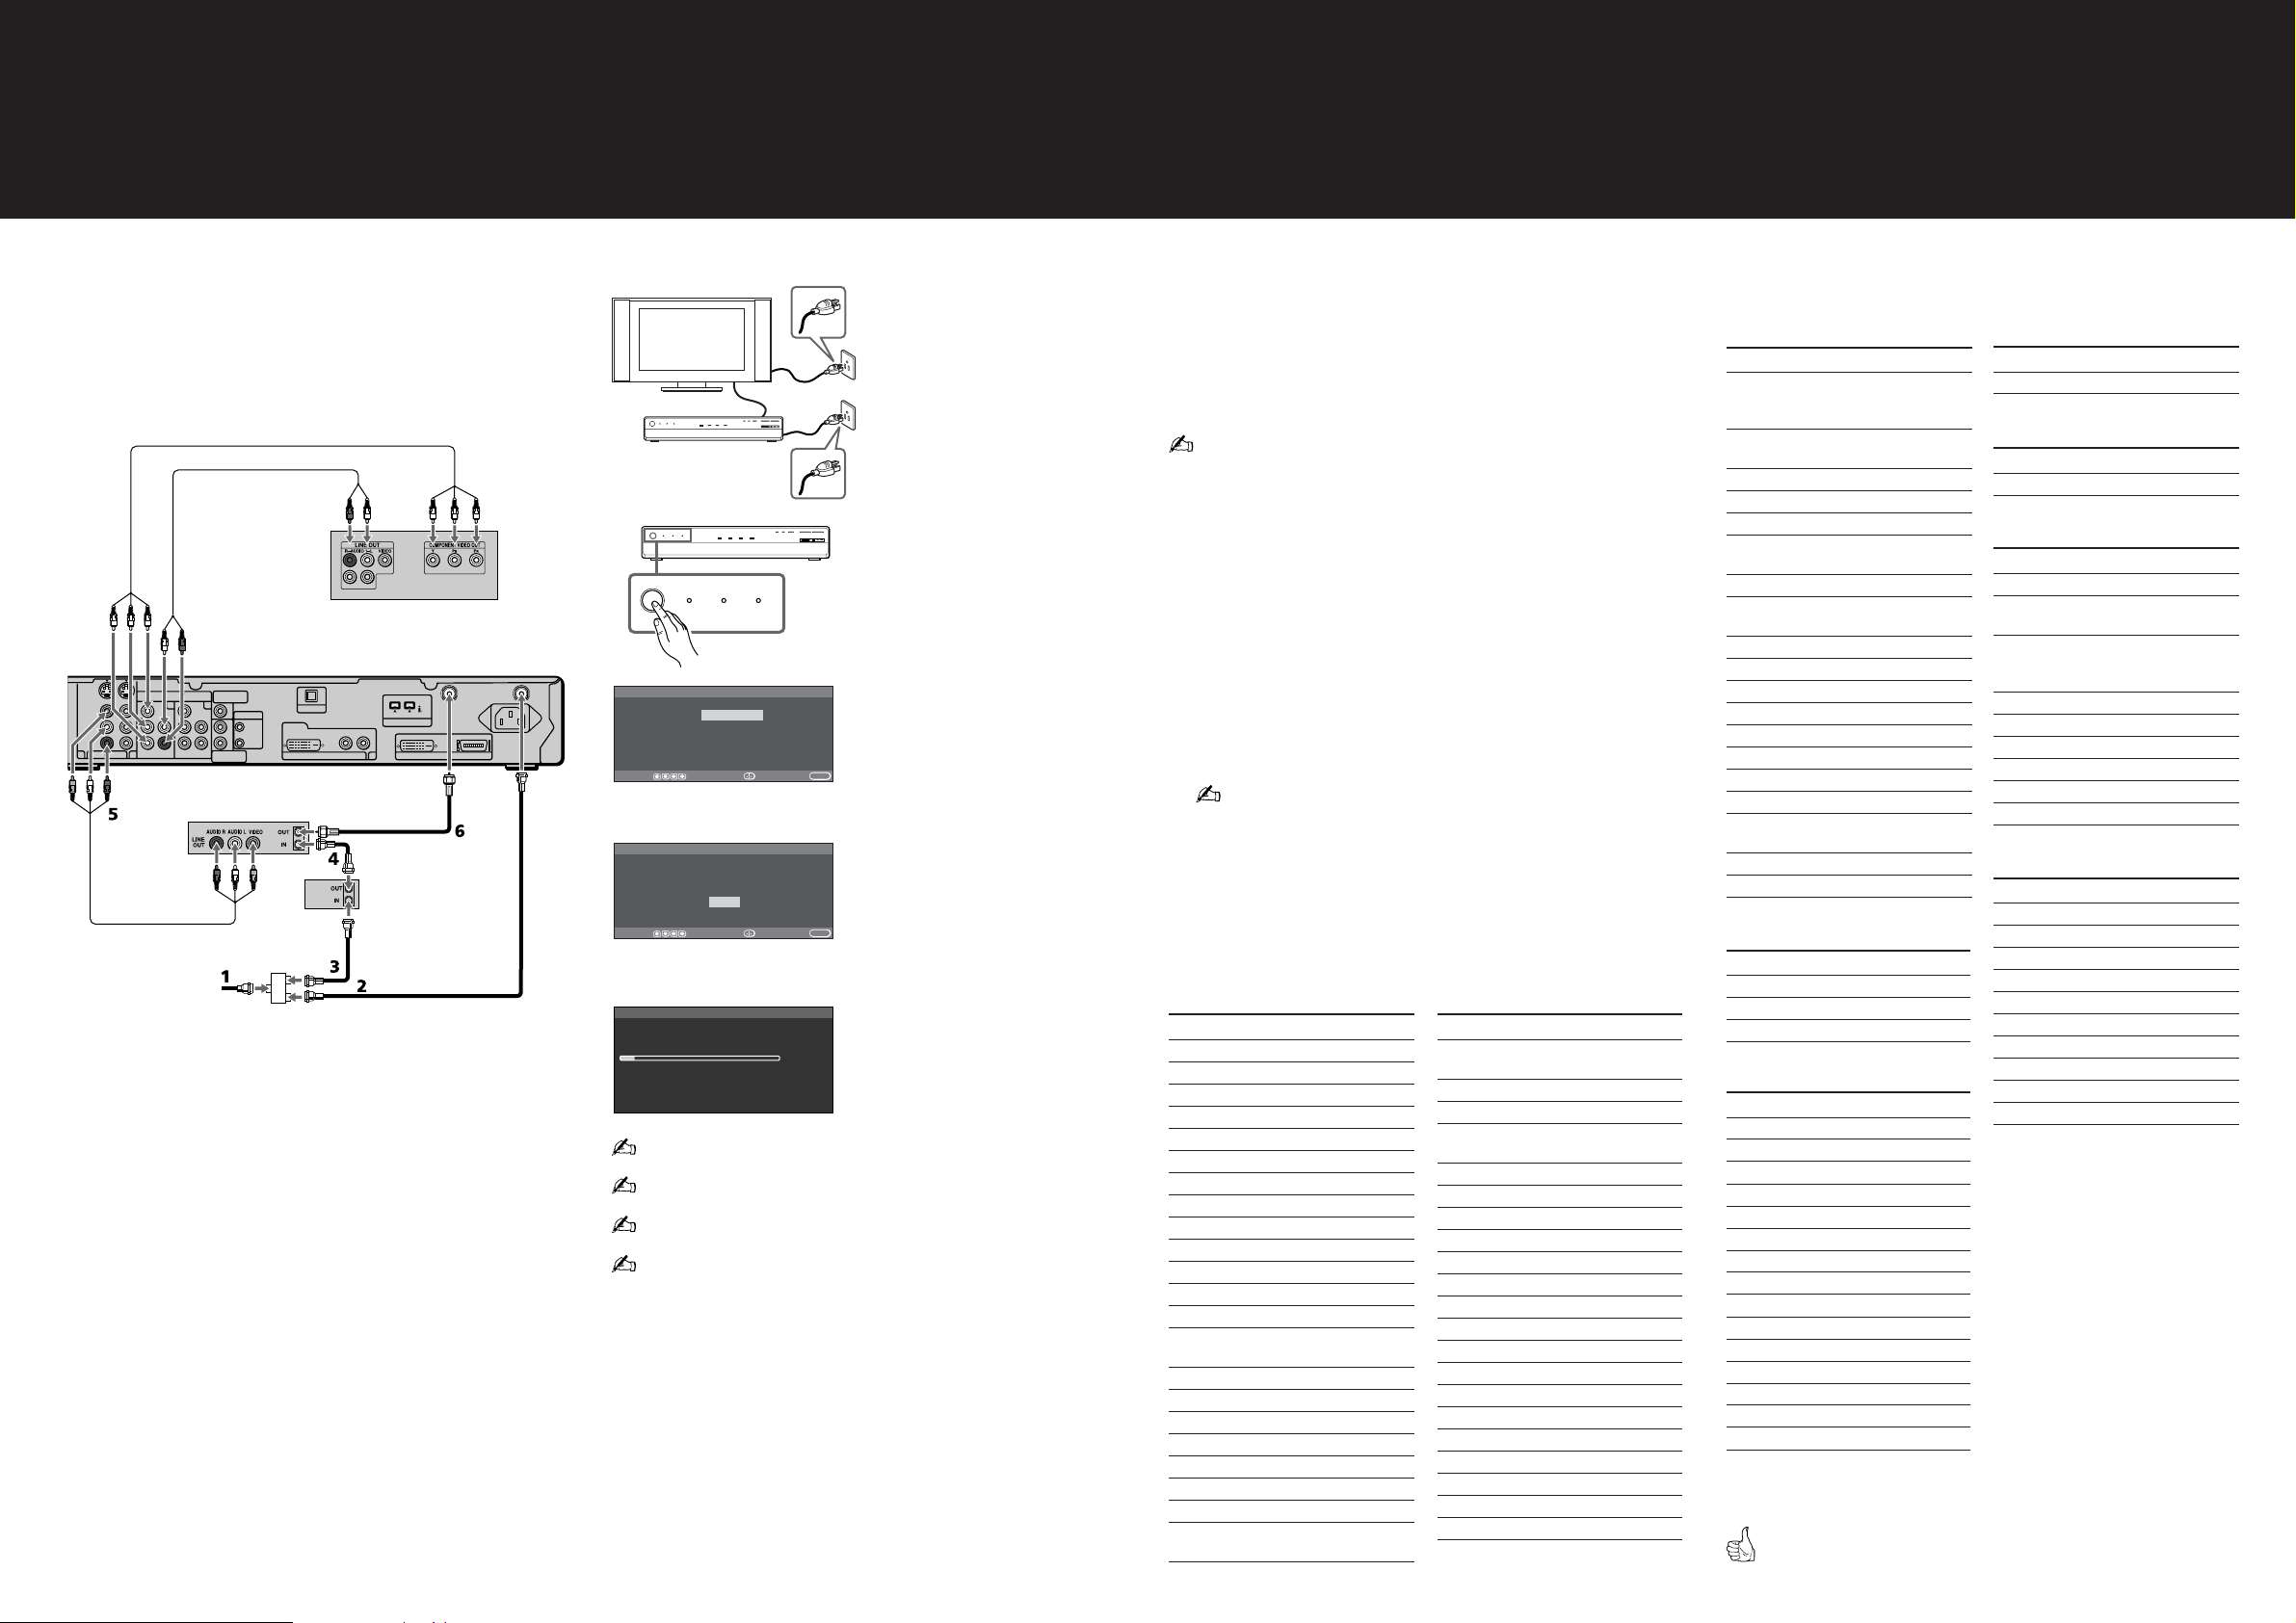
C
Cable Box, VCR and DVD Player
For best results, use this connection if;
•Your cable company scrambles some channels, such as premium
channels (which requires you to use a cable box), but does not
scramble all channels.
Component video cable
78
Audio cable
DVD Player
Rear of Media Receiver Unit
S VIDEO
VIDEO
AUDIO
1
L
R
VIDEO IN 3
(1080i/720p/480p/480i)
Y
P
B
P
R
A/V cable
HD/DVD IN
Y
4
AUDIO
P
L
B
R
P
R
VCR
CATV cable
SUB WOOFER
(VAR)
OUT
5
AUDIO
L
L
R
R
AUDIO OUT
(VAR/FIX)
Splitter
(not supplied)
CONTROL S
IN
OUT
OPTICAL OUT
DVI–HDTV
DVI–HDTV IN
S400
(TS/DV/MICROMV)
6
i.LINK
WHITE BLACK
DISPLAY SIGNAL OUT
R - AUDIO - L
Antenna cable
(supplied)
75-ohm coaxial cable
(not supplied)
Cable box
75-ohm coaxial cable
(not supplied)
VHF/UHF
CABLE
CATV
cable
~
AC IN
Automatically
5
1 Connect the display unit and
media receiver unit to wall
outlets.
PIC OFF i.LINK INPUT SELECT
POWER
POWER/STANDBY
TIMER
i.LINK/STANDBY
TV VIDEO i.LINK
POWER
POWER/STANDBY
TIMER
i.LINK/STANDBY
POWER
POWER/STANDBY
Initial Setup
Language: English
Move: Select: End:
Initial Setup
First please connect
cable/antenna
Start auto program now?
Move: Select: End:
Auto Program
Analog CH Found : 6
Digital
Searching..
Please wait. Allow 33 minutes
for completion
Press any button to cancel
Español
Français
CH Found : 0
To run the Auto Program feature at a later time, see page 110 of the
operating instructions.
To add individual digital channels, use the Digital Channel feature on
page 78 of the operating instructions.
The Auto Program feature does not apply for installations that use a
cable box for all channel selection.
Auto Program may take up to 30 minutes to complete. A progress bar is
displayed while the channel list is being created.
MEMORY STICK
TV VIDEO i.LINK
TIMER
m
Yes
No
m
MEMORY STICK
i.LINK/STANDBY
VOL–+–+CHANNEL
PIC OFF i.LINK INPUT SELECT
VOL
–+–+
CHANNEL
2 Press POWER to turn on the TV.
The Initial Setup screen appears.
3 Press v or V of the remote control
to select the on-screen display
language. Then press ENTER of
the remote control.
MENU
The message “Start auto program
now?” appears.
4 Press v or V of the remote
control to select “Yes”, then press
ENTER of the remote control.
MENU
Auto Program automatically creates
a list of receivable channels. When
finished, the lowest numbered
channel is displayed.
Remote Control
6
The remote control is preset to operate Sony brand video equipment.
Beta/ED Beta VCRs: 303, 8mm VCR: 302, VHS VCR: 301, DVD
player: 751, i.LINK: 901.
If you have video equipment other than Sony brand that you want to
control with the TV’s remote control, use the following procedure to
program the remote control.
The equipment must have infrared (IR) remote capability in order to be
used with the remote control.
1 Refer to the following list of “Manufacturer’s Codes” below and right,
and find the three-digit code number for the manufacturer of your
equipment. (If more than one code number is listed, use the number
listed first.)
2 Press FUNCTION repeatedly until the DVD/VCR, SAT/CABLE or
i.LINK indicator lights up.
3 Press SAT/CABLE for five seconds until the indicator of the selected
input flashes.
4 While the desired indicator is flashing, enter the three-digit
manufacturer’s code number.
5 Press ENTER.
You must do step 5 within 10 seconds of step 4, or you must redo
steps 4 through 5.
6 To check if the code number works, aim the remote control at the
equipment and press POWER that corresponds with that equipment. If
it responds, you are done. If not, try using another code listed for that
manufacturer.
Manufacturer’s Codes
VCRs
Manufacture Code
Sony
Admiral (M.Ward)
Aiwa
Audio Dynamic
Broksonic
Canon
Citizen
Craig
Criterion
Curtis Mathes
Daewoo
DBX
Dimensia
Emerson
Fisher
Funai
General Electric
Go Video
Goldstar
Hitachi
Instant Replay
JC Penney
301, 302, 303
327
338, 344
314, 337
319, 317
309, 308
332
302, 332
315
304, 338, 309
341, 312, 309
314, 336, 337
304
319, 320, 316, 317,
318, 341
330, 335
338
329, 304, 309
322, 339, 340
332
306, 304, 305, 338
309,308
309, 305, 304,
330, 314, 336, 337
Manufacture Code
JVC
Kenwood
LG
LXI (Sears)
Magnavox
Marantz
Marta
Memorex
Minolta
Mitsubishi/MGA
Multitech
NEC
Olympic
Optimus
Orion
Panasonic
Pentax
Philco
Philips
Pioneer
Quasar
314, 336, 337,
345, 346, 347
314, 336, 332, 337
332
332, 305, 330, 335,
338
308, 309, 310
314, 336, 337
332
309, 335
305, 304
323, 324, 325, 326
325, 338, 321
314, 336, 337
309, 308
327
317
308, 309, 306, 307
305, 304
308, 309
308, 309, 310
308
308, 309, 306
Manufacturer’s Codes
VCRs
Manufacture Code
RCA/PROSCAN
Realistic
Sansui
Samsung
Sanyo
Scott
Sharp
Signagure 2000
(M.Ward)
SV2000
Sylvania
Symphonic
Tashiro
Tatung
Teac
Technics
Toshiba
Wards
Yamaha
Zenith
304, 305, 308, 309,
311, 312, 313, 310,
329
309, 330, 328, 335,
324, 338
314
322, 313, 321
330, 335
312, 313, 321, 335,
323, 324, 325, 326
327, 328
338, 327
338
308, 309, 338, 310
338
332
314, 336, 337
314, 336, 338, 337
309, 308
312, 311
327, 328, 335, 331,
332
314, 330, 336, 337
331
Laserdisc Players
Manufacture Code
Sony
Panasonic
Pioneer
701
704, 710
702
DVD Players
Manufacture Code
Sony
Sony (i.LINK)
General Electric
Hitachi
JVC
Magnavox
Mitsubishi
Oritron
Panasonic
Philips
Pioneer
RCA/Proscan
Samsung
Toshiba
Zenith
751
901
755
758
756
757
761
759
753
757
752
755
758
754
760
AV Receiver*
Manufacture Code
Sony
5.1 DVD AV System (DAV)*
Manufacture Code
Sony
Cable Boxes
Manufacture Code
Sony
Hamlin/Regal
Jerrold/G.I.
Oak
Panasonic
Pioneer
Scientific Atlanta
Tocom
Zenith
Satellite Receivers
Manufacture Code
Sony
Dish Network
Echostar
General Electric
Hitachi
Hughes
Mitsubishi
Panasonic
RCA/PROSCAN
Toshiba
* This manufacturer code might not
Your TV is now ready for use.
651
601
230
222, 223, 224, 225,
226
201, 202, 203, 204,
205, 206, 207, 208,
218
227, 228, 229
219, 220, 221
214, 215
209, 210, 211
216, 217
212, 213
801
810
810
802
805
804
809
803
802, 808
806, 807
work for some models. Please see
page 62 of the operating
instructions for the models
functioning with these codes.
 Loading...