

Sony KDL-32W650A, KDL-42W650A, KDL-24W600A, KDL-55W900A, KDL-40W900A Operating Instructions Manual
...
LCD TV
Operating Instructions GB
操作手冊
CT
KDL-42W670A / 42W650A / 32W670A / 32W650A / 32W600A

Introduction
Thank you for choosing this Sony product. Before operating
the TV, please read this manual thoroughly and retain it for
future reference.
~
• Instructions about “Installing Wall-Mount Bracket” are
included within this TV’s instructions manual.
• The illustrations used in this manual may differ depending on
your TV model.
• The illustrations of the remote control used in this manual are
of the RM-GD027 unless otherwise stated.
• Before operating the TV, please read page 29 (Safety
Information). Retain this manual for future reference.
Trademark information
The terms HDMI and HDMI High-Definition Multimedia
Interface, and the HDMI Logo are trademarks or registered
trademarks of HDMI Licensing LLC in the United States and
other countries.
DLNA®, the DLNA Logo and DLNA CERTIFIED® are
trademarks, service marks, or certification marks of the Digital
Living Network Alliance.
Manufactured under license from Dolby Laboratories.
“BRAVIA” and are trademarks of Sony Corporation.
TrackID is a trademark or registered trademark of Sony Mobile
Communications AB.
Music and video recognition technology and related data are
provided by Gracenote®. Gracenote is the industry standard
in music recognition technology and related content delivery.
For more information, please visit www.gracenote.com.
CD, DVD, Blu-ray Disc, and music and video-related data from
Gracenote, Inc., copyright © 2000-present Gracenote.
Gracenote Software, copyright © 2000-present Gracenote.
One or more patents owned by Gracenote apply to this
product and service. See the Gracenote website for a nonexhaustive list of applicable Gracenote patents.
Gracenote, MusicID, VideoID, Video Explore, the Gracenote
logo and logotype, and the “Powered by Gracenote” logo are
either registered trademarks or trademarks of Gracenote in
the United States and/or other countries.
Opera® Devices SDK from Opera Software ASA. Copyright
1995-2013 Opera Software ASA. All rights reserved.
Wi-Fi, Wi-Fi Direct and Miracast are marks or registered marks
of the Wi-Fi Alliance.
“Blu-ray Disc”, “Blu-ray” and “Blu-ray Disc” logo are
trademarks of Blu-ray Disc Association.
“Sony Entertainment Network logo” and “Sony Entertainment
Network” are trademarks of Sony Corporation.
MHL, Mobile High-Definition Link and the MHL Logo are
trademarks or registered trademarks of MHL Licensing, LLC.
Manufactured under license from DTS Licensing Limited. For
U.S. and worldwide patent and trademark information, see
www.dts.com/patents/legacy.aspx.
(c) DTS Licensing Limited and DTS, Inc. 2012.
®2013 RealNetworks, Inc. Patents Pending. All rights
reserved. RealNetworks logo are trademarks or registered
trademarks of RealNetworks, Inc.
This television is designed for use
in Hong Kong and ensured the
usage in Hong Kong only.
Location of the identification label
Labels for TV Model No. and Power Supply rating (in
accordance with applicable safety regulation) are located on
the rear of the TV. Labels for AC adapter Model No. and Serial
No. are located at the bottom of AC adapter.
GB
2

GB
GB
3
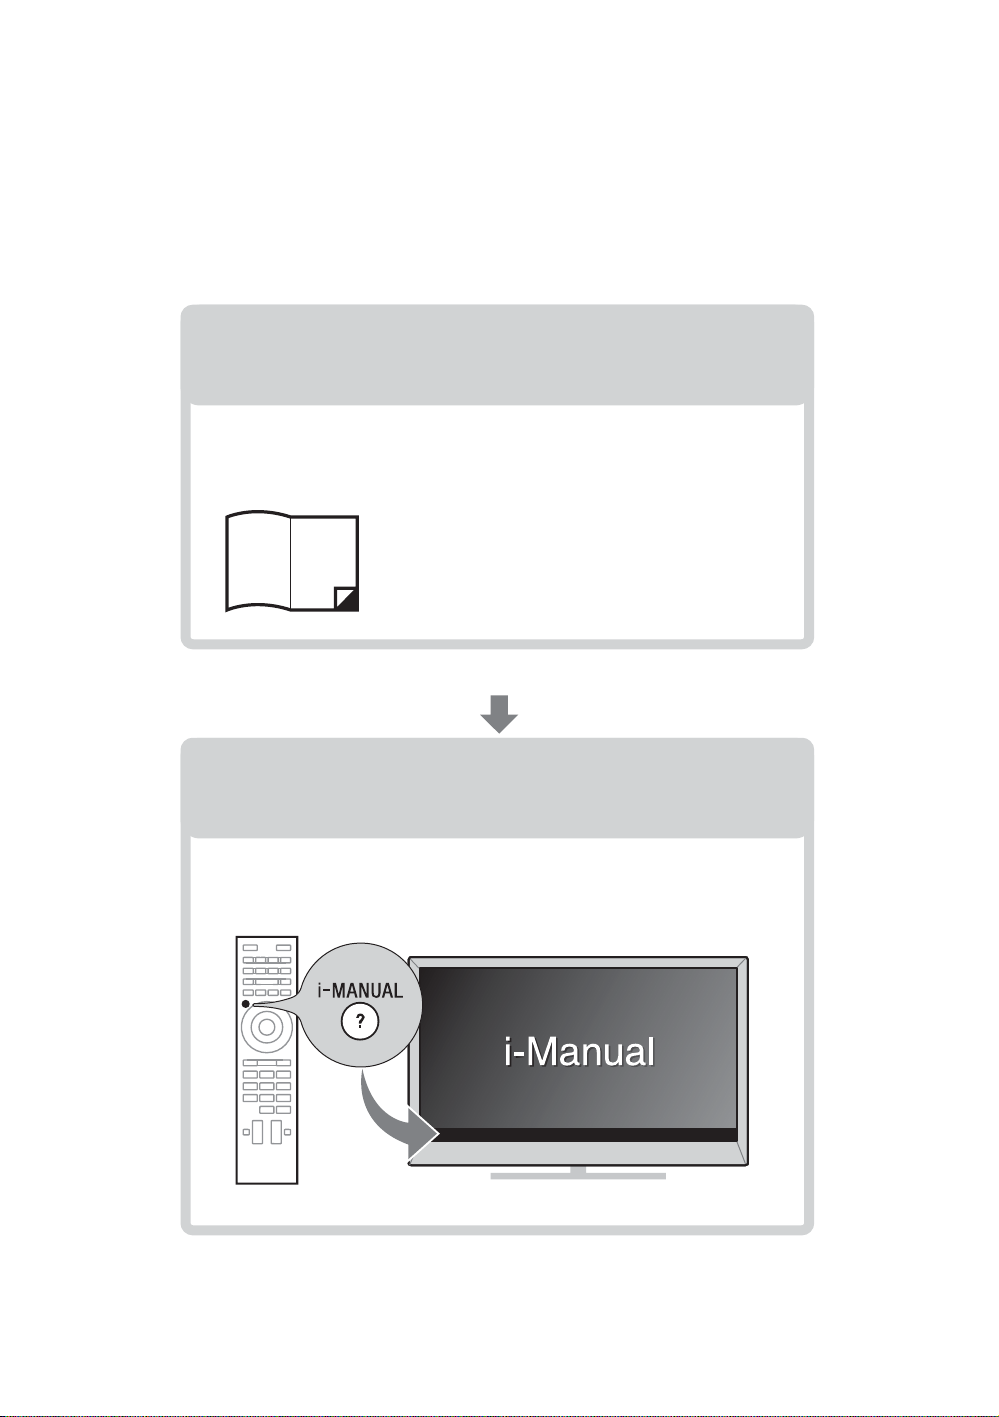
About this manual
This manual explains how to set up your TV. For more
information on how to use BRAVIA TV, refer to the “Electronic
manual”.
Operating Instructions
Electronic manual
(i-Manual)
Explains how to set up your TV such as connections,
initial set-up, and basic operations.
For more information, press the i-MANUAL button
Explains how to use all the features. See page 19 on
how to use the i-Manual.
Images and illustrations used in this manual may differ from
the actual screen.
(Operating Instructions)
GB
4

Table of Contents
Getting Started
Checking the accessories.........................................................................6
Inserting batteries into the remote control................................................. 6
1: Attaching the Table-Top Stand .............................................................7
2: Connections ..........................................................................................8
3: Preventing the TV from toppling over..................................................10
4: Bundling the cables ............................................................................11
5: Connecting the TV to the Internet........................................................11
6: Performing the initial set-up.................................................................12
Using Your BRAVIA TV
Watching TV
Selecting various functions and settings (Home Menu).......................... 16
Watching Internet Video..........................................................................18
B
............................. qf
Looking for Instructions
Looking for instructions in the
electronic manual
(i-Manual)
B
.................................. ql
GB
Additional Information
Troubleshooting....................................................................................... 21
Specifications ..........................................................................................22
Installing the Accessories (Wall-Mount Bracket)..................................... 24
Safety Information....................................................................................29
Precautions..............................................................................................31
GB
5

Getting Started
Checking the
accessories
Remote control (1)
Size AAA batteries (R03 type) (2)
AC power cord (mains lead) (1)
AC adapter (1)
Cable holder (1)
Table-Top Stand (1)*
Fixing screws for Table-Top Stand
(M5 × 16) (2)
Assembling screws for Table-Top Stand
(M5 x 16) (2)
Operating Instructions (this manual), other
documents and Wall-Mount Bracket
accessories
* Refer to the supplied Table-Top Stand leaflet to
assemble the Table-Top Stand.
Inserting batteries
into the remote
control
1 Remove the protection sheet.
2 Push and slide the cover to open.
GB
6
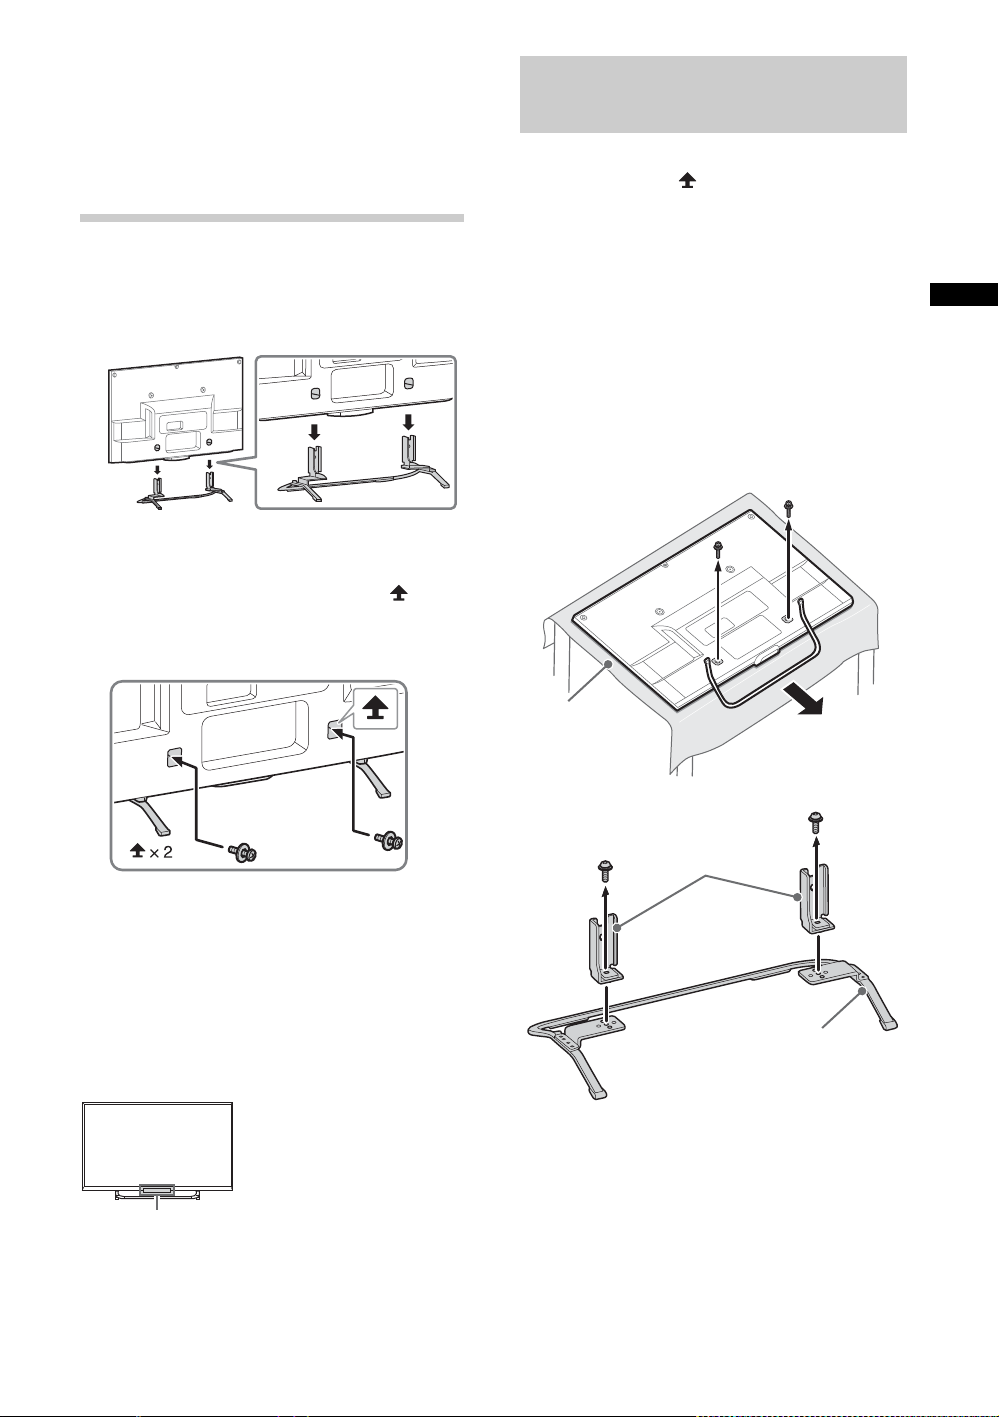
1: Attaching the
IR Sensor
Soft cloth
Stand Necks
Stand
Table-Top
Detaching the Table-Top
Stand from the TV
Stand
Refer to the supplied Table-Top Stand leaflet for
proper attachment.
1 Place the TV set on the Table-Top Stand.
2 Fix the TV to the Table-Top Stand using the
supplied screws. The arrow marks
indicate the location of the screw holes used
for securing the Table-Top Stand.
To detach the Table-Top Stand from the TV,
remove the screws fixed in step 2.
~
• Do not remove the Table-Top Stand for any
reason other than to install corresponding
accessories on the TV.
• When removing the Table-Top Stand from the
TV, lay the display face down on a stable work
surface that is larger than the TV.
• To prevent damaging the surface of the LCD
display, make sure to place a soft cloth on the
work surface.
• Once the Stand Necks are detached from the
Stand, be sure to keep the Stand Necks and
screws in a safe place.
GB
~
• If using an electric screwdriver, set the
torque at approximately 1.5 N·m
{15 kgf·cm}.
~
• Ensure that there are no objects in front of the
TV.
GB
7
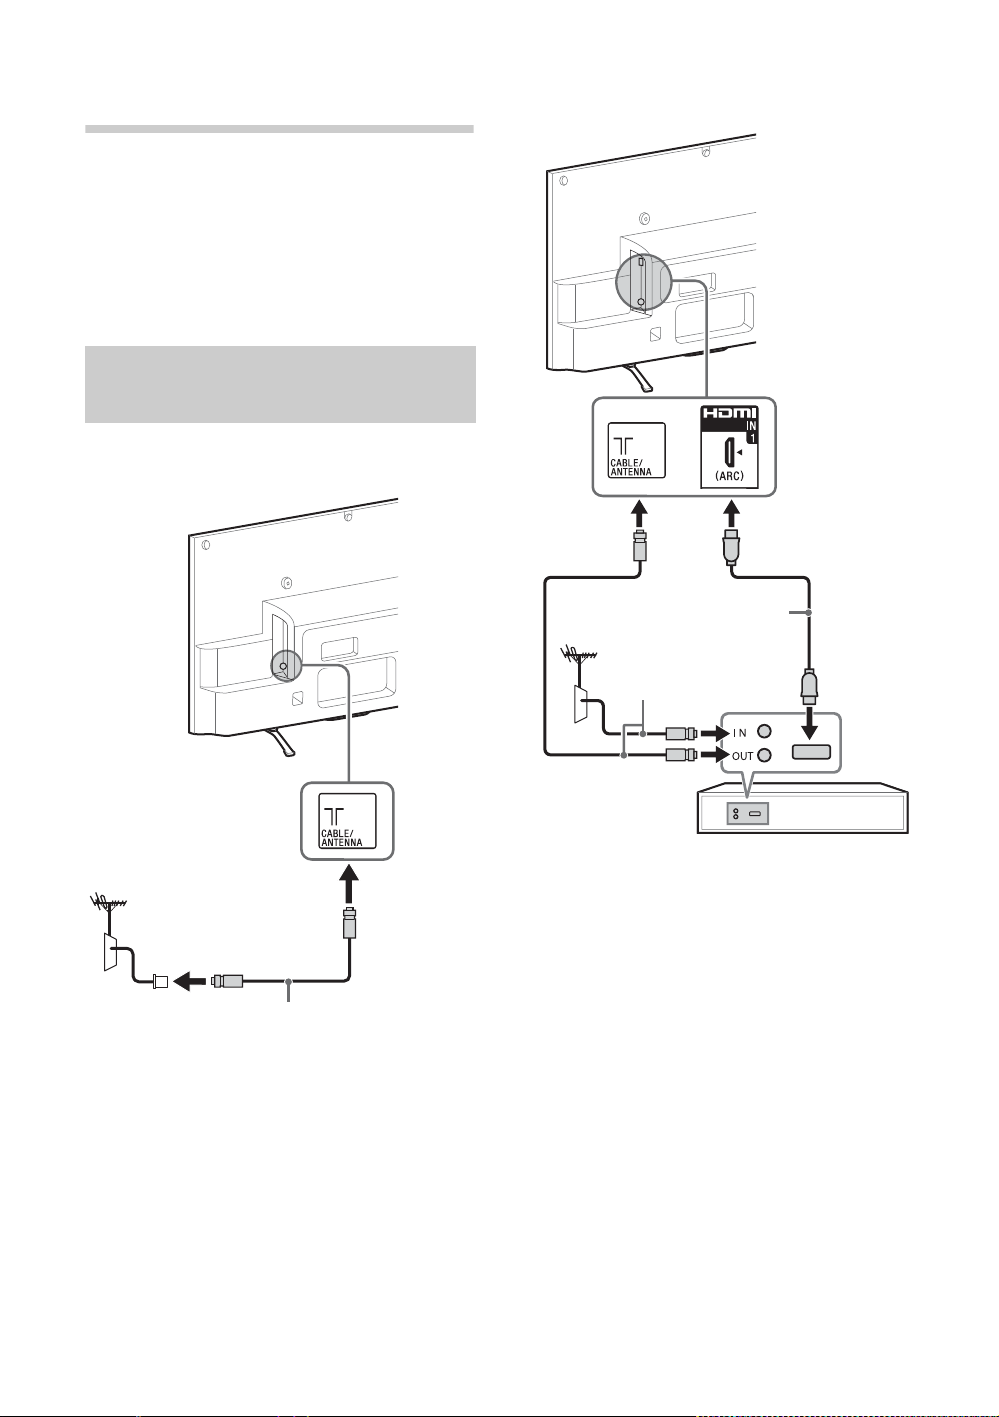
2: Connections
Antenna (aerial) cable
(not supplied)
Set Top Box/recorder (e.g. DVD recorder)
Antenna (aerial) cable
(not supplied)
HDMI cable
(not supplied)
~
• Use an antenna (aerial) cable connector no
greater than 14 mm in thickness.
• Use an HDMI cable connector within 12 mm
(thickness) × 21 mm (width).
• For more information on connections, refer to the
i-Manual.
Connecting an antenna
(aerial)/cable/VCR
x To connect an antenna (aerial)/cable
x To connect a Set Top Box/recorder
(e.g. DVD recorder) with HDMI
GB
8
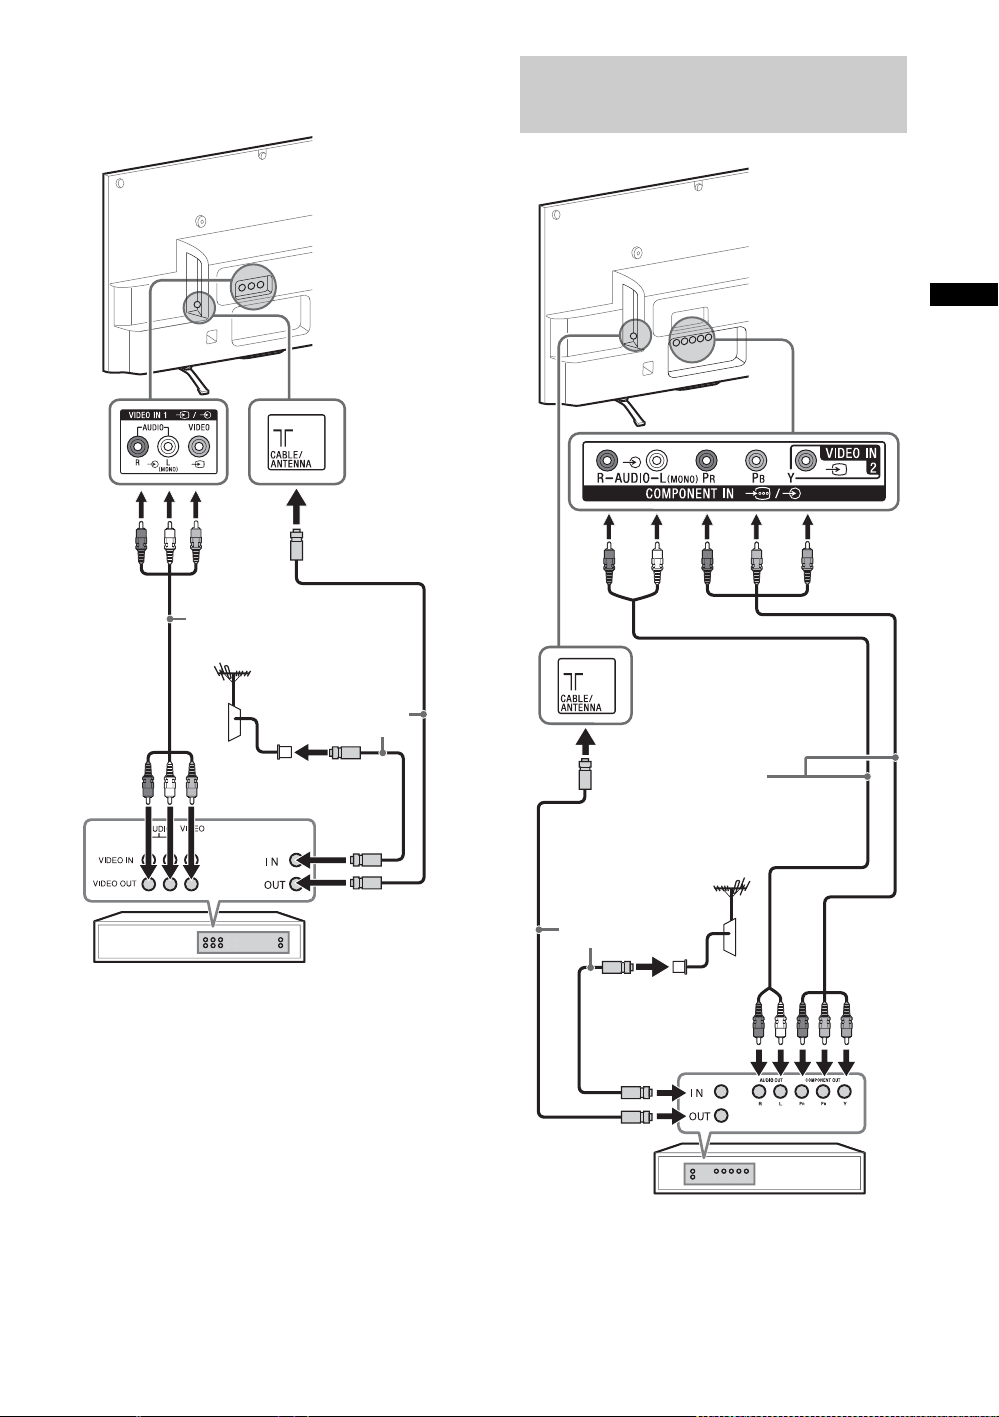
x Connecting an antenna (aerial)/cable
Antenna (aerial)
cable
(not supplied)
AV cable
(not supplied)
VCR
DVD recorder
Antenna (aerial)
cable
(not supplied)
AV cable
(not supplied)
and VCR
Connecting audio/video
devices
GB
(Continued)
GB
9
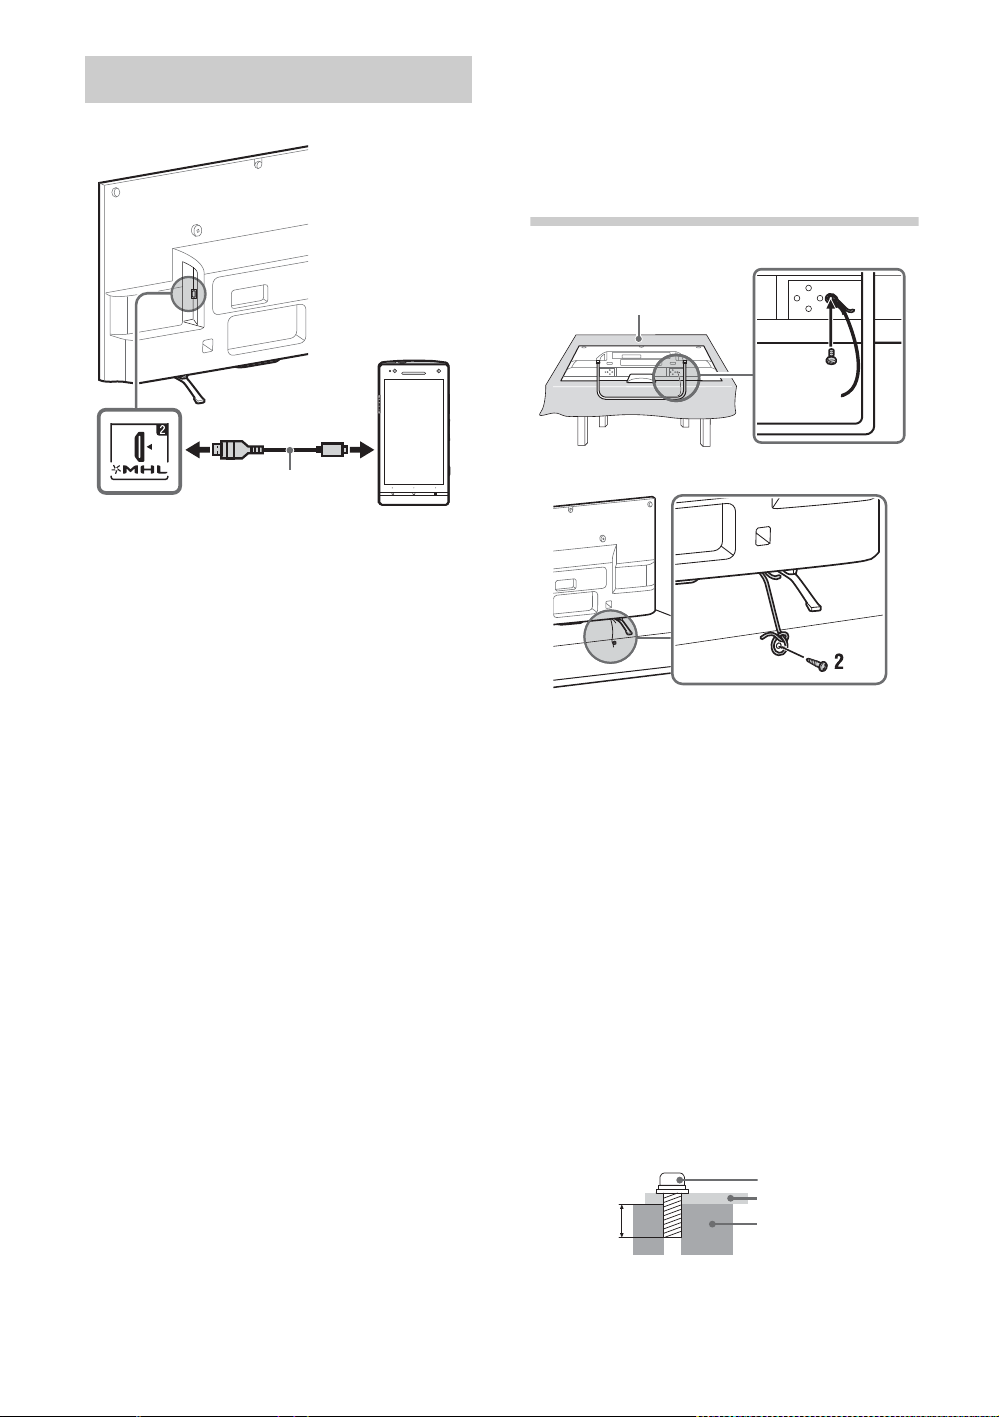
Connecting MHL device
Use authorized
MHL2 cable with
MHL logo
(not supplied)
MHL device
1
Soft cloth
6-8 mm
Screw M4
Cord
TV’s Table-Top
Stand
The MHL (Mobile High-Definition Link) enables
the TV to communicate with a connected
MHL-compatible device. The TV can charge the
connected MHL-compatible device while
playing photo/music/video from it. You can use
the TV remote control to control the connected
MHL-compatible device.
~
• If “Auto Input Change (MHL)” is set to “On”, the
TV automatically switches to HDMI IN 2/MHL
from other input when MHL-compatible device is
connected to HDMI IN 2/MHL jack. The
availability of “Auto Input Change (MHL)”
depends on whether the MHL-compatible device
can support this feature.
• You can continue normal usage of the connected
MHL-compatible device (such as receiving calls)
depending on its capability.
• Some remote control functions may not be
available depending on features of the
connected MHL-compatible device. Please refer
to the device manual for details.
• If “MHL Charging during Standby” is set to “On”,
you can continue charging the MHL-compatible
device even when the TV is in standby mode.
• This product is officially MHL-certified for
operation with other MHL-certified devices. If you
encounter any problems when using the MHL
function, please consult the device manufacturer
for support.
3: Preventing the
TV from
toppling over
~
• Before install the machine screw, lay the display
face down on a stable work surface that is larger
than the TV.
• To prevent damaging the surface of the LCD
display, make sure to place a soft cloth on the
work surface.
1 Install a machine screw (M4, not supplied)
into the screw hole of the TV and tie with a
strong cord (not supplied).
2 Install a wood screw (not supplied) in the TV
stand. Then, tie the strong cord to the wood
screw.
The length of the M4 machine screw differs
depending on the cord diameter.
Please see below illustration.
GB
10
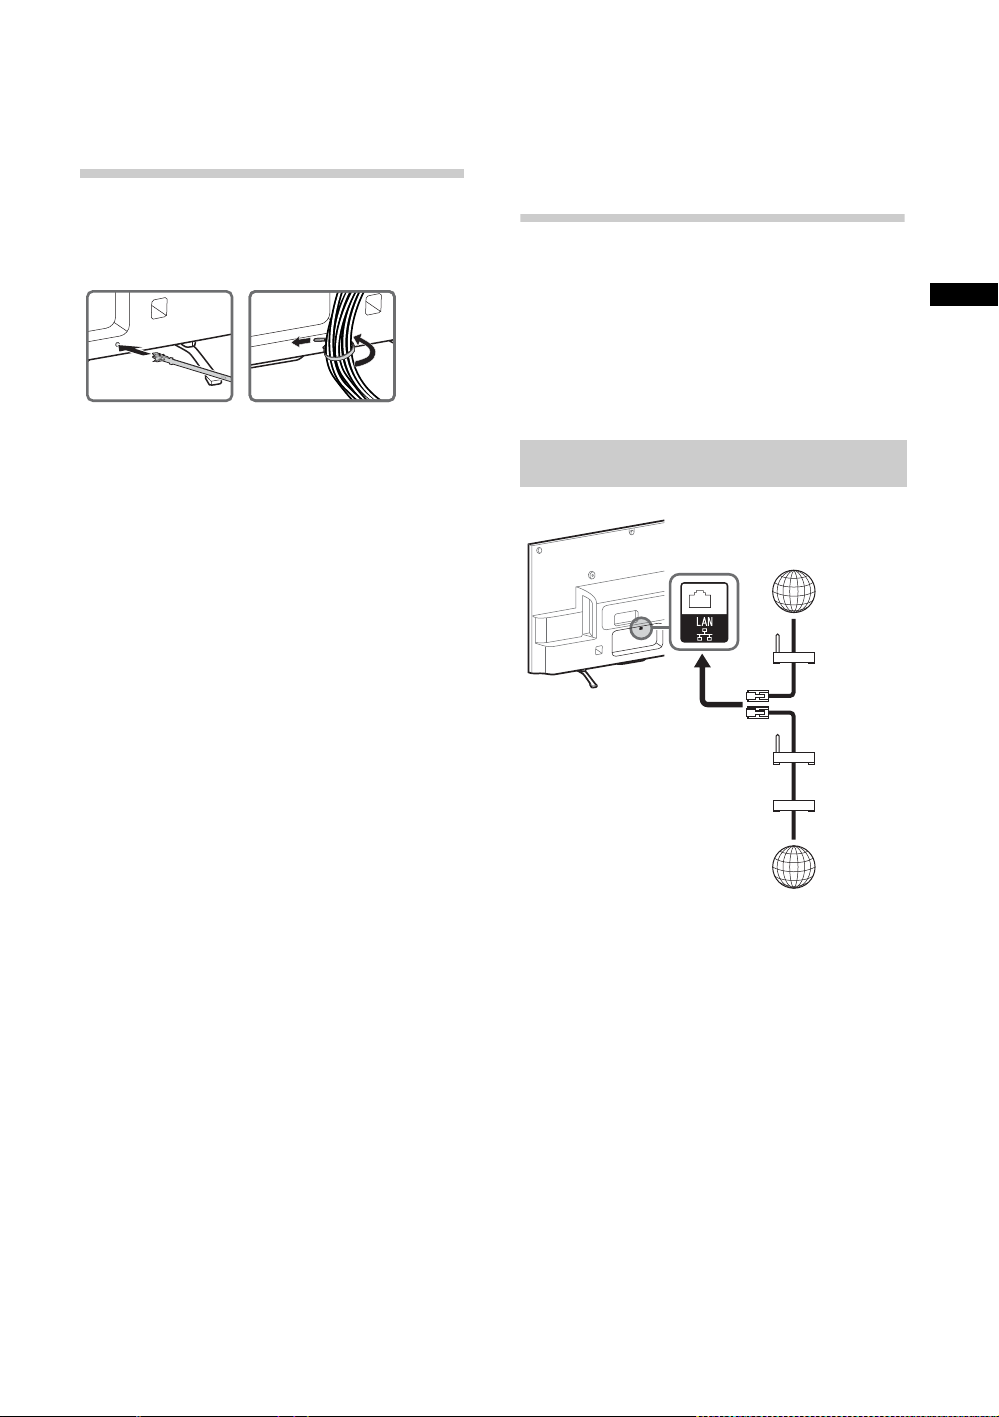
4: Bundling the
2
1
TV
Internet
Modem
with router
functions
Router
Modem
Internet
or
5: Connecting the
cables
~
• Do not bundle the AC power cord (mains lead)
together with other cables.
TV to the
Internet
When you connect this TV to the Internet, you
can enjoy multiple functions. For details on the
functions, refer to the i-Manual.
~
• You will need to contract with an Internet service
provider to connect to the Internet.
Preparing a wired network
GB
~
• For LAN connections, use a Category 7 cable
(not supplied).
(Continued)
11
GB
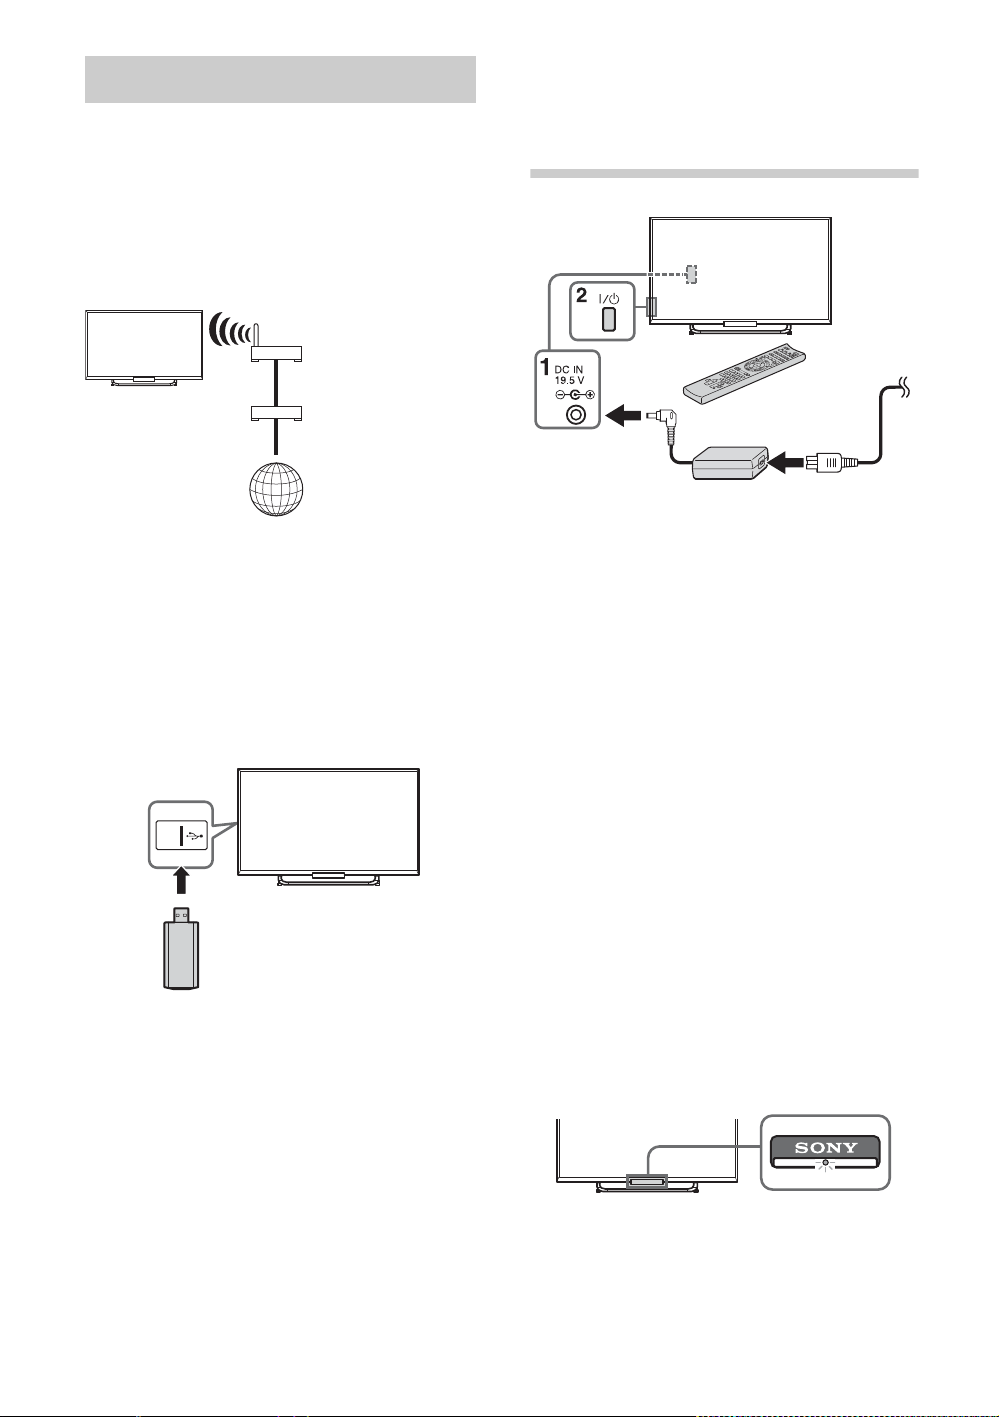
Preparing a wireless LAN
Wireless
router
Modem
Internet
TV
TV
6: Performing the
KDL-42/32W670A
The built-in wireless LAN device allows you to
access the Internet and your home network.
With this feature, you can connect to a wireless
LAN and enjoy the benefits of networking in a
cable-free environment.
Except KDL-42/32W670A
Wireless LAN Ready lets you easily access the
Internet and your home network with the USB
Wireless LAN Adapter UWA-BR100. By inserting
the USB Wireless LAN Adapter into your TV’s
USB port, you can easily create a cable-free
network.
initial set-up
1 Connect the AC power cord (mains lead) to
the AC adapter and plug the DC cable into
the DC IN terminal. Then, connect the TV to
your AC power outlet (mains socket).
2 Press =/1 on the TV. The illumination LED
will light up in white.
When you switch on the TV for the first time,
the Language menu appears on the screen.
Before setting up the wireless LAN function of
the TV, be sure to set up a wireless LAN router.
~
• When you turn on the TV for the first time, the
TV requires some internal processing for
optimisation before you can perform the initial
setup. There will be no picture and sound,
and the illumination LED on the front of the TV
blinks white for about 40 seconds. Do not turn
off the TV during this process.
This process has been completed at the
factory for some TVs.
• The illumination LED lights up in different
colours according to the status of the TV. If
you do not wish to light up the illumination
LED, you can turn it off later. Press HOME,
then select “Settings” t “System Settings”
t “General Set-up” t “Illumination LED” t
“Off”. You can also press OPTIONS, then
select “Illumination LED” t “Off”.
12
GB

3 Press V/v/B/b to select an item, then press
.
Follow the instructions on the screen.
Programme Sorting: Changes the order of
analogue channels stored in the TV.
1 Press V/v to select the channel you want
to move to a new position, then press .
2 Press V/v to select the new position for
the channel, then press .
~
• You can also tune channels manually.
Network Set-up: Sets up the Internet
settings. If you do not access the Internet, or
to set up later, select “Skip”. After you select
“Continue” or “Start” (depending on model)
at the Internet setup confirmation screen,
select “Auto” to connect to the network
automatically. Select “Custom” to connect
manually.
GB
~
• If you use WEP security, select “Custom” t
“Wireless Set-up” t “Scan”. Then, select the
network name (SSID) you want to connect.
If you cannot find the required network name,
select “[Manual Entry]” and press
enter network name.
• To set “Network Set-up” later, press HOME,
then select “Settings” t “Network” t
“Network Set-up”.
• Use the optional USB Wireless LAN Adapter
to connect with your wireless router (or
access point) at 5GHz. Insert USB Wireless
LAN Adapter and set “Wi-Fi Direct” to “Off”.
Press HOME, then select “Settings” t
“Network” t “Wi-Fi Direct” t “Off”.
to
13
GB
Using Your BRAVIA TV
1
3
3
2
1
or or
Rear of TV
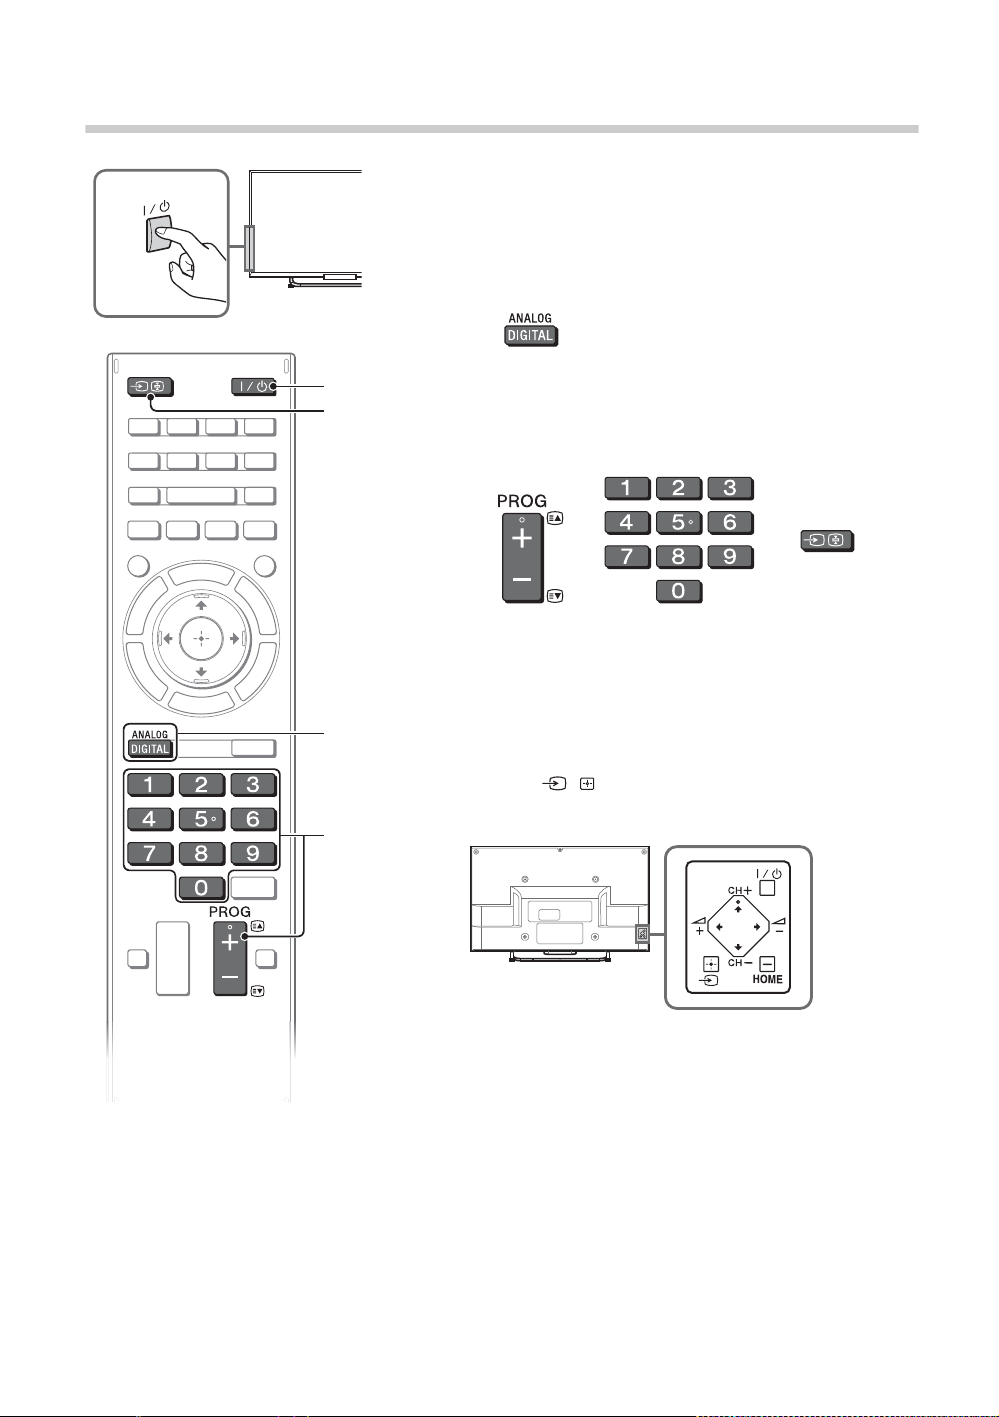
Watching TV
1 Turn on the TV.
Press =/1 on the TV or remote control to turn on the
TV.
2 Select a mode.
3 Select a TV channel or select an
input.
x To select digital channels
Use 0-9. For channel numbers 10 and above, press the
next digit quickly.
~
• See below illustration for location of the "/1, CH+/-, 2+/-,
V/v/B/b, , and HOME buttons on the TV.
GB
14
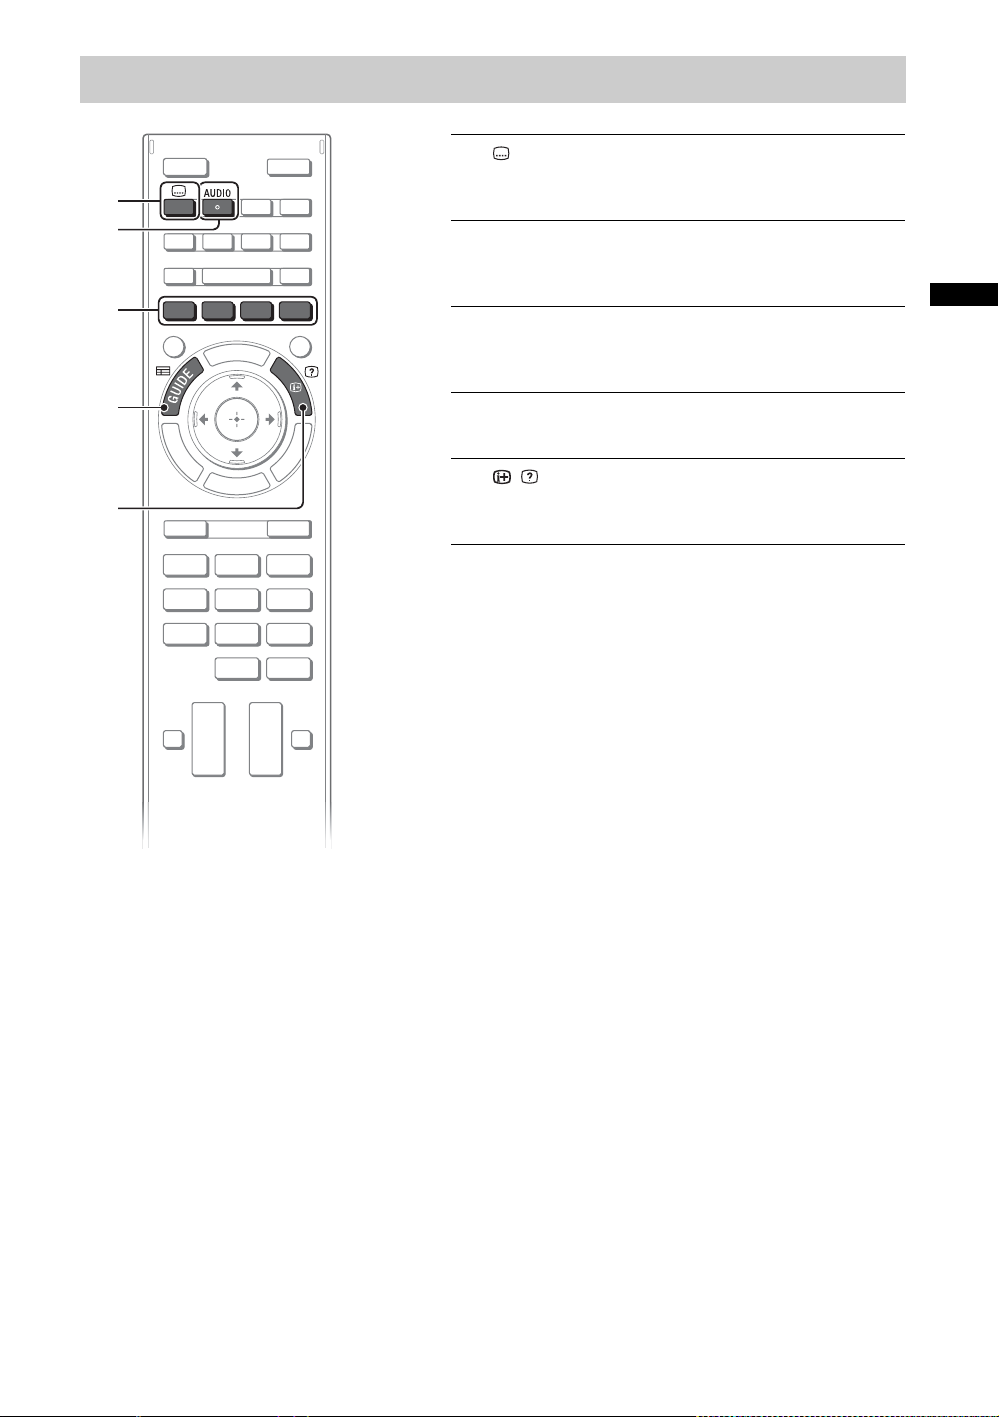
Frequently used buttons
4
3
1
2
5
1 Subtitle setting
You can turn subtitle on/off while watching digital
broadcasting.
2 AUDIO
You can select the sub sound or secondary
language while watching multiplex broadcasts.
3 Colour buttons
When the colour buttons are available, an
operation guide appears on the screen.
4 GUIDE
Displays the digital programme guide.
5 / Info/Text reveal
Displays channel number, details of programmes,
and the clock.
GB
15
GB
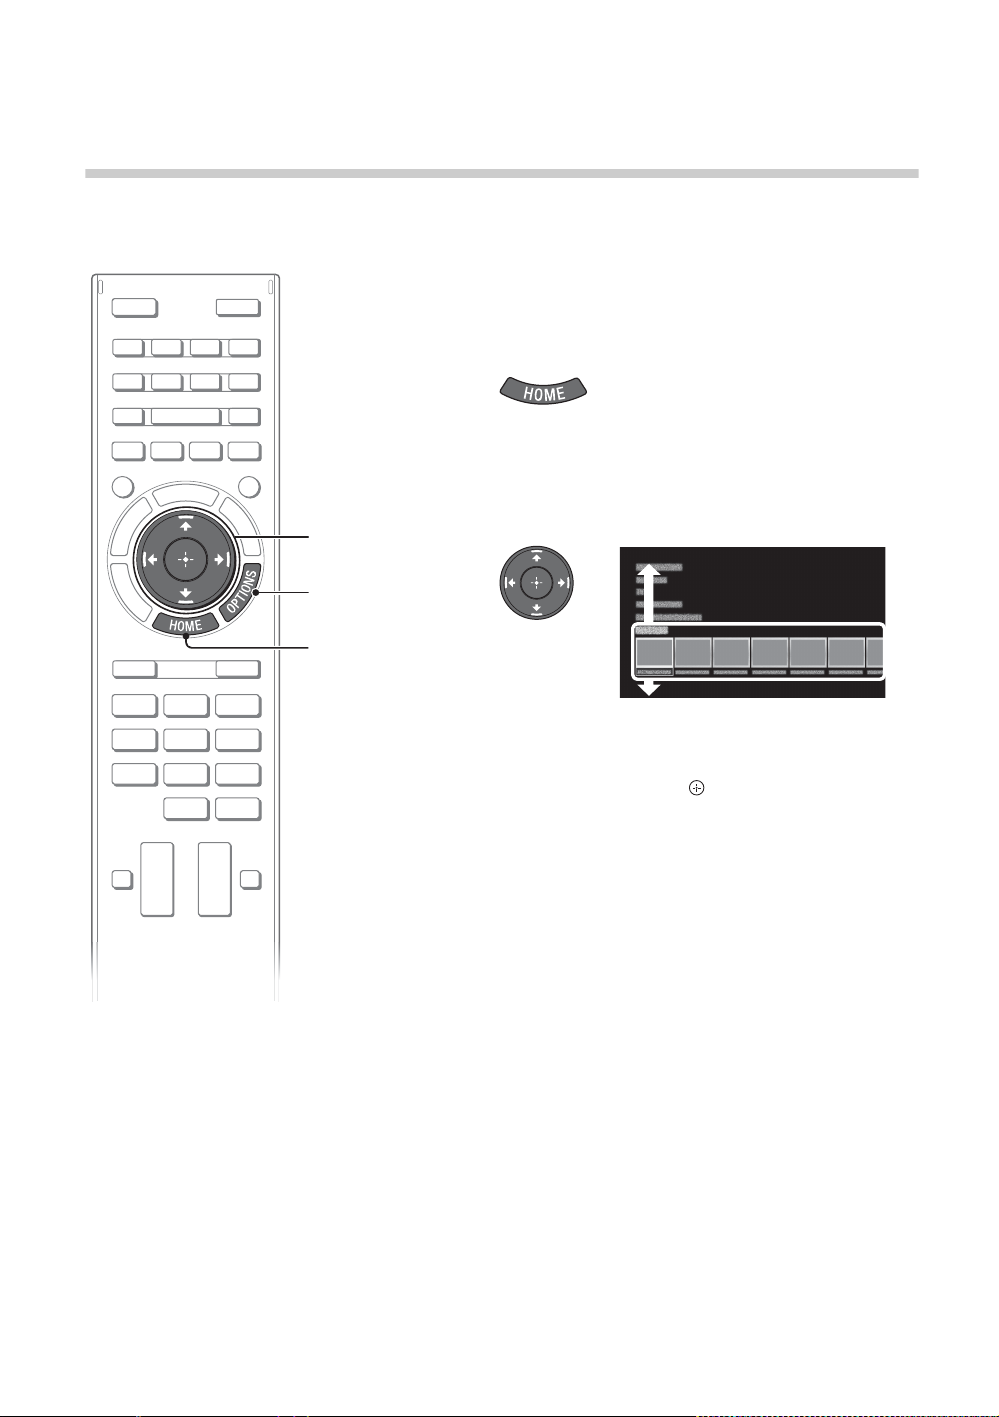
Selecting various functions and
2, 3
1
OPTIONS
settings (Home Menu)
You can select the features of your TV from the Home menu.
Here is an example on how to select an item and modify
the TV settings.
1 Press HOME.
2 Press V/v to select “Settings”
category.
The contents of “Settings” are displayed horizontally.
See page 17 (Category list) for all categories.
3 Press B/b to select a desired setting
item, then press .
4 Modify the settings.
x To exit the Home menu
Press HOME.
x To select using the OPTIONS button
Press OPTIONS.
A list of convenient functions and menu shortcuts are
displayed. The menu items vary based on the current
input and/or content.
16
GB
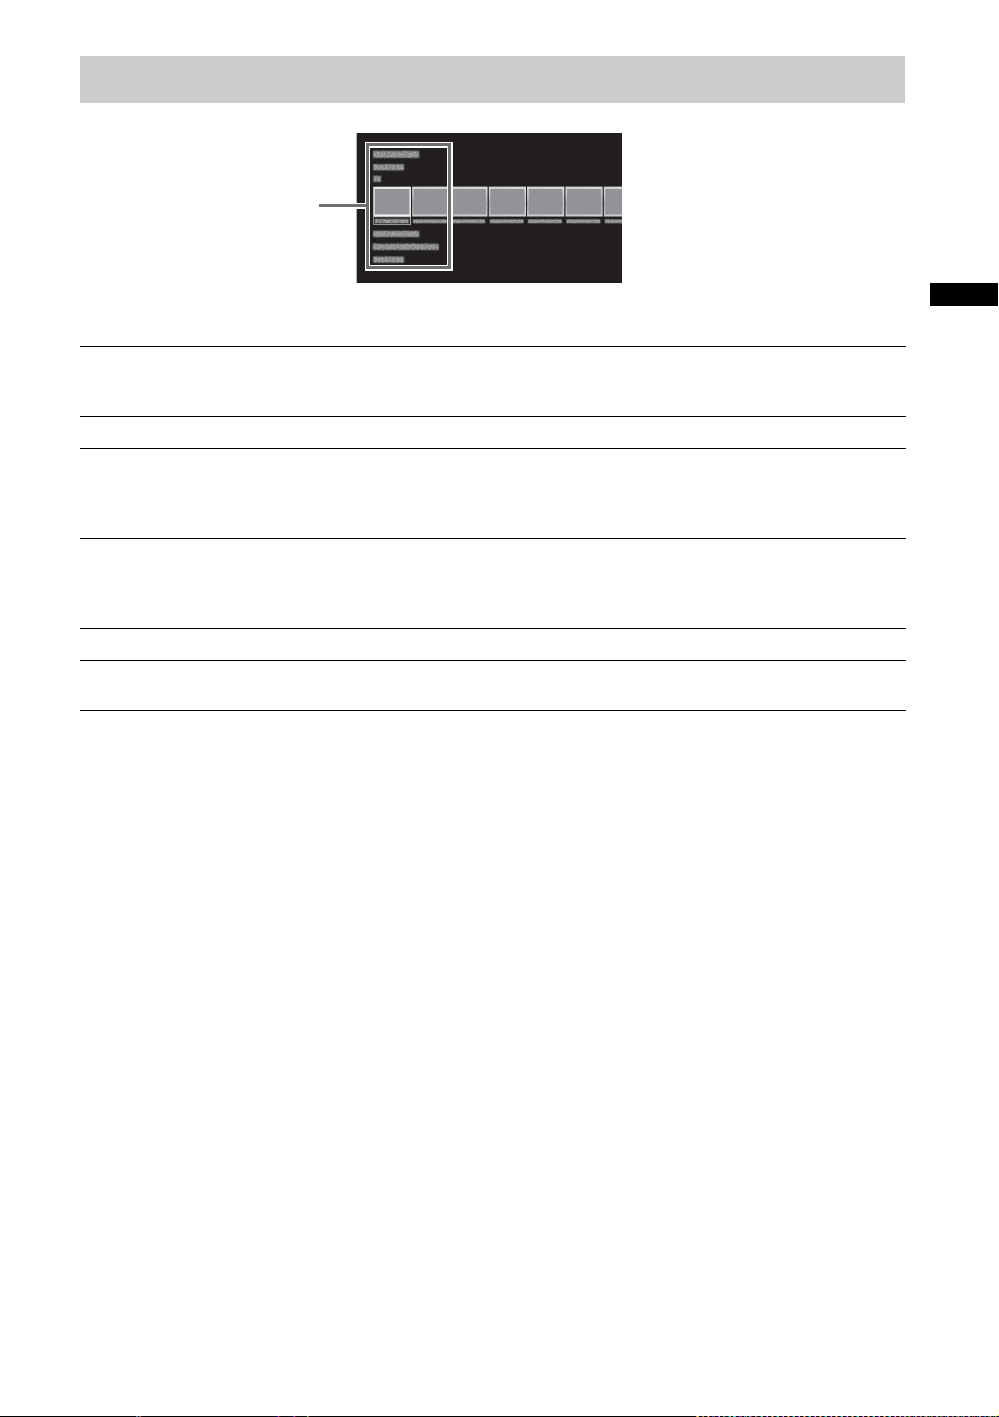
Category list
Category
The categories are available depending on your TV model, region and country.
GB
Featured
History
TV
Applications
Connected Devices
Settings
Provides information on available applications and content.
If there is no network connection, or the “Featured Display” setting is set
to “Off”, the “Featured” category will not be displayed.
Displays recently viewed items.
Allows you to select a list of TV channels, or a programme guide.
Programme guide is available depending on your TV model or region.
A list of channels registered as favourites in the “TV” category are
displayed.
Launches applications that require an Internet connection, including
Media Player which does not require an Internet connection.
A list of applications registered as favourites in the “Applications”
category are displayed.
Enables selection of devices connected to the TV.
Provides settings (e.g. picture settings, sound settings, key tone setting)
that allow you to customise your TV.
17
GB
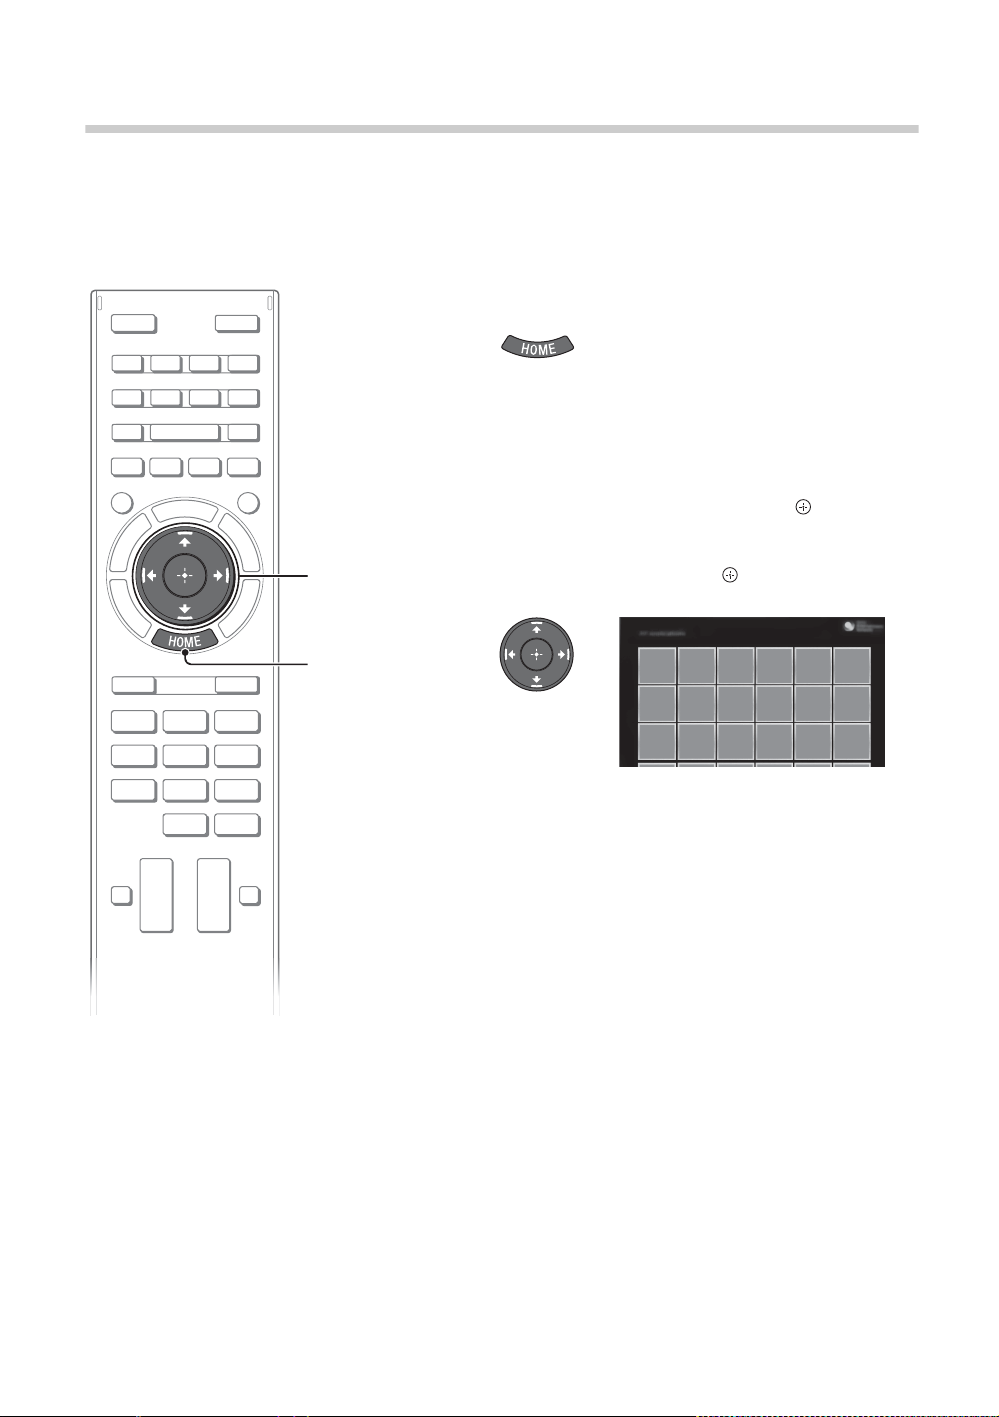
Watching Internet Video
2, 3, 4
1
This feature serves as a gateway to Internet content, delivering a variety of on-demand entertainment
straight to your TV. You can enjoy video content, including movies and cartoons.
You will need to make a broadband Internet connection. For details, see page 11 (5: Connecting the TV
to the Internet).
1 Press HOME.
2 Press V/v to select “Applications”
category.
3 Press B/b to select “All
Applications”, then press .
4 Press V/v/B/b to select the desired
service, then press .
~
• If you experience difficulties with this feature, check that the Internet connection is set up properly.
• The interface to Internet content depends on the Internet content providers.
• Services block video content based on the “Parental Lock” setting of the TV. Some service providers do not
support this function.
• To update Internet Video content services, press HOME, then select “Settings” t “Network” t “Refresh
Internet Content”.
GB
18
Looking for Instructions
1
2
RETURN
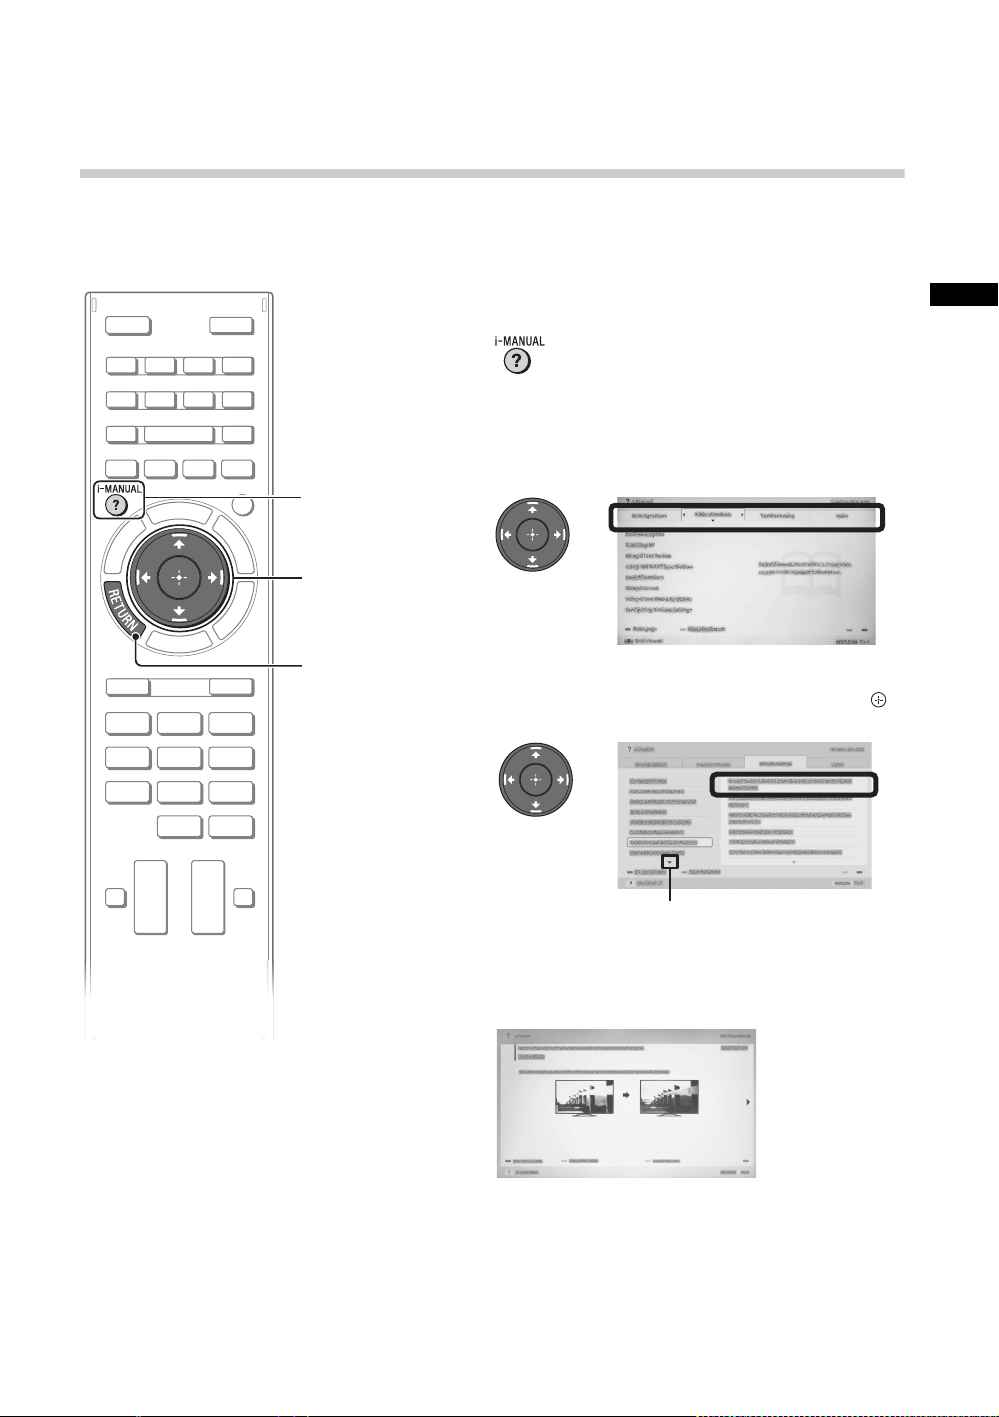
* If an arrow mark appears, press v repeatedly to
display more items.
Arrow mark*
Looking for instructions in the
electronic manual (i-Manual)
Operating instructions are built into your BRAVIA TV and can be displayed on the screen.
To learn more about your TV features, access your i-Manual with the touch of a button.
1 Press i-MANUAL.
2 Select an item.
1 Press B/b to select an item.
2 Press V/v/B/b to select an item, then press .
GB
The page of the selected item appears.
~
• You can step through pages using B/b.
Press RETURN to return to the previous page.
(Continued)
19
GB
Saving frequently viewed
i-Manual screen previously displayed
BRAVIA TV screen
pages (Bookmark)
Displaying the page again
while operating the TV
You can save frequently viewed pages for easy
access anytime.
x To save a page
In the page to bookmark, press the yellow
button on the remote control.
x To access the bookmarked page
When displaying the i-Manual, press the green
button on the remote control to display the
bookmark list.
Press V/v to select the desired item, then press
.
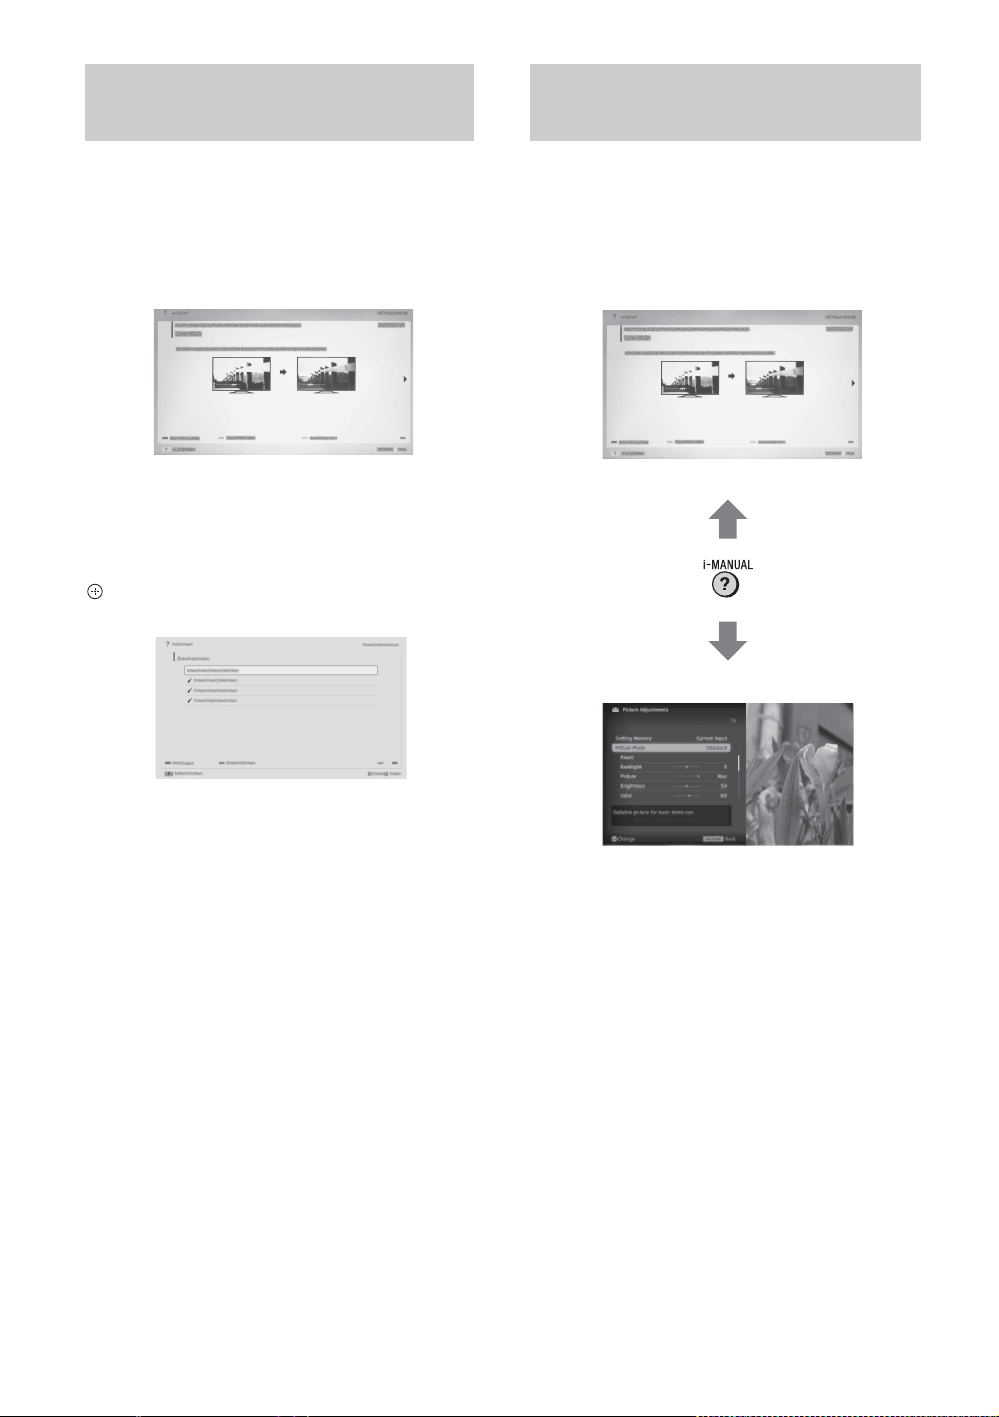
You can switch between the i-Manual screen
and the TV screen. This feature allows you to
refer to the instructions in the i-Manual while
using your BRAVIA TV. Press i-MANUAL to
switch between the i-Manual screen previously
displayed and the TV screen.
~
• To return to the previous screen, press RETURN.
x To remove a bookmark
When the bookmarked page is displayed, press
the yellow button on the remote control.
GB
20
~
• To jump to the top page of i-Manual, press the
red button on the remote control. You can also
press HOME, then select “Settings” t
“i-Manual” to jump to the top page of i-Manual.
• Once you turn off the TV or the TV goes to
standby mode, the i-Manual will be displayed
from the top page when you select “i-Manual”.
 Loading...