

Page 1

LCD Digital Colour TV
3-282-329-41(1)
K
LCD Digital Colour TV
KDL-20S40xx
Operating Instructions
Before operating the TV, please read the “Safety information”
section of this manual.
Retain this manual for future reference.
Инструкция по эксплуатации
Перед включением телевизора прочтите раздел “Сведения
по безопасности” этого руководства.
Сохраняйте данное руководство для справок в будущем.
Instrukcja obsługi
Przed rozpoczęciem eksploatacji telewizora należy zapoznać się
z treścią rozdziału „Informacje dotyczące bezpieczeństwa”
niniejszej instrukcji.
Zachować instrukcję do wykorzystania w przyszłości.
GB
RU
PL
KDL-20S40xx
Printed in Slovak RepublicPrinted in Slovak Republic
3-282-329-41(1)
K
For useful information about Sony products
Для получения полезной информации о продукции Сони
Szczegółowe informacje o produktach Sony
© 2007 Sony Corporation
Page 2

Introduction
Thank you for choosing this Sony product.
Before operating the TV, please read this manual
thoroughly and retain it for future reference.
Notice for Digital TV function
• Any functions related to Digital TV ( ) will only
work in countries or areas where DVB-T (MPEG2) digital
terrestrial signals are broadcasted. Please confirm with
your local dealer if you can receive a DVB-T signal where
you live.
• Although this TV set follows DVB-T specifications,
compatibility with future DVB-T digital terrestrial
broadcasts cannot be guaranteed.
• Some Digital TV functions may not be available in some
countries.
Disposal of the TV set
Disposal of Old Electrical &
Electronic Equipment
(Applicable in the European
Union and other European
countries with separate
collection systems)
This symbol on the product or on
its packaging indicates that this
product shall not be treated as
household waste. Instead it shall
be handed over to the applicable
collection point for the recycling
of electrical and electronic equipment. By ensuring this
product is disposed of correctly, you will help prevent
potential negative consequences for the environment and
human health, which could otherwise be caused by
inappropriate waste handling of this product. The
recycling of materials will help to conserve natural
resources. For more detailed information about recycling
of this product, please contact your local Civic Office,
your household waste disposal service or the shop where
you purchased the product.
The manufacturer of this product is Sony Corporation,
1-7-1 Konan Minato-ku Tokyo, 108-0075 Japan. The
Authorized Representative for EMC and product safety
is Sony Deutschland GmbH, Hedelfinger Strasse 61,
70327 Stuttgart, Germany. For any service or
guarantee matters please refer to the addresses given in
separate service or guarantee documents
.
Trademark information
• is a registered trademark of the DVB Project
• Manufactured under license from BBE Sound, Inc.
Licensed by BBE Sound, Inc. under one or more of the
following US patents: 5510752, 5736897. BBE and BBE
symbol are registered trademarks of BBE Sound, Inc.
• Manufactured under license from Dolby Laboratories.
“Dolby” and the double-D symbol are trademarks of
Dolby Laboratories.
• HDMI, the HDMI logo and High-Definition Multimedia
Interface are trademarks or registered trademarks of
HDMI Licensing, LLC.
DIGITAL
~
The "xx" that appears on the model name, corresponds to
two numeric digits related to colour variation.
GB
2
Page 3
Table of Contents
Start-up Guide 4
Start-up Guide 4
Safety information.....................................................................................................................7
Precautions...............................................................................................................................8
Overview of the remote ..........................................................................................................9
Overview of the TV buttons and indicators........................................................................10
Watching TV
Watching TV............................................................................................................................11
Checking the Digital Electronic Programme Guide (EPG) ............................................13
Using the Favourite list .................................................................................................15
Viewing pictures from connected equipment ..........................................................................16
Using MENU Functions
GB
Navigating through menus......................................................................................................17
Picture Adjustment menu........................................................................................................18
Sound Adjustment menu.........................................................................................................19
Features menu........................................................................................................................21
Set-up menu............................................................................................................................23
Digital Set-up menu ......................................................................................................26
Using Optional Equipment
Connecting optional equipment...............................................................................................28
Additional Information
Specifications..........................................................................................................................30
Troubleshooting ......................................................................................................................31
: for digital channels only
GB
3
Page 4
Start-up Guide
C
1: Checking the
accessories
Remote RM-ED007 (1)
Size AA batteries (R6 type) (2)
Cable holder (1)
Support belt (1) and screws (2)
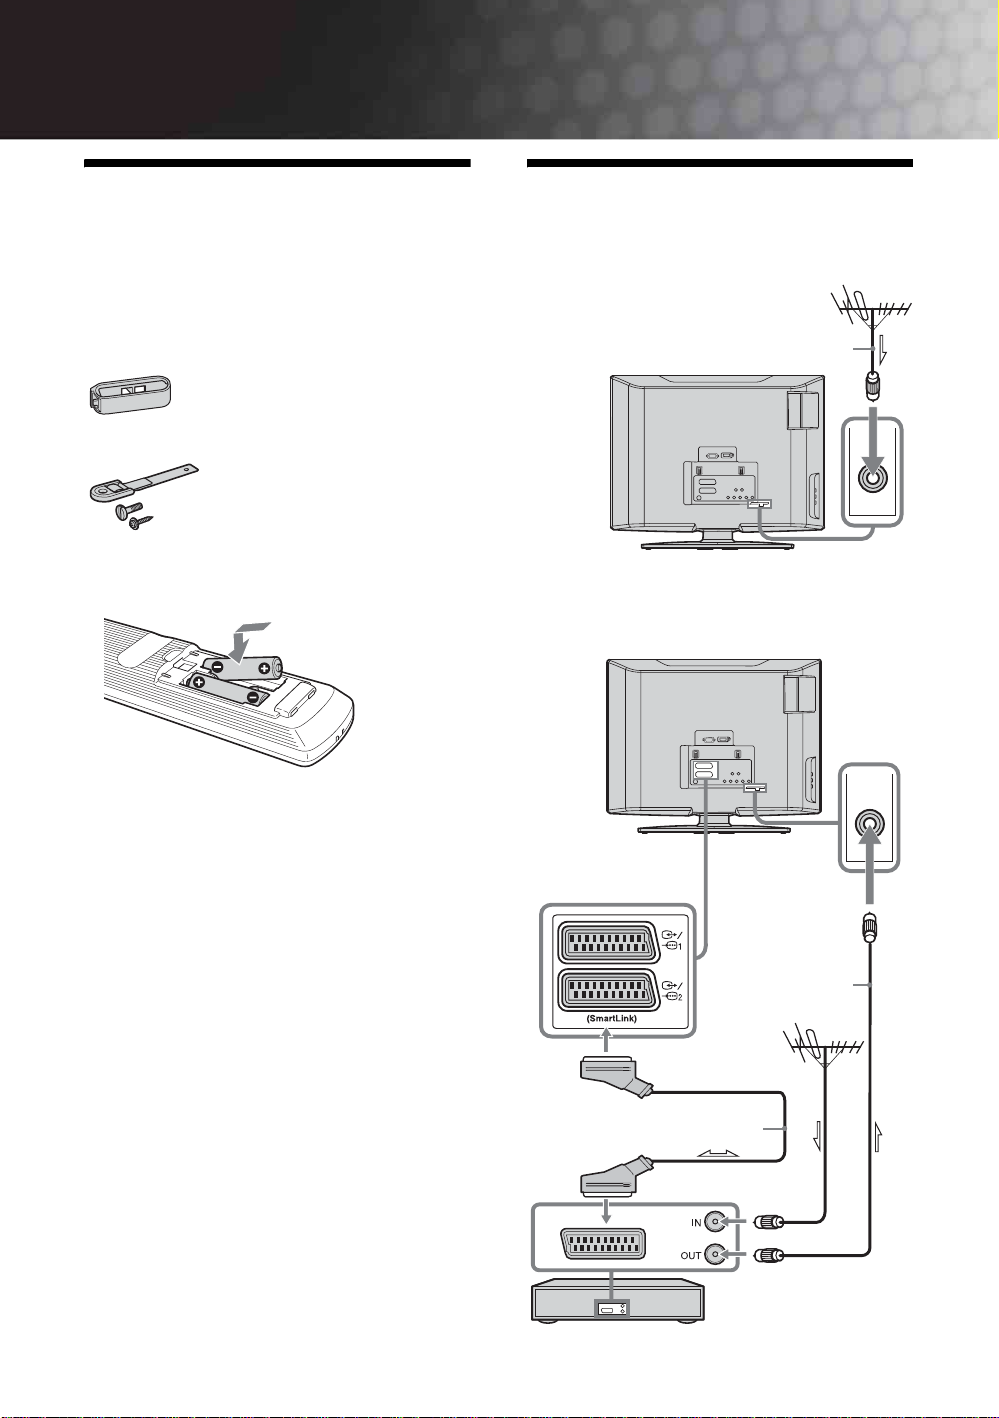
2: Connecting an aerial/
VCR
onnecting an aerial only
Coaxial cable
(not supplied)
To insert batteries into the remote
Connecting an aerial and VCR
Notes
• Observe the correct polarity when inserting batteries.
• Dispose of batteries in an environmentally friendly way.
Certain regions may regulate disposal of the battery.
Please consult your local authority.
• Do not use different types of batteries together or mix old
and new batteries.
• Handle the remote with care. Do not drop or step on it, or
spill liquid of any kind onto it.
• Do not place the remote in a location near a heat source, or
in a place subject to direct sunlight, or in a damp room.
GB
4
RF lead
(not supplied)
Scart lead (not supplied)
VCR
Page 5
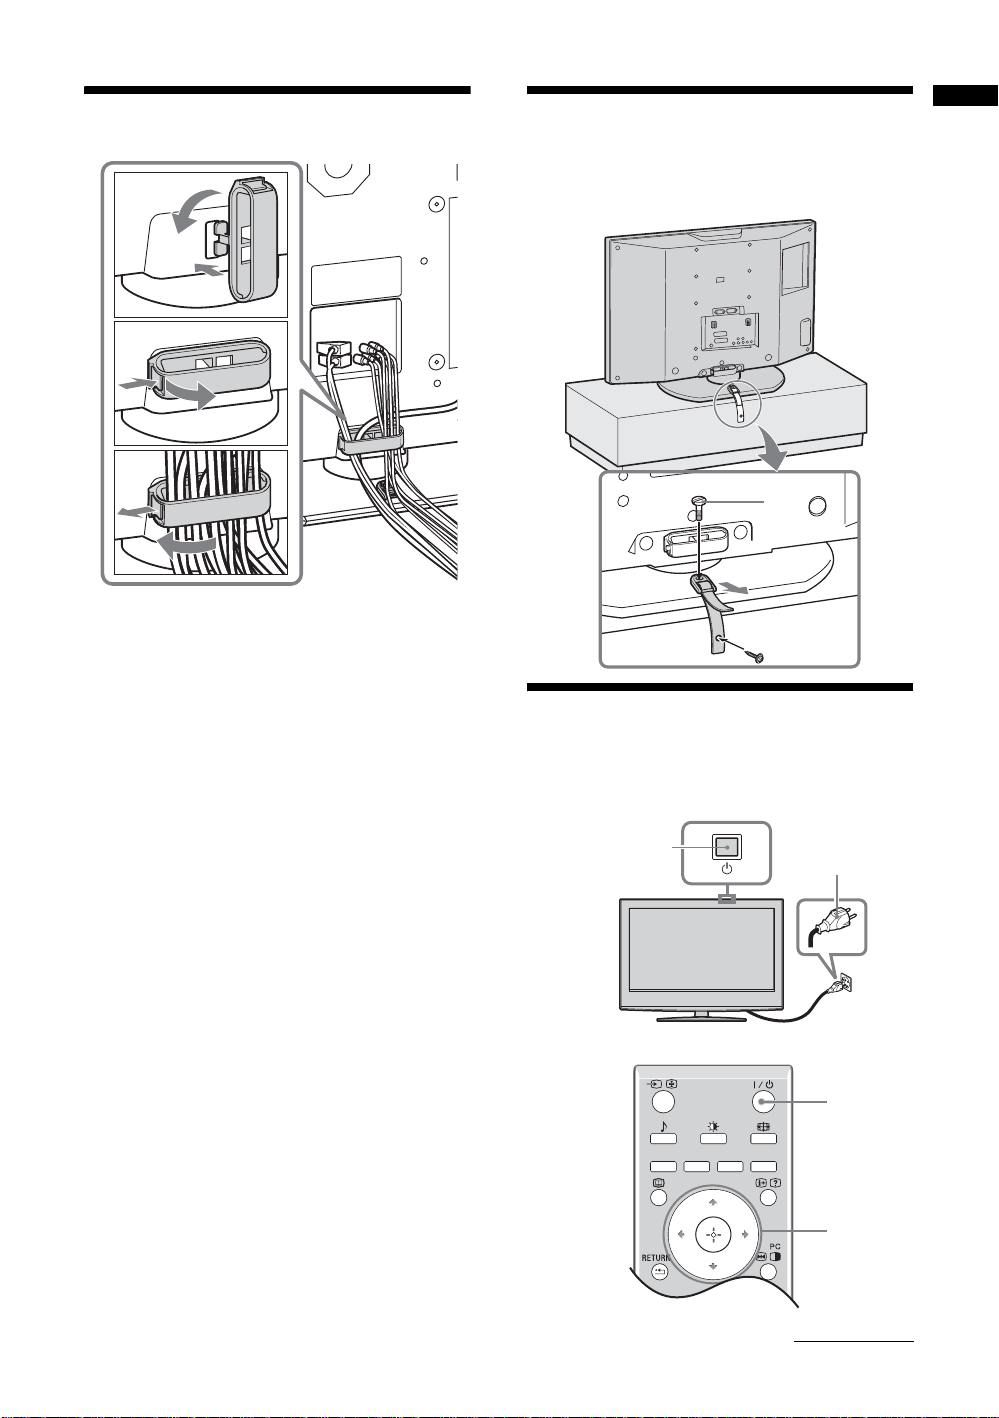
3: Bundling the cables 4: Preventing the TV
Start-up Guide
1
2
3
B
A
from toppling over
2
3
1
5:
Selecting the language
and country/region
2
Continued
1
2
3,4
GB
5
Page 6

1 Connect the TV to your mains socket
(220-240V AC, 50Hz).
2 Press 1 on the TV (top side).
When you switch on the TV for the first time, the
Language menu appears on the screen.
When the TV is in standby mode (the
indicator on the TV (front) is red), press "/1 on
the remote to switch on the TV.
1 (standby)
3 Press F/f to select the language
displayed on the menu screens, then press
.
Auto Start Up
Language
Country
6: Auto-tuning the TV
After selecting the language and country/region, a
message confirming the TV start auto-tuning appears
on the screen.
The TV will now search for and store all available TV
channels.
1
Select:
Confirm:
4 Press F/f to select the country/region in
which you will operate the TV, then press
.
Auto Start Up
Language
Country
Select:
If the country/region in which you want to use the
TV does not appear in the list, select “-” instead of
a country/region.
The message confirming the TV start auto-tuning
appears on the screen, then go to “6: Auto-tuning
the TV”.
Confirm:
3
1 Press .
Back:
The TV starts searching for all available digital
channels, followed by all available analogue
channels. This may take some time, please be
patient and do not press any buttons on the TV or
remote.
If a message appears for you to confirm the aerial
connections
No digital or analogue channels were found.
Check all the aerial connections and press to
start auto-tuning again.
Start:
Cancel:
MENU
2 When the Programme Sorting menu
appears on the screen, follow the steps of
“Programme Sorting” (page 23).
If you do not wish to change the order in which the
analogue channels are stored on the TV, go to step
3.
3 Press MENU to exit.
The TV has now tuned in all the available
channels.
GB
6
Page 7
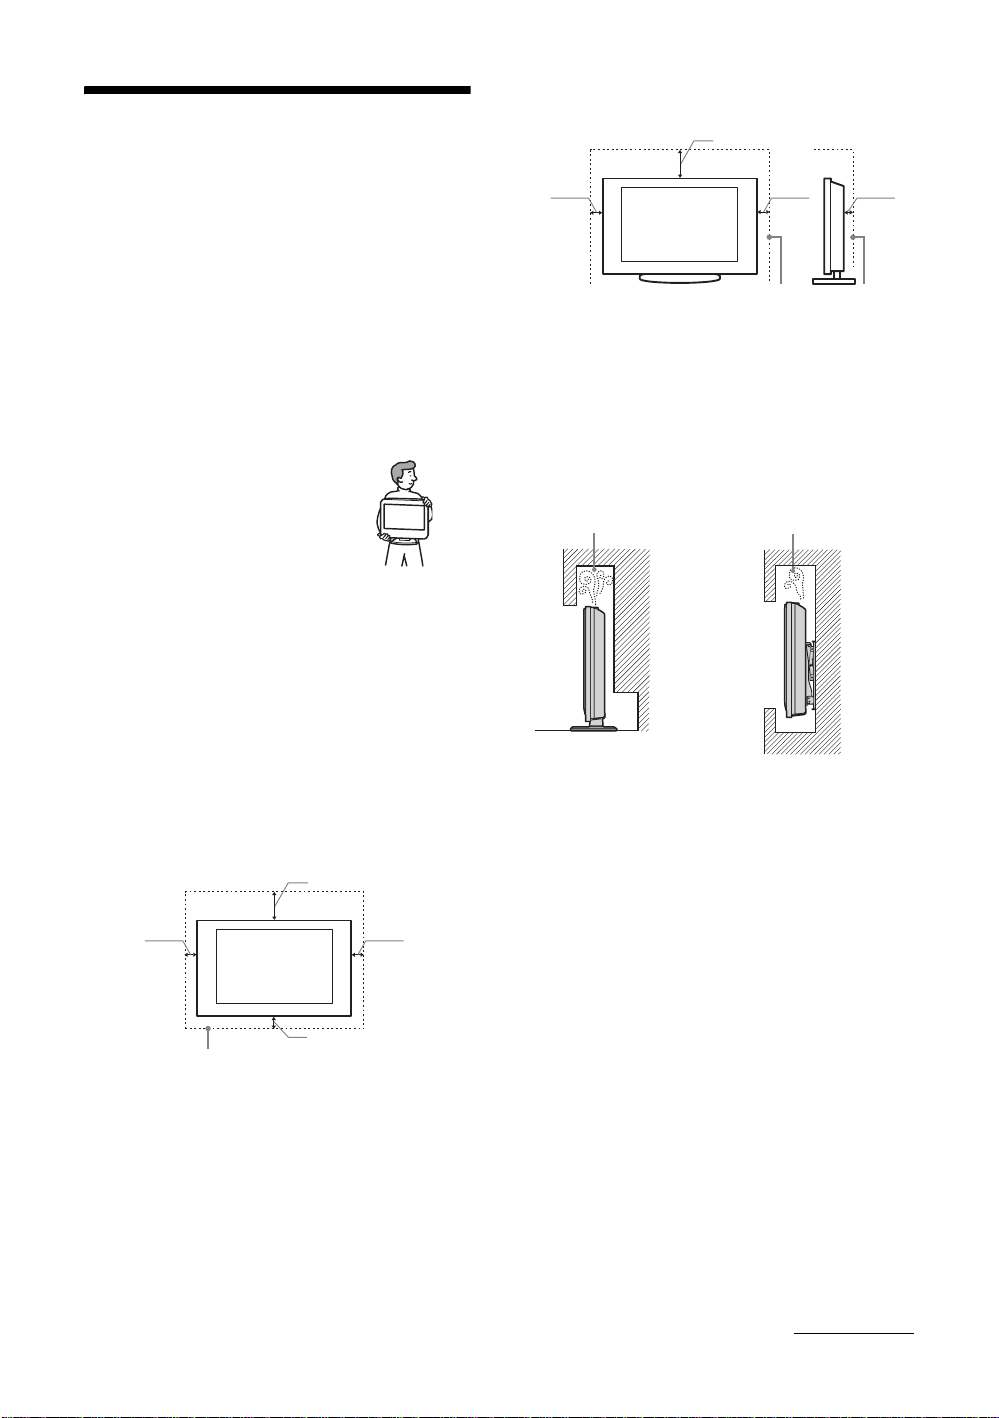
Installed with stand
Safety information
Installation/Set-up
Install and use the TV set in accordance with the
instructions below in order to avoid any risk of fire,
electrical shock or damage and/or injuries.
Installation
• The TV set should be installed near an easily accessible
mains socket.
• Place the TV set on a stable, level surface.
• Only qualified service personnel should carry out wall
installations.
Transporting
• Before transporting the TV set,
disconnect all cables.
• When transporting the TV set by
hand, hold it as shown on the right.
Do not put stress on the LCD panel
and the frame around the screen.
• When transporting the TV set, do
not subject it to jolts or excessive
vibration.
• When transporting the TV set for
repairs or when moving, pack it
using the original carton and
packing material.
30 cm
10 cm10 cm
6 cm
Leave at least this space around the set.
• To ensure proper ventilation and prevent the collection of
dirt or dust:
– Do not lay the TV set flat, install upside down,
backwards, or sideways.
– Do not place the TV set on a shelf, rug, bed or in a
closet.
– Do not cover the TV set with a cloth, such as curtains,
or items such as newspapers, etc.
– Do not install the TV set as shown below.
Air circulation
is blocked.
Wall
Air circulation
is blocked.
Wall
Ventilation
• Never cover the ventilation holes or insert anything in the
cabinet.
• Leave space around the TV set as shown below.
• It is strongly recommended that you use a Sony wallmount bracket in order to provide adequate air-circulation.
Installed on the wall
30 cm
10 cm
10 cm
10 cm
Leave at least this space around the set.
Mains lead
Handle the mains lead and socket as follows in order
to avoid any risk of fire, electrical shock or damage
and/or injuries:
– Use only Sony mains leads, not those of other brands.
– Insert the plug fully into the mains socket.
– Operate the TV set on a 220-240 V AC supply only.
– When wiring cables, be sure to unplug the mains lead
for your safety and take care not to catch your feet on
the cables.
– Disconnect the mains lead from the mains socket before
working on or moving the TV set.
– Keep the mains lead away from heat sources.
– Unplug the mains plug and clean it regularly. If the plug
is covered with dust and it picks up moisture, its
insulation may deteriorate, which could result in a fire.
Notes
• Do not use the supplied mains lead on any other
equipment.
• Do not pinch, bend, or twist the mains lead excessively.
The core conductors may be exposed or broken.
• Do not modify the mains lead.
• Do not put anything heavy on the mains lead.
• Do not pull on the mains lead itself when disconnecting
the mains lead.
Continued
GB
7
Page 8

• Do not connect too many appliances to the same mains
socket.
• Do not use a poor fitting mains socket.
Precautions
Prohibited Usage
Do not install/use the TV set in locations,
environments or situations such as those listed below,
or the TV set may malfunction and cause a fire,
electrical shock, damage and/or injuries.
Location:
Outdoors (in direct sunlight), at the seashore, on a ship or
other vessel, inside a vehicle, in medical institutions,
unstable locations, near water, rain, moisture or smoke.
Environment:
Places that are hot, humid, or excessively dusty; where
insects may enter; where it might be exposed to mechanical
vibration, near flammable objects (candles, etc).
The TV set shall not be exposed to dripping or splashing and
no objects filled with liquids, such as vases, shall be placed
on the TV.
Situation:
Do not use when your hands are wet, with the cabinet
removed, or with attachments not recommended by the
manufacturer. Disconnect the TV set from mains socket and
aerial during lightning storms.
Broken pieces:
• Do not throw anything at the TV set. The screen glass may
break by the impact and cause serious injury.
• If the surface of the TV set cracks, do not touch it until you
have unplugged the mains lead. Otherwise electric shock
may result.
When not in use
• If you will not be using the TV set for several days, the TV
set should be disconnected from the mains for
environmental and safety reasons.
• As the TV set is not disconnected from the mains when the
TV set is just turned off, pull the plug from the mains to
disconnect the TV set completely.
• However, some TV sets may have features that require the
TV set to be left in standby to work correctly.
For children
• Do not allow children to climb on the TV set.
• Keep small accessories out of the reach of children, so that
they are not mistakenly swallowed.
Viewing the TV
• View the TV in moderate light, as viewing the TV in poor
light or during long period of time, strains your eyes.
• When using headphones, adjust the volume so as to avoid
excessive levels, as hearing damage may result.
LCD Screen
• Although the LCD screen is made with high-precision
technology and 99.99% or more of the pixels are effective,
black dots may appear or bright points of light (red, blue,
or green) may appear constantly on the LCD screen. This
is a structural property of the LCD screen and is not a
malfunction.
• Do not push or scratch the front filter, or place objects on
top of this TV set. The image may be uneven or the LCD
screen may be damaged.
• If this TV set is used in a cold place, a smear may occur in
the picture or the picture may become dark. This does not
indicate a failure. These phenomena disappear as the
temperature rises.
• Ghosting may occur when still pictures are displayed
continuously. It may disappear after a few moments.
• The screen and cabinet get warm when this TV set is in
use. This is not a malfunction.
• The LCD screen contains a small amount of liquid crystal
and mercury. The fluorescent tubes used in this TV set
also contain mercury. Follow your local ordinances and
regulations for disposal.
Handling and cleaning the screen surface/cabinet of
the TV set
Be sure to unplug the mains lead connected to the TV set
from mains socket before cleaning.
To avoid material degradation or screen coating degradation,
observe the following precautions.
• To remove dust from the screen surface/cabinet, wipe
gently with a soft cloth. If dust is persistent, wipe with a
soft cloth slightly moistened with a diluted mild detergent
solution.
• Never use any type of abrasive pad, alkaline/acid cleaner,
scouring powder, or volatile solvent, such as alcohol,
benzene, thinner or insecticide. Using such materials or
maintaining prolonged contact with rubber or vinyl
materials may result in damage to the screen surface and
cabinet material.
• When adjusting the angle of the TV set, move it slowly so
as to prevent the TV set from moving or slipping off from
its table stand
If the following problems occur...
Turn off the TV set and unplug the mains lead
immediately if any of the following problems occur.
Ask your dealer or Sony service centre to have it
checked by qualified service personnel.
When:
– Mains lead is damaged.
– Poor fitting of mains socket.
– TV set is damaged by being dropped, hit or having
something thrown at it.
– Any liquid or solid object falls through openings in the
cabinet.
GB
8
Optional Equipment
Keep optional components or any equipment emitting
electromagnetic radiation away from the TV set. Otherwise
picture distortion and/or noisy sound may occur.
Page 9
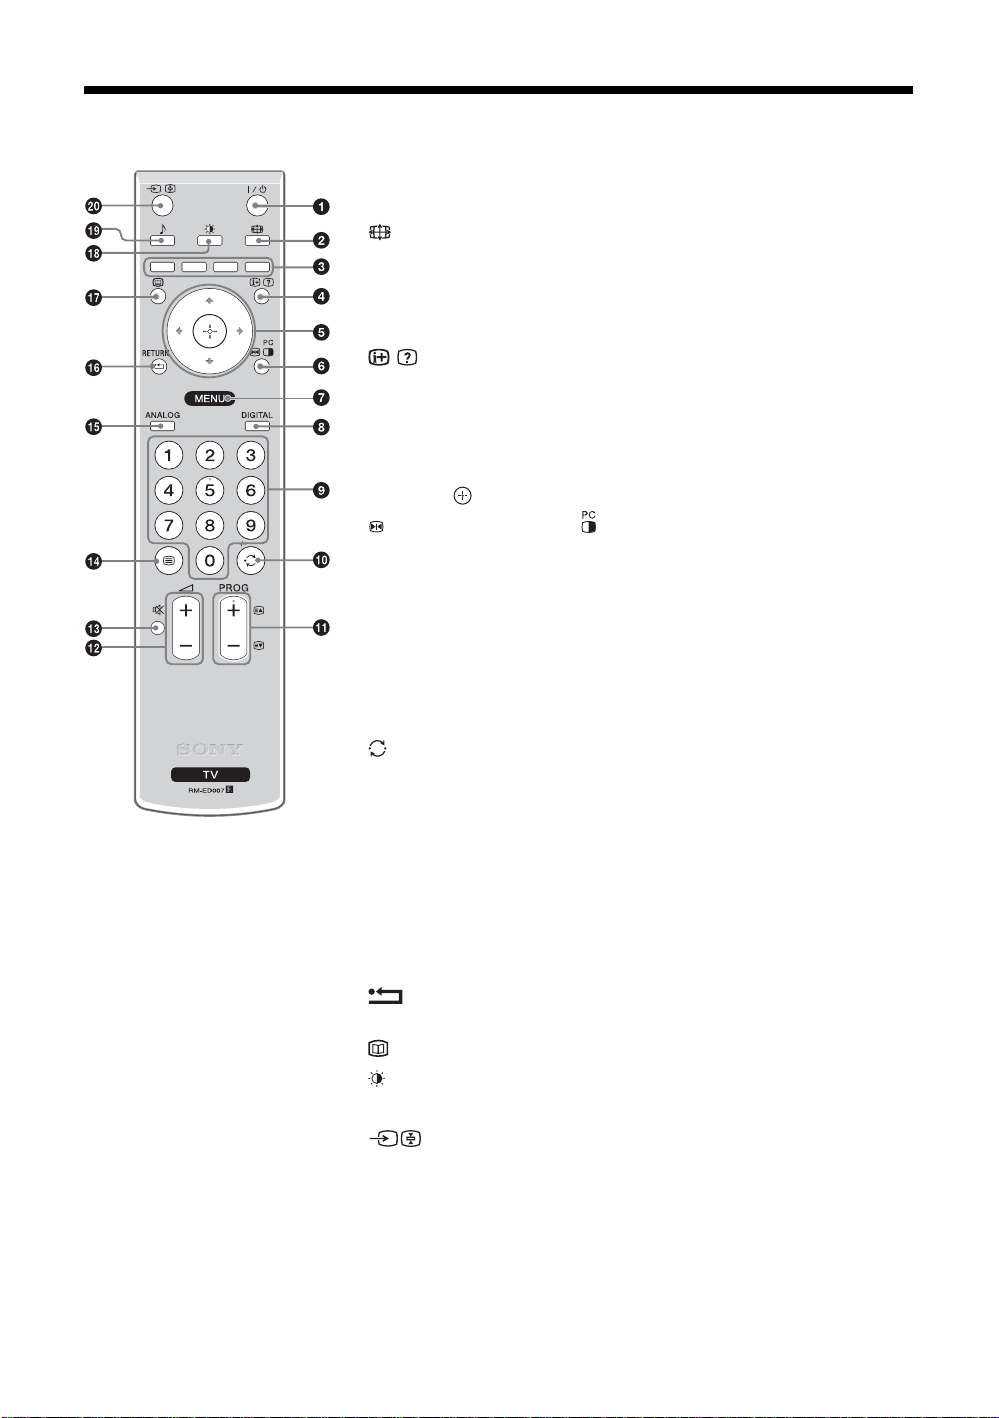
Overview of the remote
1 "/1 – TV standby
Switches off the TV temporarily and on from standby mode.
2 – Screen mode (page 12)
3 Coloured buttons
• In digital mode (page 13, 15): Selects the options at the bottom of the
Favourite and EPG digital menus.
• In Text mode (page 12): Used for Fastext.
4 / – Info / Text reveal
• In digital mode: Displays brief details of the programme currently being
watched.
• In analogue mode: Displays information such as current channel number and
screen mode.
• In Text mode (page 12): Reveals hidden information (e.g., answers to a quiz).
5 F/f/G/g/ (page17)
6 Picture Freeze (page 12)/
• In TV mode: Freezes the TV picture.
• In PC mode: Displays a small picture (PIP).
7 MENU (page 17)
8 DIGITAL – Digital mode (page 11)
9 Number buttons
• In TV mode: Selects channels. For channel numbers 10 and above, enter the
second digit within two seconds.
• In Text mode: Enters the three digit page number to select the page.
0 – Previous channel
Returns to the previous channel watched (for more than five seconds).
qa PROG +/- (page 11)
• In TV mode: Selects the next (+) or previous (-) channel.
• In Text mode: Selects the next (+) or previous (-) page.
qs 2 +/- – Volume
qd % – Mute (page 11)
/ – Text (page 12)
qf
qg ANALOG – Analogue mode (page 11)
qh / RETURN
Returns to the previous screen of any displayed menu.
qj – EPG (Digital Electronic Programme Guide) (page 13)
qk – Picture mode (page 18)
ql 9 – Sound effect (page 19)
w; – Input select / Text hold
• In TV mode (page 16): Selects the input source from equipment connected to
the TV sockets.
• In Text mode (page 12): Holds the current page.
PIP in PC Mode (page 12)
Tip
The PROG + and number 5 buttons have tactile dots. Use the tactile dots as references when operating the TV.
GB
9
Page 10

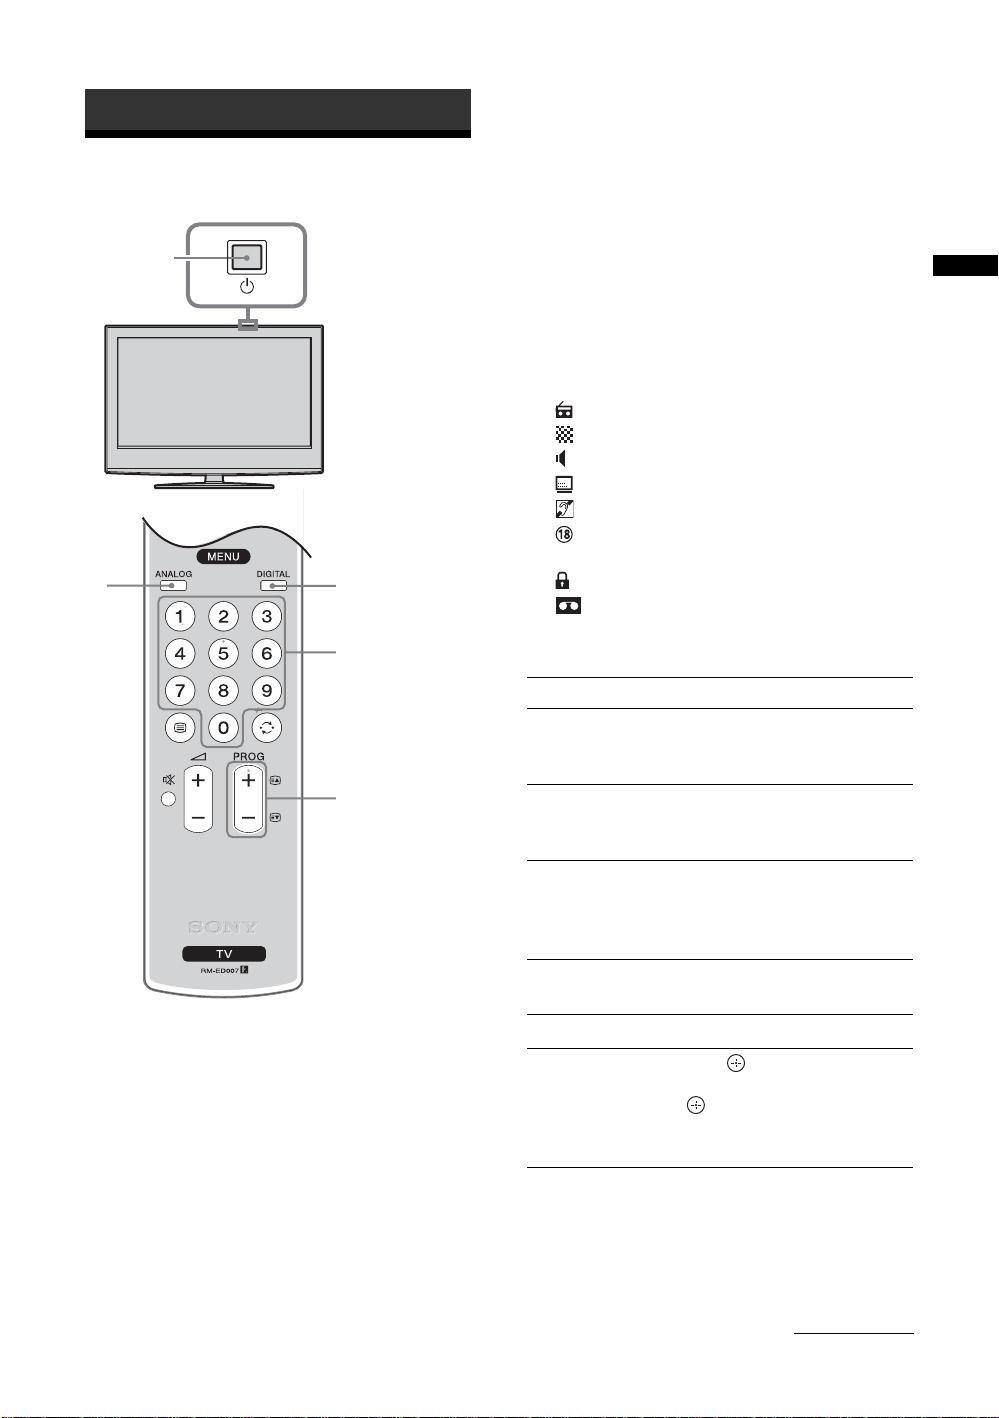
Overview of the TV buttons and indicators
1 MENU (page 17)
2 / – Input select/OK
• In TV mode (page 16): Selects the input
source from equipment connected to the TV
sockets.
• In TV menu: Selects the menu or option, and
confirm the setting.
3 2 +/-/G/g
• Increases (+) or decreases (-) the volume.
• In TV menu: Moves through the options left
G) or right (g).
(
4 PROG +/-/F/f
• In TV mode: Selects the next (+) or previous
(-) channel.
• In TV menu: Moves through the options up
F) or down (f).
(
5 1 – Power
Switches the TV on or off.
Note:
To disconnect the TV completely, pull the plug
from the mains.
6 Remote control sensor
7 – Picture Off/Timer indicator
• Lights up in green when the picture is
switched off (page 21).
• Lights up in orange when the timer is set
(page 22).
• Lights up in red when digital REC starts in
standby mode.
8 1 – Standby indicator
Lights up in red when the TV is in standby mode.
9 " – Power indicator
Lights up in green when the TV is switched on.
10
GB
Page 11
Watching TV
Watching TV
1
2
3 Press the number buttons or PROG +/- to
select a TV channel.
To select channel numbers 10 and above using the
number buttons, enter the second and third digits
within two seconds.
To select a digital channel using the Digital
Electronic Programme Guide (EPG), see page 13.
In digital mode
An information banner appears briefly. The
following icons may be indicated on the banner.
: Radio service
: Scrambled/Subscription service
: Multiple audio languages available
: Subtitles available
: Subtitles available for the hearing impaired
: Recommended minimum age for current
programme (from 4 to 18 years)
2
3
: Parental Lock
: Current programme is being recorded
Additional operations
To Do this
Turn off the TV
temporarily
(Standby mode)
Press "/1.
Watching TV
3
1 Press 1 on the TV (top side) to switch on
the TV.
When the TV is in standby mode (the 1 (standby)
indicator on the TV (front) is red), press "/1 on
the remote to switch on the TV.
2 Press DIGITAL to switch to digital mode or
ANALOG to switch to analogue mode.
The channels available vary depending on the
mode.
Turn on the TV
from Standby mode
without sound
Switch off the TV. Press 1 on the TV (top side).
Note
To disconnect the TV completely, pull the plug from the
mains.
Adjust the volume Press 2 + (increase)/
Mute the sound Press %. Press again to restore.
Access the
Programme index
table (in analogue
mode only)
Press %. Press 2 +/- to set the
volume level.
- (decrease).
Press . To select an analogue
channel, press
.
To access the Input signal index
table, see page 16.
F/f, then press
Continued
11
GB
Page 12

To access Text
Press /. Each time you press /, the display changes
cyclically as follows:
Text t Text over the TV picture (mix mode) t No
Text (exit the Text service)
To select a page, press the number buttons or PROG
+/-.
To hold a page, press / .
To reveal hidden information, press / .
Tips
• Ensure that the TV is receiving a good signal, or some text
errors may occur.
• Most TV channels broadcast a Text service. For
information on the use of the service, select the index page
(usually page 100).
• When four coloured items appear at the bottom of the Text
page, Fastext is available. Fastext allows you to access
pages quickly and easily. Press the corresponding
coloured button to access the page.
Picture Freeze
Freezes the TV picture (e.g. to make a note of a
telephone number or recipe).
1 Press on the remote control.
2 Press F/f/G/g to adjust the position of the
window.
Smart*
Displays conventional 4:3 broadcasts with an
imitation wide screen effect. The 4:3 picture is
stretched to fill the screen.
4:3
Displays conventional 4:3 broadcasts (e.g., non-wide
screen TV) in the correct proportions.
Wide
Displays wide screen (16:9) broadcasts in the correct
proportions.
Zoom*
3 Press to remove the window.
4 Press again to return to normal TV
mode.
Tip
Not available for AV3, AV5 and AV6.
PIP in PC Mode (Picture in Picture)
In PC mode, displays a small picture of the last
channel selected.
1 Press on the remote control.
2 Press F/f/G/g to adjust the position of the
window.
3 Press to cancel.
Tip
The sound is output from the small picture.
To change the screen mode manually to
suit the broadcast
Press repeatedly to select Smart, 4:3, Wide,
Zoom, or 14:9.
Displays cinemascopic (letter box format) broadcasts
in the correct proportions.
14:9*
Displays 14:9 broadcasts in the correct proportions.
As a result, black border areas are visible on the
screen.
* Parts of the top and bottom of the picture may be cut off.
Tips
• Alternatively, you can set “Auto Format” to “On”. The TV
will automatically select the best mode to suit the
broadcast (page 21).
• You can adjust the position of the picture when selecting
Smart, 14:9, or Zoom. Press
(e.g., to read subtitles).
F/f to move up or down
12
GB
Page 13
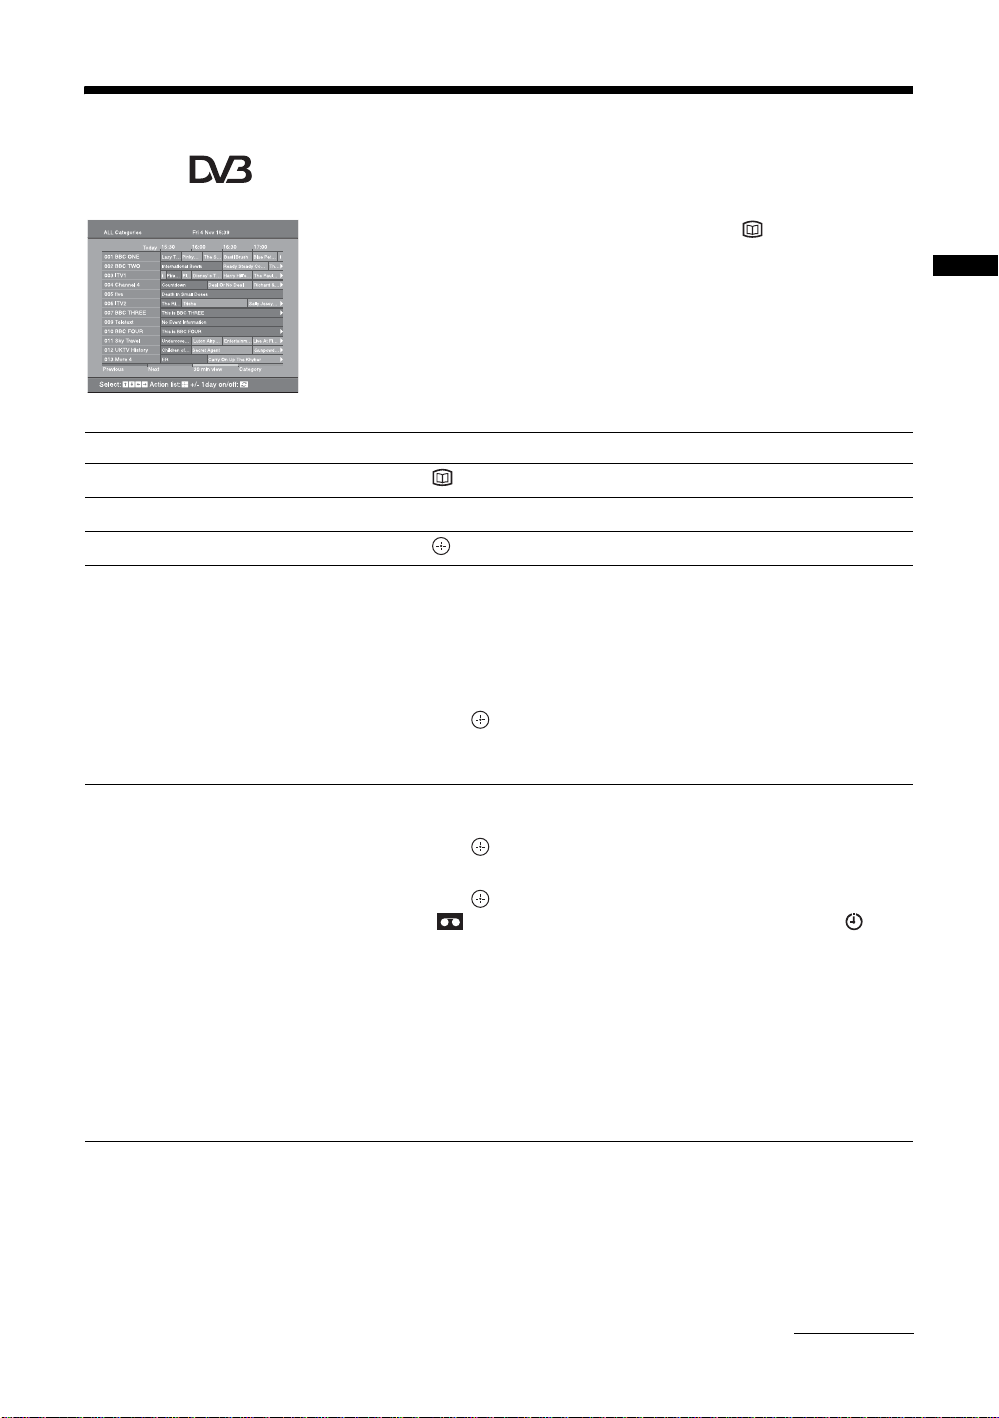
Checking the Digital Electronic Programme Guide
(EPG)
1 In digital mode, press to display the
Digital Electronic Programme Guide
(EPG).
2 Perform the desired operation, as shown in
the following table.
Note
Programme information will only be displayed if the TV
Digital Electronic Programme Guide (EPG)
To Do this
Turn off the EPG Press .
station is transmitting it.
Watching TV
Move through the EPG Press
Watch a current programme Press while the current programme is selected.
Sort the programme information by
category – Category list
Set a programme to be recorded – Timer
REC
F/f/G/g.
1 Press the blue button.
2 Press
3 Press .
1 Press F/f/G/g to select the future programme you want to
2 Press .
3 Press
4 Press to set the TV and your VCR timers.
Notes
• You can set VCR timer recording on the TV only for Smartlink compatible
VCRs. If your VCR is not Smartlink compatible, a message will be displayed to
remind you to set your VCR timer.
• Once a recording has begun, you can switch the TV to standby mode, but do not
switch off the TV completely or the recording may be cancelled.
• If an age restriction for programmes has been selected, a message asking for pin
code will appear on the screen. For more details refer to “Parental Lock” on
page 27.
F/f/G/g to select a category. The category name is
displayed on the side.
The categories available include:
“All Categories”: Contains all available channels.
“News”: Contains all news channels.
The Digital Electronic Programme Guide (EPG) now only displays the
current programmes from the category selected.
record.
F/f to select “Timer REC”.
A symbol appears by that programme’s information. The
indicator on the TV (front) lights up.
Continued
13
GB
Page 14
To Do this
Set a programme to be displayed
automatically on the screen when it starts
– Reminder
1 Press F/f/G/g to select the future programme you want to
display.
2 Press .
3 Press
4 Press to automatically display the selected programme
when the programme starts.
A c symbol appears by that programme’s information.
Note
If you switch the TV to standby mode, it will automatically turn itself on
when the programme is about to start.
F/f to select “Reminder”.
Set the time and date of a programme you
want to record – Manual timer REC
Cancel a recording/reminder – Timer list
Tip
You can also display the Digital Electronic Programme Guide (EPG) by selecting “Digital EPG” in the “MENU”.
1 Press .
2 Press
3 Press
4 Set the start and stop time in the same way as in step 3.
5 Press
Notes
• You can set VCR timer recording on the TV only for Smartlink compatible
VCRs. If your VCR is not Smartlink compatible, a message will be displayed to
remind you to set your VCR timer.
• Once a recording has begun, you can switch the TV to standby mode, but do not
switch off the TV completely or the recording may be cancelled.
• If an age restriction for programmes has been selected, a message asking for pin
code will appear on the screen. For more details refer to “Parental Lock” on
page 27.
1 Press .
2 Press
3 Press
4 Press g to select “Yes”, then press to confirm.
F/f to select “Manual timer REC”, then press .
F/f to select the date, then press g.
F/f to select the programme, then press to set the
TV and your VCR timers.
A symbol appears by that programme’s information. The
indicator on the TV (front) lights up.
F/f to select “Timer list”.
F/f to select the programme you want to cancel, then
press .
A display appears to confirm that you want to cancel the programme.
14
GB
Page 15

Using the Favourite list
The Favourite feature allows you to select programs
from a list of up to 8 channels you specify. To display
the Favourite list, see “Navigating through menus”
(page 17).
Favourite list
To Do this
Create your Favourite list for the first time A message appears asking if you want to add channels to the Favourite list
when you select “Digital Favourites” in the “MENU” for the first time.
1 Press to select “Yes”.
2 Press
3 Press .
Turn off the Favourite list Press RETURN.
Watch a channel Press while selecting a channel.
F/f to select the channel you want to add.
If you know the channel number, you can use the number buttons to
directly select a channel.
Channels that are stored in the Favourite list are indicated by a
symbol.
Watching TV
Add or remove channels in the Favourite
list
Remove all channels from the Fav ourite list
1 Press the blue button.
Channels that are stored in the Favourite list are indicated by a
symbol.
2 Press F/f to select the channel you want to add or remove.
If you know the channel number, you can use the number buttons to
directly select a channel.
3 Press .
4 Press the blue button to return to the Favourite list.
1 Press the blue button.
2 Press the yellow button.
A display appears to confirm that you want to delete all channels from the
Favourite list.
3 Press G to select “Yes”, then press to confirm.
15
GB
Page 16

Viewing pictures from
connected equipment
Switch on the connected equipment, then
perform one of the following operation.
For equipment connected to the scart sockets using a
fully-wired 21-pin scart lead
Start playback on the connected equipment.
The picture from the connected equipment appears on
the screen.
For an auto-tuned VCR (page 4)
In analogue mode, press PROG +/-, or the number
buttons, to select the video channel.
For other connected equipment
Press / repeatedly until the correct input
symbol (see below) appears on the screen.
AV1/ AV1 , AV2/ AV2 :
Audio/video or RGB input signal through the scart
socket / 1 or 2. appears only if an RGB
source has been connected.
AV3:
Component input signal through the Y, P
sockets / 3, and audio input signal through the
L, R sockets / 3.
B/CB, PR/CR
To Do this
Access the Input
signal index table
Press to access the Input signal
index table. (Then, only in
analogue mode, press
select an input source, press
then press .
g.) To
F/f,
AV4/ AV4:
Video input signal through the video socket 4, and
audio input signal through the L (MONO), R audio
sockets 4. appears only if the equipment is
connected to the S video socket 4 instead of the
video socket 4, and S video input signal is input
through the S video socket 4.
5:
RGB input signal through the PC connectors 5, and
audio input signal through the socket .
AV6:
Digital audio/video signal is input through the HDMI IN
6 socket. Audio input signal is analogue only if the
equipment has been connected using the DVI and audio
out socket.
Additional operations
To Do this
Return to the normal
TV operation
Press DIGITAL or ANALOG.
16
GB
Page 17
Using MENU Functions
Navigating through menus
“MENU” allows you to enjoy various convenient features of this TV. You can easily select channels or external
inputs with the remote. Also, settings for your TV can be changed easily using “MENU”.
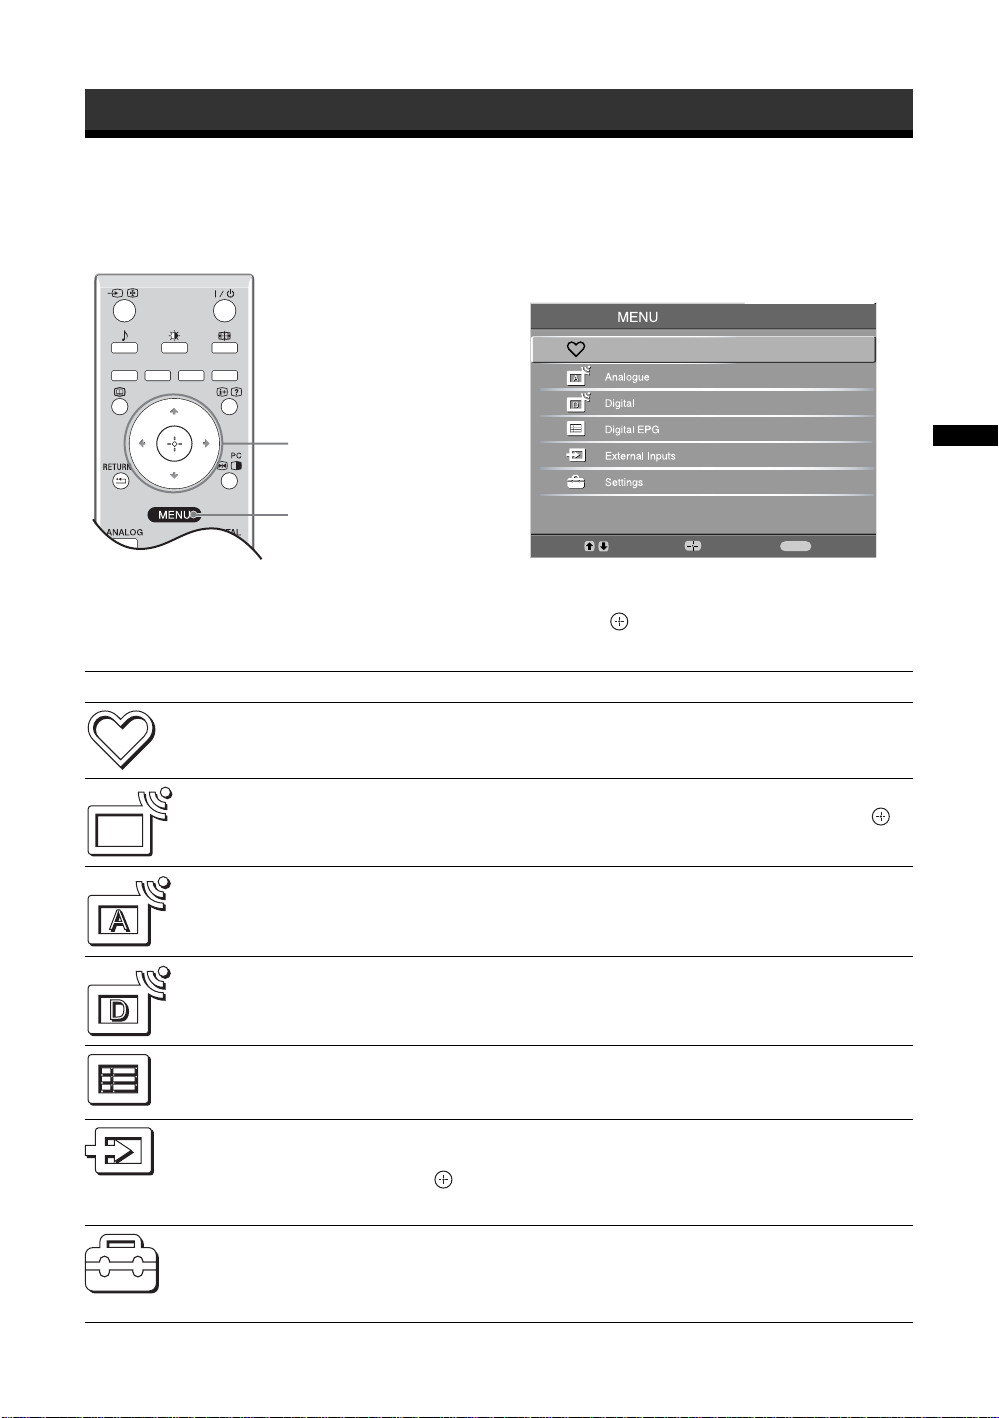
1 Press MENU to display the menu.
Digital Favourites
2,3
1
Menu Description
Digital Favourites
(in digital mode only)
Programme List
(in analogue mode
only)
Analogue
(in digital mode only)
Digital
(in digital mode only)
Launches the Favourite list. For details about settings, see page 15.
Allows you to select TV programs from a list of channel labels.
• To watch the desired channel, select the channel, then press .
• To assign a label to a program, see page 24.
Returns to the last viewed analogue channel.
Returns to the last viewed digital channel.
MENU
Select:
Enter:
Exit:
2 Press F/f to select an option.
3 Press to confirm a selected option.
To exit the menu, press MENU.
Using MENU Functions
Digital EPG
(in digital mode only)
External Inputs
Settings
Launches the Digital Electronic Programme Guide (EPG).
For details about settings, see page 13.
Selects equipment connected to your TV.
• To watch the desired external input, select the input source, then
press .
• To assign a label to an external input, see page 23.
Opens the Settings menu screen where most of advanced settings and
adjustments are performed. Select a menu icon, select an option and make the
desired change or adjustment using
For details about settings, see page 18 to 27.
F/f/G/g.
17
GB
Page 18

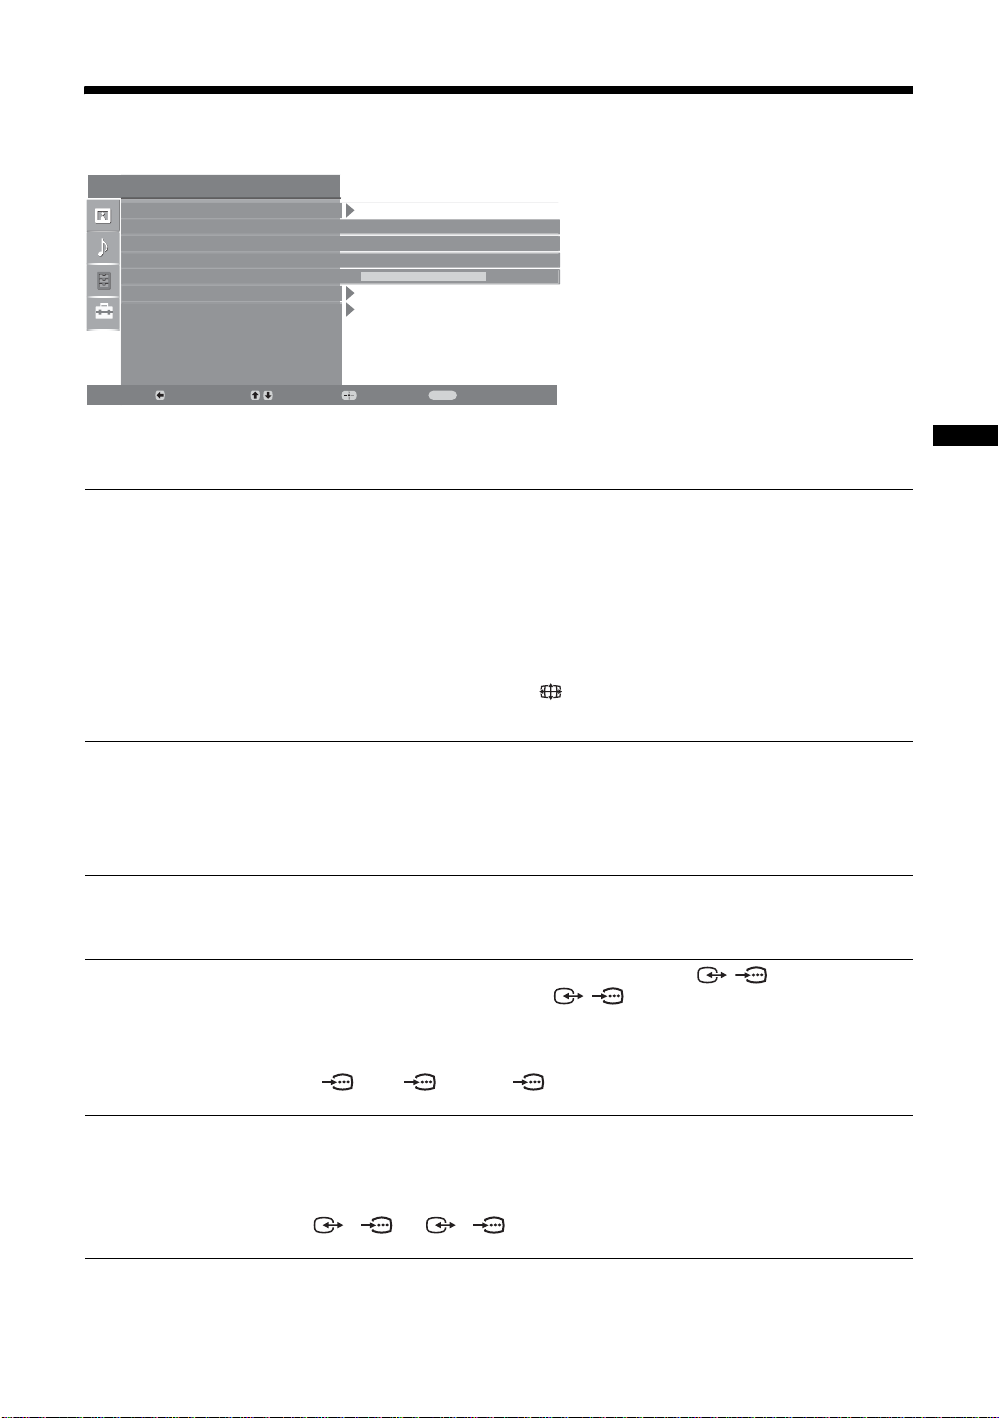
Picture Adjustment menu
Picture Adjustment
Picture Mode
Backlight
Contrast
Brightness
Colour
Hue
Sharpness
Colour Tone
Reset
Noise Reduction
Back:
Picture Mode
Backlight
Contrast
Brightness
Select:
You can select the options listed below on the
Picture menu. To select options in “Settings”,
see “Navigating through menus” (page 17).
Enter:
Custom
5
Max
50
50
0
15
Warm
Auto
Exit:
MENU
Selects the picture mode.
• “Vivid”: For enhanced picture contrast and sharpness.
• “Standard”: For standard picture. Recommended for home entertainment.
• “Custom”: Allows you to store your preferred settings.
Adjusts the brightness of the backlight.
Increases or decreases picture contrast.
Brightens or darkens the picture.
Colour
Hue
Sharpness
Colour Tone
Reset
Noise Reduction
GB
18
Increases or decreases colour intensity.
Increases or decreases the green tones.
Tip
“Hue” can only be adjusted for an NTSC colour signal (e.g., U.S.A. video tapes).
Sharpens or softens the picture.
Adjusts the whiteness of the picture.
• “Cool”: Gives the white colours a blue tint.
• “Neutral”: Gives the white colours a neutral tint.
• “Warm”: Gives the white colours a red tint.
Tip
“Warm” can only be selected when you set “Picture Mode” to “Custom”.
Resets all picture settings except “Picture Mode” to the factory settings.
Reduces the picture noise (snowy picture) in a weak broadcast signal.
• “Auto”: Automatically reduces the picture noise.
• “High/Mid/Low”: Modifies the effect of the noise reduction.
Page 19

Sound Adjustment menu
Sound Adjustment
Sound Effect
Tr eb l e
Bass
Balance
Reset
Dual Sound
Auto Volume
TV Speakers
Back:
Sound Effect
Select:
You can select the options listed below on the
Sound menu. To select options in “Settings”,
Enter:
Standard
50
50
0
Mono
On
On
Exit:
MENU
see “Navigating through menus” (page 17).
Selects the sound mode.
• “Standard”: Enhances clarity, detail, and sound presence by using “BBE High definition
Sound System.”
• “Dynamic”: Intensifies clarity and sound presence for better intelligibility and musical
realism by using the “BBE High definition Sound System.”
• “BBE ViVA”: BBE ViVA Sound provides musically accurate natural 3D image with Hi-Fi
sound. The clarity of the sound is improved by BBE while the width depth and height of
sound image are expanded by BBE’s proprietary 3D sound process. BBE ViVA Sound is
compatible with all TV programs including news, music, dramas, movies, sports and
electronic games.
• “Dolby Virtual
channel system.
• “Off”: Flat response.
”
: Uses the TV speakers to simulate the surround effect produced by a multi
Tips
• You can change sound effect by pressing 9 repeatedly.
• If you set “Auto Volume” to “On”, “Dolby Virtual” changes to “Natural”.
Using MENU Functions
Treble
Bass
Balance
Reset
Dual Sound
Auto Volume
Adjusts higher-pitched sounds.
Adjusts lower-pitched sounds.
Emphasizes left or right speaker balance.
Resets all the sound settings to the factory settings.
Selects the sound from the speaker for a stereo or bilingual broadcast.
• “Stereo”, “Mono”: For a stereo broadcast.
• “A”/“B”/“Mono”: For a bilingual broadcast, select “A” for sound channel 1, “B”
for sound channel 2, or “Mono” for a mono channel, if available.
Tip
If you select other equipment connected to the TV, set “Dual Sound” to “Stereo”, “A” or “B”.
Keeps a constant volume level even when volume level gaps occur (e.g., adverts tend
to be louder than programmes).
19
GB
Page 20

TV Speakers
Turns off the TV speakers e.g. to listen to the sound through external audio
equipment connected to the TV.
• “On”: the sound is output from the TV speakers.
• “One Time Off”: the TV speakers are temporarily turned off allowing you to listen
to the sound from external audio equipment.
• “Permanently Off”: the TV speakers are permanently turned off allowing you to
listen to the sound from external audio equipment.
Tips
• To turn on the TV speakers again, change to on.
• The “One Time Off” option automatically returns to “On” when the TV set is
switched off.
• “Sound Adjustment” options are not available if “One Time Off” or “Permanent
Off” have been selected.
20
GB
Page 21
Features menu
Features
Screen
Power Saving
Adv. Contrast Enhancer
AV2 Output
RGB Center
PC Adjustment
Timer
Back:
Screen
Select:
You can select the options listed below on the
Features menu. To select options in “Settings”,
Standard
On
TV
0
see “Navigating through menus” (page 17).
MENU
Enter:
Changes the screen format.
• “Auto Format”: Automatically changes the screen format according to the
broadcast signal.
• “Screen Format”: For details about the screen format, see page 12
• “Vertical Size”: Adjusts the vertical size of the picture when the screen format is
set to Smart.
Tips
• Even if you have selected “On” or “Off” in “Auto Format”, you can always modify the
format of the screen by pressing repeatedly.
• “Auto Format” is available for PAL and SECAM signals only.
Exit:
Using MENU Functions
Power Saving
Adv. Contrast
Enhancer
AV2 Output
RGB Center
Selects the power saving mode to reduce the power consumption of the TV.
• “Standard”: Default settings.
• “Reduce”: Reduces the power consumption of the TV.
• “Picture Off”: Switches off the picture. You can listen to the sound with the picture
off.
Automatically adjusts "Backlight" to the most suitable settings judging from the
brightness of the picture. It will increase the contrast distinction of the picture.
Sets a signal to be output through the socket labelled / 2 on the rear of the
TV. If you connect a VCR to the / 2 socket, you can then record from the
equipment connected to other sockets of the TV.
• “TV”: Outputs a broadcast.
• “Auto”: Outputs whatever is being viewed on the screen. Not available for
AV3, AV5 and AV6.
Adjusts the horizontal picture position so that the picture is in the middle of the
screen.
Tip
This option is only available if an RGB source has been connected to the Scarts connectors
1/ 1
or 2/ 2 on the rear of the TV.
21
GB
Page 22

PC Adjustment
Customizes the TV screen as a PC monitor.
Tip
This option is only available if you are in PC Mode.
• “Phase”: Adjust the screen when a part of a displayed text or image is not clear.
• “Pitch”: Enlarges or shrinkes the screen size horizontally.
• “H Center”: Moves the screen to the left or to the right.
• “V Lines”: Corrects the picture lines while viewing an RGB input signal from the
PC connector.
• “Power saving”: Turns to standby mode if no PC signal is received.
• “Reset”: Resets to the factory settings.
Timer
Sets the timer to turn on/off the TV.
•Sleep Timer
Sets a period of time after which the TV automatically switches itself into standby
mode.
When the Sleep Timer is activated, the (Timer) indicator on the TV (front)
lights up in orange.
Tips
• If you switch off the TV and switch it on again, “Sleep Timer” is reset to “Off”.
• “TV will soon turn off by sleep timer.” appears on the screen one minute before the TV
switches to standby mode.
• Clock Set
Allows you to adjust the clock manually. When the TV is receiving digital
channels, the clock cannot be adjusted manually since it is set to the time code of
the broadcasted signal.
•Timer
Sets the timer to turn on/off the TV.
“Timer Mode”: Selects the desired period.
“On Time”: Sets the time to turn on the TV.
“Off Time”: Sets the time to turn off the TV.
22
GB
Page 23

Set-up menu
Set Up
Auto Start Up
Language
Country
Auto Tuning
Programme Sorting
AV Preset
Sound Offset
Manual Programme Preset
Digital Set Up
Back:
Auto Start-up
Language
Country
Select:
You can select the options listed below on the
Set-up menu. To select options in “Settings”, see
“Navigating through menus” (page 17).
Enter:
English
-
Exit:
MENU
Starts the “first time operation menu” to select the language and country/region, and
tune in all available digital and analogue channels. Usually, you do not need to do
this operation because the language and country/region will have been selected and
channels already tuned when the TV was first installed (page 5, 6). However, this
option allows you to repeat the process (e.g., to retune the TV after moving house,
or to search for new channels that have been launched by broadcasters).
Selects the language in which the menus are displayed.
Selects the country/region where you operate the TV.
Tip
The country/region in which you want to use the TV does not appear in the list, select
“-” instead of a country/region.
Using MENU Functions
Auto Tuning
Programme Sorting
AV Preset
Sound Offset
Tunes in all the available analogue channels.
Usually you do not need to do this operation because the channels are already tuned
when the TV was first installed (page 5, 6). However, this option allows you to
repeat the process (e.g., to retune the TV after moving house, or to search for new
channels that have been launched by broadcasters).
Changes the order in which the analogue channels are stored on the TV.
1 Press
2 Press
F/f to select the channel you want to move to a new position,
then press
g.
F/f to select the new position for your channel, then press .
Assigns a name to any equipment connected to the side and rear sockets. The name
will be displayed briefly on the screen when the equipment is selected. You can skip
an input source that is not connected to any equipment.
1 Press
2 Press
F/f to select the desired input source, then press .
F/f to select the desired option below, then press .
• AV1 (or AV2/ AV3/ AV4/ PC/ HDMI), VIDEO, DVD, CABLE, GAME, CAM, SAT:
Uses one of the preset labels to assign a name to connected equipment.
• “Edit”: Creates your own label.
• “Skip”: Skips an input source that is not connected to any equipment when you
press F/f to select the input source.
Sets an independent volume level to each equipment connected to the TV.
Continued
23
GB
Page 24

Manual Programme
Preset
Before selecting “Label”/“AFT”/“Audio Filter”/“Skip”/“Decoder”, press F/f to
select the programme number you want to modify. Then, press .
/Channel
System
Presets programme channels manually.
1 Press
2 Press
Note
3 Press F/f to select “Channel”, then press .
4 Press
5 Tune the channels as follows:
6 Press to jump to “Confirm”, then press .
7 Press
Repeat the procedure above to preset other channels manually.
Label
Assigns a name of your choice, up to five letters or numbers, to the selected channel.
This name will be displayed briefly on the screen when the channel is selected.
AFT
Allows you to fine-tune the selected programme number manually if you feel that a
slight tuning adjustment will improve the picture quality.
You can adjust the fine tuning over a range of -15 to +15. When “On” is selected, the
fine tuning is performed automatically.
Audio Filter
Improves the sound for individual channels in the case of distortion in mono
broadcasts. Sometimes a non-standard broadcast signal can cause sound distortion or
intermittent sound muting when watching mono programmes.
If you do not experience any sound distortion, we recommend that you leave this
option set to the factory setting “Off”.
Notes
• You cannot receive stereo or dual sound when “Low” or “High” is selected.
• “Audio Filter” is not available when “System” is set to “L”.
F/f to select “System”, then press .
F/f to select one of the following TV broadcast systems, then
G.
press
B/G: For western European countries/regions
D/K: For eastern European countries/regions
L: For France
I: For the United Kingdom
Depending on the country/region selected for “Country” (page 5), this option may not be
available.
F/f to select “S” (for cable channels) or “C” (for terrestrial
channels), then press
If you do not know the channel number (frequency)
Press F/f to search for the next available channel. When a channel has been found,
the search will stop. To continue searching, press
If you know the channel number (frequency)
Press the number buttons to enter the channel number of the broadcast you want or
your VCR channel number.
g.
F/f.
f to select “OK”, then press .
24
GB
Page 25

Skip
Skips unused analogue channels when you press PROG +/- to select channels. (You
can still select a skipped channel using the number buttons.)
Decoder
Views and records the scrambled channel selected when using a decoder connected
directly to scart connector / 1, or to scart connector / 2 via a VCR.
Note
Depending on the country/region selected for “Country” (page 5), this option may not be
available.
Confirm
Saves changes made to the “Manual Programme Preset” settings.
Using MENU Functions
25
GB
Page 26

Digital Set-up menu
Set Up
Auto Start Up
Language
Country
Auto Tuning
Programme Sorting
AV Preset
Sound Offset
Manual Programme Preset
Digital Set Up
Back:
Digital Tuning
Select:
You can change/set the digital settings using the
Digital Set-up menu. To select options in
“Settings”, see “Navigating through menus”
(page 17).
Enter:
English
-
Exit:
MENU
Displays the “Digital Tuning” menu.
Digital Auto Tuning
Tunes in all the available digital channels.
Usually you do not need to do this operation because the channels are already tuned
when the TV was first installed (page 5). However, this option allows you to repeat
the process (e.g., to retune the TV after moving house, or to search for new channels
that have been launched by broadcasters).
Programme List Edit
Removes any unwanted digital channels stored on the TV, and changes the order of
the digital channels stored on the TV.
1 Press
F/f to select the channel you want to remove or move to a new
position.
If you know the programme number (frequency)
Press the number buttons to enter the three-digit programme number of the broadcast
you want.
2 Remove or change the order of the digital channels as follows:
To remove the digital channel
Press . A message that confirms whether the selected digital channel is to be
deleted appears. Press
G to select “Yes”, then press .
To change the order of the digital channels
Press g, then press F/f to select the new position for the channel and press G.
Repeat the procedure in steps 1 and 2 to move other channels if required.
3 Press RETURN.
Digital Manual Tuning
Tunes the digital channels manually.
1 Press the number button to select the channel number you want to
manually tune, then press
2 When the availab le channels are f ound, press
F/f to tune the channel.
F/f to select the channel
you want to store, then press .
3 Press
F/f to select the programme number where you want to store the
new channel, then press .
Repeat the procedure above to tune other channels manually.
26
GB
Page 27

Digital Set-up
Displays the “Digital Set-up” menu.
Subtitle Setting
Displays digital subtitles on the screen.
When “For Hard Of Hearing” is selected, some visual aids may also be displayed
with the subtitles (if TV channels broadcast such information).
Subtitle Language
Selects which language subtitles are displayed in.
Audio Language
Selects the language used for a programme. Some digital channels may broadcast
several audio languages for a programme.
Audio Type
Increases the sound level when “For Hard Of Hearing” is selected.
Parental Lock
Sets an age restriction for programmes. Any programme that exceeds the age
restriction can only be watched after a PIN Code is entered correctly.
1 Press the number buttons to enter your existing PIN code.
If you have not previously set a PIN, a PIN code entry screen appears. Follow the
instruction of “PIN Code” below.
2 Press F/f to select the age restriction or “None” (for unrestricted
watching), then press .
3 Press RETURN.
PIN Code
Sets a PIN code for the first time, or allows you to change your PIN code.
1 Enter a PIN as follows:
If you have previously set a PIN
Press the number buttons to enter your existing PIN.
If you have not set a PIN
Press the number buttons to enter the factory setting PIN of 9999.
2 Press the number buttons to enter the new PIN code.
A message appears to inform you that the new PIN has been accepted.
3 Press RETURN.
Tip
PIN code 9999 is always accepted.
Technical Set-up
Displays the Technical Set-up menu.
“Auto Service Update”: Enables the TV to detect and store new digital services as
they become available.
“Software Download”: Enables the TV to automatically receive software updates,
free through your existing aerial (when issued). Sony recommends that this option is
set to “On” at all times. If you do not want your software to be updated, set this option
to “Off”.
“System Information”: Displays the current software version and the signal level.
“Time Zone”: Allows you to select the correct time zone for your country.
CA Module Set-up
Allows you to access a Pay Per View service once you obtain a Conditional Access
Module (CAM) and a view card. See page 28 for the location of the (PCMCIA)
socket.
Using MENU Functions
27
GB
Page 28

Using Optional Equipment
Connecting optional equipment
You can connect a wide range of optional equipment to your TV. Connecting cables are not supplied.
Connecting to the TV (side)
To connect Do this
Conditional Access
Module (CAM) A
To use Pay Per View services.
For details, refer to the instruction
manual supplied with your CAM.
To use the CAM, remove the
rubber cover from the CAM slot.
Switch off the TV when inserting
your CAM into the CAM slot.
When you do not use the CAM, we
recommend that you replace the
cover on the CAM slot.
S VHS/Hi8/DVC
camcorder
S VHS/Hi8/DVC
camcorder B
Headphones C Connect to the i socket to listen to
Connect to the S video socket
4 or the video socket 4,
and the audio sockets 4. To
avoid picture noise, do not connect
the camcorder to the video socket
4 and the S video socket
4 at the same time. If you
connect mono equipment, connect
to the L socket 4, and set
“Dual Sound” to “A” (page 19).
sound from the TV on headphones.
28
Headphones
GB
Page 29
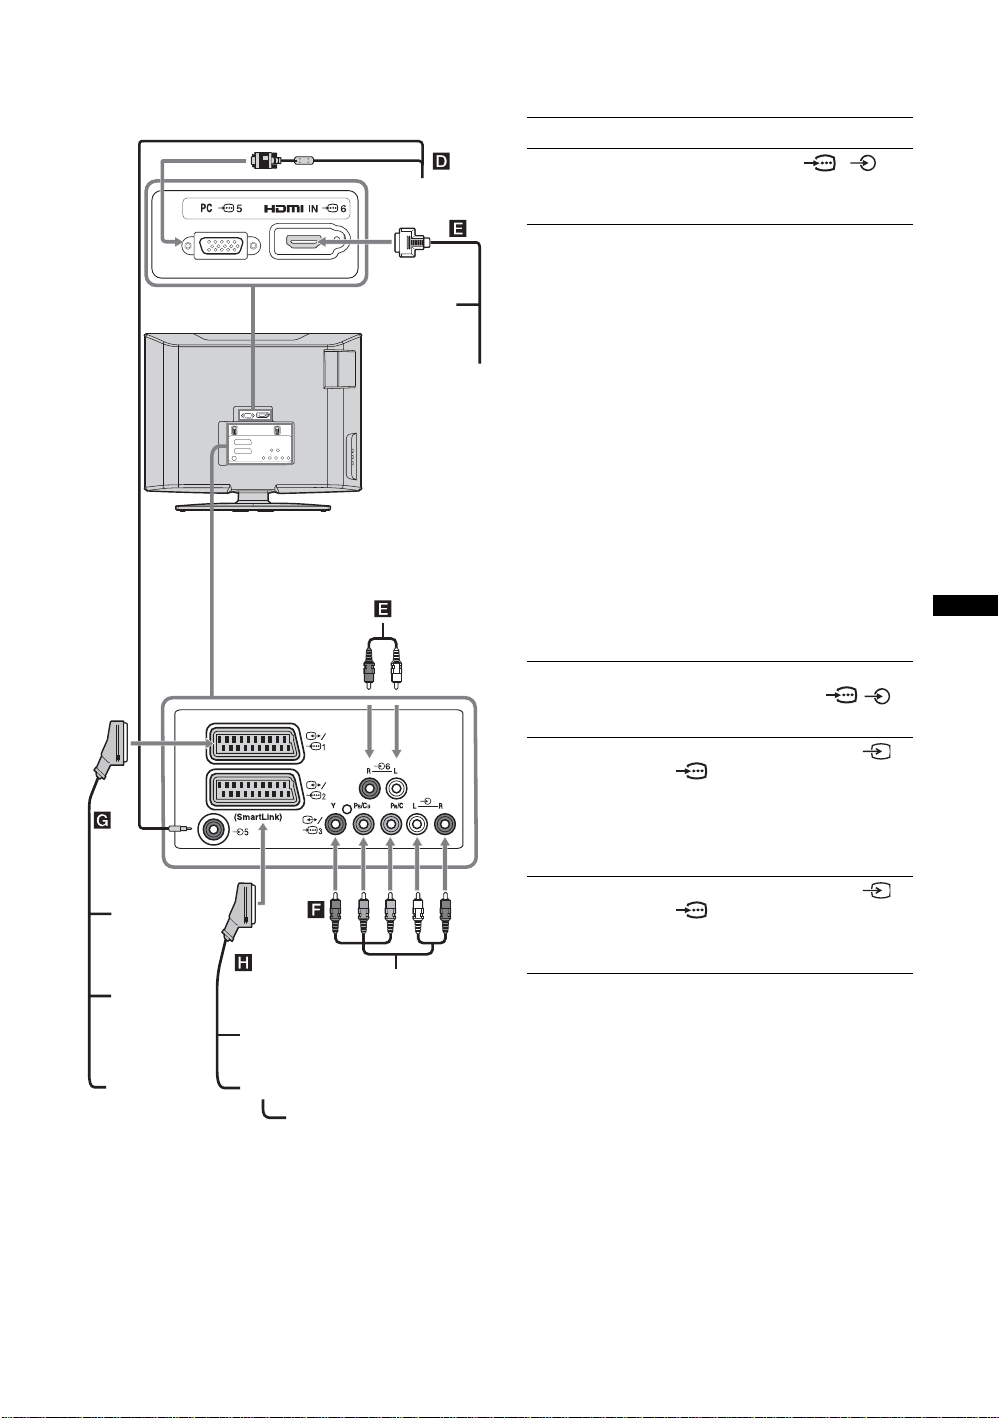
Connecting to the TV (rear)
PC
To connect Do this
PC D Connect to the PC 5/ 5
sockets. It is recommended to use
a PC cable with ferrites.
DVD player
Digital satellite
receiver
Digital satellite
receiver or DVD
player E
DVD player with
component output
F
Video game
equipment, DVD
player or decoder
G
Connect to the HDMI IN 6 socket
if the equipment has a HDMI
socket. The digital video and audio
signals are input from the
equipment. If the equipment has a
DVI socket, connect the DVI
socket to the HDMI IN 6 socket
through a DVI - HDMI adaptor
interface (not supplied), and
connect the equipment’s audio out
sockets to the audio in HDMI IN 6
sockets.
Notes
• The HDMI sockets only support
the following V ideo inputs: 480i,
480p, 576i, 576p, 720p and
1080i. To connect a PC, please
use the PC input socket.
• Use HDMI certified cable with
HDMI logo.
Connect to the component sockets
and the audio sockets / 3.
Connect to the scart socket /
1. When you connect the
decoder, the scrambled signal from
the TV tuner is output to the
decoder, then the unscrambled
signal is output from the decoder.
Using Optional Equipment
Video game
equipment
DVD player
Decoder
with component output
DVD recorder
VCR
Decoder
DVD player
DVD recorder or
VCR that supports
SmartLink H
Connect to the scart socket /
2. SmartLink is a direct link
between the TV and a VCR/DVD
recorder.
29
GB
Page 30

Additional Information
Specifications
Display Unit
Power Requirements:
220–240 V AC, 50 Hz
Screen Size:
20 inches
Display Resolution:
1,366 dots (horizontal) × 768 lines (vertical)
Power Consumption:
65 W or less
Standby Power Consumption*:
1 W or less
* Specified standby power is reached after the TV finishes
necessary internal processes.
Dimensions (w × h × d):
Approx. 500 × 406 × 209 mm (with stand)
Approx. 500 × 370 × 100 mm (without stand)
Mass:
Approx. 8 kg (with stand)
Approx. 7 kg (without stand)
Panel System
LCD (Liquid Crystal Display) Panel
TV System
Depending on your country/region selection:
Analogue: B/G/H, D/K, L, I
Digital: DVB-T
Colour/Video System
Analogue: PAL, SECAM
NTSC 3.58, 4.43 (only Video In)
Digital: MPEG-2 MP@ML
Aerial
75 ohm external terminal for VHF/UHF
Channel Coverage
Analogue: 48.25 - 855.25 MHz
Digital: VHF Band III (177.5 - 226.5 MHz)
UHF E21 - E69 (474 - 858 MHz)
Terminals
/1
21-pin Scart connector (CENELEC standard) including
audio/video input, RGB input, and TV audio/video
output.
/ 2 (SmartLink)
21-pin Scart connector (CENELEC standard) including
audio/video input, RGB input, selectable audio/video
output, and SmartLink interface.
3
Supported formats: 1080i, 720p, 576p, 576i, 480p, 480i
Y: 1 Vp-p, 75 ohms, 0.3V negative sync
B/CB: 0.7 Vp-p, 75 ohms
P
R/CR: 0.7 Vp-p, 75 ohms
P
3
Audio input (phono jacks)
500 mVrms
Impedance: 47 kilo ohms
4 S video input (4-pin mini DIN)
4 Video input (phono jack)
4 Audio input (phono jacks)
PC 5 PC Input (15 Dsub) (see page 29)
G: 0.7 Vp-p, 75 ohms, non Sync on Green
B: 0.7 Vp-p, 75 ohms, non Sync on Green
R: 0.7 Vp-p, 75 ohms, non Sync on Green
HD: 1-5 Vp-p
VD: 1-5 Vp-p
5 PC audio input (minijack)
HDMI IN 6
Video: 1080i, 720p, 576p, 576i, 480p, 480i
Audio: Two channel linear PCM
32, 44.1 and 48 kHz, 16, 20 and 24 bits,
or analogue audio input (phono jacks)
i Headphones jack
CAM (Conditional Access Module) slot
Sound Output
5 W + 5 W (RMS)
Supplied Accessories
Refer to “1: Checking the accessories” on page 4.
Design and specifications are subject to change
without notice.
PC Input Signal Reference Chart
Signals Horizontal (Pixel) Vertical (Line)
Horizontal
frequency (kHz)
Vertical
frequency (Hz)
Standard
VGA 640 480 31.5 60 VGA
SVGA 800 600 37.9 60 VESA Guidelines
XGA 1024 768 48.4 60 VESA Guidelines
WXGA 1280 768 47.4 60 VESA
1280 768 47.8 60 VESA
• This TV’s PC input does not support Sync on Green or Composite Sync.
• This TV’s PC input does not support interlaced signals.
• This TV’s PC input supports signals in the above chart with a 60 Hz vertical frequency. For other signals, you will see the
message “NO SYNC”.
GB
30
Page 31

Troubleshooting
Check whether the 1 (standby) indicator is flashing in red.
When it is flashing
The self-diagnosis function is activated.
1 Measure how long the 1 (standby) indicator flashes and stops flashing.
For example, the indicator flashes for two seconds, stops flashing for one second, and flashes for two seconds.
2 Press 1 on the TV (top side) to switch it off, disconnect the mains lead, and inform your dealer or
Sony service centre of how the indicator flashes (duration and interval).
When it is not flashing
1 Check the items in the tables below.
2 If the problem still persists, have your TV serviced by qualified service personnel.
Picture
Problem Cause/Remedy
No picture (screen is dark) and
no sound
• Check the aerial connection.
• Connect the TV to the mains, and press 1 on the TV (top side).
•If the 1 (standby) indicator lights up in red, press "/1.
No picture or no menu
information from equipment
connected to the scarts or
HDMI IN socket
Double images or ghosting
Only snow and noise appear
on the screen
Distorted picture (dotted lines
or stripes)
Picture noise when viewing a
TV channel
Some tiny black points and/or
bright points on the screen
No colour on programmes
• Check that the optional equipment is on and press / repeatedly until
the correct input symbol is displayed on the screen.
• Check the connection between the optional equipment and the TV.
• When connecting any equipment to the HDMI IN 6 socket or when
changing the resolution, some dots can appear blinking on the screen for a
few seconds. HDMI signal decoding is in progress and it does not indicate a
malfunction.
• Check aerial/cable connections.
• Check the aerial location and direction.
• Check if the aerial is broken or bent.
• Check if the aerial has reached the end of its serviceable life (three to five
years in normal use, one to two years at the seaside).
• Keep the TV away from electrical noise sources such as cars, motorcycles,
hair-dryers or optical equipment.
• When installing optional equipment, leav e some space between the optional
equipment and the TV.
• Check the aerial connection.
• Keep the aerial cable away from other connecting cables.
• Select “Manual Programme Preset” in the “Set-Up” menu and adjust “AFT”
(Automatic Fine Tuning) to obtain better picture reception (page 24).
• The picture of a display unit is composed of pixels. T in y black points and/or
bright points (pixels) on the screen do not indicate a malfunction.
• Select “Reset” in the “Picture Adjustment” menu to return to the factory
settings (page 18).
Additional Information
No colour or irregular colour
when viewing a signal from the
B/CB, PR/CR jacks of 3
Y, P
• Check the connection of the Y, PB/CB, PR/CR jacks of 3.
• Make sure that the Y, P
respective sockets.
B/CB, PR/CR jacks of 3 are firmly seated in their
31
GB
Page 32

Sound
Problem Cause/Remedy
No sound, but good picture
•Press 2 +/– or % (Mute).
• Check that “TV Speakers” is set to “On” in the “Sound Adjustment” menu
(page 20).
Noisy sound
• See the “Picture noise” causes/remedies on page 31.
Channels
Problem Cause/Remedy
The desired channel cannot be
selected
Some channels are blank
Digital channel is not displayed
• Switch between digital and analogue mode and select the desired digital/
analogue channel.
• Scrambled/Subscription only channel. Subscribe to the Pay Per View
service.
• Channel is used only for data (no picture or sound).
• Contact the broadcaster for transmission details.
• Check that the aerial is plugged directly into the TV (not through other
equipment).
• Contact a local installer to find out if digital transmissions are provided in
your area.
• Upgrade to a higher gain aerial.
General
Problem Cause/Remedy
The TV turns off automatically
(the TV enters standby mode)
• Check if the “Sleep Timer” is activated, or confirm the setting of “Off
Time” (page 22).
• If no signal is received and no operation is performed in the TV mode for
10 minutes, the TV automatically switches to standby mode.
The TV turns on automatically
Some input sources cannot be
selected
The remote does not function
GB
32
• Check if the “On T i me” is activated (page 22).
• Select “AV Preset” in the “Set-up” menu and cancel “Skip” of the input
source (page 23).
• Replace the batteries.
Page 33

Введение
Благодарим Вас за то, что Вы выбрали этот
телевизор Sony.
Перед первым включением телевизора внимательно
ознакомьтесь с данной инструкцией по эксплуатации и
сохраните ее для консультаций в будущем
.
Примечание в отношении
Цифрового ТВ
• Все функции, относящиеся к Цифровому ТВ (),
будут действовать только в тех странах или регионах,
в которых ведется эфирная цифровая трансляция
сигнала DVB-T (MPEG2). Просим Вас уточнить у
своего дилера, можно ли принимать сигнал DVB-T
там, где Вы живете.
• Хотя данный телевизор следует характеристикам
DVB-T, мы не можем гарантировать его
совместимость с будущим вещанием
в формате
DVB-T.
• Некоторые из функций Цифрового ТВ в некоторых
странах могут быть недоступными.
Утилизация телевизора
окружающую среду и здоровье людей, поэтому для
предотвращения подобных последствий необходимо
выполнять специальные требования по утилизации
этого изделия. Переработка данных материалов
поможет сохранить природные ресурсы. Для
получения более подробной информации о
переработке этого изделия обратитесь в местные
органы городского управления, службу сбора
бытовых отходов или в магазин, где было
приобретено изделие.
Информация о торговых марках
• является зарегистрированной торговой маркой
DVB Project
• Произведено по лицензии компании BBE Sound, Inc.
Лицензия BBE Sound, Inc. зарегистрирована по
патентам США: 5510752, 5736897. Слово "BBE" и
логотип BBE являются торговыми марками компании
BBE Sound, Inc.
• Произведено по лицензии компании Dolby
Laboratories. "Dolby" и логотип с двойной буквой D
являются торговыми марками компании Dolby
Laboratories.
• HDMI, логотип HDMI и High-Definition Multimedia
Interface являются зарегистрированными торговыми
марками компании HDMI Licensing LLC.
Утилизация
электрического и
электронного
оборудования (директива
применяется в странах
Евросоюза и других
европейских странах, где
действуют системы
раздельного сбора
отходов)
Данный знак на устройстве или
данное устройство нельзя утилизировать вместе с
прочими бытовыми отходами. Его следует сдать в
соответствующий приемный пункт переработки
электрического и электронного оборудования.
Неправильная утилизация данного изделия может
привести к потенциально негативному влиянию на
Manufacturer:
Sony Corporation
1-7-1 Konan, Minato-ku, Tokyo
Japan
Factory:
Sony Spain S.A.
Pol. Ind. Can Mitjans s/n
08232 Viladecavalls (Barcelona)
Spain
Sony Slovakia, spol. sr. o., Trnava Plant
Trstínska cesta 8
917 58 Trnava
Slovak Republic
его упаковке обозначает, что
Изготовитель:
СОНИ Корпорейшен
1-7-1 Конан, Минато-ку, Токио
Япония
Завод:
СОНИ Испания С.А.
Пол. Инд. Кан Митьянс с/н
08232 Виладекавальс (Барселона)
Испания
СОНИ Словакия, спол. ср. о., Завод Трнава
Трестинска ул., 8
917 58 Трнава
Словацкая Республика
DIGITAL
~
Символы “xx” в названии модели соответствуют двум
цифрам, определяемым вариацией цвета.
АЯ19
ООО «БАЛТМИКСТ», 238530, Россия,
Калининградская область,
Зеленоградский район, пос. Переславское,
ст. «Переславское-западное»
RU
2
Page 34

Содержание
Начало работы 4
Начало работы 4
Сведения по безопасности ....................................................................................................7
Меры предосторожности .......................................................................................................8
Описание пульта ДУ .............................................................................................................9
Описание кнопок и индикаторов телевизора............................................................... 10
Просмотр телевизора
Просмотр телевизионных программ ...................................................................................11
Использование цифрового электронного экранного телегида (EPG) ....................13
Использование списка предпочитаемых программ .................................................15
Просмотр изображения с устройств, подключенных к телевизору ................................16
Использование функций меню
Навигация по системе меню ................................................................................................17
Меню "Настройка изображения" ........................................................................................18
Меню "Настройка звука" .....................................................................................................19
Меню "Функции"....................................................................................................................21
Меню "Установка" ................................................................................................................23
Меню "Цифровая конфигурация" ..............................................................................26
Использование дополнительных устройств
Подключение дополнительных устройств .........................................................................28
Дополнительные сведения
Технические характеристики ..............................................................................................30
Поиск неисправностей .........................................................................................................31
: только для цифровых каналов
RU
RU
3
Page 35

Начало работы
1: Проверка
комплекта поставки
Пульт ДУ RM-ED007 (1)
Батарейки размера AA (типа R6) (2)
Держатель кабеля (1)
Ремень для крепления (1) и винты (2)
Установка батареек в пульт ДУ
Примечания
• Вставляя батарейки, соблюдайте полярность.
• При утилизации батареек всегда помните правила
защиты окружающей среды. В некоторых регионах
правила утилизации батареек могут быть
регламентированы. Просьба обращаться по этому
поводы в местные органы власти.
• Не используйте одновременно батарейки различных
типов или старые и новые батарейки.
• Бережно обращайтесь с пультом ДУ. Не бросайте
его, не становитесь на него и не лейте на него никаких
жидкостей.
• Не оставляйте пульт ДУ вблизи источников тепла
или в месте, подверженном прямому воздействию
солнечных лучей, или во влажном помещении.
2: Подключение
антенны/
видеомагнитофона
Подключения одной
антенны
Подключение антенны и
видеомагнитофона
Коаксиальный
кабель (не входит в
комплект поставки)
ВЧ кабель
(не входит в
комплект
поставки)
4
Scart-кабель (не входит в
комплект поставки)
Видеомагнитофон
RU
Page 36

3: Крепление
4: Меры по
Начало работы
кабелей
1
B
A
2
3
предотвращению
падения телевизора
2
3
1
5:
Выбор языка и
страны/региона
2
Продолжение
1
2
3,4
5
RU
Page 37

1 Включите телевизор в сеть
(220-240 В переменного тока, 50 Гц).
2 Нажмите кнопку 1 на телевизоре (на
его верхней панели).
При первом включении телевизора на его
экране автоматически появляется меню
"Язык" (Language).
Если телевизор находится в дежурном
режиме (индикатор дежурного режима
на передней панели телевизора горит
красным цветом), нажмите кнопку "/1 на
пульте ДУ для включения телевизора.
3 Нажимая F/f, выберите из
появившегося на экране меню нужный
Вам язык, затем нажмите кнопку .
Auto Start Up
Language
Country
1
6: Автонастройка
телевизора
После выбора языка и страны/региона экране
появляется сообщение с подтверждением
начала автонастройки.
Телевизор начнет поиск и сохранение всех
доступных телевизионных каналов.
1
3
Select:
Confirm:
4 С помощью кнопок F/f выберите
страну/регион, в которой Вы хотите
использовать телевизор, затем
нажмите кнопку .
Автозапуск
Язык
Cтрана
Выбр.:
Если страны/региона, в которой Вы хотите
пользоваться телевизором, нет в списке,
вместо страны/региона выберите "-"
На экране телевизора появится cообщение
о начале выполнения автонастройки, см.
раздел “6: Автонастройка телевизора”.
Подтвер.:
1 Нажмитe .
Автонастройка
Вы хотите начать автоматическую настройку?
Назад:
Телевизор начнет автоматический поиск
всех доступных цифровых, а затем
аналоговых каналов. Это может занять
некоторое время. Пожалуйста, подождите
и не нажимайте никакие кнопки ни на
телевизоре, ни на пульте ДУ.
В случае появления на экране
сообщения:
"Ни один цифровой или аналоговый канал
не найден" проверьте, правильно ли
подключена антенна, и нажмите кнопку
, чтобы запустить процедуру
автонастройки повторно.
Запуск:
Oтказ:
MENU
2 При появлении на экране меню
"Сортировка программ", выполните
операции, указанные в разделе
“Сортировка программ” (стр. 23) .
Если Вы не хотите менять порядок, в котором
аналоговые каналы сохранены в памяти
Вашего телевизора, перейдите к шагу 3.
3 Для выхода из меню нажмите кнопку
MENU.
Теперь телевизор настроен на прием всех
доступных каналов.
6
RU
Page 38

Сведения по
Установка на подставке
30 cm
безопасности
Установка и подключение
Во избежание возгорания, поражения
электрическим током, повреждения
телевизора и/или травм выполняйте установку
и эксплуатацию телевизора в соответствии с
нижеследующими указаниями.
Установка
• Телевизор следует устанавливать вблизи
легкодоступной сетевой розетки.
• Установите телевизор на ровную устойчивую
поверхность.
• Настенная установка телевизора должна
выполняться только квалифицированными
специалистами сервисной службы.
Перемещение
• Перед перемещением телевизора
отсоедините от него все кабели.
• При переноске телевизора
вручную держите его, как
показано на рисунке справа. Не
прикладывайте усилия к ЖКпанели и к рамке вокруг экрана.
• При перевозке берегите
телевизор от ударов и сильной
вибрации.
• Если необходимо доставить телевизор в ремонтную
мастерскую или перевезти в другое место, упакуйте
его в картонную коробку и упаковочный материал, в
которых он поставлялся изначально.
Вентиляция
• Никогда не перекрывайте вентиляционные
отверстия и не вставляйте в них никакие предметы.
• Оставляйте свободное пространство вокруг
телевизора, как показано на рисунке ниже.
• Для обеспечения надлежащей циркуляции воздуха
настоятельно рекомендуется использовать
специальный кронштейн для настенной установки
производства компании Sony.
Настенная установка
30 cm
10 cm
10 cm
Обеспечьте вокруг телевизора
расстояние не меньше указанного.
10 cm
10 cm10 cm
6 cm
Обеспечьте вокруг телевизора расстояние не
меньше указанного.
• Для обеспечения надлежащей вентиляции и
предотвращения скопления грязи и пыли:
– Не кладите телевизор экраном вниз; не
устанавливайте телевизор перевернутым нижней
стороной вверх, задом наперед или набок.
– Не устанавливайте телевизор на полке, ковре,
кровати или в шкафу;
– Не накрывайте телевизор тканью, например,
занавесками, а также газетами и т.п.
– Не устанавливайте телевизор так, как показано на
рисунке ниже.
Циркуляция воздуха
нарушена.
Циркуляция воздуха
нарушена.
Стена Стена
Кабель питания
Во избежание возгорания, поражения
электрическим током, повреждения телевизора
и/или травм обращайтесь с кабелем питания и
сетевой розеткой в соответствии с
нижеследующими указаниями:
– Используйте только кабели питания Sony, не
пользуйтесь кабелями других марок.
– Вставляйте вилку в розетку до конца.
– Используйте для питания телевизора только сеть
переменного тока напряжением 220-240 В.
– Выполняя кабельные соединения между
устройствами, в целях безопасности извлеките
кабель питания из сетевой розетки и будьте
осторожны, чтобы не запнуться о кабели.
– Перед выполнением каких-либо работ с
телевизором или его переноской выньте вилку
кабеля питания от сети.
– Кабель питания не должен находиться рядом с
источниками тепла.
– Регулярно чистите вилку кабеля питания,
предварительно вынимая ее из розетки. Если на
вилке имеется пыль, в которой скапливается влага,
это может привести к повреждению изоляции и,
как следствие, к возгоранию.
Примечания
• Не используйте входящий в комплект поставки
кабель питания с другим оборудованием.
Продолжение
7
RU
Page 39

• Не пережимайте, не перегибайте и не
перекручивайте кабель питания, прилагая излишние
усилия. В противном случае могут оголиться или
переломиться внутренние жилы кабеля.
• Не изменяйте конструкцию кабеля питания.
• Не ставьте и не кладите никакие тяжелые предметы
на кабель питания.
• Вынимая кабель питания из розетки, не тяните за сам
кабель.
• Не подключайте слишком много приборов к одной
электророзетке.
• Не пользуйтесь электророзеткой с плохими контактами.
Запрещенные типы установки
Во избежание возгорания, поражения
электрическим током, повреждения телевизора и/
или травм не устанавливайте/не эксплуатируйте
телевизор в таких местах, помещениях и ситуациях,
которые перечислены ниже.
Места расположения:
На открытом воздухе (под прямыми солнечными
лучами), на берегу моря, на корабле или другом судне, в
автомобиле, в медицинских учреждениях, в
неустойчивом положении; вблизи воды, или там, где
возможно воздействие на него дождя, влаги или дыма.
Помещения:
В жарких, влажных или слишком запыленных
помещениях; в местах, где могут быть насекомые; в таких
местах, в которых телевизор может быть подвержен
механической вибрации; вблизи огнеопасных объектов
(свечей и др.). На телевизор не должны попадать какиелибо капли или брызги; нельзя ставить на него предметы,
содержащие жидкости, например вазу с цветами.
Ситуации:
Не касайтесь телевизора мокрыми руками; не
эксплуатируйте его со снятым корпусом или с
дополнительными аксессуарами, не рекомендованными
изготовителем. Во время грозы отключайте телевизор
от розетки электропитания и антенны.
Осколки:
• Не бросайте никакие предметы в телевизор.
Стеклянный экран может разбиться от удара и в этом
случае осколки могут причинить серьезную травму.
• Если на поверхности телевизора образовались
трещины, перед тем, как прикоснуться к нему, выньте
кабель питания из розетки. В противном случае Вы
можете получить удар электрическим током.
Если телевизор не используется
• Если Вы не собираетесь пользоваться телевизором в
течение нескольких дней, по соображениям
безопасности и энергосбережения его следует
отключить от сети электропитания.
• Так как телевизор не отключается от сети при
выключении кнопкой, для его полного отключения
от электропитания выньте вилку кабеля питания из
розетки.
• Следует иметь в виду, что некоторые телевизоры
обладают функциями, для корректной работы
которых требуется оставлять телевизор в дежурном
режиме.
Меры предосторожности в
отношении детей
• Не позволяйте детям взбираться на телевизор.
• Храните мелкие детали вне досягаемости детей,
чтобы они не могли случайно проглотить их.
Если имеют место следующие
неисправности...
Немедленно выключите телевизор и выньте вилку
кабеля питания из розетки в следующих случаях.
Обратитесь к своему дилеру или в сервисный
центр Sony для того, чтобы квалифицированные
специалисты сервисной службы выполнили
проверку телевизора.
В случае, если:
– Поврежден кабель питания.
– Электророзетка имеет плохие контакты.
– Телевизор получил повреждения в результате
падения, удара или попадания брошенным в него
предметом.
– Внутрь корпуса телевизора через отверстия
попала жидкость или какой-либо предмет.
Меры
предосторожности
Просмотр телевизора
• Смотрите телевизор при достаточном освещении;
просмотр при плохом освещении или в течение
чрезмерно продолжительного времени утомляет глаза.
• При пользовании наушниками не устанавливайте
слишком большую громкость, чтобы не повредить слух.
ЖК-экран
• Хотя ЖК-экран изготовлен по высокоточной
технологии и число эффективных точек достигает 99,99
% и выше, на экране могут постоянно появляться
черные или яркие цветные (красные, синие или
зеленые) точки. Это структурное свойство ЖК-экрана,
которое не является признаком неисправности.
• Не нажимайте на защитный фильтр, не царапайте его
и не ставьте на телевизор какие-либо предметы. Это
может привести к неравномерности изображения или
повреждению ЖК-экрана.
• Если телевизор работает в холодном месте,
изображение может оказаться размытым или слишком
темным. Это не является признаком неисправности.
Эти явления исчезнут с повышением температуры.
• При продолжительной демонстрации неподвижного
изображения могут появляться остаточные
изображения. Через несколько секунд они могут
исчезнуть.
• Во время работы телевизора экран и корпус
нагреваются. Это не является признаком неисправности.
• ЖК-дисплей содержит небольшое количество
жидких кристаллов и ртути. Люминесцентные
лампы, используемые в данном телевизоре, также
содержат ртуть. При утилизации соблюдайте
соответствующие местные положения и инструкции.
Уход за поверхностью экрана, корпусом
телевизора и их чистка
Перед чисткой телевизора или вилки кабеля питания
отсоедините кабель от сети.
Для обеспечения сохранности конструкционных
материалов и покрытия экрана телевизора соблюдайте
следующие меры предосторожности.
• Для удаления пыли с поверхности экрана/корпуса
телевизора осторожно протирайте его мягкой
тканью. Если пыль не удаляется полностью,
протрите экран мягкой тканью, слегка смоченной в
слабом растворе мягкого моющего средства.
• Ни в коем случае не используйте никакие абразивные
материалы, щелочные/кислотные очистители,
чистящие порошки и такие летучие растворители,
как спирт, бензин, разбавитель или инсектициды.
Применение этих веществ или длительный контакт с
изделиями из резины/винила могут повредить
покрытие корпуса или поверхность экрана.
• При регулировке угла наклона телевизора изменяйте
его положение медленно и осторожно во избежание
соскальзывания телевизора с подставки.
Дополнительные устройства
Держите дополнительные компоненты или оборудование,
излучающее электромагнитные волны, на расстоянии от
телевизора. В противном случае может иметь место
искажение изображения и/или звука.
RU
8
Page 40

Описание пульта ДУ
1 "/1 – Дежурный режим
Служит для временного выключения телевизора и его включения из дежурного
режима.
2 – Режим экрана (стр. 12)
3 Цветные кнопки
В цифровом режиме: (стр. 13, 15): Позволяют выбирать опции в нижней части
экрана в цифровых меню "Предпочитаемые программы" и EPG (Цифровой
электронный экранный телегид).
В режиме телетекста (стр.12): Используются для режима Фастекст.
4 / – Информация / Вывод скрытого текста
• В цифровом режиме: Выводит на экран краткую информацию о
просматриваемой в данный момент программе.
• В аналоговом режиме: Выводит на экран такую информацию, как текущий
номер канала и режим экрана.
• В режиме телетекста (стр.12): Выводит на экран скрытую информацию
(например, ответы телевикторины).
5 F/f/G/g/ (стр.17)
6 Замораживание изображения (стр. 12)/
(стр. 12)
• В обычном режиме работы телевизора: Замораживает телевизионное
изображение (стоп-кадр).
• В режимe ПК: Выводит на экран малую картинку (PIP).
7 MENU (стр. 17)
8 DIGITAL – Цифровой режим (стр. 11)
9 Цифровые кнопки
• В обычном режиме работы телевизора: Служат для выбора канала. Для
выбора каналов с двузначными номерами вторую цифру следует вводить в
течение двух секунд после ввода первой.
• В режиме телетекста: Служат для ввода трехзначного номера нужной
страницы.
0 – Предыдущий канал
Служит для возврата к предыдущему просматривавшемуся каналу (пи условии,
что его просмотр длился более пяти секунд).
qa PROG +/- (стр. 11)
• В обычном режиме работы телевизора: Служит для выбора следующего (+)
или предыдущего (-) канала.
• В режиме телетекста: Служит для выбора следующего (+) или предыдущего
(-) канала.
qs 2 +/- – Громкость
qd % – Отключение звука (стр. 11)
qf
/ – Tелетекст (стр. 12)
qg ANALOG – Аналоговый режим (стр. 11)
qh / RETURN
Служит для возврата к предыдущей странице любого выведенного на экран
меню.
qj – EPG (цифровой экранный электронный телегид)
(стр. 13)
qk – Режим изоб. (стр. 18)
ql 9 – Звуковой эффект (стр. 19)
w; – Выбор источника входного сигнала / Удержание
текста
• В обычном режиме работы телевизора (стр. 16): Служит для выбора
источника входного сигнала из числа устройств, подключенных к разъемам
телевизора.
• В режиме телетекста (стр.12): Служит для удержания текущей страницы.
Подсказка
На кнопке PROG + и цифровой кнопке 5 имеются выпуклые точки. По ним удобно ориентироваться при управлении телевизором.
PIP в режиме ПК
9
RU
Page 41

Описание кнопок и индикаторов телевизора
1 MENU (стр. 17)
2 / – Кнопка выбора источника
входного сигнала/OK
• В обычном режиме работы телевизора
(стр. 16): Служит для выбора источника
входного сигнала из числа устройств,
подключенных к разъемам телевизора.
• При работе с меню: Служит для выбора меню
или опции и для подтверждения установки.
3 2 +/-/G/g
• Служит для увеличения (+) или уменьшения
(-) громкости.
• При работе с меню: Служит для перемещения
между опциями влево (
4 PROG +/- /F/f
• В обычном режиме работы телевизора:
Служит для выбора следующего (+) или
предыдущего (-) канала.
• При работе с меню: Служит для перемещения
между опциями вверх (
5 1 – Кнопка включения/выключения
питания
Служит для включения или выключения
телевизора.
Примечание
Чтобы полностью выключить телевизор, выньте
вилку кабеля питания из электророзетки.
6 Датчик сигнала с пульта ДУ
7 – Отключение изображения/
Индикатор таймера
• Загорается зеленым светом при отключенном
изображении (стр. 21).
• Загорается оранжевым светом при
установленном таймере (стр.22).
• Загорается красным светом при начале
цифровой записи в дежурном режиме.
8 1 – Индикатор дежурного режима
Загорается красным светом, когда телевизор
находится в дежурном режиме.
9 " – Индикатор включения
телевизора
Загорается зеленым светом при включении
телевизора.
G) или вправо (g).
F) или вниз (f).
10
RU
Page 42

Просмотр телевизора
Просмотр
телевизионных
программ
1
2
1 Для включения телевизора нажмите кнопку
1 на телевизоре (на его верхней панели).
Если телевизор находится в дежурном режиме
(индикатор 1 дежурного режима на передней
панели телевизора горит красным цветом), для
включения телевизора нажмите кнопку "/1 на
пульте ДУ.
2 Нажмите кнопку DIGITAL для переключения
телевизора в цифровой режим или кнопку
ANALOG для его переключения в
аналоговый режим.
Число доступных каналов будет зависеть от
заданного режима.
2
3
3
3 Для выбора телевизионного канала
используйте цифровые кнопки или кнопку
PROG +/-.
Для выбора каналов с двузначными номерами
вторую цифру следует вводить в течение двух
секунд после ввода первой.
О том, как выбрать цифровой канал с помощью
цифрового электронного экранного телегида
(EPG), см. на стр. 13.
В цифровом режиме
На короткое время на экране появится
информационный баннер. Баннер может
содержать следующие пиктограммы:
: Трансляция радиосигнала
: Трансляция кодированных/получаемых по
подписке программ
: Доступно многоязычное аудиовещание
: Доступны субтитры
: Доступны субтитры для слабослышащих
: Рекомендуемый минимальный возраст для
просмотра текущей программы (от 4 до 18
лет)
: Замок от детей
: Ведется запись текущей программы
Дополнительные операции
Чтобы Необходимо
Временно
выключить телевизор
(установить его в
дежурный режим)
Включить телевизор
из дежурного режима
без звука
Выключить
телевизор.
Примечание
Для полного выключения телевизора выньте вилку сетевого
шнура из розетки.
Отрегулировать
уровень громкости
Отключить звук Нажать кнопку %. Для
Вывести на экран
таблицу программ
(только в аналоговом
режиме)
Нажать "/1.
Нажать кнопку %. С помощью
кнопки 2 +/-отрегулируйте
уровень громкости.
Нажать кнопку 1 на телевизоре
(на его верхней крышке).
Нажимать 2 + (для
увеличения)/- (для уменьшения).
восстановления звука нажмите
эту кнопку еще раз.
Нажать . Для выбора
аналогового канала нажмите
F/f, затем нажмите кнопку .
Вывод на экран таблицы
входных сигналов см. на стр. 16.
Продолжение
Просмотр телевизора
11
RU
Page 43

Вход в режим телетекста
Нажмите /. При каждом нажатии кнопки / экран
будет циклически меняться в следующей
последовательности:
Текст t Текст, наложенный на телевизионное
изображение (смешанный режим) t Изображение
без текста (выход из режима телетекста)
Для выбора страницы используйте цифровые
кнопки или PROG +/-.
Для удержания страницы нажмите / .
Для вывода на экран скрытой информации нажмите
кнопку / .
Подсказки
• Удостоверьтесь, что Вы принимаете канал
(телевизионную станцию) с хорошим сигналом, в
противном случае возможны ошибки телетекста.
• Крупнейшие телевизионные станции предоставляют
услуги телетекста. Для получения информации о том,
как пользоваться этим сервисом выберите страницу с
указателем телетекста (обычно это страница 100).
• Если в нижней части страницы телетекста появляются
четыре цветовых символа , Вы можете войти в режим
Фастекст. Фастекст обеспечивает Вам быстрый и
простой доступ к нужным страницам. Нажмите кнопку
соответствующего цвета для выхода на нужную
страницу.
Замораживание изображения:
Данная функция позволяет замораживать
телевизионное изображение (например, чтобы
записать показанный на экране телефонный номер
или рецепт).
1 Нажмите кнопку на пульте ДУ.
2 С помощью кнопок F/f/G/g отрегулируйте
положение окна.
3 Нажмите кнопку для удаления окна.
4 Снова нажмите кнопку для возврата к
обычному режиму работы телевизора.
Подсказка
Данная функция недоступна для AV3, AV5 и
AV6.
Оптималь.*
Обеспечивает воспроизведение изображения в
обычном формате 4:3 с имитацией эффекта
широкоэкранного изображения. Изображение
формата 4:3 вытягивается для заполнения всего экрана.
4:3
Обеспечивает воспроизведение с правильными
пропорциями изображения в обычном формате 4:3
(например, предназначенное для
неширокоэкранных телевизоров).
Широкоэкр.
Обеспечивает воспроизведение с правильными
пропорциями широкоэкранного изображения (16:9).
Увелич.*
Обеспечивает воспроизведение с правильными
пропорциями изображения в кинематографическом
(letter-box) формате.
14:9*
PIP (Picture in Picture - Режим двух
экранов) в режимe ПК
В режиме ПК эта функция выводит на экран окно с
изображением, соответствующим последнему
выбранному каналу.
1 Нажмите кнопку на пульте ДУ.
2 С помощью кнопок F/f/G/g отрегулируйте
положение окна.
3 Для отмены данной функции нажмите
кнопку .
Подсказка
Воспроизводимый звук будет соответствовать этому окну.
Ручное изменение формата экрана
для соответствия формату
передаваемого изображения
Несколько раз нажмите кнопку , чтобы выбрать
один из следующих режимов: "Оптималь.", 4:3,
"Широкоэкр.","Увелич." или 14:9.
RU
12
Обеспечивает воспроизведение с правильными
пропорциями изображения в формате 14:9. В
результате по краям изображения будут видны
черные полосы.
* Часть изображения вверху или внизу может оказаться
срезанной.
Подсказки
• В качестве альтернативы Вы можете установить
параметр " Автомат. формат" в опцию "Вкл.". В этом
случае телевизор будет автоматически выбирать
формат экрана, наилучшим образом
соответствующий передаваемому изображению
(стр. 21).
• Вы можете регулировать положение изображения
при выборе режимов "Оптималь"., 14:9, или
"Увелич.". Используйте кнопки
перемещения изображения вверх или вниз (например,
для того, чтобы можно было прочитать субтитры).
F/f для
Page 44

Использование цифрового
электронного экранного телегида (EPG)
1 В цифровом режиме нажмите кнопку для
вывода на экран цифрового экранного
электронного телегида (EPG).
2 Выполните нужную операцию в
соответствии со следующей таблицей.
Примечание
Информация о программе будет выведена на экран только, если
она передается телевещательной станцией.
Цифровой экранный электронный телегид
Чтобы Необходимо
Уда л ить с экрана EPG (цифровой
электронный экранный телегид)
Передвигаться по разделам цифрового
электронного экранного телегида (EPG)
Просмотреть текущую программу Нажать кнопку при выбранной программе.
Отсортировать информацию о программе
по категории – Список категорий
Задать программу для записи – Таймер
записи
Нажать .
Нажимать
F/f/G/g.
1 Нажать синюю кнопку.
2 С помощью кнопок
F/f/G/g выбрать категорию. Сбоку
на экране появится название категории.
Имеются следующие категории:
“Все категории”: Включает все доступные каналы.
“Новости”: Включает все информационные каналы.
3 Нажать .
Цифровой экранный электронный телегид (EPG) теперь будет выводить
на экран только программы, относящиеся к выбранной категории.
1 С помощью кнопок F/f/G/g выбрать предстоящую
программу, которую Вы хотите записать.
2 Нажать .
3 С помощью кнопок
F/f выбрать “Таймер записи”.
4 Нажать установки таймеров телевизора и Вашего
видеомагнитофона.
Символ появится рядом с информацией о данной программе. При
этом индикатор (на передней панели телевизора) загорится.
Примечания
• Вы можете установить на телевизоре таймер записи видеомагнитофона
только для видеомагнитофонов, совместимых с функцией Smartlink. Если
Ваш видеомагнитофон несовместим с функцией Smartlink, на экране
появится сообщение, напоминающее Вам о необходимости установить на
запись таймер Вашего видеомагнитофона.
• После начала записи Вы можете переключить телевизор в дежурный
режим; однако нельзя полностью выключать телевизор, в противном
случае возможна отмена записи.
• Если для ряда программ задано возрастное ограничение, на экране
появится запрос PIN-кода. Более подробную информацию см. в разделе
"Замок от детей" на стр. 27.
Просмотр телевизора
Продолжение
13
RU
Page 45

Чтобы Необходимо
Задать программу для автоматического
вывода на экран при начале ее трансляции
– Напоминание
1 С помощью кнопок F/f/G/g выбрать предстоящую
программу, которую Вы хотите вывести на экран.
2 Нажать .
3 С помощью кнопок
4 Нажать для автоматического вывода на экран
выбранной программы при начале ее трансляции.
Символ c появится рядом с информацией о данной программе.
Примечание
Если Вы установите телевизор в дежурный режим, он автоматически
включится перед началом трансляции данной программы.
Задать время и дату трансляции
программы, которую Вы хотите записать –
Ручной таймер записи
1 Нажать .
2 С помощью кнопок
затем нажать .
3 С помощью кнопок
4 Задать время начала и окончания записи таким же
образом, как и в шаге 3.
5 С помощью кнопок
нажать для установки таймеров телевизора и Вашего
видеомагнитофона.
Символ появится рядом с информацией о данной программе. При
этом индикатор (на передней панели телевизора) загорится.
Примечания
• Вы можете установить на телевизоре таймер записи видеомагнитофона
только для видеомагнитофонов, совместимых с функцией Smartlink. Если
Ваш видеомагнитофон несовместим с функцией Smartlink, на экране
появится сообщение, напоминающее Вам о необходимости установить на
запись таймер Вашего видеомагнитофона.
• После начала записи Вы можете переключить телевизор в дежурный
режим; однако нельзя полностью выключать телевизор, в противном
случае возможна отмена записи.
• Если для ряда программ задано возрастное ограничение, на экране
появится запрос PIN-кода. Более подробную информацию см. в разделе
"Замок от детей" на стр. 27.
Отменить запись/напоминание – Список
таймеров
1 Нажать .
2 С помощью кнопок
3 С помощью кнопок
напоминание о которой Вы хотите отменить, и нажать
кнопку .
На экране появится запрос подтверждения на отмену.
4 Нажать g для выбора опции "Да", затем для
подтверждения нажать кнопку .
F/f выбрать “Напоминание”.
F/f выбрать "Ручной таймер записи",
F/f выбрать дату, затем нажать g.
F/f выбрать программу, затем
F/f выбрать Список таймеров.
F/f выбрать программу, запись/
Подсказка
Вы можете также вывести на экран цифровой экранный электронный телегид (EPG), выбрав опцию "Цифр (EPG)" в "MENU".
RU
14
Page 46

Использование списка предпочитаемых
программ
Функция "Предпочитаемые программы" позволяет
Вам выводить на экран программы из
составляемого Вами же списка, который может
включать в себя до 8 каналов. О том, как вывести на
экран список предпочитаемых программ, см. в
разделе “Навигация по системе меню” (стр. 17).
Список предпочитаемых
Чтобы Необходимо
Впервые создать список Ваших
предпочитаемых программ
Уда л ить с экрана списка предпочитаемых
программ
Просмотреть тот или иной канал Нажать кнопку , выбрав тот или иной канал.
Добавить или уда лить каналы из списка
предпочитаемых программ
Уда л ить все каналы из списка
предпочитаемых программ
Когда Вы в первый раз выберете в меню опцию "Цифр. Избранные", на
экране появится запрос, желаете ли Вы добавить каналы в список
предпочитаемых программ.
1 Нажать кнопку для выбора опции "Да".
2 С помощью кнопок
F/f выбрать канал, который Вы
хотите добавить в список.
Если Вы знаете номер канала, Вы можете непосредственно выбрать
нужный канал с помощью цифровых кнопок.
3 Нажать .
Каналы, содержащиеся в списке предпочитаемых программ, помечены
символом .
Нажать кнопку RETURN.
1 Нажать синюю кнопку.
Каналы, содержащиеся в списке предпочитаемых программ, помечены
символом .
2 С помощью кнопок F/f выбрать канал, который Вы
ходите добавить или удалить.
Если Вы знаете номер канала, Вы можете непосредственно выбрать
нужный канал с помощью цифровых кнопок.
3 Нажать .
4 Нажать синюю кнопку для возвращения к списку
предпочитаемых программ.
1 Нажать синюю кнопку.
2 Нажать желтую кнопку.
На экране появится запрос подтверждения того, что Вы действительно
хотите удалить все каналы из списка предпочитаемых программ.
3 Нажать G для выбора опции " Да", затем для
подтверждения нажать кнопку .
Просмотр телевизора
Продолжение
15
RU
Page 47

Просмотр
изображения с
устройств,
подключенных к
телевизору
Включите подключенное к телевизору
устройство и затем выполните одну из
следующих операций.
Для устройств, подключенных к Scartразъемам с помощью полностью
распаянного 21-контактного Scart-кабеля
Начните воспроизведение на подключенном
устройстве.
На экране появится изображение, поступающее от
подключенного устройства.
Для видеомагнитофона с автоматической
настройкой (стр. 4)
В аналоговом режиме нажимайте PROG +/- или на
цифровые кнопки для выбора видеоканала.
Для других подключенных устройств
Нажимайте кнопку / до тех пор, пока на
экране не появится символ нужного источника
входного сигнала (см. ниже).
Дополнительные операции
Чтобы Необходимо
Возвратиться к
обычному режиму
работы телевизора
Вывести на экран
Таблицу входных
сигналов.
Нажать DIGITAL или ANALOG.
Нажать кнопку для вывода
таблицы входных сигналов.
(Затем, только в аналоговом
режиме, нажмите кнопку
помощью кнопки
источник входного сигнала, затем
нажмите кнопку .
F/f выберите
g.) С
AV1/ AV1, AV2/ AV2:
Входной аудио/видео иди RGB сигнал, поданный через
Scart-разъем /1 или 2. Этот символ
появляется только при подключении источника RGB
сигнала.
AV3:
Компонентный входной сигнал, поданный через гнезда
B/CB, PR/CR /3, и входной аудиосигнал,
Y, P
поданный через гнезда L, R / 3.
AV4/ AV4:
Входной видеосигнал, поданный через гнездо
видеовхода 4, и входной аудиосигнал, поданный
через гнезда аудиовхода L (MONO), R 4.
Символ появляется только в том случае, если
устройство подключено к гнезду S video 4, а не к
видеовходу 4, и входной сигнал S video подается
через гнездо S video 4.
5:
Входной сигнал RGB, поданный через разъемы PC (для
подключения ПК) 5, и
поданный через гнездо .
AV6:
Цифровой аудио/видеосигнал, поданный через гнездо
HDMI IN 6. Входной аудиосигнал является аналоговым
только в том случае, если устройство подключено через
DVI и гнездо аудиовыхода.
входной аудиосигнал,
16
RU
Page 48

Использование функций меню
Навигация по системе меню
Экранное меню позволяет Вам использовать различные возможности данного телевизора. Вы можете легко
выбрать каналы или внешние входы с помощью пульта ДУ. ВЫ можете также легко изменить установки Вашего
телевизора с помощью меню.
1 Нажмите кнопку MENU для вывода меню на
экран.
MENU
Цифр. Избранные
Аналогов.
Цифр.
2,3
1
Меню Описание
Цифр. избранные
(только в цифровом
режиме)
Выводит на экран список предпочитаемых программ. Подробности об
установках см. стр. 15.
2 С помощью кнопок F/f выберите нужную
3 Нажмите для подтверждения
Цифр. EPG
Внешние входы
Установки
MENU
Выбр.:
опцию.
сделанного выбора.
Для выхода из меню нажмите кнопку MENU.
Вход:
Выxoд:
Использование функций меню
Список программ
(только в аналоговом
режиме)
Аналогов.
(только в цифровом
режиме)
Цифр.
(только в цифровом
режиме)
Цифр. EPG
(только в цифровом
режиме)
Внешние входы
Установки
Позволяет Вам выбирать ТВ программы из списка каналов с приданным им метками.
• Для просмотра нужного канала выберите этот канал и затем
нажмите .
• О придании метки программе см. на стр. 24.
Служит для возврата к предыдущему просматривавшемуся аналоговому
каналу.
Служит для возврата к предыдущему просматривавшемуся цифровому каналу.
Выводит на экран Цифровой экранный электронный телегид (EPG).
Подробности об установках см. на стр. 13.
Выводит на экран список устройств, подключенных к Вашему телевизору.
• Для просмотра изображения с нужного внешнего входа выберите
источник входного сигнала, затем нажмите кнопку .
• О придании метки внешнему входу см. стр. 23.
Открывает меню Уст ан ов ки , в котором выполняется большинство расширенных
установок и настроек. Выберите пиктограмму какого-либо подменю, выберите
опцию и произведите ее изменение или настройку с помощью кнопок
Подробности об установках см. на стр.18 - 27.
F/f/G/g.
17
RU
Page 49

Меню "Настройка изображения"
Настройка изображения
Режим изоб.
Пoдcвeтка
Контраст
Яркость
Цветность
Оттенок
Резкость
Цвeтовой тон
Сброс
Шумопонижение
Назад:
Выбр.:
Режим изоб.
Подсветка
Контраст
Яркость
Вы можете выбрать нижеперечисленные
опции в меню "Настройка изображения". О
Индивидуальный
5
Max
50
50
0
15
Teплый
Aвто
Вход:
Выxoд:
MENU
правилах выбора опций в меню "Установки"
см. в разделе “Навигация по системе меню”
(стр. 17).
Позволяет выбрать режим изображения.
• “Яркий”: Задается для увеличения контрастности и резкости изображения.
• “Cтaндapт”: Для получения стандартного изображения. Рекомендуется для
домашнего просмотра..
• “Индивидуальный”: Позволяет Вам сохранить предпочитаемые Вами
установки.
Позволяет настроить яркость подсветки.
Служит для увеличения или уменьшения контрастности изображения.
Позволяет сделать изображение более ярким или темным.
Цветность
Оттенок
Резкость
Цветовой тон
Сброс
Шумопонижение
RU
18
Служит для увеличения или уменьшения громкости интенсивности цвета.
Служит для усиления или ослабления зеленых тонов.
Подсказка
Регулировка параметра "Оттенок" возможна только для сигнала в формате NTSC (например, при
просмотре американских видеокассет).
Позволяет делать изображение более резким или мягким.
Позволяет настроить оттенки белого на изображении.
• “Холодный”: Придает белым цветам голубой оттенок.
• “Нейтральный”: Придает белым цветам нейтральный оттенок.
• “Teплый”: Придает белым цветам красный оттенок.
Подсказка
Опция "Teплый" может быть задана только в случае, если Вы установили параметр "Режим изоб." в
опцию "Индивидуальный".
Возвращает все настройки изображения кроме "Режим изоб." к заводским
предустановкам.
Эта опция уменьшает помехи ("снег") на изображении при приеме слабого
телевизионного сигнала.
• "Авто": Эта опция уменьшает помехи на изображении.
• "Сильное/Средн./Слабое": Изменяет параметры шумопонижения.
Page 50

Меню "Настройка звука"
Настройка звука
Эффект
Те м б р ВЧ
Те м б р НЧ
Баланс
Сброс
Двойной звук
Авторег. громк.
Динамики ТВ
Назад:
Эффект
Выбр.:
Вы можете выбрать нижеперечисленные
опции в меню "Настройка звука". О правилах
Cтaндapт
50
50
0
Моно
Вкл.
Вкл.
MENU
Вход:
Позволяет выбрать тот или иной звуковой режим.
• "Стандарт": Увеличивает четкость и отчетливость звучания и эффект реального
присутствия благодаря применению "Системы обработки звука BBE"
•"Динамичный": Увеличивает четкость и отчетливость звучания и эффект реального
присутствия благодаря применению "Системы обработки звука BBE".
• "BBE ViVA": BBE ViVA Sound обеспечивает трехмерный звук с качеством Hi-Fi. Четкость
звучания улучшается BBE, а ширина, глубина, и высота звучания увеличиваются за счет
эксклюзивной системы трехмерного
всеми телевизионными программами, включая новости, музыкальные передачи,
телеспектакли, фильмы, спортивные трансляции и электронные игры.
• "Dolby Virtual
звучания, создаваемого многоканальной системой.
•"Выкл.": Без звуковых эффектов.
Выxoд:
"
: Использует динамики телевизора для имитации эффекта объемного
выбора опций см. в разделе "Установки",
“Навигация по системе меню” (стр. 17).
звука компании BBE. BBE ViVA Sound совместим со
Подсказки
• Вы можете изменять звуковой эффект, неоднократно нажимая кнопку 9.
• Если Вы установите опцию "Авторег. громк." в положение "Вкл.", произойдет
переключение из положения "Dolby Virtual" в положение "Стандарт."
Использование функций меню
Те м бр В Ч
Те м бр Н Ч
Баланс
Сброс
Двойной звук
Авторег. громк.
Позволяет выполнить регулировку уровня звука высокой частоты.
Позволяет выполнить регулировку уровня звука низкой частоты.
Позволяет регулировать баланс звука между левым и правым динамиком.
Возвращает все настройки звука к заводским предустановкам.
Эта опция позволяет производить выбор звука, который должен
воспроизводиться через динамики при стереотрансляции или трансляции на двух
языках.
• “Стерео”, “Mоно”: Для стереопрограмм.
• “A”/“B”/“Mоно”: Для двуязычных трансляций выберите "A" для звукового
канала 1, "B" для звукового канала 2 или "Mоно" для монофонического канала,
если таковой имеется.
Подсказка
Если Вы выбрали подключенное к телевизору внешнее устройство, придайте опции "Двойной звук"
значения "Стерео", "A" или "B".
Эта опция обеспечивает поддержание постоянного уровня громкости, даже когда
в нем случаются резкие изменения (например, звук в рекламных роликах обычно
бывает громче, чем в других передачах).
19
RU
Page 51

Динамики ТВ
Отключает динамики телевизора, например, чтобы слушать звук через внешнее
аудиоустройство, подключенное к телевизору.
•"Вкл.": звук выводится с динамиков телевизоров.
•"Однокр. Выкл.": динамики телевизора временно отключаются, позволяя
Вам слушать звук через внешнее аудиоустройство.
•"Пост. Выкл": динамики телевизора постоянно отключены, позволяя Вам
слушать звук через внешнее аудиоустройство.
Подсказки
• Чтобы снова включить динамики, установите опцию "Динамики ТВ" в состояние
"Вкл.".
• Опция
• Опции меню "Настройка звука" недоступны, если выбрана опция "Однокр.
"Однокр. Выкл." aвтоматически возвращается в состояние "Вкл." при
выключении телевизора.
Выкл." или "Пост. Выкл".
20
RU
Page 52

Меню "Функции"
Назад:
Выбр.:
Вход:
Вы можете выбрать нижеперечисленные
опции в меню "Функции". О правилах выбора
опций см. в разделе “Установки”, “Навигация
по системе меню” (стр. 17).
MENU
Выxoд:
Использование функций меню
Управление
экраном
Энергосбереж.
Доп. улучш.
Контраста
Выход AV2
Эта опция позволяет изменять формат экрана.
•"Автомат. формат": Эта опция позволяет автоматически изменять формат экрана
в соответствии с форматом предаваемого телевизионного сигнала.
• "Формат экрана": Подробности о формате экрана см. на стр. 12.
• "Вертик. размер": Эта опция позволяет настроить вертикальный размер
изображения в случае, когда параметр "Формат экрана" установлен в опцию
"Оптималь."
Подсказки
• Даже если Вы выбрали установку "Вкл." или "Выкл." опции "Автомат. формат", Вы всегда
можете изменить формат экрана, неоднократно нажимая кнопку .
• Опция "Автомат. формат" доступна только для сигналов в форматах PAL и SECAM.
Позволяет выбрать режим энергосбережения для уменьшения потребления
энергии Вашим телевизором.
• "Стандарт": Заводская предустановка.
• "Пониженное": Уменьшает потребление энергии телевизором.
• "Откл. изображ.": Отключает изображение. Вы можете слушать звук при
отключенном изображении.
Aвтоматическая регулировка параметра "Подсветка", придающая ему наиболее
подходящие значения в зависимости от яркости изображения. Увеличивает
контрастность изображения.
С помощью этой опции можно задавать сигнал, выводимый через разъем с меткой
/2 на задней панели телевизора. Если Вы подключили видеомагнитофон к
гнезду /2, Вы можете вести на него запись с других устройств,
подключенных к телевизору.
•"TV": Выводит на разъем телевизионный сигнал.
•"Авто": Выводит на разъем сигнал, воспроизводимый на экране, независимо от
его источника. Данная функция недоступна для AV3, AV5 и AV6.
RGB
центрирование
Эта опция позволяет Вам настроить горизонтальное положение изображения так,
чтобы оно оказалось в середине экрана.
Подсказка
Эта опция доступна только, если источник RGB сигнала подключен к Scartразъемам 1/ 1 или 2/ 2 на задней панели телевизора.
21
RU
Page 53

Настройка для
ПК
Эта опция позволяет Вам произвести настройку экрана по своему вкусу при
подключении ПК и использовании экрана телевизора в качестве его монитора.
Подсказка
• Эта опция доступна только в режиме воспроизведения сигналов, поступающих
от ПК.
•"Фаза": Выполняет регулировку экрана, когда неясно видна часть текста или
изображения.
•"Шаг": Расширяет или сужает экран по горизонтали.
•"Гориз. центр.": Перемещает экран влево или вправо.
•"Вертик. лин.": Корректирует строки изображения при просмотре RGB-
сигнала, подаваемого на разъем для подключения ПК .
•"Энергосбереж.": При отсутствии сигнала от ПК возвращает телевизор в
дежурный режим.
•"Сброс": Производит возврат к заводским предустановкам.
Та й м е р
Позволяет установить таймер для включения/выключения телевизора.
• Таймер выкл.
Эта опция позволяет Вам задать время, по истечении которого телевизор
автоматически переходит в дежурный режим.
Когда активирована опция “Таймер выкл.”, индикатор (таймер) на передней
панели телевизора загорается оранжевым светом.
Подсказки
• Если Вы выключите телевизор и снова включите его, функция "Таймер выкл."
сбросится в положение "Выкл.".
• Сообщение "Таймер СНА заканчивается. ТВ будет выключен."
за одну минуту до переключения телевизора в дежурный режим
появится на экране
.
• Устан. часов
Позволяет вручную откорректировать текущее время на часах. Когда
телевизор принимает цифровые каналы, ручная коррекция текущего
времени невозможна, т.к. часы синхронизированы с кодом времени
передаваемого сигнала.
•Таймер
Позволяет установить таймер для включения/выключения телевизора.
"Режим таймера": Позволяет выбрать нужный период.
"Время Вкл.": Устанавливает время включения телевизора.
"Время Выкл.": Устанавливает время выключения телевизора.
22
RU
Page 54

Меню "Установка"
Установка
Автозапуск
Язык
Cтрана
Автонастройка
Сортировка программ
Предустановка AV
Баланс громкости
Руч. настройка программ
Цифровая Koнфигypация
Назад:
Выбр.:
Автозапуск
Язык
Страна
Автонастройка
Вы можете выбрать нижеперечисленные
опции в меню "Установка". О правилах
выбора опций см. в разделе “Установки”,
English
-
MENU
Вход:
Запускает "меню первого включения" для выбора языка и страны/региона и
настройки всех доступных цифровых и аналоговых каналов. Обычно этого делать
не требуется, потому что язык и страна/регион уже были выбраны, а все каналы
- уже настроены при установке телевизора (стр. 5, 6). Тем не менее, эта опция
позволяет повторить процедуру (например, заново настроить телевизор после
переезда или найти новые каналы, появившиеся в эфире).
Эта опция позволяет выбрать язык, на котором меню выводятся на экран.
Эта опция позволяет выбрать страну/регион, где используется телевизор.
Подсказка
Если страны/региона, в которой Вы хотите пользоваться телевизором, нет в
списке, вместо страны выберите "-."
Настройтесь на все доступные аналоговые каналы.
Обычно этого делать не требуется, потому что все каналы уже настроены при
установке телевизора (стр. 5, 6). Тем не менее, эта опция позволяет повторить
процедуру (например, заново настроить телевизор после переезда или найти
новые каналы, появившиеся в эфире).
Выxoд:
“Навигация по системе меню” (стр. 17).
Использование функций меню
Сортировка
программ
Предустановка
AV
Баланс
громкости
Эта опция позволяет изменить порядок расположения каналов, сохраненных в
памяти телевизора.
1 С помощью кнопок F/f выберите канал, который Вы ходите
переместить в новое положение, затем нажмите кнопку
2 С помощью кнопок
F/f выберите новое положение Вашего
g.
канала, затем нажмите кнопку .
Эта опция позволяет присвоить имя любому внешнему устройству,
подключенному к разъемам на боковой и задней панелях телевизора. Данное имя
будет ненадолго выводиться на экран при выборе данного устройства. Вы можете
пропустить источник входного сигнала, к которому не подключено никакое
устройство.
1 С помощью кнопок F/f выберите нужный источник входного
сигнала, затем нажмите .
2 С помощью кнопок
F/f выберите нужную из нижеперечисленных
опций и нажмите кнопку .
•AV1 (или AV2/ AV3/ AV4/ PC/ HDMI), VIDEO, DVD, CABLE, GAME, CAM, SAT:
Используется для присвоения подсоединенному устройству одной из
предустановленных меток.
•“Изм.”: Вы создаете Вашу собственную метку.
•“Пропуск”: Эта опция позволяет пропускать источник входного сигнала, к
которому не подключено никакое устройство, при выборе источника входного
сигнала с помощью кнопок F/f.
Эта опция позволяет Вам задать независимый уровень громкости для каждого из
устройств, подключенных к телевизору.
Продолжение
23
RU
Page 55

Руч. настройка
программ
Перед тем, как выбирать опции "Метка"/"AПЧ"/"Аудиофильтр"/"Пропуск"/
"Декодер", с помощью кнопок
хотите изменить. Затем нажмите .
F/f выберите номер программы, которую Вы
Система/Канал
Позволяет выполнить ручную настройку программ.
1 С помощью кнопок F/f выберите "Система", затем нажмите
кнопку .
2 С помощью кнопок
систем телевещания, затем нажмите кнопку
B/G: для стран/регионов Западной Европы
D/K: для стран/регионов Восточной Европы
L: для Франции
I: для Великобритании
Примечание
Данная опция является доступной или нет в зависимости от страны/региона,
выбранной Вами в меню "Страна" (стр.5).
F/f выберите одну из перечисленных ниже
G.
3 С помощью кнопок F/f выберите "Канал", затем нажмите кнопку
.
4 С помощью кнопок
или "C" (для каналов эфирного вещания), затем нажмите
F/f выберите "S" (для кабельных каналов)
g.
5 Выполните настройку каналов следующим образом:
Если Вы не знаете номер канала (частоту)
Нажмите F/f для поиска следующего доступного канала. При нахождении какоголибо канала поиск останавливается. Для продолжения поиска нажмите
F/f.
Если Вы знаете номер канала (частоту)
С помощью цифровых кнопок непосредственно введите номер телевизионного
канала или канала видеосигнала.
6 Нажмите кнопку для перехода к опции "Подтвер.", затем еще
раз нажмите .
7 Нажмите
Повторите вышеописанную процедуру, чтобы установить вручную другие каналы.
f, чтобы выбрать "OK", затем нажмите кнопку .
Метка
Эта опция позволяет Вам присвоить каналу любое имя, содержащее не более пяти
символов (букв или цифр). Данное имя будет ненадолго выводиться на экран при
переключении на этот канал.
AПЧ
С помощью этой опции Вы можете выполнить точную настройку выбранной
программы в случае, если Вам кажется, что небольшая корректировка настройки
позволит повысить качество изображения.
Вы можете выполнить точную настройку в пределах от -15 до +15. При выборе
опции "Вкл." точная настройка выполняется автоматически.
Аудиофильтр
Эта опция позволяет улучшить качество звука для отдельных каналов в случае его
искажения при трансляции в режиме "Моно". Иногда нестандартный ТВ сигнал
может вызвать искажение звука или его временное исчезновение при просмотре
программ, транслируемых в режиме "Моно".
Если Вы не сталкиваетесь с проблемой искажения звука, мы рекомендуем Вам
оставить для этой опции заводскую предустановку "Выкл."
Примечания
• При выборе опции "Слабое" или "Сильное" Вы не сумеете принимать стерео или
двойной звук.
• Опция "Аудиофильтр" недоступна, если параметр "Система" установлен в опцию L".
24
RU
Page 56

Пропуск
Данная опция позволяет пропускать неиспользуемые аналоговые каналы при
выборе каналов с помощью кнопок PROG +/-. (Пропущенный канал можно
выбрать с помощью цифровых кнопок.)
Декодер
Эта опция позволяет выполнять просмотр и запись кодированных каналов с
помощью декодера, подсоединенного к scart-разъему / 1 напрямую или к
scart-разъему / 2 через видеомагнитофон.
Примечание
Данная опция является доступной или нет в зависимости от страны/региона, выбранной Вами в меню
" Страна" (стр.5).
Подтвер.
Сохраняет изменения в настройках меню "Руч. настройка программ".
Использование функций меню
25
RU
Page 57

Меню "Цифровая конфигурация"
Установка
Автозапуск
Язык
Cтрана
Автонастройка
Сортировка программ
Предустановка AV
Баланс громкости
Руч. настройка программ
Цифровая Koнфигypация
Назад:
Цифровая
настройка
Выбр.:
С помощью меню "Цифровая конфигурация"
Вы можете изменить/задать установки
цифровых функций. О правилах выбора опций
English
-
MENU
Вход:
Эта опция позволяет вывести на экран меню "Цифровая настройка"
Выxoд:
см. в разделе “Установки”, “Навигация по
системе меню” (стр. 17).
Цифровой автоматический поиск станций
Выполняет настройку на все доступные цифровые каналы.
Обычно этого делать не требуется, потому что все каналы уже настроены при
установке телевизора (стр. 5). Тем не менее, эта опция позволяет повторить
процедуру (например, заново настроить телевизор после переезда или найти
новые каналы, появившиеся в эфире).
Редактирование списка программ
Эта опция позволяет удалить из памяти телевизора ненужные цифровые каналы
и изменить порядок расположения сохраненных в ней цифровых каналов.
1 С помощью кнопок F/f выберите канал, который Вы ходите
удалить или переместить в новое положение.
Если Вы знаете номер канала (частоту)
С помощью цифровых кнопок непосредственно введите трехзначный номер
нужного телевизионного канала.
2 Выполните удаление или перемещение цифровых каналов
следующим образом:
Удаление цифрового канала
Нажмите . На экране появится запрос на подтверждение удаления выбранного
цифрового канала. Нажмите
G, чтобы выбрать "Да", затем нажмите кнопку .
Изменение порядка расположения цифровых каналов
Нажмите g, затем с помощью кнопок F/f выберите новое положение для данного
канала и нажмите кнопку
каналов, если в этом есть необходимость.
G. Повторите шаги 1 и 2 для перемещения других
3 Нажмите кнопку RETURN.
Цифровая ручная настройка
Выполняет настройку цифровых каналов.
1 С помощью цифровых кнопок введите номер канала, ручную
настройку которого Вы хотите произвести, затем с помощью
кнопок
2 После нахождения доступных каналов с помощью кнопок
F/f выполните настройку канала.
F/f
выберите канал, который Вы хотите сохранить в памяти, затем
нажмите кнопку .
3 С помощью кнопок
F/f выберите номер программы, под которой
Вы хотите сохранить новый канал, и нажмите кнопку .
Повторите вышеописанную процедуру для ручной настройки других каналов.
26
RU
Page 58

Цифровая
конфигурация
Эта опция позволяет вывести на экран меню "Цифровая конфигурация".
Установка субтитров
Эта опция позволяет выводить на экран цифровые субтитры.
При выборе опции "Плохая слышимость" на экране вместе с субтитрами
возможен также визуальный перевод (если канал передает такую информацию).
Язык субтитров
Эта опция позволяет выбрать язык, на котором субтитры выводятся на экран.
Язык аудио
Эта опция позволяет выбрать язык аудиовещания для того или иного канала.
Некоторые цифровые каналы могут транслироваться с аудиовещанием на
различных языках.
Тип аудио
Увеличивает уровень звука при выбранной опции "Плохая слышимость".
Замок от детей
Эта опция позволяет задать возрастные ограничения для тех или иных программ.
Просмотр любой программы, на которую распространяются возрастные
ограничения, возможен только после ввода правильного значения PIN-кода.
1 С помощью цифровых кнопок введите ранее заданное Вами
значение PIN-кода.
Если Вы ранее не задали PIN-код, на экране появится сообщение, указывающее на
это. Выполните указания, приведенные ниже в разделе "PIN-код".
2 С помощью кнопок F/f выберите возрастное ограничение или
"Нет" (для просмотра без возрастных ограничений), затем
нажмите кнопку .
3 Нажмите кнопку RETURN.
PIN-код
Эта опция позволяет впервые задать PIN-код или изменить Ваш ранее заданный
PIN-код.
1 Введите PIN-код следующим образом:
Если Вы ранее уже задали PIN-код:
С помощью цифровых кнопок введите ранее заданное Вами значение PIN-кода.
Если Вы ранее не задали PIN-код:
С помощью цифровых кнопок непосредственно введите заводскую предустановку
PIN-кода, равную 9999.
2 С помощью цифровых кнопок введите новое значение PIN-кода.
На экране появится сообщение о том, что новое значение PIN-кода принято.
3 Нажать RETURN.
Подсказка
PIN-код 9999 принимается в любом случае.
Установка -сервисов
Эта опция позволяет вывести на экран меню "Установка сервисов".
“вт. обновление сервиса”: Позволяет телевизору обнаруживать и сохранять в
памяти новые цифровые сервисы по мере того, как они становятся доступными.
“Загрузка программы”: Позволяет Вашему телевизору автоматически и
бесплатно получать обновления программного обеспечения через приемную
антенну (при их выпуске). Sony рекомендует всегда устанавливать эту опцию в
положение "Вкл.". Если Вы не хотите производить обновление своего
программного обеспечения, установите эту опцию в положение "Выкл."
“Системная информация”: Выводит на экран информацию о версии
программного обеспечения и уровне сигнала.
"Часовой пояс": Позволяет правильно выбрать часовой пояс для Вашей страны.
Настройка модуля СА
Эта опция позволяет получить доступ к Pay Per View (платным программам,
распространяемым по подписке) при условии, что у Вас имеется Модуль
ограниченного доступа (CAM) и карточка абонента. См. на стр. 28 расположение
гнезда (PCMCIA).
Использование функций меню
27
RU
Page 59

Использование дополнительных устройств
Подключение дополнительных
устройств
Вы можете подключить к Вашему телевизору широкий спектр дополнительных устройств. Соединительные
кабели не входят в комплект поставки.
Подключение к разъемам на боковой панели телевизора
Чтобы
подключить
CAM (Модуль
ограниченного
доступа) A
S VHS/Hi 8/DVC
видеокамера B
Наушники C Подсоединить к гнезду i, чтобы
Необходимо
Для просмотра Pay Per View кодированных платных программ,
распространяемых по подписке.
Более подробную информацию см.
в инструкции, приложенной к
Вашму CAM. Для использования
CAM снимите резиновую крышку
разъема под модуль CAM. Перед
тем, как устанавливать модуль
CAM в разъем, выключите
телевизор. Когда Вы не
используете CAM, мы
рекомендуем Вам закрывать
крышкой разъем под
Подсоединить к гнезду S video
4 или видеовходу 4 и
аудиовходам 4. Чтобы
избежать помех на изображении,
не подключайте видеокамеру
одновременно к видеовходу 4
и гнезду S video 4. В случае
подключения монофонического
устройства подключите его к
гнезду L4 и задайте для опции
"Двойной звук" значение "A"
(стр. 19).
слушать звук с
наушники.
модуль CAM.
телевизора через
28
S VHS/Hi8/DVC
видеокамера
Наушники
RU
Page 60

Подключение к разъемам на задней панели телевизора
Игровая
приставка
DVDпроигрыватель
Декодер
проигрыватель
Цифровой
спутниковый
DVD-проигрыватель с
компонентным выходом
Устройство записи
на DVD
Видеомагнитофон
Декодер
ПК
DVD-
ресивер
Чтобы
подключить
ПК D Подсоединить его к гнездам PC
Цифровой
спутниковый
ресивер/ или DVDпроигрыватель E
Необходимо
/. Рекомендуется
использовать спец альный кабель
для подключения ПК с ферритами.
Подсоединить к гнезду HDMI IN
6, если устройство оснащено
гнездом HDMI. Цифровые видеои аудиосигналы поступают от
соответствующего устройства.
Если устройство оснащено
гнездом DVI, соедините гнездо
DVI с гнездом HDMI IN 6 через
переходной интерфейс DVI HDMI (не входит
поставки) и соедините
аудиовыходы устройства с
аудиовходами HDMI IN 6.
в комплект
Примечания
• Гнезда HDMI поддерживают
только следующие входные
видеосигналы: 480i, 480p, 576i,
576p, 720p и 1080i. При
подсоединении персонального
компьютера подключайте его к
гнезду PC input.
• Используйте
сертифицированный HDMI-
кабель с логотипом HDMI.
DVD-
проигрыватель с
компонентным
выходом F
Игровую
приставку, DVDпроигрыватель или
декодер G
Устройство записи
на DVD или
видеомагнитофон с
поддержкой
SmartLink H
Подсоединить к компонентному
входу и аудиовходам /3.
Подсоединить к Scart-разъему
/1. При подключении
декодера кодированный сигнал от
ТВ-тюнера поступает
выходит с декодера и уже в
декодированном виде.
Подсоединить к Scart-разъему
/ 2. SmartLink
представляет собой прямое
соединение между телевизором и
видеомагнитофоном/ устройством
записи DVD.
на декодер
Использование дополнительных устройств
29
RU
Page 61

Дополнительные сведения
Технические
характеристики
Электропитание:
220–240 В пер. тока, 50 Гц
Размер экрана:
20 дюймов
Разрешение экрана:
1366 точек (по горизонтали) х 768 строк (по
вертикали)
Потребляемая мощность:
65 Вт или менее
Мощность, потребляемая в дежурном режиме*:
1 Вт или менее
* Номинальная величина мощности потребления в
дежурном режиме достигается после того, как
телевизор выполнит необходимые внутренние
процессы.
Габариты (ширина x высота x
Около 500 x 406 x 209 мм (с подставкой)
Около 500 х 370 х 100 мм (без подставки)
Вес:
Около 8 кг (с подставкой)
Около 7 кг (без подставки)
Система ТВ панели:
LCD (ЖК) экран
Система телевещания:
В зависимости от выбранной Вами страны/региона:
Аналоговая:B/G/H, D/K, L, I
Цифровая:DVB-T
Система цветного телевидения
Аналоговая:PAL, SECAM
NTSC 3.58, 4.43 (только вход Video In)
Цифровая:MPEG-2 MP@ML
Антенна
Разъем 75 Ом для VHF/UHF
Диапазон принимаемых каналов:
Аналоговая: 48.25 - 855.25 МГц
Цифровая:
MB поддиапазон III (177.5 - 226.5 МГц)
ДМВ E21 - E69 (474 - 858 МГц)
глубина):
Разъемы
/1
21-штырьковый Scart-разъем (стандарт CENELEC),
включая аудио/видео вход, RGB вход и аудио/видео
выход телевизора.
/ 2 (SMARTLINK)
21-штырьковый Scart-разъем (стандарт CENELEC),
включая аудио/видео вход, RGB вход, выбираемый
аудио/видео выход и интерфейс SmartLink.
3
Поддерживаемые форматы: 1080i, 720p, 576p, 576i,
480p, 480i
Y: Vp-p, 75 Ом, 0.3V отрицательная синхронизация
B/CB: 0.7 Vp-p, 75 Ом
P
R/CR: 0.7 Vp-p, 75 Ом
P
3
Аудиовход (гнезда типа "тюльпан")
500 мВ rms
Импеданс: 47 кОм
4Вход S video (4-штырьковый разъем mini DIN):
4Видеовход (гнездо типа "тюльпан")
4Аудиовход (гнезда типа "тюльпан")
PC Вход PC (для подключения компьютера) (15
Dsub) (на стр. 29)
G: 0.7 Vp-p, 75 Ом, не Sync on Green
B: 0.7 Vp-p, 75 Ом, не Sync on Green
R: 0.7 Vp-p, 75 Ом, не Sync on Green
/ HD: 1-5 Vp-p
VD: 1-5 Vp-p
5 аудиовход для подключения ПК (разъем типа
minijack)
HDMI IN 6
Видео: 1080i, 720p, 576p, 576i, 480p, 480i
Аудио: Двухканальный линейный PCM
32, 44.1 и 48 кГц, 16, 20 и
или аналоговый аудиовход (гнездо типа
"тюльпан")
i Гнездо для подключения наушников
Разъем под CAM (Модуль ограниченного доступа)
24 бит,
Выходная мощность звука:
5 Вт + 5 Вт (RMS)
Принадлежности, входящие в комплект
поставки
Refer to “1: Проверка комплекта поставки” on page 4.
Конструкция и спецификации могут быть изменены
без дополнительного оповещения.
Характеристики входа для подключения ПК
Сигналы
VGA 640 480 31.5 60 VGA
SVGA 800 600 37.9 60 VESA Guidelines
XGA 1024 768 48.4 60 VESA Guidelines
WXGA 1280 768 47.4 60 VESA
• Вход PC данного телевизора не поддерживает Sync on Green или Composite Sync.
• Вход PC данного телевизора не поддерживает чересстрочные сигналы.
• Вход PC данного телевизора поддерживает сигналы, указанные в вышеприведенной таблице, с вертикальной частотой 60 Гц.
При поступлении других сигналов на экране появится сообщение "НЕТ СИНХР.".
RU
30
Горизонтальная
(пикселей)
1280 768 47.8 60 VESA
Вертикальная
(строк)
Горизонтальная
частота (кГц)
Вертикальная
частота (Гц)
Стандарт
Page 62

Поиск неисправностей
Посмотрите, не мигает ли индикатор 1 (дежурного режима) красным светом.
Если индикатор мигает
Активирована функция автодиагностики.
1 Замерьте, в течение какого времени индикатор 1 (дежурного режима) мигает и перестает
мигать.
Например, он может мигать в течение двух секунд, перестать на одну секунду и затем снова мигать в течение двух
секунд.
2 Нажмите кнопку 1 (расположенную на верхней панели телевизора), чтобы выключить его,
выньте сетевой шнур из розетки и сообщите своему местному дилеру или специалистам
сервисного центра Sony, как мигает индикатор (продолжительность миганий и интервал
между ними).
Если индикатор не мигает
1 Выполните проверки в соответствии с нижеприведенной таблицей.
2 Если Вы не смогли устранить неисправность, обратитесь к квалифицированным
специалистам по обслуживанию телевизоров.
Изображение
Неисправность Причина/Способ устранения
Нет ни изображения (темный
экран), ни звука.
Нет изображения или
информации меню от
устройства, подключенного к
Scart-разъемам или гнезду
HDMI IN
Двойное изображение или
появление ореола
На экране видны только снег и
помехи
Помехи на изображении (в
виде точечных линий или
полос)
Помехи изображения при
просмотре ТВ канала.
Наличие на экране очень
маленьких черных и/или ярких
точек.
• Проверьте правильность подключения антенны.
• Включите телевизор в сеть, и нажмите кнопку 1, расположенную на
верхней панели телевизора.
• Если индикатор 1 (дежурного режима) горит красным светом, нажмите
кнопку "/1.
• Убедите сь, что дополнительное устройство включено и несколько раз
нажмите кнопку / на пульте ДУ до тех пор, пока на экране не
появится правильный символ источника входного сигнала.
• Проверьте правильность подсоединения дополнительных устройств к
телевизору.
• При подключении какого-либо устройства к гнезду HDMI IN 6 или при
изменении разрешающей способности в течение несколько секунд
экране могут быть видны мигающие точки. Это указывает на процесс
декодирования сигнала HDMI и не является признаком неисправности.
• Проверьте правильность подсоединения антенны и соединительных
кабелей.
• Проверьте место расположения и направление антенны.
• Проверьте, не сломана или не погнута ли антенна.
• Проверьте, не истек ли срок службы антенны (3-5 лет при нормальных
условиях, 1-2 года при использовании в районах на морском побережье).
• Держите телевизор вдали от источников электрических помех, таких как
автомобили, мотоциклы? фены или оптические приборы.
• При установке дополнительных устройств оставляйте некоторое
расстояние между ними и телевизором.
• Проверьте правильность подключения антенны.
• Держите кабель антенны вдали от других соединительных кабелей.
• Выберите опцию " Руч. настройка программ" в меню "Установка" и
выполните точную настройку "AПЧ" для получения лучшего качества
изображения (стр. 24).
• Изображение на экране ТВ панели складывается из точек (пикселей).
Маленькие черные точки и/или яркие точки (пиксели) на экране не
являются дефектом.
на
Дополнительные сведения
31
RU
Page 63

Неисправность Причина/Способ устранения
Цветные передачи
воспроизводятся в чернобелом изображении
Отсутствие цвета или плохое
качество цветов при
просмотре сигнала, поданного
через разъемы Y, P
3.
B/CB, PR/CR
• Выберите опцию "Сброс" в меню "Настройка изображения" опцию
"Настройка изображения" для возврата к заводским предустановкам
(стр. 18).
• Проверьте правильность подключений к разъемам Y, P B/CB, PR/CR 3.
• Проверьте, чтобы разъемы Y, P
B/CB, PR/CR 3 были плотно установлены
в своих гнездах.
Звук
Неисправность Причина/Способ устранения
Хорошее качество
изображения, но нет звука
• Нажмите кнопку 2 +/– или % (mute).
• Проверьте, чтобы в меню "Настройка звука" Динамики опция "Вкл. " была
установлена в положение "(стр. 20)".
Звук с помехами.
• См. "Помехи изображения" на стр. 31.
Каналы
Неисправность Причина/Способ устранения
Нужный канал не выводится
на экран
Некоторые каналы не
воспроизводятся на экране
Цифровой канал не выводится
на экран
• Задайте другой режим работы (цифровой или аналоговый) и выберите
нужный (цифровой или аналоговый) канал.
• Канал используется только для передачи кодированных/получаемых по
подписке программ Подпишитесь на платные услуги.
• Канал используется только для передачи данных (без звука или
изображения).
• Запросите в телевещательной компании информацию о передаваемой
программе.
• Проверьте, чтобы антенна была подключена напрямую к телевизору (а не
через другое устройство).
• Обратитесь в местную сервисную службу, чтобы узнать, используется ли в
Вашем регионе цифровое вещание.
• Перейдите на использование антенны с более высоким коэффициентом
усиления.
Общие
Неисправность Причина/Способ устранения
Телевизор автоматически
выключается (телевизор
входит в дежурный режим)
Телевизор автоматически
включается
Невозможно выбрать
некоторые источники входных
сигналов
Не работает пульт ДУ
RU
32
• Проверьте, установлена ли опция "Таймер выкл." или подтвердите
установку "Время Выкл." (стр. 22).
• Если в течение 10 минут на телевизор не поступает ТВ сигнал и за это
время не была нажата ни одна кнопка, телевизор автоматически переходит
в дежурный режим.
• Проверьте, не задана ли опция "Время Вкл." (стр. 22).
• Выберите опцию "Предустановка AV" в меню "Установка" и отмените
опцию "Пропуск" для данного источника входного сигнала (стр. 23).
• Замените батарейки.
Page 64

Wprowadzenie
Dziękujemy, że wybrali Państwo produkt firmy Sony.
Przed przystąpieniem do eksploatacji telewizora
należy dokładnie zapoznać się z treścią niniejszej
instrukcji oraz zachować ją do wykorzystania w
przyszłości.
Informacja dotycząca funkcji
Telewizji Cyfrowej
• Wszystkie funkcje dotyczące Telewizji Cyfrowej ( )
dostępne są tylko w krajach lub na obszarach, gdzie
nadawane są sygnały cyfrowej telewizji naziemnej DVBT (MPEG2). Prosimy skontaktować się z lokalnym
sprzedawcą, aby ustalić, czy w miejscu Państwa
zamieszkania można odbierać sygnały DVB-T.
•Choć zakupiony model telewizora jest dostosowany do
odbioru sygnałów telewizji naziemnej DVB-T, nie można
zagwarantować jego kompatybilności z tworzonymi w
przyszłości programami w formacie DVB-T.
• W niektórych krajach pewne funkcje Telewizji Cyfrowej
mogą być niedostępne.
Utylizacja telewizora
Pozbycie się zużytego
sprzętu (stosowane w
krajach Unii Europejskiej i
w pozostałych krajach
europejskich stosujących
własne systemy zbiórki)
Ten symbol na produkcie lub jego
opakowaniu oznacza, że produkt
nie może być traktowany jako
odpad komunalny, lecz powinno
się go dostarczyć do
odpowiedniego punktu zbiórki
elektronicznego w celu recyklingu. Odpowiednie
zadysponowanie zużytego produktu zapobiega
potencjalnym negatywnym wpływom na środowisko oraz
zdrowie ludzi, jakie mogłyby wystąpić w przypadku
niewłaściwego zagospodarowania odpadów. Recykling
materiałów pomoże w ochronie środowiska naturalnego. W
celu uzyskania bardziej szczegółowych informacji na temat
recyklingu tego produktu, należy skontaktować się z lokalną
jednostką samorządu terytorialnego, ze służbami
zagospodarowywania odpadów lub ze sklepem, w którym
zakupiony został ten produkt.
sprzętu elektrycznego i
Producentem tego produktu jest Sony Corporation, 1-7-1
Konan Minato-ku Tokyo, 108-0075 Japonia.
Upoważnionym przedstawicielem producenta w Unii
Europejskiej, uprawnionym do dokonywania i
potwierdzania oceny zgodności z wymaganiami
zasadniczymi, jest Sony Deutschland GmbH, Hedelfinger
Strasse 61, 70327 Stuttgart, Niemcy. Nadzór nad
dystrybucją na terytorium Rzeczypospolitej Polskiej
sprawuje Sony Poland, 00-876 Warszawa, ul. Ogrodowa 58.
W sprawach serwisowych i gwarancyjnych należy
kontaktować się z podmiotami, których adresy podano w
osobnych dokumentach gwarancyjnych lub serwisowych,
lub z najbliższym sprzedawcą produktów Sony.
Informacje dot. znaków towarowych
• jest zastrzeżonym znakiem towarowym projektu
DVB
• Wyprodukowano na licencji BBE Sound, Inc. Produkt na
licencji BBE Sound, Inc. wyprodukowany zgodnie z
jednym lub większą liczbą następujących patentów
amerykańskich: 5510752, 5736897. Nazwa “BBE” i
symbol BBE są znakami towarowymi firmy BBE Sound,
Inc.
• Wyprodukowano na licencji Dolby Laboratories. Nazwa
“Dolby” i symbol podwójnej litery D są znakami
towarowymi firmy Dolby Laboratories.
• Nazwa HDMI, logo HDMI oraz High-Definition
Multimedia Interface są znakami towarowymi lub
zastrzeżonymi znakami towarowymi firmy HDMI
Licensing LLC.
DIGITAL
~
Symbol “xx”, który pojawia się w nazwie modelu,
odpowiada dwóm znakom numerycznym opisującym
kolor.
PL
2
Page 65

Spis treści
Instrukcja podłączenia i programowania 4
Instrukcja podłączenia i programowania 4
Informacje dotyczące bezpieczeństwa......................................................................................7
Środki ostrożności.....................................................................................................................8
Przegląd przycisków pilota ....................................................................................................9
Przegląd przycisków i wskaźników telewizora...................................................................10
Odbiór audycji telewizyjnych
Odbiór audycji telewizyjnych...................................................................................................11
Sprawdzanie elektronicznego przewodnika po programach (EPG) ...............................13
Korzystanie z Listy ulubionych kanałów .........................................................................15
Oglądanie obrazów z podłączonych urządzeń........................................................................16
Korzystanie z MENU funkcji
Poruszanie się po menu..........................................................................................................17
Menu Regulacja obrazu ..........................................................................................................18
Menu Regulacja dźwięku ........................................................................................................19
Menu Funkcje..........................................................................................................................21
Menu Ustawienia.....................................................................................................................23
Menu Ustawienia cyfrowe ..............................................................................................26
Korzystanie z dodatkowego sprzętu
Podłączanie dodatkowego sprzętu .........................................................................................28
Informacje dodatkowe
Dane techniczne .....................................................................................................................30
Rozwiązywanie problemów.....................................................................................................31
:tylko w przypadku kanałów cyfrowych
PL
PL
3
Page 66

Instrukcja podłączenia i programowania
1: Sprawdzenie
wyposażenia
Pilot RM-ED007 (1)
Bateria AA (typu R6) (2)
Uchwyt kablowy (1)
Pasek podtrzymujący (1) i śruby (2)
Wkładanie baterii do pilota
2: Podłączenie
anteny/magnetowidu
Jeśli odbiornik ma być przyłączony tylko do
anteny
(niedostarczony w komplecie)
Jeśli odbiornik ma być przyłączony do
anteny i magnetowidu
Kabel koncentryczny
Uwagi
•Przy wkładaniu baterii do pilota zachować właściwą
biegunowość.
•Zużyte baterie należy utylizować w sposób nieszkodliwy
dla środowiska naturalnego. W niektórych regionach
sposób utylizacji zużytych baterii mogą regulować
stosowne przepisy. Należy skontaktować się w tej sprawie
z lokalnymi władzami.
•Nie należy używać różnych typów baterii jednocześnie
ani łączyć starych baterii z nowymi.
•Należy ostrożnie obchodzić się z pilotem. Nie należy nim
rzucać, chodzić po nim, ani wylewać na niego żadnych
płynów.
•Nie należy kłaść pilota w pobliżu źródeł ciepła lub w
miejscach narażonych na bezpośrednie dzia
słonecznych. Chronić je przed wilgocią.
łanie promieni
(niedostarczony w
(niedostarczony w komplecie)
Przewód SCART
Magnetowid
Przewód RF
komplecie)
4
PL
Page 67

3: Formowanie
4: Zabezpieczenie
Instrukcja podłączenia i programowania
wiązki przewodów
1
B
A
2
3
telewizora przed
przewróceniem
2
3
1
5:
Wybór języka i
kraju/regionu
2
(cd)
1
2
3,4
5
PL
Page 68

1 Podłączyć odbiornik TV do gniazdka
sieciowego (220-240V AC, 50Hz).
2 Nacisnąć przycisk 1 znajdujący się na
górze telewizora.
Przy pierwszym włączeniu telewizora na ekranie
pojawia się menu Język.
Gdy odbiornik TV jest w trybie czuwania
(wskaźnik
przodu telewizora pali się na czerwono), aby
włączyć odbiornik TV należy wcisnąć przycisk
"/1 na pilocie.
1 (tryb czuwania) znajdujący się z
3 Aby wybrać język wyświetlanych menu
ekranowych, należy naciskać przyciski
F/f, a następnie nacisnąć .
Auto Start Up
Language
Country
6: Autoprogramowanie
odbiornika
Po wyborze języka i kraju/regionu, na ekranie
wyświetla się komunikat potwierdzający rozpoczęcie
autoprogramowania.
Odbiornik wyszuka i zapamięta wszystkie dostępne
kanały telewizyjne.
1
Select:
Confirm:
4 W celu dokonania wyboru kraju/regionu, w
którym używany będzie odbiornik TV,
nacisnąć
Automatyczna inicjalizacja
Język:
Kraj:
Wybierz:
Jeśli kraju/regionu, w którym odbiornik będzie
używany nie ma na liście, zamiast nazwy kraju/
regionu należy wybrać “-”.
Po pojawieniu się na ekranie komunikatu
potwierdzającego rozpoczęcie
autoprogramowania, przejść do “6:
Autoprogramowanie odbiornika”.
F/f, a następnie .
Potwierdź:
3
1 Nacisnąć .
Autoprogramowanie
Czy rozpocząć automatyczne programowanie
Powrót:
Odbiornik TV rozpoczyna wyszukiwanie
wszystkich dostępnych kanałów cyfrowych, a
następnie analogowych. Procedura ta zajmuje
nieco czasu, proszę więc czekać cierpliwie i nie
naciskać żadnych przycisków ani na odbiorniku
TV, ani na pilocie.
Jeśli wyświetli się komunikat żądający
sprawdzenia podłączenia anteny:
Nie znaleziono żadnych kanałów cyfrowych lub
analogowych. Sprawdzić wszystkie połączenia
antenowe i nacisnąć , aby ponownie rozpocząć
autoprogramowanie.
Start:
Anuluj:
MENU
2 Gdy na ekranie zostanie wyświetlone
menu Sortowania programów, należy
postępować zgodnie z czynnościami
opisanymi w rozdziale “Sortowanie
programów” (strona 24).
Jeśli kolejność zachowanych w telewizorze
kanałów analogowych ma pozostać niezmieniona,
należy przejść do punktu 3.
3 Nacisnąć przycisk MENU, aby wyjść.
Odbiornik TV jest teraz dostrojony do wszystkich
dostępnych kanałów.
6
PL
Page 69

Informacje dotyczące
Instalacja na podstawie
30 cm
bezpieczeństwa
Montaż i instalacja
Aby uniknąć ryzyka wybuchu pożaru, porażenia
prądem elektrycznym, uszkodzenia sprzętu i/lub
ewentualnych obrażeń ciała, odbiornik TV należy
zainstalować zgodnie z instrukcjami podanymi
poniżej.
Instalacja
• Telewizor powinien być zainstalowany w pobliżu łatwo
dostępnego gniazdka.
• Odbiornik należy ustawić na stabilnej, poziomej
powierzchni.
• Montaż odbiornika na ścianie należy zlecić
wykwalifikowanemu instalatorowi.
Transport
• Przed rozpoczęciem przenoszenia
odbiornika należy odłączyć od
niego wszystkie kable.
• Odbiornik należy przenosić
w sposób pokazany na ilustracji po
prawej stronie. Nie wolno naciskać
ekranu ciekłokrystalicznego ani
ramy dookoła ekranu.
• Podczas transportu odbiornik nie
powinien być narażony na wstrząsy
mechaniczne i nadmierne wibracje.
• Na czas transportu odbiornika do naprawy lub podczas
przeprowadzki, należy zapakować go w oryginalny karton
i elementy opakowania.
Wentylacja
• Nie wolno zasłaniać otworów wentylacyjnych ani
wkładać żadnych rzeczy do obudowy.
• Wokół odbiornika TV należy pozostawić trochę wolnej
przestrzeni, tak jak to pokazano na rysunku poniżej.
• Zaleca się stosowanie oryginalnego ściennego uchwytu
mocującego Sony, aby zapewnić odpowiednią wentylację.
Instalacja na ścianie
30 cm
10 cm
10 cm
Pozostawić co najmniej tyle miejsca
wokół odbiornika TV.
10 cm
10 cm10 cm
6 cm
Pozostawić co najmniej tyle miejsca
wokół odbiornika TV.
• Aby zapewnić właściwą wentylację i zapobiec osiadaniu
brudu lub kurzu:
–Nie należy ustawiać odbiornika TV ekranem do góry,
montować go do góry nogami, odwróconego tyłem lub
bokiem.
–Nie należy ustawiać odbiornika TV na półce, dywanie,
łóżku lub w szafce.
– Nie należy przykrywać odbiornika TV materiałami, np.
zasłonami lub innymi przedmiotami, takimi jak gazety itp.
–Nie należy instalować odbiornika jak pokazano na
rysunkach poniżej.
Obieg powietrza
jest zablokowany.
Obieg powietrza
jest zablokowany.
Ściana Ściana
Przewód zasilający
Aby uniknąć ryzyka wybuchu pożaru, porażenia prądem
elektrycznym, uszkodzenia sprzętu i/lub ewentualnych
obrażeń ciała, z przewodem zasilającym i gniazdem
sieciowym należy postępować w następujący sposób:
–Należy używać wyłącznie oryginalnych przewodów firmy
Sony, a nie przewodów innych producentów.
– Wtyczka powinna być całkowicie włożona do gniazda
sieciowego.
– Odbiornik TV jest przystosowany do zasilania wyłącznie
napięciem 220-240 V AC.
– W celu zachowania bezpieczeństwa, podczas dokonywania
połączeń, należy wyjąć wtyczkę przewodu zasilającego
z gniazdka oraz uważać, aby nie nadepnąć na przewód.
– Przed przystąpieniem do serwisowania lub przesuwania
odbiornika TV, należy wyjąć wtyczkę przewodu
zasilającego z gniazdka.
– Przewód zasilający powinien znajdować się z dala od
źródeł ciepła.
–Należy regularnie wyjmować wtyczkę z gniazdka i czyścić
ją. Jeśli wtyczka jest pokryta kurzem i gromadzi wilgoć, jej
ci izolujące mogą ulec pogorszeniu, co może być
własnoś
przyczyną pożaru.
Uwagi
• Dostarczonego w zestawie przewodu zasilającego nie należy
używać do jakichkolwiek innych urządzeń.
•Należy uważać, aby nie przycisnąć, nie zgiąć ani nie skręcić
nadmiernie przewodu zasilającego. Może to spowodować
uszkodzenie izolacji lub urwanie żył przewodu.
•Nie należy przerabiać przewodu zasilającego.
(cd)
PL
7
Page 70

• Na przewodzie zasilającym nie należy kłaść ciężkich
przedmiotów.
• Podczas odłączania nie wolno ciągnąć za sam przewód.
•Nie należy podłączać zbyt wielu urządzeń do tego samego
gniazda sieciowego.
•Nie należy używać gniazd sieciowych słabo trzymających
wtyczkę.
Niedozwolone użycie
Odbiornika TV nie należy instalować oraz eksploatować
w miejscach, warunkach lub okolicznościach, jakie opisano
poniżej. Niezastosowanie się do poniższych zaleceń może
prowadzić do wadliwej pracy odbiornika, a nawet pożaru,
porażenia prądem elektrycznym, uszkodzenia sprzętu i/lub
obrażeń ciała.
Miejsce:
Odbiornika TV nie należy montować na zewnątrz
pomieszczeń (w miejscach narażonych na bezpośrednie
działanie promieni słonecznych), nad morzem, na statku lub
innej jednostce pływającej, w pojeździe, w instytucjach
ochrony zdrowia, w miejscach niestabilnych lub narażonych
na działanie wody, deszczu, wilgoci lub dymu.
Warunki:
Nie należy umieszczać telewizora w miejscach gorących,
wilgotnych lub nadmiernie zapylonych; w miejscach, w których do
wnętrza mogą dostawać się owady; w miejscach,w których może
być narażony na działanie wibracji mechanicznych lub w pobliżu
przedmiotów palnych (świeczek, itp.). Odbiornik TV należy
chronić przed zalaniem i nie stawiać na nim żadnych przedmiotów
wypełnionych wodą, np. wazonów.
Okoliczności:
Odbiornika TV nie należy dotykać mokrymi rękoma, przy zdjętej
obudowie lub z akcesoriami, które nie są zalecane przez
producenta. W czasie burz z wyładowaniami atmosferycznymi
należy wyjąć wtyczkę przewodu zasilającego telewizora z
gniazdka i odłączyć przewód antenowy.
Kawałki szkła lub uszkodzenia:
• W odbiornik nie należy rzucać żadnymi przedmiotami.
Może to spowodować uszkodzenie szkła ekranu i,
w efekcie, prowadzić do poważnych obrażeń ciała.
• W przypadku pęknięcia powierzchni ekranu lub obudowy
telewizora, przed dotknięciem odbiornika należy wyjąć
wtyczkę przewodu zasilającego z gniazdka.
Niezastosowanie się do powyższego zalecenia może
spowodować porażenie prądem elektrycznym.
Gdy odbiornik TV nie jest używany
•Mając na uwadze kwestie ochrony środowiska
i bezpieczeństwa, zaleca się odłączenie odbiornika od źródła
zasilania, jeśli nie będzie on używany przez kilka dni.
• Ponieważ wyłączenie odbiornika telewizyjnego nie
powoduje odcięcia zasilania, w celu całkowitego
wyłączenia urządzenia należy wyciągnąć wtyczkę
przewodu zasilającego z gniazda sieciowego.
• Niektóre odbiorniki mogą być jednak wyposażone
w funkcje wymagające pozostawienia ich w trybie
gotowości.
Zalecenia dot. bezpieczeństwa dzieci
•Nie należy pozwalać, aby na odbiornik TV wspinały się dzieci.
•Małe akcesoria należy przechowywać z dala od dzieci tak,
aby uniknąć ryzyka ich przypadkowego połknięcia.
Co robić w przypadku wystąpienia
problemów...
W przypadku wystąpienia jednego z poniższych
problemów należy bezzwłocznie wyłączyć odbiornik TV
oraz wyjąć wtyczkę zasilającą z gniazdka sieciowego.
Należy zwrócić się do punktu sprzedaży lub punktu
serwisowego firmy Sony z prośbą o sprawdzenie
odbiornika przez wykwalifikowanego serwisanta.
W przypadku:
– Uszkodzenia przewodu zasilającego.
– Gniazd sieciowych słabo trzymających wtyczkę.
– Uszkodzenia odbiornika w wyniku jego upuszczenia
lub uderzenia przez obiekt obcy.
– Dostania się do wnętrza odbiornika cieczy lub
przedmiotów obcych.
Środki ostrożności
Oglądanie telewizji
• Program telewizyjny powinien być oglądany
• w pomieszczeniu o umiarkowanym oświetleniu,
ponieważ oglądanie go w słabym świetle lub przez
dłuższy czas jest męczące dla oczu.
• Podczas korzystania ze słuchawek należy unikać nadmiernego
poziomu głośności ze względu na ryzyko uszkodzenia słuchu.
Ekran LCD
• Chociaż ekran LCD został wykonany z wykorzystaniem
technologii wysokiej precyzji, dzięki której aktywnych jest
ponad 99,99% pikseli, na ekranie mogą pojawiać się czarne
plamki lub jasne kropki (w kolorze czerwonym, niebieskim
lub zielonym). Jest to jednak właściwość wynikająca z
konstrukcji ekranu LCD i nie jest objawem usterki.
• Nie wolno naciskać ani drapać przedniego filtru, a także kłaść
na odbiorniku TV żadnych przedmiotów. Może to
spowodować zakłócenia obrazu lub uszkodzenie ekranu LCD.
•Jeśli odbiornik TV jest używany w zimnym miejscu, na
obrazie mogą wystąpić plamy lub obraz może stać się
ciemny. Nie jest to oznaką uszkodzenia telewizora.
Zjawiska te zanikają w miarę wzrostu temperatury.
•Długotrwałe wyświetlanie obrazów nieruchomych może
spowodować wystąpienie obrazów wtórnych (tzw.
zjawy). Mogą one zniknąć po krótkiej chwili.
• Ekran i obudowa nagrzewają się podczas pracy
telewizora. Nie jest to oznak
• Ekran LCD zawiera niewielką ilość ciekłych kryształów i
rtęci. Lampy fluorescencyjne umieszczone
w odbiorniku TV także zawierają rtęć. Podczas utylizacji
należy przestrzegać lokalnych zaleceń i przepisów.
Obchodzenie się z powierzchnią ekranu/
obudową odbiornika TV i ich czyszczenie
Przed przystąpieniem do czyszczenia należy wyjąć wtyczkę
przewodu zasilającego z gniazdka.
Aby uniknąć pogorszenia stanu materiału lub powłoki ekranu
odbiornika, należy postępować zgodnie z poniższymi środkami
ostrożności.
• Aby usunąć kurz z powierzchni ekranu/obudowy, należy
wytrzeć go delikatnie za pomocą miękkiej ściereczki. Jeśli nie
można usunąć kurzu, należy wytrzeć ekran za pomocą
miękkiej ściereczki lekko zwilżonej rozcieńczonym
roztworem delikatnego detergentu.
•Nie należy używać szorstkich gąbek, środków czyszczących
na bazie zasad lub kwasów, proszków do czyszczenia ani
lotnych rozpuszczalników, takich jak alkohol, benzyna,
rozcieńczalnik czy środek owadobójczy. Używanie takich
środków lub długotrwały kontakt z gumą
spowodować uszkodzenie powierzchni ekranu lub obudowy.
• Regulację kąta nachylenia odbiornika należy wykonywać
powolnym ruchem tak, aby odbiornik nie spadł lub nie zsunął
się z podstawy na telewizor.
Urządzenia dodatkowe
W pobliżu odbiornika TV nie należy umieszczać urządzeń
dodatkowych lub urządzeń emitujących promieniowanie
elektromagnetyczne. Może to spowodować zakłócenia obrazu i/
lub dźwięku.
ą uszkodzenia urządzenia.
lub winylem może
PL
8
Page 71

Przegląd przycisków pilota
1 "/1 – Tryb czuwania odbiornika TV
Czasowe wyłączenie odbiornika TV oraz jego ponowne włączenie z trybu
czuwania.
2 – Tryb ekranowy (strona 12)
3 Kolorowe przyciski
• W trybie cyfrowym (strona 13, 15): Wybranie opcji u dołu ekranu w
cyfrowych menu "Ulubione" i "EPG".
• W trybie telegazety (strona 12): Do obsługi Fastext.
4 / – Info / Wywołanie telegazety
• W trybie cyfrowym: Wyświetlanie danych aktualnie oglądanego programu.
• W trybie analogowym: Wyświetlanie informacji takich jak: aktualny numer
kanału i tryb ekranowy.
• W trybie telegazety (strona 12): Wywołanie ukrytych informacji (np.
odpowiedzi do pytań).
5 F/f/G/g/ (strona 17)
6 Zatrzymanie obrazu (strona 12)/
• W trybie TV: Zatrzymanie obrazu na ekranie TV.
• W trybie PC: Wyświetlanie małego obrazu (PIP).
7 MENU (strona 17)
8 DIGITAL – Tryb cyfrowy (strona 11)
9 Przyciski numeryczne
• W trybie TV: Wybór kanałów. W przypadku kanałów o numerze 10 i powyżej,
drugą cyfrę należy wcisnąć w ciągu 2 sekund.
• W trybie telegazety: Aby wybrać daną stronę należy za pomocą przycisków
numerycznych wprowadzić jej trzycyfrowy numer.
0 – Poprzedni kanał
Powrót do poprzednio oglądanego kanału (dłużej niż pięć sekund).
qa PROG +/- (strona 11)
• W trybie TV: Wybór następnego (+) lub poprzedniego (-) kanału.
• W trybie telegazety: Wybór następnej (+) lub poprzedniej (-) strony.
qs 2 +/- – Głośność
qd % – Wyciszenie dźwięku (strona 11)
/ – Telegazeta (strona 12)
qf
qg ANALOG – Tryb analogowy (strona 11)
qh / RETURN
Powrót do poprzedniego ekranu w wyświetlanym menu.
qj – EPG (Cyfrowy elektroniczny przewodnik po programach)
(strona 13)
qk – Tryb obrazu (strona 18)
ql 9 – Efekt dźwiękowy (strona 19)
w; – Wybór wejścia / Zatrzymanie telegazety
• W trybie TV (strona 16): Wybór sygnału wejściowego z urządzenia
podłączonego do gniazd TV.
• W trybie telegazety (strona 12): Zatrzymuje aktualnie wyświetlaną stronę.
PIP w trybie PC (strona 12)
Wskazówka
Przyciski PROG + oraz przycisk nr 5 mają delikatnie wyczuwalne pod palcami wypustki. Ułatwiają one orientację przy obsłudze
odbiornika TV.
9
PL
Page 72

Przegląd przycisków i wskaźników
telewizora
1 MENU (strona 17)
2 / – Wybór wejścia/OK
• W trybie TV (strona 16): Wybór sygnału
wejściowego z urządzenia podłączonego do
gniazd TV.
• W menu TV: Wybór opcji lub menu oraz
potwierdzenie wybranych ustawień.
3 2 +/-/G/g
•Zwiększenie (+) lub zmniejszenie (-)
głośności.
• W menu TV: Przewinięcie opcji w lewo (
lub w prawo (
4 PROG +/-/F/f
• W trybie TV: Wybór następnego (+) lub
poprzedniego (-) kanału.
• W menu TV: Przewinięcie opcji w górę (
lub w dół (f).
5 1 – Włącznik on/off
Włączenie lub wyłączenie odbiornika TV.
Uwaga:
W celu zupełnego odłączenia odbiornika TV
należy wyjąć wtyczkę z gniazda sieciowego.
6 Czujnik zdalnego sterowania
7 – Wskaźnik Bez obrazu/Timer
•Pali się na zielono, gdy telewizor jest
wyłączony (strona 21).
• Zapala się na pomarańczowo, gdy ustawiony
jest timer (strona 22).
• Zapala się na czerwono w momencie
rozpoczęcia nagrywania cyfrowego.
8 1 – Wskaźnik trybu czuwania
Pali się na czerwono, gdy telewizor jest w trybie
czuwania.
9 " – Wskaźnik zasilania
Pali się na zielono, gdy telewizor jest włączony.
g).
G)
F)
10
PL
Page 73

Odbiór audycji telewizyjnych
Odbiór audycji
telewizyjnych
1
2
1 Aby włączyć telewizor, nacisnąć przycisk 1
znajdujący się u góry odbiornika.
Gdy odbiornik TV jest w trybie czuwania
(wskaźnik 1 (czuwanie) z przodu telewizora jest
czerwony), aby włączyć odbiornik TV należy
wcisnąć przycisk "/1 na pilocie.
2 Nacisnąć przycisk DIGITAL, aby uruchomić
tryb cyfrowy lub przycisk ANALOG, aby
uruchomić tryb analogowy.
Dostępność kanałów zależy od trybu, w jakim
pracuje telewizor.
2
3
3
3 Nacisnąć przyciski numeryczne lub PROG +/-,
aby wybrać kanał telewizyjny.
Aby przyciskami numerycznymi wybrać numer
kanału 10 lub wyższy, drugą i trzecią cyfrę należy
wcisnąć w ciągu 2 sekund.
Aby wybrać kanał cyfrowy przy użyciu
cyfrowego elektronicznego przewodnika po
programach (EPG), patrz strona 13.
W trybie cyfrowym
Na chwilę pojawia się baner informacyjny. Mogą
się na nim znajdować następujące ikonki:
: Program radiowy
: Program zakodowany/dostępny po
wykupieniu abonamentu
:Dostępne różne wersje językowe audio
:Dostępne napisy u dołu ekranu
:Dostępne napisy u dołu ekranu dla osób
niesłyszących
: Zalecany minimalny wiek dla oglądania
aktualnego programu (od 4 do 18 lat)
: Blokada zabezpiecz.
: Aktualny program jest nagrywany
Czynności dodatkowe
Aby Należy
Wyłączyć na chwilę
odbiornik TV
(Tryb czuwania)
Włączyć TV z trybu
czuwania bez
dźwięku
Wyłączenie
odbiornika TV.
Uwaga
W celu zupełnego odłączenia odbiornika TV, należy wyjąć
wtyczkę z gniazda zasilającego.
Ustawić poziom
głośności
Wyłączyć dźwięk Nacisnąć %. Aby przywrócić
Uzyskać dostęp do
tabeli indeksu
programów (tylko w
trybie analogowym)
Nacisnąć "/1.
Nacisnąć %. Naciskając
przyciski 2 +/-ustawić poziom
głośności.
Nacisnąć przycisk 1 na
odbiorniku (u góry).
Nacisnąć przycisk 2 + (aby
zwiększyć poziom głośności)/
- (aby zmniejszyć poziom
głośności).
dźwięk, należy ponownie
nacisnąć ten przycisk.
Nacisnąć . Aby wybrać kanał
analogowy, nacisnąć przycisk
F/f, a następnie nacisnąć .
Aby uzyskać dostęp do tabeli
indeksu sygnałów wejściowych,
patrz strona 16.
Odbiór audycji telewizyjnych
(cd)
11
PL
Page 74

Aby wejść na strony Teletekstu
Nacisnąć /. Po każdorazowym naciśnięciu
przycisku /, ekran zmienia się w następujący
sposób:
Telegazeta t Telegazeta na obrazie telewizyjnym
(tryb mieszany) t Bez telegazety (wyjście z trybu
Telegazeta)
Aby wybrać stronę, naciskać przyciski numeryczne
lub PROG +/-.
Aby zatrzymać stronę, nacisnąć przycisk / .
Aby pokazać na ekranie ukryte informacje, nacisnąć
przycisk / .
Wskazówki
•Należy zapewnić odbiór sygnału TV dobrej jakości, gdyż
w przeciwnym razie w telegazecie mogą pojawić się
błędy.
•Większość kanałów telewizyjnych udostępnia funkcje
Telegazety. Informacje na temat używania Telegazety
można znaleźć na stronie spisu treści (zazwyczaj strona
100).
•Jeśli u dołu strony telegazety pojawiają się opcje w
czterech kolorach, dostępna jest usługa szybkiego dostępu
Fastext. Usługa Fastext umożliwia szybki i łatwy dostęp
do stron. Aby wejść na stronę, nacisnąć przycisk w
odpowiadającym danej stronie kolorze.
Naciskać przycisk , aby wybrać format Smart, 4:3,
Wide, Zoom, lub 14:9.
Smart*
Wyświetla konwencjonalny obraz telewizyjny 4:3 z
imitacją efektu szerokoekranowego. Obraz w
formacie 4:3 wypełnia cały ekran.
4:3
Wyświetla audycje TV w konwencjonalnym formacie
4:3 (np. telewizja nie szerokoekranowa) w
prawidłowych proporcjach.
Wide
Zatrzymanie obrazu:
Opcja umożliwiająca zatrzymanie obrazu na ekranie
telewizora (np. aby zanotować numer telefonu lub
przepis kulinarny).
1 Nacisnąć na pilocie.
2 Naciskać przyciski F/f/G/g, aby ustawić
położenie okna obrazu.
3 Aby zamknąć okno nacisnąć .
4 Aby powrócić do normalnego obrazu
telewizora, ponownie nacisnąć .
Wskazówka
Funkcja nie jest dostępna dla AV3, AV5 i
AV6.
PIP w trybie PC (Obraz w Obrazie)
W trybie PC powoduje wyświetlenie małego obrazka
ostatnio oglądanego kanału.
1 Nacisnąć na pilocie.
2 Naciskać przyciski F/f/G/g, aby ustawić
położenie okna obrazu.
3 Nacisnąć , aby anulować.
Wskazówka
Dźwięk pochodzi z małego obrazka.
Aby ręcznie zmienić tryb ekranowy
stosownie do transmitowanego
programu
Wyświetla panoramiczny obraz telewizyjny (16:9) w
prawidłowych proporcjach.
Zoom*
Wyświetla obrazy kinowe w prawidłowych
proporcjach.
14:9*
Wyświetla audycje TV formatu 14:9 w prawidłowych
proporcjach. Wskutek tego, na ekranie widoczne są
czarne obszary na brzegach.
*Obraz może być częściowo obcięty od góry i od dołu.
Wskazówki
• Alternatywnie, opcję “ Autoformatowanie” można
ustawić na “Wł.”. Odbiornik TV automatycznie wybierze
tryb najlepiej dostosowany do rodzaju audycji
telewizyjnej (strona 21).
• Wybierając opcje Smart, 14:9 lub Zoom, można zmieniać
ustawienie części obrazu. Aby przesuwać w górę lub w
dół, należy naciskać przyciski
napisy dialogowe).
F/f (np. by pokazać
12
PL
Page 75

Sprawdzanie elektronicznego przewodnika
po programach (EPG)
1 W trybie cyfrowym, w celu wyświetlenia
cyfrowego elektronicznego przewodnika po
programach (EPG), należy nacisnąć .
2 Wykonać wybrane operacje zgodnie z
opisem w tabeli poniżej.
Uwaga
Informacje na temat programu będą pokazywane tylko jeśli
są one nadawane przez daną stację telewizyjną.
Cyfrowy elektroniczny przewodnik po programach (EPG).
Aby Należy
Wyłączyć EPG Nacisnąć przycisk .
Odbiór audycji telewizyjnych
Poruszać się po EPG Nacisnąć
Obejrzeć bieżący program Nacisnąć w czasie, gdy wybrany jest bieżący program.
Wyświetlić informacje o programach wg
kategorii – Lista kategorii
Ustawić program, który ma być nagrywany
– Timer nagrywania
1 Nacisnąć niebieski przycisk.
2 Za pomocą przycisków
3 Nacisnąć .
1 Za pomocą przycisków F/f/G/g wybrać program, który ma
2 Nacisnąć .
3 Nacisnąć
4 Nacisnąć , aby ustawić timer TV i magnetowidu.
Uwagi
• Nagrywanie przy użyciu timera magnetowidu można ustawić w telewizorze
• Po rozpoczęciu nagrywania, telewizor można przełączyć w tryb czuwania, ale
•Jeśli wybrano funkcję ograniczenia wiekowego dla programów, na ekranie
F/f/G/g.
F/f/G/g wybrać żądaną kategorię.
Nazwa kategorii jest pokazywana z boku.
Dostępne są następujące kategorie:
“Wszystkie”: Zawiera wszystkie dostępne kanały.
“Wiadomości”: Zawiera wszystkie kanały z wiadomościami.
Cyfrowy elektroniczny przewodnik po programach (EPG) wyświetla
teraz tylko aktualne programy z wybranej kategorii.
zostać nagrany.
F/f, aby wybrać “Timer nagrywania”.
Obok informacji dot. danego programu pojawi się symbol . Zapala
się kontrolka z przodu telewizora.
tylko jeśli magnetowid obsługuje złącz Smartlink. Jeśli magnetowid nie
obsługuje Smartlink, pojawi się komunikat przypominający o konieczności
ustawieniu timera magnetowidu.
nie należy go wyłączać, gdyż może to spowodować anulowanie nagrywania.
pojawi się komunikat z prośbą o podanie kodu PIN. Szczegółowe informacje
przedstawiono w rozdziale “Blokada zabezpiecz.” na strona 27.
(cd)
13
PL
Page 76

Aby Należy
Ustawić, aby program był wyświetlany na
ekranie automatycznie po jego rozpoczęciu
– Przypomnienie
1 Za pomocą przycisków F/f/G/g wybrać program, który ma
zostać wyświetlony na ekranie.
2 Nacisnąć .
3 Nacisnąć
4 Nacisnąć , aby wybrany program został automatycznie
wyświetlony w momencie jego rozpoczęcia.
Obok informacji dot. danego programu pojawi się symbol c.
Uwaga
Jeśli odbiornik został przełączony w stan czuwania, automatycznie włączy
się on w momencie rozpoczęcia danego programu.
F/f, aby wybrać “Przypomnienie”.
Ustawić czas i datę programu, który ma
zostać nagrany – Manualne ustawianie
timera nagrywania
Skasować nagrywanie/przypomnienie –
Lista programatora
1 Nacisnąć .
2 Za pomocą przycisków
timera nagrywania”, a następnie nacisnąć .
3 Za pomocą przycisków
nacisnąć
4 Ustawić godzinę rozpoczęcia i zakończenia nagrywania
podobnie jak to opisano w kroku 3.
5 Za pomocą przycisków
nacisnąć , aby ustawić timer TV i magnetowidu.
Obok informacji dot. danego programu pojawi się symbol . Zapala
się kontrolka z przodu telewizora.
Uwagi
• Nagrywanie przy użyciu timera magnetowidu można ustawić w telewizorze
tylko jeśli magnetowid obsługuje złącz Smartlink. Jeśli magnetowid nie
obsługuje Smartlink, pojawi się komunikat przypominający o konieczności
ustawieniu timera magnetowidu.
• Po rozpoczęciu nagrywania, telewizor można przełączyć w tryb czuwania, ale
nie należy go wyłączać, gdyż może to spowodować anulowanie nagrywania.
•Jeśli wybrano funkcję ograniczenia wiekowego dla programów, na ekranie
pojawi się komunikat z prośbą o podanie kodu pin. Szczegółowe informacje
przedstawiono w rozdziale “Blokada zabezpiecz.” na strona 27.
1 Nacisnąć .
2 Za pomocą przycisków
3 Za pomocą przycisków
skasowany, a następnie nacisnąć .
Pojawi się okienko informujące o planowanym skasowaniu programu.
4 Nacisnąć g, aby wybrać “Tak”, a następnie nacisnąć , aby
potwierdzić.
g.
F/f wybrać “Manualne ustawianie
F/f wybrać datę, a następnie
F/f wybrać program, a następnie
F/f wybrać “Lista programatora”.
F/f wybrać program, który ma zostać
Wskazówka
Cyfrowy elektroniczny przewodnik po programach (EPG) można również wyświetlić wybierając “Cyfrowy EPG” w “MENU”.
PL
14
Page 77

Korzystanie z Listy ulubionych kanałów
Funkcja Ulubione umożliwia wybranie programów z
listy składającej się z maksymalnie 8 ustawionych
przez użytkownika kanałów. Aby wyświetlić Listę
ulubionych programów, patrz rozdział “Poruszanie
się po menu” (strona 17).
Lista ulubionych kanałów
Aby Należy
Po raz pierwszy stworzyć swoją listę
ulubionych kanałów
Wyłączyć listę ulubionych kanałów Nacisnąć przycisk "RETURN".
Po naciśnięciu przycisku “Ulubione kanały cyfrowe” w “MENU” po raz
pierwszy pojawi się komunikat z pytaniem, czy mają zostać dodane kanały
do listy ulubionych kanałów.
1 Nacisnąć , aby wybrać “Tak”.
2 Za pomocą przycisków
dodany.
Jeśli numer kanału jest znany, można go wybrać bezpośrednio naciskając
w tym celu przyciski numeryczne.
3 Nacisnąć .
Kanały zapisane w liście ulubionych kanałów są oznaczone symbolem
.
F/f wybrać kanał, który ma zostać
Odbiór audycji telewizyjnych
Obejrzeć dany kanał W czasie wybierania kanałów naciskać .
Dodać lub usunąć kanały z Listy
ulubionych kanałów
Usunąć wszystkie kanały z Listy
ulubionych kanałów
1 Nacisnąć niebieski przycisk.
Kanały zapisane w liście ulubionych kanałów są oznaczone symbolem
.
2 Za pomocą przycisków F/f wybrać kanał, który ma być
dodany lub usunięty.
Jeśli numer kanału jest znany, można go wybrać bezpośrednio naciskając
w tym celu przyciski numeryczne.
3 Nacisnąć .
4 Nacisnąć niebieski przycisk, aby powrócić do listy ulubionych
kanałów.
1 Nacisnąć niebieski przycisk.
2 Nacisnąć żółty przycisk.
Pojawi się okienko informujące o planowanym skasowaniu kanałów z
listy.
3 Nacisnąć G, aby wybrać “Tak”, a następnie nacisnąć , aby
potwierdzić.
(cd)
15
PL
Page 78

Oglądanie obrazów z
podłączonych
urządzeń
Włączyć podłączone urządzenie i wykonać
jedną z następujących czynności.
W przypadku urządzenia podłączonego do
złączy 21-stykowym przewodem SCART
Rozpocząć odtwarzanie w podłączonym urządzeniu.
Na ekranie pojawi się obraz z podłączonego
urządzenia.
W przypadku samoprogramującego się
magnetowidu (strona 4)
W trybie analogowym, kanał video można wybrać
naciskając przycisk PROG +/- lub przyciski
numeryczne.
W przypadku innego podłączenia urządzenia
Można również naciskać przycisk / , aż na
ekranie pojawi się odpowiedni symbol wejścia (patrz
niżej).
AV1/ AV1, AV2/ AV2:
Sygnał audio/video lub RGB ze złącza SCART /
1 lub 2. pojawia się tylko jeśli podłączono
źródło RGB.
Czynności dodatkowe
Aby Należy
Powrócić do
normalnego odbioru
telewizyjnego
Wejść do Tabeli
indeksu sygnałów
wejściowych.
Nacisnąć DIGITAL lub
ANALOG.
Nacisnąć , aby wejść do Tabeli
indeksu sygnałów wejściowych.
(Następnie, tylko w trybie
analogowym, nacisnąć
wybrania źródła sygnału
wejściowego nacisnąć
następnie .
g.) W celu
F/f, a
AV 3
Składowe sygnały wejściowe dostarczane są z gniazd Y,
B/CB, PR/CR / 3, a sygnały wejściowe audio z
P
gniazd L, R / 3.
AV 4 / AV 4 :
Sygnał cyfrowy audio/video jest odbierany z gniazda
4, natomiast sygnał wejściowy audio z gniazd audio
L (MONO), R 4. pojawi się tylko wtedy, gdy
urządzenie jest podłączone do gniazda S video 4
zamiast do gniazda video 4, a sygnał wejściowy S
video jest odbierany z gniazda S video 4.
5:
Sygnał wejściowy RGB dostarczany jest z gniazd PC
5, a sygnał wejściowy audio z gniazda .
AV 6 :
Cyfrowy sygnał audio/video jest odbierany z gniazda
HDMI IN 6. Sygnał wejściowy audio jest sygnałem
analogowym tylko wtedy, gdy urządzenie podłączono do
gniazda DVI i audio.
16
PL
Page 79

Korzystanie z MENU funkcji
Poruszanie się po menu
“MENU” umożliwia ustawienie w telewizorze wielu przydatnych funkcji. Kanały lub źródła sygnałów z wejść zewnętrznych
można łatwo wybrać przy użyciu pilota. Ustawienia telewizora można również zmienić przy pomocy “MENU”.
1 Aby wyświetlić menu, należy nacisnąć
przycisk MENU.
MENU
Ulubione
Analogowe
Cyfrowe
2,3
1
2 Za pomocą przycisków F/f wybrać żądaną
3 Nacisnąć , aby potwierdzić wybraną opcję.
Cyfrowy EPG
Wejścia zewn.
Ustawienia
MENU
Wybierz:
opcję.
Aby wyjść z menu należy nacisnąć MENU.
Wprow.:
Koniec:
Korzystanie z MENU funkcji
Menu Opis
Ulubione
(tylko w trybie
cyfrowym)
Lista programów
(tylko w trybie
analogowym)
Analogowe
(tylko w trybie
cyfrowym)
Cyfrowe
(tylko w trybie
cyfrowym)
Cyfrowy EPG
(tylko w trybie
cyfrowym)
Wejścia zewnętrzne
Ustawienia
Uruchamia Listę ulubionych. Szczegółowe informacje na temat ustawień, patrz
strona 15.
Pozwala wybrać programy telewizyjne z listy kanałów.
• Aby obejrzeć żądany kanał, wybrać kanał, a następnie nacisnąć .
• Aby przypisać nazwę danemu programowi, patrz strona 24.
Powraca do ostatnio oglądanego kanału analogowego.
Powraca do ostatnio oglądanego kanału cyfrowego.
Uruchamia elektroniczny przewodnik po programach (EPG).
Szczegółowe informacje na temat ustawień, patrz strona 13.
Służy do wyboru urządzeń podłączonych do telewizora.
• Aby obejrzeć program/nagranie z urządzenia zewnętrznego,
wybrać źródło sygnału wejściowego, a następnie nacisnąć .
• Aby przypisać nazwę zewnętrznemu sygnałowi wejściowemu,
patrz strona 23.
Otwiera ekran menu Ustawienia, w którym dokonuje się większości zaawansowanych
ustawień i regulacji. Wybrać ikonę menu, wybrać opcję i wprowadzić żądane zmiany
lub dokonać regulacji za pomocą przycisków
Szczegółowe informacje na temat ustawień, patrz strony 18 do 27.
F/f/G/g.
17
PL
Page 80

Menu Regulacja obrazu
Regulacja obrazu
Tr yb obrazu
Światło
Kontrast
Jasność
Kolo r
Odcień
Ostrość
Odcienie koloru
Zerowanie
Red. zakłóceń
Powrót:
Wybierz:
Tryb obrazu
Światło
Kontrast
Jasność
Podane niżej opcje można wybrać w menu
Regulacja obrazu. Wybór opcji w
“Ustawienia”, patrz “Poruszanie się po menu”
(strona 17).
Wprow.:
Własny
5
Max.
50
50
0
15
Ciepłe
Auto
Koniec:
MENU
Wybiera tryb obrazu.
•“Żywy”: Dla lepszego kontrastu i ostrości obrazu.
• “Standardowy”: Dla standardowego obrazu. Ustawienie zalecane dla celów kina
domowego.
•“Własny”: Umożliwia zapisanie własnych ustawień.
Regulacja jasności światła.
Zwiększenie lub zmniejszenie kontrastu obrazu.
Zwiększenie lub zmniejszenie jasności obrazu.
Kolor
Odcień
Ostrość
Odcienie koloru
Zerowanie
Red. zakłóceń
PL
18
Zwiększenie lub zmniejszenie intensywności kolorów.
Zwiększenie lub zmniejszenie odcieni zielonych.
Wskazówka
“Odcień” można zmieniać tylko w przypadku kolorowego sygnału NTSC (np. amerykańskie
taśmy wideo).
Zwiększenie lub zmniejszenie ostrości obrazu.
Regulacja białości obrazu.
• “Zimne”: Nadaje jasnym kolorom niebieski odcień.
• “Neutralne”: Nadaje jasnym kolorom neutralny odcień.
•“Ciepłe”: Nadaje jasnym kolorom czerwony odcień.
Wskazówka
“Ciepłe” można wybrać, gdy “Tryb obrazu ” ustawiono na “Własny”.
Przywraca wszystkie fabryczne ustawienia obrazu za wyjątkiem “Tryb obrazu ”.
Zmniejsza zakłócenia obrazu (obraz zaśnieżony) w przypadku słabego sygnału
nadajnika TV.
• “Auto”: Automatycznie zmniejsza zakłócenia obrazu.
•“Duża/Średnia/Mała”: Zmienia efekt redukcji zakłóceń.
Page 81

Menu Regulacja dźwięku
Regulacja dźwięku
Efekt
Tony wy s.
Tony ni skie
Balans
Zerowanie
Podwójny dźwięk
Aut. głośność
Głośniki TV
Powr ót:
Efekt
Wybierz:
Wymienione niżej opcje można wybrać w
menu Regulacja dźwięku. Wybór opcji w
Wprow.:
Standardowy
50
50
0
Mono
Wł.
Wł.
Koniec:
MENU
“Ustawienia”, patrz “Poruszanie się po menu”
(strona 17).
Służy do wyboru trybu dźwięku.
• “Standardowy”: Wzmacnia czystość, wyrazistość szczegółów i wrażenie obecności
dźwięku dzięki zastosowaniu systemu “BBE High definition Sound System.”
• “Dynamiczny”: Wzmacnia czystość i wrażenie obecności dźwięku, zapewniając lepszą
czystość i naturalność dźwięku dzięki zastosowaniu systemu “BBE High definition Sound
System.”
• “BBE ViVA”: BBE ViVA Sound dodaje precyzyjnemu muzycznie dźwiękowi
przestrzennemu 3D efektu Hi-Fi. BBE podnosi czystość dźwięku, a głębia i wysokość
dźwięku są poprawiane dzięki opracowanej przez BBE technologii 3D. Efekt BBE ViVA
działa we wszystkich programach, łącznie z wiadomościami, muzyką, sztukami teatralnymi,
filmami, sportem i grami elektronicznymi.
• “Dolby Virtual
uzyskiwanego w systemie wielokanałowym.
• “Wył.”: Płaski dźwięk.
”
: Wykorzystuje głośniki telewizora do symulacji efektu przestrzennego
Wskazówki
• Efekt dźwiękowy można zmienić naciskając kilkakrotnie przycisk 9.
• Po ustawieniu opcji “Aut. głośność” na “Wł.”, “Dolby Virtual” zmienia się na
“Standardowy”.
Korzystanie z MENU funkcji
Tony wys.
Tony niskie
Balans
Zerowanie
Podwójny dźwięk
Służy do regulacji tonów wysokich.
Służy do regulacji tonów niskich.
Zwiększa natężenie dźwięku z lewego lub prawego głośnika.
Przywraca fabryczne ustawienia dźwięku.
Wybiera dźwięk z głośnika dla programu stereofonicznego lub dwujęzycznego.
• “Stereo”, “Mono”: Dla programu stereofonicznego.
• “A”/“B”/“Mono”: W przypadku programu dwujęzycznego należy wybrać
ustawienie “A” dla kanału dźwiękowego 1, “B” dla kanału dźwiękowego 2 lub
“Mono” dla kanału monofonicznego, o ile jest dostępny.
Wskazówka
Wybierając inne urządzenie podłączone do odbiornika TV, należy ustawić “Podwójny dźwięk”
na “Stereo”, “A” lub “B”.
19
PL
Page 82

Aut. głośność
Utrzymuje stały poziom głośności, nawet gdy występują zmiany głośności poziomu
nadawanego sygnału (np. reklamy są zazwyczaj głośniejsze od programów).
Głośniki TV
Włącza/wyłącza głośniki telewizyjne np. aby słuchać dźwięku przez zewnętrzny
sprzęt audio podłączony do telewizora.
•“Wł.”: dźwięk z odbiornika jest odtwarzany przez wbudowane głośniki
telewizora.
•“Wył. jeden raz”: głośniki TV są chwilowo wyłączane, a dźwięk z odbiornika jest
odtwarzany przez zewnętrzne urządzenie audio.
•“Wył. na stałe”: głośniki TV są na stałe wyłączane, a dźwięk z odbiornika jest
odtwarzany przez zewnętrzne urządzenie audio.
Wskazówki
• Aby ponownie włączyć głośniki TV, wybrać opcję "Wł
•Opcja “Wył. jeden raz” automatycznie ustawiana jest w stanie “Wł.” w momencie
wyłączenia telewizora.
• Opcje "Regulacjia dźwięku" nie są dostępne, jeśli wybrano "Wył. jeden raz" lub
"Wył. na stałe".
.".
20
PL
Page 83

Menu Funkcje
Funkcje
Ustawienia ekranu
Oszcz. energii
Zaaw.zwiêksz.kontrastu
Wyjście AV2
Centr. RGB
Regulacja PC
Timer
Powrót:
Wybierz:
Ustawienia Ekran
Wymienione niżej opcje można wybrać w menu
Funkcje. Wybór opcji w “Ustawienia”, patrz
“Poruszanie się po menu” (strona 17).
Wprow.:
Standardowy
Wł.
TV
0
Koniec:
MENU
Zmienia format ekranu.
• “Autoformatowanie”: Automatycznie zmienia format ekranu zgodnie z sygnałem
programu.
• “Format obrazu”: Szczegółowe informacje na temat formatu obrazu
przedstawiono na stronie 12
• “Rozmiar V”: Ustawia położenie obrazu w pionie, gdy format ekranu ustawiono
na Smart.
Wskazówki
• Nawet jeśli w opcji "Autoformatowanie" wybrano "Wł." lub "Wył.", zawsze można zmienić
format ekranu naciskając przycisk .
• Opcja "Autoformatowanie" jest dostępna tylko w przypadku systemów PAL i SECAM.
Korzystanie z MENU funkcji
Oszcz. energii
Zaaw.zwiększ.
kontrastu
Wyjście AV2
Centr. RGB
Pozwala wybrać tryb oszczędzania energii tak, aby zmniejszyć zużycie energii przez
telewizor.
• “Standardowy”: Ustawienie domyślne.
• “Oszczędzanie”: Zmniejszenie zużycia energii przez telewizor.
• “Bez obrazu”: Wyłączenie obrazu. Mimo wyłączonego obrazu można słuchać
dźwięków.
Automatycznie nastawia "Światło" na najbardziej odpowiednie wartości, zgodnie z
oceną jasności obrazu. Zwiększa kontrast obrazu.
Ustawia wysyłanie sygnału przez gniazdo oznaczone / 2 znajdujące się z
tyłu odbiornika TV. Po podłączeniu magnetowidu do gniazda / 2, można
nagrywać z urządzenia podłączonego do innych gniazd odbiornika TV.
•“TV”: Udostępnia sygnał.
• “Auto”: Udostępnia sygnał obrazu wyświetlanego w danym momencie na ekranie
telewizora. Funkcja nie jest dostępna dla AV3, AV5 i AV6.
Ustawia położenie obrazu w poziomie tak, aby obraz znajdował się w środku ekranu.
Wskazówka
Opcja ta jest dostępna tylko jeśli do znajdujących się z tyłu odbiornika gniazd SCART
1/ 1 lub 2/ 2 przyłączono źródło sygnałów RGB.
21
PL
Page 84

Regulacja PC
Pozwala indywidualnie ustawić nastawy odbiornika TV i PC.
Wskazówka
• Opcja ta jest dostępna tylko podczas pracy w trybie PC.
• “Faza”: Regulacja obrazu, gdy część wyświetlanego tekstu lub obrazu jest
niewyraźna.
•“Wielkość piksela”: Powiększa lub zmniejsza obraz w płaszczyźnie poziomej.
• “Centrowanie H”: Przesunięcie obrazu w lewo lub w prawo.
• “Linie pionowe”: Koryguje linie obrazu podczas oglądania sygnału wejściowego
RGB ze złącza PC .
• “Oszcz. energii”: Przełączenie telewizora w tryb czuwania jeśli nie dochodzi
sygnał PC.
• “Zerowanie”: Przywrócenie ustawień fabrycznych.
Timer
Służy do ustawienia czasu włączenia i wyłączenia telewizora za pomocą timera.
• Timer wyłączania
Ustawia okres czasu, po upływie którego odbiornik TV automatycznie przełącza
się w tryb czuwania.
Po uruchomieniu Timer wyłączania, wskaźnik (Timer) z przodu telewizora pali
się na pomarańczowo.
Wskazówki
•Jeśli telewizor zostanie wyłączony i ponownie włączony, ustawienia “Timer wyłączania”
zostaną skasowane “Wył.”.
•Na jedną minutę przed wyłączeniem telewizora i przejściem w stan czuwania, wyświetlony
zostanie komunikat “Timer wkrótce wyłączy zasilanie”.
• Nast. zegara
Umożliwia ręczne ustawienie zegara. Gdy telewizor odbiera sygnały kanałów
cyfrowych, zegara nie można ustawić ręcznie ponieważ dostosowuje się on do
czasu nadawanego sygnału.
•Timer
Służy do ustawienia czasu włączenia i wyłączenia telewizora za pomocą timera.
“Tryb timera”: Wybiera żądany czas.
“Czas wł”: Czas włączenia telewizora.
“Czas wył”: Czas wyłączenia telewizora
22
PL
Page 85

Menu Ustawienia
Ustawienia
Automatyczna inicjalizacja
Język
Kraj
Autoprogramowanie
Sortowanie programów
Ustawienia A/V
Korekta dźwięku
Programowanie ręczne
Ustawienia cyfrowe
Powr ót:
Wybierz:
Automatyczna
inicjalizacja
Język
Kraj
Autoprogramowa
nie
Sortowanie
programów
Ustawienia A/V
Korekta dźwięku
Podane niżej opcje można wybrać w menu
Ustawienia. Wybór opcji w “Ustawienia”, patrz
“Poruszanie się po menu” (strona 17).
Wprowadź:
English
-
Koniec:
MENU
Uruchamia “menu pierwszego uruchomienia” w celu wyboru języka oraz kraju/
regionu, a także dostrojenia wszystkich dostępnych kanałów cyfrowych i
analogowych. Zazwyczaj nie ma potrzeby wykonywania tej operacji, ponieważ
język oraz kraj/region zostały wybrane, a kanały dostrojone podczas pierwszej
instalacji odbiornika (strona 5, 6). Opcja ta umożliwia jednak powtórzenie tego
procesu (np. w celu ponownego dostrojenia odbiornika po zmianie mieszkania lub
w celu wyszukania nowych kanałów uruchomionych przez stacje telewizyjne).
Wybiera język, w którym wyświetlane są menu.
Wybiera kraj/region, w którym użytkowany jest odbiornik TV.
Wskazówka
Jeśli kraju/regionu, w którym odbiornik będzie używany nie ma na liście, zamiast
nazwy kraju/regionu należy wybrać “-”.
Wykonuje strojenie wszystkich dostępnych kanałów.
Zazwyczaj nie ma potrzeby wykonywania tej operacji, ponieważ kanały zostały już
dostrojone przy pierwszej instalacji odbiornika (strona 5, 6). Opcja ta umożliwia
jednak powtórzenie tego procesu (np. w celu ponownego dostrojenia odbiornika po
zmianie mieszkania lub w celu wyszukania nowych kanałów uruchomionych przez
stacje telewizyjne).
Zmienia kolejność, w jakiej kanały są zapisane w odbiorniku TV.
1 Za pomocą przycisków
nowe miejsce, a następnie nacisnąć
2 Za pomocą przycisków
F/f wybrać kanał, który ma być przeniesiony w
g.
F/fwybrać nowe miejsce dla wybranego
kanału, a następnie nacisnąć .
Przypisuje nazwę każdemu urządzeniu podłączonemu do bocznych i tylnych gniazd. Po
wybraniu urządzenia, nazwa ta będzie przez chwilę wyświetlana na ekranie. Można
pominąć źródło sygnału wejściowego, które nie jest podłączone do żadnego z urządzeń.
1 Za pomocą przycisków
F/f wybrać żądane źródło sygnału
wejściowego, a następnie nacisnąć .
2 Za pomocą przycisków
F/f wybrać żądaną opcję spośród podanych
poniżej, a następnie nacisnąć .
• AV1 (lub AV2/ AV3/ AV4/ PC/ HDMI), VIDEO, DVD, CABLE, GAME, CAM,
SAT: Przypisuje jedną z fabrycznie zaprogramowanych nazw do każdego z
podłączanych urządzeń.
• “Edycja”: Tworzy własną nazwę.
•“Pomiń”: Pomija źródło sygnału wejściowego, które nie jest podłączone do
żadnego z urządzeń w momencie naciskania F/f, aby wybrać źródło sygnału
wejściowego.
Pozwala wybrać indywidualny poziom głośności dla każdego urządzenia
podłączonego do odbiornika TV.
Korzystanie z MENU funkcji
(cd)
23
PL
Page 86

Programowanie
ręczne
Przed wybraniem “Nazwa”/“ ARC”/“Filtracja dźwięku”/“Pomiń”/“Dekoder”,
nacisnąć
nacisnąć .
System
Programuje ręcznie kanały programów.
1 Za pomocą przycisków
2 Aby wybrać jeden z następujących systemów telewizji, naciskać
Uwaga
3 Za pomocą przycisków F/f wybrać “Kanał”, a następnie nacisnąć .
4 Za pomocą przycisków
5 Aby wykonać strojenie kanałów należy postępować w następujący
F/f, aby wybrać numer programu, który ma zostać zmieniony. Następnie
/Kanał
F/f wybrać “System”, a następnie nacisnąć .
przyciski
B/G: dla krajów/regionów zachodnioeuropejskich
D/K: dla krajów/regionów wschodniej Europy
L: dla Francji
I: dla Wielkiej Brytanii
Zależnie od wybranego kraju/regionu, zaznaczonego w opcji “Kraj ” (strona 5), opcja ta
może nie być dostępna.
F/f, a następnie G.
F/f wybrać “S” (dla kanałów telewizji kablowej)
lub “C” (dla kanałów telewizji naziemnej), a następnie nacisnąć
sposób:
Jeśli numer kanału (częstotliwość) jest nieznany
Naciskać przyciski F/f, aby znaleźć następny dostępny kanał. Z chwilą znalezienia
kanału, przeszukiwanie zatrzyma się. Aby kontynuować przeszukiwanie, nacisnąć
g.
F/f.
Jeśli numer kanału (częstotliwość) jest znany
Przyciskami numerycznymi wpisać numer żądanego kanału stacji telewizyjnej lub
numer kanału magnetowidu.
6 Nacisnąć , aby przejść do “Potwierdź”, a następnie nacisnąć .
7 Nacisnąć
Powtórzyć powyższą procedurę, aby ręcznie zaprogramować inne kanały.
Nazwa
Nadaje wybranemu kanałowi nazwę wybraną przez użytkownika i zawierającą do 5
liter lub cyfr. Po wybraniu kanału, nazwa ta będzie przez chwilę wyświetlana na
ekranie.
ARC
Pozwala wykonać ręczne strojenie precyzyjnie wybranego programu, jeśli
użytkownik uzna, że nieznaczna korekta dostrojenia poprawi jakość obrazu.
Strojenie można skorygować w zakresie -15 do +15. Po wybraniu “Wł.”, strojenie
precyzyjne jest wykonywane automatycznie.
Filtracja dźwięku
Polepsza jakość dźwięku na poszczególnych kanałach w przypadku zniekształceń
transmisji monofonicznej. W pewnych przypadkach, niestandardowy sygnał
telewizyjny może powodować zniekształcenie dźwięku lub przejściowy zanik
dźwięku podczas oglądania programów emitowanych w mono.
Jeśli nie występują żadne zniekształcenia dźwięku, zalecamy pozostawienie
ustawienia fabrycznego “Wył.”.
Uwagi
• Po wybraniu opcji “Mała” lub “Duża” nie można odbierać dźwięku stereo lub podwójnego
dźwięku.
• Funkcja “Filtracja dźwięku” nie jest dostępna, gdy “System” ustawiono na “L”.
f, aby wybrać “OK”, a następnie nacisnąć .
24
PL
Page 87

Pomiń
Pomija nieużywane kanały analogowe, gdy podczas wyboru kanałów naciśnie się
PROG +/-. (Można wciąż wybrać pominięty kanał przyciskami numerycznymi).
Dekoder
Wyświetla i nagrywa kodowane kanały telewizyjne przy użyciu dekodera
podłączonego do złącza SCART / 1, albo do złącza SCART / 2 za
pośrednictwem magnetowidu.
Uwaga
Zależnie od wybranego kraju/regionu, wybranego w opcji “Kraj ” (strona 5), opcja ta może nie
być dostępna.
Potwierdź
Zachowuje zmiany dokonane w ustawieniach “Programowanie ręczne”.
Korzystanie z MENU funkcji
25
PL
Page 88

Menu Ustawienia cyfrowe
Ustawienia
Automatyczna inicjalizacja
Język
Kraj
Autoprogramowanie
Sortowanie programów
Ustawienia A/V
Korekta dźwięku
Programowanie ręczne
Ustawienia cyfrowe
Powrót:
Wybierz:
Strojenie kanałów
cyfrowych
Menu Ustawienia cyfrowe pozwala na zmianę/
konfigurację nastaw kanałów cyfrowych.
Wybór opcji w “Ustawienia”, patrz “Poruszanie
się po menu” (strona 17).
Wprowadź:
English
-
Koniec:
MENU
Wyświetla menu “Strojenie kanałów cyfrowych”.
Cyfrowe programowanie automatyczne
Dostraja wszystkie kanały cyfrowe.
Zazwyczaj nie ma potrzeby wykonywania tej operacji, ponieważ kanały zostały już
dostrojone przy pierwszej instalacji odbiornika (strona 5). Opcja ta umożliwia
jednak powtórzenie tego procesu (np. w celu ponownego dostrojenia odbiornika po
zmianie mieszkania lub w celu wyszukania nowych kanałów uruchomionych przez
stacje telewizyjne).
Edycja listy programóv
Usuwa wszystkie niechciane kanały cyfrowe zapisane w pamięci telewizora oraz
zmienia kolejność, w jakiej zapisane są kanały.
1 Za pomocą przycisków
F/f wybrać kanał, który ma być usunięty lub
przeniesiony w nowe miejsce.
Jeśli numer programu (częstotliwość) jest znany
Przyciskami numerycznymi wpisać trzycyfrowy numer żądanego kanału stacji
telewizyjnej.
2 Usuwanie lub zmiana kolejności, w jakiej zapisane są kanały cyfrowe:
Usuwanie kanału cyfrowego
Nacisnąć . Pojawia się komunikat informujący, że wybrany kanał cyfrowy ma być
skasowany. Nacisnąć
G, aby wybrać “Tak”, a następnie nacisnąć .
Zmiana kolejności kanałów cyfrowych
Nacisnąć g, a następnie F/f, aby wybrać nowe położenie dla danego kanału, a
następnie
G. W razie potrzeby powtórzyć kroki 1 i 2, aby przesunąć inne kanały.
3 Nacisnąć przycisk RETURN.
Ręczne strojenie kanałów cyfrowych
Umożliwia manualne strojenie kanałów cyfrowych.
1 Wybrać przycisk numeryczny, aby wybrać kanał, który ma być ręcznie
dostrojony, a następnie nacisnąć
2 Po wyszukaniu dostępnych kanałów nacisnąć
F/f, aby go dostroić.
F/f, aby wybrać kanał,
który ma być zapisany, a następnie nacisnąć .
3 Za pomocą przycisków
F/f wybrać numer programu, pod którym ma
zostać zapisany nowy kanał, a następnie nacisnąć .
Powtórzyć powyższą procedurę, aby ręcznie zaprogramować inne kanały.
26
PL
Page 89

Ustawienia
cyfrowe
Wyświetla menu “Ustawienia cyfrowe”.
Ustawienia napisów u dołu ekranu
Wyświetla na ekranie cyfrowe napisy u dołu ekranu.
Po wybraniu opcji “Słaby słuch” wraz z napisami u dołu ekranu mogą wyświetlane
być dodatkowe znaki wizualne (jeśli na danym kanale nadawane są takie
informacje).
Język napisów
Wybiera język, w którym wyświetlane są napisy u dołu ekranu.
Język audio
Wybiera język stosowany dla programu. W przypadku niektórych kanałów
cyfrowych, dla danego programu dostępnych może być kilka wersji językowych.
Typ audio
Po wybraniu “Słaby słuch” zwiększa poziom głośności.
Blokada zabezpiecz.
Pozwala ograniczyć wiekowo dostęp do programów. Programy, które przekraczają
ustawione ograniczenie wiekowe mogą być oglądane tylko po wpisaniu poprawnego
numeru PIN.
1 Przyciskami numerycznymi wpisać dany kod PIN.
Jeśli PIN nie został wcześniej ustawiony, pojawi się ekran, w którym należy wpisać
kod PIN. Zastosować się do instrukcji podanych w opisie “Kod PIN” poniżej.
2 Za pomocą przycisków F/f wybrać ograniczenie wiekowe lub “Brak”
(oglądanie bez ograniczeń), a następnie nacisnąć .
3 Nacisnąć przycisk RETURN.
Kod PIN
Do ustawienia kodu PIN po raz pierwszy lub do zmiany istniejącego kodu.
1 PIN należy wpisać zgodnie z poniższym opisem:
W przypadku, jeśli kod PIN został już wcześniej ustawiony
Przyciskami numerycznymi wpisać aktualny numer PIN.
W przypadku, jeśli kod PIN nie był wcześniej ustawiony
Przyciskami numerycznymi wpisać fabrycznie ustawiony numer PIN tj. 9999
2 Przyciskami numerycznymi wpisać numer nowego kodu PIN.
Pojawi się komunikat informujący o zaakceptowaniu nowego kodu PIN.
3 Nacisnąć przycisk RETURN.
Wskazówka
Kod PIN 9999 jest zawsze akceptowany.
Konfiguracja techniczna
Wyświetla menu "Konfiguracja techniczna".
“Auto. info. dot. usług”: Opcja ta pozwala na wyszukanie i zapisanie
nowoudostępnionych usług cyfrowych.
“Pobier. oprogramowania”: Opcja ta pozwala na automatyczne i bezpłatne pobranie
aktualizacji oprogramowania przez antenę (po opublikowaniu takich aktualizacji).
Sony zaleca, aby funkcja ta była stale włączona (ustawiona na “Wł.”). Jeśli
oprogramowanie nie ma być aktualizowane, opcję tę należy ustawić na “Wył.”.
“Informacje o systemie”: Wyświetla aktualną wersje oprogramowania oraz poziom
sygnału.
“Strefa czasowa”: Pozwala ustawić strefę czasową w kraju użytkownika.
Ustawienia modułu CA
Po uzyskaniu Modułu Dostępu Warunkowego (CAM) i specjalnej karty, opcja ta
umożliwia uzyskanie dostępu do usługi płatnej telewizji Pay Per View. Patrz strona
28 w celu uzyskania informacji na temat położenia gniazda (PCMCIA).
Korzystanie z MENU funkcji
27
PL
Page 90

Korzystanie z dodatkowego sprzętu
Podłączanie dodatkowego sprzętu
Do odbiornika TV można podłączyć cały szereg dodatkowych urządzeń. Przewody łączące nie zostały dostarczone
w komplecie.
Podłączenie do gniazd z boku odbiornika TV
Aby podłączyć Należy
Moduł Dostępu
Warunkowego
(CAM) A
Opcja umożliwiająca korzystanie z
usług Pay Per View.
Więcej informacji można znaleźć
w instrukcji obsługi modułu CAM.
Aby użyć Modułu Dostępu
Warunkowego (CAM) należy
usunąć gumową zaślepkę z
gniazda CAM. Przed włożeniem
modułu CAM do gniazda CAM
należy wyłączyć odbiornik TV.
Jeśli moduł CAM nie jest
używany, zaleca się nałożenie
zaślepki na gniazdo CAM.
Kamera S VHS/
Hi8/DVC
Słuchawki
Kamerę S VHS/
Hi8/DVC B
Słuchawki C Aby w słuchawkach odbierać
Podłączyć do gniazda S-video
4 lub gniazda video 4
oraz gniazd audio 4. Aby
uniknąć zakłóce
podłączać równocześnie kamery
do gniazda video 4 i gniazda
S-video 4. Sprzęt
monofoniczny należy podłączyć
do gniazda L 4, a “Podwójny
dźwięk” ustawić na “A”
(strona 19).
dźwięk z odbiornika TV należy je
podłączyć do gniazda i.
ń obrazu, nie
28
PL
Page 91

Podłączanie do gniazd znajdujących się z tyłu telewizora
Aby podłączyć Należy
PC
PC D Podłączyć do gniazd PC
/. Zaleca się stosowanie
przewodów komputerowych z
rdzeniem ferrytowym.
Przystawka do
gier video
Odtwarzacz
DVD
Dekoder
Odtwarzacz
Odtwarzacz DVD
z wyjściem kompozytowym
Nagrywarka DVD
Magnetowid
Dekoder
DVD
Odbiornik
cyfrowej
telewizji
satelitarnej
Odbiornik cyfrowej
telewizji
satelitarnej lub
odtwarzacz DVD
E
Odtwarzacz DVD z
wyjściem
kompozytowym F
Przystawkę do gier
video, odtwarzacz
DVD lub dekoder
G
Nagrywarkę DVD
lub magnetowid z
obsługą SmartLink
H
Jeśli urządzenie jest wyposażone
w gniazdo HDMI, podłączyć do
gniazda HDMI IN 6. Cyfrowe
sygnały video i audio pochodzą z
podłączonego urządzenia. Jeśli
urządzenie jest wyposażone w
gniazdo DVI, gniazdo DVI należy
podłączyć do gniazda HDMI IN 6
za pomocą łączówki DVI - HDMI
(nie dostarczona w komplecie), a
gniazdo audio podłączanego
urządzenia połączyć z gniazdami
audio w HDMI IN 6.
Uwagi
• Gniazda HDMI obsługują tylko
następujące sygnały wejściowe
video: 480i, 480p, 576i, 576p,
720p i 1080i. Do podłączenia
komputera PC należ
y użyć
gniazda wejściowego PC.
•Należy stosować wyłącznie
oryginalne kable HDMI z logo
HDMI.
Podłączyć do gniazd
kompozytowych oraz gniazd audio
/3.
Przyłączyć do złącza SCART /
1. Przy podłączeniu dekodera,
kodowany sygnał z tunera TV jest
wysyłany do dekodera, a następnie
dekoder wysyła sygnał
dekodowany.
Przyłączyć do złącza SCART /
2. Smartlink stanowi
bezpośrednie łącze między
odbiornikiem TV, a
magnetowidem/nagrywarką DVD.
Korzystanie z dodatkowego sprzętu
29
PL
Page 92

Informacje dodatkowe
Dane techniczne
Wyświetlacz
Wymagania dotyczące zasilania:
220–240 V AC, 50 Hz
Wielkość ekranu:
20 cali
Rozdzielczość ekranu:
1,366 punktów (w poziomie) × 768 linii (w pionie)
Pobór mocy:
65 W lub mniej
Pobór mocy w stanie czuwania*:
1 W lub mniej
* Podana moc pobierana w trybie czuwania jest osiągana,
gdy odbiornik TV zakończy wymagane procesy
wewnętrzne.
Wymiary (szer. × wys. × gł.):
Ok. 500 × 406 × 209 mm (z podstawą)
Ok. 500 × 370 × 100 mm (bez podstawy)
Waga:
Ok. 8 kg (z podstawą)
Ok. 7 kg (bez podstawy)
System panelu:
Panel z wyświetlaczem ciekłokrystalicznym
System TV
Zależnie od wybranego kraju/regionu:
Analogowy:B/G/H, D/K, L, I
Cyfrowy:DVB-T
System kodowania kolorów
Analogowy:PAL, SECAM
NTSC 3.58, 4.43 (tylko wejście Video In)
Cyfrowy:MPEG-2 MP@ML
Antena
75-omowa antena zewnętrzna VHF/UHF
Zakres kanałów
Analogowych: 48.25 - 855.25 MHz
Cyfrowych: VHF Pasmo III (177.5 - 226.5 MHz)
UHF E21 - E69 (474 - 858 MHz)
Złącza
/1
21-wtykowe złącze SCART (standard CENELEC), w
tym wejście audio/video, wejście RGB, wyjście audio/
video TV.
/ 2 (SmartLink)
21-wtykowe złącze SCART (standard CENELEC), w
tym wejście audio-video, wejście RGB, wybieralne
wyjście audio/video oraz interfejs Smartlink
3
Obsługiwane formaty: 1080i, 720p, 576p, 576i, 480p,
480i
Y: 1 Vp-p, 75 omów, 0.3V synchronizacja ujemna
B/CB: 0.7 Vp-p, 75 omów
P
R/CR: 0.7 Vp-p, 75 omów
P
3
Wejście audio (gniazda foniczne typu "jack")
500 mVrms
Impedancja: 47 kiloomów
4Wejście S video (4-wtykowe mini DIN)
4Wejście video (gniazda foniczne typu "jack")
4Wejście audio (gniazda foniczne typu "jack")
PC Wejście PC Input (15 Dsub) (patrz strona 29)
G: 0.7 Vp-p, 75 omów, bez Sync on Green
B: 0.7 Vp-p, 75 omów, bez Sync on Green
R: 0.7 Vp-p, 75 omów, bez Sync on Green
HD: 1-5 Vp-p
VD: 1-5 Vp-p
5 Wejście PC (minijack)
HDMI IN 6
Video: 1080i, 720p, 576p, 576i, 480p, 480i
Audio: Dwukanałowe liniowe PCM
32, 44.1 i 48 kHz, 16, 20 i 24 bitowe,
lub analogowe wejście audio (gniazda foniczne
typu "jack")
i Gniazdo słuchawkowe
Gniazdo CAM (Moduł Warunkowego Dostępu)
Moc dźwięku
5 W + 5 W (RMS)
Dostarczone wyposażenie
Patrz “1: Sprawdzenie wyposażenia” na stronie 4.
Dane techniczne oraz konstrukcja monitora mogą ulec
zmianie bez uprzedzenia.
Tabela sygnałów wejściowych PC
Sygnały
W poziomie
(piksele)
W pionie (linie)
Częstotliwość
pozioma (kHz)
Częstotliwość
pionowa (Hz)
Norma
VGA 640 480 31.5 60 VGA
SVGA 800 600 37.9 60 Wytyczne VESA
XGA 1024 768 48.4 60 Wytyczne VESA
WXGA 1280 768 47.4 60 VESA
1280 768 47.8 60 VESA
• Niniejszy odbiornik TV nie obsługuje Sync on Green ani Composite Sync.
•Wejście PC niniejszego odbiornika nie obsługuje sygnałów z przeplotem.
•Wejście PC niniejszego odbiornika obsługuje sygnały opisane w powyższej tabeli o częstotliwości poziomej 60 Hz. W
przypadku innych sygnałów pojawi się komunikat “BRAK SYNCHR.”.
PL
30
Page 93

Rozwiązywanie problemów
Sprawdzić, czy wskaźnik 1 (czuwanie) nie miga w kolorze czerwonym.
Jeśli miga
Uruchomiona została funkcja autodiagnostyki.
1 Zmierzyć czas, w którym wskaźnik 1 (czuwanie) miga i przestaje migać.
Na przykład, wskaźnik miga przez dwie sekundy, przestaje migać na jedną sekudę, a następnie ponownie miga przez
dwie sekundy.
2 Nacisnąć 1 na odbiorniku TV (u góry), aby wyłączyć telewizor, odłączyć go od gniazdka oraz
poinformować sprzedawcę lub punkt serwisowy firmy Sony o sposobie migania wskaźnika (podać
czas trwania i długość przerw między miganiem).
Jeśli nie miga
1 Sprawdzić problemy przedstawione w tabeli poniżej.
2 Jeśli nie uda się wyeliminować problemu, oddać odbiornik TV do naprawy.
Obraz
Problem Przyczyna/Sposób usunięcia
Brak obrazu (ekran jest
ciemny), brak dźwięku.
• Sprawdzić podłączenie anteny.
•Podłączyć odbiornik do sieci i nacisnąć przycisk 1 (u góry odbiornika TV).
•Jeśli wskaźnik 1 (czuwania) zapali się na czerwono, należy nacisnąć
przycisk "/1.
Brak obrazu lub brak w menu
informacji pochodzących z
urządzenia podłączonego do
gniazd SCART lub gniazda
HDMI IN
Podwójne obrazy lub
zakłócenia
Na ekranie widać tylko
śnieżenie i zakłócenia
Zniekształcony obraz
(kropkowane linie lub pasy)
Zakłócenia obrazu podczas
oglądania kanału
telewizyjnego
Czarne i (lub) jasne punkciki
na ekranie
• Sprawdzić, czy dodatkowe urządzenie jest włączone i kilkakrotnie nacisnąć
/ aż na ekranie zostanie wyświetlony odpowiedni symbol
urządzenia.
• Sprawdzić połączenie między urządzeniem dodatkowym i telewizorem.
• Podczas podłączania urządzeń do gniazda HDMI IN 6 lub podczas zmiany
rozdzielczości na ekranie przez kilka sekund mogą migać niektóre punkty.
Trwa dekodowanie sygnału HDMI i nie jest to objawem wadliwego
działania odbiornika.
• Sprawdzić połączenia antenowe/kablowe.
• Sprawdzić antenę i jej ustawienie.
• Sprawdzić, czy antena nie złamała się lub czy nie jest ona zgięta.
• Sprawdzić, czy nie upłynął okres żywotności anteny (3-5 lat w zwykłych
warunkach, 1-2 lat w środowisku nadmorskim).
• Przechowywać telewizor z dala od źródeł zakłóceń elektrycznych takich jak
pojazdy, motocykle, suszarki do włosów lub innych urządzeń optycznych.
• Podczas podłączania dodatkowych urządzeń należy zachować odpowiedni
dystans od telewizora.
• Sprawdzić podłączenie anteny.
• Kabel antenowy powinien znajdować się z dala od innych kabli
przyłączeniowych.
•Wybrać opcję “ Programowanie ręczne” w menu “Ustawienia” i dostroić
“ARC” (Automatyczne Strojenie Precyzyjne) tak, aby uzyskać lepszy
odbiór obrazu (strona 24).
• Obraz na ekranie składa się z pikseli. Niewielkie czarne plamki l/lub białe
punkciki (piksele) występujące na ekranie nie oznaczają defektu
odbiornika.
Informacje dodatkowe
31
PL
Page 94

Problem Przyczyna/Sposób usunięcia
Brak koloru w programach
•Wybrać opcję “Zerowanie” w menu “Tryb Obrazo”, aby przywrócić
ustawienia fabryczne (strona 18).
Brak koloru lub nieprawidłowy
kolor przy sygnale
pochodzącym z gniazd Y, P
B, PR/CR wyjścia 3
C
• Sprawdzić podłączenie gniazd Y, PB/CB, PR/CR złącza 3.
• Sprawdzić, czy wtyczki Y, P
B/
swoich gniazd.
B/CB, PR/CR złącza 3 są dobrze włożone do
Dźwięk
Problem Przyczyna/Sposób usunięcia
Brak dźwięku, ale obraz jest
dobry
• Nacisnąć 2 +/– lub % (Wyłączenie dźwięku).
• Sprawdzić, czy opcja “Głośniki TV” jest ustawiona na “Wł.” w menu
“Regulacja dźwięku” (strona 20).
Dźwięk z zakłóceniami
• Patrz informacje na temat przyczyn/sposobów usuwania "Zakłóceń obrazu"
na stronie31.
Kanały
Problem Przyczyna/Sposób usunięcia
Nie można wybrać danego
kanału
Niektóre kanały są puste
•Przełączyć między trybem cyfrowym i analogowym oraz wybrać żądany
kanał cyfrowy/analogowy.
•Kanał jest kodowany lub dostępny po wykupieniu abonamentu. Wykupić
abonament na usługi płatnej telewizji Pay Per View.
• Na kanale pojawiają się tylko dane (brak obrazu lub dźwięku).
• Skontaktować się z nadawcą audycji, aby uzyskać informacje na temat
transmisji.
Brak kanału cyfrowego
• Sprawdzić, czy antena została bezpośrednio podłączona do odbiornika (nie
za pośrednictwem innych urządzeń).
• Skontaktować się z instalatorem, aby ustalić, czy na danym terenie dostępna
jest transmisja cyfrowa.
•Kupić antenę o większym zysku.
Ogólne
Problem Przyczyna/Sposób usunięcia
Odbiornik TV automatycznie
wyłącza się (przełącza się w
tryb czuwania)
Odbiornik TV automatycznie
włącza się
Nie można wybrać pewnych
sygnałów wejściowych
Pilot nie działa
• Sprawdzić, czy uruchomiono “Timer wyłączania” lub potwierdzić
ustawienia “Czas wył” (strona 22).
• Po 10 minutach bez odebrania sygnału i wykonania dowolnej czynności
telewizor automatycznie przechodzi do trybu czuwania.
• Sprawdzić, czy nie ustawiono funkcji “Czas wł” (strona 22).
•Wybrać opcję “Ustawienia A/V” w menu “Ustawienia” i anulować opcję
“Pomiń” źródła sygnału wejściowego (strona 23).
• Wymienić baterie.
32
PL
 Loading...