

Sony KD-98ZG9, KD-85ZG9 User Manual

5-001-735-11(1)
Television
For useful information about Sony products
Pour obtenir les informations utiles concernant les produits Sony
Información de utilidad para productos Sony
Voor nuttige informatie over Sony producten
Für hilfreiche Informationen zu Sony Produkten
Para informação útil sobre os produtos Sony
Per informazioni utili sui prodotti Sony
For nyttig information om Sony-produkter
For mere information om Sony-produkter
Hyödyllista tietoa Sony tuotteista
For nyttig informasjon om Sony produkter
Szczegółowe informacje o produktach Sony
Užitečné informace o výrobcích Sony
Pre viac informácií o produktoch Sony
Sony termékekről hasznos információkat találhat az alábbi
weboldalon
Pentru informaţii utile despre produsele Sony
За полезна информация отноcно продуктите на Sony
Για χρήσιμες πληρoφoρίες σχετικά με τα πρoϊόντα SONY
Sony ürünleri için faydali bilgiler
Reference Guide
Guide de référence
Guía de referencia
Referentiegids
Referenzanleitung
Guia de referência
Guida di riferimento
Referensmaterial
Referencevejledning
Viiteopas
Referanseveiledning
Przewodnik
Referenční příručka
Referenčná príručka
Felhasználói útmutató
Ghid de referinţă
Информация за продукта
GB
FR
ES
NL
DE
PT
IT
SE
DK
FI
NO
PL
CZ
SK
HU
RO
BG
KD-98ZG9 / 85ZG9
Οδηγός αναφοράς
Başvuru Kılavuzu
GR
TR

Note
For information on setting
up your TV, refer to the
Setup Guide.
Table of Contents
IMPORTANT NOTICE . . . . . . . . . . . . . . . . . . . . 2
Safety Information . . . . . . . . . . . . . . . . . . . . .2
Parts and Controls . . . . . . . . . . . . . . . . . . . 6
Controls and Indicators . . . . . . . . . . . . . . . . . 6
Using Remote Control . . . . . . . . . . . . . . . . 7
Remote Control Parts Description. . . . . . . . . 7
Attaching the Floor Stand
(KD-98ZG9 only). . . . . . . . . . . . . . . . . . . . . 9
Bundling the cables
(KD-98ZG9 only). . . . . . . . . . . . . . . . . . . . .11
Connection Diagram . . . . . . . . . . . . . . . . 13
Installing the TV to the Wall . . . . . . . . . . 16
Troubleshooting. . . . . . . . . . . . . . . . . . . . 18
Troubles and Solutions. . . . . . . . . . . . . . . . . 18
Specifications . . . . . . . . . . . . . . . . . . . . . . 19
Internet Connection and Data Privacy
This product connects to the internet during initial setup as soon
as a network is connected in order to confirm internet
connection, and later to configure the Home screen. Your IP
address is used in these and all other internet connections. If
you do not want your IP address be used at all, do not set-up the
wireless internet function and do not connect an internet cable.
Please refer to the privacy information presented in the set-up
screens for further details of internet connections.
Introduction
Thank you for choosing this Sony product.
Before operating the TV, please read this manual thoroughly and
retain i t for future reference.
• Before operating the TV, please read the “Safety Information”
(page 2).
• Read the supplied Safety Information for additional safety
information.
• Images and illustrations used in the Setup Guide and this
manual are for reference only and may differ from the actual
product.
Help
Find more troubleshooting and other useful information
directly from your TV. Press HELP on the remote control to
display a list of topics, or to search by keyword.
Help Guide (Manual)
For more detailed information, select [Help Guide] from the
Help menu on your TV. You can also check the Help Guide from
your PC or smartphone (information provided on the back
cover of this manual).
Location of the identification label
Labels for the TV Model No., Production Date (year/month) and
Power Supply rating are located on the rear of the TV or package.
They can be found by removing the terminal cover.
IMPORTANT NOTICE
Notice for Radio Equipment
Hereby, Sony Visual Products Inc. declares
that the radio equipment types
KD-98ZG9, KD-85ZG9 are in compliance
with Directive 2014/53/EU. The full text of the EU declaration of
conformity is available at the following internet address:
http://www.compliance.sony.de/
Notice for customers: the following information is only applicable
to equipment sold in countries applying EU directives.
For this radio equipment, the following restrictions on putting into
service or of requirements for authorization of use apply in
AT, BE, HR, CY, CZ, DK, EE, FI, FR, DE, EL, HU, IE, IT, LV, LT, LU, MT,NL,
PL, PT, SK, SI, ES, SE, UK, IS, LI, NO, CH, BG, RO, TR, AL, BA, MK, MD,
RS, ME, Kosovo :
5150 - 5350 MHz band is restricted to indoor operations only.
Safety Information
Installation/Set-up
Install and use the TV set in accordance with the instructions
below in order to avoid any risk of fire, electric shock or damage
and/or injuries.
Installation
• The TV set should be installed near an easily accessible mains
socket.
• Place the TV set on a stable, level surface to prevent it from
falling over and causing personal injury or property damage.
• Install the TV where it cannot be pulled, pushed, or knocked
over.
GB
2

GB
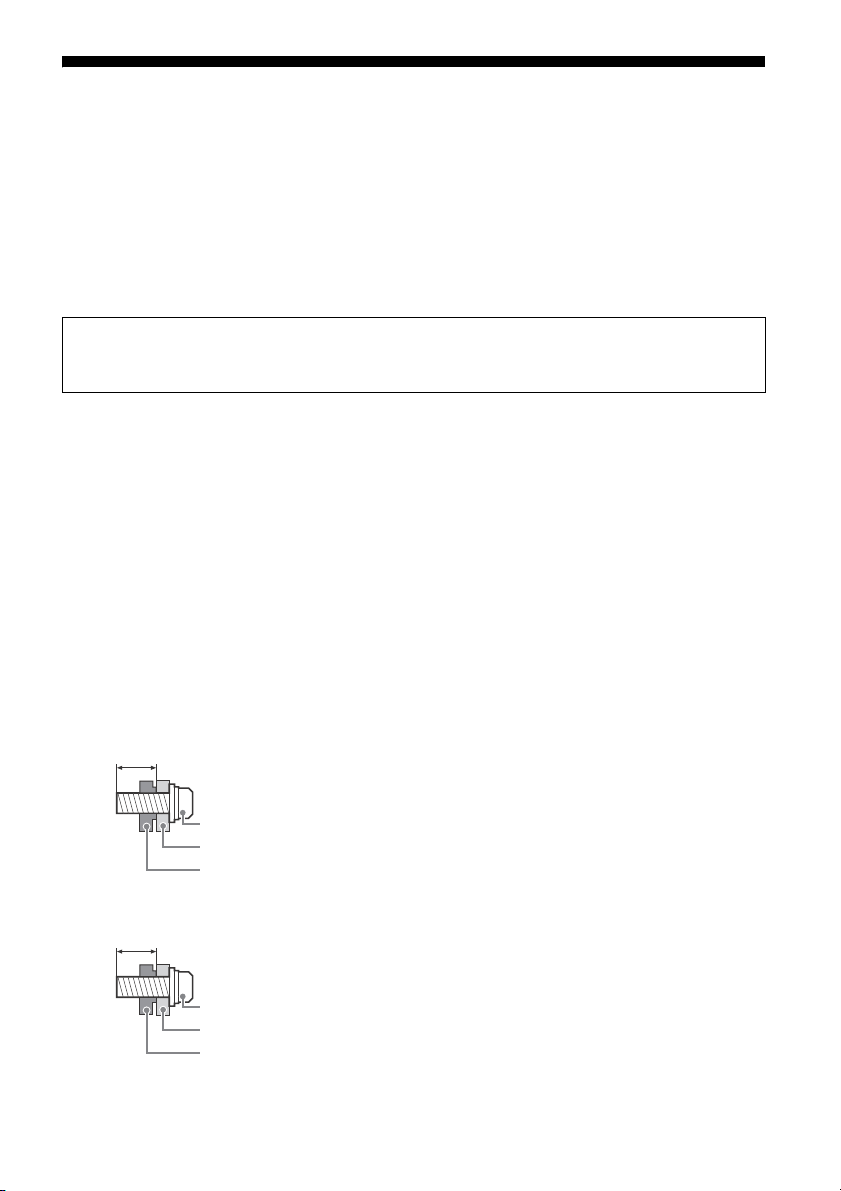
Screw (M8)
Wall-Mount Bracket
12 mm - 16 mm
TV set
Screw (M6)
Wall-Mount Bracket
10 mm - 12 mm
TV set
• Install the TV so that the TV’s Table-Top Stand does not protrude
out from the TV stand (not supplied). If the Table-Top Stand
protrudes out from the TV stand, it may cause TV set to topple
over, fall down, and cause personal injury or damage to the TV.
• Only qualified service personnel should carry out wall-mount
installations.
• For safety reasons, it is strongly recommended that you use
Sony accessories, including:
Wall-Mount Bracket SU-WL450 (KD-85ZG9 only)
• Be sure to use the screws supplied with the Wall-Mount Bracket
when attaching the Wall-Mount Bracket to the TV set. The
supplied screws are designed as indicated by illustration when
measured from the attaching surface of the Wall-Mount Bracket.
The diameter and length of the screws differ depending on the
Wall-Mount Bracket model.
Use of screws other than those supplied may result in internal
damage to the TV set or cause it to fall, etc.
KD-98ZG9
Tran spo rti ng
• Before transporting the TV set, disconnect all cables.
• Three or more people (five or more people for KD-98ZG9) are
needed to transport a large TV set.
• When transporting the TV set by hand, hold it as shown below.
Do not put stress on the LCD panel and the frame around the
screen.
KD-98ZG9
KD-85ZG9
• When transporting the TV set, do not subject it to jolts or
excessive vibration.
• When transporting the TV set for repairs or when moving, pack
it using the original carton and packing material.
KD-85ZG9
GB
3
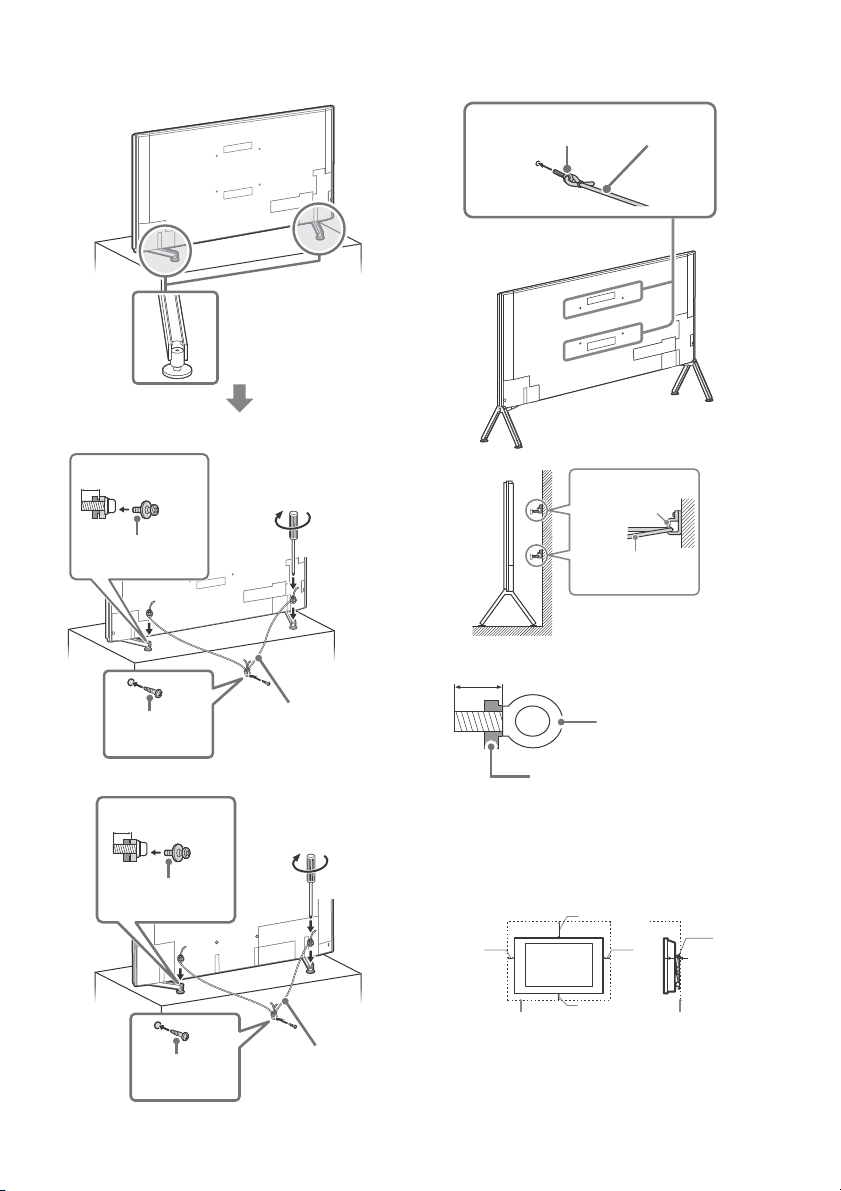
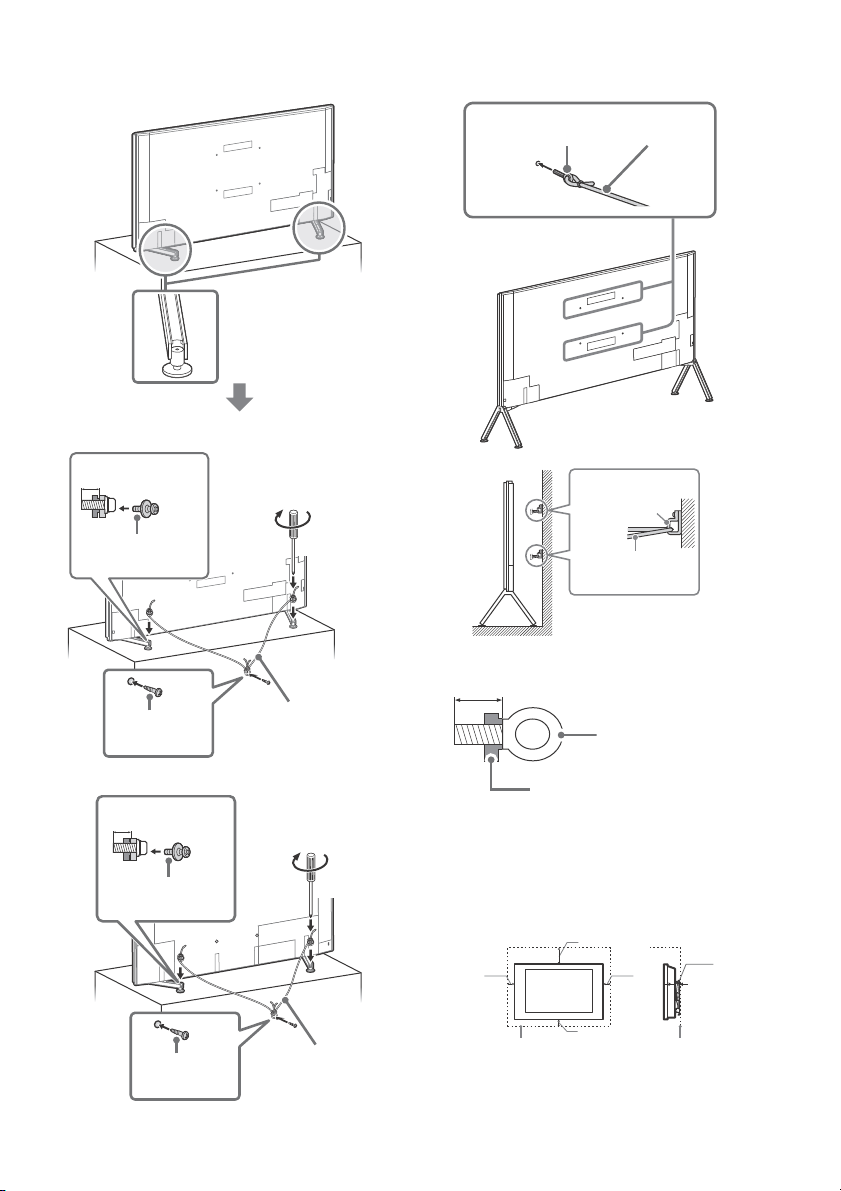
Topple prevention
M6 screw (not
supplied)
Cord (not
supplied)
Screw (not
supplied)
8 mm - 12 mm
1.5 N·m
{15 kgf·cm}
M4 screw (not
supplied)
Cord (not
supplied)
Screw (not
supplied)
1.5 N·m
{15 kgf·cm}
4 mm - 7 mm
M8 eye bolt
(not supplied)
Cord (not
supplied)
Wall-anchor
(not supplied)
Cord (not
supplied)
12 mm - 16 mm
TV’s rear cover
M8 eye bolt
30 cm
10 cm
10 cm
10 cm
Leave at least this space around the set.
2 cm
(KD-85ZG9
only)
Tab le-To p Stand
KD-98ZG9
Floor Stand
KD-98ZG9 only
KD-85ZG9
GB
4
Please refer to below illustration for M8 eye bolt length.
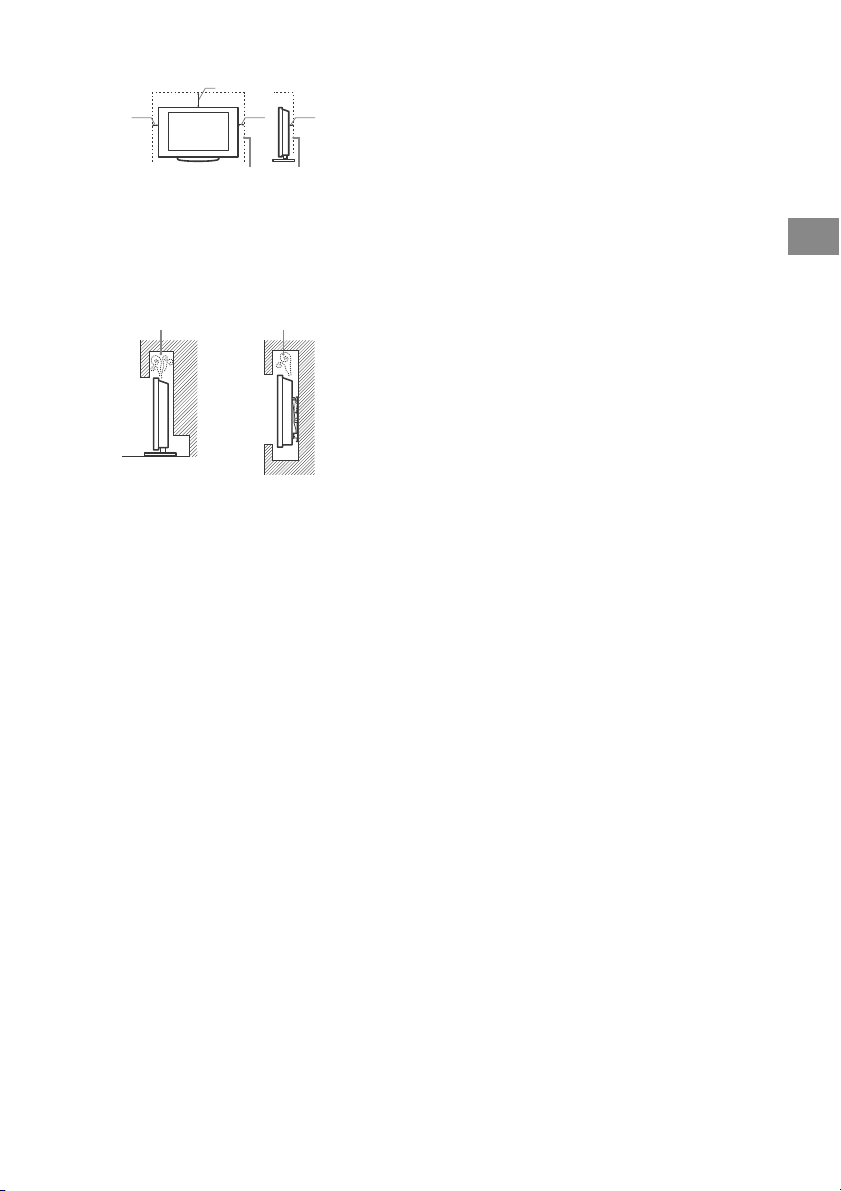
Vent ilation
• Never cover the ventilation holes or insert anything in the
cabinet.
• Leave space around the TV set as shown below.
• It is strongly recommended that you use a Sony Wall-Mount
Bracket in order to provide adequate air circulation.
Installed on the wall

GB
30 cm
10 cm
10 cm
Leave at least this space around the set.
6 cm
Air circulation is blocked.
Wall Wall
Installed with stand
• To ensure proper ventilation and prevent the collection of dirt or
dust:
Do not lay the TV set flat, install upside down, backwards, or
sideways.
Do not place the TV set on a shelf, rug, bed or in a closet.
Do not cover the TV set with a cloth, such as curtains, or items
such as newspapers, etc.
Do not install the TV set as shown below.
GB
5

Parts and Controls
ȩ
Controls and Indicators
(Power) / + / –
When the TV is off,
Press to power on.
When the TV is on,
Press and hold to power off.
Press repeatedly to change the function,
then press + or – button to:
•Adjust the volume.
• Select the channel.
• Select the input source of TV.
Remote Control sensor*1 /
Light sensor*
1
/ Illumination LED
The illumination LED lights up or blinks
according to the status of the TV.
For more information, refer to the Help
Guide.
Built-in MIC*2*
3
Use the hands-free built-in microphone for
voice search. To enable the built-in MIC,
follow the on-screen instructions when you
press the button.
Built-in MIC LED
The built-in MIC LED lights up in amber
when the built-in MIC is enabled. The builtin MIC LED can be disabled.*
*1 Do not place anything near the sensor.
*2 The voice search requires an Internet connection.
The voice search with the built-in MIC is available
only on limited region/country/language.
Standby power consumption will increase because
the built-in MIC is always listening when the voice
search with the built-in MIC is enabled.
*3 For more information, see the Online Help Guide
(page 2).
3
GB
6

GB
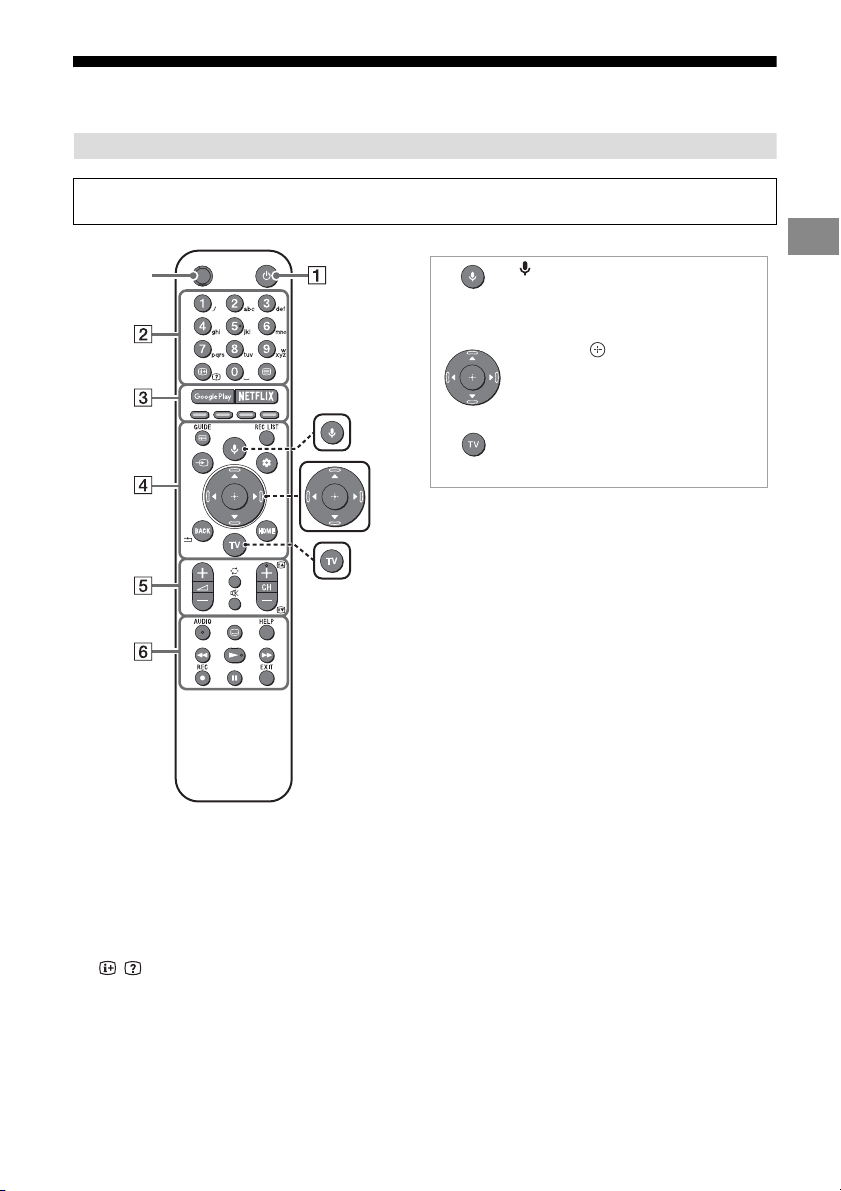
Using Remote Control
MIC
(Microphone)
Use voice search*. (e.g., Search
various content by voice.)
//// (Navigation D-Pad)
On screen menu navigation and
selection.
TV
Switch to a TV channel or input and
display the TV menu.
* The voice search requires an Internet connection.
Remote Control Parts Description
The remote control shape, location, availability and function of remote control buttons may vary
depending on your region/country/TV model.
(TV standby)
Turn on or turn off the TV (standby mode).
Number buttons
/ (Info/Text reveal)
Display information.
(Text)
Display text information.
Google Play
Access the “Google Play” online service.
NETFLIX (Only on limited region/
country/TV model)
Access the “NETFLIX” online service.
Colour buttons
Execute corresponding function at that time.
GB
7
GUIDE/
Hint
Note
Display the digital programme guide, or EPG
of cable/satellite box after setting [Cable/
Satellite box setup] (Set top box control
compatible models only).
REC LIST
Display the Rec list of USB HDD, or DVR after
setting [Cable/Satellite box setup].
(Input select)
Display and select the input source, etc.
(Quick settings)
Display Quick Settings.
BACK/
Return to the previous screen.
HOME
Display the TV Home Menu.
+/– (Volume)
Adjust the volume.
(Jump)
Jump back and forth between two channels
or inputs. The TV alternates between the
current channel or input and the last
channel or input that was selected.
(Mute)
Mute the sound. Press again to restore the
sound.
AUDIO
Select the sound of multilingual source or
dual sound for the programme currently
being viewed (depend on programme
source).
(Subtitle setting)
Turn subtitles on or off (when the feature is
available).
HELP
Display the Help menu. Help Guide can be
accessed from here.
///
Operate media contents on the TV and
connected BRAVIA Sync-compatible device.
REC
Record the currently viewed programme on
the USB HDD, or DVR after setting [Cable/
Satellite box setup] (only on limited region/
country/TV model).
EXIT
Return to the previous screen or exit from
the menu. When an Interactive Application
service is available, press to exit from the
service.
• For more information about [Cable/Satellite box
setup], refer to the Help Guide.
• The accessibility shortcut service can be turned
on or off by pressing and holding .
CH +/–//
In TV mode: Select the channel.
In Text mode: Select the next () or
previous () page.
GB
8
GB
Note
FS1
FS2
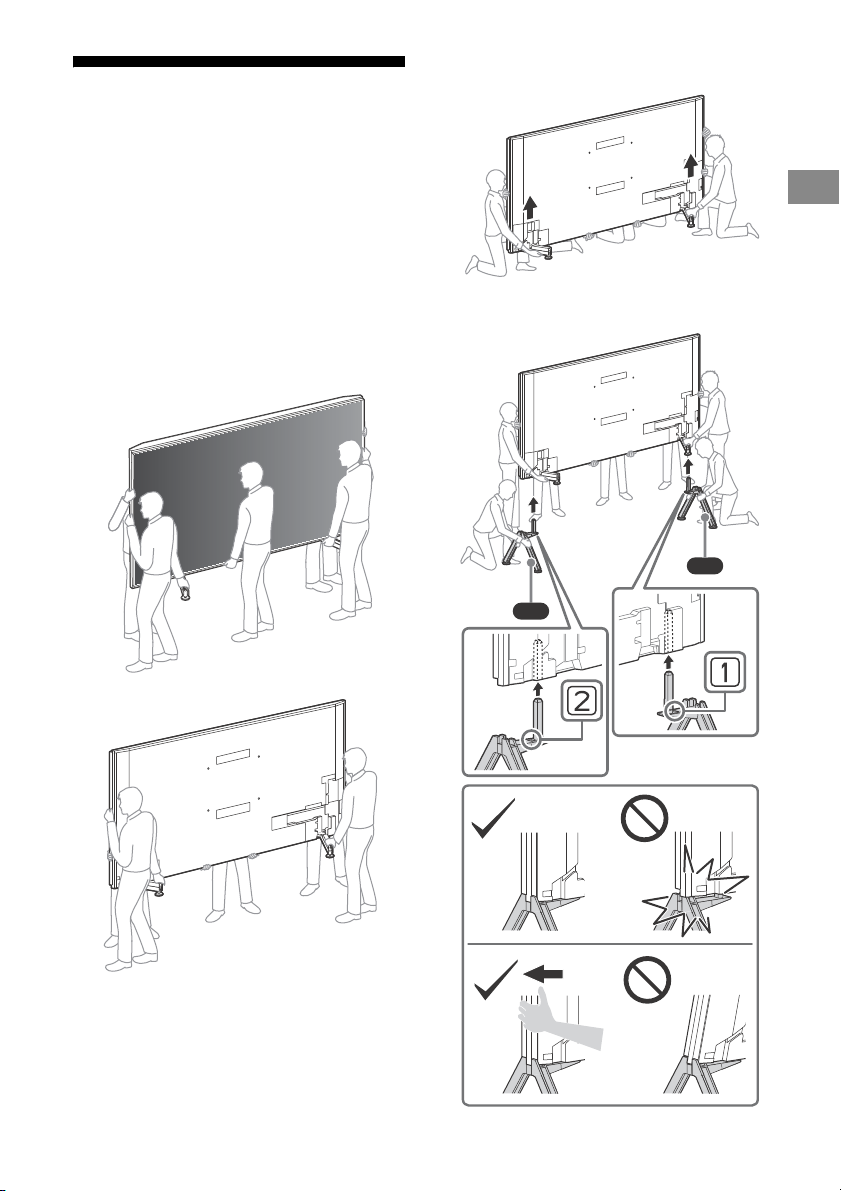
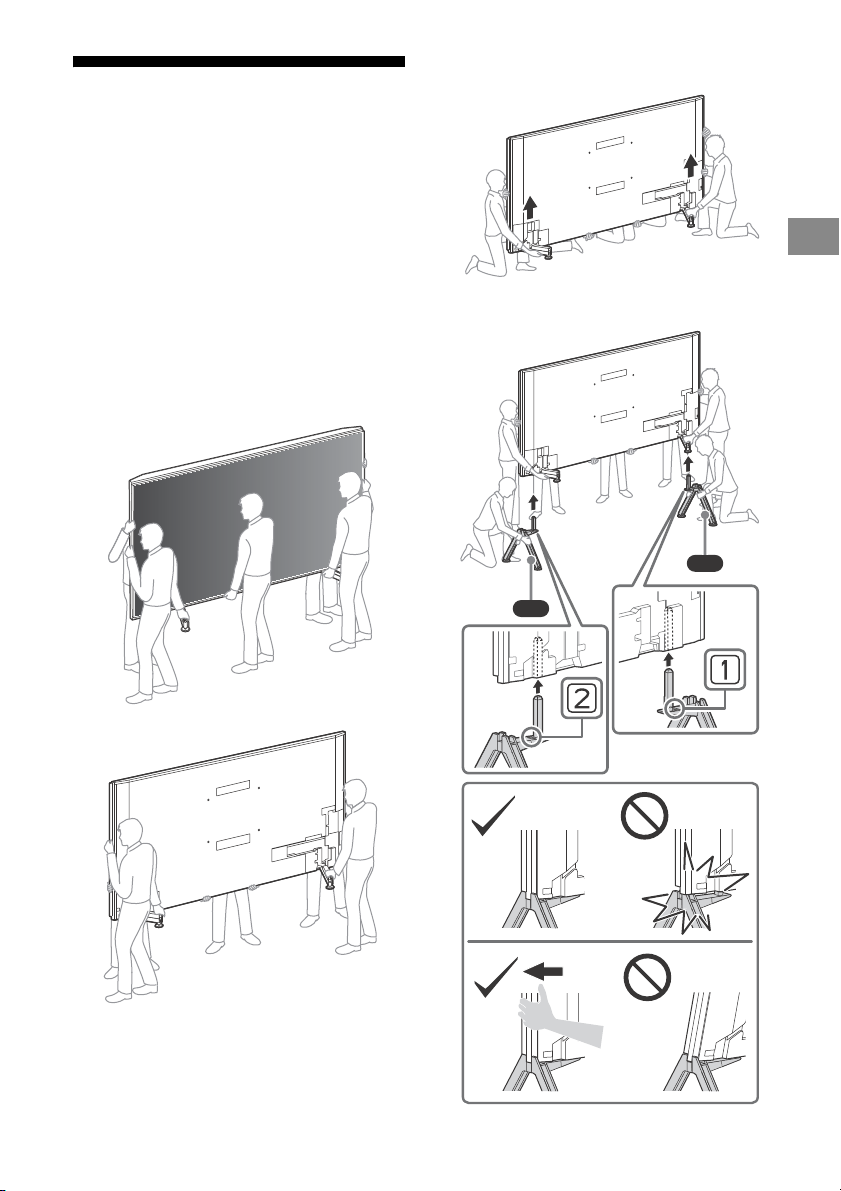
Attaching the Floor Stand
(KD-98ZG9 only)
Your TV is shipped with Table-Top Stand
attached to the TV.
Recommended
Refer to the instructions below on how to
change the Table-Top Stand to Floor Stand.
• Do not put stress on the LCD panel or the frame
around the screen.
• Be careful to not pinch your hands or the mains lead
when you install the TV set to the Floor Stand.
• Seven or more people are needed to carry out this
installation.
1 Lift up the TV.
2 Attach the Floor Stand to the TV.
GB
9

3 Support the Floor Stand while attaching
Note
Note
M6L23
M6L23
them to the TV using the supplied
screws to avoid dropping.
• If using an electric screwdriver, set the torque at
approximately 1.5 N·m {15 kgf·cm}.
4 Remove screws from Table-Top Stand.
• Five or more people are needed to
transport a large TV set.
• When reassemble the Table-Top Stand, make
sure it matches the screw holes.
10
GB

GB
Note
Note
ʓ
ʔ
CA
CB
CC
CC2
CC2
Bundling the cables
(KD-98ZG9 only)
• Do not bundle the mains lead together with other
cables.
1
2
3
• To open the cable clamper for bundling the
cables, press the side of the clamper , then
open as illustrated.
GB
11

4
5
GB
12

GB
Connection Diagram
Cable/
Antenna/
External Box
Router
Satellite
Audio
System
with
eARC/
ARC/
HDMI
Device
Digital still camera/
Camcorder/USB
storage media
Headphone
< 7 mm
AV Receiver
HDMI
Device
HDMI Device
VCR/Video game
equipment/DVD player/
Camcorder/External Box*
1
< 14 mm
Conditional
Access Module
Digital still
camera/
Camcorder/
USB storage
media/USB
HDD device
Audio
System
with Optical
Audio Input
HDMI
Device
< 1.5 mm
For more information on connections, refer to the Help Guide by pressing HELP on the remote control.
GB
13
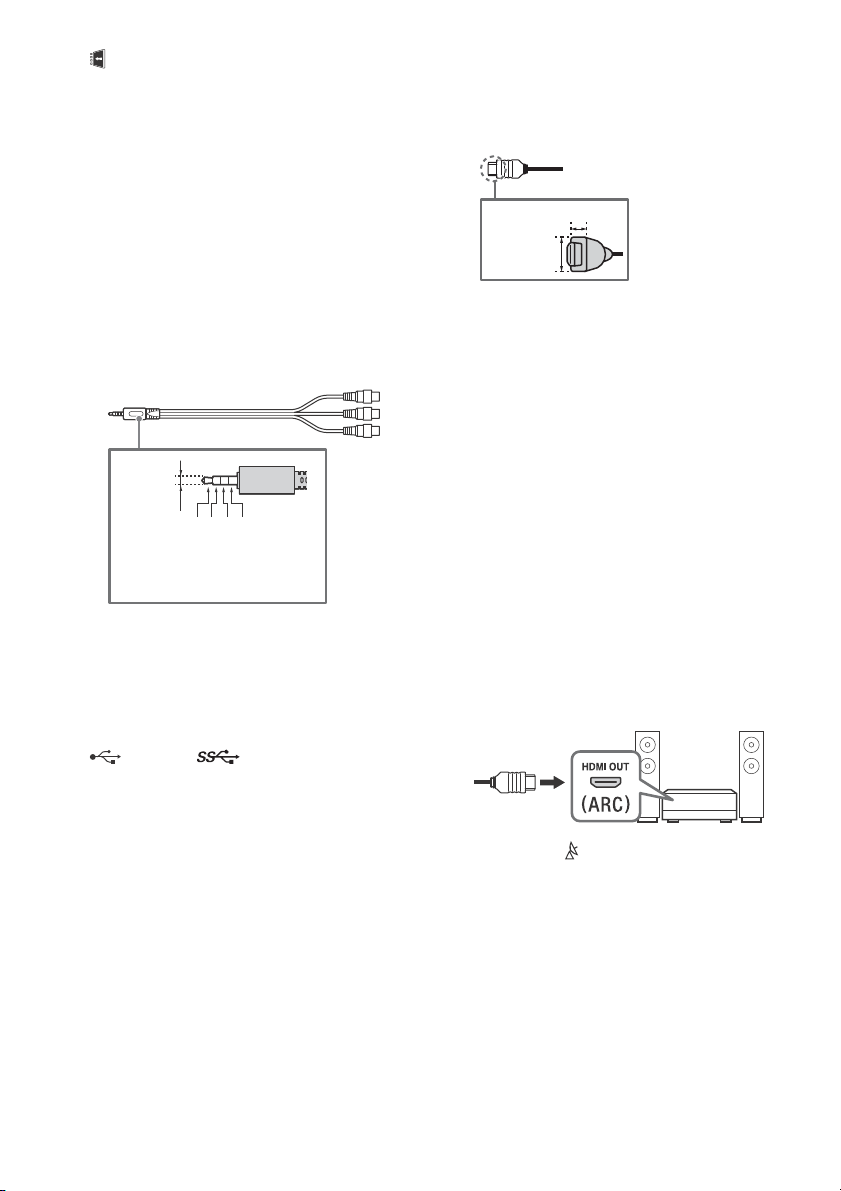
CAM (Conditional Access Module)
3.5 mm
1234
1: L
2: Video
3: Ground
4: R
< 12 mm
< 21 mm
• Provides access to pay TV services. For
details, refer to the instruction manual
supplied with your CAM.
• Do not insert the smart card directly into
the TV CAM slot. It must be fitted into the
Conditional Access Module provided by
your authorised dealer.
• CAM is not supported in some countries/
areas. Check with your authorised dealer.
• A CAM message may appear when you
switch to a digital programme after using
the Internet video.
/ AV IN
• For a composite connection, use an
Analogue Extension Cable (not supplied).
•
(Headphone)
• Supports 3-pole stereo mini jack only.
• You cannot output sound from both the
headphone and the TV speakers at the
same time.
USB 1/2, USB 3 (HDD REC)*
• Connecting a large USB device may
interfere with other connected devices
beside it.
• When connecting a large USB device,
connect to the USB 1 port.
• Connect a USB HDD device to the USB 3
port (blue).
HDMI IN 1/2/3/4
• HDMI interface can transfer the digital
video and audio on a single cable.
• When connecting an 8K supported device,
connect to the HDMI IN 4 terminal.
•
• To enjoy high quality 4K 50p/60p
contents, connect a Premium High Speed
HDMI cable and set the [HDMI signal
format] to Enhanced format.
Do this setting individually for each
connected HDMI IN terminal. For details of
supported formats, refer to the
“Specifications“ in this manual (page 19-
20).
• HDMI IN 3 eARC/ARC (Enhanced Audio
Return Channel/Audio Return Channel)
Connect your audio system to the
HDMI IN 3 to route TV audio to your audio
system. An audio system that supports
HDMI eARC/ARC can send video to the TV,
and receive audio from the TV via the
same HDMI cable. If your audio system
does not support HDMI eARC/ARC, an
additional connection with DIGITAL AUDIO
OUT (OPTICAL) is necessary.
• Use the HDMI cable with Ethernet to
connect audio system with eARC.
2
(RF input), (Satellite input)
• Connections for terrestrial/cable and
satellite. Connection steps: SUB. MAIN
Antenna
• For SUB. jack, connect only when you are
using twin tuner mode except for Single
Cable Distribution EN50494.
GB
14

GB
10 mm
CENTER SPEAKER IN
• To use your TV speakers as the centre
speaker, connect the output of your AV
receiver to the CENTER SPEAKER IN on
your TV.
• Before connecting cables, disconnect the
mains lead of both TV and AV receiver.
• Make sure the [Speakers] is set to [Audio
system].
To prevent hiss when not connecting the
CENTER SPEAKER IN to an AV receiver,
disable [TV center speaker mode]. For
details, refer to the Help Guide.
*1 For an external device which has only SCART AV
OUT, use a SCART-RCA adaptor and Analogue
Extension Cable.
*2 Only on limited region/country/TV model.
GB
15
Installing the TV to the Wall
Wall-Mount Bracket
Screw (M8)
12 mm - 16 mm
TV set
Wall-Mount Bracket
Screw (M6)
10 mm - 12 mm
TV set
This TV’s instruction manual only provides the steps to prepare the TV for Wall-Mount installation
before it is installed on the wall.
To Customers:
For product protection and safety reasons, Sony strongly recommends that installation of your TV be
performed by Sony dealers or licensed contractors. Do not attempt to install it yourself.
To Sony Dealers and Contractors:
Provide full attention to safety during the installation, periodic maintenance and examination of this
product.
Please contact Customer Support to obtain the Wall-Mount Bracket 6L (not supplied) (KD-98ZG9 only).
Sufficient expertise is required for installing this product, especially to determine the strength of the wall for
withstanding the TV’s weight. Be sure to entrust the attachment of this product to the wall to Sony dealers or
licensed contractors and pay adequate attention to safety during the installation. Sony is not liable for any
damage or injury caused by mishandling or improper installation.
Use the Wall-Mount Bracket 6L (not supplied) (KD-98ZG9 only) or SU-WL450 (not supplied) (Except
KD-98ZG9) to install the TV to the wall.
When installing the Wall-Mount Bracket, also refer to the Operating Instructions and Installation Guide
supplied with the Wall-Mount Bracket.
For product protection and safety reasons, Sony strongly recommends that you use the
Wall-Mount Bracket 6L (not supplied) (KD-98ZG9 only) designed for your TV and the installation
should be performed by a Sony dealer or licensed contractor.
• Follow the instruction guide provided with the Wall-Mount Bracket for your model. Sufficient
expertise is required in installing this TV, especially to determine the strength of the wall for
withstanding the TV’s weight.
• Be sure to use the screws supplied with the Wall-Mount Bracket when attaching the Wall-Mount
Bracket to the TV set.
The supplied screws are designed as indicated by illustration when measured from the attaching
surface of the Wall-Mount Bracket.
• The diameter and length of the screws differ depending on the Wall-Mount Bracket model. Use of
screws other than those supplied may result in internal damage to the TV set or cause it to fall, etc.
KD-98ZG9
KD-85ZG9
GB
16

GB
ʓ
ʔ
ʔ
ʕ
ʓ
Note
• Be sure to store the removed screws in a safe place, keeping them away from children.
For instructions on Wall-Mount Bracket installation, see the Installation Information (Wall-Mount Bracket) on the
product page for your TV model.
www.sony.eu/support/
KD-85ZG9 only
1 Remove the stand cover and terminal covers.
2 Remove the screws from the rear of the TV.
GB
17

Troubleshooting
General troubleshooting for issues like: black
screen, no sound, frozen picture, TV does not
respond, or network is lost, do the following
steps.
1 Restart your TV by pressing the power button
on the remote control until a message
appears. The TV will restart. If the TV does not
recover, try unplugging the mains lead. Then
press the power button on the TV and wait for
two minutes, and plug in the mains lead.
2 Refer to the Help menu by pressing HELP on
the remote control.
3 Connect your TV to the Internet and perform
a software update. Sony recommends you to
keep your TV software updated. Software
updates provide new features and
performance improvements.
4 Visit Sony support website (information
provided on the front cover of this manual).
When you plug in the TV, the TV may not be
able to turn on for a while even if you press
the power button on the remote control or
the TV.
It takes time to initialize the system. Wait for
about one minute, then operate it again.
Satellite service cannot be received.
Check the satellite cable connection.
When [No signal. LNB overload detected…]
message is displayed, unplug the mains lead.
Then, ensure the satellite cable is not damaged
and the satellite signal line is not short-circuited
in the satellite connector.
The remote control does not function.
Replace the batteries.
The parental lock for broadcast password has
been forgotten.
Enter 9999 for the PIN code and select [Change
PIN code].
The TV surrounds become warm.
When the TV is used for an extended period, the
TV surrounds become warm. You may feel hot
when touching there by the hand.
Troubles and Solutions
When the illumination LED is flashing in red.
Count how many times it flashes (interval time is
three seconds).
Reboot the TV by disconnecting the mains lead
until the illumination LED stopped flashing in red,
then turn on the TV.
If the problem persists, disconnect the mains
lead, and contact your dealer or Sony service
centre with the number of times the illumination
LED flashes.
Terrestrial/cable service cannot be received.
Check the antenna (aerial)/cable connection and
booster settings.
Select terrestrial/cable service by pressing TV on
the remote control, and then select [Digital] if the
broadcasting service is not displayed.
Terrestrial signal might be suppressed if there is a
strong signal supplied nearby. Set [LNA (CH ---)]
to [Off] in digital tuning settings.
After moving to a new house or trying to receive
new services, attempt a service search by
selecting [Digital tuning].
GB
18

GB
Specifications
System
Panel system
LCD (Liquid Crystal Display) Panel, LED Backlight
TV system
Depending on your country/area selection/TV
model
Analogue: B/G, D/K, I
Digital: DVB-T/DVB-C
DVB-T2*
Satellite*1: DVB-S/DVB-S2
Colour system
PAL/SECAM/NTSC3.58 (Video only)/NTSC4.43
(Video only)
Channel coverage
Depending on your country/area selection/TV
model
Analogue: UHF/VHF/Cable
Digital: UHF/VHF/Cable
Satellite*
Sound output
10 W + 10 W + 10 W + 10 W + 10 W + 10 W + 10 W +
10 W
Wireless technology
Protocol IEEE802.11ac/a/b/g/n
(IEEE802.11ac may not be available depending on
countries/regions.)
Bluetooth Version 4.2
Frequency band(s)
Wireless LAN (IEEE802.11ac/a/b/g/n)
Frequency range Output Power
2400 - 2483.5 MHz < 20.0 dBm
5150 - 5250 MHz < 23.0 dBm
5250 - 5350 MHz < 20.0 dBm
5470 - 5725 MHz < 20.0 dBm
5725 - 5850 MHz < 13.9 dBm
Frequency range Output Power
2400 - 2483.5 MHz < 10.0 dBm
RMF-TX600E
Frequency range Output Power
2400 - 2483.5 MHz < 10.0 dBm
1
1
: IF Frequency 950-2,150 MHz
Bluetooth
Bluetooth
Software version
This radio equipment is intended to be used with
the approved version(s) of software that are
indicated in the EU Declaration of Conformity.
Press HELP on the remote control to know the
software version.
Remote control: _._.__.___
Select [Remote control] [Software version]
from [Settings]. For more information, refer to the
Help Guide.
The software loaded on this radio equipment is
verified to comply with the essential requirements
of the Directive 2014/53/EU.
Input/Output jacks
Antenna (aerial)/cable
75 ohm external terminal for VHF/UHF
Satellite antenna*
Female F Type Connector, 75 ohm.
DiSEqC 1.0, LNB 13 V/18 V & 22 kHz tone, Single
Cable Distribution EN50494.
/ AV IN
Video/Audio input (mini jack)
HDMI IN 1/2/3/4 (support 4K resolution, HDCP
2.3-compatible)
Video:
4096 × 2160p (50, 60 Hz)*
(24 Hz)*
3840 × 2160p (24, 25, 30 Hz), 1080p (30, 50,
60, 100, 120 Hz), 1080/24p, 1080i (50, 60 Hz),
720p (30, 50, 60 Hz), 720/24p, 576p, 480p,
PC Formats*
7680 × 4320p (24, 25, 30 Hz)*4*5, 3840 × 2160p
(100, 120 Hz)*
Audio:
In eARC (Enhanced Audio Return Channel)
mode*
Refer to the Help Guide for details.
Except eARC mode
5.1 channel linear PCM: 32/44.1/48/88.2/96/
176.4/192 kHz 16/20/24 bits, Dolby Digital,
Dolby Digital Plus, DTS
eARC/ARC (Enhanced Audio Return Channel/
Audio Return Channel) (HDMI IN 3 only)
In eARC mode*
Refer to the Help Guide for details.
In ARC mode
Two channel linear PCM: 48 kHz 16 bits, Dolby
Digital, Dolby Digital Plus, DTS
DIGITAL AUDIO OUT (OPTICAL)
Digital optical jack (Two channel linear PCM:
48 kHz 16 bits, Dolby Digital, DTS)
(Stereo mini jack)
Headphone
1
2*3
2
, 3840 × 2160p (50, 60 Hz)*3,
4
4*5
6
6
, 4096 × 2160p
GB
19

1, 2, 3 (HDD REC)*
Note
USB device port ( 3 USB HDD device for REC
feature)
USB port 1 and 2 support High Speed USB
(USB 2.0)
USB port 3 supports Super Speed USB (USB 3.1
Gen 1)
CAM (Conditional Access Module) slot
7
LAN
10BASE-T/100BASE-TX connector (Depending on
the operating environment of the network,
connection speed may differ. The communication
rate and quality are not guaranteed.)
CENTER SPEAKER IN
Centre speaker input (Binding post)
Others
Optional accessories
Wall-Mount Bracket: SU-WL450 (KD-85ZG9 only)
Operating temperature
0 ºC – 40 ºC
Operating humidity
10 % – 80 % RH (non-condensing)
Power, Product Fiche and others
Power requirements
220 V - 240 V AC, 50 Hz
Energy Efficiency Class
KD-98ZG9: D
KD-85ZG9: D
Screen size (measured diagonally) (Approx.)
KD-98ZG9: 247.7 cm / 98 inches
KD-85ZG9: 214.8 cm / 85 inches
Power consumption
In [Standard] mode
KD-98ZG9: 802 W
KD-85ZG9: 636 W
In [Vivid] mode
KD-98ZG9: 1,123 W
KD-85ZG9: 921 W
Annual energy consumption*
KD-98ZG9: 1,112 kWh per year
KD-85ZG9: 882 kWh per year
Standby power consumption*9*
0.50 W (67 W in software/EPG update mode)
Display resolution
7,680 dots (horizontal) × 4,320 lines (vertical)
Output Rating
USB 1/2
5 V , 500 mA MAX
USB 3
5 V , 900 mA MAX
8
10
Dimensions (Approx.) (w × h × d)
with Floor Stand (KD-98ZG9 only)
224 × 172.5 × 69.4 cm
with Table-Top Stand
KD-98ZG9: 220.2 × 139.5 × 48.6 cm
KD-85ZG9: 191.3 × 122.6 × 43.2 cm
without Floor Stand/Table-Top Stand
KD-98ZG9: 220.2 × 131.1 × 11.1 cm
KD-85ZG9: 191.3 × 114.1 × 12 cm
Mass (Approx.)
with Floor Stand (KD-98ZG9 only)
113.2 kg
with Table-Top Stand
KD-98ZG9: 101.8 kg
KD-85ZG9: 74.5 kg
without Floor Stand/Table-Top Stand
KD-98ZG9: 94.2 kg
KD-85ZG9: 71.7 kg
*1 Not all the TV sets have DVB-T2 or DVB-S/S2
technology or satellite antenna terminal.
*2 When 4096 × 2160p is input and [Wide mode] is
set to [Normal], the resolution is displayed as
3840 × 2160p. To display 4096 × 2160p, set
[Wide mode] setting to [Full 1] or [Full 2].
*3 To support 18 Gbps, set [HDMI signal format] to
Enhanced format.
*4 Refer to the Help Guide for details.
*5 HDMI IN 4 only.
*6 eARC mode is active when [eARC mode] is set
to [Auto], [Speakers] is set to [Audio system]
and eARC compatible audio system is
connected.
*7 Only on limited region/country/TV model.
*8 Energy consumption in kWh per year, based on
the power consumption of the television
operating 4 hours per day for 365 days. The
actual energy consumption will depend on how
the television is used.
*9 Specified standby power is reached after the TV
finishes necessary internal processes.
*10 Standby power consumption will increase when
your TV is connected to the network.
• Do not remove the dummy card or cover (availability
depends on TV model) from TV CAM (Conditional
Access Module) slot other than to insert a smart card
fitted in CAM.
• Optional accessories availability depends on
countries/region/TV model/stock.
• Design and specifications are subject to change
without notice.
20
GB
GB
Notes on Digital TV function
• Digital TV (DVB terrestrial, satellite and
cable), interactive services and network
functions may not be available in all
countries or areas. Some functions might
not be enabled or might not operate
correctly with some providers and network
environments. Some TV service providers
may charge a fee for their services.
• This TV supports digital broadcasting using
MPEG-2, H.264/MPEG-4 AVC and H.265/
HEVC codecs, but compatibility with all
operator/service signals, which may
change over time, cannot be guaranteed.
Trademark Information
• The terms HDMI and HDMI High-Definition
Multimedia Interface, and the HDMI Logo
are trademarks or registered trademarks of
HDMI Licensing Administrator, Inc. in the
United States and other countries.
• Dolby, Dolby Vision, Dolby Audio, and the
double-D symbol are trademarks of Dolby
Laboratories. Manufactured under license
from Dolby Laboratories. Confidential
unpublished works. Copyright © 1992-2015
Dolby Laboratories. All rights reserved.
• “BRAVIA”, and BRAVIA Sync are
trademarks or registered marks of Sony
Corporation.
• Gracenote, the Gracenote logo and
logotype, “Powered by Gracenote” logo are
either registered trademarks or trademarks
of Gracenote, Inc. in the United States and/
or other countries.
• Vewd® Core. Copyright 1995-2019 Vewd
Software AS. All rights reserved.
• Google, Google Play, Chromecast,
YouTube, Android TV and other related
marks and logos are trademarks of Google
LLC.
• Wi-Fi®, Wi-Fi Alliance® and Wi-Fi Direct® are
registered trademarks of Wi-Fi Alliance.
• The Wi-Fi CERTIFIED™ Logo is a
certification mark of Wi-Fi Alliance.
• For DTS patents, see
http://patents.dts.com. Manufactured
under license from DTS, Inc.
DTS, the Symbol, & DTS and the Symbol
together are registered trademarks, and
DTS Digital Surround is a trademark of DTS,
Inc. © DTS, Inc. All Rights Reserved.
• The Bluetooth® word mark and logos are
registered trademarks owned by the
Bluetooth SIG, Inc. and any use of such
marks by Sony Corporation is under
license. Other trademarks and trade names
are those of their respective owners.
• Netflix is a registered trademark of Netflix,
Inc.
• DiSEqC™ is a trademark of EUTELSAT.
This TV supports DiSEqC 1.0. This TV is not
intended for controlling motorized
antennas.
• TUXERA is a registered trademark of Tuxera
Inc. in the US and other countries.
• USB-IF SuperSpeed USB Trident logo is a
registered trademark of USB Implementers
Forum, Inc.
• All other trademarks are the property of
their respective owners.
GB
21

Pour les informations sur
l’installation de votre
téléviseur, reportez-vous
au Guide d’installation.
Table des matières
AVIS IMPORTANT. . . . . . . . . . . . . . . . . . . . . . . 2
Consignes de sécurité . . . . . . . . . . . . . . . . . .2
Pièces et commandes . . . . . . . . . . . . . . . . 6
Commandes et voyants. . . . . . . . . . . . . . . . .6
Utilisation de la télécommande . . . . . . . . 7
Description des pièces de la
télécommande . . . . . . . . . . . . . . . . . . . . . . . . 7
Fixation du support au sol
(KD-98ZG9 uniquement). . . . . . . . . . . . . . 9
Rangement des câbles
(KD-98ZG9 uniquement). . . . . . . . . . . . . .11
Schéma de connexion . . . . . . . . . . . . . . . 13
Installation du téléviseur au mur . . . . . . 16
Dépannage. . . . . . . . . . . . . . . . . . . . . . . . 18
Problèmes et solutions . . . . . . . . . . . . . . . . 18
Spécifications . . . . . . . . . . . . . . . . . . . . . . 19
Connexion Internet et confidentialité des données
Ce produit se connecte à Internet au cours de la configuration
initiale dès qu’un réseau est connecté afin de confirmer la
connexion Internet, puis ultérieurement pour configurer
l’écran d’accueil. Votre adresse IP est utilisée dans ces
connexions Internet et toutes les autres. Si vous ne voulez pas
que votre adresse IP soit utilisée, ne configurez pas la fonction
Internet sans fil et ne connectez pas de câble Internet. Veuillez
vous référer aux informations de confidentialité présentées
dans les écrans de configuration pour en savoir plus sur les
connexions Internet.
Introduction
Sony vous remercie d’avoir choisi ce téléviseur.
Avant de l’utiliser, nous vous invitons à lire attentivement ce
manuel et à le conserver pour vous y référer ultérieurement.
Remarque
• Avant d’utiliser le téléviseur, lisez les « Consignes de sécurité »
(page 2).
• Veuillez lire les Consignes de sécurité fournies pour plus
d’informations sur la sécurité.
• Les images et illustrations reprises dans ce manuel et dans le
Guide d’installation sont fournies pour référence uniquement et
peuvent présenter des différences par rapport au produit
proprement dit.
Aide
Vous trouverez des renseignements supplémentaires sur le
dépannage et d’autres informations utiles directement sur
votre téléviseur. Appuyez sur HELP sur la télécommande pour
afficher une liste de thèmes ou cherchez par mot-clé.
Guide d’aide (Manuel)
Pour obtenir des informations supplémentaires, sélectionnez
[Guide d'aide] du menu Aide sur votre téléviseur. Vous pouvez
également consulter le Guide d’aide depuis votre PC ou
smartphone (informations fournies sur le cache arrière de ce
manuel).
Emplacement de l’étiquette d’identification
Les étiquettes reprenant le numéro de modèle, la date de
production (année/mois) et les caractéristiques nominales de
l’alimentation se trouvent à l’arrière du téléviseur ou de
l’emballage. Vous les trouverez en retirant le cache des bornes.
AVIS IMPORTANT
Avis concernant les
équipements radio
Le soussigné, Sony Visual Products Inc.,
déclare que les équipements radioélectriques de type
KD-98ZG9, KD-85ZG9 sont conformes à la directive 2014/53/UE.
Le texte complet de la déclaration UE de conformité est
disponible à l’adresse internet suivante :
http://www.compliance.sony.de/
Avis aux clients : les informations suivantes s’appliquent
uniquement aux appareils vendus dans les pays qui appliquent
les directives de l’UE.
Pour cet équipement radio, les restrictions de mise en service ou
de demandes d’autorisation d’utilisation suivantes s’appliquent
en AT, BE, HR, CY, CZ, DK, EE, FI, FR, DE, EL, HU, IE, IT, LV, LT, LU, MT,
NL, PL, PT, SK, SI, ES, SE, UK, IS, L I, NO, CH, BG, RO, TR, AL, BA, M K,
MD, RS, ME, Kosovo :
La bande 5 150 - 5 350 MHz est limitée aux utilisations en intérieur
uniquement.
Consignes de sécurité
Installation/Mise en place
Installez et utilisez le téléviseur conformément aux instructions
ci-dessous afin d’éviter tout risque d’incendie, d’électrocution ou
autre dommage et/ou blessure.
Installation
• Le téléviseur doit être installé à proximité d’une prise de courant
aisément accessible.
• Positionnez le téléviseur sur une surface stable et horizontale
afin d’éviter qu’il ne tombe, n’entraîne des blessures ou
n’endommage des biens.
• Installez le téléviseur dans un endroit où vous ne risquez pas de
le pousser, de le tirer ou de le renverser.
FR
2

• Installez le téléviseur de façon à ce que son support de table ne
Vis
(M8)
Support de fixation murale
12 mm - 16 mm
Tél év is eu r
Vis
(M6)
Support de fixation murale
10 mm - 12 mm
Tél év is eu r
FR
dépasse pas du meuble TV (non fourni). Si le support de table
dépasse du meuble TV, le téléviseur risque d’être renversé, de
tomber, d’être endommagé ou de provoquer des blessures.
• L’installation murale du téléviseur doit être confiée à un
technicien spécialisé.
• Pour des raisons de sécurité, il est vivement recommandé
d’utiliser les accessoires Sony, notamment :
Support de fixation murale SU-WL450 (KD-85ZG9
uniquement)
• Veillez à bien utiliser les vis fournies avec le Support de fixation
murale lors de la mise en place du Support de fixation murale
sur le téléviseur. Les vis fournies sont conçues de la manière
illustrée, mesurées à partir de la surface de fixation du Support
de fixation murale.
Leur diamètre et leur longueur varient suivant le modèle de
Support de fixation murale.
L’utilisation de vis autres que celles fournies peut occasionner
des dégâts à l’intérieur du téléviseur ou provoquer sa chute, etc.
KD-98ZG9
Tran spo rt
• Avant de transporter le téléviseur, débranchez tous ses câbles.
• Trois personnes au moins (cinq personnes au moins pour le
KD-98ZG9) sont nécessaires pour transporter un téléviseur de
grande dimension.
• Pour transporter le téléviseur à la main, saisissez-le de la
manière illustrée. N’exercez aucune pression sur le panneau LCD
ni sur le cadre qui entoure l’écran.
KD-98ZG9
KD-85ZG9
• Lorsque vous transportez le téléviseur, ne le soumettez pas à
des secousses ou des vibrations excessives.
• Lorsque vous transportez le téléviseur pour le porter à réparer
ou lorsque vous déménagez, glissez-le dans son emballage et
son carton d’origine.
KD-85ZG9
FR
3
Prévention des basculements
Vis M6 (non fournie)
Cordon
(non fourni)
Vis (non fournie)
8 mm - 12 mm
1,5 N·m
{15 kgf·cm}
Vis M4 (non fournie)
Cordon
(non fourni)
Vis (non fournie)
1,5 N·m
{15 kgf·cm}
4 mm - 7 mm
Anneau de levage
M8 (non fourni)
Cordon
(non fourni)
Ancrage mural
(non fourni)
Cordon
(non fourni)
12 mm - 16 mm
Couvercle arrière du téléviseur
Anneau de levage M8
30 cm
10 cm
10 cm
10 cm
Laissez au moins cet espace libre autour du téléviseur.
2 cm
(KD-85ZG9
uniquement)
Support de table
KD-98ZG9
Socle
KD-98ZG9 uniquement
KD-85ZG9
FR
4
Veuillez-vous reportez-vous à l’illustration ci-dessous pour
connaître la longueur du bouton à œil M8.
Aération
• Vous ne devez jamais obstruer les orifices d’aération du boîtier
ni y introduire un objet quelconque.
• Laissez un espace libre autour du téléviseur, comme indiqué
ci-dessous.
• Il est vivement recommandé d’utiliser le support de fixation
murale Sony pour favoriser la circulation adéquate de l’air.
Installation murale
Installation sur pied
30 cm
10 cm
10 cm
Laissez au moins cet espace libre autour du téléviseur.
6 cm
La circulation de l’air est bloquée.
Mur Mur
FR
• Pour une ventilation correcte, sans accumulation de salissures ni
de poussière :
Ne placez pas le téléviseur à plat, à l’envers, vers l’arrière ou
sur le côté.
Ne placez pas le téléviseur sur une étagère, un tapis, un lit ou
dans un placard.
Ne couvrez pas le téléviseur avec des tissus tels que des
rideaux, pas plus qu’avec des journaux, etc.
N’installez pas le téléviseur comme illustré ci-dessous.
FR
5

Pièces et commandes
ȩ
Commandes et voyants
(Alimentation) /+/–
Quand le téléviseur est hors tension,
Appuyez sur pour le mettre sous tension.
Quand le téléviseur est sous tension,
Maintenez enfoncé pour le mettre hors
tension.
Appuyez sur plusieurs fois pour changer
de fonction, puis appuyez sur la touche + ou
– pour :
• Réglez le volume.
• Sélectionnez la chaîne.
• La sélection de la source d’entrée du
téléviseur.
Capteur de télécommande*1 /
Capteur de lumière*
1
/ Affichage LED
L’affichage LED s’allume ou clignote selon
l’état du téléviseur.
Pour plus d’informations, consultez le Guide
d’aide.
MICRO intégré*2*
3
Utilisez le microphone mains-libres intégré
pour la recherche vocale. Pour activer le
micro intégré, suivez les instructions qui
s’affichent à l’écran lorsque vous appuyez
sur la touche .
LED du MICRO intégré
La LED du micro intégré s’allume en orange
lorsque le micro intégré est activé. La LED du
micro intégré peut être désactivée.*
*1 Ne posez aucun objet à proximité du capteur.
*2 La recherche vocale nécessite une connexion à
Internet.
La recherche vocale avec le micro intégré est
disponible uniquement dans certaines régions/
langues ou dans certains pays.
La consommation électrique en veille augmentera,
car le micro intégré reste à l’écoute lorsque la
recherche vocale avec le micro intégré est activée.
*3 Pour plus d’informations, consultez le Guide d’aide
en ligne (page 2).
3
FR
6
Utilisation de la télécommande
MIC
(Microphone)
Utilisez la recherche vocale*. (par ex.,
recherchez différents contenus par la
voix).
//// (Touches
directionnelles de navigation)
Navigation et sélection du menu à
l’écran.
TV
Commutez une chaîne télévisée ou
une entrée et affichez le menu TV.
* La recherche vocale nécessite une connexion à
Internet.
FR
Description des pièces de la télécommande
La forme de la télécommande, l’emplacement, la disponibilité et la fonction des touches de la
télécommande peuvent varier selon votre région/pays/modèle de téléviseur.
(Veille du téléviseur)
Mettez le téléviseur sous ou hors tension
(mode veille).
Touches numériques
/ (Affichage des infos/du Télétexte)
Affichez des informations.
(Télétexte)
Affichez les informations de Télétexte.
Google Play
Accédez au service en ligne « Google Play ».
NETFLIX (Uniquement dans certains
pays ou certaines régions/modèle de
téléviseur.)
Accédez au service en ligne « NETFLIX ».
Touches de couleurs
Exécutez la fonction correspondante à ce
moment.
FR
7

GUIDE/
Pour afficher le guide des programmes
numériques, ou l’EPG du câble/satellite
[Configuration de votre récepteur câble/
satellite] (modèles compatibles avec la
commande de décodeur uniquement).
REC LIST
Pour afficher la liste des enregistrements du
disque dur USB ou DVR après avoir réglé
[Configuration de votre récepteur câble/
satellite].
(Sélection de l’entrée)
Pour afficher et sélectionner la source
d’entrée, etc.
(Paramètres rapides)
Pour afficher les Paramètres rapides.
BACK/
Revenez à l’écran précédent.
HOME
Affichez le menu Accueil du téléviseur.
+/– (Volume)
Réglez le volume.
(Saut)
Basculez entre deux chaînes ou entrées. Le
téléviseur affiche successivement la chaîne
ou l’entrée en cours et la dernière chaîne ou
entrée sélectionnée.
(Coupure du son)
Coupez le son. Appuyez à nouveau sur la
touche pour rétablir le son.
Conseil
• Le service des raccourcis d’accessibilité peut être
activé ou désactivé en maintenant les touche
enfoncée.
CH +/–//
En mode TV : Sélectionnez la chaîne.
En mode Télétexte : Sélectionnez la page
suivante () ou précédente ().
AUDIO
Pour sélectionner le son d’une source
multilingue ou un double son pour le
programme en cours de visionnage (selon la
source du programme).
(Réglage des sous-titres)
Activez ou désactivez les sous-titres
(lorsque cette fonction est disponible).
HELP
Affichez le menu Aide. Le Guide d’aide est
accessible à partir de là.
///
Reproduisez le contenu multimédia du
téléviseur et du périphérique raccordé
compatible BRAVIA Sync.
REC
Pour enregistrer le programme en cours de
visionnage sur le disque dur USB ou le DVR
après avoir réglé [Configuration de votre
récepteur câble/satellite] (uniquement pour
certaines régions, certains pays ou certains
modèles de téléviseur).
EXIT
Revenez à l’écran précédent ou quittez le
menu. Quand un service d’application
interactive est disponible, appuyez sur cette
touche pour quitter le service.
Remarque
• Pour plus d’informations sur [Configuration de votre
récepteur câble/satellite], consultez le Guide d’aide.
FR
8
Fixation du support au sol
FS1
FS2
FR
(KD-98ZG9 uniquement)
Votre téléviseur est livré avec un support de
table fixé sur celui-ci.
Recommandé
Reportez-vous aux instructions ci-dessous pour
savoir comment changer le support de table en
support au sol.
Remarque
• N’exercez aucune pression sur l’écran LCD ou le cadre
qui l’entoure.
• Faites attention de ne pas vous pincer les mains ou de
coincer le cordon d’alimentation lors de l’installation
du téléviseur sur le support au sol.
• Au moins sept personnes sont nécessaires pour
effectuer cette installation.
1 Soulevez le téléviseur.
2 Fixez le support au sol au téléviseur.
FR
9

3 Pour éviter toute chute, soutenez le
M6L23
M6L23
support au sol pour le fixer au téléviseur
à l’aide des vis fournies .
Remarque
• Si vous utilisez un tournevis électrique, réglez le
couple à environ 1,5 N·m {15 kgf·cm}.
4 Retirez les vis du support de table.
• Au moins cinq personnes sont nécessaires
pour transporter un grand téléviseur.
Remarque
• Avant de remonter le support de table, vérifiez
qu’il est bien aligné sur les trous de vis.
10
FR
 Loading...