

Page 1
Television
Reference Guide
KD-65X7500D / 55X7000D / 49X7000D
Page 2

Table of Contents
Note
Safety Information . . . . . . . . . . . . . . . . . . . . . 2
Precautions . . . . . . . . . . . . . . . . . . . . . . . . . . . 5
Parts and Controls . . . . . . . . . . . . . . . . . . . 6
Controls and Indicators . . . . . . . . . . . . . . . . .6
Using Remote Control . . . . . . . . . . . . . . . . 7
Remote Control Parts Description. . . . . . . . . 7
Connection Diagram . . . . . . . . . . . . . . . . . 9
Installing the TV to the Wall . . . . . . . . . . .11
Troubleshooting . . . . . . . . . . . . . . . . . . . . 15
Troubles and Solutions. . . . . . . . . . . . . . . . . 15
Specifications . . . . . . . . . . . . . . . . . . . . . . 16
Introduction
Thank you for choosi ng this Sony product.
Before operating the TV, please read this manual thoroughly and
retain it for f uture re ference.
• Before operating the TV, please read the “Safety Information”
(page 2).
• Instructio ns about “Installing th e TV to the Wall” are included
within this TV’s instruction manual.
• Imag es and illus trations used in the Setup Guide and th is
manual are for reference only and may differ from the actual
product.
Location of the Setup Guide
Setup Guide is placed on top of the cushion inside the TV carton.
Help Guide
Help Guide explains the info rmation on how to use th e TV's
features. To display Help Guide on the TV, press HELP on the
remote control and select [Help Guide].
Location of the identification label
Labels for the TV Model No. and Power Supply rating are located
on the rear of the TV.
Notice for customers in Thailand
This telecommunication equi pment conforms to NTC technical
requirement.
Notes for Australia and New Zealand model
This product is ENERGY RATING qualified in the default mode.
ENERGY RATING is a programme designed to promote energy
efficient products and p ractices.
• When the TV is initially set up, it is designed to meet ENERGY
RATING requirement s while main tainin g optimum p icture
quality.
• Changes to cer tain features, settings and fun ctionalities of this
TV (e.g. TV Guide, Picture/Sound, Eco setting) can slightly
change the power consumption.
Depending upon suc h changed settings (e.g . Shop mode), the
power consumption may vary which possibly could exceed the
stated energy rating.
To reset the TV to ENERGY RATING qualified settings, compl ete
the initial set-up procedure in [Settings] [Storage & reset]
[Factory data reset].
After factory data reset, down loaded application data w ill be
deleted. Please download them again.
Safety Information
WARN ING
Batteries must not be expose d to excessive heat such as
sunshine, fire or the like.
Never place a television set in an unstable locati on. A television
set may fall, ca using seriou s personal in jury or death. Many
injuries, particularly to children, can be avoided by taking simple
precautions such as:
Using cabinets or stands recommended by the manufacturer o f
the television set.
Onl y using furniture that can safe ly support the televis ion set.
Ens uring the television set is no t overhanging the ed ge of the
supporting furniture.
Not p lacing the television set on tall furniture (for example ,
cupboards or bookcases) w ithout anchoring b oth the furniture
and the television s et to a suitable support .
Not p lacing the television se t on cloth or other materi als that
may be located between the television set and supporting
furniture.
Educati ng children about the dang ers of climbing on furni ture
to reach the television set or its controls.
If your existing television set is b eing retained and relocated, the
same considerations as above should be applied.
GB
2
Page 3
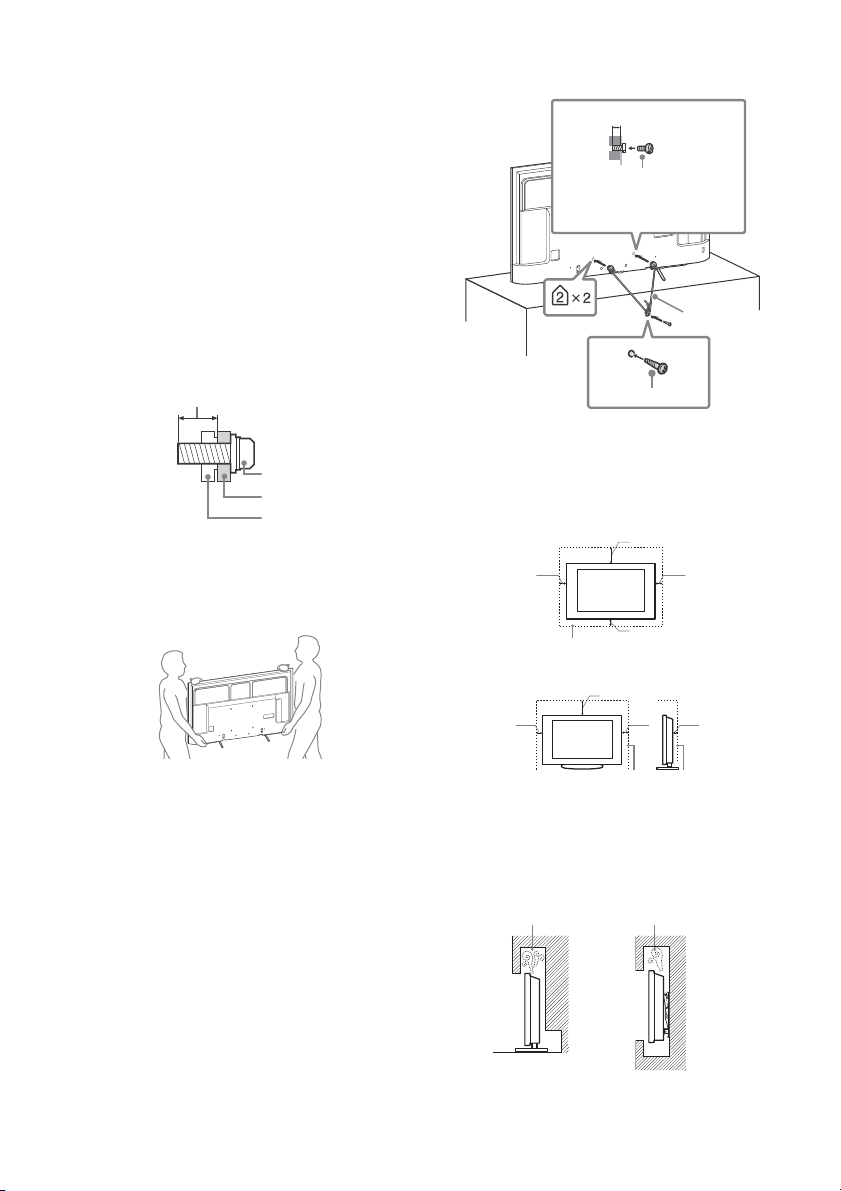
Installation/Set-up
Screw
Wall-Mount Bracket
8 mm - 12 mm
TV’s rear cover
Screw (not supplied)
M6 screw
(not supplied)
8 mm - 12 mm
Cord (not
supplied)
30 cm
10 cm
10 cm
10 cm
Leave at least this space around the set.
30 cm
10 cm
10 cm
Leave at least this space around the set.
6 cm
Air circulation is blocked.
Wall Wall
Install and use the TV s et in accordance with the instructi ons
below in order to avoid any risk of fire, electric shock or damage
and/or in juries.
Installation
• The TV se t should be insta lled near an easi ly accessible AC
power outlet (mains socket).
• Place the TV on a stable, level surface to prevent it from falling
over and causing personal injury or property damage.
• Install the TV where it cannot be pulled, pushed, or knocked
over.
• Only qualified service personnel should carry out wall-mount
installations.
• For safety reasons, it is strongly recommended t hat you use
Sony accessories, includ ing:
Wall-Mou nt Bracket SU-WL450
• Be sure to use the screws supplied with the Wall-Mount Bracket
when attaching the Wall-Moun t Bracket to the TV set. The
supplied screws are designed as indicated by illustration when
measured from the attaching surface of the Wall-Mount Bracket.
The diameter and length of the screws differ depending on the
Wall-Mount Bracket model.
Use of screws other than t hose supplied may result in internal
damage to the TV se t or cause it to fall, etc.
Tran spo rti ng
• Before transporting the TV set, disconnect all cables.
• Two or three people are needed to transport a large TV set.
• When transpo rting the TV set by han d, hold it as shown be low.
Do not put stress on the LCD pane l and the frame around th e
screen.
Topple prevention
Ventilation
• Never cover the ventilation holes or insert anything in the
cabin et.
• Leave space around the TV set as shown below.
• It is strongly recomme nded that you use a Sony Wall-Mo unt
Bracket in order to provide adequate air circulation.
Installed on the wall
• When transpo rting the TV set, do not su bject it to jolts or
excessive vibration.
• When transpo rting the TV set for repairs or when moving, pack
it using the original carton and packing material.
Installed with stand
• To ensure proper ventilation and prevent the collection of dirt or
dust:
Do n ot lay the TV set flat, instal l upside down, bac kwards, or
sideways.
Do not p lace the TV set on a shelf, rug, bed or in a closet.
Do not cover the TV set with a c loth, such as curtains, or i tems
such as newspapers, etc.
Do n ot install the TV set as show n below.
3
GB
Page 4
AC power cord (mains lead)
Note
Handle the AC power cord (mai ns lead) and outlet (ma ins socket)
as follows in order to avoi d any risk of fire, electric sh ock or
damage and/or injuries:
The shape of AC power plug (mains plug), which is supplied
with the TV set, varies depending on the region. Be sure to
connect the appropriate suppli ed AC power cord (mains lead)
with the plug that fits into th e AC power outlet (mains socket).
Use only Sony supplied AC power cords (mains lead), not those
of other brands.
Insert the plug fully into the AC power outlet (mains socket).
Operate th e TV set on a 110 V - 240 V AC sup ply only.
When wiring cables, be sure to unplug the AC power cord
(mains lead) for yo ur safety and take care not to catch your feet
on the cables.
Disconnect the AC power cord (mains lead) from the AC power
outlet (mains socket) before working on or moving the TV set.
Keep the AC p ower cord (mains lead) a way from heat so urces.
Unplug the AC power plug (mains plug) and clean it regularly. If
the plug is covered with dust and it picks up moisture, its
insulation may deterio rate, which could result in a fire.
• Do not use the s upplied AC power cord (m ains lead) on any
other equipment.
• Do not pinch, bend, or twist the AC powe r cord (mains lead)
excessively. The core conductors may be exposed or broken.
• Do not modify the AC power cord (mains lead) .
• Do not put anythi ng heavy on the AC powe r cord (mains lead).
• Do not pull on th e AC power cord (mains lead) i tself when
disconnecting the AC power cord (mains lead).
• Do not connect to o many appliances to the same AC power
outlet (m ains so cket).
• Do not use a po or fitting AC power outlet (m ains socket).
Prohibited Usage
Do not install/use the TV s et in locations, environme nts or
situations such as t hose listed below, or the TV set may
malfunction and cau se a fire, electric shock, da mage and/or
injuries.
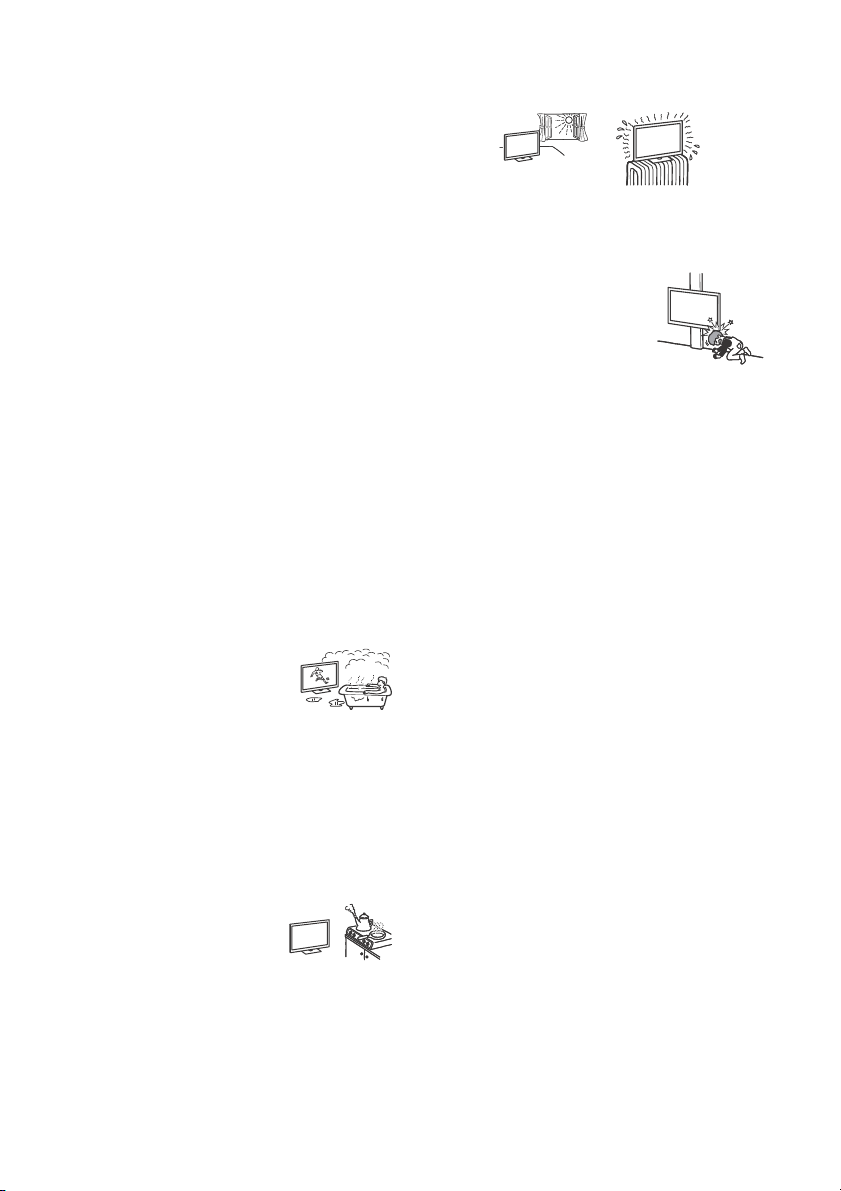
Location:
• Outdoors (in d irect sunlight), at the seash ore, on a ship or other
vessel, inside a vehicle, in medical institutions, unstable
locations, near water, rain, moisture or s moke.
• If the TV is placed in the chan ging room of
a public bath or hot spring , the TV may be
damaged by airborne sulfur, etc.
• For best picture quality, do not expose the screen to direct
illumination or sunlight.
• Avoid moving the TV from a cold area to a warm area. S udden
room temperature changes m ay cause moisture condens ation.
This may cause the TV to show poor picture and/or poor colour.
Should this occur, allow moisture to evap orate completely
before powering the TV on.
Environment:
• Places that are hot, hu mid, or excessively dusty; where insects
may enter; where it mig ht be exposed to mechani cal vibration,
near flammable o bjects (candles, etc). T he TV set shall not be
exposed to dripping or splashing and no objects filled with
liquids, such as va ses, shall be placed on th e TV.
• Do not place the T V in a humid or dusty
space, or in a room with oily smoke or
steam (near cooking tables or
humidifiers). Fire, electric shock, or
warping ma y result.
• Do not install the T V in places subject to extreme tem perature,
such as in direct sunlight, near a radiator or a heating vent. The
TV may overheat in such conditions which can cause
deformation of the en closure and/or TV ma lfunction.
Situation:
• Use when yo ur hands are wet, with th e cabinet removed, or
with attachments no t recommended by the manufac turer.
Disconnect the TV set from AC power outlet (mains socket) and
antenna (aerial) during lightning storms.
• Do not in stall the TV so that it sticks out
into an open space. This may result in
injury or damage from a person or
object bum ping into the TV.
Broken pieces:
• Do n ot throw anything at the TV set. T he screen glass may break
by the impact and cause serious injury.
• If the surface of th e TV set cracks, do not touch it unti l you have
unplugged the AC powe r cord (mains lead). Othe rwise this may
cause an electric shock.
When not in use
• If you will not be using the TV set for several days, the TV set
should be disconnected from the AC power (mains) for
environmental and safety reasons.
• As the TV s et is not disconnected from the AC pow er (mains)
when the TV set is just turned off, pull the plug from the AC
power outlet (mains socket) to disconnect the TV set
completely.
• Some TV se ts may have features that require th e TV set to be
left in standby to work correctly.
For children
• Do not allow children to climb on the TV set.
• Keep small accessorie s out of the reach of children, so that the y
are not mistakenly swallowe d.
If the following problems occur...
Turn off the T V set and unplug the AC power cord (mains lead)
immediately if any of th e following p roblems occ ur.
Ask your dealer or Sony service centre to have it checked by
qualified service personnel.
When:
AC pow er cord (mains lead) is damag ed.
Poor fitt ing of AC power outlet (m ains socket).
TV set is damaged by being dropped, hit or having something
thrown at it.
Any liquid or solid object falls through openings in the cabinet.
About LCD TV Temperature
When the LCD TV is used for an extended period, the panel
surrounds become warm. You may feel hot wh en touching there
by the hand.
GB
4
Page 5

Precautions
Viewing the TV
• Vi ew the TV i n moderate li ght, as view ing the TV i n poor ligh t or
during long period of time, strains your eyes.
• When using he adphones, adjust th e volume so as to avoid
excessive levels , as hea ring dama ge may resu lt.
LCD Screen
• Although th e LCD screen is made with high-precision
technology and 99.99 % o r more of the pixels are effect ive,
black dots may appear or bright points of light (red, blue, or
green) may appear cons tantly on the LCD screen. This is a
structural property of th e LCD screen and is not a malfunctio n.
• Do not push or sc ratch the front filter, or place objects on top of
this TV set. The image may be uneven or the LCD screen may be
damaged.
• If this TV set is u sed in a cold place, a smear m ay occur in the
picture or the picture may become dark. This does not indicate a
failure. These phenomena d isappear as the temp erature rises.
• Ghos ting may o ccur when s till pictures are disp layed
continuously. It may disappe ar after a few moments.
• The screen an d cabinet get warm when this TV set is in use. This
is not a malfunction.
• The LCD screen con tains a small amount of liquid cry stal. Follow
your local ordi nances and re gulations for d isposal.
Handling and cleaning the screen surface/
cabinet of the TV set
Be sure to unplug the AC pow er cord (mains lead) connected to
the TV set from AC power outlet (mains socket) before cleaning.
To avoid material degradation or screen coating deg radation,
observe the following precautions.
• To remove dust from the screen surface/cabinet, wipe gently
with a soft cloth. If dust is persistent, wipe with a soft cloth
slightly moistened w ith a diluted mild detergent so lution.
• Never spray water or d etergent directly on
the TV set. It may drip to the bottom of the
screen or exterior parts and enter the TV
set, and may cause da mage to the TV set.
• Never use any type of abrasive pad,
alkaline/acid cle aner, scouring powder, or
volatile solvent, su ch as alcohol, benzene, thinner or insecti cide.
Using such materials o r maintaining prolonged contact with
rubber or vinyl materials may resul t in damage to the screen
surface and cabinet material.
• Do not touch the TV if your hand is covered in any chemical
substance such as ha nd cream or sunblock .
• Periodic vacuuming of the ventilation openings is
recommended to ensure proper ventilation.
• When adju sting the angle of the TV set, move it slowly so as to
prevent the TV set from m oving or slipping o ff from its table
stand.
Optional Equipment
Keep optional components or any equipment emitting
electromagnetic radiation awa y from the TV set. Otherwise
picture distortion and/or noisy sound may occur.
Wireless Function of the unit
• Do not operate this un it near medical equipmen t (pacemaker,
etc.), as this may result in the malfunction of the medical
equipment.
• Althoug h this unit transmits/ receives scrambled si gnals, be
careful of unauthorise d interception. We cannot be respon sible
for any trouble as a result.
Caution about handling the remote control
• Obser ve the correct polarity whe n inserting batteries.
• Do not use di fferent types of batter ies together or mix old and
new batteries.
• Disp ose of batteri es in an envi ronmentally friendly way. Cert ain
regions may regulate the disp osal of batteries. Plea se consult
your local au thority.
• Handle the rem ote control with care. Do not drop or step on it,
or spill liquid of any kind onto it.
• Do not pla ce the remote control in a location nea r a heat source,
a place subject to direct sunligh t, or a damp room.
Disposal of the TV set
Disposal of Old Electrical &
Electronic Equipment (Applicable in
the European Union and other
European countries with separate
collection systems)
Notice for customer in UAE
TRA
REGISTERED No: ER35215/14
DEALER No:
DA0065531/11
GB
5
Page 6
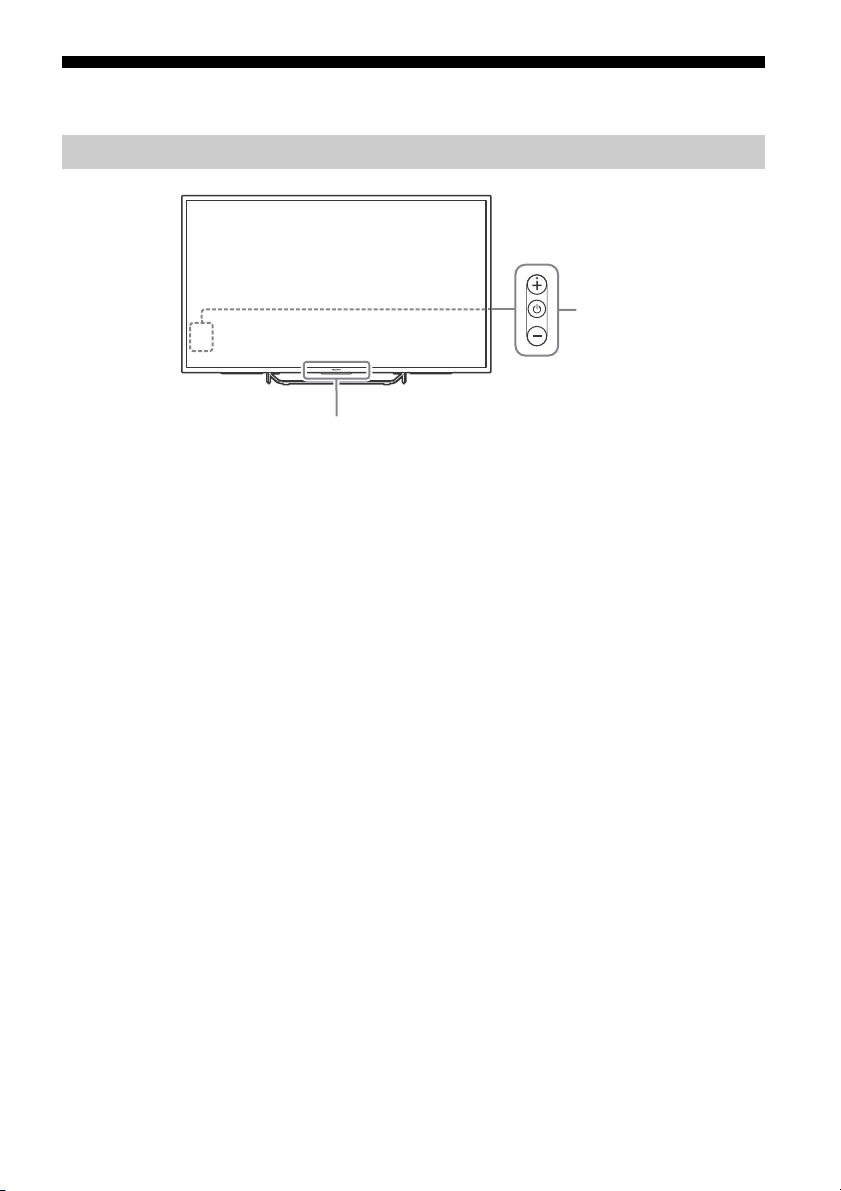
Parts and Controls
2
1
Controls and Indicators
Remote Control sensor*1 / Light
1
sensor*
The illumination LED lights up or blinks
according to the status of the TV.
•White
•Cyan
•Pink*
•Amber
/ Illumination LED
When turning on the TV/picture off
mode/software update, etc.
When connecting with a mobile device
wirelessly.
2
Recording mode.
Timer is set.
(Power) / + / –
When the TV is off,
Press to power on.
When the TV is on,
Long press to power off.
Press repeatedly to change the function,
then press + or - button to:
• Adjust the volume
• Select the channel
• Select the input source of TV
*1 Do not place anything near the sensor.
*2 Only on limited region/country/TV model.
GB
6
Page 7

Using Remote Control
Ȫ
ȩ
ȫ
Ȭ
ȭ
Ȯ
ȯ
Remote Control Parts Description
The remote control shape, location, availability and function of remote control button may vary
depending on your region/country/TV model.
/ (Input select/Text hold)
In TV mode: Display and select the input
source.
In Text mode: Hold the current page.
(TV standby)
Turn on or turn off the TV (standby mode).
DIGITAL/ANALOG
Switch between digital and analogue mode.
SYNC MENU
Display the BRAVIA Sync Menu.
Number buttons
EXIT
Return to the previous screen or exit from
the menu. When an Interactive Application
service is available, press to exit from the
service.
(Text)
Display text information.
Colour buttons
Execute corresponding function at that time.
/ (Info/Text reveal)
Display information.
NETFLIX (Only on limited region/
country/TV model)
Access the “NETFLIX” online service.
HELP
Display Help Menu. Help Guide can be
accessed from here.
GB
7
Page 8

ACTION MENU
Display a list of contextual functions.
TV
• Switch to a TV channel or input from other
applications.
• Turn on the TV to display TV channel or
input.
GUIDE/
Display the digital programme guide.
BACK
Return to previous screen.
HOME
Display the TV Home Menu.
DISCOVER
Bring up the Content Bar to search for
content.
//// (Item select/Enter)
+/– (Volume)
Adjust the volume.
(Jump)
Jump back and forth between two channels
or inputs. The TV alternates between the
current channel or input and the last
channel or input that was selected.
(Muting)
Mute the sound. Press again to restore the
sound.
PROG +/–//
In TV mode: Select the channel.
In Text mode: Select the next () or
previous () page.
AUDIO
Change the language for the programme
currently being viewed.
(Subtitle setting)
Turn subtitles on or off (when the feature is
available).
(Wide mode)
Change the screen format.
//////
Operate media contents on TV and
connected BRAVIA Sync-compatible device.
REC
Record the current programme with the USB
HDD recording function.
TITLE LIST
Display the Title list.
GB
8
Page 9

Connection Diagram
*2
*1
*4
*1
*5
*1
*1
*3
DVD player with
component output
VCR/Video game
equipment/DVD
player/Camcorder
Home Audio
System with ARC/
HDMI Device
HDMI
Device
Cable/Antenna
Headphone/
Home Audio
System/
Subwoofer
Digital still
camera/
Camcorder/
USB storage
media
HDMI Device
VCR/Video game
equipment/DVD
player/Camcorder
Home Audio System
with Optical Audio
Input
Router
HDMI Device
For more information on connections, refer to the Help Guide (page 2).
GB
9
Page 10

AUDIO OUT*5 /
< 12 mm
< 21 mm
3.5 mm
1234
1: L
2: Video
3: Ground
4: R
< 14 mm
Standard definition (SD) videos have picture signals with a
vertical resolutio n of 480 (NTSC) or 57 6 (PAL/SECAM) lines.
High definition (HD) videos have picture signals
with a vertical resolution of 720 or 1,080 lines.
(For 4K vertical resol ution: 2,160 lines)
Picture Quality
• AV composite cable
• Antenna (aerial) cable
• Component cable
•HDMI cable
• To listen to the TV's sound through the
connected equipment, press HOME.
Select [Settings] [Sound]
[Headphone/Audio out] and then select
the desired item.
USB 1/2, USB 3 (HDD REC)*
• Connecting a large USB device may
interfere with other connected devices
beside it.
• When connecting a large USB device,
connect to the USB 1 port.
HDMI IN 1/2/3/4
• If connecting a digital audio system that is
compatible with Audio Return Channel
(ARC) technology, use HDMI IN 3. If not, an
additional connection with DIGITAL AUDIO
OUT (OPTICAL) is necessary.
/ VIDEO IN 1
• For a composite connection, use the
supplied Analogue Extension Cable*
6
.
*1
*2
6
*3
*4 When connecting mono equipment, connect to the
L (MONO) audio jack (socket).
*5 Supports 3-pole stereo mini jack only.
*6 Only on limited region/country/TV model.
10
GB
Page 11

Installing the TV to the Wall
Note
This TV’s instruction manual only shows the steps on preparing the installation of the TV before
installing to the wall.
To Customers:
For product protection and safety reasons, Sony strongly recommends that installation of your TV be
performed by Sony dealers or licensed contractors. Do not attempt to install it yourself.
To Sony Dealers and Contractors:
Provide full attention to safety during the installation, periodic maintenance and examination of this
product.
Sufficient expertise is required for installing this product, especially to determine the strength of the wall for
withstanding the TV’s weight. Be sure to entrust the attachment of this product to the wall to Sony dealers or
licensed contractors and pay adequate attention to safety during the installation. Sony is not liable for any
damage or injury caused by mishandling or improper installation.
Use the Wall-Mount Bracket SU-WL450 (not supplied) to install the TV to the wall.
When installing the Wall-Mount Bracket, also refer to the Operating Instructions and Installation Guide
supplied with the Wall-Mount Bracket.
• Be sure to store the removed screws in a safe place, keeping them away from children.
GB
11
Page 12

1 Make sure that the wall has enough space for the TV and is capable of supporting a
Note
Screen centre point
Standard
mounting
Slim
mounting
weight of at least four times that of the TV.
Refer to the following table on installing the TV to the wall. See page 16-17 (Specifications)
for the TV’s weight.
Display dimensions
Model Name
KD-
65X7500D 1,463 852 26 458 142 100
55X7000D 1,245 730 86 458 141 99
49X7000D 1,107 651 116 448 141 99
Screen
centre
dimension
Length for mounting
Standard
mounting
mounting
Unit: mm
Slim
• Figures in the table may differ slightly depending on the installation.
• When your TV is installed on the wall, the upper side of the TV slightly leans forward.
GB
12
Page 13

2 Attach the Attachment parts for Wall-Mount Bracket. Check the Attachment parts by
Note
Note
Screw (+PSW 6 x 20)
Pulley
Spacer (60 mm)
Screw (+PSW 6 x 50)
Belt
referring to “1” of the Wall-Mount Bracket Installation Guide.
• If using an electric screwdriver, set the torque at approximately 1.5 N·m {15 kgf·cm}.
• Be sure to store the unused parts in a safe place for future use. Retain this manual for future reference.
Standard mounting
Slim mounting
• You cannot use some of the terminals on the rear of the TV when using this mounting style.
Connect the Analogue Extension Cable (Availability depends on countries/regions/TV models) if you need to
use the / VIDEO IN 1 jack.
GB
13
Page 14

3 Connect necessary cables to the TV.
Note
Pulley
Spacer (20 mm)
Screw (+PSW 6 x 20)
Belt
Screw (+PSW 6 x 20)
a
b
c
d
• You cannot access to any terminal after installing the TV to the wall.
4 Detach the Table-Top Stand from the TV.
5 Install the TV to the Base. Refer to “5” of Installation Guide and “Installing the TV to the
Wall” of Operating Instructions supplied with the Wall-Mount Bracket.
Model Name KD- Hook location
65X7500D b
55X7000D c
49X7000D c
Refer to the instructions supplied with the Wall-Mount Bracket for your model to install the TV on the wall.
GB
14
Page 15

Updating...
Rear of TV
Troubleshooting
In order to keep your TV software up-to-date, it
is necessary to download the latest software
information via the digital broadcasting system
or internet and to update the software. Select
[Update Now] to start a software update. The
illumination LED flashes white while the
software is updating.
The following screen with [Updating…] will
appear while software is updating.
Do not unplug the AC power cord (mains lead)
during the software update. If you do, the
software update may not finish completely, and
it may cause a software malfunction. Software
updates can take up to 30 minutes. If you do not
wish to update the software automatically,
press HOME and select [Help] [System
software update] [Automatic software
download] [Off].
When you plug in TV, the TV may not be able to
turn on for a while even if you press the power
button on the remote control or the TV, because
it takes time to initialize the system. Wait for
about one minute, then operate it again. When
you turn on by pressing the power button on
the remote control or the TV, it takes some time
to turn on the illumination LED and for the
remote control to be functional.
When the illumination LED is flashing in red,
count how many times it flashes (interval
time is three seconds).
If the illumination LED flashes red, reset the TV
by disconnecting the AC power cord (mains
lead) for two minutes, then turn on the TV.
If the problem persists, contact your dealer or
Sony service centre with the number of times
the illumination LED flashes red (interval time is
three seconds). Disconnect the AC power cord
(mains lead), and inform your dealer or Sony
service centre.
When the illumination LED is not flashing,
check the items as follows.
You can also refer to troubleshooting in the Help
Guide or perform self-diagnosis by selecting
[Help] [Self diagnostics]. If the problem
persists, have your TV serviced by qualified
service personnel.
Troubles and Solutions
There is no picture (screen is dark) and no
sound.
Check the antenna (aerial)/cable connection.
Connect the TV to the AC power (mains), and
press on the TV or remote control.
Some programmes cannot be tuned.
Check the antenna (aerial)/cable connection.
The remote control does not function.
Replace the batteries.
The [Parental lock (Broadcast)] password has
been forgotten.
Enter 9999 for the PIN code. Update PIN code by
selecting [Settings] [Parental lock (Broadcast)]
[Change PIN code].
The TV surrounds become warm.
When the TV is used for an extended period, the
TV surrounds become warm.
You may feel hot when touching there by the
hand.
Frozen audio or video, a blank screen, or the
TV does not respond to TV or remote control
buttons.
Perform a simple reset of the TV by unplugging
the AC power cord (mains lead) for two minutes,
then plug it in again.
The , +, and – buttons cannot be located on
the TV.
See below illustration for location of the buttons
on the TV.
GB
15
Page 16

The illumination LED is turned on.
If you do not wish to light up the illumination LED,
you can turn it off.
Press HOME, then select [Settings]
[Illumination LED] [Off].
Cannot connect to a wireless router by WPS
(Wi-Fi Protected Setup).
If you use WEP security, select [Easy]
[Wi-Fi] [Connect by scan list]. Then, select the
network name (SSID) you want to connect.
Cannot find the required network name in
network setup.
Select [[Manual entry]] and press to enter
network name.
Specifications
System
Panel system
LCD (Liquid Crystal Display) Panel, LED Backlight
TV system
Depend on your country/area selection
Analogue: B/G, I, D/K, M
Digital: DVB-T/DVB-T2
Colour/video system
Analogue: PAL, SECAM, NTSC3.58, NTSC4.43
Digital: Refer to the Help Guide
Channel coverage
Depend on your country/area selection
Analogue: UHF/VHF/Cable
Digital: UHF/VHF
Sound output
10 W + 10 W
Wireless technology
Protocol IEEE802.11ac/a/b/g/n
(IEEE802.11ac may not be available depending on
countries/regions.)
Bluetooth Version 4.1
Input/Output jacks
Antenna (aerial)/cable
75 ohm external terminal for VHF/UHF
/ VIDEO IN 1
Video/Audio input (mini jack)
/ COMPONENT IN
YPBPR (Component Video): 1080p (50, 60 Hz),
1080i (50, 60 Hz), 720p (50, 60 Hz), 576p, 576i,
480p, 480i
Audio input (phono pin jack)
VIDEO IN 2
Video input (common phono pin with Y input)
HDMI IN 1, 2, 3, 4 (support 4K resolution, HDCP
2.2-compatible)
Video:
4096 × 2160p (50, 60 Hz)*
1
(24 Hz)*
, 3840 × 2160p (50, 60 Hz)*2,
3840 × 2160p (24, 25, 30 Hz), 1080p (30, 50,
60 Hz), 1080/24p, 1080i (50, 60 Hz), 720p (30,
50, 60 Hz), 720/24p, 576p, 576i, 480p, 480i,
PC Formats
1
*
3840 × 2160p is displayed when
4096 × 2160p is input
2
*
HDMI IN 2 / 3 only.
Audio: 5.1 channel linear PCM: 32, 44.1, 48, 88.2,
96, 176.4 and 192 kHz, 16, 20 and 24 bits, Dolby
Digital, Dolby Digital Plus and DTS
ARC (Audio Return Channel) (HDMI IN 3 only)
1, *2
, 4096 × 2160p
GB
16
Page 17

(Two channel linear PCM, Dolby Digital, Dolby
Note
Digital Plus, DTS)
DIGITAL AUDIO OUT (OPTICAL)
Digital optical jack (Two channel linear PCM,
Dolby Digital, DTS)
AUDIO OUT / (Stereo mini jack)
Headphone, Audio output, Subwoofer
1, 2, 3 (HDD REC)*
USB device port. ( 3 USB HDD device for
REC feature)
USB port 1 and 2 support High Speed USB
(USB2.0).
USB port 3 supports Super Speed USB (USB3.0).
1
LAN
10BASE-T/100BASE-TX connector (Depending on
the operating environment of the network,
connection speed may differ. 10BASE-T/
100BASE-TX communication rate and
communication quality are not guaranteed for
this TV.)
Others
Optional accessories
Voice Re mote Cont rol:
RMF-TX200A (Australia and New Zealand model
only)
RMF-TX200P (Except Australia and New Zealand
model)
Wall-Mount Bracket: SU-WL450
Wireless Subwoofer: SWF-BR100
Operating temperature
0 ºC – 40 ºC
Power and others
Power requirements
110 V - 240 V AC, 50/60 Hz
Energy Efficiency Class*
KD-65X7500D: A
KD-55X7000D: A
KD-49X7000D: A
Screen size (measured diagonally) (Approx.)
KD-65X7500D: 65 inches / 163.9 cm
KD-55X7000D: 55 inches / 138.8 cm
KD-49X7000D: 49 inches / 123.2 cm
Powe r consum ption
Indicated on the rear of the TV
Power Consumption*
In [Standard] mode
KD-65X7500D: 125 W
KD-55X7000D: 112 W
KD-49X7000D: 90 W
In [Vivid] mode
KD-65X7500D: 193 W
KD-55X7000D: 171 W
KD-49X7000D: 138 W
2
2
Average annual energy consumption*2*
KD-65X7500D: 173 kWh
KD-55X7000D: 155 kWh
KD-49X7000D: 125 kWh
Standby power consumption*2*4*
KD-65X7500D: 0.50 W
KD-55X7000D: 0.50 W
KD-49X7000D: 0.50 W
3
5
Display resolution
3,840 pixels (horizontal) × 2,160 lines (vertical)
Output Rating
USB 1/2: 5 V, 500 mA MAX
USB 3: 5 V, 900 mA MAX
Dimensions (Approx.) (w × h × d)
with Table-Top Stand
KD-65X7500D: 1,463 × 901 × 295 mm
KD-55X7000D: 1,245 × 770 × 235 mm
KD-49X7000D: 1,107 × 690 × 235 mm
without Table-Top Stand
KD-65X7500D: 1,463 × 852 × 80 mm
KD-55X7000D: 1,245 × 730 × 78 mm
KD-49X7000D: 1,107 × 651 × 78 mm
Mass (Approx.)
with Table-Top Stand
KD-65X7500D: 22.7 kg
KD-55X7000D: 17.8 kg
KD-49X7000D: 14.1 kg
without Table-Top Stand
KD-65X7500D: 21.5 kg
KD-55X7000D: 16.9 kg
KD-49X7000D: 13.2 kg
1
*
Only on limited region/country/TV model.
2
*
This information is for EU and other countries
whose relevant regulation is based on EU energy
labelling regulation.
3
*
Energy consumption per year, based on the
power consumption of the television operating 4
hours per day for 365 days. The actual energy
consumption will depend on how the television is
used.
4
*
Specified standby power is reached after the TV
finishes necessary internal processes.
5
*
Standby power consumption will increase when
your TV is connected to the network.
• Optional accessories availability depends on
countries/region/TV model/stock.
• Design and specifications are subject to change
without notice.
GB
17
Page 18

Notes on Digital TV function
• Any functions related to Digital TV ( )
will only work in countries or areas where
DVB-T/DVB-T2 (MPEG-2 and H.264/MPEG4 AVC) digital terrestrial signals are
broadcast. Please confirm with your local
dealer if you can receive a DVB-T/DVB-T2
signal where you live.
• This TV set complies with DVB-T/DVB-T2
specifications, but compatibility with future
DVB-T/DVB-T2 digital terrestrial broadcasts
are not guaranteed.
• Some Digital TV functions may not be
available in some countries/areas.
Trademark Information
• The terms HDMI and HDMI High-Definition
Multimedia Interface, and the HDMI Logo
are trademarks or registered trademarks of
HDMI Licensing LLC in the United States
and other countries.
• Manufactured under license from Dolby
Laboratories.
Dolby, Dolby Audio, and the double-D
symbol are trademarks of Dolby
Laboratories.
• “BRAVIA” and are trademarks of
Sony Corporation.
• Gracenote, Gracenote eyeQ, Gracenote
VideoID, Gracenote Video Explore, the
Gracenote logo and logotype, and the
“Powered by Gracenote” logo are either
registered trademarks or trademarks of
Gracenote in the United States and/or
other countries.
• Opera® Devices SDK from Opera Software
ASA. Copyright 1995-2015 Opera Software
ASA. All rights reserved.
• Wi-Fi, Wi-Fi Direct, Miracast, Wi-Fi
Protected Setup and Wi-Fi CERTIFIED Logo
are trademarks or registered trademarks of
Wi-Fi Alliance.
• For DTS patents, see
http://patents.dts.com. Manufactured
under license from DTS, Inc.
DTS, the Symbol, & DTS and the Symbol
together are registered trademarks, and
DTS Digital Surround is a trademark of DTS,
Inc. © DTS, Inc. All Rights Reserved.
• QuickSet and the QuickSet logo are
trademarks of Universal Electronics Inc.
Portions © UEI 2000-2015
• The Bluetooth® word mark and logos are
registered trademarks owned by Bluetooth
SIG, Inc. and any use of such marks by
Sony Corporation is under license. Other
trademarks and trade names are those of
their respective owners.
• TUXERA is a registered trademark of Tuxera
Inc. in the US and other countries.
• USB-IF SuperSpeed USB Trident logo is a
registered trademark of USB Implementers
Forum, Inc.
GB
18
Page 19

GB
19
Page 20

Customer Support and Contact:
Help Guide
4-585-026-11(1)Printed in Malaysia©2016 Sony Corporation
 Loading...