

Page 1
SERVICE MANUAL
ORIGINAL MANUAL ISSUE DATE: 2/2016
Version Date Subject
1.0 2/2016 Original manual issue.
GN2SK CHASSIS
Segment: QF
LCD TV
9-888-588-01
Page 2
MODEL LIST
MODEL COLOR COMMANDER DEST.
KD-55XD9305 Black RMF-TX200E CEI/UKA/RU3
KD-65XD9305 Black RMF-TX200E CEI/UKA/RU3
MODEL COLOR COMMANDER DEST.
KD-55/65XD9305
2
Page 3

WARNINGS AND CAUTIONS - ENGLISH
CAUTION
These servicing instructions are for use by qualified service personnel only.
To reduce the risk of electric shock, do not perform any servicing other than that contained in the operating instructions unless you are qualified to do so.
WARNING!!
An isolation transformer should be used during any service to avoid possible shock hazard, because of live chassis.
The chassis of this receiver is directly connected to the ac power line.
CARRYING THE TV
Be sure to follow these guidelines to protect your property and avoid causing serious injury.
• Carry the TV with an adequate number of people; larger size TVs require two or more people.
• Correct hand placement while carrying the TV is very important for safety and to avoid damages.
SAFETY-RELATED COMPONENT WARNING!!
Components identified by shading and ! mark on the schematic diagrams, exploded views, and in the parts list are critical for safe operation. Replace these components with Sony
parts whose part numbers appear as shown in this manual or in supplements published by Sony. Circuit adjustments that are critical for safe operation are identified in this manual.
Follow these procedures whenever critical components are replaced or improper operation is suspected.
CAUTION ABOUT THE LITHIUM BATTERY
• Danger of explosion if battery is incorrectly replaced. Replace only with the same or equivalent type.
• Outer case broken battery should not contact to water.
KD-55/65XD9305
3
Page 4
WARNINGS AND CAUTIONS - FRENCH
ATTENTION!!
Ces instructions de service sont à l’usage du personnel de service qualifi é seulement.
Pour prévenir le risque de choc électrique, ne pas faire l’entretien autre que celui contenu dans le Mode d’emploi à moins que vous soyez qualifi é faire ainsi.
WARNING!!
Afi n d’eviter tout risque d’electrocution provenant d’un chássis sous tension, un transformateur d’isolement doit etre utilisé lors de tout dépannage. Le chássis de ce récepteur est
directement raccordé à l’alimentation du secteur.
POUR TRANSPORTER LE TÉLÉVISEUR
Tenez compte de ce qui suit pendant l’installation du téléviseur :
• Débranchez tous les câbles avant de transporter le téléviseur.
• Transportez le téléviseur avec le nombre de personnes approprié ; un téléviseur de grande taille doit être transporté par au moins deux personnes.
• Lors du transport du téléviseur, l’emplacement des mains est très important pour votre sécurité, ainsi que pour éviter de causer des dommages.
ALERTE!!
Afi n d’eviter tout risque d’electrocution provenant d’un chassis sous tension, un transformateur d’isolement doit etre utilise lors de tout depannage. Le chassis de ce recepteur est
directement raccorde a l’alimentation du secteur.
ATTENTION AUX COMPOSANTS RELATIFS A LA SECURITE!!
Les composants identifi es par une trame et par une marque sur les schemas de principe, les vues explosees et les listes de pieces sont d’une importance critique pour la securite
du fonctionnement. Ne les remplacer que par des composants Sony dont le numero de piece est indique dans le present manuel ou dans des supplements publies par Sony. Les
reglages de circuit dont l’importance est critique pour la securite du fonctionnement sont identifi es dans le present manuel. Suivre ces procedures lors de chaque remplacement de
composants critiques, ou lorsqu’un mauvais fonctionnement suspecte.
KD-55/65XD9305
4
Page 5
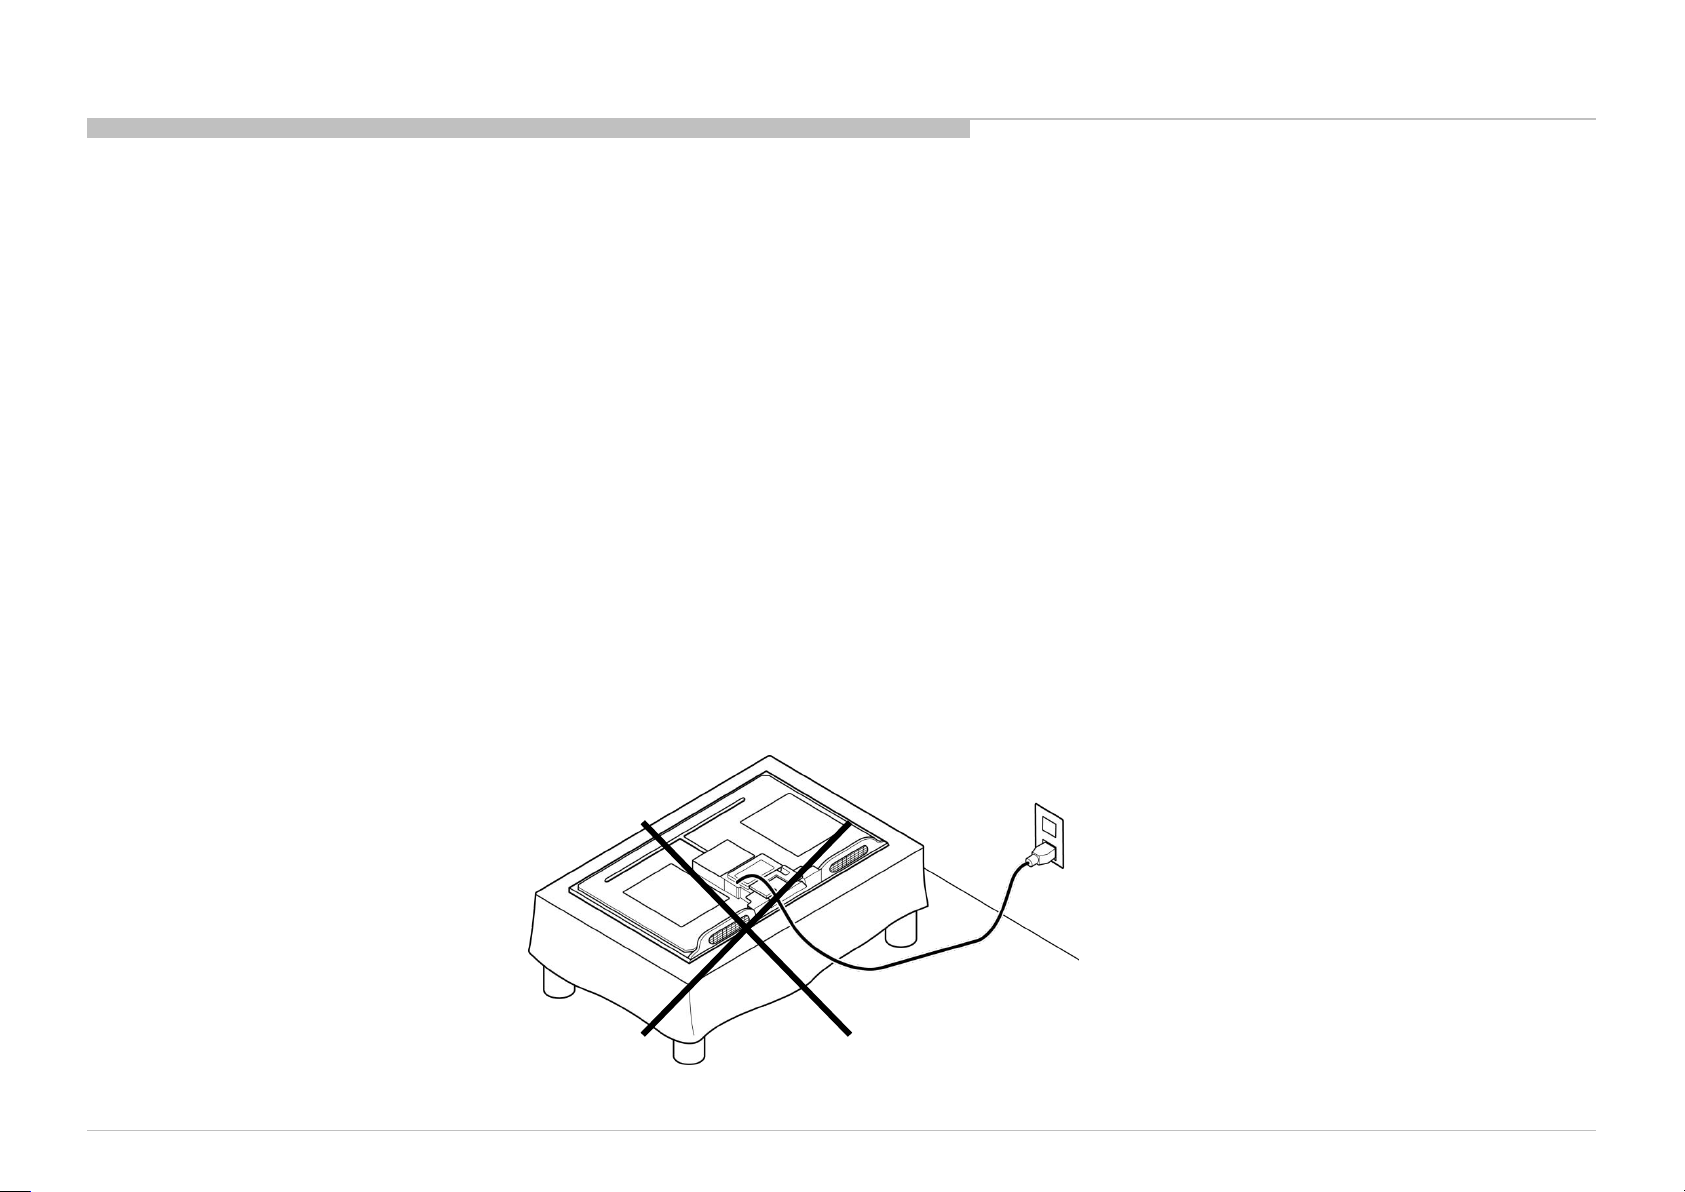
USE CAUTION WHEN HANDLING THE LCD PANEL
When repairing the LCD panel, be sure you are grounded by using a wrist band.
When repairing the LCD panel on the wall, the LCD panel must be secured using the 4 mounting holes on the rear cover.
1) Do not press on the panel or frame edge to avoid the risk of electric shock.
2) Do not scratch or press on the panel with any sharp objects.
3) Do not leave the module in high temperatures or in areas of high humidity for an extended period of time.
4) Do not expose the LCD panel to direct sunlight.
5) Avoid contact with water. It may cause a short circuit within the module.
6) Disconnect the AC power when replacing the backlight (CCFL) or inverter circuit. (High voltage occurs at the inverter circuit at 650Vrms.)
7) Always clean the LCD panel with a soft cloth material.
8) Use care when handling the wires or connectors of the inverter circuit. Damaging the wires may cause a short.
9) Protect the panel from ESD to avoid damaging the electronic circuit (C-MOS).
10) It is recommended not to exceed 1 hour of Power-On nor Burn-in period with LCD panel face down condition, in repair activity.
WARNINGS AND CAUTIONS
KD-55/65XD9305
5
Page 6

SAFETY CHECK-OUT
After correcting the original service problem, perform the following safety checks before releasing the set to the customer:
1. Check the area of your repair for unsoldered or poorly soldered connections. Check the entire board surface for solder splashes and bridges.
2. Check the interboard wiring to ensure that no wires are “pinched” or touching high-wattage resistors.
3. Check that all control knobs, shields, covers, ground straps, and mounting hardware have been replaced. Be absolutely certain that you have replaced all the insulators.
4. Look for unauthorized replacement parts, particularly transistors, that were installed during a previous repair. Point them out to the customer and recommend their replacement.
5. Look for parts which, though functioning, show obvious signs of deterioration. Point them out to the customer and recommend their replacement.
6. Check the line cords for cracks and abrasion. Recommend the replacement of any such line cord to the customer.
7. Check the antenna terminals, metal trim, “metallized” knobs, screws, and all other exposed metal parts for AC leakage. Check leakage as described below.
8. For safety reasons, repairing the Power board and/or Inverter board is prohibited.
KD-55/65XD9305
6
Page 7
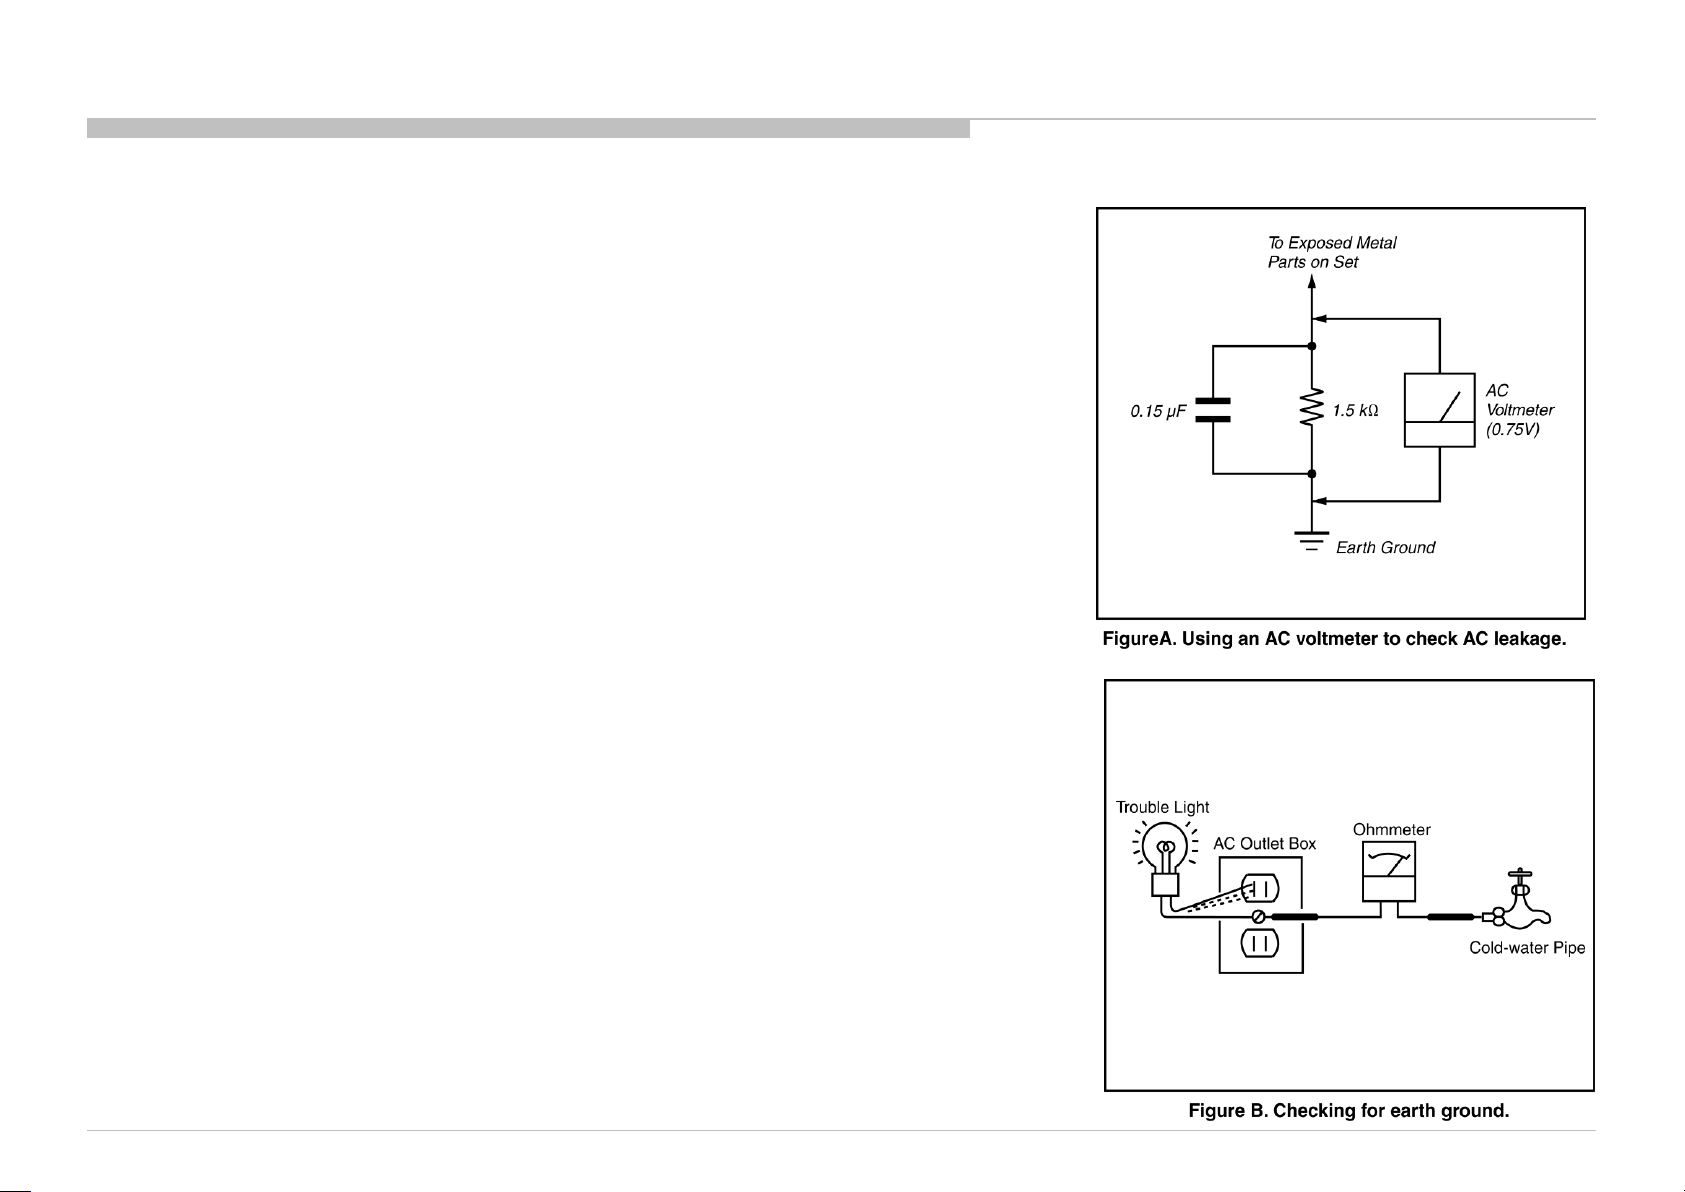
Leakage Test
The AC leakage from any exposed metal part to earth ground and from all exposed metal parts to any exposed
metal part having a return to chassis, must not exceed 0.5 mA (500 microamperes).
Leakage current can be measured by any one of three methods.
1. A commercial leakage tester, such as the Simpson 229 or RCA WT-540A. Follow the manufacturers’
instructions to use these instructions.
2. A battery-operated AC milliampmeter. The Data Precision 245 digital multimeter is suitable for this job.
3. Measuring the voltage drop across a resistor by means of a VOM or battery-operated AC voltmeter. The
“limit” indication is 0.75 V, so analog meters must have an accurate low voltage scale.
The Simpson’s 250 and Sanwa SH-63TRD are examples of passive VOMs that are suitable. Nearly all
battery-operated digital multimeters that have a 2 VAC range are suitable (see Figure A).
How to Find a Good Earth Ground
A cold-water pipe is a guaranteed earth ground; the cover-plate retaining screw on most AC outlet boxes is also
at earth ground.
If the retaining screw is to be used as your earth ground, verify that it is at ground by measuring the resistance
between it and a cold-water pipe with an ohmmeter. The reading should be zero ohms.
If a cold-water pipe is not accessible, connect a 60- to 100-watt trouble- light (not a neon lamp) between the hot
side of the receptacle and the retaining screw. Try both slots, if necessary, to locate the hot side on the line; the
lamp should light at normal brilliance if the screw is at ground potential (see Figure B).
SAFETY CHECK-OUT
KD-55/65XD9305
7
Page 8
SELF DIAGNOSIS FUNCTION
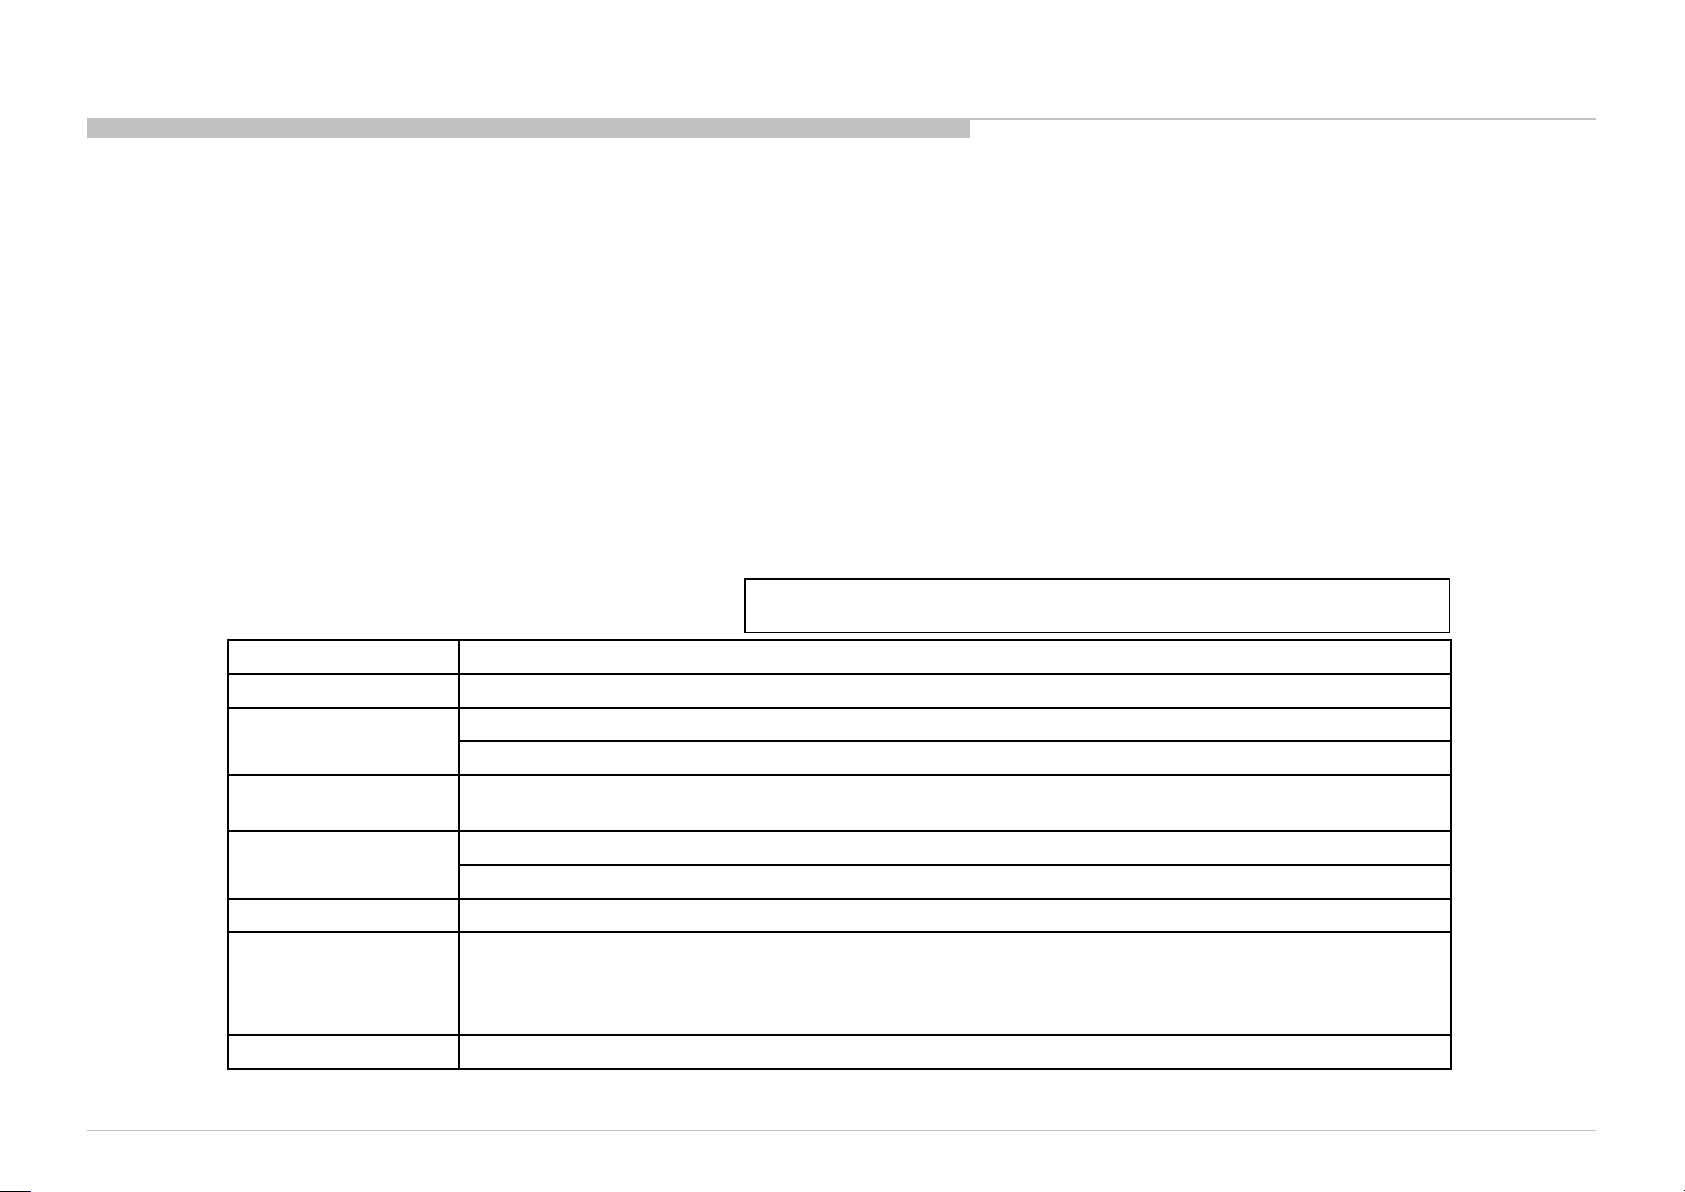
The units in this manual contain a self-diagnostic function. If an error occurs, the Smart Core Red LED will automatically begin to flash.
The number of times the LED flashes translates to a probable source of the problem.
A definition of the Smart Core Red LED flash indicators is listed in the instruction manual for the user’s knowledge and reference.
If an error symptom cannot be reproduced, the remote commander can be used to review the failure occurrence data stored in memory to reveal past problems and how often these
problems occur.
DIAGNOSTIC TEST INDICATORS
When an error occurs, the Smart Core Red LED will flash a set number of times to indicate the possible cause of the problem.
If there is more than one error, the LED will identify the first of the problem areas.
Result for all of the following diagnostic items are displayed on screen.
If the screen displays a “0”, no error has occurred .
<G>: Power supply board, <B>: Main board, <T>: Tcon board, (LD) board,<P>: Panel module,
<S>: Speaker, <A>: Power Adapter, <D>: DPS 4K BE board, <T>: Temperature Board
RED LED blinking count Detection Items
2x <G/B/A> Main 12V over voltage [MAIN_POWER]
3x
4x
5x
6x <G/P/B/LD/D> Backlight failure [BACKLIGHT]
7x
8x <B/D> Software error [SW_ERR]
<B> Main 5.0V failure [DC_ALERT]
<B/S> Audio amp. protection [AUD_ERR]
<LD/P/D> LED driver failure/LED voltage protection [LD_ERR]
<LD/P/D>Error detection of the I2C communication between the Main device and the LD IC.[BCM_ERR]
<P/T/G/B> Panel ID EEPROM I2C No ACK (Also panel power failure is a suspect) [P_ID_ERR]
<T> Tcon IC I2C communication error [TCON_ERR]
Over temperature protection [TEMP_ERR]
<B/T> Temp. sensor I2C No ACK [TEMP_ERR]
<B/D> V By One lock error between Main device and 4KBE device [4KBE_ERR]
<B>4KBE device UART communication error detection.
KD-55/65XD9305
Red italic: detect at startup sequence only.
8
Page 9
SELF DIAGNOSIS FUNCTION
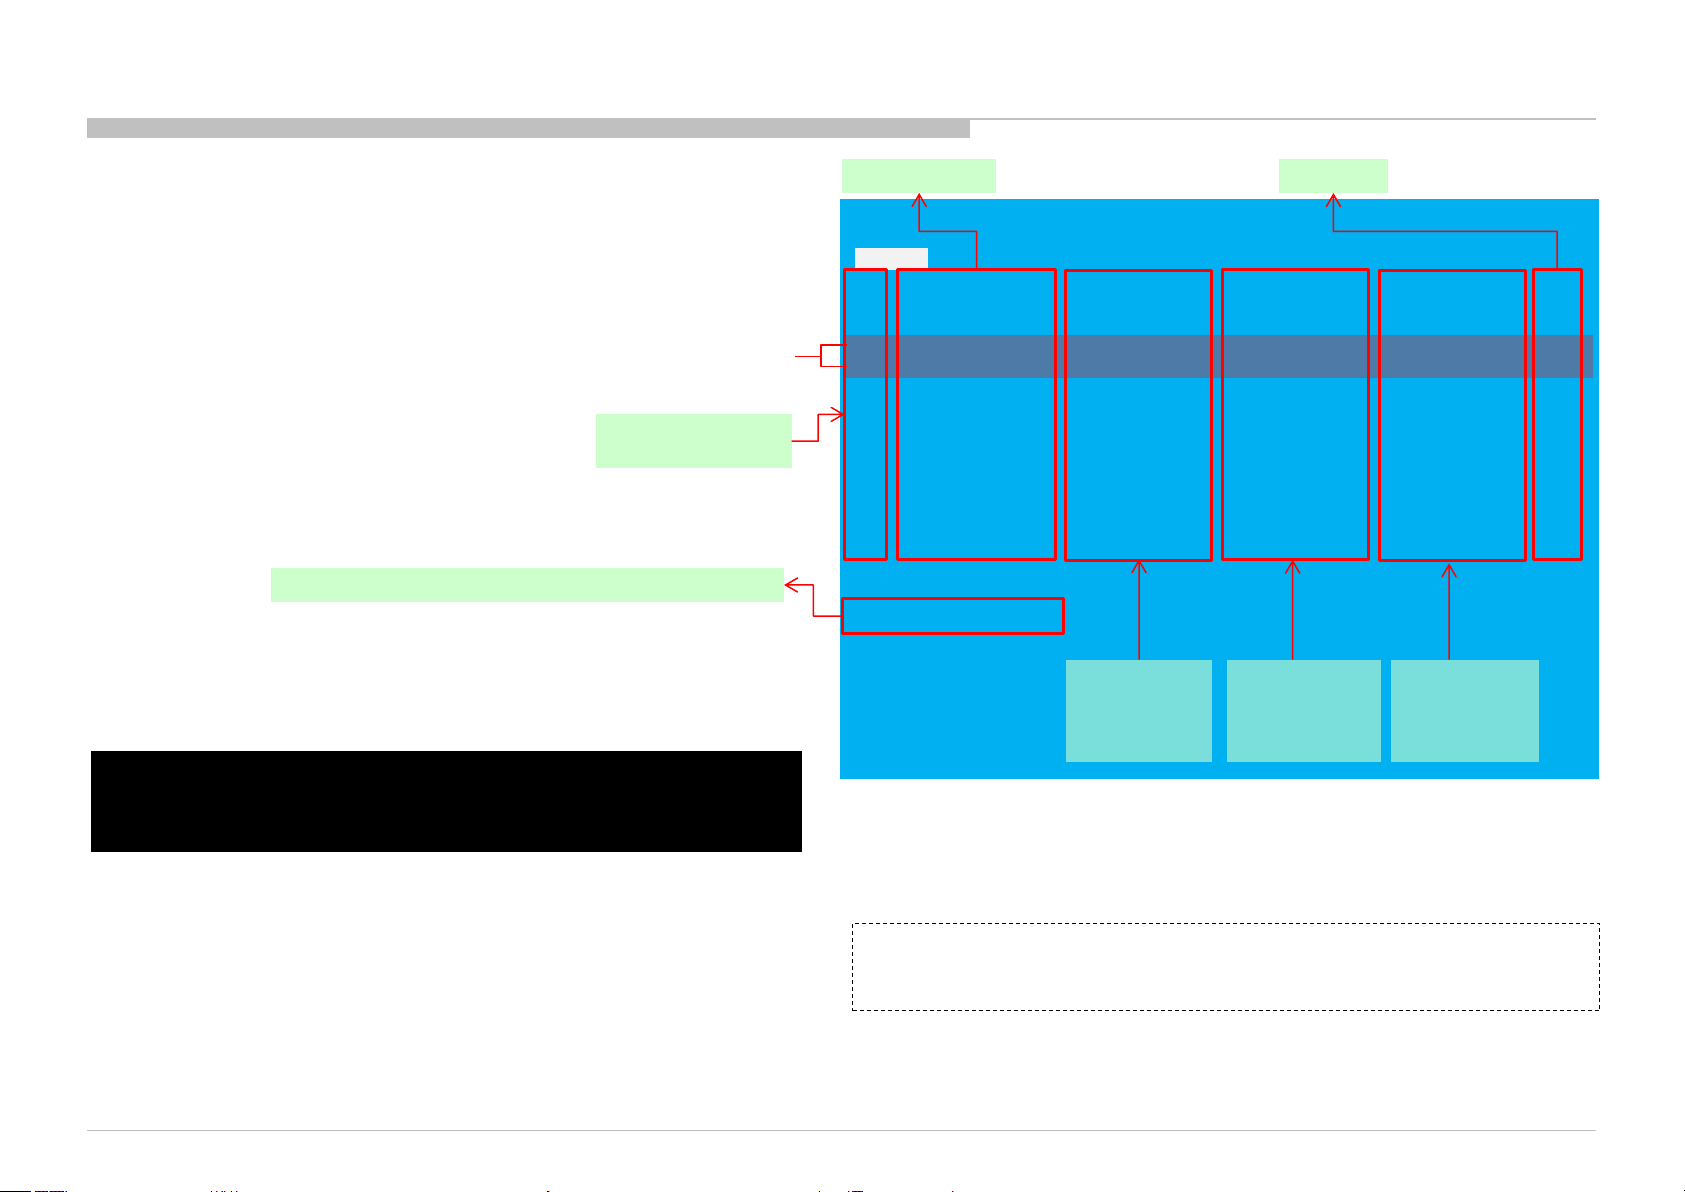
[SELF DIAGNOSTIC SCREEN DISPLAY]
Format of error timestamps
YYMMDDhh mmss (in UTC)
Example :
120823132523 -> Aug 23 2012 13:25:23 UTC
* On ly whe n time is set, an err or tim estamp
is save d.
• Panel Ope rat ion Ti me is recorded ever y 30 min,
but Total Operation Ti me is recorded eve ry 1 h r .
Ther efo re, the panel op. time might bec ome l arg er t han th e total op. tim e.
Total Operation Time [hr] – Boot Count – Panel Operation Time [hr]
" These error item
does not work."
Smart Core Red LED
blinking count
For errors with symptoms such as “power sometimes shuts off” or
“screen sometimes goes out” that cannot be confirmed,
it is possible to bring up past occurrences of failure for confirmation on the screen:
In standby mode, press buttons on the remote commander sequentially in rapid
succession as shown below:
Error Naming
SELF CHECK
Back
<<
002 MAIN_POWER 000000000000 000000000000 000000000000 000
003 DC_ALERT 000000000000 000000000000 000000000000 000
003 AUD_ERR 150101000018 150101000018 150101000018 003
003 HDMI_EQ 150101000123 150101000045 150101000045 003
003 TU_DEMOD 150101000218 150101000223 150101000105 003
004 LD_ERR 000000000000 000000000000 000000000000 000
004 BCM_ERR 000000000000 000000000000 000000000000 000
005 TCON_ERR 150101000504 000000000000 000000000000 001
005 P_ID_ERR 000000000000 000000000000 000000000000 000
006 BACKLIGHT ERR 000000000000 000000000000 000000000000 000
007 TEMP_ERR 150101000200 150101000002 000000000000 002
007 4KBE_ERR 000000000000 000000000000 000000000000 000
008 SW_ERR 000000000000 000000000000 000000000000 000
00005 00414 00002
[Home]Exit
Error
timestamp for
last recorded
error
Error count
Error
timestamp for
second last
recorded error
Error
timestamp for
3rd last
recorded error
Since the diagnostic results displayed on the screen are not automatically cleared, always check the self-diagnostic screen.
After you have completed the repairs, clear the result display to “0”.
Clearing the Self Check Diagnostic List
Panel operation time : Press the Channel 7 => Channel 0 .
NOTE:
This model does not have the function to clear the error history of self-diagnostic screen
by remote such as press the Channel 8 => Channel 0.
To exit the Self Diagnostic screen...
*If you want to finish service mode app, do AC OFF/ON
→Service mode app is disable perfectly
*if you want to move home menu, push <HOME>button
→Service mode app do background(not disable perfectly)
KD-55/65XD9305
9
Page 10
ADJUSTMENT
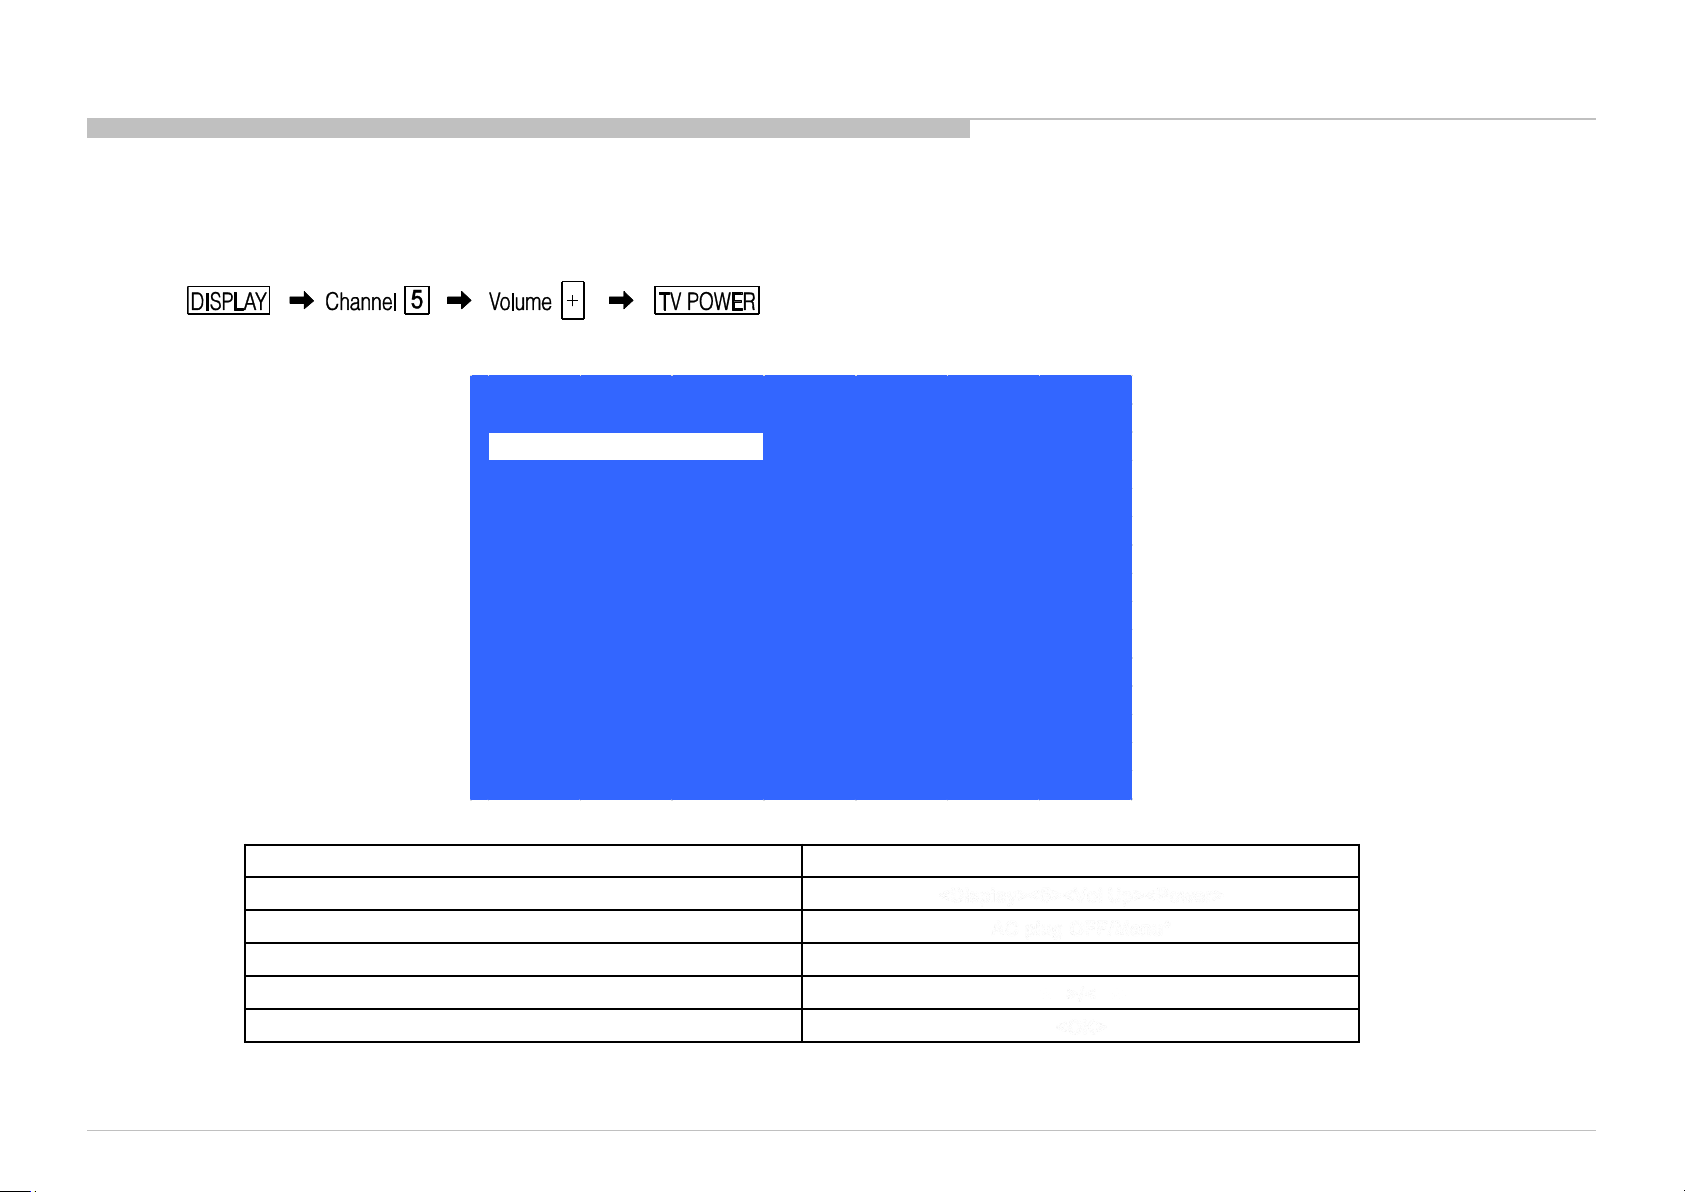
HOW TO ENTER SERVICE MODE
1) Turn on the main power switch to place the set in standby mode.
2) Press the buttons on the remote commander as follows, and entering service mode.
3) Service mode display.
Service Mode
Model Information
Self diagnosis History
Video / Audio
Panel / PQ
General Setting
Tuner
Wifi
>>
>>
>>
>>
>>
>>
>>
4) How to use the remote commander.
*When finished the operation of service mode , please AC Plug OFF/ON the TV set.
If you don’t do AC plug OFF/ON, remain the Service Mode App and User can see the Service Mode after RC ON.
(Refer the previous page.)
KD-55/65XD9305
[</>] Set [Home]Exit
Function The flow of control
Service mode on <Display><5><V ol Up><Powe r>
Service mode off AC plug OF F/Menu*
Item up / down <↑>/ <↓ >
Item select left/right
Execute <OK>
<←>/<→>
10
Page 11
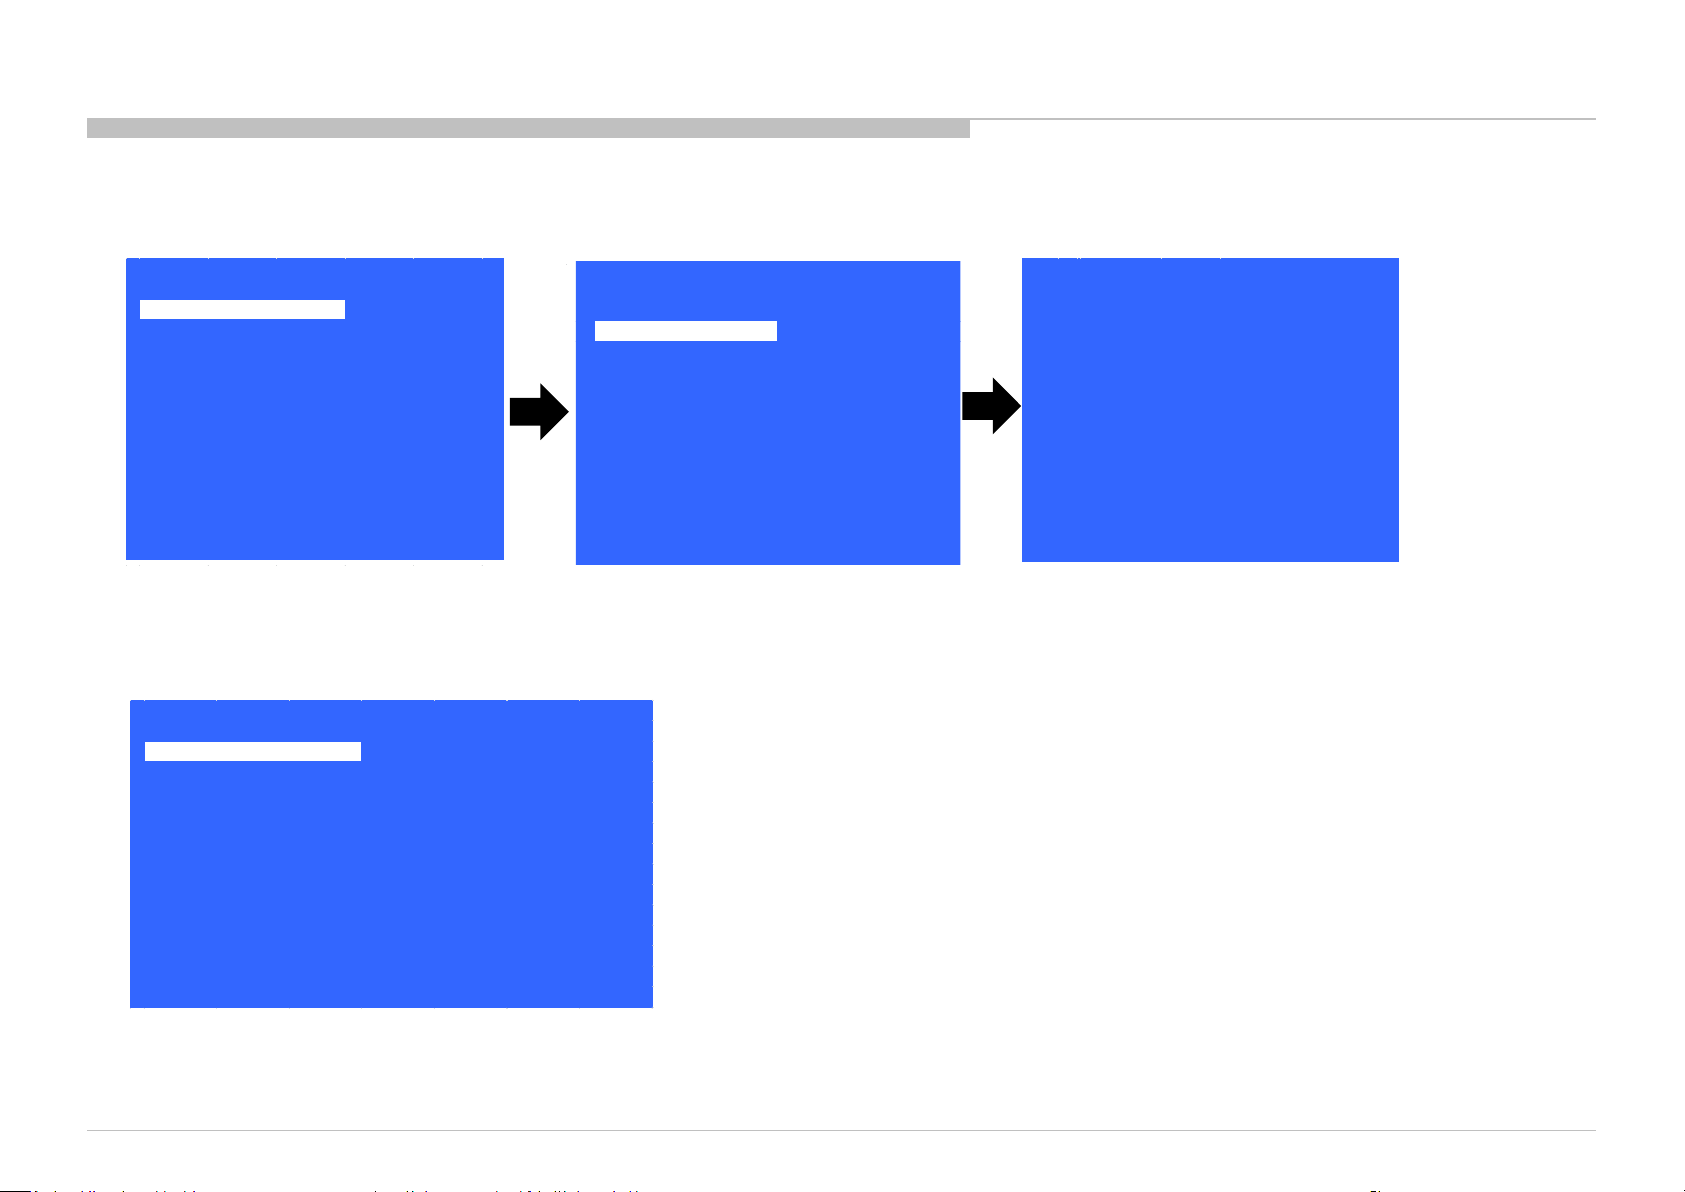
SOFTWARE VERSION
>>
Model Information
>>
Model Number Setting
>>
SERIAL NUMBER EDIT
[</> ] Set [Home]Exit
Model
Status Information
1) In Service Mode, select “Model Information”, press “Enter” or “→” button to enter Status Information.
ADJUSTMENT
Model Information
Self diagnosis History
Video / Audio
Panel / PQ
General Setting
Tuner
Wifi
Service Mode
>>
>>
>>
>>
>>
>>
>>
[</>] Set [Home]Exit
2) Press “Enter” or “Return” button to return to Service Mode.
Service Mode
Model Information
Self diagnosis History
Video / Audio
Panel / PQ
General Setting
Tuner
Wifi
>>
>>
>>
>>
>>
>>
>>
>>
Main Micro
SW Version:
NVM Version:
Boot Version:
PQ Version:
AQ Version:
<Ext>
exFRC:
CameraVID:
CameraPIC:
CameraFW:
4k BE
MLFW:
MAFW:
ADSP
NDAT
PDAT
BDAT
BCM
FDAT
UDAT
BDIX
PKG2.011.0010NAB
0001 UC2
V1.000
102100006
AQ1.100
00.00.00.00
0
0
0
SF1.002
SF0.360
SF0.501
SD0.370
SD0.370
SD1.011
SD------SD0.002
SD0.000
SD0.370
KD-55/65XD9305
[</>] Set [Home]Exit
11
Page 12
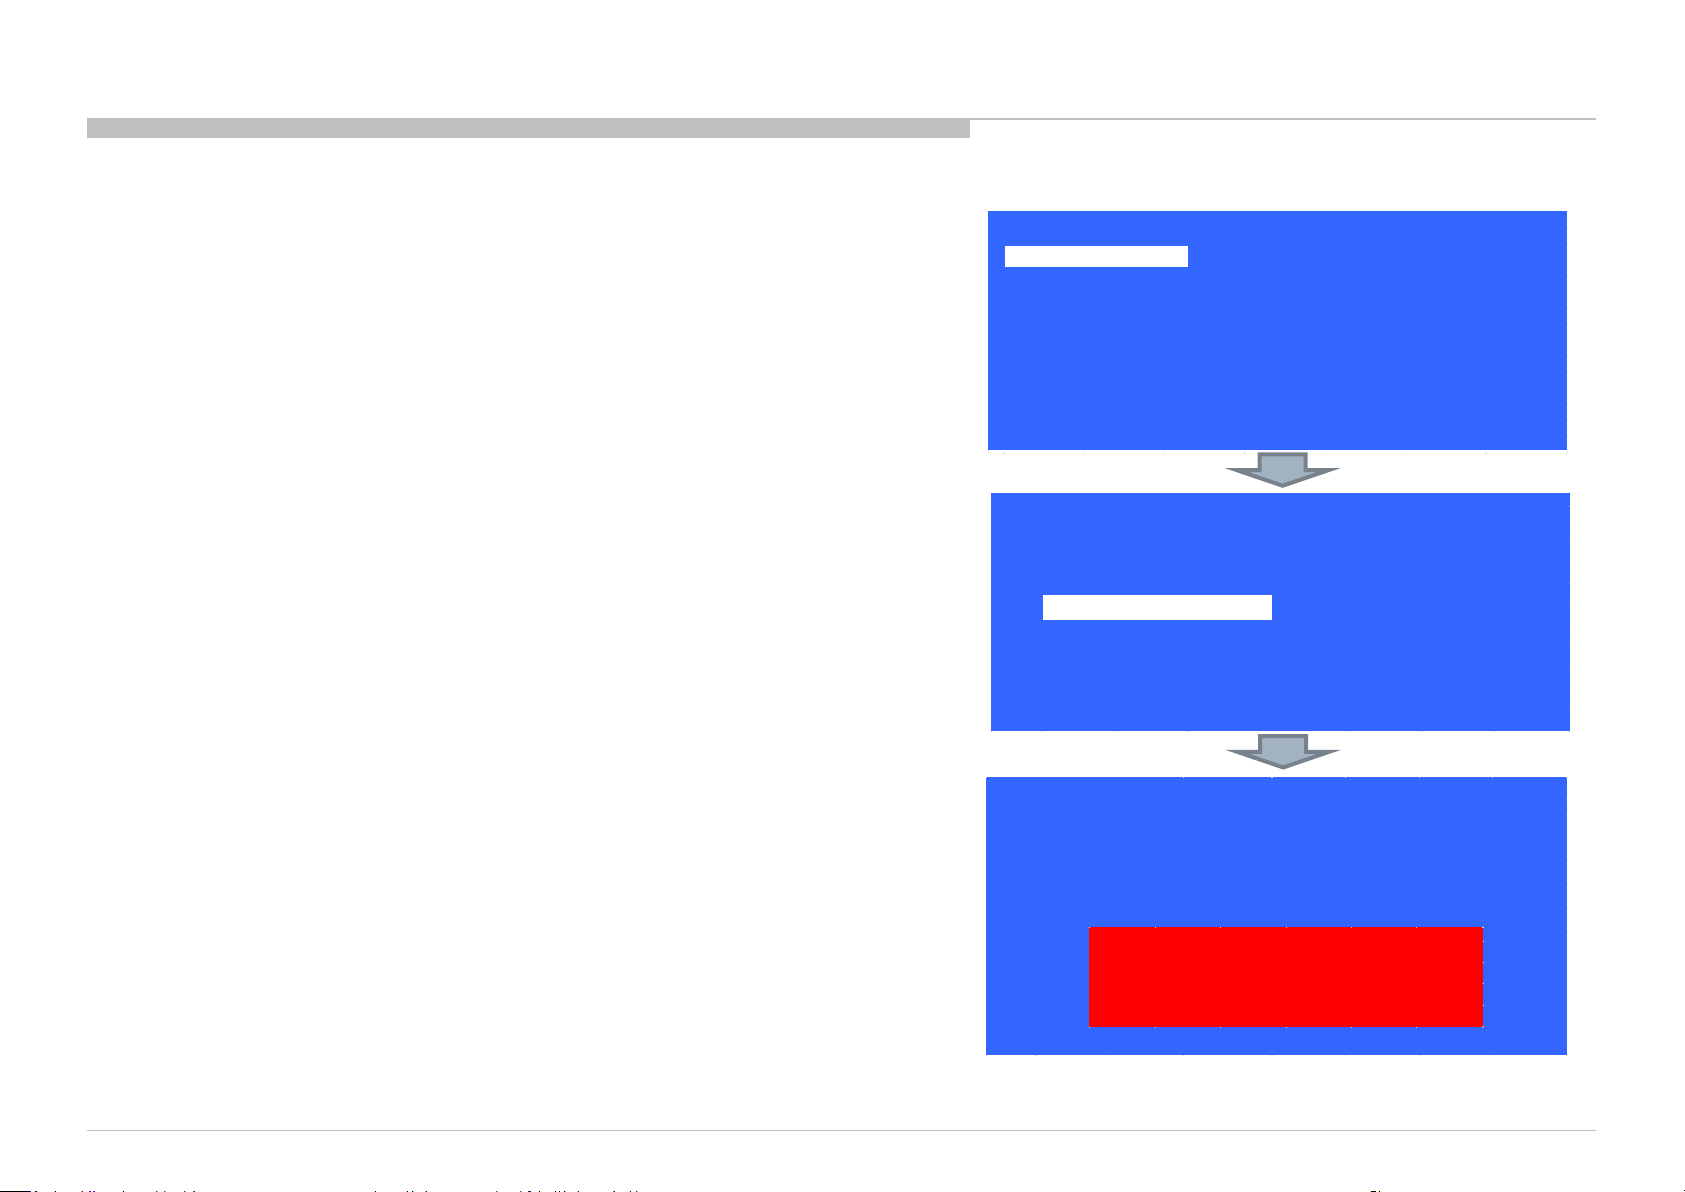
SERIAL NUMBER EDIT (1)
ADJUSTMENT
1) In “Service Mode”, select “Model Information” by pressing “↑” or “↓” then pressing “Enter” or
“→” button to enter inside.
2) Select “Serial Number Edit” by pressing “↑” or “↓” button then pressing “→” button.
3) Press “↑” or “↓” to input numbers.
4) After user input data , press <Enter> .
• Pop-up dialog appear to confirm input data correct
• Serial Number can be set ONLY ONCE
5) Press “→” or “←” button to select YES or NO.
Select YES if input data is correct.
Select NO if input data is incorrect.
Press <Enter> to save answer.
Model Information
Self diagnosis History
Video / Audio
Panel / PQ
General Setting
Tuner
Wifi
Status Information
Model Information
Model Number Setting
Serial Number Edit
Status Information
Model Information
Model Number Setting
Serial Number Edit
Service Mode
>>
>>
>>
>>
>>
>>
>>
[</>] Set [Home]Exit
Service Mode
Service Mode
>>
>>
>>
_ _ _ _ _ _ _
>>
>>
>>
9 9 9 9 9 9 9
KD-55/65XD9305
Input Data correct?
Yes No
12
Page 13
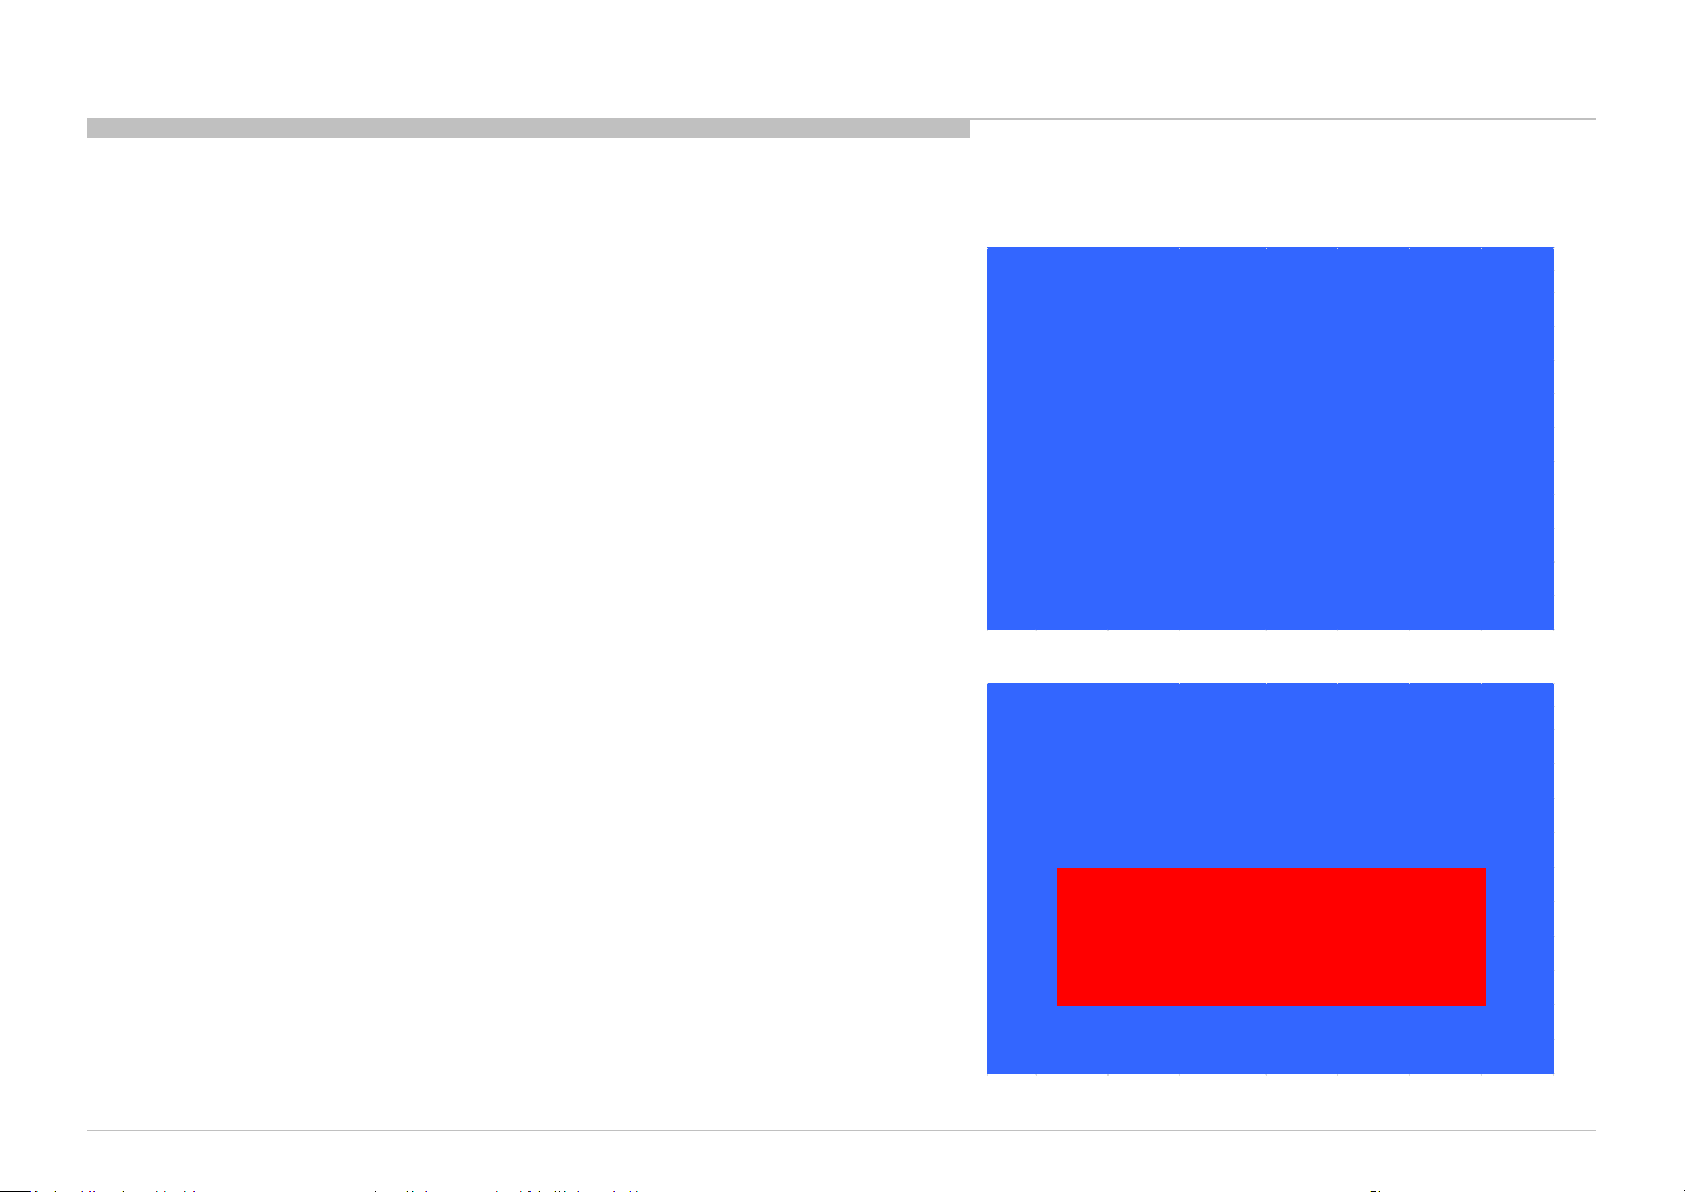
SERIAL NUMBER EDIT (2)
Yes No
Input Data correct?
ADJUSTMENT
If YES is selected, the input data is saved into EEPROM.
SERIAL NUMBER EDIT is greyed out and the serial number that has been input is displayed.
User will not able to edit anymore.
If NO is selected, the input data is not saved into EEPROM.
The serial number that has been input is displayed.
User can still edit the Serial Number.
Status Information
Model Information
Model Number Setting
Serial Number Edit
Status Information
Model Information
Model Number Setting
Serial Number Edit
Service Mode
>>
>>
>>
9 9 9 9 9 9 9
Service Mode
>>
>>
>>
9 9 9 9 9 9 9
KD-55/65XD9305
13
Page 14
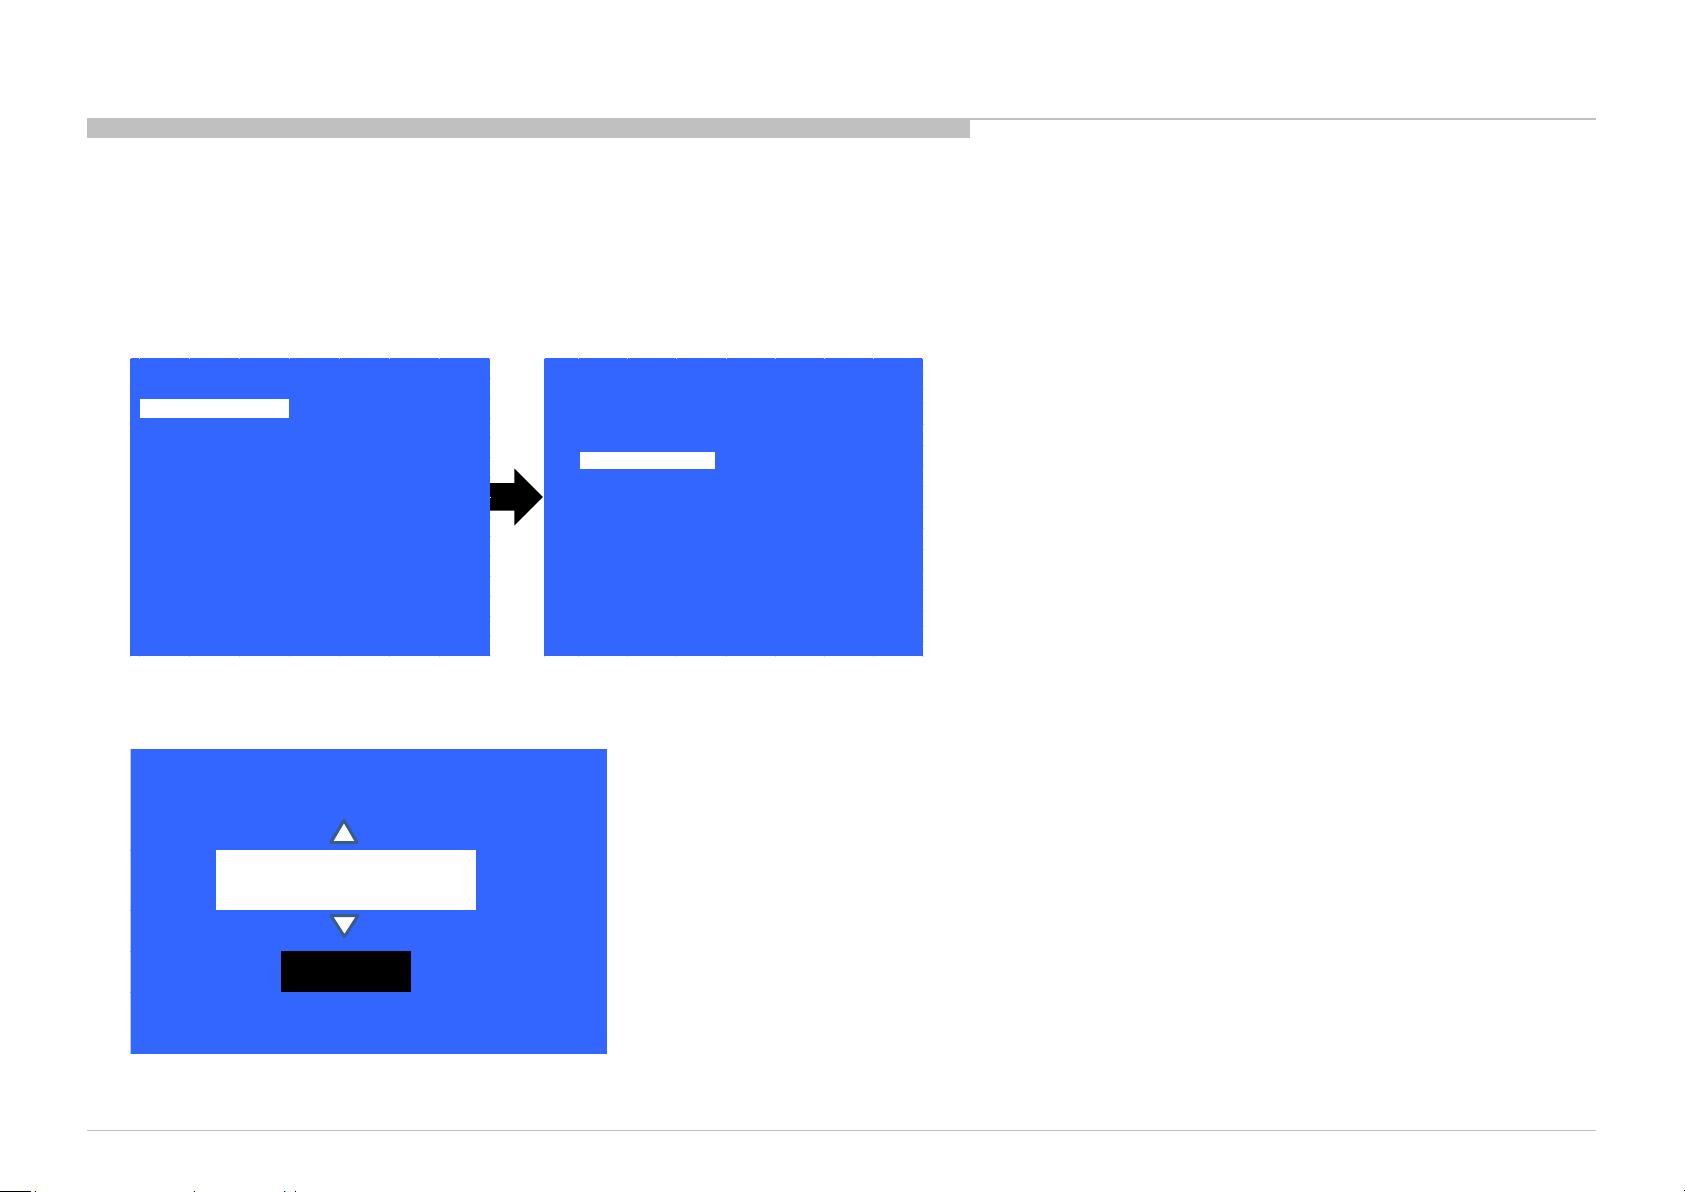
MODEL NUMBER SETTING
_ _ _ _ _ _ _ _ _ _ _ _
OK
[MODEL_NUMBER_SETTING]
1) In “Service Mode”, select “Model Information” by pressing “↑” or “↓” then pressing “Enter” or “→” button to enter inside.
2) Select “Model Number Setting” by pressing “↑” or “↓” button then pressing “Enter” or “→” button.
3) Press “↑” or “↓” arrow key to scroll Product Name Candidate.
(e.g. KDL-40X500B CO1,KDL-40X500C BR6)
ADJUSTMENT
Service Mode
Model Information
Self diagnosis History
Video / Audio
Panel / PQ
General Setting
Tuner
Wifi
>>
>>
>>
>>
>>
>>
>>
Status Information
Model Information
Model Number Setting
Serial Number Edit
Service Mode
>>
>>
>>
>>
[</>] Set [Home]Exit
4) Select one Product Name from the list, press <Enter> will pop dialog to inform user to confirm data. Model dependent settings will be overwritten into EEPROM.
KD-55/65XD9305
14
Page 15
ADJUSTMENT
Back
R WB Gain
<[ 0 ]>
G WB Gai n
<[ 0 ]>
B WB Gain
<[ 0 ]>
R WB Offs et
<[ 0 ]>
G WB Offs et
<[ 0 ]>
B WB Offs et
<[ 0 ]>
<<
[</>] Set [Home]Exit
>>
>>
>>
>>
>>
>>
>>
Service Mode
[</>] Set [Home]Exit
Tuner
Wifi / BT
Model Information
Self diagnosis History
Video / Audio
Panel / PQ
General Setting
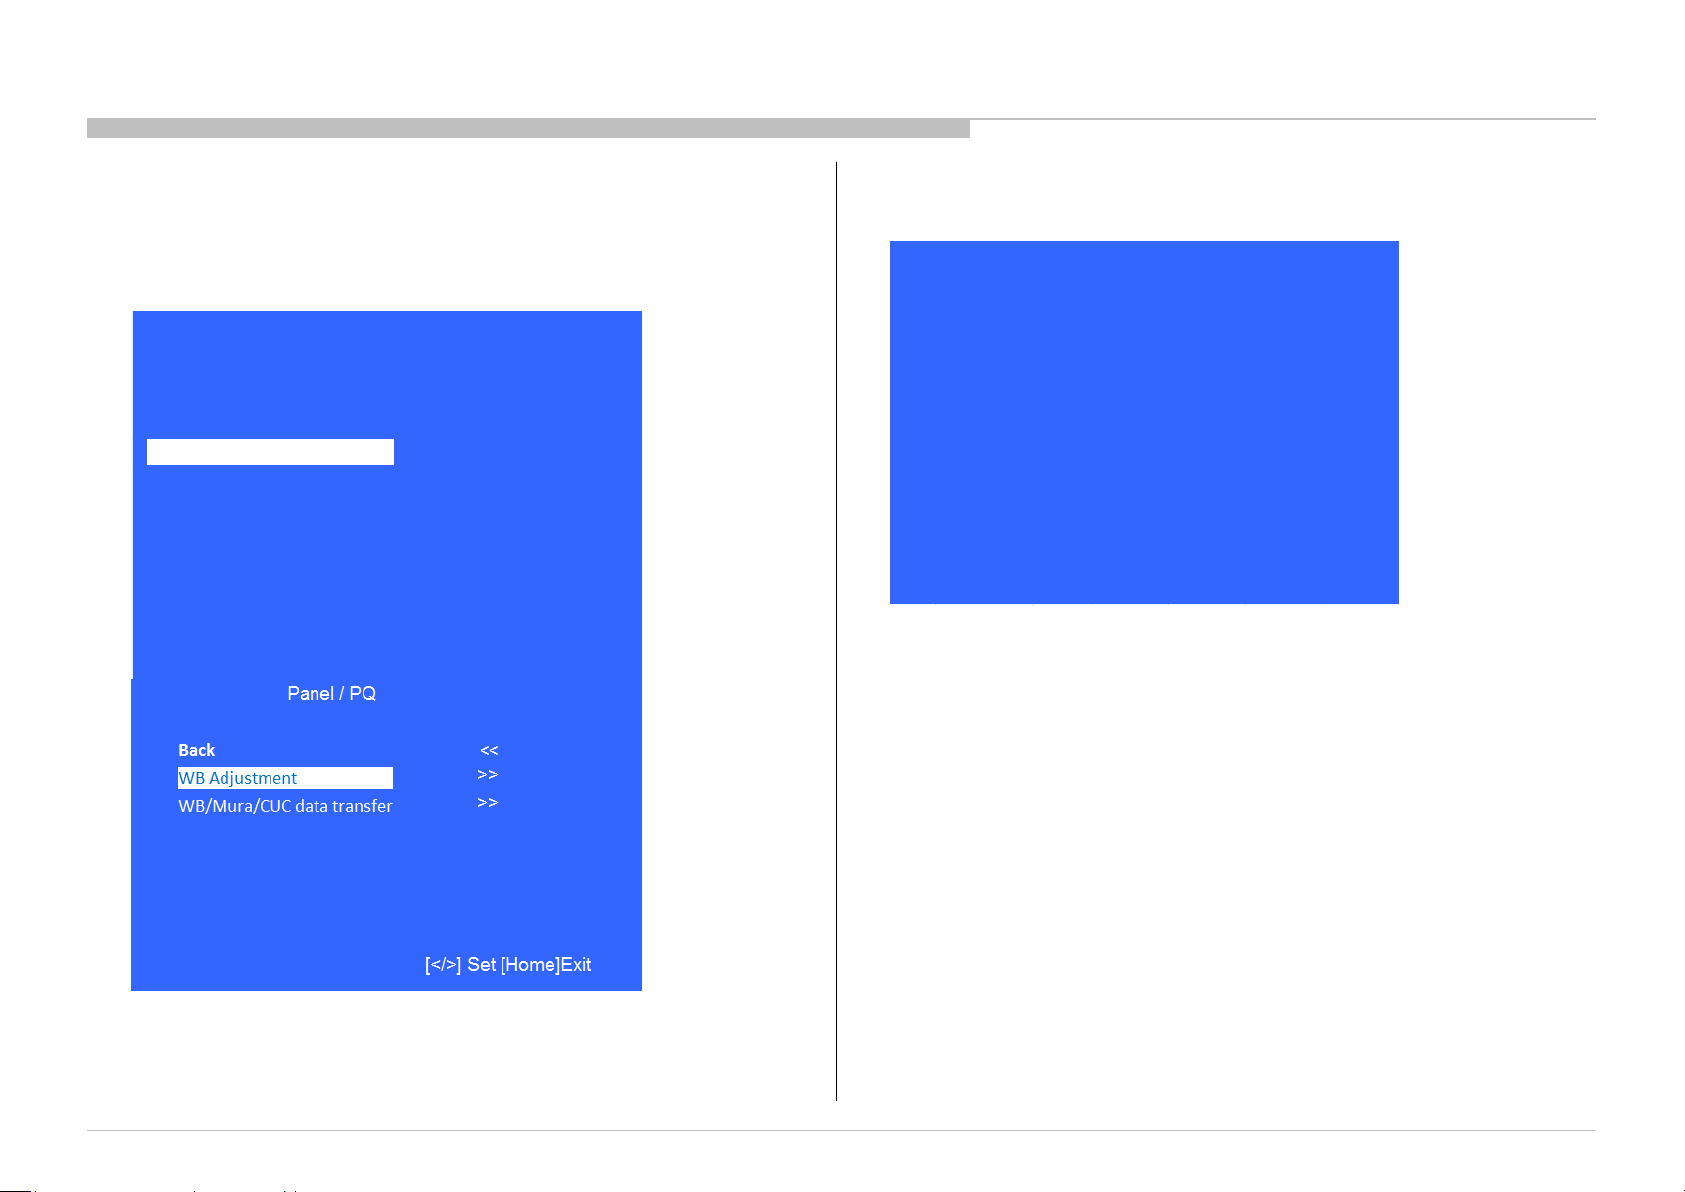
WB ADJUSTMENT
(Please apply when the Main board or panel is replaced.)
In “Panel/PQ” service mode.
a. Go to “WB Adjustment” category by “↑” or “↓”.
b. To select “WB Adjustment”, press “→” button.
c. To change data , press “←” or “→” on remote commander.
KD-55/65XD9305
15
Page 16
ADJUSTMENT
>>
>>
>>
>>
>>
>>
>>
Service Mode
[</>] Set [Home]Exit
Tuner
Wifi / BT
Model Information
Self diagnosis History
Video / Audio
Panel / PQ
General Setting
Back
<<
<[ 0. SoC to T-con ]>
Mura data transfer
<[ 0. SoC to T-con ]>
CUC data trans fer
<[ 0. SoC to T-con ]>
[Start]
[</>] Set [Home]Exit
WB/Gamma data trans fer
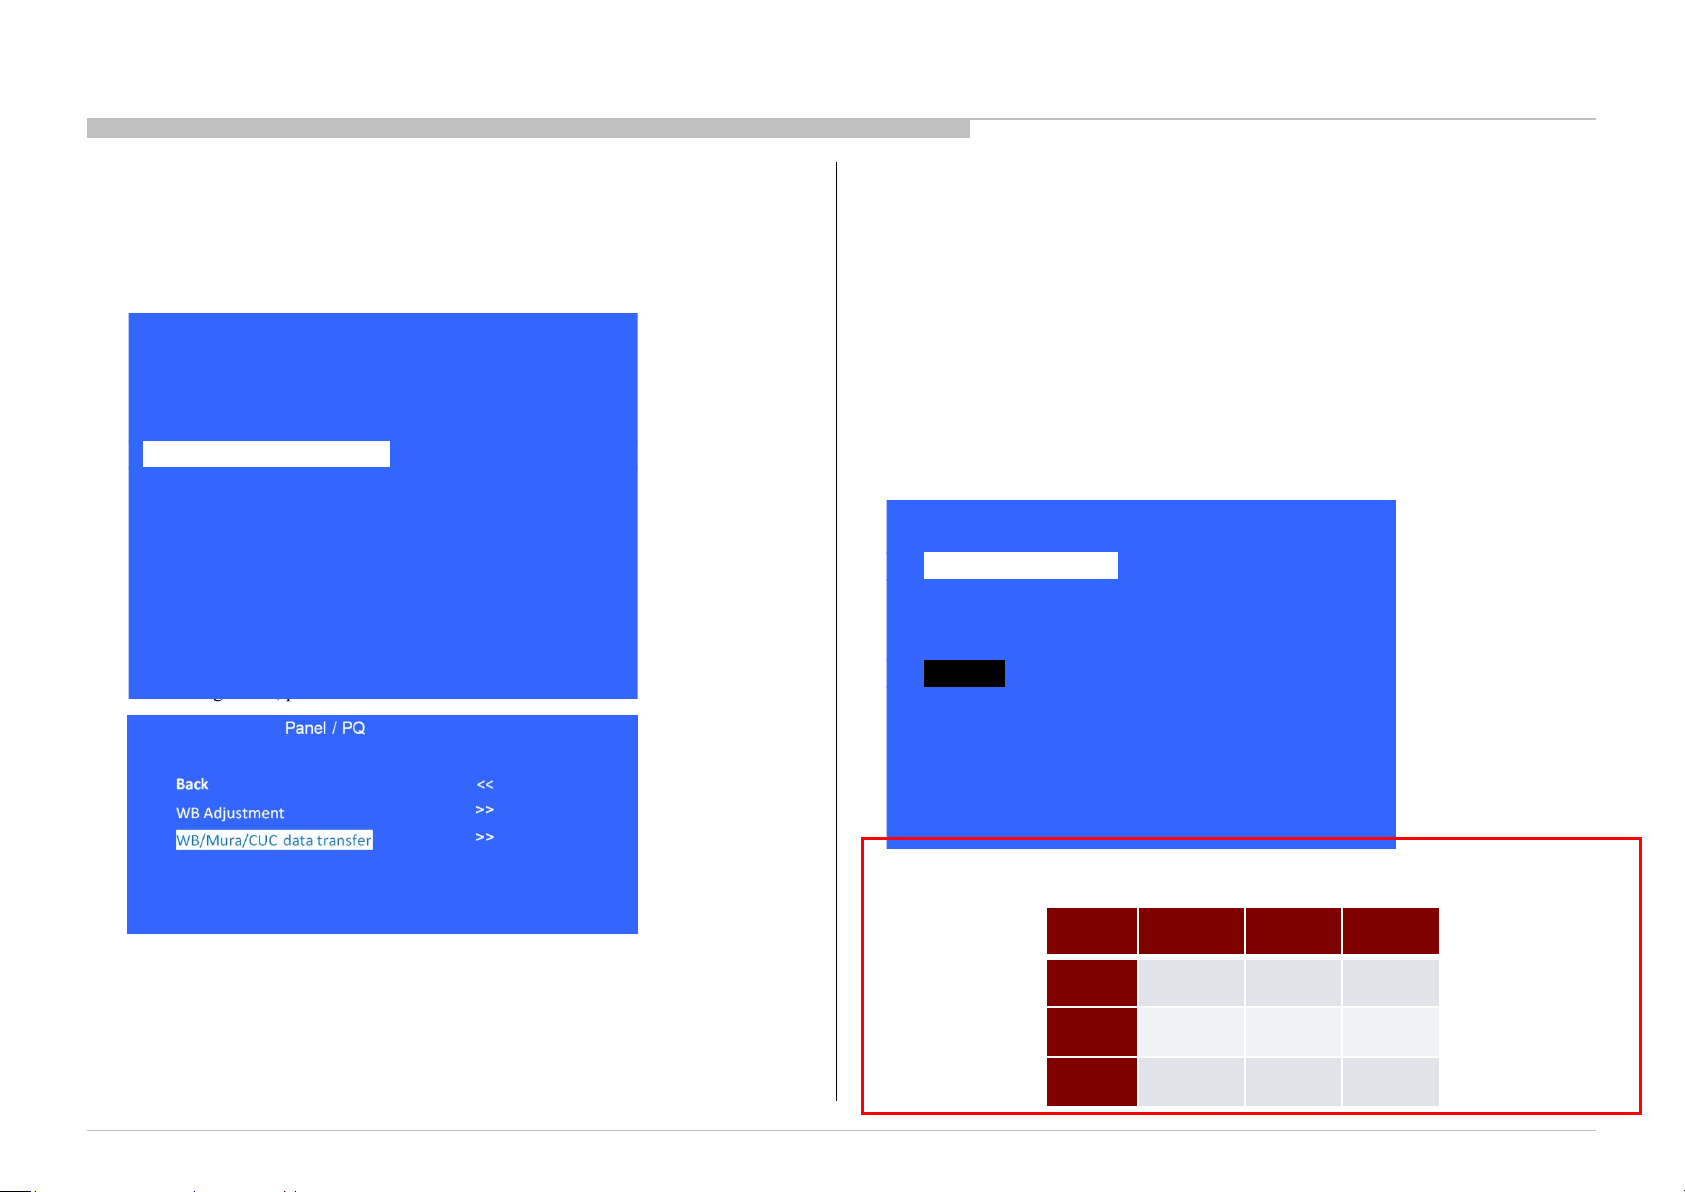
WB/MURA/CUC DATA TRANSFER
(Please apply when the Main board or panel is replaced.)
1. In “Panel/PQ” service mode.
a. Go to “WB/Mura/CUC data transfer” category by “↑” or “↓”.
b. To select “WB/Mura/CUC data transfer”, press “→” button.
c. To change data , press “←” or “→” on remote commander.
2. In “WB/Mura/CUC data transfer”.
a. Select “WB/Gamma data transfer” by pressing “↑” or “↓” on remote commander.
b. To change the items, press “←” or “→” on remote commander and press “Enter”
button.
Selectable items are:
0. SoC to T-con
1. T-con to SoC
2. Not action
c. Select “[start]” and press “Enter” button to start transfer.
KD-55/65XD9305
*Please refer to another manual “Service Procedure for Panel, Board and Software Change /
Upgrade(P/N:98881800x)” for details. GN2SK chassis is the same as GN1T chassis basically.
WB/
Gamma
Mura
CUC
B-board
replace
1.T-con to
Soc
1.T-con to
Soc
1.T-con to
Soc
T-con
replace
0.SoC to
T-con
0.SoC to
T-con
0.SoC to
T-con
Panel
replace
0.SoC to
T-con
1.T-con
to Soc
1.T-con
to Soc
16
Page 17

HDD PERFORMANCE CHECK
>>
>>
>>
>>
>>
>>
>>
[</>] Set [Home]Exit
General Setting
Tuner
Wifi / BT
Service Mode
Model Information
Self diagnos is History
Video / Audio
Panel / PQ
Service Mode
Please wait…
<[ NG ]>
Back <<
HDD Performace Check
Result
ADJUSTMENT
1. In “Service Mode”, select “General Setting” by pressing “↑” or “↓” then
pressing “Enter” or “→” button to enter inside.
2. Select “HDD Performance check ” by pressing “↑” or “↓” then pressing
“Enter” or “→” button to enter inside.
General Setting
Back <<
Aging mode <[On/Off]>
HDD Performance Check
AAA
Update CI+ Credentials >>
Boot count reset >>
ECS Enable <[On/Off]>
3. A message "Please wait ..." is displayed during performance check processing.
4. Result OK or NG will be displayed after performance of HDD is checked.
HDD Performance Check
>>
>>
[</>] Set [Home]Exit
KD-55/65XD9305
17
Page 18
HDD RE-REGISTRATION
>>
>>
>>
>>
>>
>>
>>
[</> ] Set [Home]Exit
General Setting
Tuner
Wifi / B T
Servic e Mode
Model Information
Self diagnosis History
Video / Audio
Panel / PQ
<[ NG ]>
Back <<
HDD Re-Register
Result
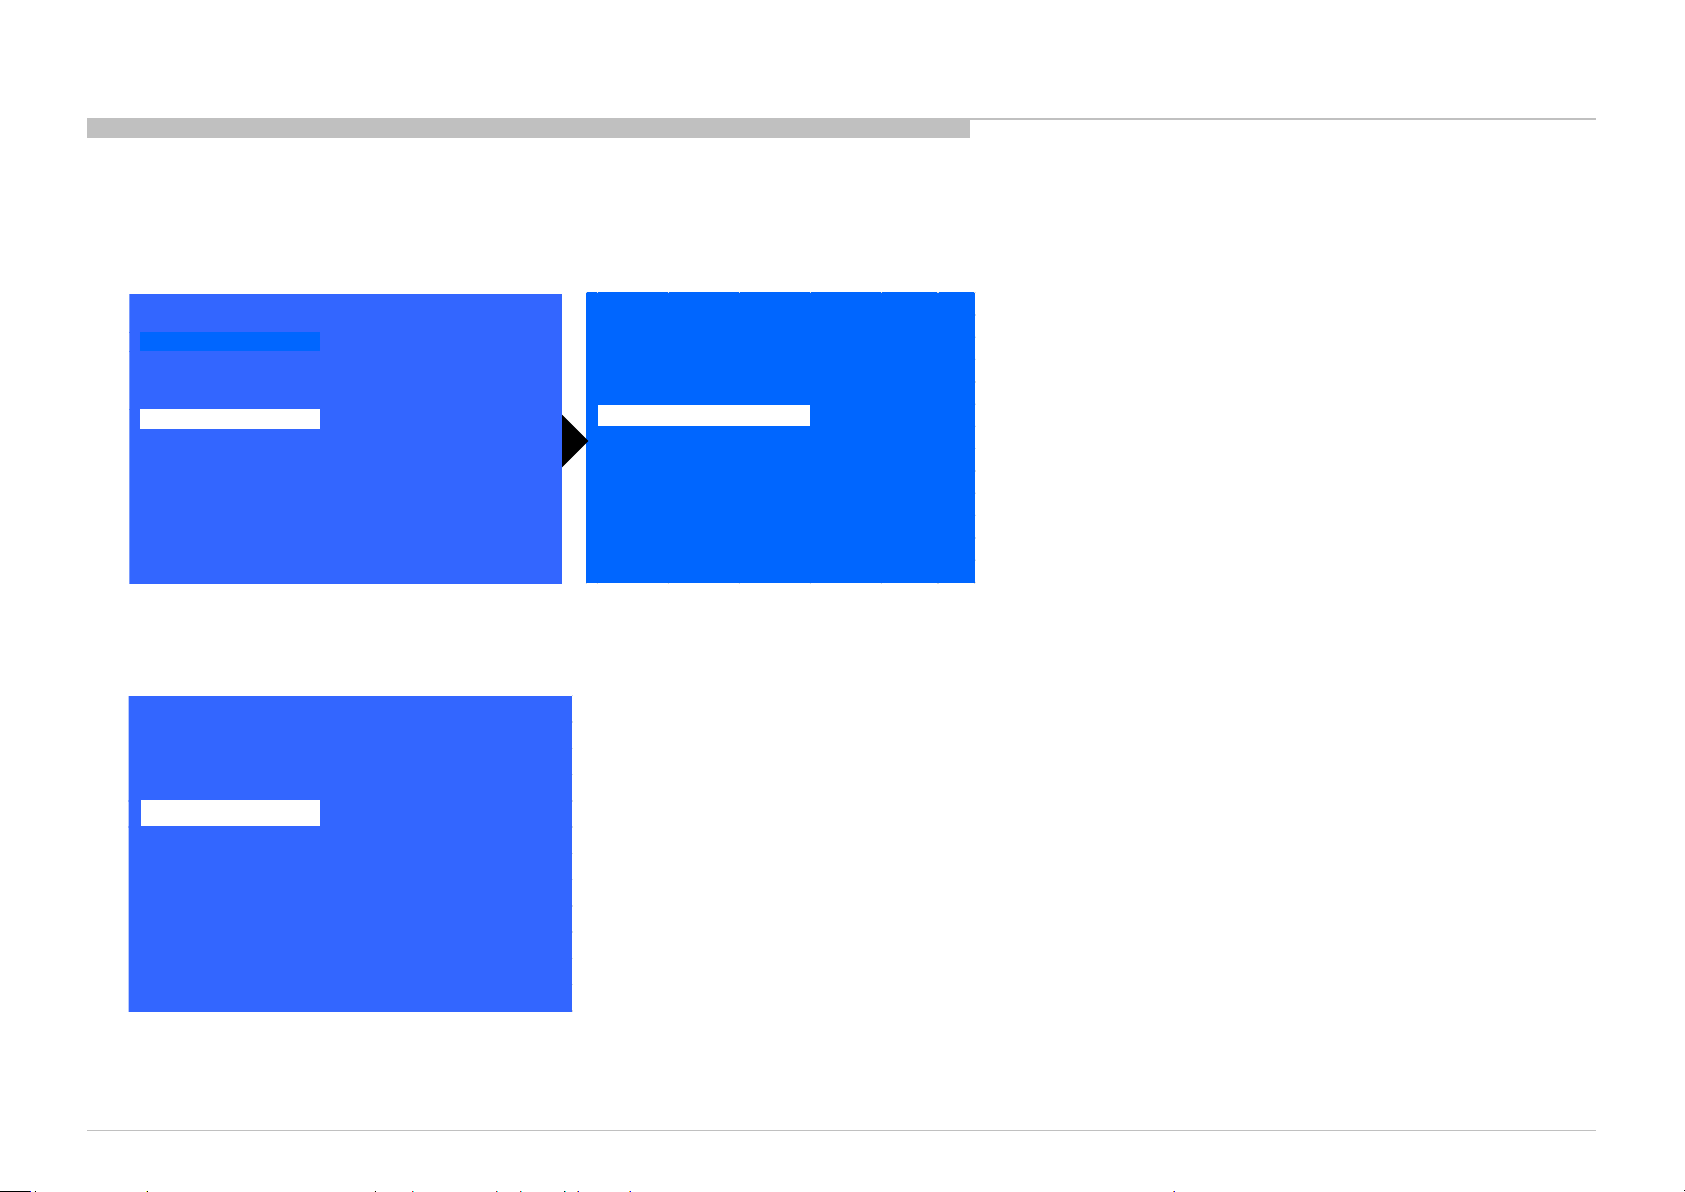
1) In “Service Mode”, select “General Setting” by pressing “↑” or “↓” then pressing “Enter” or “→” button to enter inside.
2) Select “AAA” by pressing “↑” or “↓” then pressing “Enter” or “→” button to enter inside.
Back <<
Aging mode <[On/Off]>
HDD Performance Check >>
AAA >>
Update CI+ Credentials >>
Boot count reset >>
ECS Enable <[On/Off]>
General Setting
ADJUSTMENT
3) Result OK or NG will be displayed after HDD re-registration is succeed/failed.
[</>] Set [Home]Exit
KD-55/65XD9305
18
Page 19
USB UPDATE
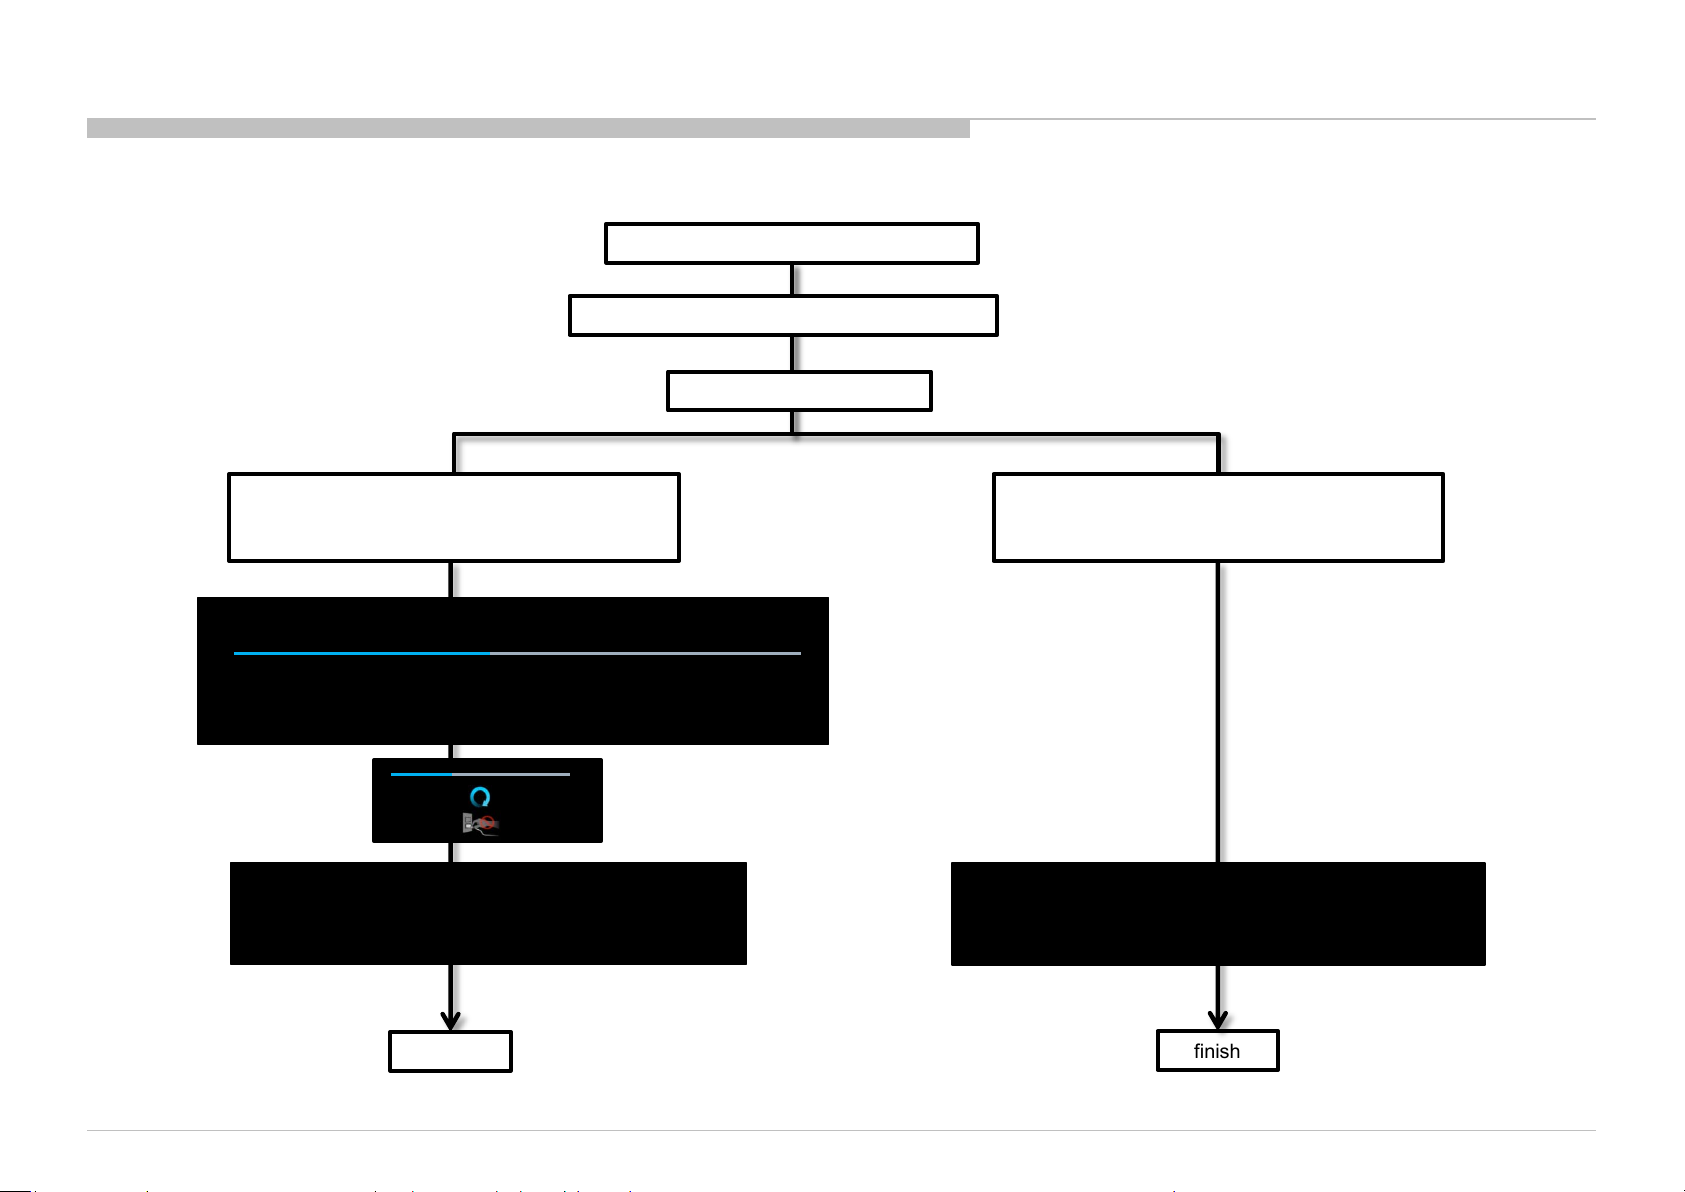
1:Download USB image and unzip file.
2: copy unzip file to USB memory root folder.
3: USB memory insert TV.
*Please refer to another manual “Service Procedure for Panel, Board
and Software Change / Upgrade(P/N:98881800x)” for details.
GN2SK chassis is the same as GN1T chassis basically.
4:USB image is newer soft version.
Automatically show message and start update.
Please follow directions.
System software update
Copying USB update file. Please wait…
Preparing for system software update. During the system software update, the TV will automatically restart.
Please do not remove the USB device until an update complete message is displayed . The update may take up to
30 minutes to complete.
System software update
The system software update is complete .
Some user settings may have changed during the update.
Please remove the USB device and select ”OK” to exit
5: finished
OK
46%
4:USB image is not newer soft version.
Automatically show message and start update.
Please follow directions.
System software update
Your software is up to date
Please remove the USB device and select [OK] to exit
5: finished
OK
KD-55/65XD9305
19
Page 20
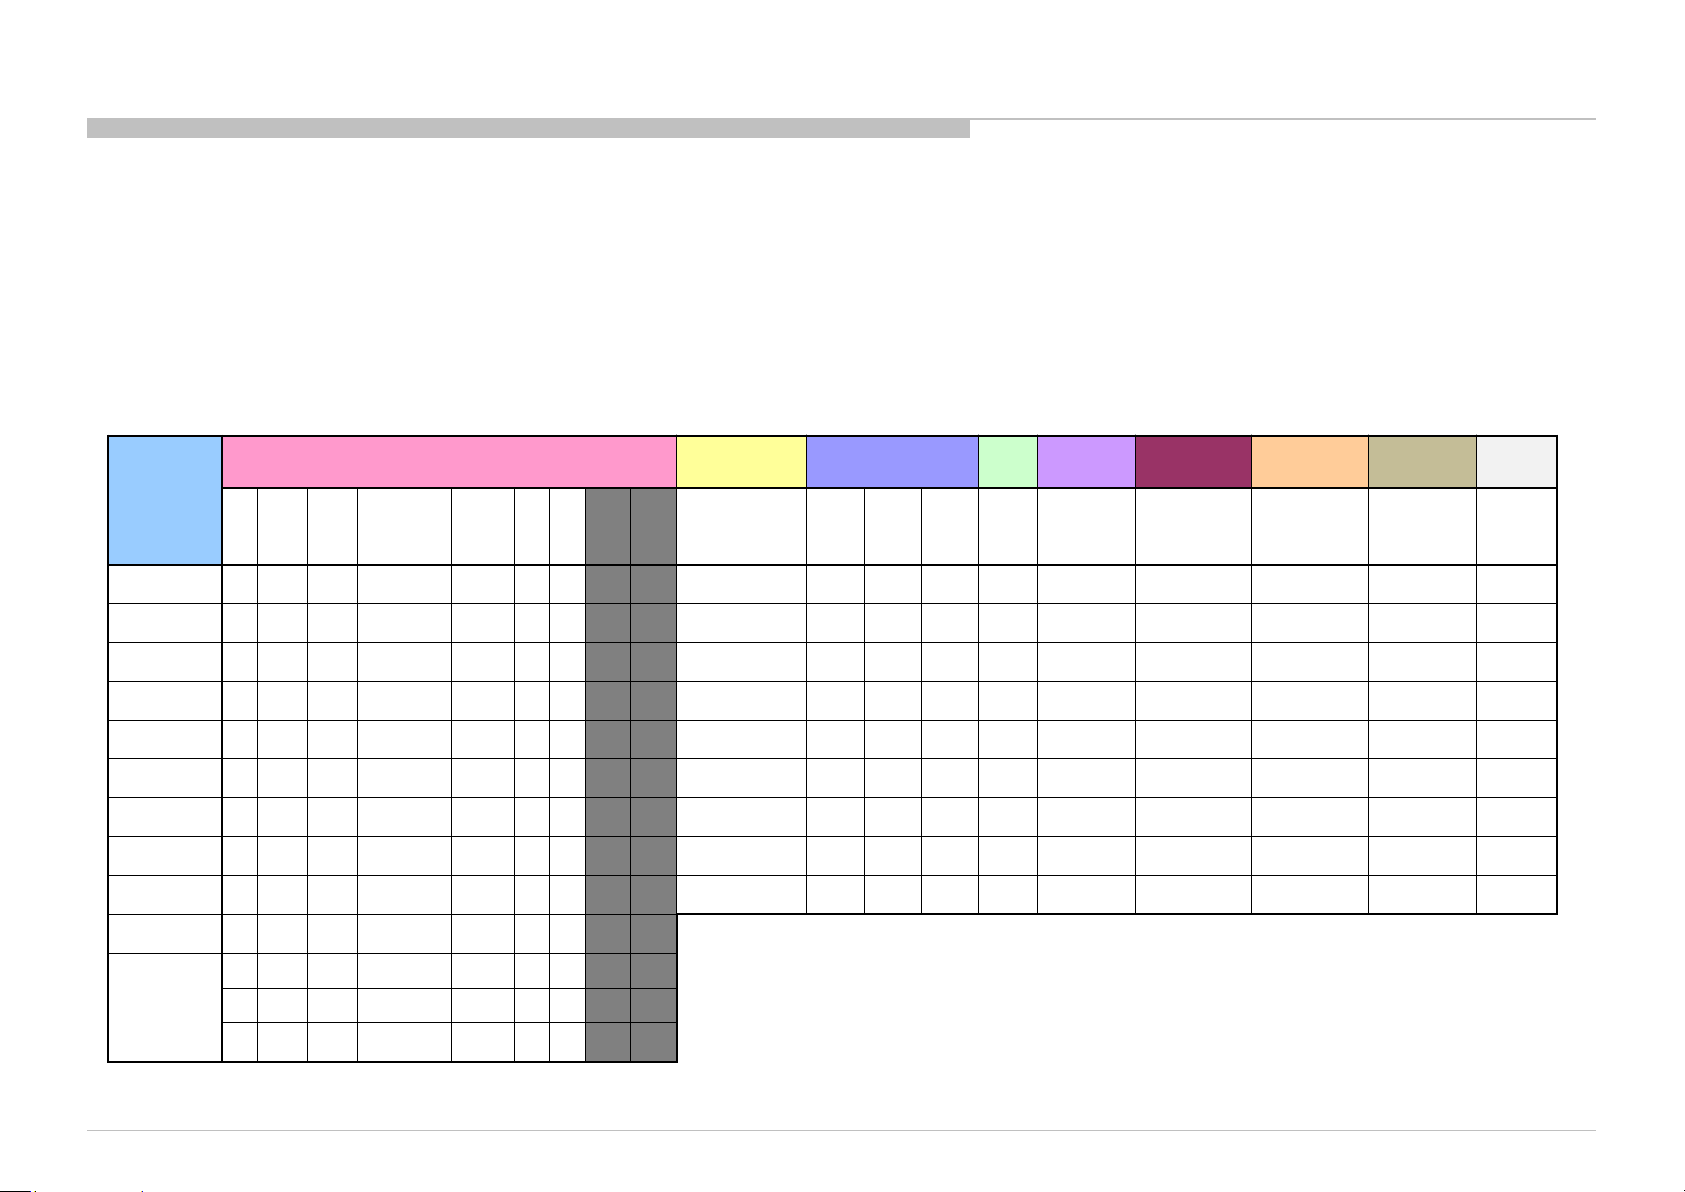
TROUBLE SHOOTING
Remote
Bluetooth
No White Power LED &
Stationary
dots
No video
No video
all Inputs
No Remote
Smart Core no LED
Bluetooth / One
Step Remote
Power
(Communication)
(Backlight)
TEMP
Software
4KBE
TRIAGE
1. Confirm the symptom from the customer.
2. Select that symptom from the chart.
3. Bring all the boards and cables listed for that symptom.
4. Follow the troubleshooting charts in the technical guides to isolate the board.
5. Chart Color Code.
RED DOT: Most likely defective part
BLUE TRIANGLE: Secondary possible defective part
BLACK TEXT: Board that may correct the symptom
KD-55/65XD9305
Reference
B* Board
G* Board/ADP
H* Board
Speaker
Wifi & BT
Module
LD* Board
V By One FFC
Tcon
LCD Panel
Temp Board
Problem
Symptoms - Shutdown. Power LED
blinking red diagnostics sequences
2 3 4 5 6 7 8 9 10
p l p
l p p
p
p p l l
p l
l p l p l
Power LD
Audio
p
p
l
l l
l
Panel
Panel
does not response to
remote (Dead Set)
No
Power
Video
- missing or distorted
colored
One of
lines or
Inputs
Network Audio Skype Smart Core
Wireless
can't connect
No Audio
Skype
Can't Work
(Set is still alive)
(OSR) can't
p p l l p p l p p p
l
p
l
p
p
l
p
p
p
p
l
l
p
l
p
p
l
(BT)
connect
l
20
Page 21
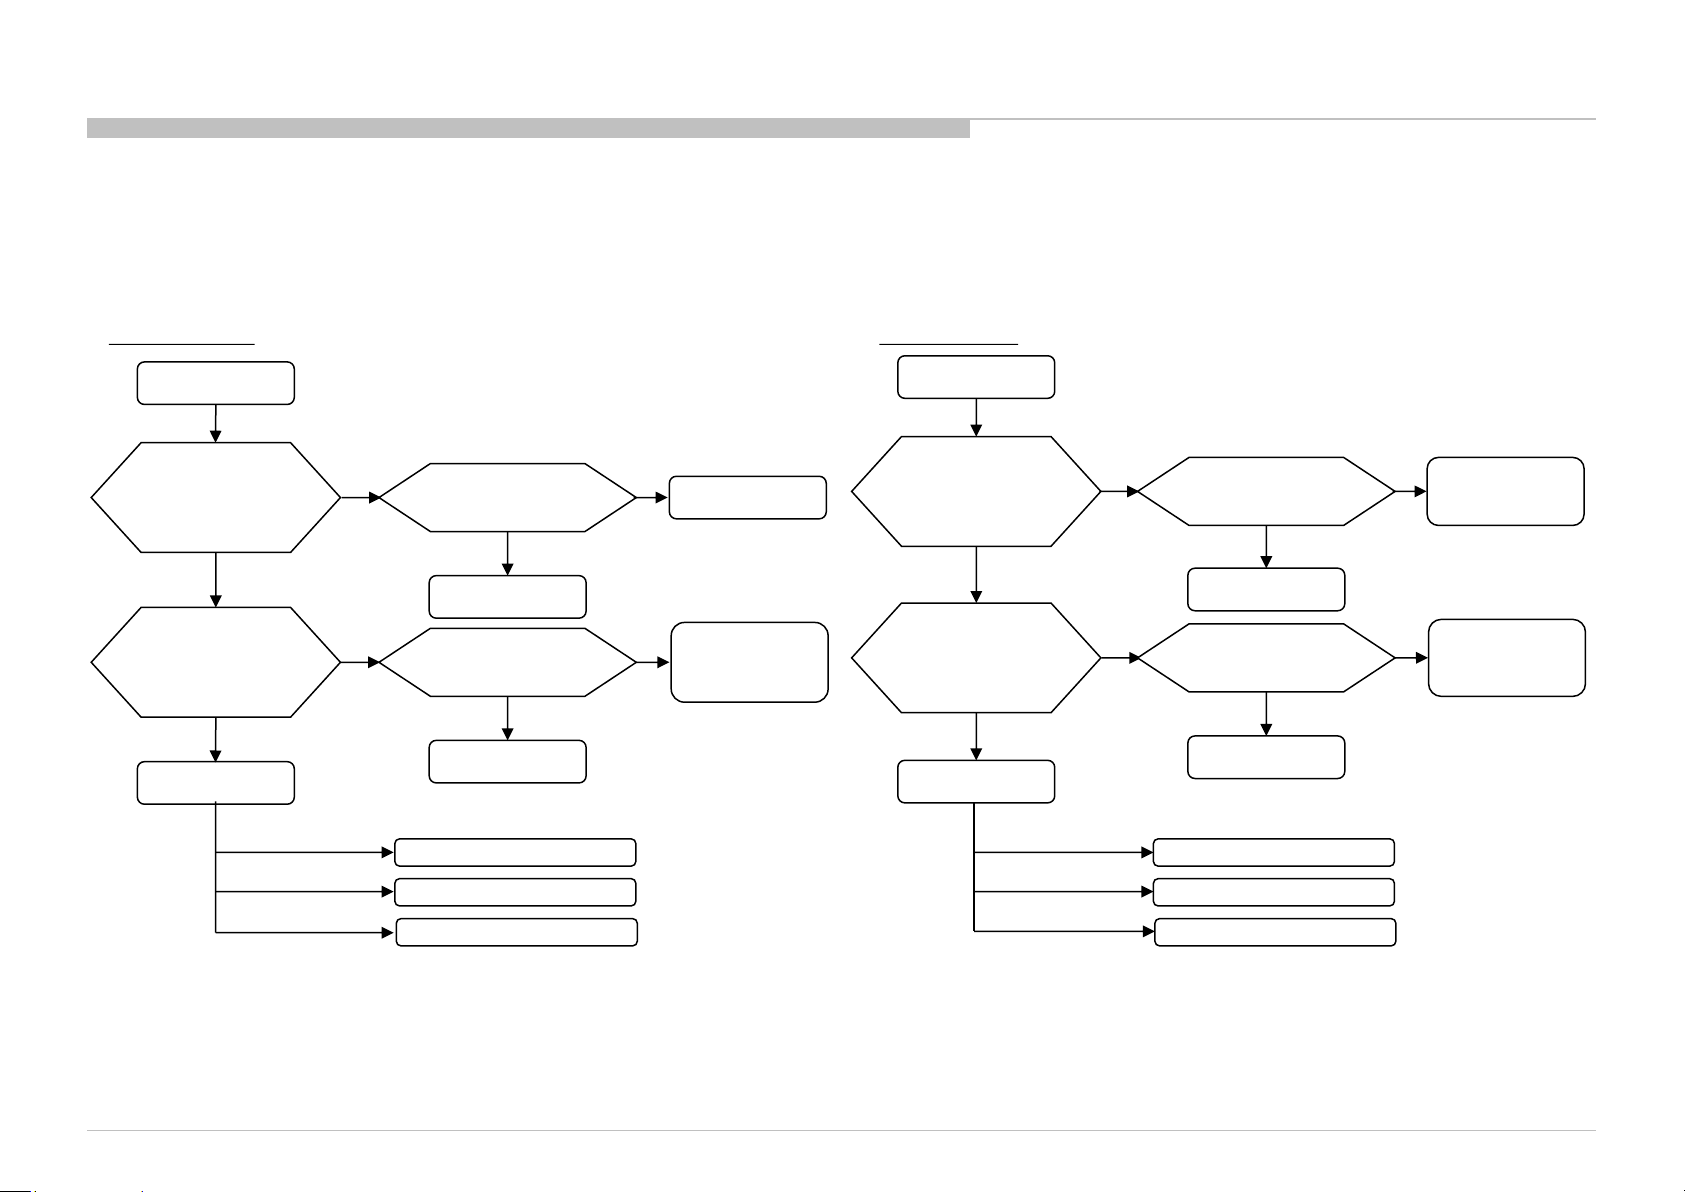
FLOW
1-1. NO POWER
TROUBLE SHOOTING
with G* board
No Power
Check STBY 3.3V
C484
near CN401
on DPS board
OK
Check STBY 3.3V
C9006
near CN9000
on BM1 board
OK
B* Board
NG
NG
Replace
Between G* Board to
DPS Board Harness
OK
Harness
Replace
Between DPS Board to
BM1 Board Harness
OK
Harness
u-Com Failure
DDCON/LDO
NG
NG
G* Board
DPS Board /
R407, R408
on DPS Board
with AC-ADP
No Power
Check 24V
C485
near CN401
on DPS board
OK
Check STBY 3.3V
C9006
near CN9000
on BM1 board
OK
B* Board
NG
NG
Replace
Between LD Board to
DPS Board Harness
OK
Harness
Replace
Between DPS Board to
BM1 Board Harness
OK
Harness
u-Com Failure
DDCON/LDO
NG
NG
LD Board
or
AC Adaptor
DPS Board /
IC408
on DPS Board
KD-55/65XD9305
Main Device Failure
Main Device Failure
21
Page 22
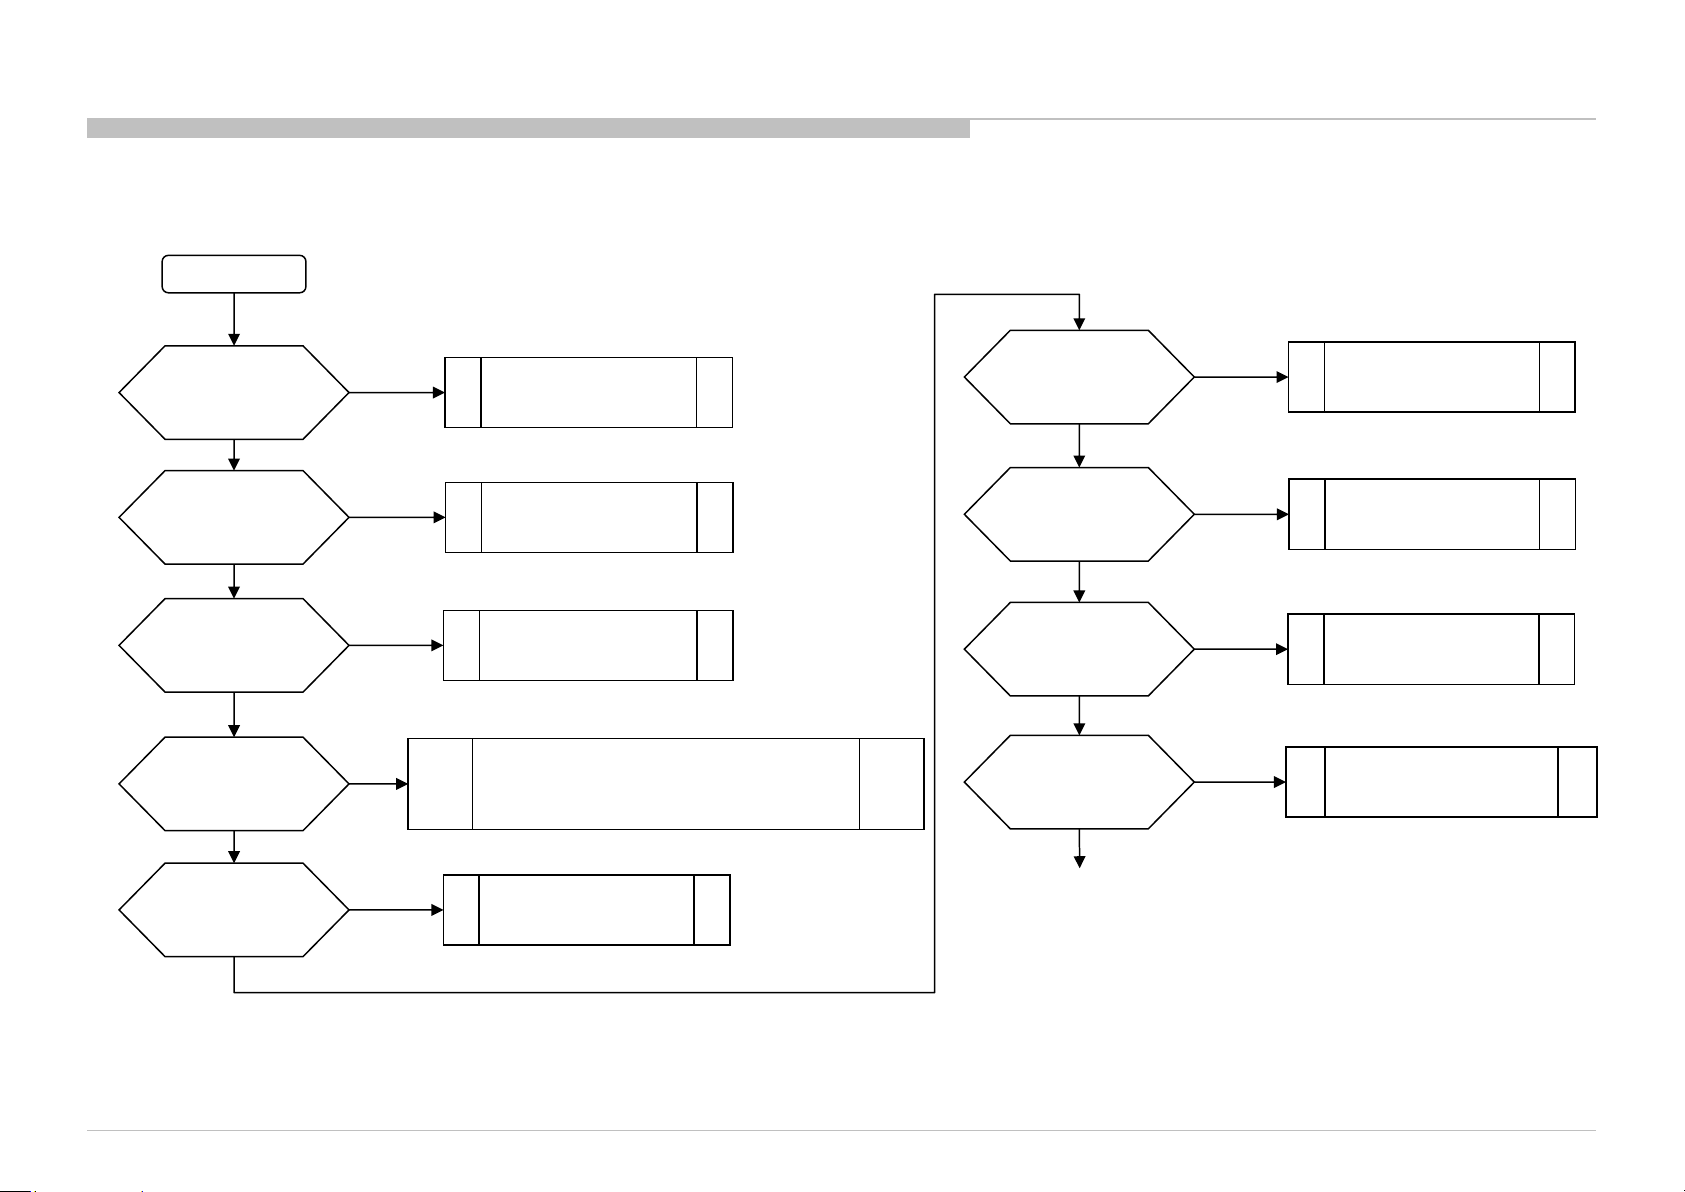
FLOW
1-2-1. NO POWER U-COM FAILURE
START
TROUBLE SHOOTING
Check C9117 Voltage.
Is the voltage >3.0V?
yes
Check C9129 Voltage.
Is the voltage >3.0V?
yes
Check OPWRSB
R9179 Voltage.
Is the voltage 0V?
yes
Check POWER_ON
IC9017 #pin19
Is the voltage >3.0V?
yes
Check P_ON_LNB
IC9017 #pin15
Is the voltage >3.0V?
no
no
no
no
no
Check +3.3V_STBY
C9006, CN9000 #24pin
Check DC_OFF_DET
IC9000
SOC
Muffin
problem
Try AC Off and On after few minutes.
If #pin19 keep Low, change IC9017.
If #pin19 goes High few seconds and downs to Low,
Check 12.5V Line (G board or IC403 on DPS).
Change IC9017
Check MAIN_VCC
R9175 Voltage.
Is the voltage >1.6V?
yes
Check P_ON_VBUS
IC9017 #pin11
is >3.0V?
yes
Check P_ON_#1
IC9017 #pin13
is >3.0V?
yes
Check PGOOD_1
R9173 Voltage.
Is the voltage >3.0V?
yes
Continue next page…
no
no
no
no
Check 12.5V Line
(G board or IC403 on DPS).
Change IC9017
Change IC9017
1-3 No POWER - DDCON/LDO
Check 1.0V DDCON (IC9008)
KD-55/65XD9305
yes
22
Page 23
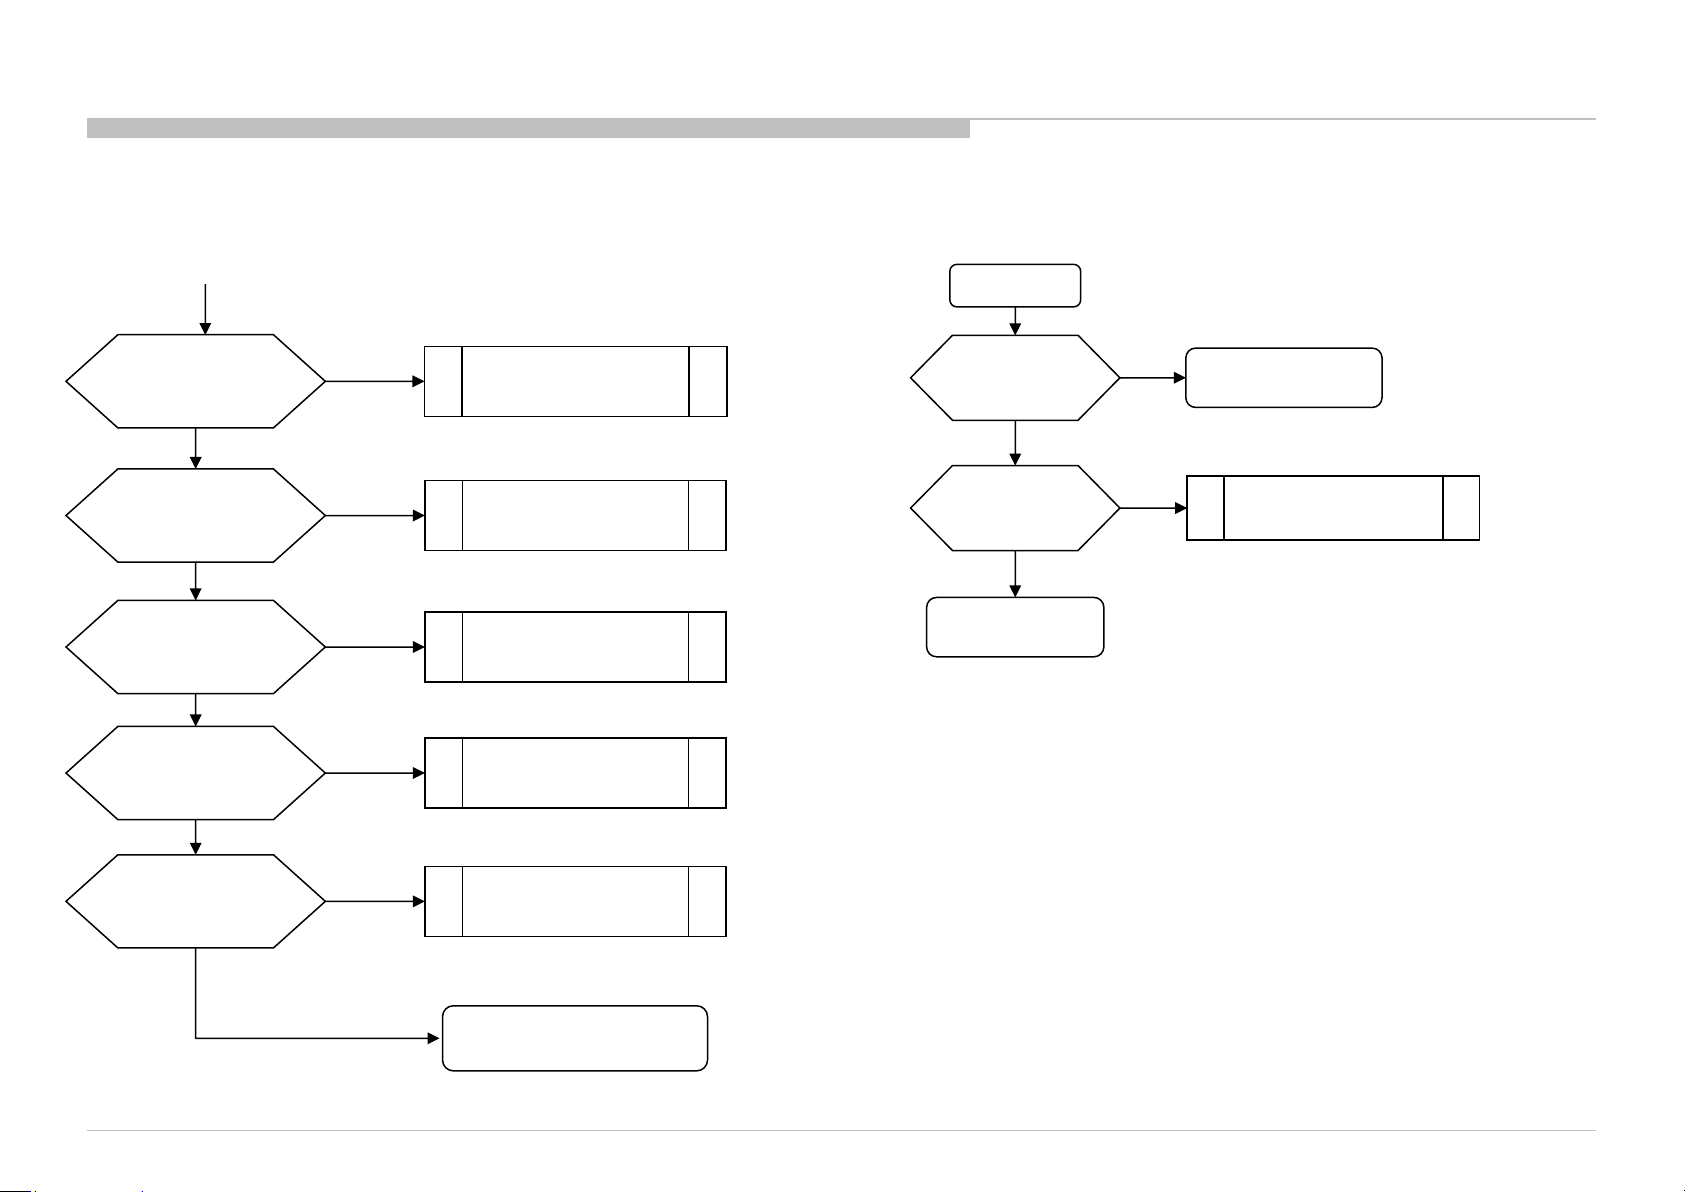
FLOW
1-2-1. NO POWER U-COM FAILURE
from the previous page
TROUBLE SHOOTING
1-2-2. NO POWER DC_OFF_DET CHECK
START
Check P_ON_#2
IC9017 #pin14
Is the voltage >3.0V?
yes
Check ORESETB
IC9017 #pin12
Is the voltage >3.0V?
yes
Check X_SYSTEM_RST
IC9017 #pin16
Is the voltage >3.0V?
yes
If PANEL_PWER_ON
(R9172) is 0V
Check XRST
IC9017 #pin17
Is the voltage >3.0V?
yes
If BL_MUTE
(R9090) is 0V
Check BL_ON
IC9017 #pin18
Is the voltage >3.0V?
yes
no
no
no
no
no
Change IC9017
Change IC9017
Change IC9017
Change IC9017
Change IC9017
Check DC_OFF_DET
R9035
Is voltage < 3V?
yes
Check Vdd
C9024
Is voltage < 5V?
yes
END
( IC9000 is working OK )
no
( IC9000 is working OK )
no
END
Change IC9000
KD-55/65XD9305
( IC9017 is working OK )
END
23
Page 24
FLOW
1-3. NO POWER DDCON/LDO
DDCONs check
START
TROUBLE SHOOTING
Check fuse
F9xxx / F4xx
Is fuse OK?
yes
Check Vcc voltage
C9xxx / C4xx
Is voltage >12.0V?
yes
Check Enable pin
voltage
Is voltage >2.5V?
yes
Change DDCON IC
no
no
no
Change Fuse
Check POWER_ON IC9017 #pin19
(Refer 1-2 No Power U-Com Failure)
1-2 No Power U-Com Failure
or
Enable source
KD-55/65XD9305
24
Page 25
FLOW
1-3. NO POWER DDCON/LDO
DDCON check
START
TROUBLE SHOOTING
Check IC9001 Vcc voltage
C9033
Is voltage >12V?
yes
Check Vcc voltage
C9061
Is voltage >4V?
yes
Check Enable
IC9010 #pin1
Is voltage >2.5V?
yes
Change DDCON
IC9009
no
no
no
Check Vcc voltage
C9061
Is voltage >3V?
yes
Check
D9001
Is diode ?
yes
Change IC9010
no
no
Check
D9000
Is diode ?
no
yes
Change D9001
Check +5V_MAIN DDCON (IC9001)
Change D9000
Check +3.3V_STBY.
G board or IC408 on DPS
KD-55/65XD9305
25
Page 26
FLOW
1-3. NO POWER DDCON/LDO
LDOs check
START
yes
TROUBLE SHOOTING
Check Vcc voltage
C9xxx
Is voltage >3V?
yes
Check Enable pin
voltage
Is voltage >3V?
yes
Change LDO IC
no
Check +3.3V_DDC_OUT
DDCON (IC409)
no
1-2 No Power U-Com Failure
KD-55/65XD9305
26
Page 27
FLOW
2-1. LED BLINKING 2X (MAIN POWER ERROR)
TROUBLE SHOOTING
with G* board
2-time blinking
Check +12V_REG
at pin 11/13 of on B Board
(CN9000 BM1),
Voltage > 13.2V ?
No
BM1 Board
Yes
G* Board
with AC-ADP
2-time blinking
Check +12V_REG
at pin 11/13 of on B Board
(CN9000 BM1),
Voltage > 13.2V ?
No
BM1 Board
Yes
DPS Board /
IC403 on DPS
KD-55/65XD9305
27
Page 28
FLOW
2-2. LED BLINKING 3X
TROUBLE SHOOTING
2-3. LED BLINKING 4X (LED VOLTAGE ERROR)
AUDIO ERROR DC_ALERT
LED 3x blinking
Check +5.0V_VBUS
at pin1 in IC8001, 4.959V
<Voltage<5.285V?
OK
Audio check point
Go to Audio Error
NG
IC9014,etc
(B* Board)
LED 3x blinking
Audio Error ?
Yes
Go to
3-3 Power Off Checking
Go to
3-4 Power On Checking
Replace B Board
No
See other flow
4-time blinking
Check
BMFW2: CN9000 21Pin
BM1: CN7704 29Pin
on the B* Board
Under0.897V or less
B* Board
Change LD board or G* board/Adapter.
Between 0.898V to 2.997V
LED driver or G* board/Adapter
KD-55/65XD9305
Finish
28
Page 29
FLOW
2-4. LED BLINKING 5X (PANEL COMMUNICATION ERROR)
5-times blinking
TROUBLE SHOOTING
Check
“+12.5V_TCON” at
CN401 #4 (or C493)
on the DPS-Board
OK
Replace the Harness
Between G-Board
and DPS
NG
Replace
the V-By-One FFC
NG
NG
Replace G-Board
Symptom
improve
Symptom
improve
OK
NG
Harness is
suspicious
V-By-One FFC
is suspicious
G-Board is
suspicious
Change
DPS
Symptom
improvement
DPS is
suspicious
NG
Change
Panel (or T-con)
Symptom
improvement
Panel (or T-Con) is
suspicious
KD-55/65XD9305
29
Page 30
FLOW
2-5. LED BLINKING 6X (BACKLIGHT ERROR)
6-times blinking
Check Voltage of
BL_ERR_DET
on 21pin of CN401
on DPS
Voltage < 1.85 V
Voltage ≥ 1.85 V
Check
harness/connection
G/LD* board to DPS Board
Harness /
Connection OK
Harness /
Connection
broken
Change
harness
No
improvement
LED driver or G board
Change LD board or G board.
TROUBLE SHOOTING
Symptom
Improvement
Harness
Symptom
Improvement
LD board / G board
No
Improvement
between DPS and BM1
No
Improvement
KD-55/65XD9305
Change
DPS
Change 30P FFC
BM1 Board
Symptom
Improvement
Symptom
Improvement
DPS Board
30P FFC
No
improvement
Change
No
Improvement
Panel
Symptom
Improvement
Panel
30
Page 31
FLOW
2-6. LED BLINKING 7X (TEMPERATURE ERROR)
7-time blinking
Setting
circumstance is OK?
Temperature,
Ventilation, etc.
Yes
No
Set to another
location, etc.
TROUBLE SHOOTING
Change B* Board,
and Aging a few
KD-55/65XD9305
hours
Symptom
improvement
B* Board NG
No
improvement
Panel
Check I2C_C bus
communication OK?
(IC1400 #1,#6)
No
I2C_C bus dumping or
Muffin check
Yes
Temp sensor
IC1400
31
Page 32
FLOW
3-1. NO SOUND
No Sound
Without LED 3x
AV receiver is connected
to HDMI in ?
Yes
Select [External Inputs]
[BRAVIA Sync Settings]
[BRAVIA Sync Control] [off]
No sound only
Analog RF and Digital RF ?
No
Yes
TROUBLE SHOOTING
Go to
3-6 No Sound Tuner
No
[Speakers] setting is
[Audio System] ?
No
Headphone is connected to
HP/Audio Out terminal ?
No
[Sound]
[Headphone Speaker Link]
setting is [On] ?
No
Go to
3-3 Power Off Checking
Yes
Yes
Yes
Change the setting to
[TV Speakers]
Disconnect the Headphone
Change [Sound]
[Headphone Speaker Link]
to [Off], OK ?
Yes
Replace B Board
HP/Audio out terminal or Headphone detect
GPIO may be broken
No
No sound only HDMI ?
No
Go to
3-2 No Sound Audio
Yes
Go to
3-7 No Sound HDMI
KD-55/65XD9305
32
Page 33
FLOW
3-2. NO SOUND (AUDIO)
TROUBLE SHOOTING
3-3. NO SOUND (POWER OFF CHECK)
No Sound
Audio
Replace B Board
Finish
Power Off Check
From 2-2
(1) B / DPS Board
PVDD-GND short ?
No
(2) B / DPS Board
LDO out short ?
No
(3) B / DPS Board
Fuse broken ?
No
Yes
Yes
Yes
Replace B Board
Power Off Check
From 3-1
Measure the Speaker
impedance by multi-meter
Less than 3Ω ?
No
Confirm the speaker
harness
Cut or shorted
to the chassis ?
No
Return to 2-2 or 3-1
Yes
Yes
Replace Speaker
Replace Speaker Harness
KD-55/65XD9305
BMFW2 Board
(1) PVDD-GND short check
Measure impedance between PVDD and GND at
capacitor C7881.
If impedance is <100Ω NG
(2) LDO out short check
Measure impedance between +3.3V and GND at C7880.
If impedance is <100Ω NG
(3) Fuse open check
Measure impedance of fuse
F7702 5A (12.5V or 19.5V)
If fuse open NG
DPS Board
(1) PVDD-GND short check
Measure impedance between PVDD and GND at
capacitor C7932, C7914.
If impedance is <100Ω NG
(2) LDO out short check
Measure impedance between +3.3V and GND at C7913,
C7931.
If impedance is <100Ω NG
(3) Fuse open check
Measure impedance of fuse
F7700, F7701 5A (12.5V or 19.5V)
If fuse open NG
33
Page 34
FLOW
3-4. NO SOUND (POWER ON CHECK)
Power On Check
From 2-2
TROUBLE SHOOTING
Yes
(4) POWER_AU check
POWER_AU is supplied to
B / DPS Board for a moment
before LED 3x blinking ?
Replace G Board
Return to 2-2 Finish
OK ?
No
No
No
Yes
BMFW2 Board
(4) POWER_AU check
Measure voltage between PVDD and GND at capacitor
C7881.
Voltage rise more than 0V for a moment at power on Yes
DPS Board
(4) POWER_AU check
Measure voltage between PVDD and GND at capacitor
C7932, C7914.
Voltage rise more than 0V for a moment at power on Yes
KD-55/65XD9305
34
Page 35
FLOW
3-5. NO SOUND (AUDIO HP/AUDIO OUT)
No Sound Audio
HP/Audio out
TROUBLE SHOOTING
[Sound]
[Headphone/Audio out]
is set to ?
[Headphone]
[Audio Out (Fixed)]
[Audio Out (Variable)]
[Subwoofer]
Headphone Volume
is set to MIN?
Volume
is set to MIN?
Yes
Increase Headphone Volume
No
Replace B Board
Replace B Board
Yes
Increase Volume
No
Replace B Board
Set [Headphone/Audio Out]
to [Headphone] or [Audio Out]
KD-55/65XD9305
35
Page 36
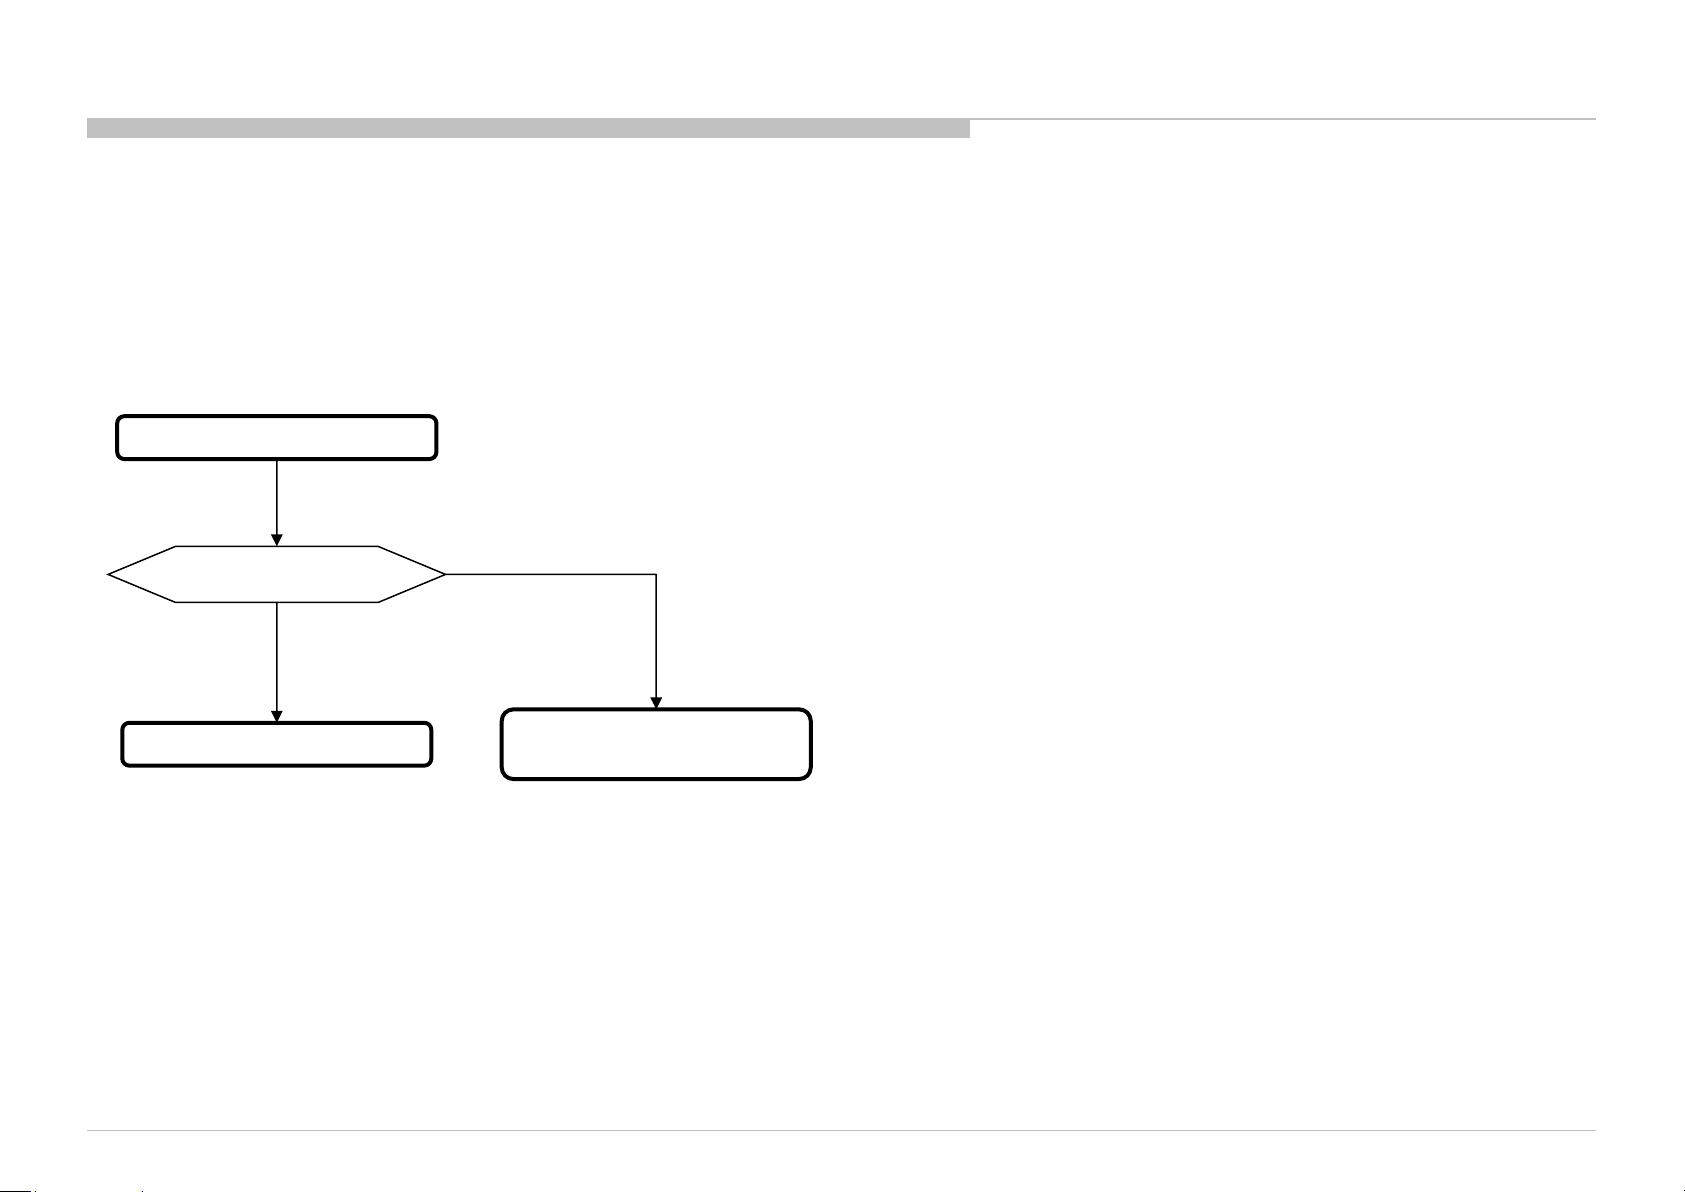
FLOW
3-6. NO SOUND (TUNER)
This troubleshooting is only for Analog
No Sound with normal picture
TROUBLE SHOOTING
Only RF tuner input?
YES
Check IC1000 (SOC)
NO
Please refer Audio
troubleshooting
KD-55/65XD9305
36
Page 37
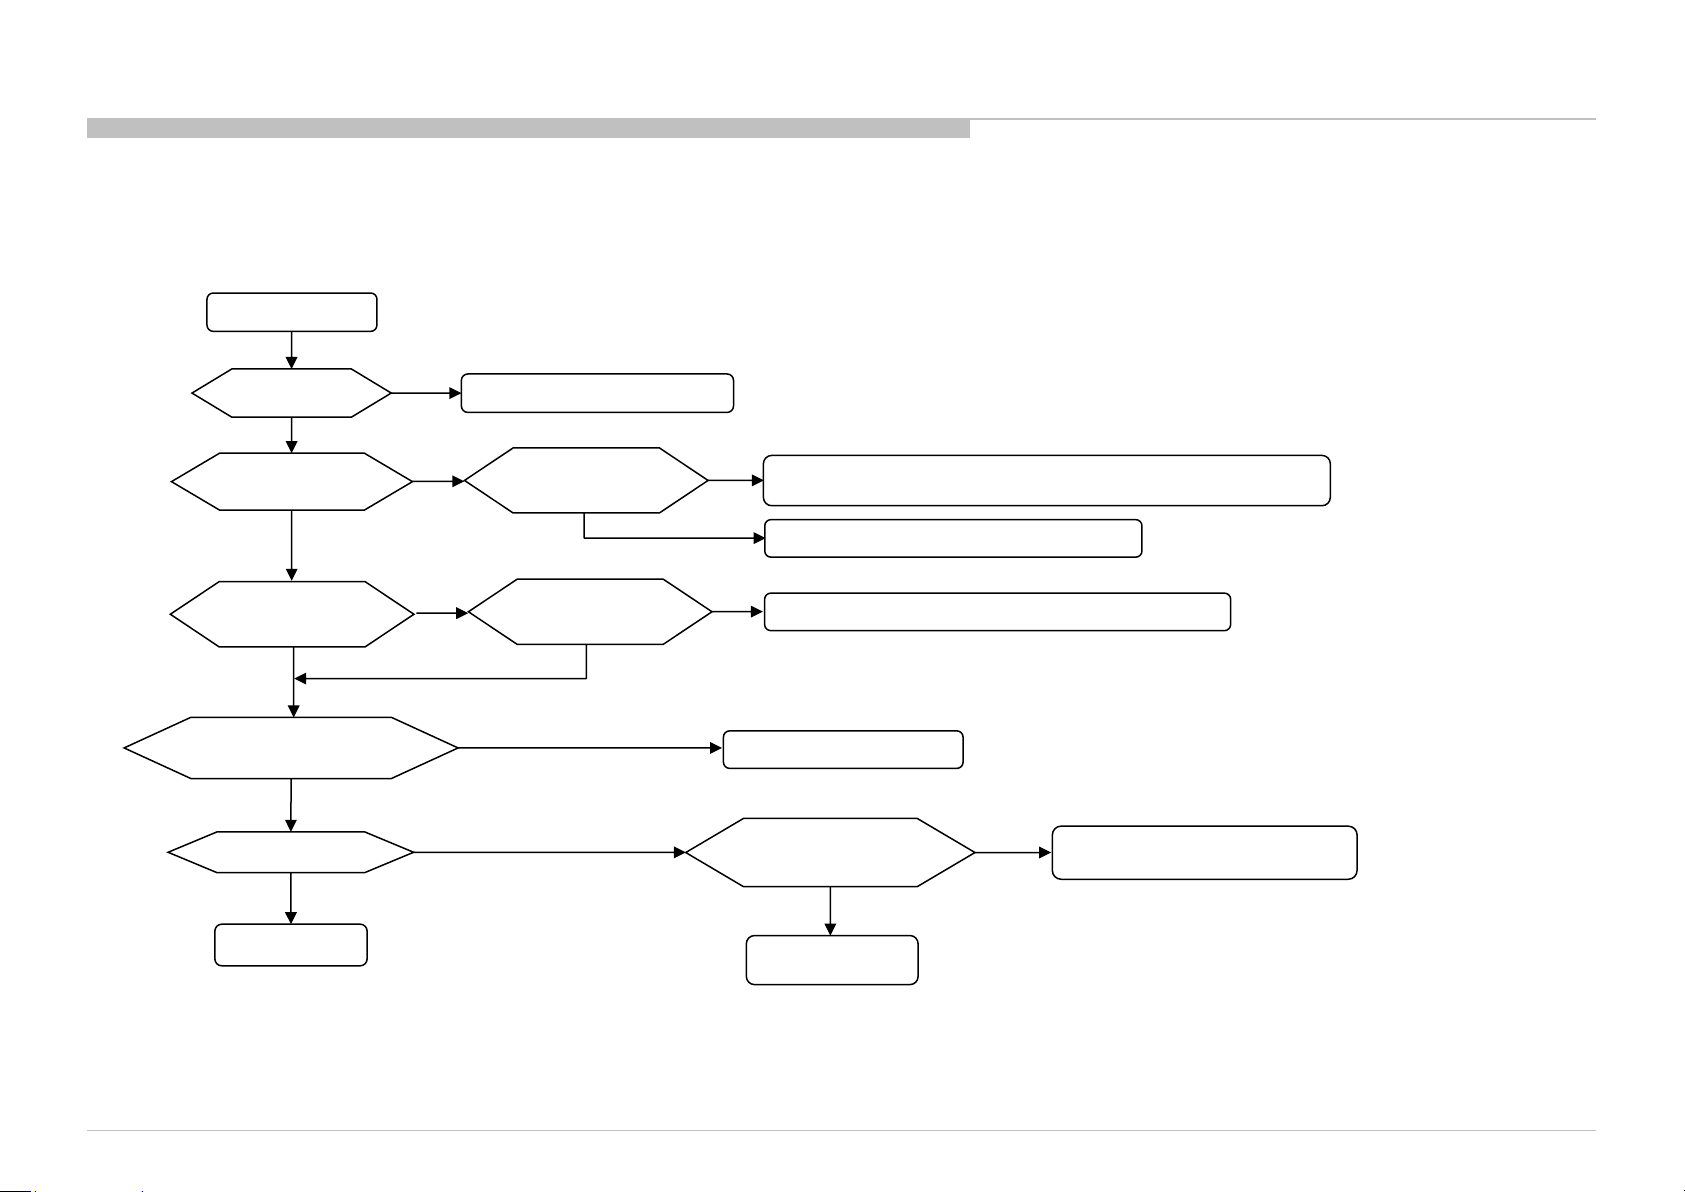
FLOW
3-7. NO SOUND (HDMI1/2/3/4)
No Sound
TROUBLE SHOOTING
Check the picture
OK
Check the mode
of Source equipment
HDMI
Does this model have
Analog Audio In
(Stereo mini-jack)?
NO
Check Sound by other TV set
which is same model
NG
Is Distributor used ?
YES
Connect Source
equipment directly
NG
DVI
YES
Refer to 4-5 HDMI NO PICTURE
Does this model have
Analog Audio In
(Stereo mini-jack)?
“HDMI/DVI Audio Source”
setting is?
Auto or HDMI Audio
OK
NO
YES
NO
Analog Audio In
Connect Stereo mini-jack cable between Source and the TV, and
Change “HDMI/DVI Audio Source” to Auto or Analog Audio In.
Change the mode of Source equipment to HDMI
Change “HDMI/DVI Audio Source” to Auto or HDMI Audio In
Refer to 3-2 No Sound Audio
Check Source equipment
by Reference TV set
(For example, RB2, RB1)
Check the settings of
Source equipment
NG
OK
Change B-Board.
And inform the designer of it
KD-55/65XD9305
37
Page 38
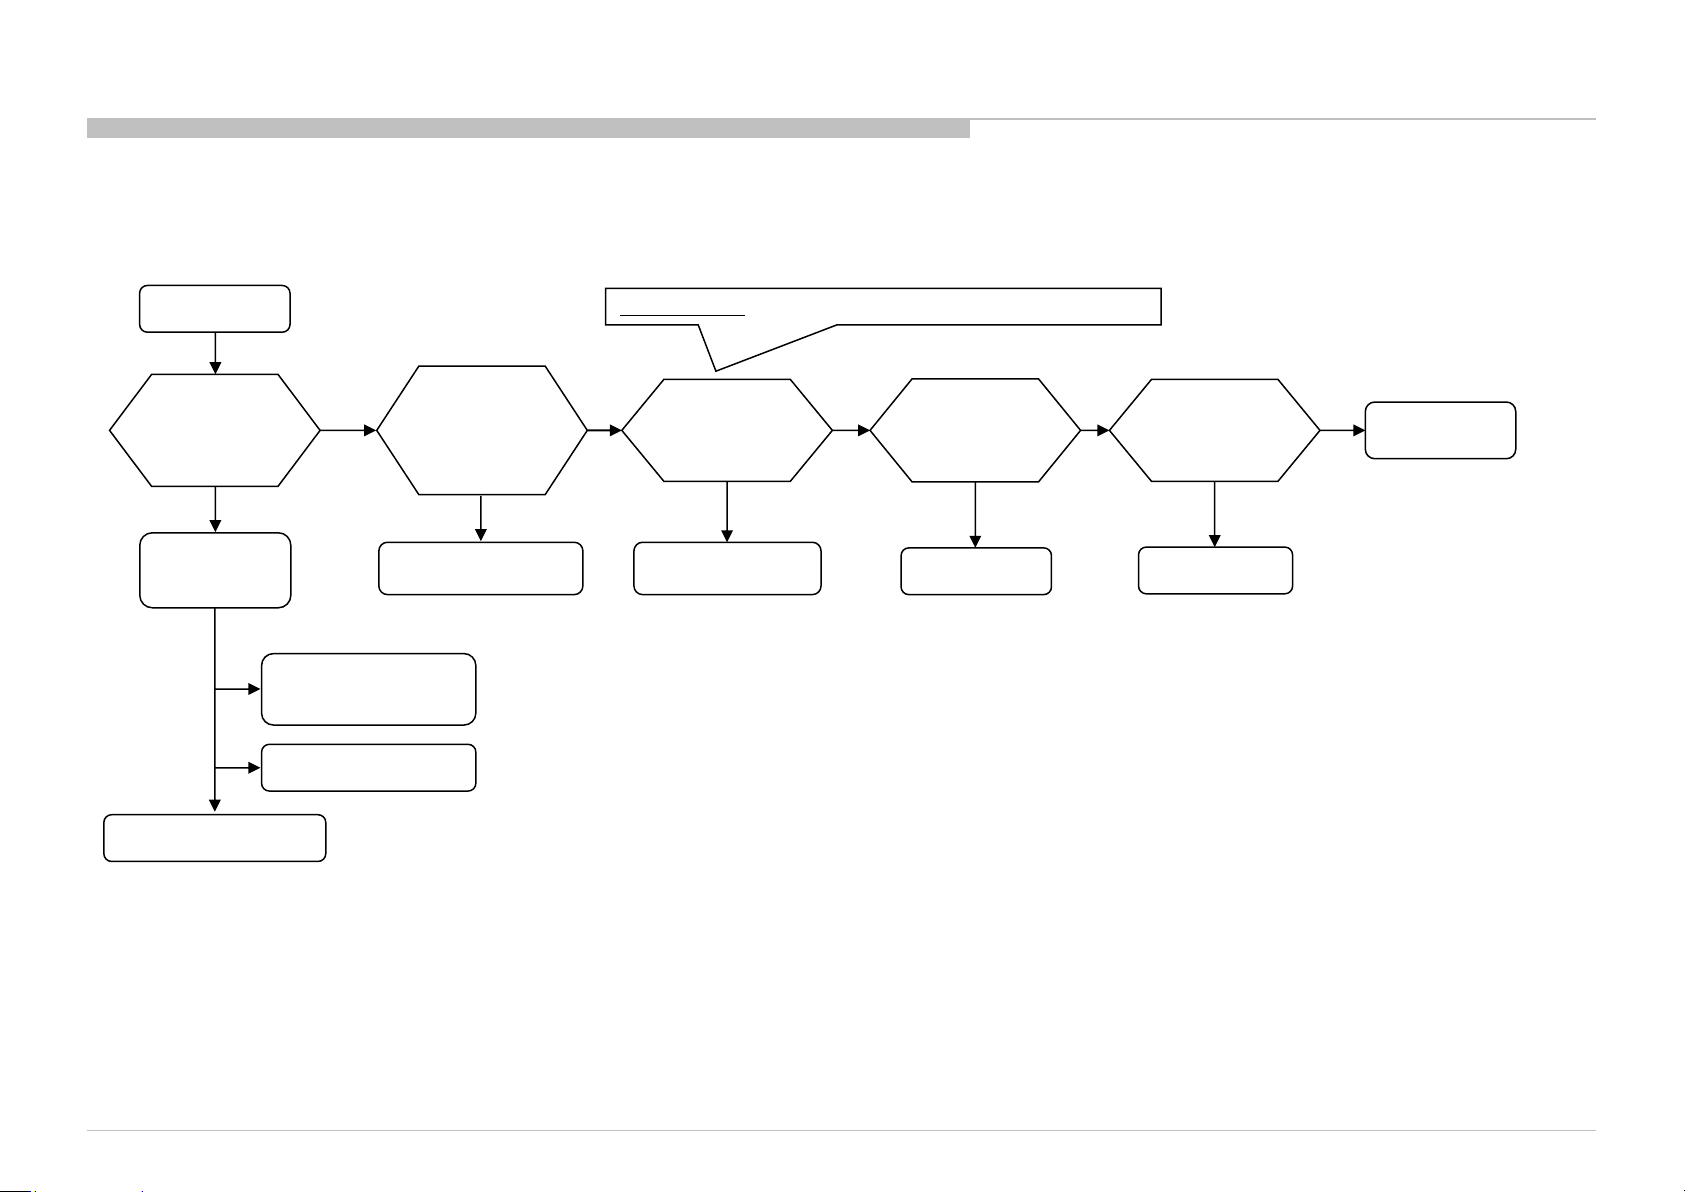
FLOW
4-1. NO PICTURE
TROUBLE SHOOTING
No Picture
Got Any Normal
Display?
Yes
Check Other
Portion:
Tuner - No Picture
No
Ext. Video Input -
No Picture
HDMI - No Picture
Check Smart Core
(5x Blinking)
Behavior
Yes
5x Blinking
BL_ON (L or H): IC9017 #18pin (for 4K BMFW2/BM1 board)
No
Check
BL_ON
on the main board
BL_ON : L
Backlight
BL_ON : H
Replace
the V by One FFC
Harness
Symptom
improvement
V by One FFC
Harness
NG
Replace
the main Board
Symptom
improvement
Main board NG
NG
LCD Panel
(or T-CON)
KD-55/65XD9305
38
Page 39
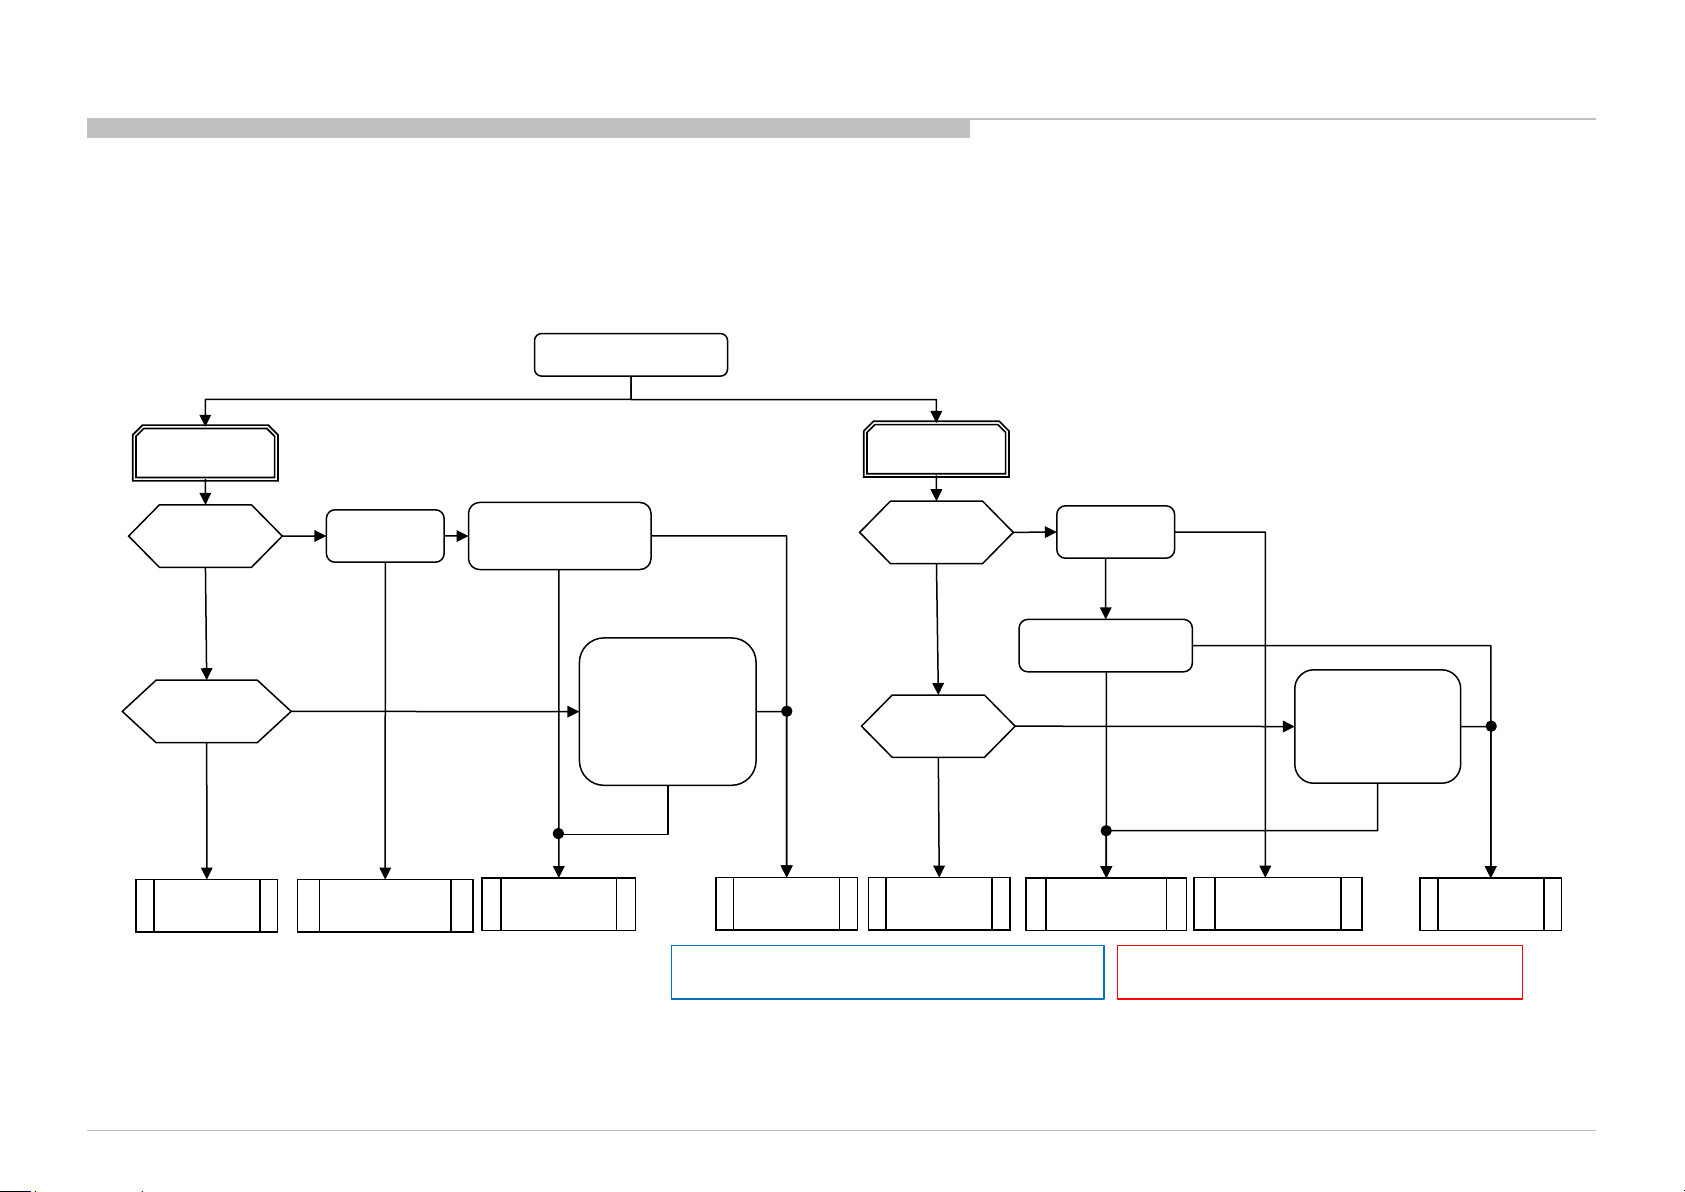
FLOW
4-2. NO PICTURE (VIDEO) (AEP)
TROUBLE SHOOTING
No Picture AEP
SCART RGB
No Picture
Check SCART_FB
IC1000 L37
[SOY0] at R7514
OK [HIGH: 0.4V Composite]
OK [HIGH: 3V RGB]
Check wave between
C7502/C7505/C7507
and IC1000
Muffin [IC1000]
Problem
[LOW: 0V]
OK (Vpp: 1 V)
NG
* Check CN7501
NG (Vpp: 0 V)
CN7501 Connectivity
Connection
NG
Problem
OK
** Detailed check all parts
at SCART_FB signal
Path [VD7504/R7513]
CN7501 Connector
OK
** Detailed check all parts at
CN7501 along signal path
7 : [VD7503/R7503/C7501/
11 : [VD7502/R7506/C7503/
15 : [VD7501/R7510/C7506/
Problem
SCART CVBS
No Picture
NG
at Pin No:
R7504]
R7507]
R7511]
OK
NG
Parts Broken
* OK Condition : No solder splash can be seen
NG Condition : Solder splash can be seen
Check SCART_FB
IC1000 L37
[SOY0] at R7514
OK [HIGH: 0.4V Composite]
OK [HIGH: 3V RGB]
Check wave between
C7511 and IC1000
Muffin [IC1000]
Problem
[LOW: 0V]
OK (Vpp: 1 V)
NG
* Check CN7501
Connection
** Detailed check all parts
at SCART_FB signal
Path [VD7504/R7513]
NG (Vpp: 0 V)
CN7501 Connector
Problem
NG
OK
NG
OK
CN7501 Connectivity
Detailed check all parts at
CN7501 along signal path
20 : [D7505/R7518/C7510/
Problem
at Pin No:
R7599/R7519]
OK
** OK Condition : No part short-circuited
NG Condition : Part short-circuited
NG
Parts Broken
KD-55/65XD9305
39
Page 40
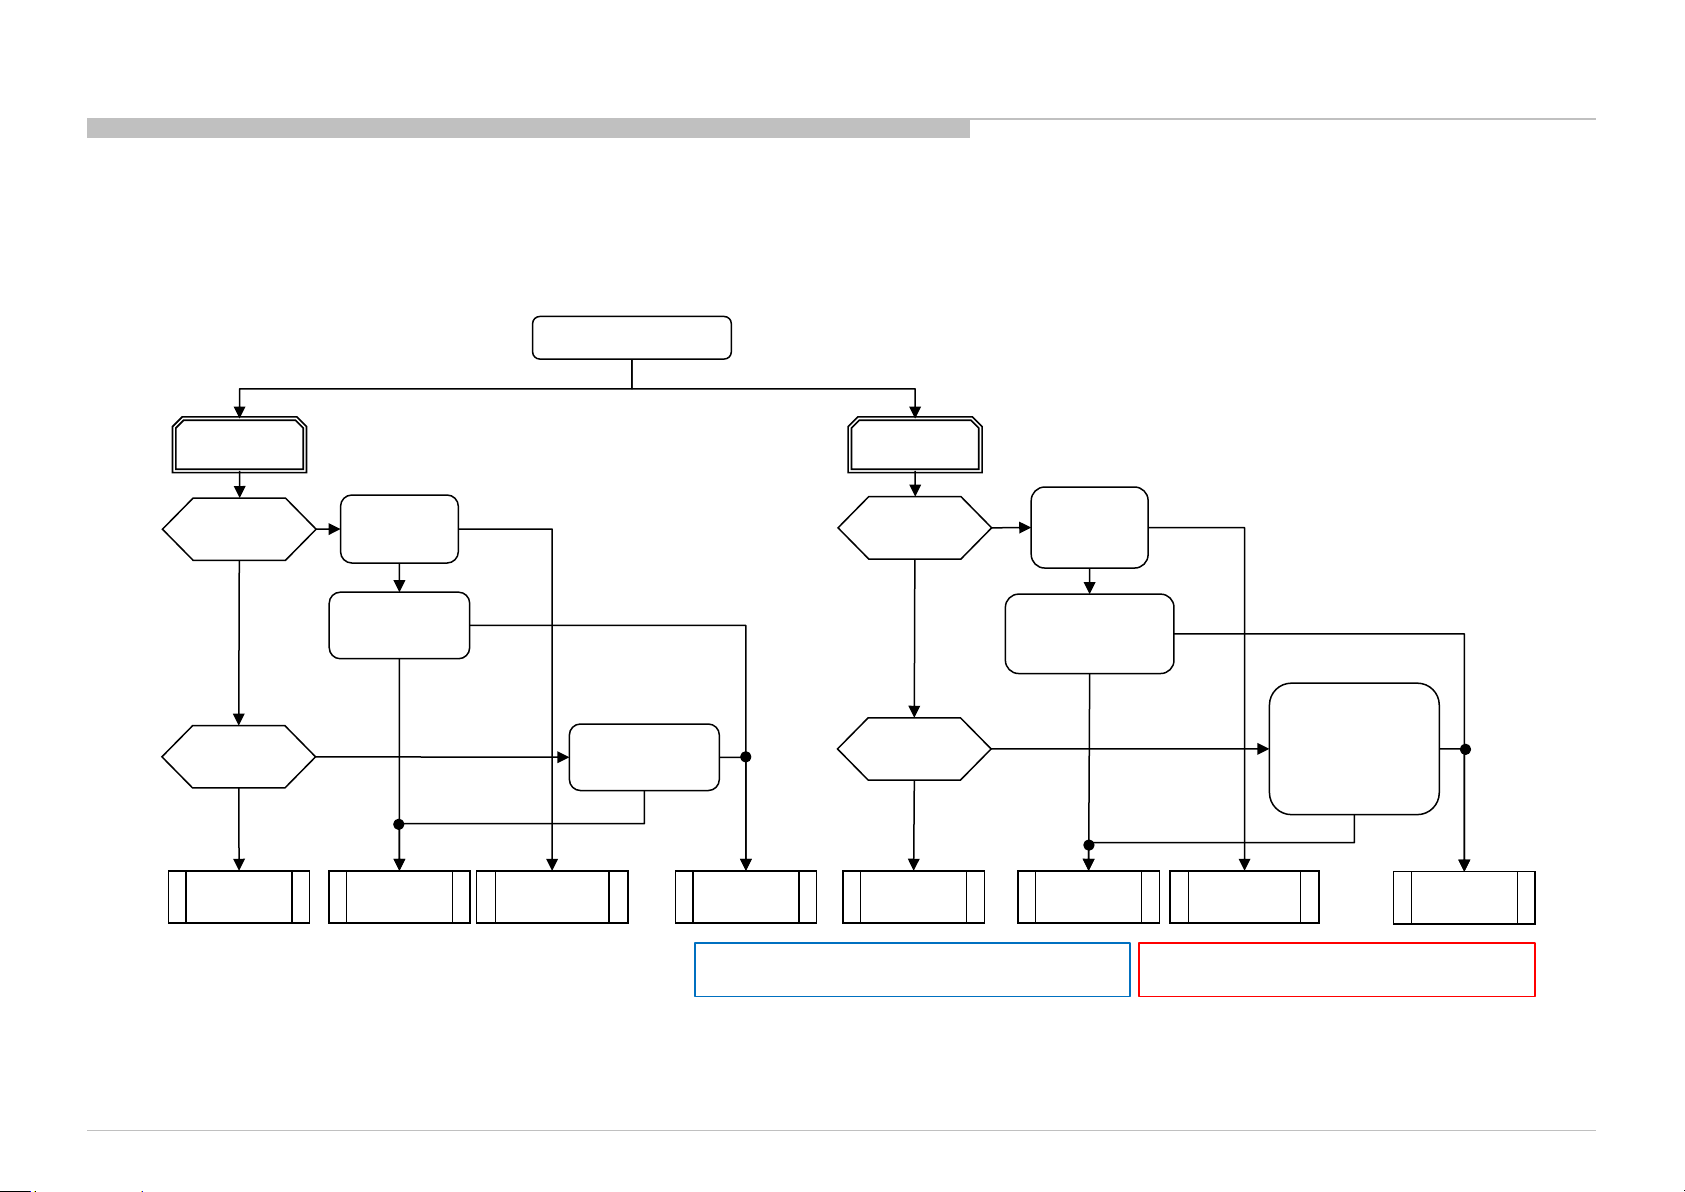
FLOW
4-3. NO PICTURE (COMPONENT) (AEP)
TROUBLE SHOOTING
No Picture AEP
Video 2
No Picture
Check if input OSD
is GREY OUT
OK if it is highlighted
OK
Check wave between
C7512 and IC1000
OK (Vpp: 1 V)
Muffin [IC1000]
Problem
NG
* Check J7504
Connection,
VIDEO_DET
** Detailed check all
parts at VIDEO_DET
signal Path [R7535]
NG (Vpp: 0 V)
J7504 Connector
At R7539
OK (Vpp: 3.3 V)
OK (Vpp: 3.3V)
Problem
NG (Vpp: 0V)
NG (Vpp: 0V)
J7504 Connectivity
** Detailed check all parts
at CVBS3P signal path
[D7530/R7524/R7525]
Problem
OK
Component
No Picture
* Check J7504 Con
OK
NG
VIDEO_DET at
CR_DET at R7538
** Detailed check all parts
at VIDEO_DET signal
Path [R7535] and CR_DET
signal path [R7534]
NG (Vpp: 0 V)
J7504 Connector
Check if input OSD
is GREY OUT
OK if it is highlighted
Check wave
NG
Parts Broken
Between
C7515/C7518/C7520
and IC1000
OK (Vpp: 1 V)
Muffin [IC1000]
Problem
* OK Condition : No solder splash can be seen
NG Condition : Solder splash can be seen
R7539,
OK (Vpp: 3.3 V)
OK (Vpp: 3.3V)
Problem
NG (Vpp: 0V)
NG
(Vpp: 0V)
** Detailed check all parts
at signal path of:
Y1P : [D7530/R7524/C7514/
PB1P : [VD7508/R7529/C7517/
PR1P : [VD7509/R7532/C7519/
J7504 Connectivity
Problem
R7527]
R7530]
R7553]
OK
NG
Parts Broken
** OK Condition : No part short-circuited
NG Condition : Part short-circuited
KD-55/65XD9305
40
Page 41
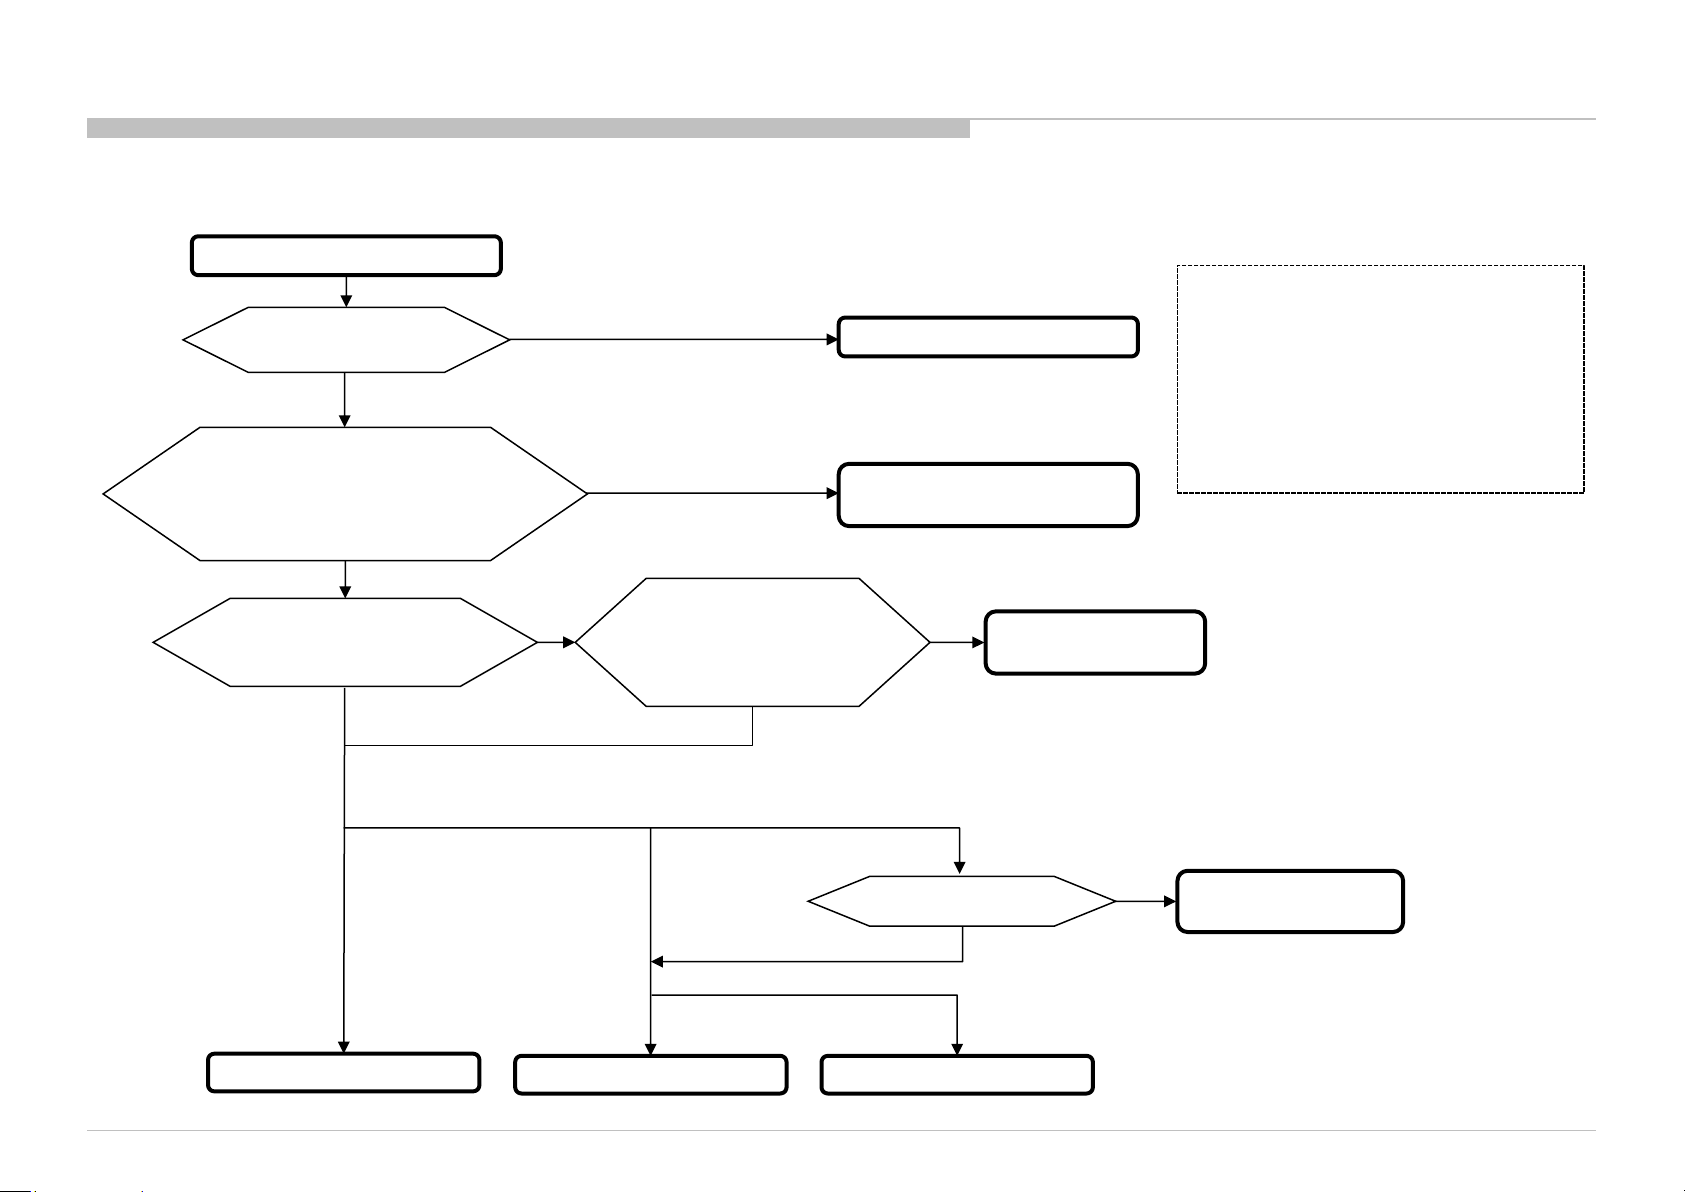
FLOW
4-4. NO PICTURE (@ TUNER)
RF input no picture / noisy picture
Check RF source cable
and antenna, OK?
OK
Check Tuner power line:
3.3V at JL6005 = 3.3V?
1.8V at JL6006 = 1.8V?
DEM_3.3V at JL6019 = 3.3V?
A_RESET value at JL6012 = 3.3V?
For JP_SK only – TU1.1 V (Refer notes)
OK
All broadcasting channel
cannot be received?
NO
NG
YES
NG
Check part mounting condition
for “I2C_A_SDA, I2C_A_SCL
or
I2C_D_SDA, I2C_D_SCL”
Refer Note I2C
OK
Change RF cable and antenna
Please refer DDCON
troubleshooting
NG
Change NG parts
connected to I2C bus
TROUBLE SHOOTING
Note:
I2C line for all tuners except Japan_SKP
- Parts for I2C_A_SDA line: R6001, C6004.
- Parts for I2C_A_SCL line: R6002, C6005.
I2C line for Japan_SKP
- Parts for I2C_D_SDA line: R6003,C6006
- Parts for I2C_D_SCL line: R6004,C6007
TU_1.1V line only in Japan_SKP Tuner
- Parts for TU_1.1V: FB6800
KD-55/65XD9305
Analog
Refer Analog Tuning
Digital
Terrestrial/Cable
For TW & NA-ATSC
(MX/UC) only
Refer Digital Tuning 1
Satellite
Check Tuner power line
12V at JL6027 = 12V?
OK
All tuners except
TW & NA-ATSC(MX/UC)
Refer Digital Tuning 2
NG
12V LNB Voltage
Checking
41
Page 42
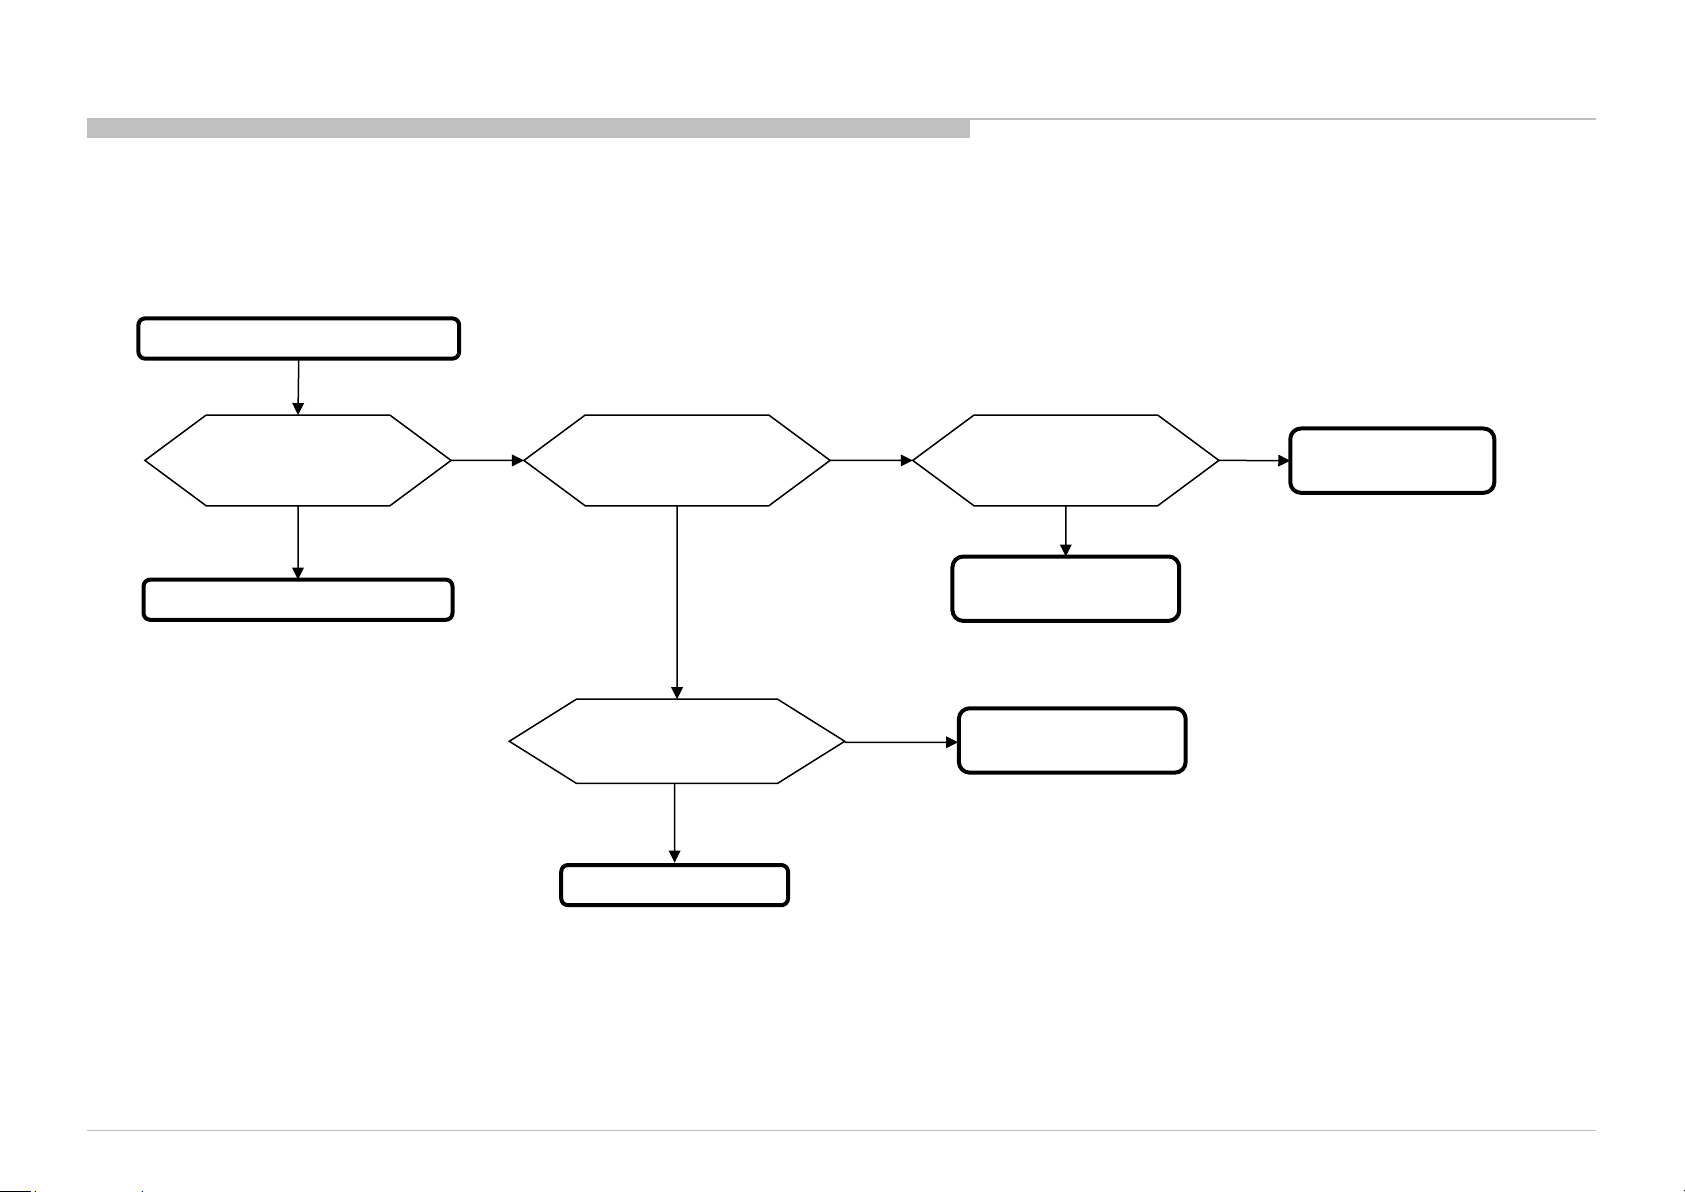
FLOW
4-4. NO PICTURE (@ TUNER)
(1) FOR 12V LNB Voltage Checking
12V LNB Voltage Checking
TROUBLE SHOOTING
Check fuse F6000
NG
Change the fuse
OK
Check Tuner power line
12V at JL9012 = 12V?
NG
Check harness between
B-Board and G-board
NG
Harness broken
OK
OK
Check P_ON_LNB signal line
at R9167 = 3.3V?
NG
Please refer DDCON
troubleshooting
Please refer G-board
troubleshooting
OK
MOSFET Q9019
broken
KD-55/65XD9305
42
Page 43
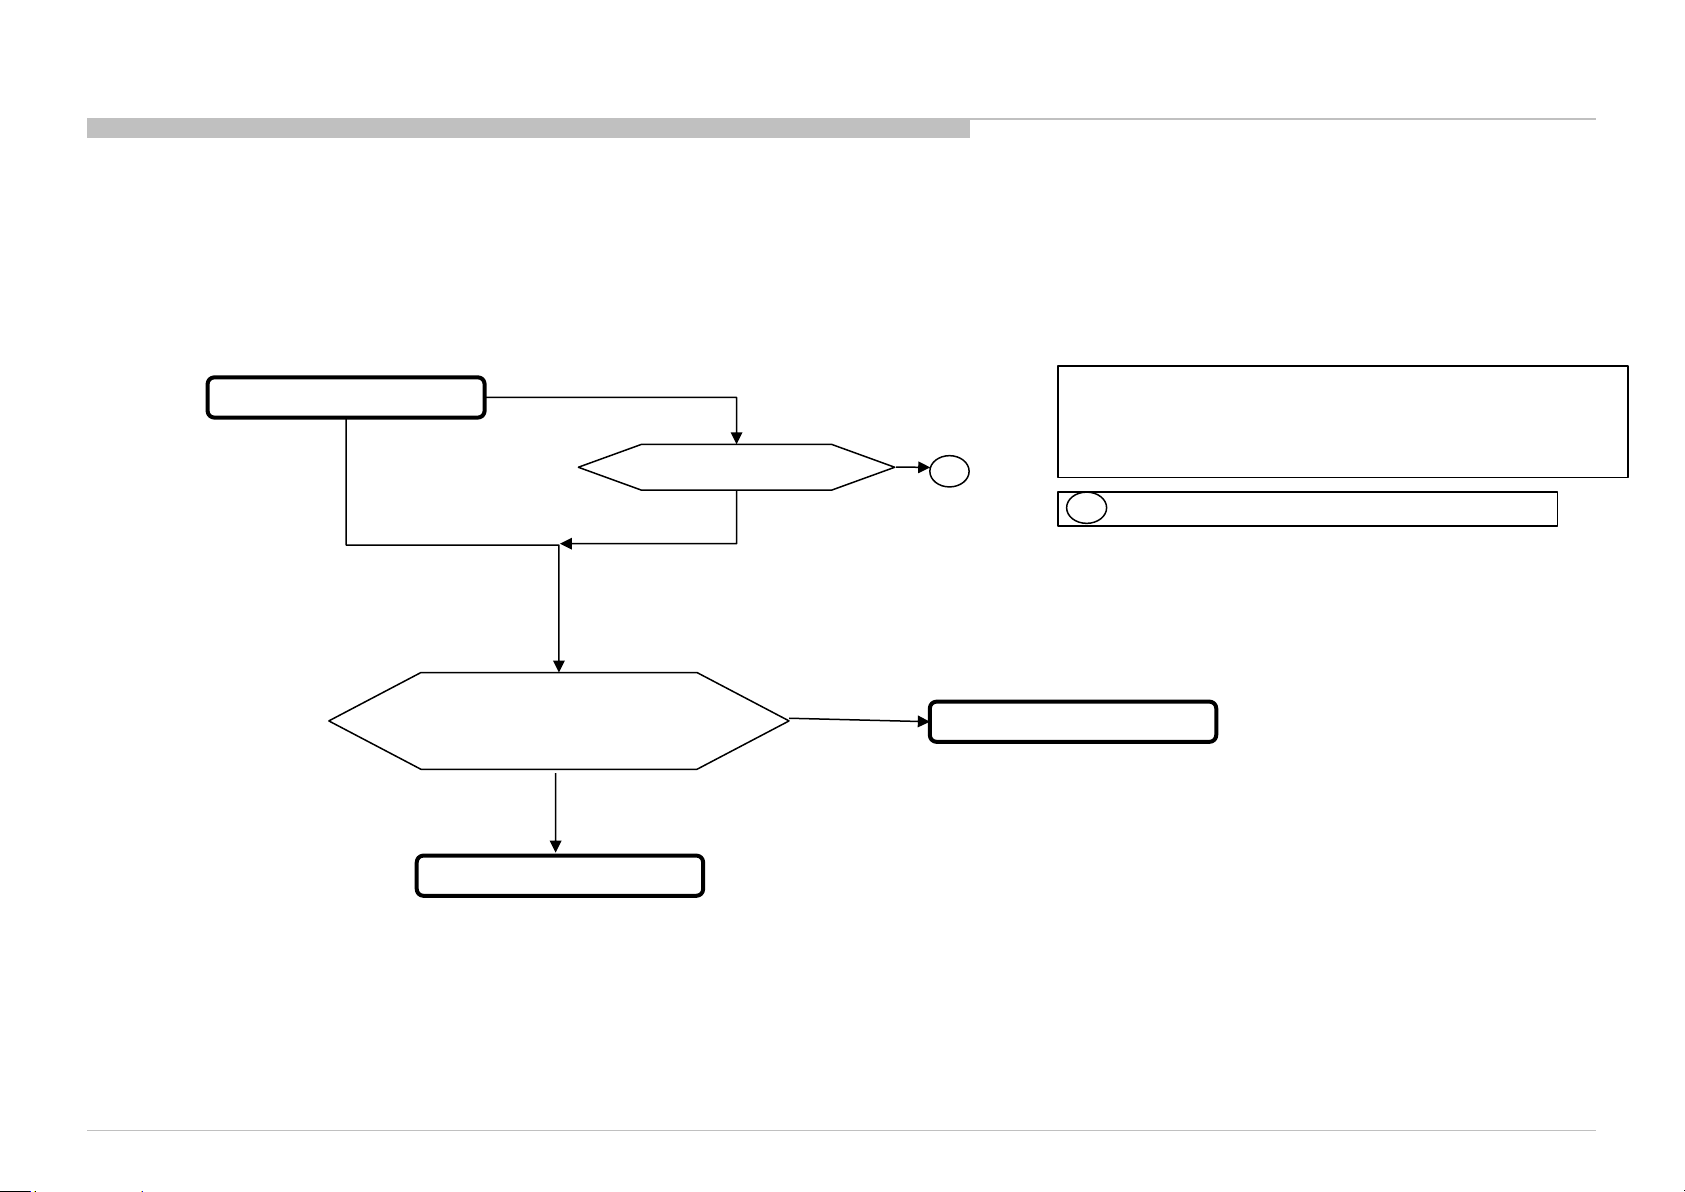
FLOW
4-4. NO PICTURE (@ TUNER)
(2) FOR ANALOG TUNING
TROUBLE SHOOTING
Analog Tuning
For Other destination
For LA-ISDB(BR/AR), LA-T2(COL) and TW only
Confirm ANT or Cable connection
Check part mounting condition
for analog control line
“IFOUT_N, IFOUT_P, IFAGC”
OK
Check IC1000(SOC)
OK
NG
NG
A
Change NG parts
Note:
- Parts for IFOUT_N line: R6007, FB6002, C6008, R6327, C6301, R6301.
- Parts for IFOUT_P line: R6008, FB6003, C6009, R6326, C6300, R6300.
- Parts for IFAGC line: R6072, R6009, R6010, R6069, C6302, R6303.
A
: Insert correct signal in correct terminal.
KD-55/65XD9305
43
Page 44
FLOW
4-4. NO PICTURE (@ TUNER)
(3) FOR DIGITAL TUNING
For LA-ISDB(BR) and
LA-T2(COL) only
Confirm ANT or Cable connection
OK
Digital cable/ Terrestrial
Cable
Refer to Digital Tuning 1
Check part mounting condition for digital data line
Digital Tuning 2
NG
A
Terrestrial
Sound is normal?
“TU1_TS_DATA0, TU1_TS_CLK,
TU1_TS_VALID, TU1_TS_SYNC”
For PA_T2 and
CH/HK only
No sound
On Service
mode display
TS_LOCK ?
UEC ?
CASE A
NG
OK
CASE B
For AEP-W
Confirm ANT or Satellite connection
OK
All except SKP_Opticast
Check IC1000 (SoC)
Change Tuner module
(Refer to Note tuner )
OK
Check IC1000 (SoC)
NG
TROUBLE SHOOTING
For JP_SKP
A
Confirm ANT or Satellite connection
OK
BS/CS or SKP_Opticast/
SKP_Premium or terrestrial
SKP_Opticast
Refer to Digital Tuning 1
Note:
- Parts for TU1_TS_DATA0 line: R6015, R6321.
- Parts for TU1_TS_CLK line: R6016, R6322.
- Parts for TU1_TS_VALID line: R6017, R6323.
- Parts for TU1_TS_SYNC line: R6018, R6324.
- CASE A : TS _LOCK = LOCK and UEC constant
- CASE B : TS _LOCK = UNLOCK or UEC is increasing
Note Tuner –
(IC reference -- destination)
TU6001 - PA-T2
TU6001 - LA-T2/LA-ISDB
TU6001 - CH, HK
TU6003 - AEP_W
TU6802 - JP_SKP
NG
A
KD-55/65XD9305
Change NG parts
A
: Insert correct signal in correct terminal.
44
Page 45
FLOW
4-5. NO PICTURE (HDMI)
(1) HDMI1
No Picture
TROUBLE SHOOTING
Check other
HDMI input
All Inputs are NG
Check voltage
a Pin104 of IC5212
Voltage OK
Check Picture by other TV set
which is same model
Target board & other
TV set both NG
Is Distributor used ?
NO
Check Source equipment
by Reference TV set
(For example, RB1)
Reference TV set
NG
Check the settings of
Source equipment
Other Input is OK
Voltage NG
Spec:2.7~3.6V
Other TV set OK
YES
Reference TV Set OK
Replace
IC5212(HDMI EQ)
Replace
IC1000
RB5227,RB5228,RB5243,RB5244
RB5235,RB5236,RB5241,RB5242
Connect Source
equipment directly
Change B-Board.
And inform the designer of it
Check the below point at
Only +5V line
is NG
Spec:4.7~5.3V
Replace
R5515
Replace IC5212 (HDMI EQ).
And inform the designer of it
Connector side
- Check +5V line
- Check HPD line
- Check DDC lines
- Check TMDS lines
+5V line is OK
and HPD line
is NG
Spec:2.4~5.3V
All lines are NG
Only DDC lines
are NG
Replace IC5212
(HDMI EQ)
Replace
CN5201
Only TMDS lines
are NG
Replace
RB5231,RB5232
RB5209,RB5210
NG
NG
KD-55/65XD9305
45
Page 46
FLOW
4-5. NO PICTURE (HDMI)
(2) HDMI2
No Picture
TROUBLE SHOOTING
Check other
HDMI input
All Inputs are NG
Check voltage
a Pin104 of IC5212
Voltage OK
Check Picture by other TV set
which is same model
Target board & other
TV set both NG
Is Distributor used ?
NO
Check Source equipment
by Reference TV set
(For example, RB1)
Reference TV set
NG
Check the settings of
Source equipment
Other Input is OK
Voltage NG
Spec:2.7~3.6V
Other TV set OK
YES
Reference TV Set OK
Replace
IC5212(HDMI EQ)
Replace
IC1000
RB5227,RB5228,RB5243,RB5244
RB5235,RB5236,RB5241,RB5242
Connect Source
equipment directly
Change B-Board.
And inform the designer of it
Check the below point at
Only +5V line
is NG
Spec:4.7~5.3V
Replace
R5517
Replace IC5212 (HDMI EQ)
And inform the designer of it
Connector side
- Check +5V line
- Check HPD line
- Check DDC lines
- Check TMDS lines
+5V line is OK
and HPD line
is NG
Spec:2.4~5.3V
All lines are NG
Only DDC lines
are NG
Replace IC5212
(HDMI EQ)
Replace
CN5202
Only TMDS lines
are NG
Replace
RB5229,RB5230
RB5211,RB5212
NG
NG
KD-55/65XD9305
46
Page 47
FLOW
4-5. NO PICTURE (HDMI)
(3) HDMI3
No Picture
TROUBLE SHOOTING
Check other
HDMI input
All Inputs are NG
Check voltage
a Pin104 of IC5212
Voltage OK
Check Picture by other TV set
which is same model
Target board & other
TV set both NG
Is Distributor used ?
NO
Check Source equipment
by Reference TV set
(For example, RB1)
Reference TV set
NG
Check the settings of
Source equipment
Other Input is OK
Voltage NG
Spec:2.7~3.6V
Other TV set OK
YES
Reference TV Set OK
Replace
IC5212(HDMI EQ)
Replace
IC1000
RB5227,RB5228,RB5243,RB5244
RB5235,RB5236,RB5241,RB5242
Connect Source
equipment directly
Change B-Board.
And inform the designer of it
Check the below point at
Connector side
- Check +5V line
- Check HPD line
- Check DDC lines
- Check TMDS lines
Only +5V line
is NG
Spec:4.7~5.3V
Replace
R5428
Replace IC5212 (HDMI EQ).
And inform the designer of it
+5V line is OK
and HPD line
is NG
Spec:2.4~5.3V
Only DDC lines
are NG
All lines are NG
Replace IC5212
(HDMI EQ)
Replace
CN5203
Only TMDS lines
are NG
Replace
RB5237,RB5238
RB5213,RB5214
NG
NG
KD-55/65XD9305
47
Page 48
FLOW
4-5. NO PICTURE (HDMI)
(4) HDMI4
No Picture
TROUBLE SHOOTING
Check other
HDMI input
All Inputs are NG
Check voltage
a Pin104 of IC5212
Voltage OK
Check Picture by other TV set
which is same model
Target board & other
TV set both NG
Is Distributor used ?
NO
Check Source equipment
by Reference TV set
(For example, RB1)
Reference TV set
NG
Check the settings of
Source equipment
Other Input is OK
Voltage NG
Spec:2.7~3.6V
Other TV set OK
YES
Reference TV Set OK
Replace
IC5212(HDMI EQ)
Replace
IC1000
RB5227,RB5228,RB5243,RB5244
RB5235,RB5236,RB5241,RB5242
Connect Source
equipment directly
Change B-Board.
And inform the designer of it
Check the below point at
Connector side
- Check +5V line
- Check HPD line
- Check DDC lines
- Check TMDS lines
Only +5V line
is NG
Spec:4.7~5.3V
Replace
R5467
Replace IC5212 (HDMI EQ).
And inform the designer of it
+5V line is OK
and HPD line
is NG
Spec:2.4~5.3V
Only DDC lines
are NG
All lines are NG
Replace IC5212
(HDMI EQ)
Replace
CN5208
Only TMDS lines
are NG
Replace
RB5239,RB5240
RB5215,RB5216
NG
NG
KD-55/65XD9305
48
Page 49
FLOW
5. KEY SWITCH BUTTONS ERROR
TROUBLE SHOOTING
Side key buttons error
Resistor value
[BMFW2/BM1]
R1089 : 0 [ohm]
R1086 : 47k [ohm]
R1432 : 4.7k [ohm]
* R1089 may be not mounted
Resistor value
[BMFW2/BM1]
R1042 : 4.7k [ohm]
R1091 : 0 [ohm]
R1087 : 20k [ohm]
R1088 : 22k [ohm]
* R1091 may be not mounted
Check harness connection
between B-board and
OK
Harness connection issue
switch module
NG
Change harness between
B-board to switch module
harness
OK
B-board to switch module
harness issue
NG
OK
Change switch module Switch module issue
NG
Check resistor value on B-
board
OK
In case that power key error
Check resistor value on B-
NG
Parts issue
NG
board
In case that buttons error except power key
OK
Main device issue
Change B-board
KD-55/65XD9305
49
Page 50
FLOW
6. IR REMOTE COMMANDER ERROR
TROUBLE SHOOTING
IR remote commander does not
respond
Resistor value
[BMFW2/BM1]
R1080 : 0 [ohm]
R1502 : 47k [ohm]
* R1080 may be not mounted
[BFM/BM2]
R1110 : 0 [ohm]
R1259 : 47k [ohm]
* R1110 may be not mounted
Center white LED blinks
when pushing buttons of
remote commander at close
to IR sensor.
OK
Battery of remote commander
could be weak.
Change battery.
NG
Check harness connection
between B-board and
SmartCore
OK
Harness connection
issue
NG
Change harness between B-
board to SmartCore harness
OK
B-board to SmartCore harness
issue
NG
OK
Change SmartCore SmartCore issue
NG
Check resistor value on B-
board
NG
Parts issue
OK
Change B-board
Main device issue
KD-55/65XD9305
50
Page 51
FLOW
7. LIGHT SENSOR ERROR
TROUBLE SHOOTING
Backlight level does not
change when ambient light
changed
Check UI setting and
make sure light sensor
setting is “ON”
Setting is “OFF”
Setting issue
Change setting to “ON”
Resistor value
[BMFW2/BM1]
R1079 : 0 [ohm]
R1090 : 150k [ohm]
* R1079 may be not mounted
[BFM/BM2]
R1029 : 0 [ohm]
R1109 : 0 [ohm]
R1052 : 150k [ohm]
* R1029, R1109 may be not mounted
Setting is “ON”
Check harness
connection between B-
board and SmartCore
OK
Battery of remote commander
could be weak.
Change battery.
NG
Check harness
connection between B-
board and H-board
OK
Harness connection
issue
NG
Change harness
between B-board to
SmartCore harness
OK
B-board to SmartCore harness
issue
NG
OK
Change SmartCore SmartCore issue
NG
Check resistor value on
B-board
NG
Parts issue
OK
Change B-board
Main device issue
KD-55/65XD9305
51
Page 52
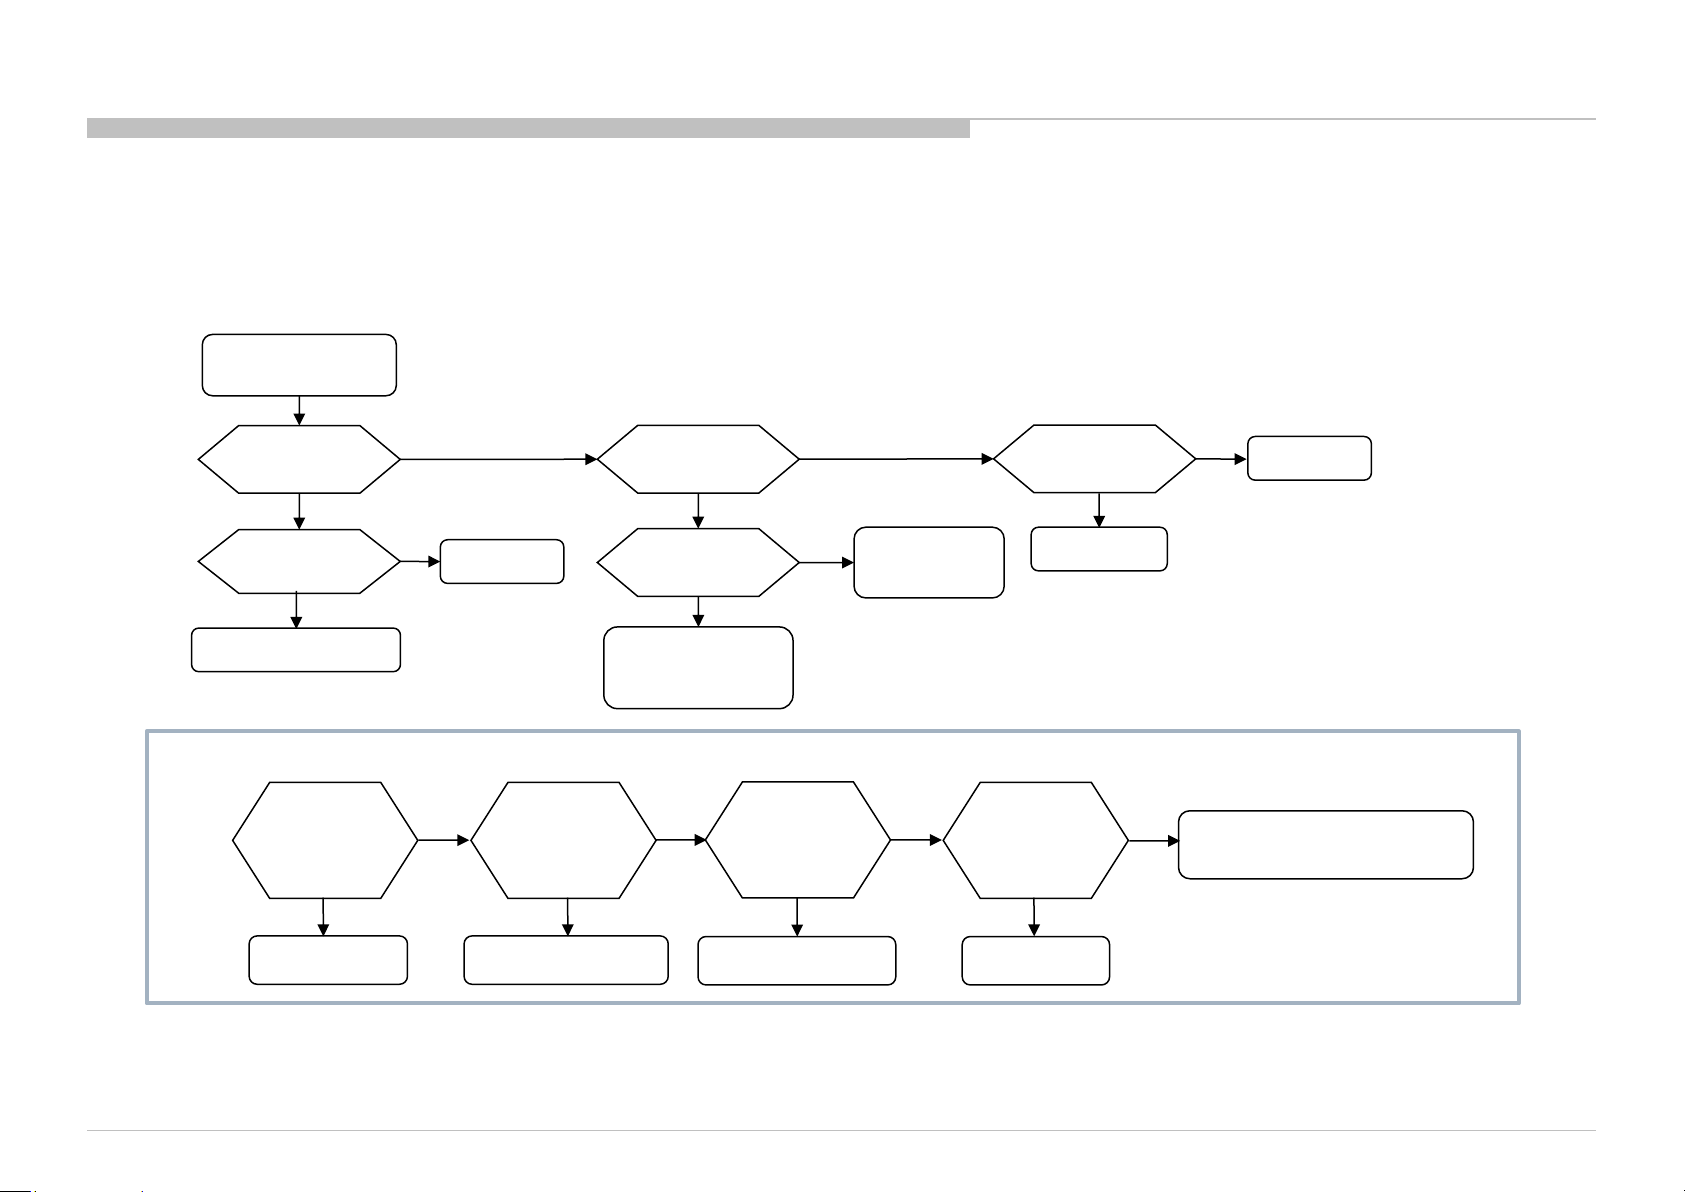
FLOW
8. NETWORK MALFUNCTION
(1) Ethernet (Wired)
[Network Set-up]
>[Wired Set-up]
on the TV
TROUBLE SHOOTING
B Board
Connection Results
Cable Connection
Failed
Check cable
NG
Ethernet Cable
CHK1
Any scratches
along
TX+/-, RX+/-
lines?
YES
Change B-board
OK
OK
NO
Connection Results
Local Access
Failed
B board
CN8003
CHK2
Check Ethernet
Connector pins
Soldering
CN8003
NG NG
Change
Ethernet Connector
Wired Set-up
IP address setting
Manual
Check IP address
&
Local router setting
OK
CHK3 CHK4
Pulse Transformer
Change Pulse Trans
OK
Auto
Local router
DHCP server
Check
soldering
T8001,T8002
NG
Check
OK
Connection Results
Internet Access
Failed
Proxy setting
Check CMF
Soldering
L8000
Change CMF
OK
B board
OK
IC1000 problem.
Change B-board
KD-55/65XD9305
52
Page 53
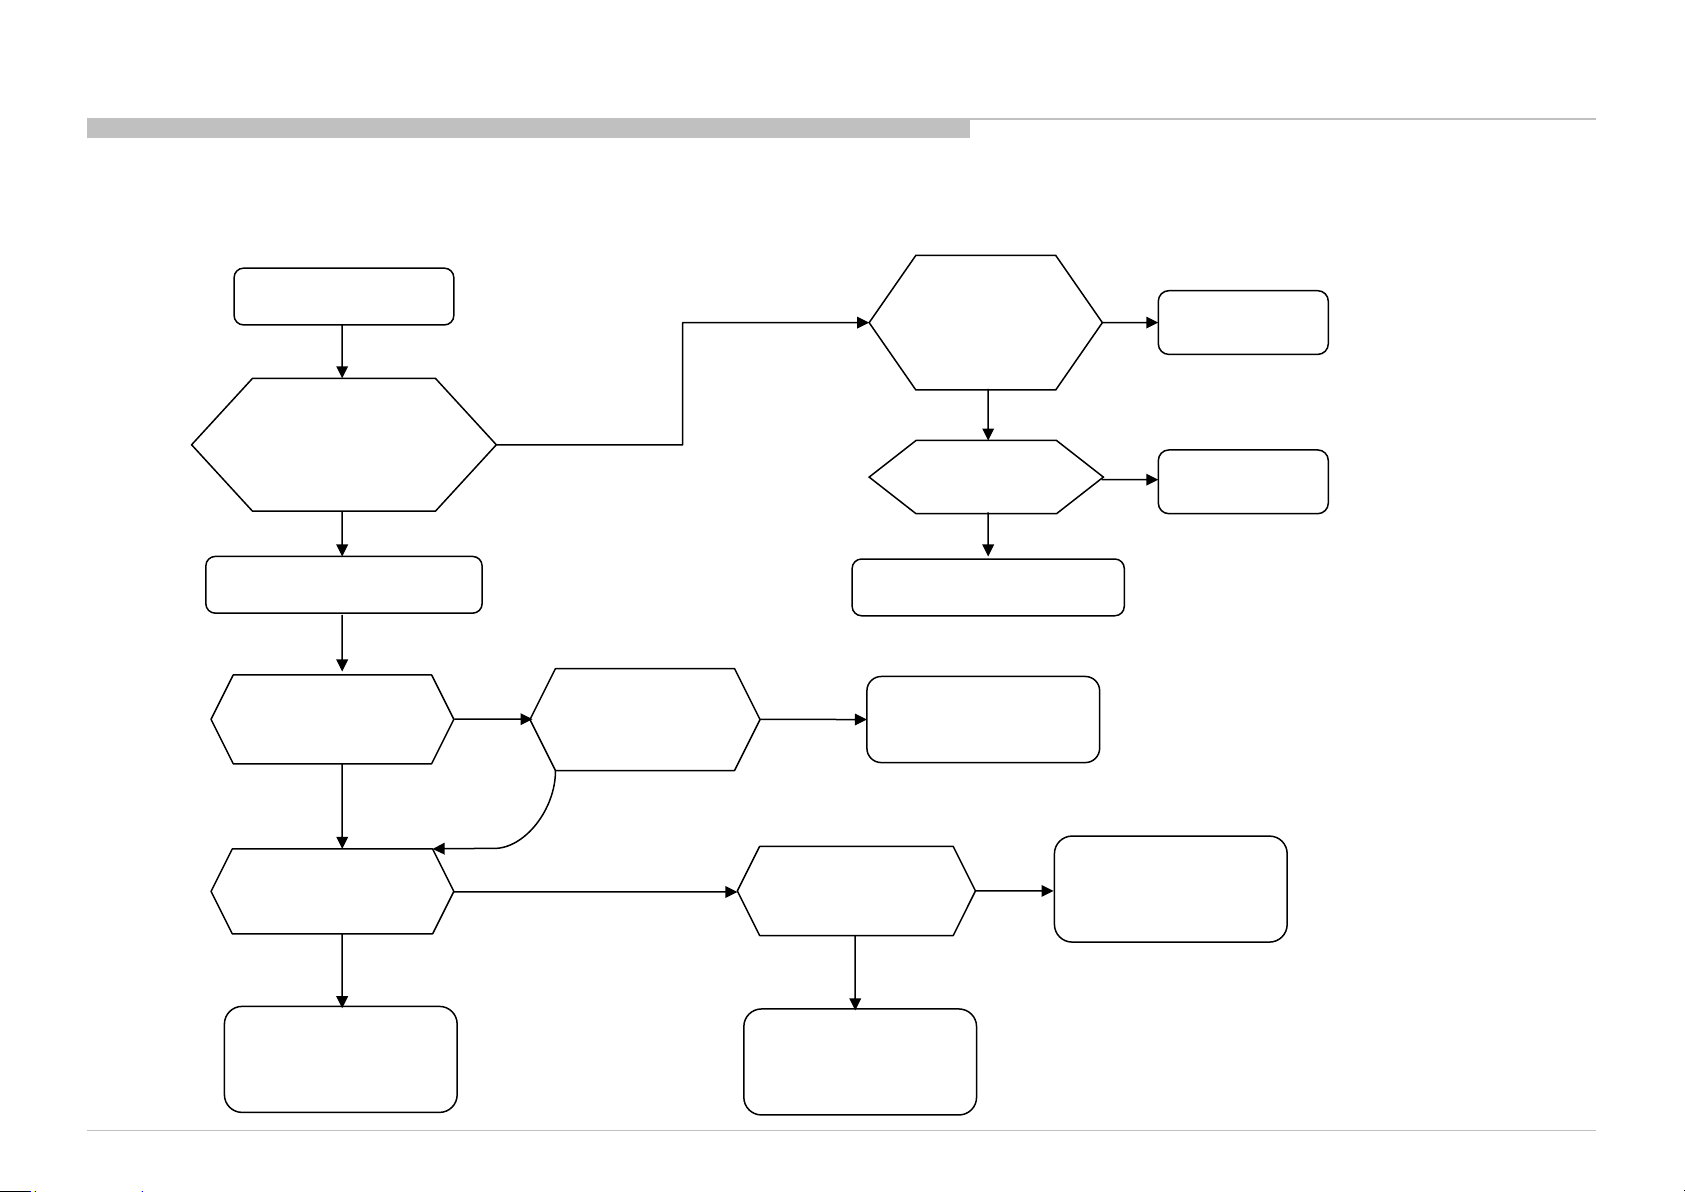
FLOW
8. NETWORK MALFUNCTION
(2) Internal Wireless Network malfunction
TROUBLE SHOOTING
Wireless Network
on the TV
Error Message appear
when the Wireless
Network is selected?
Yes
Hardware defect suspected.
Check harness
connection is OK
between WiFi and Bxx
OK
NG
No
Connect properly
NG
OK
Is the radio field
Strength too weak
or even No signal?
Yes
Change WiFi module
OK
WiFi module
Loose harness
No
Bxx Board
NG
Access Point
KD-55/65XD9305
Change
Wi-Fi module
OK
Wi-Fi module
NG
Change harness
between Bxx board
and WiFi
OK
Main Harness
NG
Change Bxx board
If Wi-Fi malfunction happens,
• Wi-Fi module
• Harness between WiFi and Bxx
• Bxx board
are suspected.
53
Page 54
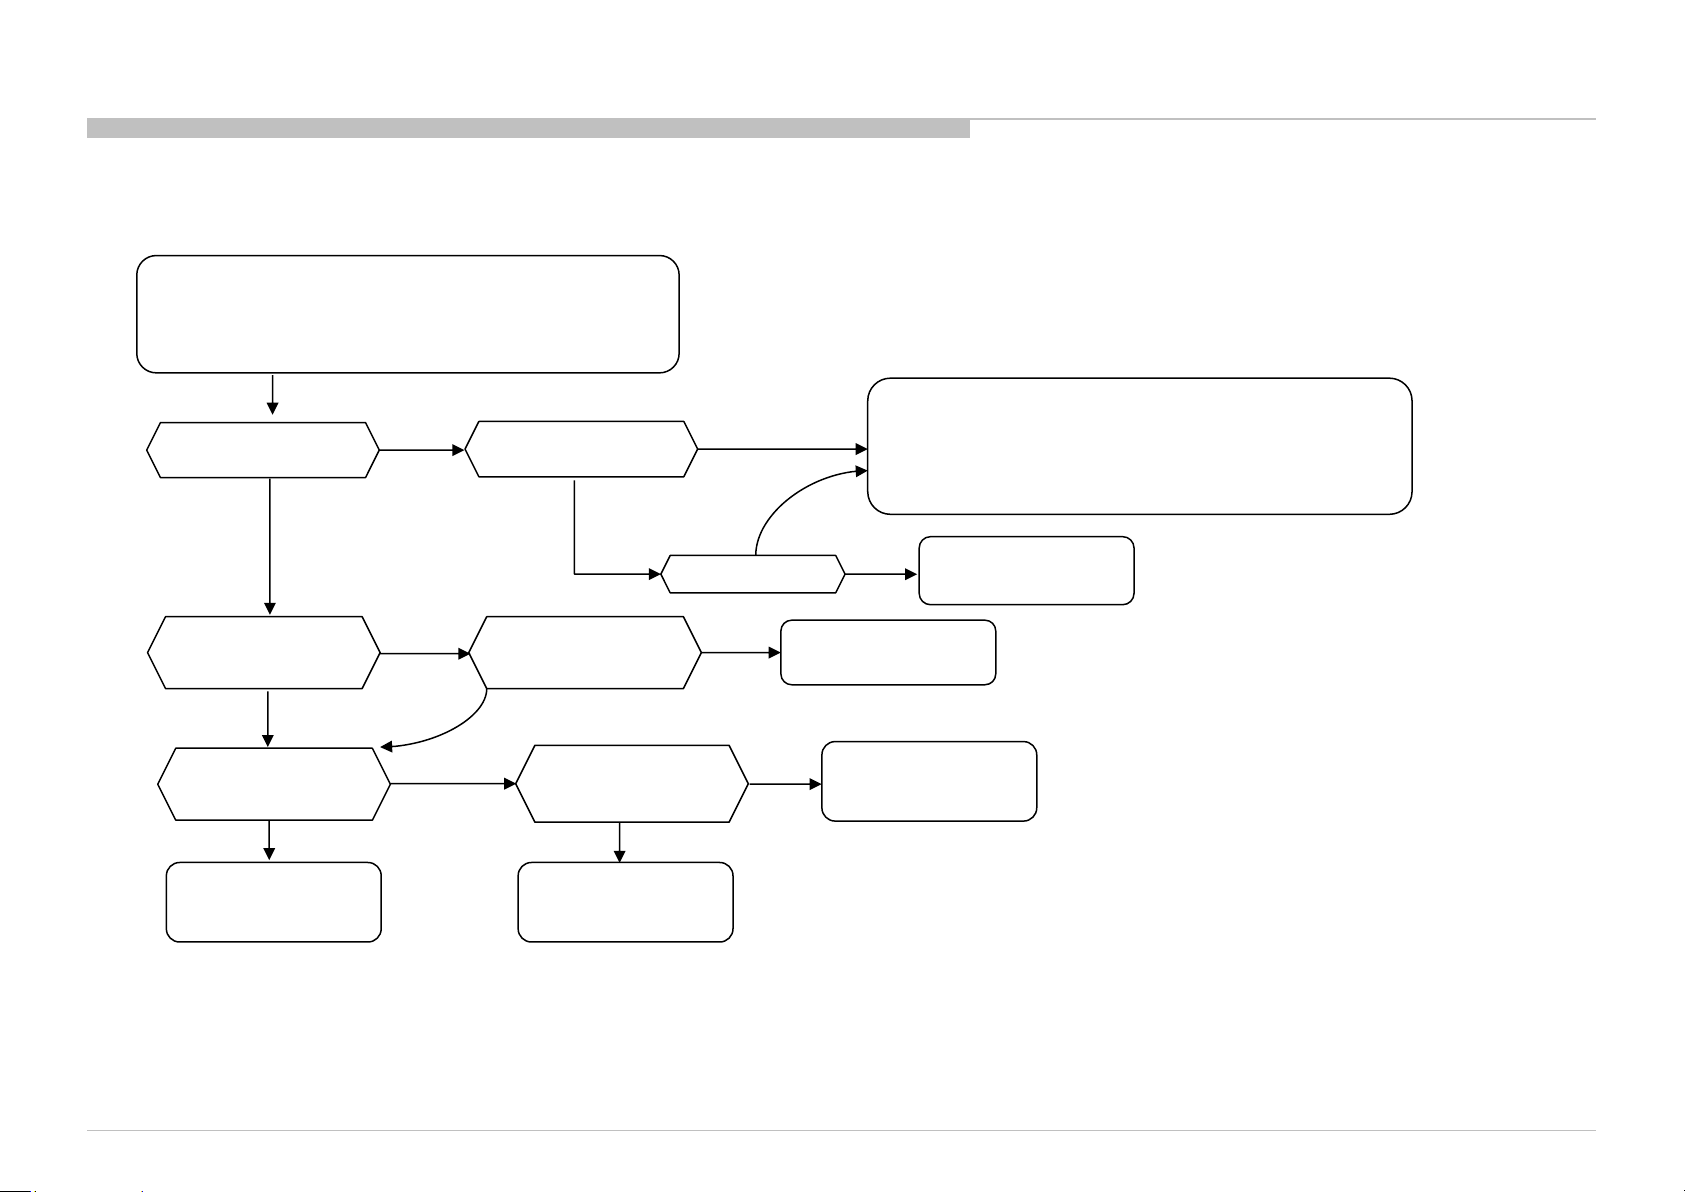
FLOW
9. BLUETOOTH MALFUNCTION
Touch pad Remote doesn’t work
Or
3D-glasses (Active) doesn’t work
Or
Bluetooth Speaker/Headphone/Headset doesn’t work
Home > Settings >
Bluetooth Settings
NG
else
Can read
Near discoverable
Bluetooth Device
Check BT antenna
Connection is OK
NG
TROUBLE SHOOTING
Please refer
OK OK
Bluetooth Speaker/Headphone/Headset operation manual
NG
Touch pad Remote manual
3D-glasses (Active) manual
Or
Check harness
connection is OK
between BT and Bxx
OK
Change BT module
OK
BT module
NG
NG
Connect properly
NG
Change harness
Between Bxx board
and BT
Main Harness
Connect properly
OK
OK
NG
OK
Loose harness
Change Bxx board
Loose BT antenna
connection
KD-55/65XD9305
54
Page 55
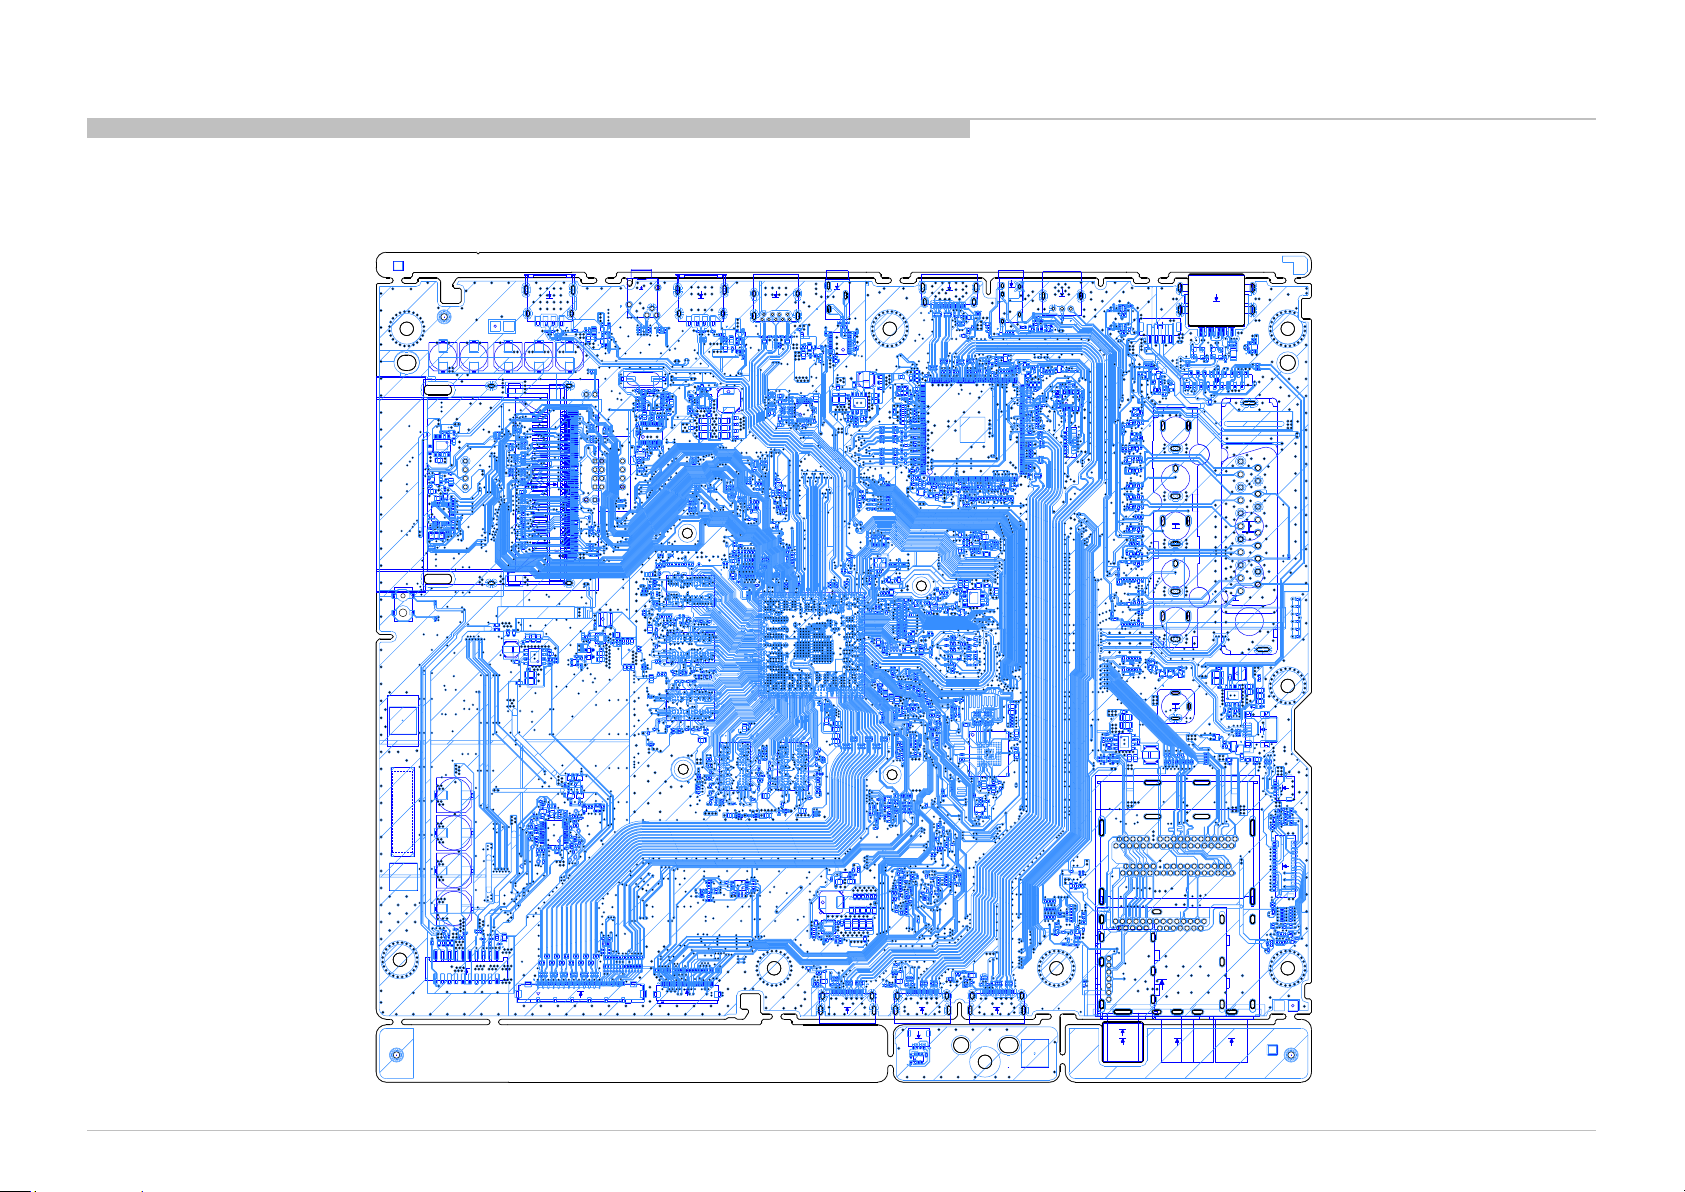
PCB PARTS MAP
BM1 (A side view)
TROUBLE SHOOTING
cam203
cam013
cam001
cam003
cam113
C8408
C8412
cam069
R8417
R8418
R8416
1 4
C8410
9
IC8402
58
D8400
15 18
C8409
C8430
4
31
R7003
2
IC7002
C7003
C7004
5
A7001
C7001
R7006
cam059
C7002
C7007
C7006
C8425
R7026
R7027
16 9
C8422
R8423
IC7003
C8426
C7005
R7030
R7029
1 8
C8427
R7028
cam060
R7002
R7032
R7035
R7033
R7034
X7000
RB7018
R8422
S8400
R8421
cam119
cam118
cam117
cam10005
cam041
DM
15x9
C9017
cam019
C9016
C9015
DM001
C9014
C9020
C9021
CM9001
C9001
C9007
C9011
C9005
C9019
R9007
R9019
R9016
R9017
R9018
cam004
19
CN9000
cam106
cam045
cam005
cam006
cam002 cam003
KJ001 KJ002
8
IRM002
KA002
3148C
CM7001
RB7015
RB7017
R7001
RB7027
RB7034
R7013
R7014
RB7003
RB7030
RB7026
RB7035
RB7029
CN8400
R7031
RB7028
RB7031
R7005
RB7016
R7009
RB7032
R7015
RB7025
796
0
3222
R9039
R9040
R9041
R9042
C9039
C9042
C9044
R9020
L9002
58
9
IC9001
C9028
C9031
C9033
C9036
F9002
C9160
C9159
R9170
C9158
R9169
C9165
CL9008
R9167
C9163
R9165
R9164
C9162
R9163
C9161
CL9006
R9194
R9166
C9164
CL9007
CL9010
C9018
C9006
R9009
C9009
C9013
R9004
C9003
R9006
cam101
C8731
1
202
cam100
53 60
cam017
CN7001
Q9023
R9215
CL9009
RB8710
cam012
6 7
CN8002
5
1 2 3 4
cam095
R8012
VD8004
VD8005
C8040
RB8001
C8411
4148C
21
cam090
1
34
8653
24
C9074
C9010
C9004
C9059
R9071
R9010
2
3
R9005
R9011
C9000
IC9010
1 4
1
4
R9000
R9069
cam096
cam073
cam115
Q9001
Q9002
R9024
R9026
R9025
R9027
R9029
Q9000
Q9003
CL9011
R9028
R9030
R9171
C9124
R9091
R9153
D9002
CL9005
R9090
R9174
Q9022
C9125
CL9003
R9172
R9162
R9175
R9159
R9173
C9122
C9123
1120
C9126
R9161
R9176
CL9004
IC9017
R9177
C9127
R9157
1 10
C9129
R9179
R9155
cam217
C9130
R9180
C9128
R9178
C9117
CL9001
R9168
R9154
R9156
CL9002
CL9000
C9157
C8729
C8728
C8725
C8724
C8713
C8716C8717
C8720
C8721
C8730
C8727
C8715
C8726
C8714
C8719
C8723
C8722
C8718
RB8711
RB8707
RB8706
RB8708
CN8701
J7700
cam104
CM7705
VD7702
VD7701
VD7700
IC8002
31452
VD8006
R8009
C8002
cam021
C8004
C8003
cam064
C8429
R8424
20
R7016
RB7024
RB7010
R7012
11 14
9
0191
R7008
RB7012
R7019
RB7011
R7022
R7017
CM9000
C9121
C9082
C9076
R9068
cam28
D9001
D9000
cam116
cam036
C9024
R9034
IC9000
C8708
C8709
C8712
C8710
C8711
RB8709
C7835
C7833
C7834
IC8001
3
1452
R8010
X8400
C8402
C8401
R8404
R8420
16 9
1 8
cam068
C8403
IC8401
R8407
R8415
R8414
R8406
C8407
C8424
C8420
R8403
R8408
R8405
C8400
11
R7021
C8419
C8428
IC8400
12010
cam067
C8417
R8401
R8400
C8421
R8402
IC8403
31452
cam099
R8419
C8418
cam070
RB7020
41
85
R7010
R7011
C2417
C2600
C2601
C2628
C2636
C2652
R2613
R2614
C2634
R2612
FL2607
R2601
C2420
R2602
C2612
C2416
R2207
R2208
C2608
L9007
C2622
C2623
C2627
C9087
12 9
R2206
13
17
IC9009
5816
1 4
C9073
R9072
R9083
R9081
R9082
R9067
R9070
C2666
C2225
C9152
CL2206
C2421
C9061
C9060
C2205
C2624
FL2606
C2226
C2227
C2423
C2201
C2620
C2625
C2236
C2212
C2658
C2222
FL2604
cam072
2
1
R9035
3
4
R8703
R8704
D8701
D8700
R8721
R8722
C8743
C8744
C8741
C8742
R8715
C8740
R8714
C8739
C8732
C8738
C8733
C8737
C8736
C8735
C8734
R8730
R8731
R8732
R8733
R8734
R8724
R8725
R8726
R8729
R8723
R8735
R8727
R8728
R7982
R7987
R7988
CL8709
CL8705
CL8706CL8707
CL8708
CL8711
CL8701
CL8704
CL8710
CL8712
CL8702
CL8703
CL8700
cam093
6152
151
9545 55 56 57 58
6 7
CN8000
8
5
1 2 3 4
cam094
R7818
VD8001
VD8000
C8038
R7845
R8038
IC8007
cam020
RB8000
VD8009
R8035
C8031
IC8008
C8034
C8032
cam066
C9141
C9142
C9140
cam078
23
18
R8409
R9202
17
1
R8410
R9205
C8405
R8412
C8423
R8413
C2422
C2419
R2216
R2215
C2621
C2626
C2214
C2211
R7985
R7986
L9008
IC9014
R9204
C8406
12
6
11
7
R9206
C9149
C9139
R9207
R9203
C9138
R9120
C9144
C9135
R9121
F9011
C9145
C9136
R9122
C9137
C9146
R9123
RB7022
RB7019
RB7008
RB7005
RB7009
RB7007
R1098
RB7021
cam039
C7008
R7004
CL5221
R1101
C2418
C2615
C2616
C2230
C2232
C2605
C2207
C2221
R2209
C2619
R2213
C2217
C2231
R2214
R7984
R7983
R7981
R7989
R1132
R1100
R1133
C1051
C2228
R2610
R2611
C2651
R2605
C2613
R2604
C2629
R1060
R2219
R9802
CL2200
cam053
C9813
R1135
C9812
R1134
IC2600
C2220
C2602
C2614
C2233
R2200
C2200
C2206
C2611
cam018
IC2202
C2204
C2202
C2216
C2203
R2201
R2210
C2208
C2213
C2215
cam023
C2234
C2661
C2618
IC2203
R2202
C2209
C2609
C2210
C2403
cam028
C2653
C2404
C2617
R2400
IC2400
cam038
C2430
FL2605
C2224
C2662
C2424
C2405
R2406
R2405
C2406
C2639
R2402
C2638
C2407
C2640
C2665
C2654
FL2603
D1005
R1196
IC1001
R1195
R1193
R1191
Q1000
R1187
R1194
C1089
R1184
R1192
R1186
D1004
R7980
R7978
R7991
R7990
R7995
R7992
R7996
R7993
R7994
R8000
R7997
R7998
R7711
31
0
CN7704
2313
11
12
CN8005
cam102
1 4
10
13
9 5
C8039
cam098
R1481
R8033
31452
VD8010
VD8011
VD8002
VD8003
VD8012VD8013
L8001
L8002
RB8005
VD8008
R8031
31452
R8036
RB7014
RB7023
C1027
C1023
R7023
C1010
C1049
C1048
R1011
R1058
R1059
C1022
C1046
R1012
R1014
R1057
R9804
C2219
C2660
C2656
C2659
5
41
8
C1090
R1185
cam107
C8028
IC8006
31452
C8030
C8029
C1454
cam065
C1453
R8032
RB7709
C7815
C7810
C7811
C7809
C9037
R7806
R7805
C7817
C7812
R7804
814
RB7708
RB7710
RB7711
C7805
IC7703
C7806
C7807
1 7
C7814
R7808
C7818
R7807
R7809
C7808
C7813
C7816
R7979
cam062
CM7707
RB7033
RB7013
R7018
R5615
R5614
C1005
R7020
R1124
Q5605
R1009
R5612
CM5202
C5603
R5351
R5613
C5602
R1466
R1467
C7010
R7007
C7009
R1455
R7024
R7025
C1437
R1456
R1028
C1438
R1027
C1007
R1010
R1051
CL1009
C6302
C1018
C1003
R6303
R6315
C6304
R6318
RB7006
R6313
R1008
R1013
CL6304
R6314
CL6312
RB7002
C1031
C1014
CL6302
RB7001
RB7004
R1029
C1052
C5604
R8014
R1123
C1050
cam040
C9821
C2414
C2413
C2400
C2412
C2607
C2429
R2411
C2409
C2425
C2603
C2664
R2408
R2407
C2415
C2402
C2408
C2637
C2401
C2655
FL2602
CM1002
R1190
R1182
R1181
CM1001
R1189
cam047
cam042
C5605
IC1000
C8705
C2218
R8700
C8703
CM2200
R2217
C9806
C8701
C9805
C9803
C9804
C8700
C9801
cam050
C2610
C2410
C2604
FL2600
C2606
IC2401
R2412
C2428
C2427
R2410
R2409
C2663
C2426
C2411
C2434
C2635
FL2601
R2404
C2223
R2403
R9045
L9004
1217
C9065
IC9008
C9068
23
1 6
C9070
R9129
C9069
R9062
cam179
R9051
R9064
D5213
cam005
R5467
R5468
C5380
RB5208
C5379
VD5211
R5526
VD5212
CL5292
23
22
cam046
cam009
21
22
CN5201
20
J1401
VD1401
VD1402
R1472
R1473
cam2
R1475
1120
10
C1446
IC1402
C1445
C1444
C1443
1
cam051
cam112
R9033
R5424
R5423
CM9006
L9003
R9031
C9029
F9003
R9032
X5202
C5297
C9040
C9032
58
C5298
C9034
R9001
R9002
cam074
R1002
C1025
C8035
C8036
C8001
C8000
C8019
C8018
C9800
C9802
C9807
CL2201
RB8700
7
IC9004
C9045
1118
C9051
C9116
C9050
7
R9060
C9062
R9065
R9066
RB5240
VD5210
CN5208
R5368
C9043
R5478
9
IC9002
C5376
1 4
361
C5
R5480
C5356
R9008
C9012
R9003
C9008
C5377
R9015
C5339
C5353
C9002
R9014
R5503
RB5243
RB5227
R5504
R5505
RB5244
RB5228
R5506
C5362
R5499
RB5241
RB5235
R5500
R5501
RB5242
RB5236
R5502
C5354
R5622
C5305
CL5604
R6317
R6316
C5606
CL6307
R6321
D5600
R5611
CL6305
CL6306
R6319
R6320
VD5600
CL6309
R6323
CL6308
R6322
R5610
CL6311
CL6310
R6324
R6325
CL7750
CL7751
CL7753
CL7752
R7575
R7570 R7571
R7962
R7960
R7573
R7848
R7849
R7852
R7853
R7846
R7847
R1003
C6300
X1000
CM6300
R6300
R6326
R1044
R6302
CM6301
R6301
R6327
C6301
C1044
C1045
R1055
R8015
R1052
C7737
C7738
C7735
C7736
C7739
C7740
CM7702
CL6300
CL6301
C8702
C8704
C8706C8707
R1056
R7515
R7516
R6035
R7519
C7511
C8021
C1047
R1064
R7525
C7512
C6303
R7511
C7507
C7532
C7602
R7601
R7507
C7505
FB7501
R7508
C7504
R7504
C7502
C7520
R7553
R7530
C7518
R7551
C7516
R7554
R7527
C7515
C7533
R7526
C7513
R8013
FB7500
C8037
CL7603
CL9802
R9803
CL7607
R1048
CL7604
CL7605
CL7610
C7600
C7601
C9814
CL7608
CL7606
CL7602
CL7609
C1038
C9809
C9810
C1418
R1508
RB2006
R1431
R1507
C9811
R1428
C2005
C1427
R1457
C2006
R1458
C2004
C2007
C2008
C2003
CL7767
R7716
CL1012
R7718
R7714
R7717
R7719
R7720
R2007
R7715
R1120
R7721
R1023
R2011
C1008
C2023
R1025
C1015
R1175
R1178
CL1014
RB8701
RB8703
RB8705
CL1017
C1084
C1087
R1121
RB8702
RB8704
R1119
R1024
R1022
C1011
R1176
C1006
R1197
cam049
R1454
R1451
R1452
R1453
R1445
R1444
R1034
R1117
R1114
CL1024
C1430
C1432
C1412
C1434
C1024
R1031
C1408
C1436
R1033
R1035
R1116
R1036
R1413
R1464
CL1023
R1462
CL1021
R1412
R1465
C1020
R1463
C1028
C1012
C1032
R1032
R1113
R1115
CL1022
R1030
C1016
CL1025
CL1020
C1009
R8702
R9038
R9044
R1020
C1002
2 315 46
R9043
R1118
C1000
cam079
R1018
C1004
R1017
R1102
C9046
C1034
R1019
C1030
R1016
R1015
C1001
R1040
C1026
R1111
R8701
R9086
R9087
R9089
R9088
R9085
084
R9
C1041
R1122
R5486
R1142
CL5220
C1039
R1039
R1037
R1038
C9075
C9081
C9085
C9086
C9088
R1007
R1006
C1035
C1037
C9048
C9049
C9047
F9005
D5212
R5428
R5429
C5371
RB5207
C5370
RB5239
cam089
VD5206VD5207
VD5208
R5525
CL5270
119
23
20
22
21
cam017
C003
cam001
C002
cam014
119
cam086
RB5231
RB5209
RB5210
C5335
C5321
C5373
C5320
R5422
C5315
156
157
C5352
C5338
C5326
C5374
C5341
C5340
C5375
C5330
C5309
C5308
C5337
C5342
C5306
C5307
C5336
C5343
208
1
C5304
R5399
cam057
C5378
C5310
R5400
C5355
C5314
RB5221
C5311
Q5208
C5317
R5421
R5419
cam052
R1047
C1036
R1171
R1172
CL8003
R8043
R8018
R8042
R8017
C8042
R8056
Q8001
R8045
Q8000
R8044
C8022
C8005
C1435
R1505
R1461
R1046
R7600
R1049
R9801
R1161
C9808
R1050
R1162
R1418
R1426
RB2005
C1439
R1468
R1469
C1440
R1436
C1403
R5476
R1509
R7712
R1435
R7713
R1437
R2014
C1405
R1443
R1442
C1401
C1420
C1423
R1441
R1414
R2006
R1440
R1415
R1402
R1177
R1179
R1501
CL1016
C1088
C1413
R1180
C1409
C1086
R1073
CL1011
C1082
C1085
CL1015
R1026
C1019
R1112
CM1000
C1043
CL1002
R1125
R1063
R1417
R1042
C1029
R1131
C1017
C1424
R1421
C1410
R1450
R1434
R1439
C1407
R1021
R1438
R1499
R1500
C1419
C1416
R1400
R1401
R1427
R1460
R1432
C1428
C1415
C1433
R1503
R1433
C1411
R1173
RB5238
RB5237
cam088
119
20
CN5203
21
cam013
5 6
CN001
1 4
cam009
cam004
cam015
C001
cam003
46
IC001
1 3
cam005 cam006 cam007
23
J7505
CL5222
VD5201
R5523
RB5232
VD5205
VD5203
C5388
CL5245
RB5218
D7538
R5515
VD7539
cam103
R5216
C7561
C5387
C7560
C7559
VD7538
D7537
C7562
D5210
Q5206
R5394
R5477
RB5211
R5393
RB5212
R5395
R5498
CL5260
CL5262
CL5263
RB5206
CL5264
R5396
R5390
R5391
R5408
R5405
R5406
C5327
C5324
C5325
C5322
C5323
C5381
C5372
C5382
CL5259
CL5261
C5347
105
104
IC5212
209
52
C5332
C5357
CL5279
CL5277
CL5278
CL5271
CL5228
CL5272
R5409
RB5222
R5418
R5417
CL7705
R7706
cam061
R8057
R8058
D8001
C1033
R1099
R1005
C1040
R1001
C1042
C1421
C1429
R1502
R1053
R1054
R1429
R1062
R1459
CL1010
C1431
C1079
R7724
R7725
R1045
R1043
C1021
R1506
R1425
R1420
C1400
C1414
R5520
D5211
CL5305
C5334
CL5276
C5331
C5333
C5359
R5451
R5298
R5299
R5445
R5444
R5481
R5427
C5303
CM5206CM5207
R5398
CL5275
CL5303
R5455
R5447
R5446
R5397
CL5301
CL5269
CL5274
CL5273
R5433
R5431
R5430
R5454
R5441
R5438
R5439
R5440
R5436
R5437
R5452
R5479
R5442
R5443
R5434
R5435
R5432
R5453
C5360
R7973
C7822
R7815
C7832
C7870
R7814
C7872
6
10
C7820
IC7707
51
RB7712
RB7713
R7813
C7871
C7821
C7831
R7811
C7824
C7819
C7823
cam063
CM7703
C7733
C7734
C7732
F7701
1 4
R7707
L9001
9
R7708
IC7702
CL7707
58
R7705
Q8002
C1013
R1041
R1000
R1004
C1406
R1422
CL1026
R1517
C1402
CL1027
R1424
R1518
R1519
C1404
R1423
R1511
C1426
R1416
C1425
R2010
C2014
R1430
C2013
RB2003
RB2004
C1422
C2009
C2010
C2011
RB2001
RB2002
C2001
C2012
C2017
cam054
C2020
R2002
IC2001
R2015
C2002
R2016
R2012
R2017
R2001
C2018
C2021
C2019
C2022
R2009
R2004
R2003
C2015
R2013
cam055
31452
IC2002
C2016
R2005
R1130
R1419
CL1401
C1417
R5517
C5390
C5391
RB5219
R5524
C5389
RB5230
RB5229
R5456
cam087
VD5202
VD5204
VD5209
CL5237
119
23
CN5202
22
cam010
cam019
cam018
cam011
cam008
4 5
CN7703
1 2 3
R7561
R7562
C7764
cam092
C7521
R7522
R7521
FB7502
CM7510
D7513
D7512
D7514
VD7520
R7558
C5383
C5384
R5496
R5497
Q5204
Q5203
R5
495
R5213R5407
D5208
C5294
R5309
R5312
R5494
C5350
R5308
C5351
R5373
CM5203
R5274
R5273
C5349
R5374
C5200
C5348
R5268
CL5251
CL5252
R5521
D5204
R5357
CL5253
CL5254
58
D5203
R5527
R5380
RB5220
CL5255
CL5256
IC5200
CL5257
CL5258
1 4
RB5224
R5379
R5296
R5295
R5293
CL5225
R5294
CL5226
cam056
R5448
R5378
R5376
C5329
R5450
CL5300
CL5299
R5377
R5375
CM5204
CM5205
R5449
CL5297
CL5298
R5297
CL5296
CL5295
CL5227
R5320
CL5293
CL5294
1
cam085
2
C5368
RB5214
CN5200
C5318
RB5213
C5367
13
C5366
14
C5328
C5365
RB5216
C5319
C5364
53
C5363
RB5215
FB6001
C6002
C6001
C6015
FB6004
C6014
C6013
R6011
R6066
R6064
R6065
R6002
CM6002
CM6003
CM6001
CM6000
R6001
R6012
R6014
R6013
R6068
C6004
R6003
C6024
C6006
R6005
R6004
R6061
C6030
C6029
C6028
C6027
R6006
C6007
C6005
R6062
R6063
R6019
R6067
R6071
R6070
C6070
R6036
Q6001
5 4
IC6000
1
3
cam058
R6010
CM6012
R6072
R6069
R6009
C6012
CL5223
cam006
cam108
20
21
C6003
cam014
cam012
cam016
cam002
cam010
CL1403
6
1
cam211
R1516
IC1407
R1447
3
4
R1449
R1515
R1513
CL1402
6
1
cam212
IC1406
R1446
3
4
R1448
C1462
R1512
R1514
R7524
C7514
R7598
R7580
R7518
R7599
C7510
L7500
C7509
R7513
R7514
R7529
C7517
C7506
R7510
R7506
C7503
R7532
C7519
C7500
C7501
R7503
R7533
C7545
CL7504
R7581
R7583
R7572
R7
578
C7550
C7546
CL7503
R7582
R7528
CL7505
C7544
R7584
C7547
CL7502
R7574
R7579
C7551
R7966
C7858
C7862
R7965
C7861
C7857
F9009
C9077
C9071
C9066
cam076
1 4
R9047
C9052
R9052
R9057
9
R9056
IC9005
C9054
C9057
C6022
C6010
R6007
C6008
FB6002
C9083
R6008
C6009
FB6003
C6023
C6011
TU6000
10
CN8003
9
1
56
CN1403
14
cam097
cam084
R1510
R5211
R5212
D5202
R5209
R5210
C5222
Q5201
Q5209
R5207
CL5248
R5488
R5489
C5295
Q5200
R5490
R5487
D5201
D5200
R5208
R5491
R7535
R7539
D7506
D7500
VD7507
R7523
D7530
cam120
D7511
D7510
VD7506
R7517
D7505
CL7501
VD7505
C7508
R7536
R7512
VD7504
D7504
R7552
VD7508
D7531
D7501
R7509
VD7501
R7505
VD7502
D7502
R7585
R7538
R7534
R7531
VD7509
D7532
R7537
R7556
R7557
R7501
VD7500
R7500
D7508
R7502
VD7503
VD7533
C7543
D7536
R7576
VD7534
C7548
D7533
VD7531
C7541
D7535
VD7532
C7542
VD7530
C7540
D7534
R7577
VD7535
C7549
2
cam00
R7964
VD7704
C7860
R7961
IC1408
R1521
R7963
C7859
VD7703
C1463
Q1400
Q1401
R7959
cam105
C9063
58
L9005
C6016
C6017
C9079
CM6004
CM6005
R6015
R6016
TU6001
cam010
RB8004
T8001
T8002
C8016
C8015
L8000
2
CN1400
1
cam083
C1461
J7504
cam091
R1520
F9010
Q1402
C9078
C9064
C9072
C9067
IC9006
1 4
J7701
cam077
R9053
R9048
R9059
R9058
C9053
Q9018
R9190
C9120
R9189
R6803
C6026
C6025
R6802
CM6011
CM6010
CM6009
CM6008
CM6007
CM6006
FB6800
R6801
R6021
R6020
R6022
R6017
R6018
R6033
R6800
C6800
A6000
R6023
TU6802
TU6003
cam009
cam008
cam011
11
12
8
cam111
cam001
C1441
46
IC1400
1 3
C8017
cam048
R1471
R1470
18
17
21
20
J7501
CN7501
R7520
2
1
L9006
R1108
cam008
C9080
C1065
58
C9084
9
C1066
C1064
R1174
C1083
C9058
C9055
8
9
5
CN1003
RB1001
1
6
7
cam082
Q9019
F6000
C6019
FB6005
RB1000
C6018
CL1007
CL1008
7
5
CN1002
1
6
cam081
R1077
R1106
R1105
C1072
R1126
R1
076
C1071
R1078
CL1004
R1129
R1109
C1073
R1127
R1128
C1070
R1075
CL1006
C1067
C1068
cam080
1
2 31
CN1001
30
29
32
C1062
C1061
C1078
R1085
C1077
R1084
R1107
C1076
R1083
R1082
C1075
C1074
R1081
VD1001
C1057
R1080
D1001
R1090
R1079
R1089
R1086
VD1002
C1055
D1002
VD1000
D1003
C1056
R1088
R1087
C6021
C6020
FB6006
cam007
IRM001
KA001
cam015
cam201
cam004
cam007
R1141
R1140
R1139
R1138
R1137
R1136
cam110
CL1005
CL1003
R1091
cam109
KD-55/65XD9305
55
Page 56
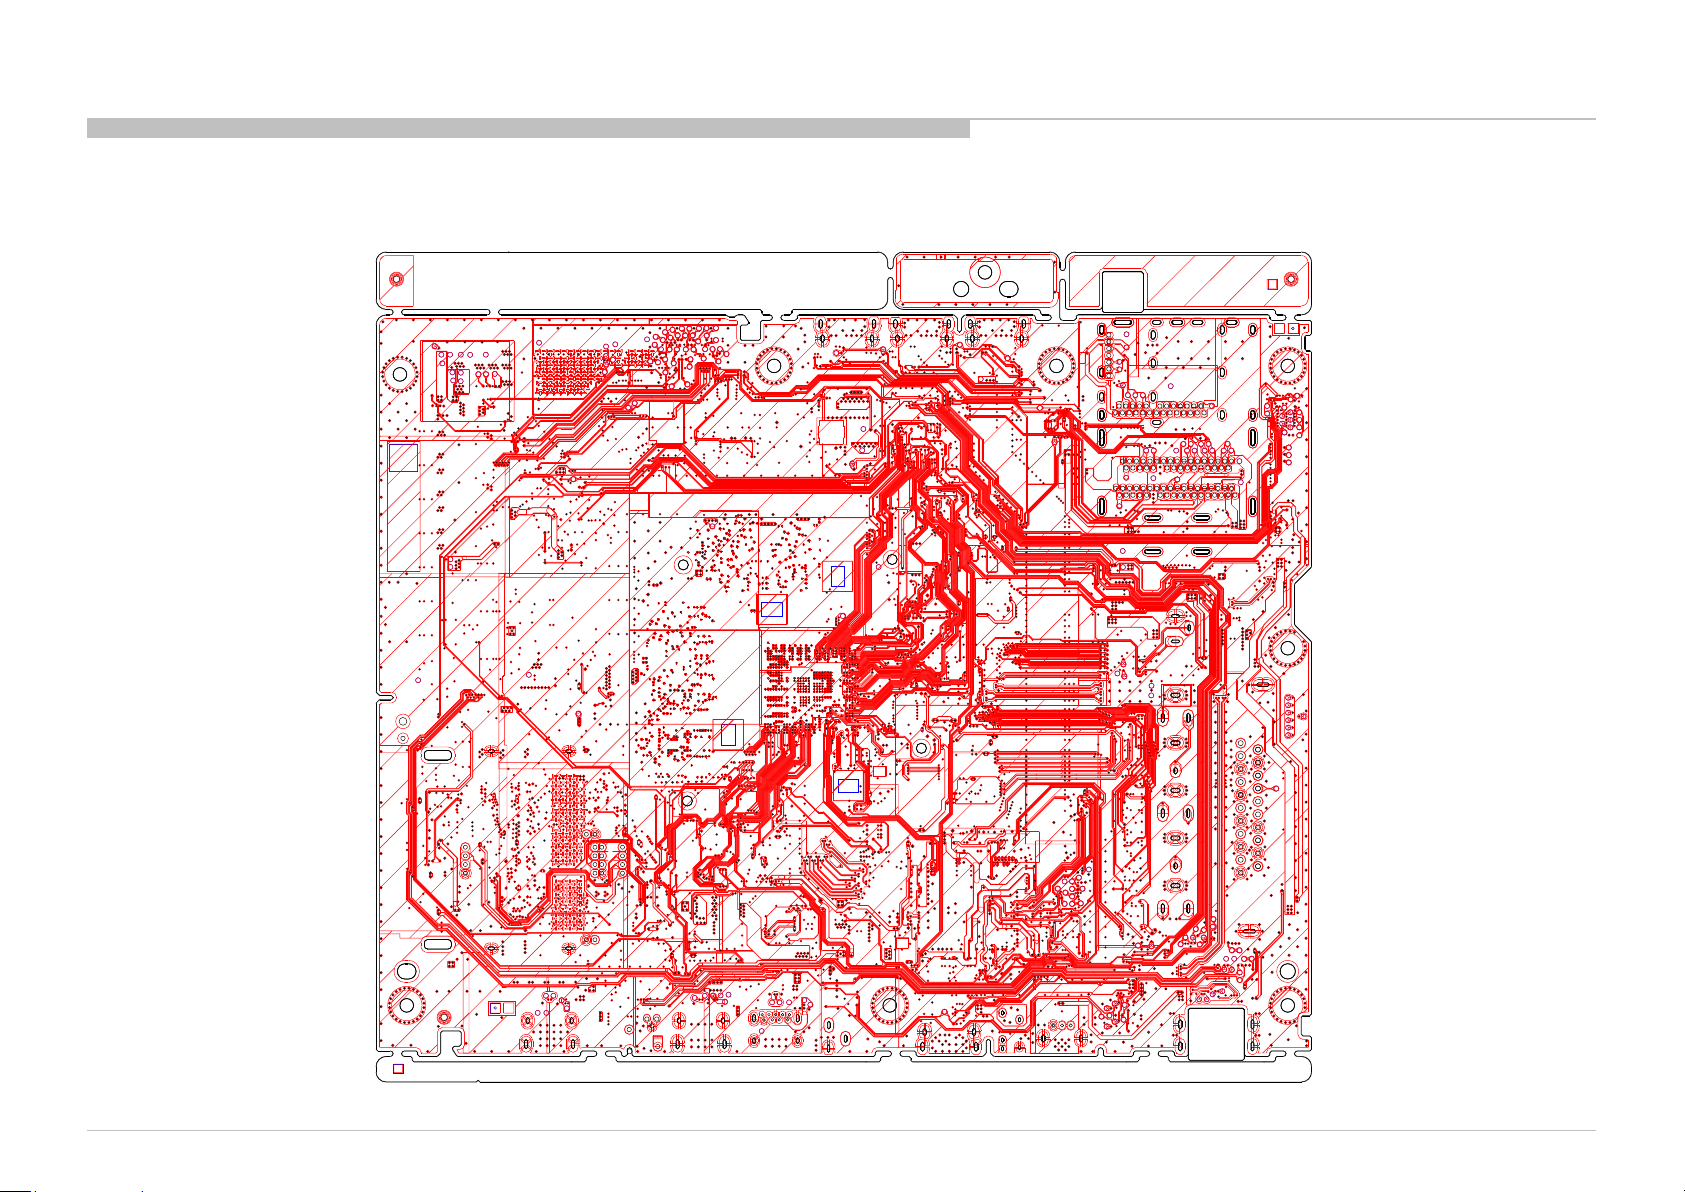
PCB PARTS MAP
BM1 (B side view)
TROUBLE SHOOTING
cam012
cam011
JL7872
JL7878
JL7865
JL7870
JL7869
JL7863
JL7862
JL7843
JL7841
JL7845
JL7853
JL7860
JL7840
JL7857
JL7838
JL7877
JL9009
JL9000
JL9011
JL9019
JL9010
JL9008
JL9007
JL9013
JL9014
JL9006
DM002
cam033
cam032
cam031
cam037
cam022
JL9012
JL9005
JL9024
JL7856
JL9004
JL9001
JL9002JL9003
cam027
cam026
cam025
cam035
JL9016
JL8705
JL8702
JL8701
JL8704
JL8700
JL8703
JL1421
JL1420
JL1418
cam034
cam029
JL9015
JL7847
JL7861
JL7852
JL7854
JL7835
JL7858
JL7836
JL7855
JL7842
JL7839
JL7846
JL7844
JL7880
JL7871
JL7848
JL7837
JL7879
JL7864
JL7868
JL7859
JL7833
JL7832
JL9023
1
ET014
cam030
CL9810
CL9800
1
ET011
JL5213
JL5214
CL5307
JL9026
JL9025
JL9017
JL9018
1
ET013
JL9800
CL7708
CL1013
CL1018
CL1019
CL9803
CL9805
CL9801
CL1001
CL1000
CL7601
CL7766
CL7600
CL7763
CL7764
CL8005
CL6000
ET012
1
CM7701
JL5212
CL5306
CL8004
JL5211
JL5209
JL6034
JL6032
CM7706
JL6029
JL6005
JL6008
JL6007
JL6009
JL6030
JL6028
JL6010
JL6011
JL6012
JL6006
JL6004
JL9022
JL9021
JL7830
JL7834
JL7831
JL7506
JL7507
JL6019
JL6020
JL6022
JL6025
JL6016
JL6014
JL6802
JL6021
JL6023 JL6024
JL6026
JL6017
JL6013
JL6015
JL6031
JL6018
JL6027
JL6033
KJ003KJ004
cam202
IRM003
KB001
JL1016
JL1017
JL1000
JL1021
JL1004
JL1002
JL1001
JL1005
JL1006
JL1003
JL1007
JL1019
JL1008
JL1023
JL1018
JL1024
JL1022
JL1020
JL1010
JL1011
JL1012
JL1009
JL1013
JL1014
JL1015
JL7500
KD-55/65XD9305
CL5290
CL5282
CL5268
CL5287
CL5288
CL5285
CL5281
CL5603
CL5602
CL5601
CL5600
JL8021
JL8011
JL8006
JL8005
IRM004
cam204
JL8017
KB002
JL8007
JL8008
JL8018
JL8000
JL8009
JL8010
JL8001
CM7704
JL8024
JL8003
JL8004
JL8022
JL8023
JL8002
JL5210
CL5283
CL5280
CL5289
CL5286
CL5284
CL5266
CL5267
CL5304
JL5226
JL5225
JL5206JL5207
JL5221
JL5224
JL5205
JL5223
JL5204
JL5222
JL5202JL5203
JL5215
JL5201
JL1411
JL1424
JL1408
JL1426
JL1427
JL1425
JL1412
JL1409
JL7866
JL7867
JL1416
JL1403
JL1401JL1402
JL1410
JL1417
JL1419
JL1413
JL1422
JL1423
JL1400
JL1415
JL1414
JL1406
JL1407
JL1404
JL1405
JL8015
JL8014
JL8012
3
JL801
56
Page 57
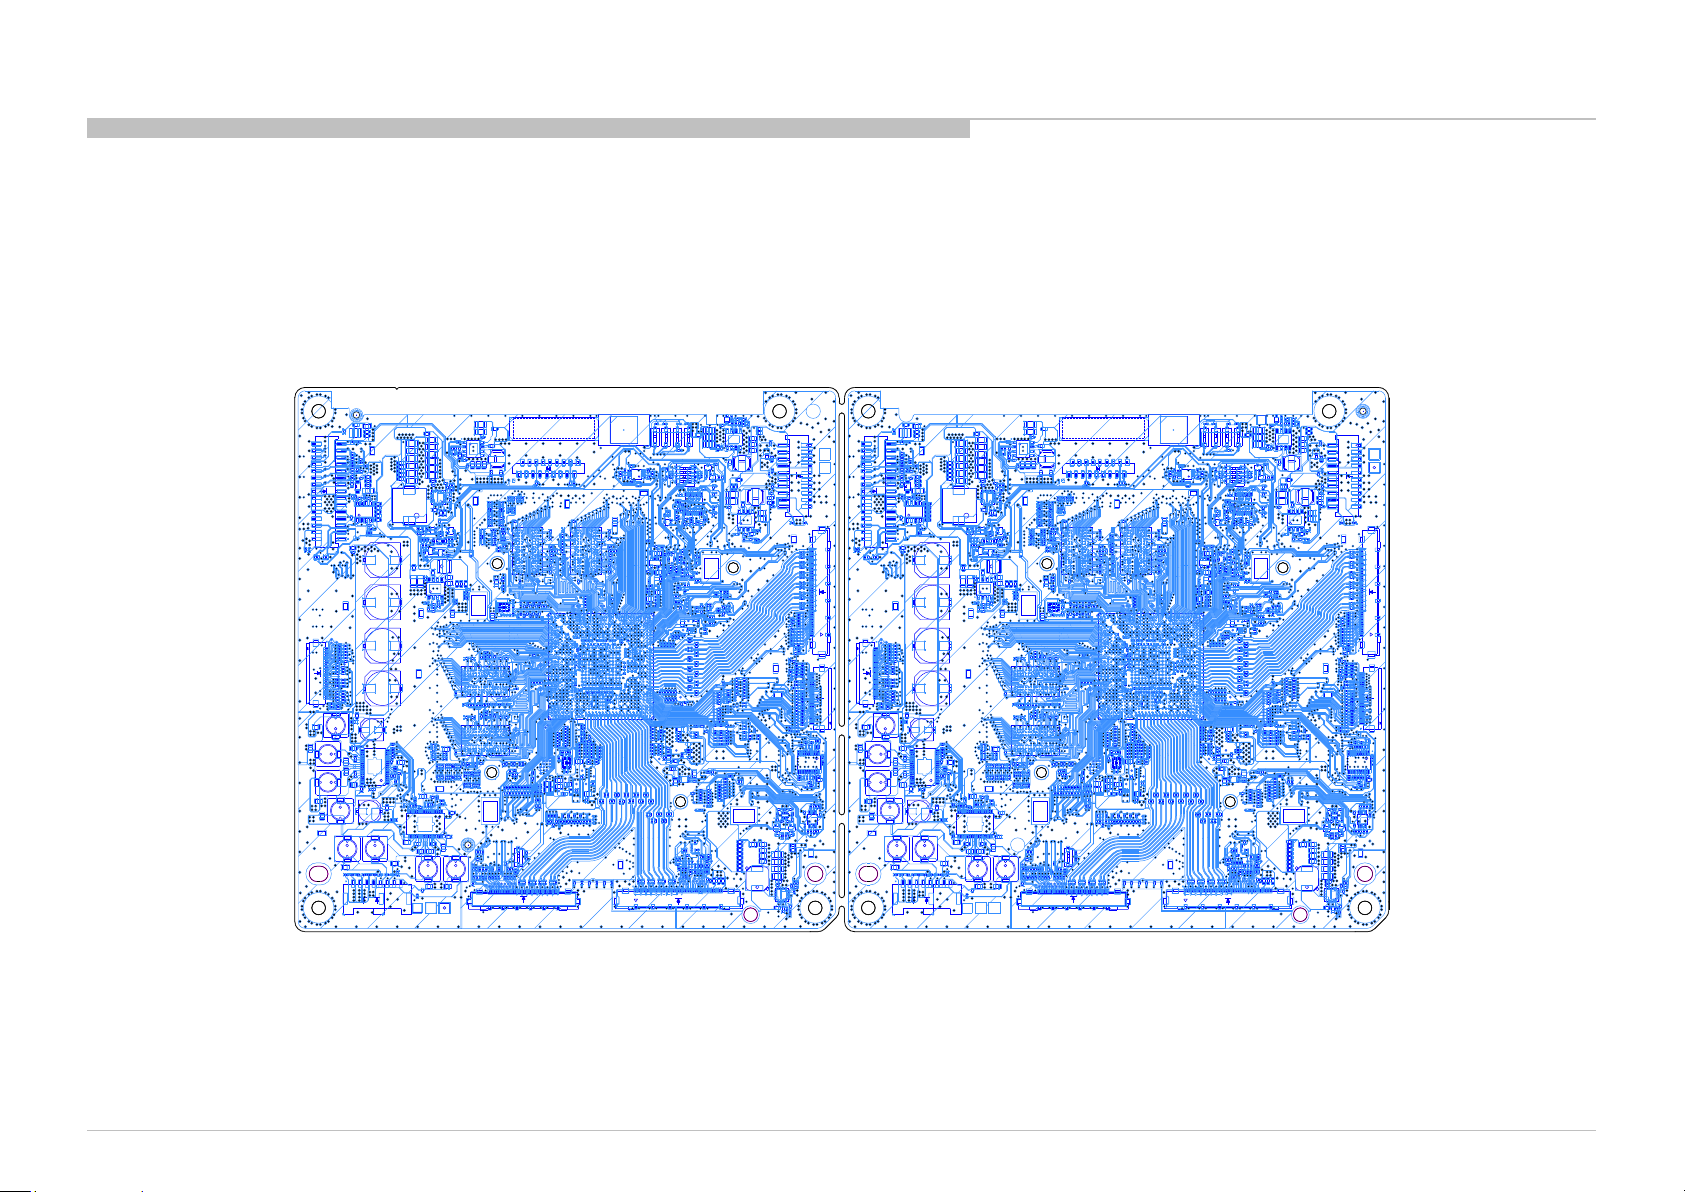
PCB PARTS MAP
DPS (A side view)
cam015 cam015
C518 C518
C493 C493
R522 R522
cam010 cam010
cam016 cam016
cam002 cam002
31
32
C7946 C7946
cam013 cam013
C7945 C7945
cam007 cam007
cam014 cam014
KJ001
cam10014 cam10014
cam12 cam12
cam036 cam036
cam001
cam22 cam22
R524 R524
C497 C497
C484 C484
R407 R407
L407 L407
R408 R408
29
30
R513 R513
C486 C486
C505 C505
C504 C504
TP3109 TP3109
R515 R515
C492 C492
C439 C439
C496 C496
R517 R517
C498 C498
R512 R512
R518 R518
C438 C438
C499 C499
R519 R519
R465 R465
20 R520
R5
C500 C500
R464 R464
C501 C501
R521 R521
C437 C437
R463 R463
C489 C489
R536 R536
C485 C485
R462 R462
R525 R525
C436 C436
R535 R535
C515 C515
R534 R534
D402
R527 R527
CN401 CN401
C488 C488
R529 R529
R528 R528
C513 C513
C514 C514
R507 R507
L402 L402
5 58 8
R508 R508
R509 R509
IC410 IC410
1 14 4
R510 R510
C517 C517
R
511 R511
cam048 cam048
R530 R530
R531 R531
Q8304 Q8304
R532 R532R533 R533
2
1
cam043 cam043
C516 C516
C487 C487
C491 C491
R523 R523
C495 C495
C7901 C7901
F9403 F9403
C9428 C9428
cam095 cam095
cam012 cam012
TP3110 TP3110
cam025 cam025
CL8328 CL8328
cam042 cam042
CL8334 CL8334
CL8329 CL8329
R8358 R83
C8354 C8354
1
R8357 R8357
C8353 C8353
C8350 C8350
R8354 R8354
C8352 C835
R8356 R8356
CL8330
R8344 R8344
C8339
CL8326 CL8326
R8345 R8345
C8340 C8340
CL8335 CL8335
R8393 R8393
R8349 R8349
C8344 C8344
C8349 C8349
R8353 R8353
CN8301
C8342 C8342
R8347 R8347
CL8336 CL8336
R8346 R8346
C8341 C8341
C8343 C8343
R8348 R8348
C8347 C8347
R8351
CL8337
C8346 C8346
R8350
30
C8348 C8348
R8352 R8352
CL8327 CL8327
R8355 R8355
C8361 C8361
R8359 R8359
C8355
R514 R514
94
C4
C490 C490
R516 R516
L7707 L7707
L7706 L7706
C7940 C7940
C7939 C7939
L7705
C7944 C7944
L7704 L7704
C7943 C7943
TP3100 TP3100
L7703 L7703
C7928 C7928
C7947 C7947
C7905 C7905
cam037 cam037
cam034 cam034
5 56 6
cam005
C9429 C9429
C7902 C7902
C7903 C7903
TP3108 TP3108
C7904 C7904
F7701 F7701
C7952 C7952
C7932 C7932
R8059 R8059
R8055 R8055
R8051 R8051
C7941 C7941
17
16
R8050 R8050
R8046 R8046
R8045 R8045
C7937 C7937
R8049 R8049
C7931 C7931
IC7702 IC7702
33
R8048
R8047 R8047
C7935 C7935
C7936 C7936
C7933 C7933
C7934
R8054 R8054
R8053 R8053
1
32
C7938 C7938
cam046
C7942
C7951
R8035 R8035
R8058 R8058
R8040 R8040
R8039 R8039
R8034 R8034
R8038 R8038
F7700 F7700
C
7914 C7914
C7924 C7924
17
R8044 R8044
C7921 C7921
C
7950 C7950
L7702 L7702
C
C7927 C7927
C7911 C7911
C7908 C7908
C7948 C7948
C7910 C7910
C7907 C790
C7909 C7909
C7930
C7906 C7906
1 18 8
1 14 4
C7912 C7912
CN7710 CN7710
CN7709
10 109 9
cam007
C479 C479
C478 C478
F401 F401
C477 C477
cam051 cam051
C411 C411
8
1
R475 R475
C503 C503
9
C473 C473
R476 R476
R478 R478
IC409 IC409
445
R477 R477
C502 C502
C474 C474
C475 C475
C412 C412
C482 C482
C480 C480
C481 C481
R479 R479
C413 C413
C414 C414
CM400 CM400
C415 C415
R526 R526
C416 C416
C417 C417
R424 R424
R410 R410
R423 R423
7
11
6
12
R411 R411
IC403
R422 R422
1
TP3111
17
18
23
cam0
50 cam050
RB3208 RB3208
R409 R409
C433 C433
C435 C435
C434 C434
RB3209 RB3209
R8322 R8322
R8315 R8315
R8403 R8403
CM8306 CM8306
R8401 R8401
R8316 R8316
R8405 R8405
R8408 R8408
R8391 R8391
4 R8384
R838
CM8301
R8383 R838
C9427 C9427
cam579 cam579
R9428 R9428
R9426 R9426
TP3103 TP3103
C7913 C7913
R8037 R8037
R8036
3333
IC7701 IC7701
C7919 C7919
7920 C7920
L7701 L7701
C7926 C7926
C7929 C7929
RB3210 RB3210
Q8303 Q8303
Q8305 Q8305
R8314 R8314
RB3211 RB3211
R8407 R8407
R8317 R8317
R8
R8400 R8400
406 R8406
Q8302 Q8302
RB3212 RB3212
D8301 D8301
D8300 D8300
R8404 R8404
R8402 R8402
CM8307 CM8307
301 Q8301
Q8
Q8300 Q8300
R3178 R3178
R8390 R8390
L9402 L9402
C9426 C9426
C9430 C9430
C9431 C9431
5 58 8
R9430 R9430
R9431 R9431
R9432 R9432
9 9
IC9403 IC9403
C3420 C3420
C3412 C3412
1 14 4
C3408 C3408
C3409 C3409
C3410 C3410
C9424 C9424
C3411 C3411
C9425 C9425
R9427 R9427
1
ET200 ET200
C9432 C9432
R9425 R9425
C3507 C3507
C3442
R3407 R3407
C3435 C3435
R3408 R3408
C3433 C3433
C3434
C3441
CL3410
IC3400 IC3400
C3425 C3425
C342
C3426 C3426
R3406
C3427 C3427
R3404 R3404
R3405
C3439 C3439
C3440 C3440
C3460 C3460
R3412 R3412
C3453 C3453
R3413 R3413
C3459 C
C3452 C3452
C3451
CL3415 CL3415
IC3401 IC3401
RB3406 RB3406
C3508 C3508
C3443
RB3407 RB3407
RB3400
C3458 C3458
C3457
R3403 R3403
C3444 C3444
RB3402 RB3402
RB3403 RB3403
R3410 R3410
RB3401 RB3401
R3411 R3411
RB3405 RB3405
RB3404 RB3404
RB3408 RB3408
RB3409 RB3409
RB3410 RB3410
RB3412
RB3411
TP3101 TP3101
C7955 C7955
R8042
7915 C7915
C
C7916 C7916
R8043 R8043
cam045 cam045
ET201 ET201
C7923 C7923
1
C7922 C7922
C7949
CL3654 CL3654
cam002
C7918 C7918
R3670
R3671
R3627 R3627
R3634 R3634
CL3660 CL3660
R3628 R3628
L7700 L7700
R3633 R3633
R3672
R3673 R3673
R3631 R3631
R3630 R3630
CL3655
R3629 R3629
C3683
C3686
C3684
C3685
R363
2 R3632
682 C3682
C3
CL3615 CL3615
C7925 C7925
CL3614 CL3614
cam038 cam038
1 141 41
42 4251 51
44 4445 4546 4647 4748 4849 49
KA001
IRM001
cam15 cam15
F405 F405
C476 C4
L406 L406
2 2
CN8302 CN8302
1 1
R505 R505
R506 R506
cam10011_ cam10011_
R1638 R1638
RB3206 RB3206
RB3207 RB3207
RB3201
RB3200 RB3200
RB3202 RB
C3243
RB3203 RB3203
C3244 C3244
C3251 C3251
RB3204 RB3204
R3210 R3210
C3257 C325
C3252 C3252
R3211 R3211
C3258 C3258
RB3205 RB3205
R3203 R3203
R3213 R3213
R32
09 R3209
C3245 C3245
IC3201 IC3201
R3212 R3212
C3259 C3259
CL3215 CL3215
C3253 C3253
C3254 C3254
C3255 C3255
C3256 C3256
46 C32
C32
cam055 cam055
C3247 C3247
CL3212 CL3212
CL3213 CL3213
C3250 C3250
C3308 C3308
CL3214 CL3214
C3249
C3248 C3248
C3120 C3120
C3217 C3217
C3214 C3214
C3212 C3212
C3210 C3210
C3215 C3215
C3208 C3208
C3209 C3209
C3213 C3213
C3211 C3
X3100 X3100
R3126 R3126
C3216 C3216
C3418 C3418
C3416 C3416
C3414 C3414
R3127 R3127
C3064 C3064
C3121 C3121
R3125 R3125
C3419 C3419
C3417 C3417
C3415 C3415
C3413 C3413
C3124 C3124
C3126 C3126
R3402 R3402
CL3400 CL3400
C3436 C3436
C3438 C3438
C3437 C3437
CL3404 CL3404
cam060 cam060
CL3405 CL3405
CL3408 CL3408
CL3401
CL3409 CL3409
CL3402 CL3402
CL3411 CL3411
C3422 C3422
R3400 R3400
R3401
C3421 C3421
CL3406 CL3406
C3432 C3432
CL3413 CL3413
CL3403 C
C3430 C3430
8 C3428
C3429 C3429
C3431 C3
C3454 C3454
C3455 C3455
C3456 C3456
C3063 C3063
CL8313 CL8313
cam061 cam061
CL8312 CL8312
CL3412 CL3412
CL3407
CL3414 CL3414
C3450 C3450
CL8314 CL8314
CL8310
CL8315 CL8315
CL8316 CL8316
C3446 C3446
C3447 C3447
C3448 C3448
C3449 C3449
C3445 C3445
CL8311 CL8311
CL8321 CL8321
R3409
CL8317 CL8317
CL8320 CL8320
CL8322 CL8322
R8301
CL8319 CL8319
CL8324 CL8324
C8300 C8300
R8309 R
CL8323
R8389 R8389
R8300
C8308 C8308
C3201 C3201
R8318
R8325 R8325
R8308 R8308
R8304 R8304
R8324 R8324
R8302 R8302
R8305 R8305
R8306 R8306
R8307 R8307
R8310 R8310
R8311 R8311
R8312 R8312
C3401 C3401
C8307 C8307
C8324 C8324
C8317 C8317
C8305 C8305
C8311 C8311
C8306 C8306
C8309 C8309
C8310 C8310
C8303 C8303
C83
04 C8304
C8323 C8323
C8301 C8301
CM9400
R8303 R8303
R8313 R8313
C8312 C8312
C8302
1
R8328 R8328
R8323 R8323
R8334 R8334
CL8333 CL8333
C8327 C8327
C8322 C8322
C8333 C8333
ON
R3715
S3602 S3602
R3714 R3714
R3636 R3636
R3674 R3674
R3705 R3705
R3702 R3702
R3701 R3701
R3703 R370
R3635 R3635
R3704 R3704
C3713 C
C3692 C3692
C3693 C3693
C3694 C3694
C3712 C3712
C3687
C3688
RB3600 RB3600
RB3601 RB3601
RB3602 RB3602
RB3603 RB3603
CL3626 CL3626
CL3628 CL3628
CL3659
CL3622 CL3622
CL3619
CL3624 CL3624
CL3617 CL3617
621 CL3621
CL3
CL3623 CL3623
CL3625 CL3625
CL3627 CL3627
CL3616 CL3616
CL3618 CL3618
CL3620 CL3620
CN3600 CN3600
DM
15x9
18 18
17 17
R1640 R1640
R1639 R16
TP3113 TP3113
C3225 C3225
C3307 C3307
C3226 C3226
C3233 C3233
R3205 R3205
C3234 C3234
C3239 C3239
R3206 R3206
CL3210 CL3210
C3240 C3240
R3208
R3204 R3204
IC3200 IC3200
R3207 R3207
C3260 C3260
C3241 C3241
C3242 C3242
C3227 C3227
C3235 C3235
C3228 C3228
CL3211 CL3211
C3236 C3236
C3229 C3229
C3237 C3237
C3231 C3231
C3238 C3238
C3230 C3230
cam054 cam054
CL3208 CL3208
CL3209 CL3209
C3232 C3232
C3221 C3221
R3202 R3
R3200 R3200
C3222 C3222
CL3203 CL3203
CL3204 CL3204
CL3205 CL3205
CL3206 CL3206
CL3207 CL3207
R3201 R3201
CL3200 CL3200
CL3201 CL3201
CL3202 CL3202
C3467 C3467
C3269 C3269
C3262 C3262
C3273 C3273
C3280 C3280
C3282 C3282
C3281 C3281
C3283 C3283
C3471
C3461 C3461
70
C34
C3466 C3466C3272 C3272
C3463 C3463
C3464 C3464
C3465
C3268 C3268
C3147 C3147
C3478 C3478
C3480 C3480
C34
C3483 C3483
81 C3481
C3482
C3049 C3049
C3048 C3048
C3279 C3279
C3050 C3050
C3270 C3270
C3267 C3267
C3060 C3060
C3061 C3061
C3073 C3073
C3469 C3469
C3479 C3479
C3477 C3477
C3274 C3274
C3278
C3476 C3476
C3277 C3277
C3468
IC3000 IC3000
C3276 C3276
C3474 C3474
C3275
C3475 C3475
C3271 C3271
C3265 C3265
C3264 C3264
C3263
C3669 C3669
C3670 C3670
C3671 C3671
C3047 C3047
C3672 C3672
C3673 C3673
C3678 C3678
C3677 C3677
C3041
C3676 C3676
C3039 C3039
C3040 C3
C3042 C3042
C3045
C3266 C3266
C3056 C3056
C3053 C3053
C3261 C3261
C3070 C3070
C3665 C3665
C3666 C3666
C3043 C3043
C3038
C3044 C3044
C3037 C3037
C3661 C3661
C3662 C3662C3663 C3663C3664 C3664
C3066 C3066
C3069 C3069
C3679 C3679
C3067 C3067
C3068
C3680 C3680
C3621 C3621
C3406 C3406
C3600
C3405 C3405
C3015
C3206 C3206
C3404 C3404
C3020 C3020
C3407 C3407
C3403 C3403
C3618 C3618
C3127 C3127
C3204 C3204
C3402 C3402
C3125 C3125
C3622 C3622
C3205 C3205
C3203
C3623
C3611 C3611
C3613 C3613
C3207 C3207
C3202 C3202
C3609 C3609
C3610 C3610
C3608 C3608
C3615 C3615
C3624 C36
C3619 C3619
C3604 C3604
C3606 C3606
R3617
R3615 R3615
R3611 R3611
C3616 C3616
C3612 C3612
C3605 C3605
C3620 C3620
R3620 R3620
C3602 C3602
C3617 C3617
C3607 C3607
C3614
C3658 C3658
C3006 C3006
C3004 C3004
C3603 C3603
X3600 X3600
C3001 C3001
C3005 C3005
CL3603 CL3603
C3657 C3657
CL3602 CL3602
R3603 R3603
C3027 C3027
R3602 R3602
CL3600
CL3601 CL3601
C3123 C3123
C3030 C3030
R3600 R3600
CL3003 CL3003
R3177 R3177
CM3001 CM3001
R3004 R3004
C3601
C3631 C3631
C3632 C3632
C3627 C3627
C3628 C3628
R3601 R3601
C3630
C362
C3625 C3625
C3626 C3626
9
R8337 R8337
R8336 R8336
R8339 R8339
R8338 R8338
R8333 R8333
R8335 R8335
CL8715 CL8715
CL8716 CL8716
R83
R8387 R8387
C8332 C8332
C8334 C8334
C8335 C8335
C8336 C8336
C8337 C8337
C8338 C8338
R8341 R8341
R8343 R8343
R8394 R8394
R8395 R8395
96 R8396
CL8717 CL8717
CL8332 CL8332
R206 R206
R201 R201
R202
R203 R203
R204 R204
R205
50 5043 43
R3312 R3312
R8713 R8713
R3622 R3622
R3623
ON ONON ON
ON ONON ON
DM001 DM001
cam10005 cam10005
R3336 R3336
5
R3331 R3331
R3333 R3333
R3329 R3329
IC3103 IC3103
R3328
R3330 R3330
1
R3332 R3332
8
cam062 cam062
C3152 C3152
CM3102 CM3102
R3334 R3334
CM3103 CM3103
R3335 R3335
TP3105 TP3105
C3218 C3218
C3219 C
C3143 C3143
R3176 R3176
C3220
cam047 cam047
C346
2 C3462
C3472 C3472
C3473 C3473
C3055 C3055
C3052
C3054
C3051 C3051
C8751 C8751
C8752 C8752
C8753 C8753
C8754
C8755 C8755
C8756 C8756
C8748 C8748
C8750 C8750
C8749 C8749
C8747
C3058
C3057 C3057
C3046
C3059 C3059
C3640 C3640
C3643 C3643
C3644
C3635 C3635
C3636 C3636
C3639 C3639
C3638 C3638
C3637
C3633 C3633
C3641 C3641
C3642 C3642
C3634 C3634
C3647 C3647
TP3102 TP3102
RB3604 RB3604
cam039 cam039
1 151 51
53 5360 60
54 54
C440 C440
F404 F404
S3600 S3600
S3601 S3601
S8700 S8700
S3107 S3107
C441 C441
C442 C442
C444 C444
CL8700 CL8700
R3313 R3313
R3341 R3341
Q3101 Q3101
CL3114 CL3114
R3306 R3306
R3327 R3327
RB3100 RB3100
RB3101 RB3101
S3100 S3100
R3326 R3326
R3343 R3343
R3344 R3344
Q3102 Q3102
R3307 R3307
CL3115 CL3115
ON
CL8301 CL8301
C8357 C8357
R1607 R1607
R1636 R1636
R1637 R1637
CL8307 CL8307
C8358
C1600 C1600
16 169 9
CM8304 CM8304
CM8305 CM8305
R1631 R1631
R1632 R1632
R1604 R1604
R3185 R3185
IC1600 IC1600
R1600 R1600
CL8308 CL8308
C8359 C8359
R3192
CM8303 CM8303
R1629 R1629
CM8302 CM8302
R1630 R1630
1 1
8 8
R3191 R3191
R3100 R3100
R3186 R3186
CL8300 CL8300
C8356 C8356
D3100 D3100
R3197 R3197
R1601 R1601
R3179 R3179
cam044 cam044
R3198 R3198
R3184
R3183 R3183
R3189 R3189
Q3100 Q3100
C3144 C3144
R3188 R3188
R3187 R3187
90 R3190
R31
C3102 C3102
R3119 R3119
CL3103 CL3103
cam017 cam017
C3116 C3116
C3106 C3106
R9438 R9438
R3150 R3150
C9436 C9436
CL3100 CL3100
C3118 C3118
C3104 C3104
CL3102 CL3
R3155 R3155
C3129 C3129
C3131 C3131
R3120 R3120
33 11
22
R3109 R3109
C3109 C3109
R3110 R3110
4
R3134 R3134
405 IC9405
IC9
R3107 R3107
R3138 R3138
CL3101 CL3101
R3131 R3131
R3157 R3157
R3156 R3156
1
ET203 ET203
C3153 C3153
C3115 C3115
C3113 C3113
R3154
C3111 C3111
C9437
R3108 R3108
C3107 C3107
C3105 C3105
R3117 R3117
R3342 R3342
R3118 R3118
R3116 R3116
R3106 R3106
R3175 R3175
R9440 R9440
R3115 R3115
C3103 C3103
R3153 R3153
R3337 R3337
R3166 R3166
C3135 C3135
R3172 R3172
R3139 R3139
CM3200 CM3200
CL3113 CL3113
R3132 R3132
C3133 C3133
C3400 C3400
CL3116 CL3116
C3200 C3200
C3065 C3065
C3062 C3062
C3009
C3010
C3008 C
C3035
C3036 C3036
C3023 C3023
C3026
C3025 C3025
C3018 C3018
C3645 C3645
C3646 C3646
C3648 C3648
C3650 C3650
C3649 C3649
RB3605 RB3605
55 5556 5657 5758
R3130
R3137 R3137
C3139 C3139
R3167 R3167
C3423 C3423
CL3119 CL3119
C3223 C3223
CL3118 CL3118
C3137 C3137
R3140 R3140
R3133 R3133
C3424 C3424
CL3120 CL3120
C3224 C3224
C3128 C3128
CL3121 CL3121
RB3102 RB3102
R3128 R3128
R3305 R3305
R3129 R3129
CL3122 CL3122
R3135 R3135
C3130 C3130
R3136 R3136
CL3123 CL3123
R3152 R3152
C3101 C3101
R3105 R3105
R3002 R3002
CL3001 CL3001
C3024 C3024
R3151
C3100 C3100
R3114
CM3000 CM3000
R3003 R30
R3182 R3182
CL3002
R3181
C8741 C8741
C8740
R8718 R8718
R8717
C8731 C8731
C8730 C8730
C8729 C8729
C8735 C8735
C8737 C8737
C3014 C3014
C3013 C3013
C3019 C3019
C8728 C8728
C8727 C8727
C8726 C8726
C8725 C8725
C872
4 C8724
C8723
C8722 C8722
C8721
C8720
C8719 C8719
C8718 C8718
C8717
C8716
C8715 C8715
C8714
C8713
C8712 C8712
CL7762 CL7762
C8711 C8711
C8710 C8710
C8709 C8709
C8736 C8736
C8738 C8738
C8732 C8732
C8734 C87
C8733 C8733
C8745 C8745
R7858 R7858
CL7717 CL7717
C8708 C8708
R7860 R7860
CL7719 CL7719
CL8718 CL8718
R7861
CL7720 CL7720
C8739 C8739
C8742
C8743
C8744 C8744
R8720 R8720
CL7715 CL7715
R7856 R7856
R8716 R8716
CL7756 CL7756
CL7757 CL7757
C7836 C7836
CL7758 CL7758
C7785 C7785
CL7759 CL7759
C7786
CL7760 CL7760
C7787 C7787
CL7761
C7788 C7788
R7734 R7734
R7744 R77
R7745 R7745
C3003 C3003
C7797 C7797
FL3001 FL3001
R7732 R773
CL7713
R7854 R7854
C3002 C3002
R7736 R7736
C3033 C3033
CL7714 CL7714
R7855 R7855
C3032 C3032
R7738 R7738
C3034 C3034
C3031 C3031
R7742 R7742
R7740 R7740
C3029 C3029
C3021 C3021
C3012 C3012
CL3000 CL3000
C3017 C3017
FL3000 FL3000
C3007 C3007
C3016 C3016
C3011 C3011
C3000 C3000
C3022 C3022
C3028 C3028
CL3004 CL3004
R3005
R9436 R9436
R3180 R3180
C3150 C3150
C9434 C9434
cam089 cam089
6
1
7
5
2
IC9404
4
3
R9434 R9434
C9435 C9435
R3124 R3124
R3122
R3111 R3111
R3113 R3113
C3117 C3117
R3112
R3199 R3199
R3314 R3314
R3160 R3160
R3121 R3121
C3119 C3119
R3123 R3123
R3174
C3145 C3145
R3173
R3159
CL3112 CL3112
R3168 R3168
C3142 C3142
CL3605 CL3605
R3613 R3613
CL8331 CL8331
CM8300 CM8
R8382 R8382
C3651 C3651
C3652 C3652
C3655 C3655
C3656 C
C3653 C3653
C3654 C3654
R3625 R3625
R3643 R3643
R3640 R3640
CL3611
R3637
R3686 R3686
R3647 R3647
R3646 R3646
R3626 R3626
R3642
R3641
R3644 R3644
CL3606
R3648 R3648
R3649 R3649
CL3609 CL3609
CL3612 CL3612
CL3610 CL3610
R3692
R3683 R3683
R3687 R3687
R3638 R3638
R3639 R3639
R3682 R3682
R3689 R3689
R3645 R3645
C3702
R3690 R3690
R3691 R3691
CL3607 CL3607
CL3608 CL3608
C3697 C3697
C3695 C3695
C3696 C3696
R3688 R3688
C3699 C3699
C3700 C3700
C3701 C3701
R3693 R3693
R3694 R3694
C3698 C3698
84 R3684
R36
R3685 R3685
CL3637 CL3637
CL3635 CL3635
CL3629 CL3629
5 R3695
R369
R3653 R3653
R3716
C3704 C3704
CL3642 CL3642
CL3640 CL3640
CL3638 CL3
CL3630 CL3630
CL3636 CL3636
CL3632 CL3632
RB3607 RB3607
RB3606 RB3606
CL3641 CL3641
CL3639 CL3639
CL3643 CL3643
CL3631 CL3631
CL3633 CL3633
CN3601
cam004 cam004
R474 R474
C471 C471
R470
D401
R469 R469
R473 R473
R471 R471
C472 C472
R468 R468
R472 R472
C447 C447
R466 R466
R467 R467
8
5
C483 C483
9
8 IC408
IC40
C506 C506
1 1
4 4
cam032 cam032
C445 C445
C446 C446
cam026 cam026
C443 C443
F9401 F9401
C519 C519
C448 C448
L405 L405
C507 C507
C520 C520
R3340 R3340
F402
C509 C509
R487 R487
R488 R488
C510 C510
C455 C455
L403 L403
R486 R486
C454 C454
R485
C452 C452
C521 C521
C453 C453
C456 C456
5 58 8
C457 C457
9 9
IC404 IC404
1 14 4
cam031 cam031
C451 C451
C450 C450
R481
R480 R480
C449 C449
R483 R483
R482 R482
R484 R484
C3136 C3136
RB3104 RB3104
C3138 C3138
C3132 C3132
RB3103 RB3103
C3134 C3134
TP3106 TP3106
R3311 R3311
R3310
R8712
R8711 R8711
R8033 R8033
R8710 R8710
R8709 R8709
R8708 R8708
R8707 R8707
R8705 R8705
R8706 R8706
CL7716 CL7716
R7857 R7857
R3308 R3308
R3309 R3309
TP3112 TP3112
CL7718 CL7718
R7859 R7859
CL8705 CL8705
R8724 R8724
R7862 R7862
CL7721 CL7721
CL8704 CL8704
R7863 R7863
CL7722 CL7722
R8715 R8715
R8714 R8714
CL8702 CL8702
CL8712 CL8712
CL8703 CL8703
CL8713 CL8713
CL8714 CL8714
CL7771 CL7771
R3604 R3604
C7792 C7792
R7735 R7735
R3605
CL7766 CL7766
R3606 R3606
R3614 R3614
R3616 R3616
R7733 R7733
C7791 C7791
CL7765 CL7765
R3607
C7793 C7793
R7737 R7737
CL7767 CL7767
R3608 R3608
R3696 R3696
R3618 R3
C7794 C7794
R7739 R7739
R3609 R3609
R3697 R3697
R3619 R3619
C7796 C7796
R7743 R7743
C7795 C7795
R7741 R7741
R3675 R3675
C3122 C3122
R3158 R3158
R3681 R3681
R3612 R3612
C3114 C3114
C3108 C3108
C3112 C3112
C3110 C3110
C3146 C3146
R3710 R37
1
CM3601 CM3601
R3709 R3709
ET202 ET202
cam058 cam058
R3706 R3706
R3713 R3713
Q3600 Q3600
R3650 R3650
R9421 R9421
C9417 C9417
C9418 C9418
R9420
R9419 R9419
C9416 C9416
R9418 R9418
C9433 C9433
C9415 C9415
R9417
C9414 C9414
C9412 C9412
R9416 R9416
R94
15 R9415
C9413 C9413
R9414 R9414
C9411 C9411
L9401 L9401
R3652 R3652
C9410 C9410
C9451 C9451
11
12
61 6152 52
IC9401
17
18
59 59
C9409 C9409
cam006 cam006
1
2
CN400 CN400
19
20
C512 C512
C522 C522
60
TP3107 TP3107
61
51
59
RB8704 RB8704
RB8705 RB8705
58
RB8700 RB8700
57
RB8701 RB8701
CN8700 CN8700
RB8702 RB8702
56
RB8703
CL8719 CL8719
R8725 R8725
R8726 R8726
CL8720 CL8720
55
C8757 C8
R8727 R8727
CL8721 C
C8758 C8758
R8728 R8728
CL8722 CL8722
R8729 R8729
C8759
CL8723 CL8723
R8730 R8730
CL8724 CL8724
C8760 C8760
CL8725 CL8725
R8731 R8731
C8761 C8761
CL8726 CL8726
R8732 R8732
1
C8762 C8762
54
CL8727 CL8727
R8733 R8733
C8763
CL8728 CL8728
R8734 R8734
C8764 C8764
R8735 R8735
CL8729 CL8
C8765 C8765
52
R8736 R8736
CL8730 CL8730
C8766 C8766
R8737 R8737
cam030 cam030
53
CL8731 CL8731
C8767 C8767
C7881 C7881
C7880
R7991
R7990 R7990
R7988 R7988
R7989
R7986 R7986
R7987
C7882 C7882
R7995
R7994 R799
C7883 C7883
30
32
R7992 R7992
R7993 R7993
C7884 C7884
R7746 R7746
R8004
R8003
C7895 C7895
CL7770 CL7770
R8002 R8002
C7896 C7896
C7897 C7897
R8001 R8001
C7898 C7898
R8000 R8000
C7879 C7879
R8005 R8005
CN7708 CN7708
R7999 R7999
C7894
R7998 R7998
C7893 C7893
R7997 R7997
C7892 C7892
R7996 R7996
C7891 C7891
R7985 R7985
C7890 C7890
R7984 R7984
C7889 C7889
R7983
C7888 C7888
R7982
C7887 C7887
1
31
R7981 R7981
C7886 C7886
R8056 R8056
C7954 C7954
cam8 cam8
R7980 R7980
C7953 C7953
cam008 cam008
R8010 R8010
R8008 R8008
R8012 R8012
R8014 R8014
R8016 R8016
R8011 R8011
7 R8017
R8013 R8013
R801
R8015 R8015
R8009 R800
cam057 cam057
1
10
R8007 R8007
IC7700 IC7700
R8006 R8006
20
1111
C7899 C7899
R8027 R8027
R8020 R8020
R8026 R8026
R8022 R8022
R8024 R8024
R8025
C7900 C7900
R8023 R8023
R8018 R8018
R8021 R8021
R8019 R8019
CM3101 CM3101
R3318 R3318
R3322
R3324 R3324
R3321
C3714
R3711 R3711
C3151 C3151
6 6
4 4
R3708 R3708
CM3600 CM3600
R3325 R3325
IC3600 IC3600
5 5
8 8
3 3
1 1
IC3102 IC3102
cam009 cam009
R3707
R3712 R3712
4 4
1 1
R3317
Q3601 Q3601
R3315 R3315
R3316 R3316
CM3100 CM3100
R3323 R3323
R3319 R3319
R3320 R3320
R3651 R3651
D3601 D3601
D3600 D3600
11 cam011
cam0
R9422 R942
R9423 R9423
TP3104 TP3104
R9411 R9411
C9419 C9419
R9408 R9408
cam035 cam035
R9410 R9410
7
6
R9409 R9409
1
23
cam001
cam056 cam056
R9412 R9412
cam003 cam003
C9448 C9448
C9420
R9413 R9413
TROUBLE SHOOTING
470
R
cam005
3623
R
29
30
D402
2
1
31
58
1
2
CL8330
C8339
CN8301
R8351
CL8337
R8350
32
30
C8355
C494
17
16
33
R8048
L7705
cam005
C7934
1
32
cam046
C7942
C7951
16
17 3232
7
C7930
CN7709
8
1
76
9
5
7
11
6
12
IC403
1
TP3111
17
18
23
RB3201
3202
C3243
7
CM8301
3
RB3400
R8042
R8036
C7949
46
C3249
1
211
C3442
C3434
C3441
CL3410
R3406
R3405
C3451
C3443
C3457
RB3412
RB3411
1 16
R3670
CL3655
C3683
CL3401
R3401
L3403
431
3459
CL3407
CL8310
R3409
R8301
8309
CL8323
R8300
R831
8
CM9400
C8302
1
ON
R367
1
R3715
R3672
3
3713
C3686
C3687
C3688
C3684
C3685
CL3659
CL3619
DM
15x9
544
R3328
1
39
C3468
C3263
C3203
R3617
CL3600
8
R3208
4 55
3219
C9437
202
C3220
C3471
C3470
C3465
C3482
C3052
C3054
C3278
C8754
C3275
C8747
C3058
C3046
040
C3045
C3041
C3038
C3068
C3600
C3015
C3623
24
C3601
R202
C3009
C3010
3008
C3035
C3026
C3614
C3644
C3637
C3630
C3629
R205
D401
5
8
9
F402
ON
C8358
R3192
R3184
R481
102
1
R3154
R3130
R3151
R3114
03
CL3002
R3181
C8740
R8717
C8723
C8721
C8720
C8717
C8716
R3310
C8714
C8713
34
C8742
C8743
R3005
3656
R8712
R7861
C7786
CL7761
R3605
44
2
R3607
CL7713
6
1
7
5
2
IC9404
4
3
CL3
R3637
CL3606
CN3601
618
R3122
R3112
R3174
R3173
R3159
300
1
R9420
611
R3642
R3641
R9417
R3692
C3702
R3716
638
58
cam003
1
2
KA002
IRM002
R485
19
20
60
61
51
59
58
57
56
RB8703
55
757
L8721
C8759
1
54
C8763
729
52
53
C7880
R7991
R7989
R7987
R7995
4
30
32
R8004
R8003
C7894
R7983
R7982
1
31
9
1
10
20
R8025
R3322
R3321
C3714
10
R3707
R3317
2
7
11
6
12
IC9401
1
17
18
23
cam001
C9420
KJ002
KD-55/65XD9305
57
Page 58
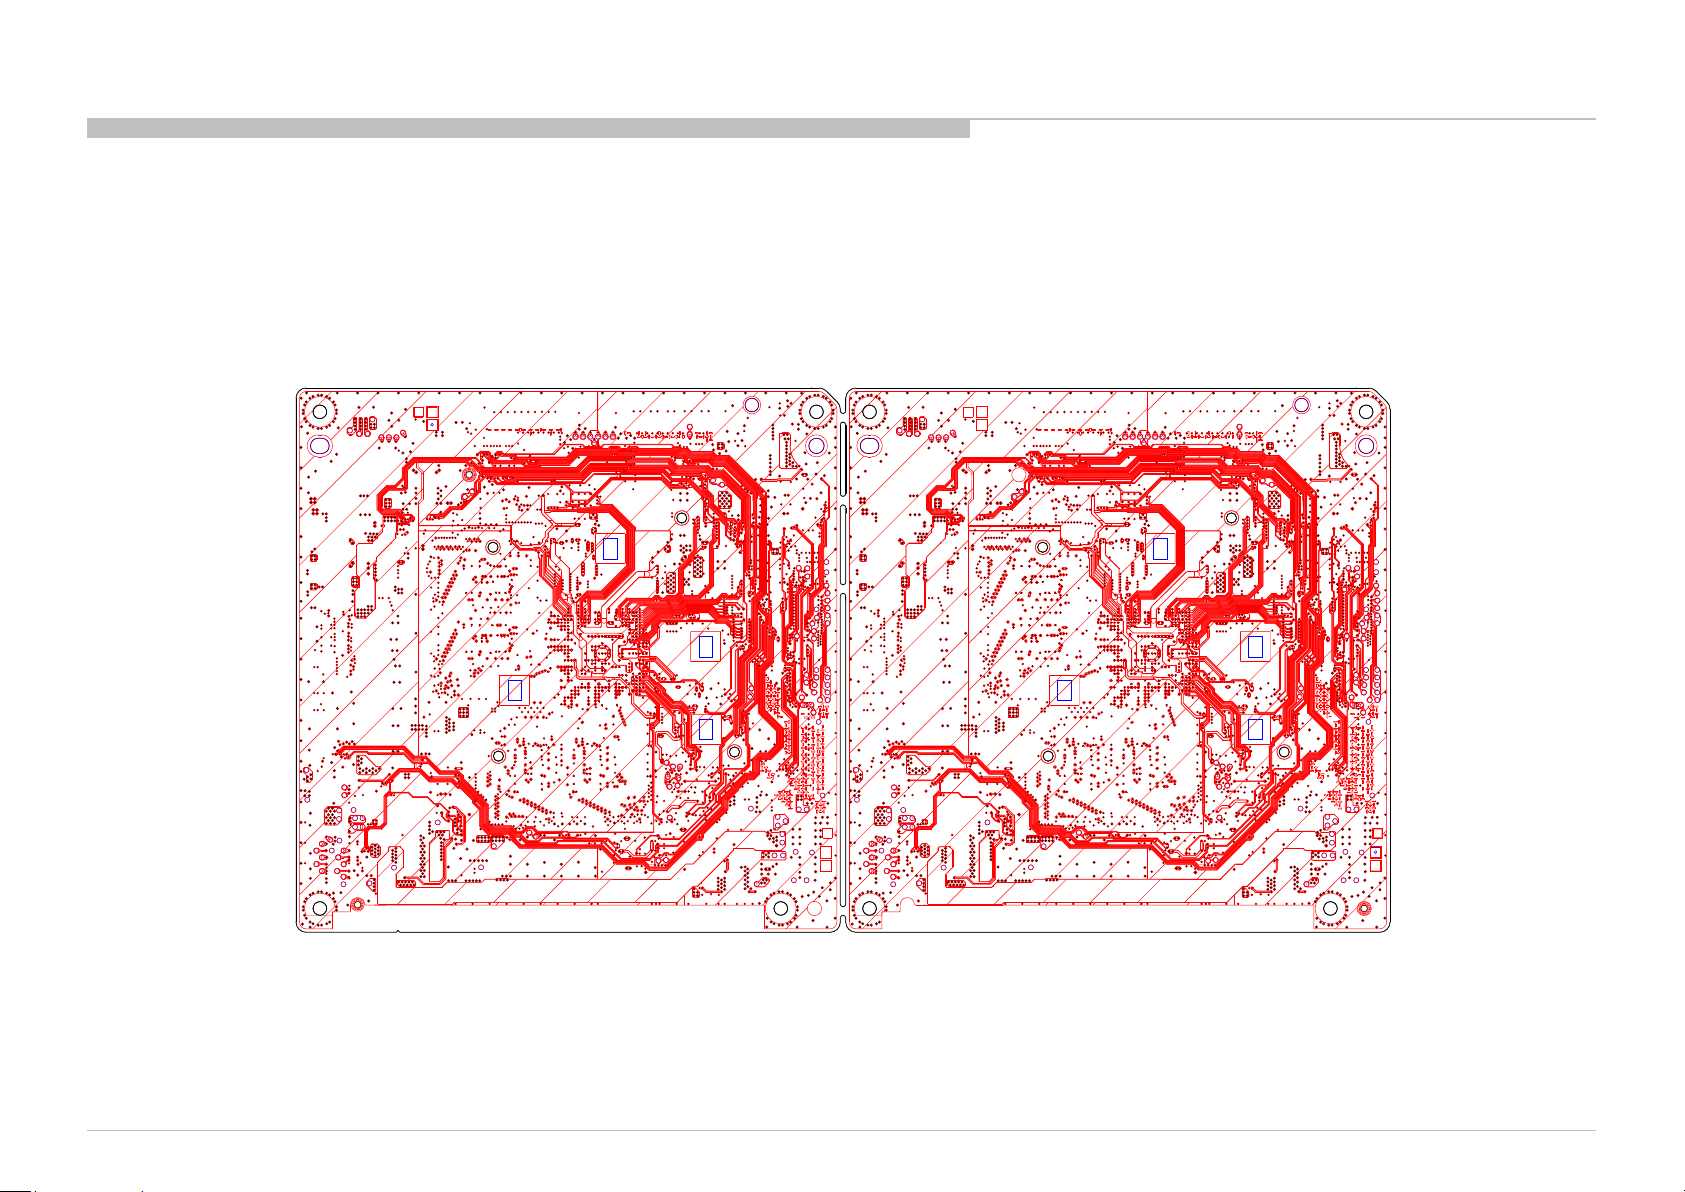
PCB PARTS MAP
DPS (B side view)
TROUBLE SHOOTING
cam008 KB001
JL7703 JL7703
JL7700
JL7701 JL7701JL7702 JL7702
cam10011 cam10011
cam10019 cam10019
cam20008 cam20008
cam018 cam018
cam10023 cam10023
cam20017
cam10096 cam10096
cam10016 cam10016
JL442 JL442
JL443
JL441 JL441
JL444
JL445 JL445
JL440 JL440
JL401
JL402
JL439
JL427 JL427
JL438 JL438
5 JL425
JL42
JL446 JL446
JL436 JL436
JL434 JL434JL435 JL435
JL437 JL437
JL432 JL432JL433 JL433
JL430 JL430
JL431 JL431
JL428 JL428JL429
JL424
JL415 JL415
JL416 JL416
IRM003
JL7707 JL7707
JL7704 JL7704JL7705 JL7705JL7706 JL7706
cam10020 cam10020
JL412 JL412
cam20208 cam20208
cam20209 cam20209
cam20210 cam20210
JL7738 JL7738
JL7739 JL7739
ET207 ET207
JL411 JL411
JL414 JL414
JL413 JL413
JL201 JL201
JL202 JL202JL203 JL203JL204 JL204JL205 JL205JL206 JL206
JL200 JL200
1
ET206 ET206
CL3604 CL3604
CL3109 CL3109
1
JL8301 JL8301
JL8300 JL8300
JL3602 JL3602
JL3600
JL7736 JL7736
JL7737 JL7737
JL7729 JL7729
JL7735 JL7735
JL7731 JL7731
JL7730 JL7730
JL7732 JL7732
JL7751 JL7751
JL7734 JL7
JL7727 JL7727
JL7726 JL7726
JL7725 JL7725
JL7708 JL7708
JL7724 JL7724
JL7722 JL7722
JL7723 JL7723
JL7721 JL7721
JL7728 JL7728
JL7733 JL7733
CL8706 CL8706
CL8707
CL8708
CL8709 CL8709
CL8710
CL8711 CL8711
1
ET205 ET205
JL3105 JL3105
JL3104 JL3104
1
ET204 ET204
JL3107 JL3107
JL3100 JL3100
JL3101 JL3101
JL3102 JL3102
JL3103 JL3103
JL3109 JL
JL3108
JL3106
JL3603 JL3
JL3601
JL422 JL422
JL7740 JL7740
JL7709 JL7709
JL7720 JL7720
JL7710
JL7714 JL7714
JL7719 JL7719
JL7711 JL7711
JL7713 JL7713
JL7718 JL7718
JL7712 JL7712
JL7717 JL7717
JL8703
JL7715 JL7715JL7716 JL7716
JL8700 JL8700
JL8701 JL8701
JL8704 JL8704
JL8702 JL8702
JL8705 JL8705
JL444
JL407 JL407
JL419 JL419
JL406
JL418
JL423 JL423
JL405 JL405
JL417 JL417
JL420 JL420
JL409 JL409
JL404 JL404
JL410 JL410
JL403 JL403
JL421 JL421
JL400 JL400
KJ003KJ004
JL7700
cam20017
JL3600
1
734
CL8707
CL8708
CL8710
1
1
JL7710
JL8703
1
3109
JL443
JL402
1
JL40
JL439
JL429
JL424
JL3108
JL3106
603
JL3601
JL406
JL418
cam006
IRM004
KB002
KD-55/65XD9305
58
Page 59
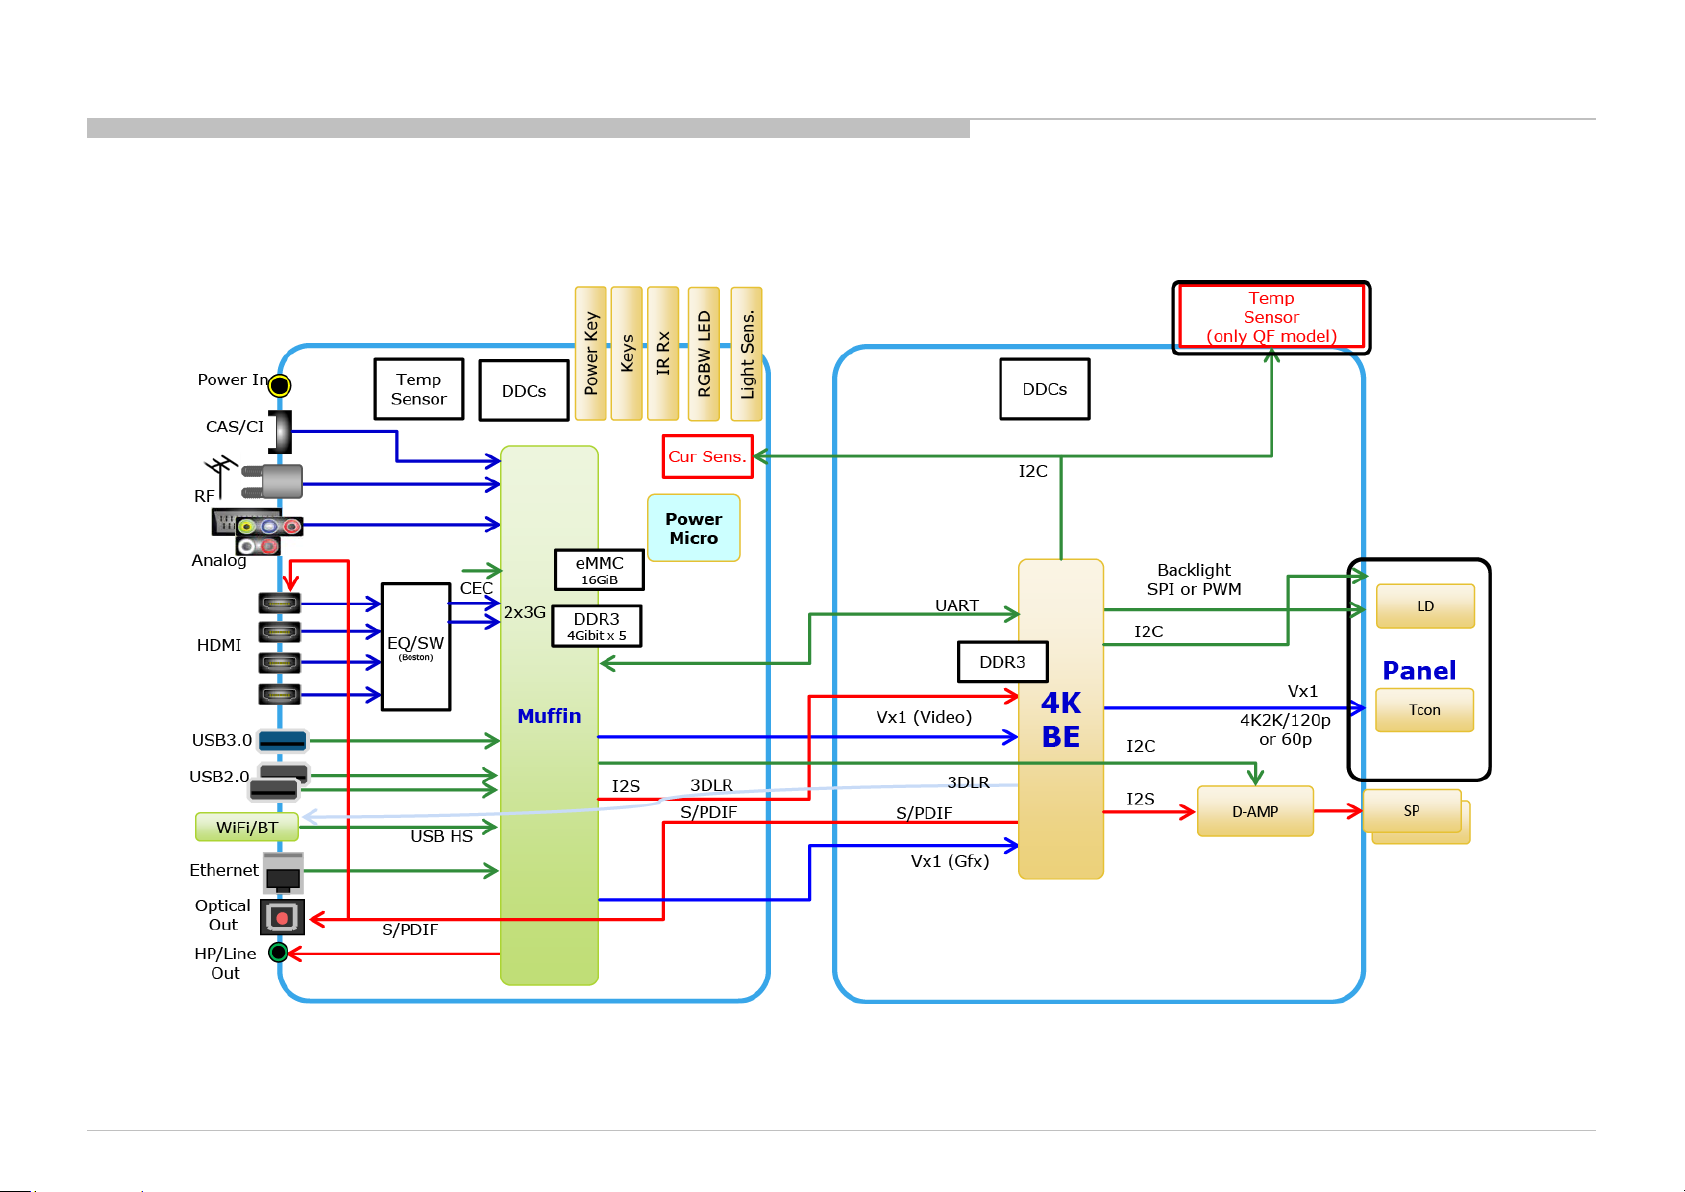
DIAGRAMS
BLOCK DIAGRAM
KD-55/65XD9305
59
Page 60
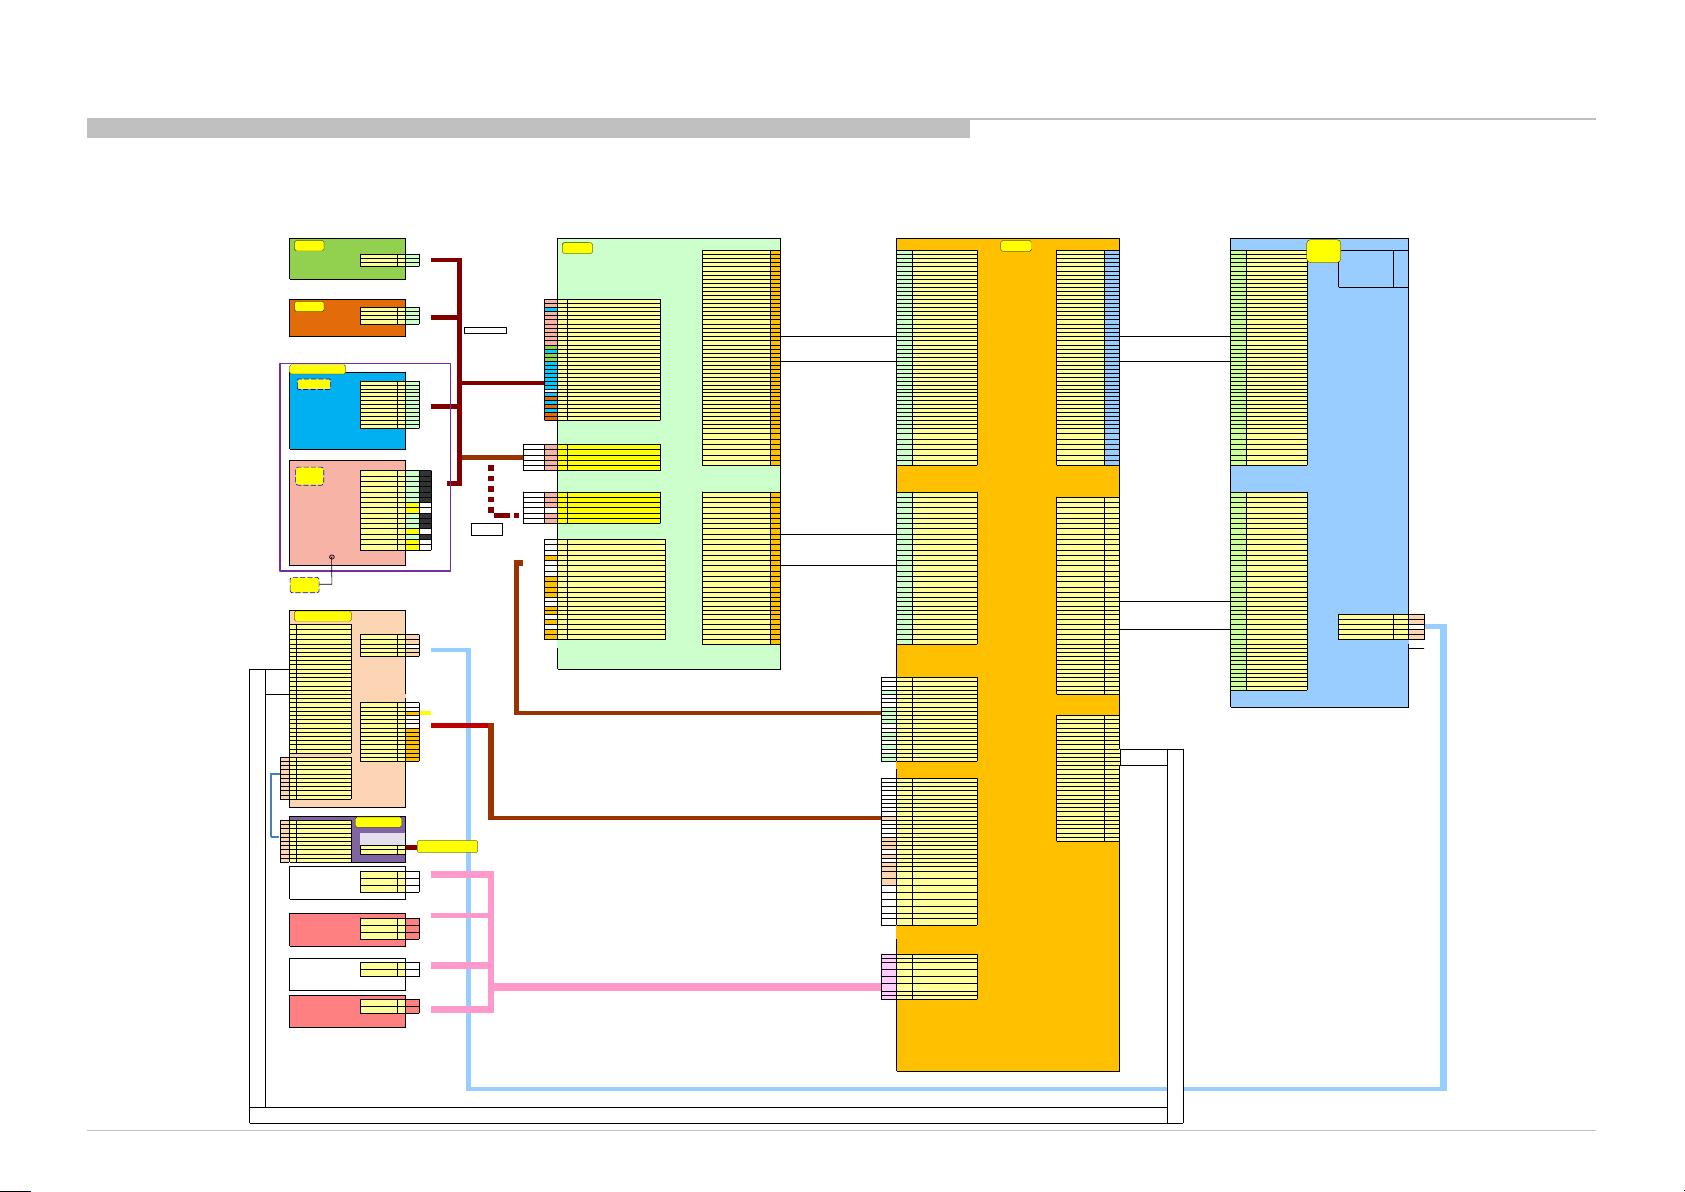
CONNECTOR DIAGRAM
CN870 1 CN870 0 CN360 1 To BMFW
CN203 GND 1 51 GND GND 1 51 GND
1-798-510-31 HUS_GND 1 15 #30
VBTX11P
2 50
VBTX11P
VBTX7P 2 50 RxP7
HUS_KEY_AD 2 12 #30
VBTX11N
3 49
VBTX11N
VBTX7N 3 49 RxN7
HUS_POWER_KEY 3 14 #30
GND
4 48
GND
GND 4 48 GND
1-822-693-11 1-821-900-11
VBTX10P
5 47
VBTX10P
VBTX6P 5 47 RxP6
JAM SZ15-03WLR VBTX10N 6 46 VBTX10N VBTX6N 6 46 RxN6
GND 7 45 GND GND 7 45 GND
VBTX9P 8 44 VBTX9P VBTX5P 8 44 RxP5
VBTX9N 9 43 VBTX9N VBTX5N 9 43 RxN5
GND 10 42 GND GND 10 42 GND
VBTX8P 11 41 VBTX8P VBTX4P 11 41 RxP4
CN100 1 VBTX8N 12 40 VBTX8N VBTX4N 12 40 RxN4
6 1 WIFI_STB Y_3.3V GND 13 39 GND GND 13 39 GND
2 2 X_WIFI_ BT_RST VBTX7P 14 38 VBT X7P VBTX3P 14 38 RxP3
TS_MAIN_+3.3V 1 30 #30 1 3 SC_STBY_3.3V
VBTX7N
15 37
VBTX7N
VBTX3N 15 37 RxN3
TS_SCL 2 25 #30 3 4 X_WIFI_WAKEUP
GND
16 36
GND
GND 16 36 GND
TS_SDA 3 29 #30 1 5
WIFI_GND VBTX6P
17 35
VBTX6P
VBTX2P 17 35 RxP2
TS_GND 4 27 #30 4 6 X_BT_WAKEUP
VBTX6N
18 34
VBTX6N
VBTX2N 18 34 RxN2
1-821-144-11 1-821-118-11
5 7 WIFI_GND GND 19 33 GND GND 19 33 GND
SYT10-04WL SYT10-04HG 11 8
3D_LR VBTX5P
20 32
VBTX5P
VBTX1P 20 32 RxP1
9 9 WIFI_GND VBTX5N 21 31 VBTX5N VBTX1N 21 31 RxN1
10 10 X_BT_ WAKE2 GND 22 30 GND GND 22 30 GND
13 11
WIFI_GND VBTX4P
23 29
VBTX4P
VBTX0P 23 29 RxP0
2 12
KEY_AD VBTX4N 24 28 VBTX4N VBTX0N 24 28 RxN0
2 13 5V_MAIN GND 25 27 GND GND 25 27 GND
3 14 POWER_KEY VBTX3P 26 26 VBTX3P VBTXLOCKN0 26 26 LOCKN
1 15 WIFI_GND VBTX3N 27 25 VBTX3N VBTXH TPDN0 27 25 HTPDN
11 16 SC_OPT_ SENSE GND 28 24 GND GND 28 24 GND
3 17 SC_GND VBTX2P 29 23 VBTX2P NC 29 23 SDC Use
12 18 SC_SIRCS VBTX2N 30 22 VBTX2N NC 30 22 SDC Use
10 19 SC_MAIN_3 .3V GND 31 21 GND BITSEL 31 21 SDC Use
CN001 4 20 SC_LED_AMBER VBTX1P 32 20 VBTX1P /WP/(BINT) 32 20 B_INT (High:Write / L/Open: Protect)
STBY3.3V 1 3 #30 9 21 SC_GND VBTX1N 33 19 VBTX1N SCL 33 19 SCL
5V_MAIN 2 13 #30 5 22 SC_LED_PWM_W GND 34 18 GND SDA 34 18 SDA
GND 3 17 #30 NC 23
KEY_GND VBTX0P 35 17 VBTX0P 3D_EN/ (MUTE) 35 17 3D_EN
LED_AMBER 4 20 #30 8 24 SC_LED_PWM_G VBTX0N 36 16 VBTX0N 3D_SYNC_IN 36 16 3D_Sync_In
LED_PWM_W 5 22 #30 2 25 TS_SCL GND 37 15 GND 3D_SY NC_OUT 37 15 SDC U se
LED_STBY_PWM_R 6 28 #30 7 26 SC_LED_PWM_B VBTXLOCKN0 38 14 VBTXLOCKN0 GND 38 14 GND
LED_STBY_PWM_B 7 26 #30 4 27 TS_GND VBTXLOCKN1 39 13 VBTXLOCKN1 PANEL_DET 39 13 GND
LED_STBY_PWM_G 8 24 #30 6 28 SC_LED_PWM_R VB1_REQ 40 12 VB1 _REQ GND 40 12 GND
GND 9 21 #30 3 29
TS_SDA(TS_TEMP) BOO TUP_NOTE 41 11 BOOTUP_NOTE NC/GND 41 11 GND
MAIN_3.3V 10 19 #30 1 30
TS_MAIN_+3.3V X_BE_RST 42 10 X_BE_RST NC 42 10 GND
OPT_SENSE 11 16 #30 BL_MUTE 43 9 BL_MUTE NC 43 9 NC
SIRCS 12 18 #30 1-819-455-11 1-818-693-22 BL_ON 44 8 BL_ON NC(PANEL_RESETX)/12V 44 8 NC
1-821-139-11 1-821-126-11
SHLDP-30V-S-1 (B) JST SM30B- SHL DS-G ANF-1 -TF( LF)( SN)
BE_SCL
45 7
BE_SCL
NC(PANEL_READY)/12V 45 7 NC
JAM SYT 10- 12WS SYT10-12H G
BE_SDA
46 6
BE_SDA
NC/12V 46 6 NC
CN100 2
FE_TX_BE_RX
47 5
FE_TX_BE_RX
NC(PANEL_PWR)/12V
47 5 NC
USB 14 1
WIFI_USB_M FE_RX_BE_TX
48 4
FE_RX_BE_TX
NC(PANEL_ON)/12V 48 4 NC
USB 15 2
WIFI_USB_P 3D_ LR
49 3
3D_LR
NC(ABL_HOT2)/12V 49 3 NC
USB 12 3
WIFI_GND BE_WDTEXP
50 2
BE_WDTEXP
NC(ABL_HOT1)/12V 50 2 NC
USB 8 4
WIFI_STBY_3.3V GND
51 1
GND
NC(ABL_HOT0)/12V 51 1 NC
USB Cable(UL2725) USB 7 5
WIFI_STBY_3.3V
1-819-812-11
GND 1 5 #30 FFC Dire ct C onn ecto r :I PEX FFC Dir ect Con nec tor :IPEX FFC Dir ect Con nec tor : IPEX JAE/FI- RE51 S-HF
RST_L 2 2 #30 1-821-119-11 1-821-145-11 or Yamaic hi 1-8 43- 107 -12 or Y amaic hi 1-8 43-1 07- 12
WOW_L 3 4 #30 SYT10-05HG J AM SY T10 -05 ?
WOBT1_L 4 6 #30 CN1 003 C N770 4 CN77 08 To BM FL
GND 5 7 #30 USB 7 1
WIFI_STBY_3.3V GND_D
1 30
GND_D
CN360 0 41
VCC 6 1 #30 USB 14 2
WIFI_USB_M AOSDATA1
2 29
AOSDATA1
NC/HTPDN1/ELTIMO3/POWER_ON
1 40
VCC 7 5 1 BL K#28 USB 15 3
WIFI_USB_P AOSDATA0
3 28
AOSDATA0
NC/LOCKN1/ABL_PHT/READY 2 39
VCC 8 4 1 RED #28 NC 4
NC AOLRCK
4 27
AOLRCK
NC/SDA/PANEL_ERROR/PANEL ON
3 38
GND 9 9 #30 USB 8 5
WIFI_STBY_3.3V GND_D
5 26
GND_D
NC/SCL/PANEL_ERROR 4 37 NC (SPI_CS)
WOBT2_L 10 10 #30 USB 12
Shell
WIFI_GND AOBCK
6 25
AOBCK
SPI_CS 5 36 NC (SPI_CK)
VSYNC 11 8 #30 1-822-425-11
GND_D
7 24
GND_D
SPI_CK 6 35
GND 12 3 1 Shie ld USB mini-B ACON USB min i-AB
AOMCLK
8 23
AOMCLK
SPI_DEVICE_SEL
NC/RESETX 7 34
GND 13 11 #30 CN9 000
GND_D
9 22
GND_D
NC 8 33
DM 14 1 1 WHT #28 NC 20 NC(VPP_PIC)
X_DAMP_MUTE
10 21
X_DAMP_MUTE
NC 9 32
DP 15 2 1 GRN# 28 NC 19 NC
X_AMP_ERR_DET
11 20
X_AMP_ERR_DET
NC 10 31
1-819-332-11 1-819-502-11 NC 18 NC
X_DAMP_RESET
12 19
X_DAMP_RESET
NC 11 30 NC
JST SM 15B- GHS- TB( LF)( SN)
GHR-15V-S #22 17 17 MAIN_3.3V
I2C_C_SCL
13 18
I2C_C_SCL
VCA/(SPI_SEL0) 12 29 NC
NC 16 NC
I2C_C_SDA
14 17
I2C_C_SDA
BUS_SW 13 28 NC
NC 15 MAIN_5V(NC)
NC
15 16
NC
SPI_DI/(WDT) 14 27 NC
NC 14 NC
DC_DET_VTH
16 15
DC_DET_VTH
SPI_DO 15 26 NC
#22 13 13 REG_12V
POWER_ON
17 14
POWER_ON
SPI_ENB 16 25 GND
#22 12 12 GND
P_ON_#1
18 13
P_ON_#1
GND 17 24 RxP15
#22 11 11 REG_12V
P_ON_#2
19 12
P_ON_#2
VBTX15P 18 23 RxN15
#22 10 10 REG_24V_12V
GND_D
20 11
GND_D
VBTX15N 19 22 GND
NC 9
REG_24V_12V BE_ECS_RX
21 10
BE_ECS_RX
GND 20 21 RxP14
NC 8
GND BE_ECS_TX
22 9
BE_ECS_TX
VBTX14P 21 20 RxN14
#22 7 7 GND BE_LOG_RX 23 8 BE_LOG_RX VBTX14N 22 19 GND
#22 6 6
GND BE_LOG_TX
24 7
BE_LOG_TX
GND 23 18 RxP13 J110
NC 5
NC(POWER_ON/ICSPDAT)
GND_D
25 6
GND_D
VBTX13P 24 17 RxN13
GND Ground
1
1 AWG#22
CN6002
#22 4 4
GND
TEMP_SENS/TEMP_SNS_SDA
26 5
TEMP_SENS/TEMP_SNS_SDA
VBTX13N 25 16 GND
GND Ground
2
2 AWG#22
30
GND
1-844-492-11
NC 3
NC(BL_ON/ICSPCLK)
TEMP_SENS_SCL
27 4
TEMP_SENS_SCL
GND 26 15 RxP12
PWR Power V12 IN
3
NC
29
NC(TM_ECS_TX)
20022WR-05AML YEONHO 20022HS-05L1
#22 2 2
GND
GND_D
28 3
GND_D
VBTX12P 27 14 RxN12
PWR Power V12 IN
4
4 AWG#22
28
NC(TM_ECS_RX)
T-CON12V
5
5 #22 1 1
STBY_3.3V_IN
BL_ERR_DET
29 2
BL_ERR_DET
VBTX12N 28 13 GND
PWR Power V12 IN 5
5 AWG#22
27
LD_ERR_DET
T-CON12V
4
4 1-843-150-11
1-843-151-11
4KBE_DET
30 1
4KBE_DET
GND 29 12 RxP11
※新規部品
26
TM_LOG_TX
T-CON12V
3
NC PBDP-20V-S
JST SM20B-PBDSS-TF
1-843-858-71 VBTX11P 30 11 RxN11 20022WR-05P
YEONHO 20022HS-05
25
TM_LOG_RX
GND
2
2 IMSA-9 637 S-30 -Y8 00 IMSA-96 37S- 30- Y80 0 VBTX11N 31 10 GND
24
TM_MODE0
GND
1
1 GND 32 9 RxP10
23
NC(TM_RESET) VBTX10P 33 8 RxN10
22
Reserve VBTX10N 34 7 GND
21TM_RDY_MO N GND 35 6 RxP9
20
TM_SCL VBTX9P 36 5 RxN9
19
TM_SDA CN400 VBTX9N 37 4 GND
18
P_SENS_MON(QX) NC 20
NC
GND 38 3 RxP8
17
TM_DRV_EMIT NC 19
NC
VBTX8P 39 2 RxN8
16
TM_SPI_SYNC NC 18
NC
VBTX8N 40 1 GND
15
GND
CN6001
17 17
MAIN_3.3V
GND 41 1-819-564-11
14
TM_DRV_SPI_MOSI_01
YEONHO 1-822-228-11
NC 16
NC
1-843-708-12 JAE/FI- RE41 S-HF
13
TM_DRV_SPI_MISO_01
20022W R-14AM L YEONHO 20022HS-14L1
NC 15
MAIN_5V(NC)
HF507 S-41 -72 (05 )
12TM_DRV_SPI_SCK_ 01 NC
14 NC NC 14 NC
11
TM_DRV_SPI_NSS_01
NC
13 NC
13 13
REG_12V
10
GND
BL_ERR
12 21
#22 12 12
GND
CN830 1
9
TM_DRV_SPI_MOSI_00
SA_ADIM_L
11 NC
11 11
REG_12V
GND 1
8
TM_DRV_SPI_MISO_00
SA_ADIM_H
10 NC
10 10
REG_24V_12V
NC(TM_ECS_TX) 2
7
TM_DRV_SPI_SCK_00
GND
9 NC
NC 9
REG_24V_12V
NC(TM_ECS_RX) 3
6
TM_DRV_SPI_NSS_00
24V_SS
8 16
#22 NC 8
GND
LD_ERR_DET 4
5
GND
24V_SS
7 15
#22 7 7
GND
TM_LOG_TX 5
4
TCON_ON
24V_A
6 14
#22 6 6
GND
TM_LOG_RX 6
3
SA_MODE
24V_A
5 12
#22 NC 5
NC
TM_MODE0 7
2
Reserve
GND
4 10
#22 4 4
GND
NC(TM_RESET) 8
1
BL_ON
GND
3 9
#22 NC 3
NC
Reserve 9
GND
2 8
#22 2 2
GND
TM_RDY_MON 10
110+24V
GND
1 7
#22 1 1
STBY_3.3V_OUT
TM_SCL 11
29+24V 1-843-150-11 1-843-151-11 TM_SDA 12
38+24V PBDP-20V-S JST SM20B-PBDSS-TF P_SENS_MON(QX) 13
47+24V TM_DRV_EMIT 14
56+24V CN401 TM_SPI_SYNC 15
65GND NC 30
GND
GND 16
74GND NC 29
GND
TM_DRV_SPI_MOSI_01
17
83GND NC 28
BLINKING
TM_DRV_SPI_MISO_01
18
92GND NC 27
PWM1_DIMMER
TM_DRV_SPI_SCK_01 19
101GND NC 26
DC_DIMMER
TM_DRV_SPI_NSS_01 20
CN6003
NC 25
PWM2_DIMMER
GND 21
20022WR-H10AML NC 24 STBY_3.3V
TM_DRV_SPI_MOSI_00
22
YEONHO 20022HS-10 L1 1-843-5 58-11 NC 23
PWM3_DIMMER
TM_DRV_SPI_MISO_00
23
NC 22 BL_ON/ICSPCLK TM_DRV_SPI_SCK_00 24
CN101
12 21
BL_ERR
TM_DRV_SPI_NSS_00 25
101+24V NC 20
POWER_ON/ICSPDAT
GND 26
92+24V NC 19
GND
TCON_ON 27
83+24V NC 18
PWM3
SA_MODE 28
74+24V
24V 角型ジャック
NC 17
GND
Reserve 29
65+24V
J6003
8 16
REG_24V_12V
BL_ON 30
56GND
1-844-445-11
7 15
REG_24V_12V
47GND
+
6 14
REG_24V_12V_Audio
38GND
-
NC 13
REG_12V
29GND 5 12
REG_24V_12V_Audio
1 10 GND NC 11
REG_12V
JST PBVP10V-S 1-842-596- 11 4 10 GND
3 9
GND
Main sp eaker
L+ 1A 1 #22 2 8 GND
NC 2A NC 1 7 GND
Lch
L- 3A 2 #22 NC 6 DC_DET_VTH
JST SMP-03VF-N NC 5
GND
1-818-961-21 NC 4 NC(TCON_VCC12V)
NC 3
TCON_ON
NC 2
NC(TCON_VCC12V)
Main sp eaker
R+ 1C 4 #22 NC 1 NC
NC 2C NC
1-843-960-11 1-843-953-11
Rch
R- 3C 3 #22 SJE20-30HG
JAM SJE20-30WH-ET
JST SMP-03VF-N
1-818-961-21
CN770 9
1A 1
3A 2
Tweete r
L+ 1B 8 #22 3C 3
L- 2B 7 #22 1C 4
Lch
JST SMP-02VF-N 1D 5 SP_TW_RP
1-784-991-21 2D 6 SP_TW_RN
2B 7 SP_TW_LN
1B 8 SP_TW_LP
Tweete r
R+ 1D 5 #22 1-842-595-11 1-842-568-12
R- 2D 6 #22 PBVP08V-S SM08B-PBVSS-TB(LF)(SN)(PS)
Rch
JST SMP-02VF-N
JST
1-784-991-21
FFC
1-842-546-21
SP_MAIN_LP
PANEL FFC
FFC
or Yam aich i 1- 843 -10 7-1 2
1-842-546-21
FFC
FFC
1-843-858-71
SP_MAIN_RN
GND
SP_MAIN_LN
FFC
SP_MAIN_RP
1-842-546-21
Main Harness
BAX_F
AC Adaptor 24V
GN2 Smart Core
BM1
HSC4
VM
BT
Antena
LD Board
Wifi/BT
FY15
DPS
TSI
T-con
Board
For only EMI
measurement
単独ハーネス
単独ハーネス
J Board
1. KD-55XD9305
DIAGRAMS
KD-55/65XD9305
60
Page 61
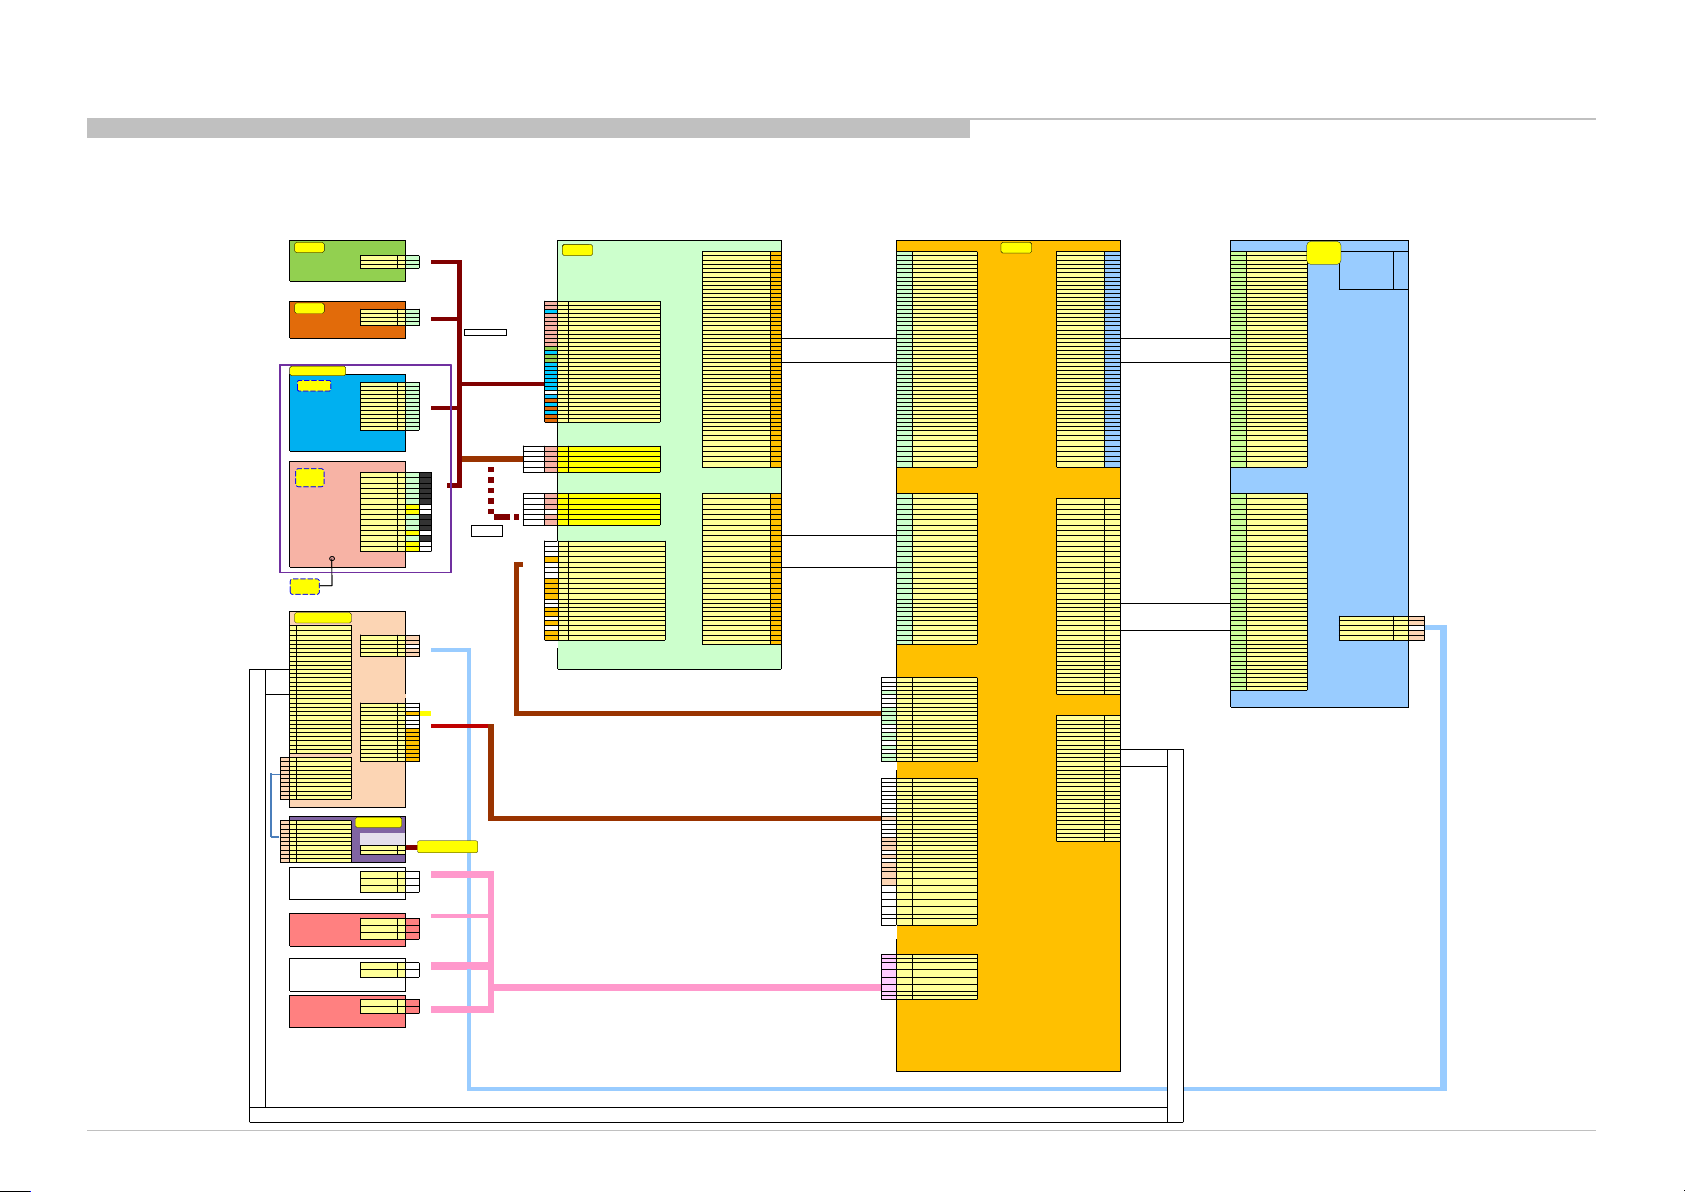
CN870 1 CN870 0 CN360 1 To BMFW
CN203 GND 1 51 GND GND 1 51 GND
1-798-510-31 HUS_GND 1 15 #30
VBTX11P
2 50
VBTX11P
VBTX7P 2 50 RxP7
HUS_KEY_AD 2 12 #30
VBTX11N
3 49
VBTX11N
VBTX7N 3 49 RxN7
HUS_POWER_KEY 3 14 #30
GND
4 48
GND
GND 4 48 GND
1-822-693-11 1-821-900-11
VBTX10P
5 47
VBTX10P
VBTX6P 5 47 RxP6
JAM SZ15-03WLR VBTX10N 6 46 VBTX10N VBTX6N 6 46 RxN6
GND 7 45 GND GND 7 45 GND
VBTX9P 8 44 VBTX9P VBTX5P 8 44 RxP5
VBTX9N 9 43 VBTX9N VBTX5N 9 43 RxN5
GND 10 42 GND GND 10 42 GND
VBTX8P 11 41 VBTX8P VBTX4P 11 41 RxP4
CN100 1 VBTX8N 12 40 VBTX8N VBTX4N 12 40 RxN4
6 1 WIFI_STB Y_3.3V GND 13 39 GND GND 13 39 GND
2 2 X_WIFI_ BT_RST VBTX7P 14 38 VBT X7P VBTX3P 14 38 RxP3
TS_MAIN_+3.3V 1 30 #30 1 3 SC_STBY_3.3V
VBTX7N
15 37
VBTX7N
VBTX3N 15 37 RxN3
TS_SCL 2 25 #30 3 4 X_WIFI_WAKEUP
GND
16 36
GND
GND 16 36 GND
TS_SDA 3 29 #30 1 5
WIFI_GND VBTX6P
17 35
VBTX6P
VBTX2P 17 35 RxP2
TS_GND 4 27 #30 4 6 X_BT_WAKEUP
VBTX6N
18 34
VBTX6N
VBTX2N 18 34 RxN2
1-821-144-11 1-821-118-11
5 7 WIFI_GND GND 19 33 GND GND 19 33 GND
SYT10-04WL SYT10-04HG 11 8
3D_LR VBTX5P
20 32
VBTX5P
VBTX1P 20 32 RxP1
9 9 WIFI_GND VBTX5N 21 31 VBTX5N VBTX1N 21 31 RxN1
10 10 X_BT_ WAKE2 GND 22 30 GND GND 22 30 GND
13 11
WIFI_GND VBTX4P
23 29
VBTX4P
VBTX0P 23 29 RxP0
2 12
KEY_AD VBTX4N 24 28 VBTX4N VBTX0N 24 28 RxN0
2 13 5V_MAIN GND 25 27 GND GND 25 27 GND
3 14 POWER_KEY VBTX3P 26 26 VBTX3P VBTXLOCKN0 26 26 LOCKN
1 15 WIFI_GND VBTX3N 27 25 VBTX3N VBTXH TPDN0 27 25 HTPDN
11 16 SC_OPT_ SENSE GND 28 24 GND GND 28 24 NC
3 17 SC_GND VBTX2P 29 23 VBTX2P NC 29 23 INX Use
12 18 SC_SIRCS VBTX2N 30 22 VBTX2N NC 30 22 NC
10 19 SC_MAIN_3 .3V GND 31 21 GND BITSEL 31 21 INX Use
CN001 4 20 SC_LED_AMBER VBTX1P 32 20 VBTX1P /WP/(BINT) 32 20 B_INT (High:Write / L/Open: Protect)
STBY3.3V 1 3 #30 9 21 SC_GND VBTX1N 33 19 VBTX1N SCL 33 19 SCL
5V_MAIN 2 13 #30 5 22 SC_LED_PWM_W GND 34 18 GND SDA 34 18 SDA
GND 3 17 #30 NC 23
KEY_GND VBTX0P 35 17 VBTX0P 3D_ EN/(MUTE) 35 17 3D_EN
LED_AMBER 4 20 #30 8 24 SC_LED_PWM_G VBTX0N 36 16 VBTX0N 3D_SYNC_IN 36 16 3D_Sync_In
LED_PWM_W 5 22 #30 2 25 TS_SCL GND 37 15 GND 3D_SY NC_OUT 37 15 INX Use
LED_STBY_PWM_R 6 28 #30 7 26 SC_LED_PWM_B VBTXLOCKN0 38 14 VBTXLOCKN0 GND 38 14 GND
LED_STBY_PWM_B 7 26 #30 4 27 TS_GND VBTXLOCKN1 39 13 VBTXLOCKN1 PANEL_DET 39 13 GND
LED_STBY_PWM_G 8 24 #30 6 28 SC_LED_PWM_R VB1_REQ 40 12 VB1 _REQ GND 40 12 GND
GND 9 21 #30 3 29
TS_SDA(TS_TEMP) BOO TUP_NOTE 41 11 BOOTUP_NOTE NC/GND 41 11 GND
MAIN_3.3V 10 19 #30 1 30
TS_MAIN_+3.3V X_BE_RST 42 10 X_BE_RST NC 42 10 GND
OPT_SENSE 11 16 #30 BL_MUTE 43 9 BL_MUTE NC 43 9 NC
SIRCS 12 18 #30 1-819-455-11 1-818-693-22 BL_ON 44 8 BL_ON NC(PANEL_RESETX)/12V 44 8 12V
1-821-139-11 1-821-126-11
SHLDP-30V-S-1 (B) JST SM30B- SHL DS-G ANF-1 -TF( LF)( SN)
BE_SCL
45 7
BE_SCL
NC(PANEL_READY)/12V 45 7 12V
JAM SYT 10- 12WS SYT10-12H G
BE_SDA
46 6
BE_SDA
NC/12V 46 6 12V
CN100 2
FE_TX_BE_RX
47 5
FE_TX_BE_RX
NC(PANEL_PWR)/12V
47 5 12V
USB 14 1
WIFI_USB_M FE_RX_BE_TX
48 4
FE_RX_BE_TX
NC(PANEL_ON)/12V 48 4 12V
USB 15 2
WIFI_USB_P 3D_ LR
49 3
3D_LR
NC(ABL_HOT2)/12V 49 3 12V
USB 12 3
WIFI_GND BE_WDTEXP
50 2
BE_WDTEXP
NC(ABL_HOT1)/12V 50 2 12V
USB 8 4
WIFI_STBY_3.3V GND
51 1
GND
NC(ABL_HOT0)/12V 51 1 12V
USB Cable(UL2725) USB 7 5
WIFI_STBY_3.3V
1-819-812-11
GND 1 5 #30 FFC Dire ct C onn ecto r :I PEX FFC Dir ect Con nec tor : IPEX FFC Dir ect Con nec tor : IPEX JAE/FI- RE51 S-HF
RST_L 2 2 #30 1-821-119-11 1-821-145-11 or Yamaic hi 1-8 43- 107 -12 or Y amaic hi 1-84 3-1 07- 12
WOW_L 3 4 #30 SYT10-05HG J AM SY T10 -05 ?
WOBT1_L 4 6 #30 CN1 003 C N770 4 CN77 08 To BM FL
GND 5 7 #30 USB 7 1
WIFI_STBY_3.3V GND_D
1 30
GND_D
CN360 0 41 NC
VCC 6 1 #30 USB 14 2
WIFI_USB_M AOSDATA1
2 29
AOSDATA1
NC/HTPDN1/ELTIMO3/POWER_ON
1 40 NC
VCC 7 5 1 BL K#28 USB 15 3
WIFI_USB_P AOSDATA0
3 28
AOSDATA0
NC/LOCKN1/ABL_PHT/READY 2 39 NC
VCC 8 4 1 RED #28 NC 4
NC AOLRCK
4 27
AOLRCK
NC/SDA/PANEL_ERROR/PANEL ON
3 38 NC
GND 9 9 #30 USB 8 5
WIFI_STBY_3.3V GND_D
5 26
GND_D
NC/SCL/PANEL_ERROR 4 37 SPI_CS
WOBT2_L 10 10 #30 USB 12
Shell
WIFI_GND AOBCK
6 25
AOBCK
SPI_CS 5 36 SPI_CK
VSYNC 11 8 #30 1-822-425-11
GND_D
7 24
GND_D
SPI_CK 6 35 SPI_ENB_B
GND 12 3 1 Shie ld USB mini-B ACON USB min i-AB
AOMCLK
8 23
AOMCLK
SPI_DEVICE_SEL
NC/RESETX 7 34 NC
GND 13 11 #30 CN9 000
GND_D
9 22
GND_D
NC 8 33 NC
DM 14 1 1 WHT #28 NC 20 NC(VPP_PIC)
X_DAMP_MUTE
10 21
X_DAMP_MUTE
NC 9 32 NC
DP 15 2 1 GRN# 28 NC 19 NC
X_AMP_ERR_DET
11 20
X_AMP_ERR_DET
NC 10 31 NC
1-819-332-11 1-819-502-11 NC 18 NC
X_DAMP_RESET
12 19
X_DAMP_RESET
NC 11 30 VCA
JST SM 15B- GHS- TB( LF)( SN)
GHR-15V-S #22 17 17 MAIN_3.3V
I2C_C_SCL
13 18
I2C_C_SCL
VCA/(SPI_SEL0) 12 29 NC
NC 16 NC
I2C_C_SDA
14 17
I2C_C_SDA
BUS_SW 13 28 SPI_DI (Out)
NC 15 MAIN_5V(NC)
NC
15 16
NC
SPI_DI/(WDT) 14 27 SPI_DO (In)
NC 14 NC
DC_DET_VTH
16 15
DC_DET_VTH
SPI_DO 15 26 SPI_ENB_A
#22 13 13 REG_12V
POWER_ON
17 14
POWER_ON
SPI_ENB 16 25 GND
#22 12 12 GND
P_ON_#1
18 13
P_ON_#1
GND 17 24 RxP15
#22 11 11 REG_12V
P_ON_#2
19 12
P_ON_#2
VBTX15P 18 23 RxN15
#22 10 10 REG_24V_12V
GND_D
20 11
GND_D
VBTX15N 19 22 GND
NC 9
REG_24V_12V BE_ECS_RX
21 10
BE_ECS_RX
GND 20 21 RxP14
NC 8
GND BE_ECS_TX
22 9
BE_ECS_TX
VBTX14P 21 20 RxN14
#22 7 7 GND BE_LOG_RX 23 8 BE_LOG_RX VBTX14N 22 19 GND
#22 6 6
GND BE_LOG_TX
24 7
BE_LOG_TX
GND 23 18 RxP13 J110
NC 5
NC(POWER_ON/ICSPDAT)
GND_D
25 6
GND_D
VBTX13P 24 17 RxN13
GND Ground
1
1 AWG#22
CN6002
#22 4 4
GND
TEMP_SENS/TEMP_SNS_SDA
26 5
TEMP_SENS/TEMP_SNS_SDA
VBTX13N 25 16 GND
GND Ground
2
2 AWG#22
30
GND
1-844-492-11
NC 3
NC(BL_ON/ICSPCLK)
TEMP_SENS_SCL
27 4
TEMP_SENS_SCL
GND 26 15 RxP12
PWR Power V12 IN
3
NC
29
NC(TM_ECS_TX)
20022WR-05AML YEONHO 20022HS-05L1
#22 2 2
GND
GND_D
28 3
GND_D
VBTX12P 27 14 RxN12
PWR Power V12 IN
4
4 AWG#22
28
NC(TM_ECS_RX)
T-CON12V
5
5 #22 1 1
STBY_3.3V_IN
BL_ERR_DET
29 2
BL_ERR_DET
VBTX12N 28 13 GND
PWR Power V12 IN 5
5 AWG#22
27
LD_ERR_DET
T-CON12V
4
4 1-843-150-11
1-843-151-11
4KBE_DET
30 1
4KBE_DET
GND 29 12 RxP11 1-820-264-11
26
TM_LOG_TX
T-CON12V
3
NC PBDP-20V-S
JST SM20B-PBDSS-TF
1-843-858-71 VBTX11P 30 11 RxN11 20022WR-05P PAP-05V-S
25
TM_LOG_RX
GND
2
2 IMSA-9 637 S-30 -Y8 00 IMSA-96 37S- 30- Y80 0 VBTX11N 31 10 GND
24
TM_MODE0
GND
1
1 GND 32 9 RxP10
23
NC(TM_RESET) VBTX10P 33 8 RxN10
22
Reserve VBTX10N 34 7 GND
21TM_RDY_MO N GND 35 6 RxP9
20
TM_SCL VBTX9P 36 5 RxN9
19
TM_SDA CN400 VBTX9N 37 4 GND
18
P_SENS_MON(QX) NC 20
NC
GND 38 3 RxP8
17
TM_DRV_EMIT NC 19
NC
VBTX8P 39 2 RxN8
16
TM_SPI_SYNC NC 18
NC
VBTX8N 40 1 GND
15
GND
CN6001
17 17
MAIN_3.3V
GND 41 1-819-564-11
14
TM_DRV_SPI_MOSI_01
YEONHO 1-822-228-11
NC 16
NC
1-843-708-12 JAE/FI- RE41 S-HF
13
TM_DRV_SPI_MISO_01
20022W R-14AM L YEONHO 20022HS-14L1
NC 15
MAIN_5V(NC)
HF507 S-41 -72 (05 )
12TM_DRV_SPI_SCK_ 01 NC
14 NC NC 14 NC
11
TM_DRV_SPI_NSS_01
NC
13 NC
13 13
REG_12V
10
GND
BL_ERR
12 21
#22 12 12
GND
CN830 1
9
TM_DRV_SPI_MOSI_00
SA_ADIM_L
11 NC
11 11
REG_12V
GND 1
8
TM_DRV_SPI_MISO_00
SA_ADIM_H
10 NC
10 10
REG_24V_12V
NC(TM_ECS_TX) 2
7
TM_DRV_SPI_SCK_00
GND
9 NC
NC 9
REG_24V_12V
NC(TM_ECS_RX) 3
6
TM_DRV_SPI_NSS_00
24V_SS
8 16
#22 NC 8
GND
LD_ERR_DET 4
5
GND
24V_SS
7 15
#22 7 7
GND
TM_LOG_TX 5
4
TCON_ON
24V_A
6 14
#22 6 6
GND
TM_LOG_RX 6
3
SA_MODE
24V_A
5 12
#22 NC 5
NC
TM_MODE0 7
2
Reserve
GND
4 10
#22 4 4
GND
NC(TM_RESET) 8
1
BL_ON
GND
3 9
#22 NC 3
NC
Reserve 9
GND
2 8
#22 2 2
GND
TM_RDY_MON 10
110+24V
GND
1 7
#22 1 1
STBY_3.3V_OUT
TM_SCL 11
29+24V 1-843-150-11 1-843-151-11 TM_SDA 12
38+24V PBDP-20V-S JST SM20B-PBDSS-TF P_SENS_MON(QX) 13
47+24V TM_DRV_EMIT 14
56+24V CN401 TM_SPI_SYNC 15
65GND NC 30
GND
GND 16
74GND NC 29
GND
TM_DRV_SPI_MOSI_01
17
83GND NC 28
BLINKING
TM_DRV_SPI_MISO_01
18
92GND NC 27
PWM1_DIMMER
TM_DRV_SPI_SCK_01 19
101GND NC 26
DC_DIMMER
TM_DRV_SPI_NSS_01 20
CN6003
NC 25
PWM2_DIMMER
GND 21
20022WR-H10AML NC 24 STBY_3.3V
TM_DRV_SPI_MOSI_00
22
YEONHO 20022HS-10 L1 1-843-5 58-11 NC 23
PWM3_DIMMER
TM_DRV_SPI_MISO_00
23
NC 22 BL_ON/ICSPCLK TM_DRV_SPI_SCK_00 24
CN101
12 21
BL_ERR
TM_DRV_SPI_NSS_00 25
101+24V NC 20
POWER_ON/ICSPDAT
GND 26
92+24V NC 19
GND
TCON_ON 27
83+24V NC 18
PWM3
SA_MODE 28
74+24V
24V 角型ジャック
NC 17
GND
Reserve 29
65+24V
J6003
8 16
REG_24V_12V
BL_ON 30
56GND
1-844-445-11
7 15
REG_24V_12V
47GND
+
6 14
REG_24V_12V_Audio
38GND
-
NC 13
REG_12V
29GND 5 12
REG_24V_12V_Audio
1 10 GND NC 11
REG_12V
JST PBVP10V-S 1-842-596- 11 4 10 GND
3 9
GND
Main sp eaker
L+ 1A 1 #22 2 8 GND
NC 2A NC 1 7 GND
Lch
L- 3A 2 #22 NC 6 DC_DET_VTH
JST SMP-03VF-N NC 5
GND
1-818-961-21 NC 4 NC(TCON_VCC12V)
NC 3
TCON_ON
NC 2
NC(TCON_VCC12V)
Main sp eaker
R+ 1C 4 #22 NC 1 NC
NC 2C NC
1-843-960-11 1-843-953-11
Rch
R- 3C 3 #22 SJE20-30HG
JAM SJE20-30WH-ET
JST SMP-03VF-N
1-818-961-21
CN770 9
1A 1
3A 2
Tweete r
L+ 1B 8 #22 3C 3
L- 2B 7 #22 1C 4
Lch
JST SMP-02VF-N 1D 5 SP_TW_RP
1-784-991-21 2D 6 SP_TW_RN
2B 7 SP_TW_LN
1B 8 SP_TW_LP
Tweete r
R+ 1D 5 #22 1-842-595-11 1-842-568-12
R- 2D 6 #22 PBVP08V-S SM08B-PBVSS-TB(LF)(SN)(PS)
Rch
JST SMP-02VF-N
JST
1-784-991-21
GND
SP_MAIN_LP
SP_MAIN_LN
SP_MAIN_RN
PANEL FFC
FFC
FFC
FFC
1-842-546-21
1-842-546-21
1-842-546-21
or Yam aich i 1- 843 -10 7-1 2
FFC
FFC
1-843-858-71
SP_MAIN_RP
Main Harness
BAX_F
GN2 Smart Core
BM1
HSC4
SM
BT
Antena
Wifi/BT
FY16
DPS
TSI
T-con
Board
For only EMI
measurement
Main Harness
BAX_F
AC Adaptor 24V
GN2 Smart Core
BM1
HSC4
VM
BT
Antena
LD Board
Wifi/BT
FY15
DPS
TSI
For only EMI
measurement
単独ハーネス
単独ハーネス
J Board
CONNECTOR DIAGRAM
2. KD-65XD9305
DIAGRAMS
KD-55/65XD9305
61
Page 62
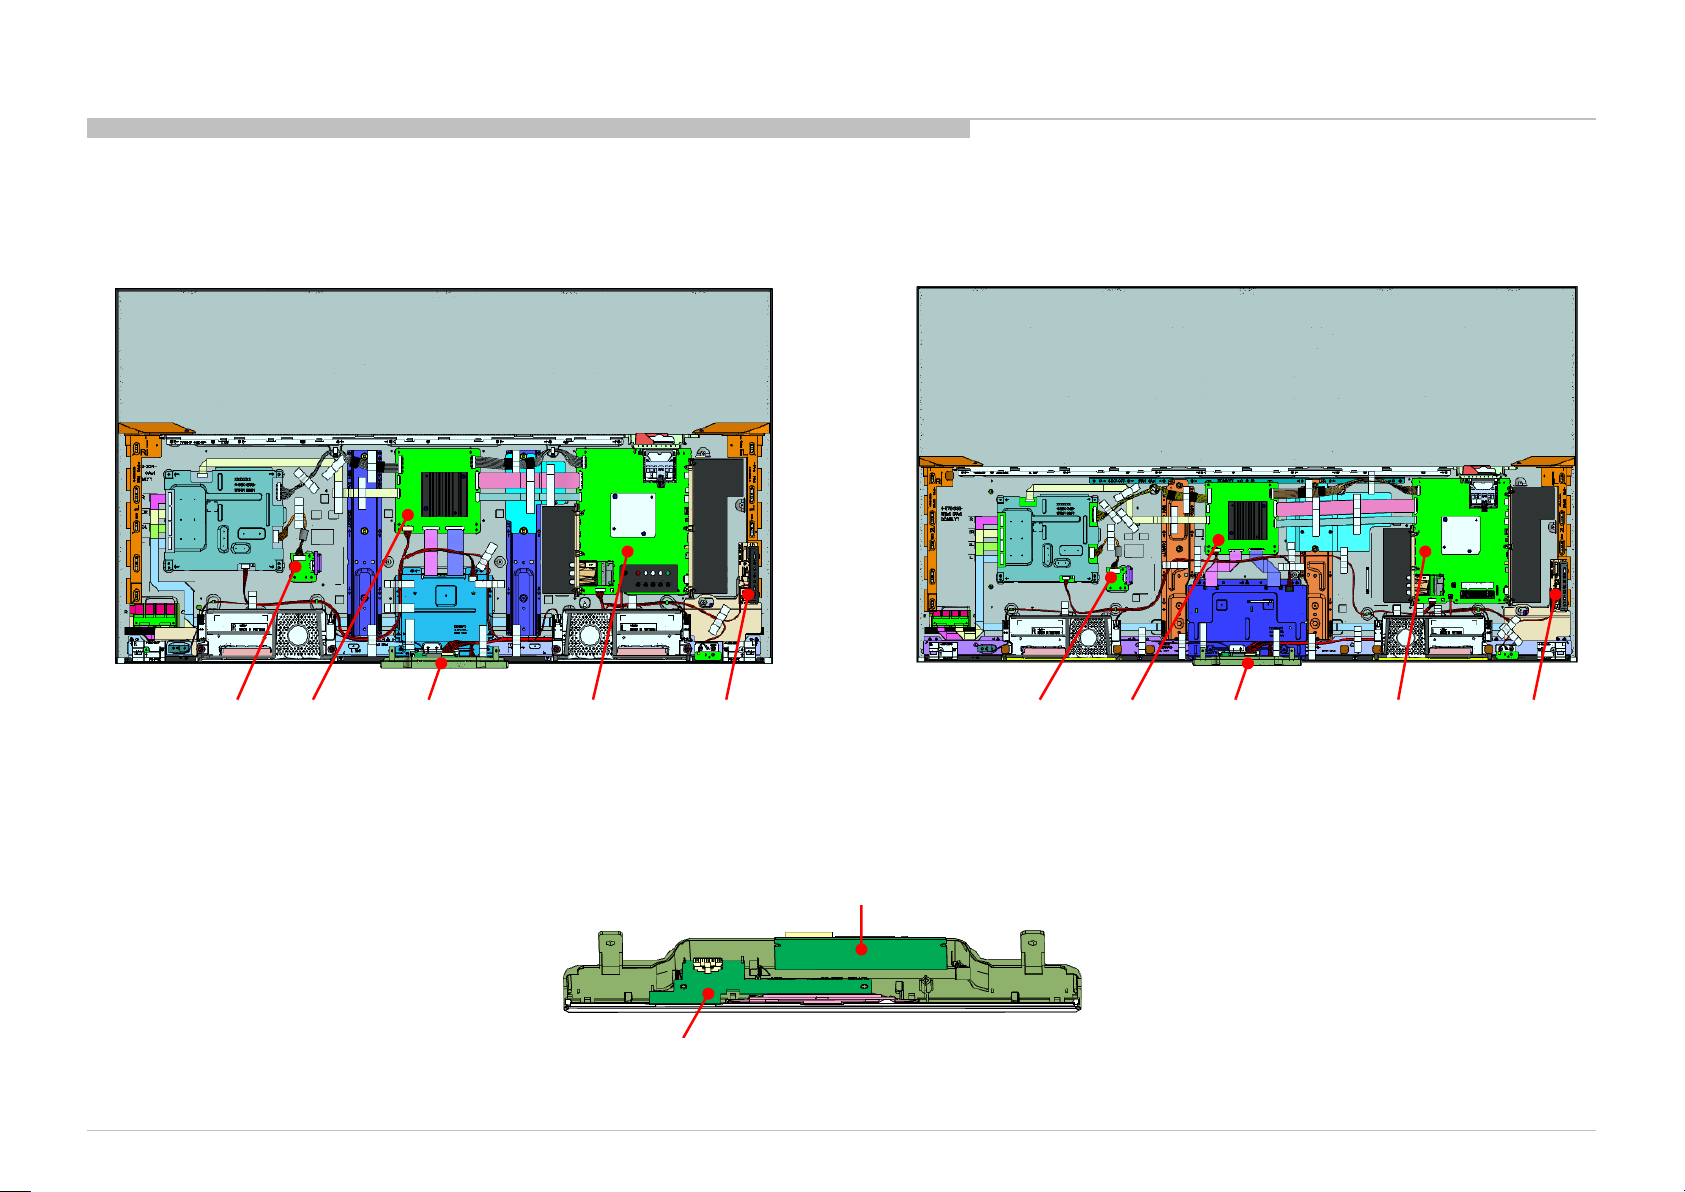
BOARDS LOCATION
DIAGRAMS
KD-55XD9305
J
DPS
BM1
KD-65XD9305
SWITCH UNIT SMART CORE (S) SMART CORE (S)
J
DPS
SMART CORE (S)
SWITCH UNIT BM1
KD-55/65XD9305
WLAN / BT MODULE(11AC)
HSC4-S
62
Page 63
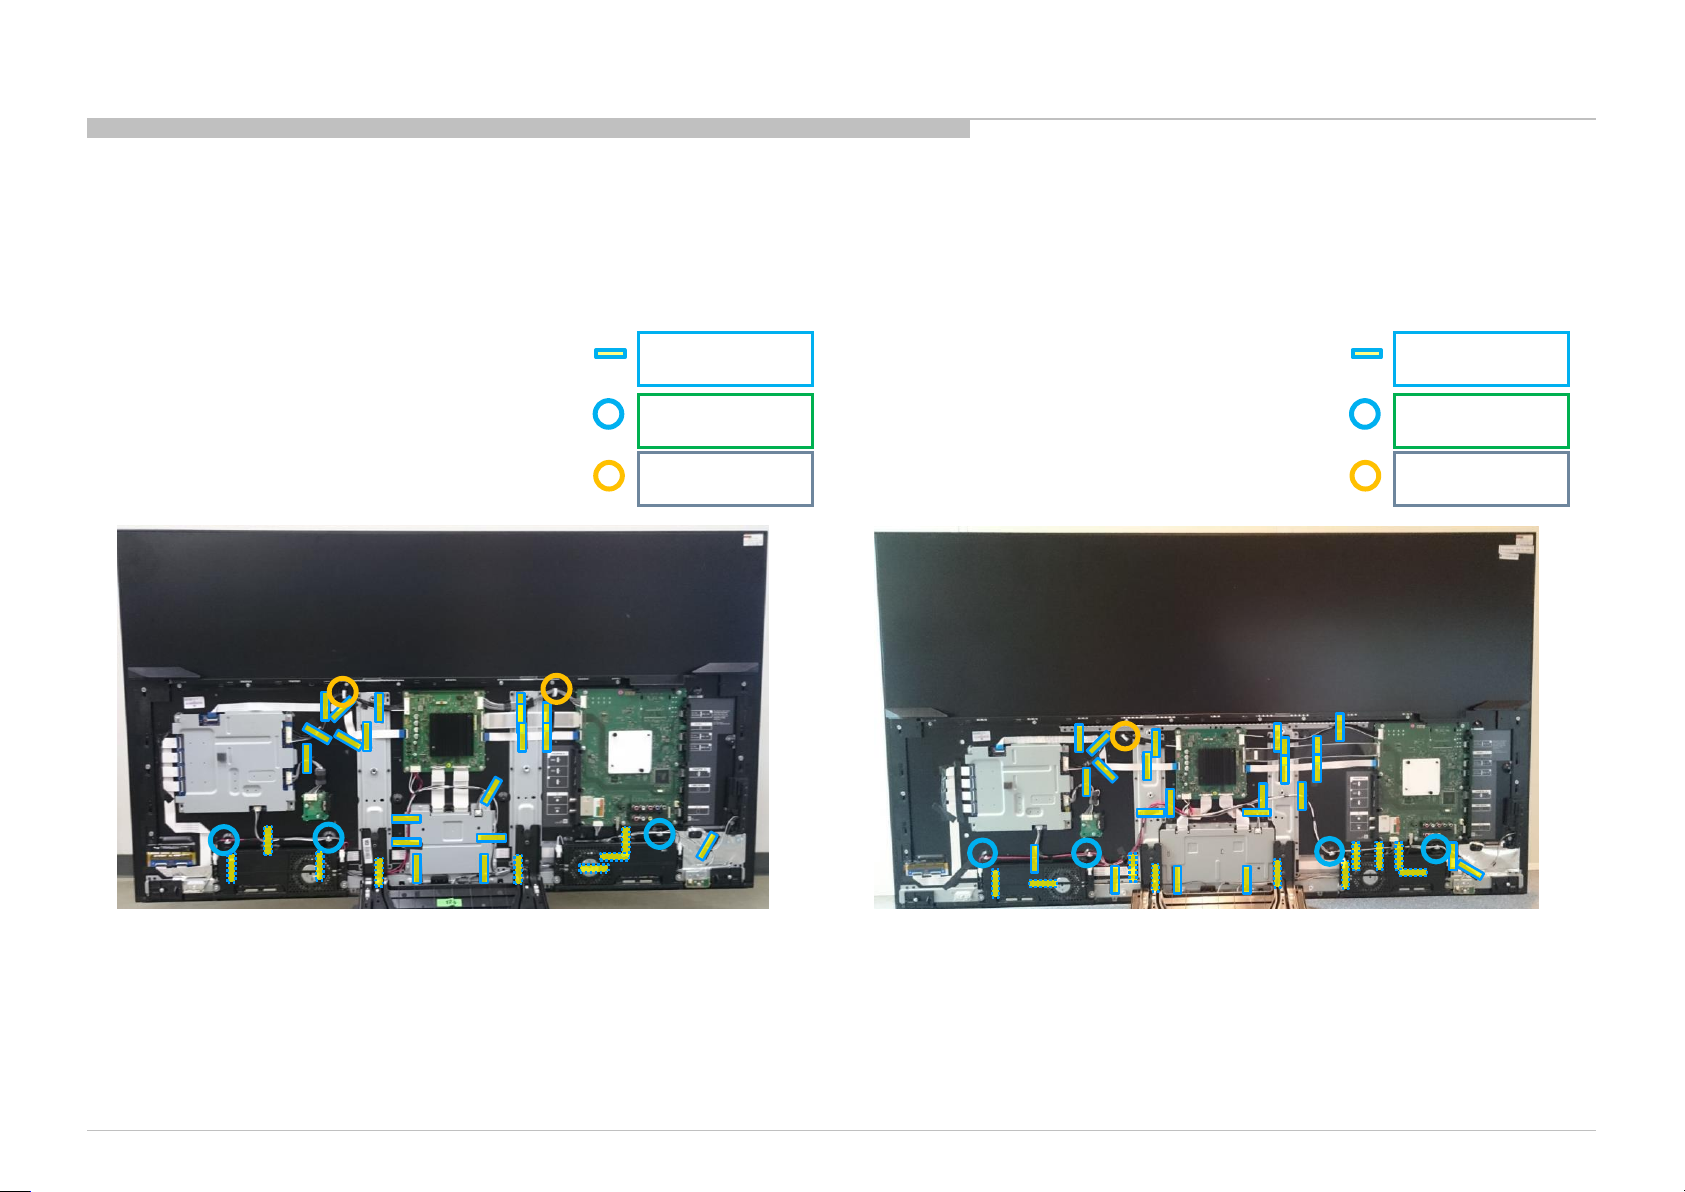
WIRE DRESSING
Overview
KD-55XD9305 KD-65XD9305
VA Tape x27
・Fix wire
Harness Tie x3
• Fix wire
Slide Clamp x2
• Hold wires
VA Tape x33
・Fix wire
Harness Tie x4
• Fix wire
Slide Clamp x1
• Hold wires
KD-55/65XD9305
63
Page 64
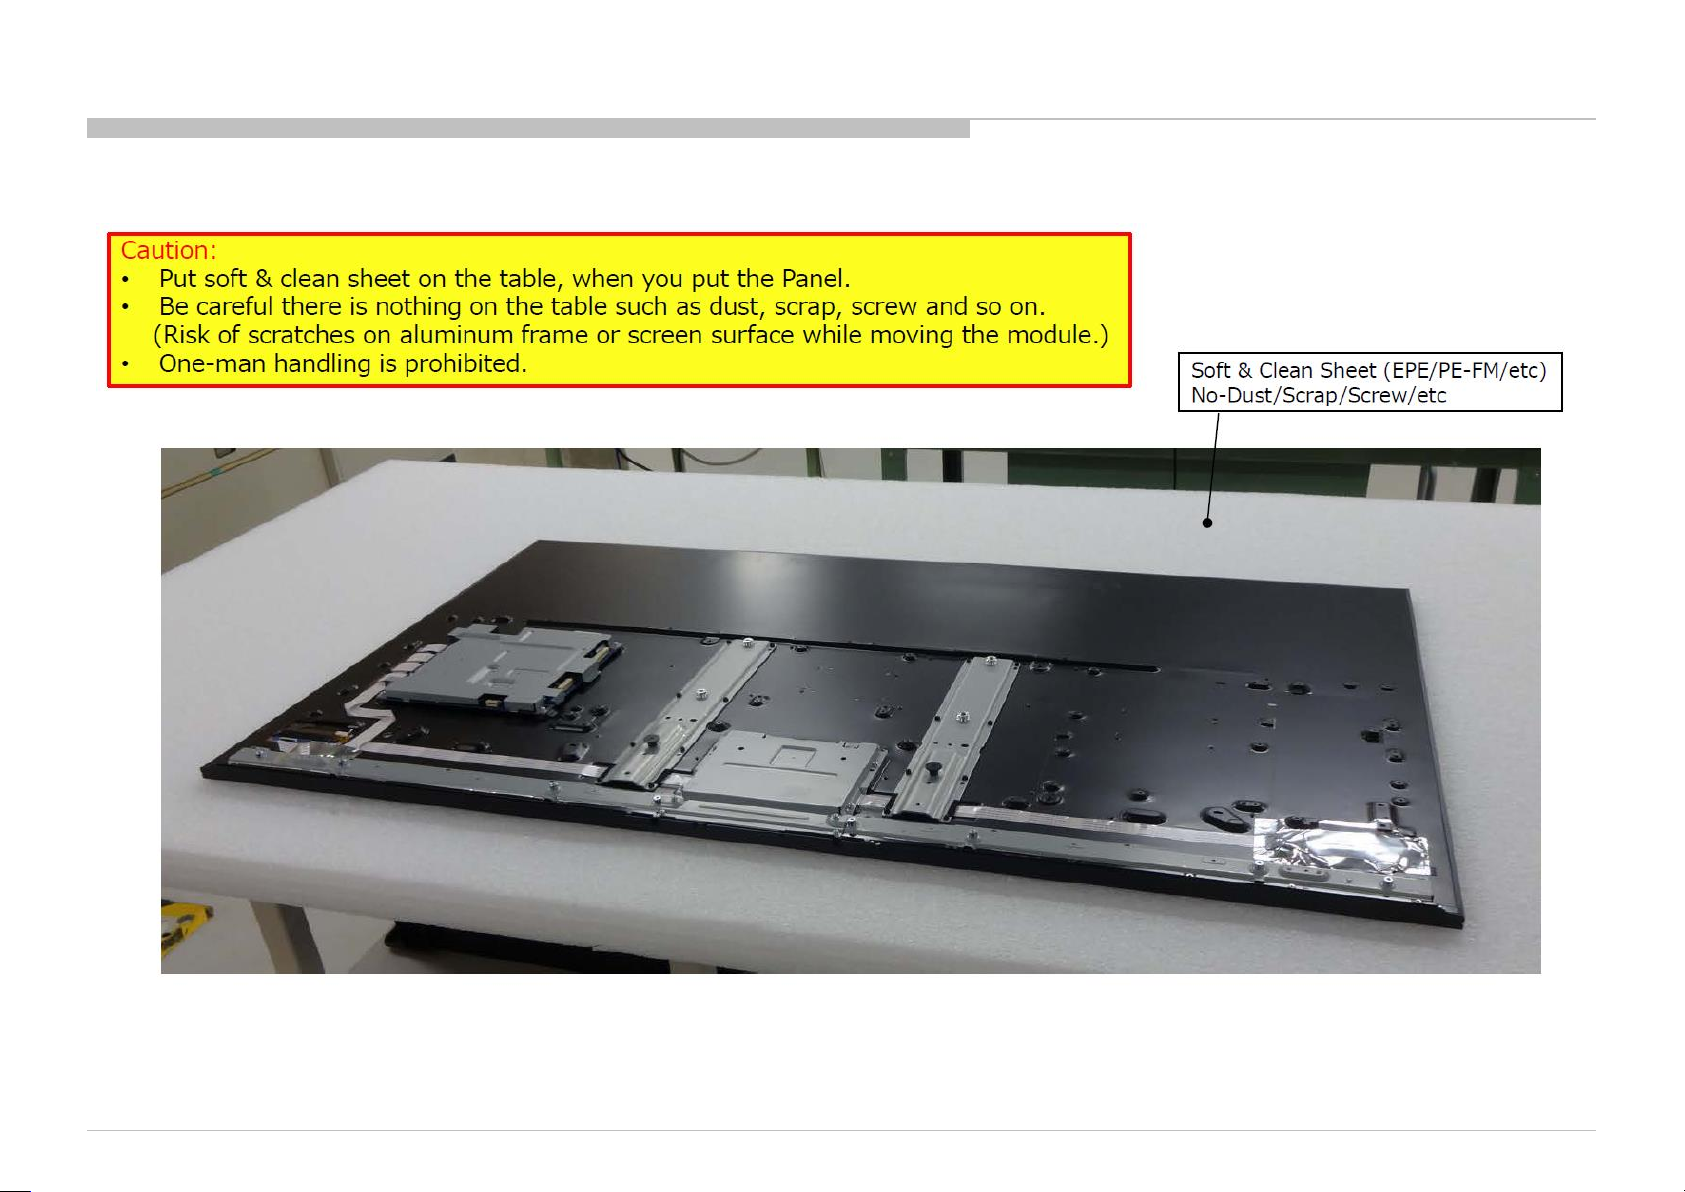
PANEL HANDLING
ON WORKING TABLE *TV set handling is same as Panel basically.
KD-55/65XD9305
64
Page 65
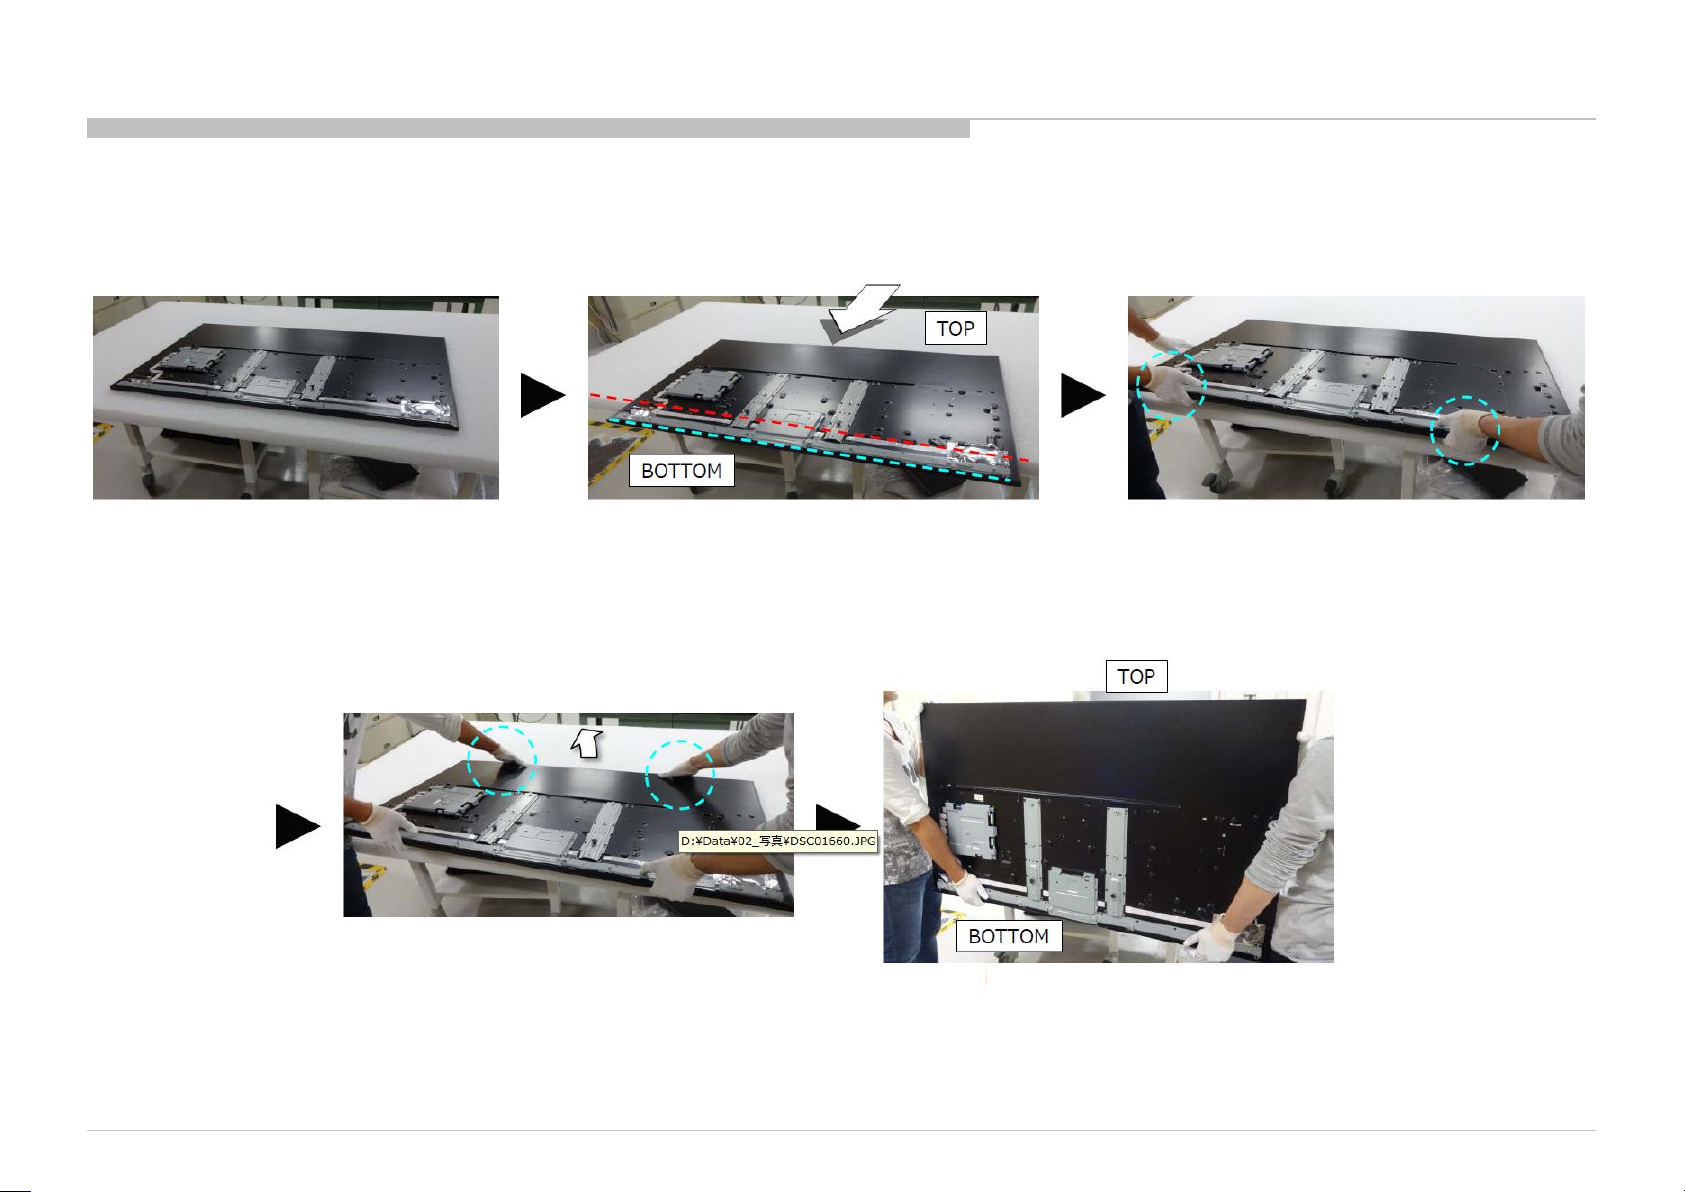
PANEL HANDLING
LIFTING UP
Shift the panel to hold Bottom side
(Don’t slip the panel)
*TV set handling is same as Panel basically.
Hold Bottom side
KD-55/65XD9305
Lift up Top side
Flip up to vertical position
Recommended holding position (Refer to following pages for detail)
65
Page 66
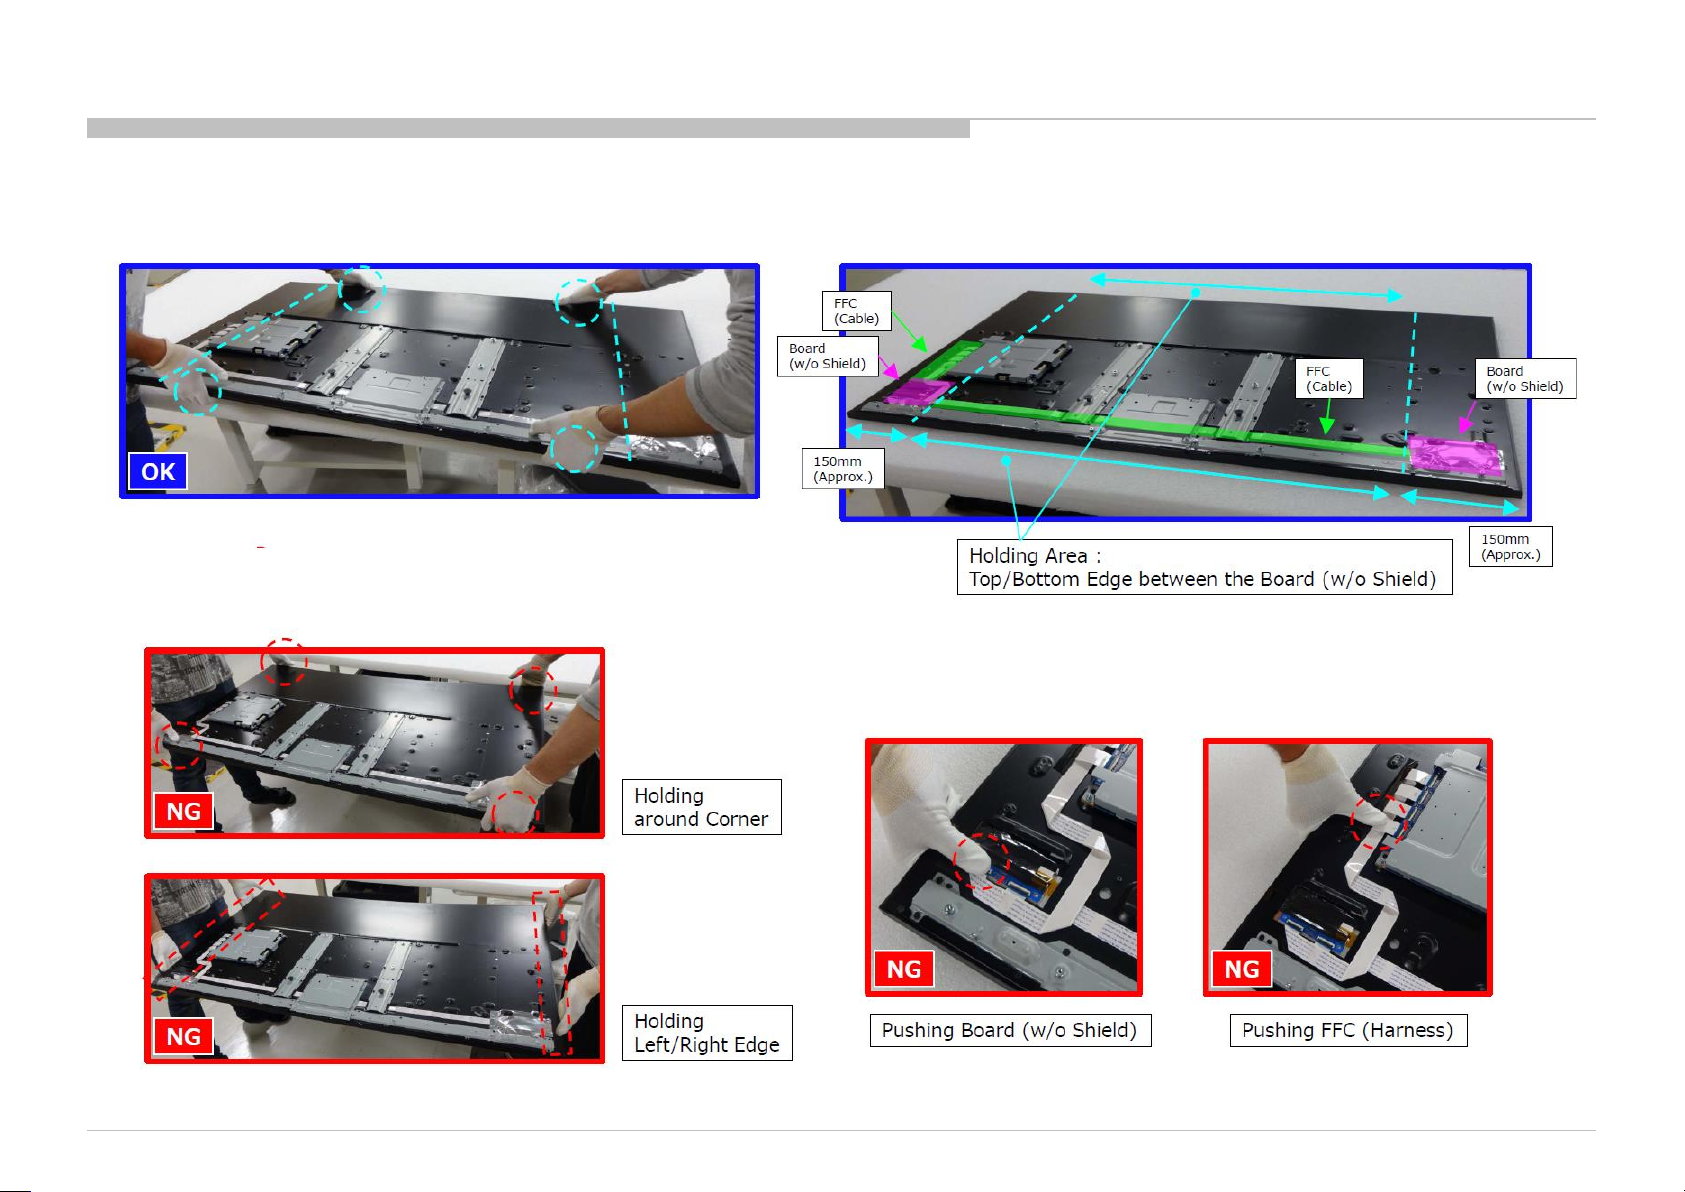
PANEL HANDLING
HOLDING ON HORIZONTAL POSITION *TV set handling is same as Panel basically.
KD-55/65XD9305
66
Page 67
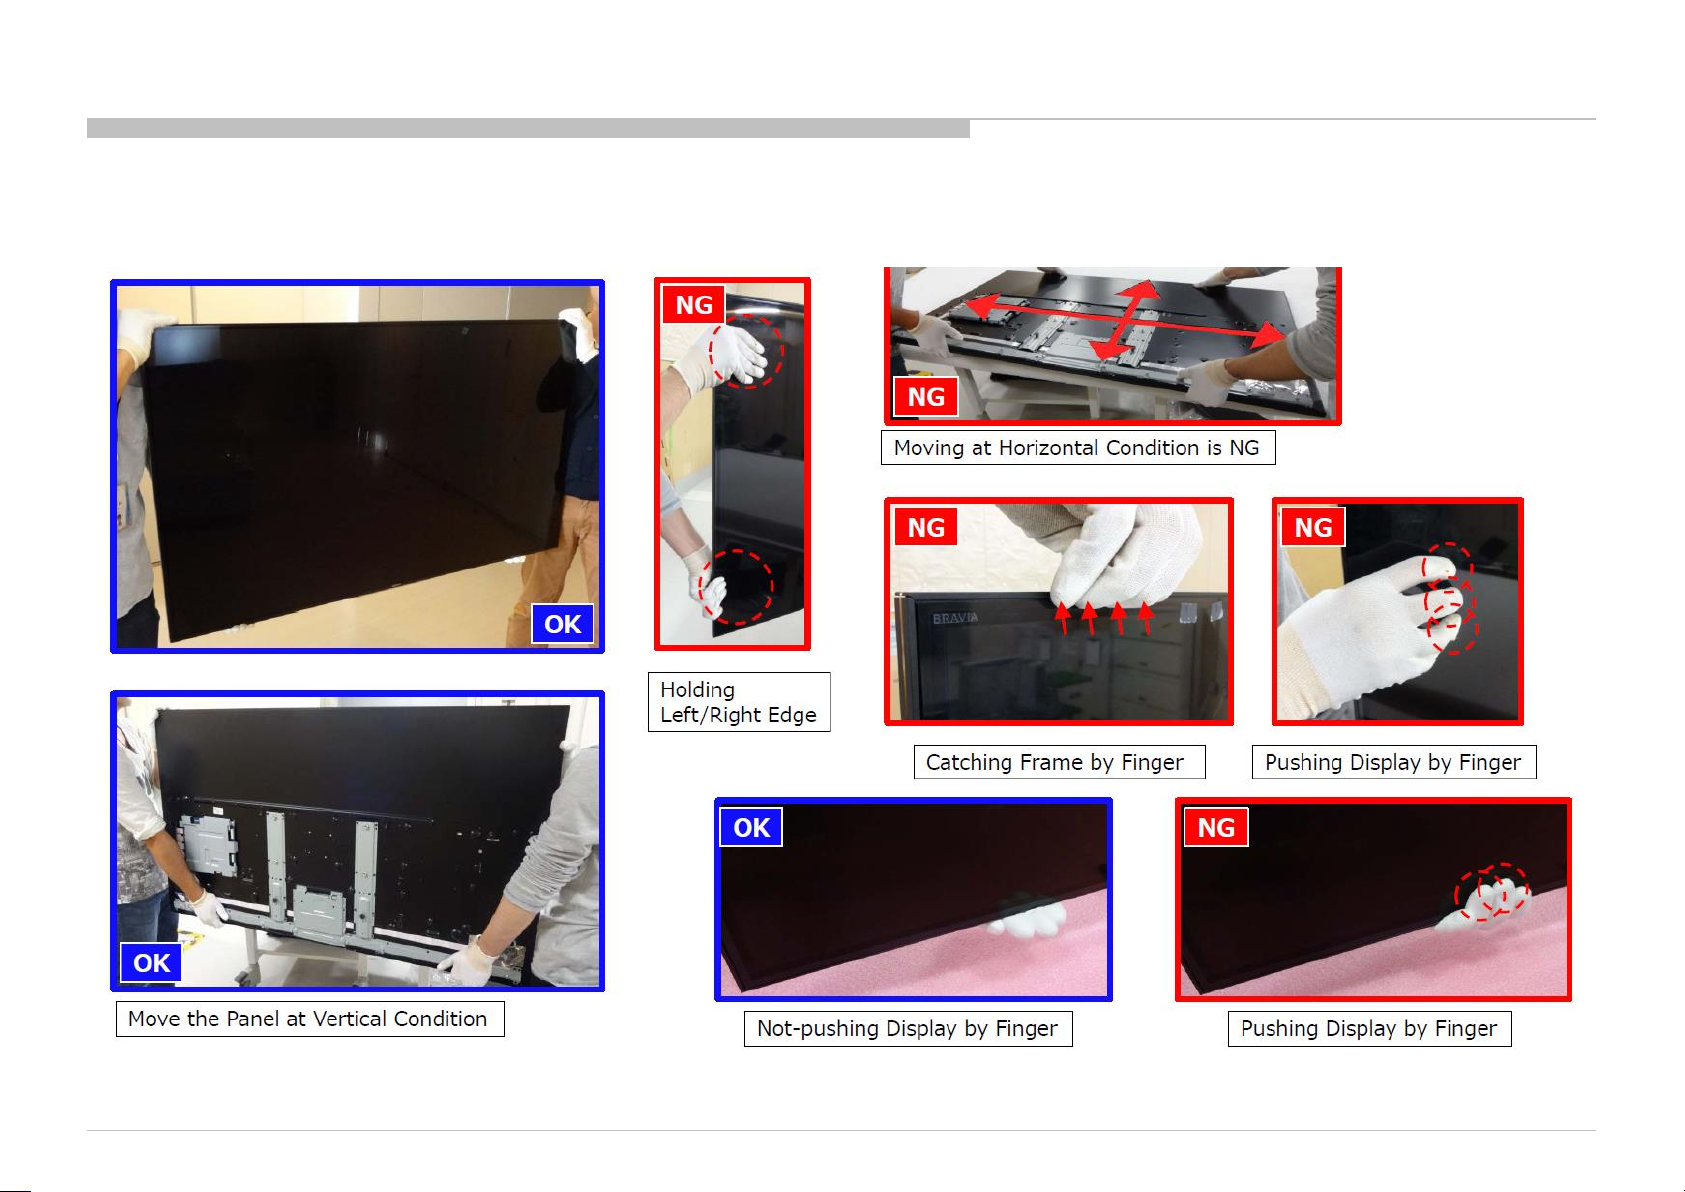
PANEL HANDLING
HOLDING ON VERTICAL POSITION & MOVING *TV set handling is same as Panel basically.
KD-55/65XD9305
67
Page 68
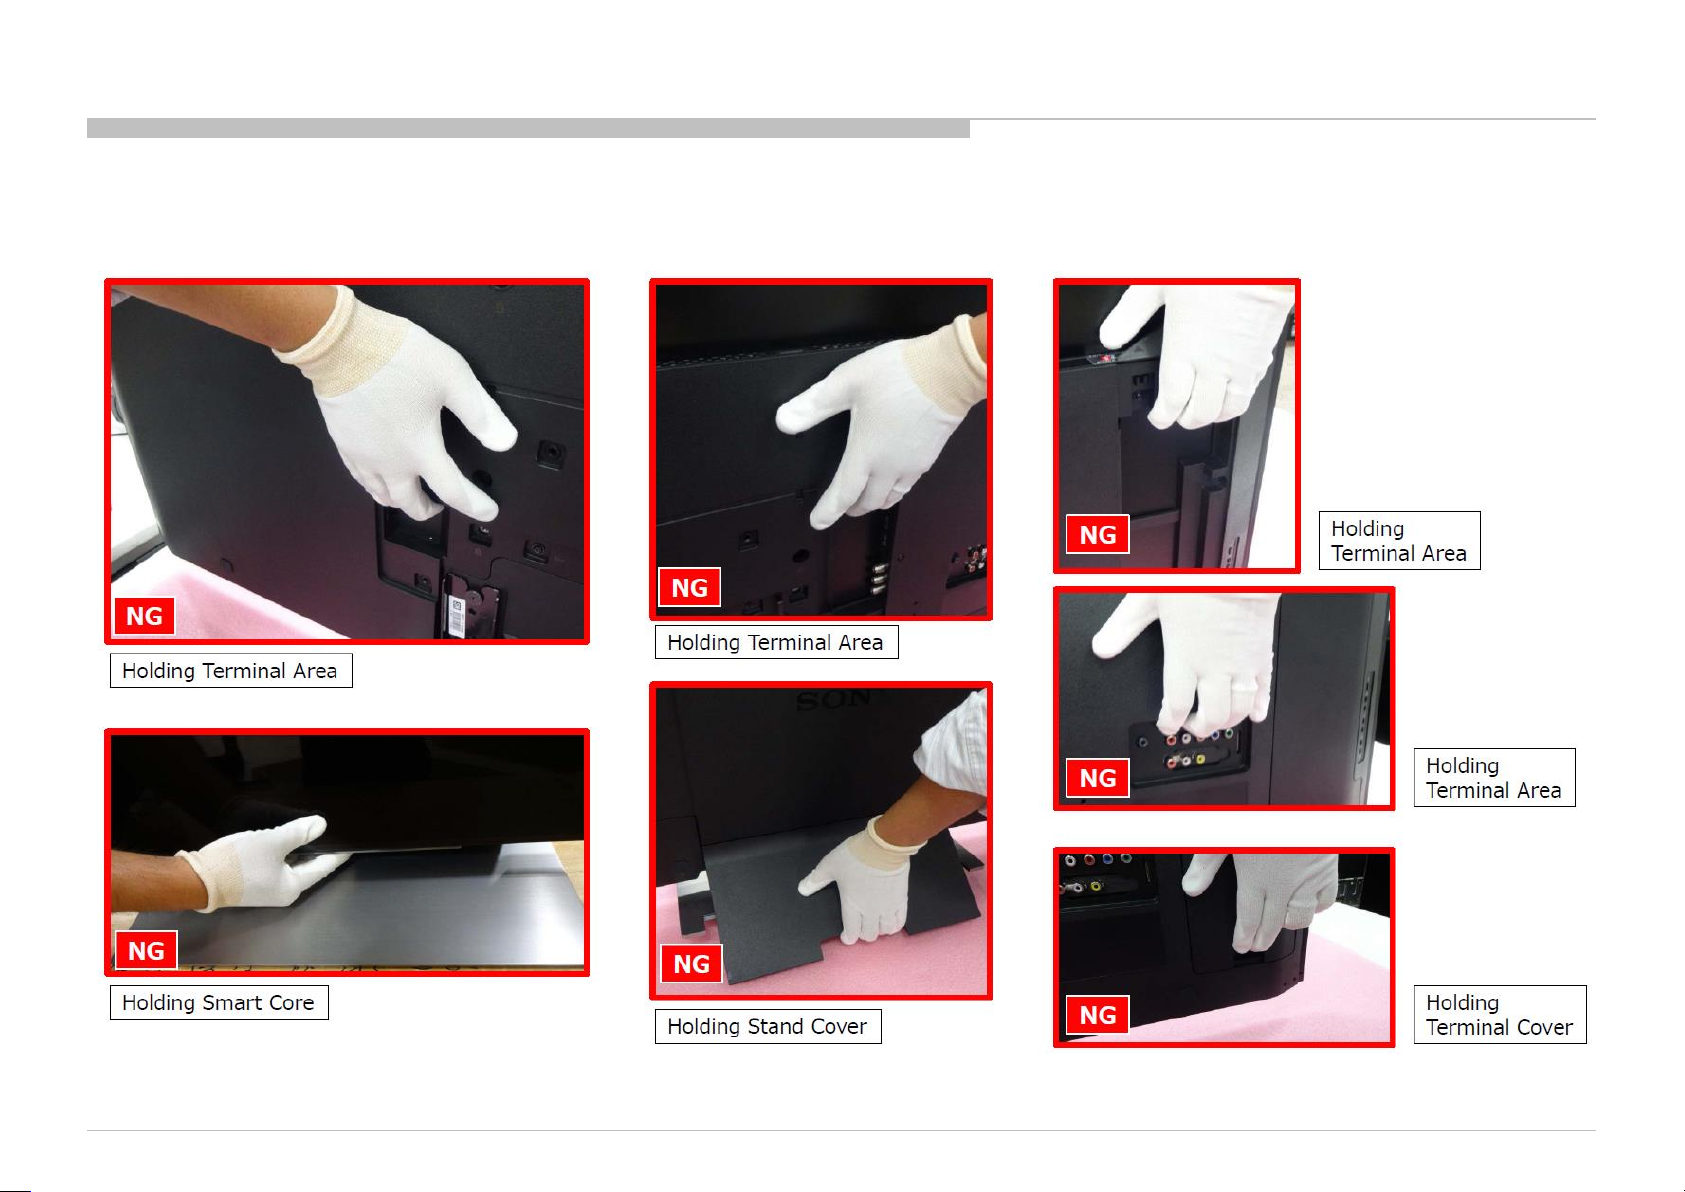
HOLDING ON VERTICAL POSITION & MOVING (TV set only)
PANEL HANDLING
KD-55/65XD9305
68
Page 69
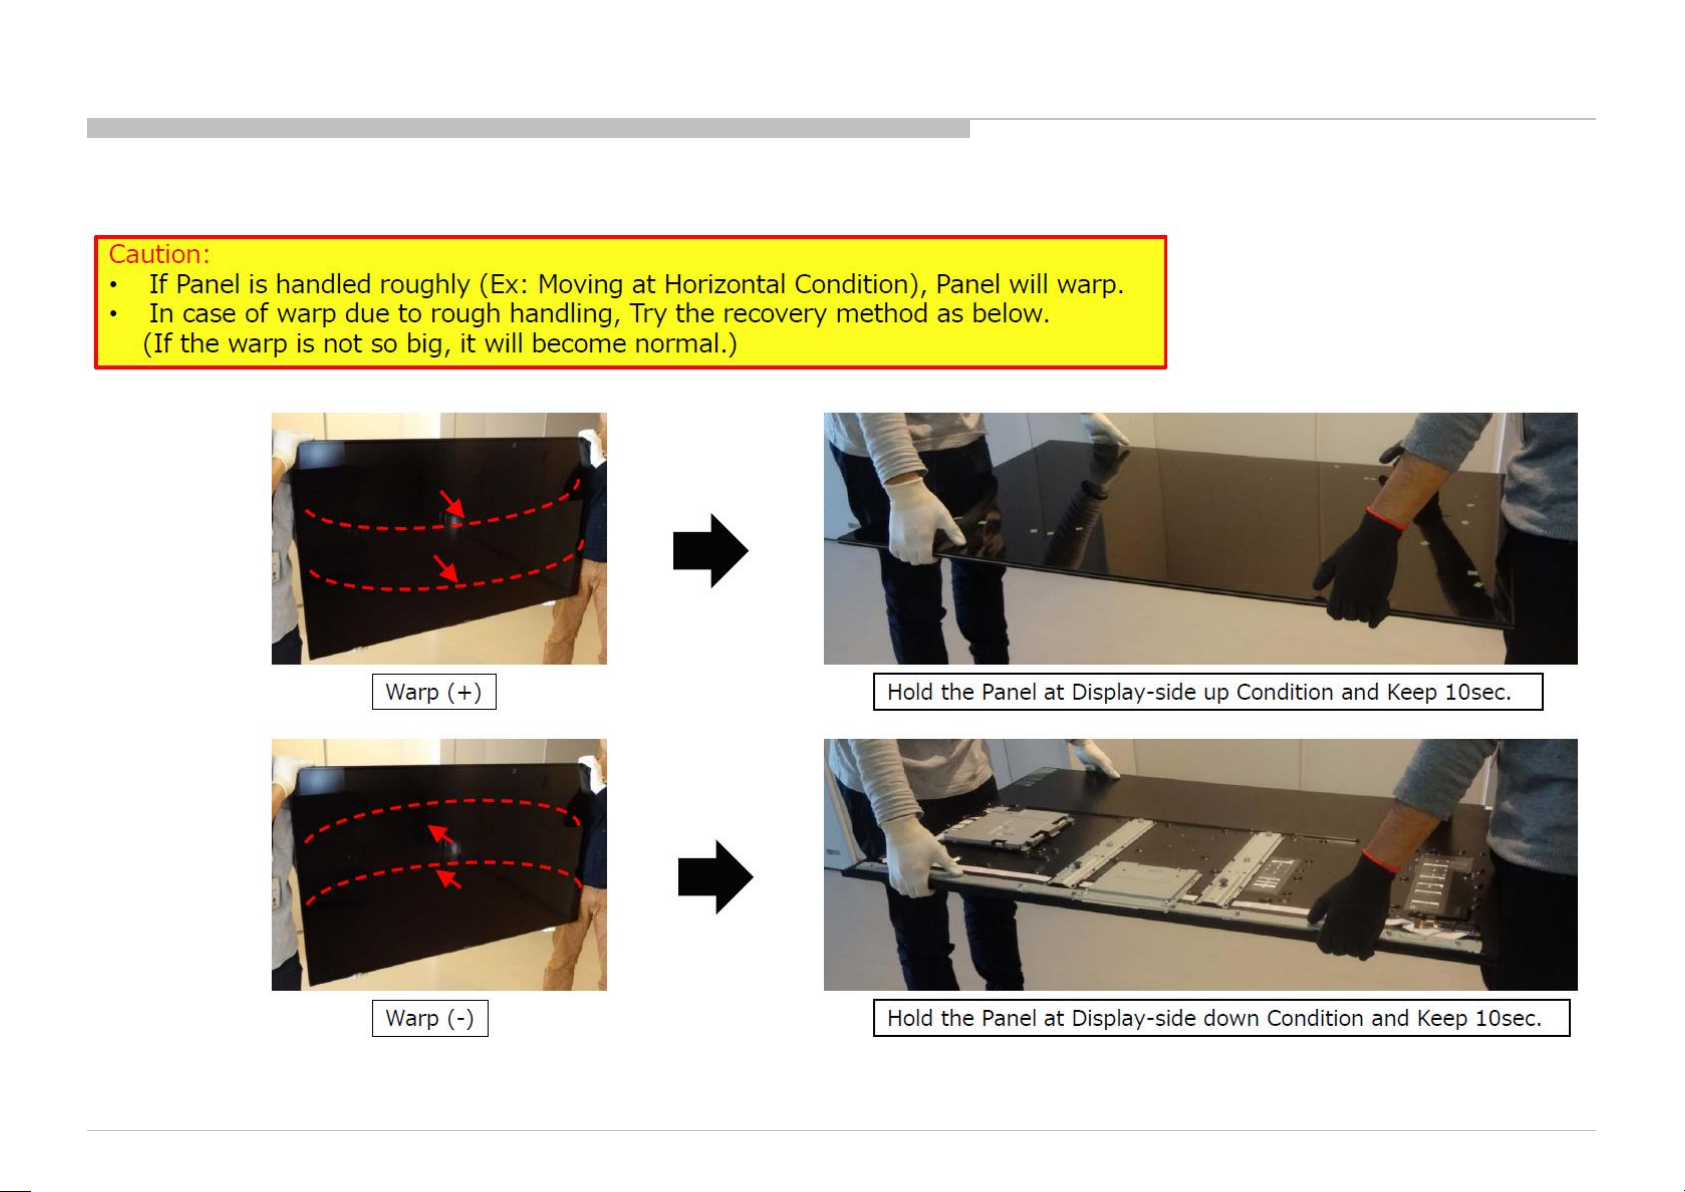
PANEL HANDLING
BACK UP *TV set handling is same as Panel basically.
KD-55/65XD9305
69
Page 70
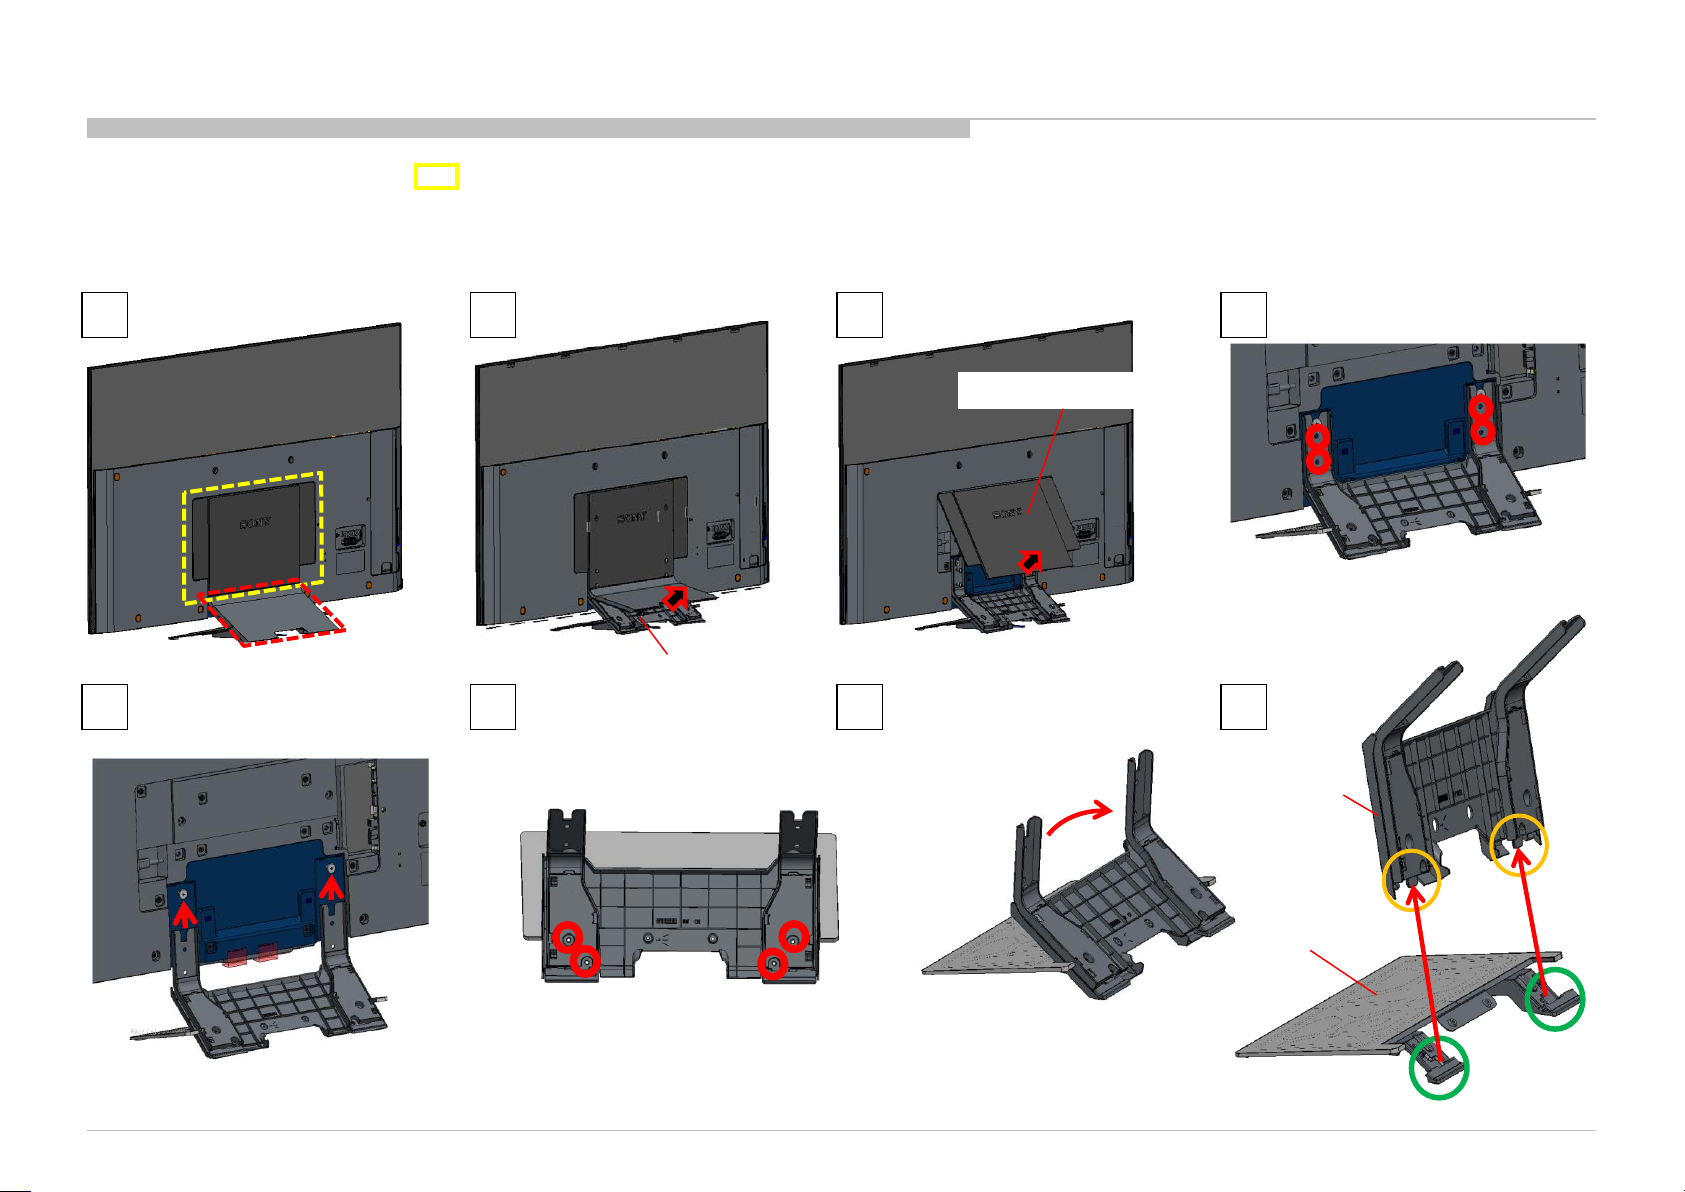
DISASSEMBLY
• There are clutch in the yellow frame[ ]. Therefore please be careful in the case of the disassembly or assembly of parts.
1. KD-55XD9305
1-1. STAND
1 2 3 4
CENTER COVER
4 Screws (SCREW, +PSW M5 X12) P/N: 2-580-607-01
STAND COVER
5 6 7 8
4 Screws (SCREW, +PSW M5 X12) P/N: 2-580-607-01
KD-55/65XD9305
STAND NECK
STAND BASE
70
Page 71
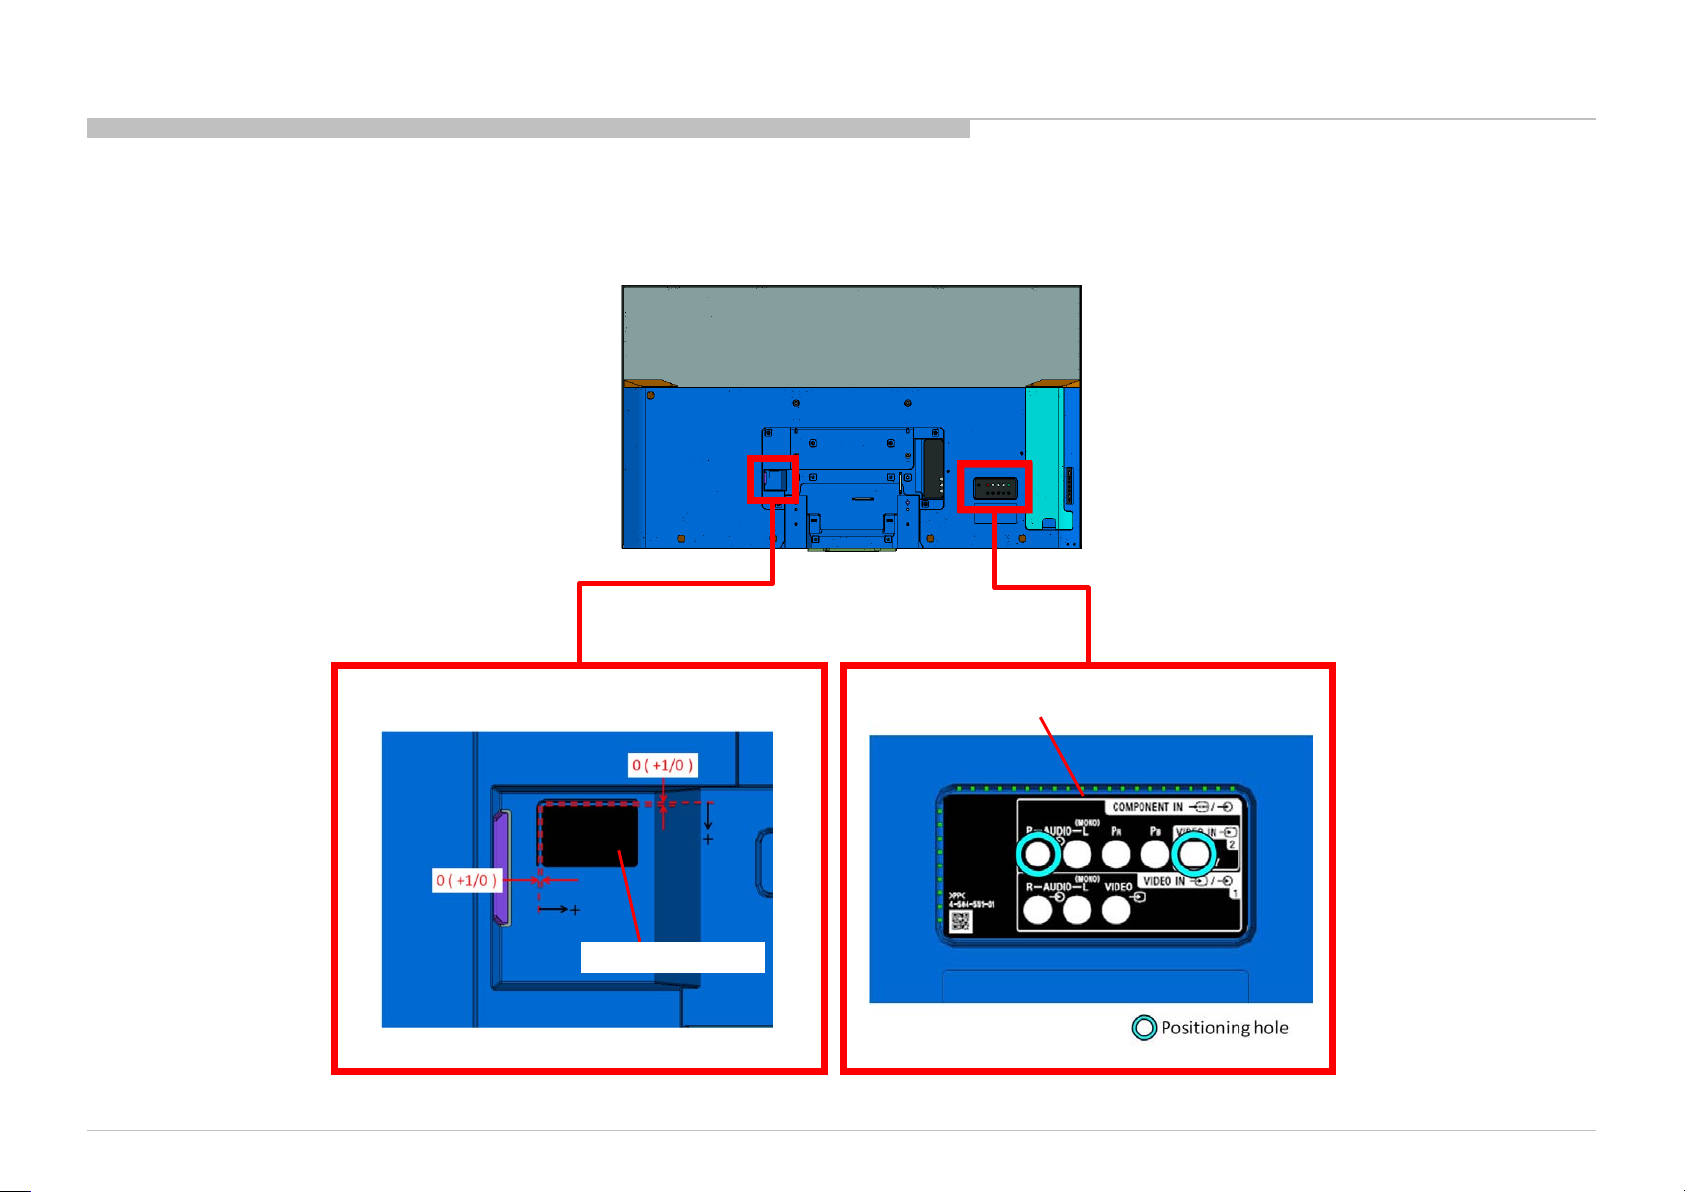
1. KD-55XD9305
1-2. LABEL, REAR TERMINAL (GNT) AND LABEL, DC IN (GNT)
DISASSEMBLY
KD-55/65XD9305
LABEL, REAR TERMINAL (GNT)
LABEL, DC IN (GNT)
71
Page 72
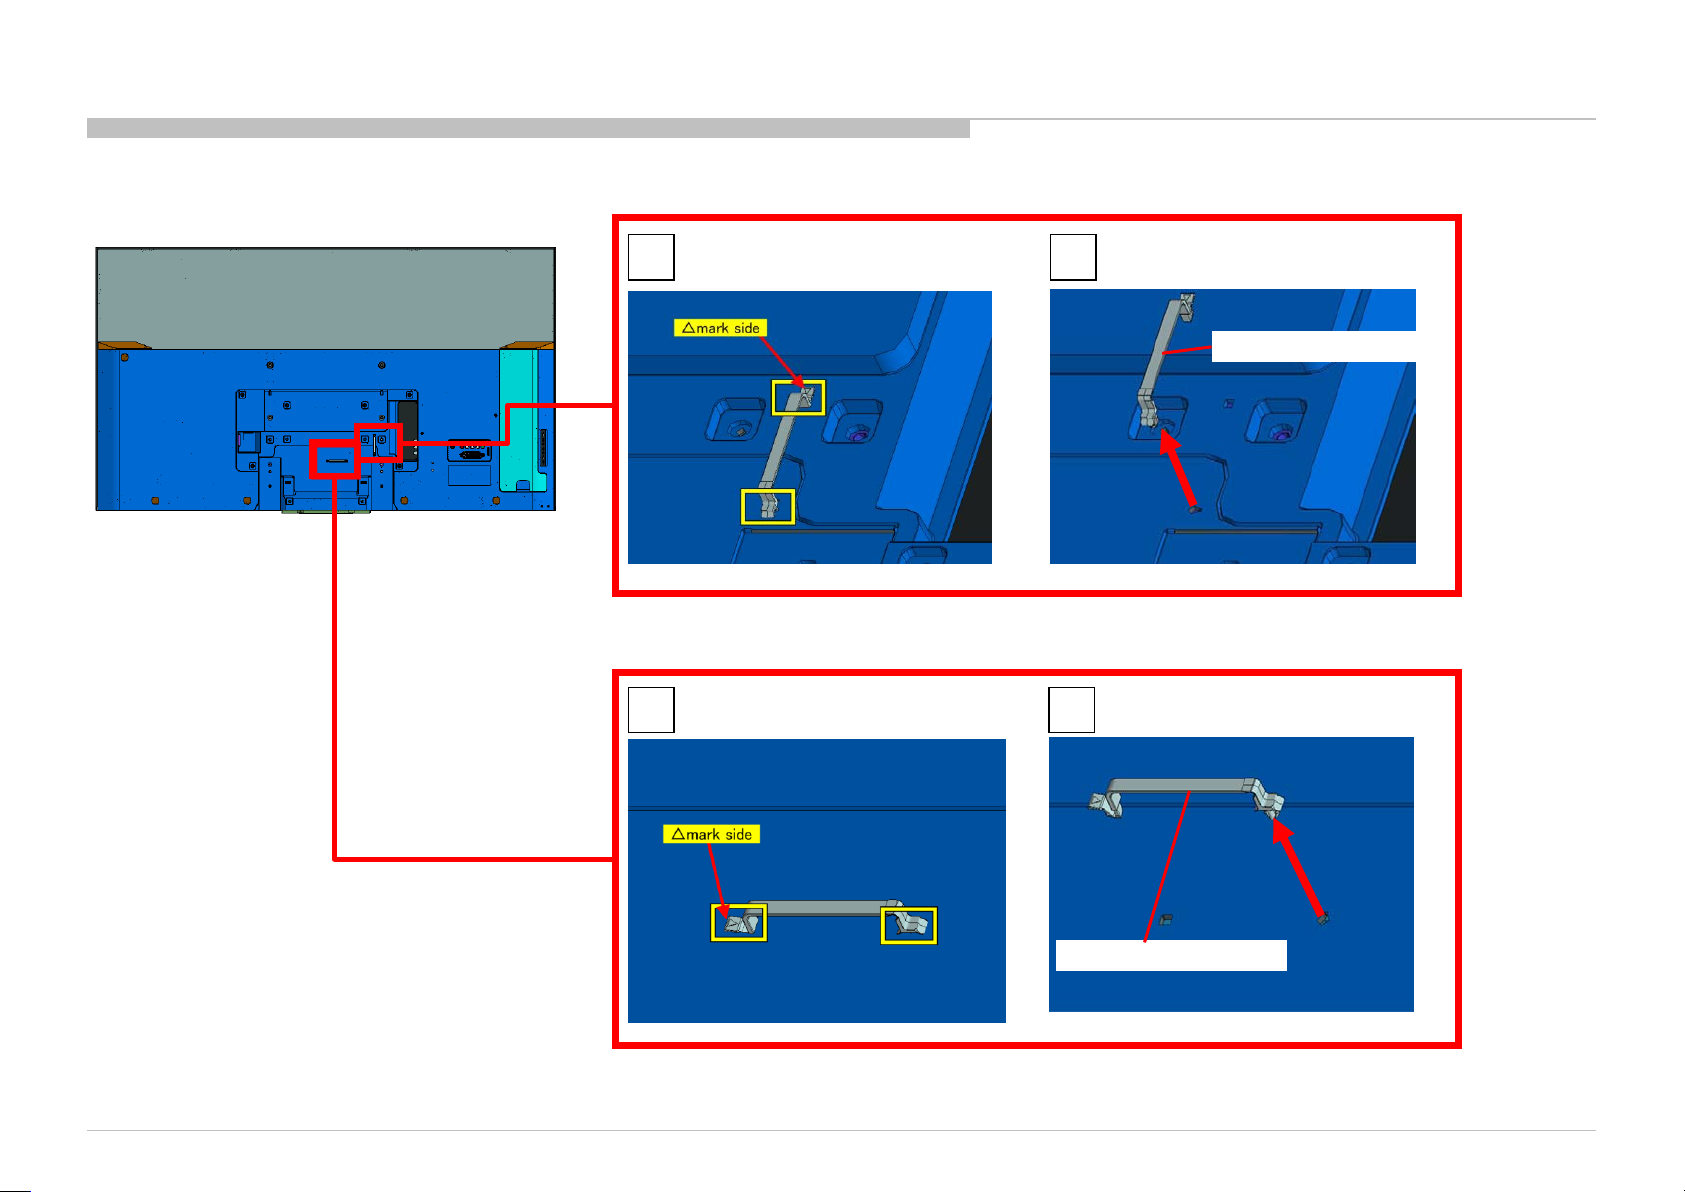
1. KD-55XD9305
1-3. CLAMP, CABLE (GNT L)
DISASSEMBLY
1 2
CLAMP, CABLE (GNT L)
KD-55/65XD9305
1 2
CLAMP, CABLE (GNT L)
72
Page 73
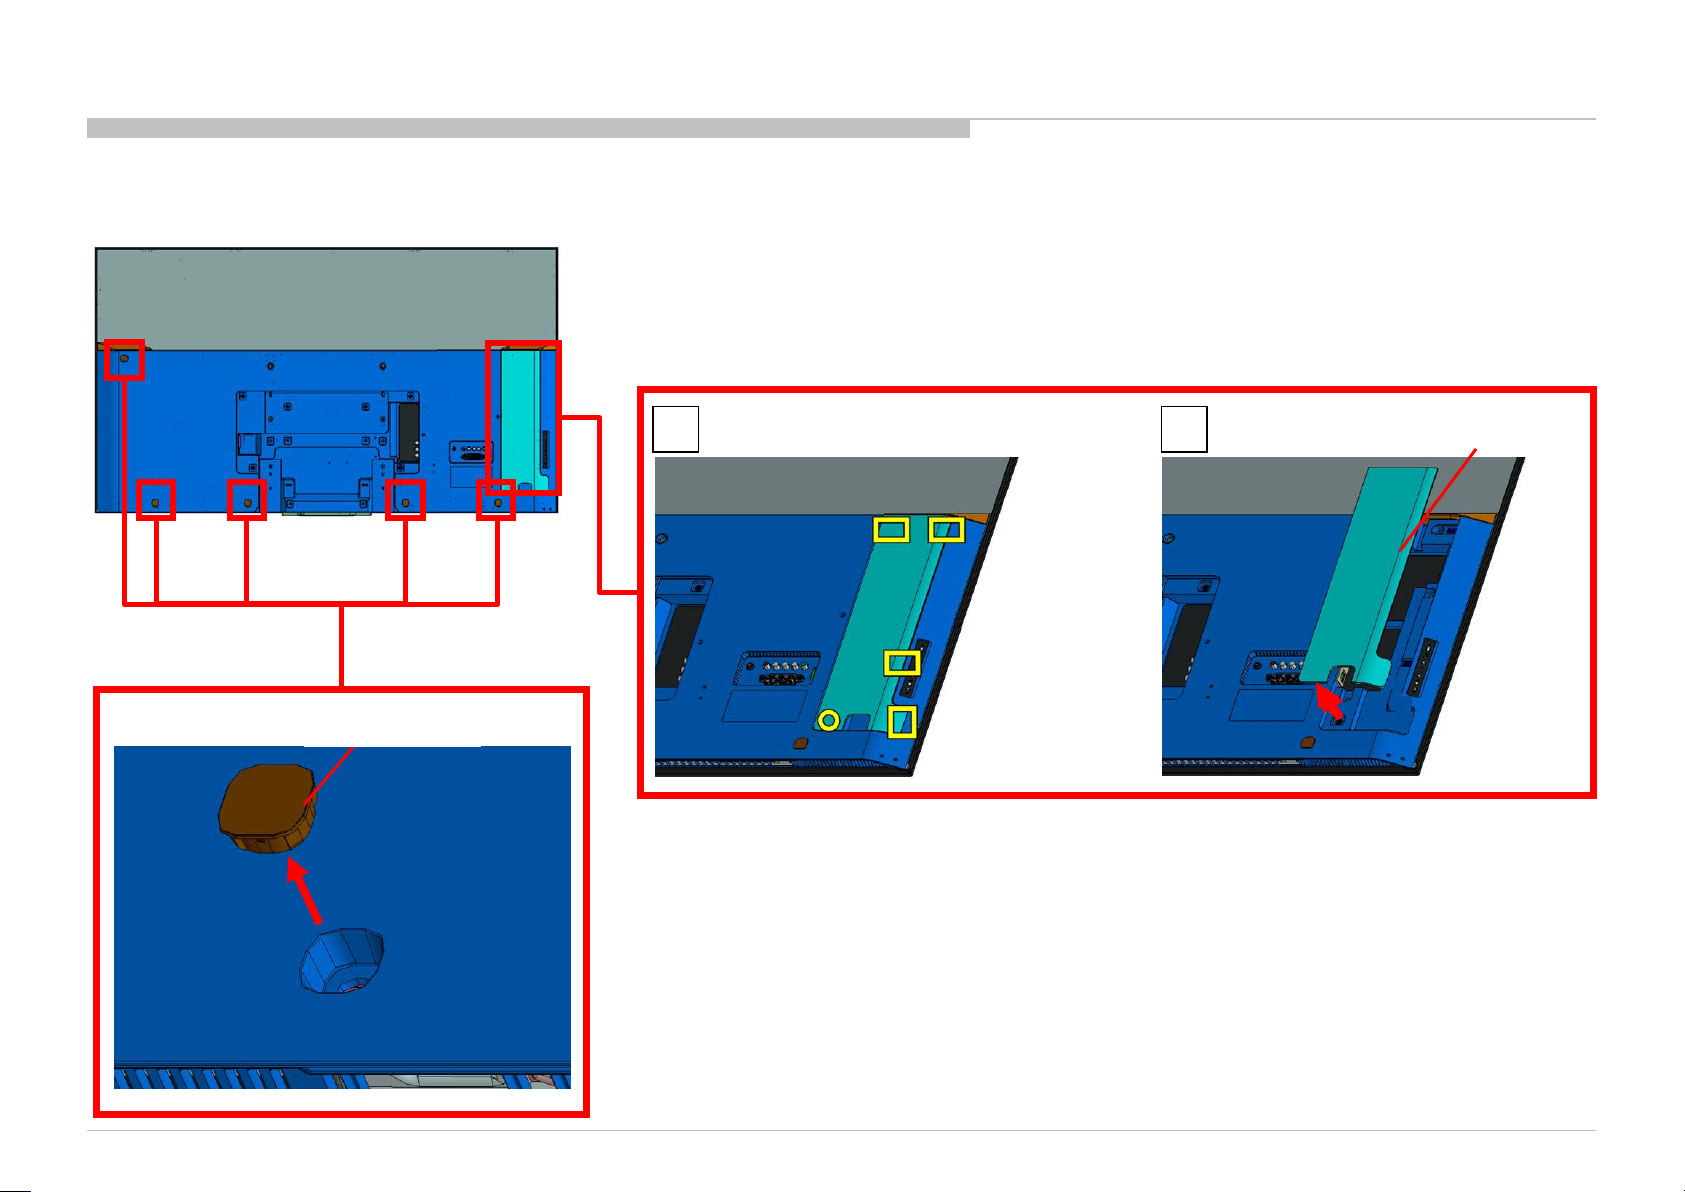
1. KD-55XD9305
1-4. COVER, SIDE (GNT) AND SCREW CAP (GNT)
DISASSEMBLY
SCREW CAP (GNT)
1 2
COVER, SIDE (GNT)
KD-55/65XD9305
73
Page 74
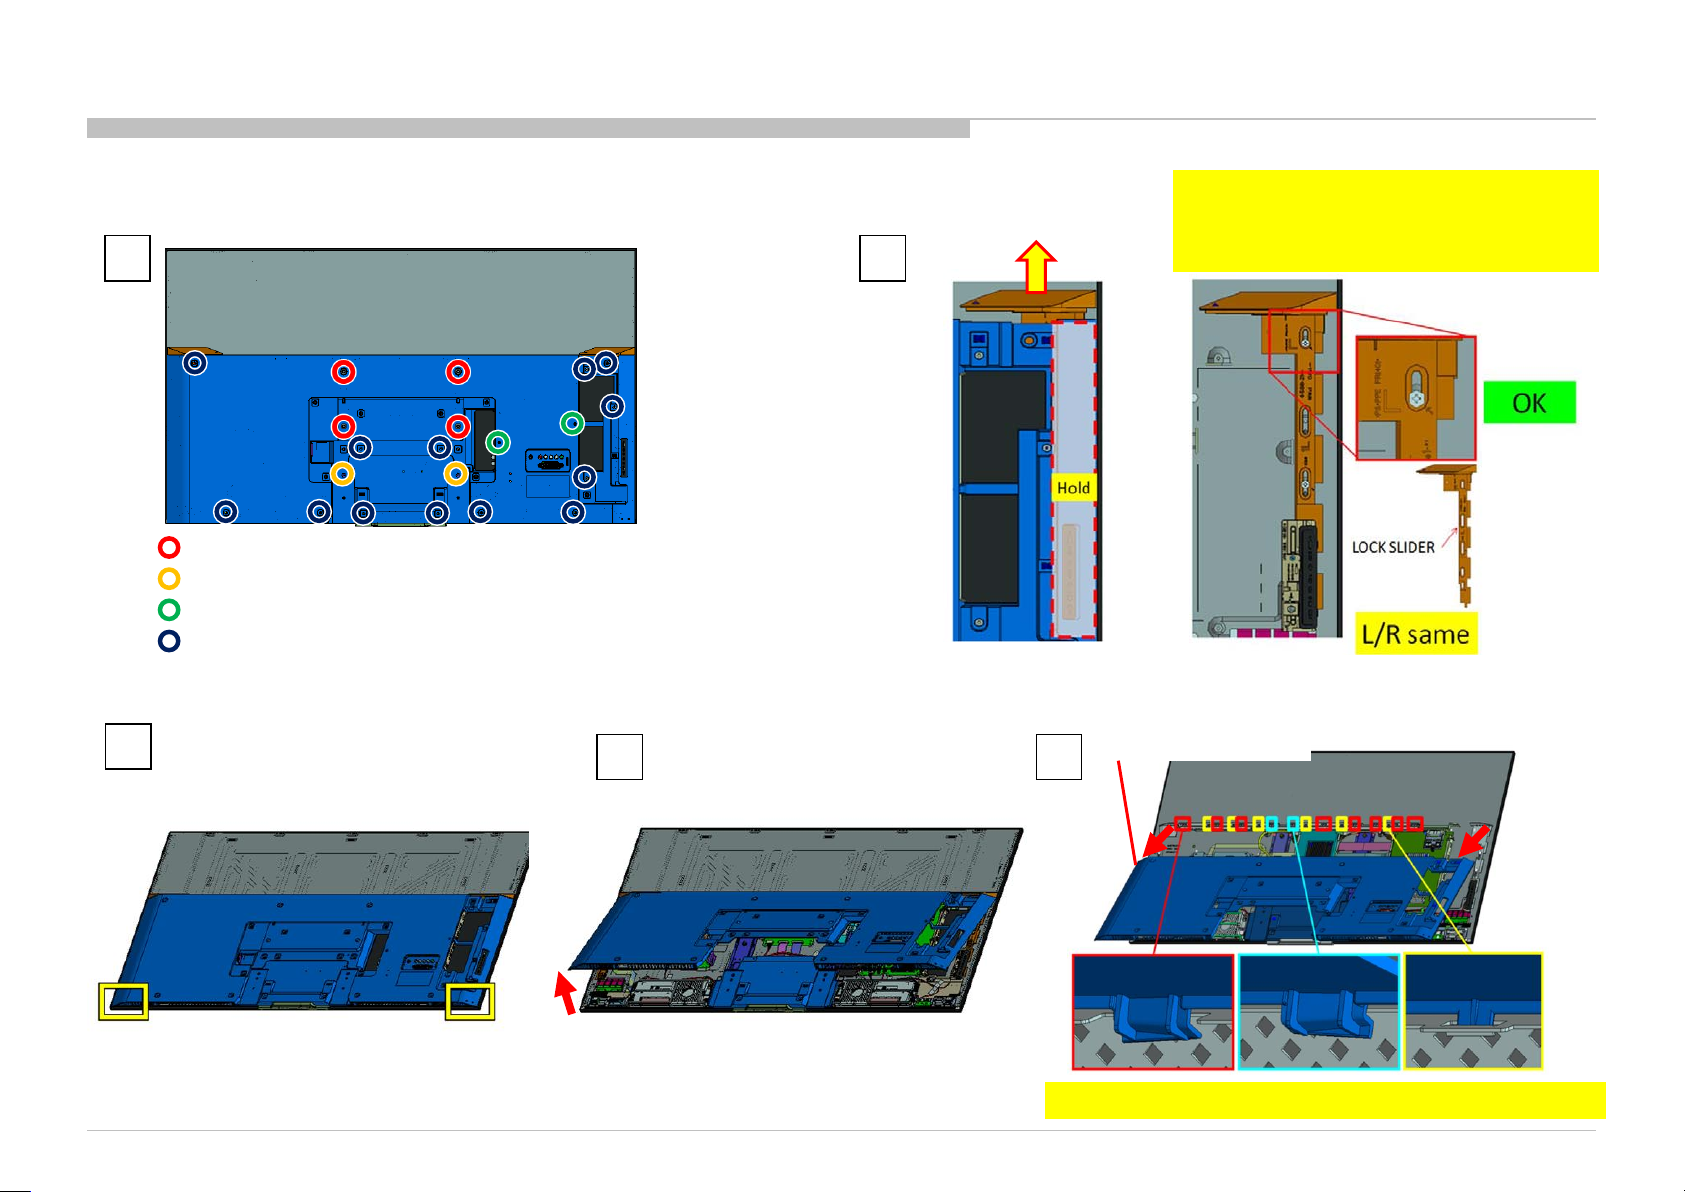
DISASSEMBLY
1. KD-55XD9305
1-5. REAR COVER (L GNT) A
1
4 screws (SCREW, ORNAMENTAL M6X12) P/N: 4-268-126-02
2 screws (JOINT, SCREW) P/N: 4-400-043-11
2 screws (SCREW +BVTP 3X10 TYPE2 IT-3) P/N: 7-685-647-79
13 screws (SCREW , +PWH M3X6) P/N: 4-452-935-01
3
4
2
Note:
Before taking off Rear Cover, you have to slide
BRACKET-SLIDE of both sides to the top side.
Please refer to Appendix-1.
REAR COVER (L GNT) A
5
KD-55/65XD9305
Note: Check the hook has not broken after taking off Rear Cover.
74
Page 75
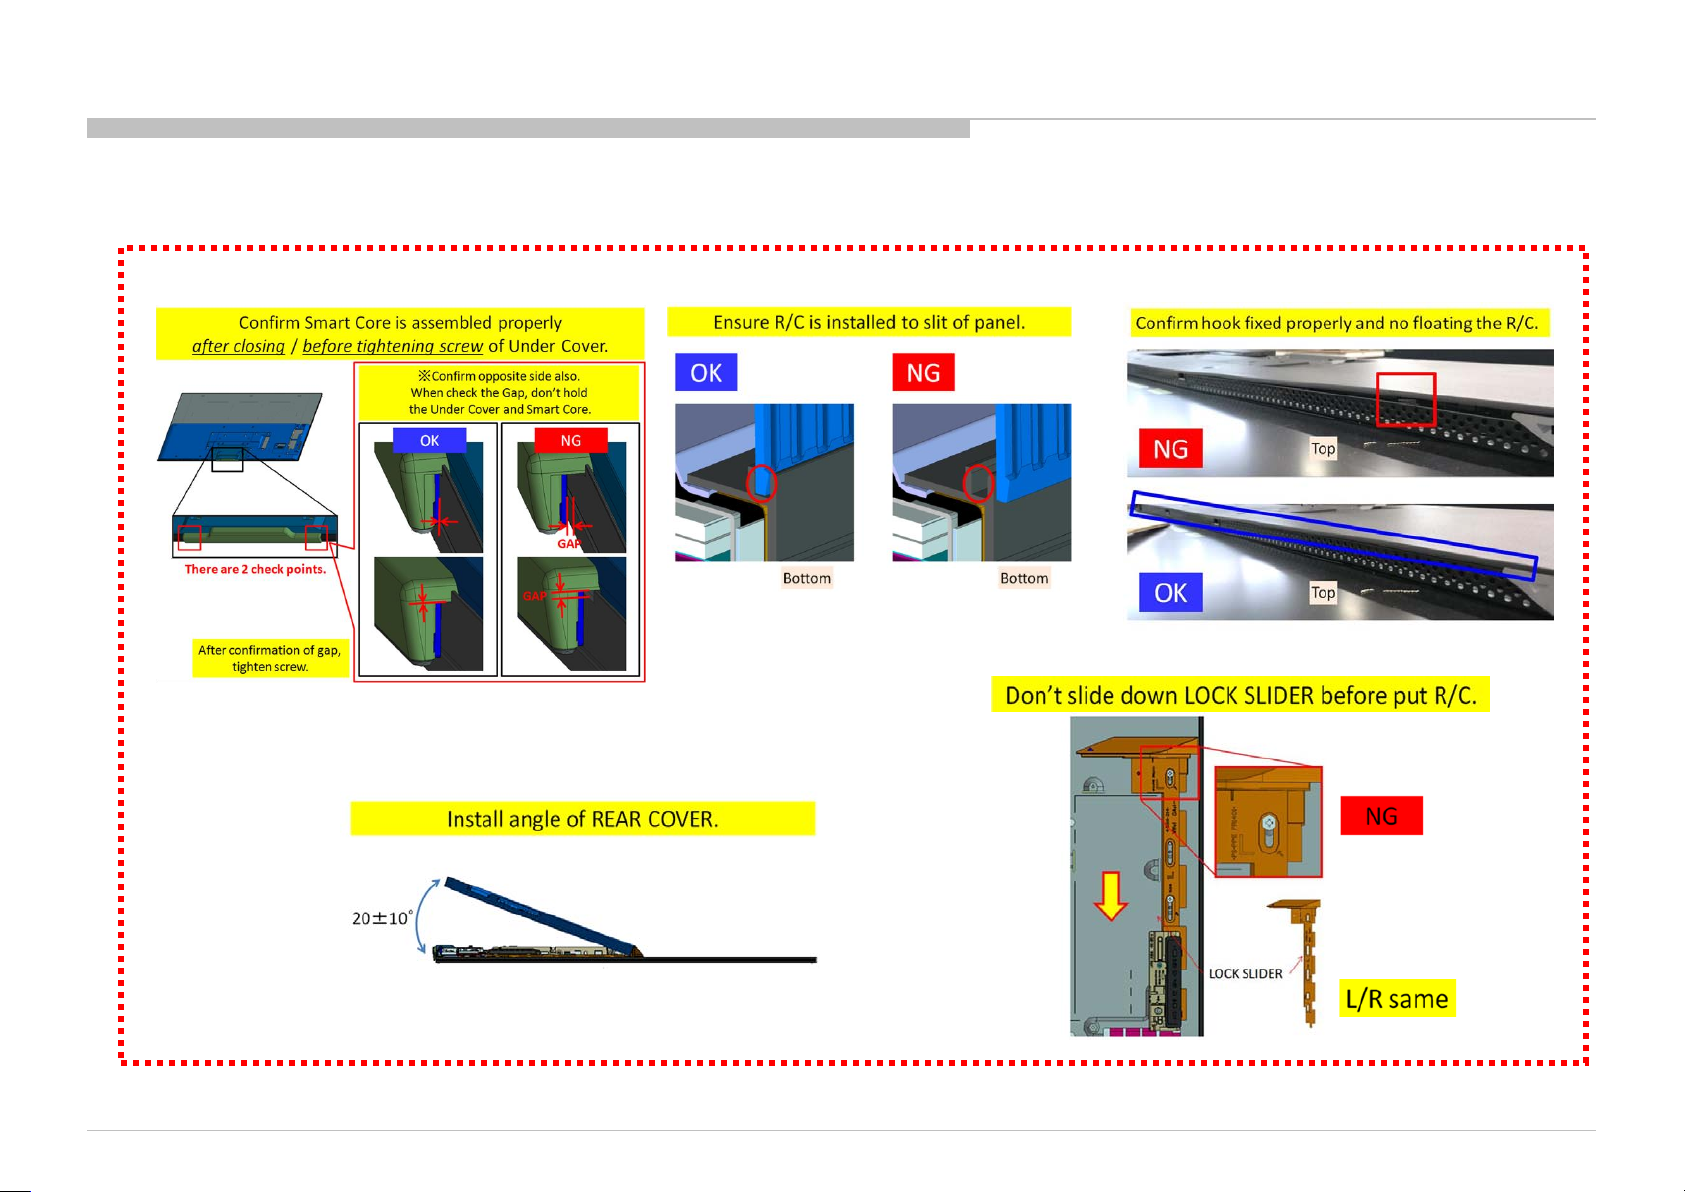
1. KD-55XD9305
1-5. REAR COVER (L GNT) A
NOTES: When re-assembling REAR COVER (L GNT) A
DISASSEMBLY
KD-55/65XD9305
75
Page 76
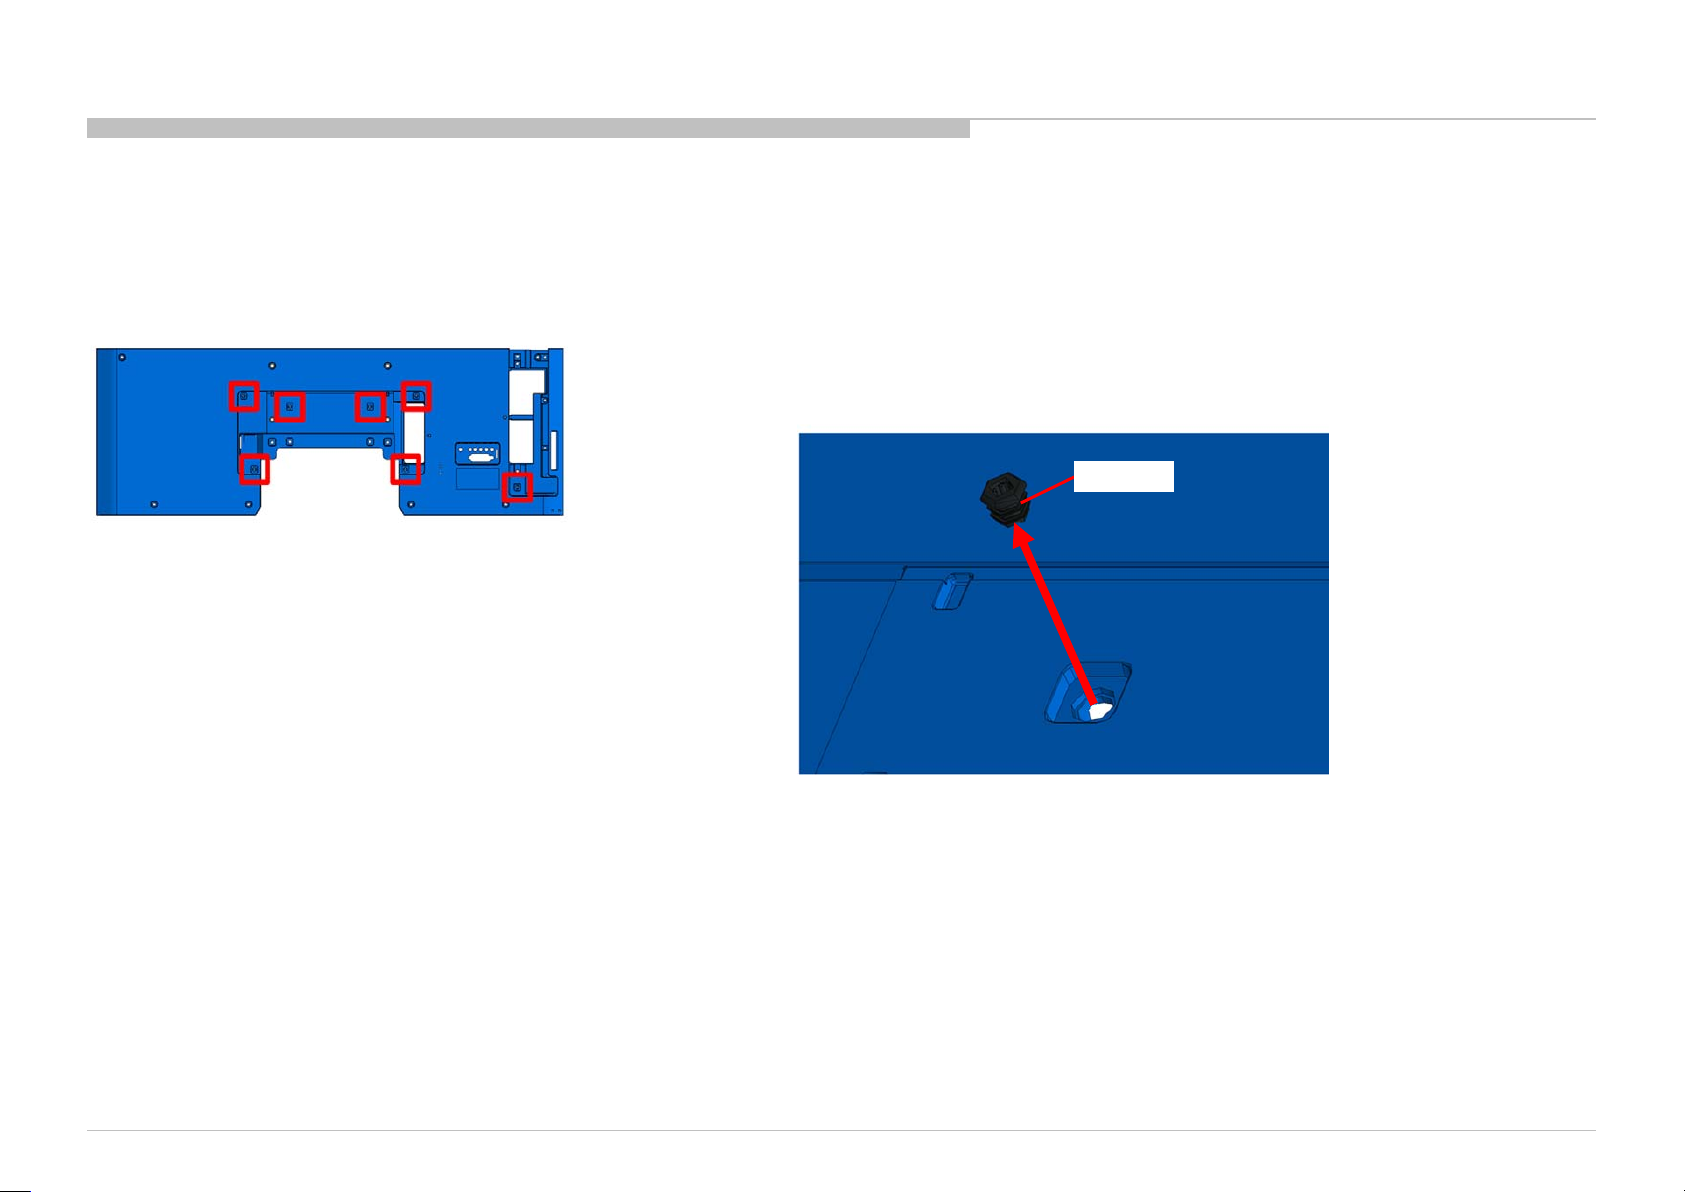
1. KD-55XD9305
1-6. CATCHER
DISASSEMBLY
CATCHER
KD-55/65XD9305
76
Page 77
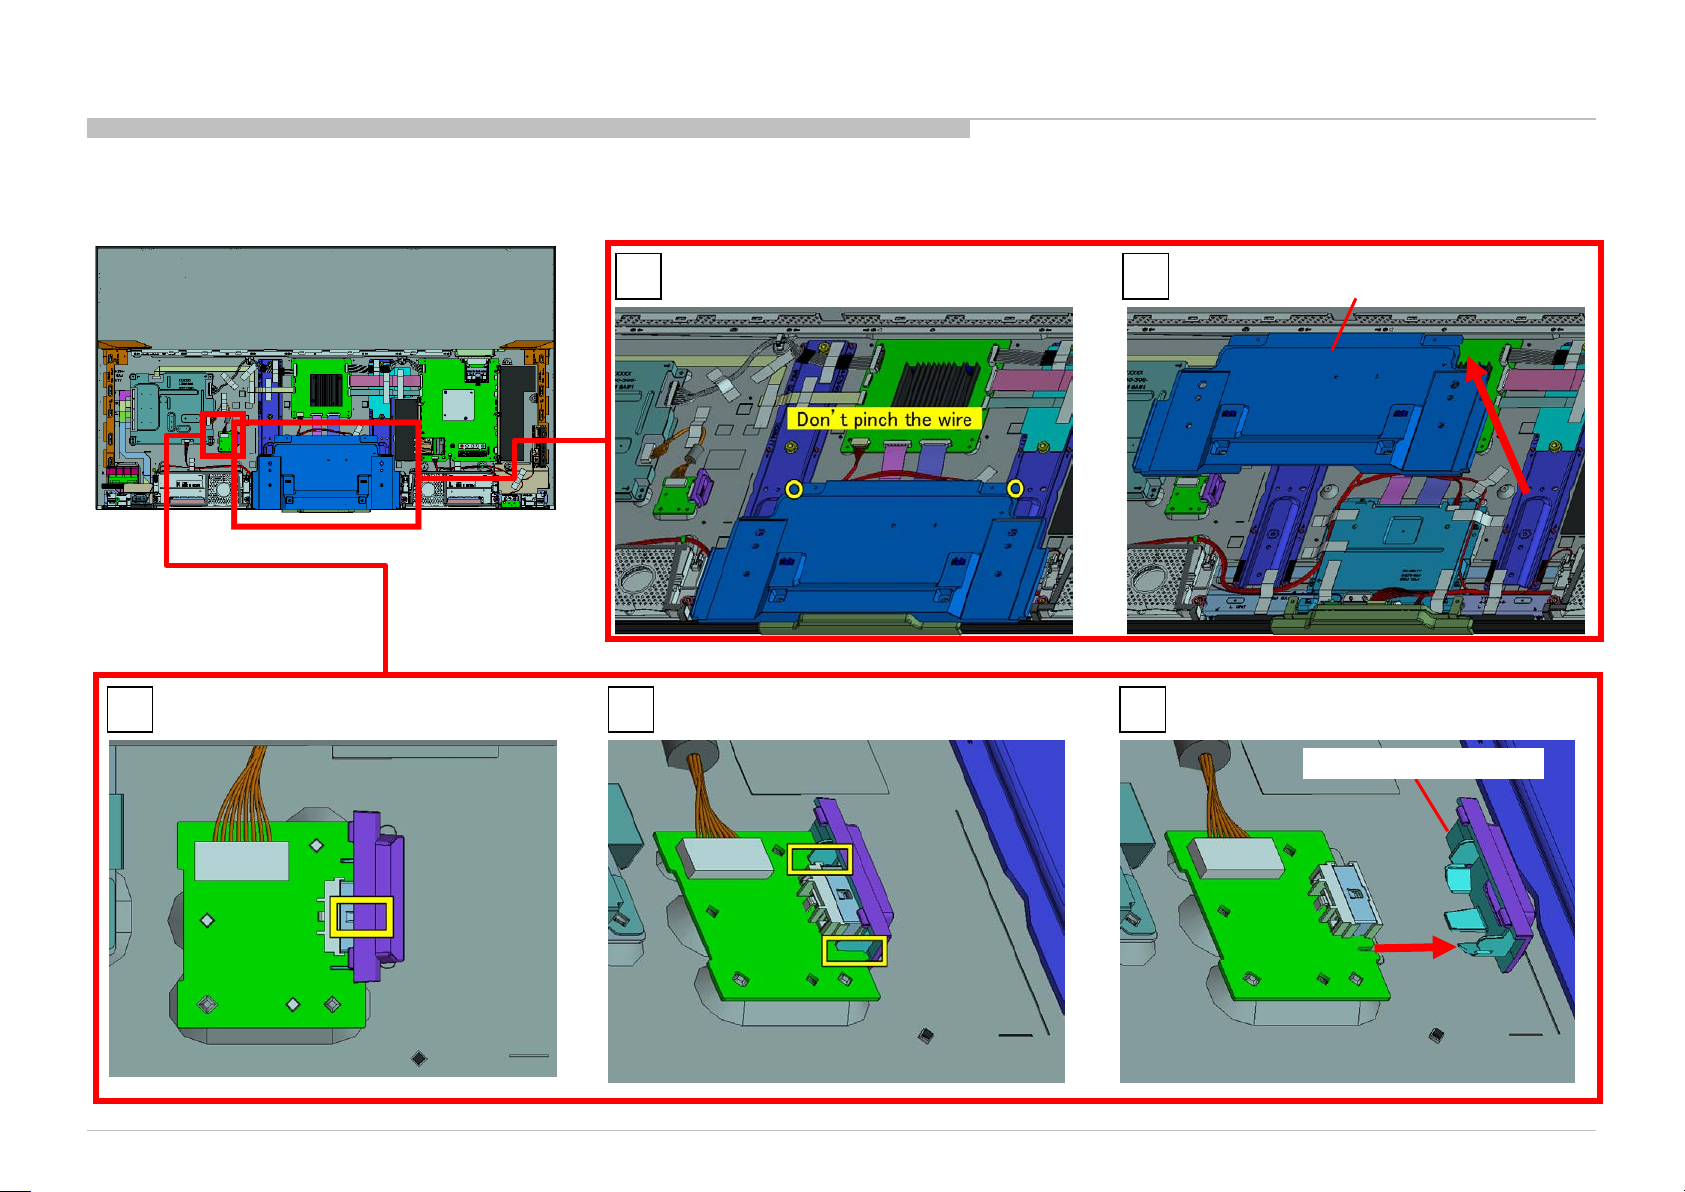
1. KD-55XD9305
1-7. COVER, UNDER (GNT) A AND BRACKET, DC JACK (GNT)
DISASSEMBLY
1 2
1 2 3
COVER, UNDER (GNT) A
BRACKET, DC JACK (GNT)
KD-55/65XD9305
77
Page 78
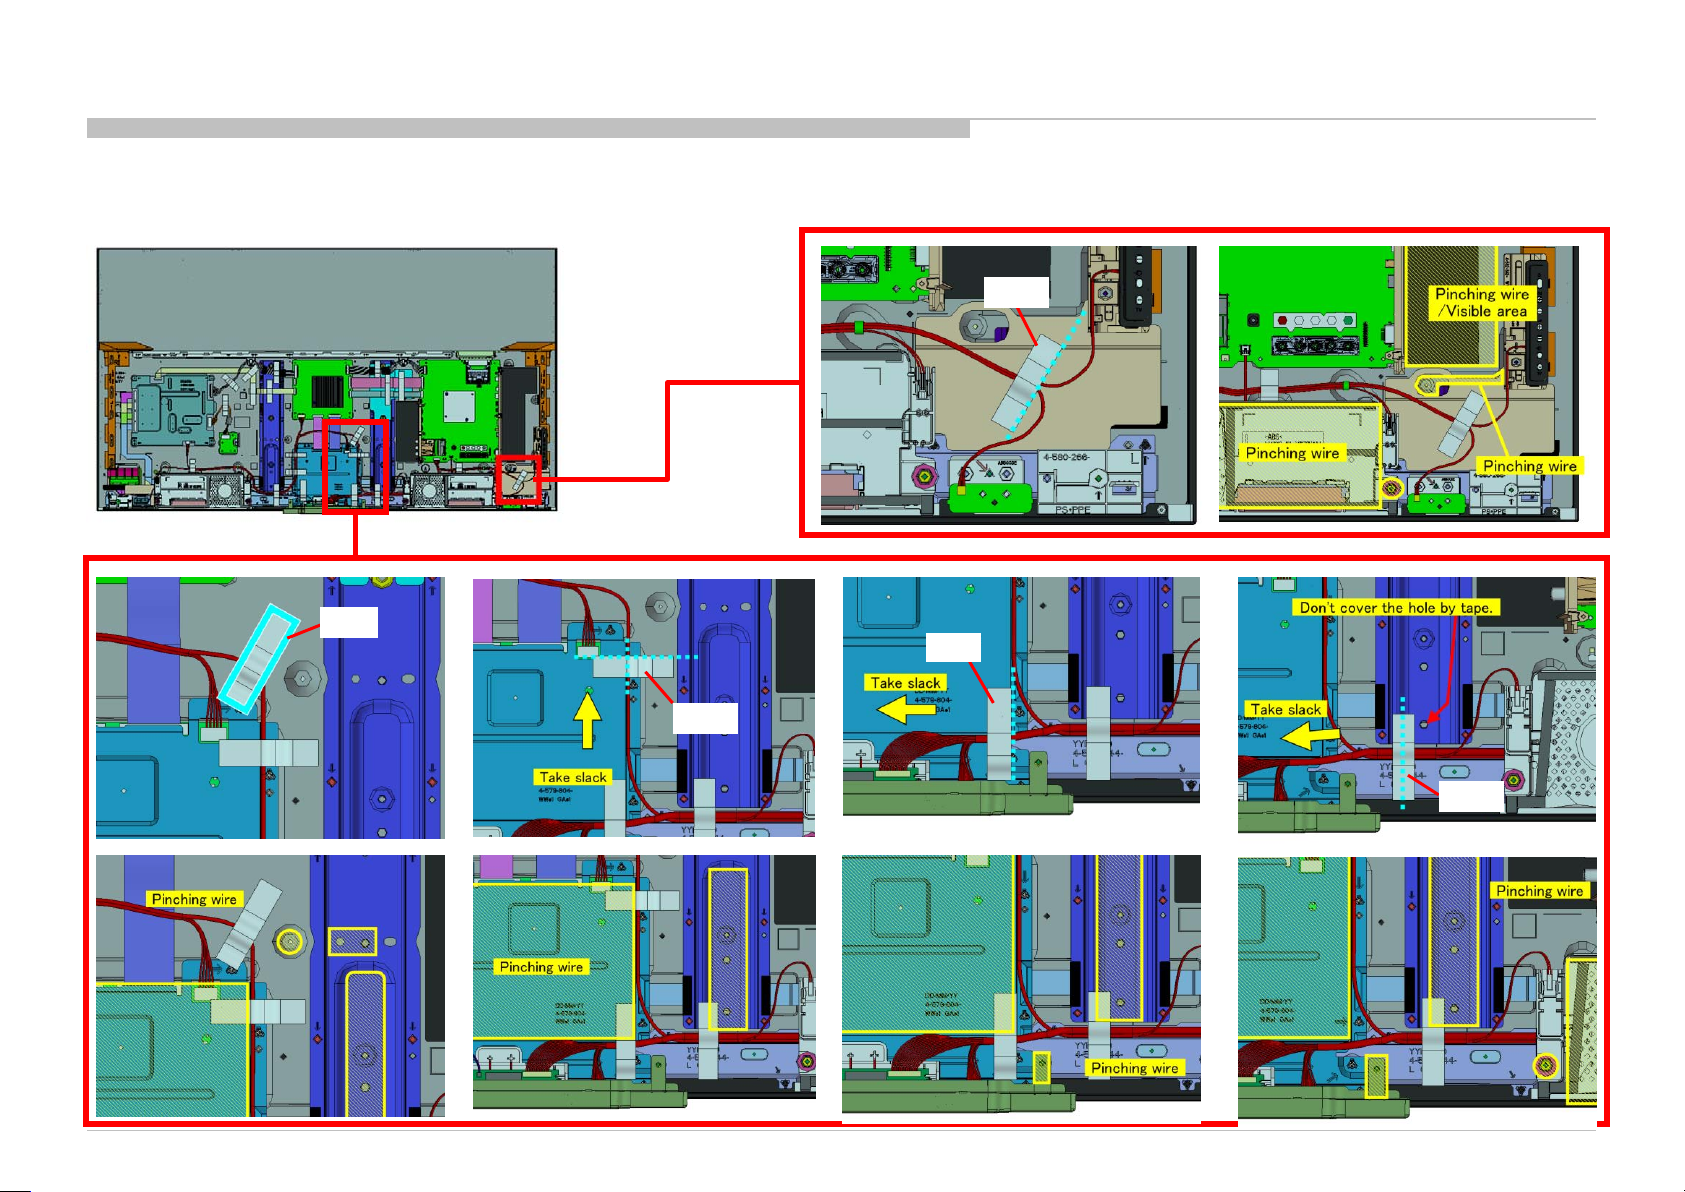
1. KD-55XD9305
1-8. TAPE
DISASSEMBLY
TAPE
TAPE
TAPE
KD-55/65XD9305
TAPE
TAPE
78
Page 79
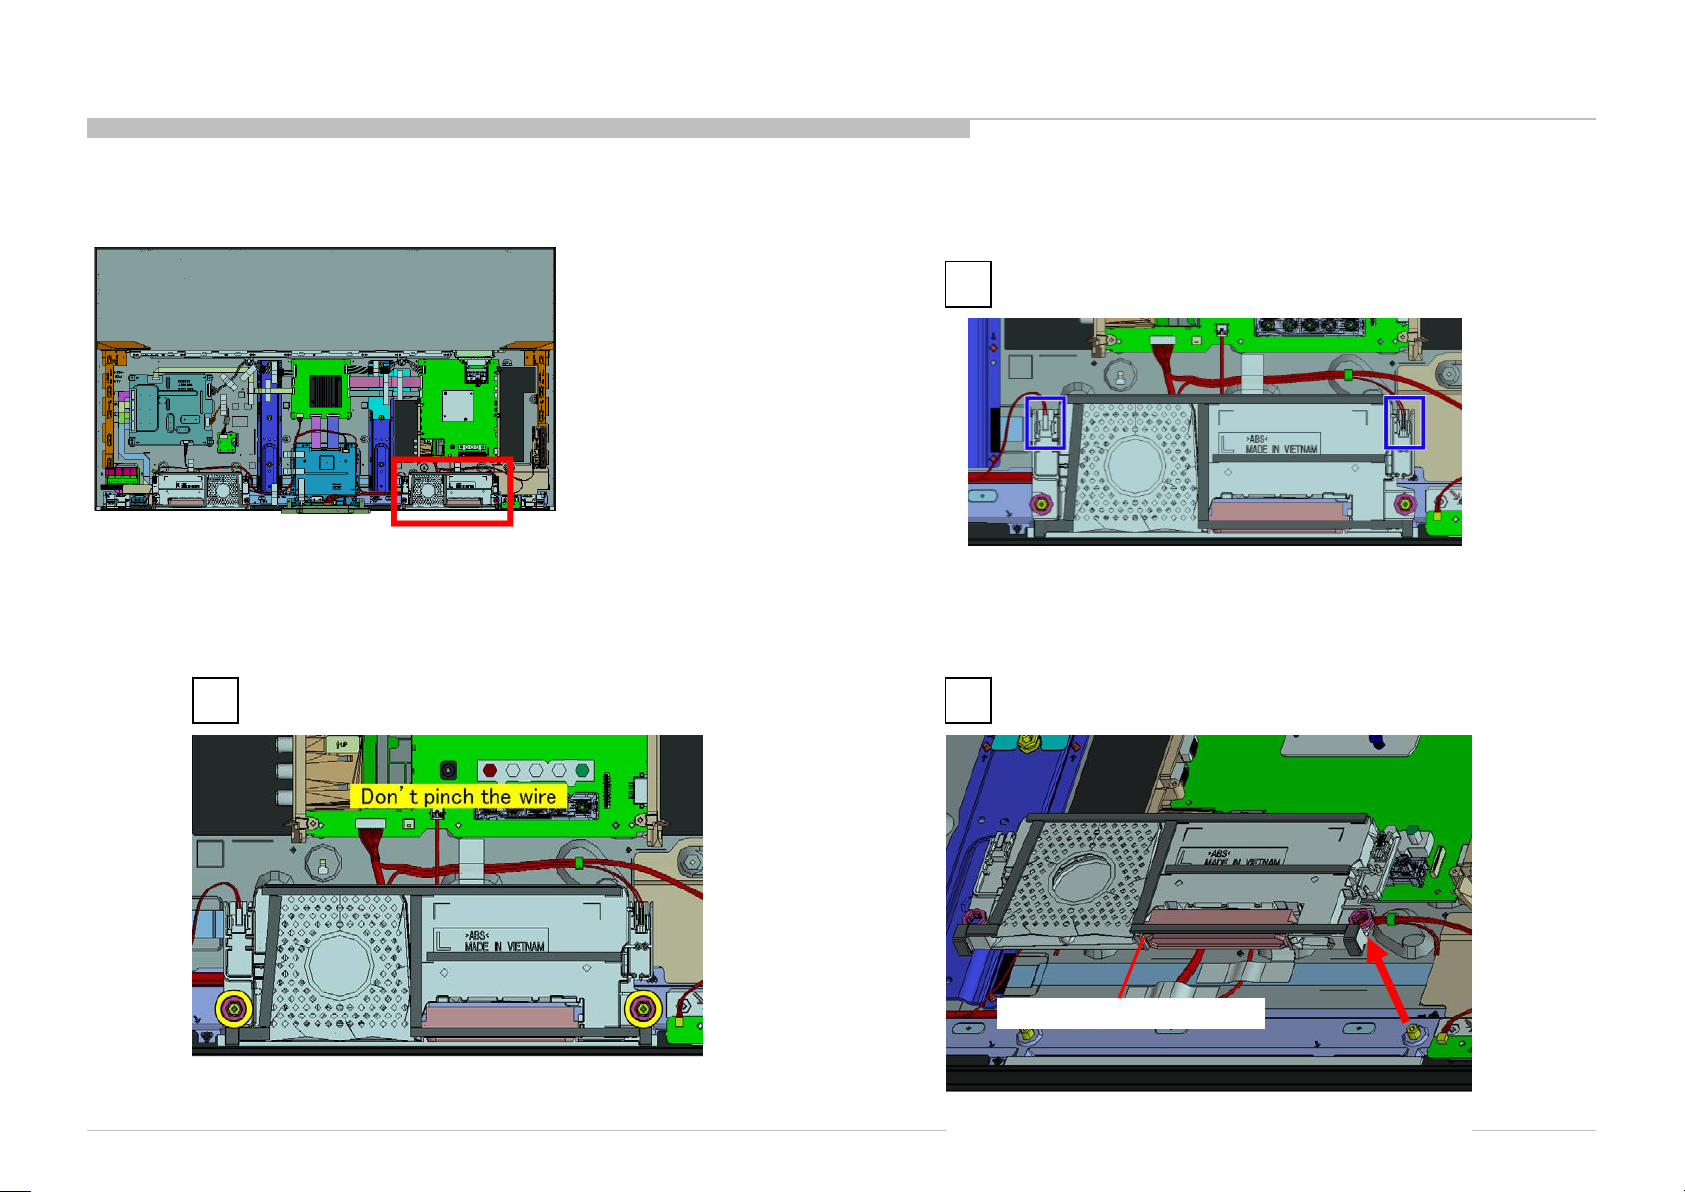
1. KD-55XD9305
1-9. SP-BOX ASSY (W12-L CH-ND)
DISASSEMBLY
1
KD-55/65XD9305
2 3
SP-BOX ASSY (W12-L CH-ND)
79
Page 80
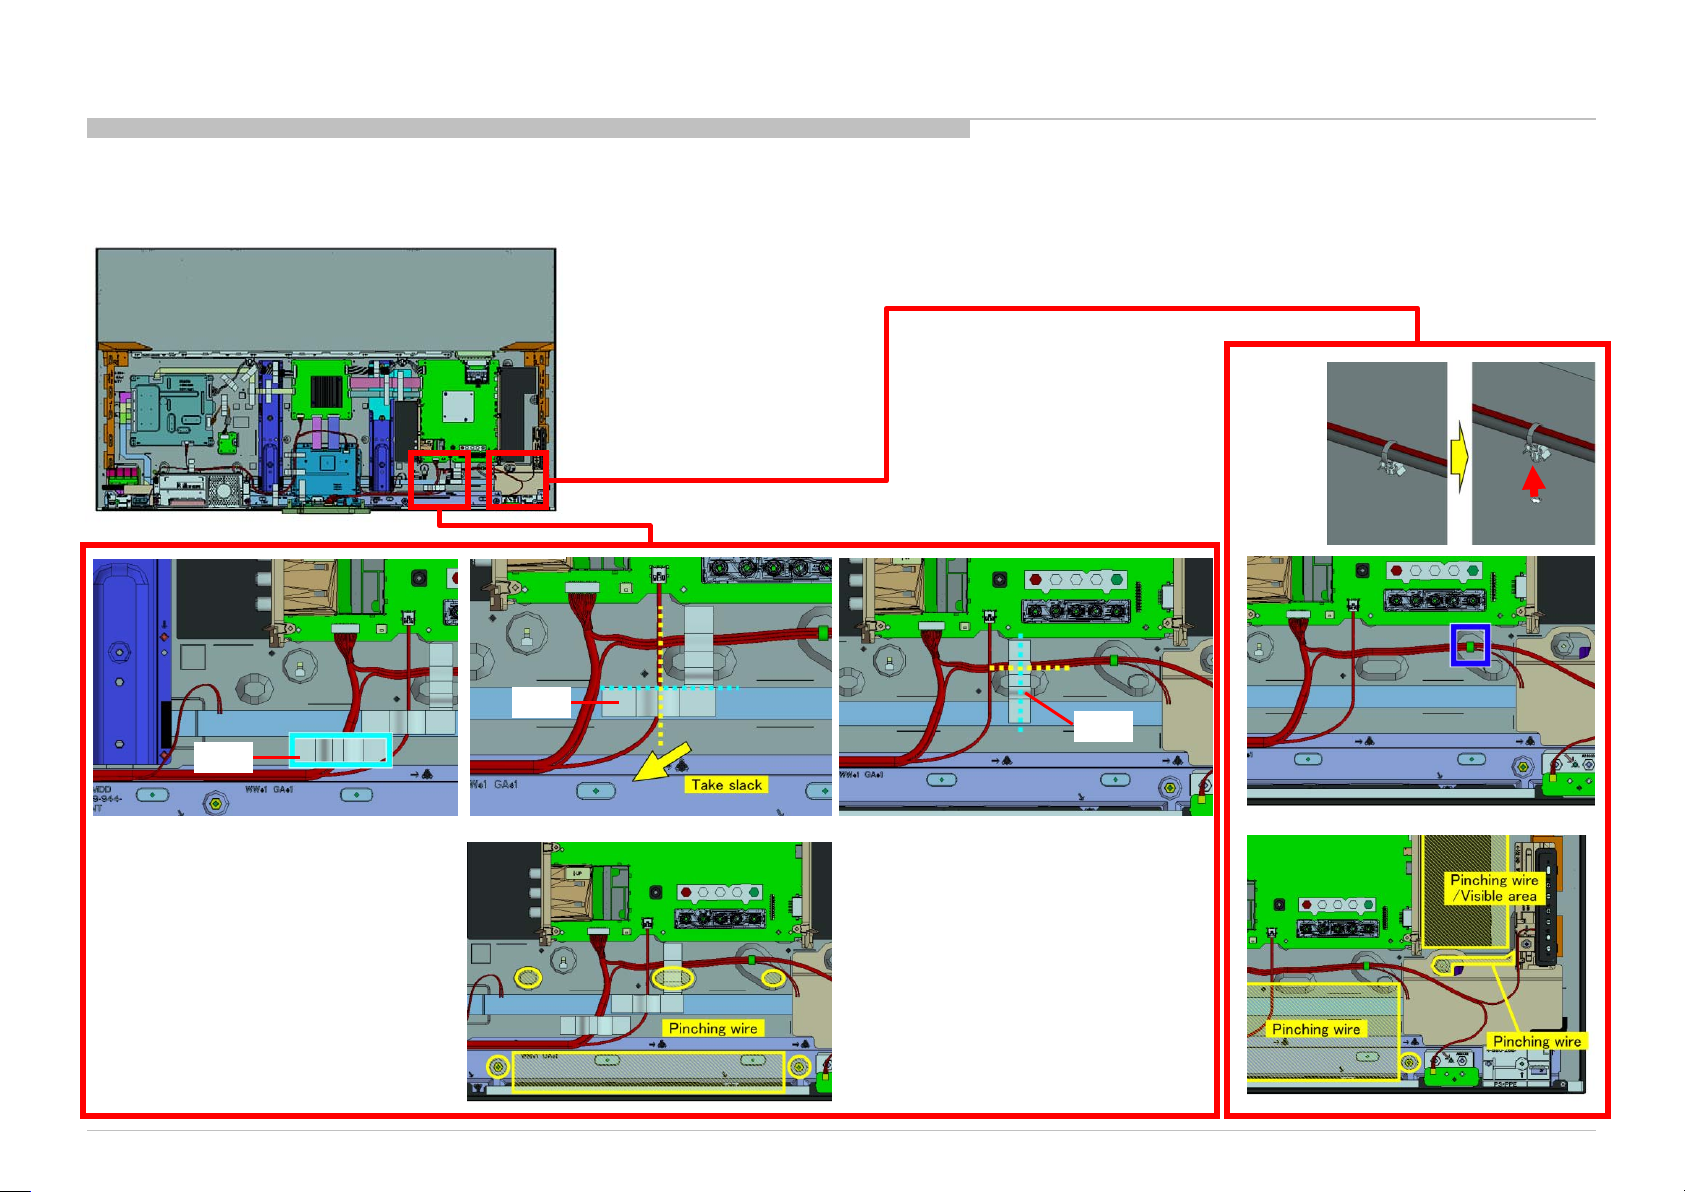
1. KD-55XD9305
1-10. TAPE AND WIRE DRESSING
DISASSEMBLY
TAPE
KD-55/65XD9305
TAPE
TAPE
80
Page 81
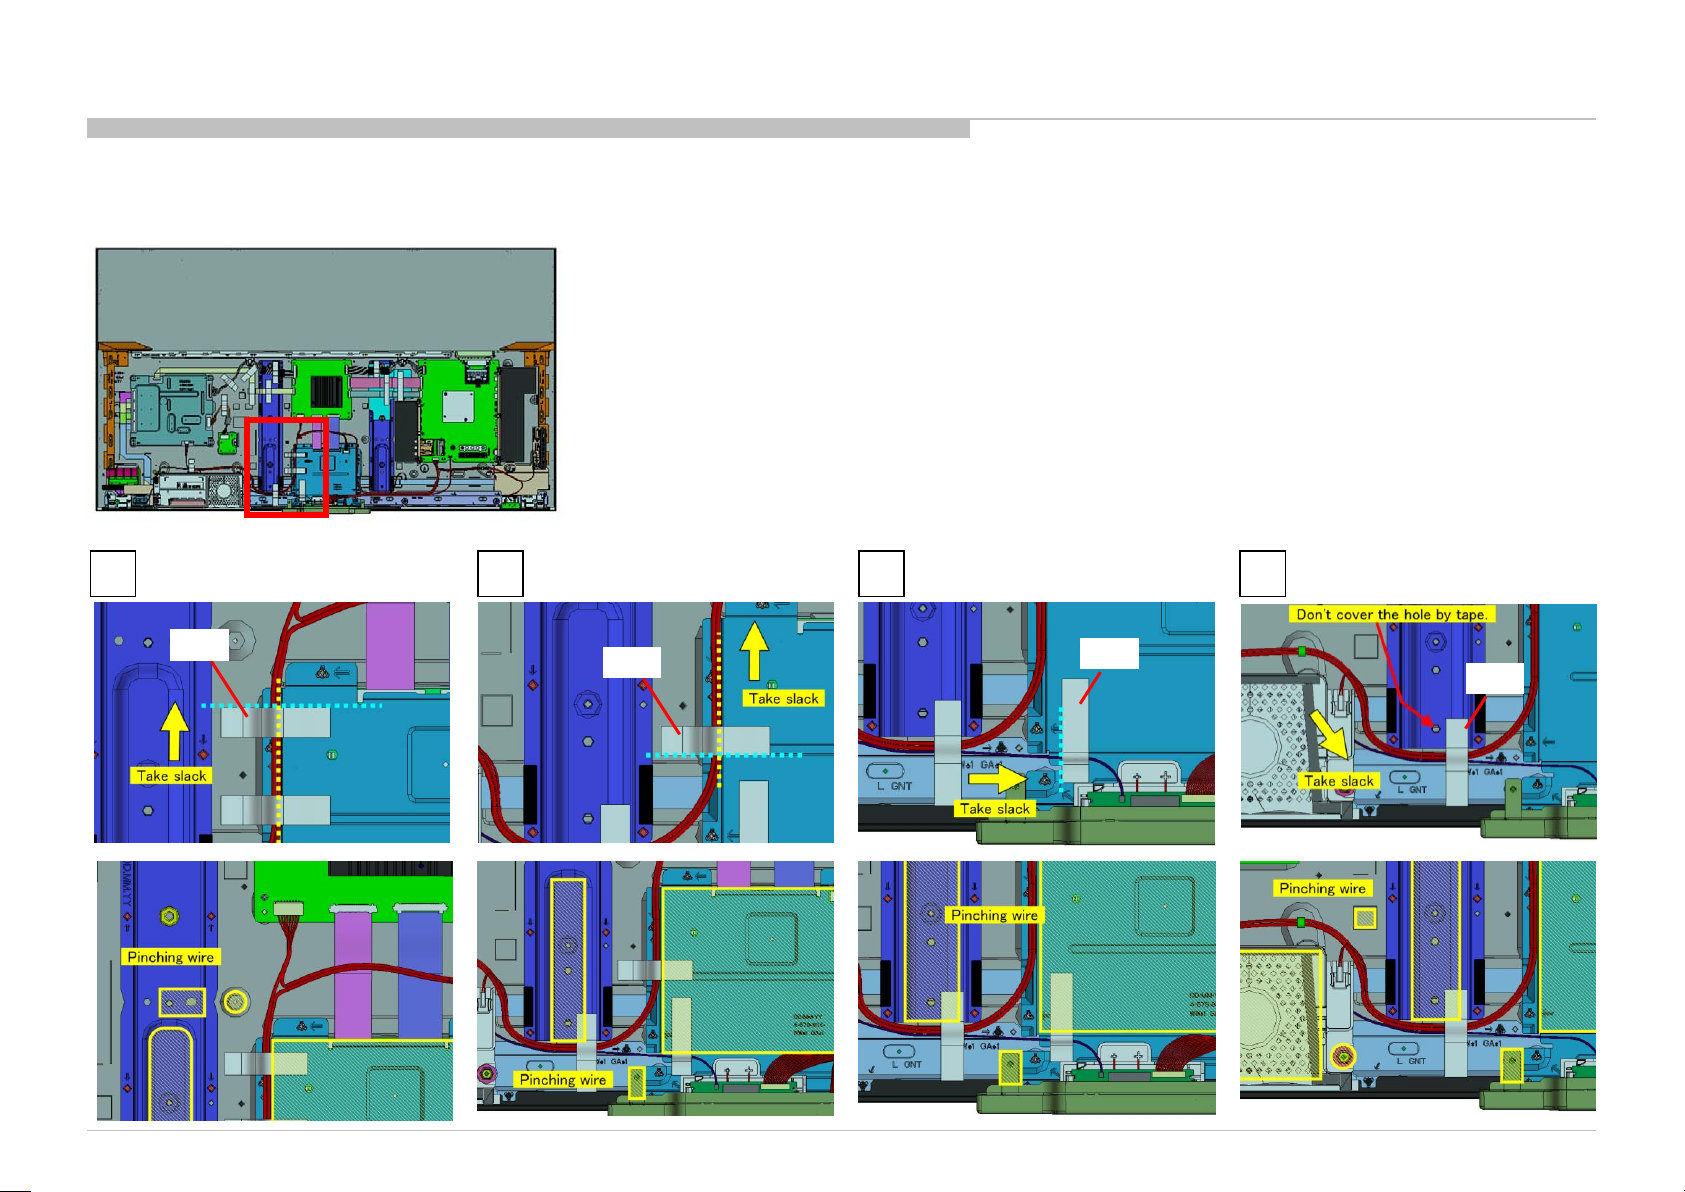
1. KD-55XD9305
1-11. TAPE
1 2 3 4
DISASSEMBLY
TAPE
KD-55/65XD9305
TAPE
TAPE
TAPE
81
Page 82
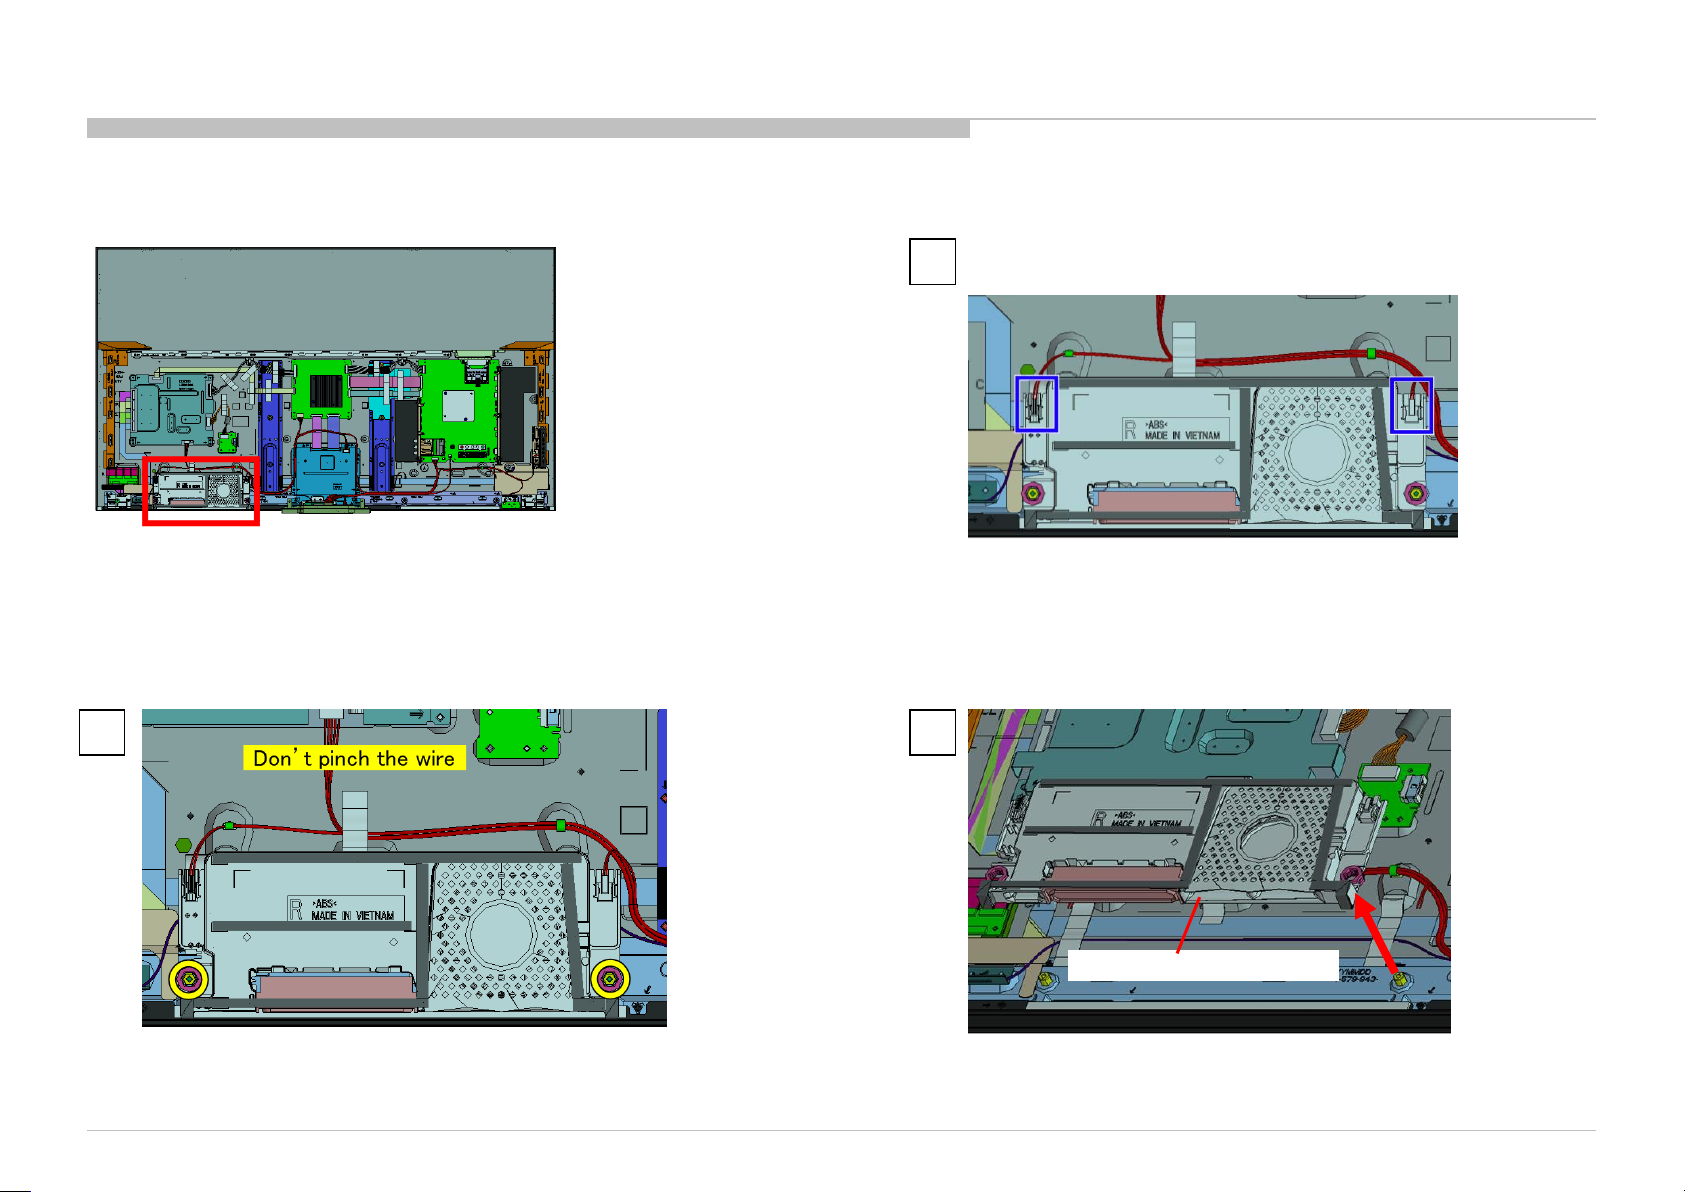
1. KD-55XD9305
1-12. SP-BOX ASSY (W12-R CH-ND)
DISASSEMBLY
1
2 3
KD-55/65XD9305
3
SP-BOX ASSY (W12-R CH-ND)
82
Page 83
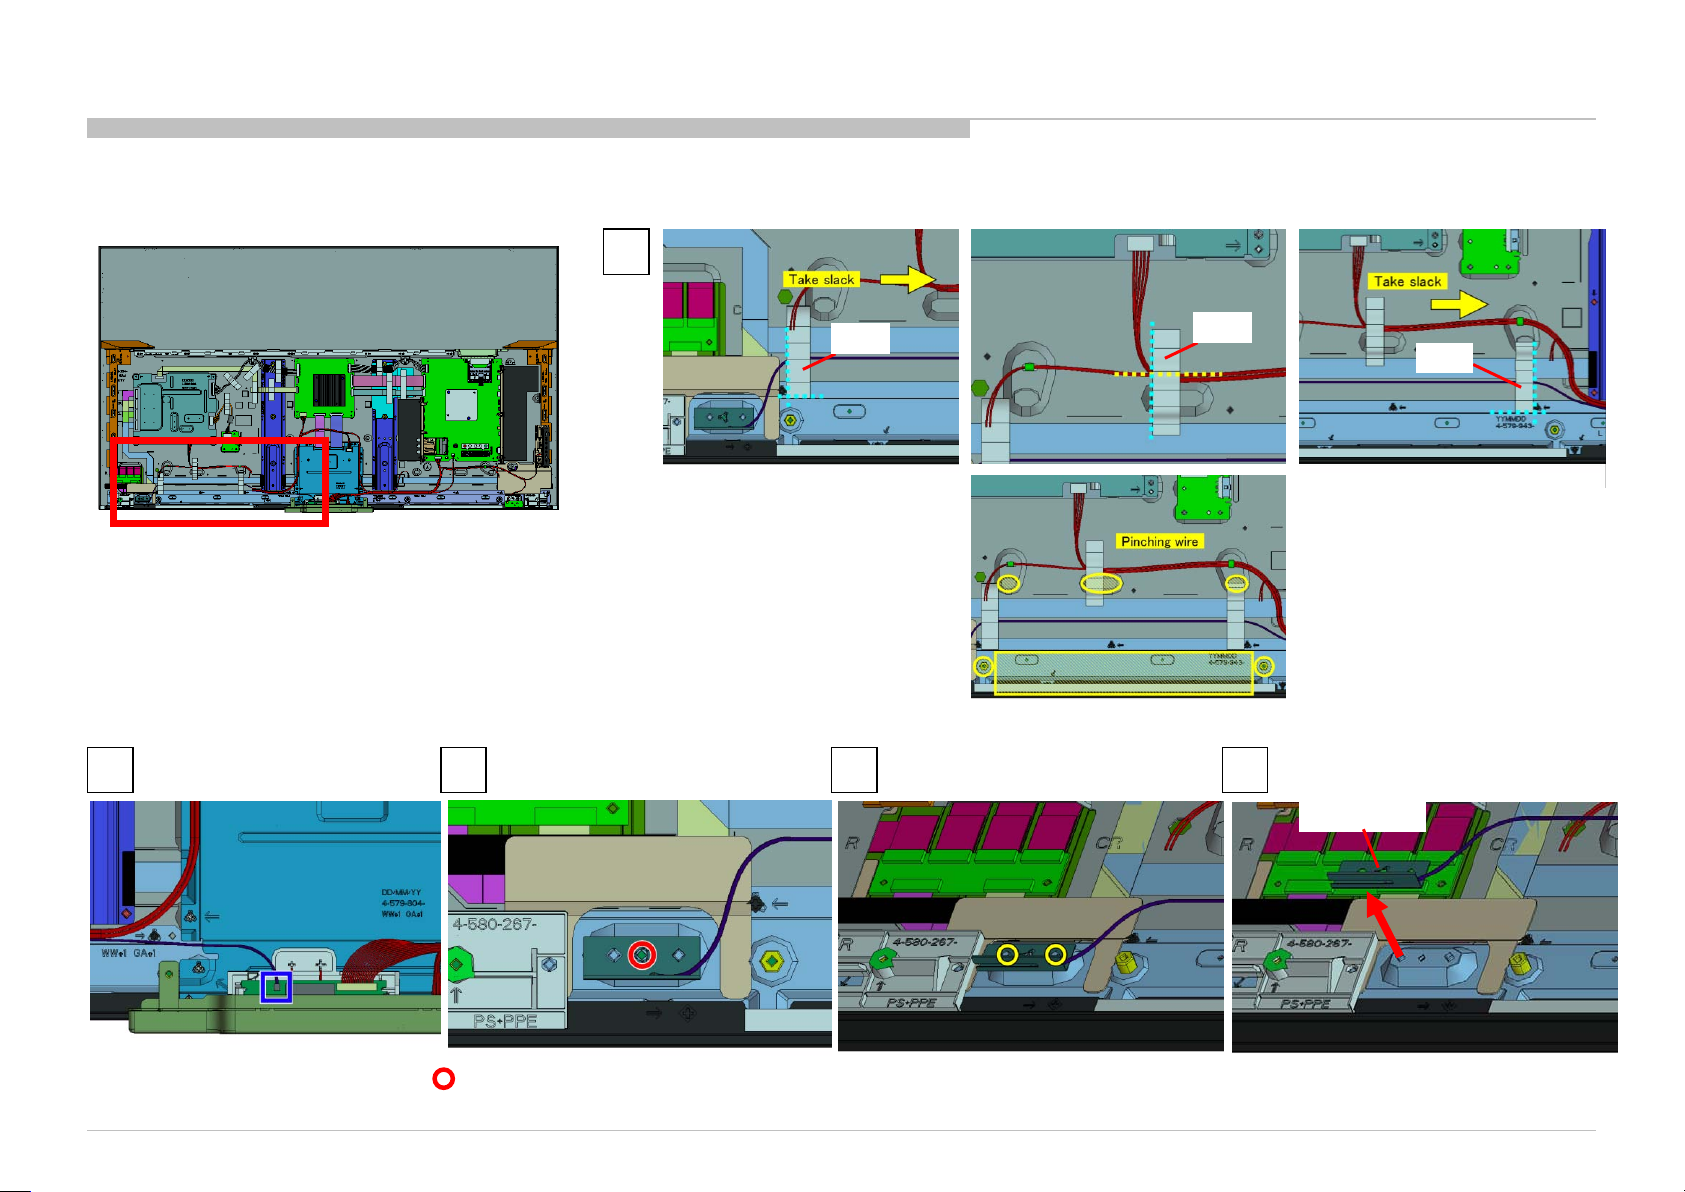
1. KD-55XD9305
1-13. TAPE AND BT ANTENNA
DISASSEMBLY
1
2
TAPE
TAPE
3 4 5
TAPE
BT ANTENNA
KD-55/65XD9305
Screw (SCREW, +PSW M3X6) P/N: 4-472-518-11
83
Page 84
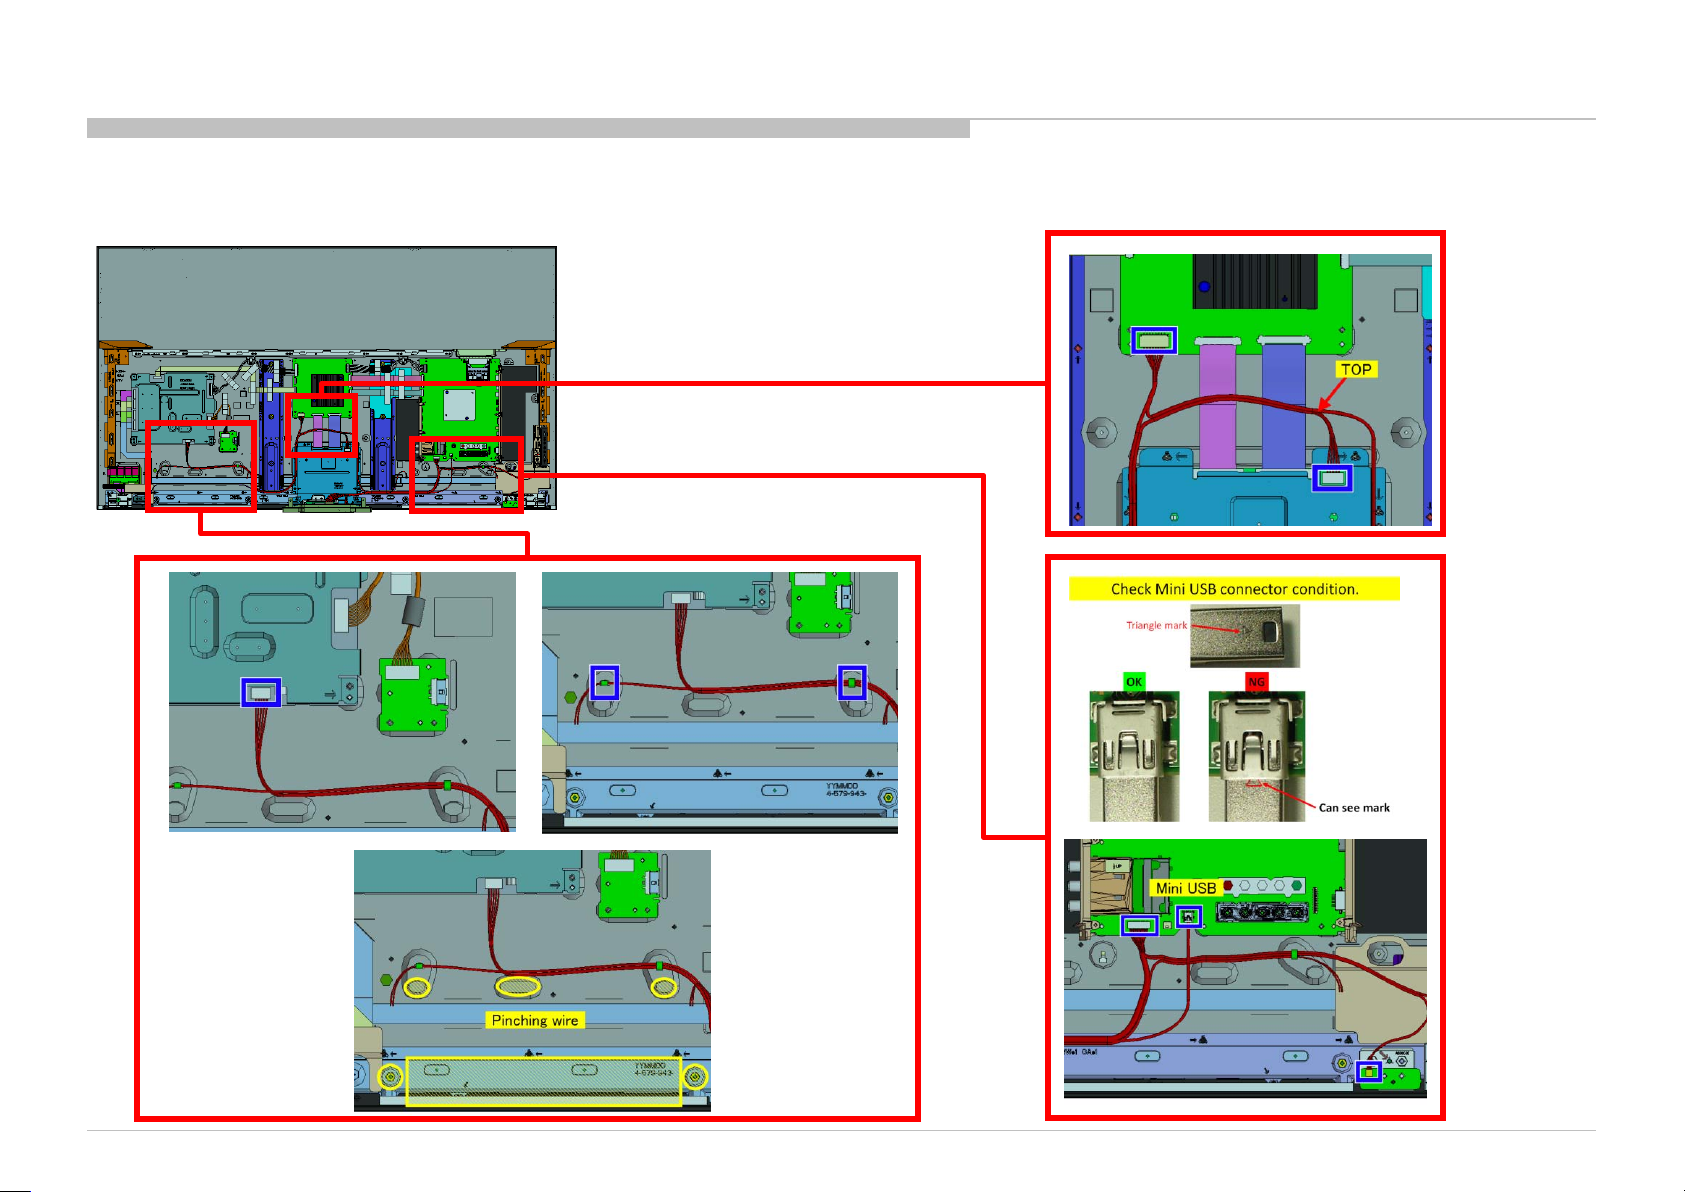
1. KD-55XD9305
1-14. WIRE DRESSING
DISASSEMBLY
KD-55/65XD9305
84
Page 85
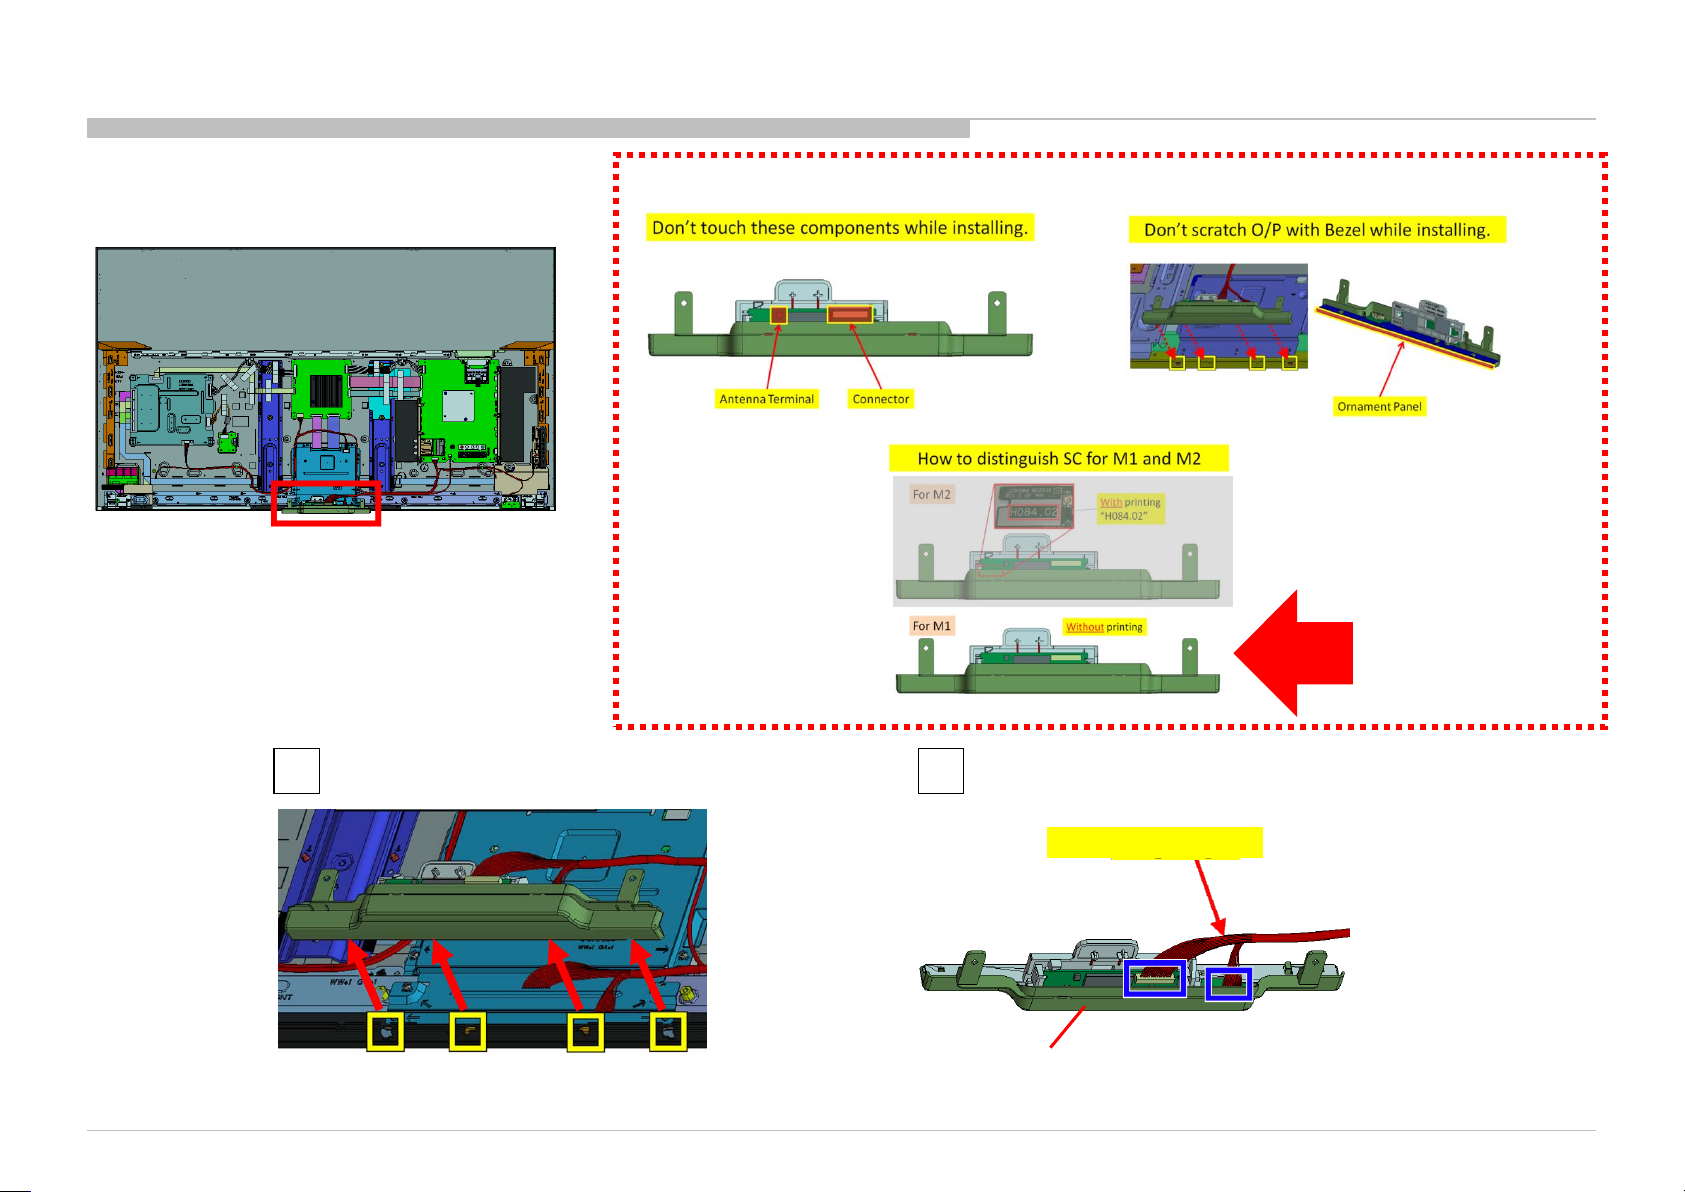
DISASSEMBLY
1. KD-55XD9305
1-15. SMART CORE (S)
NOTES:
For This
Model
For This
Model
KD-55/65XD9305
1 2
HARNESS ASSY (MAIN)
SMART CORE (S)
85
Page 86
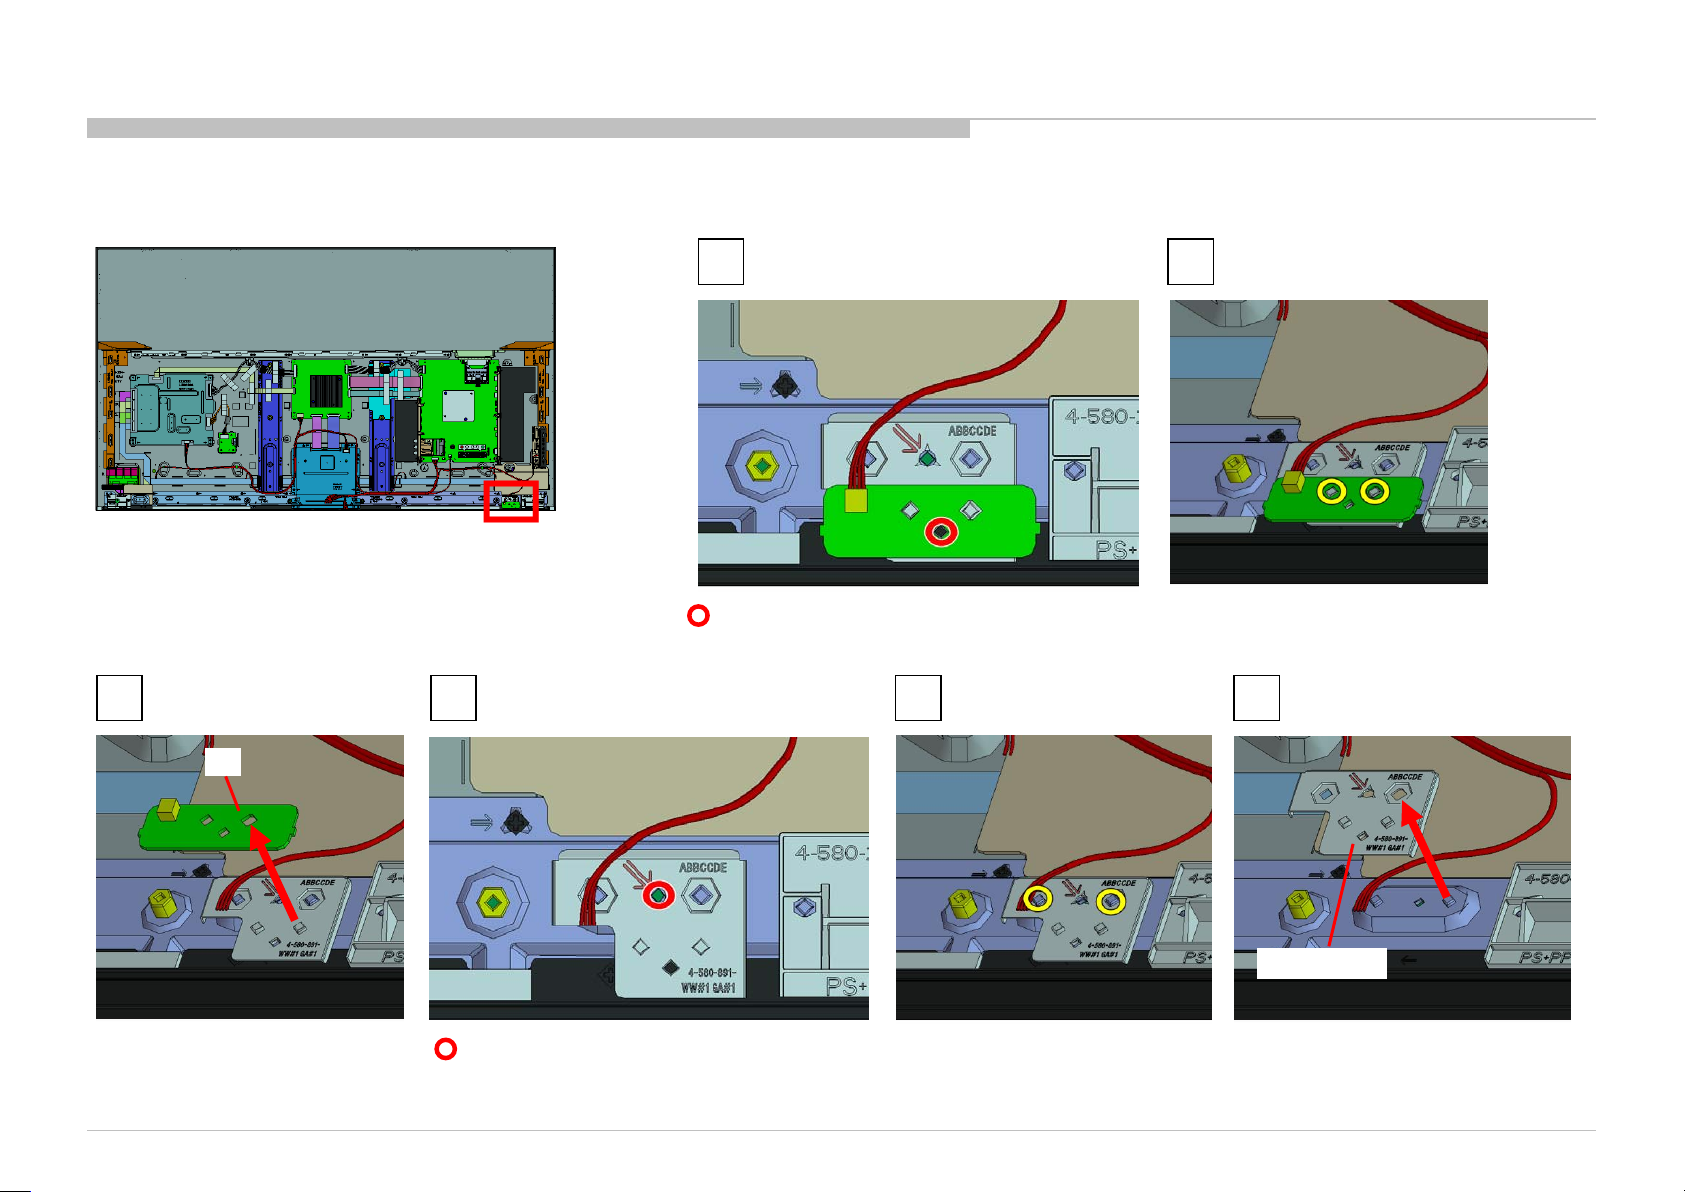
1. KD-55XD9305
1-16. TSI AND BRACKET, TS
DISASSEMBLY
3
TSI
1
2
Screw (SCREW, +PSW M3X6) P/N: 4-472-518-11
4 5 6
KD-55/65XD9305
BRACKET, TS
Screw (SCREW, +PSW M3X6) P/N: 4-472-518-11
86
Page 87
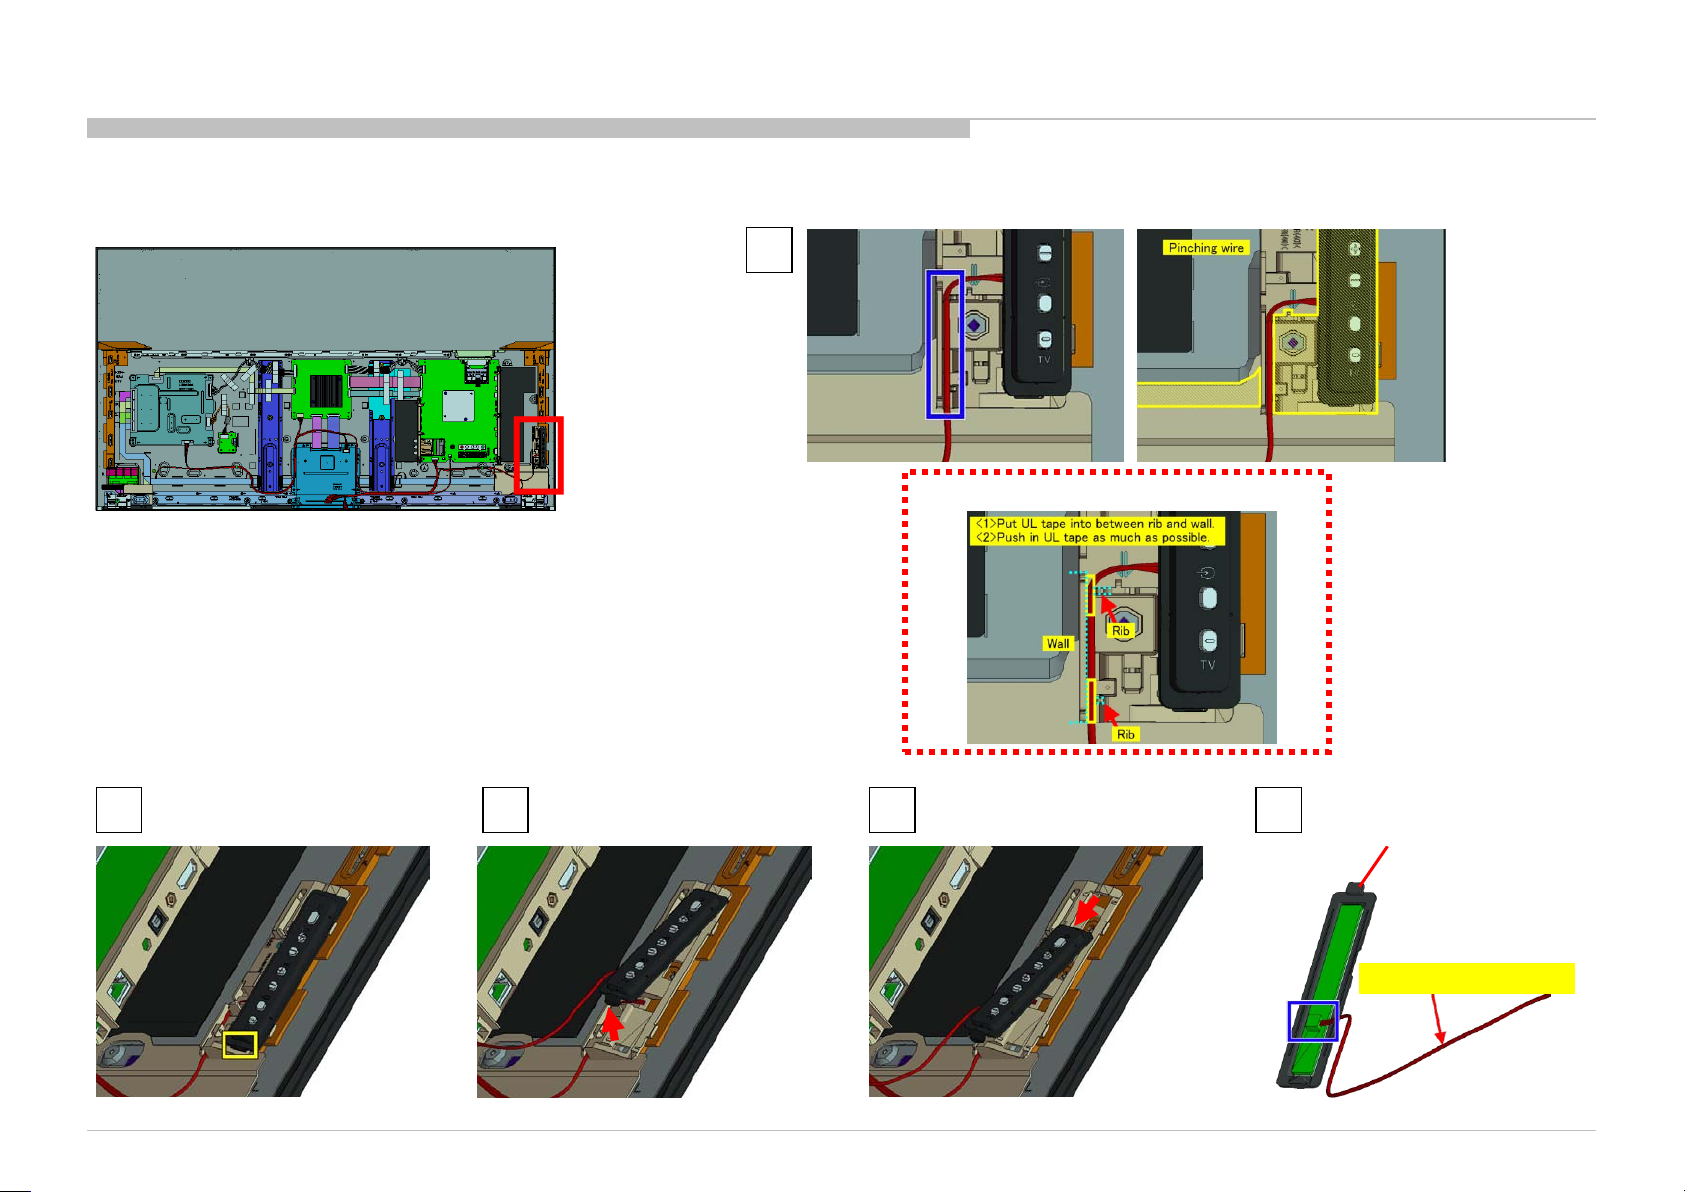
1. KD-55XD9305
1-17. SWITCH UNIT
DISASSEMBLY
1
NOTE: When passing harness into the slit
2 3 4 5
KD-55/65XD9305
SWITCH UNIT
HARNESS ASSY (MAIN)
87
Page 88
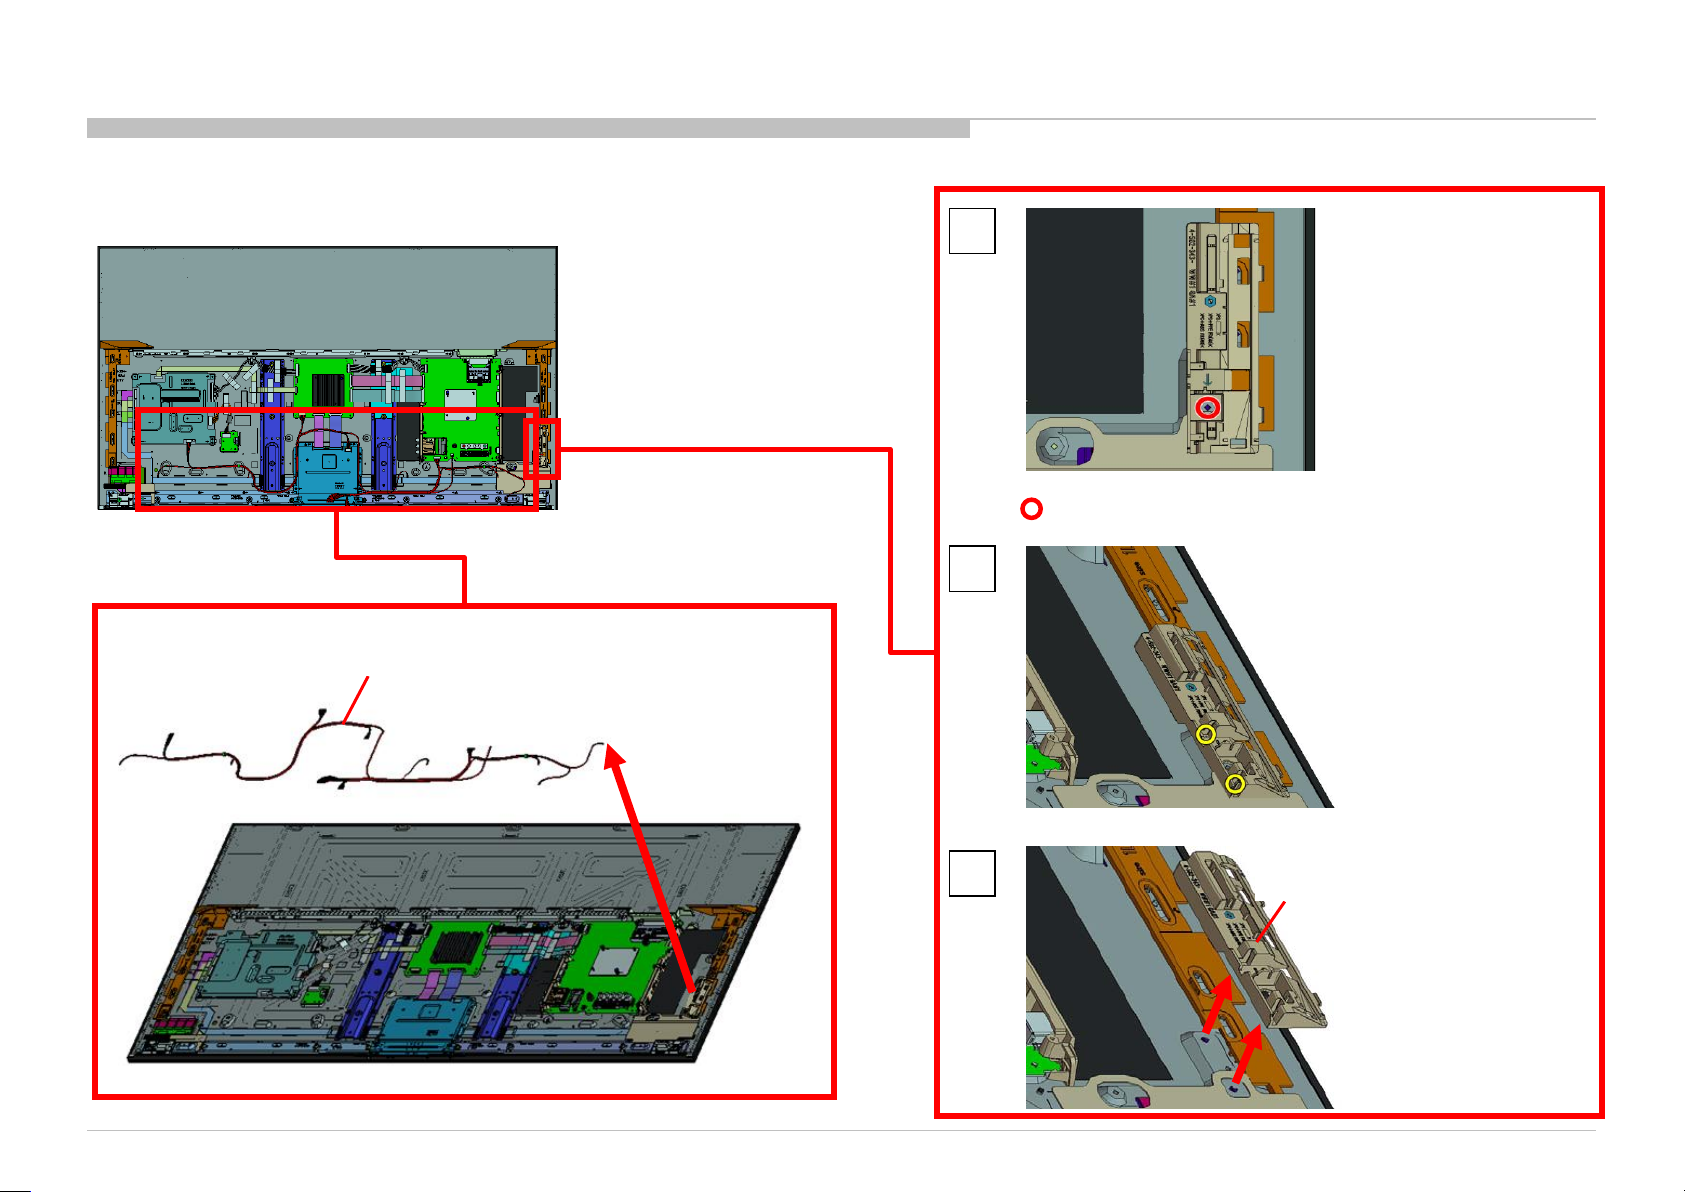
1. KD-55XD9305
1-18. HARNESS ASSY (MAIN) AND HOLDER SIDE SW (GNT L M1)
HARNESS ASSY (MAIN)
P/N: 1-910-111-07
DISASSEMBLY
1
Screw (SCREW, +LH M3X2.1 STEP (GNT)) P/N: 4-586-665-01
2
KD-55/65XD9305
3
HOLDER SIDE SW (GNT L M1)
88
Page 89
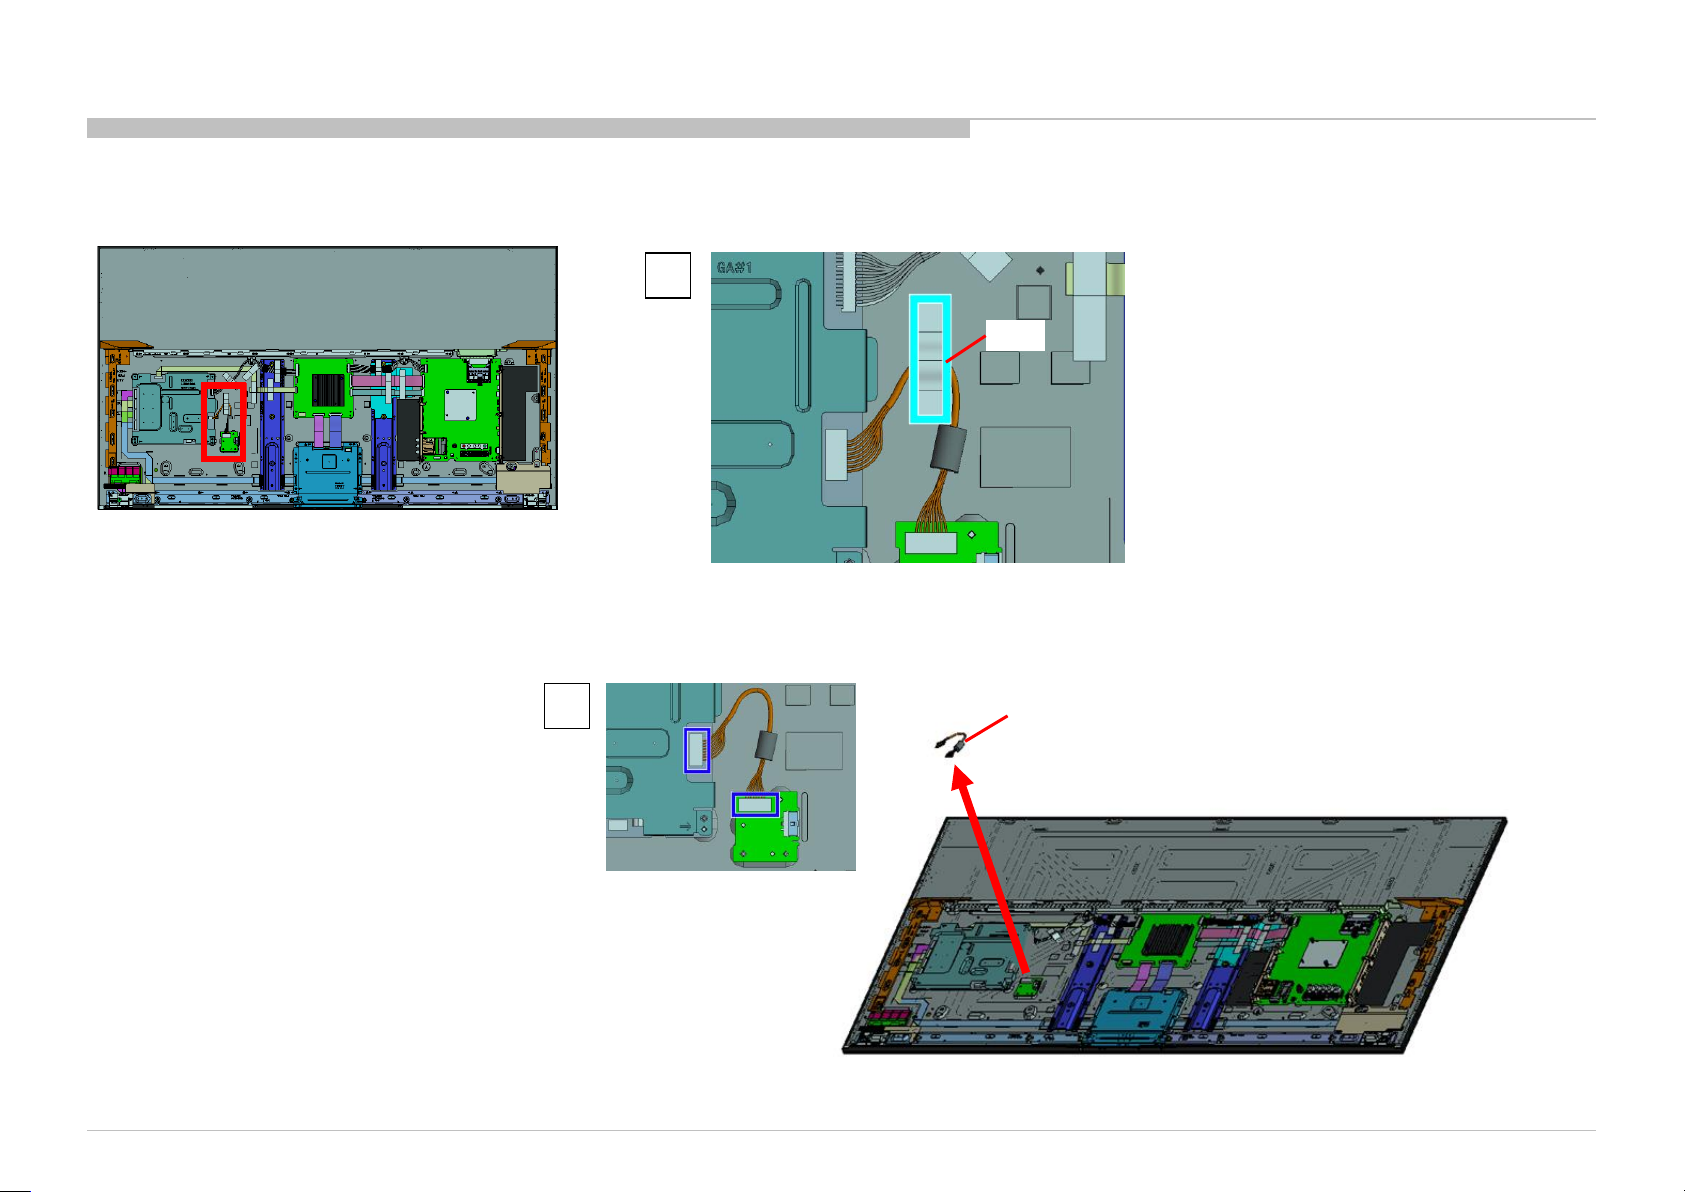
1. KD-55XD9305
1-19. TAPE AND CONNECTOR ASSY 10P
DISASSEMBLY
1
TAPE
KD-55/65XD9305
2
CONNECTOR ASSY 10P
P/N: 1-910-111-21
89
Page 90
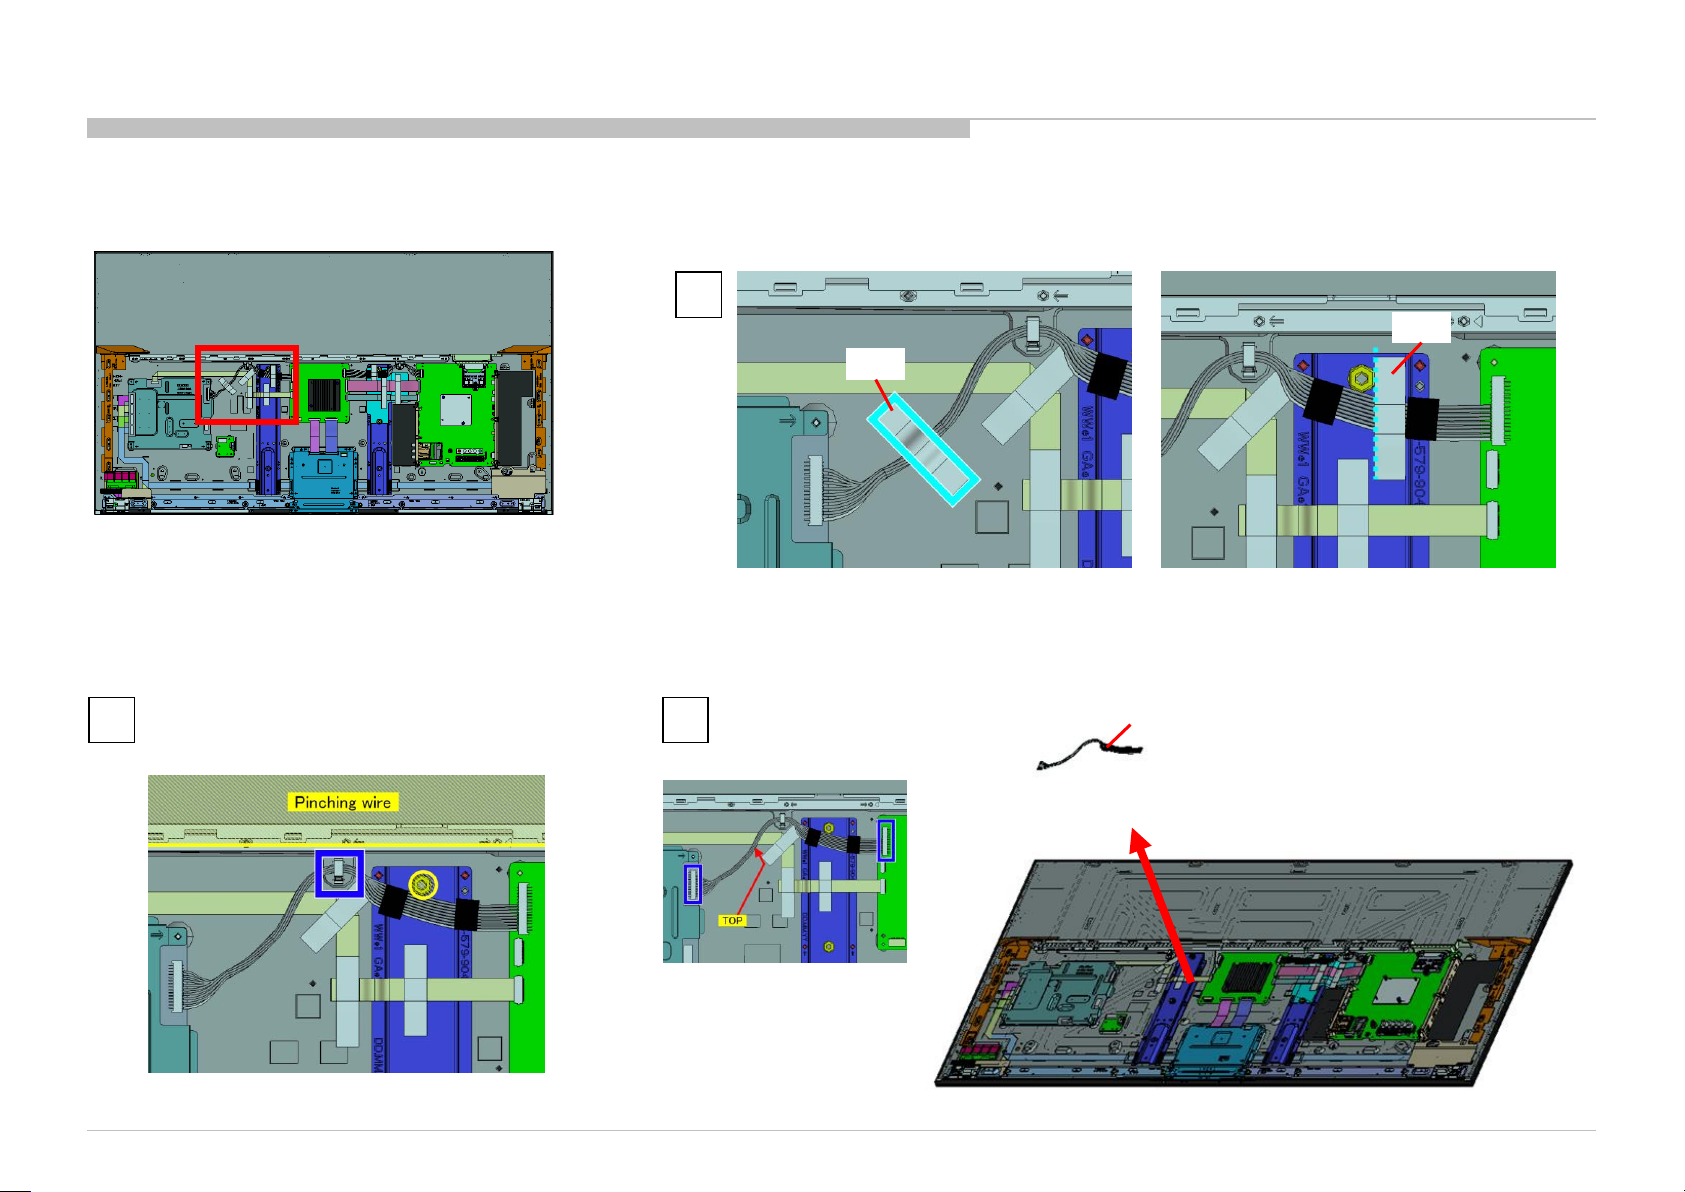
1. KD-55XD9305
1-20. TAPE AND CONNECTOR ASSY 30P
2 3
DISASSEMBLY
1
TAPE
TAPE
CONNECTOR ASSY 30P
P/N: 1-910-111-08
KD-55/65XD9305
90
Page 91
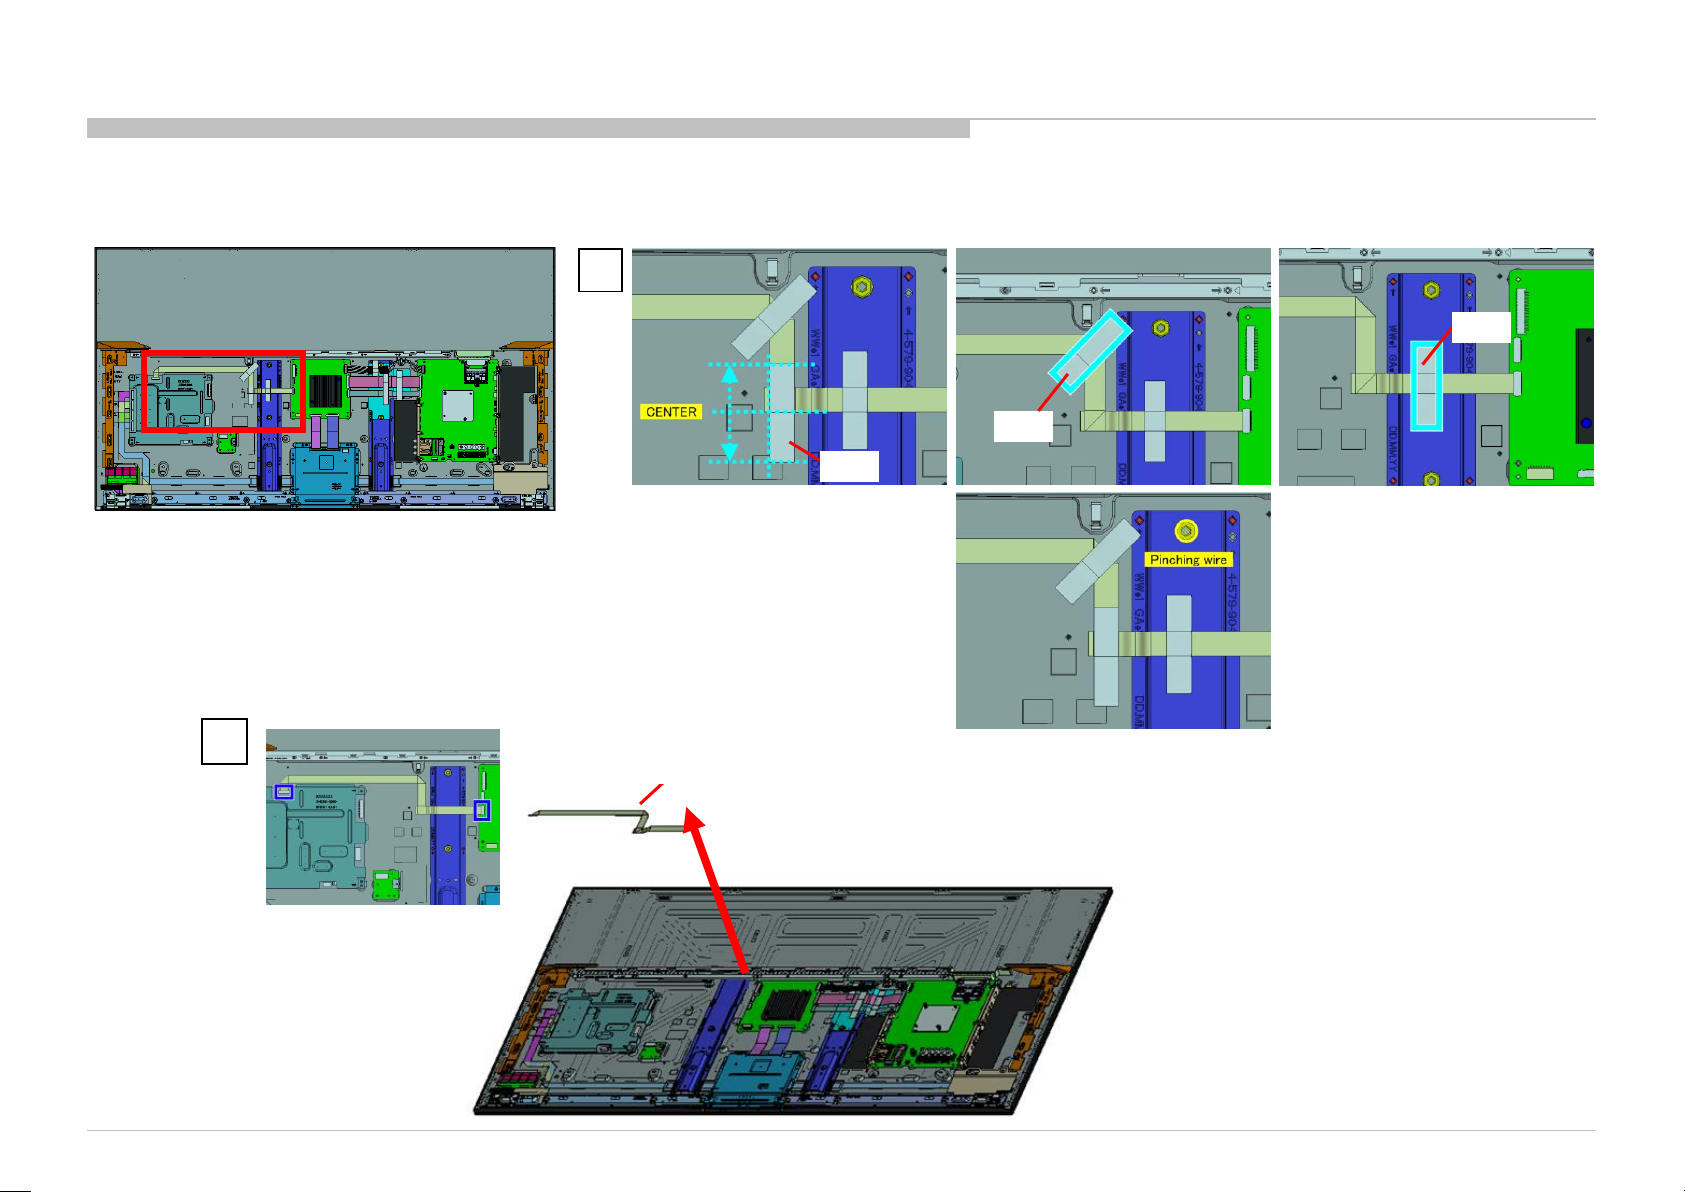
1. KD-55XD9305
1-21. TAPE AND FLEXIBLE FLAT CABLE 30P
DISASSEMBLY
1
TAPE
TAPE
TAPE
KD-55/65XD9305
2
FLEXIBLE FLAT CABLE 30P
P/N: 1-910-111-05
91
Page 92
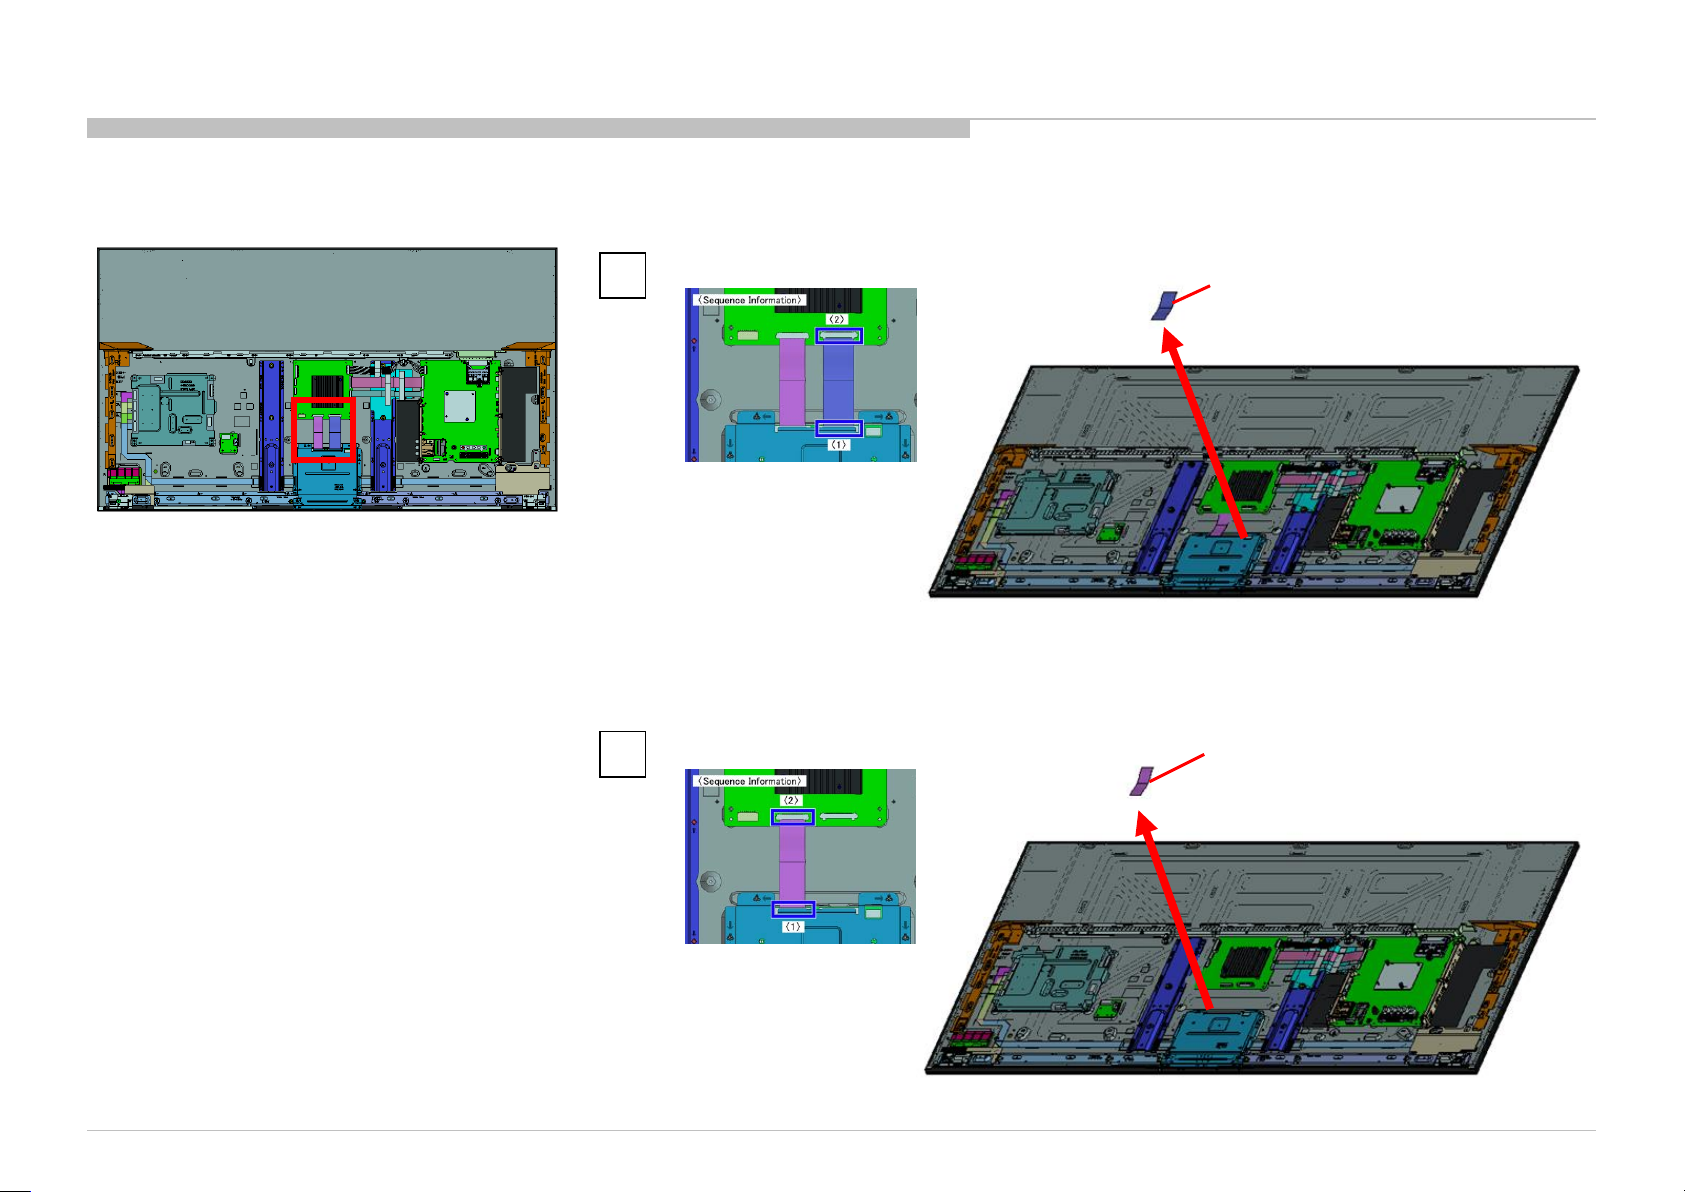
1. KD-55XD9305
1-22. FLEXIBLE FLAT CABLE 51P AND FLEXIBLE FLAT CABLE 41P
DISASSEMBLY
1
2
FLEXIBLE FLAT CABLE 51P
P/N: 1-849-325-11
FLEXIBLE FLAT CABLE 41P
P/N: 1-849-319-11
KD-55/65XD9305
92
Page 93
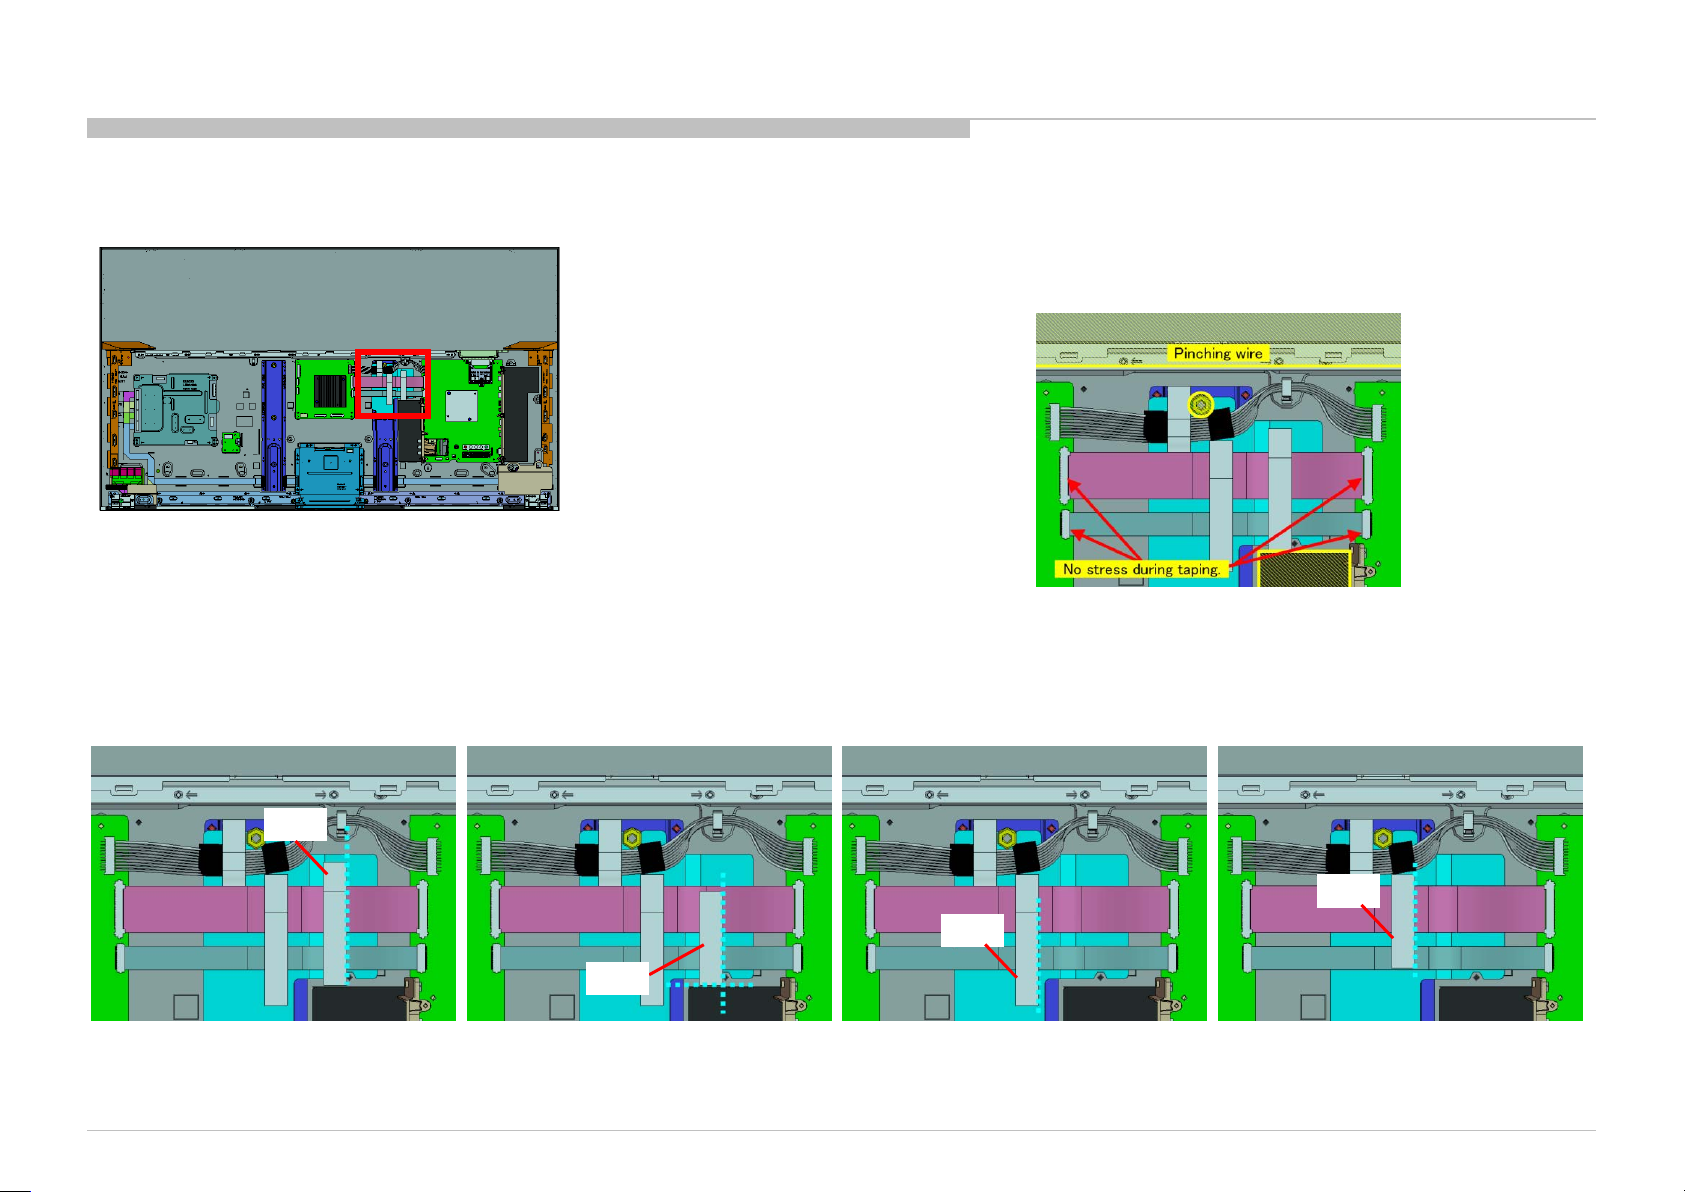
1. KD-55XD9305
1-23. TAPE
DISASSEMBLY
KD-55/65XD9305
TAPE
TAPE
TAPE
TAPE
93
Page 94
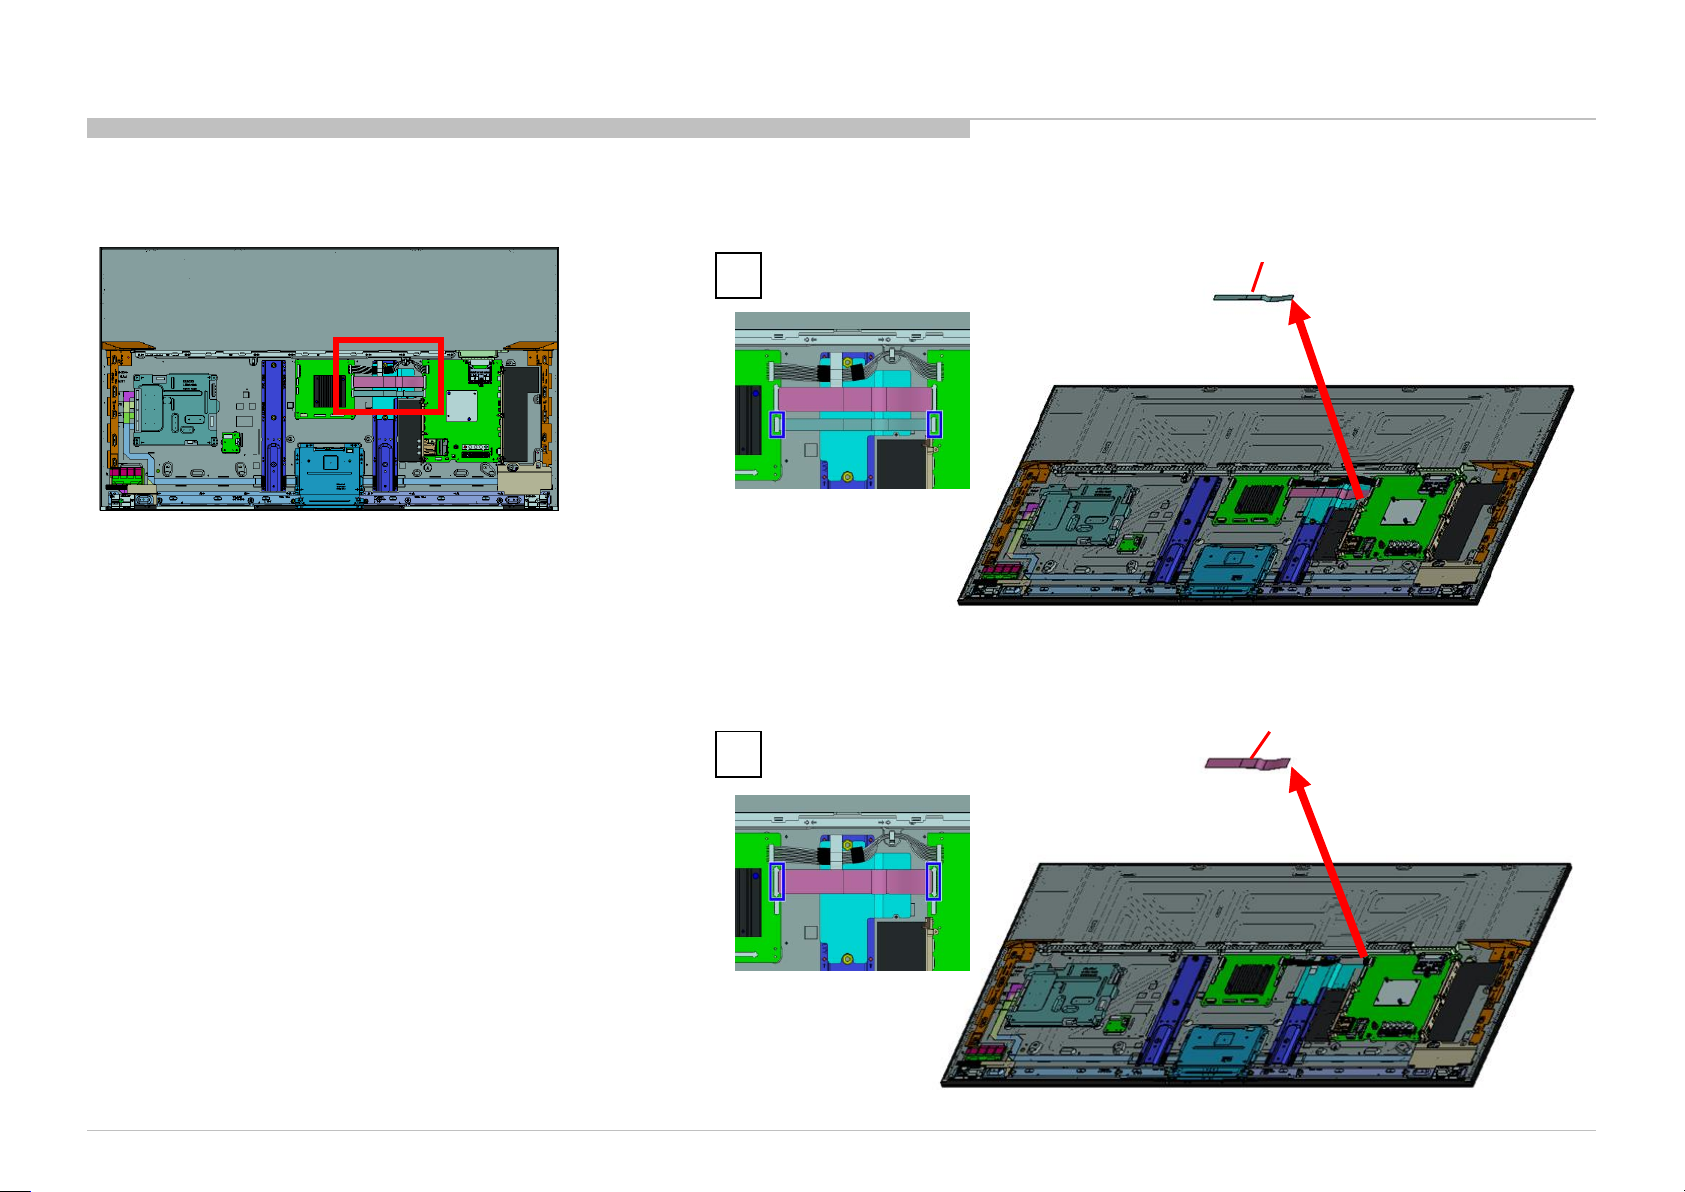
1. KD-55XD9305
DISASSEMBLY
1-24. FLEXIBLE FLAT CABLE 30P(BD) AND FLEXIBLE FLAT CABLE 51P
1
2
FLEXIBLE FLAT CABLE 30P (BD)
P/N: 1-910-111-06
FLEXIBLE FLAT CABLE 51P
P/N: 1-849-326-11
KD-55/65XD9305
94
Page 95
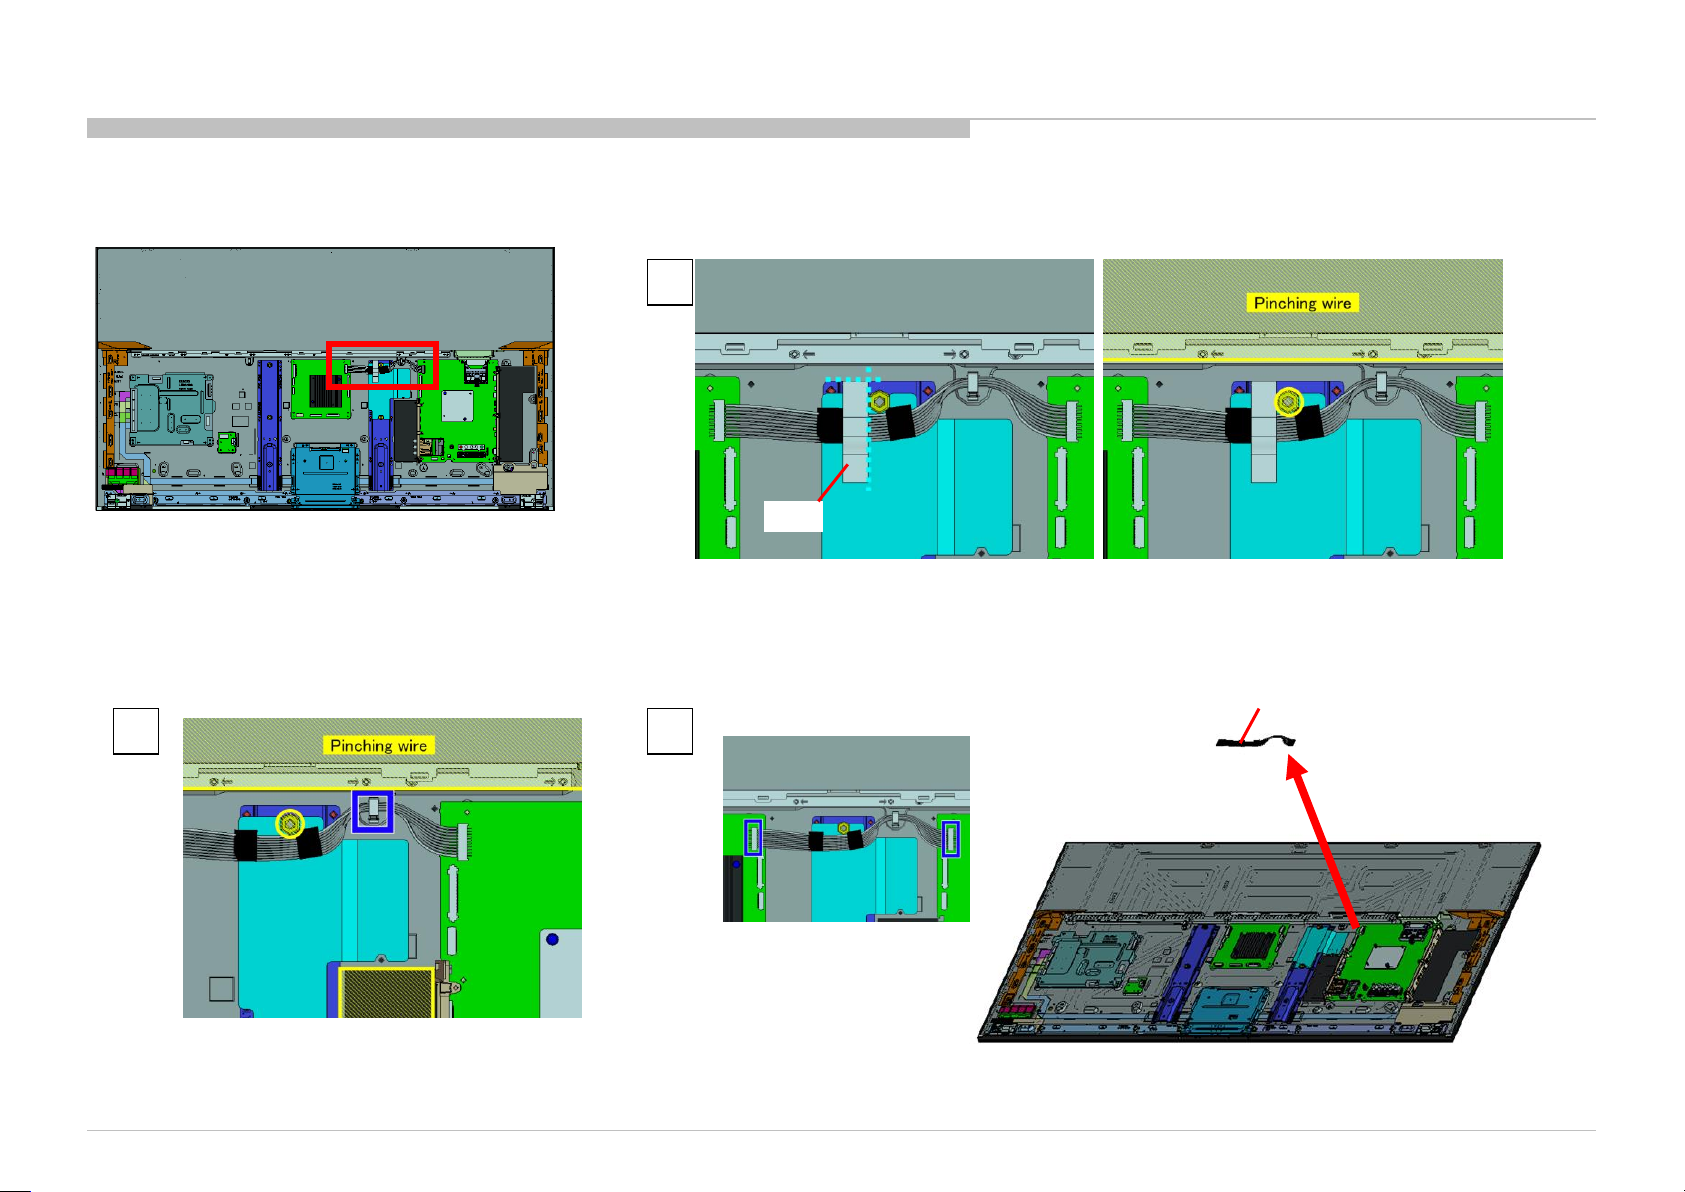
1. KD-55XD9305
1-25. TAPE AND CONNECTOR ASSY 20P
DISASSEMBLY
1
TAPE
CONNECTOR ASSY 20P
P/N: 1-910-111-09
2
KD-55/65XD9305
3
95
Page 96
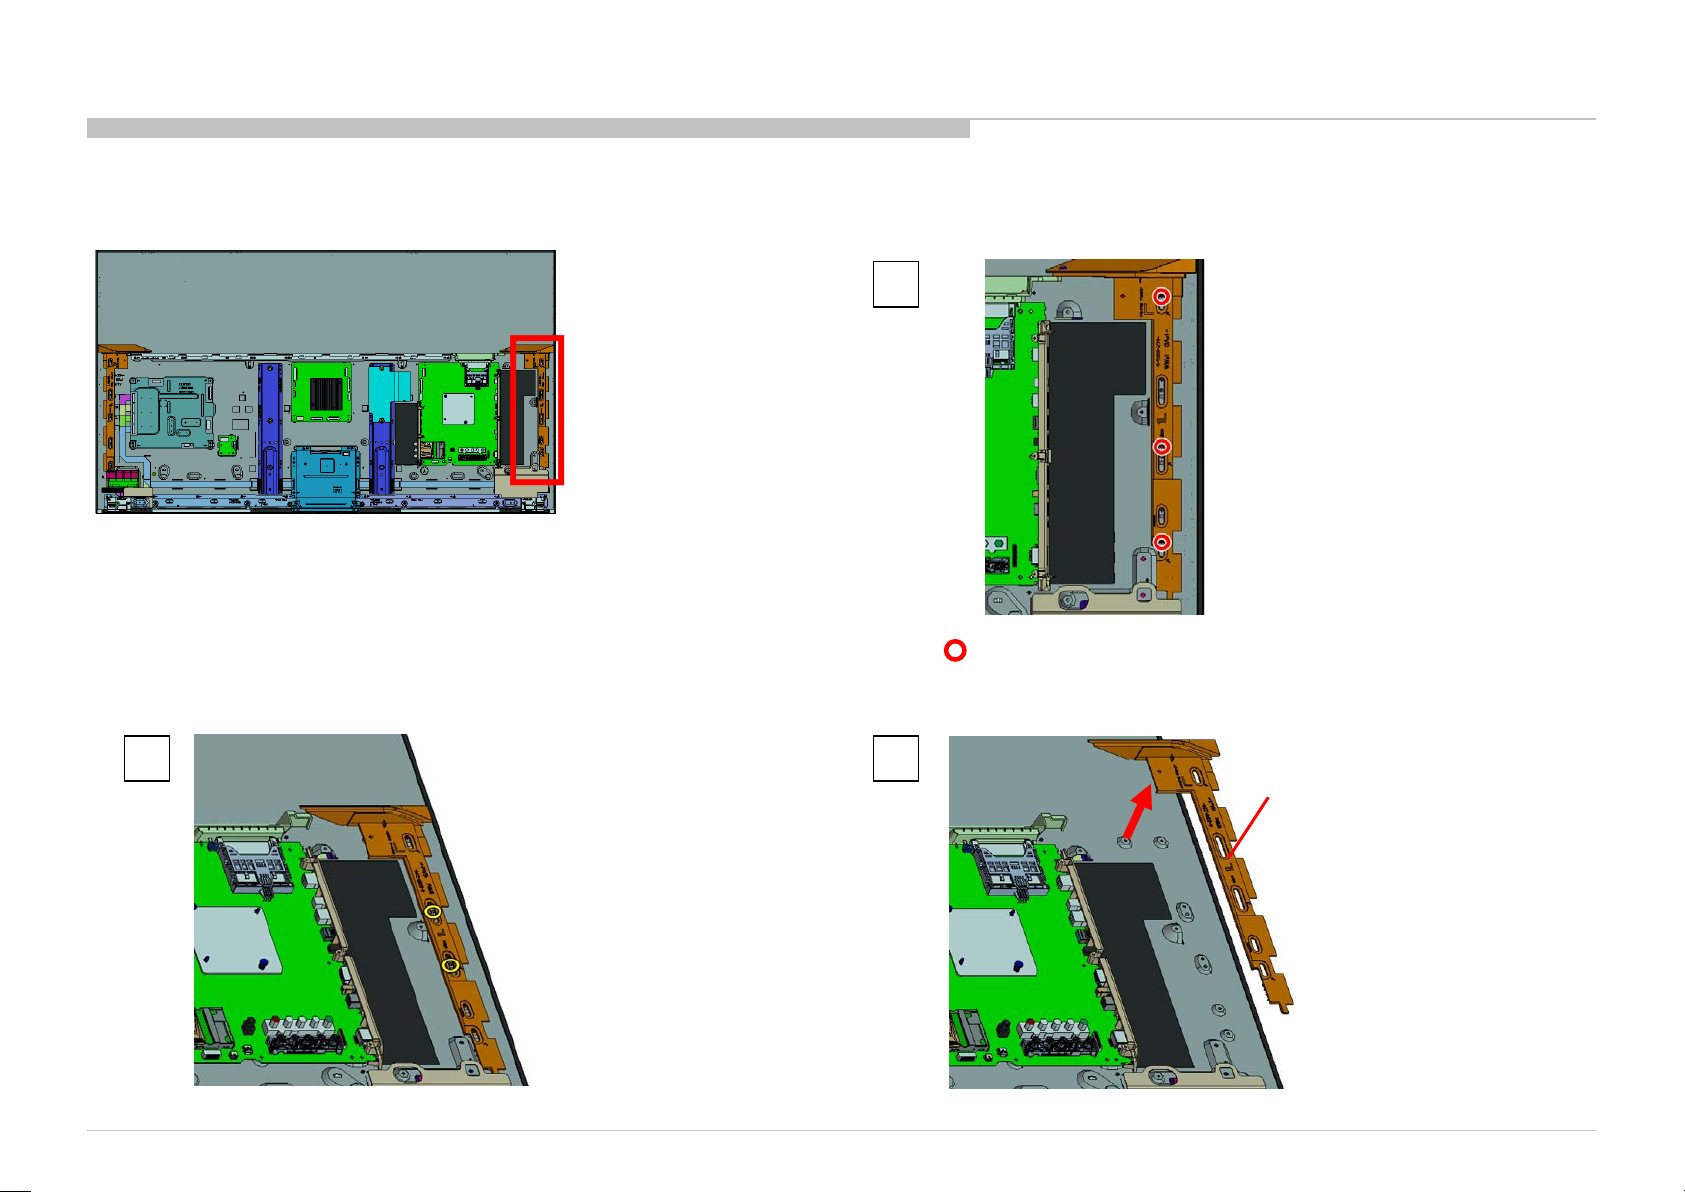
1. KD-55XD9305
1-26. BRACKET, SLIDE (L) (L GNT)
DISASSEMBLY
1
3 screws (SCREW, +LH M3X2.1 STEP (GNT)) P/N: 4-586-665-01
2 3
KD-55/65XD9305
BRACKET, SLIDE (L) (L GNT)
96
Page 97
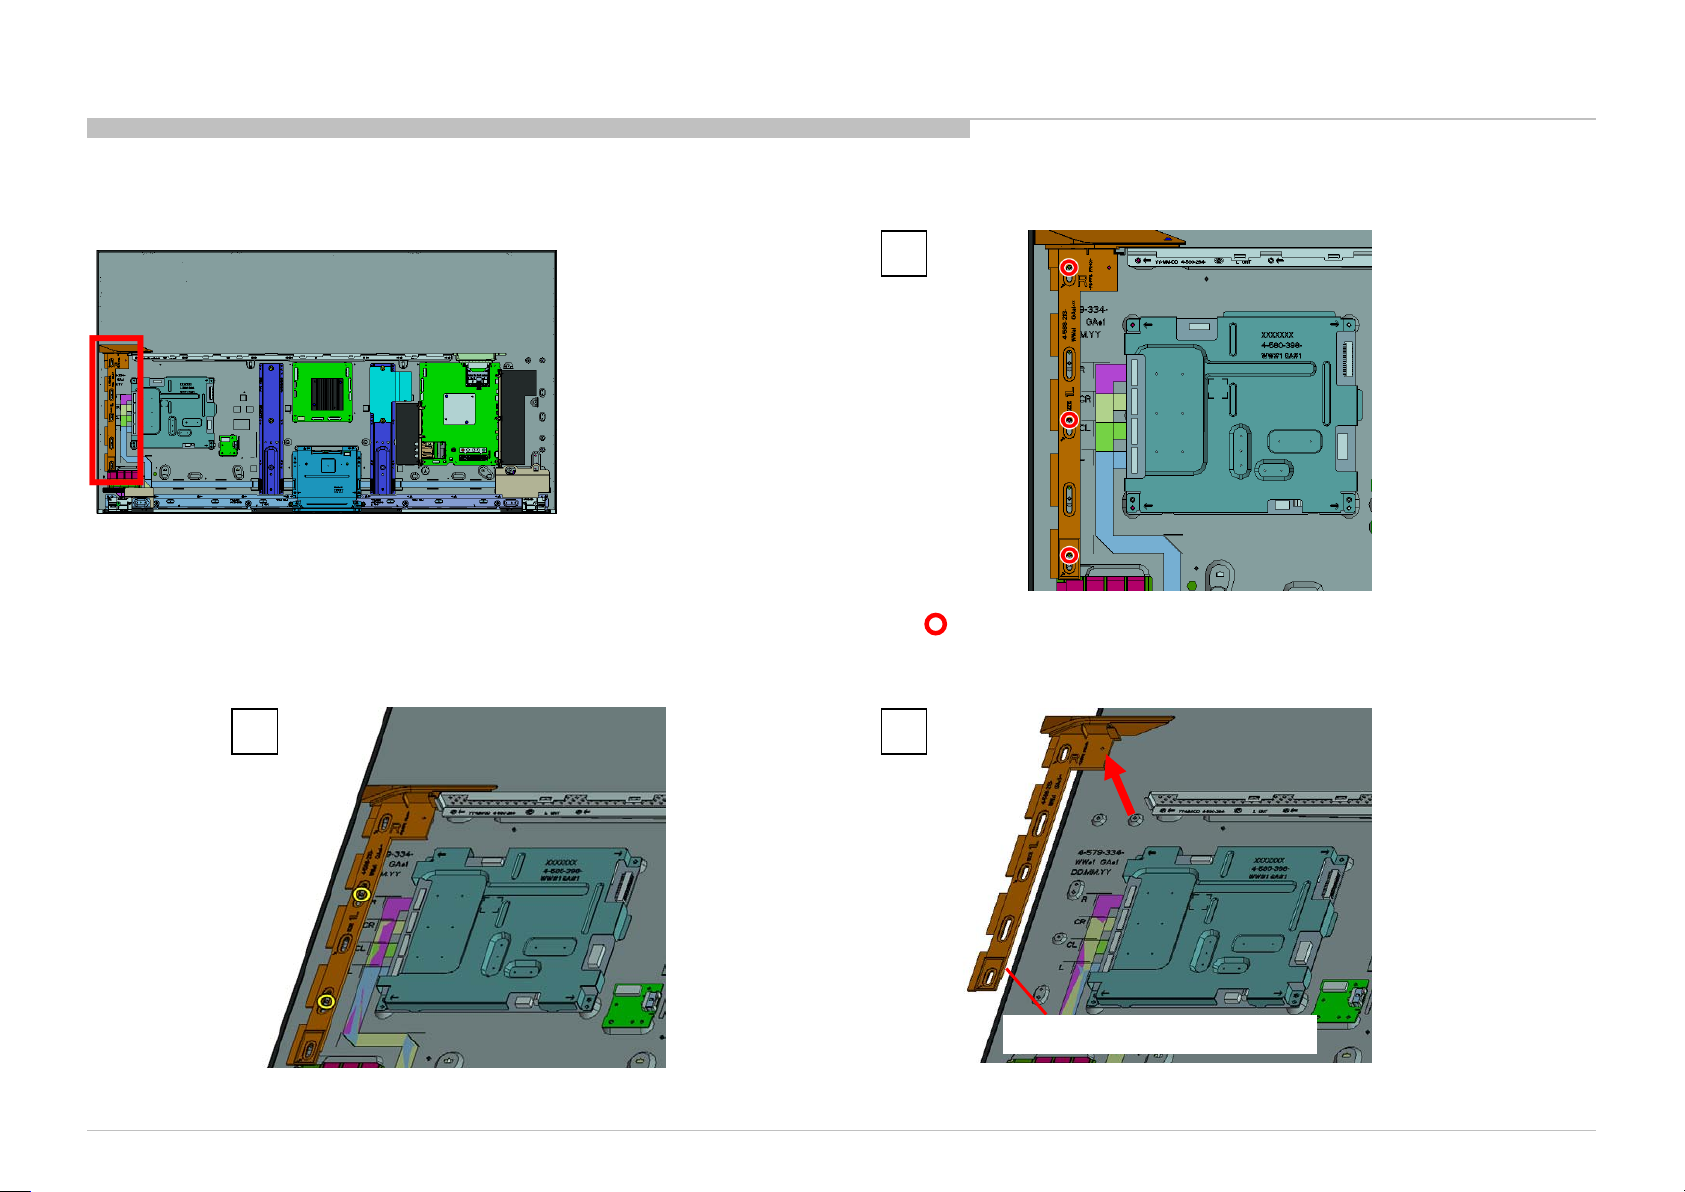
1. KD-55XD9305
1-27. BRACKET, SLIDE (R) (L GNT)
DISASSEMBLY
1
3 screws (SCREW, +LH M3X2.1 STEP (GNT)) P/N: 4-586-665-01
KD-55/65XD9305
2 3
BRACKET, SLIDE (R) (L GNT)
97
Page 98
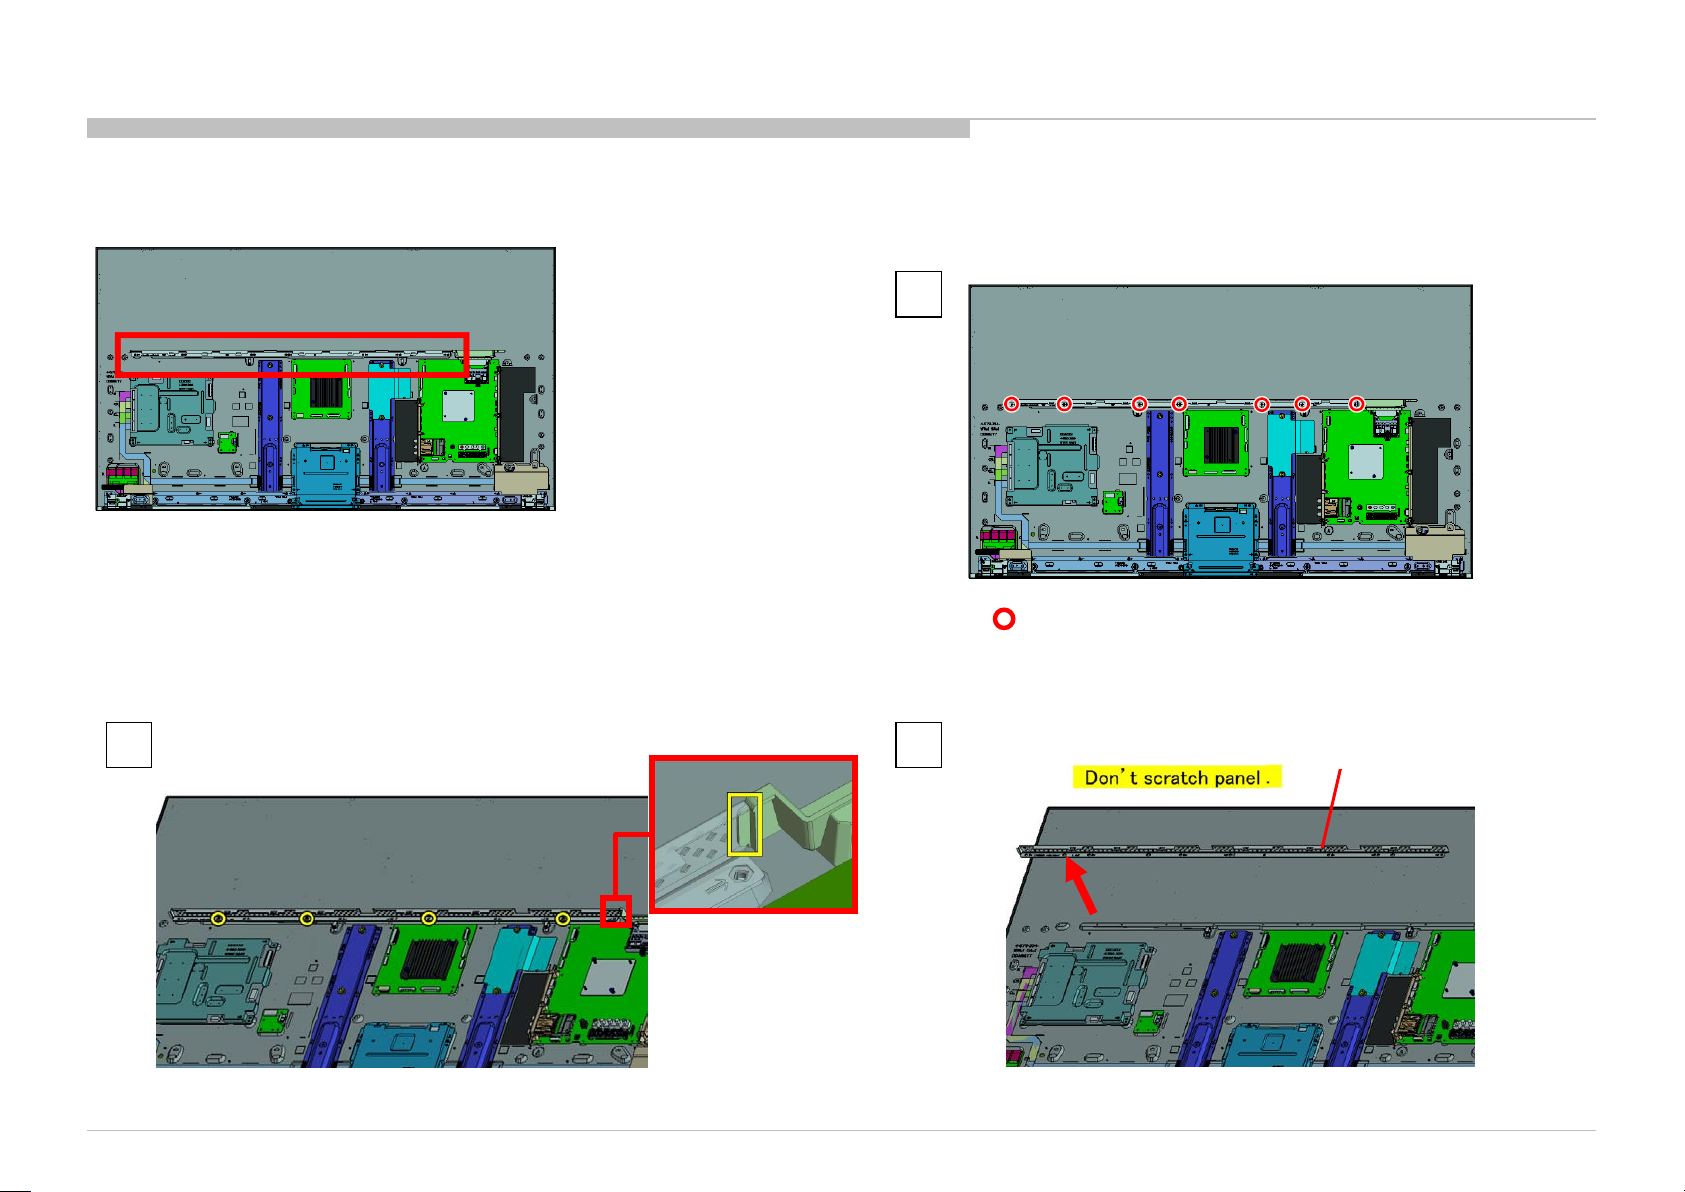
1. KD-55XD9305
1-28. TOP COVER (L GNT)
DISASSEMBLY
1
7 screws (SCREW, +PSW M3X6) P/N: 4-472-518-11
2 3
KD-55/65XD9305
TOP COVER (L GNT)
98
Page 99
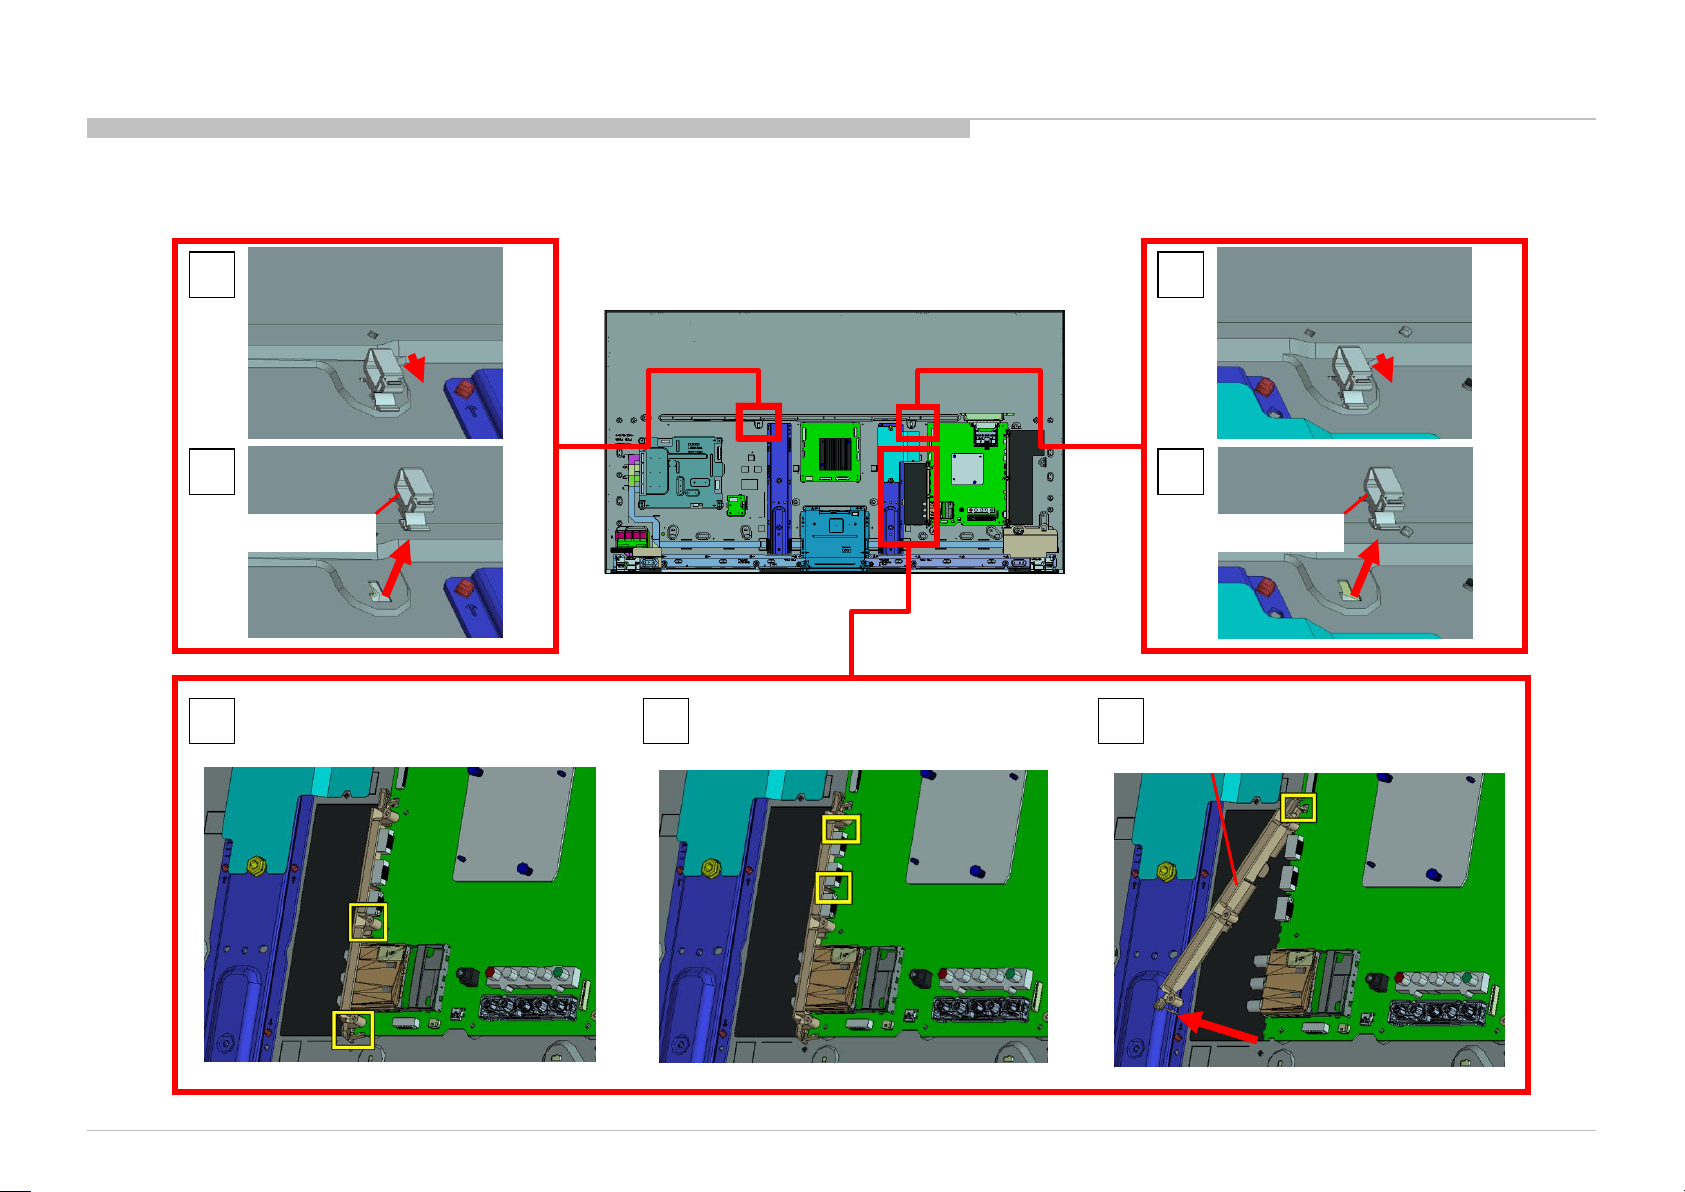
1. KD-55XD9305
1-29. SLIDE, CLAMP AND BRACKET, INSIDE (GNT)
DISASSEMBLY
1
2
SLIDE, CLAMP
1 2 3
1
2
SLIDE, CLAMP
BRACKET, INSIDE (GNT)
KD-55/65XD9305
99
Page 100
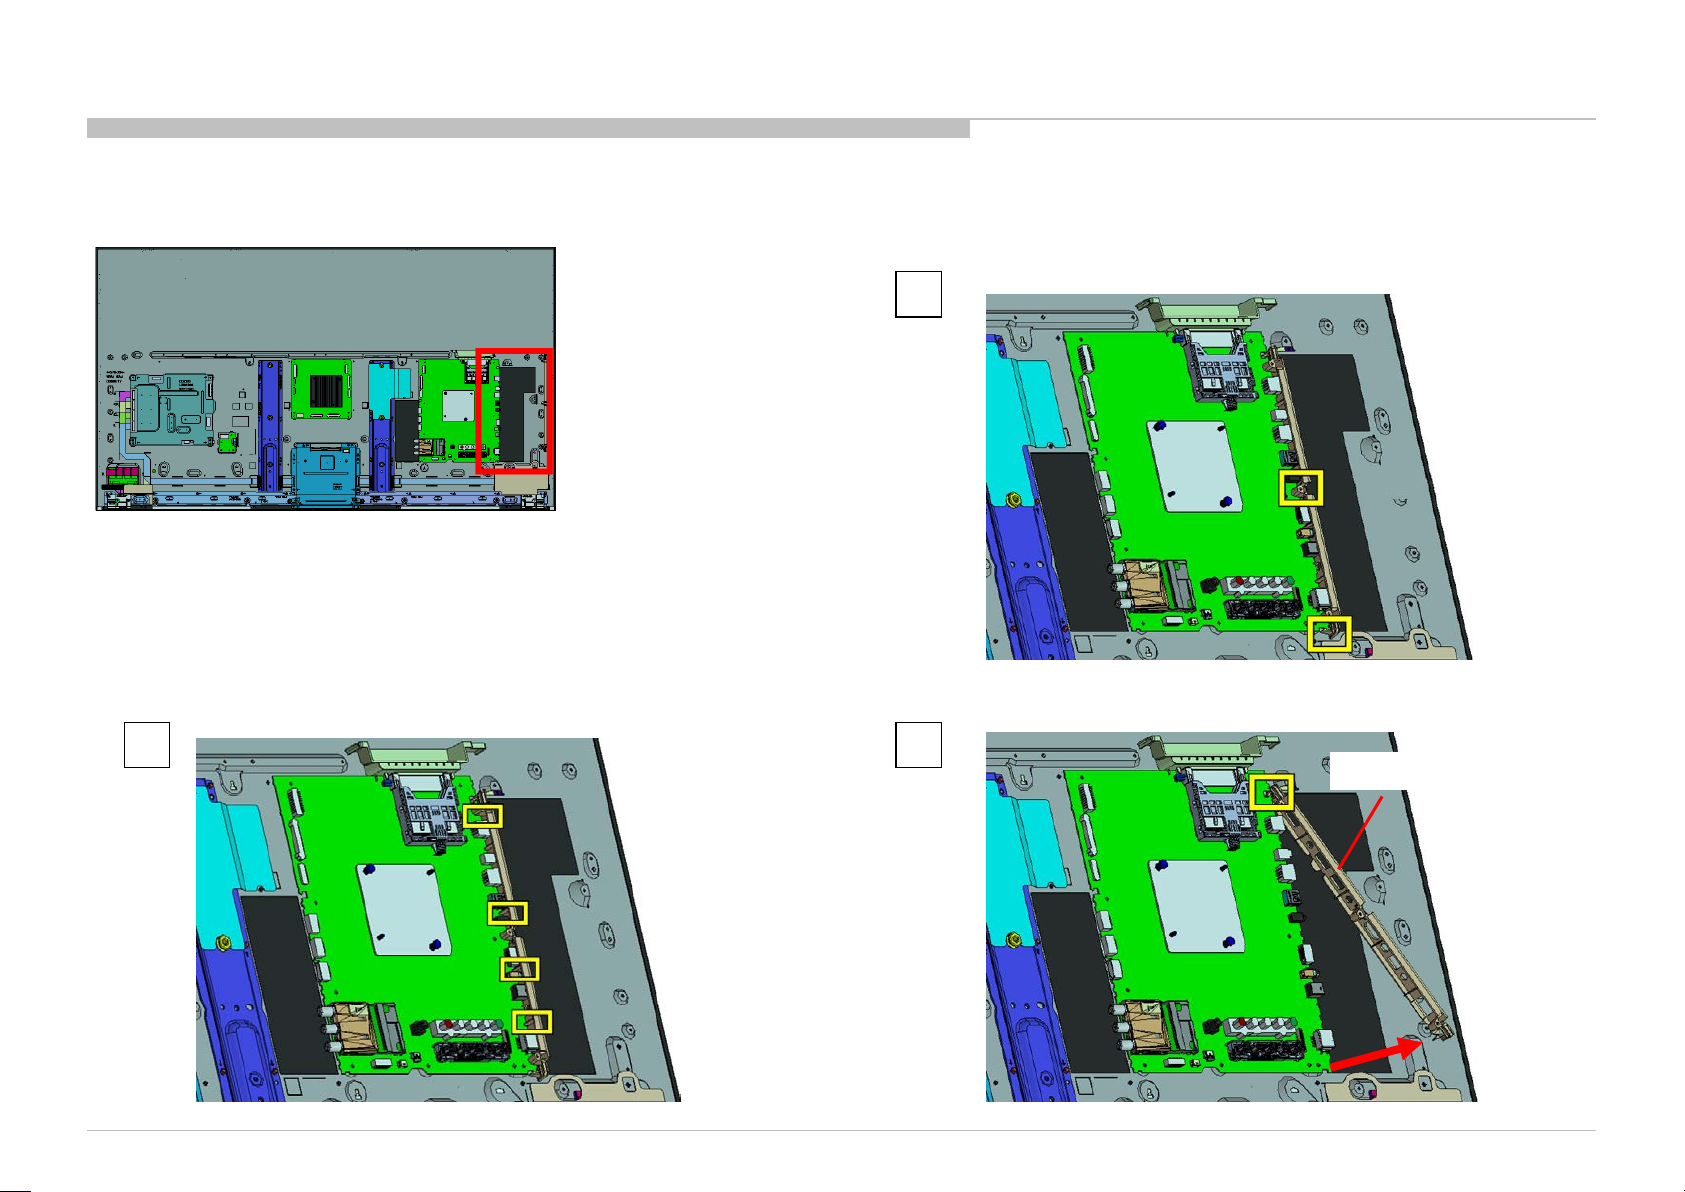
1. KD-55XD9305
1-30. BRACKET, SIDE (GNT)
DISASSEMBLY
1
2 3
KD-55/65XD9305
BRACKET, SIDE (GNT)
100
 Loading...