

Page 1

User guide
Smart Imaging Stand
IPT-DS10M
Page 2

Contents
Smart Imaging Stand User guide...................................................3
Introduction....................................................................................4
Function overview..............................................................................4
Hardware overview............................................................................4
Basics.............................................................................................5
Assembly...........................................................................................5
Batteries.............................................................................................5
Turning the Smart Imaging Stand on and off.....................................
Resetting the Smart Imaging Stand...................................................6
Getting started...............................................................................7
Installing necessary applications.......................................................7
Pairing your Smart Imaging Stand with an Android™ phone............7
Connecting your Smart Imaging Stand with an Android™ phone.....8
Using your Smart Imaging Stand.................................................10
Shooting photos and videos............................................................10
Improving the accuracy of face recognition....................................10
Changing the smile detection sensitivity.........................................11
Installing extension applications......................................................11
Setting the preferred extension application.....................................11
6
Legal information .........................................................................12
2
This is an Internet version of this publication. © Print only for private use.
Page 3
Smart Imaging Stand User guide
3
This is an Internet version of this publication. © Print only for private use.
Page 4
Introduction
Function overview
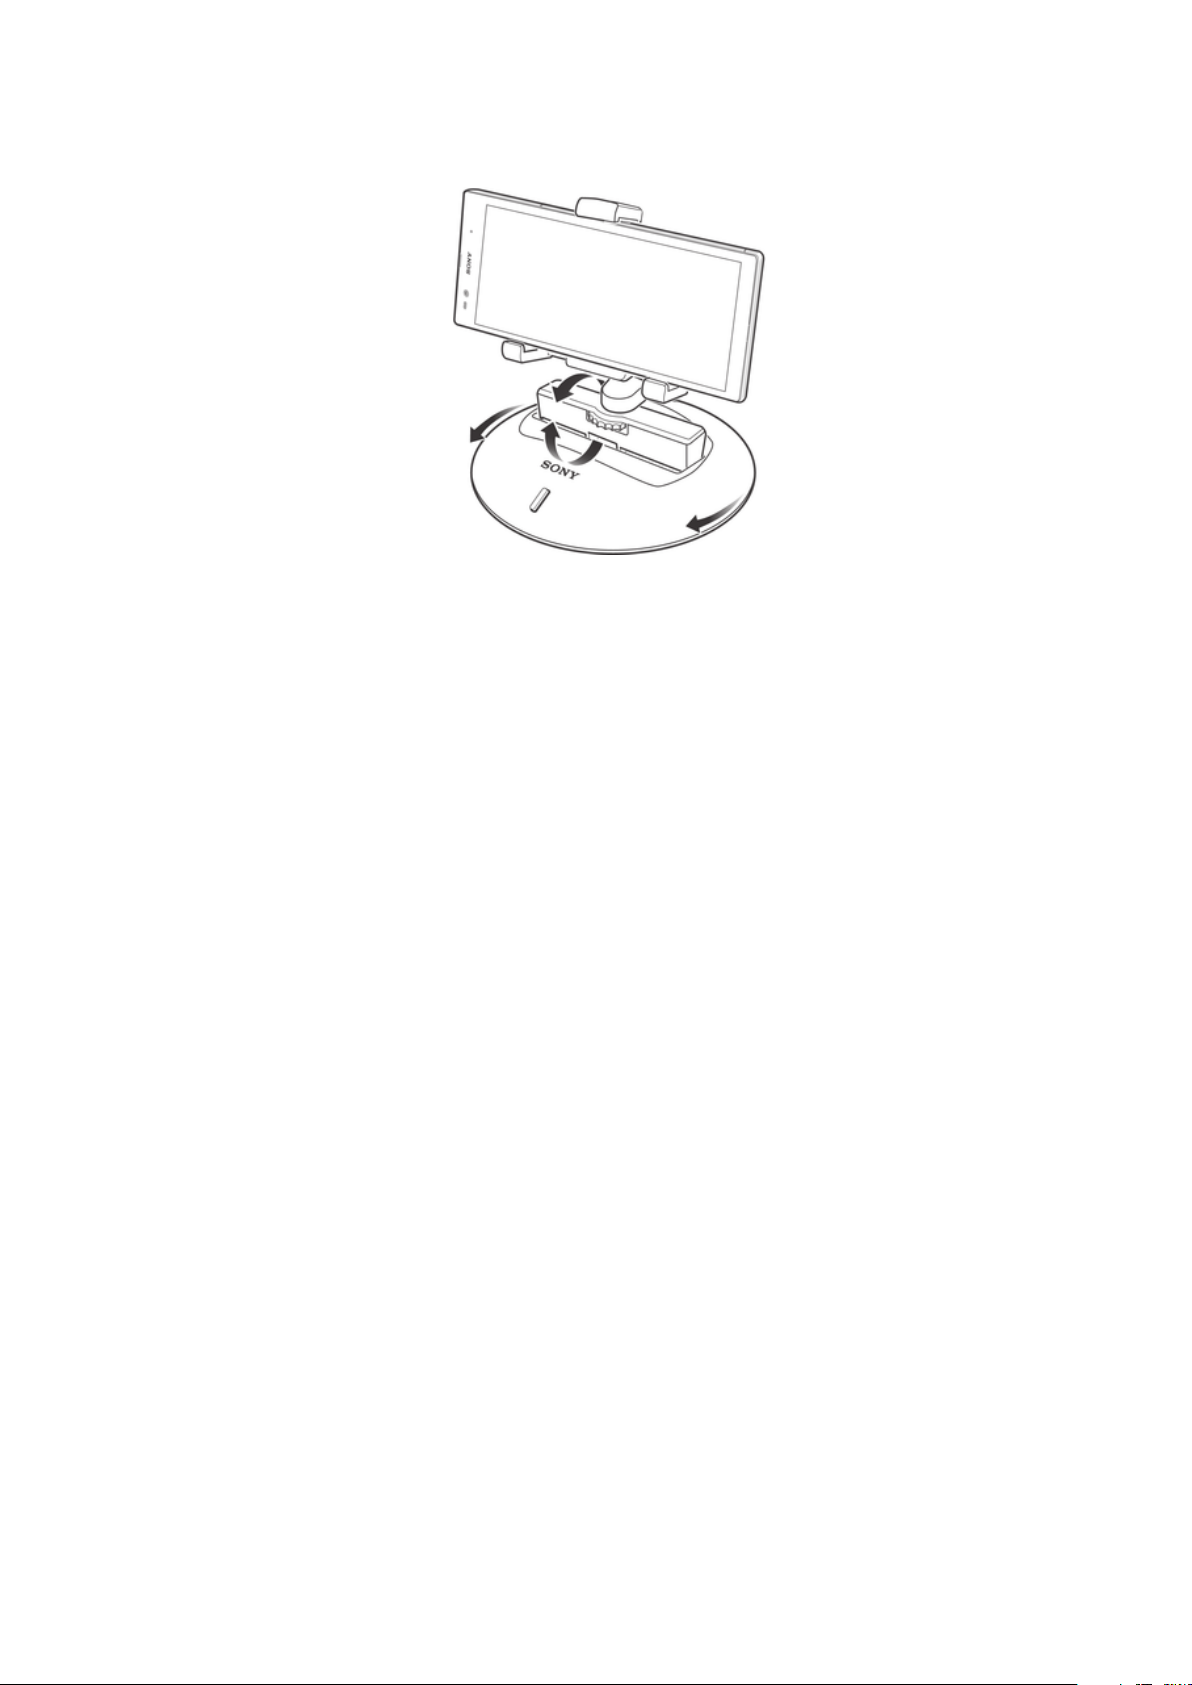
The IPT-DS10M Smart Imaging Stand is designed to make life more convenient for
you when you're shooting photos and videos with the camera of your Android™
phone. The IPT-DS10M stand lets you automatically pan your phone camera
clockwise or anti-clockwise and tilt it forwards or backwards in one smooth motion.
The stand works together with your phone so that the camera can follow a particular
person's face and shoot a photo of that face when a smile gets detected. You can
also get the video recorder to follow and record a particular person's face. You can
add more even more functions by downloading extra applications for your Smart
Imaging Stand.
For the above described functionality to work, your phone must support Bluetooth® and have
the Smart Connect application (version 5.4) and the Smart Imaging Stand application installed.
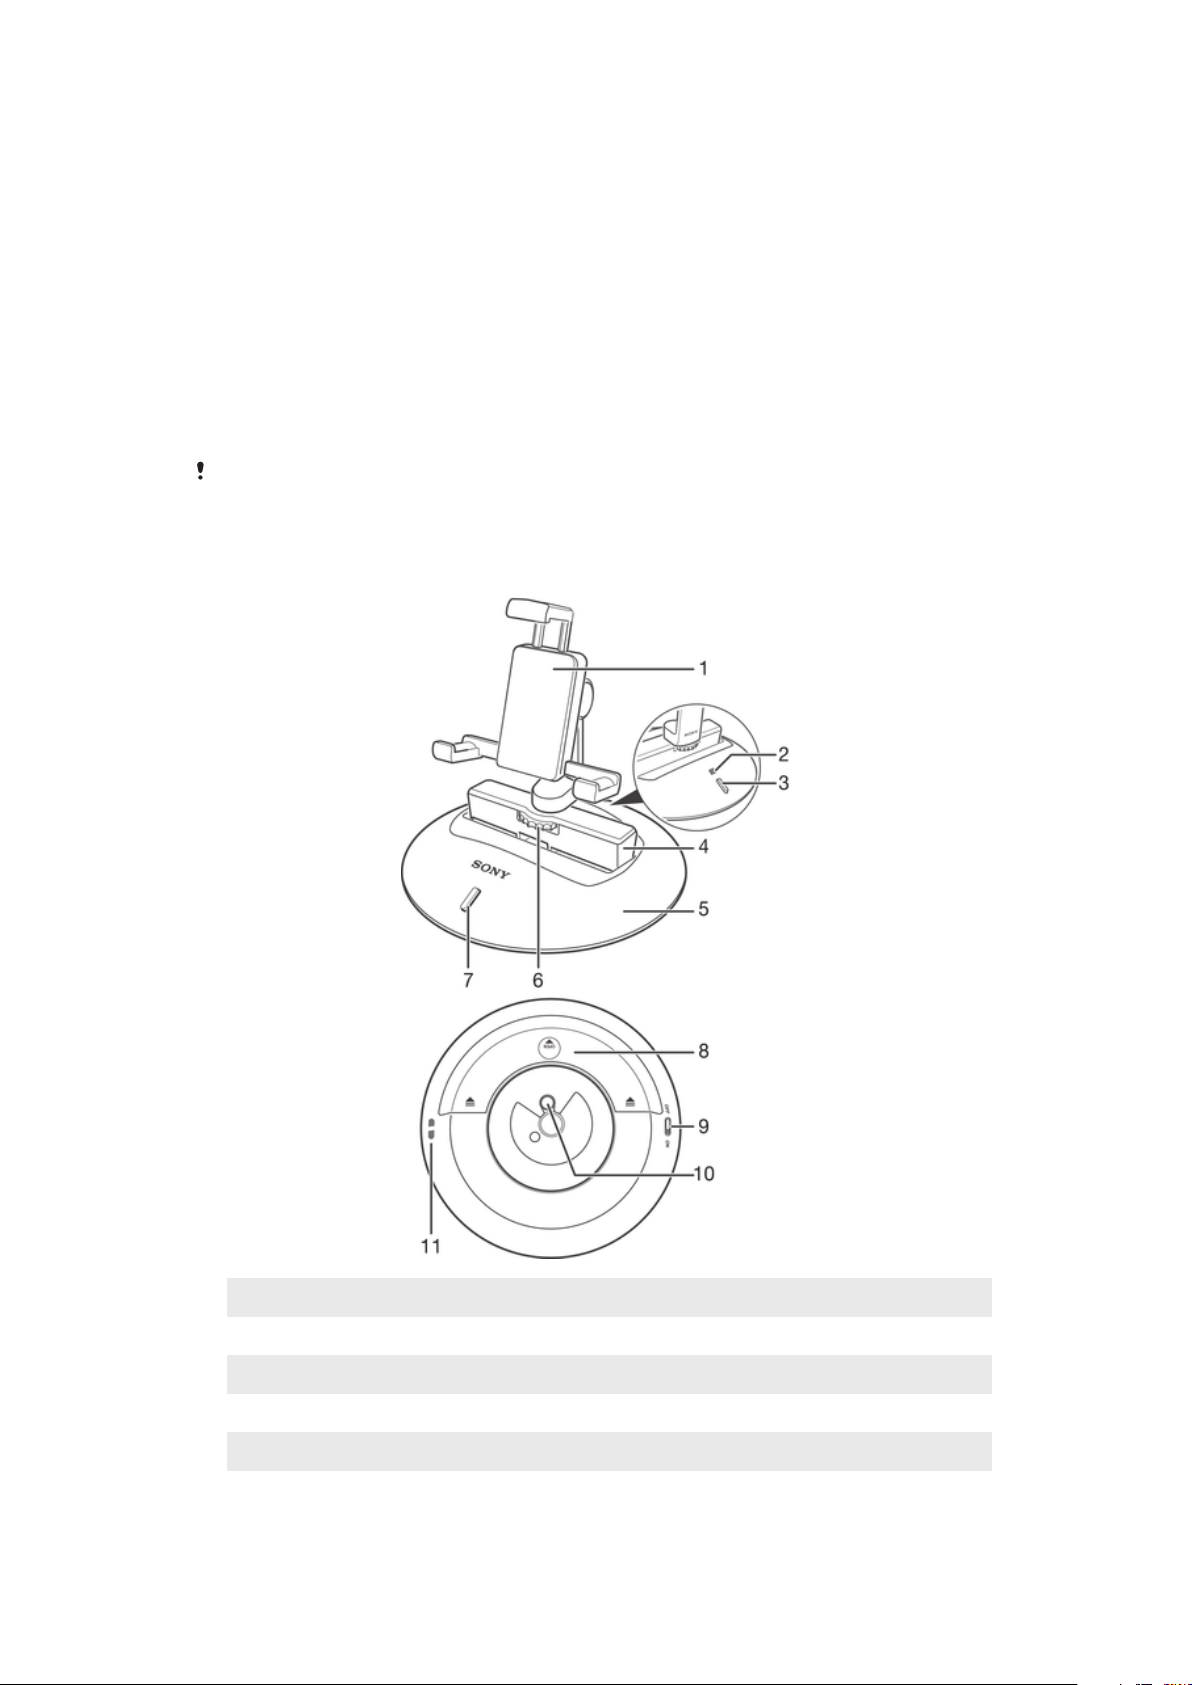
Hardware overview
1
Phone holder
2
NFC detection area
3
Bluetooth® indicator / button
4
Tilt arm
5
Stand base
6
Screw knob
This is an Internet version of this publication. © Print only for private use.
7
Power indicator
8
Battery cover
9
Power switch
10
Tripod receptacle
11
Anti-theft hole
4
Page 5

Basics
Assembly
Before using your Smart Imaging Stand for the first time, you must assemble it
correctly.
To assemble your Smart Imaging Stand
•
Rotate the screw knob anticlockwise to fasten the phone holder onto the tilt
arm.
The phone holder must be mounted in such a way that it faces the power indicator.
Batteries
Your Smart Imaging Stand uses two AA batteries as its power source.
You may need to purchase the batteries separately.
To insert the batteries
1
Press down on both sides of the battery cover and slide it outwards.
2
Insert the two AA batteries with the positive and negative ends facing in the
direction indicated.
3
Slide the battery cover back into position.
5
This is an Internet version of this publication. © Print only for private use.
Page 6

Turning the Smart Imaging Stand on and off
To turn on the Smart Imaging Stand
•
Slide the power switch to the ON position.
To turn off the Smart Imaging Stand
•
Slide the power switch to the OFF position.
Resetting the Smart Imaging Stand
Reset the Smart Imaging Stand if it behaves unexpectedly. When you reset the
device, all information about paired phones gets deleted.
To reset the Smart Imaging Stand
1
Make sure the Smart Imaging Stand is turned off.
2
Remove the batteries and then re-insert them.
6
This is an Internet version of this publication. © Print only for private use.
Page 7

Getting started
Installing necessary applications
For your Smart Imaging Stand to work with an Android™ phone, you must first install
the Smart Connect application (version 5.4 or higher) and then install the Smart
Imaging Stand application on the phone.
To install the Smart Connect application on an Android™ phone
1
Turn on the Smart Imaging Stand.
2
Android™ phone: Make sure that the NFC function is turned on and that the
screen is activated and unlocked.
3
Place the phone over your Smart Imaging Stand so that the NFC detection
area of each device touches the other.
4
Android™ phone: Follow the instructions that appear on the screen.
If your phone does not support NFC, you can download and install the Smart Connect
application directly from the Google Play store.
To install the Smart Imaging Stand application on an Android™ phone
1
Turn on the Smart Imaging Stand.
2
Make sure the Smart Connect application is successfully installed on the
phone.
3
Make sure the phone screen is active and that the NFC function in the phone is
turned on.
4
Place the phone over the Smart Imaging Stand so that the NFC detection area
of each device touches the other.
5
Follow the instructions that appear on the phone screen.
If your phone does not support NFC, you can download and install the Smart Imaging Stand
application directly from the Google Play store.
Pairing your Smart Imaging Stand with an Android™ phone
After you install the necessary applications on an Android™ phone, you must pair
your Smart Imaging Stand with the phone. Once the pairing is successful, you can
then connect the Smart Imaging Stand with the phone and start using the two
devices together.You can pair the two devices automatically (using NFC) or manually
(using Bluetooth®).
7
This is an Internet version of this publication. © Print only for private use.
Page 8

To automatically pair the Smart Imaging Stand with an Android™ phone
1
Turn on the Smart Imaging Stand.
2
Make sure the Smart Connect application and the Smart Imaging Stand
application are successfully installed on the phone.
3
Make sure the phone screen is active and that the NFC function in the phone is
turned on.
4
Place the phone over the Smart Imaging Stand so that the NFC detection area
of each device touches the other.
5
Follow the instructions that appear on the phone screen.
In step 5, please ignore the request to verify the Bluetooth passkey on the Smart Imaging
Stand, and just tap the Pair button.
To manually pair the Smart Imaging Stand with an Android™ phone
1
Turn on the Smart Imaging Stand, then press and hold down the Bluetooth®
button until it blinks rapidly.
2
Android™ phone: Make sure the Smart Connect application and the Smart
Imaging Stand application are successfully installed.
3
Turn on Bluetooth®, then scan for nearby devices and select Smart Imaging
Stand in the list of available devices.
4
Follow the instructions that appear on the screen.
In step 4, please ignore the request to verify the Bluetooth passkey on the Smart Imaging
Stand, and just tap the Pair button.
Connecting your Smart Imaging Stand with an Android™ phone
After you install the necessary applications and successfully pair the Smart Imaging
Stand with an Android™ phone, you are ready to connect the devices and start using
them together. You can establish a connection between the two devices
automatically (using NFC technology) or manually (using the Smart Connect
application).
8
This is an Internet version of this publication. © Print only for private use.
Page 9

To automatically connect your Smart Imaging Stand with an Android™ phone
1
Android™ phone: Make sure the Bluetooth® function is turned on and that
your Smart Imaging Stand is paired with the phone.
2
Place the phone over your Smart Imaging Stand so that the NFC detection
area of each device touches the other. The Smart Imaging Stand now connects
automatically to the Android phone.
To manually connect your Smart Imaging Stand with an Android™ phone
1
Android™ phone: Make sure the Bluetooth® function is turned on and that
your Smart Imaging Stand is paired with the phone.
2
Open the Smart Connect application, then select Smart Imaging Stand in the
device list.
3
Tap , then select Smart Imaging Stand in the list of paired devices. Once
changes to , your Smart Imaging Stand is connected to the phone.
9
This is an Internet version of this publication. © Print only for private use.
Page 10

Using your Smart Imaging Stand
Shooting photos and videos
After you connect the Smart Imaging Stand with an Android phone, you are ready to
take photos and record videos.
To take a photo
1
Fasten the Android™ phone onto the phone holder so that the phone screen
faces the power indicator.
2
Connect your Smart Imaging Stand with the phone.
3
If the Smile Catcher application does not open automatically, select Smile
Catcher from the pop-up list.
4
The phone camera automatically starts to locate and follow your face.
5
Tap the photo capture button on the phone screen. The phone camera is ready
to take a photo.
6
Stay in a stable position and smile. The phone camera takes a photo of your
face automatically when it detects a smile.
Your phone camera captures a photo only when the target is stable and smiling.
After taking two photos of the same target person, the Smart Imaging Stand automatically
stops following its target and searches for another target.
If you want the Smile Catcher application to always launch automatically in step 3, you can
mark it as your preferred application in the Smart Imaging Stand application settings.
To record videos
1
Fasten the Android™ phone onto the phone holder so that the phone screen
faces the power indicator.
2
Connect your Smart Imaging Stand with the Android™ phone.
3
If the Smile Catcher application does not open automatically, select Smile
Catcher from the pop-up list.
4
The phone camera automatically starts to locate and follow your face.
5
Switch the phone camera to video mode, then tap the record button on the
camera screen. The video camera now records and follows your face.
If you want the Smile Catcher application to always launch automatically in step 3, you can
mark it as your preferred application in the Smart Imaging Stand application settings.
To switch the camera target to another person
1
When the video or still camera is following you, wave your hand to the left or
right.
2
The Smart Imaging Stand rotates accordingly to locate and follow a different
target, that is, a person to your left or right side.
When waving your hand, make sure your hand is within view of the camera viewfinder.
Improving the accuracy of face recognition
The Smile Catcher application, which gets installed when you install the Smart
Imaging Stand application, uses face recognition technology. The application may fail
to operate as expected in conditions where it is difficult to recognise your face, for
example, when you are in a dark environment or when you are wearing a scarf or
headwear that partially covers your face.
10
This is an Internet version of this publication. © Print only for private use.
Page 11

When using the Smile Catcher application, you can take the following steps to
improve the face recognition accuracy:
•
Make sure there is sufficient light falling on your face.
•
Make sure your phone camera lens is clear of any foreign matter.
Changing the smile detection sensitivity
You can adjust the sensitivity of the smile detection feature. For example, you can set
the sensitivity so that only big smiles are detected and captured by the phone
camera.
To adjust the smile detection sensitivity
1
When the Smile Catcher application is open, tap
2
Tap Smile Shutter, then select a sensitivity option.
on your phone screen.
Installing extension applications
In addition to the Smile Catcher application, which gets installed automatically with
the Smart Imaging Stand application, you can install other extension applications that
enable you to do more with your Smart Imaging Stand. For example, you can install
the Smart Camera extension application and use a Smart Watch accessory to control
the motion of the Smart Imaging Stand.
To install extension applications
1
Android™ phone: Open the Smart Connect application, then select Smart
Imaging Stand in the Devices list.
2
Tap Applications, then tap Search for applications.
3
Follow the instructions that appear on the screen.
Setting the preferred extension application
If you have more than one extension application installed on the Android™ phone,
you can set one of them as the preferred application so that it launches automatically
when the Smart Imaging Stand connects to the Android™ phone.
To set the preferred extension application
1
Android™ phone: Open the Smart Connect application, then select Smart
Imaging Stand in the devices list.
2
Tap Applications, then tap
changes to .
beside the preferred application so that
11
This is an Internet version of this publication. © Print only for private use.
Page 12

Legal information
Sony IPT-DS10M
Prior to use, please read the Important information leaflet separately provided.
This User guide is published by Sony Mobile Communications AB or its local affiliated company, without any
warranty. Improvements and changes to this User guide necessitated by typographical errors, inaccuracies of
current information, or improvements to programs and/or equipment, may be made by Sony Mobile
Communications AB at any time and without notice. Such changes will, however, be incorporated into new
editions of this User guide.
All rights reserved.
©2013 Sony Mobile Communications AB.
Publication number: 1277-5566.1
Interoperability and compatibility among Bluetooth® devices varies. Device generally supports products
utilizing Bluetooth spec. 1.2 or higher, and Headset or Handsfree profile.
Sony is the trademark or registered trademark of Sony Corporation. Bluetooth is the trademark of the
Bluetooth (SIG) Inc. and is used under license. All other marks are the property of their respective owners. All
rights reserved.
All product and company names mentioned herein are the trademarks or registered trademarks of their
respective owners. Any rights not expressly granted herein are reserved. All other trademarks are property of
their respective owners.
Visit www.sonymobile.com for more information.
All illustrations are for illustration only and may not accurately depict the actual accessory.
FCC Statement
This device complies with Part 15 of the FCC rules. Operation is subject to the following two
conditions: (1) This device may not cause harmful interference, and (2) This device must
accept any interference received, including interference that may cause undesired operation.
Any change or modification not expressly approved by Sony may void the user's authority to operate the
equipment.
This equipment has been tested and found to comply with the limits for a Class B digital device, pursuant to
Part 15 of the FCC Rules. These limits are designed to provide reasonable protection against harmful
interference in a residential installation. This equipment generates, uses and can radiate radio frequency
energy and, if not installed and used in accordance with the instructions, may cause harmful interference to
radio communications. However, there is no guarantee that interference will not occur in a particular
installation.
If this equipment does cause harmful interference to radio or television reception, which can be determined by
turning the equipment off and on, the user is encouraged to try to correct the interference by one or more of
the following measures:
•
Reorient or relocate the receiving antenna.
•
Increase the separation between the equipment and receiver.
•
Connect the equipment into an outlet on a circuit different from that to which the receiver is connected.
•
Consult the dealer or an experienced radio/TV technician for help.
Industry Canada Statement
This device complies with RSS-210 of Industry Canada.
Operation is subject to the following two conditions: (1) this device may not cause interference, and (2) this
device must accept any interference, including interference that may cause undesired operation of the device.
This Class B digital apparatus complies with Canadian ICES-003.
Cet appareil numérique de la classe B est conforme à la norme NMB-003 du Canada.
12
This is an Internet version of this publication. © Print only for private use.
 Loading...