

Sony Ipela NSR-S10, Ipela NSR-S20 User Manual

Network
Surveillance
4-262-347-12 (1)
Recorder
User’s Guide
Before operating the unit, please read this manual thoroughly
and retain it for future reference.
NSR-S10/S20
© 2010 Sony Corporation

Table of Contents
Chapter 1 Introduction
Overview...........................................................................................5
System Requirements .....................................................................6
Features and Functions ..................................................................6
Front panel............................................................................................. 6
Rear panel.............................................................................................. 6
Infrared remote control unit .................................................................. 7
Chapter 2 Operation and Control
Overview...........................................................................................9
Logging On to the NSR ...................................................................9
Basic Window Operations ............................................................11
Monitoring ......................................................................................15
Monitoring Live Images...................................................................... 15
Displaying images from different cameras in succession
(AutoScan) ................................................................................. 15
Functions and Operating Procedure of “Monitoring (LIVE)”
Screen......................................................................................... 16
Controlling Cameras .....................................................................17
Using Camera Presets.......................................................................... 17
Recording, Searching, and Playing Images ................................18
Recording Camera Images .................................................................. 18
Playing Recorded Images.................................................................... 19
Searching by Event.............................................................................. 20
Setting a Bookmark ............................................................................. 21
Functions and Operating Procedure of “Playback” Screen................. 22
Exporting Recorded Images .........................................................23
Backing Up Recorded Images ............................................................. 23
Exporting Recorded Images as Movies............................................... 24
Exporting Recorded Images as Still Images........................................ 25
Releasing Alarms...........................................................................26
System Administration..................................................................26
Changing the Password ....................................................................... 26
Shutting Down, Restarting and Logging Off...............................27
2
Table of Contents

Chapter 3 Monitoring from a Web Browser (WebViewer)
Overview.........................................................................................28
Accessing the NSR from a Web Browser ........................................... 28
Functions and Operating Procedure of WebViewer Page................... 30
Chapter 4 Detailed Descriptions of Settings and Windows
Available Settings..........................................................................33
Displaying “Setting” screen .........................................................33
System Setting...............................................................................35
Settings Related to the System ............................................................ 35
Adding a Storage Location.................................................................. 36
Importing/Exporting Configuration Data............................................ 36
“System Setting” Screen Details ......................................................... 38
Camera Setting ..............................................................................40
Settings Related to the Cameras.......................................................... 40
Camera Settings................................................................................... 41
Advanced Camera Settings ................................................................. 41
“Camera Setting” Screen Details ........................................................ 43
Recording Setting..........................................................................45
Making Settings Related to Recording................................................ 46
Recording Mode Combinations for Schedule Recording.................... 46
Setting a Schedule ............................................................................... 47
Details of “Recording Setting” Screen................................................ 48
Network Setting ............................................................................49
Settings Related to the Network......................................................... 49
“Network Setting” Screen Details ....................................................... 50
Sensor Setting ...............................................................................52
Settings Related to Sensor Input ......................................................... 52
“Sensor Setting” Screen Details .......................................................... 52
Relay Setting ..................................................................................53
Settings Related to Relays................................................................... 53
“Relay Setting” Screen Details............................................................ 53
Alarm Setting .................................................................................55
Settings Related to Alarms .................................................................. 55
Registering the Alarm Settings............................................................ 56
“Alarm Setting” Screen Details........................................................... 57
User Setting....................................................................................61
Registering a User ............................................................................... 61
“User Setting” Screen Details ............................................................. 61
Table of Contents
3

Chapter 5 Miscellaneous
Firmware Update............................................................................63
I/O Port............................................................................................64
Troubleshooting ............................................................................65
Specifications ................................................................................66
NSR-S10/S20 ...................................................................................... 66
4
Table of Contents
Trademarks
• “IPELA” and are trademarks of Sony Corporation.
• Microsoft and Windows are registered trademarks of Microsoft Corporation in the
United States and/or other countries.
Other products or system names appearing in this document are trademarks or registered
trademarks of their respective owners.
Further, the ®‚ or ™ symbols are not used in the text.

Introduction
Chapter
1
Overview
The NSR-S10/S20 is a network surveillance recorder for network cameras. The server allows you to monitor and record
JPEG, MPEG-4 and H.264 images from network cameras via the network. The server also allows you to easily search for
and play back previously recorded images.
Monitor
Network
Windows PC
Chapter 1 Introduction
Mouse
Keyboard
Surveillance cameras
Manage and control compatible cameras from remote locations
You can manage, control, and display the images from up to four network cameras with the NSR-S10, and up to eight
network cameras with the NSR-S20. You can pan, tilt, and perform zoom operations of compatible cameras.
Large-capacity hard disks allow recording for long periods of time
Models with internal hard disks are equipped with large-capacity storage that enables recording for extended periods of
time. In addition, the unit allows you to connect storage devices that support the e-SATA interface.
Monitor from a browser
You can access the NSR from a computer browser, which then can be used to monitor, record, or play back images.
Other features
• The NSR is capable of continuous recording, motion detection, and alarm recording, among others.
• Run searches for recorded images by date and time, sensors, movement detection, video signal loss, etc.
• Audio recording and playback
1) Optional audio amplifiers or speakers are required.
Important
• This manual uses screen examples of NSR-S10 in the explanations.
• This manual describes the installation and initial setup of this unit. For details on the various settings for this unit, refer
to chapter 4, “Detailed Descriptions of Settings and Windows” (page 33).
• For details on the system requirements for client computers, supported camera models, and other important information,
refer to the Release Note (PDF).
Access the following URL to download the Release Note.
http://www.sony.co.jp/Products/NSR/NSR-S_ReleaseNote_E.pdf
1)
are also supported from compatible cameras.
Overview
5
System Requirements
Features and Functions
The hardware required in order to use this recorder is as
Chapter 1 Introduction
follows.
• Monitor
1)
• Sony Network Camera
Contact your Sony dealer for details about compatible
Sony network cameras.
• USB keyboard
•USB mouse
2)
3)
•Network switch
• 1000Base-T/100Base-TX/10Base-T cable
• USB flash memory device
1) This unit supports computer displays that support analog
RGB input.
2) Use a USB keyboard with a cable. Note that wireless or
infrared USB keyboards may not function with this unit. In
addition, nonstandard keys may not function.
3) Use a USB mouse with a cable. Wireless or infrared USB
mice may not function properly. Functions such as threebutton and wheel operations may also function improperly.
4) Required when exporting videos or still images.
- This unit supports USB 2.0 Mass Storage devices.
However, it does not support USB 2.0 Mass Storage HDDs
or CD/DVD drives. Do not connect mass storage devices
other than USB memory devices to the unit. Be aware that
errors may still occur when writing data to a USB 2.0 Mass
Storage memory device, depending on the type of device
used. If errors occur when writing data, use a USB flash
memory device of a different type.
4)
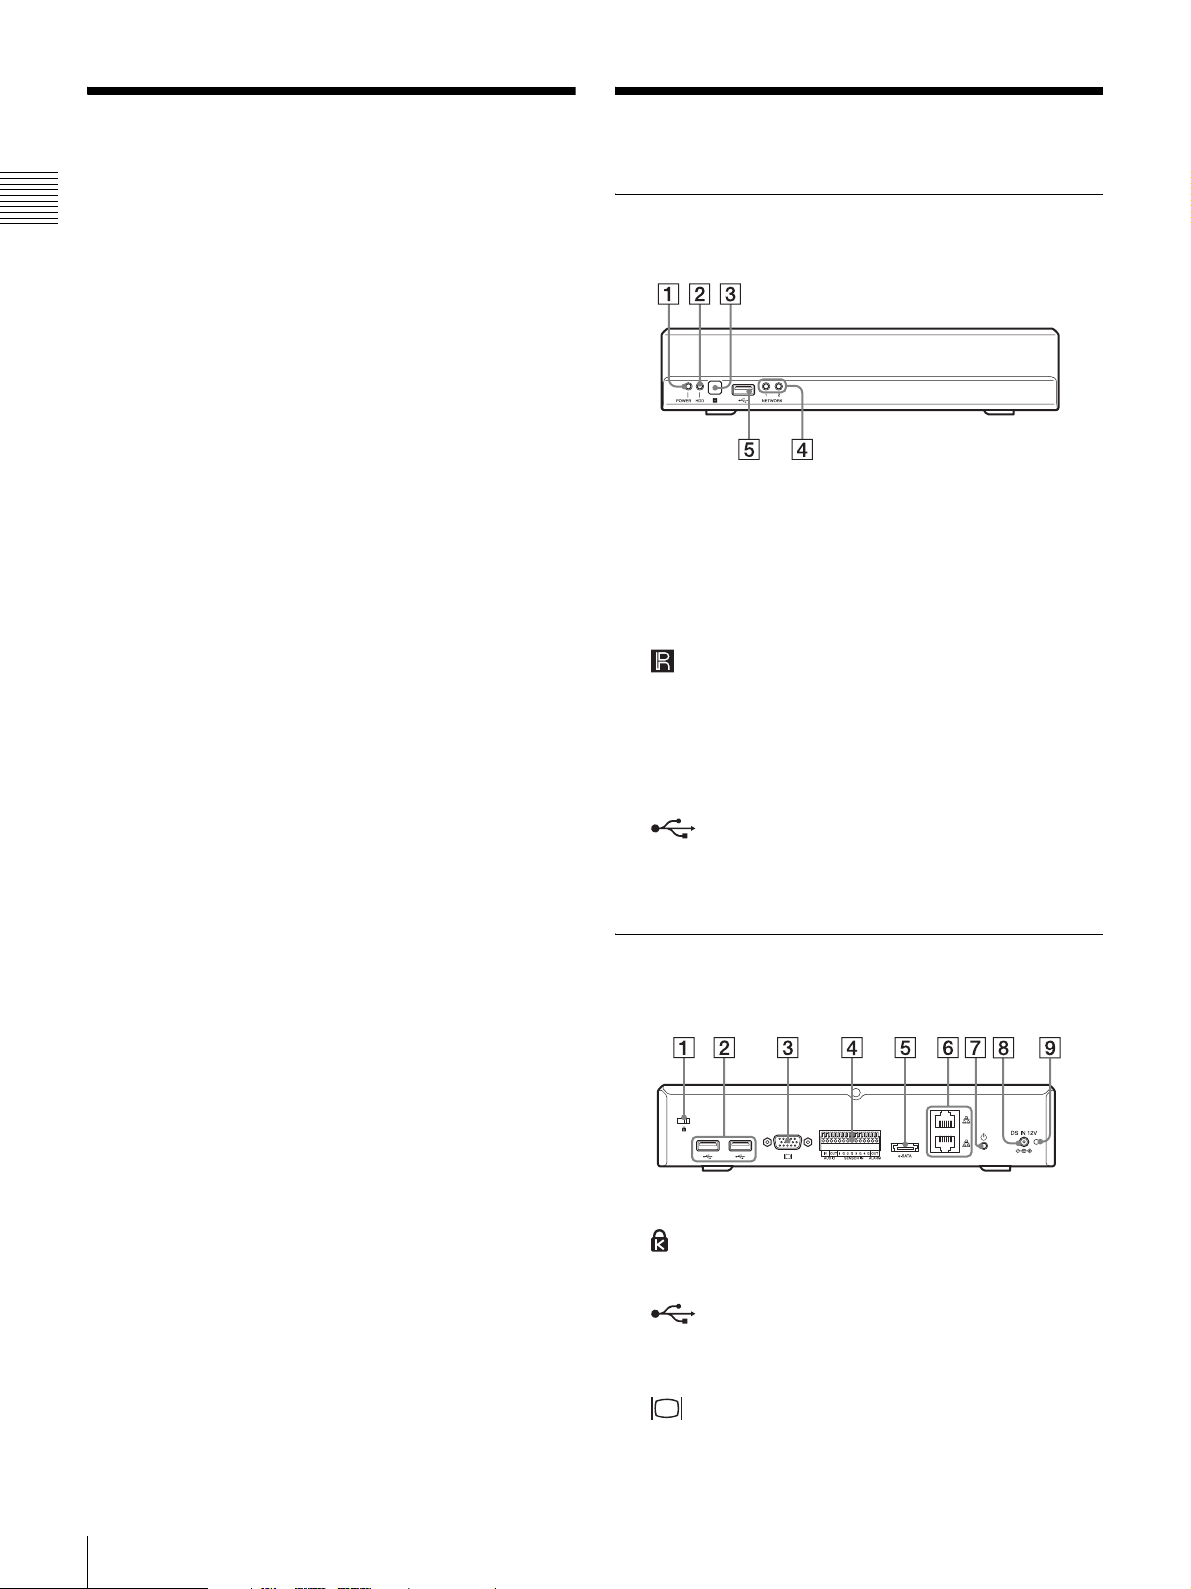
Front panel
A POWER LED
Lights green when the unit is turned on.
B HDD LED
Blinks green when the internal hard disks are accessed.
C Infrared sensor
Receives signals from the infrared remote control unit.
D NETWORK LED (1, 2)
Lights green when there is activity at the
corresponding LAN connector at the rear of the NSR.
E USB connector
Use this connector to connect a USB keyboard, USB
mouse or USB flash memory to the NSR.
Rear panel
A Security slot
Attach an anti-theft cable here.
B USB connector
Use this connector to connect a USB keyboard, USB
mouse or USB flash memory to the NSR.
C Monitor connector
Use this connector to connect a monitor.
6
System Requirements / Features and Functions
D I/O Port
Use this connector to connect audio, sensor inputs, and
relay outputs.
For connection details and wiring diagrams for sensor
inputs, see “I/O Port” (page 64).
E e-SATA connector
Use this connector to connect storage devices that
support the e-SATA interface.
F LAN connectors (1, 2)
Use these connectors to connect 10 Base-T, 100 BaseTX, or 1000 Base-T network cables.
The top connector is LAN2, and the bottom connector
is LAN1.
LAN1: Network camera
LAN2: Network camera (LAN2 can only be used
when using a different segment from LAN1.)
CAUTION for LAN ports
For safety reason, do not connect the LAN ports to any
network devices that might have excessive voltage.
Follow the instructions for the above ports.
G 1 Power switch
Press this to turn on the unit.
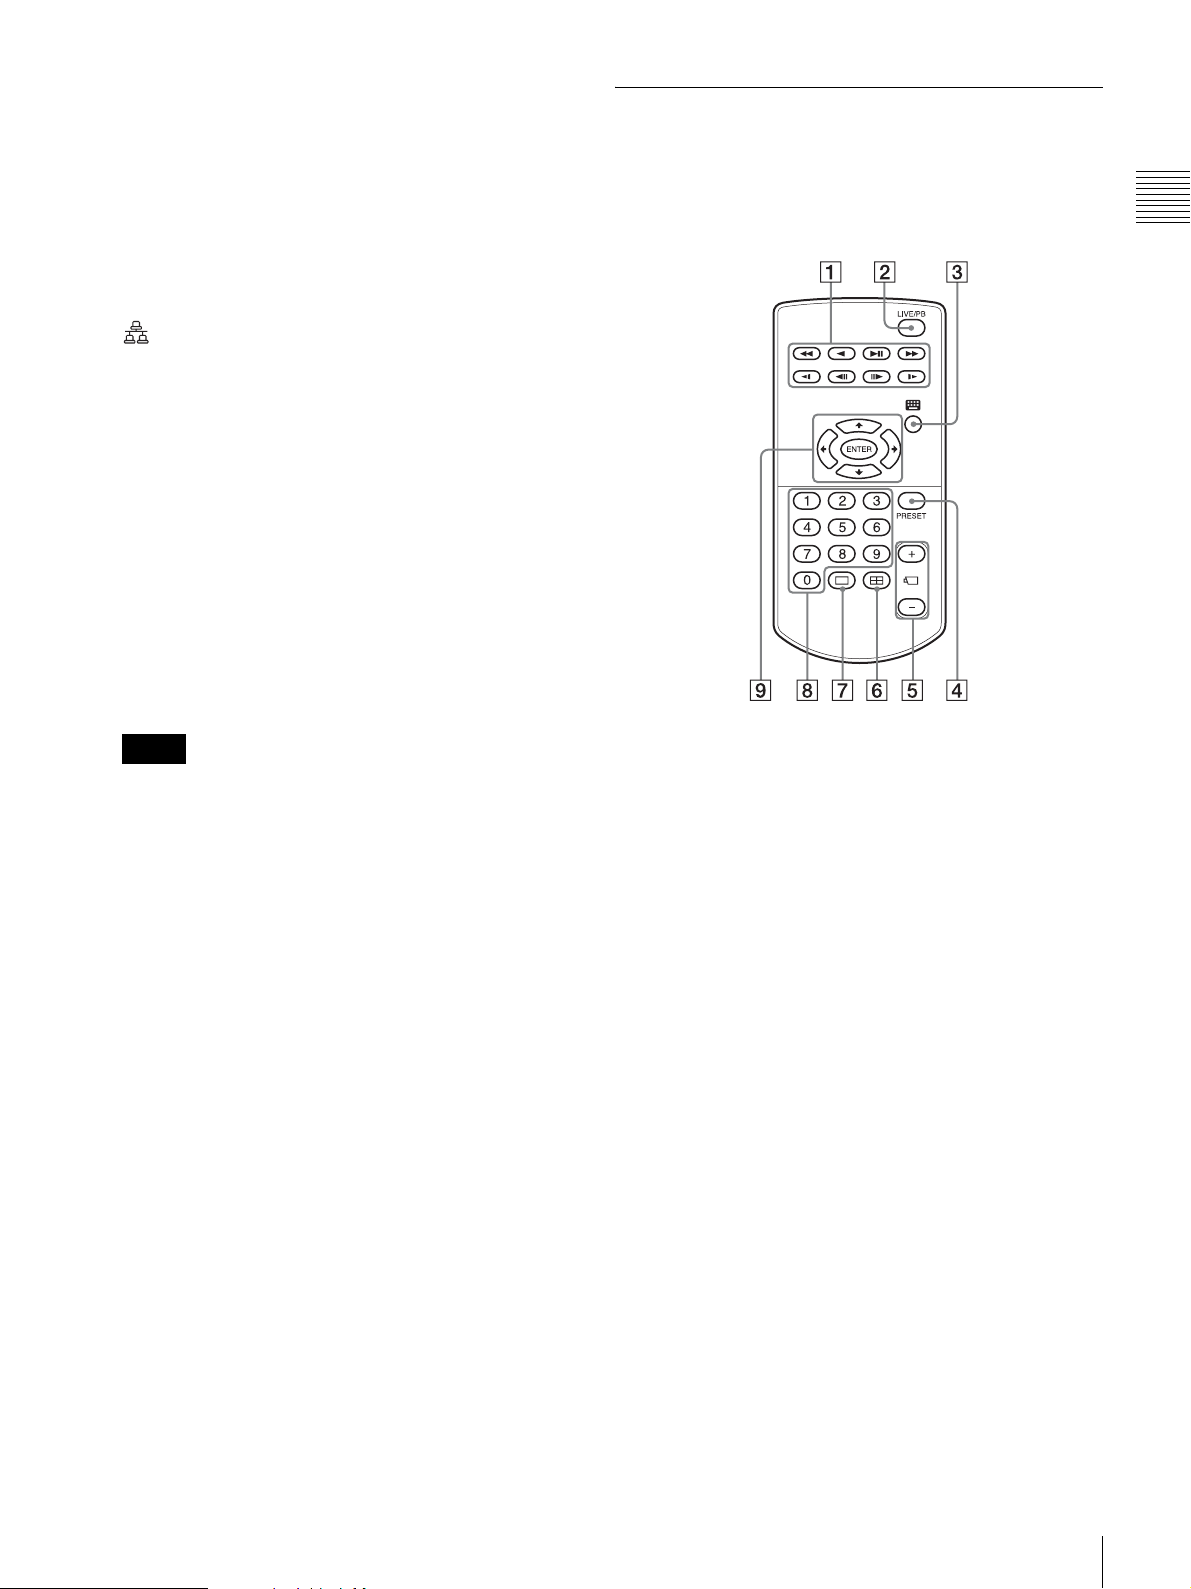
Infrared remote control unit
If a button on the infrared remote control unit is pressed
while the remote control unit is pointed at the infrared
sensor on the main unit, then the main unit will perform the
operation corresponding to that button.
Chapter 1 Introduction
Note
Although this button can be used to force a shut off of
power to the unit, under normal circumstances the
shutdown command on the screen should be used.
H DC IN connector (12V)
Use this connector to connect the AC adapter.
I Cable clamp hole
Attach the supplied cable clamp here to prevent the
power cord from disconnecting.
A Play button
Use this button to play recorded images.
m (Fast Rewind) button
Use this button for fast rewind. (2x, 4x, 8x, 16x, 32x,
64x speed)
n (Reverse Play) button
Use this button to play recorded images in reverse.
u (Play/Pause) button
During pause: Use this button for playback.
(1x speed).
During playback: Use this button to pause playback.
M (Fast Forward) button
Use this button for fast forward. (2x, 4x, 8x, 16x, 32x,
64x speed)
t (Slow Rewind) button
Use this button for slow rewind. (1/2 speed, 1/4 speed)
c (Previous) button
Use this button to go back one frame.
T (Slow Forward) button
Use this button for slow forward. (1/2 speed, 1/4
speed)
C (Next) button
Use this button to advance one frame.
B LIVE/PB button
Use this button to switch between live image display
and playback of recorded images.
Features and Functions
7
C (Soft Keyboard) button
Use this button to display the soft keyboard that is used
for text input.
D PRESET button
Chapter 1 Introduction
Use this button to move the camera to a preset
position.
E + / – (Camera Number) Button
Use these buttons to switch between cameras for
selection.
Press the [+] button to select the next camera number,
and the [–] button to select the previous camera
number.
F (2 × 2 Layout) button
This button switches the screen layout to 2 × 2 (4
screen).
G (1 × 1 Layout) button
This button switches the screen layout to 1 × 1 (1
screen).
H Numeric keys
Use these keys to input numbers.
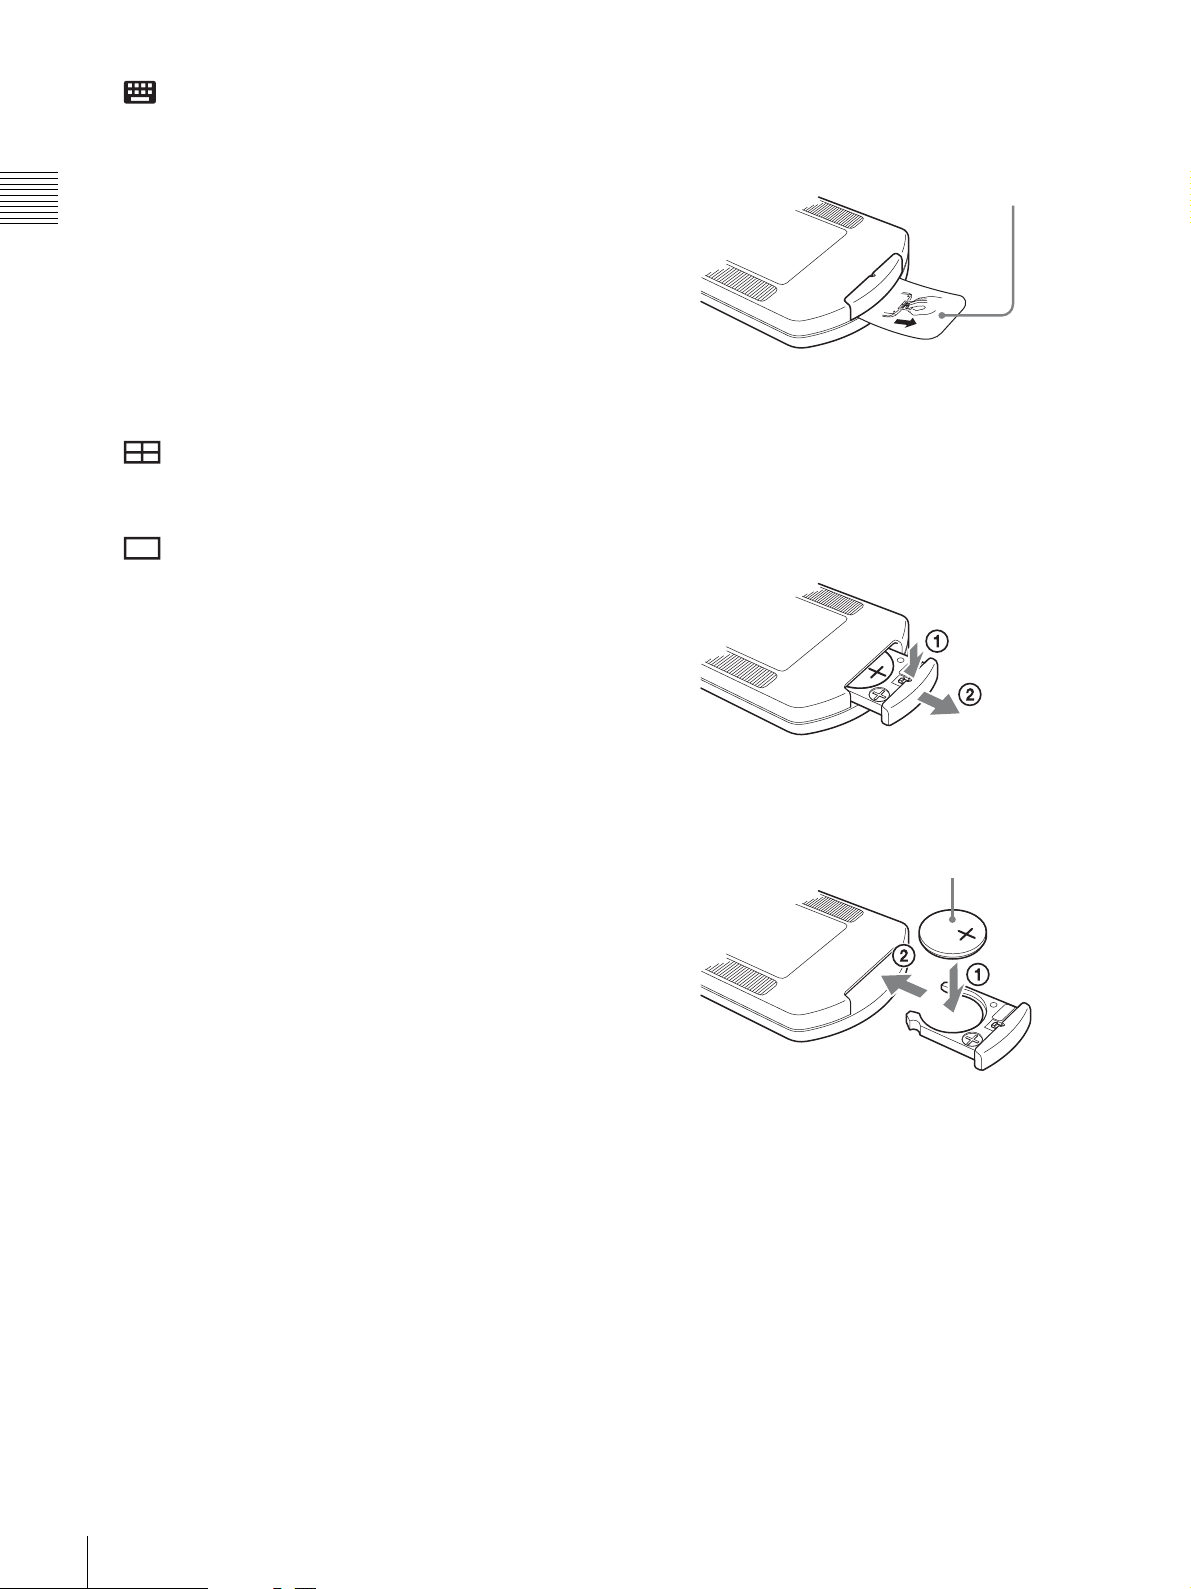
Before using the infrared remote control
unit
Remove the insulating sheet.
Insulating sheet
Replacing the lithium battery in the infrared
remote control unit
The infrared remote control unit uses a standard CR2025
lithium battery. Do not use any battery other than the
CR2025.
1
While holding down the locking lever (1), pull the
battery holder out (2).
I Operation selection buttons
Use these buttons to select items.
V button
Use this button to move the focus cursor upwards in
order to select an item that is higher on the screen.
B button
Use this button to move the focus cursor to the left in
order to select an item that is located to the left on the
screen.
v button
Use this button to move the focus cursor downwards in
order to select an item that is lower on the screen.
b button
Use this button to move the focus cursor to the right in
order to select an item that is located to the right on the
screen.
ENTER button
Use this button to confirm the selection of the current
item or monitor frame, and to execute other
operations.
2
Insert the battery with the “+” side facing up (1) and
then push the battery holder in until it clicks into
place (2).
“+” side faces up
Caution
Danger of explosion if battery is incorrectly replaced.
Replace only with the same or equivalent type
recommended by the manufacturer.
When you dispose of the battery, you must obey the law in
the relative area or country.
Battery replacement interval
When the lithium battery becomes weak, the unit may not
respond even when the buttons are pressed. The average
life of a lithium battery used in this unit is one year, but this
will vary according to how frequently the unit is used. If
the main unit does not respond when buttons on the remote
control are pressed, replace the battery and try the
operation again.
8
Features and Functions

Operation and Control
Chapter
2
Chapter 2 Operation and Control
Overview
This chapter describes how to perform the basic operations
listed below on the NSR, including logging on; using
various windows; monitoring; and how to record, retrieve
and play back images.
• Logging On to the NSR (page 9)
• Basic Window Operations (page 11)
• Monitoring (page 15)
• Controlling Cameras (page 17)
• Recording, Searching, and Playing Images (page 18)
• Exporting Recorded Images (page 23)
• Releasing Alarms (page 26)
• System Administration (page 26)
• Shutting Down, Restarting and Logging Off (page 27)
Note
For details on operation from a computer’s browser, refer
to Chapter 3, “Monitoring from a Web Browser
(WebViewer)” (page 28); for details on the camera and on
various settings for recording, sensors, and alarms, refer to
“Detailed Descriptions of Settings and Windows”
(page 33).
Logging On to the NSR
Before you can use the NSR, you must first log on.
1
Turn on the NSR.
The power comes on automatically when the power
cord of the AC adapter is plugged into the power
outlet.
After the NSR has been turned off either by a screenbased operation or by the power switch on the rear
panel, the power can be turned back on by pressing the
power switch.
The unit beeps, and the POWER LED on the front
panel lights green.
After a minute or two, the startup screen appears on the
monitor.
After startup, the “Main” screen appears.
Note
• The user ID and password for logging in to the
“Main” screen are as follows.
Default user ID: admin
Default password: admin
• For details how to change the auto login setting,
refer to “Settings Related to the System” (page 35).
Overview / Logging On to the NSR
9

Chapter 2 Operation and Control
Cameras connected to the same segment on the
network are automatically located and registered to the
NSR, and images from these cameras appear on the
“Main” screen.
Continuous recording starts automatically after the
cameras are registered.
10
Logging On to the NSR
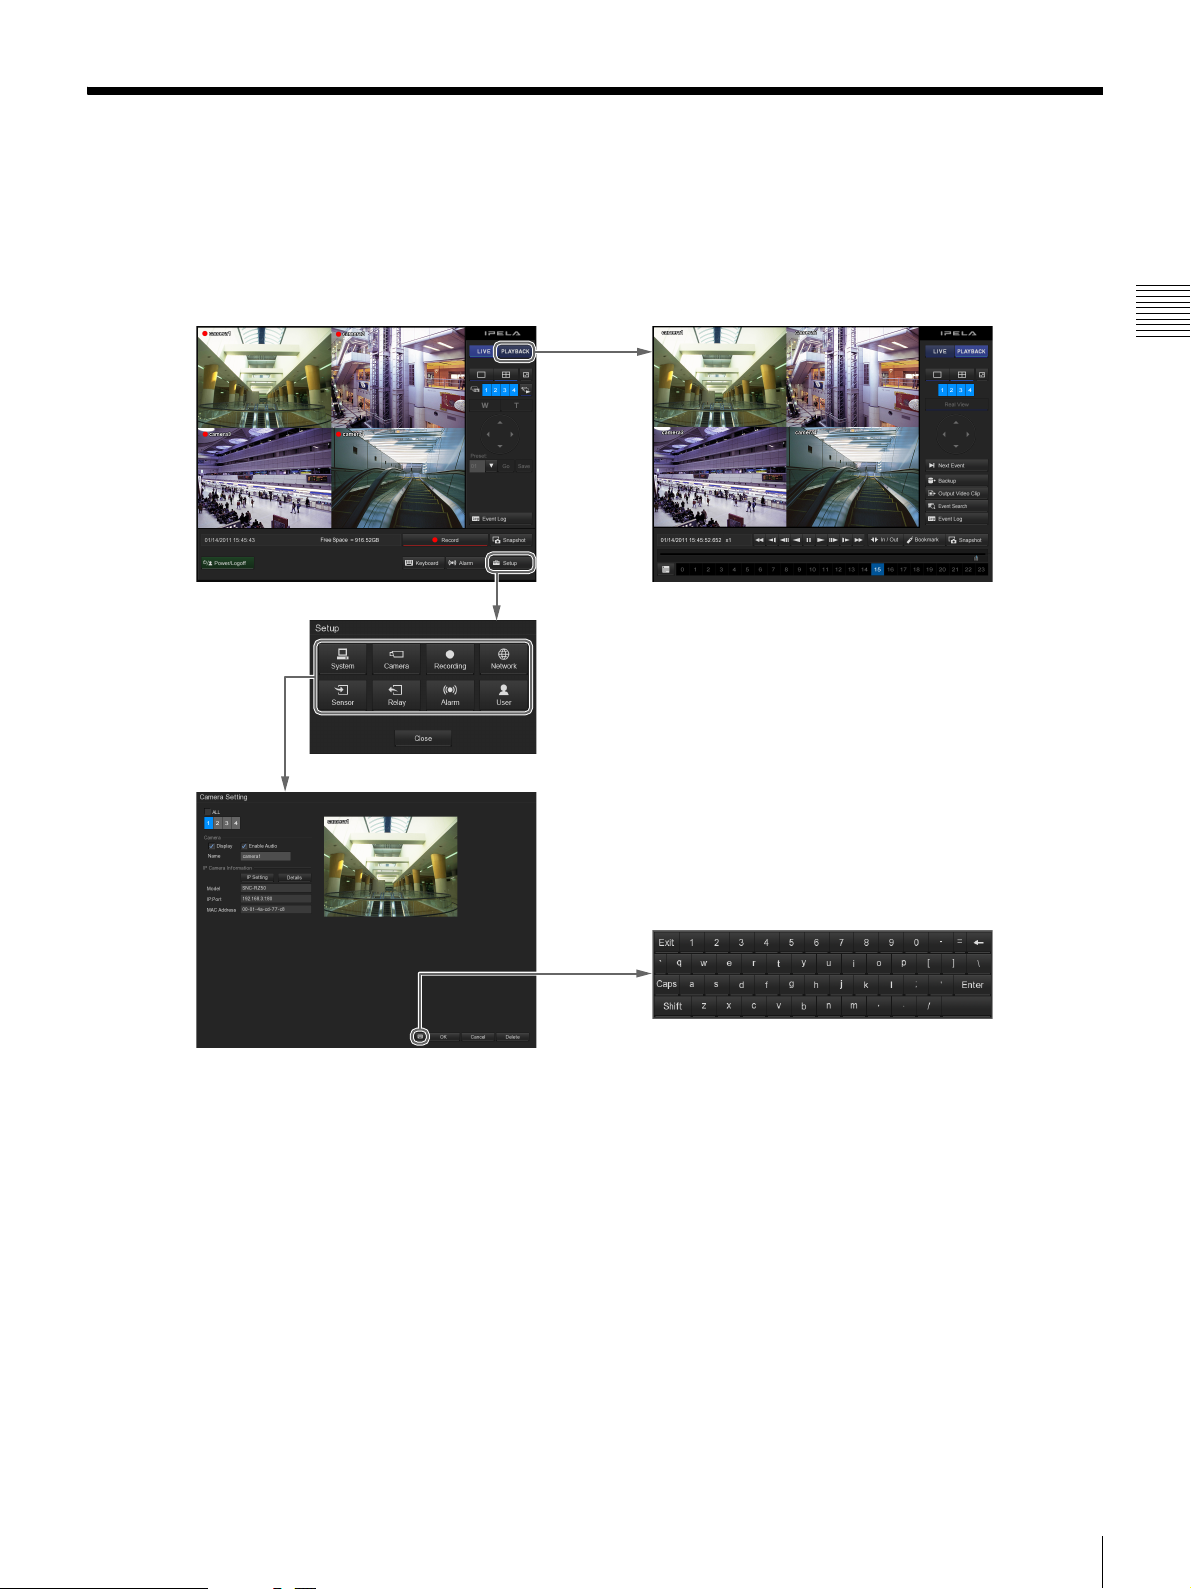
Basic Window Operations
This section provides a brief description of the basic operations for each screen.
This unit has a “Main” screen, which is used to monitor live images and to retrieve and play back recorded images, and a
“Setup” screen, which is used for making various settings.
“Main” screen
“Monitoring (LIVE)” screen
“Setup” Screen
“PLAYBACK” screen
Chapter 2 Operation and Control
Various setting screens
Soft keyboard
Basic Window Operations
11
“Main” screen
In the “Main” screen, you can monitor live images from each monitor frame, and search for and play back recorded images.
To switch between live image display (monitoring) and playback of recorded images, click [LIVE] or [PLAYBACK] in
the upper right corner of the screen.
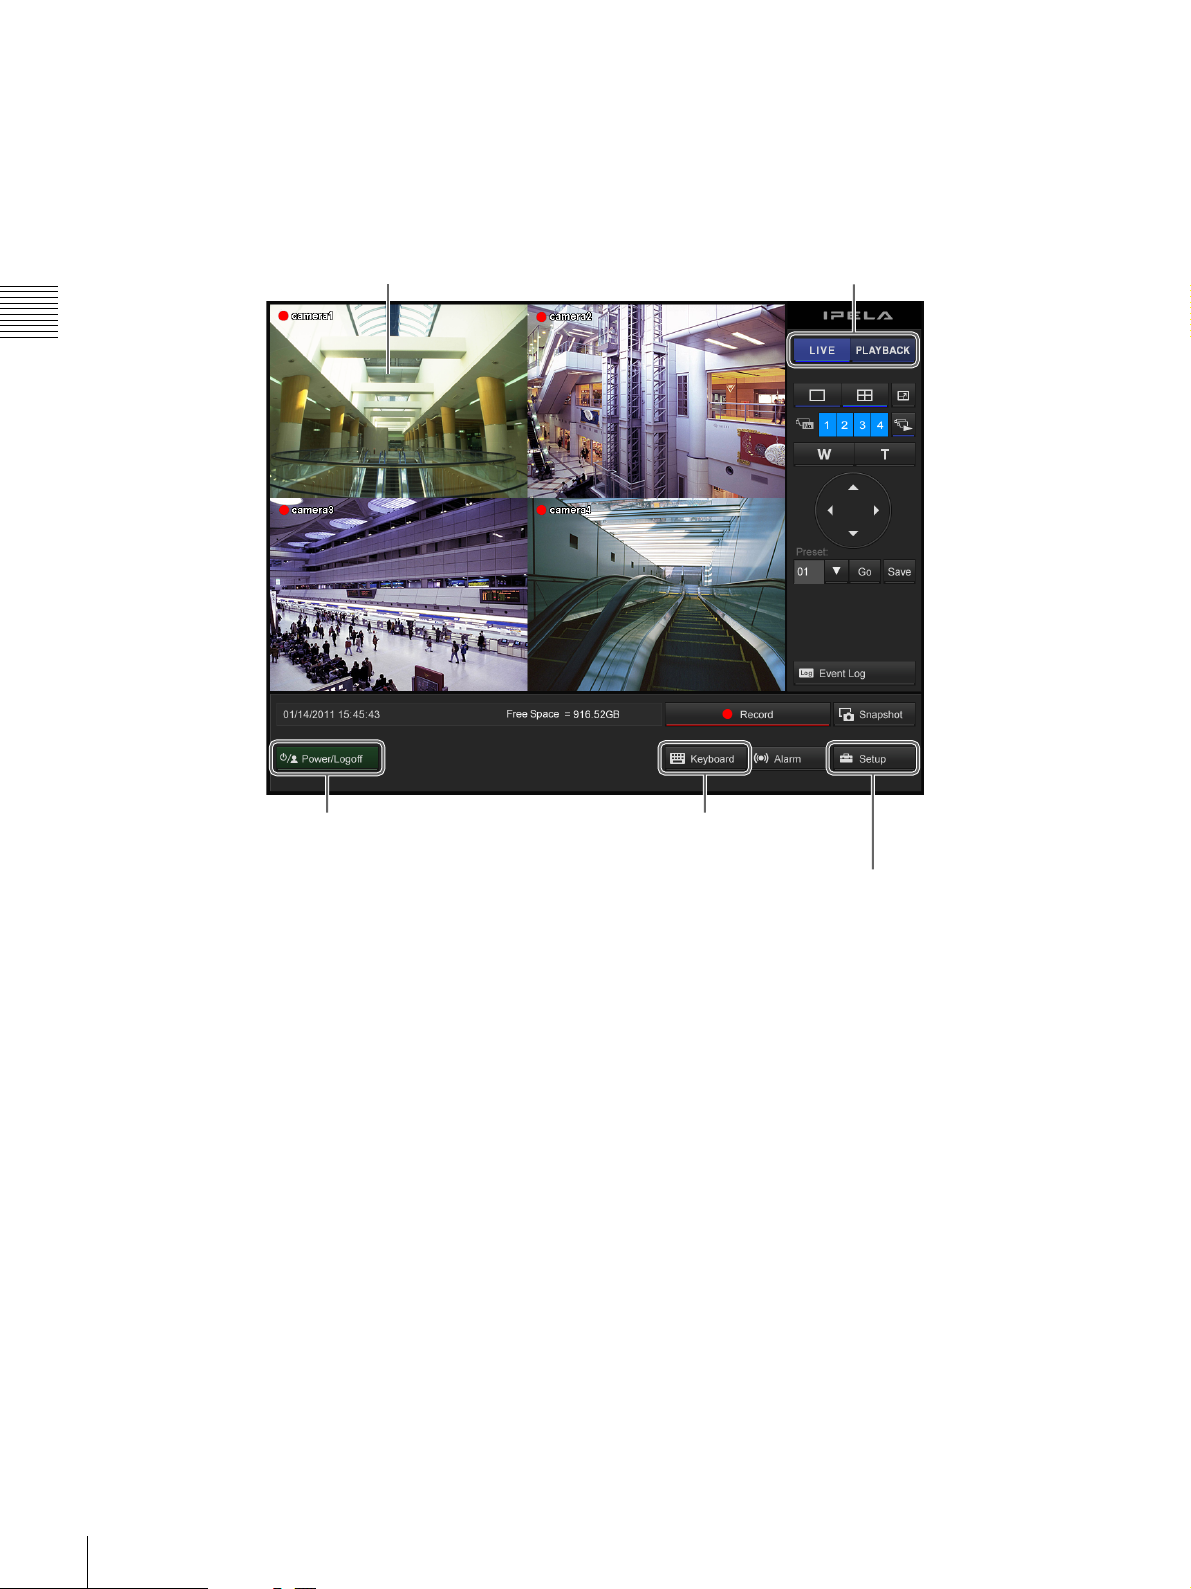
“Monitoring (LIVE)” screen
Chapter 2 Operation and Control
Monitor Frame
Allows you to log off or
restart the NSR.
Use this button to switch between live image
display and playback of recorded images.
This displays the soft keyboard
that is used to input text.
This is used to make various settings.
Click this button to display the “Setup” screen.
For details on monitoring, refer to Monitoring (page 15) and Controlling Cameras (page 17).
12
Basic Window Operations
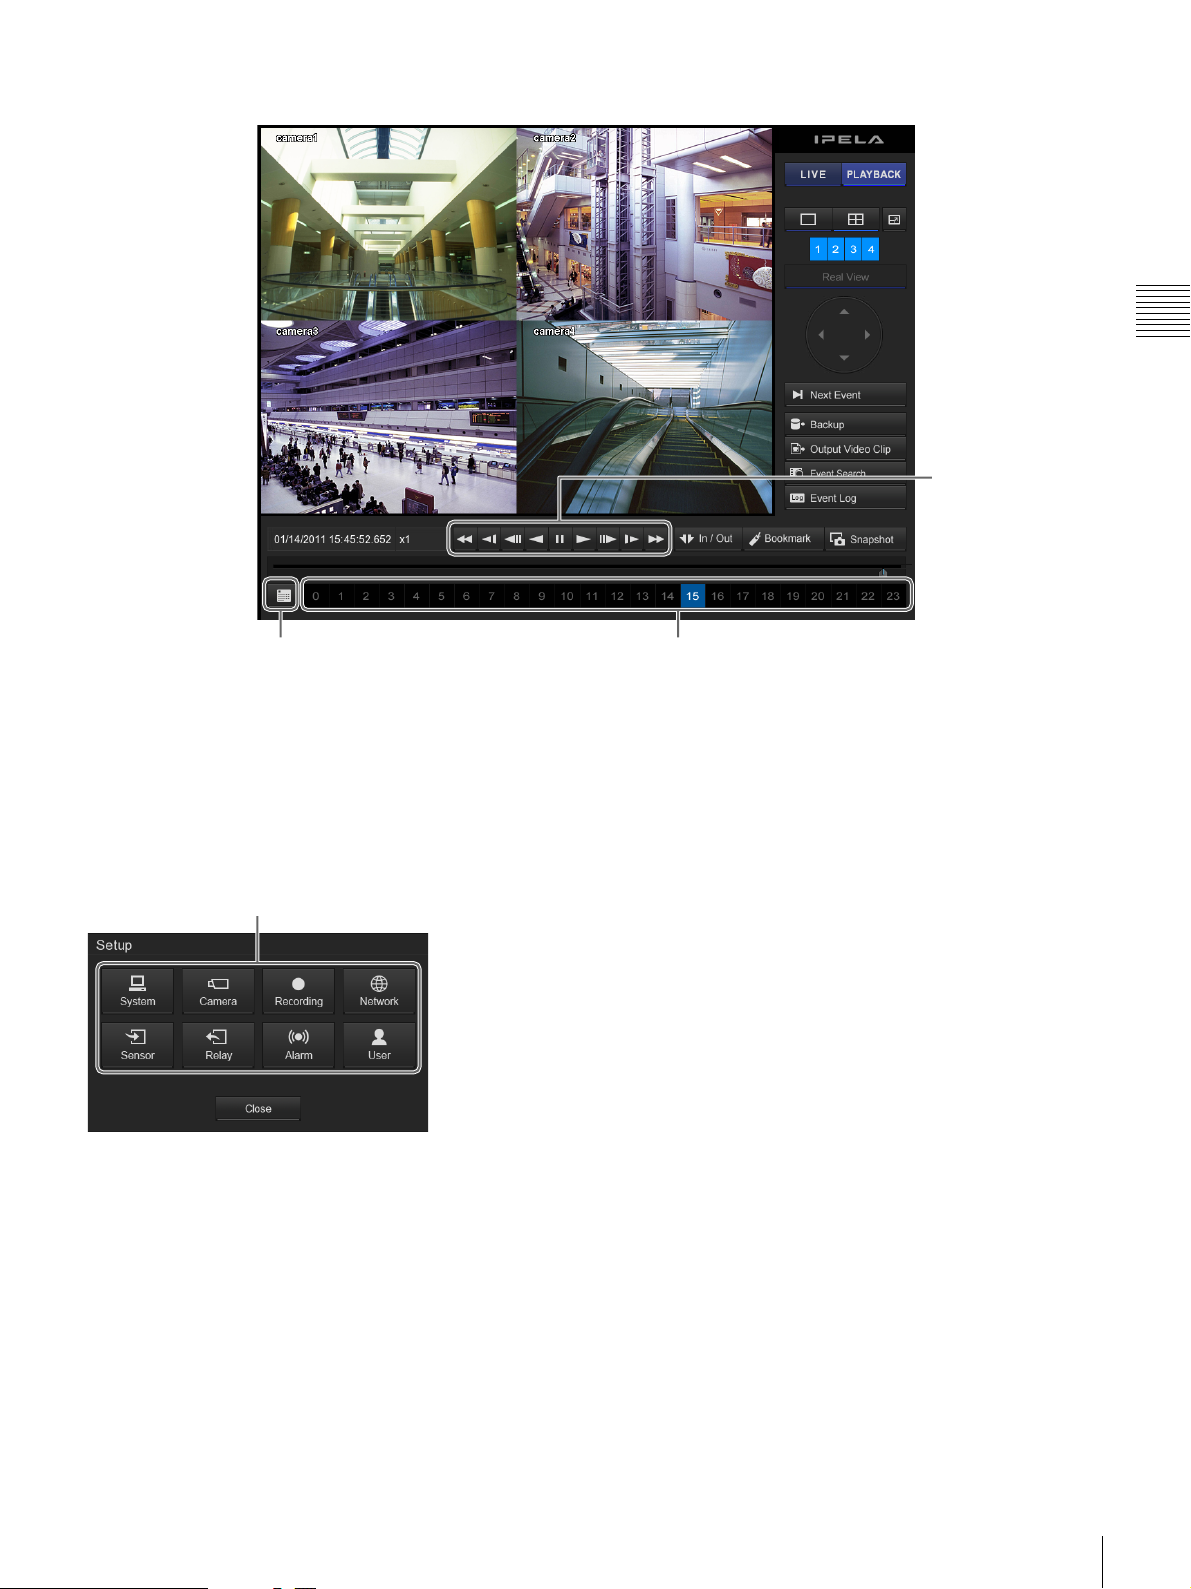
“PLAYBACK” screen
Chapter 2 Operation and Control
These are used
when playing back
recorded images.
This is used when searching for a
recording from a specified date and time.
These are used to specify particular time
frames from which to play back images in
the selected monitor frame.
For details on searching for and playing back recorded images, refer to “Recording, Searching, and Playing Images”
(page 18).
“Setup” Screen
Click the button for the item that you want to configure to
display the configuration screen.
Click the button for the item you want to set.
Basic Window Operations
13
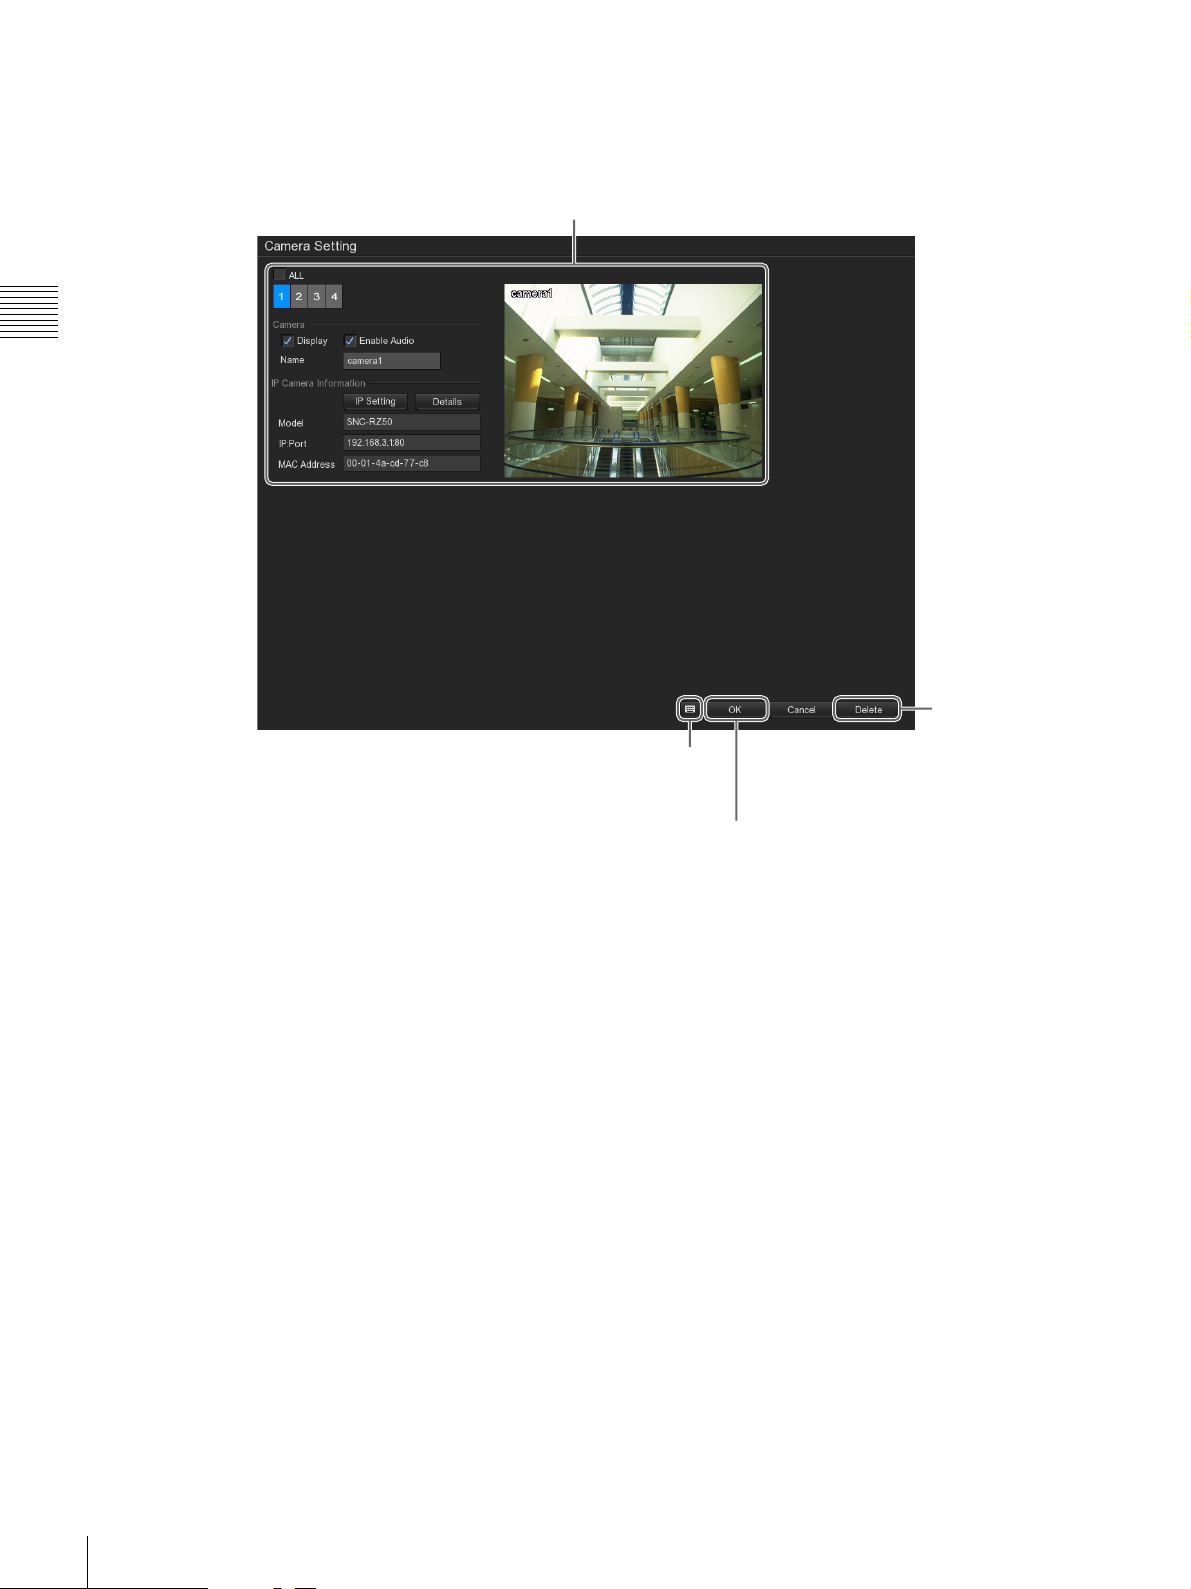
Various setting screens
These screens are used for making settings that are necessary for operating the NSR, such as camera registration, schedule
settings, and user registration.
The setting items that are displayed depend on
the button that was click on the “Setup” screen.
Chapter 2 Operation and Control
This displays the
soft keyboard that is
used to input text.
This puts the new settings into effect.
This restores the
default settings.
14
Basic Window Operations
Monitoring
You can monitor the live images currently being captured
by the camera, as well as the audio from the camera. The
AutoScan function, which displays the camera images in
succession in the 1 × 1 (1 screen) layout, can also be used
when monitoring.
Monitoring Live Images
You can monitor the images the camera is currently
capturing by clicking [LIVE] in the upper right corner of
the screen.
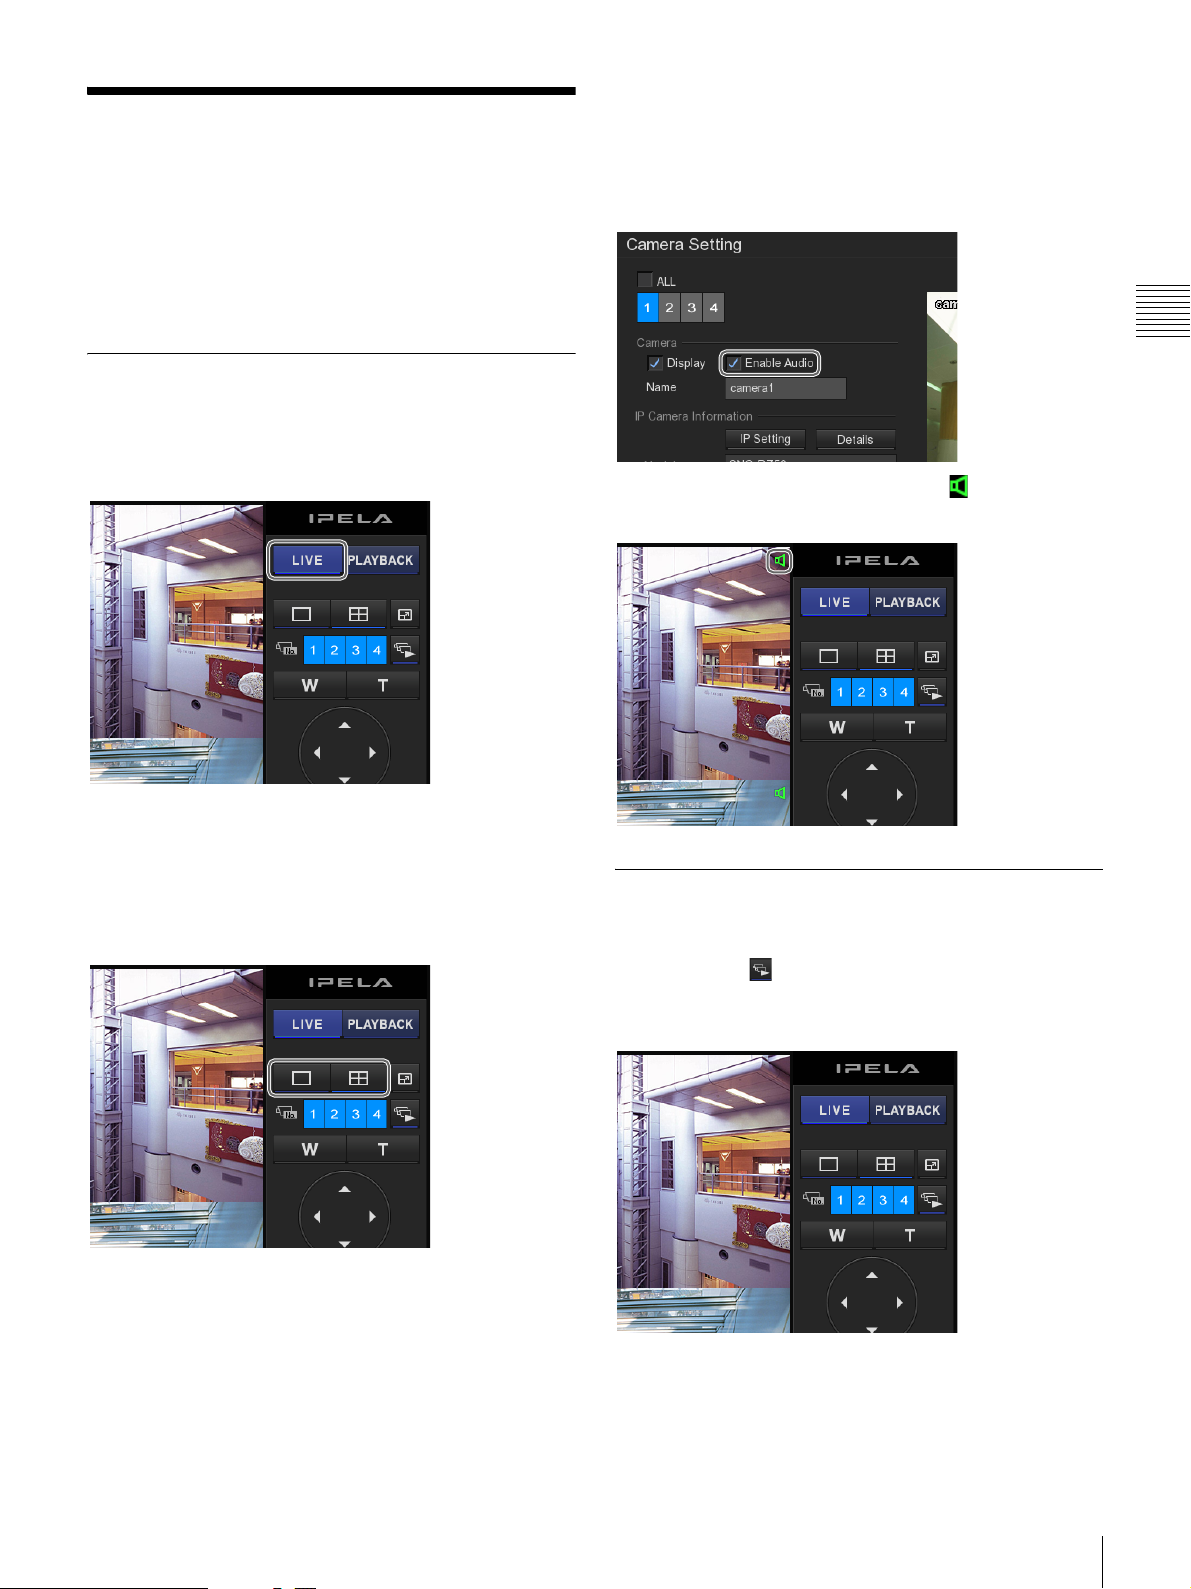
Monitoring Audio from Cameras
Enable audio from the cameras by checking the [Enable
Audio] checkbox on the “Camera Setting” screen.
For details on this setting, refer to “Settings Related to the
Cameras” (page 40).
Chapter 2 Operation and Control
When audio from a camera is enabled, “ ” appears in the
upper left corner of the monitor frame.
Changing the Layout
The layout can be changed by clicking the layout buttons.
In addition, the image from a specific camera can be
displayed in the 1 × 1 (1 screen) layout by clicking the
camera ID button or by clicking the monitor frame.
Displaying images from different cameras in succession (AutoScan)
Once you click (AutoScan) and AutoScan function is
enabled (the button turns blue), the camera images are
displayed in succession.
You can set the display time for each monitor frame. For
details on how to make this setting, refer to “AutoScan
Period” (page 39) in ““System Setting” Screen Details”.
Monitoring
15
Turning AutoScan function off
BACDE
Click (AutoScan) again; the button turns off.
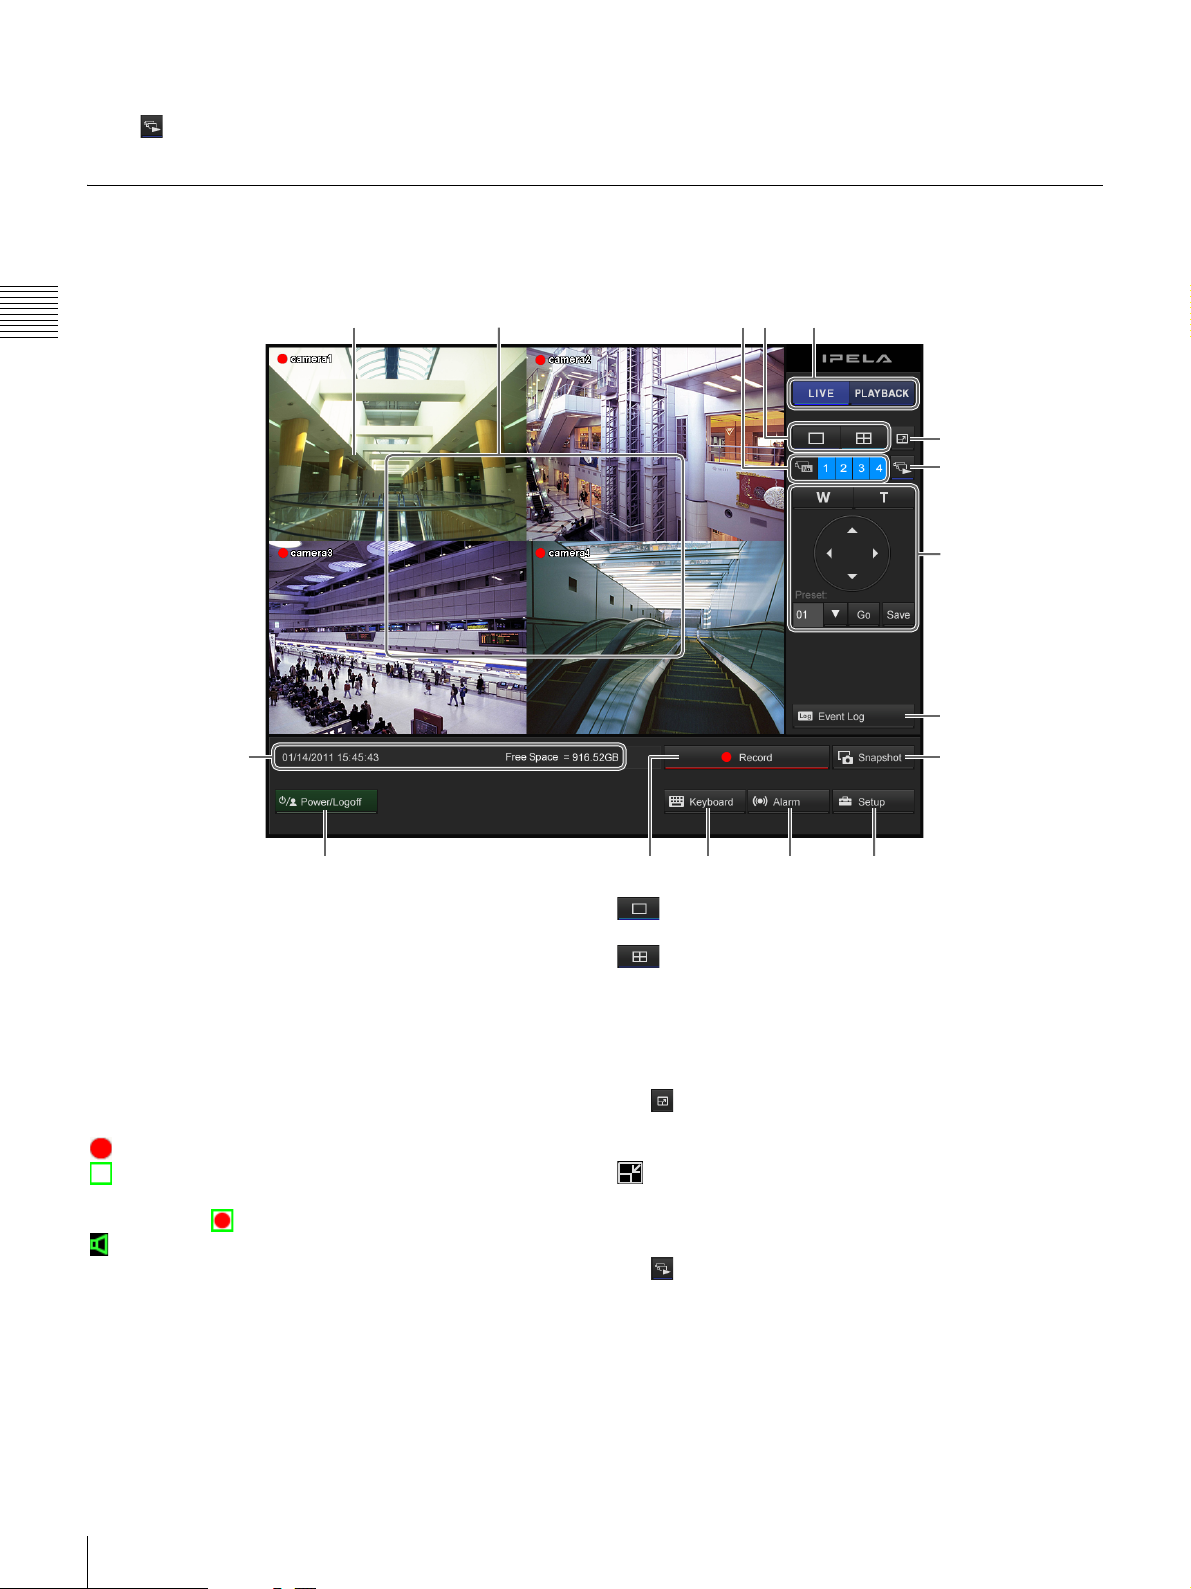
Functions and Operating Procedure of “Monitoring (LIVE)” Screen
On the “Monitoring (LIVE)” screen, you can perform operations such as monitoring the live images captured from the
current camera.
Chapter 2 Operation and Control
F
G
H
P
ONMLK
A During 1 × 1 (1 screen) layout
You can perform digital zoom by right-clicking and
dragging the mouse.
B Monitor Frame
You can display live images and play back recorded
images in the monitor frames. Clicking on one of the
monitor frames switches that monitor frame to full screen
display.
The following icons appear in monitor frames.
: Recording in progress
: Motion is detected.
When motion is detected while recording is in
progress, appears.
: Audio enabled (grayed out when disabled)
C Camera ID
This is used to select the camera for displaying images in
the monitor frame.
D Layout switch
Switches the layout of the monitor frames.
I
J
: This button switches the screen layout to 1 × 1
(1 screen).
: This button switches the screen layout to 2 × 2
(4 screen).
E Monitor frame status switch
Switches the monitor window status (live/playback).
F (Fullscreen)
This displays the current layout (monitor arrangement)
over the whole screen. To return to the normal screen, click
that appears in the upper right corner of the screen.
You can also return to the normal screen by pressing the
Esc key on the keyboard.
G (AutoScan)
This displays the camera images in succession.
H Camera Control
If the camera is equipped with pan, tilt, and zoom
functions, this controls these functions for the camera
images.
16
Monitoring
Wide-angle/Telephoto Zoom
This controls zooming between wide-angle and
telephoto views.
[W] is for wide-angle (zoom out), and [T] is for
telephoto (zoom in).
Pan/Tilt
This moves the camera up, down, left, or right.
Caution
If an analog camera equipped with pan, tilt, and zoom
functions is connected to an SNT-EX series unit, these
functions of the analog camera cannot be controlled by
the NSR.
Preset
This moves the camera to the selected preset position.
For details on this operation, refer to “Using Camera
Presets” (page 17).
I (Event Log)
This displays the event/operation/system/network history.
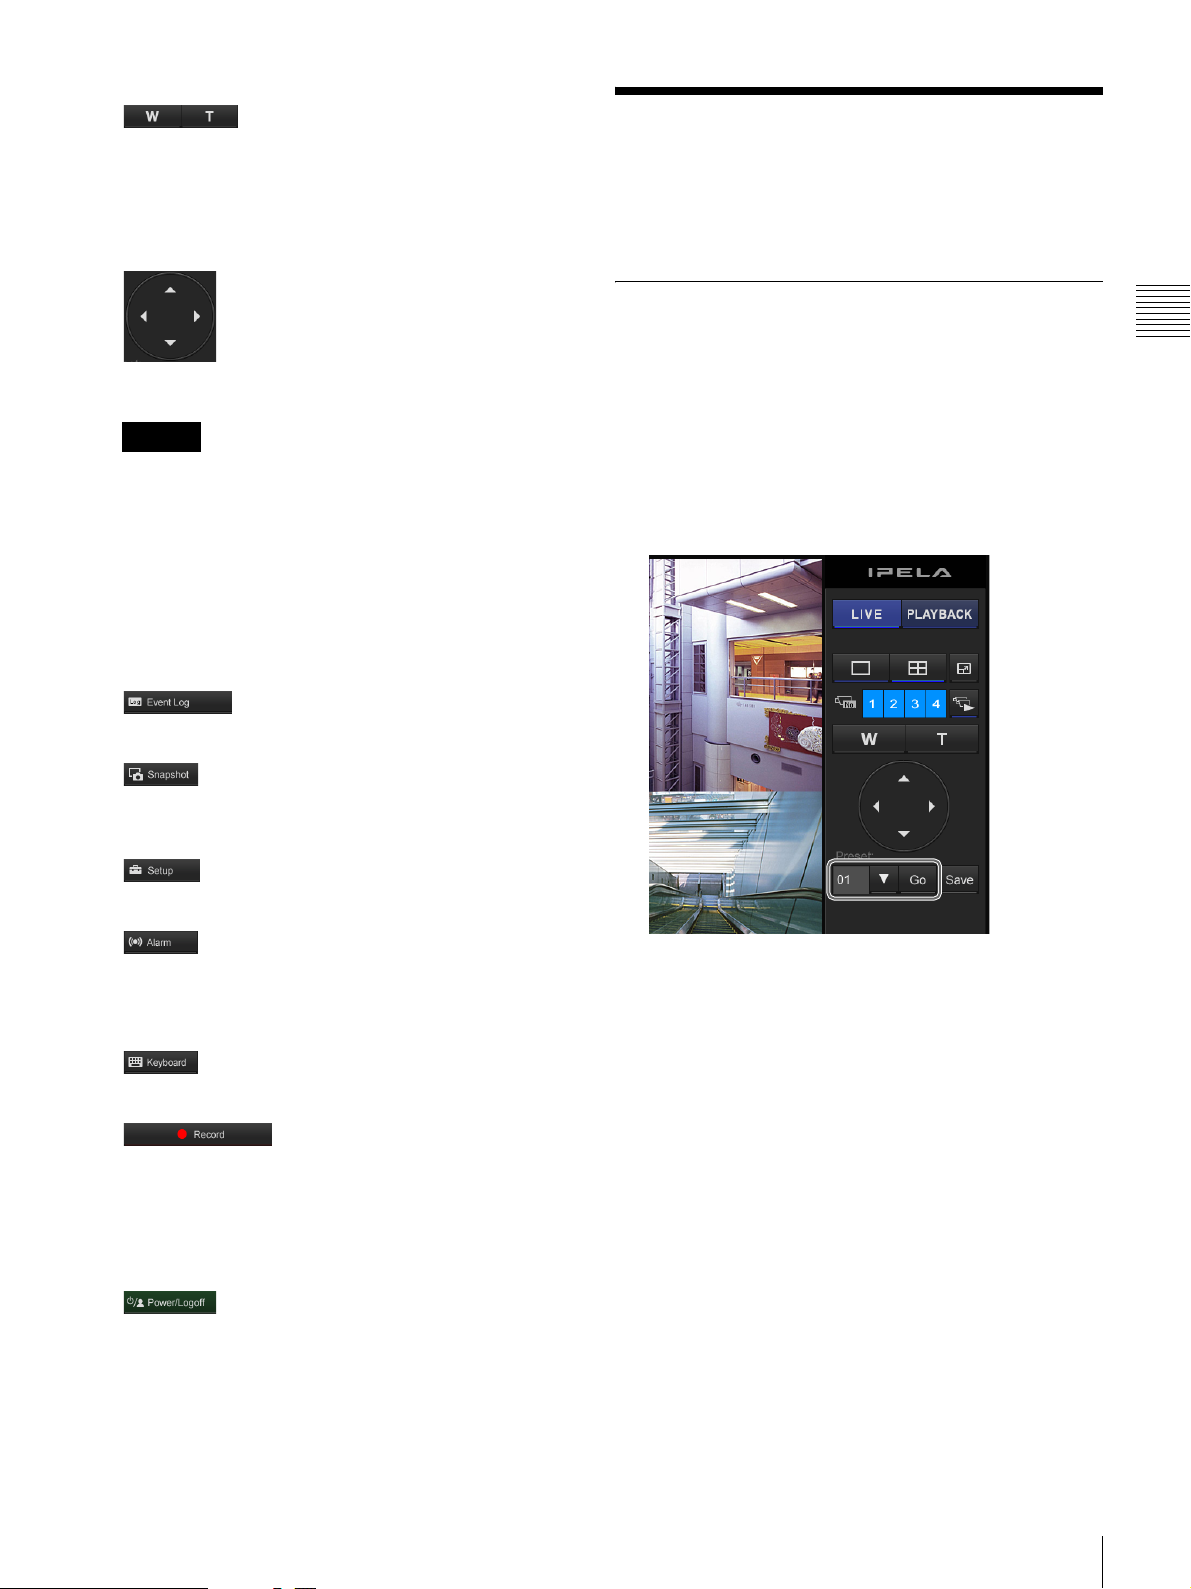
Controlling Cameras
You can move the camera to preset positions stored in the
camera.
Using Camera Presets
You can move the camera to preset positions stored in the
camera. You can also configure a new preset position.
1
Select the monitor frame displaying the images from
the camera that you want to control.
2
Using [Preset], select the desired preset number and
then click [Go].
Chapter 2 Operation and Control
J (Save)
This exports the image currently displayed as a still image file.
Still images are exported in JPEG format.
K (System Setup)
This displays the “Setup” screen.
L (Alarm Status)
This displays the status and history of alarms.
To release an alarm condition, click this button and then
click [Reset] in the “Alarm Status” screen that appears.
M (Keyboard)
This displays the soft keyboard that is used to input text.
N (Record)
This starts or stops the recording of camera images
according to the recording mode configured in the
“Recording Setting” screen.
Under default settings, recording starts automatically at
system startup.
O (Exit)
This allows you to reboot, power off, or log on as a
different user.
The camera moves to the preset position.
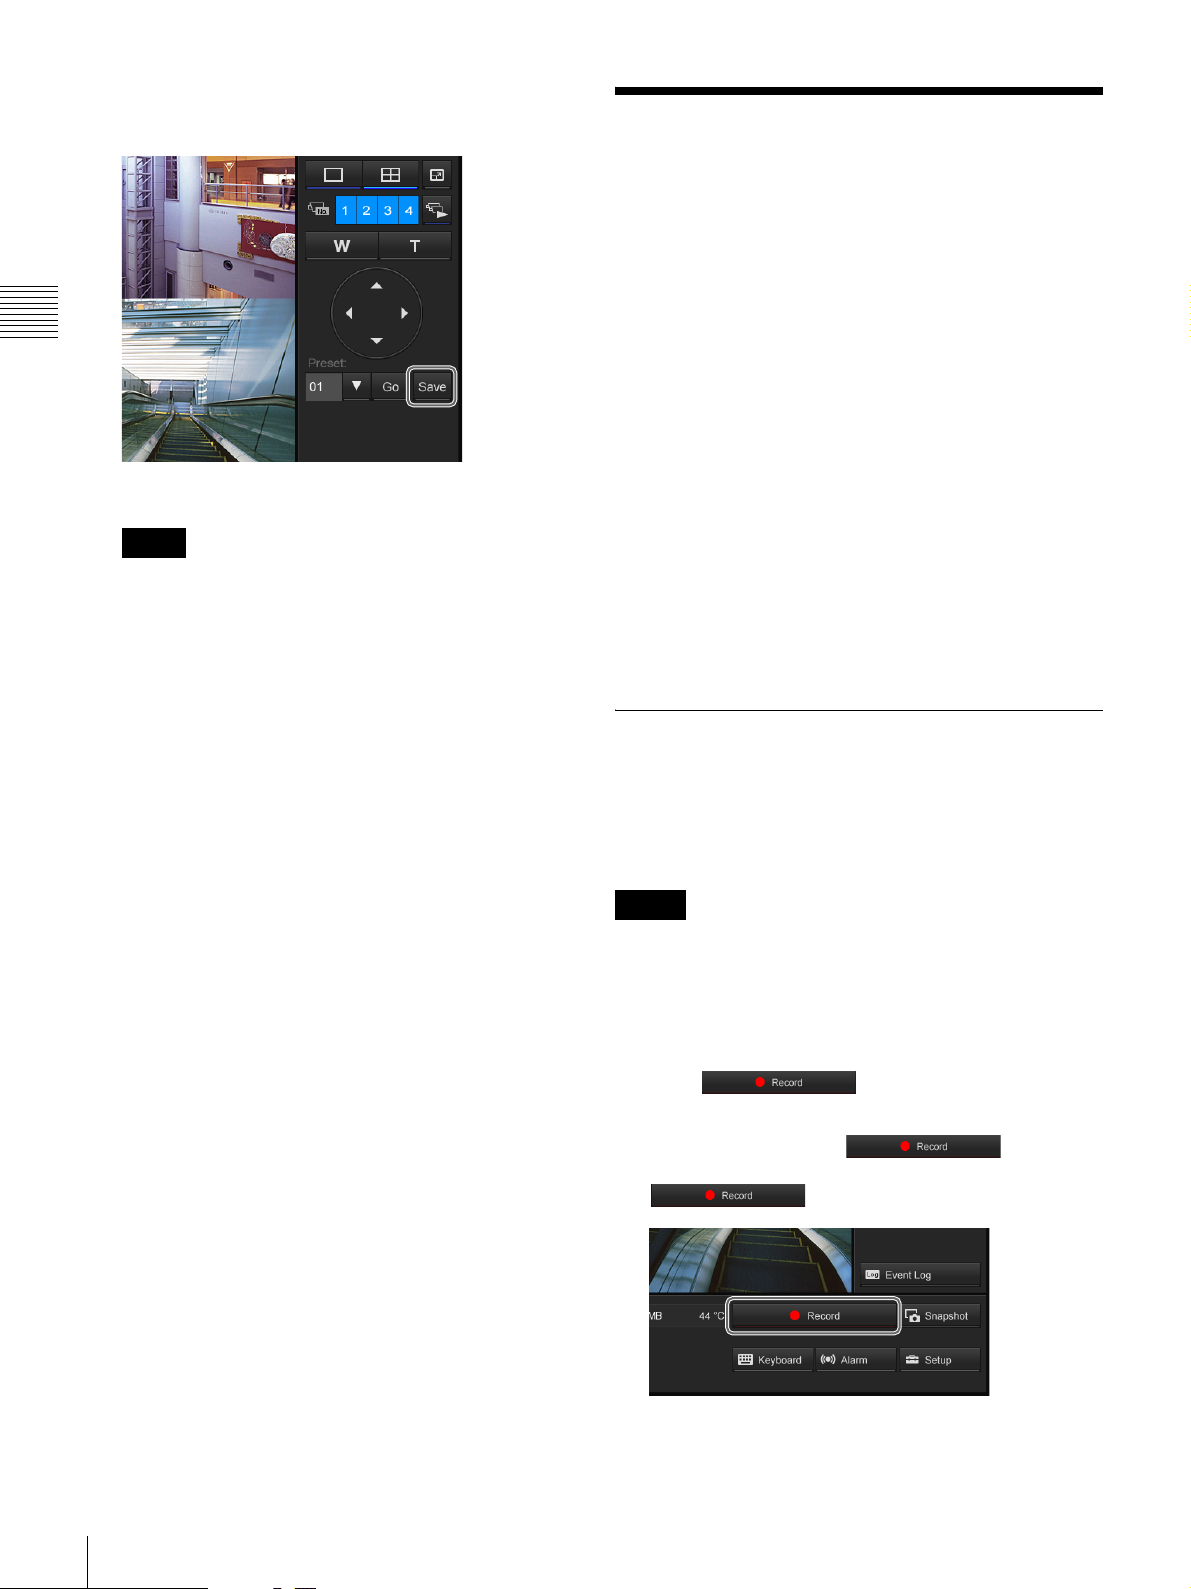
Configuring a New Preset Position
These settings are only available for cameras with a
function for configuring preset positions.
1
Select the monitor frame displaying the image from
the camera for which you want to configure the preset
position.
2
Adjust the camera position using the pan, tilt, and
zoom operations while watching the image.
P Status display
This displays the current date and time, and the current
hard disk capacity.
Controlling Cameras
17
Chapter 2 Operation and Control
3
Select the desired preset number for the new present
and then click [Save].
The new preset position is configured.
Note
The number of presets depends on the type of camera
used. For details, refer to the user’s guide for your
camera.
Recording, Searching, and Playing Images
You can record live images, and search and play back
recorded image data and audio data.
This section describes the following operations.
• Recording Camera Images (page 18)
You can record the images currently being captured by a
camera.
• Playing Recorded Images (page 19)
Simple operations are available for playing recorded
images, including instant playback for automatically
rewinding a specified amount of time and playing,
specifying the playback position by date and time, and
playing from alarm history.
• Searching by Event (page 20)
You can search for and play back recorded images
according to a specified event (sensor input, movement
detection, or loss of video signal)
• Setting a Bookmark (page 21)
You can bookmark recorded images for quick retrieval.
Recording Camera Images
You can manually start and stop the recording of camera
images according to the recording settings configured in
the “Recording Setting” screen. When you start or stop
recording, the operation is performed for all cameras.
Notes
• You cannot start recording images from a camera for
which [Recording Mode] is set to [No Recording] in the
“Recording Setting” screen.
• If no live images are displayed, click [LIVE] on the
upper right corner of the screen.
1
Click (Record).
If continuous recording or motion detection recording
is in progress, clicking (Record)
will stop the recording. In such cases, click
again to start recording manually.
18
Recording, Searching, and Playing Images
Recording starts.
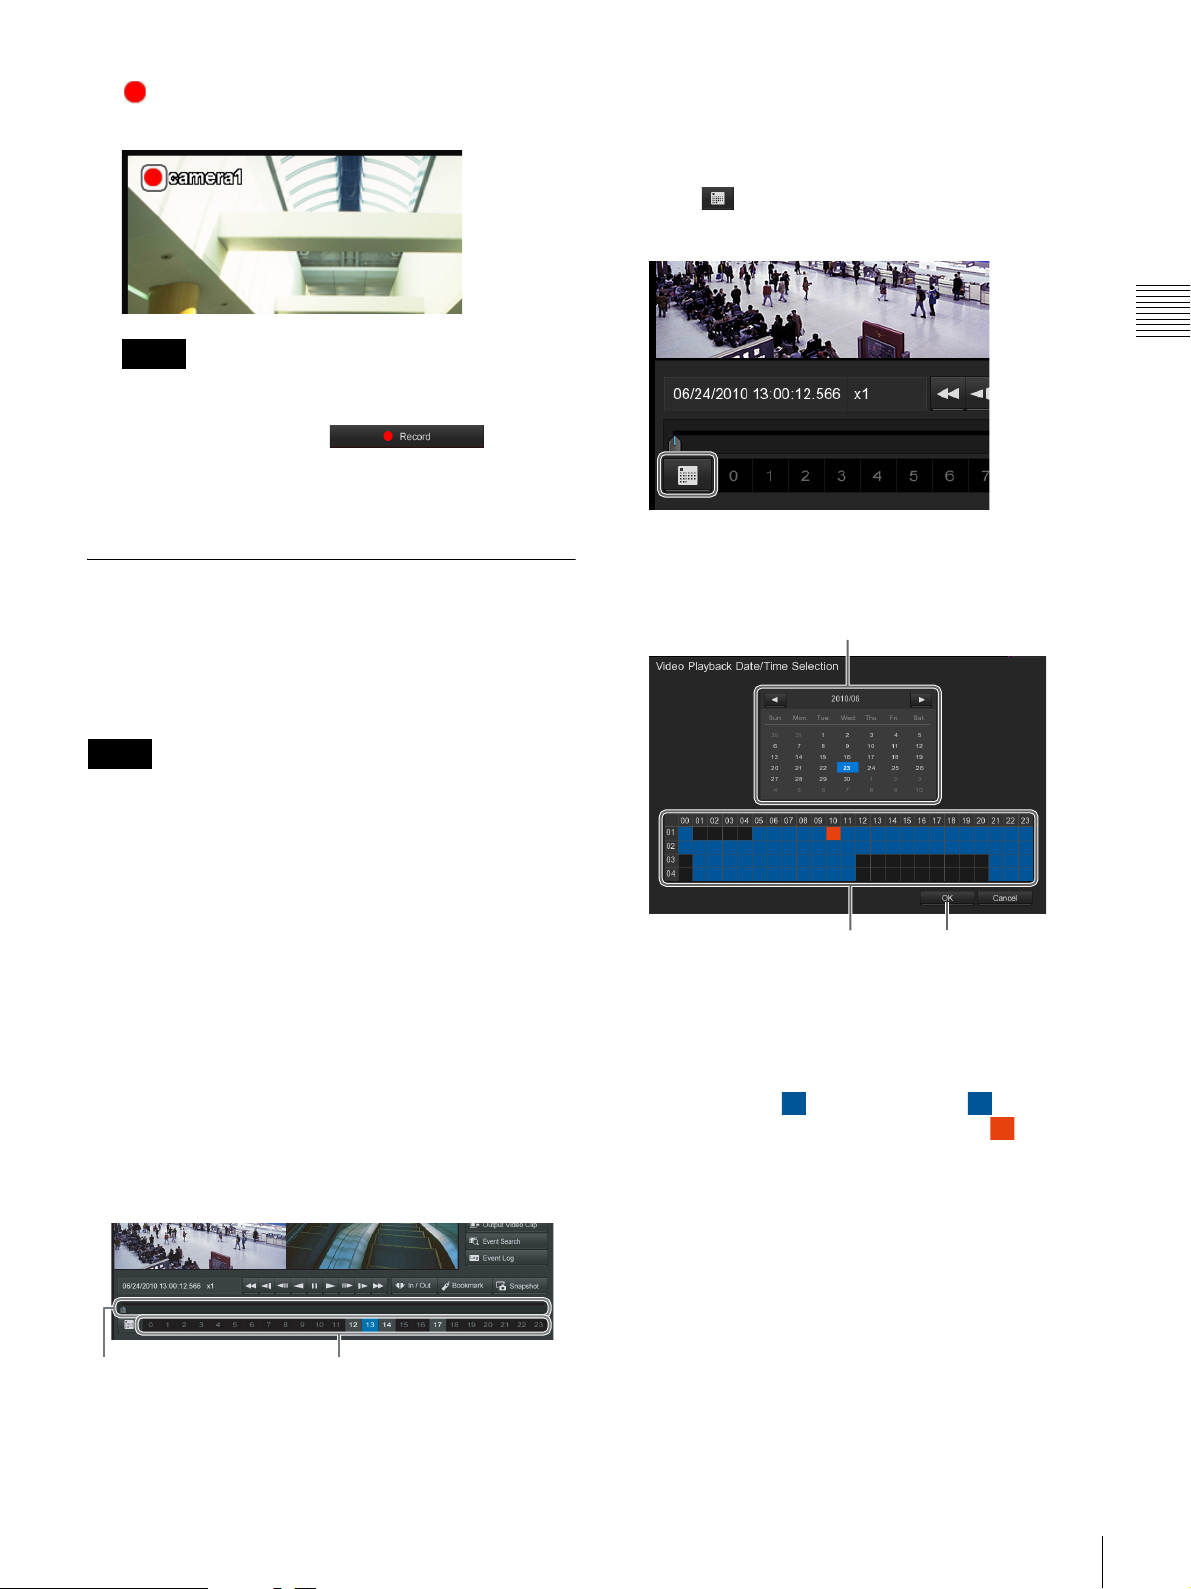
appears in the upper left corner of the monitor
1
2
3
frame while recording is in progress.
Specifying a Date and Time for Playback
This allows you to specify a date and time for the playback
position of the recorded images.
1
Click (Date Selection) in the lower left corner of
the “Playback” screen.
Note
Recording continues even if you change the layout.
2
To stop recording, click (Record)
again.
Recording stops.
Playing Recorded Images
Simple operations are available for playing recorded
images, including instant playback for automatically
playing the most recently recorded image, and specifying
the playback position by date and time.
Note
You can set the operation that happens when you click
[PLAYBACK] and switch to the “Playback” screen. For
details on how to make this setting, refer to “Playback
Mode” (page 39) in ““System Setting” Screen Details”.
The calendar appears.
2
Specify the date and time.
Chapter 2 Operation and Control
Instant Playback
When you click [PLAYBACK], the recorded image is
played back.
Changing the Playback Time Frame for
Selected Images
You can change the time frame from which to play back
images for the selected image by using the hour buttons
and playback slider at the bottom of the “Playback” screen.
Use the hour buttons to specify the hour, and the playback
slider to specify the minute.
Move the slider to
specify the minute.
Use the buttons to
specify the hour.
1 Select the date.
2 Select the camera and time for which a recording is
to be played back.
Time periods for which recorded images exist are
displayed in . When you click a time period,
the selected time period will become .
3 Click [OK].
The recording is played back.
Recording, Searching, and Playing Images
19
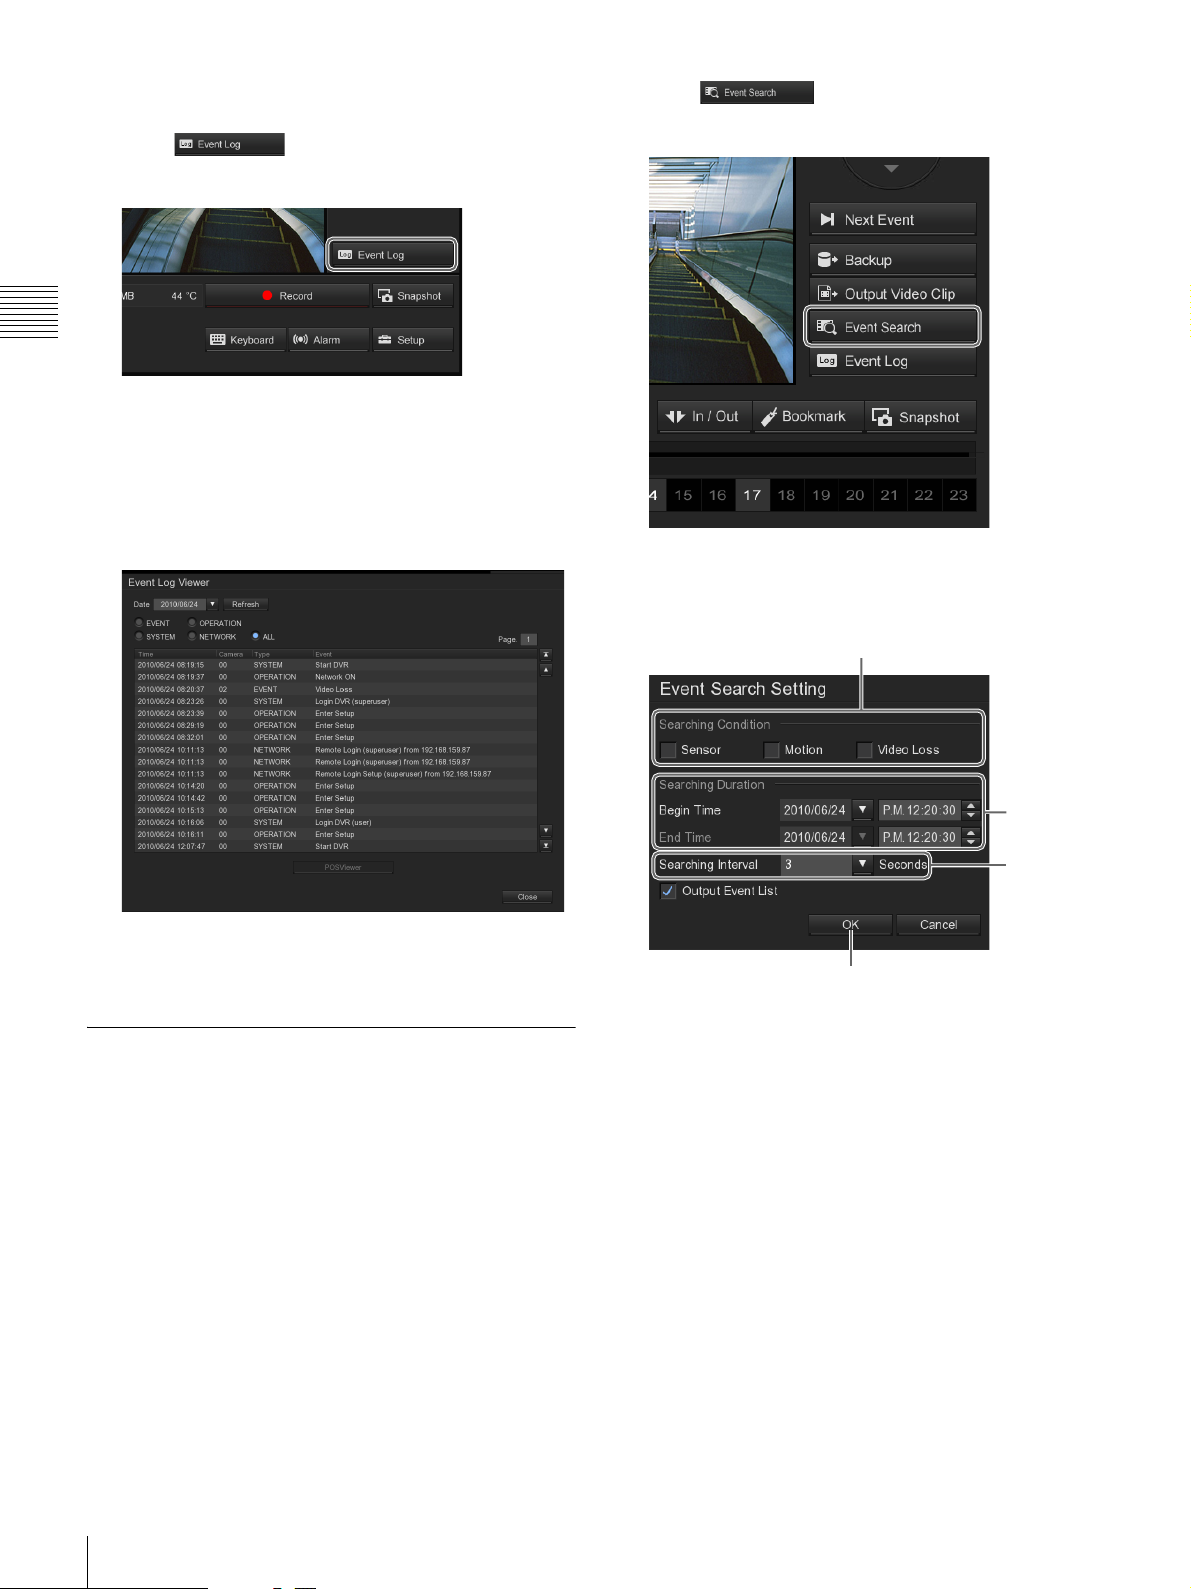
Playing from Event History
1
1
Click (Event Log) in the lower right
corner of the screen.
Chapter 2 Operation and Control
The “Event Log Viewer” screen appears.
2
Select the event type and date.
The relevant events are displayed.
If a recorded image exists, double-click the history to
play the recorded image.
2
Click (Event Search) on the right side of
the “Playback” screen.
The “Event Search Setting” screen appears.
3
Set the search conditions.
3
To close the “Event Log Viewer” screen, click
[Close].
Searching by Event
You can search for and play back recorded images
according to a specified event (sensor input, movement
detection, or loss of video signal).
1
Select the monitor frame displaying the image from
the camera for which you want to search.
2
3
4
1 Select the check boxes of the events for which to
search.
2 Specify a range of dates and times for which to
search.
3 Select the number of seconds to search for.
4 Click [OK].
The search begins, and the results are displayed in the
“Event List” screen.
20
Recording, Searching, and Playing Images
4
Double-click the event that you want to play back.
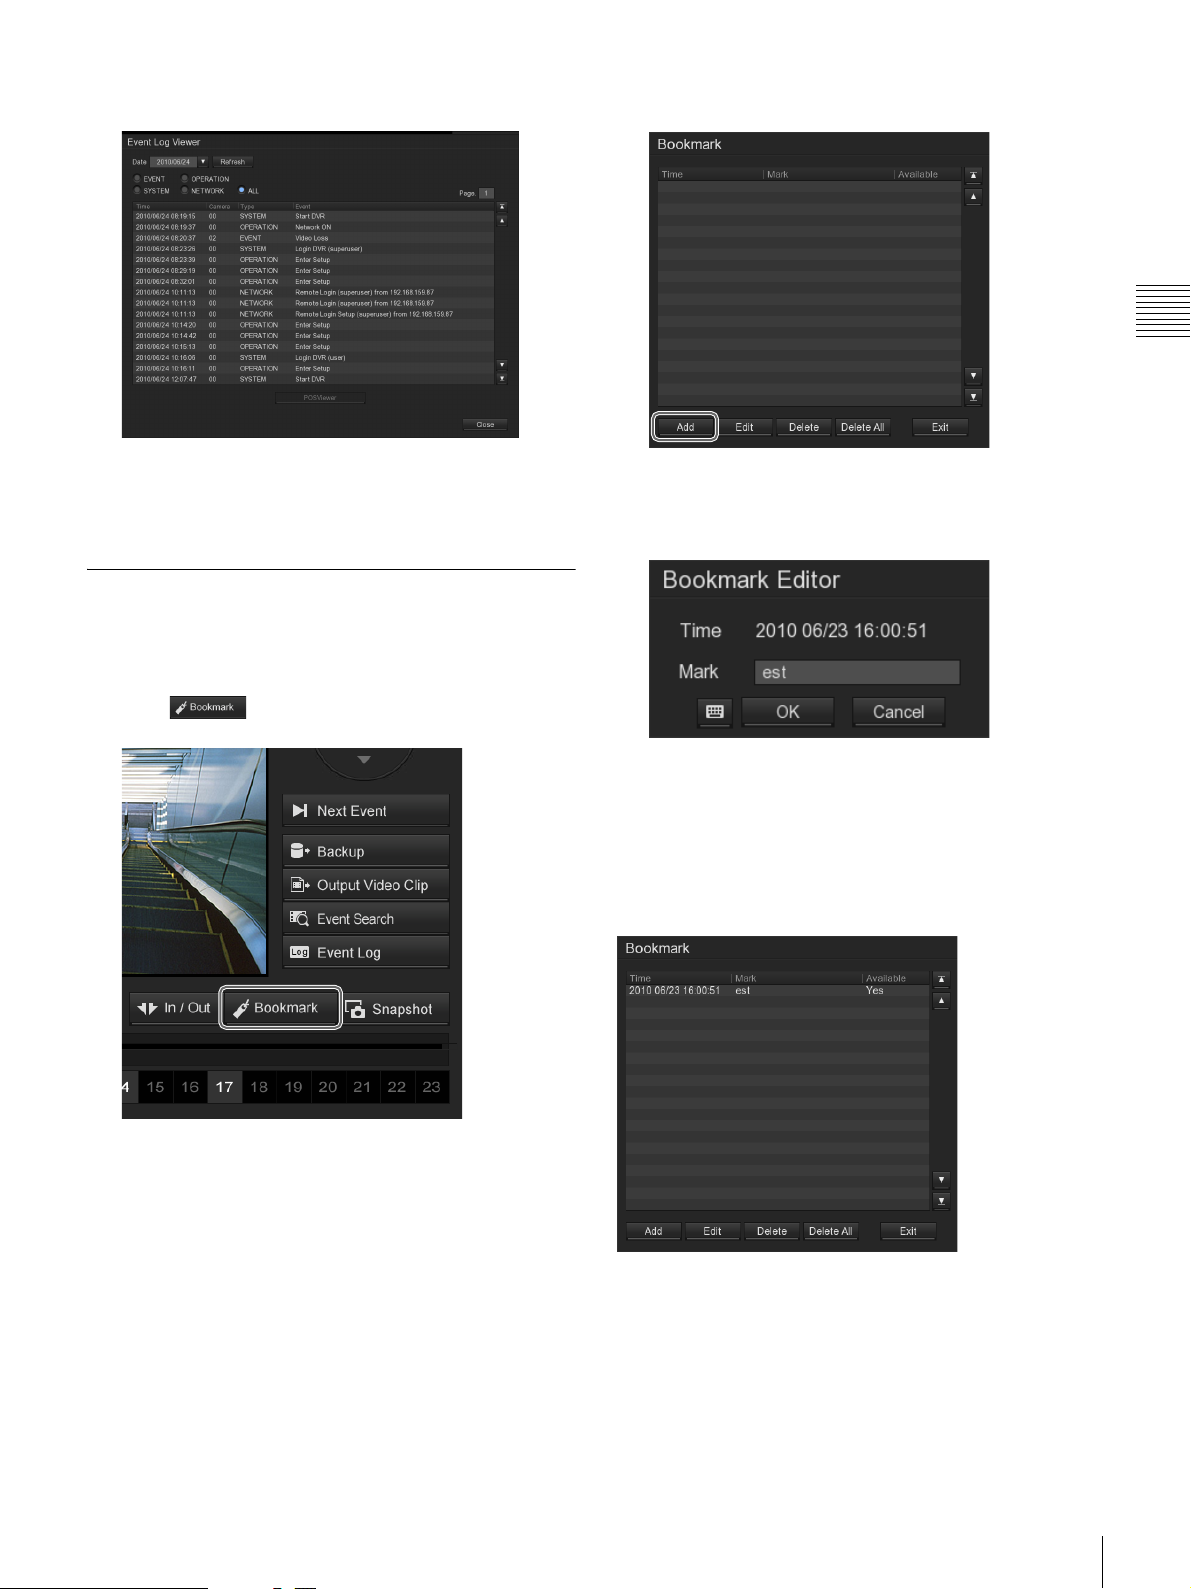
2
Click [Add].
Chapter 2 Operation and Control
The recorded images are played back.
5
To close the “Event List” screen, click [Close].
Setting a Bookmark
You can bookmark recorded images for quick retrieval.
1
Pause at the scene that you want to bookmark, and
click (Bookmark).
The “Bookmark Editor” screen appears.
3
Input the bookmark name, and click [OK].
The bookmark is added to the list.
Returning to a Bookmark
When you double-click the desired bookmark, the
corresponding bookmarked scene is displayed in the
monitor frame.
The “Bookmark” screen appears.
Recording, Searching, and Playing Images
21
 Loading...