

Sony ICF-SW1005,ICF-SW100E Operating Lnstructions
SONY
3-757-853-42(1)
FM Stereo/SW/MW/LW/
PLL
Synthesized Receiver
ICF-SW1005
ICF-SW100E
Operating
lnstrudions
page
2
Before operating the unit, please read this manual thoroughly
and
retain it for future reference.
Mode
d'emploi
page
40
Avant la mise
en
service
de
cet appareil, veuillez lire attentivement
ce
mode
d'emploi et le conserver
pour
toute reference.
Manual
de
instrucciones
pagina
78
Antes
de
utilizar la unidad, lea este manual detenidamente, y
conservelo para futuras referencias.
Bruksanvisning
sid.
11&
Uis noga igenom bruksanvisningen for att Iara kanna till
kameraspelaren och dess anvandning.
Spara bruksanvisningen .
.
Manual
de
instru~6es
pagina
154
Antes
de
utilizar o aparelho, leia atentamente este manual e guarde-o
para futuras consultas.
WARNING
Dmliml
OWNER'S RECORD
The model
number
is located
on
the bottom
and
serial
number
also
on
the bottom. Record the serial number in the space provide below.
Refer to these numbers whenever you call
upon
your
Sony dealer
regarding this product.
Model No.
ICF-SWlOOS
Serial No.
WARNING
To
rrevent
fire
or
shock
hazard,
do
not
expose
the
uni
to
rain
or
moisture.
To
avoid
electrical
shock,
do
not
open
the
cabinet.
Refer
servicing
to
qualified
personnel
only.
You
are
cautioned that
any
changes
or
modifications not expressly
approved in this manual could void your authority to operate this
equipment.
This device complies with
Part
15
the FCC Rules. Operation is subject
to the condition that this device does not cause harmful interferense.
INFORMATION
This
equipment
has
been
tested
and
found
to
comply
with
the
limits
for a Class
B
digital
device,
pursuant
to
Part
15
of
the
FCC
Rules.
These
limits
are
designed
to
provide
reasonable
protection
against
harmful
interference
in
a
residential
installation.
This
equipment
generates,
uses,
and
can
radiate
radio
frequency
energy
and, if
not
installed
and
used
in
accordance
with
the
instruc·
tions,
may
cause
harmful
interference
to
radio
communications.
However,
there
is
no
guarantee
that
interference
will
not
occur
in a particular
installa·
tion.
If
this
equipment
does
cause
harmful
interference
to
radio
or
television
reception,
which
can
be
determined
by
turning
the
equipment
off
and
on.
the
user
is
encouraged
to
try
to
correct
the
interference
by
one
or
more
of
the
following
measures:
•
Reorient
or
relocate
the
receiving
antenna.
•
Increase
the
separation
between
the
equipment
and
receiver.
•
Connect
the
equipment
into
an
outlet
on a circuit
different
from
that
to
which
the
receiver
is
connected.
•
Consult
the
dealer
or
an
experienced
radio/TV
technician
for
help.
Table
of
Contents
Features .......................................................................................................... 4
Precautions ..................................................................................................... 5
Location
and
Function
of
Controls ............................................................ 6
Power Sources ............................................................................................. 10
Installing Batteries .................................................................................... 10
House Current ...........................................................................................
11
12V
Car
Battery .........................................................................................
11
Setting the Clock ......................................................................................... 12
Setting the Local
Current
Time ............................................................... 12
Finding
out
the Current Time in Some Place
in
the World ................ 15
Tuning in
by
Selecting a Preset Station
Name
........................................ 16
To Improve Reception .............................................................................. 17
Direct Tuning ............................................................................................... 18
Manual Tuning ............................................................................................
20
Scan Tuning ................................................................................................ 22
Presetting a Station ..................................................................................... 24
Editing Labels .............................................................................................. 26
Using the Standby Function ...................................................................... 28
Using the Sleep Timer ............................................................................... 30
For
better SW
/MW
/LW
Reception .........................................................
31
Using the Active Antenna AN-100 ........................................................
31
Using the SW Compact Antenna AN-71 ............................................... 32
Using the Wide Range Antenna ............................................................ 33
Recording Radio
Programs ...................................................................... 34
Specifications ............................................................................................... 35
Troubleshooting
Guide
.............................................................................. 36
Summary
of
the Operations ...................................................................... 38
•
Features
Refer to the pages indicated in ( )
for
details.
•An
FM
stereo/SW /MW /LW receiver with worldwide band cover-
age.
•Quartz
controlled
PLL
(Phase Locked
Loop)
synthesizer system
using a microcomputer
for
easy pinpoint tuning. The tuned fre-
quency
is
digitally displayed.
•
FM
stereo recepion
for
headphones.
Worldtime clock
Preset tuning
Direct tuning
Manual tuning
Scan tuning
Editable label
Timer standby
Sleep timer
Power sources
Finding out the time anywhere in the world
by selecting only the
city name.
(15)
Tuning in a preset station by selecting the name
of the station.
Up to 5 stations in every
10
paged
memories can be preset for button-touch tuning.
(16,
24)
Tuning in the station by inputting the frequency
of the station directly
(18)
Even if you don't know the frequency of the
station, you can tune in the station
precisely.
(20)
Automatic searching of a station (22)
Naming preset stations and one time zone with 6
characters.
(26)
Receiving a desired station at the desired time. (28)
Turning the radio off automatically in
60
minutes.
(30)
Three different power sources: internal batteries,
house current, car batteries.
(10)
The
ICF-SWlOOS
and
ICF-SWIOOE
differ only in supplied accessories.
Sold
type might be different from country to country.
The
ICF-SWlOOS
system includes the following components.
•FM
stereo/SW /MW /LW
PLL
synthesized receiver
ICF-SWIOO
•AC
power adaptor:
AC-E311
for
European countries,
AC-E312
for
USA.
•
AC
plug adaptor
• Active antenna
AN-100
• Stereo headphones
• Carrying case
The
ICF-SWIOOE
system includes the following components.
•
FM
stereo/SW /MW /LW
PLL
synthesized receiver
ICF-SWIOO
• Compact antenna
AN-71
• Stereo headphones
• Carrying case
•
Precautions
• Operate the unit only
on
3 V DC with
two
R6
(size AA) batteries.
For AC operation, use the
AC-E311
I AC-E312 AC
power
adaptor•.
Do
not use
any
other type.
For
car
battery operation, use the car battery cord recommended for
this unit;
do
not use
any
other type.
• The unit is not disconnected from the AC
power
source (mains)
as
long as it is connected to the wall outlet, even
if
the unit itself
has
been turned off.
• Disconnect the AC
power
adaptor
from the wall outlet
when
the unit
is not to be used for a long period
of
time.
• The name plate indicating operating voltage, etc., is located
on
the
bottom
of
the unit.
•Use
the unit within a temperature range
of
O"C
to
40"C
(32r
to
104"F).
If
it
is used in temperatures outside this range,
an
irregular
display may appear
on
the display window.
If
it is used in temperatures lower than this range, the display may change very slowly.
These irregularities will disappear
and
there will
be
no
damage to
the unit when the unit is used
in
its recommended temperature
range.
•
Do
not leave the unit near heat sources, such
as
radiators
or
air ducts,
or
in a place subject to direct sunlight, excessive dust, moisture, rain,
mechanical vibration
or
shock.
• Should
any
solid object
or
liquid fall into the unit, remove the
batteries,
and
have the
unit
checked by qualified personnel before
operating it
any
further.
• Since a strong magnet is used for the speaker, keep personal credit
cards using magnetic coding
or
spring-wound watches
away
from
the
unit
to
prevent them from possible damage caused
by
the
magnet.
• When the casing becomes soiled, clean
it
with a soft
dry
cloth
dampened with mild detergent solution. Never use abrasive cleansers
or
chemical solvents,
as
they may
mar
the
casing.
• When there is lightning
and
you are using
an
external antenna,
immediately disconnect the AC
power
adaptor (if connected) from
the wall outlet. Never touch the antenna wire
when
there is a
lightning storm.
• Never connect a ground wire to a gas pipe.
• Reception
of
3.0 MHz may
be
difficult because
of
internal spurious
signals generated by the built-in oscilators.
• In vehicles
or
buildings, radio reception may be difficult
or
noisy.
Try listening near a window.
•The
AC power
adaptor
is supplied only for the
ICF-SWlOOS.
If
you have any question
or
problem concerning
your
unit that is not
covered in this manual, please consult the nearest Sony dealer .
•
Location
and
Function
of
Controls
Refer to the pages indicated ( )
in
for details.
IH.!.11
21----1~1---
[II
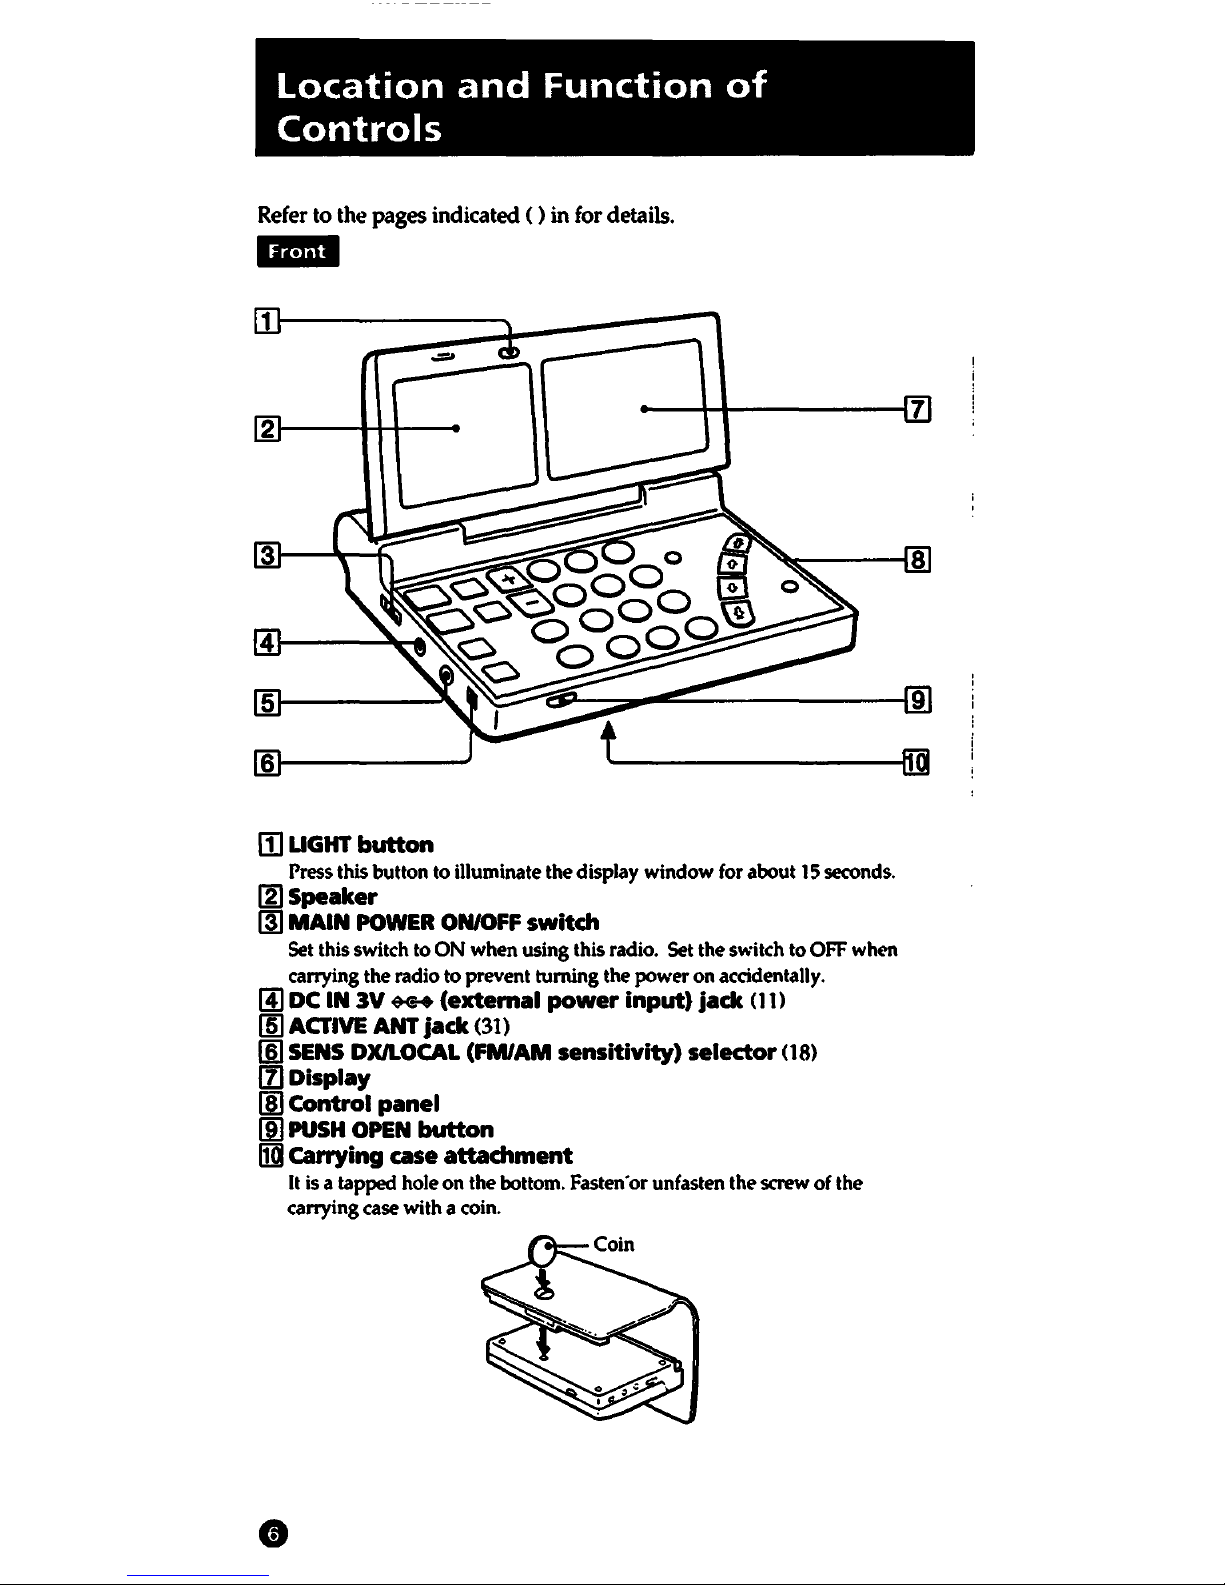
LIGHT
button
Press this button to illuminate the display window
for
about
15
seconds.
IZJSpeaker
(ID
MAIN
POWER
ON/OFF
switch
Set
this switch to ON when using this radio. Set the switch to
OFF
when
carrying the radio to prevent turning the power on accidentally.
[!)
DC
IN
3V
*-+
(extemal
power
input)
jack
01)
(m
ACTIVE ANT
jack
(31)
[§I
SENS
DXJLOCAL
(FM/AM
sensitivity)
selector
08)
[fl
Display
!ID
Control
panel
(ID
PUSH
OPEN
button
IIl1
carrying
case
attachment
It
is
a tapped hole on the bottom.
Fasten•
or
unfasten the
screw
of the
carrying case with a coin.
i;(@ii
IIll
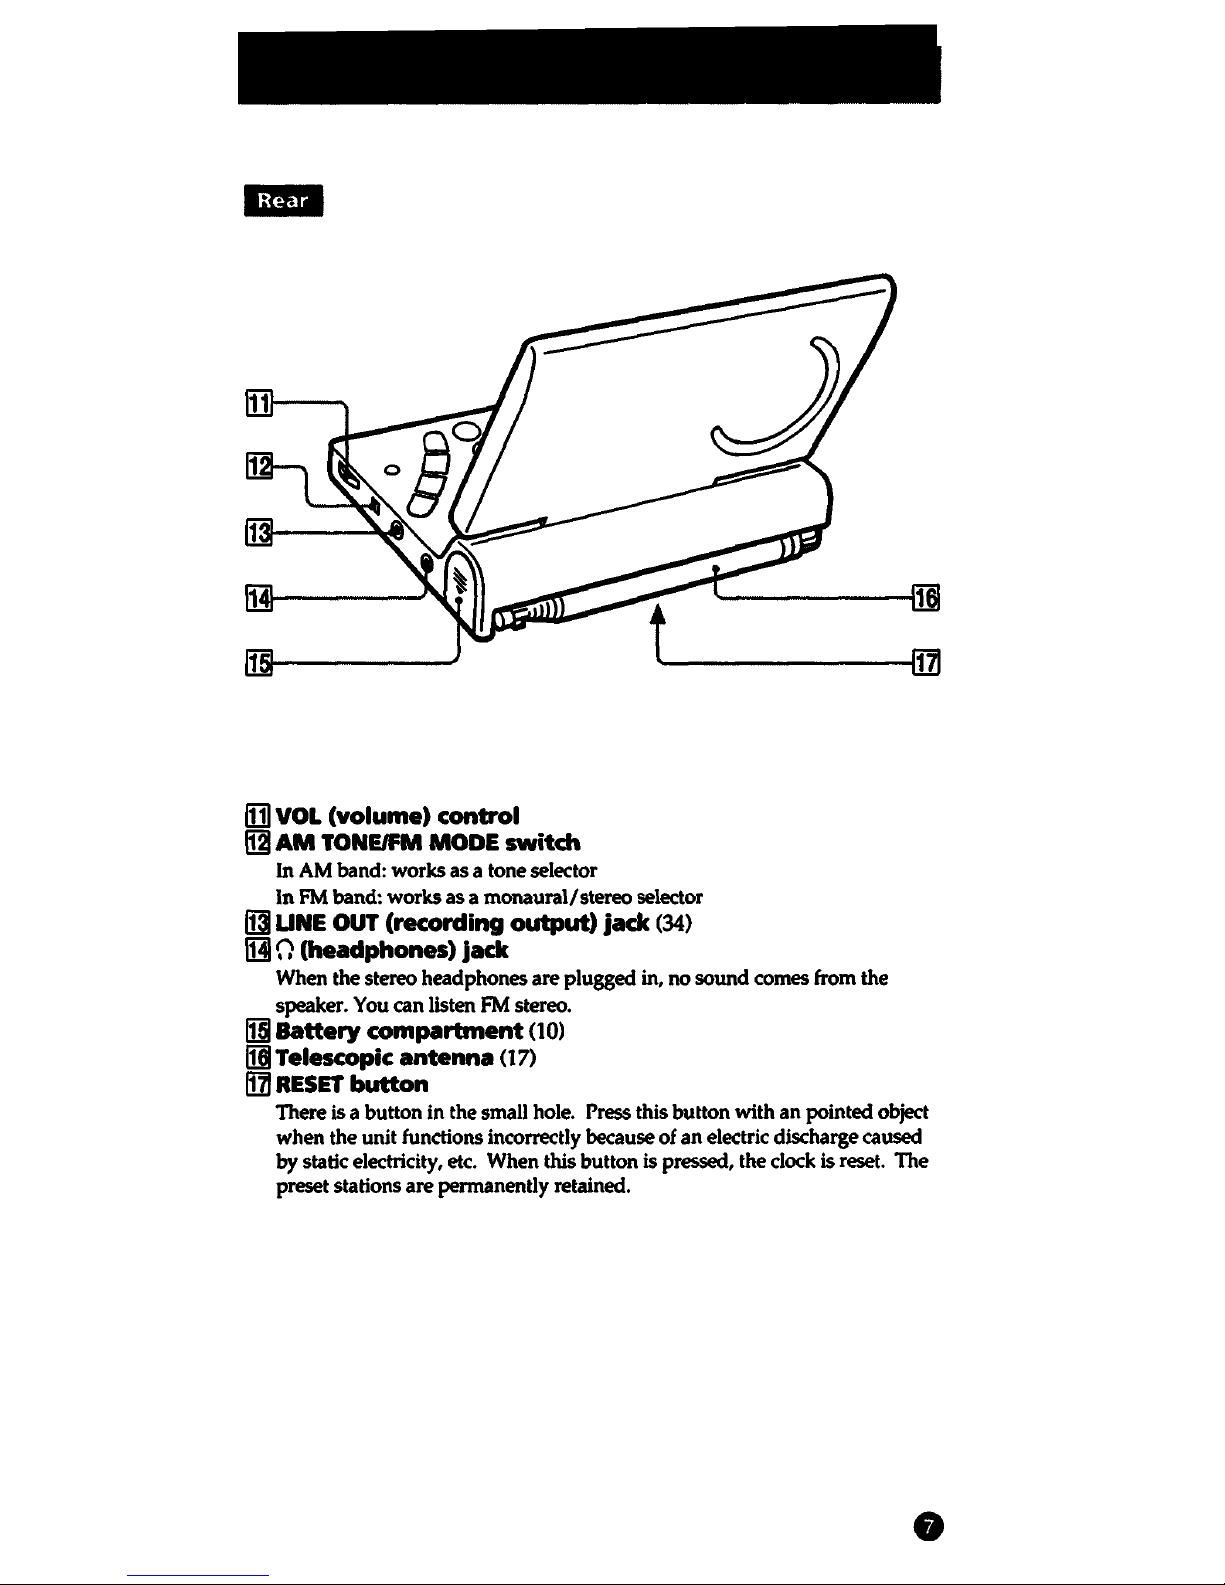
VOL (volume) control
~AM
TONE/FM
MODE
switch
In
AM
band: works
as
a tone selector
In
FM
band: works
as a monaural/
stereo selector
~
UNE
OUT
(recording
output)
jack (34)
IHI
n (headphones>
Jack
When the stereo headphones
are
plugged in,
no
sound
comes from the
speaker. You
can
listen
FM
stereo.
~
Battery compartment (10)
11§1
Telescopic
antenna
(17)
Ill!
RESET
button
There is a button
in
the small hole. Press this button with
an
pointed object
when
the unit functions incorrectly because
of
an
electric discharge caused
by
static electricity, etc. When this button is pressed, the clock is reset.
The
preset stations
are
permanently retained.
•
Control
panel
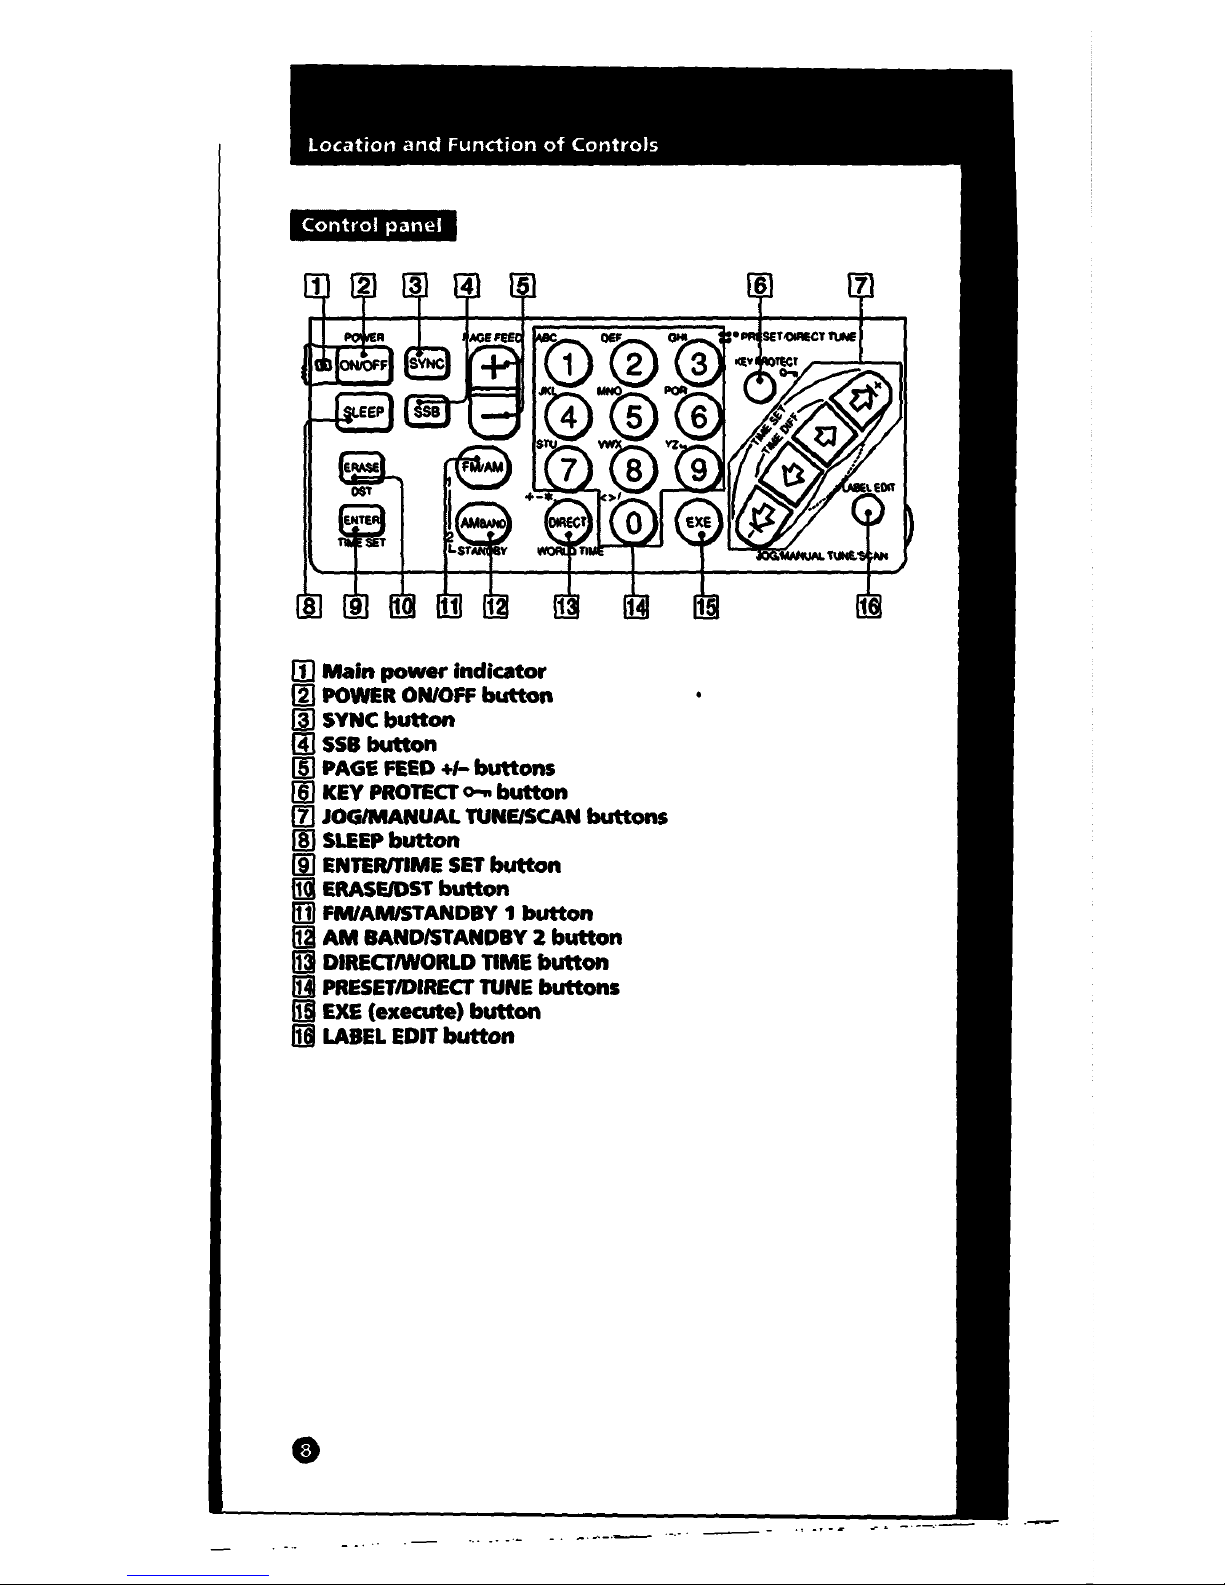
[I]
Main
power
indicator
[g}
POWER ON/OFF
button
lj]
SYNC
button
(!!
558
button
(ID
PAGE
FEED
+I-
buttons
[§)
KEY
PROTECT
o-..
button
IZJ
JOG/MANUAL TUNE/SCAN
buttons
(ii
SLEEP
button
II)
ENTEMIME
SET
button
fili
ERASE/DST
button
IIlJ
FM/AM/STANDBY 1
button
HJ
AM
BAND/STANDBY 2
button
~
DIRECTIWORLD TIME
button
IHI
PRESET/DIRECT
TUNE
buttons
Iii EXE
(execute)
button
li§J
LABEL
EDIT
button
•
..
--
-·- -.
-·-·-·-
-
.,
-~
--
·-.-·--
_
..
-·--.·-
'"MU41
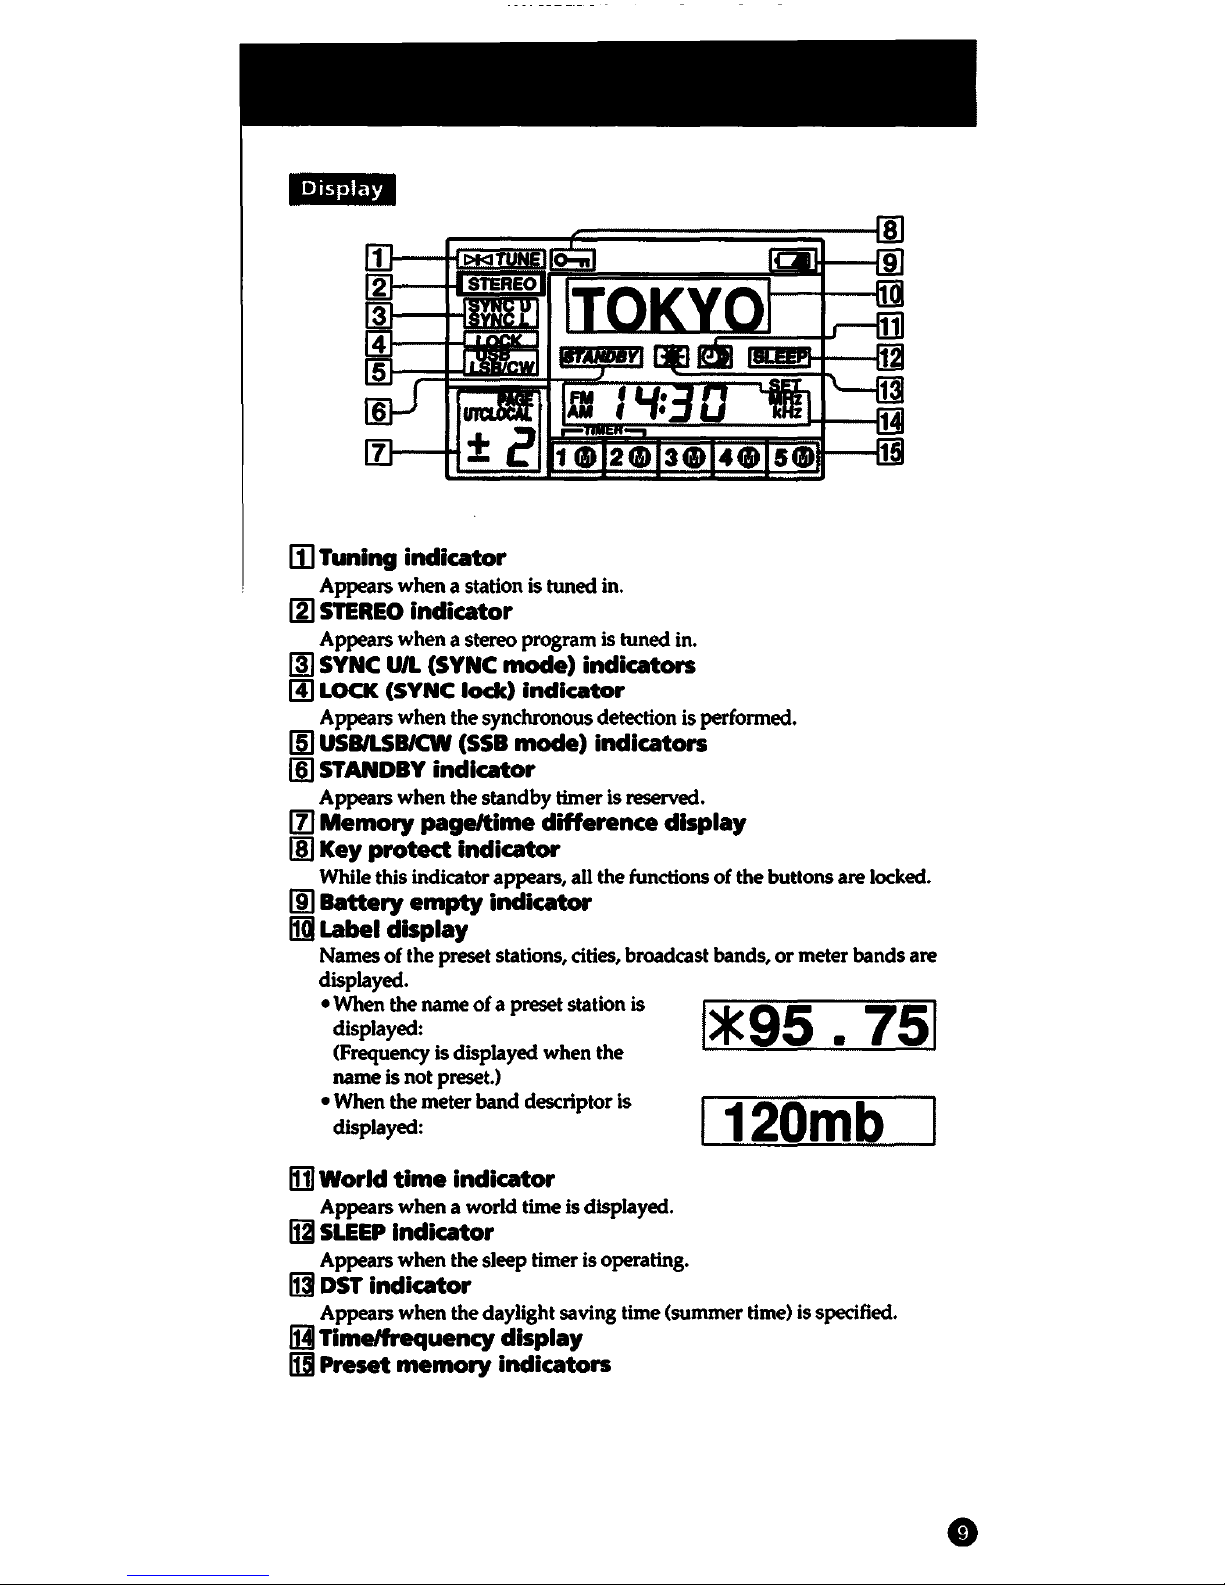
III Tuning indicator
Appears when a station is tuned in.
~STEREO
indicator
Appears when a stereo program is tuned in.
I!J
SYNC
U/L
(SYNC mode) indicaton
[!)
LOCK
(SYNC
lock)
indicator
Appears when the synchronous detection is performed.
~
USBILSB/CW
(SSB
mode) indlcaton
11]
STANDBY
indicator
Appears when the standby timer is reserved.
11]
Memory page/time difference display
Ill Key protect indicator
While this indicator appears, all the functions of the buttons are locked.
[ID
Battery empty indicator
fill
Label display
Names
of
the preset stations, cities, broadcast bands,
or
meter bands are
displayed.
•Whenthenameofapresetstationis
'*
95 • 751
displayed: . .
(Frequency is displayed when the
name is not preset.)
• When the meter band descriptor is I
120
m b
displayed: _
Ill!
World
time
indicator
Appears when a world time is displayed.
~SLEEP
Indicator
Appears when the sleep timer is operating.
~
DST
indicator
Appears when the daylight saving time (summer time) is specified.
IHI
Time/frequency display
~Preset
memory indicators
•
Power
Sources
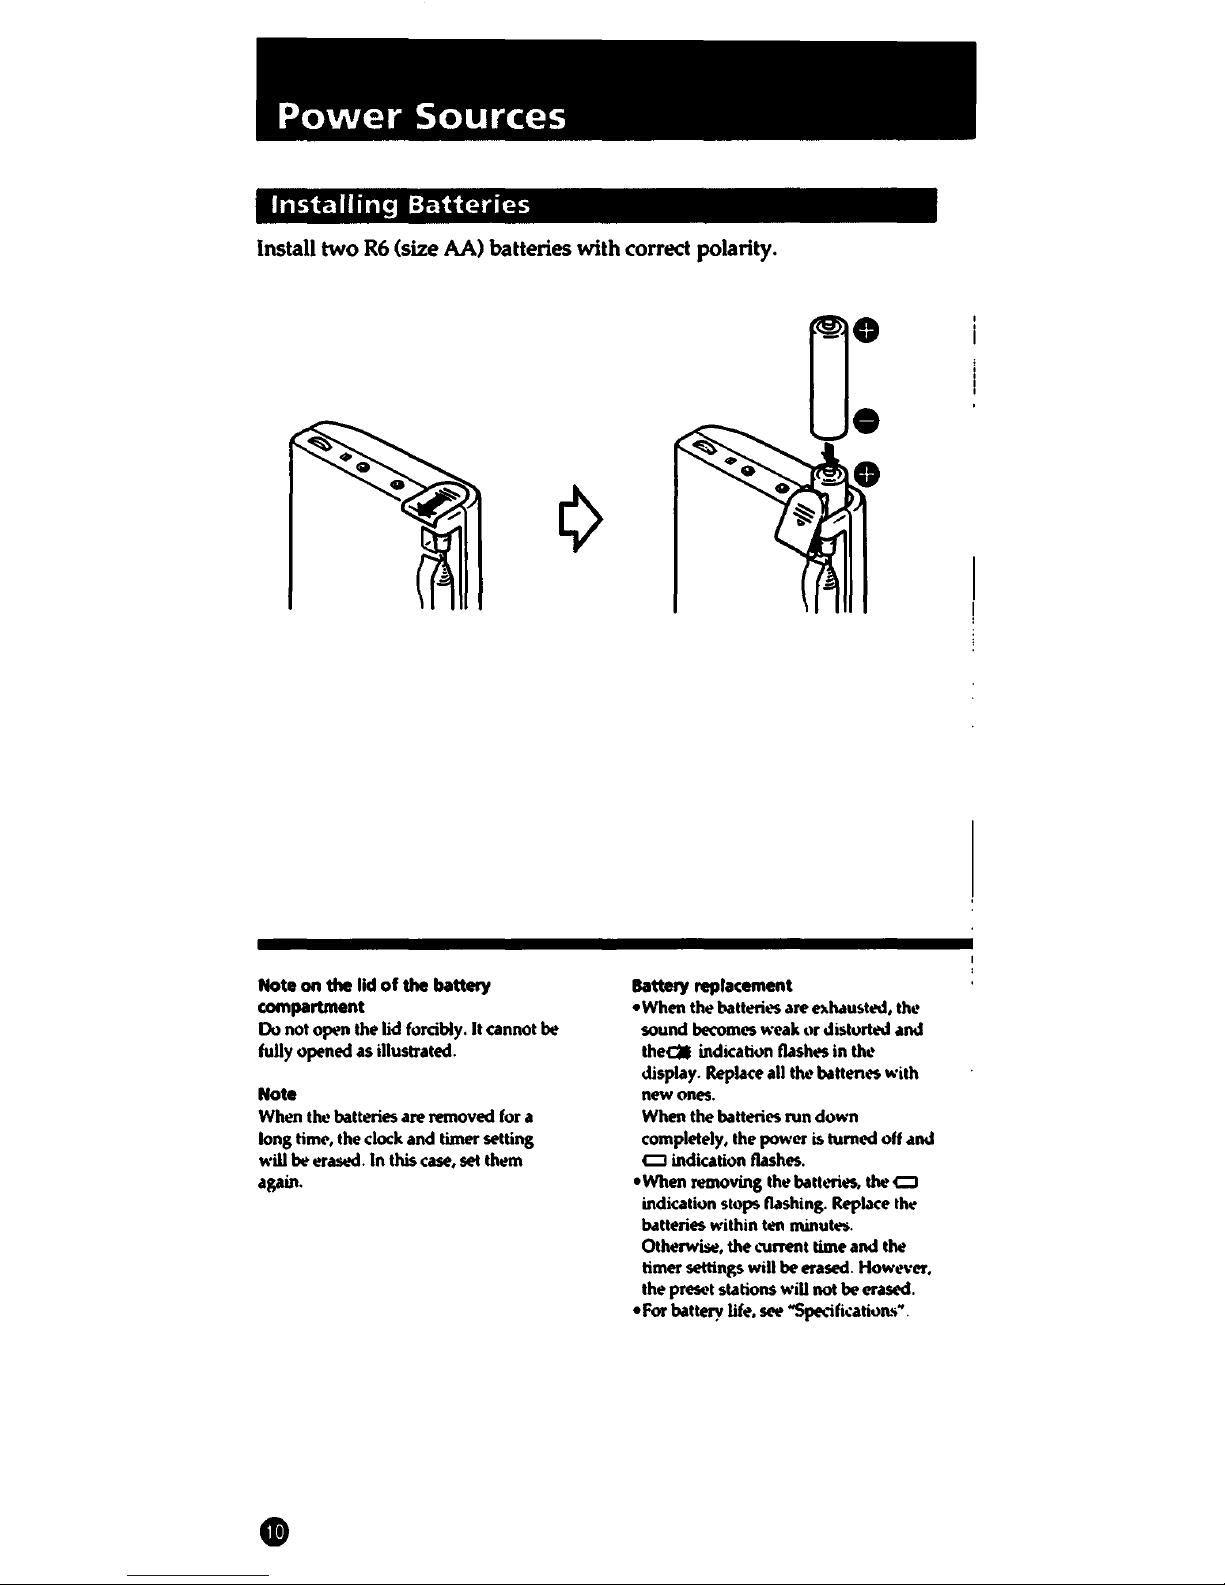
Installing
Batteries
Install
two
R6
(size AA) batteries with correct polarity.
Note on the lid
of
the
battery
compartment
Do
not open the lid
forcibly.
It cannot be
fully
opened as illustrated.
Note
When
tho!
batteries are removed
for
a
long
timt>,
the
clock
and timer setting
will
be erased.
In
this
case,
set
t"'1m
again.
Battery replacement
•When
the battml.'S are
ei.h.lu!ttt!d,
thl!
sound
becomes
weak or dist"rtt!d
and
theQt
indicati"n flashes
in
thl!
display.
Replace
all
tho!
battent'S with
new ones.
When the battmes run down
completely, the power i$ tumed
off
and
CJ
indication
flashes.
•When removing the
batt~>ries,
the
CJ
indicati"n stops
flashing.
Replace
the
b.ttteries
within ten minutes.
Otherwise, the
~"Urrent
time
and
the
timer settings
will
be erased. However.
the preset stations
will
not be erased.
•For battery
life,
SC!e
~;fi.:ation.-;•.
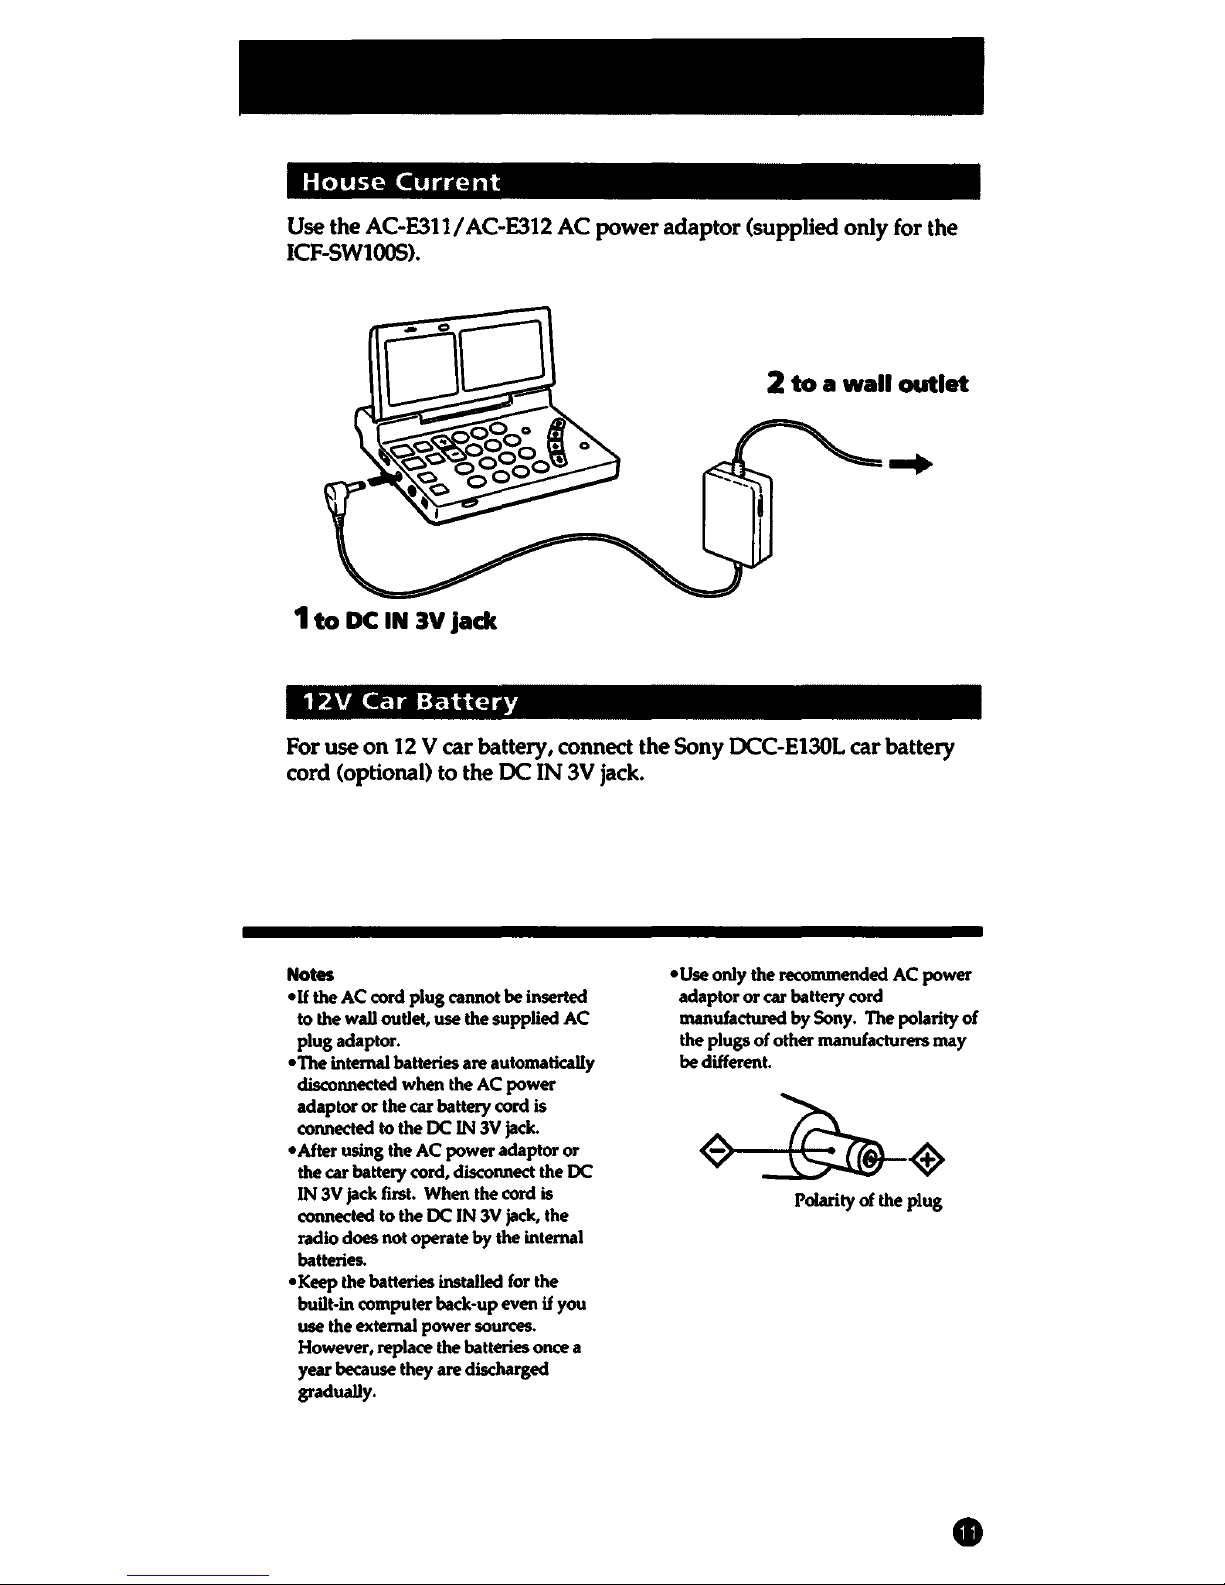
House
Current
Use the AC-E311 I AC-E312
AC
power
adaptor
(supplied
only
for the
ICF-SWlOOS).
2
to
a wall outlet
1
to
DC
IN
3V
jack
12V
Car
Battery
For
use
on
12 V
car
battery, connect
the
Sony
DCC-E130L
car
battery
cord
(optional)
to
the
DC
IN
3V jack.
Notes
•If
the
AC
cord plug cannot be inserted
to
the wall outlet, use the supplied
AC
plug adaptor.
•The internal batteries are automatically
disconnected when the
AC
power
adaptor or
the car battery cord is
connected
to
the
DC
IN
3V
jac:k.
•After using the
AC
power adaptor or
the car battery
c:ord,
disconnect the
DC
IN
3V
jack
fust. When the cord is
connected
to
the
DC
IN
3V
jac:k,
the
radio does not operate by the internal
batteries.
•Keep the batteries installed
for
the
built-in
computer back-up even
if
you
use the
external power sources.
However, replace
the batteries
onc:e
a
year
because they are discharged
gradually.
•Use only the recommended
AC
power
adaptor or
c:ar
battery
c:ord
manufactured by Sony. The polarity of
the
plugs of other manufacturers may
be different.
Polarity
of the plug
•
Setting
the
Clock
Set
the
time when the radio is turned off.
Local time means the time in
your
area
and
world time means the time
in a certain place in the world.
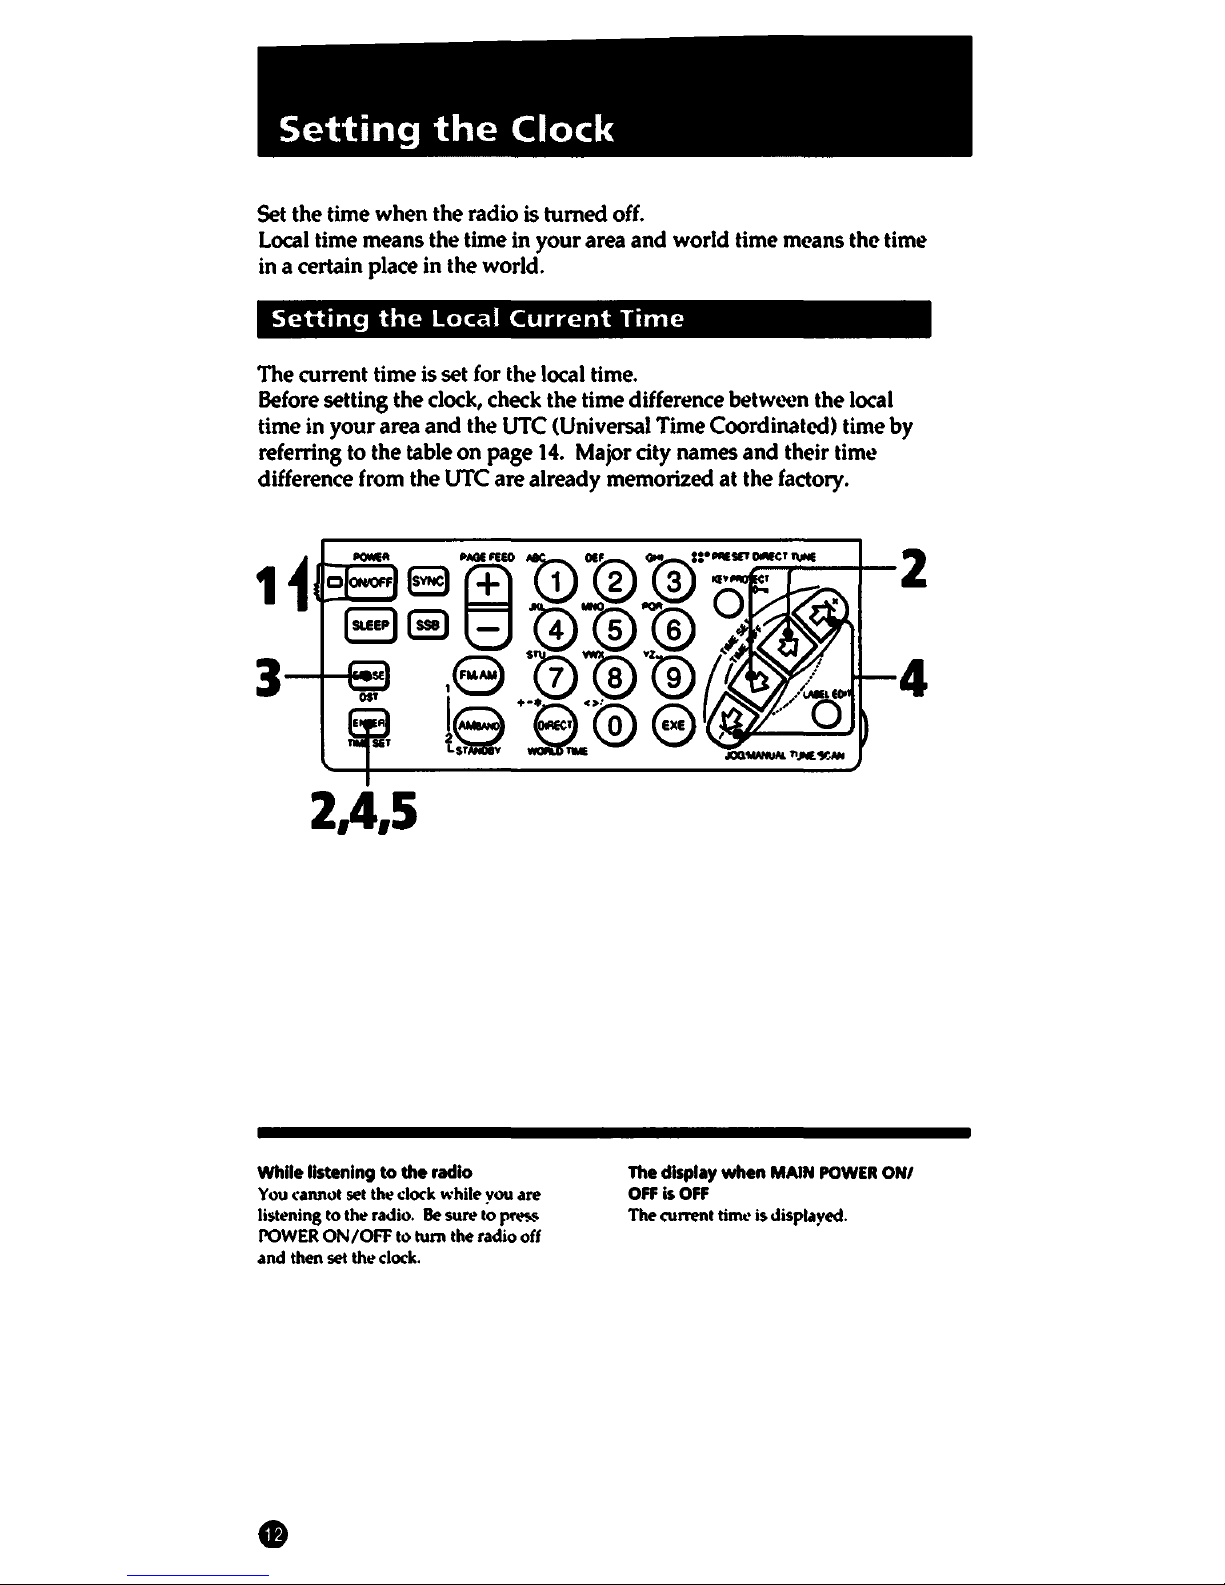
Setting
the
Local
Current
Time
The current time is set for the local time.
Before setting the dock, check the time difference
betwt.>en
the local
time in
your
area
and
the UTC (Universal Time Coordinated) time by
referring to the table
on
page 14. Major city names
and
their time
difference from the UTC
are
already memorized
at
the factory.
2,4,5
While listening
to
the
radio
You
cannot set
th01
c:lock
while you are
listening to
th'1
radio.
Be
sure
to~
POWER
ON/OFF
to tum the radio off
and
then set
th01
clock
.
•
The
display when MAIN
POWER
ON/
Off
is
Off
The current time is displayed.
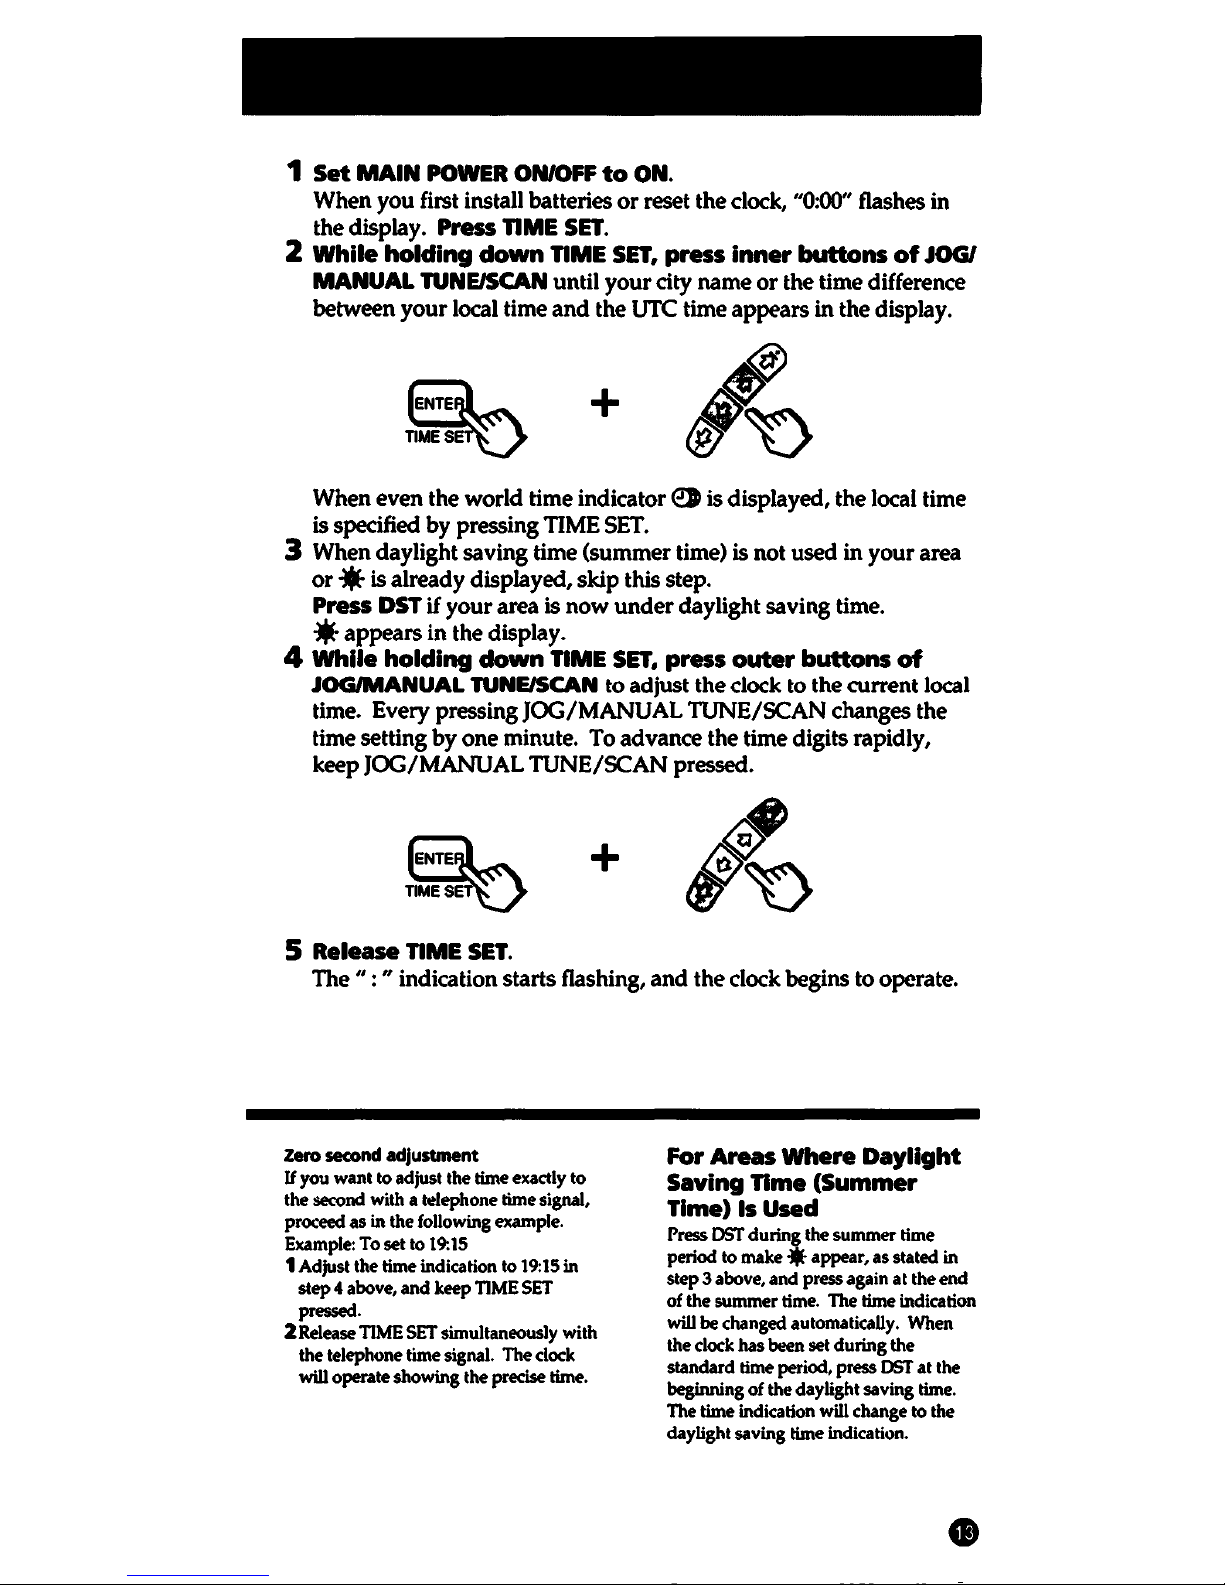
1 Set
MAIN
POWER
ON/OFF
to
ON.
When you first install batteries
or
reset the clock, "0:00" flashes in
the display.
Press
TIME
SET.
2
While
holding
down
TIME
SET,
press
inner
buttons
of
JOG/
MANUAL TUNE/SCAN until your city name
or
the time difference
between
your
local time
and
the UTC time appears in the display.
+
When even the world time indicator
e>
is displayed, the local time
is
specified by pressing TIME
SET.
3 When daylight saving time (summer time) is not used in your area
or
* is already displayed, skip this step.
Press
DST
if
your
area is
now
under
daylight saving time.
*appears
in the display.
4
While
holding
down
TIME
SET,
press
outer
buttons
of
JOG/MANUAL TUNE/SCAN to adjust the
dock
to the current local
time. Every pressing
JOG/MANUAL TUNE/SCAN changes the
time setting
by
one
minute. To advance the time digits rapidly,
keep JOG/MANUAL TUNE/SCAN pressed.
+
5 Release TIME
SET.
The " : " indication starts flashing,
and
the clock begins to operate.
Zero second adjustment
If
you
want
to adjust the time exactly
to
the
second with a telephone time signal,
proc:eed
as
in
the following example.
Example:
To
set to 19:15
1 Adjust the time indication to 19:15 in
step
4 above,
and
keep
TIME SET
pressed.
2Release
TIME SET simultaneously
with
the
telephone time signal.
The
clock
will
operate
showing
the precise time.
For Areas Where
Daylight
Saving Time (Summer
Time) Is Used
Press DST
durin~
the
summer
time
period
to
make*
appear,
as
stated
in
step
3 above,
and
press again
at
the
end
of
the
summer
time.
The
time indication
will be
changed
automatically.
When
the clock
has
been
set
during
the
standard
time period, press DST
at
the
beginning
of
the
daylight saving time.
The
time indication will change to the
daylight saving time indication
•
•
Setting
the
Clock
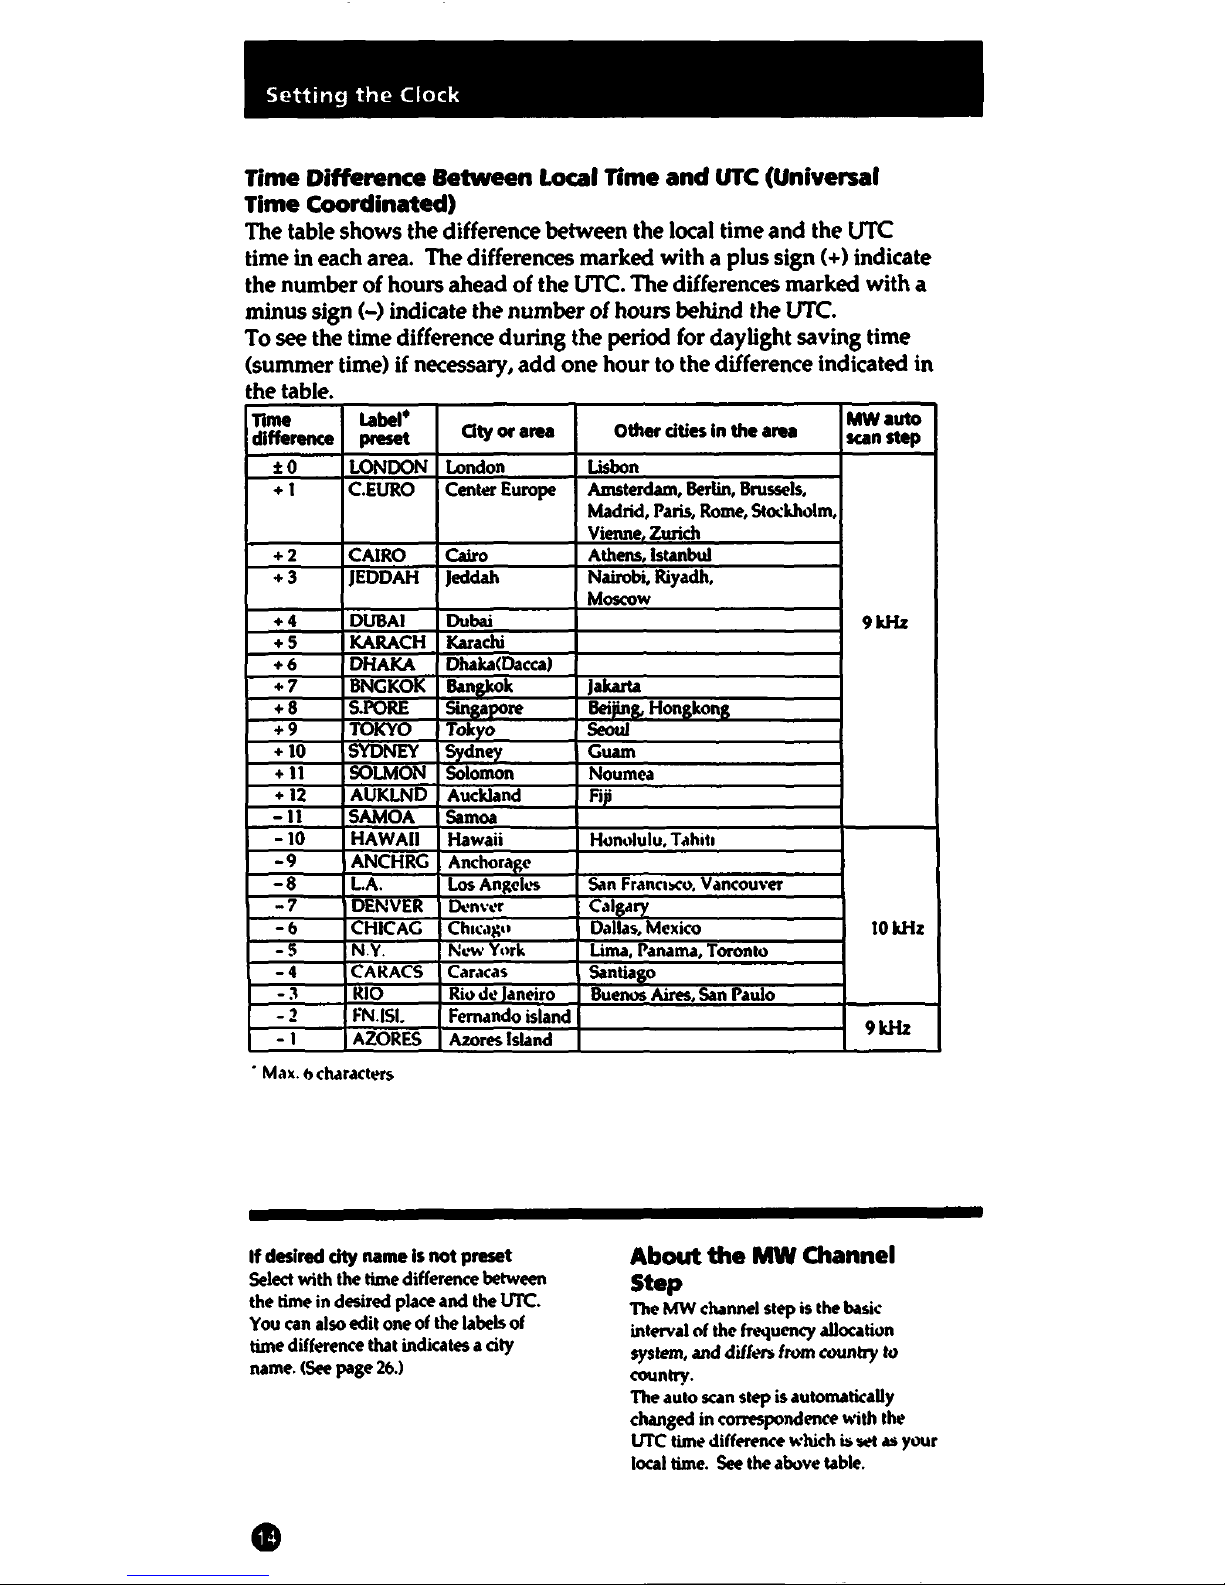
Time Difference Between Local Time and
UTC
(Universal
Time Coordinated)
The table shows the difference between the local time
and
the UTC
time
in each area. The differences marked with a
plus
sign (
+)
indicate
the number of hours ahead of the UTC. The differences marked with a
minus sign (-) indicate the
number
of
hours behind the UTC.
To see the time difference
during
the period for daylight saving time
(summer time) if necessary,
add
one
hour
to
the difference indicated in
the table.
nme
Label.
City or area
difference
preset
:tO
LONDON
London
+1
C.EURO
Center Europe
+2
CAIRO Cairo
+3
JEDD
AH
Jedd.ah
+4
DUBAI
Dubai
+S
KARA
CH
J<arachi
+6
DHAKA
Dhaka(Dacca)
+7
BNGKOK
Ban2k0k
+8
S.PORE
Sinnoore
+9
TOKYO
Tokvo
+
10
SYDNEY
Sydnev
+
11
SOLMON
Solomon
+
12
AUKLND
Auckland
-11
SAMOA
Samoa
-10
HAWAII
Hawaii
-9
ANCHRG
Anchora2e
-8
L.A.
Los
Angel~>s
-7
DENVER
°'1n\'\'I'
-6
CHlCAG
Chu:.1i;"
-5
NY.
N .. wYurk
-4
CARACS
Caracas
-:l
RIO
Rio
di! Ianciro
-2
1-'N.ISI.
Fernando island
-1
AZORES
Azores Island
•
Max.
I>
characters
If
desired
dty
name ls not preset
Select with the time difference
between
the time in desired place and the
UTC.
You
can also edit
one
of
the labels of
time difference that indicates a city
name.
(See
page 26.)
Other dtles
In
the area
MW
auto
scan step
Lisbon
Amsterdam,
Berlin,
Brussels,
Madrid, Paris,
Rome.
Stoc:l<holm.
Vlenne Zurich
Athens, Istanbul
Nairobi, Riyadh,
Moscow
9kHz
Jakarta
Beiiine.
Honnnn2
Seoul
Guam
Noumea
Fi
ii
HoMlulu, T ahih
S.n
Franc1!oCo,
Vancou\·er
Call?drv
Dallas,
Mexico
lOkHz
Uma,
Panama, Toronto
Santlair.o
Buenos Aires San Paulo
9kHz
About
the
MW
Channel
Step
The
MW
channel step is the
basic
interval of the frequency allocation
system, and differs
from
country
to
country.
The auto scan step is automatically
changed in
correspondence
with the
UTC
time difference which
ii;
1"t
.Ill
your
local time.
See
the above table.
Finding
Out
the
Current
Time
in
Some
Place
in
the
World
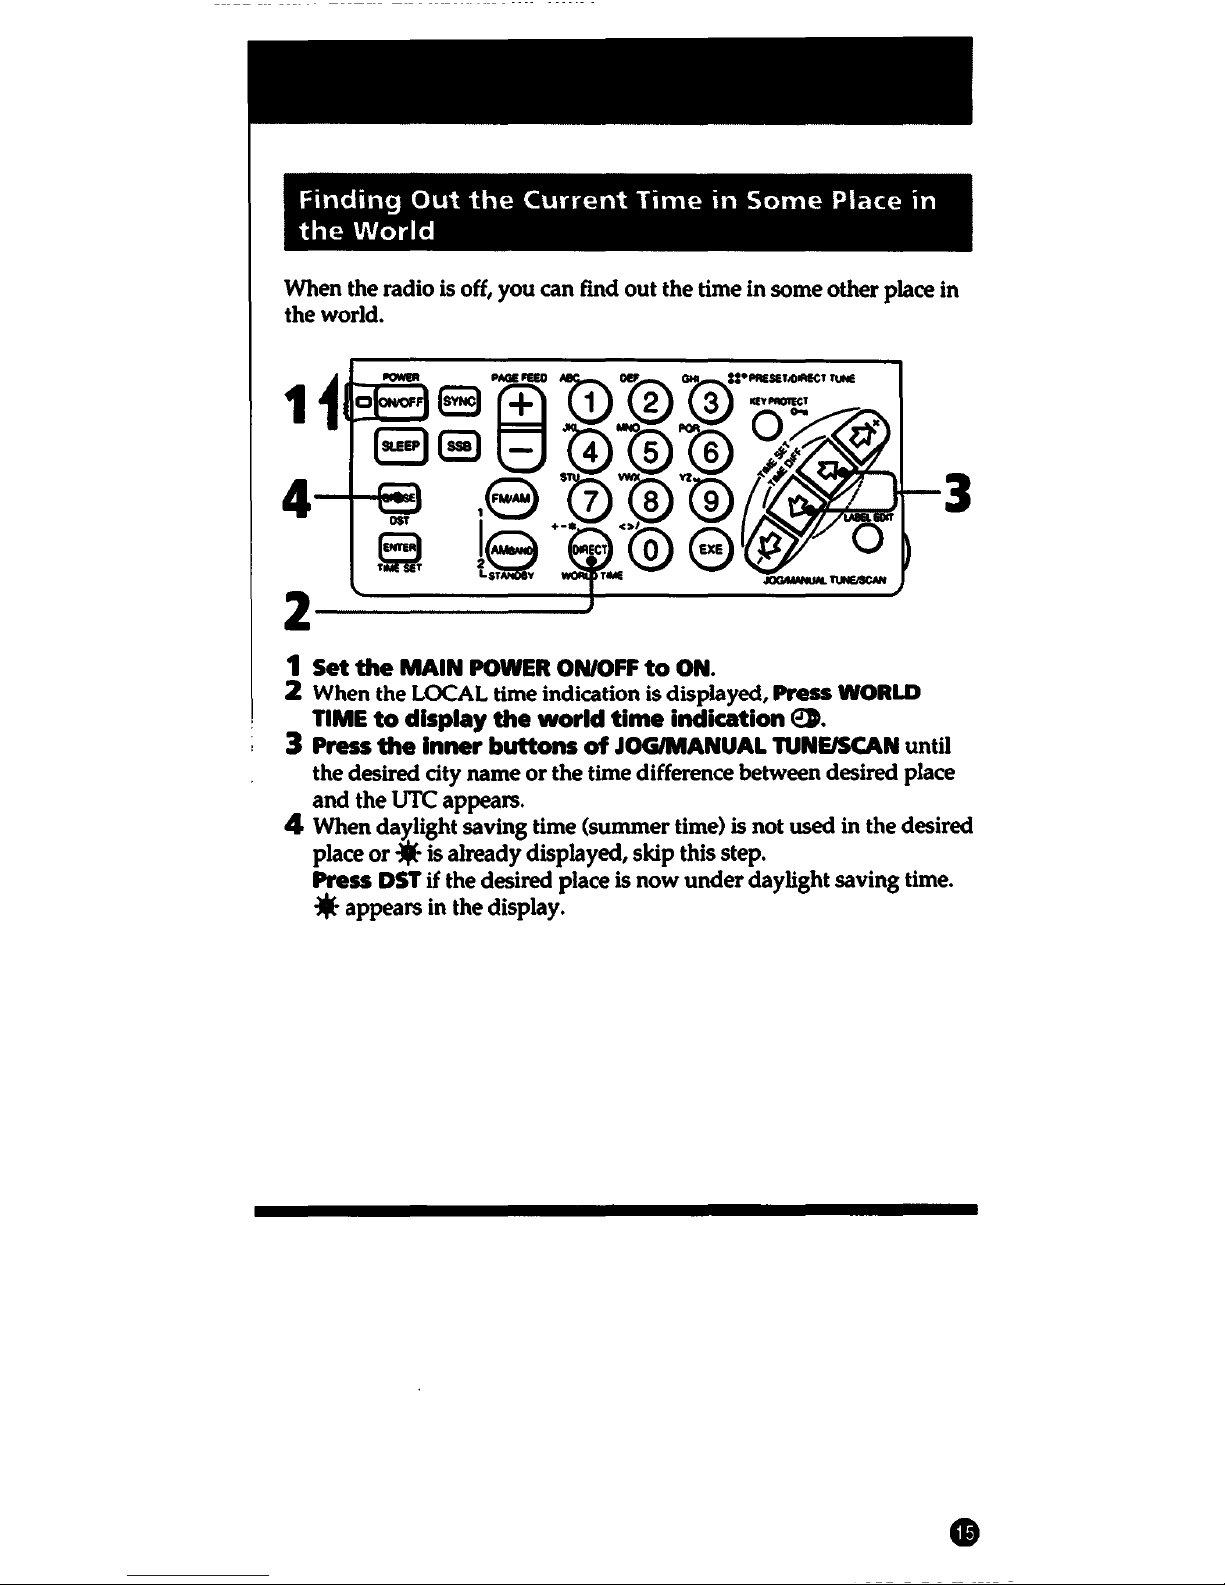
When the radio is off, you can fmd
out
the time in some other place in
the world.
3
2-----'
1 Set
the
MAIN
POWER
ON/OFF
to
ON.
2 When the LOCAL time indication is displayed,
Press
WORLD
TIME
to
display
the
world
time
indication
e>.
3 Press
the
Inner
buttons
of
JOG/MANUAL TUNE/SCAN until
the desired city name
or
the time difference between desired place
and
the UTC appears.
4 When daylight saving time (summer time) is not used in the desired
place
or
* is already displayed, skip this step.
Press DST
if
the desired place is
now
under
daylight saving time.
*appears
in the display.
Tuning
in
by
Selecting
a
Preset
Station
Name
Once the frequencies of the stations
are
preset, you can
tune
in the
station easily just by selecting
the memory page
and
pressing the
desired preset button.
Up
to
SO
stations of either
FM
or
AM, 5 stations for every 10 pages, can
be
preset. Some stations
are
already preset in this unit
at
the factory.
Lefs
try
to receive some
of
the preset stations.
To preset
the stations,
go
on
to the next section to learn how to
tune
in
a station by direct, manual
or
scan tuning
and
read the "Presetting a
Station (page 24)"
and
"Editing
Labels
<page 26)".
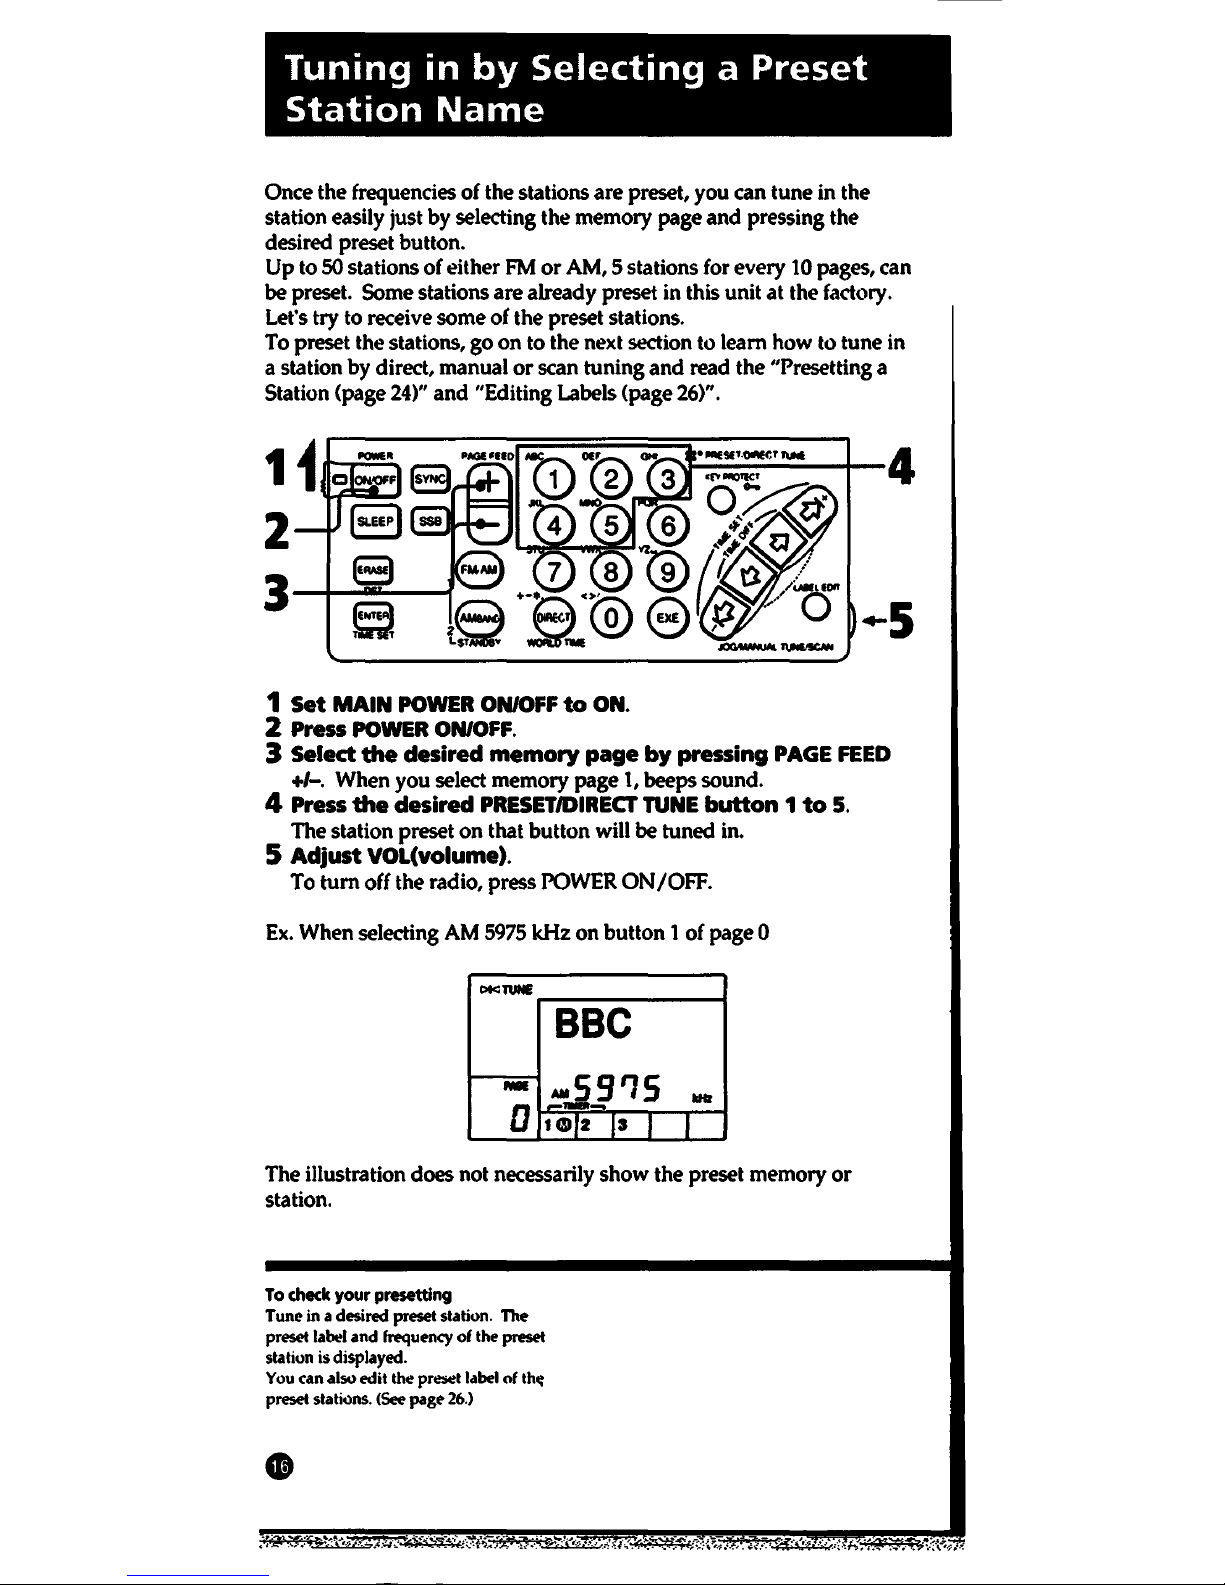
1
Set
MAIN
POWER
ON/OFF
to
ON.
2 Press POWER ON/OFF.
3 Select
the
desired
memory
page
by
pressing
PAGE
FEED
+/-. When you select memory page
1,
beeps sound.
4 Press
the
desired
PRESET/DIRECT
TUNE
button 1 to
5.
The station preset
on
that button will
be
tuned in.
5
Adjust
VOL(volume).
To
tum
off the radio, press POWER
ON/OFF.
Ex.
When selecting AM 5975
kHz
on
button 1 of page 0
C>tc:TUNE
BBC
-59'15
-
llltr
D
---
Hlll2
,,
I
I
The illustration does not necessarily
show
the preset memory
or
station.
To
check your presetting
Tune in a desired
preset
station. The
preset
label
and
frequency
of the preset
station is displayed.
You
can also edit the
preliet
label
of
th~
preset stations.
(See
page
26.)
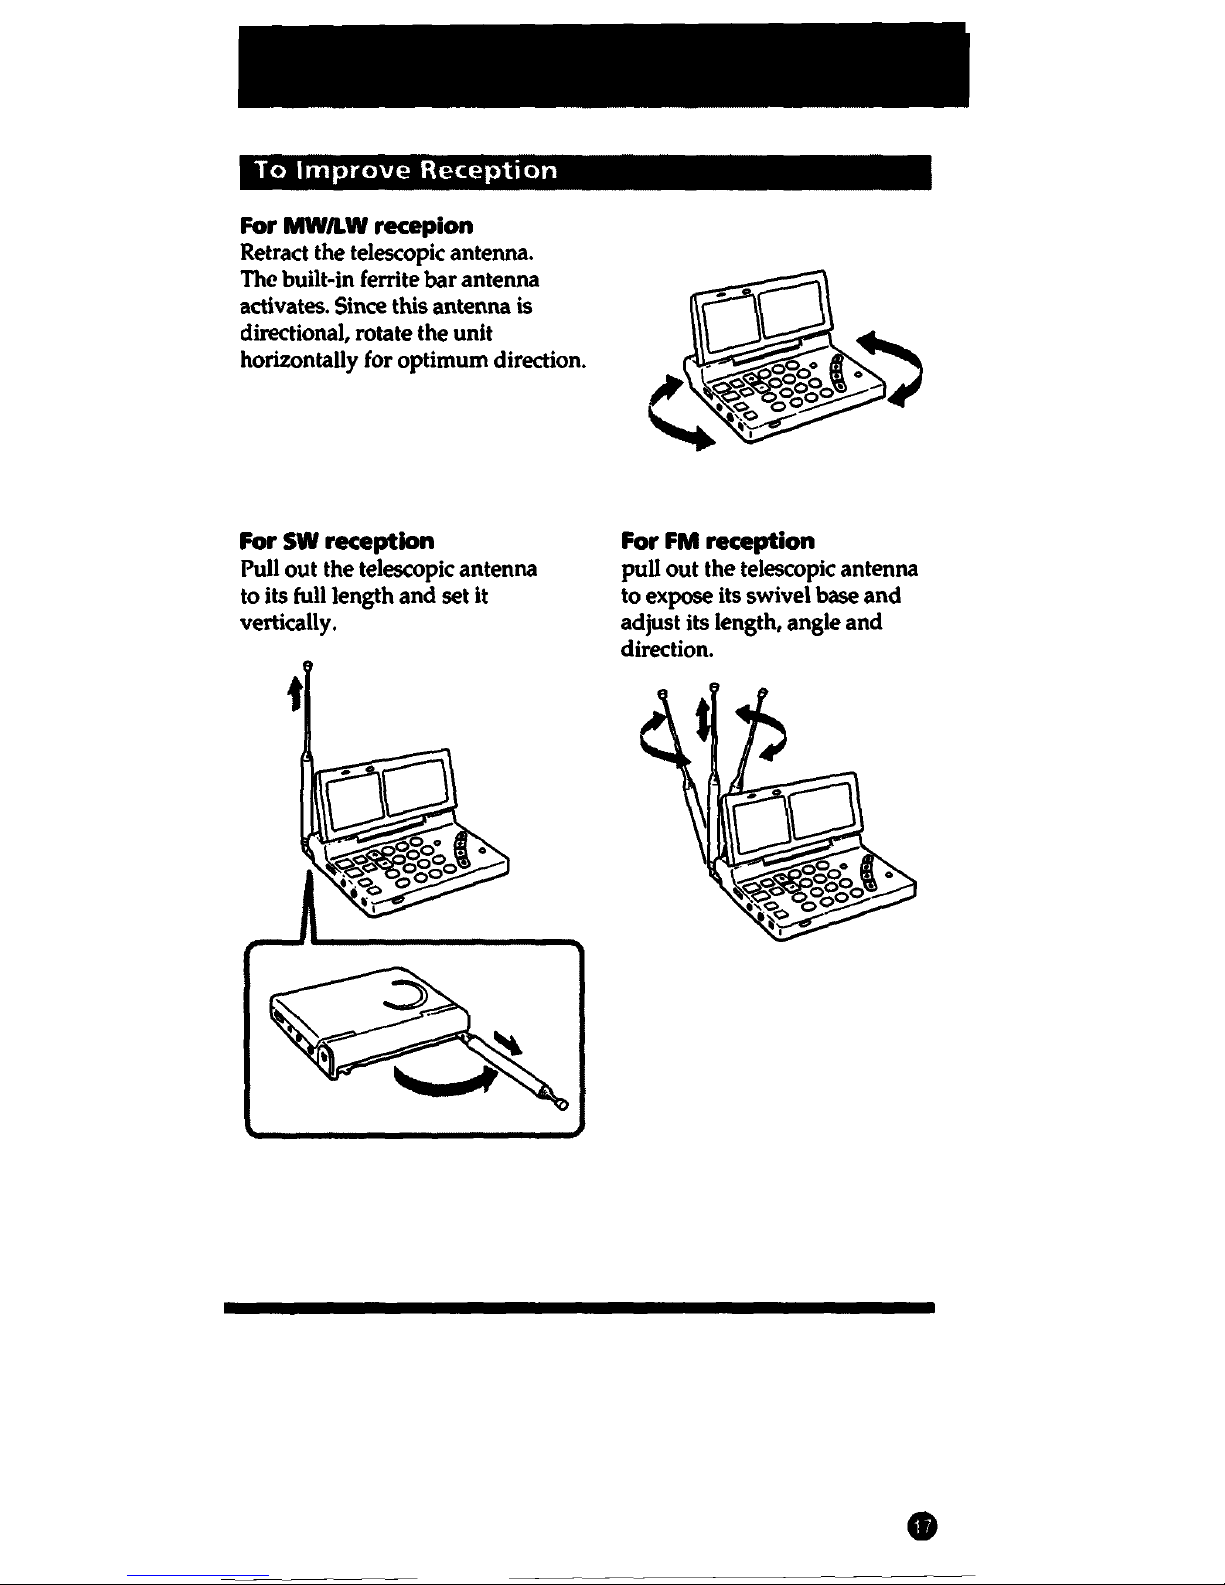
To
Improve
Reception
For MW/LW recepion
Retract the telescopic antenna.
The built-in ferrite
bar
antenna
activates.
Since this antenna is
directional, rotate the unit
horizontally for optimum direction.
For SW reception
Pull out the telescopic antenna
to
its full length
and
set it
vertically.
t
For FM reception
pull
out
the telescopic antenna
to expose its swivel
base
and
adjust its length, angle
and
direction.
•
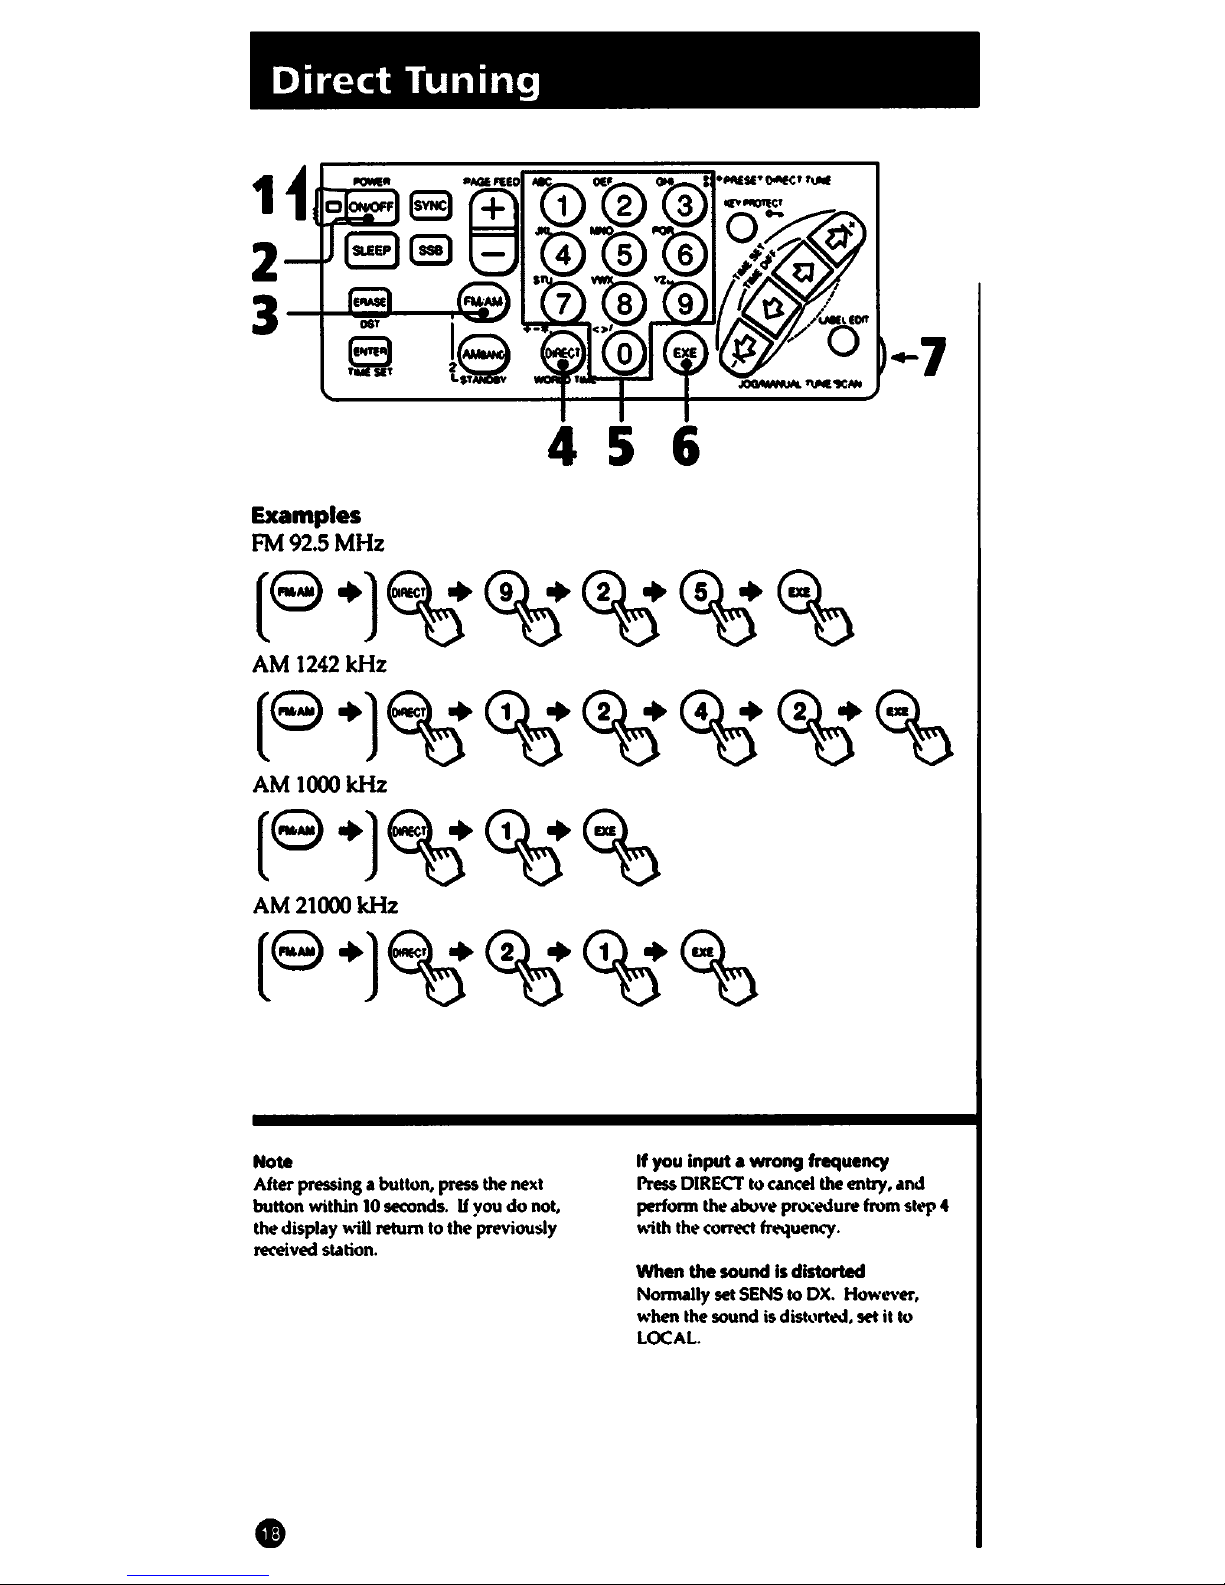
Direct
Tuning
Examples
FM92.5MHz
6
(S•)~~~~~
AM 1242kHz
(S•)~~~~~~
AM
lOOOkHz
(S•)~~~
AM21000kHz
(S•)~~~~
Note
After pressing a button, press the next
button within
10
seconds. U vou
do
not,
the display will return to the ·previously
received station.
•
If
you Input a wrong frequency
l're5$
DIRECT
to cancel
the
entry, and
perform the .ibuve
pr1>o:t!dure
from
stt>p
4
with the
comet
frequency.
When
the
sound
is
distorted
Normally set
SENS
to
DX.
Howl?\-er,
when the sound is
dist<•rtt!d,
set
it
to
LOCAL.
1 Set
MAIN
POWER ON/OFF
to
ON.
2 Press POWER ON/OFF. The radio is turned on.
3
Press
FM/AM
to select the
band
(FM
or
AM).
4
Press
DIRECT. The frequency
in
the display is erased.
5
Enter
the
frequency
of
the
desired
station
directly
by
pressing
the
PRESET/DIRECT TUNE
buttons
0 • 9. You should
press a button within 10 seconds after pressing the precedent
button.
Minimum entry digit
AM:t
kHz
FM:
0.05
MHz
(50
kHz)
For
FM
band, decimal point is
not
required.
For AM band, lower triple zero digits can
be
omitted.
(See the left examples.)
6 Press EXE.
When the station is tuned in, the tuning indicator appears
in
the
display.
7
Adjust
VOL(volume).
To
tum
off the radio, press POWER
ON/OFF.
The
TRY
AGAIN
Indication
If
you
input
a frequency outside the frequency range,
beeps
sound
and
"TRY"
and
"AGAIN"
are
displayed. Press DIRECT
and
enter the
correct frequency again.
On
AM
TONE
selector
Set
AM
TONE
to
NEWS.
Vocal
will
be
heard more clearly. When you are
listening to music, set
ii
to
MUSIC.
This
function does not work in
FM
band.
On
FM MODE selector
(only
for
listening through stereo headphones)
For
FM
reception, normally set
FM
MODE
to
ST
(stereo). When it is hard to
hear the broadcast due to noise,
set to
MONO
(monaural). The reception will
be
more state and noise will
be
reduced.
In this mode, there is no stereo
effect.
To
Prevent
Accidental
Change
of
the
Received
Station
Press
KEY
PROTECT
o-... Theo-.. mark
appears
in
the display window and
all
the buttons on the control panel do not
work.
To
release the key protect function,
press
KEY
PROTECT
o-.. again.
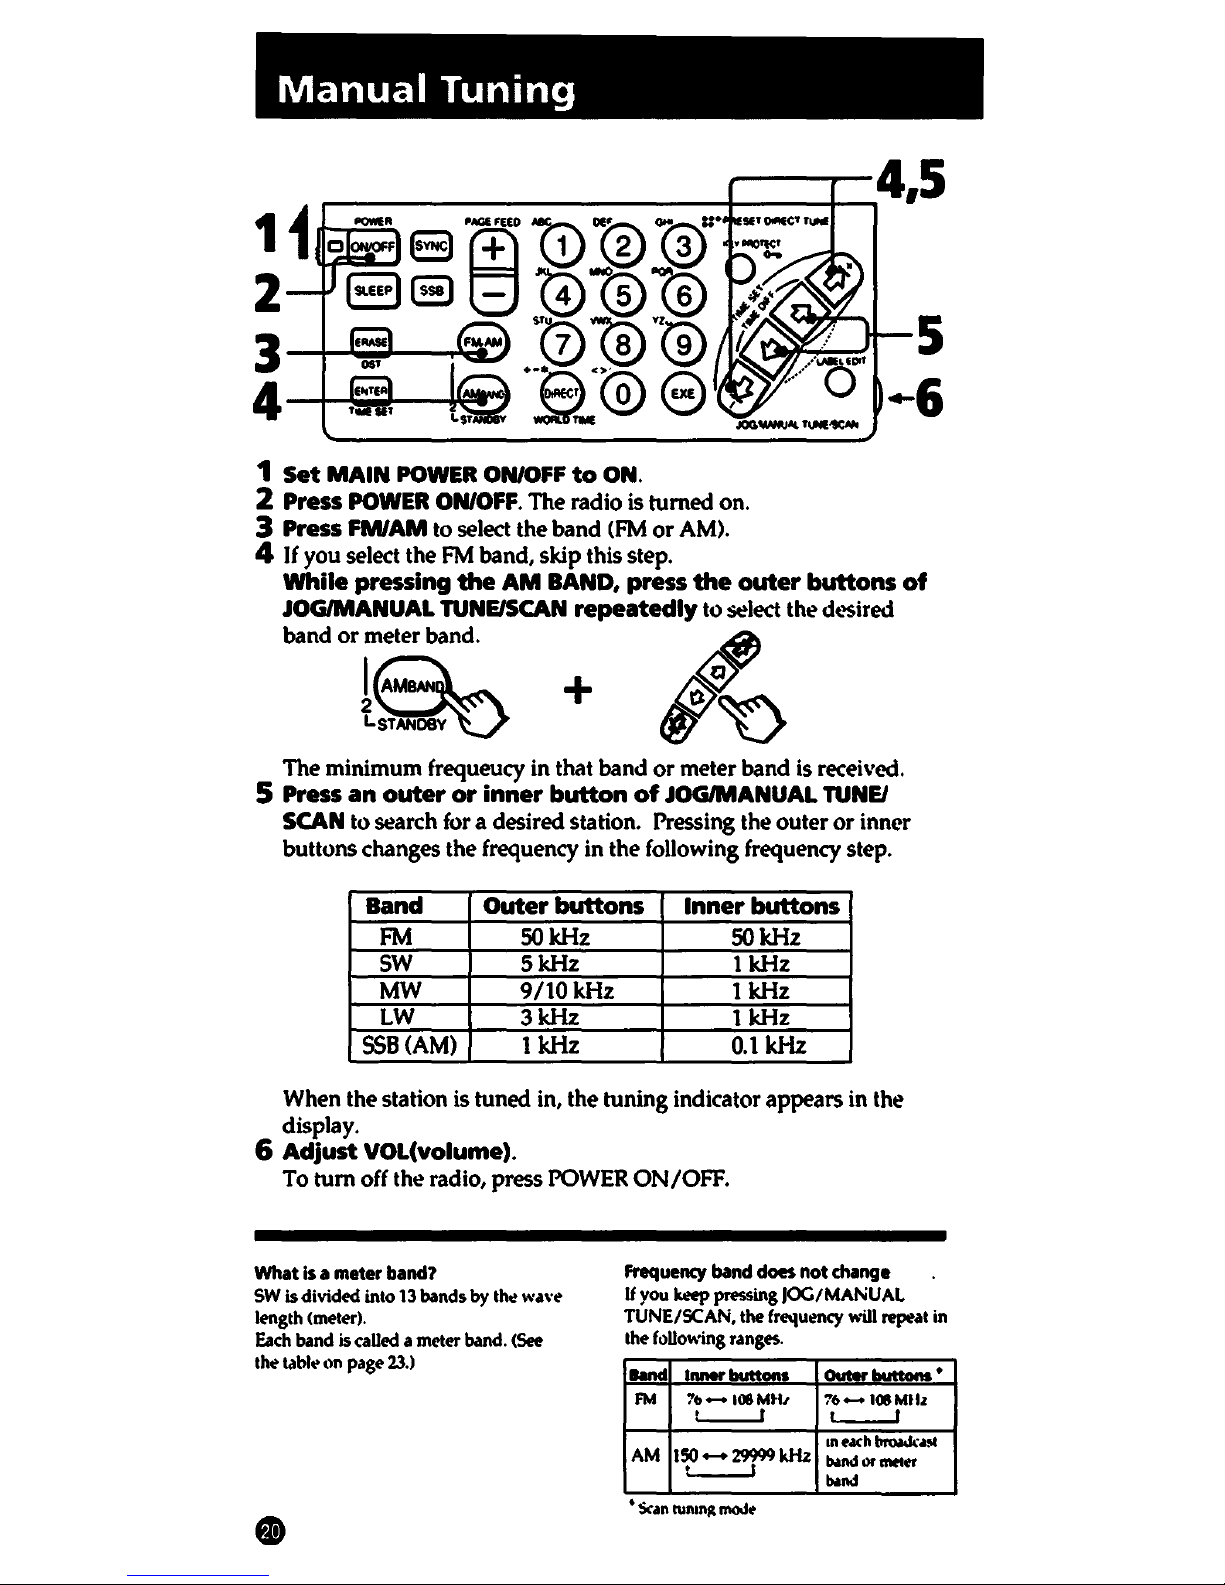
Manual
Tuning
1
Set
MAIN
POWER
ON/OFF
to
ON.
2 Press
POWER
ON/OFF. The radio is turned on.
3 Press
FM/AM
to
select the band
(FM
or
AM).
4
If
you select the
FM
band, skip this step.
5
..
,
While
pressing
the
AM
BAND, press
the
outer
buttons
of
JOG/MANUAL TUNE/SCAN
repeatedly
to
~lect
the
dt.>Sired
bandor~~
+
1"
t~
fl)'~
The minimum frequeucy in that band or meter band
is
received.
5 Press
an
outer
or
inner
button
of
JOG/MANUAL
TUNEJ
SCAN to
~arch
for
a desired station. Pressing the outer or inner
buttons changes the frequency in the following frequency step.
Band
Outer
buttons
Inner
buttons
FM
SO
kHz
SO
kHz
SW
5kHz
1 kHz
MW
9/tOkHz
1 kHz
LW
3kHz
1 kHz
SSB(AM)
1 kHz
0.1
kHz
When the station
is
tuned in, the tuning indicator appears
in
the
display.
6
Adjust
VOL(volume).
To
tum off the radio, press
POWER
ON/OFF.
What
Is
a meter
band?
SW is divided into 13 bands by the wa\·e
length
<meter).
Each
band is called a meter band.
(See
the table
tln
page
23.)
Frequency
band
does
not
change
U
you
keep
pressing
JOG/MANUAL
TUNE/SCAN,
the
frequency
"ill
repeat
in
the
following
ranges.
llMd
Inner
buttons
aut.r
...........
FM
71>-108Mtl1
76-108Mtlz
L__J
t..___f
1n
each
brw.ka!ll
AM
150 -29999
kHz
b.andor_,
L__J
b.and
•
Scan
tun1n~
mo.le
To Receive
the
SSB
(Single Side Band)
Press
558 repeatedly
while
the
radio is on.
Every press
changes
the display as follows.
(normal>-
uss-
I.SB/CW
t I
Whatls558?
SSB
is very popular
among
ham
and
business radio users
and
will
be
found
on
all
of
the
amateur
bands
because
of
its signal intelligibility.
In
general,
SSB
transmissions employ
USB
modulation,
and
for amateur
bands
lower
than
10
MHz,
I.SB
is often used.
What
Is
CW
(Continuous Wave)?
CW is also popular among
ham
and
business radio. In CW transmission, the amplitude
of
a carrier
is
not modulated while that
of
other system is modulated. CW conveys informa-
tion by interrupting a carrier using Morse code. It can be heard
as
a beat sound only with
the unit
equipped with the BFO circuits. To understand the information transmitted
by
CW,
you
need to team the Morse code.
To Receive
the
SYNC (Synchronous Detection)
Press
SYNC
repeatedly
while
the
radio is on.
Every press changes the display
as
follows.
(normal)
-SYNC
U -
SYNC
L
t I
When the synchronous detection is locked, "LOCK" indication appears in the display.
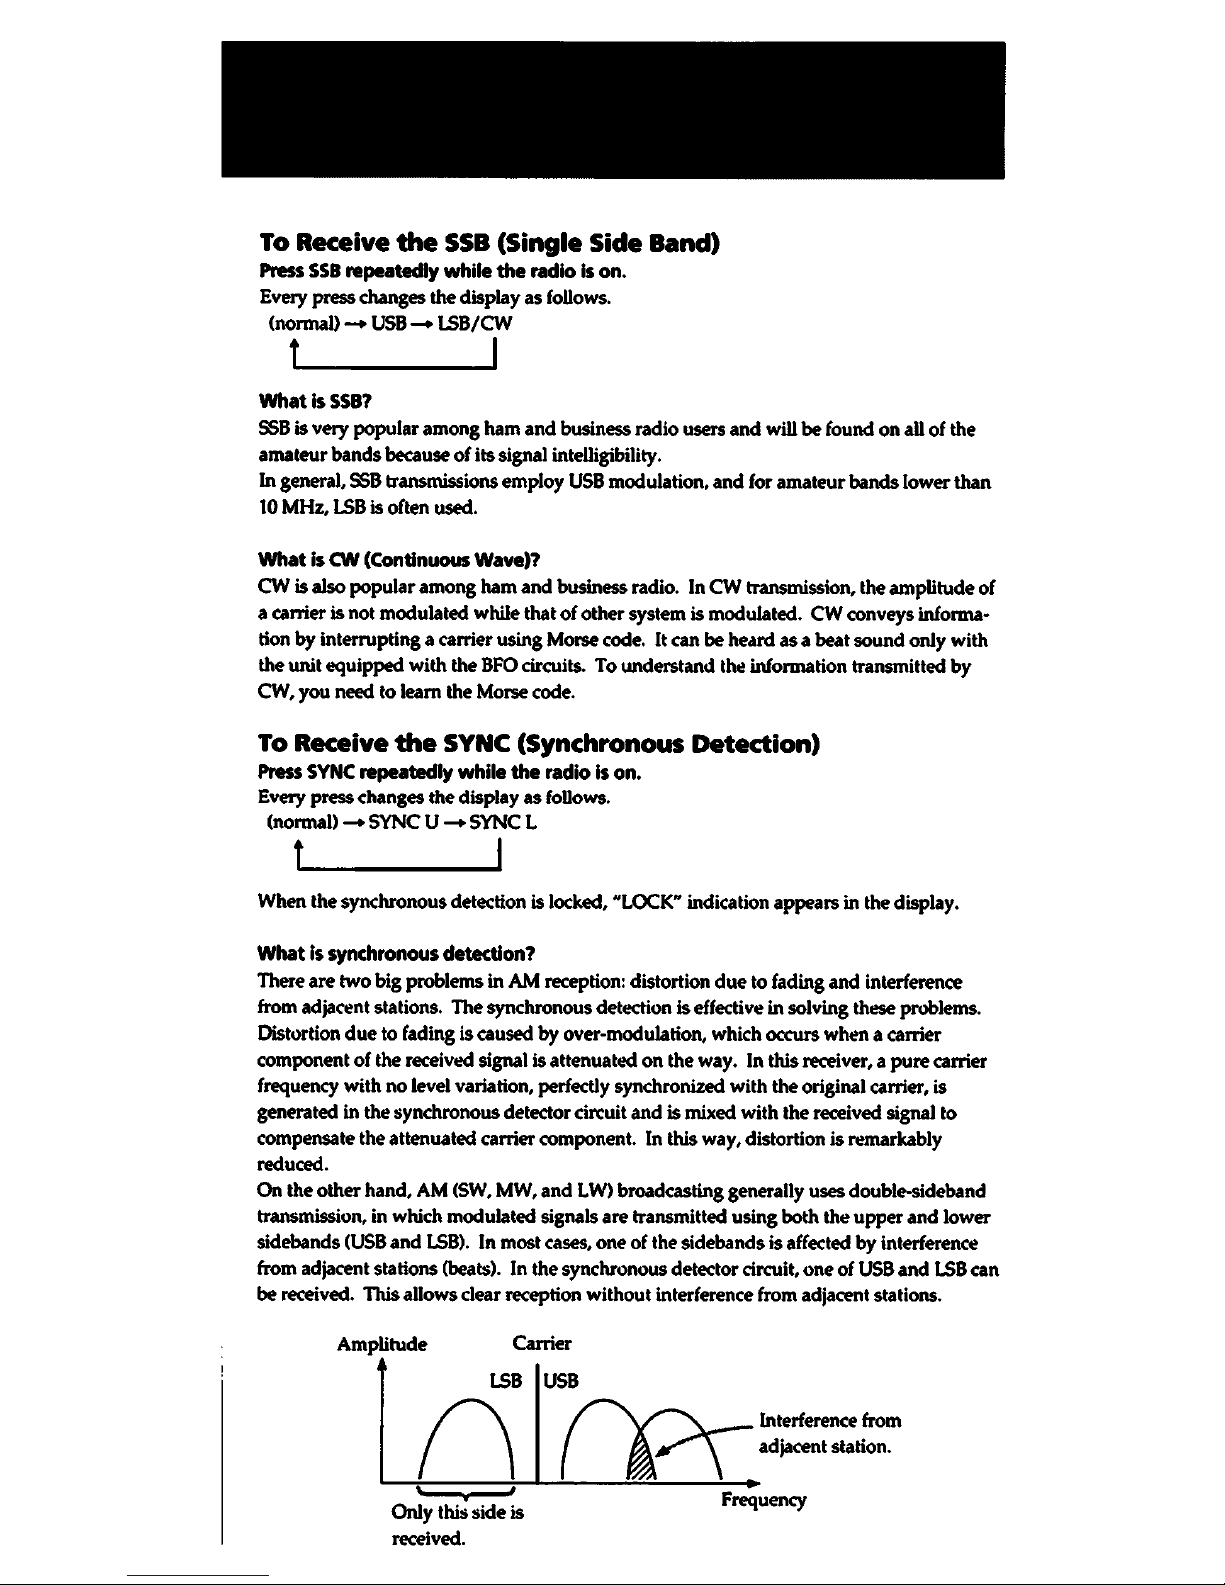
What Is synchronous detection?
There
are
two big problems in
AM
reception: distortion
due
to fading
and
interference
from
adjacent stations. The synchronous detection
is
effective in solving these problems.
Distortion
due
to fading is caused by over-modulation, which occurs when a carrier
component
of
the received signal is attenuated
on
the way. In this receiver, a
pure
carrier
frequency with
no
level variation, perfectly synchronized with the original carrier, is
generated in
the synchronous detector circuit
and
is mixed with the received signal to
compensate the attenuated carrier component. In
this way, distortion is remarkably
reduced.
On
the other hand,
AM
(SW,
MW,
and
LW)
broadcasting generally uses double-sideband
transmission, in which
modulated signals
are
transmitted using both the
upper
and
lower
sidebands
(USB
and
I.SB).
In most cases,
one
of
the sidebands is affected
by
interference
from adjacent stations (beats). In the synchronous detector circuit,
one
of
USB
and
I.SB
can
be received. This allows clear reception without interference from adjacent stations.
Only
this side is
received.
Scan
Tuning
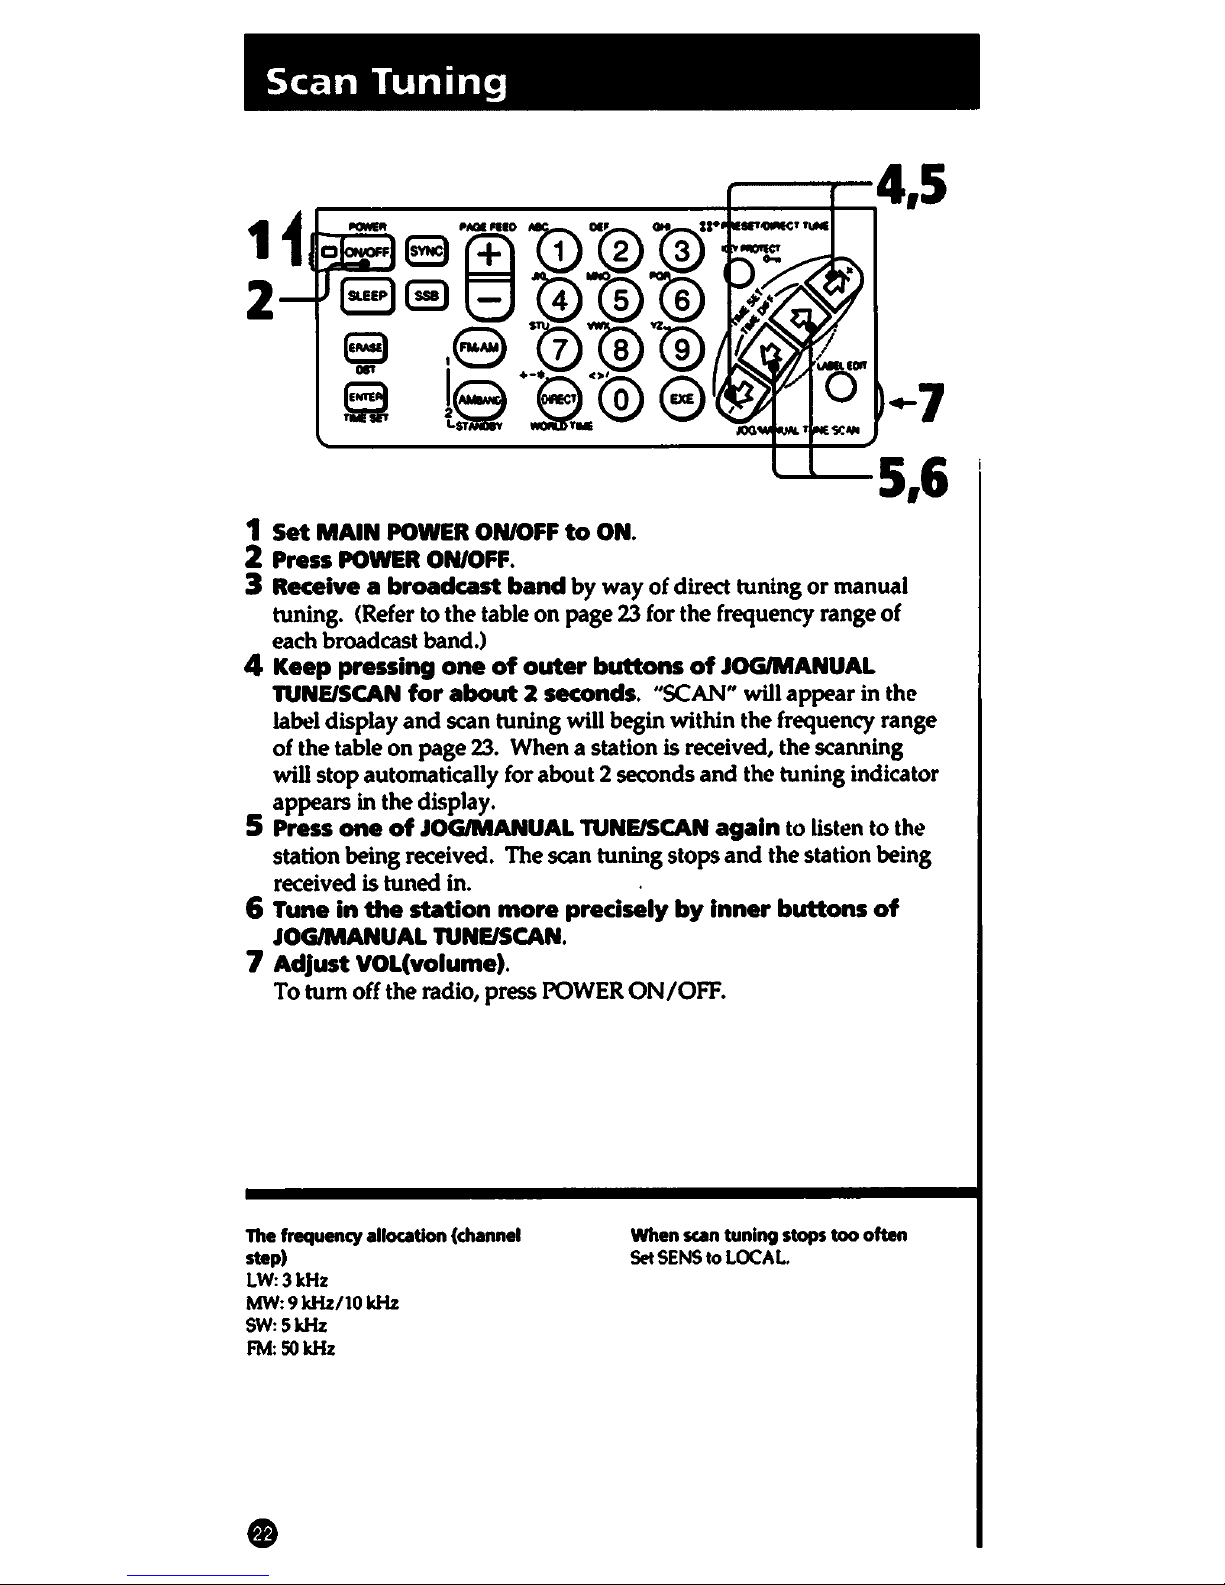
1 Set
MAIN
POWER ON/OFF
to
ON.
2 Press
POWER
ON/OFF.
--4,5
.-7
---5,6
3 Receive a broadcast
band
by
way
of
direct tuning
or
manual
tuning. (Refer to
the
table
on
page 23 for the frequency range of
each broadcast band.)
4 Keep pressing
one
of
outer
buttons
of
JOG/MANUAL
TUNE/SCAN
for
about
2 seconds. "SCAN" will appear in the
label
display
and
scan tuning will begin within the frequency range
of the table
on
page
23.
When a station is received, the scanning
will
stop
automatically for about 2 seconds and the tuning indicator
appears in
the
display.
5 Press
one
of
JOG/MANUAL TUNE/SCAN
again
to listen
to
the
station being received. The scan tuning stops
and
the station being
received is tuned in. .
6 Tune
in
the
station
more
precisely
by
inner
buttons
of
JOG/MANUAL TUNE/SCAN.
7 Adjust VOL(volume).
To
tum
off the radio, press POWER
ON/OFF.
The frequency allocation (channel
step)
LW:3kHz
MW: 9 kHz/10 kHz
SW:5kHz
FM:50kHz
When scan tuning
stops
too often
Set
SENS
to
LOCAL.
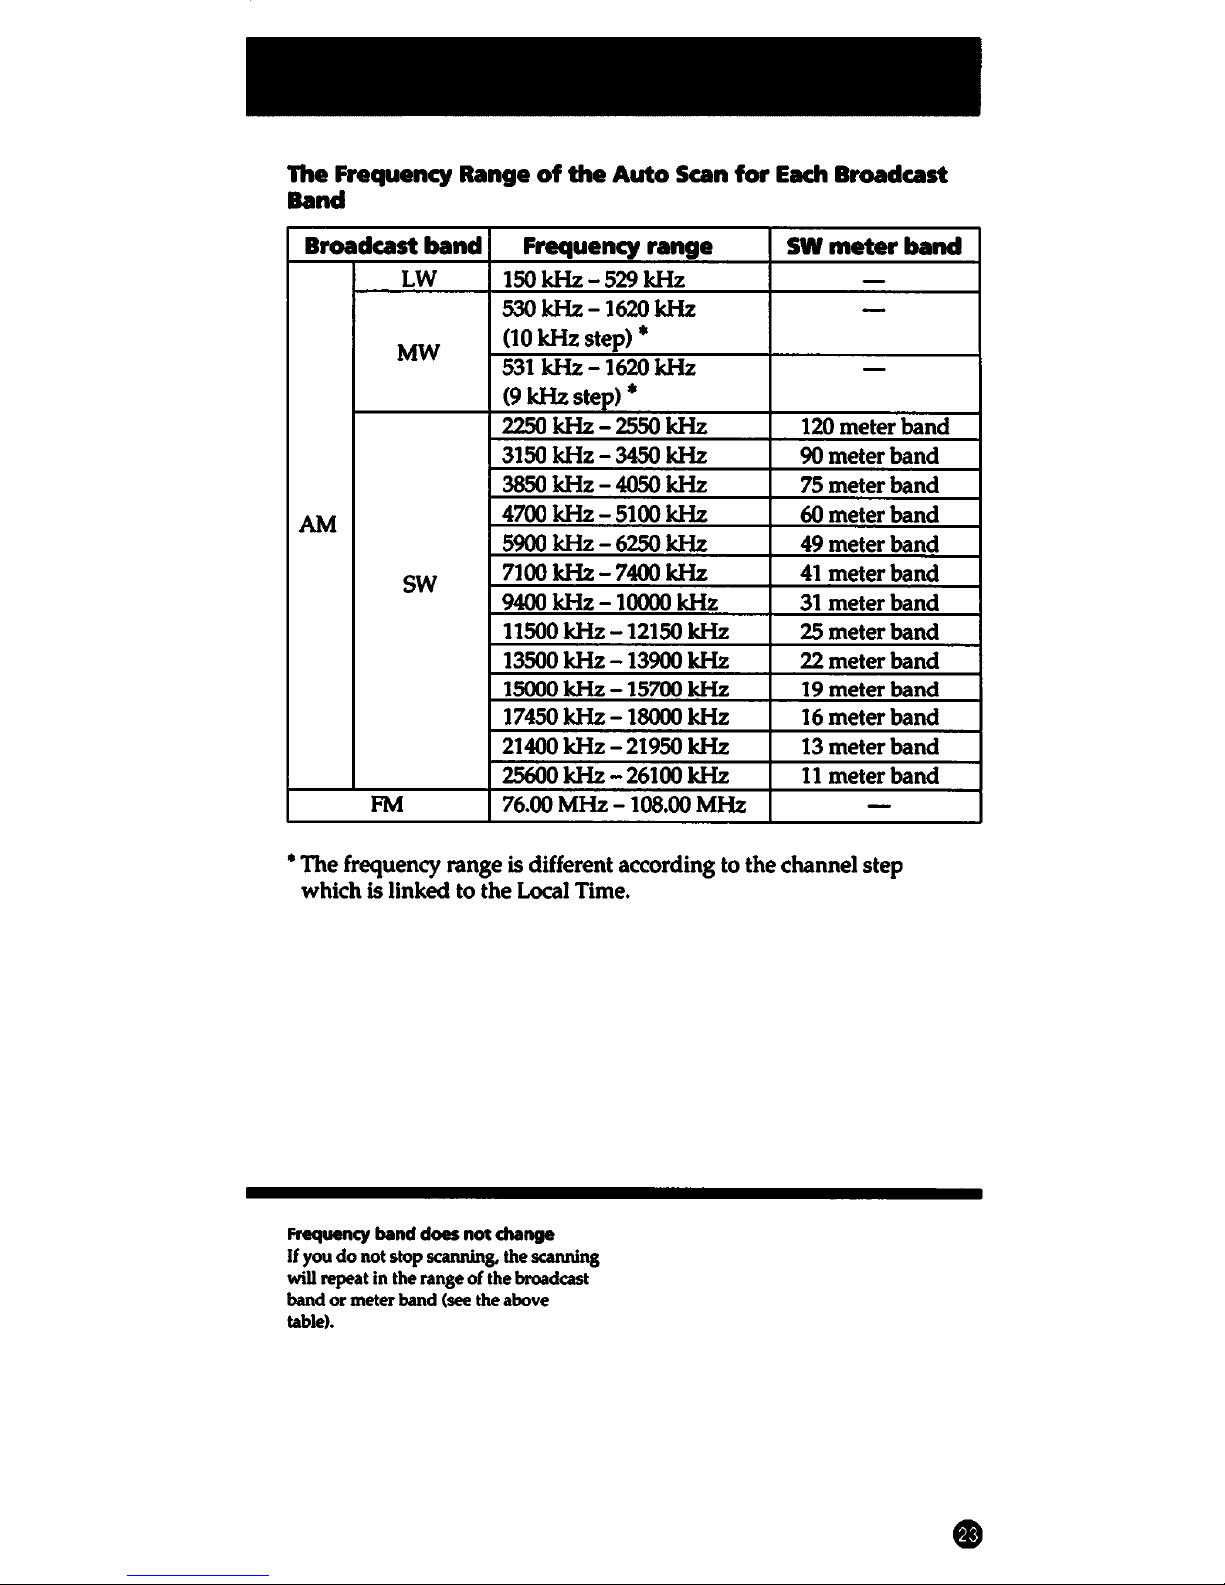
The Frequency Range
of
the
Auto
Scan
for
Each
Broadcast
Band
Broadcast band Frequency range
SW
meter
band
LW
150
kHz
- 529
kHz
-
530
kHz
- 1620
kHz
-
MW
(10
kHz
step) *
531
kHz-1620kHz
-
(9
kHz
step) *
2250
kHz
- 2550
kHz
120 meter
band
3150
kHz
- 3450
kHz
90 meter
band
3850
kHz
- 4050
kHz
75
meter
band
AM
4700
kHz
- 5100
kHz
60 meter
band
5900
kHz
- 6250
kHz
49 meter
band
SW
7100
kHz
- 7400
kHz
41
meter
band
9400
kHz
- 10000 kHz
31
meter
band
11500
kHz
- 12150
kHz
25 meter
band
13500
kHz
- 13900
kHz
22 meter
band
15000
kHz
- 15700
kHz
19 meter
band
17450
kHz
- 18000
kHz
16
meter
band
21400
kHz
- 21950
kHz
13 meter
band
25600
kHz
- 26100
kHz
11
meter
band
FM 76.00
MHz-108.00
MHz
-
• The frequency range is different according to the channel step
which
is linked to the Local Time.
Frequency
band
does
not
change
If
you
do not stop
scanning,
the scanning
will
repeat
in
the range of the broadcast
band
or
meter band (see the above
table).
•
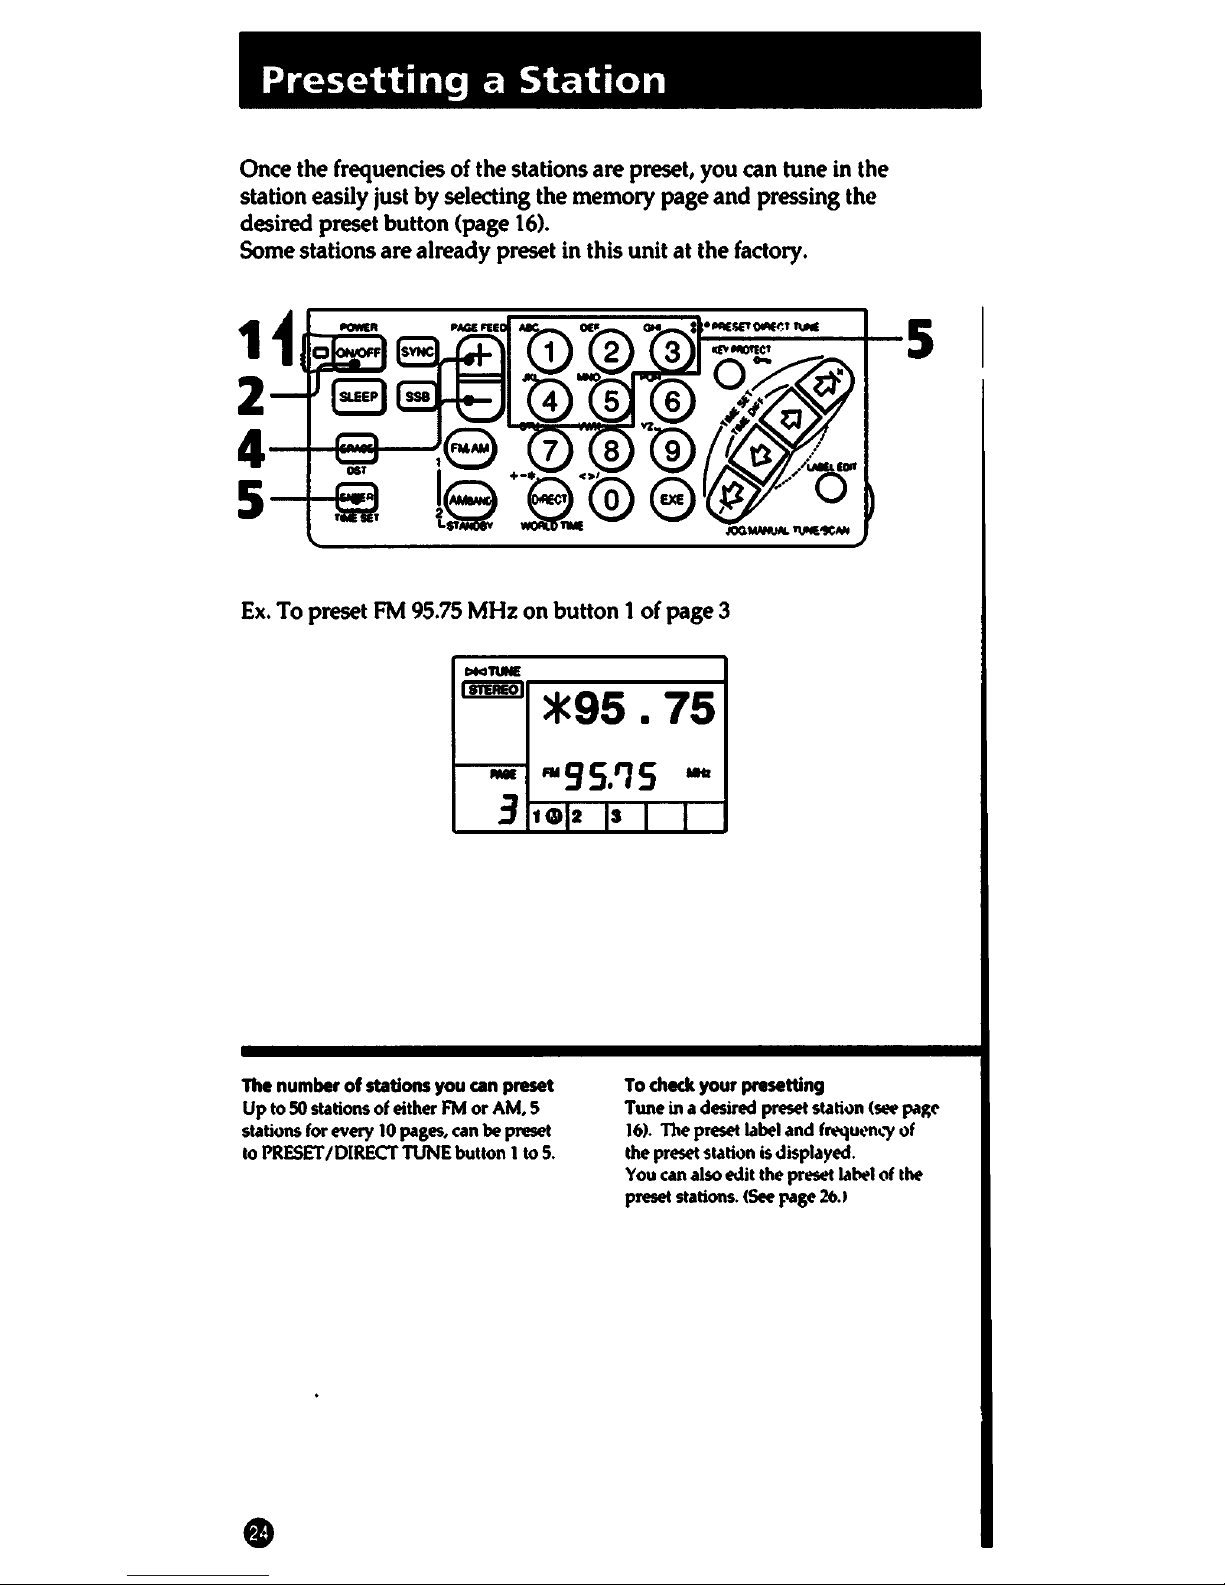
Presetting
a
Station
Once the frequencies of the stations are preset, you can tune
in
the
station easily just by selecting the memory page and pressing the
desired preset button (page
16).
Some
stations are already preset
in
this unit at the
factory.
1i~~~
2
4---f--flAMlf.---'
5--1-
.........
Ex.
To
preset
FM
95.75
MHz
on button 1 of page 3
l>l<ITUNE
llTEllEO!
*95.
75
-
...
95.'75
-
3
1Gl2
IS
I
I
The
number of stations
you
can
preset
Up
to
50
stations
of
either
FM
or
AM,
5
stations
for
every
10
pages, can
be
preset
to
PRESET
/DIRECT
TUNE
button 1 to
5.
•
To
check your presetting
Tune in a desired preset station
(see
pagt'
16).
The preset
label
and
f""'!Ut'll~")'
of
the
preset station is displayed.
You
can
also edit the preset
label
of
the
preset stations.
<See
page
2b.'
1
Set
MAIN
POWER ON/OFF
to
ON.
2
Press
POWER ON/OFF.
3 Tune
In
a desired
station
by
way
of
direct tuning (see page 18),
manual tuning (see page
20)
or
scan tuning (see page
22).
4 Press PAGE
FEED
+/-to
display
a desired
memory
page
from 0
to
9. When you select memory page 1, beeps sound.
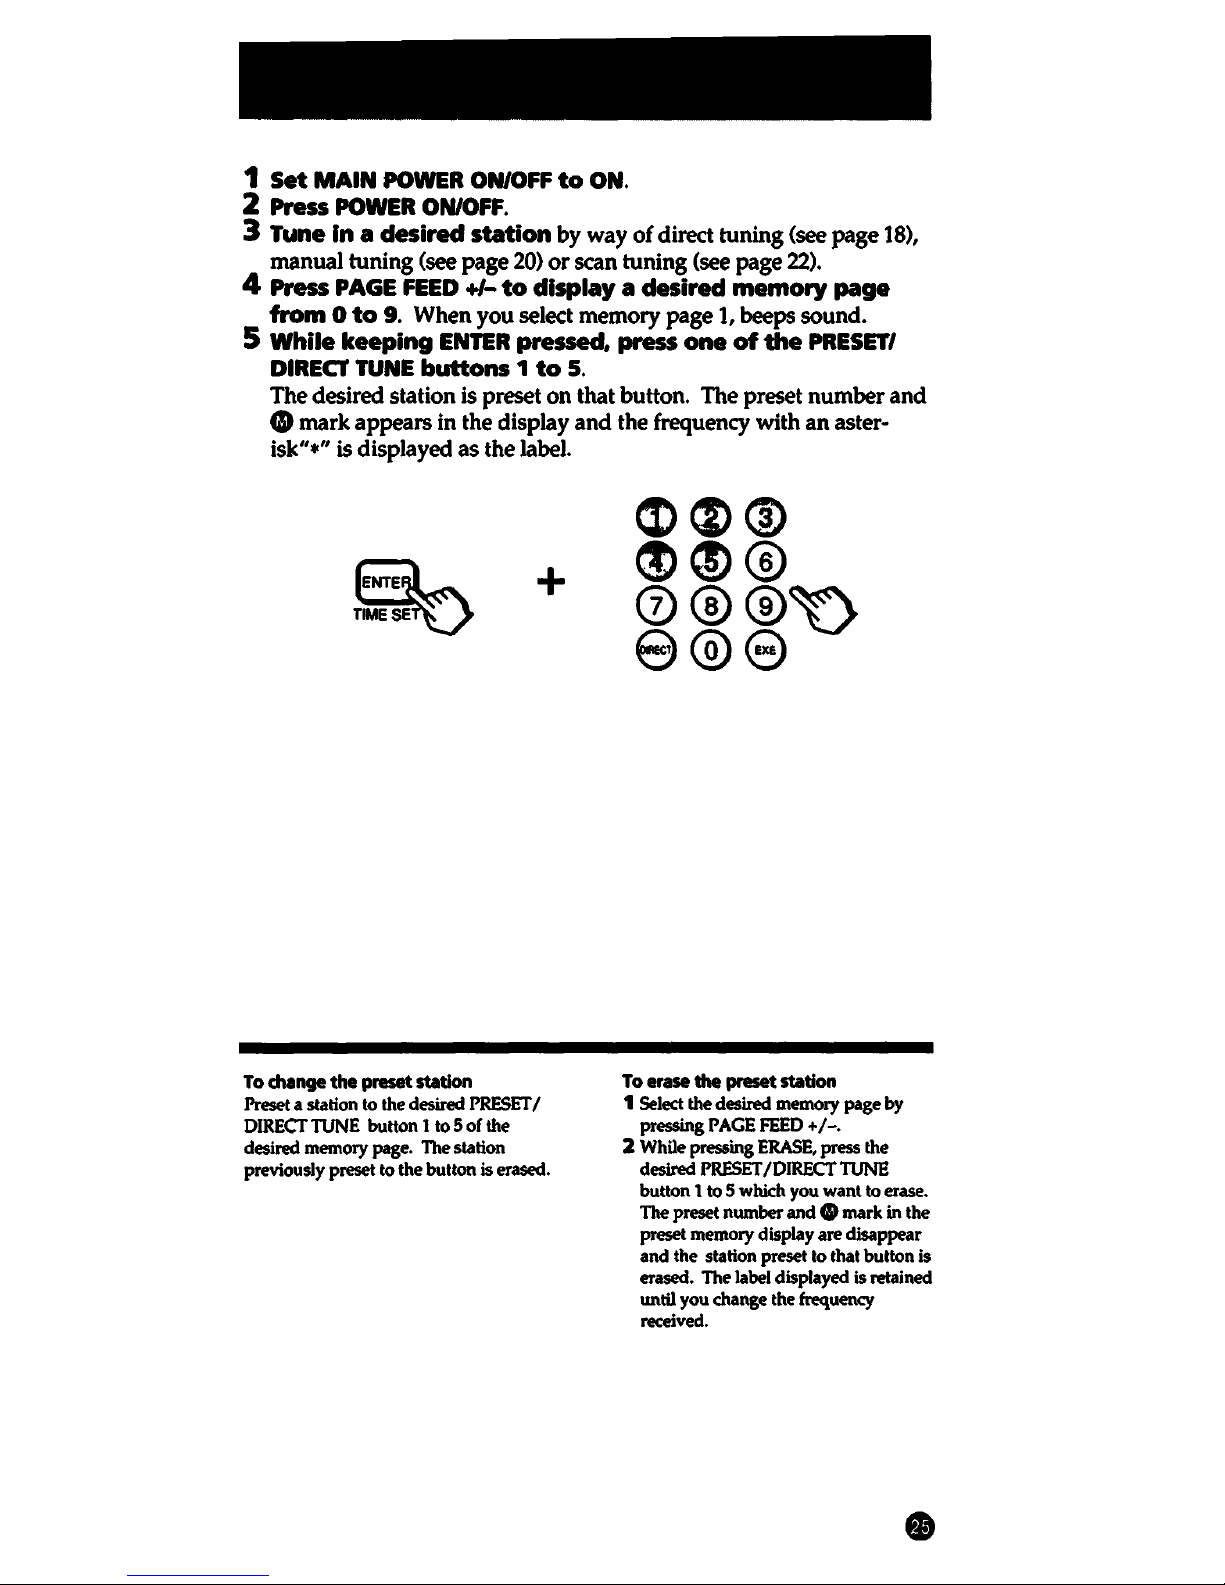
5
While
keeping
ENTER
pressed, press
one
of
the
PRESET/
DIRECT TUNE
buttons 1 to
5.
The desired station is preset
on
that button. The preset
number
and
G>
mark appears in the display
and
the frequency with
an
aster·
isk"•" is displayed
as
the label.
~
TIME'SeTQ
To
change
the
preset station
+
Preset a station to
the
desired
PRESET
I
DIRECT
TUNE
button
1 to 5
of
the
desired
memory
page.
The
station
previously
preset to
the
button
is erased.
To erase the preset station
1 Select
the
desired memory
page
by
pressing
PAGE
FEED+/-.
2 While pressing
ERASE,
press
the
desired
PRESET
/DIRECT
TUNE
button
1
to
5
which
you
want
to
erase.
The
preset number and 9 mark in
the
preset
memory
display
are
disappear
and
the station
preset
to that
button
is
erased.
The
label displayed is retained
until
you
change the
frequency
received.

Editing
Labels
You
can edit the label (up to 6 characters) of the preset stations or one
of
the time difference.
When
the
flashing
of
the
character
stopS
This oo:urs when
you
have
not
pressed
any button within
15
seconds during
editing characters.
Press
LABEL
EDIT
again.
4,5
6
3,5
To interrupt
the
editing
Press
LABEL
EDIT.
1 Display
the
label
you
want
to
edit.
by
way
of
the
praset
tuning
(see
page
16)
or
the
worldtime clock (see
page
15)
2 Press
LABEL
EDIT. The first character
of
the label flashes.
3 Press
the
inner
buttons
of
JOG/MANUAL TUNE/SCAN to
move
the
cursor to the character which
you
want
to edit.
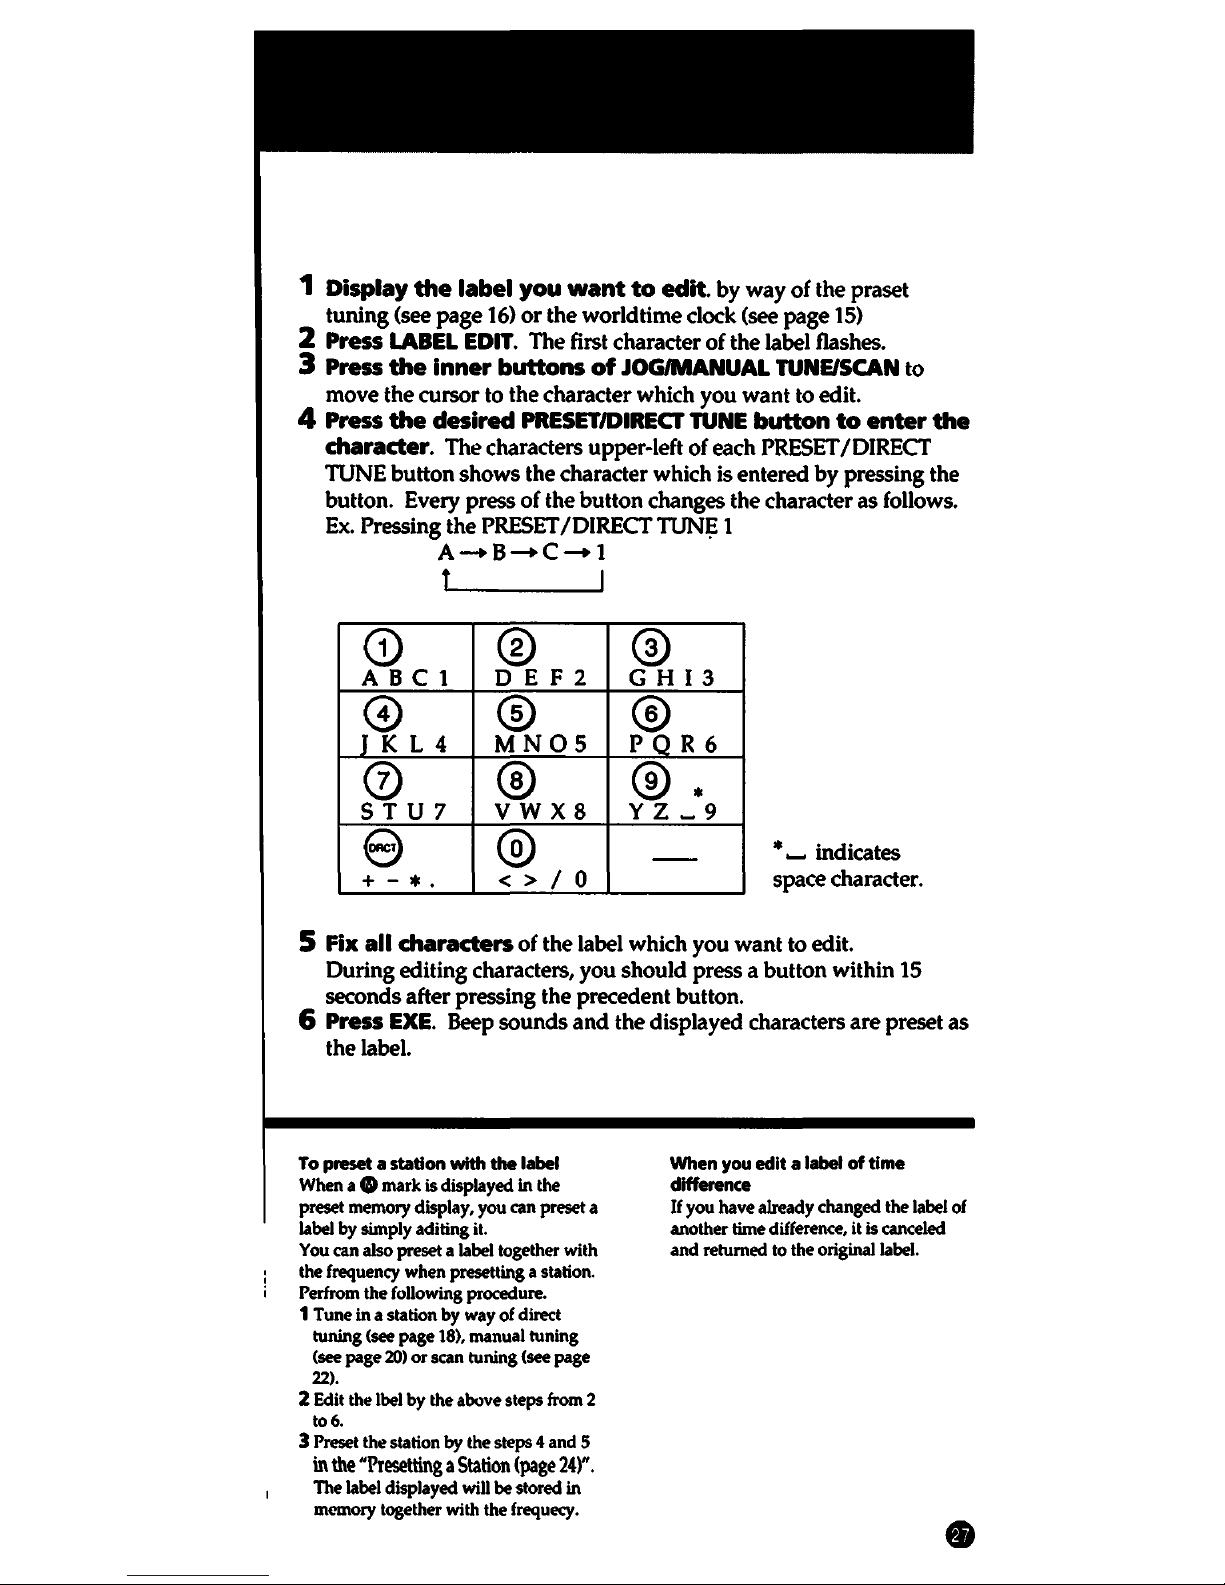
4 Press
the
desired
PRESET/DIRECT
TUNE
button
to
enter
the
charader.
The characters upper-left
of
each PRESET /DIRECT
TUNE
button
shows
the character which is entered
by
pressing the
button. Every press
of
the
button
changes the character as follows.
Ex.
Pressing
the
PRESET /DIRECT
TUN!;:
1
A-e-c-1
t I
G)
©
AB
Cl
DEF
2
©
®
I
KL
4
MNOS
0
©
STU7
vwxs
e
@
+ -
*.
< > I o
@
G
HI
3
@
PQR6
®·
y z _ 9
--
*.... indicates
space character.
5
Fix
all charaders
of
the
label which
you
want
to
edit.
During editing characters,
you
should
press a
button
within 15
seconds after pressing the precedent button.
6 Press
EXE.
Beep
sounds
and
the
displayed characters
are
preset
as
the
label.
To preset a station with the label
When a e mark is displayed
in
the
preset memory display, you can preset a
label
by simply aditing it.
You
can also preset a label together with
the
frequency when presetting a station.
Perfrom the following procedure.
1 Tune in a station by way of direct
tuning
(see
page 18), manual tuning
(see
page 20)
or
scan tuning
(see
page
22).
2 Edit the lbel by the above steps from 2
to6.
3 Preset the station by the steps 4 and 5
in
the
"Presetting a Station
(page
24)".
The label displayed
will
be stored
in
memory together with the frequecy.
When you edit a label
of
time
difference
If
you
have already changed the label of
another time difference, it is
canceled
and returned to the original label.
•
Using
The
Standby
Function
5,6---
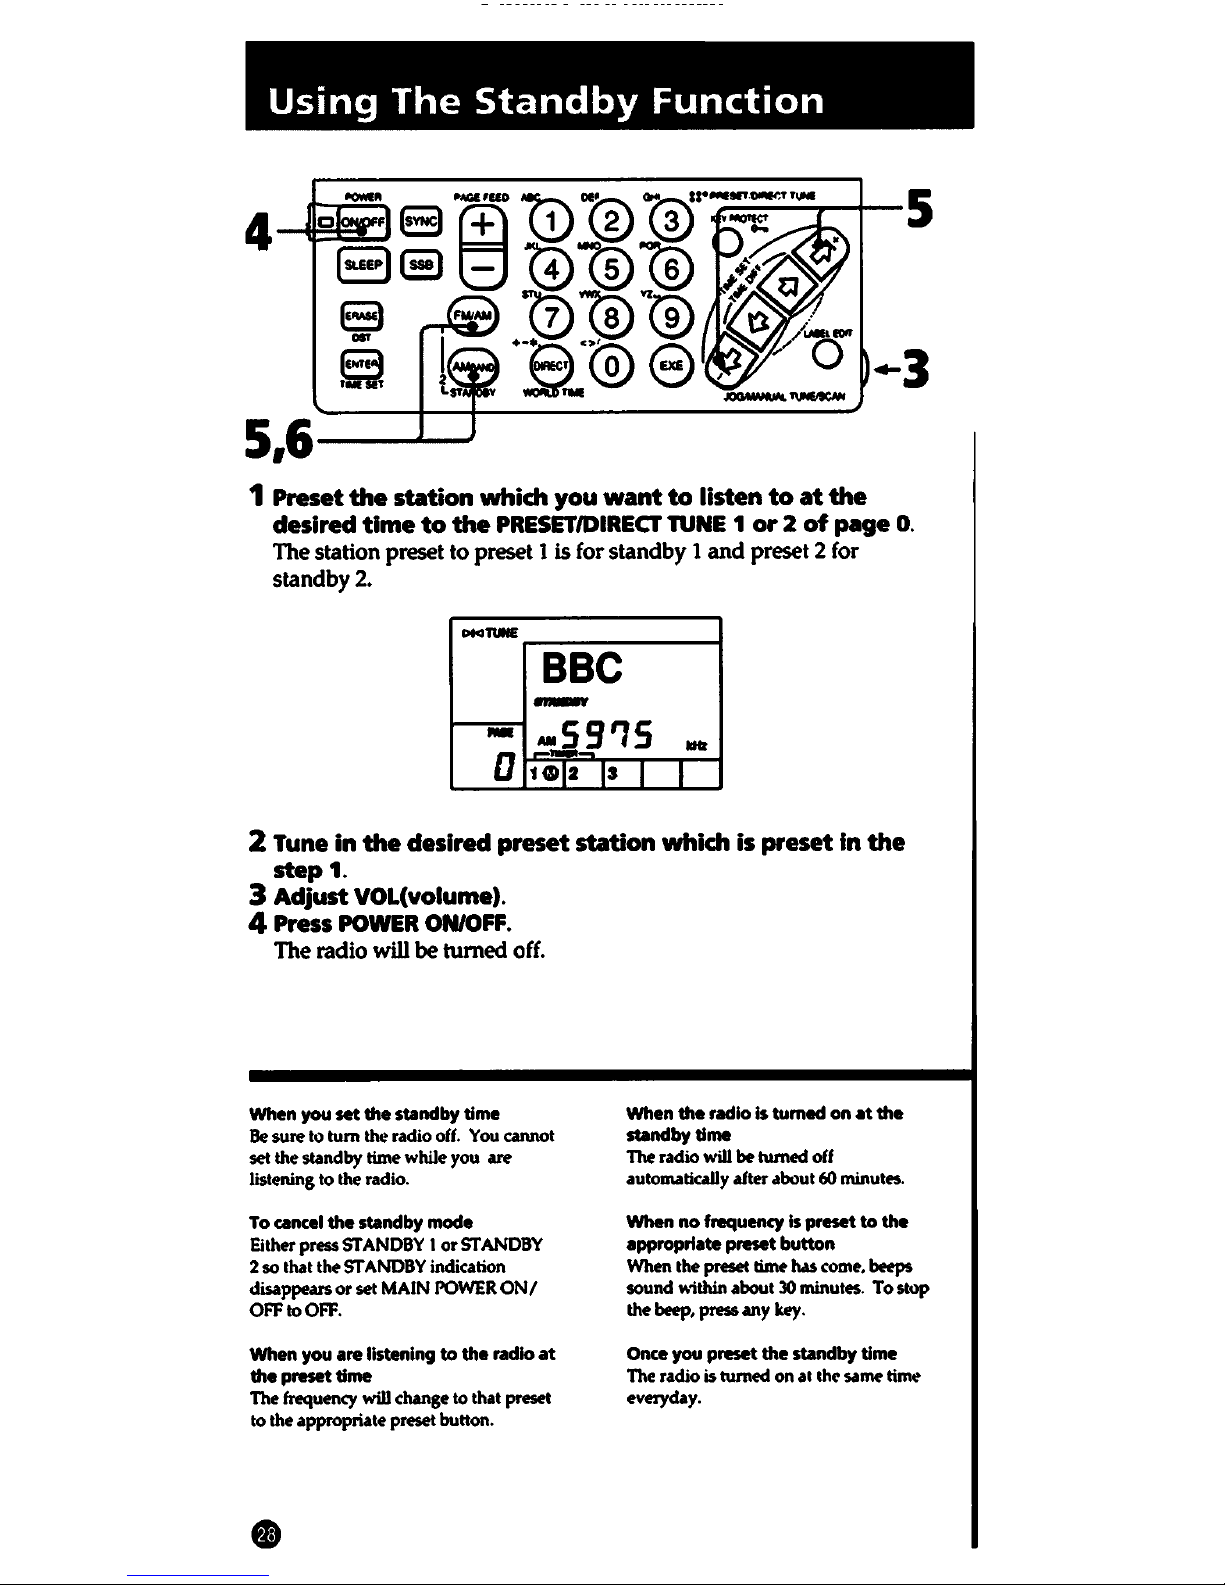
1 Preset
the
station which you
want
to
listen
to
at
the
desired
time
to
the
PRESET/DIRECT
TUNE 1 or
2
of
page
0.
The station preset to preset 1 is for standby 1
and
preset 2 for
standby2.
Plcl'IUNE
BBC
-
-
-59'15
...
---
D
1Gl2
IS
I
I
2 Tune in
the
desired preset station which is preset
In
the
step
1.
3 Adjust VOL(volume).
4
Press
POWER
ON/OFF.
The radio
will
be
turned off.
When you
set
the
mnclby
time
Be
sure to
tum
the radio
off.
You
cannot
set the standby time while you
are
listening to the radio.
To
cancel
the
standby mode
Either press
STANDBY
I or
STANDBY
2 so that the
STANDBY
indication
disappears or set
MAIN
POWER
ON/
OFF
to
OFF.
When you are listening
to
the radio
at
the preset time
The frequency will change to that
preset
to the appropriate
preset
button.
When the radio Is tumad on
at
the
mnclbytlme
The radio will
be
turned off
automatically after about 60 minutes.
When
no
frequency
Is
preset
to
the
appropriate preset button
When the preset time has
come.
beeps
sound
within about
30
minutes.
To
stop
the
beep,
press
any
key.
Once you preset the
mndby
time
The radio is turned on al the same time
everyday.
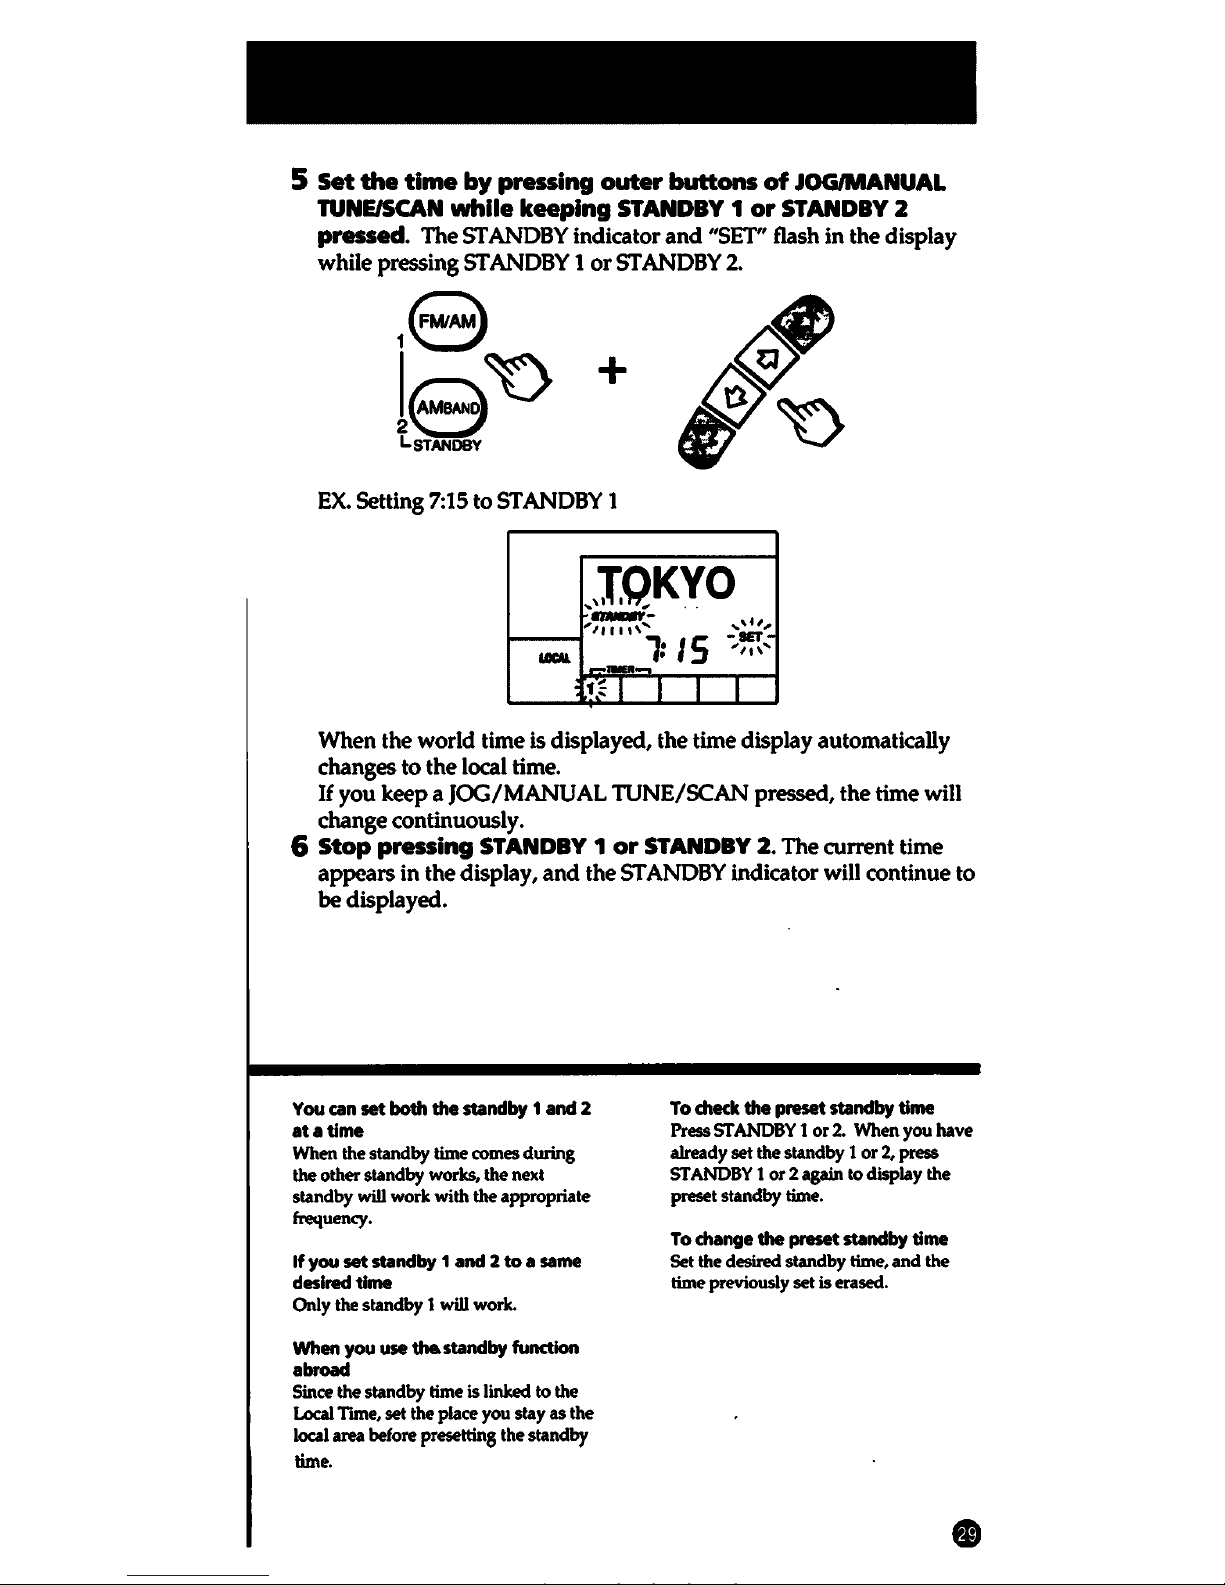
5
Set
the
time
by
pressing outer buttons
of
JOG/MANUAL
TUNE/SCAN
while keeping STANDBY 1
or
STANDBY 2
pressed. The STANDBY indicator
and
"SET" flash
in
the
display
while pressing STANDBY 1
or
STANDBY 2.
+
EX.
Setting 7:15 to STANDBY 1
1~
I I I I
When
the
world
time is displayed, the time display automatically
changes
to
the
local time.
If you
keep a JOG/MANUAL
TUNE/SCAN
pressed,
the
time will
change continuously.
6
Stop
pressing STANDBY 1
or
STANDBY 2. The current time
appears
in
the
display,
and
the
STANDBY indicator will continue to
be
displayed.
You can
set
both
the
standby 1
and
2
at a
time
When
the standby time comes during
the other standby works, the next
standby will work with
the appropriate
frequency.
If
you
set
standby 1
and 2 to
a same
desired
time
Only the standby 1 will work.
When you use the.standby
function
abroad
Since the standby time is linked to the
Local Tune, set the place you stay as the
local
area before
presetting
the standby
time.
To check
the
preset standby time
Press
STANDBY
1 or
2.
When you have
already set the standby 1 or
2,
press
STANDBY
1 or 2 again
to
display the
preset standby
time.
To change the
preset
standby time
Set the desired standby time, and the
time previously set is erased.
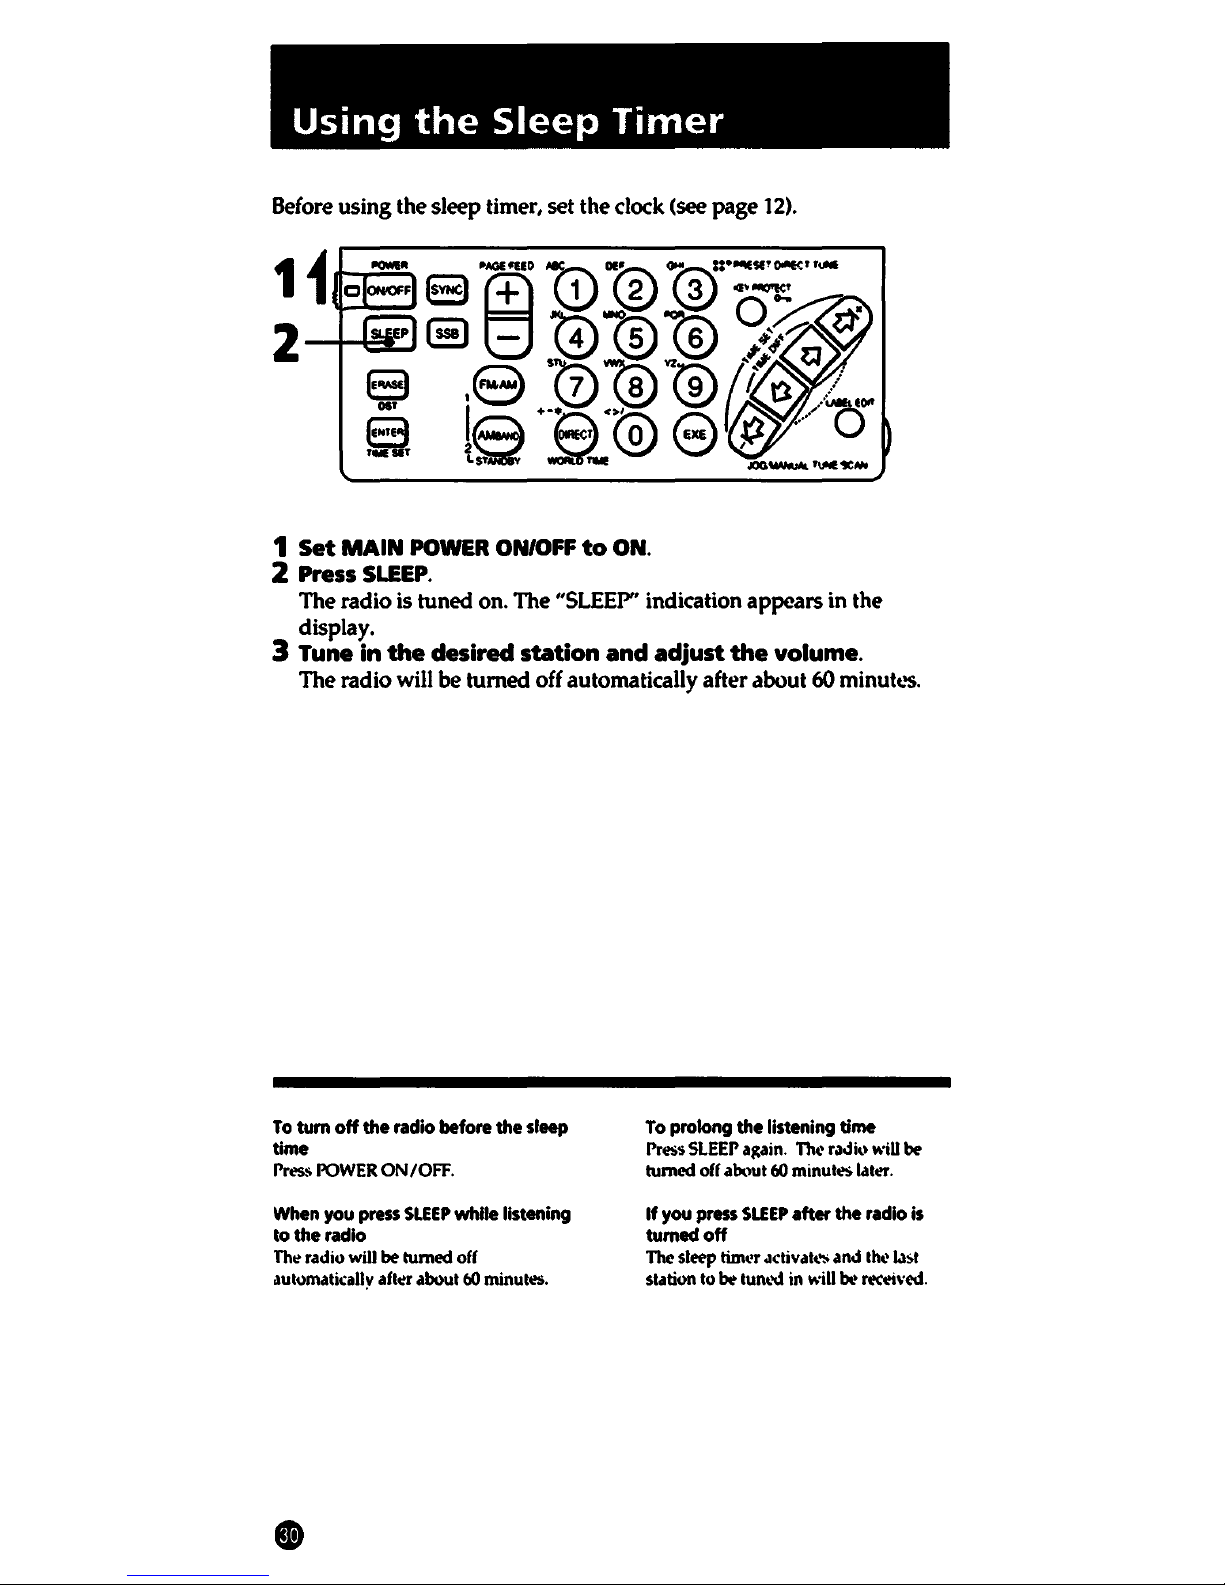
Using
the
Sleep
Timer
Before
using
the sleep timer, set
the
dock (see
page
12).
El
OST
8
.......
1
Set
MAIN
POWER
ON/OFF
to
ON.
2 Press
SLEEP.
The radio is
tuned
on. The "SLEEP" indication
appears
in
the
display.
3 Tune
in
the
desired station
and
adjust
the
volume.
The radio will
be
turned
off automatically after about 60
minutc..'S.
To
tum off the radio before the sleep
time
l'res.~
POWER
ON/OFF.
When
you
press
SLEEP
while listening
to the radio
Th~
radio will
be
turned off
automatil:ally
afttt aoout
60
minutes.
To
prolong the listening time
l'ress
SLEEP
a1tain.
The
r.idi<•
will
be
turned
off
ab\lUt
60
minutes l.lttt.
If
you press
SLEEP
after the radio
is
tumedoff
The sleep tinwr .ictiv atw and the
l.l:>t
statfon
to
be
turn.'\!
in
will
be re«ived.
 Loading...