

Page 1

3-865-472-21 (1)
FM Stereo/SW/MW/LW
PLL Synthesized Receiver
Operating Instructions
Mode d’emploi
Manual de instrucciones
Betjeningsvejledning
Käyttöohjeet
GB
FR
ES
DK
FI
ICF-SW07
1998 by Sony Corporation
Page 2

Owner’s record
The model and serial numbers are
located at the bottom of the unit.
Record the serial number in the space
provided below. Refer to them
whenever you call your Sony dealer
regarding this product.
Model No. ICF-SW07
Serial No. _________________________
Warning
To prevent fire or shock hazard,
do not expose the unit to rain or
moisture.
To avoid electrical shock, do not
open the cabinet.
Refer servicing to qualified
personnel only.
For the customers in the U.S.A.
You are cautioned that any changes
or modifications not expressly
approved in this manual could void
your authority to operate this
equipment.
INFORMATION
This equipment has been tested and
found to comply with the limits for a
Class B digital device, pursuant to Part
15 of the FCC Rules. These limits are
designed to provide reasonable
protection against harmful interference
in a residential installation. This
equipment generates, uses, and can
radiate radio frequency energy and, if
not installed and used in accordance
with the instructions, may cause
harmful interference to radio
communications. However, there is no
guarantee that interference will not
occur in a particular installation. If this
equipment does cause harmful
interference to radio or television
reception, which can be determined by
turning the equipment off and on, the
user is encouraged to try to correct the
interference by one or more of the
following measures:
— Reorient or relocate the receiving
antenna.
— Increase the separation between the
equipment and receiver.
— Connect the equipment into an
outlet on a circuit different from
that to which the receiver is
connected.
— Consult the dealer or an
experienced radio/TV technician
for help.
GB
Introduction2
Features
• World clock feature
Find out the time for any place in
the world by selecting a city name.
• Worldwide coverage with FM
stereo/SW/MW/LW reception
Simple and precise tuning with
the quartz controlled PLL (Phase
Locked Loop) synthesizer system.
FM: 76–108 MHz
SW: 1621–29999 kHz
MW: 530–1620 kHz
LW: 150–529 kHz
Refer to the supplied “Wave
Handbook” for more information.
• SW STATION CALL tuning
Tune in to major short wave
stations just by pressing the
station buttons. The radio
automatically chooses the
frequencies used in your time
zone from the ROM data and
scans for them.
• MY-Memory tuning
Memorizes and scans up to 100
frequencies of your choice.
• Four other tuning methods to
suit your needs
– Direct tuning: tune in by
inputting the frequency digits
directly.
– Manual tuning: tune in by
manually changing the
frequency step by step.
– Scan tuning: scans
automatically through the band
and stops at reception.
– Preset tuning: tune in by
recalling a preset broadcast
station with the single press of a
button.
• Label editing
Label preset frequencies, time
zones, etc., with a station name,
city name, etc., or any
combination of up to 6
alphanumeric letters.
• Built-in timer operation
Turns on the radio automatically at
any preset time to a station of your
choice. Preset two individual
standby-times and frequencies
under STANDBY MEMORY a and b.
• Sleep timer
Set the sleep timer and fall asleep
to the radio. The timer turns off
the radio automatically after
approximately 60 minutes.
• Stereo FM reception
Use the supplied stereo
headphones to enjoy stereo FM.
Page 3

Table of contents
Preparation
Location of parts and controls ...........................4
Power sources ...................................................... 9
Operating on batteries ................................... 9
Operating on house current........................11
Operating on car battery .............................11
Setting the clock................................................. 12
Setting the Local Time .................................12
Finding out the time in other areas of the
world .............................................................. 14
Listening to the radio
Various ways of reception ............................... 16
Direct tuning .................................................16
Manual tuning ..............................................18
Scan tuning.................................................... 20
Preset tuning .................................................22
SW STATION CALL tuning ....................... 24
MY-Memory tuning .....................................27
Receiving SSB and CW Transmissions...........30
Adjusting for optimum AM reception
—Synchronous detection .................................31
GB
Other operations
Using the supplied external antenna..............32
Recording broadcasts........................................35
Editing labels......................................................36
Using the timer ..................................................38
Waking up to the radio or buzzer
— Standby function ....................................38
Falling asleep listening to the radio
— Sleep timer................................................ 41
Using the hold function.................................... 42
Turning off the beep ......................................... 43
Additional information
Precautions and maintenance.......................... 44
Troubleshooting ................................................ 47
Specifications ..................................................... 49
Tips on radio waves .......................................... 50
Table of Contents
GB
3
Page 4
Preparation
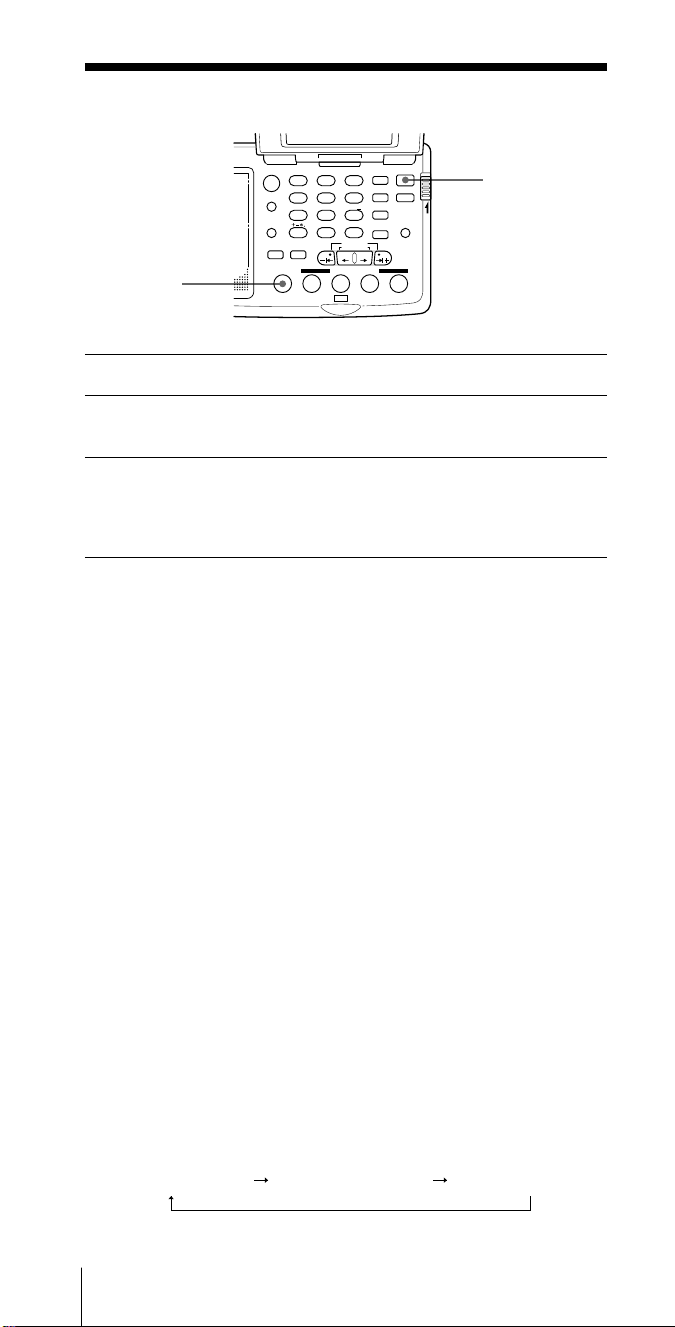
Location of parts and controls
Refer to the pages in the parentheses for details.
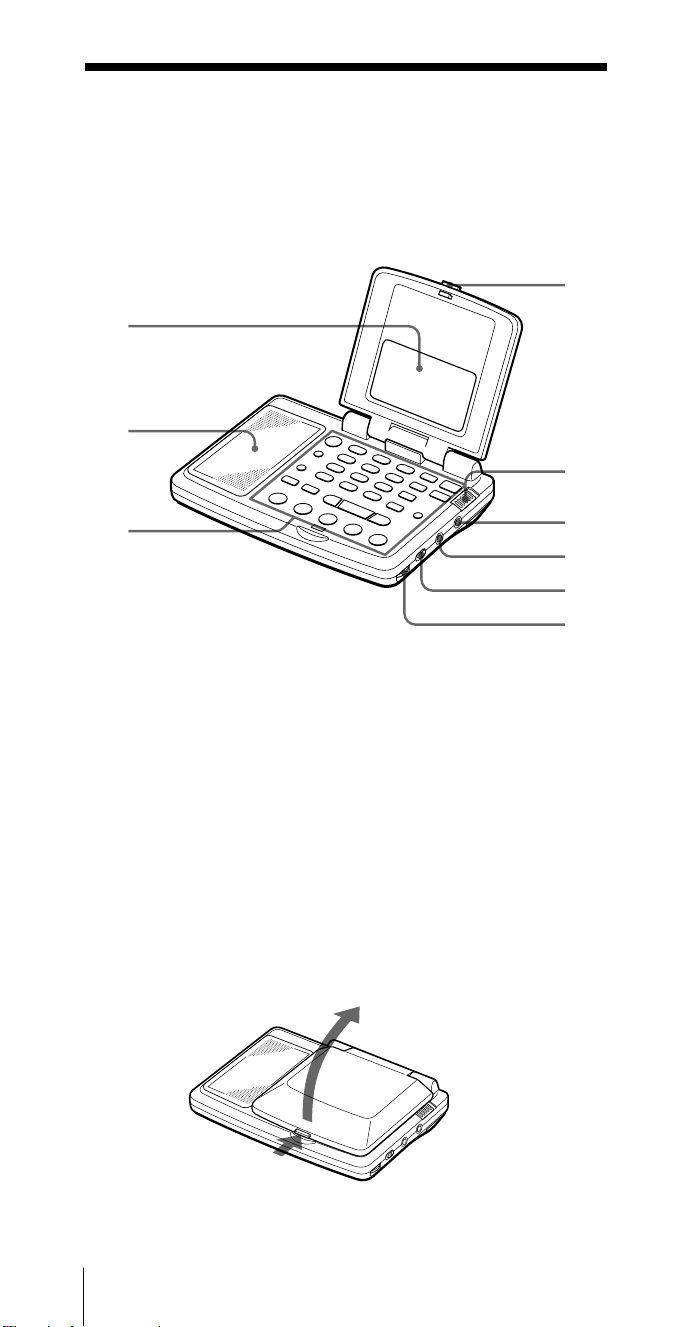
Front
4
1
2
5
3
1 Display (7)
2 Speaker
3 Controls (6)
4 OPEN button (4)
5 HOLD switch (42)
6 2 (headphones) jack
Opening the cover
Push the OPEN button to open the cover. Adjust the angle to
your choice.
7 LINE OUT (recording
output) jack (35)
8 TONE/ST•MONO
(stereo•monaural)
selector (17)
9 VOL (volume) control
(17)
6
7
8
9
GB
Preparation4
Page 5
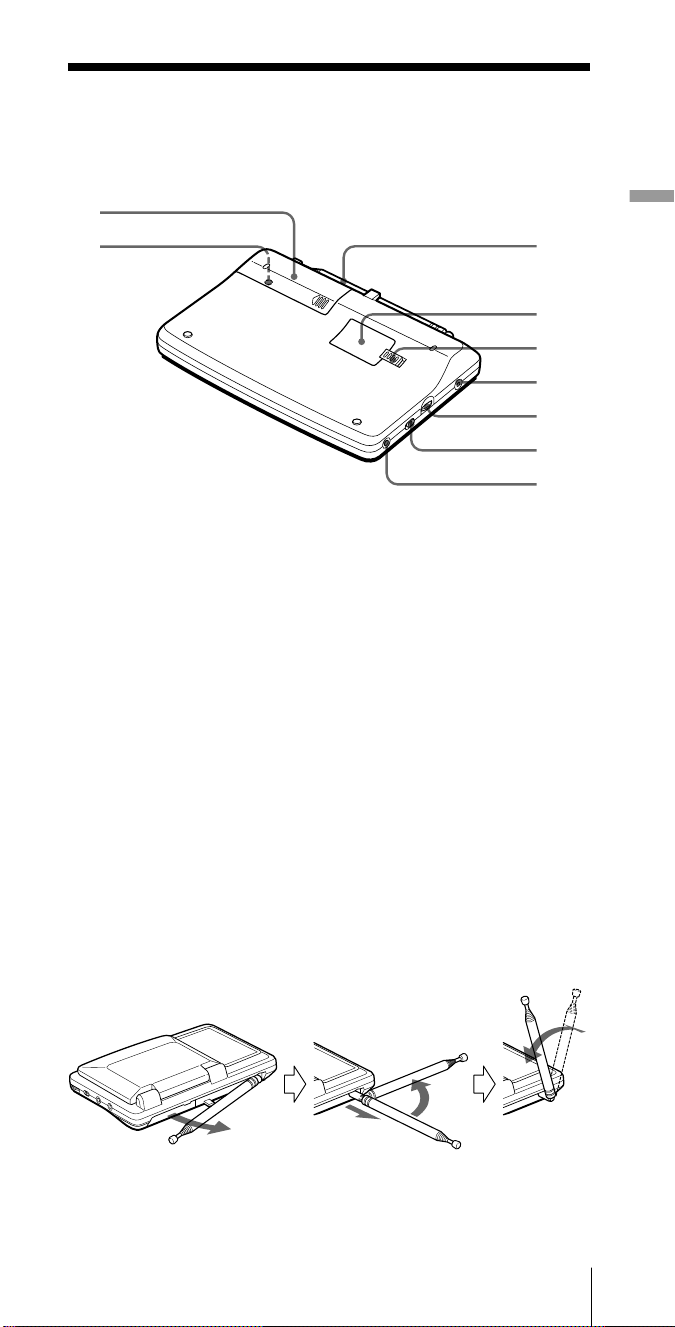
Rear
1
2
1 Battery compartment (9)
2 RESET button
Press this button in the
battery compartment
with a pointed object
when the radio fails to
function properly. The
clock settings, etc., will
revert to the factory
preset. The frequencies
you have preset in the
memory are retained.
3 Telescopic antenna (17)
4 ROM compartment lid
(46)
Preparation
3
4
5
6
7
8
9
5 RELEASE (ROM
compartment lid slide
open) switch (46)
6 DC IN 3V ¥ (external
power input) jack (11)
7 ATT (attenuator) control
(21)
8 ATT ON•OFF
(attenuator on•off)
selector (21)
9 AM EXT ANT (external
antenna) jack (33)
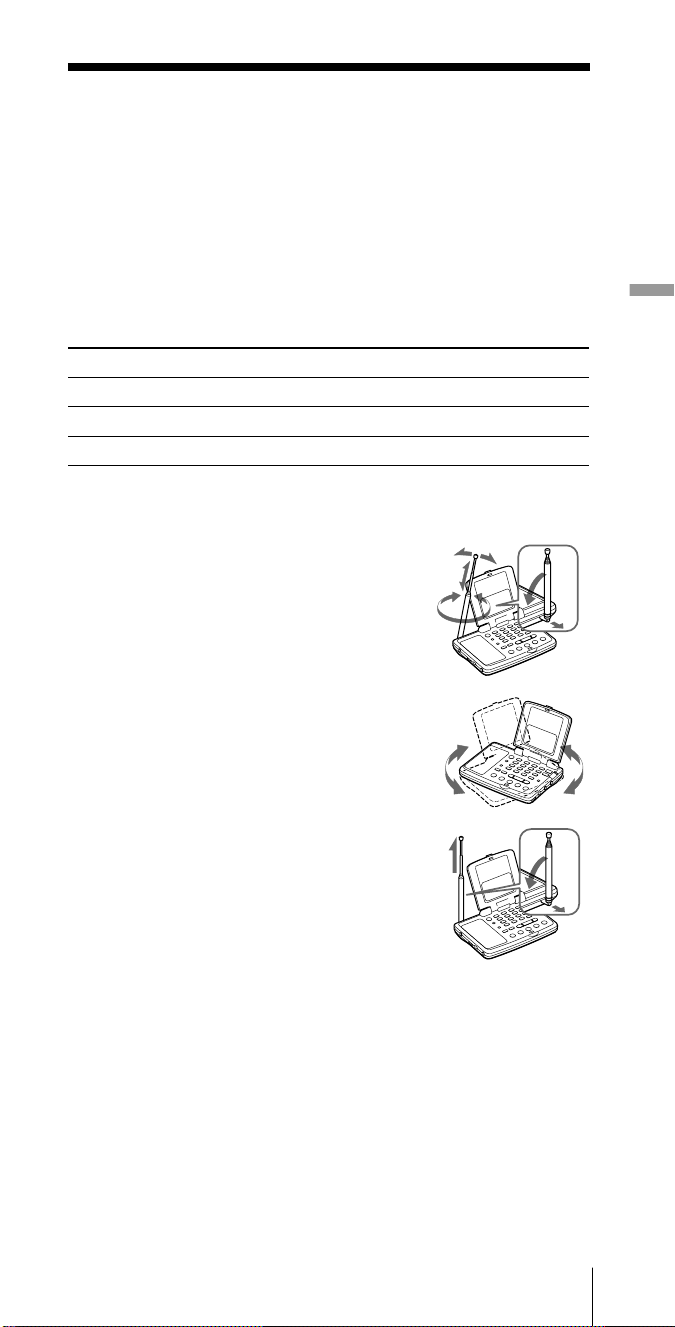
Extending the antenna
Gently pull out the base of the antenna before rotating it, as shown
below.
2Turn horizontally
to a right angle
1Pull out
Preparation
GB
5
Page 6
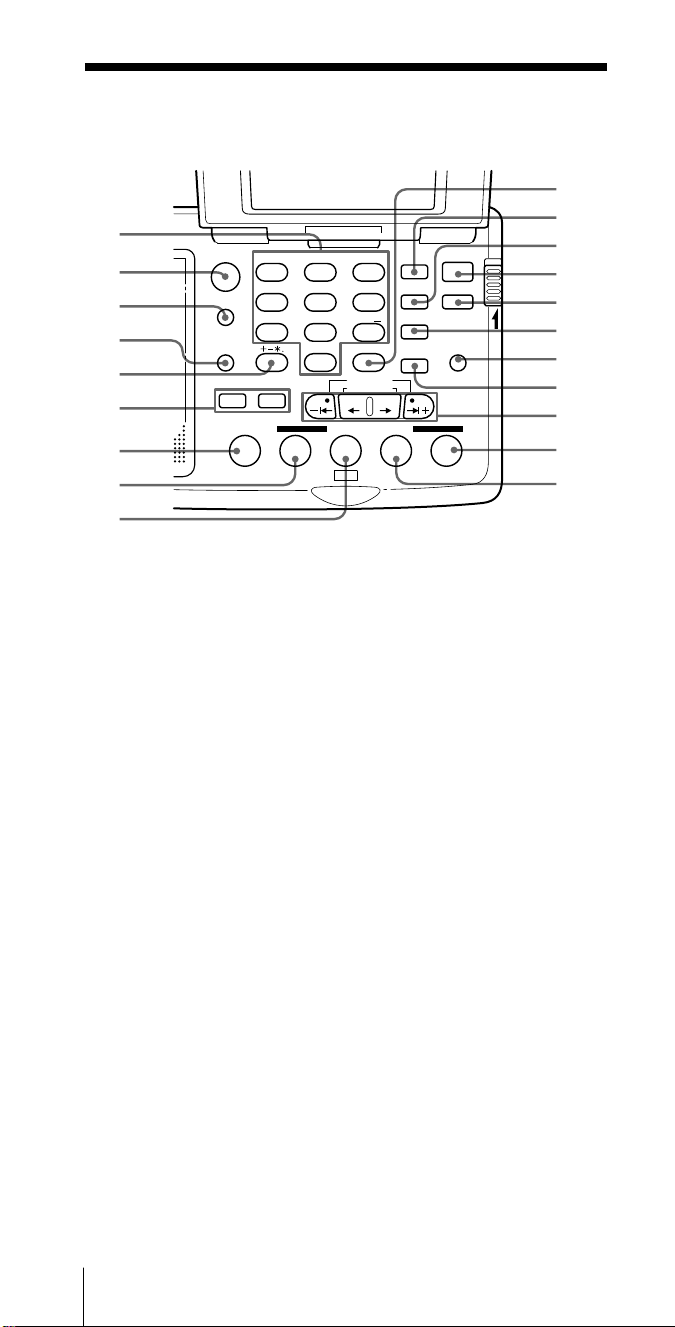
Controls
1
2
3
4
5
6
7
8
9
ABC1DEF2GHI
FM/
AM
JKL4MNO5PQR
AM BAND
STU
LOCAL/
7
WORLD
LABEL EDIT
DIRECT
TIMERSTANDBY/
STANDBY TIME SET
ab
STANDBY MEMORY
MY DW VOA BBC OTH
VWX8YZ
<>
/
DISPLAY
EXE
0
TIME SET
TIME DIFF
SW STATION CALL
3
6
9
SYNC
SSB
DST
ERASE
TIME SET
ENTER
POWER
ON/
OFF
SLEEP
LIGHT
JOG/
TUNE/
SCAN˚
HOLD
!º
!¡
!™
!£
!¢
!∞
!§
!¶
!•
!ª
@º
1 Number buttons (16, 22,
36)
2 FM/AM button (16, 43)
3 AM BAND•LOCAL/
WORLD (local time/
world time) button (14,
18)
4 LABEL EDIT button (36)
5 DIRECT button (16)
6 STANDBY
MEMORY•TIMER
STANDBY/STANDBY
TIMESET button (38)
7 MY button (27)
8 DW button (24)
9 VOA button (24)
!º EXE•DISPLAY button
(13, 16, 36)
Press to switch to clock
display while operating
the radio. Press again to
return to the previous
display. If you do not
press the button, the
display will return to the
previous condition in
about 10 seconds.
!¡ SYNC (Synchronous
detection) button (31)
!™ SSB (Single Side Band)
button (30)
!£ POWER ON/OFF button
(16)
!¢ SLEEP button (41)
!∞ ERASE•DST (Daylight
Saving Time) button (12,
23, 29 40)
!§ LIGHT button
Press this button to
illuminate the display for
approximately 30
seconds.
!¶ ENTER•TIME SET button
(12, 22, 27, 38)
!• JOG/TUNE/
SCAN•TIME DIFF/TIME
SET buttons (12, 18, 20)
!ª OTH (others) button (25)
@º BBC button (24)
GB
Preparation6
Page 7
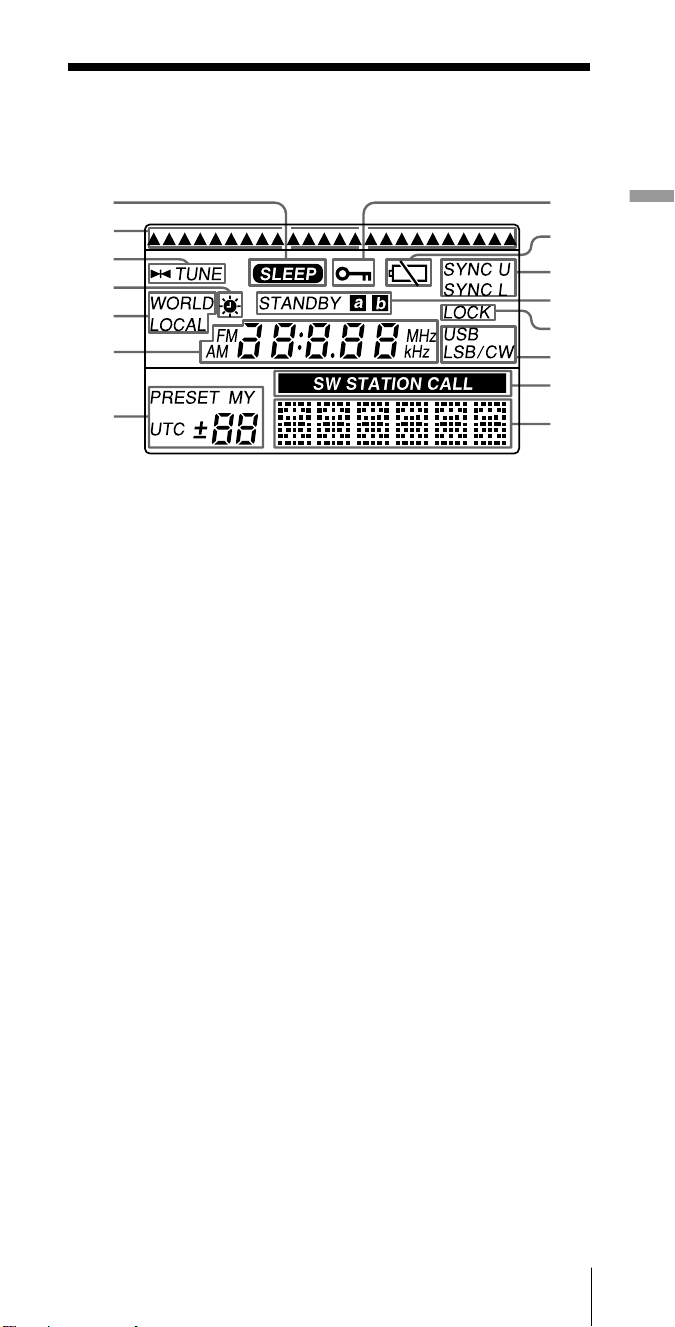
Display
18
2
3
4
5
6
9
!º
!¡
!™
!£
Preparation
!¢
7
1 SLEEP indicator (41)
Appears when the sleep
timer is in effect.
2 Time zone indicator (12,
14)
Points at the time zone
on the map
corresponding to your
time difference setting.
3 TUNE indicator (16)
Appears when a station
is tuned in.
4 s (Daylight Saving
Time) indicator (12, 14)
Appears when the time
display is adjusted to the
Daylight Saving Time.
5 WORLD•LOCAL
indicator (12, 14)
6 Time/frequency display
(12, 16)
7 Memory number/time
difference display (12, 22,
27)
8 HOLD indicator (42)
9 Battery indicator (10)
!º SYNC U•SYNC L
(synchronous detection)
indicators (31)
!¡ STANDBY a•b
indicators (38)
Appear when standing
by for timer activated
reception.
!™ LOCK (synchronous
detection lock) indicator
(31)
Appears when
synchronous detection is
in effect.
!£ USB•LSB/CW (single
side band/continuous
wave) indicators (30)
!¢ SW STATION CALL
indicator (24)
!∞ Label display (12, 16)
Names of the preset
stations, cities, bands or
meter bands are
displayed.
!∞
Appears when HOLD is
in effect. All buttons will
be inoperative.
Preparation
GB
7
Page 8

Short wave active antenna AN-LP2
Refer to page 32 on how to use the active antenna.
Antenna controller
1
2
1 Cord winder
2 Short cord
3 Long cord
4 Power lamp
5 Battery compartment
3
4
5
Antenna module
1 Clip
2 Suction cup
GB
Preparation8
1
2
Page 9
Power sources
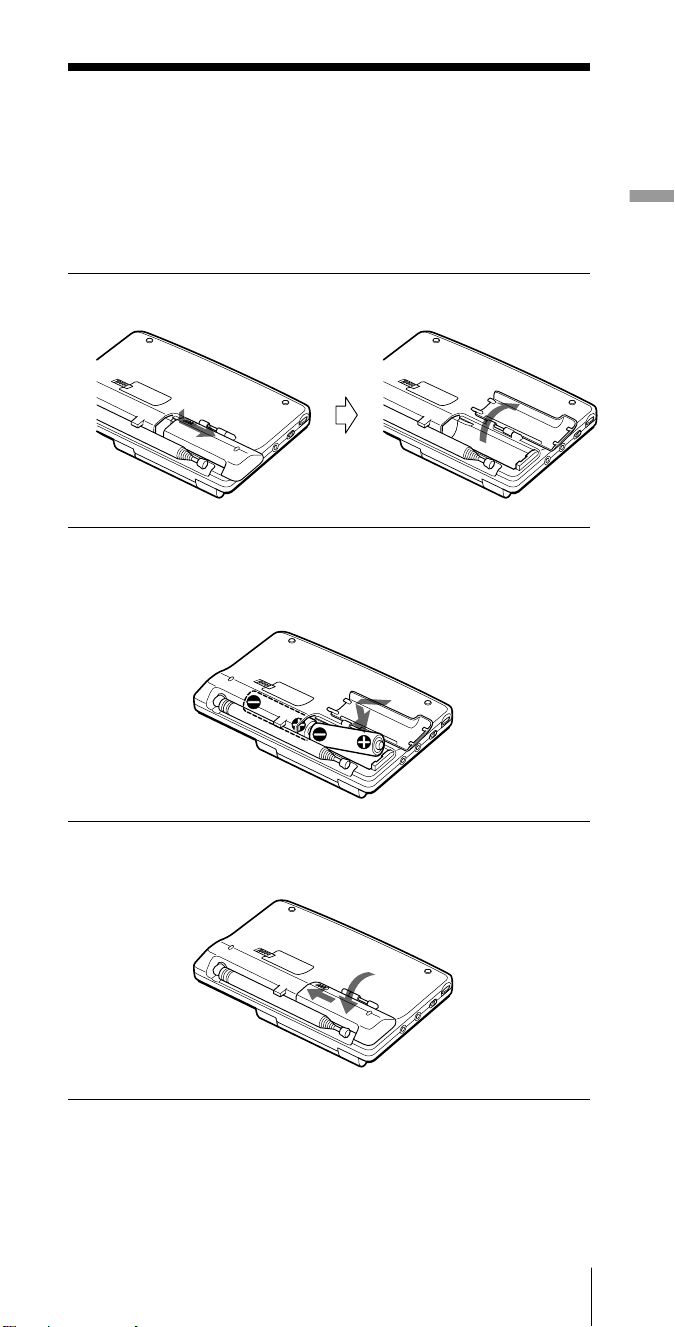
Operating on batteries
To operate the unit on house current, see “Operating on house current”,
page 11.
To operate the unit on a car battery, see “Operating on car battery”, page
11.
1 Slide and open the battery compartment lid.
2 Insert two R6 (size AA) batteries in the battery
compartment.
Insert with correct polarity as shown.
Preparation
3 Close the battery compartment lid.
Preparation
GB
9
Page 10
Replacing the batteries
The sound will be distorted and “i” will flash in the display
when the batteries become weak. Replace both batteries with
new ones.
Battery Life
Sony LR6 alkaline (size AA) Sony R6 (size AA)
FM approx. 32 hours approx. 10 hours
AM approx. 23 hours approx. 8 hours
Tips
• Replace the batteries within 3 minutes. Otherwise, the clock setting
will be erased. Frequencies preset in the memory are not erased.
• When the batteries are completely exhausted, the power turns off, and
“i” stops flashing and lights up in the display. All buttons except the
LIGHT button will become inoperable.
The buttons will not become operable again until you replace the
batteries and press POWER ON/OFF to turn on the power and clear
the “i” indication.
Notes on dry batteries
• Insert the batteries with the correct polarity.
• Do not mix new and used batteries. Do not mix different types of
batteries.
• Do not try to charge dry batteries, as they cannot be charged.
• Remove the batteries when the unit is not to be used for a long time.
• Should any battery leakage occur, wipe the battery compartment
thoroughly before installing new batteries.
GB
Preparation10
Page 11
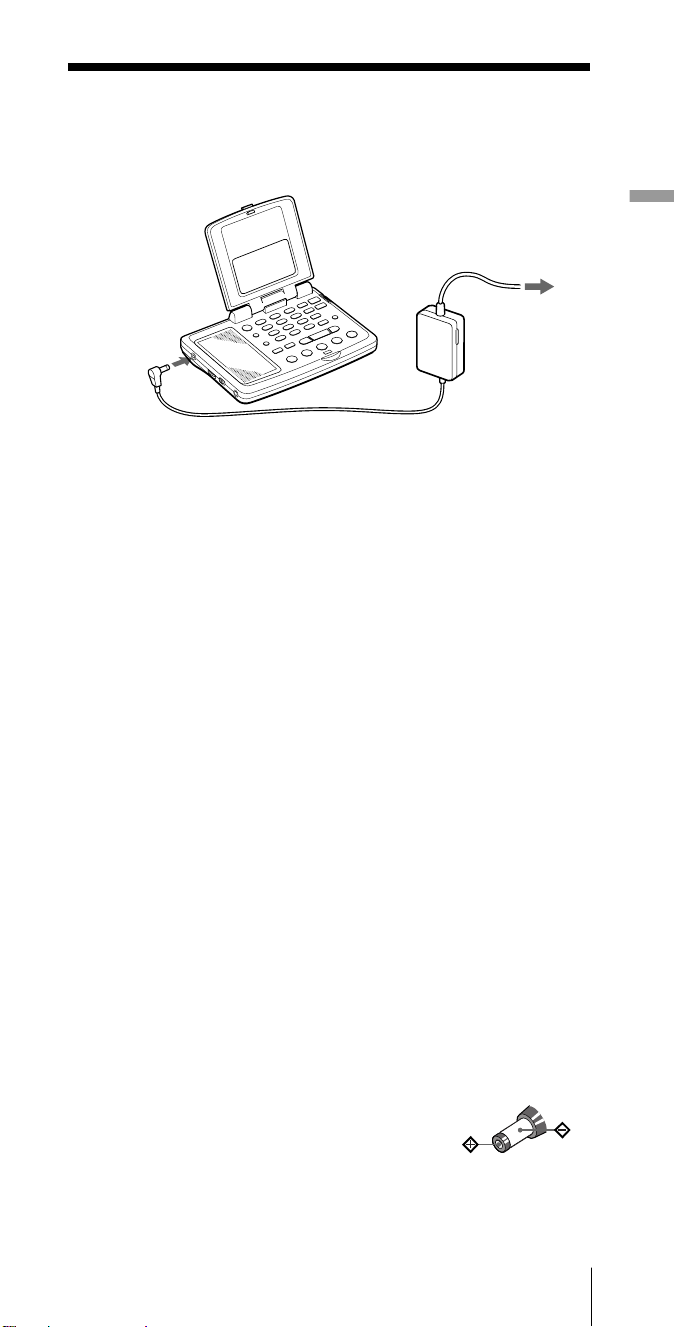
Operating on house current
To operate the unit on house current, connect the supplied AC power
adaptor to the DC IN 3V jack of the unit.
to a wall outlet
to the DC IN 3V jack
Notes on the AC power adaptor
• Do not bend or twist the power cord forcibly. Do not place heavy
objects on the power cord.
• When disconnecting the AC power adaptor from the wall outlet, pull
out by the plug. Do not pull the cord itself.
• Disconnect the AC power adaptor from the wall outlet and the radio
when the unit is not to be used for a long period of time.
• Do not use the supplied AC power adaptor outside the AC 120V
region (USA model only).
Tip
When the AC power adaptor or the car battery cord is plugged into the
DC IN 3V jack, the batteries are disconnected, and the unit automatically
switches to external power source.
Preparation
Operating on car battery
To operate the unit on car batteries, connect a recommended Sony car
battery cord to the DC IN 3V jack of the unit. Refer to its Operating
Instructions for details.
Notes on external power sources
• Keep the batteries installed even when operating on external power, as
they supply power for the unit’s memory backup. Replace the batteries
once a year.
• Turn off the unit when connecting or disconnecting external power
sources. Otherwise, the power may go off and “i” may appear. In
this case, turn on the power again to clear the “i” indication.
• When operating the unit on batteries, first disconnect the AC power
adaptor or the car battery cord from the wall outlet or car battery, then
disconnect the AC power adaptor or the car battery cord from the DC
IN 3V jack of the unit. The unit will not run on batteries as long as the
DC IN 3V jack is plugged in.
• Use only the recommended AC power adaptor or
car battery cord manufactured by Sony. Using AC
power adaptors or car battery cords with different
specifications (polarity of the plug, etc.) will result
in malfunction and damage to the unit.
• Use the supplied AC plug adaptor* if the AC power adaptor plug does
not match your wall outlet.
* Not supplied for models for certain countries. See “Specifications”.
Polarity of the plug
Preparation
11
GB
Page 12
Setting the clock
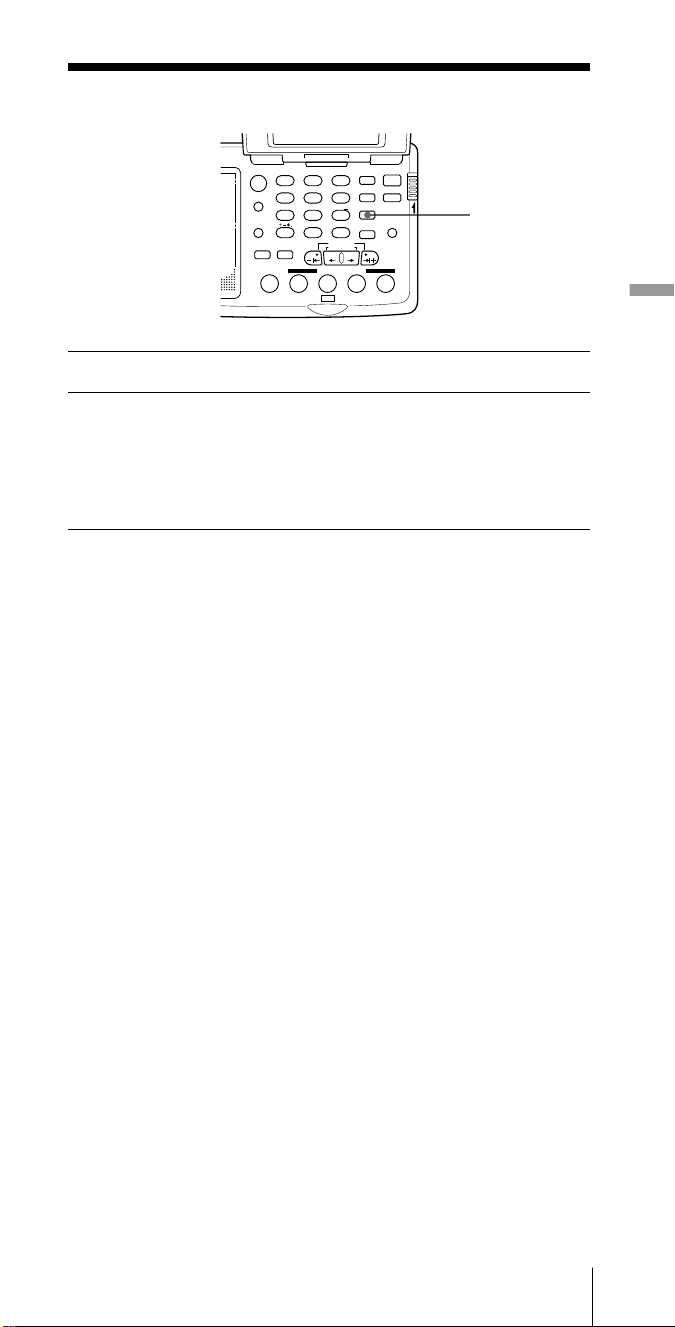
Setting the Local Time
Set the clock if “0:00” flashes in the display (i.e., when you installed the
batteries for the first time or after you reset the clock). Set the clock with
the radio turned off.
HOLD
POWER
ON/OFF
DST
TIME SET
¿/÷
–
|¿/÷|
+
ABC1DEF2GHI
FM/
AM
JKL4MNO5PQR
AM BAND
STU
LOCAL/
7
WORLD
LABEL EDIT
DIRECT
TIMERSTANDBY/
STANDBY TIME SET
ab
STANDBY MEMORY
MY DW VOA BBC OTH
VWX8YZ
<>
/
DISPLAY
0
TIME SET
TIME DIFF
SW STATION CALL
3
6
9
EXE
SYNC
SSB
DST
ERASE
TIME SET
ENTER
POWER
ON/
OFF
SLEEP
LIGHT
JOG/
TUNE/
SCAN˚
LOCAL time signifies the time for your time zone, while WORLD time is
the time for any other time zone in the world.
Clock adjustment is done in LOCAL time. Before setting the clock, refer
to the table on page 15 and check the time difference between your area
and the UTC (Coordinated Universal Time). Names of major cities and
their time differences from the UTC are preset in the unit’s memory.
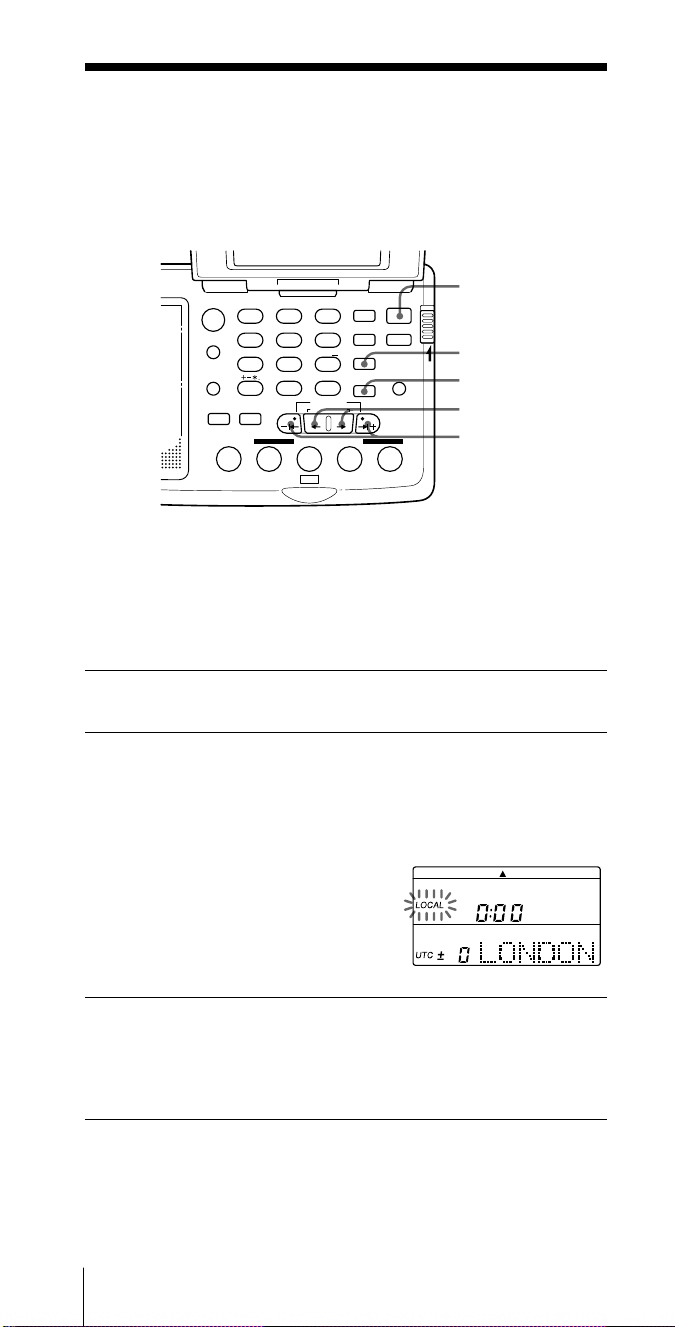
1 If the radio is turned on, press POWER ON/OFF to
turn it off.
2 Hold down TIME SET and press ¿ or ÷ to choose a
city or the time difference between your local time and
the UTC.
When TIME SET is pressed, the clock display will automatically
switch to LOCAL time if WORLD time had been displayed.
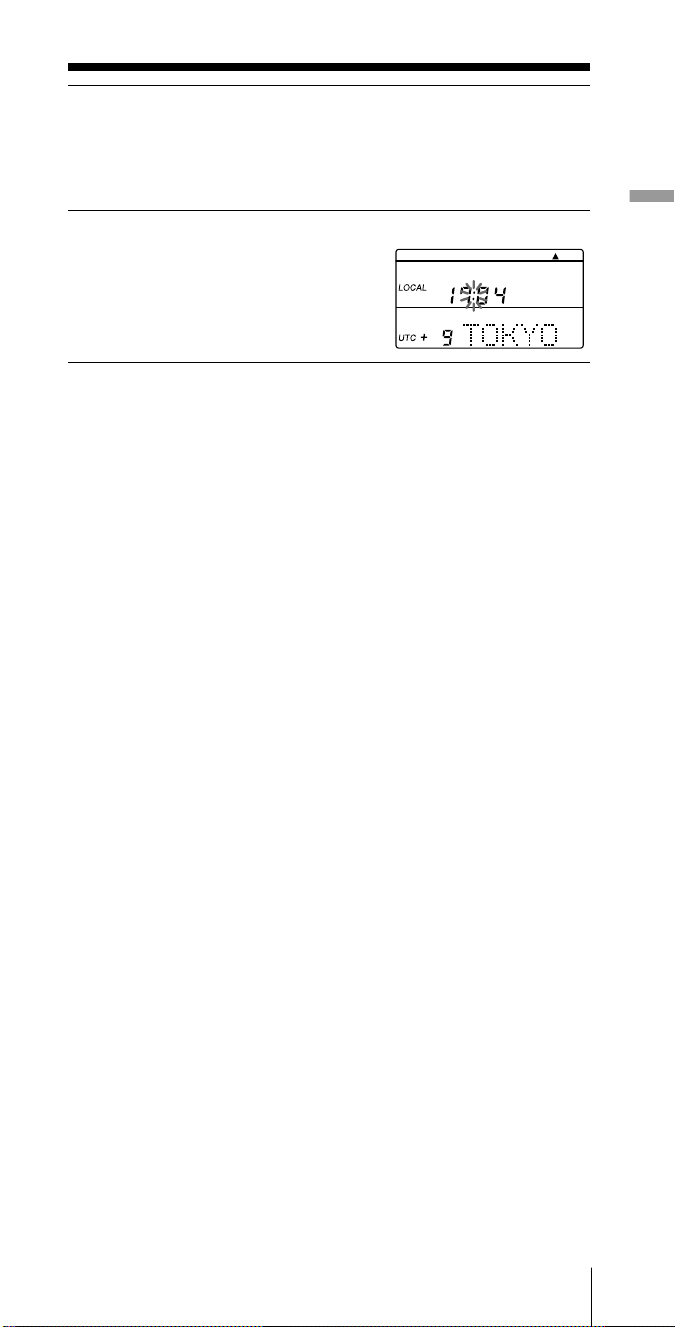
The LOCAL indication flashes. Each
time you press ¿ or ÷, the time
zone indicator will move to the right
or left.
When you release TIME SET, LOCAL
indication will stop flashing and light
up. Your local time zone has been selected.
3 Press DST if your area is now under daylight saving
time.
s appears in the display.
If daylight saving time is not used in your area, or if s is already
displayed, skip this step.
GB
Preparation12
Page 13
4 Hold down TIME SET and press
–
1¿ or ÷1+ to set
the local time.
Each time you press –1¿ or ÷1+, the current time will decrease or
increase by a minute.
To change the digits rapidly, hold down –1¿ or ÷1
+.
5 Release TIME SET.
“ : ” starts flashing and the clock
starts running.
To switch to clock display while the radio is turned on
Press EXE. The current time appears for about 10 seconds and
then returns to the previous display. Press EXE again to return to
the previous display manually.
The display will not switch to the clock while the radio is
running scan.
For areas adopting daylight saving time (summer time)
Press DST to light up the s indication if you are now in the
summer time period (step 3 in the previous page). If you are now
in the standard time period, press DST at the beginning of the
daylight saving time period. Press again at the end of the
daylight saving time period to clear the indication. The time
display will be adjusted accordingly.
Preparation
Note
You cannot set the clock while listening to the radio.
If the radio is on, press POWER ON/OFF first to turn off the radio.
Tips
• The clock is displayed in the 24 hour system.
• Press TIME SET to stop the flashing of “0:00”.
• To adjust the time to the second, release TIME SET at the time of the
tone.
Preparation
13
GB
Page 14
Setting the clock (continued)
Finding out the time in other areas of the world
Besides your local time, you can display the time for any other area in the
world (WORLD time). Turn off the radio to display the WORLD time.
POWER
ON/OFF
DST
HOLD
¿/÷
LOCAL/
WORLD
ABC1DEF2GHI
FM/
AM
JKL4MNO5PQR
AM BAND
STU
LOCAL/
7
WORLD
LABEL EDIT
DIRECT
TIMERSTANDBY/
STANDBY TIME SET
ab
STANDBY MEMORY
MY DW VOA BBC OTH
VWX8YZ
<>
/
DISPLAY
0
TIME SET
TIME DIFF
SW STATION CALL
3
6
9
EXE
SYNC
SSB
DST
ERASE
TIME SET
ENTER
POWER
ON/
OFF
SLEEP
LIGHT
JOG/
TUNE/
SCAN˚
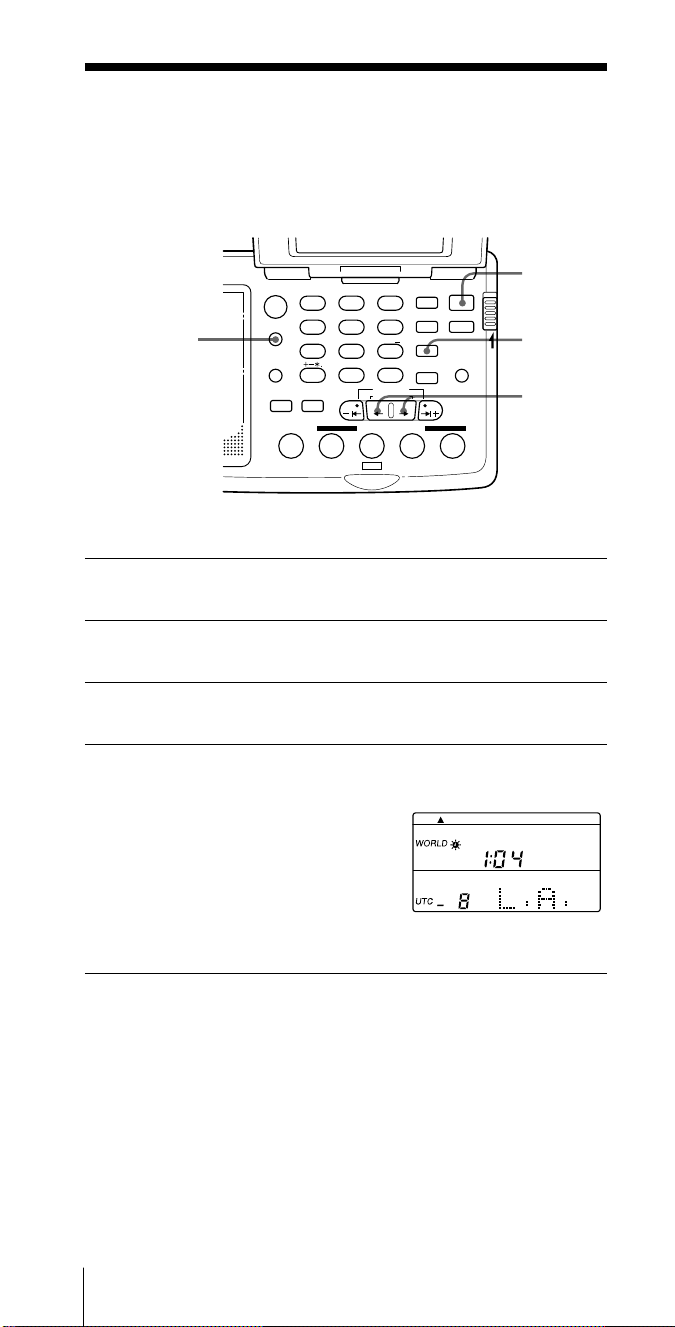
1 If the radio is turned on, press POWER ON/OFF to
turn it off.
2 If the LOCAL indication is displayed, press LOCAL/
WORLD to switch the indication to WORLD.
3 Press ¿ or ÷ to choose a city or the time difference
with the UTC.
4 Press DST to light up the s indication if the specified
area is now under daylight saving time.
If daylight saving time is not used in
the desired area, or if s is already
displayed, skip this step.
The current time for the area you have
specified will appear in the display.
To switch back to the LOCAL time display
Press LOCAL/WORLD again.
If the desired city name or area name is not preset
Select the area by selecting the time difference with the UTC.
To edit the label (i.e., name of the city) for the time zone, see
“Editing labels”, page 36.
GB
Preparation14
Page 15
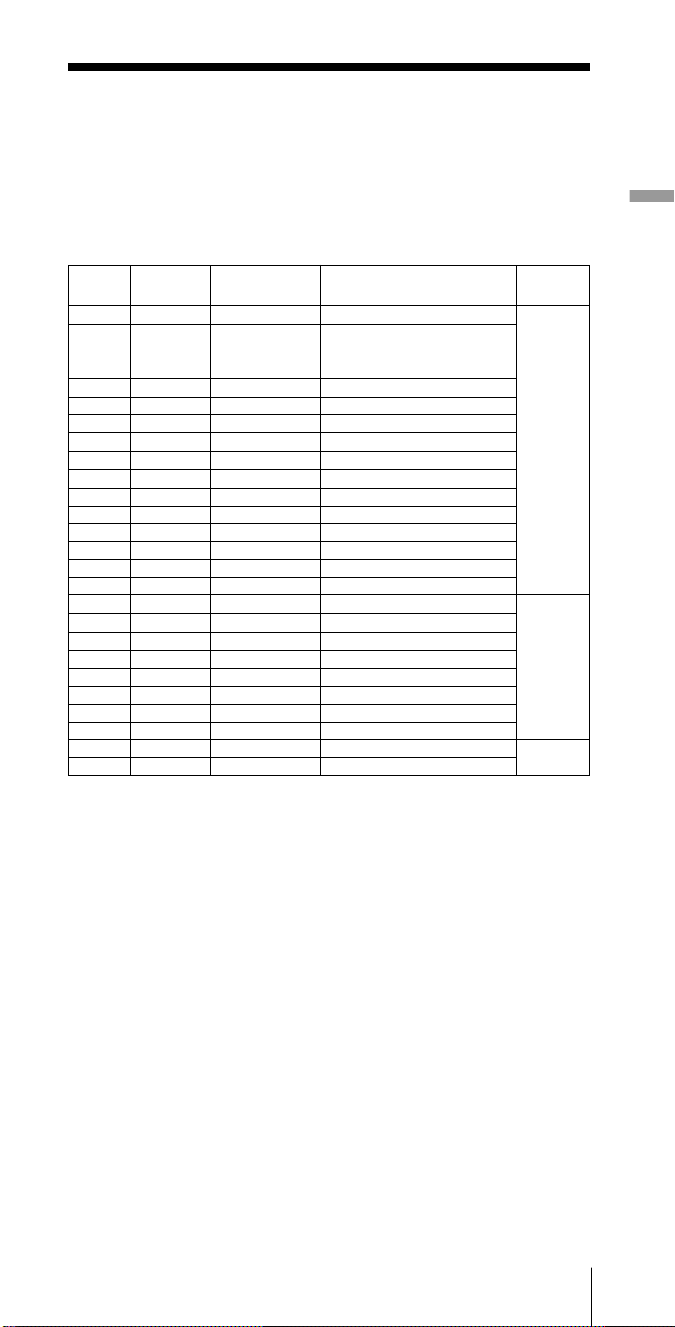
Time difference between local time and UTC
The table shows the time difference of each time zone with the
UTC, which could be formulated as follows:
Time difference = Local time* – UTC
The number of hours marked with a plus sign (+) indicate the
hours ahead of the UTC, while those marked with a minus sign
(–) indicate the hours behind the UTC.
Preparation
Time
difference
± 0 LONDON London
+ 1 C.EURO Central Europe Amsterdam, Berlin, Brussels,
+ 2 CAIRO Cairo Athens, Istanbul
+ 3 JEDDAH Jeddah Nairobi, Riyadh, Moscow
+ 4 DUBAI Dubai
+ 5 KARACH Karachi
+ 6 DHAKA Dhaka(Dacca)
+ 7 BNGKOK Bangkok Jakarta
+ 8 S.PORE Singapore Beijing, Hongkong
+ 9 TOKYO Tokyo Seoul
+ 10 SYDNEY Sydney Guam
+ 11 SOLMON Solomon Noumea
+ 12 AUKLND Auckland Fiji
– 11 SAMOA Samoa
– 10 HAWAII Hawaii Honolulu, Tahiti
– 9 ANCHRG Anchorage
– 8 L.A. Los Angeles San Francisco, Vancouver
– 7 DENVER Denver Calgary
– 6 CHICAG Chicago Dallas, Mexico City
– 5 N.Y. New York Lima, Panama, Toronto
– 4 CARACS Caracas Santiago
– 3 RIO Rio de Janeiro Buenos Aires, San Paulo
– 2 FN.ISL Fernando island
– 1 AZORES Azores Island
Label **
City or area Other cities in the area
Lisbon, Madrid, Paris, Rome,
Stockholm, Vienna, Zurich
Scan step
9 kHz
10 kHz
9 kHz
* Local time prior to DST (daylight saving time) adjustment. The DST
setting does not affect the time difference indication.
** Default labels. To change the labels, see “Editing labels”, page 36.
Automatic adjustment of the MW channel step
A channel step is the basic interval unit in a frequency allocation
system. The MW channel step differs from country to country (10
kHz for North and South American countries, and 9 kHz for
Japan, Europe and other countries). Normally, the scanning or
tuning steps needs to be adjusted to match the system for the
area to scan or manually tune MW frequencies. This unit,
however, determines your local area from your time zone setting
(the time difference from the UTC) and automatically chooses the
appropriate channel step.
Preparation
15
GB
Page 16
Listening to the radio
Various ways of reception
Direct tuning
If you know the frequency of the station you want to listen to, enter the
frequency digits with the number buttons directly.
HOLD
POWER
ON/OFF
Number
buttons
EXEDIRECT
FM/AM
ABC1DEF2GHI
FM/
AM
JKL4MNO5PQR
AM BAND
STU
LOCAL/
7
WORLD
LABEL EDIT
DIRECT
TIMERSTANDBY/
STANDBY TIME SET
ab
STANDBY MEMORY
MY DW VOA BBC OTH
VWX8YZ
<>
/
DISPLAY
0
TIME SET
TIME DIFF
SW STATION CALL
3
6
9
EXE
SYNC
SSB
DST
ERASE
TIME SET
ENTER
POWER
ON/
OFF
SLEEP
LIGHT
JOG/
TUNE/
SCAN˚
1 Press POWER ON/OFF to turn on the radio.
2 Press FM/AM to select either band.
To listen to SW (short wave), MW (medium wave) or LW (long
wave) broadcasts, select AM.
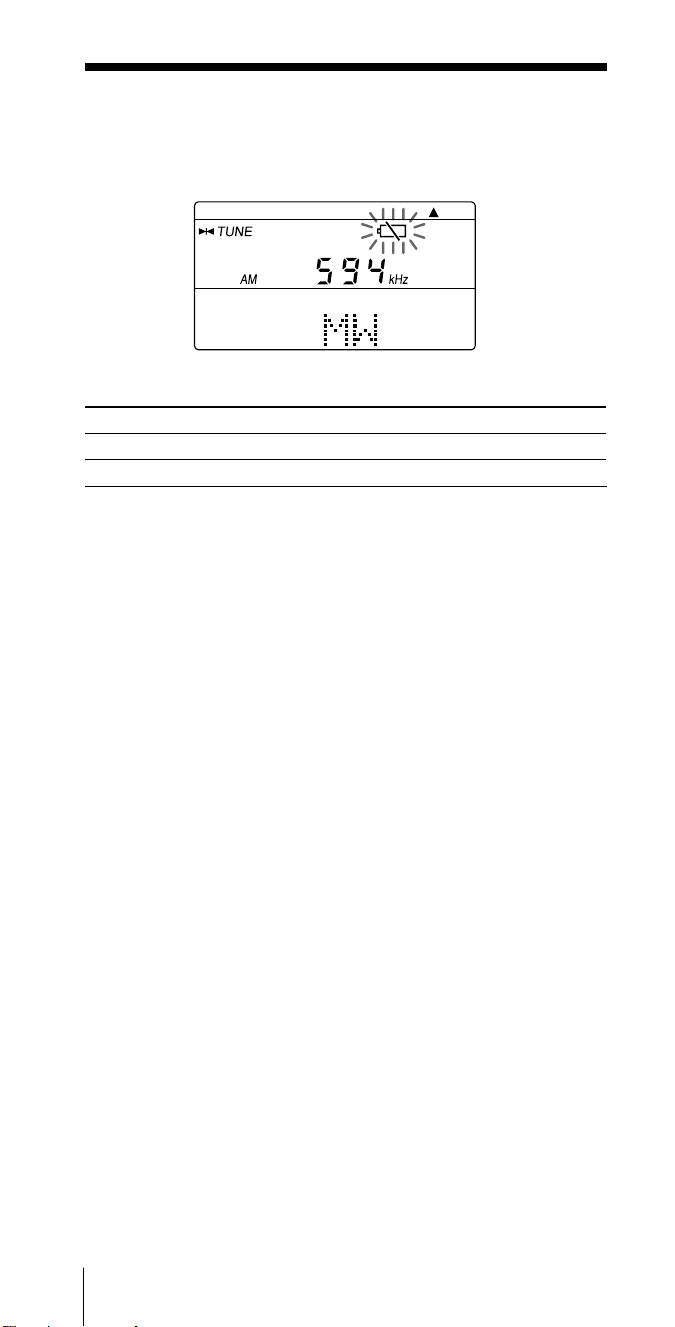
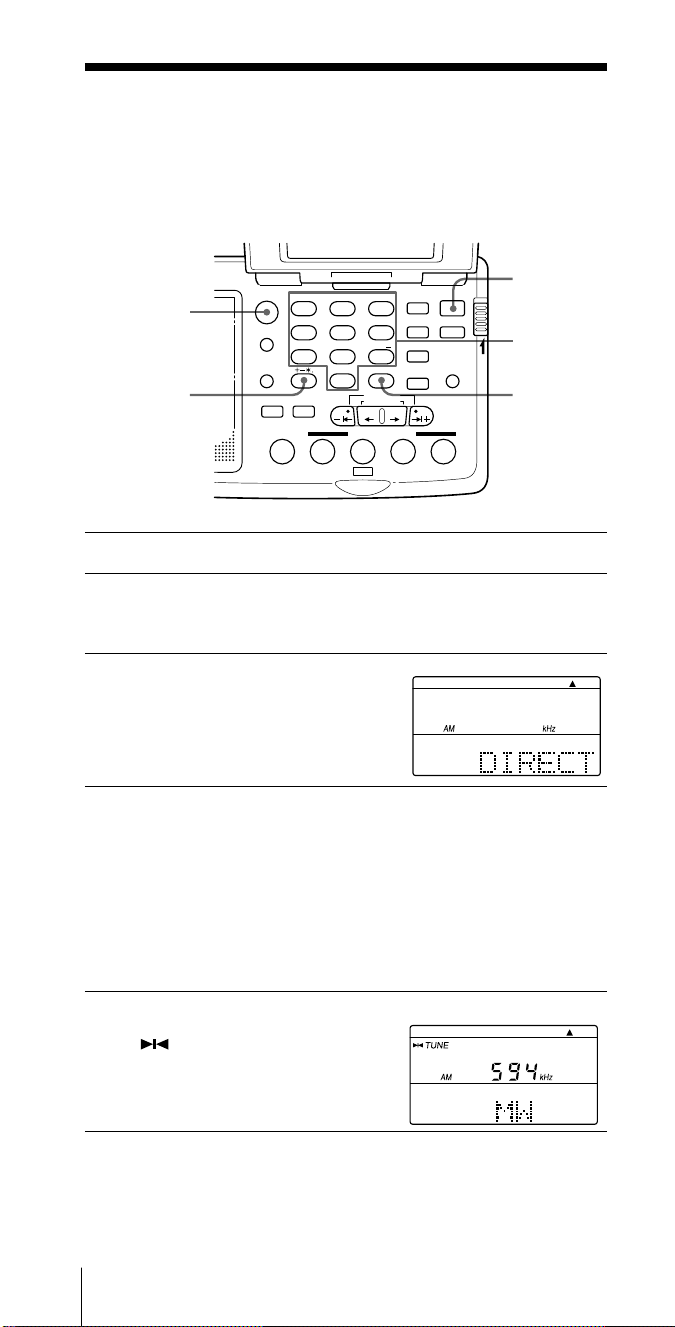
3 Press DIRECT.
The frequency disappears and
“DIRECT“ appears in the
display.
4 Press the number buttons and input the frequency of
the desired station.
FM band: You can ignore the decimal point.
To enter 84.7 MHz, for example, press 8, 4 and 7.
AM band: You can ignore the last 3 digits if they are all zero.
To enter 10,000 kHz, for example, press 1 and 0.
Complete each button operation within 10 seconds.
The minimum frequency step for direct input is 0.05 MHz (50 kHz)
for FM, and 1 kHz for AM.
5 Press EXE to enter.
“
when the station is tuned in.
To correct input
Press DIRECT and repeat from step 3.
GB
Listening to the radio16
“ appears in the display
TUNE
Page 17
If “TRY” “AGAIN” appears in the display
When you enter an invalid frequency (i.e., a figure that is not within the
frequency range of the band you chose), you will hear a beep and “TRY”
“AGAIN” appears in the display.
Check the frequency and repeat from step 3.
Notes
• Complete each operation from step 3 to 5 within 10 seconds. If the
display returns to the previously tuned frequency, repeat from step 3.
• The unit will not beep if the beep is set to BEEP OFF (see “Turning off
the beep”, page 43).
Other operations
To Press or adjust
Fine tune the reception
Adjust the volume VOL
Turn off the radio* POWER ON/OFF
*The radio tunes to the previously tuned frequency when you turn on the
radio.
–
1¿, ¿, ÷, ÷1
+
To improve reception
FM reception
Gently pull out the telescopic antenna
and adjust the length, angle and
direction (see “Extending the antenna”,
page 5).
Listening to the radio
MW/LW reception
Retract the telescopic antenna and rotate
the unit to reorient the built-in ferrite
bar antenna.
SW reception
Gently pull out the telescopic antenna
vertically to its full length.
For SW reception, you can enjoy even
better reception by using the supplied
external antenna (see “Using the
supplied external antenna”, page 32).
Tips
• Plug in the supplied stereo headphones to enjoy FM stereo reception.
Set ST • MONO to ST or MONO to select stereo or monaural
reception. Select MONO when reception is noisy or unclear.
• When listening to news programs, etc., set TONE to NEWS. Speaking
voices will be heard clearer. When listening to music programs, set
TONE to MUSIC.
• Reception of frequencies around 3.0MHz and 3.64 MHz may be
difficult due to internal spurious signals generated by the built-in
oscillators.
Listening to the radio
17
GB
Page 18
Various ways of reception (continued)
Manual tuning
Use –1¿ ,÷1+ or ¿ ,÷ to change the frequency manually step by step.
The outer buttons (–1¿ and ÷1+) change the frequency in large
frequency steps, and the inner buttons (¿ and ÷) in small frequency
steps.
HOLD
POWER
ON/OFF
¿/÷
–
|¿/÷|
FM/AM
AM BAND
ABC1DEF2GHI
FM/
AM
JKL4MNO5PQR
AM BAND
STU
LOCAL/
7
WORLD
LABEL EDIT
DIRECT
TIMERSTANDBY/
STANDBY TIME SET
ab
STANDBY MEMORY
MY DW VOA BBC OTH
VWX8YZ
<>
/
DISPLAY
0
TIME SET
TIME DIFF
SW STATION CALL
3
6
9
EXE
SYNC
SSB
DST
ERASE
TIME SET
ENTER
POWER
ON/
OFF
SLEEP
LIGHT
JOG/
TUNE/
SCAN˚
1 Press POWER ON/OFF to turn on the radio.
2 Press FM/AM to select either band.
To listen to SW, MW or LW broadcasts, select AM.
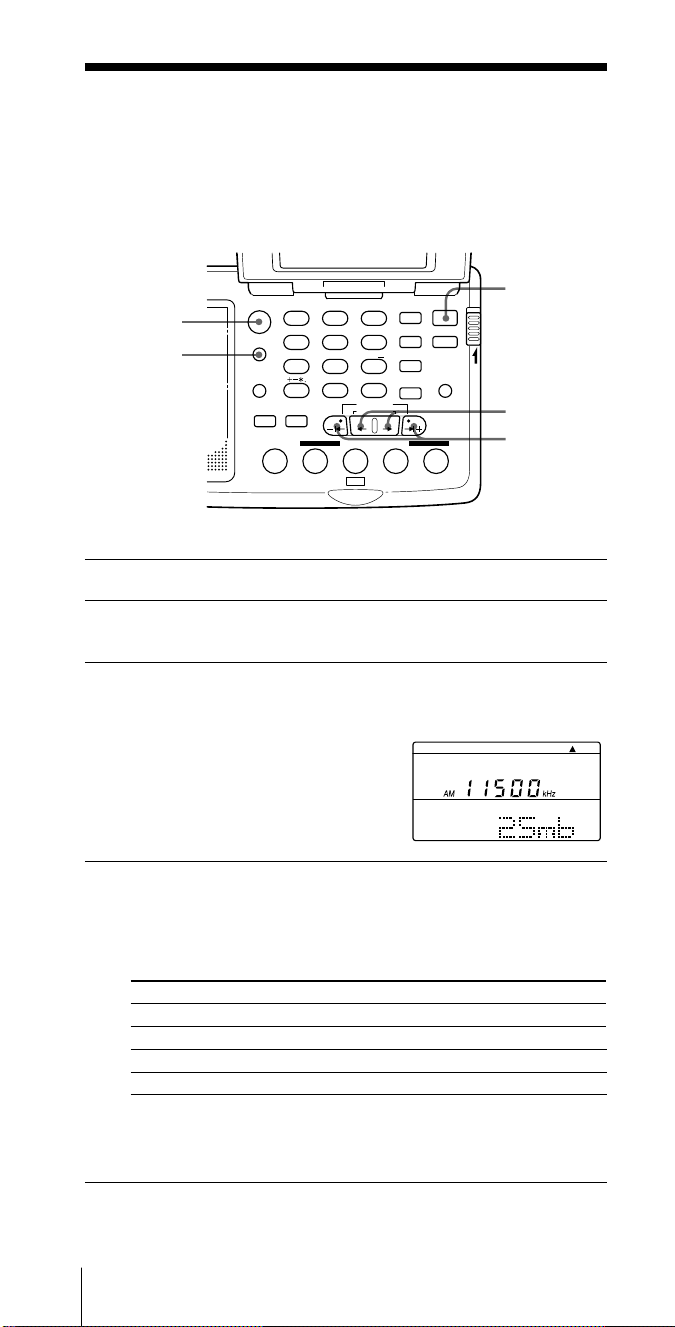
3 For the AM bands, hold down AM BAND and press
–
1¿ or ÷1+ to select MW (medium wave), LW (long
wave) or a meter band (short
wave).
The name of the band or the meter
band and its lowest frequency appears
in the display.
For FM, skip this step.
+
4 Press
GB
Listening to the radio18
–
1¿, ÷1+ or ¿, ÷ repeatedly to tune in to the
desired broadcast station.
With each press, the frequency changes in the channel steps shown
below. (The figures in the parentheses indicate the steps in the SSB
mode).
Band
–
1¿ or ÷1
FM 0.05 MHz 0.05 MHz
SW 5 kHz (1 kHz) 1 kHz (0.1 kHz**)
MW 9 or 10 kHz* (1 kHz) 1 kHz (0.1 kHz**)
LW 9 kHz (1 kHz) 1 kHz (0.1 kHz**)
* The frequency step is adjusted automatically to your time zone
according to your local time zone setting (see “Automatic
adjustment of the MW channel step”, page 15).
** Units of 0.1 kHz are not indicated in the display.
+
¿ or ÷
Page 19
Tips
• The unit starts scan tuning when
–
1¿ or ÷1+ is held down (see “Scan
tuning”, page 20).
• The frequency changes rapidly when ¿ or ÷ is held down, and stops
when released. In the AM bands (MW, SW, and LW), the unit scans
continuously in the range of 150 to 29,999 kHz.
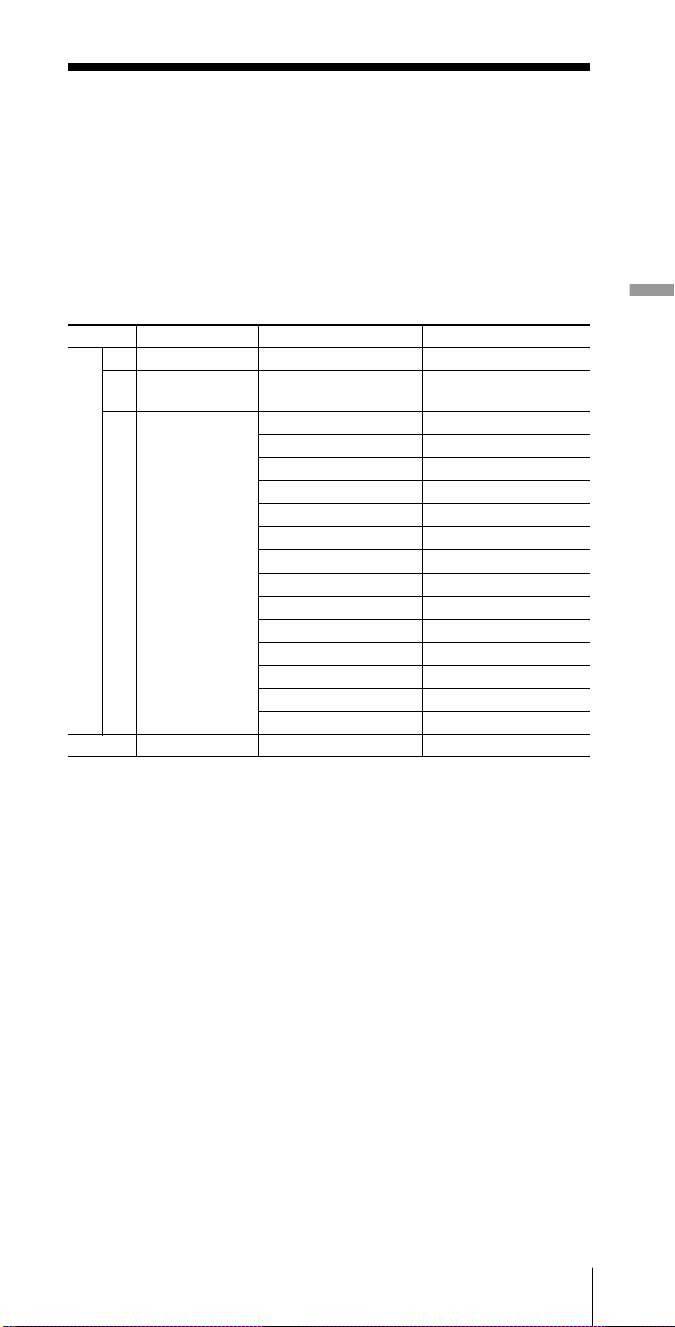
Frequency range of the bands/meter bands
The short wave range is divided into 14 bands that are generally
referred to as “meter bands”.
(kHz for AM / MHz for FM)
Band
AM
*1 10 kHz channel step (see page 15).
*2 9 kHz channel step (see page 15).
Frequency Range Scan Frequency Range
LW 150–529 153–522 —
MW 530–1620
SW 1621–29999
FM 76.00–108.00 76.00–108.00 —
530–1620 *
531–1620 *
2250–2550 120 meter band
3150–3450 90 meter band
3850–4050 75 meter band
4700–5100 60 meter band
5900–6250 49 meter band
7100–7400 41 meter band
9400–10000 31 meter band
11500–12150 25 meter band
13500–13900 22 meter band
15000–15700 19 meter band
17450–18000 16 meter band
18850–19100 15 meter band
21450–21950 13 meter band
25600–26100 11 meter band
1
2
Meter band
—
Listening to the radio
Note
The actual frequency range of short wave broadcasts and the range of the
meter bands for this unit may differ. Refer to the supplied “Wave
Handbook” for more information.
Listening to the radio
19
GB
Page 20
Various ways of reception (continued)
Scan tuning
FM/AM
AM BAND
ABC1DEF2GHI
FM/
AM
JKL4MNO5PQR
AM BAND
STU
LOCAL/
WORLD
LABEL EDIT
TIMERSTANDBY/
STANDBY TIME SET
ab
STANDBY MEMORY
VWX8YZ
7
<>
/
DIRECT
MY DW VOA BBC OTH
DISPLAY
EXE
0
TIME SET
TIME DIFF
SW STATION CALL
POWER
ON/
SYNC
3
6
9
SSB
DST
ERASE
TIME SET
ENTER
LIGHT
JOG/
TUNE/
SCAN˚
OFF
SLEEP
HOLD
1 Press POWER ON/OFF to turn on the radio.
2 Press FM/AM to select either band.
To listen to SW, MW or LW broadcasts, select AM.
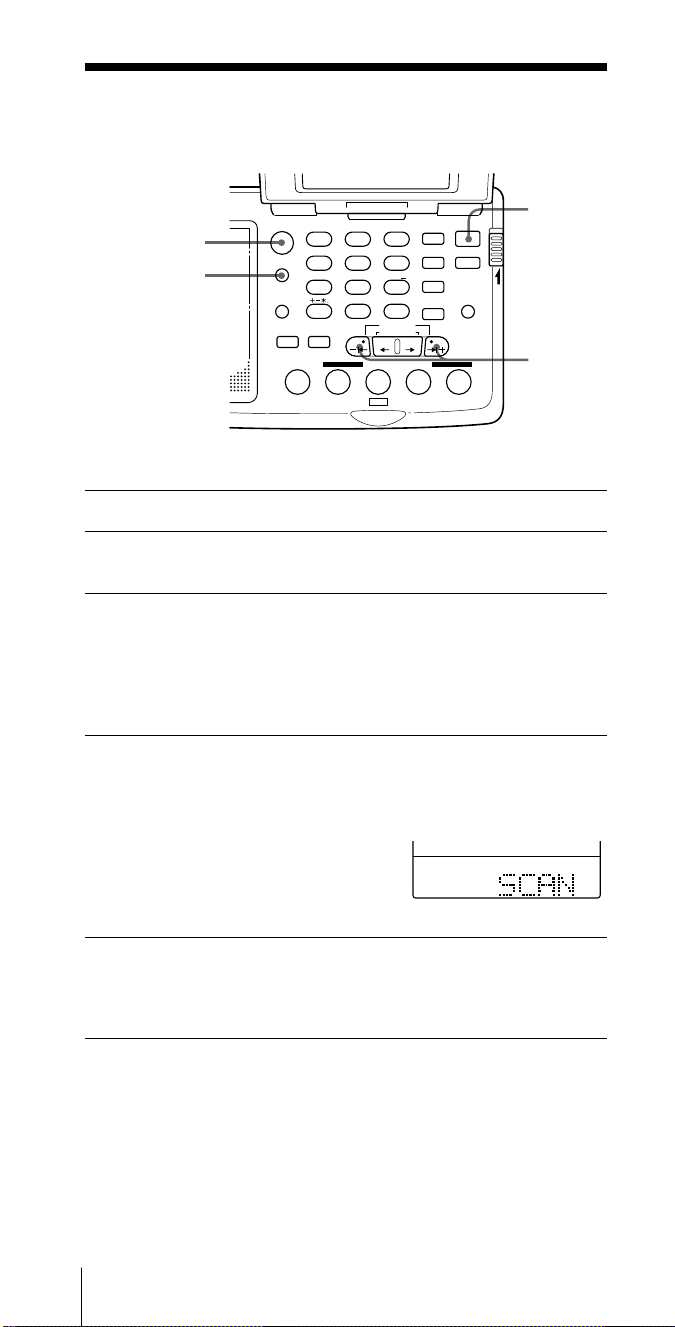
3 For AM bands, hold down AM BAND and press
or ÷1+ to select MW (medium wave), LW (long wave)
or a meter band (short wave).
The name of the band or the meter band and its lowest frequency
appear in the display.
For FM, skip this step.
4 Hold down
scanning.
“SCAN” is displayed. The unit stops at each reception and
resumes scanning after about 3 seconds.
The unit scans within the frequency
range of the chosen band or meter
band (see “Frequency range of the
bands/meter bands”, page 19). In the
SSB reception mode, the unit scans the
whole 150 to 29999 kHz frequency range.
–
1¿ or ÷1+. Release when the unit starts
POWER
ON/OFF
–
|¿/÷|
–
1¿
+
5 Press
GB
Listening to the radio20
–
1¿ or ÷1+ to stop scanning and listen to the
desired broadcast.
“SCAN” disappears and the name of the band appears in the
display.
Page 21

Tips
• The unit scans the frequencies in descending order when holding
down –1¿, and in ascending order when holding down ÷1+.
• To change the scanning direction, hold down either –1¿ or ÷1
opposite to the current direction. This is convenient when, for example,
you want to return to the previous reception after the unit has resumed
scanning.
• When scanning for MW broadcasts at night when reception is intense,
or when scanning under prevalent interference, the unit may stop
scanning to null broadcasts frequently. Switch ATT to ON and adjust
sensitivity with the ATT Control (see “Controlling scan stops”, below).
Under normal conditions, set ATT to OFF.
+
Controlling scan stops — using the ATT switch and the ATT
Control
Use the ATT (attenuator) switch and the ATT Control to control
reception sensitivity when the unit stops scanning to null
broadcasts frequently or when scanning under prevalent
interference. Under normal conditions, use the radio with ATT
set to OFF (i.e., with maximum sensitivity).
ATT Control
Listening to the radio
ATT
The ATT Control is activated when ATT is switched ON. Turn
the ATT Control toward MAX to reduce sensitivity. The radio
will skip weaker signals and stop at only stronger ones.
Note
If the ATT Control is turned too much toward MAX, the radio will not
stop on any weaker signals at all. Switch ATT to OFF if you do not need
to use the attenuator.
Listening to the radio
21
GB
Page 22
Various ways of reception (continued)
Preset tuning
You can preset a total of 20 stations of your choice to the number buttons
(10 for FM and 10 for AM).
Presetting stations
HOLD
POWER
ON/OFF
Number
buttons
ENTER
FM/AM
ABC1DEF2GHI
FM/
AM
JKL4MNO5PQR
AM BAND
STU
LOCAL/
7
WORLD
LABEL EDIT
DIRECT
TIMERSTANDBY/
STANDBY TIME SET
ab
STANDBY MEMORY
MY DW VOA BBC OTH
VWX8YZ
<>
/
DISPLAY
0
TIME SET
TIME DIFF
SW STATION CALL
3
6
9
EXE
SYNC
SSB
DST
ERASE
TIME SET
ENTER
POWER
ON/
OFF
SLEEP
LIGHT
JOG/
TUNE/
SCAN˚
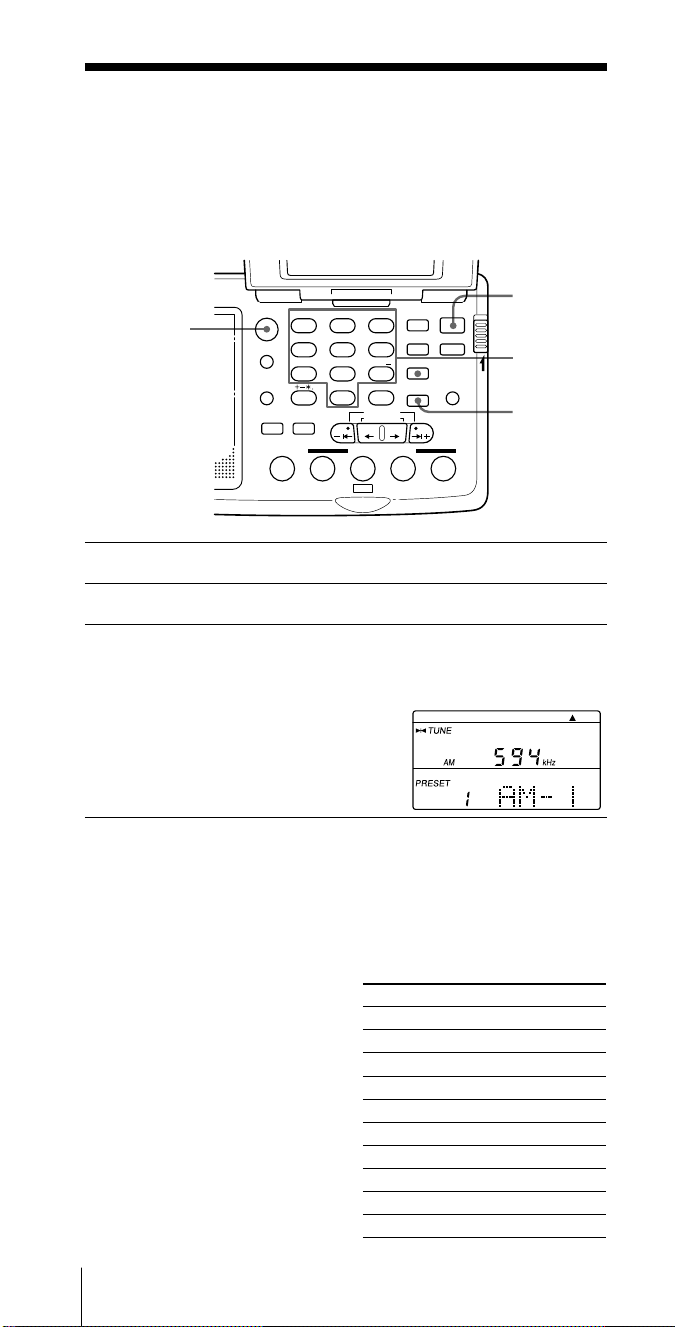
1 Press POWER ON/OFF to turn on the radio.
2 Tune in to the station you want to preset.
3 Hold down ENTER and press a number button (0–9) of
your choice.
When ENTER is held down, “PRESET MY” will flash in the
display.
A beep sounds when a number button
is pressed. The station is stored to the
selected button. The preset number
and the preset label are displayed.
Note
If a station is already stored to the button you chose, it will be
overwritten by the new preset. If the preset label had been edited, it will
return to the default setting.
Default preset labels
Each time a station is preset, the
preset key is assigned the default
preset label as shown.
To change labels, see
“Editing labels”, page 36.
GB
Listening to the radio22
Button AM FM
1 AM-1 FM-1
2 AM-2 FM-2
3 AM-3 FM-3
4 AM-4 FM-4
5 AM-5 FM-5
6 AM-6 FM-6
7 AM-7 FM-7
8 AM-8 FM-8
9 AM-9 FM-9
0 AM-0 FM-0
Page 23
Tuning in to a preset station
POWER
FM/AM
ABC1DEF2GHI
FM/
AM
JKL4MNO5PQR
AM BAND
STU
VWX8YZ
LOCAL/
7
WORLD
LABEL EDIT
STANDBY TIME SET
STANDBY MEMORY
<>
/
DIRECT
0
TIMERSTANDBY/
ab
SW STATION CALL
MY DW VOA BBC OTH
3
6
9
DISPLAY
EXE
TIME SET
TIME DIFF
SYNC
SSB
DST
ERASE
TIME SET
ENTER
POWER
ON/
OFF
SLEEP
LIGHT
JOG/
TUNE/
SCAN˚
ON/OFF
Number
HOLD
buttons
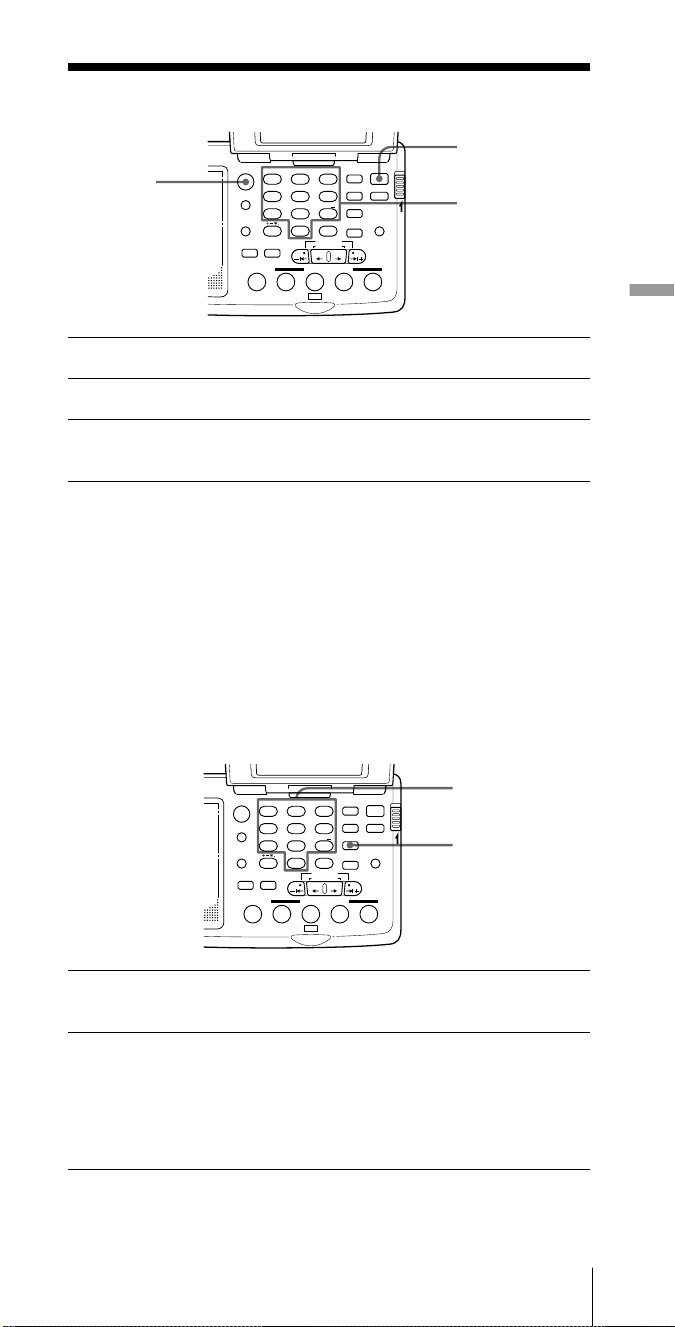
1 Press POWER ON/OFF to turn on the radio.
2 Press FM/AM to select either band.
3 Press a number button (0–9) of your choice.
The radio receives the station assigned to the button.
If no station is preset
A beep sounds and “MEMORY” “EMPTY” appears in the
display. Then the display will return to the previous condition.
Notes
• The radio may have frequencies stored in the preset memory at factory
shipment.
• The unit will not beep if the beep is set to BEEP OFF (see “Turning off
the beep”, page 43).
Listening to the radio
Erasing a preset station
ABC1DEF2GHI
JKL4MNO5PQR
STU
VWX8YZ
7
<>
/
0
TIME SET
TIME DIFF
SW STATION CALL
DISPLAY
EXE
3
6
9
FM/
AM
AM BAND
LOCAL/
WORLD
LABEL EDIT
DIRECT
TIMERSTANDBY/
STANDBY TIME SET
ab
STANDBY MEMORY
MY DW VOA BBC OTH
SYNC
SSB
DST
ERASE
TIME SET
ENTER
POWER
OFF
SLEEP
LIGHT
JOG/
TUNE/
SCAN˚
ON/
Number
buttons
ERASE
HOLD
1 Press a number button (0–9) for the preset station you
want to erase.
2 Hold down ERASE.
The preset number flashes in the display while ERASE is held
down.
A beep sounds after 3 seconds and the station assigned to the
button you chose is erased. The preset number and the preset label
disappear.
Note
When a preset station is erased, any changes to its default label is erased
as well.
Listening to the radio
23
GB
Page 24
Various ways of reception (continued)
SW STATION CALL tuning
Tune in to major short wave stations by just pressing the station buttons:
DW, VOA, BBC and OTH (others). The radio automatically chooses the
frequencies used in your time zone from the SW STATION CALL ROM*
encased at the bottom of the unit, scans for them, and stops scan at
reception.
ABC1DEF2GHI
FM/
AM
JKL4MNO5PQR
AM BAND
STU
LOCAL/
WORLD
LABEL EDIT
TIMERSTANDBY/
STANDBY TIME SET
ab
STANDBY MEMORY
VWX8YZ
7
<>
/
DIRECT
MY DW VOA BBC OTH
DISPLAY
EXE
0
TIME SET
TIME DIFF
SW STATION CALL
POWER
ON/
SYNC
3
6
9
SSB
DST
ERASE
TIME SET
ENTER
OFF
SLEEP
LIGHT
JOG/
TUNE/
SCAN˚
POWER
ON/OFF
HOLD
Station
name
buttons
*ROM = Read Only Memory
1 Set the time zone to your area.
For LOCAL time, see “Setting the Local Time”, page 12.
For WORLD time, see “Finding out the time in other areas of the
world”, page 14.
SW STATION CALL automatically selects only the frequencies
that are receivable in the area corresponding to your time
zone setting, regardless of LOCAL or WORLD time. Thus, it is
crucial that you set the time zone properly to match your current
location before using SW STATION CALL.
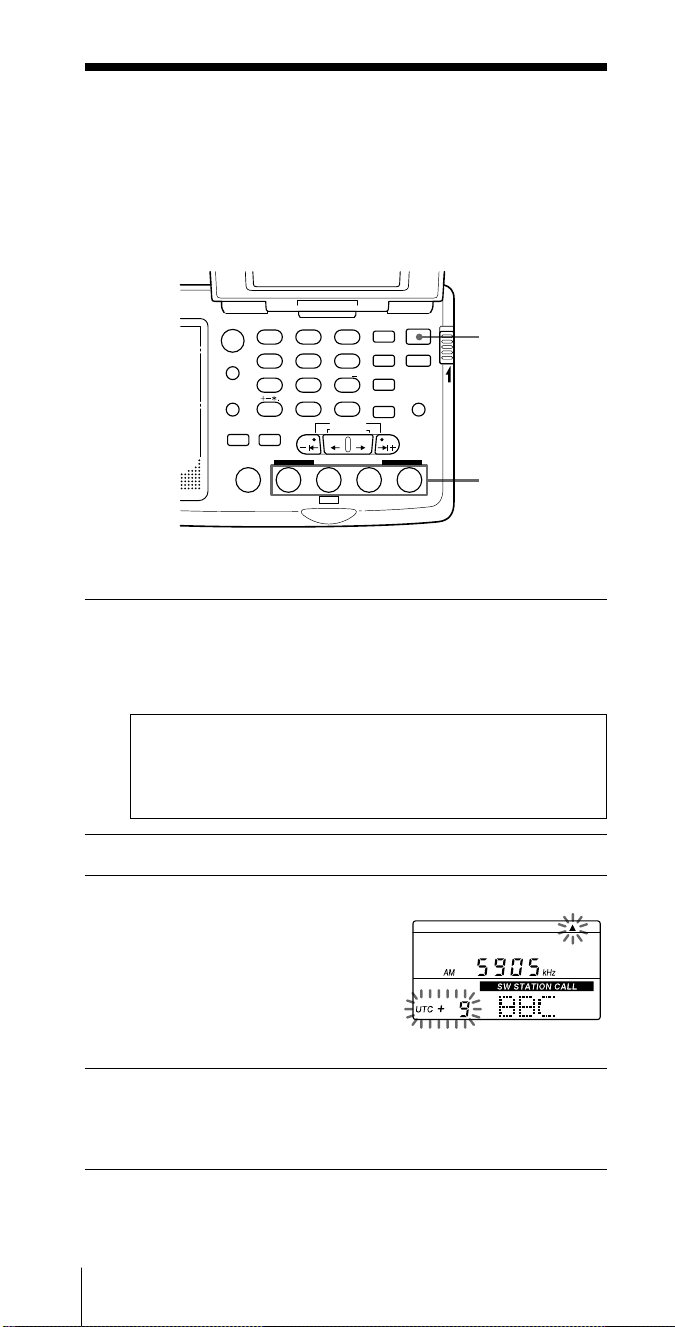
2 Press POWER ON/OFF to turn on the radio.
3 Press the station button of your choice.
“SW STATION CALL”, the station
name and a frequency is displayed.
The time difference from the UTC
and the time zone indicator flash for
about 3 seconds, and then light up.
Confirm your time zone setting.
The frequency actually displayed
may be different from the illustration.
4 Press the same station button again.
The radio scans the frequencies for your area in ascending order,
and stops at reception.
Press the button again to resume scanning.
To stop scanning
Press the same station button during scan.
GB
Listening to the radio24
Page 25

To manually recall the selected frequencies one by one
Hold down the station button and press ¿ , ÷ or –1¿ , ÷1
+.
The frequency changes quickly when –1¿ or ÷1+ is held down,
and stops when released.
Tip
When scanning at night when reception is intense, or when scanning
under prevalent interference, the unit may stop scanning to null
broadcasts frequently. Switch ATT to ON and adjust sensitivity with the
ATT Control (see “Controlling scan stops”, page 21). Under normal
conditions, set ATT to OFF.
Stations recalled by the SW STATION CALL station buttons
Button Station and program
DW English and German programs of Deutsche Welle
VOA English programs of Voice of America
BBC English programs of British Broadcasting Corporation
OTH Choose one of the following*;
R.NED – English and Dutch programs of Radio Nederland
RFI –
English and French programs of Radio France International
R.JPN – English and Japanese programs of Radio Japan
REE –
English and Spanish programs of Radio Exterior de España
CRI –
English and Chinese programs of China Radio International
*Selecting the station for the OTH button
Listening to the radio
DISPLAY
EXE
TIME SET
TIME DIFF
POWER
ON/
SYNC
3
OFF
SSB
SLEEP
6
DST
ERASE
9
LIGHT
TIME SET
ENTER
JOG/
TUNE/
SCAN˚
HOLD
¿/÷
OTH
ABC1DEF2GHI
FM/
AM
JKL4MNO5PQR
AM BAND
STU
VWX8YZ
LOCAL/
7
WORLD
<>
LABEL EDIT
TIMERSTANDBY/
STANDBY TIME SET
STANDBY MEMORY
/
DIRECT
0
ab
SW STATION CALL
MY DW VOA BBC OTH
Turn off the radio if it is turned on.
Hold down OTH and press ¿ or ÷. Release OTH when the
station of your choice appears in the display.
Steps for reception is the same as the other SW STATION CALL
buttons.
Listening to the radio
25
GB
Page 26

When there is no reception
If the radio was not able to receive any of the frequencies for the
time zone stored in the ROM, scanning stops with a beep when
the radio returns to the frequency where it started scanning.
Lowest
frequency
Scan start
frequency
Highest
frequency
Short wave reception may be difficult at times due to various
factors, such as sunspot activity and atmospheric conditions.
Furthermore, the major broadcast stations whose data are stored
in the ROM may change the broadcast time and/or frequencies
at the change of season, etc. In such cases, the radio may not be
able to receive the frequencies stored in the SW STATION CALL
ROM.
Updating the SW STATION CALL ROM
To conform with possible changes in frequencies, the SW
STATION CALL ROM is designed to be replaceable by the user
to an updated version of the ROM. The newest SW STATION
CALL ROM is sold by F Corporation. The ROM is to be updated
in around October every year. We recommend the ROM to be
replaced at least once in 2 to 3 years.
To purchase the newest ROM, refer to “Purchasing the latest SW
STATION CALL ROM” and contact F Corporation.
To exchange the ROM, see “Exchanging the SW STATION CALL
ROM”, page 46.
Notes
• Many of the worldwide broadcast programs of the major broadcast
stations stored in the ROM are broadcast only at certain times of the
day. If the station is not broadcasting on the scanned frequency at the
time, the radio will not receive any broadcast or receive broadcast by
some other station, such as a local station, broadcasting on the same
frequency.
• If the frequency is changed by manual tuning, etc., when “SW
STATION CALL” indication is lit in the display, the radio will exit SW
STATION CALL and the indication will disappear.
• If there is no frequency for the station corresponding to the time zone
stored in the ROM, a beep sounds, “MEMORY” “EMPTY” appears in
the display, and the radio returns to the previous condition.
• If you press a station button without the ROM in the ROM
compartment of the radio, a beep sounds, “NO” “ROM” appears in the
display, and the radio returns to the previous condition. If the ROM is
displaced when “SW STATION CALL” indication is lit in the display,
a beep sounds, “NO” “ROM” appears in the display, and the radio
changes to manual tuning.
• If “NO” “ROM” is displayed with the SW STATION CALL ROM
inserted in the ROM compartment, the contact surface of the ROM
may be dirty. See “Cleaning the SW STATION CALL ROM contact
surface”, page 46, and clean the contact surface with a cotton swab.
Do not clean the contact springs of the main unit, as they may deform
and cause a malfunction.
GB
Listening to the radio26
Page 27
Various ways of reception (continued)
MY-Memory tuning
Preset up to 100 frequencies of any band (FM, SW, MW or LW) to the MY
button. You can scan these stations or tune in one by one.
Presetting stations to MY-Memory
FM/AM
MY
ABC1DEF2GHI
FM/
AM
JKL4MNO5PQR
AM BAND
STU
LOCAL/
WORLD
LABEL EDIT
TIMERSTANDBY/
STANDBY TIME SET
ab
STANDBY MEMORY
VWX8YZ
7
<>
/
DIRECT
MY DW VOA BBC OTH
DISPLAY
EXE
0
TIME SET
TIME DIFF
SW STATION CALL
POWER
ON/
SYNC
3
6
9
SSB
DST
ERASE
TIME SET
ENTER
SLEEP
LIGHT
JOG/
TUNE/
SCAN˚
OFF
POWER
ON/OFF
HOLD
ENTER
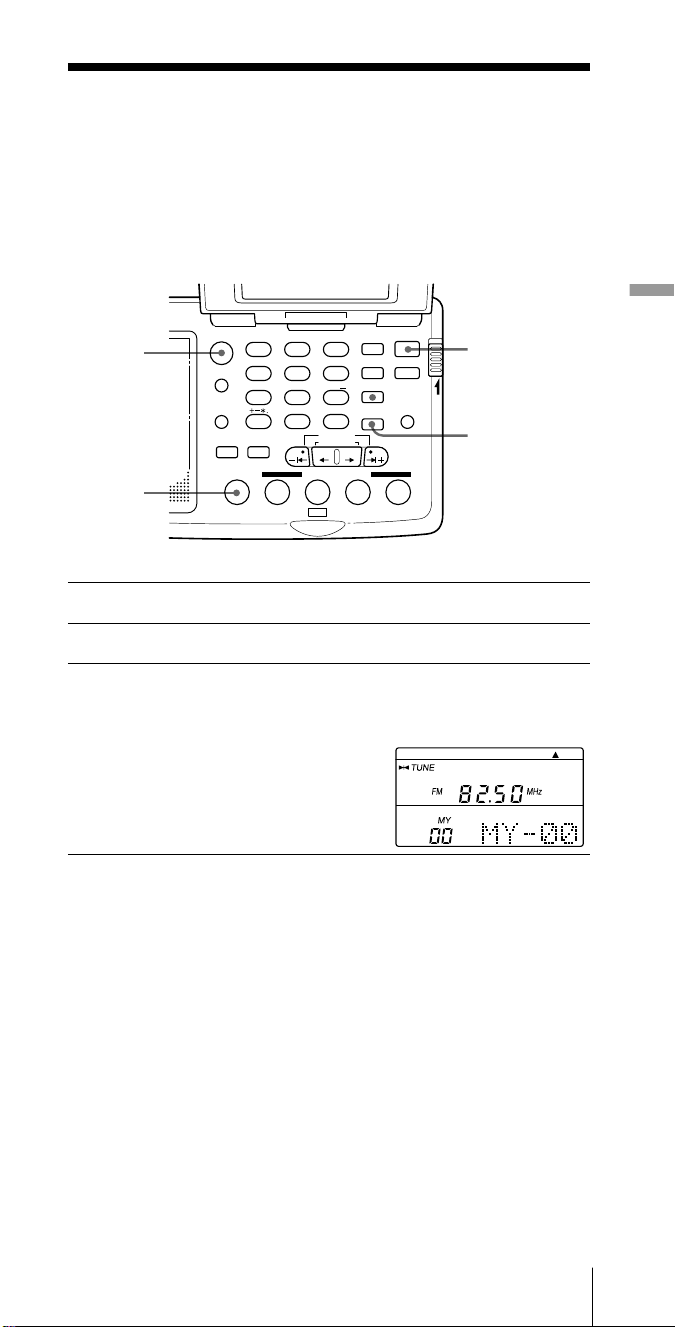
1 Press POWER ON/OFF to turn on the radio.
2 Tune in to the station you want to preset.
Listening to the radio
3 Hold down ENTER and press MY.
When ENTER is held down, “PRESET MY” will flash in the
display.
A beep sounds when MY is pressed.
The station is stored to the lowest
available MY-Memory number (00 to
99). The MY-Memory number and the
MY-Memory label are displayed.
Default MY-Memory labels
Each time a station is stored to MY-Memory, it is assigned the
default MY-Memory label “MY-xx” (with the memory number in
place of “xx”).
To change labels, see “Editing labels”, page 36.
Note
The radio may have frequencies stored in MY-Memory at factory
shipment. In this case, erase them before presetting stations to MYMemory (see “Erasing a MY-Memory preset”, page 29).
Tips
• If you press MY with all the MY-Memory numbers (00 to 99) assigned
a station, a beep sounds, “MEMORY” “FULL” appears in the display,
and the radio returns to the previous condition.
• MY-Memory tuning is not affected by the time zone setting.
Listening to the radio
27
GB
Page 28
Tuning in to a MY-Memory station
DISPLAY
EXE
TIME SET
TIME DIFF
POWER
ON/
SYNC
3
OFF
SLEEP
SSB
6
DST
ERASE
9
LIGHT
TIME SET
ENTER
JOG/
TUNE/
SCAN˚
POWER
ON/OFF
HOLD
MY
ABC1DEF2GHI
FM/
AM
JKL4MNO5PQR
AM BAND
STU
VWX8YZ
LOCAL/
7
WORLD
<>
LABEL EDIT
TIMERSTANDBY/
STANDBY TIME SET
ab
STANDBY MEMORY
/
DIRECT
0
SW STATION CALL
MY DW VOA BBC OTH
1 Press POWER ON/OFF to turn on the radio.
2 Press MY.
The radio enters the MY-Memory tuning mode.
3 Press MY again.
The radio scans the frequencies stored in MY-Memory and stops at
reception.
Press the button again to resume scanning.
To stop scanning
Press MY during scan.
To manually recall the MY-Memory frequencies one by one
Hold down MY and press ¿ , ÷ or –1¿ , ÷1
The frequency changes quickly when –1¿ or ÷1+ is held down
and stops when released.
+.
Tips
• MY-Memory scans only the stored memory numbers and skips the
empty ones.
• MY-Memory scans fastest if the frequencies are stored in ascending or
descending order.
• If MY is pressed with no frequency stored in MY-Memory, a beep
sounds and “MEMORY” “EMPTY” appears in the display. Then the
display returns to the previous condition.
• When scanning at night when reception is intense, or when scanning
under prevalent interference, the unit may stop scanning to null
broadcasts frequently. Switch ATT to ON and adjust sensitivity with
the ATT Control (see “Controlling scan stops”, page 21). Under normal
conditions, set ATT to OFF.
When there is no reception
If any of the frequencies stored in MY-Memory was not received,
scanning stops with a beep when the radio returns to the
frequency where it started scanning.
Lowest stored
MY-Memory number
GB
Listening to the radio28
Scan start
MY-Memory number
Highest stored
MY-Memory number
Page 29
Erasing a MY-Memory preset
DISPLAY
EXE
TIME SET
TIME DIFF
POWER
ON/
SYNC
3
OFF
SLEEP
SSB
6
DST
ERASE
9
LIGHT
TIME SET
ENTER
JOG/
TUNE/
SCAN˚
ERASE
HOLD
ABC1DEF2GHI
FM/
AM
JKL4MNO5PQR
AM BAND
STU
VWX8YZ
LOCAL/
7
WORLD
<>
LABEL EDIT
TIMERSTANDBY/
STANDBY TIME SET
ab
STANDBY MEMORY
/
DIRECT
0
SW STATION CALL
MY DW VOA BBC OTH
1 Recall the MY-Memory number you want to erase.
2 Hold down ERASE.
The MY-Memory number flashes in the display while ERASE is
held down.
A beep sounds after 3 seconds and the station assigned to the MYMemory number is erased. The MY-Memory number and the MYMemory label disappear.
Note
When a MY-Memory station is erased, any changes to its default label is
erased as well.
To change the station stored in MY-Memory
You cannot overwrite a frequency stored in MY-Memory with a
new one. Erase the particular MY-Memory number first, then
store a new frequency.
Listening to the radio
Note
MY-Memory stores stations to the lowest available MY-Memory number.
Note, thus, that if a MY-Memory number lower than the one you erased
is available, the new frequency will be stored to that number.
Listening to the radio
29
GB
Page 30

Receiving SSB and CW Transmissions
You can receive SSB (Single Side Band) and CW (Continuous Wave)
transmissions with the built-in BFO circuit.
FM/AM
ABC1DEF2GHI
FM/
AM
JKL4MNO5PQR
AM BAND
STU
LOCAL/
WORLD
LABEL EDIT
TIMERSTANDBY/
STANDBY TIME SET
ab
STANDBY MEMORY
VWX8YZ
7
<>
/
DIRECT
MY DW VOA BBC OTH
DISPLAY
EXE
0
TIME SET
TIME DIFF
SW STATION CALL
POWER
ON/
SYNC
3
6
9
SSB
DST
ERASE
TIME SET
ENTER
JOG/
TUNE/
SCAN˚
OFF
SLEEP
LIGHT
HOLD
1 Press POWER ON/OFF to turn on the radio.
2 Press FM/AM and select AM.
3 Press SSB to select USB or LSB/CW.
Each time SSB is pressed, the display
changes as follows:
(Normal mode) USB LSB/CW
4 Tune in to the desired station.
For tuning methods, see “Various ways of reception”, pages 16 to
29.
POWER
ON/OFF
SSB
Tip
For more on SSB and CW, refer to “Tips on radio waves”, page 50.
Notes
• The USB or the LSB/CW mode cannot be preset to memory. You can
tune in to stations in 0.1 kHz steps in the USB or the LSB/CW mode,
but the frequency digit below the decimal point is ignored when
memorized.
• If a preset AM frequency is recalled during the USB or the LSB/CW
mode, the mode setting remains active and the frequency is received in
the respective mode.
GB
Listening to the radio30
Page 31

Adjusting for optimum AM reception —Synchronous detection
Adjust AM reception (especially SW reception) to optimum condition
with synchronous detection.
ABC1DEF2GHI
FM/
AM
JKL4MNO5PQR
AM BAND
STU
LOCAL/
7
WORLD
LABEL EDIT
DIRECT
TIMERSTANDBY/
STANDBY TIME SET
ab
STANDBY MEMORY
MY DW VOA BBC OTH
VWX8YZ
<>
/
DISPLAY
0
TIME SET
TIME DIFF
SW STATION CALL
3
6
9
EXE
SYNC
SSB
DST
ERASE
TIME SET
ENTER
POWER
ON/
OFF
SLEEP
LIGHT
JOG/
TUNE/
SCAN˚
SYNC
POWER
ON/OFF
HOLD
1 Press POWER ON/OFF to turn on the radio.
2 Tune in to the desired station.
For tuning methods, see “Various ways of reception”, pages 16 to
29.
3 Press SYNC repeatedly to select the synchronous
detection mode with better reception (SYNC U or
SYNC L).
Each time SYNC is pressed, the display
changes as follows:
(Normal mode) SYNC LSYNC U
“LOCK” appears in the display when
synchronous detection is in effect.
Listening to the radio
Tip
For more on synchronous detection, see “Tips on radio waves”, page 50.
Notes
• Synchronous detection may be cancelled when the batteries become
weak.
• Even when you have chosen either of the synchronous detection
modes and SYNC U or SYNC L is lit in the display, synchronous
detection may not take effect if reception is weak. In this case, “LOCK”
will not light up.
• Synchronous detection setting cannot be preset to memory.
• If a preset AM frequency is recalled when either synchronous detection
mode is in effect, the mode setting remains active and the frequency is
received in the respective mode.
Listening to the radio
31
GB
Page 32

Other operations
Using the supplied external antenna
Use the supplied Short Wave Active Antenna AN-LP2 for better short
wave reception. The antenna gives you stable indoor reception with the
built-in amplifier.
This antenna can be used only to receive the short wave meter bands
from the 120 meter band to the 11 meter band as seen in “Frequency
range of the bands/meter bands”, page 19. Be sure to disconnect it for
FM, MW or LW reception.
Inserting the Batteries
1 Open the battery compartment lid of the antenna
controller.
2 Insert two R6 (size AA) batteries with correct polarity.
3 Close the lid.
Battery life of the active antenna
Using Sony R6 (size AA) dry batteries: approx. 40 hours
When to replace the batteries
When the batteries become weak, the POWER lamp of the
antenna controller dims. Replace both batteries with new ones.
GB
Other operations32
Page 33

Setting Up
1 Unfold the antenna module slowly.
Be careful not to hit anyone or anything when unfolding the
antenna module.
2 Pull out the long cord with the double pin plug from
the antenna controller until it stops, and connect it to
the antenna module.
3 Attach the antenna module to the window glass or the
curtain.
Fix the antenna with the supplied clip or the suction cup, as seen in
the illustration on the previous page.
4 Connect the short cord with a single pin plug to the
AM EXT ANT (AM external antenna) jack of the radio.
To AM EXT ANT
The power supply of the antenna controller is linked to the power
supply of the radio. The POWER lamp lights up on the controller.
Switch ATT to OFF on the radio.
On setup
• Place the antenna module where reception is well, such as by the
window.
• Reception may become poorer if the long cord of the antenna
controller is kept near the radio. Keep it as far away from the radio as
possible.
• Keep the radio and the antenna away from fluorescent lamps,
television sets, telephones, personal computers, etc., as they may
generate noise interference.
• Set up the antenna as far away from the street as possible.
• Do not use the antenna outdoors.
• When using the external antenna, be sure to retract the telescopic
antenna on the main unit.
Other operations
Other operations
33
GB
Page 34

After use
1 Disconnect the antenna module, antenna controller
and radio.
2 Reel up the long cord.
3 Wrap the short cord to the antenna controller and set it
in place.
4 Twist and fold the antenna module, set it in place, and
put it in the carrying case.
Note
• When receiving FM, MW or LW broadcasts, be sure to disconnect the
active antenna. The radio cannot receive these bands with the external
antenna plugged in, as the telescopic antenna and the built-in ferrite
bar antenna will be disconnected.
• The supplied external antenna is to be used only with this unit. It
cannot be used on other radios.
• Do not connect any other antennas other than the recommended active
antennas to the AM EXT ANT jack of the unit, as the jack supplies DC
voltage to power the recommended active antennas.
GB
Other operations34
Page 35

Recording broadcasts
Connect the radio to a cassette recorder with connecting cables to record
radio broadcasts.
Cassette
recorder
to LINE OUT
to MIC IN or
LINE IN
1 Connect the radio to a cassette recorder with
connecting cords (not supplied).
Use the appropriate cord for the type of cassette corder.
Cassette recorder
Type Jack
Monaural MIC IN (minijack) RK-G135
MIC IN (minijack) RK-G134
Stereo
LINE IN (minijack) RK-G136
LINE IN (pinjack) RK-G129
Connecting cord
2 Tune in to the station you want to record.
3 Record on the cassette recorder.
If you record with a stereo recorder
FM stereo programs are recorded in stereo. AM programs are recorded
monaurally to both channels.
Tip
Adjusting VOL on the radio has no effect on the recording.
Other operations
Other operations
35
GB
Page 36

Editing labels
A BC1
You can change the default label for a station preset, time zone, etc., to
any combination of up to 6 alphanumeric letters.
POWER
ON/
SYNC
3
6
9
SSB
DST
ERASE
TIME SET
ENTER
LIGHT
JOG/
TUNE/
SCAN˚
OFF
SLEEP
HOLD
Number
buttons
EXE
¿/÷
LABEL EDIT
DIRECT
ABC1DEF2GHI
FM/
AM
JKL4MNO5PQR
AM BAND
STU
LOCAL/
WORLD
LABEL EDIT
TIMERSTANDBY/
STANDBY TIME SET
ab
STANDBY MEMORY
VWX8YZ
7
<>
/
DIRECT
MY DW VOA BBC OTH
DISPLAY
EXE
0
TIME SET
TIME DIFF
SW STATION CALL
1 Display the label you want to edit by preset tuning
(page 22), MY-Memory tuning (page 27), WORLD time
display (page 14) or the Standby function (page 38).
2 Press LABEL EDIT.
The first letter of the label flashes.
3 Press ¿ or ÷ to move the cursor to the letter you
want to change.
4 Press one of the number buttons (0 to 9) or DIRECT to
enter the letter of your choice.
The first letter written above the number button is entered when
the button is pressed. Every press of the button changes the letter
as follows.
Ex. Pressing number button (1):
GB
Other operations36
(1) (2) (3)
A B C 1 D E F 2 G H I 3
(4) (5) (6)
J K L 4 M N O 5 P Q R 6
(7) (8) (9)
S T U 7 V W X 8 Y Z
(DIRECT) (0)
+ – ∗ . < > / 0
—
†
9
†
indicates a
blank space.
Page 37

5 Repeat steps 3 and 4 to change other letters.
Complete each button operation within 20 seconds.
6 Press EXE.
A beep sounds and the displayed letters are stored as the label.
If the flashing of the character stops
You took more than 20 seconds to complete a button operation.
If the display returns to the original label, press LABEL EDIT
again and start over.
To cancel editing
Press LABEL EDIT before pressing EXE.
Notes
• The SW STATION CALL labels cannot be edited.
• The unit does not beep if the beep is set to BEEP OFF (see “Turning off
the beep”, page 43).
• An edited preset label returns to the default setting if a station is
overwritten to the preset button (see “Default preset labels”, page 22).
Other operations
Other operations
37
GB
Page 38

Using the timer
Waking up to the radio or buzzer — Standby function
You can wake up to your favorite radio program using the Standby
function. You can preset different frequencies and standby times to
STANDBY MEMORY a and b.
To wake up to the buzzer, see “To wake up to the buzzer”, page 40.
SYNC
SSB
DST
ERASE
TIME SET
ENTER
POWER
ON/
OFF
SLEEP
LIGHT
JOG/
TUNE/
SCAN˚
POWER
ON/OFF
HOLD
ENTER
–|¿/÷|+
VOL
STANDBY
MEMORY
a/b
ABC1DEF2GHI
FM/
AM
JKL4MNO5PQR
AM BAND
STU
LOCAL/
7
WORLD
LABEL EDIT
DIRECT
TIMERSTANDBY/
STANDBY TIME SET
ab
STANDBY MEMORY
MY DW VOA BBC OTH
VWX8YZ
<>
/
DISPLAY
0
TIME SET
TIME DIFF
SW STATION CALL
3
6
9
EXE
Make sure the clock is set correctly before using the Standby function
(page 12).
1 Tune in to the station you want to preset.
2 Adjust VOL to your choice.
3
Hold down ENTER and press STANDBY MEMORY a
or b.
When ENTER is held down, “PRESET
MY” will flash in the display.
A beep sounds when STANDBY
MEMORY a or b is pressed. The station
is stored to the selected button. The
STANDBY MEMORY number (a or b)
and the STANDBY MEMORY label are
displayed.
4 Press POWER ON/OFF to turn off the radio.
5 Hold down the STANDBY MEMORY button you
pressed in step 3 and press –1¿ or ÷1+ repeatedly to
set the standby time (i.e., the time the radio is to turn
on).
“STANDBY” and “a” or “b” flash while the STANDBY
MEMORY button is held down.
6 Release the STANDBY MEMORY button.
“STANDBY” and “a” or “b” light
up and the standby setting is complete.
The clock indication returns to the
current time.
The radio turns on at the standby time
to receive the preset broadcast station.
GB
Other operations38
Page 39

To check the standby time
Hold down STANDBY MEMORY a or b with the radio turned
off. The preset standby time is displayed while the button is
pressed.
To change the standby time
Repeat steps 4 to 6 and preset a new standby time.
To cancel the standby function
Press STANDBY MEMORY a or b with the radio turned off so
that “STANDBY” “a” or “b” is cleared from the display.
Make sure to release the button within a second. If the button is
pressed for longer than a second, the radio goes to step 5.
At the standby time
The radio turns on, “SLEEP” lights up, and the preset broadcast
station is tuned in. The radio turns off after about 60 minutes.
Notes
• The Standby function is activated when the currently displayed time,
whether in LOCAL or WORLD display mode, reaches the standby
time. Make sure, therefore, that the time display is in the mode of your
choice.
• If a station was already stored to the STANDBY MEMORY button, the
previous preset station is overwritten by the new preset. If the preset
label had been edited, it will return to the following default;
a = “STBY-a”
b = “STBY-b”
To change labels, see “Editing labels”, page 36.
• Make sure that the radio is turned off before setting the standby time.
You cannot set the standby time with the radio turned on.
Other operations
Tips
• To temporarily cancel the Standby function, turn off the radio and
slide HOLD in the direction of the arrow so that “H” is displayed.
The standby timer goes back to effect when HOLD is turned off (“H”
is cleared from the display). See “Using the hold function”, page 42.
• Once the standby presets are set, the radio turns on at the preset time
everyday unless the standby status is canceled (see “To cancel the
standby function”, above). Canceling the standby status does not erase
the standby setting itself. The setting can be put back to the standby
status by pressing STANDBY MEMORY a or b with the radio turned
off so that “STANDBY” “a” or “b” is lit in the display.
• If the standby memory is in standby status, it takes effect even when
you are listening to the radio. The radio switches to the preset standby
frequency at the standby time.
• You can set both STANDBY memories to the standby status at the
same time (i.e., both the a and b indicators are lit in the display).
The radio turns on at the first standby time to receive the first standby
frequency, then switches to the second standby frequency at the
second standby time.
• If both STANDBY memories are set to the same standby time,
STANDBY a takes precedence.
Other operations
39
GB
Page 40

To wake up to the buzzer
If a STANDBY MEMORY without a frequency preset is activated, the
buzzer sounds at the standby time. Erase if a frequency is preset.
POWER
ON/
SYNC
3
6
9
SSB
DST
ERASE
TIME SET
ENTER
SLEEP
LIGHT
JOG/
TUNE/
SCAN˚
OFF
HOLD
POWER
ON/OFF
ERASE
STANDBY
MEMORY
a/b
ABC1DEF2GHI
FM/
AM
JKL4MNO5PQR
AM BAND
STU
LOCAL/
WORLD
LABEL EDIT
TIMERSTANDBY/
STANDBY TIME SET
ab
STANDBY MEMORY
VWX8YZ
7
<>
/
DIRECT
MY DW VOA BBC OTH
DISPLAY
EXE
0
TIME SET
TIME DIFF
SW STATION CALL
1 Press POWER ON/OFF to turn on the radio.
2 Press STANDBY MEMORY a or b.
The preset frequency is recalled.
If no frequency is stored, a beep sounds and “MEMORY”
“EMPTY” appears in the display. Go to step 4.
3 Hold down ERASE.
The Standby Memory number flashes in the display while ERASE
is held down.
A beep sounds after 3 seconds and the station assigned to the
STANDBY MEMORY button is erased. The Standby Memory
number and the Standby Memory label disappear.
4 Follow steps 4 to 6 of “Waking up to the radio or
buzzer”, page 38 to set the standby time (i.e., the time
the buzzer is to sound).
The buzzer sounds at the standby time.
To stop the buzzer
Press any button except LIGHT.
The buzzer stops after about 60 minutes if it is left on.
Notes
• The buzzer volume cannot be adjusted with VOL.
• The Standby Memory buzzer sounds regardless of the BEEP OFF
setting.
• When a Standby Memory preset is erased, any changes to its default
label is erased as well.
GB
Other operations40
Page 41

Falling asleep listening to the radio — Sleep timer
You can turn off the radio automatically after about 60 minutes using the
sleep timer.
ABC1DEF2GHI
FM/
AM
JKL4MNO5PQR
AM BAND
STU
LOCAL/
WORLD
LABEL EDIT
TIMERSTANDBY/
STANDBY TIME SET
ab
STANDBY MEMORY
VWX8YZ
7
<>
/
DIRECT
MY DW VOA BBC OTH
DISPLAY
EXE
0
TIME SET
TIME DIFF
SW STATION CALL
POWER
ON/
SYNC
3
6
9
SSB
DST
ERASE
TIME SET
ENTER
SLEEP
LIGHT
JOG/
TUNE/
SCAN˚
OFF
SLEEP
HOLD
1 Press SLEEP.
If the radio was off, the radio turns on.
“SLEEP” lights up.
2 Tune in to the station of your choice.
The radio turns off automatically after about 60 minutes.
To turn off the radio before the 60 minute duration
Press POWER ON/OFF.
Tips
• If SLEEP is pressed with the radio turned on, “SLEEP” lights up and
the radio turns off after about 60 minutes.
• If you press SLEEP to turn on the radio, the radio tunes to the
previously tuned frequency.
• If SLEEP is pressed when “SLEEP” is already lit, the sleep countdown
is reset and the radio turns off after about 60 minutes from this point.
Other operations
Other operations
41
GB
Page 42

Using the hold function
When the hold function is activated, all buttons become inoperative,
preventing accidental operation when the radio is being carried or used.
The hold function can also be used to temporarily cancel the standby
timer function.
ABC1DEF2GHI
FM/
AM
JKL4MNO5PQR
AM BAND
STU
LOCAL/
WORLD
LABEL EDIT
TIMERSTANDBY/
STANDBY TIME SET
ab
STANDBY MEMORY
VWX8YZ
7
<>
/
DIRECT
MY DW VOA BBC OTH
DISPLAY
EXE
0
TIME SET
TIME DIFF
SW STATION CALL
POWER
ON/
SYNC
3
6
9
SSB
DST
ERASE
TIME SET
ENTER
SLEEP
LIGHT
JOG/
TUNE/
SCAN˚
OFF
HOLD
HOLD
1 Slide HOLD in the direction of the arrow.
“H” lights up and all buttons become
inoperative.
To cancel the hold function
Slide HOLD in the direction opposite to the arrow so that “H”
disappears in the display.
To temporarily cancel the Standby timer
When the hold function is activated, the Standby timer function
is temporarily canceled (see “Waking up to the radio or buzzer
— Standby function”, page 38).
Temporary cancellation of the Standby timer by the hold
function is effective only when the power is turned off.
GB
Other operations42
Page 43

Turning off the beep
The confirmation beep can be turned off. Do so with the power turned
off.
FM/AM
ABC1DEF2GHI
FM/
AM
JKL4MNO5PQR
AM BAND
STU
LOCAL/
WORLD
LABEL EDIT
TIMERSTANDBY/
STANDBY TIME SET
ab
STANDBY MEMORY
VWX8YZ
7
<>
/
DIRECT
MY DW VOA BBC OTH
DISPLAY
EXE
0
TIME SET
TIME DIFF
SW STATION CALL
POWER
ON/
SYNC
3
6
9
SSB
DST
ERASE
TIME SET
ENTER
OFF
SLEEP
LIGHT
JOG/
TUNE/
SCAN˚
POWER
ON/OFF
HOLD
1 If the radio is turned on, press POWER ON/OFF to
turn it off.
2 Hold down FM/AM for longer than 2 seconds.
A beep sounds and “BEEP” “OFF” appears in the display. The
beep has been turned off.
To turn the beep back on, hold down FM/AM for longer than 2
seconds again. “BEEP” “ON” appears in the display and the beep
turns on.
Tip
The beep setting does not affect the buzzer sound for the Standby timer
function (see “To wake up to the buzzer”, page 40).
Other operations
Other operations
43
GB
Page 44

Additional information
Precautions and maintenance
On placement
• Do not leave the unit near heat sources, such as radiators or air
ducts, or in a place subject to direct sunlight, excessive dust,
humidity, rain, mechanical vibration or shock.
• Use the unit within a temperature range of 0°C to 40°C (32°F to
104°F). If it is used in temperatures outside this range, an
irregular display (i.e., 88.88) may appear. If it is used in
temperatures below this range, the display may change very
slowly. The unit will return to its normal condition when the
unit is used in its recommended temperature range once again.
• Reception may be difficult or noisy in vehicles or buildings.
Try listening near a window.
On safety
• Operate the unit only on 3 V DC with two R6 (size AA)
batteries.
For AC operation, use the supplied AC power adaptor. Do not
use any other type of AC power adaptor.
For car battery operation, use the car battery cord
recommended for this unit. Do not use any other type of car
battery cord.
• The unit is not disconnected from the AC power source
(mains) as long as it is connected to the wall outlet, even if the
unit itself has been turned off.
• Disconnect the AC power adaptor from the wall outlet when
the unit is not to be used for a long period of time.
• The name plate indicating operating voltage, etc., is located at
the bottom of the unit.
• Should any solid object or liquid fall into the unit, unplug the
unit, and have it checked by qualified personnel before
operating it any further. Make sure that no liquid or foreign
material enters the DC IN 3V jack of the unit. This may lead to
malfunction of the unit.
• When the casing becomes soiled, clean it with a soft dry cloth
dampened with mild detergent solution. Never use abrasive
cleansers or chemical solvents, as they may mar the casing.
• Since a strong magnet is used for the speaker, keep personal
credit cards using magnetic coding or spring-wound watches
away from the unit to prevent them from possible damage
caused by the magnet.
• If there is lightning and when using the external antenna,
disconnect the AC power adaptor immediately from the wall
outlet, if connected. Never touch the antenna wire when there
is a lightning storm.
• Never connect a ground wire to a gas pipe.
GB
Additional information44
Page 45

On the active antenna AN-LP2
• Do not wash the antenna module.
• Be careful not to break the antenna module when folding it.
• Keep the antenna in its case when it is not to be used for a
period of time.
Service and repair
When taking your unit for service or repair, take note of
important preset settings. They may be deleted depending on the
type of necessary repair.
If you have any questions or problems concerning your unit,
please consult your nearest Sony dealer.
Additional information
Additional information
45
GB
Page 46

Exchanging the SW STATION CALL ROM
To purchase the newest ROM, refer to “Purchasing the latest SW
STATION CALL ROM” and contact F Corporation.
1 Hold down the ROM
compartment lid at the bottom of
the unit and slide RELEASE in
the direction of the arrow. Then,
release your finger slowly from
the lid.
2 Remove the ROM compartment
lid and the ROM in the
compartment. Be careful not to
touch the contact surfaces
(metallic parts).
3 Insert the projection of the ROM
in the compartment cavity and
place the replacement ROM in
the ROM compartment with the
contact surface facing down.
Be careful not to touch the
Cavity
contact surfaces.
4 Insert the projections of the
ROM compartment lid in the
compartment cavities and lock
the cover by sliding RELEASE
Cavities
opposite the direction of the
arrow while holding down the
lid.
Note
Do not touch the contact surfaces on the ROM or the radio, as this may
cause a malfunction.
Cleaning the SW STATION CALL ROM contact surface
If “NO” “ROM” is displayed with the SW STATION CALL ROM
inserted in the ROM compartment, the contact surface of the ROM may
be dirty.
Remove the ROM following the steps above and clean the contact surface
with a cotton swab.
Note
Do not clean the contact springs of the main unit, as they may deform
and cause a malfunction.
GB
Additional information46
Page 47

Troubleshooting
If you have any trouble with the unit, check the following before
consulting your nearest Sony dealer.
Symptom
The radio does
not accept button
input.
The power does
not turn on when
POWER ON/OFF
is pressed.
The display is not
operating.
The display is
dim.
The display is
slow.
There is no sound
output.
Poor reception.
Cannot complete
direct tuning.
Cause
•The HOLD function is
activated.
•Improper installation of
batteries.
•Weak batteries (“i”
flashes in the display).
•The AC power adaptor
or car battery cord is
disconnected.
•Improper installation of
batteries.
•Weak batteries (“i”
flashes in the display).
•The unit is being used
in extremely low
temperatures or in
extreme humidity.
•The unit is being used
in extremely low
temperatures.
•VOL is turned down
completely.
•The stereo headphones
are plugged in.
•Improper installation of
batteries.
•Weak batteries (“i”
flashes in the display).
•Improper tuning or
antenna adjustment.
•Weak radio signal.
•ATT is set to ON.
•You took more than 10
seconds for a button
operation.
Remedy
•Slide HOLD in the
opposite direction of
the arrow so that “H”
disappears in the
display (page 42).
•Insert the batteries with
correct polarity.
•Replace with new
batteries.
•Check and make sure
that the AC power
adaptor or car battery
cord is connected
properly.
•Insert the batteries with
correct polarity.
•Replace with new
batteries.
•Avoid subjecting the
unit to extremely low
temperatures or
extreme humidity.
•Avoid subjecting the
unit to extremely low
temperatures.
•Adjust VOL to the
desired setting.
•Unplug the stereo
headphones for speaker
output.
•Insert the batteries with
correct polarity.
•Replace with new
batteries.
•Adjust tuning and
antenna properly.
•Listen to the radio near
a window when in a
vehicle or building.
•Set ATT to OFF (page
21).
•Complete each button
operation within 10
seconds.
Additional information
Additional information
47
GB
Page 48

Troubleshooting (continued)
Symptom
Cannot preset a
station.
Cannot recall a
preset station.
The radio does
not turn on at the
standby time.
SW STATION
CALL does not
operate.
Cannot preset a
station in MYMemory.
Cause
•Incorrect procedure.
•You pressed an
incorrect number
button for the desired
station.
•The preset setting was
accidentally erased.
•You forgot to press
STANDBY a or b.
•The HOLD function is
activated.
•The standby time
setting was erased
because you took more
than 3 minutes to
replace the batteries.
•VOL is turned down
completely.
•No frequencies are
stored in the STANDBY
MEMORY (the buzzer
sounds at the preset
time).
•The ROM compartment
is empty.
•Bad connection of the
ROM.
•MY-Memory is full (00
to 99).
Remedy
•Hold down ENTER and
press a number button
(0-9) (page 22).
•Press the correct
number button for the
desired preset.
•Preset the station again
(page 22).
•Press STANDBY a or b
(page 38).
•Slide HOLD in the
direction opposite to
the arrow so that “H”
disappears in the
display (page 42).
•Preset the standby time
again.
•Adjust VOL.
•Store a frequency in the
STANDBY MEMORY
(page 38).
•Insert the ROM (page
46).
•Clean the ROM contact
surface (page 46).
•Erase a memory preset
and preset the station
(page 29).
GB
Additional information48
Page 49

Specifications
ICF-SW07
Circuit system
FM: Super heterodyne
AM: Dual conversion super heterodyne
Frequency range
FM: 76–108 MHz
SW: 1,621–29,999 kHz
MW: 530–1,620 kHz
LW: 150–529 kHz
Intermediate frequency
FM: 10.7 MHz
SW/MW/LW: 55.845 MHz (1st), 455 kHz (2nd)
Output
LINE OUT jack (stereo minijack) approx. 245 mV, less than 10 kilohms
2 (headphones) jack (stereo minijack) 16 ohms
Speaker
Approx. 40 mm (15/8 inches) diameter, 8 ohms
Maximum output
200 mW (at 10 % harmonic distortion)
Power requirements
DC 3 V, two R6 (size AA) batteries
External power source
DC IN 3V jack accepts: supplied AC power adaptor
Dimensions
Approx. 135 x 32.5 x 91 mm (w/h/d)(5 3/8 x 1 5/16 x 3 5/8 inches) not incl.
projecting parts
Mass
Approx. 220 g (7.8 oz)
Approx. 257 g (9.1 oz) incl. batteries
AN-LP2
Power requirements
DC 3 V, two R6 (size AA) batteries
Dimensions (w/h/d)
Antenna Module
In use: Approx. 490 x 480 x 17.8 mm (19 3/8 x 19 x 23/32 in.)
Folded: Approx. 205 x 180 x 17.8 mm (8 1/8 x 7 1/8 x 23/32 in.)
Antenna Controller
Approx. 120 x 29.5 x 72 mm (4 3/4 x 1 3/
Mass
Antenna Module: approx. 92 g (3.3 oz.)
Antenna Controller: approx. 144 g (5.1 oz.) incl. batteries
x 2 7/8 in.)
16
Additional information
Supplied accessories
Stereo headphones (1)
Ear pads (2)
AC power adaptor (1)
AC plug adaptor (1) (Not supplied with the USA model)
Active antenna AN-LP2 (1)
Carrying case for ICF-SW07 (1)
Carrying case for AN-LP2 (1)
Wave Handbook (1)
Optional accessories
LW/MW/SW wide range antenna AN-1, AN-102
Connecting cord
RK-G135 (stereo miniplug ˜ miniplug)
RK-G134 (stereo miniplug ˜ stereo miniplug)
RK-G136 (stereo miniplug ˜ stereo miniplug)
RK-G129 (stereo miniplug ˜ two pinplugs)
Your dealer may not handle some of the above listed optional accessories.
Please ask your dealer for detailed information on the optional accessories
available in your country.
Design and specifications are subject to change without notice.
Additional information
49
GB
Page 50

Tips on radio waves
What is SSB (Single Side Band)?
SSB is very popular among ham and business radio transmissions,
and is commonly used in many amateur bands because of its
superiority in signal intelligibility. Its impressive signal intelligibility
is achieved with minimum interferences when compared to DSB
(Double Side Band) owing to its half bandwidth structure.
In general, SSB transmissions employ the USB (Upper Side Band)
modulation, while amateur band transmissions below 10 MHz
employ the LSB (Lower Side Band) modulation.
Conventional radios without a BFO
(Beat Frequency Oscillator) circuit
cannot receive SSB transmissions
successfully. This unit can receive
SSB transmissions successfully with
the built-in BFO (Beat Frequency
Oscillator) circuit.
Amplitude
What is CW (Continuous Wave)?
CW is also popular among ham and business radio transmissions.
Unlike other signals, the amplitude of a carrier is not modulated for
CW transmissions. CW transmissions convey information by
interrupting the carrier and use Morse code as a means of
communication.
This unit can receive CW transmissions successfully with the built-in
BFO (Beat Frequency Oscillator) circuit as beat sound only. To fully
comprehend the information transmitted by CW transmissions, an
understanding of the Morse code is prerequisite.
Carrier
LSB
USB
Frequency
What is synchronous detection?
There are two underlying obstacles in optimum AM reception:
distortions due to fading and interferences from adjacent broadcast
stations.
Synchronous detection is effective in solving these obstacles.
Distortions due to fading are generally caused by over-modulation
which occurs when a carrier component of the received signal is
attenuated along the way. The synchronous detection circuit of this
unit generates a pure carrier frequency with no level variation which
is ideally synchronized with the original carrier to compensate for
the attenuated carrier component, thus dramatically reducing
distortion.
Likewise, AM (LW, MW, and SW) broadcast generally employs DSB
(Double Side Band) signals for transmissions in which the modulated
signals are transmitted using both the upper and lower side bands
(USB and LSB). In most cases, one of the side bands is affected by
interferences from adjacent broadcast stations (i.e., beats). The
synchronous detection circuit of this unit extracts one of the two
sides (USB or LSB) of the DSB
(Double Side Band) signal which is
free from interferences. This allows
clear reception without the
interferences from adjacent broadcast
stations.
GB
Additional information50
Carrier
Only this side is received.
USBLSB
Interference
Page 51

Page 52

Avertissement
Pour prévenir tout risque
d’incendie ou d’électrocution,
garder cet appareil à l’abri de
la pluie et de l’humidité.
Pour prévenir tout risque
d’électrocution, ne pas ouvrir
le boîtier.
Confier l’entretien de cet
appareil exclusivement au
personnel qualifié.
Caractéristiques
• Fonction d’horloge mondiale
Pour savoir l’heure à n’importe
quel endroit du monde en
sélectionnant simplement le nom
d’une ville.
• Couverture mondiale avec
réception FM stéréo/SW/MW/
LW
Syntonisation simple et précise
grâce au synthétiseur PLL (boucle
à verrouillage de phase) verrouillé
par quartz
FM: 76-108 MHz
SW: 1621-29999 kHz
MW: 530-1620 kHz
LW: 150-529 kHz
Pour plus de détails, reportez-
vous au “Guide des ondes” fourni.
• Syntonisation SW STATION CALL
Syntonisez les principales stations
en ondes courtes en appuyant
simplement sur les touches de
station. La radio sélectionne
automatiquement les fréquences
utilisées dans votre fuseau horaire
parmi les données ROM et les
explore.
• Mémoire de syntonisation - MY
Mémorise et explore jusqu’à 100
fréquences de votre choix.
• Quatre autres méthodes de
syntonisation pour répondre à
vos besoins
– Syntonisation directe:
syntonisez une station en
introduisant directement sa
fréquence.
– Syntonisation manuelle:
syntonisez une station en
changeant manuellement la
fréquence, intervalle par
intervalle.
– Syntonisation par exploration:
le système explore
automatiquement la bande de
fréquence et s’arrête dès qu’il
capte une station.
FR
Introduction2
– Syntonisation des stations
présélectionnées: syntonisez
une station présélectionnée en
appuyant simplement sur une
touche.
• Identification personnalisée
Identifiez les fréquences
présélectionnées, les fuseaux
horaires, etc., par un nom de
station, un nom de ville, etc., ou
toute autre combinaison de
caractères alphanumériques (6
max.).
• Programmateur intégré
Mise sous tension de la radio et
syntonisation automatiques de la
station de votre choix à l’heure
souhaitée. Présélection de deux
heures d’activation et de deux
fréquences différentes dans les
mémoires de veille (STANDBY
MEMORY) a et b.
• Programmateur d’extinction
Réglez le programmateur
d’extinction et endormez-vous au
son de la radio. Le
programmateur met
automatiquement la radio hors
tension au bout d’environ 60
minutes.
• Réception FM stéréo
Utilisez le casque d’écoute stéréo
fourni pour écouter des stations
FM stéréo.
Page 53

Table des matières
Préparation
Emplacement et fonction des composants et
des commandes ...................................................4
Sources d’alimentation ....................................... 9
Fonctionnement sur piles ..............................9
Fonctionnement sur secteur........................11
Fonctionnement sur une batterie de
voiture ............................................................11
Réglage de l’horloge ......................................... 12
Réglage de l’heure locale.............................12
Affichage de l’heure d’autres zones
géographiques dans le monde ................... 14
Ecouter la radio
Différents modes de réception ........................ 16
Syntonisation directe ...................................16
Syntonisation manuelle ...............................18
Syntonisation par exploration ....................20
Syntonisation des stations
présélectionnées............................................22
Syntonisation SW STATION CALL...........24
Mémoire de syntonisation - MY.................27
Réception SSB et transmissions CW ............... 30
Accord pour une réception AM optimale
– Détection synchrone ...................................... 31
FR
Autres opérations
Utilisation de l’antenne extérieure fournie.... 32
Enregistrement d’émissions de radio.............35
Personnalisation d’identifications .................. 36
Utilisation du programmateur ........................ 38
S’éveiller avec la radio ou le vibreur
— Fonction de veille ....................................38
S’endormir en écoutant la radio -
Programmateur d’extinction ......................41
Utilisation de la fonction de verrouillage ...... 42
Désactivation du bip sonore ............................ 43
Informations complémentaires
Précautions et entretien .................................... 44
Dépannage..........................................................47
Spécifications ..................................................... 49
A propos des ondes radio ................................50
Table des matières
FR
3
Page 54

Préparation
Emplacement et fonction des composants et des commandes
Pour plus de détails, reportez-vous aux pages indiquées entre
parenthèses.
Avant
4
1
2
5
3
1 Fenêtre d’affichage (7)
2 Haut-parleur
3 Commandes (6)
4 Touche OPEN (4)
5 Commutateur HOLD (42)
6 Prise 2 (casque d’écoute)
Ouverture du couvercle
Appuyez sur le bouton OPEN pour ouvrir le couvercle. Ajustezle suivant l’angle de votre choix.
7 Prise LINE OUT (sortie
d’enregistrement) (35)
8 Sélecteur TONE/
ST•MONO (stéréo•
monaural) (17)
9 Commande VOL
(volume) (17)
6
7
8
9
FR
4
Préparation
Page 55

Arrière
1
2
1 Compartiment à piles (9)
2 Touche RESET
Appuyez sur cette touche
dans le compartiment à
piles à l’aide d’un objet
pointu lorsque la radio
ne fonctionne pas
correctement. Les
réglages de l’horloge,
etc., sont ramenés aux
valeurs par défaut. Les
fréquences que vous
avez présélectionnées
dans la mémoire sont
cependant conservées.
3 Antenne télescopique
(17)
Préparation
3
4
5
6
7
8
9
4 Couvercle du
compartiment ROM (46)
5 Commutateur RELEASE
(coulisser pour ouvrir le
couvercle du
compartiment ROM) (46)
6 Prise DC IN 3V ¥
(entrée d’alimentation
externe) (11)
7 Commande ATT
(atténuateur) (21)
8 Sélecteur ATT ON•OFF
(activation/désactivation
de l’atténuateur) (21)
9 Prise AM EXT ANT
(antenne extérieure) (33)
Déploiement de l’antenne
Dégagez délicatement la base de l’antenne avant de la faire pivoter
comme illustré ci-dessous.
2Tournez
horizontalement à
angle droit.
1Tirez.
Préparation
FR
5
Page 56

Commandes
1
2
3
4
5
6
7
8
9
FM/
AM
AM BAND
LOCAL/
WORLD
LABEL EDIT
TIMERSTANDBY/
STANDBY TIME SET
ab
STANDBY MEMORY
ABC1DEF2GHI
JKL4MNO5PQR
STU
7
DIRECT
MY DW VOA BBC OTH
VWX8YZ
<>
/
DISPLAY
EXE
0
TIME SET
TIME DIFF
SW STATION CALL
3
6
9
SYNC
SSB
DST
ERASE
TIME SET
ENTER
POWER
JOG/
TUNE/
SCAN˚
ON/
OFF
SLEEP
LIGHT
HOLD
!º
!¡
!™
!£
!¢
!∞
!§
!¶
!•
!ª
@º
1 Touches numériques (16,
22, 36)
2 Touche FM/AM (16, 43)
3 Touche AM
BAND•LOCAL/WORLD
(heure locale/heure
mondiale) (14, 18)
4 Touche LABEL EDIT (36)
5 Touche DIRECT (16)
6 Touche STANDBY
MEMORY•TIMER
STANDBY/STANDBY
TIMESET (38)
7 Touche MY (27)
8 Touche DW (24)
9 Touche VOA (24)
!º Touche EXE•DISPLAY
(13, 16, 36)
Appuyez pour commuter
l’affichage de l’horloge
pendant que vous écoutez
la radio. Appuyez à
nouveau pour revenir à
l’affichage précédent. Si
vous n’appuyez sur la
touche, l’affichage revient
à la condition précédente
au bout d’environ 10
secondes.
!¡ Touche SYNC (détection
synchrone) (31)
!™ Touche SSB (bande
latérale unique) (30)
!£ Touche POWER ON/OFF
(16)
!¢ Touche SLEEP (41)
!∞ Touche ERASE•DST
(heure d’été) (12, 23, 29,
40)
!§ Touche LIGHT
Appuyez sur cette touche
pour illuminer l’affichage
pendant environ 30
secondes.
!¶ Touche ENTER•TIME
SET (12, 22, 27, 38)
!• Touches JOG/TUNE/
SCAN•TIME DIFF/TIME
SET (12, 18, 20)
!ª Touche OTH (autres) (25)
@º Touche BBC (24)
FR
6
Préparation
Page 57

Fenêtre d’affichage
18
2
3
4
5
6
9
!º
!¡
!™
!£
Préparation
!¢
7
1 Indicateur SLEEP (41)
Apparaît lorsque le
programmateur
d’extinction est activé.
2 Indicateur de fuseau
horaire (12, 14)
Pointe le fuseau horaire
sur la carte en fonction
du décalage horaire que
vous avez réglé.
3 Indicateur TUNE (16)
Apparaît lorsqu’une
station est syntonisée.
4 Indicateur s (heure
d’été) (12, 14)
Apparaît lorsque
l’horloge est réglée sur
l’heure d’été.
5 Indicateur
WORLD•LOCAL (12,
14)
6 Affichage de l’heure/
fréquence (12, 16)
7 Affichage du numéro de
mémoire/décalage
horaire (12, 22, 27)
8 Indicateur HOLD (42)
Apparaît lorsque la
9 Indicateur de charge des
piles (10)
!º Indicateurs SYNC U
•SYNC L (détection
synchrone) (31)
!¡ Indicateurs STANDBY
a•b (38)
Apparaissent en mode de
veille de réception
activée par le
programmateur.
!™ Indicateur LOCK
(verrouillage de
détection synchrone) (31)
Apparaît lorsque la
fonction de détection
synchrone est activée.
!£ Indicateurs USB•LSB/
CW (Single Side Band/
Continuous Wave) (30)
!¢ Indicateur SW STATION
CALL (24)
!∞ Affichage d’identification
(12, 16)
Affichage des noms des
stations présélectionnées,
des villes et des bandes
métriques.
!∞
fonction HOLD est
activée. Toutes les
touches sont alors
inopérantes.
Préparation
FR
7
Page 58

Antenne active à ondes courtes AN-LP2
Pour l’utilisation de l’antenne active, reportez-vous à la page 32.
Commande d’antenne
3
1
4
2
5
1 Enrouleur du cordon
2 Cordon court
3 Cordon long
4 Témoin d’alimentation
5 Compartiment à piles
Module d’antenne
1 Agrafe
2 Ventouse
FR
8
Préparation
1
2
Page 59

Sources d’alimentation
Fonctionnement sur piles
Pour faire fonctionner l’appareil sur le courant secteur, voir
“Fonctionnement sur secteur” à la page 11.
Pour faire fonctionner l’appareil sur une batterie de voiture, voir
“Fonctionnement sur une batterie de voiture” à la page 11.
1 Faites glisser et ouvrez le couvercle du compartiment à
piles.
2 Introduisez deux piles R6 (AA) dans le compartiment à
piles.
Respectez la polarité des piles comme illustré ci-dessous.
Préparation
3 Refermez le couvercle du compartiment à piles.
Préparation
FR
9
Page 60

Remplacement de piles
Lorsque les piles faiblissent, le son devient distordu et
l’indication “i” clignote dans la fenêtre d’affichage. Il est alors
temps de remplacer les piles.
Autonomie des piles
Piles alcalines Sony LR6 (AA) Piles Sony R6 (AA)
FM approx. 32 heures approx. 10 heures
AM approx. 23 heures approx. 8 heures
Conseils
• Remplacez les piles dans un délai de trois minutes. Sinon, le réglage de
l’horloge est effacé. Les fréquences présélectionnées dans la mémoire
ne sont cependant pas effacées.
• Lorsque les piles sont complètement à plat, la radio se met hors tension
et l’indication “i” cesse de clignoter pour rester allumée dans la
fenêtre d’affichage. Toutes les touches à l’exception de la touche
LIGHT deviennent inopérantes.
Les touches seront à nouveau opérationnelles dès que vous aurez
remplacé les piles et appuyé sur POWER ON/OFF pour remettre la
radio sous tension et désactiver l’indication “i”.
Remarques sur les piles sèches
• Introduisez les piles en en respectant la polarité.
• Ne mélangez pas des piles neuves et des piles usagées. Ne mélangez
pas des piles de différents types.
• Ne tentez pas de charger des piles sèches, parce qu’elles ne sont pas
rechargeables.
• Retirez les piles de l’appareil lorsque vous prévoyez de ne pas l’utiliser
pendant une période prolongée.
• En cas de fuite des piles, essuyez soigneusement le compartiment à
piles avant d’installer de nouvelles piles.
FR
10
Préparation
Page 61

Fonctionnement sur secteur
Pour faire fonctionner l’appareil sur le secteur, branchez l’adaptateur
secteur fourni sur la prise DC IN 3V de l’appareil.
vers une prise
murale
vers la prise
DC IN 3V
Remarques sur l’adaptateur secteur
• Ne pliez pas et ne torsadez pas le cordon d’alimentation en forçant. De
même, ne posez pas d’objets lourds dessus.
• Pour débrancher l’adaptateur secteur de la prise murale, saisissez-le
par la fiche. Ne tirez jamais sur le cordon.
• Déconnectez l’adaptateur secteur de la prise murale et de la radio
lorsque vous prévoyez de ne pas l’utiliser pendant une période
prolongée.
• N’utilisez pas l’adaptateur secteur fourni en-dehors des zones 120 V
CA (modèle pour les USA uniquement).
Conseil
Lorsque l’adaptateur secteur ou le cordon pour batterie de voiture est
branché sur la prise DC IN 3V, les piles sont déconnectées et l’appareil
commute automatiquement la source d’alimentation externe.
Fonctionnement sur une batterie de voiture
Pour faire fonctionner l’appareil sur la batterie d’une voiture, branchez le
cordon pour batterie de voiture Sony recommandé sur la prise DC IN 3V
de l’appareil. Pour plus de détails, reportez-vous au mode d’emploi qui
l’accompagne.
Remarques sur les sources d’alimentation externes
• Laissez les piles en place même lorsque vous faites fonctionner
l’appareil sur une source d’alimentation externe parce qu’elles
alimentent la mémoire de sauvegarde de l’appareil. Remplacez les
piles une fois par an.
•
Mettez l’appareil hors tension lorsque vous connectez et que vous
déconnectez des sources d’alimentation externes. Sinon, l’alimentation
risque d’être coupée et l’indication “i” d’apparaître. Si cela se produit,
remettez l’appareil sous tension de façon à désactiver l’indication “i”.
• Lorsque vous faites fonctionner l’appareil sur les piles, débranchez
d’abord l’adaptateur secteur ou le cordon pour batterie de voiture de la
prise murale ou de la batterie de la voiture, et débranchez ensuite
seulement l’adaptateur secteur ou le cordon pour batterie de voiture de
la prise DC IN 3V de l’appareil. L’appareil ne fonctionnera pas sur les
piles tant que la prise DC IN 3V reste connectée.
• Utilisez uniquement l’adaptateur secteur préconisé ou
le cordon pour batterie de voiture fabriqué par Sony.
L’utilisation d’un adaptateur secteur ou d’un cordon
pour batterie de voitures de spécifications différentes
(polarité de la fiche, etc.) entraînera un
dysfonctionnement et des dommages à l’appareil.
• Utilisez l’adaptateur de fiche secteur fourni* si la fiche de l’adaptateur
secteur ne correspond pas au modèle de votre prise murale.
* Non fourni avec les modèles pour certains pays. Voir "Spécifications".
Polarité de
la fiche
Préparation
Préparation
FR
11
Page 62

Réglage de l’horloge
Réglage de l’heure locale
Réglez l’horloge si l’indication “0:00” clignote dans la fenêtre d’affichage
(par ex., après avoir installé les piles pour la première fois ou après avoir
réglé l’horloge). Réglez l’horloge lorsque la radio se trouve hors tension.
HOLD
POWER
ON/OFF
DST
TIME SET
¿/÷
–|¿/÷|+
ABC1DEF2GHI
FM/
AM
JKL4MNO5PQR
AM BAND
STU
LOCAL/
7
WORLD
LABEL EDIT
DIRECT
TIMERSTANDBY/
STANDBY TIME SET
ab
STANDBY MEMORY
MY DW VOA BBC OTH
VWX8YZ
<>
/
DISPLAY
0
TIME SET
TIME DIFF
SW STATION CALL
3
6
9
EXE
SYNC
SSB
DST
ERASE
TIME SET
ENTER
POWER
ON/
OFF
SLEEP
LIGHT
JOG/
TUNE/
SCAN˚
L’heure locale (LOCAL) désigne l’heure dans votre propre fuseau
horaire, alors que l’heure mondiale (WORLD) indique l’heure d’un autre
fuseau horaire dans le monde.
Le réglage de l’horloge doit être effectué suivant l’heure locale (LOCAL).
Avant de régler l’horloge, consultez le tableau de la page 15 et vérifiez le
décalage horaire entre votre zone géographique et l’UTC (temps
universel coordonné). Le nom des grandes métropoles et leur décalage
horaire par rapport à l’UTC sont présélectionnés dans la mémoire de
l’appareil.
1 Si la radio est sous tension, appuyez sur POWER ON/
OFF pour la mettre hors tension.
2 Maintenez la touche TIME SET enfoncée et appuyez
ensuite sur ¿ ou ÷ pour choisir une ville ou le
décalage horaire entre votre heure locale et l’UTC.
Lorsque vous appuyez sur TIME SET, l’affichage de l’horloge
commute automatiquement l’heure locale (LOCAL) si l’heure
mondiale (WORLD) était affichée.
L’indication LOCAL clignote. Chaque
fois que vous appuyez sur ¿ ou ÷,
l’indicateur de fuseau horaire se
déplace vers la gauche ou vers la
droite.
Dès que vous relâchez TIME SET,
l’indication LOCAL cesse de clignoter
pour rester allumée. Votre fuseau horaire a été sélectionné.
3 Appuyez sur DST si votre zone géographique applique
en ce moment l’heure d’été.
L’indication s apparaît dans la fenêtre d’affichage.
Si l’heure d’été n’est pas appliquée dans votre zone géographique
ou si l’indication s est déjà affichée, sautez cette étape.
FR
12
Préparation
Page 63

4 Maintenez la touche TIME SET enfoncée et appuyez
sur –1¿ ou ÷1+ pour régler l’heure locale.
Chaque fois que vous appuyez sur –1¿ ou ÷1+, l’heure diminue
ou augmente d’une minute.
Pour changer les chiffres plus rapidement, maintenez la touche
–
1¿ ou ÷1+ enfoncée.
5 Relâchez TIME SET.
L’indication “ : “ se met à clignoter et
l’horloge démarre.
Pour commuter l’affichage de l’horloge lorsque la radio est
sous tension
Appuyez sur EXE. L’horloge s’affiche pendant environ 10
secondes, après quoi l’affichage précédent est à nouveau activé.
Appuyez à nouveau sur EXE pour revenir manuellement à
l’affichage précédent.
L’affichage de l’horloge n’est pas commuté lorsque la radio
exécute une procédure d’exploration.
Pour les zones géographiques appliquant l’heure d’été
Appuyez sur DST de manière à activer l’indication s si vous
vous trouvez en ce moment durant la période de l’heure d’été
(étape 3 de la page précédente). Si vous êtes en ce moment dans
la période de l’heure standard, appuyez sur DST au début de la
période d’application de l’heure d’été. Appuyez à nouveau sur
cette touche à la fin de la période de l’heure d’été pour désactiver
l’indication. L’affichage de l’heure se règle automatiquement.
Préparation
Remarque
Vous ne pouvez pas régler l’horloge pendant que vous écoutez la radio.
Si la radio fonctionne, appuyez d’abord sur POWER ON/OFF pour
couper la radio.
Conseils
• L’heure est affichée suivant le cycle de 24 heures.
• Appuyez sur TIME SET pour désactiver le clignotement de l’indication
“0:00”.
• Pour régler l’heure à la seconde près, relâchez la touche TIME SET au
top horaire.
Préparation
13
FR
Page 64

Réglage de l’horloge (suite)
Affichage de l’heure d’autres zones géographiques dans le monde
Outre l’heure locale, cet appareil vous permet d’afficher l’heure de
n’importe quelle autre zone géographique dans le monde (heure
WORLD). Coupez la radio pour afficher l’heure mondiale (WORLD).
POWER
ON/OFF
DST
HOLD
¿/÷
LOCAL/
WORLD
ABC1DEF2GHI
FM/
AM
JKL4MNO5PQR
AM BAND
STU
LOCAL/
7
WORLD
LABEL EDIT
DIRECT
TIMERSTANDBY/
STANDBY TIME SET
ab
STANDBY MEMORY
MY DW VOA BBC OTH
VWX8YZ
<>
/
DISPLAY
0
TIME SET
TIME DIFF
SW STATION CALL
3
6
9
EXE
SYNC
SSB
DST
ERASE
TIME SET
ENTER
POWER
ON/
OFF
SLEEP
LIGHT
JOG/
TUNE/
SCAN˚
1 Si la radio fonctionne, appuyez sur POWER ON/OFF
pour la couper.
2 Si l’indication LOCAL est affichée, appuyez sur
LOCAL/WORLD pour commuter l’indication
WORLD.
3 Appuyez sur ¿ ou ÷ pour choisir une ville ou un
décalage horaire par rapport à l’UTC.
4 Appuyez sur DST pour activer l’indication s si la
zone géographique spécifiée applique actuellement
l’heure d’été.
Si l’heure d’été n’est pas appliquée
dans la zone géographique voulue ou
si l’indication s est déjà affichée,
sautez cette étape.
L’heure dans la zone géographique
que vous avez spécifiée apparaît dans
la fenêtre d’affichage.
Pour revenir à l’affichage de l’heure locale (LOCAL)
Appuyez à nouveau sur LOCAL/WORLD.
Si le nom de la ville ou de la zone géographique n’est pas
présélectionné
Sélectionnez la zone géographique en spécifiant le décalage
horaire par rapport à l’UTC.
Pour personnaliser l’identification (par ex., nom de ville) d’un
fuseau horaire, voir “Personnalisation des identifications” à la
page 36.
FR
14
Préparation
Page 65

Décalage entre l’heure locale et l’heure UTC
Le tableau ci-dessous indique le décalage entre chaque fuseau
horaire et l’UTC, que l’on peut déterminer au moyen de la
formule suivante:
Décalage horaire = heure locale* – UTC
Les décalages horaires précédés du signe plus (+) indiquent le
nombre d’heures en avance par rapport à l’UTC et les décalages
horaires précédés du signe moins (–) le nombre d’heures en
retard par rapport à l’UTC.
Préparation
Décalage
Identification**
horaire
± 0 LONDON Londres
+ 1 C.EURO Europe centrale Amsterdam, Berlin, Bruxelles,
+ 2 CAIRO Le Caire Athènes, Istanbul
+ 3 JEDDAH Djedda Nairobi, Riyadh, Moscou
+ 4 DUBAI Dubai
+ 5 KARACH Karachi
+ 6 DHAKA Dhaka(Dacca)
+ 7 BNGKOK Bangkok Djakarta
+ 8 S.PORE Singapour Pékin, Hongkong
+ 9 TOKYO Tokyo Séoul
+ 10 SYDNEY Sydney Guam
+ 11 SOLMON Salomon Nouméa
+ 12 AUKLND Auckland Fiji
– 11 SAMOA Samoa
– 10 HAWAII Hawaii Honolulu, Tahiti
– 9 ANCHRG Anchorage
– 8 L.A. Los Angeles San Francisco, Vancouver
– 7 DENVER Denver Calgary
– 6 CHICAG Chicago Dallas, Mexico City
– 5 N.Y. New York Lima, Panama, Toronto
– 4 CARACS Caracas Santiago
– 3 RIO Rio de Janeiro Buenos Aires, San Paulo
– 2 FN.ISL Ile Fernando
– 1 AZORES Açores
Ville ou zone
géographique
Autres villes dans la zone
géographique
Lisbonne, Madrid, Paris,
Rome, Stockholm, Vienne,
Zurich
Intervalle de
balayage
9 kHz
10 kHz
9 kHz
* Heure locale avant le réglage de l’heure d’été (DST). Le réglage DST
n’affecte pas l’indication du décalage horaire.
** Identifications par défaut; pour changer les identifications, voir
“Personnalisation des identifications” à la page 36.
Réglage automatique de l’intervalle de syntonisation PO
L’intervalle de syntonisation désigne l’unité d’incrément de base
d’un système d’attribution de fréquences. L’intervalle de
syntonisation PO diffère d’un pays à un autre (10 kHz dans les
pays d’Amérique du Nord et du Sud, et 9 kHz au Japon, en
Europe ainsi que dans d’autres pays). En principe, les intervalles
de balayage ou de syntonisation doivent être ajustés en fonction
du système appliqué dans la zone géographique afférente pour
pouvoir explorer ou syntoniser manuellement les fréquences PO.
Cet appareil détermine votre zone géographique locale sur la
base de votre sélection de fuseau horaire (le décalage horaire par
rapport à l’UTC) et choisit automatiquement l’intervalle de
syntonisation approprié.
Préparation
15
FR
Page 66

Ecouter la radio
Différents modes de réception
Syntonisation directe
Si vous connaissez la fréquence de la station que vous voulez écouter,
introduisez directement la fréquence à l’aide des touches numériques.
HOLD
POWER
ON/OFF
Touches
numériques
EXEDIRECT
FM/AM
ABC1DEF2GHI
FM/
AM
JKL4MNO5PQR
AM BAND
STU
LOCAL/
7
WORLD
LABEL EDIT
DIRECT
TIMERSTANDBY/
STANDBY TIME SET
ab
STANDBY MEMORY
MY DW VOA BBC OTH
VWX8YZ
<>
/
DISPLAY
0
TIME SET
TIME DIFF
SW STATION CALL
3
6
9
EXE
SYNC
SSB
DST
ERASE
TIME SET
ENTER
POWER
ON/
OFF
SLEEP
LIGHT
JOG/
TUNE/
SCAN˚
1 Appuyez sur POWER ON/OFF pour mettre la radio
sous tension.
2 Appuyez sur FM/AM pour sélectionner une bande de
fréquence.
Pour écouter des émissions OC (ondes courtes), PO (petites ondes)
ou en GO (grandes ondes), sélectionnez AM.
3 Appuyez sur DIRECT.
La fréquence disparaît et l’indication
“DIRECT” apparaît dans la fenêtre
d’affichage.
4 Appuyez sur les touches numériques et introduisez la
fréquence de la station voulue.
Bande FM: Vous pouvez ignorer la virgule décimale.
Pour introduire 84,7 MHz, par exemple, appuyez sur 8, 4 et 7.
Bande AM: Vous pouvez ignorer les trois derniers chiffres si ce
sont des zéros.
Pour introduire 10.000 kHz, par exemple, appuyez sur 1 et 0.
Actionnez successivement les différentes touches de la séquence
dans un délai de 10 secondes.
L’intervalle de fréquence minimum pour l’introduction directe de
la fréquence est de 0,05 MHz (50 kHz) en FM et de 1 kHz en AM.
5 Appuyez sur EXE pour
confirmer votre saisie.
L’indication “
dans la fenêtre d’affichage lorsque la
station est syntonisée.
Pour corriger une saisie
Appuyez sur DIRECT et répétez la procédure à partir de l’étape 3
FR
Ecouter la radio16
TUNE
” apparaît
.
Page 67

Si l’indication “TRY” “AGAIN” apparaît dans la fenêtre d’affichage
Si vous introduisez une fréquence incorrecte (par ex., un chiffre qui n’est
pas compris dans la plage de fréquence de la bande sélectionnée), vous
entendez un bip sonore et l’indication “TRY” “AGAIN” apparaît dans la
fenêtre d’affichage. Vérifiez la fréquence et répétez la procédure à partir
de l’étape 3.
Remarques
• Exécutez chaque opération des étapes 3 à 5 dans un délai de 10
secondes. Si l’affichage revient à la fréquence précédemment
sélectionnée, répétez la procédure à partir de l’étape 3.
• L’appareil n’émet pas de bip si la fonction de bip sonore est réglée sur
BEEP OFF (voir “Désactivation du bip sonore” à la page 43).
Autres opérations
Pour Appuyez ou réglez
Accorder finement la réception
Régler le volume VOL
Mettre la radio hors tension* POWER ON/OFF
*La radio s’accorde sur la fréquence précédemment syntonisée lorsque
vous la mettez sous tension.
–
1¿, ¿, ÷, ÷1
+
Pour améliorer la qualité de réception
Réception FM
Extrayez délicatement l’antenne
télescopique et ajustez-en la longueur,
l’angle et l’orientation (voir
“Déploiement de l’antenne” à la page 5).
Ecouter la radio
Réception PO/GO
Rétractez l’antenne télescopique et faites
pivoter l’appareil pour réorienter
l’antenne tige en ferrite intégrée.
Réception OC
Déployez délicatement l’antenne
télescopique
à la verticale sur toute sa longueur.
En réception OC, vous pouvez obtenir
une meilleure qualité de réception au
moyen de l’antenne extérieure fournie
(voir “Utilisation de l’antenne extérieure
fournie” à la page 32).
Conseils
• Branchez le casque d’écoute stéréo fourni pour écouter des émissions
FM.
Réglez ST • MONO sur ST ou MONO pour sélectionner la réception
stéréo ou monaurale. Sélectionnez MONO lorsque la réception est
parasitée ou difficilement audible.
• Lorsque vous écoutez des émissions d’information, etc., réglez TONE
sur NEWS. La voix des présentateurs sera plus clairement audible.
Pour écouter des émissions musicales, réglez TONE sur MUSIC.
• La réception de fréquences aux alentours de 3,0 MHz et 3,64 MHz peut
être difficile en raison de signaux parasites internes générés par les
oscillateurs intégrés.
Ecouter la radio
17
FR
Page 68

Différents modes de réception (suite)
Syntonisation manuelle
Utilisez les touches –1¿ , ÷1+ ou ¿ ,÷ pour changer la fréquence
manuellement, par intervalle de syntonisation. Les touches extérieures
(–1¿ et ÷1+) changent la fréquence suivant de grands intervalles de
syntonisation et les touches intérieures (¿ et ÷) suivant de petits
intervalles de syntonisation.
HOLD
POWER
ON/OFF
¿/÷
–
|¿/÷|
+
FM/AM
AM BAND
ABC1DEF2GHI
FM/
AM
JKL4MNO5PQR
AM BAND
STU
LOCAL/
7
WORLD
LABEL EDIT
DIRECT
TIMERSTANDBY/
STANDBY TIME SET
ab
STANDBY MEMORY
MY DW VOA BBC OTH
VWX8YZ
<>
/
DISPLAY
0
TIME SET
TIME DIFF
SW STATION CALL
3
6
9
EXE
SYNC
SSB
DST
ERASE
TIME SET
ENTER
POWER
ON/
OFF
SLEEP
LIGHT
JOG/
TUNE/
SCAN˚
1 Appuyez sur POWER ON/OFF pour mettre la radio
sous tension.
2 Appuyez sur FM/AM pour sélectionner une bande de
fréquence.
Pour écouter des émissions OC, PO ou GO, sélectionnez AM.
3 Pour les bandes AM, maintenez la touche AM BAND
enfoncée et appuyez sur –1¿ ou ÷1+ pour
sélectionner PO (petites ondes), GO (grandes ondes)
ou une bande métrique (ondes courtes).
Le nom de la bande de fréquence ou
de la bande métrique et sa fréquence la
plus basse apparaissent dans la fenêtre
d’affichage.
Pour la FM, sautez cette étape.
4 Appuyez plusieurs fois de suite sur
¿, ÷ pour syntoniser la station de radio voulue.
Chaque fois que vous appuyez sur cette touche, la fréquence change
suivant les intervalles de syntonisation précisés ci-dessous. (Les
chiffres entre parenthèses indiquent les intervalles en mode SSB.)
Bande
–
1¿ ou ÷1
FM 0,05 MHz 0,05 MHz
OC 5 kHz (1 kHz) 1 kHz (0,1 kHz**)
PO 9 ou 10 kHz* (1 kHz) 1 kHz (0,1 kHz**)
GO 9 kHz (1 kHz) 1 kHz (0,1 kHz**)
*
L’intervalle de syntonisation se règle automatiquement sur votre
fuseau horaire suivant le réglage de votre fuseau horaire local (voir
“Réglage automatique de l’intervalle de syntonisation PO ” à la
page 15).
**Les unités de 0,1 kHz ne sont pas indiquées dans la fenêtre
d’affichage.
FR
Ecouter la radio18
+
–
1¿, ÷1+ ou
¿ ou ÷
Page 69

Conseils
• L’appareil démarre la syntonisation par exploration lorsque vous
maintenez la touche –1¿ ou ÷1+ enfoncée (voir “Syntonisation par
exploration” à la page 20).
• La fréquence change rapidement lorsque vous maintenez la touche ¿
ou ÷ enfoncée et s’arrête dès que vous la relâchez. Dans les bandes
AM (PO, OC et GO), l’appareil explore en continu la plage de
fréquence comprise entre 150 et 29.999 kHz.
Plage des bandes de fréquence/bandes métriques
La plage d’ondes courtes est divisée en 14 bandes généralement
appelées “bandes métriques”.
(kHz en AM / MHz en FM)
Bande
AM
*1 Intervalle de syntonisation de 10 kHz (voir page 15).
*2 Intervalle de syntonisation de 9 kHz (voir page 15).
Plage de fréquence
GO 150–529 153–522 —
PO 530–1620
OC 1621–29999
FM 76,00–108,00 76,00–108,00 —
Plage de fréquence d’exploration
530–1620 *
531–1620 *
2250–2550 Bande de 120 mètres
3150–3450 Bande de 90 mètres
3850–4050 Bande de 75 mètres
4700–5100 Bande de 60 mètres
5900–6250 Bande de 49 mètres
7100–7400 Bande de 41 mètres
9400–10000 Bande de 31 mètres
11500–12150 Bande de 25 mètres
13500–13900 Bande de 22 mètres
15000–15700 Bande de 19 mètres
17450–18000 Bande de 16 mètres
18850–19100 Bande de 15 mètres
21450–21950 Bande de 13 mètres
25600–26100 Bande de 11 mètres
Bande métrique
1
2
—
Ecouter la radio
Remarque
La plage de fréquence effective des émissions en ondes courtes et la plage
des bandes métriques pour cet appareil peuvent différer. Pour plus de
détails, reportez-vous au “Guide des ondes” fourni.
Ecouter la radio
19
FR
Page 70

Différents modes de réception (suite)
Syntonisation par exploration
HOLD
POWER
ON/OFF
–
|¿/÷|
FM/AM
AM BAND
ABC1DEF2GHI
FM/
AM
JKL4MNO5PQR
AM BAND
STU
LOCAL/
7
WORLD
LABEL EDIT
DIRECT
TIMERSTANDBY/
STANDBY TIME SET
ab
STANDBY MEMORY
MY DW VOA BBC OTH
VWX8YZ
<>
/
DISPLAY
0
TIME SET
TIME DIFF
SW STATION CALL
3
6
9
EXE
SYNC
SSB
DST
ERASE
TIME SET
ENTER
POWER
ON/
OFF
SLEEP
LIGHT
JOG/
TUNE/
SCAN˚
1 Appuyez sur POWER ON/OFF pour mettre la radio
sous tension.
2 Appuyez sur FM/AM pour sélectionner une bande.
Pour écouter des émissions OC, PO ou GO, sélectionnez AM.
3 Pour les bandes AM, maintenez la touche AM BAND
enfoncée et appuyez sur –1¿ ou ÷1+ pour
sélectionner PO (petites ondes), GO (grandes ondes)
ou une bande métrique (ondes courtes).
Le nom de la bande de fréquence ou de la bande métrique et sa
fréquence la plus basse apparaissent dans la fenêtre d’affichage.
Pour les FM, sautez cette étape.
+
4 Maintenez la touche
la lorsque l’appareil entame l’exploration.
L’indication “SCAN” s’affiche. L’appareil s’arrête dès qu’il capte
une station et reprend ensuite l’exploration après environ 3
secondes.
L’appareil explore la plage de fréquence de la bande ou de la
bande métrique choisie (voir “Plage des bandes de fréquences/
bandes métriques” à la page 19). En
mode de réception SSB, l’appareil
explore toute la plage de fréquence de
150 à 29999 kHz.
5 Appuyez sur
et écouter l’émission de votre choix.
L’indication “SCAN” disparaît et le nom la bande de fréquence
apparaît dans la fenêtre d’affichage.
FR
Ecouter la radio20
–
1¿ ou ÷1+ enfoncée. Relâchez-
–
1¿ ou ÷1+ pour arrêter l’exploration
Page 71

Conseils
• L’appareil explore les fréquences par ordre décroissant lorsque vous
maintenez la touche –1¿ enfoncée et par ordre croissant lorsque vous
maintenez la touche ÷1+ enfoncée.
• Pour changer de sens de balayage, maintenez enfoncée la touche –1¿
ou ÷1+ opposée au sens de balayage actuel. Cette fonction s’avère
bien pratique lorsque vous voulez revenir à la station précédente après
que l’appareil a repris l’exploration.
• Lors de l’exploration des stations PO la nuit lorsque la réception est
intense ou si l’exploration se fait en présence de puissantes
interférences, il se peut que l’appareil arrête fréquemment l’exploration
alors qu’il ne capte pas de station. Commutez ATT sur ON et réglez la
sensibilité à l’aide de la commande ATT (voir “Contrôle des arrêts
d’exploration” ci-dessous). Dans des conditions normales, réglez ATT
sur OFF.
Contrôle des arrêts d’exploration — avec le commutateur
ATT et la commande ATT
Utilisez le commutateur ATT (atténuateur) et la commande ATT
pour contrôler la sensibilité de réception lorsque l’appareil
interrompt fréquemment l’exploration alors qu’il ne capte pas de
station ou lorsque l’exploration se fait en présence de puissantes
interférences. Dans des conditions normales, utilisez la radio
avec le commutateur ATT réglé sur OFF (par ex., avec une
sensibilité maximum).
Ecouter la radio
Commande
ATT
ATT
La commande ATT est activée lorsque ATT est réglé sur ON.
Tournez la commande ATT vers MAX pour réduire la sensibilité.
La radio saute les signaux trop faibles et ne s’arrête qu’aux
signaux plus puissants.
Remarque
Si la commande ATT est réglée trop loin vers la position MAX, la radio
ne s’arrêtera sur aucun des signaux plus faibles. Réglez ATT sur OFF si
vous ne devez pas utiliser l’atténuateur.
Ecouter la radio
21
FR
Page 72

Différents modes de réception (suite)
Syntonisation des stations présélectionnées
Vous pouvez présélectionner 20 stations de radio au choix à l’aide des
touches numériques (10 en FM et 10 en AM).
Présélection de stations de radio
POWER
ON/OFF
HOLD
ENTER
Touches
numériques
FM/AM
ABC1DEF2GHI
FM/
AM
JKL4MNO5PQR
AM BAND
STU
LOCAL/
7
WORLD
LABEL EDIT
DIRECT
TIMERSTANDBY/
STANDBY TIME SET
ab
STANDBY MEMORY
MY DW VOA BBC OTH
VWX8YZ
<>
/
DISPLAY
0
TIME SET
TIME DIFF
SW STATION CALL
3
6
9
EXE
SYNC
SSB
DST
ERASE
TIME SET
ENTER
POWER
ON/
OFF
SLEEP
LIGHT
JOG/
TUNE/
SCAN˚
1 Appuyez sur POWER ON/OFF pour mettre la radio
sous tension.
2 Syntonisez une station que vous voulez
présélectionner.
3 Maintenez la touche ENTER enfoncée et appuyez sur
la touche numérique (0-9) de votre choix.
Lorsque vous maintenez la touche ENTER enfoncée, l’indication
“PRESET MY” clignote dans la fenêtre d’affichage.
Un bip sonore retentit lorsqu’une
touche numérique est enfoncée. La
station est mémorisée sous la touche
sélectionnée. Le numéro de
présélection et l’identification de
présélection s’affichent.
Remarque
Si une station était déjà mémorisée sous la touche numérique que vous
avez choisie, la précédente station présélectionnée est remplacée par la
nouvelle présélection. Si l’identification de présélection avait été
personnalisée, elle revient à la sélection par défaut.
Identification par défaut des
présélections
Chaque fois qu’une station est
présélectionnée, la touche de
présélection se voit assigner une
identification de présélection par
défaut comme indiqué ci-dessous.
Pour changer une identification,
voir “Personnalisation
d’identifications” à la page 36.
Touche AM FM
1 AM-1 FM-1
2 AM-2 FM-2
3 AM-3 FM-3
4 AM-4 FM-4
5 AM-5 FM-5
6 AM-6 FM-6
7 AM-7 FM-7
8 AM-8 FM-8
9 AM-9 FM-9
0 AM-0 FM-0
FR
Ecouter la radio22
Page 73

Syntonisation d’une station présélectionnée
POWER
FM/AM
ABC1DEF2GHI
FM/
AM
JKL4MNO5PQR
AM BAND
STU
VWX8YZ
LOCAL/
7
WORLD
LABEL EDIT
STANDBY TIME SET
STANDBY MEMORY
<>
/
DIRECT
0
TIMERSTANDBY/
ab
SW STATION CALL
MY DW VOA BBC OTH
3
6
9
DISPLAY
EXE
TIME SET
TIME DIFF
SYNC
SSB
DST
ERASE
TIME SET
ENTER
POWER
ON/
OFF
SLEEP
LIGHT
JOG/
TUNE/
SCAN˚
ON/OFF
Touches
HOLD
numériques
1 Appuyez sur POWER ON/OFF pour mettre la radio
sous tension.
2 Appuyez sur FM/AM pour sélectionner une bande.
3 Appuyez sur la touche numérique (0-9) de votre choix.
La radio diffuse la station présélectionnée assignée à cette touche.
Si aucune station n’est présélectionnée
Un bip sonore retentit et l’indication “MEMORY” “EMPTY” apparaît
dans la fenêtre d’affichage. L’affichage revient ensuite à la condition
précédente.
Remarques
• La radio peut comporter des fréquences enregistrées par défaut dans la
mémoire de présélections.
• L’appareil n’émet pas de bip sonore si la fonction de bip BEEP OFF
(voir “Désactivation du bip sonore” à la page 43).
Ecouter la radio
Suppression d’une station présélectionnée
HOLD
Touches
numériques
ERASE
ABC1DEF2GHI
FM/
AM
JKL4MNO5PQR
AM BAND
STU
VWX8YZ
LOCAL/
7
WORLD
<>
/
DIRECT
DISPLAY
0
TIME SET
TIME DIFF
SW STATION CALL
EXE
LABEL EDIT
TIMERSTANDBY/
STANDBY TIME SET
ab
STANDBY MEMORY
MY DW VOA BBC OTH
POWER
ON/
SYNC
3
OFF
SSB
SLEEP
6
DST
ERASE
9
LIGHT
TIME SET
ENTER
JOG/
TUNE/
SCAN˚
1 Appuyez sur une touche numérique (0-9)
correspondant à la station présélectionnée que vous
voulez supprimer.
2 Maintenez la touche ERASE enfoncée.
Le numéro de présélection clignote dans la fenêtre d’affichage
pendant que vous maintenez la touche ERASE enfoncée.
Un bip retentit après 3 secondes et la station assignée à la touche
que vous avez choisie est supprimée. Le numéro de présélection et
l’identification de présélection disparaissent.
Remarque
Lorsqu’une station présélectionnée est supprimée, toutes les
modifications opérées à son identification par défaut sont également
effacées.
Ecouter la radio
23
FR
Page 74

Différents modes de réception (suite)
Syntonisation SW STATION CALL
Syntonisez les principales stations émettant en ondes courtes en
appuyant simplement sur l’une des touches de station: DW, VOA, BBC et
OTH (autres). La radio sélectionne automatiquement les fréquences
utilisées dans votre fuseau horaire dans la mémoire ROM* SW STATION
CALL logée dans le dessous de l’appareil, explore les stations et arrête
l’exploration dès qu’elle capte une station.
ABC1DEF2GHI
FM/
AM
JKL4MNO5PQR
AM BAND
STU
LOCAL/
WORLD
LABEL EDIT
TIMERSTANDBY/
STANDBY TIME SET
STANDBY MEMORY
VWX8YZ
7
<>
/
DIRECT
ab
MY DW VOA BBC OTH
DISPLAY
0
TIME SET
TIME DIFF
SW STATION CALL
POWER
ON/
SYNC
3
OFF
SSB
SLEEP
6
DST
ERASE
9
LIGHT
TIME SET
EXE
ENTER
JOG/
TUNE/
SCAN˚
POWER
ON/OFF
HOLD
Touches
des
stations
*ROM = Read Only Memory (mémoire morte)
1 Sélectionnez le fuseau horaire correspondant à votre
zone géographique.
Pour l’heure LOCAL, voir “Réglage de l’heure locale” à la page 12.
Pour l’heure WORLD, voir “Pour savoir l’heure dans une autre
zone géographiques du monde” à la page 14.
La fonction SW STATION CALL ne sélectionne
automatiquement que les fréquences captables dans la zone
géographique correspondant à votre fuseau horaire, quelle
que soit l’heure LOCAL ou WORLD. Il est donc déterminant
que vous sélectionniez correctement votre fuseau horaire avant
d’activer la fonction SW STATION CALL.
2 Appuyez sur POWER ON/OFF pour mettre la radio
sous tension.
3 Appuyez sur la touche de station de votre choix.
L’indication “SW STATION CALL”, le nom de la station et une
fréquence s’affichent. Le décalage
horaire par rapport à l’UTC et
l’indicateur de fuseau horaire
clignotent pendant environ 3
secondes et puis s’allument.
Confirmez le réglage de votre fuseau
horaire.
La fréquence affichée peut être différente de celle de l’illustration.
4 Appuyez à nouveau sur la même touche de station.
La radio explore les fréquences pour votre zone géographique par
ordre croissant et s’arrête dès qu’elle capte une station.
Appuyez à nouveau sur la touche pour reprendre l’exploration.
Pour arrêter l’exploration
Appuyez sur la même touche de station en cours d’exploration.
FR
Ecouter la radio24
Page 75

Pour rappeler manuellement une par une les fréquences
sélectionnées
Maintenez la touche de station enfoncée et appuyez sur ¿ ,
÷ ou –1¿ , ÷1+.
La fréquence change rapidement lorsque vous maintenez la
touche –1¿ ou ÷1+ enfoncée et s’arrête dès que vous la
relâchez.
Conseil
Lors de l’exploration la nuit lorsque la réception est intense ou si
l’exploration se fait en présence de puissantes interférences, il se peut que
l’appareil arrête fréquemment l’exploration alors qu’il ne capte pas de
station. Commutez ATT sur ON et réglez la sensibilité à l’aide de la
commande ATT (voir “Contrôle des arrêts d’exploration” à la page 21).
Dans des conditions normales, réglez ATT sur OFF.
Stations rappelées par les touches de station SW STATION
CALL
Touche Station et émission
DW Emissions anglaises et allemandes de Deutsche Welle
VOA Emissions anglaises de Voice of America
BBC Emissions anglaises de la British Broadcasting Corporation
OTH Au choix*;
R.NED — Emissions anglaises et néerlandaises de Radio
Nederland
RFI — Emissions anglaises et françaises de Radio France
International
R.JPN — Emissions anglaises et japonaises de Radio Japan
REE — Emissions anglaises et espagnoles de Radio
Exterior de España
CRI — Emissions anglaises et chinoises de China Radio
International
Ecouter la radio
*Sélection de la station pour la touche OTH
DISPLAY
EXE
TIME SET
TIME DIFF
POWER
ON/
SYNC
3
OFF
SLEEP
SSB
6
DST
ERASE
9
LIGHT
TIME SET
ENTER
JOG/
TUNE/
SCAN˚
HOLD
¿/÷
OTH
Ecouter la radio
ABC1DEF2GHI
FM/
AM
JKL4MNO5PQR
AM BAND
STU
VWX8YZ
LOCAL/
7
WORLD
<>
LABEL EDIT
TIMERSTANDBY/
STANDBY TIME SET
ab
STANDBY MEMORY
/
DIRECT
0
SW STATION CALL
MY DW VOA BBC OTH
Mettez la radio hors tension si elle fonctionne.
Maintenez la touche OTH enfoncée et appuyez sur ¿ ou ÷.
Relâchez OTH lorsque la station de votre choix apparaît dans la
fenêtre d’affichage.
La procédure de réception est la même que pour les autres
touches SW STATION CALL.
25
FR
Page 76

En cas d’absence de réception
Si la radio n’est pas en mesure de capter l’une des fréquences pour le
fuseau horaire enregistrées dans la mémoire ROM, l’exploration
s’arrête avec un bip sonore lorsque la radio revient à la fréquence où
l’exploration a démarré.
Fréquence la
plus basse
Fréquence de début
d’exploration
Fréquence la
plus élevée
La réception en ondes courtes peut s’avérer difficile en raison de
différents facteurs comme l’activité solaire et les conditions
atmosphériques. De plus, les grandes stations de radio dont les
données sont enregistrées dans la mémoire ROM peuvent modifier
leurs horaires de diffusion et/ou leurs fréquences aux changements
de saison, etc. Si c’est le cas, il se peut que la radio ne puisse capter
les fréquences enregistrées dans la mémoire ROM SW STATION
CALL.
Mise à jour de la mémoire ROM SW STATION CALL
Pour s’adapter aux éventuels changements de fréquences, la
mémoire ROM SW STATION CALL est conçue pour être remplacée
par une version mise à jour par l’utilisateur. Les mises à jour de la
mémoire ROM SW STATION CALL sont commercialisées par F
Corporation. La mémoire ROM doit être mise à jour vers le mois
d’octobre de chaque année. Nous conseillons de remplacer la
mémoire ROM au moins une fois tous les deux à trois ans.
Pour vous procurer la dernière mise à jour de la mémoire ROM, voir
“Purchasing the latest SW STATION CALL ROM” (uniquement en
anglais et en japonais) et consultez F Corporation.
Pour le remplacement de la mémoire ROM, voir “Remplacement de
la mémoire ROM SW STATION CALL” à la page 46.
Remarques
• Nombre des émissions de radiodiffusion mondiale des grandes stations
de radio enregistrées dans la mémoire ROM ne sont émises qu’à
certaines heures de la journée. Si une station ne diffuse pas d’émissions
sur la fréquence sélectionnée à une heure donnée, la radio ne capte
aucune émission ou capte les émissions d’une autre station comme une
station locale.
• Si, lorsque la fréquence est changée par syntonisation manuelle, etc.,
l’indication “SW STATION CALL” est allumée dans la fenêtre
d’affichage, la radio quitte SW STATION CALL et l’indication disparaît.
• S’il n’y a pas de fréquence pour la station correspondant au fuseau
horaire enregistré dans la mémoire ROM, un bip sonore retentit,
l’indication “MEMORY” “EMPTY” apparaît dans la fenêtre d’affichage
et la radio revient à la condition précédente.
• Si vous appuyez sur une touche de station alors qu’il n’y a pas de
mémoire ROM dans le logement de la mémoire ROM de la radio, un bip
sonore retentit, l’indication “NO” “ROM” apparaît dans la fenêtre
d’affichage et la radio revient à la condition précédente. Si la mémoire
ROM est retirée lorsque l’indication “SW STATION CALL” est allumée
dans la fenêtre d’affichage, un bip sonore retentit, “NO” “ROM”
apparaît dans la fenêtre d’affichage et la radio passe en mode de
syntonisation manuelle.
• Si l’indication “NO” “ROM” est affichée alors qu’une mémoire ROM SW
STATION CALL se trouve effectivement dans le logement ROM de la
radio, c’est que la surface de contact de la mémoire ROM est peut-être
souillée. Voir “Nettoyage de la surface de contact de la mémoire ROM
SW STATION CALL” à la page 46 et nettoyez la surface de contact avec
un coton-tige.
Ne nettoyez pas les ressorts de contact de l’appareil principal parce que
vous risquez sinon de les déformer et de provoquer un
dysfonctionnement.
FR
Ecouter la radio26
Page 77

Différents modes de réception (suite)
Mémoire de syntonisation - MY
Vous pouvez présélectionner 100 fréquences de n’importe quelle bande
(FM, OC, PO ou GO) sous la touche MY. Vous pouvez explorer ces
stations ou les syntoniser une à une.
Présélection de stations dans la mémoire MY
FM/AM
MY
ABC1DEF2GHI
FM/
AM
JKL4MNO5PQR
AM BAND
STU
LOCAL/
WORLD
LABEL EDIT
TIMERSTANDBY/
STANDBY TIME SET
ab
STANDBY MEMORY
VWX8YZ
7
<>
/
DIRECT
MY DW VOA BBC OTH
DISPLAY
EXE
0
TIME SET
TIME DIFF
SW STATION CALL
POWER
ON/
SYNC
3
6
9
SSB
DST
ERASE
TIME SET
ENTER
LIGHT
JOG/
TUNE/
SCAN˚
OFF
SLEEP
POWER
ON/OFF
HOLD
ENTER
1 Appuyez sur POWER ON/OFF pour mettre la radio
sous tension.
2
Syntonisez une station que vous voulez présélectionner.
3 Maintenez la touche ENTER enfoncée et appuyez sur
MY.
Lorsque vous maintenez la touche ENTER enfoncée, l’indication
“PRESET MY” clignote dans la fenêtre d’affichage.
Un bip sonore retentit lorsque la
touche MY est enfoncée. La station est
mémorisée sous le plus petit numéro
de mémoire disponible (00 à 99). Le
numéro de mémoire MY et
l’identification de mémoire MY
s’affichent.
Ecouter la radio
Identifications par défaut de la mémoire MY
Chaque fois qu’une station est enregistrée dans la mémoire MY,
elle se voit assigner l’identification MY par défaut “MY-xx” (avec
le numéro de mémoire à la place de “xx”).
Pour changer une identification, voir “Personnalisation
d’identifications” à la page 36.
Remarque
Il se peut que la mémoire MY de la radio comporte des fréquences
enregistrées par défaut. Dans ce cas, effacez-les avant de présélectionner
des stations dans la mémoire MY (voir “Suppression d’une présélection
de la mémoire MY” à la page 29).
Conseils
• Si vous appuyez sur MY alors qu’une station est assignée à tous les
numéros de mémoire MY (00 à 99), un bip sonore retentit, l’indication
“MEMORY” “FULL” apparaît dans la fenêtre d’affichage et la radio
revient à la condition précédente.
• La mémoire de syntonisation MY n’est pas affectée par le réglage du
fuseau horaire.
Ecouter la radio
27
FR
Page 78

Syntonisation d’une station présélectionnée dans la
mémoire MY
DISPLAY
EXE
TIME SET
TIME DIFF
POWER
ON/
SYNC
3
OFF
SLEEP
SSB
6
DST
ERASE
9
LIGHT
TIME SET
ENTER
JOG/
TUNE/
SCAN˚
POWER
ON/OFF
HOLD
MY
ABC1DEF2GHI
FM/
AM
JKL4MNO5PQR
AM BAND
STU
VWX8YZ
LOCAL/
7
WORLD
<>
LABEL EDIT
TIMERSTANDBY/
STANDBY TIME SET
ab
STANDBY MEMORY
/
DIRECT
0
SW STATION CALL
MY DW VOA BBC OTH
1 Appuyez sur POWER ON/OFF pour mettre la radio
sous tension.
2 Appuyez sur MY.
La radio passe en mode de syntonisation de mémoire MY.
3 Appuyez à nouveau sur MY.
La radio explore les fréquences enregistrées dans la mémoire MY
et s’arrête dès qu’elle capte une station.
Appuyez à nouveau sur cette touche pour reprendre l’exploration.
Pour arrêter l’exploration
Appuyez sur MY en cours d’exploration.
Pour rappeler manuellement une par une les fréquences de la
mémoire MY
Maintenez la touche MY enfoncée et appuyez sur ¿ , ÷ ou
–
1¿ , ÷1+.
La fréquence change rapidement lorsque vous maintenez la touche
–
1¿ ou ÷1+ enfoncée et s’arrête dès que vous la relâchez.
Conseils
• La mémoire MY ne balaie que les numéros de mémoire enregistrés et
saute ceux qui ne le sont pas.
• L’exploration de la mémoire MY est plus rapide si les fréquences sont
enregistrées par ordre croissant ou décroissant.
• Si vous appuyez sur MY alors qu’il n’y a aucune fréquence enregistrée
dans la mémoire MY, un bip sonore retentit et l’indication “MEMORY”
“EMPTY” apparaît dans la fenêtre d’affichage. L’affichage revient
ensuite à la condition précédente.
• Lors de l’exploration la nuit lorsque la réception est intense ou si
l’exploration se fait en présence de puissantes interférences, il se peut
que l’appareil arrête fréquemment l’exploration alors qu’il ne capte pas
de station. Commutez ATT sur ON et réglez la sensibilité à l’aide de la
commande ATT (voir “Contrôle des arrêts d’exploration” à la page 21).
Dans des conditions normales, réglez ATT sur OFF.
En cas d’absence de réception
Si aucune des fréquences enregistrées dans la mémoire MY n’est
captée, l’exploration s’arrête avec un bip sonore lorsque la radio
revient à la fréquence où l’exploration a démarré.
Numéro de mémoire MY
enregistrée le plus bas
FR
Ecouter la radio28
Numéro de mémoire MY
de début d’exploration
Numéro de mémoire MY
enregistrée le plus élevé
Page 79

Suppression d’une présélection de mémoire MY
DISPLAY
EXE
TIME SET
TIME DIFF
POWER
ON/
SYNC
3
OFF
SLEEP
SSB
6
DST
ERASE
9
LIGHT
TIME SET
ENTER
JOG/
TUNE/
SCAN˚
ERASE
HOLD
ABC1DEF2GHI
FM/
AM
JKL4MNO5PQR
AM BAND
STU
VWX8YZ
LOCAL/
7
WORLD
<>
LABEL EDIT
TIMERSTANDBY/
STANDBY TIME SET
ab
STANDBY MEMORY
/
DIRECT
0
SW STATION CALL
MY DW VOA BBC OTH
1 Rappelez le numéro de mémoire MY que vous voulez
supprimer
2 Maintenez la touche ERASE enfoncée.
Le numéro de mémoire MY clignote dans la fenêtre d’affichage
pendant que vous maintenez la touche ERASE enfoncée.
Un bip sonore retentit après 3 secondes et la station assignée à ce
numéro de mémoire MY est supprimée. Le numéro et
l’identification de mémoire MY disparaissent.
Remarque
Lorsqu’une station est supprimée de la mémoire MY, les éventuelles
modifications apportées à son identification par défaut sont également
effacées.
Pour changer une station enregistrée dans la mémoire MY
Vous ne pouvez pas remplacer une fréquence enregistrée dans la
mémoire MY par une autre. Supprimez d’abord la fréquence du
numéro de mémoire MY voulu et enregistrez ensuite une
nouvelle fréquence.
Ecouter la radio
Remarque
La mémoire MY enregistre une nouvelle station sous le plus petit numéro
de mémoire disponible. N’oubliez donc pas que si un numéro de
mémoire MY inférieur à celui que vous venez d’effacer est disponible, la
nouvelle fréquence sera enregistrée sous ce numéro.
Ecouter la radio
29
FR
Page 80

Réception SSB et transmissions CW
Vous pouvez recevoir des transmissions SSB (bande latérale unique) et
CW (télégraphie) grâce au circuit BFO intégré.
POWER
ON/OFF
SSB
HOLD
FM/AM
ABC1DEF2GHI
FM/
AM
JKL4MNO5PQR
AM BAND
STU
LOCAL/
7
WORLD
LABEL EDIT
DIRECT
TIMERSTANDBY/
STANDBY TIME SET
ab
STANDBY MEMORY
MY DW VOA BBC OTH
VWX8YZ
<>
/
DISPLAY
0
TIME SET
TIME DIFF
SW STATION CALL
3
6
9
EXE
SYNC
SSB
DST
ERASE
TIME SET
ENTER
POWER
ON/
OFF
SLEEP
LIGHT
JOG/
TUNE/
SCAN˚
1 Appuyez sur POWER ON/OFF pour mettre la radio
sous tension.
2 Appuyez sur FM/AM et sélectionnez AM.
3 Appuyez sur SSB pour sélectionner USB ou LSB/CW.
Chaque fois que vous appuyez sur
SSB, l’affichage change selon la
séquence suivante:
(Mode normal) USB LSB/CW
4 Syntoniser la station de votre choix.
Pour les modes de syntonisation, voir “Différents modes de
syntonisation” aux pages 16 à 29.
Conseil
Pour plus d’informations sur SSB et CW, reportez-vous a la section “A
propos des ondes radio” à la page 50.
Remarques
• Le mode USB ou LSB/CW ne peut être présélectionné dans la
mémoire. Vous pouvez syntoniser des stations à des intervalles de 0,1
kHz dans le mode USB ou LSB/CW, mais le chiffre décimal de la
fréquence est ignoré lors de la mémorisation.
• Si une fréquence AM présélectionnée est rappelée en mode USB ou
LSB/CW, le réglage de mode reste actif et la fréquence est reçue dans
le mode respectif.
FR
Ecouter la radio30
Page 81

Accord pour une réception
AM optimale - Détection
synchrone
Le mode de détection synchrone permet d’accorder la réception AM (et
plus particulièrement la réception en OC) dans des conditions optimales.
ABC1DEF2GHI
FM/
AM
JKL4MNO5PQR
AM BAND
STU
LOCAL/
7
WORLD
LABEL EDIT
DIRECT
TIMERSTANDBY/
STANDBY TIME SET
ab
STANDBY MEMORY
MY DW VOA BBC OTH
VWX8YZ
<>
/
DISPLAY
0
TIME SET
TIME DIFF
SW STATION CALL
3
6
9
EXE
SYNC
SSB
DST
ERASE
TIME SET
ENTER
POWER
ON/
OFF
SLEEP
LIGHT
JOG/
TUNE/
SCAN˚
SYNC
POWER
ON/OFF
HOLD
1 Appuyez sur POWER ON/OFF pour mettre la radio
sous tension.
2 Syntonisez la station de votre choix.
Pour les modes de syntonisation, voir “Différents modes de
syntonisation” aux pages 16 à 29.
3 Appuyez plusieurs fois de suite sur SYNC pour
sélectionner le mode de détection synchrone offrant
une meilleure qualité de réception (SYNC U ou SYNC
L).
Chaque fois que vous appuyez sur
SYNC, l’affichage change selon la
séquence suivante:
(Mode normal) SYNC LSYNC U
Ecouter la radio
L’indication “LOCK” apparaît dans la fenêtre d’affichage lorsque
la détection synchrone est activée.
Conseil
Pour plus de détails sur la détection synchrone, voir “A propos des ondes
radio” à la page 50.
Remarques
• Le mode de détection synchrone peut être désactivé lorsque les piles
faiblissent.
• Même si vous avez choisi l’un des modes de détection synchrone et si
l’indication SYNC U ou SYNC L est allumée dans la fenêtre
d’affichage, la détection synchrone peut rester sans effet si la réception
est faible. Dans ce cas, l’indication “LOCK” ne s’allume pas.
• Le réglage de détection synchrone ne peut être présélectionné dans la
mémoire.
• Si une fréquence AM présélectionnée est rappelée lorsque l’un des
modes de détection synchrone est activé, le réglage de mode reste
effectif et la fréquence est captée dans le mode respectif.
Ecouter la radio
31
FR
Page 82

Autres opérations
Utilisation de l’antenne extérieure fournie
Utilisez l’antenne active à ondes courtes fournie AN-LP2 pour améliorer
la qualité de réception des ondes courtes. L’antenne vous assure une
réception en intérieur stable grâce à l’amplificateur intégré.
Cette antenne peut uniquement être employée pour capter les bandes de
120 à 11 mètres en ondes courtes comme décrit dans la section “Plage des
bandes de fréquence/bandes métriques” à la page 19. N’oubliez pas de la
déconnecter pour la réception FM, PO ou GO.
Introduction des piles
1 Ouvrez le couvercle du compartiment à piles de la
commande d’antenne.
2 Introduisez deux piles R6 (AA) en en respectant la
polarité.
3 Refermez le couvercle.
Autonomie des piles de l’antenne active
Avec des piles sèches Sony R6 (AA): approx. 40 heures
Quand faut-il remplacer les piles ?
Lorsque les piles faiblissent, le témoin POWER de la commande
d’antenne s’atténue. Remplacez alors les deux piles.
FR
32
Autres opérations
Page 83

Installation
1 Déployez délicatement le module d’antenne.
Veillez à ne rien heurter ni personne lorsque vous déployez le
module d’antenne.
2 Extrayez le long cordon terminé par une fiche à deux
broches de la commande d’antenne jusqu’à ce qu’il
s’arrête et raccordez-le au module d’antenne.
3 Fixez le module d’antenne sur une vitre ou accrochez-
le au rideau.
Fixez l’antenne à l’aide de l’agrafe ou de la ventouse fournie
comme illustré à la page précédente.
4 Branchez le cordon court terminé par une fiche à une
broche sur la prise AM EXT ANT (Antenne AM
extérieure) de la radio.
Vers AM
EXT ANT
L’alimentation de la commande d’antenne est reliée à
l’alimentation de la radio. Le témoin POWER s’allume sur la
commande. Réglez ATT sur OFF sur la radio.
Autres opérations
A propos de l’installation
• Placez le module d’antenne là où la réception est la meilleure, comme
près d’une fenêtre.
• La réception peut se détériorer si le long cordon de la commande
d’antenne est maintenu à proximité de la radio. Eloignez-le le plus loin
possible de la radio.
• Gardez la radio et l’antenne à l’écart des lampes fluorescentes, des
téléviseurs, des téléphones, des ordinateurs personnels, etc., car ils sont
susceptibles de générer des interférences.
• Installez l’antenne le plus loin possible de la rue.
• N’utilisez pas l’antenne à l’extérieur.
• Lorsque vous employez l’antenne extérieure, n’oubliez pas de rétracter
l’antenne télescopique de la radio.
Autres opérations
33
FR
Page 84

Après utilisation
1 Déconnectez le module d’antenne, la commande
d’antenne et la radio.
2 Bobinez le long cordon.
3 Enroulez le cordon court autour de la commande
d’antenne et maintenez-le en place.
4 Torsadez et repliez le module d’antenne, et glissez-le
ensuite correctement dans son étui de transport.
Remarque
• Lors de la réception d’émissions FM, PO ou GO, n’oubliez pas de
déconnecter l’antenne active. La radio ne peut recevoir ces bandes de
fréquences tant que l’antenne extérieure est branchée, parce que
l’antenne télescopique et l’antenne tige en ferrite intégrée seront
déconnectées.
• L’antenne extérieure fournie doit uniquement être employée avec cet
appareil. Elle ne peut être utilisée avec d’autres radios.
• Ne raccordez à la prise AM EXT ANT aucune autre antenne que les
antennes actives préconisées parce que cette prise transmet une tension
continue servant à alimenter les antennes actives préconisées.
FR
34
Autres opérations
Page 85

Enregistrement d’émissions de radio
Raccordez la radio à un magnétophone à cassettes à l’aide de câbles de
connexion pour pouvoir enregistrer des émissions de radio.
Magnétophone
à cassettes
vers LINE OUT
vers MIC IN
ou LINE IN
1 Raccordez la radio à un magnétophone à cassettes à
l’aide de câbles de connexion (non fournis).
Utilisez les cordons appropriés en fonction du magnétophone à
cassettes.
Magnétophone à cassettes
Type Prise
Monaural MIC IN (miniprise) RK-G135
MIC IN (miniprise) RK-G134
Stéréo
LINE IN (miniprise) RK-G136
LINE IN (prise à broche) RK-G129
Câble de connexion
2 Syntonisez la station que vous voulez enregistrer.
3 Démarrez l’enregistrement sur le magnétophone à
cassettes.
Si vous enregistrez sur un magnétophone stéréo
Les émissions FM stéréo sont enregistrées en stéréo. Les émissions AM
sont enregistrées en monaural sur les deux canaux.
Autres opérations
Conseil
Le réglage VOL sur la radio est sans effet sur l’enregistrement.
Autres opérations
35
FR
Page 86

A BC1
Personnalisation d’identifications
Vous pouvez changer l’identification par défaut d’une station
présélectionnée, d’un fuseau horaire, etc., par une combinaison au choix
de 6 caractères alphanumériques.
POWER
ON/
SYNC
3
6
9
SSB
DST
ERASE
TIME SET
ENTER
LIGHT
JOG/
TUNE/
SCAN˚
OFF
SLEEP
Touches
numériques
HOLD
EXE
¿/÷
LABEL EDIT
DIRECT
ABC1DEF2GHI
FM/
AM
JKL4MNO5PQR
AM BAND
STU
LOCAL/
WORLD
LABEL EDIT
TIMERSTANDBY/
STANDBY TIME SET
ab
STANDBY MEMORY
VWX8YZ
7
<>
/
DIRECT
MY DW VOA BBC OTH
DISPLAY
EXE
0
TIME SET
TIME DIFF
SW STATION CALL
1 Affichez l’identification que vous voulez changer pour
la syntonisation de présélection (page 22), la mémoire
de syntonisation MY (page 27), l’affichage de l’heure
WORLD (page 14) ou la fonction de veille (page 38).
2 Appuyez sur LABEL EDIT.
La première lettre de l’identification
se met à clignoter.
3 Appuyez sur ¿ ou ÷ pour déplacer le curseur sur la
lettre que vous voulez changer.
4 Appuyez sur l’une des touches numériques (0 à 9) ou
DIRECT pour introduire la lettre de votre choix.
La première lettre indiquée au-dessus de la touche numérique est
introduite lorsque vous appuyez sur la touche. Chaque fois que
vous appuyez sur la touche, la lettre change selon la séquence
suivante:
Ex. Appuyez sur la touche numérique (1):
FR
36
Autres opérations
(1) (2) (3)
A B C 1 D E F 2 G H I 3
(4) (5) (6)
J K L 4 M N O 5 P Q R 6
(7) (8) (9)
S T U 7 V W X 8 Y Z
(DIRECT) (0)
+ – ∗ . < > / 0
†
†
indique un
9
—
espace blanc.
Page 87

5 Répétez les étapes 3 et 4 pour changer d’autres lettres.
Actionnez successivement les différentes touches de la séquence
dans un délai de 20 secondes.
6 Appuyez sur EXE.
Un bip sonore retentit et les lettre affichées sont enregistrées
comme la nouvelle identification.
Si le caractère cesse de clignoter
Cela signifie que vous avez attendu plus de 20 secondes après
avoir actionné la dernière touche.
Si l’affichage revient à l’identification originale, appuyez à
nouveau sur LABEL EDIT et recommencez.
Pour annuler la procédure de personnalisation
Appuyez sur LABEL EDIT avant d’appuyer sur EXE.
Remarques
• Les identifications SW STATION CALL ne peuvent être
personnalisées.
• L’appareil n’émet aucun bip sonore si la fonction de bip est réglée sur
BEEP OFF (voir “Désactivation du bip sonore” à la page 43).
• Une identification de présélection personnalisée revient à la sélection
par défaut lorsqu’une station présélectionnée est remplacée (voir
“Identification par défaut des présélections” à la page 22).
Autres opérations
Autres opérations
37
FR
Page 88

Utilisation du programmateur
S’éveiller avec la radio ou le vibreur — Fonction de veille
Vous pouvez vous éveiller avec votre émission de radio favorite en activant la
fonction de veille. Vous pouvez programmer différentes fréquences et heures
d’activation dans les mémoires de veille (STANDBY MEMORY) a et b.
Pour vous éveiller avec le vibreur, voir “Pour s’éveiller avec le vibreur” à la
page 40.
POWER
ON/
SYNC
3
OFF
SSB
SLEEP
6
DST
ERASE
9
LIGHT
TIME SET
EXE
ENTER
JOG/
TUNE/
SCAN˚
HOLD
POWER
ON/OFF
ENTER
–
|¿/÷|
+
VOL
STANDBY
MEMORY
a/b
ABC1DEF2GHI
FM/
AM
JKL4MNO5PQR
AM BAND
STU
LOCAL/
WORLD
LABEL EDIT
TIMERSTANDBY/
STANDBY TIME SET
ab
STANDBY MEMORY
VWX8YZ
7
<>
/
DIRECT
MY DW VOA BBC OTH
DISPLAY
0
TIME SET
TIME DIFF
SW STATION CALL
Assurez-vous que l’horloge est correctement réglée avant d’activer la
fonction de veille (page 12).
1 Syntonisez la station que vous voulez programmer.
2 Réglez le VOL suivant vos préférences.
3 Maintenez la touche ENTER enfoncée et appuyez sur
STANDBY MEMORY a ou b.
Lorsque vous maintenez la touche
ENTER enfoncée, l’indication “PRESET
MY” clignote dans la fenêtre d’affichage.
Un bip sonore retentit lorsque vous
appuyez sur STANDBY MEMORY a ou
b. La station mémorisée sous la touche
sélectionnée. Le numéro STANDBY
MEMORY (a ou b) et l’identification STANDBY MEMORY s’affichent.
4 Appuyez sur POWER ON/OFF pour mettre la radio
hors tension.
5 Maintenez enfoncée la touche STANDBY MEMORY
sur laquelle vous avez appuyé à l’étape 3, puis
appuyez plusieurs fois de suite sur –1¿ ou ÷1+ pour
régler l’heure d’activation (par ex., l’heure à laquelle la
radio doit se mettre sous tension).
Les indications “STANDBY” et “a” ou “b” clignotent pendant
que vous maintenez la touche STANDBY MEMORY enfoncée.
6 Relâchez la touche STANDBY MEMORY.
Les indications “STANDBY” et “a” ou
“b” s’allument et la programmation de
veille est terminée.
L’indication de l’horloge affiche à
nouveau l’heure.
La radio se met sous tension à l’heure
programmée et syntonise la station présélectionnée.
FR
38
Autres opérations
Page 89

Pour vérifier l’heure d’activation
Maintenez la touche STANDBY MEMORY a ou b enfoncée alors que
la radio est hors tension. L’heure d’activation programmée s’affiche
pendant que vous appuyez sur la touche.
Pour modifier l’heure d’activation
Répétez les étapes 4 à 6 et programmez une nouvelle heure
d’activation.
Pour désactiver la fonction de veille
Appuyez sur STANDBY MEMORY a ou b alors que la radio est hors
tension de façon à ce que l’indication “STANDBY” a ou b
disparaisse de la fenêtre d’affichage.
Relâchez la touche dans un délai d’une seconde. Si vous maintenez la
touche enfoncé pendant plus d’une seconde, la radio passe à l’étape 5
de la procédure.
A l’heure d’activation programmée
La radio se met sous tension, l’indication “SLEEP” s’allume et la
station présélectionnée est syntonisée. La radio se remet ensuite hors
tension au bout d’environ 60 minutes.
Remarques
• La fonction de veille est activée lorsque l’heure affichée, que ce soit en mode
LOCAL ou WORLD, atteint l’heure d’activation programmée. Assurezvous par conséquent que l’heure est affichée dans le mode de votre choix.
• Si une station était déjà mémorisée sous la touche STANDBY MEMORY, la
précédente station présélectionnée est remplacée par la nouvelle. Si
l’identification de présélection avait été personnalisée, elle revient à
l’identification par défaut suivante:
a = “STBY-a”
b = “STBY-b”
Pour changer une identification, voir “Personnalisation d’identifications” à
la page 36.
• Assurez-vous que la radio est hors tension avant de programmer l’heure
d’activation. Vous ne pouvez pas programmer l’heure d’activation alors
que la radio fonctionne.
Autres opérations
Conseils
•
Pour désactiver temporairement la fonction de veille, mettez la radio hors
tension et faites glisser HOLD dans le sens de la flèche de façon à afficher
l’indication “H”. Le programmateur de veille est de nouveau activé lorsque
HOLD est désactivé (“H” disparaît de la fenêtre d’affichage). Voir
“Utilisation de la fonction de verrouillage” à la page 42.
• Lorsque les réglages du programmateur de veille sont terminés, la radio se
met tous les jours sous tension à l’heure programmée sauf lorsque la
fonction de veille est désactivée (voir “Pour désactiver la fonction de veille”
ci-dessus). La désactivation de la fonction de veille n’efface pas les réglages
du programmateur de veille proprement dits. La fonction de veille peut à
nouveau être activée en appuyant sur la touche STANDBY MEMORY a ou
b alors que la radio est hors tension de façon à ce que l’indication
“STANDBY” a ou b soit allumée dans la fenêtre d’affichage.
• Lorsque la mémoire de veille se trouve en mode de veille, elle est activée
quand vous écoutez la radio. La radio commute la fréquence de veille
présélectionnée à l’heure d’activation programmée.
• Vous pouvez régler les deux mémoires STANDBY en mode de veille à la
même heure (par ex., les indicateurs a et bsont allumés dans la fenêtre
d’affichage). La radio se met sous tension à la première heure d’activation
pour recevoir la première fréquence de veille programmée, et passe ensuite
à la seconde fréquence de veille à la seconde heure d’activation
programmée.
• Si les deux mémoires STANDBY sont programmées sur la même heure
d’activation, STANDBY a a la priorité.
Autres opérations
39
FR
Page 90

Pour s’éveiller avec le vibreur
Lorsqu’une mémoire STANDBY MEMORY sans fréquence
présélectionnée est activée, le vibreur retentit à l’heure d’activation
programmée. Si une fréquence est présélectionnée, supprimez-la.
POWER
ON/
SYNC
3
6
9
SSB
DST
ERASE
TIME SET
ENTER
SLEEP
LIGHT
JOG/
TUNE/
SCAN˚
OFF
HOLD
POWER
ON/OFF
ERASE
STANDBY
MEMORY
a/b
ABC1DEF2GHI
FM/
AM
JKL4MNO5PQR
AM BAND
STU
LOCAL/
WORLD
LABEL EDIT
TIMERSTANDBY/
STANDBY TIME SET
ab
STANDBY MEMORY
VWX8YZ
7
<>
/
DIRECT
MY DW VOA BBC OTH
DISPLAY
EXE
0
TIME SET
TIME DIFF
SW STATION CALL
1 Appuyez sur POWER ON/OFF pour mettre la radio
sous tension.
2 Appuyez sur STANDBY MEMORY a ou b.
La fréquence présélectionnée est rappelée.
Si aucune fréquence n’est présélectionnée, un bip sonore retentit et
l’indication “MEMORY” “EMPTY” apparaît dans la fenêtre
d’affichage. Passez à l’étape 4.
3 Maintenez la touche ERASE enfoncée.
Le numéro de mémoire de veille clignote dans la fenêtre
d’affichage pendant que vous maintenez la touche ERASE
enfoncée.
Un bip sonore retentit après 3 secondes et la station assignée à la
touche STANDBY MEMORY est supprimée. Le numéro et
l’identification de mémoire de veille disparaissent.
4 Exécutez les étapes 4 à 6 de la procédure “S’éveiller
avec la radio ou le vibreur” à la page 38 pour
programmer l’heure d’activation (c.-à-d. l’heure à
laquelle le vibreur doit être activé).
Le vibreur retentit à l’heure d’activation programmée.
Pour arrêter le vibreur
Appuyez sur n’importe quelle touche à l’exception de LIGHT.
Le vibreur s’arrête après environ 60 minutes si vous ne l’arrêtez
pas.
Remarques
• Le volume du vibreur ne peut être réglé avec la commande VOL.
• Le vibreur de la mémoire de veille est activé quel que soit le réglage de
BEEP OFF.
• Lorsqu’un réglage de mémoire de veille est supprimé, les éventuelles
modifications apportées à son identification par défaut sont également
effacées.
FR
40
Autres opérations
Page 91

S’endormir en écoutant la radio Programmateur d’extinction
Vous pouvez mettre la radio automatiquement hors tension au bout
d’environ 60 minutes à l’aide du programmateur d’extinction.
ABC1DEF2GHI
FM/
AM
JKL4MNO5PQR
AM BAND
STU
LOCAL/
WORLD
LABEL EDIT
TIMERSTANDBY/
STANDBY TIME SET
ab
STANDBY MEMORY
VWX8YZ
7
<>
/
DIRECT
MY DW VOA BBC OTH
DISPLAY
EXE
0
TIME SET
TIME DIFF
SW STATION CALL
POWER
ON/
SYNC
3
6
9
SSB
DST
ERASE
TIME SET
ENTER
SLEEP
LIGHT
JOG/
TUNE/
SCAN˚
OFF
SLEEP
HOLD
1 Appuyez sur SLEEP.
Si la radio était coupée, elle se met
sous tension. L’indication “SLEEP”
s’allume.
2 Syntonisez la station de votre choix.
La radio se met automatiquement hors tension au bout d’environ
60 minutes.
Pour mettre la radio hors tension avant la fin des 60
minutes
Appuyez sur POWER ON/OFF.
Autres opérations
Conseils
• Si vous appuyez sur la touche SLEEP alors que la radio fonctionne,
l’indication “SLEEP” s’allume et la radio se met hors tension au bout
d’environ 60 minutes.
• Si vous appuyez sur SLEEP pour mettre la radio sous tension, la radio
syntonise la fréquence précédemment syntonisée.
• Si vous appuyez sur la touche SLEEP alors que l’indication “SLEEP”
est déjà allumée, le décompte d’extinction est réinitialisé et la radio se
mettra hors tension après environ 60 minutes à partir de ce point.
Autres opérations
41
FR
Page 92

Utilisation de la fonction de verrouillage
Lorsque la fonction de verrouillage est activée, toutes les touches
deviennent inopérantes ce qui empêche tout opération accidentelle
pendant que vous transportez ou que vous employez la radio.
La fonction de verrouillage peut également être utilisée pour désactiver
temporairement le programmateur de veille.
ABC1DEF2GHI
FM/
AM
JKL4MNO5PQR
AM BAND
STU
LOCAL/
WORLD
LABEL EDIT
TIMERSTANDBY/
STANDBY TIME SET
ab
STANDBY MEMORY
VWX8YZ
7
<>
/
DIRECT
MY DW VOA BBC OTH
DISPLAY
EXE
0
TIME SET
TIME DIFF
SW STATION CALL
POWER
ON/
SYNC
3
6
9
SSB
DST
ERASE
TIME SET
ENTER
SLEEP
LIGHT
JOG/
TUNE/
SCAN˚
OFF
HOLD
HOLD
1 Faites glisser HOLD dans le sens de la flèche.
L’indication “H” s’allume et toutes
les touches deviennent inopérantes.
Pour désactiver la fonction de verrouillage
Faites glisser HOLD dans le sens opposé à la flèche de façon à ce
que l’indication “H” disparaisse de la fenêtre d’affichage.
Pour désactiver temporairement le programmateur de
veille
Lorsque la fonction de verrouillage est activée, le programmateur
de veille est temporairement désactivé (voir “S’éveiller avec la
radio ou le vibreur— Fonction de veille” à la page 38).
La désactivation temporaire du programmateur de veille par la
fonction de verrouillage n’est effective que lorsque la radio est
hors tension.
42
FR
Autres opérations
Page 93

Désactivation du bip sonore
Le bip de confirmation peut être désactivé. Pour cette procédure, la radio
doit être hors tension.
FM/AM
ABC1DEF2GHI
FM/
AM
JKL4MNO5PQR
AM BAND
STU
LOCAL/
WORLD
LABEL EDIT
TIMERSTANDBY/
STANDBY TIME SET
ab
STANDBY MEMORY
VWX8YZ
7
<>
/
DIRECT
MY DW VOA BBC OTH
DISPLAY
EXE
0
TIME SET
TIME DIFF
SW STATION CALL
POWER
ON/
SYNC
3
6
9
SSB
DST
ERASE
TIME SET
ENTER
OFF
SLEEP
LIGHT
JOG/
TUNE/
SCAN˚
POWER
ON/OFF
HOLD
1 Si la radio fonctionne, appuyez sur POWER ON/OFF
pour la couper.
2 Maintenez la touche FM/AM enfoncée pendant au
moins 2 secondes.
Un bip sonore retentit et “BEEP” “OFF” apparaît dans la fenêtre
d’affichage. La fonction de bip sonore est désactivée.
Pour activer de nouveau le bip sonore, maintenez à nouveau la
touche FM/AM enfoncée pendant au moins 2 secondes.
L’indication “BEEP” “ON” apparaît dans la fenêtre d’affichage et
le bip sonore est activé.
Conseil
Le réglage du bip sonore n’affecte pas le vibreur pour la fonction de
programmateur de veille (voir “Pour s’éveiller avec le vibreur” à la page
40).
Autres opérations
Autres opérations
43
FR
Page 94

Informations complémentaires
Précautions et entretien
Installation
• Ne laissez pas l’appareil à proximité de sources de chaleur
comme des radiateurs ou des conduits d’air chaud, ni dans un
endroit exposé au rayonnement direct du soleil, à un excès de
poussière, d’humidité, à la pluie, aux vibrations et aux chocs
mécaniques.
• Utilisez l’appareil dans une plage de températures comprises
entre 0 et 40 °C (32 et 104 °F). S’il est utilisé au-dessus de cette
plage de températures, l’affichage peut présenter des anomalies
(par ex., 88.88). S’il est utilisé en-dessous de cette plage de
températures, l’affichage peut ne changer que très lentement.
L’appareil revient à des conditions normales de
fonctionnement dès qu’il est ramené dans sa plage de
températures spécifiée.
• La réception peut s’avérer difficile ou comporter des parasites
dans les voitures et les buildings. Placez à côté d’une fenêtre.
Sécurité
• Faites uniquement fonctionner l’appareil sur une tension de 3 V
CC avec deux piles R6 (AA).
Pour le fonctionnement sur secteur, utilisez l’adaptateur
secteur fourni. N’utilisez aucun autre type d’adaptateur
secteur.
Pour l’utilisation en voiture, utilisez le cordon pour batterie de
voiture préconisé pour cet appareil. N’utilisez aucun autre type
de cordon pour batterie de voiture.
• L’appareil n’est pas déconnecté de la source d’alimentation
(secteur) aussi longtemps qu’il reste raccordé à une prise
murale, même si l’appareil proprement dit a été mis hors
tension.
• Débranchez l’adaptateur secteur de la prise murale si vous
prévoyez de ne pas utiliser l’appareil pendant une période
prolongée.
• La plaquette signalétique indiquant la tension de service, etc.,
est située sur la base de l’appareil.
• Si des liquides ou des objets venaient à pénétrer à l’intérieur de
l’appareil, débranchez-le et faites-le vérifier par le personnel
qualifié avant de le remettre en service. Assurez-vous qu’aucun
liquide ou corps étranger ne pénètre dans la prise DC IN 3V de
l’appareil, car cela pourrait provoquer un dysfonctionnement.
• Si le boîtier est souillé, nettoyez-le avec un chiffon doux et sec
légèrement imprégné d’une solution détergente neutre.
N’utilisez jamais de nettoyants abrasifs ni de solvants
chimiques qui risqueraient de ternir le fini de l’appareil.
• Etant donné que le haut-parleur intègre un puissant aimant,
gardez les cartes de crédit à code magnétique et les montres à
remontoir mécanique à l’écart de l’appareil afin d’éviter tout
dommage éventuel causé par l’aimant.
FR
Informations complémentaires44
Page 95

•S’il y a de la foudre pendant que vous employez l’antenne
extérieure, débranchez immédiatement l’adaptateur secteur de
la prise murale, s’il y est raccordé. Ne touchez jamais le fil
d’antenne pendant un orage accompagné d’éclairs.
•Ne reliez jamais un fil de masse à une conduite de gaz.
A propos de l’antenne active AN-LP2
•Ne lavez pas le module d’antenne.
•Veillez à ne pas briser le module d’antenne lorsque vous le
repliez.
•Gardez l’antenne dans son étui si vous prévoyez de ne pas
l’utiliser pendant une période prolongée.
Service et réparations
Lorsque vous présentez votre appareil en vue d’un entretien ou
d’une réparation, veillez à prendre note des réglages de
présélection importants. Suivant le type de réparation requis, il
est possible qu’ils soient effacés.
Si vous avez des questions ou des problèmes concernant votre
appareil, consultez votre revendeur Sony.
Informations complémentaires
Informations complémentaires
45
FR
Page 96

Remplacement de la mémoire ROM SW STATION CALL
Pour vous procurer la dernière mise à jour de la mémoire ROM,
reportez-vous à la section “Purchasing the latest SW STATION
CALL ROM” (uniquement en anglais et en japonais) et consultez
F Corporation.
1 Abaissez le couvercle du
logement de la mémoire ROM
sur le dessous de l’appareil et
faites glisser RELEASE dans le
sens de la flèche. Relâchez
ensuite doucement le couvercle.
2 Retirez le couvercle du
logement de la mémoire ROM et
enlevez la mémoire ROM de son
logement. Veillez à ne pas
toucher les surfaces de contact
(éléments métalliques).
3 Insérez la saillie de la mémoire
ROM dans la cavité du
logement et placez la nouvelle
mémoire ROM dans le logement
avec la surface de contact vers le
Cavité
bas.Veillez à ne pas toucher les
surfaces de contact.
4 Glissez les saillies du couvercle
du logement de la mémoire
ROM dans les cavités du
logement et verrouillez le
Cavités
couvercle en faisant glisser
RELEASE dans le sens opposé à
la flèche tout en appuyant sur le
couvercle.
Remarque
Ne touchez pas les surfaces de contact de la mémoire ROM ou de la
radio, parce que vous risquez sinon de provoquer un dysfonctionnement.
Nettoyage de la surface de contact de la mémoire ROM SW
STATION CALL
Si l’indication “NO” “ROM” est affichée alors que la mémoire ROM SW
STATION CALL est installée dans son logement, c’est probablement
parce que la surface de contact de la mémoire ROM est souillée.
Retirez la mémoire ROM en appliquant la procédure ci-dessus et
nettoyez la surface de contact à l’aide d’un coton-tige.
Remarque
Ne nettoyez pas les ressorts de contact de l’appareil principal parce que
vous risquez sinon de les déformer et de provoquer un
dysfonctionnement.
FR
Informations complémentaires46
Page 97

Dépannage
Si vous rencontrez des problèmes avec cet appareil, vérifiez d’abord les
éléments suivants avant de consulter votre revendeur Sony.
Symptômes
La radio refuse
les instructions
saisies à l’aide
des touches.
La radio ne se
met pas sous
tension même
lorsque vous
appuyez sur
POWER ON/
OFF.
L’affichage ne
fonctionne pas.
La luminosité
de la fenêtre
d’affichage
s’atténue.
L’affichage est
lent/
Aucun son
n’est diffusé.
Qualité de
réception
médiocre.
Cause
•Le verrouillage est
activé.
•Installation incorrecte
des piles.
•Les piles sont faibles
(“i” clignote dans la
fenêtre d’affichage).
•L’adaptateur secteur ou
le cordon pour batterie
de voiture est
déconnecté.
•Installation incorrecte
des piles.
•Les piles sont faibles
(“i” clignote dans la
fenêtre d’affichage).
•L’appareil est employé
sous une température
extrêmement faible ou
sous une forte humidité.
•L’appareil est employé
sous une température
extrêmement faible .
•La commande VOL est
réglée sur la position
minimum.
•Le casque d’écoute
stéréo est branché.
•Installation incorrecte
des piles.
•Les piles sont faibles
(“i” clignote dans la
fenêtre d’affichage).
•Syntonisation ou
ajustement de l’antenne
incorrect.
•Faible signal radio.
•ATT est réglé sur ON.
Remèdes
•Faites glisser HOLD dans
le sens opposé à la flèche
de façon à ce que “H”
disparaisse de la fenêtre
d’affichage (page 42).
•Installez les piles en en
respectant la polarité.
•Remplacez les piles.
•Assurez-vous que
l’adaptateur secteur ou le
cordon pour batterie de
voiture est correctement
raccordé.
•Installez les piles en en
respectant la polarité.
•Remplacez les piles.
•N’exposez pas l’appareil à
des températures
extrêmement basses ni à
une forte humidité.
•N’exposez pas l’appareil à
des températures
extrêmement basses.
•Réglez la commande VOL
sur la position voulue.
•Débranchez le casque
d’écoute stéréo pour
permettre la diffusion du
son via le haut-parleur.
•Installez les piles en en
respectant la polarité.
•Remplacez les piles.
•Ajustez correctement la
syntonisation et
l’orientation de l’antenne.
•Ecoutez la radio à côté
d’une fenêtre lorsque vous
vous trouvez dans une
voiture ou à l’intérieur
d’un building.
•Réglez ATT sur OFF (page
21).
Informations complémentaires
Informations complémentaires
FR
47
Page 98

Dépannage (suite)
Symptômes
Impossible de
syntoniser
directement une
station.
Impossible de
présélectionner
une station.
Impossible de
rappeler une
station
présélectionnée.
La radio ne se met
pas sous tension à
l’heure
d’activation
programmée.
La fonction SW
STATION CALL
est inopérante.
Impossible de
présélectionner
une station dans
la mémoire MY.
Cause
•Vous avez attendu plus
de 10 secondes avant
d’actionner une touche.
•Procédure incorrecte
•Vous n’avez pas
appuyé sur la bonne
touche numérique pour
cette station.
•Le réglage de
présélection a été
effacé accidentellement.
•Vous avez omis
d’appuyer sur
STANDBY a ou b.
•La fonction de
verrouillage est activée.
•Le réglage de l’heure
d’activation a été effacé
parce qu’il vous a fallu
plus de 3 minutes pour
remplacer les piles.
•La commande VOL est
réglée sur la position
minimum.
•Aucune fréquence n’est
enregistrée dans la
mémoire STANDBY
MEMORY (le vibreur
retentit à l’heure
programmée).
•Le logement de la
mémoire ROM est vide.
•Mauvaise connexion de
la mémoire ROM.
•La mémoire MY est
saturée (00 à 99).
Remèdes
•Actionnez
successivement les
différentes touches
dans un délai de 10
secondes.
•Maintenez la touche
ENTER enfoncée et
appuyez sur une
touche numérique (0-9)
(page 22).
•Appuyez sur la touche
numérique
correspondant à la
station présélectionnée
voulue.
•Présélectionnez à
nouveau la station
(page 22).
•Appuyez sur
STANDBY a ou b (page
38).
•Faites glisser HOLD
dans le sens opposé à la
flèche de façon à ce que
“H” disparaisse de la
fenêtre d’affichage
(page 42).
•Programmez à nouveau
l’heure d’activation.
•Réglez la commande
VOL.
•Enregistrez une
fréquence dans la
mémoire STANDBY
MEMORY (page 38).
•Introduisez la mémoire
ROM (page 46).
•Nettoyez la surface de
contact de la mémoire
ROM (page 46).
•Supprimez une
présélection de la
mémoire et
présélectionnez la
station (page 29).
FR
Informations complémentaires48
Page 99

Spécifications
ICF-SW07
Système de circuit
FM: Superhétérodyne
AM: Superhétérodyne à double conversion
Plage de fréquence
FM: 76-108 MHz
OC: 1.621-29.999 kHz
PO: 530-1.620 kHz
GO: 150-529 kHz
Fréquence intermédiaire
FM: 10,7 MHz
OC/PO/GO: 55,845 MHz (1re), 455 kHz (2e)
Sortie
Prise LINE OUT (miniprise stéréo) approx. 245 mV, moins de 10 kilohms
Prise 2 (casque d’écoute) (miniprise stéréo) 16 ohms
Haut-parleur
Approx. 40 mm (1 5/8 pouces) diam., 8 ohms
Puissance de sortie maximum
200 mW (à 10 % de distorsion harmonique)
Puissance de raccordement
3 V CC, deux piles R6 (AA)
Source d’alimentation externe
La prise DC IN 3V accepte: adaptateur secteur fourni
Dimensions
Approx. 135 x 32,5 x 91 mm (l/h/p)(5 3/8 x 1 5/16 x 3 5/8 pouces) parties
saillantes non comprises
Masse
Approx. 220 g (7,8 oz)
Approx. 257 g (9,1 oz), piles comprises
AN-LP2
Puissance de raccordement
3 V CC, deux piles R6 (AA)
Dimensions (l/h/p)
Module d’antenne
Déployé: Approx. 490 x 480 x 17,8 mm (19 3/8 x 19 x 23/32 po)
Replié: Approx. 205 x 180 x 17,8 mm (8 1/8 x 7 1/8 x 23/32 po)
Commande d’antenne
Approx. 120 x 29,5 x 72 mm (4 3/4 x 1 3/16 x 2 7/8 po)
Masse
Module d’antenne: approx. 92 g (3,3 oz.)
Commande d’antenne: approx. 144 g (5,1 oz.), piles comprises
Accessoires fournis
Casque d’écoute stéréo (1)
Oreillettes (2)
Adaptateur secteur (1)
Adaptateur de fiche secteur (1) (sauf avec le modèle pour les Etats-Unis)
Antenne active AN-LP2 (1)
Etui de transport pour ICF-SW07 (1)
Etui de transport pour AN-LP2 (1)
Guide des ondes (1)
Accessoires en option
Antenne GO/PO/OC à large plage AN-1, AN-102
Câble de connexion
RK-G135 (minifiche stéréo ˜ minifiche)
RK-G134 (minifiche stéréo ˜ minifiche stéréo)
RK-G136 (minifiche stéréo ˜ minifiche stéréo)
RK-G129 (minifiche stéréo ˜ fiche à deux broches)
Il se peut que votre revendeur ne dispose pas de certains des accessoires en
option mentionnés ci-dessus. Consultez votre revendeur pour des informations
détaillées sur les Accessoires en option disponibles dans votre pays.
La conception et les spécifications sont sujettes à modifications sans préavis.
Informations complémentaires
Informations complémentaires
FR
49
Page 100

A propos des ondes radio
Qu’est-ce que la SSB (Single Side Band / Bande latérale
unique) ?
La SSB, en français BLU, est très populaire parmi les radioamateurs
et les radios commerciales et c’est une des bandes radioamateurs les
plus utilisées car elle offre un signal d’une excellente qualité.
L’exceptionnelle netteté du signal provient d’une absence presque
totale d’interférences par rapport à la DSB (Double Side Band), car
elle utilise un spectre de fréquences plus étroit de moitié.
En général, les transmissions SSB emploient la modulation de la
bande latérale supérieure (USB) tandis que les transmissions
radioamateurs inférieures à 10 MHz emploient la modulation de la
bande latérale inférieure (LSB).
Les radios classiques sans oscillateur de fréquence de battement
(BFO) ne peuvent pas recevoir les
transmissions SSB correctement.
Mais cet appareil peut les recevoir
car il intègre un oscillateur de
fréquence de battement.
Amplitude
Qu’est-ce que la CW (télégraphie)?
La CW est également très populaire parmi les radioamateurs et les
radios commerciales. A la différence d’autres signaux, l’amplitude de
la porteuse n’est pas modulée pour les transmissions CW. Les
transmissions CW véhiculent l’information en interrompant la
porteuse et elles utilisent le morse comme moyen de communication.
Cet appareil peut recevoir les CW grâce à l’oscillateur de fréquence
de battement (BFO) intégré, mais sous forme de battement
uniquement. Pour comprendre entièrement l’information véhiculée
par les transmissions CW, il est nécessaire de connaître le morse.
Porteuse
LSB US B
Fréquence
Qu’est-ce que la détection synchrone?
Deux phénomènes font généralement obstacle à une bonne réception
de la bande AM: les distorsions dues au fading, une décroissance
graduelle de l’amplitude du signal, et les interférences dues aux
stations adjacentes.
La détection synchrone permet de résoudre de manière efficace ces
problèmes.
Les distorsions dues au fading proviennent généralement d’une
surmodulation survenant quand un élément de la porteuse du signal
reçu est atténué durant son parcours. Le circuit de détection
synchrone de cet appareil génère une fréquence de porteuse pure,
sans changement de niveau, synchronisée de manière idéale sur la
porteuse originale pour compenser l’atténuation, ce qui réduit
considérablement la distorsion.
Ainsi, les émetteurs AM (GO, PO et OC) emploient généralement les
signaux de la DSB (Double Side Band) pour transmettre des signaux
modulés sur les bandes latérales supérieures et inférieures (USB et
LSB). Dans la plupart des cas, une des bandes latérales est affectée
par les interférences provenant de stations adjacentes (par ex., des
battements). Le circuit de détection synchrone de cet appareil extrait
le signal de ces deux bandes (USB ou
LSB) de la DSB (Double Side Band) qui
ne présente pas d’interférences.
De cette façon, la réception est nette et
les stations adjacentes n’interfèrent pas.
FR
Informations complémentaires50
Porteuse
Réception sur ce côté
uniquement
USBLSB
Interférences
 Loading...