

Sony ICF-M60SRDS User Manual
3-241-630-11(1)
SONY RDS
TRAFFIC
INFORMATION
FM/MW/LW 3 Band RDS Radio
ICF-M60LRDS
FM/SW/MW 3 Band RDS Radio
ALTERNATIVE
ICF-M60SRDS
Operating Instructions
Mode d’emploi
Bedienungsanleitung
Sony Corporation © 2002 Printed in China
SEARCH
PTY SEARCH
RADIO TEXT
* This EON extends the functions of this unit
SONY
Features
•
Searches and
stands by for
traffic
information
•
Automatically
switches from
the tuned in
station to
traffic
information
provided by
EON. When
the broadcast
is over, the
unit retunes to
the previously
tuned station.
•
Automatically
searches for a
relatively
stronger signal
within the
same
broadcasting
network of
multiple
broadcasting
stations.
•
Displays the
programme
type of the
received
station or the
programme
type list.
•
Searches
automatically
among the
stations of the
same
programme
type.
•
Displays and
scrolls the radio
text of
broadcast
information.
to be able to track other stations
transmitting the EON data while the unit is
tuned in to a network station.
Other Features
•Quartz-controlled PLL (Phase Locked
A
Rear
Arrière
Rückseite
Insert E side of the battery first.
Insérez la borne E de la pile en premier.
Legen Sie die Batterien mit dem Minuspol E zuerst ein.
B
To a wall outlet
Vers une prise murale
An eine Netzsteckdose
R14 (size C) × 4
R14 (C) × 4
R14 (Größe C) × 4
To AC IN
Vers AC IN
An AC IN
AC power cord
Cordon d’alimentation secteur
Netzkabel
Loop) synthesizer system using a
microcomputer for easy pinpoint tuning.
•Shuttle dial with an analog touch for
station selection.
•A total of 28 stations can be preset, 14 FM
stations and 7 stations each for SW, MW
and LW.
•Easy to press 7 PRESET TUNING buttons
on the top panel.
•A large 12 cm diameter built-in speaker for
obtaining high quality sounds.
•Radio standby timer that turns on the radio
and buzzer standby timer that sounds a
buzzer which can be used as an alarm at a
preset time.
•Sleep timer that turns off the radio
automatically (can be set to turn off after
15, 30, 45 or 60 minutes).
•Scan Tuning that automatically scans the
stations in the frequency range.
•Tone quality adjustment function.
•Backlight for viewing the display in the
dark.
•You can choose from two power sources:
batteries or house current.
Precautions
•Operate the unit on the power sources
listed in “Specifications”.
•The unit is not disconnected from the AC
power source (mains) as long as it is
connected to the wall outlet, even if the
unit itself has been turned off.
•The nameplate indicating operating
voltage, power consumption, etc. is located
on the rear exterior.
•Avoid exposure to temperature extremes,
direct sunlight, moisture, sand, dust or
mechanical shock. Never leave in a car
parked under the sun.
•Should any solid object or liquid fall into
the unit, disconnect the AC power cord or
remove the batteries, and have the unit
checked by a qualified personnel before
operating it any further.
•Do not place the unit on surfaces (rugs,
blankets, etc.) or near materials (curtains,
draperies) that block the ventilation holes.
•Use the unit within a temperature range of
0°C to 40°C (32°F to 104°F). If it is used in
temperatures higher than this range,
numbers may appear in the display which
have nothing to do with the frequency
being received. If it is used in temperatures
lower than this range, the numbers
displayed may change very slowly. (These
irregularities will disappear and there will
be no damage to the unit when the unit is
used in the recommended temperature
range.)
•In vehicles or buildings, radio reception
may be difficult or noisy. Try listening near
a window.
•Since a strong magnet is used for the
speakers, keep away personal credit cards
using magnetic coding or spring-wound
watches from the unit to prevent possible
damage from the magnet.
•To clean the casing, use a soft cloth
dampened with a mild detergent solution.
If you have any questions or problems
concerning your unit, please consult your
nearest Sony dealer.
Troubleshooting
Guides
LIGHT
mb/CLOCK
CLOCK AUTO ADJUST
PTY TEXT
CLOCK for ICF-M60LRDS
CLOCK pour ICF-M60LRDS
CLOCK beim ICF-M60LRDS
English
WARNING
To prevent fire or shock hazard, do
not expose the unit to rain or
moisture.
To avoid electrical shock, do not open
the cabinet. Refer servicing to
qualified personnel only.
Do not install the appliance in a
confined space, such as a bookcase or
built-in cabinet.
To prevent fire or shock hazard, do
not place objects filled with liquids,
such as vases, on the apparatus.
Before You Begin
Thank you for choosing the Sony
radio!
It will give you many hours of reliable
service and listening pleasure.
Before operating the radio, please
read these instructions thoroughly
and retain them for future reference.
These instructions cover these
models:
ICF-M60LRDS and ICF-M60SRDS.
Their differences are shown below.
Model number Band
ICF-M60LRDS FM/MW/LW
ICF-M60SRDS FM/SW/MW
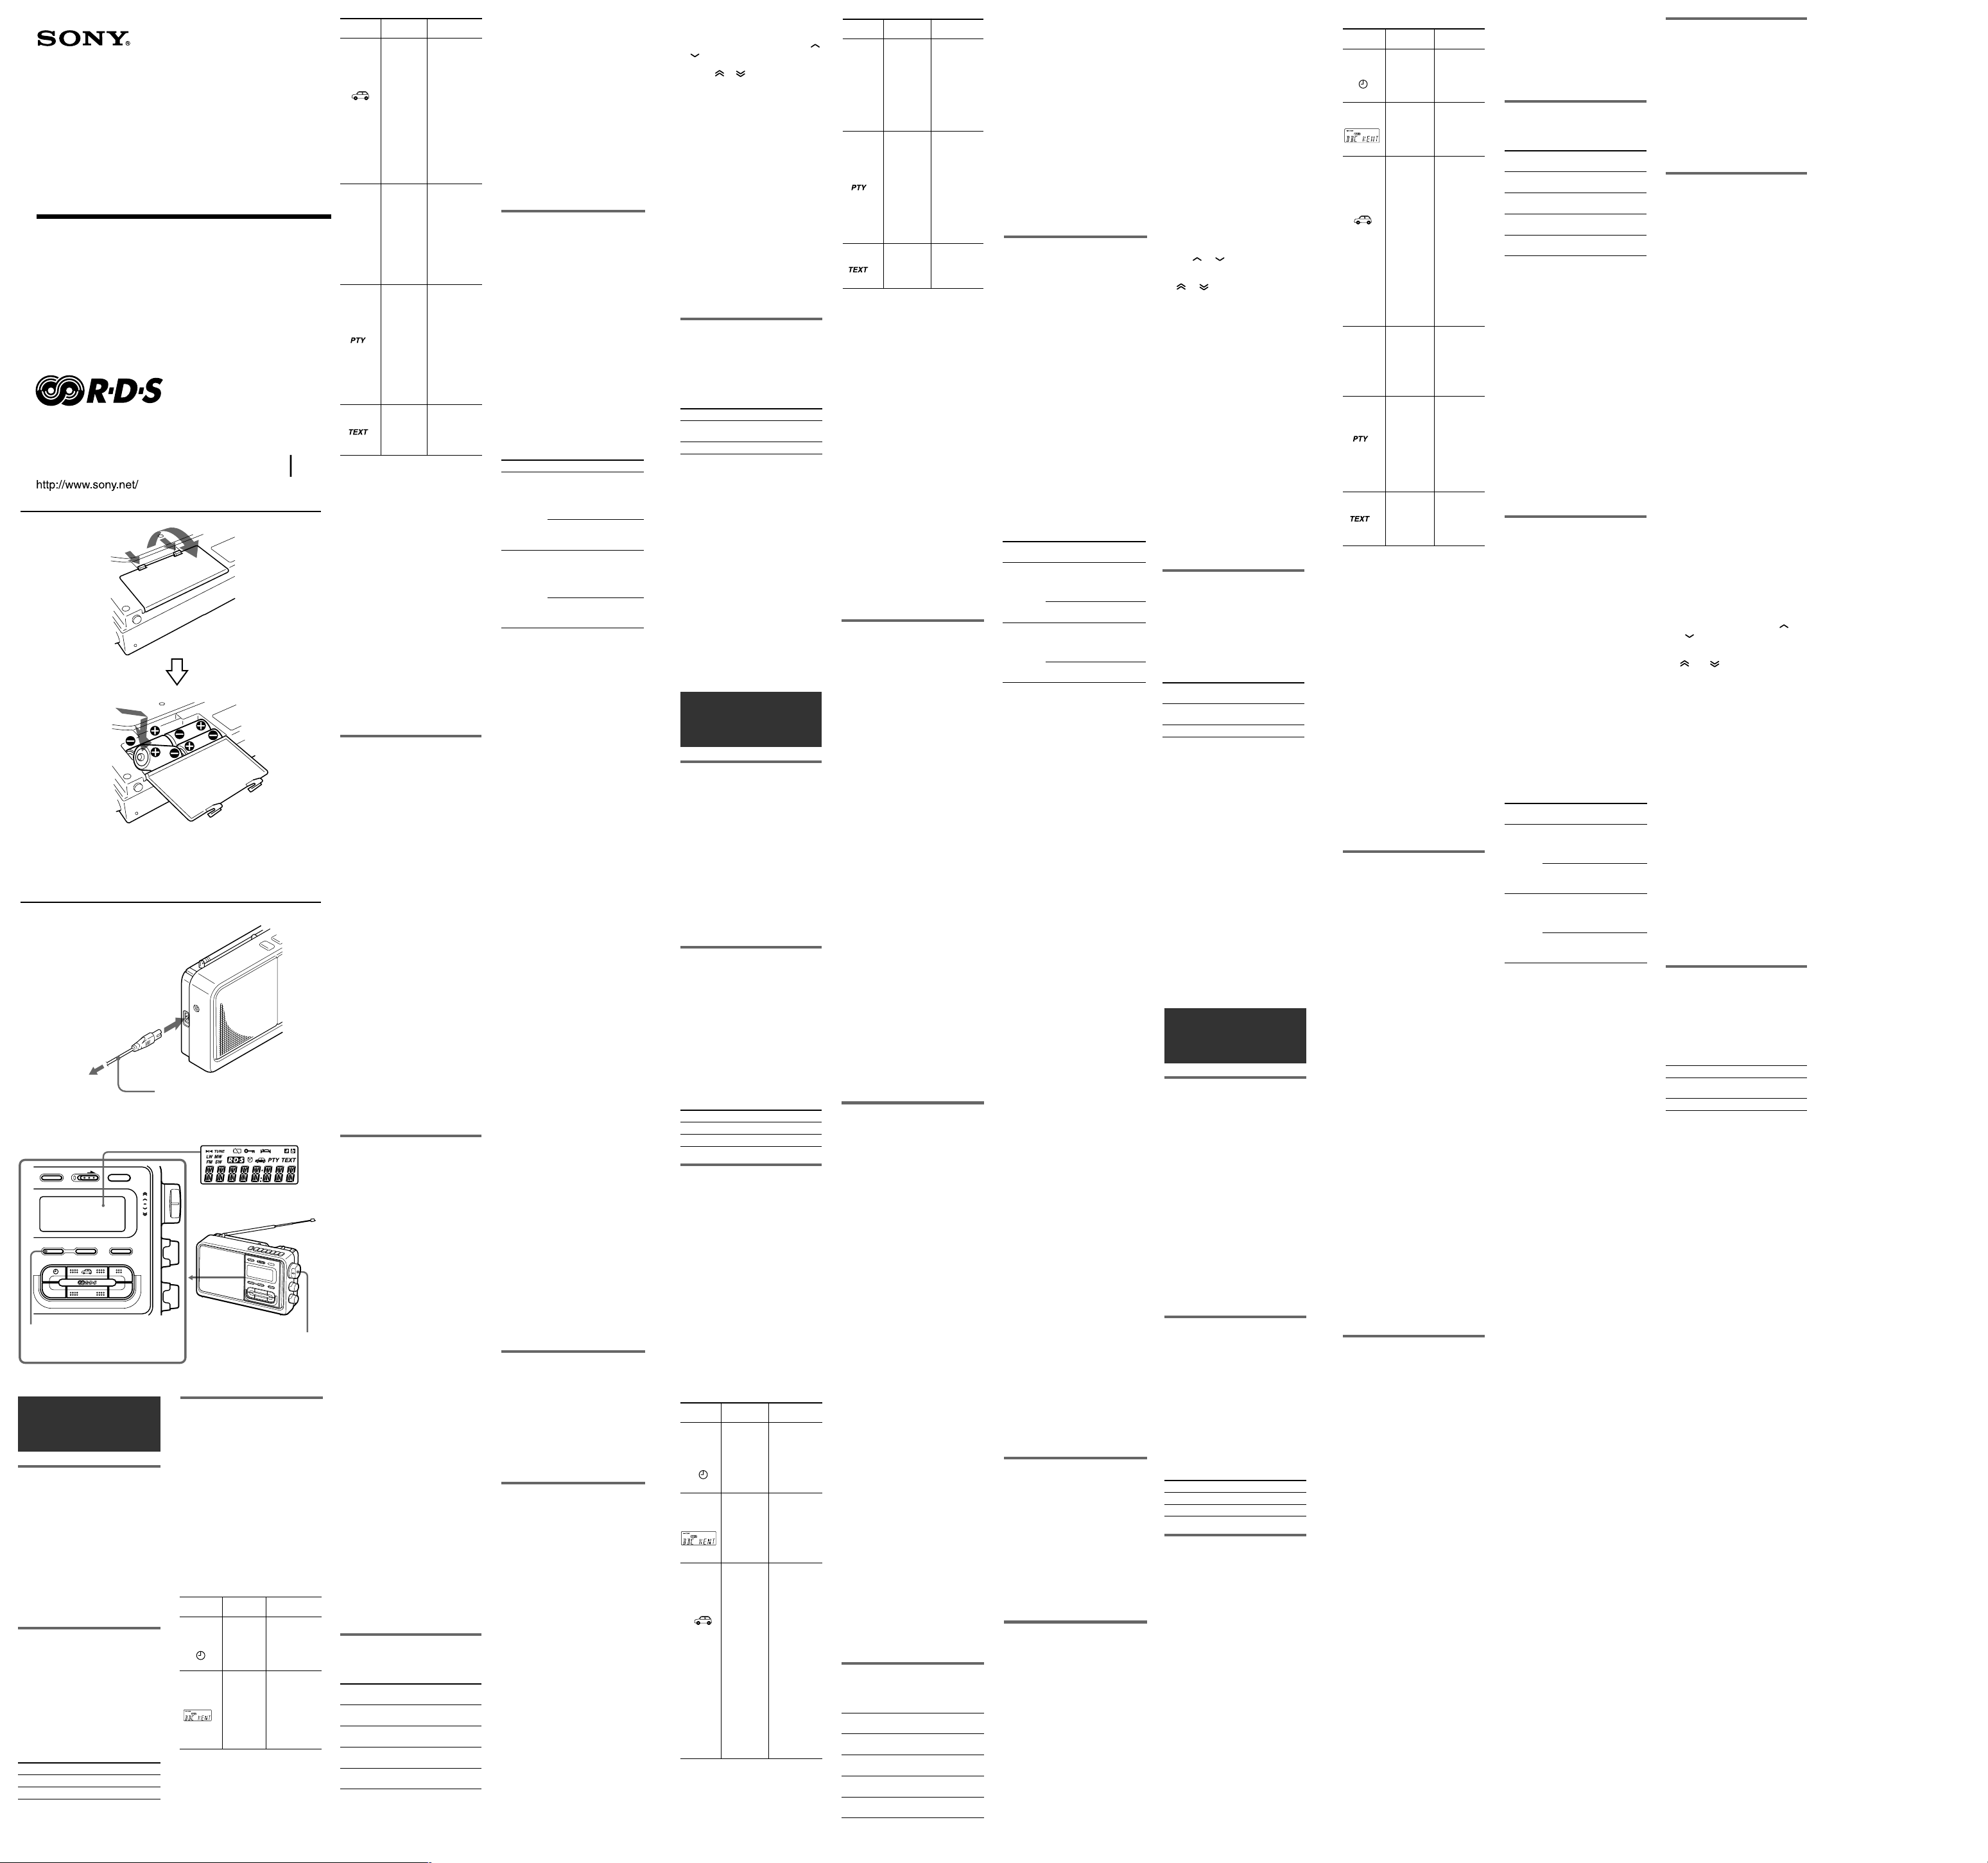
MHz/kHz PRESET
SLEEP
TRAFFIC INFO
DISPLAY
OPERATIONHOLD
STANDBY
SCAN/PTY SEARCH
ALTERNATIVE SEARCH
TUNE/
TIME SET
Should any problem persist after you
have made the following checks,
consult your nearest Sony dealer.
The buttons do not operate
at all.
•“ - ” is displayed. Slide HOLD in
VOL
TONE
TUNE/TIME SET
the opposite direction of the arrow
so that “ - ” disappears.
Display is dim, or no
indication is displayed.
• Weak batteries.
• The unit is being used in extremely
high or low temperatures or in a
place with excessive moisture.
Very weak or interrupted
sound, or unsatisfactory
reception.
• Weak batteries.
• In a vehicle or in a building, listen
Features
What is RDS?
The Radio Data System, RDS is a
radio digital information system
developed by the European
Broadcasting Union, EBU and
introduced in 1987. Using the 57 kHz
sub-carrier of FM broadcasting, the
RDS enables you to receive a variety
of information such as station names
and traffic information.
However, the availability of the RDS
data varies according to areas.
Therefore, there may be cases where
you may not be able to receive some
of the following data.
RDS Features
SONY RDS
CLOCK
AUTO
ADJUSTMENT
STATION
NAME
DISPLAY
SONY
Features
•
Automatic
time setting
•
Summer/
Winter time
auto
adjustment
•
Checks the
station name
you are
listening to.
•
Detects the
station
without
knowing the
frequency.
Conventional RDS
Function
CT (Clock Time)
- Automatic
adjustment of
time
PS (Programme
Service)
- Display of the
station names in 8
characters
near a window.
A station cannot be
received when a PRESET
TUNING button is pressed.
• The station has not been preset.
• The memory of the station has been
initialized, or another station is
preset. Preset the station again.
The radio is not turned on
even if OPERATION is
pressed, or the radio is
suddenly turned off.
• The batteries are used up and the
“ E ” is displayed. Replace all the
batteries with new ones.
The preset stations may be initialized,
if a maintenance service is performed.
Please keep a copy of your settings in
case you want to preset them again.
Specifications
Time display:
24-hour system
Frequency range:
Band ICF-M60LRDS ICF-M60SRDS Channel
FM 87.5 – 87.5 – 0.05 MHz
108 MHz 108 MHz
SW — 5 800 – 5 kHz
MW 531 – 531 – 9 kHz
1 602 kHz 1 602 kHz
LW 153 – — 9 kHz
279 kHz
Speaker:
12 cm (43⁄4 inches), 8 Ω
Power output:
400 mW (at 10% harmonic distortion)
15 900 kHz
Conventional RDS
Function
TA (Traffic
Announcement)
with EON*
(Enhanced Other
Networks)
- Automatic
selection of traffic
information
AF (Alternative
Frequencies)
- Automatic
selection of a
relatively stronger
signal
PTY (Programme
Type)
- Automatic search
of stations from
each programme
type
RT (Radio Text)
- Display of radio
text data
step
Output:
v (earphone) jack (ø 3.5 mm minijack)
Power requirements:
220–230 V AC, 50Hz
6 V DC, four R14 (size C) batteries
Dimensions:
Approx. 271.9 × 160 × 71 mm
(w/h/d)
(Approx. 10
projecting parts and controls
Mass:
Approx. 1 420 g (3lb 2 oz ) incl.
batteries
Supplied accessories:
AC power cord (1)
Design and specifications are subject
to change without notice.
3
⁄4 × 63⁄8 × 27⁄8 inches) incl.
Choosing Power
Sources
Installing the Batteries
(See Fig. A)
Press and hold both tabs of the battery
compartment lid at the rear of the unit,
and pull towards you to open the lid.
Install four R14 (size C) batteries (not
supplied) with correct polarity and
close the lid.
“0:00” flashes in the display when you
install batteries for the first time. To
stop the display from flashing, set the
clock. (See “Setting the Clock”)
Note
When operating the unit on batteries, remove
the AC power cord from the AC IN jack. The
unit cannot be operated on batteries when the
AC power cord is connected to the AC IN
jack.
Battery Life (Approx. hours) (JEITA)*
ICF-M60LRDS
ICF-M60SRDS
* Measured by JEITA (Japan Electronics and
Information Technology Industries
Association) standards. The actual battery
life may vary depending on the
circumstance of the unit.
When to replace the batteries
When the batteries become weak, the
sound may become weak or distorted,
and “ E ” will flash in the display.
After that, when the batteries are used
up, “ E ” will light and the power of
the unit will be turned off. If this
happens, replace the batteries with
new ones.
After the batteries are replaced, press
OPERATION to turn off the indication.
Notes on replacing the batteries
•Before replacing the batteries, make sure
that the radio is turned off.
•Replace the batteries within 60 seconds.
Otherwise, the settings for the clock,
standby timers and the channel step will be
initialized and “0:00” will flash in the
display. Should this happen, set the
functions again. The memory for the preset
stations will not be initialized.
Notes on the batteries
•Do not charge the dry batteries.
•Do not carry the dry batteries together with
coins or other metallic objects. It can
generate heat if the positive and negative
terminals of the batteries accidentally come
into contact with metallic objects.
Sony
alkaline
LR14 (size
C)
battery
Sony R14
(size C)
battery
Sony
alkaline
LR14
(size C)
battery
Sony R14
(size C)
battery
FM
185
190
SW
MW
LW
–
232
245
69
–
87
92
221
245
–
72
83
92
–
Using on House Current
(See Fig. B)
Connect the AC power cord (supplied)
to the AC IN jack of the unit and plug
it in to a wall outlet.
Notes on the AC power cord
connection
•If the batteries are not installed and the AC
power cord is disconnected for more than
60 seconds, the settings for the clock,
standby timers and the channel step will be
initialized. Should this happen, set the
functions again. The memory for the preset
stations will not be initialized.
•Before connecting or disconnecting the AC
power cord from the wall outlet, be sure to
turn off the radio. Otherwise the radio will
turn off and “ E ” will appear even when
the batteries are not used up. To turn off
“ E ”, press OPERATION.
•When the AC power cord is not used, be
sure to turn off the radio, then unplug it
from the AC IN jack and the wall outlet. If
the AC power cord is connected to the AC
IN jack without being connected to a wall
outlet, “ E ” will appear even when the
batteries are not used up. To turn off “ E ”,
unplug the AC power cord from the AC IN
jack, then press OPERATION.
To prevent settings from
being accidentally erased
Whether you are operating the radio
on batteries or AC power source, or
even if you are not using the unit for a
long period, do not remove the
batteries from the unit. The batteries
are used to back up the computer
inside the unit. However, the batteries
will be discharged gradually. Replace
the batteries once a year.
Preventing Accidental
Change
– HOLD function
Slide HOLD in the direction of
the arrow.
“ - ” is displayed, indicating that all
the function buttons are locked.
To release the key protection, slide
HOLD in the opposite direction of the
arrow so that “ - ” disappears.
Setting the Clock
“0:00” will flash in the display when
the batteries are installed or the AC
power cord is plugged in for the first
time.
The clock can be adjusted only when
the radio is turned off.
1Press mb/CLOCK (CLOCK
for ICF-M60LRDS) for more
than 2 seconds.
The “hour” starts flashing.
2Turn TUNE/TIME SET to set
the hour for the current time,
then press mb/CLOCK
(CLOCK for ICF-M60LRDS).
The “minute” starts flashing.
3Turn TUNE/TIME SET to set
the minute for the current
time, then press mb/CLOCK
(CLOCK for ICF-M60LRDS).
The clock starts operating, and “:” starts
flashing.
To set the current time exactly to the
second, adjust the minute and then
press mb/CLOCK (CLOCK for ICFM60LRDS) to synchronize with a time
signal (such as the telephone time
signal).
To display the time while the radio is
on, press DISPLAY. (See “Changing
the Display Mode”)
How to Adjust the Time
Digits
When you turn TUNE/TIME SET to
or , the time digits move forward or
backward by one step, and when you
turn it to
move rapidly.
Notes
•If you do not operate mb/CLOCK (CLOCK
•24-hour system : “0:00” = midnight,
or , the time digits
for ICF-M60LRDS) or TUNE/TIME SET
within 65 seconds, the clock setting mode
will be cancelled.
“12:00” = noon
Using the Backlight
Function
Press LIGHT to turn on the backlight.
To turn off the backlight, press LIGHT
again.
When operating the unit on batteries
The backlight will turn off
automatically after 30 seconds to save
the batteries. However, if you operate
the radio while the backlight is lit, it
will stay on for another 30 seconds.
To turn off the backlight before the
time has elapsed, press LIGHT.
Changing MW
Channel Step
The MW channel step differs
depending on areas. The channel step
of this unit is factory-set to 9 kHz.
Change the settings as shown below
to be able to listen to the radio.
Area Channel step
North and South 10 kHz
American countries
Other countries 9 kHz
The MW channel step can be set only
when the radio is turned off.
1Press OPERATION to turn
off the power.
2While holding down mb/
CLOCK (CLOCK for ICF-
M60LRDS), keep pressing
OPERATION for more than
5 seconds until you hear two
short beeps.
The MW channel step will be changed
and “MW 10” (or “MW 9”) is displayed
for 2 seconds.
If you proceed to step 2 again, the channel
step changes again.
Note
When the MW channel step is changed, only
the preset stations on the MW band will be
initialized.
Français
AVERTISSEMENT
Afin d’éviter tout risque d’incendie
ou d’électrocution, ne pas exposer
l’appareil à la pluie ou à l’humidité.
N’ouvrez jamais le boîtier de
l’appareil, sous risque d’électrocution.
Confiez l’entretien exclusivement à
un personnel qualifié.
N’installez pas l’appareil dans un
espace restreint, comme une
bibliothèque ou un meuble encastré.
Pour éviter tout risque d’incendie ou
d’électrocution, ne posez pas de
récipients remplis d’eau (ex. un vase)
sur l’appareil.
Avant de commencer
Nous vous remercions d’avoir choisi
cette radio Sony qui vous apportera
de nombreuses heures de service
fiable et d’écoute divertissante.
Avant d’utiliser cette radio, veuillez
lire attentivement ces explications et
conservez-les pour toute référence
ultérieure.
Ce mode d’emploi couvre les
modèles :
ICF-M60LRDS et ICF-M60SRDS.
Ils présentent les différences
suivantes.
Numéro de modèle Bande
ICF-M60LRDS FM/MW/LW
ICF-M60SRDS FM/SW/MW
Caractéristiques
Qu’est-ce que le système
RDS ?
Le RDS (Radio Data System) est un
système de transmission de données
numériques par ondes
radiophoniques mis au point par
l’Union européenne de radiodiffusion
(UER) et lancé en 1987. Ce système
permet la réception, sur l’onde sousporteuse FM des 57 kHz, de toute une
variété de données, par exemple des
bulletins d’information routière et les
noms des stations de radio.
Cependant, la disponibilité des
données RDS peut varier selon les
régions. Ainsi, dans certains cas, il se
peut que vous ne puissiez pas
recevoir certaines des informations cidessous.
Fonctions RDS
RDS SONY
REGLAGE
AUTOMATIQUE
DE
L’HORLOGE
AFFICHAGE
DU NOM DE
LA STATION
INFORMATIONS
ROUTIERES
Fonction
SONY
•
Réglage
automatique de
l’heure.
•
Passage
automatique à
l’heure d’été ou
à l’heure
d’hiver.
•
Vérification du
nom de la
station écoutée.
•
Syntonisation
de la station
lorsque sa
fréquence est
inconnue.
•
Recherche
d’informations
routières et
mode de veille
pour la
réception de
nouveaux
bulletins.
•
Commutation
automatique de
la station en
cours vers le
bulletin
d’information
routière EON.
Lorsque le
bulletin est
terminé, la
syntonisation
de la station
précédemment
écoutée est
rétablie.
Fonction RDS
courante
CT (heure)
- Réglage
automatique de
l’heure.
PS (services offerts
par le programme)
- Affichage du nom
de la station, d’une
longueur de huit
caractères au
maximum.
TA (bulletins de
radioguidage) avec
EON* (autres
réseaux améliorés)
- Sélection
automatique du
service
d’informations
routières.
RDS SONY
RECHERCHE
D’UNE
STATION
ALTERNATIVE
RECHERCHE
PTY (par type
d’émission)
TEXTE RADIO
* La fonction EON permet à cet appareil de
repérer d’autres stations diffusant les
données EON lorsque la station syntonisée
fait partie d’un réseau de diffusion.
Fonction
SONY
•
Recherche
automatique
d’une fréquence
alternative dont
le signal est
plus puissant
parmi les
stations d’un
même réseau de
radiodiffusion.
•
Affichage du
type d’émission
de la station
captée ou de la
liste des types
de programmes.
•
Recherche
automatique
parmi les
stations
diffusant le
même type
d’émission.
•
Affichage et
défilement des
données texte
de diffusion
radio.
Fonction RDS
courante
AF (Fréquence
alternative)
- Sélection
automatique d’un
signal plus
puissant que celui
de la station en
cours.
PTY (type
d’émission)
- Recherche
automatique de
stations par type
d’émission
diffusée.
RT (texte radio)
- Affichage des
données texte de
diffusion radio
Autres caractéristiques
•Système de synthétisation PLL (boucle à
verrouillage de phase) piloté par quartz,
faisant appel à un micro-ordinateur pour
obtenir facilement une syntonisation
exacte.
•Cadran à vitesse variable comportant une
touche analogique pour sélectionner les
stations.
•28 stations peuvent être préréglées (14
stations FM et 7 stations pour chaque
bande OC/PO/GO).
•Les 7 touches PRESET TUNING du
panneau avant sont faciles à utiliser.
•Grand haut-parleur intégré de 12 cm de
diamètre pour obtenir des sons de haute
qualité.
•Minuterie d’activation automatique de la
radio et minuterie avec alarme pouvant
toutes deux servir d’alarme à une heure
préréglée.
•Temporisateur permettant d’éteindre la
radio automatiquement (la radio peut être
réglée pour s’éteindre après 15, 30, 45 ou 60
minutes).
•Syntonisation par balayage qui règle
automatiquement les stations dans la plage
de fréquences.
•Fonction de réglage de la qualité de la
tonalité.
•Rétroéclairage pour l’affichage dans
l’obscurité.
•Vous pouvez choisir deux sources
d’alimentation : piles ou secteur.
Précautions
•Faites fonctionner la radio sur les sources
d’alimentation mentionnées dans les
“Spécifications”.
•La radio n’est pas déconnectée de la source
d’alimentation secteur tant qu’elle est
branchée sur la prise murale, même si elle a
été mise hors tension.
•La plaque signalétique indiquant la tension
de fonctionnement, la consommation et
d’autres informations électriques se trouve
à l’arrière de la radio.
•Evitez d’exposer l’appareil à des
températures extrêmes, aux rayons directs
du soleil, à l’humidité, au sable, à la
poussière ou à des chocs mécaniques. Ne le
laissez jamais dans un véhicule garé en
plein soleil.
•Si du liquide ou un objet venait à pénétrer à
l’intérieur de l’appareil, débranchez
l’alimentation secteur ou retirez les piles,
puis faites vérifier l’appareil par un
technicien qualifié avant de l’utiliser de
nouveau.
•Ne placez pas l’appareil sur des surfaces
textiles (tapis, couvertures, etc.) ni à
proximité de tissus (rideaux, tentures)
susceptibles d’obstruer les orifices de
ventilation.
•Utilisez l’appareil à une température
supérieure à 0°C (32°F) et inférieure à
40°C (104°F). Si l’appareil est utilisé à une
température supérieure à 40°C, les chiffres
affichés peuvent ne pas correspondre à la
fréquence captée. S’il est utilisé à une
température inférieure à 0°C, la vitesse
d’affichage des chiffres peut ralentir
considérablement. Cependant, ces
conditions d’utilisation n’endommagent
pas l’appareil , et les aberrations cessent
lorsque l’appareil est de nouveau utilisé
dans la plage de température
recommandée.
•Dans des véhicules ou des bâtiments, la
réception radio s’avère parfois difficile ou
parasitée. Essayez d’écouter votre radio
près d’une fenêtre.
•Comme les haut-parleurs contiennent un
aimant puissant, ne laissez pas de cartes de
crédit à code magnétique ni de montres à
ressorts près de la radio afin d’éviter tout
dommage.
•Pour nettoyer le boîtier, utilisez un linge
doux imbibé d’une solution de détergent
neutre.
Pour toute question ou difficulté relative à
cet appareil, veuillez vous adresser à votre
revendeur Sony.
Guide de dépannage
Si le problème persiste après avoir fait
les vérifications suivantes, adressezvous à votre revendeur Sony.
Les touches ne fonctionnent
pas du tout.
•“ - ” est affiché. Faites glisser la
touche HOLD dans le sens inverse
de la flèche de manière à faire
disparaître “ - ”.
L’affichage est terne ou
aucune indication n’est
visible.
• Piles faibles.
• L’appareil est utilisé dans un
endroit très chaud ou très froid ou
dans un lieu très humide.
Son très faible ou
interrompu, ou réception
médiocre.
• Piles faibles.
• Dans un véhicule ou un immeuble,
écoutez près d’une fenêtre.
La station ne peut pas être
reçue lorsqu’une touche
PRESET TUNING est activée.
• La station n’a pas été préréglée.
• La mémoire de la station a été
initialisée ou une autre station est
préréglée. Préréglez de nouveau la
station.
La radio n’est pas mise sous
tension même si la touche
OPERATION est enfoncée ou
que la radio est
brusquement mise hors
tension.
• Les piles sont épuisées et “ E ” est
affiché. Remplacez toutes les piles
par des neuves.
Les stations préréglées peuvent être
initialisées lors d’une opération
d’entretien.
Gardez une copie de vos réglages si
vous souhaitez les utiliser de
nouveau.
Spécifications
Affichage horaire :
cycle de 24 heures
Plages de fréquences :
Bande ICF-M60LRDS ICF-M60SRDS Intervalle
FM 87,5 – 87,5 – 0,05 MHz
108 MHz 108 MHz
OC
— 5 800 – 5 kHz
(SW)
PO
531 – 531 – 9 kHz
(MW)
1 602 kHz 1 602 kHz
GO
153 – — 9 kHz
(LW)
279 kHz
Haut-parleur :
12 cm (43⁄4 pouces), 8 Ω
15 900 kHz
d’accord
Puissance de sortie :
400 mW (à 10% de distorsion
harmonique)
Sortie :
Prise de casque v (minifiche ø 3,5
mm)
Alimentation :
220-230 V CA, 50Hz
6 V CC, quatre piles R14 (C)
Dimensions :
Env. 271,9 × 160 × 71 mm (l/h/p)
3
(Env. 10
⁄4 × 63⁄8 × 27⁄8 pouces)
parties saillantes et commandes
comprises
Poids :
Env. 1 420 g (3lb 2 oz) piles comprises
Accessoires fournis :
Cordon d’alimentation secteur (1)
La conception et les spécifications sont
sujettes à modification sans préavis.
Choix des sources
d’alimentation
Mise en place des piles
(Voir Fig. A)
Le logement des piles est situé à
l’arrière de l’appareil. Appuyez sur les
deux loquets du couvercle du
logement et maintenez-les enfoncés,
puis tirez le couvercle vers vous pour
l’ouvrir.
Mettez en place quatre piles R14 (C)
(non fournies) en respectant la polarité
et refermez le couvercle.
“0:00” clignote sur l’afficheur lorsque
vous installez les piles pour la
première fois. Pour arrêter le
clignotement, réglez l’horloge. (Voir
“Réglage de l’horloge”)
Remarque
Lorsque vous utilisez l’appareil sur piles,
débranchez le cordon d’alimentation secteur
de la prise AC IN. L’appareil ne peut pas
fonctionner sur piles lorsque le cordon
d’alimentation secteur est raccordé à la prise
AC IN.
Autonomie
(estimation en heures) (JEITA)*
FM
OC
PO
221
GO
(MW)
(LW)
–
232
245
–
87
92
245
83
92
ICF-M60LRDS
ICF-M60SRDS
* Mesurées selon les normes JEITA (Japan
Remplacement des piles
Lorsque les piles faiblissent, le son
devient faible et présente des
distorsions, puis “ E ” clignote sur
l’afficheur. Lorsque les piles sont
épuisées, “ E ” clignote et l’appareil
s’éteint. Dans ce cas, remplacez les
piles par des neuves.
Après le remplacement des piles,
appuyez sur OPERATION pour
désactiver l’indication.
Remarques sur le remplacement des
piles
•Avant de remplacer les piles, assurez-vous
•Remplacez les piles en moins de 60
Remarques à propos des piles
•Ne rechargez pas une pile sèche.
•Ne portez pas de pile sèche avec des pièces
Pile
alcaline
Sony LR14
(C)
Pile Sony
R14 (C)
Pile
alcaline
Sony LR14
(C)
Pile Sony
R14 (C)
Electronics and Information Technology
Industries Association). L’autonomie réelle
peut varier selon les caractéristiques de
l’appareil.
que la radio est hors tension.
secondes. Sinon, les réglages de l’heure, des
minuteries de veille et le pas de
syntonisation sont réinitialisés et “0:00”
clignote à l’affichage. Si cela se produit,
refaites les réglages des fonctions. La
mémoire de présélection des stations n’est
pas effacée.
de monnaie ou d’autres objets métalliques.
Le contact des bornes positive et négative
avec un objet métallique peut générer de la
chaleur.
(SW)
185
69
190
72
Utilisation du courant
secteur (voir Fig. B)
Raccordez le cordon d’alimentation
secteur (fourni) à la prise AC IN de
l’appareil et branchez-le sur une prise
murale.
Remarques à propos du raccordement
secteur
•Si les piles ne sont pas mises en place et si le
cordon d’alimentation secteur est
débranché pendant plus de 60 secondes, les
réglages de l’horloge, de la minuterie de
réveil et des intervalles d’accord sont
réinitialisés. Dans ce cas, réglez à nouveau
les fonctions. La mémoire de présélection
des stations n’est pas effacée.
•Avant de brancher ou de débrancher le
cordon d’alimentation secteur sur la prise
murale, éteignez la radio. Sinon, la radio
s’éteint et “ E ” apparaît même si les piles
ne sont pas usées. Pour désactiver “ E ”,
appuyez sur OPERATION.
•Si vous n’utilisez pas le cordon
d’alimentation secteur, éteignez la radio
puis débranchez-la de la prise AC IN et de
la prise murale. Si le cordon d’alimentation
est raccordé à la prise AC IN sans être
branché sur une prise murale, “ E ”
apparaît même si les piles ne sont pas
usées. Pour désactiver “ E ”, débranchez le
cordon d’alimentation secteur de la prise
AC IN puis appuyez sur OPERATION.
Pour éviter tout effacement
accidentel des réglages
Que vous utilisiez les piles ou le
cordon d’alimentation secteur, ne
retirez pas les piles de l’appareil,
même si vous ne l’utilisez pas pendant
une période prolongée. Les piles
permettent de sauvegarder les
données à l’intérieur de l’appareil.
Toutefois, elles se déchargent
progressivement. Remplacez-les une
fois par an.
Pour éviter toute
modification
accidentelle
– Fonction HOLD
Faites glisser HOLD dans le
sens de la flèche.
L’indication “ - ” s’affiche,
indiquant que toutes les touches de
commande sont verrouillées.
Pour déverrouiller les touches, faites
glisser la touche HOLD dans le sens
inverse de la flèche de manière à faire
disparaître “ - ”.
Réglage de l’horloge
L’affichage clignote et indique “0:00”
lors de la première installation des
piles ou lorsque le cordon
d’alimentation secteur est branché
pour la première fois.
L’horloge peut être réglée uniquement
lorsque la radio est éteinte.
1Appuyez sur mb/CLOCK
(CLOCK pour ICFM60LRDS) pendant plus de 2
secondes.
L’indication des heures commence à
clignoter.
2Tournez TUNE/TIME SET
pour régler les heures, puis
appuyez sur mb/CLOCK
(CLOCK pour ICFM60LRDS).
L’indication des minutes commence à
clignoter.
3Tournez TUNE/TIME SET
pour régler les minutes, puis
appuyez sur mb/CLOCK
(CLOCK pour ICFM60LRDS).
L’horloge commence à fonctionner et
l’indication “:” commence à clignoter.
Pour régler l’heure à la seconde près,
réglez les minutes, puis appuyez sur
mb/CLOCK (CLOCK pour ICFM60LRDS) pour vous synchroniser
avec un signal horaire (tel que celui
du téléphone).
Pour afficher l’heure pendant que la
radio est allumée, appuyez sur
DISPLAY. (Voir “Changement du
mode d’affichage”)
Comment régler les chiffres
des heures
Lorsque vous tournez TUNE/TIME
SET sur
heures avancent ou reculent d’une
unité à la fois et lorsque vous tournez
sur
Remarques
•Si vous n’actionnez pas la touche mb/
•Cycle de 24 heures : “0:00” = minuit,
ou , les chiffres des
ou , ils changent rapidement.
CLOCK (CLOCK pour ICF-M60LRDS) ou
TUNE/TIME SET pendant 65 secondes, le
mode de réglage de l’horloge est annulé.
“12:00” = midi
Utilisation de la fonction de
rétroéclairage
Appuyez sur LIGHT pour allumer le
rétroéclairage.
Pour éteindre le rétroéclairage,
appuyez de nouveau sur LIGHT.
Si vous utilisez l’appareil sur piles
Le rétroéclairage s’éteint
automatiquement au bout de 30
secondes afin d’économiser les piles.
Cependant, si vous utilisez la radio
alors que le rétroéclairage est allumé,
celui-ci reste allumé encore 30
secondes.
Pour éteindre le rétroéclairage avant
que le temps soit écoulé, appuyez sur
LIGHT.
Modification de
l’intervalle d’accord
MW
L’intervalle d’accord MW est différent
selon les pays. L’intervalle d’accord
–
de cet appareil a été réglé par défaut
sur 9 kHz. Modifiez les réglages
comme indiqué ci dessous pour
écouter la radio.
–
Pays Intervalle
Amérique 10 kHz
du Nord et du Sud
Autres pays 9 kHz
Le pas de syntonisation de la bande
MW peut uniquement être réglé
lorsque la radio est éteinte.
1Appuyez sur OPERATION
pour mettre l’appareil hors
tension.
2En maintenant mb/CLOCK
(CLOCK pour ICFM60LRDS) enfoncé, appuyez
pendant plus de 5 secondes
sur OPERATION jusqu’à ce
que 2 bips courts soient
émis.
L’intervalle d’accord MW est modifié et
l’indication “MW 10” (or “MW 9”)
s’affiche pendant 2 secondes.
Si vous recommencez l’étape 2,
l’intervalle d’accord change de nouveau.
Remarque
Un changement de l’intervalle d’accord MW
a pour effet d’effacer uniquement les stations
préréglées de la bande MW.
Deutsch
ACHTUNG
Um Feuergefahr und die Gefahr
eines elektrischen Schlags zu
vermeiden, setzen Sie das Gerät
weder Regen noch sonstiger
Feuchtigkeit aus.
Um einen elektrischen Schlag zu
vermeiden, öffnen Sie das Gehäuse
nicht. Überlassen Sie
Wartungsarbeiten stets nur
qualifiziertem Fachpersonal.
Stellen Sie das Gerät nicht in einem
geschlossenen Bücherregal, einem
Einbauschrank u. ä. auf, wo eine
ausreichende Belüftung nicht gegeben
ist.
Um Feuergefahr und die Gefahr eines
elektrischen Schlags zu vermeiden,
stellen Sie keine Gefäße mit
Flüssigkeiten darin, wie z. B. Vasen,
auf das Gerät.
Einführung
Danke, dass Sie sich für dieses Radio
von Sony entschieden haben!
Es wird Ihnen viele Stunden lang
zuverlässigen Hörgenuss bieten.
Lesen Sie diese Anleitung vor
Inbetriebnahme des Radios bitte
genau durch und bewahren Sie sie
zum späteren Nachschlagen sorgfältig
auf.
Diese Anleitung bezieht sich auf die
folgenden Modelle:
ICF-M60LRDS und ICF-M60SRDS.
Die Unterschiede sind in der
folgenden Tabelle dargestellt:
Modellnummer Frequenzbereich
ICF-M60LRDS FM /MW/LW
ICF-M60SRDS FM /SW /MW
Merkmale und
Funktionen
Was ist RDS?
Das Radiodatensystem (RDS) ist ein
digitales Radioinformationssystem,
das von der Europäischen Rundfunkund Fernseh-Union entwickelt und
1987 eingeführt wurde. Über die 57kHz-Hilfsträgerfrequenz von UKWSendungen ermöglicht RDS den
Empfang einer Vielzahl von
Informationen wie den Sendernamen
und Verkehrsinformationen.
RDS-Daten sind jedoch nicht in allen
Sendegebieten zu empfangen. Es kann
also vorkommen, dass Sie einige der
folgenden Daten nicht empfangen
können.
d’accord
RDS-Funktionen
SONY-RDS
AUTOMATISCHE
UHRZEITEINSTELLUNG
ANZEIGE DES
SENDERNAMENS
VERKEHRSINFORMATIONEN
ALTERNATIVSENDER-SUCHE
PTY-SUCHE
RADIOTEXT
* Dank EON kann dieses Gerät andere
Sender, die EON-Daten ausstrahlen,
verfolgen, wenn am Gerät ein Sender im
Netzwerk eingestellt ist.
SONY-Funktionen
•
Automatisches
Einstellen der
Uhrzeit
•
Automatische
Sommerzeitumschaltung
•
Anzeigen des
Namens des
aktuellen Senders
•
Sendererkennung
ohne Angabe der
Frequenz
•
Verkehrsinformationen
werden gesucht
und dann schaltet
das Gerät in
Empfangsbereitschaft.
•
Vom eingestellten
Sender wird
automatisch zu
EON-Verkehrsinformationen
umgeschaltet.
Nach dem Ende
der Durchsage
wechselt das
Gerät wieder zum
zuvor
eingestellten
Sender.
•
Innerhalb
desselben
Netzwerks mit
mehreren
Sendeanstalten
wird automatisch
ein stärkeres
Signal gesucht.
•
Der Programmtyp
des eingestellten
Senders oder die
Programmtypliste
wird angezeigt.
•
Sender mit
demselben
Programmtyp
werden
automatisch
gesucht.
•
Der vom Sender
ausgestrahlte
Radiotext wird
angezeigt und
läuft im Display
durch.
Herkömmliche RDSFunktion
CT (Uhrzeit)
- Automatische
PS (Programmdienst)
- Anzeige des
TA (Verkehrsdurchsagen) mit
EON* (Enhanced
Other Networks)
- Automatische
AF (Alternativfrequenzen)
- Automatische
PTY (Programmtyp)
- Automatische
RT (Radiotext)
- Anzeige der
Uhrzeit-einstellung
Sendernamens mit 8
Buchstaben
Auswahl von
Verkehrsinformationen
Auswahl eines
stärkeren Signals
Suche nach Sendern
eines
Programmtyps
Radiotextdaten
Weitere Funktionen
•Quarzgesteuertes PLL-Synthesizer-System
(Phase Locked Loop) mit Mikrocomputer
für problemloses und präzises Einstellen
von Sendern.
•Shuttle-Dial-Ring für Senderauswahl mit
Analog-Feeling.
•Bis zu 28 Sender (14 UKW- und je 7 KW-,
MW- und LW-Sender) können gespeichert
werden.
•7 leicht zu bedienende PRESET TUNINGTasten an der Oberseite.
•Hohe Tonqualität dank eines großen,
eingebauten Lautsprechers mit 12 cm
Durchmesser.
•Mit einem Einschalt-Timer lässt sich das
Radio einschalten, mit einem zweiten
Timer lässt sich ein Summer auslösen, so
dass Sie über das Gerät zu einer
voreingestellten Zeit einen Alarm ausgeben
lassen können.
•Sleep-Timer zum automatischen
Ausschalten des Radios (kann auf 15, 30, 45
oder 60 Minuten eingestellt werden).
•Sendersuchlauf zum automatischen Suchen
der Sender im Frequenzbereich.
•Funktion zum Einstellen des Klangs.
•Dank Hintergrundbeleuchtung ist das
Display auch im Dunkeln ablesbar.
•Zwei verschiedene Stromquellen: Batterien
oder Netzstrom.
Sicherheitsmaßnahmen
•Betreiben Sie das Gerät an den unter
“Technische Daten” angegebenen
Stromquellen.
•Das Gerät bleibt auch in ausgeschaltetem
Zustand mit dem Stromnetz verbunden,
solange das Netzkabel mit der
Netzsteckdose verbunden ist.
•Das Typenschild mit Betriebsspannung,
Leistungsaufnahme usw. befindet sich
außen an der Geräterückseite.
•Setzen Sie das Gerät keinen extremen
Temperaturen, direktem Sonnenlicht,
Feuchtigkeit, Sand, Staub oder
mechanischen Erschütterungen aus. Lassen
Sie es nie in einem in der Sonne geparkten
Auto liegen.
•Sollten Fremdkörper oder Flüssigkeiten in
das Gerät gelangen, lösen Sie das
Netzkabel bzw. nehmen Sie die Batterien
heraus und lassen Sie das Gerät von
qualifiziertem Fachpersonal überprüfen,
bevor Sie es wieder benutzen.
•Stellen Sie das Gerät nicht auf Oberflächen
wie Teppichen oder Decken oder in der
Nähe von Materialien wie Gardinen und
Wandbehängen auf, die die
Lüftungsöffnungen blockieren könnten.
•Verwenden Sie das Gerät bei
Umgebungstemperaturen zwischen 0°C
und 40°C. Bei höheren Temperaturen
erscheinen möglicherweise anstelle der
Empfangsfrequenz sinnlose Ziffern im
Display. Bei niedrigeren Temperaturen
ändern sich die Ziffern im Display
möglicherweise nur sehr langsam. Das
Gerät wird dabei nicht dauerhaft
beschädigt. Die genannten Phänomene
verschwinden wieder, wenn Sie das Gerät
bei den empfohlenen Temperaturen
verwenden.
•In Fahrzeugen oder Gebäuden ist der
Radioempfang möglicherweise nur schwer
möglich oder verrauscht. Versuchen Sie es
in der Nähe eines Fensters.
•Da für die Lautsprecher ein starker Magnet
verwendet wird, halten Sie Kreditkarten
mit Magnetcodierung oder Zugfederuhren
(mechanische Uhren) vom Gerät fern, um
mögliche Schäden durch den Magneten zu
vermeiden.
•Verwenden Sie zum Reinigen des
Gehäuses ein weiches Tuch, das Sie mit
einer milden Reinigungslösung
angefeuchtet haben.
Sollten an Ihrem Gerät Probleme auftreten
oder sollten Sie Fragen haben, wenden Sie
sich bitte an Ihren Sony-Händler.
Störungsbehebung
Sollte eine Funktionsstörung auch
nach der Durchführung der
folgenden Maßnahmen fortbestehen,
wenden Sie sich bitte an Ihren SonyHändler.
Die Tasten funktionieren
gar nicht.
•“ - ” wird angezeigt. Schieben Sie
HOLD entgegen der Pfeilrichtung,
so dass “ - ” ausgeblendet wird.
Display ist dunkel oder
keine Anzeige erscheint.
• Schwache Batterien.
• Das Gerät wird bei extremer Hitze
oder Kälte oder an einem Ort mit
sehr hoher Luftfeuchtigkeit benutzt.
Sehr leiser Ton oder
Tonaussetzer oder
schlechter Empfang.
• Schwache Batterien.
• Verwenden Sie das Gerät in einem
Auto oder Gebäude in der Nähe
eines Fensters.
Eine der PRESET TUNINGTasten wird gedrückt, aber
der Sender wird nicht
empfangen.
• Der Sender wurde nicht
gespeichert.
• Der Senderspeicher wurde
initialisiert oder ein anderer Sender
ist auf der Taste gespeichert.
Speichern Sie den Sender erneut.
Das Radio lässt sich mit
OPERATION nicht
einschalten oder es schaltet
sich plötzlich aus.
• Die Batterien sind verbraucht und
“ E ” wird angezeigt. Tauschen Sie
alle Batterien gegen neue aus.
Die gespeicherten Sender werden
möglicherweise initialisiert, wenn das
Gerät vom Kundendienst gewartet
wird.
Notieren Sie die Einstellungen, damit
Sie sie später problemlos wieder
speichern können.
Technische Daten
Zeitanzeige:
24-Stunden-Format
Frequenzbereich:
Bereich ICF-M60LRDS ICF-M60SRDS Einstell-
UKW
87,5 – 87,5 – 0,05 MHz
(FM)
108 MHz 108 MHz
KW
— 5 800 – 5 kHz
(SW)
MW 531 – 531 – 9 kHz
1 602 kHz 1 602 kHz
LW 153 – — 9 kHz
279 kHz
Lautsprecher:
12 cm, 8 Ω
Ausgangsleistung:
400 mW (bei 10% harmonischer
Verzerrung)
Ausgang:
Ohrhörerbuchse v (ø 3,5 mm,
Minibuchse)
Stromversorgung:
220 - 230 V Wechselstrom, 50 Hz
6 V Gleichstrom, vier R14-Batterien
(Größe C)
Abmessungen:
ca. 271,9 × 160 × 71 mm (B/H/T)
einschließlich vorstehender Teile und
Bedienelemente
Gewicht:
ca. 1 420 g einschließlich Batterien
Mitgeliefertes Zubehör:
Netzkabel (1)
Änderungen, die dem technischen
Fortschritt dienen, bleiben
vorbehalten.
15 900 kHz
intervall
Auswählen der
Stromquelle
Einlegen der Batterien
(siehe Abb. A)
Halten Sie beide Laschen am Deckel
des Batteriefachs an der Rückseite des
Geräts nach innen gedrückt und
ziehen Sie den Deckel zum Öffnen auf
sich zu.
Legen Sie vier R14-Batterien (Größe
C, nicht mitgeliefert) polaritätsrichtig
ein und schließen Sie den Deckel.
“0:00” blinkt im Display, wenn Sie
zum ersten Mal Batterien einlegen.
Stellen Sie die Uhr ein, damit das
Display aufhört zu blinken (siehe
“Einstellen der Uhr”).
Hinweise
Wenn Sie das Gerät mit Batterien betreiben,
lösen Sie das Netzkabel von der Buchse AC
IN. Das Gerät lässt sich nicht mit Batterien
betreiben, solange das Netzkabel mit der
Buchse AC IN verbunden ist.
Ungefähre Lebensdauer der
Batterien in Stunden (JEITA)*
UKW
KW
MW
(SW)
–
–
221
83
232
245
LW
245
87
92
92
ICF-M60LRDS
ICF-M60SRDS
* Gemessen nach JEITA-Standards (Japan
Electronics and Information Technology
Industries Association). Die Lebensdauer
der Batterie kann je nach Gebrauch des
Geräts variieren.
Wann müssen die Batterien
ausgetauscht werden?
Wenn die Batterien schwächer
werden, wird der Ton leiser oder ist
verzerrt und “ E ” blinkt im Display.
Sind die Batterien leer, leuchtet “ E ”
im Display und das Gerät schaltet
sich aus. Tauschen Sie die Batterien in
diesem Fall gegen neue aus.
Schalten Sie die Anzeige nach dem
Austauschen der Batterien mit
OPERATION aus.
Hinweise zum Austauschen der
Batterien
•Schalten Sie das Radio unbedingt aus,
bevor Sie die Batterien austauschen.
•Tauschen Sie die Batterien innerhalb von
60 Sekunden aus. Andernfalls werden die
Uhrzeit, die Einstellungen für die
Einschalt-Timer und das Einstellintervall
initialisiert und “0:00” blinkt im Display.
Werden die Einstellungen gelöscht,
müssen Sie sie erneut speichern. Die
gespeicherten Sender werden dagegen
nicht initialisiert.
Hinweise zu den Batterien
•Versuchen Sie nicht, Trockenbatterien
aufzuladen.
•Wenn Sie Trockenbatterien bei sich tragen,
halten Sie sie von Münzen und anderen
Metallgegenständen fern. Andernfalls kann
durch einen Metallgegenstand ein Kontakt
zwischen den positiven und negativen
Polen der Batterien hergestellt werden, was
zu Hitzeentwicklung führt.
(FM)
Alkalibatterie
LR14 von
Sony (Größe
C)
Batterie R14
von Sony
(Größe C)
Alkalibatterie
LR14 von
Sony (Größe
C)
Batterie R14
von Sony
(Größe C)
185
69
190
72
Netzstrom (siehe Abb. B)
Schließen Sie das Netzkabel
(mitgeliefert) an die Buchse AC IN am
Gerät und an eine Netzsteckdose an.
Hinweise zum Anschließen des
Netzkabels
•Wenn keine Batterien eingelegt sind und
das Netzkabel mehr als 60 Sekunden lang
gelöst wird, werden die Uhr und die
Einstellung für den Einschalt-Timer und
das Einstellintervall auf die werkseitige
Einstellung zurückgesetzt. In diesem Fall
müssen Sie sie erneut speichern. Die
gespeicherten Sender werden dagegen
nicht initialisiert.
•Schalten Sie unbedingt das Radio aus,
bevor Sie das Netzkabel in die
Netzsteckdose stecken oder daraus
herausziehen. Andernfalls schaltet sich das
Radio aus und “ E ” erscheint, auch wenn
die Batterien noch nicht erschöpft sind. Um
“ E ” auszuschalten, drücken Sie
OPERATION.
•Wenn Sie das Netzkabel nicht verwenden
wollen, schalten Sie zunächst unbedingt
das Radio aus. Lösen Sie dann das
Netzkabel von der Buchse AC IN und der
Netzsteckdose. Wenn das Netzkabel mit
der Buchse AC IN verbunden, aber nicht
an eine Netzsteckdose angeschlossen ist,
erscheint “ E ”, selbst wenn die Batterien
noch nicht leer sind. Um “ E ”
auszublenden, lösen Sie das Netzkabel von
der Buchse AC IN und drücken
OPERATION.
So verhindern Sie, dass
Einstellungen versehentlich
gelöscht werden
Ganz gleich, ob Sie das Radio mit
Batterien oder Netzstrom betreiben
oder es längere Zeit nicht benutzen
wollen, nehmen Sie die Batterien
nicht aus dem Gerät heraus. Die
Batterien dienen als Speicherbatterien
für den Computer im Gerät. Die
Batterien entladen sich jedoch
allmählich. Tauschen Sie die Batterien
einmal im Jahr aus.
Schutz vor
versehentlichen
Änderungen
– Funktion HOLD
Schieben Sie HOLD in
Pfeilrichtung.
“ - ” wird angezeigt. Alle
Funktionstasten sind jetzt gesperrt.
Um die Tastensperre aufzuheben,
schieben Sie HOLD entgegen der
Pfeilrichtung, so dass “ - ”
ausgeblendet wird.
Einstellen der Uhr
“0:00” blinkt im Display, wenn Sie
zum ersten Mal Batterien einlegen
bzw. das Netzkabel anschließen.
Die Uhr kann nur bei
ausgeschaltetem Radio eingestellt
werden.
1Drücken Sie mehr als zwei
Sekunden lang mb/CLOCK
(CLOCK beim ICFM60LRDS).
Die Stundenanzeige beginnt zu blinken.
2Stellen Sie durch Drehen
von TUNE/TIME SET die
Stunden ein und drücken Sie
dann mb/CLOCK (CLOCK
beim ICF-M60LRDS).
Die Minutenanzeige beginnt zu blinken.
3Stellen Sie durch Drehen
von TUNE/TIME SET die
Minuten ein und drücken
Sie dann mb/CLOCK
(CLOCK beim ICFM60LRDS).
Die Uhr beginnt zu laufen und “:”
beginnt zu blinken.
Wenn Sie die Uhrzeit auf die Sekunde
genau einstellen wollen, stellen Sie
die Minuten ein und drücken dann
mb/CLOCK (CLOCK beim ICFM60LRDS) zeitgleich mit einem
Zeitsignal (zum Beispiel einer
telefonischen Zeitansage).
Wenn Sie DISPLAY drücken, wird die
Uhrzeit bei eingeschaltetem Radio
angezeigt (siehe “Wechseln des
Anzeigemodus”).
So ändern Sie die
Uhrzeitziffern
Wenn Sie TUNE/TIME SET auf
oder drehen, werden die
Uhrzeitziffern schrittweise erhöht
bzw. verringert. Wenn Sie den Regler
auf
oder drehen, laufen die
Ziffern schnell durch.
Hinweise
•Wenn Sie nicht innerhalb von 65 Sekunden
mb/CLOCK (CLOCK beim ICF-M60LRDS)
oder TUNE/TIME SET betätigen, wird der
Uhreinstellmodus beendet.
•24-Stunden-Format: “0:00” = Mitternacht,
“12:00” = Mittag
Die
Hintergrundbeleuchtung
Mit LIGHT schalten Sie die
Hintergrundbeleuchtung ein.
Zum Ausschalten der
Hintergrundbeleuchtung drücken Sie
LIGHT erneut.
Beim Betrieb des Geräts mit Batterien
Die Hintergrundbeleuchtung schaltet
sich nach 30 Sekunden automatisch
aus, um die Batterien zu schonen.
Wenn Sie jedoch das Radio mit
eingeschalteter
–
Hintergrundbeleuchtung verwenden,
bleibt diese weitere 30 Sekunden an.
Drücken Sie LIGHT, um die
Hintergrundbeleuchtung von Hand
–
auszuschalten.
Ändern des MWEinstellintervalls
Das MW-Einstellintervall variiert je
nach Region. Das Einstellintervall
dieses Geräts ist werkseitig auf 9 kHz
eingestellt. Ändern Sie die
Einstellung gegebenenfalls wie unten
angegeben.
Region Einstellintervall
Nord- und süd- 10 kHz
amerikanische Länder
Andere Länder 9 kHz
Das MW-Einstellintervall kann nur
bei ausgeschaltetem Radio eingestellt
werden.
1Schalten Sie das Gerät mit
OPERATION aus.
2Halten Sie mb/CLOCK
(CLOCK beim ICFM60LRDS) gedrückt und
drücken Sie OPERATION
mehr als 5 Sekunden lang,
bis zwei kurze Signaltöne zu
hören sind.
Das MW-Einstellintervall wird geändert
und “MW 10” (bzw. “MW 9”) wird 2
Sekunden lang angezeigt.
Wenn Sie Schritt 2 nochmals ausführen,
wechselt das Einstellintervall erneut.
Hinweis
Wenn Sie das MW-Einstellintervall ändern,
werden nur die gespeicherten Sender im
MW-Frequenzbereich initialisiert.
LIGHT
mb/CLOCK
CLOCK AUTO ADJUST
PTY TEXT
MHz/kHz PRESET
SLEEP
TRAFFIC INFO
DISPLAY
OPERATIONHOLD
STANDBY
SCAN/PTY SEARCH
ALTERNATIVE SEARCH
TUNE/
TIME SET
VOL
TONE
CLOCK for ICF-M60LRDS
CLOCK pour ICF-M60LRDS
CLOCK beim ICF-M60LRDS
v jack
Prise v
Buchse v
C
FM SW MW/LW
English
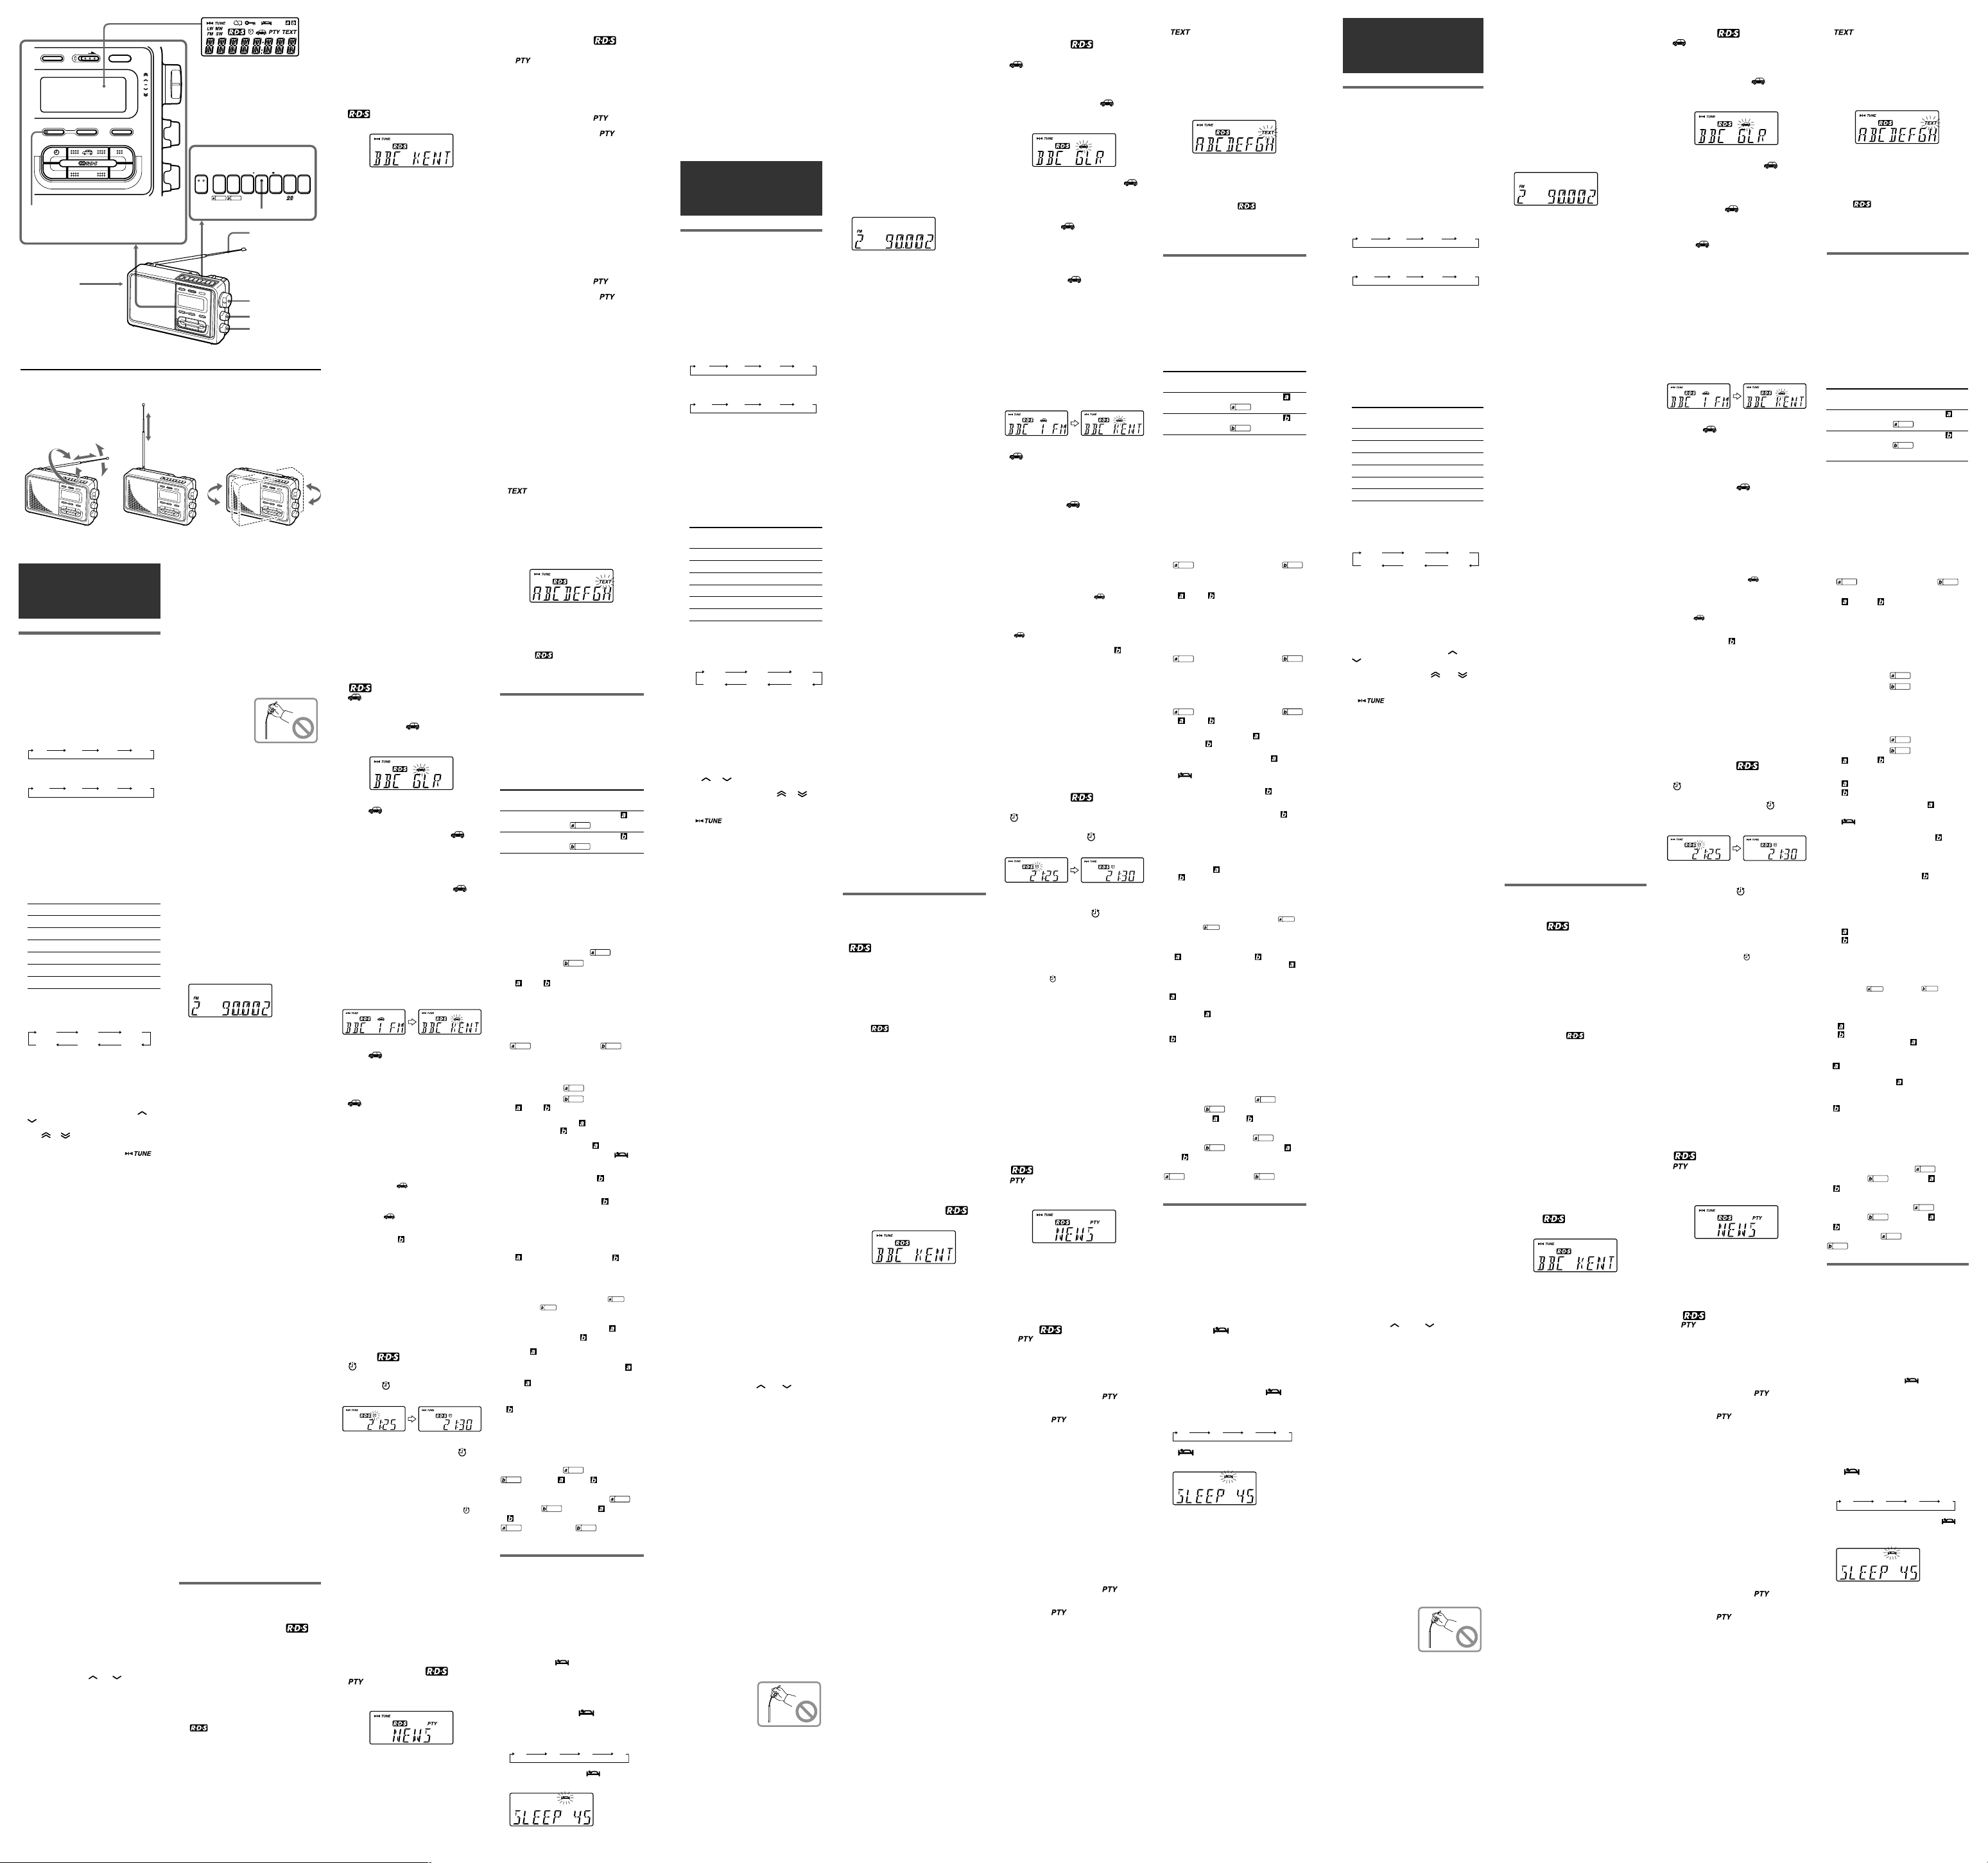
Operating the Radio
Manual Tuning
1Press OPERATION.
To turn off the radio, press OPERATION
again.
2Press BAND repeatedly to
select the band.
Each press changes the band as follows.
ICF-M60LRDS:
LW MW FM1* FM2*
ICF-M60SRDS:
MW SW FM1* FM2*
* FM1 and FM2 are differentiated only for
Preset Tuning. For Manual or Scan
Tuning of FM stations, select either
band.
When you select SW
(for ICF-M60SRDS only):
As the SW frequencies are assigned to the
meter bands shown below, you can make
a quick search for a desired frequency by
specifying the corresponding meter band.
Meter band Frequency range (kHz)
49 mb 5 800 - 6 250
41 mb 7 100 - 7 400
31 mb 9 400 - 10 000
25 mb 11 500 - 12 150
22 mb 13 500 - 13 900
19 mb 15 000 - 15 900
Press mb/CLOCK repeatedly to select a
meter band. Each press changes the meter
band as follows.
49 mb 41 mb 31 mb
19 mb 22 mb 25 mb
The unit receives the lowest frequency of
the selected meter band. In step 3, tuning
will be performed starting from that
frequency among the whole SW band.
3Turn TUNE/TIME SET to
select the desired station.
When you turn TUNE/TIME SET to or
, the frequency digits move forward or
backward by one step, and when you turn
it to
or , the frequency digits move
rapidly.
When the station is tuned in, “
appears.
You will hear two short beeps when the
lowest frequency has been located.
The FM channel step is set to 0.05 MHz*
and the MW/LW channel step is set to 9
KHz.
* The FM frequency display is raised or
lowered by a step of 0.1 MHz. For
example, frequency 88.00 or 88.05 MHz
is displayed as “88.0 MHz.”
4Adjust the volume using
VOL.
5Adjust the tone to your
preference using TONE.
When you select FM, the frequency
will be displayed for 2 seconds, then
the name of the station will appear if
that station transmits RDS data. (See
“Displaying the Station Names Using
Programme Service – PS”)
To listen with an earphone (not
supplied)
Connect an earphone to the v jack.
The sound through the speaker will
not be heard.
Scan Tuning
Scan tuning allows you to
automatically scan the stations in the
frequency range of a band. For SW
band, if the scanning starts from a
frequency inside the range of a meter
band, the scanning is performed only
within the current meter band. If the
scanning starts from a frequency
outside the range of a meter band and
reaches the following meter band, the
scanning will continue within that
meter band.
1Follow steps 1 to 2 in
“Manual Tuning.”
2Press SCAN/PTY SEARCH.
The frequency starts changing.
Scan Tuning begins from the previously
received frequency and pauses for 3
seconds when a station is received, then
the scanning will continue.
3When the radio tunes in to
the desired station, press
SCAN/PTY SEARCH to stop
scanning.
4If necessary, turn TUNE/
TIME SET to
in to the station more
precisely.
5Adjust the volume using
VOL.
6Adjust the tone to your
preference using TONE.
Note
For details on the frequency range or SW
meter band, see “Specifications” or “Manual
Tuning” respectively.
or to tune
* The PRESET TUNING 4
button has a tactile dot.
* La touche PRESET TUNING 4
a un point tactile.
* Auf der PRESET TUNING-
Taste 4 befindet sich ein
fühlbarer Punkt.
BAND
STANDBY
PRESET TUNING
STATION SELECT/ PRESET
1234567
RADIO BUZZER
Telescopic
Antenna
Antenne
télescopique
Teleskopantenne
TUNE/TIME SET
VOL
TONE
Improving Radio Reception
(See fig. C)
FM: Extend the telescopic
SW: Extend the telescopic
MW/LW: Rotate the unit
Note
Adjust the direction
of the antenna by
holding the bottom of
it. The antenna can be
damaged when you
move the antenna
with excessive force.
antenna and adjust the
length and the angle for
best reception.
antenna vertically.
horizontally for optimum
reception. A ferrite bar
antenna is built in the unit.
Preset Tuning
You can preset up to 14 FM stations (7
stations each for FM1 and FM2) and 7
stations each for SW, MW and LW.
Presetting a Station
1Tune in to the station you
wish to preset by performing
“Manual Tuning” or “Scan
Tuning.”
2Press the PRESET TUNING
button you wish to preset for
more than 2 seconds.
You will hear two short beeps and the
preset number appears in the display.
In FM reception, if the unit receives a
station transmitting RDS data that
includes the programme service data, the
station name will also be preset.
Example: Display window when you
preset FM 90.00 MHz in preset number 2
for FM2.
To preset another station, repeat these
steps.
To change the preset station, preset a
new station. The previously preset
station will be cancelled.
Tuning in to a Preset Station
1Press OPERATION.
To turn off the radio, press OPERATION
again.
2Select the band with BAND.
3Press the desired PRESET
TUNING button.
In FM reception, if the station name has
”
been preset together with the RDS station,
the station name will be displayed.
4Adjust the volume using
VOL.
5Adjust the tone to your
preference using TONE.
Note
Holding down the desired PRESET TUNING
button for more than 2 seconds will replace
the previous station on the PRESET TUNING
button with the station you tuned in to.
Changing the Display Mode
You can switch over between the
clock display mode and frequency/
station name display mode as
required by pressing DISPLAY.
In clock display mode
The current time is always displayed
while you are listening to the radio. If
you tune in to a station, the frequency
is displayed for 2 seconds, and the
station name is displayed for 2
seconds if that station is an FM station
transmitting the RDS data that
includes programme service data. If
the unit cannot receive the
programme service data while the
frequency is displayed for 2 seconds,
the station name will not be displayed
and the display returns to the current
time.
In frequency/station name display
mode
The frequency of the received station
is always displayed. In FM reception,
the station name will be displayed if
the received station transmits the RDS
data. (See “Displaying the Station
Names Using Programme Service –
PS”)
Using the RDS
Functions
When the unit receives an FM station
transmitting the RDS data, “
appears and the following functions
are available.
Tune in to an FM station by
performing “Manual Tuning”, “Scan
Tuning” or “Preset Tuning”, then
perform the following functions as
required.
Notes
•When the unit cannot receive the RDS data,
“
” will turn off.
•This function will not be activated if the
FM station being received is not
transmitting the RDS data. It may also not
work properly in areas where the RDS
transmissions are in the experimental
stage.
•If the radio signal being received is weak, it
may take time to receive the RDS data.
Displaying the Station
Names Using Programme
Service – PS
This function displays the name of
the station that you are currently
tuned in to.
If the unit receives a station
transmitting the RDS data that
includes programme service data,
” will light up and the station
“
name will appear.
PRESETS
*
Searching Alternative
Frequency – AF
This function searches for an
alternative frequency with a stronger
signal from the AF list in the same
network such as “BBC”, which have
several different frequencies.
Press ALTERNATIVE
SEARCH.
The searching for an alternative
frequency starts.
When the station with a stronger
signal is detected, the unit
automatically tunes in to that station.
If the RDS data being received does
not contain AF list, “NO AF” will be
displayed for 2 seconds. If the unit
cannot receive a station after the
searching of the whole AF list is
completed, the unit retunes to the
previously tuned station. If you
preset a station transmitting RDS data
that includes the AF list, the AF list
being received will also be
memorized.
Note
If the unit cannot receive the RDS data
within 3 seconds after you have tuned in to
the preset station, or the unit fails to receive
the preset station and receives a different
station, the unit will automatically search for
an alternative frequency in the memorized
AF list. You do not need to press
ALTERNATIVE SEARCH.
Receiving Traffic
Announcements – TA
This function searches and stands by
for traffic information facilitated by
EON network through detecting the
Traffic Programme and Traffic
Announcement signals in the RDS
data.
The unit automatically searches for
traffic information from the station
you are listening to and changes its
mode to receive the traffic
announcement when the broadcast
starts.
Press TRAFFIC INFO while
“
” is lit.
“ ” lights up. The unit is standing
by for a traffic announcement. When
the traffic announcement starts on the
current station, “
and you will hear the traffic
announcement.
When the traffic announcement is
over, “
If you press TRAFFIC INFO after the
traffic announcement starts, “
disappears but the unit will continue
broadcasting the traffic
announcement.
If the unit receives a station
transmitting EON data while “
lit
The unit will automatically tune in to
another station of the same network
when that station starts broadcasting
traffic announcements.
Example: Display window when the
traffic information starts on the BBC
KENT station while you are listening
to the BBC 1 broadcasting, the unit
tunes in to the BBC KENT station
automatically.
” starts flashing
” stops flashing.
To search for other stations of the
same programme type
1Press PTY while “ ” is
lit.
“ ” appears and the programme type
of the received station is displayed for 3
seconds.
2Press SCAN/PTY SEARCH
while the programme type is
displayed.
The searching starts and “ ” starts
flashing. When the unit detects a station, it
will tune in to that station. “
disappears and the frequency of the
received station is displayed for 2 seconds.
If the station has programme service data,
the station name appears.
To stop the searching, press SCAN/PTY
SEARCH.
To search for other stations of the
different programme type
1Press PTY repeatedly to
select a desired programme
type from the PTY list.
2Press SCAN/PTY SEARCH
while the programme type
being selected is displayed.
The searching starts and “ ” starts
flashing. When the unit detects a station, it
will tune in to that station. “
disappears and the frequency of the
received station is displayed for 2 seconds.
If the station has programme service data,
the station name appears.
To stop the searching, press SCAN/PTY
SEARCH.
Notes
•The PTY list can be scrolled only in one
direction.
•If the station is not received, the unit
retunes to the previously tuned station and
the searching stops.
•If you press SCAN/PTY SEARCH while “NO
PTY” is displayed, the unit starts scan
tuning.
Receiving Radio Texts – RT
This function displays the radio texts
transmitted by the RDS station.
Press TEXT.
“ ” starts flashing. The
beginning of the radio texts will be
displayed in 8 characters first and
scrolled to the left accordingly. The
scrolling will continue and will be
repeated.
If you press TEXT again, the unit stops
displaying the radio texts.
Notes
•If the received station transmits RDS data
which does not contain the radio text data,
“NO TEXT” will be displayed for 2 seconds
when you press TEXT.
•Even if “
is scrolled, the scrolling will continue.
•When the radio signal is weak, the text may
not be displayed correctly.
” disappears while the text
Setting the Standby
Timers
– Radio and Buzzer
You can set the radio to turn on or
sound a buzzer which can be used as
an alarm at a preset time. The standby
timers can be set only when the radio
is turned off.
Standby
Function
timer
Radio
Turns on
”
” is
the radio
Buzzer
Sounds a
buzzer
You can set both the radio and buzzer
standby timers as required.
For adjusting the hour and minute
with TUNE/TIME SET, see “How to
Adjust the Time Digits” in “Setting the
Clock.”
1Press OPERATION to turn
off the radio.
2Press STANDBY
STANDBY
than 2 seconds.
“ ” or “ ” and the “hour” start
flashing.
3Turn TUNE/TIME SET to set
Button to
be used
STANDBY
RADIO
STANDBY
BUZZER
BUZZER
for more
RADIO
”
”
Indicator
or
the hour of the time for the
standby timer to be turned
When the traffic announcement is
over, “
unit retunes to the previously tuned
station.
You can press TRAFFIC INFO to stop
receiving the traffic information.
“
retunes to the previously tuned
station.
Notes
•You will hear a beep when you press
•If the unit cannot receive RDS data
•This function will be cancelled when the
” stops flashing and the
” disappears and the unit
TRAFFIC INFO if the station you are
listening to is not a station transmitting
traffic information or EON data.
continuously, “
the unit is standing by for a traffic
announcement. However, when the
reception of the RDS data becomes
available, “
radio is turned off or when the buzzer
standby timer “
other than FM is selected.
” appears again.
” is activated, or a band
Setting the Clock Using
Clock Time – CT
This function enables the built-in
clock of this unit to automatically
synchronize with the CT data being
received.
Press CLOCK AUTO ADJUST
to turn on the CT function
while “ ” is lit.
“ ” starts flashing.
When the current time is set by the
CT data, “
current time appears.
To turn off the CT function, press
CLOCK AUTO ADJUST while “
displayed.
Notes
•If the unit cannot receive the CT data
within 2 minutes, “NO CT” will be
displayed for 2 seconds.
•If you select a band other than FM, “
disappears temporarily.
•Turn off the CT function in areas where it
may not operate.
•If the CT function is being activated while
you adjust the clock manually, the clock
will be adjusted by the CT data the next
time the unit receives it.
” lights up and the
Receiving Programme Types
– PTY
This function searches for stations in
each programme type such as NEWS,
SPORT, etc., of the PTY list
”
transmitted in the RDS data.
To display the programme type of the
station being received
Press PTY while “ ” is lit.
“ ” appears and the programme
type of the received station is
displayed for 3 seconds.
” disappears even if
RADIO
or STANDBY
The “minute” starts flashing.
4Turn TUNE/TIME SET to set
the minute, then press
STANDBY
STANDBY
“ ” or “ ” lights up, the preset time
will be displayed for 2 seconds and the
radio standby timer “
standby timer “
The radio standby timer “
the radio at the preset time and “
appears. After 60 minutes, the radio will
automatically turn off.
The buzzer standby timer “
sound a buzzer for 3 minutes at the preset
time whether or not the radio is turned on.
If the buzzer standby timer “
activated when the radio is turned on, the
radio will turn off and the buzzer will
sound. You can press any button to stop
the buzzer sound before the time has
elapsed.
Once you preset the radio standby timer
“
” or buzzer standby timer “ ”, the
radio will turn on or sound a buzzer at the
preset time everyday.
Notes
•If you do not operate STANDBY
STANDBY
65 seconds, the standby timer setting mode
will be cancelled.
•If both the radio standby timer “
buzzer standby timer “
same preset time, only the radio standby
timer “
Note on the radio standby timer “ ”
If you do not turn off the radio, the standby
timer “
Note on the buzzer standby timer
“ ”
The buzzer sound level is fixed regardless of
the VOL level.
Deactivating the Standby
” is
Timer
Press STANDBY
BUZZER
disappears. To activate the standby
timer again, press STANDBY
STANDBY
”
” appears. Do not press STANDBY
“
RADIO
than 2 seconds in either case.
or TUNE/TIME SET within
BUZZER
” will activate.
” will not activate.
so that “ ” or “ ”
BUZZER
so that “ ” or
or STANDBY
Setting the Sleep
Timer
By setting the sleep timer, you can fall
asleep to the radio sound. The radio
will turn off automatically after a set
time. The sleep timer can be set to turn
off after 15, 30, 45 or 60 minutes.
1Press SLEEP.
The sleep timer setting of “SLEEP 60”
appears and “
If you press SLEEP while the radio is off,
the radio turns on.
2Press SLEEP repeatedly to
select the desired sleep timer
BUZZER
RADIO
or
BUZZER
.
” or buzzer
” will be activated.
” will turn on
” will
” is
RADIO
” and
” are set to the
RADIO
or STANDBY
RADIO
BUZZER
for more
” flashes.
.
”
or
or
on, then press STANDBY
setting while “ ” is
flashing.
Each press changes the time setting as
follows:
If the received station does not
transmit programme type, “NO PTY”
will be displayed for 3 seconds.
60 45 30 15
After about 3 seconds, “ ” lights up
and the sleep timer starts operating.
To Cancel the Sleep Timer
Press OPERATION to turn off the
radio before the set time has elapsed,
then press OPERATION again to turn
on the radio.
To Change the Sleep Timer
Setting
You can press SLEEP repeatedly to
select the desired sleep timer setting
even after the sleep timer has
activated.
Français
Utilisation de la radio
Accord manuel
1Appuyez sur OPERATION.
Pour mettre la radio hors tension,
appuyez de nouveau sur OPERATION.
2Appuyez sur BAND de
façon répétée pour
sélectionner la bande d’onde.
Chaque pression modifie la bande comme
suit.
ICF-M60LRDS:
LW MW FM1* FM2*
ICF-M60SRDS:
MW SW FM1* FM2*
* FM1 et FM2 ont deux modes de
préréglage différents. Pour l’accord
manuel ou par balayage des stations
FM, sélectionnez l’une des bandes.
Lorsque vous sélectionnez SW
(pour ICF-M60SRDS uniquement) :
Etant donné que les fréquences SW sont
affectées aux bandes indiquées ci-dessous,
vous pouvez effectuer une recherche
rapide sur une fréquence de votre choix
en spécifiant la bande correspondante.
Bande métrique Plage de
49 mb 5 800 - 6 250
41 mb 7 100 - 7 400
31 mb 9 400 - 10 000
25 mb 11 500 - 12 150
22 mb 13 500 - 13 900
19 mb 15 000 - 15 900
Appuyez plusieurs fois sur mb/CLOCK
pour sélectionner une bande métrique.
Chaque pression modifie la bande
métrique comme suit.
49 mb 41 mb 31 mb
19 mb 22 mb 25 mb
L’appareil reçoit la fréquence la plus basse
de la bande sélectionnée. A l’étape 3, la
syntonisation est effectuée en
commençant à cette fréquence et sur toute
la bande SW.
fréquences (kHz)
3Tournez TUNE/TIME SET
pour sélectionner la station
souhaitée.
Lorsque vous tournez TUNE/TIME SET
sur
ou , les chiffres des fréquences
avancent ou reculent d’une unité à la fois
et lorsque vous tournez sur
changent rapidement.
Lorsque la station est trouvée, l’indication
“
” s’affiche.
Deux bips courts sont émis lorsque la
fréquence la plus basse a été captée.
L’intervalle d’accord FM est réglé sur 0,05
MHz* et l’intervalle d’accord MW/LW est
réglé sur 9 KHz.
* La fréquence FM affichée augmente ou
diminue par incréments de 0,1 MHz. Par
exemple, les fréquences de 88,00 et de
88,05 MHz sont affichées de la façon
suivante : “88.0 MHz”.
4Réglez le volume à l’aide de
ou , ils
la commande VOL.
5Réglez la tonalité selon vos
préférences à l’aide de la
commande TONE.
Lorsque vous sélectionnez la bande
FM, la fréquence s’affiche pendant
deux secondes, puis le nom de la
station s’affiche si elle diffuse des
données RDS. (Voir “Affichage des
noms de stations avec la fonction de
services offerts par le programme
– PS”)
Pour une écoute individuelle
(écouteurs non fournis)
Branchez des écouteurs sur la prise
v. Aucun son n’est émis par le haut-
parleur.
Accord par balayage
L’accord par balayage vous permet de
balayer automatiquement les stations
dans la plage de fréquences d’une
bande. Pour la bande SW, si le
balayage commence à une fréquence
comprise dans la plage d’une bande, il
est uniquement réalisé sur cette
bande. Si le balayage commence à une
fréquence non comprise dans la plage
d’une bande et atteint la bande
suivante, il se poursuivra sur cette
dernière.
1Suivez les étapes 1 et 2 de la
section “Accord manuel”.
2Appuyez sur SCAN/PTY
SEARCH.
La fréquence commence à changer.
L’accord par balayage commence à partir
de l’ancienne fréquence et s’arrête
pendant 3 secondes lorsqu’une station est
reçue, puis le balayage se poursuit.
3Lorsque la radio atteint la
station souhaitée, appuyez
sur SCAN/PTY SEARCH
pour arrêter le balayage.
4Si nécessaire, tournez TUNE/
TIME SET sur ou pour
accorder la station plus
précisément.
5Réglez le volume à l’aide de
la commande VOL.
6Réglez la tonalité selon vos
préférences à l’aide de la
commande TONE.
Remarque
Pour obtenir davantage de détails sur la
plage de fréquences ou la bande métrique
SW, consultez la section “Spécifications” ou
“Accord manuel”.
Amélioration de la réception
radio (Voir fig. C)
FM : déployez l’antenne
SW : déployez l’antenne
MW/LW : faites tourner l’appareil
Remarque
Ajustez la direction
de l’antenne en la
tenant par le bas.
L’antenne peut être
endommagée si vous
la déplacez
brutalement.
Accord préréglé
Vous pouvez prérégler jusqu’à 14
stations FM (7 en FM1, 7 en FM2) et 7
stations en SW, MW et LW.
télescopique et ajustez sa
longueur et son angle pour
une réception optimale.
télescopique verticalement.
horizontalement pour une
réception optimale. Une
antenne consistant en une
barre de ferrite est intégrée
à l’appareil.
Préréglage d’une station
1Faites l’accord sur la station
que vous souhaitez prérégler
en réalisant un “Accord
manuel” ou un “Accord par
balayage”.
2Appuyez pendant plus de 2
secondes sur la touche
PRESET TUNING que vous
souhaitez prérégler.
Deux bips courts sont émis et le numéro
préréglé apparaît sur l’afficheur.
En cours de réception FM, si l’appareil
capte une station transmettant des
données RDS incluant les données de
services offerts par le programme, le nom
de la station est également mémorisé.
Exemple : affichage lorsque vous préréglez
FM 90,00 MHz sur le numéro préréglé 2
pour FM2.
Pour prérégler une autre station,
répétez ces étapes.
Pour changer la station préréglée,
préréglez une nouvelle station et la
station précédente sera annulée.
Accord d’une station préréglée
1Appuyez sur OPERATION.
Pour mettre la radio hors tension, appuyez
de nouveau sur OPERATION.
2Sélectionnez la bande avec
BAND.
3Appuyez sur la touche
PRESET TUNING souhaitée.
En cours de réception FM, si le nom de la
station a été mémorisé au moment de la
présélection d’une station RDS, le nom de
la station s’affiche.
4Réglez le volume à l’aide de
la commande VOL.
5Réglez la tonalité selon vos
préférences à l’aide de la
commande TONE.
Remarque
Si vous maintenez la touche PRESET TUNING
de votre choix enfoncée pendant plus de 2
secondes, la station précédemment
mémorisée sur la touche PRESET TUNING est
remplacée par la station syntonisée.
Changement du mode
d’affichage
Vous pouvez faire passer l’affichage
du mode heure au mode fréquence/
nom de station en appuyant sur
DISPLAY.
Mode d’affichage de l’heure
L’heure s’affiche en permanence
pendant que vous écoutez la radio.
Lorsque vous syntonisez une station,
la fréquence s’affiche pendant deux
secondes. Le nom de la station
s’affiche également pendant deux
secondes s’il s’agit d’une station FM
qui transmet des données RDS
comprenant les données des services
offerts par le programme. Si, pendant
les deux secondes d’affichage de la
fréquence, l’appareil ne capte pas les
données des services offerts par le
programme, le nom de la station
n’apparaît pas et l’heure s’affiche de
nouveau.
Mode d’affichage de la fréquence et du
nom de la station
La fréquence de la station captée
s’affiche en permanence. En cours de
réception FM, le nom de la station
s’affiche si la station captée transmet
des données RDS. (Voir “Affichage
des noms de stations avec la fonction
de services offerts par le programme
– PS”)
Utilisation des
fonctions RDS
En cours de réception d’une station
FM transmettant des données RDS,
” s’affiche et les fonctions ci-
“
dessous sont disponibles.
Syntonisez une station FM
manuellement, par balayage ou par
présélection, puis activez les fonctions
souhaitées.
Remarques
•Lorsque l’appareil ne capte aucune donnée
RDS, “
•La fonction RDS n’est pas activée si la
station FM captée ne transmet pas de
données RDS. Il se peut également qu’elle
ne fonctionne pas bien dans les régions où
le système RDS est encore au stade
expérimental.
•La réception des données RDS peut prendre
un certain temps si le signal radio capté est
faible.
Affichage des noms de
stations avec la fonction de
services offerts par le
programme – PS
Cette fonction affiche le nom de la
station syntonisée.
Si l’appareil capte une station
transmettant des données RDS
incluant les données des services
offerts par le programme, “ ” et
le nom de la station s’affichent.
Recherche d’une fréquence
alternative – AF
Cette fonction recherche, parmi les
stations du même réseau de diffusion,
une fréquence alternative dont le
signal est plus puissant. Par exemple,
le réseau “BBC” compte plusieurs
fréquences différentes.
Appuyez sur ALTERNATIVE
SEARCH (recherche d’une
station alternative).
La recherche d’une fréquence
alternative commence.
Lorsqu’une station dont le signal est
plus puissant est repérée, l’appareil
syntonise automatiquement cette
station.
Lorsque les données RDS de la station
captée ne contiennent aucune liste de
fréquences alternatives, “NO AF”
s’affiche pendant deux secondes. Si
l’appareil ne réussit pas à capter une
autre station après avoir balayé toute
la liste de fréquences alternatives, la
station précédente est de nouveau
syntonisée. Lorsque vous
présélectionnez une station
transmettant des données RDS qui
comprennent une liste de fréquences
alternatives, cette liste est également
mémorisée.
Remarque
Si l’appareil ne capte pas de données RDS
dans les trois secondes suivant la
syntonisation d’une station présélectionnée,
ou s’il ne réussit pas à capter la présélection
et syntonise une autre station, la recherche
d’une fréquence alternative dans la liste
mémorisée commence automatiquement.
Vous n’avez pas besoin d’appuyer sur
ALTERNATIVE SEARCH.
Réception des bulletins de
radioguidage – TA
Cette fonction permet la recherche
d’informations routières et la mise en
veille pour la réception de nouveaux
bulletins. Le réseau EON facilite ces
opérations en permettant la détection
des signaux des programmes et
bulletins de radioguidage.
L’appareil recherche
automatiquement des bulletins
d’informations routières à partir de la
station écoutée. Ensuite, le mode
d’écoute change automatiquement au
début du bulletin de radioguidage
capté pour en permettre l’écoute.
” disparaît.
Appuyez sur TRAFFIC INFO
(informations routières)
pendant que “
affiché.
“ ” s’affiche. L’appareil est en
mode d’attente pour la réception de
bulletins de radioguidage. Lorsque le
bulletin commence sur la station
actuellement syntonisée, “
clignote et le bulletin de radioguidage
se fait entendre.
Lorsque le bulletin est terminé, “ ”
cesse de clignoter.
Si vous appuyez sur TRAFFIC INFO
après le début du bulletin de
radioguidage, “
la radio continue de diffuser le
bulletin.
Si l’appareil capte une station
transmettant des données EON alors
que l’indicateur “ ” est affiché.
L’appareil syntonise
automatiquement une autre station
appartenant au même réseau lorsque
cette station entame la diffusion de
bulletins de radioguidage.
Exemple : éléments affichés lorsqu’un
bulletin de radioguidage commence
sur la station BBC KENT pendant que
vous écoutez la station BBC 1.
L’appareil syntonise
automatiquement la station BBC
KENT.
Lorsque le bulletin est terminé,
” cesse de clignoter et l’appareil
“
resyntonise la station précédemment
écoutée.
Pour mettre fin à la réception du
bulletin de radioguidage, appuyez sur
TRAFFIC INFO. “
de l’affichage, puis l’appareil
resyntonise la station précédemment
écoutée.
Remarques
•Si vous appuyez sur TRAFFIC INFO alors
que la station écoutée ne transmet pas
d’informations routières ni de données
EON, un bip retentit.
•Si l’appareil ne peut pas recevoir les
données RDS en continu, “
même si l’appareil est en mode de veille
pour la réception de bulletins de
radioguidage. Cependant, lorsque les
données RDS sont de nouveau disponibles
“
” s’affiche de nouveau.
•Cette fonction est désactivée si la radio est
éteinte, si la minuterie d’alarme “
activée, ou si une bande autre que la bande
FM est sélectionnée.
” est
”
” disparaît, mais
” disparaît alors
” disparaît,
” est
Réglage automatique de
l’heure de l’horloge – CT
Cette fonction synchronise
automatiquement l’horloge intégrée
de cet appareil avec les données CT
(heure) captées.
Pour activer la fonction CT
(heure), appuyez sur CLOCK
AUTO ADJUST (réglage
automatique de l’heure)
pendant que “ ” est
affiché.
“ ” commence à clignoter.
Lorsque l’heure est réglée par les
données CT (heure), “
actuelle s’affichent.
Pour désactiver la fonction CT
(heure), appuyez sur CLOCK AUTO
ADJUST pendant que “
affiché.
Remarques
•Si l’appareil ne capte pas les données CT
dans les deux minutes qui suivent, “NO
CT” s’affiche pendant deux secondes.
•Si vous sélectionnez une bande autre que la
bande FM, “
momentanément.
•Désactivez la fonction CT dans les régions
où elle ne fonctionne pas.
•Si la fonction CT est activée pendant le
réglage manuel de l’horloge, l’heure est de
nouveau réglée selon les données CT la
prochaine fois qu’elles sont captées.
” disparaît
” et l’heure
” est
Syntonisation par type
d’émission – PTY
Cette fonction recherche des stations
selon le type d’émission qu’elles
diffusent, par exemple NEWS
(actualités) , SPORT, etc., selon la liste
des types d’émission transmise avec
les données RDS.
Affichage du type d’émission de la
station écoutée
Appuyez sur PTY pendant que
“ ” est affiché.
“ ” s’affiche, puis le type
d’émission de la station captée
s’affiche pendant trois secondes.
Si la station captée ne transmet pas de
données sur les types d’émissions
diffusées, “NO PTY” s’affiche pendant
trois secondes.
Recherche de stations diffusant le
même type d’émission
1Appuyez sur PTY pendant
que “ ” est affiché.
“ ” s’affiche, puis le type d’émission
de la station captée s’affiche pendant trois
secondes.
2Appuyez sur SCAN/PTY
SEARCH pendant que le
type d’émission est affiché.
La recherche commence et “ ”
commence à clignoter. Lorsque l’appareil
capte une station de ce type, il la
syntonise. “
fréquence de la station captée s’affiche
pendant deux secondes. Le nom de la
station s’affiche si elle diffuse des données
de services offerts par le programme.
Pour mettre fin à la recherche, appuyez
sur SCAN/PTY SEARCH.
Recherche de stations diffusant un
autre type d’émission
” disparaît, puis la
1Appuyez plusieurs fois sur
PTY pour sélectionner le
type d’émission souhaité
dans la liste PTY.
2Appuyez sur SCAN/PTY
SEARCH pendant que le
type d’émission sélectionné
est affiché.
La recherche commence et “ ”
commence à clignoter. Lorsque l’appareil
capte une station de ce type, il la
syntonise. “
fréquence de la station captée s’affiche
pendant deux secondes. Le nom de la
station s’affiche si elle diffuse des données
de services offerts par le programme.
Pour mettre fin à la recherche, appuyez
sur SCAN/PTY SEARCH.
Remarques
•La liste des types d’émission PTY ne peut
défiler que dans une seule direction.
•Si aucune station n’est captée, la
syntonisation de la station précédemment
écoutée est rétablie et la recherche est
désactivée.
•Si vous appuyez sur SCAN/PTY SEARCH
pendant que “NO PTY” est affiché,
l’appareil commence la syntonisation par
balayage.
Réception de texte radio
– RT
Cette fonction affiche le texte
accompagnant les données transmises
par les stations RDS.
” disparaît, puis la
Appuyez sur TEXT.
“ ” commence à clignoter. Les
huit premières lettres du texte radio
s’affichent et le reste du texte défile
vers la gauche. Le défilement
s’effectue jusqu’à la fin, puis reprend
en boucle.
Si vous appuyez de nouveau sur
TEXT, l’appareil cesse d’afficher le
texte radio.
Remarques
•Lorsque les données RDS de la station
captée ne contiennent aucun texte radio,
“NO TEXT” s’affiche pendant deux
secondes lorsque vous appuyez sur TEXT.
•Même si la mention “
pendant le défilement du texte, le
défilement continue.
• Si le signal radio est faible, il est possible
que le texte ne s’affiche pas correctement.
” disparaît
Réglage des
minuteries de veille
– Minuteries radio et
Alarme
Vous pouvez régler l’appareil en guise
d’alarme pour que la radio s’allume
ou qu’une alarme retentisse à une
heure préréglée. Les minuteries
peuvent uniquement être réglées
lorsque la radio est éteinte.
Minuterie
Fonction
Touche à
Allume la
radio
Fait retentir
une alarme
utiliser
STANDBY
STANDBY
Radio
Alarme
Vous pouvez régler à la fois la
minuterie de la radio et celle de
l’alarme.
Pour le réglage de l’heure de la
minuterie à l’aide de TUNE/TIME SET,
voir “Comment régler les chiffres des
heures” dans la section “Réglage de
l’horloge”.
Indication
RADIO
BUZZER
1Appuyez sur OPERATION
pour éteindre la radio.
2Appuyez sur STANDBY
RADIO
ou sur STANDBY
BUZZER
pendant plus de deux
secondes.
“ ” ou “ ” et l’indication des heures
commencent à clignoter.
3Tournez TUNE/TIME SET
pour régler l’heure
d’activation de la minuterie,
puis appuyez sur STANDBY
RADIO
ou sur STANDBY
L’indication des minutes clignote.
BUZZER
4Tournez TUNE/TIME SET
pour régler les minutes, puis
appuyez sur STANDBY
RADIO
ou sur STANDBY
“ ” ou “ ” s’affiche, l’heure préréglée
s’affiche ensuite pendant deux secondes et
la minuterie de la radio “
l’alarme “
Avec la minuterie de la radio “
radio s’allume à l’heure préréglée et
“
automatiquement après 60 minutes.
Avec la minuterie d’alarme “
alarme retentit pendant trois minutes à
l’heure préréglée, que la radio soit allumée
ou non. Si la minuterie d’alarme “
activée alors que la radio est allumée, la
radio s’éteint et l’alarme retentit. Appuyez
sur n’importe quel bouton pour éteindre
l’alarme avant la fin de la période de trois
minutes.
Une fois que vous avez réglé la minuterie
de la radio “
“
retentit quotidiennement à l’heure
préréglée.
Remarques
•Si vous n’actionnez pas STANDBY
STANDBY
les 65 secondes qui suivent, le réglage de la
minuterie est annulé.
•Si vous avez réglé la minuterie de la radio
“
heure, seule la minuterie de la radio “
se déclenche.
Remarque sur la minuterie de la radio
“
Si vous n’éteignez pas la radio, la minuterie
de la radio “
Remarque sur la minuterie de l’alarme
“
Le volume de l’alarme est fixe, peu importe le
réglage de la commande VOL.
” est activée.
” s’affiche. La radio s’éteint
” ou celle de l’alarme
”, la radio s’allume ou l’alarme
BUZZER
ou TUNE/TIME SET dans
” et celle de l’alarme “ ” à la même
”
” n’a aucun effet.
”
BUZZER
” ou celle de
”, la
”, une
” est
RADIO
,
Désactivation de la
minuterie
Appuyez sur STANDBY
STANDBY
disparaître “
réactiver la minuterie, appuyez de
nouveau sur STANDBY
STANDBY
ou “
l’autre, n’appuyez pas sur STANDBY
pendant plus de deux secondes.
BUZZER
” ou “ ”. Pour
BUZZER
”. Dans un cas comme dans
RADIO
ou sur STANDBY
RADIO
RADIO
BUZZER
ou sur
ou sur
pour faire
pour afficher “ ”
Réglage du
temporisateur
En réglant le temporisateur, vous
pouvez vous endormir au son de la
radio. La radio s’éteint
automatiquement au bout d’une durée
prédéfinie. Le temporisateur peut être
réglé pour s’éteindre au bout de 15,
30, 45 ou 60 minutes.
1Appuyez sur SLEEP.
Le réglage du temporisateur “SLEEP 60”
s’affiche et “
Si vous appuyez sur SLEEP alors que la
radio est éteinte, elle s’allume.
” clignote.
2Appuyez plusieurs fois sur
SLEEP pour sélectionner le
réglage du temporisateur
souhaité alors que “ ”
clignote.
Chaque pression modifie l’affichage
comme suit :
60 45 30 15
“ ” s’allume au bout de 3 secondes et
le temporisateur commence le décompte.
Pour annuler le
temporisateur
Appuyez sur OPERATION pour
éteindre la radio avant que la durée
définie se soit écoulée, puis appuyez
de nouveau sur OPERATION pour
allumer la radio.
Pour modifier le réglage du
temporisateur
Vous pouvez appuyer plusieurs fois
sur SLEEP pour sélectionner le réglage
de temporisateur souhaité même
après l’activation du temporisateur.
2Drücken Sie die PRESET
TUNING-Taste, auf der der
Sender gespeichert werden
Deutsch
Radioempfang
Manuelle Sendersuche
1Drücken Sie OPERATION.
Zum Ausschalten des Radios drücken Sie
OPERATION erneut.
2Drücken Sie mehrmals
BAND, um den
Frequenzbereich
auszuwählen.
Mit jedem Tastendruck wechselt der
Frequenzbereich folgendermaßen:
ICF-M60LRDS:
LW MW FM1* FM2*
ICF-M60SRDS:
MW SW FM1* FM2*
* Zwischen FM1 und FM2 wird nur beim
Speichern von Sendern unterschieden.
Beim manuellen oder automatischen
FM-Sendersuchlauf wählen Sie einfach
einen der Frequenzbereiche.
Wenn Sie SW wählen (nur beim ICFM60SRDS):
Da die SW-Frequenzen den unten
aufgeführten Meterbereichen zugeordnet
sind, können Sie eine bestimmte
Frequenz rasch suchen, indem Sie den
entsprechenden Meterbereich angeben.
Meterbereich Frequenzbereich
49 mb 5 800 - 6 250
41 mb 7 100 - 7 400
31 mb 9 400 -10 000
25 mb 11 500 -12 150
22 mb 13 500 -13 900
19 mb 15 000 -15 900
Drücken Sie mehrmals mb/CLOCK, um
einen Meterbereich auszuwählen. Mit
jedem Tastendruck wechselt der
Meterbereich folgendermaßen:
49 mb 41 mb 31 mb
19 mb 22 mb 25 mb
Das Gerät empfängt die niedrigste
Frequenz des ausgewählten
Meterbereichs. In Schritt 3 wird das
Einstellen ab dieser Frequenz im ganzen
SW-Frequenzbereich ausgeführt.
(kHz)
3Stellen Sie durch Drehen
von TUNE/TIME SET den
gewünschten Sender ein.
.
.
Wenn Sie TUNE/TIME SET auf oder
drehen, werden die Frequenzziffern
schrittweise erhöht bzw. verringert.
Wenn Sie den Regler auf
drehen, laufen die Ziffern schnell durch.
Wenn ein Sender eingestellt ist, erscheint
“
”.
Zwei kurze Signaltöne sind zu hören,
wenn die niedrigste Frequenz gefunden
wurde.
Das FM-Einstellintervall beträgt 0,05
MHz*, das MW/LW-Einstellintervall 9
kHz.
* Die FM-Frequenzanzeige wechselt in
Schritten von 0,1 MHz nach oben oder
unten. Die Frequenzen 88,00 und 88,05
MHz werden zum Beispiel als “88.0
MHz” angezeigt.
4Stellen Sie die Lautstärke
oder
mit VOL ein.
5Stellen Sie mit TONE den
Klang nach Belieben ein.
Wenn Sie FM wählen, wird 2
Sekunden lang die Frequenz
angezeigt und danach erscheint der
Sendername, sofern der Sender RDSDaten ausstrahlt (siehe “Anzeigen der
Sendernamen über den
Programmdienst – PS”).
Wiedergabe über Ohrhörer (nicht
mitgeliefert)
Schließen Sie Ohrhörer an die Buchse
v an. Über den Lautsprecher wird
”
kein Ton mehr ausgegeben.
Sendersuchlauf
Mit dem Sendersuchlauf können Sie
die Sender innerhalb eines
Frequenzbereichs automatisch
suchen. Wenn der Suchlauf beim SWFrequenzbereich bei einer Frequenz
innerhalb eines Meterbereichs startet,
wird der Suchlauf nur innerhalb des
aktuellen Meterbereichs ausgeführt.
Wenn der Suchlauf bei einer
Frequenz außerhalb eines
Meterbereichs startet und den
folgenden Meterbereich erreicht, wird
er innerhalb dieses Meterbereichs
fortgesetzt.
1Gehen Sie wie in Schritt 1
und 2 unter “Manuelle
Sendersuche” erläutert vor.
2Drücken Sie SCAN/PTY
SEARCH.
Die Frequenz beginnt zu wechseln.
Der Sendersuchlauf beginnt ab der zuvor
eingestellten Frequenz und hält 3
Sekunden an, sobald ein Sender
empfangen wird. Danach wird der
Sendersuchlauf fortgesetzt.
3Sobald der gewünschte
Sender eingestellt ist,
stoppen Sie den
Sendersuchlauf mit SCAN/
PTY SEARCH.
4Stellen Sie gegebenenfalls
den Sender noch genauer
ein, indem Sie TUNE/TIME
SET auf oder drehen.
5Stellen Sie die Lautstärke
mit VOL ein.
6Stellen Sie mit TONE den
Klang nach Belieben ein.
Hinweis
Näheres zum Frequenzbereich oder zum
SW-Meterbereich finden Sie unter
“Technische Daten” bzw. “Manuelle
Sendersuche”.
Verbessern des Empfangs
(siehe Abb. C)
FM: Ziehen Sie die
SW: Richten Sie die
MW/LW: Drehen Sie das Gerät
Hinweis
Fassen Sie die
Antenne unten an,
wenn Sie ihre
Richtung einstellen.
Die Antenne kann
beschädigt werden,
wenn Sie sie
gewaltsam bewegen.
Teleskopantenne heraus
und stellen Sie Länge und
Winkel so ein, dass Sie
einen optimalen Empfang
erzielen.
Teleskopantenne vertikal
aus.
horizontal, um den
Empfang zu verbessern.
Das Gerät enthält eine
Ferritstabantenne.
Einstellen gespeicherter
Sender
Sie können bis zu 14 FM-Sender (je 7
Sender für FM1 und FM2) und je 7
SW-, MW- und LW-Sender speichern.
Speichern eines Senders
1Stellen Sie den zu
speichernden Sender wie
unter “Manuelle
Sendersuche” oder
“Sendersuchlauf” erläutert
ein.
soll, mehr als 2 Sekunden
lang.
Zwei kurze Signaltöne werden
ausgegeben und die Speichernummer
erscheint im Display.
Wenn das Gerät beim FM-Empfang einen
Sender empfängt, der RDS-Daten mit
Programmdienstdaten ausstrahlt, wird
auch der Sendername gespeichert.
Beispiel: Display beim Speichern des FMSenders bei 90,00 MHz unter
Speichernummer 2 im Frequenzbereich
FM2.
Wenn Sie einen weiteren Sender
speichern wollen, gehen Sie wie in
den Schritten oben erläutert vor.
Wenn Sie einen gespeicherten Sender
ändern wollen, speichern Sie einen
anderen Sender auf der
entsprechenden Taste. Der zuvor
gespeicherte Sender wird gelöscht.
Einstellen eines gespeicherten Senders
1Drücken Sie OPERATION.
Zum Ausschalten des Radios drücken Sie
OPERATION erneut.
2Wählen Sie mit BAND den
Frequenzbereich aus.
3Drücken Sie die gewünschte
PRESET TUNING-Taste.
Wenn beim FM-Empfang der Sendername
zusammen mit dem RDS-Sender
gespeichert wurde, wird der Sendername
angezeigt.
4Stellen Sie die Lautstärke mit
VOL ein.
5Stellen Sie mit TONE den
Klang nach Belieben ein.
Hinweis
Wenn Sie die gewünschte PRESET TUNINGTaste länger als 2 Sekunden gedrückt halten,
wird der zuvor auf dieser PRESET TUNINGTaste gespeicherte Sender durch den aktuell
eingestellten Sender ersetzt.
Wechseln des
Anzeigemodus
Sie können bei Bedarf zwischen dem
Uhrzeitanzeigemodus und dem
Frequenz-/SendernameAnzeigemodus wechseln, indem Sie
DISPLAY drücken.
Im Uhrzeitanzeigemodus
Beim Radioempfang wird die aktuelle
Uhrzeit immer angezeigt. Wenn Sie
einen Sender einstellen, wird 2
Sekunden lang die Frequenz
angezeigt. Auch der Sendername
wird 2 Sekunden lang angezeigt,
sofern es sich um einen FM-Sender
handelt, der RDS-Daten mit
Programmdienstdaten ausstrahlt.
Wenn das Gerät die
Programmdienstdaten nicht
empfangen kann, während 2
Sekunden lang die Frequenz
angezeigt wird, wird der Sendername
nicht angezeigt. Stattdessen erscheint
wieder die aktuelle Uhrzeit.
Im Frequenz-/SendernameAnzeigemodus
Die Frequenz des eingestellten
Senders wird immer angezeigt. Beim
FM-Empfang wird außerdem der
Sendername angezeigt, sofern der
eingestellte Sender RDS-Daten
ausstrahlt (siehe “Anzeigen der
Sendernamen über den
Programmdienst – PS”).
Die RDS-Funktionen
Wenn das Gerät einen FM-Sender
empfängt, der RDS-Daten ausstrahlt,
erscheint “
beschriebenen Funktionen stehen zur
Verfügung.
Stellen Sie wie unter “Manuelle
Sendersuche”, “Sendersuchlauf” oder
“Einstellen gespeicherter Sender”
beschrieben einen FM-Sender ein und
nutzen Sie bei Bedarf die folgenden
Funktionen.
Hinweise
•Wenn das Gerät keine RDS-Daten
empfängt, wird “
•Diese Funktion wird nicht aktiviert, wenn
der eingestellte FM-Sender keine RDSDaten ausstrahlt. Außerdem arbeitet die
Funktion in Gebieten, in denen sich RDS
noch in der Probephase befindet,
möglicherweise nicht korrekt.
•Wenn das empfangene Radiosignal
schwach ist, dauert es möglicherweise
einige Zeit, bis die RDS-Daten empfangen
werden.
Anzeigen der Sendernamen
über den Programmdienst
– PS
Diese Funktion bewirkt, dass der
Name des aktuell eingestellten
Senders angezeigt wird.
Wenn das Gerät einen Sender
empfängt, der RDS-Daten mit
Programmdienstdaten ausstrahlt,
leuchtet “
Sendername wird angezeigt.
Suchen nach
Alternativfrequenzen – AF
Mit dieser Funktion können Sie in der
AF-Liste eines Sendernetzwerks, wie
z. B. der BBC, die mehrere
verschiedene Frequenzen umfasst,
eine Alternativfrequenz mit einem
stärkeren Signal suchen lassen.
Drücken Sie ALTERNATIVE
SEARCH.
Das Gerät beginnt, eine
Alternativfrequenz zu suchen.
Wenn ein Sender mit einem stärkeren
Signal erkannt wird, wechselt das
Gerät automatisch zu diesem Sender.
Wenn die empfangenen RDS-Daten
keine AF-Liste enthalten, wird 2
Sekunden lang “NO AF” angezeigt.
Wenn das Gerät die AF-Liste
vollständig durchsucht hat und
keinen Sender empfangen kann,
wechselt das Gerät wieder zum zuvor
eingestellten Sender. Wenn Sie einen
Sender speichern, der RDS-Daten mit
einer AF-Liste ausstrahlt, wird die
AF-Liste ebenfalls gespeichert.
Hinweis
Wenn das Gerät innerhalb von 3 Sekunden
nach dem Einstellen des gespeicherten
Senders keine RDS-Daten empfängt bzw.
wenn das Gerät den gespeicherten Sender
nicht empfangen kann und stattdessen einen
anderen Sender einstellt, beginnt das Gerät
automatisch mit der Suche nach einer
Alternativfrequenz in der gespeicherten AFListe. In diesem Fall brauchen Sie
ALTERNATIVE SEARCH nicht zu drücken.
Empfang von
Verkehrsdurchsagen – TA
Unterstützt durch das EONNetzwerk sucht diese Funktion nach
Verkehrsinformationen und schaltet
dann in Empfangsbereitschaft. Hierzu
werden die Verkehrsfunk- (TP) und
Verkehrsdurchsagesignale (TA) in
den RDS-Daten verwendet.
Das Gerät sucht automatisch die
Verkehrsinformationen des aktuell
eingestellten Senders und schaltet auf
Empfang, sobald eine
Verkehrsdurchsage beginnt.
” und die unten
” ausgeblendet.
” auf und der
Drücken Sie TRAFFIC INFO,
während “
“ ” leuchtet auf. Das Gerät
schaltet in Empfangsbereitschaft für
Verkehrsdurchsagen. Wenn eine
Verkehrsdurchsage im aktuellen
Sender beginnt, fängt “
blinken und Sie hören die
Verkehrsdurchsage.
Nach dem Ende der
Verkehrsdurchsage hört “
blinken auf.
Wenn Sie nach dem Starten der
Verkehrsdurchsage TRAFFIC INFO
drücken, wird “
aber die Verkehrsdurchsage ist
weiterhin zu hören.
Wenn “ ” leuchtet und das Gerät
einen Sender empfängt, der EONDaten ausstrahlt
Das Gerät stellt automatisch einen
anderen Sender desselben Netzwerks
ein, wenn dieser Sender
Verkehrdurchsagen ausstrahlt.
Beispiel: Wenn Sie gerade den Sender
BBC 1 hören und der Sender BBC
KENT anfängt, eine
Verkehrsdurchsage zu senden,
wechselt das Gerät automatisch zum
Sender BBC KENT. Im Display ist
Folgendes zu sehen:
Wenn die Verkehrsdurchsage vorbei
ist, hört “
das Gerät stellt wieder den zuvor
eingestellten Sender ein.
Sie können TRAFFIC INFO drücken,
um den Empfang von
Verkehrsinformationen zu stoppen. In
diesem Fall wird “
ausgeblendet, und der zuvor
eingestellte Sender wird wieder
eingestellt.
Hinweise
•Wenn Sie einen Sender hören, der keine
Verkehrsinformationen oder EON-Daten
ausstrahlt, und TRAFFIC INFO drücken,
wird ein Signalton ausgegeben.
•Wenn das Gerät nicht durchgehend RDSDaten empfängt, wird “
ausgeblendet, auch wenn das Gerät in
Empfangsbereitschaft für
Verkehrsdurchsagen geschaltet ist. Sobald
wieder RDS-Daten empfangen werden,
wird “
•Die Funktion wird deaktiviert, wenn Sie
das Radio ausschalten, den SummerEinschalt-Timer “
einen anderen Frequenzbereich als FM
auswählen.
” leuchtet.
” an zu
” zu
” ausgeblendet,
” zu blinken auf und
”
”
” wieder eingeblendet.
” aktivieren oder
Einstellen der Uhr anhand
von Uhrzeitdaten – CT
Dank dieser Funktion kann die
integrierte Uhr des Geräts
automatisch mit den empfangenen
CT-Daten synchronisiert werden.
Schalten Sie die CT-Funktion
mit CLOCK AUTO ADJUST
ein, während “ ”
leuchtet.
“ ” beginnt zu blinken.
Wenn die Uhrzeit über die CT-Daten
eingestellt wird, leuchtet “
und die aktuelle Uhrzeit wird
angezeigt.
Zum Auschalten der CT-Funktion
drücken Sie CLOCK AUTO ADJUST
erneut, während “
wird.
Hinweise
•Wenn das Gerät die CT-Daten nicht
innerhalb von 2 Minuten empfängt, wird 2
Sekunden lang “NO CT” angezeigt.
•Wenn Sie einen anderen Frequenzbereich
als FM wählen, wird “
ausgeblendet.
•Schalten Sie die CT-Funktion in Gegenden,
in denen sie nicht arbeitet, aus.
•Wenn die CT-Funktion aktiviert wird,
während Sie gerade die Uhr von Hand
einstellen, wird die Uhr mit den CT-Daten
synchronisiert, sobald das Gerät das
nächste Mal diese Daten empfängt.
” auf
” angezeigt
” kurz
Empfangen von Sendern
nach Programmtyp – PTY
Mit dieser Funktion können Sie
Sender nach bestimmten
Programmtypen wie NEWS, SPORT
usw. suchen, die in der mit den RDSDaten ausgestrahlten PTY-Liste
enthalten sind.
So lassen Sie den Programmtyp des
eingestellten Senders anzeigen
Drücken Sie PTY, während
“
” leuchtet.
“ ” erscheint und der
Programmtyp des eingestellten
Senders wird 3 Sekunden lang
angezeigt.
Wenn der eingestellte Sender keine
Programmtypdaten ausstrahlt, wird 3
Sekunden lang “NO PTY” angezeigt.
So suchen Sie andere Sender mit
demselben Programmtyp
1Drücken Sie PTY, während
“ ” leuchtet.
“ ” erscheint und der Programmtyp
des eingestellten Senders wird 3
Sekunden lang angezeigt.
2Drücken Sie SCAN/PTY
SEARCH, während der
Programmtyp angezeigt
wird.
Die Suche beginnt und “ ” beginnt
zu blinken. Wenn das Gerät einen Sender
erkennt, wird dieser automatisch
eingestellt. “
und die Frequenz des eingestellten
Senders wird 2 Sekunden lang angezeigt.
Wenn der Sender Programmdienstdaten
ausstrahlt, wird auch der Sendername
angezeigt.
Zum Stoppen der Suche drücken Sie
SCAN/PTY SEARCH.
So suchen Sie andere Sender mit
einem anderen Programmtyp
1Drücken Sie mehrmals PTY,
” wird ausgeblendet
um den gewünschten
Programmtyp in der PTYListe auszuwählen.
2Drücken Sie SCAN/PTY
SEARCH, während der
ausgewählte Programmtyp
angezeigt wird.
Die Suche beginnt und “ ” beginnt
zu blinken. Wenn das Gerät einen Sender
erkennt, wird dieser automatisch
eingestellt. “
und die Frequenz des eingestellten
Senders wird 2 Sekunden lang angezeigt.
Wenn der Sender Programmdienstdaten
ausstrahlt, wird auch der Sendername
angezeigt.
Zum Stoppen der Suche drücken Sie
SCAN/PTY SEARCH.
Hinweise
•Sie können nur in einer Richtung durch die
PTY-Liste blättern.
•Wenn kein neuer Sender empfangen wird,
wechselt das Gerät wieder zum zuvor
eingestellten Sender und die Suche stoppt.
•Wenn Sie SCAN/PTY SEARCH drücken,
während “NO PTY” angezeigt wird,
beginnt der normale Sendersuchlauf.
Empfangen von Radiotext
– RT
Mit dieser Funktion wird der von
RDS-Sendern ausgestrahlte Radiotext
angezeigt.
” wird ausgeblendet
Drücken Sie TEXT.
“ ” beginnt zu blinken. Die
ersten 8 Zeichen des Radiotexts
werden angezeigt und danach läuft
der Text um weitere 8 Zeichen nach
links im Display durch. Dieser
Vorgang wiederholt sich fortlaufend.
Wenn Sie TEXT erneut drücken, wird
der Radiotext nicht länger angezeigt.
Hinweise
•Wenn der eingestellte Sender RDS-Daten
ohne Radiotextdaten ausstrahlt, erscheint 2
Sekunden lang “NO TEXT”, sobald Sie
TEXT drücken.
•Wenn bei der fortlaufenden Anzeige von
Text “
Text dennoch weiter im Display durch.
• Wenn das Radiosignal zu schwach ist,
wird der Text unter Umständen nicht
korrekt angezeigt.
” ausgeblendet wird, läuft der
Einstellen der
Einschalt-Timer
– Radio und Summer
Sie können einen Timer zum
Einschalten des Radios und einen
weiteren zum Auslösen eines
Summers einstellen, so dass Sie über
das Gerät zu einer voreingestellten
Zeit einen Alarm ausgeben lassen
können. Die Einschalt-Timer können
nur bei ausgeschaltetem Radio
eingestellt werden.
Einschalt-
Funktion
Einschalten
des Radios
Auslösen
eines
Summers
Zu drückende
Taste
STANDBY
STANDBY
Timer
Radio
Summer
Sie können den Radio- und den
Summer-Einschalt-Timer nach Bedarf
einstellen.
Das Einstellen von Stunden und
Minuten mit TUNE/TIME SET wird in
“So ändern Sie die Uhrzeitziffern”
unter “Einstellen der Uhr” erläutert.
Anzeige
RADIO
BUZZER
1Schalten Sie das Radio mit
OPERATION aus.
2Drücken Sie STANDBY
RADIO
oder STANDBY
mehr als 2 Sekunden lang.
“ ” oder “ ” und die Stundenanzeige
beginnen zu blinken.
BUZZER
3Stellen Sie durch Drehen von
TUNE/TIME SET die Stunde
ein, zu der der EinschaltTimer ausgelöst werden soll,
und drücken Sie dann
STANDBY
STANDBY
Die Minutenanzeige beginnt zu blinken.
RADIO
BUZZER
oder
.
4Stellen Sie durch Drehen von
TUNE/TIME SET die
Minuten ein und drücken Sie
STANDBY
STANDBY
“ ” oder “ ” leuchtet auf, die
eingestellte Zeit wird 2 Sekunden lang
angezeigt und der Radio-Einschalt-Timer
“
” oder der Summer-Einschalt-Timer
“
” wird aktiviert.
Der Radio-Einschalt-Timer “
das Radio zur eingestellten Zeit ein und
“
” erscheint. Nach 60 Minuten
schaltet sich das Radio automatisch aus.
Der Summer-Einschalt-Timer “
bewirkt, dass zur eingestellten Zeit 3
Minuten lang der Summer ertönt,
unabhängig davon, ob das Radio
eingeschaltet ist oder nicht. Wenn der
Summer-Einschalt-Timer “
eingeschaltetem Radio aktiviert wird,
schaltet sich das Radio aus und der
Summer ertönt. Sie können den Summer
mit jeder beliebigen Taste vor Ablauf von
3 Minuten ausschalten.
Wenn Sie den Radio-Einschalt-Timer
“
” oder den Summer-Einschalt-Timer
“
” eingestellt haben, wird jeden Tag
zur eingestellten Zeit das Radio
eingeschaltet bzw. der Summer ausgelöst.
Hinweise
•Wenn Sie nicht innerhalb von 65 Sekunden
STANDBY
TUNE/TIME SET betätigen, wird der
Einstellmodus für den Einschalt-Timer
beendet.
•Wenn Sie für den Radio-Einschalt-Timer
“
” und den Summer-Einschalt-Timer
“
” dieselbe Zeit einstellen, wird nur der
Radio-Einschalt-Timer “
Hinweis zum Radio-Einschalt-Timer
”
“
Wenn Sie das Radio nicht ausschalten, wird
der Einschalt-Timer “
Hinweis zum Summer-Einschalt-Timer
”
“
Die Lautstärke für den Summer ist festgelegt
und kann nicht mit VOL eingestellt werden.
RADIO
, STANDBY
RADIO
oder
BUZZER
.
” bei
BUZZER
” aktiviert.
” nicht aktiviert.
” schaltet
”
oder
Deaktivieren des EinschaltTimers
Drücken Sie STANDBY
STANDBY
“
Einschalt-Timer wieder zu aktivieren,
drücken Sie STANDBY
STANDBY
“
Sie STANDBY
BUZZER
BUZZER
” ausgeblendet wird. Um den
BUZZER
” wieder angezeigt wird. Drücken
nicht mehr als 2 Sekunden lang.
RADIO
, so dass “ ” bzw.
, so dass “ ” bzw.
RADIO
oder
RADIO
oder
bzw. STANDBY
Einstellen des SleepTimers
Mit dem Sleep-Timer können Sie beim
Einschlafen Radio hören. Das Radio
schaltet sich nach der voreingestellten
Anzahl an Minuten automatisch aus.
Sie können für den Sleep-Timer 15, 30,
45 oder 60 Minuten einstellen.
1Drücken Sie SLEEP.
Die Sleep-Timer-Einstellung “SLEEP 60”
wird angezeigt und “
Wenn Sie bei ausgeschaltetem Radio
SLEEP drücken, schaltet sich das Radio
ein.
” blinkt.
2Drücken Sie SLEEP
mehrmals, um die
gewünschte Einstellung für
den Sleep-Timer
auszuwählen, während
“ ” blinkt.
Mit jedem Tastendruck wechselt die
Anzeige folgendermaßen:
60 45 30 15
Nach etwa 3 Sekunden leuchtet “ ”
auf und der Sleep-Timer beginnt, die
Miunten herunterzuzählen.
So deaktivieren Sie den
Sleep-Timer
Schalten Sie mit OPERATION das
Radio aus, bevor die eingestellte
Anzahl an Minuten verstrichen ist,
und drücken Sie dann erneut
OPERATION, um das Radio
einzuschalten.
So ändern Sie die
Einstellung für den SleepTimer
Drücken Sie mehrmals SLEEP, um die
gewünschte Einstellung auszuwählen.
Dies ist auch möglich, wenn der
Sleep-Timer bereits aktiviert wurde.
 Loading...