

Page 1
3-048-384-22(1)
English
Español
FM/AM Radio
Operating Instructions
Manual de instrucciones
ICF-F1
Sony Corporation © 2000 Printed in China
LIMITED WARRANTY
(Portable Audio)
WARNING
To prevent fire or shock hazard, do not expose
the unit to rain or moisture.
To avoid electrical shock, do not open the
cabinet. Refer servicing to qualified personnel
only.
You are cautioned that any changes or
modifications not expressly approved in this
manual could void your authority to operate
this equipment.
Before You Begin
Thank you for choosing the Sony FM/AM
Radio! This unit will give you many hours of
reliable service and listening pleasure.
Before operating the unit, please read these
instructions thoroughly and retain them for
future reference.
Features
• Water-resistant: you can listen to the radio in
all weathers.
• Long battery life.
• Has a built-in carrying handle and folding
stand
• Easy to see backlit tuning display.
Precautions
• Operate the unit only on 4.5 V DC. For battery
operation, use three size C (R14) batteries. For
AC operation, use only the recommended AC
power adaptor.
• Avoid exposure to temperature extremes,direct
sunlight, moisture, sand, dust or mechanical
shock. Never leave in a car parked in the sun.
• Should any solid object or liquid fall into the
unit, disconnect the AC power adaptor and
remove the batteries, and have the unit
checked by qualified personnel before
operating it any further.
• In vehicles or in buildings, radio reception may
be difficult or noisy. Try listening near a
window.
• Since a strong magnet is used for the speaker,
keep personal credit cards using magnetic
coding or spring-wound watches away from
the unit to prevent possible damage from the
magnet.
• When the casing becomes soiled, clean it with a
soft cloth dampened with mild detergent
solution. Never use abrasive cleansers or
chemical solvents, as they may mar the casing.
Cautions on Water-resistance
This radio is designed so that it can be used with
slight exposure to rain, snow and other forms of
moisture, but there are several points on which
caution should be observed.
• Do not allow it to come in contact with large
amounts of water.
• Do not immerse it in water.
• If water should get on it or if it should fall into
water, take it out immediately and wipe it off
with a dry cloth. The interior of the battery
compartment has no water-resistance. The
batteries may corrode, so wipe out the
interior of the battery compartment as follows.
– Open or close the battery compartment with
dry hands in a place without exposure to any
water.
– Wipe off the batteries and the inside of the
battery compartment. Give special attention
to the contacts so that no water remains on
them.
• If water gets into the speaker, turn the case
upside down and remove all the water from it.
If you have any questions or problems
concerning your unit, please consult your nearest
Sony dealer.
Specifications
Frequency range:
FM : 87.5 - 108 MHz
AM : 530 - 1 710 kHz
Speaker
Approx. 10.0 cm (4 inches) dia., 8 Ω
Output
v (earphone) jack (ø 3.5 mm minijack)
Power output
250 mW (at 10 % harmonic distortion)
Power requirements
4.5V DC, three size C (R14) batteries
DC IN 4.5V jack accepts: Sony AC-E45HG AC
power adaptor (not supplied)
Dimensions
Approx. 130 × 237 × 71.5 mm (w/h/d)
1
/8 × 9 3/8 × 2 7/8 inches) incl.
(5
projecting parts and controls
Mass
Approx. 673.5 g (1 lb 8 oz) incl. batteries
Optional accessory
AC power Adaptor AC-E45HG*
* The voltage of power supply is different
depending on the country. Please buy an AC
power adaptor in the country where the radio is to
be used.
Your dealer may not handle the above listed
accessory. Please ask the dealer for detailed
information.
ADVERTENCIA
Para evitar descargas eléctricas o incendios, no
exponga la unidad a la lluvia ni a la humedad.
Para evitar descargas eléctricas, no abra la
unidad. En caso de avería, solicite los servicios
de personal cualificado.
Antes de comenzar
Muchas gracias por la adquisición de esta radio
de FM/AM Sony! Esta unidad le ofrecerá
muchas horas de servicio fiable y placer de
escucha.
Antes de utilizar la unidad, lea detenidamente
este manual de instrucciones, y consérvelo para
futuras referencias.
Características
• Resistente a las salpicaduras de agua: usted
podrá escuchar la radio independientemente
del clima.
• Duración larga de las pilas.
• Incorpora un asa de transporte y un soporte
plegable.
• Visualizador de sintonía con iluminación de
fondo fácil de ver.
Precautions
• Alimente la unidad solamente con 4,5 V CC.
Para alimentarla con pilas, utilice tres R14
(tamaño C). Para alimentarla con CA, utilice
solamente el adaptador de alimentación de CA
recomendado.
• Evite exponer la unidad a temperaturas
extremadas, la luz solar directa, la humedad, la
arena, el polvo, y los golpes. No la deje nunca
en el interior de un automóvil estacionado al sol.
• Si dentro de la unidad cae algún objeto sólido o
líquido, desconecte el adaptador de
alimentación de CA, extráigale las pilas, y haga
que sea revisada por personal cualificado antes
de seguir utilizándola.
• En vehículos o edificios, la radiorrecepción
puede resultar difícil o ruidosa. Pruebe a
escuchar cerca de una ventana.
• Como el altavoz utiliza un imán potente,
mantenga las tarjetas de crédito, que utilizan
codificación magnética, y los relojes de cuerda
alejados de la unidad para evitar los daños que
podría causar tal imán.
• Cuando la caja se ensucie, límpiela con un
paño ligeramente humedecido en una solución
muy diluida de detergente. No utilice nunca
limpiadores abrasivos ni disolventes químicos,
porque podría dañar el acabado.
Precauciones sobre la resistencia al
agua
Esta radio ha sido diseñada para poder utilizarse
exponiéndola ligeramente a la lluvia, la nieve, y
otras formas de humedad, pero hay varios
puntos que habrá que tener en cuenta.
• No permita que la radio entre en contacto con
gran cantidad de agua.
• No la sumerja en agua.
• Si cae al agua o ésta entra en ella, séquela
inmediatamente con un paño seco. El interior
del compartimiento de las pilas no es
resistente al agua. Las pilas podrían
corroerse, por lo que tendrá que secar el
compartimiento de las mismas de la forma
siguiente.
– Abra o cierre el compartimiento de las pilas
con las manos secas en un lugar que no
expuesto al agua.
– Seque las pilas y el interior de su
compartimiento. Preste especial atención a
los contactos para que no quede agua en
ellos.
• Si entra agua en el altavoz, dé la vuelta a la caja
y elimine completamente el agua.
Si tiene alguna pregunta o problema en relación
con esta unidad, consulte a su proveedor Sony.
Especificaciones
Gama de frecuencias
FM : 87,5 - 108 MHz
AM : 530 - 1 710 kHz
Altavoz
Aproximadamente 10,0 cm de diámetro, 8 Ω
Salida
Toma v (auricular) (ø 3,5 mm minitoma)
Salida de potencia
250 mW (al 10 % de distorsión armónica total)
Alimentación
4,5 V CC, tres pilas R14 (tamaño C)
la toma DV IN 4.5V acepta: Adaptador de
alimentación de CA AC-E45HG Sony (no
suministrado)
Dimensiones
Aproximadamente 130 x 237 x 71,5 mm
(am/al/prf), incluyendo partes y controles
salientes
Masa
Aproximadamente 673,5 g, incluyendo las pilas
Accesorio opcional
Adaptador de alimentación de CA AC-E45HG*
* La tensión de alimentación diferirá de acuerdo con
el país. Compre el adaptador de alimentación de
CA en el país en el que vaya a utilizar la radio.
Es posible que su proveedor no disponga del
accesorio indicado. Solicítele información
detallada.
Page 2
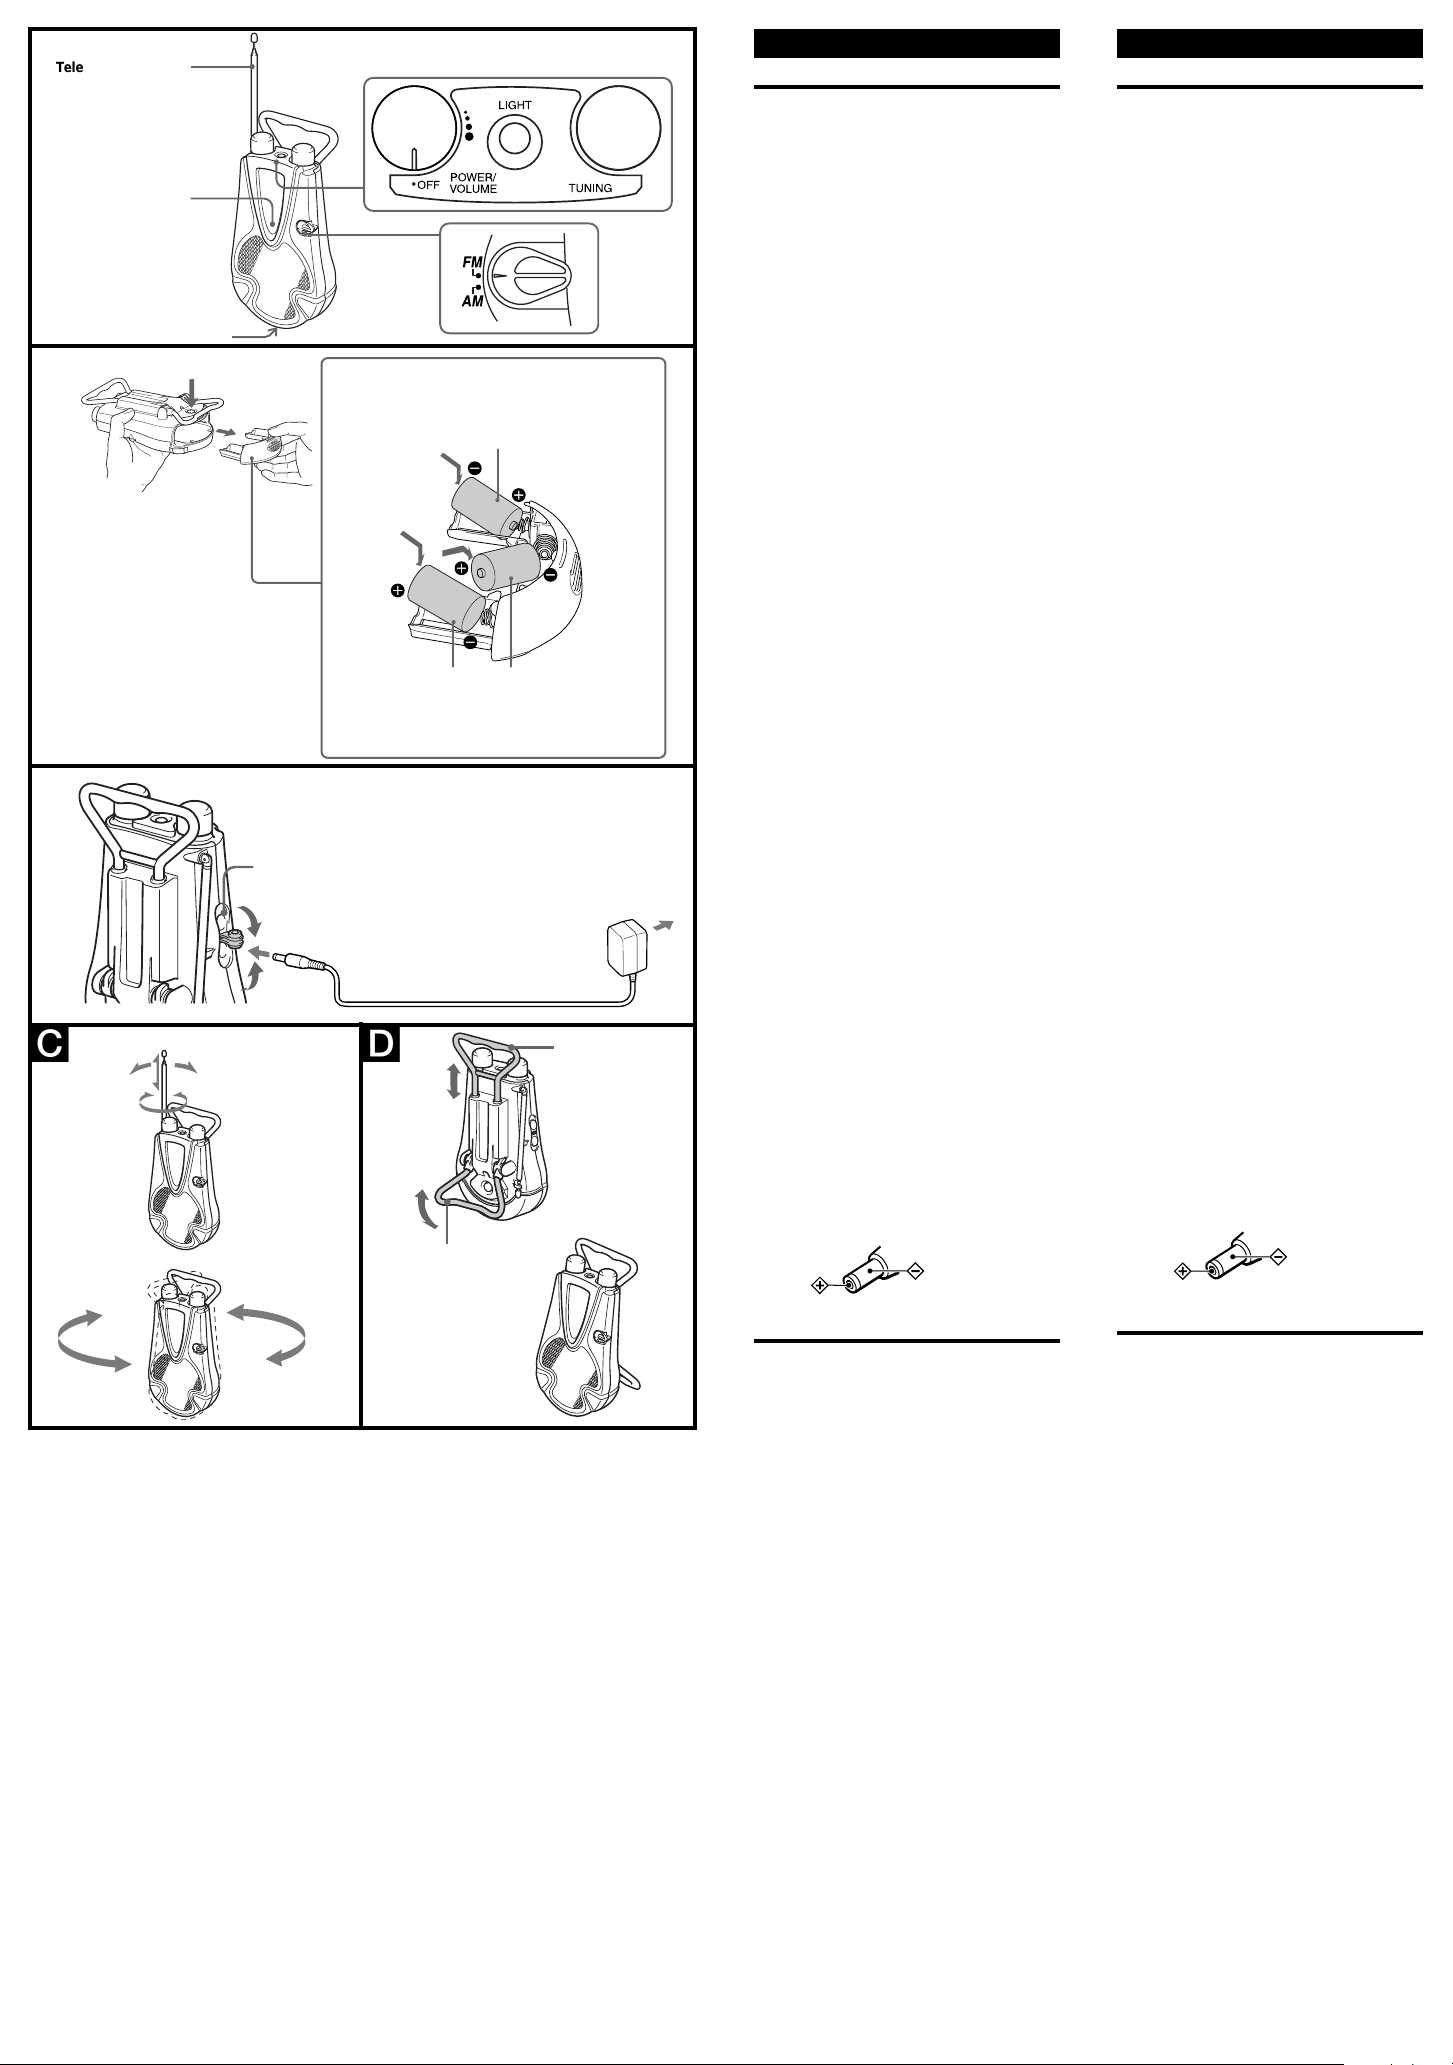
Telescopic antenna
Antena telescópica
TUNE indicator
Indicador TUNE
Battery compartment
Compartimiento de las pilas
A
Insert the 3 side of the battery first.
Inserte en primer lugar el lado 3 de la pila.
size C (R14) battry ×3
3 pilas R14 (tamaño C)
Insert the # side of the battery first.
Inserte en primer lugar el lado # de la pila.
B
v
DC IN 4.5 V
C D
FM
AM
AC power adaptor (not supplied)
Adaptador de alimentación de CA
(no suministrado)
Stand
Soporte
to a wall outlet
a un tomacorriente
de la red
Carrying handle
Asa de transporte
English
Choosing Power
Sources
Batteries (See fig. A)
Installing the batteries
Before installing the batteries, be sure to wipe off
drops of water on the unit.
1 Push the button on the rear of the unit
to release the battery compartment.
Always place or hold the unit with the
face down to prevent the battery
compartment from falling off the unit.
2 Pull the battery compartment out from
the unit on the bottom.
3 Insert three size C (R14) batteries (not
supplied) with correct polarity.
Push the center battery until the 3
electrode is all the way in.
4 Put the battery compartment in its
original position.
Note
• Please handle the batteries not to drop them.
When replacing old batteries with new ones,
pull the battery compartment out first as the
illustration shows.
Battery life
Using Sony size C (LR14) alkaline batteries:
Approx. 270 hours
Using Sony size C (R14) batteries:
Approx. 100 hours
Replacing batteries
When the sound becomes weak or distorted,
replace all batteries with new ones.
Notes on batteries
• Do not charge the dry batteries.
• Do not carry the dry batteries with coins or
other metallic objects. It can generate heat if
the positive and negative terminals of the
batteries are accidentally contacted by a
metallic object.
• When you are not going to use the unit for a
long time, remove the batteries to avoid
damage from battery leakage and corrosion.
• Do not use different types of batteries at the
same time.
• When you replace the batteries, replace all
with new ones.
House current (See fig. B)
Open the cover of the DC IN 4.5 V jack and connect
the AC power adaptor (not supplied) to the jack.
Plug the AC power adaptor into a wall outlet.
Notes on the AC power adaptor
• To prevent battery leakage, we recommend
removing the batteries when the receiver is
connected to a wall outlet.
• When the AC power adaptor (not supplied) is
not to be used for a long period of time, unplug
it both from the DC IN 4.5 V jack and from the
wall outlet.
• Use only the recommended AC power adaptor
(not supplied)*. Using any other AC power
adaptor may cause damage to the unit.
• When the cover of the DC IN 4.5V jack is open
(to use the AC power adaptor), the jack area is
not water-resistant. When the AC power
adaptor is not connected to the DC IN 4.5V
jack, be sure to close the cover of the DC IN
4.5V jack. If you do not close the cover, the unit
will not be water-resistant.
Polarity of the plug
* For details of the AC power adaptor (not
supplied), see “Specifications”.
Español
Elección de la fuente de
alimentación
Pilas (Consulte la fig. A)
Instalación de las pilas
Antes de instalar las pilas, cerciórese de secar las
gotas de agua de la unidad.
1 Presione el botón de la parte posterior de la
unidad para liberar el compartimiento de las
pilas.
Coloque siempre la unidad encarada hacia abajo
para evitar que caiga el compartimiento de las
pilas.
2 Extraiga el compartimiento de las pilas de la
parte inferior de la unidad.
3 Inserte tres pilas R14 (tamaño C) (no
suministradas) con la polaridad correcta. Empuje
el centro de la pila hasta que el electrodo 3 se
inserte completamente.
4 Coloque el compartimiento de las pilas en su
posición original.
Nota
• Maneje las pilas de forma que no se caigan.
Para reemplazar las pilas por otras nuevas, tire en
primer lugar del corte del compartimiento de las
mismas como se muestra en la ilustración.
Duración de las pilas
Utilizando pilas alcalinas LR14 (tamaño C) Sony:
Aproximadamente 270 horas
Utilizando pilas R14 (tamaño C) Sony:
Aproximadamente 100 horas
Reemplazo de las pilas
Cuando el sonido se vuelva débil o distorsionado,
reemplace las pilas por otras nuevas.
Notas sobre las pilas
• No cargue las pilas.
• No lleve las pilas con monedas ni otros objetos
metálicos. Si los terminales positivos y negativos
de las pilas se pusiesen accidentalmente en
contacto con un objeto metálico, se produciría
calor.
• Cuando no vaya a utilizar la unidad durante
mucho tiempo, extráigale las pilas para evitar los
daños que podría producir el electrólito de las
mismas en caso de fugarse.
• No utilice al mismo tiempo pilas de tipos
diferentes.
• Cuando tenga que reemplazar las pilas,
reemplácelas todas por otras nuevas.
Corriente de la red
(Consulte la fig. B)
Abra la tapa de la toma DC IN 4.5 V y conecte un
adaptador de alimentación de CA (no suministrado) en
dicha toma. Enchufe el adaptador de alimentación de
CA en un tomacorriente de la red.
Notas sobre el adaptador de
alimentación de CA
• Para evitar la fuga del electrólito de las pilas, le
recomendamos que extraiga éstas cuando conecte
la unidad a un tomacorriente de la red.
• Cuando no vaya a utilizar el adaptador de
alimentación de CA (no suministrado) durante
mucho tiempo, desconéctelo de la toma DC IN 4.5
V y del tomacorriente de la red.
• Utilice solamente el adaptador de alimentación de
CA recomendado (no suministrado)*. La
utilización de otro adaptador de alimentación de
CA podría dañar la unidad.
• Cuando abra la tapa de la toma DC IN 4.5V (para
utilizar el adaptador de alimentación de CA), la
zona de la toma no será resistente a las
salpicaduras de agua. Cuando el adaptador de
alimentación de CA no esté conectado a la toma
DC IN 4.5V, cerciórese de cerrar la tapa de la
misma. Si no la cerrarse, la unidad no sería
resistente a las salpicaduras de agua.
Polaridad de la clavija
* Con respecto a los detalles sobre el adaptador de
alimentación de CA (no suministrado), consulte
“Especificaciones”.
Playing the Radio
1 Turn up POWER/VOLUME to turn
power on and adjust the volume.
2 Select a desired band.
3 Tune in to a station using TUNING.
The TUNE indicator lights up when a
station is tuned in.
To turn off the radio
To turn the power off, turn POWER/VOLUME all
the way down to OFF where it clicks.
To listen with an earphone
(not supplied) (See fig. B)
Open the cover of the v (earphone) jack.
Connect the earphone to the v (earphone) jack.
The speaker is deactivated when an earphone is
connected.
Note
• When the earphone is not connected to the v
(earphone) jack, be sure to close the cover of
the v jack. If you do not close the cover, the
unit will not be water-resistant.
To turn on the backlight
Press LIGHT on the top of the unit to turn on the
backlight. The light will automatically turn off
after a while.
To improve reception (See fig. C)
FM: Extend the telescopic antenna and adjust the
angle for optimum reception.
AM:Rotate the unit horizontally for optimum
reception. A ferrite bar antenna is built into
the unit.
To use the stand (See fig. D)
To support the unit, unfold the stand until it stops.
To use the carrying handle (See fig. D)
To carry the unit, pull out the carrying handle.
Note
• When carrying the radio, do not hold it by the
POWER/VOLUME or TUNING knob. Holding
it in that manner is dangerous because it may
cause the case to fall.
Radiorrecepción
1 Gire POWER/VOLUME hacia arriba para
conectar la alimentación y ajustar el volumen.
2 Seleccione la banda deseada.
3 Sintonice la emisora deseada utilizando
TUNING.
Cuando sintonice una emisora, se encenderá el
indicador TUNE.
Para desconectar la alimentación de la radio
Para desconectar la alimentación, gire
completamente hacia abajo POWER/VOLUME hacia
OFF hasta que chasquee.
Para escuchar con un auricular
(no sumministrado) (Consulte la fig. B)
Abra la tapa de la toma v (auricular).
Conecte el auricular a la toma v (auricular).
Cuando conecte el auricular, el altavoz se desactivará.
Nota
• Cuando no haya conectado un auricular a la toma
v (auricular), cerciórese de cerrar la tapa de dicha
toma. Si no cerrarse esta tapa, la unidad no sería
resistente a las salpicaduras de agua.
Para activar la iluminación de fondo
Para activar la iluminación de fondo, presione LIGHT
de la parte superior de la unidad. La iluminación se
desactivará automáticamente después de un
momento.
Para mejorar la recepción (Consulte la fig. C)
FM: Extienda la antena telescópica y ajuste al ángulo
de la misma hasta obtener la mejor recepción
posible.
AM:
Gire horizontalmente la unidad hasta
obtener la óptima recepción. La unidad
tiene incorporada una antena de barra de ferrita.
Para utilizar el soporte (Consulte la fig. D)
Para apoyar la unidad, despliegue el soporte hasta
que se pare.
Para utilizar el asa de transporte (Consulte la fig. D)
Para transportar la unidad, tire hacia fuera del asa de
transporte.
Nota
• Cuando transporte la radio, no la sujete por el
mando POWER/VOLUME ni TUNING.El sujetarla
de tal forma podría resultar peligroso porque la
caja podría caerse.
 Loading...