

Page 1

FM/AM
Clock Radio
4-154-584-11(2)
Operating Instructions
ICF-CL75iP/ICF-CL70
©2009 Sony Corporation
US
Page 2

Owner’s Record
The model number and the serial number are located
on the bottom.
Record the serial number in the space provided below.
Refer to them whenever you call upon your Sony
dealer regarding this product.
The nameplate and important information concerning
safety are located on the bottom exterior.
CAUTION
Danger of explosion if battery is incorrectly replaced.
Replace only with the same type.
Model No. ICF-CL75iP/ICF-CL70
Serial No. ________________________________
For customers who purchased this product in the
USA
Please register this product on line at
http://www.sony.com/productregistration.
Proper registration will enable us to send you
periodic mailings about new products, services,
and other important announcements. Registering
your product will also allow us to contact you in
the unlikely event that the product needs
adjustment or modification. Thank you.
WARNING
To reduce the risk of fire or electric
shock, do not expose this apparatus to
rain or moisture.
To reduce the risk of fire, do not cover the ventilation
of the apparatus with newspapers, tablecloths , curtains,
etc. And do not place lighted candles on the apparatus.
To reduce the risk of fire or electric shock, do not
expose this apparatus to dripping or splashing, and do
not place objects filled with liquids, such as vases, on
the apparatus.
As the main plug i s used to disconnect the unit from th e
mains, connect the unit to an easily accessible AC
outlet. Should you notice an abnormality in the unit,
disconnect the main plug from the AC outlet
immediately.
The unit is not disconne cted from the AC power source
(mains) as long as it is connected to the wall outlet,
even if the unit itself has been turned off.
Do not install the appliance in a confined space, such
as a bookcase or built-in cabinet.
Do not expose the batteries (battery pack or batteries
installed) to excessive heat such as sunshine, fire or the
like for a long time.
You are cautioned that any changes or modifications
not expressly approved in this manual could void your
authority to operate this equipment.
NOTE
This equipment has been tested and found to comply
with the limits for a Class B digital device, pursuant to
Part 15 of the FCC Rules. These limits are designed to
provide reasonable protection against harmful
interference in a residential installation. This
equipment generates, uses and can radiate radio
frequency energy and, if not installed and used in
accordance with the instructions, may cause harmful
interference to radio communications. However, there
is no guarantee that interference will not occur in a
particular installation. If this equipment does cause
harmful interference to radio or television reception,
which can be determined by turning the equipment off
and on, the user is encouraged to try to correct the
interference by one or more of the following measures:
– Reorient or relocate the receiving antenna.
– Increase the separ ation between the equipment and
receiver.
– Connect the equipment into an outlet on a circuit
different from that to which the receiver is
connected.
– Consult the dealer or an experienced radio/TV
technician for help.
WARNING
• Replace the battery for the clock backup with a Sony
CR2032 lithium battery. Use of another battery may
present a risk of fire or explosion.
• Battery may explode if mistreated. Do not recharge,
disassemble or dispose of in fire.
• Dispose of used battery promptly. Keep away from
children.
US
2
Page 3

Important Safety Instructions
1) Read these instructions.
2) Keep these instructions.
3) Heed all warnings.
4) Follow all instructions.
5) Do not use this apparatus near water.
6) Clean only with dry cloth.
7) Do not block any ventilation openings.
Install in accordance with the manufacturer’s
instructions.
8) Do not install near any heat sources such as
radiators, heat registers, stoves, or other apparatus
(including amplifiers) that produce heat.
9) Do not defeat the safety purpose of th e polarized or
grounding-type plug. A polarized plug has two
blades with one wider than the other. A grounding
type plug has two blades and a third grounding
prong. The wide blade or the third prong are
provided for your safety.
If the provided plug does not fit into your outlet,
consult an electrician for replacement of the
obsolete outlet.
10) Protect the power cord from being walked on or
pinched particularly at plugs, convenience
receptacles, and the point where they exit from the
apparatus.
11) Only use attachments/accessories specified by the
manufacturer.
12) Use only with the cart, stand, tripod, bracket, or
table specified by the manufacturer, or sold with
the apparatus. When a cart is used, use caution
when moving the cart/apparatus combination to
avoid injury from tip-over.
Notes on LCD screen
• The displayed image on the screen is not identical in
picture quality and colors with the printed image
because phosphor methods or profiles differ. Please
regard the displayed image as just a reference.
• Do not press against the LCD screen. The screen may
be discolored and that may cause a malfunction.
• Exposing the LCD screen to direct sunlight for long
periods may cause malfunctions.
• The LCD screen is manufactured using extremely
high-precision technology, so over 99.99% of the
pixels are operational for effective use. However,
there may be some tiny black points and/or bright
points (white, red, blue or green in color) that
constantly appear on the LCD screen. These points
are normal in the manufacturing process and do not
affect the printing in any way.
• Images may trail across on the LCD screen in a cold
location. This is not a malfunction.
US
13) Unplug this apparatus during lightning storms or
when unused for long periods of time.
14) Refer all servicing to qualified service personnel.
Servicing is required when the apparatus has been
damaged in any way, such as power-supply cord or
plug is damaged, liquid has been spilled or objects
have fallen into the apparatus, the apparatus has
been exposed to rain or moisture, does not operate
normally, or has been dropped.
For the state of california, USA only
Perchlorate Material –special handling may apply, See
www.dtsc.ca.gov/hazardouswaste/perchlorate
Perchlorate Material: Lithium battery contains
perchlorate.
US
3
Page 4

About this Operating
Instructions
• The example illustrations and images are of
the ICF-CL75iP, therefore may appear
different from illustrations, images and screen
indicators that actually appear on your clock
radio.
• “Note” indicates cautions and limitations
relevant to the correct operation of this unit.
• “Tip” indicates information that is useful to
know.
• The figures in parentheses indicate the
reference page for details on operation.
• The language used for on-screen displays are
English for all countries and regions.
• In this Operating Instructions, iPod is used as
a general reference to iPod functions on iPod
or iPhone, unless otherwise specified by the
text or illustrations (ICF-CL75iP only).
• Design and specifications of this unit and
accessories are subject to change without
notice.
US
4
Page 5

Table of Contents
Features............................................ 6
Identifying the parts ........................ 8
Screen indicators .......................................10
Getting started
Checking the supplied items........ 11
Connecting the AM antenna and
AC power cord (mains lead) ... 11
Setting the clock............................ 12
Using this unit
Basic operations............................ 14
Home and Option menu ............................14
Adjusting the volume ................................14
Adjusting the brightness............................14
Changing the clock display type ...............15
Listening to the radio.................... 15
Presetting a station.....................................15
Using the timer function ............... 16
Setting an alarm.........................................16
Fun Wake-up .............................................18
Using the sleep timer.................................19
Enjoying music, video and
photos....................................... 19
Importing files...........................................19
Playing back music, video and setting the
background photo (wallpaper) ........... 20
Using iPod & iPhone functions
(For ICF-CL75iP only) .............. 21
Compatible iPod models ...........................21
Playing iPod ..............................................22
Additional information
General Settings............................ 24
Troubleshooting ............................ 25
About the memory cards .............. 26
“Memory Stick” media..............................26
SD memory card........................................28
Precautions.................................... 29
Specifications ................................ 31
US
5
Page 6
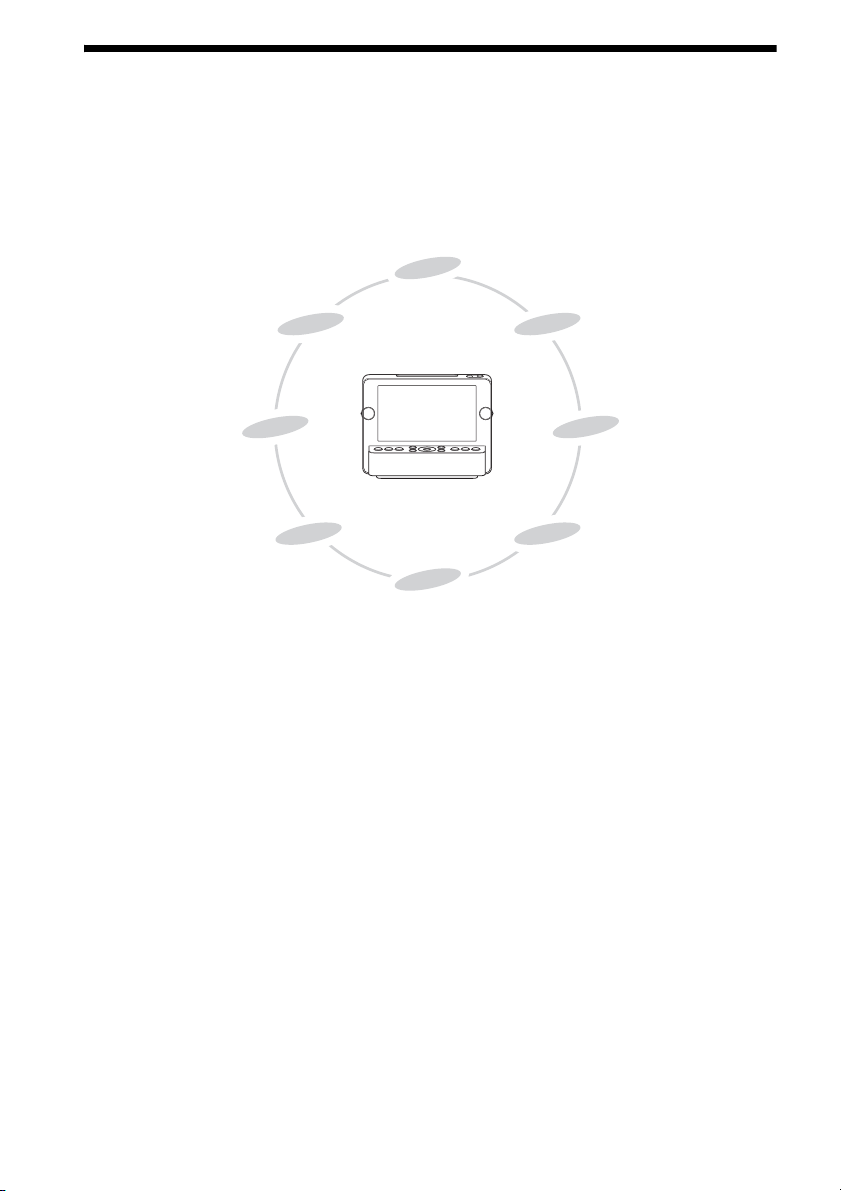
Features
This unit is multifunctional FM/AM clock radio with 7.0 inch LCD screen. As well as playing your
favorite music and video, you can also set a photo as wallpaper, etc. You can listen to your favorite
music, watch a video or view a slideshow at bed time and set your favorite alarm sound for when you
wake up.
Furthermore, when you insert iPod into the docking tray, you can operate iPod via this unit or iPod
directly (ICF-CL75iP only).
Clock
Music
Video
Background photos
(Wallpaper)
iPod & iPhone
Radio
Alarm
Sleep
Operability (8, 16)
• Various useful functions available in the 7.0 inch LCD screen.
• Easy to turn on or off by pressing the ALARM button.
• Quick and easy alarm time setting using the TIME SET lever.
Screen-display (10, 14)
• LCD screen allows you to check the clock easily.
• The brightness of night mode shifts to sleep mode automatically to coincide with your bed time.
• Triple time display allows you to view your current time and 2 alarm times, at a glance.
US
6
Page 7

Playback function (19, 20)
• iPod, iPhone, memory card, internal memory, or USB device can be used to play back music and
video (iPod and iPhone functions only for ICF-CL75iP).
• You can listen to music with album artwork on the screen.
• 1 W × 1 W front speakers can be used to listen to sounds.
• You can save contents into the 1 GB internal memory.
Note
• You cannot display the album artwork of iPod or iPhone on this unit.
• You cannot display the cover photo for WMA content.
Background photos (20)
• Photos can be displayed as wallpaper on the screen, similar to a photo frame.
• Photo images can be played back as a slideshow.
Alarm/Sleep timer function (16)
• Using Fun Wake-up, you can wake up to your favorite recorded voice and photo.
• Nature Sound for relaxed listening and a good night’s sleep.
iPod & iPhone function (ICF-CL75iP only) (21)
• You can operate iPod or iPhone connected to the dock, and the connected iPod or iPhone will be
charged automatically.
• You can enjoy iPod or iPhone music and iPod or iPhone video by connecting to this unit.
US
7
Page 8

Identifying the parts
For details, see the pages indicated in parentheses.
Front
A LCD screen
B ALARM A ON/OFF button (16)
Rear
E AC power cord (mains lead) (11)
F USB connector (19)
G FM wire antenna (16)
C Speaker
D ALARM B ON/OFF button (16)
H AM ANTENNA terminals (11)
I PRO/SD/MMC (Multi card slot) (19,
26)
J Battery holder (29)
US
8
Page 9
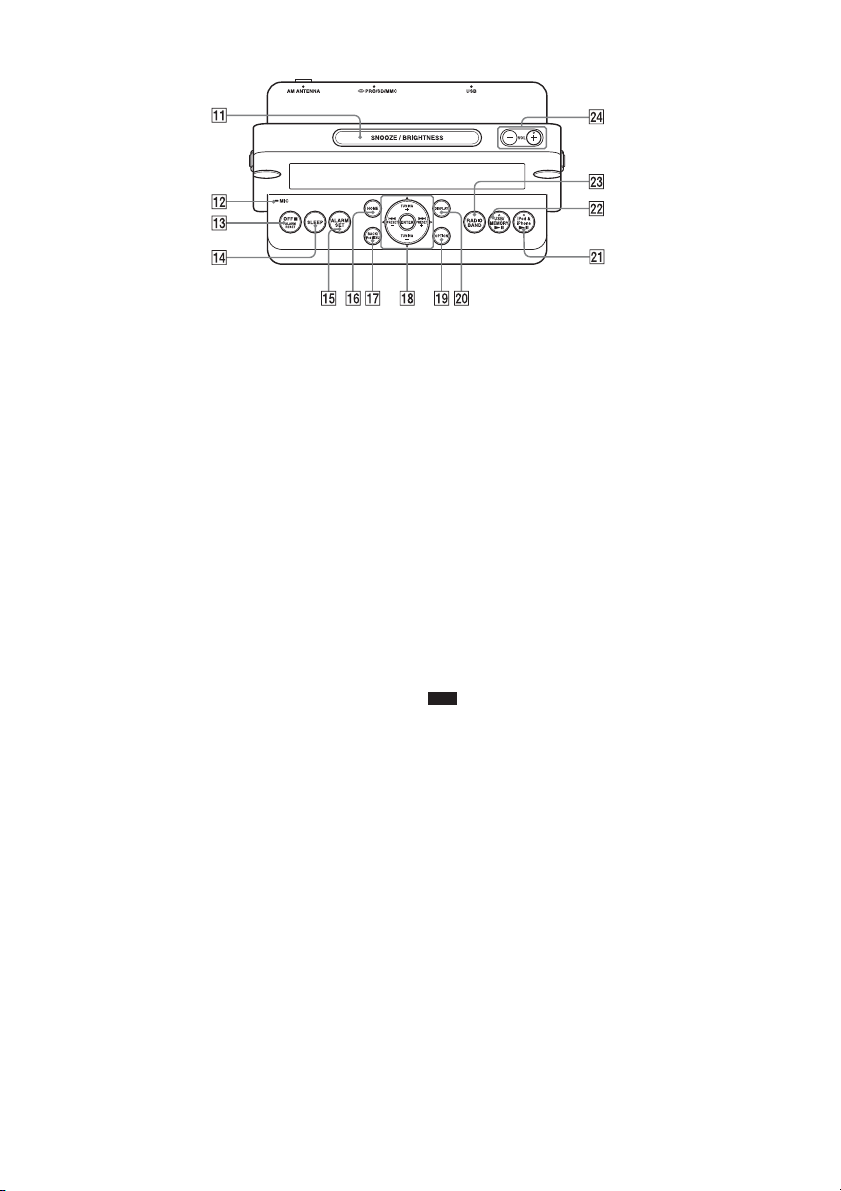
Top
K SNOOZE/BRIGHTNESS button (14, 17)
L Microphone (18)
M OFF x ALARM RESET button
N SLEEP button (19)
O ALARM SET button (16)
P HOME button (14)
Q BACK/iPod MENU button (ICF-CL75iP)/
BACK button (ICF-CL70)
• Return to the previous menu screen.
R Control button
• ENTER: You can select and fix menu items or
setting values.
• TUNING+/v (Up): You can set the tuning to
plus and tune into a station by its frequency. You
can select the relevant menu items.
• TUNING–/V (Down): You can set the tuning
to minus and t une into a station by its fr equency.
You can select the relevant menu items.
• . PRESET–/b (Left): You can set the
tuning to plus and tune into a station by its
preset. You can select the relevant menu items.
Press and hold to rewind.
• > PRESET+/B (Right): You can set the
tuning to minus and tune into a station by its
preset. You can select the relevant menu items.
Press and hold to fast forward.
• Operation procedure indicates with v/V/b/B
on the control button in this manual.
S OPTION button (14)
T DISPLAY button (15)
U iPod & iPhone u button (ICF-CL75iP)/
USB/MEMORY u button (ICF-CL70)
(23)
V USB/MEMORY u button (ICF-
CL75iP)/BAND button (ICF-CL70) (21)
W RADIO BAND button (ICF-CL75iP)/
RADIO button (ICF-CL70) (15)
X VOL+/VOL– button (14)
Note
• The iPod & iPhone u button (ICF-CL75iP)/ USB/
MEMORY u button (ICF-CL70) U, the USB/
MEMORY u button (ICF-CL75iP) V and the
VOL+ button X have a tactile dot.
US
9
Page 10
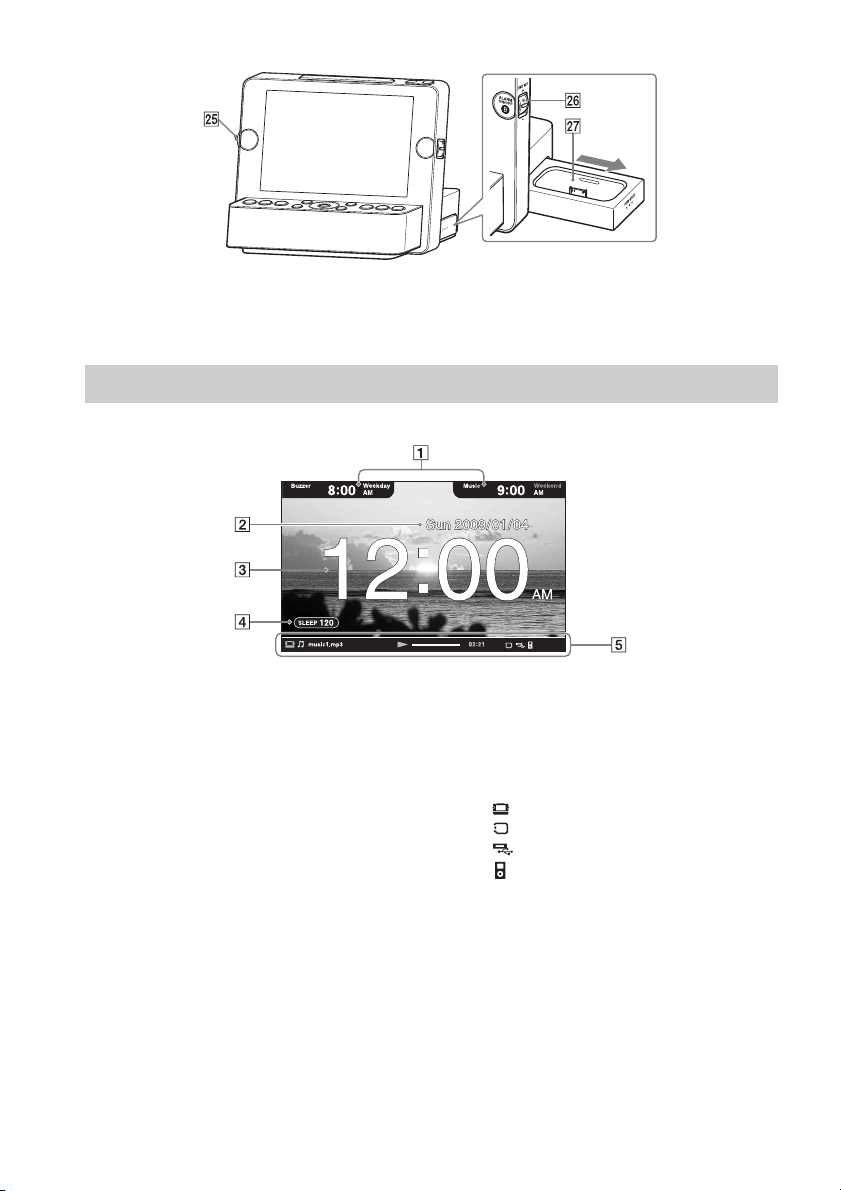
Side
Y TIME SET A lever (16)
Z TIME SET B lever (16)
Screen indicators
A Alarm A/Alarm B indicator (16)
B Date (13)
C Time (13)
• Time is always displayed.
wj Docking tray for iPod & iPhone (22)
(ICF-CL75iP only)
D SLEEP timer indicator (19)
E Status bar
• Displays the file name, the source, and elapsed
time of the music or movie playing.
• Memory icon indicates as follows:
: Internal memory
: Memory card
: USB device
: iPod (ICF-CL75iP only)
10
US
Page 11

p
Getting started
Checking the supplied items
Make sure that the following items are supplied:
• FM/AM Clock Radio (1)
• AM loop antenna (1)
• Operating Instructions (this manual) (1)
• Warranty (1) (In some countries or regions, the
warranty is not supplied.)
• Universal dock adaptor for iPhone (1) / iPhone
3G (1) (ICF-CL75iP only)
• Sony CR2032 lithium battery (1) (In some
countries or regions, the lithium battery is
already set in the unit.)
Connecting the AM antenna and AC power cord (mains lead)
3 Connect the cords to the AM antenna
terminals.
Push down and hold
the terminal clamp
and insert the cord.
• Cord (A) or cord (B) can be connected to
either terminal.
4 Make sure the AM loop antenna is
connected firmly by pulling gently.
Note
• Do not place the AM loop antenna near the unit or
other AV equipment, as noise may result.
• The sha pe and the length of the antenna is designed to
receive AM signals. Do not dismantle or roll up the
antenna.
Ti
• See page 16 about determining the place for the
antenna and its orientation for good reception.
Getting started
1 Remove only the loop part from the
plastic stand.
2 Set up the AM loop antenna.
5 Connect the AC power cord to the wall
outlet (wall socket).
• The clock screen in the default setting
appears.
11
US
Page 12

Note
p
• The unit’s ATS (Automatic Time Set) function
automatically keeps the correct time and never
requires resetting. In some countries or regions, ATS
(Automatic Time Set) function is not available.
• You can use this unit and the AC power cord (mains
lead) in any country or region where the power supply
is within 100 V to 240 V AC, 50 Hz/60 Hz.
Ti
Getting started
• You may change the time zone in some countries or
regions. For details on setting the time zone, refer to
“Time zone.”
• Though the clock is correctly set at the factory,
discrepancies may arise dur ing transport or storage. If
necessary, set the clock to the correct time by
referring to “Setting the clock.”
• For details on setting language, refer to “General
Settings” (24).
To deactivate the Demo mode
When you connect the power cord to a wall
outlet (wall socket), the demo mode will start
automatically 5 seconds later.
If you want to deactivate the demo mode, press
the HOME button to select [General Settings],
then select [Video Setting], [Demo mode] and
[OFF].
Note
• If you do not operate the unit for about 1 minute, the
demo mode will start automatically, except when
playing back music and video.
Setting the clock
This unit automatically sets the date and time. If
this unit is initialized, you will need to set the
clock manually.
1 Press the HOME button.
2 Select [Clock Settings] and press the
ENTER button.
3 Select each of the settings as follows:
x Time zone
Set your local area with v/V.
For the USA and Canada
Atlantic Standard Time
Eastern Standard Time
Central Standard Time
Mountain Standard Time
Pacific Standard Time
Yukon Standard Time
Hawaiian Standard Time
For Europe
Western European Time
Central European Time
Eastern European Time
* Factory default setting
** For the United Kingdom, the time zone is fixed.
Note
• When [Auto DST] (Auto Summer Time) is set to on,
the clock advances 1 hour.
• In some countries or regions, [Time zone] is not
available.
*
**
*
US
12
Page 13

x Auto DST (Auto Summer Time)
p
This unit automatically adjusts for daylight
savings time (summer time) by the default
setting. [ ] is displayed from the beginning of
daylight savings time (summer time) and
disappears at the end of daylight savings time
(summer time) automatically.
Note
• In some country or region, [Auto DST] (Auto
Summer Time) is not available.
• Displayed menu item differs depending on the
country or region.
• You can be set [Auto DST] (Auto Summer Time)
manually as necessary. Customers living in a country
or region that does not use daylight savings time
(summer time) must cancel [Auto DST] (Auto
Summer Time) before using the unit.
x Date/Time
Adjust the date and time display manually with
v/V/b/B.
• b/B: Select the date and time.
v/V: Adjust the date and time.
Note
• This unit displays “Year/Month/Date” and 12H time
format in the USA, Canada and the United Kingdom,
and “Date/Month/Year” and 24H time format in
Europe.
Ti
• You can set the range of year from 2009 to 2099.
Getting started
4 Press the ENTER button.
• The desired settings are made.
13
US
Page 14

p
Using this unit
Basic operations
This section describes basic operations of the
unit.
Home and Option menu
Using the Home menu
You can perform the various functions, such as
playing music, changing a settings, etc., easily
by pressing the HOME button.
x Home menu list
For details, see the pages indicated in parentheses.
Music (20)
Video (20)
Background Photos (20)
Radio (15)
iPod & iPhone
Import (19)
Fun Wake-up (18)
Alarm Settings (16)
Clock Settings (12)
General Settings (24)
* [iPod & iPhone] is available on ICF-CL75iP only.
*
(21)
Using the Option menu
This function is useful for changing the current
setting easily while using any function by
pressing the OPTION button.
x Option menu list
Set preset/Delete preset (15)
Select background photo (21)
Begin slide show/Stop slide show (21)
Select music (20)
Select video (20)
Set current device to Alarm (A/B) (17)
Adjusting the volume
You can adjust the volume level from 0 to 30
using the VOL+ or VOL– buttons.
Adjusting the brightness
The brightness level is changed by pressing the
SNOOZE/BRIGHTNESS button repeatedly.
High (default) Middle Low
(Press the OFF x
ALARM RESET
button)
Ti
• When night mod e is set with no operation on this unit,
the night mode is switches to the sleep mode 5
seconds later. If you want to return the clock screen,
press the SNOOZE/BRIGHTNESS button (High
brightness) or press the OFF x ALARM RESET
button (Night brightness).
• When the sleep mode is activated, the current photo
disappears and the background photo (wallpaper) is
black.
Night mode
5 sec.
Sleep mode
US
14
Page 15

p
Changing the clock display type
Listening to the radio
The clock display has four variations. You can
select the clock screen, the clock and photo
screen, the photo frame, or the music or radio
player screen.
1 Press the DISPLAY button repeatedly.
• Changes the clock display type cycles as
shown below.
Note
• You can select the music or radio player screen
display type, while playing the radio or music.
1 Press the RADIO BAND button (ICF-
CL75iP) or the RADIO button (ICFCL70) to turn on the radio.
• Displays the radio screen.
2 Press the RADIO BAND button (ICF-
CL75iP) or the BAND button (ICF-CL70)
and select the FM/AM band.
3 Select a frequency with v/V.
4 To turn off the radio, press the OFF x
ALARM RESET button.
• Returns to the clock screen.
Note
• Radio frequency range differs depending on the
country or region. Make sure to match your current
location before using the radio. For details on the
frequency range, refer to “Specifications” (31).
Presetting a station
1 Follow steps 1 to 3 in “Listening to the
radio” above to select the desired radio
station.
2 Press the OPTION button and select
[Set preset].
• Confirmation screen appears, the station
is stored into the new preset.
Note
• This unit stores stations in the order they are preset.
• The radio presetting data will not be lost by
disconnecting the AC power supply.
Ti
• v : Scans upward through the frequency bands.
V : Scans downwards through the frequency bands.
• Scanning starts from the currently tuned frequency.
When the frequency is received, scanning stops.
• To search for a preset number, you press b/B untile
the desired preset number appears.
• You can preset 20 FM stations and 10 AM stations
manually.
• If the preset number becomes full, delete the
unnecessary preset.
Using this unit
US
15
Page 16

Deleting a preset
p
p
1 Select the desired preset number with
b/B.
2 Press the OPTION button and select
[Delete preset].
• Confirmation screen appears, the selected
preset is deleted.
Improving the reception
FM: Extend the FM wire antenna fully to
increase reception sensitivity.
AM: Connect the supplied AM loop antenna to
the unit. Rotate the antenna horizontally
for optimum reception.
Note
• Keep digital music players or mobile phones away
from the AM loop antenna or the FM antenna, as this
may lead to reception interference.
• When you are listening to the radio with iPod
connected to the unit or while charging iPod,
interference with radio reception may occur (ICFCL75iP only).
Ti
• If the FM radio is noisy, press the HOME button to
select [General Settings], then select [Radio Setting]
and [Mono]. The radio becomes clearer although the
sound becomes monaural.
Using the timer function
The dual alarm function allows you to use two
individually set alarms. For each alarm, you can
set a favorite sound, or use an originally
recorded sound with a selected photo display.
Setting an alarm
1 Press the ALARM SET button.
• Displays [Alarm Settings] screen.
2 Select [Alarm A] or [Alarm B] and press
the ENTER button.
3 Set each of the settings as follows:
Note
• You can also pres s the HOME button to select [Alarm
Settings].
x Alarm A/Alarm B
Turn the alarm [ON] or [OFF]
* Factory default setting
Note
• You can also turn the alarm on or off by pressing the
ALARM A ON/OFF or ALARM B ON/OFF button.
x Alarm Time
Set the alarm time with v/V/b/B.
Note
• You can also change the alarm time setting by turning
the TIME SET A or TIME SET B lever.
Ti
• To increase or decrease the alarm time, push the lever
up or down to increase or decrease the alarm time by
1 minute-increments. If you continuously hold the
lever, the alarm time increases or decreases by 10
minute-increments.
*
with v/V.
US
16
Page 17

x Alarm Sound
p
p
Select your favorite alarm sound with v/V. This
unit is equipped with 7 alarm modes listed
below.
FM Radio Sets the preset FM station.
AM Radio Sets the preset AM station.
Buzzer Sets the buzzer.
Music Sets the desired music.
*
Nature Sound
**
iPod
Fun Wake-up Sets your original voice and
* Factory default setting
** [iPod] is available on ICF-CL75iP only.
Ti
• To set the current sound, press the OPTION button to
select [Set current device to Alarm (A)] or [Set
current device to Alarm (B)].
Sets 5 types of nature sounds preinstalled in the internal memory
on this unit.
Sets the iPod music.
photo (18).
x Alarm Volume
Adjust the volume level from 0 to 30 with v/V.
The factory default setting is set to 8.
Note
• You cannot adjust the volume for buzzer.
x Alarm Date
Select the alarm date with v/V.
Everyday Alarm sounds everyday.
*
Weekday
Weekend Alarm sounds Saturday or
* Factory default setting
Alarm sounds Monday to Friday.
Sunday.
Deactivating the alarm setting
Press the OFF x ALARM RESET button to
deactivate the alarm. The alarm will sound again
at the same time the next day.
Note
• When the alarm sounds, the original alarm screen
appears except [Fun Wake-up] alarm screen.
• For details on what to do in the event of a power
interruption, see page 30.
• If an alarm time comes while files are being
transferred, the alarm will sound after the transfer is
finished.
Using the snooze function
You can doze for a few more minutes by using
the snooze function. Each time you can change
the snooze time by pressing the SNOOZE/
BRIGHTNESS button.
Alarm
sounds
Note
• The maximum snooze time is 60 minutes.
Ti
• To stop the snooze function, press the OFF x
ALARM RESET button.
10 6020 30 40 50
Using this unit
4 Press the ENTER button.
• The desired settings are made.
17
US
Page 18

Fun Wake-up
You can wake up by your original voice and a
photo as an alarm. If you want to set an alarm to
“Fun Wake-up”, refer to “Setting an alarm” on
page 16.
Good morning!
12:00AM
1 Press the HOME button.
2 Select [Fun Wake-up].
3 Select the desired , , N setting
from [Fun-Wake up 1] to [Fun-Wake up
3] with b/B.
4 Set each of the settings as follows:
x To select a photo
A Select and press the ENTER
button.
• Confirmation screen appears.
B Select the desired media with b/B and
press the ENTER button.
C Select the desired photo from the
thumbnail with v/V/b/B and press the
ENTER button.
• Selected photo appears in full screen.
D Select the desired photo by pressing b/
B and press the ENTER button.
• Confirmation screen appears.
E Select [Yes] with b/B and press the
ENTER button.
• The selected photo is set as the
background photo (wallpaper).
x To record voice
A Select and press the ENTER button.
• Confirmation screen appears.
B Select [Yes] with b/B and press the
ENTER button.
• When recording starts, record into the
microphone.
Note
• Maximum recording time is 10 seconds. If you want
to stop during recording, select x.
• If you want to confirm the recorded voice, select N
and press the ENTER button.
18
US
Page 19

p
Using the sleep timer
Enjoying music, video
You can easily set the sleep timer by pressing
the SLEEP button repeatedly.
Each time you press the SLEEP button, the
duration (in minutes) changes as follows:
120 90 60 30 20 10
OFF
Ti
• [SLEEP] appears on the screen when the sleep timer
is set.
Nature Sound for a good night’s
sleep
Pre-installed nature sound gives you relaxation
and a good night’s sleep.
1 Press the HOME button.
2 Select [Music] and press the ENTER
button.
3 Select [Internal memory] and press the
ENTER button.
4 Select the desired nature sound files
and press the SLEEP button.
and photos
Importing files
1 Insert a memory card firmly into the
slot with its label side facing toward
you or connect a USB device to the rear
of this unit.
2 Press the HOME button.
3 Select [Import] and press the ENTER
button.
4 Select the desired media and press the
ENTER button.
5 Check the desired multiple files with v/
V and press the ENTER button. Then
press B, to select [Import].
• Confirmation screen appears.
6 Select [Yes] with b/B and press the
ENTER button.
• Copying of the selected files to the
internal memory starts.
Using this unit
US
19
Page 20

Note
p
p
• For details on memory cards you can use with this
unit, see “About the memory cards” (26).
• Do not disconnect the AC power cord (mains lead)
from the wall outlet (wall socket) during the
operation. The file may be damaged.
• Remove a memory card from the slot or disconnect
the USB device from the USB connector in the
opposite direction from which it was inserted.
Deleting files
1 Press the HOME button.
2 Select [General Settings] and select
[Delete files], then press the ENTER
button.
3 Select the internal memory and press
the ENTER button.
4 Check the desired multiple files with v/
V and press the ENTER button. Then
press B to select [Delete].
• Confirmation screen appears.
5 Select [Yes] with b/B and press the
ENTER button.
• The selected files are deleted from the
internal memory.
Note
• This unit cannot use data that has been encrypted or
compressed using, for instance, fingerprint
authentication or a password.
• Refer also to the connected device’s manual.
• Compatibility with all external devices are not
guaranteed.
• While playing or pausing music or video, you cannot
copy or delete files.
Playing back music, video and setting the background photo (wallpaper)
1 Press the HOME button.
2 Select [Music] or [Video] and
[Background Photos] and press the
ENTER button.
3 Select the desired media and press the
ENTER button.
4 Select the desired file and press the
ENTER button.
• Plays the selected file for music and
video.
Ti
• You can also play directly music or video by pressing
the USB/MEMORY u button.
• To set the background photo (wallpaper)
as follows:
5 Select the desired photo and press the
ENTER button.
• Confirmation screen appears.
Ti
• You can display the next or previous photo by
pressing b/B.
• To change the music or video, press the OPTION
button to bring up [Option] menu, then select [Select
music] or [Select video].
• For details on changing each setting of music, video
and photo, refer to “General Settings” (24).
6 Select [Yes] with b/B and press the
ENTER button.
• The selected photo is set as the
background photo (wallpaper).
US
20
Page 21

Note
p
• Check supported file formats beforehand, refer to
“Specifications” on page 31.
• You cannot display the cover photo for WMA
content.
• Photos are used only for the background photo
(wallpaper). The background photo cannot be played
back.
Ti
• To change the background photo (wallpaper), press
the OPTION button to bring up [Option] menu, then
[Select background photo].
• You can select from 6 pre-installed photographs in
the internal memory as wallpaper.
Setting the slideshow
Photos in the desired media are automatically
displayed one after another.
1 Press the OPTION button.
2 Select [Begin slide show].
3 Press the ENTER button.
• The slideshow starts with the selected
media.
Note
• The factory default setting is 10 seconds for the
slideshow interval. If you want to change the interval,
see page 24.
Using iPod & iPhone
functions (For ICFCL75iP only)
You can enjoy music, etc., from iPod by
connected to this unit. To use iPod, refer to the
user’s guide of your iPod.
Compatible iPod models
Compatible iPod models are as follows. Update
your iPod to use the latest software beforehand.
iPod touch 2nd
generation
iPod nano 4th
generation (video)
Using this unit
Other operations for playing,
music and video
Play/Pause Press the USB/MEMORY u
Restart Press the USB/MEMORY u
Skip to previous/
the next
Fast forward/
rewind
Stop Press the OFF x ALARM
button.
button.
Press >/..
Press and hold > /..
RESET button.
iPhone 3G iPod touch 1st
iPod nano 3rd
generation (video)
generation
iPod classic
21
US
Page 22

Playing iPod
You can play iPod music or iPod video content
by connecting to this unit. For details on iPod
operation, see the user’s guide of your iPod.
iPhone iPod nano 2nd
iPod 5th generation
(video)
iPod 4th generation
(color display)
generation
(aluminum)
iPod nano 1st
generation
iPod 4th
generation
1 Push the PUSH OPEN.
• The docking tray is ejected halfway.
2 Pull the docking tray all the way out.
iPod mini
Note
• iPod shuffle is not available on this unit.
• Sony cannot accept responsibility in the event that
data recorded to iPod is lost or damaged when using
iPod connected to this unit.
• iPod 4th generation (color display) cannot play photo.
US
22
Page 23

3 Attach the adapter for your iPod/
p
iPhone.
Note
Universal dock adapter
For iPhone For iPhone 3G
qs qg
• If you are using iPhone or iPhone 3G, attach the
supplied universal dock adapter for iPhone or iPhone
3G before inserting into the connector. The adapter
number, qs or qg, is shown on the bottom-rear of the
supplied universal dock adapters. qs is for the
iPhone, and qg is for the iPhone 3G. Check the
adapter number before use.
4 Insert your iPod/iPhone into the
connector of the unit.
5 Press the iPod & iPhone u button.
• iPod starts playing.
Note
• iPod touch/iPhone cannot play video automatically.
Please manually start playing video from the iPod
unit.
• You cannot display the album artwork of iPod or
iPhone on this unit.
Displaying iPod photo
If you want to display iPod photo on this unit,
select [Video] in [iPod & iPhone] menu while
playing iPod.
Basic operation of this unit
To Press
Stop iPod OFF x ALARM RESET
Pause playback iPod & iPhone u button. To
Go to the next track >
Go back to the
previous track
Locate a point while
listening to the
sound
Go back to the
previous menu
Select a menu item
or a track for
playback
Execute the selected
menu or begin
playback
Ti
• Another way to play iPod is by pressing the HOME
button to select [iPod & iPhone].
• You can operate the menu for iPod Touch and iPhone
when [Music] or [Video] is already selected.
button
resume play, press it again.
.
> or . while playing
and hold it until you find the
point.
BACK/iPod MENU button
v/V
ENTER button
Charging iPod
You can use the unit as an iPod battery charger.
Charging begins when iPod is connected.
Setting iPod alarm
You can set an alarm sound from your iPod. For
details on how to set iPod sound as the alarm,
refer to “Setting an alarm” on page 16.
Using this unit
US
23
Page 24

Additional information
General Settings
1 Press the HOME button.
2 Select [General Settings] and press the
ENTER button.
3 Select each of the settings as follows:
x Language Setting
Select the language to be displayed with v/V.
Language
Setting
* Factory default setting
x Music Setting
Select the playing mode with v/V.
*
Normal
Repeat Plays music repeatedly.
Repeat 1 Song The current song is played
* Factory default setting
x Video Setting
Change the playing back mode with v/V.
Display
***
mode
Demo mode ON
* Factory default setting
** The original image data will not change.
*** Display mode is not available while playing iPod/
iPhone Video.
English*, Deutsch, Español,
Français, Italiano, Português,
Русский, Nederlands
Plays music without repeating.
repeatedly.
Full screen
mode
Fit to
screen
*
OFF Deactivates the demo
Displays an image
enlarged to full screen
**
size.
Zooms in on the center
*
of the image, sufficient
to fill the entire
screen.
Activates the demo
mode.
mode.
**
x Photo Setting
Select the display mode for photo with v/V/b/
B.
Display
mode
Slide show ON
Slide show
interval
* Factory default setting
Full screen
mode
Fit to
screen
*
OFF Cancels the slideshow.
10sec.
The entire photo is
displayed.
The photo size fits in the
*
unit screen.
Plays the slideshow.
*
/1min./1hour/12hours/24hours
x Radio Setting
Select the radio setting with v/V.
AM channel step
10kHz For the USA and Canada
9kHz For Europe
FM Mono/Auto
Mono Forces the radio to play in
*
Auto
* Factory default setting
monaural.
Switches from stereo to monaural
automatically, in response to the
FM signal.
x Reset all settings
Resets the current settings to the default settings.
x Format
Formatting deletes all the music, video and
photo files to free up space in the internal
memory.
Note
• Initializing the unit may be required depending on the
problem. In the event of this, the data stored on the
internal memory will be deleted.
• All files imported to the internal memory will be
deleted except pre-installed music and photos.
• Do not format the internal memory by connecting to
other external devices.
24
US
Page 25

x Delete files
You can delete selected files in the internal
memory. Refer to “Deleting files” on page 20.
x Unit information
Display the information of this unit.
4 Press the ENTER button.
• The desired settings are made.
Troubleshooting
Should any problem persist after you have made
the following checks, consult your nearest Sony
dealer.
The power cannot be turned on.
• Insert the power plug properly.
Cannot hear sound from this unit.
• The volume is set too low. Turn up the volume.
The clock setting screen appears due to a
power interruption.
• The battery is low. Replace the battery.
Remove the old battery and install a new one.
When daylight savings time begins, the
clock does not employ the daylight
savings time automatically.
• Make sure the clock is set correctly.
The alarm settings do not sound at the
preset alarm time.
• Check that [Alarm A] or [Alarm B] is properly
displayed.
The alarm settings are activated but there
is no sounds at the preset alarm time.
• Check the alarm the volume setting.
Music file in the USB device is not played.
• The USB device is not recognized, try another
USB device.
Cannot listen to the AM radio sound.
• Connect the AM loop antenna to this unit.
No photos are displayed on the screen.
• Insert a memory card or connect a USB device
properly.
• Insert a memory card containing photos or
connect an external device containing photos.
• Check the file formats that can be displayed.
Some images are not displayed.
• The unit can play, save, delete, or otherwise
handle up to 9,999 image files.
A photo was deleted accidentally.
• A photo cannot be recovered once it is deleted.
There is no sound from iPod (ICF-CL75iP
only).
• Make sure iPod is securely connected.
• Adjust the volume.
iPod cannot be operated with this unit
(ICF-CL75iP only).
• Make sure iPod is securely connected.
Additional information
25
US
Page 26

iPod cannot be charged (ICF-CL75iP only).
• Make sure iPod is securely connected.
About the memory cards
“Memory Stick” media
“Memory Stick” media are a compact, portable
IC recording medium with a large data capacity.
The types of “Memory Stick Duo” media that
can be used with the clock radio are listed in the
table below.
Types of “Memory Stick” media
that the clock radio can use
With the clock radio, you can use the following
types of “Memory Stick” media
Type of “Memory Stick” media Playback
“Memory Stick”*2 (Not compatible
with “MagicGate”)
“Memory Stick”
with “MagicGate”)
“MagicGate Memory Stick”
“Memory Stick PRO”
“Memory Stick PRO DUO” a
“Memory Stick PRO-HG” –
“Memory Stick Micro”
*2
(Compatible
*2
*3
*1
:
*5
(“M2”*4) a
a
a
a
a
26
*1)
The clock radio supports FAT32. The clock radio
has been demonstrated as operable with a “Memory
Stick” media with a capacity of 32 GB or less
manufactured by Sony Corporation. However, we
do not guarantee the operations of all the “Memory
Stick” media.
*2)
The clock radio is equipped with a slot compatible
with both standard-size and Duo-size media.
Without a “Memory Stick Duo” media adaptor, you
can use both a standard-size “Memory Stick” media
and the compact-size “Memory Stick Duo” media.
US
Page 27

*3)
When using a “Memory Stick Micro” media with
the clock radio, always insert it into an M2 adaptor.
*4)
“M2” is an abbreviation for “Memory Stick Micro”
media. In this section, “M2” is used to describe
“Memory Stick Micro” media.
*5)
Data reading/recording that requires “MagicGate”
copyright protection cannot be performed.
“MagicGate” is the general name of a copyright
protection technology developed by Sony using
authentication and encryption.
• The clock rad io does not support 8 bit parallel data
transfer.
Notes on use
• For the latest information on the “Memory
Stick” media types that the clock radio
supports, see the “Memory Stick” media
compatibility information on the Sony web
site:
http://www.memorystick.com/en/support/
compatible.html
• Do not insert more than one “Memory Stick”
media at the same time, which may cause
trouble with the clock radio.
• If you use a “Memory Stick Micro” media with
the clock radio, “Memory Stick Micro” media
needs to be inserted into an “M2” adaptor.
• If you insert a “Memory Stick Micro” media
into the clock radio without an “M2” adaptor,
you may be unable to remove the “Memory
Stick Micro” media.
• If you insert a “Memory Stick Micro” media
into an “M2” adaptor, and insert the “M2”
adaptor into a “Memory Stick Duo” media
adaptor, the clock radio may not operate
properly.
• When you format a “Memory Stick” media,
use the format function of your clock radio. If
you format a “Memory Stick” media with your
computer, images may not be displayed
properly.
• When you format a “Memory Stick” media, all
the data including protected image files will be
erased. To avoid erasing important data by
accident, make sure to check the contents of
the “Memory Stick” media before formatting.
• You cannot record, edit or delete data if you
slide the write-protect switch to LOCK.
Write-protect switch
Write
enable
position
Place the label here.
Write
protect
position
• Do not attach any other material than the
supplied label on the labelling position.
When you attach the supplied label, be sure to
attach it to the labelling position. Be careful
that the label does not stick out.
Additional information
27
US
Page 28

SD memory card
The SD memory card slot of the clock radio
allows you to use the following:
• SD memory card
• miniSD card, microSD card
(An adaptor is necessary.)
• SDHC memory card
• MMC standard memory card
We do not guarantee proper operations for all
types of SD memory cards and MMC standard
memory cards.
*1)
The clock radio has been demonstrated as operable
with an SD memory card with a capacity of 2 GB or
smaller.
*2)
Some commercially available card adaptors have
projected terminals on the rear. This type of adaptor
may not work properly with the clock radio.
*3)
The clock radio has been demonstrated as operable
with an SDHC memory card with a capacity of 8
GB or less.
*4)
The clock radio has been demonstrated as operable
with an MMC standard memory card with a
capacity of 2 GB or less.
Notes on use
Data reading that requires copyright protection cannot
be performed.
*1
*2
*3
*4
Notes on using a memory card
• When using a card, make sure to check the
correct insertion direction of the card and the
correct insertion slot.
• When inserting the memory card, it will only
insert the portion of the way, so do not try to
force it as this could damage the memory card
and/or clock radio.
• Do not remove a card while the clock radio is
reading or writing data. Otherwise, data may
be rendered unreadable or erased.
• We recommend that you save a backup of
important data.
• Data processed with the computer may not be
displayed with the clock radio.
• When you carry or store a card, put it in the
case supplied with it.
• Do not touch the terminal of a card with your
hand or a metal object.
• Do not strike, bends or drop a card.
• Do not disassemble or modify a card.
• Do not expose a card to water.
• Do not use or store a card under the following
conditions:
– Locations beyond the required operational
conditions including locations such as the
hot interior of a car parked in the sun and/
or in the summer, the outdoors exposed to
direct sunlight, or a place near a heater.
– Humid locations or locations with
corrosive substances present
– Locations subject to static electricity or
electrical noises
28
US
Page 29

Precautions
• Play the unit on the power source specified in
“Specifications.”
• To disconnect the AC power cord (mains
lead), pull it out by the plug, not the cord.
• Since a strong magnet is used for the speaker,
keep personal credit cards using magnetic
coding or spring-wound watches away from
the unit to prevent possible damage from the
magnet.
• Do not leave the unit in a location near a heat
source such as a radiator or airduct, or in a
place subject to direct sunlight, excessive dust,
mechanical vibration, or shock.
• Allow adequate air circulation to prevent
internal heat build-up. Do not place the unit on
a surface (a rug, a blanket, etc.) or near
materials (a curtain) which might block the
ventilation holes.
• Should any solid object or liquid fall into the
unit, unplug the unit and have it checked by
qualified personnel before operating it any
further.
• To clean the casing, use a soft cloth dampened
with a mild detergent solution.
• Never touch the wire of the external FM
antenna during a thunderstorm. Furthermore,
immediately disconnect the AC power cord
(mains lead) from the radio.
Replacing the battery
1 Keep the AC plug connected to the wall
outlet (wall socket), remove the screw
that secures the battery holder at the
back of the unit using a screwdriver.
2 Open the battery holder.
3 Replace a new battery in the battery
holder with the + side facing up.
4 Close the battery holder and secure it
with the screw.
5 Press the HOME button and the
DISPLAY button at the same time in
[Home] menu screen to turn off on
the screen.
Note
• When you replace the battery, do not disconnect the
plug from the wall outlet (wall socket). Otherwise,
the calendar, current time, alarm and station presets
will be initialized.
Additional information
If you have any questions or problems
concerning your unit, please consult your
nearest Sony dealer.
29
US
Page 30

Note on the alarm in the event of
a power interruption
In the event of a power interruption, the alarm
will work until the battery is totally discharged.
However, certain functions will be affected as
follows:
• The backlight will not light up.
• If the alarm mode is set to any mode other than
buzzer, it will change to buzzer automatically.
• If a power interruption occurs while the alarm
is sounding, the alarm will stop.
• If the alarm is not stopped, the alarm will
sound for about 5 minutes.
• If “ ” appears in the display, the alarm will
not sound in the event of power interruption.
Replace the battery if “ ” appears.
• The snooze function will not work.
• During a power interruption, the alarm will
sound at the set time only once.
Note
• To keep accurate time, this unit contains a CR2032
battery inside of the unit as a backup power source. If
a power interruption oc curs while the bat tery is weak,
the current time and alarm will be initialized. Replace
the battery with a Sony CR2032 lithium battery. Use
of another battery may cause a fire or explosion.
Note for customers in Europe
(except East Europe)
The clock is preset at the factory, and its
memory is powered by the preinstalled Sony
CR2032 battery. If the clock setting screen
appears in the display when the unit is connected
to AC outlet for the first time, the battery may be
weak. In this case, consult a Sony dealer. The
preinstalled CR2032 battery is considered part
of the product, and is covered by the warranty.
You are required to show “Note for customers in
Europe (except East Europe)” (in this
instruction) to a Sony dealer in order to validate
the warranty for this product.
NOTES ON LITHIUM BATTERY
• Wipe the battery with a dry cloth to assure a
good contact.
• Be sure to observe the correct polarity when
installing the battery.
• Do not hold the battery with metallic tweezers,
otherwise a short circuit may occur.
On trademarks
• , “Memory Stick”, , “Memory
Stick Duo”, , “MagicGate
Memory Stick”, “Memory Stick PRO”,
Duo”, , “Memory Stick
Micro”, , , “Memory StickROM”, , “MagicGate”, and
trademarks of Sony Corporation.
• iPod is a trademark of Apple Inc., registered in the
U.S. and other countries.
• iPhone is trademark of Apple Inc.
• “Made for iPod” means that an electronic accessory
has been designed to connect specifically to iPod and
has been certified by the developer to meet Apple
performance standards.
• “Works with iPhone” means that an electronic
accessory has been designed to connect specifically
to iPhone and has been certified by the developer to
meet Apple performance standards.
• Apple is not responsible for the operation of this
device or its compliance with safety and regulatory
standards.
• MPEG Layer-3 audio decoding technology licensed
from Fraunhofer IIS and Thomson Multimedia.
• Dream Machine is a trademark of Sony Corporation.
• No Power No Problem is a trademark of Sony
Corporation.
• All other companies and product names mentioned
herein may be the trademarks or registered
trademarks of their respective companies.
Furthermore, “™” and “
case in this manual.
, “Memory Stick PRO Duo”,
, “Memory Stick PRO-HG
are trademarks or registered
®
” are not mentioned in each
30
US
Page 31

Specifications
x Radio section
Frequency range:
For USA and Canada
FM: 87.5 - 108 MHz (0.1 MHz Channel step)
AM: 530 - 1710 kHz (10 kHz Channel step)
For Europe
FM: 87.5 - 108 MHz (0.05 MHz Channel step)
AM: 531 - 1602 kHz (9 kHz Channel step)
Station Preset(s): 20 FM, 10 AM
x Alarm section
Alarm numbers: Dual
Weekend Alarm: Every day/Work day/Week
end
Snooze: 10 minutes intervals up to 1 Hour
Fun Wake up (Wake up Photo and recording
voice): Numbers: 3
Maximum recording time: 10 sec.
x iPod section (for ICF-CL75iP only)
DC out: 5 V
MAX: 500 mA
x General
LCD Size: 7 inch/WVGA (800 × 480)
Brightness: 4 steps (Hi, Mid, Lo, Night mode)
Speaker: ¢31.3 mm (1.2 inches) × 2
Rated impedance 8 Ω
Memory slot: Multi card slot (MS, MS PRO,
MS Duo, MS PRO Duo, SD, SDHC, MMC)/
USB
Internal memory size (User area): 1 GB (902
MB)
Audio:
MP3
Bit rate: 32 - 320 kbps (VBR-compatible)
Sampling rate: 8 - 48 kHz
*1*2
WMA
Bit rate: 32 - 192 kbps
Sampling rate: 8 - 48 kHz
*1)
Support version 7.0, 8.0
*2)
Files with copyright protection cannot be played by
this unit.
Photo: JPEG (Maximum size: 4,096 × 4,096)
Slide show: 10 sec./1 min./1 hour/12 hours/24
hours
Video Compression Format:
MPEG-1
File Format: MP4 File Format, AVI File
Format
Extension: .mpg, .avi
Bit rate: Max. 4 Mbps
Frame rate: Max. 30 fps
Resolution: Max. 720 × 576
MPEG-4
File Format: MP4 File Format, AVI File
Format
Extension: .mp4, .avi
Profile: Advanced Simple Profile
Bit rate: Max. 4 Mbps
Frame rate: Max. 30 fps
Resolution: Max. 720 × 576
Motion-JPEG
Format: Quick Time Format, AVI Format
Extension: .mov, .avi
Resolution: Max. 640 × 480
Audio Compression Format:
AAC-LC (For MP4, AVI file format)
Channel: Max. 2 ch
Sampling rate: 24, 32, 44.1, 48 kHz
MPEG-3 (For AVI file format)
Channel: Max. 2 ch
Sampling rate: 24, 32, 44.1, 48 kHz
PCM (For MPEG-1)
Channel: Max. 2 ch
Sampling rate: 24, 32, 44.1, 48 kHz
Sleep: 10 min./20 min./30 min./60 min./90 min./
120 min.
Nature sound: Sea Waves, Birds, Rain, Brook,
Under the Sea
Power output: 1 W + 1 W (at 10% harmonic
distortion)
Power requirements:
For USA and Canada: 120 V AC, 60 Hz
For Europe: 230 V AC, 50 Hz
Power consumption: 18 W (Brightness Hi)
Back up battery: CR2032
Dimensions (Approx.): 205.6 × 148 × 119.5
mm (8 1/8 × 5 7/8 × 4 3/4 inches) (w/h/d)
(not including projecting parts and controls)
Mass (Approx.): 976 g (2 lb 2.4 oz) (including
power supply unit)
Check the supplied items on page 11.
Additional information
31
US
Page 32

This unit includes a preinstalled Sony Lithium battery (CR2032) as back-up power source for the clock, which is
preset to EST (Eastern Standard Time) at the factory. And this battery is considered part of the product.
Printed in China
 Loading...