

Sony ICF-C143 Operating Instruction
TV/WEATHER/FM/AM PLL Synthesized
-
AM P1 to 5 FM1 P1 to 5
FM2 P1 to 5TV P1 to 5WEATHER
P1 to 5
10
20
30 40 50 60
OFF
(current time)
10
20
90
120
60
30
On
90
60
30
15
B
BUZZER
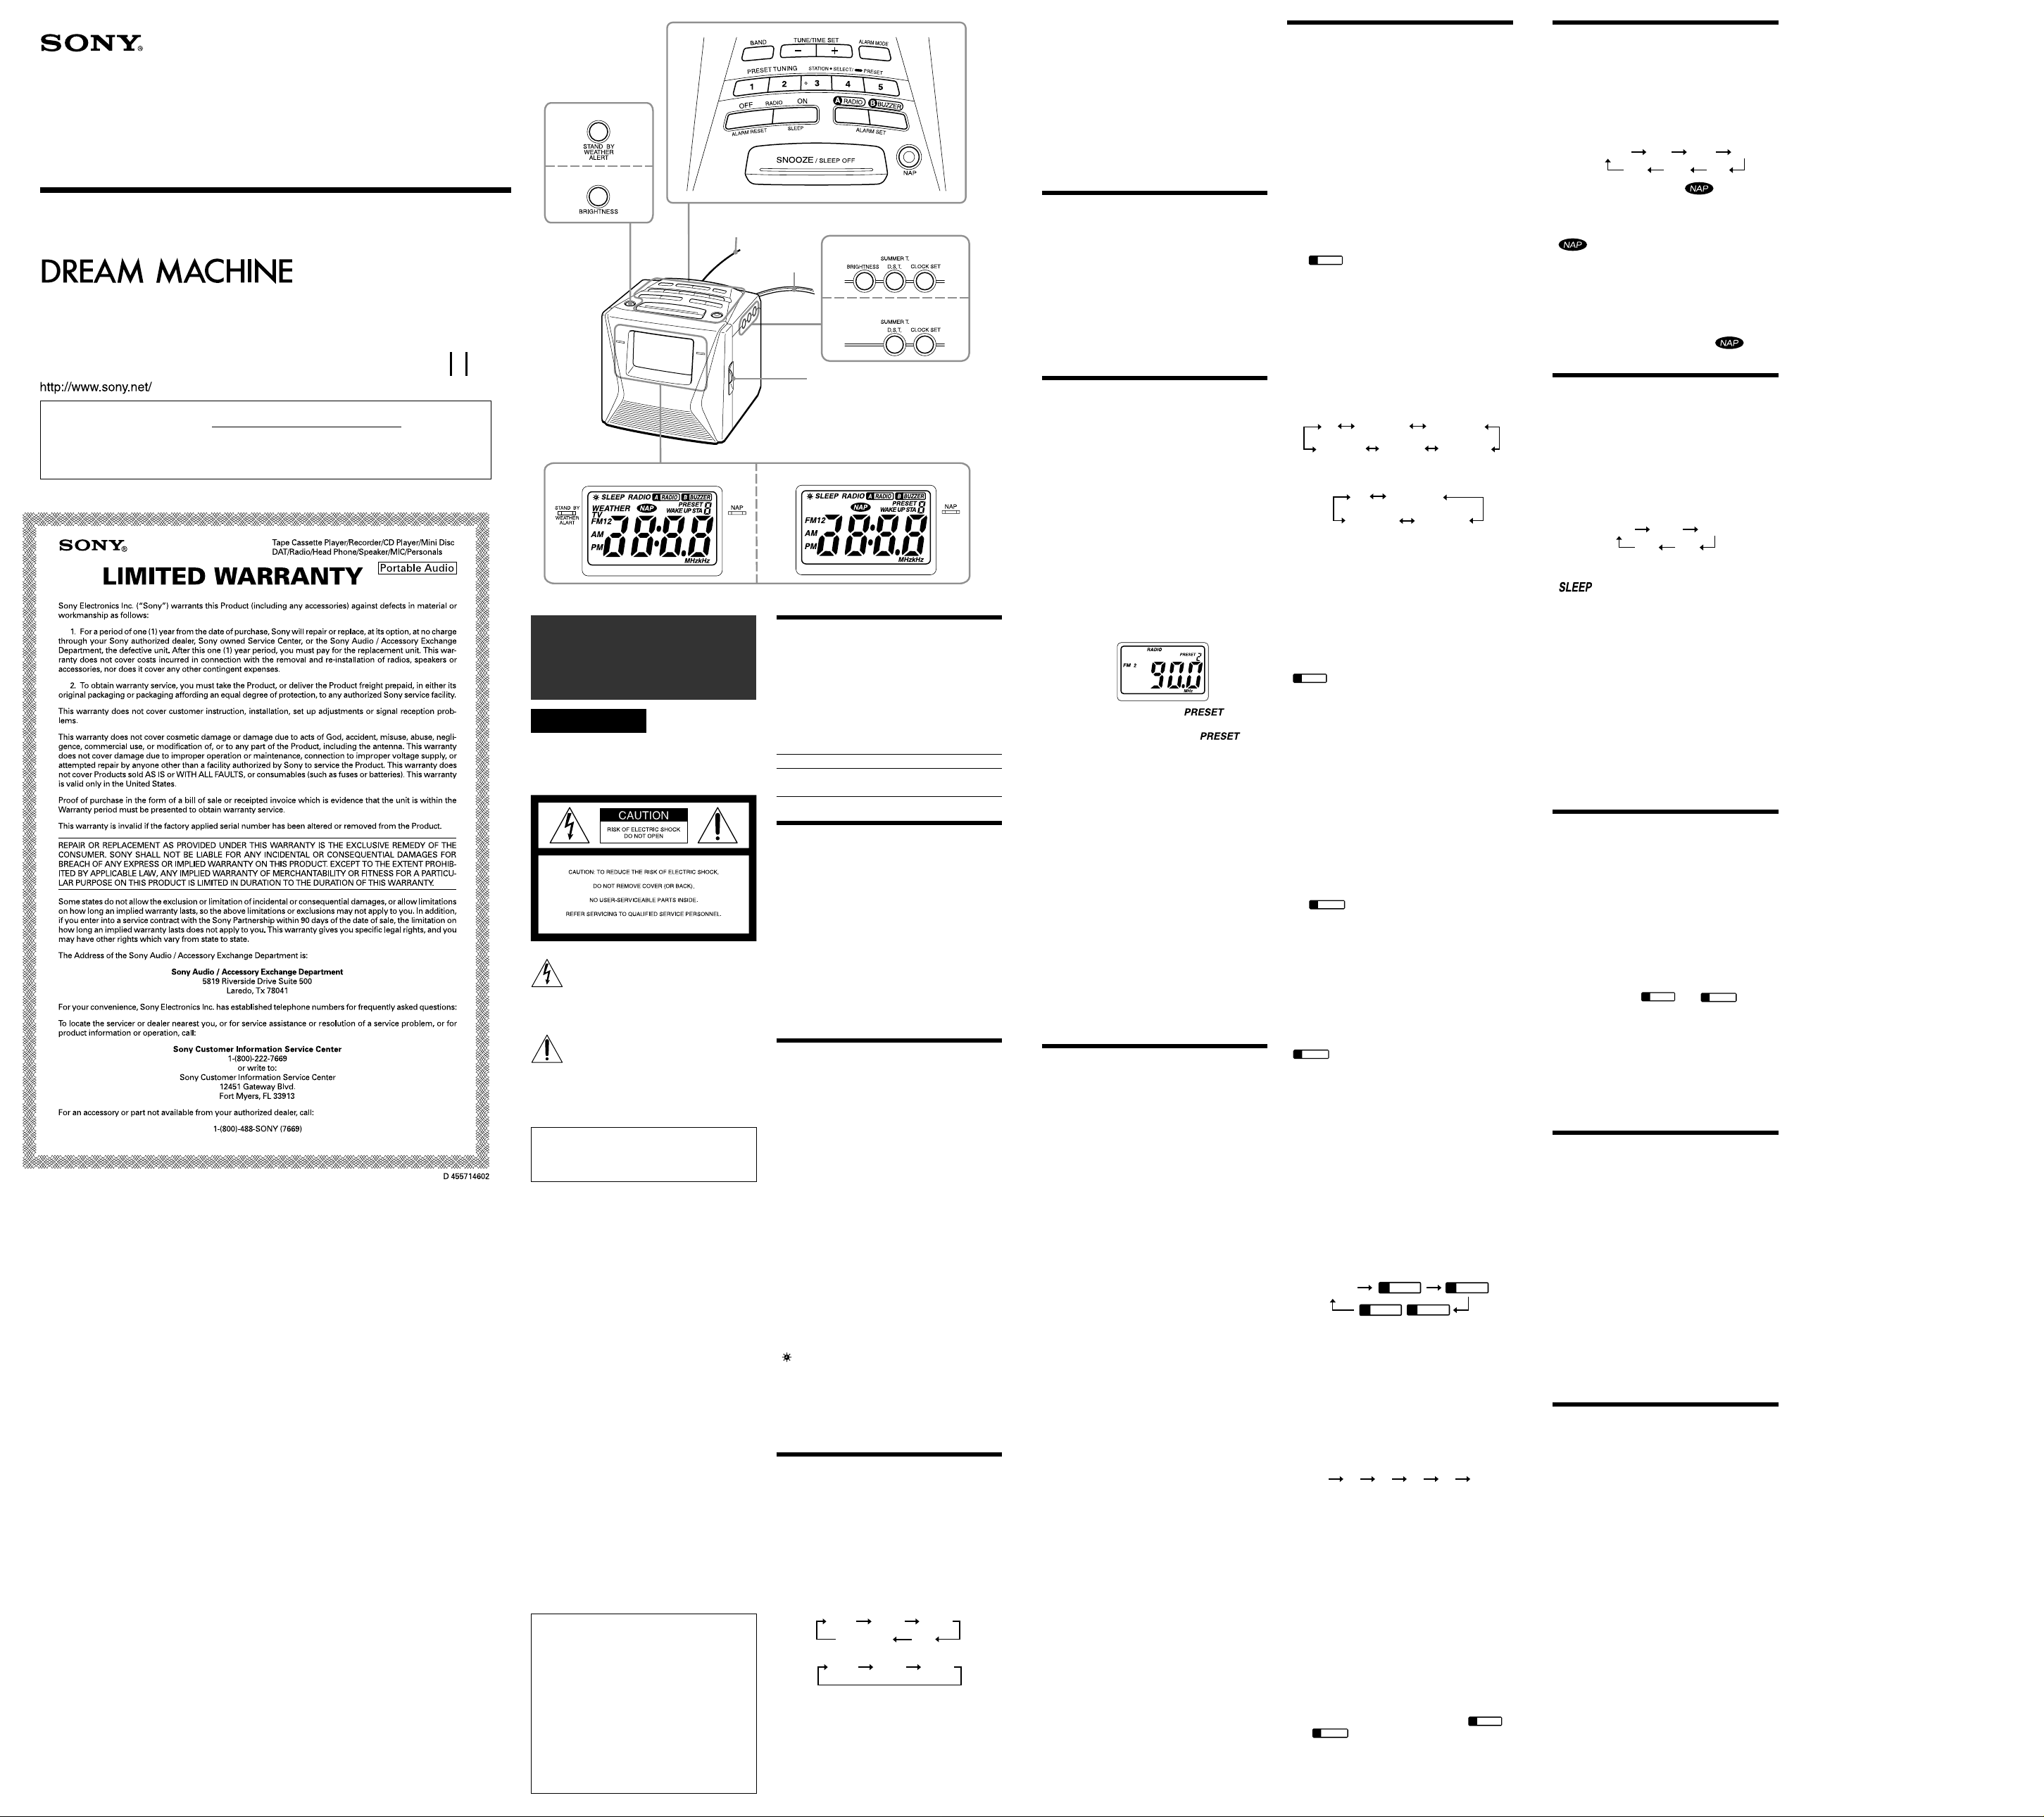
Clock Radio ICF-C153V
FM/AM PLL Synthesized
Clock Radio ICF-C143
Operating Instructions
Manual de instrucciones (en el reverso)
Dream Machine is a trademark of Sony Corporation.
Dream Machine es marca comercial de Sony Corporation.
Sony Corporation © 2002 Printed in China
For customers in the USA
Please register this product on line at
Proper registration will enable us to send you periodic mailings about new products, services, and
other important announcements.
Registering your product will also allow us to contact you in the unlikely event that the product
needs adjustment or modification. Thank you.
http://www.sony.com/productregistration.
3-238-577-21(1)
ICF-C153V
ICF-C143
FM wire
antenna
AC power cord
ICF-C153V
English
WARNING
To prevent fire or shock hazard, do
not expose the unit to rain or
moisture.
This symbol is intended to alert the user
to the presence of uninsulated
“dangerous voltage” within the
product’s enclosure that may be of
sufficient magnitude to constitute a risk
of electric shock to persons.
This symbol is intended to alert the user
to the presence of important operating
and maintenance (servicing) instructions
in the literature accompanying the
appliance.
∗ The graphical symbols are at the bottom of the
unit.
You are cautioned that any changes or
modifications not expressly approved in this
manual could void your authority to operate
this equipment.
INFORMATION
This equipment has been tested and found to
comply with the limits for a Class B digital device,
pursuant to Part 15 of the FCC Rules. These limits
are designed to provide reasonable protection
against harmful interference in a residential
installation. This equipment generates, uses, and
can radiate radio frequency energy and, if not
installed and used in accordance with the
instructions, may cause harmful interference to
radio communications. However, there is no
guarantee that interference will not occur in a
particular installation. If this equipment does cause
harmful interference to radio or television
reception, which can be determined by turning the
equipment off and on, the user is encouraged to try
to correct the interference by one or more of the
following measures:
—Reorient or relocate the receiving
antenna.
—Increase the separation between the
equipment and receiver.
—Connect the equipment into an outlet
on a circuit different from that to which
the receiver is connected.
—Consult the dealer or an experienced
radio/TV technician for help.
If you have any questions about the product, you
may call:
Sony Direct Response Center 1-(800)-222-7669 or
write to:
Sony Direct Response Center 12451 Gateway Blvd.
Fort Myers, FL 33913
Trade Name: SONY
Model: ICF-C153V
Responsible Party: Sony Electronics Inc.
Address: 680 Kinderkamack Road,
Telephone Number: 201-930-6972
This device complies with Part 15 of the FCC
Rules. Operation is subject to the following two
conditions: (1) This device may not cause
harmful interference, and (2) this device must
accept any interference received, including
interference that may cause undesired
operation.
Declaration of Conformity
Oradell, NJ 07649 USA
The PRESET TUNING 3 button has
a tactile dot.
ICF-C153V
ICF-C143
VOLUME
There is a tactile dot beside volume to
show the direction to turn up the volume.
ICF-C143
Before You Begin
Thank you for choosing the Sony Dream Machine.
The Dream Machine will give you many hours of
reliable service and listening pleasure.
Before operating your unit, please read these
instructions thoroughly and retain them for future
reference.
These instructions cover the models ICF-C153V
and ICF-C143, and their difference is as follows:
Model Number
Band
ICF-C153V ICF-C143
TV/WEATHER/
FM/AM
FM/AM
Features
• TV/WEATHER/FM/AM 4 band (ICF-C153V) or
FM/AM 2 band (ICF-C143) PLL (phase locked
loop) synthesized clock radio
• Stand by Weather Alert call you if you set the
“standby weather alert” mode (ICF-C153V only).
• Easy Preset Digital Tuning with 25 memory
presets for ICF-C153V, 15 memory presets for
ICF-C143
• Easy nap timer –one push operation.
• Dual Alarm (radio and buzzer) with the
extendable snooze function.
• LCD with backlight which has a brightness
control switch (high/middle/low).
• D.S.T. (Daylight Saving Time) –Summer time
calculation
Setting the Clock
1 Plug in the unit.
“AM 12:00” flashes on the display.
2 Press CLOCK SET for a few seconds until
a beep sounds.
The hour starts to flash on the display.
3 Press TUNE/TIME SET + or – until the
correct hour appears.
To set the current time rapidly, hold down
TUNE/TIME SET + or –.
4 Press CLOCK SET once.
The minute starts flashing.
5 Repeat steps 3 and 4 to set the minute.
Two short beeps sound, and the counting of the
seconds starts.
If you quit during the clock setting, after about 65
seconds the previous display will return.
To set the current time from zero seconds, press
CLOCK SET with the time signal in step 5.
To change the display to the daylight saving
time (summer time) indication
Press SUMMER T. D.S.T..
” is displayed and the time indication changes
“
to summer time.
To deactivate the summer time function, press
SUMMER T. D.S.T. again.
To set the brightness of the backlight
Press BRIGHTNESS to select high, middle or low for
the display according to your preferences.
Playing the Radio
—Manual Tuning
1 Press RADIO ON•SLEEP to turn on the
radio.
The display shows the band and frequency for
a few seconds and then changes back to the
current time.
2 Press BAND to select the band.
Each press changes the band as follows:
ICF-C153V
AM FM1 FM2
FM1
TV
FM2
ICF-C143
When using FM1 or FM2 preset mode, you may
listen to the radio on either mode. (See
“Presetting Your Favorite Station”.)
WEATHER
AM
3 Press TUNE/TIME SET + or – to tune in to
the desired station.
Two short beeps sound when the minimum
frequency of each band is received during
tuning.
4 Adjust volume using VOLUME.
To check the station being received
Press TUNE/TIME SET + or – lightly. The display
shows the band and frequency for a few seconds
and then returns to the previous display.
To turn off the radio, press OFF•ALARM RESET.
Improving the
Reception
TV*/WEATHER*/ FM:
Extend the FM wire antenna fully to increase
reception sensitivity.
* ICF-C153V only
AM: Rotate the unit horizontally for optimum
reception. A ferrite bar is built in to the unit.
Do not operate the unit over a steel desk or
metal surface, as this may lead to interference
of reception.
Presetting Your
Favorite Station
—Preset Tuning
You can preset up to 10 stations in FM (5 stations in
FM1, 5 stations in FM2), and 5 stations in each AM,
TV*, WEATHER*.
* ICF-C153V only
Presetting a Station
1 Follow steps 1 to 4 in “Playing the Radio”
and manually tune in to the station you
wish to preset.
2 Hold down the preset button you wish to
preset for more than 2 seconds.
Example: Display window when you set FM
The preset number “2” and “ ” flash in
the display.
Two beeps sound, and “2” and “
flashing.
To preset another station, repeat these steps.
To change the preset station, tune in to the
desired station and hold down the PRESET
TUNING 1 to 5 button. The new station will
replace the previous station on the preset
button.
90 MHz in the PRESET TUNING 2
button for FM2.
” stop
Tuning in to a Preset Station
1 Press RADIO ON•SLEEP to turn on the
radio.
2 Press BAND to select the band.
3 Press the desired preset button.
4 Adjust the volume using VOLUME.
After a few seconds, the display will return to
the current time but the preset button number
will remain.
Note
Holding down the desired PRESET TUNING button
for more than a few seconds in step 3 will replace
the previous station on the PRESET TUNING button
with the station you tuned in to.
Setting the Stand by
Weather Alert
(ICF-C153V only)
When the Stand by Weather Alert is set, emergency
broadcasting is informed by the buzzer.
Make sure to turn the radio off before using this
function.
1 Press STAND BY WEATHER ALERT
while the radio is not playing.
The display shows the received Stand by
Weather Alert channel for 10 seconds and then
changes to the current time.
The previously received Stand by Weather
Alert channel will be received.
When you set the Stand by Weather Alert for
the first time, press TUNE/TIME SET + or – to
check the channel available in your residential
area, and select that channel.
2 Press STAND BY WEATHER ALERT
again.
The Stand by Weather Alert will be in a
standby mode and the STAND BY WEATHER
ALERT indicator lights up.
No sound can be heard from the speaker even
when the Stand by Weather Alert is in standby
mode.
To Receive the Emergency
Broadcasting
When the tone signal is received while the
Stand by Weather Alert is on standby
A beep sounds for 20 seconds and the STAND BY
WEATHER ALERT indicator flashes for 12 hours.
At this time, the beep sounds louder than usual.
1 Press STAND BY WEATHER ALERT
while the STAND BY WEATHER ALERT
indicator flashes.
Emergency broadcasting is received.
2 Press STAND BY WEATHER ALERT
again to turn off the radio.
To return to the usual band reception
Press OFF•ALARM RESET to turn off the radio, and
then turn on the radio. (See “Playing the Radio”)
Notes
• If the alarm function has started up while the
Stand by Weather Alert is in the standby mode,
the Stand by Weather Alert will be deactivated
temporarily only while the radio or buzzer alarm
sounds.
• If an invalid key is pressed while the Stand by
Weather Alert is functioning, an error beep
sounds.
Setting the Alarm
You can set two types of alarms, radio (ALARM A)
and buzzer (ALARM B).
The alarm will come on at the same time everyday.
Before setting the alarm, make sure to set the clock.
(See “Setting the Clock”)
Notes
• The factory setting alarm time for radio (ALARM
A) and buzzer (ALARM B) is “AM 12:00”.
• If you quit during the alarm setting, after about
65 seconds the previous display will return.
To Set the Radio Alarm
(ALARM A)
Press A RADIO•ALARM SET for a few
1
seconds until a beep sounds.
“
” and the hour flash on the display.
RADIO
A
2 Press TUNE/TIME SET + or – to set the
desired hour.
3 Press A RADIO•ALARM SET.
4 Repeat steps 2 and 3 to set the minute.
A beep sounds to confirm the setting of time.
“WAKE UP STA” appears and the preset
number flashes on the display.
5 Press TUNE/TIME SET + or – to select the
wake up station.
Preset number changes in the order as follows:
ICF-C153V
ICF-C143
AM P1 to 5
-
FM1 P1 to 5FM2 P1 to 5
“–” is the last received station.
You can directly select the desired wake up
station by pressing BAND or the PRESET
TUNING button while the indication “–” is not
displayed.
6 Press A RADIO•ALARM SET.
Two beeps sound to confirm the setting.
To use ALARM A, set the alarm mode. (See
“Setting the Alarm Mode”.)
When the alarm comes on at the preset time,
” flashes on the display and the wake up
“
RADIO
A
station (the station selected in step 5) comes on.
The radio is turned off automatically after about 30
minutes (ICF-C153V) or about 60 minutes (ICFC143).
To check the alarm setting
Press A RADIO•ALARM SET once. The display
shows the preset time.
If you press A RADIO•ALARM SET again, the
display shows the wake up station.
To return to the previous display, press CLOCK SET
or wait for a few seconds.
To Set the Buzzer Alarm
(ALARM B)
1 Press B BUZZER•ALARM SET for a few
seconds until a beep sounds.
“
2 Press TUNE/TIME SET + or – to set the
desired hour.
3 Press B BUZZER•ALARM SET.
4 Repeat steps 2 and 3 to set the minute.
A beep sounds to confirm the setting of time.
5 Press B BUZZER•ALARM SET again.
Two beeps sound to confirm the setting.
To use ALARM B, set the alarm mode. (See
“Setting the Alarm Mode”.)
When the alarm comes on at the preset time,
“
BUZZER
B
The buzzer is turned off automatically after about
30 minutes (ICF-C153V) or about 60 minutes (ICFC143).
To check the alarm setting
Press B BUZZER•ALARM SET once. The display
shows the preset time.
To return to the previous display, press CLOCK SET
or wait for a few seconds.
Setting the Alarm Mode
Before setting the alarm mode, be sure to set the
alarm time. (See “Setting the Alarm”)
Press ALARM MODE repeatedly until the desired
mode is selected.
Each press of ALARM MODE changes the
indication on the display as follows:
If the same alarm time is set for both radio and
buzzer alarm (ALARM A and B), the radio alarm
(ALARM A) takes priority.
To Doze for a Few More
Minutes
Press SNOOZE/SLEEP OFF.
The radio or buzzer turns off but will automatically
come on again after about 10 minutes. Every time
you press SNOOZE/SLEEP OFF, the snooze time
changes as follows:
The maximum length of the snooze time is 60
minutes.
The display shows the snooze time for a few
seconds and returns to show the current time.
When you press SNOOZE/SLEEP OFF after the
current time appeared, the snooze time starts from
10 minutes again.
Note
The SNOOZE/SLEEP OFF button does not function
while the Stand by Weather Alert is on standby.
To Stop the Alarm
Press OFF•ALARM RESET to turn off the alarm.
The alarm will come on again at the same time the
next day.
To Deactive the Alarm
Press ALARM MODE repeatedly so that “
and “
” and the hour flashes on the display.
BUZZER
B
” flashes on the display.
No alarm
Indication
BUZZER
B
” go off.
A
A
RADIO
RADIO
B
BUZZER
BUZZER
B
A
RADIO
Using the NAP Timer
(Count Down Timer)
The NAP timer sounds the buzzer after a preset
time duration.
Press NAP repeatedly until the desired minutes is
displayed.
Every press changes the display as follows:
The NAP indicator turns on, “ ” and the NAP
time is displayed for a few seconds.
NAP timer starts counting down the NAP time.
When selected NAP time has passed, the beep
sound comes on, and the NAP indicator and
” on the display flash.
“
To Stop NAP Timer
Press NAP or OFF•ALARM RESET to turn off the
buzzer.
To Deactive NAP Timer
Press NAP. The NAP indicator and “ ” go
off.
Setting the Sleep
Timer
You can enjoy falling asleep to the radio using the
built-in sleep timer that turns off the radio
automatically after a preset duration.
Press RADIO ON•SLEEP.
The radio turns on. You can set the sleep timer to
durations of 90, 60, 30, or 15 minutes. Every press
changes the display as follows:
Two short beeps sound when the display returns to
“On”.
“ ” will appear in the display when the
duration time is set.
The radio will play for the time you set, then shut
off.
To turn off the radio before the preset time
Press SNOOZE/SLEEP OFF or OFF•ALARM RESET.
To Use Both Sleep Timer and
Alarm
You can fall asleep to the radio and also be
awakened by the radio or buzzer alarm at the
preset time.
1 Set the alarm. (See “Setting the Alarm”.)
2 Set the sleep timer. (See “Setting the Sleep
Timer”.)
Troubleshooting
Should any problem occur with the unit, make the
following simple checks to determine whether or
not servicing is required.
If the problem persists, consult your nearest Sony
dealer.
The clock does not show the correct time.
• Has an electrical power outage lasting more than
1 minutes occurred?
The radio or buzzer alarm does not sound at the
preset alarm time.
• Has the desired radio or buzzer alarm been
activated? (i.e. Is “
displayed?)
The radio alarm is activated but no sound comes
on at the preset alarm time.
• Has VOLUME been adjusted?
The preset stations may be deleted from the
memory, if a maintenance service is performed.
Please note down your settings in case you want to
preset them again.
A
RADIO
” or “
”
Precautions
• Operate the unit only on 120 V AC, 60 Hz.
• To disconnect the power cord (mains lead), pull it
out the plug, not by the cord.
• Do not leave the unit in a location near a heat
source such as a radiator or airduct, or in a place
subject to direct sunlight, excessive dust,
mechanical vibration, or shock.
• Do not place the unit on surfaces (rugs, blankets,
etc.) or near materials (curtains, draperies) that
block the ventilation holes.
• Should any liquid or solid object fall into the unit,
unplug the unit and have it checked by qualified
personnel before operating it further.
• When the casing becomes soiled, clean it with a
soft cloth dampened with a mild detergent
solution. Never use abrasive cleaners or chemical
solvents, as they may mar the casing.
If you have any questions, please consult your
nearest Sony dealer.
Specifications
Time display
12-hour system
Frequency range
TV: 2 – 13 ch (ICF-C153V only)
WEATHER: 1 – 7 ch (ICF-C153V only)
FM: 87.5 – 108 MHz
AM: 530 – 1 710 kHz
Speaker
Approx. 6.6 cm (2
Power output
170 mW (at 10 % harmonic distortion)
Power requirements
120 V AC, 60 Hz
Dimensions
Approx. 118.5 × 116.5 × 126 mm (w/h/d)
3
/4 × 4 5/8 × 5 inches) including projecting
(4
parts and controls
Mass
ICF-C153V: Approx. 730 g (1 lb 9.6 oz)
ICF-C143: Approx. 715 g (1 lb 9.1 oz)
Design and specifications are subject to change
without notice.
”
5
/8 inches) dia. 8 Ω

IMPORTANT SAFEGUARDS
For your protection, please read these safety instructions completely before operating the appliance,
and keep this manual for future reference.
Carefully observe all warnings, precautions and instructions on the appliance and in the operating
instructions, and adhere to them.
INSTALLATION
Water and Moisture
Do not use powerline operated appliances near water - for example, near a bathtub, washbowl,
kitchen sink, or laundry tub, in a wet basement, or near a swimming pool, etc.
Heat
Do not place the appliance near or over a radiator or heat register, or where it is exposed to direct
sunlight.
Ventilation
The slots and openings in the cabinet are provided for necessary ventilation. To ensure reliable
operation of the appliance, and to protect it from overheating, these slots and openings must never be
blocked or covered.
-Never cover the slots and openings with a cloth or other materials.
-Never block the slots and openings by placing the appliance on a bed, sofa, rug or other similar
surface.
-Never place the appliance in a confined space, such as a bookcase, or built-in cabinet, unless proper
ventilation is provided.
Accessories
Do not place the appliance on an unstable cart, stand, tripod, bracket, or table. The appliance may fall,
causing serious injury to a child or an adult, and serious damage to the appliance. Use only a cart,
stand, tripod, bracket, or table recommended by Sony.
-An appliance and cart combination should be moved with care. Quick stops, excessive force, and
uneven surfaces may cause the appliance and cart combination to overturn.
Wall or Ceiling Mounting
If your appliance can be mounted to a wall or ceiling, mount it only as recommended by Sony.
USE
Power Source
This appliance should be operated only from the type of power source indicated on the marking label.
If you are not sure of the type of electrical power supplied to your home, consult your dealer or local
power company. For those appliances designed to operate from battery power, or other sources, refer
to the operating instructions.
Grounding or Polarization
This appliance is equipped with a polarized AC power cord plug (a plug having one blade wider than
the other), or with a three-wire grounding type plug (a plug having a third pin for grounding). Follow
the instructions below:
-For the appliance with a polarized AC power cord plug:
This plug will fit into the power outlet only one way. This is a safety feature. If you are unable to
insert the plug fully into the outlet, try reversing the plug. If the plug should still fail to fit, contact
your electrician to have a suitable outlet installed. Do not defeat the safety purpose of the polarized
plug by forcing it in.
-For the appliance with a three-wire grounding type AC plug:
This plug will only fit into a grounding-type power outlet. This is a safety feature. If you are unable to
insert the plug into the outlet, contact your electrician to have a suitable outlet installed. Do not defeat
the safety purpose of the grounding plug.
Overloading
Do not overload wall outlets, extension cords or convenience receptacles beyond their capacity, since
this can result in fire or electric shock.
When not in use
Unplug the power cord of the appliance from the outlet when left unused for a long period of time.
To disconnect the cord, pull it out by grasping the plug. Never pull the plug out by the cord.
Power-Cord Protection
Route the power cord so that it is not likely to be walked on or pinched by items placed upon or
against them, paying particular attention to the plugs, receptacles, and the point where the cord exits
from the appliance.
Lightning
For added protection for this appliance during a lightning storm, or when it is left unattended and
unused for long periods of time, unplug it from the wall outlet and disconnect the antenna or cable
system. This will prevent damage to the appliance due to lightning and powerline surges.
Object and Liquid Entry
Never push objects of any kind into the appliance through openings as they may touch dangerous
voltage points or short out parts that could result in a fire or electric shock. Never spill liquid of any
kind on the appliance.
Cleaning
Unplug the appliance from the wall outlet before cleaning or polishing it. Do not use liquid cleaners
or aerosol cleaners. Use a cloth lightly dampened with water for cleaning the exterior of the appliance.
Clean the appliance only as recommended by Sony.
Attachments
Do not use attachments not recommended by Sony, as they may cause hazards.
ANTENNAS
Outdoor Antenna Grounding
If an outdoor antenna or cable system is installed, follow the precautions below.
An outdoor antenna system should not be located in the vicinity of overhead power lines or other
electric light or power circuits, or where it can come in contact with such power lines or circuits.
WHEN INSTALLING AN OUTDOOR ANTENNA SYSTEM, EXTREME CARE SHOULD BE TAKEN
TO KEEP FROM CONTACTING SUCH POWER LINES OR CIRCUITS AS CONTACT WITH THEM
IS ALMOST INVARIABLY FATAL.
Be sure the antenna system is grounded so as to provide some protection against voltage surges and
built-up static charges. Section 810 of the National Electrical Code provides information with respect
to proper grounding of the mast and supporting structure, grounding of the lead-in wire to an
antenna discharge unit, size of grounding conductors, location of antenna-discharge unit, connection
to grounding electrodes, and requirements for the grounding electrode.
Antenna Grounding According to the National
Electrical Code
SERVICE
Damage Requiring Service
Unplug the appliance from the wall outlet and refer servicing to qualified service personnel under the
following conditions:
-When the power cord or plug is damage or frayed.
-If liquid has been spilled or objects have fallen into the appliance.
-If the appliance has been exposed to rain or water.
-The appliance does not appear to operate normally or exhibits a marked change in performance.
-This indicates a need for service.
-If the appliance does not operate normally when following the operating instructions, adjust only
those controls that are specified in the operating instructions. Improper adjustment of other controls
may result in damage and will often require extensive work
by a qualified technician to restore the appliance to normal operation.
-If the appliance has been subject to excessive shock by being dropped, or the cabinet has been
damaged.
Servicing
Do not attempt to service the appliance yourself as opening or removing covers may expose you to
dangerous voltage or other hazards.
Refer all servicing to qualified service personnel.
Replacement parts
When replacement parts are required, be sure the service technician has used replacement parts
specified by Sony that have the same characteristics as the original parts.
Unauthorized substitutions may result in fire, electric shock, or other hazards.
Safety Check
Upon completion of any service or repairs to the appliance, ask the service technician to perform
routine safety checks (as specified by Sony) to determine that the appliance is in safe operating
condition.
Antenna Discharge Unit
(NEC Section 810-20)
Grounding Conductors
(NEC Section 810-20)
Antenna Lead-in Wire
Ground
Clamps
NEC-NATIONAL
ELECTRICAL CODE
Electric Service
Equipment
Ground Clamps
Power Service Grounding Electrode System
(NEC Art 250 Part H)
ICF-C153V
OFF
(hora actual)
10
20
90
120
60
30
On
90
60
30
15
A
RADIO
B
BUZZER
ICF-C143
Antena monofilar
de FM
Cable de
alimentación
El botón de sintonía 3 tiene un
punto táctil.
ICF-C153V
de CA
ICF-C143
ICF-C153V
Español
ADVERTENCIA
Para evitar el riesgo de incendio o
electrocución, no exponga la unidad a
condiciones de lluvia o humedad.
Este símbolo tiene por objeto advertir al
usuario de la presencia de “voltaje
peligroso” desprovisto de aislamiento en
el interior del producto que puede ser de
suficiente magnitud como para presentar
un riesgo de descarga eléctrica para las
personas.
Este símbolo tiene por objeto advertir al
usuario de la presencia de instrucciones
importantes de operación y
mantenimiento (servicio) en la
documentación que acompaña a este
aparato.
∗ Los símbolos gráficos se encuentran en la parte
inferior de la unidad.
Se le advierte que cualquier cambio o
modificación que no esté aprobada de modo
explícito en este manual podría anular su
autorización para utilizar este equipo.
INFORMACIÓN
Mediante pruebas se ha establecido que este
equipo cumple con los límites establecidos para un
dispositivo digital de Clase B conforme a la Parte
15 de la normativa de la FCC. Estos límites se han
establecido para proporcionar un grado de
protección razonable contra interferencias adversas
en instalaciones residenciales. Este equipo genera,
utiliza y puede emitir energía en radiofrecuencia y,
si no se instala y utiliza de acuerdo con estas
instrucciones, puede causar interferencias adversas
a las radiocomunicaciones. Sin embargo, no existe
ninguna garantía de que no se generarán
interferencias en una instalación particular. En el
caso de que este equipo produzca interferencias
adversas a la recepción de señales de radio o
televisión, lo que se puede establecer encendiendo
y apagando el equipo, se sugiere que los usuarios
intenten corregir la interferencia aplicando una o
más de las siguientes medidas:
—Cambiar la orientación o la ubicación de
la antena de recepción.
—Incrementar la distancia entre el equipo
y el receptor.
—Conectar el equipo a un tomacorriente
sobre un circuito distinto al que utiliza
el receptor.
—Ponerse en contacto con el proveedor o
con un técnico especialista en radio y
televisión para obtener ayuda.
Si tiene alguna pregunta sobre el producto, puede
llamar al número siguiente:
Centro de respuesta directa de Sony 1-(800)-2227669 o escribir a:
Sony Direct Response Center 12451 Gateway Blvd.
Fort Myers, FL 33913 U.S.A.
Nombre comercial: SONY
Modelo: ICF-C153V
Entidad responsable: Sony Electronics Inc.
Dirección: 680 Kinderkamack Road,
Número de teléfono: 201-930-6972
Este dispositivo cumple con la Parte 15 del
reglamento de la FCC. Su funcionamiento está
sujeto a las siguientes condiciones: (1) Este
dispositivo no puede causar interferencias
prejudiciales, y (2) este dispositivo debe aceptar
cualquier interferencia recibida, incluidas las
interferencias que puedan causar un
funcionamiento no deseado.
Declaración de conformidad
Oradell, NJ 07649 USA
VOLUME
Al lado de la tecla del volumen hay un
punto táctil que muestra el sentido para
subir el volumen.
ICF-C143
Antes de empezar
Gracias por elegir Sony Dream Machine. Dream
Machine le proporcionará muchas horas de servicio
fiable y agradable sonido.
Antes de utilizar la unidad, lea estas instrucciones
atentamente y consérvelas para consultarlas en el
futuro.
Estas instrucciones cubren los modelos ICF-C153V
e ICF-C143, y sus diferencias son las siguientes.
Número de modelo
Banda TV/WEATHER/
ICF-C153V ICF-C143
FM/AM
FM/AM
Características
• Radio despertador sintetizado PLL (bucle de fase
cerrada) de 4 bandas TV/WEATHER/FM/AM
(ICF-C153V) o de 2 bandas FM/AM (ICF-C143)
• Si ajusta el modo “Standby weather alert” (alerta
meteorológica en espera), la opción Stand by
Weather Alert (alerta meteorológica) lo llamará
(sólo ICF-C153V).
• Sintonización memorizada digital fácil con 25
presintonías para ICF-C153V, 15 presintonías
para ICF-C143
• Temporizador NAP fácil de utilizar, con sólo
pulsar una tecla.
• Alarma dual (radio y pitido) con la función
ampliable snooze.
• LCD con iluminación de fondo e interruptor de
control del brillo (alto/medio/bajo).
• D.S.T. (Daylight Saving Time) – cálculo del
horario de verano
Ajuste del reloj
1 Conecte la unidad.
“AM 12:00” parpadea en la pantalla.
2 Pulse CLOCK SET durante unos
segundos hasta que se oiga un pitido.
La hora empieza a parpadear en la pantalla.
3 Pulse TUNE/TIME SET + o – hasta que
aparezca la hora correcta.
Para ajustar rápidamente la hora actual,
mantenga pulsado TUNE/TIME SET + o –.
4 Pulse CLOCK SET una vez.
5 Repita los pasos 3 y 4 para ajustar los
minutos.
Se emiten dos pitidos breves y empiezan a
contarse los segundos.
Si no termina el ajuste del reloj, volverá a mostrarse
la pantalla anterior al ajuste transcurridos unos 65
segundos.
Para ajustar la hora actual desde cero segundos,
pulse CLOCK SET con la señal horaria en el paso 5.
Para cambiar la pantalla a la indicación de hora
de ahorro de luz (horario de verano)
Pulse SUMMER T. D.S.T..
Aparecerá “
horario de verano.
Para desactivar la función de horario de verano,
pulse de nuevo SUMMER T. D.S.T..
Para ajustar el brillo de la luz de fondo
Pulse BRIGHTNESS para seleccionar alto, medio o
bajo en la pantalla según sus preferencias.
” y la indicación de hora cambiará a
Utilización de la radio
—Sintonización manual
1 Pulse RADIO ON•SLEEP para encender
la radio.
La pantalla muestra la banda y la frecuencia
durante unos segundos y, a continuación,
vuelve a la hora actual.
2 Pulse BAND para seleccionar la banda.
Cada vez que la presiona, la banda cambiará de
la siguiente forma:
ICF-C153V
AM FM1 FM2
FM1
TV
FM2
ICF-C143
Cuando utiliza el modo presintonizado FM1 o
FM2, puede escuchar la radio en cualquiera de
los modos. (Consulte “Memorización de la
emisora favorita”.)
WEATHER
AM
3 Pulse TUNE/TIME SET + o – para
sintonizar la emisora deseada.
Cuando se recibe la frecuencia mínima de cada
banda durante la sintonización, se emiten dos
pitidos cortos.
4 Ajuste el volumen utilizando VOLUME.
Para comprobar la emisora que se recibe
Pulse ligeramente TUNE/TIME SET + o –. La
pantalla muestra la banda y la frecuencia durante
unos segundos y, a continuación, vuelve a la
pantalla anterior.
Para apagar la radio, pulse OFF•ALARM RESET.
Mejora de la recepción
TV*/ WEATHER*/ FM:
Extienda completamente la antena monofilar
de FM para incrementar la sensibilidad de
recepción.
* ICF-C153V solamente
AM: Gire la unidad en sentido horizontal para
obtener una recepción óptima. La unidad
tiene incorporada una barra de ferrita.
No utilice la unidad sobre un escritorio de
acero ni sobre una superficie de metal, puesto
que podrían producirse interferencias en la
recepción.
Memorización de la
emisora favorita
—Sintonización memorizada
Puede memorizar hasta 10 emisoras en FM (5
emisoras en FM1 y 5 emisoras en FM2) y 5
emisoras en cada AM, TV*, WEATHER*.
* ICF-C153V solamente
Memorización de una emisora
1 Siga los pasos 1 a 4 de “Utilización de la
radio” y sintonice manualmente la
emisora que desea memorizar.
2 Mantenga pulsado durante más de 2
segundos el botón de presintonía en el
que desea memorizar la emisora.
Ejemplo: Pantalla de visualización al
El número “2” de presintonía y “ ”
parpadean en la pantalla.
Se emiten dos pitidos y “2” y “
de parpadear.
Para memorizar otra emisora, repita estos
pasos.
Para cambiar la emisora memorizada, sintonice
la emisora deseada y mantenga pulsado uno de
los botones del 1 al 5 PRESET TUNING. La
nueva emisora reemplazará la emisora anterior
memorizada en el botón de presintonía.
memorizar FM 90 MHz en el botón
PRESET TUNING 2 para FM2.
” dejan
Sintonizar una emisora
memorizada
1 Pulse RADIO ON•SLEEP para encender
la radio.
2 Pulse BAND para seleccionar la banda.
3 Pulse el botón de presintonía deseado.
4 Ajuste el volumen mediante VOLUME.
Transcurridos unos segundos, la pantalla
volverá a la hora actual pero permanecerá el
número de botón de presintonía.
Nota
Si mantiene pulsada la tecla PRESET TUNING
deseada durante más de unos segundos en el paso
3, la emisora sintonizada reemplazará la emisora
memorizada previamente en dicha tecla.
Ajuste de la opción
Stand by Weather
Alert (sólo ICF-C153V)
Al ajustar la opción Stand by Weather Alert, la
emisión de urgencia se indica mediante un pitido.
Asegúrese de apagar la radio antes de utilizar esta
función.
1 Presione STAND BY WEATHER ALERT
mientras la radio no esté sonando.
La pantalla muestra durante 10 segundos el
canal de alerta meteorológica que se recibe y
luego cambia a la hora actual.
Se recibirá el canal de alerta meteorológica que
se recibió previamente.
Al ajustar la opción Stand by Weather Alert por
primera vez, presione TUNE/TIME SET + o –
para verificar el canal que está disponible en su
zona residencial y seleccione dicho canal.
2 Vuelva a presionar STAND BY
WEATHER ALERT.
La opción Stand by Weather Alert se pone en
modo de espera y se ilumina el indicador
STAND BY WEATHER ALERT.
Cuando la opción Stand by Weather Alert está
en modo de espera, no se escucha ningún
sonido por el altavoz.
Recepción de la emisión de
urgencia
Al recibir la señal de tono mientras la opción
Stand by Weather Alert está en espera
Se escucha un silbido durante 20 segundos y el
indicador STAND BY WEATHER ALERT parpadea
durante 12 horas.
En ese momento, el tono se escucha más fuerte que
lo normal.
1 Presione STAND BY WEATHER ALERT
mientras parpadea el indicador STAND
BY WEATHER ALERT.
Se recibe la emisión de urgencia.
2 Vuelva a presionar STAND BY
WEATHER ALERT para apagar la radio.
Para volver a la banda de recepción habitual
Presione OFF•ALARM RESET para apagar la radio
y vuelva a encender la radio. (Consulte la sección
“Utilización de la radio”)
Notas
• Si la función de alarma se activa mientras que la
opción Stand by Weather Alert está en modo de
espera, Stand by Weather Alert se desactivará
temporalmente solamente mientras suena la
alarma de silbido o de la radio.
• Si se presiona una tecla no válida durante el
funcionamiento de la opción Stand by Weather
Alert, se escuchará un pitido de error.
Programación de la
alarma
Puede ajustar dos tipos de alarma: radio (ALARM
A) y pitido (ALARM B).
La alarma se activará todos los días a la misma
hora.
Antes de ajustar la alarma, asegúrese de ajustar el
reloj. (Consulte “Ajuste del reloj”)
Notas
• El ajuste horario definido de fábrica para la
alarma de radio (ALARM A) y de pitido
(ALARM B) es “AM 12:00”.
• Si cierra durante el ajuste de la alarma, volverá a
mostrarse la pantalla anterior al ajuste
transcurridos unos 65 segundos.
Para ajustar la alarma de la radio
(ALARM A)
1 Pulse A RADIO•ALARM SET durante
unos segundos hasta que se oiga un
pitido.
“
” y la hora parpadean en la pantalla.
RADIO
A
2 Pulse TUNE/TIME SET + o – para ajustar
la hora deseada.
3 Pulse A RADIO•ALARM SET.
4 Repita los pasos 2 y 3 para ajustar los
minutos.
Se emite un pitido para confirmar el ajuste de la
hora.
“WAKE UP STA” aparece y el número de
presintonía parpadea en el visualizador.
5 Pulse TUNE/TIME SET + o – para
seleccionar la emisora para el
despertador.
El numero de presintonía cambia en el orden
siguiente:
ICF-C153V
AM P1 al 5 FM1 P1 al 5
-
FM1 P1 al 5FM2 P1 al 5
RADIO
B
FM2 P1 al 5TV P1 al 5WEATHER
BUZZER
BUZZER
B
P1 al 5
ICF-C143
AM P1 al 5
-
“–” es la última emisora recibida.
Puede seleccionar directamente la emisora para
el despertador deseada pulsando BAND o el
botón PRESET TUNING cuando no aparece la
indicación “–”.
6 Pulse A RADIO•ALARM SET.
Suenan dos pitidos para confirmar el ajuste.
Para utilizar ALARM A, ajuste el modo de alarma.
(Consulte “Ajuste del modo de alarma”.)
Cuando la alarma se active en la hora establecida,
“
” parpadeará en la pantalla y aparece la
RADIO
A
emisora para el despertador (la emisora
seleccionada en el paso 5).
La radio se apaga automáticamente transcurridos
unos 30 minutos (ICF C153V) o unos 60 minutos
(ICF C143).
Para comprobar la configuración de la alarma
Pulse A RADIO•ALARM SET una vez. La pantalla
muestra la hora preestablecida.
Si pulsa de nuevo A RADIO•ALARM SET, la
pantalla muestra la emisora para el despertador.
Para volver a la pantalla anterior, pulse CLOCK SET
o espere unos segundos.
Para programar la alarma con
pitido (ALARM B)
1 Pulse B BUZZER•ALARM SET durante
unos segundos hasta que se oiga un
pitido
“
” y la hora parpadean en la pantalla.
BUZZER
B
2 Pulse TUNE/TIME SET + o – para ajustar
la hora deseada.
3 Pulse B BUZZER•ALARM SET.
4 Repita los pasos 2 y 3 para ajustar los
minutos.
Se emite un pitido para confirmar el ajuste de la
hora.
5 Pulse de nuevo B BUZZER•ALARM SET.
Suenan dos pitidos para confirmar el ajuste.
Para utilizar ALARM B, ajuste el modo de alarma.
(Consulte “Ajuste del modo de alarma”.)
Cuando se activa la alarma a la hora establecida,
“
El pitido se apaga automáticamente transcurridos
unos 30 minutos (ICF C153V) o unos 60 minutos
(ICF C143).
Para comprobar la configuración de la alarma
Pulse B BUZZER•ALARM SET una vez. La pantalla
muestra la hora preestablecida.
Para volver a la pantalla anterior, pulse CLOCK SET
o espere unos segundos.
” parpadea en la pantalla.
BUZZER
B
Ajuste del modo de alarma
Antes de ajustar el modo de alarma, asegúrese de
ajustar la hora de la alarma. (Consulte
“Programación de la alarma”.)
Pulse repetidamente ALARM MODE hasta que se
seleccione el modo deseado.
Cada vez que pulsa ALARM MODE cambia la
indicación en pantalla de la forma siguiente:
Sin indicación
de alarma
Si se ajusta la misma hora de alarma de radio y la
alarma de pitido (ALARM A y B), la alarma por
radio (ALARM A) tiene prioridad.
A
A
RADIO
Para dormir algunos minutos más
Pulse SNOOZE/SLEEP OFF.
Se apaga la radio o el pitido pero se activa de
nuevo automáticamente transcurridos unos 10
minutos. Cada vez que pulse SNOOZE/SLEEP OFF,
el tiempo de repetición de la alarma cambiará en el
orden siguiente:
30 40 50 60
20
10
El tiempo máximo de la repetición de la alarma es
de 60 minutos.
El visualizador muestra el tiempo de repetición de
la alarma durante unos segundos y vuelve a
mostrar la hora actual. Si pulsa SNOOZE/SLEEP
OFF una vez mostrada la hora actual, el tiempo de
repetición de la alarma volverá a empezar a partir
de 10 minutos.
Nota
El botón SNOOZE/SLEEP OFF no funciona mientras
Stand by Weather Alert está en espera.
Para silenciar la alarma
Pulse OFF•ALARM RESET para apagar la alarma.
La alarma se activará de nuevo a la misma hora el
día siguiente.
Para desactivar la alarma
Pulse repetidamente ALARM MODE de forma que
se apaguen “
A
RADIO
” y “
BUZZER
B
”.
Utilización del
temporizador NAP
(temporizador de
cuenta atrás)
El temporizador NAP hace sonar el pitido
transcurrido un tiempo preestablecido.
Pulse repetidamente NAP hasta que se muestren los
minutos deseados.
Cada vez que lo pulse, el visualizador cambiará de
la forma siguiente:
El indicador NAP se activará y “ ” y el
temporizador NAP aparecerán durante unos
segundos.
El temporizador NAP empieza la cuenta atrás de la
hora NAP.
Una vez transcurrido el tiempo seleccionado en el
temporizador NAP, el pitido se activa y el
indicador NAP y “
pantalla.
” parpadean en la
Para detener el temporizador
NAP
Pulse NAP u OFF•ALARM RESET para apagar el
pitido.
Para desactivar el temporizador
NAP
Pulse NAP. El indicador NAP y “ ”
desaparecerán.
Ajuste del
temporizador de
apagado
Puede dormirse tranquilo con la radio encendida
utilizando el temporizador de apagado integrado
que apaga la radio automáticamente, una vez
transcurrido el tiempo preestablecido.
Pulse RADIO ON•SLEEP.
Se enciende la radio. Puede programar el
temporizador de apagado con duraciones de 90, 60,
30 ó 15 minutos. Cada vez que lo pulse, el
visualizador cambiará de la forma siguiente:
Se emiten dos pitidos breves cuando la pantalla
vuelve a la posición “On”.
Aparecerá “ ” en el visualizador cuando se
haya ajustado el tiempo para el temporizador de
apagado.
La radio permanecerá encendida durante el tiempo
que se haya establecido y, una vez transcurrido, se
apagará.
Para apagar la radio antes de la hora establecida
Pulse SNOOZE/SLEEP OFF u OFF•ALARM RESET.
Para utilizar el temporizador de
apagado y la alarma
Puede dormirse con la radio encendida y también
puede despertarse con la radio o con el pitido de la
alarma a la hora preestablecida.
1 Ajuste la alarma. (Consulte
“Programación de la alarma”.)
2 Ajuste el temporizador de apagado.
(Consulte “Ajuste del temporizador de
apagado”.)
Solución de
problemas
Si surgiera cualquier problema con la unidad, lleve
a cabo las siguientes comprobaciones para
determinar si se necesita repararla.
Si el problema continúa, consulte con su proveedor
Sony más cercano.
El reloj no muestra la hora correcta.
•¿Se ha producido un corte de la corriente eléctrica
durante más de 1 minuto?
La alarma de radio o de sonido no suena a la
hora de alarma preestablecida.
•¿Se ha activado la alarma de radio o de sonido
deseada? (¿Aparece en pantalla “
“
La alarma de radio se activa pero no se oye
ningún sonido a la hora preestablecida de la
alarma.
•¿Se ha ajustado el volumen (VOLUME)?
Las emisoras memorizadas pueden borrarse de la
memoria, si es necesario realizar una reparación de
mantenimiento.
Anote los ajustes por si desea volver a
memorizarlos.
”?)
” o
Precauciones
• Haga funcionar la unidad con las fuentes de 120
V CA, 60 Hz.
• Para desconectar el cable de alimentación (cable
de corriente) tire siempre del enchufe, nunca del
cable.
• No deje la unidad cerca fuentes de calor, como
radiadores o conductos de aire, ni en lugares
expuestos a la luz solar directa, polvo excesivo,
vibraciones mecánicas o golpes.
• No instale la unidad sobre superficies como
alfombras, mantas, etc., ni cerca de materiales
(cortinas, tapices) que puedan bloquear los
orificios de ventilación.
• Si se introduce algún objeto sólido o líquido en la
unidad, desenchúfela y haga que sea revisada por
personal especializado antes de volver a
utilizarla.
• Cuando se ensucie la unidad, límpiela con una
paño suave humedecido con una solución de
detergente suave. No utilice nunca limpiadores
abrasivos ni disolventes químicos, puesto que
podrían dañarla.
Si tiene cualquier pregunta, póngase en
contacto con su proveedor Sony más cercano.
Especificaciones
Visualización de la hora
Sistema de 12 horas
Gama de frecuencias
TV: 2 – 13 ch (ICF-C153V solamente)
WEATHER: 1 – 7 ch (ICF-C153V solamente)
FM: 87,5 – 108 MHz
AM: 530 – 1 710 kHz
Altavoz
Aprox. 6,6 cm dia. 8 Ω
Salida de alimentación
170 mW (a un 10 % de distorsión armónica)
Requisitos de alimentación
120 V CA, 60 Hz
Dimensiones
Aprox. 118,5 × 116,5 × 126 mm (an/al/pr)
incluyendo los mandos y las partes salientes
Masa
ICF-C153V: Aprox. 730 g
ICF-C143: Aprox. 715 g
El diseño y las especificaciones están sujetos a
cambios sin previo aviso.
 Loading...