

Page 1

Page 2

The recorded music is limited to private use
only. Use of the music beyond this limit requires
permission of the copyright holders.
Sony is not responsible for incomplete
recording/downloading or damaged data due
to problems of the IC recorder or computer.
Depending on the types of the text and
characters, the text shown on the IC recorder
may not be displayed properly on device. This
is due to:
The capacity of the connected IC recorder.
The IC recorder is not functioning normally.
Content information is written in the
language or the character that is not
supported by the IC recorder.
Notice for users
Program © 1999, 2000, 2001, 2002, 2003, 2004, 2005,
2006, 2007, 2008, 2009 Sony Corporation
Documentation ©2009 Sony Corporation
All rights reserved. This manual or the software
described herein, in whole or in part, may not be
reproduced, translated or reduced to any machine
readable form without prior written approval from
Sony Corporation.
IN NO EVENT SHALL SONY CORPORATION BE LIABLE
FOR ANY INCIDENTAL, CONSEQUENTIAL OR SPECIAL
DAMAGES, WHETHER BASED ON TORT, CONTRACT,
OR OTHERWISE, ARISING OUT OF OR IN CONNECTION
WITH THIS MANUAL, THE SOFTWARE OR OTHER
INFORMATION CONTAINED HEREIN OR THE USE
THEREOF.
Sony Corporation reserves the right to make any
modification to this manual or the information
contained herein at any time without notice.
The software described herein may also be governed
by the terms of a separate user license agreement.
This software is for Windows and cannot be used
for Macintosh.
The supplied connecting cable is for the IC recorder
ICD-SX950. You cannot connect other IC recorders.
GB
2
Page 3

Table of Contents
Checking the Contents of
the Package ..........................................................
Index to Parts and Controls ........................
Getting Started
Step 1: Preparing a Power Source ........13
Inserting the batteries.............................13
Disconnecting the IC recorder from
your computer .............................................
When charging/replacing the
batteries ...........................................................15
Step 2: Setting the Clock ............................18
Setting the clock after recharging
batteries ...........................................................18
Setting the clock using the menu ...
Step 3: Preparations Required before
Recording ............................................................20
Turning the IC Recorder On or Off .......
Turning the power off .............................23
Turning the power on ............................
14
19
23
23
Recording
Recording Messages.....................................24
Selecting the Recording Mode ..............
6
Setting the Recording Level ....................
7
Manual Recording Mode ...........................
Setting the Input Level Automatically
to Prevent Sound Distortion
– the Limiter Function .................................
Recording a Few Seconds in Advance,
before Starting to Record
– the Pre-Recording Function ................
Cutting out Low Frequency
– the LCF Function .........................................
Starting to Record Automatically in
Response to Sound
– the VOR Function .......................................
Dividing a Message into Two During
Recording ............................................................40
Adding a Recording to a Previously
Recorded Message ........................................
Adding an Overwrite Recording during
Playback ................................................................43
Recording with an External
Microphone .......................................................45
Recording sound from a telephone
or a cell phone .............................................
27
30
31
33
35
37
38
41
46
GB
3
Page 4

4
GB
Recording from Other Equipment.......47
To record using the synchronized
recording function ....................................
To record without using the
synchronized recording function ....
47
49
Playback
Playing Back Messages ................................51
Selecting the Playback Mode .................
Playing back a specified section
repeatedly – A-B Repeat ........................
Adjusting the Playback Speed
– the DPC Function .......................................
Reinforcing the Bass Sound .....................
Reducing Distortion to Make the
Human Voice Clearer
– the Noise Cut Function ...........................
Adjusting the Playback Sound by
Amplifying Inaudible Sound
– the Digital Voice Up Function .............
Adding a
Bookmark ......................................61
Recording with Other Equipment .......
Playing Back a Message at a Desired
Time with an Alarm .......................................
54
55
56
57
58
60
63
64
Editing Messages
Erasing Messages............................................68
Erasing messages one by one ...........68
Erasing all messages in a folder ........
69
Moving a Message to a Different
Folder .....................................................................70
Dividing a Message into Two ..................
Adding Priority Mark(s)
– the Priority Mark Function ....................
Preventing Accidental Operation
– the HOLD function ....................................
72
74
75
Utilizing the Menu Function
Making Settings for the Menu ................76
Utilizing Your Computer
What You Can Do Using
the Computer ...................................................
System requirements for your
computer ........................................................90
Connecting the IC recorder to your
computer ........................................................91
Disconnecting the IC recorder from
your computer .............................................
Copying Files from the IC Recorder to
Your Computer ................................................
89
92
92
Page 5

Copying Files from Your Computer to
the IC Recorder and Playing Them
Back .........................................................................93
Construction of folders and files ......95
Using the Supplied Digital Voice Editor
Software ...............................................................97
What You Can Do Using the Digital
Voice Editor Software ..............................
System requirements ..............................
Installing the software .........................
Referring to the help files ...................
Transferring the files using the Digital
Voice Editor software ............................
97
99
100
104
104
Using the IC Recorder as a USB Mass
Storage Device ..............................................
105
Troubleshooting
Troubleshooting ...........................................106
IC recorder ................................................... 106
Error messages .........................................
System limitations ..................................
116
119
Additional Information
Using a USB AC Adaptor
(not supplied) ................................................
Disconnecting the IC recorder from
the AC outlet ..............................................
Precautions ......................................................123
121
122
Specifications .................................................125
Index ....................................................................127
GB
5
Page 6

Checking the Contents of the Package
IC Recorder (1)
Remove the film on the display window
before you use the IC recorder.
NH-AAA (size AAA) rechargeable
batteries (2)
Stereo headphones (1)
USB connecting cable (1)
Wind Screen (1)
Use this to cover the built-in
microphones.
Application Software, Digital Voice
Editor (CD-ROM)
Stand (1)
Carrying pouch (1)
Telephone recording microphone (1)
Battery case (1)
Operating Instructions
You are cautioned that any changes or
modifications not expressly approved in
this manual could void your authority to
operate this equipment.
GB
6
Page 7

Index to Parts and Controls
Refer to the pages indicated in
parentheses for details.
Front
Built-in microphone (directional)*1
(25, 32)
Built-in microphones (stereo)*1 (25,
32)
Operation indicator (14, 17, 24, 51, 88)
Display window (9)
DIVIDE/ (bookmark) button (40, 62,
72)
(folder)/MENU button (24, 51, 76)
(headphone) jack*2 (26, 52, 63)
(record/pause) button (24, 26, 36)
(stop) button (25, 51, 66, 76)
(cue/fast forward) button (24, 51,
52, 62, 76)
(play/stop/enter) button*3 (26,
51, 53, 76)
(review/fast backward) button
(24, 51, 52, 62, 76)
VOL (volume) +*3/– button (26, 51)
(repeat) A-B/ (priority) button
(55, 74)
ERASE button (68)
Opening for a handstrap
(A handstrap is not supplied.)
GB
7
Page 8

*1 When you use your IC recorder outdoors,
attach the supplied wind screen to the IC
recorder so that the wind screen covers the
built-in microphones, to reduce wind noise.
*2 Connect the supplied or commercially
available stereo headphones to the
(headphone) jack. If unwanted noise is
heard, wipe the headphones plug clean.
To the
(headphone) jack
*3 These buttons and the jack have a
tactile dot. Use it as a reference point for
operations, or to identify each terminal.
Rear
Speaker
HOLD switch (20, 23, 75)
NOISE CUT switch (58)
DPC switch (56)
DIRECTNL (directional) switch (26)
(microphone) jack*3 (45, 48)
(USB) connector (13, 91, 121)
Battery compartment (13)
GB
8
Page 9

Display window
Display during playback and stop
Operating mode indicator
Displays the following, depending on
the current operation mode
: stop
: playback
: review (fast backward)/
cue (fast forward)
: backward/forward
continuously
Folder indicator
: Folder for messages recorded
using the IC recorder.
: Folder for messages/music
copyed from a computer, which
can only be played back.
Elapsed time/Remaining time/
Recorded date and time indication
Folder name/Message title/Artist
name/File name indication
Battery indicator
When rechargeable batteries or drycell batteries are used, the indicator
shows the remaining battery power.
While the rechargeable batteries are
charging, an animation appears.
Message number
The selected message number is
displayed in the numerator and
the total number of messages
in the folder is displayed in the
denominator.
Priority marks
Appear(s) when a message is set with
priority mark(s).
Bookmark indicator
Appears when a bookmark is set for
a message.
Alarm indicator
Appears when the alarm is set for a
message.
GB
9
Page 10

Repeat playback indicator
: Appears when one message is
played back repeatedly.
: Appears when messages
in one folder are played back
repeatedly.
: Appears when all the
messages are played back
repeatedly.
Sound effect indicator
Displays the “
效果” setting in the
menu.
: “重低音1” has been selected.
The bass sound is reinforced.
: “重低音2” has been selected.
The bass sound is further
reinforced.
Recording mode indicator
Displays the recording mode set
using the menu when the IC recorder
is in the stop mode, and displays the
current recording mode when the IC
recorder is in the playback mode.
, , : MP3 files recorded
using the IC recorder
, : LPCM files recorded using
the IC recorder
, , , , : LPEC
files recorded using the IC recorder.
For details, see “Selecting the
Recording Mode” (page 27).
Displays one of the following when a
file is transferred from the computer.
: MP3 files transferred
: LPCM files transferred
: WMA files transferred
Displays the following icon if the IC
recorder cannot recognize the file.
Recording level indicator
Displays the currently selected
microphone sensitivity for recording.
: Recorded with the low
recording level.
: Recorded with the high
recording level.
: Recorded with the further high
recording level.
: Recorded with proper balance
for music.
: Recorded with the manual
recording mode.
10
GB
Page 11

Remaining recording time indication
Displays the remaining recording
time in hours, minutes, and seconds.
If there is more than 10 hours time
remaining, the time is displayed in
hours.
If there is more than 10 minutes and
less than 10 hours time remaining,
the time is displayed in hours and
minutes.
If there is less than 10 minutes time
remaining, the time is displayed in
minutes and seconds.
Display during recording
Operating mode indicator
Displays the following, depending
on the current operation of the IC
recorder.
: recording
: Flashes while recording
standby/recording pause
: recording with the VOR
function
: recording pause with the
VOR function (flashing)
11
GB
Page 12

If you press (record/pause) to
pause recording when “VOR” is set to
“開” in the menu, only “ ” flashes.
: Synchronized recording
: Flashes while
synchronized recording is set to
pause.
Recording level meter
Recording level indicator
Displays the current microphone
sensitivity when recording.
: To record for dictation or in a
noisy place.
: To record at a meeting or in a
quiet/spacious place.
: To record with further high
sensitivity.
: To record music.
Displays the recording level during
manual recording.
Elapsed recording time/Pre-recording
standby time indication
If more than 100 hours have elapsed
since start of the recording, the time
is displayed in hours and minutes.
If less than 100 hours have elapsed
since start of the recording, the time
is displayed in hours, minutes and
seconds.
When “
預先錄音” is set to “開” in the
menu, the pre-recording standby
time is displayed in seconds between
0 and 5.
Alarm indicator
Recoding mode indicator
Displays the recording mode set in
the menu.
Limiter indicator
: When “LIMITER” is set to “開” in
the menu.
: When you are recording in
other than the manual recording
mode.
Remaining recording time indication
Battery indicator
LCF (Low Cut Filter) indicator
: When “LCF (LOW CUT)” is set
to “
開” in the menu.
: When “LCF (LOW CUT)” is set
to “
關” in the menu.
12
GB
Page 13

Getting Started
Step 1: Preparing a Power Source
Remove the film on the display window
before you use the IC recorder.
Inserting the batteries
3 Charge the batteries by connecting
the (USB) connector of the
IC recorder to a computer that is
currently turned on.
Computer
To USB port of
your computer
Getting Started
1 Slide and lift the battery
compartment lid.
2 Insert two NH-AAA rechargeable
batteries with correct polarity, and
close the lid.
To (USB)
connector
USB connecting cable
IC recorder
While the batteries are charging, “連接中”
and the battery indicator are displayed in
an animation.
When the battery indicator indicates “
charging is completed. (Charging time:
approx. 4 hours*)
,”
13
GB
Page 14

14
GB
When you use the IC recorder for the
first time, or after you have not used the
IC recorder for a certain period of time,
it is recommended that you charge
the batteries continuously until “
” is
displayed.
If the battery indicator is not displayed,
charging has not been done properly.
Proceed from step 1 again.
* This is an approximation for the time it takes
to charge from no remaining battery power
to full battery power at room temperature.
It varies depending on the remaining power
and the condition of the batteries. It also
takes more time if the temperature of the
batteries are low, or if the batteries are
charged while you are transferring data to
the IC recorder.
Disconnecting the IC recorder from your computer
Follow the procedures below; otherwise,
data may be damaged.
1 Make sure that the operation
indicator is not ashing.
2 Disconnect the USB connecting
cable connected to the IC recorder
from the USB port of the computer.
On the Windows screen, left-click
“Safely Remove Hardware” on the
taskbar, and click “Safely remove USB
Mass Storage Device.”
On the Macintosh screen, drag the “IC
RECORDER” on the desktop to “Trash”
and drop it there.
For details on disconnecting the
IC recorder, refer to the operating
instructions supplied with your
computer.
Page 15

Tips
You can charge the rechargeable batteries
by connecting the IC recorder to an AC
outlet using a USB AC adaptor (not supplied)
(page 121).
When replacing the batteries, messages
recorded or alarm settings are not erased
even when you remove the batteries.
When replacing the batteries, the clock
continues moving for a certain period of
time after you remove the batteries.
Notes
While “ ” or “ ” is flashing instead
of the battery indicator, you cannot charge
the batteries. Charge the batteries in an
environment with a temperature of 5 °C
- 35 °C.
If “
USB充電” in the “細部選單” menu is set
to “
關”, you cannot charge the batteries
using your computer. Set “
USB充電” to “開”
(page 88).
During playback using the internal speaker,
you cannot charge the batteries.
When you use the IC recorder with
rechargeable batteries, the battery indicator
may not light fully.
You cannot charge the batteries of your IC
recorder while your computer is in the sleep
mode, even if the computer is turned on.
Clock setting display appears and the
year section flashes when you insert
batteries for the first time, or when you
insert batteries after the IC recorder
has been without batteries for a certain
period of time. Please refer to “Setting
the clock after recharging batteries” on
page 18 to set the date and time.
When charging/replacing the batteries
The battery indicator on the display
shows the battery condition.
Battery remain indication
: Charge the rechargeable batteries or
replace the old batteries with new
ones.
: “電量不足“ appears and the IC
recorder will stop operation.
You can use commercially available LR03
(size AAA) alkaline batteries, however you
cannot use manganese batteries.
Getting Started
15
GB
Page 16

16
GB
Battery life
*1
When using Sony NH-AAA rechargeable
batteries
Recording Playback*2
through
speaker
LPCM 44/16*3Approx. 19 hr. Approx. 16 hr. Approx. 20 hr.
LPCM 22/16*4Approx. 17 hr. Approx. 15 hr. Approx. 18 hr.
MP3 192k*5Approx. 17 hr. Approx. 16 hr. Approx. 20 hr.
MP3 128k*6Approx. 17 hr. Approx. 16 hr. Approx. 20 hr.
MP3 48k*7Approx. 19 hr. Approx. 16 hr. Approx. 20 hr.
LPEC STHQ*8Approx. 14 hr. Approx. 15 hr. Approx. 18 hr.
*9
LPEC ST
LPEC STLP
LPEC SP
LPEC LP
Music file
(WMA 128 kbps/
44.1 kHz)
Approx. 15 hr. Approx. 16 hr. Approx. 19 hr.
*10
Approx. 17 hr. Approx. 16 hr. Approx. 20 hr.
*11
Approx. 17 hr. Approx. 17 hr. Approx. 21 hr.
*12
Approx. 19 hr. Approx. 18 hr. Approx. 22 hr.
— Approx. 16 hr. Approx. 19 hr.
Playback
using the
headphones
(hr. : hours)
When using Sony LR03 (SG) (size AAA)
alkaline batteries
Recording Playback*2
through
speaker
LPCM 44/16*3Approx. 25 hr. Approx. 21 hr. Approx. 26 hr.
LPCM 22/16*4Approx. 23 hr. Approx. 19 hr. Approx. 23 hr.
MP3 192k*5Approx. 22 hr. Approx. 21 hr. Approx. 26 hr.
MP3 128k*6Approx. 22 hr. Approx. 21 hr. Approx. 26 hr.
MP3 48k*7Approx. 25 hr. Approx. 21 hr. Approx. 26 hr.
LPEC STHQ*8Approx. 18 hr. Approx. 20 hr. Approx. 24 hr.
*9
LPEC ST
LPEC STLP
LPEC SP
LPEC LP
Music file
(WMA 128 kbps/
44.1 kHz)
Approx. 20 hr. Approx. 21 hr. Approx. 25 hr.
*10
Approx. 22 hr. Approx. 21 hr. Approx. 27 hr.
*11
Approx. 22 hr. Approx. 22 hr. Approx. 28 hr.
*12
Approx. 26 hr. Approx. 24 hr. Approx. 30 hr.
— Approx. 20 hr. Approx. 25 hr.
Playback
using the
headphones
(hr. : hours)
Page 17

*1
The battery life is measured in testing using
methods proprietary to Sony.
The battery life may shorten depending on
how you operate the IC recorder.
*2
When playing back music through the
internal speaker with the volume level set to
20
*3
LPCM 44/16: LPCM file recorded using the
IC recorder in stereo high-quality recording
mode
*4
LPCM 22/16: LPCM file recorded using the IC
recorder in stereo long play recording mode
*5
MP3 192k: MP3 file recorded using the IC
recorder in stereo high-quality recording
mode
*6
MP3 128k: MP3 file recorded using the IC
recorder in stereo standard recording mode
*7
MP3 48k: MP3 file recorded using the IC
recorder in monaural standard recording
mode
*8
LPEC STHQ: LPEC stereo high quality
recording mode
*9
LPEC ST: LPEC stereo standard recording
mode
*10
LPEC STLP: LPEC stereo long play recording
mode
*11
LPEC SP: LPEC monaural standard play
recording mode
*12
LPEC LP: LPEC monaural long play recording
mode
Note while accessing
The IC recorder is accessing data when
an updating animation and “
庫...” appear in the display window or
the operation indicator flashes in orange.
While the IC recorder is accessing data,
do not remove the batteries or connect
or disconnect the USB AC adaptor (not
supplied). Doing so may damage the
data.
Note
If the IC recorder is required to process a
large amount of data, an updating animation
and “
更新資料庫...” may be displayed for
an extended period of time. This is not a
malfunction of the IC recorder.
Wait until the animation and message
disappear before starting operation.
更新資料
Getting Started
17
GB
Page 18

18
GB
Step 2: Setting the Clock
,
Setting the clock after recharging batteries
1 Press or to set the year,
month, day, hour, and minute in
sequence, then press .
/MENU
You need to set the clock to use the
alarm function or record the date and
time.
Clock setting display appears when you
insert batteries for the first time, or when
you insert batteries after the IC recorder
has been without batteries for a certain
period of time, “
and then the year section flashes in the
display window.
設定日期時間” appears,
“執行中...” appears and the clock
is set.
2 Press (stop) to return to the
display of the stop mode.
Page 19

Setting the clock using the menu
While the IC recorder is in the stop mode,
you can set the clock using the menu.
1 Select “日期&時間” in the menu.
Press and hold /MENU to enter the
menu mode.
The menu mode window will be
displayed.
Press or to select “細部選
單”, then press .
Press or to select “日期&時
間”, then press .
2 Press or to select “自動” or
“手動” and press .
When you selected “自動”, the clock is
automatically adjusted using the clock
in the computer connected to the IC
recorder and on which the supplied
Digital Voice Editor software is started.
When you select “
the next steps.
手動”, proceed to
3 Press the or to select
“09y1m1d,” then press .
4 Press or to set the year,
month, day, hour, and minute in
sequence, then press .
“執行中...” appears and the clock
is set.
19
Getting Started
GB
Page 20

20
GB
5 Press (stop) to return to the
display of the stop mode.
Tips
Press /MENU to return to the previous
operation.
You can set the time display for the clock
to “
12時制” or “24時制” in the menu. When
“12時制” is set, “AM” or “PM” appears in the
display window.
Note
If you do not press within one minute
of entering the clock setting data, the clock
setting mode is cancelled and the window will
return to the display of the stop mode.
To display the current time
Slide the HOLD switch in the direction of
the arrow to display the current time.
Step 3: Preparations Required before Recording
Recording at a meeting
Set “錄音等級” to “高 ” or “較高 ” in
the menu (page 30).
Slide the DIRECTNL switch to “ON” to
record a voice coming from a specific
direction (page 26).
Set “LCF (LOW CUT)” to “
to prevent noise caused by a projector,
etc. (page 37).
By placing the IC recorder on the stand,
you can record with clear and lownoise sound, without vibration noise
from the desk.
開” in the menu
Page 21

Recording a musical
performance
Set “錄音等級” to “音樂 ” (page 30)
in the menu to record more natural
acoustic sound, with preventing sound
distortion. For more realistic sound
recording, you can adjust the recording
level manually by setting “
“手動” (page 31).
Set “LIMITER” to “
開” in the menu
(page 33), to prevent distortion when a
loud sound is suddenly input.
By attaching a tripod (not supplied)
using the stand, you can adjust the
angles of the IC recorder and the builtin microphones more precisely.
錄音等級” to
Sound source
Approx. 2 to 3 m
Getting Started
Place the IC recorder
with its display
window facing
upward and the
built-in microphones
pointing at the sound
source.
Tripod (not supplied)
21
GB
Page 22

22
GB
Recording dictation (using the
voice recognition software)
Set “錄音等級” to “低 ” in the menu
(page 30).
Slide the DIRECTNL switch to “ON” to
record a voice coming from a specific
direction (page 26).
To transcribe a message recorded on
the IC recorder using voice recognition
software (not supplied), set “
to the LPCM, MP3 or LPEC (except LP)
mode (page 27).
Microphone
Before you can transcribe recorded
messages, you have to create a user file
specifically adapted to the sound of your
recorded speech. This procedure is called
“training.” For details on “training,” refer to the
help files supplied with the voice recognition
software you are using.
錄音模式”
To obtain maximum recognition accuracy,
hold the IC recorder so that the microphone
is about 2 - 3cm from the corner of your
mouth.
To minimize the sound of your breath in the
recordings, do not hold the microphone
directly in front of your mouth.
To obtain maximum recognition accuracy,
avoid recording in a noisy place.
You cannot transcribe a message recording
the voices of more than one person.
Page 23

Turning the IC
Recorder On or Off
When you are not using the IC recorder,
you can prevent the batteries from
getting weak quickly by turning the
power off.
Turning the power o
Slide the HOLD switch in the direction
of the arrow in the stop mode. “HOLD”
with the key mark and the current time is
displayed, then “
關閉電源” is displayed.
The IC recorder turns off within a few
seconds.
Turning the power on
Slide the HOLD switch in the opposite
direction from that of the arrow. The IC
recorder turnes on, and an accessing
animation is displayed.
Tips
When you are not going to use the IC
recorder for a long time, we recommend to
turn off the IC recorder.
About 10 minutes after you have turned
on the IC recorder and left it without doing
anything, the display goes off automatically
and the IC recorder turns off. (Press any
button to show the display.)
Getting Started
23
GB
Page 24

Recording
Recording Messages
Built-in directional
microphone
Built-in stereo
microphones
Operation indicator
1 Select a folder.
Press /MENU to display the folder
selection window.
Press or to select the
folder in which you want to record
messages, then press .
GB
24
(headphone)
jack
,
/MENU
2 Start recording.
Press (record/pause) in the stop
mode.
The operation indicator lights in red.
(When “LED” is set to “關” in the menu
(page 88), the operation indicator
does not light.)
You do not need to press and hold
(record/pause) while recording.
DIRECTNL
HOLD
Page 25

When you press and hold (record/
pause), the IC recorder enters the
recording pause mode.
The new message will be
automatically recorded after the last
recorded message.
Speak into the built-in microphones.
3 Press (stop) to stop recording.
The IC recorder stops at the beginning
of the current recording.
Tips
Before you start recording, we recommend
you make a trial recording first.
When you purchase the IC recorder, there
are 5 folders already available, and you can
record up to 999 messages in each folder.
You can make new folders or delete
unwanted folders using the supplied Digital
Voice Editor software (page 97).
While recording, you can lock all the
functions of all the buttons so that you can
prevent inadvertent operations, by sliding
the HOLD switch in the direction of the
arrow.
Notes
You cannot record a message in a folder
transferred from a computer. If you press
(record/pause) when you have selected
a
folder, the folder will be automatically
switched to a
folder in which a message
can be recorded, and the message will be
recorded as the last one in the folder.
While the operation indicator is flashing or
is lit in red or orange, do not remove the
batteries or connect or disconnect the USB
AC adaptor. Doing so may damage the data.
Noise may be recorded if an object, such
as your finger, etc., accidentally rubs or
scratches the IC recorder during recording.
Before making a recording, be sure to
check the remaining power of the batteries
(page 15).
When “
錄音等級” is set to “低 ”, “高 ”, “較
高 ”, or “音樂 ”, the limiter function does
not work.
To avoid replacing batteries during a long
recording session, use a USB AC adaptor (not
supplied) (page 121).
The maximum recording time varies if you
record messages in different recording
modes.
Recording
25
GB
Page 26

To Do this
pause
recording*
release pause
and resume
recording
review the
current
recording
instantly**
review during
recording**
* One hour after you pause recording,
recording pause is automatically released
and the IC recorder enters the stop mode.
** You cannot select this function in the
manual recording mode.
Press (record/pause).
During recording pause, the
operation indicator flashes
in red and “ “ flashes in
the display window.
Press (record/pause)
again.
Recording resumes
from that point. (To stop
recording after pausing
recording, press (stop).)
Press .
Recording stops and
playback starts from the
beginning of the message
just recorded.
Press and hold during
recording or recording
pause. Recording stops and
you can search backwards
while listening to fast
playback sound. After you
release , playback starts
from that point.
Monitoring the recording
Connect the supplied stereo
headphones to the
(headphone)
jack and monitor the recording. You
can adjust the monitoring volume by
pressing VOL + or –, but the recording
level is fixed.
Recording a sound centering on a
specic direction
To record a sound centering on a specific
direction, slide the DIRECTNL switch
to the “ON” position. This is convenient
when you want to record a particular
sound at a conference/meeting, etc.
When the DIRECTNL switch is set to
“ON,” the directional microphone is used,
therefore the sound is recorded in the
monaural mode even when you select
the stereo recording mode (LPCM 44/16,
LPCM 22/16, MP3 192k, MP3 128k, LPEC
STHQ, LPEC ST or LPEC STLP mode).
When you are using an external
microphone, the DIRECTNL switch does
not function.
26
GB
Page 27

When the DIRECTNL switch is set to “OFF”
Selecting the Recording Mode
When the DIRECTNL switch is set to “ON”
,
/MENU
The IC recorder is compatible with 3
kinds of codec, LPCM (Linear PCM), MP3,
and LPEC. The features offered by each
are as follows.
LPCM (Linear PCM): This is a WAV file
and you can record the sound without
compression, providing higher quality
than MP3 or LPEC. On the other hand,
the file size is very large, it takes time to
transfer to a computer, and the available
recording time is shorter than either MP3
27
Recording
GB
Page 28

or LPEC. We recommend this codec for
recording only when the sound quality
is important, such as when recording a
musical performance.
MP3: A standard method of sound
compression, which can be played back
using many different kinds of computers.
We recommend this codec when you
want to send recorded messages by mail
or share them with other people.
LPEC: A sound compression method
provided solely by Sony. You can play
back, edit, and convert files to an MP3
or WAV format using the supplied
application software, “Digital Voice Editor”
We recommend you use this software
when you want to edit messages/music
recorded using the IC recorder on a
computer. When you record messages
using the LPEC format, you can add
bookmarks and/or priority marks to the
messages.
You can select the recording mode in the
menu when the IC recorder is stopped.
“錄音模式” is set to “MP3 ” when you
purchase the IC recorder.
1 Press and hold /MENU to enter
the menu mode.
The menu mode window will be
displayed.
2 Press or to select “錄音模
式”, then press .
3 Press or to select the
recording mode you want, then
press .
LPCM 44/16 : Stereo (44.1 kHz/16
bit/WAV)
You can record with stereo highquality sound equivalent to a CD.
LPCM 22/16 : Stereo (22.05 kHz/16
bit/WAV)
You can record for a longer time
with high-quality stereo sound.
28
GB
Page 29

MP3 192k : Stereo (44.1 kHz/192 kbps,
MPEG1 Layer3)
You can record with high-quality
stereo sound.
MP3 128k : Stereo (44.1 kHz/128 kbps,
MPEG1 Layer3)
You can record with stereo sound.
MP3 48k : Monaural (44.1 kHz/48 kbps,
MPEG1 Layer3)
You can record with monaural
sound.
LPEC STHQ : Stereo (44.1 kHz/128
kbps)
You can record with high-quality
stereo sound.
LPEC ST : Stereo (44.1 kHz/48 kbps)
You can record with standard stereo
sound.
LPEC STLP : Stereo (44.1 kHz/24 kbps)
You can record for a longer time
with stereo sound.
LPEC SP : Monaural (16 kHz/16 kbps)
You can record with standard
monaural sound.
LPEC LP : Monaural (8 kHz/6 kbps)
You can record for a longer time
with monaural sound.
4 Press (stop) to exit the menu
mode.
Note
You cannot set the recording mode while
recording.
Maximum recording time
When all messages are recorded with
the same recording mode, the maximum
recording time of all the folders is as
follows.
LPCM 44/16 mode LPCM 22/16 mode MP3 192k mode
12 hr. 55 min. 25 hr. 50 min. 95 hr. 15 min.
MP3 128k mode MP3 48k mode LPEC STHQ mode
142 hr. 50 min. 381 hr. 5 min. 140 hr. 45 min.
LPEC ST mode LPEC STLP mode LPEC SP mode
371 hr. 35 min. 715 hr. 20 min. 1,132 hr. 15 min.
LPEC LP mode
3,019 hr. 25 min.
(hr. : hours/min. : minutes)
Recording
29
GB
Page 30

Setting the Recording Level
,
/MENU
1 Press and hold /MENU to enter
the menu mode.
The menu mode window will be
displayed.
2 Press or to select “錄音等
級,” then press .
3 Press or to select
recording level you want, then
press .
You can set the recording level in the
menu when the IC recorder is stopped or
is recording.
“錄音等級” is set to “高 ” when you
purchase the IC recorder.
GB
30
低 : To record dictation with a
microphone in front of your mouth,
a sound near the IC recorder, or a
loud sound.
高 : To record the sound of a normal
conversation or meeting, such as
a recording made in a conference
room or during interviews.
Page 31
較高 : To record a sound far away
from the IC recorder or a low sound,
such as a recording made in a
spacious room.
音樂 : To record more natural
acoustic sound, as well as
preventing sound distortion.
手動 : During manual recording,
you can adjust the recording level
manually.
4 Press (stop) to exit the menu
mode.
Manual Recording Mode
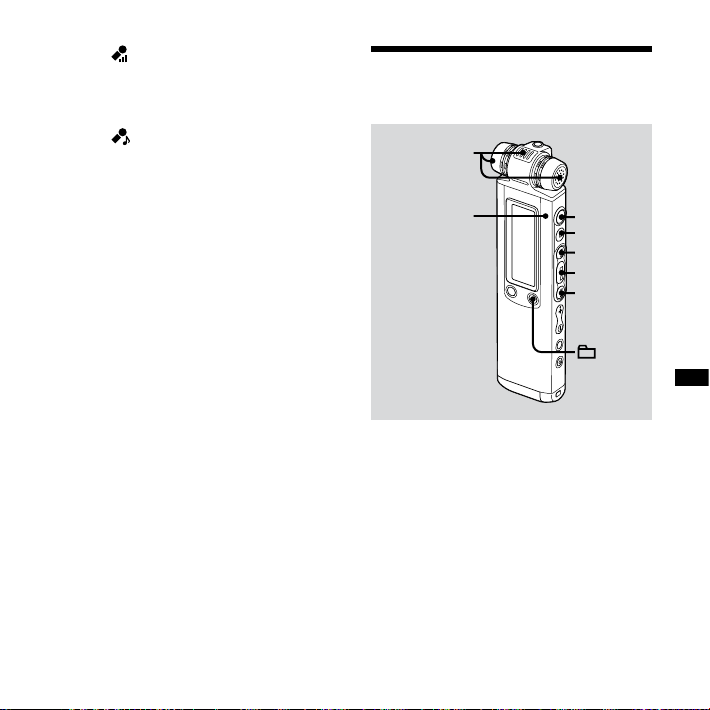
Built-in
microphones
Operation
indicator
When you set “錄音等級” to “手動”, you
can adjust the recording level manually.
/MENU
Recording
31
GB
Page 32
1 Set “錄音等級” to “手動” in the
menu.
For details, see “Setting the Recording
Level” (page 30).
2 Select a folder.
Press /MENU to display the folder
selection window.
Press or to select the
folder in which you want to record
messages, then press .
3 Press and hold (record/pause).
The IC recorder enters the record
standby mode. When you speak into
the microphone, the level meter in the
display window moves.
4 Press or to adjust the
recording level, depending on the
sound source.
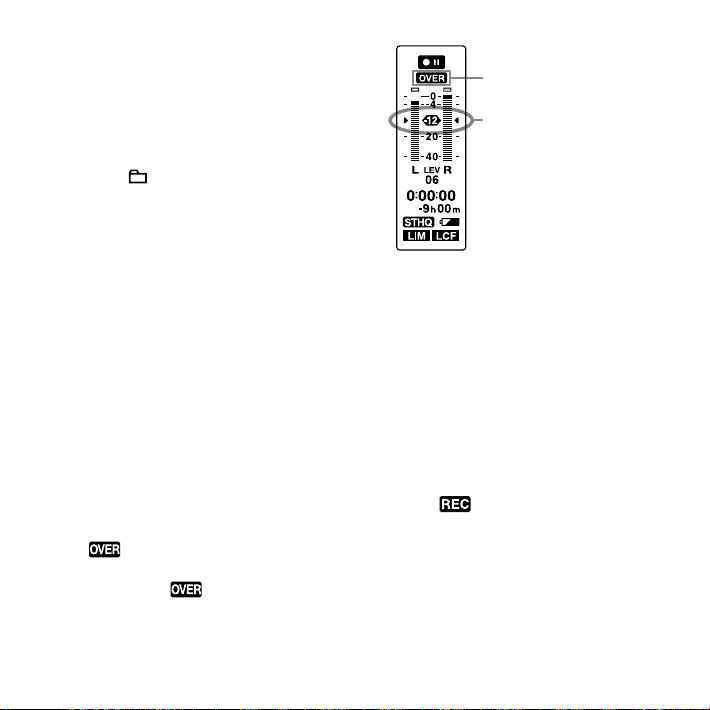
Adjust the maximum level of the
sound to be recorded to about –12 dB
on the level meter, according the
sound source.
If “
” is displayed, press or
and adjust the recording level
down so that “
prevent sound distortion.
” is not displayed, to
OVER indicator
Adjust the maximum
level of the sound to
about –12 dB.
Press and hold or to change
the sound level continuously. The
sound level is also displayed as a
number below the level meter.
5 Make other settings for recording
such as “LIMITER,” “LCF (LOW CUT),”
etc., in the menu.
6 Start recording.
Press (record/pause).
The operation indicator lights in red
and “ ” is displayed.
You do not need to press and hold
(record/pause) while recording.
Speak into the built-in microphone.
7 Press (stop) to stop recording.
32
GB
Page 33
Tip
The settings you have set for the manual
recording mode are saved after the recording
is finished or the recording level is switched to
settings other than “
can start the manual recoding with the same
settings the next time.
Notes
In the manual recording mode, you cannot
record with the VOR function (page 38).
In the manual recording mode, you cannot
review the current recording, even if you
press
.
手動”, such as “低 ”. You
Setting the Input Level Automatically to Prevent Sound Distortion – the Limiter Function
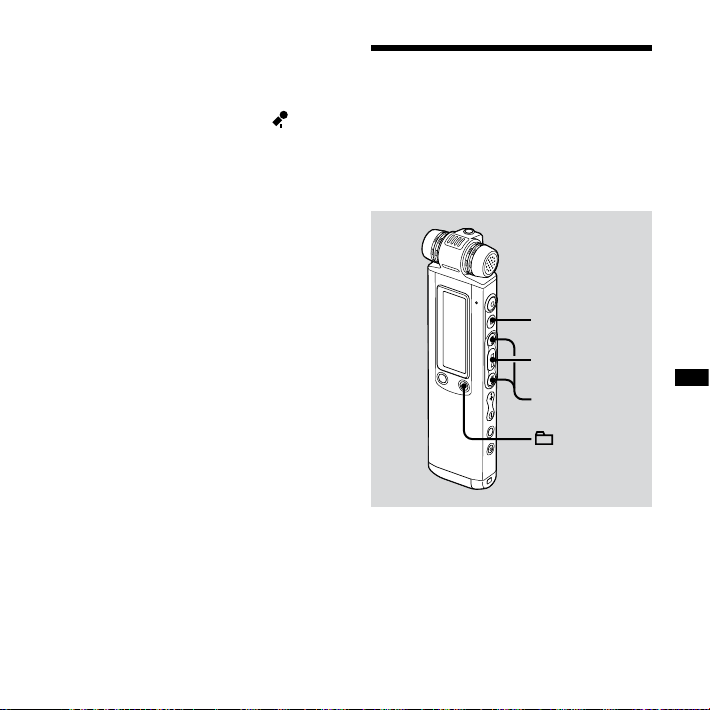
,
/MENU
During the stop or recording mode set
“LIMITER” to “
automatically within the maximum input
level to prevent the sound distortion
which occurs when a sound that is too
loud is input. A sound that is too loud
開”, and the input level is set
Recording
33
GB
Page 34
is adjusted automatically to the proper
level to prevent sound distortion.
“LIMITER” is set to “
the IC recorder.
開” when you purchase
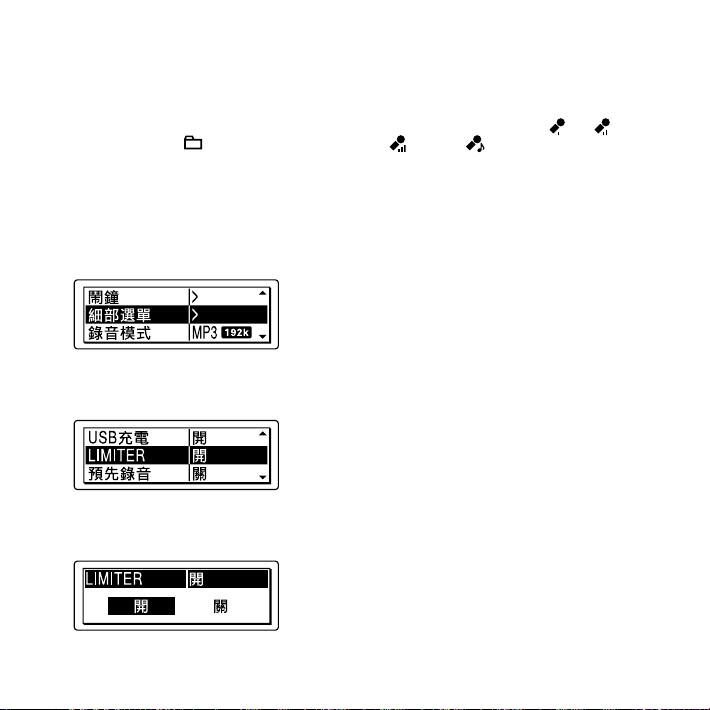
1 Press and hold /MENU to enter
the menu mode.
The menu mode window will be
displayed.
2 Press or to select “細部選
單”, then press .
3 Press or to select
“LIMITER,” then press .
4 Press or to select “開”, then
press .
5 Press (stop) to exit the menu
mode.
Note
When “錄音等級” is set to “低 ”, “高 ”, “較
高 ”, or “音樂 ”, the limiter function does
not work.
To cancel the limiter function
Set “LIMTER” to “關” in step 4.
34
GB
Page 35
Recording a Few
Seconds in Advance,
before Starting to
Record – the PreRecording Function
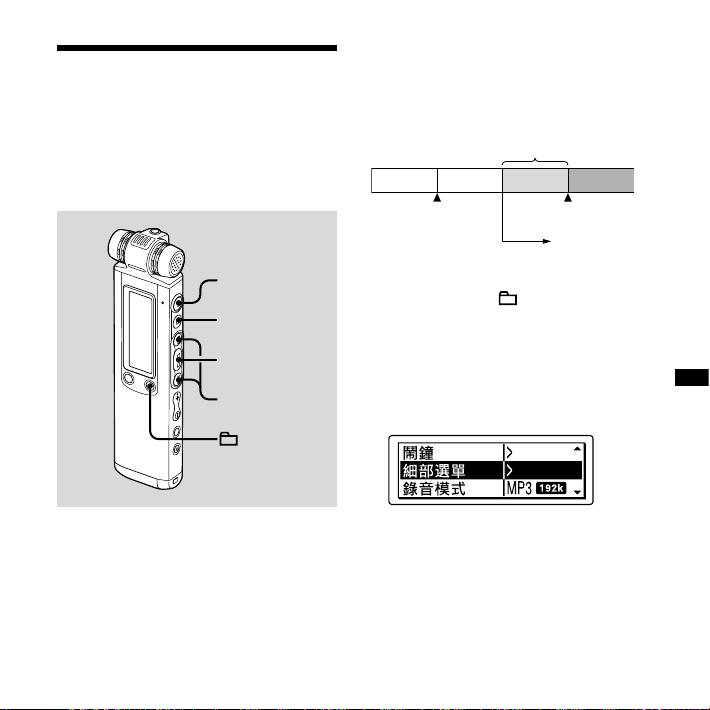
This is useful to record during interviews
or when making an open-air recording
so that you will not miss the chance to
start recording.
Sounds for 5 seconds are buffered in the memory
Press and hold (record/
pause) to enter the recording
the standby mode.
Press (record/pause).
Recording starts.
,
/MENU
The pre-recording function allows you
to record sound sources for a maximum
of 5 seconds prior to the point when
the recording is started. Sounds for 5
seconds are buffered in the memory.
1 Press and hold /MENU to enter
the menu mode.
The menu mode window will be
displayed.
2 Press or to select “細部選
單”, then press .
35
Recording
GB
Page 36
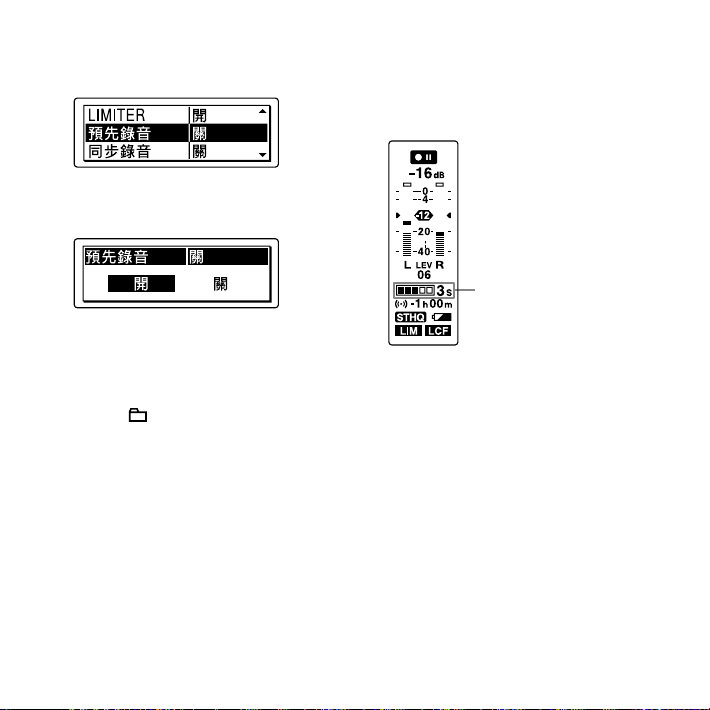
3 Press or to select “預先錄
音”, then press .
4 Press or to select “開”, then
press .
5 Press (stop) to exit the menu
mode.
6 Select a folder.
Press /MENU to display the folder
selection window.
Press or to select the
folder in which you want to record
messages, then press .
7 Press and hold (record/pause) to
enter the recording standby mode.
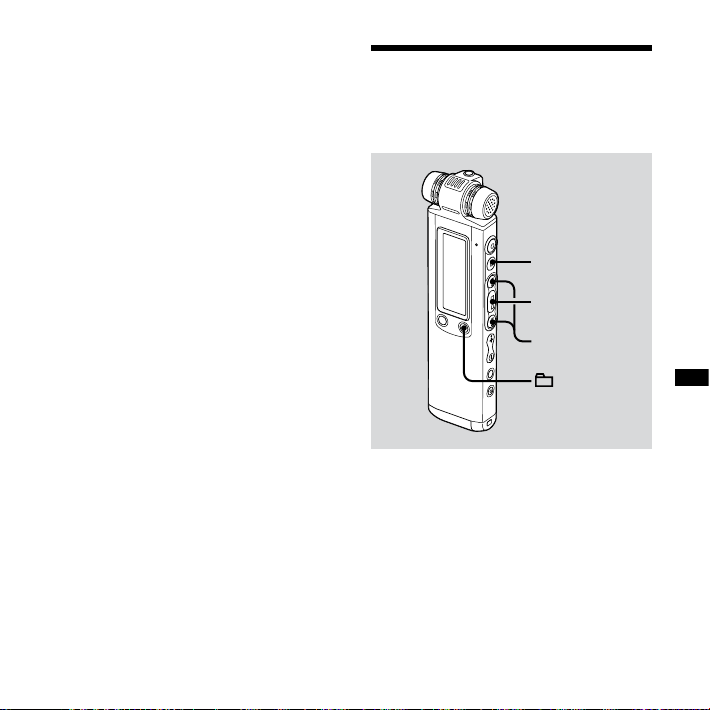
Sounds for the last 0 to 5 seconds are
buffered in the memory.
Displays that the sound
for 0 to 5 seconds are
buered in the memory.
8 Press (record/pause) to start
recording.
The standby for recording mode is
released, and recording starts. Sounds
are saved for the 0 to 5 seconds prior
to the point the button is pressed.
9 Press (stop) to stop recording.
36
GB
Page 37
Notes
If you start recording with pre-recording
function using the built-in microphones,
a click noise may be recorded when you
press
(record/pause). To record with pre-
recording function, we recommend using an
external microphone.
When the remaining recordable time is less
than 10 seconds, the pre-recording function
is disabled.
When 60 minutes have passed after the
IC recorder entered the standby mode,
the standby mode will be cancelled and
recording stops.
If you stop recording before step 8, sounds
buffered in the memory will not be saved.
To cancel the pre-recording
function
Set “預先錄音” to “關” in step 4.
Cutting out Low Frequency – the LCF Function
,
/MENU
When you set the LCF (Low Cut Filter)
function to “
mode, you cut out a frequency of lower
than 200 Hz to reduce the roaring noise
from wind, etc., this helps to record a
sound source more clearly.
The LCF function is set to “
purchase the IC recorder.
開” in the stop or recording
關” when you
Recording
37
GB
Page 38
1 Press and hold /MENU to enter
the menu mode.
The menu mode window will be
displayed.
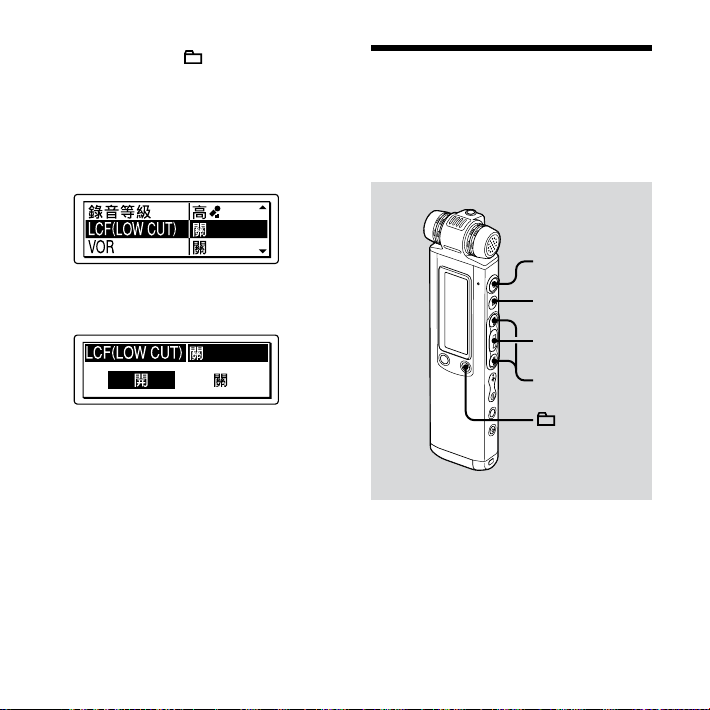
2 Press or to select “LCF
(LOW CUT),” then press .
3 Press or to select “開”, then
press .
Starting to Record Automatically in Response to Sound – the VOR Function
,
4 Press (stop) to exit the menu
mode.
To cancel the LCF function
Set “LCF (LOW CUT)” to “關” in step 3.
GB
38
/MENU
You can set the VOR (Voice Operated
Recording) function to “
IC recorder start recording when the IC
recorder detects sound, and pause when
no sound is heard, eliminating recording
during soundless periods.
開”, to make the
Page 39
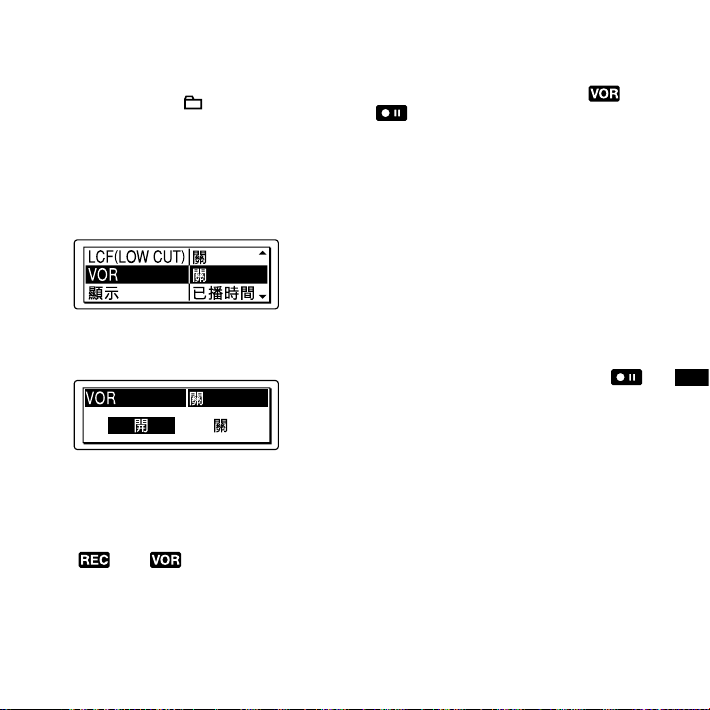
The VOR function is set to “關” when you
purchase the IC recorder.
1 Press and hold /MENU to enter
the menu mode.
The menu mode window will be
displayed.
2 Press or to select “VOR,”
then press .
3 Press or to select “開”, then
press .
4 Press (stop) to exit the menu
mode.
5 Press (record/pause).
“ ” and “ ” appear in the display
window.
The recording starts when the IC recorder
detects sound. The recording pauses
when no sound is detected and “
” and
“ ” flash. When the IC recorder detects
sound again, the recording starts again.
To cancel the VOR function
Set “VOR” to “關” in step 3.
Notes
The VOR function is affected by the sound
around you. Set “
according to the recording conditions. If
recording is not satisfactory after you have
changed the microphone sensitivity, or for
an important recording, set “VOR” to “
the menu.
If you press
recording during VOR recording, only “
” flashes.
During synchronized recording (page 47),
manual recording (page 31), and prerecording (page 35), the VOR function does
not work.
錄音等級” in the menu
關” in
(record/pause) to pause
Recording
39
GB
Page 40
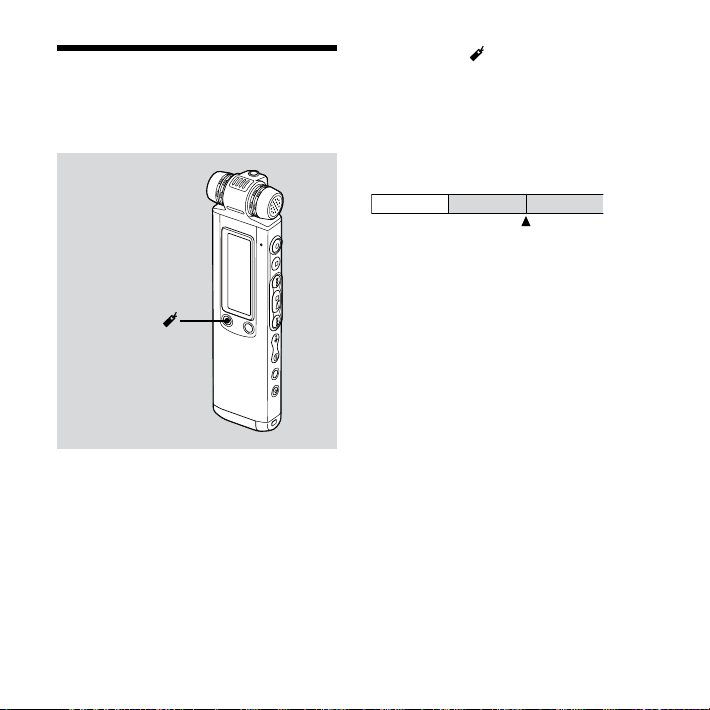
Dividing a Message into Two During Recording
DIVIDE/
You can divide a message during
recording so that the message is divided
into two parts, and a new message
number is added to the newer part of
the divided message.
Press DIVIDE/ during recording.
An animation appears on the display
and the new message number is added
at the point you pressed the button.
The message will be recorded as two
messages, however recording continues
without stopping.
Message 1 Message 2 Message 3
Message is divided.
Message 2 and Message 3 are recorded
without stopping.
Tip
You can divide the currently recorded message
during recording pause.
40
GB
Page 41
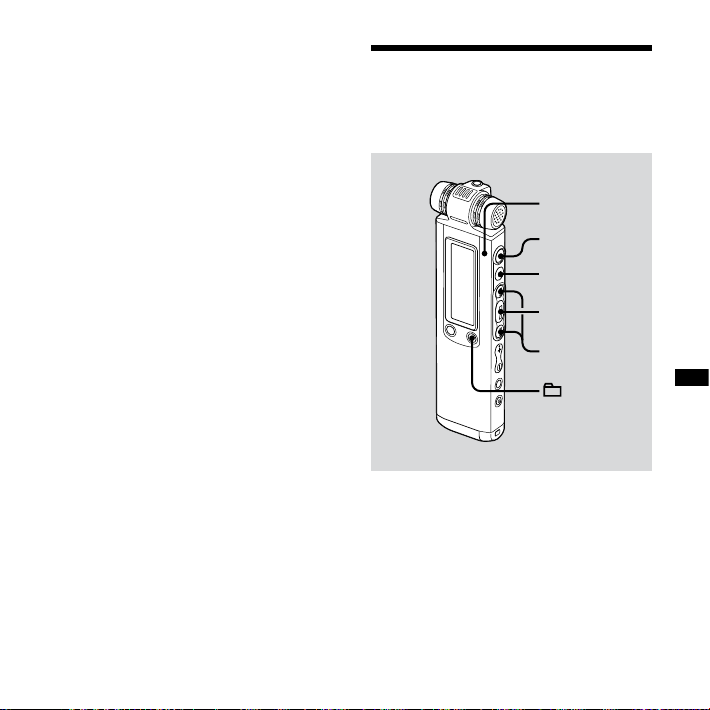
Notes
You need a certain amount of free space in
the memory to divide a message. For more
information, see “System Limitations” on
page 119.
If 999 messages have been recorded in a
folder, you cannot divide a message in that
folder.
Once a message is divided, you cannot
re-combine the divided messages using the
IC recorder.
You cannot divide a message at the very
beginning (0.5 seconds from the beginning)
of the message.
When you divide a message into two, at the
point of division, the end of the first message
and the beginning of the second message
may be interrupted.
During synchronized recording (page 47),
you cannot divide a message.
If you divide messages too frequently while
the unit is recording them, the following
phenomenon may occur: The operation
indicator keeps flashing, and you cannot
operate the unit for a certain period. This is
not a malfunction. Wait until the operation
indicator goes off.
Adding a Recording to a Previously Recorded Message
Operation
indicator
,
/MENU
When “新增/覆寫” in the menu is set to
“新增”, you can add a recording to the
message being played back. The added
recording will be placed after the current
message, and will be counted as a part of
the message.
Recording
41
GB
Page 42
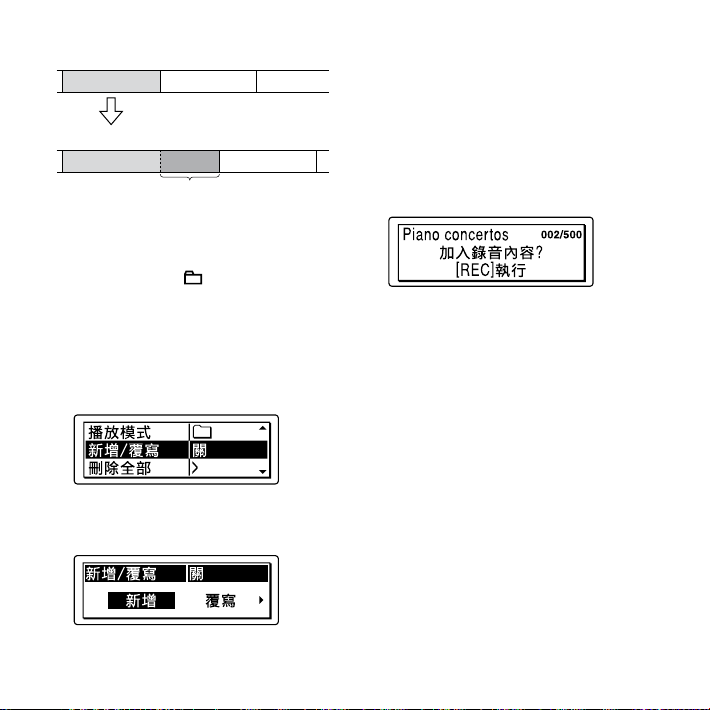
During playback of Message 3
Message 3 Message 4
After adding a recording
Message 3 Message 4
Added recording
Select the message to which you want to
add a recording first.
1 Press and hold /MENU to enter
the menu mode.
The menu mode window will be
displayed.
2 Press or to select “新增/覆
寫”, then press .
3 Press or to select “新增”,
then press .
4 Press (stop) to exit the menu
mode.
5 When the message to be added
is played back, press (record/
pause).
“加入錄音內容? [REC]執行” appears.
For details on playback, see page 51.
6 While “加入錄音內容? [REC]執行” is
displayed, press (record/pause).
The operation indicator will turn red.
The new recording will be added at
the end of the current message.
7 Press (stop) to stop recording.
42
GB
Page 43
Notes
You cannot add a recording when the
message file has reached the maximum size
limit (1 GB with LPEC files or MP3 files and 2
GB with LPCM files).
You cannot add a recording to an LPCM file
or an MP3 file that was not recorded using
the IC recorder.
If 10 minutes have passed after step 5, you
must start the procedure again from step 5.
You cannot add a recording if the remaining
memory is insufficient.
The added portion of a message will be
recorded in the same recording mode.
Adding an Overwrite Recording during Playback
Operation
indicator
,
/MENU
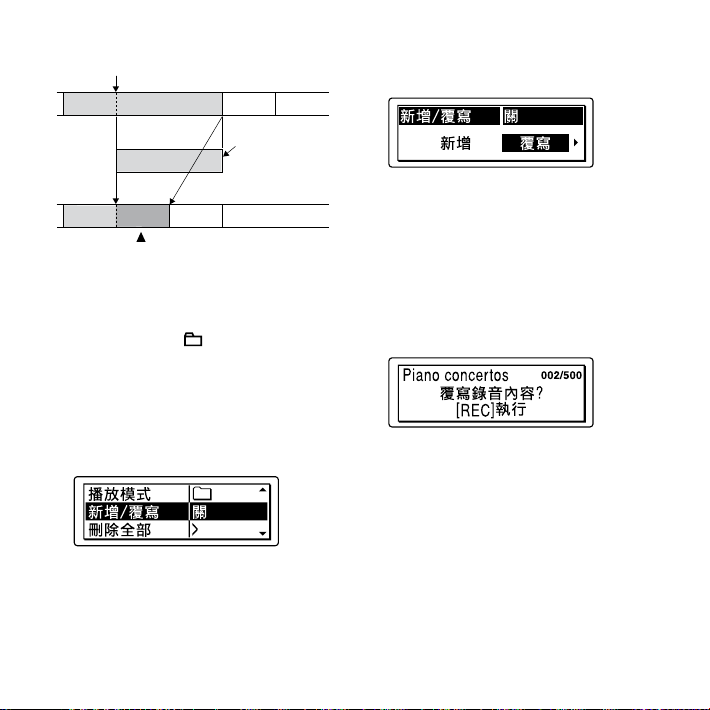
When “新增/覆寫” in the menu is set
to “
覆寫”, you can add an overwrite
recording after a selected point in a
recorded message. The part of the
message after the selected point is
deleted.
Recording
43
GB
Page 44
The starting point of an
overwrite recording
Message 2 Message 3 Message 4
The deleted part of
Message 2
3 Press or to select “覆寫”,
then press .
Message 2 Message 3 Message 4
Added overwrite recording in Message 2
Select the message to which you want to
add an overwrite recording first.
1 Press and hold /MENU to enter
the menu mode.
The menu mode window will be
displayed.
2 Press or to select “新增/覆
寫”, then press .
GB
44
4 Press (stop) to exit the menu
mode.
5 When the message to be
overwritten is played back, press
(record/pause).
“覆寫錄音內容? [REC]執行” appears.
For details on playback, see page 51.
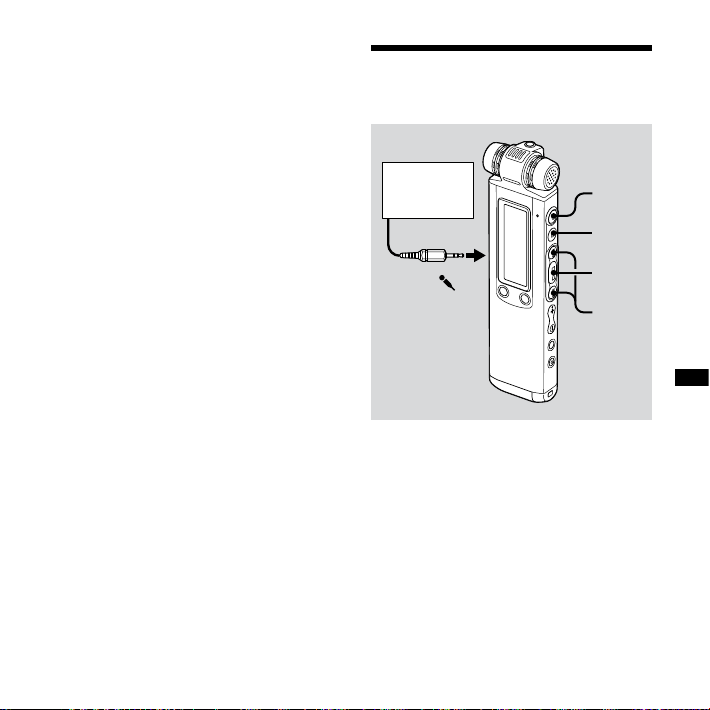
6 While “覆寫錄音內容? [REC]執行” is
displayed, press (record/pause).
The operation indicator will turn red.
Then recording starts.
7 Press (stop) to stop recording.
Page 45
Notes
You cannot add an overwrite recording
to a file other than an LPCM file when
the message/music file has reached the
maximum size limit (1 GB). You can add
an overwrite recording to an LPCM file,
even if the message/music file has reached
the maximum size limit (2 GB), when the
beginning of the point to be overwritten has
not reached the maximum size limit.
You cannot add an overwrite recording to an
LPCM file or MP3 file which was not recorded
using the IC recorder.
If 10 minutes have passed after step 5, you
must start the procedure again from step 5.
Recording with an External Microphone
Stereo
microphone
To the
(microphone)
jack
Tip
Before you start recording, we recommend
you make a trial recording first.
1 Connect an external microphone to
the (microphone) jack when the
IC recorder is in the stop mode.
“選擇輸入” appears in the display
window.
,
Recording
45
GB
Page 46
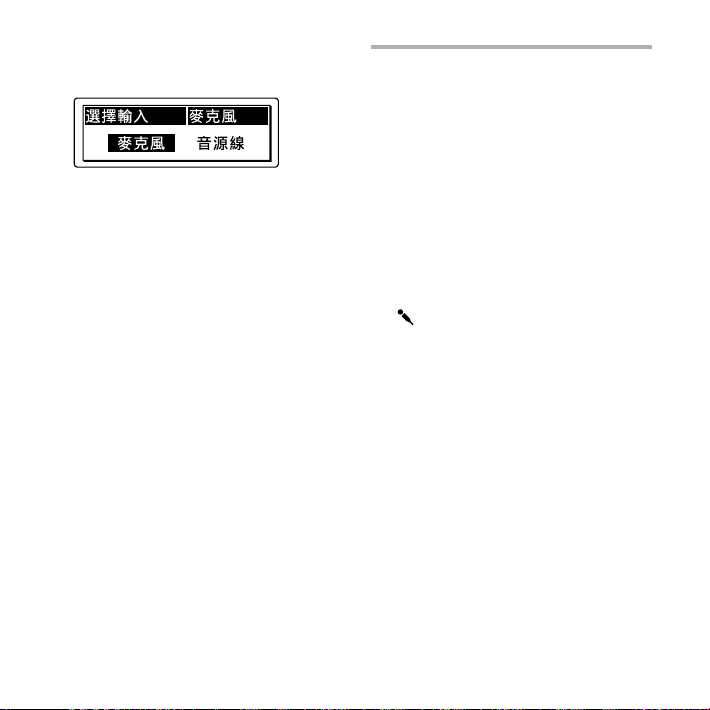
2 Press or to select “麥克風”,
then press .
3 Press (record/pause) to start
recording.
The built-in microphones are
automatically cut off.
If the input level is not strong enough,
adjust the recording level on the IC
recorder.
When a plug in power type
microphone is connected, power
is automatically supplied to the
microphone from the IC recorder.
Note
If “選擇輸入” is not displayed, set it in the
menu (page 86).
Recommended microphones
You can use the Sony ECM-CS10, or ECM-CZ10
electret condenser microphone (not supplied).
GB
46
Recording sound from a telephone or a cell phone
You can use the supplied telephone
recording microphone or the ECM-TL1
headphone-type telephone recording
electret condenser microphone (not
supplied) to record sound from a
telephone or a cell phone.
Insert the earphone of the microphone
into your ear, then, while holding the
receiver to the ear with the earphone in
it, connect the plug of the earphone to
the
jack of the IC recorder.
Notes
After you have made the connection, check
the sound quality of the conversation
and the recording level before you start
recording.
If the beep of the telephone or a dial tone is
recorded, the conversation may be recorded
with lower level of sound. In this case, start
recording after the conversation has started.
The VOR function may not work, depending
on the kind of telephone or the line
condition.
We assume no responsibility whatsoever
for any inconvenience, even if you cannot
record a conversation using the IC recorder.
Your dealer may not handle some of the
above listed optional accessories. Please ask
the dealer for detailed information.
Page 47
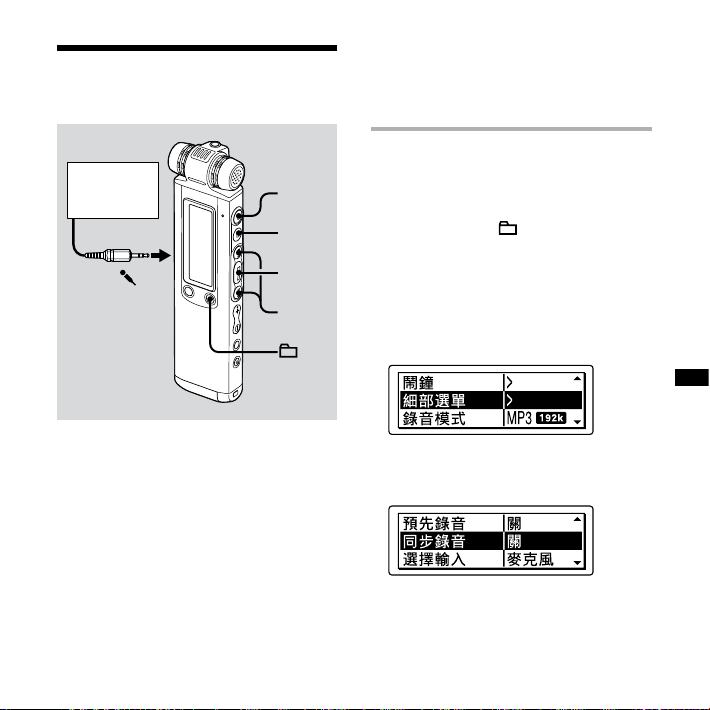
Recording from Other Equipment
CD player,
etc.
To the
(microphone)
jack
You can make music files without using
the computer by recording the sound
from other equipment, such as a CD
player, connected to the IC recorder.
When you use the synchronized
recording function, the IC recorder
enters the recording pause mode when
no sound is detected for more than
2 seconds and the IC recorder starts
recording again as a new message when
sound is detected.
,
/
MENU
Tip
Before you start recording, we recommend
you make a trial recording first.
To record using the synchronized recording function
1 Press and hold /MENU to enter
the menu mode.
The menu mode window will be
displayed.
2 Press or to select “細部選
單”, then press .
3 Press or to select “同步錄
音”, then press .
47
Recording
GB
Page 48
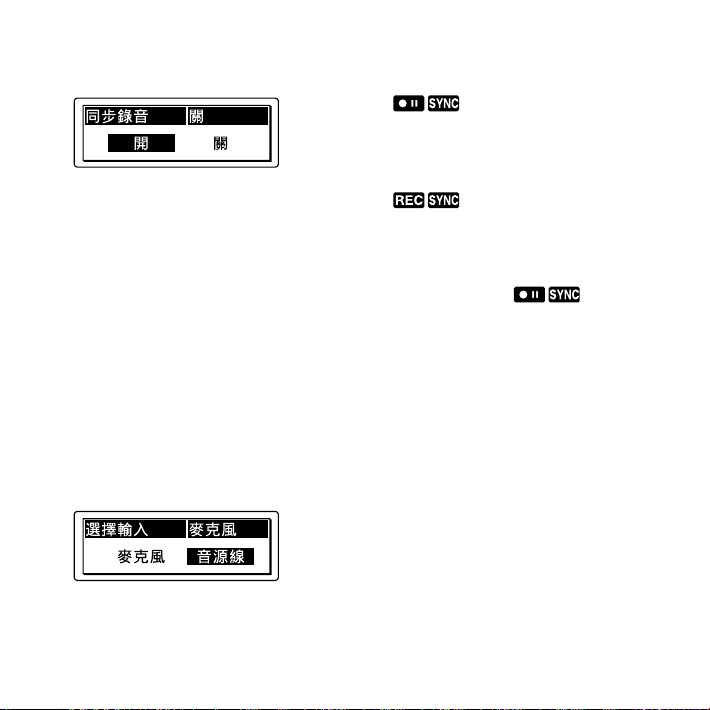
4 Press or to select “開”, then
press .
5 Press (stop) to exit the menu
mode.
6 Connect other equipment to the IC
recorder when the IC recorder is in
the stop mode.
Connect the audio output connector
(stereo mini-plug) of other equipment
to the
(microphone) jack of the IC
recorder using an audio connecting
cable*.
“選擇輸入” appears in the display
window.
7 Press or to select “音源線”,
then press .
8 Press (record/pause) to start
recording.
“ ” flashes and the IC recorder
enters the recording pause mode.
9 Start playback on the component
connected to the IC recorder.
“ ” appears on the display and
synchronized recording starts.
The synchronized recording pauses
when no sound is detected for more
than 2 seconds, and “
The IC recorder starts recording again as
a new message when sound is detected.
Notes
During synchronized recording, you cannot
divide a recording message (page 40), you
cannot pause recording (page 26), you
cannot record with the VOR function or
you cannot record with the pre-recording
function.
Depending on the equipment connected to
the IC recorder, the synchronized recording
function may not operate properly due to a
difference in the audio input level.
” flashes.
48
GB
Page 49
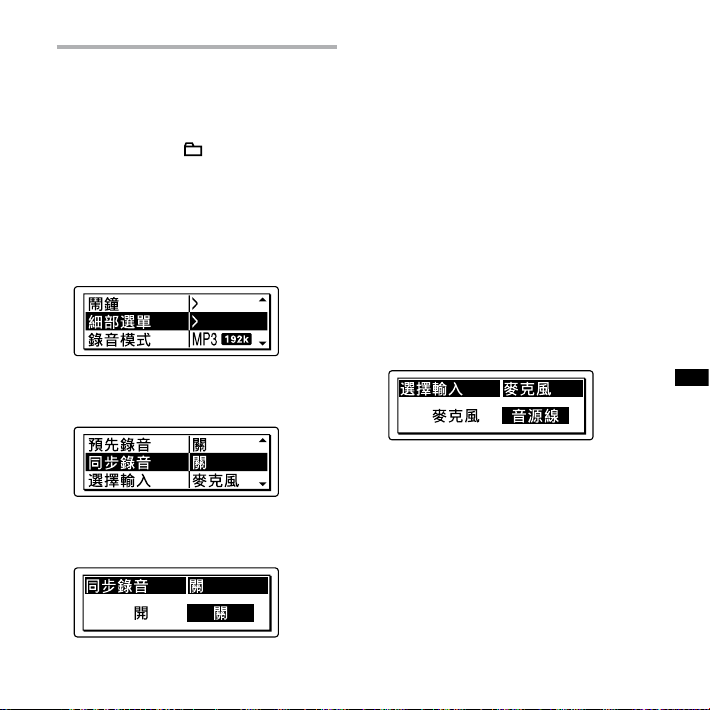
To record without using the synchronized recording function
1 Press and hold /MENU to enter
the menu mode.
The menu mode window will be
displayed.
2 Press or to select “細部選
單”, then press .
3 Press or to select “同步錄
音”, then press .
4 Press or to select “關”, then
press .
5 Press (stop) to exit the menu
mode.
6 Connect other equipment to the IC
recorder when the IC recorder is in
the stop mode.
Connect the audio output connector
(stereo mini-plug) of other equipment
to the
(microphone) jack of the IC
recorder using an audio connecting
cable*.
“選擇輸入” appears in the display
window.
7 Press or to select “音源線”,
then press .
8 Press (record/pause) to start
recording.
The built-in microphones are
automatically cut off and the sound
from the connected equipment is
recorded.
9 Start playback on the component
connected to the IC recorder.
Recording
49
GB
Page 50

* Optional audio connecting cables (not
supplied)
To the IC
recorder
RK-G139 Stereo
mini-plug
RK-G136 Stereo
mini-plug
Notes
If the input level is not strong enough,
To the other
equipment
Mini-plug
(monaural)
Stereo
mini-plug
connect the headphone jack (minijack,
stereo) of other equipment to the
(microphone) jack of the IC recorder in
step 6 and adjust the volume level on the
equipment connected to the IC recorder.
If “
選擇輸入” is not displayed, set it in the
menu (page 86).
Your dealer may not handle some of the
above listed optional accessories. Please ask
the dealer for detailed information.
50
GB
Page 51
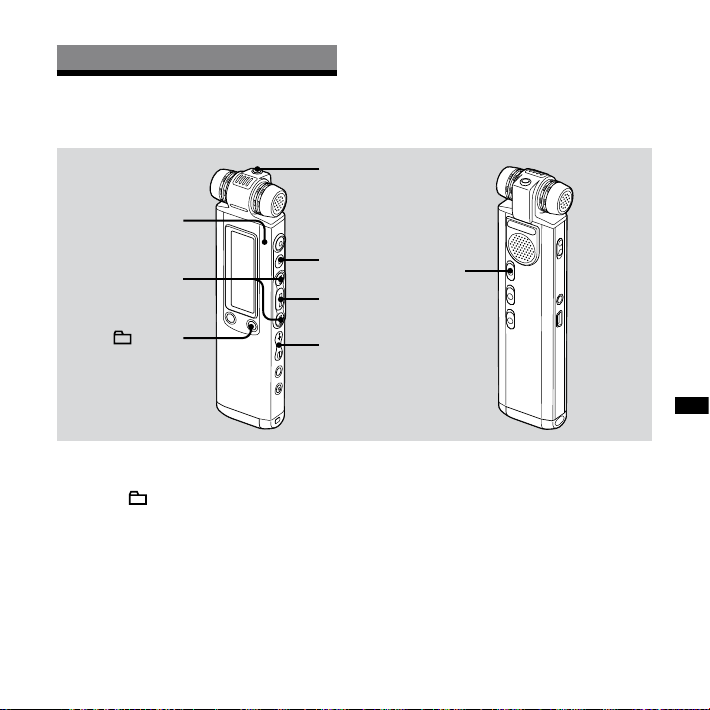
Playback
Playing Back Messages
Operation
indicator
,
/MENU
(headphone)
jack
VOL +, –
HOLD
Playback
1 Select a folder.
Press /MENU.
Press or to select the folder,
then press .
2 Press or to select the
message you want to play.
3 Press to start playback.
The operation indicator lights in green.
(When “LED” is set to “
(page 88), the operation indicator does
not light.)
關” in the menu
4 Press VOL + or – to adjust the
volume.
5 Press (stop) to stop playback.
51
GB
Page 52

52
GB
Tip
During playback you can lock all the functions
of all the buttons so that you can prevent
inadvertent operations by sliding the HOLD
switch in the direction of the arrow.
Listening with better sound
quality
To listen with the headphones :
Connect the stereo headphones to
the
(headphone) jack. The built-
in speaker will be automatically
disconnected.
To listen from an external speaker:
Connect an active speaker (not
supplied) to the
(headphone) jack.
Quickly locating the point you
wish to start playback (Easy
Search)
When “簡易搜尋” is set to “開” (page 82)
in the menu, you can quickly locate the
point at which you wish to start playback
by pressing
during playback.
You can go back approx. 3 seconds by
pressing
10 seconds by pressing
function is useful for locating a desired
point in a long recording.
or repeatedly
once, or advance approx.
once. This
Searching forward/backward
during playback (Cue/Review)
To search forward (Cue): Press and
hold
during playback and release
it at the point you wish to resume
playback.
To search backward (Review): Press
and hold
release it at the point you wish to
resume playback.
The IC recorder searches at slow speed
with playback sound first. This is useful to
check one word forward or back. Then,
if you press and hold the button, the IC
recorder starts to search at higher speed.
during playback and
Page 53

When messages are played back
to the end of the last message
When you play back or fast play back to the
end of the last message, “MESSAGE END”
lights up for 5 seconds and the operation
indicator lights up in green. (You cannot
hear the playback sound.)
When “MESSAGE END” and the operation
indicator go off, the IC recorder will stop at
the beginning of the last message.
If you press and hold
END” is lit, the messages are played back
rapidly, and normal playback will start at the
point you release the button.
If the last message is long and you wish to
start playback at a later part of the message,
press, hold
message, then press
END” is lit to go back to the desired point.
For messages other than the last one, go to
the beginning of the next message and play
backward to the desired point.
while “MESSAGE
to go to the end of the
while “MESSAGE
To Do this
stop at the
current position
(Playback Pause
function)
go back to the
Press (stop) or .
To resume playback from
that point, press
again.
Press once.**
beginning of
the current
message*
go back to
previous
messages
Press repeatedly.
(During stop mode, keep
the button pressed to
go back the messages
continuously.)
skip to the next
Press once.**
message*
skip to the
succeeding
messages
Press repeatedly.
(During stop mode,
keep the button pressed
to skip the messages
continuously.)
* If you have set a bookmark on the message,
the IC recorder stops at the bookmark.
** These operations are for when “
set to “
關” (page 82).
簡易搜尋” is
Playback
53
GB
Page 54
54
GB
Playing back a message
repeatedly
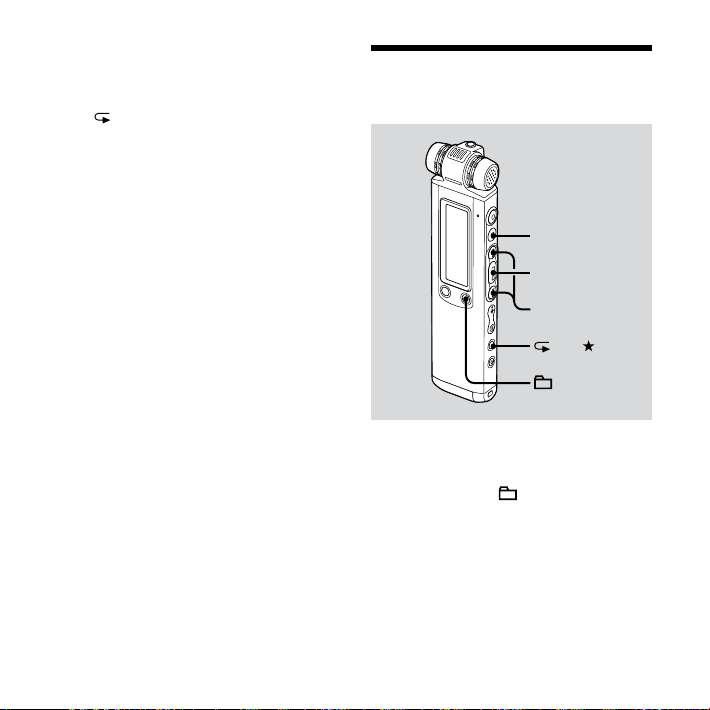
During playback, press and hold
until “
1” appears. The selected message
will be played back repeatedly.
To resume normal playback, press
again.
Selecting the Playback Mode
,
A-B/
/MENU
You can select the playback mode in the
menu.
1 Press and hold /MENU to enter
the menu mode.
The menu mode window will be
displayed.
Page 55
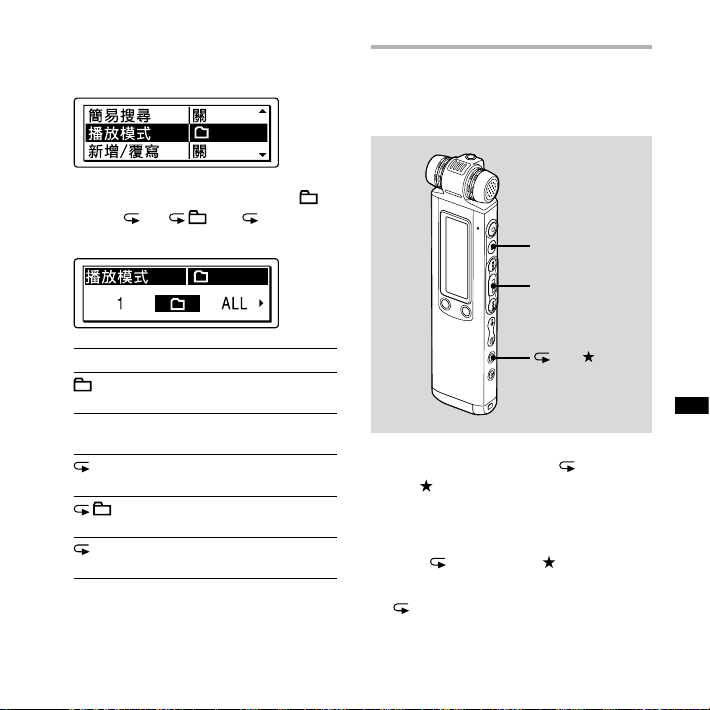
2 Press or to select “播放模
式”, then press .
3 Press or to select “1,” “ ,”
“ALL,” “ 1,” “ ,” or “ ALL,” then
press .
1 A message is played back.
Messages in one folder are
played back continuously.
ALL All the messages are played
back continuously.
1 One message is played back
repeatedly.
Messages in one folder are
played back repeatedly.
ALL All the messages are played
back repeatedly.
4 Press (stop) to exit the menu
mode.
Playing back a specied
section repeatedly – A-B
Repeat
A-B/
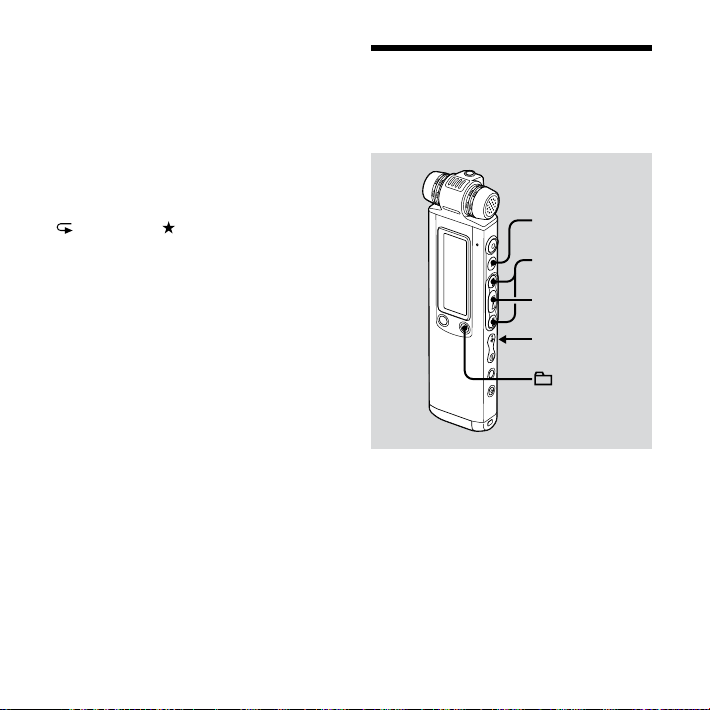
1 During playback, press (repeat)
A-B/
to specify the starting point
A.
“A-B B?” is displayed.
2 Press (repeat) A-B/ again to
specify the nishing point B.
“ A-B” is displayed and the specified
section is played back repeatedly.
Playback
55
GB
Page 56
56
GB
To resume normal playback
Press .
To stop A-B Repeat playback
Press (stop).
To change the segment specied
for A-B Repeat playback
During A-B Repeat playback, press
(repeat) A-B/ again to specify a new
starting point A. Then specify a new
finishing point B, as in step 2.
Notes
You cannot set point A and point B at
the very beginning (0.5 seconds from the
beginning) or at the very end (0.5 seconds
prior to the end) of the message.
You cannot set point A and point B near a
bookmark you have set (0.5 seconds before
or after the bookmark).
Adjusting the Playback Speed – the DPC Function
,
DPC
/MENU
When you slide the DPC (Digital Pitch
Control) switch to “ON,” you can adjust
the playback speed between +200% and
–75% of normal speed in the menu.
The message is played back in natural
tones by the digital processing function.
Page 57
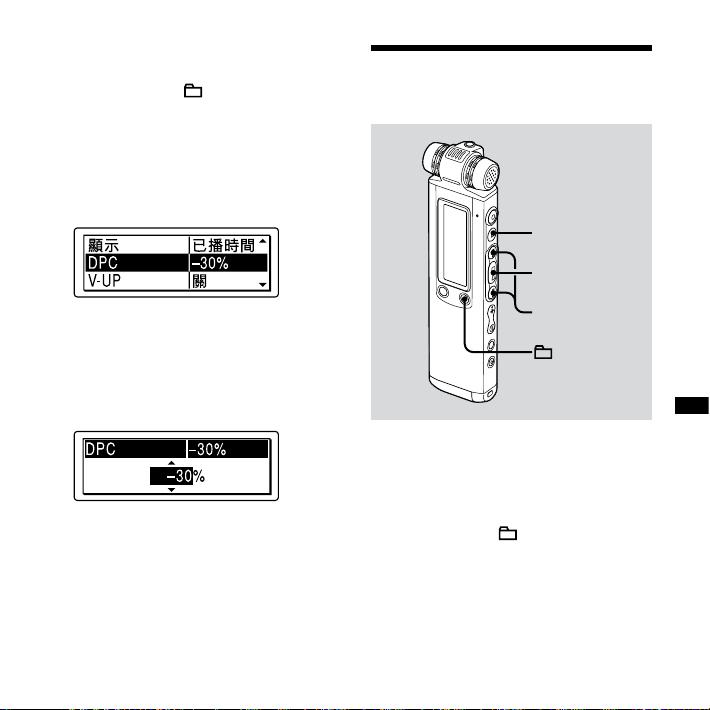
1 Slide the DPC switch to “ON.”
2 Press and hold /MENU to enter
the menu mode.
The menu mode window will be
displayed.
3 Press or to select “DPC,”
then press .
Reinforcing the Bass Sound
4 Press or to adjust the
speed of the playback, then press
.
You can set the speed by 10% for +
setting and by 5% for – setting.
5 Press (stop) to exit the menu
mode.
To resume normal playback
Slide the DPC switch to “OFF.”
,
/MENU
You can set the bass sound you want
for the playback in the menu. However,
when you play back using the built-in
speaker, this setting does not work.
1 Press and hold /MENU to enter
the menu mode.
The menu mode window will be
displayed.
57
Playback
GB
Page 58
58
GB
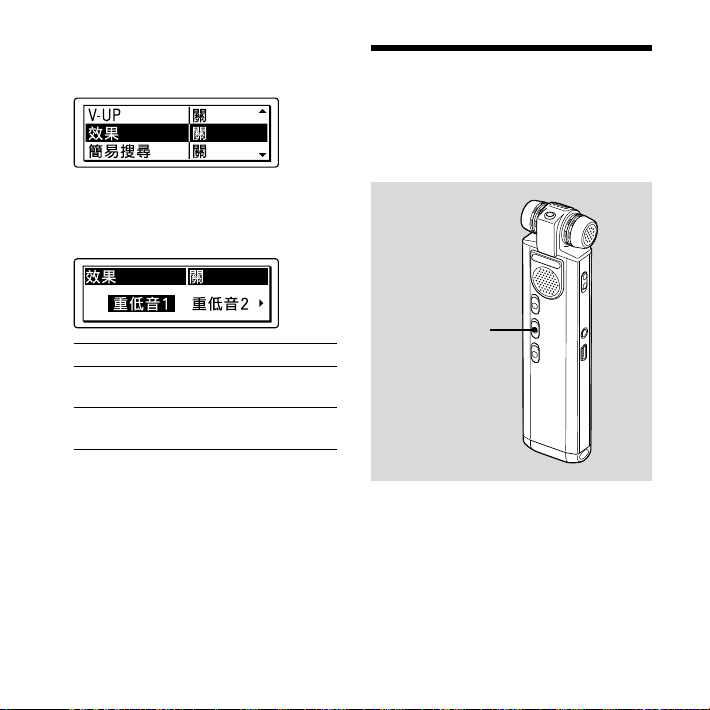
2 Press or to select “效果”,
then press .
3 Press or to select the bass
sound you want for the playback,
then press .
重低音1
重低音2
關
The bass sound is reinforced.
The bass sound is further
reinforced.
The bass sound cannot be
reinforced.
4 Press (stop) to exit the menu
mode.
Note
The bass sound cannot be reinforced if the
NOISE CUT switch is set to “ON.”
Reducing Distortion to Make the Human Voice Clearer – the Noise Cut Function
NOISE CUT
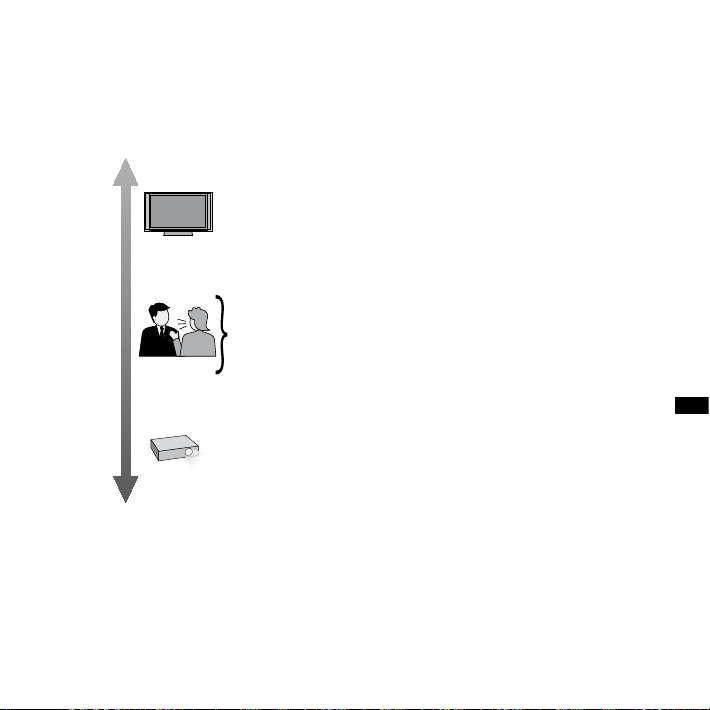
When the NOISE CUT switch is set to
“ON,” the distortion of very low and
high frequencies which are outside the
human voice range is reduced, therefore
you can hear the human voice more
clearly.
Page 59
When you are using the built-in speaker,
the Noise Cut function does not work.
During playback set the NOISE CUT
switch to “ON.”
High
frequency
sound
High frequency
noise such as
an electronic
device
You can hear
Frequency
the human
voice more
clearly.
Low frequency
noise such as
roaring noise
Low
frequency
sound
from wind
Notes
The bass sound cannot be reinforced if the
NOISE CUT switch is set to “ON.”
The effect of the Noise Cut function may be
different depending on the condition of the
recorded voice.
To cancel the Noise Cut function
Set the NOISE CUT switch to “OFF.”
Playback
59
GB
Page 60
60
GB
Adjusting the Playback Sound by Amplifying Inaudible Sound – the Digital Voice Up Function
,
/MENU
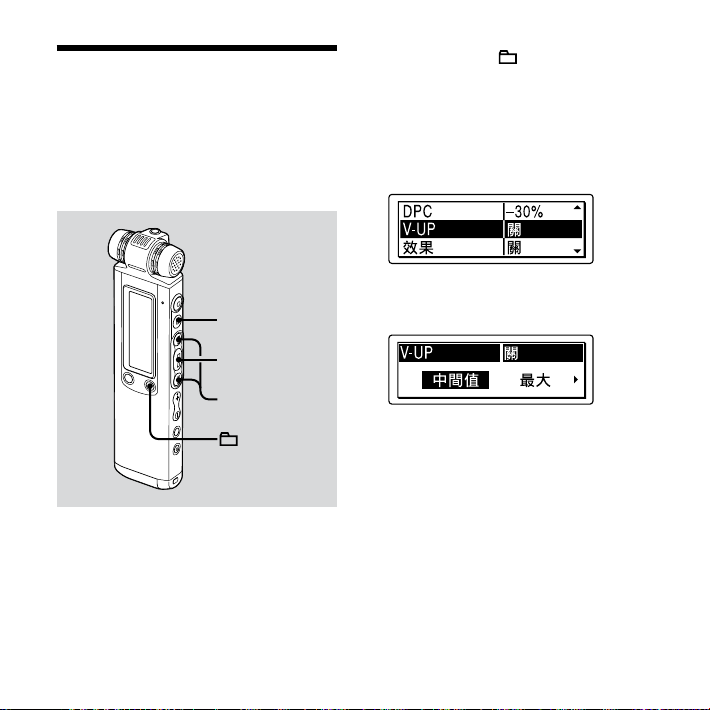
When you set “V-UP” to “中間值” or “最
大”, the low-level part of a recorded
message is amplified, allowing you to
hear even low/small voices more easily.
1 Press and hold /MENU to enter
the menu mode.
The menu mode window will be
displayed.
2 Press or to select “V-UP,”
then press .
3 Press or to select “中間值”
or “最大”, then press .
中間值: You can adjust the Digital
Voice Up function less finely.
最大: You can adjust the Digital Voice
Up function more effectively.
關: The Digital Voice Up function does
not work.
4 Press (stop) to exit the menu
mode.
Page 61
To cancel the Digital Voice Up
function
Set “V-UP” to “關” in step 3.
Adding a Bookmark
,
/MENU
DIVIDE/
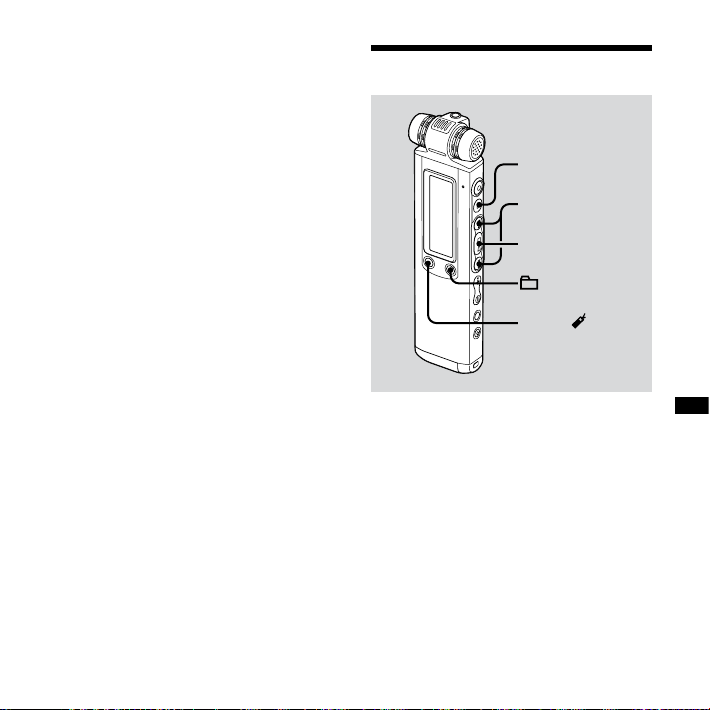
You can add a bookmark at a point in
a message and use it during playback.
You can add only one bookmark in each
message.
61
Playback
GB
Page 62

62
GB
During playback or stop, press and
hold DIVIDE/ (bookmark) at the
position you want to add a bookmark.
A bookmark is added and “
” (bookmark)
flashes three times.
If you add a bookmark to a message that
already has a bookmark, the previously
added bookmark is deleted and a
new bookmark is added at the newly
specified point.
To start playback at the
bookmark
Press or when the IC recorder is
in the stop mode. When “
flashes once, press
” (bookmark)
.
To delete the bookmark
1 Press and hold /MENU to enter the
menu mode.
The menu mode window will be
displayed.
2 Press or to select “刪除書籤”,
then press
“刪除書籤?” is displayed.
.
3 Press or to select “是”, then
press
.
An erasing animation and “
will appear and the bookmark will be
deleted.
刪除中...”
4 Press (stop) to exit the menu mode.
Notes
You cannot add a bookmark on MP3, LPCM,
and WMA files.
You cannot add a bookmark at the very
beginning or at the very end of the message.
Page 63
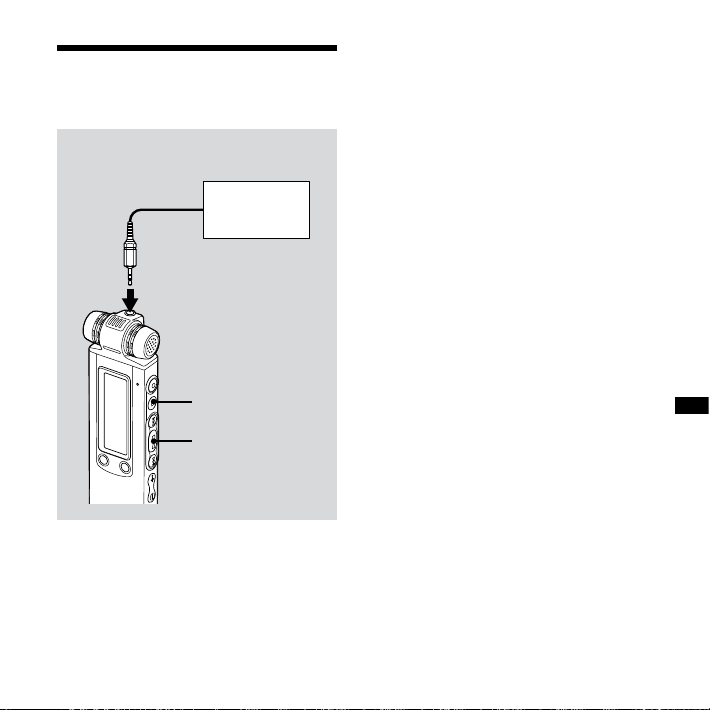
Recording with Other Equipment
To audio input
connector
Tape recorder,
etc.
To (headphone) jack
To record the sound of the IC recorder
with other equipment, connect the
(headphone) jack of the IC recorder
to the audio input connector (minijack,
stereo) of other equipment using an
audio connecting cable* (not supplied).
1 Connect the (headphone) jack
of the IC recorder to the audio
input connector (stereo minijack)
of other equipment using an audio
connecting cable*.
2 Press to start playback and at
the same time set the connected
equipment to the recording mode.
A message from the IC recorder
will be recorded on the equipment
connected.
3 Press (stop) on the IC recorder
and the connected equipment at
the same time to stop recording.
63
Playback
GB
Page 64
64
GB
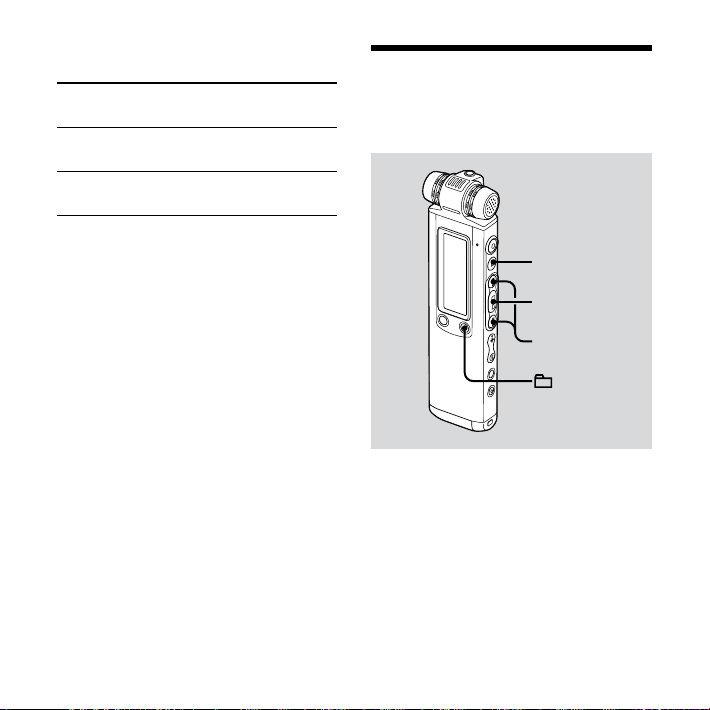
* Optional audio connecting cables (not
supplied)
To the IC
recorder
RK-G139 Stereo
RK-G136 Stereo
Tip
Before you start recording, we recommend
you to make trial recording first.
Note
Your dealer may not handle some of the above
listed optional accessories. Please ask the
dealer for detailed information.
mini-plug
mini-plug
To the other
equipment
Mini-plug
(monaural)
Stereo
mini-plug
Playing Back a Message at a Desired Time with an Alarm
,
/MENU
You can sound an alarm and start
playback of a selected message at a
desired time.
You can have the message played back
on a specified date, once every week, or
at the same time every day.
Page 65
1 Select the message you want to
play back with an alarm.
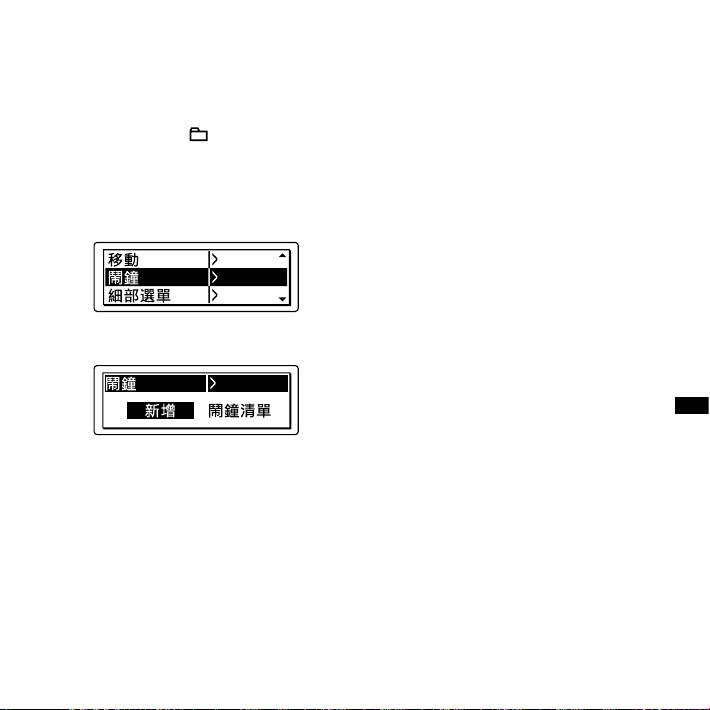
2 Enter the alarm setting mode.
Press and hold /MENU to enter the
menu mode.
The menu mode window will be
displayed.
Press or to select “鬧鐘”,
then press .
Press or to select “新增”,
then press .
3 Set the alarm date and time.
Press or to select “日期”, a
day of the week, or “每日”, then press
.
When you select “日期”:
Set the year, month, day, hour, and
minute in sequence, as described in
“Step 2: Setting the Clock” on page 18,
then press . “執行中...”, then
your settings are displayed.
When you select a day of the week
or “每日”:
Press or to set the hour,
then press , press or
to set the minute, then press .
“執行中...”, then your settings are
displayed.
The setting process is finished and “”
(alarm indicator) appears in the display
window.
4 Press (stop) to exit the menu
mode.
Playback
65
GB
Page 66

66
GB
When the set date and time
comes
At the set time, the alarm will sound
for about 10 seconds while “
displayed in the display window and the
selected message will be played back.
When the playback ends, the IC recorder
will stop automatically at the beginning
of that message.
鬧鐘” is
To listen to the same message
again
Press , and the same message will
be played back from the beginning.
To stop the alarm before the
playback starts
Press (stop) while the alarm sound is
heard. You can stop the alarm playback
even when the HOLD function is
activated.
To change the alarm setting
1 Select “鬧鐘” – “鬧鐘清單” in the
menu, then press .
The alarm list is displayed.
2 Press or to select the item
you want to change, then press
.
3 Press or to select “編輯”,
then press .
4 Select “日期”, a day of the week, or
“每日”, then press .
5 Set the date and time and press
.
“執行中...”, then your settings are
displayed.
6 Press (stop) to exit the menu
mode.
Page 67

To cancel the alarm setting
Follow steps 1 and 2 of “To change the
alarm setting.” In step 3, select “
press
. “取消鬧鐘?” is displayed.
Press
or to select “是”, then
press
. The alarm will be cancelled
and the alarm indicator will disappear
from the display window.
Notes
You can set only one alarm each one
message.
When the clock has not been set or no
messages are recorded, you cannot set the
alarm.
When “
” is displayed for the folder
indicator, you cannot set the alarm (page 64).
The alarm sounds even if you set “
“關” in the menu (page 87).
If the alarm time comes during recording,
the alarm will sound after the recording is
finished. “
” will flash when the alarm time
comes.
If the alarm time comes while you are
erasing a message, the alarm will sound after
the operation is finished.
If the alarm time comes while you are
updating data, the alarm will be cancelled
automatically.
If more than one alarm time comes, only
the first message will be played back with
an alarm.
取消” and
嗶一聲” to
Once the alarm is set, the alarm will not be
cancelled, even after the message is played
back.
If the alarm time comes while another
message is being played back with an alarm,
the payback stops and the new message will
be played back.
If the alarm time comes when you are
setting the menu, the alarm will sound and
the menu operation will be cancelled.
If you divide a message you have set an
alarm for, the alarm setting remains on only
the first part of the divided message.
If you delete a message on which you
have set an alarm, that alarm will be also
cancelled.
Playback
67
GB
Page 68
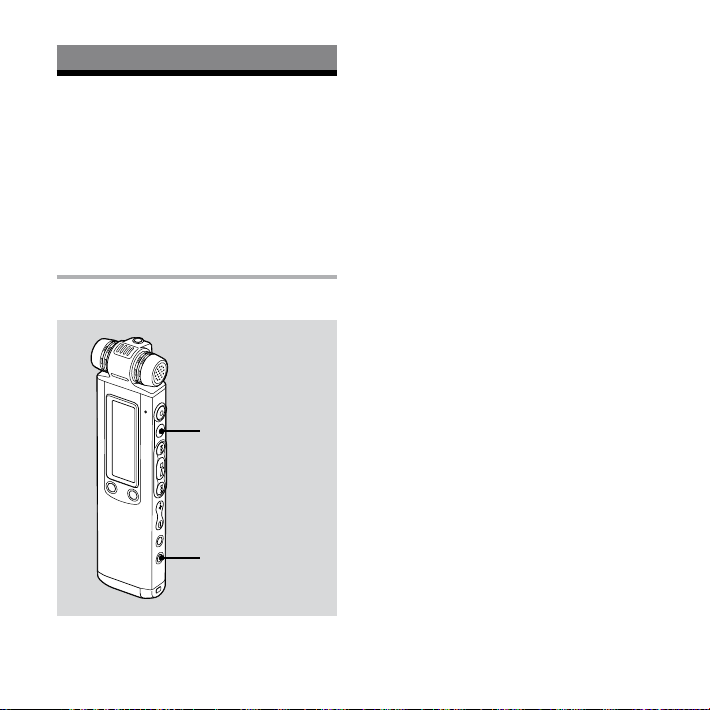
Editing Messages
Erasing Messages
You can erase the recorded messages
one by one or all messages in a folder at
a time.
Note
Once a recording has been erased, you cannot
retrieve it.
Erasing messages one by one
ERASE
You can erase unwanted messages,
retaining all other messages when the IC
recorder is in the stop or playback mode.
When a message is erased, the
remaining messages will advance and
be renumbered so that there will be no
space between messages.
1 Press ERASE while playing back
the message you want to erase or
press and hold ERASE while the IC
recorder is in the stop mode.
The message title, message number,
and “
刪除? [ERASE]執行” will be
displayed and the message will be
played back.
2 Press ERASE again while “刪除?
[ERASE]執行” is displayed.
“刪除中...” will be displayed,
one message will be erased, and
the remaining messages will be
renumbered.
To cancel erasing
Press (stop) in step 1.
68
GB
Page 69
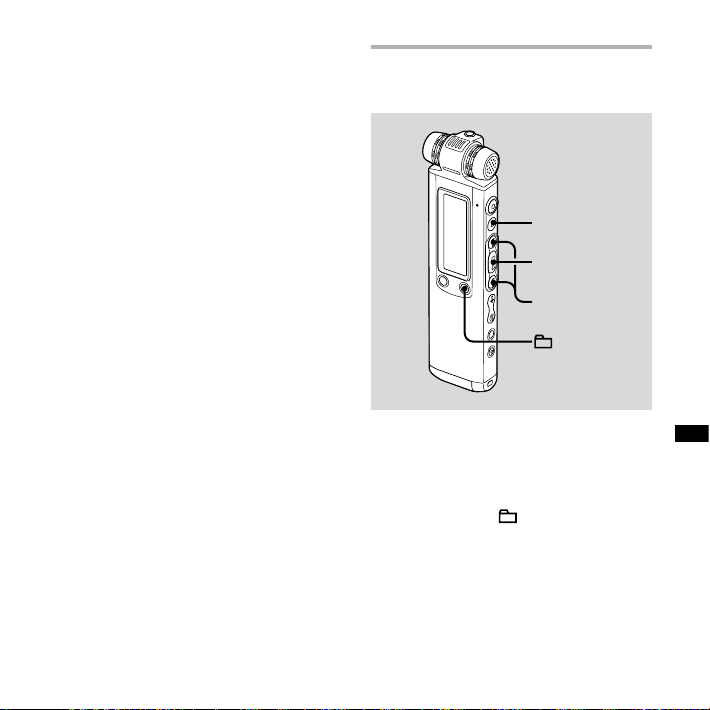
To erase another message
Proceed with the same steps again from
the beginning.
To erase a part of one message
Divide the message into two messages
first, then proceed with the same steps
from the beginning.
Erasing all messages in a folder
,
/MENU
1 Select the folder containing the
messages you want to erase when
the IC recorder is in the stop mode.
2 Press and hold /MENU to enter
the menu mode.
The menu mode window will be
displayed.
69
Editing Messages
GB
Page 70
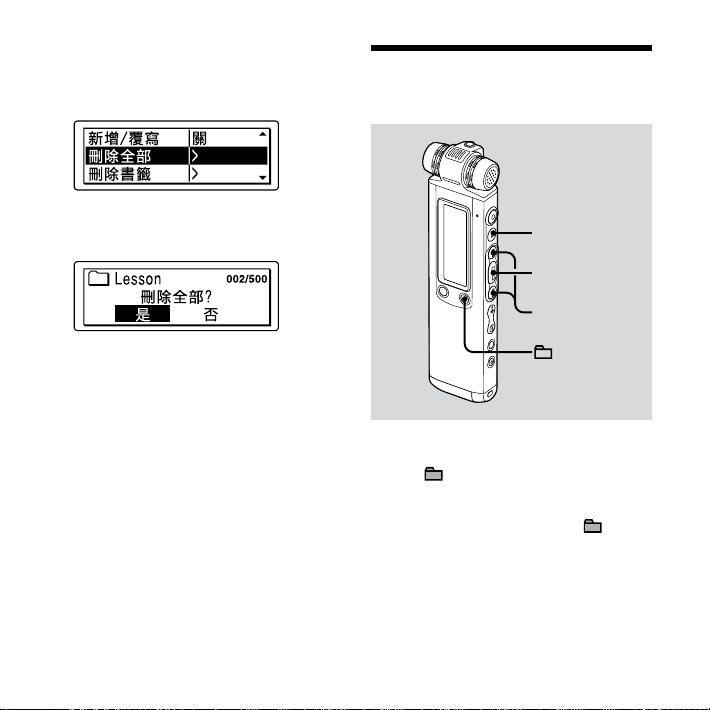
3 Press or to select “刪除全
部”, then press .
“刪除全部?” appears.
Moving a Message to
a Different Folder
4 Press or to select “是”, then
press .
“刪除中...” with animation appears
and all messages in the selected folder
will be erased.
5 Press (stop) to exit the menu
mode.
To cancel erasing
Select “否” in step 4, then press .
GB
70
,
/MENU
Notes
When “ ” is displayed for the folder
indicator, you cannot move a message
(page 95).
You cannot move a message to a
folder.
Page 71
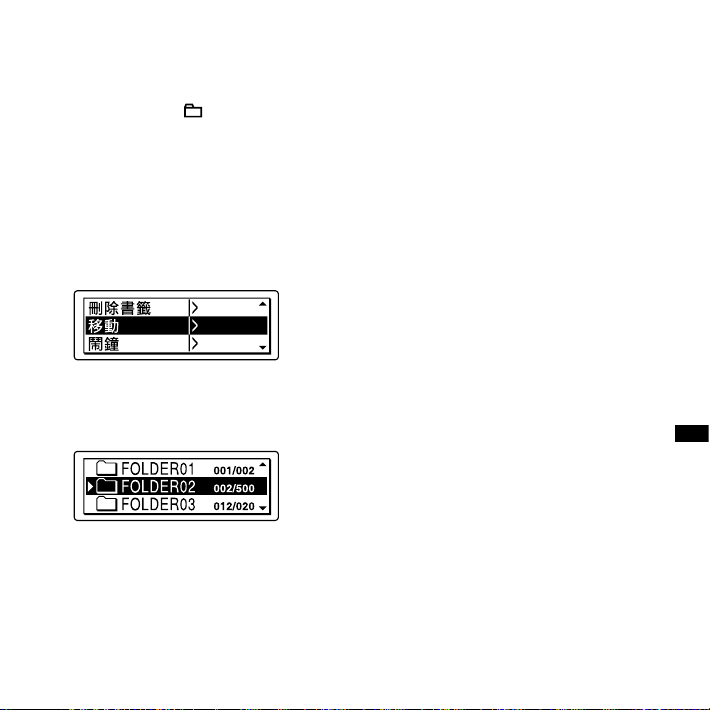
1 Select the message you want to
move.
2 Press and hold /MENU to enter
the menu mode.
The menu mode window will be
displayed.
3 Press or to select “移動”,
then press .
The message to be moved will be
played back.
4 Press or to select the
folder that you want to move the
message into, then press .
“執行中...” is displayed and the
message is moved to the last position
in the destination folder.
When you move a message to another
folder, the original message in the
previous folder will be deleted.
5 Press (stop) to exit the menu
mode.
To cancel moving the message
Press (stop) before step 4.
71
Editing Messages
GB
Page 72
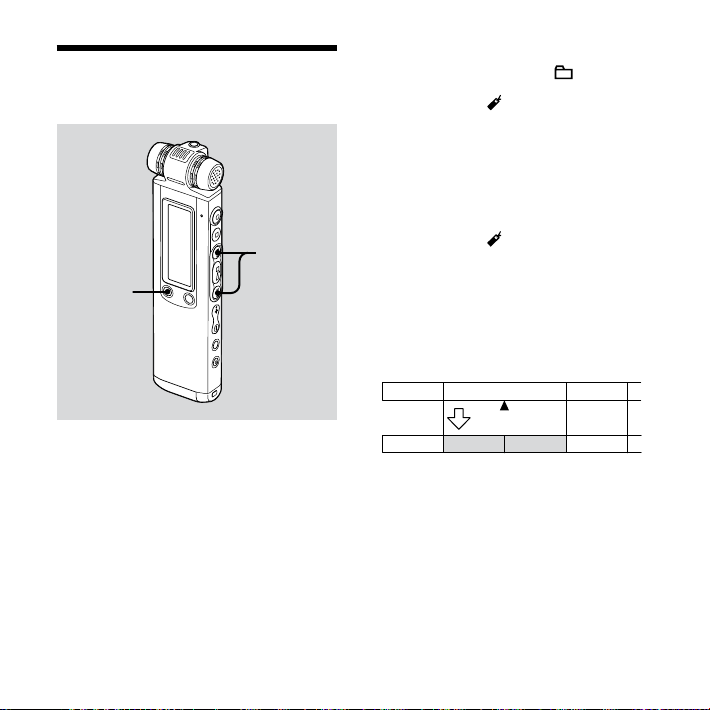
Dividing a Message into Two
,
DIVIDE
You can divide a message during
playback, so that the message is divided
into two parts and a new message
number is added to the newer part
of the divided message. By dividing a
message, you can easily find the point
from which you want to play back when
you make a long recording such as at
a meeting. You can divide a message
until the total number of messages
in the folder reaches 999 or until the
GB
72
total number of messages in all folders
reaches 1,012 if there are 5
folders.
1 Press DIVIDE/ (bookmark) while
you are playing back the message
you want to divide.
“要分割嗎? [DIVIDE]執行” appears
with the message title or file name,
and a message number.
2 Press DIVIDE/ (bookmark).
“分割中...” with an animation
appears, a new number is added
to the newer part of the divided
message, and the message numbers
of the following messages will be
incremeted by one.
Message 1 Message 3
Message 1 Message 2
Message 2
A Message is divided.
Message 3 Message 4
The message numbers are incremeted.
Page 73

Notes
You need a certain amount of free space in
the memory to divide a message. For more
information, see “System Limitations” on
page 119.
When you divide a message with a title and
artist name, the newer part has the same
title, and artist name.
If you divide a message with priority mark(s),
the priority mark(s) will be added to both
parts of the divided message.
If you divide a message at the position
where you have set the bookmark, the
bookmark will be deleted.
The recording time of the latter half of the
divided message will be the same time as
that of the divided position. If you divide
an LPCM or MP3 file recorded using the IC
recorder, the recording time of the latter file
will be the same time as the original file.
If you divide a message during A-B repeat
playback or one message repeat playback,
the repeat setting will be cancelled.
If more than 10 seconds have passed after
step 1, you must start the procedure again
from the beginning.
You cannot divide a message other than
the one recorded using the IC recorder
(MP3/LPCM/WMA file transferred from a
computer).
Once a message is divided, you cannot
combine divided messages using the IC
recorder.
If you divide a message frequently, the unit
may become unable to divide the message
further.
If you divide a message with an alarm
setting, the same alarm setting remains only
with the former message divided.
You cannot divide a message at the very
beginning (0.5 seconds from the beginning)
or at the very end (0.5 seconds prior to the
end) of the message.
You cannot divide a message within the
range of 0.5 seconds before and after you
have set a bookmark.
When “
” is displayed for the folder
indicator, you cannot divide a message.
To play the divided message
Press or to display the message
number, as the divided messages now
each have message numbers.
Editing Messages
73
GB
Page 74
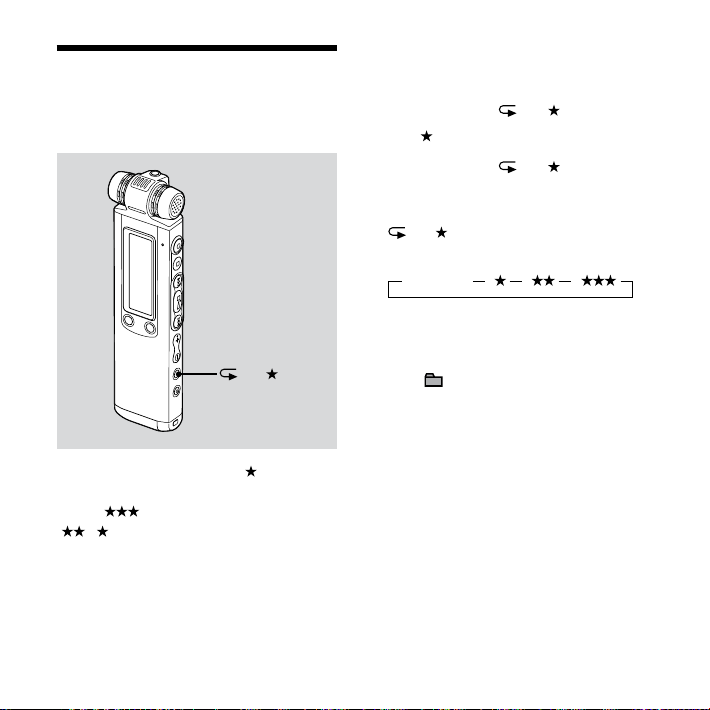
Adding Priority Mark(s) – the Priority Mark Function
A-B/
You can add priority marks ( ) to
important messages. There are four
levels, “
“ ,” “ ,” and no priority mark. You can
add priority marks both in the stop
mode, and in the playback mode.
” (the most important),
1 Select the message you want to
mark.
2 Press and hold A-B/ (priority).
” indicator will flash.
The “
3 Press and hold A-B/ (priority)
again to add the priority mark.
Each time you press and hold
A-B/ , the priority mark(s) will
change as follows:
No mark
Notes
You cannot add priority marks to an LPCM,
MP3 or WMA file.
When “
indicator, you cannot add a priority mark.
” is displayed for the folder
74
GB
Page 75
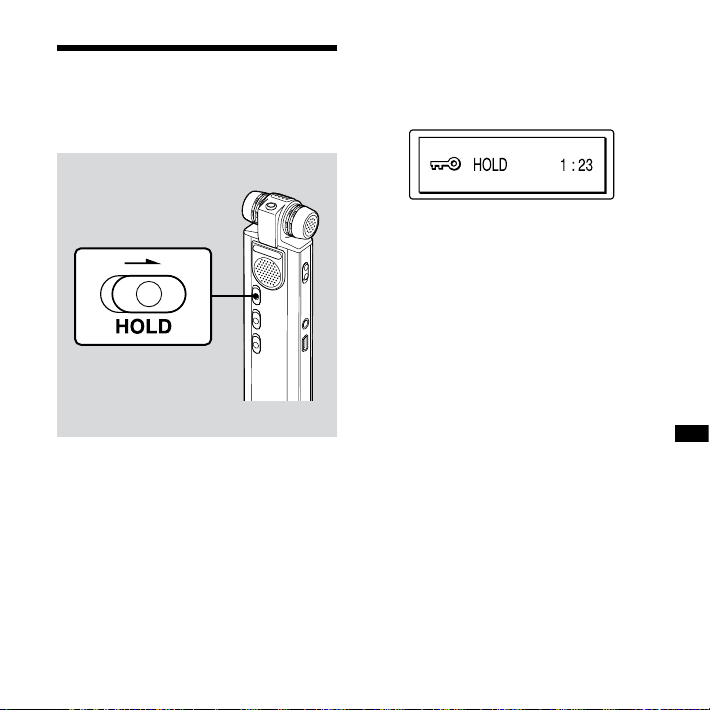
Preventing Accidental Operation – the HOLD function
To prevent accidental operation, slide the
HOLD switch in the direction of arrow in
the recording or playback mode.
“HOLD” with the key mark and the
current time will appear for 3 seconds
indicating that all the functions of the
buttons are locked.
To cancel the HOLD function
Slide the HOLD switch in the opposite
direction from that of the arrow.
Note
When the HOLD function is activated during
recording, cancel the HOLD function first to
stop recording.
Tip
Even if the HOLD function is activated, you can
stop the alarm playback. To stop the alarm or
playback, press
(stop).
Editing Messages
75
GB
Page 76
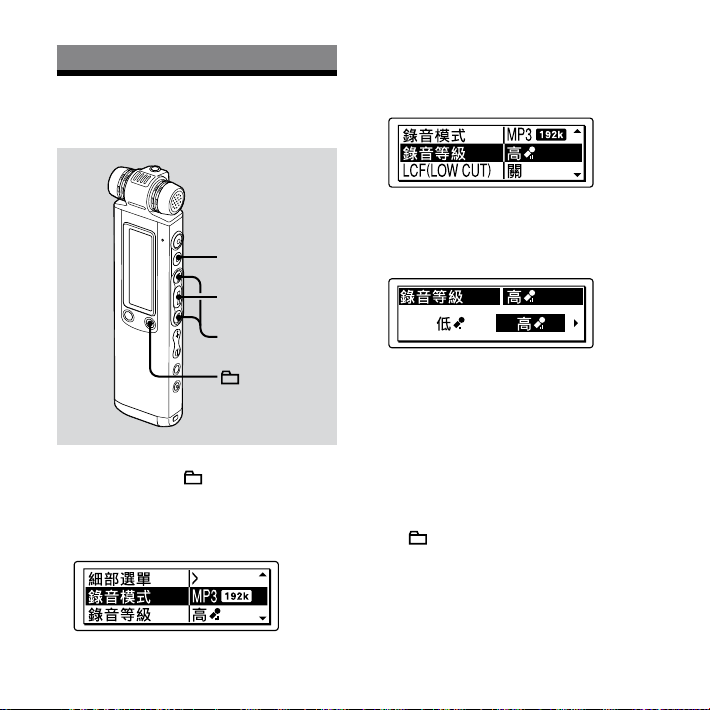
Utilizing the Menu Function
Making Settings for the Menu
,
2 Press or to select the
menu item for which you want to
make setting, then press .
3 Press or to select the
setting that you want to set, then
press .
/MENU
1 Press and hold /MENU to enter
the menu mode.
The menu mode window will be
displayed.
GB
76
4 Press (stop) to exit the menu
mode.
Note
If you do not press any button for one minute,
the menu is automatically cancelled and the
window will return to the normal display.
To return to the previous window
Press /MENU during menu setting.
To stop the menu operation in
the middle
Press (stop).
Page 77
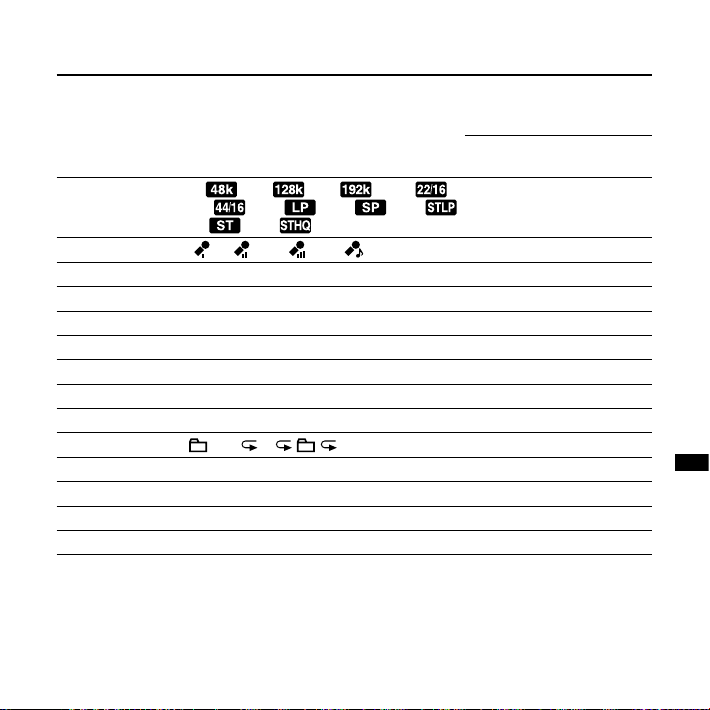
Menu settings
Menu items Settings Operation mode
錄音模式 MP3 , MP3 , MP3 , LPCM ,
LPCM , LPEC , LPEC , LPEC ,
LPEC , LPEC
錄音等級 低 , 高 , 較高 , 音樂 , 手動
LCF (LOW CUT) 開, 關
VOR 開, 關
顯示 已播時間, 剩餘時間, 錄音日期
DPC n% (n = –75 - +200)
V-UP 中間值, 最大,
效果 重低音1, 重低音2,
關
關
簡易搜尋 開, 關
播放模式 1, , ALL, 1, , ALL
新增/覆寫
新增, 覆寫, 關
刪除全部 刪除全部? 是, 否
刪除書籤 刪除書籤? 是, 否
移動 (Folder to be moved)
( : the setting can be made/
: the setting cannot be made)
Stop
Playback
mode
mode
Recording
mode
Utilizing the Menu Function
77
GB
Page 78

Menu items Settings Operation mode
( : the setting can be made/
: the setting cannot be made)
Stop
Playback
mode
mode
鬧鐘 新增, 鬧鐘清單
細部選單
LIMITER 開, 關
預先錄音 開, 關
同步錄音 開, 關
選擇輸入 麥克風, 音源線
日期&時間 自動, 手動
時間顯示方式 12時制, 24時制
格式化
刪除所有資料? 是, 否
嗶一聲 開, 關
LED 開, 關
背光 10秒, 60秒,
關
USB充電 開, 關
Recording
mode
78
GB
Page 79
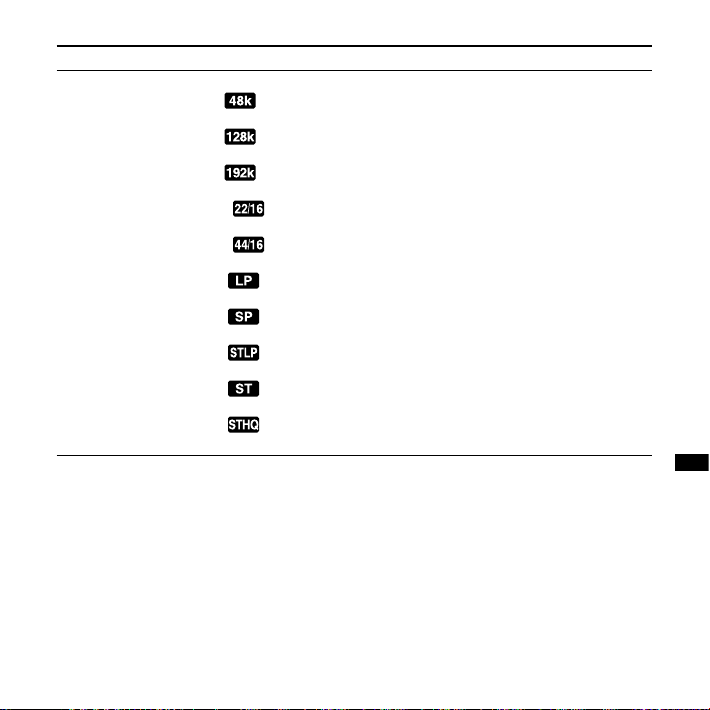
Menu items Settings (*: Initial setting)
錄音模式 Sets the recording mode.
MP3 :
Monaural standard recording mode.
MP3 :
Stereo standard recording mode.
MP3 *:
Stereo high-quality recording mode.
LPCM :
Stereo long play high-quality recording mode.
LPCM :
Stereo high-quality recording mode.
LPEC :
Monaural long play recording mode.
LPEC :
Monaural standard recording mode.
LPEC :
Stereo long play recording mode.
LPEC :
Stereo standard recording mode.
LPEC :
Stereo high-quality recording mode.
See page
27
Utilizing the Menu Function
79
GB
Page 80
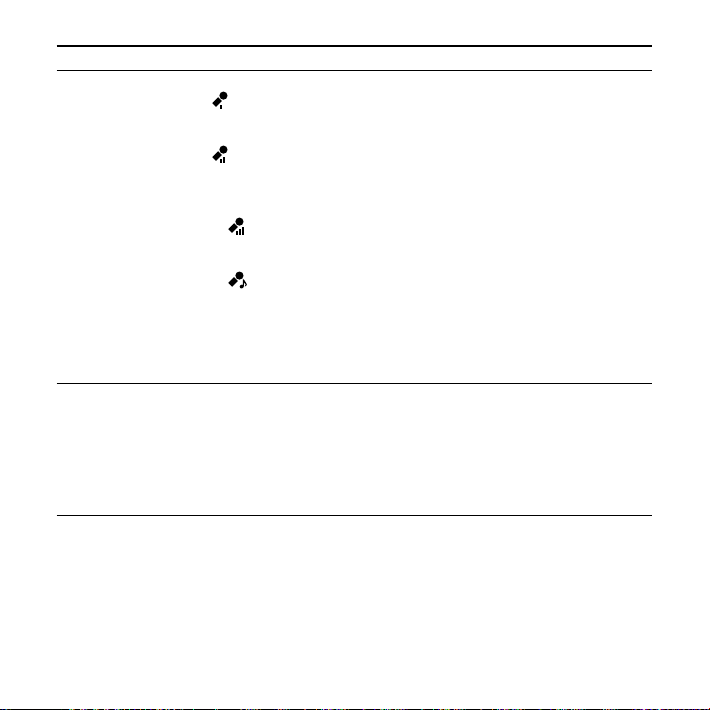
Menu items Settings (*: Initial setting)
錄音等級 Sets the microphone sensitivity.
低 :
To record dictation with a microphone in front of your
mouth, a sound near the IC recorder, or a loud sound.
高 *:
To record the sound of a normal conversation or meeting,
such as a recording made in a conference room or during
interviews.
較高 :
To record a sound far away from the IC recorder or a low
sound, such as a recording made in a spacious room.
音樂 :
To record more natural acoustic sound, as well as
preventing sound distortion.
手動 :
During manual recording, you can adjust the recording
level manually.
LCF (LOW CUT) Sets the LCF (Low Cut Filter) function to cut a low frequency
to reduce the roaring noise from wind; therfore you can
record a message more clearly.
開:
The LCF function is activated.
關*:
The LCF function is cancelled.
See page
30
37
80
GB
Page 81

Menu items Settings (*: Initial setting)
VOR Sets the VOR (Voice Operated Recording) function.
開:
Recording starts when the IC recorder detects sound and
pauses when no sound is heard, eliminating recording
during soundless periods. The VOR function is activated
when (record/pause) is pressed.
關*:
The VOR function does not work.
Note
If “錄音等級” is set to “手動”, the VOR function does not work.
顯示 Changes the display mode in the playback/stop mode.
已播時間*:
Elapsed playback time of one message
剩餘時間:
The remaining time of one message
錄音日期:
Date recorded
DPC Sets the DPC (Digital Pitch Control) function.
When you set the DPC switch to “ON,” you can adjust the
speed of the playback in a range from +200% to -75%. Set the
speed by 10% for + setting and by 5% for – setting.
–30%*
See page
38
Utilizing the Menu Function
–
56
81
GB
Page 82

Menu items Settings (*: Initial setting)
V-UP A low-level portion of a recorded message can be
amplified, allowing you to hear even low/small voices more
easily.
中間值:
Adjusts the V-UP function less finely.
最大:
Adjusts the V-UP function more effectively.
關*:
The V-UP function does not work.
效果 Sets whether to reinforce bass sound during playback.
重低音1:
The bass sound is reinforced.
重低音2:
The bass sound is further reinforced.
關*:
The 效果 function does not work.
Note
When playing back messages using a built-in speaker, the 效果
function does not work.
簡易搜尋 Sets the easy search function.
開:
You can go forward for about 10 seconds by pressing
and go back for about 3 seconds by pressing . This
function is useful when attempting to locate desired point
in a long recording.
關*:
The easy search function does not work. When you
press or , a message will be moved forward or
backward.
See page
60
57
52
82
GB
Page 83
Menu items Settings (*: Initial setting)
播放模式 Sets the playback mode.
1:
A message is played back and the IC recorder stops after
playback.
*:
Messages in one folder are played back continuously and
the IC recorder stops after playback.
ALL:
All the messages are played back continuously and the IC
recorder stops after playback.
1:
One message is played back repeatedly.
:
Messages in one folder are played back repeatedly.
ALL:
All the messages are played back repeatedly.
新增/覆寫 You can add a recording to a previously recorded message
or an overwrite recording during playback.
新增:
You can add a recording.
覆寫:
You can overwrite a recording.
關*:
You cannot add or overwrite a recording.
刪除全部 All messages in the selected folder will be erased.
Press /MENU to return to the folder window before erasing
the messages and select a folder from which all messages are
to be erased, then go to the menu window and select “是”.
否*: The erase function is cancelled.
See page
54
Utilizing the Menu Function
41, 43
69
83
GB
Page 84
Menu items Settings (*: Initial setting)
刪除書籤 The bookmark of the selected message will be cancelled.
Press /MENU to return to the folder window before erasing
the bookmark and select a folder from which the bookmark is
to be erased, then go to the menu window and select “是”.
否*: The erase function is cancelled.
移動 The selected message will be moved to the selected folder.
Press /MENU to return to the folder window before moving
the message and select a folder from which the message is to
be moved.
鬧鐘 Sets the alarm.
新增*:
Set 日期 for playback, 週日 (Sunday), 週一 (Monday), 週
二 (Tuesday), 週三 (Wednesday), 週四 (Thursday), 週五
(Friday), 週六 (Saturday), or 每日.
鬧鐘清單 :
A list of the message numbers, date, or the days of the
week on which the alarm has already been set will be
displayed.
編輯 : You can change the selected date or day of the
week.
取消: You can cancel the alarm on the selected date or on
a day of the week.
See page
62
70
64
84
GB
Page 85

Menu items Settings (*: Initial setting)
細部選單
LIMITER Sets the input level automatically to prevent the sound
distortion that occurs when a sound that is too loud is
input.
開*:
The LIMITER function is activated.
關:
The LIMITER function is cancelled.
Note
When “錄音等級” is set to “手動”, this setting is effective.
預先錄音 Allows you to record sound sources for a maximum of 5
seconds prior to the point when the recording is started.
Sounds for 5 seconds are buffered in the memory.
開:
The pre-recording function is activated.
關*:
The pre-recording function is cancelled.
同步錄音 When set to “開”, the IC recorder enters the recording pause
mode when no sound is detected for more than 2 seconds,
and the IC recorder starts recording again as a new
message when any sound is detected.
開:
The synchronized recording function is activated.
關*:
The synchronized recording function is cancelled.
Note
You can record using the synchronized recording function only
when you have connected other equipment to the IC recorder
using an audio connecting cable and set “
選擇輸入” to “音源線”.
See page
33
Utilizing the Menu Function
35
47
85
GB
Page 86

Menu items Settings (*: Initial setting)
選擇輸入
Selects the external input to be recorded that is connected
to the (microphone) jack.
麥克風*:
Select when you record messages using an external
microphone.
音源線:
Select when you record using other equipment.
日期&時間 Sets the clock.
自動*:
When the IC recorder is connected to a computer that
is running the Digital Voice Editor, the clock will be
automatically adjusted according to that computer.
手動:
You can set the clock by setting year, month, day, hour, and
minute in sequence.
時間顯示方式
Sets the clock display.
12時制:
12:00AM = midnight, 12:00PM = noon
24時制*:
0:00 = midnight, 12:00 = noon
See page
45, 47
18
–
86
GB
Page 87

Menu items Settings (*: Initial setting)
格式化 Sets the formatting of the drive after “刪除所有資料?” has
been displayed.
是:
The drive will be formatted.
否*:
The drive will not be formatted.
Notes
Use the IC recorder formatting function to format the memory.
If you format the IC recorder using your computer, the sound
may be interrupted unexpectedly and the recording time may
be shortened.
When you format the memory, all the data which you have
stored in the IC recorder will be deleted. Once the data is
deleted, you cannot retrieve it.
嗶一聲 Sets whether a beep will be heard or not.
開*:
A beep will sound to indicate that an operation has been
accepted.
關:
No beep sound will be heard.
Note
The alarm sounds even if you set “嗶一聲” to “關” in the menu.
See page
–
Utilizing the Menu Function
–
87
GB
Page 88

Menu items Settings (*: Initial setting)
LED Turns the operation indicator on or off during operation.
開*:
During recording or playback, the operation indicator lights
or flashes.
關:
The operation indicator does not light or flash, even during
operation.
Note
When the IC recorder is connected to a computer, the operation
indicator lights or flashes even if “LED” is set to “
背光 Turns the backlight in the display window on or off.
10秒*:
The backlight in the display window lights up for 10
seconds.
60秒:
The backlight in the display window lights up for 60
seconds.
關:
The backlight in the display window does not light, even
during operation.
USB充電 Sets whether batteries will be charged using a USB
connection or not.
開*:
The batteries will be charged.
關:
The batteries will not be charged.
Note
If you use a USB AC adaptor (not supplied) to connect the IC
recorder to the AC outlet, you can charge batteries regardless this
setting.
See page
–
關”.
–
–
88
GB
Page 89

Utilizing Your Computer
What You Can Do Using the Computer
You can do the following when you
connect the IC recorder to your
computer using the supplied USB
connecting cable.
Copying les from the IC recorder
to your computer to save them
(page 92)
You can copy the files and folders
recorded on the IC recorder to save
them.
Copying les from your
computer to the IC recorder and
playing them back (page 93)
You can copy WAV/MP3/WMA files saved
on your computer by a simple drag &
drop operation when you connect the
IC recorder to your computer using the
supplied USB connecting cable. You can
also play back the copied files.
Managing and editing les using
the Digital Voice Editor software
(page 97)
The Digital Voice Editor software allows
you to transfer the messages that you
have recorded using the IC recorder
to your computer to manage and edit
them. You can also transfer music files
saved on your computer to the IC
recorder.
Using the IC recorder as a USB
mass storage device (page 105)
You can store image data or text data
saved on the computer temporarily in
the IC recorder.
Utilizing Your Computer
89
GB
Page 90

90
GB
System requirements for your computer
To use your computer with the
Digital Voice Editor software
To use your computer with the Digital
Voice Editor software, see “System
requirements” on page 99.
To use your computer without
the Digital Voice Editor software
To use your computer with the IC recorder
without the Digital Voice Editor software,
or to use the IC recorder as a USB mass
storage device, your computer must meet
the operating system requirements and
port environment described below.
Operating systems:
Windows Vista® Ultimate Service Pack 1
or higher
Windows Vista® Business Service Pack 1
or higher
Windows Vista® Home Premium Service
Pack 1 or higher
Windows Vista® Home Basic Service Pack
1 or higher
Windows® XP Media Center Edition 2005
Service Pack 3 or higher
Windows® XP Media Center Edition 2004
Service Pack 3 or higher
Windows® XP Media Center Edition
Service Pack 3 or higher
Windows® XP Professional Service Pack 3
or higher
Windows® XP Home Edition Service Pack
3 or higher
Windows® 2000 Professional Service Pack
4 or higher
Mac OS X (v10.2.8-v10.5)
Pre-installed.
Hardware Environment:
Port: USB port
Sound board: Sound cards compatible
with any of the supported Microsoft®
Windows® operating systems
Note
The following systems are not supported:
64 bit versions of Windows® XP
Any operating systems other than the ones
indicated above
Personally assembled PCs or operating
systems
Upgraded operating systems
Multi-boot environments
Multi-monitor environments
For the latest version information and
compatibility with your operating system,
please access the support home page for
the IC recorder:
http://www.sony-asia.com/support
Page 91
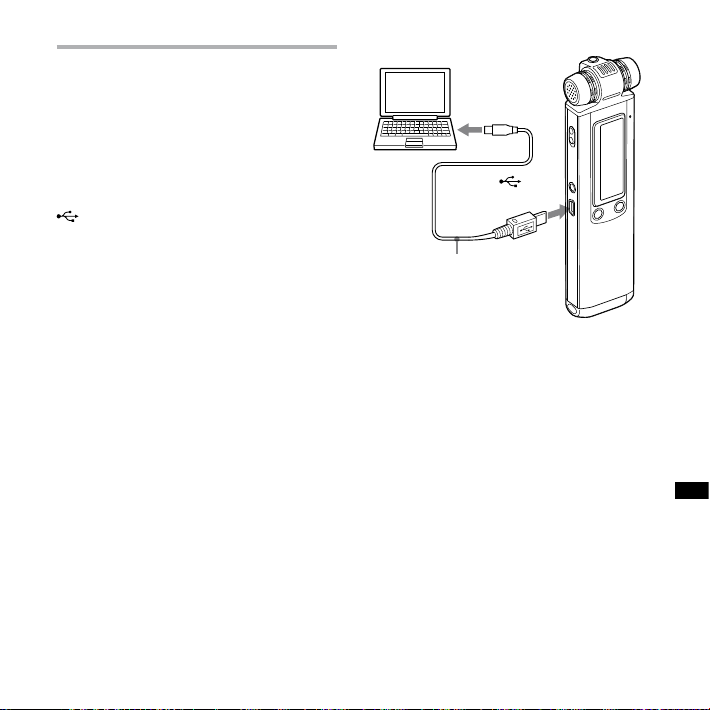
Connecting the IC recorder to your computer
You can transfer the IC recorder data
onto your
IC recorder to the computer.
Use the USB connecting cable supplied
with the IC recorder to connect the
and the USB port of your computer.
The IC recorder is recognized by
the computer as soon as the cable
is connected. You can connect or
disconnect the cable when the IC
recorder and the computer are turned
on or off.
While the IC recorder is connected to the
computer, “
display window of the IC recorder.
computer by connecting the
(USB) connector of the IC recorder
連接中” is displayed in the
Computer
To USB port of
your computer
To (USB)
connector
USB connecting cable
IC recorder
Notes
Do not connect more than two USB devices
to your computer. Normal operation will not
be guaranteed.
Use of this IC recorder with a USB hub or a
USB extension cable is not guaranteed.
A malfunction may occur depending on the
USB devices connected at any one time.
Before connecting the IC recorder to the
computer, check that batteries are inserted
in the IC recorder.
It is recommended that you disconnect the
cable from the computer when you do not
use the Digital Voice Editor.
Utilizing Your Computer
91
GB
Page 92

92
GB
Disconnecting the IC recorder from your computer
Follow the procedures below; otherwise,
data may be damaged.
1 Make sure that the operation
indicator is not ashing.
2 Disconnect the USB connecting
cable connected to the IC recorder
from the USB port of the computer.
On the Windows screen, left-click
“Safely Remove Hardware” on the
taskbar, and click “Safely remove USB
Mass Storage Device.”
On the Macintosh screen, drag the “IC
RECORDER” on the desktop to “Trash”
and drop it there.
For details on disconnecting the
IC recorder, refer to the operating
instructions supplied with your
computer.
Copying Files from the IC Recorder to Your Computer
You can save files or folders by
transferring them from the IC recorder to
your computer.
1 Connect the IC recorder to your
computer (page 91).
On the Windows screen; open “My
Computer” and make sure that “IC
RECORDER” has been recognized. On
the Macintosh screen; make sure that
an “IC RECORDER” drive is displayed on
the desk top.
2 Copy les or folders you want to
transfer to your computer.
Drag and drop the folders contains
files you want from “IC RECORDER” to
the local disc on your computer.
Page 93
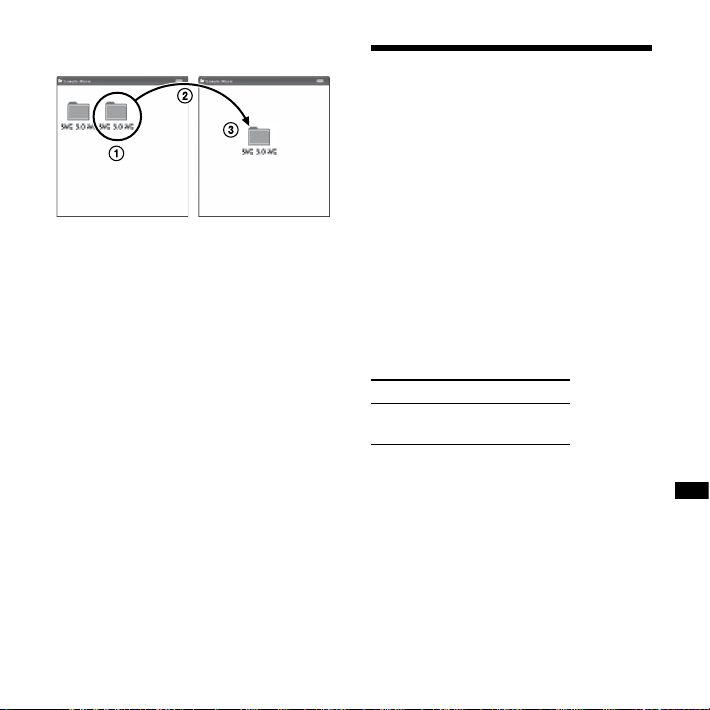
To copy a folder (Drag and drop)
Click and hold,
drag,
and then drop.
Copying Files from Your Computer to the IC Recorder and Playing Them Back
You can copy music or the other audio
files (WAV/MP3/WMA) from your
computer to the IC recorder by dragging
and dropping without using the Digital
Voice Editor software, and you can play
them back using the IC recorder.
The maximum playback time (tracks*),
when playing music files using the IC
recorder, is as follows.
48 kbps 128 kbps
381 hr. 5 min.
(5,716 tracks)
* In the case where tracks of 4 minutes each
are transferred to the IC recorder.
142 hr. 50 min.
(2,142 tracks)
Utilizing Your Computer
93
GB
Page 94

94
GB
1 Connect the IC recorder to your
computer (page 91).
On the Windows screen; open “My
Computer” and make sure that “IC
RECORDER” has been recognized. On
the Macintosh screen; make sure that
an “IC RECORDER” drive is displayed on
the desk top.
2 Copy the folder in which the music
les are stored to the IC recorder.
On the Windows screen using Explorer,
and on the Macintosh screen using
Finder, drag and drop the folder onto
the IC recorder.
The IC recorder can recognize up to
500 folders. You can copy up to 999
files to one folder and up to 5,000 files
in total.
3 Remove the IC recorder from your
computer, then press /MENU to
select the folder you want.
4 Press or to select the le
you want to play, then press .
5 Press to stop playback.
Notes
When you copy a music file from your
computer, you can play it back, however, you
cannot divide it, or move it.
To disconnect the IC recorder from your
computer, refer to page 92.
Page 95
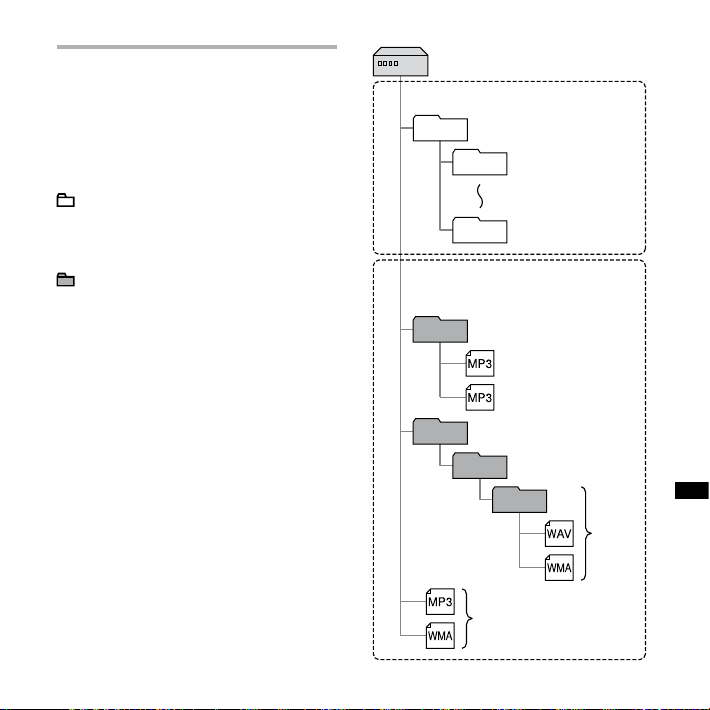
Construction of folders and
les
The folders and files are displayed on the
computer screen as shown.
The folder indicators in the display
window of the IC recorder are as follows:
Folder for messages recorded using
:
the IC recorder (They have been
already made when you purchase
the IC recorder.)
Folder transferred from a computer
:
(They are displayed when music
files have been transferred from a
computer.)
Note
A file cannot be played back, even if you
transfer it to a VOICE folder.
“IC RECORDER”
VOICE
FOLDER01
FOLDER05
Conversation
MUSIC
POP
Folder for messages
recorded using the IC
*4
recorder
Folder copied from your
computer
*1
OLDIES
*3
Utilizing Your Computer
*2
95
GB
Page 96

96
GB
*1
The name of a folder in which music files are
stored will be displayed on the IC recorder as
it is, so it is convenient if you put an easy-toremember name on the folder in advance.
Folders shown in the illustration are
examples of folder names.
*2
The IC recorder can recognize up to three
levels of folders copied to the IC recorder,
that is, up to “OLDIES” shown in the figure.
*3
If you copy music files separately, they are
classified as being in “
*4
Even if you transfer a file directly under the
無資料夾”.
VOICE folder, the file cannot be played back.
When you are going to transfer a file, transfer
it into a folder in the VOICE folder.
Tip
You can enter title, or artist name, etc., into
music files. The titles and artist names can be
displayed on the IC recorder. It is useful if you
input them using the software you use to
make the music files on your computer.
Notes
You cannot always transfer all files or
folders, depending on either the number of
characters you use in file or folder names, or
the operating system.
If no title, or artist name has been entered,
“Unknown” will be displayed.
If no title has been entered, a file name will
be displayed.
A title or artist name associated with an
LPCM file cannot be displayed using the
IC recorder. In this case, a file name will be
displayed.
To disconnect the IC recorder from your
computer, refer to page 92.
Page 97

Using the Supplied Digital Voice Editor Software
What You Can Do Using the Digital Voice Editor Software
The Digital Voice Editor software allows
you to transfer messages that you
have recorded using the IC recorder to
your computer. You can save them on
your computer, play them back, and
edit them. You can also transfer music
files saved on your computer to the IC
recorder.
For details on using the Digital Voice
Editor software, refer to the help files.
Transferring messages recorded
on the IC recorder to your
computer
You can save messages that you have
recorded using the IC recorder on your
computer’s hard disk, by message, by
folder, or all messages at one time. You
can select a format to be used to save
those messages as follows; MSV (LPEC)
files, MSV (ADPCM) files, MP3 files,
Windows standard WAV files.
Playing back messages on the
computer
You can play back messages on the
computer using the following functions,
one-message repeat playback, A-B repeat
playback, easy search, playback with a
bookmark as well as normal playback.
You can also adjust the playback speed.
Transferring messages saved on
your computer to the IC recorder
to play
You can transfer messages saved on
your computer, as well as other files,
such as voice files sent by e-mail, MSV
(LPEC/ADPCM) files, WAV files, MP3 files,
WMA files, by file or by folder, to the IC
recorder. You can also play them back
using the IC recorder.
Editing messages saved on your
computer or IC recorder using
your computer
You can change message titles or user
names, sort messages, set/delete priority
marks or bookmarks, divide/combine
messages, etc., on your computer,
depending on the format of the file. You
can change the order of the messages in
97
Utilizing Your Computer
GB
Page 98

98
GB
the IC recorder using the computer. You
can also save messages saved on your
computer by converting the voice format
to a more appropriate one.
Creating your own original audio
or data CDs
Using the CD Burning Tool for the Digital
Voice Editor, you can make your original
music CD or data CD from files recorded
using the IC recorder, or from files saved
on your computer’s hard disk using the
Digital Voice Editor.
Other convenient uses
You can send voice e-mail messages
using MAPI e-mail software.
You can transcribe your IC
recorder messages using Dragon
NaturallySpeaking® speech-recognition
software (Only when Dragon
NaturallySpeaking version 5.0 (or
higher) Preferred or Professional Edition
is installed on your computer).
You can set/cancel the user name
of the IC recorder, changing alarm
settings, etc., on your computer.
Using the CD Recording Tool for the
Digital Voice Editor, you can play tracks
of a CD in the computer’s CD drive, and
save CD tracks onto the PC hard disk
in a file format that the Digital Voice
Editor supports. Saved files can then be
transferred to an IC recorder using the
Digital Voice Editor.
Use of the CD Recording Tool for DVE is
limited to the personal purposes.
Note
For information on using Dragon
NaturallySpeaking, please refer to the
documentation supplied with the software.
Page 99

System requirements
To use the supplied software, your
computer must meet the operating
system requirements and hardware
environment described below.
Operating Systems:
Windows Vista® Ultimate Service Pack 1
or higher
Windows Vista® Business Service Pack 1
or higher
Windows Vista® Home Premium Service
Pack 1 or higher
Windows Vista® Home Basic Service Pack
1 or higher
Windows® XP Media Center Edition 2005
Service Pack 3 or higher
Windows® XP Media Center Edition 2004
Service Pack 3 or higher
Windows® XP Media Center Edition
Service Pack 3 or higher
Windows® XP Professional Service Pack 3
or higher
Windows® XP Home Edition Service Pack
3 or higher
Windows® 2000 Professional Service Pack
4 or higher
Pre-Installed
Hardware Environment:
Computer: IBM PC/AT or compatible
CPU : 266 MHz Pentium® II processor
or higher (For Windows Vista®, 800MHz
Pentium® III processor or higher)
RAM: 128MB or more (For Windows
Vista®, 512MB or more)
Hard disk space: 300MB or more
CD-ROM drive (When creating an
audio CD or data CD, a CD-R/RW drive
is needed)
Port: USB port
Sound board: Sound cards compatible
with any of the supported Microsoft®
Windows® operating systems
Display: High color (16bit) or more and
800×480 dots or more
Internet access for Voice Mail function
and CD database service
Note
The following systems are not supported:
64 bit versions of Windows® XP
Any operating systems other than the ones
indicated above
Personally assembled PCs or operating
systems
Upgraded operating systems
Multi-boot environment
Multi-monitor environment
For the latest version information and
compatibility with your operating system,
please access the support home page for
the IC recorder:
http://www.sony-asia.com/support
99
Utilizing Your Computer
GB
Page 100

100
GB
Note on transcribing a message
When you use Dragon
NaturallySpeaking® speech-recognition
software to transcribe a message,
your computer must also meet the
system requirements that the Dragon
NaturallySpeaking requires.
Note on sending a voice e-mail
When you use Microsoft® Outlook
Express 5.5/6.0/7.0, Microsoft® Outlook
2000/2002/2003/2007, and Microsoft®
Windows Mail to send a voice e-mail of
a message, your computer must also
meet the system requirements that the
Outlook Express requires.
Installing the software
Install the Digital Voice Editor software on
your computer’s hard disk.
Notes
64 bit versions of Windows® XP are not
supported.
While installing the software do not connect
or disconnect the USB connecting cable. The
software may not be installed properly.
When installing or uninstalling the software
in Windows® 2000 Professional, make sure
to log on Windows as the user name of
“Administrator. ”
When installing or uninstalling the software
in Windows Vista® Ultimate Service Pack 1
or higher/Windows Vista® Business Service
Pack 1 or higher/Windows Vista® Home
Premium Service Pack 1 or higher/Windows
Vista® Home Basic Service Pack 1 or higher/
Windows® XP Media Center Edition 2005
Service Pack 3 or higher/Windows® XP Media
Center Edition 2004 Service Pack 3 or higher/
Windows® XP Media Center Edition Service
Pack 3 or higher/Windows® XP Professional
Service Pack 3 or higher/Windows® XP
Home Edition Service Pack 3 or higher,
log on as a user name with the “Computer
administrator” user account. (To find if the
user name has a “Computer administrator”
user account, open the “User Accounts” from
the “Control Panel” and refer to the section
beneath the user name being displayed.)
 Loading...