

Page 1

3-865-582-12(1)
English
Français
Battery IR
Light
Operating Instructions
Mode d’emploi
Manual de instrucciones
Istruzioni per l’uso
HVL-IRC
Sony Corporation © 1998 Printed in Japan
A
BATT-
B
3
+ side up/
Côté + vers le
haut
BATT-
2
C–1
D
1, 2
1
12
3
1
A
– side up/
Côté - vers le
haut
+
–
–
+
This mark indicates that this product is a genuine
accessory for Sony video products. When
purchasing Sony video products, Sony
recommends that you purchase accessories with
this “GENUINE VIDEO ACCESSORIES” mark.
Ce logo indique qu’il s’agit d’un accessoire
authentique pour produits vidéo Sony. Lorsque
vous achetez des produits vidéo Sony, nous vous
recommandons d’acheter des accessoires munis de
ce logo “GENUINE VIDEO ACCESSORIES”.
4, 5
4
3
C–2
3
WARNING
To prevent fire or shock hazard, do not expose the
unit to rain or moisture.
To avoid electrical shock, do not open the cabinet.
Refer servicing to qualified personnel only.
This symbol is intended to alert
the user to the presence of
important operating and
maintenance (servicing)
instructions in the literature
accompanying the appliance.
For the customers in the U.S.A.
NOTE
This equipment has been tested and found to
comply with the limits for a Class B digital device,
pursuant to Part 15 of the FCC Rules. These limits
are designed to provide reasonable protection
against harmful interference in a residential
installation. This equipment generates, uses, and
can radiate radio frequency energy and, if not
installed and used in accordance with the
instructions, may cause harmful interference to
radio communications. However, these is no
guarantee that interference will not occur in a
particular installation. If this equipment does cause
harmful interference to radio or television
reception, which can be determined by turning the
equipment off and on, the user is encouraged to
try to correct the interference by one or more of the
following measures:
— Reorient or relocate the receiving antenna.
— Increase the separation between the equipment
and receiver.
— Connect the equipment into an outlet on a
circuit different from that to which the receiver
is connected.
— Consult the dealer or an experienced radio/TV
technician for help.
You are cautioned that any changes or
modifications not expressly approved in this
manual could void your authority to operate this
equipment.
DISPOSAL OF LITHIUM ION
BATTERY.
LITHIUM ION BATTERY.
DISPOSE OF PROPERLY.
You can return your unwanted lithium ion
batteries to your nearest Sony Service Center or
Factory Service Center.
Note
In some areas the disposal of lithium ion batteries
in household or business trash may be prohibited.
For the Sony Service Center nearest you call
1-800-222-SONY (United States only)
For the Sony Factory Service Center nearest you
call 416-499-SONY (Canada only)
Caution
Do not handle damaged or leaking lithium ion
battery.
Features
•The battery IR light can be used on a camcorder
with the NightShot function. Using the battery IR
light, you can record more distant subjects in
NightShot operation.
•If your camcorder doesn’t have the accessory
shoe attached, you can record with the battery IR
light using the shoe bracket.
Precautions
•Avoid placing the battery IR light near
combustible or volatile solvents such as alcohol
or benzine.
•Do not let any solid object or liquid fall onto or
into the battery IR light.
•Do not pick up the camcorder by the head of the
battery IR light.
•Remove the battery IR light and shoe bracket
before putting the camera into a carrying case.
•Avoid placing or storing the battery IR light in
locations that are
– Extremely hot such as in a car parked in the sun
– In areas subject to direct sunlight or sources of
high temperature, such a heating device
– Vibrating
•Remove the battery pack after using or when
carrying the battery IR light.
After use
• Be sure to set the POWER switch to OFF.
• Store in pouch after making sure that the unit
is cool enough to handle.
On cleaning
Clean the battery IR light with a dry soft cloth. You
can remove stubborn stains with a cloth lightly
dampered with a mild detergent solution, then dry
the unit with a soft cloth.
Never use strong solvents, such as thinner or
benzine, since these will damage the finish on the
surface.
Specifications
IR light segment
Power requirements 7.2 V DC
Maximum power consumption 2 W
Continuous lighting time
Type of battery Lighting duration
pack (min.)
NP-F330 180
NP-F550 360
NP-F750 760
NP-F950 1,120
(Approx. minutes using fully-charged battery
pack)
Type of dry Lighting duration
battery (min.)
LR6 (size AA) 60
(Approx.minutes using two new dry batteries.)
Illumination distance Approx. 3-20 m
Dimensions Approx. 46 × 102 × 43 mm
Mass Approx. 90 g (3 oz)
Accessories (supplied) shoe bracket (1)
Design and specifications are subject to change
without notice.
A
Using with the
(1 13/16 × 4 1/8 × 1 3/4
inches) (w/h/d)
Operating instructions (1)
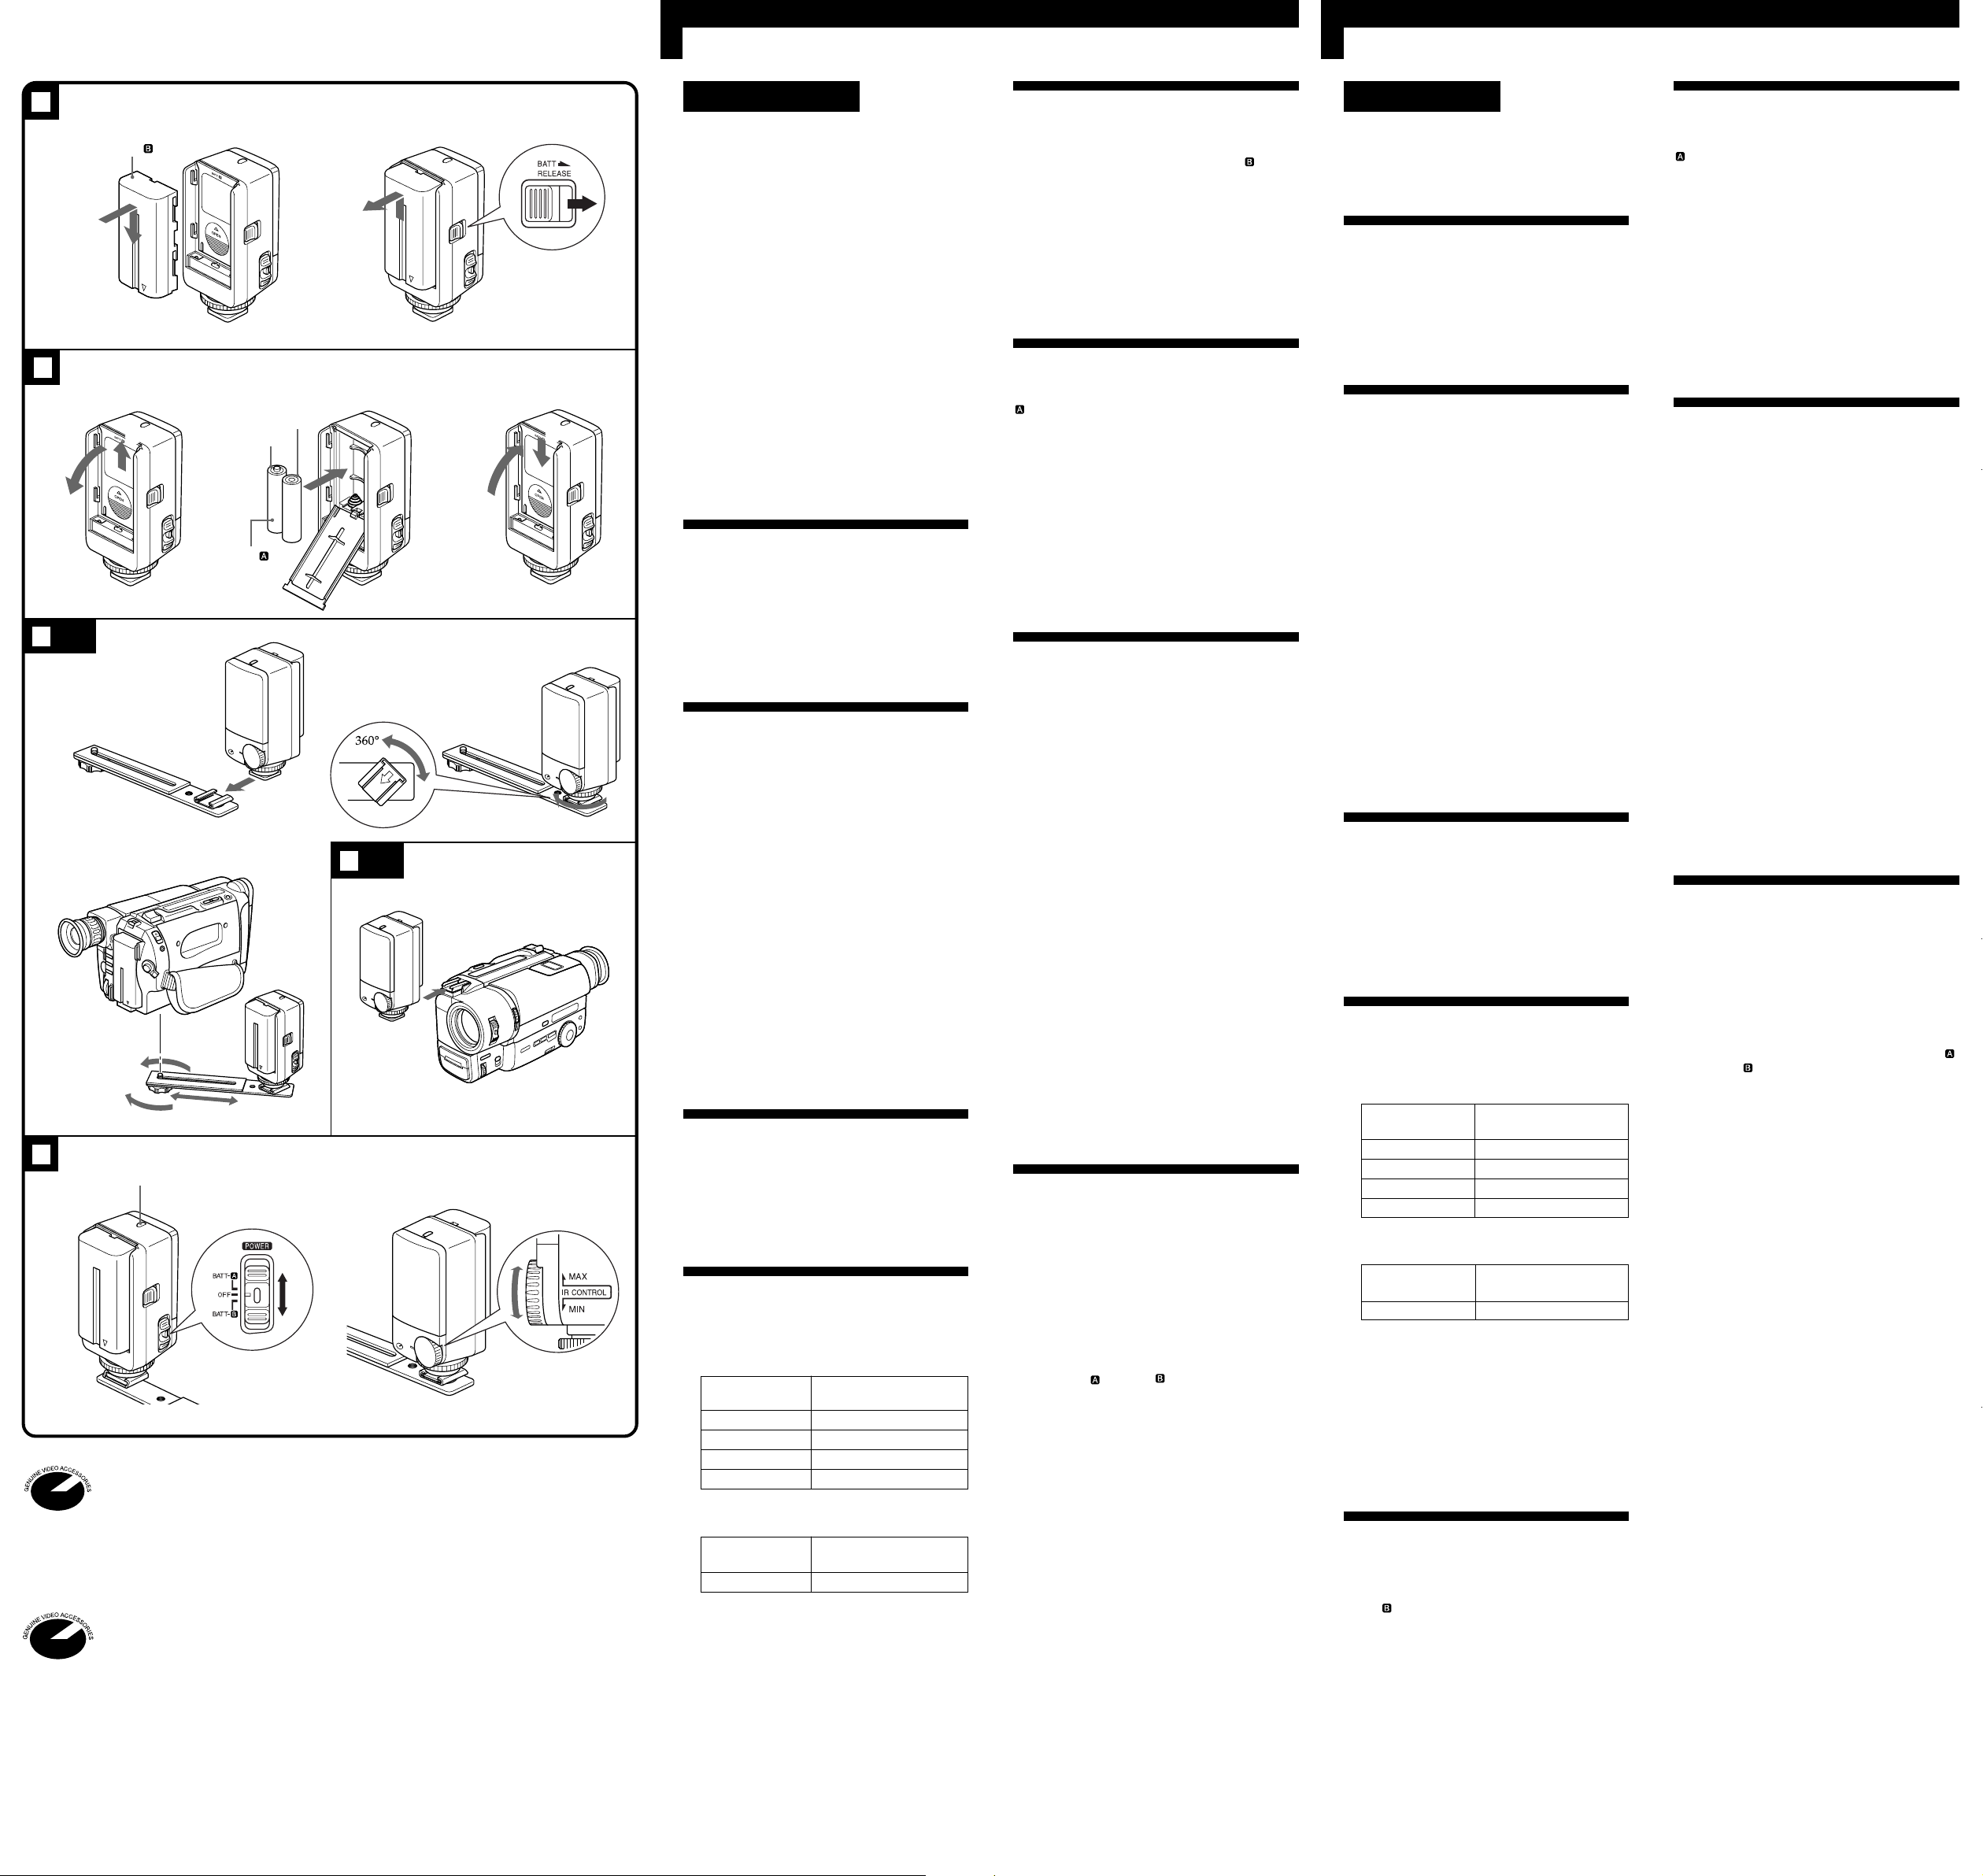
rechargeable battery
The rechargeable battery pack is to be set at the
behind of the battery IR light, and it is indicated as
the BATT- .
To attach the rechargeable
battery
Attach the fully charged battery to the
battery IR light in the direction of the arrow.
To remove the rechargeable
battery
While sliding the BATT RELEASE button on
the battery IR light, slide out the battery in
the direction of the arrow.
B
Using with the dry
batteries
The dry batteries are to be set inside of the battery
IR light, and they are indicated as the BATT- .
(marked on the center of the battery compartment)
1 Slide the lid in the direction of the arrow
1.
2 Open the lid in the direction of the arrow
2.
3 Insert both of the size LR6 (AA) batteries
with correct polarity.
4 Lift up and close the lid in the direction of
the arrow 3.
5 Slide the lid in the direction of the arrow
4 until it clicks.
Note on the dry battery
Pay attention to the polality of the batteries when
attaching.
C
Attaching the battery
IR light to the
camcorder
Using supplied shoe bracket
(illustration C-1)
1 Insert the battery IR light into the shoe in
the direction of the arrow and slit on its
bottom until it reaches the end.
2 Turn and tighten the lock knob to lock in
the direction of the arrow.
3 Align the camcorder mounting screw with
the hole on the bottom of the camcorder,
and tighten the screw firmly.
Using the accessory shoe of the
camcorder (illustration C-2)
1 Insert the battery IR light into the shoe of
the camcorder.
2 Follow the same procedure as above step
2.
To remove the battery IR light
Turn and loosen the lock knob to remove the
battery IR light in the opposite direction of
the arrow.
D Shooting in the dark
(using the IR light)
The IR light can be used on a camcorder with the
NightShot function. For details of the NightShot
operation, refer to the operating instructions
supplied with the camcorder.
1 Set the POWER switch to BATT- or
BATTpushing the small green button.
The IR indicator A lights up.
2 Slide the NIGHTSHOT switch on the
camcorder to ON.
3 View the picture in the viewfinder or
on the LCD screen, and adjust the
brightness by turning IR CONTROL.
Tip
The distance between the IR light and the subject
in the dark should be from about 3 m (9 4/5 ft) to 20
m (65 3/5 ft). When the subject is too close, IR light
cannot light the subject completely.
Since the recording distance will differ depending
on the environment, be sure to check the
brightness of the picture in step 3 before you start
recording.
Notes on IR light
•The picture recorded with the IR light is nearly
monochrome.
•IR light is invisible because it is infrared lighting.
The emitting section may turn red.
After use
Set the POWER switch to OFF.
of the battery IR light while
AVERTISSEMENT
Afin d’éviter tout risque d’incendie ou
d’électrocution, ne pas exposer cet appareil à la
pluie ou à l’humidité.
Afin d’écarter tout risque d’électrocution, garder le
coffret fermé. Ne confier l’entretien de l’appareil
qu’à un professionnel.
DEPOT DES BATTERIES AU
LITHIUM-ION
DEPOSEZ LES BATTERIES AU LITHIUM-ION
AUX ENDROITS RECOMMANDES.
Vous pouvez rapporter les batteries au lithium-ion
dans un centre de Service Sony ou dans un point
de ramassage.
Remarque
Dans certain pays, il est interdit de jeter les
batteries au lithium-ion avec les ordures
ménagères ou dans les poubelles de bureau.
Pour connaître le centre de Service Sony le plus
proche de chez vous, composez le
1-800-222-SONY (Etats-Unis uniquement)
Pour connaître le point de ramassage le plus
proche de chez vous, composez le 416-499-SONY
(Canada uniquement)
Avertissement
Ne pas utiliser des batteries au lithium-ion qui sont
endommagées ou qui fuient.
Caractéristiques
•La lampe infrarouge à batterie peut être utilisée
sur un camescope doté de la fonction NightShot
(Prise de vues nocturne). Pendant l’utilisation de
la lampe infrarouge à batterie, vous pouvez
enregistrer des sujets plus éloignés en mode de
fonctionnement NightShot.
•Si votre camescope n’a pas de griffe porteaccessoires, vous pouvez filmer avec la lampe IR
en utilisant le porte-griffe.
Précautions
•Evitez de poser la lampe IR près de combustibles
ou de solvants volatils, comme l’alcool ou la
benzine.
•Ne pas laisser d’objets solides ou de liquides
tomber sur ou pénétrer à l’intérieur de la lampe
IR.
•Ne pas saisir le camescope par la lampe IR.
•Enlevez la lampe IR et le porte-griffe avant de
ranger le camescope dans une sacoche de
transport.
•Évitez de laisser ou ranger la lampe IR
– dans des endroits extrêmement chauds, comme
dans une voiture garée en plein soleil
– en plein soleil ou près de sources de
températures élevées, comme un appareil de
chauffage
– dans des endroits soumis à des vibrations
•Enlevez la batterie rechargeable après utilisation
ou lorsque vous transportez la lampe IR.
Après utilisation
• Veillez à régler le commutateur POWER sur
OFF.
• Rangez la lampe dans sa pochette après vous
être assuré que la lampe était suffisamment
froide pour pouvoir être manipulée.
Nettoyage
Nettoyez la lampe IR avec un chiffon sec et doux.
Vous pouvez enlever les tâches rebelles avec un
chiffon légèrement imprégné de détergent neutre.
Essuyez ensuite la lampe avec un chiffon doux.
Ne jamais utiliser de solvants puissants, tels qu’un
diluant ou de la benzine, car ils peuvent
endommager la finition.
Spécifications
Section lampe infrarouge
Alimentation 7,2 V CC
Consommation maximale 2 W
Temps d’éclairage continu
Type de batterie Temps d’éclairage
rechargeable (min.)
NP-F330 180
NP-F550 360
NP-F750 760
NP-F950 1,120
(Env. en minutes avec une batterie rechargeable
pleine)
Type de pile Durée d’éclairage
sèche (min.)
LR6 (taille AA) 60
(Approx. en minutes lorsque deux piles sèches
sont utilisées.)
Distance d’utilisation recommandée
Env. 3-20 m
Dimensions Env. 46 × 102 × 43 mm
(1 13/16 × 4 1/8 × 1 3/4
pouces) (l/h/p)
Poids Env. 90 g (3 on.)
Accessoires (fournis) Porte-griffe (1)
Mode d’emploi (1)
La conception et les spécifications peuvent être
modifiées sans préavis.
A Utilisation avec la
batterie rechargeable
La batterie rechargeable doit être mise au dos de la
lampe IR et elle est indiquée par BATT- .
Pour mettre la batterie
rechargeable en place
Fixez la batterie rechargeable (pleinement
chargée) sur la lampe IR en la faisant glisser
dans le sens de la flèche.
Pour retirer la batterie
rechargeable
Tout en poussant sur le bouton BATT
RELEASE sur la lampe IR, sortez la batterie en
la faisant glisser dans le sens de la flèche.
B Utilisation avec
des
piles sèches
Les piles sèches doivent être mises dans la lampe
IR et elles sont indiquées par BATT- (au centre
du logement de piles).
1 Faites glisser le couvercle dans le sens de
la flèche 1.
2 Ouvrez le couvercle dans le sens de la
flèche 2.
3 Insérez les deux piles de taille LR6 (AA) en
respectant la polarité.
4 Soulevez et fermez le couvercle dans le
sens de la flèche 3.
5 Faites glisser le couvercle dans le sens de
la flèche 4 jusqu'au déclic.
Remarque sur les piles sèches
Faites attention à la polarité des piles lorsque vous
les insérez.
C Fixation de la lampe
IR sur le porte-griffe
Utilisation du porte-griffe
fourni (illustration C-1)
1 Insérez la lampe IR dans la griffe et faites-
la glisser dans le sens de la flèche.
2 Serrez le bouton de verrouillage en le
tournant dans le sens de la flèche.
3 Alignez la vis de montage sur l’orifice
fileté se trouvant sous le camescope et
serrez bien la vis.
Utilisation de la griffe porteaccessoire du camescope
(illustration C-2)
1 Insérez la lampe IR dans la griffe du
camescope.
2 ci-dessus à l'étape 2.
Pour enlever la lampe IR
Desserrez le bouton de verrouillage pour
enlever la lampe IR en le tournant dans le
sens opposé de la flèche.
D
Prise de vues nocturne
(utilisation de la
lampe IR)
La lampe IR peut être utilisée sur un camescope
dotée ole la fonction NightShot. Pour des détails
sur le fonctionnement en mode NightShot, veuillez
vous reporter au mode d’emploi de votre
camescope.
1 Réglez le commutateur POWER sur
BATTen appuyant sur le petit bouton vert.
L’indicateur d’éclairage infrarouge A s’allume.
2 Réglez le commutateur NIGHTSHOT du
camescope sur ON.
3 Regardez l’image dans le viseur ou sur
l’écran LCD, et réglez la luminosité en
tournant la molette IR CONTROL.
Conseil
La distance entre la lampe infrarouge et le sujet
dans le noir devrait être comprise entre 3 m (9 4/
pi.) et 20 m (65 3/5 pi.). Si le sujet est trop proche, la
lampe infrarouge ne pourra pas éclairer
complétement le sujet.
La distance d’enregistrement variant en fonction
de l’environnement, n’oubliez pas de vérifier la
luminosité de l’image à l’étape 3 avant de
commencer l’enregistrement.
Remarques sur la lampe IR
•L’image enregistrée avec la lampe IR est presque
monochrome.
•La lumière de la lampe IR est invisible parce
qu’elle est émise sous forme de rayons
infrarouges.
La partie émettant la lumière devient rouge.
Après utilisation
Réglez le commutateur POWER sur OFF.
ou BATT- de la lampe IR. Tout
5
Page 2
Español
Italiano
A
BATT-
B
2
1, 2
1
3
lado+ hacia
arriba/
Lato + verso
l'alto
BATT-
lado-hacia
arriba/
Lato - verso
l'alto
+
–
–
+
C–1
12
3
D
1
Esta marca indica que este producto es un
accesorio genuino para productos de vídeo Sony.
Cuando adquiera productos de vídeo Sony, Sony
recomienda adquirir accesorios con esta marca
“GENUINE VIDEO ACCESSORIES”.
Questo marchio indica che questo prodotto è un
accessorio autentico per prodotti video Sony.
Quando si acquistano prodotti video Sony, la Sony
consiglia di acquistare accessori con questo
marchio “GENUINE VIDEO ACCESSORIES”.
A
C–2
3
4, 5
3
4
ADVERTENCIA
Para evitar incendios o descargas eléctricas, no
exponga la unidad a la lluvia ni a la humedad.
Para evitar descargas eléctricas, no abra la unidad.
En caso de avería, solicite los servicios de personal
cualificado.
FORMA DE DESHACERSE DE LAS
PILAS DE IONES DE LITIO
PILA DE IONES DE LITIO FORMA APROPIADA
DE DESHACERSE DE LAS PILAS
Usted podrá devolver las pilas de iones de litio a
un centro de reparaciones Sony o a una fábrica
Sony.
Nota
En ciertas zonas puede estar prohibido tirar las
pilas de iones de litio a la basura.
Para información sobre el centro de reparaciones
Sony más cercano, llame a
1-800-222-SONY (EE.UU. solamente)
Para información sobre la fábrica Sony más
cercana, llame a 416-499-SONY
(Canadá solamente)
Precaución
No utilice pilas de iones de litio dañadas o con
fugas de electrólito.
Características
•La lámpara IR para batería solamente podrá
utilizarse con una videocámara con función de
videofilmación nocturna. Utilizando la lámpara
IR para batería, usted podrá videofilmar motivos
más distantes en la operación de videofilmación
nocturna.
•Si su videocámara no está provista de zapata
para accesorios, podrá videofilmar con la
lámpara IR para batería utilizando el soporte
para la zapata.
Precauciones
•Evite colocar la lámpara IR para batería cerca de
combustibles o disolventes volátiles, como
alcohol o bencina.
•No permita que dentro de la lámpara IR para
batería entre ningún objeto sólido ni líquido.
•No tome la videocámara por la cabeza de la
lámpara IR para batería.
•Quite la lámpara IR para batería y el soporte de
la zapata antes de colocar la videocámara en una
caja de transporte.
•Evite colocar o guardar la lámpara IR para
batería en lugares
– Extremadamente cálidos, como en un
automóvil estacionado al sol
– Sometidos a la luz solar directa o a fuentes de
alta temperatura, como un aparato de
calefacción
– Sometido a vibraciones
•Extraiga la batería después dehaber transportado
la lámpara IR para batería.
Después de la utilización
• Cerciórese de poner el interruptor POWER en
OFF.
• Después de haberse asegurado de que la
unidad está suficientemente fría como para
manejarla, guárdela en la bolsa.
Limpieza
Limpie la lámpara IR para batería con un paño
suave y seco. Usted podrá eliminar las manchas
difíciles con un paño ligeramente humedecido en
una solución de detergente suave, y después secar
la unidad con un paño suave.
No utilice nunca disolventes fuertes, como diluidor
de pintura ni bencina, ya que éstos podrían dañar
el acabado de la superficie.
Especificaciones
Segmento de la lámpara IR
Alimentación 7,2 V CC
Consumo máximo de energía 2 W
Tiempo de iluminación continua
Tipo de batería
NP-F330 180
NP-F550 360
NP-F750 760
NP-F950 1,120
(Minutos aproximados utilizando una batería
completamente cargada)
Tipo de pila
LR6 (tamaño AA) 60
(Minutos aproximados utilizando dos pilas
nuevas.)
Distancia de utilización recomendada
Dimensiones Aprox. 46 × 102 × 43 mm
Masa Aprox. 90 g
Accesorios suministrados
El diseño y las especificaciones están sujetos a
cambio sin previo aviso.
Duración de iluminación
(min.)
Duración de iluminación
(min.)
Aprox. 3-20 m
(an/al/prf)
Soporte para la zapata (1)
Manual de instrucciones
(1)
A
Utilización con la
batería
La batería es para colocarse detrás de la lámpara IR
para batería, y está indicada como BATT- .
Para fijar la batería
Fije una batería completamente cargada a la
lámpara IR para batería en el sentido de la
flecha.
Para quitar la batería
Mientras deslice el mando BATT RELEASE de
la lámpara IR para batería, deslice hacia
afuera la batería en el sentido de la flecha.
B
Utilización con pilas
Las pilas son para instalarse en el interior de la
lámpara IR para batería, y se indican como BATT-
. (marcado en el centro del compartimiento de la
batería).
1 Deslice la tapa en el sentido de la flecha
1.
2 Abra la tapa en el sentido de la flecha 2.
3 Inserte ambas pilas de tamaño LR6 (AA)
con la polaridad correcta.
4 Levante y cierre la tapa en el sentido de la
flecha 3.
5 Deslice la tapa en el sentido de la flecha
4 hasta que chasquee.
Nota sobre las pilas
Preste atención a las pilas cuando las instale.
C Fijación de la lámpara
IR para batería a la
vidocámara
Utilización del soporte para
zapata suministrado
(ilustración C-1)
1 Inserte la lámpara IR para batería en la
zapata en el sentido de la flecha y
deslícela hacia abajo hasta que llegue al
final.
2 Gire y apriete el mando de bloqueo para
bloquear en el sentido de la flecha.
3 Alinee el tornillo de montaje a la
videocámara con el orificio en la base de
la videocámara, y apriete firmemente el
tornillo.
Utilización de la zapata para
accesorios de la videocámara
(ilustración C-2)
1 Inserte la lampara IR para bateria en la
zapata para accesorios de la videocamara.
2 Siga el mismo procedimiento que en el
paso 2 anterior.
Para extraer la lámpara IR para
batería
Gire y afloje el mando de bloqueo para
quitar la lámpara IR para batería en el
sentido opuesto al de la flecha.
D Videofilmación en la
obscuridad
(utilizando la
lámpara IR)
La lámpara IR para vídeo podrá utilizarse en una
videocámara con función de videofilmación
nocturna (NightShot). Con respecto a los detalles
sobre la operación de videofilmación nocturna,
consulte el manual de instrucciones suministrado
con la videocámara.
1 Ponga el selector POWER de la lampara IR
en BATTpara batería manteniendo presionado el
pequeño el botón verde.
El indicador IR A se encenderá,
2 Deslice el interruptor NIGHTSHOT de la
videocámara hasta ON.
3 Observe la imagen en el visor o en la
pantalla de cristal líquido, y ajuste el
brillo girando IR CONTROL.
Sugerencia
La distancia entre la lámpara IR y el motivo en la
obscuridad deberá ser de unos 3 a 20 m. Cuando el
motivo esté demasiado cerca, la lámpara IR no
podrá iluminarlo completamente.
Como la distancia de videofilmación diferirá
dependiendo del medio ambiente, cerciórese de
comprobar el brillo de la imagen en el paso 3 antes
de iniciar la videofilmación.
Notas sobre la lámpara IR
•Las imágenes grabadas con la lámpara IR serán
prácticamente monocromas.
•La luz IR es invisible porque es infrarroja.
La sección de emisión puede volverse roja.
Después de la utilización
Ponga el selector POWER en OFF.
o BATT- de la lámpara IR
ATTENZIONE
Per evitare il pericolo di incendi o scosse elettriche,
non esporre l’apparecchio alla pioggia o
all’umidità.
Per evitare scosse elettriche, non aprire
l’apparecchio. Per le riparazioni rivolgersi solo a
personale qualificato.
Caratteristiche
•La lampada IR a batteria può essere usata su
videocamere dotate di funzione di riprese
notturne (NightShot). Usando la lampada IR a
batteria si possono riprendere soggetti più
distanti nel modo di riprese notturne.
•Se la videocamera è priva di attacco accessori, è
possibile registrare con la lampada IR a batteria
usando la staffa per attacco.
Precauzioni
•Evitare di collocare la lampada IR a batteria
vicino a combustibili o solventi volatili come
alcool o benzina.
•Evitare la penetrazione di oggetti o liquidi nella
lampada IR a batteria.
•Non sollevare la videocamera tenendola per la
testata della lampada IR a batteria.
•Rimuovere la lampada IR a batteria e la staffa per
attacco prima di inserire la videocamera in una
custodia di trasporto.
•Evitare di collocare o conservare la lampada IR a
batteria in luoghi:
– estremamente caldi come un’auto parcheggiata
al sole
– dove batte direttamente il sole o vicini a fonti di
calore elevato, come impianti di riscaldamento
– con vibrazioni
•Rimuovere il blocco batteria dopo l'uso e quando
si trasporta la lampada IR a batteria.
Dopo l’uso
• Assicurarsi di regolare l’interruttore POWER su
OFF.
• Riporre nella custodia dopo essersi accertati
che la lampada si sia raffreddata a sufficienza.
Pulizia
Pulire la lampada IR a batteria con un panno
morbido asciutto. È possibile rimuovere macchie
resistenti con un panno leggermente inumidito con
una blanda soluzione detergente e quindi
asciugando con un panno morbido.
Non usare forti solventi, come acquaragia o
benzina, perché possono danneggiare la finitura
della superficie.
Caratteristiche tecniche
Sezione lampada IR
Alimentazione 7,2 V CC
Consumo massimo 2 W
Tempo di illuminazione continua
Tipo di blocco Durata illuminazione
batteria (min.)
NP-F330 180
NP-F550 360
NP-F750 760
NP-F950 1,120
(Minuti circa usando un blocco batteria
completamente carico)
Tipo di pila Durata illuminazione
a secco (min.)
LR6 (formato AA) 60
(Minuti circa usando due pile a secco nuove)
Distanza di uso consigliata Circa 3-20 m
Dimensioni Circa 46 × 102 × 43 mm
(l/a/p)
Massa Circa 90 g
Accessori (in dotazione) Staffa per attacco (1)
Istruzioni per l’uso (1)
Disegno e caratteristiche tecniche soggetti a
modifiche senza preavviso.
A Uso con il blocco
batteria ricaricabile
Il blocco batteria ricaricabile deve essere applicato
dietro la lampada IR a batteria ed è indicato come
BATT-
Per applicare il blocco batteria
ricaricabile
Applicare il blocco batteria completamente
carico alla lampada IR a batteria in direzione
della freccia.
Per rimuovere il blocco batteria
ricaricabile
Tenendo spostato il tasto BATT RELEASE
sulla lampada IR a batteria, far scorrere in
fuori il blocco batteria in direzione della
freccia.
B
Uso con le pile a secco
Le pile a secco devono essere inserite nella
lampada IR a batteria e sono indicate come BATT-
(indicato al centro del comparto pile).
1 Spostare il coperchio in direzione della
freccia 1.
2 Aprire il coperchio in direzione della
freccia 2.
3 Inserire entrambe le pile tipo LR6
(formato AA) con la corretta polarità.
4 Sollevare e chiudere il coperchio in
direzione della freccia 3.
5 Far scorrere il coperchio in direzione della
freccia 2 fino a che scatta.
Nota sulle pile a secco
Fare attenzione alla polarità delle pile quando le si
inserisce.
C Applicazione della
lampada IR a batteria
alla videocamera
Uso della staffa per attacco in
dotazione (illustrazione C-1)
1 Inserire la lampada IR a batteria
nell'attacco in direzione della freccia e
farla scorrere sulla sua base fino a che
raggiunge la fine.
2 Girare e serrare la manopola di blocco in
direzione della freccia.
3 Allineare la vite di montaggio
videocamera con il foro sul fondo della
videocamera e serrare saldamente la vite.
Uso dell'attacco accessori della
videocamera (illustrazione C-2)
1 Inserire la lampada IR a batteria
nell'attacco sulla videocamera.
2 Usare lo stesso procedimento del punto 2
sopra.
Rimozione della lampada IR a
batteria
Girare e allentare la manopola di blocco per
rimuovere la lampada IR a batteria in
direzione della freccia.
D Riprese in luoghi
scuri (usando la
lampada IR)
La lampada IR può essere usata su una
videocamera dotata di funzione di riprese notturne
(NightShot). Per dettagli sull’uso della funzione di
riprese notturne, fare riferimento alle istruzioni per
l’uso in dotazione alla videocamera.
1 Regolare l’interruttore POWER su BATT-
o BATT- della lampada IR a batteria
tenendo premuto il piccolo tasto verde.
L’indicatore IR A si illumina.
2 Spostare l‘interruttore NIGHTSHOT della
videocamera su ON.
3 Osservando l’immagine nel mirino o sullo
schermo LCD della videocamera, regolare
la luminosità girando IR CONTROL.
Informazione
La distanza tra la lampada IR e il soggetto al buio
deve essere da circa 3 m a 20 m. Se il soggetto è
troppo victino, la lampada IR non può illuminare
completamente il soggetto.
Poiché la distanza di registrazione differisce a
seconda delle situazioni, controllare la luminosità
dell’immagine come descritto al punto 3 prima di
iniziare a registrare.
Note sulla lampada IR
•Le immagini registrate con l’illuminazione IR
sono quasi in bianco e nero.
•L’illuminazione IR è invisibile perché consiste di
raggi infrarossi.
La sezione emittente può divenire rossa.
Dopo l’uso
Regolare l’interruttore POWER su OFF.
 Loading...