


Sound Bar
Operating Instructions GB
CT
HT-X8500

WARNING
Do not install the Sound Bar in a
confined space, such as a bookcase or
built-in cabinet.
To reduce the risk of fire, do not cover
the ventilation opening of the Sound
Bar with newspapers, tablecloths,
curtains, etc.
Do not expose the Sound Bar to naked
flame sources (for example, lighted
candles).
To reduce the risk of fire or electric
shock, do not expose this Sound Bar to
dripping or splashing, and do not place
objects filled with liquids, such as vases,
on the Sound Bar.
The AC adapter is not disconnected
from the mains as long as it is
connected to the AC outlet, even if the
Sound Bar itself has been turned off.
As the m ain p lug o f AC powe r ada pter is
used to disconnect the AC power
adapter from the mains, connect it to an
easily accessible AC outlet. Should you
notice an abnormality in it, disconnect it
from the AC outlet immediately.
For the AC adapter
Labels for AC adapter Model No. and
Serial No. are located at the bottom of
AC adapter.
For models sold outside Taiwan
This equipment has been tested and
found to comply with the limits set out
in the EMC regulation using a
connection cable shorter than 3 meters.
Do not expose batteries or appliances
with battery-installed to excessive heat,
such as sunshine and fire.
Indoor use only.
Recommended cables
Properly shielded and grounded cables
and connectors must be used for
connection to host computers and/or
peripherals.
For the Sound Bar
The nameplate is located on the bottom
of the Sound Bar.
GB
2

Table of Contents
About These Operating
Instructions ..............................3
What’s in the Box ..........................4
What You Can Do with the Sound
Bar ............................................5
Guide to Parts and Controls ..........6
Connecting to a TV or AV
Device
Connecting to a
TV or AV Device
with the HDMI
Cable
Connecting Sony TV with the
BLUETOOTH Function
Wirelessly ...............................12
Connecting a 4K TV and 4K
Devices .................................. 15
Connecting a TV Compatible with
eARC ...................................... 16
Mounting the Sound Bar on a
Wall .........................................17
When the TV Remote Control does
not Work ................................ 18
Listening to the Sound
Listening to a TV and Other
Devices .................................. 19
Enjoying the Surround Sound .....20
Adjusting the Sound .................... 22
Listening to Music/Sound
with the BLUETOOTH®
Function
Listening to Music from a Mobile
Device ....................................24
Changing the Settings of the
BLUETOOTH Function ............26
Startup Guide
(separate
document)
Using the Various Functions
Using the Control for HDMI
Function .................................27
Using the “BRAVIA” Sync
Function .................................29
Saving Power Consumption ........29
Troubleshooting
Troubleshooting ..........................30
Resetting the Sound Bar .............35
Additional Information
Specifications ...............................36
Supported Input Audio
Formats .................................. 37
Supported HDMI Video
Formats ..................................38
On BLUETOOTH
Communication .....................40
Precautions .................................. 41
About These Operating
Instructions
•The instructions in these Operating
Instructions describe the controls on
the remote control.
•Some illustrations are presented as
conceptual drawings, and may be
different from the actual products.
•The default settings are underlined on
each feature description.
Example: Vertical surround off
GB
GB
3
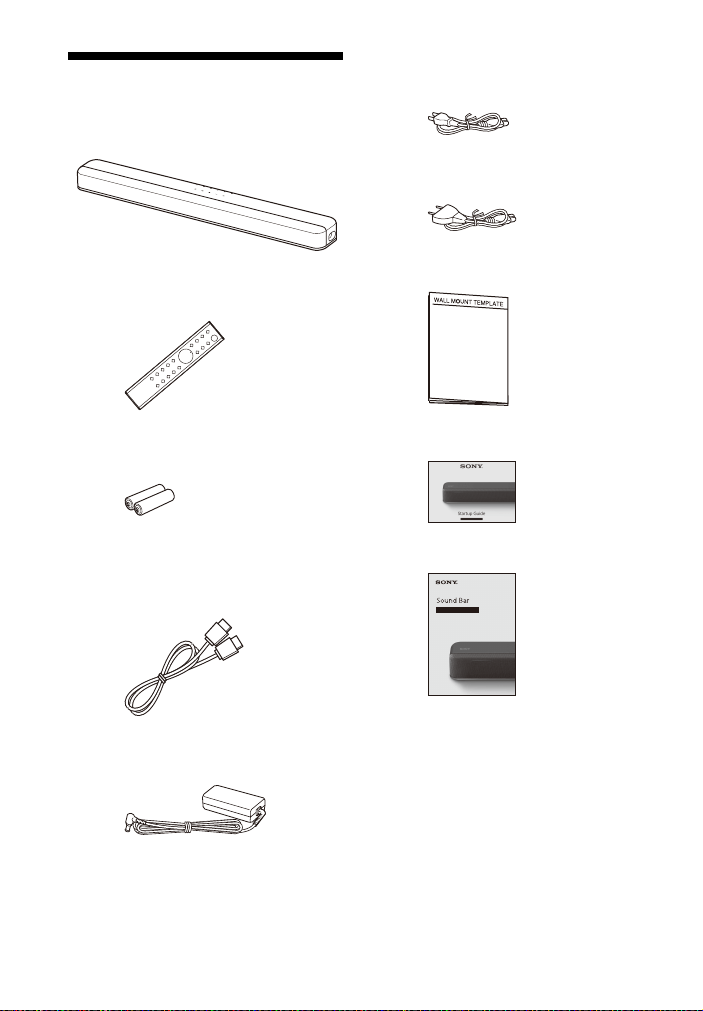
What’s in the Box
•Sound Bar (1)
• AC power cord (mains lead) (1)
–Taiwan models
– Models for other countries/regions
• Remote control (1)
• R03 (size AAA) battery (2)
• HDMI cable (supports the specification
equal to Premium High Speed HDMI
Cable with Ethernet) (1)
• AC adapter (1)
• WALL MOUNT TEMPLATE (1)
•Startup Guide
• Operating Instructions
GB
4
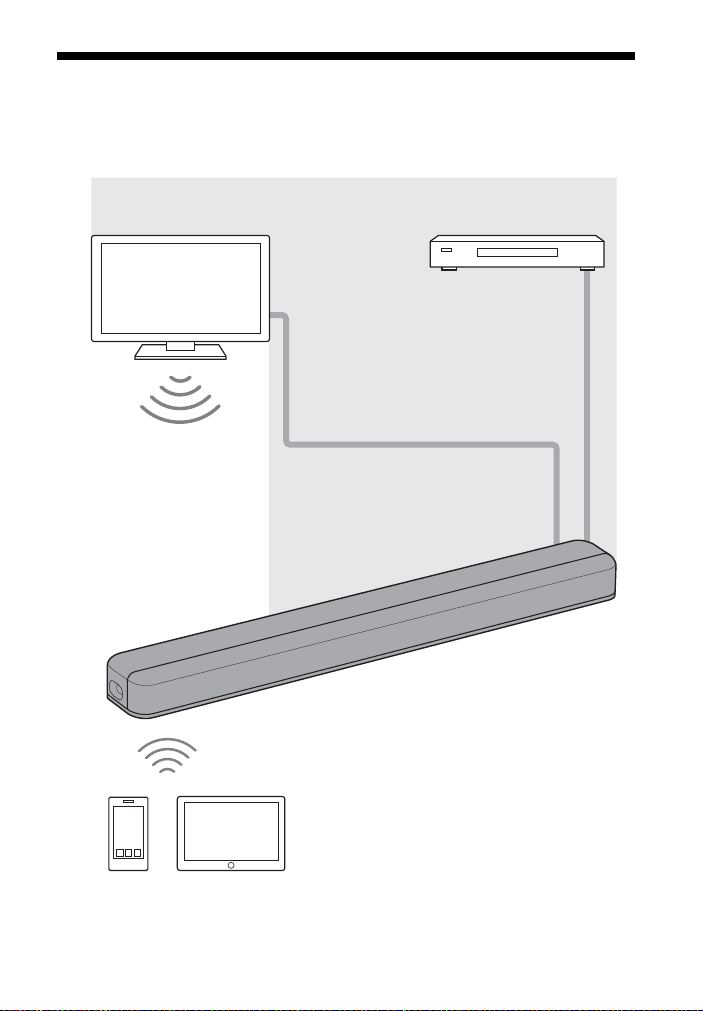
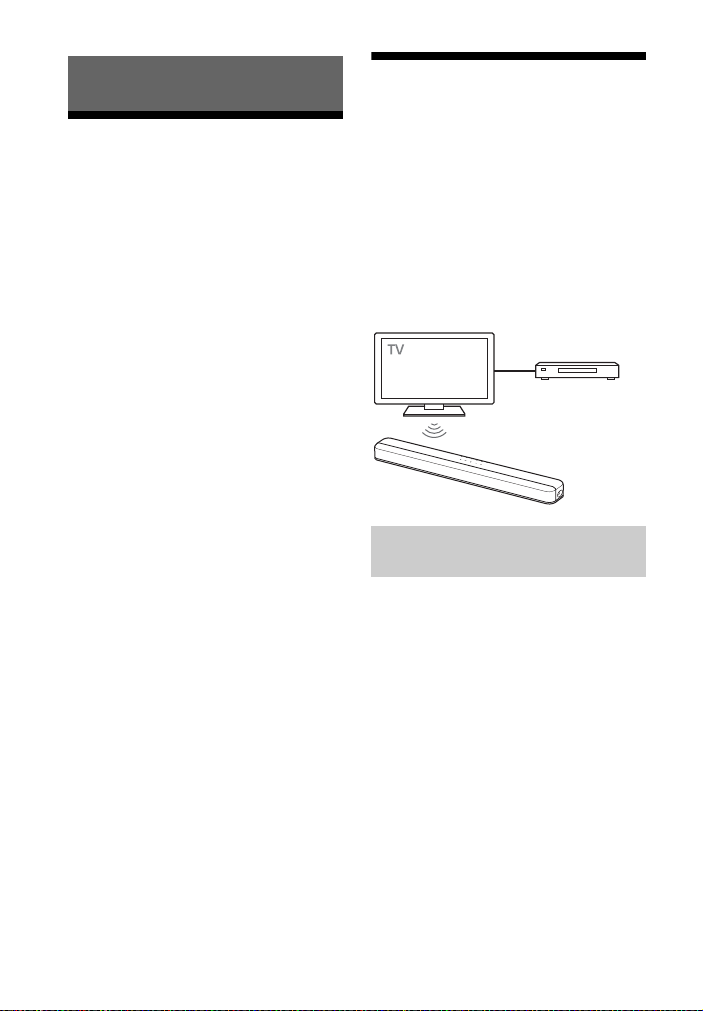
What You Can Do with the Sound Bar
“Listening to a TV and Other
Devices” (page 19)
Blu-ray Disc™ player, cable
box, satellite box, etc.
“Using the Control for HDMI
Function” (page 27)
“Using the “BRAVIA” Sync
Function” (page 29)
“Listening to Music from a
Mobile Device” (page 24)
“Connecting Sony TV
with the BLUETOOTH
Function Wirelessly”
(page 12)
Basic connection: Refer to
“Startup Guide” (separate
document).
Other connections: See
“Connecting to a TV or AV
Device” (page 12).
The Sound Bar supports object-based audio formats such as Dolby Atmos and
DTS:X as well as HDR video formats such as HDR10, HLG, and Dolby Vision.
GB
5
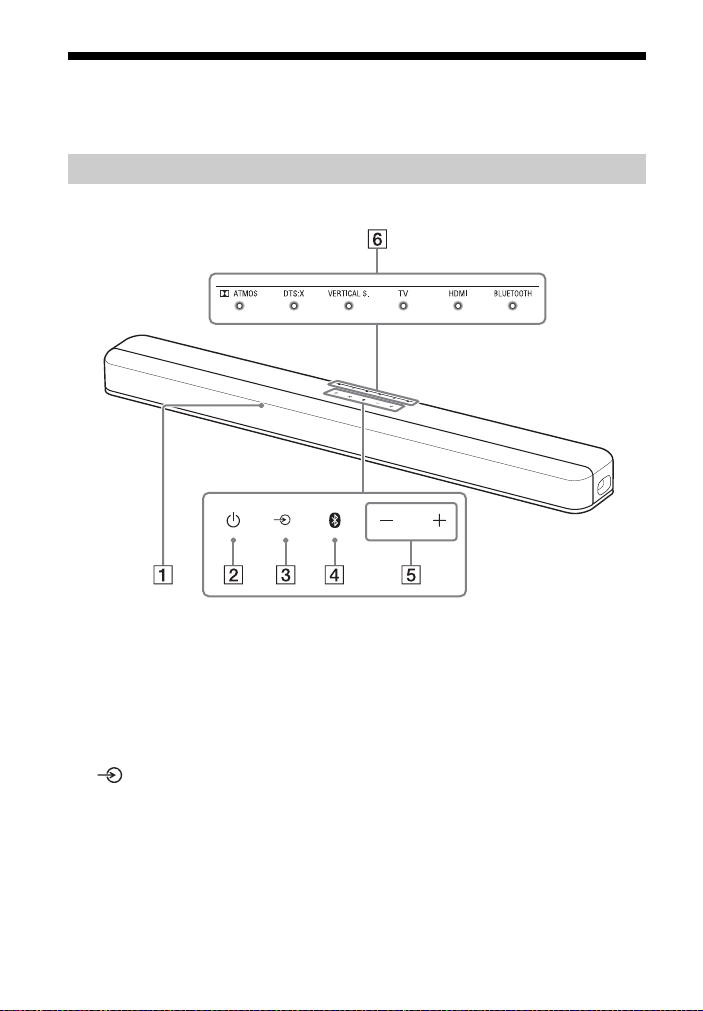
Guide to Parts and Controls
Details are omitted from the illustrations.
Sound Bar
Front
Remote control sensor
Point the remote control at the
remote control sensor to operate
the Sound Bar.
(power) button
Turns on the Sound Bar or sets it to
standby mode.
(input select) button
(page 19)
BLUETOOTH button (page 24)
+/– (volume) buttons
GB
6

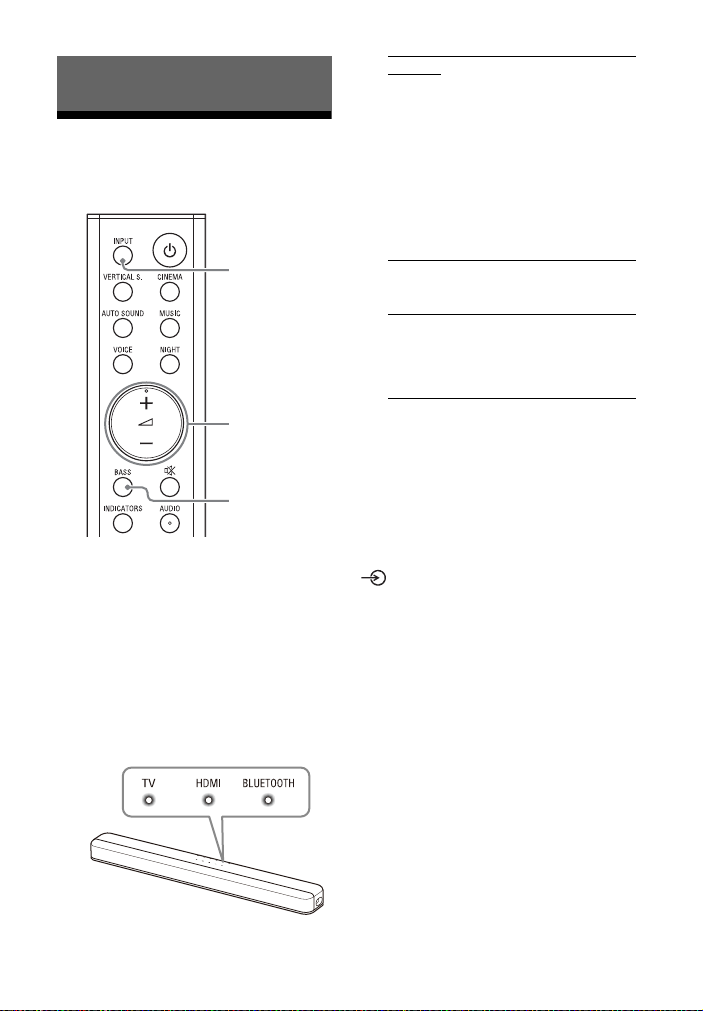
Indicators
A lighting or flashing of the indicators on the Sound Bar indicates the following
state.
Currently selected input
Indicators Status
Lights while TV input is selected.
Lights while HDMI input is selected.
Lights while BLUETOOTH input is selected.
Light while the Sound Bar is connected to the TV with the BLUETOOTH
function (TV input is selected).
Sound format, surround effect
Indicators/colors Status
White Lights while the Dolby Atmos format is playing and the virtual
White Lights while the DTS:X format is playing.
Green Lights while the DTS format is playing and the sound effect setting is
Orange Lights while the DTS:X format is playing and the sound effect setting
White Lights while the vertical surround function is set to on (page 20).
surround processing is activated.
set to “DTS Virtual:X” (page 21).
is set to “DTS Virtual:X” (page 21).
Volume
Indicators Status
Indicate the volume level by the flashing
indicators when adjusting the volume by
+/–.
pressing
As the volume level is turned up, the flashing
indicators increase (from left to right).
• Flash repeatedly while the sound is muted.
• Flash twice when the volume level is set to
minimum.
Flash twice when the volume level is set to
maximum.
GB
7

Setting value for each function
The changed setting for each function is indicated as the status of the indicators. The
following status indicates the on/off setting for each function.
For the status when the settings other than the on/off setting are changed, see the
description for each function.
Indicators Status
• Flash twice when the function is set to on
(for the function other than the night/voice
mode).
• Light for 2 seconds when the function is set
to on (for the night/voice mode).
• Flash twice when the function is set to off
(for the function other than the night/voice
mode).
• Light for 2 seconds when the function is set
to off (for the night/voice mode).
GB
8

Rear
DC IN terminal
TV IN (OPT) jack
HDMI IN jack
Peel the sticker when connecting
the device to the HDMI IN jack.
For specifications and notes on
connections, see “Supported HDMI
Video Formats” (page 38).
HDMI OUT (TV eARC/ARC) jack
Connect a TV that has an HDMI
input jack with an HDMI cable.
The Sound Bar is compatible with
eARC and ARC. ARC is the function
that sends TV sound to an AV device
such as the Sound Bar from the TV’s
HDMI jack. eARC is an extension of
ARC and enables transmission of
the object audio and multi-channel
LPCM content that cannot be
transmitted with ARC. For details of
eARC, see “Connecting a TV
Compatible with eARC” (page 16).
For supported audio formats, see
“Supported Input Audio Formats”
(page 37). For specifications and
notes on connections, see
“Supported HDMI Video Formats”
(page 38).
IR repeater (page 18)
Transmits the remote signal of the
TV remote control to the TV.
GB
9
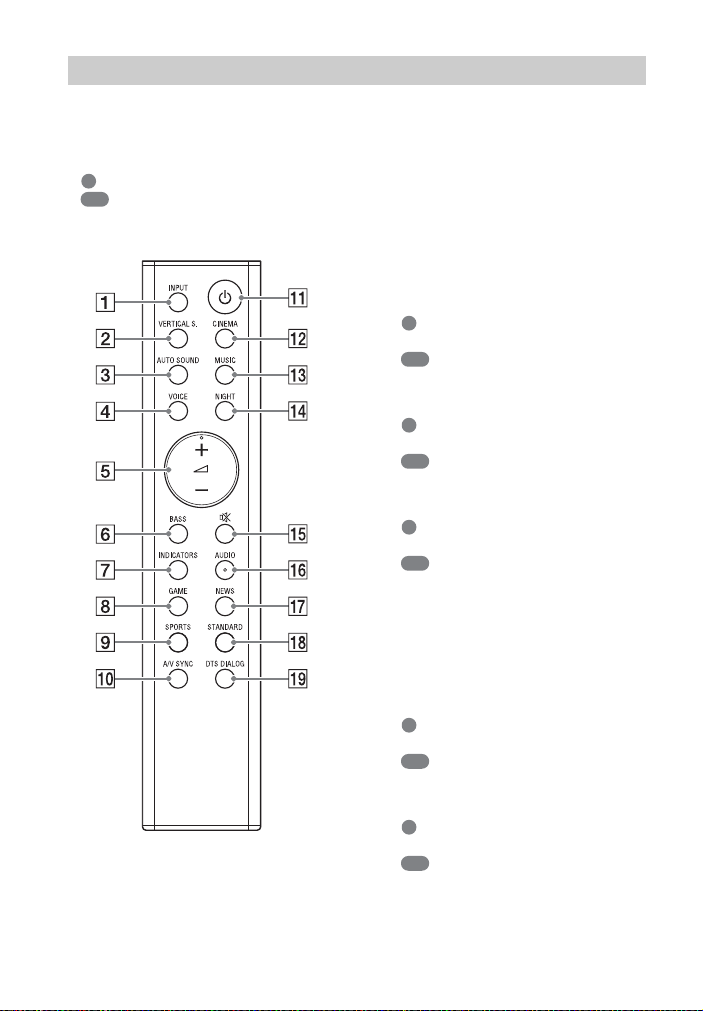
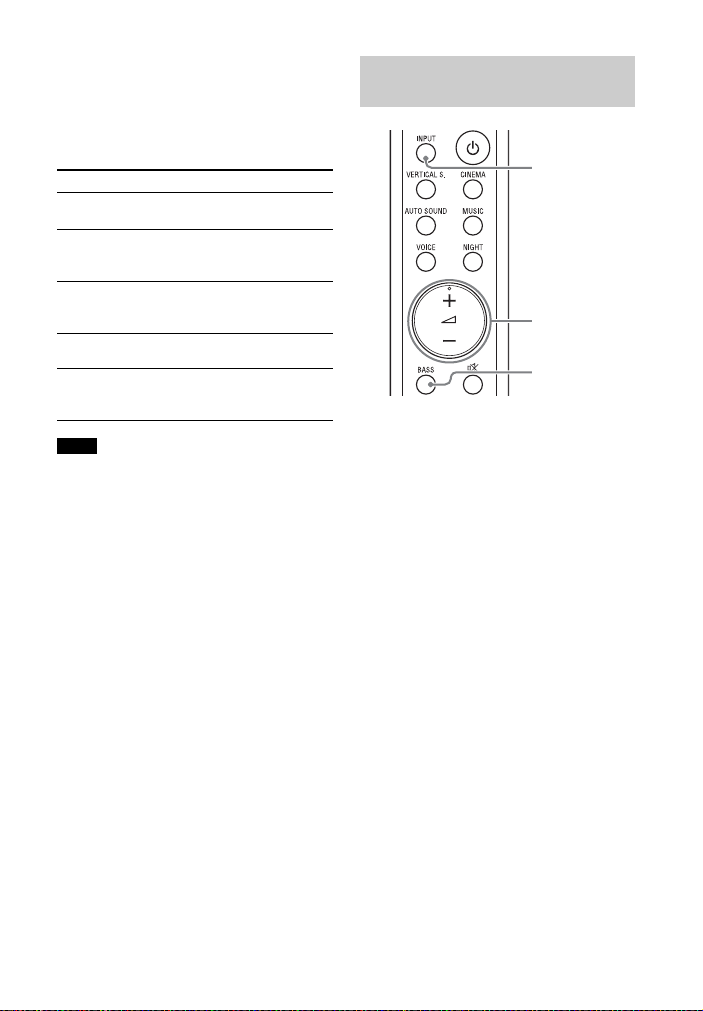
Remote Control
Some buttons function differently
depending on how long the button is
pressed. The icons below indicate how
long to press the button.
• : Press the button.
• : Press and hold the button for 5
seconds.
INPUT (page 19)
Selects the playback source. When
you press INPUT once, the current
input indicator flashes.
Press INPUT again to select the
device you want.
Each time you press INPUT, the
input changes cyclically as follows.
TV input HDMI input
BLUETOOTH input
VERTICAL S.
: Turns on/off the vertical
surround function. (page 20)
: Selects the sound effect
setting. (page 21)
AUTO SOUND
: Selects AUTO SOUND for the
sound mode. (page 20)
: Turns on/off the AAC codec
function. (page 26)
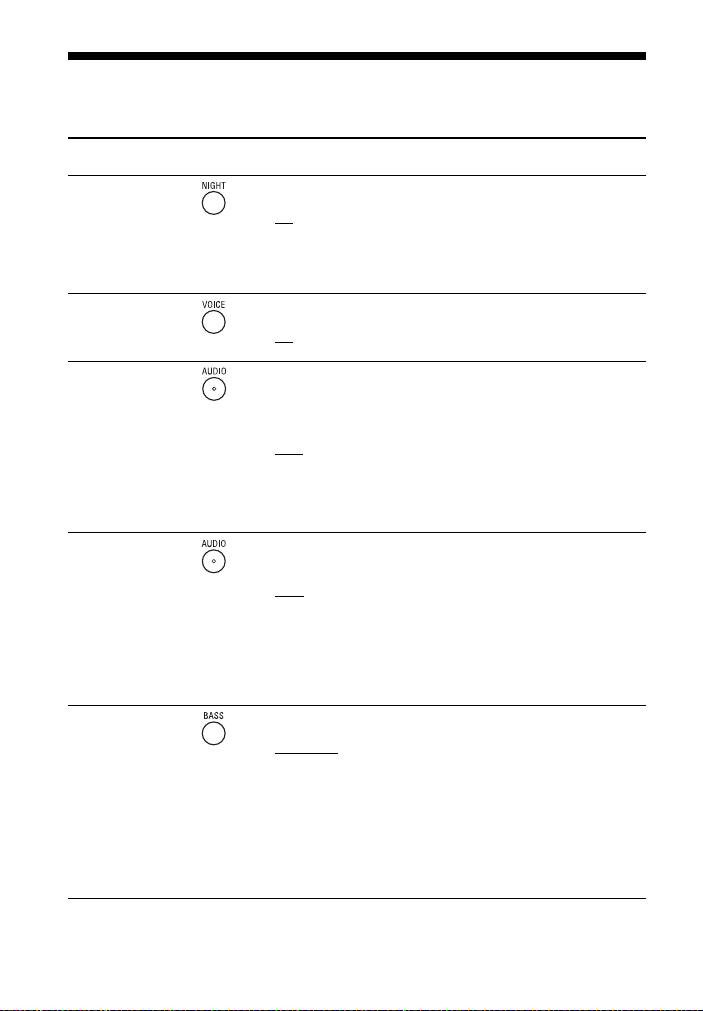
VOICE
: Turns on/off the voice mode.
(page 22)
: Turns on/off the Control for
HDMI function. (page 27)
(volume) +*/–
Adjusts the volume.
BASS (page 22)
Adjusts the level of the bass tone.
INDICATORS
: Turns on/off the indicators on
the Sound Bar.
: Turns on/off the auto standby
function. (page 29)
GAME
: Selects GAME for the sound
mode. (page 20)
: Selects the HDMI standby
through setting. (page 28)
10
GB

SPORTS
: Selects SPORTS for the sound
mode. (page 20)
: Turns on/off the eARC
function. (page 27)
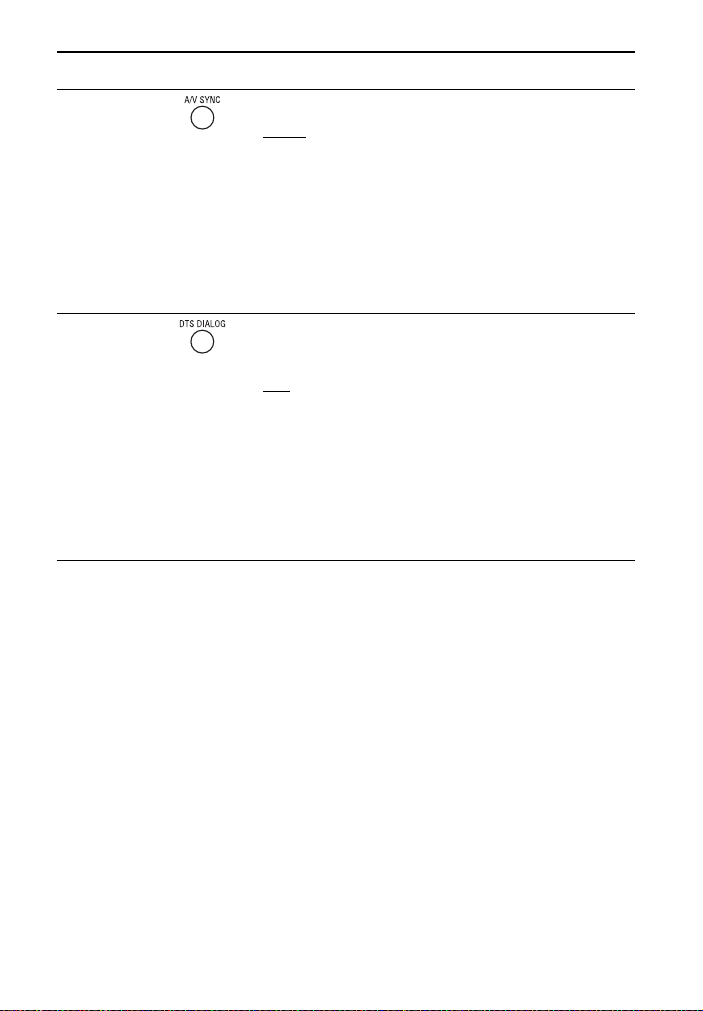
A/V SYNC (page 23)
Adjusts the delay between the
picture and sound.
(power)
Turns on the Sound Bar or sets it to
standby mode.
CINEMA (page 20)
Selects CINEMA for the sound
mode.
MUSIC (page 20)
Selects MUSIC for the sound mode.
NIGHT
: Turns on/off the night mode.
(page 22)
: Turns on/off the BLUETOOTH
standby mode. (page 26)
(muting)
Turns off the sound temporarily or
turns on the sound.
AUDIO*
: Selects the audio channel for
Dolby Digital multiplex broadcast.
(page 22)
: Turns on/off the Audio DRC
function. (page 22)
NEWS
: Selects NEWS for the sound
mode. (page 20)
: Selects the HDMI signal
format setting. (page 16)
STANDARD
: Selects STANDARD for the
sound mode. (page 20)
: Turns on/off the IR repeater
function. (page 18)
DTS DIALOG (page 23)
Adjusts the dialog volume while the
DTS:X content is played back.
*The + and AUDIO buttons have a
tactile dot. Use it as a guide during
operation.
Tip
You can turn the indicators off by pressing
INDICATORS.
Even if the indicators are turned off by
pressing INDICATORS, when you operate
the Sound Bar, the indicators in relation to
the operation light or flash.
About the replacement of
batteries for the remote control
When the Sound Bar does not respond
by operating with the remote control,
replace two batteries with new
batteries.
Use R03 (size AAA) manganese
batteries for replacement.
GB
11
Connecting to a TV or AV Device
Blu-ray Disc player,
cable box, satellite
box, etc.
Connecting to a TV or AV
Device with the HDMI
Cable
To connect a 4K TV or 4K devices
See “Connecting a 4K TV and 4K
Devices” (page 15).
To connect a TV compatible with
eARC
For the connection, refer to Startup
Guide (separate document). For the
settings, see “Connecting a TV
Compatible with eARC” (page 16).
To connect to a TV oth er than the above,
refer to Startup Guide (separate
document).
Connecting Sony TV with
the BLUETOOTH Function
Wirelessly
When using Sony TV* with the
BLUETOOTH function, you can listen to
sound of the TV or device that is
connected to the TV by connecting the
Sound Bar and TV wirelessly.
* The TV needs to be compatible with
A2DP (Advanced Audio Distribution
Profile).
Connecting the Sound Bar
and TV Wirelessly
To connect the Sound Bar and TV
wirelessly, you need to perform pairing
of the Sound Bar and TV by using the
BLUETOOTH function.
Pairing is the process required to
mutually register the information on
BLUETOOTH devices to be connected
wirelessly in advance.
12
GB
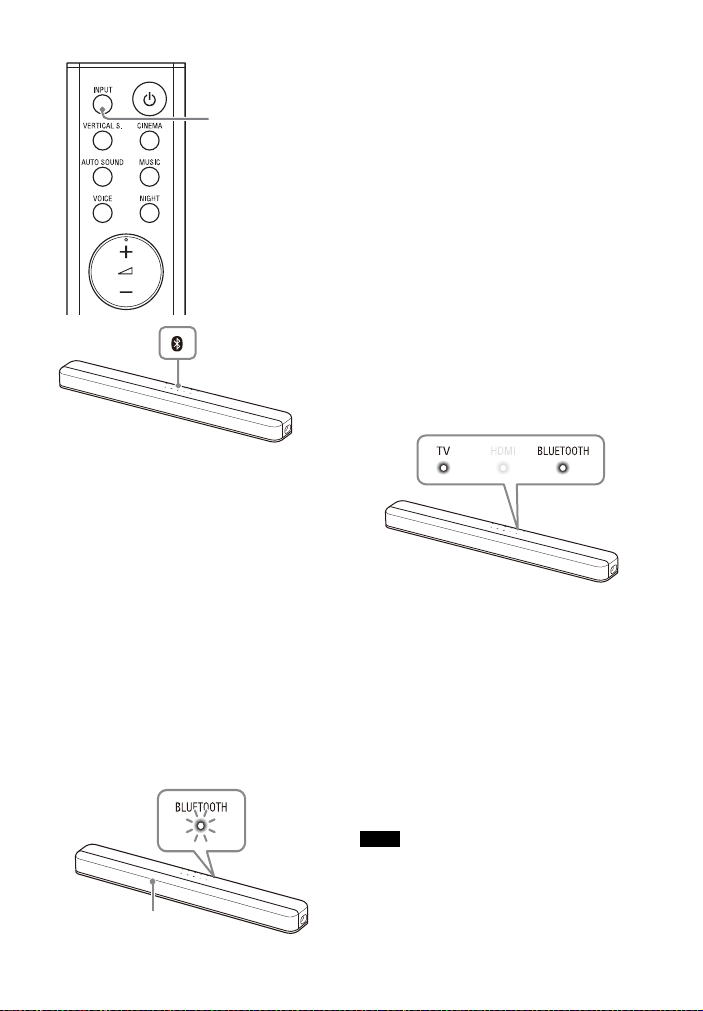
1 Insert batteries (supplied) into the
INPUT
BLUETOOTH
button
Remote control sensor
BLUETOOTH
indicator
remote control.
2 Turn on the TV.
3 Turn on the Sound Bar.
4 Point the remote control at the
remote control sensor on the
Sound Bar, and press and hold the
INPUT on the remote control and
BLUETOOTH button on the Sound
Bar simultaneously for 5 seconds.
The TV and BLUETOOTH indicators
flash twice, the Sound Bar enters
the pairing mode, then the
BLUETOOTH indicator flashes
quickly.
5 On the TV, search the Sound Bar
by performing the pairing
operation.
The list of the BLUETOOTH devices
that are searched appears on the TV
screen.
For the operation method to pair
the BLUETOOTH device to the TV,
refer to the operating instructions of
the TV.
6 Pair the Sound Bar and TV by
selecting “HT-X8500” from the list
on the TV screen.
7 Make sure that the TV and
BLUETOOTH indicators on the
Sound Bar light.
A connection between the Sound
Bar and TV has been established.
8 Select the program or input of the
TV by using the TV remote control.
The sound of the displayed image
on the TV screen is output from the
Sound Bar.
9 Adjust the volume of the Sound
Bar by using the TV remote
control.
When pressing the muting button
on the TV remote con trol, the sound
is muted temporarily.
Notes
• If the TV sound is not output from the
Sound Bar, press INPUT on the remote
control of the Sound Bar repeatedly to
select the TV input and check the statu s of
13
GB

the indicators on the Sound Bar.
– The TV and BLUETOOTH indicators light:
The Sound Bar and TV are connected
and TV sound is output from the Sound
Bar.
– The BLUETOOTH indicator flashes
quickly: Perform pairing on the TV.
– The TV indicator lights: Perform the
connecting operation again from the
start.
• When you connect the Sound Bar and TV
with the HDMI cable (supplied), the
BLUETOOTH connection is canceled. To
connect the Sound Bar and TV with the
BLUETOOTH function again, disconnect
the HDMI cable, then perform the
connecting operation from the start.
• To pair another TV after the first TV is
paired, turn off the paired TV, then pair
the new one by following the steps of
mobile device connection (page 24).
Listening to the Sound of the
TV or Device that is
Connected to the TV
You can turn the Sound Bar on/off,
adjust the volume, and mute the sound
by using the TV remote control when
connecting the TV to the Sound Bar
wirelessly.
1 Turn the TV on with the TV remote
control.
The Sound Bar is turned on by
interlocking with the TV power and
TV sound is output from the Sound
Bar.
2 Select the program or input of the
TV by using the TV remote control.
The sound of the image displayed
on the TV screen is output from the
Sound Bar.
3 Adjust the volume of the Sound
Bar by using the TV remote
control.
When pressing the mute button on
the TV remote control, the sound is
muted temporarily.
Tip
When the TV is turned off, the Sound Bar is
also turned off by interlocking with the TV
power.
14
GB
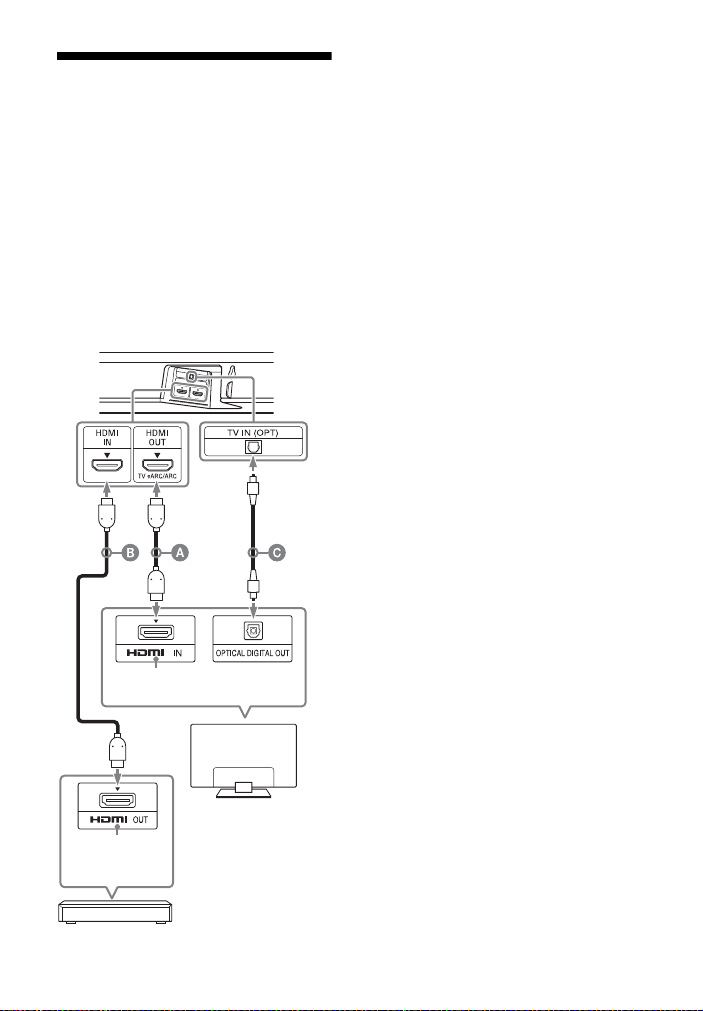
Connecting a 4K TV and
HDCP2.2 or HDCP2.3compatible HDMI jack
Blu-ray Disc player, cable
box, satellite box, etc.
HDCP2.2 or HDCP2.3-
compatible HDMI jack
TV
4K Devices
All HDMI jacks on the Sound Bar support
4K video format, HDCP2.2, and HDCP2.3
(High-bandwidth Digital Content
Protection System Revision 2.2 and 2.3).
To watch 4K video content, connect the
4K TV and 4K devices to the Sound Bar
via an HDCP2.2 or HDCP2.3-compatible
HDMI jack on each device. You can only
view 4K video content through the
HDCP2.2 or HDCP2.3-compatible HDMI
jack connection.
HDMI cable (supplied)
HDMI cable (not supplied)
Use an HDMI cable which supports the 4K video
format that you want to watch. For details, see
“Supported HDMI Video Formats” (page 38).
Optical digital cable (not supplied)
1 Check which HDMI IN jack on your
TV is compatible with HDCP2.2 or
HDCP2.3.
Refer to the operating instructions
of the TV.
2 Connect the HDCP2.2 or HDCP2.3-
compatible HDMI IN jack on the TV
and HDMI OUT (TV eARC/ARC) jack
on the Sound Bar with the HDMI
cable (supplied).
If the HDCP2.2 or HDCP2.3compatible HDMI IN jack on the TV
supports eARC or ARC, TV connection
is complete. Go to step 4.
3
The HDCP2.2 or HDCP2.3compatible HDMI IN jack on the TV
does not support eARC or ARC,
connect the optical digital output
jack on the TV and the TV IN (OPT)
jack on the Sound Bar with an
optical digital cable (not supplied).
When connecting the TV and Sound
Bar with the HDMI cable (supplied)
only, the TV sound is not output
from the Sound Bar. Connect an
optical digital cable (not supplied).
TV connection is complete.
4 Connect the HDCP2.2 or HDCP2.3-
compatible HDMI OUT jack of the
4K device and HDMI IN jack of the
Sound Bar with an HDMI cable
(not supplied).
Refer to the operating instructions of
the 4K device to check that the HDMI
OUT jack of the 4K device is
compatible with HDCP2.2 or HDCP2.3.
4K device connection is complete.
5 Insert batteries into the remote
control.
15
GB

6 Turn on the TV.
7 Turn on the Sound Bar.
Tip
4K content can be watched by a device
compatible with HDCP2.2 or HDCP2.3 even
though devices with different versions (ex.
TV compatible with HDCP2.2 and 4K device
compatible with HDCP2.3) are connected.
Setting the HDMI Signal
Format to Watch 4K Video
Content
To watch 4K video content, select the
appropriate setting for the connected
4K TV and 4K device.
Press and hold NEWS for 5 seconds to
select the HDMI signal format setting.
Connecting a TV
Compatible with eARC
The Sound Bar is compatible with eARC
(Enhanced Aud io Return Channel). eARC
is a new function standardized by HDMI
2.1 and supports latest audio formats in
addition to audio formats that are
supported with existing ARC (Audio
Return Channel).
You can enjoy object audio content
such as Dolby Atmos - Dolby TrueHD
and DTS:X, or multi-channel LPCM
content that cannot be t ransmitted with
ARC by connecting the Sound Bar and
TV compatible with eARC using an HDMI
cable.
For the connection, refer to Startup
Guide (separate document).
Standard format
Select when the connected TV and devices
support standard bandwidth video formats.
The Dolby ATMOS and DTS:X indicators flash.
Enhanced format
Select when both the connected TV and
devices support high bandwidth video
formats such as 4K 60p 4:4:4, etc.
The HDMI and BLUETOOTH indicators flash.
For the relation of the HDMI signal
format setting, supported video format
signals, and HDMI cables to be use d, see
“Supported HDMI Video Formats”
(page 38).
Notes
• Depending on the TV, the TV setting for
HDMI output may be required. Refer to
the operating instructions of the TV.
• When the picture is not displayed after
“Enhanced format” is set, set it to
“Standard format.”
GB
16
Preparing to Use the eARC
Function
The default setting of the eARC
function is on. If the eARC function is
set to off, press and hold SPORTS for 5
seconds to set the eARC function to on
(page 27).
The eARC function is enabled and it
works while connecting a TV compatible
with eARC.
The ARC function works while
connecting a TV compatible with ARC
(not compatible with eARC).
Note
When the eARC function is set to on, make
sure to check the eARC setting of the
connected TV. For details, refer to the
operating instructions of the TV.
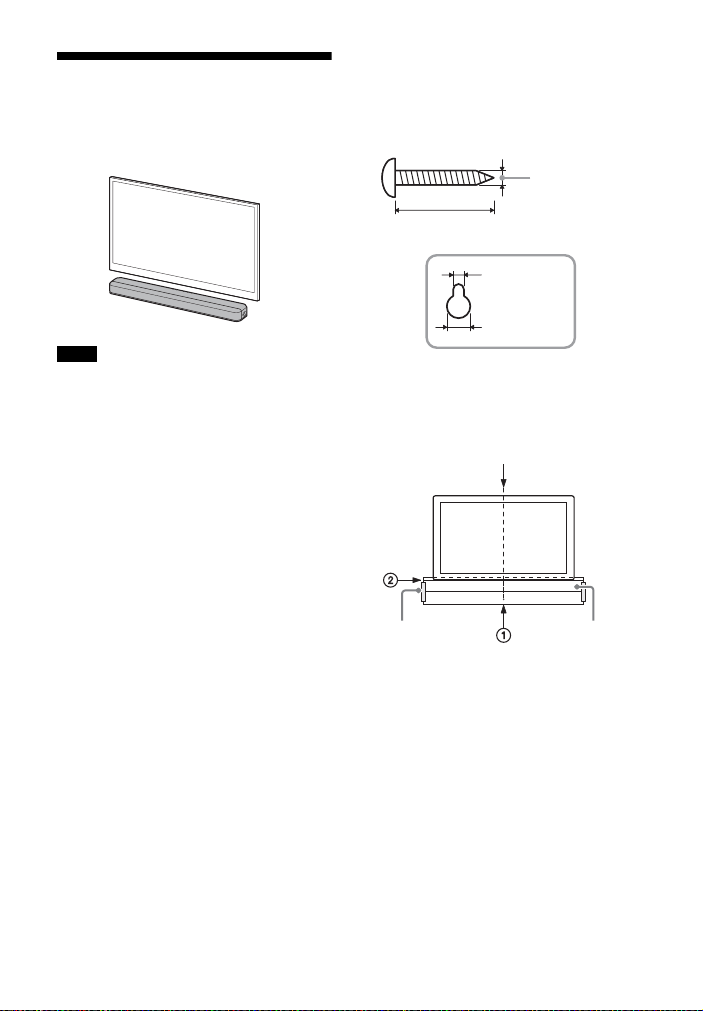
Mounting the Sound Bar
Hole on the rear of the Sound Bar
4mm
More than 30 mm
5.1 mm
10 mm
Center of the TV
WALL MOUNT
TEMPLATE
Adhesive tape,
etc.
on a Wall
You can mount the Sound Bar on a wall.
Notes
• Prepare screws (not supplied) that are
suitable for the wall material and
strength. As a plasterboard wall is
especially fragile, attach the screws
securely in the wall beam. Install the
speakers horizontally, hung by screws in
studs in a continuous flat section of the
wall.
• Have the installation done by a Sony
dealer or licensed contractor and pay
special attention to safety during the
installation.
• Sony shall not be held responsible for
accidents or damage caused by improper
installation, insufficient wall strength,
improper screw installation or natural
disaster, etc.
1 Prepare two screws (not supplied)
that are suitable for the wall
mount holes on the rear of the
Sound Bar.
2 Stick WALL MOUNT TEMPLATE
(supplied) on a wall.
1 Align TV CENTER LINE () of
WALL MO UNT TEMPLATE w ith the
center line of your TV.
2 Align TV BOTTOM LINE () of
WALL MO UNT TEMPLATE w ith the
bottom of your TV, then stick
WALL MOUNT TEMPLATE on a
wall by using a commercially
available adhesive tape, etc.
GB
17
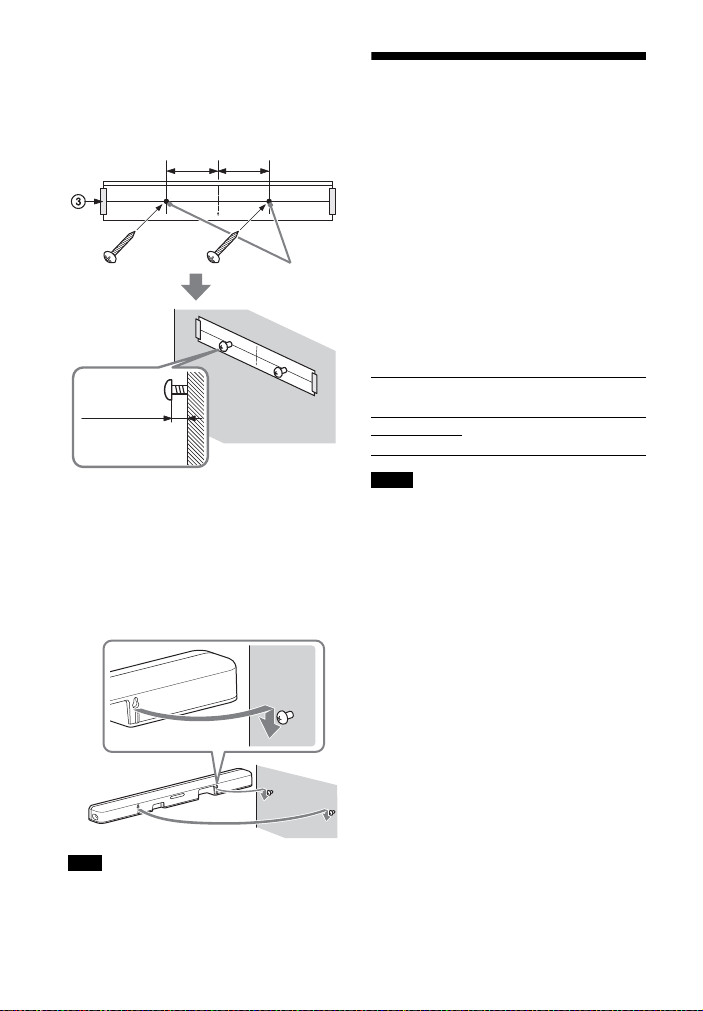
3 Fasten the screws into the marks
Screws
Marks ()
10 mm to
11 mm
228.5 mm
228.5 mm
() on SCREW LINE () of WALL
MOUNT TEMPLATE as in the
illustration below.
When the TV Remote
Control does not Work
When the Sound Bar obstructs the
remote control sensor of the TV, the TV
remote control may not work. In that
case, enable the IR repeater function of
the Sound Bar.
You can control the TV with the TV
remote control by sending the remote
signal from the rear of the Sound Bar.
Press and hold STANDARD for 5
seconds to set the function to on or
off.
IR repeater on
The HDMI and BLUETOOTH indicators flash.
IR repeater off
The Dolby ATMOS and DTS:X indicators flash.
4 Remove WALL MOUNT TEMPLATE.
5 Hang the Sound Bar on the
screws.
Align the holes of the rear of the
Sound Bar with the screws, then
hang the Sound Bar on the two
screws.
Note
When sticking WALL MOUNT TEMPLATE,
smooth it out fully.
GB
18
Notes
• Be sure to check that the TV remote
control cannot control the TV, and then
set the IR repeater function to on. If it is
set to on when the remote control can
control the TV, appropriate operation
may not be obtained because of the
interference between the direct
command from the remote control and
the command via the Sound Bar.
• If the IR repeater function is set to on, this
function may not work depending on
your TV. Also, the remote controls of
other devices such as an air conditioner
may not work correctly. In this case,
change the installation position of the
Sound Bar or TV.
Listening to the Sound
INPUT
+/–
BASS
Listening to a TV and
Other Devices
1 Press INPUT repeatedly.
When you press INPUT once, the
current input indicator flashes.
Press INPUT again to select the
device you want.
The indicator of the selected device
lights up.
Each time you press INPUT, the
input changes cyclically as follows.
TV input HDMI input
BLUETOOTH input
TV input
• TV that is connected to the TV IN (OPT)
jack on the Sound Bar
• TV compatible with the eARC or ARC
function that is connected to the HDMI
OUT (TV eARC/ARC) jack on the Sound
Bar
When you connect the TV to both the
HDMI OUT (TV eARC/ARC) and TV IN
(OPT) jacks, the input of the HDMI OUT
(TV eARC/ARC) jack has priority if the TV
audio signal is input with the ARC or
eARC function.
HDMI input
Device that is connected to the HDMI IN
jack on the Sound Bar
BLUETOOTH input
BLUETOOTH device that supports A2DP
For details, see “Listening to Music/
Sound with the BLUETOOTH® Function”
(page 24).
2 Adjust the volume.
• Adjust the volume by pressing
+/– on the remote control.
• Adjust the level of the bass tone
by pressing BASS on the remote
control (page 22).
Tip
You can also select the input by pressing
on the Sound Bar.
19
GB
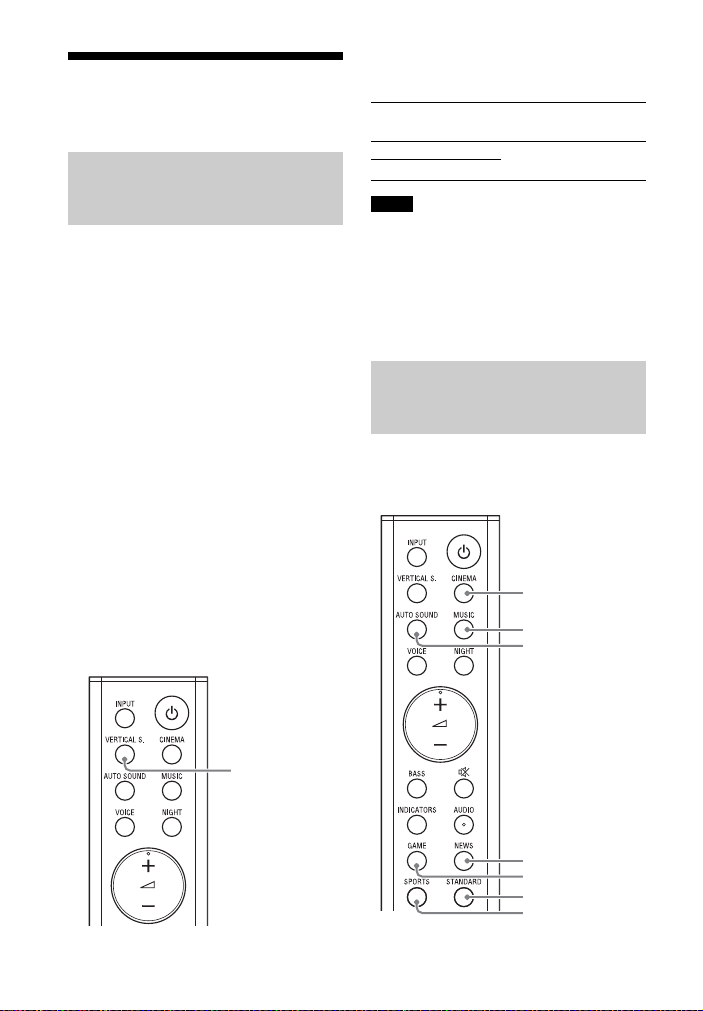
Enjoying the Surround
VERTICAL S.
CINEMA
MUSIC
AUTO SOUND
NEWS
GAME
STANDARD
SPORTS
Sound
Enjoying Immersive
Surround Experience
(VERTICAL S.)
You can feel immersed by the sound
from not only the horizontal direction,
but also from the upward direction by
using Vertical Surround Engine*
effectively for sound modes (page 20)
other than NEWS. This function also
works for the 2.0 channel signal such as
a TV program.
* Vertical Surround Engine is a highly
precise digital sound field processing
technology developed by Sony that
produces the sound field in the height
direction virtually in addition to a sound
field in the horizontal direction by only
using front speakers and without using
top speakers.
You do not need to install speakers on a
ceiling and you can enjoy the sound with
rich presence regardless of the ceiling
height. Also, this function is hardly
affected by the shape of a room because
it does not use the sound reflected from
a wall and enables improved surround
playback.
Press VERTICAL S. to set the function
to on or off.
Vertical surround on
The VERTICAL S. indicator lights.
Vertical surround off
The VERTICAL S. indicator turns off.
Notes
• The surround effect from all directions
differs depending on the sound source.
• A time gap between the sound and
picture may occur depending on the
sound source. If your TV has a function
that delays the image, use it for
adjustment.
Enjoying the Sound Mode
that is Tailored to Sound
Sources
You can easily enjoy pre-programmed
sound effects that are tailored to
different kinds of sound sources.
20
GB
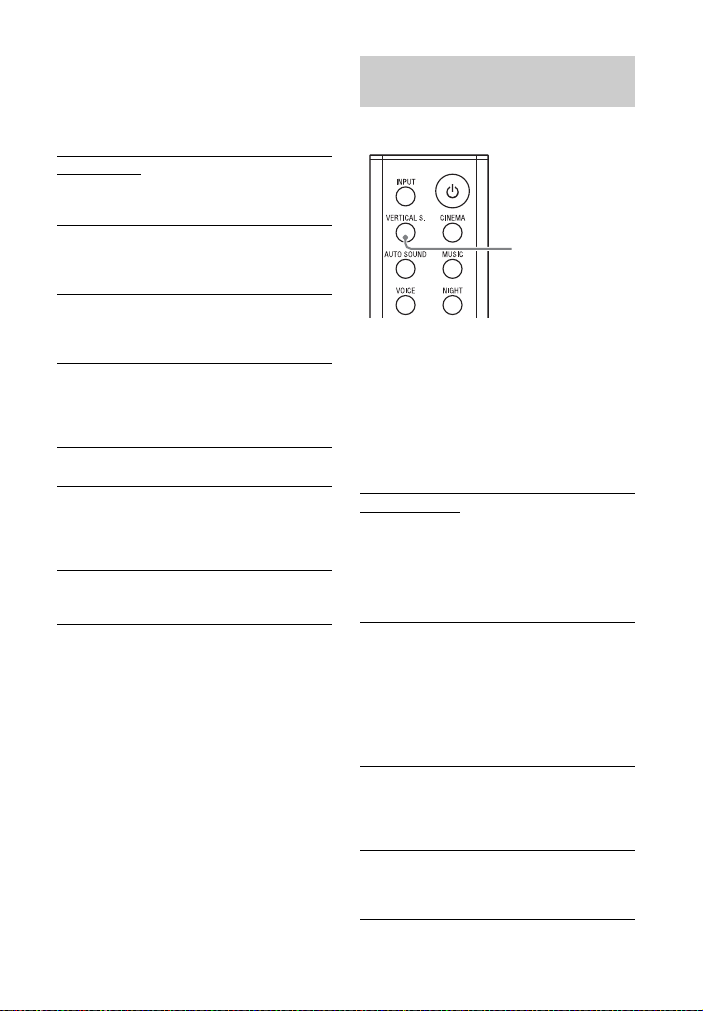
Press the sound mode selecting
VERTICAL S.
button to select the sound mode.
When selecting the sound mode, the
Dolby ATMOS, DTS:X, and VERTICAL S.
indicators light for 2 seconds.
AUTO SOUND
The appropriate sound setting is
automatically selected for the sound source
with ClearAudio+.
CINEMA
You feel immersed by the sound that travels
behind you and surrounds your entire body.
This mode is suitable for watching movies.
MUSIC
Vividness and glossiness of the sound are
expressed in detail. This mode is suitable for
enjoying music in a way that moves you.
GAME
You can immerse yourself in your game by
reproducing the feeling of movement and
distance of objects, as well as clearly hearing
the dialog.
NEWS
Recreates the clear speech of newscasts.
SPORTS
You can experience an atmosphere as if you
were watching an event in a stadium.
However, narrations of commentators are
reproduced vividly.
STANDARD
The sound of a TV program can be heard
clearly.
Selecting the Sound Effect
Setting
You can select sound effects.
Press and hold VERTICAL S. for 5
seconds to select the sound effect
setting.
The sound effect setting changes
cyclically as follows.
Sound mode on Dolby Speaker
Virtualizer DTS Virtual:X Sound
effect off
Sound mode on
Vertical Surround Engine enhances the
surround and height speaker channels to
create an immersive and enveloping virtual
surround effect such as sound mode
(page 20) and vertical surround (page 20).
The VERTICAL S. indicator lights for 2
seconds.
Dolby Speaker Virtualizer
Dolby Speaker Virtualizer enhances the
surround and height speaker channels to
create an immersive and enveloping virtual
surround effect when you play Dolby format.
Disables sound effects other than Dolby
format.
The Dolby ATMOS indicator lights for 2
seconds.
DTS Virtual:X
DTS Virtual:X is enabled.
DTS Virtual:X Technology in the Sound Bar
puts you in the middle of multi speaker.
The DTS:X indicator lights for 2 seconds.
Sound effect off
Disables the sound effects.
The Dolby ATMOS, DTS:X, and VERTICAL S.
indicators flash 3 times.
21
GB
Adjusting the Sound
You can adjust the sound with the buttons on the remote control.
Function
name
Night mode You can enjoy clear sound with low volume at midnight.
Voice mode You can make dialogs clearer.
Audio DRC
Multiplex
broadcast
sound
Bass tone
adjustment
Button Function
• On: The HDMI and BLUETOOTH indicators light for 2 seconds.
•Off
seconds.
Note
When you turn the Sound Bar off, the night mode is set to off
automatically.
• On: The HDMI and BLUETOOTH indicators light for 2 seconds.
•Off
seconds.
You can compress dynamic range of the audio signal (range
between the maximum and minimum volume) and sound with
Press and
hold for 5
seconds
low volume is easy to hear. This function works only when
playing the Dolby Digital or DTS signal. The setting changes
cyclically in the order of Auto
•Auto
TrueHD.
The Dolby ATMOS, DTS:X, HDMI, and BLUETOOTH indicators
flash.
• On: The HDMI and BLUETOOTH indicators flash.
• Off: The Dolby ATMOS and DTS:X indicators flash.
You can enjoy multiplex broadcast sound when the Sound Bar
receives a Dolby Digital multiplex broadcast signal. The setting
changes cyclically in the order of Main
•Main
seconds.
• Sub: The Dolby ATMOS and DTS:X indicators light for 2
seconds.
• Main/Sub: Main sound is output from the left speaker and
sub sound is output from the right speaker.
The Dolby ATMOS, DTS:X, HDMI, and BLUETOOTH indicators
light for 2 seconds.
The level of the bass tone changes cyclically as follows.
+1 -1 0...
0
•0 (Normal)
seconds.
• +1 (Strong): The HDMI and BLUETOOTH indicators light for 2
seconds.
• -1 (Light): The Dolby ATMOS and DTS:X indicators light for 2
seconds.
Note
When the input source does not contain much bass sound,
such as in TV programs, the bass sound from the subwoofer
may be difficult to hear.
: The Dolby ATMOS and DTS:X indicators light for 2
: The Dolby ATMOS and DTS:X indicators light for 2
: Automatically compresses sound encoded in Dolby
: The HDMI and BLUETOOTH indicators light for 2
: The VERTICAL S. and TV indicators light for 2
On Off.
Sub Main/Sub.
22
GB
Function
name
A/V Sync When the sound does not match the pictures on the TV screen,
DTS dialog
control
Button Function
you can adjust the delay between the picture and sound.
•0 msec
• 40 msec: The Dolby ATMOS and DTS:X indicators light for 2
seconds.
• 80 msec: The Dolby ATMOS, DT S:X, and VERTICAL S.
indicators light for 2 seconds.
• 120 msec: The Dolby ATMOS, DTS:X, VERTICAL S., and TV
indicators light for 2 seconds.
Tips
• This function works only for the HDMI input.
• If your TV has a function that adjusts the delay between the
picture and sound, use it for adjustment. For details, refer to
the operating instructions of the TV.
You can easily listen to dialog since it stands out from the
ambient noise b y adjusting the dialog volume. This function
works while playing content that is compatible with the DTS:X
dialog control function.
: The Dolby ATMOS and BLUETOOTH indicators flash
•0 dB
twice.
• 1 dB: The Dolby ATMOS indicator lights for 2 seconds.
• 2 dB: The Dolby ATMOS and DTS:X indicators light for 2
seconds.
• 3 dB: The Dolby ATMOS, DTS:X, and VERTICAL S. indicators
light for 2 seconds.
• 4 dB: The Dolby ATMOS, DTS:X, VERTICAL S., and TV
indicators light for 2 seconds.
• 5 dB: The Dolby ATMOS, DTS:X, VERTICAL S., TV, and HDMI
indicators light for 2 seconds.
• 6 dB: All the indicators flash twice.
: The Dolby ATMOS indicator lights for 2 seconds.
Tip
AUDIO does not work while the BLUETOOTH indicator is lit.
23
GB
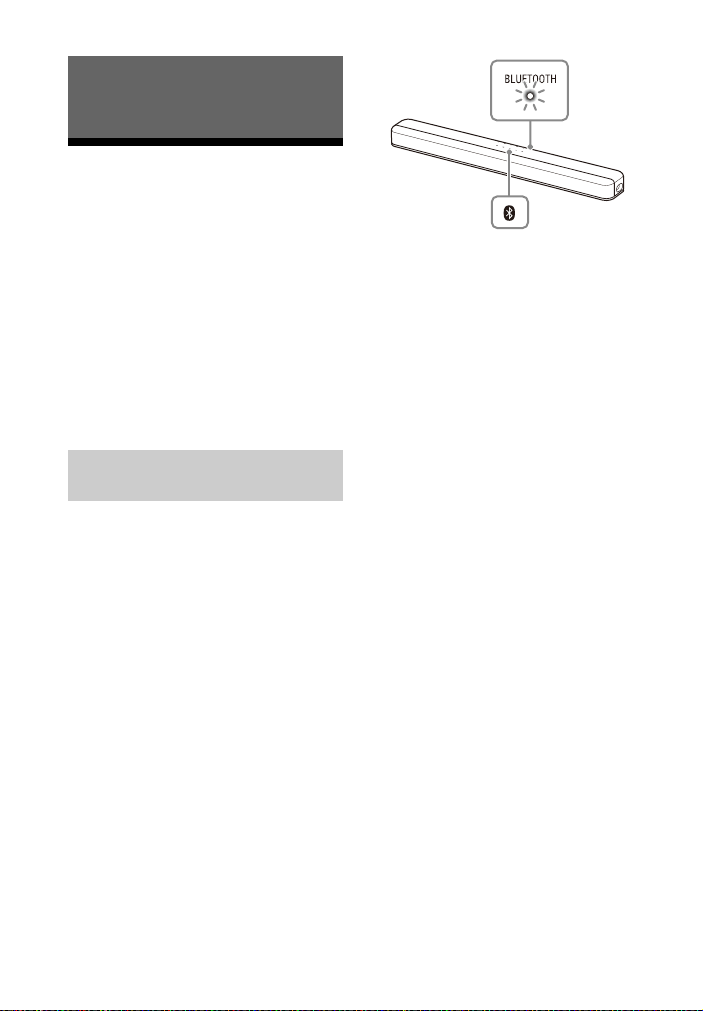
Listening to Music/Sound with the
BLUETOOTH
indicator
BLUETOOTH
button
BLUETOOTH® Function
Listening to Music from
a Mobile Device
You can listen to music stored on a
mobile device such as a smartphone or
tablet via a wireless connection by
connecting the Sound Bar and the
mobile device with the BLUETOOTH
function.
When connecting to the mobile device
with the BLUETOOTH function, you can
operate by simply using the supplied
remote control without turning the TV
on.
Listening to Music by Pairing
with a Mobile Device
To listen to music of the mobile device
with the BLUETOOTH functi on, you need
to perform pairing of the Sound Bar and
mobile device.
Pairing is the process required to
mutually register the information on
BLUETOOTH devices to be connected
wirelessly in advance.
1 Press and hold the BLUETOOTH
button on the Sound Bar for 2
seconds.
The Sound Bar enters the pairing
mode and the BLUETOOTH indicator
flashes quickly.
If pairing is not performed for 5
minutes after the Sound Bar enters
the pairing mode, the pairing mode
is canceled. In this case, perform
pairing from the start.
2 On the mobile device, search the
Sound Bar by performing the
pairing operation.
The list of the BLUETOOTH devices
that are searched appears on the
screen of the mobile device.
For the operation method to pair
the BLUETOOTH device to the
mobile device, refer to the
operating instructions of the mobile
device.
3 Pair the Sound Bar and mobile
device by selecting “HT-X8500”
from the list on the screen of the
mobile device.
If a Passkey is requested, enter
“0000.”
4 Make sure that the BLUETOOTH
indicator on the Sound Bar lights
in blue.
A connection between the Sound
Bar and mobile device has been
established.
5 Start audio playback with the
music app on the connected
mobile device.
Sound is output from the Sound Bar.
6 Adjust the volume.
• Adjust the volume by pressing
+/– on the remote control.
GB
24
• Adjust the level of the bass tone
INPUT
+/–
BASS
by pressing BASS on the remote
control (page 22).
To check the connection status of
the BLUETOOTH function
Status BLUETOOTH indicator
During pairing
standby status
Connection is
being
attempted
Connection has
been
established
Not connected Lights at 2 second
The BLUETOOTH
function is
turned off
Notes
• You can pair the BLUETOOTH devices up
to the following number.
–Mobile devices: 9
– Sony TV with the BLUETOOTH function:
1
If a new device is paired after pairing the
above number of devices, the least recent
connected device will be replaced by the
new one.
• Perform pairing for the second and
subsequent mobile devices.
Tips
• You can check the connection status of
the BLUETOOTH function by checking the
BLUETOOTH indicator status.
• While the BLUETOOTH input is being
selected, the Sound Bar enters the pairing
mode by pressing the BLUETOOTH button
on the Sound Bar shortly.
• While the BLUETOOTH input is not
selecting, the Sound Bar automatically
reconnects to the BLUETOOTH device it
was most recently connected to by
pressing the BLUETOOTH button on the
Sound Bar shortly.
Flashes quickly in blue
Flashes in blue
Lights in blue
intervals
Turns off
Listening to Music from the
Paired Mobile Device
1 Turn the BLUETOOTH function of
the mobile device on.
2 Press INPUT repeatedly to select
the BLUETOOTH input or press the
BLUETOOTH button on the Sound
Bar shortly.
The BLUETOOTH indicator flashes
and the Sound Bar automatically
reconnects to the BLUETOOTH
device it was most recently
connected to.
3 Make sure that the BLUETOOTH
indicator lights in blue.
A connection between the Sound
Bar and mobile device has been
established.
4 Start audio playback with the
music app on the connected
mobile device.
Sound is output from the Sound Bar.
5 Adjust the volume.
• Adjust the volume by pressing
+/– on the remote control.
• Adjust the level of the bass tone
by pressing BASS on the remote
control (page 22).
25
GB

Changing the Settings of
the BLUETOOTH Function
Turning the BLUETOOTH
Function Off
You can turn the BLUETOOTH function off.
Turning the Sound Bar On by
Operating the BLUETOOTH
Device
When the Sound Bar has pairing
information, you can turn the Sound Bar
on and listen to music from a
BLUETOOTH device even when the
Sound Bar is in standby mode by setting
the BLUETOOTH standby mode to on.
Press and hold NIGHT for 5 seconds to
set the function to on or off.
BLUETOOTH standby mode on
The HDMI and BLUETOOTH indicators flash.
BLUETOOTH standby mode off
The Dolby ATMOS and DTS:X indicators flash.
Note
While the BLUETOOTH standby mode is on,
standby power consumption increases.
Enjoying the Sound of the
BLUETOOTH Device with
High Sound Quality
You can enjoy high-quality sound if the
AAC codec function is set to on and your
device supports AAC.
Press and hold (power),
(input), and
Bar for more than 10 seconds.
BLUETOOTH function on
The HDMI and BLUETOOTH indicators flash.
BLUETOOTH function off
The Dolby ATMOS and DTS:X indicators flash.
Note
When the BLUETOOTH function is set to off,
the BLUETOOTH input is skipped while
selecting input by pressing INPUT.
– (volume) on the Sound
Press and hold AUTO SOUND for 5
seconds to set the function to on or
off.
AAC codec on
The HDMI and BLUETOOTH indicators flash.
AAC codec off
The Dolby ATMOS and DTS:X indicators flash.
GB
26
 Loading...