

Page 1
SON3t':
4-479-707-11 (1)
Digital HD Video Camera Recorder
.........O=
Owner'sRecord
The model and serial numbers are located inside the connector cow.r. Record the
serial number in the space provided below. Refk.r to these numbers whenew.r you
call your SoW dealer regarding this product.
Model No. HDR-AS
Serial No.
Read this first
This manual cowws basic operations. For more detailed operations, refbr to the
Handbook (PDF) built into this camera, by doing the following.
(_) Insert a charged battery pack into the camera.
@ Connect the camera to a computer with the micro USB cable (supplied).
@ Press the NEXT or PREV button to power on.
@ Display [Computer] ---+ [PMHOME] ---+[HANDBOOK] on your computer,
then install the Handbook (PDF).
Checking the bundled items
Camera (1)
Camera is set in the Waterproof Case. Open the cover of the case as illustrated belmsc
@
Micro USB cable (1)
Rechargeable battery pack (NP-BX1) (1)
Waterproof Case (1)
Attachment Buckle (1)
Flat Adhesiw, Mount (1)
Curw, d Adhesiw, Mount (1)
Handbook
Included in the internal memory of this camera.
Set of printed documentation
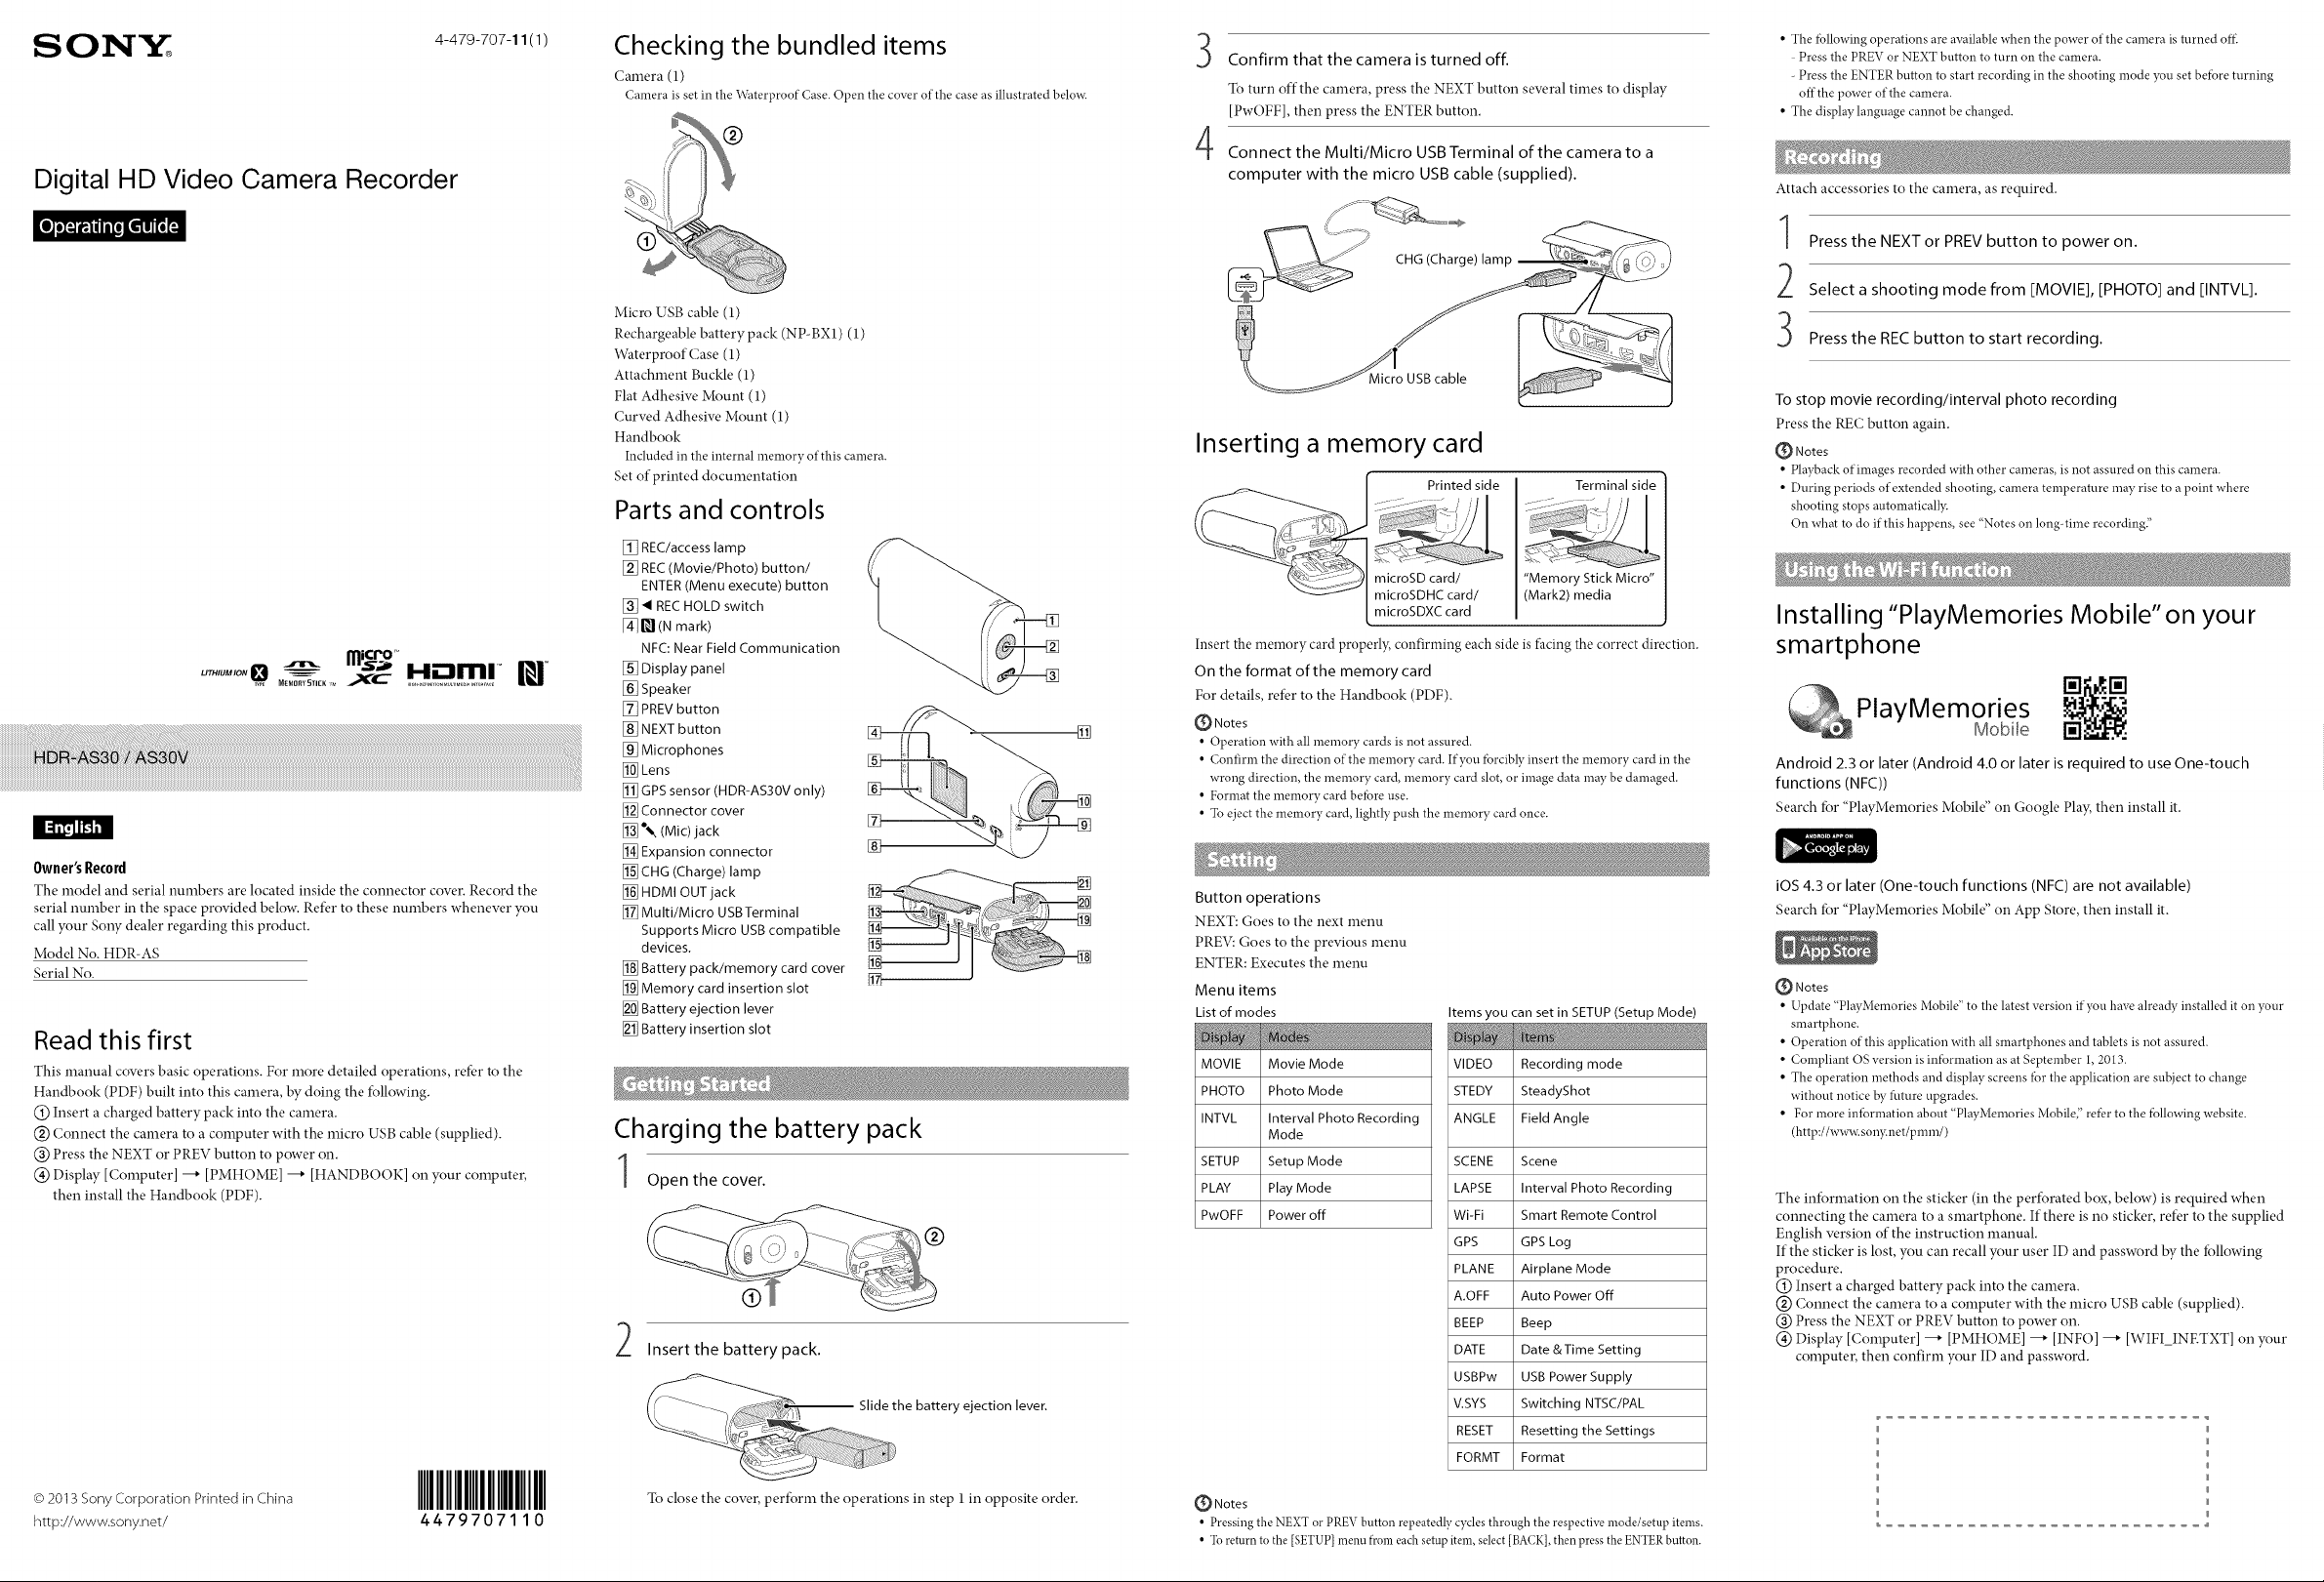
Parts and controls
[] REC/access lamp
[] REC(Movie/Photo) button/
ENTER (Menu execute) button
[] 4 REC HOLD switch
_] _] (N mark)
NFC: Near Field Communication
[] Display panel
[] Speaker
[] PREV button
[] NEXT button
[] Microphones
[] Lens
[] GPS sensor (HDR-AS30V only)
[] Connector cover
[] e%(Mic) jack
[] Expansion connector
[] CHG (Charge) lamp
[] HDMI OUT jack
[] Multi/Micro USBTerminal
Supports Micro USB compatible
devices.
[] Battery pack/memory card cover
[] Memory card insertion slot
[] Battery ejection lever
[] Battery insertion slot
Charging the battery pack
Open the cover.
®
®
Insert the battery pack.
-- Slide the battery ejection lever.
3
Confirm that the camera is turned off.
To turn off the camera, press the NEXT button several times to display
[PwOFF], then press the ENTER button.
4
Connect the Multi/Micro USBTerminal of the camera to a
computer with the micro USB cable (supplied).
Inserting a memory card
Printed side
microSD card/
microSDHC card/
microSDXC card
Insert the memory card properly, confirming each side is facing the correct direction.
On the format of the memory card
For details, refk,r to the Handbook (PDF).
Notes
• Operation with all memory cards is not assured.
• Confirm the direction of the memory card. If you tbrcibly insert the memory card in the
wrong direction, the memory card, memory card slot, or image data may be damaged.
• Format the memory card beI%re use.
• To eject the memory card, lightly push the memory card once.
Button operations
NEXT: Goes to the next menu
PREV: Goes to the previous menu
ENTER: Executes the menu
Menu items
Listof modes
MOVIE Movie Mode
PHOTO Photo Mode
INTVL Interval Photo Recording
SETUP Setup Mode
PLAY Play Mode
PwOFF Power off
Mode
Items you can set in SETUP (Setup Mode)
VIDEO Recording mode
STEDY SteadyShot
ANGLE Field Angle
SCENE Scene
LAPSE Interval Photo Recording
Wi-Fi Smart Remote Control
GPS GPSLog
PLANE Airplane Mode
A.OFF Auto Power Off
BEEP Beep
DATE Date & Time Setting
USBPw USB Power Supply
V.SYS Switching NTSC/PAL
RESET Resetting the Settings
FORMT Format
Terminal side
"Memory Stick Micro"
(Mark2) media
• The tbllowing operations are available when the power of the camera is turned ot}i
- Press the PREV or NEXT button to turn on the camera.
- Press the ENTER button to start recording in the shooting mode you set befbre turning
off the power of the camera.
• The display language cannot be changed.
Attach accessories to the camera, as required.
Press the NEXT or PREV button to power on.
Select a shooting mode from EMOVlE], EPHOTO] and EINTVL].
Press the REC button to start recording.
To stop movie recording!interval photo recording
Press the RE(; button again.
(_ Notes
• Playback of images recorded with other calneras, is not assured on this camera.
• During periods of extended shooting, camera temperature may rise to a point where
shooting stops automaticall3c
On what to do if this happens, see "Notes on long-time recording;'
Installing "PlayMemories Mobile"on your
smartphone
[]
PlayMemories
Mobile []
Android 2.3 or later (Android 4.0 or later is required to use One-touch
functions (NFC))
Search fi)r "PlayMelnories Mobile" on Google Pla}; then install it.
iOS4.3 or later IOne-touch functions (NFC) are not available)
Search fi)r "PlayMelnories Mobile" on App Store, then install it.
(_ Notes
• Update "PlayMemories Mobile" to the latest version if you have alrea@ installed it on your
smartphone.
• Operation of this application with all smartphones and tablets is not assured.
• Compliant OS version is information as at September 1,2013.
• The operation methods and display screens lbr the application are subject to change
without notice by future upgrades.
• For more intbrmation about "PlayMemories Mobile" refi:r to the fbllowing website.
(http://w_ son3_net/pmm/)
The information on the sticker (in the perforated box, below) is required when
connecting the camera to a smartphone. If there isno sticker, refk.r to the supplied
English w.rsion of the instruction manual.
If the sticker is lost, you can recall your user ID and password by the fbllowing
procedure.
@ Insert a charged battery pack into the camera.
@ Connect the camera to a computer with the micro USB cable (supplied).
@ Press the NEXT or PREV button to power on.
@ Display [Computer] ---+ [PMHOME] ---+ [INFO] ---+[WIFI_INETXT] on your
computer, then confirm your ID and password.
© 2013 Sony Corporation Printed in China
http://www.sony.net/
IIIIIIIIIIII
4479707110
To close the cover, perform the operations in step I in opposite order.
Notes
• Pressing the NEXT or PREV button repeatedly cycles through the respective mode/setup items.
• To return to the [SETUP] menu from each setup item, select [BACK],then press the ENTER button.
Page 2

Connecting
Android
(_) Insert a memory card in the camera, turn on the camera, then select the
shooting mode: [MOVIE], [PHOTO], [INTVL]
(_) Start "PlayMemories Mobile" on the smartphone.
@ Select the SSID, as printed on the sticker attached to this manual.
@ Input the password on the same sticker. (First time only.)
(_) On your smartphone, select the mode of the camera: Smart Remote Control
mode or Copy mode.
Android (Supporting NFC)
Touch the _] (N mark) of the smartphone against the [_ (N mark) of the camera.
When "PlayMemories Mobile" starts, settings are automatically applied to
establish Wi-Fi connection.
JPhone
(_) Insert a memory card in the camera, turn on the camera, then select the
shooting mode: [MOVIE], [PHOTO], [INTVL]
(_) ()pen [Settings] on the smartphone.
@ Select [Wi-Fi] on the smartphone.
@ Select the SSID, as printed on the sticker attached to this manual.
(_) Input the password on the same sticker. (First time only.)
@ Confirm that the SSID of the camera is displayed on the smartphone.
(_) Return to the Home screen, then start "PlayMemories Mobile."
(8) On your smartphone, select the mode of the camera: Smart Remote Control
mode or Copy mode.
®_ ®
IIEiiiiiiiiEZiiiiiiiEZZZ?ll
Noteson long-timerecording
• If the power is turned o_ leave the camera _r 10 minutes or longer to allow the
temperature inside the camera to decrease to a safeleveh
• Under high ambient temperatures, the temperature of the camera rises quickl)c
• When the temperature ofthe camera rises, the image quality *naydeteriorate.
It is recommended that you waituntil the temperature of the camera drops beibre
continuing to shoot.
• The surihce of thecamera may gethot. This is not a malfunction.
Note on using
• When warning is displayed, entire screen flashes with the message displayed. For details,
refbr to the Handbook (PDF).
Aboutthesoftware
You can download the image management software "PlayMemories Home" from
the fbllowing URL
_ PlayMemo[ies
http://www.sony.net/pm/
Note on wireless network function
• We assume no responsibili_ whosoever _r aW damage cansed by unanthorized access to,
or unauthorized use of', destinations loaded on the camera, resulting fi'om loss or theft.
Specifications
Signal tormat: NTSC color, EIA standards
HDTV 1080/60i, 1080/60p specification
PAL color, CCIR standards
HDTV 1080/50i, 1080/50p specification
Power requirements: Rechargeable battery pack, 3.6 V (NP-BX1)
USB, 5.0 V
USB charging (Multi/Micro USB Terminal): DC 5.0 V, 500 mA/800 mA
Rechargeable battery pack NP-BXI:
Maximum charge voltage: DC 4.2 V
Maximum charge current: 1.89 A
For more specifications, refbr to "Specifications" in Handbook (PDF).
Design and specifications are subject to change without notice.
On trademarks
• "Memory Stick_' "_, ,_' "Memory Stick DuoS' "MEMORY 5TIEK Flus;' "Memory Stick PRO
Duo;' "MEMORY5TIEKPRI] DUO;'"MemoryStick PRO HG Duo;'
"MEMORYSTIrKPR0-HEBU0;'"MemoryStick Micro;' "MagicGate;'
"Mz'MG IC_LNTE;' "MagicGateMemory Stick"and "MagicGateMemory StickDud' are
trademarks or registered trademarks of SonyCorporation.
• The terms HDMI and HDMI High-Definition Multimedia Interface, andthe HDMILogo
are trademarks or registered trademarks of HDMI LicensingLLCin the United States and
other countries.
• Mac,App Storeare registered trademarks of Apple Inc.
• lOS is a registered trademark ortrademark ofCisco Systems,Inc. and/or its af}_liatesin the
United Statesand certain other countries.
• Android, Google Playare trademarks ofGoogle Inc.
• iPhone is a trademark or a registered trademark ofApple Inc.
• Wi-Fi, the Wi-Filogo, Wi-FiPROTECTEDSET-UP are registered trademarks of the Wi-Fi
Alliance.
• The N Markis a trademark or registered trademark ofNFC Formn, Inc. in the United
States and in other countries.
• ",&" and "PlayStatioff'are registeredtrademarks of Sony Computer Entertainment Inc.
• Add further enjoyment with your PlayStation 3 by downloading the application for
PlayStation 3 ficom PlayStation Store (where available.)
• The application lbr PlayStation 3 requires PlayStation Network account and application
download. Accessible in areas where the PlayStation Store is available.
• Adobe, the Adobe logo, and Adobe Acrobat are either registered trademarks or trademarks
of Adobe Systems Incorporated in the United States and/or other countries.
• microSDX(; logo is a trademark of SD 3C, LLC.
In addition, system and product names used in this manual are, in general, trademarks or
registered trademarks of their respective developers or manufhcturers. However, the rM or (_
marks are not used in all cases in this manual.
To reduce the risk of fire or electric shock,
1) do not expose the unit to rain or moisture.
2) do not place objects filled with liquids, such as vases, on the apparatus.
Do not expose the batteries to excessive heat such as sunshine, fire or the
like.
Batterypack
If the battery pack is mishandled, the battery pack can burst, cause a fire or ew,n
chemical burns. Obserw, the following cautions.
• Do not disassemble.
• Do not crush and do not exposethe battery pack to aW shockor lbrce such ashammering,
dropping or steppingon it.
• Do not short circuit and do not allow metal objects to comeinto contact with the battery
terminals.
• Do not expose to high temperature above60°C (140°F) suchas in direct sunlight orin a car
parked in the sun.
• Do not incinerate or dispose ofin fire.
• Do not handle damaged or leakinglithium ion batteries.
• Be sureto charge the battery pack using agenuine Sonybattery chargeror a devicethat can
charge the battery pack.
• Keep the battery packout of the reach of smallchildren.
• Keep the battery packdr),.
• Replaceonly with the same or equivalenttype recommended by Son3c
• Dispose of usedbattery packs promptly as described in the instructions.
Replace the battery with the specified type only. Otherwise, fire or injury may
result.
ACAdaptor
Use the nearbywall outlet (wall socket) when using the AC Adaptor. Disconnect
the AC Adaptor from the wall outlet (wall socket) immediately if aW malfunction
occurs while using the apparatus.
RECYCLINGLITHIUM-IONBATTERIES
Lithium-Ion batteries are recyclable.
You can help preserve our environment by returning your used
rechargeable batteries to the collection and recycling location
nearest you.
For more information regarding recycling of rechargeable
batteries, call toll free
1-800-822- 8837, or visit http://www.call2recycle.org/
Caution: Do not handle damaged or leaking Lithium-Ion
batteries.
Batterypack
This device complies with Part 15 of the FCC Rules. Operation is subject to the
tollowing two conditions: (1) This device may not cause harmful interfk,rence, and
(2) this device must accept any intertbrence receiw, d, including interfk,rence that
may cause undesired operation.
CAN ICES-3 B/NMB-3 B
This equipment complies with FCC/IC radiation exposure limits set torth tot an
uncontrolled environment and meets the FCC radio frequency (RF) Exposure
Guidelines in Supplement C to OET65 and RSS-102 of the IC radio frequency
(RF) Exposure rules.
This equipment has w,ry low lew,ls of RF energy that are deemed to comply
without testing of specific absorption ratio (SAR).
If you haw, any questions about this product, you may call:
Sony Customer Information Center
1-800-222-SONY (7669)
The number below is for the FCC related matters only.
RegulatoryInformation
Declaration of Conformity
Trade Name: SONY
Model No.: HDR-AS30V
Responsible Party: So W Electronics Inc.
Address: 16530 Via Esprillo, San Diego, CA 92127 U.S.A.
Telephone No.: 858-942-2230
This device complies with Part 15 of the FCC Rules. Operation is subject
to the following two conditions: (1) This device may not cause harmful
interfk,rence, and (2) this device nmst accept aW interfbrence receiw, d,
including interfbrence that may cause undesired operation.
This equipment must not be co-located or operated in conjunction with aW other
antenna or transmitter.
CAUTION
You are cautioned that any changes or modifications not expressly approw, d in this
manual could w_id your authority to operate this equipment.
Note
This equipment has been tested and found to comply with the limits for a Class B
digital device, pursuant to Part 15of the FCC Rules.
These limits are designed to provide reasonable protection against harmful
interfk,rence in a residential installation. This equipment generates, uses, and can
radiate radio frequency energy and, if not installed and used in accordance with
the instructions, may cause harmful interf_,rence to radio comnmnications.
However, there is no guarantee that interfk,rence will not occur in a particular
installation. If this equipment does cause harmful interfbrence to radio or
television reception, which can be determined by turning the equipment off and
on, the user is encouraged to try to correct the interfk,rence by one or more of the
following measures:
- Reorientor relocatethe receiving antenna.
- Increasethe separation between the equipment and receiver.
- Connect the equipment into an outlet on a circuit diflbrent from that to which the receiver
is connected.
- Consult the dealeror an experienced radio/TV technician for help.
The supplied interface cable must be used with the equipment in order to comply
with the limits for a digital device pursuant to Subpart Bof Part 15 of FCC Rules.
This device complies with Industry Canada licence-exempt RSS standard(s).
Operation is subject to the following two conditions: (1) this device may not
cause interfbrence, and (2) this device must accept any interfk,rence, including
interference that may cause undesired operation of the device.
Noticefor the customersin the countries applying EUDirectives
Manufacturer: Sony Corporation, 1-7-1 Konan Minato-ku Tolq,o, 108-0075 Japan
For EU product compliance: SoW Deutschland GmbH, Hedelfinger Strasse 61,
70327 Stuttgart, Germany
Hereby, SoW Corporation, declares that this HDR-AS30V Digital HD Video
Camera Recorder is in compliance with the essential requirements and other
relevant provisions of Directiw, 1999/5/EC. For details, please access the following
URL:
http://www.compliance.sony.de/
Notice
If static electricity or electromagnetism causes data transt_,r to discontinue midway
(fail), restart the application or disconnect and connect the comnmnication cable
(USB, etc.) again.
This product has been tested and found compliant with the limits set out in the
EMC regulation for using connection cables shorter than 3 meters (9.8 fk,et).
The electromagnetic fields at the specific frequencies may influence the picture
and sound of this unit.
Disposalof OldElectrical& ElectronicEquipment(Applicableinthe EuropeanUnion
andother Europeancountrieswith separatecollectionsystems)
product shall not be treated as household waste. Instead it shall be
handed over to the applicable collection point for the recycling of
This symbol on the product or on its packaging indicates that this
electrical and electronic equipment. By ensuring this product is
disposed of correctly, you will help prew,nt potential negatiw,
consequences for the environment and human health, which could
otherwise be caused by inappropriate waste handling of this product.
The recycling of materials will help to conserw, natural resources. For more
detailed information about recycling of this product, please contact your local
Civic Office, your household waste disposal service or the shop where you
purchased the product.
Disposalof waste batteries(applicableinthe EuropeanUnionand otherEuropean
countrieswith separatecollectionsystems)
battery provided with this product shall not be treated as household
waste.
This symbol on the battery or on the packaging indicates that the
On certain batteries this symbol might be used in combination with
a chemical symbol. The chemical symbols for mercury (Hg) or lead
(Pb) are added if the battery contains more than 0.0005% mercury or 0.004% lead.
By ensuring these batteries are disposed of correctly, you will help prew, nt
potentially negatiw, consequences for the environment and human health which
could otherwise be caused by inappropriate waste handling of the battery. The
recycling of the materials will help to conserw, natural resources.
In case of products that for safk,ty, performance or data integrity reasons require
a permanent connection with an incorporated batter B this battery should be
replaced by qualified service staff only. To ensure that the battery will be treated
properly, hand ow, r the product at end-of_lifb to the applicable collection point for
the recycling of electrical and electronic equipment.
For all other batteries, please view the section on how to remow, the battery from
the product sat_'ly.
Hand the battery ow,r to the applicable collection point tor the recycling of waste
batteries.
For more detailed intormation about recycling of this product or battery, please
contact your local Civic Office, your household waste disposal service or the shop
where you purchased the product.
IDA Standards
I Complies with I
DB00353
 Loading...