

Page 1
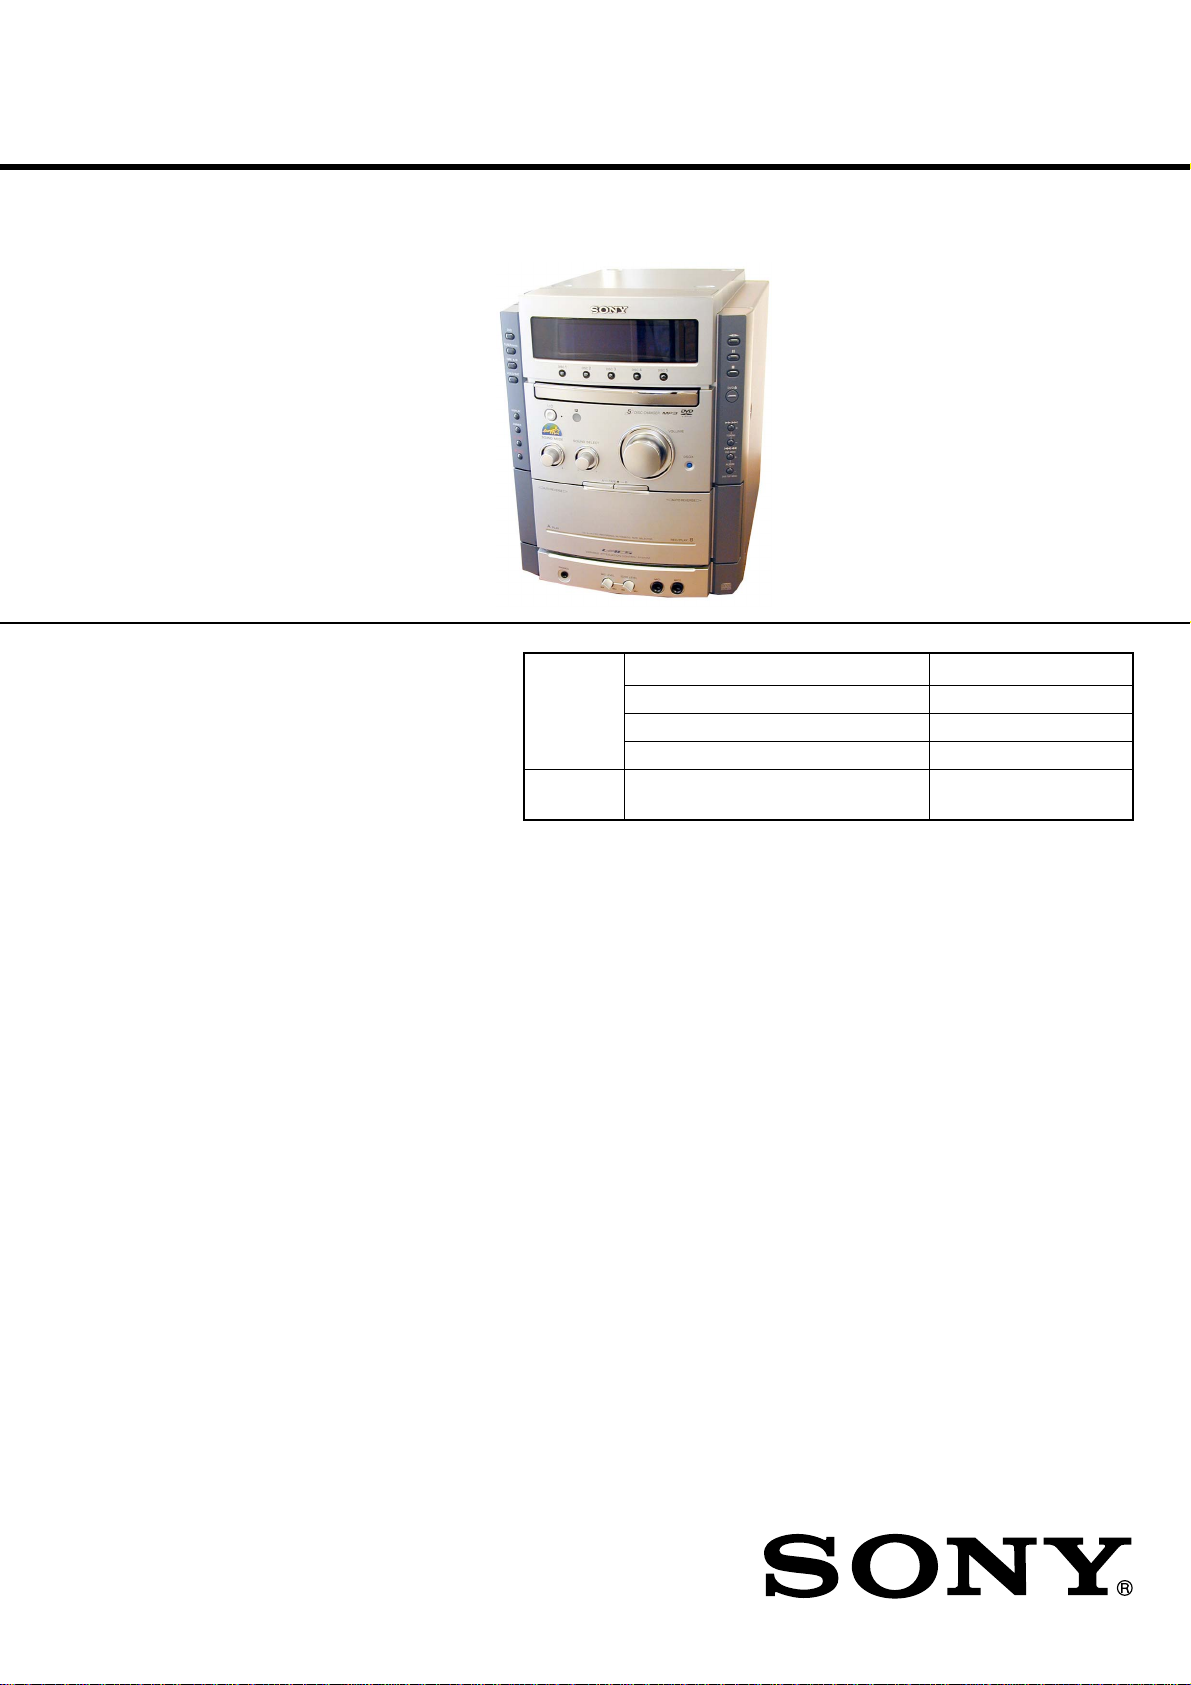
HCD-NXM4D
SERVICE MANUAL
Ver. 1.2 2005.05
• HCD-NXM4D is the Amplifier, DVD player,
tape deck and tuner section in DHC-NXM4D.
Model Name Using Similar Mechanism NEW
DVD DVD Mechanism Type CDM81A-DVBU60
Section Base Unit Name DVBU60
Optical Pick-up Name DBU-3
TAPE
Section
Model Name Using Similar Mechanism HCD-CPX22
l
SPECIFICATIONS
Main unit
Amplifier section
The following measured at AC 120, 127, 220, 240 V, 50/60 Hz
DIN power output (rated): 60 + 60 watts
(6 ohms at 1 kHz, DIN)
Continuous RMS power output (reference)
Front speaker: 75 + 75 watts
(6 ohms at 1 kHz, 10% THD)
Center speaker:
Surround speaker: 40 + 40 watts
Sub woofer: 120 watts
Inputs
VIDEO/SAT IN (phono jacks):
MIC1/MIC2 (phone jacks): sensitivity 1 mV, impedance 10
Outputs
VIDEO/SAT OUT (phono jacks):
VIDEO OUT (phono jack): max. output level
40 watts (6 ohms at 1 kHz, 10% THD)
(6 ohms at 1 kHz, 10% THD)
(4 ohms at 100 Hz, 10% THD)
voltage 250/450 mV, impedance 47
kilohms
kilohms
voltage 250 mV, impedance 1 kilohm
1 Vp-p, unbalanced, Sync negative,
load impedance 75 ohms
S VIDEO OUT (4-pin/mini-DIN jack):
Y: 1 Vp-p, unbalanced,
Sync negative, C: 0.286 Vp-p, load
impedance 75 ohms
COMPONENT VIDEO OUT:
Y: 1 Vp-p, 75 ohms
PB, PR: 0.7 Vp-p, 75 ohms
PHONES (stereo mini jack): accepts headphones of 8 ohms or
more
FRONT SPEAKER: Use only the supplied speaker
SS-NXM4D
SURROUND SPEAKER: Use only the supplied speaker
SS-RS400S
CENTER SPEAKER : Use only the supplied speaker
SS-CT400S
SUB WOOFER SPEAKER: Use only the supplied speaker
SS-WG4D
– Continued on next page –
9-877-971-03
2005E02-1
© 2005.05
DISPLAY SIDE Hi-Fi COMPONENT SYSTEM
Sony Corporation
Audio Group
Published by Sony Engineering Corporation
Page 2
HCD-NXM4D
Disc player section
System Compact disc and digital audio and
video system
Laser Semiconductor laser
(DVD: λ=650 nm, CD: λ=780 nm)
Emission duration: continuous
Frequency response DVD (PCM 48 kHz):
2 Hz – 22 kHz (±1 dB)
CD: 2 Hz – 20 kHz (±1 dB)
Video color system format Latin American model: NTSC
Other models: NTSC, PAL
Tape deck section
Recording system 4-track 2-channel stereo
Frequency response 50 – 13,000 Hz (±3 dB), using Sony
TYPE I cassette
Tuner section
FM stereo, FM/AM superheterodyne tuner
FM tuner section
Tuning range 87.5 – 108.0 MHz (50 kHz step)
Antenna FM lead antenna
Antenna terminals 75 ohms unbalanced
Intermediate frequency 10.7 MHz
AM tuner section
Tuning range
Latin American models: 530 – 1,710 kHz
(with the interval set at 10 kHz)
531 – 1,710 kHz
(with the interval set at 9 kHz)
Saudi Arabian models: 531– 1,602 kHz
(with the interval set at 9 kHz)
Other models: 531 – 1,602 kHz
(with the interval set at 9 kHz)
530 – 1,710 kHz
(with the interval set at 10 kHz)
Antenna AM loop antenna
Antenna terminals External antenna terminal
Intermediate frequency 450 kHz
Notes on chip component replacement
• Never reuse a disconnected chip component.
• Notice that the minus side of a tantalum capacitor may be
damaged by heat.
Flexible Circuit Board Repairing
• Keep the temperature of soldering iron around 270˚C
during repairing.
• Do not touch the soldering iron on the same conductor of the
circuit board (within 3 times).
• Be careful not to apply force on the conductor when soldering
or unsoldering.
CAUTION
Use of controls or adjustments or performance of procedures
other than those specified herein may result in hazardous
radiation exposure.
This appliance is classified as
a CLASS 1 LASER product.
This label is located on the rear
exterior.
General
Power requirements
Australian model: 230 – 240 V AC, 50/60 Hz
Saudi Arabian model: 120 – 127 V or 220 – 240 V AC,
50/60 Hz
Adjustable with voltage selector
Thai model: 220 V AC, 50/60 Hz
Other models: 120 V or 220 – 240 V AC, 50/60 Hz
Adjustable with voltage selector
Power consumption 315 watts
Dimensions (w/h/d) Approx. 230 x 290 x 355 mm
Mass Approx. 7.0 kg
Design and specifications are subject to change without notice.
SAFETY-RELATED COMPONENT WARNING!!
COMPONENTS IDENTIFIED BY MARK 0 OR DOTTED LINE WITH
MARK 0 ON THE SCHEMATIC DIAGRAMS AND IN THE PARTS
LIST ARE CRITICAL TO SAFE OPERATION. REPLACE THESE
COMPONENTS WITH SONY PARTS WHOSE PART NUMBERS
APPEAR AS SHOWN IN THIS MANUAL OR IN SUPPLEMENTS
PUBLISHED BY SONY.
2
Page 3

TABLE OF CONTENTS
HCD-NXM4D
1. SERVICING NOTES
................................................ 4
2. GENERAL
Location of Controls ........................................................ 5
3. DISASSEMBLY
3-1. Disassembly Flow ........................................................... 7
3-2. Case ................................................................................. 8
3-3. Back Panel ....................................................................... 8
3-4. DVD Section ................................................................... 9
3-5. Main Board ...................................................................... 10
3-6. Front Panel ...................................................................... 10
3-7. Front Amp Boardm Sur Amp Board ................................ 11
3-8. Tape Mechanism Deck .................................................... 12
3-9. Panel Board ..................................................................... 12
3-10. Video Board ..................................................................... 13
3-11. DMB07 Board, DVD Mechanism Deck
(CDM81A-DVBU60) ...................................................... 13
3-12. Tray .................................................................................. 14
3-13. Motor Board, M761 (LD/ST Motor),
M762 (BU U/D Motor) ................................................... 14
3-14. Base Unit (DVBU60) ...................................................... 15
3-15. RF Board ......................................................................... 15
3-16. Optical Pick-Up (DBU-3) ............................................... 16
4. TEST MODE .............................................................. 17
5. MECHANICAL ADJUSTMENTS ....................... 19
6. ELECTRICAL ADJUSTMENTS
Deck section .................................................................... 26
Video Section .................................................................. 27
7. DIAGRAMS
7-1. Circuit Board Location .................................................... 29
7-2. Block Diagram – DVD DSP (1/2) Section – .................. 31
7-3. Block Diagram – DVD DSP (2/2) Section – .................. 32
7-4. Block Diagram – Tuner/Tape Deck Section – ................ 33
7-5. Block Diagram – Main Section – ................................... 34
7-6. Block Diagram – Amp Section –.................................... 35
7-7. Printed Wiring Board – RF Board – ............................... 36
7-8. Schematic Diagram – RF Board – .................................. 37
7-9. Printed Wiring Board – DVD Mechanism Board – ....... 38
7-10. Schematic Diagram – DVD Mechanism Board – .......... 39
7-11. Printed Wiring Board – DMB07 Board (Side A) – ........ 40
7-12. Printed Wiring Board – DMB07 Board (Side B) – ........ 41
7-13. Schematic Diagram – DMB07 Board (1/6) – ................. 42
7-14. Schematic Diagram – DMB07 Board (2/6) – ................. 43
7-15. Schematic Diagram – DMB07 Board (3/6) – ................. 44
7-16. Schematic Diagram – DMB07 Board (4/6) – ................. 45
7-17. Schematic Diagram – DMB07 Board (5/6) – ................. 46
7-18. Schematic Diagram – DMB07 Board (6/6) – ................. 47
7-19. Printed Wiring Board – Video Board – .......................... 48
7-20. Schematic Diagram – Video Board – ............................. 49
7-21. Printed Wiring Boards – Main Board – .......................... 50
7-22. Schematic Diagram – Main Board (1/3) – ..................... 51
7-23. Schematic Diagram – Main Board (2/3) – ..................... 52
7-24. Schematic Diagram – Main Board (3/3) – ..................... 53
7-25. Printed Wiring Boards – Panel Board – ......................... 54
7-26. Schematic Diagram – Panel Board – ............................... 55
7-27. Printed Wiring Board – Disc SW, Vol, HP Board – ....... 56
7-28. Schematic Diagram – Disc SW, Vol, HP Board – .......... 57
7-29. Printed Wiring Board – Front Amp Board – .................. 58
7-30. Schematic Diagram – Front Amp Board – ..................... 59
7-31. Printed Wiring Board – SURAmp Board – .................... 60
7-32. Schematic Diagram – SUR Amp Board – ...................... 61
7-33. IC Block Diagram ........................................................... 63
8. EXPLODED VIEWS
8-1. Case, Rear Panel Section ................................................. 78
8-2. Front Panel Section ......................................................... 79
8-3. Chassis Section ................................................................ 80
8-4. DVD Mechanism Deck Section-1
(CDM81A-DVBU60) ..................................................... 81
8-5. DVD Mechanism Deck Section-2
(CDM81A-DVBU60) ..................................................... 82
8-6. DVD Mechanism Deck Section-3
(CDM81A-DVBU60) ..................................................... 83
8-7. Base Unit (DVBU60) ...................................................... 84
9. ELECTRICAL PARTS LIST ................................ 85
3
Page 4
HCD-NXM4D
)
SECTION 1
SERVICING NOTES
NOTES ON HANDLING THE OPTICAL PICK-UP BLOCK
OR BASE UNIT
The laser diode in the optical pick-up block may suffer electrostatic
break-down because of the potential difference generated by the
charged electrostatic load, etc. on clothing and the human body.
During repair, pay attention to electrostatic break-down and also
use the procedure in the printed matter which is included in the
repair parts.
The flexible board is easily damaged and should be handled with
care.
NOTES ON LASER DIODE EMISSION CHECK
The laser beam on this model is concentrated so as to be focused on
the disc reflective surface by the objective lens in the optical pickup block. Therefore, when checking the laser diode emission, observe
from more than 30 cm away from the objective lens.
LASER DIODE AND FOCUS SEARCH OPERATION CHECK
Carry out the “S curve check” in “CD section adjustment” and check
that the S curve waveform is output several times.
•Abbreviation
E2 : 120 V AC Area in E model
E3 : 240 V AC Area in E model
E15 : Iran model
EA : Saudi Arabia model
SP : Singapore model
MY : Malaysia model
AUS : Australian model
TH : Thai model
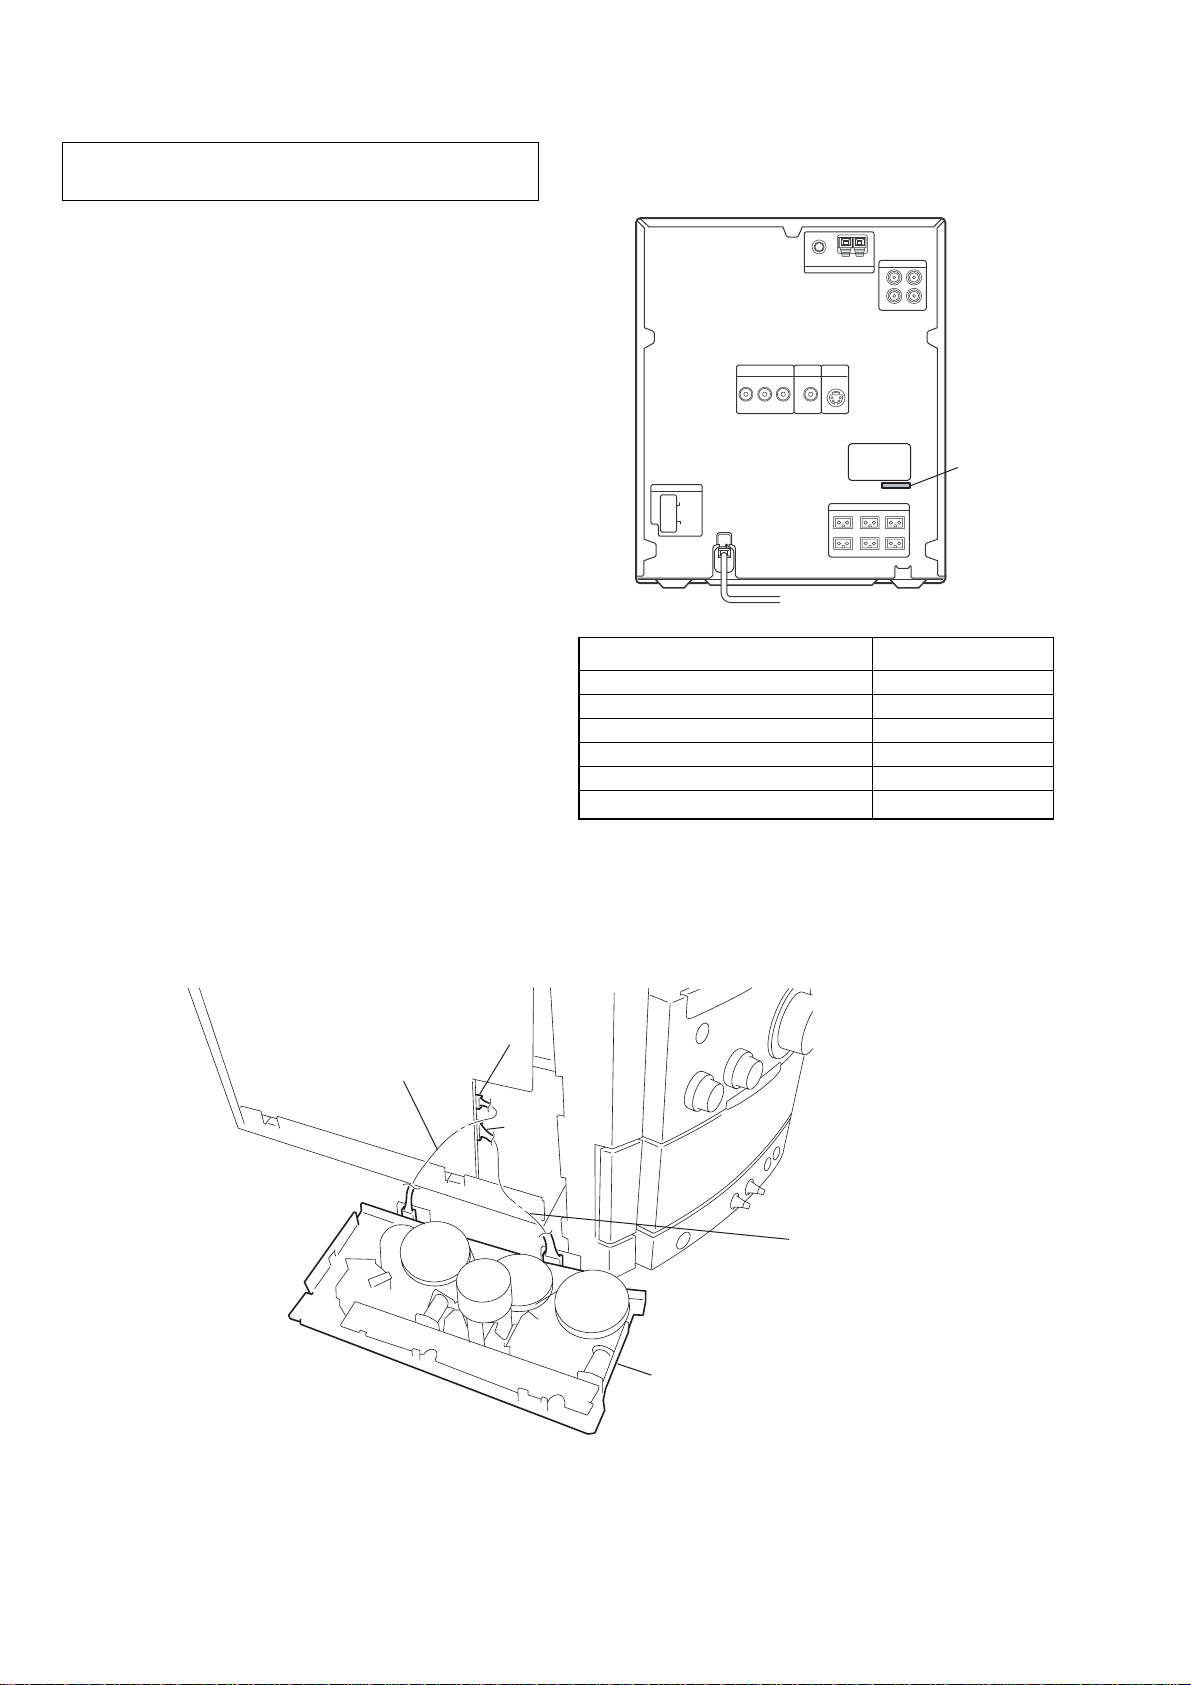
• MODEL IDENTIFICATION
– Back Panel –
PAR T No.
MODEL PART No.
SP, MY models 4-253-361-0[]
E2 model 4-253-361-1[]
E3, E15 model 4-253-361-2[]
EA model 4-253-361-3[]
AUS model 4-253-361-4[]
TH model 4-253-361-5[]
• SERVICE POSITION FOR TAPE MECHANISM DECK
CN301
Jig (J-2501-270-A)
CN302
Jig (J-2501-271-A
tape mechanism deck
•NOTE ON CD/DVD MECHANISM DECK EXCHANGE
If CD/DVD mechanism deck is exchanged while the desk had gone into trays 2 or 3, since the address is memorized by the microprocessor,
the set will not operate normally.
In this case, please perform cold reset with reference to test mode (page 17.)
4
Page 5
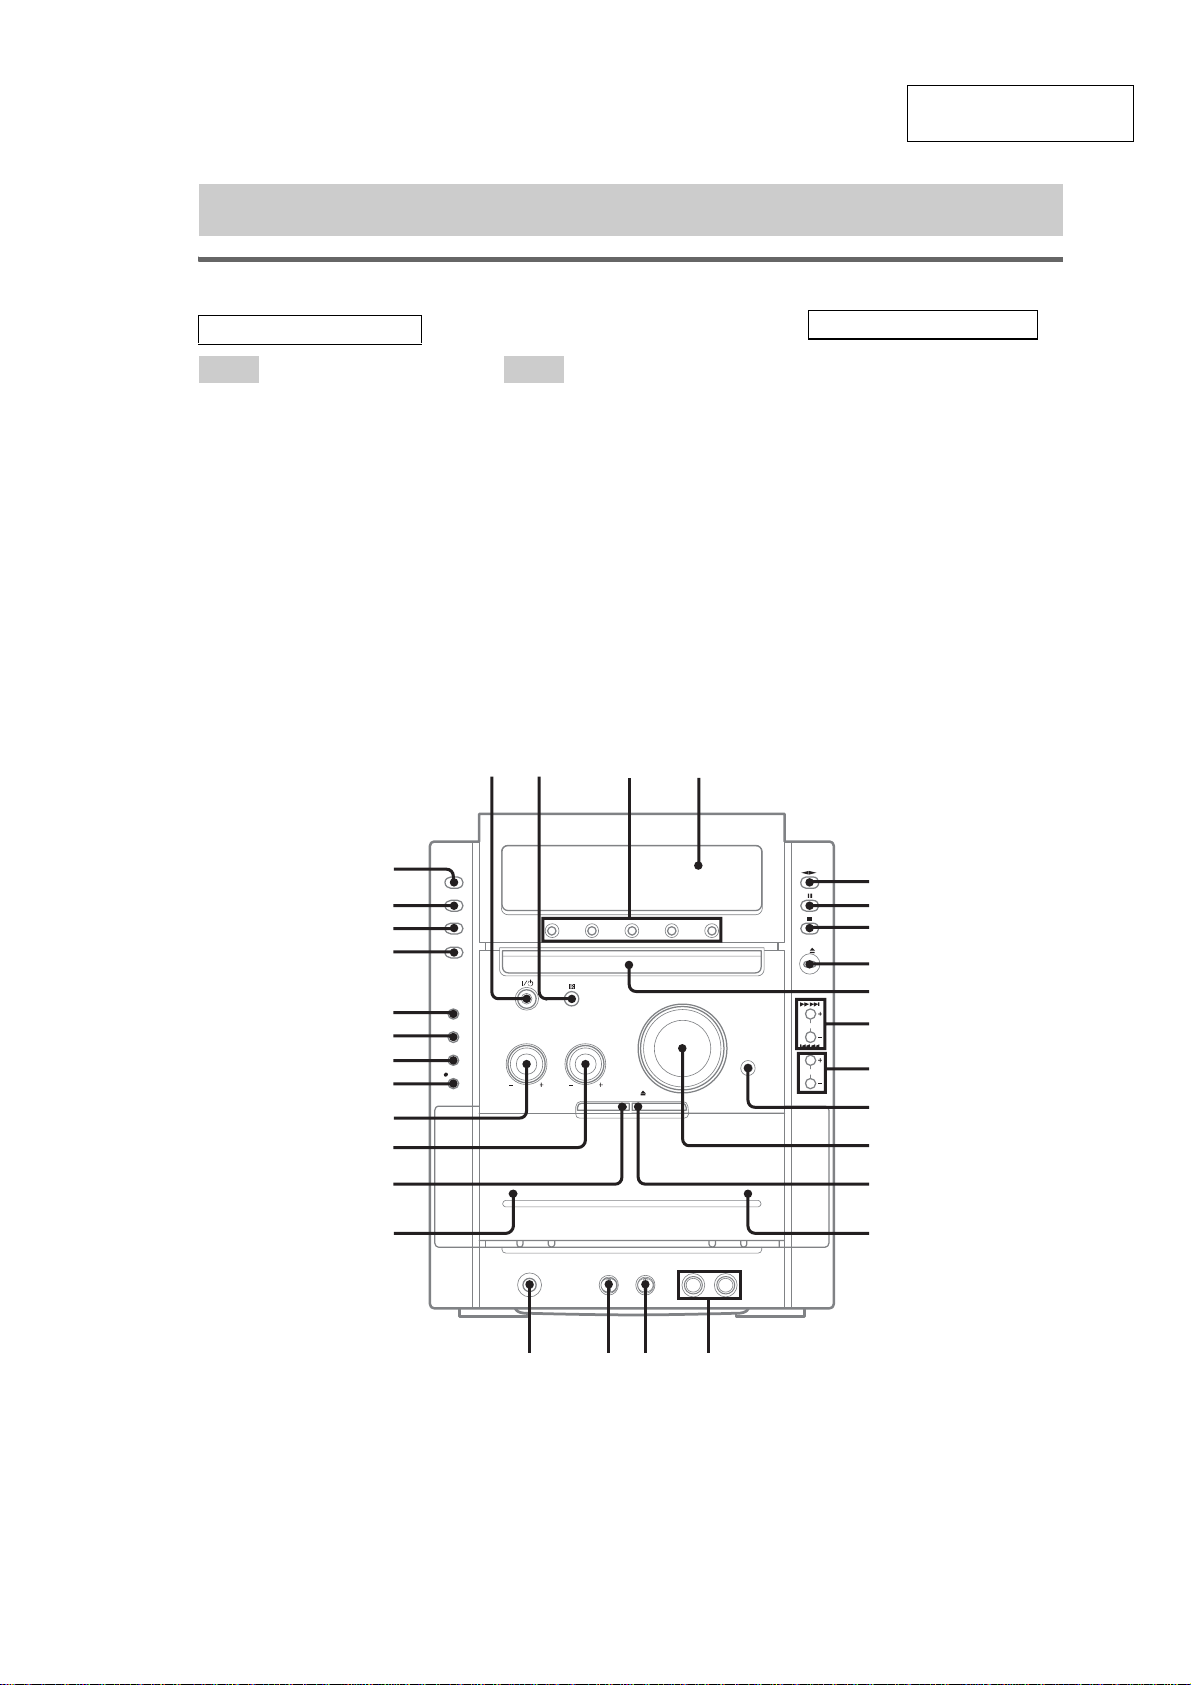
LOCATING THE CONTROLS
List of button locations and reference pages
Main unit
SECTION 2
GENERAL
HCD-NXM4D
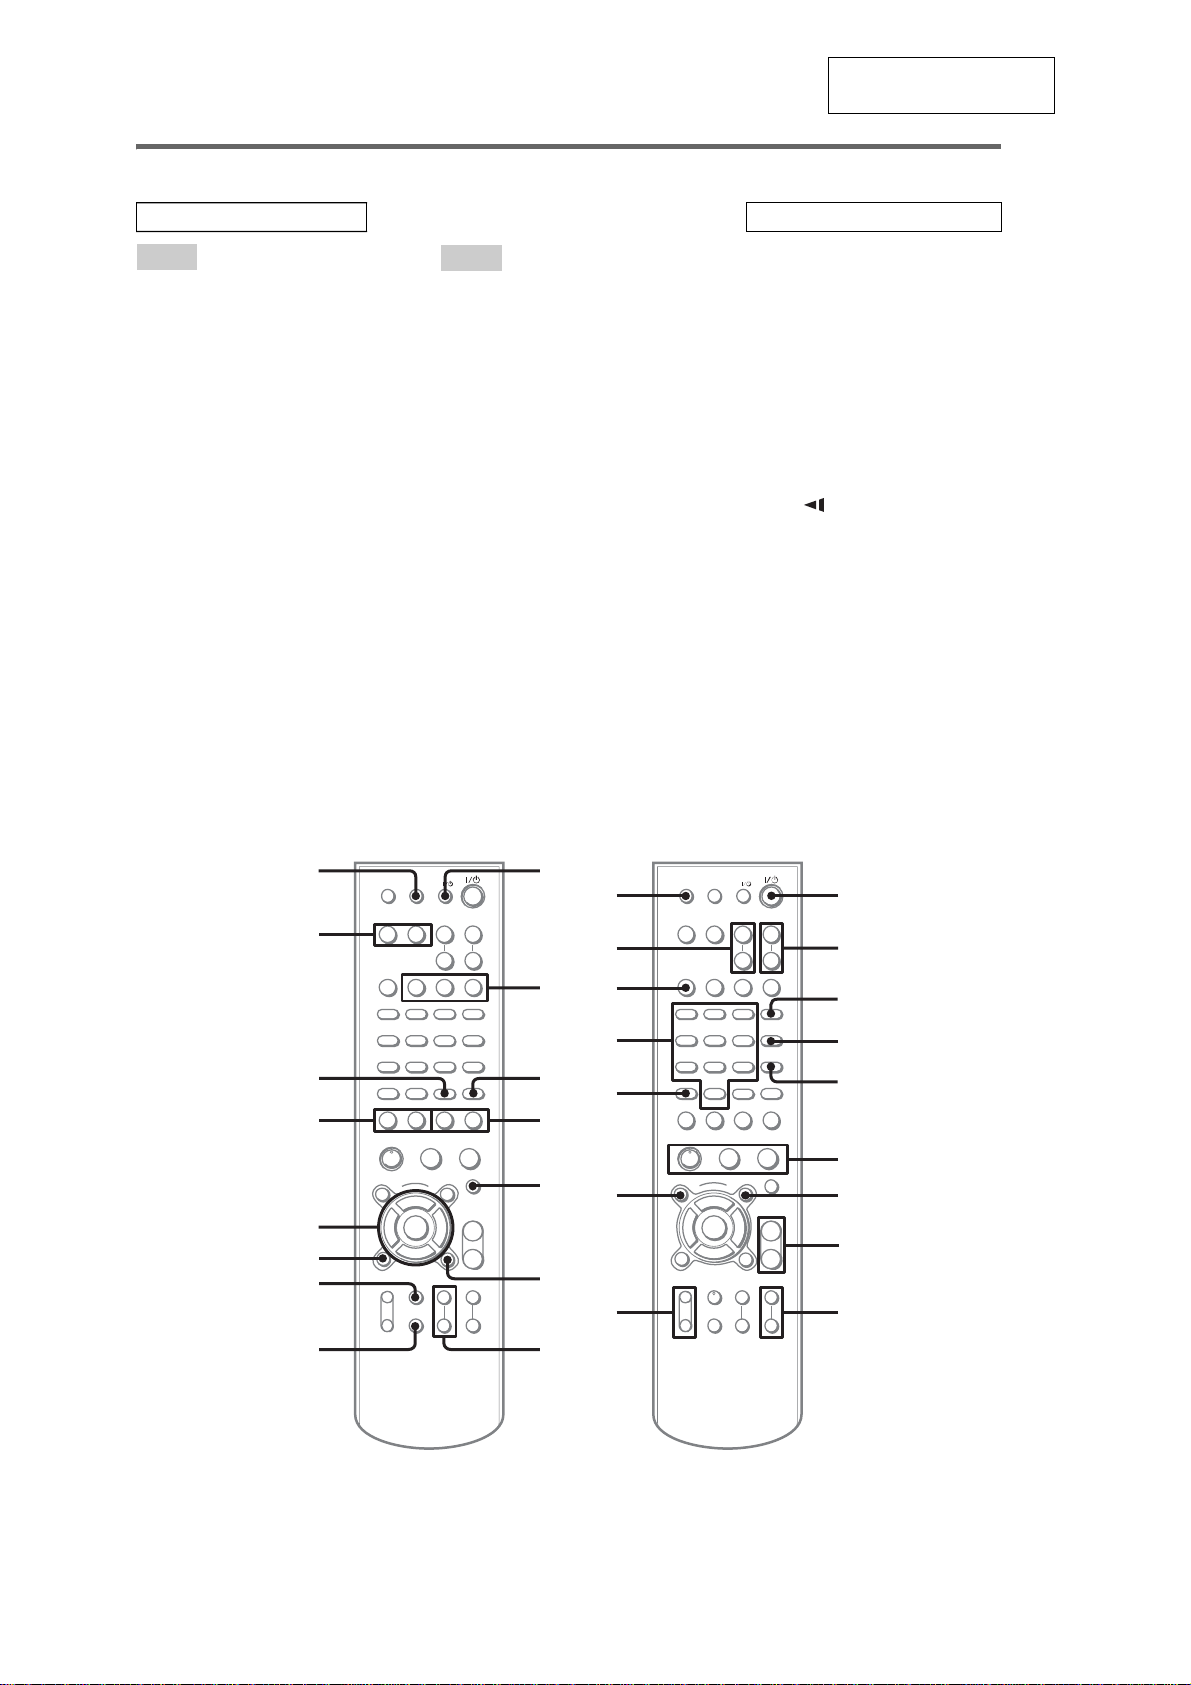
This section is extracted
from instruction manual.
ALPHA BETICAL ORDER
A – D E – Z
ALBUM +/– qa
CD SYNC wg
Deck A w;
Deck B qg
DIMMER wh
DISC 1 – 5 3
Disc tray 9
DISPLAY wj
Display window 4
DSGX qs
DVD ea
DVD MENU qa
DVD TOP M
ENU
qa
ECHO LEVEL qj
MIC1/MIC2 jacks qh
MIC LEVEL qk
PHONES jack ql
Remote sensor 2
SOUND MODE control wd
SOUND SELECT control ws
TAPE A/B wl
TUNER/BAND e;
TUNING +/– 0
VIDEO/SAT wk
VOLUME c
12 3
ea
e;
wl
wk
wj
wh
wg
wf
wd
ws
ontrol
qd
4
BUTTON DESCRIPTIONS
?/1 (power) 1
nN (play) 5
X (pause) 6
x (stop) 7
DVD Z (open/close) 8
.m/M> (rewind/fast
forward, go back/go forward)
TAPE Z B (eject) qf
A TA PE Z (eject) wa
z START (record) wf
5
6
7
8
9
0
qa
qs
qd
0
wa
w;
ql
qf
qg
qhqjqk
5
Page 6
HCD-NXM4D
Remote control
This section is extracted
from instruction manual.
ALPHABETICA L ORDER
A – E
ALBUM + 7
ALBUM – qa
ANGLE qk
AUDIO qk
BAN D wg
CLEAR wl
CLOCK/TIMER SELECT e;
CLOCK/TIMER SET e;
DISC SKIP wf
DISPLAY wa
DVD DISPLAY wh
DVD MENU 7
DVD SETUP ws
DVD TOP MENU qa
ENTER wj
F – Z
FM MODE 5
FUNCTION +/– 0
KARAOKE/MPX qf
Number buttons qd
PLAY MODE 4
REPEAT 5
SLEEP qh
SOUND FIELD +/– wd
SUBTITLE qk
TUNER MEMORY 3
TUNING MODE 4
TUNING +/– wk
TV CH +/– qg
TV/VIDEO ea
TV VOL +/– 2
VOLUME +/– 8
BUTTON DESCRIPTIONS
?/1 (power) 1
nN (play) 6
X (pause) 6
x (stop) 6
KEY CONTROL
#/2 9
>10 qs
TV ?/1 qj
O RETURN ql
m (rewind) w;
M (fast forward) w;
SLOW /y w;
M/m/</, wj
. (go back) wk
> (go forward) wk
ea
e;
wl
wk
wj
wh
wg
wf
qj
qh
+–+
–
qk
qf
+–+
–
qd
O
+–
y
y
mM.>
XbB
x
+
–
V
bB
+
v
–
+
+
–
–
ql
w;
wa
ws
qs
qa
O
+–
y
y
mM.>
XbB x
+–
V
bB
+
v
–
+
+
–
–
1
2qg
3
4
5
6
7
8
90
wd
6
Page 7
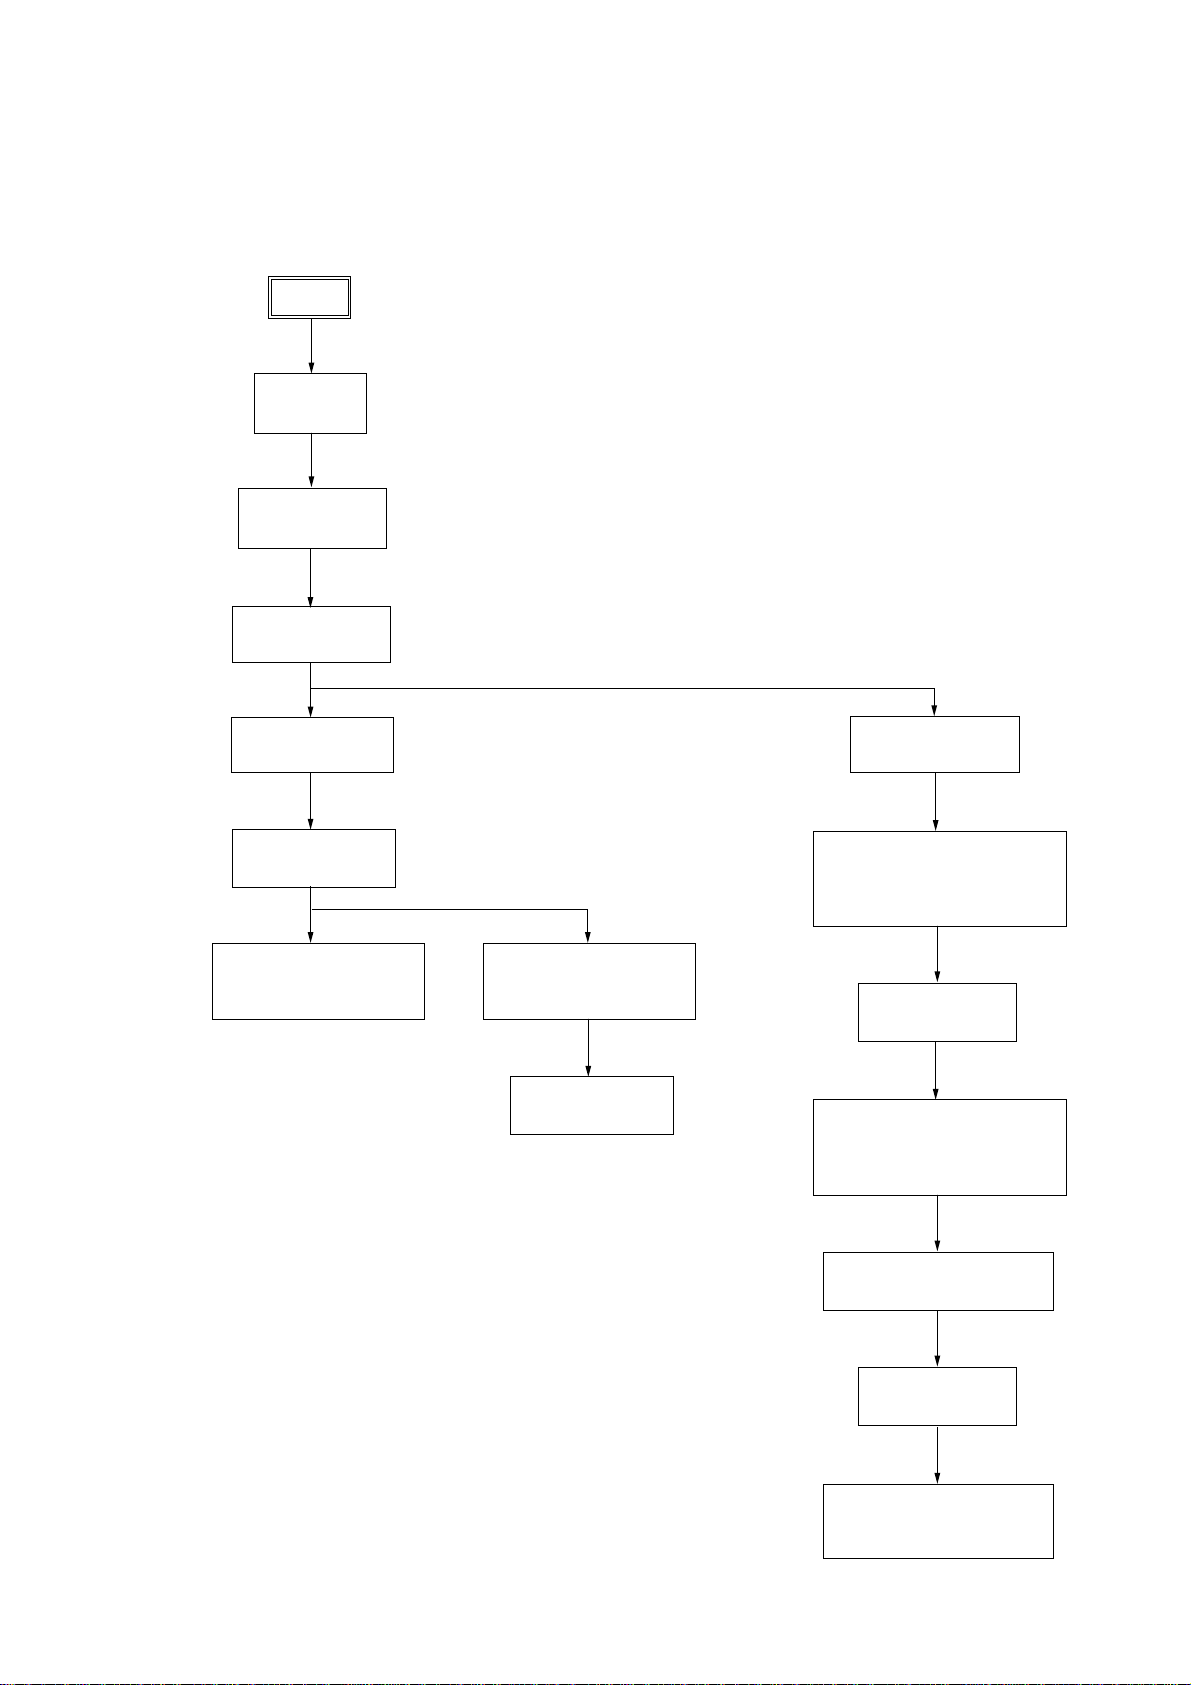
• This set can be disassembled in the order shown below.
3-1. DISASSEMBLY FLOW
SET
3-2.CASE
(Page 8)
3-3.BACK PANEL
(Page 8)
3-4.DVD SECTION
(Page 9)
HCD-NXM4D
SECTION 3
DISASSEMBLY
3-5.MAIN BOARD
(Page 10)
3-6.FRONT PANEL
(Page 10)
3-7.FRONT AMP BOARD,
SUR AMP BOARD
(Page 11)
3-8.TAPE MECHANISM
DECK
(Page 12)
3-9.PANEL BOARD
(Page 12)
3-10.VIDEO BOARD
(Page 13)
3-11. DMB07 BOARD,
DVD MECHANISM DECK
(CDM81A-DVBU60)
(Page 13)
3-12. TRAY
(Page 14)
3-13. MOTOR BOARD,
M761 (LD/ST MOTOR),
M762 (BU U/D MOTOR)
(Page 14)
3-14. BASE UNIT (DVBU60)
(Page 15)
3-15. RF BOARD
(Page 15)
3-16. OPTICAL PIC-UP
(DBU-3)
(Page 16)
7
Page 8
HCD-NXM4D
)
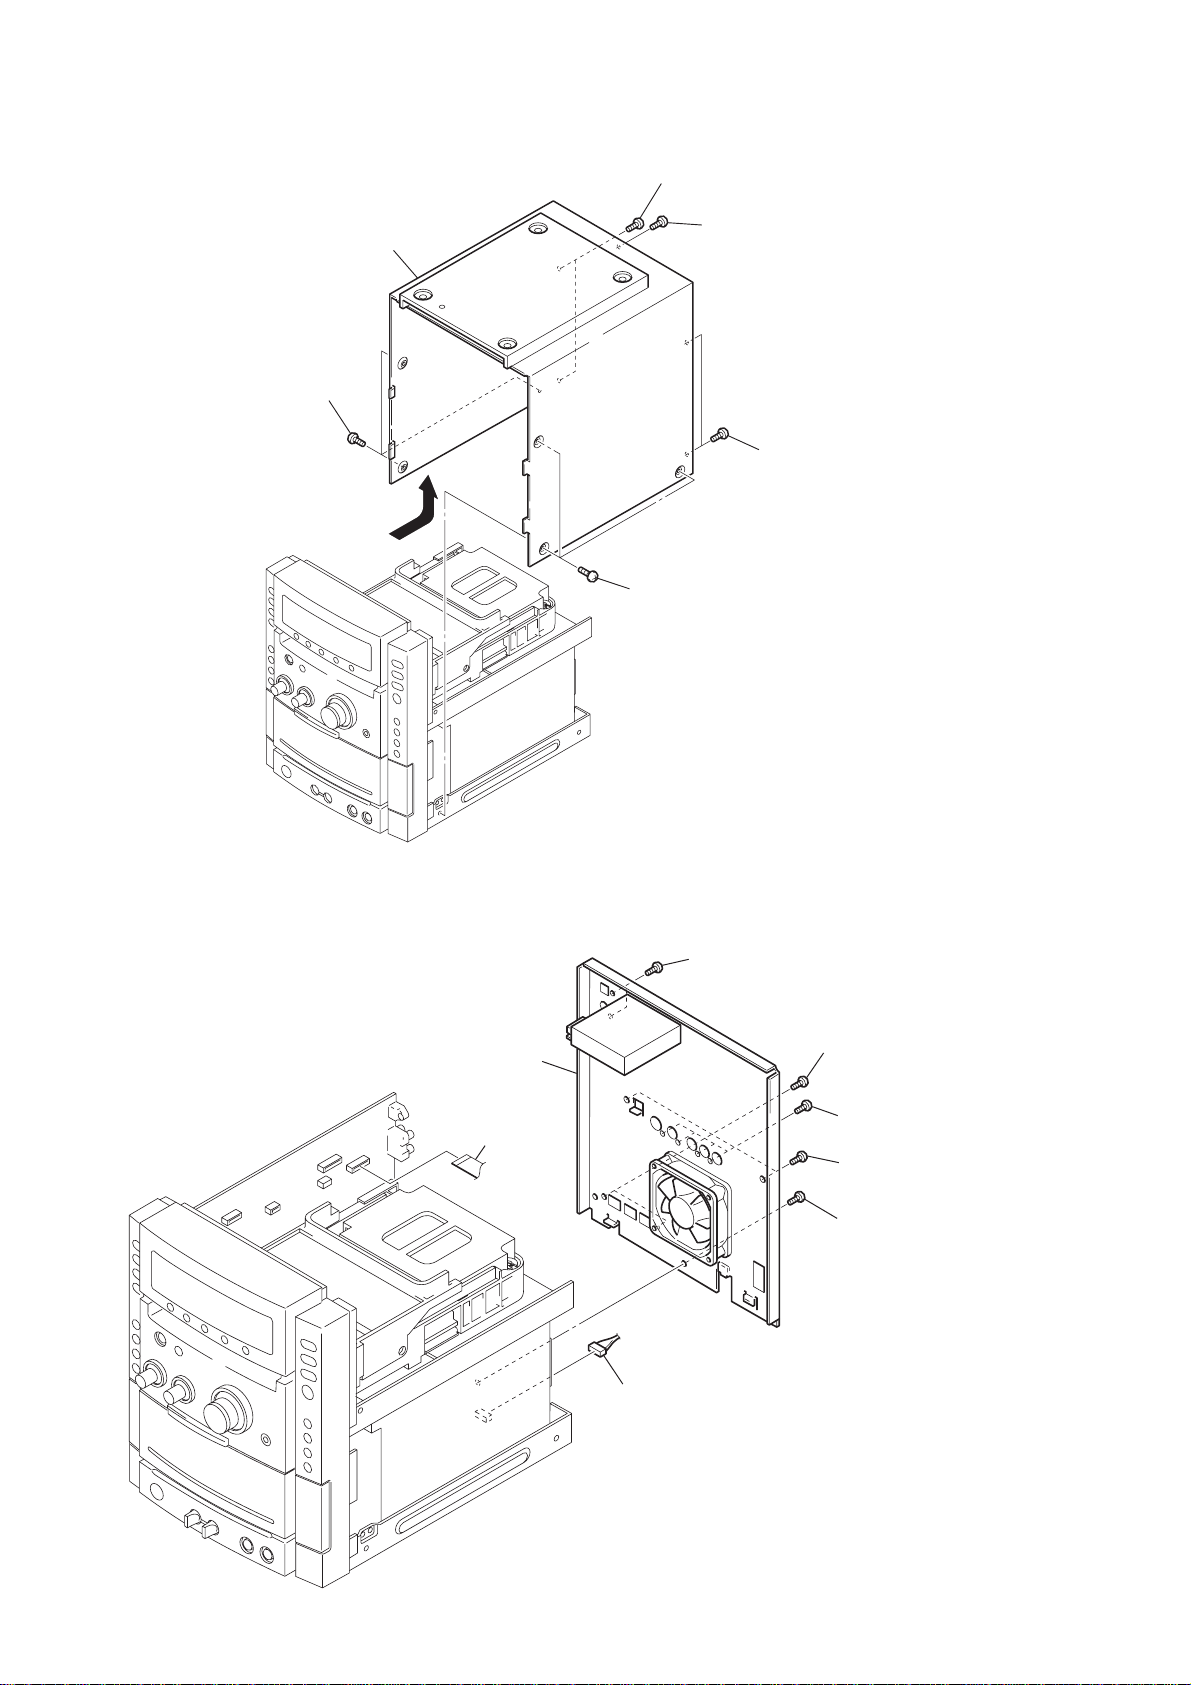
Note: Follow the disassembly procedure in the numerical order given.
3-2. CASE
2
three
(CASE 3 TP2)
screws
7
CASE
6
4
two
screws
(sumitite (B3))
5
screw
(sumitite (B3))
1
three
(CASE 3 TP2)
screws
3
two
screws
(sumitite (B3)
3-3. BACK PANEL
6
back panel section
7
CNP204
5
(+BVTP 3X8)
8
connector
(CN506)
two
screws
4
two
screws
(+BVTP 3X8)
3
four
screws
(+BVTP 3X8)
2
two
screws
(+BVTP 3X8)
1
screw
(+BVTP 3
X
8)
8
Page 9
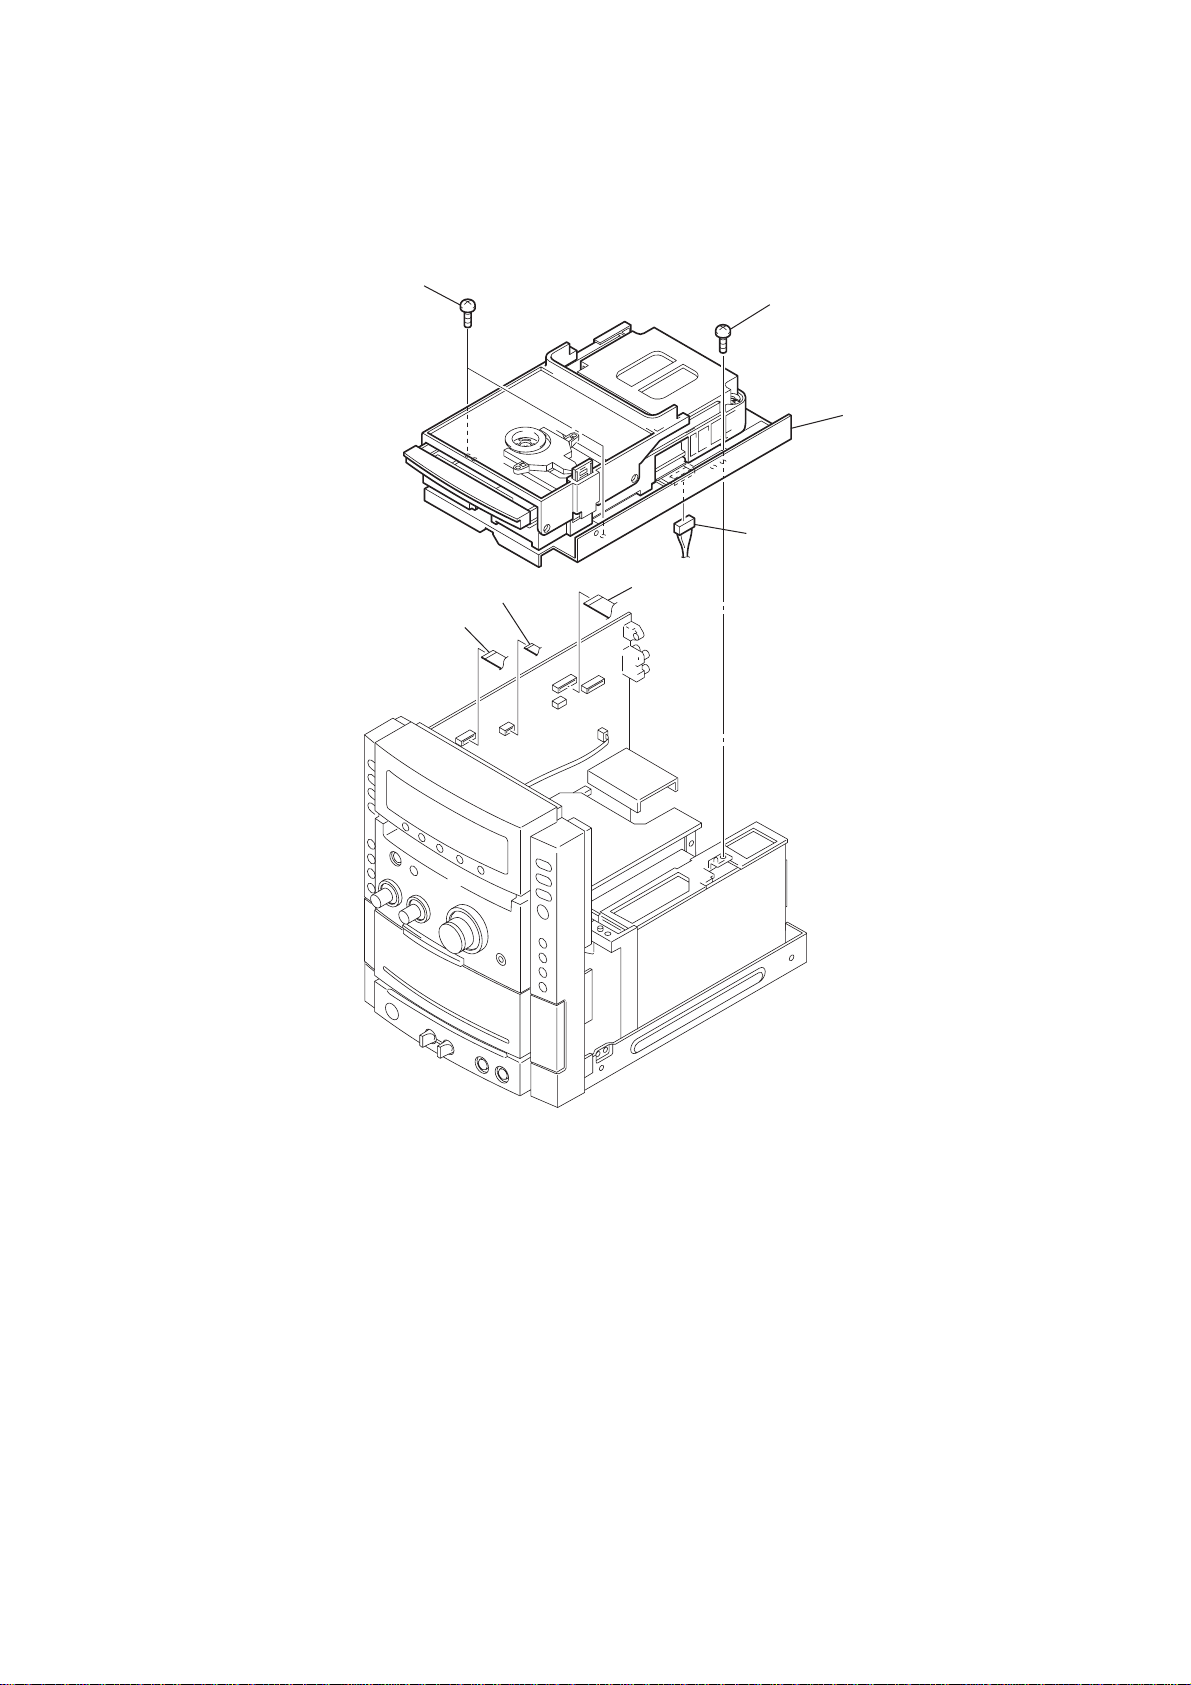
3-4. DVD SECTION
n
5
two
screws
(sumitite (B3))
1
CNP200
2
CNP202
3
CNP372
4
screw
(+BVTP 3
7
connector
(CN102)
X8
)
6
DVD sectio
HCD-NXM4D
9
Page 10
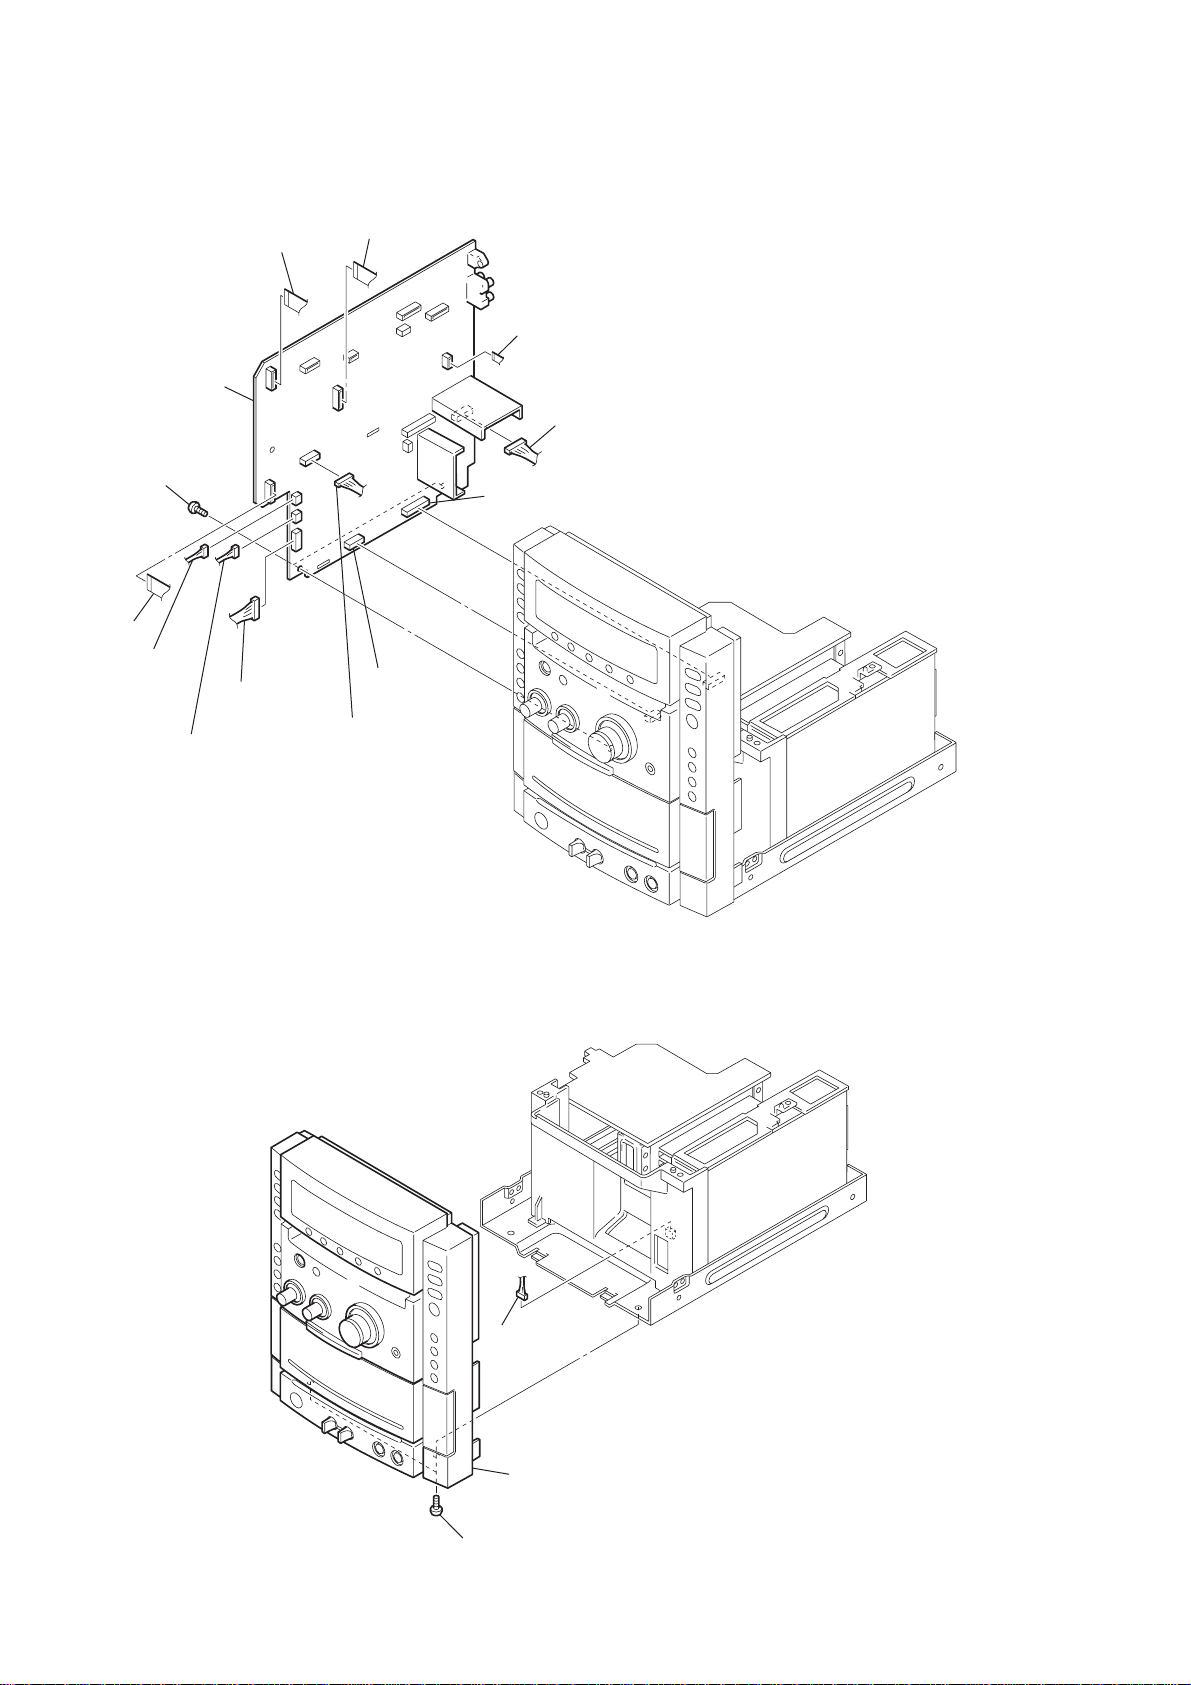
HCD-NXM4D
3-5. MAIN BOARD
4
MAIN board
1
two
screws
(sumitite (B3))
qd
CNP109
qs
CNP110
qa
CNP112
3
connector
(CN103)
0
connector
(CN101)
5
CNP303
6
connector
(CN108)
7
connector
(CN301)
3-6. FRONT PANEL
8
connector
(CN302)
2
connector
(CN102)
9
connector
(CN102)
10
3
connector
(CN505)
2
front panel section
1
two
screws
(+BVTP 3X8)
Page 11
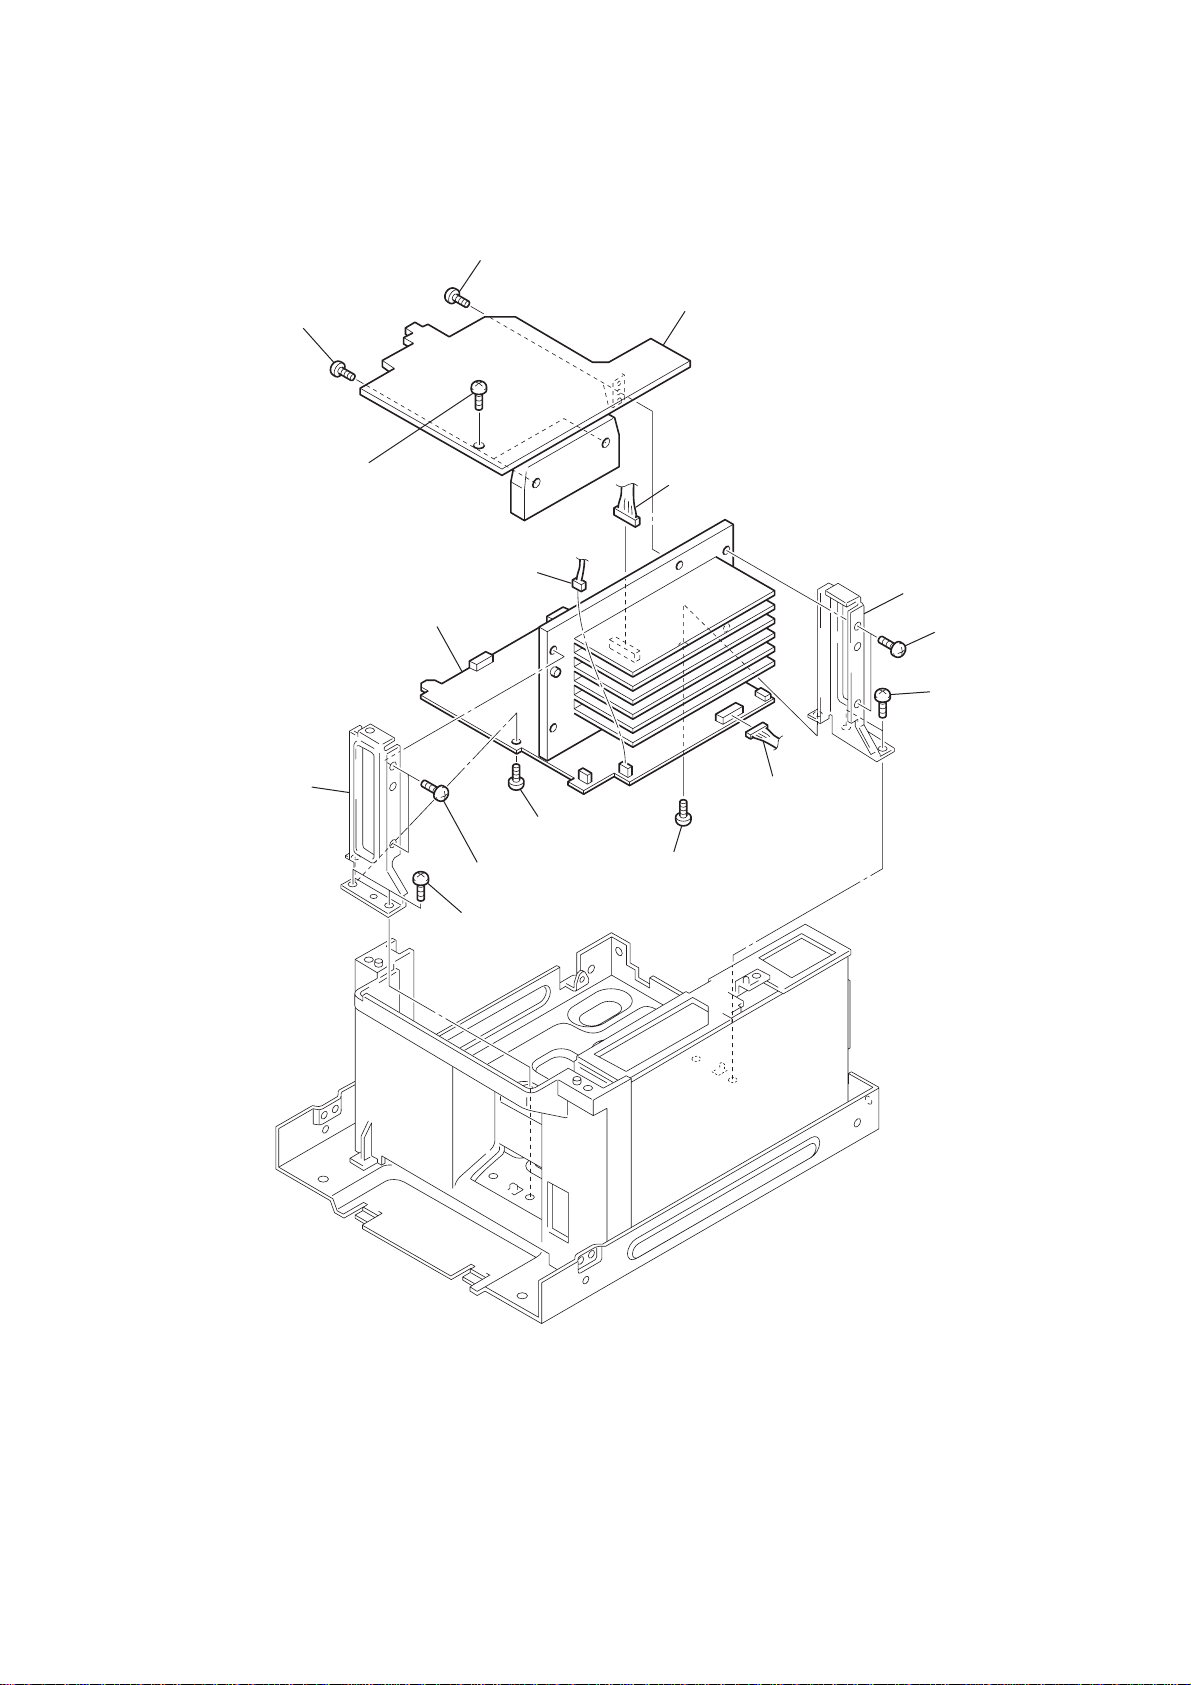
3-7. FRONT AMP BOARD, SUR AMP BOARD
)
)
5
screw
(+BVTP 3
6
two
screws
(+BVTP 3X8)
7
screw
(+BVTP 3
3
X8
)
FRONT AMP board
q;
connector
(CN507)
X8
HCD-NXM4D
)
8
SUR AMP board
9
connector
(CN503)
qh
bracket
qg
two
screws
(+BVTP 3
X8
qf
bracket
qa
screw
(+BVTP 3X8)
qd
two
screws
(+BVTP 3X8)
2
two
screws
(sumitite (B3))
qs
screw
(+BVTP 3X8)
4
connector
(CN502)
1
two
screws
(sumitite (B3)
11
Page 12
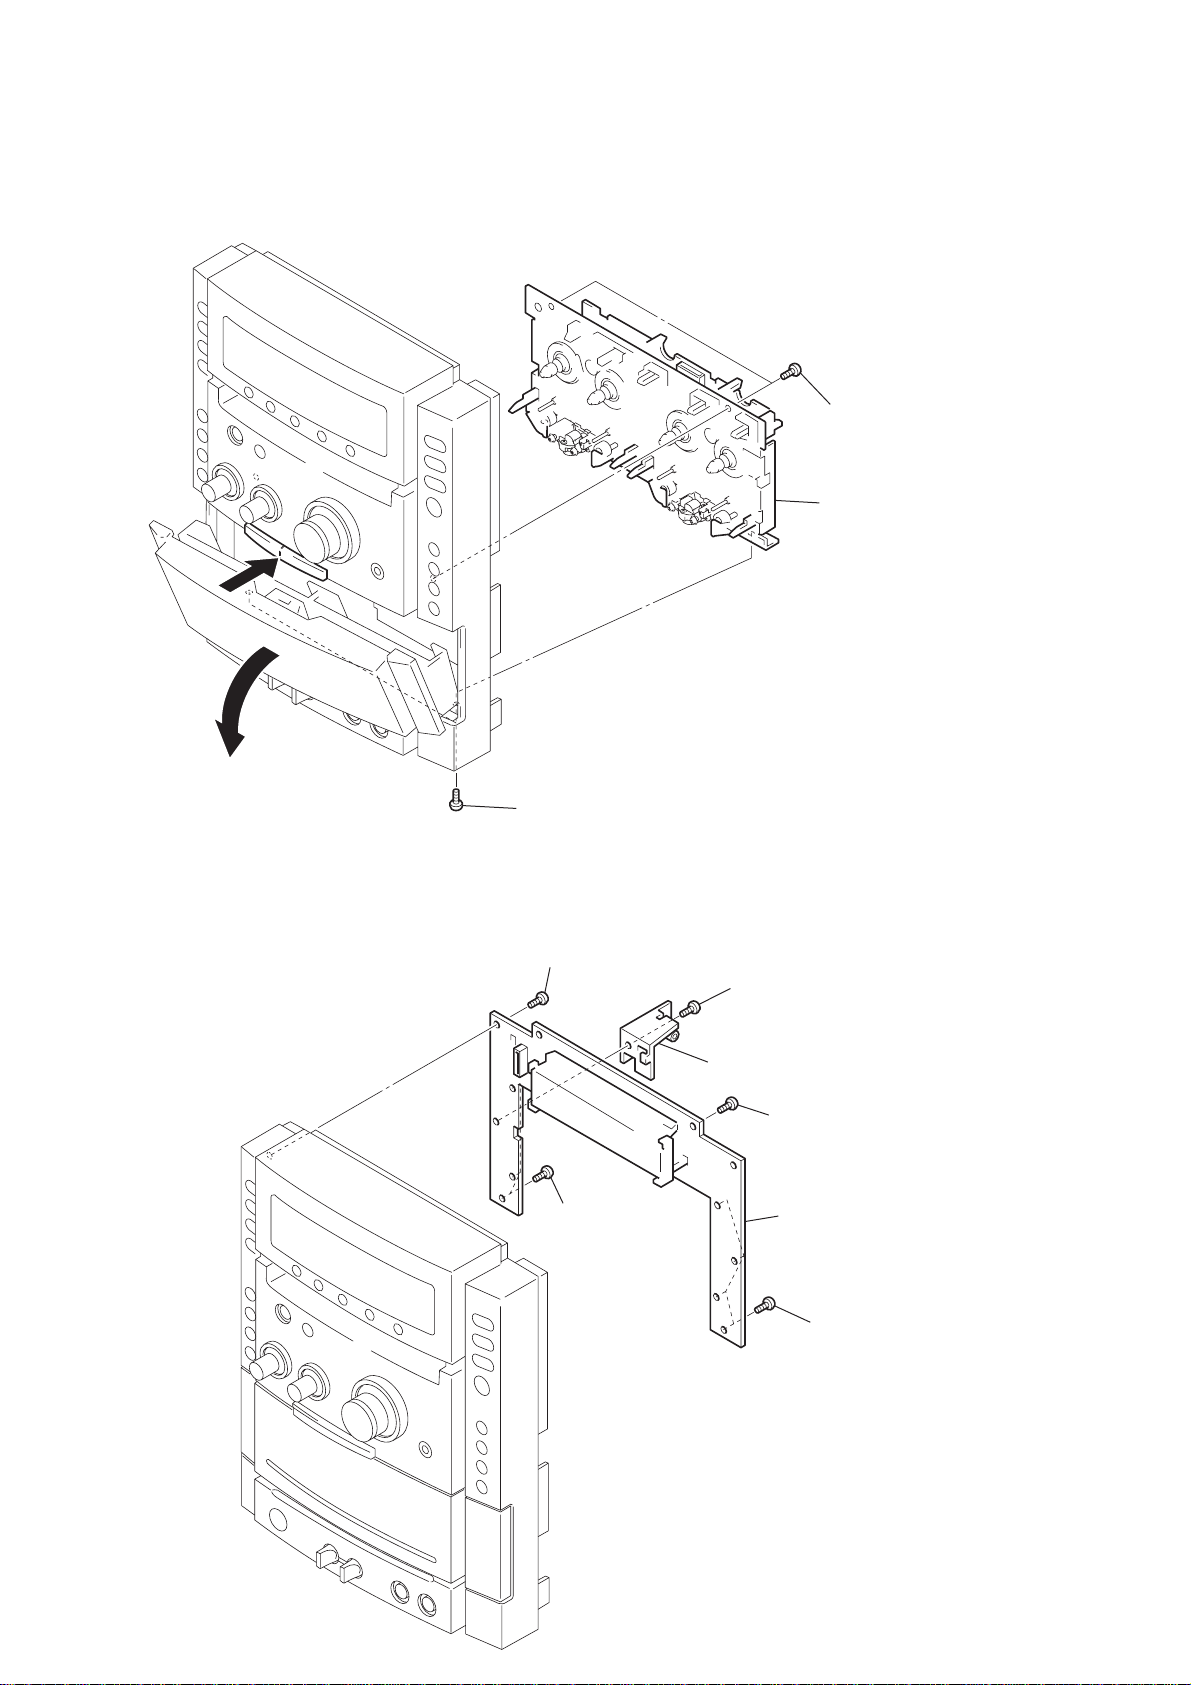
HCD-NXM4D
)
k
3-8. TAPE MECHANISM DECK
1
4
two
screws
(+BVTP 2.6X8)
5
tape mechanism dec
2
3-9. PANEL BOARD
3
two
screws
(+P 2.6X3)
5
screw
(+BVTP 2.6X8)
6
three
(+BVTP 2.6X8)
screws
3
screw
(+BVTP 2.6X8)
4
bracket (main)
2
screw
(+BVTP 2.6X8)
7
PANEL board
12
1
four
screws
(+BVTP 2.6X8
Page 13
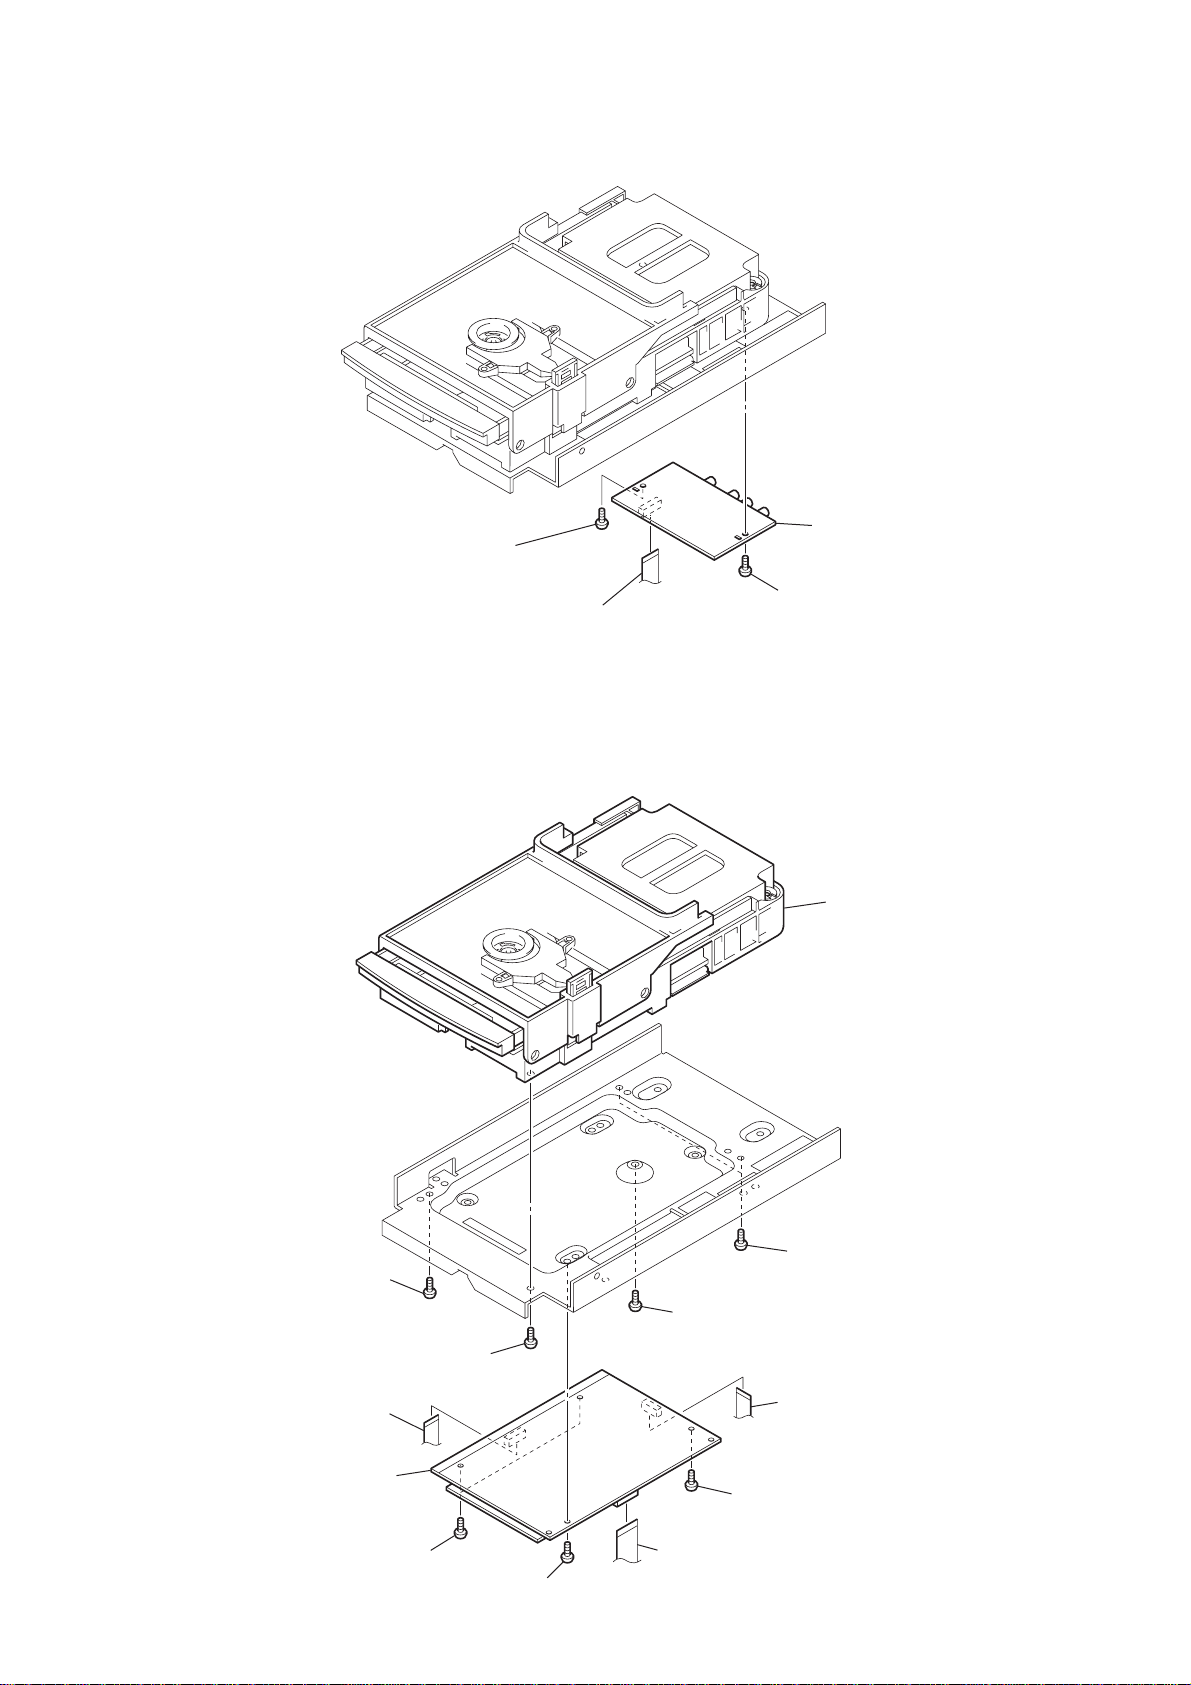
3-10. VIDEO BOARD
d
k
2
screw
(+BVTP 3
X8
)
1
CNP1101
4
VIDEO boar
3
screw
(+BVTP 3
X8
HCD-NXM4D
)
3-11. DMB07 BOARD, DVD MECHANISM DECK (CDM81A-DVBU60)
qa
screw
(+BVTP 3
X8
)
qs
DVD mechanism dec
(CDM81A-DVBU60)
8
two
screws
(+BVTP 3
X8
)
2
7
DMB07 board
0
screw
(+BVTP 3
CNP105
4
two
screws
(+BVTP 3
X8
)
X8
)
5
screw
(+BVTP 3
X8
)
9
screw
(+BVTP 3
1
CNP501
X8
)
3
CNP107
6
screw
(+BVTP 3
X8
)
13
Page 14
HCD-NXM4D
)
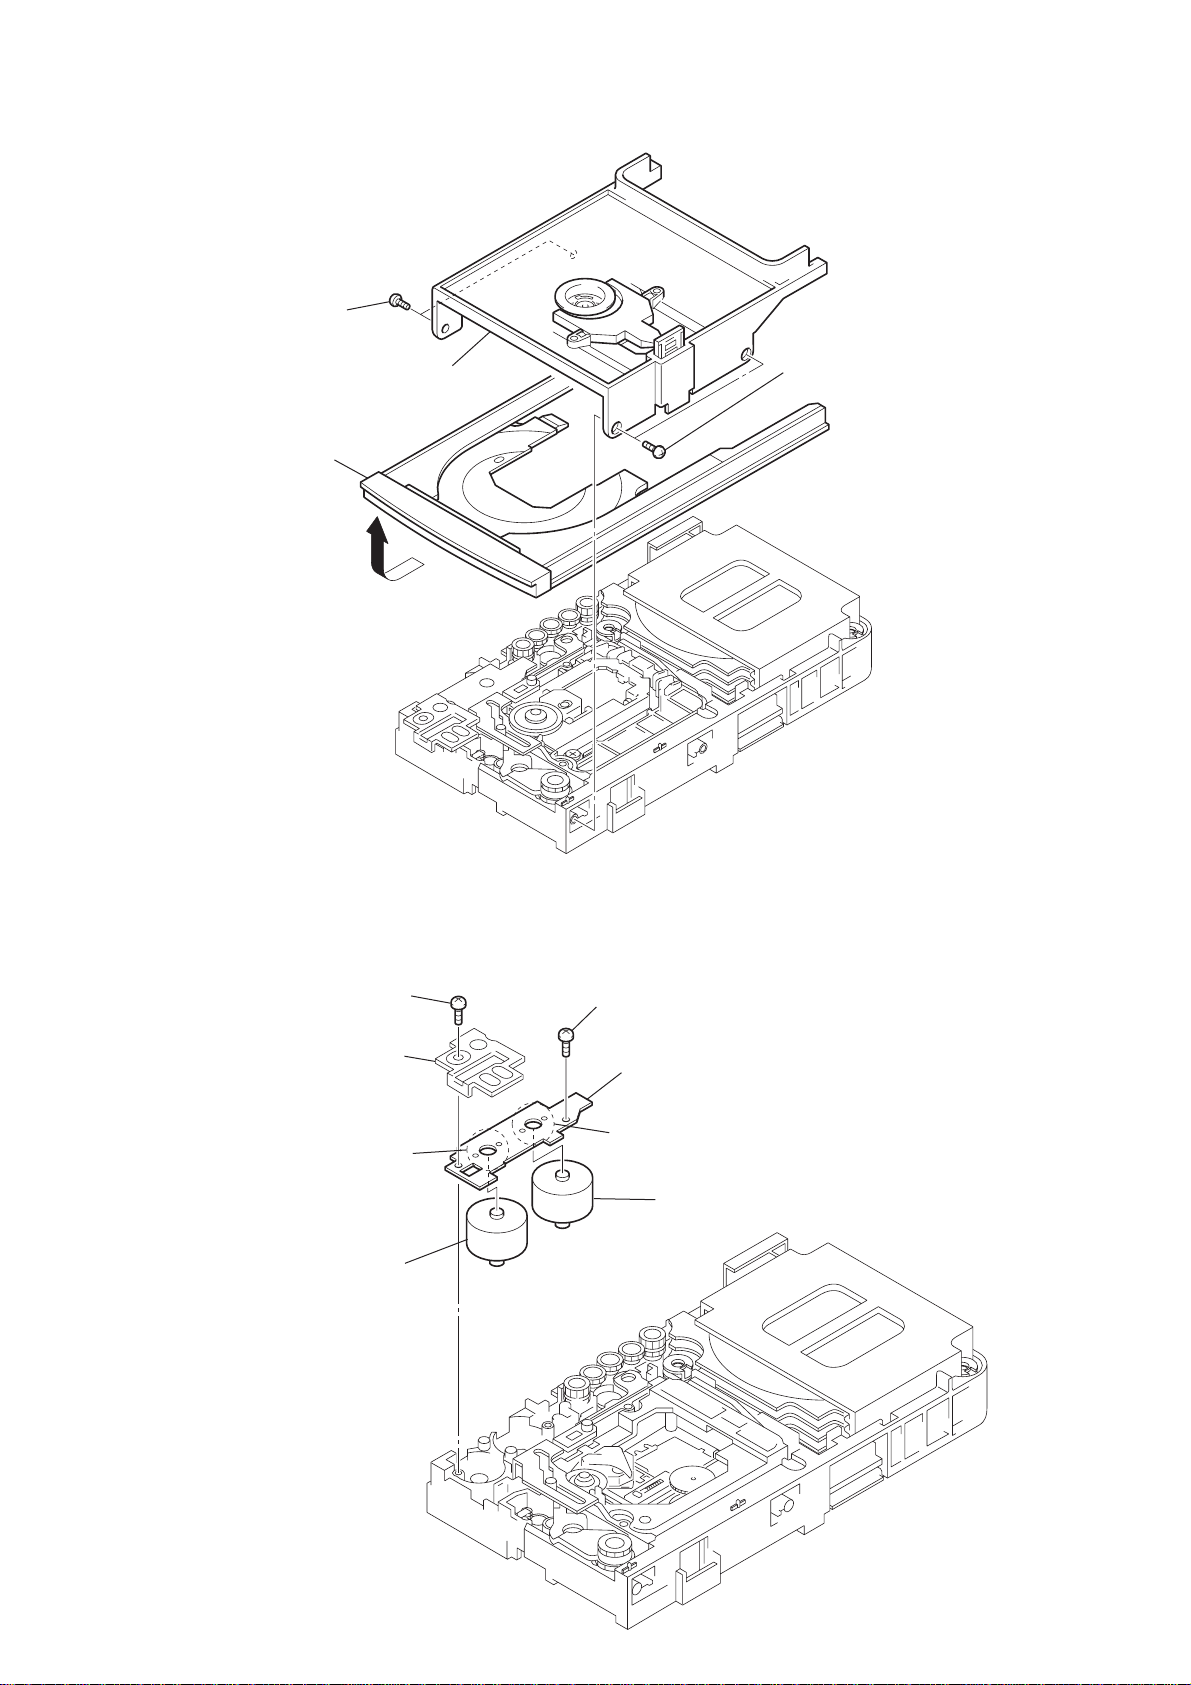
3-12. TRAY
2
two
screws
(+BTP 2.6X8)
5
tray
4
3
bracket
1
two
screws
(+BTP 2.6X8
3-13. MOTOR BOARD, M761 (LD/ST MOTOR), M762 (BU U/D MOTOR)
1
screw
(+BTP 2.6X8)
2
bracket
7
Remove soldering from the two points.
8
M762 (BU U/D MOTOR)
3
screw
(+BTP 2.6X8)
4
MOTOR board
5
Remove soldering from the two points.
6
M761 (LD/ST MOTOR)
14
Page 15
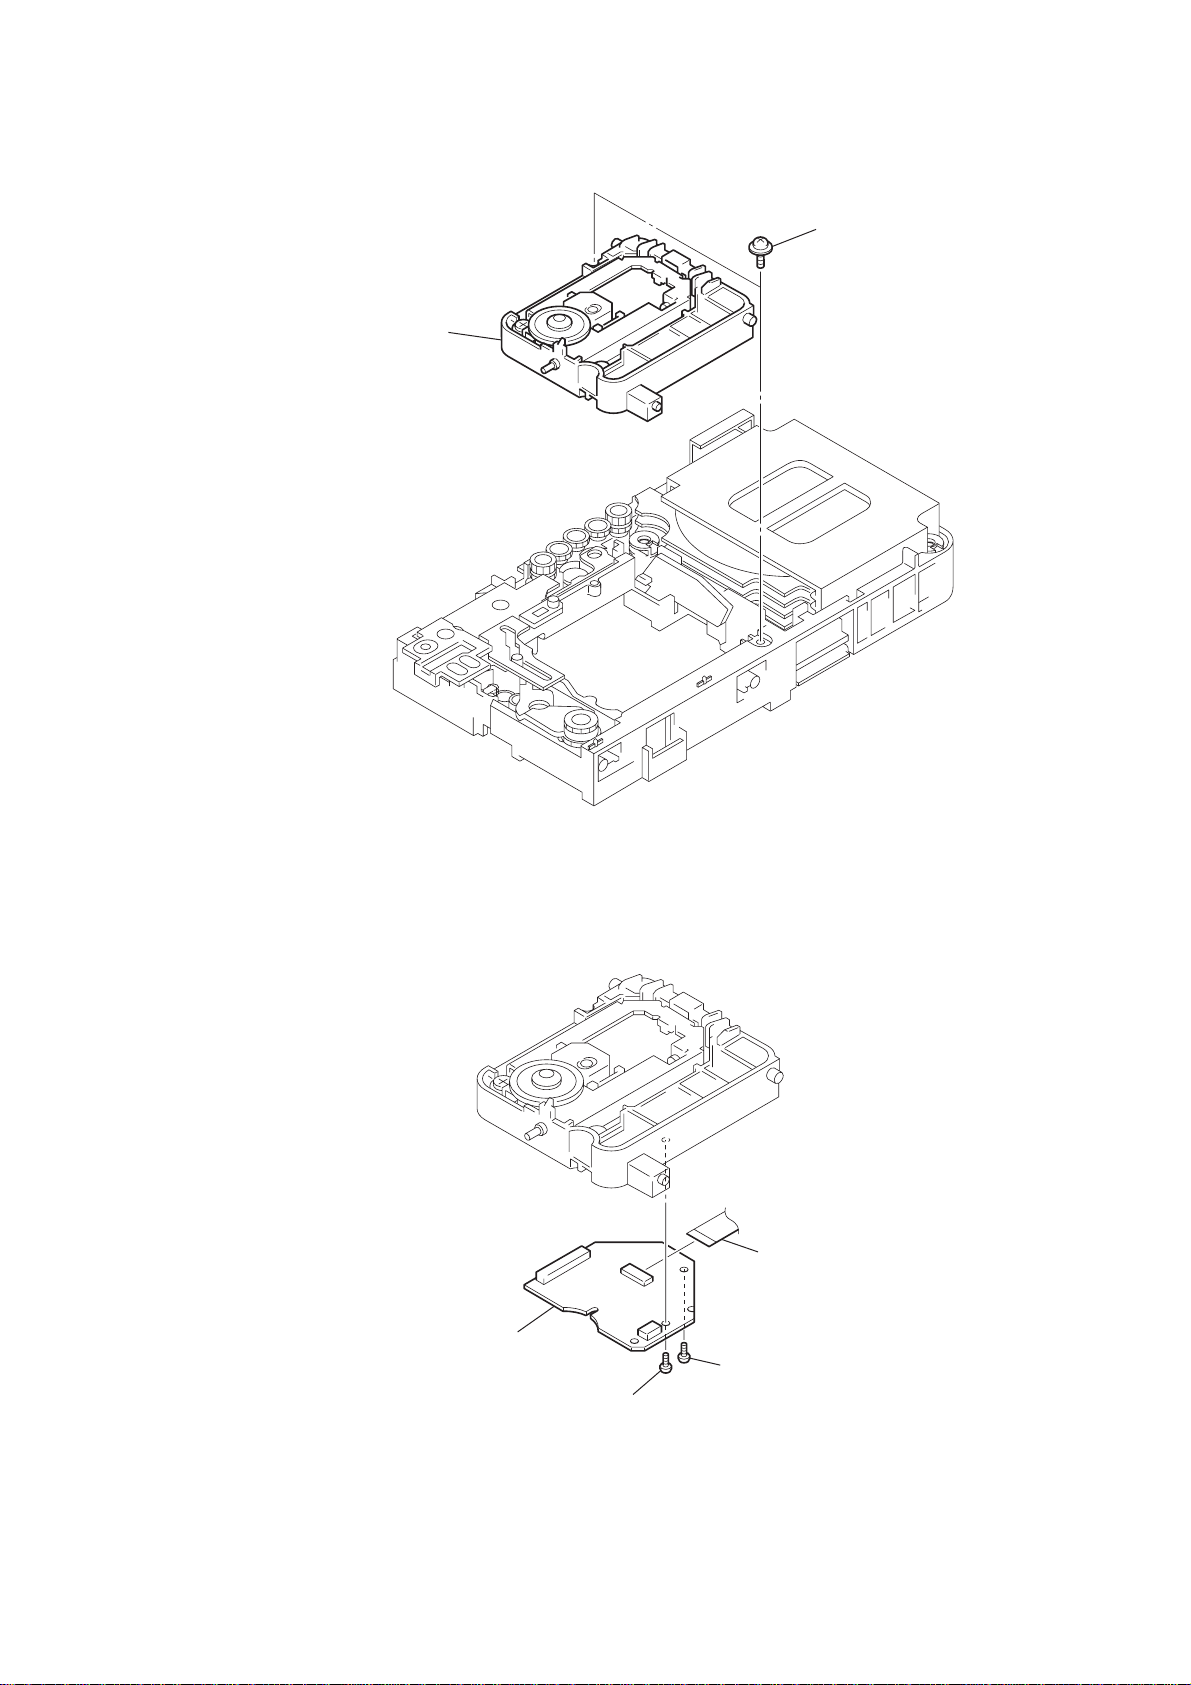
3-14. BASE UNIT (DVBU60)
s
2
base unit (DVBU60)
1
two floating
(+PTPWH2.6)
screw
HCD-NXM4D
3-15. RF BOARD
3
RF board
1
2
screw
(+BTP 2.6X6)
(+BTP 2.6X6)
4
screw
CNP101
15
Page 16
HCD-NXM4D
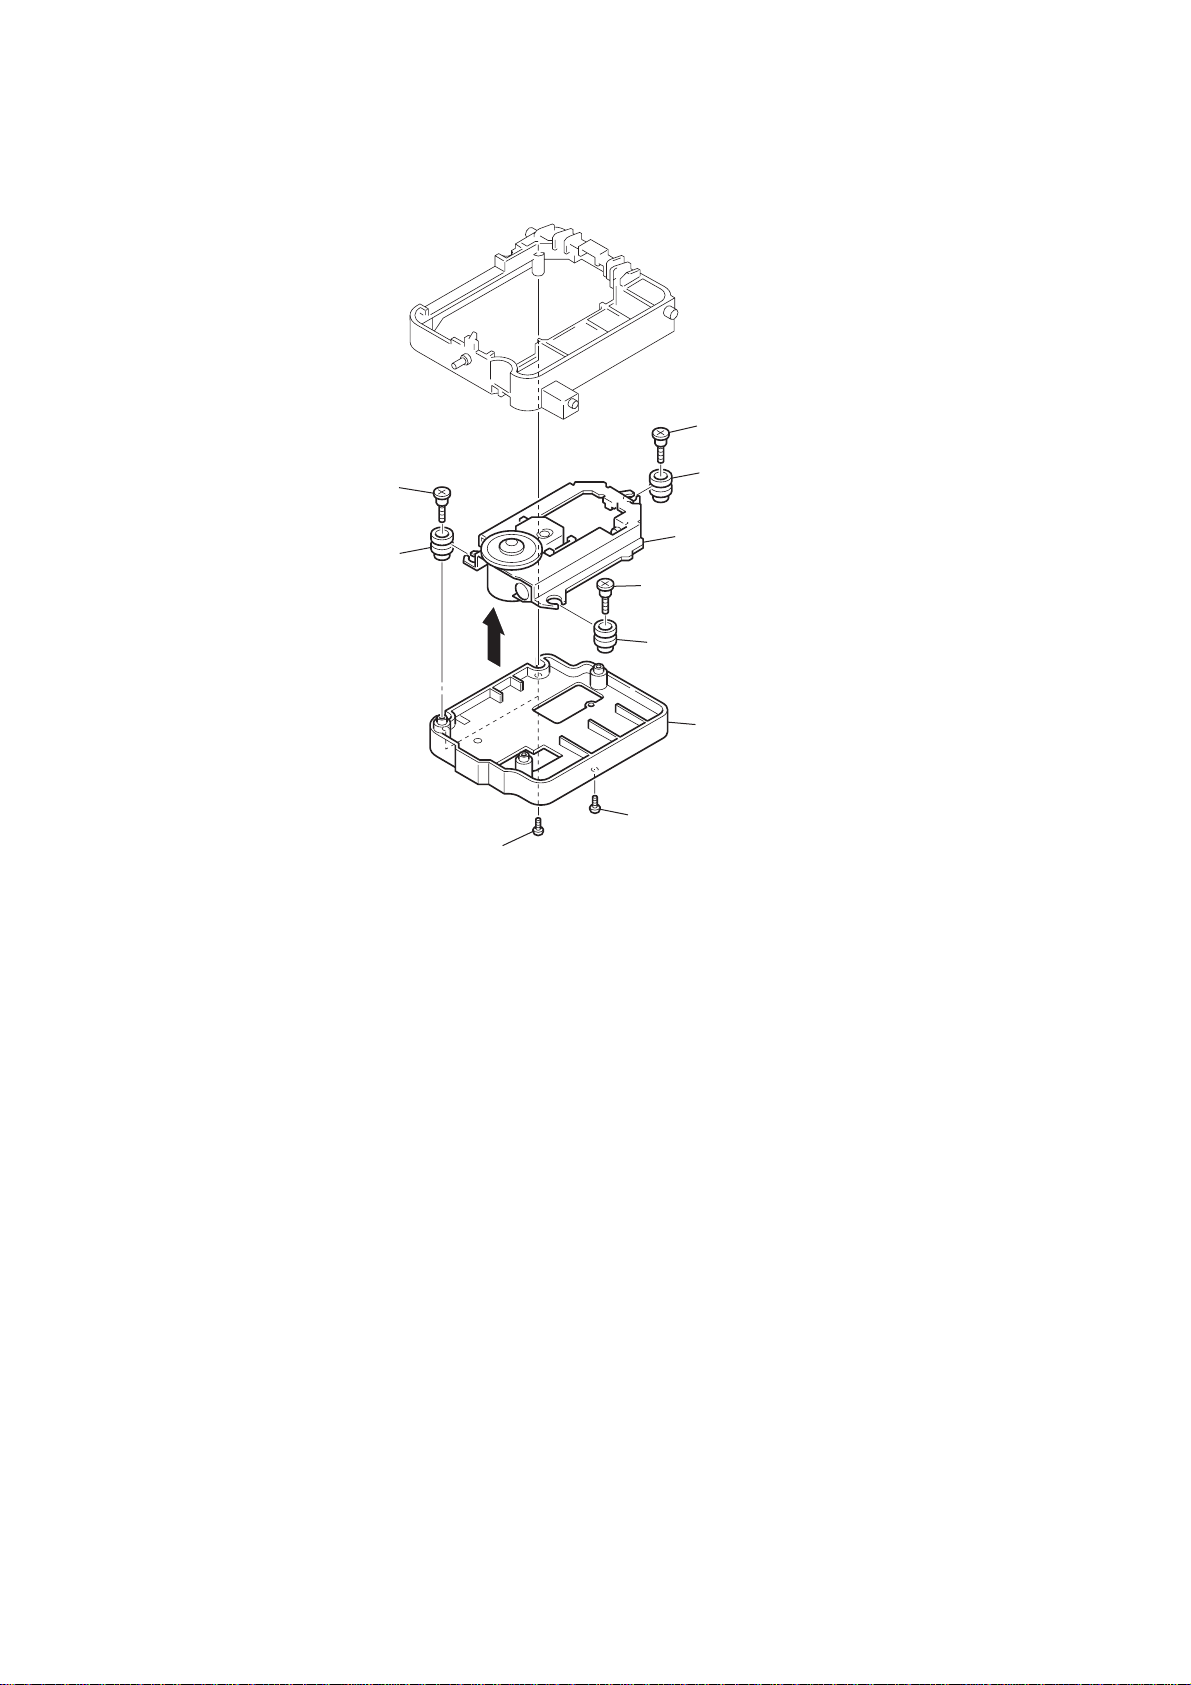
3-16. OPTICAL PICK-UP (DBU-3)
6
step
qa
insulator
screw
4
step
5
step
0
insulator
8
optical pick-up
(DBU-3)
screw
screw
2
two
screws
(+BTP 2.6
7
X8
9
insulator
3
holder (DBU1) assy
1
screw
)
(+BTP 2.6
X8
)
16
Page 17
SECTION 4
TEST MODE
HCD-NXM4D
[Change-over of AM Tuner Step between 9 kHz and 10 kHz]
•A step of AM channels can be changed over between 9 kHz
and 10 kHz.
Procedure:
1. Press
button to turn the set ON.
?/1
2. Select the function “TUNER”, and press [TUNER/BAND]
button to select the BAND “AM”.
3. Press
4. Press x button continuously, then press
button to turn the set OFF.
?/1
?/1
button. The
set will POWER on automatically, and the display of
fluorescent indicator tube changes to “AM 9 kHz step” or “AM
10 kHz step”, and thus the channel step is changed over.
[Cold Reset]
• The cold reset clears all data including preset data stored in
the RAM to initial conditions. Execute this mode when
returning the set to the customer.
Procedure:
1.
Press x button continuously, then press [DIMMER]
buttons
and
?/1
.
[Switching MD/VIDEO Functions]
Procedure:
1. Press the
2. Press the
button to turn the set ON.
?/1
button while holding the VIDEO/SAT button
?/1
depressed to toggle between “SAT” and “VIDEO.” The
selected mode is displayed.
[Aging Mode]
This mode can be used for operation check Tape deck section.
• If an error occurred:
The aging operation stops and is displayed status.
• If no error occurs:
The aging operation continues repeatedly
Aging mode in Tape Deck section
Procedure:
1. Load the tapes into the decks A and B respectively.
2. Press
button on the set ON
?/1
3. Select the function “TAPE A”
4. Press x button continuously, then press X and [TAPE A/B]
buttons. and aging mode is started.
5. To exit from the aging mode perform [Cold Reset].
[GC Test Mode]
• All fluorecent segments and LEDs are tested.
• Microprocessor virsion.
• Keyboard and jog check.
• Display check.
Procedure:
1. To enter the test mode, press x button coutinuously, then
press X and [TUNER/BAND] buttons.
2. All segments and LEDs (without STANDBY LED) are turned
on.
3. Press the [TUNING -] button to increment the microprocessor
software version.
4. Press the [TUNING -] button to change the indication for the
microprocessor software version.
3. Press the b B button to set the check mode for the entries
(KEY, JOG, etc.).
4. Press the X button to display the current VACS level.
7. Press the x button to enter the mode to check the display. If
you press this button repeatedly, the display will change
sequentially as the button is pressed.
8. Press x button coutinuously, then press X and [TUNER/BAND]
buttons.
[MC Test Mode] (Amplifier SECTION)
• This mode is used to test the function of the amplifier section.
Procedure:
1. Press
2. To enter the test mode, press x button coutinuously, then
press X and z START buttons.
button to turn the set ON.
?/1
3. Turn [VOLUME] knob to counter-clockwise, the function of
the equalizer is set to “MIN”.
4. Turn [VOLUME] knob to clockwise, the function of the
equalizer is set to “MAX”.
5. Whenever turn [SOUND MODE] knob to clockwise, the display
switches as follows.
“TONE MAX” t“TONE MIN” t“TONE FLAT”
6. Press [DSGX] button to select DBFB ON or OFF.
7. To exit from this mode, press
button to turn the set
?/1
OFF.
8. Press
9. To enter the test mode, press x button coutinuously, then
press X and z START buttons.
button to turn the set ON.
?/1
10. Select SOUND FIELD mode by turn the SOUND MODE
knob.
11. Change the speaker output by turn the SOUND SELECT knob.
• In the aging mode ,the program is executed in the following
sequence.
Step Operation Display
1 Rewind the TAPE A TAPE A AG-1
2 Rewind the TAPE B TAPE B AG-1
3 Play the TAPE A (t) (2 minute) TAPE A AG-2
4 F•F. (AMS) the TAPE A TAPE A AG-3
5 Play the TAPE A (T) (2 minute) TAPE A AG-4
6 Rewind the TAPE A TAPE A AG-5
7 Play the TAPE B (t) (2 minute) TAPE B AG-2
8 F•F.(AMS) the TAPE B TAPE B AG-3
9 Play the TAPE B (T) (2 minute) TAPE B AG-4
10 Rewind the TAPE B TAPE B AG-5
[MC Test Mode] (Tape section)
• This mode is used to test the functions of the Tape Section.
Procedure:
1. Press
2. To enter the test mode, press x button coutinuously, then
press X and z START buttons.
button to turn the set ON.
?/1
3. While holding the [DIMMER] button depressed, turn the ALC
ON.
4. Press the z START button to start REC (recording).
5. While recording, press the [TUNING +] button to perform
automatic rewind and automatic playback (for FF version).
Also, press the [TUNING -] button to perform automatic rewind
and automatic playback (for FR version).
6. Select the function “TAPE A” or “TAPE B”
17
Page 18
HCD-NXM4D
7. Press the [CD SYNC] button while “TAPE A” or “TAPE B”
is selected, to perform AMS check. “EDG[ ]” is displayed.
A number appears inside[ ].
8. To exit from this mode, press ^/1 button to turn the set OFF.
[DVD Ship Mode (LOCK) ]
• This mode moves the pick-up to the position durable to
vibration. Use this mode when returning the set to the customer
after repair.
Procedure:
1. Press ^/1 button to turn the set ON.
2. Select the function “DVD”.
3. Press x button and [DVD] button simultaneously.
4. The “STANDBY” display blinks instantaneously, and the DVD
ship mode is set.
5. To fluorescent indicator tube displays ‘‘LOCK’’.
[DVD Ship (LOCK) & COLD RESET MODE]
Procedure:
1. Press ^/1 button to turn the set ON.
2. Select the function “DVD”.
3 Press x button continuously, then press X and VIDEO/SAT
buttons.
4. The “STANDBY” display blinks instantaneously and DVD
ship mode is set.
5. To fluorescent indicator tube displays “LOCK” and the set is
reset.
[DVD Repeat 5 Times Limit Release Mode]
Procedure:
1. Press ^/1 button to turn the set ON.
2. Select the function “DVD”.
3. Press x button continuously, then press [CD SYNC]
button.
4. The message “LIMIT OFF” is displayed.
5. Press ^/1 button to the set OFF.
[DVD power -manage function]
• This mode let you switch on or off power supply to the BU
during TUNER function.
• When DVD POWER is set to OFF, the power supply to the
BU is cut off during TUNER function. It will increase the
time taken to access DVD when function change from TUNER
to DVD but it will improve tuner reception.
• When DVD POWER is set to ON, the power supply to the
BU is not cut off during TUNER function. It will reduce the
time taken to access DVD when function change from TUNER
to DVD but it will decrease tuner reception performance.
Procedure:
1. Press ^/1 button to the set ON.
2. Select the function “DVD”.
3. Press ^/1 button to turn the set OFF.
4. Press x button continuously, then press ^/1 button.The set
will POWER on automatically, and the display of fluorescent
indicator tube changes “DVD POWER OFF” or “DVD
POWER ON”.
5. Press ^/1 button to turn the set OFF.
[DISC Tray Lock]
Procedure:
1. Press ^/1 button to the set ON.
2. Select the function “DVD”.
3. Press x button continuously, then press DVD Z button for
5 seconds.
And the displays of fluorescent indicator tube changes to
“LOCKED” or “UNIOCKED”.
4. Press ^/1 button to turn the set OFF.
18
Page 19
HCD-NXM4D
DVD OSD Test Mode
[GENERAL DESCRIPTION]
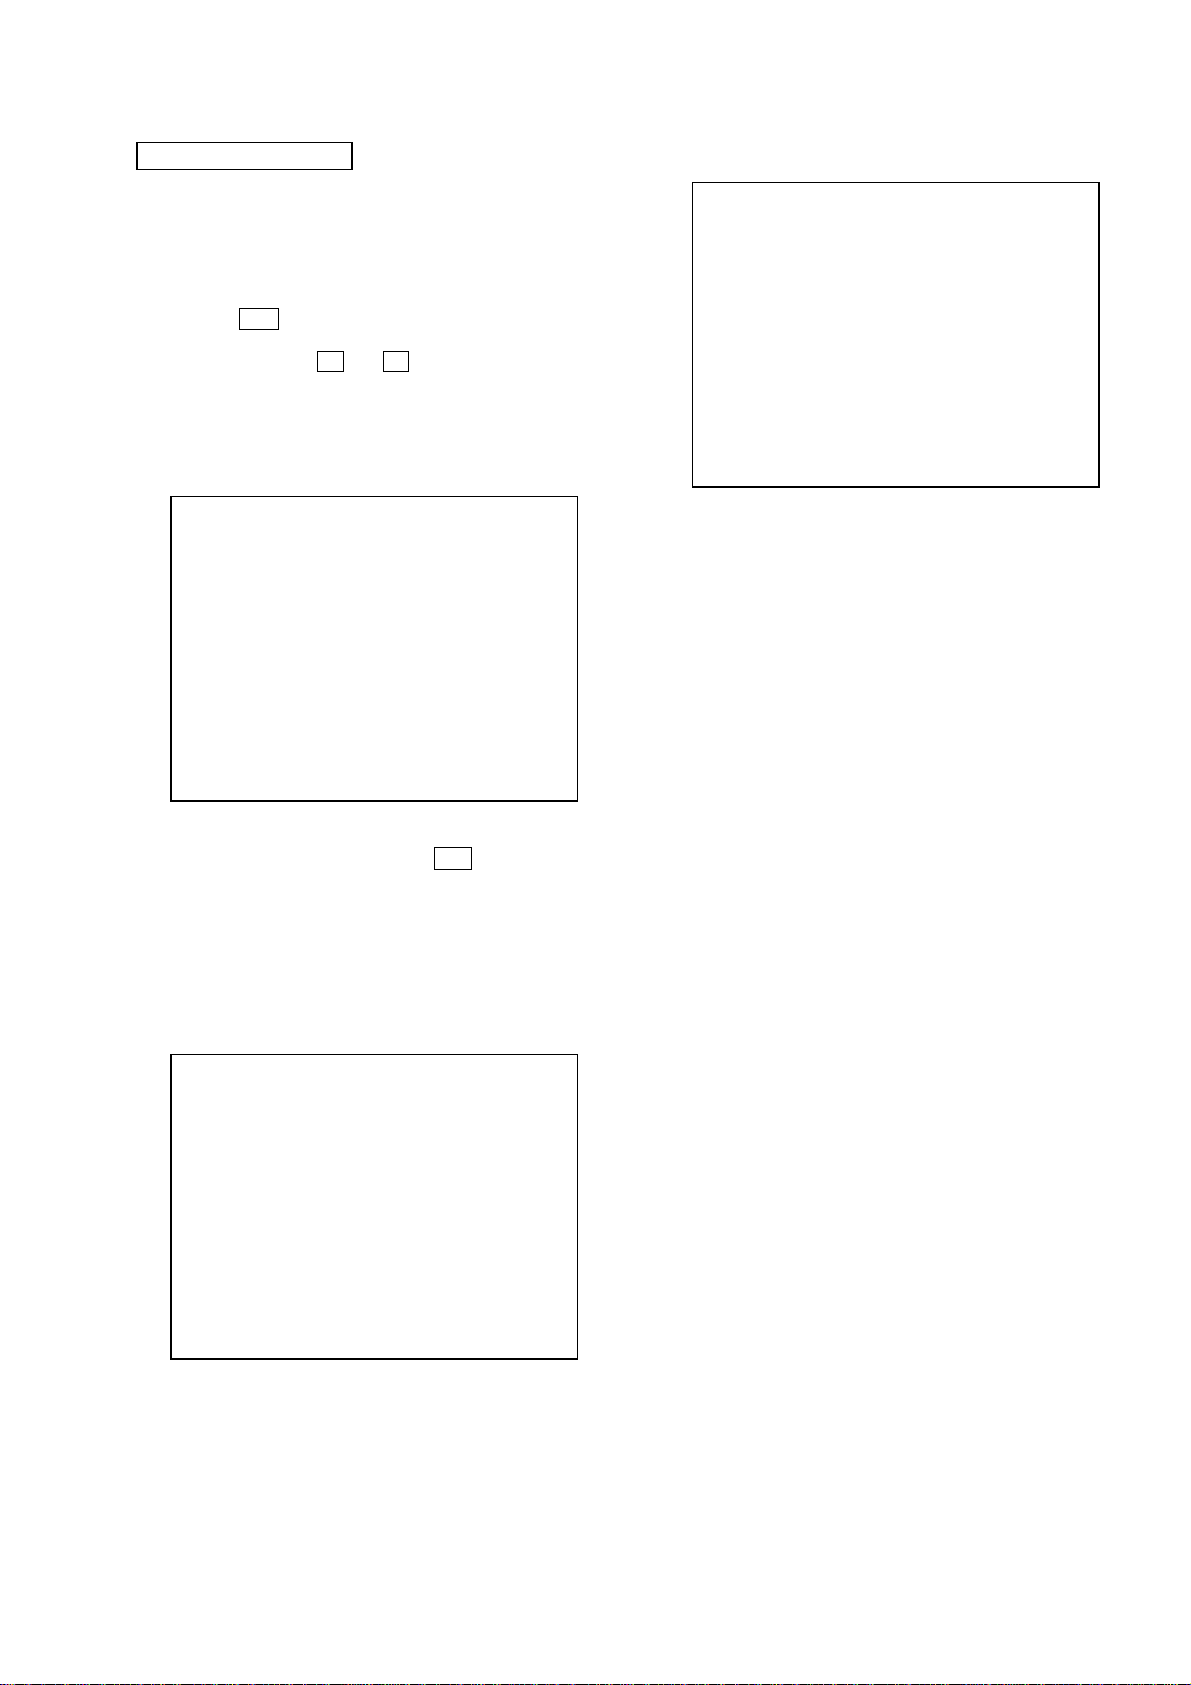
The Test Mode allows you to make diagnosis and adjustment easily
using the remote commander and monitor TV. The instructions,
diagnostic results, etc. are given on the on-screen display (OSD).
[STARTING TEST MODE]
1. Press the +/1 button to turn the power on, and set the function
to DVD.
2. While pressing the x and Z button, turn the [VOLUME]
knob clockwise to enter the test mode.
3. It displays “SERVICE IN” on the liquid crystal display, and
displays the Test Mode Menu on the monitor screen as follows.
(At the bottom of the menu screen, the model name and
revision number are displayed)
Test Mode Menu
0. Syscon Diagnosis
1. Drive Auto Adjustment
2. Drive Manual Operation
3. Mecha Aging
4. Emergency History
5. Mecha Error History
6. Version Information
7. Video Level Adjustment
Exit: POWER Key
Model :DHC-NXMxx
Revision :x.xx
4. To execute each function, select the desired menu and press
its number on the remote commander.
5. To release from test mode, press the +/1 button and turn the
power off.
[OPERATING TEST MODE]
0. SYSCON DIAGNOSIS
The same contents as board detail check by serial interface can be
checked from the remote commander operation.
On the Test Mode Menu screen, press [10/0] key on the remote
commander, and the following Check Menu will be displayed.
### Syscon Diagnosis ###
Check Menu
0. Quit
1. All
2. Version
3. EEPROM
4. GPIO
5. SD Bus
6. Video
0-0. Quit
Quit the Syscon Diagnosis and return to the Test Mode Menu.
0-1. All (All items continuous check)
This menu checks all diagnostic items continuously. Normally, all
items are checked successively one after another automatically
unless an error is found, but at a certain item that requires judgment
through a visual check to the result, the following screen is displayed
for the key entry.
• Example display
### Syscon Diagnosis ###
Diag All Check
No.2 Version
2-3. ROM Check Sum
Check Sum = xxxx
Press NEXT Key to Continue
Press PREV Key to Repeat
For the ROM Check, the check sum calculated by the Syscon is
output, and therefore you must compare it with the specified value
for confirmation.
Following the message, press the [NEXT ] button to go to the
next item, or press the [ PREV] button to repeat the same
operation again.
To quit the diagnosis and return to Check Menu screen, press the
[RETURN] key on the remote commander to display Check Menu.
• Error occurred
If an error occurred, the diagnosis is suspended and error is displayed.
Press the [RETURN] key on the remote commander to quit the
diagnosis, or press the [ PREV] button to repeat the same check
where an error occurred, or press the [NEXT ] button to continue
the check from the item next to faulty item.
General Description of Checking Method
Selecting 2 and subsequent items calls the submenu screen of each
item. And selecting 2 and subsequent items executes respective
menus and outputs the results.
For the contents of each submenu, see “Check Items List” as below.
Check Items List:
0-2. Version
0-2-1. All
0-2-2. Revision
0-2-3. ROM Check Sum
0-2-4. Model Type
0-2-5. Region
0-3. EEPROM Check
0-3-1. Sampling Check
0-3-2. Detail Check
0-4. GP I/O Check
0-5. SD Bus Check
0-6. Video Check
0-2. Version
0-2-2. Revision
The revision number of ROM (IC206) that the program
for the DVD system processor (IC207) is stored.
0-2-3. ROM Check Sum
Check sum is calculated.
(4 digits hexadecimal number)
0-2-4. Model Type
Model name is displayed. (DHC-NXMXX)
.
.
>
>
19
Page 20

HCD-NXM4D
0-2-5. Region
Model destination code is displayed. (2 digits number)
0-3. EEPROM Check
0-3-1. Sampling Check
EEPROM check at every 64 words.
It compares read data with write data of each address.
When there are discrepancies between two data, it displays
error.
0-3-2. Detail Check
EEPROM check at every 1 word.
It compares read data with write data of each address.
When there are discrepancies between two data, it displays
error.
0-4. GP I/O Check
Pull up/down setting check of the DVD system processor (IC207)
pin 150, 151 and 154 (for clock setting port).
0-5. SD Bus Check
SD bus data check between DVD decoder (IC701) and D-RAM
(IC706).
0-6. Video Check
Output the color bars for video level adjustment.
1. DRIVE AUTO ADJUSTMENT
On the Test Mode Menu screen, press the [1] key on the remote
commander, and the Adjustment Menu will be displayed.
•Use DVD reference disc unless othermise indicated.
[DVD reference disc]
• LUV-P01 (4-999-032-01) (CD)
•TDV-540C (J-2501-235-A) (DVD-DL)
• TDV-520CSO (J-2501-236-A) (DVD-SL)
## Drive Auto Adjustment ##
Adjustment Menu
Note: During adjustment of each disc, the measurement for disc type judg-
ment is made. As automatic adjustment does not judge the disc
type unlike conventional models, take care not to insert wrong type
discs. Also, do not give a shock during adjustment.
1-1. DVD-SL (single layer)
Press the [1] key on the remote commander and insert a DVD single
layer disc following the message. Then the adjustment will be made
through the steps below, then adjusted values will be written to the
EEPROM.
DVD Single Layer Disc Adjustment Steps:
1. Sled reset
2. Disc check memory SL
3. Wait 300 msec
4. Set disc type SL
5. LD on
6. Spindle start
7. Wait 1 sec
8. Focus servo on 0
9. Auto track offset adjust
10. CLVA on
11.Wait 500 msec
12. Tracking on
13. Wait 1 sec
14. Sled on
15. Check CLV on
16. Auto focus offset adjust
17. Auto focus gain adjust
18. Auto focus offset adjust
19. EQ boost adjust
20. Auto track gain adjust
21. All servo stop
22. EEP copy loop filter offset
1-2. CD
Press the [2] key on the remote commander and insert a CD disc
following the message. Then the adjustment will be made through
the steps below, then adjusted values will be written to the EEPROM.
0. ALL
1. DVD-SL
2. CD
3. DVD-DL
Exit: RETURN
Normally, [10/0] is selected to adjust DVD (single layer), CD and
DVD (dual layer) in this order. But, individual items can be adjusted
for the case where adjustment is suspended due to an error. In this
mode, the adjustment can be made easily through the operation
following the message displayed on the screen.
The disc used for adjustment must be the one specified for
adjustment.
1-0. ALL
Press the [10/0] key on the remote commander, and the servo set
data in EEPROM will be initialized. Then, 1. DVD-SL disc, 2. CD
disc and 3. DVD-DL disc are adjusted in this order.
Each time one disc was adjusted, it is ejected. Replace it with the
specified disc following the message. You can finish the adjustment
by pressing the [RETURN] button on the remote commander.
CD Adjustment Steps
1. Sled tilt rest
2. Disc check memory CD
3. Wait 500 msec
4. Set disc type CD
5. LD on
6. Spindle start
7. Wait 500 msec
8. Focus servo on 0
9. Auto track offset adjust
10. CLVA on
11.Wait 500 msec
12. Tracking on
13. (TC display start)
14. Wait 1 sec
15. Sled ON
16. Check CLV on
17. Auto focus offset adjust
18. Auto focus gain adjust
19. Auto focus offset adjust
20. EQ boost adjust
21. Auto track gain adjust
22. All servo stop
20
Page 21
HCD-NXM4D
1-3. DVD-DL (dual layer)
Press the [3] key on the remote commander and insert a DVD dual
layer disc following the message. Then the adjustment will be made
through the steps below, then adjusted values will be written to the
EEPROM.
DVD Dual Layer Disc Adjustment Steps:
1. Sled tilt reset
2. Disc check memory DL
3. Wait 500 msec
4. Set disc type DL
5. LD on
6. Spindle start
7. Wait 1 sec
Layer 1 Adjust
8. Focus servo on 0
9. Auto track offset adjust
10. CLVA on
11.Wait 500 msec
12. Tracking on
13. Wait 500 msec
14. Sled on
15. Check CLV lock
16. Auto loop filter offset adjust, Auto focus adjust
17. Auto focus gain adjust
18. Auto focus offset adjust
19. EQ boost adjust
20. Auto loop filter offset adjust
21. Auto Track Gain Adjust
Layer 0 Adjust
22. Focus jump (L1 t L0)
23. Auto track offset adjust L0
24. CLVA on
25. Wait 500 msec
26. Tracking on
27. Wait 500 msec
28. Sled on
29. Check CLV lock
30. Auto Focus Adjust
31. Auto focus gain adjust
32. Auto focus offset adjust
33. EQ boost adjust
34. Auto track gain adjust
35. All servo stop
2. DRIVE MANUAL OPERATION
Note: This mode is used for design, and not used in service fundamen-
tally.
In using the manual operation menu, take care of the following
points. These commands do not provide protection, thus requiring
correct operation. The sector address or time code field is displayed
when a disc is loaded.
Note:
1. Set correctly the disc type to be used on the Disc Type
screen.
2. In case of an alarm, immediately press the x button to
stop the servo operation, and press the +/1 button to
turn the power off.
Basic operation:
(controllable from front panel or remote commander)
+/1 : Power OFF (release the Test Mode)
x : Servo stop
Z : Stop and eject/Loading
[RETURN] : Return to Operation Menu or Test
[ PREV], [NEXT ] : Transition between sub modes of menu
.
[1] to [9], [10/0] : Selection of menu items
Cursor o/O : Increase/Decrease in manually
>
Mode Menu
adjusted value
2-1. Disc Type
Disc Type
Disc Type Select
1. Disc Type Auto Check
2. Set Disc Type DVD
3. Set Disc Type CD
4. Set Disc Type Hybrid
Exit: RETURN
2-1-1. Disc Type Auto Check
1) Press the [1] key on the remote commander to display the Disc
Type Auto Check screen.
2) Insert a disc and press the [ENTER] key on the remote
commander.
3) It judges the type of inserted disc automatically and displays
the disc type and so on as below.
On the Test Mode Menu screen, press the [2] key on the remote
commander, and the Operation Menu will be displayed. For the
manual operation, each servo on/off control and adjustment can be
executed manually.
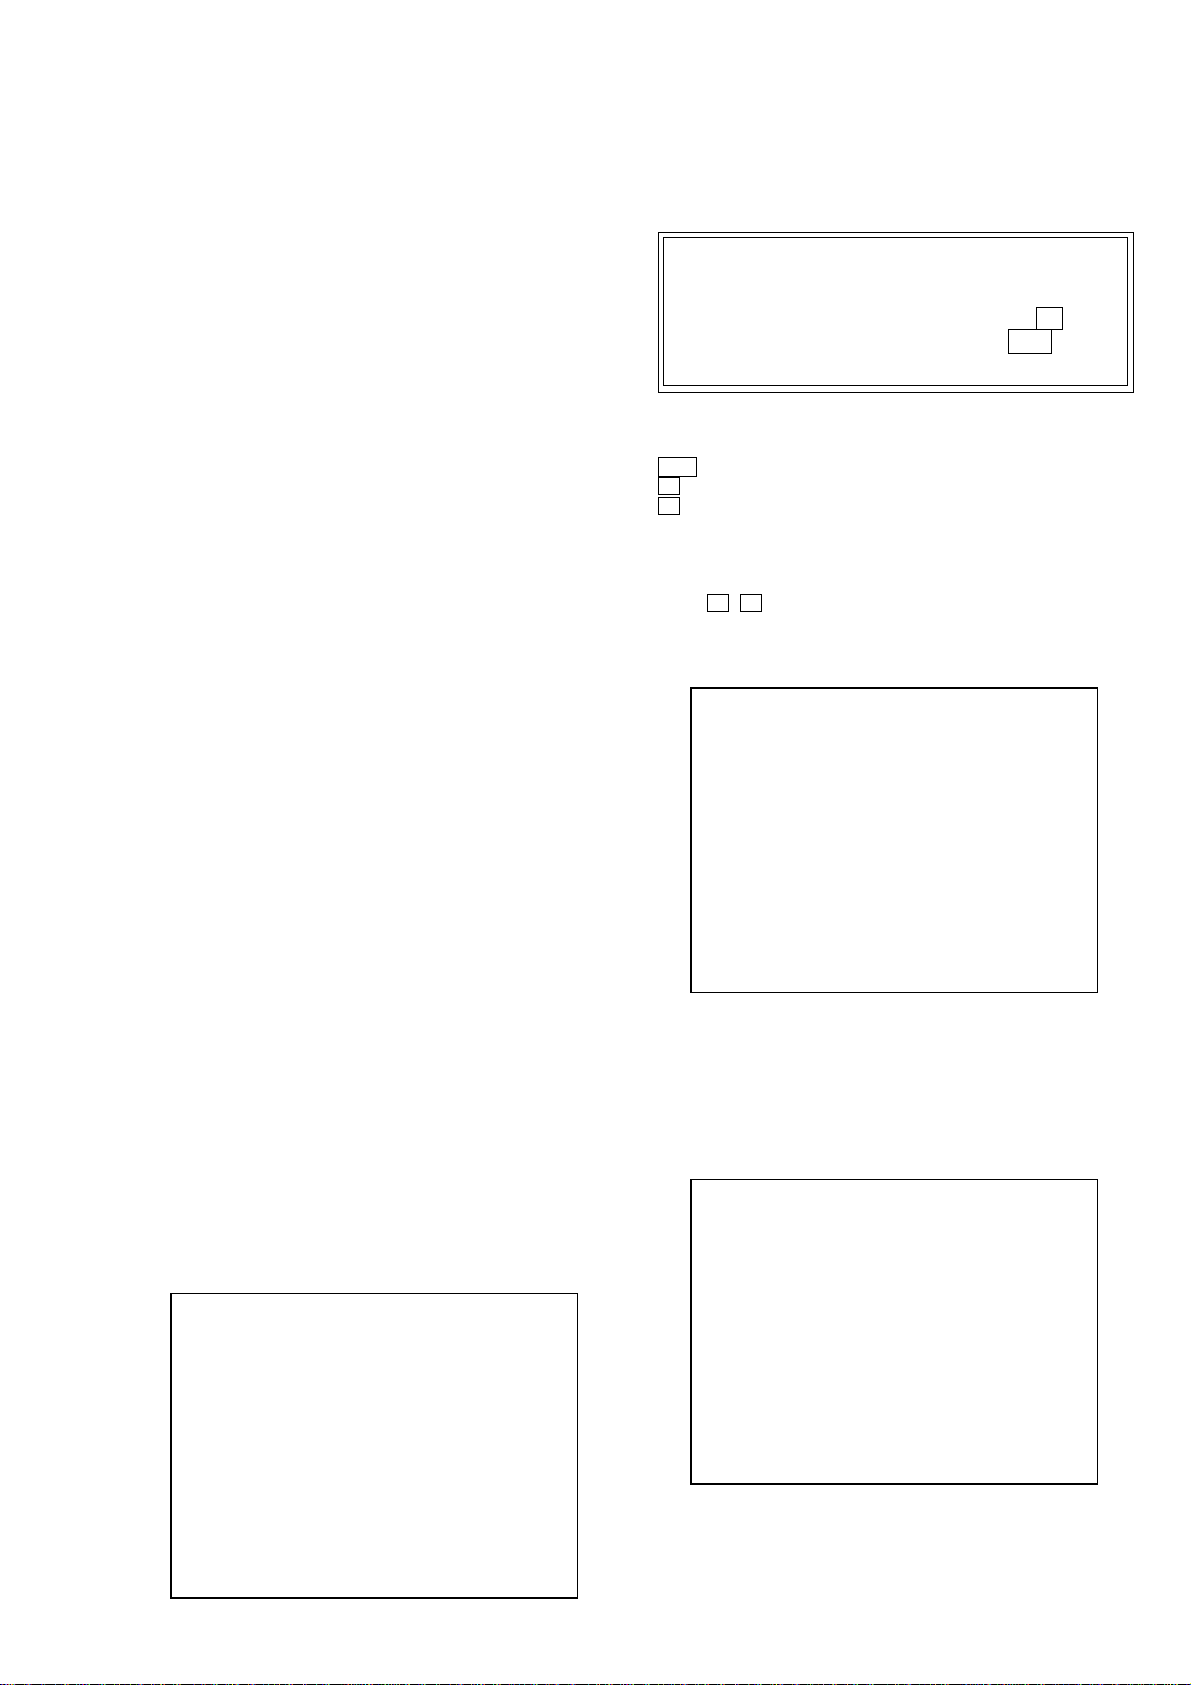
## Drive Manual Operation ##
Operation Menu
1. Disc Type
2. Servo Control
3. Track/Layer Jump
4. Non EEPROM Write Adjust
5. EEPROM Write Adjust
6. Memory Check
7. Disc Check Memory
8. Error Rate Display
9. SACD Water Mark
Exit: RETURN
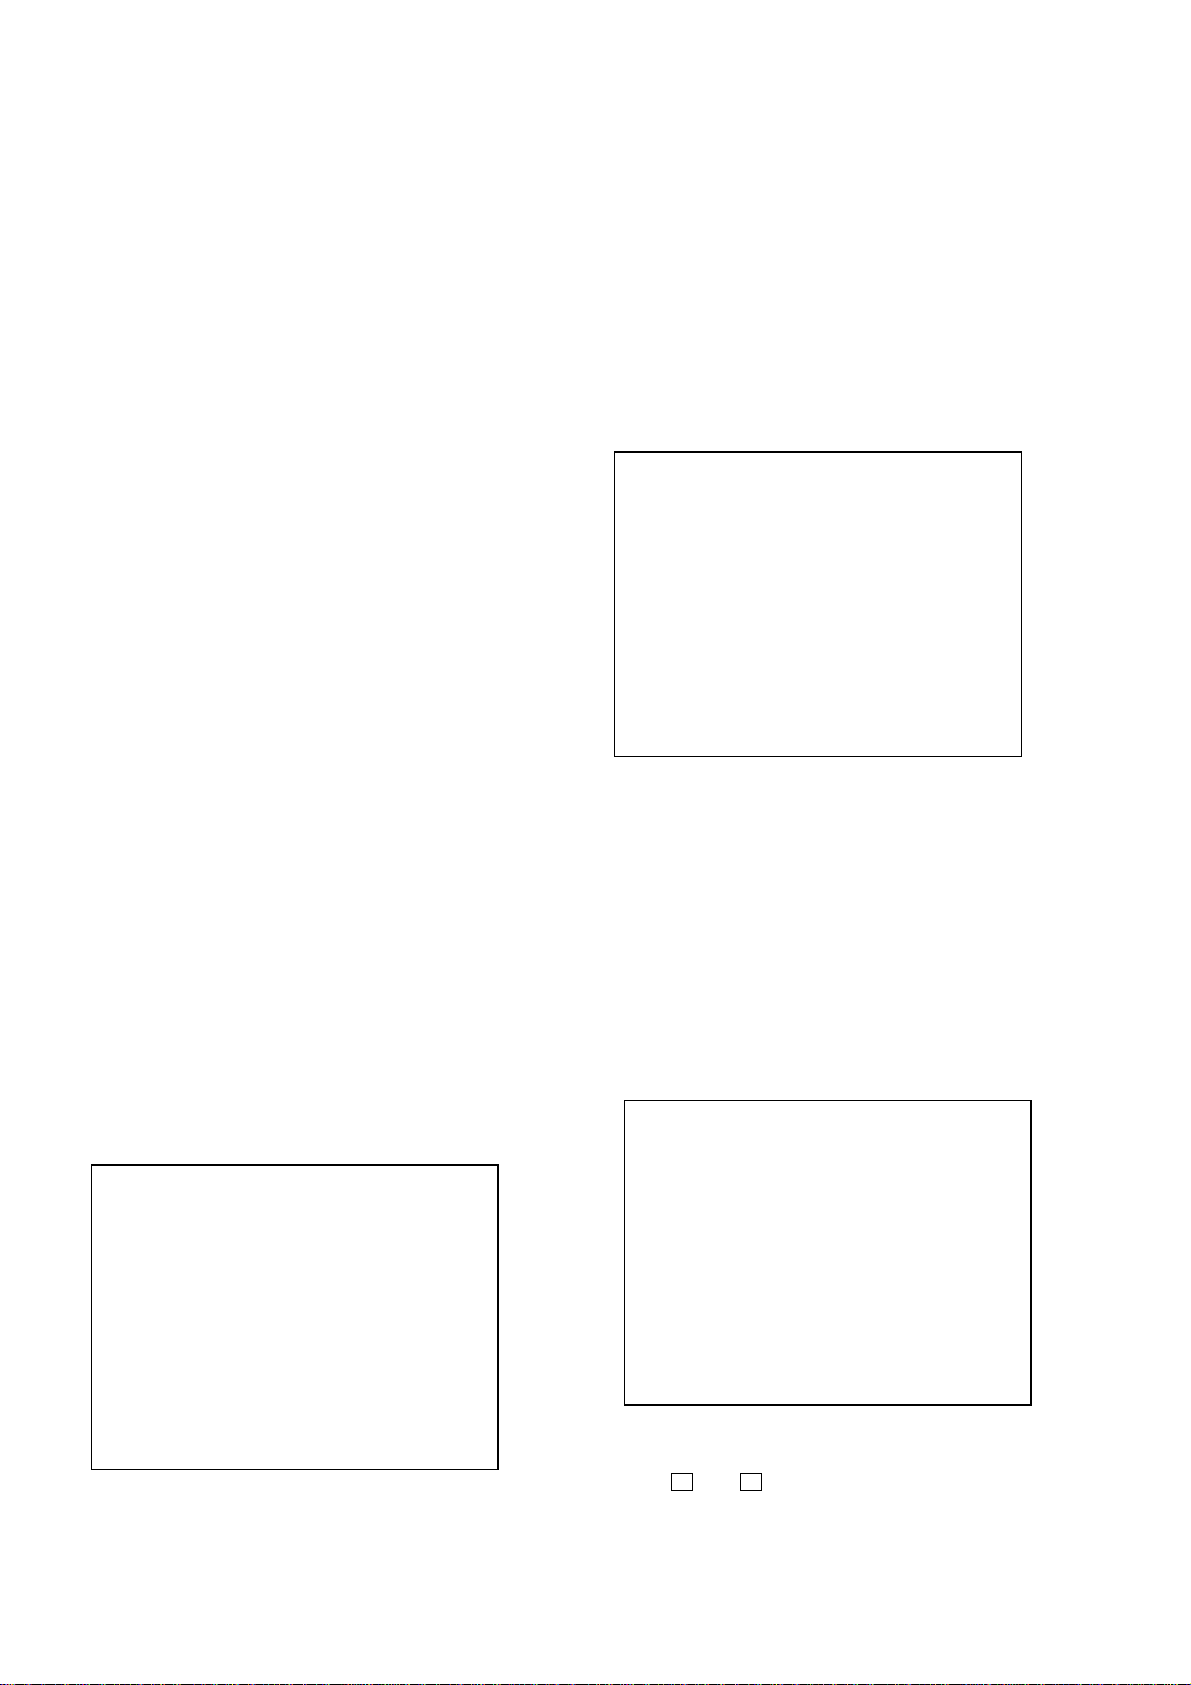
Disc Type Auto Check
Disc Type xx
Layer xx
Mirr Time xx
Mirr Count xx
FZC Count xx
PI Reference xx
PI Peak xx
ENTER.Execute
Exit: RETURN
Disc Type : CD, DVD or Hybrid (SACD)
Layer : SINGLE, DUAL or HYBRID
Mirr Time : Mirror time of between disc surface and record
surface when disc type judgment. (hexadecimal
number)
21
Page 22
HCD-NXM4D
Mirr Count : The number of times which mirror
counts between disc surface and record
surface when disc type judging.
FZC Count : The number of times which focus zero
cross points of each layer when lens
down.
PI Reference : The average of PI reference voltage.
(hexadecimal number)
PI Peak : PI peak level voltage. It performs only
when disc type judgment is successful.
(hexadecimal number)
2-1-2. Disc Type DVD
It sets up so that it may judge as a disc type of specification of the
disc with which the set was inserted.
[1]: DVD single layer disc (12 cm)
[2]: DVD dual layer disc (0 layer, 12 cm)
[3]: DVD dual layer disc (1 layer, 12 cm)
[4]: DVD-RW disc (12 cm)
[5]: DVD single layer disc (8 cm)
[6]: DVD dual layer disc (0 layer, 8 cm)
[7]: DVD dual layer disc (1 layer, 8 cm)
[8]: DVD-RW disc (8 cm)
2-1-3. Disc Type CD
It sets up so that it may judge as a disc type of specification of the
disc with which the set was inserted.
[1]: CD disc (normal speed, 12 cm)
[2]: CD disc (double speed, 12 cm)
[3]: CD disc (normal speed, 8 cm)
[4]: CD disc (double speed, 8 cm)
[5]: CD-RW disc (normal speed, 12 cm)
[6]: CD-RW disc (double speed, 12 cm)
[7]: CD-RW disc (normal speed, 8 cm)
[8]: CD-RW disc (double speed, 8 cm)
2-1-4. Disc Type Hybrid
It sets up so that it may judge as a disc type of specification of the
disc with which the set was inserted.
[1]: SACD Hybrid disc (SACD layer, 12 cm)
[2]: SACD Hybrid disc (CD layer, normal speed, 12 cm)
[3]: SACD Hybrid disc (CD layer, double speed, 12 cm)
[4]: SACD Hybrid disc (SACD layer, 8 cm)
[5]: SACD Hybrid disc (CD layer, normal speed, 8 cm)
[6]: SACD Hybrid disc (CD layer, double speed, 8 cm)
[1] LD : Turn on/off the laser.
[2] Focus : Search the focus and turn on the focus.
[3] SPDL : Turn on/off the spindle.
[4] CLVA : Turn on/off normal servo of spindle servo.
[5] Trk. : Turn on/off the tracking servo.
[6] Sled : Turn on/off the sled servo.
[7] FCS. Srch : Turn on/off the focus search.
[10/1] : All servo off.
[R] Sled FWD (right cursor) : Move the sled forward.
[L] Sled REV (left cursor) : Move the sled reverse.
[U] Sled FWD (up cursor) : Reset the sled.
[D] Sled REV (down cursor) : Limit in the sled.
2-3. Track/Layer Jump
Track/Layer Jump
1. 1Tj FWD
2. 1Tj REV
3.500Tj Fine FWD
4.500Tj Fine REV
5.10kTj Dirc FWD
6.10kTj Dirc REV
7.20kTj Dirc FWD
8.20kTj Dirc REV
0. All Servo Off
Exit: RETURN
On this screen, track jump, etc. can be performed. Only for the DVD
dual layer disc, the focus jump and layer jump are displayed in the
right field
[1] 1Tj FWD : 1 track jump forward.
[2] 1Tj REV : 1 track jump reverse.
[3] 500Tj FWD : 500 track jump (fine search)forward.
[4] 500Tj REV : 500 track jump (fine search) reverse.
[5] 10kTj FWD : 10k track jump (direct search) forward.
[6] 10kTj REV : 10k track jump (direct search) reverse.
[7] 20kTj FWD : 20k track jump (direct search) forward.
[8] 20kTj REV : 20k track jump (direct search) reverse.
[10/0] : All servo off.
2-4. Non EEPROM Write Adjust
2-2. Servo Control
Note: Be sure to perform the disc type setup before performing this item.
Servo Control
1.LD off R.Sled FWD
2.Focus off L.Sled REV
3.SPDL off U.Sled Reset
4.CLVA off D.Sled Limit
5.Trk. off
6.Sled off
7.Fcs.Srch off
0.All Servo Off
Exit: RETURN
On this screen, the servo on/off control necessary for replay is
executed. Normally, turn on each servo from 1 sequentially and
when CLVA is turned on, the usual trace mode becomes active. In
the trace mode, DVD sector address or CD time code is displayed.
This is not displayed where the spindle is not locked.
The spindle could run overriding the control if the spindle system is
faulty or RF is not present. In such a case, do not operate CLVA.
22
Non EEPROM Write Adjust
1. Focus Offset
2. Focus Gain
3. Trk. Offset Coarse
4. Trk. Offset Fine
5. Trk. Gain
6. EQ Boost
0.All Servo Off
Exit: RETURN
On this screen, each item can be adjusted manually. Select the desired
number [1] to [10/0] from the remote commander, and current setting for
the selected item will be displayed, then increase or decrease numeric
value with the O key or o key. If CLV has been applied, the jitter is
displayed for reference for the adjustment.
Page 23
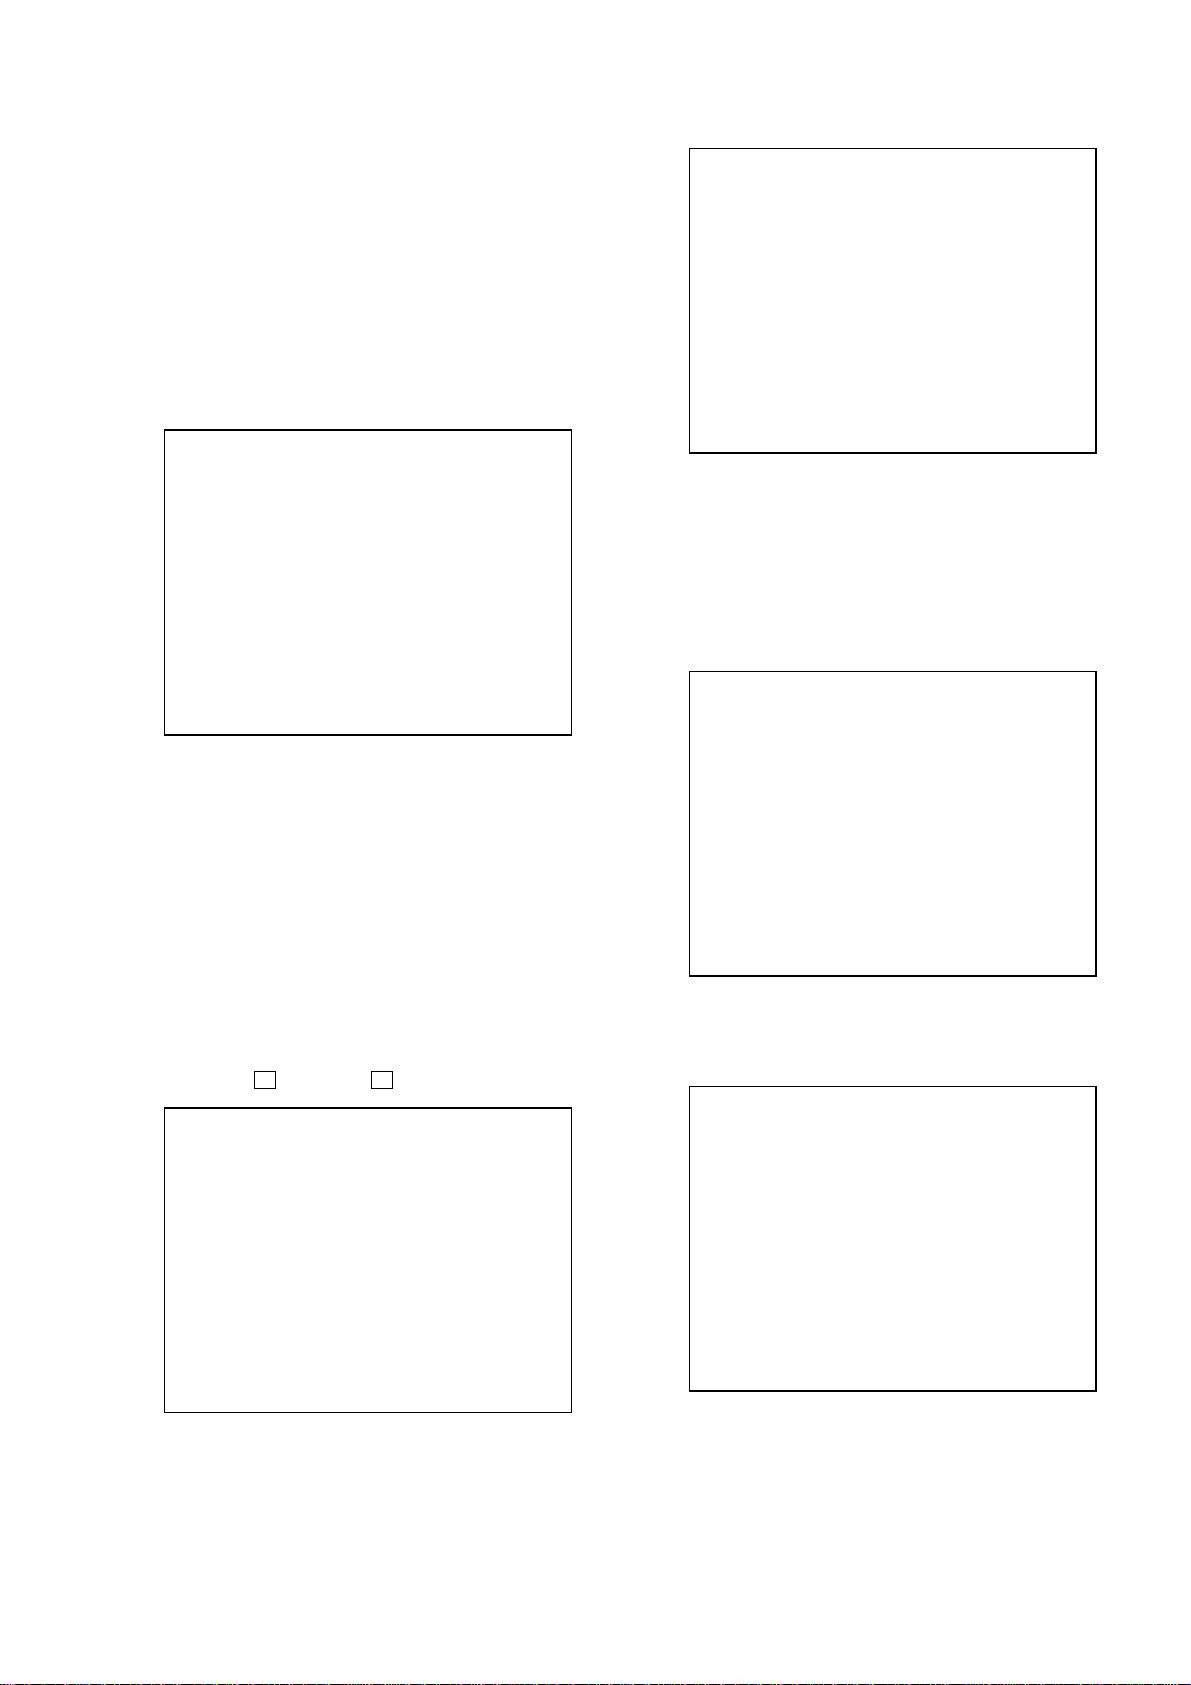
[1] Focus Offset : Adjusts focus offset.
[2] Focus Gain : Adjusts focus gain.
[3] TRK. Offset coares :
Adjusts tracking offset of the RF amp
(IC001) side.
[4] TRK. Offset fine :
Adjusts tracking offset of the DSP (IC401)
side.
[5] TRK. Gain : Adjusts track gain.
[6] EQ Boost : Adjusts amount of boost of equalizer.
[10/0] : All servo off.
2-5. EEPROM Write Adjust
EEPROM Write Adjust
1. Focus Offset
2. Focus Gain
3. Trk. Offset Coarse
4. ——————
5. Trk. Gain
6. EQ Boost
HCD-NXM4D
EEPROM Data 2/2 CDRW DVDRW
Focus Gain xx xx
Trk. Gain xx xx
Focus Offset xx xx
Trk. Offset xx xx
EQ. Boost xx xx
Prev:UP Default:CLR Exit:RET
On this screen, current servo adjusted data stored in the EEPROM
are displayed. The adjusted data are initialized by pressing the
[CLEAR] key, but be careful that they are not recoverable after
initialization.
Before clearing the adjusted data, make a note of the set data. This
screen will also appear if [0]-All is selected in the Drive Auto
Adjustment. In this case, default setting cannot be made.
0.All Servo Off
Exit: RETURN
On this screen, each item can be adjusted automatically. Select the
desired number [1] to [10/0] from the remote commander, and
selected item is adjusted automatically.
[1] Focus Offset : Adjusts focus offset.
[2] Focus Gain : Adjusts focus gain.
[3] TRK. Offset coarse :
Adjusts tracking offset of the RF amp
(IC001) side.
[5] TRK. Gain : Adjusts track gain.
[6] EQ Boost : Adjusts amount of boost of equalizer.
[10/0] : All servo off.
2-6. Memory Check
Display images are shown as follows, and all two screens are able
to switch by the O key (UP) or o key (DW).
EEPROM Data 1/2 CD SL L0 L1
Focus Gain xx xx xx xx
Trk. Gain xx xx xx xx
Focus Offset xx xx xx xx
Trk. Offset xx xx xx xx
EQ. Boost xx xx xx xx
PI Level xx xx -- -Fcs. Balance -- xx -- -Jitter xx xx xx xx
Mirror Time xx xx xx -FE Level -- xx -- -Traverse Lv1. -- xx -- -Next:DW Default:CLR Exit:RET
2-7. Disc Check Memory
Disc Check Memory
1. SL Disc check
2. CD Disc check
3. DL Disc check
Exit: RETURN
On this screen, measure the mirror time of chucked disc, and write
to the EEPROM.
2-8. Error Rate Display
Error Rate Display
UC CR Address
PI1 Err Now xx xxxx xxxxxxxx
Max xx xxxx xxxxxxxx
Avg xx xxxx
PI2 Err Now xx xxxx xxxxxxxx
Max xx xxxx xxxxxxxx
Avg xx xxxx
PO Err Now xx xxxx xxxxxxxx
Max xx xxxx xxxxxxxx
Avg xx xxxx
START: ENTER STOP: RETURN
On this screen, measure and display the error rate.
UC : Incorrect value
CR : Correct value
Add : Address
23
Page 24
HCD-NXM4D
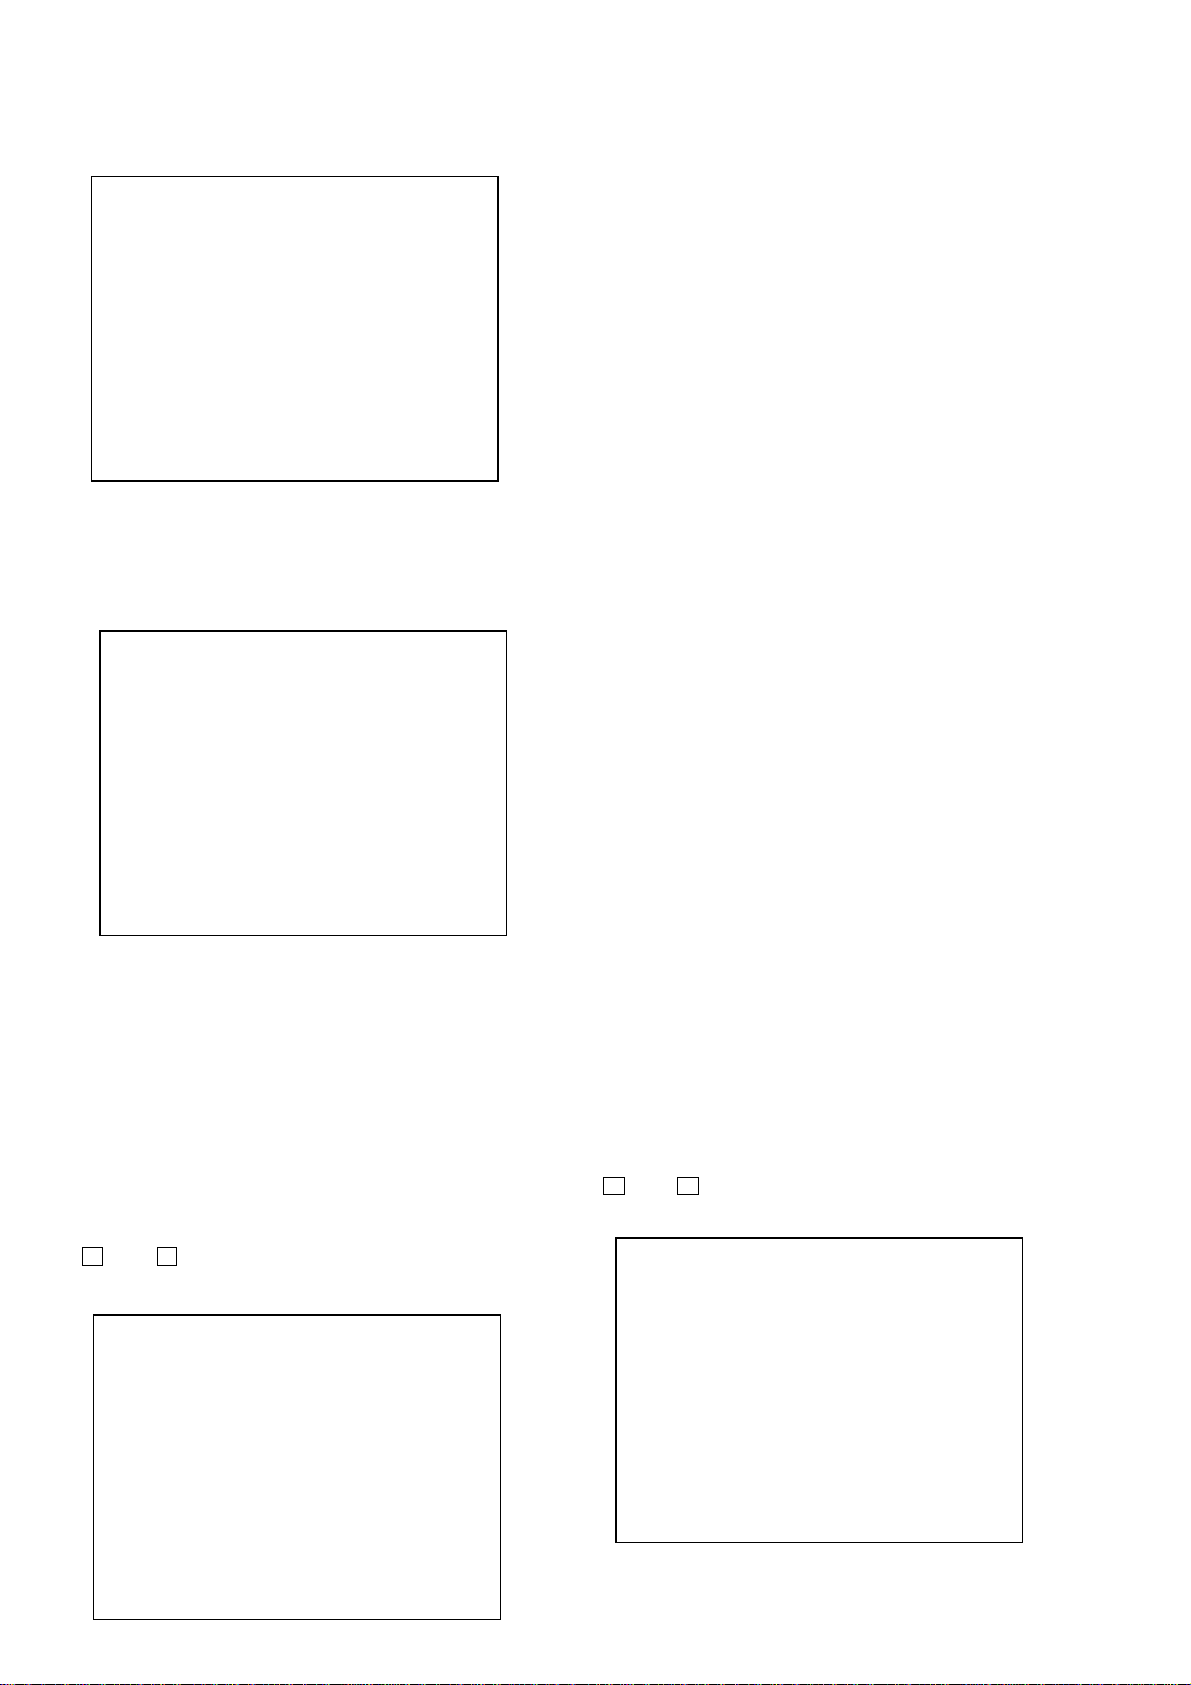
2-9. SACD Water Mark Check (Not used)
SACD Water Mark Check
PSP AMP
PSN
Adjust Error Failed
Start: ENTER Stop: RETURN
On this screen, measure the PSP AMP value and PSN value of SACD
water mark.
3. MECHA AGING
On the Test Mode Menu screen, selecting [3] executes the aging of
the mechanism deck.
## Aging Test MENU ##
Pls use over 40min. CD
**
1. Open/Close Test
1) On the Aging Test MENU screen, press the [1] key on the
remote commander to display the Open/Close Test screen.
2) Insert discs and press the [ENTER] key on the remote
commander.
3) Is starts the aging.
During aging, the disc number, operating status and repeat
cycle are displayed. Aging can be aborted at any time by
pressing the [RETURN] key. After the operation is stopped,
press the [RETURN] key to return to the Aging Test MENU.
Operation Menu
Exit: RETURN
**
4. EMERGENCY HISTORY
On the Test Mode Menu screen, selecting [4] displays the
information such as servo emergency history.
The history information from last 1 up to 10 can be scrolled with
the O key or o key. Also, specific information can be displayed
by directly entering that number with ten keys.
### EMG. History ###
Laser Hours CD xxxxhxxm
DVD xxxxhxxm
a. bb xx xx xx xx xx xx xx
xx xx xx xx xx xx xx xx
a. bb xx xx xx xx xx xx xx
xx xx xx xx xx xx xx xx
xxxxhxxm : The laser on total hours. Data below
minutes are omitted.
a. : Error number.
bb : Error code.
xx : Not used.
• Clearing History Information
Clearing laser hours:
Press the [DVD DISPLAY] and [CLEAR] keys in this order.
Then both CD and DVD data are cleared.
Clearing emergency history:
Press the [DVD TOP MENU] and [CLEAR] keys in this order.
Initializing set up data:
Press [DVD MENU] and [CLEAR] keys in this order.
The data have been initialized when “EEPROM Initialize
Finished” message is displayed.
• Code list of Emergency History
10 : Communication to RF AMP (IC001) failed.
11 : Each servo for focus, tracking, and spindle is unlocked.
12 : Check sum error of EEPROM (IC204).
14 : Communication to servo DSP (IC509) failed, or servo
DSP (IC509) is faulty.
15 : Communication to DVD decoder (IC701) failed, or DVD
decoder (IC701) is faulty.
16 : Communication to DSD decoder (IC801) failed, or DSD
decoder (IC801) is faulty. (Not used)
20 : Initialization of sled servo failed. It is not placed in the
initial position.
23 : Sled servo operation error.
24 : Made a request to move the sled servo to wrong position.
30 : Tracking balance adjustment error.
31 : Tracking gain adjustment error.
33 : Focus bias adjustment error.
34 : Focus gain adjustment error.
35 : Equalizer adjustment error.
40 : Focus servo does not operate.
41 : With a DVD dual layer disc, focus jump failed.
50 : CLV (spindle) servo does not operate.
51 : Spindle does not stop.
60 : Made a request to seek nonexistent address.
61 : Seek error of retry more than regulated times.
70 : Control data could not be read.
80 : Disc reading failed.
5. MECHA ERROR HISTORY
On the Test Mode Menu screen, selecting [5] displays the
information of mechanism deck error history.
The history information from last 1 up to 8 can be scrolled with
the O key or o key.
### Mecha Error History ###
1. xx xx xx xx xx xx xx xx
2. xx xx xx xx xx xx xx xx
3. xx xx xx xx xx xx xx xx
4. xx xx xx xx xx xx xx xx
5. xx xx xx xx xx xx xx xx
6. xx xx xx xx xx xx xx xx
7. xx xx xx xx xx xx xx xx
8. xx xx xx xx xx xx xx xx
Scroll:UP/DOWN
(1.Latest Err.) Exit: RETURN
Select:1-9 Scroll:UP/DOWN
(1.Latest EMG.) Exit: RETURN
24
Page 25

HCD-NXM4D
aa: Initialization is completed or not.
FF : Complete.
other number : Not complete.
bb: Operating status of mechanism deck at an error occurred.
(lod sq jcp)
00 : Initializing.
10 to 15 : Open operating.
16 to 19 : Kicking cause open failed.
1A to 1F : Open operating.
20 to 27 : Complete the open operation.
28 : No disc and complete the open operation.
29 to 2F : Complete the open operation.
30 to 3F : Close requesting.
40 to 4F : Open requesting.
50 to 5F : Close operating.
60 to 6F : Complete the chucking operation.
80 to 8F : Complete the release operation.
(BU is home position)
90 to 9F : BU down operating.
A0 to AF : Opening/closing the shutter. Or stationary state
in open/close the shutter is enablement.
B0 to BF : BU up requesting.
C0 to CF : BU down requesting.
D0 to DF : BU upping.
E0 to EF : No disc checking in disc loading.
cc : Operating status of table at an error occurred.
(tbl sq jcp)
13 : The rotation stop position determination error of a table
11 to 12 : The loading position determination error of a table
dd: Operating status of mechanism deck at an error occurred.
(lod OP jcp)
00 : Complete the operation.
10 to 1F : Open operating.
20 to 2F : Close operating.
30 to 3F : Release operating.
60 to 6F : Chucking operating.
70 to 7F : Kicking operating.
80 to 8F :
ee : The status of table operation. (“n” is unfixed)
(tbl op jcp)
1n : Rotating in the direction of a forward.
2n : Rotating in the direction of a reverse.
Returning the BU to home position. (after kicking)
6. VERSION INFORMATION
On the Test Mode Menu screen, selecting [6] displays the ROM
version and region code.
The parenthesized hexadecimal number in version field is checksum
value of ROM.
## Version Information ##
IF con. Ver.x. xx
SYScon. Ver.x. xx (xxxx)
Model DHC-NXMXX
Region 0x
Config xxxxxxxx
xxxxxxxx
Front End Ver.x.xx
Exit: RETURN
IF con. : The version of system controller (IC501).
SYScon. : The version of DVD system processor (IC207).
Front End : The version of mechanism controller (IC901).
7. VIDEO LEVEL ADJUSTMENT
On the Test Mode Menu screen, selecting [7] displays color bars for
video level adjustment. During display of color bars, OSD disappears
but the menu screen will be restored if pressing the [RETURN] key.
25
Page 26
HCD-NXM4D
SECTION 5
MECHANICAL ADJUSTMENTS
Precaution
1. Clean the following parts with a denatured alcohol-moistened
swab:
record/playback heads pinch rollers
erase head rubber belts
capstan idlers
2. Demagnetize the record/playback head with a head
demagnetizer.
3. Do not use a magnetized screwdriver for the adjustments.
4. After the adjustments, apply suitable locking compound to
the parts adjusted.
5. The adjustments should be performed with the rated power
supply voltage unless otherwise noted.
Torque Measurement
Mode Torque meter Meter reading
3.06 N • m to 6.96 N • m
FWD CQ-102C 31 to 71 g • cm
(0.43 – 0.98 oz • inch)
FWD
back tension
REV CQ-102RC 31 to 71 g • cm
REV
back tension
FF/REW CQ-201B 71 to 143 g • cm
FWD tension CQ-403A 100 g or more
REV tension CQ-403R 100 g or more
CQ-102C 2 to 6 g • cm
CQ-102RC 2 to 6 g • cm
0.19 N • m to 0.58 N • m
(0.02 – 0.08 oz • inch)
3.06 N • m to 6.96 N • m
(0.43 – 0.98 oz • inch)
0.19 N • m to 0.58 N • m
(0.02 – 0.08 oz • inch)
6.96 N • m to 14.02 N • m
(0.98 – 1.99 oz • inch)
9.80 N • m
(3.53 oz or more)
9.80 N • m
(3.53 oz or more)
SECTION 6
ELECTRICAL ADJUSTMENTS
DECK SECTION
1. Demagnetize the record/playback head with a head
demagnetizer.
2. Do not use a magnetized screwdriver for the adjustments.
3. After the adjustments, apply suitable locking compound to the
parts adjust.
4. The adjustments should be performed with the rated power
supply voltage unless otherwise noted.
5. The adjustments should be performed in the order given in
this service manual. (As a general rule, playback circuit
adjustment should be completed before performing recording
circuit adjustment.)
6. The adjustments should be performed for both L-CH and RCH.
7. Switches and controls should be set as follows unless otherwise
specified.
•Test Tape
Tape Signal Used for
P-4-A100 10 kHz, –10 dB Azimuth Adjustment
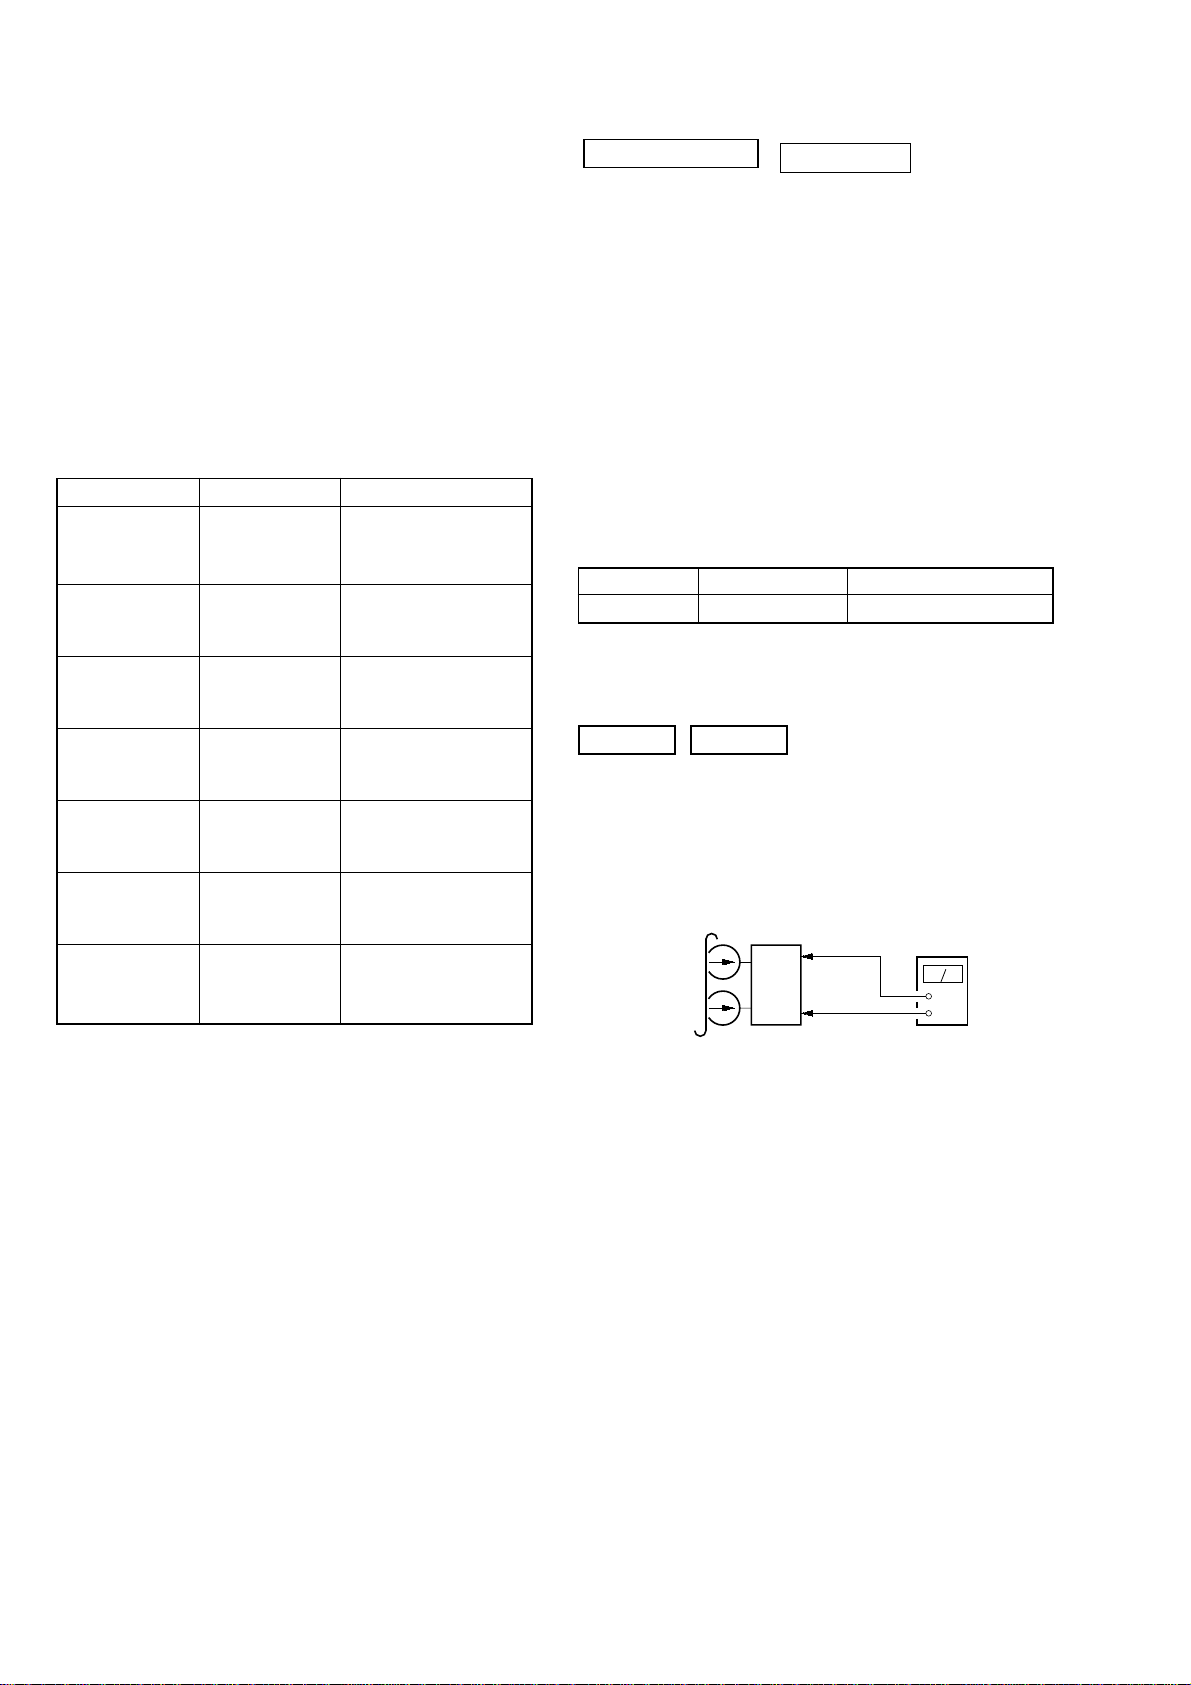
RECORD/PLAYBACK HEAD AZIMUTH ADJUSTMENT
DECK A DECK B
Note: Perform this adjustments for both decks
Procedure:
1. Mode: Playback
test tape
P-4-A100
(10 kHz, –10 dB)
0 dB=0.775 V
MAIN board
CN304
1
(L-CH)
Pin
3
(R-CH)
Pin
set
MAIN board
CN304
2
(GND)
Pin
level meter
+
–
26
Page 27
HCD-NXM4D
e
e
1.00 ± 0.05 Vp-p
(WHITE 100%)
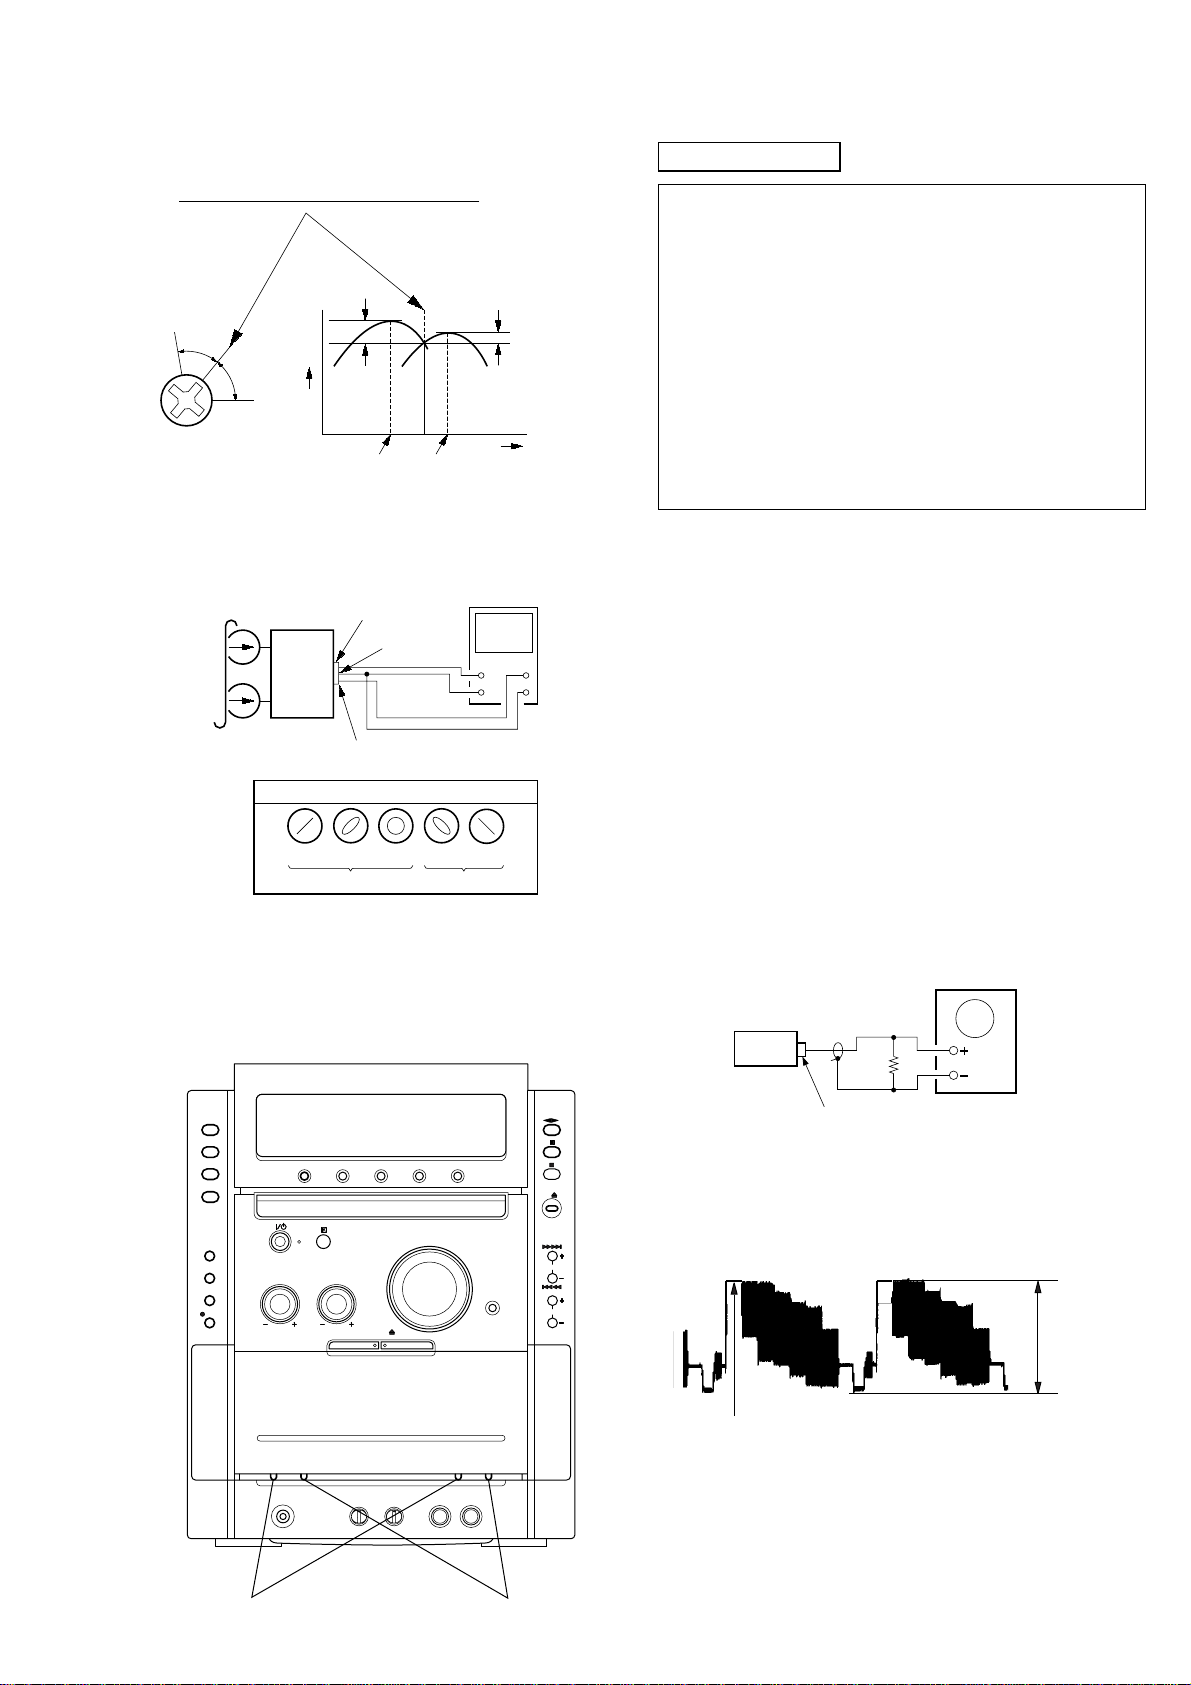
2. Turn the adjustment screw and check output peaks. If the peaks
do not match for L-CH and R-CH, turn the adjustment screw
so that outputs match within 1dB of peak.
Output
level
within
1dB
L-CH
peak
R-CH
peak
within
1dB
Screw
position
L-CH
peak
Screw
position
R-CH
peak
3. Mode: Playback
test tape
P-4-A100
(10 kHz, –10 dB)
L-CH
MAIN
board
CN301
set
R-CH
waveform of oscilloscope
pin
L
R
pin
pin
3
1
2
oscilloscop
H
V
VIDEO SECTION
RE-ADJUSTMENT OF THE SERVO CIRUIT
The re-adjustment of the servo circuit is necessary when
the part which relates to the servo circuit is replaced.
Referring to “1. DRIVE AUTO ADJUSTMENT” (see page 20).
Choose ALL and do the re-adjustment of each item of
DVD-SL, CD and DVD-DL.
THE PART THAT THE RE-ADJUSTMENT OF THE SERVO
CIRCUIT IS NECESSARY.
1. Optical pick-up
2. RF AMP (IC001)
3. DSP IC (IC509)
4. Motor driver IC (IC501)
5. EEPROM (IC204)
Note :
1. DBM07 board is basically designed to operate without adjustment. Therefore, check each item in order given.
2. Use DVD reference disc unless othermise indicated.
[DVD reference disc]
• LUV-P01 (4-999-032-01) (CD)
•TDV-540C (J-2501-235-A) (DVD-DL)
• TDV-520CSO (J-2501-236-A) (DVD-SL)
3. Use an oscilloscope with more than 10MΩ impedance.
4. Clean the object lens by an applicator with neutral detergent
when the signal level is low than specified value with the
following checks.
in phase 45°90°135°180
good
°
wrong
4. After the adjustments, apply suitable locking compound to
the pats adjusted.
Adjustment Location: Playback Head (Deck A).
Record/Playback/Erase Head (Deck B).
Video Level Check (DBM07 BOARD)
Purpose
This adjustment is made to satisfy the NTSC standard, and if not
adjusted correctly, the brightness will be too large or small.
Oscilloscop
75
Ω
set
J1102
VIDEO OUTPUT
Procedure:
1. Connect oscilloscope to VIDEO output.
2. Load a DVD reference disc playback.
3. Check the video signal level is 1.00±0.05Vp-p.
reverse
forward
27
Page 28
HCD-NXM4D
R
R
R
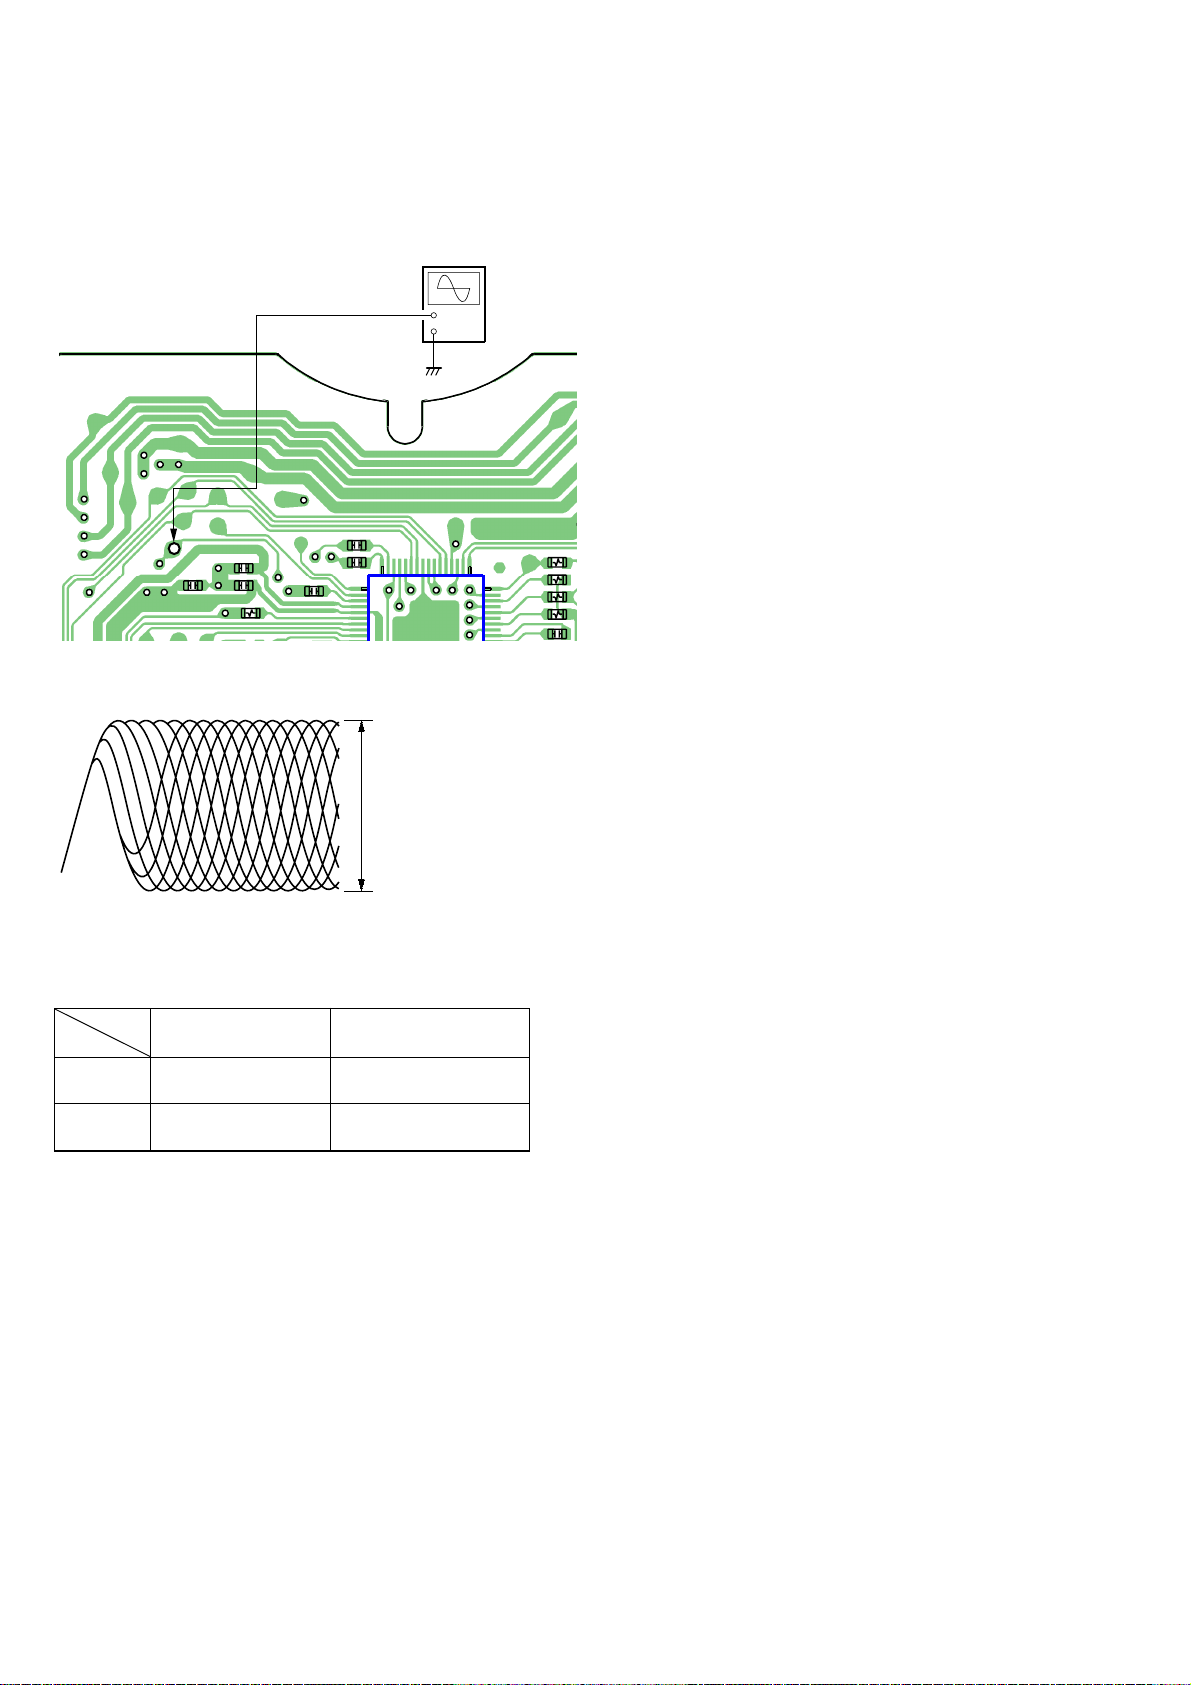
RFMON Level Check
Perform a RFMON level check before exchanging optical pick-up.
Connection:
oscilloscope
–RF board (side B) –
JL005
(RFMON)
RFMON signal waveform
C035
C012
JL005(RFMON)
C051
C036
C033
R031
33
C034
+
–
VC
32
17
16
IC001
VOLT/DIV: 200 mV
TIME/DIV: 500 ns
RFMON level
R013
• Standard value
DVD
CD
Test Disc
TDV-520CSO
(J-2501-236-A)
LUV-P01
(4-999-032-01)
RFMON level
Standard Value
1.09±0.2Vp-p
1.05±0.2Vp-p
28
Page 29
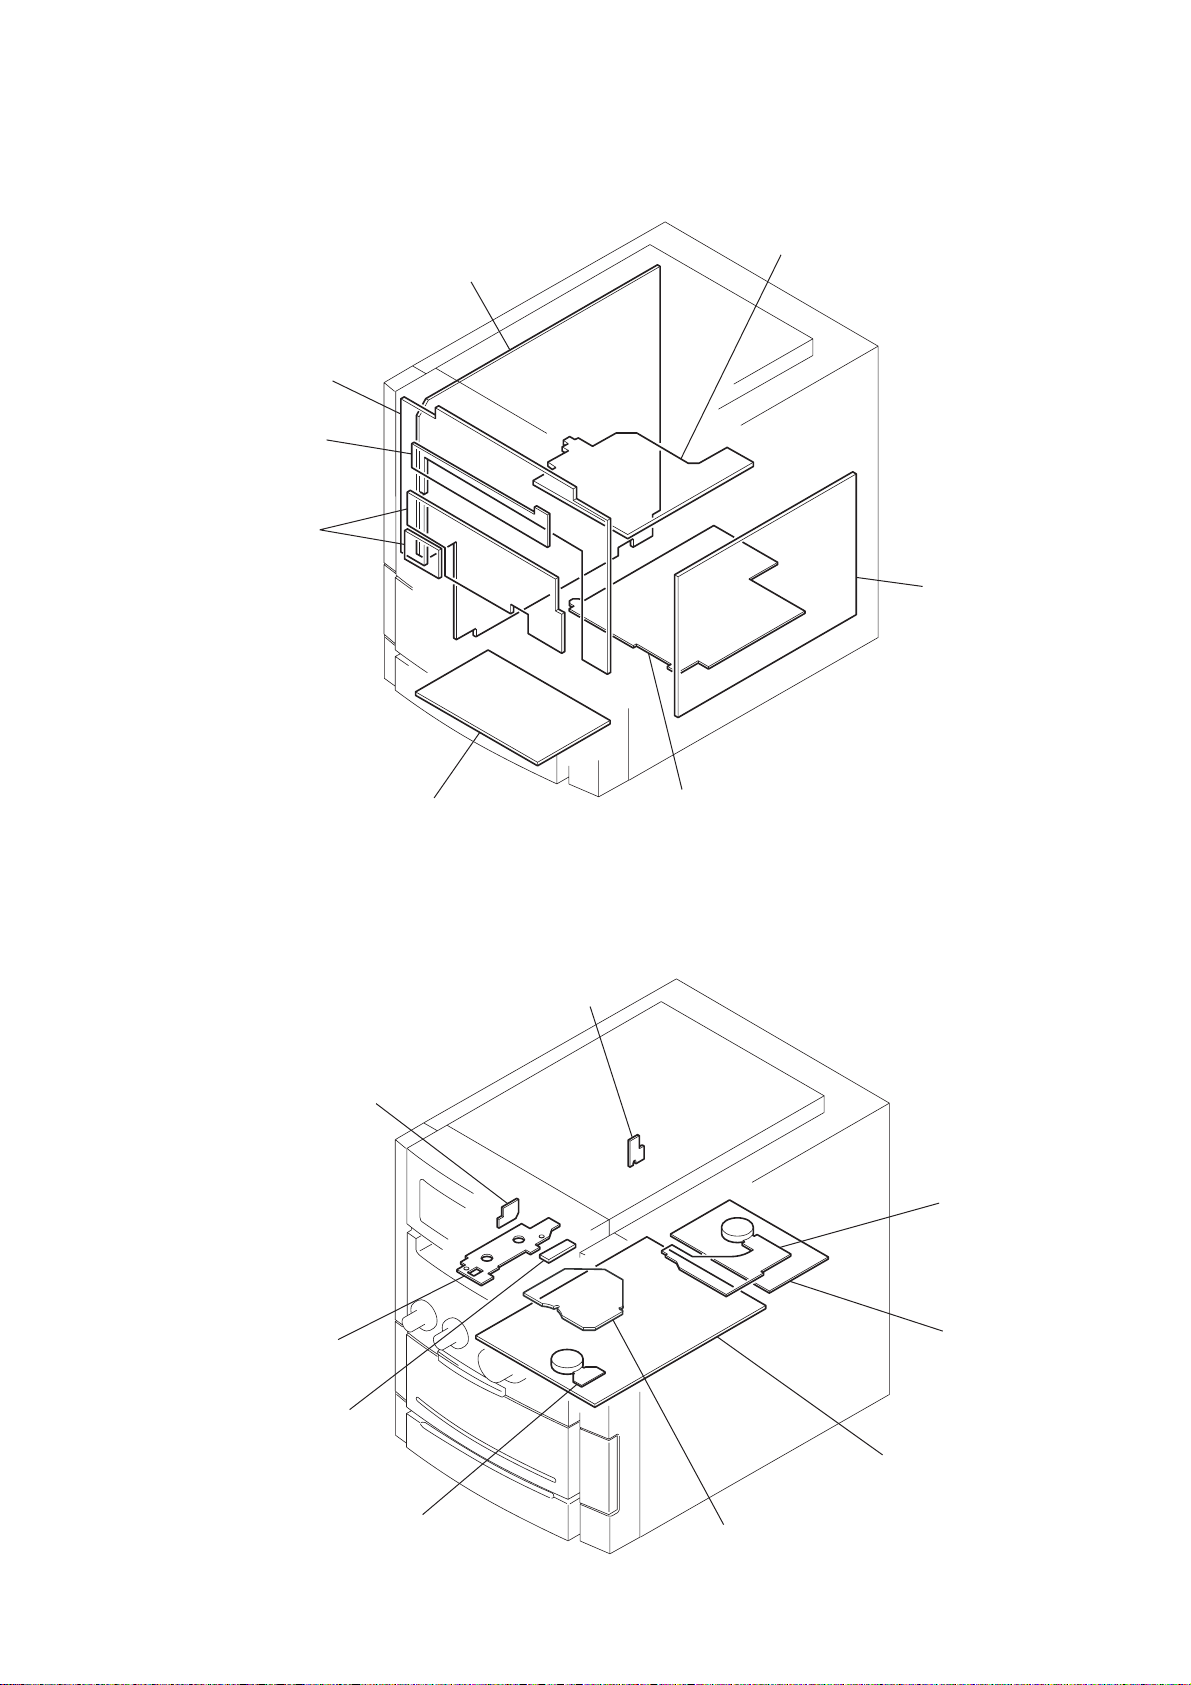
7-1. CIRCUIT BOARD LOCATION
r
d
PANEL board
DISC SW board
VOL board
HCD-NXM4D
SECTION 7
DIAGRAMS
SUR AMP board
MAIN board
switching regulato
SW(1) board
MOTOR board
HP board
FRONT AMP board
SW(2) board
RELAY board
VIDEO boar
SENSOR board
ENCODER board
RF board
DMB07 board
29
Page 30
HCD-NXM4D
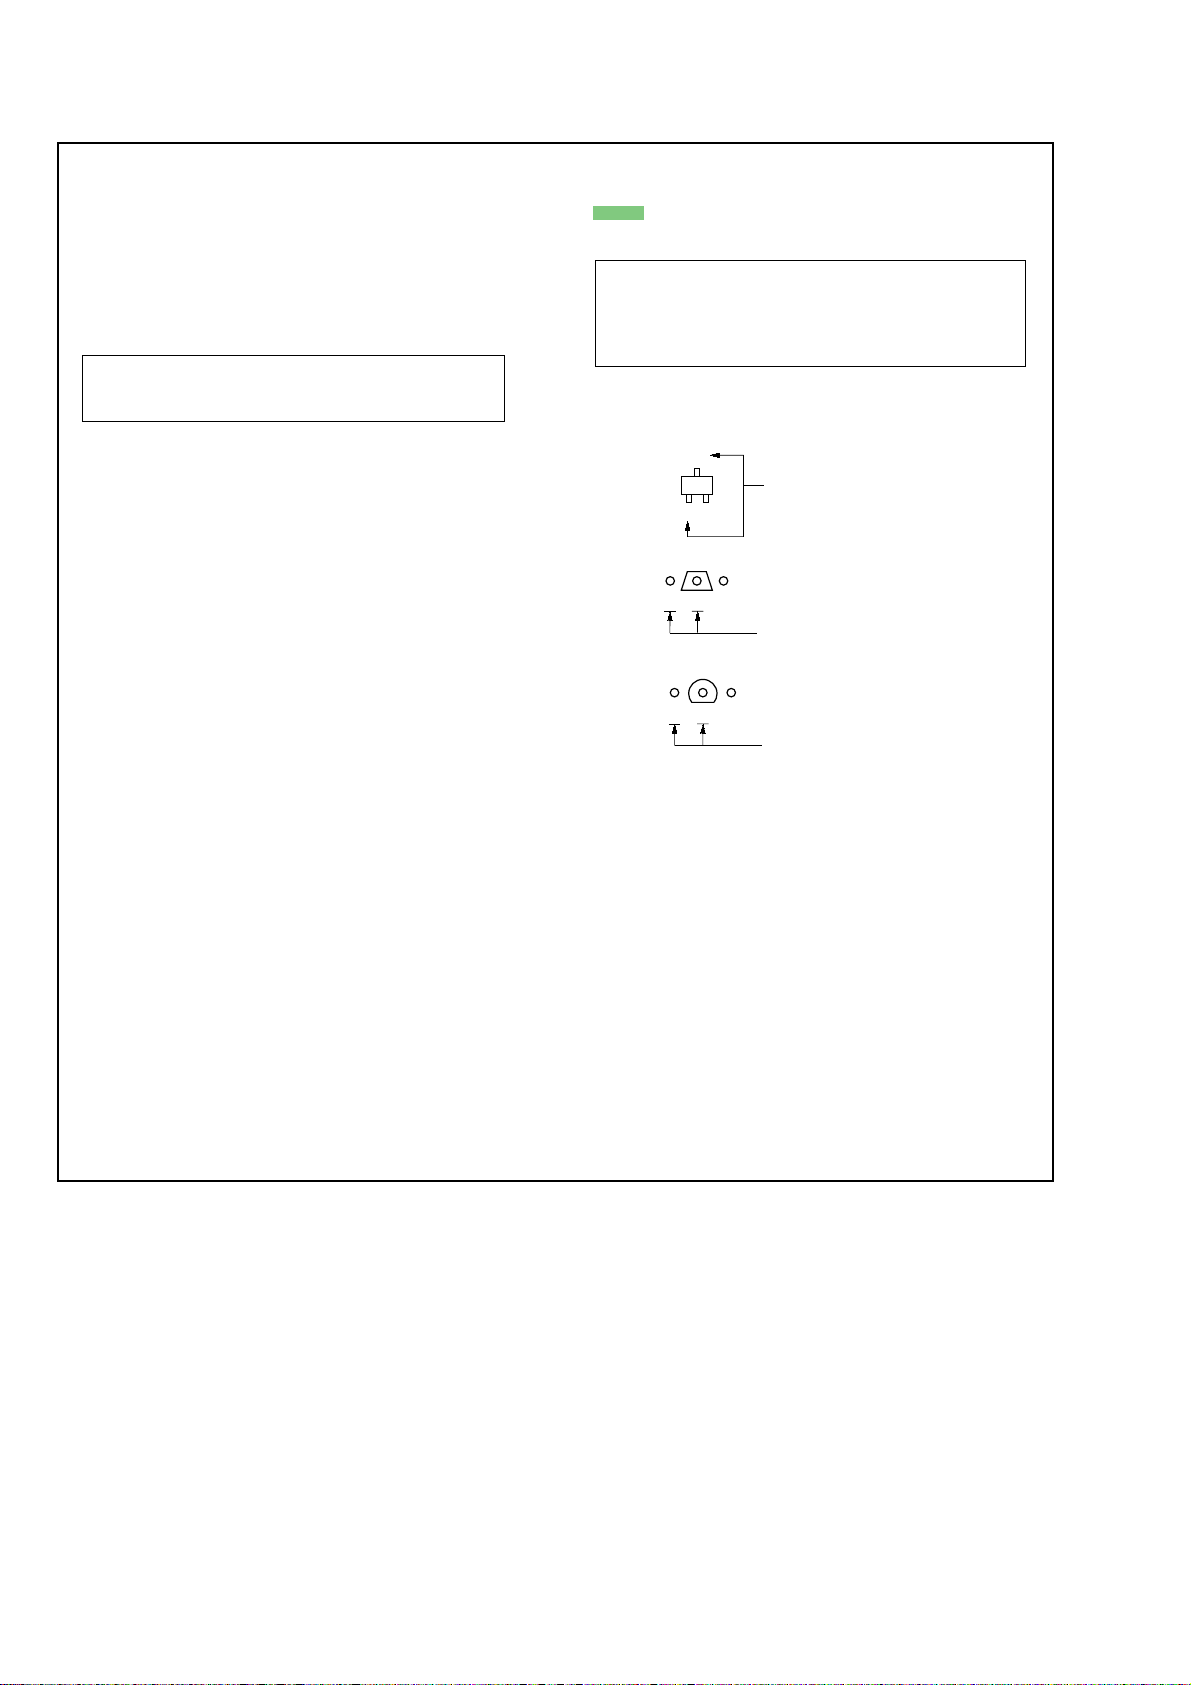
For schematic diagrams.
Note:
• All capacitors are in µF unless otherwise noted. (p: pF)
50 WV or less are not indicated except for electrolytics
and tantalums.
• All resistors are in Ω and
specified.
1
4
/
W or less unless otherwise
• f : internal component.
• 2 : nonflammable resistor.
• 5 : fusible resistor.
Note: The components identified by mark 0 or dotted line
with mark ! are critical for safety.
Replace only with part number specified.
• C : panel designation.
• A : B+ Line.
• B : B– Line.
• H : adjustment for repair.
•Voltages and waveforms are dc with respect to ground
under no-signal conditions.
RF, DMB07, VIDEO boards section
no mark: DVD PLAY
Other board section
no mark: TUNER (FM/AM)
( ): DVD PLAY
< >: TAPE REC
[ ]: TAPE PLAY
* : Impossible to measure
•Voltages are taken with a VOM (Input impedance 10 MΩ).
Voltage variations may be noted due to normal production tolerances.
•Waveforms are taken with a oscilloscope.
Voltage variations may be noted due to normal production tolerances.
• Circled numbers refer to waveforms.
• Signal path.
F : TUNER (FM/AM)
E : TAPE PLAY (DECK A)
d : TAPE PLAY (DECK B)
G : RECORD
J : DVD PLAY
N : MIC INPUT
Note on Printed Wiring Boards:
• X : parts extracted from the component side.
•
: Pattern from the side which enables seeing.
(The other layers' patterns are not indicated.)
Caution:
Parts face side: Parts on the parts face side seen from
(Side A) the parts face are indicated.
Pattern face side: Parts on the pattern face side seen from
(Side B) the pattern face are indicated.
• Indication of transistor.
C
Q
B
E
These are omitted.
Q
B
CE
These are omitted.
Q
B
CE
These are omitted.
• Abbreviation
E2 : 120V AC Area in E model
E3 : 240V AC Area in E model
EA : Saudi Arabia mdoel
E15 : Iran model
SP : Shingapore model
MY : Malaysia model
AUS : Australian mdoel
TH : Thai model
• Abbreviation
E2 : 120V AC Area in E model
E3 : 240V AC Area in E model
EA : Saudi Arabia mdoel
E15 : Iran model
SP : Shingapore model
MY : Malaysia model
AUS : Australian mdoel
TH : Thai model
30
Page 31
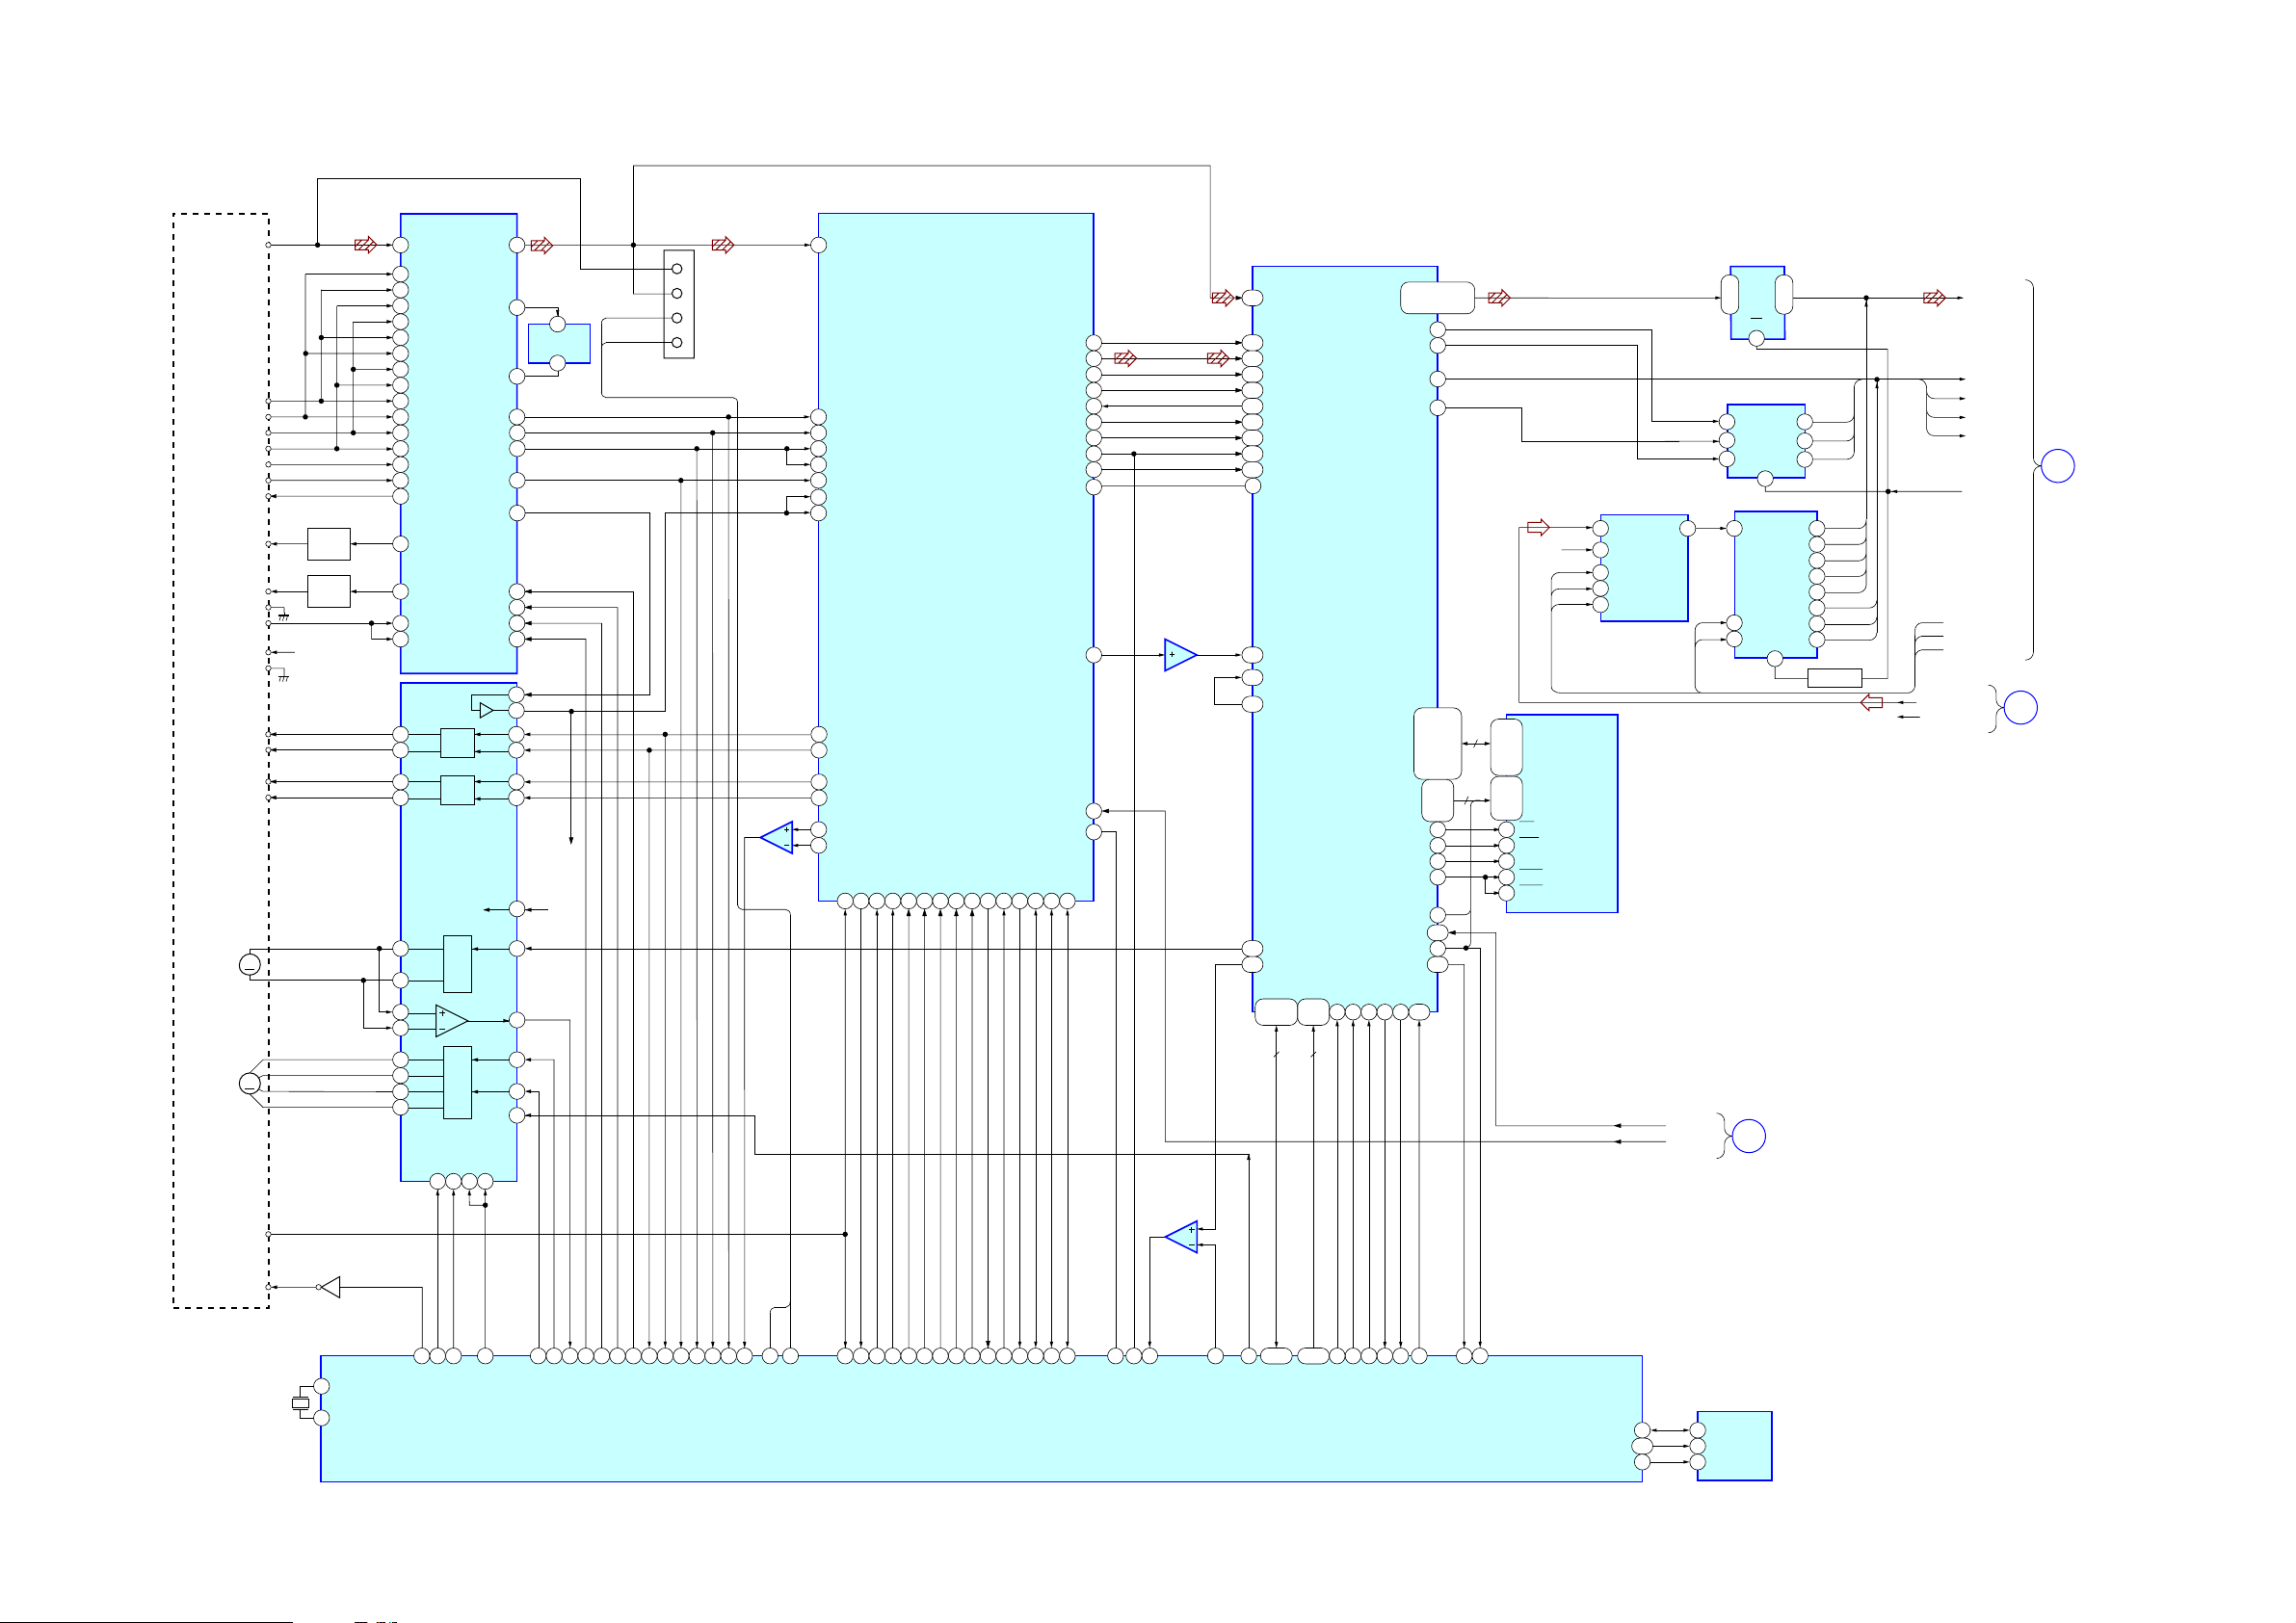
7-2. BLOCK DIAGRAM – DVD DSP (1/2) SECTION –
HCD-NXM4D
OPTICAL PICK-UP
BLOCK
(DBU-3)
DVDLD
CDLD
LD GND
VCC
GND
FCS+
FCS-
TRK+
TRK-
SPINDLE
M
MOTOR
SLED
M
MOTOR
INLIM
DSP
IC001
DVD/CD RF AMP
RF
B
A
D
C
E
F
VC
Q001
LD
DRIVE
Q002
LD
DRIVE
PD
A +5V
SPDL+
SPDL-
SLEDA+
SLEDASLEDB+
SLEDB-
1
DVDRFP
A23
B2
4
C25
6
D2
A12
B
11
C10
9
D
CD A16
CD B
15
CD C
14
13
CD D
17
CD F
18
CD E
VC
20
21
DVD LD
22
CD LD
23
DVDPD
24
CDPD
DO1+
36
DRV
DO1-
37
DO2+
34
DRV
DO2-
35
IC501
MOTOR/COIL DRIVE
DO5+
27
DRV
DO5-
28
IN6+
47
IN6-
46
DO3+
32
DO3-
31
DRV
DO4+
30
DO4-
29
TSD-M
57RFAC
32
MEVO
OP AMP
31MIN
MIRR
27MIRR
40FE
39TE
PI/CE
42
MNTR
VI25
36
SDEN
48SDEN
DATA RF
47SDATA
CLK RF
46SCLK
LDON
26LDON
42
40
IN1+
FFDR
48
FRDR
IN1-
1
IN2+
TFDR
3
TRDR
IN2-
4
43
AVC AVC
IN5-
13
OUT6
45
IN3-
10
IN4-
7
POWER
39
SAVE
MUTE12
MUTE34
MUTE5
19202122
IC003
1
4
AVC
CN901
(RS232C)
RF1
2
RF AC
4
TXD
RXD
5
7
IC503
AMP
5
6
50 RFAC
20 MIRR
39 FE
40 SE
41 TE
RFDC
43
CE
42
VC
38
33
FFDR
34 FRDR
TFDR
31
TRDR
32
29
SFDR
30 SRDR
26
SSTP
76
SQSO77SQCK
63
MD2
2
XRST
MUTE
3
CD DECODER
4
IC509
SERVO DSP
DATA5XLAT6CLOK7SENS
8
SCLK
13
GFS
COUT22FOK24LOCK
19
LRCK
PCMD
BCK
EXCK
C2PO
SCOR
WDCK
DFCT
XTAI
XTSL
IC701
DVD DECODER
117
RFIN
SPIN
LRCK
163
MDAT
160
BCLK
158
SBIN
148
EXCK
147
WFCK
151
C2PO
155
SCOR
150
GSCOR
146
45
DFCT
MDIN2
137
MDIN1
138
MDSOUT
142
SPO
135
APE0
109
D0-D7 A0-A7
172-176
1,2,4
8 8
65
66
67
79SBSO
80
10WFCK
14
15
17
21
IC703(2/2)
AMP
25MDP
71
69
768FS
IC703(1/2)
AMP
5,7,
9-14
HDB0-HDB7
MDB0-MDB9,
MDBA-MDZBF
MA0-MA9/MNT0
XRD17XWR18XCS19XINT020XINT1
44,41,39,35
32,30,27,24
XSAK
46HDRQ
XDCK
48
XHWR
XSRQ
53XHAC
SDEF
26HDB8
66-69,71,
73-75,
96,97,99,
101,102,
104-106
79,80,
12
82-87,
89,91
XMWR
76
XRAS RAS
XMOE OE
95
XCAS
MA11/MNT2
MA10/MNT1
21
XTL1
GFS
93
170
92
107
XRST
164
IC352
A/D CONVERTER
L-CH
VINL
R-CH
2-5,
16
7-10,
I/O0-I/O15
41-44,
46-49
21-24,
A0-A11
27-32,
20,19
WE
17
1878
3394
34
UCAS
35
LCAS
2
13
14
16
DOUT
VINR
LRCK
BCK
SYSCK
IC706
16M DRAM
HDB0
HDB7
XSAK
HDB8
XDCK
151
768FS-2
768FS-1
IC256 DATA LATCH
-
2
ID
-
-
9
8D
OE
IC258 DATA LATCH
21D
3
2D
4
3D
IC259 DATA LATCH
ADC
DATA
7D
LRCK
7
6D
BCK
9
8D
B
1Q
19
-
-
8Q
12
1
2Q
3Q
OE
1
OE
1
DVD DSP (2/2)
SECTION
(Page 32)
191Q
18
17
2Q
3Q
4Q
5Q
6Q
7Q
8Q
AVO-AV7
XSRQ
XSAK#
SDEF#
XDCK#
191Q8
18
17
16
15
XSAK#
14
SDEF#
13
XDCK#
12
Q201
INVERTER
AV7
AV0
AV1
AV2
AV6
R-CH
HDB-DATA
XSRQ
XSAK#
SDEF#
XDCK#
INT/EXT
BCK
LRCK
XCK
ANALDG-IN-L
ANALDG-IN-R
DVD DSP (2/2)
A
SECTION
(Page 32)
MAIN
H
SECTION
(Page 34)
HCD-NXM4D
SW
X901
20MHz
Q901
40 XTAL
41 EXTAL
76
73
LDSEL
63
TSD-M
SP_ON
60
MUTE_2D
44
SLED_B
43
SLED_A
IC901(1/2)
6
MNT1
MECHANISM
CONTROLLER
SDA_EEP
SCL_EEP
WP_EEP
100
IC903
EEPROM
5 SDA
5
99
SCL
6
WP
7
• R-ch is omitted due to same as L-ch.
• Signal path
J : DVD
F : AUDIO
XRST
62
82
28
FG
LDON
2
83
SDEN
SDATA_RF
SDCLK_RF
7
8
66
FCS_JMP_1
FCS_JMP_2
65TE67FE29
PI
61 8180
SLED
MIRR
RTD
TXD
31
52
INLIM
54
3
SQCK
SQSO
DOCTRL/ISBTEST
98
59
XDRST
49 27 50 9 72
LAT_CD
DATA_CD
CLOK_CD
MUTE_CD
71
SCLK_CD
SENS_CD
30
GFS_CD
COUT_CD
74
FOK_CD
75
LOCK_CD
10
26
CDSP2
64
SCOR
45
97
14-21
89-96
D0-D7A8
JIT
SCK_DSD
A0-A7
22
84
85
12
XRD
XWR
XCS_DVD
INIT0_DVD23INIT1_DVD
25
XRST_1882
58
GFS_DVD
3131
Page 32
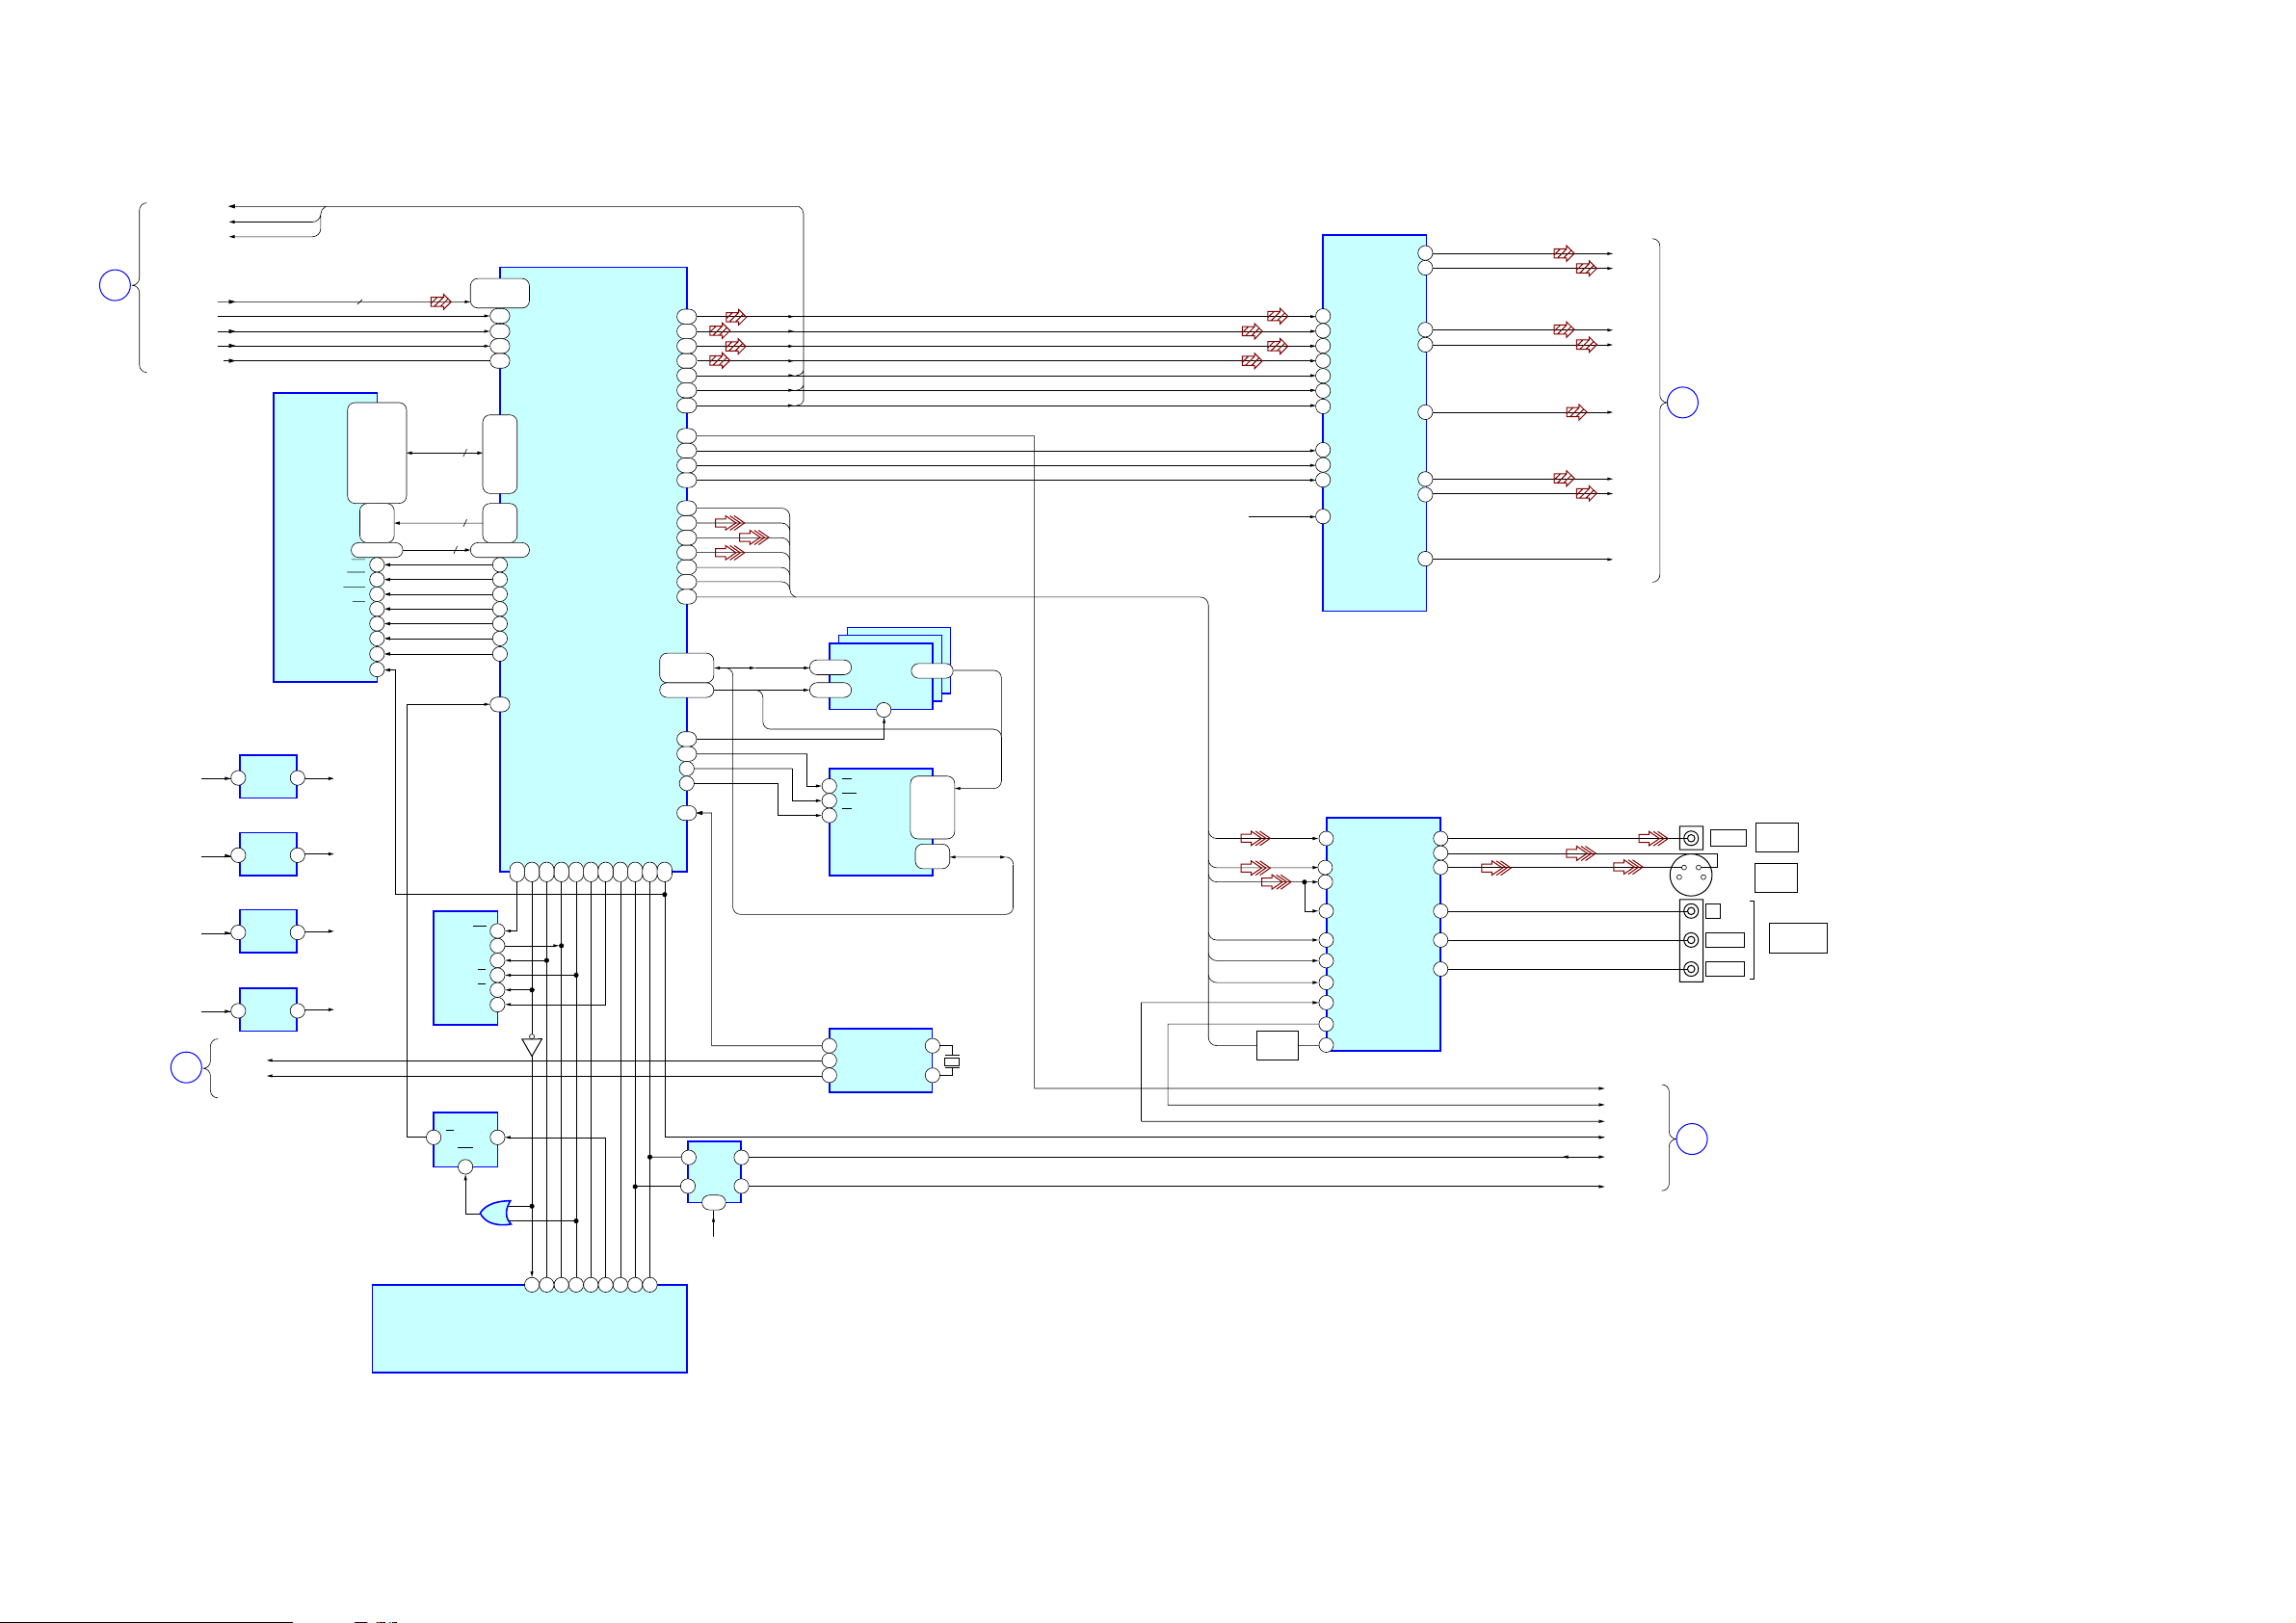
HCD-NXM4D
7-3. BLOCK DIAGRAM – DVD DSP (2/2) SECTION –
DVD DSP (1/2)
SECTION
(Page 31)
A
DVD DSP(1/2)
SECTION
(Page 31)
HDB-DATA
SDEF#
X SAK#
X DCK#
X SRQ
AUDIO
+5V
D +5V
D +3.3V
D +5V
B
DCK
LRCK
XCK
768FS-2
768FS-1
A0-A9,A10/AP,NC
IC392
+3.3V
1 3
REG.
IC907
+3.3V
1 3
REG.
IC211
+1.8V
1 3
REG.
IC502
+3.3V
1 3
REG.
IC203
DQ0-DQ31
8
SDRAM
2,4,5,7,
8,10,11,13,
74,76,77,79,
80,82,83,85,
31,33,34,36,
37,39,40,42,
45,47,48,50,
51,53,54,56
25-27
60-66
24,21
16,71,28,59
WE
17
18 52
19 51
20 49
22 48
23
68 56
67
CKE
D+3.3V
A3V-2
D +1.8V
A3V-1
IC901 (2/2)
MECHANISM
CONTROLLER
177-174
171-168
32
12
4
62,73,86,97
IC204
EEPROM
WC
DO
IC904
FF
CKQ
3 1
CLR
6
4
DVD SYSTEM PROCESSOR
SDDATA0-SDDATA7,
SDERROR
182
SDEN
179
SDCLK
183
SDREQ
178
57-60
64-71
75-78
MD0-MD31
81-84
88-95
99-102
42-33
MA0-MA11
45,46
MDQM0-MDQM3DQM0-DQM3
53
MWE
MCASCAS
MRASRAS
MCS0CS
BA0BS0
47
BA1BS1
MCLKCLK
188 DRVRDY
162 CS (ZIVA_E2P)
165 WRITE_CTRL (ZIVA_E2P)
8
6
5DI
4SK
3CS
1R/B
Q202
IC902
GATE
2
1
33
32
186 DRVTXSO_ZIVA
187 DRVRXSI_ZIVA
34
IC207
185 DRVCLKSCK_ZIVA
35
HAD0-HAD15
HA1-HA3
184 HIRQ1DRVIRQ36191 RST_SPCRST
116 HIRQ2
38
37
155DATA3(CSW)
154DATA2(SLR)
151DATA1(FLR)
150DATA0(DM)
149BCK
148LRCK
147XCK
110MREQ
115ML
114MC
113MDI
108I/P SW
131VDAC 0
128VDAC 1
125VDAC 2
122VDAC 3
119
VDAC 4
107VS
22,19-14,
11-3
2,207,206
190ALE
195HCS0
XIN
139
161 I2C DAI2C_SIO78160 I2C CLI2C_SCL79202 RESET
25WEH.UDS
27HREAD
IC111
SWITCH
2S-CD
4 3
1S-1D
2,5
D +3.3V
DATA3
DATA2
DATA1
DATA0
LRCK-1
HA1-3
HAD0-15
I2C-CL
I2C-DA
61
BCK-1
XCK1
MREQ
ML
MC
MDI
I/P SW
CB/R
CR/B
WIDE
HAD0-15
V
C
Y
27M
768FS
768FS
IC231,232,233
ADDRESS LATCH
2-9
7-9
1LE
11
IC206
RAM
26
CE
A0-A21
11 WE
28
OE
DQ0-DQ15
IC906
CLOCK GENERATOR
3 MO1
SO2
10
SO3
13
12-19
25,24,23,
22-18,
8-1,48,
17,16,9,
10,13
29-36,
38-45
7XTI
8XTO
HA4-22
HA1-3
HA1-22
HAD0-15
X902
27MHz
AUDIO
D +3.3V
CVBS
C
Y/G
CB/R
CR/B
WIDE
I/P SW
I/P
SWITCH
Q1101
IC302
D/A CONVERTER
DATA3
47
DATA2
46
DATA1
45
DATA4
31
BCK
40
LRCK
41
SCKI
38
36
ML
MC
35
MDI
34
RST
37
IC1101
VIDEO AMP/BUFFER
4 CVBS IN
2 C-IN
6 Y-IN
10 CY-IN
CB-IN
12
CR-IN
14
SI
25
13
MUTE2
3
MUTE1
I/P
9
VOUT7
VOUT8
VOUT1
VOUT2
VOUT5
VOUT3
VOUT4
VOUT6
CVBS OUT
Y-OUT
C-OUT
CY-OUT
CB-OUT
CR-OUT
16
20
14
13
10
12
11
9
23
21
26
20
18
16
DM-L
DM-R
FL-IN
FR-IN
C-IN
SL-IN
SR-IN
LFE-IN
MAIN
SECTION
C
(Page 34)
J1102
VIDEO
VIDEO
OUT
J1101
Y
C
Y
PB/C
PR/C
B
R
S VIDEO
OUT
J1103
COMPONENT
VIDEO OUT
M-REQ
VMUTE
VIDEO SW
SYS RESET
2
C-CLK I/O
I
2
C-DATA
I
MAIN
D
SECTION
(Page 34)
HCD-NXM4D
CS_ZIVA
DRVRDY
• Signal path
J : DVD
g : VIDEO
3232
Page 33
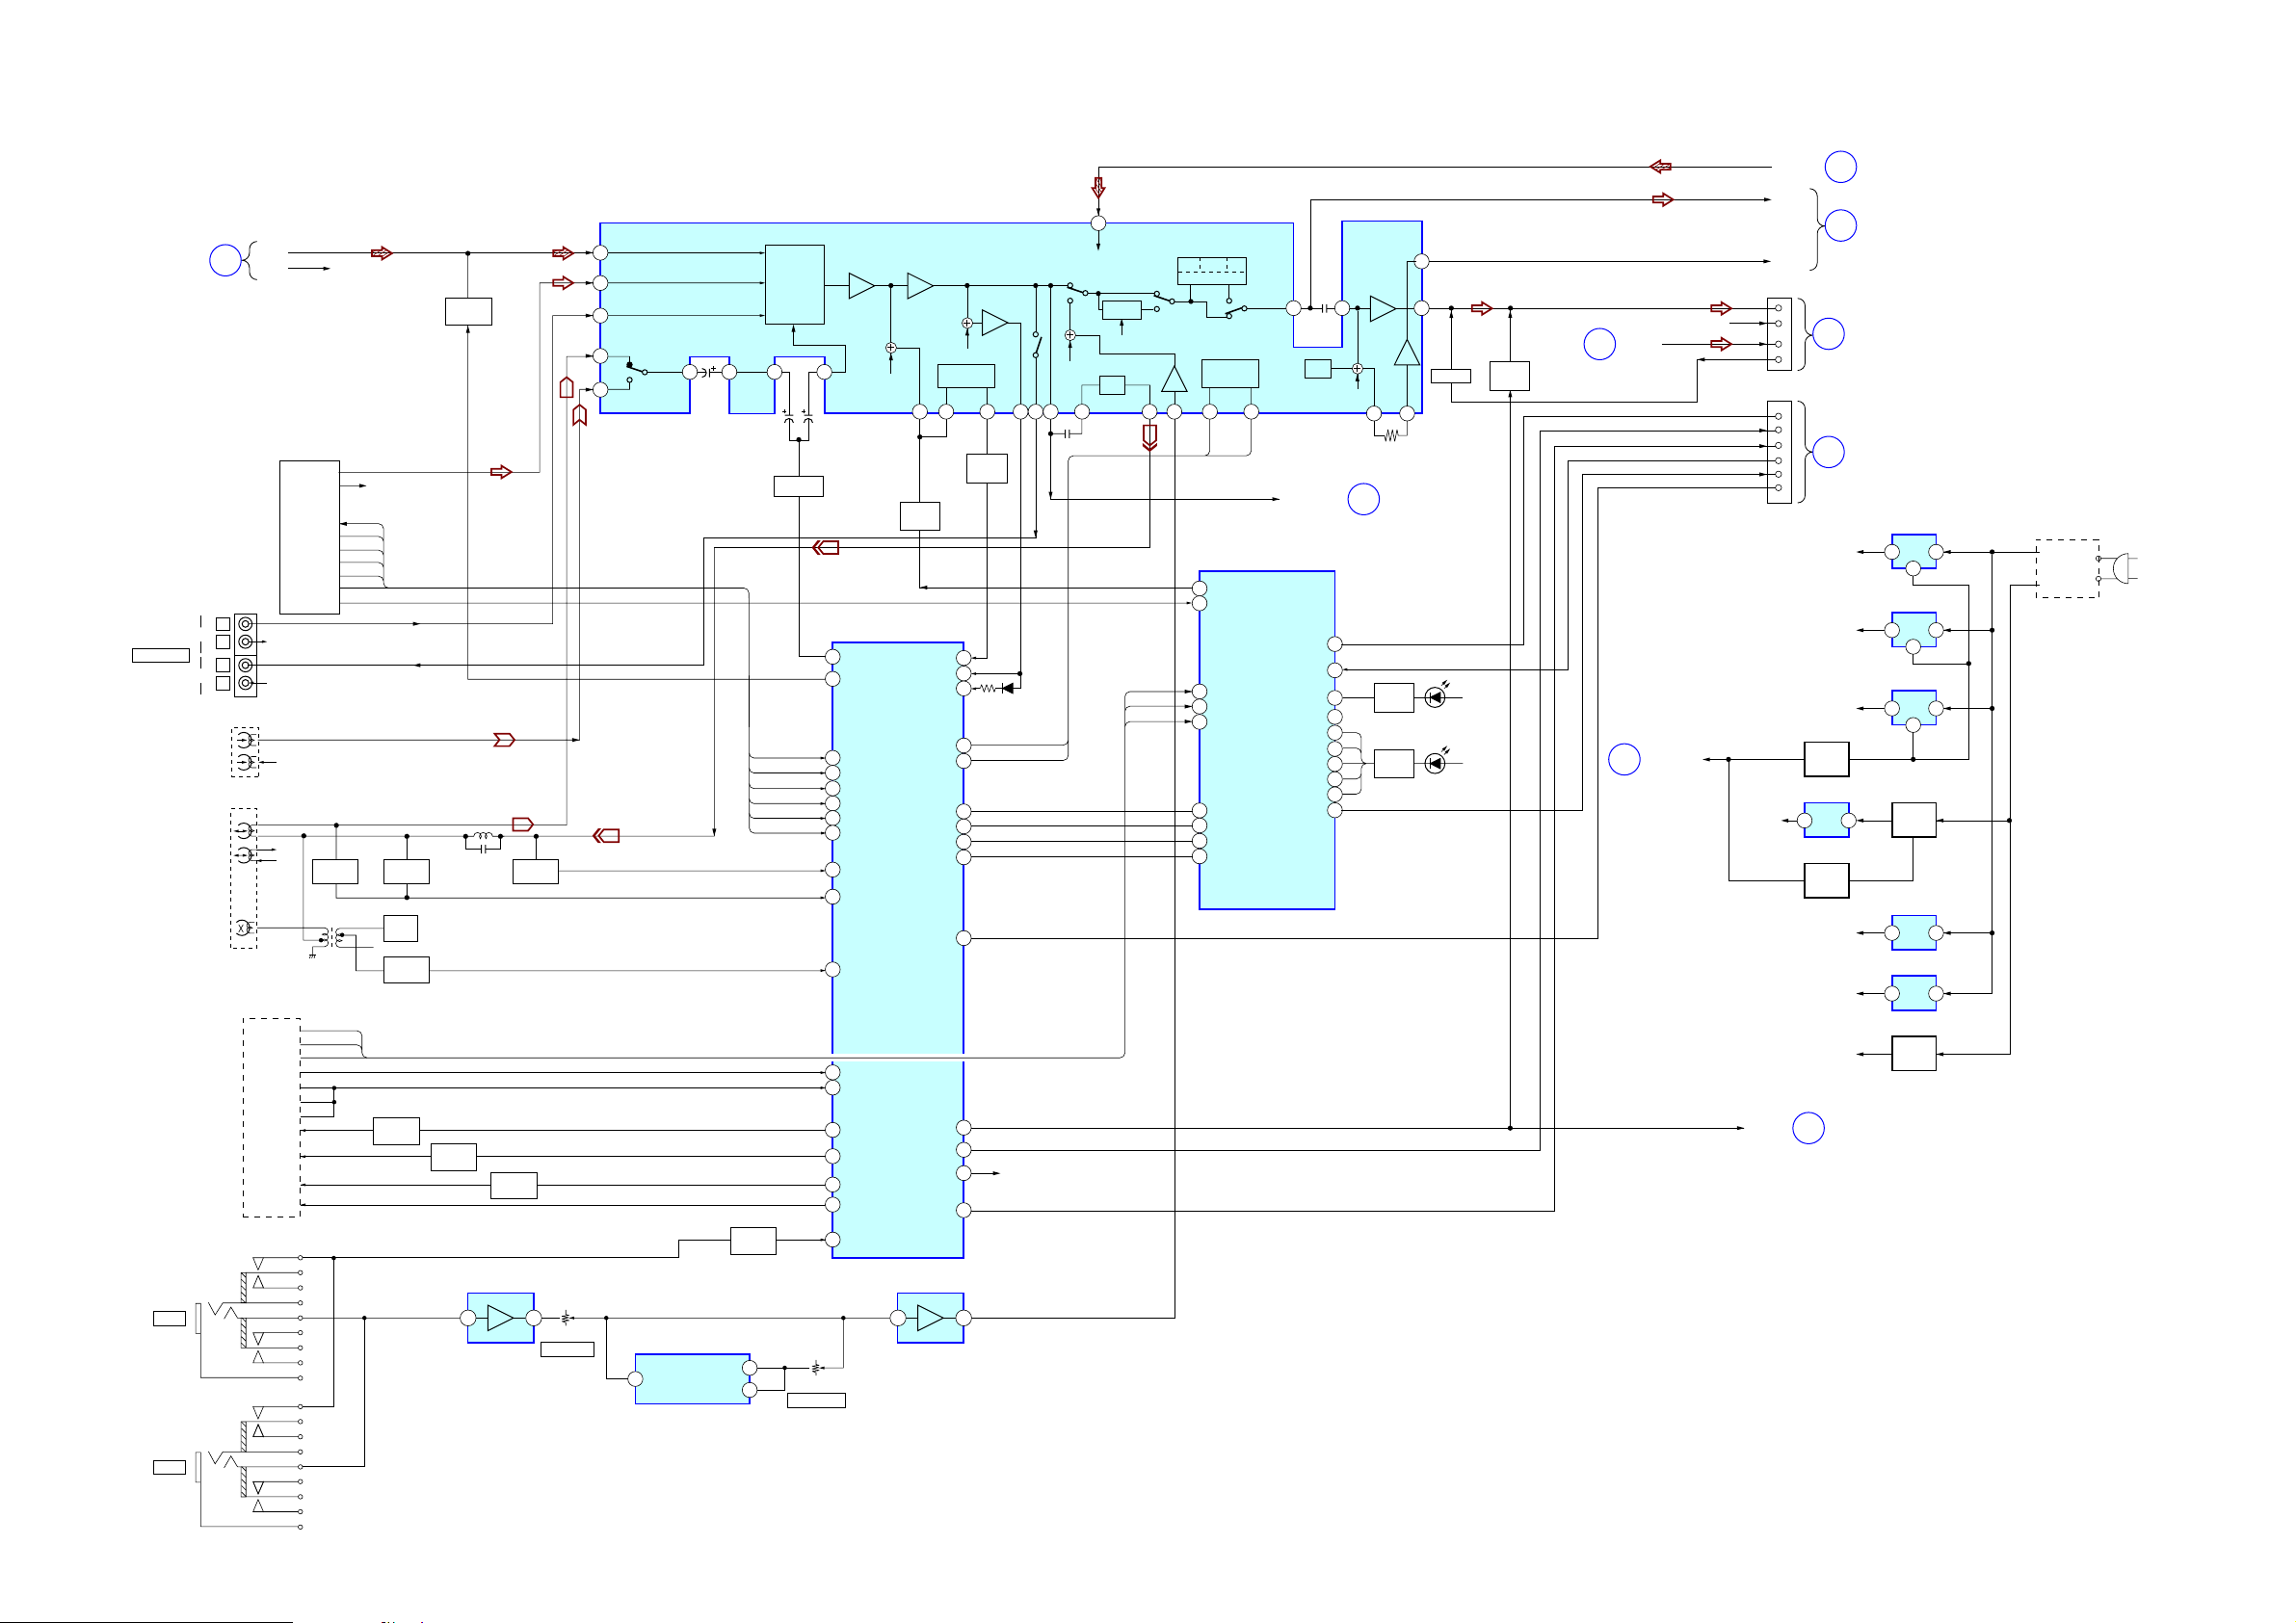
7-4. BLOCK DIAGRAM – TUNER/TAPE DECK SECTION –
MAIN
SECTION
(Page 34)
VIDEO/SAT
OUT
HP901
HP901
HRP901
HRP901
I
L
IN
R
L
R
DECK-A
L
R
DECK-B
L
R
HE901
MECHANISM DECK
L-OUT
R-OUT
R-CH
R-CH
TAPE
B PLAY
A PLAY
A HALF
B SHUT
R-REC
B HALF
F REC
A SHUT
CAPM+
A TRIG+
B TRIG+
TUNER
ST-MUTE
ST D OUT
R-CH
R-CH
L OUT
R OUT
TUNER
ST-CE
ST D IN
ST CLK
STEREO
B PLAY
A PLAY
A HALF
R-CH
REC/PB
SWITCH
T301
Q303
Q314,315
R-CH
Q316,317
Q326,327
CAP M
DRIVE
REC/PB
SWITCH
Q318
BIAS
OSC
BIAS
SWITCH
Q301,302
Q311-313
Q323,324
SWITCH
A TRIG
DRIVE
MUTE
BIAS
Q25,26
Q270
REC/PB
TC REC
Q321,322
B TRIG
DRIVE
MUTE
Q104
Q31,22
64
63
62
71
70
SELECTOR
68 67 66 65
Q103
Q29,30
PB MUTE
Q401
MIC
SWITCH
IC401 (1/2)
SYSTEM CONTROL
61
LINE MUTE
27
A MUTE
ST-MUTE
50
TUNED
51
52
ST-CE
ST-DOUT
53
ST-DIN
54
55
ST-CLK
63
TC REC MUTE
60
TC REC/PB
59
BIAS
90
B SHUT
91
B HALF
89
A SHUT
CAPM-CNT1
86
A TRIG
87
B TRIG
88
MIC SW
3
IC101
INPUT SELECT SWITCH
ELECTRICAL VOLUMEI
DPL-2
SURR
R-CH
R-CH
M16537 DATA
I/O EXP DATYA IN
I/O EXP DATA OUT
FDRONT RELAY
AMS
7 8 11 53 515650 5948 34 35
Q341-343
AMS
BUFFER
Q140
Q33,34
AMS
MUTE
100
AMS IN
97
VACS IN
92
SPEC-IN
M16537 CLK
I/O EXP CLK
I/O EXP LAT
SW RELAY
TA MUTE
STK-MUTE
STBY RELAY
D182
DATA
80
CLK
81
66
67
68
69
7
56
57
65
58
DPL-2
52
ON/OFF
(SWITCHING REGULATOR)
S2
EQ
MD BUS
TONE
MCU
CLK DATA
CLK DATA
H
18
AMS-MUTE
5
STEREO
10
B PLAY
11
A PLAY
12
A HALF
3
CLK
LATCH
4
26
DI 1
DO 2
25
TRE
I/F
IC951
I/O EXPANDER
42 41 37
AGC
R-CH
ANALOG-IN-L
PROTECT
HP IN
HALF PLAY
AMS MUTE
DISC1
DISC2
DISC3
DISC4
DISC5
FAN
(Page 34)
8
9
17
18
19
20
21
22
23
24
J
MAIN
SCTION
Q1026
LED
SWITCH
Q1001-1005
LED
SWITCH
29
3031
D1021
D1001-1005
FL
BUFFER
Q101
VCC
LED 9V
MUTE
SWITCH
Q21,22
Q1
MAIN
SECTION
(Page 34)
SW-OUT
M
DBFB FEED BACK
G
MAIN
SECTION
(Page 34)
DVD POWER
FL
FR
R-CH
SW
PROTECT
STK MUTE
FRONT RELAY
HP SW
FAN CTL
SW RELAY
DVD+5V
CN102
CN103
TA MUTE
FL-OUT
SURR-L
SW
Q903.904
M+9V,LED+9V
E
F
D+3.3V
D+5.5V
M+12V
REG SW
IC903
REG
3
Q902
REG SW
AUDIO+9V
D+3.3V
N
K
L
SECTION
(Page 35)
SECTION
(Page 35)
1
MAIN
SECTION
(Page 34)
MAIN
SECTION
(Page 34)
MAIN
SECTION
(Page 34)
AMP
AMP
IC906
REG
2
IC905
REG
2
IC904
REG
2
Q901
REG
IC901
REG
3
IC902
REG
3
Q906
REG
HCD-NXM4D
SWITCHING
REGULATOR
1
5
1
5
1
4
1
1
UNREG+12V
AC-IN
UNREG+5V
HCD-NXM4D
J1060
MIC1
J1061
MIC2
31
H
IC1060(1/2)
RV1060
MIC LEVEL
2
LPF1 IN
IC1061
MIC ECHO
LPF1 OUT
LPF2 OUT
IC1060(2/2)
67
H
MIC SIG
• R-ch is omitted due to same as L-ch.
• Signal path
4
RV1061
9
ECHO LEVEL
F : TUNER
E : PLAY BACK (DECK A)
d : PLAY BACK (DECK B)
G : RECORD
J : DVD
N : MIC
3333
Page 34
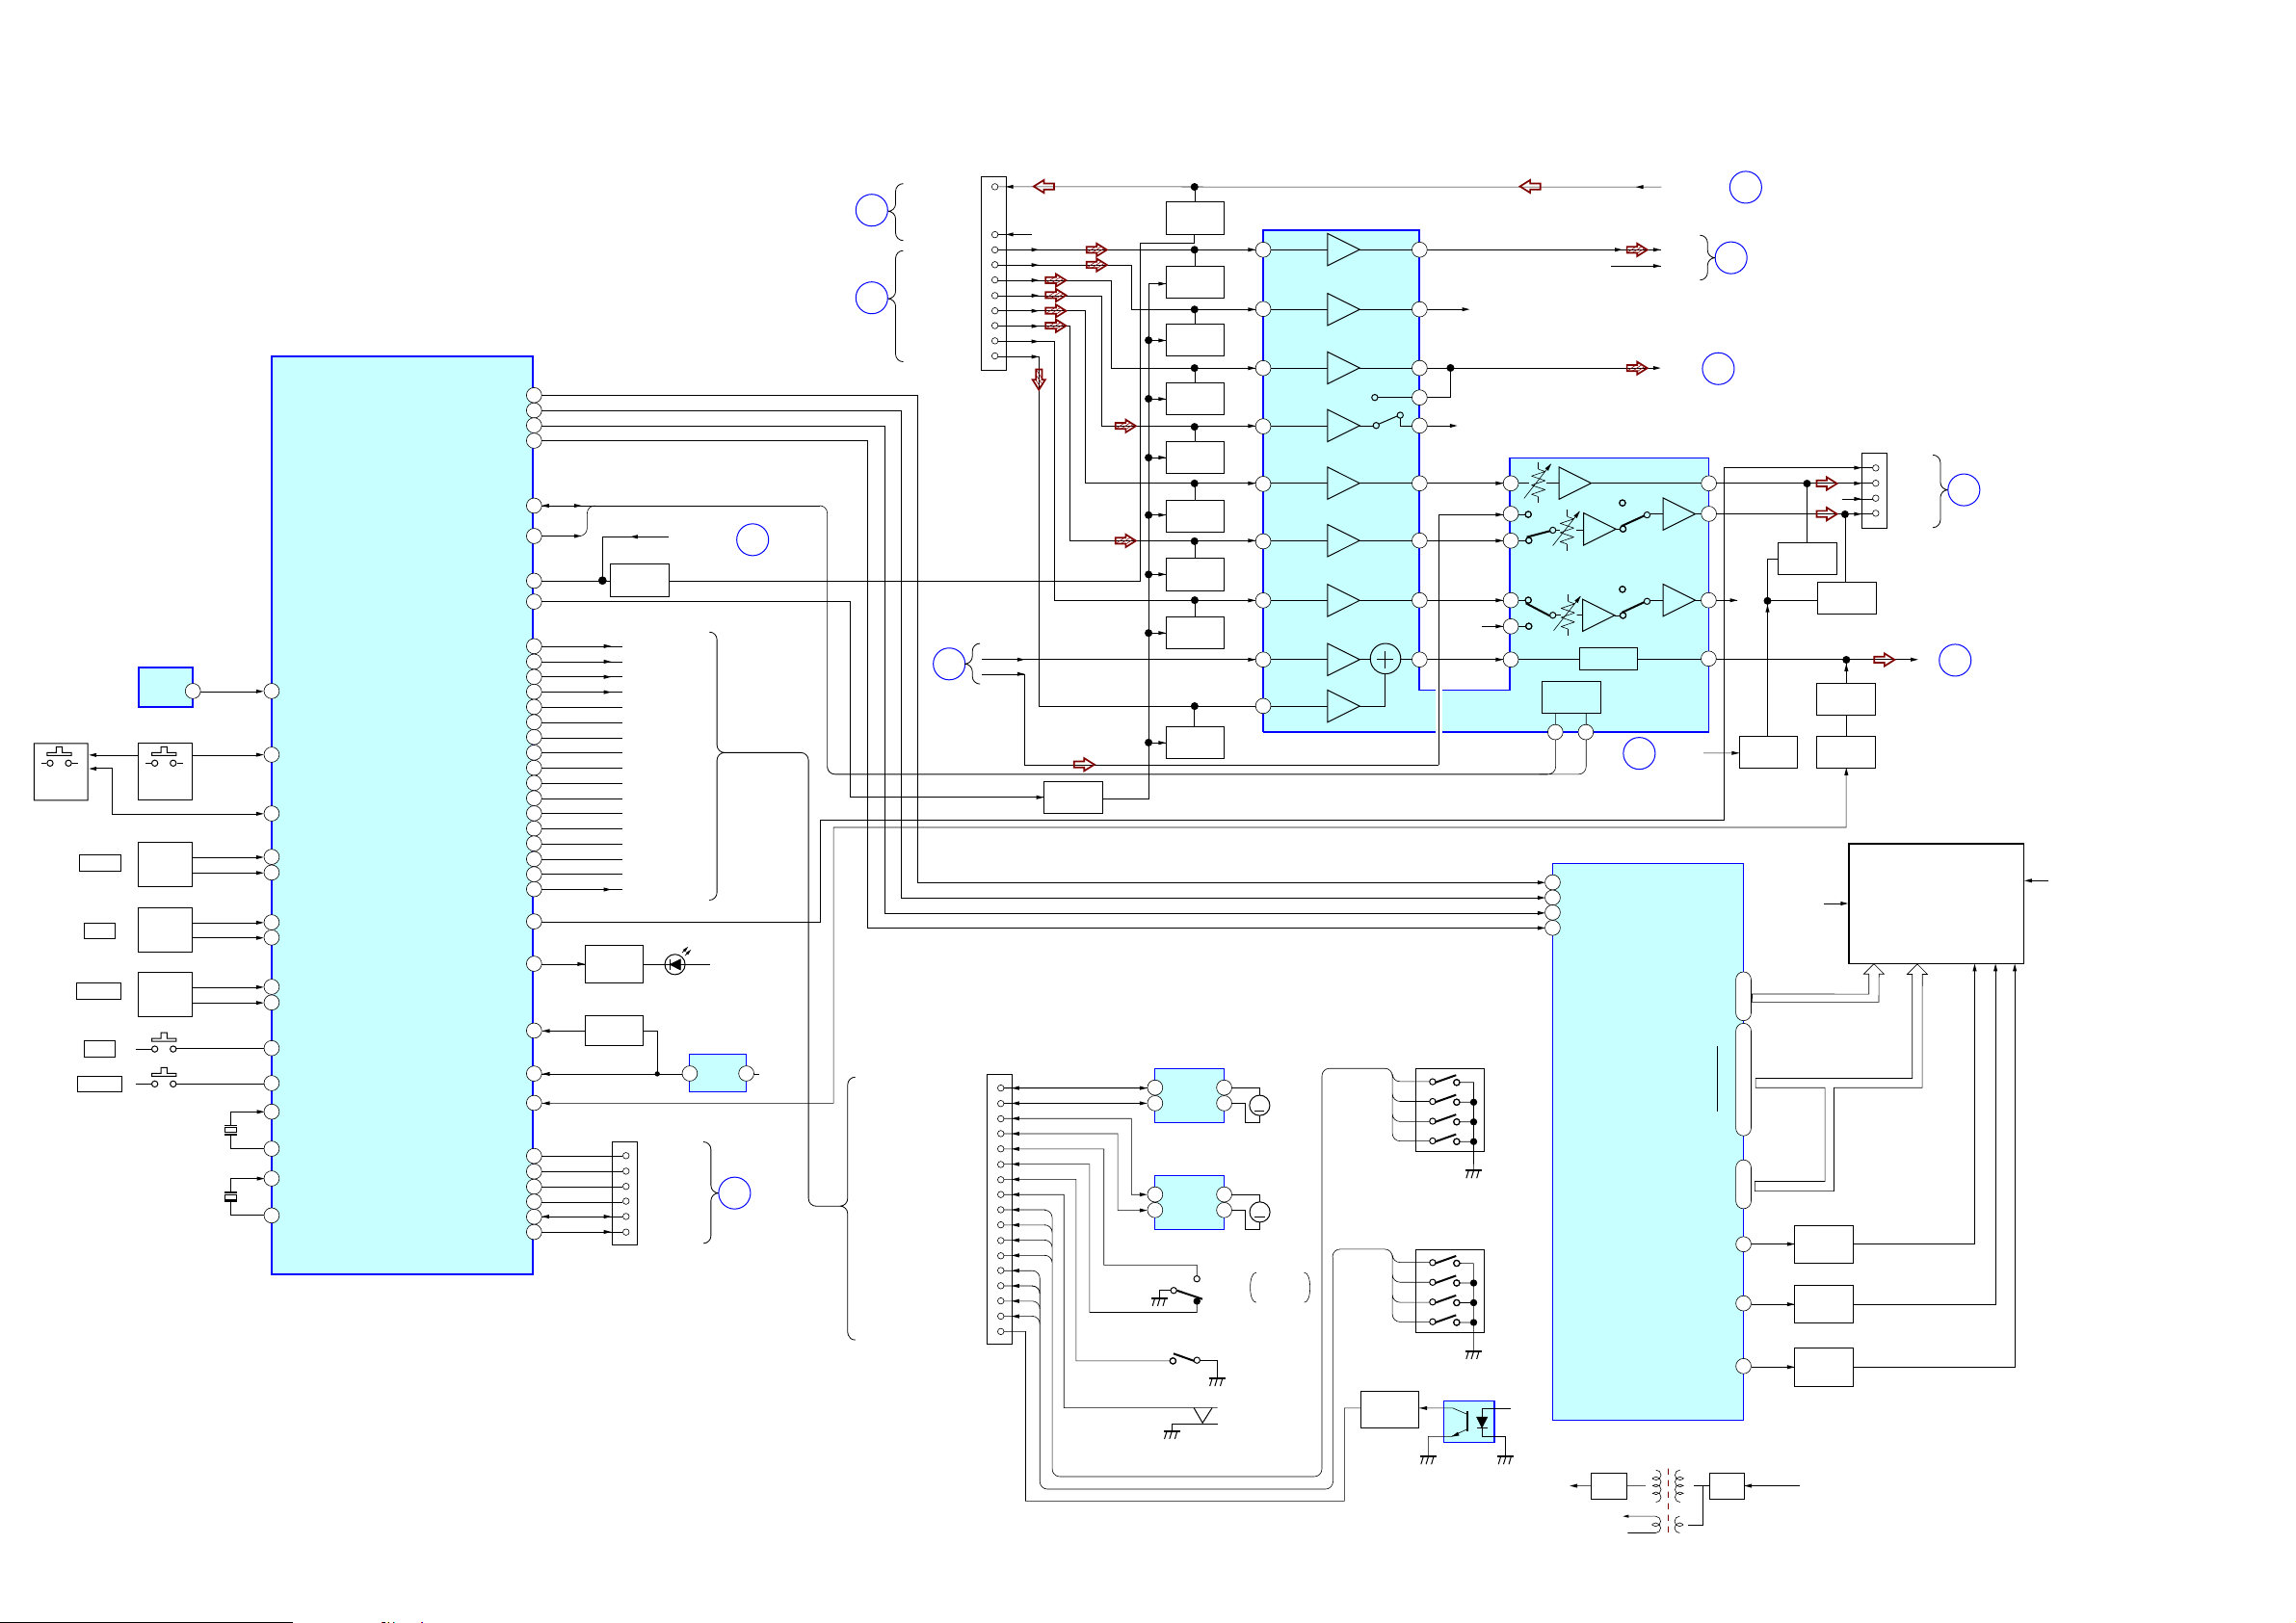
HCD-NXM4D
7-5. BLOCK DIAGRAM – MAIN SECTION –
REMOTE
CONTROL
RECEIVER
S1021-1027,1029-1031
S1032-1036
KEY
NETWORK
TREBLE
BASS
VOLUME
BASS
DISPLAY
IC1050
OUT
S1043
S1001-1005
KEY
NETWORK
S1051
ROTARY
ENCODER
S1050
ROTARY
ENCODER
S1052
ROTARY
ENCODER
36.768kHz
16MHz
SIRCS
KEY2-1KEY2-2
S1042
S1028
X401
X402
41
SIRCD
94
AD-KEY2
95
AD-KEY1
JOG2-A
78
JOG2-B
79
76
JOG1-A
77
JOG1-B
70
VOL-A
71
VOL-B
74
POWER KEY
73
DISPLAY KEY
10
XC-IN
11
XC-OUT
13
X-OUT
X-IN
15
• R-ch is omitted due to same as L-ch.
• Signal path
F : AUDIO
J : DVD
IC401 (2/2)
SYSTEM CONTROL
CDN-MOT-NEG-1(LD)
CDN-MOT-POS-1(LD)
CDN-MOT-NEG-2(U/D)
CDN-MOT-POS-2(U/D)
CDM-MAIN-SW-OPEN(SW2)
CDM-MAIN-SW-CLOSE(SW4)
CDM-SUB-SW-OPEN(SW2)
CDM-SUB-SW-CLOSE(SW3)
CDM-ENC-A-0(STE1)
CDM-ENC-A-1(STE2)
CDM-ENC-A-2(STE3)
CDM-ENC-A-3(STE4)
CDM-ENC-B-0(MDM1)
CDM-ENC-B-1(MDM2)
CDM-ENC-B-2(MDM3)
CDM-ENC-B-3(MDM4)
FL-DATA
FL-CLK
FL-CS
FL-RESET
M61530
CLK
M61530
DATA
DVD POWER
DVD A MUTE
DISC SENS
REAR RELAY
LED-STANDBY
RESET
AC-CUT
SW MUTE
DVD MUTE REQ
DVD SYS REST
DVD VIDEO SW
DVD VIDEO MUTE
IIC-CLK
IIC-DATA
CN201
DVD DSP(1/2)
SECTION
(Page 31)
DVD DSP(2/2)
SECTION
(Page 32)
85
84
83
82
CLCK
1
DATA
2
28
27
48
33
47
34
46
35
45
36
44
37
43
38
42
39
41
40
75
6
72
12
20
19
26
25
24
23
29
30
Q1041
LED
SWITCH
Q391
RESET
Q23,24,40
ANALOG IN
MUTE
LD MTR NEG
LD MTR POS
U/D MTR NEG
U/D MTR POS
TRAY OPEN SW
TRAY CLOSE SW
SUB TRAY IN
SUB TRAY OUT
ST-E1
ST-E2
ST-E3
ST-E4
MD-E1
MD-E2
MD-E3
MD-E4
D,SENSER
D1050
M-REG
SYS RESET
VIDEO SW
VMUTE
2
I
C CLK I/O
2
C DATA
I
DVD POWER
IC391
LEVEL
3 1
DETECT
EVER+4V
G
EVER+4V
D
DVD DSP(2/2)
SECTION
(Page 32)
TUNER/
TAPE
DECK
SECTION
(Page 33)
ANALOG-IN-L
H
ANALOG-IN-R R-CH
DM-L
DM-R
FL-IN
C
FR-IN
C-IN
SL-IN
SR-IN
LFE-IN
L
TUNER/
TAPE
DECK
SECTION
(Page 33)
LD/ST MTR NEG
LD/ST MTR POS
BU U/D MTR NEG
BU U/D MTR POS
SW1 SUB TRAY OPEN OUT
SW4 SUB TRAY CLOSE OUT
SW2 SUB TRAY OUT
SW3 SUB TRAY OUT
ST-E1
ST-E2
ST-E3
ST-E4
MD-E1
MD-E2
MD-E3
MD-E4
D,SENSER
S,W
SURR-L
DVD
A MUTE
Q25,26
LD/ST MOTOR DRIVER
Q102
MUTE
SW
Q270
MUTE
SW
Q271
MUTE
SW
Q272
MUTE
SW
Q273
MUTE
SW
Q274
MUTE
SW
Q275
MUTE
SW
Q276
MUTE
SW
Q277
MUTE
SW
IC701
9RIN
OUT1
OUT2
FIN
7
IC711
U/DOTOR DRIVER
9RIN
OUT1
FIN
OUT2
7
S721
OPEN
CROSE
S731
S761
DM-L L OUT
37 38
DM-R
40
FL IN
41
FR IN
2
CIN
13
SL-IN
6
SR-IN
10
SWSW
15
LFE-IN
14
4
M761
2
M
(LD/ST)
4
M762
2
M
(U/D)
MAIN TRAY
OPEN/IN
(SUB TRAY OUT)
(SUB TRAY OUT)
R OUT
EL OUT
Q751
SENSE
SWITCH
39
34
33
32
12
SURR-L
5
9
SURR-R
24
S781
S771
(DISC SENSOR)
R-CH
R-CH
ENCODER
ENCODER
IC751
11
3
4
8
9
23
ROTARY
(ST U/D)
ROTARY
(MD)
D+3.3V
ANALOG-IN-L
L-OUT
R-CH
FL-OUT
IC201
INPUT ATTENUATOR
LPF, AGC, BASS BOOST
SW-LPF
DATA
CLOCK
17 18
TA MUTE
DATA
8
7
6
5
SDATA
SCK
CS
RESET
N
CLOCK
TUNER/TAPE DECK
SECTION
(Page 33)
IC1020
DISPLAY CONTROL/KEY CONTROL
ANALOG-IN-L
L-OUT
R-OUT
FL-OUT
25
29
26
22
SEG00
SEG35
DEG01
DEG11
DEG12/SEG36
DEG13/SEG37
DIG14SEG38
J
I
TUNER/TAPE DECK
K
R-ch
51
I
I
15
3
•
2
•
1
•
64
I
57
56
•
55
4
DG00
54
55
TUNER/TAPE DECK
SECTION
(Page 33)
TUNER/TAPE DECK
SECTION
(Page 33)
SECTION
(Page 33)
R-CH
MUTE
SW
Q21,22
TA
MUTE
F1
Q1021
GREID
DRIVE
Q1022
GRID
DRIVE
Q1023
GRID
DRIVE
Q3
MUTE
SW
SW
MUTE
SW
MUTE
CN104
Q4
Q19,20
Q6
RELAY
C-IN
SR-IN
SL-IN
SW
FLUORESCENT
INDICATOR
M
FL1020
TUBE
AMP
SECTION
O
(Page 35)
TUNER/TAPE DECK
SECTION
(Page 33)
F2
HCD-NXM4D
VP
VF1
VF2
T801
Q1024
BIAS
OSC
D1023-1026
VP D/D CON+9V
RECT
3434
Page 35
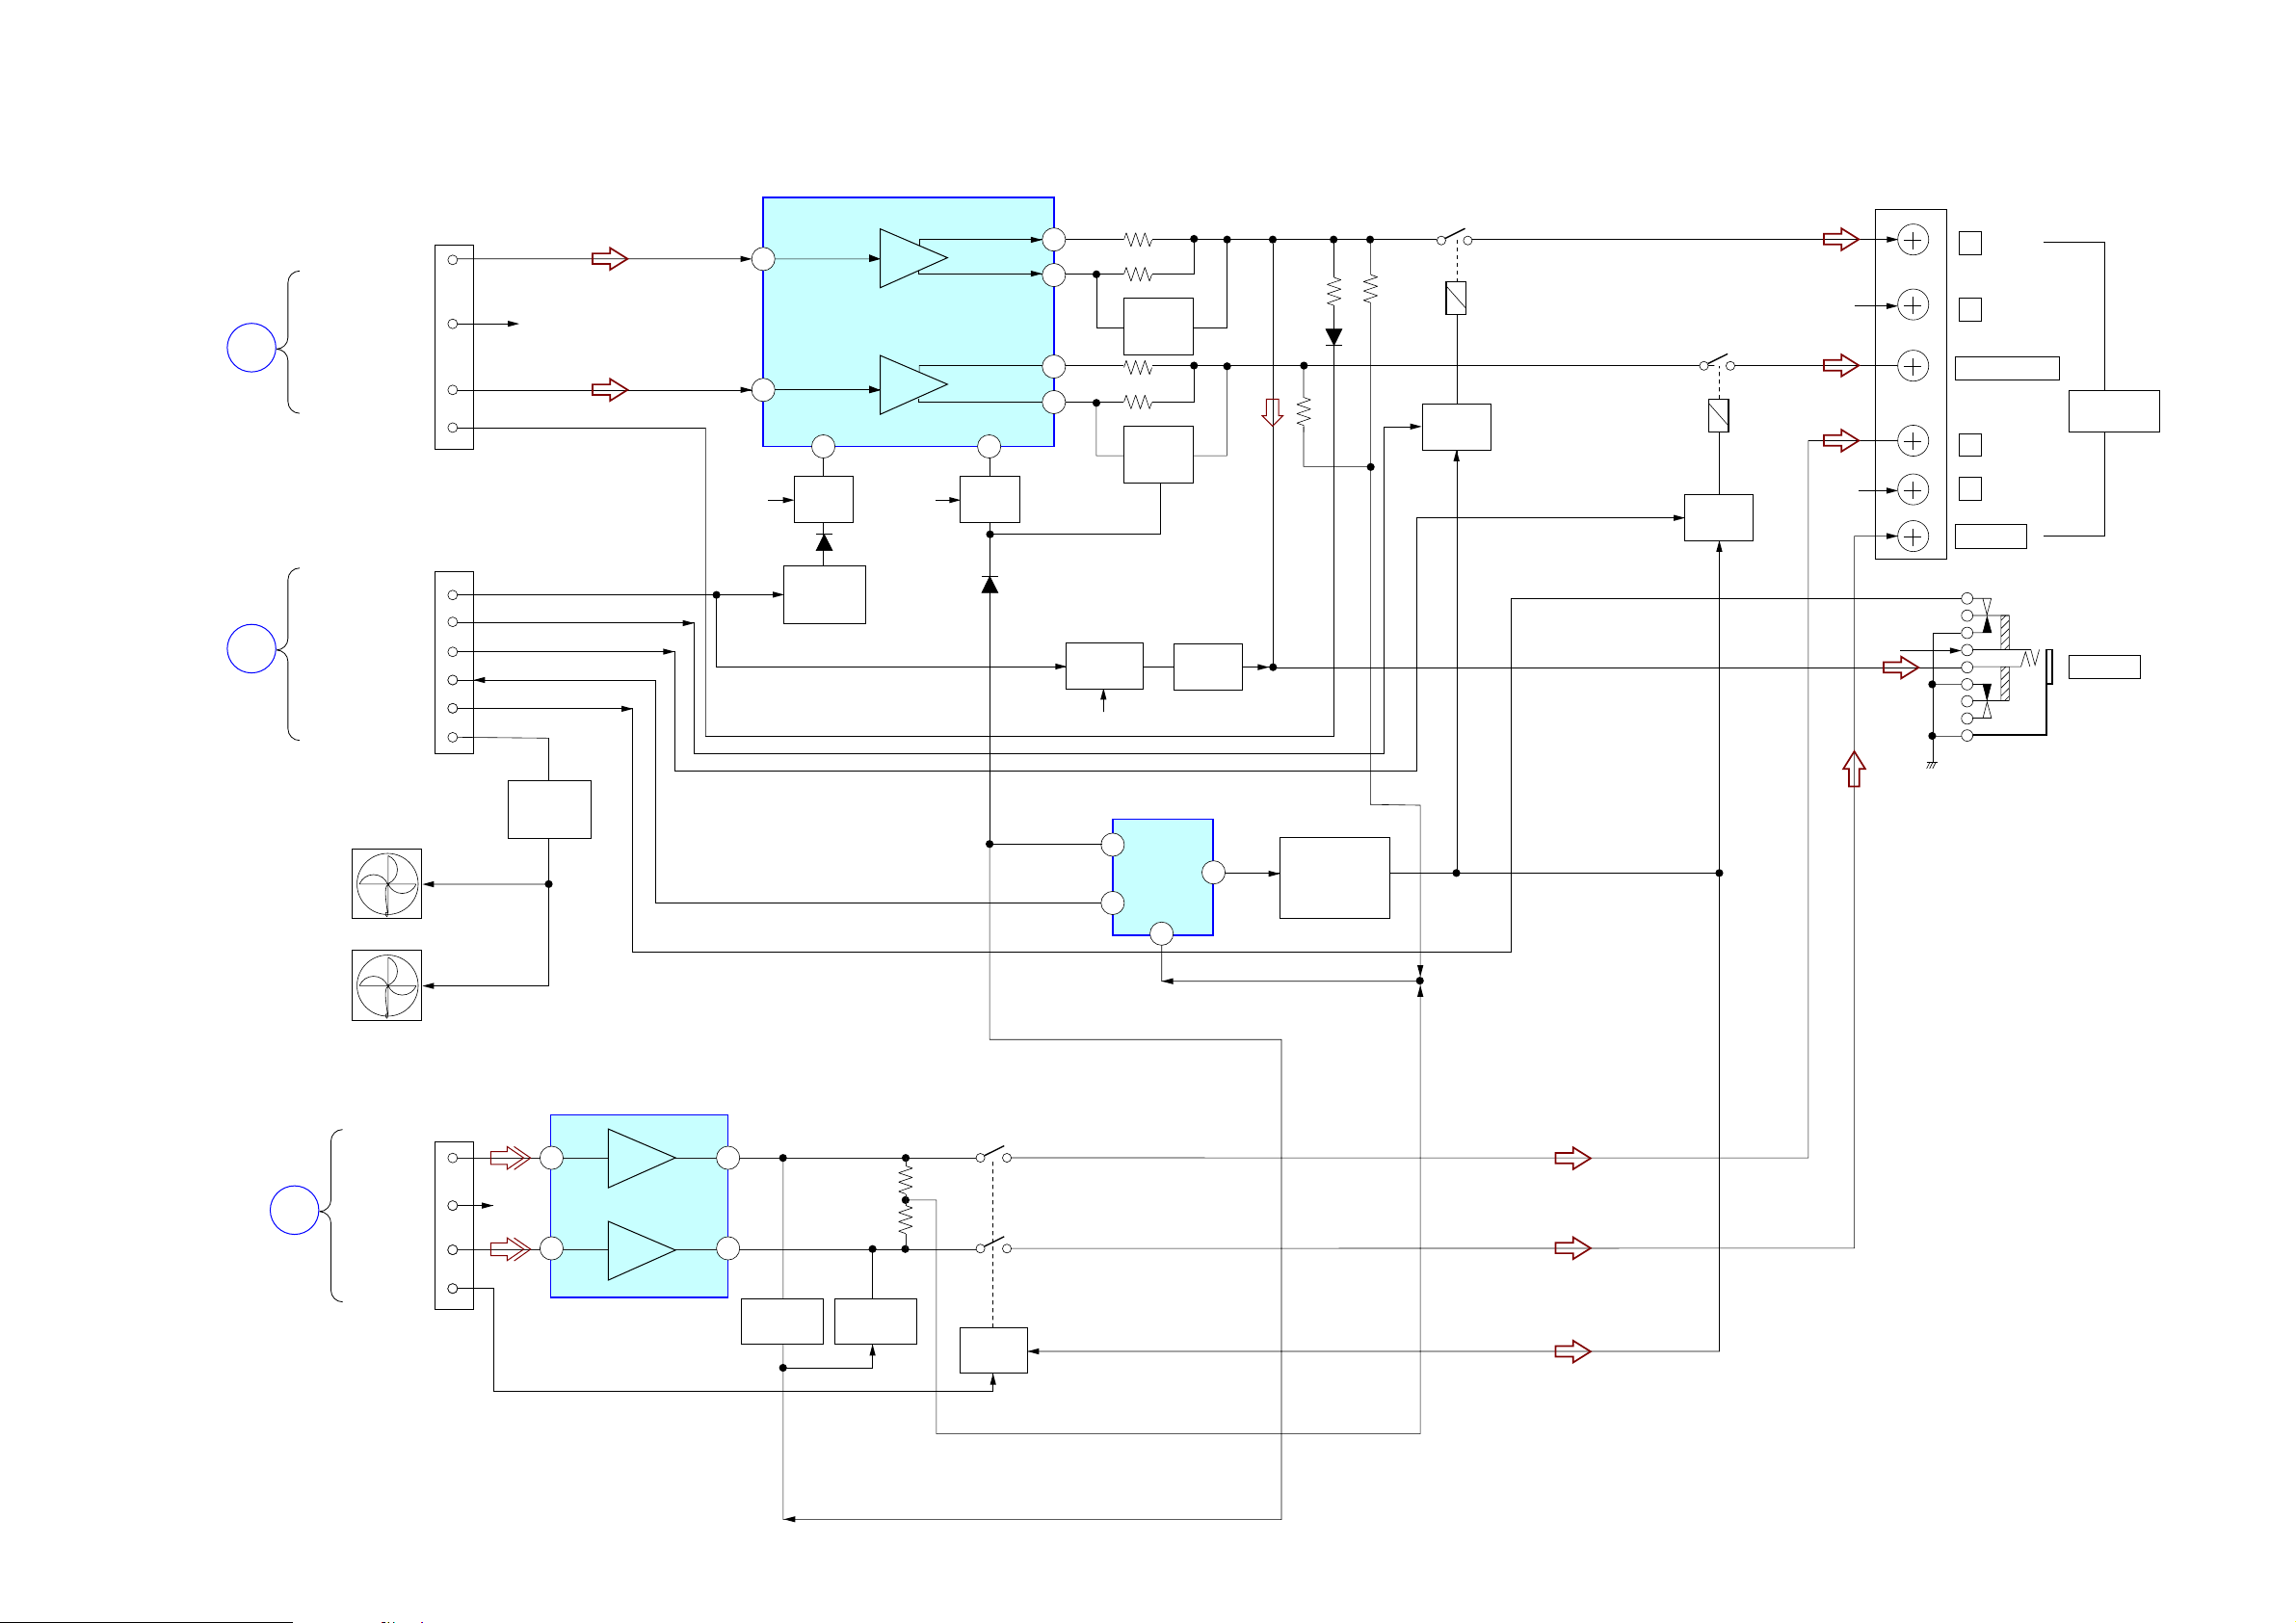
7-6. BLOCK DIAGRAM – AMP SECTION –
IC501
POWER AMP
HCD-NXM4D
TM502
TUNER/TAPE
DECK
SECTION
(Page 33)
TUNER/TAPE
DECK
SECTION
(Page 33)
E
F
FR
SW
DBFB FEED BACK
STK MUTE
FRONT RELAY
SW RELAY
PROTECT
HP SW
FAN CTL
FAN
FAN
FL
CN501
CN508
R-CH
Q858-861
FAN
MOTOR
DRIVE
-VH
18
19
-PRE +PRE
8 9
-VH
SUPP
D501
Q507,508
STK
MUTE
SWITCH
+VH
Q501,502Q503
TEMP
DETECT
D507
10
11
22
21
Q868,869,890
MUTE
CONTROL
Q854
Q505
OVER
LOAD
DETECT
Q506
OVER
LOAD
DETECT
Q854
MUTE
SWITCH
IC850
OVER CURRENT PROTECTER
1
OCP
CT
3
OUT
VP
2
FRONT
L
R-CH
Q509
RELAY
DRIVE
Q510
RELAY
DRIVE
Q850-852
SPEAKER
4
PROTECT
RELAY
DRIVE
R-CH
R-CH
R
SUB WOOFER
SURROUND
L
R
CENTER
SPEAKER
OUT
J1063
PHONES
HCD-NXM4D
MAIN
SECTION
(Page 34)
O
SL IN
SR IN
C IN
RELAY
CN601
R-CH
SURROUND AMP
8
13
IC601
3
15
Q603 Q601
PROTECT
SWITCH
PROTECT
SWITCH
Q610
RELAY
DRIVE
OVER DC CURRENT DETECT
SL SP
C SP
PROTECT
OVER DC
DETECT
• R-ch is omitted due to same as L-ch.
• Signal path
F : AUDIO
3535
Page 36
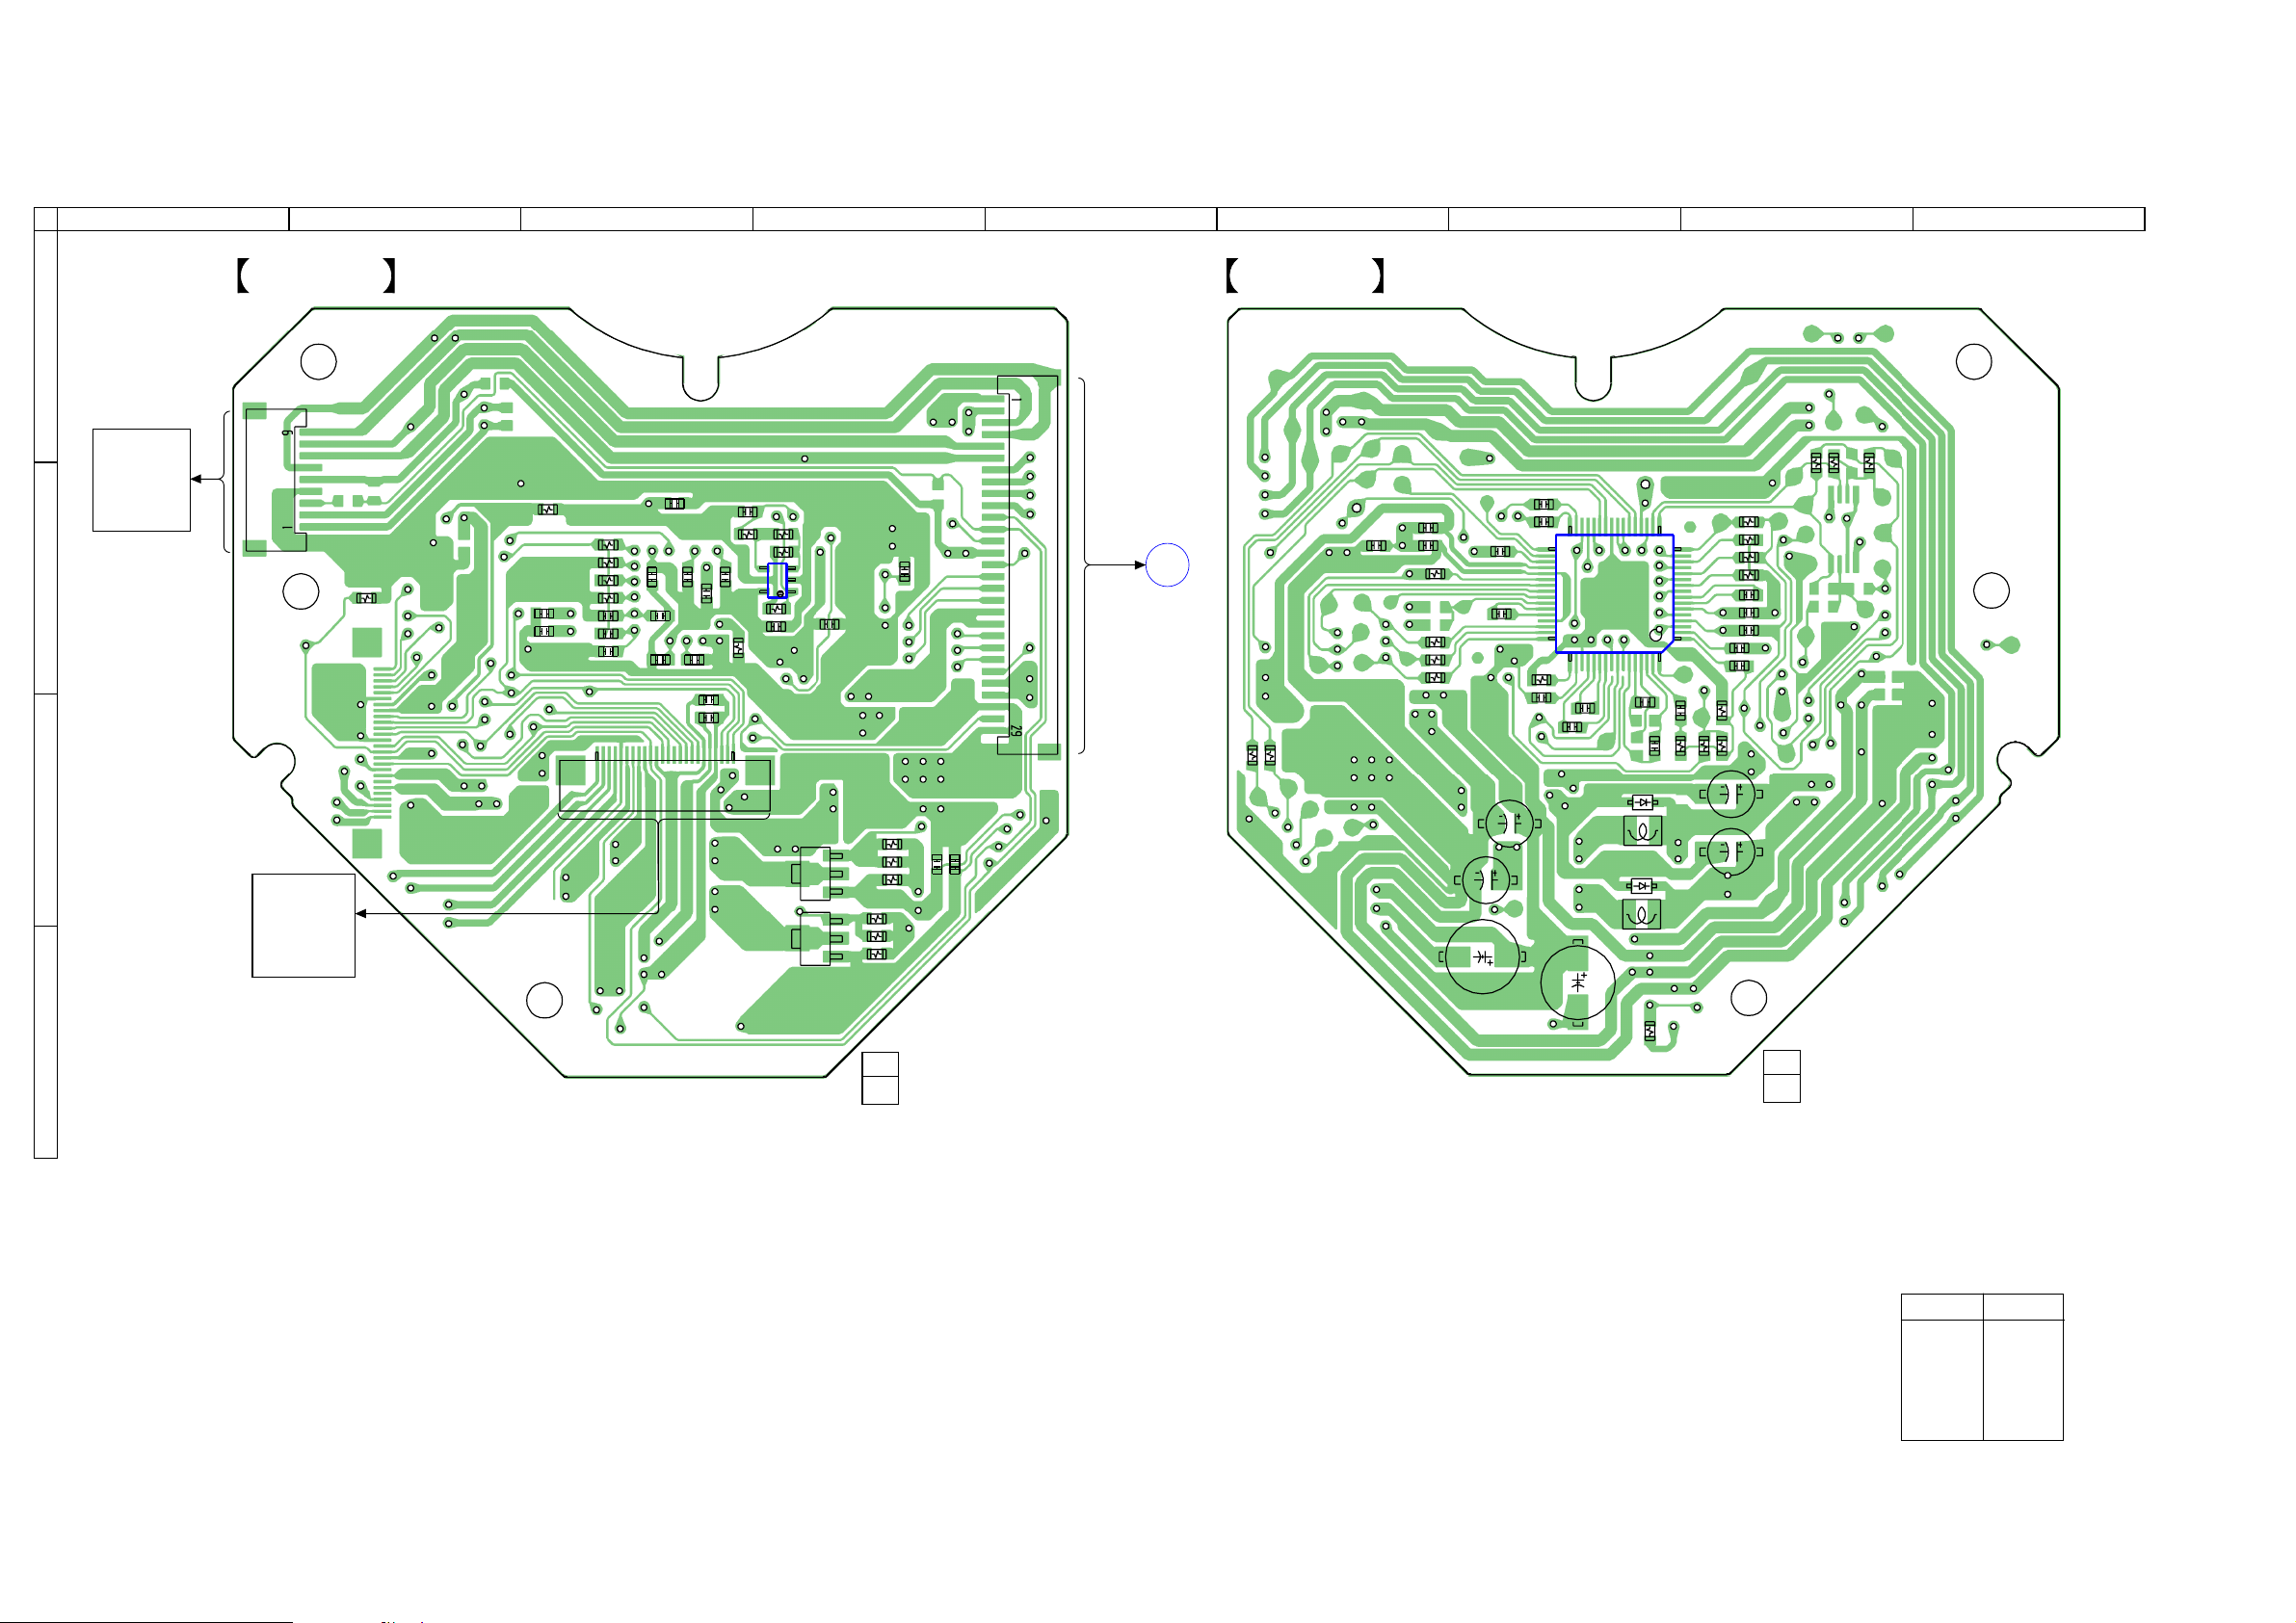
HCD-NXM4D
7-7. PRINTED WIRING BOARD – RF SECTION –
1
RF BOARD
2
(SIDE A)
A
OPTICAL
PICK-UP
BLOCK
(DBU-3)
B
CN003
R001
C
OPTICAL
PICK-UP
BLOCK
(DBU-3)
• See page 29 for Circuit Boards Location.
3 4 5 6 7
C040
C022
C027
CN001
R034
C039
C041
C028
C038
1
C050
C009
C008
4
C037
5
R091
C052
C023
C021
R021
R016
R018
R012
R014
C015
C017
C020
24
R047
R046
3
IC003
1
R033
Q001
Q002
C013
E
E
R004
R003
R005
R007
R009
R008
C049
C010
C011
CN002
A
DMB07
BOARD
(Page40)
RF BOARD
JL005
R006
R010
RFMON
C012
(SIDE B)
C035
C033
R031
R029
R028
R027
C006
C005
C001
C036
C034
C031
C051
33
C032
48
32
49
R026
C030
IC001
C029
D001
L001
VC
C026
C025
D002
L002
17
64
16
R013
C042
C014
1
C018
C019
R025
R024
C024
R015
R017
R011
C016
R023
R022
8
C002
C004
R035
R020
9
R019
D
HCD-NXM4D
1-684-822-
12
(12)
C003
R041
1-684-822-
12
(12)
• Semiconductor
Location
Ref. No. Location
IC101 D-8
IC251 C-6
IC301 C-8
IC303 B-8
Q10 E-4
3636
Page 37
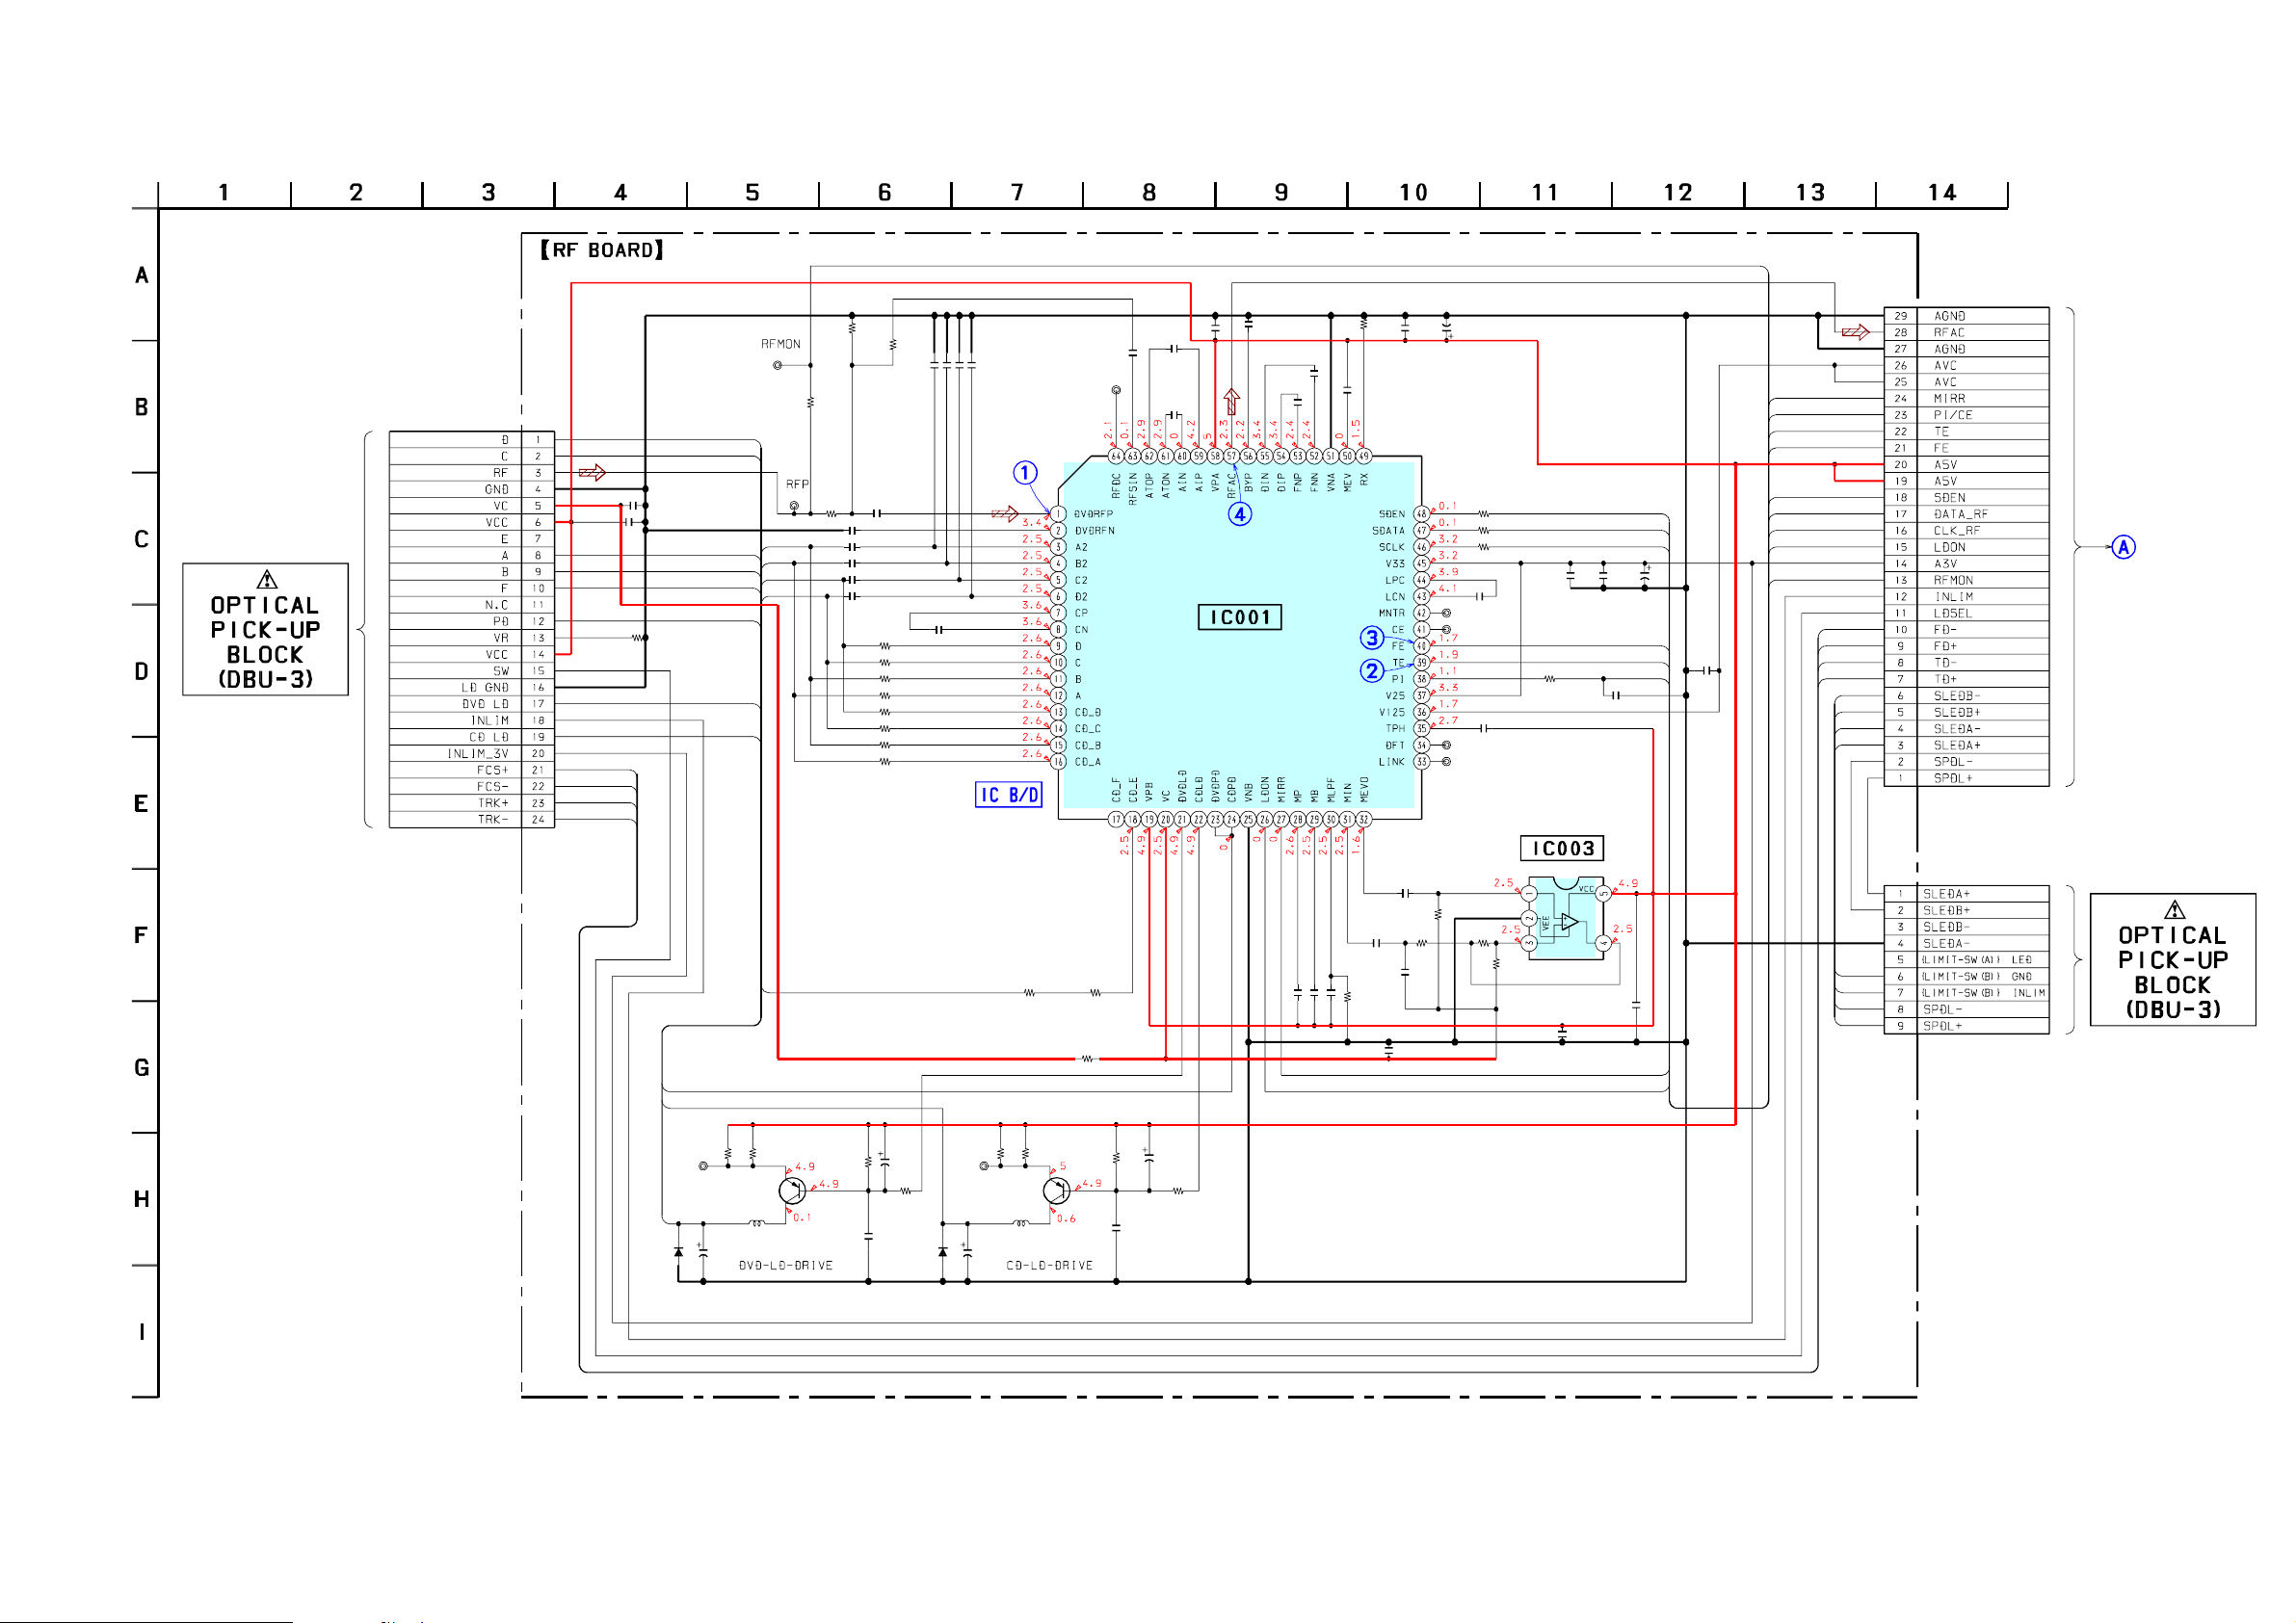
HCD-NXM4D
7-8. SCHEMATIC DIAGRAM – RF BOARD –
CN001
24P
TO DBU-1
• See page 63 for IC Block Diagram. • See page 62 for Waveforms.
R023
820
R024
0
CH
CH
CH
CH
22p
22p
22p
100
R022
220
C019
5600p
B
C018
5600p
B
2200p
B
C017
2200p
B
C016
2200p
B
C015
2200p
B
C014
C042
R014
R013
R012
R011
R018
R017
R016
R015
22p
C022
C021
C023
C020
180p
CH
0
0
0
0
0
0
0
0
JL004
C024
0.01
FD+
TD+
TD-
JL005
R025
D
C
C008
0.1
C009
0.1
R001
100
DVD_LD
CD_LD
FD-
JL007
A
A
B
B
C
F
D
PD
C026
0.1
C025
0.1
C028
C027
0.1
IC001
SP3723CAF0PM
DVD/CD RF AMP
RFMON
CN002
R026
C013
C030
0.01
12k
0.1
C006
22
C036
0.47
JL006
JL003
JL002
JL001
R033
100k
10V
MIRR
PI/CE
TE
FE
R027
R028
R029
C032
0.047
C034
0.1u
C049
0.1
C012
0.1
SDEN
DATA_RF
CLK_RF
C005
10V
PI/CE
22
FE
C035
TE
0.1
0
0
0
C033
0.1
R031
100
B
IC003
TL343IDBVR
OP AMP
SDEN
DATA_RF
CLK_RF
LDON
RFMON
FD-
FD+
TD-
TD+
SLB-
SLB+
SLA-
SLA+
C031
1000p
0.1
C029
0.01
29P
TO MAIN
CN003
9P
TO DBU-1/KHM240A
/KHM270A
DMB07
BOARD
(1/6)
(Page42)
PD
CD_LD
IOP2
DVD_LD
D001
1SS355TE-17
R003
33
C002
16V
10
F
R004
33
L001
47uH
Q001
2SB1132-T100-QR
R005
47k
C010
1000p
C001
6.3V
R006
470
100
IOP1
D002
1SS355TE-17
R007
33
C004
10
16V
R019
0
R008
33
L002
47uH
Q002
2SB1132-T100-QR
R020
R021
0
0
R009
R034
C051
0.47
0.033
680p
0.033
C038
C039
C011
1000p
C003
100
6.3V
R010
470
47k
C037
R091
560k
C050
0.0033
C040
0.1
R047
470
33k
R046
10k
C041
0.1
C052
0.1
MIRR
LDON
SLA-
SLB-
SLB+
SLA+
HCD-NXM4D
3737
Page 38
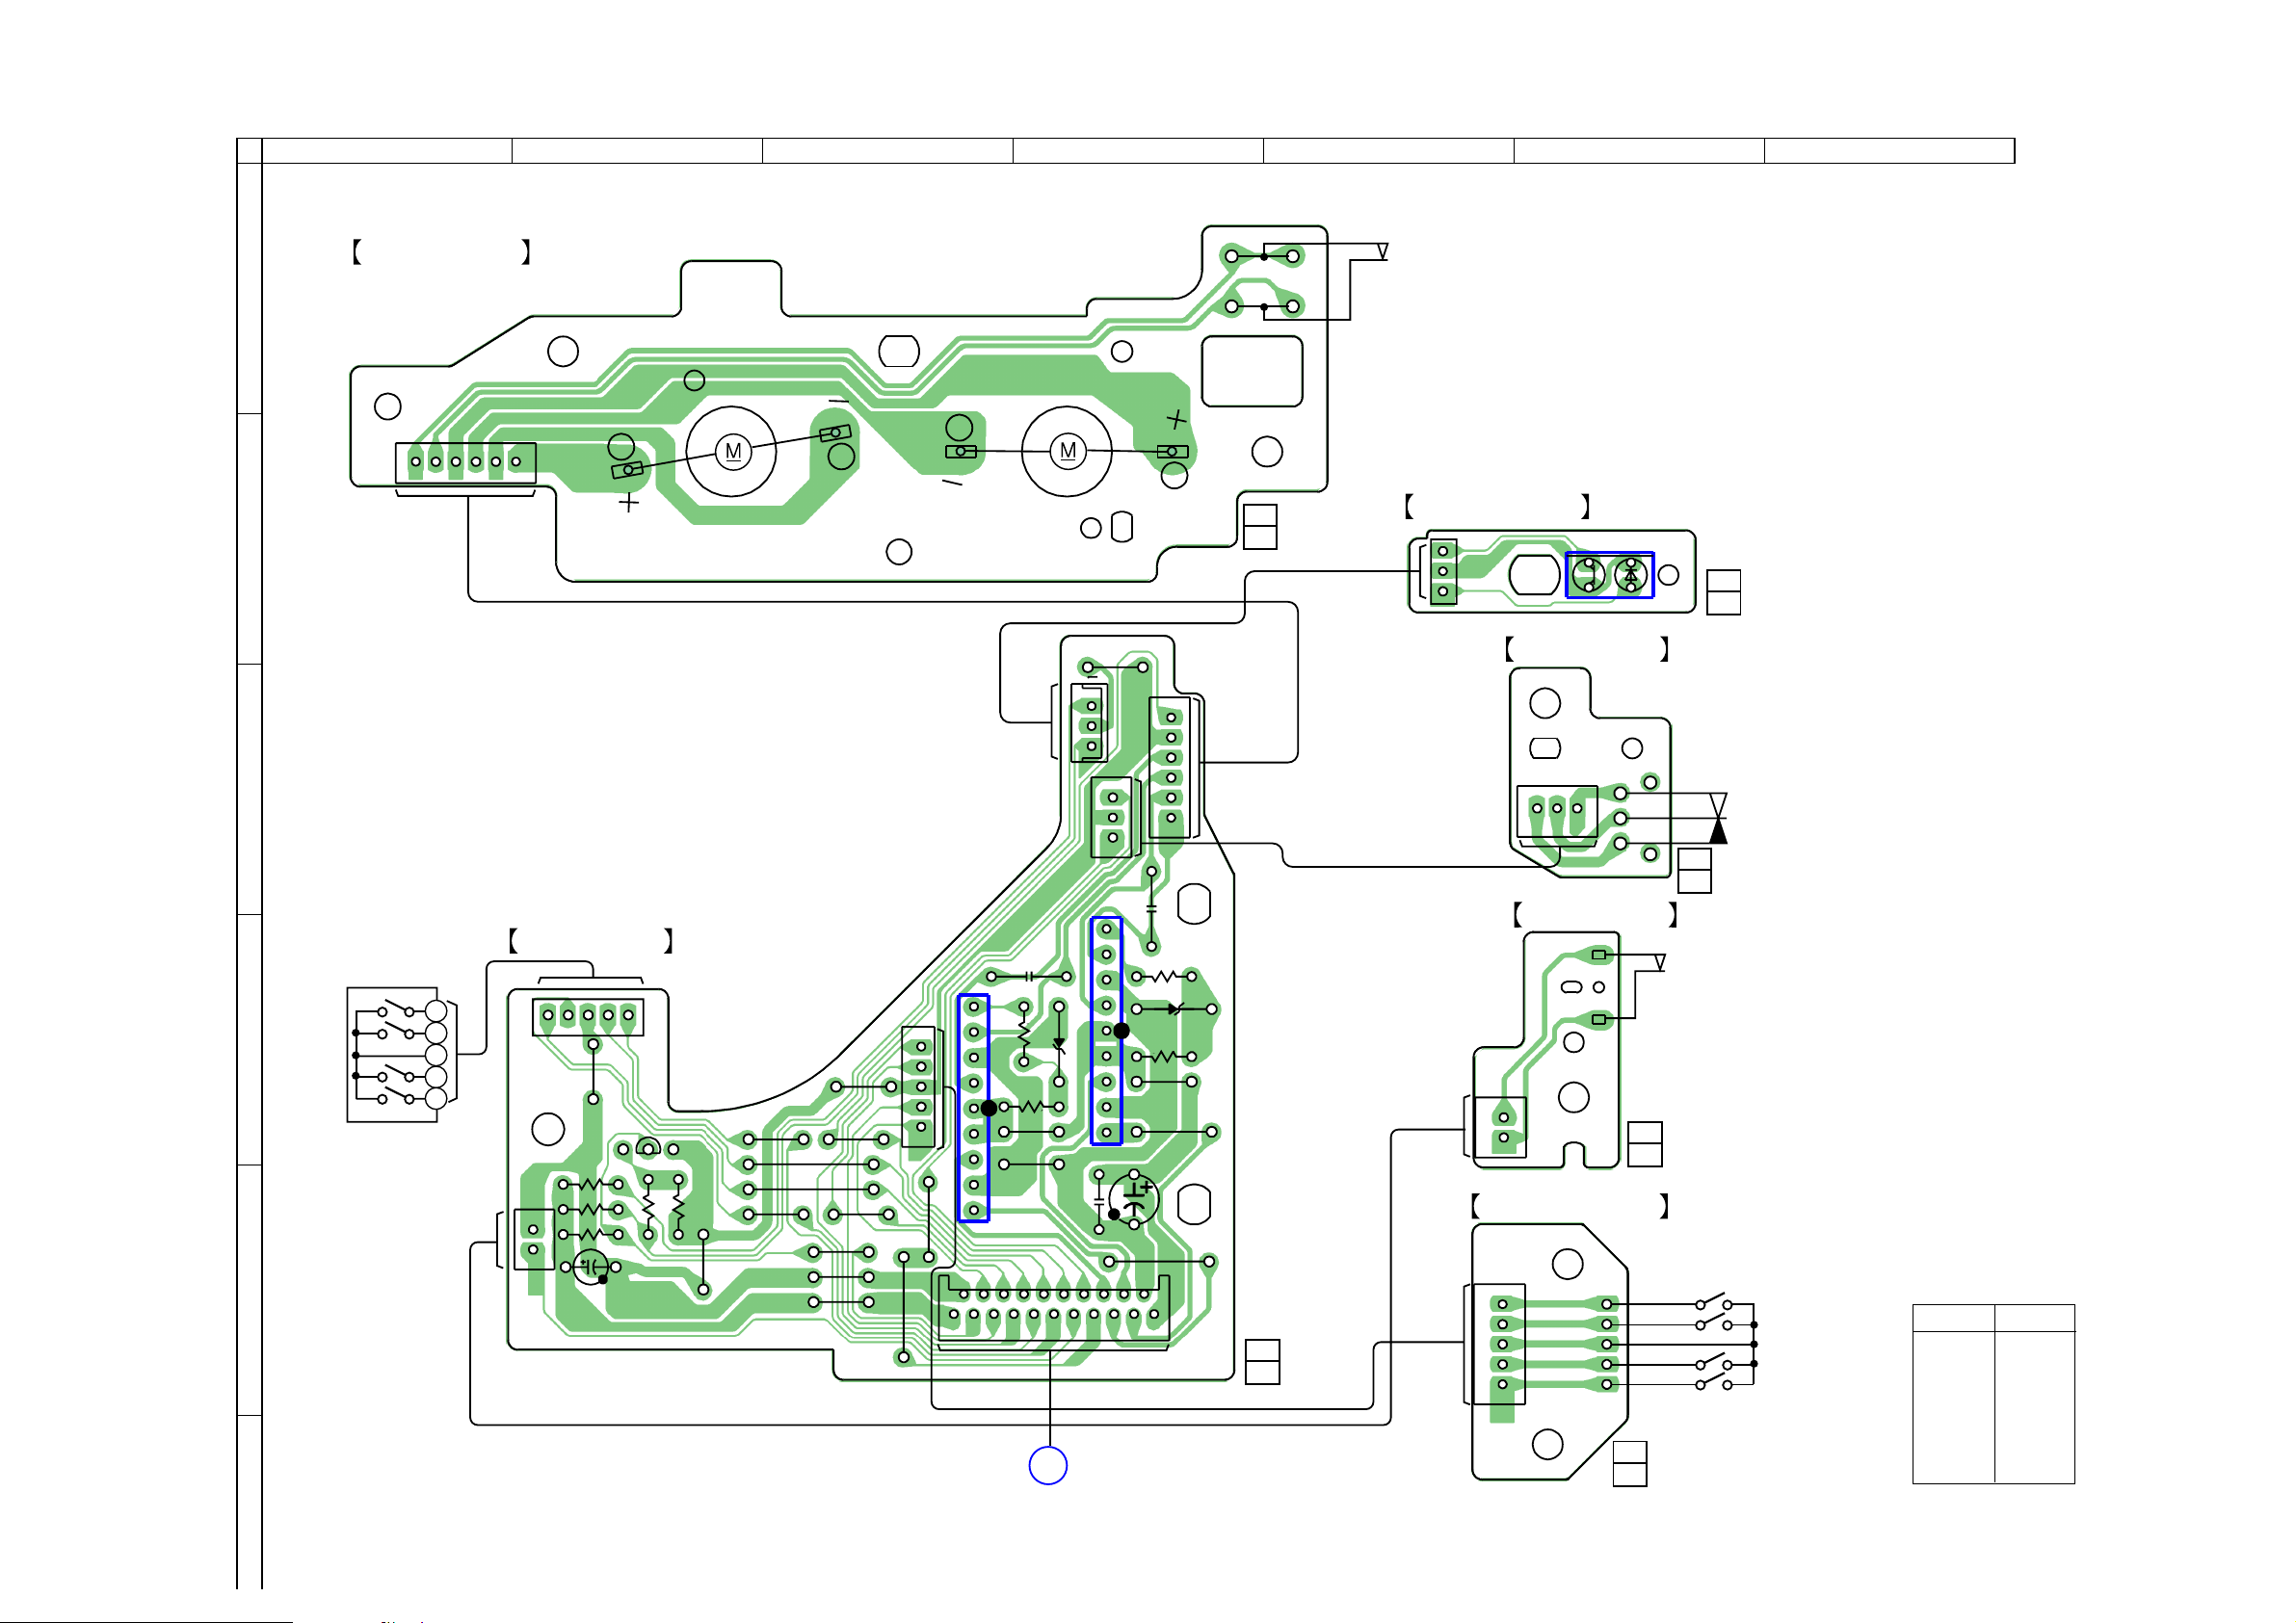
HCD-NXM4D
7-9. PRINTED WIRING BOARD – DVD MECHANISM BOARD –
1
2
MOTOR BOARD
A
CN761
6
B
1
M761
(LD/ST MOTOR)
• See page 29 for Circuit Boards Location.
3 4 5 6 7
S761
(SUB TRAY OUT)
M762
(BU U/D MOTOR)
JW701
1-861-240-
12
(12)
SENSOR BOARD
IC751
3
1
CN751
SW(1) BOARD
12
(12)
1-861-244-
1
3
C
3
CN702
1
CN705
CN706
6
CN721
1
1
3
1-861-241-
12
(12)
S721
(MAIN TRAY IN/OUT)
IC701
SW(2) BOARD
CN731
1-861-242-
12
(12)
ENCODER BOARD
CN771
1-861-243-
12
(12)
S731
(SUB TRAY N)
S771
ROTARY ENCODER
(MD)
• Semiconductor
Location
Ref. No. Location
D701 D-4
D711 D-4
IC701 D-4
IC711 E-3
IC751 B-6
Q751 D-2
D711
C703
CN701
B
1
9
C701
MAIN
BOARD
(Page 50)
R702
D701
R701
JW702
JW716
JW715
2
1
1-861-245-
C761
11
(12)
S781
ROTARY ENCODER
(ST U/D)
4
D
3
G
2
1
E
RELAY BOARD
1
2
3
4
G
JW713
Q751
R751
R754
R753
1
2
CN703
C702
R752
R755
JW708
JW706
JW712
JW707
JW709
JW710
JW711
JW714
JW705
JW718
JW720
1
2
G
3
4
CN707
JW719
1
JW717
20
21
9
C762
R712
R711
JW703
JW704
IC711
HCD-NXM4D
F
3838
Page 39
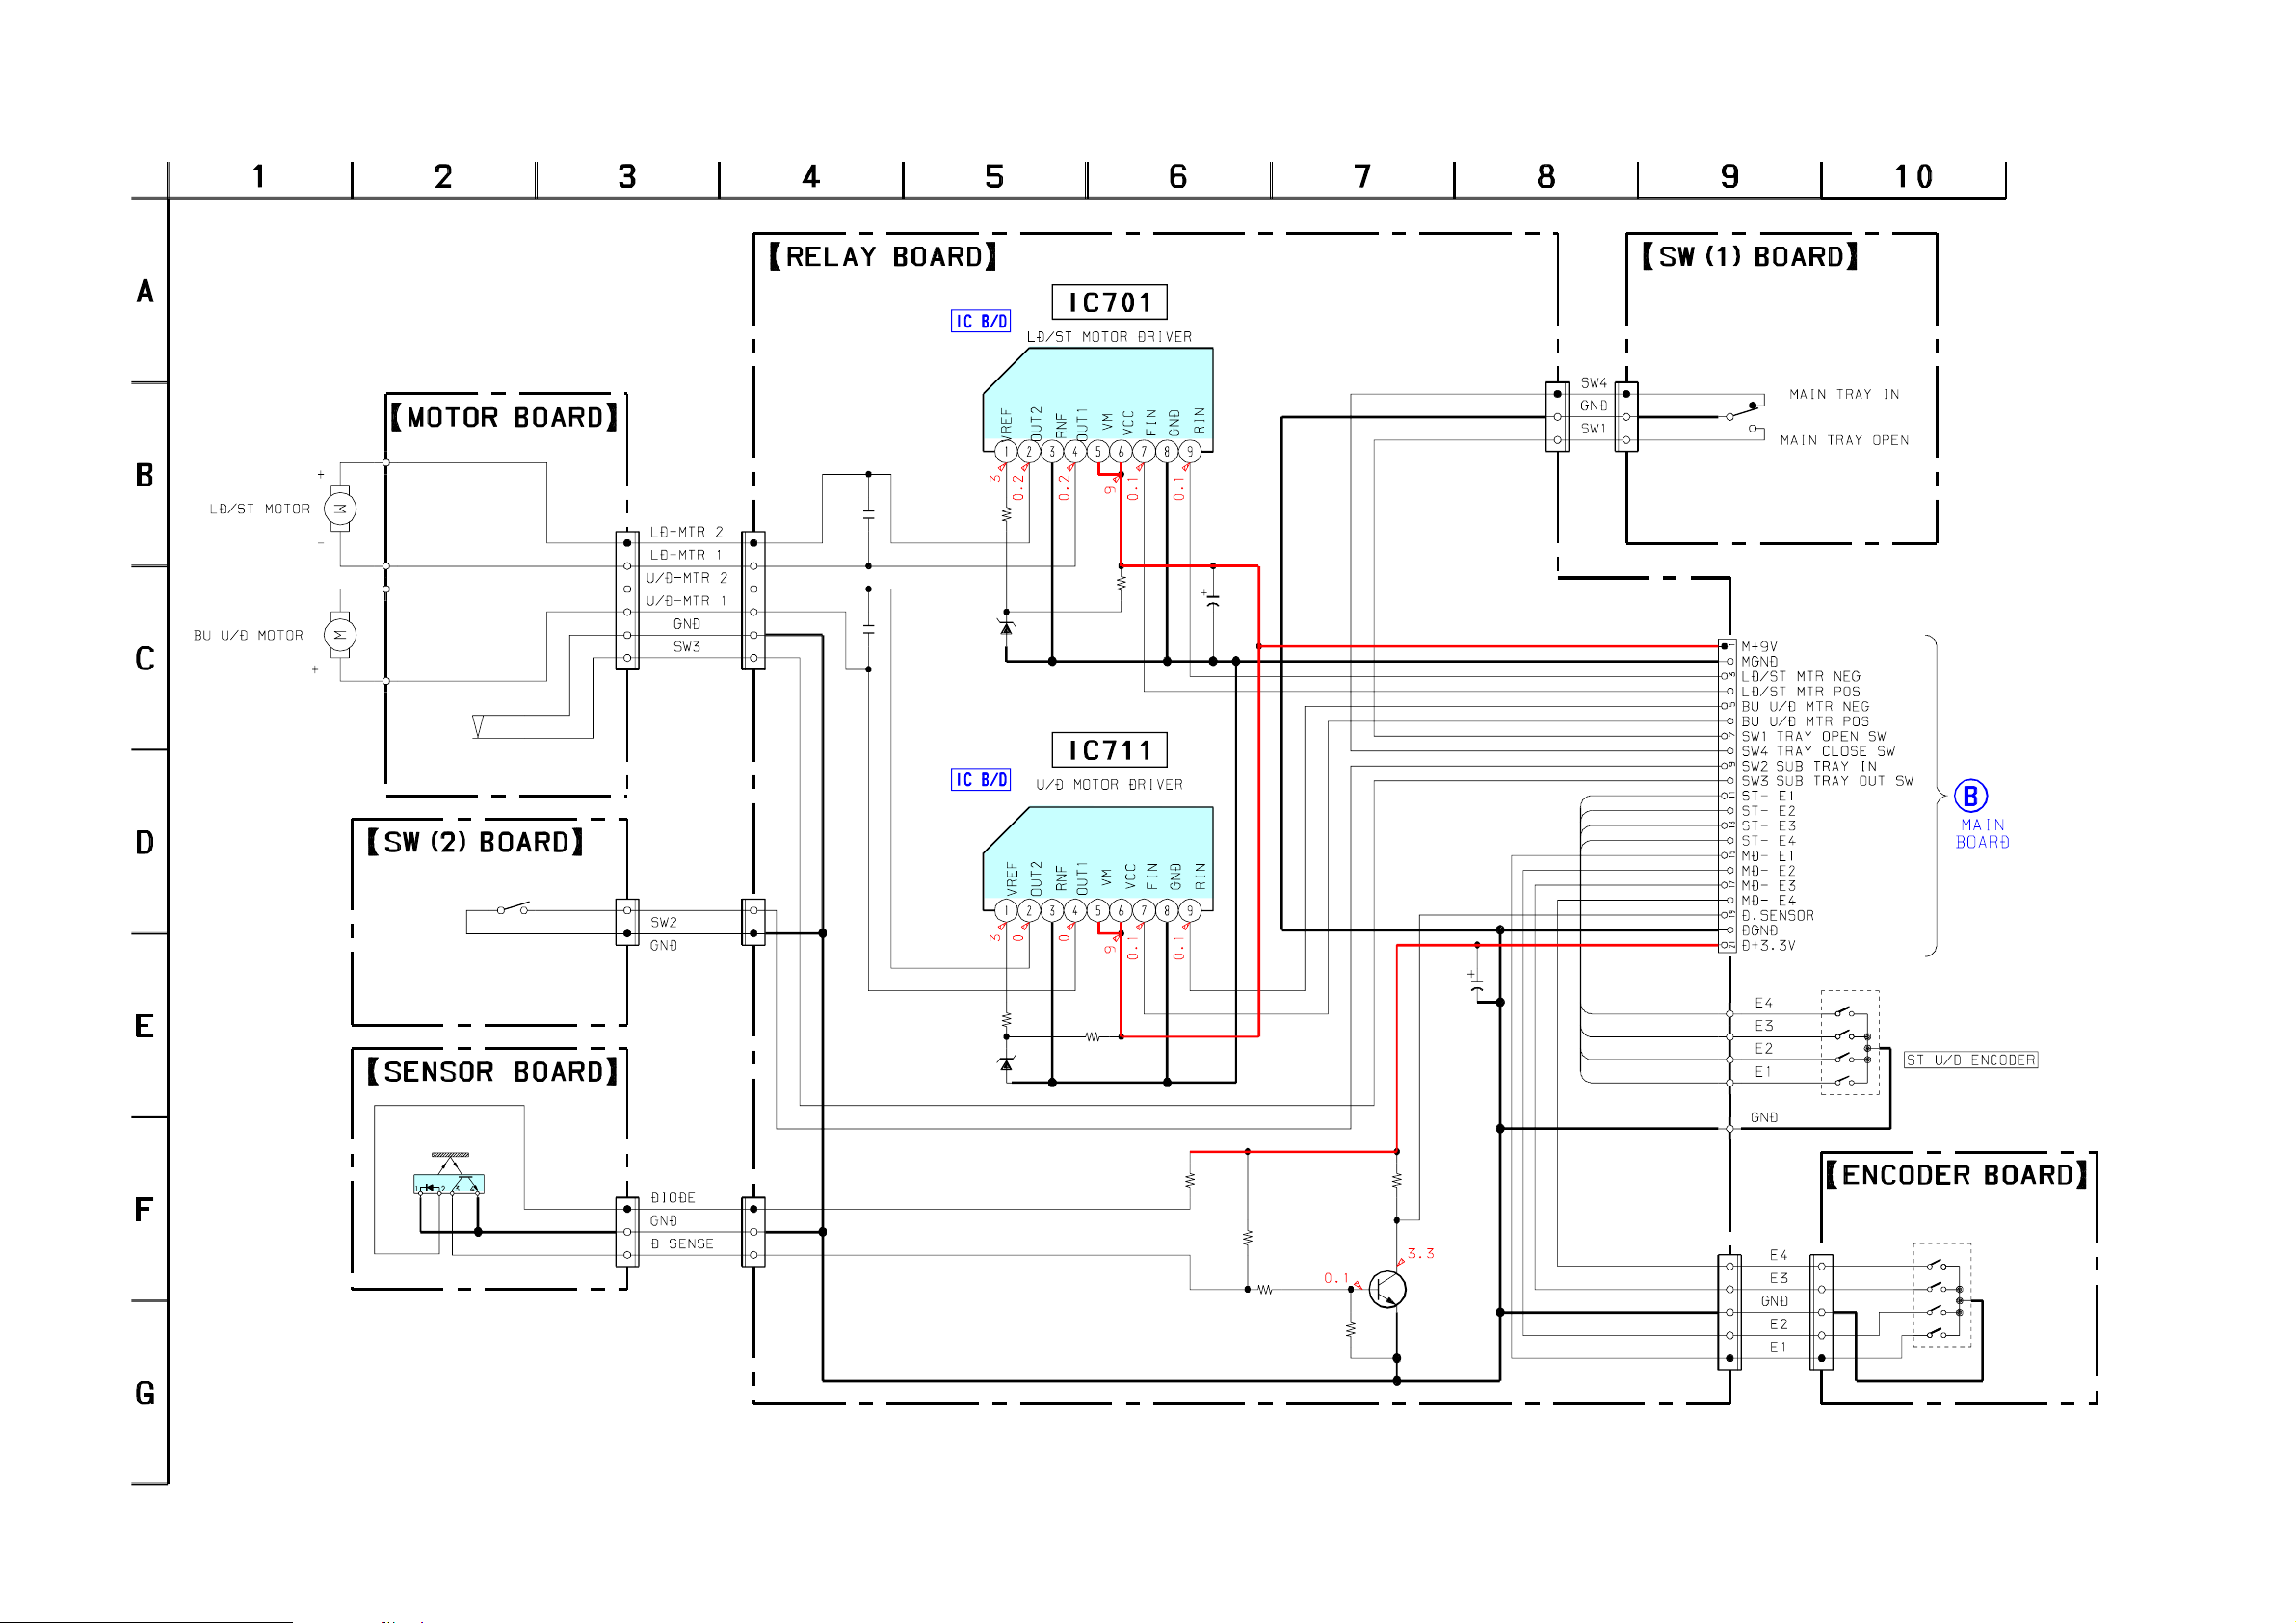
HCD-NXM4D
7-10. SCHEMATIC DIAGRAM – DVD MECHANISM BOARD –
M761
RF500TB
M762
RF500TB
CN761
6P
• See page 66 for IC Block Diagram.
CN706
6P
C761
0.01
C762
0.01
R702
100
MTZJ-T-77-4.7B
D701
IC701
BA6956AN
R701
680
IC711
BA6956AN
C701
47
16V
CN702
3P
CN721
3P
S721
(MAIN TRAY
IN/OUT)
CN701
21PIN
S761
(SUB TRAY OUT)
S731
(SUB TRAY IN)
IC751
RPR-359F
CN751
3P
CN731
2P
CN703
2P
CN705
3P
R712
100
D711
MTZJ-T-77-4.3A
R711
680
R751
91
R754
12k
R752
10k
R753
10k
Q751
2SC2785-HFE
DISC SENSOR
R755
10k
C702
10
16V
ST-E1
ST-E2
ST-E3
ST-E4
ST-E4
ST-E3
ST-E2
ST-E1
CN707
5P
ROTARY ENCODER
CN771
5P
(1/3)
(Page 51)
S781
ROTARY
ENCODER
S771
(MD)
HCD-NXM4D
3939
Page 40
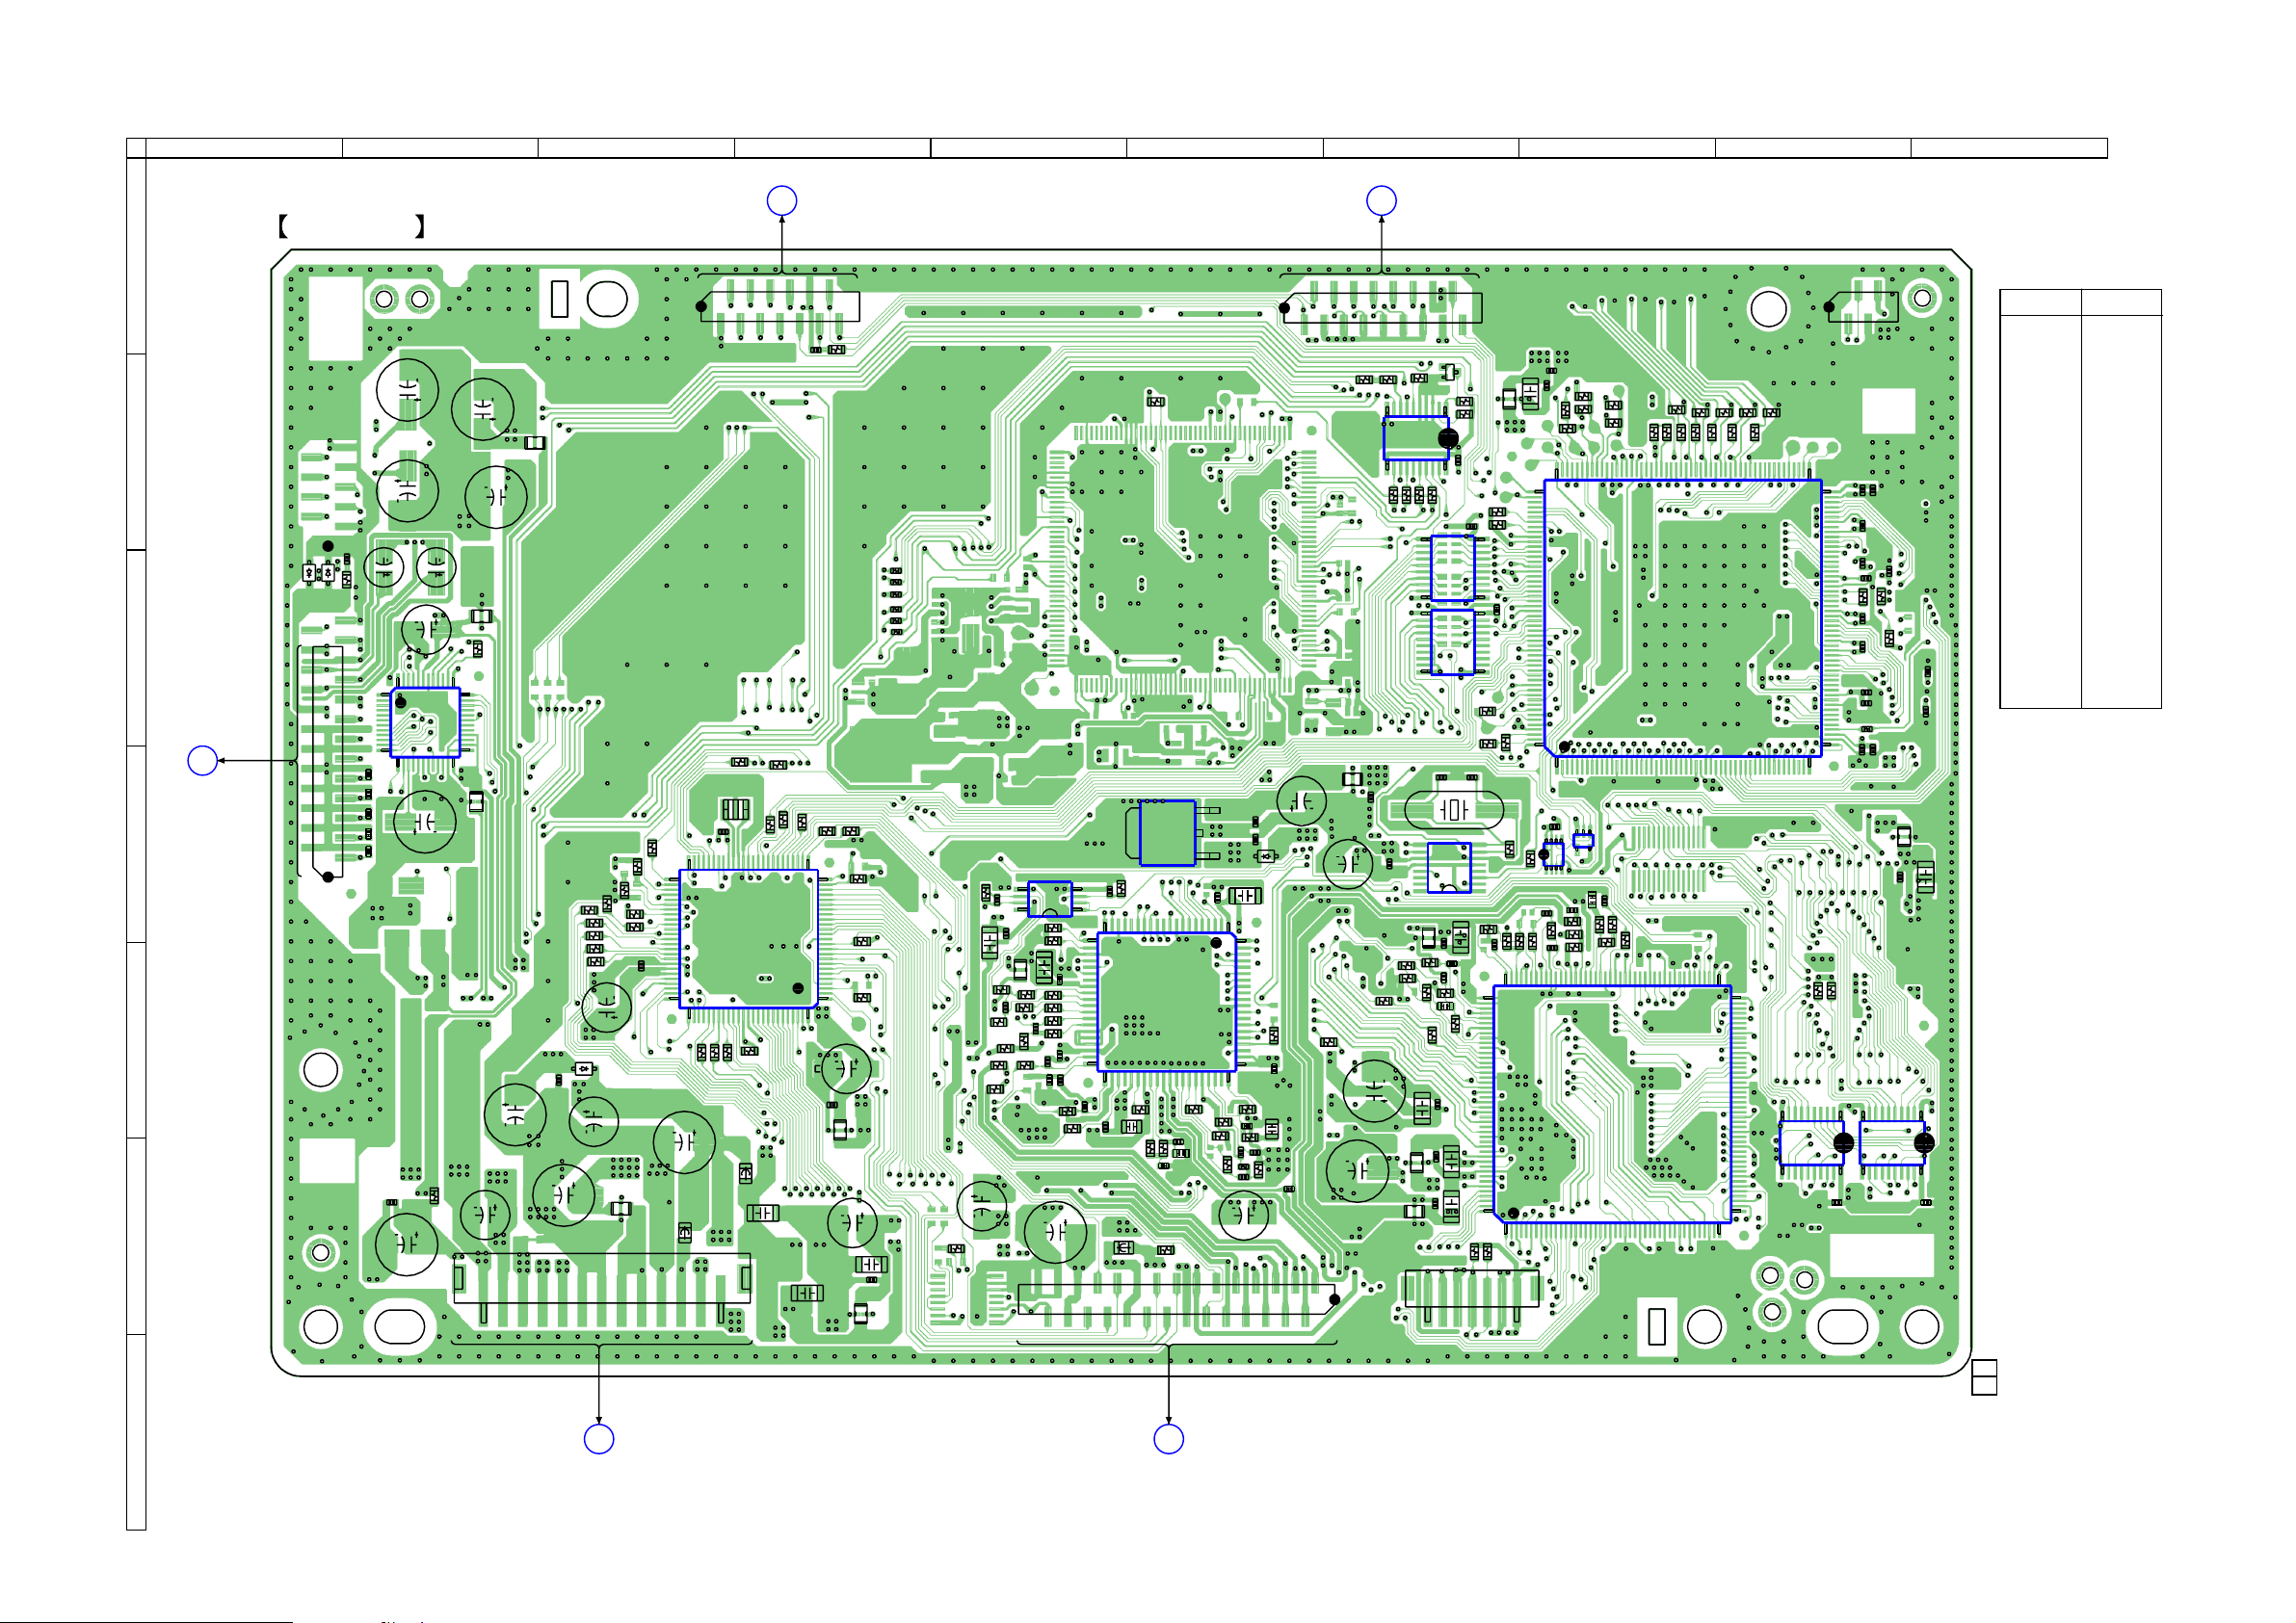
HCD-NXM4D
7-11. PRINTED WIRING BOARD – DMB07 BOARD (Side A) –
1
DMB07 BOARD
2
(SIDE A)
A
C355
C364
FL352
21
1
A5
C1302
R1302
C303
C304
C356
12
C306
1
C305
C352
48
13
C325
IC302
C321
C366
C357
FL302
R314
A6
37
36
25
24
FL303
R995
R994
R917
R988
R916
B
D1303
D1304
C
O
MAIN
BOARD
(Page50)
D
CN107
2
E
C926
C927
392
C394
JW
C392
C101
1
C393
F
3 4 5 6 7
R938
R922
R984
R936
R998
R997
C904
A9
C903
D901
C925
FL101
CN102
C151
C905
51
75
FB105
• See page 29 for Circuit Boards Location.
MAIN
BOARD
N
(Page50)
CN101
1
50
76
R907
13
2
R928
X901
R906
IC901
R905
L103
C530
R929
R923
R978
C924
R940
100
C902
C532
R921
26
C558
R942
A10
25
1
12
R962
C901
C556
13
R970
R964
FL901
R943
C561
FL501
R958
JW801
JW803
JW802
JW804
JW805
JW806
C588
R505
C528
R751
R504
C517
R506
R511
R586
R510
C502
R552
5
8
C518
R550
R523
IC503
C545
FL502
C590
R560
R562
29
28
C533
C576
C592
R548
R545
C543
R551
R559
R563
R564
C544
C531
R561
4
1
A13
C535
L501
21
40
C522
20
41
C534
C547
R805
IC211
R536
IC509
R584
R588
C548
CN501
R593
R599
3
1
C573
C551
R566
R565
R567
JW501
C567
1
61
60
C539
80
R568
C568
R572
C565
C560
C526
A14
C215
C214
D202
C569
R571
R601
C213
C552
1
R629
C563
C553
P
VIDEO
BOARD
(Page48)
8
9 10
• Semiconductor
Location
Ref. No. Location
D1303 C-1
D1304 C-1
D202 D-6
D901 E-3
IC207 C-8
IC211 D-6
IC231 E-9
IC232 E-9
IC256 C-7
IC258 C-7
IC259 B-7
IC302 C-2
IC503 D-5
IC509 E-6
IC701 E-8
IC901 D-4
IC902 D-7
IC904 D-7
IC906 D-7
Q201 B-7
12
(12)
104
53
R215
IC231
A18
1
20
C201
1
R14
CN202
2
C248
C252
C253
C278
C261
C263
R250
4
3
C241
C279
C242
C246
R213
C277
IC232
10
11
C245
R15
R13
C239
C227
FL204
C258
C259
A19
1
20
C202
1-861-848-
2
CN105
R327
R296
10
IC259
11
R9985
R9984
Q201
E
R197
1
20
R9982
R9983
1
IC256
10
1
IC258
10
R202
16
R198
C284
17
C287
C283
A17
FL205
R234
R254
C265
157
C266
R219
156
R269
R217
R268
R225
R226
R284
R263
R283
R273
R264
R274
R275
R265
R266
R276
R267
R277
105
20
11
C286
20
IC207
11
R299
R788
FL206
C916
R762
R760
C701
C291
R764
C917
R769
C914
IC906
FL701
R767
C771
R758
C733
X902
9
16
C705
R231
C915
C706
C774
R765
C773
8
1
C702
A15
R763
R230
R708
133
R927
C708
R707
132
8
R931
1
IC904
C711
R711
R709
208
1
C907
R712
C712
5
4
C715
R748
R714
R747
52
1
3
IC902
5
4
C716
C717
R717
R716
R718
R719
89
88
IC701
10
C781
FL702
C778
C779
11
176
FL703
1
2
C780
C777
1
CN901
R908
R975
1
7
45
44
A16
G
HCD-NXM4D
K
MAIN
BOARD
(Page50)
RF
BOARD
A
(Page36)
4040
Page 41
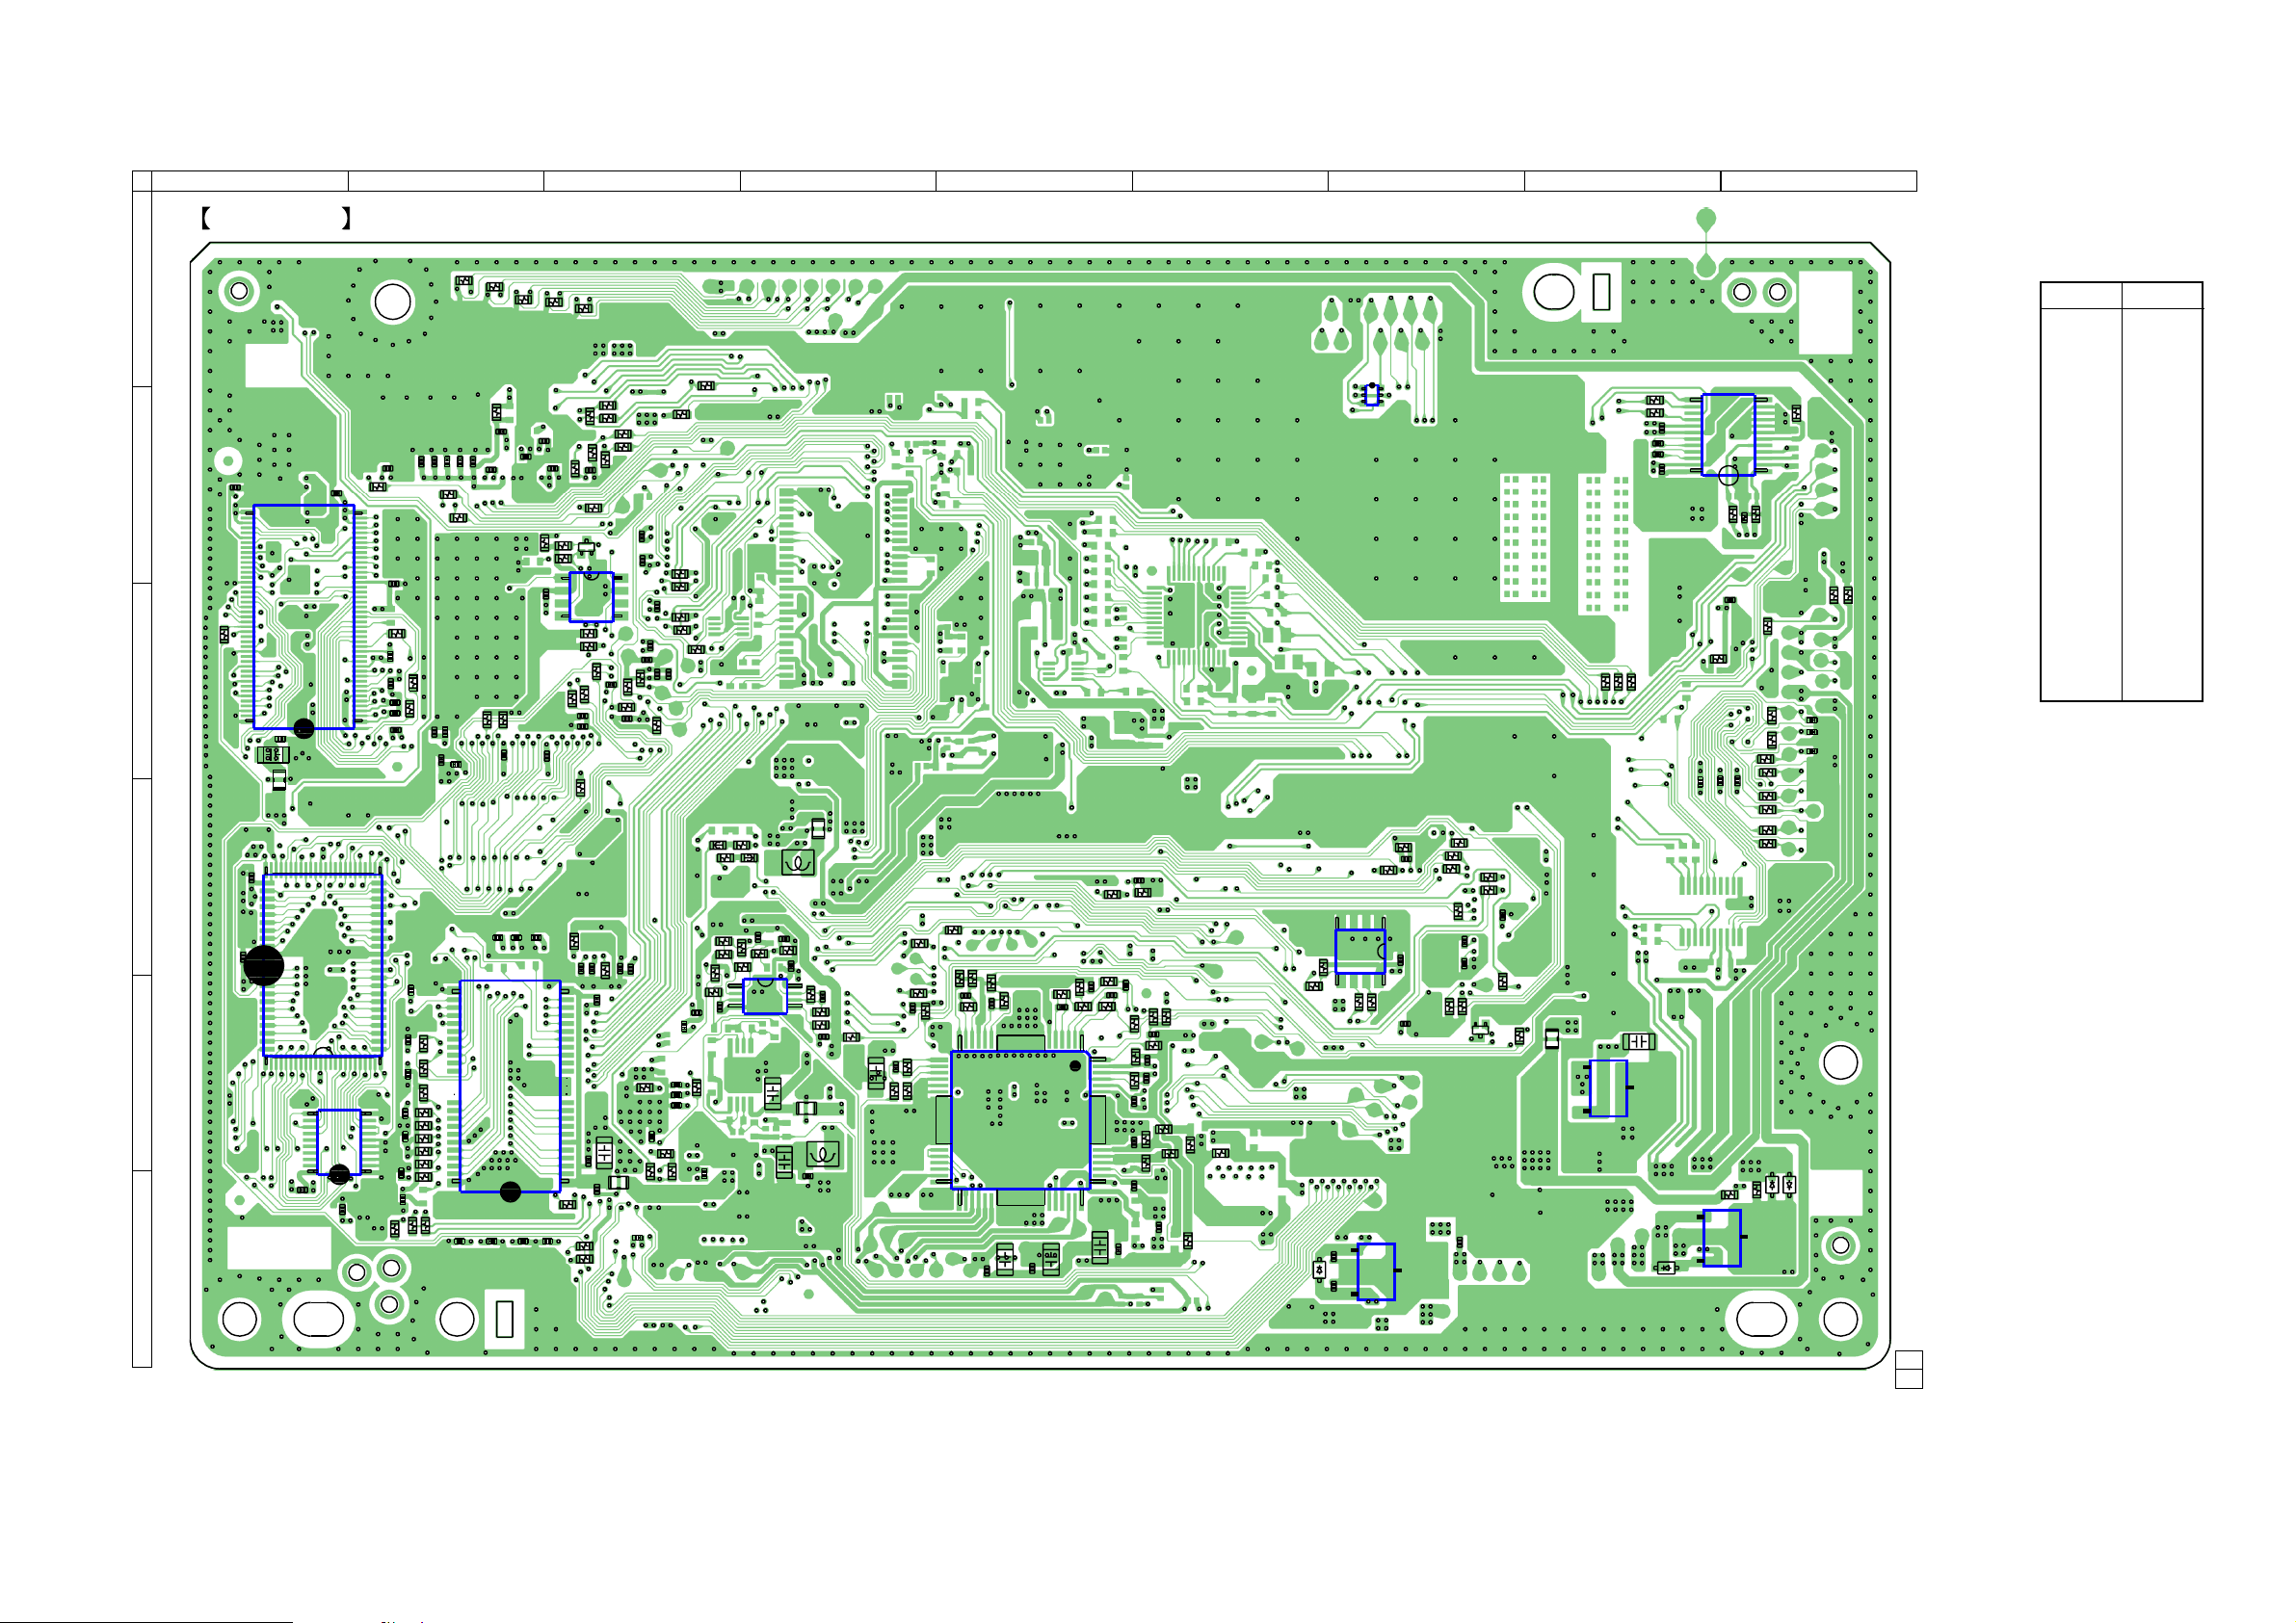
HCD-NXM4D
7-12. PRINTED WIRING BOARD – DMB07 BOARD (Side B) –
3 4 5 6 7
R328
R294
R228
R221
R222
R259
C236
R239
C244
1
4
C725
R745
E
C216
R232
C713
C726
C727
C724
R746
8
5
R255
R713
C256
R246
C262
C752
C709
R778
C764
C247
C251
R244
C260
FL705
R9998
R9980
R9981
C257
C290
R247
C769
C766
R777
R720
R721
R776
R750
R12
R272
C271
B6
C730
C740
C741
C742
C743
C744
R10
R11
R743
C233
C234
C280
C281
R730
R731
R732
R733
R734
R735
R736
R737
R738
R742
2
R282
C232
C760
C231
C270
C272
C723
R281
C230
C237
R290
26
50
C761
R280
R251
C276
R245
R257
C722
IC706
C762
C226
C229
C269
C718
R744
C763
R279
C274
R261
R253
C204
R227
R248
R292
R291
C282
C267
C714
R278
R260
R241
C268
25
1
R1000
Q202
R240
IC204
R715
1
DMB07 BOARD
(SIDE B)
A
B5
B
C249
44
C250
C238
R271
43
C243
IC203
C240
C
D
E
R301
86
C254
C255
FL203
48
IC206
C264
C205
1
C203
B11
1
IC233
11
20
C275
C235
C218
C220
25
24
10
1
C745
R741
F
R9999
R932
R725
R724
C772
C767
R220
C768
R799
R293
R270
C775
C765
• See page 29 for Circuit Boards Location.
FL903
FB902
R933
FB903
L901
R694
R698
C519
R580
R581
C542
R573
R589
R699
R579
C514
12
13
24
R534
R533
25
R530
C512
IC501
C515
C720
C703
R700
R726
1
4
IC703
C729
R727
8
5
C728
C721
R787
C783
FL706
C734
R728
C776
B7
C782
R786
R789
R785
L704
C570
R529
C540
C511
R527
C510
1
36
C513
R517
R525
48
37
R537
C508
R522
R521
R513
C507
C501
R524
C509
R516
C525
C516
R503
C589
R512
C524
C529
B8
R520
C506
C503
C504
R514
R549
R519
R515
R555
C527
R583
R591
R576
R918
D500
4
IC903
R913
5
IC111
R901
C521
C523
C910
R904
1
8
R902
R935
C918
C906
R925
R996
C908
C909
IC502
R930
R926
R911
R912
C102
E
Q901
R990
R920
C913
R915
R974
FL908
8
C367
C368
R311
R310
C928
R329
R312
R335
C365
IC907
D392
C363
C324
JW393
IC352
13
24
R353
C326
R313
C323
IC392
R305
R304
R302
12
1
R352
JW352
R367
R309
C322
R392
R308
R307
R306
R303
D393
D394
9
R362
R368
C308
C309
C307
R369
• Semiconductor
Location
Ref. No. Location
D392 F-8
D393 F-9
D394 F-9
D500 F-6
IC111 B-7
IC203 C-1
IC204 C-3
IC206 D-1
IC233 E-1
IC352 B-9
IC392 F-9
IC501 E-5
IC502 F-7
IC703 E-4
IC706 E-2
IC903 D-6
IC907 E-8
Q202 B-3
Q901 E-7
HCD-NXM4D
1-861-848-
12
(12)
4141
Page 42
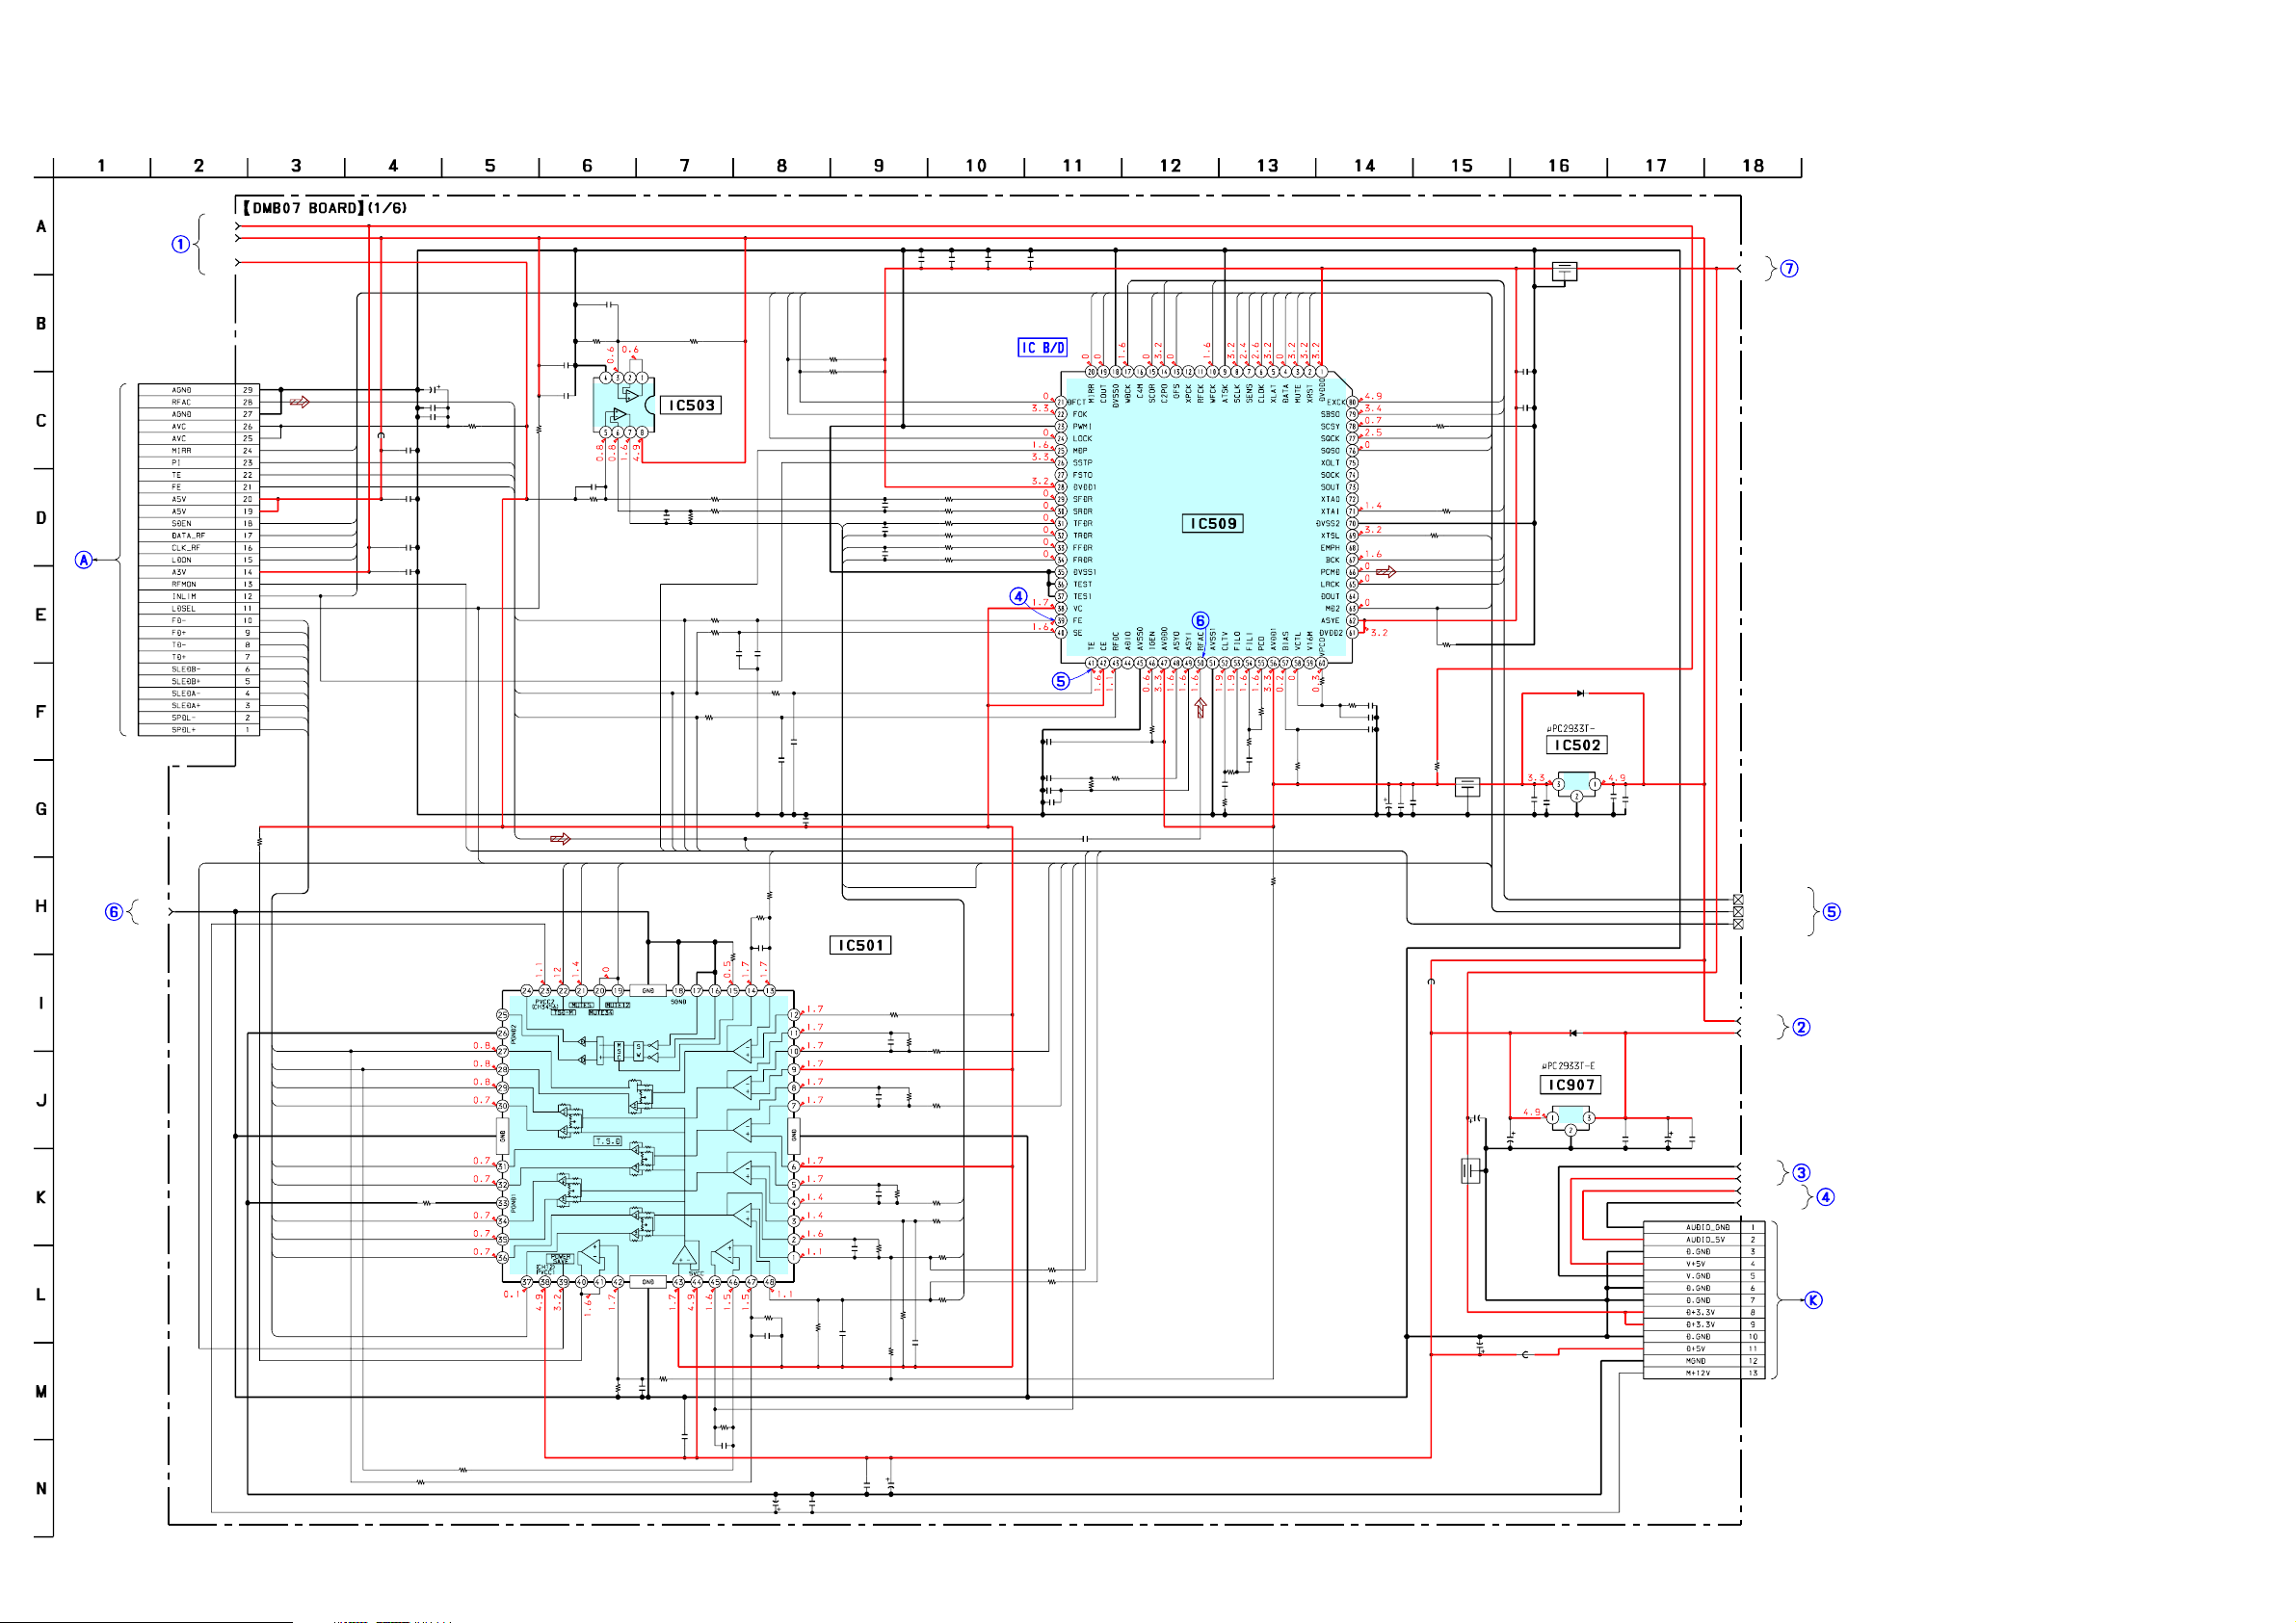
HCD-NXM4D
7-13. SCHEMATIC DIAGRAM – DMB07 (1/6) BOARD –
-1
V
3
A
V
5
A
7
0
B
M
D
V
5
.6
1
D
R
A
O
B
)
/6
2
(
)
3
4
e
g
a
(P
2
9
5
1
0
5
N
C
P
9
2
R
IR
M
N
E
D
S
F
R
_
A
T
A
D
F
R
_
K
L
C
N
O
D
L
F
R
D
R
A
O
B
)
7
3
e
g
a
(P
F
T
L
S
E
L
S
L
S
E
L
S
S
P
S
5
5
5
R
0
DSAVE
D
N
G
D
7
7
0
0
B
B
M
M
D
D
D
D
R
R
A
A
O
O
B
B
)
)
/6
/6
(3
(2
a
(P
M
D
O
B
(5
a
(P
)
)
4
3
4
4
e
e
g
g
a
(P
7
7
0
0
B
B
M
D
D
D
R
R
A
A
O
B
)
)
/6
/6
(6
)
)
7
6
4
4
e
e
g
g
a
(P
P
S
P
S
L
S
L
S
L
S
L
S
R
T
R
T
C
F
C
F
IM
L
IN
-
S
C
F
+
S
C
-
K
R
T
+
K
R
-
B
D
E
+
B
D
-
A
D
E
+
A
D
-
L
D
P
+
L
D
+
L
D
-
L
D
-
B
D
E
+
B
D
E
-
A
D
E
+
A
D
E
+
K
-
K
+
S
-
S
C
0
1
6
1
5
C
V
6
1
2
2
0
.0
0
C
A
F
R
1
9
5
R
0
7
0
5
C
1
0
5
L
0
1
0
3
1
5
C
0
1
1
1
5
C
p
0
2
2
0
4
5
C
0
1
5
1
5
C
p
0
2
2
7
8
5
R
0
1
1
5
R
k
0
5
1
W
0
/1
1
P
T
F
LDSEL
RFMON
0
1
5
R
k
0
5
1
W
0
/1
1
• See page 64 for IC Block Diagram. • See page 62 for Waveforms.
7
7
0
0
B
B
M
M
D
D
D
D
R
R
A
A
O
O
B
B
)
)
/6
/6
(2
(3
)
)
4
3
4
4
e
e
g
g
a
a
(P
(P
V
3
3
5
7
4
4
5
5
C
C
1
.0
0
0
2
2
5
C
.1
0
6
3
5
R
k
0
1
W
0
/1
1
8
1
5
C
1
.0
0
7
1
5
C
0
1
9
9
5
R
k
1
W
0
/1
1
I
E
E
E
F
E
T
I
P
C
A
F
R
TSD-M
SP_ON
1
0
5
C
1
.0
0
3
0
5
R
k
7
4
W
0
/1
1
MUTE_2D
4
1
5
5
C
R
k
.0
0
0
1
W
0
/1
1
7
3
5
R
k
8
6
W
0
/1
1
3
0
5
IC
V
A
4
0
4
3
M
J
N
)
2
E
(T
P
M
A
6
0
5
R
k
7
4
W
0
/1
1
2
4
5
0
0
0
5
5
5
C
R
R
1
k
k
.0
7
7
0
4
4
W
W
0
0
/1
/1
1
1
0
6
5
R
W
0
/1
k
1
1
8
5
5
R
k
7
4
W
0
/1
1
1
6
5
R
W
0
/1
k
1
1
MDP
FE
TE
PI
R
1
/1
1
5
1
5
R
k
0
1
W
0
/1
1
4
2
1
5
2
5
C
1
.0
0
FOK
DFCT
LOCK
W
0
5
k
4
0
/1
5
1
1
R
W
0
8
k
4
0
/1
5
1
1
R
R
D
F
T
L
R
T
C
D
E
L
S
C533
C531
0.047
0.0022
2
6
5
R
W
0
/1
k
1
1
C
.0
0
C
0
5
C
.1
RF_AC
9
8
5
k
0
W
0
0
SPIN
1
8
5
R
k
2
1
W
0
/1
1
0
8
5
R
k
3
3
W
0
/1
1
9
1
5
C
1
.0
0
2
1
5
R
W
0
k
/1
6
1
5
6
1
5
R
k
.7
4
W
0
/1
1
3
0
5
C
p
0
0
0
3
3
3
1
5
R
k
6
5
W
0
/1
1
4
0
5
C
p
0
0
0
3
3
6
2
5
C
2
2
V
6
1
R
D
R
T
R
D
F
F
R
D
R
F
5
3
5
2
2
0
4
3
5
2
2
.0
4
4
L
R
T
C
D
E
L
S
1
0
5
IC
L
5
3
0
8
N
A
F
R
D
IL
O
C
G
IN
K
C
A
R
/T
S
U
C
O
F
D
IN
P
S
0
5
C
0
3
3
7
2
5
C
1
.0
0
R
D
R
O
T
O
M
D
E
L
/S
E
L
R
8
/1
1
4
1
5
C
1
.0
0
2
1
5
C
1
.0
0
0
1
5
C
1
0
.0
0
9
2
0
2
5
5
C
R
p
k
0
3
.7
3
4
W
0
/1
1
7
1
5
R
k
.2
2
W
0
/1
1
6
p
6
8
5
R
k
0
0
2
W
0
/1
1
9
2
5
C
1
.0
0
1
0
5
k
5
1
R
2
2
8
0
8
5
.0
0
C
9
8
5
C
0
9
5
C
E
IV
,
E
IV
9
7
5
k
.2
W
0
5
R
k
3
3
R
3
/1
1
5
R
.2
2
/1
1
2
5
C
2
2
V
6
1
1
5
k
5
1
R
2
5
k
5
1
R
2
2
0
.0
0
9
5
k
5
1
R
3
6
k
5
1
R
2
2
0
.0
0
4
6
k
5
1
R
D
E
L
S
4
3
5
R
k
6
5
W
0
/1
1
3
3
W
0
/1
1
0
3
5
R
k
6
5
W
0
/1
1
9
2
5
k
3
W
0
7
2
k
W
0
5
2
5
R
D
R
T
W
0
k
0
/1
1
1
D
F
T
4
2
5
R
W
0
k
/1
0
1
1
3
2
5
R
W
0
k
0
/1
1
1
D
R
F
D
F
F
0
2
5
R
W
0
k
/1
0
1
1
8
0
5
C
1
0
.0
0
8
8
6
6
5
5
C
C
1
.0
0
0
1
XLAT
GFS_CD
A
IT
SCLK
DATA
CLOK
SENS
WFCK
9
0
5
IC
Q
8
6
0
3
D
X
C
R
E
D
O
C
E
D
C
D
O
S
S
E
C
O
R
P
O
V
R
E
S
L
1/10W
1/10W
1k
3.3k
R565
R567
0
6
5
C
5
1
0
.0
0
1
0
6
R
0
XRST_CD
MUTE_CD
4
9
6
R
k
0
1
W
0
/1
1
K
C
X
E
O
S
B
S
K
C
Q
S
O
S
Q
S
8
9
6
R
0
S
F
8
6
7
2
P
S
D
C
9
9
6
R
R
2
7
5
R
k
0
7
4
1
7
5
R
W
0
/1
1
M
1
W
0
/1
1/10W
10k
R566
9
5
5
C
.1
0
5
R
1
8
6
5
R
M
1
3
8
0
0
K
L
C
B
T
A
D
M
K
C
R
L
2
D
M
3
7
5
R
k
0
1
W
0
/1
1
2
5
5
C
0
5
6
5
.1
C
0
3
p
6
0
5
0
C
1
6
7
5
R
1
0
5
L
6
5
5
C
0
1
8
5
5
C
0
0
1
V
4
F
0
H
U
0
1
6
5
C
.1
0
3
0
1
L
0
1
0
1
C
0
2
2
V
4
1
0
1
L
F
H
U
0
1
5
1
C
0
0
1
V
.3
6
MIRR
W
0
/1
1
W
0
/1
1
W
0
/1
1
W
0
/1
1
W
0
/1
1
W
0
/1
1
7
4
5
.1
0
C
8
1
4
.0
5
0
C
1
7
5
5
.4
0
C
p
3
0
7
0
5
1
C
R
R
R
R
SLEDA
R
1
1
R
1
1
9
5
R
0
0
1
0
/1
1
3
5
5
C
3
3
0
.0
0
SPFG
FJMP2
SLEDB
1
2
5
k
0
0
W
0
/1
9
1
5
k
0
0
W
0
/1
3
k
W
FJMP1
SCOR
GSCOR
IG
D
4
8
5
R
8
8
k
5
3
3
R
W
0
k
/1
0
1
1
W
0
/1
1
C2PO
COUT
2
0
5
L
F
H
U
0
0
7
5
C
0
1
9
6
5
C
.1
0
0
0
5
D
7
-1
E
T
5
5
3
S
S
1
IC502
E2
R
O
T
A
L
U
G
E
R
V
.3
3
+
0
1
3
2
5
5
C
C
3
2
2
3
5
5
C
C
.1
0
0
1
D
5
3
S
S
1
IC907
G
E
R
V
.3
3
+
5
2
9
C
2
2
V
6
1
5
0
1
B
F
H
U
0
0
.1
1
0
1
0
9
-1
E
T
5
7
2
R
O
T
A
L
U
6
2
9
C
7
2
0
9
2
2
C
1
V
.0
4
0
D
B
P
S
D
9
C
P
S
L
A
N
A
V
5
D
-2
V
3
A
8
2
9
C
0
1
D
N
G
V
V
5
V
IO
D
U
A
IO
D
U
A
2
0
1
N
C
P
3
1
7
7
0
0
B
B
M
M
D
D
D
D
R
R
A
A
O
O
B
B
)
)
/6
/6
4
5
(
(
)
)
5
6
4
4
e
e
g
g
a
a
(P
(P
S
U
S
U
B
_
0
7
S
U
B
G
O
7
0
B
M
D
D
R
A
O
B
e
g
a
(P
7
0
B
M
D
D
R
A
O
B
)
/6
(5
6
4
e
g
a
(P
V
5
_
D
N
G
A
_
B
(P
7
7
0
0
B
B
M
M
D
D
D
D
R
R
A
A
O
O
B
B
)
)
/6
/6
(3
(2
a
(P
)
/6
4
)
7
0
B
M
D
D
R
A
O
B
)
/6
(6
)
7
4
e
g
a
(P
IN
A
M
D
R
A
O
)
/3
(1
)
1
5
e
g
a
)
)
4
3
4
4
e
e
g
g
a
(P
HCD-NXM4D
4242
Page 43
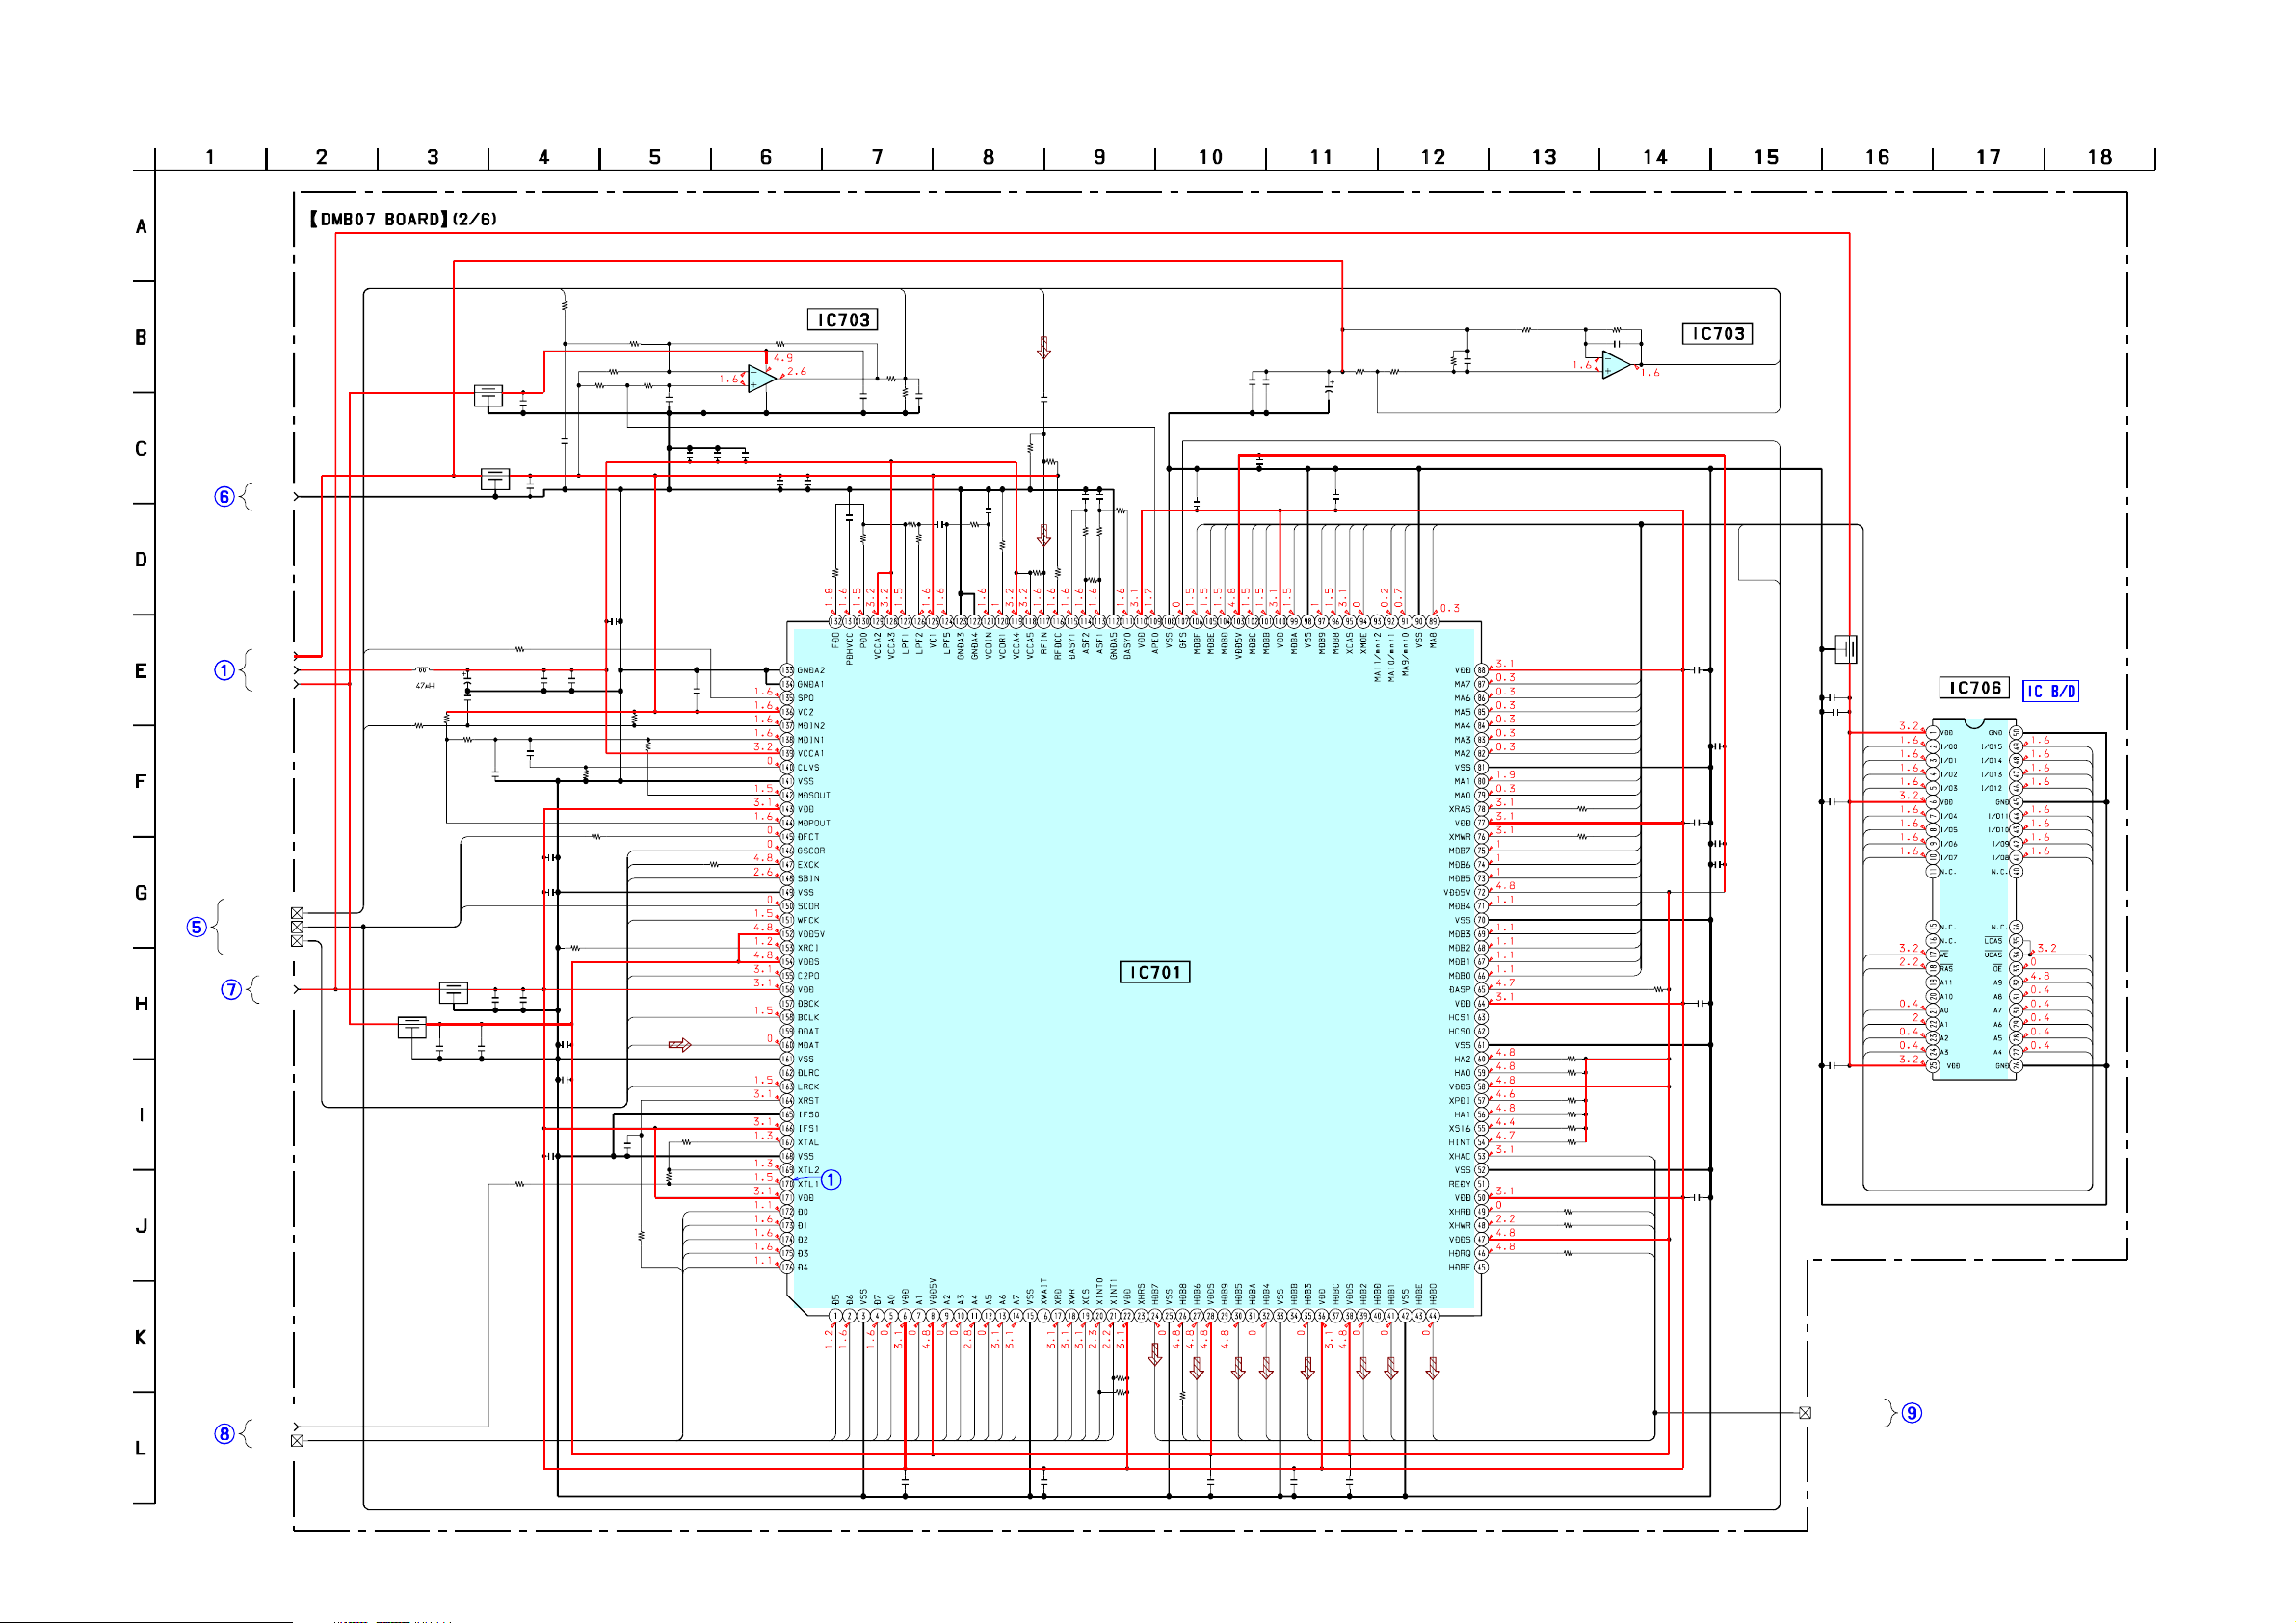
HCD-NXM4D
7-14. SCHEMATIC DIAGRAM – DMB07 (2/6) BOARD –
R700
8.2k
1/10W
FF
JITO
C703
R724
R720
1k
1/10W
0.1
C776
0.01
R764
C773
1M
0.47
1/10W
R760
0
R778
100k
1/10W
C769
0.01
C768
0.01
DMB07
BOARD
(1/6)
(Page42)
DMB07
BOARD
(5/6)
(Page46)
DMB07
BOARD
(1/6)
(Page42)
DMB07
BOARD
(3/6)
(Page44)
DMB07
BOARD
(1/6)
(Page42)
DMB07
BOARD
(Page42)
DMB07
BOARD
(Page44)
DMB07
BOARD
(Page45)
DMB07
BOARD
(Page46)
DMB07
BOARD
(3/6)
(Page44)
DMB07
BOARD
(6/6)
(Page47)
ANALOG BUS
SPC970_BUS
(1/6)
(3/6)
(4/6)
(5/6)
DSP BUS
DGND
A3V-1
D3V
1.65V
FL706
C729
0UH
10
FL701
C702
0UH
10
SPIN
L704
FL703
0UH
1/10W
R767
47k
1/10W
R769
C781
150
2.2k
FL702
C780
10
A5V
MDIN
R751
0
C734
DFCT
SCOR
C777
0.01
C774
C779
10
0.0047
C771
0.047
C770
0.01
C767
0.01
C778
10
0.01
C765
0.01
R777
0
4V
R762
22k
1/10W
0UH
• See page 64 for IC Block Diagram. • See page 71 for IC Pin Function Description. • See page 62 for Waveforms.
R748
33k
1/10W
1/10W
10k
713
R
C
F_A
R
R785
R788
R789
100k
10k
1/10W
C733
C705
C715
0.0015
R714
10k
C716
C717
0.01
1/10W
0.47
R716
R717
100k
100
1/10W
1/10W
R718
10k
W
0
/1
1
3k
3
7
74
R
1/10W
0W
1/1
k
10
0W
5
1/1
71
R
k
1
9
71
R
IC701
TMC57929PGF-RDP
DVD DECODER
10
C718
0.01
F
E
D
D
D
D
B
B
B
C701
0.01
150
4V
C722
0.01
9
B
C
A
D
D
D
D
B
B
B
B
1/10W
C723
0.01
E
8
S
D
A
B
C
X
9
10
A
O
A
M
M
M
X
100k
1/10W
C783
0.0015
8
A
M
R709
150k
1/10W
R728
1/10W
R727
3.3k
1/10W
10k
JIT
R710
10k
1/10W
/10W
1
.2k
2
711
R
C728
0.1
C712
100p
C711
0.047
R712
10k
1/10W
R725
1.8k
1/10W
1/10W
1k
R721
33k
1/10W
C772
0.01
R765
22k
1/10W
GSCOR
EXCK
SBSO
WFCK
C2PO
BCLK
MDAT
LRCK
C766
100p
R799
0
R763
XRST
C775
0.01
8.2k
R750
C720
C714
0.1
0.1
NJM3404AV(
C713
1/10W
R776
10k
D0
D1
D2
D3
D4
IC703(1/2)
0.1
R758
0
1/10W
R726
100k
TE2)
1/10W
BUFFER
8
2
1
3
4
C709
C752
0.1
0.1
0
C706
0.01
R708
470k
1/10W
C721
0.1
1
0.0
708
C
R786
100k
1/10W
R742
R730
R731
R743
1/10W
R733
10k
1/10W
R741
22
22
R787
100k
1/10W
C782
0.0015
6
7
5
IC703(2/2)
NJM3404AV(
TE2)
MA7
MA6
MA5
MA4
MA3
MA2
MA1
MA0
RAS
1/10W
22
WE
1/10W
22
BD7
BD6
BD5
BD4
BD3
BD2
BD1
R732
BD0
10k
1/10W
R734
10k
1/10W
R735
10k
1/10W
R736
10k
1/10W
R737
10k
1/10W
R738
10k
1/10W
XSRQ
XSHD
1/10W
22
XDCK
1/10W
XSAK
C730
0.01
C741
0.01
C740
0.01
C743
0.01
C745
0.01
0.01
C742
C744
BUFFER
MDIN
MDP
GFS_DVD
0
1
A
M
MNT1
FL705
0UH
C727
10
C724
0.01
BD0
BD1
BD2
BD3
C725
0.01
BD4
BD5
BD6
BD7
WE
RAS
MA0
C726
0.01
MA1
MA2
MA3
0.01
IC706
MSM51V1816
5B-60TSKR1
16MBT D-RAM
BDF
BDE
BDD
BDC
BDB
BDA
BD9
BD8
XCAS
XMOE
MA9
MA8
MA7
MA6
MA5
MA4
HCD-NXM4D
DMB07
BOARD
(3/6)
(Page44)
768FS
BUS 5
R745
47k
1/10W
R746
47k
1/10W
2
0
1
88
R
D
1
IT
IT
R
W
C763
0.01
S
H
H
C
IN
IN
X
X
X
X
X
7
6
5
0
1
4
2
A
D
A
C764
0.01
A
D
D
7
A5
A
A6
A3
A
0W
1/1
2
2
4
7
EF
6
5
4
74
D
D
D
R
SD
S
S
S
C762
0.01
3
D
D
S
S
C761
0.01
C760
2
1
D
S
0.01
0
D
D
S
S
SIGNAL_BUS
DMB07
BOARD
(5/6)
(Page46)
4343
Page 44
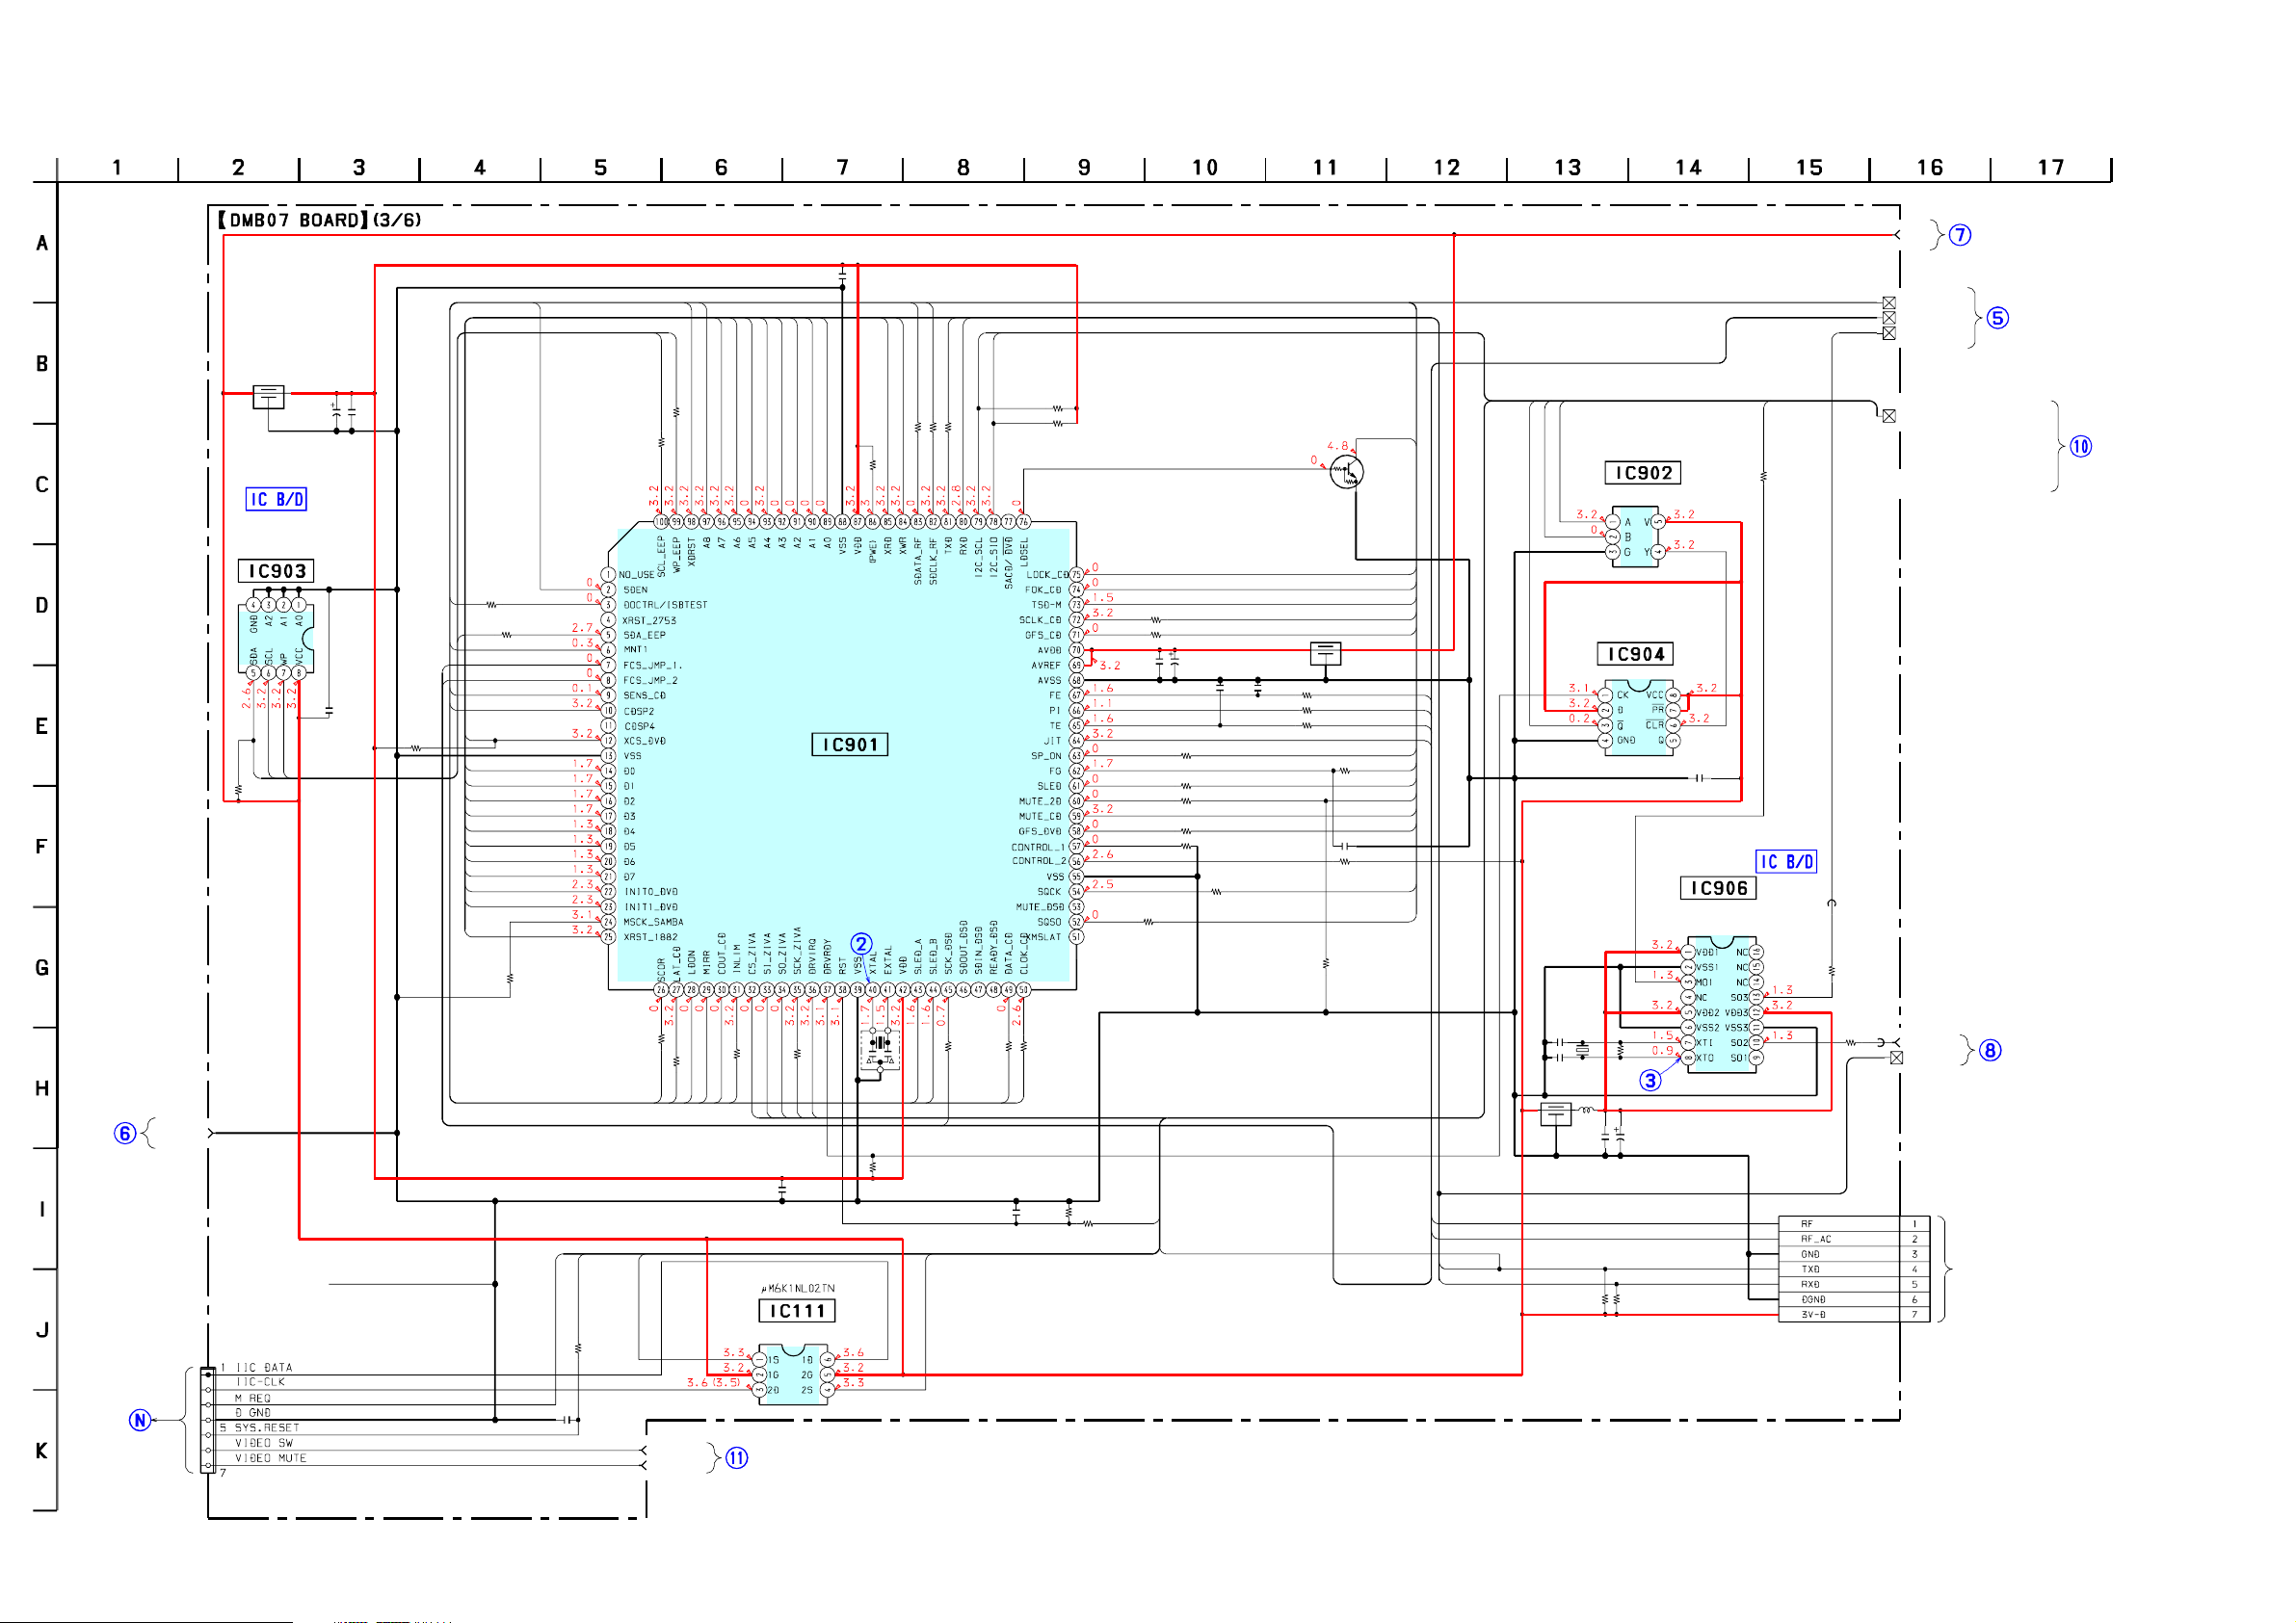
HCD-NXM4D
7-15. SCHEMATIC DIAGRAM – DMB07 (3/6) BOARD –
C901
100
0UH
4V
C902
0.01
E2
R958
22
1/10W
D2
M
R918
SDA
1/10W
NT1
M
P1
FJM
P2
FJM
SENS
C918
0.01
WP
R962
1/10W
CDSP2
10k
XCS1882
D0
D1
D2
D3
D4
D5
D6
D7
XINIT0
XINIT1
XRST
R964
10k
R913
1/10W
10k
FL901
IC903
BR24L16F-W
EEPROM
SDA
SCL
• See page 65 for IC Block Diagram. • See page 74 for IC Pin Function Description. • See page 62 for Waveforms.
C906
0.01
A1
A2
A5
A6
A4
A7
DSAVE
WP
SCL
XRST_CD
SDEN
22
R902
1/10W
22
R901
1/10W
22
A0
A3
CONTROLLER
IC901
CXP973064
-245R
ECHANISM
M
R978
10k
1/10W
XHRD
XHWR
CLK_RF
DATA_RF
1/10W
22
R905
TXD
1/10W
22
R906
RXD
1/10W
22
R907
I2C_SCL
I2C_SIO
R911
10k
1/10W
R912
10k
1/10W
C904
0.01
R990
R915
R974
Q901
TC114TE-TL
D
INVERTER
1/10W
100
0
C903
100
4V
0
R994
R996
R997
R998
R936
R920
C908
100p
C909
100p
0
0
0
0
1/10W
100
1/10W
100
C913
33000p
R984
10k
1/10W
R988
R916
R917
R938
10k
1/10W
FL908
0UH
1/10W
1k
0
1/10W
1k
R995
M
M
LDSEL
LOCK
FOK
TSD-M
SCLK
GFS_CD
SP_ON
0
SPFG
SLED
UTE_2D
UTE_CD
GFS_DVD
SQCK
SQSO
B07
DM
B07
DM
BOARD
BOARD
(1/6)
(2/6)
(Page42)
D3V
SPC970_BUS
ANALOG BUS
DSP BUS
768FS
ZIVA_CTRL_BUS
IC906
-E2
CLICK
R931
22
1/10W
27M
FB903
0UH
R932
22
1/10W
CS_SPC
DRVCLK
DRVRDY
FE
PI
TE
JIT
IC902
SN74AHC1G32DCKR
ITCHING
SW
IC904
SN74AHC2G74HDCUR
FLIP FLOP
C907
0.01
8707GV-G
SM
GENERATOR
B07
DM
BOARD
(4/6)
(Page45)
(Page43)
DM
BOARD
(Page46)
B07
DM
BOARD
(1/6)
(Page42)
(5/6)
B07
B07
DM
BOARD
(2/6)
(Page43)
B07
DM
BOARD
(4/6)
(Page45)
B07
B07
DM
DM
BOARD
BOARD
(2/6)
(1/6)
(Page43)
(Page42)
B07
B07
DM
DM
BOARD
BOARD
(6/6)
(5/6)
(Page47)
(Page46)
AIN
M
BOARD
(1/3)
(Page51)
HCD-NXM4D
DGND
IC101
R933
FB902
C915
FL903
0UH
C914
7p
R927
X902
1M
Hz
27M
9p
L901
47uH
R908
10k
1/10W
C917
0.01
R975
10k
1/10W
1/10W
C916
100
4V
R943
100
1/10W
R942
100
1/10W
X901
Hz
MIRR
COUT
R921
100
1/10W
INLIM
CS_SPC
DM
BOARD
(5/6)
(Page46)
B07
C905
0.01
SW
R940
100
1/10W
IC111
ITCHING
XLAT
LDON
SCOR
MREQ
I2C_SIO
SYS_RST
R970
C924
0.01
0
VIDEO _SW
UTE
VM
7P
DRVIRQ
DRVCLK
DRVTX
DRVRX
20M
R904
10k
1/10W
SLEDA
SLEDB
R930
100
1/10W
I2C_SCL
JITOFF
DATA
R926
100
1/10W
C910
0.01
CLOK
R925
100
1/10W
R935
4.7k
1/10W
R923
220
1/10W
RST_SPC
JIG_M
ON
RFM
OD
RF_AC
TXD
RXD
22
1/10W
0UH
768FS
BUS 5
CN901
7P
DM
BOARD
(2/6)
(Page43)
(FOR CHECK)
B07
4444
Page 45
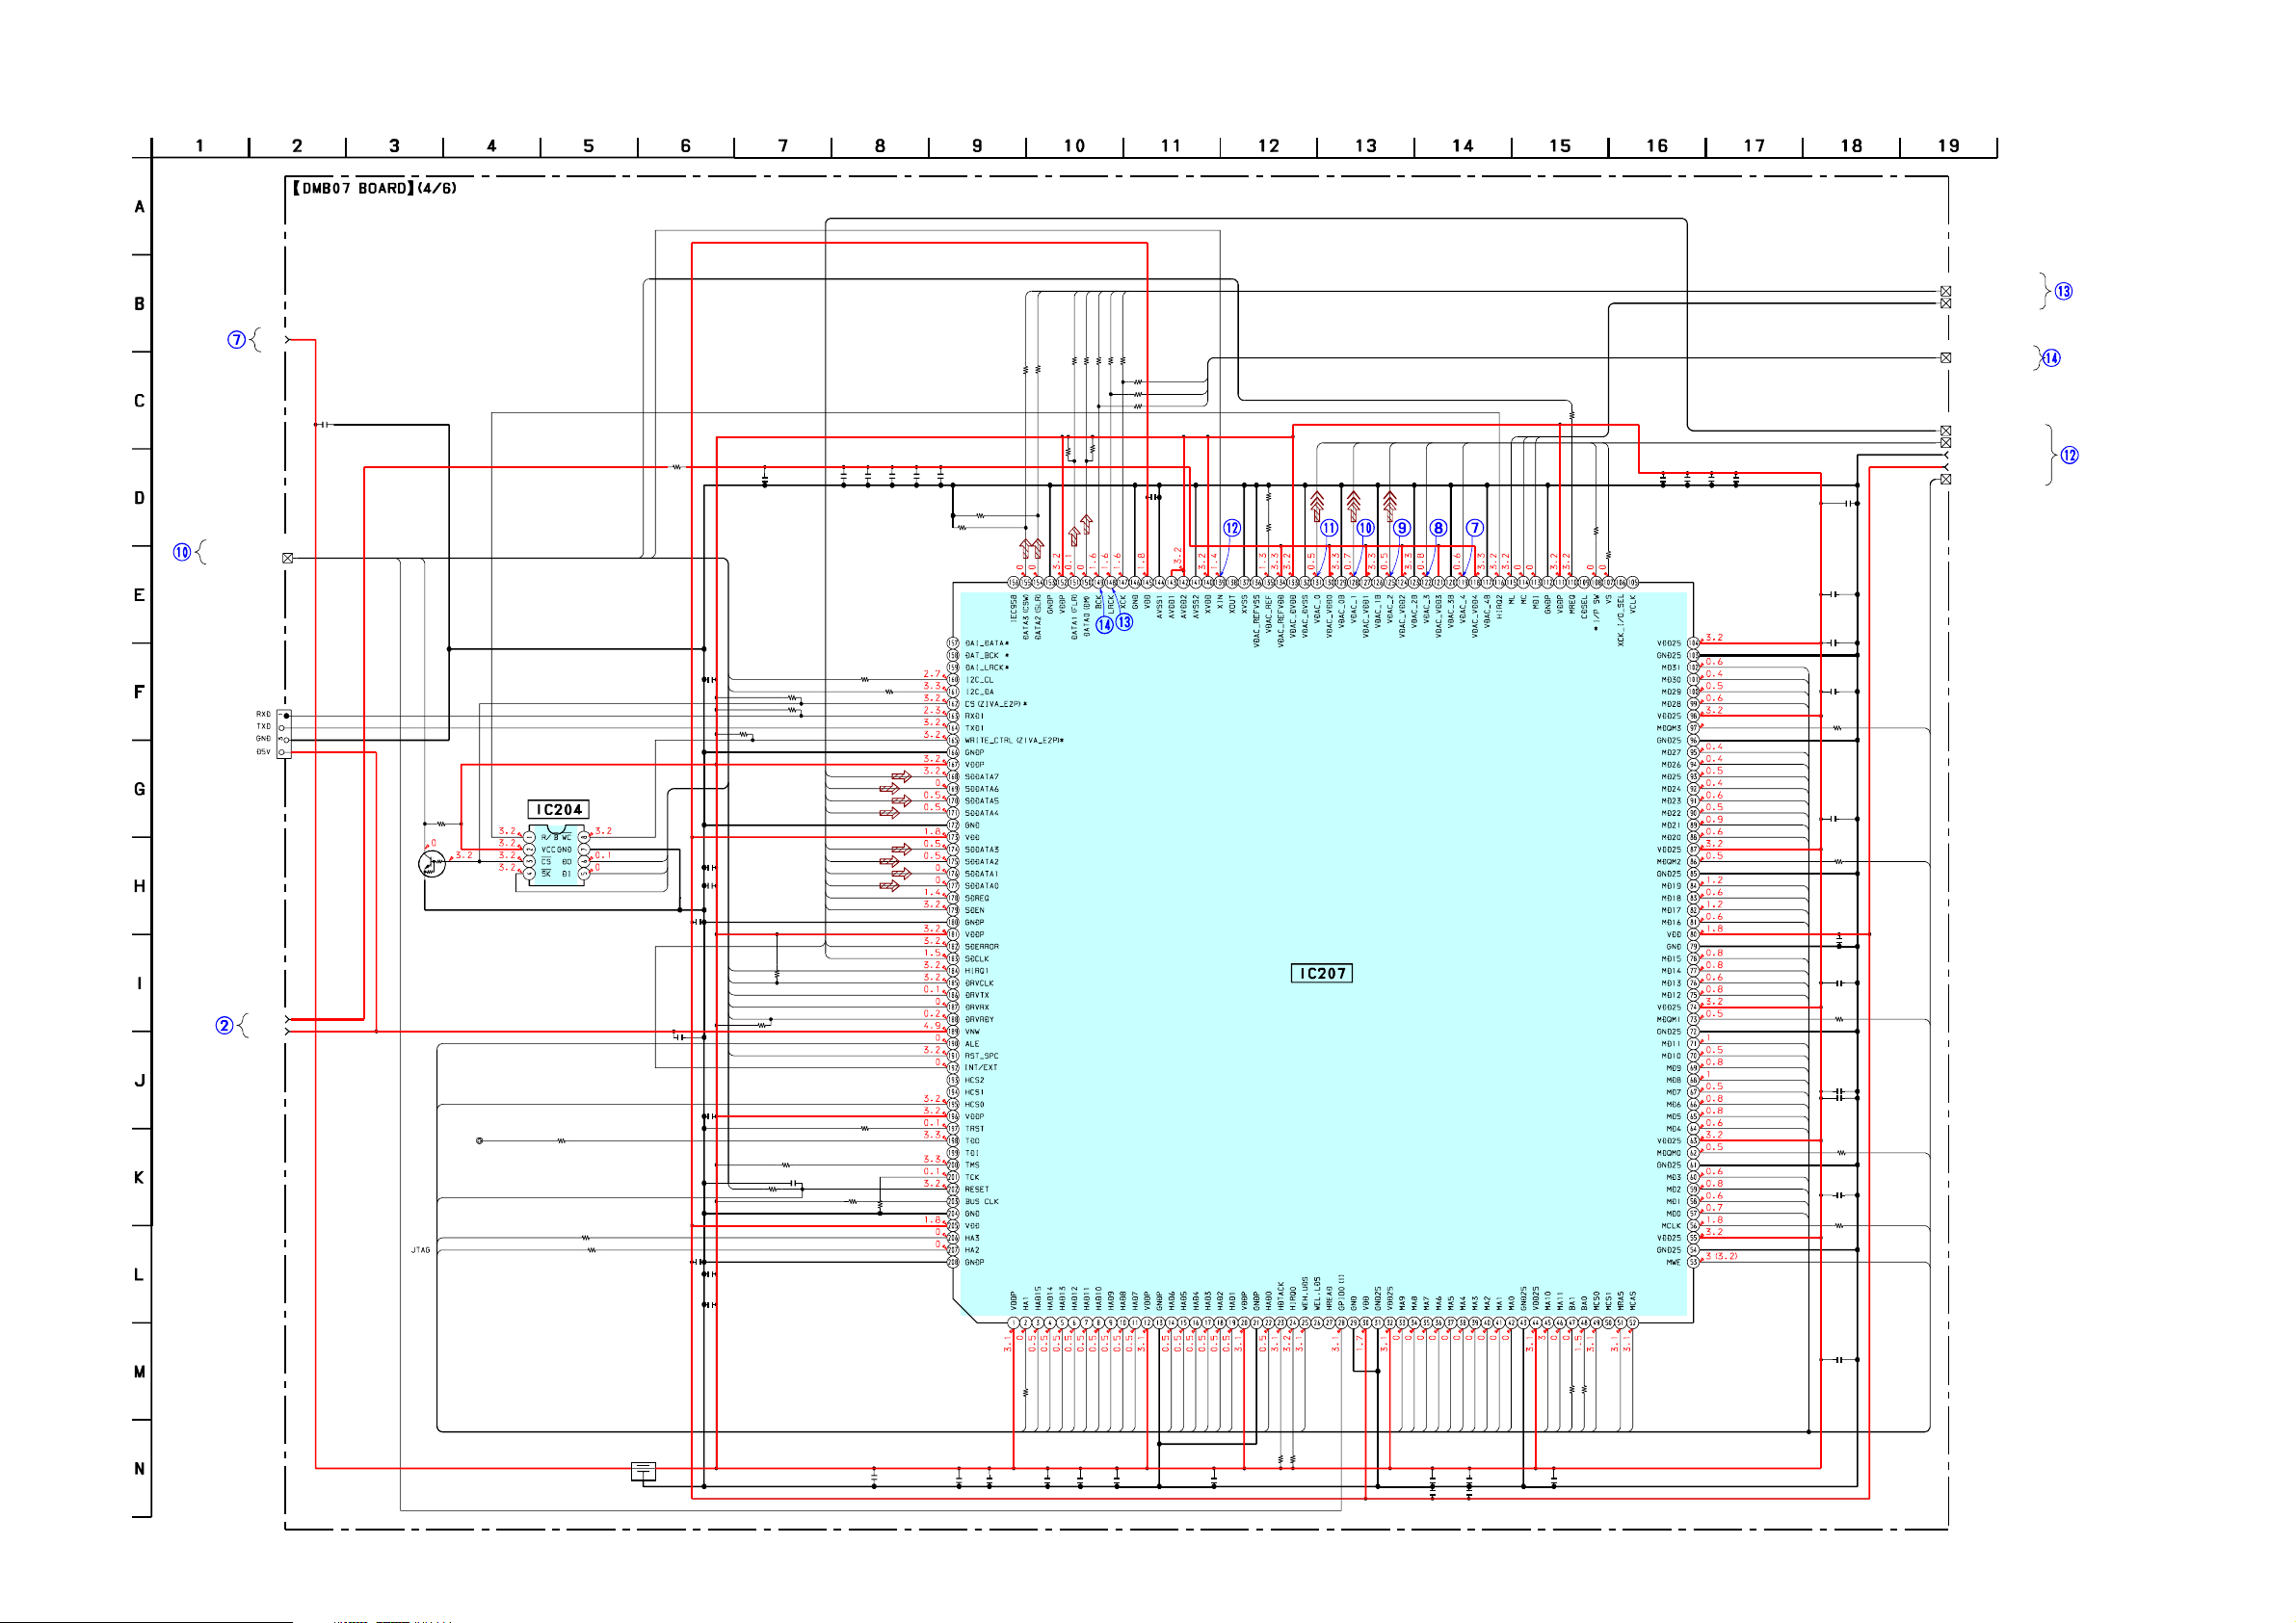
HCD-NXM4D
7-16. SCHEMATIC DIAGRAM – DMB07 (4/6) BOARD –
V
3
D
7
7
0
0
B
B
M
M
D
D
D
D
R
R
A
A
O
O
B
B
)
)
/6
/6
(2
(1
a
(P
M
D
O
B
(3
a
(P
7
0
B
M
D
D
R
A
O
B
)
/6
(3
)
4
4
e
g
a
(P
)
)
3
2
4
4
e
e
g
g
a
(P
7
7
0
0
B
B
M
D
D
D
R
R
A
A
O
B
)
)
/6
/6
(5
)
)
6
4
4
4
e
e
g
g
a
(P
S
U
B
_
L
R
T
C
_
A
IV
Z
0
2
N
C
P
4
-2
V
3
A
5
D
7
0
B
M
D
D
R
A
O
B
)
/6
(1
)
2
4
e
g
a
(P
9
8
2
C
1
.0
0
CS_SPC
JIG_MOD
2
0
4
2
R
k
7
4
W
0
/1
1
2
0
2
Q
-T
E
T
4
1
1
C
T
D
L
V
E
L
A
E
C
5
5
2
L
C
T
S
R
_
S
Y
S
3
A
H
2
A
H
4
0
2
IC
2
E
-W
F
0
4
0
9
R
B
M
O
R
P
E
E
5
0
8
R
0
0
3
2
R
3
3
W
0
/1
1
1
3
2
R
3
3
W
0
/1
1
• See page 67 for IC Pin Function Description. • See page 62 for Waveforms.
MREQ
1
5
2
R
0
6
2
2
C
.1
0
MREQ
27M
5
2
R
.7
4
4
2
C
1
.0
0
X
T
V
R
D
X
R
V
R
D
K
L
C
V
R
D
7
4
2
C
1
.0
0
6
5
2
C
1
.0
0
7
5
2
C
1
.0
0
2
6
2
C
1
.0
0
C
.0
0
C
0
1
4
0
/1
1
L
C
S
_
C
I2
IO
S
_
C
I2
4
5
2
R
k
.7
4
W
0
/1
1
1
5
2
C
1
.0
0
4
0
2
C
1
.0
0
T
IN
2
R
.7
4
Q
IR
V
R
D
/1
1
K
L
C
V
R
D
X
T
V
R
D
X
R
V
R
D
Y
D
R
V
R
D
8
4
2
R
C
P
S
_
T
S
R
6
4
2
R
k
0
1
W
0
/1
1
5
5
2
R
0
T
S
R
_
S
Y
S
0
6
2
1
0
9
2
p
0
0
1
2
3
3
3
2
2
C
C
C
1
1
.0
.0
0
0
3
k
W
T
X
/E
7
2
k
W
0
0
k
.7
/1
4
1
6
1
2
C
1
.0
0
2
1
9
9
2
2
R
R
0
0
0
0
1
1
W
4
0
3
k
2
/1
0
R
1
1
7
V
A
6
V
A
5
V
A
4
V
A
3
V
A
2
V
A
1
V
A
0
V
A
A
IV
Z
_
Q
R
S
X
#
K
A
S
X
#
F
E
D
S
#
K
C
D
X
W
4
4
2
R
k
1
W
0
/1
1
9
9
2
R
0
2
8
W
0
/1
1
7
4
2
k
1
1
R
4
3
3
3
2
2
2
C
C
1
1
1
.0
.0
.0
0
0
0
9
5
2
R
k
.7
4
W
0
/1
1
W
0
/1
DATA3
DATA2
2
2
2
R
0
0
6
2
R
k
.7
4
W
0
/1
1
BCK1
XCK1
DATA0
DATA1
LRCK1
0
0
0
0
0
R268
R217
R269
R219
R220
1
2
2
R
0
1
6
2
R
k
.7
4
W
0
/1
1
5
2
2
R
0
K
C
X
6
2
2
R
0
K
C
R
L
8
2
2
R
0
K
C
B
0
0
0
1
R
k
.7
4
W
0
/1
1
9
2
2
C
1
.0
0
D
R
A
O
A
_
S
U
B
_
H
C
.1
5
_
M
C
P
S
U
B
_
L
R
T
C
_
C
A
D
S
U
B
_
L
A
N
IG
S
_
T
X
E
0
9
2
R
0
0
1
S
U
B
_
L
A
N
IG
S
_
A
B
M
A
S
5
0
1
N
ML
MC
4
8
2
R
131
0
8
1
W
0
/1
1
%
.5
0
3
8
2
R
k
1
W
0
/1
1
%
.5
0
7
0
2
IC
-C
X
5
A
IV
Z
R
P
M
E
T
S
Y
S
D
V
D
125
128
F
2
R
O
S
S
E
C
O
119
122
MDI
MREQ
I/P SW
WIDE
1
7
2
R
0
0
1
W
0
/1
1
2
7
2
R
0
0
1
W
0
/1
1
4
6
3
2
C
C
1
.0
0
0
8
6
7
3
7
2
2
2
C
C
1
1
1
.0
.0
.0
0
0
7
3
2
C
1
.0
0
1
4
2
C
1
.0
0
9
7
2
C
p
0
0
1
1
3
D
M
0
3
D
M
2
4
2
C
1
.0
0
9
2
D
M
8
2
D
M
5
1
R
2
2
W
0
/1
1
7
2
D
M
6
2
D
M
5
2
D
M
4
2
D
M
3
2
D
M
8
4
2
C
2
2
D
M
1
.0
0
1
2
D
M
0
2
D
M
4
1
R
2
2
W
0
/1
1
9
1
D
M
8
1
D
M
7
1
D
M
6
1
D
M
2
5
2
C
1
.0
0
5
1
D
M
4
1
D
M
3
5
2
C
1
.0
0
3
1
D
M
2
1
D
M
3
1
R
2
2
W
0
/1
1
1
1
D
M
0
1
D
M
9
D
M
8
D
M
8
7
2
C
p
0
0
1
7
D
M
6
D
M
1
6
2
C
5
D
M
1
.0
0
4
D
M
2
1
R
2
2
W
0
/1
1
3
D
M
3
6
2
C
2
D
M
1
.0
0
1
D
M
0
D
M
3
1
2
R
8
6
C
D
N
G
-5
4
D
D
V
-5
4
B
3
M
Q
D
M
2
M
Q
D
M
1
M
Q
D
M
0
M
Q
D
M
K
L
C
M
E
W
M
B
)
/6
(6
)
7
4
e
g
a
(P
D
D
R
R
A
A
O
O
B
B
)
)
/6
/6
(5
(6
)
)
7
6
4
4
e
e
g
g
a
a
(P
(P
D
R
A
O
B
)
/6
(5
)
6
4
e
g
a
(P
HCD-NXM4D
7
7
2
C
p
0
0
1
1/10W
2
3
2
R
3
3
W
0
/1
1
HA1
HAD12
HAD13
HAD14
HAD15
5
0
2
L
F
H
U
0
5
6
2
C
0
1
3
6
8
6
2
2
C
C
p
1
0
.0
0
0
1
2
8
2
C
C
p
0
0
0
1
HAD7
HAD8
HAD9
HAD10
HAD11
8
7
6
6
2
2
C
1
1
.0
.0
0
HAD6
HAD5
HAD4
HAD3
C
0
HAD0
HAD1
HAD2
9
6
2
1
.0
WE
5
7
4
5
2
2
R
R
k
k
.7
.7
4
4
W
W
0
0
/1
/1
1
1
MA7
MA8
MA9
MA6
0
7
2
C
1
.0
0
2
7
2
C
1
.0
0
MA1
MA2
MA3
MA4
MA5
0
8
2
C
p
0
0
1
1
8
2
C
p
0
0
1
1/10W
22
22
R11
R10
MA0
MA10
BA0
BA1
MA11
1
7
2
C
1
.0
0
MCSO
MRAS
MCAS
4545
Page 46
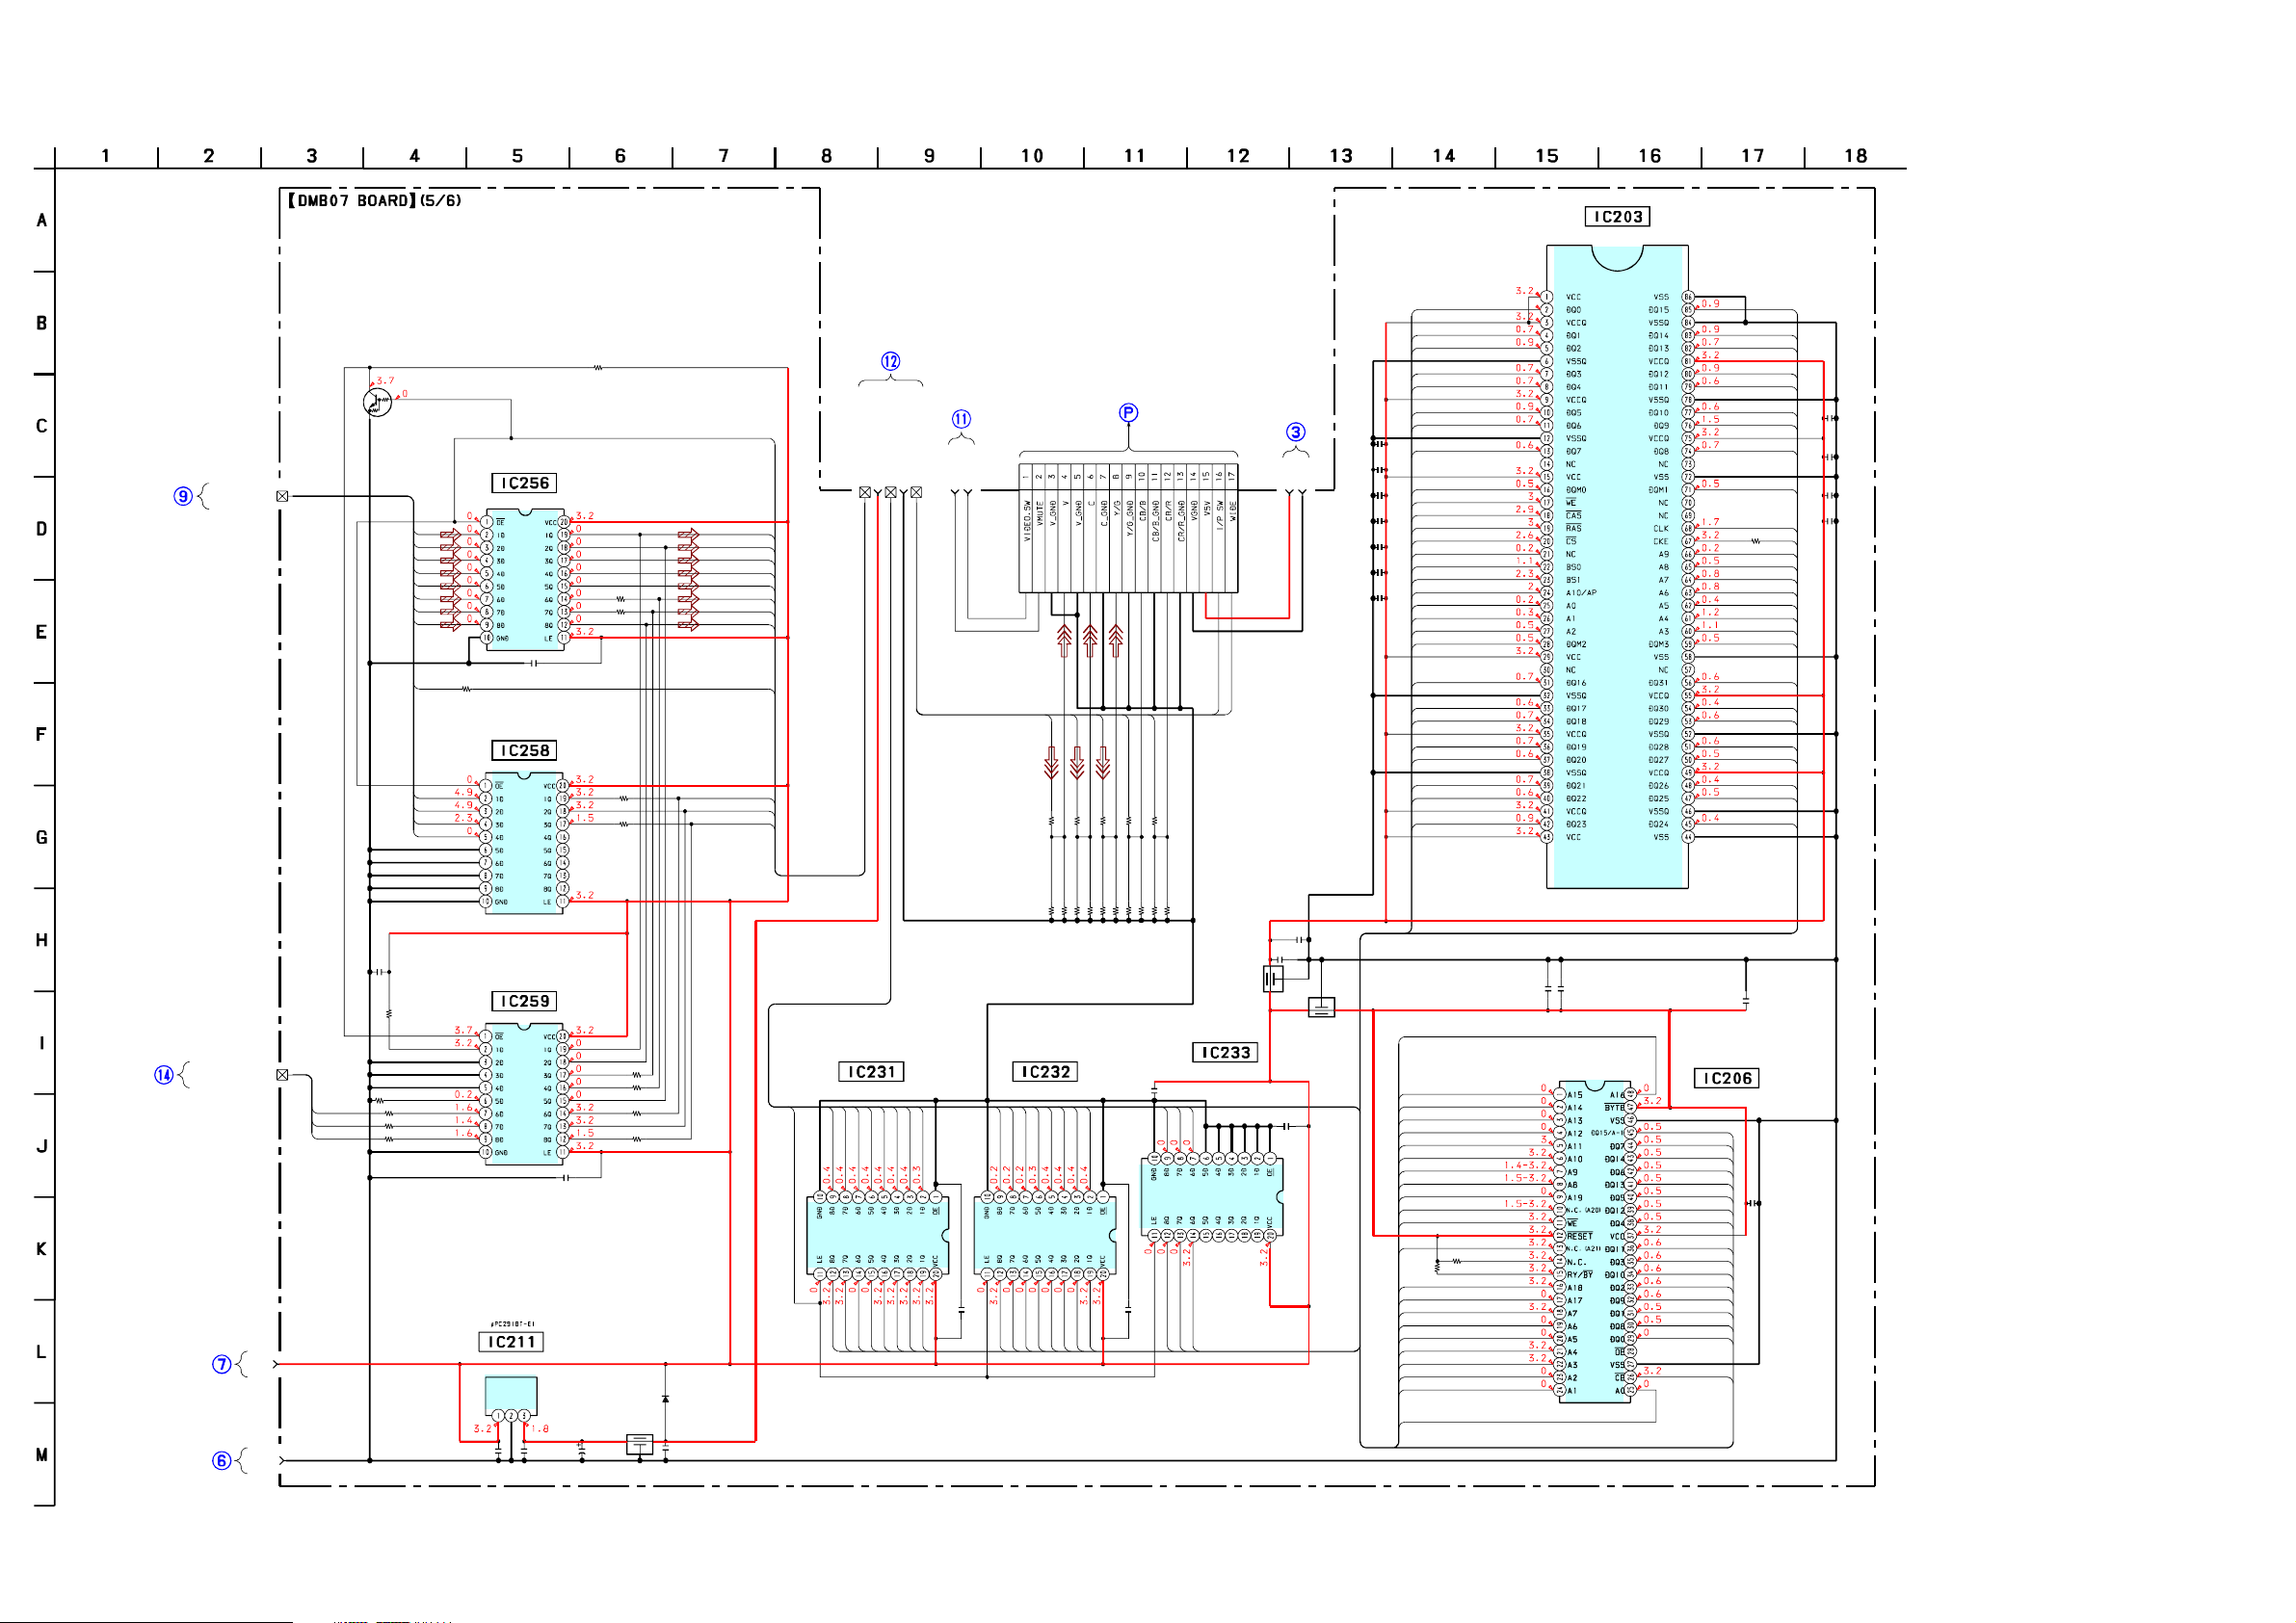
HCD-NXM4D
7-17. SCHEMATIC DIAGRAM – DMB07 (5/6) BOARD –
Q201
DTC114TE-TL
INVERTER
S
NAL_BU
SIG
B07
DM
BOARD
(2/6)
(Page43)
SD7
SD6
SD5
SD4
3
SD
SD2
SD1
SD0
IC256
SN74LV573A
R
PW
DATA LATCH
R202
1/10W
IC203
HY57V283220T6
AM
SDR
D15
R301
1k
SYS_RST
M
D14
M
D13
M
D12
M
D11
M
D10
M
D9
M
D8
M
QM
D
M
CLK
M
A9
M
A8
M
A7
M
A6
M
A5
M
A4
M
A3
M
DQM
M
C227
0.01
C239
0.01
1
C245
0.01
C249
0.01
3
D0
B07
DM
BOARD
(4/6)
47k
INT/EXT
AV7
AV6
AV5
AV4
R9998
R9999
0
0
AV3
AV2
AV1
AV0
(Page45)
BA_SIGNAL_BUS
B 4-5
VDD 4-5
SAM
B07
DM
ARD
BO
(3/6)
(Page44)
CN105
GND
VMUTE
VIDEO_SW
VIDEO
BOAR
(Page49)
B07
D
DM
BOARD
(1/6)
(Page42)
C218
0.01
CN
105
17P
C220
VGND
0.01
C240
0.01
C235
0.01
C243
0.01
C246
0.01
C250
0.01
V5V
M
D1
M
2
D
M
D3
M
D4
M
D5
M
D6
M
D7
M
0
DQM
M
E
W
M
CAS
M
RAS
M
CSO
M
A11
M
BA0
BA1
A10
M
A0
M
A1
M
A2
M
2
DQM
M
(Page45)
(Page47)
B07
B07
DM
DM
BOARD
BOARD
(2/6)
(1/6)
(Page42)
(Page43)
B07
DM
BOARD
(4/6)
(Page45)
B07
DM
BOARD
(3/6)
(Page44)
B07
DM
BOARD
(1/6)
(Page42)
HCD-NXM4D
DM
BOARD
(4/6)
DM
BOARD
(6/6)
B07
B07
DM
BOARD
(3/6)
(Page44)
DM
BOARD
(6/6)
(Page47)
DM
BOARD
(2/6)
(Page43)
B07
B07
B07
EXT_SIGNAL_BUS
D3V
DGND
LRCK
ADC_DATA
BCK
R197
4.7k
1/10W
C284
XSRQ
R270
XSAK
SDEF
XDCK
XSHD
C286
0.01
R198
4.7k
1/10W
0
R294
0
R296
0
R293
0.01
0
IC258
SN74LV573A
LATCH
IC211
+1.8V REG
C214
0.01
DATA LATCH
IC259
SN74LV573A
LATCH
DATA LATCH
C215
0.01
C287
0.01
R9980
0
R9981
0
FL206
C213
0UH
100
4V
C291
100p
D202
1SS355TE-1
R9982
R9983
R9984
R9985
0
0
0
0
7
XSRQ_ZIVA
XSAK#
SDEF#
XDCK#
IDE
W
I/P SW
119
122
125
128
131
0
0
0
R273
R274
1/10W751/10W
1/10W
75
75
R279
R263
R278
HAD8
HA12
HAD9
HA13
IC232
SN74LV573APW
LATCH
11
12
HAD
HAD
HAD10
HA16
HA15
HA14
R
HAD13
HA17
14
HAD
HA18
15
HAD
HA19
IC231
R
SN74LV573APW
LATCH
ALE
HAD0
HA4
HAD1
HA5
HAD2
HA6
HAD3
HA7
HAD4
HA8
HAD5
HA9
HAD6
HA10
HAD7
HA11
C201
0.01
1/10W
75
R264
0
0
R275
R277
R276
1/10W
75
R265
1/10W
1/10W
1/10W
1/10W
1/10W
75
75
75
75
75
R282
R267
R281
R266
R280
C275
0.01
HA2
HA2
HA1
C202
0.01
HA22
HA21
HA20
IC233
SN74LV573APW
LATCH
FL203
C255
10
0UH
R
C254
0.01
FL204
0UH
C203
0.01
HA17
HA16
HA15
HA14
HA13
HA12
HA11
HA10
HA9
HA20
HA21
W
HA22
HA19
HA18
HA8
HA7
HA6
HA5
HA4
HA3
HA2
HA1
D16
M
D17
M
D18
M
D19
M
D20
M
D21
M
D22
M
D23
M
C258
C259
10
0.01
IC206
90TN
29PL32BM
BM
M
HAD15
HAD7
HAD14
HAD6
HAD13
HAD5
E
0
R250
R215
0
HAD12
HAD4
HAD11
HAD3
HAD10
HAD2
HAD9
HAD1
HAD8
HAD0
CE
D31
M
D30
M
D29
M
D28
M
MD27
D26
M
D25
M
D24
M
C205
0.01
RAM
C264
0.01
4646
Page 47
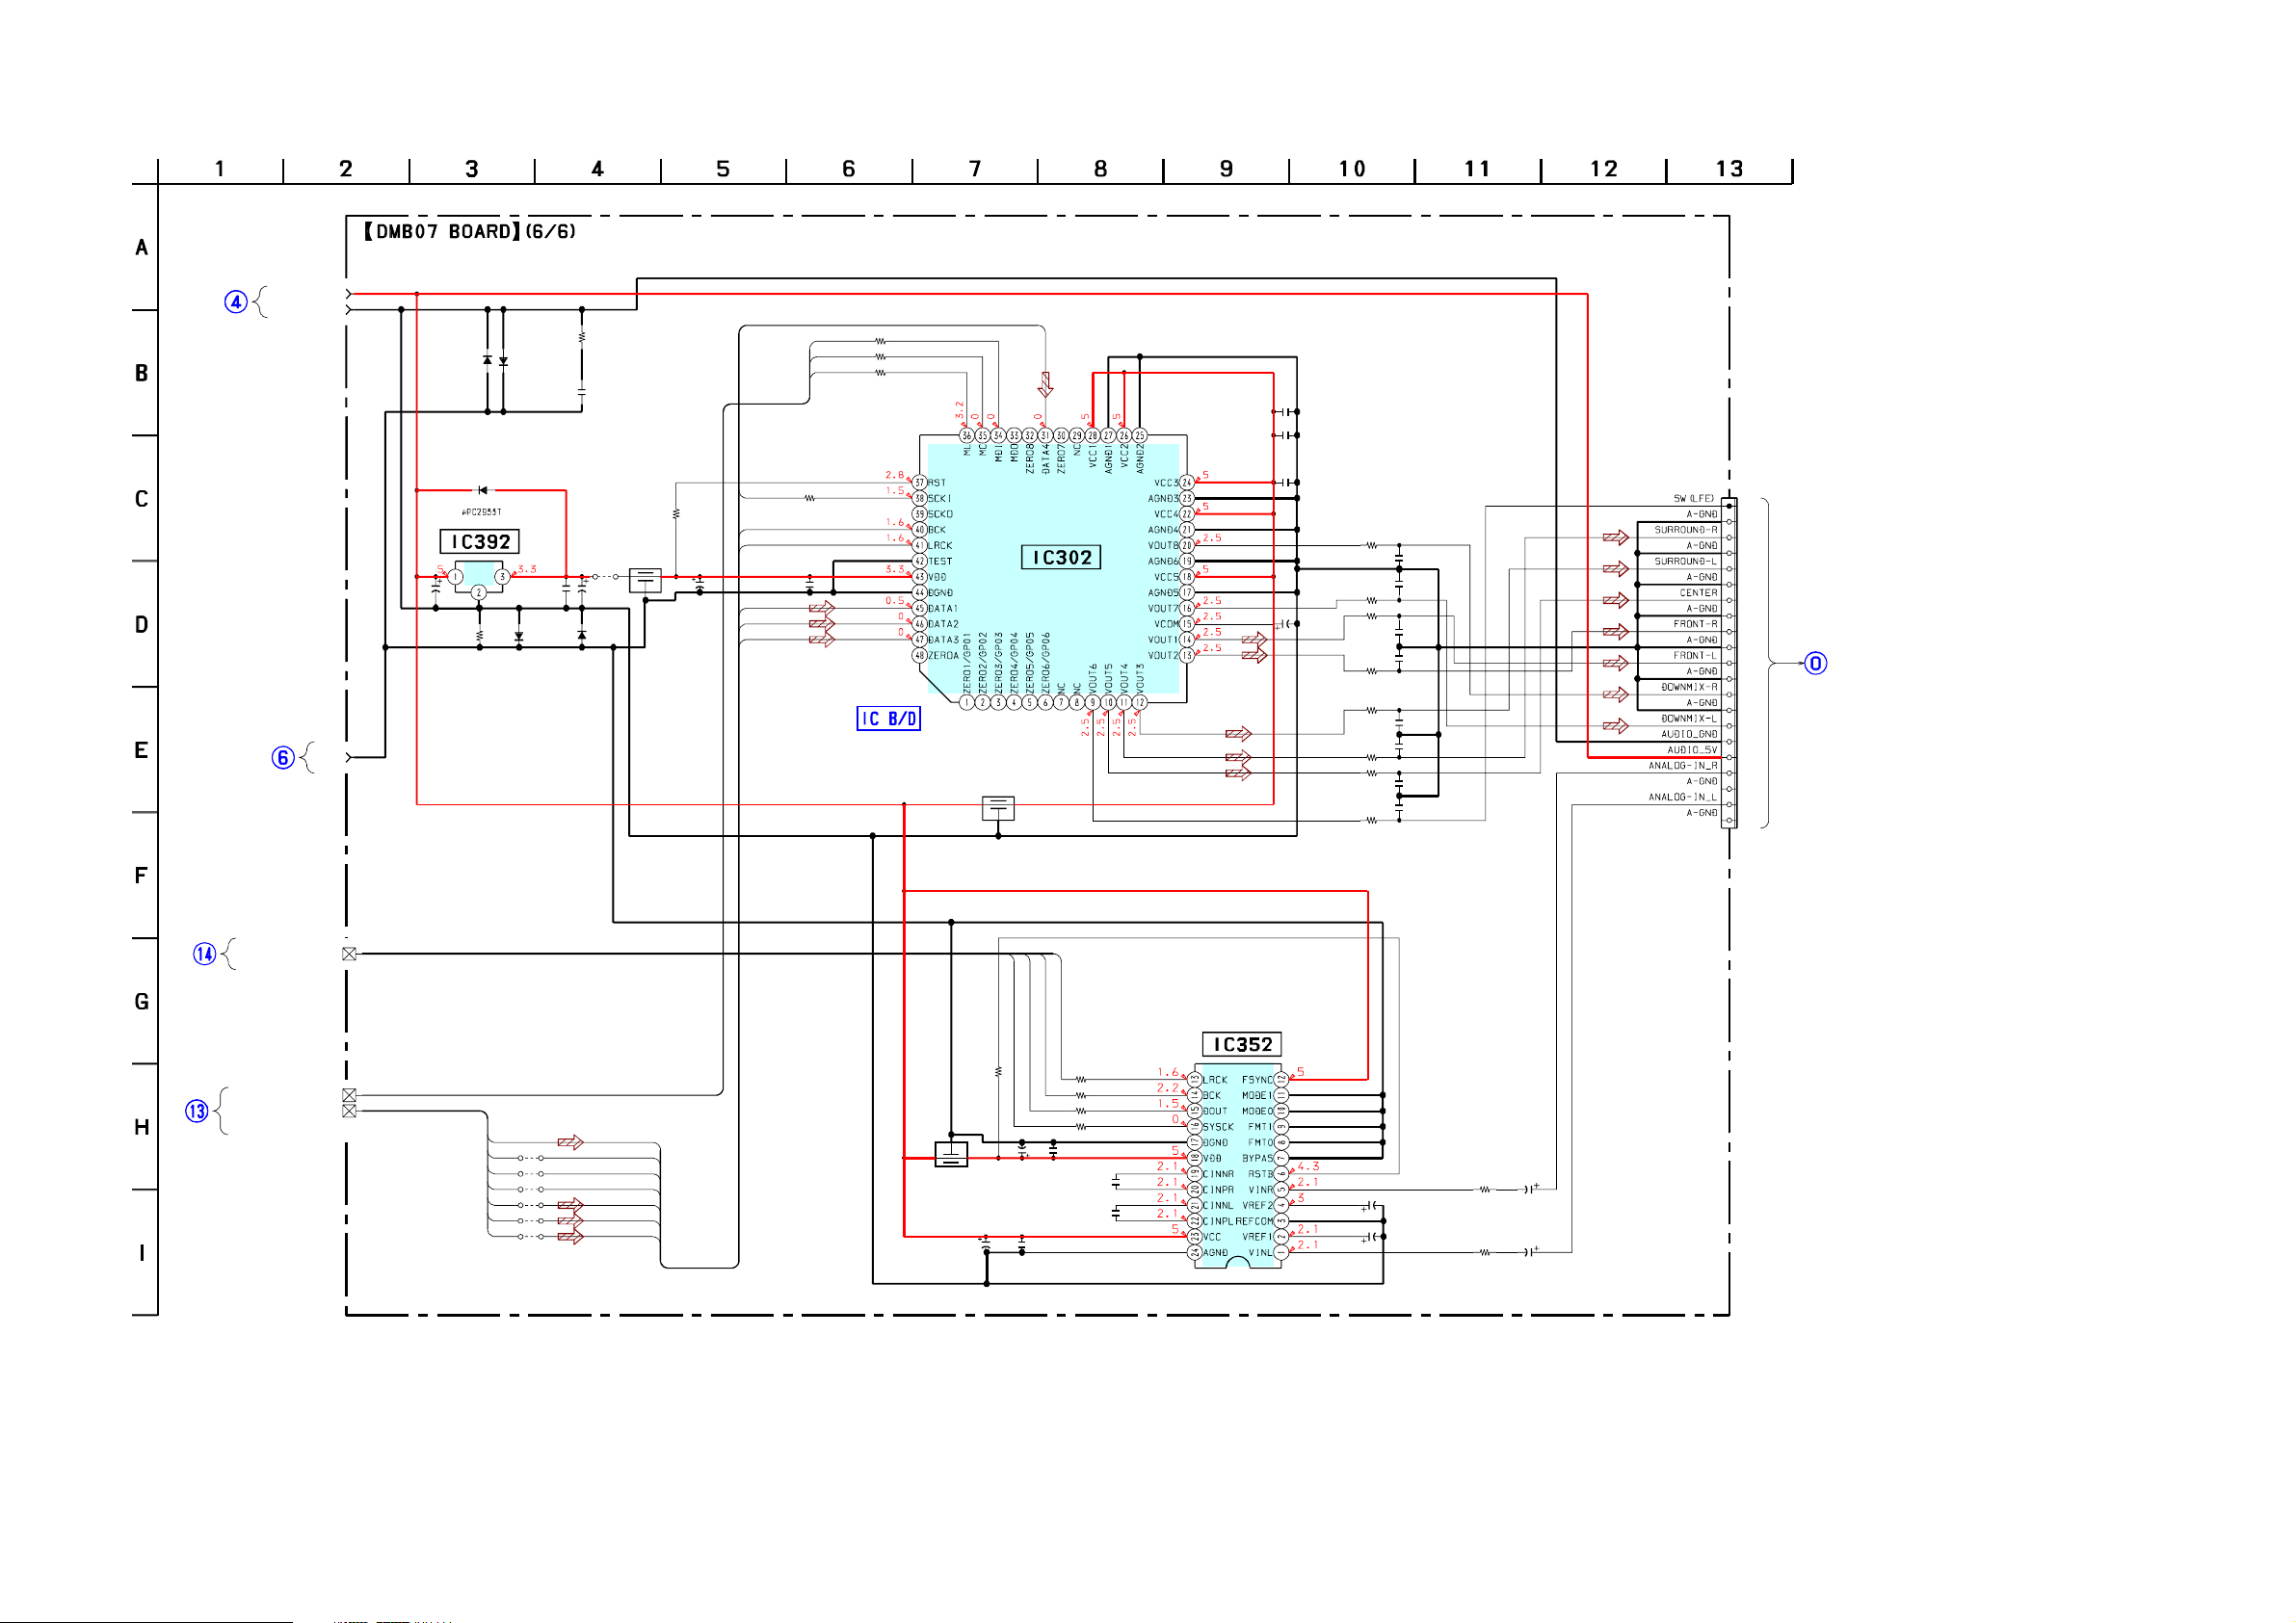
HCD-NXM4D
7-18. SCHEMATIC DIAGRAM – DMB07 (6/6) BOARD –
5V
_
IO
D
U
A
D
N
G
_A
IO
D
U
A
07
B
M
D
D
R
A
O
B
)
(1/6
)
age42
(P
07
B
M
D
D
AR
O
B
(1/6)
age42)
(P
07
B
M
D
D
R
A
O
B
(2/6)
3)
(Page4
B07
M
D
D
R
A
O
B
(3/6)
age44)
(P
07
B
M
D
D
AR
BO
(5/6)
age46)
(P
D
N
G
D
1S
C392
3
130
D
-17
355TE
S
392
D
355T
1SS
7
IC392
U
EG
R
3.3V
2
2
16V
392
R
10
1/10W
304
1
D
355
S
1S
E-1
R
TO
LA
C
0.01
393
D
355TE-1
S
1S
7
TE-17
393
1S
C394
2
D
355TE-1
S
1302
R
0
1302
C
.1
0
20
JW
4V
394
7
• See page 66 for IC Block Diagram.
D
M
C
M
L
M
314
R
22
0W
/1
1
K-A
C
M
13
3
R
k
10
1/10W
FL302
392
0
325
C
H
100
0U
4V
-A
CK
B
-A
CK
LR
C326
0.01
-A
FLR
-A
LR
S
-A
W
CS
310
1/10W
100
I
R
311
1/10W
100
R
312
1/10W
100
R
FL303
0U
DMX-A
24
C3
0.1
323
C
0.1
2
32
C
.1
0
IC302
PTR
09K
16
CM
P
TER
VER
N
CO
/A
D
C321
100
6.3V
H
R
220
1/10W
308
R
220
1/10W
307
R
220
1/10W
306
R
220
1/10W
305
R
220
1/10W
304
R
220
1/10W
303
R
220
1/10W
302
R
220
1/10W
309
309
C
100p
08
C3
100p
307
C
0.01
306
C
0.01
305
C
0.01
C304
0.01
303
C
0.01
302
C
0.01
1
5
10
IN
A
M
D
R
A
O
B
(1/3)
age51)
(P
15
20
21
M
D
O
B
(4/6)
age45)
(P
M
D
BO
(5/6)
(Page46)
M
D
O
B
(4/6)
age45)
(P
S
U
L_B
A
N
T_SIG
EX
XCK
ADC_DATA
364
C
100
6.3V
365
C
0.1
BCK
LRCK
IC352
1800E/2K
CM
P
TER
ER
V
N
O
C
/D
A
328
R
0
329
R
0
327
R
0
335
R
0
357
363
C
0.1
367
C
470p
C
470p
368
355
C
100
6.3V
352
C
100
6.3V
C
1
353
R
50V
0
356
C
352
R
1
0
50V
07
B
D
R
A
07
B
D
R
A
S
U
L_B
_CTR
AC
D
S_A
U
_B
H
_5.1C
M
PC
-A
X
M
07
B
D
R
A
0
TA
A
D
1
K
C
X
B
LR
A
D
A
D
A
D
806
JW
1
K
C
1
K
C
3
TA
2
TA
1
TA
0
805
JW
0
804
JW
0
803
JW
0
802
JW
0
801
JW
0
D
-A
K
C
M
-A
K
C
B
-A
K
C
LR
-A
W
S
C
-A
LR
S
-A
FLR
FL352
0U
62
3
R
10k
1/10W
H
366
C
100
6.3V
HCD-NXM4D
4747
Page 48
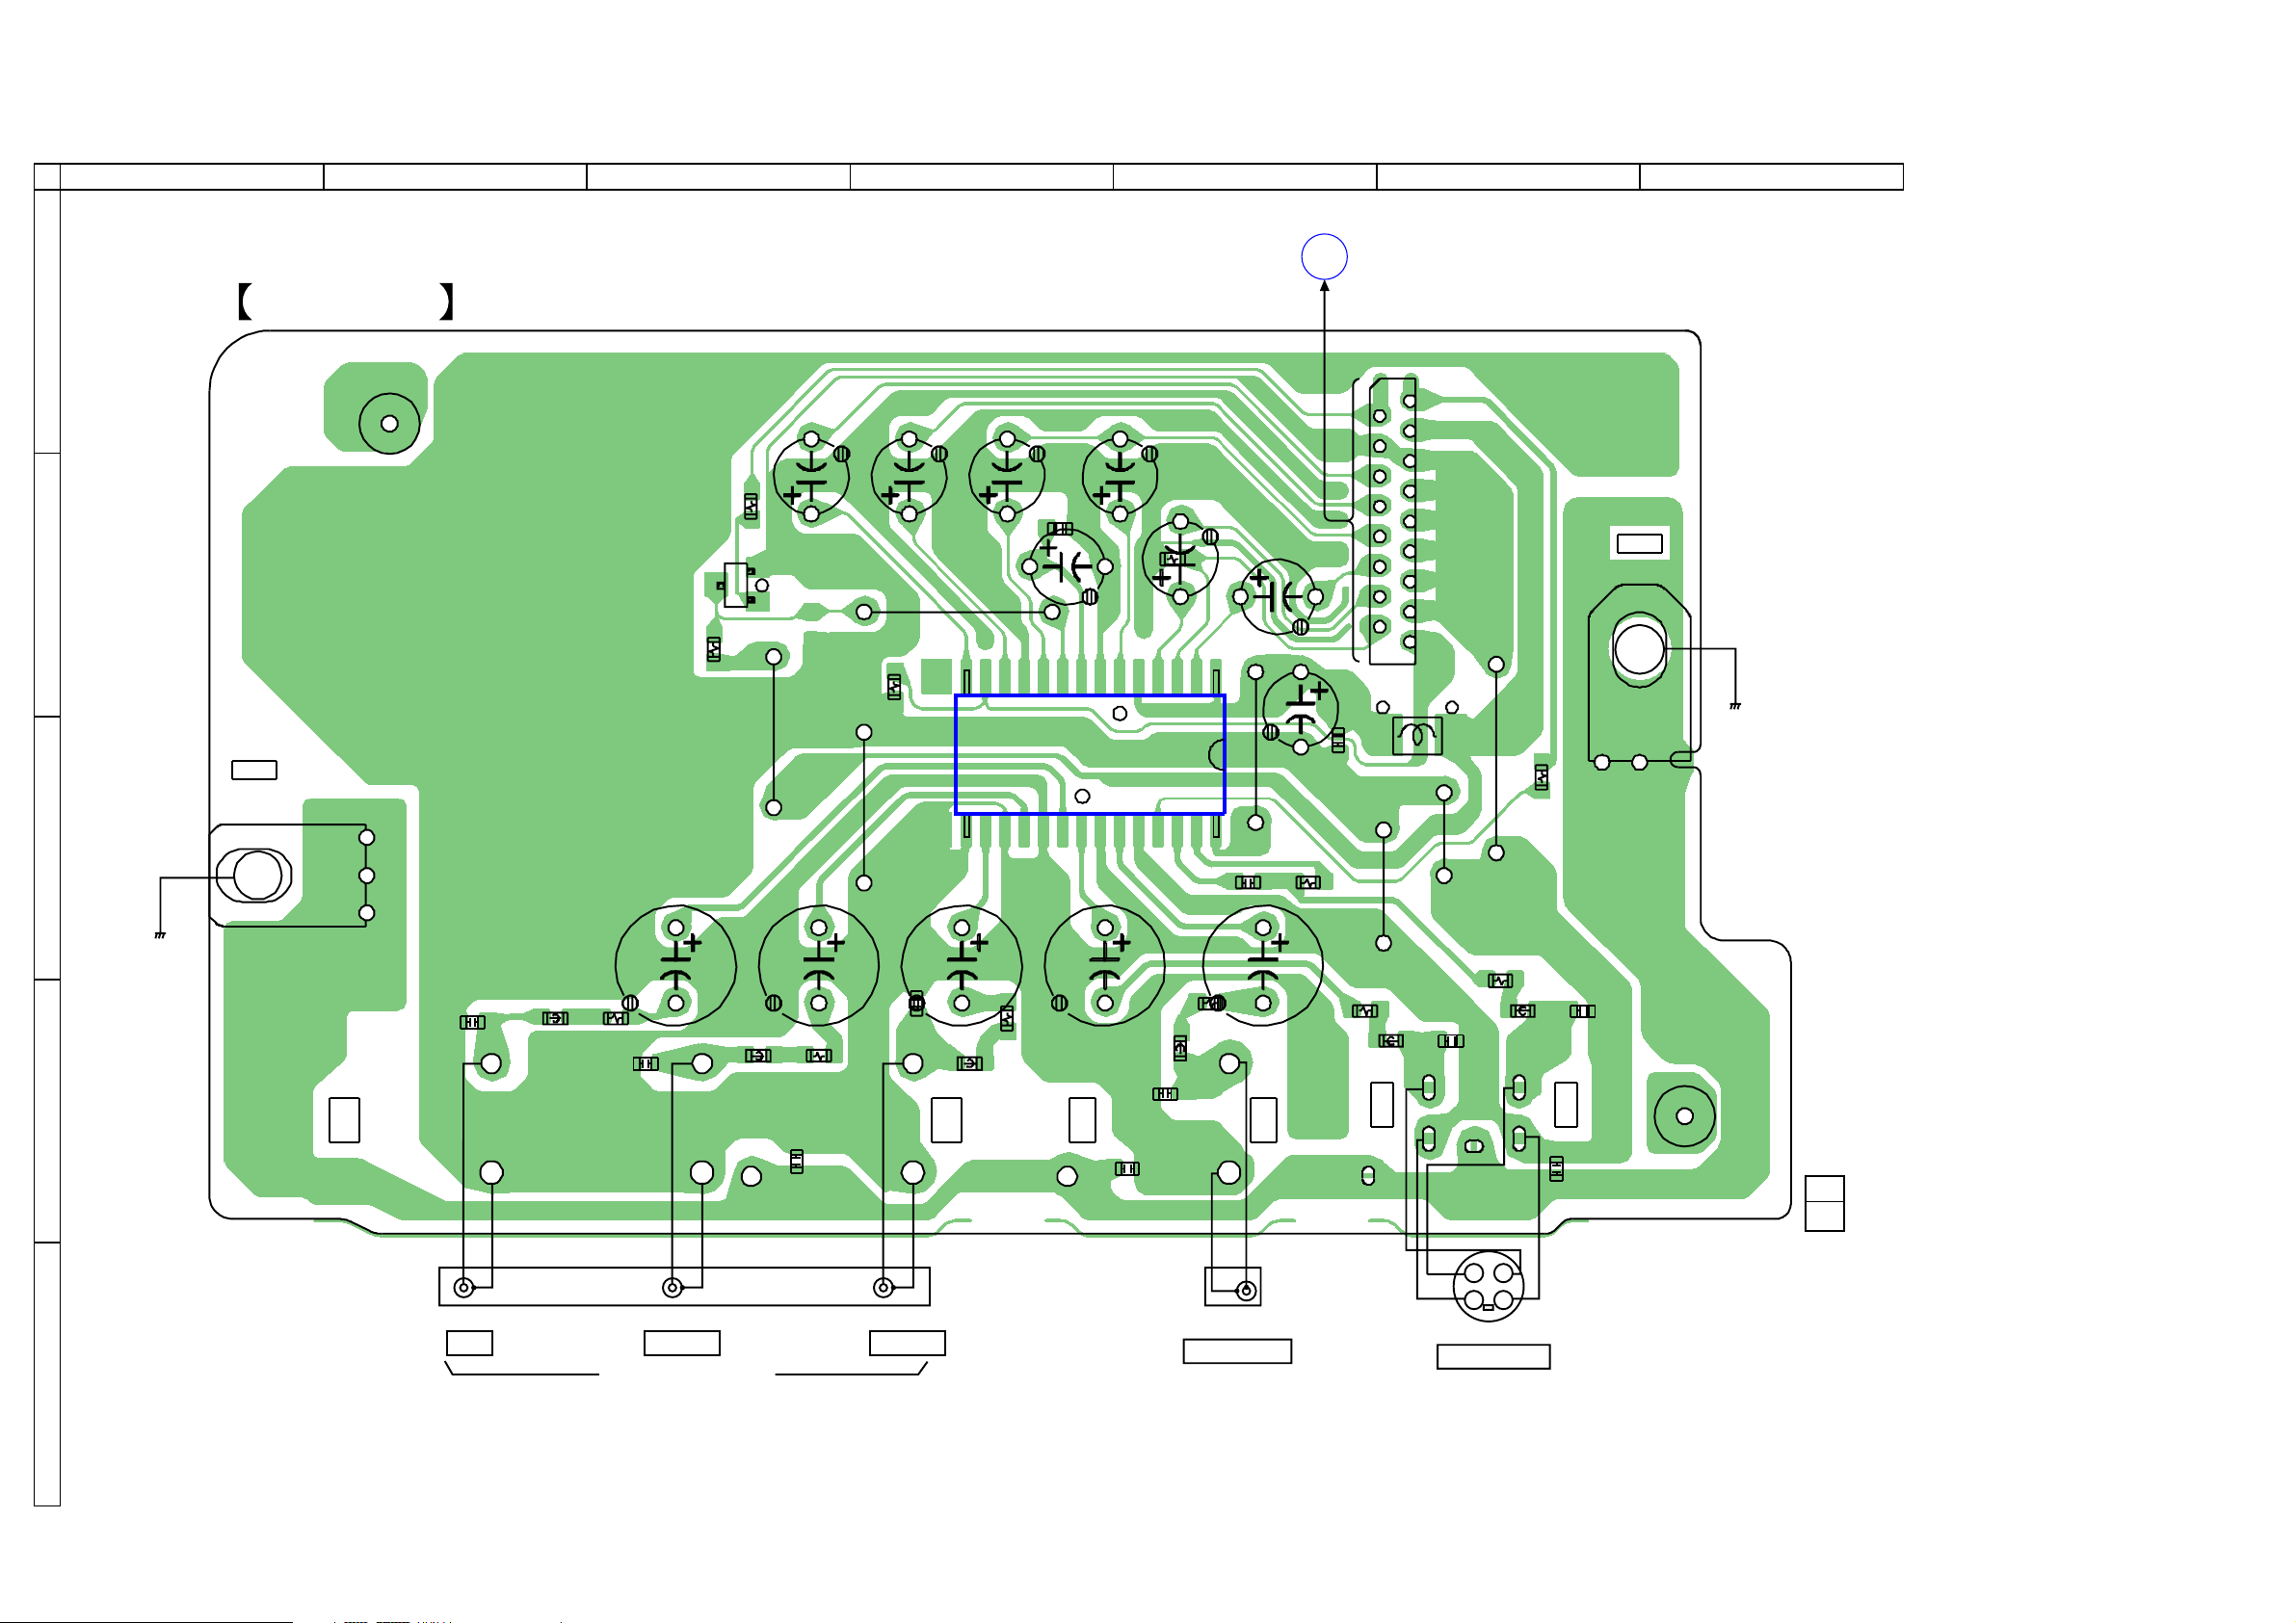
HCD-NXM4D
7-19. PRINTED WIRING BOARD – VIDEO BOARD –
2
A
1
VIDEO BOARD
LP1101
B
C
EP1101
• See page 29 for Circuit Boards Location.
3 4 5 6 7
C1101
R1102
E
Q1101
R1112
JW1109
JW1108
C1102
JW1103
R1101
C1104
C1105
C1103
IC1101
C1106
C1107
R1103
DMB07
BOARD
(Page40)
114
2815
C1116
C1108
JW1102
R1110
P
C1109
C1110
17
1
L1101
JW1107
CN1101
JW1104
JW1105
EP1102
R1109
CHASSIS
D
CHASSIS
R1106
C1119
E
FB1103
C1118
J1103
J1103
COMPONENT OUT
C1113
FB1102
C1112
R1105
C1120
PR/CRPB/CBY
C1117
C1111
FB1101
R1104
C1114
C1122
R1108
C1121
J1102
C1115
FB1105
J1102
VIDEO OUT
R1107
FB1104
R1111
C1123
J1101
C
G
J1101
S VIDEO OUT
FB1106
Y
G
C1124
C1125
LP1102
1-862-076-
11
(11)
HCD-NXM4D
4848
Page 49
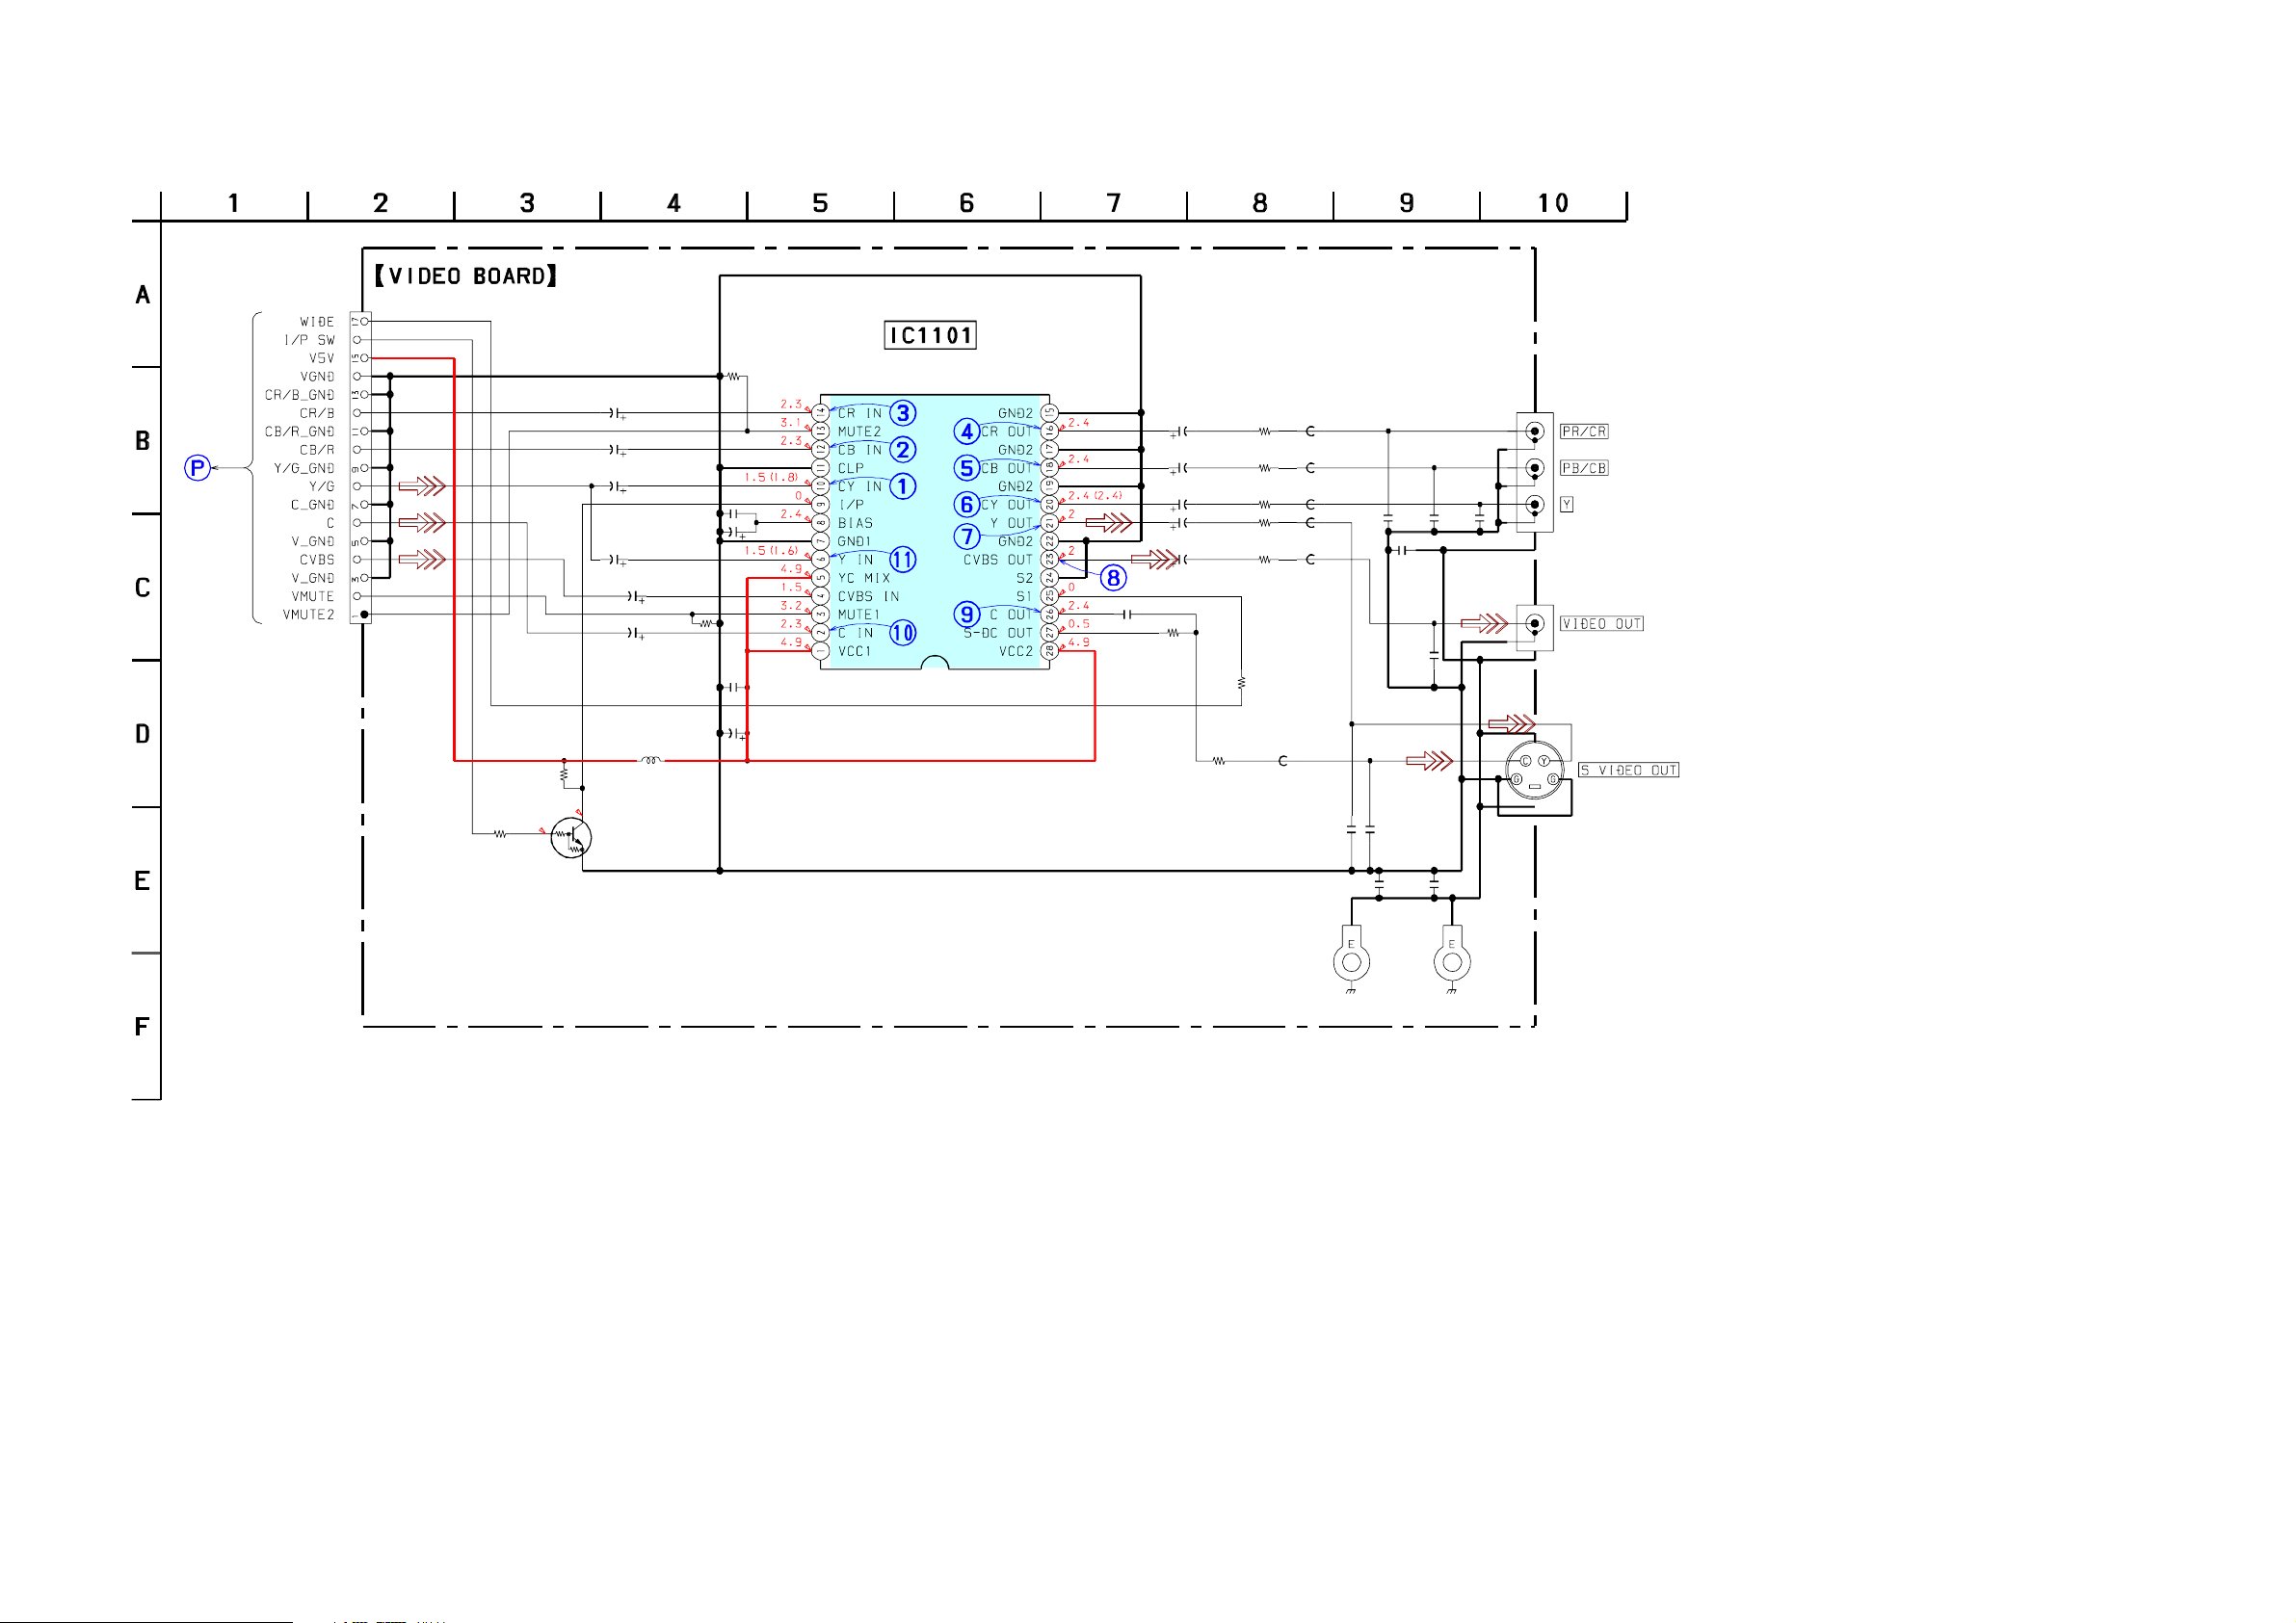
HCD-NXM4D
7-20. SCHEMATIC DIAGRAM – VIDEO BOARD –
CN1101
17P
DMB07
BOARD
(5/6)
(Page46)
R1112
10k
R1102
100
0
Q1101
DTC114EKA
SWITCH
C1103
0
• See page 62 for Waveforms.
1
C1101
50V
50V
1
C1102
1
50V
C1104
0.1
C1105
50V
1
1
1
L1101
10uH
50V
50V
50V
22
C1109
C1110
R1103
10k
0.1
100
10V
C1106
C1107
C1108
R1101
10k
IC1101
MM1623BFBE
VIDEO AMP
BUFFER
C1116
0.1
C1115
C1111
C1112
C1113
C1114
R1110
J1103
3P
C1119
22p
JALCO
J1102
J1101
R1104
FB1101
0
FB1102
FB1103
FB1104
FB1105
C1123
22p
0
0
0
C1118
C1117
22p
22p
0
C1120
C1124
22p
0
C1121
22p
C1122
0
0
6.3V
R1111
75
6.3V
6.3V
6.3V
6.3V
75
R1105
75
R1106
75
R1107
75
R1108
75
R1109
100
FB1106
1000
1000
1000
1000
1000
10k
EP1102
(CHASSIS)
C1125
0
EP1101
(CHASSIS)
HCD-NXM4D
4949
Page 50
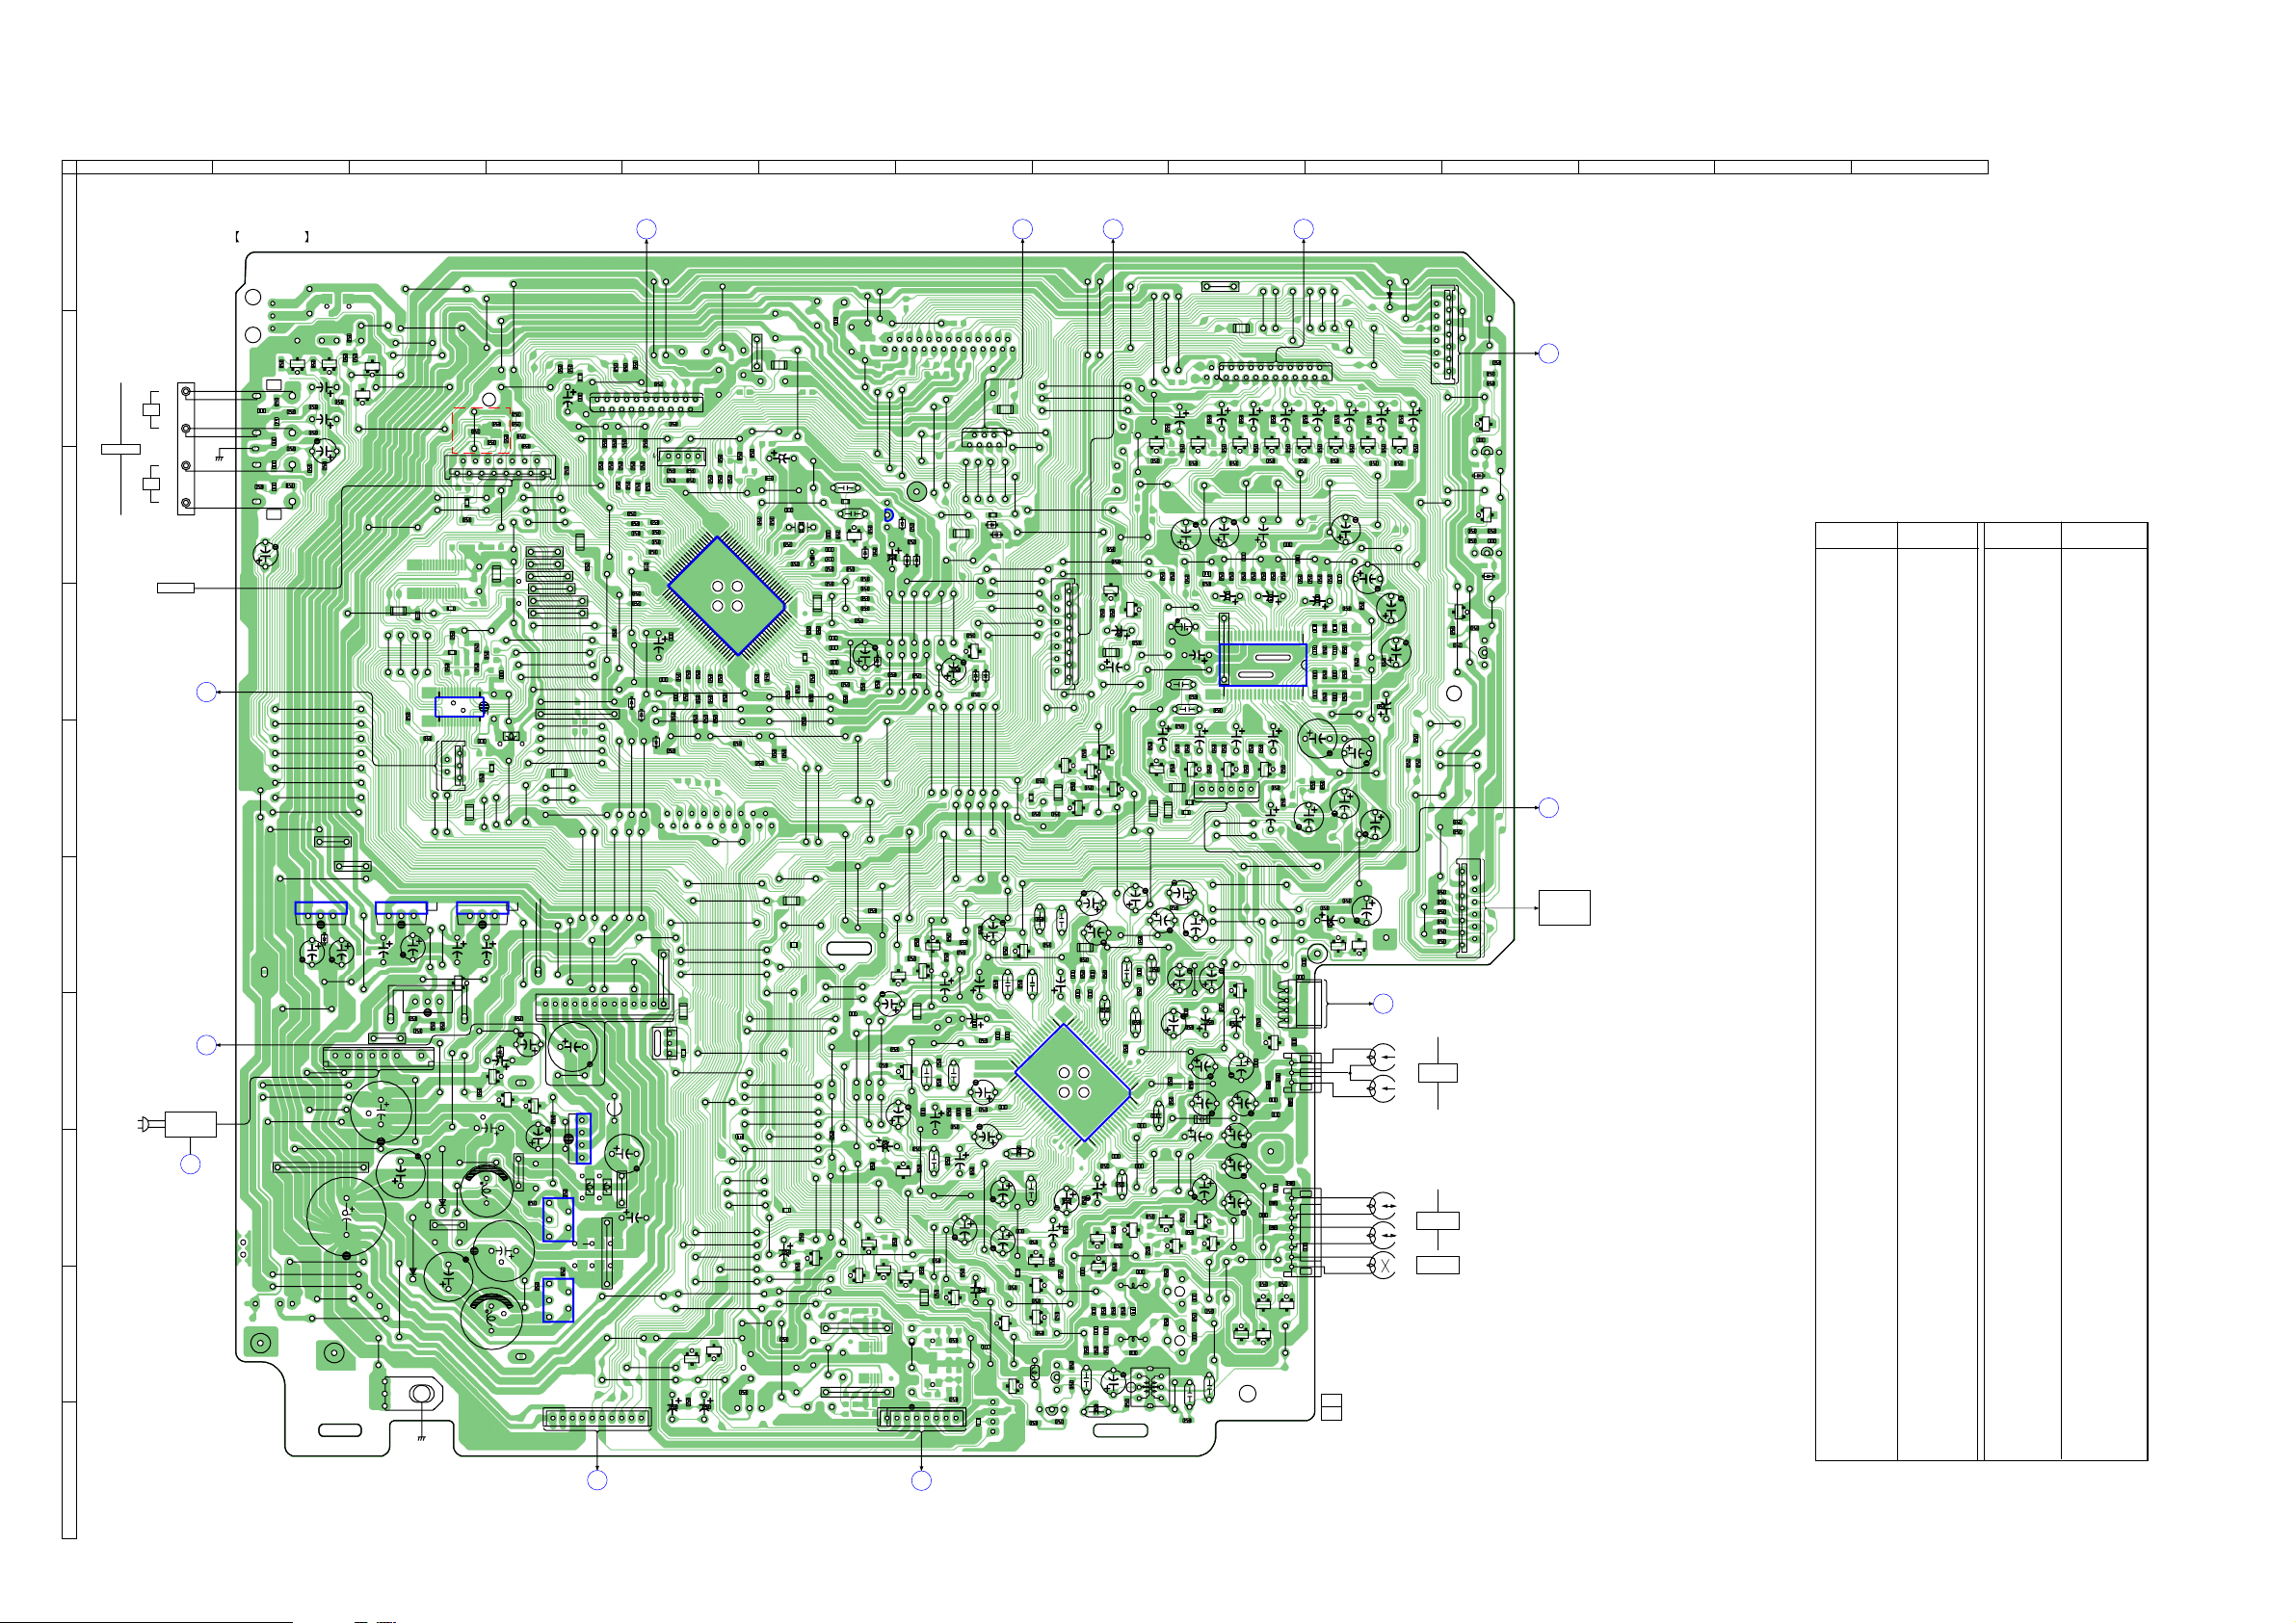
HCD-NXM4D
7-21. PRINTED WIRING BOARD – MAIN BOARD –
1
A
B
VIDEO(MD)
C
TM502
OUT
L
IN
(CHASSIS)
OUT
R
IN
2
MAIN BOARD
R196
R143
3
4
1
C
1
4
1
C
0
0
1
C
3
9
1
C
2
9
1
R
C191
R31
1
9
1
Q
1
4
1
Q
R32
R146
E
E
4
4
1
C
Q
5
4
1
R
2
4
1
R
4
4
1
R
2
4
1
C
1
4
1
R
4
9
1
R
9
1
R
C192
4
9
1
C
R195
R193
1
TUNER
D
D
VOL BOARD
(page56)
E
JW435
9
2
2
W
J
0
3
2
W
J
1
3
2
JW
2
3
2
W
J
3
3
2
JW
4
3
2
W
J
5
3
2
W
J
6
2
4
W
J
3
4
2
W
J
9
W
J
W
J
5
2
4
JW
IC902
3
F
K
G
AC IN
H
DMBO7 BOARD
(page40)
SWITCHING
REGURATOR
H
FRONT AMP BOARD
(Page58)
I
1
D904
C903
C904
6
3
4
W
J
9
8
4
JW
1
W
J
7
7
4
4
W
J
6
9
4
W
J
0
5
4
W
J
8
3
4
W
J
2
5
4
W
J
0
2
3
W
J
0
0
9
W
J
6
4
4
W
J
3
9
4
W
J
1
6
1
W
J
3
6
4
W
J
1
9
4
W
J
1
0
1
P
L
L
J
3 4 5 6 7
0
5
3
JW
7
9
1
JW
R30
7
2
7
0
C900
0
1
P
8
9
1
W
J
9
9
1
W
J
0
0
2
W
J
8
2
Q
9
3
2
W
J
E
1
0
2
W
J
E
2
0
2
W
J
0
2
2
W
J
1
2
2
W
J
3
2
2
W
J
1
1
1
R
J
7
3
2
JW
JR7
JW455
JW499
JW483
JW383
14
15
R958
9
5
9
R
IC903
3
1
JW434
C
5
C
1
N
JW433
5
0
9
C
6
0
9
8
4
4
W
J
E
C
9
Q
1
0
9
R
R903
4
0
9
R
1
0
1
JW449
C930
JW497
C910
W
J
D902
JW462
JW488
EP901
(CHASSIS)
J
B
J
R
JW415
0
D901
9
R
1
E2
R
C
JR128
5
4
R
3
2
1
R969
2
1
1
R955
IC951
1
5
JW414
JW492
Q902
R902
JW498
JW453
2
0
4
2
N
0
JW444
W
J
C914
4
2
JR132
3
E
4
4
0
4
W
J
R970
1
28
C
CN112
IC901
C902
JW443
R914
5
4
JW195
R242
JW203
1
4
2
R
R243
1
1
JR104
4
9
R952
R956
2
5
9
9
L
R957
JR121
JW410
JW409
1
C901
2
3
4
W
J
D905
E
Q906
E
1
1
9
C
L901
5
1
9
C
L904
JW416
JW238
JW218
JW247
C953
1
5
R
9
C
JW245
JW204
9
0
2
JW194
J
R247
R246
JW
5
1
C
Q904
E
JW901
• See page 29 for Circuit Boards Location.
8
RELAY BOARD
B
(Page38)
JW132
JW133
6
3
1
E
0
2
E
7
JW226
JW428
6
9
6
3
JW364
JW379
D
JW228
9
Q30
N
C
JW134
C
C
3
R495
JW260
JW324
JW360
JW369
JW378
JW144
JW145
2
9
3
4
0
1
P
L
1
9
3
3
R393
1
IC391
1
9
C393
R392
6
9
3
R
5
0
4
R
3
0
4
R
2
0
4
R
1
0
4
R
4
0
4
R
JW184
C498
D182
JW188
9
9
4
R
R494
JW190
JW317
8
8
1
R
JW326
Q343
0
4
1
C
6
2
1
R
JW358
0
1
R
JW359
Q101
JW367
JW368
R1
1
C
E
R42
Q
JW312
R33
8
9
3
W
J
E
E
1
3
Q
2
0
1
8
FRONT AMP BOARD
D393
8
E
C104
1
7
JW
JW146
D392
JW183
JW187
R
JW327
R345
E
JW332
JR117
0
1
R
Q32
E
(pge58)
R394
9
4
JW316
3
JW333
JW285
R
8
R343
C111
JR126
JW341
I
9
3
JW182
JW186
E
Q342
R36
JW139
5
D394
J
Q341
E
R2
R
JR
W
JW181
JW328
J
R107
C114
JW337
R
3
R
1
1
JW185
JW246
C390
W
R106
3
4
8
JW147
1
8
7
JW196
R347
3
C109
C105
W
J
5
E
9
J
3
J
JW180
R
3
R
R101
Q
R
JW148
W
W
8
1
JW266
JW315
R344
1
R104
1
3
3
JW336
3
7
1
C
JW173
1
3
1
2
D
D
7
7
1
JW225
5
7
4
R
7
E
1
D
C183
1
R
JW267
JW310
JW471
JW311
2
4
3
R
1
4
3
R
JW330
2
1
C
C123
R
C113
C108
C107
9
8
6
0
1
R118
C
4
R37
C102
4
C
3
9
1
JW192
JW191
R379
R381
R383
R385
R387
JR110
4
2
2
W
J
7
7
3
1
2
R455
9
C
L902
1
4
R440
0
6
1
6
JW439
N
0
R388
R439
R
JW217
JW250
JW
JW424
JW503
3
0
2
IC904
L903
3
R
1
3
3
4
R
1
0
1
W
J
6
0
2
W
J
R386
)
K
C
E
H
(C
1
0
4
N
C
R378
R384
R382
R438
R436
R437
1
4
4
3
4
4
R
5
4
4
R
4
R
JW252
JW251
R465
D397
3
W
J
5
5
3
JW430
JW405
JW423
JW502
FB903
2
1
9
C
JW903
JW904
5
W
J
9
2
4
JW
J
JW
R380
R435
4
JW253
JW399
W
JR449
R
R
0
1
7
D395
0
4
4
JW422
JW
CN304
4
3
R434
3
5
4
5
JW254
JW
D396
JW402
C
1
8
4
5
R
9
5
2
1
4
4
R
R
6
0
1
3
4
4
R
R
2
4
4
R
3
4
4
4
R
6
4
4
R
0
5
IC401
1
5
C462
C463
R474
R472
R470
5
7
4
C
R471
R473
5
5
2
C476
R414
R408
8
5
2
W
J
2
1
4
R
7
9
2
JW8
JR261
1
JR120
6
1
9
6
3
JW
E
1
2
Q
JW
2
2
R21
C22
5
0
2
W
C383
C384
2
1
W
J
R451
R452
1
R448
3
1
2
W
J
4
1
2
W
J
5
1
2
W
J
6
1
2
W
J
JR127
6
5
4
W
J
7
5
4
W
J
8
5
4
JW
5
4
W
J
4
W
J
4
W
J
9
4
2
0
4
2
JW
4
4
2
W
J
1
4
2
W
J
2
4
2
JW
8
4
2
W
J
6
W
J
6
5
3
JW
7
5
3
JW
8
0
3
JW
1
3
1
R
J
7
0
4
W
J
4
0
4
JW
6
0
4
JW
JW408
JW485
JW464
JW353
JW427
3
1
8
0
9
C
9
1
9
1
3
4
JW
Q903
JW440
4
C907
R909
1
JW465
R906
5
0
9
R
5
IC905
1
R908
5
R907
IC906
1
JW441
N
C
0
1
J
FRONT AMP
BOARD
(pge58)
JW5
JW466
2
JR
2
7
3
N
C
JW
R425
R426
JW
1
R477
R476
R493
R410
W
J
2
4
JW
W
J
W
J
JW
6
3
JW
JW
W
J
JW
2
2
8
4
R
C21
8
0
2
W
J
7
0
2
R424
2
J
3
JW
1
3
3
3
6
7
3
C
3
3
E
2
4
C
R419
R427
R
J
R423
W
J
2
1
2
JW
R420
R417
0
3
1
0
8
8
R483
R482
R479
R478
6
2
JW
6
5
2
W
J
W
J
7
5
2
W
J
W
J
9
5
2
W
J
6
6
4
R
R468
7
6
4
R
7
6
4
W
3
4
4
4
3
6
4
8
4
7
7
7
1
4
W
J
J
JW
9
4
3
W
J
JW
JW
6
W
J
W
J
JW
8
6
3
JW
J
2
8
3
W
J
4
8
3
W
J
0
9
4
W
J
R
J
6
8
3
W
J
JW385
5
9
4
W
J
7
8
3
6
W
R
J
9
8
3
W
J
8
W
8
J
3
W
J
6
9
7
9
5
9
3
W
J
5
4
R
2
2
Q
8
9
R
3
6
0
1
1
4
2
1
4
R
2
2
2
JW
R
J
JR
W
6
3
7
3
7
3
7
3
W
1
C2
3
JW394
C366
JW189
7
8
JW209
0
1
1
JR101
6
1
4
C
2
0
4
X
C412
R391
3
1
R
J
6
6
3
3
3
1
2
3
1
9
Q391
1
0
4
X
1
1
4
C
1
1
4
0
1
4
C
9
0
4
R
4
R
6
0
4
R
1
3
0
1
JR
0
0
1
JW227
9
9
4
C
R497
7
9
4
C
R400
5
9
4
C
JR102
4
9
4
C
R486
R490
R484
2
9
4
R
3
6
2
W
R489
R496
4
R485
5
R469
JW319
JW318
2
4
4
4
2
1
5
7
4
W
J
8
1
1
7
4
3
JW
1
5
3
JW
JW
C
2
2
3
2
JW361
5
6
3
JW370
R3
4
7
3
5
7
3
9
JW381
JW380
R5
4
R
Q2
E
0
Q29
1
9
3
W
J
2
9
3
W
J
1
1
9
W
J
3
9
3
JW
1
6
9
W
J
8
8
R128
4
C
R
3
N
R
J
2
0
2
1
6
JW268
1
1
1
C
JW340
JR130
2
0
C139
2
1
0
3
0
JW174
1
1
Q401
7
2
R38
7
2
1
JW269
JW309
5
JW338
Q34
DMBO7 BOARD
N
(page40)
5
0
1
JR
3
4
1
W
J
7
1
5
1
W
J
JW149
JW236
5
1
JW
JW150
4
W
J
W
J
W
J
JW
W
J
JW
D183
JW270
JW472
C136
R158
1
3
W
J
R125
C174
4
4
0
1
1
C
1
C
C128
C101
1
R
E
JW501
Q316
1
1
1
1
1
1
JW401
JW282
4
C138
C173
0
1
0
6
3
6
4
6
2
6
7
6
8
6
9
6
JW505
Q151
3
JR203
8
R
1
E
R
J
E
R124
R120
5
JW454
1
JW313
C129
JW335
C
R
E
Q104
2
Q154
L311
6
1
JW
JW
1
2
CN110
14
15
0
7
1
JW
Q24
6
2
R
JR205
3
3
E
8
9
2
2
R
R
C164
C163
6
5
1
R
C
7
5
1
R
JR204
R154
C162
C137
2
5
2
IC101
0
3
1
C
1
1
1
R
6
4
1
C116
0
1
1
R109
3
0
1
Q
R102
E
9
2
3
W
J
E
R119
9
6
1
R
3
W
J
Q318
6
1
E
3
R
0
2
3
R
E
7
1
3
Q
1
3
R
5
1
3
R
VOL BOARD
C
(Page56)
JW176
JW175
JW418
JW128
JW127
0
4
1
W
J
1
4
1
W
J
2
4
1
W
J
9
0
5
5
1
JW
1
Q
R167
8
0
1
R
J
0
2
1
C
9
7
1
W
J
R40
E
E
Q23
R25
7
2
R
Q25
6
5
1
C
9
5
1
C158
C161
R155
C160
C157
C155
4
5
6
4
6
C117
C115
R112
2
1
3
Q
R130
E
0
0
3
W
J
E
C40
3
1
3
Q
3
0
3
W
J
C308
C358
4
0
R359
R357
C311
R317
4
2
1
3
C
5
Q40
JW470
J
R153
R307
R356
JW154
R271
0
7
2
Q
E
JW138
2
7
2
R
7
3
1
W
J
6
7
4
W
J
6
6
1
R
6
1
1
R
R231
R232
6
5
1
2
2
0
1
Q
E
1
R
JW
E
Q26
JW
W
1
R
R
1
C
1
R
R
R
C357
JW
E
R165
0
7
1
C
6
2
2
C
5
1
1
R
7
1
1
2
1
W
J
7
5
1
W
J
2
C
7
7
4
2
C
6
0
5
W
J
R
R16
E
C6
6
Q
E
2
2
1
JR
JR
JR107
JW469
JR109
JW305
C154
JW352
4
3
1
C
6
0
3
R122
5
2
3
9
2
1
R
C131
C133
R121
C132
1
5
2
3
1
C121
C165
8
8
2
W
J
R131
2
1
C
R162
9
8
2
W
J
1
0
8
W
J
7
9
1
C
8
9
1
C
C168
7
4
JW294
8
4
1
C
3
1
JW293
C118
4
1
1
R352
Q352
2
1
3
R
Q311
E
E
1
1
3
R351
E
6
0
3
C
R313
R304
1
0
3
L
R309
C307
R306
R354
1
5
3
L
6
5
3
C
1
0
3
T
R318
C313
9 10 11 12 13 14
DMBO7 BOARD
O
(Page40)
0
3
9
1
2
2
1
R8
R18
JR
7
R163
2
R301
Q351
R
JW302
C270
9
8
7
1
R
C152
R
R302
JW126
R270
R223
5
1
9
JW419
3
JW
1
7
R205
R212
2
(11)
D903
JW129
JW130
JW106
JW102
R286
R289
6
5
7
7
2
2
Q
Q
R285
C275
E
E
7
8
2
R
0
9
2
R
JW114
C204
JW113
1
1
W
J
5
1
1
JW
JW
1
5
2
C
R207
C208
8
0
2
R
1
5
2
R
C252
R252
JW271
C210
R209
R261
1
1
2
R
C260
R259
JW272
C202
R202
4
0
5
W
J
1
0
2
R
9
7
2
W
J
8
3
2
C
W
J
C262
C212
JW219
4
2
R
0
C19
0
2
Q
9
1
Q
R19
E
E
G
11
JW166
JW165
JW158
1
1
C273
R280
3
7
2
Q
E
1
8
2
R
JW118
C254
5
2
C
2
2
1
R255
R257
C
C255
R13
C4
R15
E
3
6
2
R
R262
C263
8
6
4
W
J
9
1
JW
2
W
J
0
8
2
R133
Q140
E
C38
FB50
FB80
1
5
3
C
1
0
3
2
B
F
C303
4
5
B
F
JW291
4
8
B
F
CN302
5
3
5
R
E
3
5
0
3
Q
E
1-861-417-
R279
8
R258
2
2
C36
3
Q
R
5
3
2
C
4
3
3
JW261
R283
2
2
JW116
C206
R206
7
C
1
2
4
C
3
3
1
1
8
3
0
JW125
1
0
2
N
C
C274
4
7
E
4
8
R282
1
1
W
J
R204
7
0
2
C205
C253
R253
C209
R210
C259
R260
C203
R203
9
3
2
R213
C213
R
0
2
C
C31
9
1
CN108
4
CN301
C35
5
1
1
JR
1
2
C272
C271
R274
R277
1
7
2
Q
2
7
2
Q
E
E
8
7
2
R
R273
R275
C224
1
W
J
C
R
2
3
3
2
C
R
R7
Q3
1
6
0
5
2
C
3
2
1
C122
C196
JW286
1
6
1
R164
0
2
1
C
JW321
9
1
1
C
R355
9
1
R276
JW119
JW120
C220
6
5
2
C
JW
3
2
R220
R221
3
2
2
2
2
2
C
2
2
2
R254
R256
C221
JW4
IC201
1
2
2
2
5
2
2
4
2
2
R
R10
R11
R14
C3
C5
Q5
E
E
R9
Q4
R12
6
4
0
1
N
C
4
7
4
W
J
0
8
4
W
J
1
8
2
W
J
5
3
1
3
8
2
W
J
4
8
2
JW
0
2
4
JW
JW
JW287
Q153
E
C151
7
R159
6
1
C
0
6
1
R
0
8
1
R
6
6
1
C
9
6
1
C
2
5
3
C
5
2
1
C
C
0
5
1
C
0
3
C
6
4
0
3
C
4
5
3
C
E
Q302
3
5
3
C
JW292
E
9
2
W
J
Q301
3
R
JW298
JW299
E
C305
3
Q
5
0
3
R
E
C355
JW301
Q314
Q315
C314
C315
R292
2
Q
R288
C276
9
2
R
2
1
1
1
3
7
2
HP BOARD
(Page56)
L-CH
R-CH
L-CH
R-CH
7
3
7
E
JW103
R291
C277
J
C211
C261
C201
R339
R337
R338
JW
PB HEAD
REC/PB HEAD
ERASE HEAD
CN109
2
W
3
R
3
R
Q
J
5
0
1
JW277
HP901
HPR901
HE901
1
2
JW172
JW171
6
2
3
R
12
5
2
3
R
13
4
2
3
R
8
0
1
W
J
3
2
3
Q
E
4
2
3
C
4
2
3
Q
E
2
2
3
D
0
1
1
W
J
4
7
1
2
3
Q
E
1
2
3
2
3
R
2
2
2
2
3
C
2
2
3
Q
1
2
3
D
6
2
3
JW107
E
JW275
9
2
3
R
JW276
E
R327
8
2
3
R
Q327
1
1
4
W
2
1
4
W
J
3
1
4
W
J
1
3
3
R
4
3
3
R
CN303
JW278
13
12
0
4
3
R
3
3
3
R
0
3
3
R
6
3
3
R
2
3
3
R
5
3
3
R
2
1
PANEL BOARD
E
(Page54)
JW109
E
SUR AMP BOARD
L
(page60)
TAPE
MECHANISM
DECK
• Semiconductor Location
Ref. No. Location
D181 D-7
D182 D-6
D183 D-7
D201 C-7
D202 C-7
D321 C-11
D322 C-11
D391 C-6
D392 C-7
D393 C-7
D394 C-7
D395 D-5
D396 E-5
D397 D-5
D901 H-3
D902 H-3
D903 A-10
D904 F-2
D905 G-4
IC101 G-8
IC201 D-9
IC391 C-6
IC401 D-5
IC901 F-3
IC902 F-2
IC903 F-3
IC904 H-4
IC905 H-4
IC906 I-4
IC951 D-3
Q1 H-7
Q2 H-6
Q3 E-9
Q4 E-9
Q5 E-9
Q6 E-8
Q19 F-10
Q20 F-10
Q21 I-5
Q22 I-5
Q23 E-8
Q24 E-8
Q25 E-8
Q26 E-8
Q27 B-3
Q28 B-3
Q29 I-6
Q30 H-6
Q31 I-6
Q32 I-7
Ref. No. Location
Q33 I-7
Q34 I-7
Q40 E-8
Q101 G-7
Q102 D-8
Q103 I-8
Q104 I-8
Q140 G-9
Q141 B-2
Q151 F-7
Q152 D-8
Q153 F-9
Q154 I-8
Q191 B-2
Q270 B-8
Q271 B-9
Q272 B-9
Q273 B-9
Q274 B-9
Q275 B-10
Q276 B-10
Q277 B-10
Q301 H-9
Q302 H-9
Q303 I-9
Q311 H-8
Q312 H-8
Q313 I-8
Q314 I-9
Q315 I-9
Q316 I-7
Q317 J-8
Q318 I-8
Q321 C-11
Q322 C-11
Q323 B-11
Q324 C-11
Q326 D-11
Q327 D-11
Q341 F-7
Q342 F-7
Q343 F-7
Q351 H-9
Q352 H-8
Q353 I-9
Q391 C-6
Q401 D-7
Q901 G-3
Q902 F-3
Q903 G-4
Q904 G-4
Q906 G-4
HCD-NXM4D
5050
Page 51
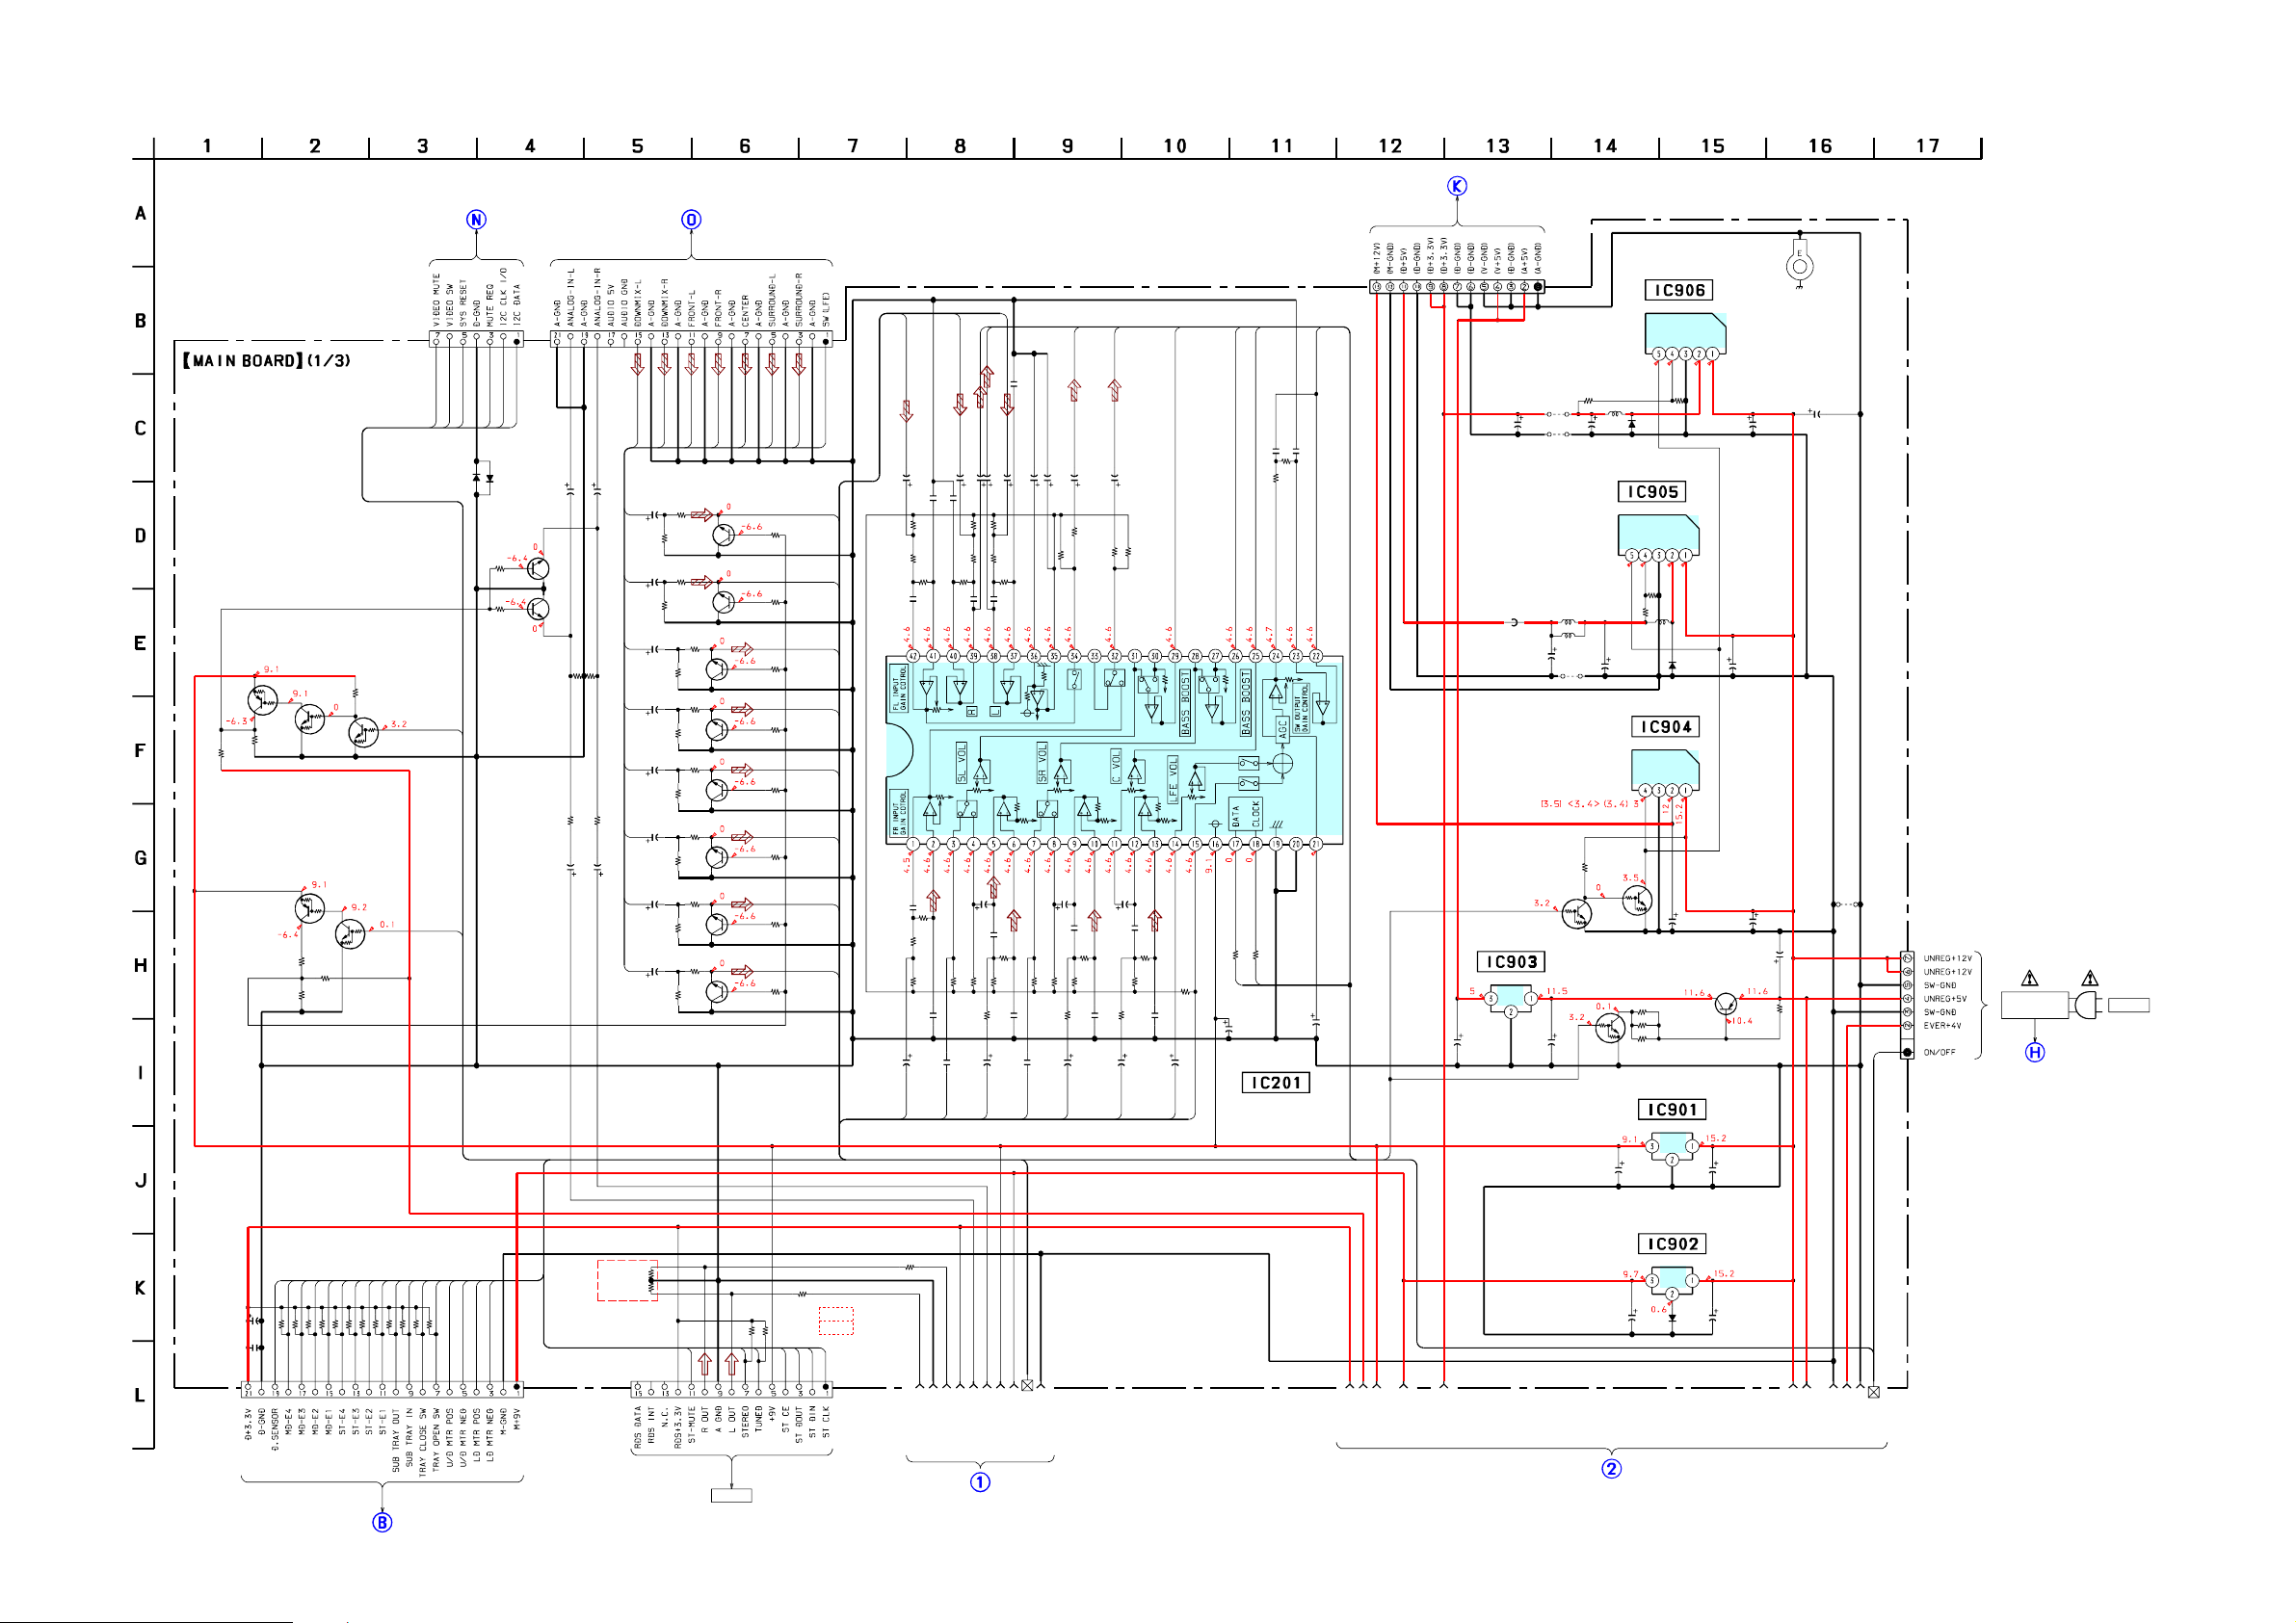
7-22. SCHEMATIC DIAGRAM – MAIN BOARD (1/3) –
DMB07
BOARD
(3/6)
(Page44)
CN202
7P
1MMFFC-S
CN201
21P
9
0
5
6
4
2
3
2
2
2
23
10k
10k
D201
1SS355
Q152
2SC5938
MUTE
Q102
2SC5938
MUTE
C149
R116
R115
C120
10
50V
47k
1k
10
50V
DTA114EKA
MUTE SWITCH
R26
100k
Q24
R25
22k
Q26
DTA114EKA
MUTE SWITCH
R27
6.8k
R28
6.8k
Q23
DTC114EKA
MUTE SWITCH
R29
100k
R40
10k
Q25
DTC114EKA
MUTE SWITCH
Q40
DTC114EKA
MUTE SWITCH
D202
1SS355
28
27
R167
R117
C199
R166
R165
C170
HCD-NXM4D
DMB07
BOARD
(1/6)
DMB07
BOARD
(6/6)
(Page47)
T
-R
T
U
M
-IN
FL
-R
-L
M
D
10
50V
DM-L
C270
10
50V
DM-R
C271
10
50V
FL-IN
C272
10
50V
47k
FR-IN
C273
10
50V
C-IN
C274
10
50V
1k
SL-IN
C275
10
50V
10
50V
SR-IN
C276
10
50V
LFE-IN
C277
10
50V
-IN
-IN
M
FL
FR
D
R270
2.2k
R271
10k
R273
2.2k
R274
10k
R276
2.2k
R277
10k
R279
2.2k
R280
10k
R282
2.2k
R283
10k
R285
2.2k
R286
10k
R288
2.2k
R289
10k
R291
2.2k
R292
10k
-IN
-IN
L-IN
R
C
S
S
R284
R287
R272
R275
R278
R281
R290
R293
LFE-IN
DM-L
1k
Q270
2SC5938
MUTE
DM-R
1k
Q271
2SC5938
MUTE
FL-IN
1k
Q272
2SC5938
MUTE
FR-IN
1k
Q273
2SC5938
MUTE
C-IN
Q274
1k
2SC5938
MUTE
SL-IN
Q275
1k
2SC5938
MUTE
SR-IN
Q276
1k
2SC5938
MUTE
LFE-IN
Q277
1k
2SC5938
MUTE
C251
p
0
V
22
50
03
10
k
2
C
47
01
C2
01
2
R
R202
470
R203
10k
p
02
0
2
C
22
C252
220p
R253
10k
R252
470
R251
47k
C253
220p
10
C208
50V
0.022
-IN
FR
U
-L
-O
D
R
M
L-O
D
01
0.0
V
9
0V
6
0
1
1
2
C
0
70
0
4
V
0
5
0
1
0.001
1
26
59
C
2
C
k
7
4
1
6
2
R
59
2
R
2.2k
0
k
26
R
2.2
22
60
0
2
C
.0
0
C207
10
50V
R207
47k
R208
47k
R204
1k
C204
10
50V
-L
R
R
U
S
1
8
0.001
R205
C206
0.001
0V
5
0
1
212
C
R206
4.7k
10k
k
47
1
1
2
R
0.022
0V
5
0
1
1
21
C
9
20
R
0
21
C
C258
9
23
23
C
C
k
.2
2
k
10
2
.2
R
2
22
0
.0
0
C257
10
50V
7k
4
47k
8
7
25
25
R
R
C254
10
50V
-R
R
R
U
S
0V
5
0
1
262
C
5
0
2
C
-IN
L
S
T
T
U
U
-O
-O
FR
FL
V
0
0V
5
5
0
0
1
1
3
26
213
C
C
M
1
R213
2
0
21
R263
R
0
C222
10
50V
C221
01
55
2
0.001
C
0.0
R256
4.7k
R255
10k
01
R254
0.0
1k
256
C
C220
10
50V
-IN
R
S
T
U
-O
L
S
M
1
2
6
2
R
R222
4.7k
R221
10k
1
k
23
0
1
2
.0
C
0
0
22
R
C224
10
50V
-IN
-IN
FE
L
C
R223
T
T
U
U
-O
-O
R
C
S
.22
0
8
22
C
k
1
4
2
2
R
R232
R231
10k
10k
1
2
47k
C233
100
16V
IC201
M61530FP
W
INPUT ATTENUATOR
S
LPF,AGC
BASS BOOST
CN203
13P
PH-S
T
U
-O
W
S
.1
.2k
0
2
5
9
2
22
2
C
R
C226
1
50V
8
2
(Page42)
+5V REGULATOR
C906
100
10V
FB903
1.1UH
IC903
TA7805S
C916
1000
6.3V
C912
1000
6.3V
Q904
DTC114EKA
MUTE SWITCH
JW904
JW902
C905
R908
LOW IMP
L902
10uH
L903
10uH
JW901
R909
10k
DTC114EKA
MUTE SWITCH
0.1
50V
100
C915
3300
6.3V
DTC114EKA
MUTE SWITCH
Q902
C902
100
10V
L904
100uH
R905
4.7k
R906
100
C911
3300
LOW IMP
Q903
6.3V
D902
RK36LF
IC905
SI-8050JF
+5V REGULATOR
PQ12RD21
+12V REGULATOR
R902
2.2k
R904
+9V REGULATOR
IC906
SI-8033JF
+3.3V REGULATOR
L901
100uH
D901
RK36LF
IC904
C908
1000
16V
R903
2.2k
2.2k
IC901
TA7809S
R907
22k
Q901
2SB1640
LINE BUFFER
C901
EP901
(CHASSIS)
C914
1000
16V
C910
1000
16V
C907
10
50V
0.1
50V
C930
2200
C900
6800
16V
JW900
CN101
7P
EH-S(2X)
16V
R901
SWITCHING
10k
65
REGULATOR
FRONT AMP
BOARD
(Page59)
AC IN
HCD-NXM4D
C384
6.3V
C383
IC902
TA7809S
*
100k
R244
100k
CN204
R242
E2
11P
R247
10k
0
5
TUNER
5
A
51
R246
*241,243
R241
*
10k
E2
0
10k
52
EXCEPT E2
5
4
5
5
53
8
3
7
9
5
40
7
41
470
k
10
10k
0.1
8
87
3
38
R
R
7
4
3
3
38
3
4
42
4
k
k
k
k
10
86
3
R
10
10
10k
10
10k
81
82
83
84
85
3
3
3
3
3
R
R
R
R
R
RELAY
BOARD
(Page39)
4
6
5
5
6
4
3
4
3
3
3
4
4
k
k
k
10k
10
10
10
77
78
79
80
3
3
3
3
R
R
R
R
CN372
21P
R243
C904
100
10V
L
R
D
TE
N
U
G
M
BOARD
(Page52)
MAIN
S
-L
-IN
G
O
L
A
N
A
(2/3)
D
-R
9V
9V
U
N
+
+
B
-G
-IN
M
IO
G
M
D
U
LO
A
A
N
A
V
V
TE
.3
+9V
U
3
+
M
IO
D
D
U
A
.3V
3
+9
+
M
MAIN
BOARD
(3/3)
(Page53)
+9V REGULATOR
1SS355
D904
C903
10
50V
V
V
V
D
D
N
N
+4
12
+5
+
EG
R
N
U
G
-G
R
G
E
R
N
U
S
E
U
M
B
EV
5151
Page 52
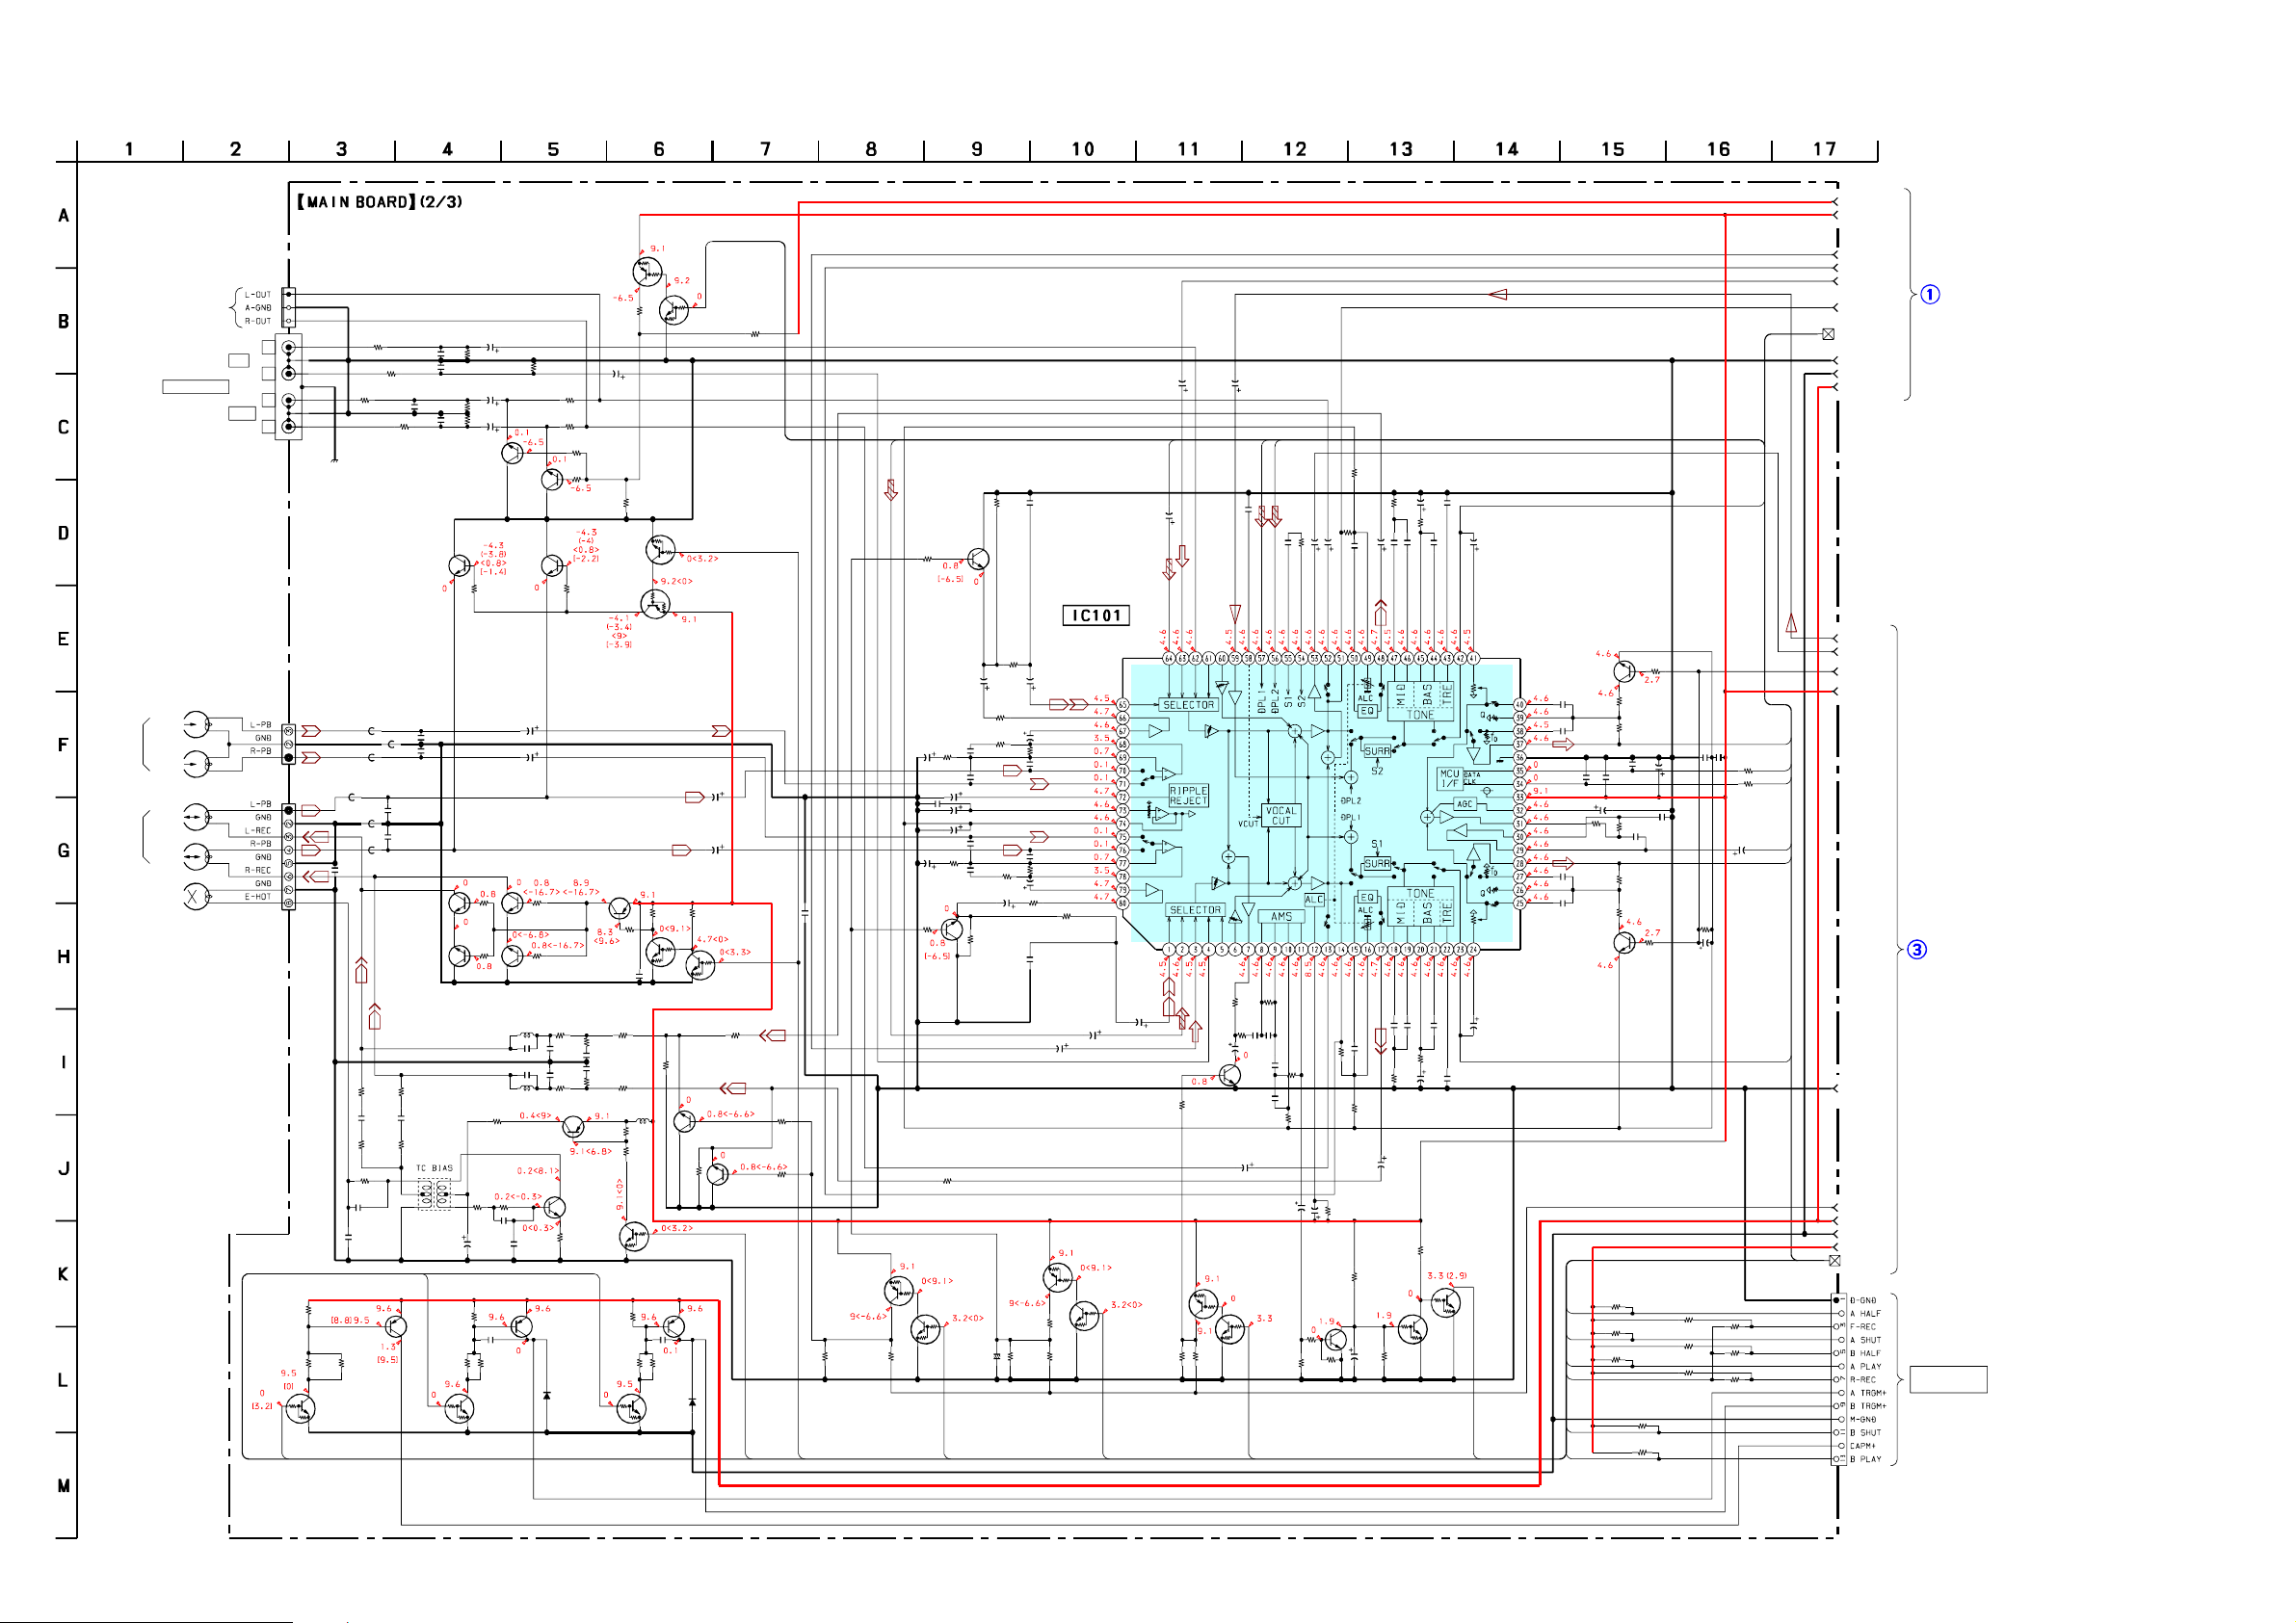
HCD-NXM4D
7-23. SCHEMATIC DIAGRAM – MAIN BOARD (2/3) –
MUTE
AUDIO+9V
HP901
PLAYBACK
HEAD
HRP901
RECORD
PLAYBACK
HEAD
L-CH
R-CH
L-CH
R-CH
HE901
ERASE
HEAD
(FOR CHECK)
J101
VIDEO(MD)
DECK A
DECK B
32
R311
10k
Q312
DTC114EKA
Q316
DTC114EKA
BIAS SWITCH
Q322
2SB1116
R321
2.2k
D321
1SS355
A
Q315
DTC114EKA
Q314
DTA114EKA
R313
10k
DTC114EKA
R102
47k
R152
47k
C
Q27
DTC114EKA
REC OUT
MUTE SW
C304
10
50V
C354
10
50V
Q313
Q104
2SC5938
TC REC MUTE
R32
100k
R118
100
Q154
2SC5938
TC REC MUTE
B19
R169
R119
10k
C102
10
50V
T
U
-O
R
Q103
2SC5938
PB MUTE
R110
1k
C116
50V
C118
C119
0.01
47
R114
16V
180
100p
C148
100p
C198
R164
C169
180
47
C168
16V
C38
0.1
10k
DTA114EKA
TC REC MUTE
R36
22k
B18
R35
100k
R160
1k
Q32
DTC114EKA
TC REC MUTE
0.01
R168
Q31
BIPOLAR
63
10
C43
2.2
50V
C125
C150
C126
C127
R159
47k
Q153
2SC5938
PB MUTE
100
R109
C146
0.0068
47k
IC101
M61537FP
INPUT SELECT SWITCH
ELECTRICAL VOLUME
100
C115
10
50V
1
50V
C117
330k
R113
100p
C147
10V
10V
10V
100p
C197
330k
R163
1
50V
C167
R180
R161
1k
100
C196
0.0068
C151
C152
10
10
50V
50V
Q30
DTA114EKA
TC PB MUTE
Q29
DTC114EKA
TC PB MUTE
R43
4.7k
R34
R33
100k
22k
7
B1
R111
R112
R130
1k
12k
100
0.1
100
100
R162
12k
C166
10
50V
T
U
L-O
C101
10
50V
C165
10
50V
R38
22k
R133
10k
C129
0.47
R131
2.2k
R132
27k
C122
4.7
50V
Q140
2SC5938
AMS MUTE
Q34
DTA114EKA
AMS MUTE
R37
100k
C128
10
50V
C154
10
50V
DTC114EKA
8
A1
T
U
-O
FR
1
C121
C132
0.01
C133
0.01
Q33
AMS MUTE
T
U
FL-O
10k
0.047
0
12
R
130
C
2.2M
1
12
R
2p
2
5k
31
1
1
C
2
12
R
R129
15k
C134
10
50V
R342
4.7k
R341
10k
50V
50V
0
0
1
1
4
3
10
10
C
C
C135
1
50V
Q341
2SC1623
AMS BUFFER
R347
2.2k
R343
R103
C109
2.2k
15k
50V
0.1
01
1
R
0
1
C105
6
10
C
k
15
0.1
151
R
C155
R153
2.2k
R123
1M
Q342
22k
DTC114EKA
AMS BUFFER
C390
22
50V
R154
R104
2.2k
2.2k
0.022
7
10
C
C156
R344
0.022
57
C1
50V
10k
C111
10
0.0056
50V
R105
10k
C112
10
50V
7
0.04
0.022
8
110
10
C
C
Q101
2SC1623
BUFFER
C113
0.47
C114
0.47
C174
C173
100p
C123
C139
R124
R125
4.7k
4.7k
C164
0.47
C163
0.47
Q151
2SC1623
BUFFER
0.047
0.022
58
C160
C1
C159
10
50V
10
R345
10k
10k
155
R
0.0056
C161
Q343
DTC114EKA
AMS BUFFER
100
C162
10
50V
R335
47k
A12
89
A11
91
90
A10
R106
R107
10k
330
R157
R156
100p
0.1
1
330
10k
R334
R331
SURR-L
R108
47k
0.1
C124
100
10V
50V
C137
0.47
R158
47k
R336
47k
R333
47k
47k
47k
0.1
369
368
C
C138
0.22
1M
28
1
R
C140
1
50V
R332
4.7k
R330
4.7k
R340
4.7k
FL
C
R127
10k
80
81
R126
10k
C136
10
50V
SW
FR
SURR-R
R337
22k
R338
10k
R339
47k
Q28
DTA114EKA
R145
R195
R306
8.2k
R356
8.2k
Q324
2SB1116
1SS355
Q191
2SC5938
MUTE
C307
330p
C357
330p
D322
1k
1k
R146
1k
R196
1k
Q303
2SC3624A
R303
1k
Q301-303,
Q311-315
REC/PB SWITCH
Q318
2SC2001
BIAS SWITCH
R316
10
REC OUT
MUTE SW
2SA812
R309
R307
C308
C358
R357
88
C192
R323
50V
Q311
R359
R30
0
10
R31
22k
R312
10k
C40
0.1
2.2k
10k
0.01
0.01
10k
2.2k
L311
100uH
R314
47k
R315
4.7k
1k
C322
0.0047
R322
2.2k
Q
321
D
TC
114EK
CN304
MOLEX
3P
R141
(CHASSIS)
DTC114EKA
FB34
0uH
C35
0.1
2SB1116
Q326
Q327
R327
2.2k
R143
R319
3.3k
0.0047
C314
0.01
10k
R191
10k
C143
1k
220p
R193
1k
Q353
2SC3624A
FB30
FB50
C301
0uH
0uH
330p
C351
FB80
330p
0uH
C303
FB54
0uH
330p
C353
330p
FB84
0uH
R354
R304
15k
15k
C355
C305
0.001
0.001
R305
R355
4.7k
4.7k
C315
SUMIDA
87
L
IN
4P
OUT
R
L
R
CN301
3P
PH-L
CN302
8P
PH-L
R329
47k
86
Q321-324,326,327
TC MOTOR SWITCH
R328
2.2k
C142
10
R142
C141
50V
100k
220p
C144
Q141
2SC5938
MUTE
R353
R301
4.7k
R302
4.7k
R318
47
C312
0.01
DTC114EKA
10
50V
C194
10
50V
1k
2SC3624A
27mH
100p
100p
27mH
R320
33
BIAS SWITCH
R317
10k
C311
0.0068
R324
2.2k
Q323
C302
C352
Q351-353
REC/PB SWITCH
Q351
Q352
2SC3624A
Q317
RT1P137L
R192
100k
10
50V
10
50V
R351
4.7k
R352
4.7k
C191
R144
220p
100k
R194
C193
220p
100k
Q301
2SC3624A
Q302
2SC3624A
L301
C306
C356
L351
T301
C313
47
10V
R326
1k
C324
0.0047
R325
2.2k
R
ANALOG-IN-R
L
ANALOG-IN-L
BUS
GND
M-GND
M+9V
MIC SIG
IC101
DBFB
AUDIO+9V
GND
MUTE
M+9V
M-GND
TC D+3.3V
BUS
CN303
13P
MAIN
BOARD
(1/3)
(Page51)
MAIN
BOARD
(3/3)
(Page53)
TAPE MECHANISM
DECK
HCD-NXM4D
5252
Page 53
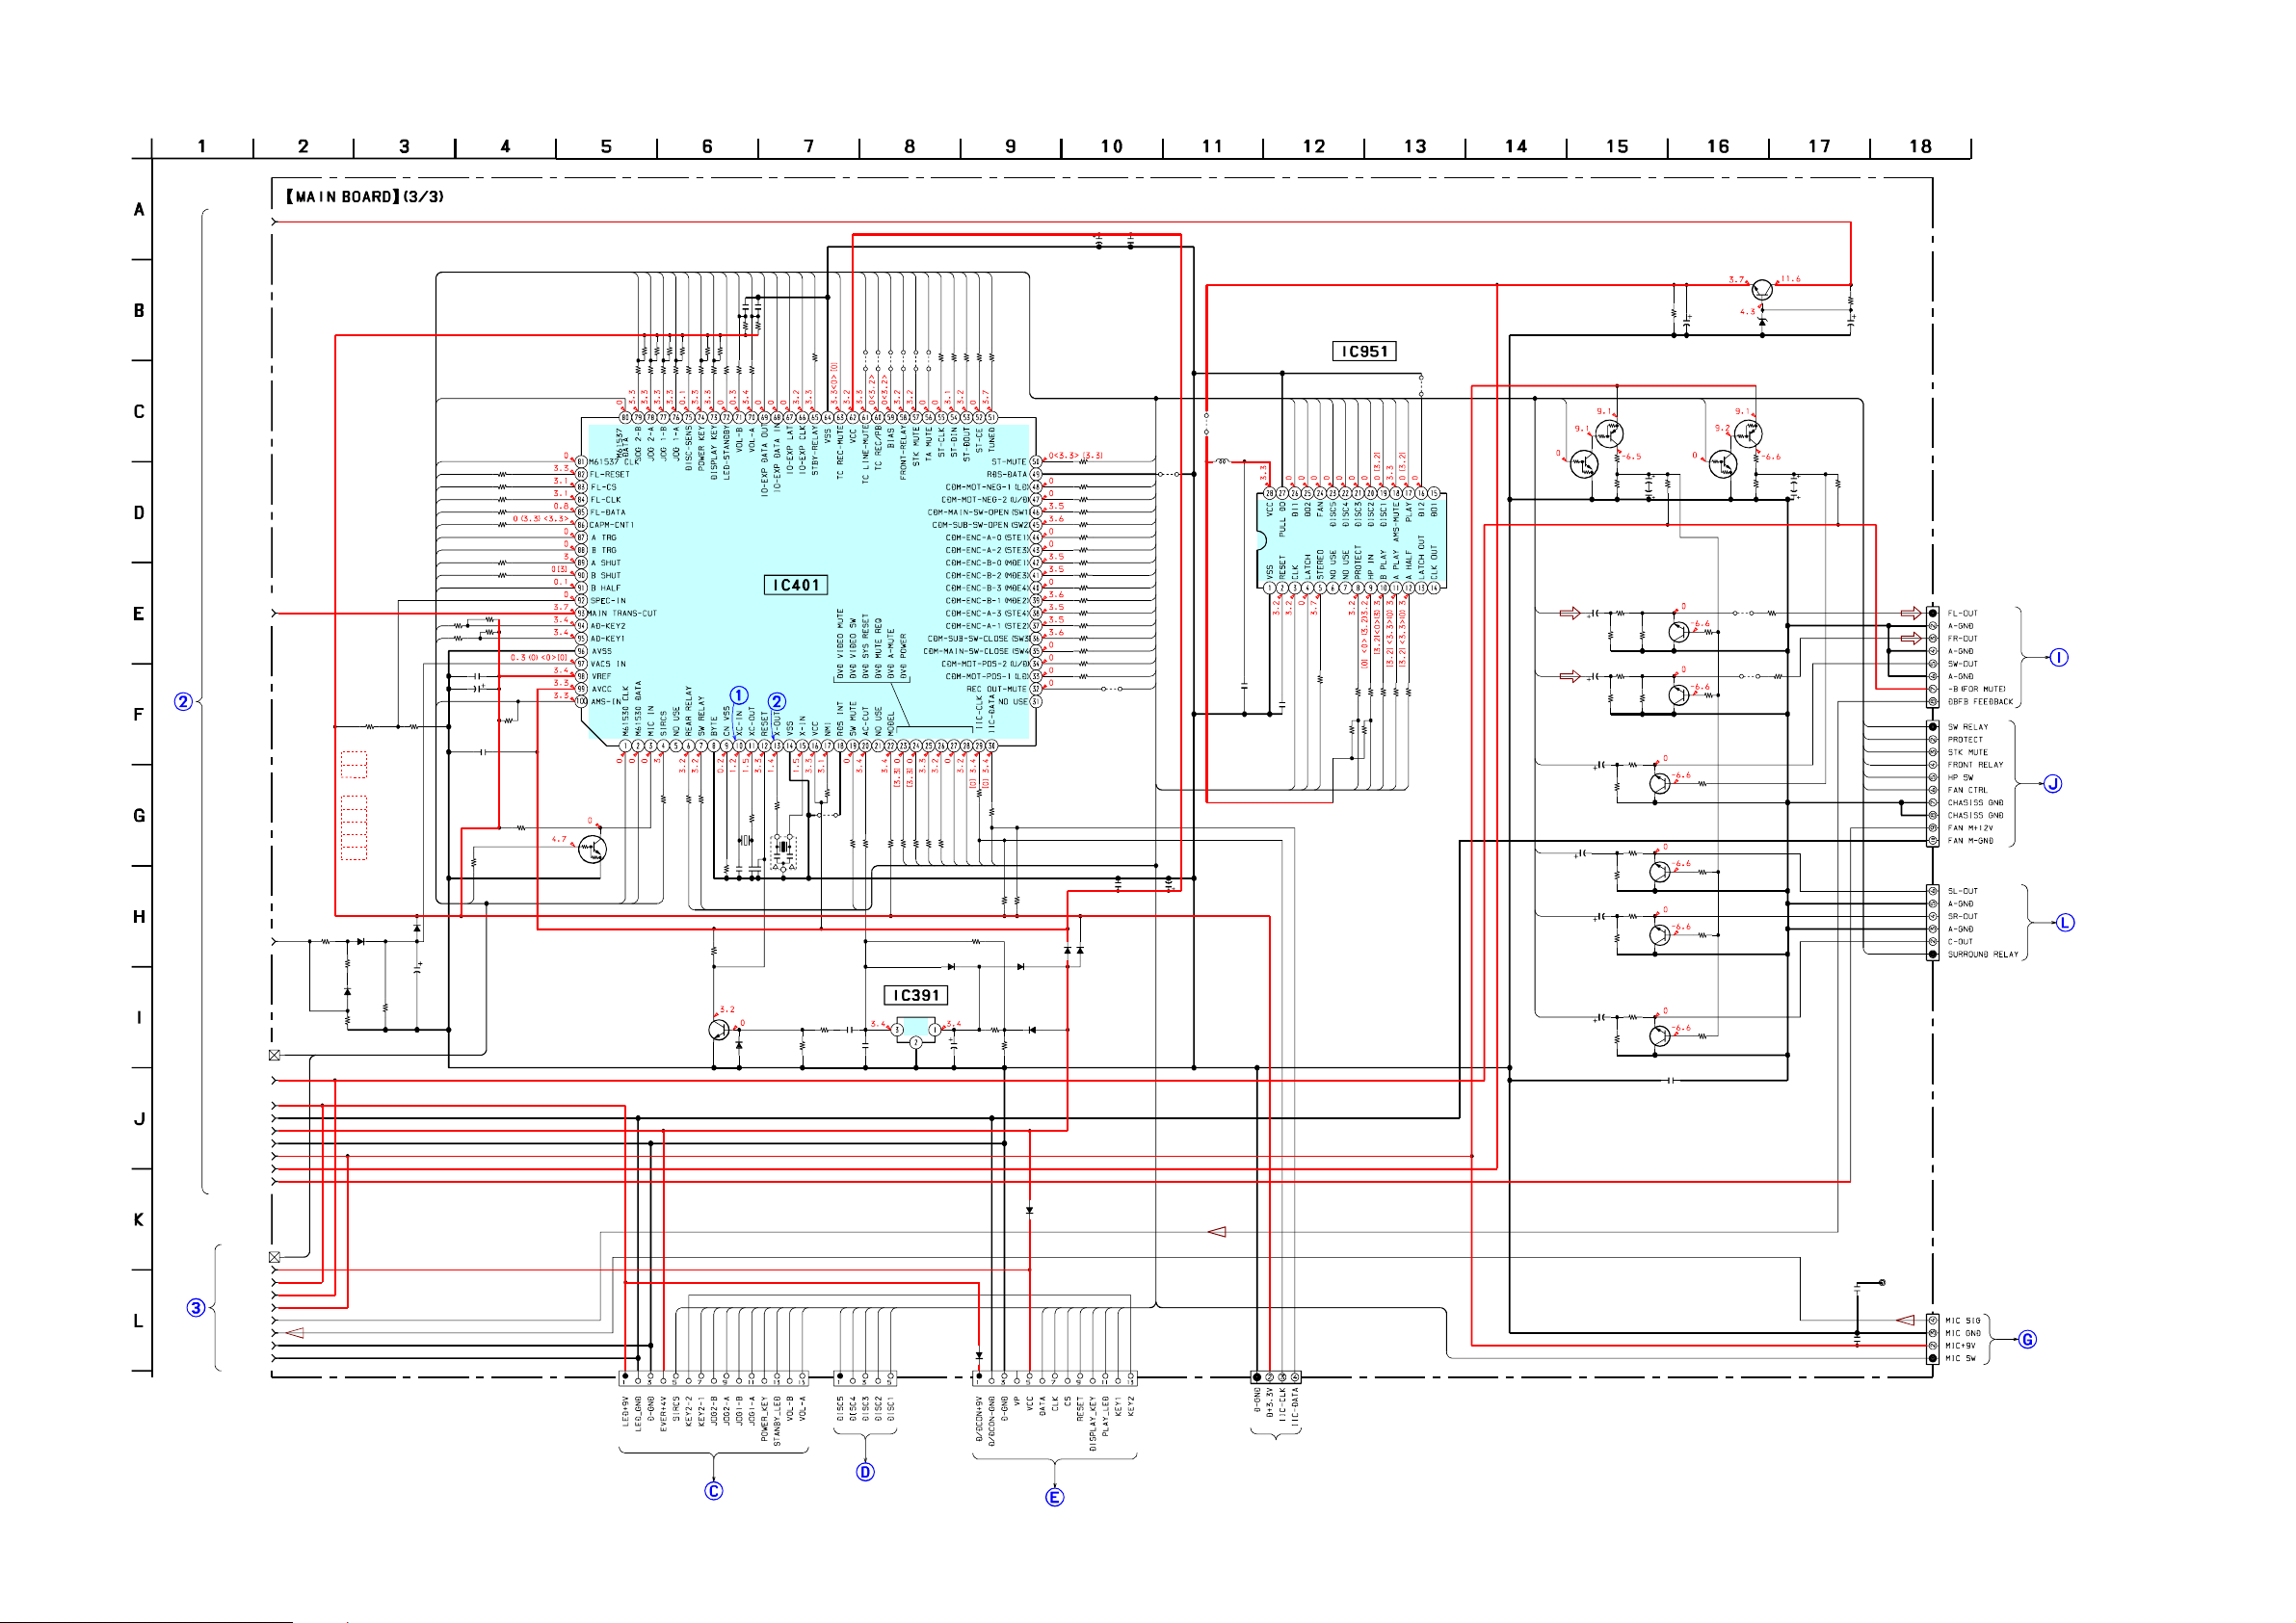
HCD-NXM4D
7-24. SCHEMATIC DIAGRAM – MAIN BOARD (3/3)–
UNREG+5V
80
81
100
R482
82
R483
100
83
R484
100
84
R485
100
85
100
R486
86
87
88
100
R489
89
100
R490
90
91
MAIN
BOARD
(1/3)
(Page51)
+3.3V
IC101
M-GND
EVER+4V
AUDIO+9V
D+3.3V
UNREG+12V
BUS
MUTE
M+9V
R498
10
R499
10
R492
*
*R492
E2
1k
EXCEPT E2
4.7k
*R496
E3,E15
330
EA
1k
AUS
1.5k
E2
4.7k
TH,SP,MY
0
D181
R188
1SS355
470
R186
0
D183
1SS355
R189
47k
GND
D182
1SS355
R187
470k
C183
94
R494
3.3k
95
R495
3.3k
0.1
C497
100
R496
2.2
50V
C498
*
10
50V
R497
10k
C499
0.1
R400
10k
R475
100
3
Q401
DTC114EKA
MIC SWITCH
• See page 76 for IC Pin Function Description. • See page 62 for Waveforms.
0.01
0.01
C476
C475
10k
10k
10k
10k
R469
R468
R467
R466
100
100
100
100
R478
R477
R476
R493
R479
77
75
78
76
79
M3062CMEN-A01FP
100
100
R404
R406
4
2
1
C6
Q391
2SC1623
RESET
10k
10k
10k
10k
R410
R408
R414
R474
100
74
100
R407
IC401
R473
C7
100
73
R472
R391
10k
R409
10k
72
C410
100
18p
R412
100
100
R471
R470
69
70
71
SYSTEM CONTROL
330k
32.768kHz
R411
0.1
X401
C412
C411
18p
D391
1SS355
68
X402
16MHz
67
0
R413
63
66
R392
65
100
R465
22k
R393
JR418
22k
B19
B18
B17
JW460
JW459
JW461
10k
R417
0
4.7k
10k
0
R419
R420
R427
C19
LEVEL DETECT
C391
0.1
C392
0.1
B20
JW458
100
R423
23
B21
JW457
100
R424
24
IC391
M62703
B22
JW456
100
R425
25
55
100
R455
100
R426
26
D392
1SS355
54
100
R454
27
C393
50V
100
R453
28
10
R394
4.7k
100
R452
29
R415
10k
R395
100
R451
220
R429
100
R430
100
30
R416
10k
D395
1SS355
D393
1SS355
D394
1SS355
R396
10k
D397
1SS355
51
52
53
100
C462
100
10V
R450
R448
R447
R446
R445
R444
R443
R442
R441
R440
R439
R438
R437
R436
R435
R434
R433
D396
1SS355
C463
0.1
50
JR449
100
100
100
100
100
100
100
100
100
100
100
100
100
100
100
100
C416
0.1
0
48
47
46
45
44
43
42
41
40
39
38
37
36
35
34
33
C32
C417
2200
6.3V
100
JW5
Q906
2SC1623
+3.3V REGULATOR
R914
R915
C920
1k
C21
22
50V
C22
22
50V
Q4
2SC5938
MUTE
Q5
2SC5938
MUTE
C37
R23
100k
Q1
2SC5938
MUTE
Q2
2SC5938
MUTE
0.1
DTC114EKA
Q6
2SC5938
MUTE
Q3
2SC5938
MUTE
10
50V
C19
Q19
SW MUTE
R18
1k
R15
1k
R12
1k
R9
1k
D905
UDZS-TE-17-3.9B
DTA114EKA
R19
15k
R20
22k
JW911
R3
1k
JW961
R6
1k
Q20
SW MUTE
R79
0
R89
0
C19
4.7
50V
5L
IC951
PT8300R
JR7
100
R955
0
Q22
DTA114EKA
TA MUTE
R21
4.7k
R22
22k
C1
10
R1
50V
2.2k
R2
R42
10k
100k
C2
10
R4
50V
2.2k
R5
10k
R45
100k
C6
10
50V
R16
5L
2.2k
R17
10k
R13
R14
2.2k
10k
C5
10
50V
R10
5L
2.2k
R11
10k
C3
10
50V
R7
5L
2.2k
R8
10k
DTC114EKA
TA MUTE
FL
FR
SW-OUT
SL-OUT
SR-OUT
C-OUT
B22
Q21
C4
10
50V
5L
A18
A19
A20
A17
100
100
100
100
R956
R957
R958
R959
10k
R970
A11
A10
A12
A9
I/O EXPANDER
68
C953
69
0.1
66
JW3
L951
0
C952
0.1
A21
A24
A22
A23
100
R952
10k
R969
67
A8
A5
1k
C919
10
50V
R24
100k
C20
4.7
50V
5L
CN102
8P
B-TO-B
FRONT AMP
BOARD
(Page59)
C7
A8
B21
B20
A9
A24
CN103
10P
B-TO-B
C6
CN104
6P
AMP-S
FRONT AMP
BOARD
(Page59)
SUR AMP
BOARD
(Page61)
HCD-NXM4D
MAIN
BOARD
(2/3)
(Page52)
TC D+3.3V
AUDIO+9V
MIC SIG
BUS
M+9V
MUTE
DBFB
M-GND
W606
C31
4
78
79
94
GND
CN110
15P
1.25MMFFC-S
VOL
BOARD
(Page57)
71
72
74
76
77
70
A23
A22
VOL
BOARD
(Page57)
A21
A19
A20
D903
10EDB40
CN112
5P
1.25MMFFC-S
85
PANEL
BOARD
(Page55)
84
95
73
82
83
A17
3
CN109
13P
1.25MMFFC-S
(FOR CHECK)
CN401
4P
AMP-S
WIRE
0.1
C39
0.1
CN108
4P
AMP-L
HP
BOARD
(Page57)
5353
Page 54
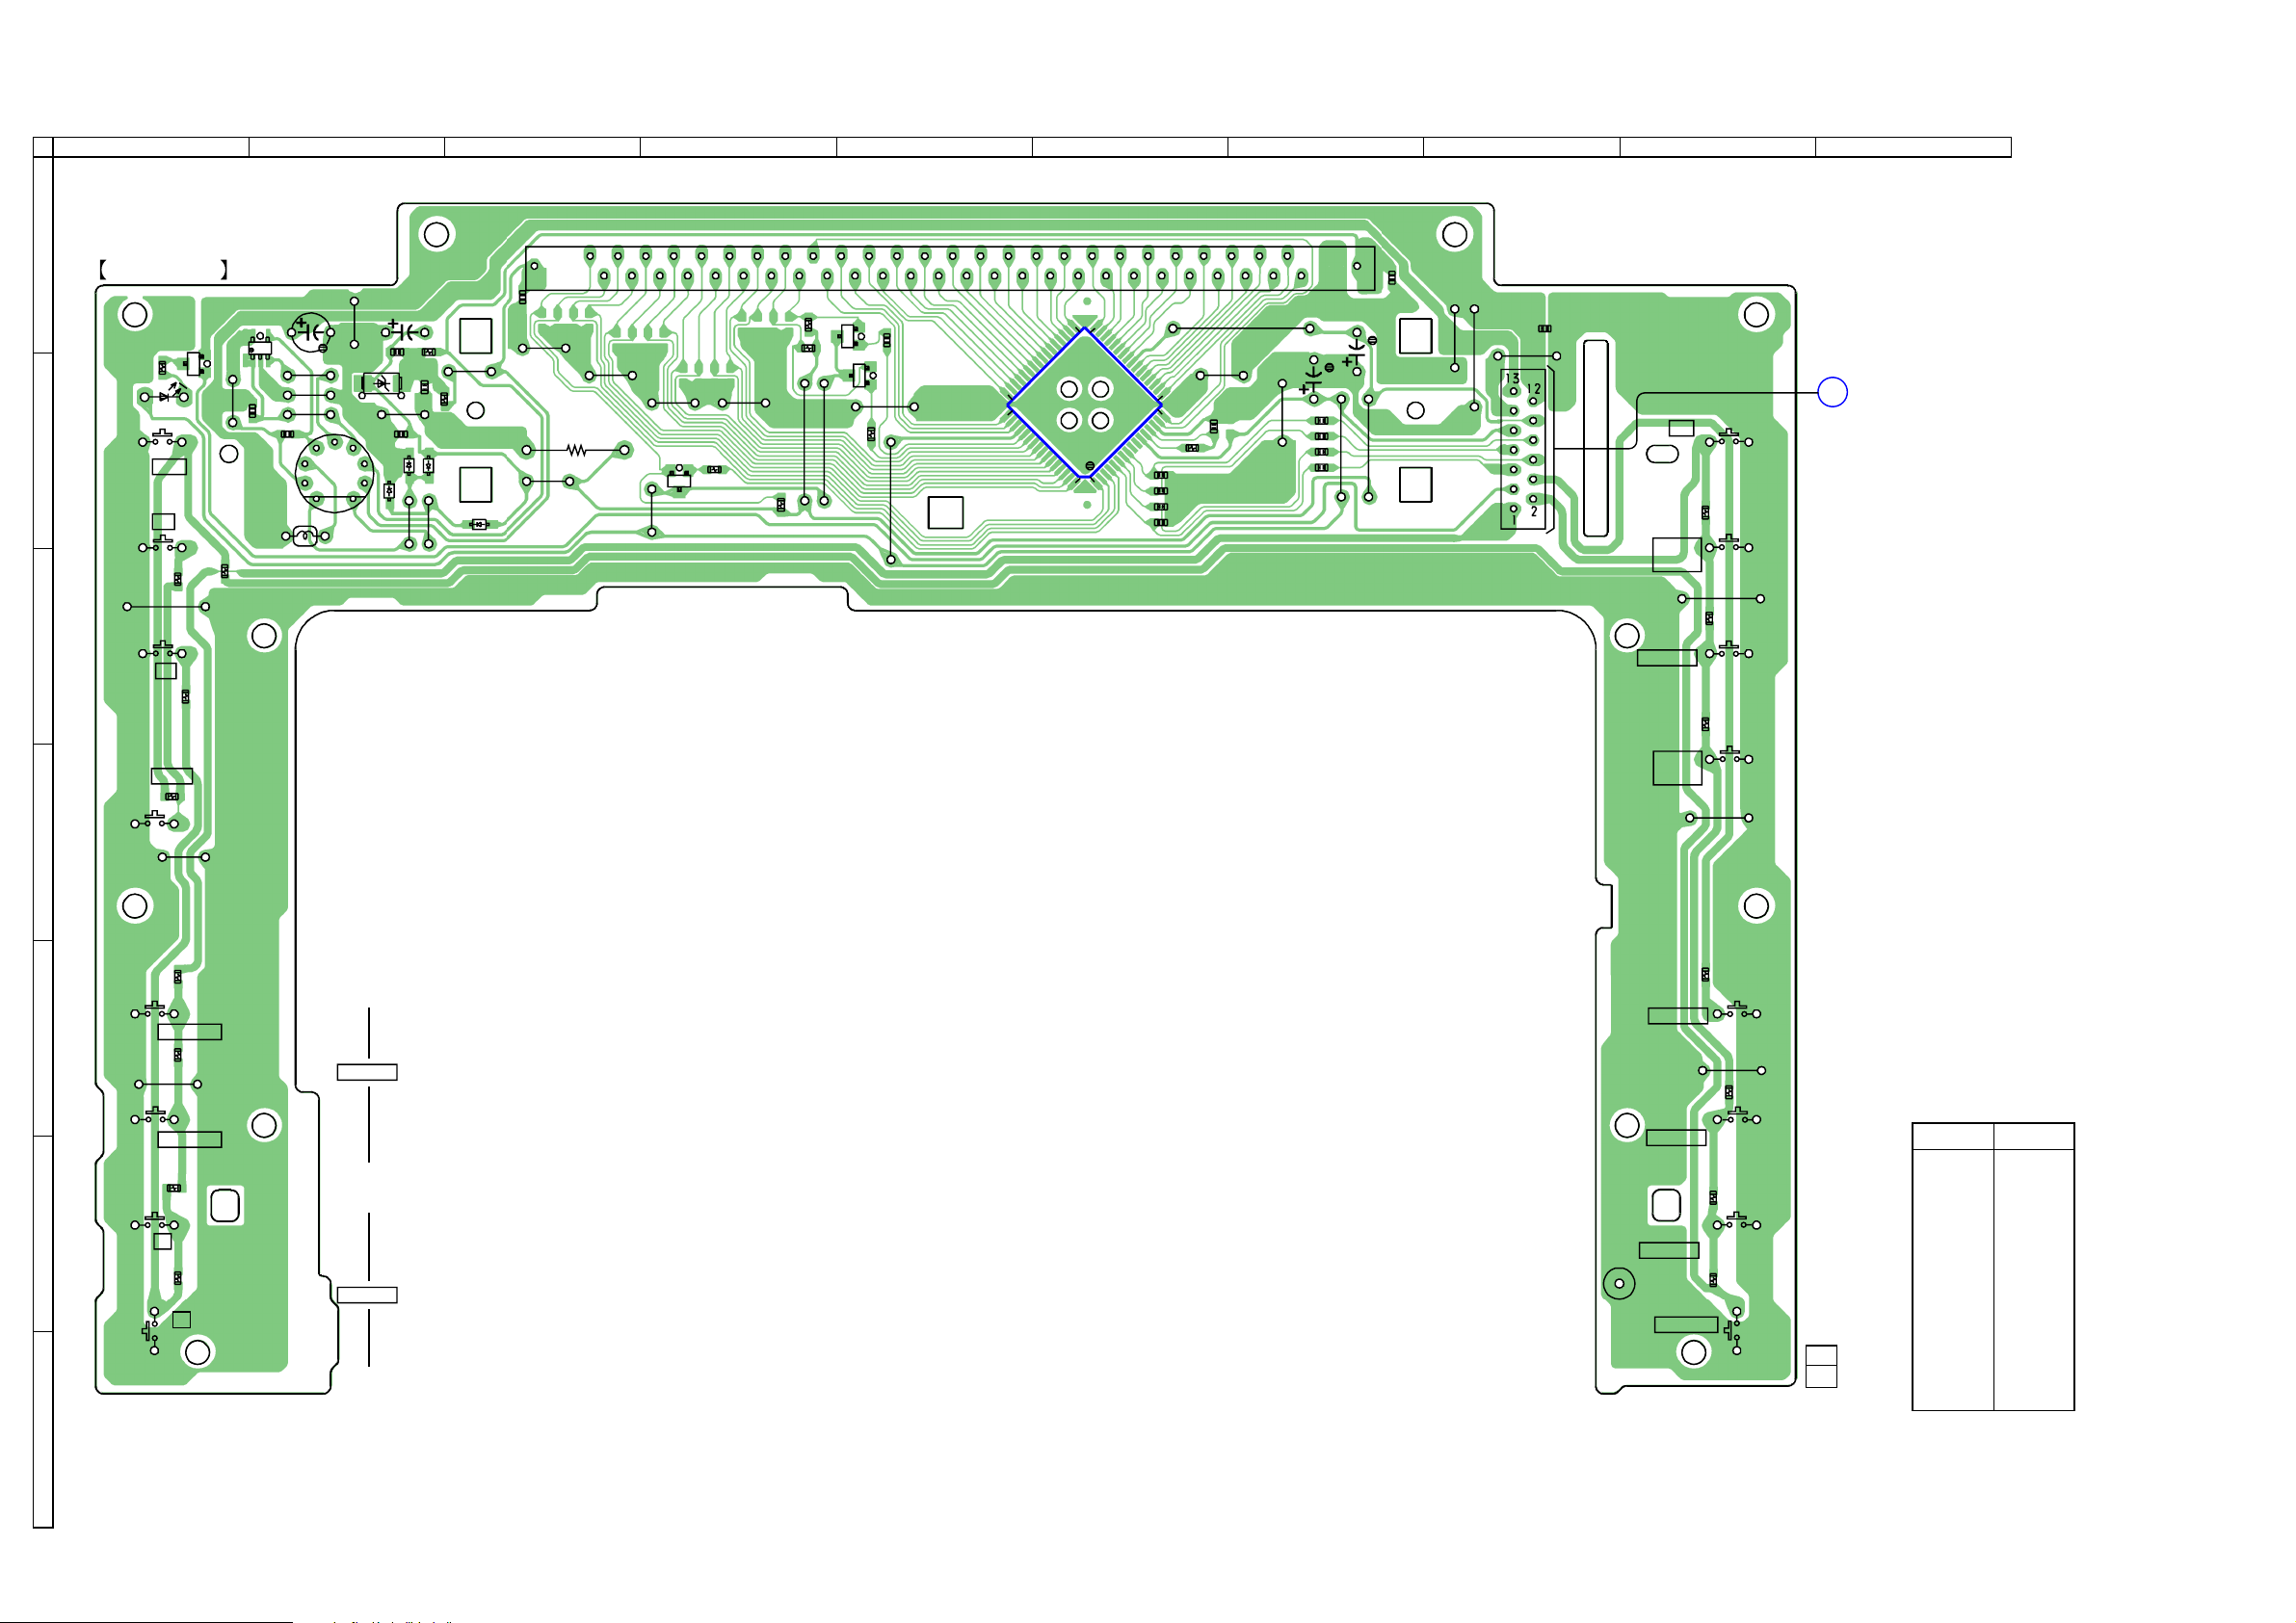
HCD-NXM4D
7-25. PRINTED WIRING BOARD – PANEL BOARD –
1
A
2
PANEL BOARD
C1053
Q1024
5
1
JW1040
R1033
4
3
R1045
T801
JW1081
JW1043
JW1050
C1054
L1021
Q1026
R1020
D1021
B
S1029
S1031
JW1033
E
b B
X
R1035
C
x
S1036
JW1039
C1050
D1022
C1052
C1051
R1052
D1026
D1024
R1046
R1051
D1025
JW1042
JW1041
JW1037
D1023
• See page 29 for Circuit Boards Location.
3 4 5 6 7
1
C1029
JW1032
JW1038
5
R1096
JW1031
10
JW1030
Q1021
E
FLOURESCENT INDICATOR TUBE
15
JW1029
R1100
JW1047
20
R1041
R1042
R1043
FL1020
Q1023
JW1046
25
E
R1101
JW1045
E
Q1022
JW1036
30
R1102
JW1028
35
40
33 32
IC1020
48
49
64 1
45
C1024
C1023
C1022
C1021
50
JW1027
JW1026
17
16
R1025
55
C1025
56
R1024
JW1024
R1023
R1022
R1021
60
C1026
JW1025
JW1048
C1048
C1028
JW1049
JW1023
8
JW1071
CN1021
C1006
S1021
CD
S1022
TUNER/
BAND
S1023
TAPE A/B
9 10
E
MAIN
BOARD
(Page 50)
R1026
JW1020
R1027
S1024
VIDEO
(MD)
S1028
S1025
R1028
JW1021
R1032
JW1022
R1029
R1030
• Semiconductor
Location
Ref. No. Location
D1021 B-1
D1022 B-2
D1023 B-3
R1040
S1030
CD Z
R1034
D
E
S1032
S1033
JW1034
M>
.m
R1038
R1036
R1037
JW1035
DISPLAY
TUNING
DIMMER
D1024 B-2
F
S1034
S1035
+
R1039
–
ALBUM
LP1001
S1026
CD SYNC
S1027
z START
R1031
11
1-861-474-
(11)
D1025 B-2
D1026 B-2
IC1020 B-6
Q1021 B-4
Q1022 B-5
Q1023 A-5
Q1024 A-2
Q1026 B-1
G
HCD-NXM4D
5454
Page 55
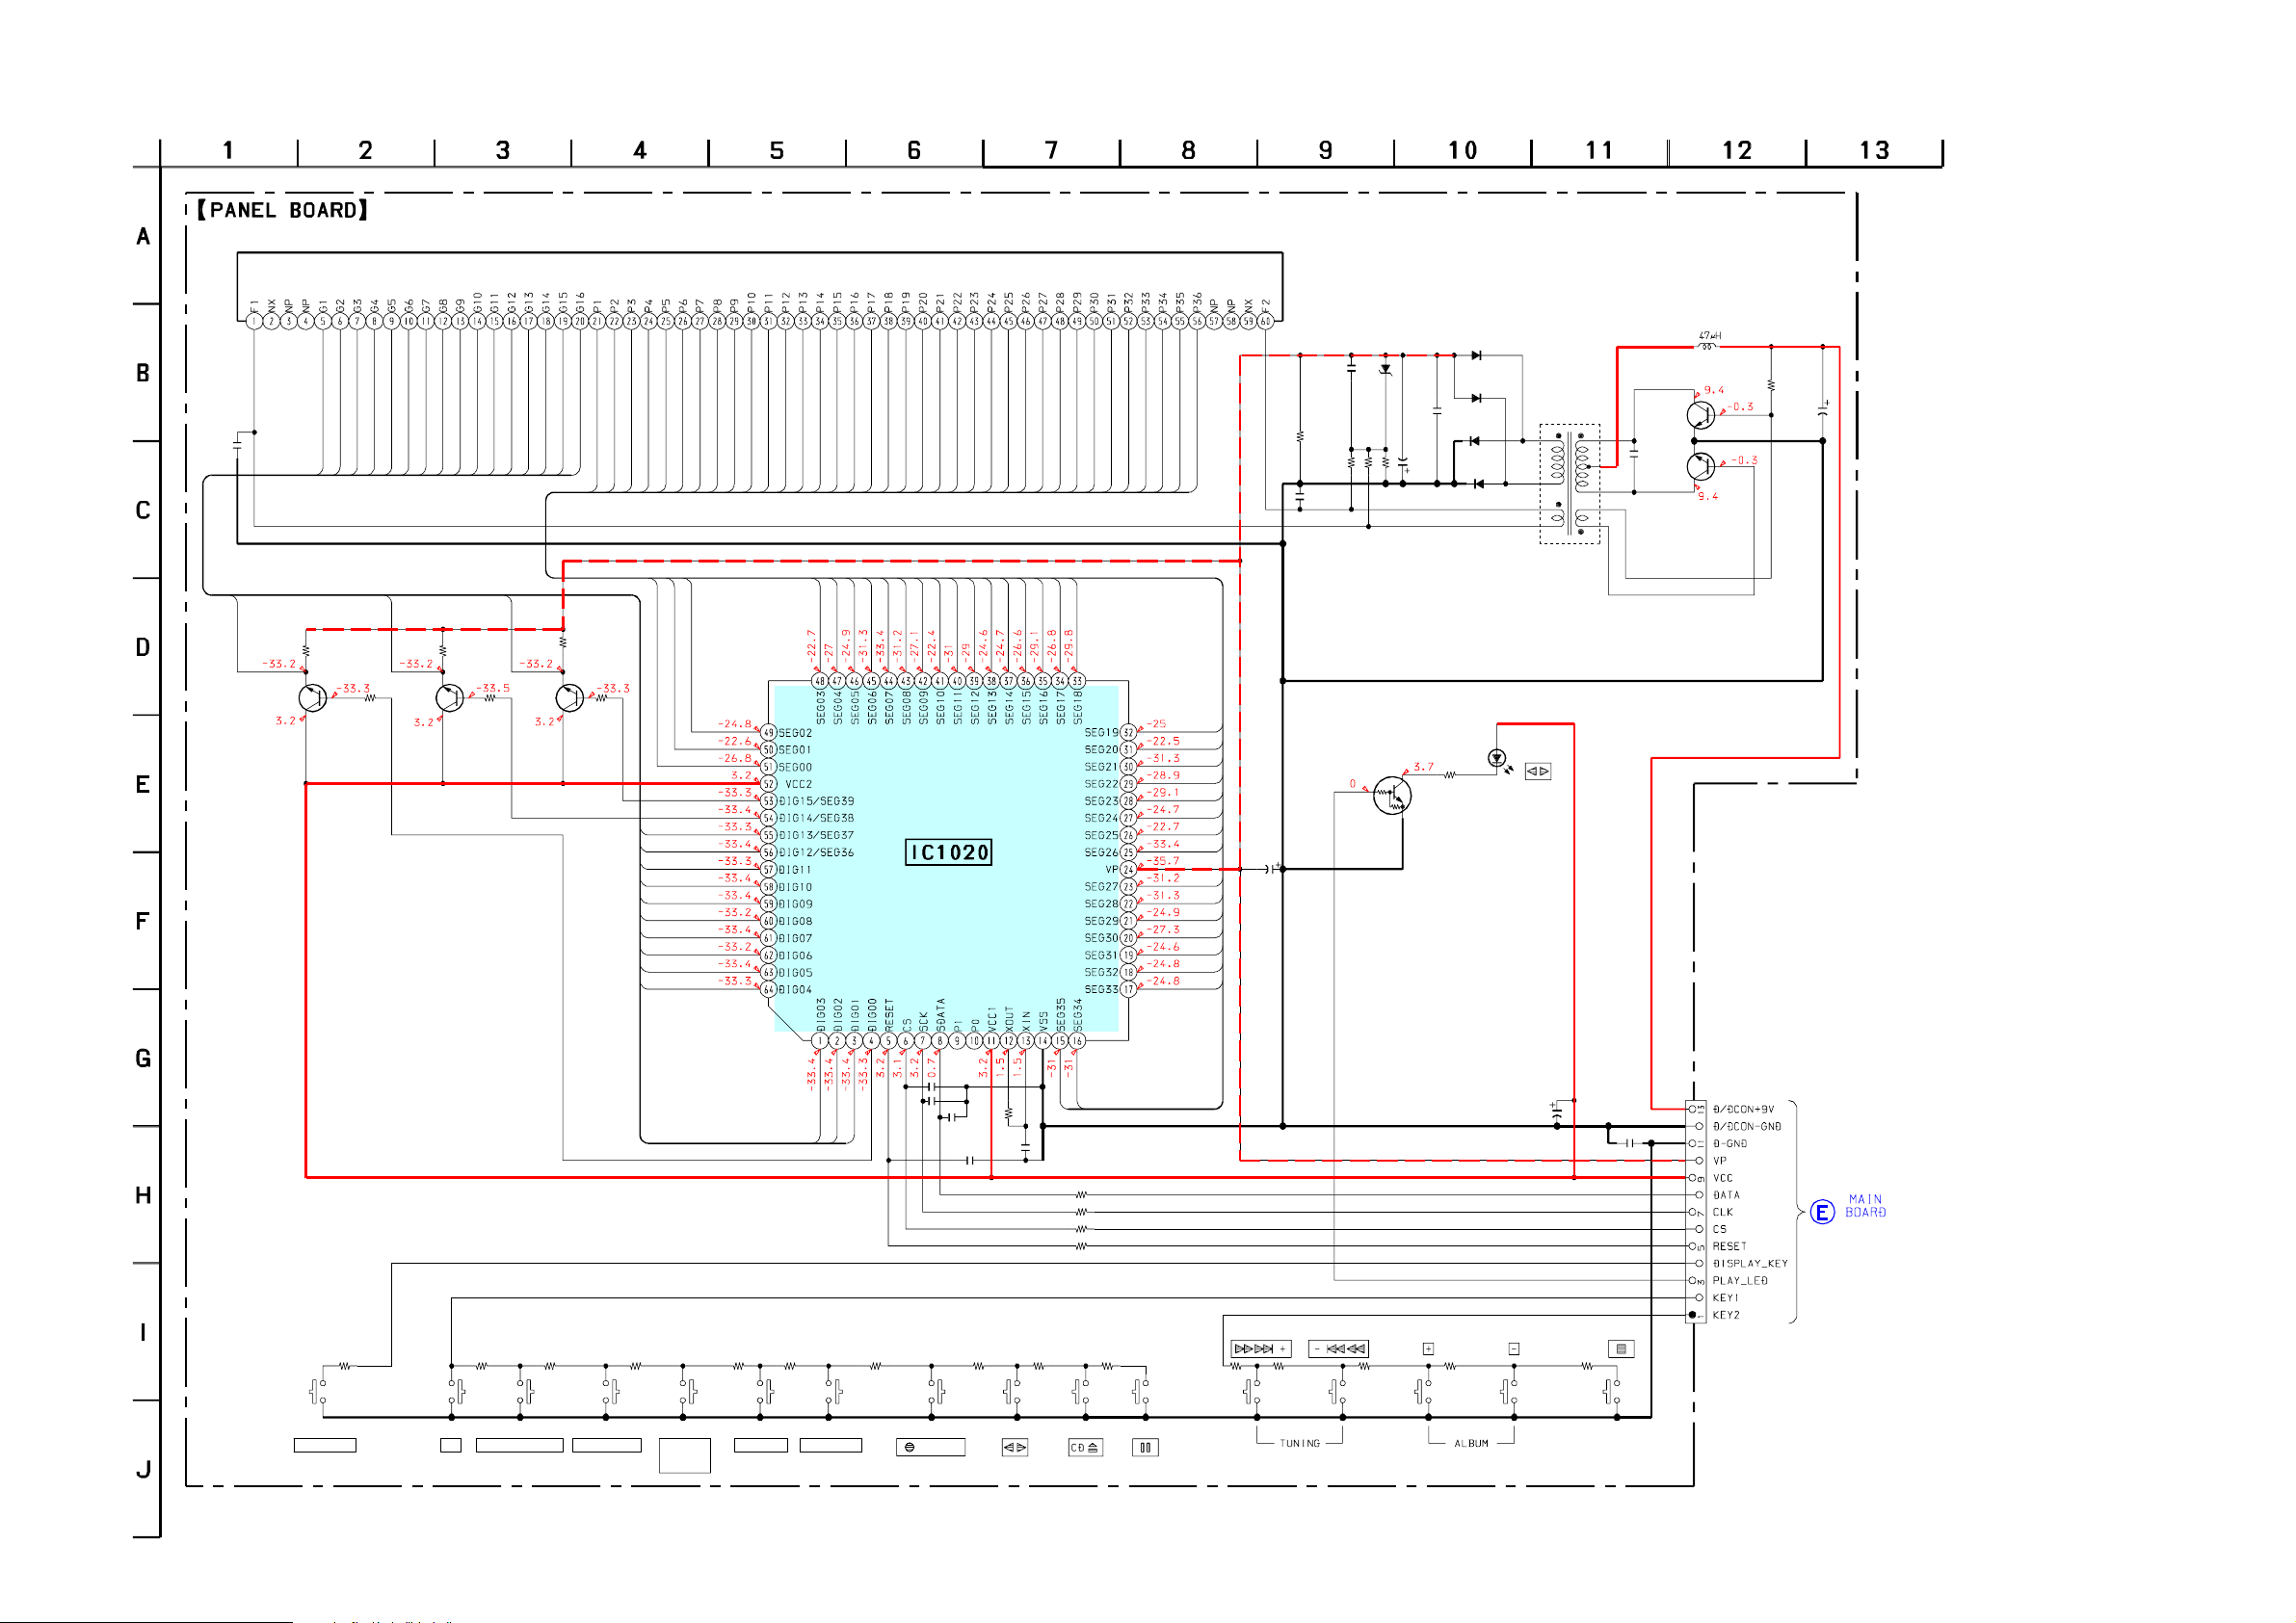
7-26. SCHEMATIC DIAGRAM – PANEL BOARD –
HCD-NXM4D
C1029
0.1
FL1020
CRYSTAL
LIQUID
52
50
48
46
44
43
42
41
40
39
38
37
R1100
10k
51
R1042
100k
DRIVE
Q1021-1023
37
R1043
100k
Q1021
2SC1623
Q1022
2SC1623
GRID
47
45
R1101
10k
51
49
52
R1041
100k
36
Q1023
2SC1623
R1102
10k
1
2
6
4
2
3
1
50
49
48
47
46
45
44
43
42
41
7
5
3
DISPLAY
C1052
0.01
C1051
220
50V
R1020
100
D1023
1SS355
D1025
1SS355
D1024
1SS355
D1026
1SS355
T801
DC-DC CONVERTER
D1021
SEL5423
D1022
RD6.2FM
C1050
0.01
R1096
2.2k
35
33
31
29
27
9
10
8
14
12
6
4
5
15
13
11
19
18
17
16
9
8
7
10
IC1020
M66005
-0131AHPRBOT
DISPLAY CONTROL
/KEY CONTROL
17
16
15
14
13
12
11
26
25
24
23
22
21
20
30
28
18
19
34
32
C1048
20
21
22
23
24
25
26
27
28
C1028
10
29
50V
30
31
32
33
34
0.1
35V
R1052
100
DTC114EKA
LED SWITCH
R1051
100
Q1026
R1046
10k
REGULATOR
Q1024(1/2)
CPH5504-TL-E
C1054
22000p
Q1024(2/2)
CPH5504-TL-E
Q1024
SWICHING
L1021
R1045
3.3k
C1053
50V
22
HCD-NXM4D
S1028
DISPLAY
R1032
2.2k
S1021
CD
R1026
220
TUNER/BAND
S1022
R1027
330
S1023
TAPE A/B
R1028
470
S1024
VIDEO
(MD)
R1029
680
S1025
DIMMER
R1030
1k
39
40
S1026
CD SYNC
38
R1031
1.5k
100P
C1023
S1027
/START
C1022
100P
C1024
100P
C1021
0.001
R1033
2.2k
R1025
10k
S1029
R1034
4.7k
36
C1025
220p
35
S1030
R1024
R1023
R1022
R1021
R1035
10k
1k
100
100
1k
S1031
CN1021
13P
(3/3)
(Page 53)
R1036
1.5k
S1032
R1037
2.2k
S1033
R1038
4.7k
S1034
R1039
10k
S1035
C1026
10
50V
R1040
33k
C1006
S1036
0.1
5555
Page 56
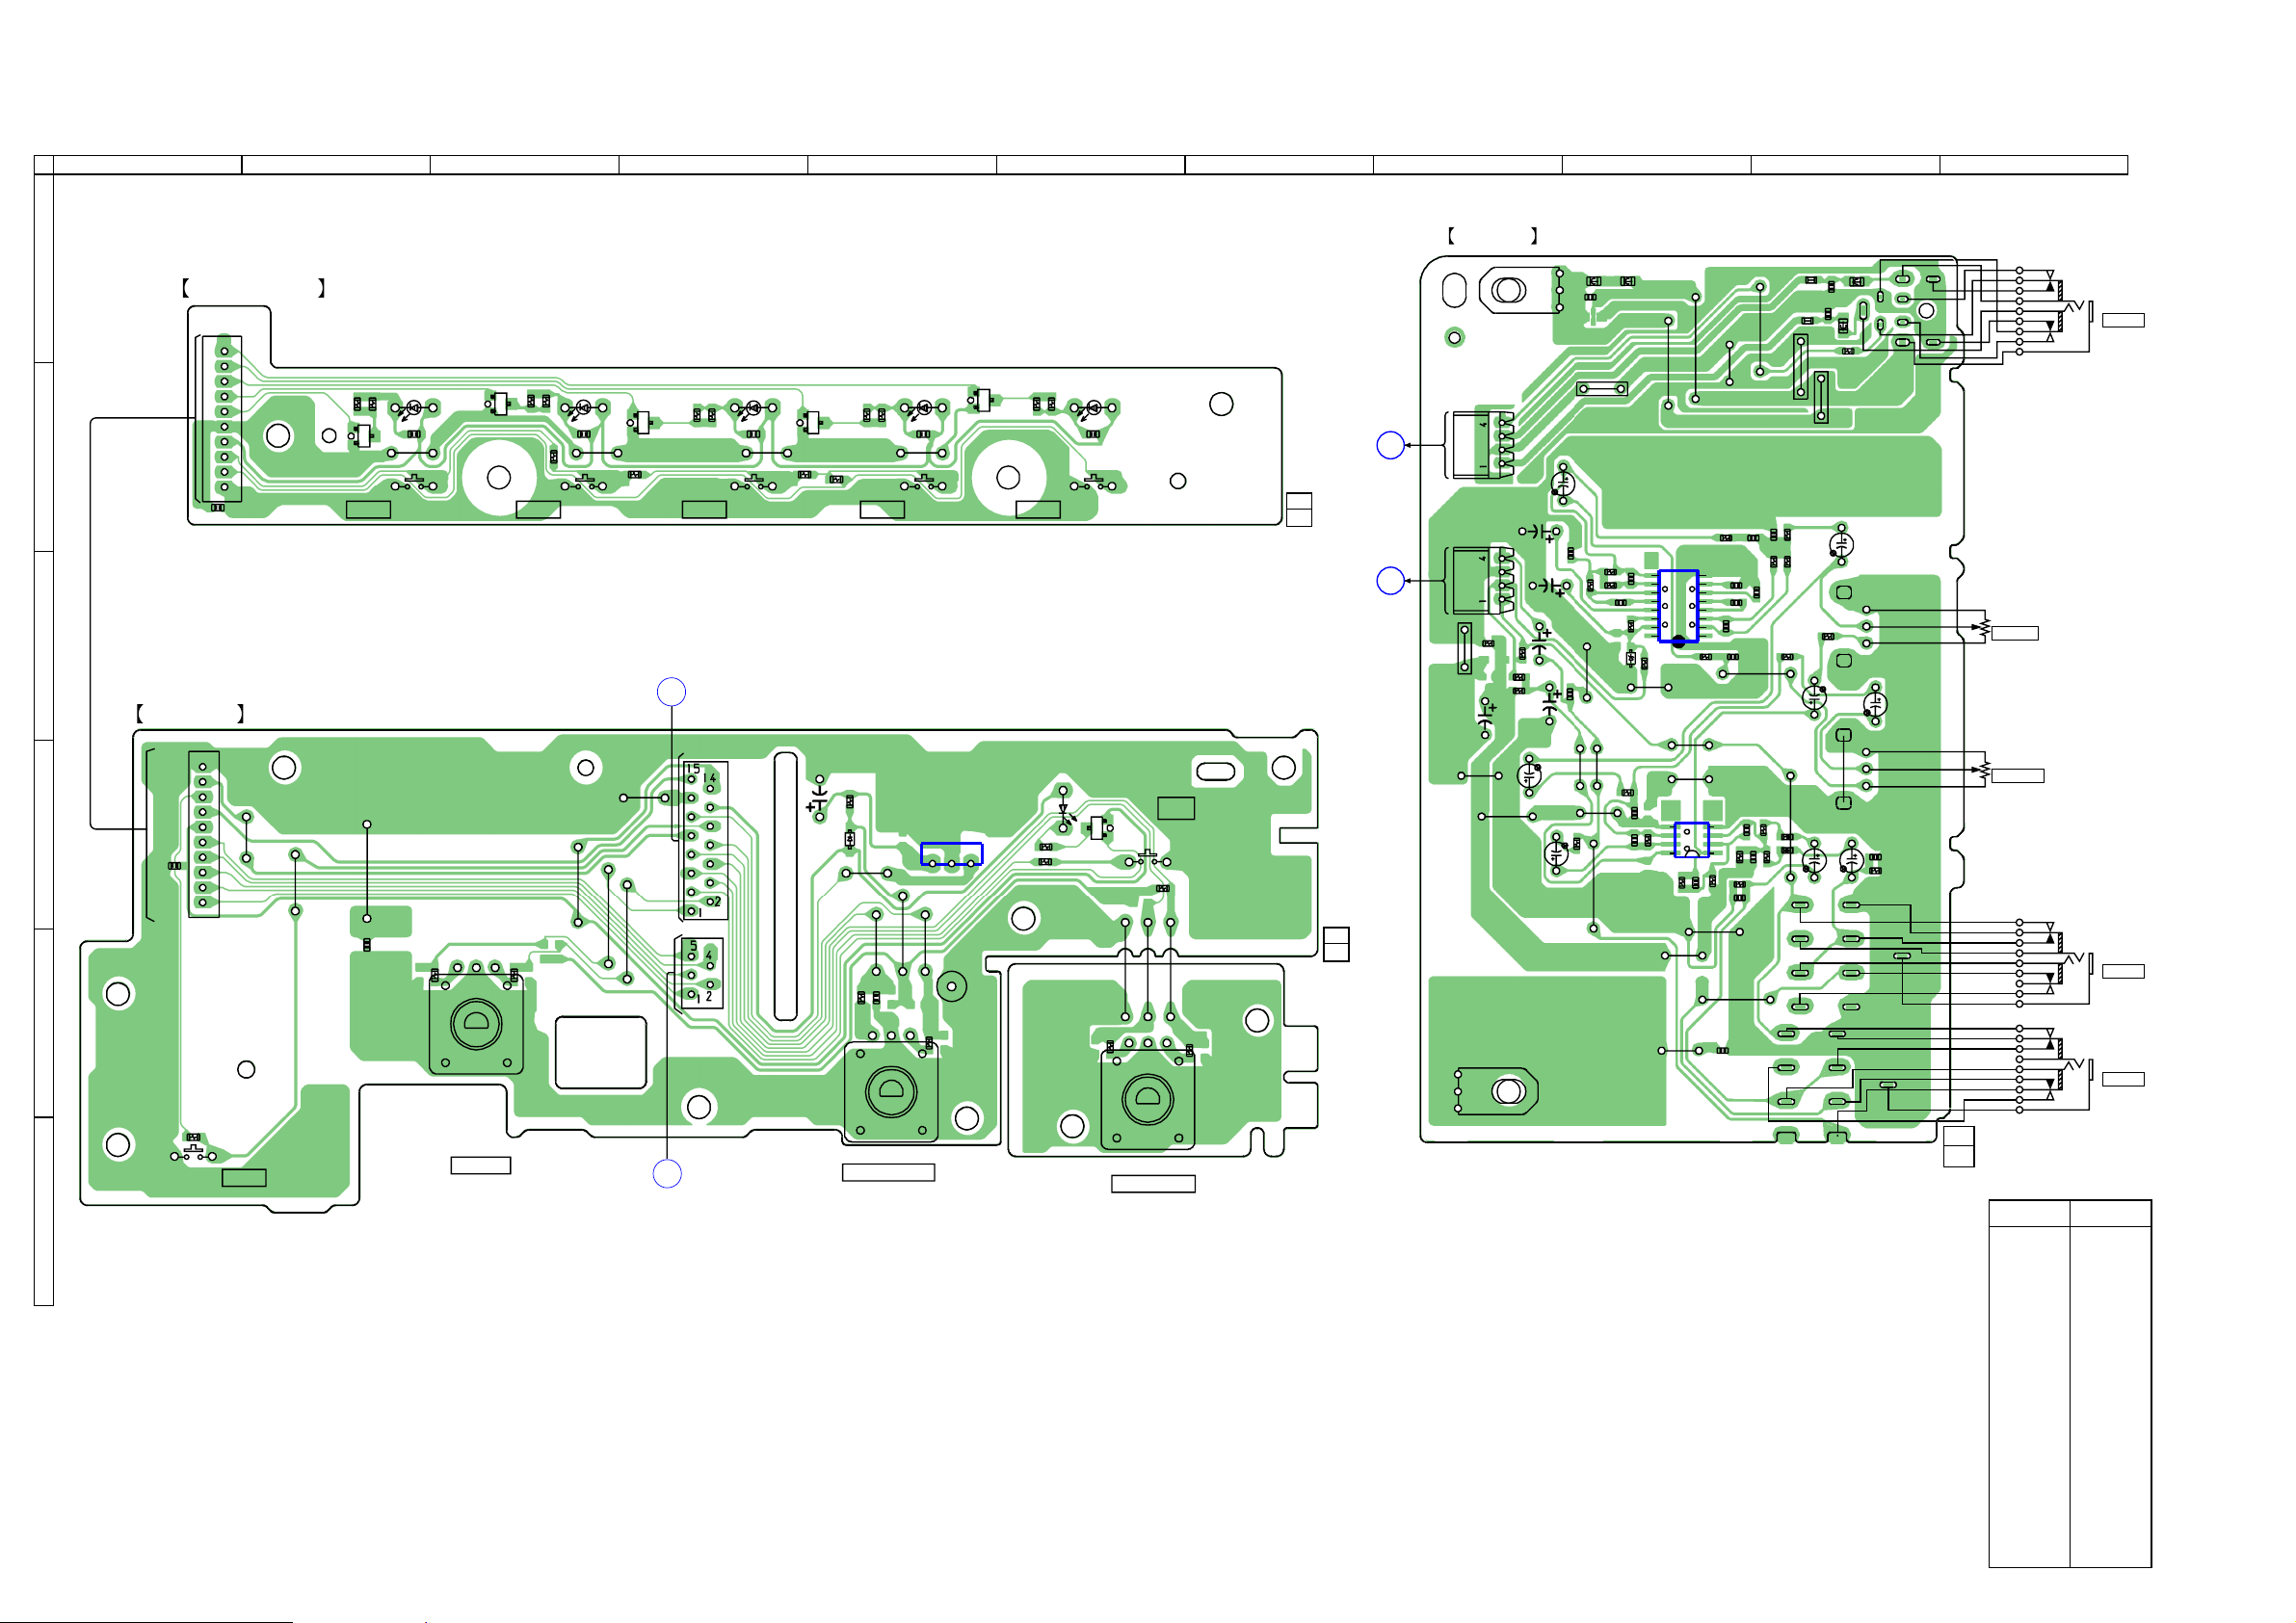
HCD-NXM4D
g
7-27. PRINTED WIRING BOARD – DISC SW, VOL, HP BOARD –
1
2
A
3 4 5 6 7
DISC SW BOARD
NO1001
10
JW1076
Q1004
E
R1014
D1005
R1010
R1009
B
1
C1009
E
Q1005
S1005
DISC 5
C1005
R1008
S1004
DISC 4
D1004
R1007
C1004
JW1002
C
VOL BOARD
1
D
E
F
C1007
NO1052
R1049
JW1069
10
JW1077
JW1001
JW1078
C1008
R1094
S1043
DSGX
R1095
S1052
VOLUME
Q1003
E
R1013
JW1073
JW1059
JW1058
• See page 29 for Circuit Boards Location.
C1002
JW1004
IC1050
1 2 3
JW1054
W1001
R1093
Q1001
E
C
(Page 50)
CN1051
R1005
R1006
S1003
DISC 3
MAIN
BOARD
CN1050
D1003
C1003
Q1002
E
JW1003
R1012
R1011
C1013
R1092
S1002
DISC 2
R1059
D1051
JW1057
JW1056
R1003
R1004
C1016
D1002
JW1055
D
MAIN
BOARD
(Page50)
S1051
SOUND SELECT
R1050
R1048
R1002
S1001
DISC 1
D1050
R1001
D1001
Q1041
R1090
C1001
E
S1042
JW1052
JW1053
S1050
SOUND MODE
\/1
R1054
JW1051
R1091
1-861-475-
1-861-476-
11
(11)
11
(11)
F
FRONT AMP
BOARD
(Page 58)
G
MAIN
BOARD
(Page 50)
8
HP BOARD
CN1062
CN1060
R1072
JW1006
R1074
R1071
C1074
1060
JW
JW1084
EP1060
C1083
R1075
C1069
CHASSIS
C1076
C1073
EP1061
C1085
C1082
C1072
FB1004
C1096
R1073
R1070
JW1099
C1080
R1083
R1082
R1081
JW1064
JW1085
1074
JW
9 10 11
FB1003
C1084
JW1062
R1068
JW1061
R1080
D1061
JW
C1070
9
C1086
16
1066
C1071
JW1070
IC1061
R1079
JW
JW1079
IC1060
5
R1069
8
JW1063
JW1088
JW1083
R1077
1067
R1066
R1084
8
1
4
C1067
JW1086
C1095
JW1075
C1091
C1089
C1079
1
R1065
JW
C1088
R1064
R1063
1082
JW1072
C1087
C1090
JW1068
C1066
C1064
C1063
C1092
R1086
R1076
R1062
R1060
JR1080
JW1098
R1078
R1085
FB1010
FB1011
JR1081
R1067
JW1080
C1093
C1062
C1094
JW1097
C1068
FB1001
FB1002
R1088
C1060
C1077
C1078
C1061
R1061
1-861-477-
RV1060
MIC LEVEL
RV1061
ECHO LEVEL
11
(11)
• Semiconductor
Location
Ref. No. Location
D1001 B-6
D1002 B-5
D1003 B-4
D1004 B-3
D1005 B-2
D1050 D-6
D1051 D-5
D1061 C-9
J1063
PHONES
J1060
MIC1
J1061
MIC2
HCD-NXM4D
IC1050 D-5
IC1060 D-9
IC1061 C-9
Q1001 B-5
Q1002 B-5
Q1003 B-4
Q1004 B-3
Q1005 B-2
Q1041 D-6
5656
Page 57
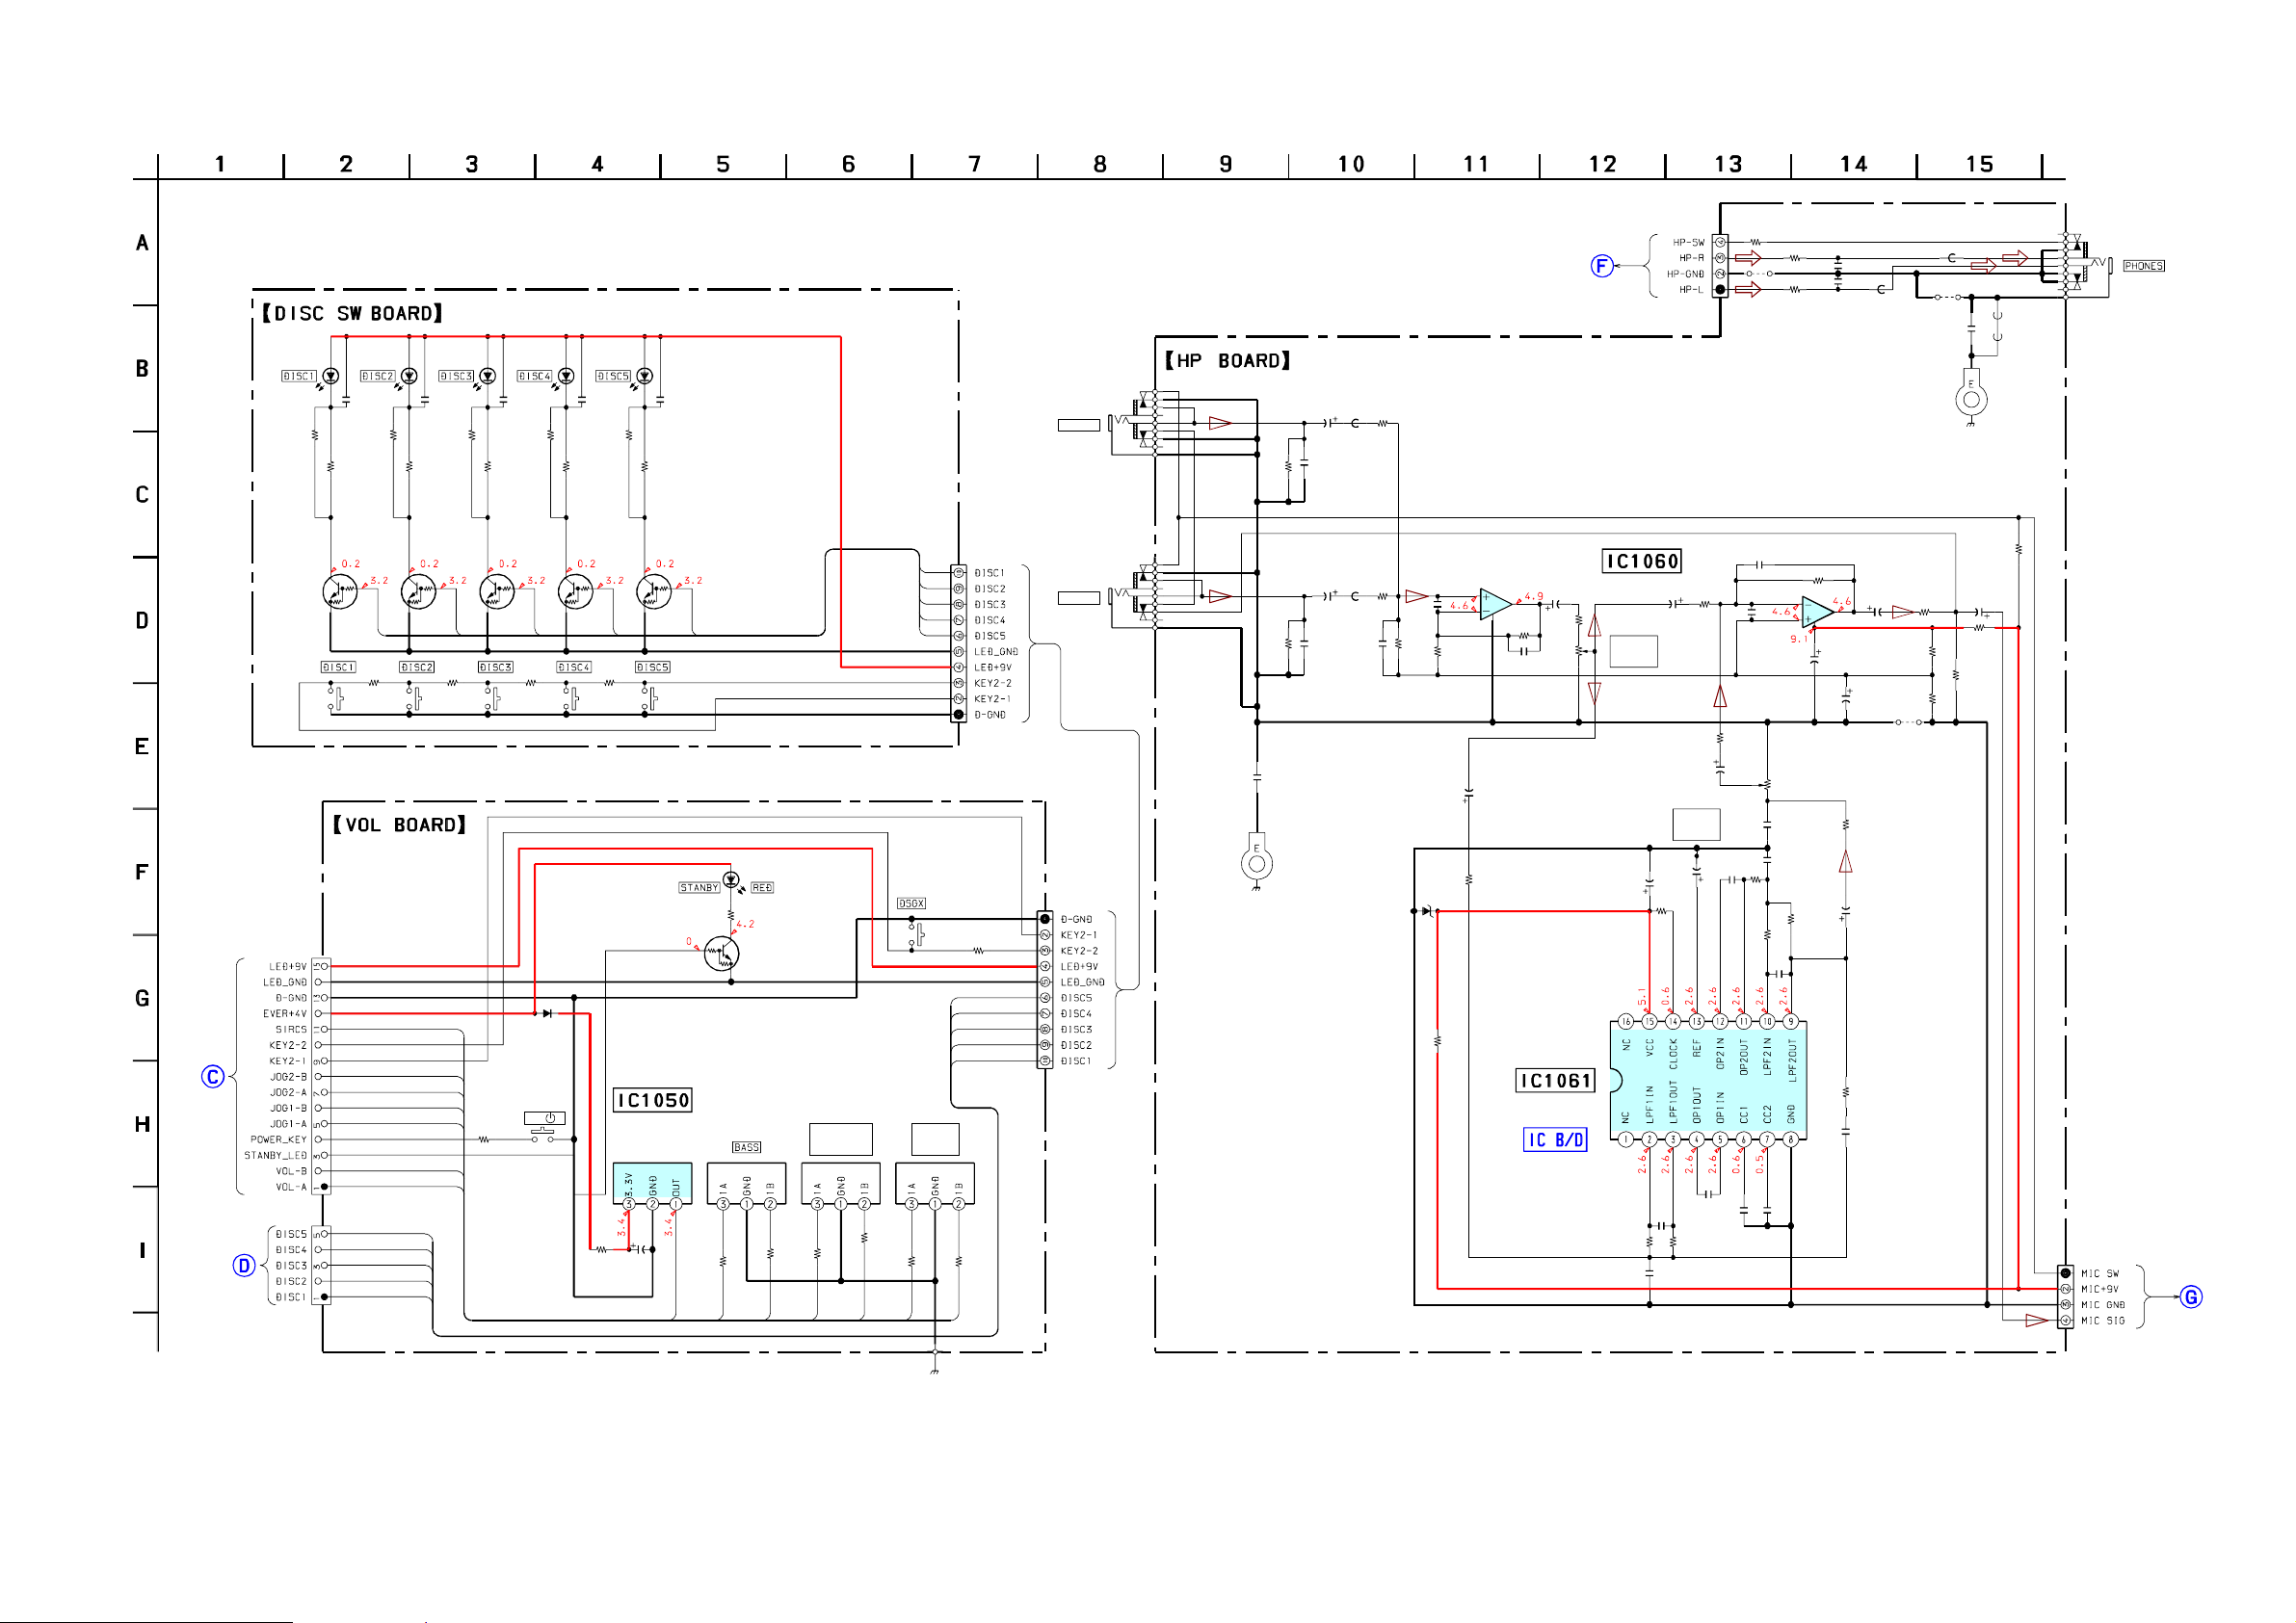
HCD-NXM4D
7-28. SCHEMATIC DIAGRAM – DISC SW, VOL, HP BOARD –
MAIN
BOARD
(3/3)
(Page53)
MAIN
BOARD
(3/3)
(Page53)
D1001
SEL5823A
R1002
1k
SEL5E23C
C1001
0.1
R1001
1k
Q1001
DTC114EKA
LED DRIVE
S1001
CN1050
15P
CN1051
5P
D1002
R1003
1k
R1011
220
1
D1003
SEL5E23C
C1002
0.01
R1005
R1004
1k
Q1002
DTC114EKA
LED DRIVE
R1012
S1002
12
11
10
9
8
D1004
SEL5E23C
C1003
0.01
1k
330
7
1
2
3
4
5
6
2
R1048
2.2k
R1007
R1006
1k
Q1003
DTC114EKA
LED DRIVE
R1013
470
S1003
1k
1SS355
S1042
I/
3
D1051
D1005
SEL5E23C
C1004
0.01
R1009
R1008
1k
Q1004
DTC114EKA
LED DRIVE
S1004
R1059
47
1k
4
R1014
680
NJM24M400A
CONTROL
RECEIVER
C1013
16V
DTC114EKA
LED DRIVE
IC1050
REMOTE
47
R1010
• See page 66 for IC Block Diagram.
C1005
0.01
1k
Q1005
S1005
Q1001-1005
LED
SWITCH
5
D1050
SEL5223S
R1050
220
R1090
1k
7
Q1041
DTC114EKA
LED
SWITCH
S1051
S1050
4
SOUND
SELECT
R1093
R1091
1k
R1092
1k
3
2
1k
R1094
1k
1
S1043
6
1
2
3
4
5
S1052
SOUND
MODE
NO1001
R1049
12
11
10
9
8
R1095
5
(CHASSIS)
10P
1k
CN1062
3P
AMP-L
FRONT AMP
BOARD
(Page59)
C1060
0.22
J1060
MIC 1
R1061
C1061
0.01
10k
J1061
MIC 2
R1063
10k
C1063
0.01
C1095
0.1
EP1060
NO1052
10P
1k
(CHASSIS)
50V
FB1011
C1062
0.22
50V
FB1010
UDZSTE-175.1B
FB
FB
C1064
0.001
D1061
R1060
R1062
1k
1k
1
R1066
47k
C1067
220p
C1068
0.22
50V
R1067
100
IC1061
M65850FP-E
DIGITAL
ECHO
MIC AMP
RV1060
50k
MIC
VOL
C1082
47
16V
C1088
0.001
R1085
22k
C1092
0.0068
C1069
C1083
R1080
120k
50V
16V
2.2
47
C1078
ECHO
LEVEL
R1086
22k
R1064
100k
C1066
47p
R1065
R1079
220
1k
IC1060(1/2)
NJM4565M
3
2
4
C1077
1.0
50V
R1078
22k
R1068
2.2
50V
10k
C1089
0.068
C1084
0.068
R1088
JW1099
C1070
100p
C1071
47p
IC1060(2/2)
NJM4565M
R1076
15k
C1090
0.47
0
C1091
0.47
JR1080
RV1061
C1079
0.022
C1085
0.0068
R1081
22k
JR1081
0
0
6
5
50k
R1083
R1082
C1086
0.001
R1069
22k
22k
C1094
0.001
150k
8
R1084
47k
C1087
0.1
C1093
0.001
7
C1072
10
35V
FB1002
C1073
2.2
50V
C1074
220
10V
R1077
15k
C1080
1
50V
FB1001
FB
R1071
10k
R1072
10k
JW1006
R1070
100
JW1098
C1096
1000p
(CHASSIS)
EP1061
C1076
10
35V
R1074
R1073
100k
R1075
0
10k
FB1003
FB
FB1004
FB
FB
CN1060
4P
AMP-L
J1063
MAIN
BOARD
(3/3)
(Page53)
HCD-NXM4D
5757
Page 58
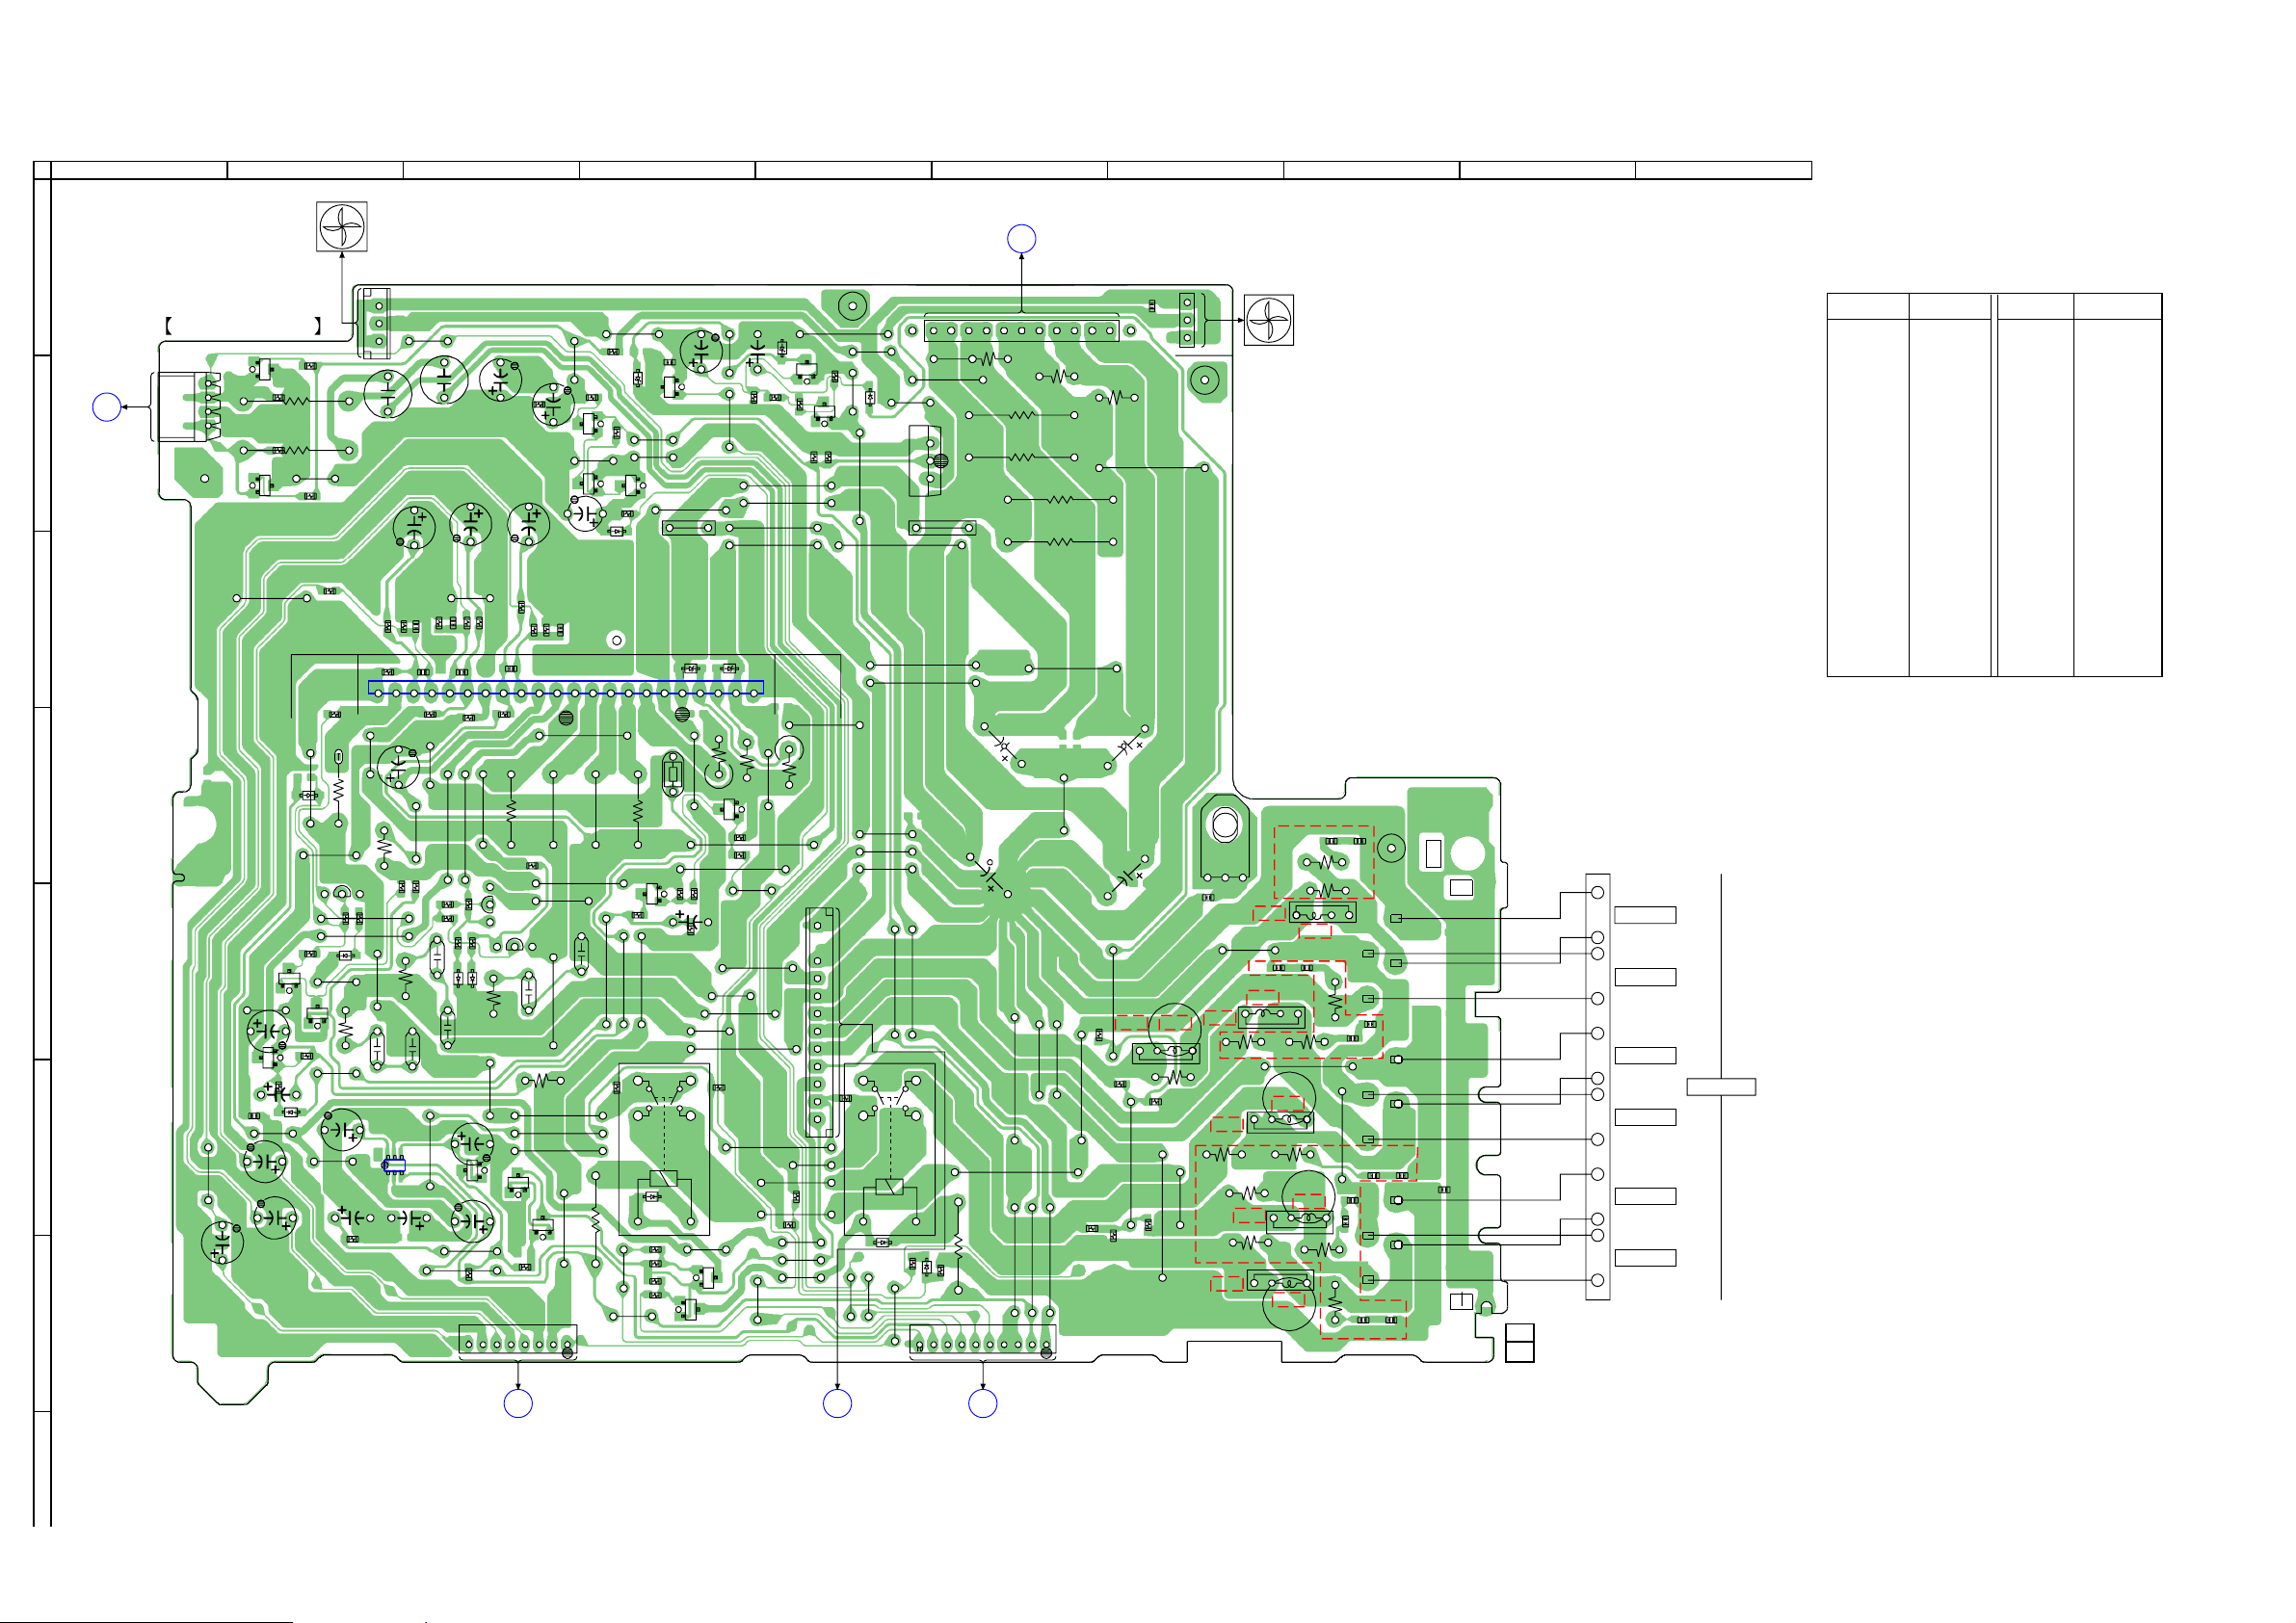
HCD-NXM4D
7-29. PRINTED WIRING BOARD – FRONT AMP BOARD –
3 4 5 6 7
C862
C861
R871
C855
506
R
666
JW
543
R
585
JW
JW665
C509
C503
C508
R515
649
JW
531
R
C525
JW693
530
R
504
D
C851
850
Q
C852
505
R
C524
650
JW
505
D
511
R
JW678
648
JW
E
534
R
542
R
860
R
R513
E
R535
504
Q
Q505
657
JW
536
R
Q852
C510
C511
R851
512
R
C523
E
509
R
E
Q851
CN501
M962
DC FAN
2
1
A
1
544
R
C856
645
JW
E
JW668
3
R527
22
538
JW669
R
581
JW
C526
IC850
6
1
510
R
C515
C506
C853
503
R
4
3
518
R
520
R
JW639
C502
C507
R516
R532
R533
C527
646
JW
517
R
FRONT AMP BOARD
R857
D501
Q501
R502
R539
541
R
JW652
JW692
E
JW580
JW583
R855
R858
Q506
540
R
D506
C854
R850
CN507
JW640
C850
853
Q
R854
854
Q
E
R876
R875
E
JW654
4
F
HP BOARD
B
(Page56)
1
CN505
C
C513
Q502
JW579
503
Q
C505
R519
JW663
D507
E
522
R
658
JW
E
R523
D
E
C516
C518
C560
C501
664
JW
F
G
507
R
E
C504
JW549
582
JW
JW670
JW626
JW687
• See page 29 for Circuit Boards Location.
LP504
636
JW
868
Q
JW638
869
Q
C865
IC501
JW653
JW632
R521
686
JW
R870
R880
C522
JW685
R872
E
E
D853
R547
581
R
890
Q
630
JW
567
R
JW621
850
D
890
R
JW634
529
R
629
JW
623
JW
R559
JW635
E
C528
507
Q
628
JW
D510
R574
C858
861
Q
D502
C859
JW521
E
R575
R560
545
R
E
JW655
531
TH
JW683
Y502
R
JW688
E
604
JW
548
R
JW607
E
R550
R549
546
R
JW627
Q509
R524
508
Q
JW606
JW608
594
JW
R569
Q510
R864
637
JW
D503
E
JW603
JW605
R865
JW595
JW597
JW651
1
R526
JW684
R556
851
D
JW596
JW689
JW612
JW614
619
JW
C860
867
R
JW610
JW609
JW615
JW616
Q859
JW613
JW676
JW691
866
R
E
588
JW
E
Q860
863
862
R
R
JW591
JW600
R525
JW682
JW681
JW680
1
CN503
11
555
R
590
JW
R568
MAIN BOARD
H
8
(Page50)
9 10
• Semiconductor
Location
1
C534
C530
564
JW
R577
R564
1
JW584
EXCEPT
EA
JW511
565
JW
R595
857
C
R586
L506
R590
R582
EA
JW696
CN506
C529
EA
695
JW
3
LP502
EP502
EXCEPT
EA
JW509
EXCEPT
JW505
R563
R585
EXCEPT
EA
R561
JW504
EXCEPT
EXCEPT
EA
EA
JW514
EA
JW562
C548
L504
R583
JW507
EA
EA
R578
R576
EA
L502
R587
L501
EA
M961
DC FAN
L503
EA
C547
R584
JW561
R566
EA
L505
C541
R591
R562
EA
C544
C546
C542
C543
JW563
C545
C537
C539
LP503
C538
C540
502
TM
402
TM
C557
1-861-478-
11
(11)
TM
502
-
+
-
+
-
+
-
+
-
+
-
+
S.WOOFER
CENTER
FRONT R
SURR R
FRONT L
SURR L
SPEAKER
Ref. No. Location
D501 F-2
D502 C-4
D503 C-4
D504 E-3
D505 E-3
D506 E-2
D507 D-2
D508 G-5
D509 G-5
D510 F-4
D850 B-4
D851 A-5
D852 B-5
D853 C-4
IC501 C-4
IC850 F-2
Q501 E-2
Q502 E-2
Ref. No. Location
Q503 E-2
Q504 E-3
Q505 E-3
Q506 E-2
Q507 E-4
Q508 D-4
Q509 G-4
Q510 G-4
Q850 F-3
Q851 F-3
Q852 F-3
Q853 B-2
Q854 B-2
Q858 B-2
Q859 B-5
Q860 B-5
Q861 B-4
Q868 B-4
Q869 B-4
Q890 B-4
JW553
11
JW601
JW625
577
JW
D509
578
JW
R554
574
JW
E
JW593
JW675
RY501
JW520
508
D
R573
852
D
Q858
617
618
JW
JW
CN502
R599
R572
R571
R570
C535
C531
JW690
580
R
557
R
CN508
R598
JW674
JW673
697
698
JW
JW
661
JW
567
JW
R589
660
JW
R565
672
671
JW
JW
H
HCD-NXM4D
I
MAIN BOARD
(Page50)
M
SUR AMP BOARD
(Page60)
J
MAIN BOARD
(Page50)
5858
Page 59
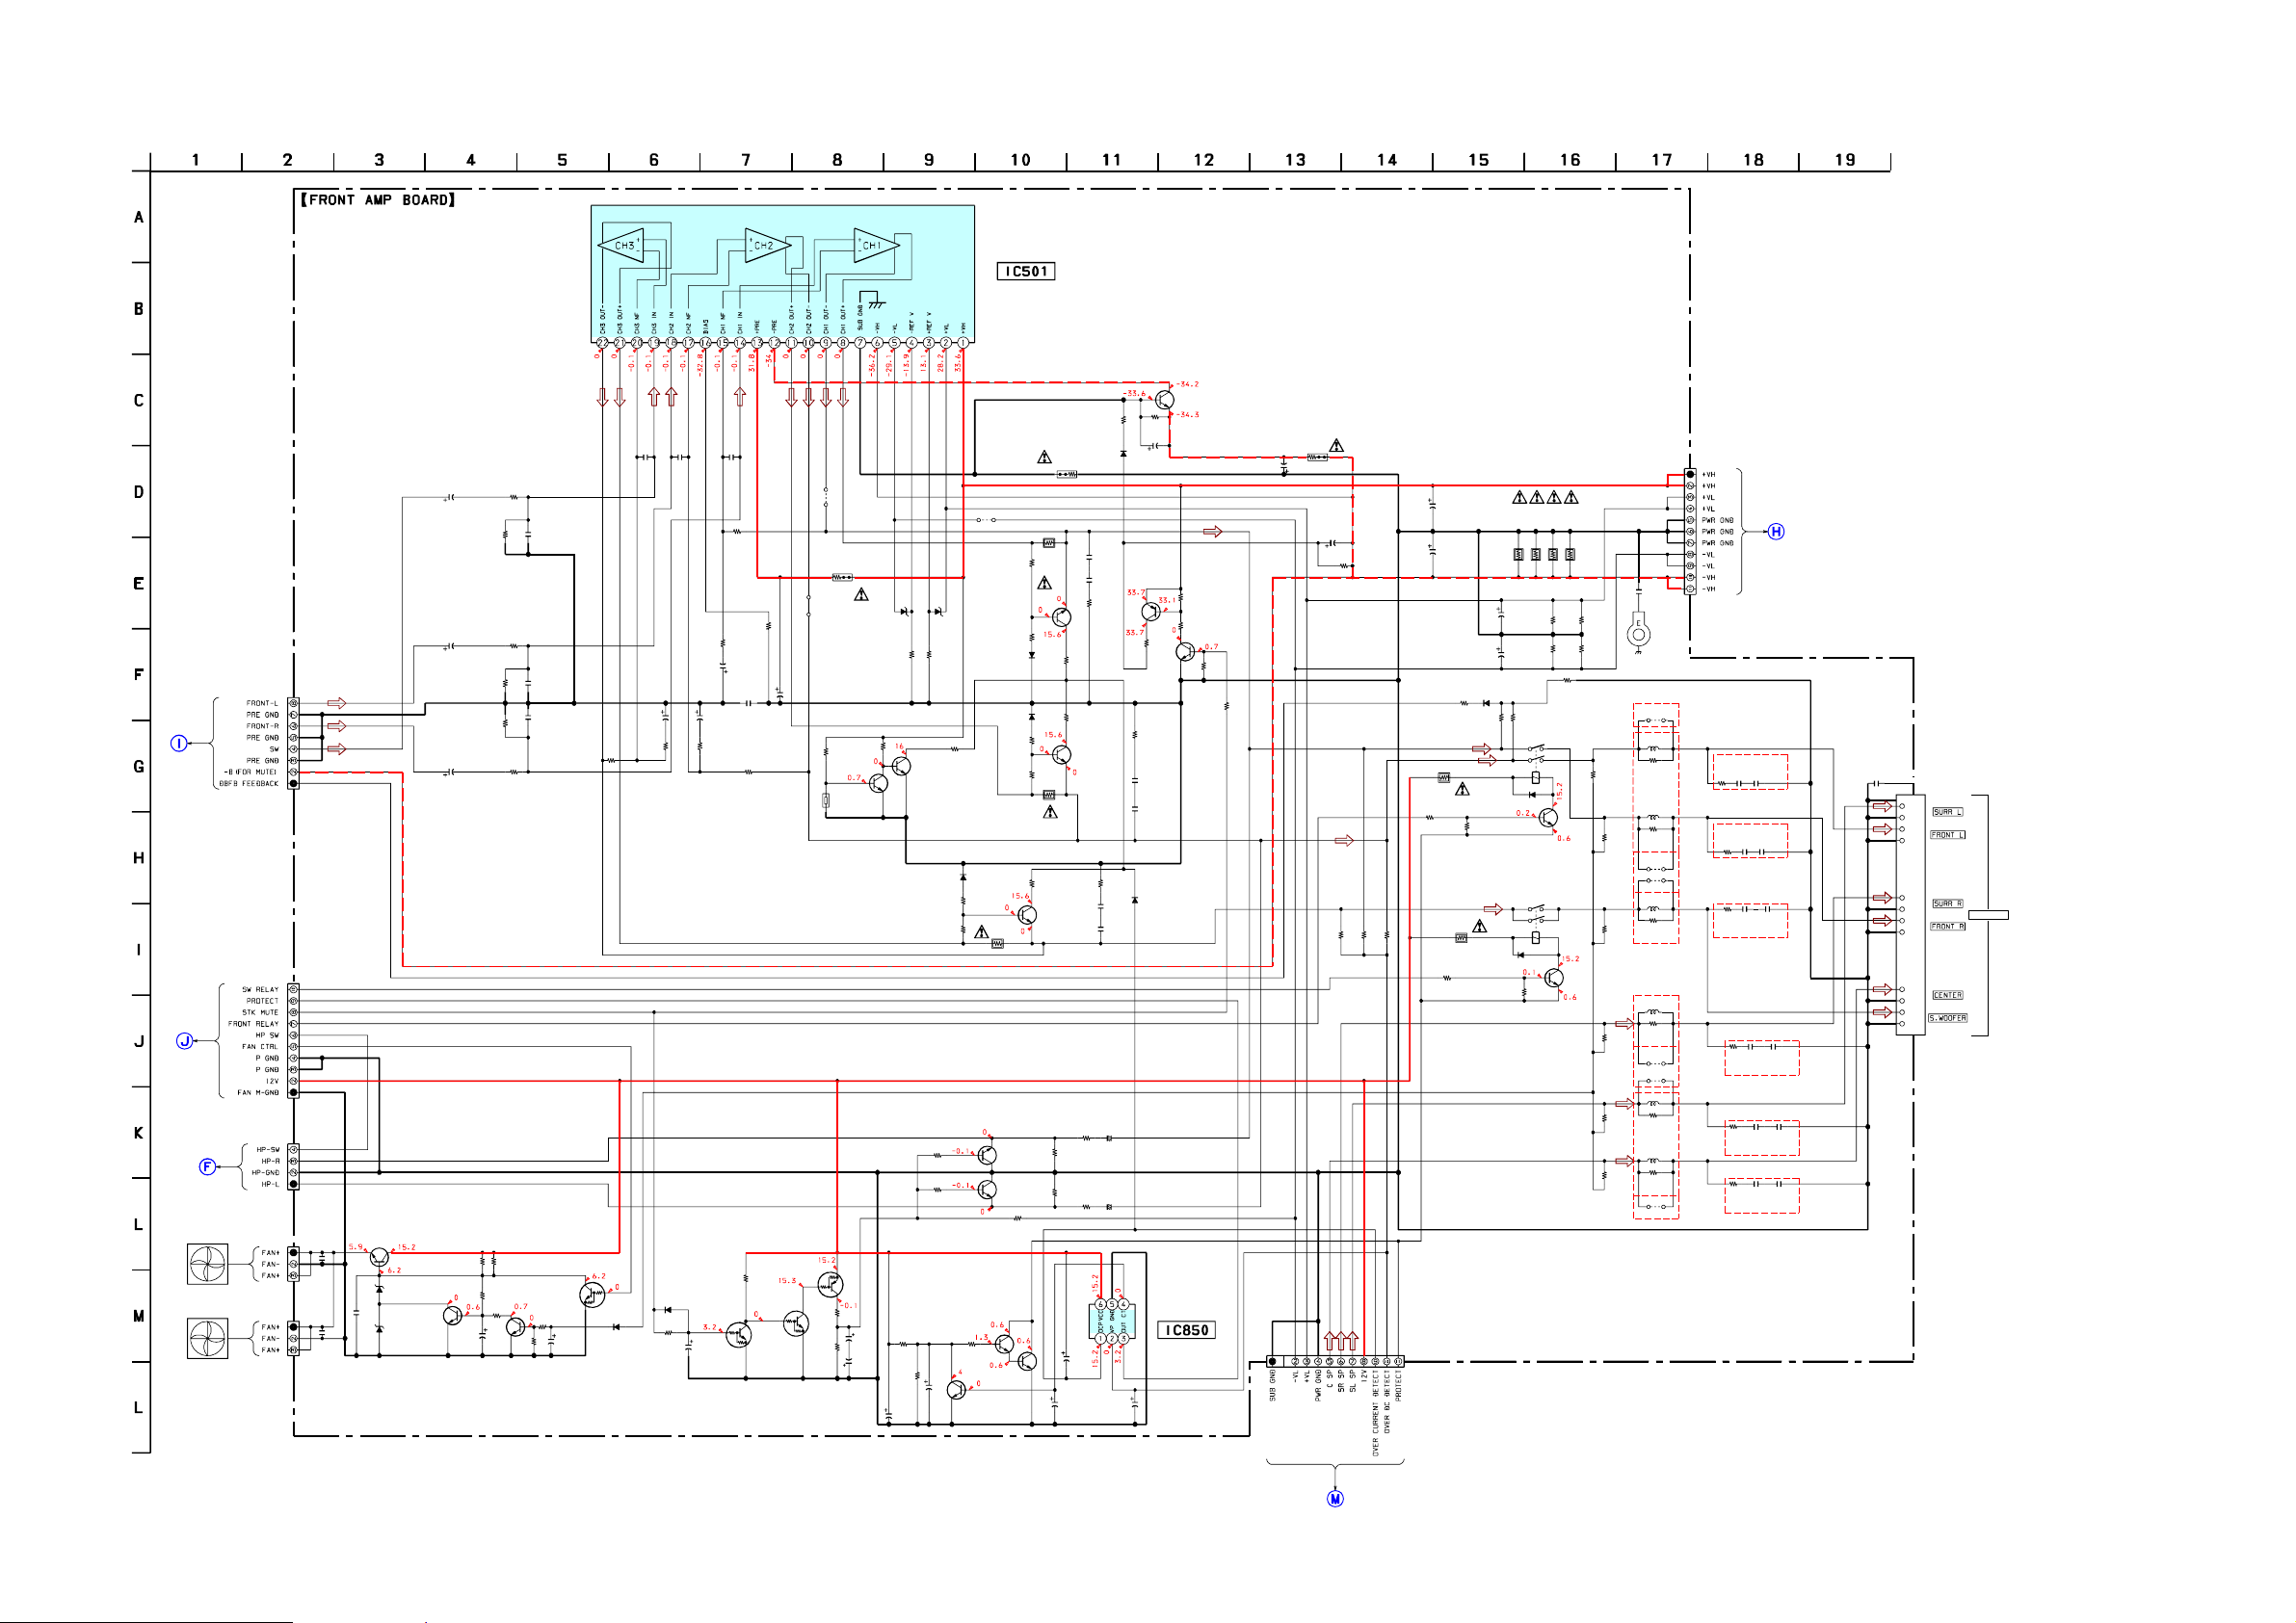
7-30. SCHEMATIC DIAGRAM – FRONT AMP BOARD –
R502
1k
R503
C502
47k
470p
R505
R862
22k
C859
47
16V
R506
47k
R507
47k
R509
1k
R863
22k
Q860
R864
2SC1623
220k
R865
100
FAN MOTOR DRIVE
1k
R866
47k
Q858-861
C503
470p
C504
470p
R527
47k
Q861
DTC114EKA
R867
4.7k
C860
4.7
50V
50V
50V
MAIN
BOARD
(3/3)
(Page53)
BOARD
(Page53)
MAIN
(3/3)
HP
BOARD
(Page57)
M961
FAN
M962
FAN
CN501
B-TO-B
CN508
10P
B-TO-B
CN505
AMP-L
CN506
3P
EH-L
CN507
EH-S
C501
10
50V
C560
10
8P
C505
10
4P
Q858
2SD2525
C857
0.01
C870
0.01
3P
UDZS-TE-17-6.2B
C858
0.01
D851
UDZS-TE-17-6.8B
D850
Q859
2SC1623
D852
1SS355
HCD-NXM4D
IC501
STK413-420
POWER AMP
Q503
2SC2713G-TE85L
-VH SUPP
R522
15k
R523
D501
1SS355
0.1
C523
0.1
100V
C856
4.7
100V
1SS355
C527
0.1
50V
C855
4.7
100V
D507
C853
220
10V
33k
C518
100
100V
Q507
2SA1163G-TE85L
STK MUTE SW
R547
68k
R543
10
1/2W
C524
0.1
100V
C525
0.1
100V
OVER CURRENT
R545
2.2k
R546
47k
IC850
RT8H015C
PROTECTER
Q508
2SC1623
STK MUTE SW
R550
2.2k
R549
2.2k
R524
1
R530
1k
R531
15k
D504
1SS355
D505
1SS355
R534
15k
R535
1k
Q853
2SC3624A
MUTE
Q854
2SC3624A
MUTE
R872
100k
Q852
R529
0.22
R533
100k
R536
0.22
R540
100k
OVER LOAD
C851
100
10V
2W
R532
100k
2W
Q506
2SC1841
DETECT
1/4W
R876
R875
RF
220
220
R542
10
1/2W
2SC1841
OVER LOAD
DETECT
R544
10
1/2W
C526
0.1
50V
R855
680
2W
R858
C852
2.2
50V
C522
100V
Q505
680
2W
C507
220p
C506
47
16V
R510
330
D853
1SS355
R880
22k
C511
C508
220p
220p
528
C509
16V
R511
150
DTC114EKA
C865
22
50V
47
Q890
R513
47k
R512
C510
R
R520
100
1/4W
FR
537
R
R515
33k
150
47
16V
C513
0.001
C515
47
50V
R516
47k
R517
502
D
-TE-17-15B
ZS
D
U
R525
1.5k
1/2W
R518
100k
47k
2SC1623
TH531
MT
Q501
2SC1623
Q868
DTA114EKA
R890
10k
Q869
DTC114EKA
R870
4.7k
R871
22k
Q868,869,890
MUTE
CONTROL
C861
100
10V
C862
100
10V
R860
4.7k
R850
2.2k
C854
10
50V
RELAY DRIVE
R526
1.5k
1/2W
Q502
Q501,502
OVER HEAT
DETECT
D506
1SS355
R854
1k
R857
1k
Q850-852
PROTECT
(SPEAKER)
C850
10
50V
R538
R539
R519
100k
15k
1k
3
50
D
-TE-17-15B
ZS
D
U
R851
4.7k
Q850
2SC1623
JW520
Q504
2SC1841
OVER LOAD
DETECT
R541
0.22
5W
Q851
2SC1623
2SC1623
R521
C516
100
47
1/4W
50V
FR
C530
R567
2200
CN503
11P
50V
C531
2200
50V
R554
D508
22k
ISS355
R580
100
1W
W
/2
1
R560
R559
2.2k
10k
1/2W
R581
100
1W
D510
1SS355
R574
2.2k
/2W
1
C528
47
100V
R548
5.6k
71
70
5
5
R
R
k
k
.8
.8
1
1
W
W
2
2
R569
R568
68k
47k
68k
R555
22k
R575
10k
C534
2200
35V
C535
2200
35V
R556
D509
1SS355
22k
R572
1.8k
2W
RY501
12V
Q509
2SC1623
RELAY SWITCH
RY502
12V
Q510
2SC1623
RELAY SWITCH
R598
4.7k
1/2W
R599
4.7k
1/2W
R557
4.7k
R573
1.8k
2W
R595
4.7k
1/2W
R596
4.7k
1/2W
R564
47k
R582
47k
R586
47k
R589
47k
(CHASSIS)
R565
47k
R577
47k
C529
0.01
EXCEPT EA
JW504
L501
R561
1/2W
L502
R563
JW505
JW507
L503
R576
1/2W
EA
EA
L504
R583
1/2W
JW509
JW514
L505
R585
1/2W
L506
R590
1/2W
JW511
EXCEPT EA
EP502
10
10
10
10
10
10
CN502
SCN-L
11P
EA
EXCEPT EA
EXCEPT EA
EA
MAIN
BOARD
(1/3)
(Page51)
R562
10
C537
C538
100000p
100000p
EA
R566
C539
10
C540
100000p
1/2W
100000p
C557
0.001
TM502
+
+
-
EA
EA
R578
C541
C542
100000p
100000p
10
1/2W
EA
R584
C543
C544
10
100000p
100000p
1/2W
+
+
-
+
+
-
SPEAKER
EA
C545
R587
C546
10
100000p
100000p
EA
R591
C548
C547
100000p
100000p
10
1/2W
HCD-NXM4D
SURR AMP
BOARD
(Page61)
5959
Page 60
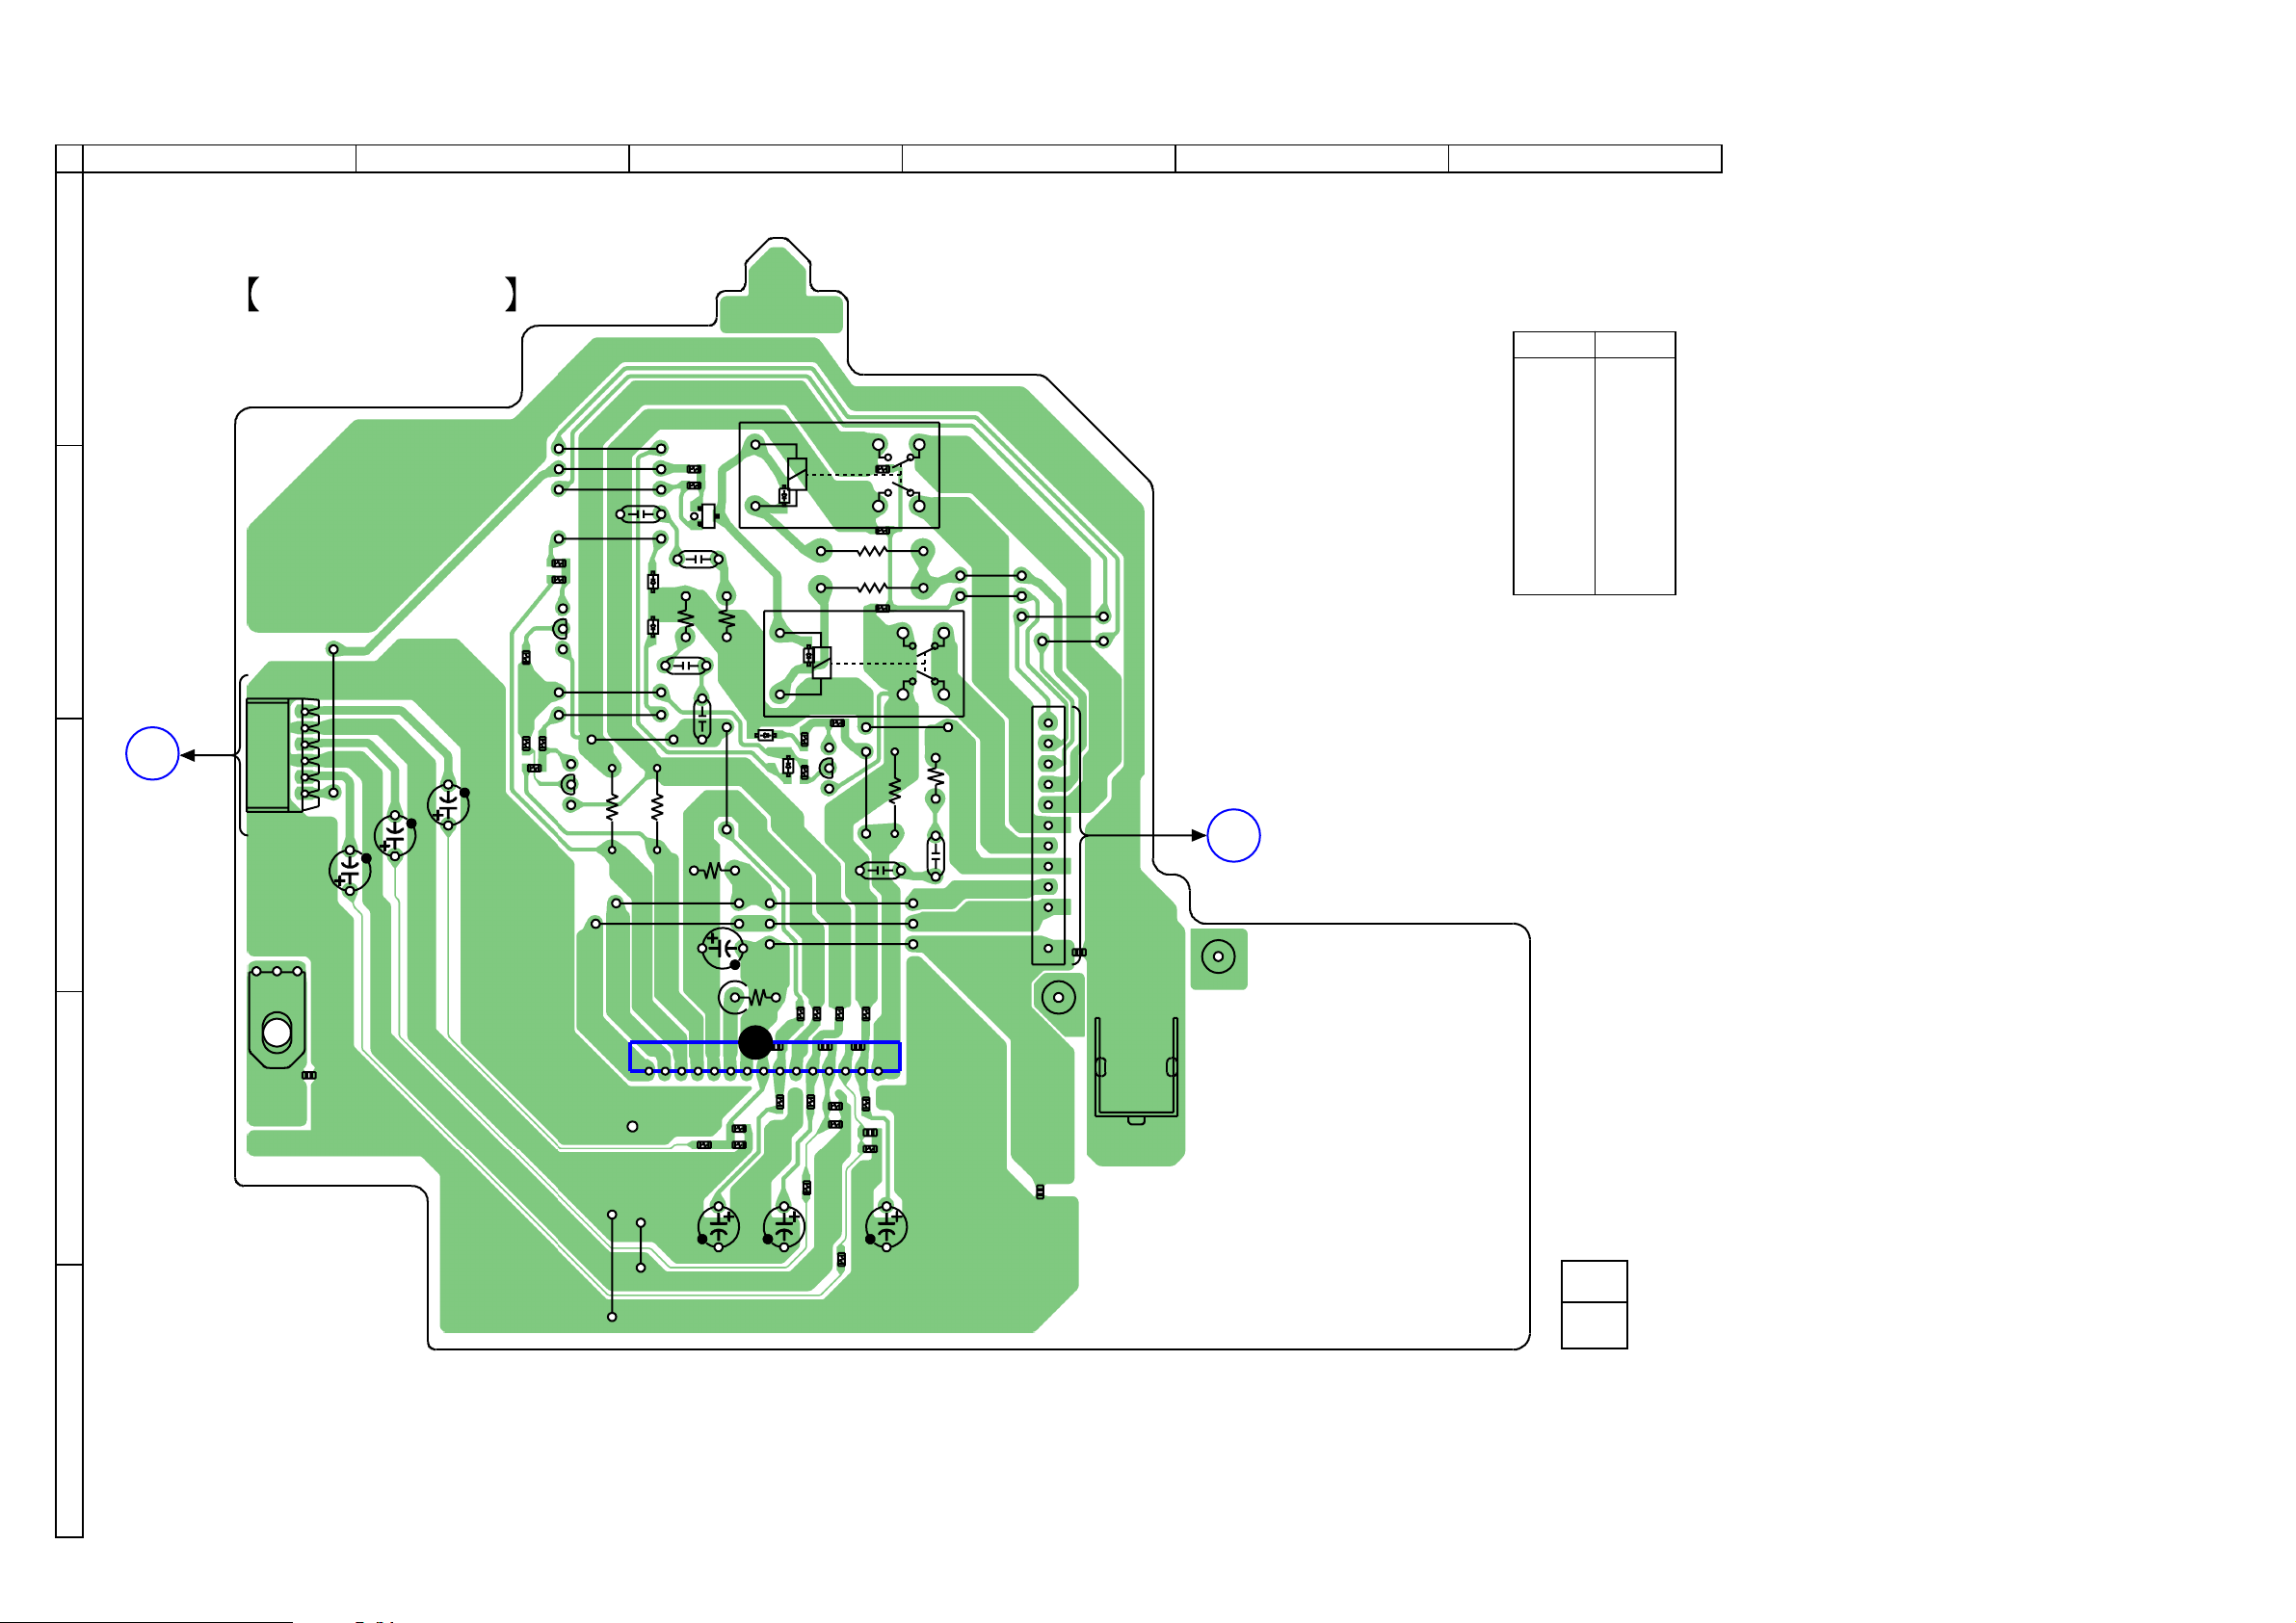
HCD-NXM4D
7-31. PRINTED WIRING BOARD – SUR AMP BOARD –
C609
2
R628
R627
R629
R658
R622
A
B
C
L
MAIN
BOARD
(Page50)
1
SUR AMP BOARD
CN601
6
1
JW601
C605
C601
EP601
C623
D
Q603
R623
E
E
IC601
• See page 29 for Circuit Boards Location.
3 4 5 6
RY602
JW602
JW603
JW604
C617
JW605
Q602
R615
C621
JW606
JW607
JW608
JW622
D603
D602
1
JW623
R630
R610
R656
JW609
JW610
Q610
R670
R612
R653
R652
E
C620
JW611
D512
C618
R625
D601
C624
C611
R614
R613
C610
C612
D511
R618
D604
R626
R609
C608
R617
Q601
R657
C614
R635
C607
R608
C606
R663
R661
RY601
E
JW612
JW614
JW615
JW616
R621
C603
15
R607
R602
R662
R616
C602
R603
R604
C604
R680
R605
R681
JW613
R620
C615
JW621
JW624
11
NO603
1
LP602
C622
JW619
JW620
C650
EP602
M
LP601
• Semiconductor
Location
Ref. No. Location
D511 B-3
D512 B-3
D601 C-3
D602 B-3
D603 B-3
D604 C-3
IC601 D-3
Q601 C-3
Q602 C-2
Q603 B-2
Q610 B-3
FRONT AMP BOARD
(Page58)
11
E
HCD-NXM4D
1-867-087-
(11)
6060
Page 61
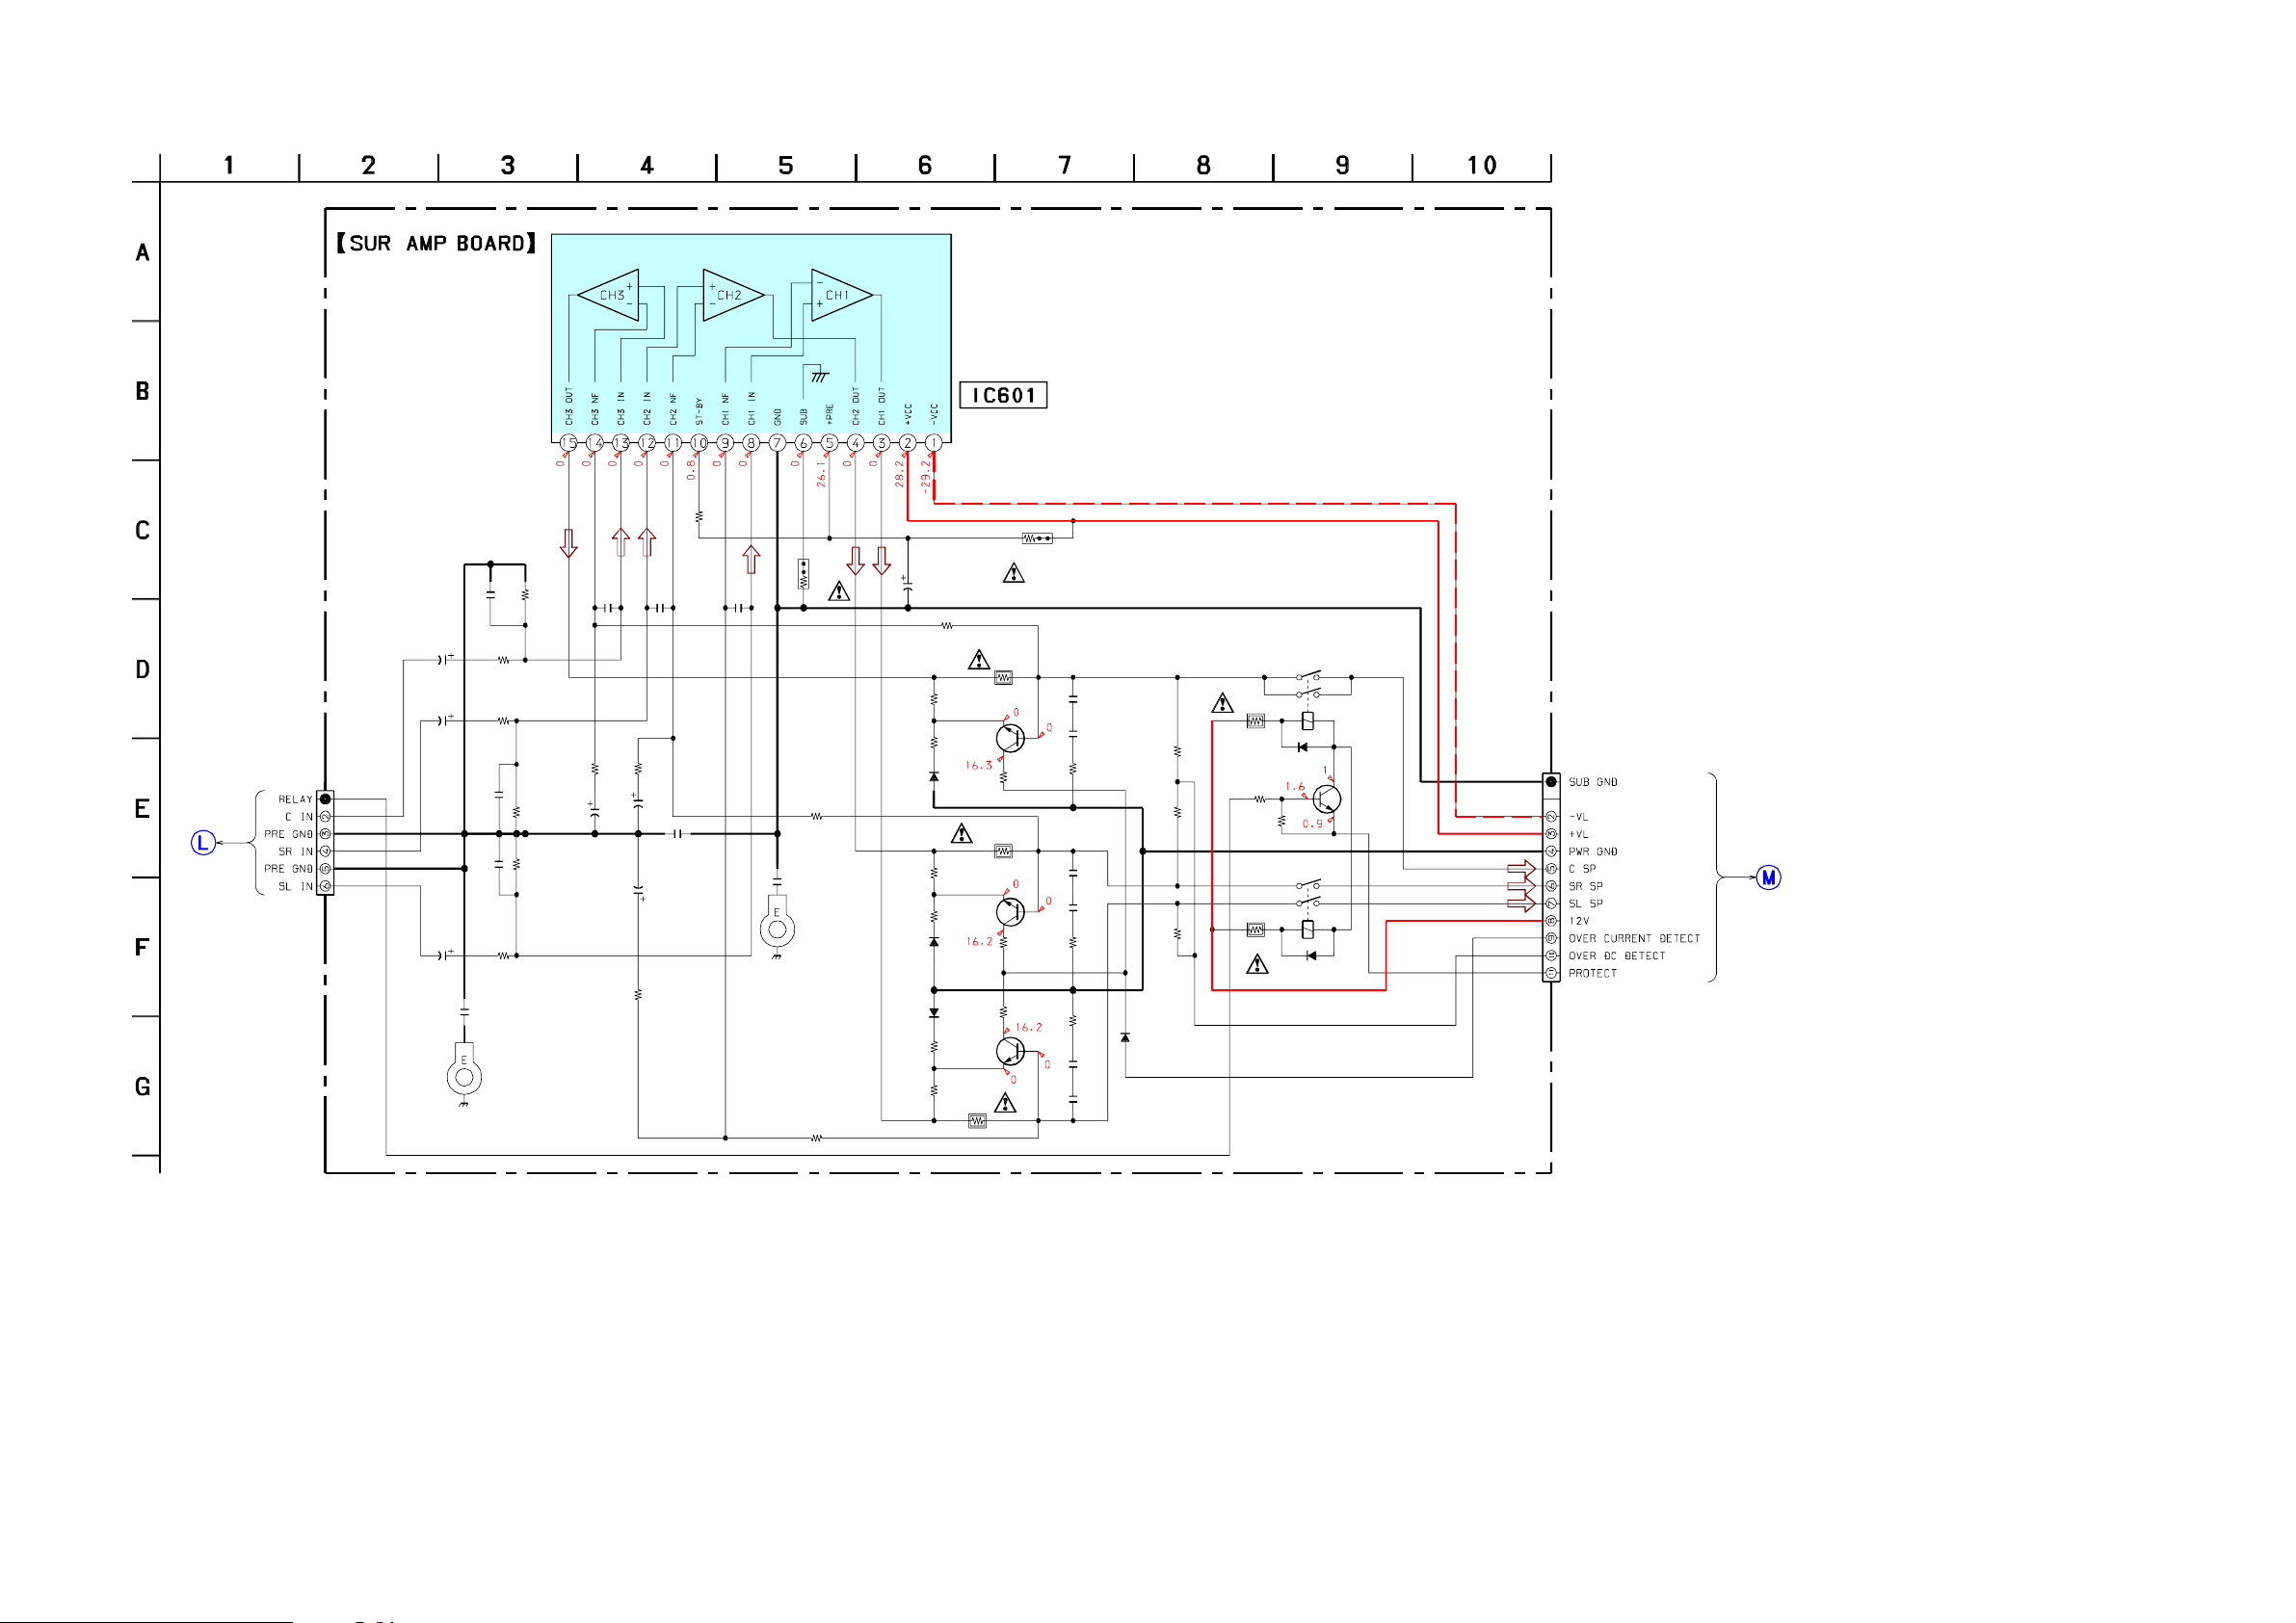
7-32. SCHEMATIC DIAGRAM – SUP AMP BOARD –
IC601
STK403-240A
SURROUND AMP
HCD-NXM4D
MAIN
BOARD
(3/3)
(Page53)
CN601
6P
CT-L
C601
2.2
50V
C605
2.2
50V
C609
2.2
50V
(CHASSIS)
C606
470p
C610
470p
C623
0.01
C602
470p
R602
1k
R607
1k
R612
1k
EP601
R603
47k
R608
47k
R613
47k
R604
560
C604
10V
R635
10k
C603
C607
100p
100p
R609
430
C608
47
47
10V
C612
R614
430
10V
C622
0.001
47
C611
100p
(CHASSIS)
C650
0.01
R670
1/4W
R621
47k
EP602
R626
47k
1
RF
R617
1k
R618
15k
D601
1SS355
R622
1k
R623
15k
D602
1SS355
D603
1SS355
R628
15k
R627
1k
C624
22
50V
R616
47k
Q601
2SC1841
PROTECT
Q602
2SC1841
PROTECT
Q603
2SC1841
PROTECT
R615
0.22
R610
0.22
2W
2W
R605
0.22
2W
R657
100k
R658
100k
R629
100k
R656
100
1/4W
FR
C614
C615
R620
10
1/2W
C617
C618
R625
1/2W
R630
1/2W
C621
C620
0.1
RY601
12V
0.1
0.1
0.1
0.1
10
10
0.1
R661
R662
R663
D604
1SS355
68k
47k
68k
R680
100
R681
100
1W
1W
R653
2.2k
R652
10k
D511
1SS355
RY602
D512
12V
1S355
Q610
2SC3624A
RELAY
SWITCH
NO603
11P
FRONT AMP
BOARD
(Page59)
HCD-NXM4D
6161
Page 62
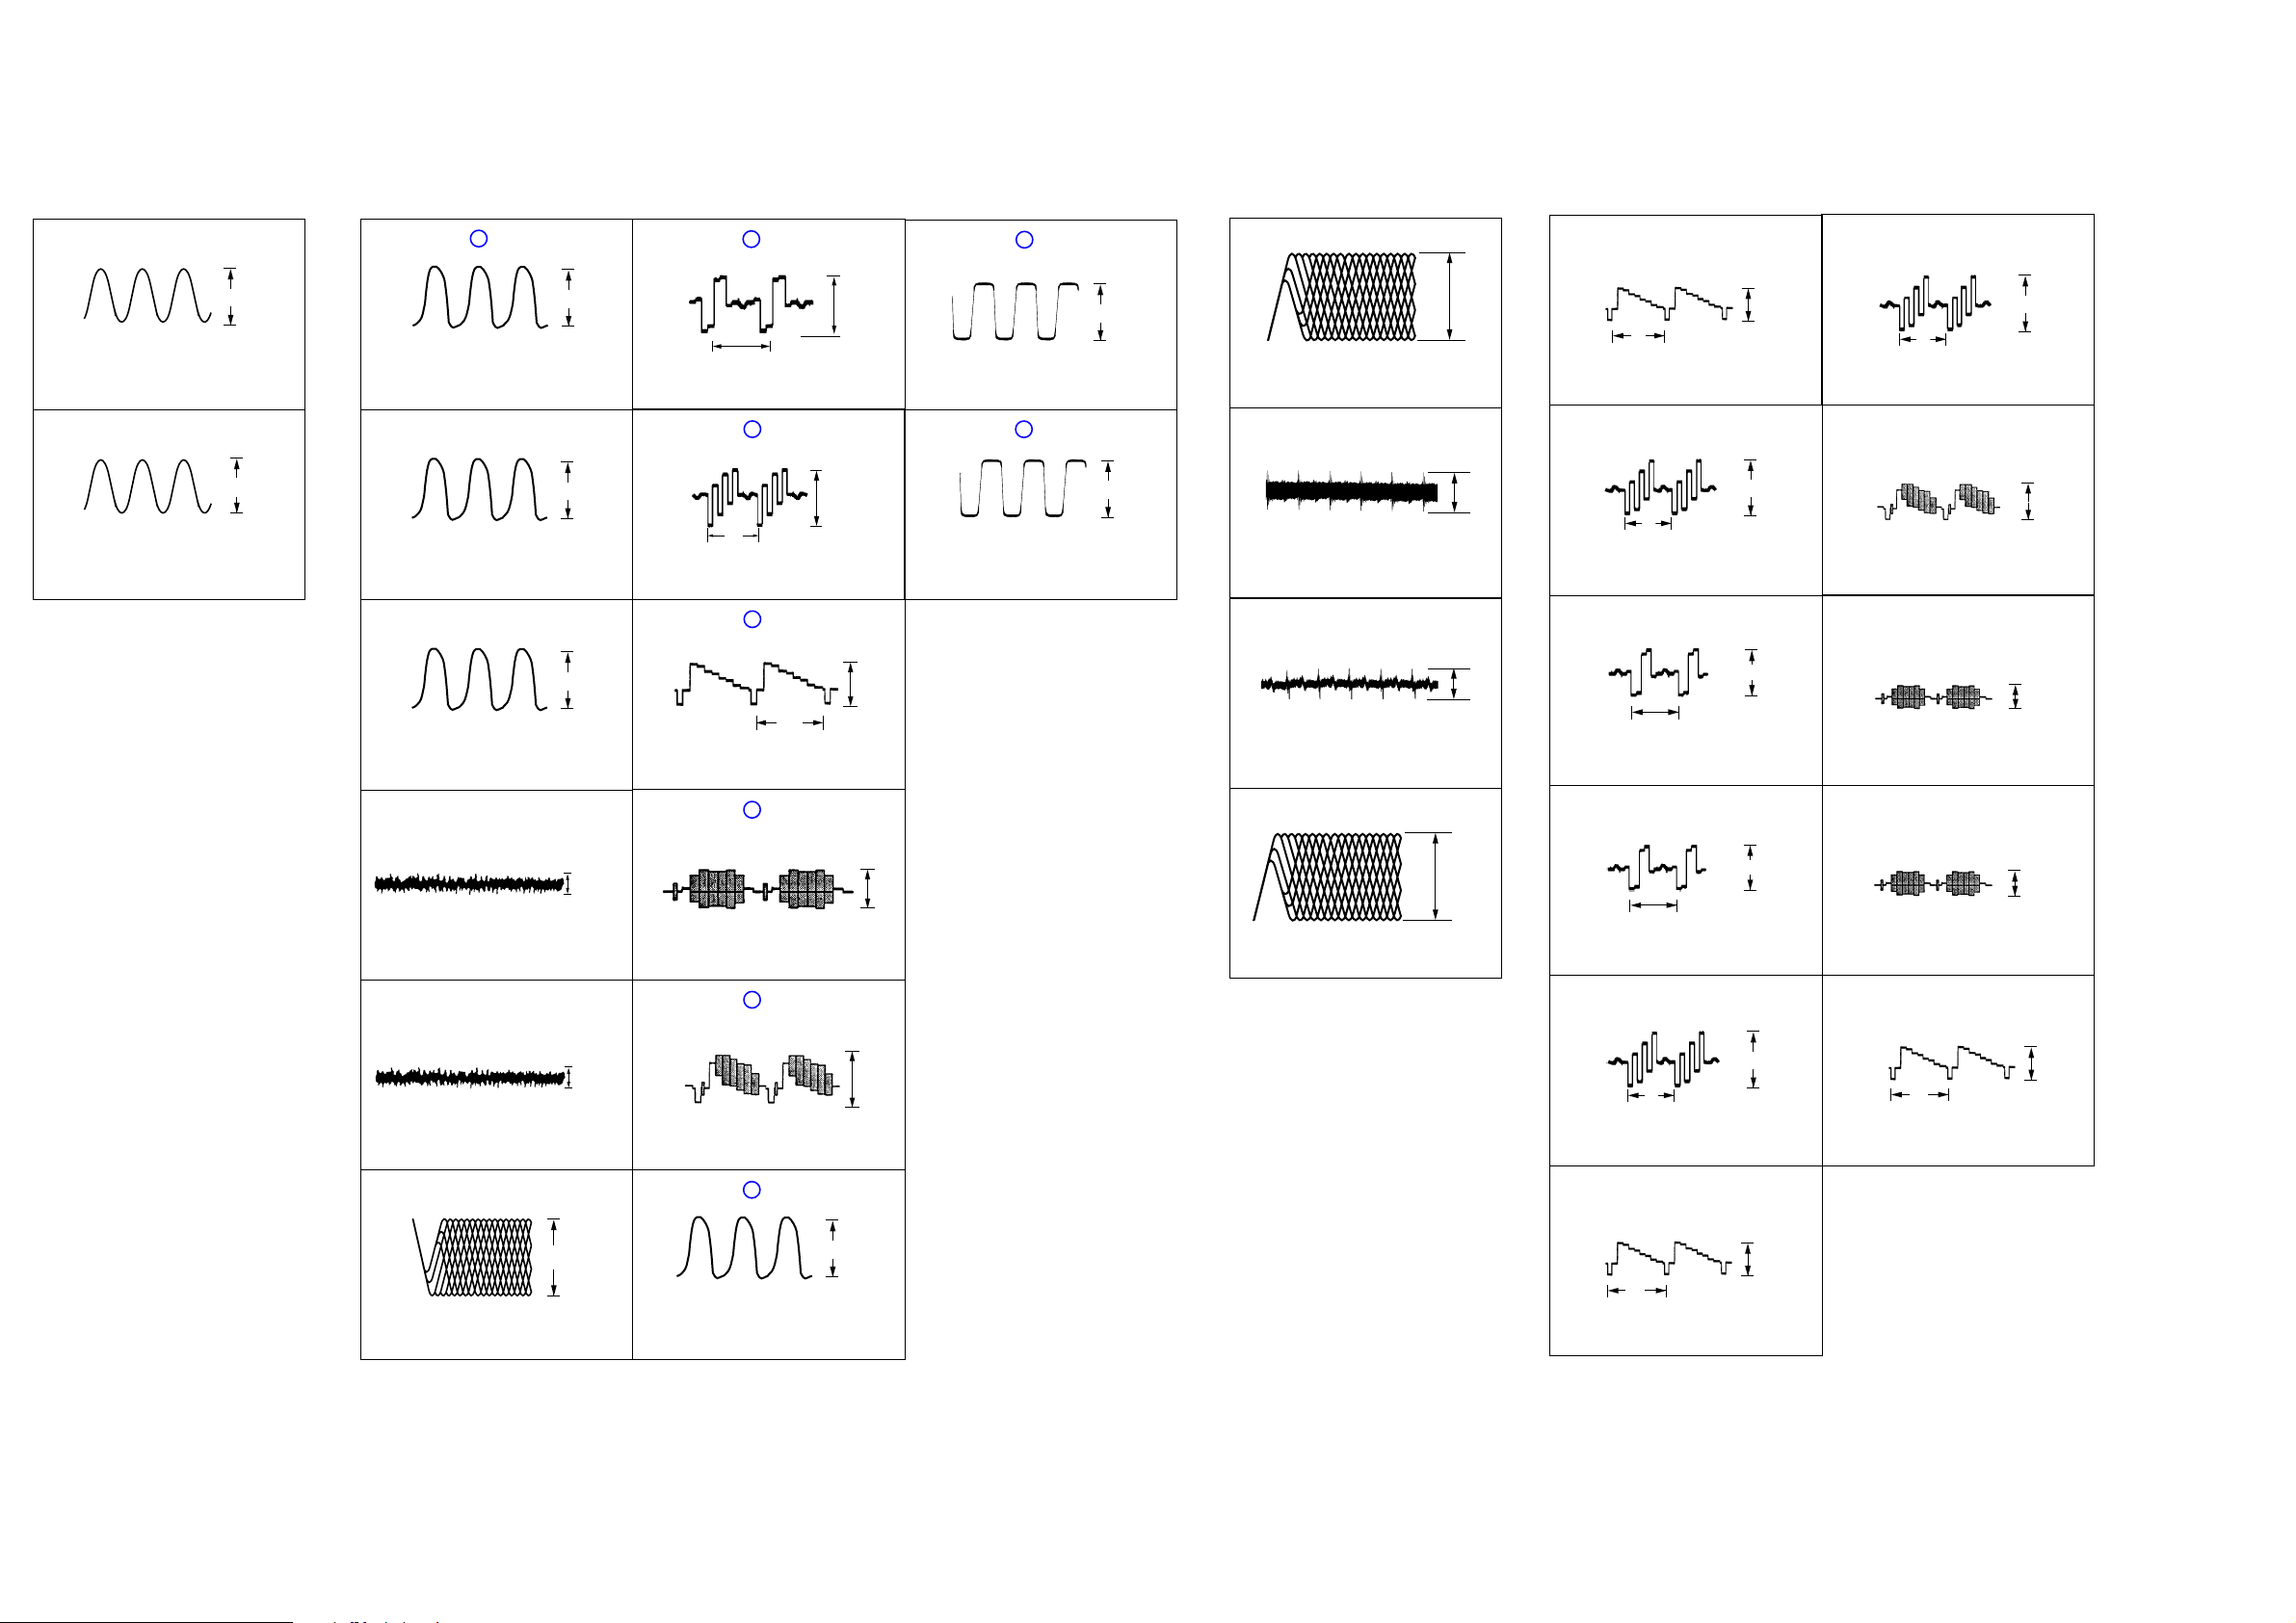
HCD-NXM4D
p
p
p
4Vp-p
15.3 MHz
p
p
1.8Vp-p
0.3Vp-p
1Vp-p
H
0.7Vp-p
H
0.7Vp-p
H
1.5Vp-p
H
1.5Vp-p
H
2Vp-p
H
p
•WAVEFORMS
– MAIN BOARD –
IC401 0 XC-IN
1
32.768KHz
IC401 qd X-OUT
2
16MHz
1.5Vp-p
VOL/DIV : 0.5 V AC
TIME/DIV : 2.0
VOL/DIV : 0.5 V AC
TIME/DIV : 50 nsec
1.5Vp-p
µ
sec
– DMB07 BOARD –
IC701
1
IC901 r; XTAL
2
IC906 8 XTO
3
170
XTL1
33MHz
VOL/DIV : 2 V AC
TIME/DIV : 20 nsec
20 MHz
VOL/DIV : 1 V AC
TIME/DIV : 20 nsec
27 MHz
VOL/DIV : 1 V AC
TIME/DIV : 20 nsec
5.2Vp-p
3.2Vp-p
3.4Vp-p
7
8
9
IC207
IC207
IC207
119
VDAC_4
0.7Vp-p
H
VOL/DIV : 0.5 V AC
TIME/DIV : 20
122
VDAC_3
0.7 Vp-
H
VOL/DIV : 0.5 V AC
TIME/DIV : 20
125
VDAC_2
1H
VOL/DIV : 0.5 V AC
TIME/DIV : 20
1.1 Vp-p
– RF BOARD –
IC207
qd
µ
sec
IC207
qf
µ
sec
µ
sec
148
LRCK
47 KHz
VOL/DIV : 1 V AC
TIME/DIV : 5
149
BCK
1.5MHz
VOL/DIV : 1 V AC
TIME/DIV : 0.2
3.3Vp-p
3.2 Vp-p
µ
sec
µ
sec
IC001 1 DVD RFP
1
IC001 el TE
2
IC001 r; FE
3
0.7Vp-
VOL/DIV : 0.2 V AC
TIME/DIV : 100 nsec
VOL/DIV : 0.5 V AC
TIME/DIV : 1 msec
VOL/DIV : 0.1 V AC
TIME/DIV : 1 msec
– VIDEO BOARD –
IC1101 0 CY IN
1
IC1101 qs CB IN
2
IC1101 qf CR IN
3
VOL/DIV : 0.5 V AC
TIME/DIV : 20
VOL/DIV : 0.5 V AC
TIME/DIV : 20
VOL/DIV : 0.5 V AC
TIME/DIV : 20
µ
sec
µ
sec
µ
sec
IC1101 wa Y OUT
7
H
VOL/DIV : 0.5 V AC
TIME/DIV : 20
IC1101 wd CVBS OUT
8
VOL/DIV : 1 V AC
TIME/DIV : 20
IC1101 wh C OUT
9
VOL/DIV : 1 V AC
TIME/DIV : 20
2Vp-p
2.6Vp-p
1.8Vp-p
µ
sec
µ
sec
µ
sec
IC509 el FE
4
IC509 ra TE
5
IC509 t; RFAC
6
0.1Vp-p
VOL/DIV : 0.1 V AC
TIME/DIV : 2 msec
0.1Vp-p
VOL/DIV : 0.1 V AC
TIME/DIV : 2 msec
1.1 Vp-
VOL/DIV : 0.5 V AC
TIME/DIV : 0.1 µsec
0
qa
qs
IC207
IC207
IC207
128
VDAC_1
VOL/DIV : 1 V AC
TIME/DIV : 20
131
VDAC_0
1.2 Vp-
VOL/DIV : 1 V AC
TIME/DIV : 20 µsec
139
X IN
VOL/DIV : 1 V AC
TIME/DIV : 20 nsec
0.8 Vp-
IC001 tj RFAC
4
1.2Vp-p
VOL/DIV : 0.5 V AC
µ
sec
TIME/DIV : 100 nsec
IC1101 qh CR OUT
4
IC1101 qk CB OUT
5
IC1101 w; CY OUT
6
VOL/DIV : 0.5 V AC
TIME/DIV : 20
VOL/DIV : 0.5 V AC
TIME/DIV : 20 µsec
VOL/DIV : 0.5 V AC
TIME/DIV : 20
µ
sec
µ
sec
IC1101 2 C IN
0
IC1101 6 Y IN
qa
VOL/DIV : 0.5 V AC
TIME/DIV : 20
H
VOL/DIV : 0.5 V AC
TIME/DIV : 20 µsec
1Vp-p
1Vp-
µ
sec
HCD-NXM4D
6262
Page 63
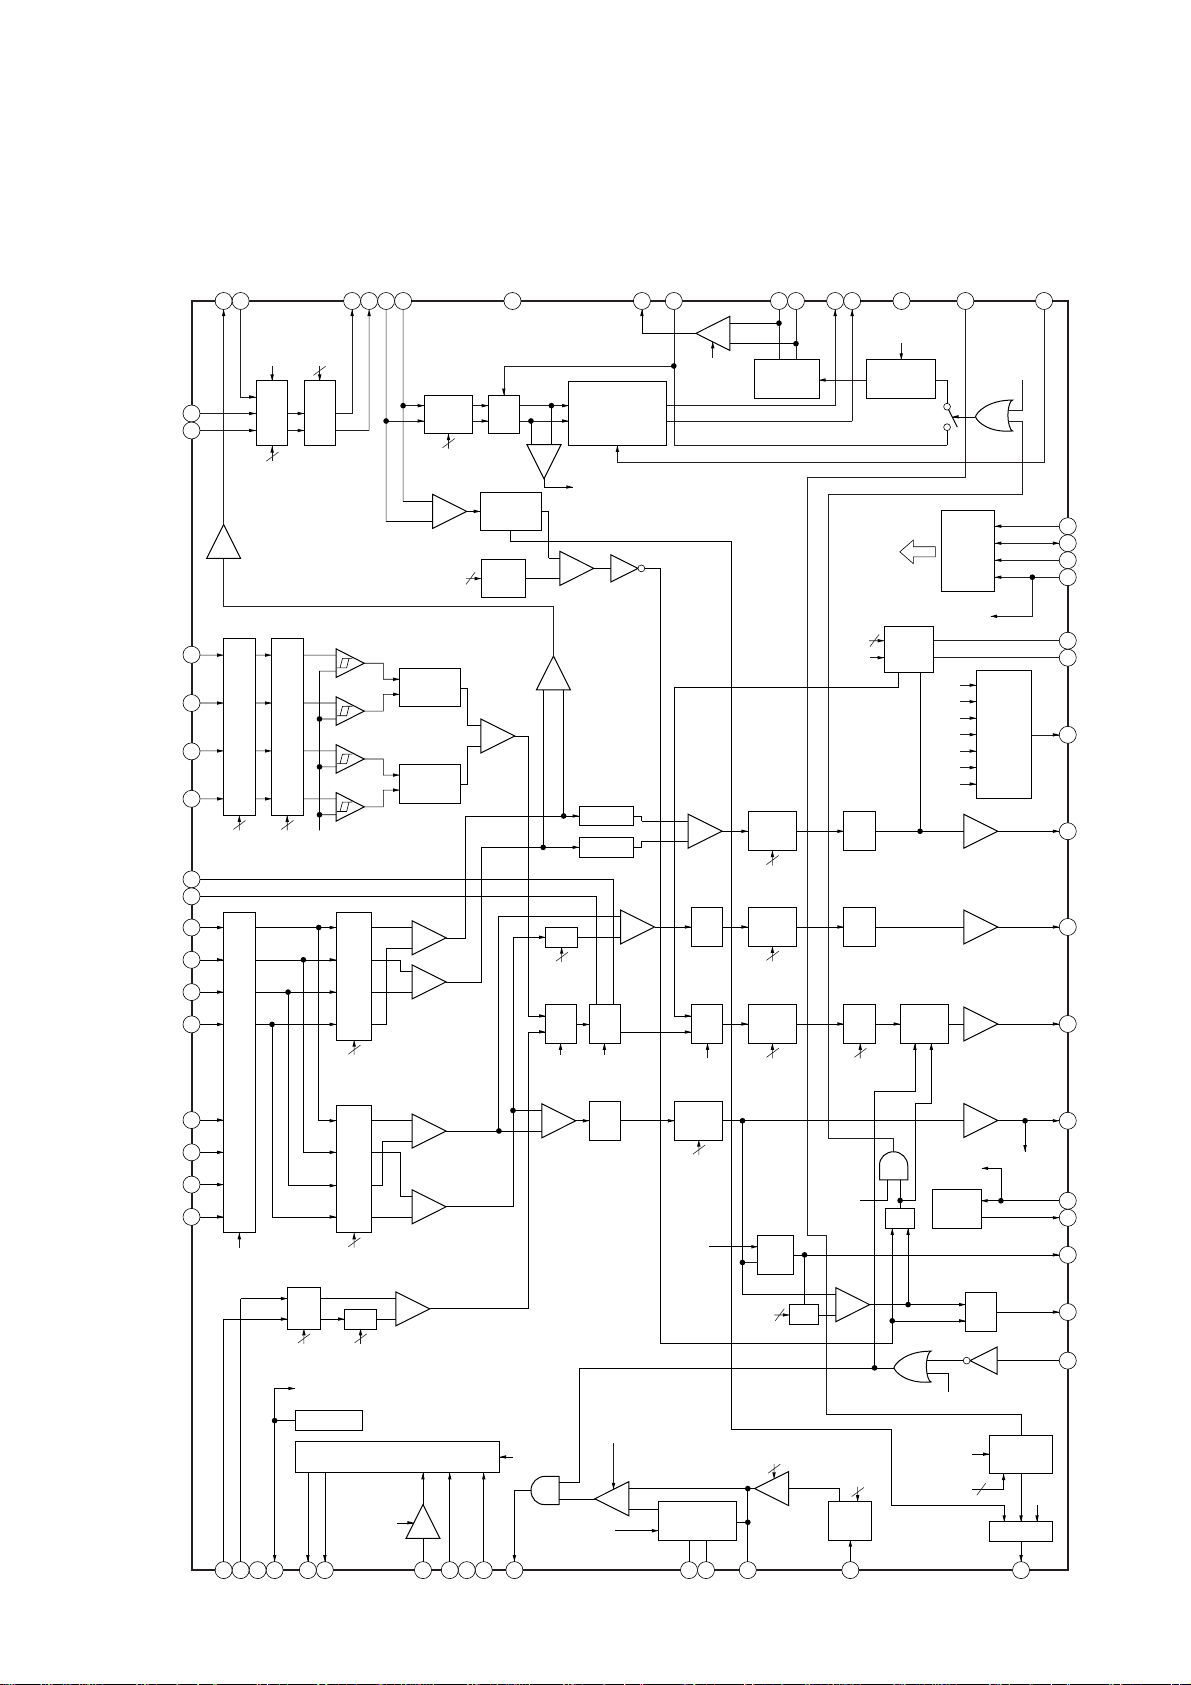
7-33. IC Block Diagram
– RF Board –
IC001 SP3723CAFOPM
RFDC
RFSIN
64 63 62 61 60 59 58 57 5156
ATOP
ATON
AIN
AIP
VPA
RFAC
BYP
HCD-NXM4D
DIN
DIP
55 54 53 52 50 49
FNP
FNN
VNA
MEV
RX
DVDRFP
DVDRFN
CD D
CD C
CD B
CD A
CONTROL
SIGNALS
TO EACH
BLOCK
CE ATT
CEPOL
GCA
GCA
GCA
GCA
GCA
GCAGCA
FROM
S-PORT
HOLDEN
COMPA-
RATOR
–
+
INPUT
IMPEDANCE
FROM S-PORT
INPUT
BUFFER
FAST ATTACK
AGC CHARGE
PUMP
3
LPF ATT
POL SEL
BUFFER
3
SEL
SINK CURRENT
2
FROM S-PORT
REGISTER
V33 FOR
OUTPUT
BUFFER
PI
FE
TE
CE
V25
V125
V25/3
TE
RST
FOR SERVO
OUTPUT
V25/2
LINKEN
AGCO
SERIAL
PORT
MNTR
CONTROL
GCASEL
2
AGC
HOLD
PH
BOTTOM
ENVELOPE
PH
MUX
48
SDEN
47
SDATA
46
SCLK
V33
45
44
LCP
43
LCN
42
MNTR
41
CE
FE
40
TE
39
PI
38
V25
37
V125
36
35
TPH
DFT
34
LINK
33
INPUT
SEL
ATT
4
PROGRAMMABLE
––
GCA
FROM
S-PORT
CD/DVD
+
+
INTERNAL
+
–
4
FDGHG
EQUALIZER
FILTER
DIFFERENTIATOR
AGCO
TOPHOLD
TOPHOLD
–
+
CP/CN
LOW
IMPEDANCE
GCALPF
HYSTERESISTER
& OFFSET
FROM S-PORT
IMPEDANCE
SIGDET
PHASE
DETECTOR
PHASE
DETECTOR
A+D
+
+
+
+
B+C
B+D
+
+
SUM
AMP
+
+
A+C
–
+
INPUT
BIAS
INPUT
SEL
+
–
2
ENVELOPE
2
+
+
AGC
CLAMP &
LEVEL
DAC
APC SEL
DVD/CD
1
2
3
A2
4
B2
C2
5
D2
6
CP
7
8
CN
D
9
C
10
B
11
A
12
13
14
15
16
BUFFER
GCA
FROM
S-PORT
MUX
CD/DVD
MUX ATT
2
INPUT
IMPEDANCE
SEL
EQ
3
FROM
S-PORT
D
C
B
A
S-PORT
COMPARATOR
3
VC
GCA
3
FROM
S-PORT
GCA
W/LPF
3
FROM
S-PORT
GCA
GCA
4
3
FROM
FROM
S-PORT
VCI FOR SERVO INPUT
VC = VPB/2
DUAL APC
LD H/L
FROM S-PORT
FROM S-PORT
OFFSET
CANSEL
FROM
S-PORT
BCA
DET
MIRR
COMPARATOR
PEAK/BOTTOM
HOLD
OUTPUT
INHIBIT
–
+
GCALPF
SUBGCAMUX GCALPF
CEFDB
5
FULL WAVE
RECTIFER
OFFSET
CANSEL
4
FROM
S-PORT
OFFSET
CANSEL
5
FROM
S-PORT
OFFSET
CANSEL
6
FROM
S-PORT
TOP
HOLD
2
FROM
S-PORT
INPUT GAIN
FROM S-PORT
DAC
2
17
18 19 20 21 22 24 2523 26 27 28 29 31 3230
CD F
CD E
VPB
VC
CDLD
DVDLD
DVDPD
CDPD
VNB
LDON
MIRR
MP
MB
MLPF
MIN
MEVO
63
Page 64
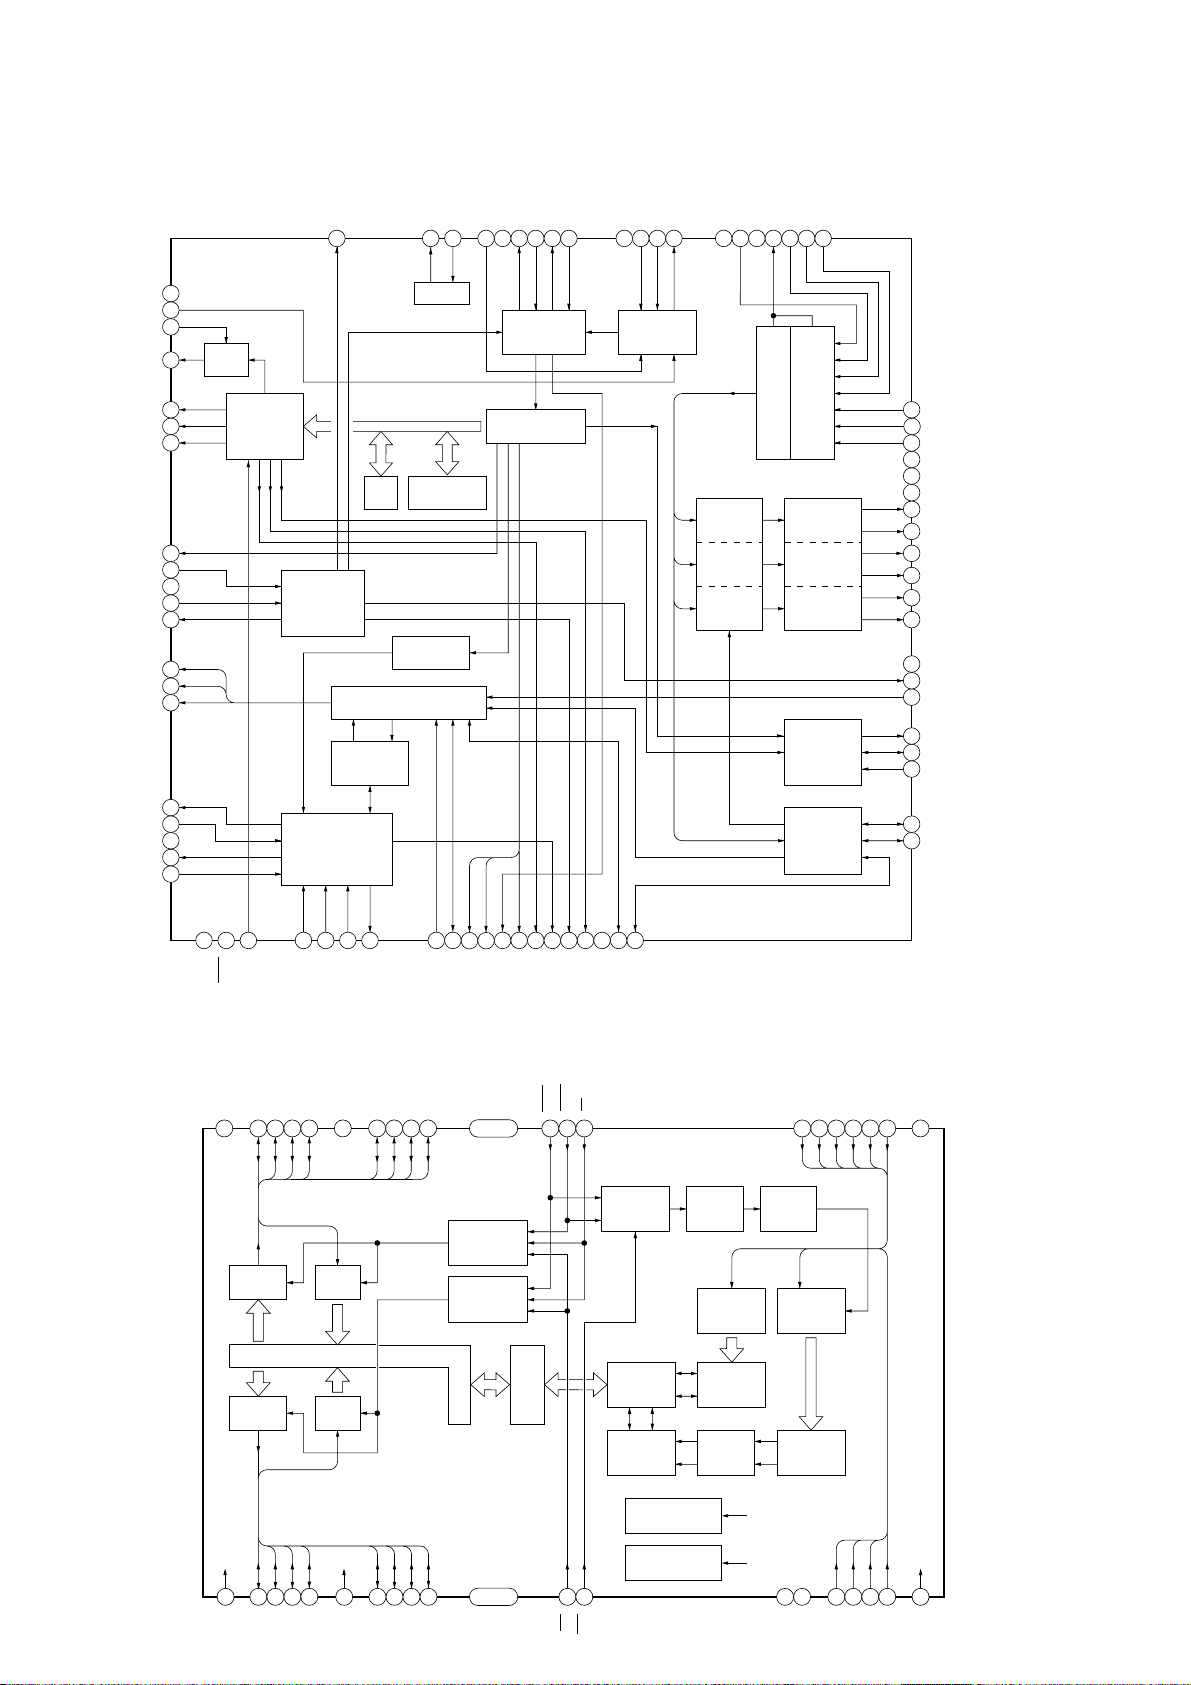
HCD-NXM4D
– DMB07 Board –
IC509 CXD3068Q
DVDD2
61
ASYE
62
MD2
63
DOUT
64
65
LRCK
66
PCMD
67
BCK
EMPH
68
XTSL
69
DVSS2
70
XTAI
71
XTAO
72
73
SOUT
SOCK
74
XOLT
75
SQSO
76
SQCK
77
SCSY
78
SBSO
79
EXCK
80
DIGITAL
OUT
D/A DIGITAL
INTERFACE
60
CLOCK
GENERATOR
CPU
INTERFACE
VPCO
32K
RAM
SERVO INTERFACE
SERVO
AUTO
SEQUENCER
AVDD0
IGEN
FOCUS
SERVO
DSP
TRACKING
SERVO
DSP
SLED
SERVO
DSP
AVSS0
AVSS1
RFAC
ASYI
ASYMMETRY
CORRECTOR
ASYO
BIAS
AVDD1
PCO
FILI
FILO
DIGITAL
PLL
EFM
CLTV
V16M
VCTL
59 58 57 56 55 54 53 52 51 50 49 48 474645 44 43 42 41
OSC
DEMODULATOR
ERROR
CORRECTOR
SUBCODE
PROCESSOR
ADIO
A/D
CONVERTER
GENERATOR
GENERATOR
GENERATOR
PROCESSOR
RFDCCETE
AMPLIFIER &
OPERATIONAL
ANALOG SWITCH
FOCUS
PWM
TRACKING
PWM
SLED
PWM
DIGITAL
CLV
MIRR, DFCT,
FOK
DETECTOR
40
SE
39
TE
38
VC
37
TES1
36
TEST1
35
DVSS1
FRDR
34
FFDR
33
32
TRDR
TFDR
31
SRDR
30
29
SFDR
DVDD1
28
FSTO
27
SSTP
26
MDP
25
LOCK
24
PWMI
23
FOK
22
DFCT
21
1 2 3 4 5 6 7 8 9
MUTE
DATA
DVDD0
XRST
– DMB07 Board –
IC706 MSM51V18165B-60TSKR1
VSS
DQ15
DQ14
DQ13
DQ12
4950 4748 4546 4344 4142 35
OUTPUT
64
BUFFER
OUTPUT
BUFFER
VDD
1 43 65 87 109
VDD
DQ0
DQ1
DQ2
BUFFER
BUFFER
DQ3
12 13 14 15 16 17 18 19 20
10 11
GFS
XLAT
CLOK
SENS
VSS
DQ11
DQ10
DQ9
DQ8
SCLK
ATSK
WFCK
NC
XUGF
XPCK
40 – 36
I/O
CONTROLLER
C2PO
SCOR
LCAS34UCAS33OE
C4M
WDCK
DVSS0
TIMING
GENERATOR
COUT
MIRR
REFRESH
CONTROL
CLOCK
A9A8A7A6A5A4VSS
3132 2930 262728
INTERNAL
ADDRESS
COUNTER
INPUT
I/O
CONTROLLER
SENSE
AMPLIFIER
MEMORY
CELLS
INPUT
I/O
SELECTOR
VBB GENERATOR
VCC VDD
VCC
DQ4
DQ5
DQ6
DQ7
11 – 16
NC
17 18
WE
IVCC GENERATOR
RAS
ON CHIP
ON CHIP
COLUMN
ADDRESS
BUFFERS
COLUMN
DECODERS
WORD
DRIVERS
VDD
VDD
ROW
ADDRESS
BUFFERS
ROW
DECODERS
2019 2221 24 25232
A11
A10
A0A1A2
A3
VDD
Page 65
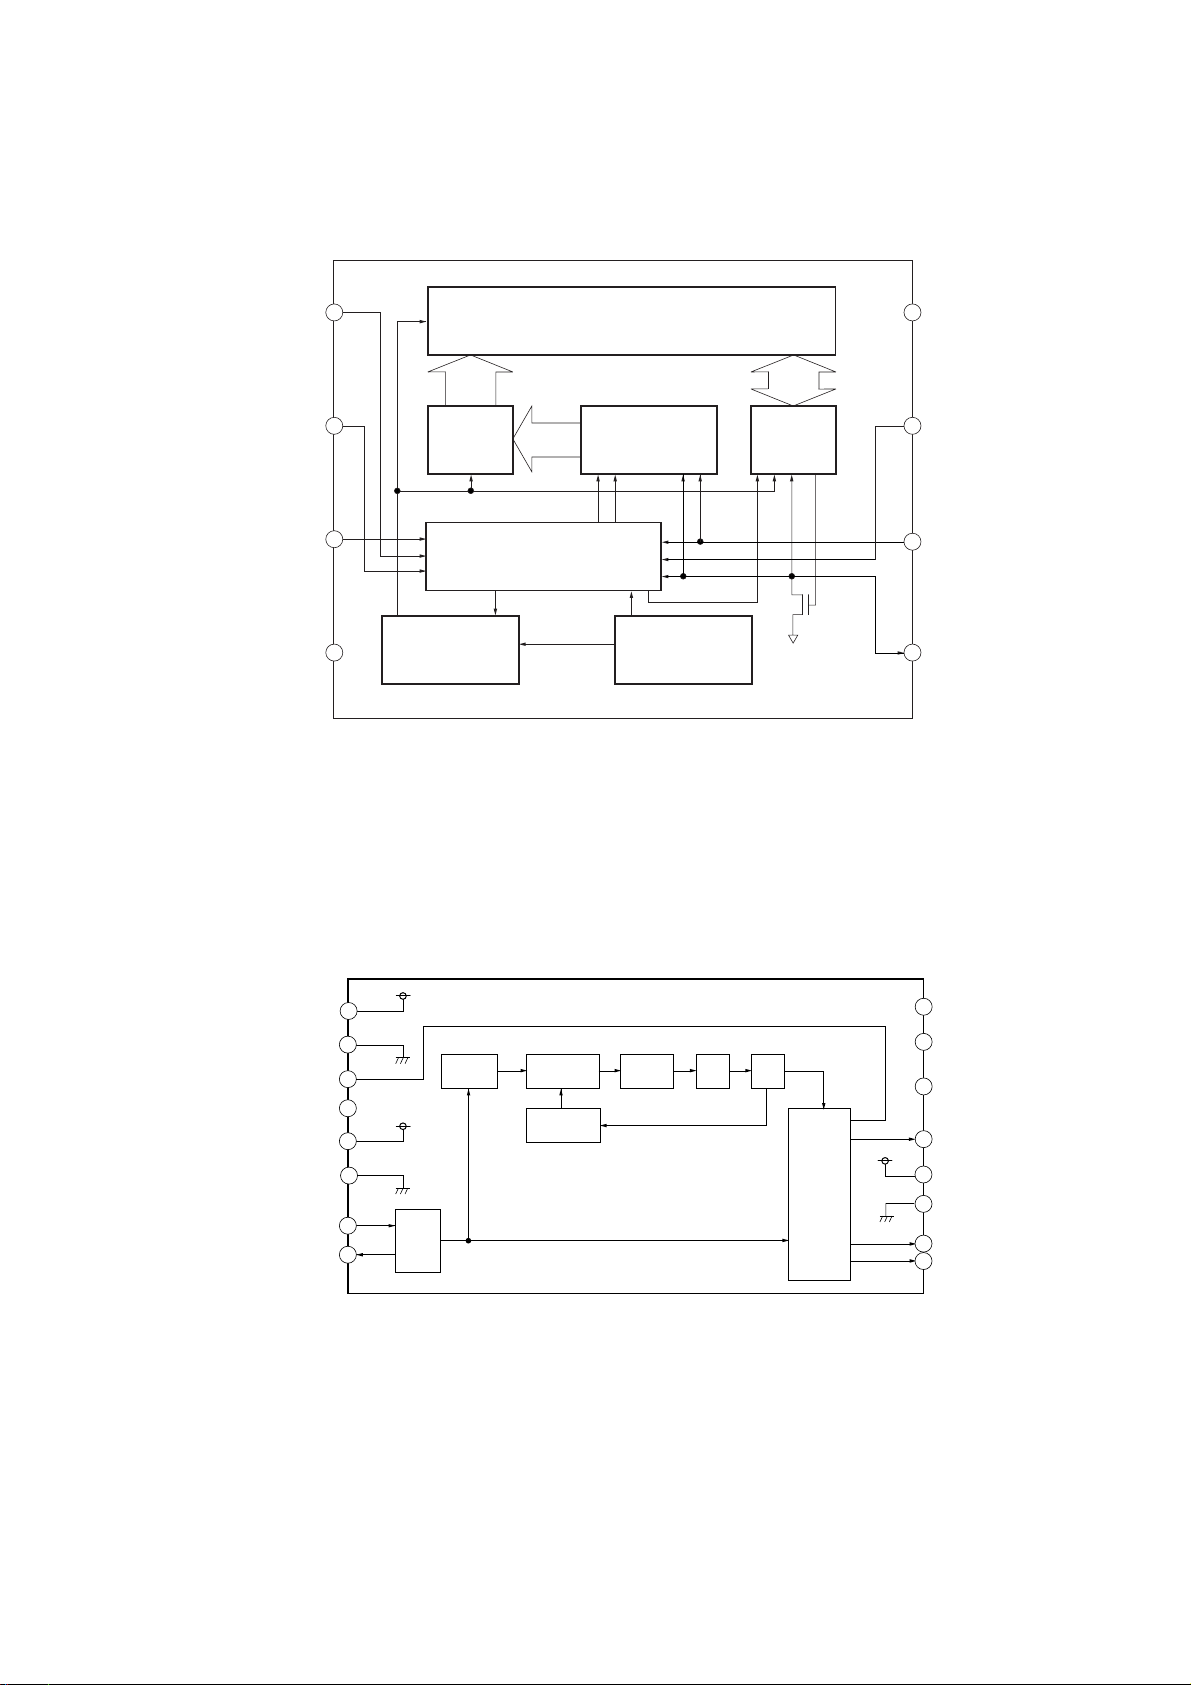
– DMB07 Board –
IC903 BR24C16F-WE2
HCD-NXM4D
VCC
WP
SCL
SDA
– DMB07 Board –
IC906 SM8707GV-G-E2
8
11 bit
7
6
5
ADDRESS
DECODER
HIGHT VOLTAGE
GENERATOR
CONTROL CIRCUIT
16 K bit EEPROM ARRAY
11 bit
ADDRESS REGISTER
SLAVE WORD
STOPSTART
POWER SUPPLY
VOLTAGE DETECTION
ACK
8 bit
DATA
REGISTER
A0
1
A1
2
A2
3
GND
4
VDD1
VSS1
MO1
VDD2
VSS2
XTI
XTO
16
1
2
X'tal
OSC
REF
Div.1
3
4
NC
5
6
7
8
PHASE
DETECTOR1
LOOP
Div.1
PHASE
PUMP1
LPF
VCO
CONTROL
LOGIC
NC
NC
15
NC
14
13
SO3
VDD3
12
11
VSS3
SO2
10
SO1
9
65
Page 66
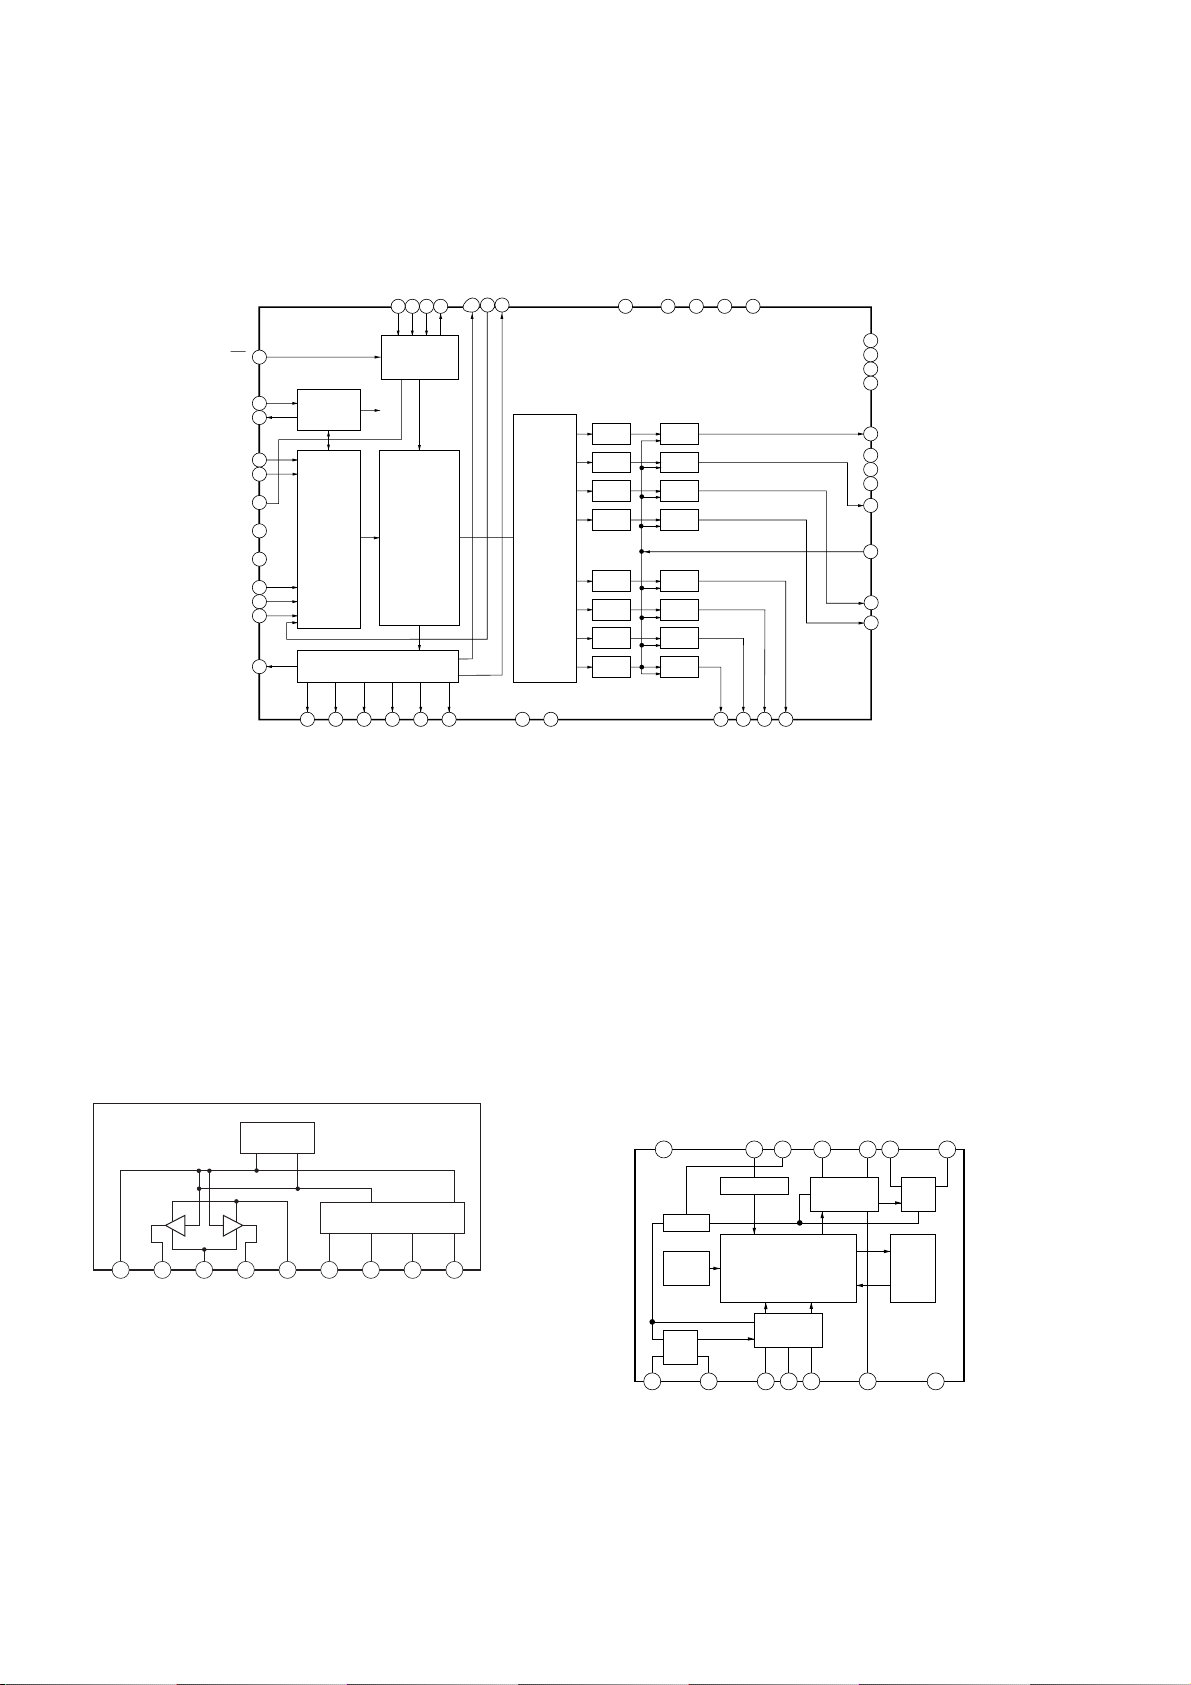
HCD-NXM4D
– DMB07 Board –
IC302 PCM1609KPTR
SCKI
SCKO
LRCK
TEST
DGND
DATA1
DATA2
DATA3
ZEROA
RST
BCK
VDD
ZERO8
DATA4
MDO
32 31 30
ZERO7
ENHANCED
MULTI-
LEVEL
DELTASIGMA
MOJULE
NC
VCC1
29 28 27 26 25
DAC LPF
DAC LPF
DAC LPF
DAC LPF
DAC LPF
DAC LPF
DAC LPF
DAC LPF
AGND1
VCC2
AGND2
VCC3
24
AGND3
23
VCC4
22
AGND4
21
VOUT8
20
AGND6
19
VCC5
18
17
AGND5
16
VOUT7
15
VCOM
14
VOUT1
13
VOUT2
MLMCMDI
36 35 34 33
OVER SAMPLING
ZERO DETECT
FUNCTION
CONTROL
INTERFACE
4X/8X
DIGITAL
FILTER
WITH
FUNCTION
CONTROLLER
37
SYSTEM
38
39
40
41
42
43
44
45
46
47
48
CLOCK
MANAGER
SERIAL
INPUT
INTERFACE
– RELAY Board –
IC701, 711 BA6956AN
1 2 3 4 5 6 7 8 9
OUT2
RNF
VREF
1 2 3 4 5 6 7 8 9 10 11 12
NC
NC
ZERO1/GPO1
ZERO2/GPO2
ZERO3/GPO3
ZERO4/GPO4
ZERO5/GPO5
ZERO6/GPO6
– HP Board –
IC1061 M65850FP-E1
TSD
OUT1
VM
CONTROL LOGIC
FIN
VCC
GND
RIN
1/2 VCC
1
LPF1IN
VOUT6
VOUT5
VOUT4
VOUT3
VCC
AUTO
RESET
CLOCK
OSCILLATOR
CLOCK
RESET
CONTROL
D1
REF
MAIN
DO0
DO1
OP2IN
D/A
MO
MI
A/D
LPF1
2 345 6 7
CC1
OP1IN
OP1OUT
LPF1OUT
OP2OUT
LPF2IN
20KBIT
CC2
LPF2OUT
891014 13 12 11
LPF2
SRAM
GND
66
Page 67
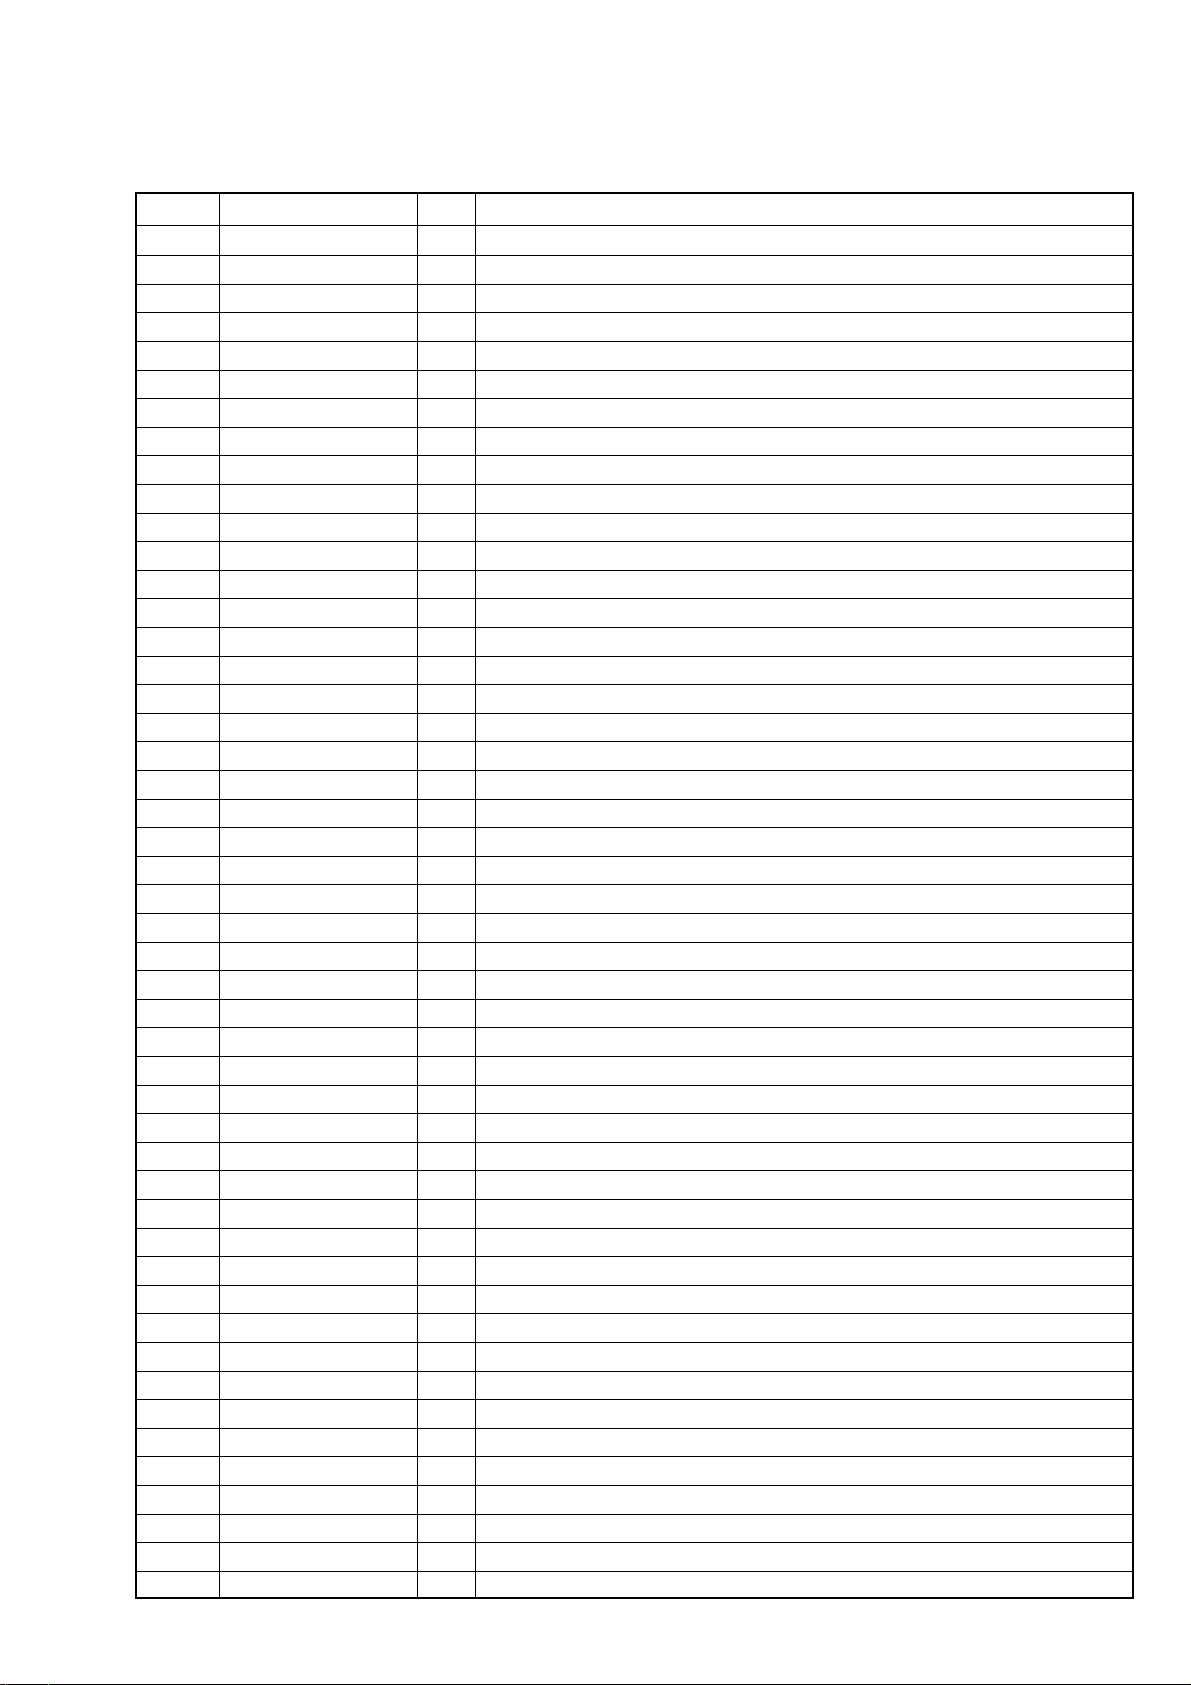
• IC Pin Function Descriptions
• IC207 ZIVA5X-C2F (DVD SYSTEM PROCESSOR) (DMB07 BOARD)
Pin No. Pin Name I/O Description
1 VDDP — Power supply terminal (+3.3V) (I/O signal)
2 HA1 I/O Address bus
3 to 11 HD15 to HD7 I/O Data bus (address signal multiplexed)
12 VDDP — Power supply terminal (+3.3V) (I/O signal)
13 GNDP — Ground terminal (I/O signal)
14 to 19 HD6 to HD1 I/O Data bus (address signal multiplexed)
20 VDDP — Power supply terminal (+3.3V) (I/O signal)
21 GNDP — Ground terminal (I/O signal)
22 HD0 I/O Data bus (address signal multiplexed)
23 HDTACK I/O Acknowledge signal input/output for host data transfer (not used)
24 HIRQ0 I Interrupt signal input for Medusa (not used)
25 WEH.UDS I/O Host upper data strobe signal output (not used)
26 WEL.LDS I/O Host lower data strobe signal output (not used)
27 HREAD I/O Read/write strobe signal output (not used)
28 GPIO0 I/O Jig detection port (pull-up)
29 GND — Ground terminal (inside core)
30 VDD — Power supply terminal (+1.8V) (inside core)
31 GND25 — Ground terminal (SDRAM I/O signal)
32 VDD25 — Power supply terminal (+3.3V) (SDRAM I/O signal)
33 to 42 MA9 to MA0 O SDRAM address bus
43 GND25 — Ground terminal (SDRAM I/O signal)
44 VDD25 — Power supply terminal (+3.3V) (SDRAM I/O signal)
45, 46 MA10,MA11 O SDRAM address bus
47 BA1 O SDRAM bank select 1 signal output
48 BA0 O SDRAM bank select 0 signal output
49 MCS0 O SDRAM chip select 0 signal output
50 MCS1 O Not used
51 MRAS O SDRAM row address strobe signal output
52 MCAS O SDRAM column address strobe signal output
53 MWE O SDRAM write enable signal output (“H” : read, “L” : write)
54 GND25 — Ground terminal (SDRAM I/O signal)
55 VDD25 — Power supply terminal (+3.3V) (SDRAM I/O signal)
56 MCLK O SDRAM Clock output
57 to 60 MD0 to MD3 I/O SDRAM data
61 GND25 — Ground terminal (SDRAM I/O signal)
62 MDQM0 O Byte read /write mask signal 0 output
63 VDD25 — Power supply terminal (+3.3V) (SDRAM I/O signal)
64 to 71 MD6 to MD11 I/O SDRAM data
72 GND25 — Ground terminal (SDRAM I/O signal)
73 MDQM1 O Byte read /write mask signal 1 output
74 VDD25 — Power supply terminal (+3.3V) (SDRAM I/O signal)
75 to 78 MD12 to MD15 I/O SDRAM data
79 GND — Ground terminal (inside core)
80 VDD — Power supply terminal (+1.8V) (inside core)
81 to 84 MD16 to MD19 I/O SDRAM data
85 GND25 — Ground terminal (SDRAM I/O signal)
86 MDQM2 O Byte read /write mask signal 2 output
87 VDD25 — Power supply terminal (+3.3V) (SDRAM I/O signal)
HCD-NXM4D
67
Page 68
HCD-NXM4D
Pin No. Pin Name I/O Description
88 to 95 MD20 to MD27 I/O SDRAM data
96 GND25 — Ground terminal (SDRAM I/O signal)
97 MDQM3 O Byte read /write mask signal 3 output
98 VDD25 — Power supply terminal (+3.3V) (SDRAM I/O signal)
99 to 102 MD28 to MD31 I/O SDRAM data
103 GND25 — Ground terminal (SDRAM I/O signal)
104 VDD25 — Power supply terminal (+3.3V) (SDRAM I/O signal)
105 VCLK I/O System clock (not used)
106 XCK_I/O_SEL I/O 5.1ch/downmix switch signal output (not used)
107 VS O S1 signal output
108 I/P SW O Progressive/interlace switch signal output
109 CDSEL O CD-DA selection signal output
110 MREQ O Audio muting request signal output
111 VDDP — Power supply terminal (+3.3V) (I/O signal)
112 GNDP — Ground terminal (I/O signal)
113 MDI O Serial data output to the D/A converter
114MCOSerial data clock output to the D/A converter
115MLOLatch enable signal output to the D/A converter
116HIRQ2_ I Busy signal input from the EEPROM
117 VDAC_4B — Video DAC bias bit 4 (connected to the ground)
118 VDAC_VDD4 — Power supply terminal (+3.3V) (Video DAC 4)
119 VDAC_4 O VDAC output 4
120 VDAC_3B — Video DAC bias bit 3 (connected to the ground)
121 VDAC_VDD3 — Power supply terminal (+3.3V) (Video DAC 3)
122 VDAC_3 O VDAC output 3
123 VDAC_2B — Video DAC bias bit 2 (connected to the ground)
124 VDAC_VDD2 — Power supply terminal (+3.3V) (Video DAC 2)
125 VDAC_2 O VDAC output 2
126 VDAC_1B — Video DAC bias bit 1 (connected to the ground)
127 VDAC_VDD1 — Power supply terminal (+3.3V) (Video DAC 1)
128 VDAC_1 O VDAC output 1
129 VDAC_0B — Video DAC bias bit 0 (connected to the ground)
130 VDAC_VDD0 — Power supply terminal (+3.3V) (Video DAC 0)
131 VDAC_0 O VDAC output 0
132 VDAC_DVSS — Ground terminal (Video DAC digital system)
133 VDAC_DVDD — Power supply terminal (+3.3V) (Video DAC digital system)
134 VDAC_REFVDD — Power supply terminal (Video DAC reference)
135 VDAC_REF I Reference voltage input terminal(for Video DAC)
136 VDAC_REFVSS — Ground terminal (Video DAC reference)
137 XVSS — Ground terminal (crystal oscillator)
138 XOUT O Crystal oscillation signal output
139 XIN I Crystal oscillation signal input
140 XVDD — Power supply terminal (crystal oscillator)
141 AVSS2 — Ground terminal (analog PLL)
142 AVDD2 — Power supply terminal (+3.3V) (analog PLL)
143 AVDD1 — Power supply terminal (+3.3V) (analog PLL)
144 AVSS1 — Ground terminal (analog PLL)
145 VDD — Power supply terminal (+1.8V) (inside core)
146 GND — Ground terminal (inside core)
147 XCK O Audio system clock output
68
Page 69
Pin No. Pin Name I/O Description
148 LRCK O LRCK signal output for audio
149 BCK O BCK signal output for audio
150 DATA0(DM) O Audio data(Down Mix signal) output
151 DATA1(FLR) O Audio data(Front L/R signal) output
152 VDDP — Power supply terminal (+3.3V) (I/O signal)
153 GNDP — Ground terminal (I/O signal)
154 DATA2(SLR) O Audio data(Rear L/R signal) output
155 DATA3(CSW) O Audio data(Center/Subwoofer signal) output
156 IEC958 O S/PDIF signal (not used)
157 DAI_DATA I Data input from ADC (not used)
158 DAI_BCK I BCK signal input from ADC (not used)
159 DAI_LRCK I LRCK signal input from ADC (not used)
160 I2C_CL I/O I2C clock bus
161 I2C_DA I/O I2C data bus
162 CS(ZIVA_E2P) O Chip select signal output to the EEPROM
163 RXD1 I Serial data input for check jig
164 TXD1 O Serial data output for check jig
165 WRITE_CTRL(ZIVA_E2P) O Write control signal output to the EEPROM
166 GNDP — Ground terminal (I/O signal)
167 VDDP — Power supply terminal (+3.3V) (I/O signal)
168 SDDATA7 I SDBus data7 input
169 SDDATA6 I SDBus data6 input
170 SDDATA5 I SDBus data5 input
171 SDDATA4 I SDBus data4 input
172 GND — Ground terminal (inside core)
173 VDD — Power supply terminal (+1.8V) (inside core)
174 SDDATA3 I SDBus data3 input
175 SDDATA2 I SDBus data2 input
176 SDDATA1 I SDBus data1 input
177 SDDATA0 I SDBus data0 input
178 SDREQ O SDBus data request signal output
179 SDEN I SDBus data enable signal input
180 GNDP — Ground terminal (I/O signal)
181 VDDP — Power supply terminal (+3.3V) (I/O signal)
182 SDERROR I SDBus data error signal input
183 SDCLK I SDBus data clock input
184 HIRQ1 I Interrupt signal input from the mechanism controller
185 DRVCLK I Serial data clock input from the mechanism controller
186 DRVTX I Serial data input from the mechanism controller and the EEPROM
187 DRVRX I Serial data output to the mechanism controller and the EEPROM
188 DRVRDY O Ready signal input from the mechanism controller
189 VNW — Power supply for 5V tolerance voltage input
190 ALE O Latch enable signal output for address data demux
191 RST_SPC O Reset signal output to the mechanism controller
192 INT/EXT O Input selection signal output for SDBus or ADC (not used)
193 HCS2 O Chip select signal output for Medusa (not used)
194 HCS1 I/O Not used
195 HCS0 O Chip select signal output to the external ROM
196 VDDP — Power supply terminal (+3.3V) (I/O signal)
197 TRST I Reset signal input
HCD-NXM4D
69
Page 70

HCD-NXM4D
Pin No. Pin Name I/O Description
198 TDO O Data output
199 TDI I Data input
200 TMS I TMS signal input
201 TCK I TCK signal input
202 RESET I ZIVA reset input
203 BUS CLK I/O Not used
204 GND — Ground terminal (inside core)
205 VDD — Power supply terminal (+1.8V) (inside core)
206 HA3 I/O Address bus 3
207 HA2 I/O Address bus 2
208 GNDP — Ground terminal (I/O signal)
70
Page 71
• IC701 TMC57929PGF-RDP (DVD DECODER) (DBM07 Board)
Pin No. Pin Name I/O Description
1, 2 D5, D6 I/O Two-way data bus with CXP973064-245R
3 VSS — Ground
4D7I/O Two-way data bus with CXP973064-245R
5A0IAddress signal input from CXP973064-245R
6 VDD — Power supply (+3.3V)
7A1IAddress signal input from CXP973064-245R
8 VDD5V — Power supply (+5V)
9 to 14 A2 to A7 I Address signal input from CXP973064-245R
15 VSS — Ground
16 XWAIT O Not used
17 XRD I Read strobe signal input from CXP973064-245R
18 XWR I Write strobe signal input from CXP973064-245R
19 XCS I Chip select signal input from CXP973064-245R
20, 21 XINT0, XINT1 O Interrupt signal output to CXP973064-245R
22 VDD — Power supply (+3.3V)
23 XHRS I Not used
24 HDB7 O Stream data signal output to ZIVA5X-C2F
25 VSS — Ground
26 HDB8 O Error flag signal output to ZIVA5X-C2F
27 HDB6 O Stream data signal output to ZIVA5X-C2F
28 VDDS — Power supply (+5V)
29 HDB9 O Not used
30 HDB5 O Stream data signal output to ZIVA5X-C2F
31 HDBA O Not used
32 HDB4 O Stream data signal output to ZIVA5X-C2F
33 VSS — Ground
34 HDBB O Not used
35 HDB3 O Stream data signal output to ZIVA5X-C2F
36 VDD — Power supply (+3.3V)
37 HDBC O Not used
38 VDDS — Power supply (+5V)
39 HDB2 O Stream data signal output to ZIVA5X-C2F
40 HDBD O Not used
41 HDB1 O Stream data signal output to ZIVA5X-C2F
42 VSS — Ground
43 HDBE O Not used
44 HDB0 O Stream data signal output to ZIVA5X-C2F
45 HDBF O Not used
46 XSAK O Serial data effect flag signal output to ZIVA5X-C2F
47 VDDS — Power supply terminal (+5V) (digital system)
48 XDCK O Serial data transfer clock signal output to ZIVA5X-C2F
49 XSHD O Header flag signal (Not used)
50 VDD — Power supply (+3.3V)
51 REDY O Not used
52 VSS — Ground
53 XHAC I DVD mode: Serial data request signal input from ZIVA5X-C2F
54 HINT O Not used (Pull up)
55 XS16 O Not used (Pull up)
56 HA1 I Not used (Pull up)
57 XPDI I/O Not used (Pull up)
HCD-NXM4D
71
Page 72
HCD-NXM4D
Pin No. Pin Name I/O Description
58 VDDS — Power supply (+5V)
59, 60 HA0, HA2 I Not used (Pull up)
61 VSS — Ground (open)
62, 63 HCS0, HCS1 I Not used
64 VDD — Power supply (+3.3V)
65 DASP I/O Not used
66 to 69 MDB0 to MDB3 I/O Two-way data bus with the D-RAM
70 VSS — Ground
71 MDB4 I/O Two-way data bus with the D-RAM
72 VDD5V — Power supply (+5V)
73 to 75 MDB5 to MDB7 I/O Two-way data bus with the D-RAM
76 XMWR O Write enable signal output to the D-RAM
77 VDD — Power supply (+3.3V)
78 XRAS O Row address strobe signal output to the D-RAM
79, 80 MA0, MA1 O Address signal output to the D-RAM
81 VSS — Ground
82 to 87 MA2 to MA7 O Address signal output to the D-RAM
88 VDD — Power supply (+3.3V)
89 MA8 O Address signal output to the D-RAM
90 VSS — Ground
91 MA9/MNT0 O Address signal output to the D-RAM
92 MNT1/MNT1 O EEPROM ready signal output to CXP973064-245R
93 MNT2/MNT2 O Address signal output to the D-RAM
94 XMOE O Output enable signal output to the D-RAM
95 XCAS O Column address strobe signal output to the D-RAM
96, 97 MDB8, MDB9 I/O Two-way data bus with the D-RAM
98 VSS — Ground
99 MDBA I/O Two-way data bus with the D-RAM
100 VDD — Power supply (+3.3V)
101, 102 MDBB, MDBC I/O Two-way data bus with the D-RAM
103 VDD5V — Power supply (+5V)
104 to 106 MDBD to MDBF I/O Two-way data bus with the D-RAM
107 GFS O Guard frame sync signal output to CXP973064-245R
108 VSS — Ground
109 APEO O Absolute phase error signal output
110 VDD — Power supply (+3.3V)
111 DASYO O RF binary signal output
112 GNDA5 — Ground
113, 114 ASF1, AFS2 — Filter connected terminal for selection the constant asymmetry compensation
115 DASYI I Analog signal input after integrated from the RF binary signal
116 RFDCC I Input terminal for adjusting DC cut high-pass filter for RF signal
117 RFIN I RF signal input from the DVD/CD RF amplifier
118, 119 VCCA5, VCCA4 — Power supply (+3.3V)
120 VCOR1 — VCO oscillating range setting resistor connected
121 VCOIN I VCO input
122, 123 GNDA4, GNDA3 — Ground
124 LPF5 O Signal output from the operation amplifier from PLL loop filter
125 VC1 I Middle point voltage (+1.65V) input
126, 127 LPF2, LPF1 I Inverted signal input to the operation amplifier from PLL loop filter
72
Page 73
Pin No. Pin Name I/O Description
128, 129 VCCA3, VCCA2 — Power supply (+3.3V)
130 PDO O Signal output from the charge pump for phase comparator
131 PDHVCC I Middle point voltage input terminal for RF PLL
132 FDO O Signal output from the charge pump for frequency comparator
133, 134 GNDA2, GNDA1 — Ground
135 SPO O Spindle motor control signal output to FAN8035L
136 VC2 I Middle point voltage (+1.65V) input
137 MDIN2 I Spindle motor servo drive signal input
138 MDIN1 I MDP input
139 VCCA1 — Power supply (+3.3V)
140 CLVS O Control signal output for selection the spindle control filter constant at CLVS
141 VSS — Ground
142 MDSOUT O Frequency error output terminal of internal CLV circuit
143 VDD — Power supply (+3.3V)
144 MDPOUT O Phase error output of internal CLV circuit
145 DEFECT I Defect signal input (Not used)
146 GSCOR I Guard subcode sync (S0+S1) detection signal input from CXD3068Q
147 EXCK O Subcode serial data reading clock signal output to CXD3068Q
148 SBIN I Subcode serial data input from CXD3068Q
149 VSS — Ground
150 SCOR I Subcode sync (S0+S1) detection signal input from CXD3068Q
151 WFCK I Write frame clock signal input from CXD3068Q
152 VDD5V — Power supply (+5V)
153 XRCI I Not used (Pull down)
154 VDDS — Power supply (+5V)
155 C2PO I C2 pointer signal input from CXD3068Q
156 VDD — Power supply (+3.3V)
157 DBCK O Bit clock signal (2.8224 MHz) output (Not used)
158 BCLK I Bit clock signal (2.8224 MHz) input from CXD3068Q
159 DDAT O PCM data (Not used)
160 MDAT I Serial data input from CXD3068Q
161 VSS — Ground
162 DLRC O L/R sampling clock signal (Not used)
163 LRCK I L/R sampling clock signal (44.1 kHz) input from CXD3068Q
164 XRST I Reset signal input from CXP973064-245R “L”: reset
165 IFS0 I Not used (connected to ground)
166 IFS1 I Not used (connected to VDD)
167 XTAL I 33.8688 MHz clock signal input from SM8707GV
168 VSS — Ground
169 XTA2 O System clock output (33.8688 MHz)
170 XTA1 I System clock input (33.8688 MHz)
171 VDD — Power supply (+3.3V)
172 to 176 D0 to D4 I/O Two-way data bus with the CXP973064-245R
HCD-NXM4D
73
Page 74
HCD-NXM4D
• IC901 CXP973064-245R (MECHANISM CONTROLLER) (DBM07 Board)
Pin No. Pin Name I/O Description
1 NO_USE O Not used (open)
2 SDEN O Serial data enable signal output to SP3723CAFOPM
3
4 XRST_2753 O Not used
5SDA_EEP I/O Data bus with the EEPROM
6MNT1 I EEPROM ready signal input from TMC57929PGF-RDP
7 FCS_JMP_1 O Focus jump 1 signal output to the FAN8035L
8 FCS_JMP_2 O Focus jump 2 signal output to the FAN8035L
9 SENS_CD I Internal status (SENSE) signal input from CXD3068Q
10 CDSP2 O Not used
11 CDSP4 O Not used
12 XCS_DVD O Chip select signal output to TMC57929PGF-RDP
13 VSS — Ground
14 to 21 D0 to D7 I/O Two-way data bus with TMC57929PGF-RDP
22 INIT0_DVD I Interrupt signal input from TMC57929PGF-RDP
23 INIT1_DVD I Interrupt signal input from TMC57929PGF-RDP
24 MSCK_SAMBA O Not used
25 XRST_1882 O Reset signal output to TMC57929PGF-RDP
26 SCOR I Subcode sync (S0+S1) detection signal input from CXD3068Q
27 LAT_CD O Serial data latch pulse signal output to CXD3068Q
28 LD ON O Laser diode on/off control signal output to SP3723CAFOPM
29 MIRR I Mirror signal input from SP3723CAFOPM
30 COUT_CD I Numbers of track counted signal input from SP3723CAFOPM
31 INLIM I Detection signal input from limit in switch The optical pick-up is inner position when “H”
32 CS_ZIVA O Chip select signal output to ZIVA5X-C1F
33 SI_ZIVA I Serial data input from ZIVA5X-C1F
34 SO_ZIVA O Serial data output to ZIVA5X-C1F
35 SCK_ZIVA O Serial data transfer clock signal output to ZIVA5X-C1F
36 DRVIRQ O Interrupt request signal output to ZIVA5X-C1F
37 DRVRDY O Ready signal output to ZIVA5X-C1F
38 RST I System reset signal input from ZIVA5X-C1F
39 VSS — Ground
40 XTAL I System clock input terminal (20 MHz)
41 EXTAL O System clock output terminal (20 MHz)
42 VDD — Power supply (+3.3V)
43, 44 SLED_A, SLED_B O Sled motor drive signal output to FAN8035L
45 SCK_DSD O Clock output to TMC57929PGF-RDP
46 SDOUT_DSD O Serial data output (Not used)
47 SDIN_DSD I Serial data input (Not used)
48 READY_DSD I Ready signal input (Not used)
49 DATA_CD O Serial data output to CXD3068Q
50 CLOK_CD O Serial data transfer clock signal output to CXD3068Q
51 XMSLAT O Serial data latch pulse signal (Not used)
52 SQSO I Subcode Q data input from TMC57929PGF-RDP
53 MUTE_DSD O Muting on/off control signal (Not used)
54 SQCK O Subcode Q data reading clock signal output to TMC57929PGF-RDP
55 VSS — Ground
56 CONTROL_2 I Not used
DOCTRL/
ISBTEST
O Digital out on/off control signal output to CXD3068Q
74
Page 75
Pin No. Pin Name I/O Description
57 CONTROL_1 I Not used (open)
58 GFS_DVD I Guard frame sync signal input from TMC57929PGF-RDP
59 MUTE_CD O Muting on/off control signal output to CXD3068Q
60 MUTE_2D O Muting on/off control signal output to FAN8035L
61 SLED I Sled motor servo drive PWM signal input from CXD3068Q
62 FG I Spindle motor control signal input from SP3723CAFOPM
63 SP_ON O Muting on/off control signal output to FAN 8035L
64 JIT I Jitter signal input
65 TE I Tracking error signal input from SP3723CAFOPM
66 PI I Pull in signal input from SP3723CAFOPM
67 FE I Focus error signal input from SP3723CAFOPM
68 AVSS — Ground
69 AVREF I Reference voltage input (for A/D converter)
70 AVDD — Power supply (+3.3V) (for A/D converter)
71 GFS_CD I Guard frame sync signal input from CXD3068Q
72 SCLK_CD O SENSE serial data reading clock signal output to CXD3068Q
73 TSD-M O Thermal shut down signal output to FAN8035L
74 FOK_CD I Focus OK signal input from CXD3068Q
75 LOCK_CD I GFS is sampled by 460 Hz “H” input when GFS is “H”
76 LDSEL O Laser diode selection signal output
77 SACD/DVD O SACD/DVD selection signal output
78 I2C_SIO I/O Communication data bus input/output
79 I2C-SCL I/O Communication data reading clock signal input/output
80 RXD I Serial data input from the RS-232C (for check)
81 TXD O Serial data output to the RS-232C (for check)
82 SDCLK_RF O Serial data transfer clock signal output to SP3723CAFOPM
83 SDATA_RF I/O Two-way data bus with SP3723CAFOPM
84 XWR O Write strobe signal output to TMC57929PGF-RDP
85 XRD O Read strobe signal output to TMC57929PGF-RDP
86 (PWE) — Not used
87 VDD — Power supply (+3.3V)
88 VSS — Ground
89 to 96 A0 to A7 O Address signal output to TMC57929PGF-RDP
97 A8 O Motor/coil driver power save control signal (Not used)
98 XDRST O Reset signal output
99 WP_EEP O Write protect signal output to the EEPROM
100 CLK_EEP O Clock signal output to the EEPROM
HCD-NXM4D
75
Page 76
HCD-NXM4D
• IC401 M3062CMEN-A01FPUO (SYSTEM CONTROL) (MAIN Board)
Pin No. Pin Name I/O Description
1 M61530 CLK O Serial clock output to M61530RP
2 M61530 DATA O Serial data output to M61530RP
3 MIC IN I MIC detect signal input
4 SIRCS I Remote commander signal input
5 NO USE – Not used
6 REAR RELAY O Surround relay drive signal output
7SW RELAY O Super woofer relay drive signal output
8 BYTE I External data bus width select input (connected to ground)
9 CN VSS I Processor modes switch
10 XC-IN I Sub clock input (32.768kHz)
11 XC-OUT O Sub clock output (32.768kHz)
12 RESET I System reset input
13 X-OUT O Main system clock output (16MHz)
14 VSS – Ground
15 X-IN I Main system clock input (16MHz)
16 VCC – Power supply
17 NMI I Non-maskable interrupt input
18 RDS-INT I RDS signal input Clock signal output to the EEPROM
19 SW MUTE O Super woofer mute signal output
20 AC-CUT I AC cut-off detection signal input
21 NO USE – Not used
22 MODEL I Setting terminal for the model
23 DVD VIDEO MUTE O Video out mute signal output
24 DVD VIDEO SW O Video out mute signal output
25 DVD SYS RESET O System reset signal output
26 DVD MUTE REQ O Audio muting request signal output
27 DVD A-MUTE O Audio muting on/off control signal output
28 DVD POWER O DVD power ON/OFF signal output
29 IIC-CLK I/O Communication data reading clock signal input or transfer clock signal output
30 IIC-DATA I/O Communication data bus with CD mechanism and Fluorescent indicater
31 MP3 REQ I REQ signal input from MP3 circuit (not used)
32 REC OUT-MUTE O REC OUT mute signal output
33 CDM-MOT-POS-1 O Motor drive signal output (L/D)
34 CDM-MOT-POS-2 O Motor drive signal output (U/D)
35 CDM-MAIN-SW-CLS I Detection signal input from disc tray close detect main switch
36 CDM-SUB-SW-OPN I Detection signal input from disc tray open detect sub switch
37 CDM-ENC-A-1 I Detection signal input from the disc tray address detect rotary encoder
38 CDM-ENC-A-3 I Detection signal input from the disc tray address detect rotary encoder
39 CDM-ENC-B-1 I Detection signal input from the disc tray address detect rotary encoder
40 CDM-ENC-B-3 I Detection signal input from the disc tray address detect rotary encoder
41 CDM-ENC-B-2 I Detection signal input from the disc tray address detect rotary encoder
42 CDM-ENC-B-0 I Detection signal input from the disc tray address detect rotary encoder
43 CDM-ENC-A-2 I Detection signal input from the disc tray address detect rotary encoder
44 CDM-ENC-A-0 I Detection signal input from the disc tray address detect rotary encoder
45 CDM-SUB-SW-CLS I Detection signal input from disc tray close detect sub switch
46 CDM-MAIN-SW-OPN I Detection signal input from disc tray open detect main switch
47 CDM-MOT-NEG-2 O Motor drive signal output (U/D)
48 CDM-MOT-NEG-1 O Motor drive signal output (L/D)
49 RDS-DATA I RDS data input (connected to ground)
50 ST-MUTE O Tuner muting control signal output to tuner unit
76
Page 77
Pin No. Pin Name I/O Description
51 TUNED IN I Tuning detecton signal input from tuner unit
52 ST-CE O PLL chip enable signal output to tuner unit
53 ST-DOUT O PLL serial data output to tuner unit
54 ST-DIN I PLL serial data input from tuner unit
55 ST-CLK O PLL serial transfer clock signal output to tuner unit
56 TA-MUTE O Tuner line mute signal output (H:mute on)
57 STK-MUTE O Power amplifier muting on/off selection signal output
58 FRONT-RELAY O Relay drive signal output for speaker protect
59 BIAS O Recording bias on/off selection signal output
60 REC/PB O Recording/playback selection signal output
61 TC-LINE-MUTE O Line mute on/off selection signal output
62 VCC – Power supply
63 TC-REC-MUTE O Recording muting on/off selection signal output
64 VSS – Ground
65 STBY-RELAY O Main power on/off control signal output
66 IO-EXP:CLK O Serial data transfer output to PT8300R
67 IO-EXP:LAT O Serial data latch pulse output to PT8300R
68 IO-EXP DATA IN I Serial data input from PT8300R
69 IO-EXP DATA OUT O Serial data output to PT8300R
70 VOL-A I Jog dial pulse input from the rotary encoder (Volume)
71 VOL-B I Jog dial pulse input from the rotary encoder (Volume)
72 LED-STANDBY O Standby signal output to the LED driver
73 DISPLAY KEY I Display key input signal
74 POWER KEY I Power key input sigal
75 DISC-SENS I Disc status detection signal input
76 JOG 1-A I Jog dial pulse input from the rotary encoder (Bass)
77 JOG 1-B I Jog dial pulse input from the rotary encoder (Bass)
78 JOG 2-A I Jog dial pulse input from the rotary encoder (Treble)
79 JOG 2-B I Jog dial pulse input from the rotary encoder (Treble)
80 AMP-DATA O Serial data output to M61537FP
81 AMP-CLK O Serial clock output to M61537FP
82 FL-RESET O Reset signal output to M66005-0131AHPROT
83 FL-CS O Chip select signal output to M66005-0131AHPROT
84 FL-CLK O Serial clock output to M66005-0131AHPROT
85 FL-DATA O Serial data output to M66005-0131AHPROT
86 CAMP-CNT1 O Capstan motor drive signal output
87 A TRG O Deck-A side trigger plunger drive signal output
88 B TRG O Deck-B side trigger plunger drive signal output
89 A SHUT I Shut off detection signal input from the deck-A side reel pulse detector
90 B SHUT I Shut off detection signal input from the deck-B side reel pulse detector
91 B HALF I Detection input from the deck-B half detect switch
92 SPEC-IN I Setting terminal for the version
93 MAIN-TRANS-CUT I Main transformer cut detect signal input
94 AD-KEY 2 I AD key 2 signal input
95 AD-KEY 1 I AD key 1 signal input
96 AVSS – Ground
97 VACS IN I VACS signal input
98 VREF I Reference voltage input
99 AVCC – Analog power supply
100 AMS-IN I Automatic music sensor signal input
HCD-NXM4D
77
Page 78
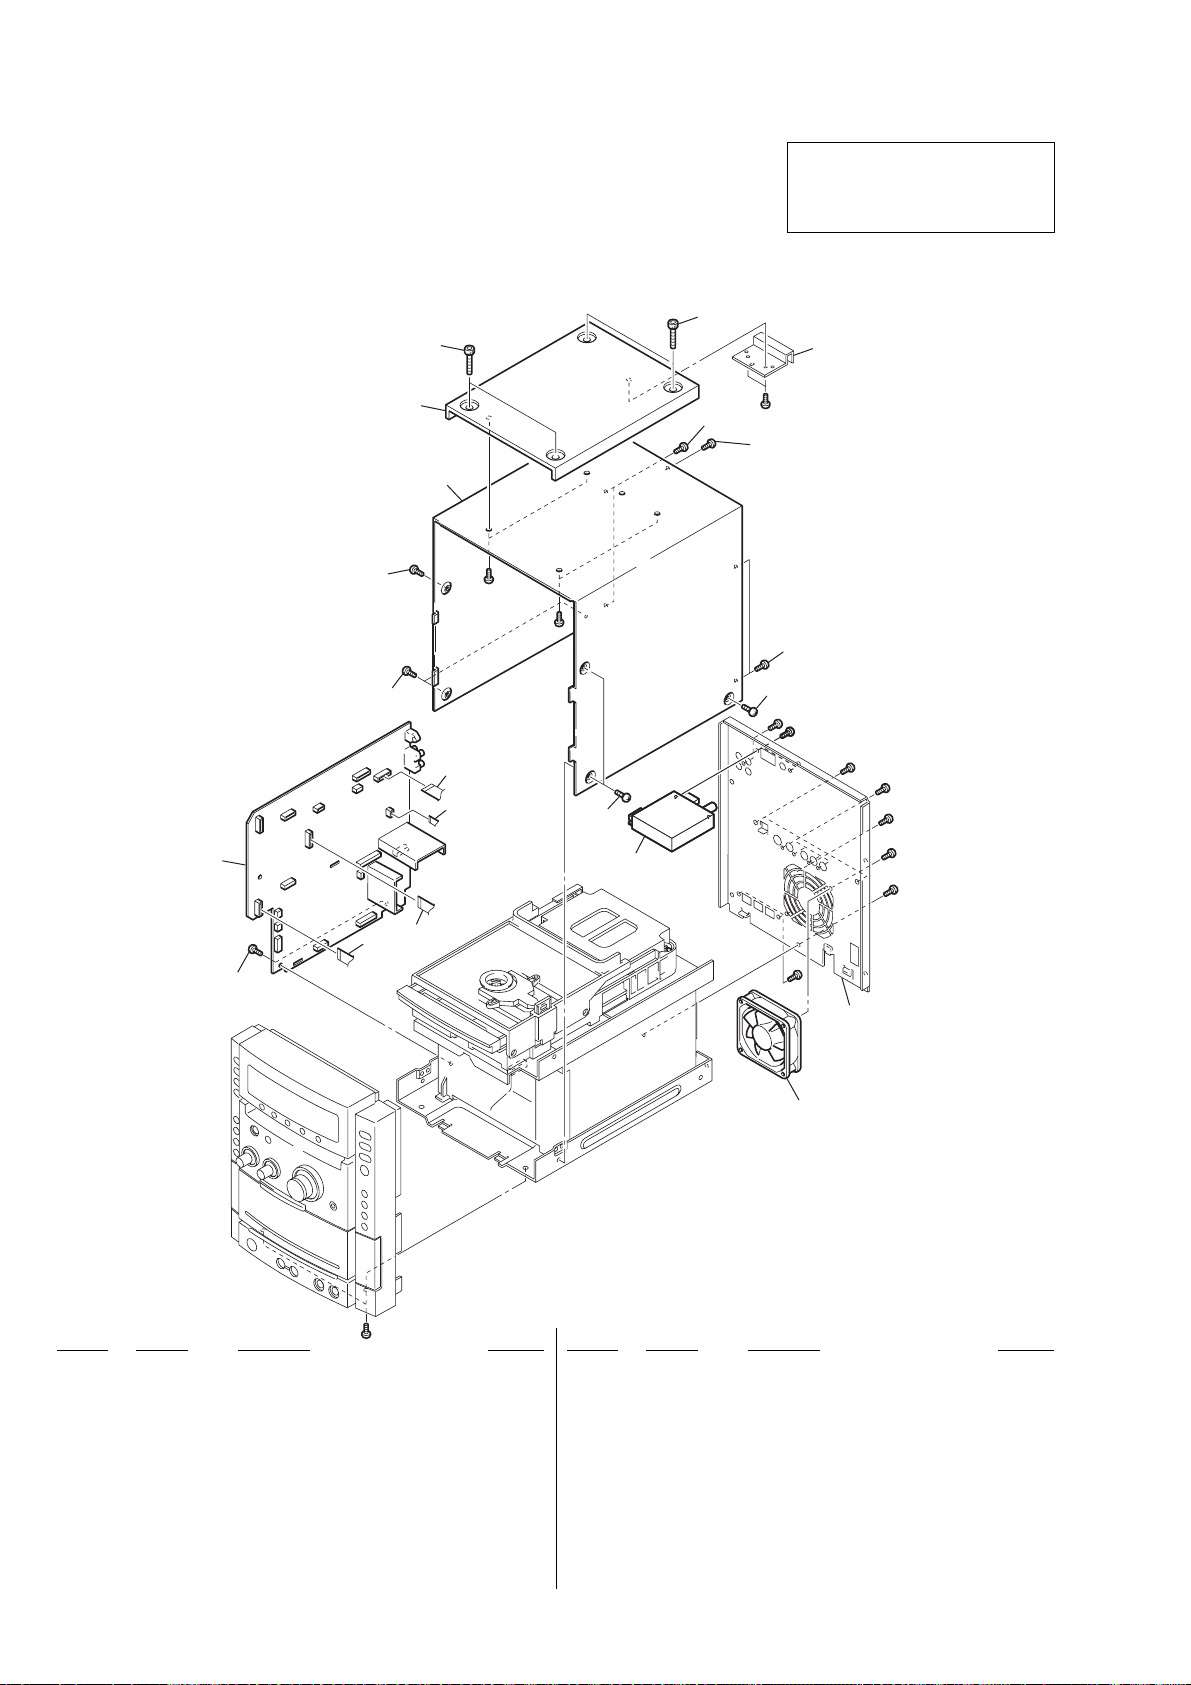
HCD-NXM4D
d
Ver. 1.2
NOTE:
• -XX, -X mean standardized parts, so they may
have some differences from the original one.
• Items marked “*” are not stocked since they
are seldom required for routine service. Some
delay should be anticipated when ordering these
items.
• The mechanical parts with no reference number
in the exploded views are not supplied.
8-1. CASE, REAR PANEL SECTION
SECTION 8
EXPLODED VIEWS
• Abbreviation
E2 : 120 V AC Area in E model
E3 : 240 V AC Area in E model
E15 : Iran model
EA : Saudi Arabia model
SP : Singapore model
MY : Malaysia model
AUS : Australian model
TH : Thai model
11
The components identified by mark 0 or
dotted line with mark 0 are critical for
safety.
Replace only with part number specified.
11
not supplied
10
#1
2
2
9
7
#1
#1
2
7
6
5
1
4
3
7
12
2
7
#1
#1
#1
#1
#1
#1
#1
#1
not supplie
Ref. No. Part No. Description Remarks
1 A-1063-570-A MAIN BOARD, COMPLETE (TH)
1 A-1063-678-A MAIN BOARD, COMPLETE (E3)
1 A-1063-681-A MAIN BOARD, COMPLETE (E15)
1 A-4752-308-A MAIN BOARD, COMPLETE (SP, MY)
1 A-4752-374-A MAIN BOARD, COMPLETE (EA)
1 A-4752-526-A MAIN BOARD, COMPLETE (AUS)
1 A-4752-532-A MAIN BOARD, COMPLETE (E2)
2 3-970-608-01 SUMITITE (B3), +BV
3 1-769-984-11 WIRE (FLAT TYPE) (13 CORE) (EXCEPT TH)
4 1-765-333-11 WIRE (FLAT TYPE) (15 CORE) (EXCEPT TH)
#2
78
M961
Ref. No. Part No. Description Remarks
5 1-769-872-11 WIRE (FLAT TYPE) (5 CORE) (EXCEPT TH)
6 1-769-939-11 WIRE (FLAT TYPE) (11 CORE) (EXCEPT TH)
7 3-363-099-22 SCREW (CASE 3 TP2)
9 4-252-541-31 CASE
10 4-252-538-11 PANEL, TOP
11 4-232-226-01 SCREW, HEXAGON SOCKET TAPPING
12 1-693-603-31 TUNER (FM/AM)
M961 1-787-099-11 FAN, DC
#1 7-685-646-79 SCREW +BVTP 3X8 TYPE2 IT-3
Page 79
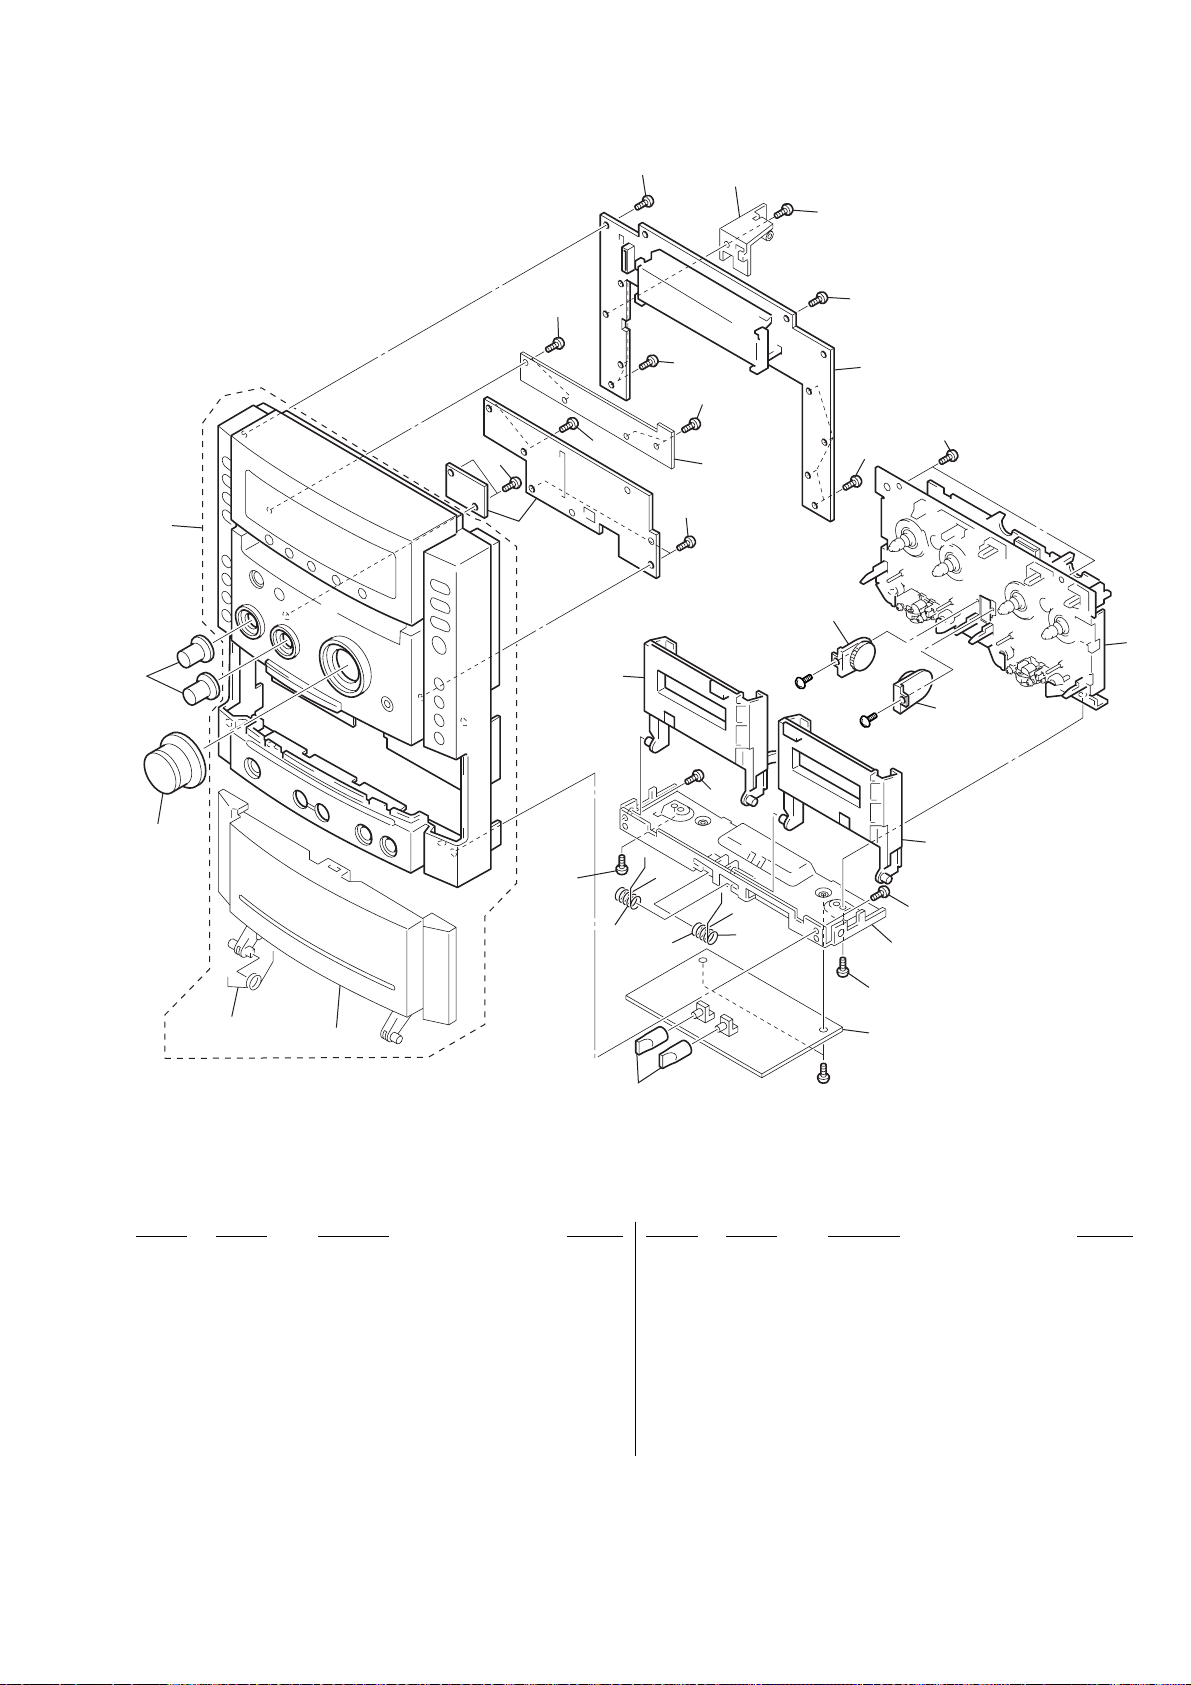
HCD-NXM4D
Ver. 1.2
8-2. FRONT PANEL SECTION
53
52
57
56
57
57
60
57
not supplied
57
57
not supplied
57
#2
57
54
57
57
58
57
59
54
#2
57
51
61
55
57
62
63
not supplied
55
not supplied
not supplied
64
Ref. No. Part No. Description Remarks Ref. No. Part No. Description Remarks
51 4-252-535-11 KNOB (VOL)
52 4-252-536-01 KNOB (B/T)
53 X-4956-321-1 PANEL ASSY, FRONT
54 4-215-062-01 DAMPER
55 4-240-965-01 SCREW 2.6X3 +P, S-TITE
56 A-1063-580-A VOL BOARD, COMPLETE (TH)
56 A-4752-315-A VOL BOARD, COMPLETE (EXCEPT TH)
57 4-951-620-01 SCREW (2.6X8), +BVTP
58 A-1063-578-A FL BOARD, COMPLETE (TH)
58 A-4752-675-A FL BOARD, COMPLETE (EXCEPT TH)
59 1-796-880-11 DECK, MECHANISM (W)
60 X-4956-197-1 HOLDER (A) (TC) ASSY
61 X-4956-198-1 HOLDER (B) (TC) ASSY
62 4-252-529-01 SPRING (HA)
63 4-252-530-01 SPRING (HB)
64 4-238-628-21 MIC KNOB
#1 7-685-646-79 SCREW +BVTP 3X8 TYPE2 IT-3
#2 7-685-853-04 SCREW +BVTT 2X6 (S)
not supplied
#1
79
Page 80
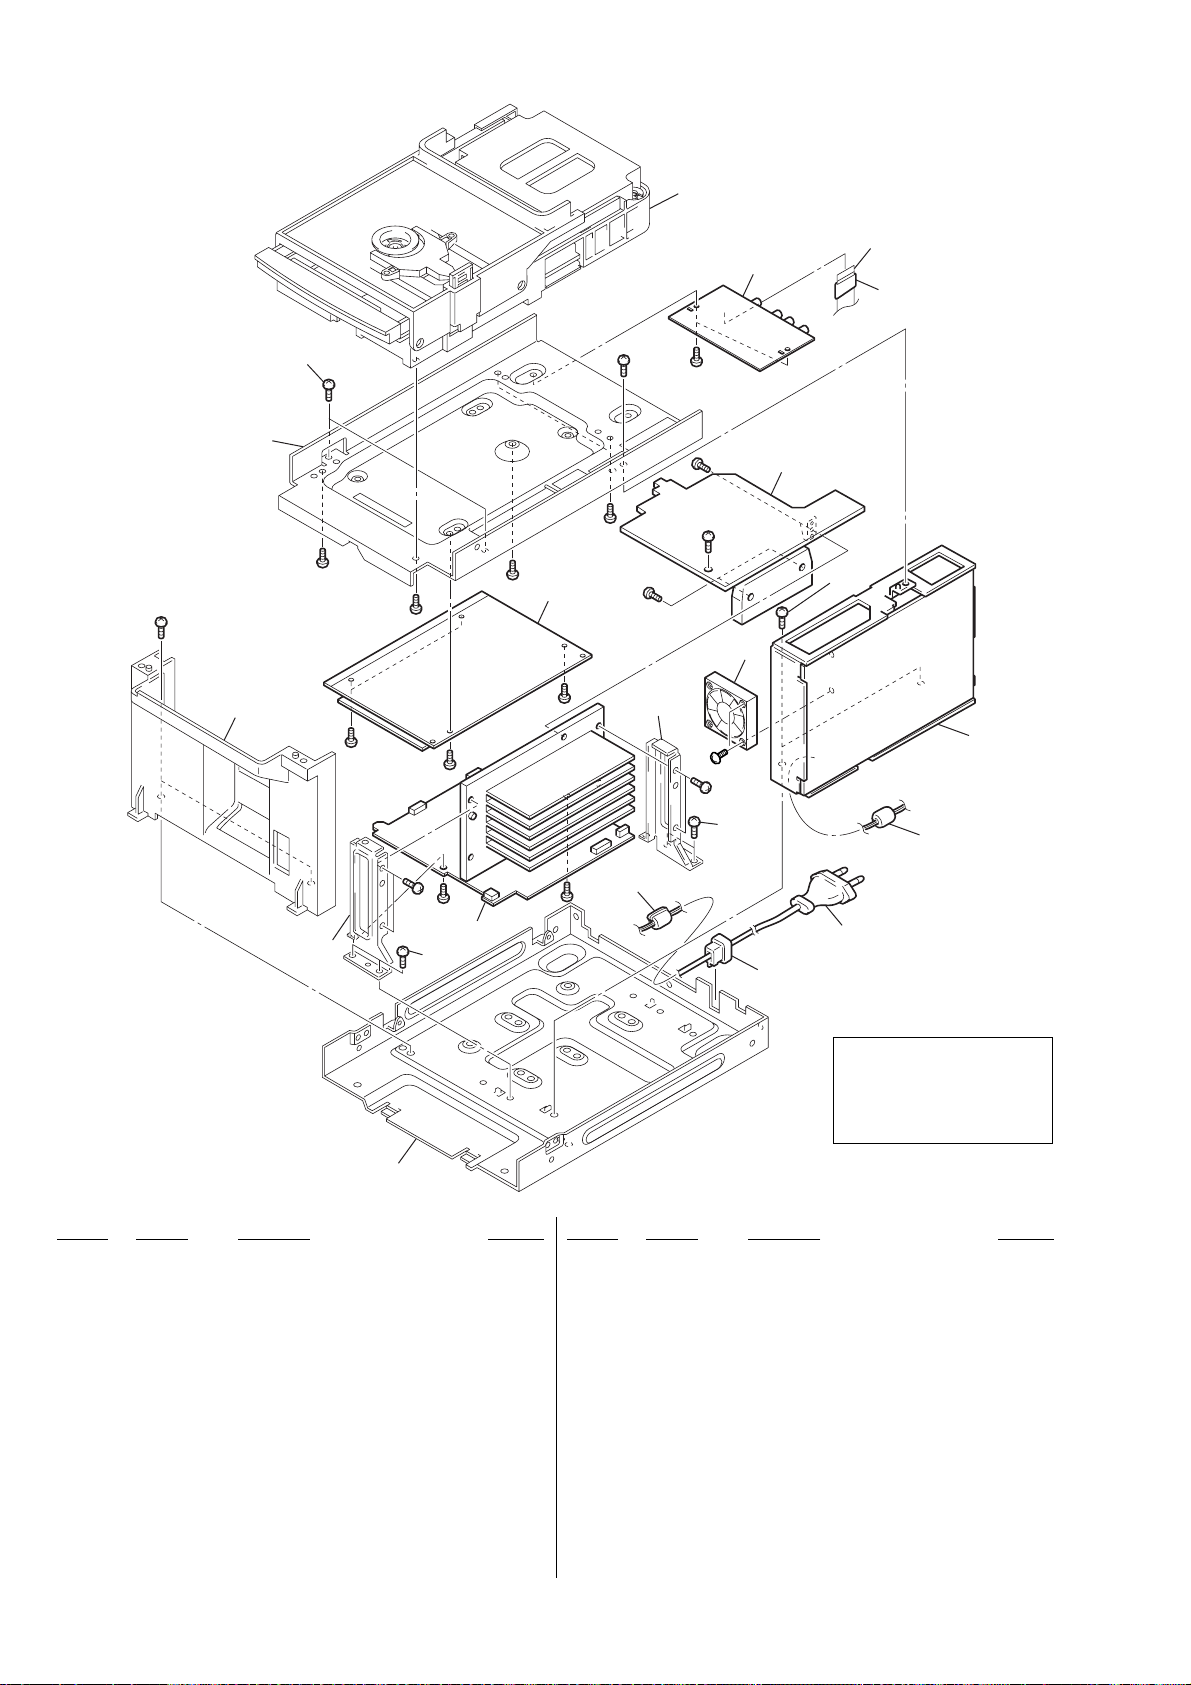
HCD-NXM4D
8-3. CHASSIS SECTION
CDM81A-DVBU60
not supplied
106
111
#1
not supplied
not supplied
not supplied
108
#1
#1
#1
#1
#1
#1
108
101
#1
105
#1
#1
not supplied
#1
#1
#1
109
#1
#1
#1
#1
M962
#9
108
107
108
102
110
103
104
not supplied
Ref. No. Part No. Description Remarks
101 A-1063-581-A FRONT AMP BOARD, COMPLETE (TH)
101 A-4752-316-A FRONT AMP BOARD, COMPLETE
(E3, E15, SP, MY)
101 A-4752-377-A FRONT AMP BOARD, COMPLETE (EA)
101 A-4752-529-A FRONT AMP BOARD, COMPLETE (AUS)
101 A-4752-535-A FRONT AMP BOARD, COMPLETE (E2)
0 102 1-468-817-11 REGULATOR, SWITCHING
0 103 1-775-786-21 CORD, POWER (EA)
0 103 1-775-790-22 CORD, POWER (AUS)
0 103 1-777-071-53 CORD, POWER (SP, MY)
0 103 1-824-818-11 CORD, POWER (WITH CONNECTOR) (TH)
0 103 1-827-226-11 CORD, POWER (E2, E3, E15)
* 104 3-703-244-00 BUSHING (2104), CORD (EA, TH, AUS, SP, MY)
104 3-703-571-11 BUSHING (S) (4516), CORD (E2, E3, E15)
The components identified by
mark 0 or dotted line with mark
0 are critical for safety.
Replace only with part number
specified.
Ref. No. Part No. Description Remarks
105 A-1063-595-A DMB07 BOARD, COMPLETE (TH)
105 A-4752-324-A DMB07 BOARD, COMPLETE (EXCEPT TH)
106 A-1063-575-A VIDEO BOARD, COMPLETE (TH)
106 A-4752-312-A VIDEO BOARD, COMPLETE (EXCEPT TH)
107 A-1063-586-A SUR AMP BOARD, COMPLETE (TH)
107 A-4752-320-A SUR AMP BOARD, COMPLETE (EXCEPT TH)
108 3-970-608-01 SUMITITE (B3), +BV
109 1-500-497-11 FILTER, CLAMP (FERRITE CORE)
110 1-543-830-11 CLAMP, SLEEVE FERRITE
111 1-500-657-11 CORE, FERRITE
M962 1-787-021-11 FAN, DC
#1 7-685-646-79 SCREW +BVTP 3X8 TYPE2 IT-3
#9 7-685-647-79 SCREW +BVTP 3X10 TYPE2
80
Page 81
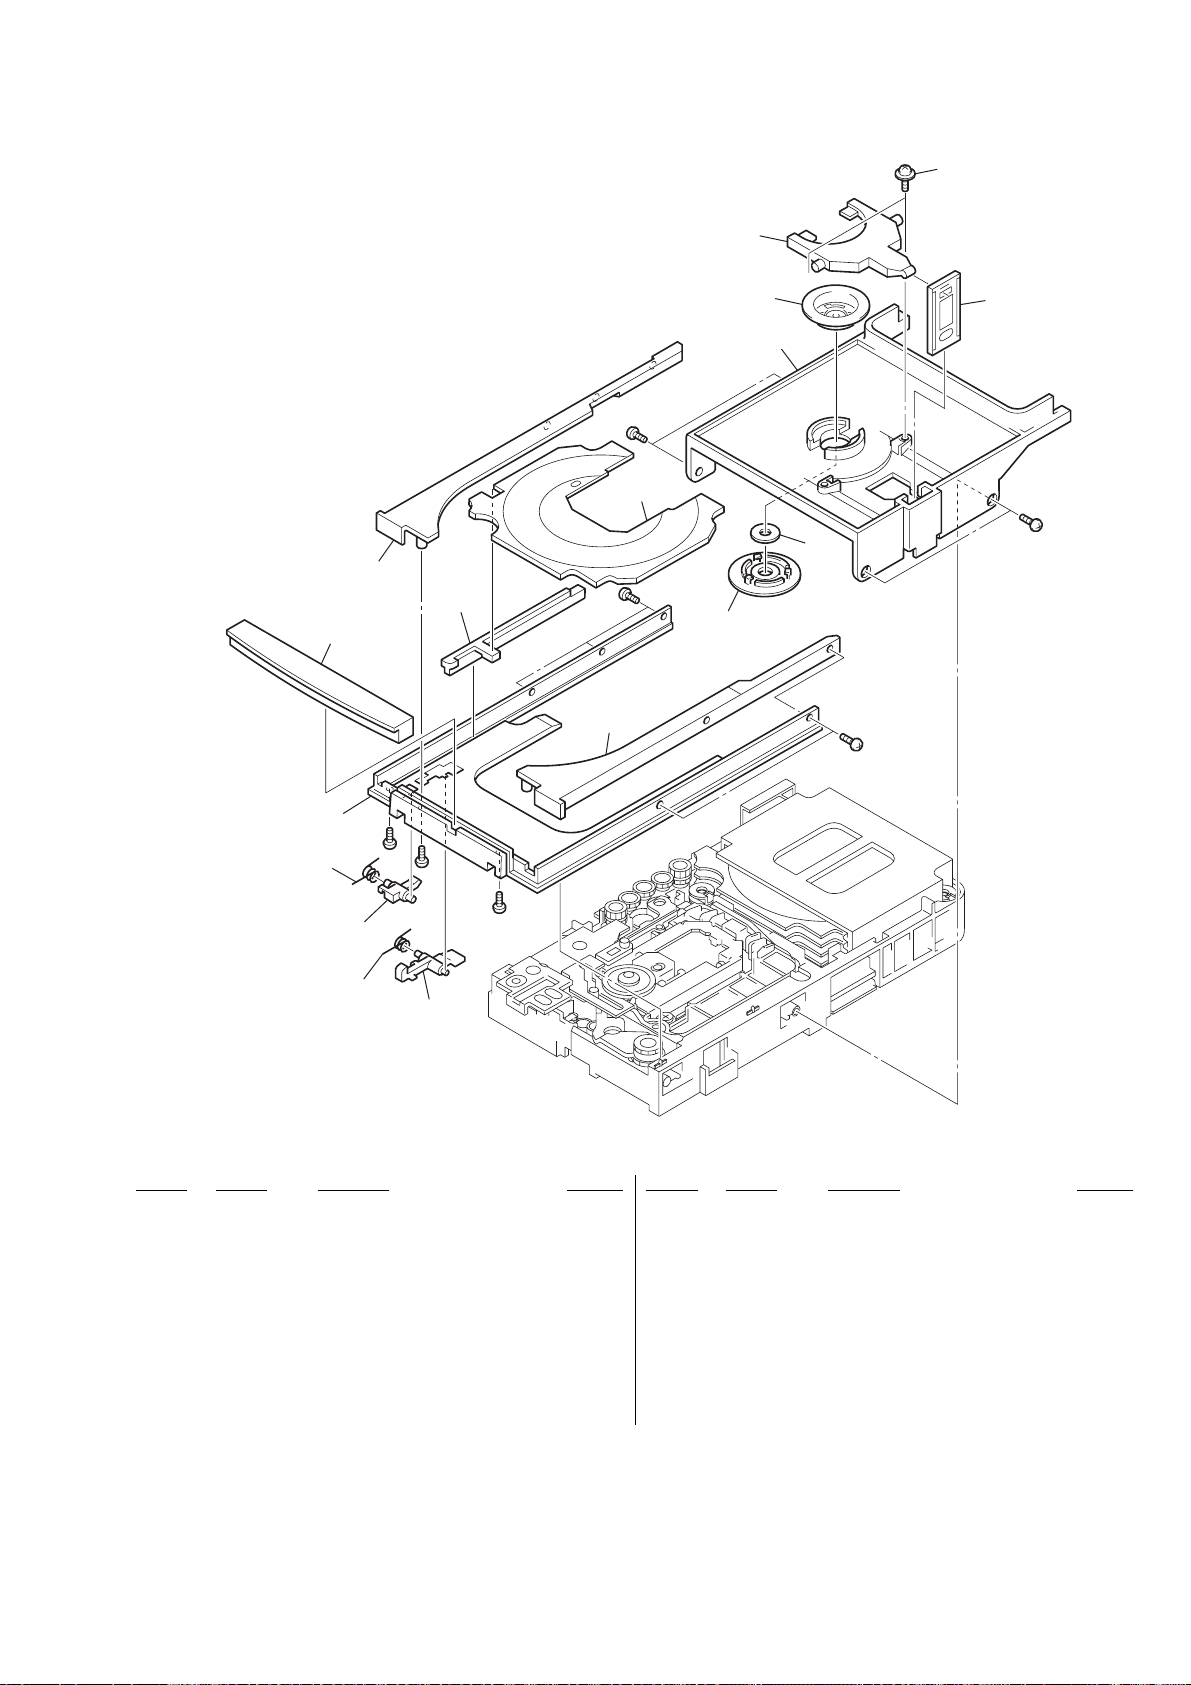
HCD-NXM4D
8-4. DVD MECHANISM DECK SECTION-1
(CDM81A-DVBU60)
159
158
156
#5
157
#3
160
165
161
164
163
162
166
167
#3
#5
155
#5
152
151
#3
#3
154
153
Ref. No. Part No. Description Remarks Ref. No. Part No. Description Remarks
151 4-251-849-01 LEVER (SW2)
152 4-251-991-01 SPRING (SW2), TORSION
153 4-251-860-01 LEVER (LOCK)
154 4-251-867-01 SPRING (LOCK), TORSION
155 4-251-828-01 TRAY (MAIN)
156 4-252-533-11 PANEL, LOADING
157 4-251-857-01 COVER (R)
158 4-251-830-01 SLIDER (ST)
159 4-251-858-01 COVER (L)
160 4-251-829-02 TRAY (SUB)
161 X-4954-450-1 PULLEY (240) ASSY
162 3-053-844-01 YOKE
163 4-251-821-02 BRACKET (TOP)
164 4-233-594-01 PULLEY (B) (DVD), CHUCKING
165 4-251-824-01 LIFTER
166 4-985-672-01 SCREW (+PTPWHM2.6), FLOATING
167 4-251-822-01 JOINT (LIFTER)
#3 7-685-534-19 SCREW +BTP 2.6X8 TYPE2 N-S
#5 7-685-102-19 SCREW +P 2X4 NON-SLIT TYPE 2
81
Page 82
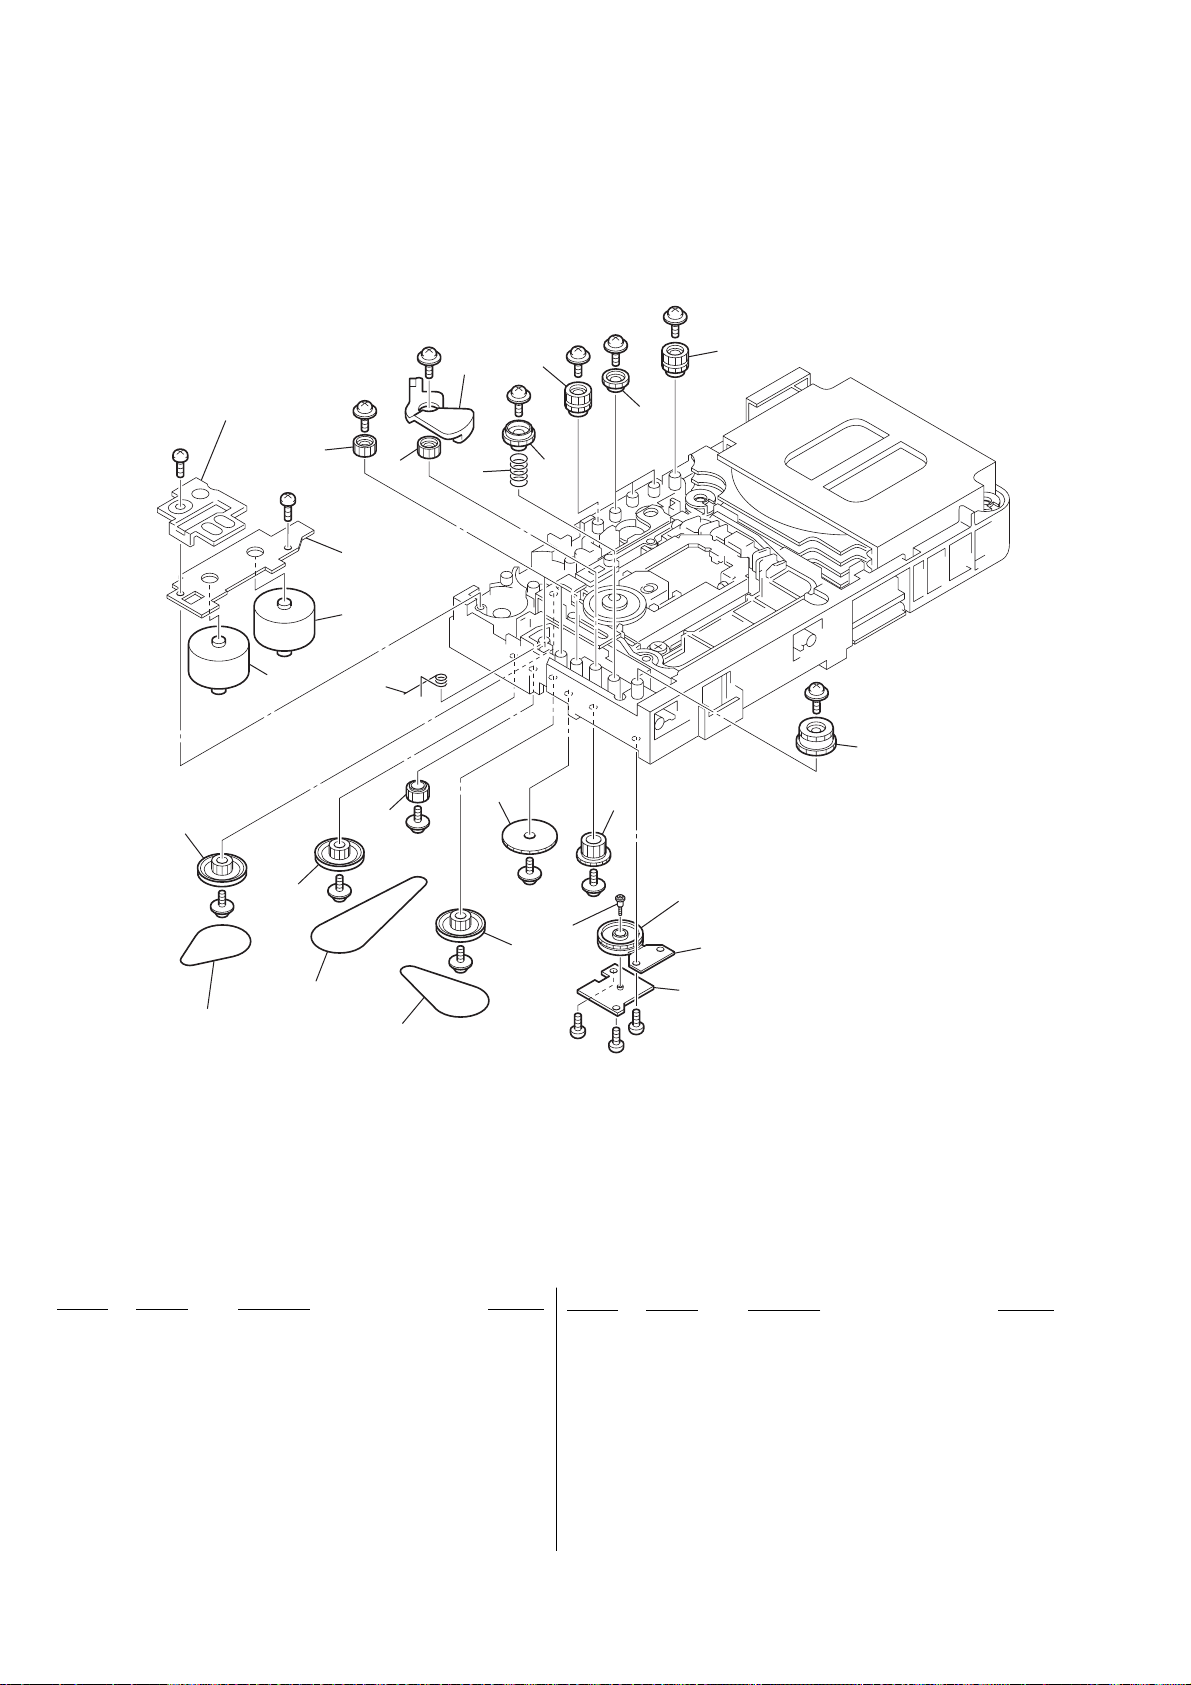
HCD-NXM4D
8-5. DVD MECHANISM DECK SECTION-2
(CDM81A-DVBU60)
#4
209
#4
not supplied
#4
214
#4
#4
#4
214
203
#3
208
#4
201
M762
208
203
#3
#4
202
203
not supplied
M761
206
212
207
#4
204
213
#4
#4
208
215
205
#3
#4
#4
210
211
S771
not supplied
not supplied
#3
#3
Ref. No. Part No. Description Remarks
201 4-251-870-01 BELT (BU)
202 4-251-869-01 BELT (MAIN TRAY)
203 4-251-841-01 GEAR (SUB TRAY 1)
204 4-251-873-01 SPRING (MODE), COMPRESSION
205 4-239-618-02 SCREW (+PWH, 2X6), STEP TAPPING
206 4-251-872-01 SPRING (LEVER), TORSION
207 4-251-868-01 BELT (SUB TRAY)
208 4-251-853-01 PULLEY (BU)
209 4-251-834-01 LEVER (MAIN TRAY)
210 4-251-852-01 GEAR (MAIN TRAY 3)
82
Ref. No. Part No. Description Remarks
211 4-251-854-01 GEAR (BU1)
212 4-251-850-01 GEAR (MAIN TRAY 1)
213 4-251-856-01 GEAR (BU2)
214 4-251-842-01 GEAR (SUB TRAY 2)
215 4-251-851-01 GEAR (MAIN TRAY 2)
M761 A-4713-174-A MOTOR (81) ASSY (LD/ST MOTOR)
M762 A-4713-174-A MOTOR (81) ASSY (BU U/D MOTOR)
S771 1-478-552-11 ENCODER, ROTARY
#3 7-685-534-19 SCREW +BTP 2.6X8 TYPE2 N-S
#4 7-685-902-21 SCREW +PTPWH 2.6X8 (TYPE2)
Page 83
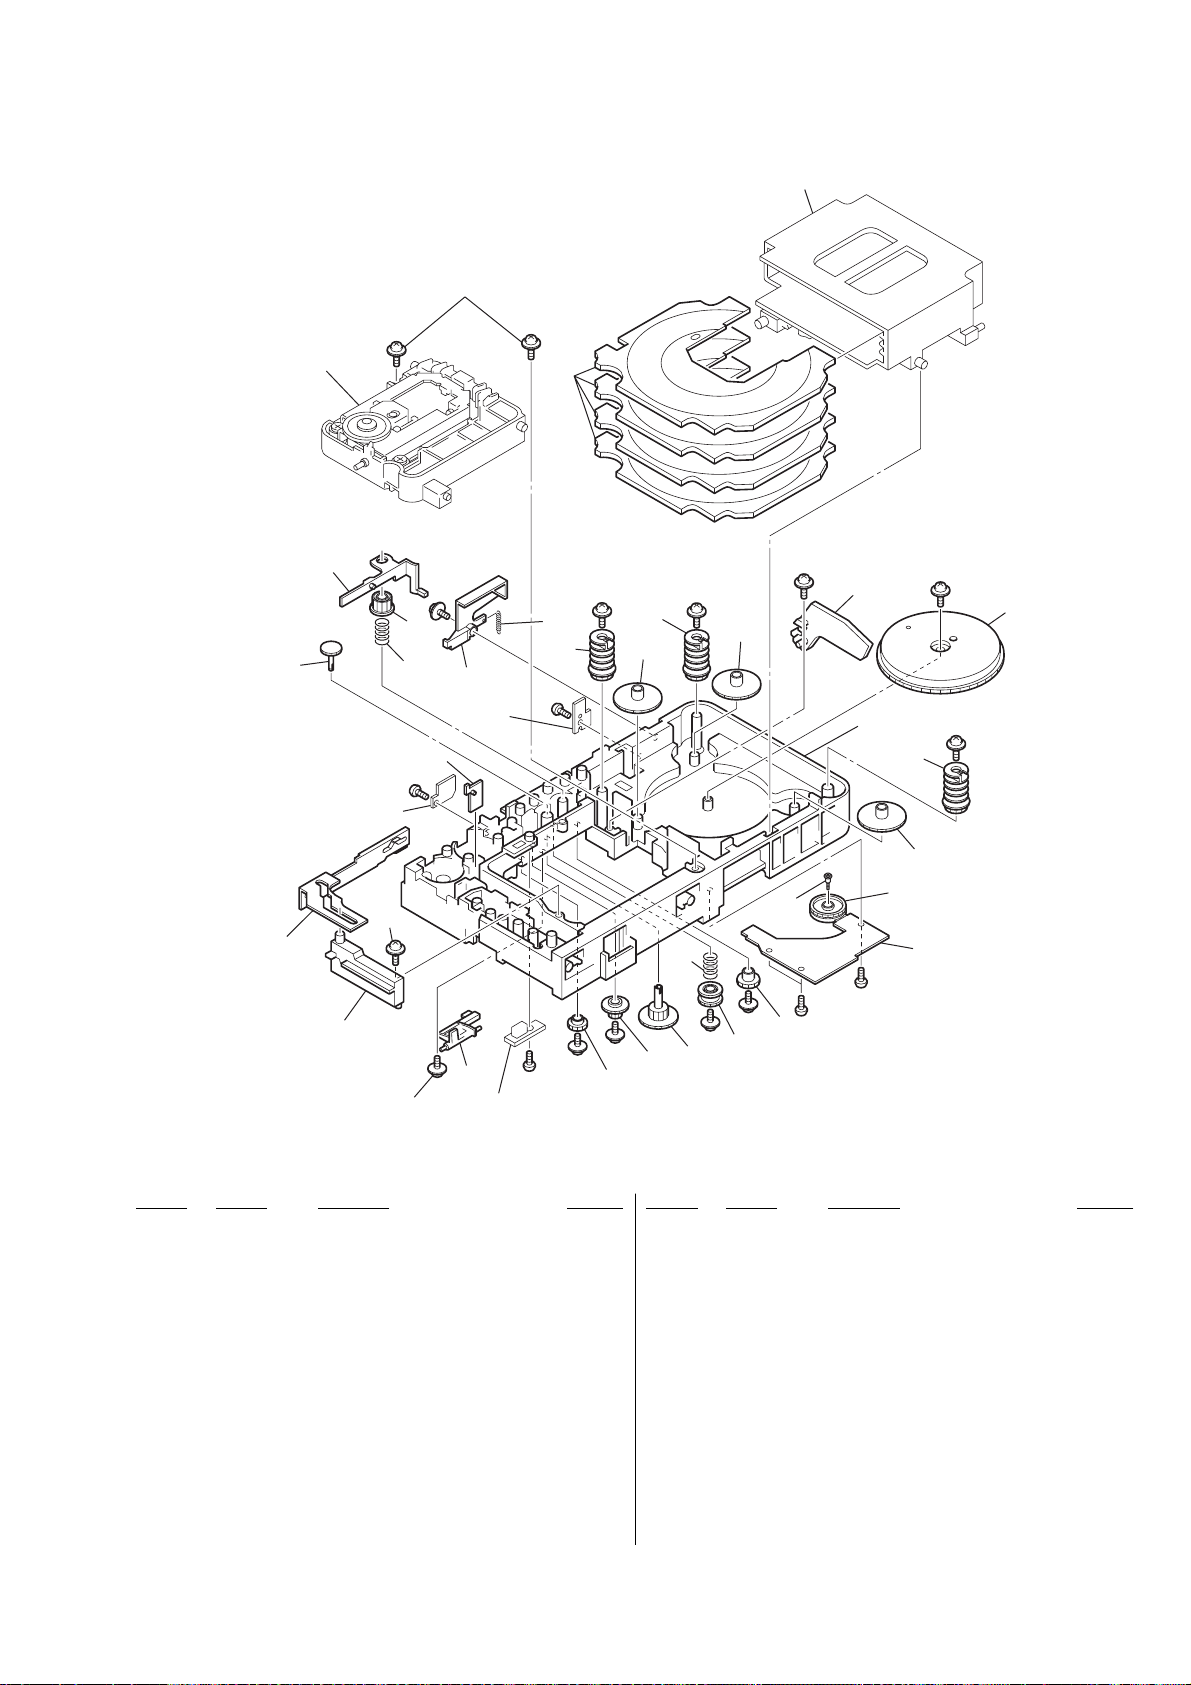
8-6. DVD MECHANISM DECK SECTION-3
(CDM81A-DVBU60)
251
HCD-NXM4D
not supplied
DVBU60
273
258
256
not supplied
268
#3
251
251
272
252
257
#4
270
not supplied
269
not supplied
#3
261
253
262
#3
#4
#4
#4
272
262
263
254
252
#4
#4
260
263
#4
271
267
255
#4
#3
259
265
#3
#4
264
#4
262
263
S781
266
Ref. No. Part No. Description Remarks Ref. No. Part No. Description Remarks
251 4-985-672-01 SCREW (+PTPWHM2.6), FLOATING
252 4-251-873-01 SPRING (MODE), COMPRESSION
253 4-251-874-02 SPRING (SW), TENSION
254 4-251-844-01 GEAR (SS2)
255 4-251-835-01 GEAR (STOCKER 1)
256 4-251-833-01 LEVER (SUB TRAY)
257 4-251-843-01 LEVER (RELEASE)
258 4-251-831-02 LEVER (MODE)
259 4-251-862-01 SHUTTER (TRAY)
260 4-251-845-01 GEAR (SS3)
261 4-251-829-02 TRAY (SUB)
262 4-251-827-01 CAM (STOCKER)
263 4-251-836-01 GEAR (STOCKER 2)
264 4-251-838-01 GEAR (STOCKER 3)
265 4-251-823-01 CHASSIS (CDM81)
266 A-4750-232-A RELAY BOARD, COMPLETE
267 4-239-618-02 SCREW (+PWH, 2X6), STEP TAPPING
268 4-251-825-01 CAM (BU)
269 4-251-832-01 LEVER (STOCKER)
270 4-251-861-01 LEVER (SW)
271 4-251-839-01 GEAR (STOCKER 4)
272 4-251-840-01 GEAR (SUB TRAY)
273 4-251-847-01 GEAR (SS4)
S781 1-478-551-11 ENCODER, ROTARY
#3 7-685-534-19 SCREW +BTP 2.6X8 TYPE2 N-S
#4 7-685-902-21 SCREW +PTPWH 2.6X8 (TYPE2)
83
Page 84
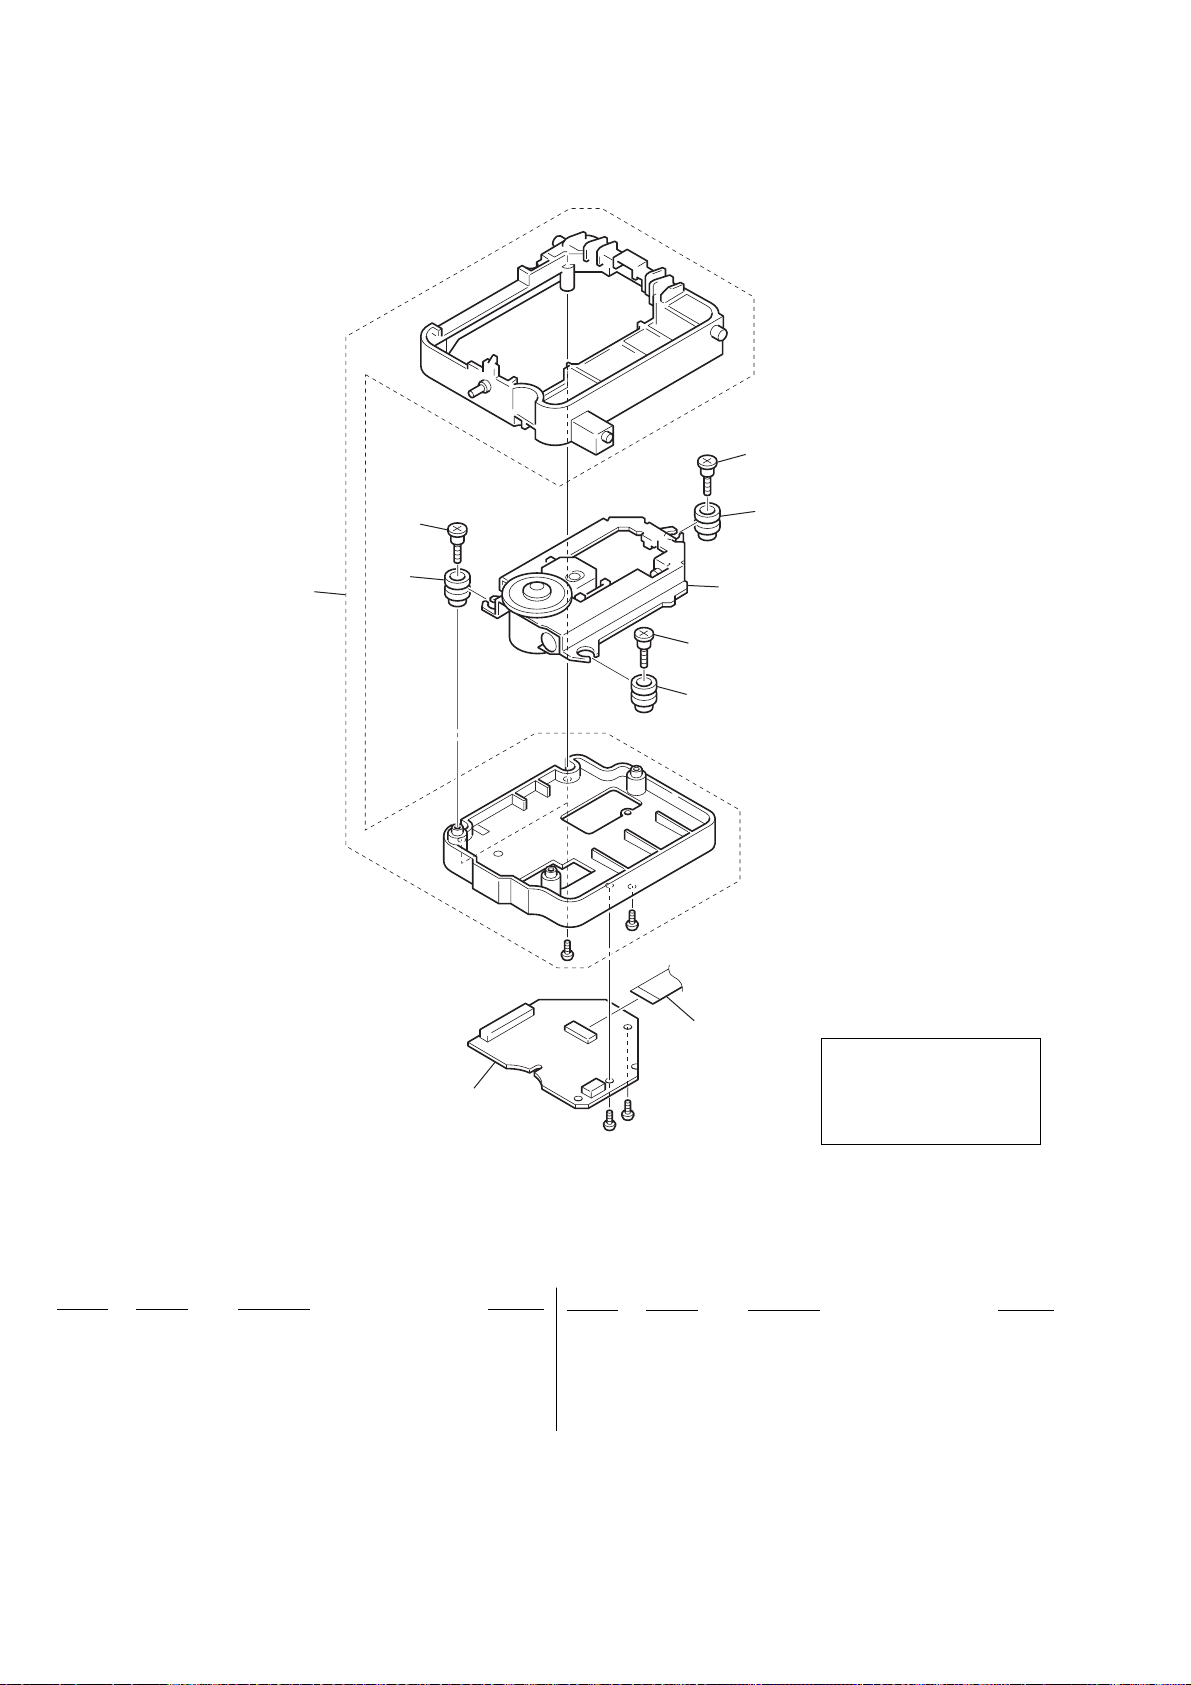
HCD-NXM4D
8-7. BASE UNIT (DVBU60)
304
301
304
303
306
#3
#8
#8
303
302
304
303
#3
305
The components identified by
mark 0 or dotted line with mark
0 are critical for safety.
Replace only with part number
specified.
Ref. No. Part No. Description Remarks
301 X-4956-103-1 HOLDER (DBU1) ASSY
0 302 A-1067-676-A OPTICAL PICK-UP SERVICE ASSY, DBU-3
303 3-057-023-11 INSULATOR (RB)
304 4-981-923-01 SCREW (M), STEP
305 1-824-106-12 CABLE, FLEXIBLE FLAT (24 CORE)
84
Ref. No. Part No. Description Remarks
306 A-4728-690-A RF BOARD, COMPLETE
#3 7-685-534-19 SCREW +BTP 2.6X8 TYPE2 N-S
#8 7-685-533-19 SCREW +BTP 2.6X6 TYPE2 N-S
Page 85
HCD-NXM4D
SECTION 9
ELECTRICAL PARTS LIST
NOTE:
• Due to standardization, replacements in the
parts list may be different from the parts
specified in the diagrams or the components
used on the set.
• -XX, -X mean standardized parts, so they
may have some difference from the original
one.
• Items marked “*” are not stocked since they
are seldom required for routine service.
Some delay should be anticipated when
ordering these items.
• CAPACITORS:
uF: µF
• RESISTORS
All resistors are in ohms.
METAL: metal-film resistor
METAL OXIDE: Metal Oxide-film resistor
F: nonflammable
Ref. No. Part No. Description Remarks Ref. No. Part No. Description Remarks
DISC SW BOARD
• COILS
uH: µH
•SEMICONDUCTORS
In each case, u: µ, for example:
uA...: µA... , uPA... , µPA... ,
uPB... , µPB... , uPC... , µPC... ,
uPD..., µPD...
• Abbreviation
E2 : 120 V AC Area in E model
E3 : 240 V AC Area in E model
E15 : Iran model
EA : Saudi Arabia model
SP : Singapore model
MY : Malaysia model
AUS : Australian model
TH : Thai model
DISC SW
The components identified by mark 0
or dotted line with mark 0 are critical
for safety.
Replace only with part number specified.
When indicating parts by reference
number, please include the board.
< SWITCH >
************
S1001 1-762-875-21 SWITCH, KEYBOARD (DISC 1)
< CAPACITOR >
C1001 1-107-726-91 CERAMIC CHIP 0.01uF 10% 16V
C1002 1-107-726-91 CERAMIC CHIP 0.01uF 10% 16V
C1003 1-107-726-91 CERAMIC CHIP 0.01uF 10% 16V
C1004 1-107-726-91 CERAMIC CHIP 0.01uF 10% 16V
C1005 1-107-726-91 CERAMIC CHIP 0.01uF 10% 16V
C1009 1-164-156-11 CERAMIC CHIP 0.1uF 25V
S1002 1-762-875-21 SWITCH, KEYBOARD (DISC 2)
S1003 1-762-875-21 SWITCH, KEYBOARD (DISC 3)
S1004 1-762-875-21 SWITCH, KEYBOARD (DISC 4)
S1005 1-762-875-21 SWITCH, KEYBOARD (DISC 5)
******************************************************
A-1063-595-A DMB07 BOARD, COMPLETE (TH)
A-4752-324-A DMB07 BOARD, COMPLETE (EXCEPT TH)
********************
DMB07
< DIODE >
D1001 6-500-327-01 DIODE SEL5E23C-STP15 (DISC 1)
D1002 6-500-327-01 DIODE SEL5E23C-STP15 (DISC 2)
D1003 6-500-327-01 DIODE SEL5E23C-STP15 (DISC 3)
D1004 6-500-327-01 DIODE SEL5E23C-STP15 (DISC 4)
D1005 6-500-327-01 DIODE SEL5E23C-STP15 (DISC 5)
< TRANSISTOR >
Q1001 8-729-027-43 TRANSISTOR DTC114EKA-T146
Q1002 8-729-027-43 TRANSISTOR DTC114EKA-T146
Q1003 8-729-027-43 TRANSISTOR DTC114EKA-T146
Q1004 8-729-027-43 TRANSISTOR DTC114EKA-T146
Q1005 8-729-027-43 TRANSISTOR DTC114EKA-T146
< RESISTOR >
R1001 1-216-821-11 METAL CHIP 1K 5% 1/10W
R1002 1-216-821-11 METAL CHIP 1K 5% 1/10W
R1003 1-216-821-11 METAL CHIP 1K 5% 1/10W
R1004 1-216-821-11 METAL CHIP 1K 5% 1/10W
R1005 1-216-821-11 METAL CHIP 1K 5% 1/10W
R1006 1-216-821-11 METAL CHIP 1K 5% 1/10W
R1007 1-216-821-11 METAL CHIP 1K 5% 1/10W
R1008 1-216-821-11 METAL CHIP 1K 5% 1/10W
R1009 1-216-821-11 METAL CHIP 1K 5% 1/10W
R1010 1-216-821-11 METAL CHIP 1K 5% 1/10W
R1011 1-216-813-11 METAL CHIP 220 5% 1/10W
R1012 1-216-815-11 METAL CHIP 330 5% 1/10W
R1013 1-216-817-11 METAL CHIP 470 5% 1/10W
R1014 1-216-819-11 METAL CHIP 680 5% 1/10W
< CAPACITOR >
C101 1-126-246-11 ELECT CHIP 220uF 20% 4V
C151 1-126-206-11 ELECT CHIP 100uF 20% 6.3V
C201 1-164-943-11 CERAMIC CHIP 0.01uF 10% 16V
C202 1-164-943-11 CERAMIC CHIP 0.01uF 10% 16V
C203 1-164-943-11 CERAMIC CHIP 0.01uF 10% 16V
C204 1-164-943-11 CERAMIC CHIP 0.01uF 10% 16V
C205 1-164-943-11 CERAMIC CHIP 0.01uF 10% 16V
C213 1-126-209-11 ELECT CHIP 100uF 20% 4V
C214 1-164-943-11 CERAMIC CHIP 0.01uF 10% 16V
C215 1-164-943-11 CERAMIC CHIP 0.01uF 10% 16V
C216 1-164-943-11 CERAMIC CHIP 0.01uF 10% 16V
C218 1-164-943-11 CERAMIC CHIP 0.01uF 10% 16V
C220 1-164-943-11 CERAMIC CHIP 0.01uF 10% 16V
C226 1-107-820-11 CERAMIC CHIP 0.1uF 16V
C227 1-164-943-11 CERAMIC CHIP 0.01uF 10% 16V
C229 1-164-943-11 CERAMIC CHIP 0.01uF 10% 16V
C230 1-164-943-11 CERAMIC CHIP 0.01uF 10% 16V
C231 1-164-943-11 CERAMIC CHIP 0.01uF 10% 16V
C232 1-164-943-11 CERAMIC CHIP 0.01uF 10% 16V
C233 1-164-943-11 CERAMIC CHIP 0.01uF 10% 16V
C234 1-164-943-11 CERAMIC CHIP 0.01uF 10% 16V
C235 1-164-943-11 CERAMIC CHIP 0.01uF 10% 16V
C236 1-164-943-11 CERAMIC CHIP 0.01uF 10% 16V
C237 1-164-943-11 CERAMIC CHIP 0.01uF 10% 16V
C238 1-164-943-11 CERAMIC CHIP 0.01uF 10% 16V
C239 1-164-943-11 CERAMIC CHIP 0.01uF 10% 16V
C240 1-164-943-11 CERAMIC CHIP 0.01uF 10% 16V
C241 1-164-943-11 CERAMIC CHIP 0.01uF 10% 16V
C242 1-164-943-11 CERAMIC CHIP 0.01uF 10% 16V
85
Page 86

HCD-NXM4D
DMB07
Ref. No. Part No. Description Remarks Ref. No. Part No. Description Remarks
C243 1-164-943-11 CERAMIC CHIP 0.01uF 10% 16V
C244 1-164-943-11 CERAMIC CHIP 0.01uF 10% 16V
C245 1-164-943-11 CERAMIC CHIP 0.01uF 10% 16V
C246 1-164-943-11 CERAMIC CHIP 0.01uF 10% 16V
C247 1-164-943-11 CERAMIC CHIP 0.01uF 10% 16V
C248 1-164-943-11 CERAMIC CHIP 0.01uF 10% 16V
C249 1-164-943-11 CERAMIC CHIP 0.01uF 10% 16V
C250 1-164-943-11 CERAMIC CHIP 0.01uF 10% 16V
C251 1-164-943-11 CERAMIC CHIP 0.01uF 10% 16V
C252 1-164-943-11 CERAMIC CHIP 0.01uF 10% 16V
C253 1-164-943-11 CERAMIC CHIP 0.01uF 10% 16V
C254 1-164-943-11 CERAMIC CHIP 0.01uF 10% 16V
C255 1-117-370-11 CERAMIC CHIP 10uF 10V
C256 1-164-943-11 CERAMIC CHIP 0.01uF 10% 16V
C257 1-164-943-11 CERAMIC CHIP 0.01uF 10% 16V
C258 1-117-370-11 CERAMIC CHIP 10uF 10V
C259 1-164-943-11 CERAMIC CHIP 0.01uF 10% 16V
C260 1-164-943-11 CERAMIC CHIP 0.01uF 10% 16V
C261 1-164-943-11 CERAMIC CHIP 0.01uF 10% 16V
C262 1-164-943-11 CERAMIC CHIP 0.01uF 10% 16V
C263 1-164-943-11 CERAMIC CHIP 0.01uF 10% 16V
C264 1-164-943-11 CERAMIC CHIP 0.01uF 10% 16V
C265 1-117-370-11 CERAMIC CHIP 10uF 10V
C266 1-164-943-11 CERAMIC CHIP 0.01uF 10% 16V
C267 1-164-943-11 CERAMIC CHIP 0.01uF 10% 16V
C268 1-164-943-11 CERAMIC CHIP 0.01uF 10% 16V
C269 1-164-943-11 CERAMIC CHIP 0.01uF 10% 16V
C270 1-164-943-11 CERAMIC CHIP 0.01uF 10% 16V
C271 1-164-943-11 CERAMIC CHIP 0.01uF 10% 16V
C272 1-164-943-11 CERAMIC CHIP 0.01uF 10% 16V
C274 1-164-943-11 CERAMIC CHIP 0.01uF 10% 16V
C275 1-164-943-11 CERAMIC CHIP 0.01uF 10% 16V
C276 1-164-943-11 CERAMIC CHIP 0.01uF 10% 16V
C277 1-164-874-11 CERAMIC CHIP 100PF 5% 50V
C278 1-164-874-11 CERAMIC CHIP 100PF 5% 50V
C279 1-164-874-11 CERAMIC CHIP 100PF 5% 50V
C280 1-164-874-11 CERAMIC CHIP 100PF 5% 50V
C281 1-164-874-11 CERAMIC CHIP 100PF 5% 50V
C282 1-164-874-11 CERAMIC CHIP 100PF 5% 50V
C283 1-164-874-11 CERAMIC CHIP 100PF 5% 50V
C284 1-164-943-11 CERAMIC CHIP 0.01uF 10% 16V
C286 1-164-943-11 CERAMIC CHIP 0.01uF 10% 16V
C287 1-164-943-11 CERAMIC CHIP 0.01uF 10% 16V
C289 1-164-943-11 CERAMIC CHIP 0.01uF 10% 16V
C290 1-164-874-11 CERAMIC CHIP 100PF 5% 50V
C291 1-164-874-11 CERAMIC CHIP 100PF 5% 50V
C302 1-164-943-11 CERAMIC CHIP 0.01uF 10% 16V
C303 1-164-943-11 CERAMIC CHIP 0.01uF 10% 16V
C304 1-164-943-11 CERAMIC CHIP 0.01uF 10% 16V
C305 1-164-943-11 CERAMIC CHIP 0.01uF 10% 16V
C306 1-164-943-11 CERAMIC CHIP 0.01uF 10% 16V
C307 1-164-943-11 CERAMIC CHIP 0.01uF 10% 16V
C308 1-164-874-11 CERAMIC CHIP 100PF 5% 50V
C309 1-164-874-11 CERAMIC CHIP 100PF 5% 50V
C321 1-126-206-11 ELECT CHIP 100uF 20% 6.3V
C322 1-107-820-11 CERAMIC CHIP 0.1uF 16V
C323 1-107-820-11 CERAMIC CHIP 0.1uF 16V
C324 1-107-820-11 CERAMIC CHIP 0.1uF 16V
C325 1-126-209-11 ELECT CHIP 100uF 20% 4V
C326 1-164-943-11 CERAMIC CHIP 0.01uF 10% 16V
C352 1-126-206-11 ELECT CHIP 100uF 20% 6.3V
C355 1-126-206-11 ELECT CHIP 100uF 20% 6.3V
C356 1-126-193-11 ELECT CHIP 1uF 20% 50V
C357 1-126-193-11 ELECT CHIP 1uF 20% 50V
C363 1-107-820-11 CERAMIC CHIP 0.1uF 16V
C364 1-126-206-11 ELECT CHIP 100uF 20% 6.3V
C365 1-107-820-11 CERAMIC CHIP 0.1uF 16V
C366 1-126-206-11 ELECT CHIP 100uF 20% 6.3V
C367 1-164-935-11 CERAMIC CHIP 470PF 10% 50V
C368 1-164-935-11 CERAMIC CHIP 470PF 10% 50V
C392 1-126-395-11 ELECT CHIP 22uF 20% 16V
C393 1-164-947-11 CERAMIC CHIP 0.01uF 50V
C394 1-126-246-11 ELECT CHIP 220uF 20% 4V
C501 1-164-943-11 CERAMIC CHIP 0.01uF 10% 16V
C502 1-164-943-11 CERAMIC CHIP 0.01uF 10% 16V
C503 1-127-772-81 CERAMIC CHIP 33000PF 10% 10V
C504 1-127-772-81 CERAMIC CHIP 33000PF 10% 10V
C506 1-164-934-11 CERAMIC CHIP 330PF 10% 50V
C507 1-117-370-11 CERAMIC CHIP 10uF 10V
C508 1-164-937-11 CERAMIC CHIP 0.001uF 10% 50V
C509 1-164-934-11 CERAMIC CHIP 330PF 10% 50V
C510 1-164-937-11 CERAMIC CHIP 0.001uF 10% 50V
C511 1-164-933-11 CERAMIC CHIP 220PF 10% 50V
C512 1-164-943-11 CERAMIC CHIP 0.01uF 10% 16V
C513 1-117-370-11 CERAMIC CHIP 10uF 10V
C514 1-164-943-11 CERAMIC CHIP 0.01uF 10% 16V
C515 1-164-933-11 CERAMIC CHIP 220PF 10% 50V
C516 1-164-939-11 CERAMIC CHIP 0.0022uF 10% 50V
C517 1-117-370-11 CERAMIC CHIP 10uF 10V
C518 1-164-943-11 CERAMIC CHIP 0.01uF 10% 16V
C519 1-164-943-11 CERAMIC CHIP 0.01uF 10% 16V
C521 1-107-820-11 CERAMIC CHIP 0.1uF 16V
C522 1-125-777-11 CERAMIC CHIP 0.1uF 10% 10V
C523 1-107-820-11 CERAMIC CHIP 0.1uF 16V
C524 1-164-943-11 CERAMIC CHIP 0.01uF 10% 16V
C525 1-164-943-11 CERAMIC CHIP 0.01uF 10% 16V
C526 1-126-395-11 ELECT CHIP 22uF 20% 16V
C527 1-164-943-11 CERAMIC CHIP 0.01uF 10% 16V
C528 1-126-395-11 ELECT CHIP 22uF 20% 16V
C529 1-164-943-11 CERAMIC CHIP 0.01uF 10% 16V
C530 1-117-370-11 CERAMIC CHIP 10uF 10V
C531 1-119-923-11 CERAMIC CHIP 0.047uF 10% 10V
C532 1-117-370-11 CERAMIC CHIP 10uF 10V
C533 1-164-939-11 CERAMIC CHIP 0.0022uF 10% 50V
C534 1-107-819-11 CERAMIC CHIP 0.022uF 10% 16V
C535 1-164-939-11 CERAMIC CHIP 0.0022uF 10% 50V
C540 1-117-370-11 CERAMIC CHIP 10uF 10V
C543 1-164-943-11 CERAMIC CHIP 0.01uF 10% 16V
C544 1-125-777-11 CERAMIC CHIP 0.1uF 10% 10V
C545 1-117-370-11 CERAMIC CHIP 10uF 10V
C547 1-107-725-11 CERAMIC CHIP 0.1uF 10% 16V
C548 1-164-943-11 CERAMIC CHIP 0.01uF 10% 16V
C551 1-125-891-11 CERAMIC CHIP 0.47uF 10% 10V
86
Page 87

HCD-NXM4D
DMB07
Ref. No. Part No. Description Remarks Ref. No. Part No. Description Remarks
C552 1-216-295-91 SHORT CHIP 0
C553 1-164-940-11 CERAMIC CHIP 0.0033uF 10% 16V
C556 1-117-370-11 CERAMIC CHIP 10uF 10V
C558 1-126-209-11 ELECT CHIP 100uF 20% 4V
C559 1-125-777-11 CERAMIC CHIP 0.1uF 10% 10V
C560 1-164-938-11 CERAMIC CHIP 0.0015uF 10% 50V
C561 1-107-820-11 CERAMIC CHIP 0.1uF 16V
C563 1-164-874-11 CERAMIC CHIP 100PF 5% 50V
C565 1-125-777-11 CERAMIC CHIP 0.1uF 10% 10V
C567 1-164-943-11 CERAMIC CHIP 0.01uF 10% 16V
C568 1-117-370-11 CERAMIC CHIP 10uF 10V
C569 1-107-820-11 CERAMIC CHIP 0.1uF 16V
C570 1-117-370-11 CERAMIC CHIP 10uF 10V
C573 1-164-874-11 CERAMIC CHIP 100PF 5% 50V
C588 1-164-939-11 CERAMIC CHIP 0.0022uF 10% 50V
C589 1-164-939-11 CERAMIC CHIP 0.0022uF 10% 50V
C590 1-164-939-11 CERAMIC CHIP 0.0022uF 10% 50V
C592 1-124-779-00 ELECT CHIP 10uF 20% 16V
C701 1-165-643-21 ELECT CHIP 150uF 20% 4V
C702 1-117-370-11 CERAMIC CHIP 10uF 10V
C703 1-125-777-11 CERAMIC CHIP 0.1uF 10% 10V
C705 1-164-943-11 CERAMIC CHIP 0.01uF 10% 16V
C706 1-164-943-11 CERAMIC CHIP 0.01uF 10% 16V
C708 1-164-943-11 CERAMIC CHIP 0.01uF 10% 16V
C709 1-125-777-11 CERAMIC CHIP 0.1uF 10% 10V
C711 1-119-923-11 CERAMIC CHIP 0.047uF 10% 10V
C712 1-164-874-11 CERAMIC CHIP 100PF 5% 50V
C713 1-125-777-11 CERAMIC CHIP 0.1uF 10% 10V
C714 1-125-777-11 CERAMIC CHIP 0.1uF 10% 10V
C715 1-164-938-11 CERAMIC CHIP 0.0015uF 10% 50V
C716 1-125-891-11 CERAMIC CHIP 0.47uF 10% 10V
C717 1-164-943-11 CERAMIC CHIP 0.01uF 10% 16V
C718 1-164-943-11 CERAMIC CHIP 0.01uF 10% 16V
C720 1-125-777-11 CERAMIC CHIP 0.1uF 10% 10V
C721 1-107-820-11 CERAMIC CHIP 0.1uF 16V
C722 1-164-943-11 CERAMIC CHIP 0.01uF 10% 16V
C723 1-164-943-11 CERAMIC CHIP 0.01uF 10% 16V
C724 1-164-943-11 CERAMIC CHIP 0.01uF 10% 16V
C725 1-164-943-11 CERAMIC CHIP 0.01uF 10% 16V
C726 1-164-943-11 CERAMIC CHIP 0.01uF 10% 16V
C727 1-117-370-11 CERAMIC CHIP 10uF 10V
C728 1-125-777-11 CERAMIC CHIP 0.1uF 10% 10V
C729 1-117-370-11 CERAMIC CHIP 10uF 10V
C764 1-164-943-11 CERAMIC CHIP 0.01uF 10% 16V
C765 1-164-943-11 CERAMIC CHIP 0.01uF 10% 16V
C766 1-164-874-11 CERAMIC CHIP 100PF 5% 50V
C767 1-164-943-11 CERAMIC CHIP 0.01uF 10% 16V
C768 1-164-943-11 CERAMIC CHIP 0.01uF 10% 16V
C769 1-164-943-11 CERAMIC CHIP 0.01uF 10% 16V
C770 1-164-943-11 CERAMIC CHIP 0.01uF 10% 16V
C771 1-119-923-11 CERAMIC CHIP 0.047uF 10% 10V
C772 1-164-943-11 CERAMIC CHIP 0.01uF 10% 16V
C773 1-125-891-11 CERAMIC CHIP 0.47uF 10% 10V
C774 1-164-941-11 CERAMIC CHIP 0.0047uF 10% 16V
C775 1-164-943-11 CERAMIC CHIP 0.01uF 10% 16V
C776 1-164-943-11 CERAMIC CHIP 0.01uF 10% 16V
C777 1-164-943-11 CERAMIC CHIP 0.01uF 10% 16V
C778 1-164-943-11 CERAMIC CHIP 0.01uF 10% 16V
C779 1-117-370-11 CERAMIC CHIP 10uF 10V
C780 1-117-370-11 CERAMIC CHIP 10uF 10V
C781 1-165-643-21 ELECT CHIP 150uF 20% 4V
C782 1-164-938-11 CERAMIC CHIP 0.0015uF 10% 50V
C783 1-164-938-11 CERAMIC CHIP 0.0015uF 10% 50V
C901 1-126-209-11 ELECT CHIP 100uF 20% 4V
C902 1-164-943-11 CERAMIC CHIP 0.01uF 10% 16V
C903 1-126-209-11 ELECT CHIP 100uF 20% 4V
C904 1-164-943-11 CERAMIC CHIP 0.01uF 10% 16V
C905 1-164-943-11 CERAMIC CHIP 0.01uF 10% 16V
C906 1-164-943-11 CERAMIC CHIP 0.01uF 10% 16V
C907 1-164-943-11 CERAMIC CHIP 0.01uF 10% 16V
C908 1-164-874-11 CERAMIC CHIP 100PF 5% 50V
C909 1-164-874-11 CERAMIC CHIP 100PF 5% 50V
C910 1-164-943-11 CERAMIC CHIP 0.01uF 10% 16V
C913 1-127-772-81 CERAMIC CHIP 33000PF 10% 10V
C914 1-164-849-11 CERAMIC CHIP 9PF 0.5PF 50V
C915 1-164-847-11 CERAMIC CHIP 7PF 0.5PF 50V
C916 1-126-209-11 ELECT CHIP 100uF 20% 4V
C917 1-164-943-11 CERAMIC CHIP 0.01uF 10% 16V
C918 1-164-943-11 CERAMIC CHIP 0.01uF 10% 16V
C924 1-164-943-11 CERAMIC CHIP 0.01uF 10% 16V
C925 1-126-395-11 ELECT CHIP 22uF 20% 16V
C926 1-126-246-11 ELECT CHIP 220uF 20% 4V
C927 1-164-943-11 CERAMIC CHIP 0.01uF 10% 16V
C928 1-117-370-11 CERAMIC CHIP 10uF 10V
C1302 1-107-820-11 CERAMIC CHIP 0.1uF 16V
C730 1-164-943-11 CERAMIC CHIP 0.01uF 10% 16V
C733 1-117-370-11 CERAMIC CHIP 10uF 10V
C734 1-117-370-11 CERAMIC CHIP 10uF 10V
C740 1-164-943-11 CERAMIC CHIP 0.01uF 10% 16V
C741 1-164-943-11 CERAMIC CHIP 0.01uF 10% 16V
C742 1-164-943-11 CERAMIC CHIP 0.01uF 10% 16V
C743 1-164-943-11 CERAMIC CHIP 0.01uF 10% 16V
C744 1-164-943-11 CERAMIC CHIP 0.01uF 10% 16V
C745 1-164-943-11 CERAMIC CHIP 0.01uF 10% 16V
C752 1-125-777-11 CERAMIC CHIP 0.1uF 10% 10V
C760 1-164-943-11 CERAMIC CHIP 0.01uF 10% 16V
C761 1-164-943-11 CERAMIC CHIP 0.01uF 10% 16V
C762 1-164-943-11 CERAMIC CHIP 0.01uF 10% 16V
C763 1-164-943-11 CERAMIC CHIP 0.01uF 10% 16V
< CONNECTOR >
CN101 1-784-366-21 CONNECTOR, FFC/FPC 7P
CN102 1-815-954-21 PIN, CONNECTOR (PC BOARD) 13P
CN105 1-784-376-11 CONNECTOR, FFC/FPC 17P
CN107 1-778-692-11 CONNECTOR, FFC/FPC 21P
CN202 1-784-364-21 CONNECTOR, FFC/FPC 4P
CN501 1-778-957-11 CONNECTOR, FFC/FPC 29P
CN901 1-764-177-11 PIN, CONNECTOR (SMD) (1.5MM) 7P
< DIODE >
D202 8-719-988-61 DIODE 1SS355TE-17
D392 8-719-988-61 DIODE 1SS355TE-17
D393 8-719-988-61 DIODE 1SS355TE-17
87
Page 88

HCD-NXM4D
DMB07
Ref. No. Part No. Description Remarks Ref. No. Part No. Description RemarksRef. No. Part No. Description Remarks
D394 8-719-988-61 DIODE 1SS355TE-17
D500 8-719-988-61 DIODE 1SS355TE-17
D901 8-719-988-61 DIODE 1SS355TE-17
D1303 8-719-988-61 DIODE 1SS355TE-17
D1304 8-719-988-61 DIODE 1SS355TE-17
< FERRITE BEAD >
FB105 1-469-324-21 FERRITE, EMI
FB902 1-500-284-21 INDUCTOR, FERRITE BEAD
FB903 1-500-284-21 INDUCTOR, FERRITE BEAD
< FILTER >
IC904 6-704-753-01 IC SN74AHC2G74HDCUR
IC906 6-700-407-01 IC SM8707GV-G-E2
IC907 8-759-583-47 IC uPC2933T-E2
< JUMPER RESISTOR >
JW392 1-216-864-11 SHORT CHIP 0
JW801 1-218-990-11 SHORT CHIP 0
JW802 1-218-990-11 SHORT CHIP 0
JW803 1-218-990-11 SHORT CHIP 0
JW804 1-218-990-11 SHORT CHIP 0
JW805 1-218-990-11 SHORT CHIP 0
JW806 1-218-990-11 SHORT CHIP 0
FL101 1-234-177-21 FILTER, CHIP EMI
FL203 1-234-177-21 FILTER, CHIP EMI
FL204 1-234-177-21 FILTER, CHIP EMI
FL205 1-234-177-21 FILTER, CHIP EMI
FL206 1-234-177-21 FILTER, CHIP EMI
FL302 1-234-177-21 FILTER, CHIP EMI
FL303 1-234-177-21 FILTER, CHIP EMI
FL352 1-234-177-21 FILTER, CHIP EMI
FL501 1-234-177-21 FILTER, CHIP EMI
FL502 1-234-177-21 FILTER, CHIP EMI
FL701 1-234-177-21 FILTER, CHIP EMI
FL702 1-234-177-21 FILTER, CHIP EMI
FL703 1-234-177-21 FILTER, CHIP EMI
FL705 1-234-177-21 FILTER, CHIP EMI
FL706 1-234-177-21 FILTER, CHIP EMI
FL901 1-234-177-21 FILTER, CHIP EMI
FL903 1-234-177-21 FILTER, CHIP EMI
FL908 1-234-177-21 FILTER, CHIP EMI
< IC >
IC111 6-550-554-01 TRANSISTOR UM6K1NL02TN
IC203 6-704-069-01 IC MT48LC4M32B2P-6-Y15W
* IC204 6-703-671-01 IC BR9040F-WE2
IC206 6-804-579-01 IC MBM29PL32BM90TN-NXM0401
IC207 6-704-630-01 IC ZIVA5X-C2F
IC211 6-700-398-01 IC uPC2918T-E1
IC231 8-759-549-21 IC SN74LV573APWR
IC232 8-759-549-21 IC SN74LV573APWR
IC233 8-759-549-21 IC SN74LV573APWR
IC256 8-759-549-21 IC SN74LV573APWR
IC258 8-759-549-21 IC SN74LV573APWR
IC259 8-759-549-21 IC SN74LV573APWR
IC302 6-703-787-01 IC PCM1609KPTR
IC352 8-759-560-56 IC PCM1800E/2K
IC392 8-759-583-47 IC uPC2933T-E2
IC501 6-702-157-01 IC FAN8035L
IC502 8-759-583-47 IC uPC2933T-E2
IC503 8-759-058-43 IC NJM3404AV
IC509 8-752-408-73 IC CXD3068Q
IC701 6-703-552-01 IC TMC57929PGF-RDP
IC703 8-759-058-43 IC NJM3404AV
IC706 8-759-564-30 IC MSM51V18165B-60TSKR1
IC901 8-753-228-87 IC CXP973064-245R
IC902 8-759-649-48 IC SN74AHC1G32DCKR
IC903 6-704-004-01 IC BR24L16F-WE2
< COIL >
L103 1-216-296-11 SHORT CHIP 0
L501 1-216-296-11 SHORT CHIP 0
L704 1-412-031-11 INDUCTOR 47uH
L901 1-412-031-11 INDUCTOR 47uH
< TRANSISTOR >
Q201 8-729-929-26 TRANSISTOR DTC114TE
Q202 8-729-929-26 TRANSISTOR DTC114TE
Q901 8-729-929-26 TRANSISTOR DTC114TE
< RESISTOR >
R10 1-216-801-11 METAL CHIP 22 5% 1/10W
R11 1-216-801-11 METAL CHIP 22 5% 1/10W
R12 1-216-801-11 METAL CHIP 22 5% 1/10W
R13 1-216-801-11 METAL CHIP 22 5% 1/10W
R14 1-216-801-11 METAL CHIP 22 5% 1/10W
R15 1-216-801-11 METAL CHIP 22 5% 1/10W
R197 1-216-829-11 METAL CHIP 4.7K 5% 1/10W
R198 1-216-829-11 METAL CHIP 4.7K 5% 1/10W
R202 1-216-841-11 METAL CHIP 47K 5% 1/10W
R213 1-218-939-11 RES-CHIP 68 5% 1/16W
R215 1-216-864-11 SHORT CHIP 0
R217 1-216-864-11 SHORT CHIP 0
R219 1-216-864-11 SHORT CHIP 0
R220 1-216-864-11 SHORT CHIP 0
R221 1-216-864-11 SHORT CHIP 0
R222 1-216-864-11 SHORT CHIP 0
R225 1-216-864-11 SHORT CHIP 0
R226 1-216-864-11 SHORT CHIP 0
R227 1-216-829-11 METAL CHIP 4.7K 5% 1/10W
R228 1-216-864-11 SHORT CHIP 0
R230 1-216-803-11 METAL CHIP 33 5% 1/10W
R231 1-216-803-11 METAL CHIP 33 5% 1/10W
R232 1-216-803-11 METAL CHIP 33 5% 1/10W
R234 1-216-833-11 METAL CHIP 10K 5% 1/10W
R239 1-216-809-11 METAL CHIP 100 5% 1/10W
R240 1-216-841-11 METAL CHIP 47K 5% 1/10W
R241 1-216-864-11 SHORT CHIP 0
R244 1-216-821-11 METAL CHIP 1K 5% 1/10W
R245 1-216-829-11 METAL CHIP 4.7K 5% 1/10W
R246 1-216-833-11 METAL CHIP 10K 5% 1/10W
R247 1-216-821-11 METAL CHIP 1K 5% 1/10W
R248 1-216-829-11 METAL CHIP 4.7K 5% 1/10W
88
Page 89

HCD-NXM4D
DMB07
Ref. No. Part No. Description Remarks Ref. No. Part No. Description Remarks
R250 1-216-864-11 SHORT CHIP 0
R251 1-216-864-11 SHORT CHIP 0
R253 1-216-829-11 METAL CHIP 4.7K 5% 1/10W
R254 1-216-829-11 METAL CHIP 4.7K 5% 1/10W
R255 1-216-864-11 SHORT CHIP 0
R257 1-216-829-11 METAL CHIP 4.7K 5% 1/10W
R259 1-216-829-11 METAL CHIP 4.7K 5% 1/10W
R260 1-216-829-11 METAL CHIP 4.7K 5% 1/10W
R261 1-216-829-11 METAL CHIP 4.7K 5% 1/10W
R263 1-218-285-11 METAL CHIP 75 5% 1/10W
R264 1-218-285-11 METAL CHIP 75 5% 1/10W
R265 1-218-285-11 METAL CHIP 75 5% 1/10W
R266 1-218-285-11 METAL CHIP 75 5% 1/10W
R267 1-218-285-11 METAL CHIP 75 5% 1/10W
R268 1-216-864-11 SHORT CHIP 0
R269 1-216-864-11 SHORT CHIP 0
R270 1-216-864-11 SHORT CHIP 0
R271 1-216-809-11 METAL CHIP 100 5% 1/10W
R272 1-216-809-11 METAL CHIP 100 5% 1/10W
R273 1-216-864-11 SHORT CHIP 0
R274 1-216-864-11 SHORT CHIP 0
R275 1-216-864-11 SHORT CHIP 0
R276 1-216-864-11 SHORT CHIP 0
R277 1-216-864-11 SHORT CHIP 0
R278 1-218-285-11 METAL CHIP 75 5% 1/10W
R279 1-218-285-11 METAL CHIP 75 5% 1/10W
R280 1-218-285-11 METAL CHIP 75 5% 1/10W
R281 1-218-285-11 METAL CHIP 75 5% 1/10W
R282 1-218-285-11 METAL CHIP 75 5% 1/10W
R283 1-218-847-11 METAL CHIP 1K 0.5% 1/10W
R284 1-218-829-11 METAL CHIP 180 0.5% 1/10W
R288 1-216-864-11 SHORT CHIP 0
R290 1-216-809-11 METAL CHIP 100 5% 1/10W
R291 1-216-809-11 METAL CHIP 100 5% 1/10W
R292 1-216-809-11 METAL CHIP 100 5% 1/10W
R293 1-216-864-11 SHORT CHIP 0
R294 1-216-864-11 SHORT CHIP 0
R296 1-216-864-11 SHORT CHIP 0
R299 1-216-820-11 METAL CHIP 820 5% 1/10W
R301 1-216-821-11 METAL CHIP 1K 5% 1/10W
R302 1-216-813-11 METAL CHIP 220 5% 1/10W
R303 1-216-813-11 METAL CHIP 220 5% 1/10W
R304 1-216-813-11 METAL CHIP 220 5% 1/10W
R305 1-216-813-11 METAL CHIP 220 5% 1/10W
R306 1-216-813-11 METAL CHIP 220 5% 1/10W
R307 1-216-813-11 METAL CHIP 220 5% 1/10W
R308 1-216-813-11 METAL CHIP 220 5% 1/10W
R309 1-216-813-11 METAL CHIP 220 5% 1/10W
R310 1-216-809-11 METAL CHIP 100 5% 1/10W
R311 1-216-809-11 METAL CHIP 100 5% 1/10W
R312 1-216-809-11 METAL CHIP 100 5% 1/10W
R313 1-216-833-11 METAL CHIP 10K 5% 1/10W
R314 1-216-801-11 METAL CHIP 22 5% 1/10W
R327 1-216-864-11 SHORT CHIP 0
R328 1-216-864-11 SHORT CHIP 0
R329 1-216-864-11 SHORT CHIP 0
R335 1-216-864-11 SHORT CHIP 0
R352 1-216-864-11 SHORT CHIP 0
R353 1-216-864-11 SHORT CHIP 0
R362 1-216-833-11 METAL CHIP 10K 5% 1/10W
R367 1-216-864-11 SHORT CHIP 0
R368 1-216-864-11 SHORT CHIP 0
R369 1-216-864-11 SHORT CHIP 0
R392 1-216-797-11 METAL CHIP 10 5% 1/10W
R503 1-216-841-11 METAL CHIP 47K 5% 1/10W
R504 1-216-841-11 METAL CHIP 47K 5% 1/10W
R505 1-216-841-11 METAL CHIP 47K 5% 1/10W
R506 1-216-841-11 METAL CHIP 47K 5% 1/10W
R510 1-216-847-11 METAL CHIP 150K 5% 1/10W
R511 1-216-847-11 METAL CHIP 150K 5% 1/10W
R512 1-216-842-11 METAL CHIP 56K 5% 1/10W
R513 1-216-842-11 METAL CHIP 56K 5% 1/10W
R514 1-216-833-11 METAL CHIP 10K 5% 1/10W
R515 1-216-833-11 METAL CHIP 10K 5% 1/10W
R516 1-216-829-11 METAL CHIP 4.7K 5% 1/10W
R517 1-216-825-11 METAL CHIP 2.2K 5% 1/10W
R519 1-216-845-11 METAL CHIP 100K 5% 1/10W
R520 1-216-833-11 METAL CHIP 10K 5% 1/10W
R521 1-216-845-11 METAL CHIP 100K 5% 1/10W
R522 1-216-829-11 METAL CHIP 4.7K 5% 1/10W
R523 1-216-833-11 METAL CHIP 10K 5% 1/10W
R524 1-216-833-11 METAL CHIP 10K 5% 1/10W
R525 1-216-833-11 METAL CHIP 10K 5% 1/10W
R527 1-216-825-11 METAL CHIP 2.2K 5% 1/10W
R529 1-216-839-11 METAL CHIP 33K 5% 1/10W
R530 1-216-842-11 METAL CHIP 56K 5% 1/10W
R533 1-216-839-11 METAL CHIP 33K 5% 1/10W
R534 1-216-842-11 METAL CHIP 56K 5% 1/10W
R536 1-216-833-11 METAL CHIP 10K 5% 1/10W
R537 1-216-843-11 METAL CHIP 68K 5% 1/10W
R545 1-216-833-11 METAL CHIP 10K 5% 1/10W
R548 1-216-833-11 METAL CHIP 10K 5% 1/10W
R550 1-216-821-11 METAL CHIP 1K 5% 1/10W
R551 1-216-821-11 METAL CHIP 1K 5% 1/10W
R552 1-216-821-11 METAL CHIP 1K 5% 1/10W
R555 1-216-864-11 SHORT CHIP 0
R558 1-216-841-11 METAL CHIP 47K 5% 1/10W
R559 1-216-821-11 METAL CHIP 1K 5% 1/10W
R560 1-216-821-11 METAL CHIP 1K 5% 1/10W
R561 1-216-821-11 METAL CHIP 1K 5% 1/10W
R562 1-216-821-11 METAL CHIP 1K 5% 1/10W
R563 1-216-821-11 METAL CHIP 1K 5% 1/10W
R564 1-216-821-11 METAL CHIP 1K 5% 1/10W
R565 1-216-821-11 METAL CHIP 1K 5% 1/10W
R566 1-216-833-11 METAL CHIP 10K 5% 1/10W
R567 1-216-827-11 METAL CHIP 3.3K 5% 1/10W
R568 1-216-857-11 METAL CHIP 1M 5% 1/10W
R571 1-216-857-11 METAL CHIP 1M 5% 1/10W
R572 1-216-853-11 METAL CHIP 470K 5% 1/10W
R573 1-216-833-11 METAL CHIP 10K 5% 1/10W
R576 1-216-864-11 SHORT CHIP 0
R579 1-216-832-11 METAL CHIP 8.2K 5% 1/10W
R580 1-216-839-11 METAL CHIP 33K 5% 1/10W
R581 1-216-834-11 METAL CHIP 12K 5% 1/10W
R583 1-216-864-11 SHORT CHIP 0
R584 1-216-839-11 METAL CHIP 33K 5% 1/10W
89
Page 90

HCD-NXM4D
DMB07
Ref. No. Part No. Description Remarks Ref. No. Part No. Description Remarks
R586 1-218-747-11 METAL CHIP 200K 0.5% 1/10W
R587 1-216-864-11 SHORT CHIP 0
R588 1-216-833-11 METAL CHIP 10K 5% 1/10W
R589 1-216-833-11 METAL CHIP 10K 5% 1/10W
R591 1-216-864-11 SHORT CHIP 0
R593 1-216-845-11 METAL CHIP 100K 5% 1/10W
R599 1-216-821-11 METAL CHIP 1K 5% 1/10W
R601 1-216-864-11 SHORT CHIP 0
R629 1-216-864-11 SHORT CHIP 0
R694 1-216-833-11 METAL CHIP 10K 5% 1/10W
R698 1-216-864-11 SHORT CHIP 0
R699 1-216-864-11 SHORT CHIP 0
R700 1-216-832-11 METAL CHIP 8.2K 5% 1/10W
R707 1-216-809-11 METAL CHIP 100 5% 1/10W
R708 1-216-853-11 METAL CHIP 470K 5% 1/10W
R709 1-216-847-11 METAL CHIP 150K 5% 1/10W
R710 1-216-833-11 METAL CHIP 10K 5% 1/10W
R711 1-216-825-11 METAL CHIP 2.2K 5% 1/10W
R712 1-216-833-11 METAL CHIP 10K 5% 1/10W
R713 1-216-833-11 METAL CHIP 10K 5% 1/10W
R714 1-216-833-11 METAL CHIP 10K 5% 1/10W
R715 1-216-833-11 METAL CHIP 10K 5% 1/10W
R716 1-216-809-11 METAL CHIP 100 5% 1/10W
R717 1-216-845-11 METAL CHIP 100K 5% 1/10W
R718 1-216-833-11 METAL CHIP 10K 5% 1/10W
R719 1-216-821-11 METAL CHIP 1K 5% 1/10W
R720 1-216-821-11 METAL CHIP 1K 5% 1/10W
R721 1-216-839-11 METAL CHIP 33K 5% 1/10W
R724 1-216-821-11 METAL CHIP 1K 5% 1/10W
R725 1-216-824-11 METAL CHIP 1.8K 5% 1/10W
R726 1-216-845-11 METAL CHIP 100K 5% 1/10W
R727 1-216-827-11 METAL CHIP 3.3K 5% 1/10W
R728 1-216-833-11 METAL CHIP 10K 5% 1/10W
R730 1-216-801-11 METAL CHIP 22 5% 1/10W
R731 1-216-801-11 METAL CHIP 22 5% 1/10W
R732 1-216-833-11 METAL CHIP 10K 5% 1/10W
R733 1-216-833-11 METAL CHIP 10K 5% 1/10W
R734 1-216-833-11 METAL CHIP 10K 5% 1/10W
R735 1-216-833-11 METAL CHIP 10K 5% 1/10W
R736 1-216-833-11 METAL CHIP 10K 5% 1/10W
R737 1-216-833-11 METAL CHIP 10K 5% 1/10W
R738 1-216-833-11 METAL CHIP 10K 5% 1/10W
R741 1-216-801-11 METAL CHIP 22 5% 1/10W
R742 1-216-801-11 METAL CHIP 22 5% 1/10W
R743 1-216-801-11 METAL CHIP 22 5% 1/10W
R744 1-216-801-11 METAL CHIP 22 5% 1/10W
R745 1-216-841-11 METAL CHIP 47K 5% 1/10W
R746 1-216-841-11 METAL CHIP 47K 5% 1/10W
R747 1-216-839-11 METAL CHIP 33K 5% 1/10W
R748 1-216-839-11 METAL CHIP 33K 5% 1/10W
R750 1-216-833-11 METAL CHIP 10K 5% 1/10W
R751 1-216-864-11 SHORT CHIP 0
R758 1-216-864-11 SHORT CHIP 0
R760 1-216-864-11 SHORT CHIP 0
R762 1-216-837-11 METAL CHIP 22K 5% 1/10W
R763 1-216-832-11 METAL CHIP 8.2K 5% 1/10W
R764 1-216-857-11 METAL CHIP 1M 5% 1/10W
R765 1-216-837-11 METAL CHIP 22K 5% 1/10W
R767 1-216-841-11 METAL CHIP 47K 5% 1/10W
R769 1-216-825-11 METAL CHIP 2.2K 5% 1/10W
R776 1-216-864-11 SHORT CHIP 0
R777 1-216-864-11 SHORT CHIP 0
R778 1-216-845-11 METAL CHIP 100K 5% 1/10W
R785 1-216-833-11 METAL CHIP 10K 5% 1/10W
R786 1-216-845-11 METAL CHIP 100K 5% 1/10W
R787 1-216-845-11 METAL CHIP 100K 5% 1/10W
R788 1-216-845-11 METAL CHIP 100K 5% 1/10W
R789 1-216-845-11 METAL CHIP 100K 5% 1/10W
R799 1-216-864-11 SHORT CHIP 0
R805 1-216-864-11 SHORT CHIP 0
R901 1-216-801-11 METAL CHIP 22 5% 1/10W
R902 1-216-801-11 METAL CHIP 22 5% 1/10W
R904 1-216-833-11 METAL CHIP 10K 5% 1/10W
R905 1-216-801-11 METAL CHIP 22 5% 1/10W
R906 1-216-801-11 METAL CHIP 22 5% 1/10W
R907 1-216-801-11 METAL CHIP 22 5% 1/10W
R908 1-216-833-11 METAL CHIP 10K 5% 1/10W
R911 1-216-833-11 METAL CHIP 10K 5% 1/10W
R912 1-216-833-11 METAL CHIP 10K 5% 1/10W
R913 1-216-833-11 METAL CHIP 10K 5% 1/10W
R915 1-216-809-11 METAL CHIP 100 5% 1/10W
R916 1-216-821-11 METAL CHIP 1K 5% 1/10W
R917 1-216-821-11 METAL CHIP 1K 5% 1/10W
R918 1-216-801-11 METAL CHIP 22 5% 1/10W
R920 1-216-809-11 METAL CHIP 100 5% 1/10W
R921 1-216-809-11 METAL CHIP 100 5% 1/10W
R922 1-216-801-11 METAL CHIP 22 5% 1/10W
R923 1-216-813-11 METAL CHIP 220 5% 1/10W
R925 1-216-809-11 METAL CHIP 100 5% 1/10W
R926 1-216-809-11 METAL CHIP 100 5% 1/10W
R927 1-216-857-11 METAL CHIP 1M 5% 1/10W
R928 1-216-809-11 METAL CHIP 100 5% 1/10W
R929 1-216-809-11 METAL CHIP 100 5% 1/10W
R930 1-216-809-11 METAL CHIP 100 5% 1/10W
R931 1-216-801-11 METAL CHIP 22 5% 1/10W
R932 1-216-801-11 METAL CHIP 22 5% 1/10W
R933 1-216-801-11 METAL CHIP 22 5% 1/10W
R935 1-216-829-11 METAL CHIP 4.7K 5% 1/10W
R936 1-216-809-11 METAL CHIP 100 5% 1/10W
R938 1-216-833-11 METAL CHIP 10K 5% 1/10W
R940 1-216-809-11 METAL CHIP 100 5% 1/10W
R942 1-216-809-11 METAL CHIP 100 5% 1/10W
R943 1-216-809-11 METAL CHIP 100 5% 1/10W
R958 1-216-801-11 METAL CHIP 22 5% 1/10W
R962 1-216-833-11 METAL CHIP 10K 5% 1/10W
R964 1-216-833-11 METAL CHIP 10K 5% 1/10W
R970 1-216-864-11 SHORT CHIP 0
R974 1-216-864-11 SHORT CHIP 0
R975 1-216-833-11 METAL CHIP 10K 5% 1/10W
R978 1-216-833-11 METAL CHIP 10K 5% 1/10W
R984 1-216-833-11 METAL CHIP 10K 5% 1/10W
R988 1-216-864-11 SHORT CHIP 0
R990 1-216-864-11 SHORT CHIP 0
R994 1-216-864-11 SHORT CHIP 0
R995 1-216-864-11 SHORT CHIP 0
90
Page 91
HCD-NXM4D
DMB07 FRONT AMP
Ref. No. Part No. Description Remarks Ref. No. Part No. Description Remarks
R996 1-216-864-11 SHORT CHIP 0
R997 1-216-864-11 SHORT CHIP 0
C538 1-131-992-91 CERAMIC CHIP 100000PF 35V (EA)
C539 1-131-992-91 CERAMIC CHIP 100000PF 35V (EA)
R998 1-216-864-11 SHORT CHIP 0
R1000 1-216-829-11 METAL CHIP 4.7K 5% 1/10W
R1001 1-216-864-11 SHORT CHIP 0
R1302 1-216-864-11 SHORT CHIP 0
R9980 1-216-864-11 SHORT CHIP 0
R9981 1-216-864-11 SHORT CHIP 0
R9982 1-216-864-11 SHORT CHIP 0
R9983 1-216-864-11 SHORT CHIP 0
R9984 1-216-864-11 SHORT CHIP 0
R9985 1-216-864-11 SHORT CHIP 0
R9998 1-216-864-11 SHORT CHIP 0
R9999 1-216-864-11 SHORT CHIP 0
< VIBRATOR >
X901 1-781-945-21 VIBRATOR, CERAMIC (20MHz) (TH)
X901 1-795-375-11 VIBRATOR, CERAMIC (20MHz) (EXCEPT TH)
X902 1-795-630-11 VIBRATOR, CRYSTAL (27MHz)
******************************************************
A-1063-581-A FRONT AMP BOARD, COMPLETE (TH)
A-4752-316-A FRONT AMP BOARD, COMPLETE
(E3, E15, SP, MY)
A-4752-377-A FRONT AMP BOARD, COMPLETE (EA)
A-4752-529-A FRONT AMP BOARD, COMPLETE (AUS)
A-4752-535-A FRONT AMP BOARD, COMPLETE (E2)
***********************
C540 1-131-992-91 CERAMIC CHIP 100000PF 35V (EA)
C541 1-131-992-91 CERAMIC CHIP 100000PF 35V (EA)
C542 1-131-992-91 CERAMIC CHIP 100000PF 35V (EA)
C543 1-131-992-91 CERAMIC CHIP 100000PF 35V (EA)
C544 1-131-992-91 CERAMIC CHIP 100000PF 35V (EA)
C545 1-131-992-91 CERAMIC CHIP 100000PF 35V (EA)
C546 1-131-992-91 CERAMIC CHIP 100000PF 35V (EA)
C547 1-131-992-91 CERAMIC CHIP 100000PF 35V (EA)
C548 1-131-992-91 CERAMIC CHIP 100000PF 35V (EA)
C557 1-162-964-11 CERAMIC CHIP 0.001uF 10% 50V
C560 1-126-964-11 ELECT 10uF 20% 50V
C850 1-126-964-11 ELECT 10uF 20% 50V
C851 1-104-658-91 ELECT 100uF 20% 10V
C852 1-126-961-11 ELECT 2.2uF 20% 50V
C853 1-126-923-91 ELECT 220uF 20% 10V
C854 1-126-964-11 ELECT 10uF 20% 50V
C855 1-107-721-11 ELECT 4.7uF 20% 100V
C856 1-107-721-11 ELECT 4.7uF 20% 100V
C857 1-162-974-11 CERAMIC CHIP 0.01uF 50V
C858 1-162-974-11 CERAMIC CHIP 0.01uF 50V
C859 1-126-947-11 ELECT 47uF 20% 35V
C860 1-126-963-11 ELECT 4.7uF 20% 50V
C861 1-104-658-91 ELECT 100uF 20% 10V
C862 1-104-658-91 ELECT 100uF 20% 10V
C865 1-126-965-11 ELECT 22uF 20% 50V
< CAPACITOR >
C501 1-126-964-11 ELECT 10uF 20% 50V
C502 1-162-962-11 CERAMIC CHIP 470PF 10% 50V
C503 1-162-962-11 CERAMIC CHIP 470PF 10% 50V
C504 1-162-962-11 CERAMIC CHIP 470PF 10% 50V
C505 1-126-964-11 ELECT 10uF 20% 50V
C506 1-126-947-11 ELECT 47uF 20% 35V
C507 1-162-960-11 CERAMIC CHIP 220PF 10% 50V
C508 1-162-960-11 CERAMIC CHIP 220PF 10% 50V
C509 1-126-947-11 ELECT 47uF 20% 35V
C510 1-126-947-11 ELECT 47uF 20% 35V
C511 1-162-960-11 CERAMIC CHIP 220PF 10% 50V
C513 1-162-964-11 CERAMIC CHIP 0.001uF 10% 50V
C515 1-126-967-11 ELECT 47uF 20% 50V
C516 1-126-967-11 ELECT 47uF 20% 50V
C518 1-128-563-11 ELECT 100uF 20% 100V
C522 1-137-749-11 MYLAR 0.1uF 100V
C523 1-137-749-11 MYLAR 0.1uF 100V
C524 1-137-749-11 MYLAR 0.1uF 100V
C525 1-137-749-11 MYLAR 0.1uF 100V
C526 1-136-497-81 FILM 0.1uF 5% 50V
C527 1-136-497-81 FILM 0.1uF 5% 50V
C528 1-128-562-11 ELECT 47uF 20% 100V
C529 1-162-974-11 CERAMIC CHIP 0.01uF 50V
C530 1-128-550-11 ELECT 2200uF 20% 50V
C531 1-128-550-11 ELECT 2200uF 20% 50V
< CONNECTOR >
CN501 1-784-031-41 CONNECTOR, BOARD TO BOARD 8P
* CN502 1-564-526-11 PLUG, CONNECTOR 11P
CN503 1-691-773-11 PLUG (MICRO CONNECTOR) 11P
CN505 1-785-330-11 PIN, CONNECTOR (LIGHT ANGLE) 4P
* CN506 1-564-518-11 PLUG, CONNECTOR 3P
CN507 1-564-506-11 PLUG, CONNECTOR 3P
CN508 1-766-719-41 CONNECTOR, BOARD TO BOARD 10P
< DIODE >
D501 8-719-988-61 DIODE 1SS355TE-17
D502 8-719-083-83 DIODE UDZS-TE17-15B
D503 8-719-083-83 DIODE UDZS-TE17-15B
D504 8-719-988-61 DIODE 1SS355TE-17
D505 8-719-988-61 DIODE 1SS355TE-17
D506 8-719-988-61 DIODE 1SS355TE-17
D507 8-719-988-61 DIODE 1SS355TE-17
D508 8-719-988-61 DIODE 1SS355TE-17
D509 8-719-988-61 DIODE 1SS355TE-17
D510 8-719-988-61 DIODE 1SS355TE-17
D850 8-719-069-56 DIODE UDZSTE-176.2B
D851 8-719-978-33 DIODE DTZ-TT11-6.8B
D852 8-719-988-61 DIODE 1SS355TE-17
D853 8-719-988-61 DIODE 1SS355TE-17
< EARTH TERMINAL >
C534 1-126-953-11 ELECT 2200uF 20% 35V
C535 1-126-953-11 ELECT 2200uF 20% 35V
C537 1-131-992-91 CERAMIC CHIP 100000PF 35V (EA)
* EP502 1-537-738-21 TERMINAL, EARTH
91
Page 92
HCD-NXM4D
FRONT AMP
Ref. No. Part No. Description Remarks Ref. No. Part No. Description Remarks
< IC >
0 R524 1-217-637-00 FUSIBLE 1 5% 1/4W
IC501 6-706-124-01 IC STK413-420
IC850 6-703-610-01 IC RT8H015C-T112-1
< COIL >
L501 1-420-872-52 COIL, AIR-CORE (EA)
L502 1-420-872-52 COIL, AIR-CORE (EA)
L503 1-420-872-52 COIL, AIR-CORE (EA)
L504 1-420-872-52 COIL, AIR-CORE (EA)
L505 1-420-872-52 COIL, AIR-CORE (EA)
L506 1-420-872-52 COIL, AIR-CORE (EA)
< TRANSISTOR >
Q501 8-729-120-28 TRANSISTOR 2SC1623-L5L6
Q502 8-729-120-28 TRANSISTOR 2SC1623-L5L6
Q503 8-729-271-31 TRANSISTOR 2SC2713-G
Q504 8-729-140-84 TRANSISTOR 2SC1841-PAFAEA
Q505 8-729-140-84 TRANSISTOR 2SC1841-PAFAEA
Q506 8-729-140-84 TRANSISTOR 2SC1841-PAFAEA
Q507 8-729-216-31 TRANSISTOR 2SA1163-G
Q508 8-729-120-28 TRANSISTOR 2SC1623-L5L6
Q509 8-729-120-28 TRANSISTOR 2SC1623-L5L6
Q510 8-729-120-28 TRANSISTOR 2SC1623-L5L6
Q850 8-729-120-28 TRANSISTOR 2SC1623-L5L6
Q851 8-729-120-28 TRANSISTOR 2SC1623-L5L6
Q852 8-729-120-28 TRANSISTOR 2SC1623-L5L6
Q853 8-729-141-73 TRANSISTOR 2SC3624A-T1L15L16
Q854 8-729-141-73 TRANSISTOR 2SC3624A-T1L15L16
Q858 8-729-026-68 TRANSISTOR 2SD2525 (TP)
Q859 8-729-120-28 TRANSISTOR 2SC1623-L5L6
Q860 8-729-120-28 TRANSISTOR 2SC1623-L5L6
Q861 8-729-027-43 TRANSISTOR DTC114EKA-T146
Q868 8-729-027-23 TRANSISTOR DTA114EKA-T146
Q869 8-729-027-43 TRANSISTOR DTC114EKA-T146
Q890 8-729-027-43 TRANSISTOR DTC114EKA-T146
< RESISTOR >
R502 1-216-821-11 METAL CHIP 1K 5% 1/10W
R503 1-216-841-11 METAL CHIP 47K 5% 1/10W
R505 1-216-821-11 METAL CHIP 1K 5% 1/10W
R506 1-216-841-11 METAL CHIP 47K 5% 1/10W
R507 1-216-841-11 METAL CHIP 47K 5% 1/10W
R509 1-216-821-11 METAL CHIP 1K 5% 1/10W
R510 1-216-815-11 METAL CHIP 330 5% 1/10W
R511 1-216-811-11 METAL CHIP 150 5% 1/10W
R512 1-216-811-11 METAL CHIP 150 5% 1/10W
R513 1-216-841-11 METAL CHIP 47K 5% 1/10W
R515 1-216-839-11 METAL CHIP 33K 5% 1/10W
R516 1-216-841-11 METAL CHIP 47K 5% 1/10W
R517 1-216-841-11 METAL CHIP 47K 5% 1/10W
R518 1-216-845-11 METAL CHIP 100K 5% 1/10W
R519 1-216-845-11 METAL CHIP 100K 5% 1/10W
0 R520 1-245-605-51 FUSIBLE 100 5% 1/4W
0 R521 1-245-605-51 FUSIBLE 100 5% 1/4W
R522 1-216-835-11 METAL CHIP 15K 5% 1/10W
R523 1-216-839-11 METAL CHIP 33K 5% 1/10W
92
R525 1-249-677-31 CARBON 1.5K 5% 1/2W
R526 1-249-677-31 CARBON 1.5K 5% 1/2W
R527 1-216-841-11 METAL CHIP 47K 5% 1/10W
0 R529 1-220-755-11 METAL 0.22 10% 2W
R530 1-216-821-11 METAL CHIP 1K 5% 1/10W
R531 1-216-835-11 METAL CHIP 15K 5% 1/10W
R532 1-216-845-11 METAL CHIP 100K 5% 1/10W
R533 1-216-845-11 METAL CHIP 100K 5% 1/10W
R534 1-216-835-11 METAL CHIP 15K 5% 1/10W
R535 1-216-821-11 METAL CHIP 1K 5% 1/10W
0 R536 1-220-755-11 METAL 0.22 10% 2W
R538 1-216-835-11 METAL CHIP 15K 5% 1/10W
R539 1-216-821-11 METAL CHIP 1K 5% 1/10W
R540 1-216-845-11 METAL CHIP 100K 5% 1/10W
0 R541 1-220-894-11 METAL 0.22 10% 5W
R542 1-249-625-31 CARBON 10 5% 1/2W
R543 1-249-625-31 CARBON 10 5% 1/2W
R544 1-249-625-31 CARBON 10 5% 1/2W
R545 1-216-825-11 METAL CHIP 2.2K 5% 1/10W
R546 1-216-841-11 METAL CHIP 47K 5% 1/10W
R547 1-216-843-11 METAL CHIP 68K 5% 1/10W
R548 1-216-830-11 METAL CHIP 5.6K 5% 1/10W
R549 1-216-825-11 METAL CHIP 2.2K 5% 1/10W
R550 1-216-825-11 METAL CHIP 2.2K 5% 1/10W
R554 1-216-837-11 METAL CHIP 22K 5% 1/10W
R555 1-216-837-11 METAL CHIP 22K 5% 1/10W
R556 1-216-837-11 METAL CHIP 22K 5% 1/10W
R557 1-216-829-11 METAL CHIP 4.7K 5% 1/10W
R559 1-216-825-11 METAL CHIP 2.2K 5% 1/10W
R560 1-216-833-11 METAL CHIP 10K 5% 1/10W
R561 1-249-625-31 CARBON 10 5% 1/2W
(EA)
R562 1-249-625-31 CARBON 10 5% 1/2W
(EA)
R563 1-249-625-31 CARBON 10 5% 1/2W
(EA)
R564 1-216-841-11 METAL CHIP 47K 5% 1/10W
R565 1-216-841-11 METAL CHIP 47K 5% 1/10W
R566 1-249-625-31 CARBON 10 5% 1/2W
(EA)
R567 1-216-843-11 METAL CHIP 68K 5% 1/10W
R568 1-216-843-11 METAL CHIP 68K 5% 1/10W
R569 1-216-841-11 METAL CHIP 47K 5% 1/10W
0 R570 1-216-458-11 METAL OXIDE 1.8K 5% 2W
0 R571 1-216-458-11 METAL OXIDE 1.8K 5% 2W
0 R572 1-216-458-11 METAL OXIDE 1.8K 5% 2W
0 R573 1-216-458-11 METAL OXIDE 1.8K 5% 2W
R574 1-216-825-11 METAL CHIP 2.2K 5% 1/10W
R575 1-216-833-11 METAL CHIP 10K 5% 1/10W
R576 1-249-625-31 CARBON 10 5% 1/2W
(EA)
R577 1-216-841-11 METAL CHIP 47K 5% 1/10W
R578 1-249-625-31 CARBON 10 5% 1/2W
(EA)
0 R580 1-215-863-11 METAL OXIDE 100 5% 1W
0 R581 1-215-863-11 METAL OXIDE 100 5% 1W
The components identified by
mark 0 or dotted line with mark
0 are critical for safety.
Replace only with part number
specified.
Page 93
HCD-NXM4D
HPFRONT AMP
Ref. No. Part No. Description Remarks Ref. No. Part No. Description Remarks
R582 1-216-841-11 METAL CHIP 47K 5% 1/10W
R583 1-249-625-31 CARBON 10 5% 1/2W
(EA)
R584 1-249-625-31 CARBON 10 5% 1/2W
(EA)
R585 1-249-625-31 CARBON 10 5% 1/2W
(EA)
R586 1-216-841-11 METAL CHIP 47K 5% 1/10W
R587 1-249-625-31 CARBON 10 5% 1/2W
(EA)
R589 1-216-841-11 METAL CHIP 47K 5% 1/10W
R590 1-249-625-31 CARBON 10 5% 1/2W
(EA)
R591 1-249-625-31 CARBON 10 5% 1/2W
(EA)
R595 1-249-689-31 CARBON 4.7K 5% 1/2W
R596 1-249-689-31 CARBON 4.7K 5% 1/2W
R598 1-249-689-31 CARBON 4.7K 5% 1/2W
R599 1-249-689-31 CARBON 4.7K 5% 1/2W
R850 1-216-825-11 METAL CHIP 2.2K 5% 1/10W
R851 1-216-829-11 METAL CHIP 4.7K 5% 1/10W
R854 1-216-821-11 METAL CHIP 1K 5% 1/10W
R855 1-215-891-11 METAL OXIDE 680 5% 2W
R857 1-216-821-11 METAL CHIP 1K 5% 1/10W
R858 1-215-891-11 METAL OXIDE 680 5% 2W
R860 1-216-829-11 METAL CHIP 4.7K 5% 1/10W
R862 1-216-837-11 METAL CHIP 22K 5% 1/10W
R863 1-216-837-11 METAL CHIP 22K 5% 1/10W
R864 1-216-849-11 METAL CHIP 220K 5% 1/10W
R865 1-216-809-11 METAL CHIP 100 5% 1/10W
R866 1-216-841-11 METAL CHIP 47K 5% 1/10W
R867 1-216-829-11 METAL CHIP 4.7K 5% 1/10W
R870 1-216-829-11 METAL CHIP 4.7K 5% 1/10W
R871 1-216-825-11 METAL CHIP 2.2K 5% 1/10W
R872 1-216-845-11 METAL CHIP 100K 5% 1/10W
R875 1-216-813-11 METAL CHIP 220 5% 1/10W
C1064 1-162-964-11 CERAMIC CHIP 0.001uF 10% 50V
C1066 1-162-949-11 CERAMIC CHIP 47PF 5% 50V
C1067 1-162-957-11 CERAMIC CHIP 220PF 5% 50V
C1068 1-124-464-11 ELECT 0.22uF 20% 50V
C1069 1-124-257-00 ELECT 2.2uF 20% 50V
C1070 1-162-953-11 CERAMIC CHIP 100PF 5% 50V
C1071 1-162-949-11 CERAMIC CHIP 47PF 5% 50V
C1072 1-124-247-91 ELECT 10uF 20% 35V
C1073 1-124-257-00 ELECT 2.2uF 20% 50V
C1074 1-126-176-11 ELECT 220uF 20% 10V
C1076 1-124-247-91 ELECT 10uF 20% 35V
C1077 1-126-160-11 ELECT 1uF 20% 50V
C1078 1-124-257-00 ELECT 2.2uF 20% 50V
C1079 1-164-227-11 CERAMIC CHIP 0.022uF 10% 25V
C1080 1-126-160-11 ELECT 1uF 20% 50V
C1082 1-124-589-11 ELECT 47uF 20% 16V
C1083 1-124-589-11 ELECT 47uF 20% 16V
C1084 1-110-563-11 CERAMIC CHIP 0.068uF 10% 16V
C1085 1-162-969-11 CERAMIC CHIP 0.0068uF 10% 25V
C1086 1-162-964-11 CERAMIC CHIP 0.001uF 10% 50V
C1087 1-107-826-11 CERAMIC CHIP 0.1uF 10% 16V
C1088 1-162-964-11 CERAMIC CHIP 0.001uF 10% 50V
C1089 1-110-563-11 CERAMIC CHIP 0.068uF 10% 16V
C1090 1-125-891-11 CERAMIC CHIP 0.47uF 10% 10V
C1091 1-125-891-11 CERAMIC CHIP 0.47uF 10% 10V
C1092 1-162-969-11 CERAMIC CHIP 0.0068uF 10% 25V
C1093 1-162-971-11 CERAMIC CHIP 0.001uF 10% 50V
C1094 1-162-971-11 CERAMIC CHIP 0.001uF 10% 50V
C1095 1-162-974-11 CERAMIC CHIP 0.01uF 50V
C1096 1-162-964-11 CERAMIC CHIP 0.001uF 10% 50V
< CONNECTOR >
CN1060 1-785-330-11 PIN, CONNECTOR (LIGHT ANGLE) 4P
CN1062 1-785-329-11 PIN, CONNECTOR (LIGHT ANGLE) 3P
R876 1-216-813-11 METAL CHIP 220 5% 1/10W
R880 1-216-837-11 METAL CHIP 22K 5% 1/10W
R890 1-216-833-11 METAL CHIP 10K 5% 1/10W
< RELAY >
RY501 1-755-373-11 RELAY
RY502 1-755-373-11 RELAY
< THERMISTOR >
TH531 1-807-796-11 THERMISTOR
< TERMINAL >
TM502 1-694-656-21 TERMINAL BOARD (6CH SPEAKER) (SPEAKER)
******************************************************
HP BOARD
********
< CAPACITOR >
C1060 1-124-464-11 ELECT 0.22uF 20% 50V
C1061 1-162-974-11 CERAMIC CHIP 0.01uF 50V
C1062 1-124-464-11 ELECT 0.22uF 20% 50V
C1063 1-162-974-11 CERAMIC CHIP 0.01uF 50V
< DIODE >
D1061 8-719-069-54 DIODE UDZSTE-175.1B
< EARTH TERMINAL >
* EP1060 1-537-738-21 TERMINAL, EARTH
* EP1061 1-537-738-21 TERMINAL, EARTH
< FERRITE BEAD >
FB1001 1-414-671-11 INDUCTOR, FERRITE BEAD
FB1002 1-414-671-11 INDUCTOR, FERRITE BEAD
FB1010 1-469-125-11 FERRITE EMI
FB1011 1-469-125-11 FERRITE EMI
FB1003 1-414-671-11 INDUCTOR, FERRITE BEAD
FB1004 1-414-671-11 INDUCTOR, FERRITE BEAD
< IC >
IC1060 8-759-710-97 IC NJM4565M-D
IC1061 8-759-496-41 IC M65850FP-E1
< JACK >
J1060 1-770-226-11 JACK (LARGE TYPE) (MIC 1)
93
Page 94
HCD-NXM4D
HP
Ref. No. Part No. Description Remarks Ref. No. Part No. Description Remarks
J1061 1-770-226-11 JACK (LARGE TYPE) (MIC 2)
J1063 1-750-032-11 JACK (DIA. 3.5) (PHONES)
JR1080 1-216-864-11 SHORT CHIP 0
JR1081 1-216-864-11 SHORT CHIP 0
R1060 1-216-821-11 METAL CHIP 1K 5% 1/10W
R1061 1-216-833-11 METAL CHIP 10K 5% 1/10W
R1062 1-216-821-11 METAL CHIP 1K 5% 1/10W
R1063 1-216-833-11 METAL CHIP 10K 5% 1/10W
R1064 1-216-845-11 METAL CHIP 100K 5% 1/10W
R1065 1-216-821-11 METAL CHIP 1K 5% 1/10W
R1066 1-216-841-11 METAL CHIP 47K 5% 1/10W
R1067 1-216-809-11 METAL CHIP 100 5% 1/10W
R1068 1-216-833-11 METAL CHIP 10K 5% 1/10W
R1069 1-216-847-11 METAL CHIP 150K 5% 1/10W
R1070 1-216-809-11 METAL CHIP 100 5% 1/10W
R1071 1-216-833-11 METAL CHIP 10K 5% 1/10W
R1072 1-216-833-11 METAL CHIP 10K 5% 1/10W
R1073 1-216-845-11 METAL CHIP 100K 5% 1/10W
R1074 1-216-864-11 SHORT CHIP 0
R1075 1-216-833-11 METAL CHIP 10K 5% 1/10W
R1076 1-216-835-11 METAL CHIP 15K 5% 1/10W
R1077 1-216-835-11 METAL CHIP 15K 5% 1/10W
R1078 1-216-837-11 METAL CHIP 22K 5% 1/10W
R1079 1-216-813-11 METAL CHIP 220 5% 1/10W
R1080 1-216-846-11 METAL CHIP 120K 5% 1/10W
R1081 1-216-837-11 METAL CHIP 22K 5% 1/10W
R1082 1-216-837-11 METAL CHIP 22K 5% 1/10W
R1083 1-216-837-11 METAL CHIP 22K 5% 1/10W
R1084 1-216-841-11 METAL CHIP 47K 5% 1/10W
R1085 1-216-837-11 METAL CHIP 22K 5% 1/10W
R1086 1-216-837-11 METAL CHIP 22K 5% 1/10W
R1088 1-216-864-11 SHORT CHIP 0
MAIN
< SHORT >
< RESISTOR >
C5 1-124-261-00 ELECT 10uF 20% 50V
C6 1-124-261-00 ELECT 10uF 20% 50V
C19 1-124-259-11 ELECT 4.7uF 20% 50V
C20 1-124-259-11 ELECT 4.7uF 20% 50V
C21 1-126-965-91 ELECT 22uF 20% 50V
C22 1-126-965-91 ELECT 22uF 20% 50V
C31 1-164-156-11 CERAMIC CHIP 0.1uF 25V
C35 1-164-156-11 CERAMIC CHIP 0.1uF 25V
C37 1-164-156-11 CERAMIC CHIP 0.1uF 25V
C38 1-164-156-11 CERAMIC CHIP 0.1uF 25V
C39 1-164-156-11 CERAMIC CHIP 0.1uF 25V
C40 1-164-156-11 CERAMIC CHIP 0.1uF 25V
C43 1-109-953-11 ELECT 2.2uF 20% 50V
C101 1-126-964-11 ELECT 10uF 20% 50V
C102 1-126-964-11 ELECT 10uF 20% 50V
C103 1-126-964-11 ELECT 10uF 20% 50V
C104 1-126-964-11 ELECT 10uF 20% 50V
C105 1-136-497-81 FILM 0.1uF 5% 50V
C106 1-126-964-11 ELECT 10uF 20% 50V
C107 1-164-227-11 CERAMIC CHIP 0.022uF 10% 25V
C108 1-164-227-11 CERAMIC CHIP 0.022uF 10% 25V
C109 1-126-964-11 ELECT 10uF 20% 50V
C110 1-165-176-11 CERAMIC CHIP 0.047uF 10% 16V
C111 1-164-172-11 CERAMIC CHIP 0.0056uF 10% 25V
C112 1-126-964-11 ELECT 10uF 20% 50V
C113 1-137-194-81 FILM 0.47uF 5% 50V
C114 1-137-194-81 FILM 0.47uF 5% 50V
C115 1-126-964-11 ELECT 10uF 20% 50V
C116 1-126-964-11 ELECT 10uF 20% 50V
C117 1-126-960-11 ELECT 1uF 20% 50V
C118 1-130-483-00 MYLAR 0.01uF 5% 50V
C119 1-126-947-11 ELECT 47uF 20% 35V
C120 1-124-261-00 ELECT 10uF 20% 50V
C121 1-136-177-00 FILM 1uF 5% 50V
C122 1-126-963-11 ELECT 4.7uF 20% 50V
C123 1-164-156-11 CERAMIC CHIP 0.1uF 25V
< VARIABLE RESISTOR >
RV1060 1-223-983-11 RES, VAR, CARBON 50K (MIC LEVEL)
RV1061 1-223-983-11 RES, VAR, CARBON 50K
(ECHO LEVEL)
******************************************************
A-1063-570-A MAIN BOARD, COMPLETE (TH)
A-1063-678-A MAIN BOARD, COMPLETE (E3)
A-1063-681-A MAIN BOARD, COMPLETE (E15)
A-4752-308-A MAIN BOARD, COMPLETE (SP, MY)
A-4752-374-A MAIN BOARD, COMPLETE (EA)
A-4752-526-A MAIN BOARD, COMPLETE (AUS)
A-4752-532-A MAIN BOARD, COMPLETE (E2)
******************
7-685-646-79 SCREW +BVTP 3X8 TYPE2 N-S
< CAPACITOR >
C1 1-126-964-11 ELECT 10uF 20% 50V
C2 1-126-964-11 ELECT 10uF 20% 50V
C3 1-124-261-00 ELECT 10uF 20% 50V
C4 1-124-261-00 ELECT 10uF 20% 50V
C124 1-104-658-91 ELECT 100uF 20% 10V
C125 1-104-658-91 ELECT 100uF 20% 10V
C126 1-104-658-91 ELECT 100uF 20% 10V
C127 1-104-658-91 ELECT 100uF 20% 10V
C128 1-126-964-11 ELECT 10uF 20% 50V
C129 1-137-194-81 FILM 0.47uF 5% 50V
C130 1-130-491-00 MYLAR 0.047uF 5% 50V
C131 1-162-919-11 CERAMIC CHIP 22PF 5% 50V
C132 1-130-483-00 MYLAR 0.01uF 5% 50V
C133 1-130-483-00 MYLAR 0.01uF 5% 50V
C134 1-126-964-11 ELECT 10uF 20% 50V
C135 1-126-960-11 ELECT 1uF 20% 50V
C136 1-126-964-11 ELECT 10uF 20% 50V
C137 1-137-194-81 FILM 0.47uF 5% 50V
C138 1-137-190-91 FILM 0.22uF 5% 50V
C139 1-126-960-11 ELECT 1uF 20% 50V
C140 1-126-960-11 ELECT 1uF 20% 50V
C141 1-162-960-11 CERAMIC CHIP 220PF 10% 50V
C142 1-126-964-11 ELECT 10uF 20% 50V
C143 1-162-960-11 CERAMIC CHIP 220PF 10% 50V
C144 1-126-964-11 ELECT 10uF 20% 50V
94
Page 95

HCD-NXM4D
MAIN
Ref. No. Part No. Description Remarks Ref. No. Part No. Description Remarks
C146 1-162-969-11 CERAMIC CHIP 0.0068uF 10% 25V
C147 1-162-927-11 CERAMIC CHIP 100PF 5% 50V
C148 1-162-927-11 CERAMIC CHIP 100PF 5% 50V
C149 1-126-964-11 ELECT 10uF 20% 50V
C150 1-163-077-00 CERAMIC CHIP 0.1uF 50V
C151 1-126-964-11 ELECT 10uF 20% 50V
C152 1-126-964-11 ELECT 10uF 20% 50V
C154 1-126-964-11 ELECT 10uF 20% 50V
C155 1-136-497-81 FILM 0.1uF 5% 50V
C156 1-126-964-11 ELECT 10uF 20% 50V
C157 1-164-227-11 CERAMIC CHIP 0.022uF 10% 25V
C158 1-164-227-11 CERAMIC CHIP 0.022uF 10% 25V
C159 1-126-964-11 ELECT 10uF 20% 50V
C160 1-165-176-11 CERAMIC CHIP 0.047uF 10% 16V
C161 1-164-172-11 CERAMIC CHIP 0.0056uF 10% 25V
C162 1-126-964-11 ELECT 10uF 20% 50V
C163 1-137-194-81 FILM 0.47uF 5% 50V
C164 1-137-194-81 FILM 0.47uF 5% 50V
C165 1-126-964-11 ELECT 10uF 20% 50V
C166 1-126-964-11 ELECT 10uF 20% 50V
C167 1-126-960-11 ELECT 1uF 20% 50V
C168 1-130-483-00 MYLAR 0.01uF 5% 50V
C169 1-126-947-11 ELECT 47uF 20% 35V
C170 1-124-261-00 ELECT 10uF 20% 50V
C173 1-162-927-11 CERAMIC CHIP 100PF 5% 50V
C174 1-162-927-11 CERAMIC CHIP 100PF 5% 50V
C183 1-126-961-11 ELECT 2.2uF 20% 50V
C191 1-162-960-11 CERAMIC CHIP 220PF 10% 50V
C192 1-126-964-11 ELECT 10uF 20% 50V
C193 1-162-960-11 CERAMIC CHIP 220PF 10% 50V
C194 1-126-964-11 ELECT 10uF 20% 50V
C196 1-162-969-11 CERAMIC CHIP 0.0068uF 10% 25V
C197 1-162-927-11 CERAMIC CHIP 100PF 5% 50V
C198 1-162-927-11 CERAMIC CHIP 100PF 5% 50V
C199 1-126-964-11 ELECT 10uF 20% 50V
C201 1-124-261-00 ELECT 10uF 20% 50V
C202 1-162-960-11 CERAMIC CHIP 220PF 10% 50V
C203 1-162-960-11 CERAMIC CHIP 220PF 10% 50V
C204 1-124-261-00 ELECT 10uF 20% 50V
C205 1-162-964-11 CERAMIC CHIP 0.001uF 10% 50V
C206 1-162-964-11 CERAMIC CHIP 0.001uF 10% 50V
C207 1-124-261-00 ELECT 10uF 20% 50V
C208 1-164-227-11 CERAMIC CHIP 0.022uF 10% 25V
C209 1-162-964-11 CERAMIC CHIP 0.001uF 10% 50V
C210 1-162-966-11 CERAMIC CHIP 0.0022uF 10% 50V
C211 1-124-261-00 ELECT 10uF 20% 50V
C212 1-124-261-00 ELECT 10uF 20% 50V
C213 1-124-261-00 ELECT 10uF 20% 50V
C220 1-124-261-00 ELECT 10uF 20% 50V
C221 1-162-964-11 CERAMIC CHIP 0.001uF 10% 50V
C222 1-124-261-00 ELECT 10uF 20% 50V
C223 1-162-964-11 CERAMIC CHIP 0.001uF 10% 50V
C224 1-124-261-00 ELECT 10uF 20% 50V
C226 1-126-160-11 ELECT 1uF 20% 50V
C228 1-137-190-91 FILM 0.22uF 5% 50V
C229 1-136-497-81 FILM 0.1uF 5% 50V
C233 1-125-972-91 ELECT 100uF 20% 16V
C238 1-125-972-91 ELECT 100uF 20% 16V
C239 1-126-925-11 ELECT 470uF 20% 10V
C251 1-124-261-00 ELECT 10uF 20% 50V
C252 1-162-960-11 CERAMIC CHIP 220PF 10% 50V
C253 1-162-960-11 CERAMIC CHIP 220PF 10% 50V
C254 1-124-261-00 ELECT 10uF 20% 50V
C255 1-162-964-11 CERAMIC CHIP 0.001uF 10% 50V
C256 1-162-964-11 CERAMIC CHIP 0.001uF 10% 50V
C257 1-124-261-00 ELECT 10uF 20% 50V
C258 1-164-227-11 CERAMIC CHIP 0.022uF 10% 25V
C259 1-162-964-11 CERAMIC CHIP 0.001uF 10% 50V
C260 1-162-966-11 CERAMIC CHIP 0.0022uF 10% 50V
C261 1-124-261-00 ELECT 10uF 20% 50V
C262 1-124-261-00 ELECT 10uF 20% 50V
C263 1-124-261-00 ELECT 10uF 20% 50V
C270 1-124-261-00 ELECT 10uF 20% 50V
C271 1-124-261-00 ELECT 10uF 20% 50V
C272 1-124-261-00 ELECT 10uF 20% 50V
C273 1-124-261-00 ELECT 10uF 20% 50V
C274 1-124-261-00 ELECT 10uF 20% 50V
C275 1-124-261-00 ELECT 10uF 20% 50V
C276 1-124-261-00 ELECT 10uF 20% 50V
C277 1-124-261-00 ELECT 10uF 20% 50V
C301 1-162-961-11 CERAMIC CHIP 330PF 10% 50V
C302 1-126-964-11 ELECT 10uF 20% 50V
C303 1-162-961-11 CERAMIC CHIP 330PF 10% 50V
C304 1-126-964-11 ELECT 10uF 20% 50V
C305 1-162-964-11 CERAMIC CHIP 0.001uF 10% 50V
C306 1-162-927-11 CERAMIC CHIP 100PF 5% 50V
C307 1-162-961-11 CERAMIC CHIP 330PF 10% 50V
C308 1-162-970-11 CERAMIC CHIP 0.01uF 10% 25V
C311 1-130-481-00 MYLAR 0.0068uF 5% 50V
C312 1-130-483-00 MYLAR 0.01uF 5% 50V
C313 1-126-947-11 ELECT 47uF 20% 35V
C314 1-137-150-11 FILM 0.01uF 5% 100V
C315 1-130-479-00 MYLAR 0.0047uF 5% 50V
C322 1-162-968-11 CERAMIC CHIP 0.0047uF 10% 50V
C324 1-162-968-11 CERAMIC CHIP 0.0047uF 10% 50V
C351 1-162-961-11 CERAMIC CHIP 330PF 10% 50V
C352 1-126-964-11 ELECT 10uF 20% 50V
C353 1-162-961-11 CERAMIC CHIP 330PF 10% 50V
C354 1-126-964-11 ELECT 10uF 20% 50V
C355 1-162-964-11 CERAMIC CHIP 0.001uF 10% 50V
C356 1-162-927-11 CERAMIC CHIP 100PF 5% 50V
C357 1-162-961-11 CERAMIC CHIP 330PF 10% 50V
C358 1-162-970-11 CERAMIC CHIP 0.01uF 10% 25V
C368 1-164-156-11 CERAMIC CHIP 0.1uF 25V
C369 1-164-156-11 CERAMIC CHIP 0.1uF 25V
C383 1-164-156-11 CERAMIC CHIP 0.1uF 25V
C384 1-104-655-91 ELECT 470uF 20% 6.3V
C390 1-126-965-91 ELECT 22uF 20% 50V
C391 1-136-497-81 FILM 0.1uF 5% 50V
C392 1-136-497-81 FILM 0.1uF 5% 50V
C393 1-126-964-11 ELECT 10uF 20% 50V
C410 1-162-918-11 CERAMIC CHIP 18PF 5% 50V
C411 1-162-918-11 CERAMIC CHIP 18PF 5% 50V
C412 1-164-156-11 CERAMIC CHIP 0.1uF 25V
C416 1-164-156-11 CERAMIC CHIP 0.1uF 25V
95
Page 96

HCD-NXM4D
MAIN
Ref. No. Part No. Description Remarks Ref. No. Part No. Description Remarks
C417 1-104-656-11 ELECT 2200uF 20% 6.3V
C462 1-104-658-91 ELECT 100uF 20% 10V
C463 1-164-156-11 CERAMIC CHIP 0.1uF 25V
C475 1-162-970-11 CERAMIC CHIP 0.01uF 10% 25V
D395 8-719-988-61 DIODE 1SS355TE-17
D396 8-719-988-61 DIODE 1SS355TE-17
D397 8-719-988-61 DIODE 1SS355TE-17
D901 8-719-080-53 DIODE RK36LF-B3
C476 1-162-970-11 CERAMIC CHIP 0.01uF 10% 25V
C497 1-164-156-11 CERAMIC CHIP 0.1uF 25V
C498 1-126-964-11 ELECT 10uF 20% 50V
C499 1-164-156-11 CERAMIC CHIP 0.1uF 25V
C900 1-128-547-11 ELECT 6800 20% 16V
C901 1-126-956-91 ELECT 0.1uF 20% 50V
C902 1-104-658-91 ELECT 100uF 20% 10V
C903 1-126-964-11 ELECT 10uF 20% 50V
C904 1-104-658-91 ELECT 100uF 20% 10V
C905 1-126-956-91 ELECT 0.1uF 20% 50V
C906 1-104-658-91 ELECT 100uF 20% 10V
C907 1-126-964-11 ELECT 10uF 20% 50V
C908 1-126-767-11 ELECT 1000uF 20% 16V
C910 1-126-767-11 ELECT 1000uF 20% 16V
C911 1-165-718-21 ELECT 3300uF 20% 6.3V
C912 1-126-916-11 ELECT 1000uF 20% 6.3V
C914 1-126-767-11 ELECT 1000uF 20% 16V
C915 1-165-718-21 ELECT 3300uF 20% 6.3V
C916 1-126-916-11 ELECT 1000uF 20% 6.3V
C919 1-126-964-11 ELECT 10uF 20% 50V
C920 1-126-964-11 ELECT 10uF 20% 50V
C930 1-126-768-11 ELECT 2200uF 20% 16V
C952 1-164-156-11 CERAMIC CHIP 0.1uF 25V
C953 1-164-156-11 CERAMIC CHIP 0.1uF 25V
< CONNECTOR >
CN101 1-691-769-11 PLUG (MICRO CONNECTOR) 7P
* CN102 1-774-876-21 CONNECTOR, BOARD TO BOARD 8P
CN103 1-766-715-21 CONNECTOR, BOARD TO BOARD 10P
CN104 1-785-318-11 PIN, CONNECTOR (STRAIGHT) 6P
CN108 1-785-330-11 PIN, CONNECTOR (LIGHT ANGLE) 4P
CN109 1-784-774-11 CONNECTOR, FFC 13P
CN110 1-784-776-11 CONNECTOR, FFC 15P
CN112 1-784-766-11 CONNECTOR, FFC 5P
CN201 1-784-418-11 CONNECTOR, FFC (LIF (NON-ZIF) 21P
CN202 1-779-275-11 CONNECTOR, FFC (LIF (NON-ZIF)) 7P
CN204 1-568-830-11 CONNECTOR, FFC 11P
* CN301 1-564-719-11 PIN, CONNECTOR (SMALL TYPE) 3P
* CN302 1-564-724-11 PIN, CONNECTOR (SMALL TYPE) 8P
CN303 1-784-774-11 CONNECTOR, FFC 13P
CN372 1-779-289-11 CONNECTOR, FFC (LIF (NON-ZIF)) 21P
< DIODE >
D181 8-719-988-61 DIODE 1SS355TE-17
D182 8-719-988-61 DIODE 1SS355TE-17
D183 8-719-988-61 DIODE 1SS355TE-17
D201 8-719-988-61 DIODE 1SS355TE-17
D202 8-719-988-61 DIODE 1SS355TE-17
D321 8-719-988-61 DIODE 1SS355TE-17
D322 8-719-988-61 DIODE 1SS355TE-17
D391 8-719-988-61 DIODE 1SS355TE-17
D392 8-719-988-61 DIODE 1SS355TE-17
D393 8-719-988-61 DIODE 1SS355TE-17
D394 8-719-988-61 DIODE 1SS355TE-17
D902 8-719-080-53 DIODE RK36LF-B3
D903 6-500-522-31 DIODE 10EDB40-TB5
D904 8-719-988-61 DIODE 1SS355TE-17
D905 8-719-083-58 DIODE UDZSTE-173.9B
< EARTH TERMINAL >
EP901 1-537-738-21 TERMINAL, GROUND
< FERRITE BEAD >
FB30 1-469-125-21 FERRITE, EMI (SMD) (1608)
FB34 1-469-125-21 FERRITE, EMI (SMD) (1608)
FB50 1-469-125-21 FERRITE, EMI (SMD) (1608)
FB54 1-469-125-21 FERRITE, EMI (SMD) (1608)
FB80 1-469-125-21 FERRITE, EMI (SMD) (1608)
FB84 1-469-125-21 FERRITE, EMI (SMD) (1608)
FB903 1-410-397-21 FERRITE 1.1uH
< IC >
IC101 6-705-667-01 IC M61537FP-RF0G
IC201 6-703-651-11 IC M61530FP-D60G
IC391 8-759-532-64 IC M62703SL-TP
IC401 6-803-927-01 IC M3062CMEN-A01FPU0
IC901 8-759-701-59 IC NJM78M09FA
IC902 8-759-701-59 IC NJM78M09FA
IC903 8-759-231-53 IC TA7805S
IC904 6-700-897-01 IC PQ12RD21
IC905 6-700-812-01 IC SI-8050JF
IC906 6-700-813-01 IC SI-8033JF
IC951 6-703-679-11 IC PT8300R-TP
< JACK >
J101 1-793-526-21 JACK, PIN 4P (VIDEO/SAT)
< SHORT >
JR7 1-216-864-11 SHORT CHIP 0
JR101 1-216-864-11 SHORT CHIP 0
JR102 1-216-864-11 SHORT CHIP 0
JR103 1-216-296-11 SHORT CHIP 0
JR104 1-216-296-11 SHORT CHIP 0
JR105 1-216-296-11 SHORT CHIP 0
JR106 1-216-864-11 SHORT CHIP 0
JR107 1-216-296-11 SHORT CHIP 0
JR108 1-216-296-11 SHORT CHIP 0
JR109 1-216-296-11 SHORT CHIP 0
JR110 1-216-864-11 SHORT CHIP 0
JR111 1-216-296-11 SHORT CHIP 0
JR112 1-216-864-11 SHORT CHIP 0
JR113 1-216-296-11 SHORT CHIP 0
JR114 1-216-864-11 SHORT CHIP 0
JR115 1-216-296-11 SHORT CHIP 0
JR116 1-216-864-11 SHORT CHIP 0
JR117 1-216-296-11 SHORT CHIP 0
JR118 1-216-864-11 SHORT CHIP 0
96
Page 97

HCD-NXM4D
MAIN
Ref. No. Part No. Description Remarks Ref. No. Part No. Description Remarks
JR119 1-216-864-11 SHORT CHIP 0
JR120 1-216-864-11 SHORT CHIP 0
JR121 1-216-864-11 SHORT CHIP 0
JR122 1-216-296-11 SHORT CHIP 0
JR123 1-216-864-11 SHORT CHIP 0
JR124 1-216-296-11 SHORT CHIP 0
JR125 1-216-864-11 SHORT CHIP 0
JR126 1-216-296-11 SHORT CHIP 0
JR127 1-216-296-11 SHORT CHIP 0
JR128 1-216-864-11 SHORT CHIP 0
JR129 1-216-864-11 SHORT CHIP 0
JR130 1-216-864-11 SHORT CHIP 0
JR131 1-216-296-11 SHORT CHIP 0
JR132 1-216-296-11 SHORT CHIP 0
JR133 1-216-864-11 SHORT CHIP 0
JR203 1-216-864-11 SHORT CHIP 0
JR204 1-216-296-11 SHORT CHIP 0
JR205 1-216-296-11 SHORT CHIP 0
JR206 1-216-296-11 SHORT CHIP 0
JR261 1-216-296-11 SHORT CHIP 0
JR418 1-216-864-11 SHORT CHIP 0
JR449 1-216-864-11 SHORT CHIP 0
< COIL >
L301 1-410-780-11 INDUCTOR 27mH
L311 1-414-189-31 INDUCTOR 100uH
L351 1-410-780-11 INDUCTOR 27mH
L901 1-456-468-11 INDUCTOR 100uH
L902 1-414-398-11 INDUCTOR 10uH
L903 1-414-398-11 INDUCTOR 10uH
L904 1-456-467-11 INDUCTOR 100uH
L951 1-216-296-11 SHORT CHIP 0
< TRANSISTOR >
Q1 6-550-889-01 TRANSISTOR 2SC5938-T112-1B
Q2 6-550-889-01 TRANSISTOR 2SC5938-T112-1B
Q3 6-550-889-01 TRANSISTOR 2SC5938-T112-1B
Q4 6-550-889-01 TRANSISTOR 2SC5938-T112-1B
Q5 6-550-889-01 TRANSISTOR 2SC5938-T112-1B
Q6 6-550-889-01 TRANSISTOR 2SC5938-T112-1B
Q19 8-729-027-43 TRANSISTOR DTC114EKA-T146
Q20 8-729-027-23 TRANSISTOR DTA114EKA-T146
Q21 8-729-027-43 TRANSISTOR DTC114EKA-T146
Q22 8-729-027-23 TRANSISTOR DTA114EKA-T146
Q23 8-729-027-43 TRANSISTOR DTC114EKA-T146
Q24 8-729-027-23 TRANSISTOR DTA114EKA-T146
Q25 8-729-027-43 TRANSISTOR DTC114EKA-T146
Q26 8-729-027-23 TRANSISTOR DTA114EKA-T146
Q27 8-729-027-43 TRANSISTOR DTC114EKA-T146
Q101 8-729-120-28 TRANSISTOR 2SC1623-L5L6
Q102 6-550-889-01 TRANSISTOR 2SC5938-T112-1B
Q103 6-550-889-01 TRANSISTOR 2SC5938-T112-1B
Q104 6-550-889-01 TRANSISTOR 2SC5938-T112-1B
Q140 6-550-889-01 TRANSISTOR 2SC5938-T112-1B
Q141 6-550-889-01 TRANSISTOR 2SC5938-T112-1B
Q151 8-729-120-28 TRANSISTOR 2SC1623-L5L6
Q152 6-550-889-01 TRANSISTOR 2SC5938-T112-1B
Q153 6-550-889-01 TRANSISTOR 2SC5938-T112-1B
Q154 6-550-889-01 TRANSISTOR 2SC5938-T112-1B
Q191 6-550-889-01 TRANSISTOR 2SC5938-T112-1B
Q270 6-550-889-01 TRANSISTOR 2SC5938-T112-1B
Q271 6-550-889-01 TRANSISTOR 2SC5938-T112-1B
Q272 6-550-889-01 TRANSISTOR 2SC5938-T112-1B
Q273 6-550-889-01 TRANSISTOR 2SC5938-T112-1B
Q274 6-550-889-01 TRANSISTOR 2SC5938-T112-1B
Q275 6-550-889-01 TRANSISTOR 2SC5938-T112-1B
Q276 6-550-889-01 TRANSISTOR 2SC5938-T112-1B
Q277 6-550-889-01 TRANSISTOR 2SC5938-T112-1B
Q301 8-729-141-73 TRANSISTOR 2SC3624A-T1L15L16
Q302 8-729-141-73 TRANSISTOR 2SC3624A-T1L15L16
Q303 8-729-141-73 TRANSISTOR 2SC3624A-T1L15L16
Q311 8-729-216-22 TRANSISTOR 2SA1162-G
Q312 8-729-027-43 TRANSISTOR DTC114EKA-T146
Q313 8-729-027-43 TRANSISTOR DTC114EKA-T146
Q314 8-729-027-23 TRANSISTOR DTA114EKA-T146
Q315 8-729-027-43 TRANSISTOR DTC114EKA-T146
Q316 8-729-027-43 TRANSISTOR DTC114EKA-T146
Q317 8-729-040-20 TRANSISTOR RT1P137L-TP
Q318 8-729-142-46 TRANSISTOR 2SC2001-LK
Q321 8-729-027-43 TRANSISTOR DTC114EKA-T146
Q322 8-729-140-04 TRANSISTOR 2SB1116A-L
Q323 8-729-027-43 TRANSISTOR DTC114EKA-T146
Q324 8-729-140-04 TRANSISTOR 2SB1116A-L
Q326 8-729-027-43 TRANSISTOR DTC114EKA-T146
Q327 8-729-140-04 TRANSISTOR 2SB1116A-L
Q341 8-729-120-28 TRANSISTOR 2SC1623-L5L6
Q342 8-729-027-43 TRANSISTOR DTC114EKA-T146
Q343 8-729-027-43 TRANSISTOR DTC114EKA-T146
Q351 8-729-141-73 TRANSISTOR 2SC3624A-T1L15L16
Q352 8-729-141-73 TRANSISTOR 2SC3624A-T1L15L16
Q353 8-729-141-73 TRANSISTOR 2SC3624A-T1L15L16
Q391 8-729-120-28 TRANSISTOR 2SC1623-L5L6
Q401 8-729-027-43 TRANSISTOR DTC114EKA-T146
Q901 8-729-030-19 TRANSISTOR 2SB1640
Q902 8-729-027-43 TRANSISTOR DTC114EKA-T146
Q903 8-729-027-43 TRANSISTOR DTC114EKA-T146
Q904 8-729-027-43 TRANSISTOR DTC114EKA-T146
Q906 8-729-120-28 TRANSISTOR 2SC1623-L5L6
Q28 8-729-027-23 TRANSISTOR DTA114EKA-T146
Q29 8-729-027-43 TRANSISTOR DTC114EKA-T146
Q30 8-729-027-23 TRANSISTOR DTA114EKA-T146
Q31 8-729-027-43 TRANSISTOR DTC114EKA-T146
Q32 8-729-027-23 TRANSISTOR DTA114EKA-T146
Q33 8-729-027-43 TRANSISTOR DTC114EKA-T146
Q34 8-729-027-23 TRANSISTOR DTA114EKA-T146
Q40 8-729-027-43 TRANSISTOR DTC114EKA-T146
< RESISTOR >
R1 1-216-825-11 METAL CHIP 2.2K 5% 1/10W
R2 1-216-833-11 METAL CHIP 10K 5% 1/10W
R3 1-216-821-11 METAL CHIP 1K 5% 1/10W
R4 1-216-825-11 METAL CHIP 2.2K 5% 1/10W
R5 1-216-833-11 METAL CHIP 10K 5% 1/10W
R6 1-216-821-11 METAL CHIP 1K 5% 1/10W
97
Page 98

HCD-NXM4D
MAIN
Ref. No. Part No. Description Remarks Ref. No. Part No. Description Remarks
R7 1-216-825-11 METAL CHIP 2.2K 5% 1/10W
R8 1-216-833-11 METAL CHIP 10K 5% 1/10W
R9 1-216-821-11 METAL CHIP 1K 5% 1/10W
R10 1-216-825-11 METAL CHIP 2.2K 5% 1/10W
R11 1-216-833-11 METAL CHIP 10K 5% 1/10W
R12 1-216-821-11 METAL CHIP 1K 5% 1/10W
R13 1-216-825-11 METAL CHIP 2.2K 5% 1/10W
R14 1-216-833-11 METAL CHIP 10K 5% 1/10W
R15 1-216-821-11 METAL CHIP 1K 5% 1/10W
R16 1-216-825-11 METAL CHIP 2.2K 5% 1/10W
R17 1-216-833-11 METAL CHIP 10K 5% 1/10W
R18 1-216-821-11 METAL CHIP 1K 5% 1/10W
R19 1-216-835-11 METAL CHIP 15K 5% 1/10W
R20 1-216-837-11 METAL CHIP 22K 5% 1/10W
R21 1-216-829-11 METAL CHIP 4.7K 5% 1/10W
R22 1-216-837-11 METAL CHIP 22K 5% 1/10W
R23 1-216-845-11 METAL CHIP 100K 5% 1/10W
R24 1-216-845-11 METAL CHIP 100K 5% 1/10W
R25 1-216-837-11 METAL CHIP 22K 5% 1/10W
R26 1-216-845-11 METAL CHIP 100K 5% 1/10W
R27 1-218-867-11 METAL CHIP 6.8K 0.5% 1/10W
R28 1-218-867-11 METAL CHIP 6.8K 0.5% 1/10W
R29 1-216-845-11 METAL CHIP 100K 5% 1/10W
R30 1-216-864-11 SHORT CHIP 0
R31 1-216-837-11 METAL CHIP 22K 5% 1/10W
R32 1-216-845-11 METAL CHIP 100K 5% 1/10W
R33 1-216-845-11 METAL CHIP 100K 5% 1/10W
R34 1-216-837-11 METAL CHIP 22K 5% 1/10W
R35 1-216-845-11 METAL CHIP 100K 5% 1/10W
R36 1-216-837-11 METAL CHIP 22K 5% 1/10W
R37 1-216-845-11 METAL CHIP 100K 5% 1/10W
R38 1-216-837-11 METAL CHIP 22K 5% 1/10W
R40 1-216-833-11 METAL CHIP 10K 5% 1/10W
R42 1-216-845-11 METAL CHIP 100K 5% 1/10W
R43 1-216-829-11 METAL CHIP 4.7K 5% 1/10W
R45 1-216-845-11 METAL CHIP 100K 5% 1/10W
R79 1-216-864-11 SHORT CHIP 0
R89 1-216-864-11 SHORT CHIP 0
R101 1-216-835-11 METAL CHIP 15K 5% 1/10W
R102 1-216-841-11 METAL CHIP 47K 5% 1/10W
R103 1-216-825-11 METAL CHIP 2.2K 5% 1/10W
R104 1-216-825-11 METAL CHIP 2.2K 5% 1/10W
R105 1-216-833-11 METAL CHIP 10K 5% 1/10W
R106 1-216-833-11 METAL CHIP 10K 5% 1/10W
R107 1-216-815-11 METAL CHIP 330 5% 1/10W
R108 1-216-841-11 METAL CHIP 47K 5% 1/10W
R109 1-216-841-11 METAL CHIP 47K 5% 1/10W
R110 1-216-821-11 METAL CHIP 1K 5% 1/10W
R111 1-216-821-11 METAL CHIP 1K 5% 1/10W
R112 1-216-834-11 METAL CHIP 12K 5% 1/10W
R113 1-216-851-11 METAL CHIP 330K 5% 1/10W
R114 1-216-812-11 METAL CHIP 180 5% 1/10W
R115 1-216-821-11 METAL CHIP 1K 5% 1/10W
R116 1-216-841-11 METAL CHIP 47K 5% 1/10W
R117 1-216-833-11 METAL CHIP 10K 5% 1/10W
R118 1-216-809-11 METAL CHIP 100 5% 1/10W
R119 1-216-833-11 METAL CHIP 10K 5% 1/10W
R120 1-216-833-11 METAL CHIP 10K 5% 1/10W
R121 1-216-861-11 METAL CHIP 2.2M 5% 1/10W
R122 1-216-835-11 METAL CHIP 15K 5% 1/10W
R123 1-216-857-11 METAL CHIP 1M 5% 1/10W
R124 1-216-829-11 METAL CHIP 4.7K 5% 1/10W
R125 1-216-829-11 METAL CHIP 4.7K 5% 1/10W
R126 1-216-833-11 METAL CHIP 10K 5% 1/10W
R127 1-216-833-11 METAL CHIP 10K 5% 1/10W
R128 1-216-857-11 METAL CHIP 1M 5% 1/10W
R129 1-216-835-11 METAL CHIP 15K 5% 1/10W
R130 1-216-809-11 METAL CHIP 100 5% 1/10W
R131 1-216-825-11 METAL CHIP 2.2K 5% 1/10W
R132 1-216-838-11 METAL CHIP 27K 5% 1/10W
R133 1-216-833-11 METAL CHIP 10K 5% 1/10W
R141 1-216-833-11 METAL CHIP 10K 5% 1/10W
R142 1-216-845-11 METAL CHIP 100K 5% 1/10W
R143 1-216-821-11 METAL CHIP 1K 5% 1/10W
R144 1-216-845-11 METAL CHIP 100K 5% 1/10W
R145 1-216-821-11 METAL CHIP 1K 5% 1/10W
R146 1-216-821-11 METAL CHIP 1K 5% 1/10W
R151 1-216-835-11 METAL CHIP 15K 5% 1/10W
R152 1-216-841-11 METAL CHIP 47K 5% 1/10W
R153 1-216-825-11 METAL CHIP 2.2K 5% 1/10W
R154 1-216-825-11 METAL CHIP 2.2K 5% 1/10W
R155 1-216-833-11 METAL CHIP 10K 5% 1/10W
R156 1-216-833-11 METAL CHIP 10K 5% 1/10W
R157 1-216-815-11 METAL CHIP 330 5% 1/10W
R158 1-216-841-11 METAL CHIP 47K 5% 1/10W
R159 1-216-841-11 METAL CHIP 47K 5% 1/10W
R160 1-216-821-11 METAL CHIP 1K 5% 1/10W
R161 1-216-821-11 METAL CHIP 1K 5% 1/10W
R162 1-216-834-11 METAL CHIP 12K 5% 1/10W
R163 1-216-851-11 METAL CHIP 330K 5% 1/10W
R164 1-216-812-11 METAL CHIP 180 5% 1/10W
R165 1-216-821-11 METAL CHIP 1K 5% 1/10W
R166 1-216-841-11 METAL CHIP 47K 5% 1/10W
R167 1-216-833-11 METAL CHIP 10K 5% 1/10W
R168 1-216-809-11 METAL CHIP 100 5% 1/10W
R169 1-216-833-11 METAL CHIP 10K 5% 1/10W
R180 1-216-809-11 METAL CHIP 100 5% 1/10W
R186 1-216-864-11 SHORT CHIP 0
R187 1-216-853-11 METAL CHIP 470K 5% 1/10W
R188 1-216-817-11 METAL CHIP 470 5% 1/10W
R189 1-216-841-11 METAL CHIP 47K 5% 1/10W
R191 1-216-833-11 METAL CHIP 10K 5% 1/10W
R192 1-216-845-11 METAL CHIP 100K 5% 1/10W
R193 1-216-821-11 METAL CHIP 1K 5% 1/10W
R194 1-216-845-11 METAL CHIP 100K 5% 1/10W
R195 1-216-821-11 METAL CHIP 1K 5% 1/10W
R196 1-216-821-11 METAL CHIP 1K 5% 1/10W
R201 1-216-841-11 METAL CHIP 47K 5% 1/10W
R202 1-216-817-11 METAL CHIP 470 5% 1/10W
R203 1-216-833-11 METAL CHIP 10K 5% 1/10W
R204 1-216-821-11 METAL CHIP 1K 5% 1/10W
R205 1-216-833-11 METAL CHIP 10K 5% 1/10W
R206 1-216-829-11 METAL CHIP 4.7K 5% 1/10W
R207 1-216-841-11 METAL CHIP 47K 5% 1/10W
R208 1-216-841-11 METAL CHIP 47K 5% 1/10W
98
Page 99

HCD-NXM4D
MAIN
Ref. No. Part No. Description Remarks Ref. No. Part No. Description Remarks
R209 1-216-825-11 METAL CHIP 2.2K 5% 1/10W
R210 1-216-825-11 METAL CHIP 2.2K 5% 1/10W
R211 1-216-841-11 METAL CHIP 47K 5% 1/10W
R212 1-216-857-11 METAL CHIP 1M 5% 1/10W
R213 1-216-864-11 SHORT CHIP 0
R220 1-216-821-11 METAL CHIP 1K 5% 1/10W
R221 1-216-833-11 METAL CHIP 10K 5% 1/10W
R222 1-216-829-11 METAL CHIP 4.7K 5% 1/10W
R223 1-216-841-11 METAL CHIP 47K 5% 1/10W
R224 1-216-821-11 METAL CHIP 1K 5% 1/10W
R225 1-216-825-11 METAL CHIP 2.2K 5% 1/10W
R231 1-216-833-11 METAL CHIP 10K 5% 1/10W
R232 1-216-833-11 METAL CHIP 10K 5% 1/10W
R241 1-216-833-11 METAL CHIP 10K 5% 1/10W
(E2)
R290 1-216-821-11 METAL CHIP 1K 5% 1/10W
R291 1-216-825-11 METAL CHIP 2.2K 5% 1/10W
R292 1-216-833-11 METAL CHIP 10K 5% 1/10W
R293 1-216-821-11 METAL CHIP 1K 5% 1/10W
R301 1-216-829-11 METAL CHIP 4.7K 5% 1/10W
R302 1-216-829-11 METAL CHIP 4.7K 5% 1/10W
R303 1-216-821-11 METAL CHIP 1K 5% 1/10W
R304 1-216-835-11 METAL CHIP 15K 5% 1/10W
R305 1-216-829-11 METAL CHIP 4.7K 5% 1/10W
R306 1-216-832-11 METAL CHIP 8.2K 5% 1/10W
R307 1-216-833-11 METAL CHIP 10K 5% 1/10W
R309 1-216-825-11 METAL CHIP 2.2K 5% 1/10W
R311 1-216-833-11 METAL CHIP 10K 5% 1/10W
R312 1-216-833-11 METAL CHIP 10K 5% 1/10W
R313 1-216-833-11 METAL CHIP 10K 5% 1/10W
R241 1-216-864-11 SHORT CHIP 0 (EXCEPT E2)
R242 1-216-845-11 METAL CHIP 100K 5% 1/10W
(E2)
R243 1-216-833-11 METAL CHIP 10K 5% 1/10W
(E2)
R243 1-216-864-11 SHORT CHIP 0 (EXCEPT E2)
R244 1-216-845-11 METAL CHIP 100K 5% 1/10W
(E2)
R246 1-216-833-11 METAL CHIP 10K 5% 1/10W
R247 1-216-833-11 METAL CHIP 10K 5% 1/10W
R251 1-216-841-11 METAL CHIP 47K 5% 1/10W
R252 1-216-817-11 METAL CHIP 470 5% 1/10W
R253 1-216-833-11 METAL CHIP 10K 5% 1/10W
R254 1-216-821-11 METAL CHIP 1K 5% 1/10W
R255 1-216-833-11 METAL CHIP 10K 5% 1/10W
R256 1-216-829-11 METAL CHIP 4.7K 5% 1/10W
R257 1-216-841-11 METAL CHIP 47K 5% 1/10W
R258 1-216-841-11 METAL CHIP 47K 5% 1/10W
R259 1-216-825-11 METAL CHIP 2.2K 5% 1/10W
R260 1-216-825-11 METAL CHIP 2.2K 5% 1/10W
R261 1-216-841-11 METAL CHIP 47K 5% 1/10W
R262 1-216-857-11 METAL CHIP 1M 5% 1/10W
R263 1-216-864-11 SHORT CHIP 0
R270 1-216-825-11 METAL CHIP 2.2K 5% 1/10W
R271 1-216-833-11 METAL CHIP 10K 5% 1/10W
R272 1-216-821-11 METAL CHIP 1K 5% 1/10W
R273 1-216-825-11 METAL CHIP 2.2K 5% 1/10W
R274 1-216-833-11 METAL CHIP 10K 5% 1/10W
R275 1-216-821-11 METAL CHIP 1K 5% 1/10W
R276 1-216-825-11 METAL CHIP 2.2K 5% 1/10W
R277 1-216-833-11 METAL CHIP 10K 5% 1/10W
R278 1-216-821-11 METAL CHIP 1K 5% 1/10W
R279 1-216-825-11 METAL CHIP 2.2K 5% 1/10W
R280 1-216-833-11 METAL CHIP 10K 5% 1/10W
R281 1-216-821-11 METAL CHIP 1K 5% 1/10W
R282 1-216-825-11 METAL CHIP 2.2K 5% 1/10W
R283 1-216-833-11 METAL CHIP 10K 5% 1/10W
R284 1-216-821-11 METAL CHIP 1K 5% 1/10W
R285 1-216-825-11 METAL CHIP 2.2K 5% 1/10W
R286 1-216-833-11 METAL CHIP 10K 5% 1/10W
R287 1-216-821-11 METAL CHIP 1K 5% 1/10W
R288 1-216-825-11 METAL CHIP 2.2K 5% 1/10W
R289 1-216-833-11 METAL CHIP 10K 5% 1/10W
R314 1-216-841-11 METAL CHIP 47K 5% 1/10W
R315 1-216-829-11 METAL CHIP 4.7K 5% 1/10W
R316 1-216-797-11 METAL CHIP 10 5% 1/10W
R317 1-216-833-11 METAL CHIP 10K 5% 1/10W
R318 1-216-805-11 METAL CHIP 47 5% 1/10W
R319 1-216-827-11 METAL CHIP 3.3K 5% 1/10W
R320 1-216-803-11 METAL CHIP 33 5% 1/10W
R321 1-216-825-11 METAL CHIP 2.2K 5% 1/10W
R322 1-216-825-11 METAL CHIP 2.2K 5% 1/10W
R323 1-216-821-11 METAL CHIP 1K 5% 1/10W
R324 1-216-825-11 METAL CHIP 2.2K 5% 1/10W
R325 1-216-825-11 METAL CHIP 2.2K 5% 1/10W
R326 1-216-821-11 METAL CHIP 1K 5% 1/10W
R327 1-216-825-11 METAL CHIP 2.2K 5% 1/10W
R328 1-216-825-11 METAL CHIP 2.2K 5% 1/10W
R329 1-216-841-11 METAL CHIP 47K 5% 1/10W
R330 1-216-829-11 METAL CHIP 4.7K 5% 1/10W
R331 1-216-841-11 METAL CHIP 47K 5% 1/10W
R332 1-216-829-11 METAL CHIP 4.7K 5% 1/10W
R333 1-216-841-11 METAL CHIP 47K 5% 1/10W
R334 1-216-841-11 METAL CHIP 47K 5% 1/10W
R335 1-216-841-11 METAL CHIP 47K 5% 1/10W
R336 1-216-841-11 METAL CHIP 47K 5% 1/10W
R337 1-216-837-11 METAL CHIP 22K 5% 1/10W
R338 1-216-833-11 METAL CHIP 10K 5% 1/10W
R339 1-216-841-11 METAL CHIP 47K 5% 1/10W
R340 1-216-829-11 METAL CHIP 4.7K 5% 1/10W
R341 1-216-833-11 METAL CHIP 10K 5% 1/10W
R342 1-216-829-11 METAL CHIP 4.7K 5% 1/10W
R343 1-216-837-11 METAL CHIP 22K 5% 1/10W
R344 1-216-833-11 METAL CHIP 10K 5% 1/10W
R345 1-216-833-11 METAL CHIP 10K 5% 1/10W
R347 1-216-825-11 METAL CHIP 2.2K 5% 1/10W
R351 1-216-829-11 METAL CHIP 4.7K 5% 1/10W
R352 1-216-829-11 METAL CHIP 4.7K 5% 1/10W
R353 1-216-821-11 METAL CHIP 1K 5% 1/10W
R354 1-216-835-11 METAL CHIP 15K 5% 1/10W
R355 1-216-829-11 METAL CHIP 4.7K 5% 1/10W
R356 1-216-832-11 METAL CHIP 8.2K 5% 1/10W
R357 1-216-833-11 METAL CHIP 10K 5% 1/10W
R359 1-216-825-11 METAL CHIP 2.2K 5% 1/10W
R377 1-216-833-11 METAL CHIP 10K 5% 1/10W
R378 1-216-833-11 METAL CHIP 10K 5% 1/10W
99
Page 100

HCD-NXM4D
MAIN
Ref. No. Part No. Description Remarks Ref. No. Part No. Description Remarks
R379 1-216-833-11 METAL CHIP 10K 5% 1/10W
R380 1-216-833-11 METAL CHIP 10K 5% 1/10W
R381 1-216-833-11 METAL CHIP 10K 5% 1/10W
R382 1-216-833-11 METAL CHIP 10K 5% 1/10W
R383 1-216-833-11 METAL CHIP 10K 5% 1/10W
R384 1-216-833-11 METAL CHIP 10K 5% 1/10W
R385 1-216-833-11 METAL CHIP 10K 5% 1/10W
R386 1-216-833-11 METAL CHIP 10K 5% 1/10W
R387 1-216-833-11 METAL CHIP 10K 5% 1/10W
R388 1-216-833-11 METAL CHIP 10K 5% 1/10W
R391 1-216-833-11 METAL CHIP 10K 5% 1/10W
R392 1-216-837-11 METAL CHIP 22K 5% 1/10W
R393 1-216-837-11 METAL CHIP 22K 5% 1/10W
R394 1-216-829-11 METAL CHIP 4.7K 5% 1/10W
R395 1-216-813-11 METAL CHIP 220 5% 1/10W
R396 1-216-833-11 METAL CHIP 10K 5% 1/10W
R400 1-216-833-11 METAL CHIP 10K 5% 1/10W
R404 1-216-809-11 METAL CHIP 100 5% 1/10W
R406 1-216-809-11 METAL CHIP 100 5% 1/10W
R407 1-216-809-11 METAL CHIP 100 5% 1/10W
R408 1-216-833-11 METAL CHIP 10K 5% 1/10W
R409 1-216-833-11 METAL CHIP 10K 5% 1/10W
R410 1-216-833-11 METAL CHIP 10K 5% 1/10W
R411 1-216-851-11 METAL CHIP 330K 5% 1/10W
R412 1-216-833-11 METAL CHIP 10K 5% 1/10W
R413 1-216-864-11 SHORT CHIP 0
R414 1-216-833-11 METAL CHIP 10K 5% 1/10W
R415 1-216-833-11 METAL CHIP 10K 5% 1/10W
R416 1-216-833-11 METAL CHIP 10K 5% 1/10W
R417 1-216-833-11 METAL CHIP 10K 5% 1/10W
R419 1-216-864-11 SHORT CHIP 0
R420 1-216-829-11 METAL CHIP 4.7K 5% 1/10W
R423 1-216-809-11 METAL CHIP 100 5% 1/10W
R424 1-216-809-11 METAL CHIP 100 5% 1/10W
R425 1-216-809-11 METAL CHIP 100 5% 1/10W
R426 1-216-809-11 METAL CHIP 100 5% 1/10W
R427 1-216-833-11 METAL CHIP 10K 5% 1/10W
R429 1-216-809-11 METAL CHIP 100 5% 1/10W
R430 1-216-809-11 METAL CHIP 100 5% 1/10W
R433 1-216-809-11 METAL CHIP 100 5% 1/10W
R434 1-216-809-11 METAL CHIP 100 5% 1/10W
R435 1-216-809-11 METAL CHIP 100 5% 1/10W
R436 1-216-809-11 METAL CHIP 100 5% 1/10W
R437 1-216-809-11 METAL CHIP 100 5% 1/10W
R438 1-216-809-11 METAL CHIP 100 5% 1/10W
R439 1-216-809-11 METAL CHIP 100 5% 1/10W
R440 1-216-809-11 METAL CHIP 100 5% 1/10W
R441 1-216-809-11 METAL CHIP 100 5% 1/10W
R442 1-216-809-11 METAL CHIP 100 5% 1/10W
R443 1-216-809-11 METAL CHIP 100 5% 1/10W
R444 1-216-809-11 METAL CHIP 100 5% 1/10W
R445 1-216-809-11 METAL CHIP 100 5% 1/10W
R446 1-216-809-11 METAL CHIP 100 5% 1/10W
R447 1-216-809-11 METAL CHIP 100 5% 1/10W
R448 1-216-809-11 METAL CHIP 100 5% 1/10W
R450 1-216-809-11 METAL CHIP 100 5% 1/10W
R451 1-216-809-11 METAL CHIP 100 5% 1/10W
R452 1-216-809-11 METAL CHIP 100 5% 1/10W
R453 1-216-809-11 METAL CHIP 100 5% 1/10W
R454 1-216-809-11 METAL CHIP 100 5% 1/10W
R455 1-216-809-11 METAL CHIP 100 5% 1/10W
R465 1-216-809-11 METAL CHIP 100 5% 1/10W
R466 1-216-833-11 METAL CHIP 10K 5% 1/10W
R467 1-216-833-11 METAL CHIP 10K 5% 1/10W
R468 1-216-833-11 METAL CHIP 10K 5% 1/10W
R469 1-216-833-11 METAL CHIP 10K 5% 1/10W
R470 1-216-809-11 METAL CHIP 100 5% 1/10W
R471 1-216-809-11 METAL CHIP 100 5% 1/10W
R472 1-216-809-11 METAL CHIP 100 5% 1/10W
R473 1-216-809-11 METAL CHIP 100 5% 1/10W
R474 1-216-809-11 METAL CHIP 100 5% 1/10W
R475 1-216-809-11 METAL CHIP 100 5% 1/10W
R476 1-216-809-11 METAL CHIP 100 5% 1/10W
R477 1-216-809-11 METAL CHIP 100 5% 1/10W
R478 1-216-809-11 METAL CHIP 100 5% 1/10W
R479 1-216-809-11 METAL CHIP 100 5% 1/10W
R482 1-216-809-11 METAL CHIP 100 5% 1/10W
R483 1-216-809-11 METAL CHIP 100 5% 1/10W
R484 1-216-809-11 METAL CHIP 100 5% 1/10W
R485 1-216-809-11 METAL CHIP 100 5% 1/10W
R486 1-216-809-11 METAL CHIP 100 5% 1/10W
R489 1-216-809-11 METAL CHIP 100 5% 1/10W
R490 1-216-809-11 METAL CHIP 100 5% 1/10W
R492 1-216-821-11 METAL CHIP 1K 5% 1/10W
(E2)
R492 1-216-829-11 METAL CHIP 4.7K 5% 1/10W
(EXCEPT E2)
R493 1-216-809-11 METAL CHIP 100 5% 1/10W
R494 1-216-827-11 METAL CHIP 3.3K 5% 1/10W
R495 1-216-827-11 METAL CHIP 3.3K 5% 1/10W
R496 1-216-815-11 METAL CHIP 330 5% 1/10W
(E3, E15)
R496 1-216-821-11 METAL CHIP 1K 5% 1/10W
(EA)
R496 1-216-823-11 METAL CHIP 1.5K 5% 1/10W
(AUS)
R496 1-216-829-11 METAL CHIP 4.7K 5% 1/10W
(E2)
R496 1-216-864-11 SHORT CHIP 0 (SP, MY, TH)
R497 1-216-833-11 METAL CHIP 10K 5% 1/10W
R498 1-216-797-11 METAL CHIP 10 5% 1/10W
R499 1-216-797-11 METAL CHIP 10 5% 1/10W
R901 1-216-833-11 METAL CHIP 10K 5% 1/10W
R902 1-216-825-11 METAL CHIP 2.2K 5% 1/10W
R903 1-216-825-11 METAL CHIP 2.2K 5% 1/10W
R904 1-216-825-11 METAL CHIP 2.2K 5% 1/10W
R905 1-216-829-11 METAL CHIP 4.7K 5% 1/10W
R906 1-216-809-11 METAL CHIP 100 5% 1/10W
R907 1-216-837-11 METAL CHIP 22K 5% 1/10W
R908 1-216-809-11 METAL CHIP 100 5% 1/10W
R909 1-216-833-11 METAL CHIP 10K 5% 1/10W
R914 1-216-821-11 METAL CHIP 1K 5% 1/10W
R915 1-216-821-11 METAL CHIP 1K 5% 1/10W
R952 1-216-809-11 METAL CHIP 100 5% 1/10W
R955 1-216-809-11 METAL CHIP 100 5% 1/10W
R956 1-216-809-11 METAL CHIP 100 5% 1/10W
R957 1-216-809-11 METAL CHIP 100 5% 1/10W
100
 Loading...