

Page 1

Compact Disc
Deck Receiver
3-757-867-21(2)
Operating Instructions
nilngfa
DIGI1AL AUDIO
H CD-241
© 1994 by Sony Corporation
Page 2

WARNING
To prevent fire or shock hazard, do not expose the unit to rain or moisture.
CAUTION
BISK OF ELECIRIC SHOCK
OO NOT OPEN
CAUTION TO REDUCE THE RISK OF ELECTRIC SHOCK.
00 NOT REMOVE COVER (OR BACK)
NO USER-SERVICEABLE PARTS INSIDE
REFER SERVICING TO QUALIFIED SERVICE PERSONNEL.
This symbol is intended to alert the user to
the presence of uninsulated "dangerous
voltage" within the product's enclosure
that may be of sufficient magnitude to
constitute a risk of electric shock to
persons.
This symbol is intended to alert the user to
the presence of important operating and
I
• The >5Mphicnl »ymK»!» are on the roar enclosure.
maintenance (servicing) instructions in the
literature accompanying the appliance.
Owner's Record
The model and serial number is located at the rear. Record
this serial number in the space provided below. Refer to
these numbers whenever you call upon your Sony dealer
regarding this product.
HCD-241 Serial No.
_____________
INFORMATION
This equipment has been tested and found to comply with
the limits for a Class B digital device, pursuant to Part IS of
the FCC Rules. These limits are designed to provide
reasonable protection against harmful interference in a
residential installation. This equipment generates, uses, and
can radiate radio frequency energy and, if not installed and
used in accordance with the instructions, may cause harmful
interference to radio communications. However, there is no
guarantee that interference will not occur in a particular
installation. If this equipment does cause harmful
interference to radio or television reception, which can be
detemiined by turning the equipment off and on, the user is
encouraged to try to correct the interference by i>ne or more
of the following measures:
— Reorient or relocate the receiving antenna.
— Increase the separation between the equipment and
receiver.
— Connect the equipment into an outlet on a circuit
different from that to which the receiver is connectc*d.
— Consult the dealer or an experienced radio/TV
technician for help.
Note to CATV system installer
This reminder is provided to call the CATV system
installer's attention to Article 820-40 of the NEC that
provides guidelines for proper grounding and, in
particular, specifies that the cable ground shall be
connected to the grounding system of the building, as
close to the point of cable entry as practical.
CAUTION
You are cautioned that any changes or modifications not
expressly approved in this manual could void your authority
to operate this equipment.
CAUTION
The use of optical instruments with this pnxluct will
increase eye hazard.
For the customers In Canada
CAUTION
TO PREVENT ELEtTTRlC SHOCK, DO NOT USE THIS
POLARIZED AC PLUG WITH AN EXTENSION CORD,
RECEPTACLE OR OTHER OUTLET UNLESS THE
BLADES CAN BE FULLY INSERTED TO PREN'ENT
BLADE EXPOSURE.
THIS APPARATUS COMPLIES WITH THE CLASS B
LIMITS FOR RADIO NOISE EMISSIONS SET OUT IN
RADIO INTERFERENCE REGULATIONS.
----------------------------------------------------
Page 3
Precautions
This unit is a compact disc deck receiver which consists of an
amplifier, tuner, stereo cassette deck and 5<ompact disc
player.
Before operating this unit, be careful about the followings.
On safety
• Operate the unit only on 120 V AC, 60 Hz.
• Should any solid object or liquid fall into the unit, unplug
it and have it checked by qualified personnel before
operating it any further.
• Unplug the unit from the wall outlet if it is not to be used
for an extended period of time. To disconnect the cord,
pull it out by grasping the plug. Never pull the cord itself.
• As the laser beam used in this compact disc player is
harmful to the eyes, do not attempt to disassemble the
cabinet. Refer servicing to qualified personnel only.
On installation
• Place the unit on a level surface.
• EX) not install the unit in a location near heat sources such
as radiators or air ducts, or in a place subject to direct
sunlight, excessive dust, mechanical vibration or shock.
• Good air circulation is essential to prevent internal heat
buildup in the unit. Place the unit in a location with
adequate air circulation. EX) not place the unit on a soft
surface, such as a rug that would block the ventilation
holes on the bottom.
• Do not place anything on top of the cabinet. The top
ventilation holes must be unobstructed for the proper
operation of the unit and to prolong the life of its
components.
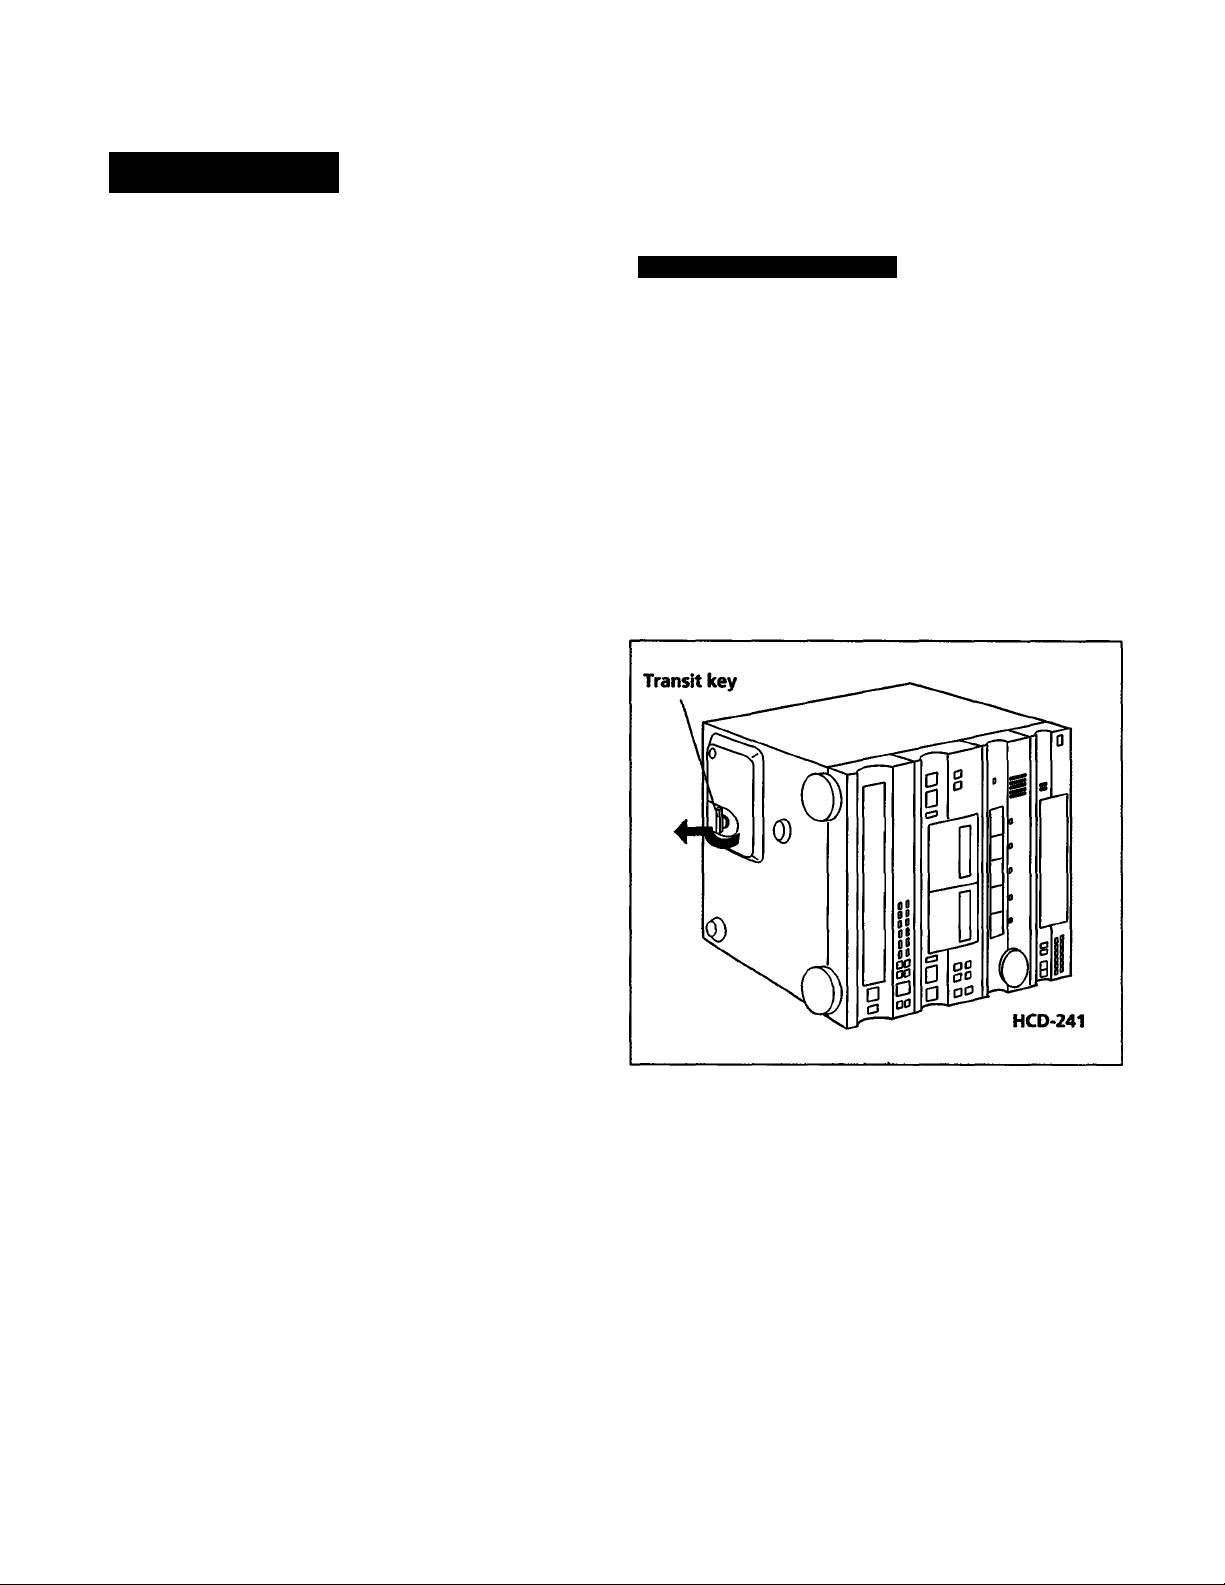
Note on the Transit Key
The transit key on the bottom exterior of the HCD-241
protects the optical system against shock during
transportation. Before operating the unit, be sure to remove
the key by following the instructions on the label, and store it
in a safe place.
When transporting the unit, re-install the key by following
the instructions below.
1 Remove all the discs from the CD section.
2 Press = to close the disc tray and wait for "¿P (orS^,
to disappear in the display.
3 Turn the power off.
4 Insert the key into*its original hole and lock it in place.
On cleaning the cabinet
Clean the cabinet, panel and controls with a soft cloth lightly
moistened with mild detergent solution. EX> not use any type
of abrasive pad, scouring powder or solvent such as alcohol
or benzine.
On repacking
EX) not throw away the carton and the packing material. It
makes an ideal container to transport the unit in.
On moisture condensation
If the unit is brought directly from a cold to a warm location,
or is placed in a very damp room, moisture may condense on
the lens inside the CD section. Should this occur, the CD
section will not operate. In this case, remove the disc and
leave the unit turned on for about an hour until the moisture
evaporates.
If you have any question or problem concerning your unit,
please consult your nearest Sony dealer.
For detailed precautions, see the leaflet "IMPORTANT
SAFEGUARDS". (Model for U.S.A.)
Page 4
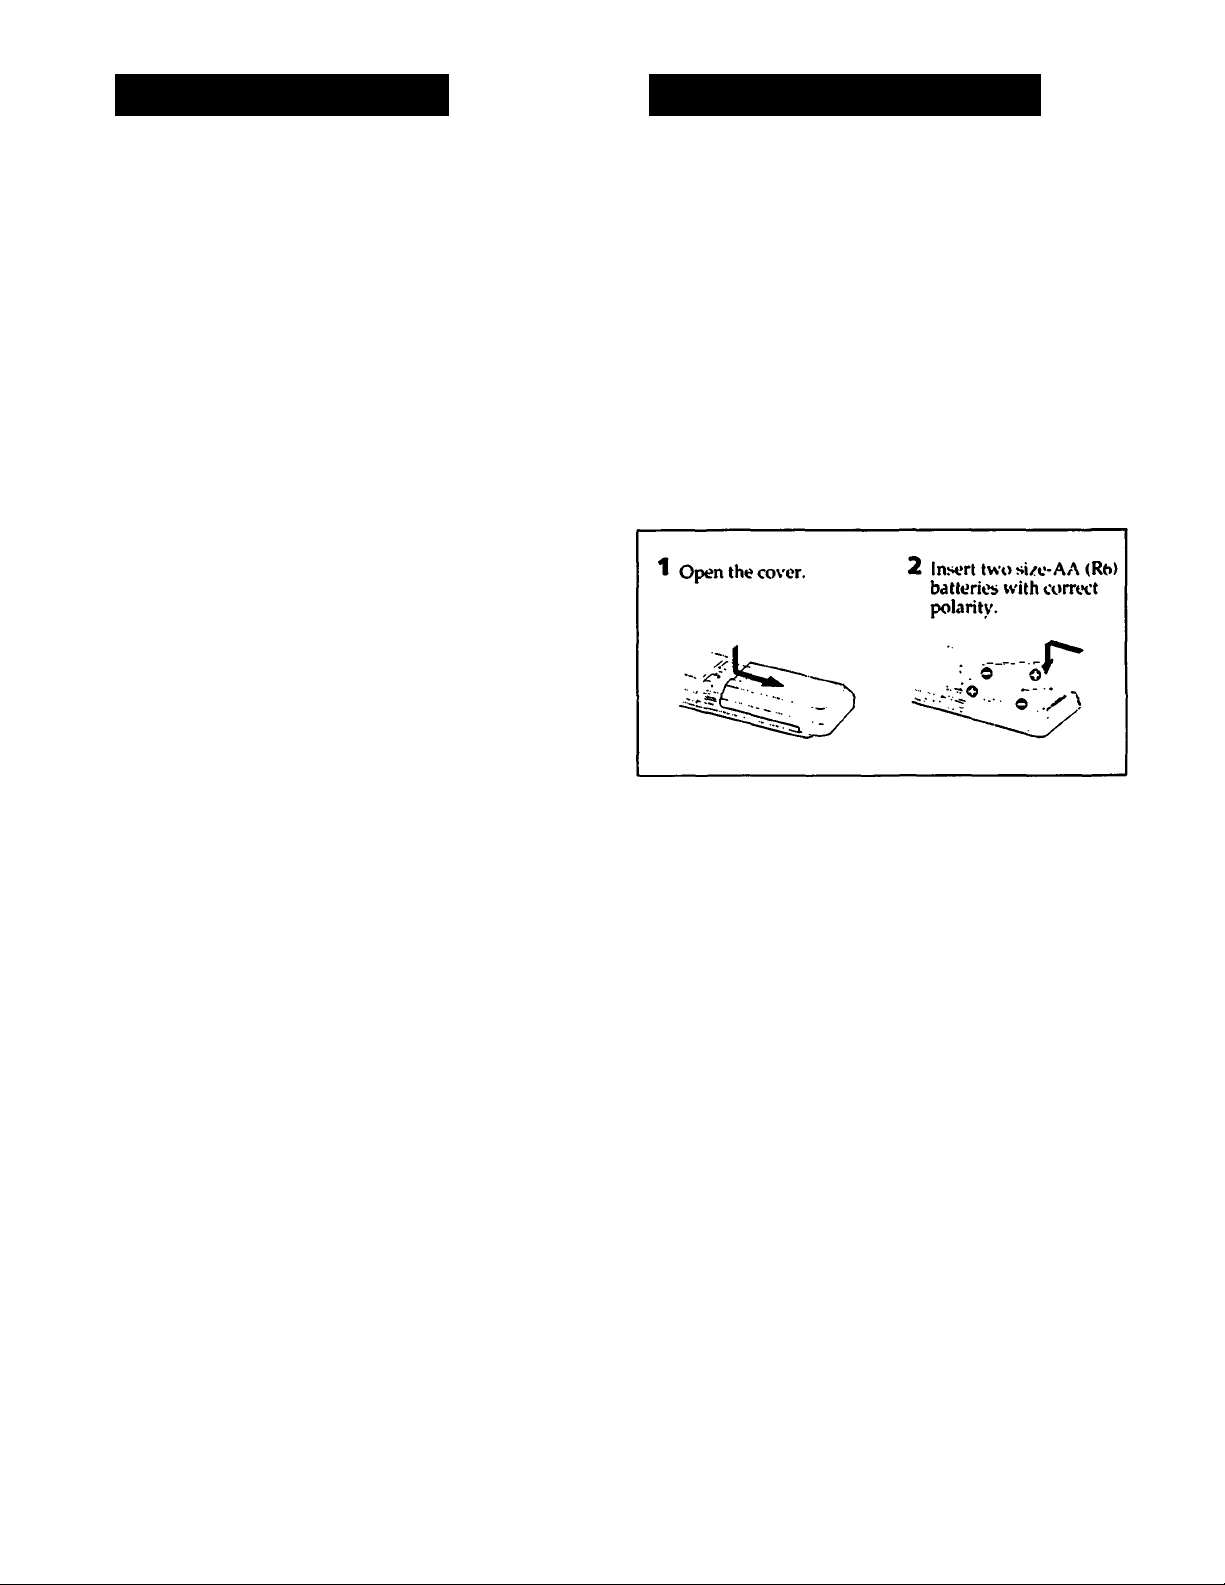
Table of Contents
Remote Commander
Introduction
Precautions................................................................................3
Note on the Transit key.........................................................3
Getting Started
Remote commander..................................................................4
Hooking up the system
.............................................................
Using Your Stereo
Adjusting the audio...................................................................7
Volume adjustment
Sound quality adjustment......................................................7
Selecting a Program Source......................................................7
Receiving broadcasts................................................................8
Storing station frequencies into memory
Tuning in a stored station
Playing back tapes (on cither deck A or B)............................10
Recording on tapes (Deck B)
Dubbing tapes (from deck A to B)
Playing the discs - Continuous play
Information display.............................................................14
Selecting a desired disc
Locating a particular selection............................................15
Locating a particular point in a selection
Playing in a random order - Shuffle play
Shuffle play on specified disc - Select shuffle play
Playing in a desired order - Program play..............................17
Designating the total playing time - Time edit
Playing repeatedly - Repeat play............................................20
...............................................................
..............................
.......................v..............................
.................................................
.........................................
.......................................
.......................................................
...........................
...............................
............
......................
11
12
13
15
15
16
16
19
The remote commander supplied with thi> unit can contn>l
the unit from a distance.
Battery life
About half a year of normal operation can be expected when
5
7
9
using the Sony SUM-3 (NS) batteries. When the batteries are
exhausted, the remote commander can no longer operate the
unit. If this happens, replace lx>th batteric*s with new ones.
To avoid battery leakage
When the commander is not to be used for a long time,
remove the batteries to avoid damage caused by battery
leakage and corrosion.
Inserting the batteries into the remote commander
^
General
Maintenance...........................................................................21
Specifications..........................................................................22
Troubleshtwting......................................................................23
Page 5
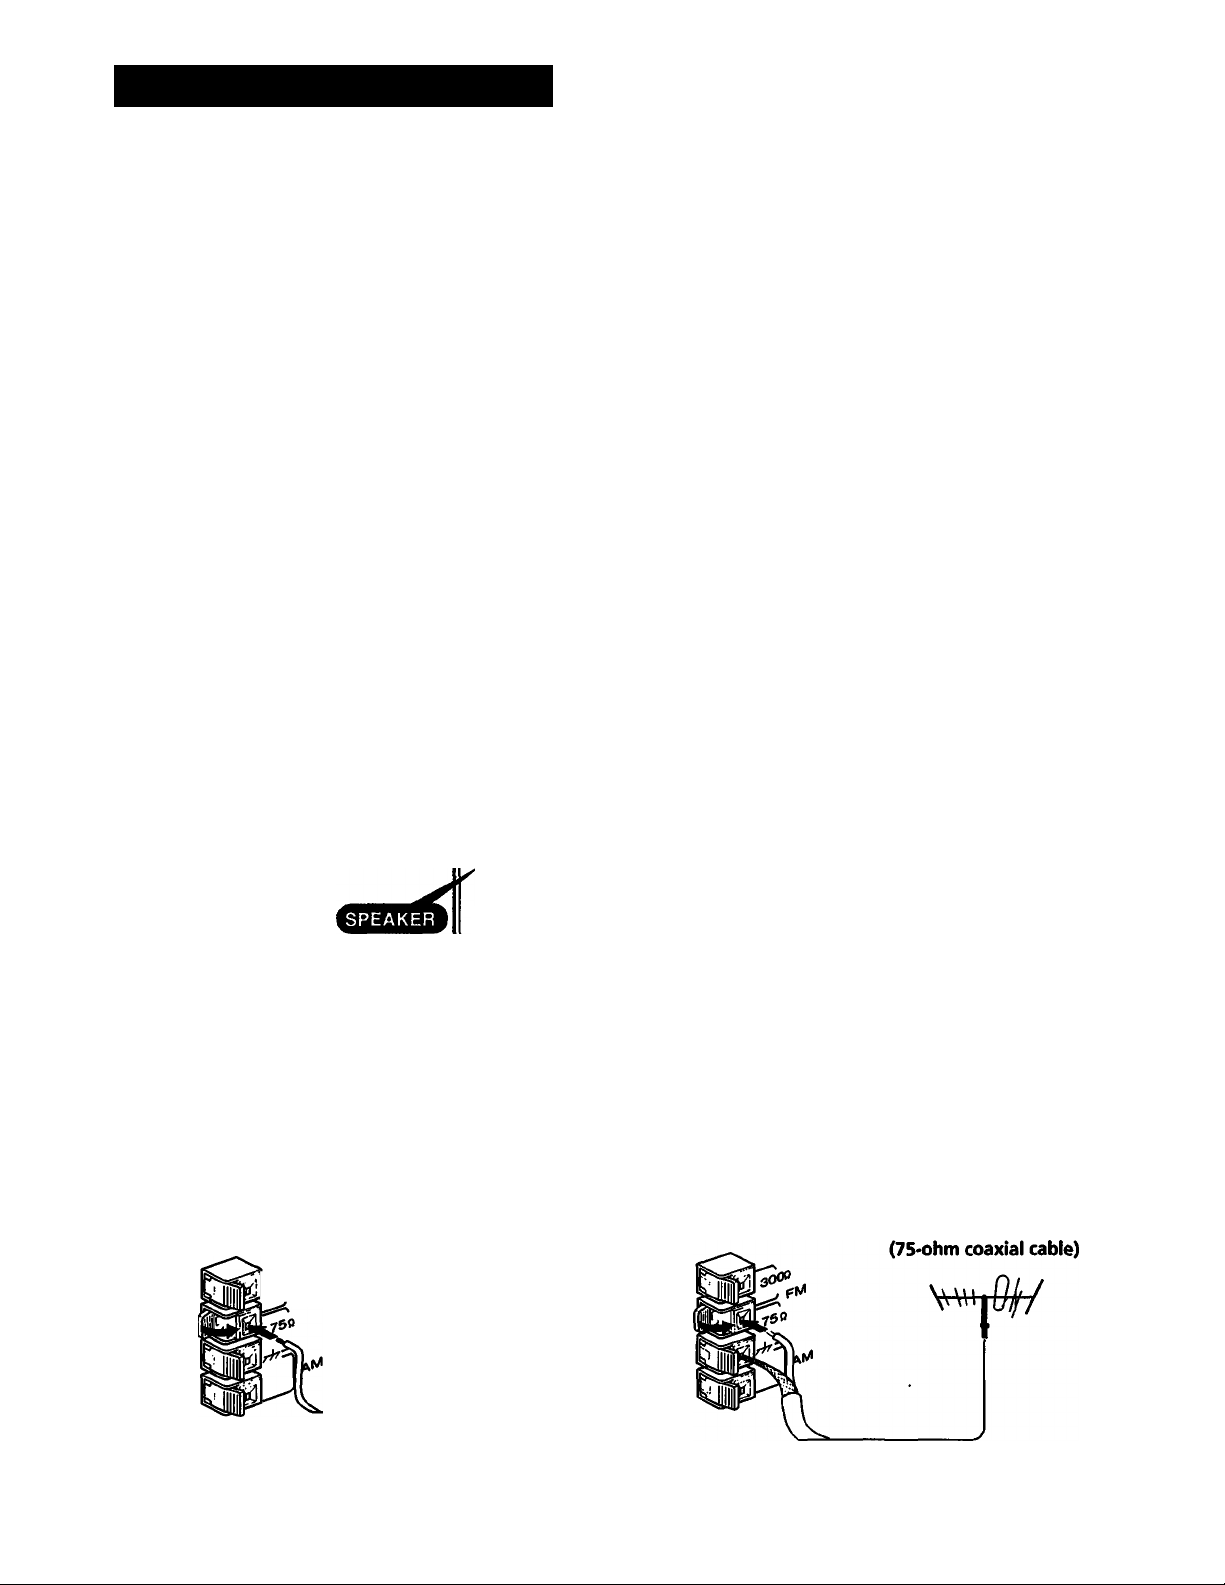
Hooking Up the System
This section describes about the antenna and speaker connections. Also, it shows about the
connection with the other audio equipments.
• Connect the AC power cord last. Make sure power is off.
• Cord plugs and jacks are color coded. Red plugs and jacks are for right channel (R) and
white ones for the left channel (L).
• The cable connectors should be fully inserted into the jacks. A loose connection may
cause hum and noise.
• Keep speaker cords, connecting cords and power cords away from the AM loop antenna
and the tuner's antenna lead-in to avoid possible noise pickup.
The numbers correspond to the following details.
Speaker system
Right Left
O
O
o
m
O FM wire antenna (supplied)
4
to a wall outlet
For better FM reception
HCD-241
Outdoor FM antenna
Page 6
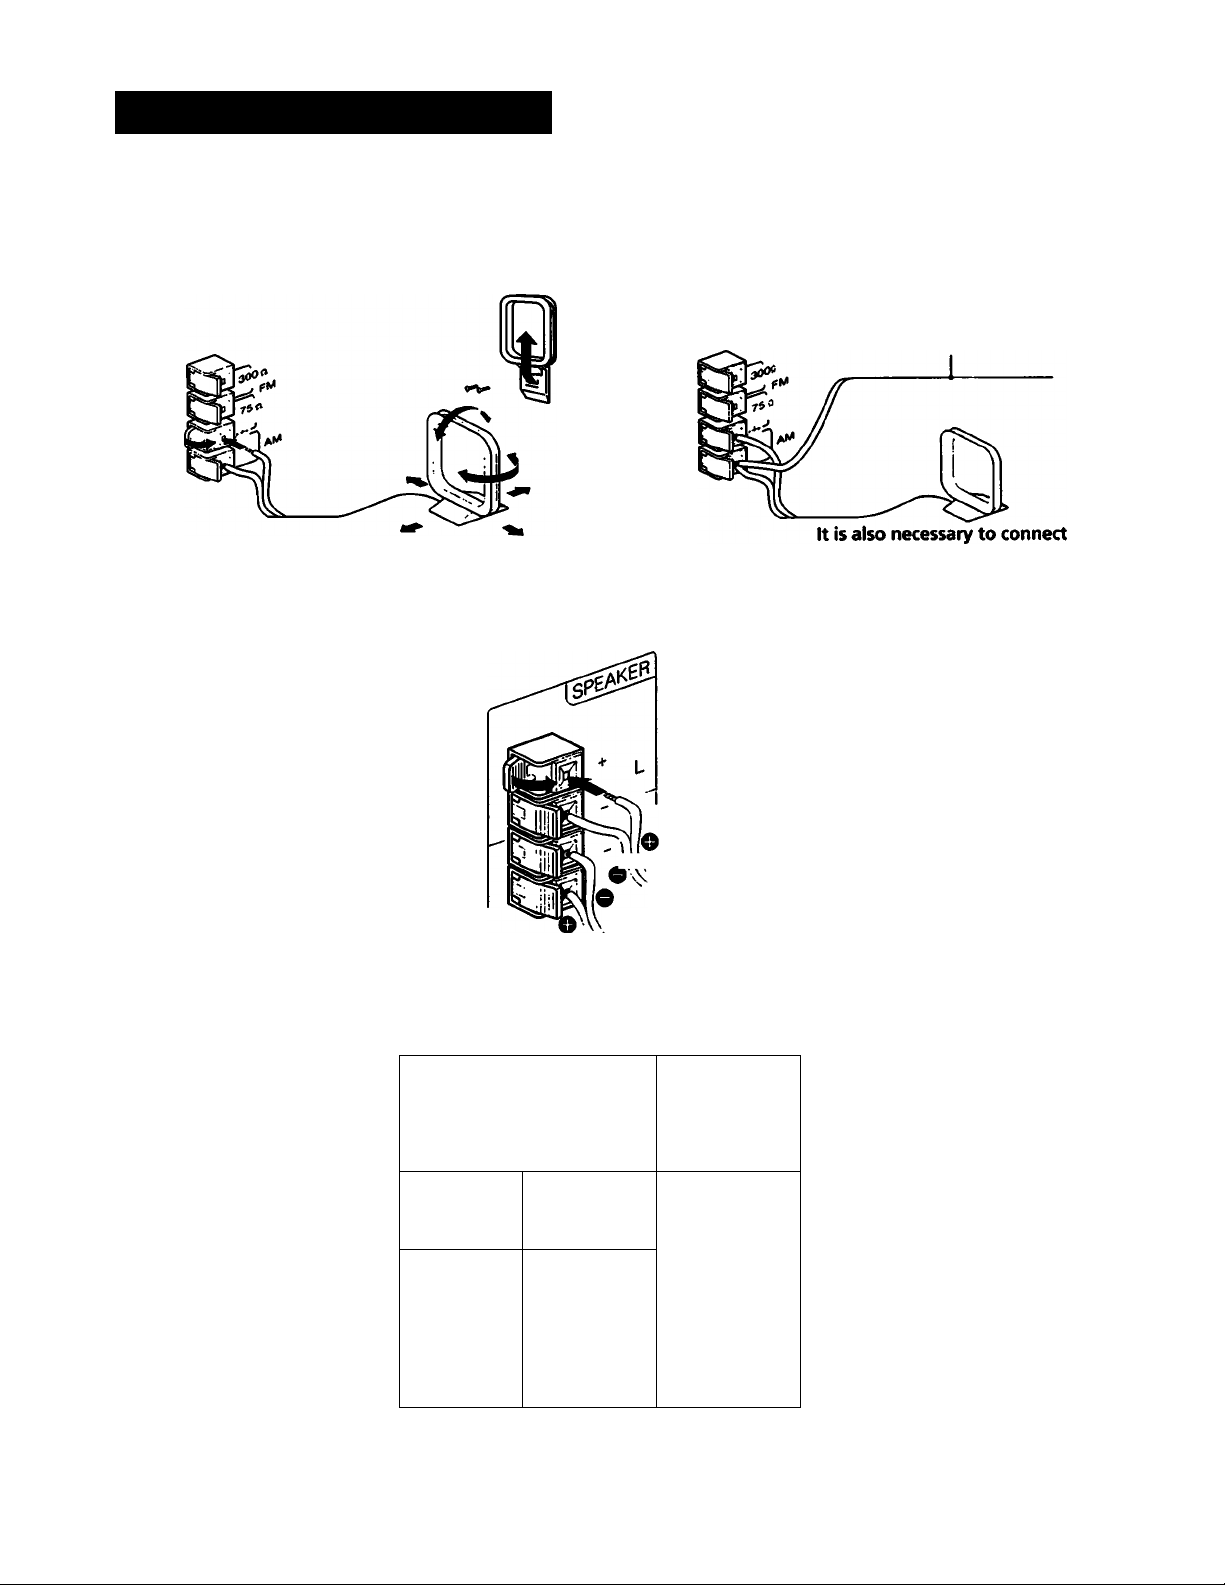
Hooking Up the System
IO AM loop antenna (supplied)
O Speaker cords
For better AM reception
To attach to a wall
Extend a 6 to 15-meter
insulated wire out of doors.
the supplied AM loop antenna.
I Adding other audio equipments to your system
Turntable system MD or VCR
to LINE IN or AUDIO IN
_______
MsmisBh
f=
\VV For left speaker
For right speaker
i'
ULl"
to LINE OUT or
c
j
i
I
I a wall outlet
Page 7
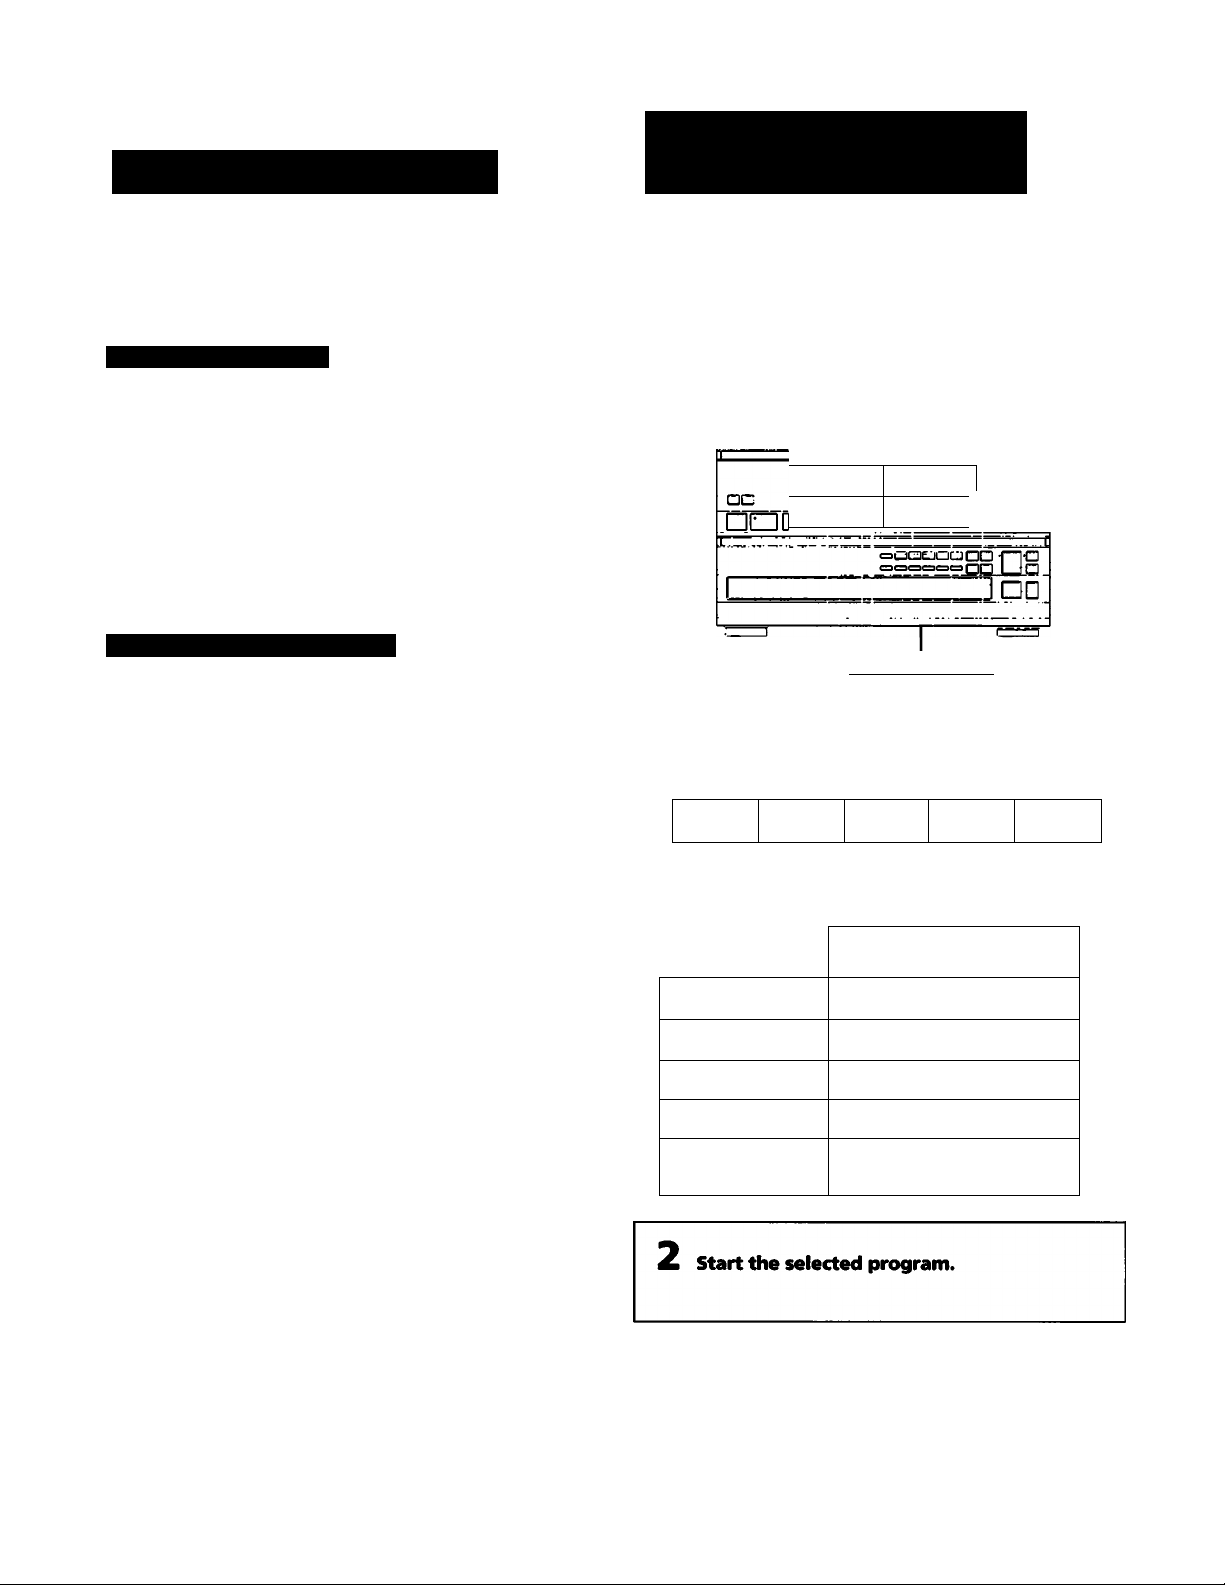
Selecting a Program
Adjusting the Audio
The following operations apply only to reproduced sound.
Volume Adjustment
To increase the sound level, turn the VOLUME control
clockwise.
To decrease it, turn the control counterclockwise.
Note
When listening with headphones connected to the
HEADPHONES jack, no sound can be heard from the
speaker system.
Sound Quality Adjustment
To adjust tone quality
Adjust the 5-BAND STEREO GRAPHIC EQUALIZER
controls according to:
• Personal preference
• The room acoustics. For instance, playback in a room with
padded walls or furniture will probably sound better with
the high frequencies boosted.
• Program quality. If reproduction contains hiss, cutting
the higher frequencies will improve playback.
Source
POWER-»ON I 1
OOI
c::r:=xrr:
I— -i
Select the program source.
s
VIDEO/MD
TAPE CO TUNER
□□□□
itt I)
I |i
aa o
_________________
Program source | 2
r
I
ionn'
Ci ]
PHONO
Function of the graphic equalizer controls
too Hz: Boosts or cuts bass.
330 Hz: Adjusts the power, spaciousness and warmth of
the sound.
1 kHz: Provides more presence for vocals.
3.3 kHz: Boosts a brighter sound or reduces stridency.
10 kHz: Highlights the delicate quality of instrumental
sound.
For personal listening
Connect headphones to the HEADPHONES jack. No sound
is heard from the speakers.
Function selector to be
pressed
Phono record
PHONO
Radio Broadcast TUNER
Compact disc
CD
Taped program TAPE
Video program
VIDEO/MD
/Mini Disc
Automatic function selection
Since the function is selected automatically by starting the
radio reception or playback, it is not necessary to select the
program source with the function selectors.
Page 8
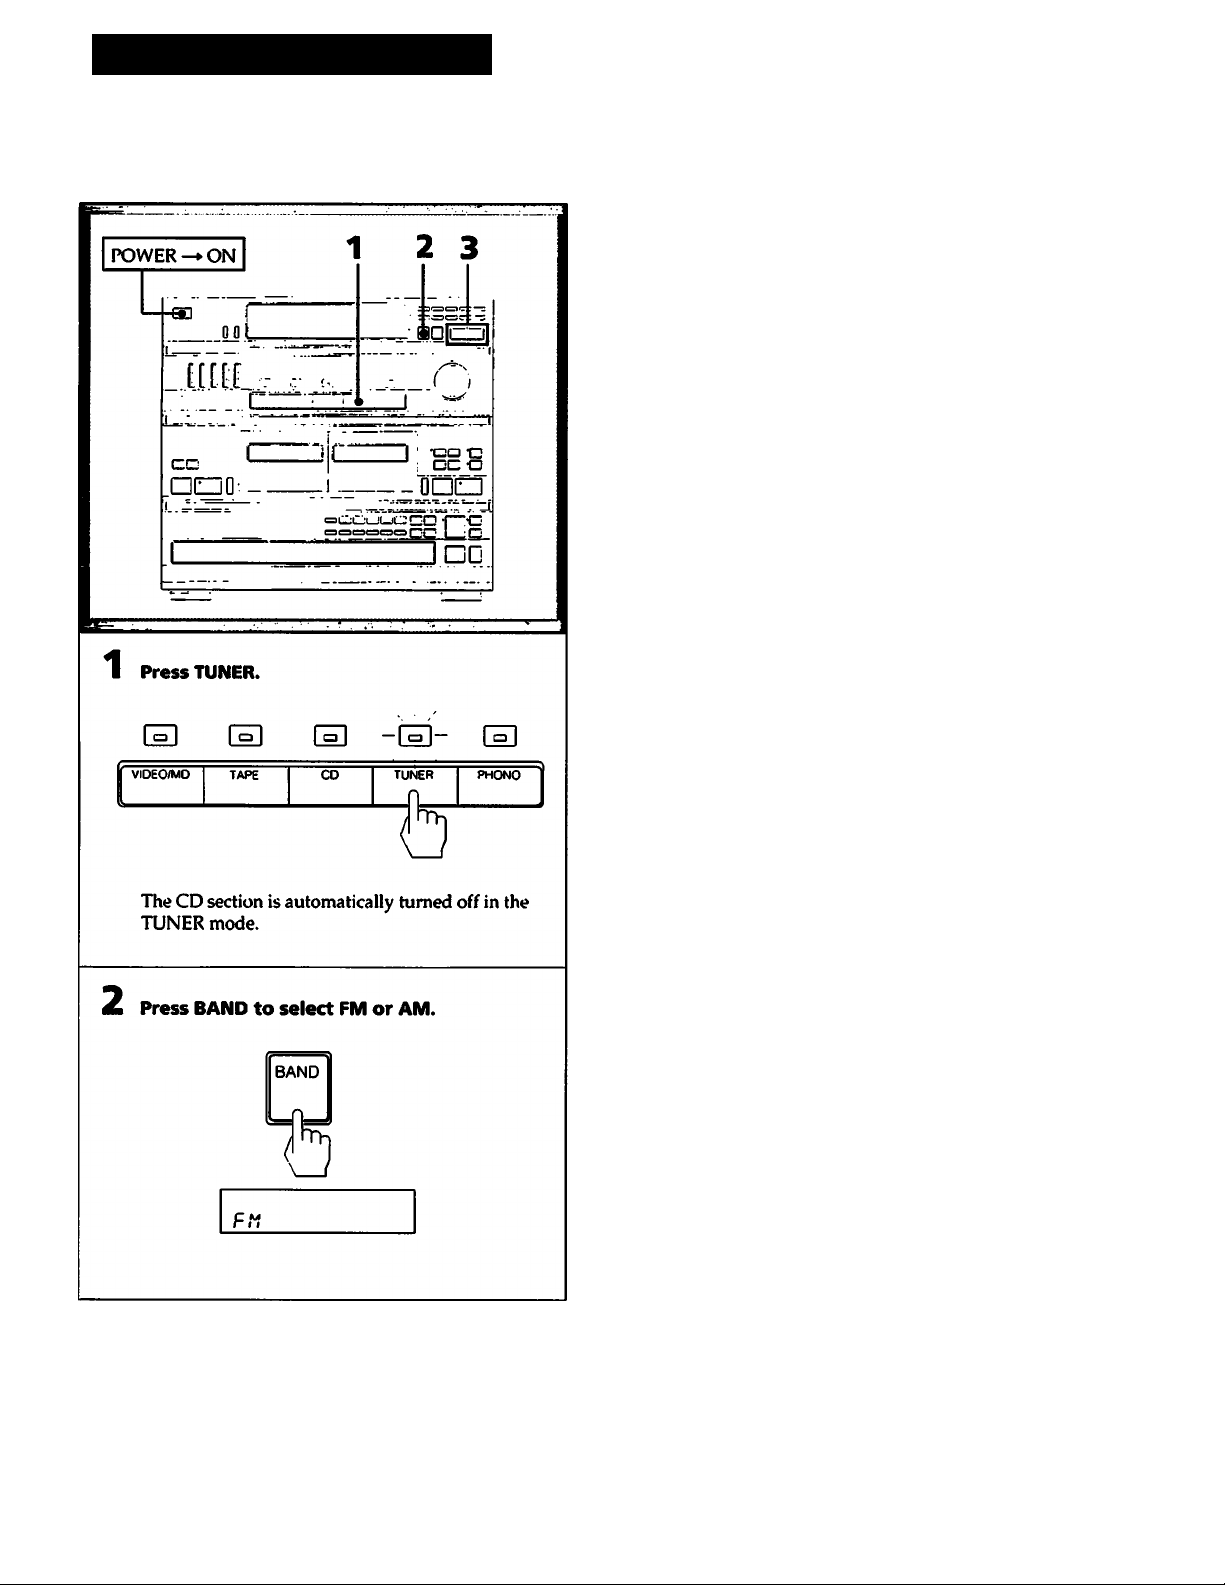
Receiving Broadcasts
This section describes about the various convenient ways of tuning.
Before reception, be sure to connect the supplied AM and FM antenna.
Press DUAL MODE TUNING - or -f.
For a lower frequency
• Tuning in automatically
Keep pressing DUAL MODE TUNING - or + for
about 1 second.
When a station is received, the automatic tuning
stops.
For a higher frequency
To stop automatic tuning
Press DUAL MODE TUNING - or +.
• Tuning in manually
Press DUAL MODE TUNING - or + to select the
staion.
Repeat step 3 until the desired station is
received.
Indicators in the display
• "TUNED” appears when a station is tuned in.
• "STEREO" appears when an FM stereo program of
sufficient signal strength is received.
When an FM stereo program is noisy
If the stereo program is noisy, press the STEREO/MONO
button to change the mode over the MONO. This eliminates
the stereo effect, but the noise will be reduced.
To return to the stereo mode, press the STEREO/MONO
button again.
To change the AM tuning interval
The AM tuning interval is preset at the factory to 10 kHz to
match the frequency allocation system of your country. To
change the interval to 9 kHz, prtKeed as follows.
1 Press the POWER switch to turn on the unit.
2 Press TUNER.
3 Set the BAND selector to AM.
4 Press ther POWER switch to turn the unit off.
5 While pressing the DUAL MODE TUNING + button, press
the POWER switch to turn the unit on.
To reset the interval to 10 kHz, follow the same prwedure.
Note
When the interv'al is changed, all stored stations will be
erased from the memory. After changing the interval, be
sure to store the stations again.
8
Page 9

storing Station Frequencies into Memory
Up lo 10 stations can be stored in any order for each memory
page (A, B, C). Therefore, 30 stations can be stored in total.
You can store a station only while "MEMORY” appears on the display
If "MEMORY" has gone off, press the MEMORY button
again.
To cancel the storing operation after pressing the SHIFT button
Press the MEMORY button.
If you store a new station
Storing a new station erases the previously stored one.
Tuning in a Stored Station
1 Press the TUNER button.
The CD section is automatically turned off in the TUNER
mode.
2 Select the memory page with the SHIFT button.
3 Designate the number with the numeric buttons.
Page 10

Playing Back Tapes (on either Deck A or B)
his section describes about a basic playback operation on
ither deck A or B.
POWER
-►ON
odi
[[.[It:.
cc
1 ^ 3
L
42
1 Press TAPE.
I o I I <=» I I g I I <=> I I g I
VIOEO/MO
TAPE
Press = to open the cassette compartment,
insert the tape with the side to be piayed
back facing you and cióse the cassette
compartment.
CD TUNER PHONO
EJECT
XiO.ItT'J
IIT,®
—I - ^.T " <i
3 Press DOLBY NR to seiect the DOLBY NR
setting.
DOLBY NR
___
I
Press O to start piayback.
II
o c>
i I
U
When the tape ends, playback automatically stops.
To stop piayback, rewinding or fast forwarding,
press ■.
To pause, press II.
To resume piayback, press II again or D>.
To rewind №e tape, press
To fast-forward the tape, press
Notes
• During playback or recording on a deck, do not operate
the other deck. (When both decks A and B are in playback
mode, only playback from deck A will be audible.)
• Before turning the power off, be sure to stop playback or
recording by pressing ■.
What is the Dolby NR* system?
Dolby NR (noise reduction) system reduces tape hiss noise in
low-level, high-frequency signals. The system boosts these
signals in recording and lowers them in playback.
When listening to a tape recorded with Dolby NR, set the
DOLBY NR switch to ON.
10
• Dolby noise reduction manufactured under license from Di'lby
Laboratories Licensing Corporation.
"EXDLBV and the double-D symbol CD are trademarks of Dolby
Laboratories Licensing Corporation.
Page 11

Recording on Tapes (Deck B)
This section describes about the recording operation only on
deck B.
Press • to enter recording pause mode.
The # and II indicators light.
Play the desired program source to be recorded.
5 Press D> or II to start recording.
The recording pause mode will be canceled and the
recording starts.
The II indicator goes off.
%
To stop recording, press ■. Notes
• The recording level is automatically adjusted during
recording.
• In the recording mode on deck B, do not operate deck A.
• It is not recommended recording with Metal tapes.
To prevent accidental erasure
To protect side A recording
Break off the tab of side A.
Side A
Tab of side B Tab of side A
To record onto side A
Cover the opening with
plastic tape.
...
11
Page 12

Dubbing Tapes (from Deck A to B)
This section describes about the operation of the recording
from deck A to B.
Press II to start dubbing.
The recording pause mode will be canceled and
dubbing starts.
The II indicator goes off.
PAUSE
To Stop dubbing, press ■ on deck A or deck B.
Notes
• The tape in deck B is automatically recorded with the s.ime
recording system as the original tape* in deck A. So it is
unnecessary to set DOLBY NR.
• If the sound is affected by a television set during dubbing,
turn off the set or move it awav from the unit.
Press & to open the cassette compartments,
insert the tapes with the sides to be played
back or recorded facing you and close the
cassette compartments.
DECK A DECKB
Press HIGH SPEED DUBBING.
The unit enters recording pause mode for high speed
dubbing, the II and # indicators light.
(Dubbing can not be carried out without pressing the
HIGH SPEED DUBBING button.)
12
HIGH SPEED
DUBBING
Page 13

Playing the Discs - Continuous Play
This section describes about the continuous play. This CD section can be played
up to 5 discs, and you can choose to play a disc or all discs.
Before playing a disc, turn on the POWER and set the function selector to the CD
mode.
4 Press the DISC SELECT button or ■>- to start
playback.
• DISC SELECT-
or
Disc being played
.ottc ^ * a < * F
i [glia'
Selection number being played
To stop play, press ■.
To stop play and open the tray, press
To stop for a moment during play, press II.
Press [>• or II to resume playback.
1—Elapsed time in the
selection being played
Selection numbers
which exist on the
c
selected disc.
When playback of a
selection is finished,
that selection number
goes out
Caution on adjusting volume
Do not turn up the volume while listening to a portion
with very low level or no audio signals. Otherwise, the
speakers may be damaged when a peak level portion is
played.
Notes
• The CD section is automatically turned off in the TUNER
mode. However only the OPEN/CLOSE and DISC SKIP
buttons on the CD player can be operated in any mode.
This is useful when recording on tape from CDs.
• The disc number of an empty tray will be displayed until
the empty tray is set to play. Once it is recognized as
empty, it will disappear.
To play an 8 cm (3-inch) CD
Place it on the inner circle of the tray. If the disc is provided
with an adaptor, first remove it. Do not put a normal CD (12
cm/5-inch) on top of an 8 cm CD.
When there are no disc at all on the tray
"no d ISC" appears on the display.
13
Page 14

Playing the Discs - Continuous Play
Each time you press TIME during playback, the display
changes as follows:
Information Display
When the disc tray is closed by pressing the total number
of selections and the total playing time of the disc to be
played are displayed for a few seconds.
If you press TIME in stop mode, the total number of
selections and the total playing time of the disc to be played
can be displayed.
The circle shows that the disc
which the playback has not been
finished yet is loaded.
When the playback of all
selections of a disc has been
finished, the circle or the tray
number goes off.
Disc number Contain^ selections
' I I
8
Shows the disc
number to be
played back or
being played back.
i 'i' .5-
ft-n
LI
E
—Total playing time
-Total number of the
selections on the disc
a) Elapsed time of the selection (automatically displayed
when playback starts.)
b) Remaining time of the selection
indicator will appear in the display instead r>f
the actual time, if selection number 21 or higher is
selected.
c) Remaining time of the disc
14
Note
Remaining time of the disc is only available during the
continuous mode. It will not be displayed by pressing the
TIME button during the program or shuffle mode.
Page 15

>■ K\h>>i
Selecting a Desired Disc
By using the DISC SELECT 1 to 5 buttons or the DISC SKIP
button during playback, you can locate the beginning of any
disc.
Locating a Particular Point in a Selection
Locating a point in sequence (Manual Search)
You can locate a particular point during playback by
monitoring the sound at high speed.
To go iiack at high speed
Keep ◄◄ pressed.
To go ahead at high speed
Keep ►► pressed.
Release the button when you reach the desired point.
To locate at higher speed
Press ◄◄ or ►► in the pause mode. Search speed will
increase three times, but there will be no sound. Find the
desired point by watching the time number on the display.
** ~7 ~7 “ appears in the display
If you continuously press ►► during play at the end of the
disc, ”~1 “I ” app>ears in the display. Press ◄◄ or KM to
return to the normal display.
To select a particular disc
Press the corresponding DISC SELECT 1 to 5 button.
To move to the disc tray next to the current one
Press DISC SKIP.
Locating a Particular Selection
Locating a selection in sequence
You can locate the beginning of a selection on the disc being
played.
To locate the beginning of the selection being played
Press KM.
To locate the beginning of the next selection
Press »1.
Press 0« or »I until the desired selection is located.
15
Page 16

Playing in a Random Order - Shuffle Play
You can have the selections (up to 99) played in a random
order. The unit will play all the discs or just one disc you
desire.
3 Press SHUFFLE to select the ALL DISCS or 1
DISC mode.
ALL DISCS: The selections from all discs are played
1 DISC; The selections from the current disc are
in a random order.
played in a random order.
. 2 $ 4 S
d JSC
* t
$'r
n'n
> ♦ *
ti t4 1$
n 19 »
Press 0 to start playback.
O
Once a selection is played, it will not be played again until
the playback in random order is completed.
To stop playback
Press ■.
To cancel shuffle play
Press CONTINUE to return to the continuous mt>de.
To change from program or continuous play to shuffle play
Press SHUF^E during program or continuous play. The
program mode or continuous mode will be cleared and
shuffle play will start from the current selection being
played.
16
While the unit is shuffling the selection
■■ r j " appears on the display.
Shuffle Play on Specified Disc - Select Shuffle
Play
If you specify discs before or during play in ALL DISCS
shuffle mode, only the selections on the specified discs will
play in a random order.
To specify the discs
Press DISC SELECT 1 to 5 to specify the discs after chiK>sing
ALL DISCS mode. Semi - circles appear around the selecteil
discs numbers to be played. To cancel the selected discs,
press DISC SELECT 1 to 5 of selected discs numbers again.
The semi-circles disappear.
Press l>-.
Select Shuffle Play starts.
To return to ail shuffle play
Press SHUFFLE twice.
Page 17

Playing in a Desired Order - Program Play
You can make a program by designating up to 32 steps in the
order you want them to be played. The unit will play the
disc according to your program. This function is very
convenient for recording on the cassette tape.
MtSISSiiiSiiSjKS.s
3*A To program discs in the order you want
to play.
Press DISC SELECT 1 - 5 in the order you
want to program.
--------------
"AL" appears in the display.
3~B To program selections on a disc in the
order you want to play.
1) Select the desired disc with DISC SELECT
1-5.
--------------
DISC SELECT
Hi gg.i?8
DISC SELECT
---------------
---------------
1 «
9*9
• 7
9 9 t9
11 U
- -1-
1 Place discs with the label side up.
After placing discs, press = to close the disc table.
Disc No.
Disc tray
Press PROGRAM so that "PROGRAM"
appears on the display.
2) Press KM or »1 repeatedly until the
desired selection is located.
3) Press PROGRAM.
program
ty 2 S 4 S .
folo] -
•« we -
3 33B ;
The selection is stored, and the blinking number in
the display light up.
_ _ _
Repeat 2) and 3) to select another selection.
To program the selection(s) on another disc, repeat
l),2)and3).
17
Page 18

Playing in a Desired Order ~ Program Play
Skipping to the next seiection programmed
4 Press O- to start playback.
O
>
Press »1 during playback.
Going back to the beginning of the seiection being piayed
Press 1« during playback.
Itv
To stop program piay
Press ■. The last selection number programmed will be
displayed.
To resume playback, press t>. Play begins from the
beginning of the program.
You can play the same program repeatedly as long as you do
not cancel program play or erase the program.
To program whiie observing the disc iabeis
You can program the selections with the disc table open.
To check the program contents
Press the CHECK button. Each time the button is prc*ssed,
the program contents are displayed in the programmed
order.
To cancei program piay
Press CONTINUE and return to the continuous playKick
mode. The program will be erased.
To cancei aii the seiections programmed
Press ■ to cancel in stop mcxie.
If the disc table is opened or the pt>wer is turned off, the
program contents are also erased.
To program for recording
After steps 1 to 3-A or 3-B3), press II to insert a pause and
program the selections for side B bv performing step 3-A U>
3-B3).
18
When the selections for side A have been played, the unit
will pause. ("B" lights up.)
Set the tape to the beginning of side B, then press I> or II.
The selections for side B will start playback.
Notes
• The playing time for selection numbers higher than 20 will
not be added into the total playing time.
• When selections have been programmed for sides A and B,
the display shows the selections programmed for side B
and the total playing time for side B in stop mode.
Page 19

Designating the Total Playing Time - Time Edit
You can designate a time and the unit will make 2 different programs of selections
each fitting within that period. Use this function by designating the length of your
tape for editing both sides of a tape.
Designate the length of one side of your
tape.
• To set the minute
Each time ll«/l»l is pressed, the time changes as
follows:
•Press KM Press »1
C-90 (45.00 min.)-
c:
-74 (37.00 min.) — C-60 (30.00 min.) — C-54 (27.00
-C-46 <23.00 min.)
3.U0 mm.) -I
'.00 min.)
d?
r-W5
♦ After 2 seconds
¿3.00
Time
Press EDIT.
The program for side A is completed.
¿P 2 3 4 S
Total playing
time
ten
i- Chosen
selections
Press EDIT once more, to make a program for the other side of your tape.
19
Page 20

Designating the Total
Playing Repeatedly-
Playing Time - Time Edit
To play the program
Press t>.
The selections for side A will be played and then the unit
will pause. "B" lights up in the tape side indicator. Set the
t>- or
tape to the beginning of side B, then press
The selections for side B will be played.
Note
Playback can be performed when "EDIT' is displayed.
To stop playback
Press ■.
You can play the same program repeatedly as long as you do
not cancel time edit or erase the program.
To cancel time edit
Press CONTINUE and return to the continuous playing
mode.
The program will be erased.
To erase the entire program
Press ■ once during stop; twice during playback.
The program is also erased, when you turn off the unit or
open the disc table.
li.
Repeat Play
Repeat play allow's you to repeat selections in any play
mode. You can repeat all discs, only specified discs, one
selection, or programmed or reshuffled selections.
iSls:
rr f r r
uUl
__
1
—
1 -■
•-— 0 — -
J
!• ”
“ -
REPEAT
To include desired selections in the program
1 Make your own program of the desired selections.
See page 17 for instructions.
2 Follow the procedures as shown on the preceding page.
Just designate the length of your tape, and you need not
subtract the playing time of your program. The unit w'ill
place your selections at the beginning of its program and
add other selections to fit the remaining time.
Press REPEAT before or during playback.
B£P€AT
CZD
In continuous mode:
To repeat all selections on a disc (1 DISC mode) or all
selections on all discs (ALL DISCS mode), press REPEAT
so that "REPEAT" appears on the display.
To repeat one selection, press REPEAT so that "REPEAT
1" appears on the display.
In program mode or shuffle mode:
Only the "REPEAT' function is available.
The entire program or all selections shuffled in random
order will be played repeatedly by pressing REPEAT.
To cancel repeat play
Press REPEA"r until "REPEAT" or "REPEAT 1" disappears.
20
Page 21

Maintenance
Cleaning the Heads and Tape Path
Clean after every 10 hours of operation and before recording
for optimum record/playback quality.
1 Pressé.
2 Slightly moisten the tip of a cotton swab with cleaning
fluid or alcohol.
3 Wipe heads, pinch rollers and capstans.
DECK A
Capstan
DECKB
n Ffl ^
I Pinch roller
Playback head Recording/playback head
Do not insert a cassette until cleaned areas are completely
dry.
Demagnetizing the Heads
After 20 to 30 hours of use, it is necessary to remove residual
magnetism built up on the head. Turn off the power and
demagnetize heads with any commercially available
demagnetizer.
Cleaning discs
Before playing, clean the disc with the cleatung cloth.
Wipe the disc from the center out.
Do not use solvents such as benzine, thinner, commercially
available cleaners or anti-static spray intended for analog
discs.
Notes on handling discs
• To keep the disc clean, handle the disc by its edge. Do not
touch the surface.
• Do not stick paper or tape on the disc.
• Do not expose the disc to direct sunlight or heat sources
such as hot air ducts, or leave it in a car parked in direct
sunlight as temperature may rise considerably.
• After playing, store the disc in its case.
21
Page 22

Specifications
AUDIO POWER SPECIFICATIONS
POWER OUTPUT AND TOTAL
HARMONIC DISTORTION:
With 8-ohm loads, both channels driven,
from 70 - 20,000 Hz; rated 100 watts per
channel minimum RMS power, with less than
0.9% total harmonic distortion from 250
milliwatts to rated output.
Amplifier
Frequency response I’HONO: RIAA curve
VIDEO/MD: 10 Hz - 50 kHz ±3 dB
Input
Sensitivity
PHONO
VIDEOfMD
Output SPEAKER: Accepts speakers of 8
Graphic equalizer controls
Tuner
System
2.5 mV 50 kilohms
250 mV 50 kilohms
to 16 ohms
HEADPHONES: Accepts
headphones with low and high
impedance
BcK)St/Cut range: ±8 dB (100 Hz,
330 Hz, 1 kHz, 3.3kHz)
±6 dB (10 kHz)
FM stereo, FM/AM superheterodyne
tuner
Quartz-locked PLL digital
synthesizer system
FM tuner section
Tuning range
Antenna terminals
Intermediate frequencylO.7 MHz
Sensitivity (at 50 dB quieting)
Usable sensitivity 19.5 dBf, 5 pV (IHF)
Signal-to-noise ratio (at 75 kHz deviation)
Separation
Selectivity
Harmonic distortion
87.5-108 MHz
75 ohms unbalanced
300 ohms balanced
22.1 dBf, 7 pV (mono)
42.1 dBf, 70 pV (stereo)
80 dB (mono)
75 dB (stereo) at 1 kHz
35dBatl kHz
55 dB at 400 kHz
03% (mono)
0.5% (stereo) at 1 kHz
AM tuner section
Tuning range
Antenna
Intermediate frequency
530 -1,710 kHz (10 kHz)
531-1,710 kHz (9 kHz)
AM loop antenna. External antenna
terminals
450 kHz
Impedance
22
Usable sensitivity
Signal-to-noise ratio
Harmonic distortion
Selectivity
Tape Deck
System 4-track 2-channel stereo
Frei]uency response (DOLBY NR OFF)
Wow and flutter 0.12(^< WRMS (NAB)
Compact Disc
System
l^ser
Wavelength
Frequency response
Harmonic distortion
General
Power requirements
Power consumption
Dimensions
Mass
Accessories supplied
Design and specifications are subject to change without
notice.
AM loop antenna; 500 |iV'/m
(1,01X) kHz)
54 dB
0.5^r
38 dB (10 kHz)
With TYPE 11 cassette (Sonv
UCX-S): 30 - 14,000 Hz (¿3 dB)
With TYPE 1 cassette (Sonv HF-S):
30 - 13,000 Hz (±3 dB)
Compact disc digital audio system
Semiconductor laser
780-790 nm
2 Hz-20 kHz (±1.5 dB)
Less than 0.03 % (1 kHz)
120 V AC, 60 Hz
180 W (Model for U.S.A)
250 VA (Model for Canada)
Approx. 430 X 410 X 400 mm (w/h/d)
(17 X 16'/X 15'/, inches)
(including projecting parts and
controls)
Approx. 13.2 kg (29 lb 2 oz) net
AM Icxip antenna (I)
FM wire antenna (1)
Remote Commander RM-S241 (1)
Sony batteries SUM-3(NS) (2)
Headphone MDR-tX)6 (1)
(Model for Canada)
Plug adaptor (1)
(Model for Canada)
Page 23

Troubleshooting
Before going through the check list below, first refer back to the connection and operating procedures.
Should any problem persist after you have made these checks, consult your nearest Sony dealer.
Tuner Operation
STEREO indicator blinks.
Severe hum or noise.
Cassette Deck Operation
The • button does not activate.
Function buttons do not activate.
Recording or playback cannot be made, or there
is decrease in sound level.
Excessive wow, flutter or dropout.
Incomplete erasure.
Unbalanced tone in high frequencies.
• A very weak FM station or a noisy FM program is received. —►
Adjust the antenna or connect an external FM antenna.
• If noise is noticeable, set the STEREO/MONO button to MONO so
that the STEREO indicator goes off.
• The signal strength is too weak. —♦ Adjust the antenna, connect an
external antenna or connect the ground wire.
• No tape in the cassette compartment.
• The tab has been removed from the tape. (See page 11.) —► Cover the
opening with plastic tape.
• Cassette compartment is not fully closed.
• Recording/playback and erase heads are either dirty or magnetized.
—» Clean or demagnetize the heads. (See page 21.)
• Capstan or pinch roller is dirty. (See page 21.)
• Erase head is dirty. (See page 21.)
• Improper setting of the DOLBY NR switch. —*■ When playing back,
set the switch to the same position used in recording.
Compact Disc Operation
Remote commander does not operate the unit. • No disc in the CD section.
• The unit is in the pause mode. —* Press O- or II to release pause.
• Moisture condensation. —► Leave the unit turned on for about an
hour.
• The disc is set upside down. —► Set the disc with the label side up.
• The disc is tilted. —» Set the disc correctly.
• The disc is extremely dirty.
Any operation is not possible.
• The internal control program may not run. —* Turn off the power
and turn it on again.
Page 24

Troubleshooting
General
The unit is not turned on.
No audio.
No audio from one channel.
Noise when TV is turned on. • Move the TV away from the audio system.
Lack of bass sound or obscure instrument
position.
• Check if any button on the front panel has been pressed before
turning on the POWER switch.
• Check the power cord connection.
• Check the connections. (See pages 5 to 6.)
• Check the speaker cord or connecting cord connection. (See pages 5 to
6.)
• Check the connection between the amplifier and speakers.
Sony Corporation Printed in Malaysia
 Loading...