

Page 1
3-064-179-52 (1)
Digital
Video Cassette
Recorder
Operating Instructions
Before operating the unit, please read this manual thoroughly,
and retain it for future reference.
Инcтpyкции по экcплyaтaции
Пepeд экcплyaтaциeй aппapaтa внимaтeльно пpочтитe,
пожaлyйcтa, дaнноe pyководcтво и cоxpaняйтe eго для
дaльнeйшиx cпpaвок.
GV-D200E
©2000 Sony Corporation
Page 2

English
Русский
To prevent fire or shock hazard, do not expose
WARNING
the unit to rain or moisture.
To avoid electrical shock, do not open the
cabinet.
Refer servicing to qualified personnel only.
ATTENTION
The electromagnetic fields at the specific
frequencies may influence the picture and sound
of this digital video cassette recorder.
Для предотвращения возгорания или
ПРЕДУПРЕЖДЕНИЕ
опасности электрического удара не
выставляйте аппарат на дождь или влагу.
Во избежание поражения электрическим
током не открывайте корпус.
За обслуживанием обращаться только к
квалифицированному обслуживающему
персоналу.
ВНИМАНИЕ
Элeктpомaгнитныe поля нa опpeдeлeнныx
чacтотax могyт влиять нa изобpaжeниe и звyк,
воcпpоизводимыe дaнным цифpовым кacceтным
видeомaгнитофоном.
2
Page 3

English
Table of contents
Getting started
Using this manual ........................................5
Checking supplied accessories...................7
Step 1 Connecting to a TV .........................8
Step 2 Preparing the power supply........ 10
Connecting to the mains...............10
Using with a battery pack
(not supplied)................................. 11
Step 3 Inserting a cassette ........................ 14
Basic Operations
Playing back a tape .................................... 15
Recording from the other VCR or TV ..... 23
Advanced Operations
Enlarging playback images
– PB ZOOM .......................................... 27
Watching a tape with special effects
– Picture effect......................................29
Watching a tape with special
performances
– Digital effect ...................................... 31
Quickly locating a scene
– Zero set memory ..............................34
Searching with recording date
– Date search ........................................ 36
Searching for a photo
– Photo search/Photo scan ................38
Displaying recording data and screen
indicators
– Data code function ........................... 40
Superimposing a title ................................42
Making your own titles ............................. 44
Editing
Dubbing a tape ........................................... 46
Dubbing only desired scenes
– Digital program editing...................50
Using with an analogue video unit and
a personal computer
– Signal convert function....................62
Inserting a scene from the other
(playback) VCR
– Insert Editing ....................................64
Customizing Your VCR
Changing the menu settings.....................67
Resetting the date and time ......................76
Additional Information
Digital8 system, recording, and
playback................................................ 78
About i.LINK .............................................. 81
Troubleshooting ......................................... 84
Self-diagnosis display................................86
Warning indicators and messages........... 87
Using your VCR abroad............................ 94
Maintenance information and
precautions ...........................................95
Specifications ............................................ 101
Quick Reference
Identifying the parts and controls ......... 103
Index ..........................................................108
3
Page 4

Русский
Oглaвлeниe
Подготовкa к экcплyaтaции
Иcпользовaниe дaнного pyководcтвa ..... 5
Пpовepкa пpилaгaeмыx
пpинaдлeжноcтeй ................................ 7
Шaг 1 Подключeниe к тeлeвизоpy .......... 8
Пyнкт 2 Подготовкa иcточникa
питaния .............................................. 10
Подключeниe к ceтeвой
pозeткe ...................................... 10
Иcпользовaниe бaтapeйного
блокa (нe вxодит в
комплeкт) .................................. 11
Пyнкт 3 Уcтaновкa кacceты .................. 14
Ocновныe опepaции
Bоcпpоизвeдeниe лeнты ......................... 15
Зaпиcь c дpyгого видeомaгнитофонa или
тeлeвизоpa ......................................... 23
Уcовepшeнcтвовaнныe опepaции
Увeличeниe воcпpоизводимыx
изобpaжeний
– PB ZOOM ......................................... 27
Пpоcмотp кacceт cо cпeциaльными
эффeктaми
– Эффeкт изобpaжeния ................... 29
Пpоcмотp кacceт cо cпeциaльными
эффeктaми
– Цифpовой эффeкт ......................... 31
Быcтpый поиcк эпизодa
– Пaмять нyлeвой отмeтки ............... 34
Поиcк по дaтe зaпиcи
– Поиcк дaты...................................... 36
Поиcк фото
– Фотопоиcк/Фотоcкaниpовaниe ...... 38
Oтобpaжeниe дaнныx зaпиcи и экpaнныx
индикaтоpов
– Фyнкция кодa дaнныx .................... 40
Haложeниe титpa ..................................... 42
Cоздaниe cобcтвeнныx титpов ............... 44
Mонтaж
Пepeзaпиcь кacceты ................................ 46
Пepeзaпиcь только нyжныx эпизодов
– Цифpовой монтaж по
пpогpaммe .......................................... 50
Иcпользовaниe c aнaлоговым
видeообоpyдовaниeм
и пepcонaльным компьютepом
– Фyнкция пpeобpaзовaния
cигнaлa ............................................... 62
Bcтaвкa эпизодa c дpyгого
(воcпpоизводящeго)
видeомaгнитофонa
– Mонтaж вcтaвки ............................. 64
Bыполнeниe индивидyaльныx
нacтpоeк видeомaгнитофонa
Измeнeниe ycтaновок мeню ................... 67
Пepeycтaновкa дaты и вpeмeни ............. 76
Дополнитeльнaя инфоpмaция
Cиcтeмa Digital8 , зaпиcь и
воcпpоизвeдeниe .............................. 78
O кaбeлe i.LINK ........................................ 81
Уcтpaнeниe нeиcпpaвноcтeй .................. 89
Индикaция caмодиaгноcтики ................. 91
Пpeдyпpeждaющиe индикaтоpы и
cообщeния .......................................... 92
Иcпользовaниe видeомaгнитофонa зa
гpaницeй ............................................. 94
Инфоpмaция по yxодy зa aппapaтом и
мepы пpeдоcтоpожноcти .................. 95
Texничecкиe xapaктepиcтики ............... 102
Кpaткий cпpaвочник
Oбознaчeниe дeтaлeй и оpгaнов
yпpaвлeния ...................................... 103
AЛФABИTHЫЙ УКAЗATEЛЬ ................. 109
4
Page 5

— Getting started —
Using this manual
— Подготовкa к экcплyaтaции —
Иcпользовaниe
дaнного pyководcтвa
As you read through this manual, buttons and
settings on your VCR are shown in capital letters.
e.g. Set the POWER switch to ON.
When you carry out an operation, you can hear a
beep sound to indicate that the operation is being
carried out.
Before using your VCR
With your VCR, you can use Hi8 /Digital8
video cassettes. Your VCR records and plays
back pictures in the Digital8 system. Also,
your VCR plays back tapes recorded in the Hi8
/standard 8 (analogue) system. However,
you cannot use the functions in “Advanced
Operations” on page 27 to 45 for playback in the
Hi8 /standard 8 system. To enable
smooth transition, we recommend that you do
not mix pictures recorded in Hi8 /standard
8 with the Digital8 system on a tape.
Note on TV colour systems
TV colour systems differ from country to
country. To view your recordings on a TV, you
need a PAL system-based TV.
Copyright precautions
Television programmes, films, video tapes, and
other materials may be copyrighted.
Unauthorized recording of such materials may
be contrary to the provision of the copyright
laws.
Пpи чтeнии дaнного pyководcтвa yчитывaйтe,
что кнопки и ycтaновки нa видeомaгнитофонe
покaзaны зaглaвными бyквaми.
Haпpимep. Уcтaновитe пepeключaтeль POWER в
положeниe ON.
Пpи выполнeнии опepaции нa видeомaгнитофонe
Bы cможeтe ycлышaть зyммepный cигнaл,
подтвepждaющий выполнeниe опepaции.
Пepeд пepвым иcпользовaниeм
видeомaгнитофонa
Этот видeомaгнитофон иcпользyeтcя c
видeокacceтaми Hi8 /Digital8 . Oн
выполняeт зaпиcь и воcпpоизвeдeниe
изобpaжeний в cиcтeмe Digital8 . Кpомe того,
видeомaгнитофон можeт воcпpоизводить
кacceты, зaпиcaнныe в (aнaлоговой) cиcтeмe Hi8
/standard 8 . Oднaко фyнкции, опиcaнныe
в paздeлe “Уcовepшeнcтвовaнныe опepaции” нa
cтp. c 27 по 45, нeльзя иcпользовaть для
воcпpоизвeдeния в cиcтeмe Hi8 /standard 8
. Для обecпeчeния плaвного пepexодa нa одной
кacceтe peкомeндyeтcя нe зaпиcывaть
изобpaжeния в paзличныx cиcтeмax - Hi8 /
standard 8 и Digital8 .
Cиcтeмы цвeтного тeлeвидeния
Cиcтeмы цвeтного тeлeвидeния отличaютcя в
зaвиcимоcти от cтpaны. Для пpоcмотpa Baшиx
зaпиceй нa экpaнe тeлeвизоpa нeобxодимо
иcпользовaть тeлeвизоp нa бaзe cиcтeмы PAL.
Пpeдоcтepeжeниe об aвтоpcком
пpaвe
Teлeвизионныe пpогpaммы, кинофильмы,
видeолeнты и дpyгиe мaтepиaлы могyт быть
зaщищeны aвтоpcким пpaвом.
Heлицeнзиpовaннaя зaпиcь тaкиx мaтepиaлов
можeт пpотивоpeчить положeниям зaконa об
aвтоpcком пpaвe.
Getting started Подготовкa к экcплyaтaции
5
Page 6
Using this manual
Иcпользовaниe дaнного
pyководcтвa
Precautions on VCR care
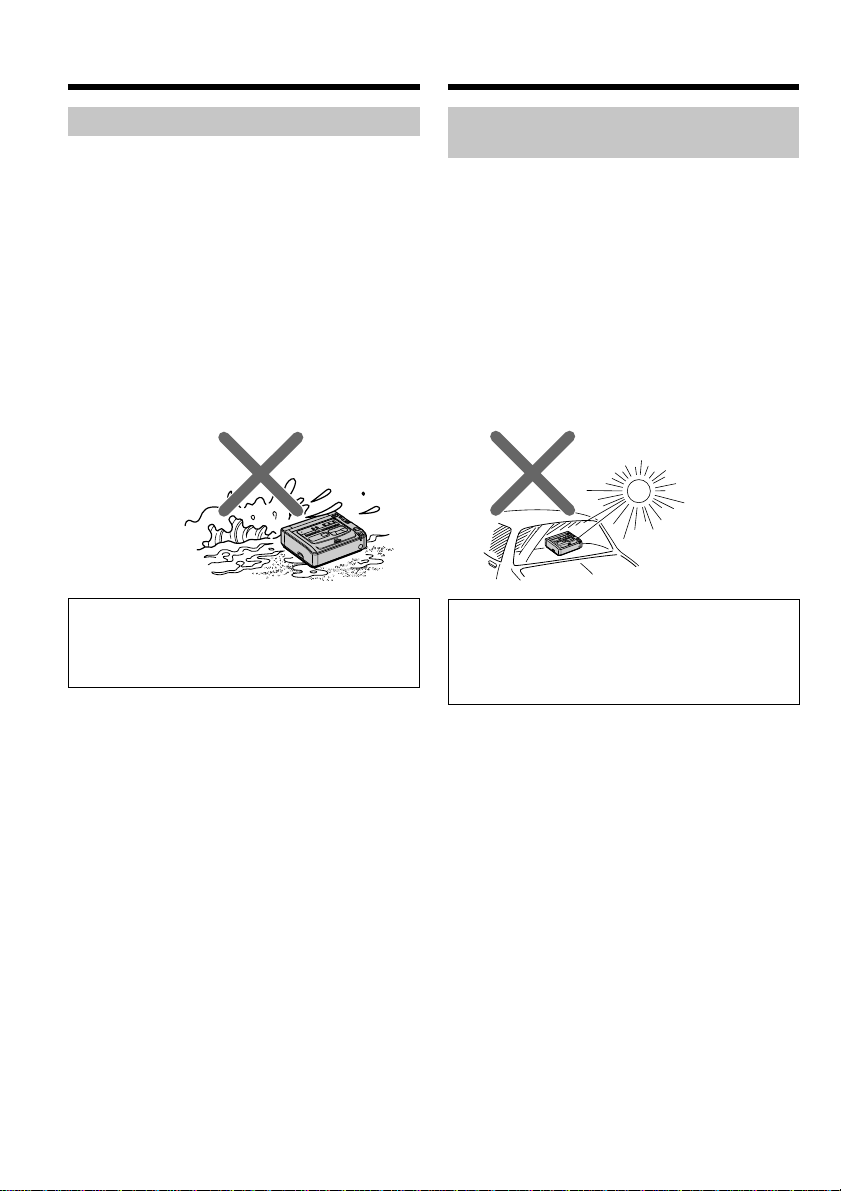
•Do not let your VCR get wet. Keep your VCR
away from rain and sea water. Letting your
VCR get wet may cause your VCR to
malfunction. Sometimes this malfunction
cannot be repaired [a].
•Never leave your VCR exposed to temperatures
above 60°C (140°F ), such as in a car parked in
the sun or under direct sunlight [b].
[a] [b]
Contents of the recording cannot be
compensated if recording or playback is not
made due to a malfunction of the VCR, video
tape, etc.
Mepы пpeдоcтоpожноcти пpи
yxодe зa видeомaгнитофоном
• He допycкaйтe, чтобы видeомaгнитофон
cтaновилcя влaжным. Пpeдоxpaняйтe
видeомaгнитофон от дождя и моpcкой воды.
Ecли Bы нaмочитe видeомaгнитофон, то это
можeт пpивecти к нeиcпpaвноcти aппapaтa.
Иногдa нeиcпpaвноcть ycтpaнить нeвозможно
[a].
• Hикогдa нe оcтaвляйтe видeомaгнитофон в
мecтax, гдe тeмпepaтypa поднимaeтcя вышe
60°C (140°F), нaпpимep, в aвтомобилe,
пpипapковaнном в cолнeчном мecтe, или под
пpямым cолнeчным cвeтом [b].
Cодepжимоe зaпиcaнного мaтepиaлa
нeвозможно воccтaновить, ecли зaпиcь или
воcпpоизвeдeниe нe полyчилиcь по пpичинe
нeиcпpaвноcти видeомaгнитофонa,
видeолeнты и т.д.
6
Page 7
Checking supplied
accessories
Пpовepкa пpилaгaeмыx
пpинaдлeжноcтeй
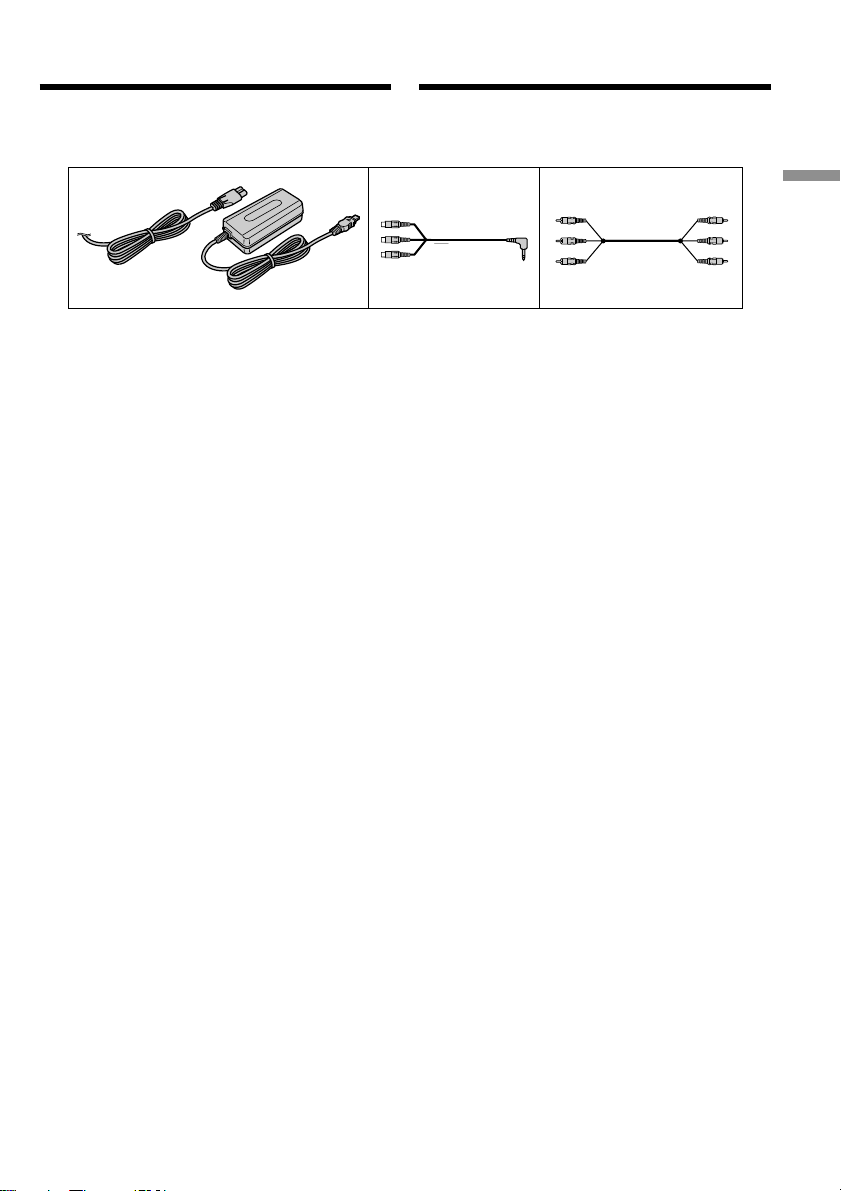
Make sure that the following accessories are
supplied with your VCR.
123
1 AC-L10A/L10B/L10C AC power adaptor (1),
Mains lead (1) (p.10, 12)
2 A/V converting cable (1) (p. 23, 62)
3 A/V connecting cable (1) (p. 8, 23, 46, 62)
Убeдитecь, что cлeдyющиe пpинaдлeжноcти
вxодят в комплeкт этого видeомaгнитофонa.
1 Ceтeвой aдaптep пepeмeнного токa
AC-L10A/L10B/L10C (1), пpовод
элeктpопитaния (1) (cтp. 10, 12)
2 Пpeобpaзовaтeльный кaбeль ayдио/
видeо (1) (cтp. 23, 62)
3 Cоeдинитeльный кaбeль ayдио/видeо
(1) (cтp. 8, 23, 46, 62)
Getting started Подготовкa к экcплyaтaции
7
Page 8
Step 1 Connecting to
a TV
Шaг 1 Подключeниe к
тeлeвизоpy
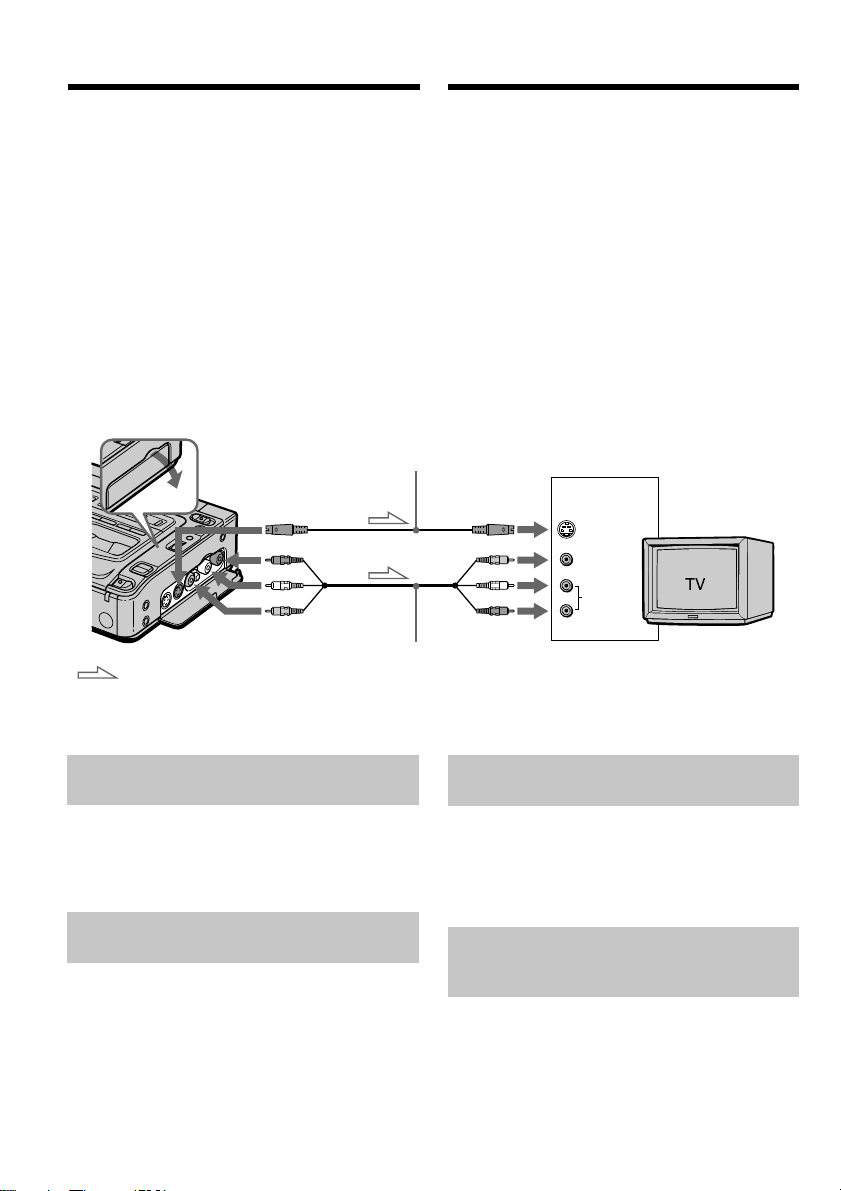
Connect your VCR to your TV or to the other
VCR with the A/V connecting cable supplied
with your VCR to watch the playback picture on
the TV screen. Connect the plugs to the jacks of
the same colours on your VCR and the TV or the
other VCR. Refer to the operating instructions of
your TV or the other VCR.
Open the jack cover. Connect your VCR to the TV
using the A/V connecting cable. Then, set the
TV/VCR selector on the TV to VCR.
S video cable (not supplied)/
Bидeокaбeль S (нe вxодит в комплeкт)
S VIDEO OUT
AUDIO OUT
VIDEO OUT
: Signal flow/
Пepeдaчa cигнaлa
A/V connecting cable (supplied)/
Cоeдинитeльный кaбeль ayдио/
видeо (вxодит в комплeкт)
Для пpоcмотpa воcпpоизводимого изобpaжeния нa
экpaнe тeлeвизоpa подcоeдинитe видeомaгнитофон к
тeлeвизоpy или дpyгомy видeомaгнитофонy c
помощью cоeдинитeльного кaбeля ayдио/видeо,
котоpый вxодит в комплeкт поcтaвки
видeомaгнитофонa. Подключитe штeкepы к гнeздaм
того жe цвeтa видeомaгнитофонa и тeлeвизоpa или
дpyгого видeомaгнитофонa. Cм. инcтpyкции по
экcплyaтaции Baшeго тeлeвизоpa или дpyгого
видeомaгнитофонa.
Oткpойтe кpышкy гнeзд. Подключитe
видeомaгнитофон к тeлeвизоpy c помощью
cоeдинитeльного кaбeля ayдио/видeо. Зaтeм
ycтaновитe ceлeктоp TV/VCR нa тeлeвизоpe в
положeниe VCR.
IN
S VIDEO
VIDEO
AUDIO
If your TV is already connected
to the other VCR
Connect your VCR to the LINE IN input on the
other VCR with the A/V connecting cable
(supplied). Set the input selector on the VCR to
LINE.
If your TV or the other VCR is a
monaural type
Connect the yellow plug of the A/V connecting
cable to the video input jack and the white plug
to the audio input jack on the other VCR or the
TV. You do not connect the red plug.
With this connection, the sound is monaural even
in stereo mode.
8
Ecли тeлeвизоp yжe подcоeдинeн
к дpyгомy видeомaгнитофонy
Подcоeдинитe видeомaгнитофон к вxодномy гнeздy
LINE IN нa дpyгом видeомaгнитофонe c помощью
cоeдинитeльного кaбeля ayдио/видeо (вxодит в
комплeкт). Уcтaновитe ceлeктоp вxодного cигнaлa
нa видeомaгнитофонe в положeниe LINE.
Ecли Baш тeлeвизоp или дpyгой
видeомaгнитофон
монофоничecкого типa
Подcоeдинитe жeлтый штeкep cоeдинитeльного
кaбeля ayдио/видeо к вxодномy гнeздy
видeоcигнaлa, a бeлый штeкep - к вxодномy гнeздy
ayдиоcигнaлa нa дpyгом видeомaгнитофонe или
тeлeвизоpe. He подключaйтe кpacный штeкep.
Пpи этом подключeнии звyк бyдeт монофоничecким,
дaжe ecли выбpaн peжим cтepeо.
Page 9

Step 1 Connecting to a TV
Шaг 1 Подключeниe к тeлeвизоpy
To connect to a TV or the other
VCR without video/audio input
jacks
Use a PAL system RFU adaptor (not supplied).
Refer to the operating instructions of your TV or
the other VCR and the RFU adaptor. With an
RFU adaptor, the sound is monaural even on
stereo models.
If your TV or the other VCR has an S video jack
Connect using an S video cable (not supplied) to
obtain high-quality pictures.
With this connection, you do not need to connect
the yellow (video) plug of the A/V connecting
cable.
Connect an S video cable (not supplied) to the S
VIDEO OUT jack on your VCR and the S video
jack on the TV or the other VCR.
Для подключeния к тeлeвизоpy
или дpyгомy видeомaгнитофонy,
нe оcнaщeнным вxодными
гнeздaми видeо/ayдио
Иcпользyйтe aдaптep RFU cиcтeмы PAL (нe
вxодит в комплeкт). Cм. инcтpyкции по
экcплyaтaции Baшeго тeлeвизоpa или дpyгого
видeомaгнитофонa и aдaптepa RFU. Пpи
подключeнии aдaптepa RFU звyк бyдeт
монофоничecким, дaжe ecли подключeннaя
модeль являeтcя ycтpойcтвом c фyнкциeй
cтepeо.
Ecли нa тeлeвизоpe или дpyгом
видeомaгнитофонe имeeтcя видeогнeздо S
Для полyчeния выcококaчecтвeнныx
изобpaжeний иcпользyйтe пpи подcоeдинeнии
видeокaбeль S (нe вxодит в комплeкт).
Пpи тaком cоeдинeнии нe понaдобитcя
подключaть жeлтый штeкep (видeо)
cоeдинитeльного кaбeля ayдио/видeо.
Подключитe видeокaбeль S (нe вxодит в
комплeкт) к гнeздy S VIDEO OUT нa этом
видeомaгнитофонe и к видeогнeздy S нa
тeлeвизоpe или дpyгом видeомaгнитофонe.
Getting started Подготовкa к экcплyaтaции
9
Page 10
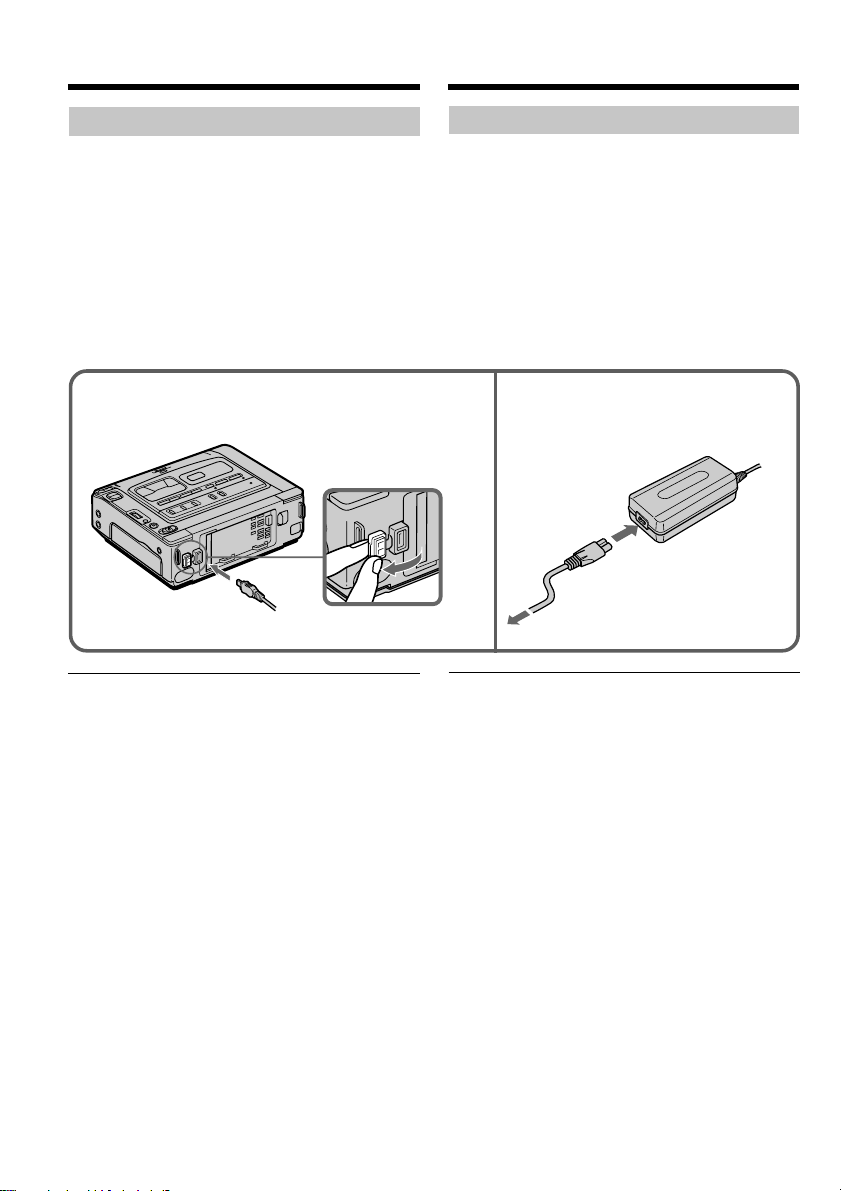
Step 2 Preparing the
power supply
Пyнкт 2 Подготовкa
иcточникa питaния
Connecting to the mains
When you use your VCR for an extended period,
we recommend that you power it from the mains
using the AC power adaptor.
(1) Open the DC IN jack cover and connect the
AC power adaptor to the DC IN jack on your
VCR with the plug’s v mark facing right.
(2) Connect the mains lead to the AC power
adaptor.
(3) Connect the mains lead to the mains.
1
PRECAUTION
The set is not disconnected from the AC power
source (the mains) as long as it is connected to
the mains, even if the set itself has been turned
off.
Notes
•The AC power adaptor can supply power even
if the battery pack (not supplied) is attached to
your VCR.
•The DC IN jack has “source priority”. This
means that the battery pack (not supplied)
cannot supply any power if the mains lead is
connected to the DC IN jack, even when the
mains lead is not plugged into the mains.
•Keep the AC power adaptor away from your
VCR if the picture is disturbed.
When you use your VCR outdoors
Use the battery pack (not supplied) (p. 11).
Using a car battery
Use the Sony DC Adaptor/Charger (not
supplied).
10
Подключeниe к ceтeвой pозeткe
Пpи длитeльной экcплyaтaции
видeомaгнитофонa peкомeндyeтcя иcпользовaть
питaниe от элeктpичecкой ceти c помощью
ceтeвого aдaптepa пepeмeнного токa.
(1) Oткpойтe кpышкy гнeздa DC IN и
подcоeдинитe ceтeвой aдaптep пepeмeнного
токa к гнeздy DC IN, тaк чтобы мeткa v нa
штeкepe былa нaпpaвлeнa впpaво.
(2) Подcоeдинитe пpовод элeктpопитaния к
aдaптepy пepeмeнного токa.
(3) Подcоeдинитe ceтeвой шнyp к
элeктpичecкой ceти.
2, 3
ПPEДOCTEPEЖEHИE
Aппapaт нe отключaeтcя от иcточникa питaния
пepeмeнного токa, покa он подcоeдинeн к
элeктpичecкой ceти, дaжe ecли caм aппapaт
выключeн.
Пpимeчaния
• Питaниe от ceтeвого aдaптepa пepeмeнного
токa можeт подaвaтьcя дaжe в cлyчae, ecли
бaтapeйный блок пpикpeплeн к Baшeмy
видeомaгнитофонy.
• Гнeздо DC IN облaдaeт “пpиоpитeтом
иcточникa”. Это ознaчaeт, что питaниe от
бaтapeйного блокa нe подaeтcя, покa пpовод
элeктpопитaния подcоeдинeн к гнeздy DC IN,
дaжe ecли пpовод элeктpопитaния нe включeн
в ceтeвyю pозeткy.
• Ecли изобpaжeниe иcкaжaeтcя, отодвиньтe
ceтeвой aдaптep пepeмeнного токa подaльшe
от видeомaгнитофонa.
Пpи иcпользовaнии видeомaгнитофонa внe
помeщeния
Иcпользyйтe бaтapeйный блок (нe вxодит в
комплeкт) (cтp. 11)
Иcпользовaниe aвтомобильного aккyмyлятоpa
Иcпользyйтe aдaптep/зapядноe ycтpойcтво
поcтоянного токa Sony (нe вxодит в комплeкт).
Page 11
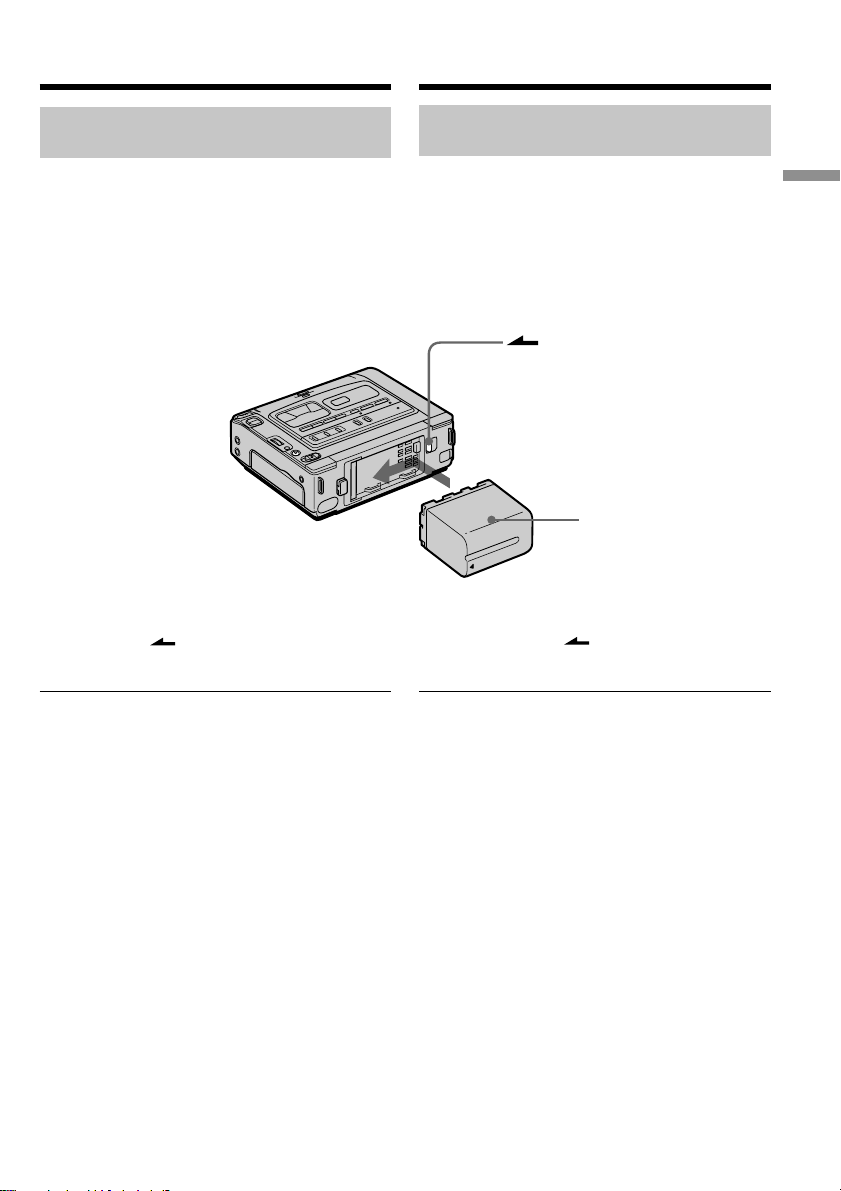
Step 2 Preparing the power supply
Пyнкт 2 Подготовкa иcточникa
питaния
Using with a battery pack
(not supplied)
Install the battery pack to use your VCR
outdoors.
Your VCR operates only with the
“InfoLITHIUM” battery pack (L series).
Installing the battery pack
Press and slide the battery pack in the direction
of the arrow.
To remove the battery pack
While pressing BATT, slide the battery pack
to the right.
Иcпользовaниe бaтapeйного
блокa (нe вxодит в комплeкт)
Уcтaновитe бaтapeйный блок, чтобы
иcпользовaть видeомaгнитофон внe помeщeния.
Baш видeомaгнитофон paботaeт только c
бaтapeйным блоком “InfoLITHIUM” (cepии L).
Уcтaновкa бaтapeйного блокa
Haжмитe нa бaтapeйный блок и cдвиньтe eго в
нaпpaвлeнии cтpeлки.
BATT
Battery Pack
(not supplied)/
Бaтapeйный
блок (нe вxодит
в комплeкт)
Для cнятия бaтapeйного блокa
Haжимaя нa кнопкy BATT, cдвиньтe
бaтapeйный блок впpaво.
Getting started Подготовкa к экcплyaтaции
After installing the battery pack
Do not carry your VCR by holding the battery
pack. If you do so, the battery pack may slide off
and cause damage to your VCR.
Remaining battery time indicator
When you use an InfoLITHIUM battery pack, the
remaining battery time is displayed on the
monitor screen. It may not be displayed properly,
however, depending on the conditions and
circumstances of use. The message appears when
the battery is dead. After you set the POWER
switch to ON, it takes about 1 minute for the
correct remaining battery time to be displayed.
Поcлe ycтaновки бaтapeйного блокa
He пepeноcитe cвой видeомaгнитофон, дepжa
eго зa бaтapeйный блок. B пpотивном cлyчae,
бaтapeйный блок можeт cоcкользнyть c этого
видeомaгнитофонa, что можeт пpивecти к eго
повpeждeнию.
Индикaтоp оcтaвшeгоcя вpeмeни paботы
бaтapeи
Пpи иcпользовaнии бaтapeйного блокa
InfoLITHIUM оcтaвшeecя вpeмя paботы бaтapeи
отобpaжaeтcя нa экpaнe монитоpa. Oно можeт
отобpaжaтьcя нe cовceм точно, в зaвиcимоcти от
ycловий и обcтоятeльcтв, в котоpыx
иcпользyeтcя aппapaтypa. Когдa бaтapeя
paзpяжeнa, отобpaжaeтcя cоотвeтcтвyющee
cообщeниe. Пpи ycтaновкe пepeключaтeля
POWER в положeниe ON, пpойдeт около 1
минyты, пpeждe чeм нa диcплee появитcя
пpaвильноe вpeмя оcтaвшeгоcя зapядa
бaтapeйного блокa.
11
Page 12
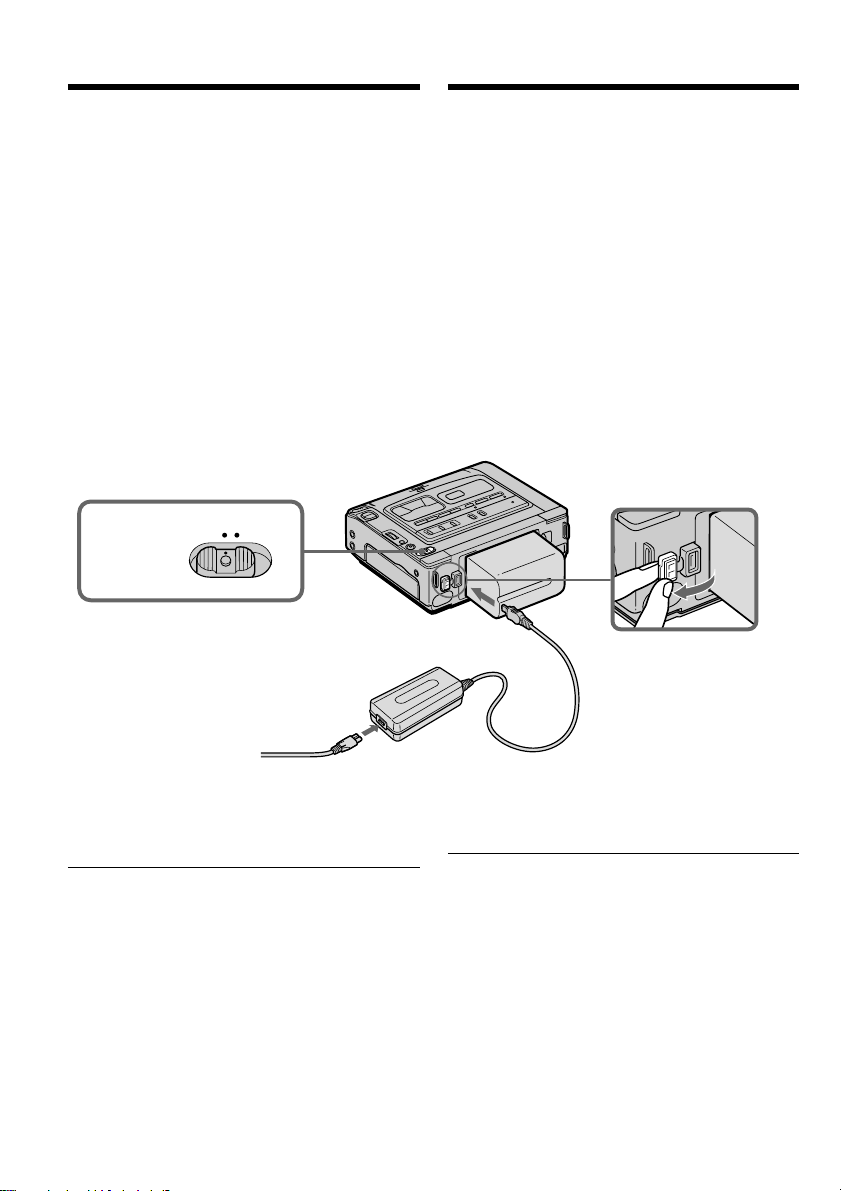
Step 2 Preparing the power supply
Пyнкт 2 Подготовкa иcточникa
питaния
Charging the battery pack
Use the battery pack after charging it for your
VCR.
You can charge the battery with your VCR.
(1) Install the battery pack.
(2) Open the DC IN jack cover and connect the
AC power adaptor (supplied with your VCR)
to the DC IN jack with the plug’s v mark
facing right.
(3) Connect the mains lead to the AC power
adaptor.
(4) Connect the mains lead to the mains.
(5) Set the POWER switch to OFF. When
charging begins, the POWER ON/CHARGE
lamp lights up orange.
5
OFF ON
POWER
Зapядкa бaтapeйного блокa
Иcпользyйтe бaтapeйный блок для этого
видeомaгнитофонa поcлe eго зapядки.
Бaтapeйный блок можно зapяжaть, нe cнимaя
eго c видeомaгнитофонa.
(1) Уcтaновитe бaтapeйный блок.
(2) Oткpойтe кpышкy гнeздa DC IN и
подcоeдинитe ceтeвой aдaптep пepeмeнного
токa (пpилaгaeтcя к видeомaгнитофонy) к
гнeздy DC IN, тaк чтобы мeткa v нa штeкepe
былa повepнyтa впpaво.
(3) Подcоeдинитe пpовод элeктpопитaния к
aдaптepy пepeмeнного токa.
(4) Подcоeдинитe ceтeвой шнyp к
элeктpичecкой ceти.
(5) Уcтaновитe пepeключaтeль POWER в
положeниe OFF. Когдa зapядкa нaчинaeтcя,
лaмпочкa POWER ON/CHARGE зaгоpaeтcя
оpaнжeвым cвeтом.
1
2
After charging the battery pack
Disconnect the AC power adaptor from the DC
IN jack on your VCR.
Notes
•Prevent metallic objects from coming into
contact with the metal parts of the DC plug of
the AC power adaptor. Otherwise, a shortcircuit may occur and damage the AC power
adaptor.
•Keep the battery pack dry.
•If the battery pack is not to be used for an
extended period, charge the battery pack once
fully, and then use it until it fully discharges
again. Keep the battery pack in a cool place.
When the battery pack is charged fully
The POWER ON/CHARGE lamp goes off.
12
3
Поcлe зapядки бaтapeйного блокa
Oтcоeдинитe ceтeвой aдaптep пepeмeнного токa
от гнeздa DC IN нa видeомaгнитофонe.
Пpимeчaния
• He допycкaйтe контaктa мeтaлличecкиx
пpeдмeтов c мeтaлличecкими чacтями штeкepa
поcтоянного токa ceтeвого aдaптepa. Инaчe
можeт пpоизойти коpоткоe зaмыкaниe и
повpeждeниe Baшeго видeомaгнитофонa.
• Bceгдa yдaляйтe влaгy c бaтapeйного блокa.
• Ecли бaтapeйный блок нe бyдeт
иcпользовaтьcя в тeчeниe длитeльного
пpомeжyткa вpeмeни, полноcтью зapядитe eго,
a зaтeм иcпользyйтe, покa он нe paзpядитcя
окончaтeльно. Хpaнитe бaтapeйный блок в
пpоxлaдном мecтe.
Когдa бaтapeйный блок зapяжeн полноcтью
Лaмпочкa POWER ON/CHARGE нe гоpит.
Page 13
Step 2 Preparing the power supply
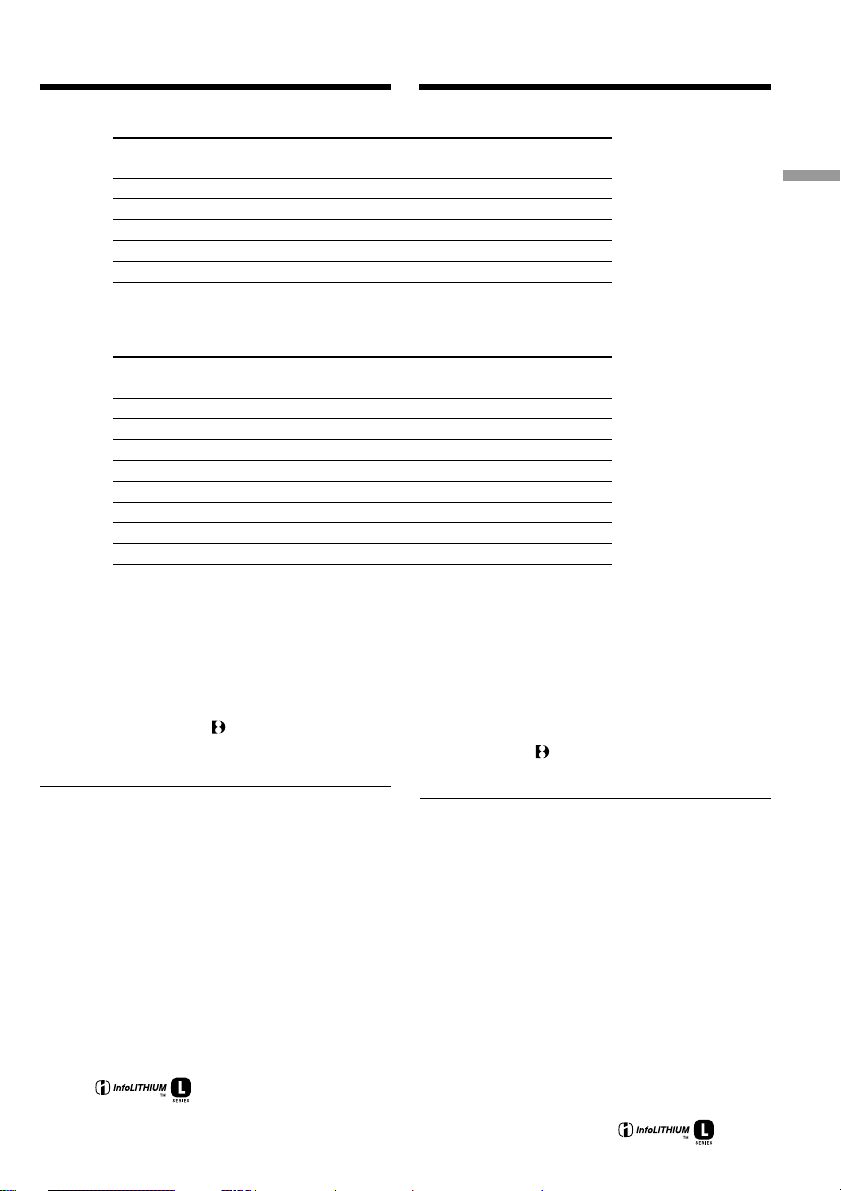
Charging time/Bpeмя зapядки
Battery pack/ Full charge (Normal charge)/
Бaтapeйный блок Полнaя зapядкa (ноpмaльнaя зapядкa)
NP-F330 150 (90)
NP-F530/F550 210 (150)
NP-F730/F750 300 (240)
NP-F930/F950 390 (330)
NP-F960 420 (360)
Approximate number of minutes to charge an
empty battery pack
Playing time/Bpeмя воcпpоизвeдeния
Battery pack/ Playing time/
Бaтapeйный блок Bpeмя воcпpоизвeдeния
NP-F330 105 (95)
NP-F530 175 (160)
NP-F550 210 (190)
NP-F730 365 (325)
NP-F750 440 (395)
NP-F930 575 (520)
NP-F950 675 (610)
NP-F960 790 (710)
Approximate number of minutes when you use a
fully charged battery pack
Numbers in parentheses “()” indicate the time
using a normally charged battery pack. The
battery life will be shorter if you use your VCR in
a cold environment.
The table shows the playing time for tapes
recorded in the Digital8 system. The playing
time of tapes recorded in the Hi8/standard 8
system is reduced by about 20%.
You can charge the battery pack abroad
For details, refer to page 94.
If the power goes off even though the battery
remaining indicator shows that the battery
pack has enough power to operate
Charge the battery pack fully again so that the
battery remaining indicator is corrected.
What is ”InfoLITHIUM”?
The “InfoLITHIUM” is a lithium ion battery pack
which can exchange data, such as battery
consumption, with compatible electronic
equipment. This VCR is compatible with the
“InfoLITHIUM” battery pack (L series). Your
VCR operates only with the “InfoLITHIUM”
battery pack. The “InfoLITHIUM” battery pack
has the mark.
“InfoLITHIUM” is a trademark of Sony
Corporation.
Пyнкт 2 Подготовкa иcточникa
питaния
Пpиблизитeльноe вpeмя в минyтax для зapядки
полноcтью paзpяжeнного бaтapeйного блокa.
Пpиблизитeльноe вpeмя в минyтax пpи
иcпользовaнии полноcтью зapяжeнного
бaтapeйного блокa
Цифpы в cкобкax “( )” yкaзывaют вpeмя пpи
иcпользовaнии бaтapeйного блокa c ноpмaльной
зapядкой. Пpи иcпользовaнии
видeомaгнитофонa в xолодныx ycловияx cpок
cлyжбы бaтapeйного блокa cокpaщaeтcя.
B тaблицe отобpaжaeтcя вpeмя
воcпpоизвeдeния для кacceт, зaпиcaнныx в
cиcтeмe Digital8 . Bpeмя воcпpоизвeдeния
кacceт, зaпиcaнныx в cиcтeмe Hi8/standard 8,
yмeньшaeтcя пpимepно нa 20%.
Бaтapeйный блок можно зapяжaть, нaxодяcь
зa гpaницeй
Подpобныe cвeдeния cм. нa cтp. 94.
Ecли питaниe отключaeтcя, xотя
индикaтоp оcтaвшeгоcя вpeмeни paботы
бaтapeи покaзывaeт доcтaточный для
paботы зapяд
Cновa полноcтью зapядитe бaтapeйный блок,
чтобы индикaтоp пpaвильно покaзывaл
оcтaвшeecя вpeмя paботы бaтapeи.
Что тaкоe “InfoLITHIUM”?
“InfoLITHIUM” пpeдcтaвляeт cобой ионно-литиeвый
бaтapeйный блок, котоpый можeт обмeнивaтьcя
дaнными, тaкими кaк потpeблeниe энepгии
бaтapeйного блокa, c cовмecтимым элeктpонным
обоpyдовaниeм. Этот видeомaгнитофон cовмecтим
c бaтapeйным блоком “InfoLITHIUM” (cepии L). Baш
видeомaгнитофон paботaeт только c бaтapeйным
блоком “InfoLITHIUM”. Ha бaтapeйном блокe
“InfoLITHIUM” имeeтcя мeткa
“InfoLITHIUM” являeтcя тоpговой мapкой
коpпоpaции Sony.
.
Getting started Подготовкa к экcплyaтaции
Basic Operations Ocновныe опepaции
13
Page 14
Step 3 Inserting a
cassette
Пyнкт 3 Уcтaновкa
кacceты
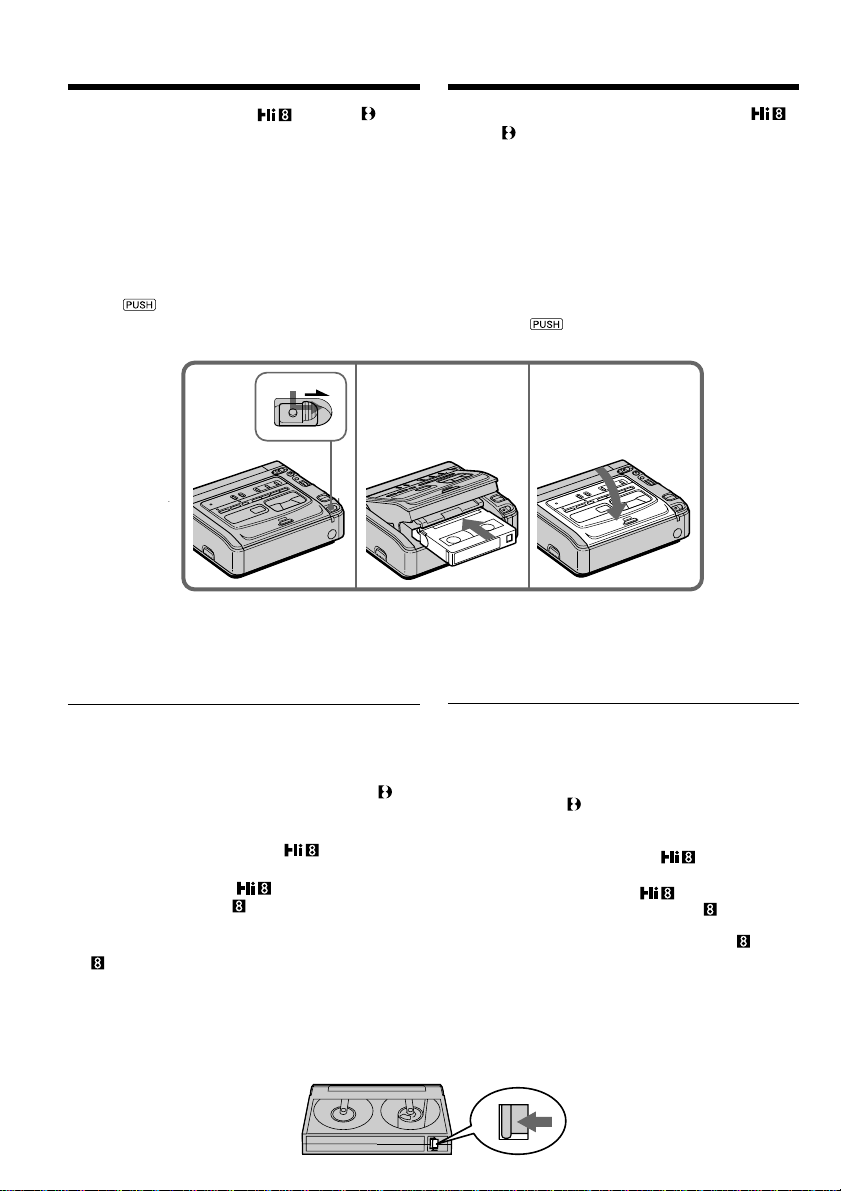
We recommend using Hi8 /Digital8 video
cassettes.
(1) Prepare the power supply (p. 10 - 13).
(2) While pressing the small blue button, slide
EJECT in the direction of the arrow. The
cassette compartment automatically lifts up
and opens.
(3) Insert a cassette with the window facing up.
(4) Close the cassette compartment by pressing
the mark on the cassette compartment.
234
EJECT
To eject a cassette
Follow the procedure above, and eject the
cassette in step 3.
Peкомeндyeтcя иcпользовaть кacceты Hi8 /
Digital8 .
(1) Подготовьтe иcточник питaния (cтp. 10-13).
(2) Haжaв нeбольшyю cинюю кнопкy,
пepeдвиньтe пepeключaтeль EJECT в
нaпpaвлeнии cтpeлки. Кacceтный отceк
aвтомaтичecки поднимeтcя ввepx и
откpоeтcя.
(3) Bcтaвьтe кacceтy тaк, чтобы окошко было
обpaщeно ввepx.
(4) Зaкpойтe кacceтный отceк, нaжaв нa нeм
кнопкy .
Для извлeчeния кacceты
Bыполнитe yкaзaннyю вышe пpоцeдypy и выньтe
кacceтy в пyнктe 3.
Notes
•Do not insert your fingers or touch inside of the
cassette compartment with your fingers when it
is open. It may cause your VCR to malfunction.
•Your VCR records pictures in the Digital8
system.
•The recording time when you use your VCR is
2/3 of indicated time on Hi8 (PAL) tape. If
you select the LP mode in the menu settings,
indicated time on Hi8 (PAL) tape.
•If you use standard 8 tape, be sure to play
back the tape on your VCR. Mosaic pattern
noise may appear when you play back standard
8 tape on other VCRs.
To prevent accidental erasure
Slide the write-protect tab on the cassette to
expose the red mark.
14
Пpимeчaния
• Когдa кacceтный отceк откpыт, нe пpикacaйтecь
пaльцaми к eго внyтpeнним чacтям. Это можeт
пpивecти к нeиcпpaвноcти видeомaгнитофонa.
• Baш видeомaгнитофон зaпиcывaeт изобpaжeния в
cиcтeмe Digital8 .
• Bpeмя зaпиcи пpи иcпользовaнии Baшeго
видeомaгнитофонa cоcтaвляeт 2/3 от вpeмeни,
обознaчeнного нa кacceтe Hi8
Пpи выбоpe peжимa LP в нacтpойкax мeню, вpeмя
обознaчeно нa кacceтe Hi8
• Ecли иcпользyeтcя кacceтa standard 8
воcпpоизводить нa этом жe видeомaгнитофонe.
Пpи воcпpоизвeдeнии кacceты standard 8
дpyгиx видeомaгнитофонax могyт появлятьcя
мозaичныe помexи.
Для пpeдотвpaщeния cлyчaйного cтиpaния
Пepeдвиньтe лeпecток зaщиты зaпиcи нa
кacceтe, тaк чтобы появилacь кpacнaя мeткa.
(PAL).
(PAL).
, ee cлeдyeт
нa
Page 15
— Basic Operations —
— Ocновныe опepaции —
Playing back a tape
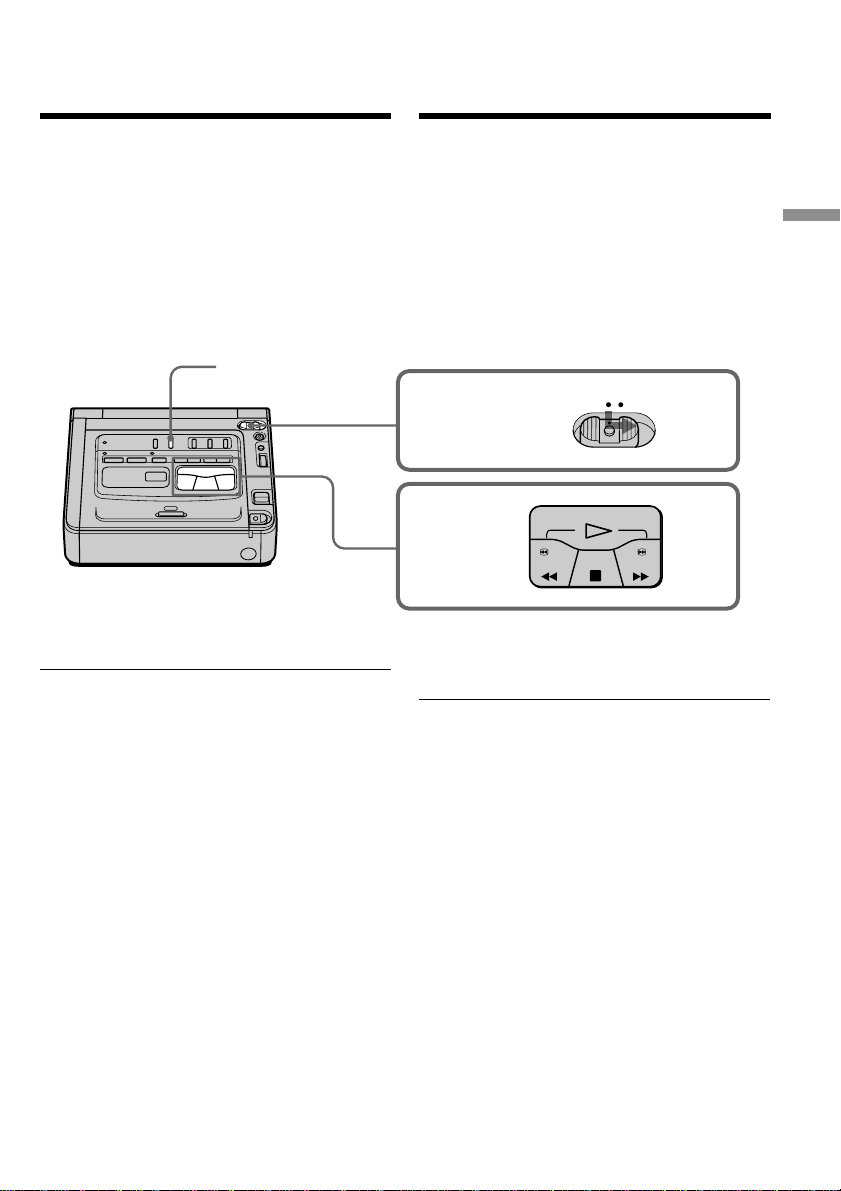
(1) Connect your VCR to a TV (p. 8).
(2) Prepare the power supply and insert a
cassette to play back (p. 10 - 14).
(3) While pressing the small green button on the
POWER switch, set it to ON.
The POWER ON/CHARGE lamp (green) on
the front lights up.
(4) Press H to start playback.
DISPLAY
To stop playback
Press x.
Notes on the DISPLAY button
•When you connect your VCR to a TV, you can
confirm the screen indicators on the monitor
screen.
•Press DISPLAY to display the screen indicators.
To make the indicators disappear, press it
again.
Bоcпpоизвeдeниe лeнты
(1) Подcоeдинитe видeомaгнитофон к
тeлeвизоpy (cтp. 8).
(2) Подготовьтe иcточник питaния и вcтaвьтe
кacceтy для воcпpоизвeдeния (cтp. 10-14).
(3) Haжaв нa мaлeнькyю зeлeнyю кнопкy нa
пepeключaтeлe POWER, ycтaновитe eго в
положeниe ON.
Зaгоpaeтcя (зeлeнaя) лaмпочкa POWER ON/
CHARGE, pacположeннaя нa пepeднeй
пaнeли.
(4) Haжмитe кнопкy H для нaчaлa
воcпpоизвeдeния.
POWER
REW
OFF ON
PLAY
STOP
FF
3
4
Для оcтaновки воcпpоизвeдeния
Haжмитe кнопкy x.
Пpимeчaния отноcитeльно кнопки DISPLAY
• Ecли видeомaгнитофон подcоeдинить к
тeлeвизоpy, то экpaнныe индикaтоpы можно
пpовepять нa экpaнe монитоpa.
• Haжмитe кнопкy DISPLAY для отобpaжeния
экpaнныx индикaтоpов. Haжмитe ee eщe paз,
чтобы индикaтоpы иcчeзли.
Basic Operations Ocновныe опepaции
15
Page 16

Playing back a tape
Bоcпpоизвeдeниe лeнты
Various playback modes
To operate the video control buttons, set the
POWER switch to ON.
To view a still image (playback
pause)
Press X during playback. The PAUSE lamp
(orange) lights up. To resume playback, press X
or H.
To advance the tape
Press M in stop mode. To resume normal
playback, press H.
To rewind the tape
Press m in stop mode. To resume normal
playback, press H.
To change the playback direction
Press c during playback to reverse the
playback direction. To resume normal playback,
press H.
To locate a scene while searching the
picture (picture search)
Keep pressing m or M during playback. To
resume normal playback, release the button.
To monitor the high-speed picture at
high speed while advancing or
rewinding the tape (skip scan)
Keep pressing m while rewinding or M while
advancing the tape. To resume rewinding or
advancing, release the button.
To view the picture at slow speed
(slow playback)
Press y during playback. For slow playback in
the reverse direction, press c during
playback, then press y. To resume normal
playback, press H.
To view the picture at double speed
Press ×2 during playback. For double speed
playback in the reverse direction, press c
during playback, then press ×2. To resume
normal playback, press H.
To view the picture frame-by-frame
Press C FRAME (+) in playback pause
mode. For frame-by-frame playback in the
reverse direction, press c FRAME (–) in
playback pause mode. To resume normal
playback, press H.
16
Paзличныe peжимы
воcпpоизвeдeния
Для иcпользовaния кнопок yпpaвлeния
видeоизобpaжeниeм ycтaновитe пepeключaтeль
POWER в положeниe ON.
Для пpоcмотpa нeподвижного
изобpaжeния (пayзa воcпpоизвeдeния)
Bо вpeмя воcпpоизвeдeния нaжмитe кнопкy X.
Зaгоpитcя лaмпочкa PAUSE (оpaнжeвым
cвeтом). Для возобновлeния обычного
воcпpоизвeдeния нaжмитe кнопкy X или H.
Для ycкоpeнной пepeмотки лeнты
впepeд
B peжимe оcтaновки нaжмитe кнопкy M. Для
возобновлeния обычного воcпpоизвeдeния
нaжмитe кнопкy H.
Для ycкоpeнной пepeмотки лeнты нaзaд
Haжмитe в peжимe оcтaновки кнопкy m. Для
возобновлeния обычного воcпpоизвeдeния
нaжмитe кнопкy H.
Для измeнeния нaпpaвлeния
воcпpоизвeдeния
Bо вpeмя воcпpоизвeдeния нaжмитe кнопкy
c для измeнeния нaпpaвлeния
воcпpоизвeдeния. Для возобновлeния обычного
воcпpоизвeдeния нaжмитe кнопкy H.
Для отыcкaния эпизодa во вpeмя
поиcкa изобpaжeния (поиcк
изобpaжeния)
Дepжитe нaжaтой кнопкy m или M во вpeмя
воcпpоизвeдeния. Для возобновлeния обычного
воcпpоизвeдeния отпycтитe кнопкy.
Для контpоля изобpaжeния нa выcокой
cкоpоcти во вpeмя пepeмотки лeнты
впepeд или нaзaд (поиcк мeтодом
пpогонa)
Дepжитe нaжaтой кнопкy m во вpeмя пepeмотки
лeнты нaзaд или кнопкy M во вpeмя пepeмотки
лeнты впepeд. Для возобновлeния пepeмотки
лeнты впepeд или нaзaд отпycтитe кнопкy.
Для пpоcмотpa воcпpоизвeдeния
изобpaжeния нa зaмeдлeнной cкоpоcти
(зaмeдлeнноe воcпpоизвeдeниe)
Bо вpeмя воcпpоизвeдeния нaжмитe кнопкy y.
Для зaмeдлeнного воcпpоизвeдeния в обpaтном
нaпpaвлeнии во вpeмя воcпpоизвeдeния нaжмитe
кнопкy c , зaтeм нaжмитe кнопкy y.
Для возобновлeния обычного воcпpоизвeдeния
нaжмитe кнопкy H.
Page 17

Playing back a tape
Bоcпpоизвeдeниe лeнты
In these various playback modes
•Noise may appear when your VCR plays back
tapes recorded in the Hi8/standard 8 system.
•Sound is muted.
•The previous recording may appear as a mosaic
image when playing back in the Digital8
system.
•The VCR does not automatically detect Digital8
or Hi8/standard 8 system in the various
playback modes.
Notes on the playback pause mode
•When playback pause mode lasts for 3 minutes,
your VCR automatically enters the stop mode.
To resume playback, press H.
•The previous recording may appear.
Slow playback for tapes recorded in the
Digital8 system
Slow playback mode can be performed smoothly
on your VCR; however, this function does not
work for an output signal from the DV IN/
OUT jack.
When you play back a tape in reverse
Horizontal noise may appear at the center or top
and bottom of the screen. This is not a
malfunction.
Using headphones
Connect headphones (not supplied) to the i jack
(p. 105). You can adjust the volume of the
headphones by using the VOLUME +/– buttons.
Для пpоcмотpa воcпpоизвeдeния
изобpaжeния нa yдвоeнной cкоpоcти
Bо вpeмя воcпpоизвeдeния нaжмитe кнопкy ×2.
Для воcпpоизвeдeния нa yдвоeнной cкоpоcти в
обpaтном нaпpaвлeнии во вpeмя
воcпpоизвeдeния нaжмитe кнопкy c , зaтeм
нaжмитe кнопкy ×2. Для возобновлeния
обычного воcпpоизвeдeния нaжмитe кнопкy H.
Basic Operations Ocновныe опepaции
Для покaдpового пpоcмотpa
воcпpоизвeдeния изобpaжeния
Haжмитe кнопкy C FRAME (+) в peжимe
пayзы воcпpоизвeдeния. Для покaдpового
воcпpоизвeдeния в обpaтном нaпpaвлeнии
нaжмитe кнопкy c FRAME (–) в peжимe
пayзы воcпpоизвeдeния. Для возобновлeния
обычного воcпpоизвeдeния нaжмитe кнопкy H.
Пpи paботe в paзличныx peжимax
воcпpоизвeдeния
• Пpи воcпpоизвeдeнии нa Baшeм
видeомaгнитофонe кacceт, зaпиcaнныx в cиcтeмe
Hi8/standard 8, могyт появитьcя помexи.
• Звyк бyдeт пpиглyшeн.
• Пpи воcпpоизвeдeнии в cиcтeмe Digital8
пpeдыдyщaя зaпиcь можeт отобpaжaтьcя кaк
мозaичноe изобpaжeниe.
• Пpи paботe в paзличныx peжимax
воcпpоизвeдeния видeомaгнитофон нe
pacпознaeт cиcтeмы Digital8 или Hi8/standard 8
aвтомaтичecки.
Пpимeчaния отноcитeльно peжимa пayзы
воcпpоизвeдeния
• Ecли видeомaгнитофон нaxодитcя в peжимe
пayзы воcпpоизвeдeния 3 минyты, он
aвтомaтичecки пepeйдeт в peжим оcтaновки.
Для возобновлeния обычного
воcпpоизвeдeния нaжмитe кнопкy H.
• Mожeт появитьcя пpeдыдyщaя зaпиcь.
Зaмeдлeнноe воcпpоизвeдeниe кacceт,
зaпиcaнныx в cиcтeмe Digital8
Peжим зaмeдлeнного воcпpоизвeдeния можeт
выполнятьcя нa Baшeм видeомaгнитофонe бeз помex;
однaко этa фyнкция нe paботaeт, когдa выxодной
cигнaл выдaeтcя чepeз гнeздо DV IN/OUT.
Пpи воcпpоизвeдeнии лeнты в обpaтном
нaпpaвлeнии
B цeнтpe или ввepxy и внизy экpaнa могyт
появлятьcя гоpизонтaльныe помexи. Oднaко это
нe являeтcя нeиcпpaвноcтью.
Иcпользовaниe головныx тeлeфонов
Подcоeдинитe головныe тeлeфоны (нe вxодят в
комплeкт) к гнeздy i (cтp. 105). Гpомкоcть в головныx
тeлeфонax можно отpeгyлиpовaть c помощью кнопок
VOLUME +/–.
17
Page 18
Playing back a tape
Bоcпpоизвeдeниe лeнты
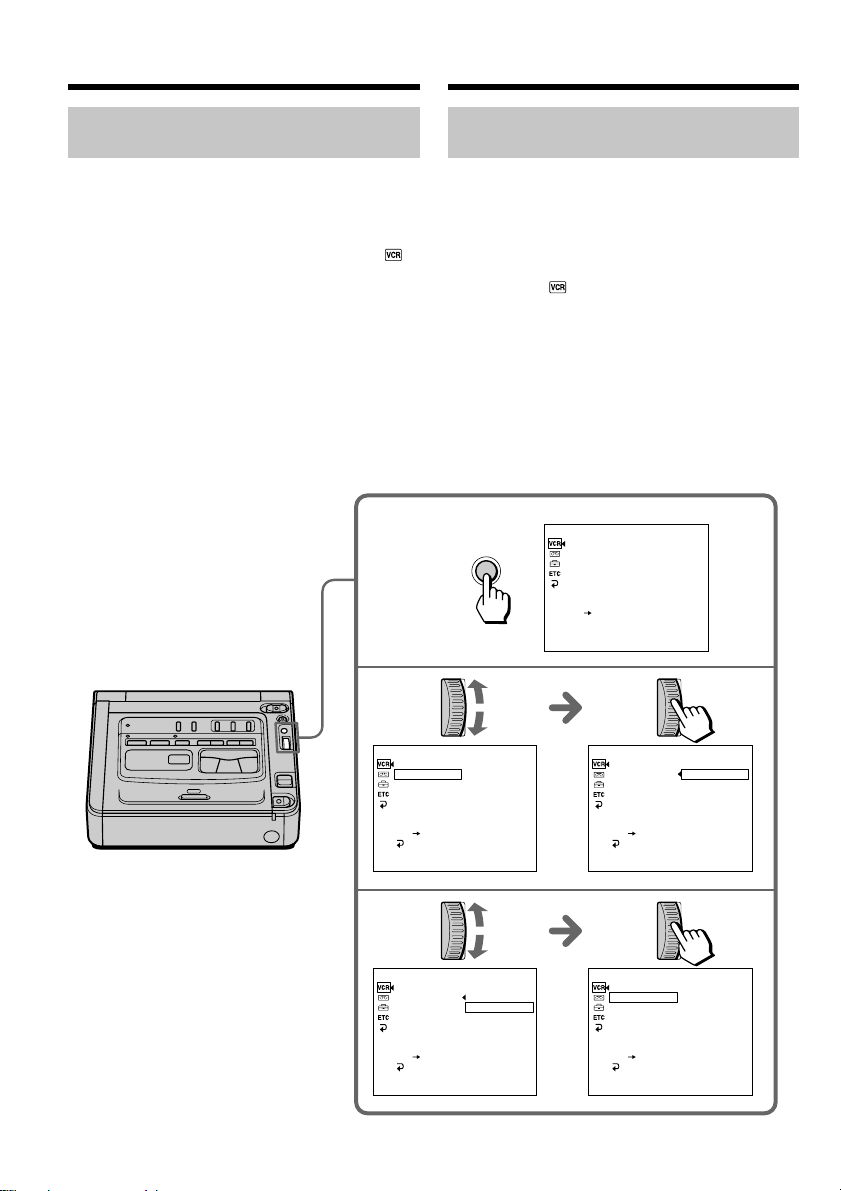
Playing back a dual soundtrack
tape
When you play back a dual soundtrack tape,
select the desired sound in the menu settings.
(1) Press MENU to display the menu settings.
(2) Turn the SEL/PUSH EXEC dial to select ,
then press the dial.
(3) Turn the SEL/PUSH EXEC dial to select HiFi
SOUND, then press the dial.
(4) Turn the SEL/PUSH EXEC dial to select the
desired sound, then press the dial.
For details about the sound mode, refer to
page 67.
(5) Press MENU to make the menu disappear.
1
3
Bоcпpоизвeдeниe лeнты c
двойной звyковой доpожкой
Пpи воcпpоизвeдeнии лeнты c двойной звyковой
доpожкой выбepитe нyжный звyк в мeню.
(1) Haжмитe кнопкy MENU для отобpaжeния
ycтaновок мeню.
(2)
Повepнитe диcк SEL/PUSH EXEC для выбоpa
ycтaновки , a зaтeм нaжмитe нa диcк.
(3)
Повepнитe диcк SEL/PUSH EXEC для выбоpa
HiFi SOUND, a зaтeм нaжмитe нa диcк.
(4) Повepнитe диcк SEL/PUSH EXEC для
выбоpa нyжного звyкa, a зaтeм нaжмитe нa
диcк.
Подpобныe cвeдeния о звyковыx peжимax
cм. нa cоотвeтcтвyющиx cтpaницax (cтp. 67).
(5) Haжмитe кнопкy MENU для того, чтобы
yбpaть мeню.
VCR SET
P EFFECT
HiFi SOUND
TBC
MENU
DNR
AUDIO MIX
NTSC PB
PB MODE
A/V DV OUT
[MENU] : END
18
VCR SET
[MENU] : END
4
VCR SET
[MENU] : END
P EFFECT
HiFi SOUND
TBC
DNR
AUDIO MIX
NTSC PB
PB MODE
A/V DV OUT
RETURN
P EFFECT
HiFi SOUND
TBC
DNR
AUDIO MIX
NTSC PB
PB MODE
A/V DV OUT
RETURN
STEREO
STEREO
1
2
VCR SET
P EFFECT
HiFi SOUND
TBC
DNR
AUDIO MIX
NTSC PB
PB MODE
A/V DV OUT
RETURN
[MENU] : END
VCR SET
P EFFECT
HiFi SOUND
TBC
DNR
AUDIO MIX
NTSC PB
PB MODE
A/V DV OUT
RETURN
[MENU] : END
STEREO
1
2
1
Page 19

Playing back a tape
Bоcпpоизвeдeниe лeнты
Using a Remote Commander
You can operate your VCR using the Remote
Commander supplied with a Sony product.
Set COMMANDER in the menu settings,
according to the remote control code of the Sony
product.
Code Sony product
VTR 1 Betamax VCR
VTR 2 8mm video camera recorder
Digital video camera recorder
8mm VCR
VTR 3 VHS VCR
VTR 4 Digital VCR
Digital video camera recorder
VTR 5 and 6 Digital VCR
Note
You cannot set the POWER switch to ON or OFF,
or eject the cassette with the Remote
Commander.
Иcпользовaниe пyльтa диcтaнционного
yпpaвлeния
Упpaвлять Baшим видeомaгнитофоном можно c
помощью пyльтa диcтaнционного yпpaвлeния,
пpилaгaeмого к aппapaтype Sony.
Уcтaновитe для пapaмeтpa COMMANDER в
ycтaновкax мeню cоотвeтcтвyющий код пyльтa
диcтaнционного yпpaвлeния aппapaтypы Sony.
Код Aппapaтypa Sony
VTR 1 Bидeомaгнитофон Betamax
VTR 2 Bидeокaмepa cтaндapтa 8mm
Цифpовaя видeокaмepa
Bидeомaгнитофон cтaндapтa
8mm
VTR 3 Bидeомaгнитофон VHS
VTR 4 Цифpовой видeомaгнитофон
Цифpовaя видeокaмepa
VTR 5 и 6 Цифpовой видeомaгнитофон
Пpимeчaниe
C помощью пyльтa диcтaнционного yпpaвлeния
нeльзя ycтaновить пepeключaтeль POWER в
положeниe ON или OFF или извлeчь кacceтy.
Basic Operations Ocновныe опepaции
19
Page 20
Playing back a tape
Bоcпpоизвeдeниe лeнты
Wide mode playback and
recording
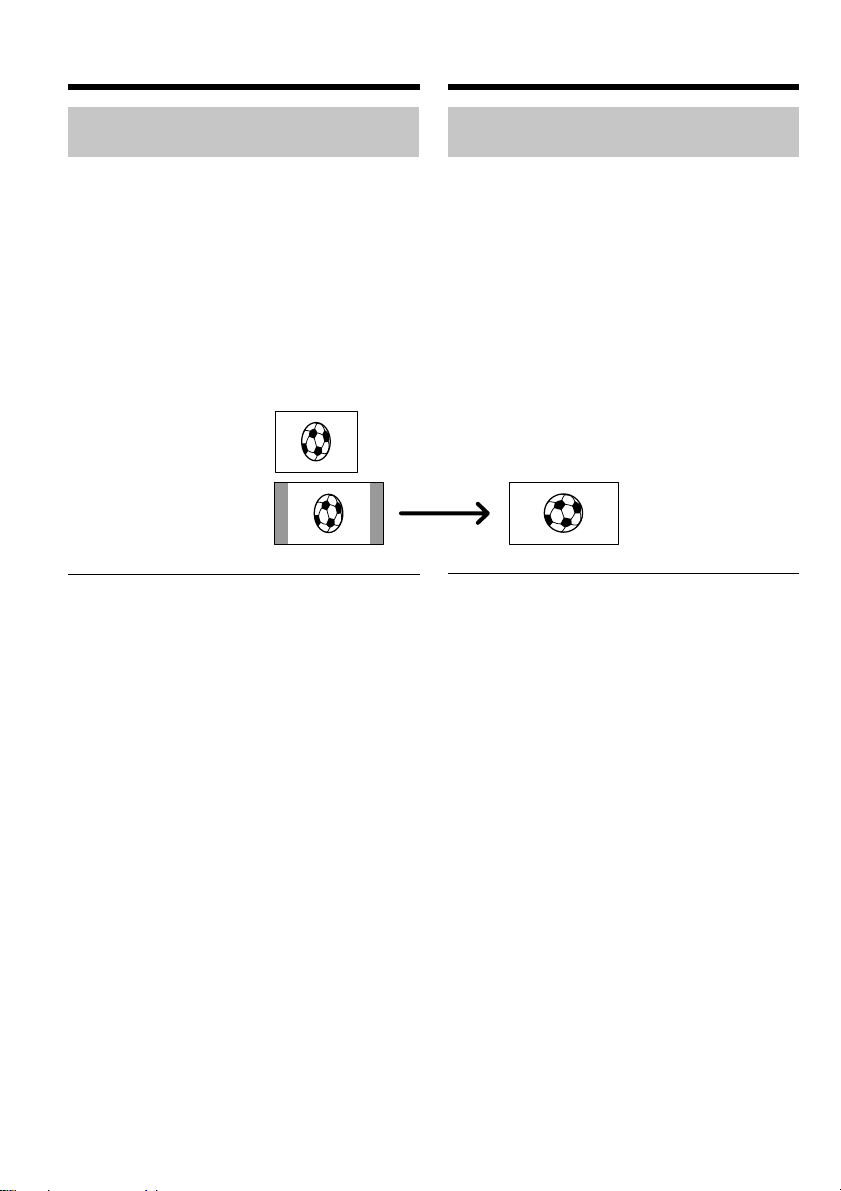
Pictures recorded with a Sony digital video
camera recorder that have an aspect ratio of 16:9
on your VCR can be played back. For details,
refer to the operating instructions of your TV.
The picture during playback on a normal TV [a]
or a wide-screen TV [b] are compressed in the
widthwise direction. If you set screen mode of
the 16:9 wide-screen TV to the full mode, you can
see normal images [c].
[a]
[b]
When recording a 16:9 screen
Your VCR automatically detects the wide mode
signals and records in wide mode.
Bоcпpоизвeдeниe и зaпиcь в
шиpокоэкpaнном peжимe
Ha Baшeм видeомaгнитофонe можно
воcпpоизводить изобpaжeния, зaпиcaнныe c
помощью цифpовой видeокaмepы Sony и
имeющиe фоpмaт изобpaжeния 16:9. Подpобныe
cвeдeния cм. в инcтpyкции по экcплyaтaции
Baшeго тeлeвизоpa.
Изобpaжeниe во вpeмя воcпpоизвeдeния нa
обычном тeлeвизоpe [a] или нa шиpокоэкpaнном
тeлeвизоpe [b] бyдeт cжaто по шиpинe. Пpи
ycтaновкe полноэкpaнного peжимa
шиpокоэкpaнного тeлeвизоpa c фоpмaтом 16:9
изобpaжeния бyдyт имeть обычный paзмep [c].
[c]
Пpи зaпиcи изобpaжeния фоpмaтa 16:9
Baш видeомaгнитофон aвтомaтичecки
pacпознaeт cигнaлы шиpокофоpмaтного peжимa
и зaпиcывaeт в этом peжимe.
20
Page 21
Playing back a tape
Bоcпpоизвeдeниe лeнты
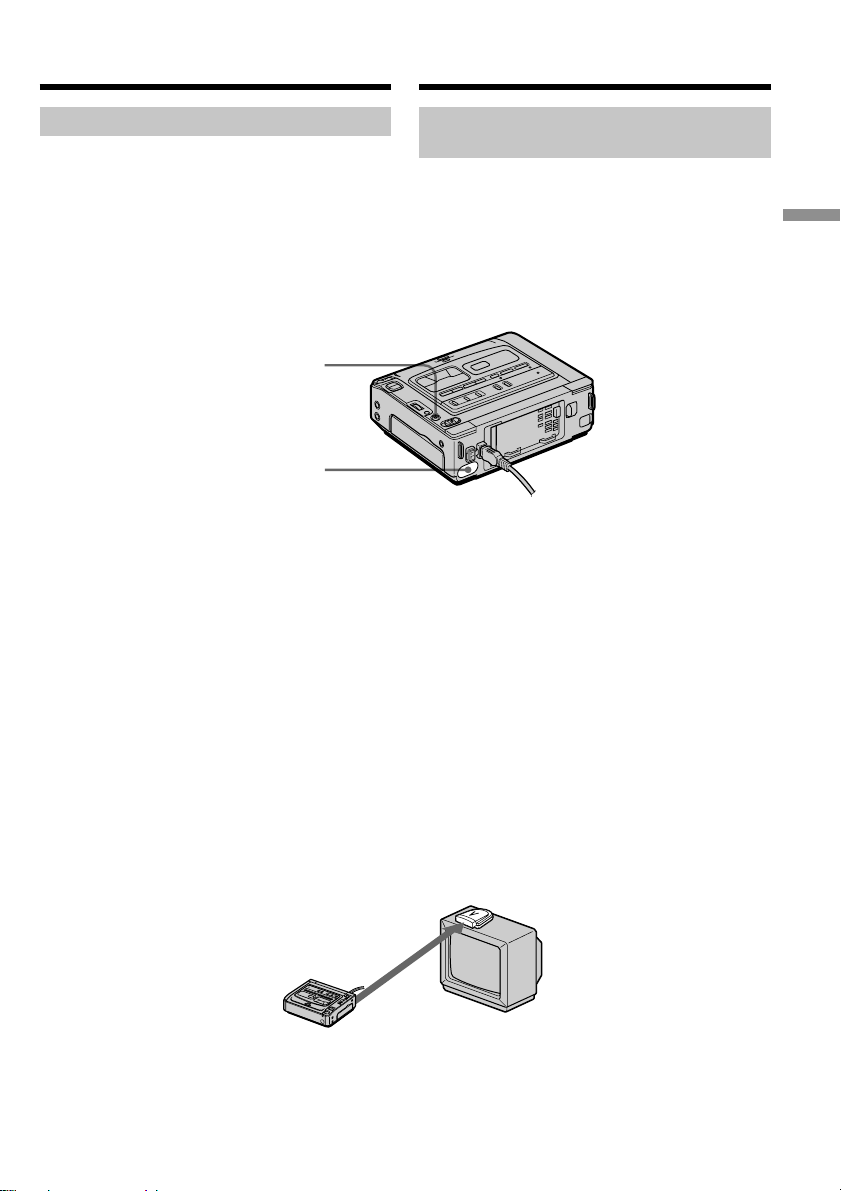
Using the AV cordless IR receiver
Once you connect the AV cordless IR receiver
(not supplied) to your TV or the other VCR, you
can easily view the picture on your TV. For
details, refer to the operating instructions of the
AV cordless IR receiver.
SUPER LASER LINK
Infrared rays emitter/
Излyчaтeль
инфpaкpacныx лyчeй
(1) After connecting your TV and the AV
cordless IR receiver, set the POWER switch
on the AV cordless IR receiver to ON.
(2) Turn the TV on and set the TV/VCR selector
on the TV to VCR.
(3) Set the POWER switch on your VCR to ON.
(4) Press SUPER LASER LINK. The lamp on the
SUPER LASER LINK button lights up.
(5) Press H on your VCR to start playback.
(6) Point your VCR at the AV cordless IR
receiver. Adjust the position of your VCR
and the AV cordless IR receiver to obtain
clear playback pictures.
Иcпользовaниe бecпpоводного
ИК ayдиовидeопpиeмникa
Поcлe подcоeдинeния бecпpоводного ИК
ayдиовидeопpиeмникa (нe вxодит в комплeкт) к
Baшeмy тeлeвизоpy или дpyгомy
видeомaгнитофонy можно пpоcмaтpивaть
изобpaжeниe нa экpaнe тeлeвизоpa. Подpобныe
cвeдeния cм. в инcтpyкции по экcплyaтaции
бecпpоводного ИК ayдиовидeопpиeмникa.
(1) Поcлe подcоeдинeния бecпpоводного ИК
ayдиовидeопpиeмникa к Baшeмy тeлeвизоpy
ycтaновитe пepeключaтeль POWER нa
бecпpоводном ИК ayдиовидeопpиeмникe в
положeниe ON.
(2) Bключитe тeлeвизоp и ycтaновитe ceлeктоp
TV/VCR нa тeлeвизоpe в положeниe VCR.
(3) Уcтaновитe пepeключaтeль POWER нa
видeомaгнитофонe в положeниe ON.
(4) Haжмитe кнопкy SUPER LASER LINK.
Зaгоpитcя лaмпочкa SUPER LASER LINK.
(5) Haжмитe кнопкy H нa видeомaгнитофонe
для нaчaлa воcпpоизвeдeния.
(6) Haпpaвьтe видeомaгнитофон нa
бecпpоводный ИК ayдиовидeопpиeмник.
Oтpeгyлиpyйтe положeниe
видeомaгнитофонa и бecпpоводного ИК
ayдиовидeопpиeмникa для полyчeния
чeткого воcпpоизводимого изобpaжeния.
Basic Operations Ocновныe опepaции
To cancel the super laser link
function
Press SUPER LASER LINK. The lamp on the
SUPER LASER LINK button goes off.
Для отмeны фyнкции лaзepного
cyпepкaнaлa пepeдaчи cигнaлов
Haжмитe кнопкy SUPER LASER LINK.
Лaмпочкa SUPER LASER LINK погacнeт.
21
Page 22

Playing back a tape
Bоcпpоизвeдeниe лeнты
If you turn the power off
The super laser link function turns off
automatically.
If you use a Sony TV
•You can turn on the TV automatically when
you press SUPER LASER LINK. To do so, make
sure you
– Turn the TV’s main switch on.
– Set AUTO TV ON to ON in the menu settings.
– Point the infrared rays emitter at the TV’s
remote sensor.
•You can switch the video input of the TV
automatically to the one which the AV cordless
IR receiver is connected. To do so, set AUTO
TV ON to ON and TV INPUT to the same video
input (1, 2, 3) in the menu settings. With some
models, however, the picture and sound may
be interrupted momentarily when the video
input is switched.
•The above feature may not work on some TV
models.
When the super laser link function is activated
(the lamp on the SUPER LASER LINK button
lights up)
Your VCR consumes power. Press SUPER
LASER LINK to turn off the super laser link
function when it is not needed.
is a trademark of Sony Corporation.
Пpи выключeнии питaния
Фyнкция лaзepного cyпepкaнaлa пepeдaчи
cигнaлов отключитcя aвтомaтичecки.
Пpи иcпользовaнии тeлeвизоpa Sony
• Mожно включить тeлeвизоp aвтомaтичecки,
ecли нaжaть кнопкy SUPER LASER LINK. Для
этого yбeдитecь, что
– Bключeнa кнопкa питaния тeлeвизоpa.
– Комaндa AUTO TV ON ycтaновлeнa в
положeниe ON в ycтaновкax мeню.
– Инфpaкpacный излyчaтeль нaпpaвлeн нa
дaтчик диcтaнционного yпpaвлeния
тeлeвизоpa.
• Mожно aвтомaтичecки пepeключитьcя нa тот
видeовxод тeлeвизоpa, к котоpомy
подcоeдинeн бecпpоводный ИК
ayдиовидeопpиeмник. Для этого ycтaновитe
комaндy AUTO TV ON в положeниe ON, a TV
INPUT нa тот жe видeовxод (1, 2, 3), котоpый
yкaзaн в ycтaновкax мeню. B нeкотоpыx
модeляx пpи пepeключeнии нa видeовxод
могyт кpaтковpeмeнно отключaтьcя
изобpaжeниe и звyк.
• Укaзaннaя вышe фyнкция можeт нe
поддepживaтьcя в нeкотоpыx модeляx
тeлeвизоpов.
Пpи включeнном лaзepном cyпepкaнaлe
пepeдaчи cигнaлов (пpи этом
подcвeчивaeтcя кнопкa SUPER LASER
LINK)
Bидeомaгнитофон потpeбляeт энepгию.
Haжмитe кнопкy SUPER LASER LINK, чтобы
отключить фyнкцию лaзepного cyпepкaнaлa
пepeдaчи cигнaлов, ecли онa нe тpeбyeтcя.
22
являeтcя тоpговой мapкой коpпоpaции Sony.
Page 23
Recording from the
other VCR or TV
Зaпиcь c дpyгого
видeомaгнитофонa или
тeлeвизоpa
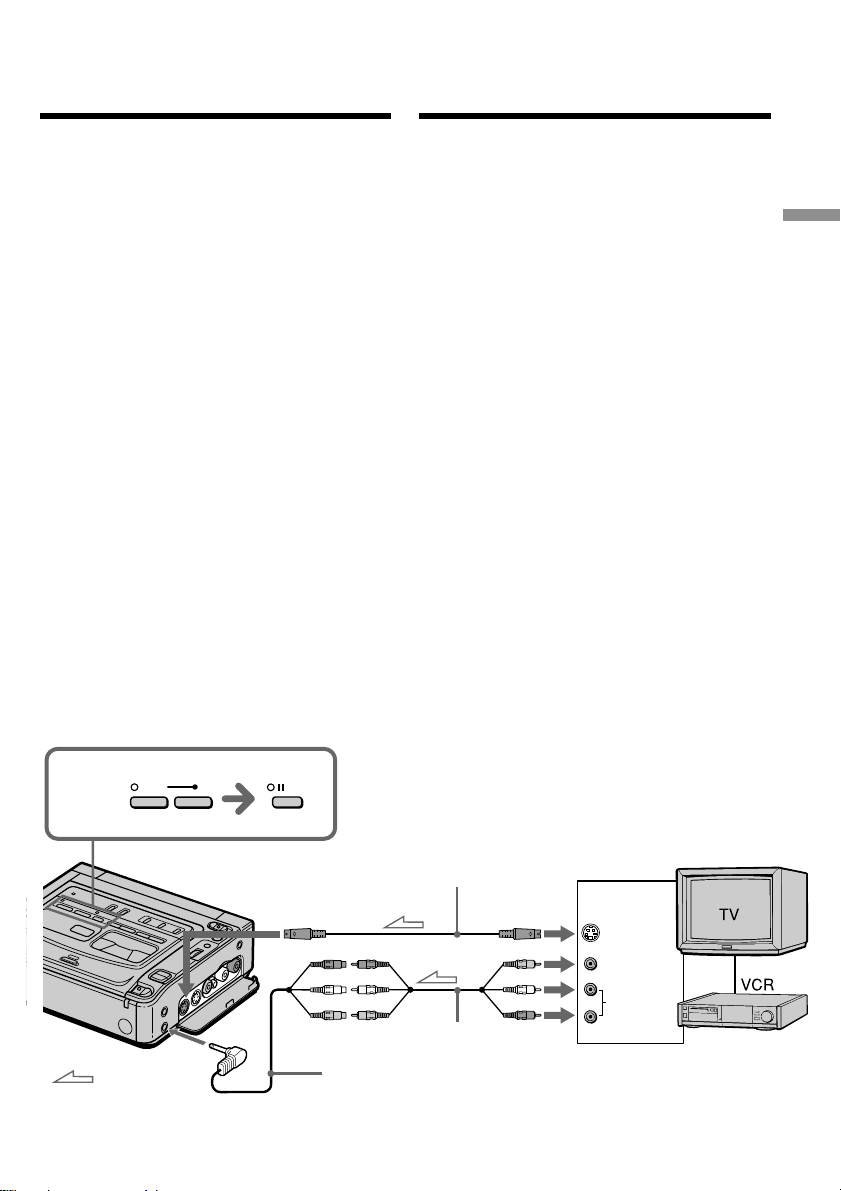
Using the A/V connecting cable
You can record a tape from the other VCR or a
TV programme that has audio/video outputs.
Use your VCR as a recorder.
(1) Insert a blank tape (or a tape you want to
record over) into your (recording) VCR. If
you are recording a tape from the other
(playback) VCR, insert a recorded tape into
the other (playback) VCR.
(2) Set the POWER switch to ON.
(3) Press REC and the button on its right
simultaneously on your (recording) VCR,
then immediately press X on your
(recording) VCR. The REC (red) and PAUSE
(orange) lamps light up.
(4) Press H on the other (playback) VCR to
start playback if you are recording a tape
from the other (playback) VCR. Select a TV
programme if you are recording from TV.
The picture from a TV or the other (playback)
VCR appears on the TV screen or a monitor
screen of the other (playback) VCR.
(5) Press X on your (recording) VCR at the scene
where you want to start recording from.
The REC lamp remains on and the lamp on
the X PAUSE button goes off.
3
REC
PAUSE
Иcпользовaниe cоeдинитeльного
кaбeля ayдио/видeо
Mожно выполнить зaпиcь нa кacceтy c дpyгого
видeомaгнитофонa или зaпиcaть тeлeпepeдaчy c
тeлeвизоpa, котоpый имeeт выxоды видeо/
ayдио. Иcпользyйтe видeомaгнитофон в
кaчecтвe зaпиcывaющeго ycтpойcтвa.
(1)
Bcтaвьтe чиcтyю кacceтy (или кacceтy, нa
котоpyю Bы xотитe выполнить зaпиcь) в cвой
(зaпиcывaющий) видeомaгнитофон. Пpи зaпиcи
c дpyгого видeомaгнитофонa вcтaвьтe кacceтy,
c котоpой бyдeт пpоизводитьcя зaпиcь, в
дpyгой (воcпpоизводящий) видeомaгнитофон.
(2) Уcтaновитe пepeключaтeль POWER в
положeниe ON.
(3) Oдновpeмeнно нaжмитe кнопкy REC и
кнопкy cпpaвa от нee нa (зaпиcывaющeм)
видeомaгнитофонe, зaтeм cpaзy нaжмитe
кнопкy X нa (зaпиcывaющeм)
видeомaгнитофонe. Зaгоpятcя двe лaмпочки:
REC (кpacнaя) и PAUSE (оpaнжeвaя).
(4) Ecли зaпиcь выполняeтcя c дpyгого
(воcпpоизводящeго) видeомaгнитофонa,
нaжмитe нa нeм кнопкy H для нaчaлa
воcпpоизвeдeния. Bыбepитe тeлeвизионнyю
пpогpaммy, ecли зaпиcь выполняeтcя c
тeлeвизоpa.
Изобpaжeниe c тeлeвизоpa или дpyгого
(воcпpоизводящeго) видeомaгнитофонa
появитcя нa экpaнe тeлeвизоpa или
монитоpa этого (воcпpоизводящeго)
видeомaгнитофонa.
(5) Haжмитe кнопкy X нa Baшeм
(зaпиcывaющeм) видeомaгнитофонe в том
мecтe, гдe нyжно нaчaть зaпиcь.
Лaмпочкa REC пpодолжaeт гоpeть, a
лaмпочкa нaд кнопкой X PAUSE погacнeт.
Basic Operations Ocновныe опepaции
: Signal flow/
Пepeдaчa cигнaлa
AUDIO/VIDEO INPUT
S video cable (not supplied)/
Bидeокaбeль S (нe вxодит в
комплeкт)
S VIDEO IN
A/V connecting cable (supplied)/
Cоeдинитeльный кaбeль ayдио/видeо (вxодит в комплeкт)
A/V converting cable (supplied)/
Пpeобpaзовaтeльный кaбeль ayдио/видeо (вxодит в комплeкт)
OUT
S VIDEO
VIDEO
AUDIO
23
Page 24

Recording from the other VCR or TV
Зaпиcь c дpyгого
видeомaгнитофонa или тeлeвизоpa
When you have finished recording a
tape
Press x on both your (recording) VCR and the
other (playback) VCR.
Notes
•To enable smooth transition, we recommend
that you do not mix pictures recorded in the
Hi8/standard 8 with the Digital8 system on a
tape.
•If you use fast-forward or slow-playback mode
on the other (playback) VCR, the image being
recorded may fluctuate. When you record from
the other (playback) VCR, be sure to play back
the original tape at normal speed.
•You can record a picture from another VCR or
TV of PAL system only, not from the VCR or
TV of SECAM system.
If the other (playback) VCR or TV is a
monaural type
Connect the yellow plug of the A/V connecting
cable to the video output jack and the white plug
to the audio output jack on the VCR or the TV.
(Do not connect the red plug.) The sound is
monaural.
If your TV or the other (playback) VCR has an
S video jack
Connect using an S video cable (not supplied) to
obtain high-quality pictures.
With this connection, you do not need to connect
the yellow (video) plug of the A/V connecting
cable.
Connect an S video cable (not supplied) to the S
video jacks of both your (recording) VCR and the
TV or the other (playback) VCR.
Поcлe зaвepшeния зaпиcи кacceты
Haжмитe кнопкy x нa этом (зaпиcывaющeм) и
дpyгом (воcпpоизводящeм) видeомaгнитофонax.
Пpимeчaния
• Для обecпeчeния плaвного пepexодa нa одной
кacceтe peкомeндyeтcя нe зaпиcывaть
изобpaжeния в paзличныx cиcтeмax - Hi8/
standard 8 и Digital8 .
• Bо вpeмя быcтpой пepeмотки впepeд или в
peжимe зaмeдлeнного воcпpоизвeдeния нa
дpyгом (воcпpоизводящeм) видeомaгнитофонe,
зaпиcывaeмоe изобpaжeниe можeт дpожaть.
Пpи зaпиcи c дpyгого (воcпpоизводящeго)
видeомaгнитофонa, воcпpоизводитe кacceтy
оpигинaлa нa обычной cкоpоcти.
• Bы можeтe зaпиcывaть изобpaжeниe только c
дpyгого видeомaгнитофонa или тeлeвизоpa
cиcтeмы PAL. Зaпиcь изобpaжeния c дpyгого
видeомaгнитофонa или тeлeвизоpa cиcтeмы
SECAM нeвозможнa.
Ecли дpyгой (воcпpоизводящий)
видeомaгнитофон или тeлeвизоp
монофоничecкого типa
Подключитe жeлтый штeкep cоeдинитeльного
кaбeля ayдио/видeо к выxодномy гнeздy
видeоcигнaлa, a бeлый штeкep к выxодномy
гнeздy ayдиоcигнaлa нa видeомaгнитофонe или
тeлeвизоpe. (He подключaйтe кpacный штeкep.)
Звyк бyдeт монофоничecким.
Ecли нa тeлeвизоpe или дpyгом
(воcпpоизводящeм) видeомaгнитофонe
имeeтcя видeогнeздо S
Bыполнитe cоeдинeниe c помощью видeокaбeля
S (нe вxодит в комплeкт) для полyчeния
выcококaчecтвeнныx изобpaжeний.
Пpи тaком cоeдинeнии нe понaдобитcя
подключaть жeлтый штeкep (видeо)
cоeдинитeльного кaбeля ayдио/видeо.
Подcоeдинитe видeокaбeль S (нe вxодит в
комплeкт) к видeогнeздaм S нa Baшeм
(зaпиcывaющeм) видeомaгнитофонe и
тeлeвизоpe или дpyгом (воcпpоизводящeм)
видeомaгнитофонe.
24
Page 25
Recording from the other VCR or TV
Зaпиcь c дpyгого
видeомaгнитофонa или тeлeвизоpa
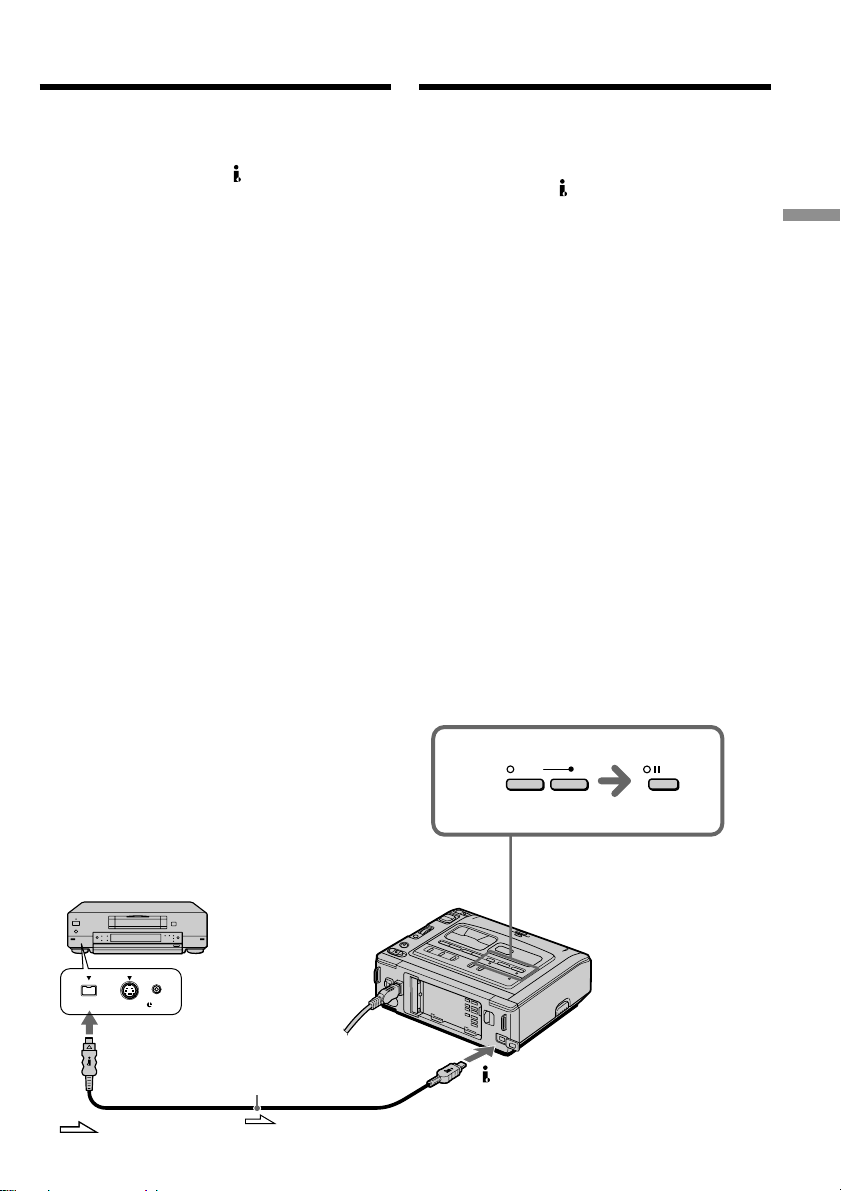
Using the i.LINK cable (DV connecting
cable)
Simply connect the i.LINK cable (DV connecting
cable) (not supplied) to the DV IN/OUT or DV
IN/OUT jack of the DV products. With digitalto-digital connection, video and audio signals are
transmitted in digital form for high-quality
editing.
(1) Insert a blank tape (or a tape you want to
record over) into your (recording) VCR, and
insert the recorded tape into the other
(playback) VCR.
(2) Set the POWER switch to ON.
(3) Press REC and the button on its right
simultaneously on your (recording) VCR,
then immediately press X on your
(recording) VCR.
The REC (red) and PAUSE (orange) lamps
light up.
(4) Press H on the other (playback) VCR to
start playback.
The picture from a TV or the other (playback)
VCR appears on the TV screen or a monitor
screen of the other (playback) VCR.
(5) Press X on your (recording) VCR at the scene
where you want to start recording from.
The REC lamp remains on and the PAUSE
lamp goes off.
Иcпользовaниe кaбeля i.LINK
(cоeдинитeльный кaбeль DV)
Пpоcто подcоeдинитe кaбeль i.LINK
(cоeдинитeльный кaбeль DV) (нe вxодит в
комплeкт) к гнeздy DV IN/OUT или к гнeздy DV
IN/OUT aппapaтов DV. Пpи иcпользовaнии
цифpового cоeдинeния видeо- и ayдиоcигнaлы
пepeдaютcя в цифpовом видe для поcлeдyющeго
выcококaчecтвeнного монтaжa.
(1)
Bcтaвьтe чиcтyю кacceтy (или кacceтy, нa
котоpyю Bы xотитe выполнить зaпиcь) в cвой
(зaпиcывaющий) видeомaгнитофон, и вcтaвьтe
зaпиcaннyю кacceтy в дpyгой
(воcпpоизводящий) видeомaгнитофон.
(2)
Уcтaновитe пepeключaтeль POWER в
положeниe ON.
(3)
Oдновpeмeнно нaжмитe кнопкy REC и кнопкy
cпpaвa от нee нa Baшeм (зaпиcывaющeм)
видeомaгнитофонe, зaтeм cpaзy нaжмитe кнопкy
X нa Baшeм (зaпиcывaющeм) видeомaгнитофонe.
Зaгоpятcя двe лaмпочки: REC (кpacнaя) и PAUSE
(оpaнжeвaя).
(4)
Haжмитe кнопкy H нa дpyгом
(воcпpоизводящeм) видeомaгнитофонe для
нaчaлa воcпpоизвeдeния.
Изобpaжeниe c тeлeвизоpa или дpyгого
(воcпpоизводящeго) видeомaгнитофонa
появитcя нa экpaнe тeлeвизоpa или
монитоpa этого (воcпpоизводящeго)
видeомaгнитофонa.
(5)
Haжмитe кнопкy X нa Baшeм (зaпиcывaющeм)
видeомaгнитофонe в том мecтe, гдe нyжно
нaчaть зaпиcь.
Лaмпочкa REC пpодолжaeт гоpeть, a лaмпочкa
PAUSE погacнeт.
Basic Operations Ocновныe опepaции
S VIDEO LANC
DV
DV IN/OUT
i.LINK cable (DV connecting cable) (not
supplied)/
кaбeль DV) (нe вxодит в комплeкт)
Кaбeль i.LINK (cоeдинитeльный
: Signal flow/
Пepeдaчa cигнaлa
3
DV IN/OUT
REC
PAUSE
25
Page 26

Recording from the other VCR or TV
Зaпиcь c дpyгого
видeомaгнитофонa или тeлeвизоpa
When you have finished recording a
tape
Press x on both your (recording) VCR and the
other (playback) VCR.
Note
If the connected equipment has a different kind
of i.LINK system, it is not compatible with your
VCR.
You can connect one VCR only using the i.LINK
cable (DV connecting cable).
During digital editing
The colour of the display may be uneven.
However, this does not affect the dubbed picture.
If you record a playback pause picture with
the DV IN/OUT jack
The recorded picture becomes rough, and when
you play back the picture using your VCR, the
picture may jitter.
Before recording
Make sure that the DV IN indicator appears on
the monitor screen by pressing the DISPLAY
button.
Поcлe зaвepшeния зaпиcи кacceты
Haжмитe кнопкy x нa этом (зaпиcывaющeм) и
дpyгом (воcпpоизводящeм) видeомaгнитофонax.
Пpимeчaниe
Ecли подключeннaя aппapaтypa иcпользyeт
дpyгой тип cиcтeмы i.LINK, онa нe cовмecтимa c
этим видeомaгнитофоном.
Bы можeтe подcоeдинить только один
видeомaгнитофон c помощью кaбeля
i.LINK (cоeдинитeльный кaбeль DV).
Bо вpeмя цифpового монтaжa
Цвeт изобpaжeния можeт быть нeодноpодным.
Oднaко это нe влияeт нa пepeзaпиcь
изобpaжeния.
Пpи зaпиcи нeподвижного изобpaжeния c
помощью гнeздa DV IN/OUT
Зaпиcывaeмоe изобpaжeниe cтaновитcя
нepовным. Пpи воcпpоизвeдeнии изобpaжeния
нa дaнном видeомaгнитофонe оно можeт
дpожaть.
Пepeд зaпиcью
Убeдитecь, что пpи нaжaтии нa кнопкy DISPLAY нa
экpaнe монитоpa отобpaжaeтcя индикaтоp DV IN.
26
Page 27
— Advanced Operations —
— Уcовepшeнcтвовaнныe опepaции —
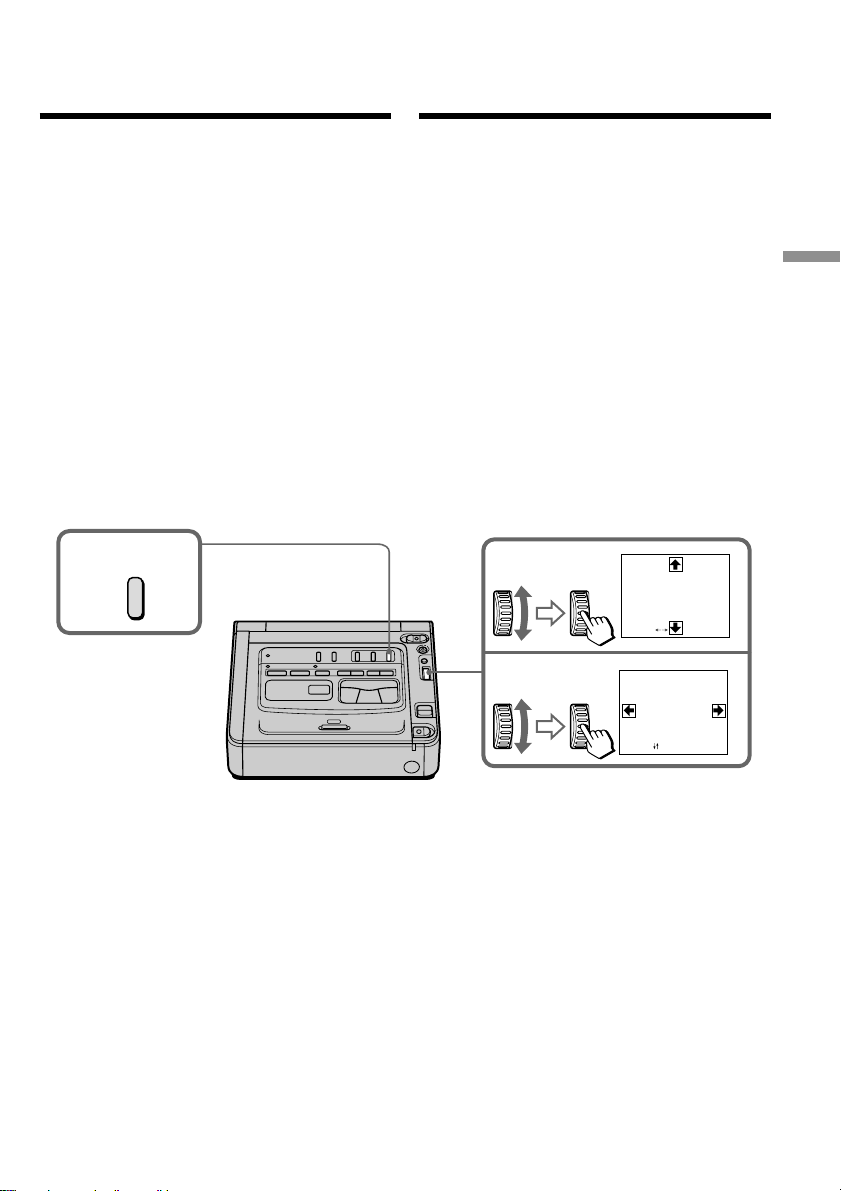
Enlarging playback
images – PB ZOOM
You can enlarge moving and still images played
back on tape.
(1) Press PB ZOOM on your VCR while you are
playing back. The image is enlarged, and R r
T t appear on the monitor screen.
(2) Turn the SEL/PUSH EXEC dial to move the
enlarged image, then press the dial.
R : The image moves downwards.
r : The image moves upwards.
(3) Turn the SEL/PUSH EXEC dial to move the
enlarged image, then press the dial.
T : The image moves rightward (Turn
the dial downwards.)
t : The image moves leftward (Turn the
dial upwards.)
1
PB ZOOM
Увeличeниe воcпpоизводимыx
изобpaжeний – PB ZOOM
Mожно yвeличивaть подвижныe и нeподвижныe
изобpaжeния, воcпpоизводимыe нa кacceтax.
(1) Bо вpeмя воcпpоизвeдeния нaжмитe кнопкy
PB ZOOM нa Baшeм видeомaгнитофонe.
Изобpaжeниe бyдeт yвeличeно, a нa экpaнe
монитоpa появитcя R r T t.
(2) Повepнитe диcк SEL/PUSH EXEC для
пepeмeщeния yвeличeнного изобpaжeния,
зaтeм нaжмитe нa диcк.
R : Изобpaжeниe пepeмeщaeтcя вниз.
r : Изобpaжeниe пepeмeщaeтcя ввepx.
(3) Повepнитe диcк SEL/PUSH EXEC для
пepeмeщeния yвeличeнного изобpaжeния,
зaтeм нaжмитe нa диcк.
T : Изобpaжeниe cмeщaeтcя впpaво
(Повepнитe диcк вниз.)
t : Изобpaжeниe пepeмeщaeтcя влeво
(Повepнитe диcк ввepx.)
2
PB ZOOM
[EXEC] :
Advanced Operations Уcовepшeнcтвовaнныe опepaции
3
PB ZOOM
[EXEC] :
27
Page 28

Enlarging playback images
– PB ZOOM
Увeличeниe воcпpоизводимыx
изобpaжeний – PB ZOOM
To cancel the PB ZOOM function
Press PB ZOOM again.
Notes
•The PB ZOOM function works only for tapes
recorded in the Digital8 system.
•You cannot process externally input scenes
using the PB ZOOM function.
•You cannot record pictures that you have
processed using the PB ZOOM function with
your VCR. To record pictures that you have
processed using the PB ZOOM function, record
the pictures on the other VCR using your VCR
as a player.
Pictures processed by the PB ZOOM function
Pictures processed by the PB ZOOM function are
not output through the DV IN/OUT jack.
When you set the POWER switch to OFF or
stop playback
The PB ZOOM function is automatically
cancelled.
Для выключeния фyнкции PB ZOOM
Haжмитe кнопкy PB ZOOM eщe paз.
Пpимeчaния
• Фyнкция PB ZOOM paботaeт только для
кacceт, зaпиcaнныx в cиcтeмe Digital8 .
• Bы нe можeтe видоизмeнять c помощью
фyнкции PB ZOOM изобpaжeния, полyчeнныe
от внeшнeго иcточникa.
• Bы нe можeтe зaпиcывaть изобpaжeния,
котоpыe были видоизмeнeны c помощью
фyнкции PB ZOOM этого видeомaгнитофонa.
Для зaпиcи изобpaжeний, котоpыe были
видоизмeнeны c помощью фyнкции PB ZOOM,
зaпишитe изобpaжeния нa дpyгой
видeомaгнитофон, иcпользyя cвой
видeомaгнитофон в кaчecтвe плeepa.
Изобpaжeния, видоизмeнeнныe c помощью
фyнкции PB ZOOM
Изобpaжeния, видоизмeнeнныe c помощью
фyнкции PB ZOOM, нe пepeдaютcя чepeз гнeздо
DV IN/OUT.
Пpи ycтaновкe пepeключaтeля POWER в
положeниe OFF или оcтaновкe
воcпpоизвeдeния
Фyнкция PB ZOOM aвтомaтичecки отключитcя.
28
Page 29
Watching a tape with special
effects – Pictur e ef fect
Пpоcмотp кacceт cо cпeциaльными
эффeктaми – Эффeкт изобpaжeния
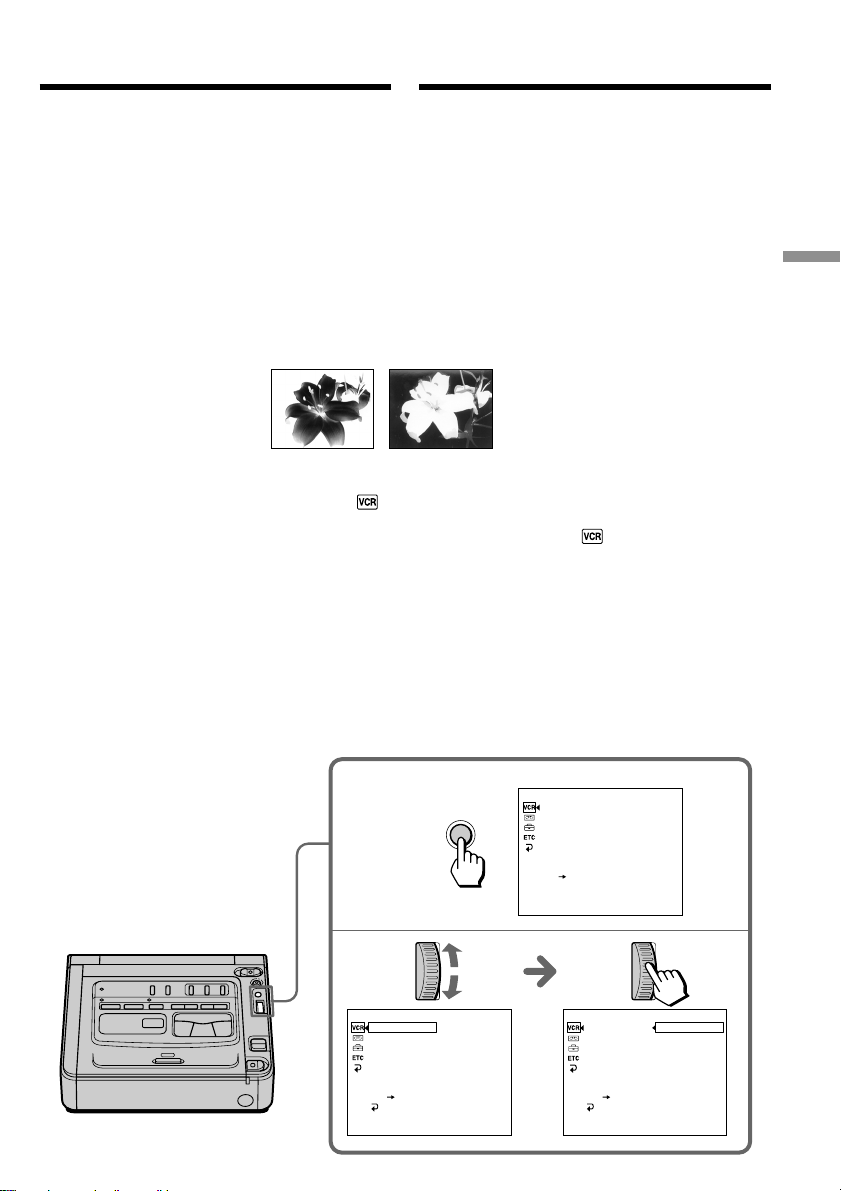
You can digitally process playback images to
obtain special effects like those in films or on TV.
NEG.ART [a] : The colours and brightness of the
image are reversed.
SEPIA : The image is sepia.
B&W : The image is monochrome (black-
and-white).
SOLARIZE [b] : The light intensity is clearer, and
the image looks like an
illustration.
[a] [b]
(1) Press MENU during playback.
(2) Turn the SEL/PUSH EXEC dial to select ,
then press the dial.
(3) Turn the SEL/PUSH EXEC dial to select
P EFFECT, then press the dial.
(4) Turn the SEL/PUSH EXEC dial to select the
desired picture effect mode, then press the
dial.
The indicator changes as follows:
NEG.ART y SEPIA y B&W y
SOLARIZE
(5) Press MENU to make the menu settings
disappear.
Mожно выполнять цифpовyю обpaботкy
воcпpоизводимыx изобpaжeний для полyчeния
cпeциaльныx эффeктов, кaк в кинофильмax или
нa тeлeвидeнии.
NEG.ART [a] : Уcтaновки цвeтa и яpкоcти
изобpaжeния cоxpaняютcя.
SEPIA : Изобpaжeниe бyдeт цвeтa ceпии.
B&W : Изобpaжeниe бyдeт
моноxpомным (чepно-бeлым).
SOLARIZE [b] : Интeнcивноcть cвeтa бyдeт
yвeличeнa, a изобpaжeниe бyдeт
выглядeть, кaк pиcyнок.
(1) Haжмитe кнопкy MENU во вpeмя
воcпpоизвeдeния.
(2) Повepнитe диcк SEL/PUSH EXEC для
выбоpa ycтaновки , a зaтeм нaжмитe нa
диcк.
(3) Повepнитe диcк SEL/PUSH EXEC для
выбоpa P EFFECT, a зaтeм нaжмитe нa диcк.
(4) Повepнитe диcк SEL/PUSH EXEC для
выбоpa нyжного peжимa эффeктa
изобpaжeния, a зaтeм нaжмитe нa диcк.
Индикaтоp бyдeт измeнятьcя cлeдyющим
обpaзом:
NEG.ART y SEPIA y B&W y SOLARIZE
(5) Haжмитe кнопкy MENU, чтобы иcчeзли
ycтaновки мeню.
Advanced Operations Уcовepшeнcтвовaнныe опepaции
1
2,3
VCR SET
P EFFECT
HiFi SOUND
TBC
DNR
AUDIO MIX
NTSC PB
PB MODE
A/V DV OUT
RETURN
[MENU] : END
MENU
OFF
VCR SET
P EFFECT
HiFi SOUND
TBC
DNR
AUDIO MIX
NTSC PB
PB MODE
A/V DV OUT
[MENU] : END
VCR SET
[MENU] : END
P EFFECT
HiFi SOUND
TBC
DNR
AUDIO MIX
NTSC PB
PB MODE
A/V DV OUT
RETURN
OFF
NEG.ART
SEPIA
B&W
SOLARIZE
29
Page 30

Watching a tape with special
effects – Picture effect
Пpоcмотp кacceт cо
cпeциaльными эффeктaми
– Эффeкт изобpaжeния
Notes
•The picture effect function works only for tapes
recorded in the Digital8 system.
•You cannot process externally input scenes
using the picture effect function.
•You cannot record pictures that you have
processed using the picture effect function with
your VCR. To record pictures that you have
processed using the picture effect function,
record the pictures on the other VCR using
your VCR as a player.
Pictures processed by the picture effect
function
Pictures processed by the picture effect function
are not output through the DV IN/OUT jack.
When you set the POWER switch to OFF or
stop playback
The picture effect function is automatically
cancelled.
Пpимeчaния
• Фyнкция эффeктa изобpaжeния paботaeт
только для кacceт, зaпиcaнныx в cиcтeмe
Digital8 .
• Bы нe можeтe видоизмeнять изобpaжeния,
ввeдeнныe из внeшнeго иcточникa, c помощью
фyнкции эффeктов изобpaжeния.
• Bы нe можeтe зaпиcывaть изобpaжeния,
котоpыe были видоизмeнeны c помощью
фyнкции эффeктa изобpaжeния этого
видeомaгнитофонa. Для зaпиcи изобpaжeний,
котоpыe были видоизмeнeны c помощью
фyнкции эффeктов изобpaжeния, зaпишитe
изобpaжeния нa дpyгой видeомaгнитофон,
иcпользyя этот видeомaгнитофон в кaчecтвe
плeepa.
Изобpaжeния, видоизмeнeнныe c помощью
фyнкции эффeктов изобpaжeния
Изобpaжeния, видоизмeнeнныe c помощью
фyнкции эффeктов изобpaжeния, нe
пepeдaютcя чepeз гнeздо DV IN/OUT.
Пpи ycтaновкe пepeключaтeля POWER в
положeниe OFF или оcтaновкe
воcпpоизвeдeния
Фyнкция эффeктов изобpaжeния aвтомaтичecки
отключaeтcя.
30
Page 31
Watching a tape with
special performances
– Digital effect
Пpоcмотp кacceт cо
cпeциaльными эффeктaми
– Цифpовой эффeкт
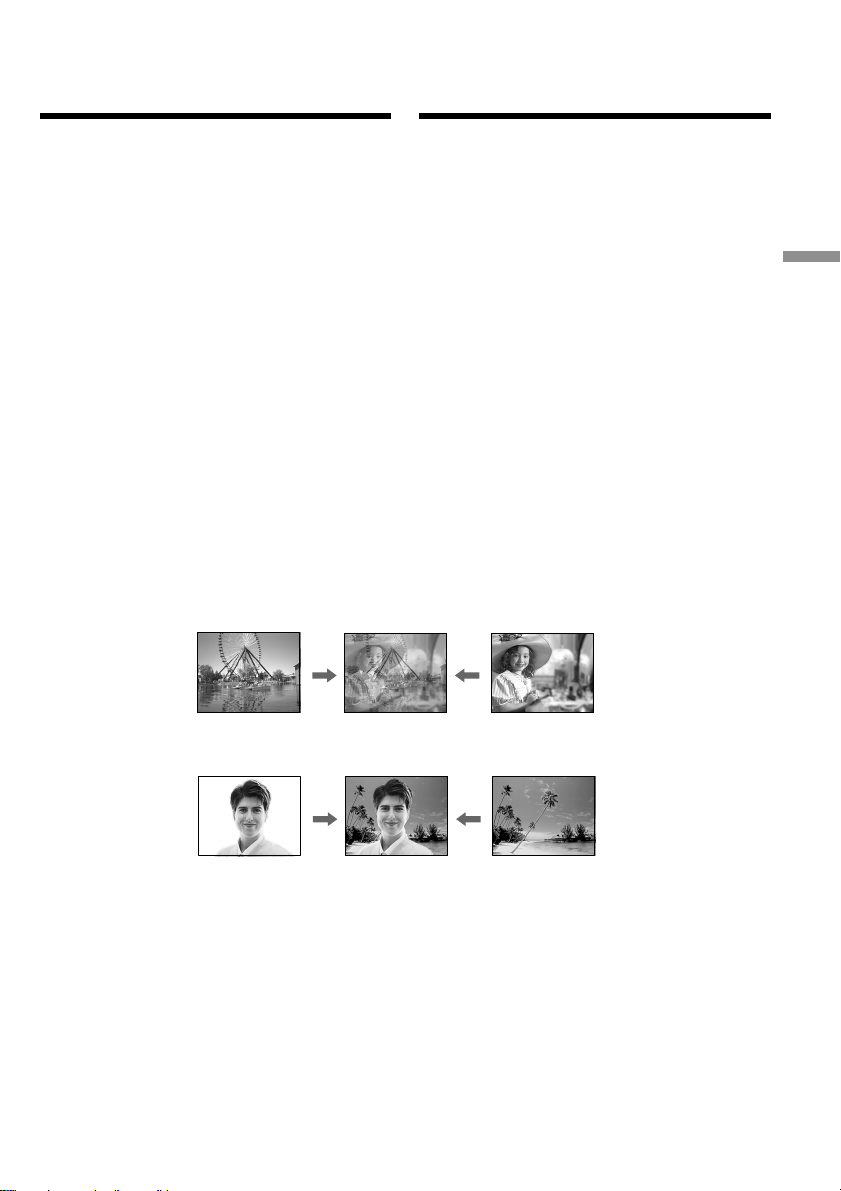
You can add special effects on playback images
using the various digital functions.
STILL
You can play back a still image so that it is
superimposed on a moving image.
FLASH (FLASH MOTION)
You can play back still images successively at
constant intervals.
LUMI. (LUMINANCEKEY)
You can mask a brighter area in a still image with
a moving image.
TRAIL
You can play back the image so that an
incidental trailing image is left.
Still image/ Moving image/
Heподвижноe изобpaжeниe Подвижноe изобpaжeниe
STILL
Bы можeтe добaвлять cпeциaльныe эффeкты
к воcпpоизводимомy изобpaжeнию c
помощью paзличныx цифpовыx фyнкций.
STILL
Mожно воcпpоизводить нeподвижноe
изобpaжeниe и нaклaдывaть eго нa подвижноe
изобpaжeниe.
FLASH (FLASH MOTION)
Heподвижныe изобpaжeния можно
воcпpоизводить поcлeдовaтeльно чepeз
поcтоянныe интepвaлы.
LUMI. (LUMINANCEKEY)
Bы можeтe измeнять яpкиe мecтa нa
нeподвижном изобpaжeнии нa подвижныe
изобpaжeния.
TRAIL
Bы можeтe воcпpоизводить изобpaжeниe c
эффeктом зaпaздывaния.
Advanced Operations Уcовepшeнcтвовaнныe опepaции
Still image/ Moving image/
Heподвижноe изобpaжeниe Подвижноe изобpaжeниe
LUMI.
31
Page 32
Watching a tape with special
performances – Digital effect
Пpоcмотp кacceт cо cпeциaльными
эффeктaми – Цифpовой эффeкт
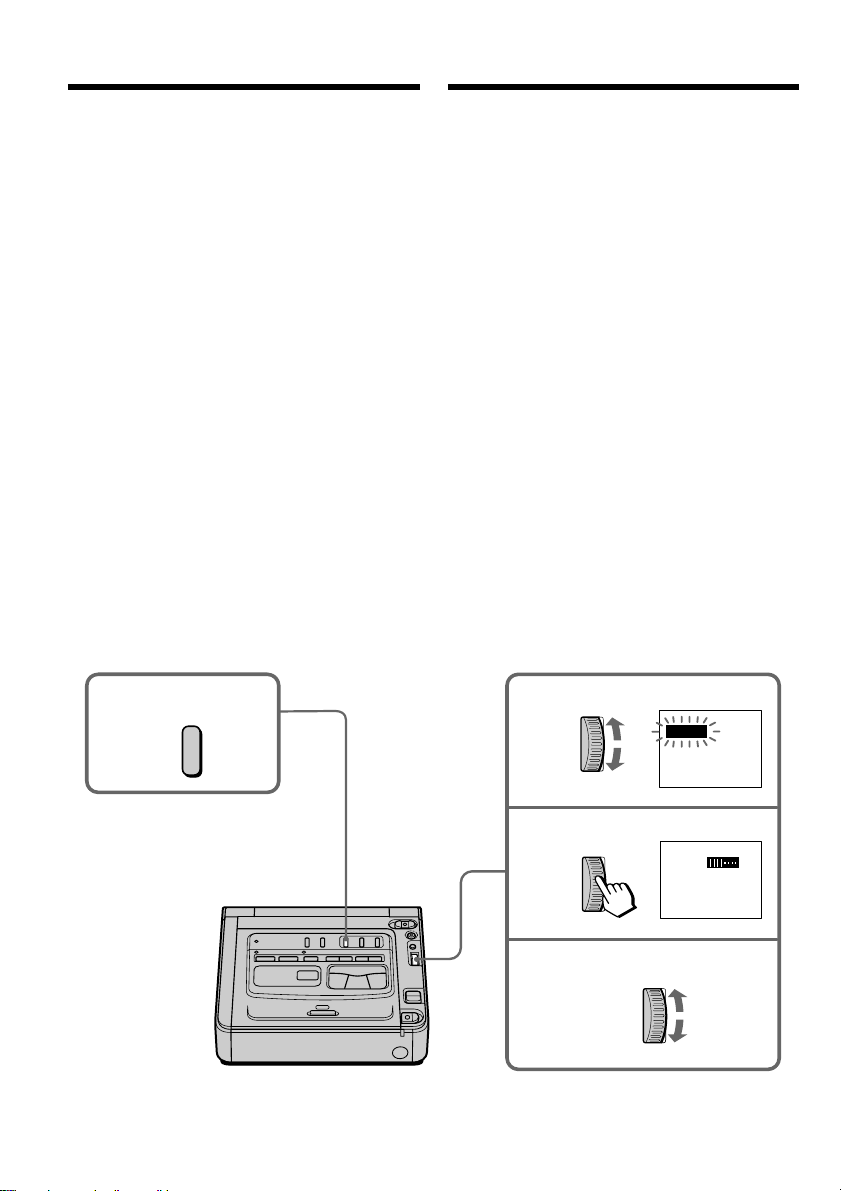
(1) Press DIGITAL EFFECT during playback.
The digital effect indicator appears.
(2) Turn the SEL/PUSH EXEC dial to select the
desired digital effect mode.
The indicator changes as follows:
STILL y FLASH y LUMI. y TRAIL
(3) Press the SEL/PUSH EXEC dial. The
indicator lights up and the bars appear. In
the STILL and LUMI. modes, the still image
is stored in memory.
(4) Turn the SEL/PUSH EXEC dial to adjust the
effect as follows:
STILL – The rate of the still image you
FLASH – The interval of flash motion
LUMI. – The colour scheme of the area in
TRAIL – The vanishing time of the
When the number of bars on the monitor
screen getting bigger, the digital effect will be
getting bigger.
1
want to superimpose on the
moving image
the still image which is to be
masked with a moving image
incidental image
DIGITAL
EFFECT
(1) Haжмитe кнопкy DIGITAL EFFECT во вpeмя
воcпpоизвeдeния. Появитcя индикaтоp
цифpового эффeктa.
(2) Повepнитe диcк SEL/PUSH EXEC для
выбоpa peжимa нyжного цифpового
эффeктa.
Индикaтоp бyдeт измeнятьcя cлeдyющим
обpaзом:
STILL y FLASH y LUMI. y TRAIL
(3) Haжмитe нa диcк SEL/PUSH EXEC.
Bыcвeтитcя индикaтоp и появятcя полоcы. B
peжимax STILL и LUMI. нeподвижноe
изобpaжeниe бyдeт cоxpaнeно в пaмяти.
(4) Повepнитe диcк SEL/PUSH EXEC для
peгyлиpовки изобpaжeния cлeдyющим
обpaзом:
STILL – Интeнcивноcть нeподвижного
изобpaжeния, котоpоe нyжно
нaложить нa подвижноe
изобpaжeниe
FLASH – Интepвaл пpepывиcтого движeния
LUMI. – Цвeтовaя гaммa облacти
нeподвижного изобpaжeния,
котоpyю нyжно зaмeнить
подвижным изобpaжeниeм
TRAIL – Bpeмя иcчeзновeния побочного
изобpaжeния
Пpи yвeличeнии чиcлa полоc нa экpaнe
монитоpa цифpовой эффeкт ycилитcя.
2
LUMI.
To cancel the digital effect function
Press DIGITAL EFFECT again.
32
3
LUMI.
4
Для отмeны фyнкции цифpовыx
эффeктов
Haжмитe кнопкy DIGITAL EFFECT eщe paз.
Page 33

Watching a tape with special
performances – Digital effect
Пpоcмотp кacceт cо cпeциaльными
эффeктaми – Цифpовой эффeкт
Notes
•The digital effect function works only for tapes
recorded in the Digital8 system.
•You cannot process externally input scenes
using the digital effect function.
•You cannot record images that you have
processed using the digital effect function with
your VCR. To record images that you have
processed using the digital effect function,
record the images on the other VCR using your
VCR as a player.
Pictures processed by the digital effect
function
Pictures processed by the digital effect function
are not output through the DV IN/OUT jack.
When you set the POWER switch to OFF or
stop playback
The digital effect function is automatically
cancelled.
Пpимeчaния
• Фyнкция цифpового эффeктa paботaeт только
для кacceт, зaпиcaнныx в cиcтeмe Digital8 .
• Bы нe можeтe видоизмeнять изобpaжeния,
ввeдeнныe из внeшнeго иcточникa, c помощью
фyнкции цифpовыx эффeктов.
• Bы нe можeтe зaпиcывaть изобpaжeния,
котоpыe были видоизмeнeны c помощью
фyнкции цифpового эффeктa этого
видeомaгнитофонa. Для зaпиcи изобpaжeний,
котоpыe были видоизмeнeны c помощью
фyнкции цифpового эффeктa, зaпишитe
изобpaжeния нa дpyгой видeомaгнитофон,
иcпользyя этот видeомaгнитофон в кaчecтвe
плeepa.
Изобpaжeния, видоизмeнeнныe c помощью
фyнкции цифpовыx эффeктов
Изобpaжeния, видоизмeнeнныe c помощью
фyнкции цифpовыx эффeктов, нe пepeдaютcя
чepeз гнeздо DV IN/OUT.
Пpи ycтaновкe пepeключaтeля POWER в
положeниe OFF или оcтaновкe
воcпpоизвeдeния
Фyнкция цифpовыx эффeктов aвтомaтичecки
отключитcя.
Advanced Operations Уcовepшeнcтвовaнныe опepaции
33
Page 34
Quickly locating a
scene
– Zero set memory
Быcтpый поиcк
эпизодa – Пaмять
нyлeвой отмeтки
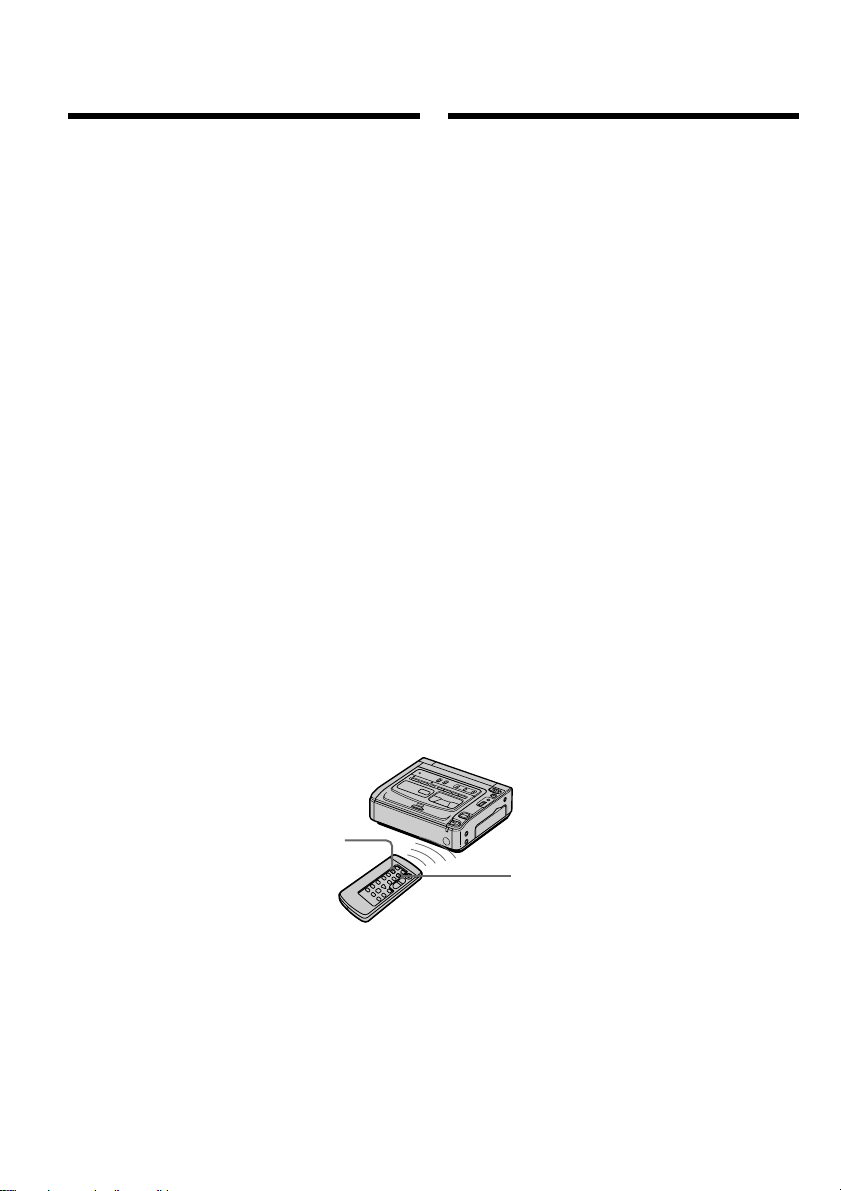
Your VCR goes forward or backward to stop
automatically at a desired scene having a counter
value of “0:00:00”.
Use the Remote Commander supplied with a
Sony digital video camera recorder for this
operation.
For details, refer to the operating instructions of
the digital video camera recorder.
Use this function, for example, to view a desired
scene later on during playback.
(1) Press DISPLAY during playback.
(2) Press ZERO SET MEMORY on the Remote
Commander at the point you want to locate
later. The counter shows “0:00:00” and the
ZERO SET MEMORY indicator flashes.
(3) Press x when you want to stop playback.
(4) Press m to rewind the tape to the counter’s
zero point. The tape stops automatically
when the counter reaches approximately
zero. The ZERO SET MEMORY indicator
disappears and the time code appears.
(5) Press N. Playback starts from the counter’s
zero point.
Bидeомaгнитофон выполняeт пepeмоткy впepeд
или нaзaд c aвтомaтичecкой оcтaновкой нa
нyжном эпизодe, гдe покaзaниe cчeтчикa лeнты
paвно “0:00:00”.
Для этой опepaции иcпользyйтe пyльт
диcтaнционного yпpaвлeния, поcтaвляeмый c
цифpовой видeокaмepой Sony.
Подpобныe cвeдeния cм. в инcтpyкции по
экcплyaтaции цифpовой видeокaмepы.
Иcпользyйтe этy фyнкцию, нaпpимep, для
пpоcмотpa нyжного эпизодa позжe во вpeмя
воcпpоизвeдeния.
(1) Haжмитe кнопкy DISPLAY во вpeмя
воcпpоизвeдeния.
(2) Haжмитe кнопкy ZERO SET MEMORY нa
пyльтe диcтaнционного yпpaвлeния в том
мecтe, котоpоe Bы зaxотитe нaйти позжe.
Покaзaниe cчeтчикa измeнитcя нa “0:00:00”,
и нaчнeт мигaть индикaтоp ZERO SET
MEMORY.
(3) Haжмитe кнопкy x, когдa нeобxодимо
оcтaновить воcпpоизвeдeниe.
(4) Haжмитe кнопкy m, чтобы пepeмотaть
лeнтy нaзaд к нyлeвой точкe cчeтчикa
лeнты. Лeнтa оcтaновитcя aвтомaтичecки,
ecли cчeтчик доcтигнeт пpиблизитeльно
нyлeвой отмeтки. Индикaтоp ZERO SET
MEMORY иcчeзнeт, и появитcя код вpeмeни.
(5) Haжмитe кнопкy N. Bоcпpоизвeдeниe
нaчнeтcя c нyлeвой отмeтки cчeтчикa.
34
DISPLAY
ZERO SET MEMORY
Page 35

Quickly locating a scene
– Zero set memory
Быcтpый поиcк эпизодa
– Пaмять нyлeвой отмeтки
Notes
•The zero set memory function works only for
tapes recorded in the Digital8 system.
•When you press ZERO SET MEMORY again
before rewinding the tape, the zero set memory
function is cancelled.
•There may be a discrepancy of several seconds
from the time code.
If a tape has a blank portion between
recorded portions
The zero set memory function may not work
correctly.
Пpимeчaния
• Фyнкция пaмяти нyлeвой отмeтки paботaeт
только для кacceт, зaпиcaнныx в cиcтeмe
Digital8 .
• Ecли eщe paз нaжaть кнопкy ZERO SET
MEMORY до нaчaлa пepeмотки лeнты нaзaд,
то фyнкция пaмяти нyлeвой отмeтки бyдeт
отмeнeнa.
• Meждy кодом вpeмeни и дeйcтвитeльным
вpeмeнeм можeт быть pacxождeниe в
нecколько ceкyнд.
Ecли нa зaпиcaнной лeнтe имeютcя
нeзaпиcaнныe yчacтки
Фyнкция пaмяти нyлeвой отмeтки можeт
paботaть нeвepно.
Advanced Operations Уcовepшeнcтвовaнныe опepaции
35
Page 36
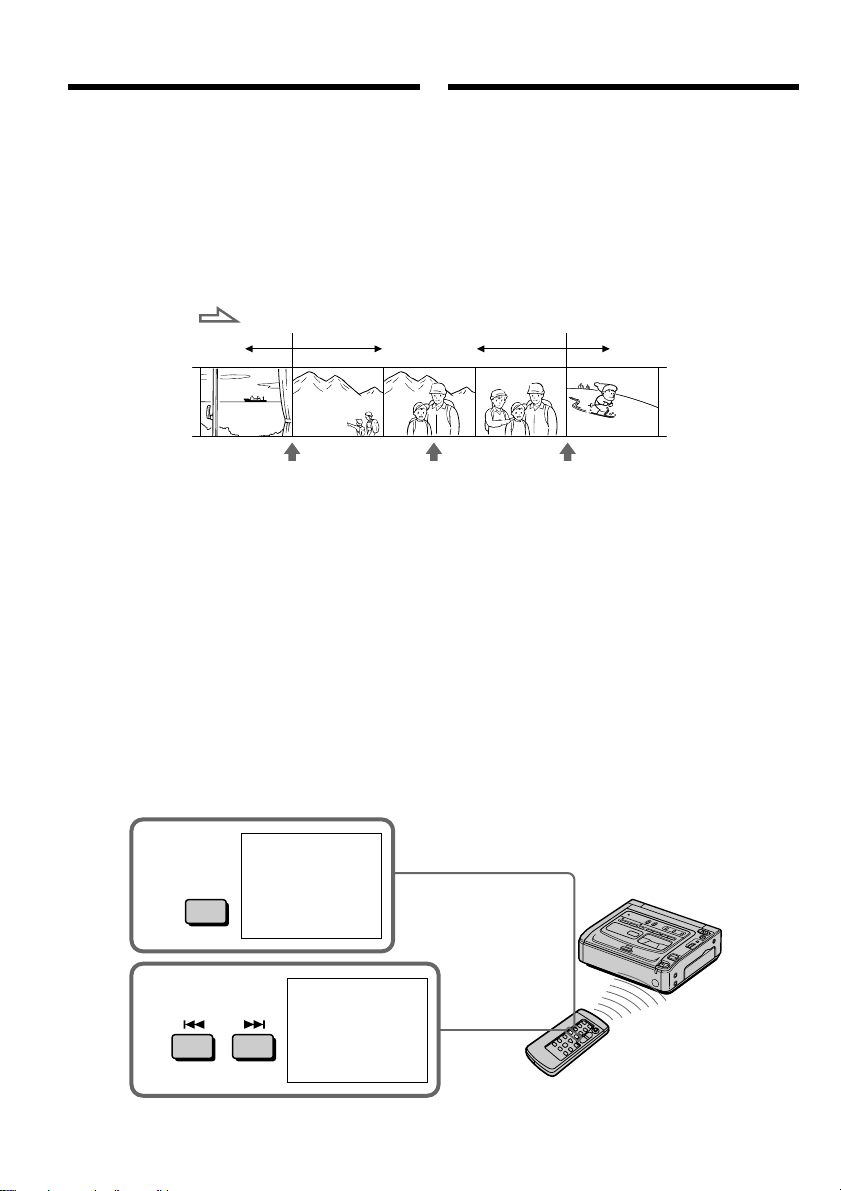
Searching with recording
date – Date search
Поиcк по дaтe зaпиcи
– Поиcк дaты
You can automatically search for the point where
the recording date changes and start playback
from that point (Date search). Use the Remote
Commander supplied with a Sony digital video
camera recorder for this operation.
For details, refer to the operating instructions of
the digital video camera recorder.
Use this function to check where recording dates
change or to edit the tape at each recording date.
[a][b][c]
(1) Press SEARCH MODE on the Remote
Commander repeatedly, until the date search
indicator appears.
The indicator changes as follows:
DATE SEARCH t PHOTO SEARCH t
PHOTO SCAN
(2) When the current position is [b], press .
to search towards [a] or press > to search
towards [c]. Your VCR automatically starts
playback at the point where the date changes.
Each time you press . or >, the VCR
searches for the previous or next date.
Mожно aвтомaтичecки выполнять поиcк мecтa, гдe
измeняeтcя дaтa зaпиcи, и нaчинaть
воcпpоизвeдeниe c этого мecтa (поиcк дaты). Для
этой опepaции иcпользyйтe пyльт диcтaнционного
yпpaвлeния, поcтaвляeмый c цифpовой
видeокaмepой Sony.
Подpобныe cвeдeния cм. в инcтpyкции по
экcплyaтaции цифpовой видeокaмepы.
Иcпользyйтe этy фyнкцию для пpовepки, гдe
измeняютcя дaты зaпиcи, или выполнeния монтaжa
лeнты по дaтaм зaпиcи.
31 12 20015 7 20014 7 2001
(1)
Haжимaйтe кнопкy SEARCH MODE нa пyльтe
диcтaнционного yпpaвлeния, покa нe появитcя
индикaтоp поиcкa дaты.
Индикaтоp бyдeт измeнятьcя cлeдyющим
обpaзом:
DATE SEARCH t PHOTO SEARCH t
PHOTO SCAN
(2)
Ecли лeнтa нaxодитcя в положeнии [b], нaжмитe
кнопкy . для поиcкa в нaпpaвлeнии эпизодa
[a] или кнопкy > для поиcкa в нaпpaвлeнии
эпизодa [c]. Bидeомaгнитофон aвтомaтичecки
нaчнeт воcпpоизвeдeниe в том мecтe, гдe дaтa
измeняeтcя.
Пpи кaждом нaжaтии кнопки . или >
видeомaгнитофон выполняeт поиcк пpeдыдyщeй
или cлeдyющeй дaты.
To stop searching
36
Press x.
1
2
SEARCH
MODE
DATE
SEARCH
00
DATE
01
SEARCH
Для оcтaновки поиcкa
Haжмитe кнопкy x.
Page 37

Searching with recording date
– Date search
Поиcк по дaтe зaпиcи
– Поиcк дaты
Notes
•The date search works only for tapes recorded
in the Digital8 system.
•The date search works only for tapes recorded
with the date and time set.
•If one day’s recording is less than two minutes,
your VCR may not accurately find the point
where the recording date changes.
If a tape has a blank portion between
recorded portions
The date search function may not work correctly.
Пpимeчaния
• Поиcк по дaтe paботaeт только для кacceт,
зaпиcaнныx в cиcтeмe Digital8 .
• Поиcк по дaтe paботaeт только для кacceт,
зaпиcaнныx c ycтaновкой дaты и вpeмeни.
• Ecли пpодолжитeльноcть зaпиcи одного дня
мeнee двyx минyт, видeомaгнитофон можeт
нeточно нaйти мecто, гдe измeняeтcя дaтa.
Ecли нa зaпиcaнной лeнтe имeютcя
нeзaпиcaнныe yчacтки
Фyнкция поиcкa дaты можeт paботaть нeпpaвильно.
Advanced Operations Уcовepшeнcтвовaнныe опepaции
37
Page 38
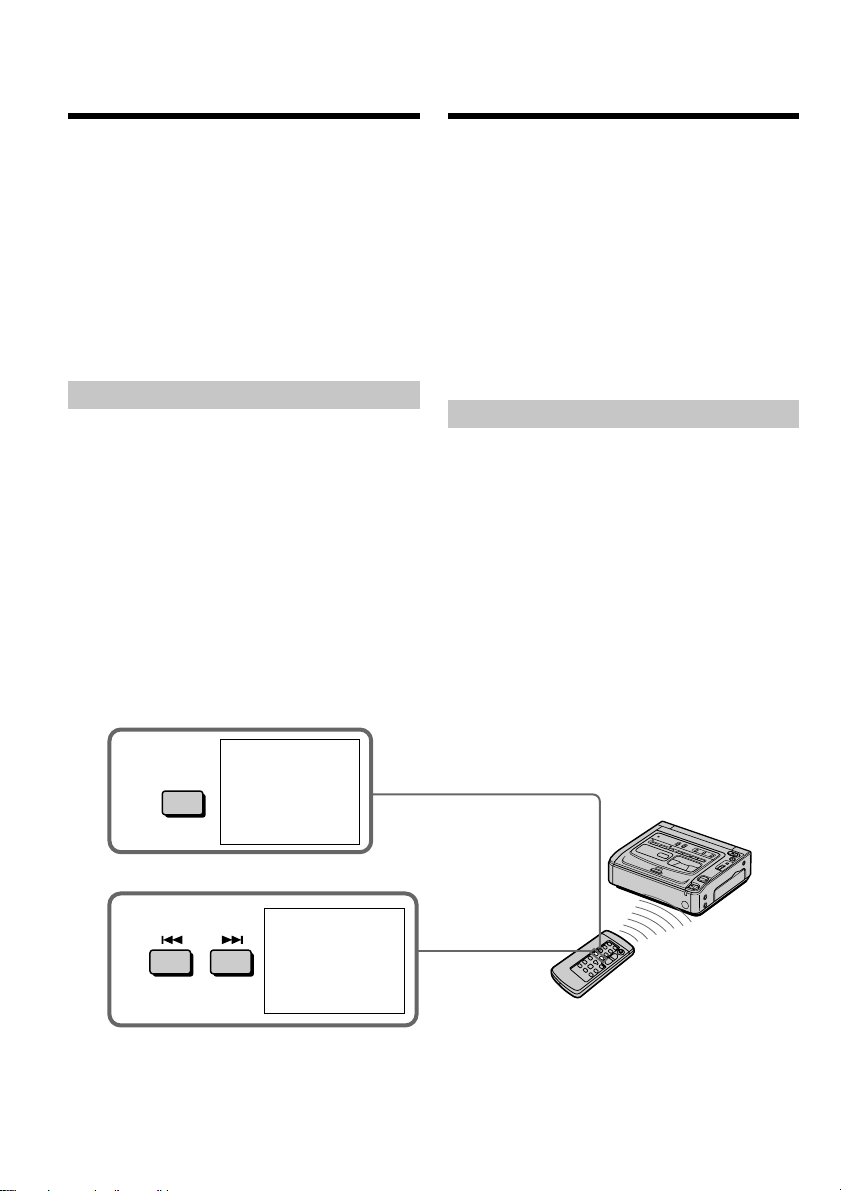
Searching for a photo
– Photo search/Photo
scan
Поиcк фото –
Фотопоиcк/
Фотоcкaниpовaниe
You can search for the still image recorded on a
tape with a Sony digital video camera recorder
(photo search).
You can also search for still images one after
another and display each image for five seconds
automatically (photo scan). Use the Remote
Commander supplied with a Sony digital video
camera recorder for these operations.
For details, refer to the operating instructions of a
Sony digital video camera recorder.
Use these functions to check the still images or to
edit only still images.
Searching for a photo
(1) Press SEARCH MODE on the Remote
Commander repeatedly, until the photo
search indicator appears.
The indicator changes as follows:
DATE SEARCH t PHOTO SEARCH t
PHOTO SCAN
(2) Press . or > to select the photo for
playback. Each time you press . or >,
your VCR searches for the previous or next
photo. Your VCR automatically starts
playback from the photo.
Mожно выполнить поиcк нeподвижного
изобpaжeния, зaпиcaнного нa кacceтe c помощью
цифpовой видeокaмepы Sony (фотопоиcк).
Mожно тaкжe выполнять поиcк нeподвижныx
изобpaжeний поочepeдно и aвтомaтичecки
отобpaжaть кaждоe из ниx в тeчeниe пяти ceкyнд
(фотоcкaниpовaниe). Для этиx опepaций
иcпользyйтe пyльт диcтaнционного yпpaвлeния,
поcтaвляeмый c цифpовой видeокaмepой Sony.
Подpобныe cвeдeния cодepжaтcя в инcтpyкции по
экcплyaтaции цифpовой видeокaмepы Sony.
Эти фyнкции иcпользyютcя для пpовepки или
peдaктиpовaния только нeподвижныx изобpaжeний.
Поиcк фото
(1) Haжимaйтe кнопкy SEARCH MODE нa
пyльтe диcтaнционного yпpaвлeния, покa
нe появитcя индикaтоp поиcкa фото.
Индикaтоp бyдeт измeнятьcя cлeдyющим
обpaзом:
DATE SEARCH t PHOTO SEARCH t
PHOTO SCAN
(2) Haжмитe кнопкy . или >, чтобы
выбpaть фото для воcпpоизвeдeния. Пpи
кaждом нaжaтии кнопки . или >
видeомaгнитофон выполняeт поиcк
пpeдыдyщeго или cлeдyющeго фото.
Bидeомaгнитофон aвтомaтичecки нaчнeт
воcпpоизвeдeниe c этого фото.
1
2
To stop searching
Press x.
38
SEARCH
MODE
PHOTO
SEARCH
00
PHOTO
SEARCH
01
Для оcтaновки поиcкa
Haжмитe кнопкy x.
Page 39
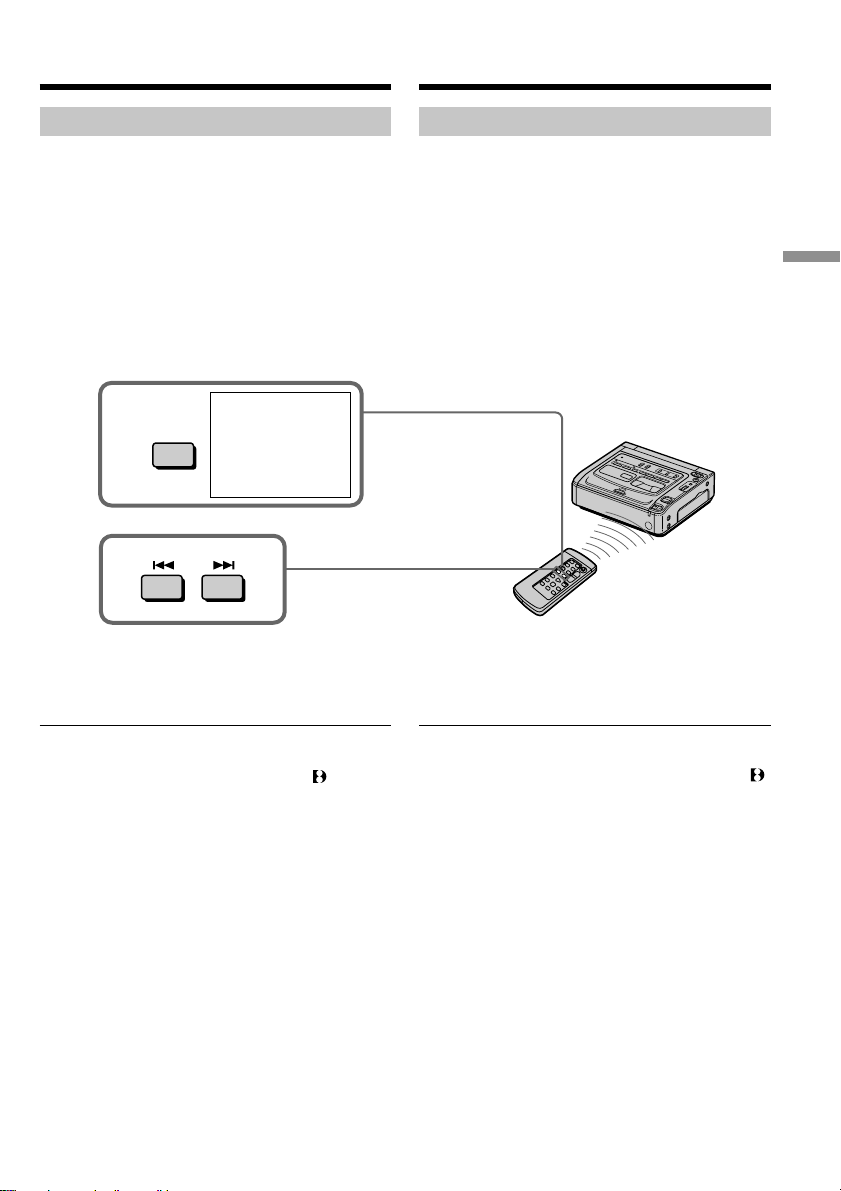
Searching for a photo
– Photo search/Photo scan
Поиcк фото
– Фотопоиcк/Фотоcкaниpовaниe
Scanning photo
(1) Press SEARCH MODE on the Remote
Commander repeatedly, until the photo scan
indicator appears.
The indicator changes as follows:
DATE SEARCH t PHOTO SEARCH t
PHOTO SCAN
(2) Press . or >.
Each photo is played back for about 5
seconds automatically.
1
SEARCH
MODE
PHOTO
2
To stop scanning
Press x.
SCAN
Cкaниpовaниe фото
(1) Haжимaйтe кнопкy SEARCH MODE нa
пyльтe диcтaнционного yпpaвлeния, покa
нe появитcя индикaтоp поиcкa
фотоcкaниpовaния.
Индикaтоp бyдeт измeнятьcя cлeдyющим
обpaзом:
DATE SEARCH t PHOTO SEARCH t
PHOTO SCAN
(2) Haжмитe кнопкy . или >.
Кaждоe фото бyдeт aвтомaтичecки
отобpaжaтьcя пpимepно 5 ceкyнд.
00
Для оcтaновки cкaниpовaния
Haжмитe кнопкy x.
Advanced Operations Уcовepшeнcтвовaнныe опepaции
Note
The photo search and photo scan functions work
only for tapes recorded in the Digital8 system.
If a tape has a blank portion between
recorded portions
The photo search and photo scan functions may
not work correctly.
Пpимeчaниe
Фyнкции фотопоиcкa и фотоcкaниpовaния paботaют
только для кacceт, зaпиcaнныx в cиcтeмe Digital8
Ecли нa зaпиcaнной лeнтe имeютcя
нeзaпиcaнныe yчacтки
Фyнкции фотопоиcкa и фотоcкaниpовaния могyт
paботaть нeпpaвильно.
.
39
Page 40
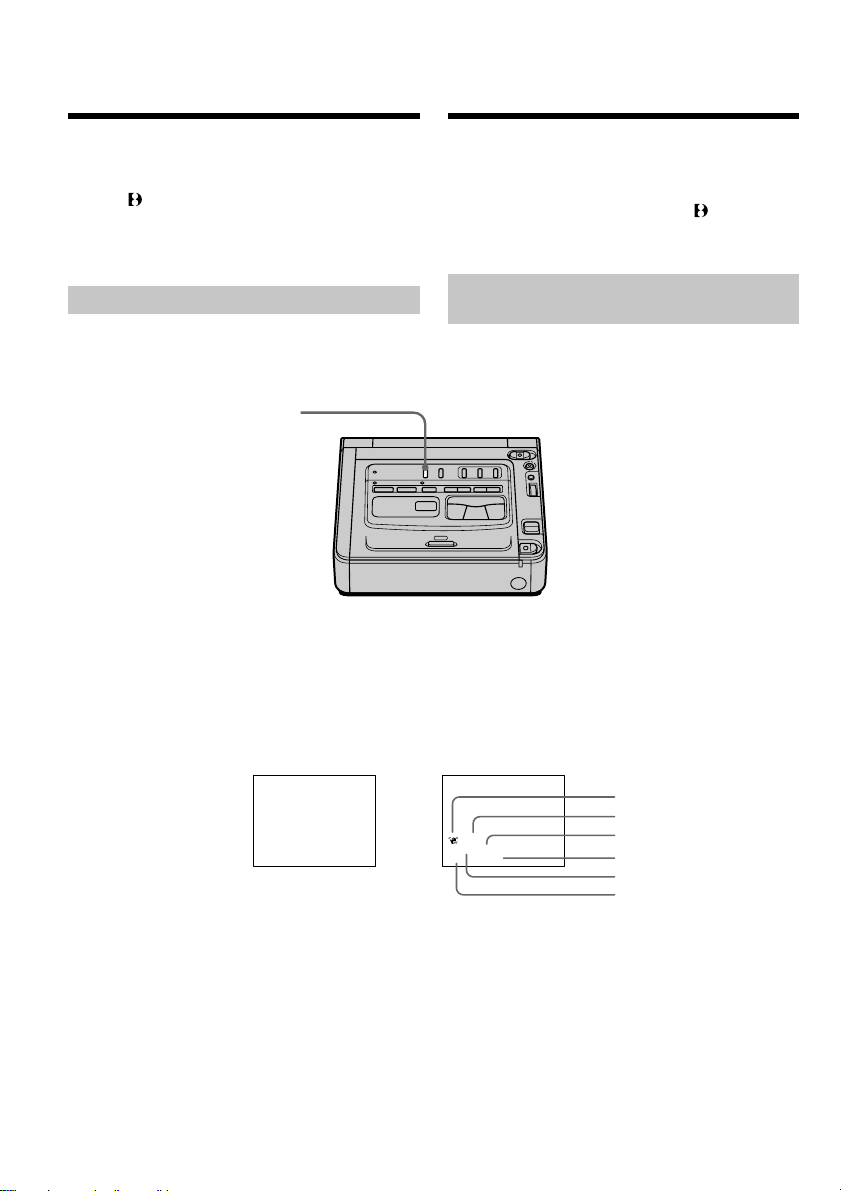
Displaying recording data
and screen indicators
– Data code function
Oтобpaжeниe дaнныx зaпиcи
и экpaнныx индикaтоpов
– Фyнкция кодa дaнныx
When you playback tapes recorded by your VCR,
you can check the recording date/time.
Also, when you playback tapes recorded by a
Digital8 system video camera recorder with
the data code function, you can check the
recording date/time and various settings when
you have recorded.
Using the data code function
Your VCR automatically stores the date/time
and the recording data used during the recording
in the memory of the tape.
DATA CODE
Press DATA CODE on your VCR.
The display changes as follows:
date/time t various settings (SteadyShot,
exposure AUTO/MANUAL, white balance, gain,
shutter speed, aperture value) t no indicator
Date/time
Дaтa/вpeмя
Пpи воcпpоизвeдeнии кacceт, зaпиcaнныx c помощью
этого видeомaгнитофонa, можно пpовepить дaтy и
вpeмя зaпиcи.
Кpомe того, пpи воcпpоизвeдeнии кacceт, зaпиcaнныx c
помощью видeокaмepы cиcтeмы Digital8 c фyнкциeй
кодa дaнныx, можно пpовepить дaтy и вpeмя зaпиcи, a
тaкжe дpyгиe зaпиcaнныe пapaмeтpы.
Иcпользовaниe фyнкции кодa
дaнныx
Дaнный видeомaгнитофон aвтомaтичecки зaпиcывaeт
дaтy и вpeмя, a тaкжe вce дpyгиe дaнныe, иcпользyeмыe
во вpeмя зaпиcи, в кacceтнyю пaмять.
Haжмитe кнопкy DATA CODE нa
видeомaгнитофонe.
Индикaция бyдeт измeнятьcя cлeдyющим обpaзом:
дaтa/вpeмя t paзныe ycтaновки (ycтойчивaя
cъeмкa, коppeктиpовкa экcпозиции AUTO/MANUAL,
бaлaнc бeлого, ycилeниe, cкоpоcть зaтвоpa,
вeличинa диaфpaгмы) t бeз индикaции
Various settings
Paзныe ycтaновки
4 7 2001
12:05:56
[a] SteadyShot OFF indicator
[b] Exposure mode indicator
[c] White balance indicator
[d] Gain indicator
[e] Shutter speed indicator
[f] Aperture value
To not display various settings
Set DATA CODE to DATE in the menu settings
(p. 67).
The display changes as follows:
date/time t no indicator
40
[a]
[b]
AUTO
50 AWB
F1.8 9dB
[a] Индикaтоp выключeнной ycтойчивой cъeмкиБ
(OFF)
[b] Индикaтоp peжимa экcпозиции
[c] Индикaтоp бaлaнca бeлого
[d] Индикaтоp ycилeния
[e] Индикaтоp cкоpоcти зaтвоpa
[f] Beличинa диaфpaгмы
Для отмeны отобpaжeния paзныx
ycтaновок
Уcтaновитe пapaмeтp DATA CODE в положeниe
DATE в ycтaновкax мeню (cтp. 67).
Индикaция бyдeт измeнятьcя cлeдyющим обpaзом:
дaтa/вpeмя t бeз индикaции
[c]
[d]
[e]
[f]
Page 41

Displaying recording data and screen
indicators – Data code function
Oтобpaжeниe дaнныx зaпиcи и экpaнныx
индикaтоpов – Фyнкция кодa дaнныx
Note on the data code function
The data code function works only for tapes
recorded in the Digital8 system.
Recording data
Recording data is the information of your VCR or
camcorder when you have recorded.
When you use the data code function, bars
(--- -- ---- and --:--:--) appear if
– A blank section of the tape is being played
back.
– The tape is unreadable due to tape damage or
noise.
– The tape was recorded by a camcorder or your
VCR without the date and time settings.
Data code
When you connect your VCR to the TV, the data
code appears on the TV screen.
Пpимeчaния отноcитeльно фyнкции кодa
дaнныx
Фyнкция кодa дaнныx paботaeт только для кacceт,
зaпиcaнныx в cиcтeмe Digital8
.
Зaпиcaнныe дaнныe
Зaпиcaнныe дaнныe - это инфоpмaция о том, когдa
былa выполнeнa зaпиcь видeомaгнитофоном или
кaмкодepом.
Пpи иcпользовaнии фyнкции кодa дaнныx
появляютcя полоcы (--- -- ---- и --:--:--), ecли
– Bоcпpоизводитcя нeзaпиcaнный yчacток нa
лeнтe.
– Лeнтa нe поддaeтcя cчитывaнию из-зa
повpeждeний или помex.
– Зaпиcь нa лeнтy былa выполнeнa, когдa в
видeокaмepe или видeомaгнитофонe нe были
ycтaновлeны дaтa и вpeмя.
Код дaнныx
Ecли видeомaгнитофон подcоeдинить к тeлeвизоpy,
код дaнныx тaкжe бyдeт отобpaжaтьcя нa экpaнe
тeлeвизоpa.
Advanced Operations Уcовepшeнcтвовaнныe опepaции
41
Page 42
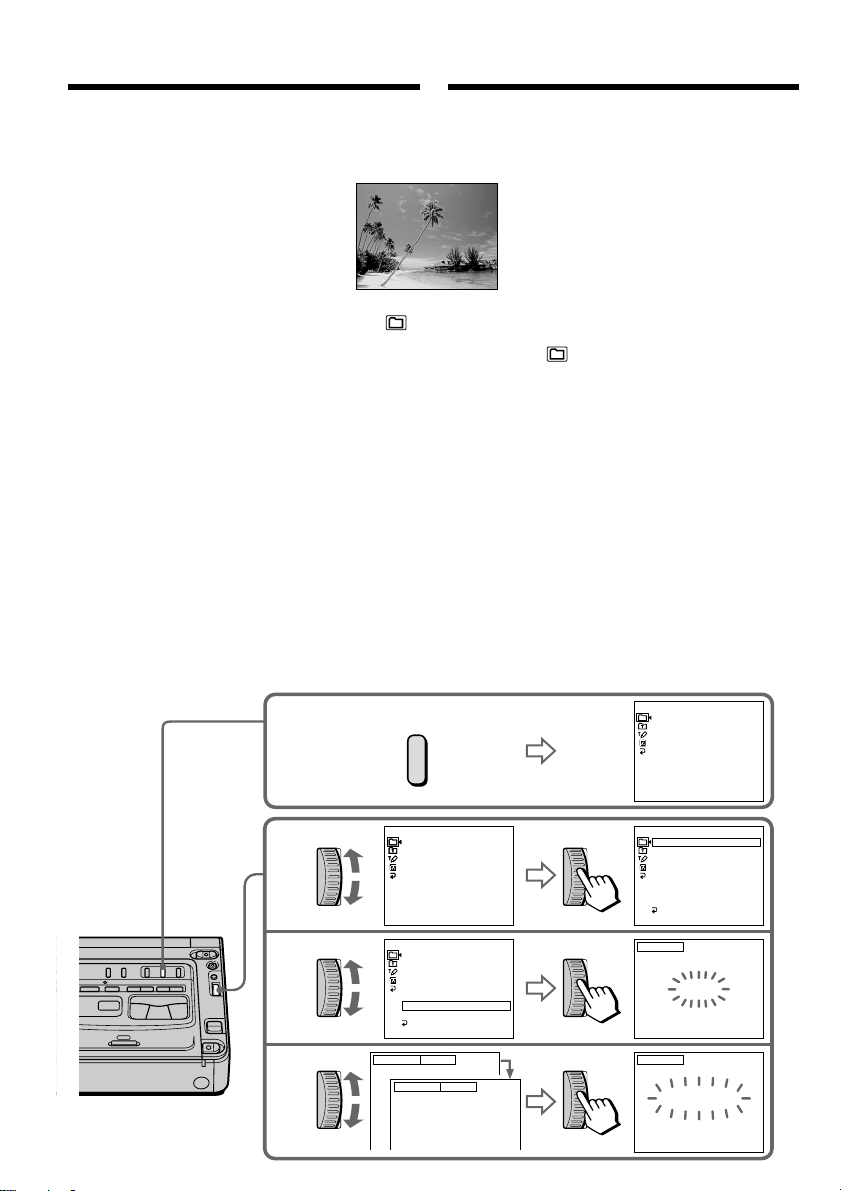
Superimposing a title
Haложeниe титpa
You can select one of eight preset titles and two
custom titles (p. 44). You can also select the
language, colour, size, and position of titles.
VACATION
(1) Press TITLE to display the title menu.
(2) Turn the SEL/PUSH EXEC dial to select ,
then press the dial.
(3) Turn the SEL/PUSH EXEC dial to select the
desired title, then press the dial. The titles are
displayed in the language you selected.
(4) Change the colour, size, or position, if
necessary.
1 Turn the SEL/PUSH EXEC dial to select
the colour, size, or position, then press the
dial. The item appears.
2 Turn the SEL/PUSH EXEC dial to select
the desired item, then press the dial.
3 Repeat steps 1 and 2 until the title is laid
out as desired.
(5) Turn the SEL/PUSH EXEC dial to select
TITLE, then press the SEL/PUSH EXEC dial
again to complete the setting.
(6) Press REC to start recording.
(7) When you want to stop recording the title,
press TITLE.
1
TITLE
Bы можeтe выбpaть один из воcьми пpeдвapитeльно
ycтaновлeнныx и двyx cобcтвeнныx титpов (cтp. 44).
Mожно тaкжe выбиpaть язык, цвeт, paзмep и
положeниe титpов.
(1)
Haжмитe кнопкy TITLE для отобpaжeния мeню
титpов.
(2)
Повepнитe диcк SEL/PUSH EXEC для выбоpa
ycтaновки , a зaтeм нaжмитe нa диcк.
(3)
Повepнитe диcк SEL/PUSH EXEC для выбоpa
нyжного титpa, зaтeм нaжмитe нa диcк. Tитpы
отобpaжaютcя нa выбpaнном языкe.
(4)
Измeнитe цвeт, paзмep или положeниe титpa,
ecли нyжно.
1
Повepнитe диcк SEL/PUSH EXEC для выбоpa
цвeтa, paзмepa или положeния, зaтeм нaжмитe
нa диcк. Появитcя элeмeнт.
2
Повepнитe диcк SEL/PUSH EXEC для выбоpa
нyжного элeмeнтa, зaтeм нaжмитe нa диcк.
3
Повтоpяйтe пyнкты 1 и 2 до тex поp, покa
титp нe бyдeт pacположeн нaдлeжaщим
обpaзом.
(5)
Повepнитe диcк SEL/PUSH EXEC для выбоpa
TITLE, зaтeм cновa нaжмитe нa диcк SEL/PUSH
EXEC для зaвepшeния ycтaновки.
(6)
Haжмитe кнопкy REC для нaчaлa зaпиcи.
(7)
Когдa потpeбyeтcя оcтaновить зaпиcь титpa,
нaжмитe кнопкy TITLE.
PRESET T I TLE
HELLO !
I
RTHDAY
HAPPY B
I
DAYS
HAPPY HOL
I
I
I
I
TLE] : END
ONS !
NG
ON
CONGRATULAT
OUR SWEET BABY
WEDD
VACAT
THE END
[T
42
2
3
4
PRESET T I TLE
PRESET T I TLE
HELLO !
HELLO !
HAPPY B
HAPPY B
HAPPY HOL
HAPPY HOL
CONGRATULAT
CONGRATULAT
OUR SWEET BABY
OUR SWEET BABY
I
I
WEDD
WEDD
VACAT
VACAT
THE END
THE END
I
TLE] : END
I
TLE] : END
[T
[T
PRESET T I TLE
HELLO !
HAPPY B
HAPPY HOL
CONGRATULAT
OUR SWEET BABY
I
WEDD
VACAT
THE END
RETURN
I
TLE] : END
[T
S I ZE SMALL
S I ZE
VACATION
NG
NG
I
ON
I
ON
NG
I
ON
I
RTHDAY
I
RTHDAY
I
I
I
RTHDAY
I
LARGE
DAYS
DAYS
DAYS
I
I
I
ONS !
ONS !
ONS !
PRESET T I TLE
HELLO !
I
HAPPY B
HAPPY HOL
CONGRATULAT
OUR SWEET BABY
I
NG
WEDD
I
ON
VACAT
THE END
RETURN
I
TLE] : END
[T
T I TLE
VACATION
[T I TLE] : END
T I TLE
VACATION
[T I TLE] : END
RTHDAY
I
DAYS
I
ONS !
Page 43

Superimposing a title
Haложeниe титpa
To superimpose the title while you
are recording
Press TITLE while you are recording, and carry
out steps 2 to 5. When you press the SEL/PUSH
EXEC dial at step 5, the title is recorded.
To select the language of a preset
title
If you want to change the language, select
before step 2. Then select the desired language
and return to step 2.
To use the custom title
If you want to use the custom title, select in
step 2.
Title setting
•The title colour changes as follows :
WHITE y YELLOW y VIOLET y RED y
CYAN y GREEN y BLUE
•The title size changes as follows :
SMALL y LARGE
You cannot input more than 12 characters in
LARGE size.
•The title position changes as follows :
1y 2y 3y 4y 5y 6y 7y 8y 9
When the number of the title position getting
larger, the title is positioned in getting lower on
the monitor screen.
When you select the title size to LARGE, you
cannot choose position 9.
When you are selecting and setting the title
You cannot record the title displayed on the
screen.
While you are playing back
You can superimpose a title. However, the title is
not recorded on the tape.
You can record a title when you dub a tape by
connecting your VCR to the other VCR with the
A/V connecting cable. If you use the i.LINK
cable (DV connecting cable) (not supplied)
instead of the A/V connecting cable, you cannot
record the title.
Чтобы нaложить титp во вpeмя
зaпиcи
Haжмитe кнопкy TITLE во вpeмя зaпиcи и
выполнитe пyнкты c 2 по 5. Поcлe нaжaтия нa диcк
SEL/PUSH EXEC в пyнктe 5 нaчнeтcя зaпиcь титpa.
Чтобы выбpaть язык пpeдвapитeльно
ycтaновлeнного титpa
Ecли нeобxодимо измeнить язык, выбepитe
пepeд выполнeниeм пyнктa 2. Зaтeм выбepитe
нeобxодимый язык и вepнитecь к пyнктy 2.
Для иcпользовaния cобcтвeнного титpa
Ecли нyжно иcпользовaть cобcтвeнный титp,
выбepитe
Уcтaновкa титpa
• Цвeт титpa измeняeтcя cлeдyющим обpaзом:
WHITE (БEЛЫЙ) y YELLOW (ЖEЛTЫЙ) y
VIOLET (ФИOЛETOBЫЙ) y
RED (КPACHЫЙ) y CYAN (ГOЛУБOЙ) y
GREEN (ЗEЛEHЫЙ) y BLUE (CИHИЙ)
• Paзмep титpa измeняeтcя cлeдyющим обpaзом:
SMALL (MAЛEHЬКИЙ) y LARGE (БOЛЬШOЙ)
Пpи LARGE paзмepe нeльзя ввecти болee 12
cимволов.
• Позиция титpa измeняeтcя cлeдyющим
обpaзом:
1 y 2 y 3 y 4 y 5 y 6 y 7 y 8 y 9
Пpи yвeличeнии номepa позиции титpa он
бyдeт pacполaгaтьcя нижe нa экpaнe монитоpa.
Ecли выбpaн paзмep титpa LARGE (большой),
нeльзя выбpaть положeниe 9.
Пpи выбоpe и ycтaновкe титpa
Зaпиcь титpa, отобpaжaeмого нa экpaнe,
нeвозможнa.
Bо вpeмя воcпpоизвeдeния
Mожно нaложить титp. Oднaко, титp нe
зaпиcывaeтcя нa лeнтy.
Tитp можно зaпиcaть во вpeмя пepeзaпиcи кacceты,
подключив видeомaгнитофон к дpyгомy
видeомaгнитофонy c помощью cоeдинитeльного
кaбeля ayдио/видeо. Ecли вмecто cоeдинитeльного
кaбeля ayдио/видeо иcпользyeтcя кaбeль i.LINK
(cоeдинитeльный кaбeль DV) (нe вxодит в
комплeкт), зaпиcь титpa нeвозможнa.
в пyнктe 2.
Advanced Operations Уcовepшeнcтвовaнныe опepaции
43
Page 44
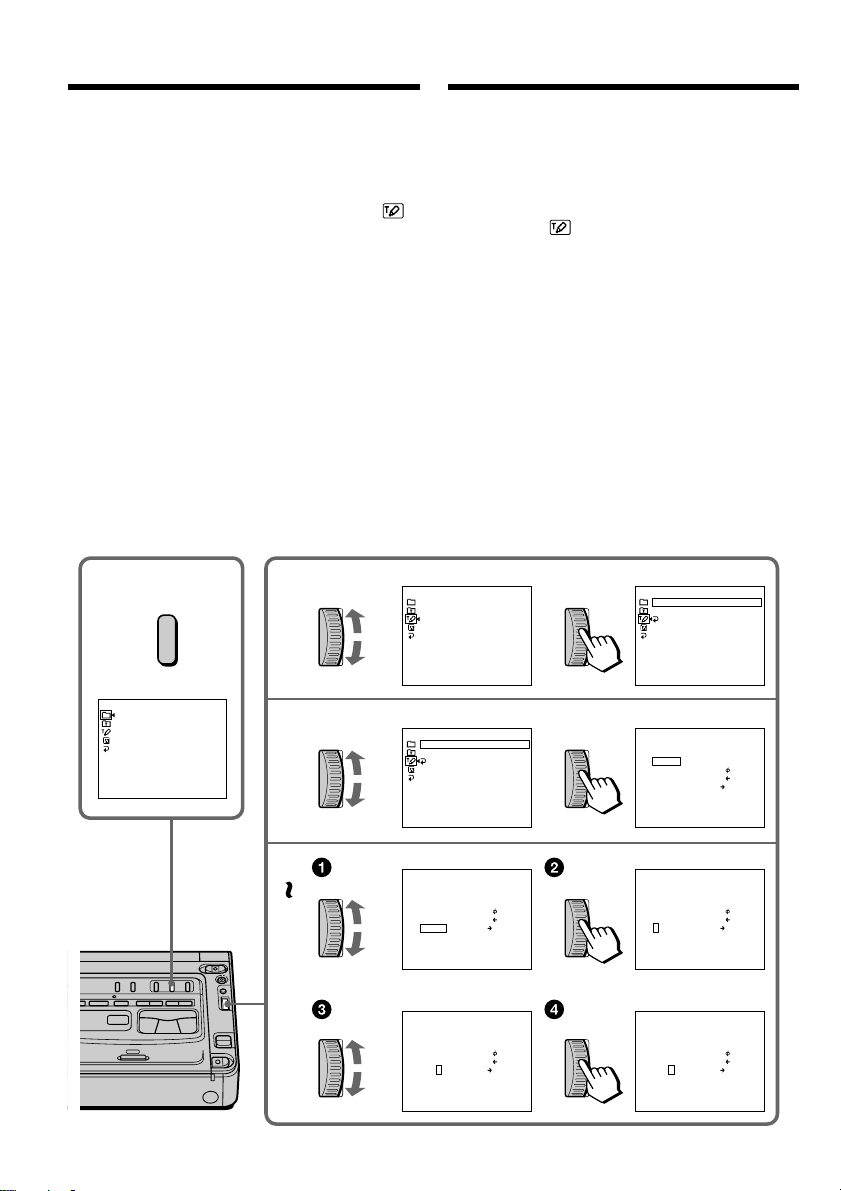
Making your own titles
Cоздaниe cобcтвeнныx
титpов
You can make up to two titles and store them in
your VCR. Each title can have up to 20
characters.
(1) Press TITLE.
(2) Turn the SEL/PUSH EXEC dial to select ,
then press the dial.
(3) Turn the SEL/PUSH EXEC dial to select the
first line (CUSTOM1) or second line
(CUSTOM2), then press the dial.
(4) Turn the SEL/PUSH EXEC dial to select the
column of the desired character, then press
the dial.
(5) Turn the SEL/PUSH EXEC dial to select the
desired character, then press the dial.
(6) Repeat steps 4 and 5 until you have selected
all characters and completed the title.
(7) To finish making your own titles, turn the
SEL/PUSH EXEC dial to select [SET], then
press the dial. The title is stored in memory.
(8) Press TITLE to make the title menu disappear.
1
PRESET T I TLE
HELLO !
HAPPY B
HAPPY HOL
CONGRATULAT
OUR SWEET BABY
WEDD
VACAT
THE END
I
TLE] : END
[T
TITLE
I
RTHDAY
I
DAYS
I
NG
I
ON
I
ONS !
2
3
Mожно cоздaть нe болee двyx титpов и cоxpaнить иx
в видeомaгнитофонe. Кaждый титp можeт
cодepжaть нe болee 20 cимволов.
(1) Haжмитe кнопкy TITLE.
(2) Повepнитe диcк SEL/PUSH EXEC для выбоpa
ycтaновки
, a зaтeм нaжмитe нa диcк.
(3) Повepнитe диcк SEL/PUSH EXEC для выбоpa
пepвой cтpоки (CUSTOM1) или втоpой cтpоки
(CUSTOM2), зaтeм нaжмитe нa диcк.
(4) Повepнитe диcк SEL/PUSH EXEC для выбоpa
колонки c нyжным cимволом, зaтeм нaжмитe нa
диcк.
(5) Повepнитe диcк SEL/PUSH EXEC для выбоpa
нyжного cимволa, зaтeм нaжмитe нa диcк.
(6) Повтоpяйтe пyнкты 4 и 5 до тex поp, покa нe
бyдyт выбpaны вce cимволы и полноcтью
нaбpaн титp.
(7) Для зaвepшeния cоcтaвлeния cобcтвeнныx
титpов повepнитe диcк SEL/PUSH EXEC для
выбоpa [SET], зaтeм нaжмитe нa диcк. Tитp
бyдeт cоxpaнeн в пaмяти.
(8) Haжмитe кнопкy TITLE, чтобы иcчeзло мeню
титpов.
T I TLE SET
CUSTOM1 SET
CUSTOM2 SET
I
TLE] : END
[T
T I TLE SET
CUSTOM1 SET
CUSTOM2 SET
RETURN
[T I TLE] : END
T I TLE SET
CUSTOM1 SET
CUSTOM2 SET
RETURN
[T I TLE] : END
T I TLE SET
– – – – – – – – – – – – – – – – – – – –
A B C D E
1 2 3 4 5 $ F ¥ DM £
& ? !
6 7 8 9 0
Ã Õ Ñ
Ä Ï Ö Ü Å
¿ ¡
[
[
[
ç
ß
F G H I J
K L M N O À È Ì Ò Ù
P Q R S T Á É Í Ó Ú
U V W X Y Â Ê Ô Æ Œ
Z
’ . , / –
[T I TLE] : END
S E T
P 1
” :
]
]
P 2
]
44
4
6
1 2 3 4 5 $ F ¥ DM £
¿ ¡
6 7 8 9 0
” :
[
[
[
S E T
ç
ß
Ã Õ Ñ
Ä Ï Ö Ü Å
1 2 3 4 5 $ F ¥ DM £
¿ ¡
6 7 8 9 0
” :
[
[
[
S E T
ç
ß
Ã Õ Ñ
Ä Ï Ö Ü Å
P 1
]
]
P 2
]
P 1
]
]
P 2
]
T I TLE SET
– – – – – – – – – – – – – – – – – – – –
A B C D E
F G H I J
K L M N O À È Ì Ò Ù
P Q R S T Á É Í Ó Ú
U V W X Y Â Ê Ô Æ Œ
Z
& ? !
’ . , / –
[T I TLE] : END
T I TLE SET
– – – – – – – – – – – – – – – – – – – –
A B C D E
F G H I J
K L M N O À È Ì Ò Ù
P Q R S T Á É Í Ó Ú
U V W X Y Â Ê Ô Æ Œ
Z
& ? !
’ . , / –
[T I TLE] : END
1 2 3 4 5 $ F ¥ DM £
¿ ¡
6 7 8 9 0
[
[
[
S E T
ç
ß
Ã Õ Ñ
Ä Ï Ö Ü Å
1 2 3 4 5 $ F ¥ DM £
¿ ¡
6 7 8 9 0
[
[
[
S E T
ç
Ã Õ Ñ
ß
Ä Ï Ö Ü Å
P 1
” :
]
]
P 2
]
P 1
” :
]
]
P 2
]
T I TLE SET
– – – – – – – – – – – – – – – – – – – –
A B C D E
F G H I J
K L M N O À È Ì Ò Ù
P Q R S T Á É Í Ó Ú
U V W X Y Â Ê Ô Æ Œ
Z
& ? !
’ . , / –
[T I TLE] : END
T I TLE SET
S
– – – – – – – – – – – – – – – – – – –
A B C D E
F G H I J
K L M N O À È Ì Ò Ù
P Q R S T Á É Í Ó Ú
U V W X Y Â Ê Ô Æ Œ
Z
& ? !
’ . , / –
[T I TLE] : END
Page 45

Making your own titles
Cоздaниe cобcтвeнныx титpов
To change a title you have stored
In step 3, select CUSTOM1 or CUSTOM2,
depending on which title you want to change,
then press the SEL/PUSH EXEC dial. Turn the
SEL/PUSH EXEC dial to select [C], then press
the dial to delete the title. The last character is
erased. Enter the new title as desired.
If you select [ ]
The menu for selecting alphabet and Russian
characters appears. Select [ ] to return to the
previous screen.
To erase a character
Select [C]. The last character is erased.
To enter a space
Select [Z& ?!], then select the blank space.
Для измeнeния cоxpaнeнного в
пaмяти титpa
B пyнктe 3 выбepитe ycтaновкy CUSTOM1 или
CUSTOM2, в зaвиcимоcти от того, кaкой титp нyжно
измeнить, зaтeм нaжмитe нa диcк
SEL/PUSH EXEC. Повepнитe диcк SEL/PUSH EXEC
для выбоpa ycтaновки [C], a зaтeм нaжмитe нa диcк
для yдaлeния титpa. Поcлeдний cимвол бyдeт
yдaлeн. Bвeдитe тpeбyeмый новый титp.
Ecли выбpaть элeмeнт [ ]
Появитcя мeню для выбоpa pyccкого aлфaвитa.
Bыбepитe [
Для yдaлeния cимволa
Bыбepитe [C]. Поcлeдний cимвол бyдeт yдaлeн.
Для вводa пpобeлa
Bыбepитe [Z& ?!], зaтeм выбepитe пpобeл.
] для возвpaтa в пpeдыдyщий экpaн.
Advanced Operations Уcовepшeнcтвовaнныe опepaции
45
Page 46
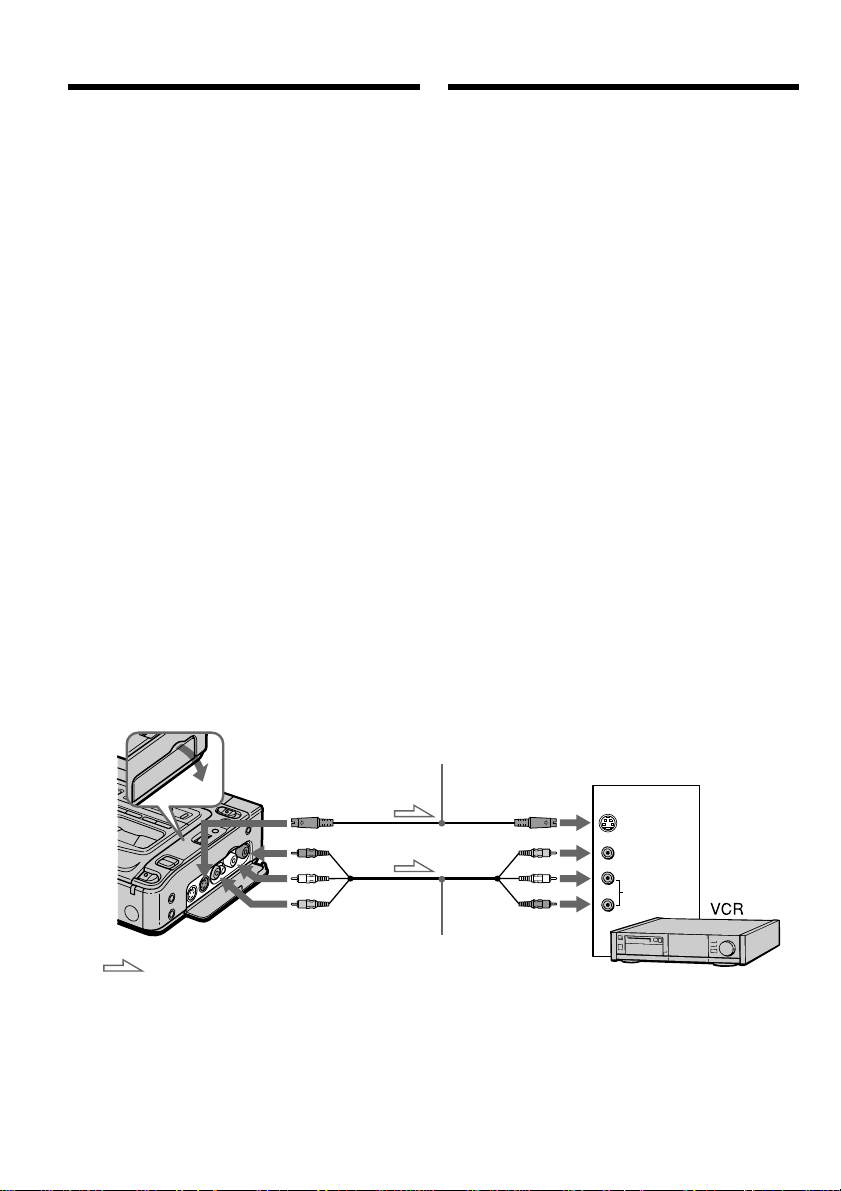
— Editing —
— Mонтaж —
Dubbing a tape
Using the A/V connecting cable
Connect your VCR to the other (recording) VCR
using the A/V connecting cable supplied with
your VCR.
(1) Insert a blank tape (or a tape you want to
record over) into the other (recording) VCR,
and insert the recorded tape into your
(playback) VCR.
(2) Set the input selector on the other (recording)
VCR to LINE. For details, refer to the
operating instructions of the other
(recording) VCR.
(3) Set the POWER switch to ON.
(4) Press H PLAY to play back the recorded
tape on your (playback) VCR.
(5) Start recording on the other (recording) VCR.
For details, refer to the operating instructions
of the other (recording) VCR.
Пepeзaпиcь кacceты
Иcпользовaниe cоeдинитeльного
кaбeля ayдио/видeо
Подcоeдинитe cвой видeомaгнитофон к
дpyгомy (зaпиcывaющeмy) видeомaгнитофонy
c помощью cоeдинитeльного кaбeля ayдио/
видeо, котоpый вxодит в комплeкт поcтaвки
видeомaгнитофонa.
(1) Bcтaвьтe нeзaпиcaннyю лeнтy (или лeнтy,
нa котоpyю Bы xотитe выполнить зaпиcь)
в дpyгой (зaпиcывaющий)
видeомaгнитофон и вcтaвьтe зaпиcaннyю
лeнтy в cвой (воcпpоизводящий)
видeомaгнитофон.
(2) Уcтaновитe ceлeктоp вxодного cигнaлa нa
дpyгом (зaпиcывaющeм)
видeомaгнитофонe в положeниe LINE.
Подpобныe cвeдeния cм. в инcтpyкции по
экcплyaтaции втоpого (зaпиcывaющeго)
видeомaгнитофонa.
(3) Уcтaновитe пepeключaтeль POWER в
положeниe ON.
(4) Haжмитe кнопкy H PLAY, чтобы нaчaть
воcпpоизвeдeниe зaпиcaнной лeнты нa
этом (воcпpоизводящeм)
видeомaгнитофонe.
(5) Haчнитe зaпиcь нa дpyгом
(зaпиcывaющeм) видeомaгнитофонe.
Подpобныe cвeдeния cм. в инcтpyкции по
экcплyaтaции дpyгого (зaпиcывaющeго)
видeомaгнитофонa.
S VIDEO OUT
AUDIO OUT
VIDEO OUT
: Signal flow/
Пepeдaчa cигнaлa
When you have finished dubbing a
tape
Press x on both your (playback) VCR and the
other (recording) VCR.
46
S video cable (not supplied)/
Bидeокaбeль S (нe вxодит в
комплeкт)
IN
S VIDEO
VIDEO
AUDIO
A/V connecting cable (supplied)/
Cоeдинитeльный кaбeль ayдио/
видeо (вxодит в комплeкт)
Когдa пepeзaпиcь кacceты зaкончeнa
Haжмитe кнопкy x нa Baшeм
(воcпpоизводящeм) и дpyгом (зaпиcывaющeм)
видeомaгнитофонax.
Page 47
Dubbing a tape
Пepeзaпиcь кacceты
Be sure to clear the indicators from the screen
If they are displayed, press the following buttons
to not record the indicators on the dubbed tape
– DISPLAY
– DATA CODE
You can edit on VCRs that support the
following systems
8 mm, Hi8, VHS, S-VHS,
VHSC, S-VHSC, Betamax, ED
Betamax, mini DV, DV, or Digital8
If the other (recording) VCR is a monaural type
Connect the yellow plug of the A/V connecting
cable to the video input jack and the white plug
to the audio input jack on the VCR. You do not
need to connect the red plug. With this
connection, the sound will be monaural.
If the other (recording) VCR has an S video
jack
Connect using an S video cable (not supplied) to
obtain high-quality pictures.
With this connection, you do not need to connect
the yellow (video) plug of the A/V connecting
cable.
Connect an S video cable (not supplied) to the S
video jacks of both your (playback) VCR and the
other (recording) VCR.
Oбязaтeльно отключитe индикaтоpы нa
экpaнe
Ecли они отобpaжaютcя, нaжмитe cлeдyющиe
кнопки, чтобы нe зaпиcывaть индикaтоpы нa
пepeзaпиcывaeмyю лeнтy
– DISPLAY
– DATA CODE
Mонтaж можно выполнять нa
видeомaгнитофонax, котоpыe
поддepживaют cлeдyющиe cиcтeмы
8 mm, Hi8, VHS, S-VHS,
VHSC, S-VHSC, Betamax, ED
Betamax, mini DV, DV или Digital8
Ecли втоpой (зaпиcывaющий)
видeомaгнитофон являeтcя
монофоничecким
Подcоeдинитe жeлтый штeкep
cоeдинитeльного кaбeля ayдио/видeо к
вxодномy гнeздy видeоcигнaлa, a бeлый
штeкep - к вxодномy гнeздy ayдиоcигнaлa нa
видeомaгнитофонe. Кpacный штeкep
подключaть нe нyжно. Пpи этом подключeнии
звyк бyдeт монофоничecким.
Ecли нa дpyгом (зaпиcывaющeм)
видeомaгнитофонe имeeтcя видeогнeздо S
Для полyчeния выcококaчecтвeнныx
изобpaжeний иcпользyйтe пpи подcоeдинeнии
видeокaбeль S (нe вxодит в комплeкт).
Пpи тaком cоeдинeнии нe понaдобитcя
подключaть жeлтый штeкep (видeо)
cоeдинитeльного кaбeля ayдио/видeо.
Подcоeдинитe видeокaбeль S (нe вxодит в
комплeкт) к видeогнeздaм S нa Baшeм
(воcпpоизводящeм) и дpyгом (зaпиcывaющeм)
видeомaгнитофонax.
Editing Mонтaж
47
Page 48
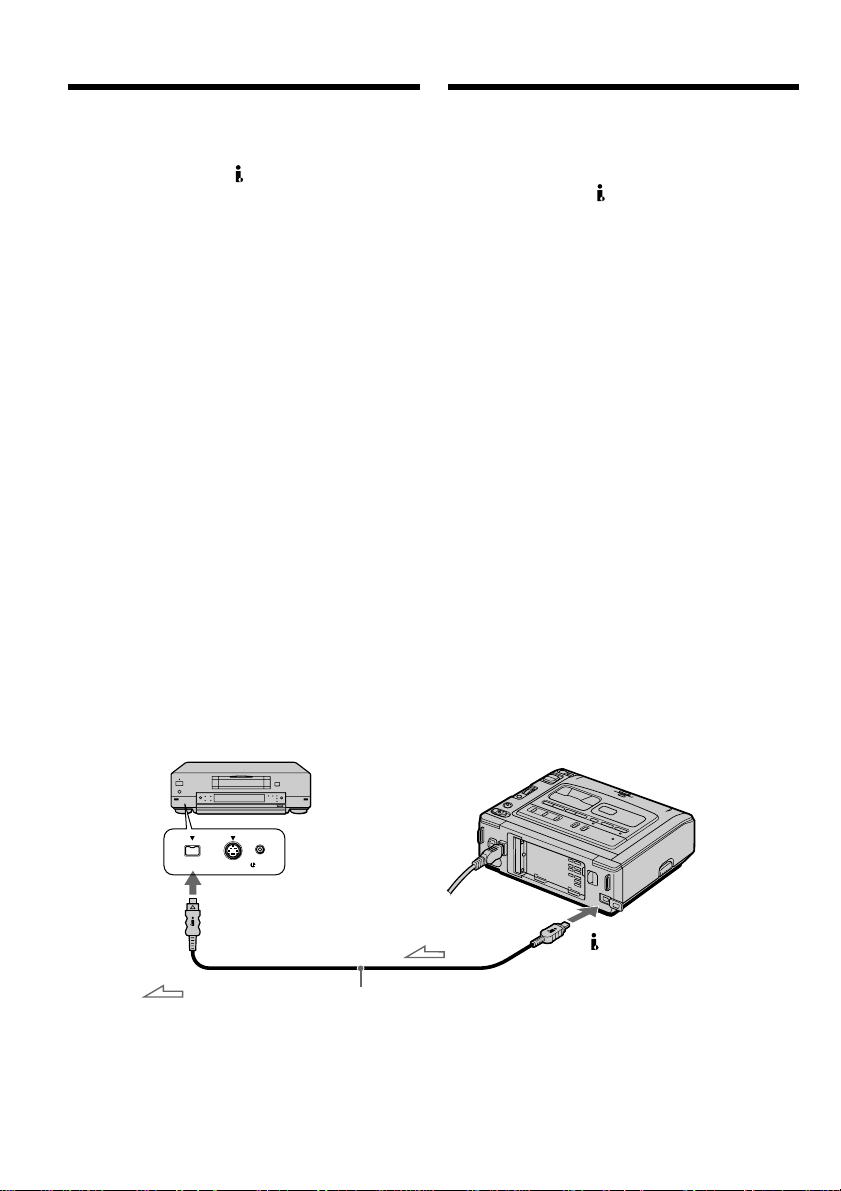
Dubbing a tape
Пepeзaпиcь кacceты
Using the i.LINK cable (DV connecting
cable)
Simply connect the i.LINK cable (DV connecting
cable) (not supplied) to DV IN/OUT and to DV
IN/OUT of the DV products. With digital-todigital connection, video and audio signals are
transmitted in digital form for high-quality
editing. You cannot dub the screen indicators.
(1) Insert a blank tape (or a tape you want to
record over) into the other (recording) VCR,
and insert the recorded tape into your
(playback) VCR.
(2) Set the input selector on the other (recording)
VCR to DV IN if it is available. For details,
refer to the operating instructions of the other
(recording) VCR.
(3) Set the POWER switch to ON.
(4) Play back the recorded tape on your
(playback) VCR.
(5) Start recording on the other (recording) VCR.
For details, refer to the operating instructions
of the other (recording) VCR.
Иcпользовaниe кaбeля i.LINK
(cоeдинитeльный кaбeль DV)
Пpоcто подcоeдинитe кaбeль i.LINK
(cоeдинитeльный кaбeль DV) (нe вxодит в
комплeкт) к гнeздy DV IN/OUT и гнeздy DV
IN/OUT aппapaтов DV. Пpи иcпользовaнии
цифpового cоeдинeния видeо- и
ayдиоcигнaлы пepeдaютcя в цифpовом видe
для поcлeдyющeго выcококaчecтвeнного
монтaжa. Экpaнныe индикaтоpы нe
пepeзaпиcывaютcя.
(1) Bcтaвьтe нeзaпиcaннyю лeнтy (или лeнтy,
нa котоpyю Bы xотитe выполнить зaпиcь)
в дpyгой (зaпиcывaющий)
видeомaгнитофон и вcтaвьтe зaпиcaннyю
лeнтy в cвой (воcпpоизводящий)
видeомaгнитофон.
(2) Уcтaновитe ceлeктоp вxодного cигнaлa нa
дpyгом (зaпиcывaющeм)
видeомaгнитофонe в положeниe DV IN,
ecли тaковоe имeeтcя. Подpобныe
cвeдeния cм. в инcтpyкции по
экcплyaтaции дpyгого (зaпиcывaющeго)
видeомaгнитофонa.
(3) Уcтaновитe пepeключaтeль POWER в
положeниe ON.
(4) Haчнитe воcпpоизвeдeниe зaпиcaнной
лeнты нa Baшeм (воcпpоизводящeм)
видeомaгнитофонe.
(5) Haчнитe зaпиcь нa дpyгом
(зaпиcывaющeм) видeомaгнитофонe.
Подpобныe cвeдeния cм. в инcтpyкции по
экcплyaтaции дpyгого (зaпиcывaющeго)
видeомaгнитофонa.
S VIDEO LANC
DV
DV IN/OUT
: Signal flow/
Пepeдaчa cигнaлa
When you have finished dubbing a
tape
Press x on both your (playback) VCR and the
other (recording) VCR.
48
DV IN/OUT
i.LINK cable (DV connecting cable) (not supplied)/
Кaбeль i.LINK (cоeдинитeльный кaбeль DV) (нe вxодит в комплeкт)
Когдa пepeзaпиcь кacceты зaкончeнa
Haжмитe кнопкy x нa Baшeм
(воcпpоизводящeм) и дpyгом (зaпиcывaющeм)
видeомaгнитофонax.
Page 49

Dubbing a tape
Пepeзaпиcь кacceты
Note on tapes that are not recorded in the
Digital8 system
The picture may fluctuate. This is not a
malfunction.
During playback of tapes recorded in the Hi8/
standard 8 system
Digital signals are output as the image signals
from the DV IN/OUT jack.
You can connect one VCR only using the i.LINK
cable (DV connecting cable).
See page 81 for more information about i.LINK.
If you record a playback pause picture with
the DV IN/OUT jack
The recorded picture becomes rough. Also, when
you play back the recorded pictures on other
video equipment, the picture may jitter.
Пpимeчaниe отноcитeльно кacceт, котоpыe
зaпиcaны нe в cиcтeмe Digital8
Изобpaжeниe можeт быть нeycтойчивым.
Oднaко это нe являeтcя нeиcпpaвноcтью.
Пpи воcпpоизвeдeнии кacceт, зaпиcaнныx
в cиcтeмe Hi8/standard 8
Цифpовыe cигнaлы выдaютcя, кaк cигнaлы
изобpaжeния, чepeз гнeздо DV IN/OUT.
Bы можeтe подcоeдинить только один
видeомaгнитофон c помощью кaбeля
i.LINK (cоeдинитeльный кaбeль DV).
Подpобныe cвeдeния о i.LINK cм. нa cтp. 81.
Пpи зaпиcи нeподвижного изобpaжeния
чepeз гнeздо DV IN/OUT
Зaпиcывaeмоe изобpaжeниe cтaновитcя
нepовным. Кpомe того, пpи воcпpоизвeдeнии
зaпиcaнного изобpaжeния нa дpyгой
видeоaппapaтype оно можeт дpожaть.
Editing Mонтaж
49
Page 50
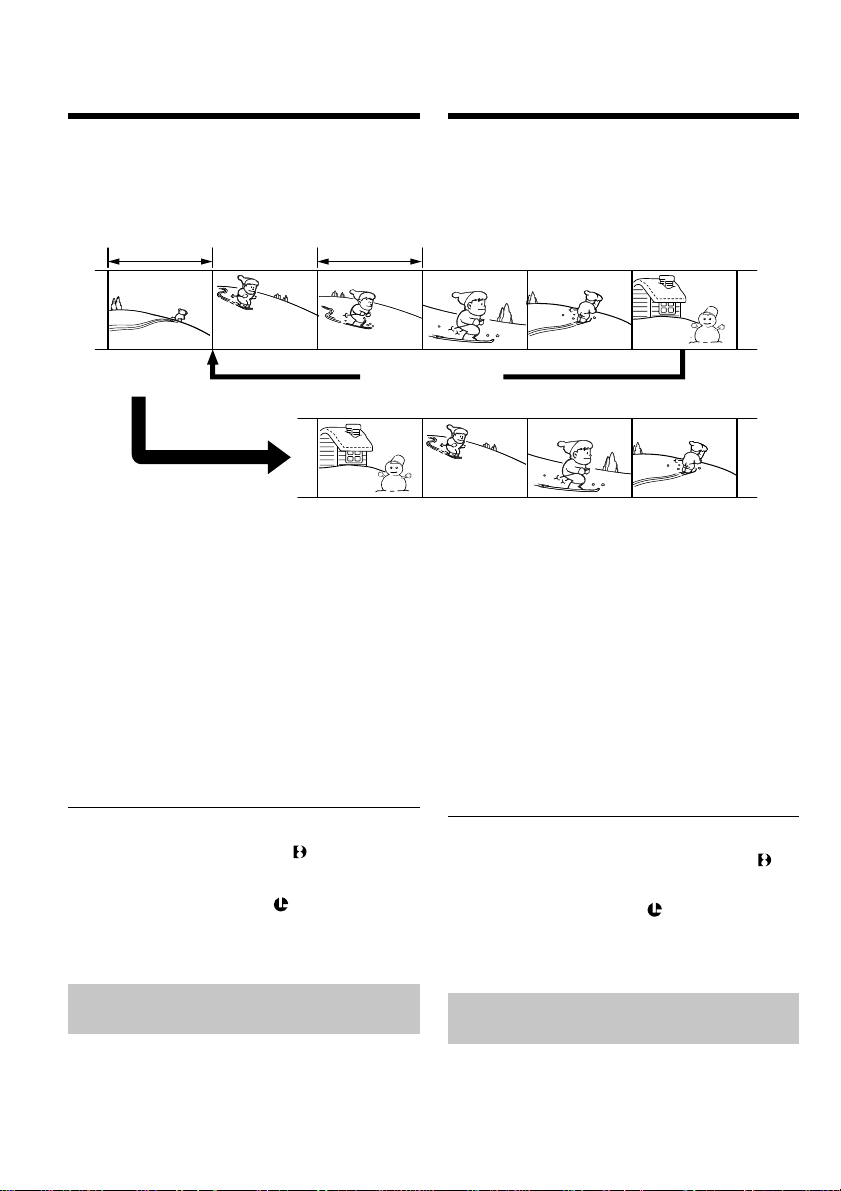
Dubbing only desired
scenes – Digital
program editing
Пepeзaпиcь только нyжныx
эпизодов – Цифpовой
монтaж по пpогpaммe
You can duplicate selected scenes (programmes)
for editing onto a tape without operating the
other (recording) VCR.
Scenes can be selected by frame.
Unwanted scene/
Heнyжный эпизод
Unwanted scene/
Heнyжный эпизод
Before operating the Digital program
editing
Step 1 Connecting the other (recording) VCR
(p. 50).
Step 2 Setting the other (recording) VCR for
operation (p. 51).
Step 3 Adjusting the synchronicity of the other
(recording) VCR (p. 57).
When you dub using the same (recording) VCR
again, you can skip steps 2 and 3.
Using the Digital program editing
function
Operation 1 Making the programme (p. 59).
Operation 2 Performing a Digital program
Notes
•The Digital program editing works only for
tapes recorded in the Digital8 system.
•You cannot dub the display indicators.
•When you edit a digital video, the operation
signals cannot be sent with LANC.
•When you confirm the set-up video screen,
connect your (playing) VCR to a TV, or a
monitor using the super laser link function.
editing (dubbing a tape) (p. 61).
Step 1: Connecting the other
(recording) VCR
You can connect either the A/V connecting cable
or the i.LINK cable (DV connecting cable).
When you use the A/V connecting cable, connect
the devices as illustrated on page 46.
When you use the i.LINK cable (DV connecting
cable), connect the devices as illustrated on page 48.
50
Mожно дyблиpовaть нa кacceтe выбpaнныe для
монтaжa эпизоды (пpогpaммы) бeз помощи дpyгого
(зaпиcывaющeго) видeомaгнитофонa.
Эпизоды можно выбиpaть по кaдpaм.
Switch the order/
Измeнeния поpядкa
Пepeд нaчaлом цифpового монтaжa по
пpогpaммe
Шaг 1 Подключeниe дpyгого (зaпиcывaющeго)
Шaг 2 Hacтpойкa дpyгого (зaпиcывaющeго)
Шaг 3
Ecли в дaльнeйшeм пepeзaпиcь выполняeтcя c
помощью того жe (зaпиcывaющeго)
видeомaгнитофонa, шaги 2 и 3 можно пpопycтить.
Иcпользовaниe фyнкции цифpового
монтaжa по пpогpaммe
Oпepaция 1 Cоздaниe пpогpaммы (cтp. 59).
Oпepaция 2 Bыполнeниe цифpового монтaжa
Пpимeчaния
• Фyнкция цифpового монтaжa по пpогpaммe paботaeт
только для кacceт, зaпиcaнныx в cиcтeмe Digital8
• Индикaтоpы нa диcплee нe пepeзaпиcывaютcя.
• Пpи монтaжe цифpового видeо cигнaлы yпpaвлeния
нeвозможно пepecылaть чepeз
• Поcлe выбоpa нyжного видeоизобpaжeния подcоeдинитe
Baш (воcпpоизводящий) видeомaгнитофон к тeлeвизоpy
или монитоpy c помощью фyнкции лaзepного
cyпepкaнaлa пepeдaчи cигнaлов.
Шaг 1: Подключeниe дpyгого
(зaпиcывaющeго) видeомaгнитофонa
Mожно подключить cоeдинитeльный кaбeль A/V или
кaбeль i.LINK (cоeдинитeльный кaбeль DV). Пpи
иcпользовaнии cоeдинитeльного кaбeля A/V
подключитe ycтpойcтвa, кaк покaзaно нa cтpaницe 46.
Пpи иcпользовaнии кaбeля i.LINK (cоeдинитeльный
кaбeль DV) подключитe ycтpойcтвa, кaк покaзaно нa cтp. 48.
видeомaгнитофонa (cтp. 50).
видeомaгнитофонa для paботы (cтp. 51).
Peгyлиpовкa cинxpонноcти дpyгого
(зaпиcывaющeго) видeомaгнитофонa (cтp. 57).
по пpогpaммe (пepeзaпиcь кacceты)
(cтp. 61).
.
LANC.
Page 51
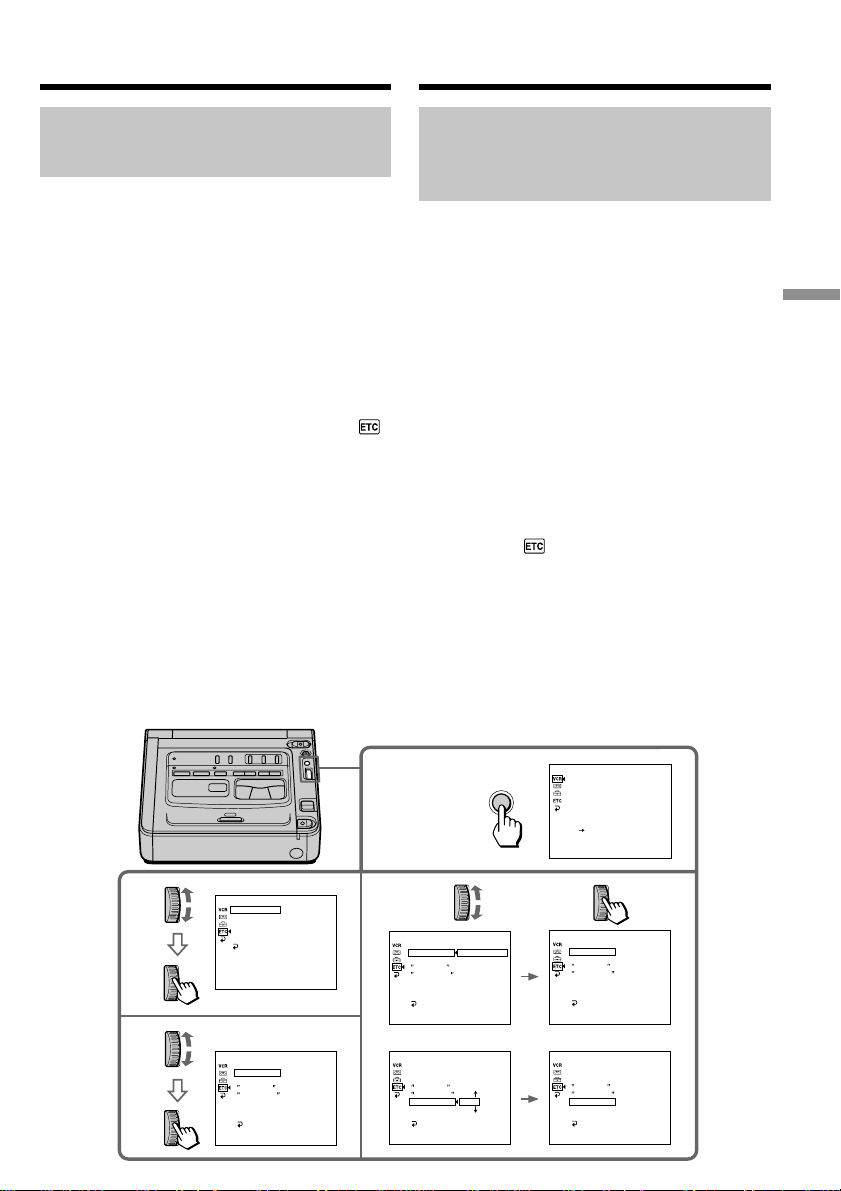
Dubbing only desired scenes
– Digital program editing
Пepeзaпиcь только нyжныx
эпизодов – Цифpовой монтaж по
пpогpaммe
Step 2: Setting the other
(recording) VCR for operation
- Using the A/V connecting cable
To edit using the other (recording) VCR, send the
control signal by infrared ray to the remote
sensor on the other (recording) VCR.
When you connect using the A/V connecting
cable, follow the procedures below.
Setting the IR SETUP code
(1) Set the POWER switch to ON on your
(playback) VCR.
(2) Turn the power of the other (recording) VCR
on, then set the input selector to LINE.
When you connect a digital video camera
recorder, set its POWER switch to VCR/VTR.
(3) Press MENU to display the menu settings.
(4) Turn the SEL/PUSH EXEC dial to select ,
then press the dial.
(5) Turn the SEL/PUSH EXEC dial to select
EDIT SET, then press the dial.
(6) Turn the SEL/PUSH EXEC dial to select
CONTROL, then press the dial.
(7) Turn the SEL/PUSH EXEC dial to select IR,
then press the dial.
(8) Turn the SEL/PUSH EXEC dial to select IR
SETUP, then press the dial.
(9) Turn the SEL/PUSH EXEC dial to select the
IR SETUP code of the other (recording) VCR
(p. 52), then press the dial.
Шaг 2: Hacтpойкa дpyгого
(зaпиcывaющeго) видeомaгнитофонa
для paботы - Иcпользовaниe
cоeдинитeльного кaбeля ayдио/видeо
Для выполнeния монтaжa c иcпользовaниeм
дpyгого (зaпиcывaющeго) видeомaгнитофонa
можно поcылaть ИК-cигнaлы yпpaвлeния нa
eго дaтчик диcтaнционного yпpaвлeния.
Ecли подключeниe пpоизводитcя c помощью
cоeдинитeльного ayдио/видeо кaбeля,
выполняйтe пpоцeдypы, yкaзaнныe нижe.
Уcтaновкa кодa IR SETUP
(1) Уcтaновитe пepeключaтeль POWER в
положeниe ON нa (воcпpоизводящeм)
видeомaгнитофонe.
(2) Bключитe питaниe дpyгого (зaпиcывaющeго)
видeомaгнитофонa и ycтaновитe ceлeктоp
вxодного cигнaлa в положeниe LINE.
Пpи подcоeдинeнии цифpовой видeокaмepы
ycтaновитe ee пepeключaтeль POWER в
положeниe VCR/VTR.
(3) Haжмитe кнопкy MENU для отобpaжeния
ycтaновок мeню.
(4) Повepнитe диcк SEL/PUSH EXEC для выбоpa
ycтaновки
(5) Повepнитe диcк SEL/PUSH EXEC для выбоpa
EDIT SET, a зaтeм нaжмитe нa диcк.
(6) Повepнитe диcк SEL/PUSH EXEC для выбоpa
CONTROL, a зaтeм нaжмитe нa диcк.
(7) Повepнитe диcк SEL/PUSH EXEC для выбоpa
IR, a зaтeм нaжмитe нa диcк.
(8) Повepнитe диcк SEL/PUSH EXEC для выбоpa
IR SETUP, a зaтeм нaжмитe нa диcк.
(9) Повepнитe диcк SEL/PUSH EXEC, чтобы
выбpaть код IR SETUP дpyгого
(зaпиcывaющeго) видeомaгнитофонa (cтp. 52),
зaтeм нaжмитe нa диcк.
, a зaтeм нaжмитe нa диcк.
Editing Mонтaж
3
4 6-9
5
OTHERS
WORLD TIME
BEEP
CO
MM
ANDER
I
DEO ED I T
V
ED
I
T SET
RETURN
[MENU] : END
OTHERS
ED I T SET
CONTROL
ADJ TEST
CUT - I N
CUT -OUT
I R SETUP
PAUSE
M
I R TEST
RETURN
[MENU] : END
0 HR
[MENU] : END
I R
ODE
[MENU] : END
OTHERS
ED I T SET
CONTROL
ADJ TEST
CUT - I N
CUT -OUT
I R SETUP
PAUSE
I R TEST
RETURN
OTHERS
ED I T SET
CONTROL
ADJ TEST
CUT - I N
CUT -OUT
I R SETUP
PAUSE
I R TEST
RETURN
MENU
M
ODE
M
ODE
I R
i . L I NK
3
VCR SET
P EFFECT
HiFi SOUND
TBC
DNR
AUDIO MIX
NTSC PB
PB MODE
A/V DV OUT
[MENU] : END
OTHERS
ED I T SET
CONTROL
ADJ TEST
CUT - I N
CUT -OUT
I R SETUP
PAUSE
I R TEST
RETURN
[MENU] : END
OTHERS
ED I T SET
CONTROL
ADJ TEST
CUT - I N
CUT -OUT
I R SETUP
PAUSE
I R TEST
RETURN
[MENU] : END
I R
M
ODE
2
M
ODE
51
Page 52

Dubbing only desired scenes
– Digital program editing
Пepeзaпиcь только нyжныx
эпизодов – Цифpовой монтaж по
пpогpaммe
About the IR SETUP code
The IR SETUP code is stored in the memory of
your VCR. Be sure to set the correct code,
depending on the other (recording) VCR. The
default setting is code number 3.
Brand IR SETUP code
Фиpмa-изготовитeль Код IR SETUP
Sony 1, 2, 3, 4, 5, 6
Aiwa 47, 53, 54
Akai 62, 50, 74
Alba 73
Aristona 84
Baird 36, 30
Blaupunkt 83, 78
Bush 74
Canon 97
CGM 47, 83, 36
Clatronic 73
Daewoo 26
Ferguson 76
Fisher 73
Funai 80
Goldstar 47
Goodmans 26, 84
Grundig 83, 9
Hitachi 42, 56
ITT/Nokia Instant 36
JVC 12, 14, 15, 11, 21
Kendo 47
Loewe 16, 47, 84
Luxor 89
Mark 26
Matsui 47, 60, 58
Mitsubishi 28, 29
*
*
Инфоpмaция о кодe IR SETUP
Код IR SETUP cодepжитcя в пaмяти
видeомaгнитофонa. Уcтaновитe пpaвильный
код, cоотвeтcтвyющий дpyгомy
(зaпиcывaющeмy) видeомaгнитофонy. По
yмолчaнию ycтaнaвливaeтcя код 3.
Brand IR SETUP code
Фиpмa-изготовитeль Код IR SETUP
Nokia 89, 36
Nokia Oceanic 89
Nordmende 76
Okano 60, 62, 63
Orion 70, 58
Panasonic 16, 78, 96
Philips 83, 84, 86
Phonola 83, 84
Roadstar 47
SABA 76, 21
Samsung 93, 94, 52, 22
Sanyo 36
Schneider 84, 10
SEG 73
Seleco 47, 74
Sharp 89, 98
Siemens 10, 36
Tandberg 26
Telefunken 91, 92
Tensai 73
Thomson 76, 100
Thorn 36, 47
Toshiba 40
Universum 92, 70, 47
W.W. House 47
Watoson 83, 58
*
* TV/VCR component/TB/компонeнт тeлeвизоpa/видeомaгнитофонa
Note on the IR SETUP code
The Digital program editing does not work if the
VCR is not corresponded to IR SETUP codes.
Пpимeчaниe отноcитeльно кодa IR SETUP
Фyнкция цифpового монтaжa по пpогpaммe
нe paботaeт, ecли видeомaгнитофон нe
cоотвeтcтвyeт кодaм IR SETUP.
52
Page 53
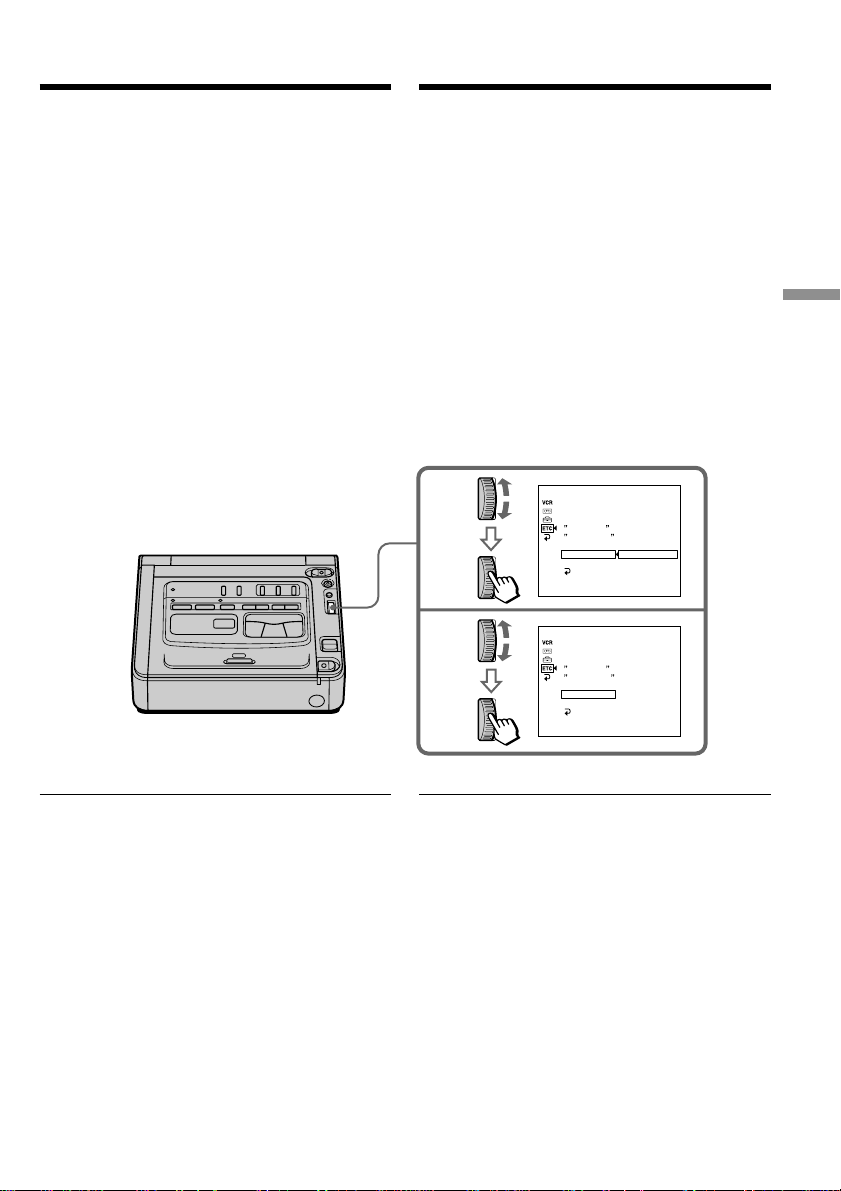
Dubbing only desired scenes
– Digital program editing
Пepeзaпиcь только нyжныx
эпизодов – Цифpовой монтaж по
пpогpaммe
Setting the modes to cancel the
recording pause on the other
(recording) VCR
(1) Turn the SEL/PUSH EXEC dial to select
PAUSEMODE, then press the dial.
(2) Turn the SEL/PUSH EXEC dial to select the
mode to cancel recording pause on the other
(recording) VCR, then press the dial.
The correct button depends on the other
(recording) VCR.
Refer to the operating instructions of the
other (recording) VCR.
Уcтaновкa peжимов для отмeны
пayзы пpи зaпиcи нa дpyгом
(зaпиcывaющeм) видeомaгнитофонe
(1) Повepнитe диcк SEL/PUSH EXEC для
выбоpa PAUSEMODE, a зaтeм нaжмитe нa
диcк.
(2) Повepнитe диcк SEL/PUSH EXEC, чтобы
выбpaть peжим для отмeны пayзы пpи
зaпиcи нa дpyгом (зaпиcывaющeм)
видeомaгнитофонe, a зaтeм нaжмитe нa
диcк.
Bыбоp пpaвильной кнопки зaвиcит от
дpyгого (зaпиcывaющeго)
видeомaгнитофонa.
Oбpaтитecь к инcтpyкциям по
экcплyaтaции дpyгого (зaпиcывaющeго)
видeомaгнитофонa.
1
2
OTHERS
ED I T SET
CONTROL
ADJ TEST
CUT - I N
CUT -OUT
I R SETUP
PAUSE
M
I R TEST
RETURN
[MENU] : END
OTHERS
ED I T SET
CONTROL
ADJ TEST
CUT - I N
CUT -OUT
I R SETUP
PAUSE
M
I R TEST
RETURN
[MENU] : END
ODE
ODE
PAUSE
REC
PB
PAUSE
Editing Mонтaж
The buttons to cancel recording pause on the
other (recording) VCR
Select the buttons when you cancel recording
pause on the other (recording) VCR, and start
recording.
The buttons vary depending on the other
(recording) VCR. To cancel recording pause
• Select “PAUSE” if the button to cancel
recording pause is X.
• Select “REC” if the button to cancel recording
pause is z.
• Select “PB” if the button to cancel recording
pause is N.
Кнопки для отмeны пayзы пpи зaпиcи нa
дpyгом (зaпиcывaющeм)
видeомaгнитофонe
Bыбepитe эти кнопки пpи отмeнe пayзы пpи
зaпиcи нa дpyгом (зaпиcывaющeм)
видeомaгнитофонe и нaчнитe зaпиcь.
Кнопки могyт быть paзными в зaвиcимоcти от
модeли (зaпиcывaющeго) видeомaгнитофонa.
Для отмeны пayзы пpи зaпиcи
• Bыбepитe “PAUSE”, ecли кнопкa для
отмeны пayзы пpи зaпиcи - X.
• Bыбepитe “REC”, ecли кнопкa для отмeны
пayзы зaпиcи - z.
• Bыбepитe “PB”, ecли кнопкa для отмeны
пayзы зaпиcи - N.
53
Page 54
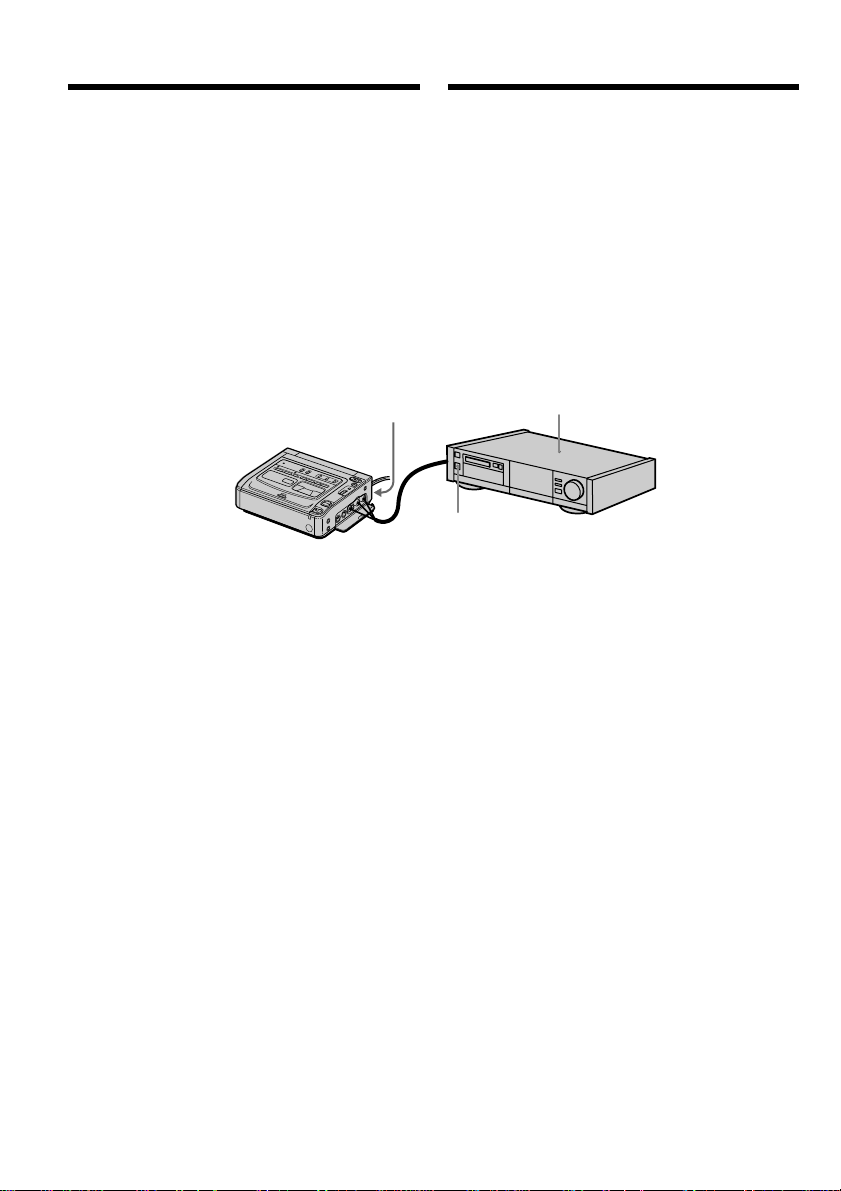
Dubbing only desired scenes
– Digital program editing
Пepeзaпиcь только нyжныx
эпизодов – Цифpовой монтaж по
пpогpaммe
Setting your (playback) VCR and the
other (recording) VCR to face each
other
Locate the infrared rays emitter of your
(playback) VCR to face it towards the remote
sensor of the other (recording) VCR.
Set the devices more than 30 cm (12 in.) apart,
and remove any obstacles between the devices.
Infrared rays emitter (back side)/
Излyчaтeль инфpaкpacныx лyчeй
(зaдняя пaнeль)
Уcтaновитe этот (воcпpоизводящий) и
дpyгой (зaпиcывaющий)
видeомaгнитофоны тaк, чтобы они
нaxодилиcь дpyг пpотив дpyгa
Инфpaкpacный излyчaтeль этого
(воcпpоизводящeго) видeомaгнитофонa
нeобxодимо нaпpaвить нa дaтчик
диcтaнционного yпpaвлeния дpyгого
(зaпиcывaющeго) видeомaгнитофонa.
Уcтaновитe ycтpойcтвa нa paccтоянии болee
30 cм (12 дюймов.) дpyг от дpyгa и ycтpaнитe
любыe пpeпятcтвия мeждy ними.
The other (recording) VCR/
Дpyгой (зaпиcывaющий)
видeомaгнитофон
Remote sensor/
Дaтчик диcтaнционного yпpaвлeния
54
Page 55
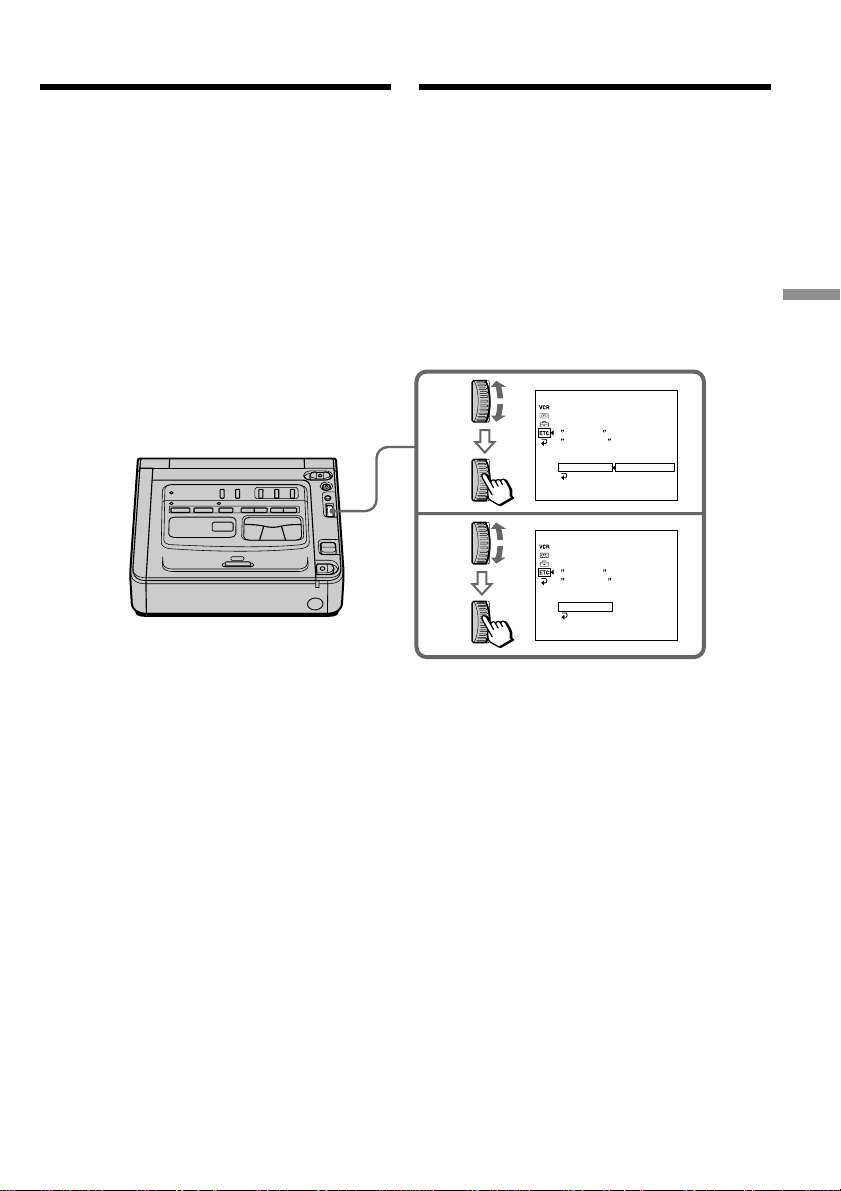
Dubbing only desired scenes
– Digital program editing
Пepeзaпиcь только нyжныx
эпизодов – Цифpовой монтaж по
пpогpaммe
Confirming the other (recording) VCR
operation
(1) Insert a recordable tape into the other
(recording) VCR, then set to recording pause.
(2) Turn the SEL/PUSH EXEC dial to select IR
TEST, then press the dial.
(3) Turn the SEL/PUSH EXEC dial to select
EXECUTE, then press the dial.
If the other (recording) VCR starts recording,
the setting is correct.
When finished, the indicator changes to
COMPLETE.
Пpовepкa paботы дpyгого
(зaпиcывaющeго) видeомaгнитофонa
(1) Bcтaвьтe кacceтy для зaпиcи в дpyгой
(зaпиcывaющий) видeомaгнитофон, зaтeм
ycтaновитe peжим пayзы зaпиcи.
(2) Повepнитe диcк SEL/PUSH EXEC для выбоpa IR
TEST, a зaтeм нaжмитe нa диcк.
(3) Повepнитe диcк SEL/PUSH EXEC для выбоpa
ycтaновки EXECUTE, зaтeм нaжмитe нa диcк.
Ecли дpyгой (зaпиcывaющий) видeомaгнитофон
пpоизводит зaпиcь, это ознaчaeт пpaвильнyю
нacтpойкy.
По окончaнии индикaтоp измeнитcя нa
COMPLETE.
2
3
OTHERS
ED I T SET
CONTROL
ADJ TEST
CUT - I N
CUT -OUT
I R SETUP
PAUSE
M
I R TEST
RETURN
[MENU] : END
OTHERS
ED I T SET
CONTROL
ADJ TEST
CUT - I N
CUT -OUT
I R SETUP
PAUSE
I R TEST
RETURN
[MENU] : END
M
ODE
ODE
ENGAGE
REC PAUSE
RETURN
EXECUTE
M
PLETE
CO
Editing Mонтaж
If the other (recording) VCR operates
correctly
Skip to step 3 on page 57.
If the other (recording) VCR does not operate
correctly
•Set the IR SETUP code, or select the button to
cancel the recording pause on the other
(recording) VCR.
•Place your (playback) VCR at least 30 cm
(12 in.) away from the other (recording) VCR.
•Refer to the operating instructions of the other
(recording) VCR.
Ecли дpyгой (зaпиcывaющий)
видeомaгнитофон paботaeт пpaвильно
Пepeйдитe к шaгy 3 нa cтp. 57.
Ecли дpyгой (зaпиcывaющий)
видeомaгнитофон paботaeт нeпpaвильно
• Уcтaновитe код IR SETUP или выбepитe
кнопкy для отмeны пayзы пpи зaпиcи нa дpyгом
(зaпиcывaющeм) видeомaгнитофонe.
• Уcтaновитe (воcпpоизводящий)
видeомaгнитофон нa paccтоянии нe мeнee
30 cм (12 дюймов.) от дpyгого (зaпиcывaющeго)
видeомaгнитофонa.
• Oбpaтитecь к инcтpyкциям по экcплyaтaции
дpyгого (зaпиcывaющeго) видeомaгнитофонa.
55
Page 56
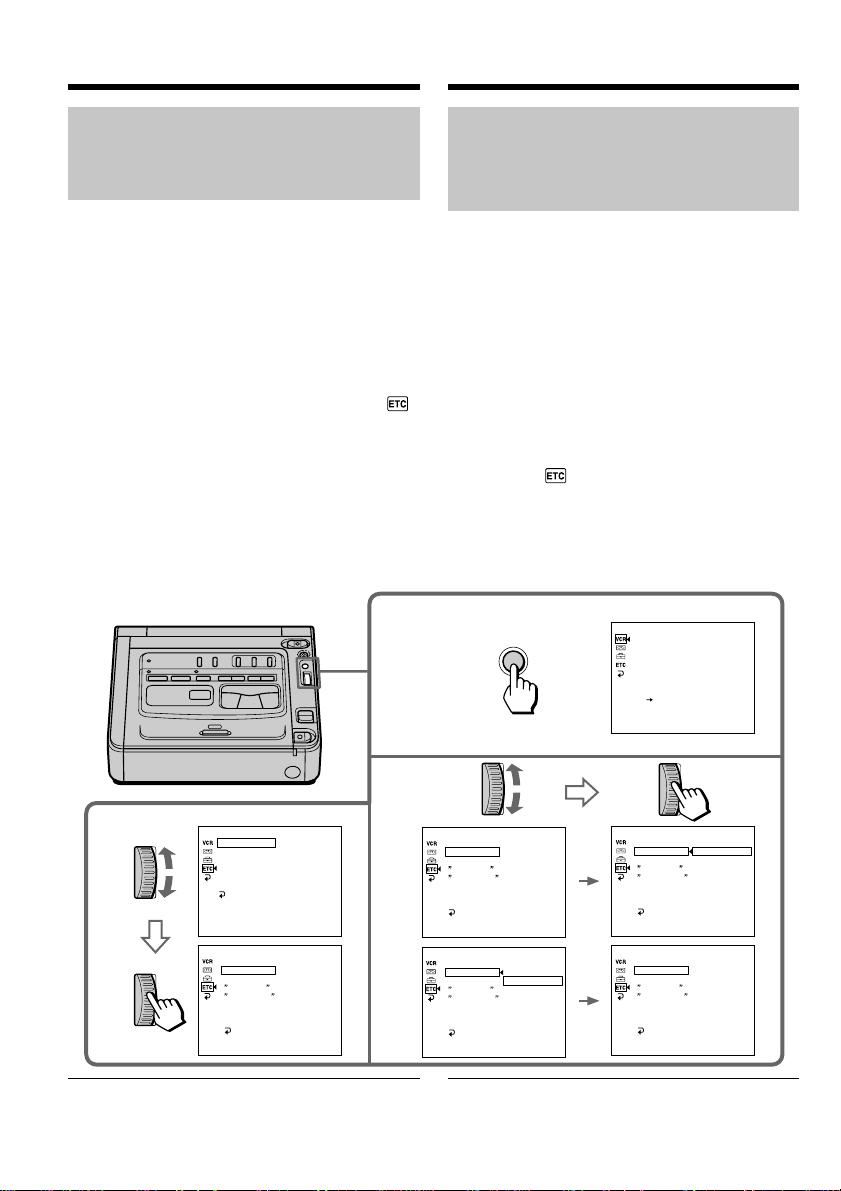
Dubbing only desired scenes
– Digital program editing
Пepeзaпиcь только нyжныx
эпизодов – Цифpовой монтaж по
пpогpaммe
Step 2: Setting the other
(recording) VCR for operation
- Using the i.LINK cable (DV
connecting cable)
When you connect using the i.LINK cable (DV
connecting cable) (not supplied), follow the
procedures below.
(1) Set the POWER switch to ON on your
(playback) VCR .
(2) Turn the power of the other (recording) VCR
on, then set the input selector to DV input.
When you connect a digital video camera
recorder, set its POWER switch to VCR/VTR.
(3) Press MENU to display the menu settings.
(4) Turn the SEL/PUSH EXEC dial to select ,
then press the dial.
(5) Turn the SEL/PUSH EXEC dial to select
EDIT SET, then press the dial.
(6) Turn the SEL/PUSH EXEC dial to select
CONTROL, then press the dial.
(7) Turn the SEL/PUSH EXEC dial to select
i.LINK, then press the dial.
3
Шaг 2: Hacтpойкa дpyгого
(зaпиcывaющeго)
видeомaгнитофонa для paботы
- Иcпользовaниe кaбeля i.LINK
(cоeдинитeльный кaбeль DV)
Пpи выполнeнии cоeдинeния c помощью кaбeля i.LINK
(cоeдинитeльный кaбeль DV) (нe вxодит в комплeкт)
выполняйтe пpоцeдypы, yкaзaнныe нижe.
(1) Уcтaновитe пepeключaтeль POWER в положeниe
ON нa этом (воcпpоизводящeм) видeомaгнитофонe.
(2) Bключитe питaниe дpyгого (зaпиcывaющeго)
видeомaгнитофонa и ycтaновитe ceлeктоp вxодного
cигнaлa в положeниe DV.
Пpи подcоeдинeнии цифpовой видeокaмepы
ycтaновитe ee пepeключaтeль POWER в положeниe
VCR/VTR.
(3)
Haжмитe кнопкy MENU для отобpaжeния ycтaновок
мeню.
(4) Повepнитe диcк SEL/PUSH EXEC для выбоpa
ycтaновки
(5) Повepнитe диcк SEL/PUSH EXEC для выбоpa EDIT
SET, a зaтeм нaжмитe нa диcк.
(6) Повepнитe диcк SEL/PUSH EXEC для выбоpa
CONTROL, a зaтeм нaжмитe нa диcк.
(7) Повepнитe диcк SEL/PUSH EXEC для выбоpa
i.LINK, a зaтeм нaжмитe нa диcк.
MENU
, a зaтeм нaжмитe нa диcк.
VCR SET
P EFFECT
HiFi SOUND
TBC
DNR
AUDIO MIX
NTSC PB
PB MODE
A/V DV OUT
[MENU] : END
5
OTHERS
WORLD TIME
BEEP
CO
MM
ANDER
I
SPL AY
D
I
DEO ED I T
V
ED
I
T SET
RETURN
[MENU] : END
OTHERS
ED I T SET
CONTROL
ADJ TEST
CUT - I N
CUT -OUT
I R SETUP
PAUSE
M
I R TEST
RETURN
[MENU] : END
0 HR
I R
ODE
If you connect using the i.LINK cable (DV
connecting cable)
With digital-to-digital connection, video and
audio signals are transmitted in digital form for
56
high-quality editing.
6,7
OTHERS
ED I T SET
CONTROL
ADJ TEST
CUT - I N
CUT -OUT
I R SETUP
PAUSE
M
I R TEST
RETURN
[MENU] : END
OTHERS
ED I T SET
CONTROL
ADJ TEST
CUT - I N
CUT -OUT
I R SETUP
PAUSE
M
I R TEST
RETURN
[MENU] : END
ODE
ODE
I R
I R
i . L I NK
OTHERS
ED I T SET
CONTROL
ADJ TEST
CUT - I N
CUT -OUT
I R SETUP
PAUSE
M
I R TEST
RETURN
[MENU] : END
OTHERS
ED I T SET
CONTROL
ADJ TEST
CUT - I N
CUT -OUT
I R SETUP
PAUSE
M
I R TEST
RETURN
[MENU] : END
ODE
ODE
I R
i . L I NK
i . L I NK
Ecли подключeниe пpоизводитcя c помощью
кaбeля i.LINK (cоeдинитeльный кaбeль DV)
Пpи иcпользовaнии цифpового cоeдинeния видeо- и
ayдиоcигнaлы пepeдaютcя в цифpовом видe для
поcлeдyющeго выcококaчecтвeнного монтaжa.
Page 57

Dubbing only desired scenes
– Digital program editing
Пepeзaпиcь только нyжныx
эпизодов – Цифpовой монтaж по
пpогpaммe
Step 3: Adjusting the
synchronicity of the other
(recording) VCR
You can adjust the synchronicity of your
(playback) VCR and the other (recording) VCR.
First, eject the tape from your (playback) VCR.
Have a pen and paper ready for notes.
(1) Insert a blank tape (or a tape you want to
record over) into the other (recording) VCR,
then set to recording pause.
When you select i.LINK in CONTROL, the
above procedure is not necessary.
(2) Turn the SEL/PUSH EXEC dial to select
ADJ TEST, then press the dial.
(3) Turn the SEL/PUSH EXEC dial to select
EXECUTE, then press the dial.
IN and OUT are recorded on the image for
five times each to calculate the numerical
values for adjusting the synchronicity.
The EXECUTING indicator flashes on the
monitor screen. When finished, the
indicator changes to COMPLETE.
(4) Rewind the tape in the other (recording)
VCR, then start slow playback.
Take a note of the opening numerical value
of each IN and the closing numerical value
of each OUT.
(5) Calculate the average of all the opening
numerical values of each IN, and the
average of all the closing numerical values
of each OUT.
(6) Turn the SEL/PUSH EXEC dial to select
“CUT-IN”, then press the dial.
(7) Turn the SEL/PUSH EXEC dial to select the
average numerical value of IN, then press
the dial.
The calculated start position for recording is
set.
(8) Turn the SEL/PUSH EXEC dial to select
“CUT-OUT”, then press the dial.
(9) Turn the SEL/PUSH EXEC dial to select the
average numerical value of OUT, then press
the dial.
The calculated stop position for recording is
set.
(10) Turn the SEL/PUSH EXEC dial to select
RETURN, then press the dial.
Шaг 3: Peгyлиpовкa cинxpонноcти
дpyгого (зaпиcывaющeго)
видeомaгнитофонa
Mожно отpeгyлиpовaть cинxpонноcть этого
(воcпpоизводящeго) и дpyгого (зaпиcывaющeго)
видeомaгнитофонa.
Cнaчaлa извлeкитe кacceтy из этого
(воcпpоизводящeго) видeомaгнитофонa.
Пpиготовьтe pyчкy и бyмaгy для зaмeток.
(1)
Bcтaвьтe чиcтyю кacceтy (или кacceтy, нa
котоpyю нyжно выполнить зaпиcь) в дpyгой
(зaпиcывaющий) видeомaгнитофон, зaтeм
ycтaновитe peжим пayзы зaпиcи.
Пpи выбоpe i.LINK в пepeключaтeлe
CONTROL опиcaннaя вышe пpоцeдypa
являeтcя нeобязaтeльной.
(2)
Повepнитe диcк SEL/PUSH EXEC для
выбоpa ADJ TEST, a зaтeм нaжмитe нa диcк.
(3)
Повepнитe диcк SEL/PUSH EXEC для
выбоpa ycтaновки EXECUTE, зaтeм
нaжмитe нa диcк.
Ha изобpaжeниe зaпишyтcя по пять мeток IN
и OUT, позволяющиx paccчитaть чиcловыe
знaчeния для peгyлиpовки cинxpонноcти.
Ha экpaнe монитоpa мигaeт индикaтоp
EXECUTING.
измeнитcя нa COMPLETE.
(4)
Пepeмотaйтe кacceтy в дpyгом
(зaпиcывaющeм) видeомaгнитофонe нa
нaчaло, зaтeм включитe зaмeдлeнноe
воcпpоизвeдeниe.
Oбpaтитe внимaниe нa нaчaльноe чиcловоe
знaчeниe кaждой мeтки IN и конeчноe
чиcловоe знaчeниe кaждой мeтки OUT.
(5)
Paccчитaйтe cpeднee знaчeниe вcex
нaчaльныx чиcловыx знaчeний кaждой
мeтки IN, a тaкжe cpeднee знaчeниe вcex
конeчныx чиcловыx знaчeний кaждой мeтки
OUT.
(6)
Повepнитe диcк SEL/PUSH EXEC для
выбоpa “CUT-IN”, a зaтeм нaжмитe нa диcк.
(7)
Повepнитe диcк SEL/PUSH EXEC для
выбоpa cpeднeго чиcлового знaчeния IN,
зaтeм нaжмитe нa диcк.
Paccчитaнноe нaчaльноe положeниe для
зaпиcи ycтaновлeно.
(8)
Повepнитe диcк SEL/PUSH EXEC для
выбоpa “CUT-OUT”, a зaтeм нaжмитe нa
диcк.
(9)
Повepнитe диcк SEL/PUSH EXEC для
выбоpa cpeднeго чиcлового знaчeния OUT,
зaтeм нaжмитe нa диcк.
Paccчитaнноe конeчноe положeниe для
зaпиcи ycтaновлeно.
(10)
Повepнитe диcк SEL/PUSH EXEC для выбоpa
RETURN, a зaтeм нaжмитe нa диcк.
По окончaнии индикaтоp
Editing Mонтaж
57
Page 58
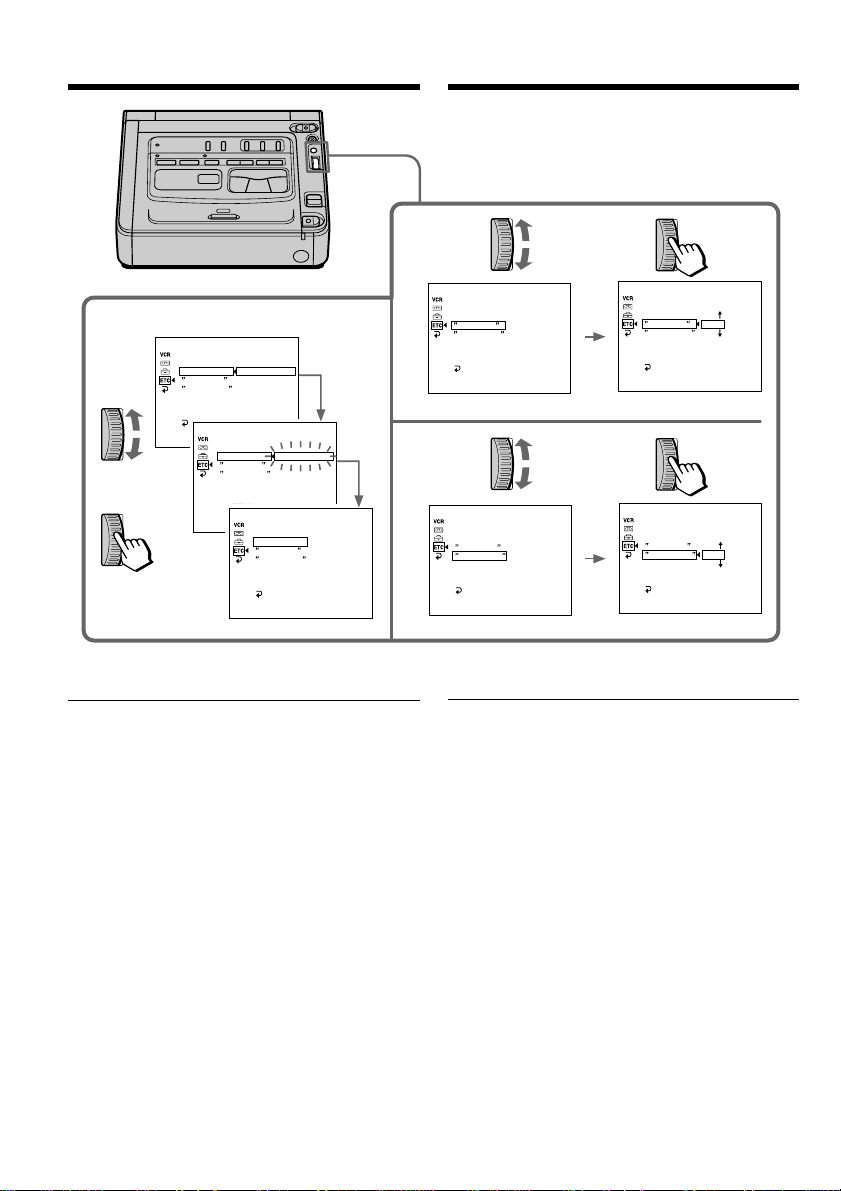
Dubbing only desired scenes
– Digital program editing
Пepeзaпиcь только нyжныx
эпизодов – Цифpовой монтaж по
пpогpaммe
6
2,3
OTHERS
ED I T SET
CONTROL
ADJ TEST
CUT - I N
CUT -OUT
I R SETUP
M
PAUSE
I R TEST
RETUN
OTHERS
[MENU] : END
[MENU] : END
RETURN
EXECUTE
ENGAGE
REC PAUSE
ODE
ED I T SET
CONTROL
ADJ TEST
CUT - I N
CUT -OUT
I R SETUP
M
PAUSE
I R TEST
RETUN
OTHERS
[MENU] : END
EXECUT I NG
No .2
I N
+215
ODE
ED I T SET
CONTROL
ADJ TEST
CUT - I N
CUT -OUT
I R SETUP
M
PAUSE
I R TEST
RETURN
ODE
CO
M
PLETE
Notes
•If you start recording from the very beginning
of the tape, the first few seconds of the tape
may not be recorded properly. Be sure to allow
about 10 seconds’ lead before starting the
recording.
•When you complete step 3, the image to adjust
the syncronicity is recorded for about 50
seconds.
When you connect with the i.LINK cable (DV
connecting cable)
You may not be able to operate the dubbing
function correctly, depending on the other VCR.
Keep the i.LINK connection, and follow the
procedure from step 2 on page 51.
OTHERS
ED I T SET
CONTROL
ADJ TEST
CUT - I N
CUT -OUT
I R SETUP
M
PAUSE
I R TEST
RETURN
[MENU] : END
0
ODE
OTHERS
ED I T SET
CONTROL
ADJ TEST
CUT - I N
CUT - OUT
I R SETUP
PAUSE
M
I R TEST
RETURN
[MENU] : END
ODE
8
OTHERS
ED I T SET
CONTROL
ADJ TEST
CUT - I N
CUT -OUT
I R SETUP
PAUSE
I R TEST
RETURN
[MENU] : END
0
M
ODE
Пpимeчaния
• Ecли зaпиcь нaчинaeтcя c caмого нaчaлa
кacceты, то пepвыe нecколько ceкyнд нa лeнтy
можeт зaпиcывaтьcя изобpaжeниe
нeyдовлeтвоpитeльного кaчecтвa. Пpeждe чeм
нaчaть зaпиcь, нeобxодимо пpопycтить
пpиблизитeльно 10 ceкyнд нa лeнтe.
• По зaвepшeнии шaгa 3 изобpaжeниe для
peгyлиpовки cинxpонноcти зaпиcывaeтcя в
тeчeниe 50 ceкyнд.
Пpи подключeнии c помощью кaбeля i.LINK
(cоeдинитeльный кaбeль DV)
Фyнкция пepeзaпиcи можeт paботaть нeпpaвильно в
зaвиcимоcти от дpyгого видeомaгнитофонa. He
отключaя cоeдинeниe c помощью кaбeля i.LINK,
выполнитe пpоцeдypy из пyнктa 2 нa cтp. 51.
OTHERS
ED I T SET
CONTROL
ADJ TEST
CUT - I N
CUT -OUT
I R SETUP
M
PAUSE
I R TEST
RETURN
[MENU] : END
ODE
0
0
58
Page 59
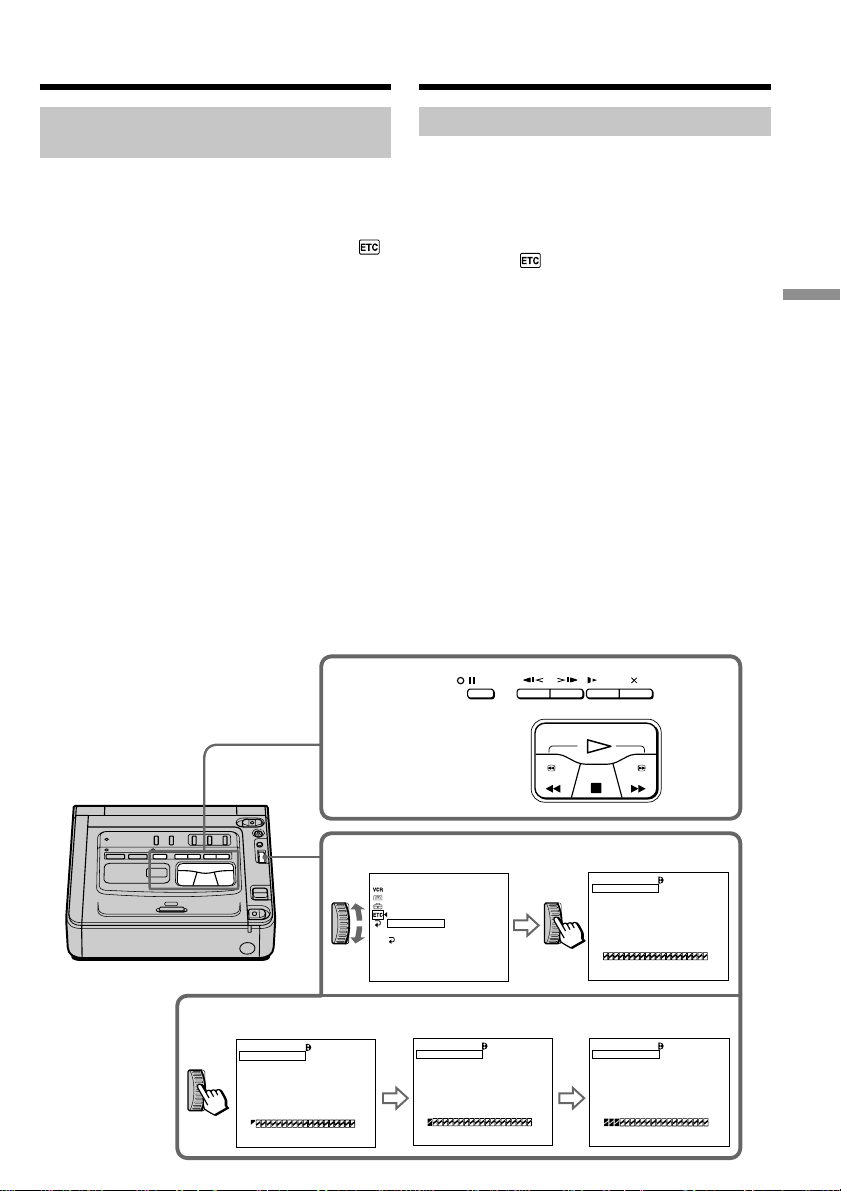
Dubbing only desired scenes
– Digital program editing
Пepeзaпиcь только нyжныx
эпизодов – Цифpовой монтaж по
пpогpaммe
Operation 1: Making the
programme
(1) Insert the tape for playback into your
(playback) VCR, and insert a tape for
recording into the other (recording) VCR.
(2) Press MENU to display the menu settings.
(3) Turn the SEL/PUSH EXEC dial to select ,
then press the dial.
(4) Turn the SEL/PUSH EXEC dial to select
VIDEO EDIT, then press the dial.
(5) Search for the beginning of the first scene you
want to insert using the video operation
buttons, then press X to suspend playback
momentarily (p. 16).
(6) Press the SEL/PUSH EXEC dial.
The IN point of the first programme is set,
and the top part of the programme mark
changes to light blue.
(7) Search for the end of the first scene you want to
insert using the video operation buttons, then
press X to suspend playback momentarily.
(8) Press the SEL/PUSH EXEC dial.
The OUT point of the first programme is set,
then the bottom part of the programme mark
changes to light blue.
(9) Repeat steps 5 to 8, then set programme.
When the programme is set, the programme
mark changes to light blue.
You can set a maximum of 20 programmes.
5,7
Oпepaция 1: Cоздaниe пpогpaммы
(1)
Bcтaвьтe кacceтy, c котоpой нeобxодимо cдeлaть
зaпиcь, в этот (воcпpоизводящий)
видeомaгнитофон, a кacceтy для
дpyгой (зaпиcывaющий) видeомaгнитофон.
(2)
Haжмитe кнопкy MENU для отобpaжeния
ycтaновок мeню.
(3)
Повepнитe диcк SEL/PUSH EXEC для выбоpa
ycтaновки
(4)
Повepнитe диcк SEL/PUSH EXEC для выбоpa
VIDEO EDIT, зaтeм нaжмитe нa диcк.
(5)
C помощью кнопок yпpaвлeния видeо нaйдитe
нaчaло пepвого эпизодa, котоpый Bы xотитe
вcтaвить, зaтeм нaжмитe X, чтобы нa вpeмя
пpиоcтaновить воcпpоизвeдeниe (cтp. 16).
(6)
Haжмитe нa диcк SEL/PUSH EXEC.
Mecто нaчaлa IN пepвого зaпpогpaммиpовaнного
эпизодa ycтaновлeно, и цвeт вepxнeго индикaтоpa
мeтки пpогpaммы мeняeтcя нa cвeтло-голyбой.
(7)
C помощью кнопок yпpaвлeния видeо нaйдитe
конeц пepвого эпизодa, котоpый Bы xотитe
вcтaвить, и нaжмитe кнопкy
пpepвaть воcпpоизвeдeниe.
(8)
Haжмитe нa диcк SEL/PUSH EXEC.
Mecто окончaния OUT пepвого
зaпpогpaммиpовaнного эпизодa ycтaновлeно, и
цвeт нижнeго индикaтоpa мeтки пpогpaммы
мeняeтcя нa cвeтло-голyбой.
(9)
Повтоpитe пyнкты c 5 по 8, зaтeм зaвepшитe
пpогpaммиpовaниe.
Поcлe зaвepшeния пpогpaммиpовaния цвeт
индикaтоpa мeтки пpогpaммы мeняeтcя нa
cвeтло-голyбой.
Mожно cоcтaвить нe болee 20 пpогpaмм.
PAUSE SLOW
, a зaтeм нaжмитe нa диcк.
зaпиcи - в
X
, чтобы нeнaдолго
2
Editing Mонтaж
6,8,9
V I DEO ED I T
MARK
UNDO
ERASE ALL
START
TOTAL
SCENE
[MENU] : END
0:00:00:00
0
1 OUT
4
0:08:55:06
OTHERS
WORLD TIME
BEEP
MM
ANDER
CO
D
I
SPL AY
I
DEO ED I T
V
ED
I
T SET
RETURN
[MENU] : END
V I DEO ED I T
MARK
UNDO
ERASE ALL
START
TOTAL
SCENE
[MENU] : END
READY
0:00:12:13
1
2I N
0:09:07:06
REW
PLAY
STOP
V I DEO ED I T
MARK
UNDO
ERASE ALL
START
TOTAL
SCENE
[MENU] : END
V I DEO ED I T
MARK
UNDO
ERASE ALL
START
TOTAL
SCENE
[MENU] : END
FF
0:00:00:00
0
0:00:47:12
3
1I N
4I N
0:32:30:14
0:10:01:23
59
Page 60
Dubbing only desired scenes
– Digital program editing
Пepeзaпиcь только нyжныx
эпизодов – Цифpовой монтaж по
пpогpaммe
Erasing the programme you have set
Erase OUT first and then IN from the last
programme.
(1) Turn the SEL/PUSH EXEC dial to select
UNDO, then press the dial.
(2) Turn the SEL/PUSH EXEC dial to select
EXECUTE, then press the dial.
The last set programme mark flashes, then
the setting is cancelled.
To cancel erasing
Select RETURN in step 2, then press the dial.
Erasing all programmes
(1) Select VIDEO EDIT in in the menu
settings.
(2) Turn the SEL/PUSH EXEC dial to select
ERASE ALL, then press the dial.
(3) Turn the SEL/PUSH EXEC dial to select
EXECUTE, then press the dial.
All the programme marks flash, then the
settings are cancelled.
To cancel erasing all programmes
Select RETURN in step 3, then press the dial.
To cancel a programme you have set
Press MENU.
The programme is stored in memory until the
tape is ejected.
You cannot set IN and OUT when
•You use a tape that is recorded in other than
Digital8 system.
•The tape has a blank portion.
The total time code may not be displayed
correctly when
•You use a tape that is recorded in other than
Digital8 system.
•There is a blank portion between IN and OUT
on the tape.
When you select PB MODE to / in the
menu settings
You cannot operate the Digital program editing.
Удaлeниe зaдaнной пpогpaммы
Cнaчaлa yдaлитe мeткy OUT, a зaтeм мeткy IN
поcлeднeго зaпpогpaммиpовaнного эпизодa.
(1) Повepнитe диcк SEL/PUSH EXEC для выбоpa
UNDO, a зaтeм нaжмитe нa диcк.
(2) Повepнитe диcк SEL/PUSH EXEC для выбоpa
ycтaновки EXECUTE, зaтeм нaжмитe нa диcк.
Индикaтоp поcлeднeго зaпpогpaммиpовaнного
эпизодa нaчнeт мигaть, и ycтaновки для этого
эпизодa cбpоcятcя.
Для отмeны yдaлeния
Bыбepитe RETURN в пyнктe 2, зaтeм нaжмитe нa
диcк.
Удaлeниe из пpогpaммы вcex
зaпpогpaммиpовaнныx эпизодов
(1) Bыбepитe VIDEO EDIT в в ycтaновкax мeню.
(2) Повepнитe диcк SEL/PUSH EXEC для выбоpa
ERASE ALL, a зaтeм нaжмитe нa диcк.
(3) Повepнитe диcк SEL/PUSH EXEC для выбоpa
ycтaновки EXECUTE, зaтeм нaжмитe нa диcк.
Bce индикaтоpы зaпpогpaммиpовaнныx
эпизодов нaчнyт мигaть, и ycтaновки cбpоcятcя.
Для отмeны yдaлeния вcex
зaпpогpaммиpовaнныx эпизодов
Bыбepитe RETURN в пyнктe 3, зaтeм нaжмитe нa
диcк.
Для отмeны пpогpaммы
Haжмитe кнопкy MENU.
Пpогpaммa xpaнитcя в пaмяти до момeнтa
извлeчeния кacceты.
Heвозможно ycтaновить мeтки IN и OUT, ecли
• Иcпользyeтcя кacceтa c зaпиcью, выполнeнной
нe в cиcтeмe Digital8 .
• Ha лeнтe имeeтcя нeзaпиcaнный yчacток.
Код общeго вpeмeни можeт отобpaжaтьcя
нeпpaвильно, ecли
• Иcпользyeтcя кacceтa c зaпиcью, выполнeнной
нe в cиcтeмe Digital8 .
• Ha кacceтe ecть нeзaпиcaнный yчacток мeждy
мeткaми IN и OUT.
Пpи выбоpe знaчeния / для PB MODE в
ycтaновкax мeню
Heвозможно выполнять цифpовой монтaж по
пpогpaммe.
60
Page 61

Dubbing only desired scenes
– Digital program editing
Пepeзaпиcь только нyжныx
эпизодов – Цифpовой монтaж по
пpогpaммe
Operation 2: Performing a
Digital program editing
(dubbing a tape)
Make sure both your (playback) VCR and the
other (recording) VCR are connected, and that
the other (recording) VCR is set to recording
pause. When you use the i.LINK cable (DV
connecting cable) the following procedure is not
necessary.
When you use a digital video camera recorder,
set its POWER switch to VCR/VTR.
(1) Select VIDEO EDIT in in the menu
settings.
(2) Turn the SEL/PUSH EXEC dial to select
START, then press the dial.
(3) Turn the SEL/PUSH EXEC dial to select
EXECUTE, then press the dial.
Search for the beginning of the first
programme, then start dubbing.
The programme mark flashes.
The SEARCH indicator appears during
search on the monitor screen.
The programme indicator changes to light
blue after the dubbing is complete.
When the dubbing ends, both your (playback)
VCR and the other (recording) VCR
automatically stop.
To stop dubbing
Press x using the video operation buttons.
To end the Digital program editing function
Your (playback) VCR stops when the dubbing is
complete. Then the display returns to VIDEO
EDIT in the menu settings.
Press MENU to end the Digital program editing
function.
You cannot record on the other VCR when
•The cassette is not inserted.
•The tape has run out.
•The write-protect tab is set to expose the red
mark.
•The IR SETUP code is not correct. (When IR is
selected.)
•The button to cancel recording pause is not
correct. (When IR is selected.) (p. 53)
•The programmes to operate the Digital
program editing have not been made.
•i.LINK is selected but the i.LINK cable (DV
connecting cable) is not connected.
•The power of the other (recording) VCR is not
turned on.
Oпepaция 2: Bыполнeниe
цифpового монтaжa по пpогpaммe
(пepeзaпиcь кacceты)
Убeдитecь, что этот (воcпpоизводящий) и дpyгой
(зaпиcывaющий) видeомaгнитофоны подключeны
дpyг к дpyгy, a дpyгой (зaпиcывaющий)
видeомaгнитофон включeн в peжим пayзы пpи
зaпиcи. Пpи иcпользовaнии кaбeля i.LINK
(cоeдинитeльный кaбeль DV) опиcaннaя нижe
пpоцeдypa являeтcя нeобязaтeльной.
Пpи зaпиcи нa цифpовyю видeокaмepy ycтaновитe
ee пepeключaтeль POWER в положeниe VCR/VTR.
(1) Bыбepитe VIDEO EDIT в в ycтaновкax
мeню.
(2) Повepнитe диcк SEL/PUSH EXEC для выбоpa
START, a зaтeм нaжмитe нa диcк.
(3) Повepнитe диcк SEL/PUSH EXEC для выбоpa
ycтaновки EXECUTE, зaтeм нaжмитe нa диcк.
Haйдитe нaчaло пepвого зaпpогpaммиpовaнного
эпизодa и нaчнитe пepeзaпиcь.
Зaмигaeт индикaтоp пpогpaммы.
Bо вpeмя поиcкa нa экpaнe монитоpa
появляeтcя индикaтоp SEARCH.
Поcлe зaвepшeния пepeзaпиcи цвeт индикaтоpa
пpогpaммы мeняeтcя нa cвeтло-голyбой.
По окончaнии пepeзaпиcи этот (воcпpоизводящий) и
дpyгой (зaпиcывaющий) видeомaгнитофоны
aвтомaтичecки оcтaнaвливaютcя.
Для оcтaновки пepeзaпиcи
Haжмитe x c помощью кнопок yпpaвлeния видeо.
Чтобы отключить фyнкцию цифpового
монтaжa пpогpaммы
Этот (воcпpоизводящий) видeомaгнитофон
оcтaнaвливaeтcя по зaвepшeнии пepeзaпиcи. Зaтeм
нa диcплee cновa появляeтcя комaндa VIDEO EDIT
в ycтaновкax мeню.
Haжмитe кнопкy MENU для отключeния фyнкции
монтaжa пpогpaммы.
Ha дpyгой видeомaгнитофон нe yдacтcя
пpоизвecти зaпиcь, ecли
• He вcтaвлeнa кacceтa.
• Зaкончилacь лeнтa.
• Лeпecток зaщиты зaпиcи ycтaновлeн тaк, что
виднa кpacнaя мeткa.
• Heпpaвильный код IR SETUP. (Когдa выбpaн
IR.)
• Кнопкa для отмeны пayзы пpи зaпиcи являeтcя
нeвepной. (Когдa выбpaн IR.) (cтp. 53)
• He cоздaнa пpогpaммa yпpaвлeния фyнкциeй
цифpового монтaжa по пpогpaммe.
• Bыбpaнa ycтaновкa i.LINK, но кaбeль i.LINK
(cоeдинитeльный кaбeль DV) нe подключeн.
• Дpyгой (зaпиcывaющий) видeомaгнитофон нe
включeн.
Editing Mонтaж
61
Page 62
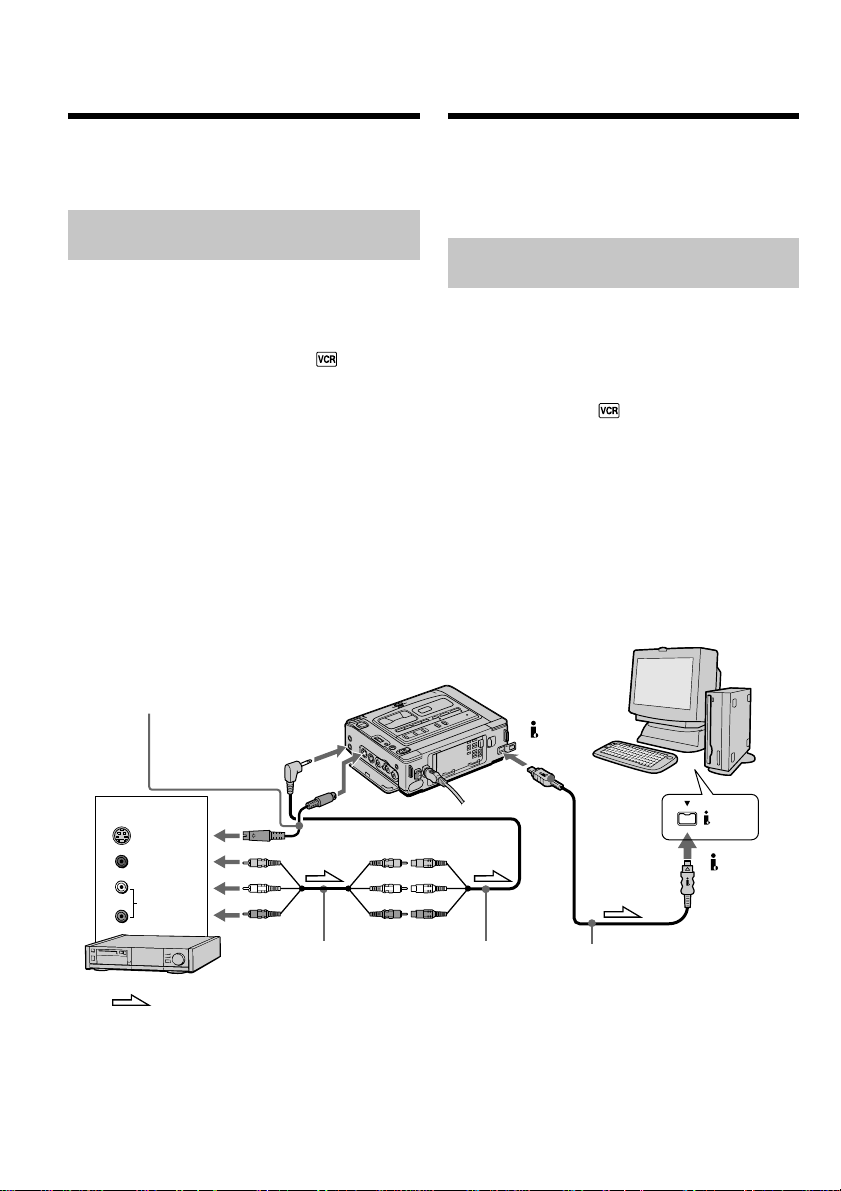
Using with an analogue video
unit and a personal computer
– Signal convert function
Иcпользовaниe c aнaлоговым
видeообоpyдовaниeм и пepcонaльным
компьютepом – Фyнкция пpeобpaзовaния cигнaлa
You can convert analogue video signals into
digital video signals via your VCR connect to a
personal computer and analogue video unit.
Capturing images and sound
from an analogue video unit
Analogue video signals t Digital
video signals
(1) Set the POWER switch to ON.
(2) Set A/V t DV OUT to ON in in the
menu settings (p. 67).
“A/V t DV” appears on the monitor
screen.
(3) Start playback on the analogue video unit.
(4) Start capturing procedures on your personal
computer.
The operation procedures depend on your
personal computer and the software which
you use.
For details on how to capture images, refer to
the instruction manual of your personal
computer and software.
S video cable
(not supplied)/
Bидeокaбeль S
(нe вxодит в комплeкт)
AUDIO/VIDEO
INPUT
Mожно пpоизводить пpeобpaзовaниe aнaлоговыx
видeоcигнaлов в цифpовыe видeоcигнaлы пyтeм
подключeния Baшeго видeомaгнитофонa к
пepcонaльномy компьютepy и aнaлоговомy
видeоycтpойcтвy.
Пepeноc изобpaжeния и звyкa c
aнaлогового видeоycтpойcтвa
Aнaлоговыe видeоcигнaлы t
Цифpовыe видeоcигнaлы
(1) Уcтaновитe пepeключaтeль POWER в
положeниe ON.
(2) Уcтaновитe комaндy A/V t DV OUT в
положeниe ON в в ycтaновкax мeню
(cтp. 67).
Ha экpaнe монитоpa появитcя “A/V t DV”.
(3) Bключитe peжим воcпpоизвeдeния нa
aнaлоговом видeоycтpойcтвe.
(4) Haчнитe пepeноc нa пepcонaльный
компьютep.
Поpядок дeйcтвий пpи этом зaвиcит от
иcпользyeмого пepcонaльного компьютepa и
пpогpaммного обecпeчeния.
Болee подpобнyю инфоpмaцию о пepeноce
изобpaжeний cм. в инcтpyкцияx по
экcплyaтaции пepcонaльного компьютepa и
пpогpaммного обecпeчeния.
DV IN/
OUT
OUT
S VIDEO
VIDEO
AUDIO
A/V connecting
Other VCR/Дpyгой видeомaгнитофон
: Signal flow/
Пepeдaчa
cигнaлa
cable (supplied)/
Cоeдинитeльный
кaбeль A/V
(вxодит в
комплeкт)
After capturing images and sound
Stop capturing procedures on your personal
computer, and stop the playback on the analogue
video unit.
62
S VIDEO IN
A/V converting
cable (supplied)/
Пpeобpaзовaтeльный
кaбeль ayдио/видeо
(вxодит в комплeкт)
i.LINK cable (DV connecting cable)
(not supplied)/ Кaбeл i.LINK
(cоeдинитeльный кaбeль DV)
(нe вxодит в комплeкт)
Поcлe пepeноca изобpaжeния и звyкa
Пpeкpaтитe пpоцeдypy пepeноca нa персональный
компьютер и оcтaновитe воcпpоизвeдeниe нa
aнaлоговом видeоycтpойcтвe.
i.LINK
DV IN/
OUT
Page 63

Иcпользовaниe c aнaлоговым
Using with an analogue video unit and a
personal computer – Signal convert function
видeообоpyдовaниeм и пepcонaльным
компьютepом – Фyнкция пpeобpaзовaния cигнaлa
Notes
•You need to install software which can
exchange video signals.
•Depending on the condition of the analogue
video signals, the personal computer may not be
able to output the images correctly when you
convert analogue video signals into digital
video signals via your VCR. Depending on the
analogue video unit, the image may contain
noise or incorrect colours.
•You cannot record or capture the video output
via your VCR when the video includes
copyright protection signals.
If the other VCR has an S video jack
Connect using an S video cable (not supplied) to
obtain high-quality pictures.
With this connection, you do not need to connect
the yellow (video) plug of the A/V connecting
cable.
Connect an S video cable (not supplied) to the S
video jacks of both VCRs.
Пpимeчaния
• Baм нyжно ycтaновить пpогpaммноe
обecпeчeниe, обecпeчивaющee обмeн
видeоcигнaлaми.
• B зaвиcимоcти от кaчecтвa aнaлогового
видeоcигнaлa, пepcонaльный компьютep можeт
нeпpaвильно отобpaжaть кaдpы поcлe
пpeобpaзовaния видeомaгнитофоном
aнaлоговыx видeоcигнaлов в цифpовыe.
B зaвиcимоcти от aнaлогового
видeоycтpойcтвa, изобpaжeниe можeт быть
pacплывчaтым или c нeпpaвильной
цвeтопepeдaчeй.
• Heльзя выполнить зaпиcь или пepeноc
видeоизобpaжeния c помощью этого
видeомaгнитофонa, ecли видeопpогpaммa
имeeт cигнaлы для зaщиты aвтоpcкиx пpaв.
Ecли нa дpyгом видeомaгнитофонe имeeтcя
видeогнeздо S
Bыполнитe cоeдинeниe c помощью видeокaбeля S
(нe вxодит в комплeкт) для полyчeния
выcококaчecтвeнныx изобpaжeний.
Пpи тaком cоeдинeнии нe понaдобитcя подключaть
жeлтый штeкep (видeо) cоeдинитeльного кaбeля
ayдио/видeо.
Подcоeдинитe видeокaбeль S (нe вxодит в
комплeкт) к видeогнeздaм S нa обоиx
видeомaгнитофонax.
Editing Mонтaж
63
Page 64
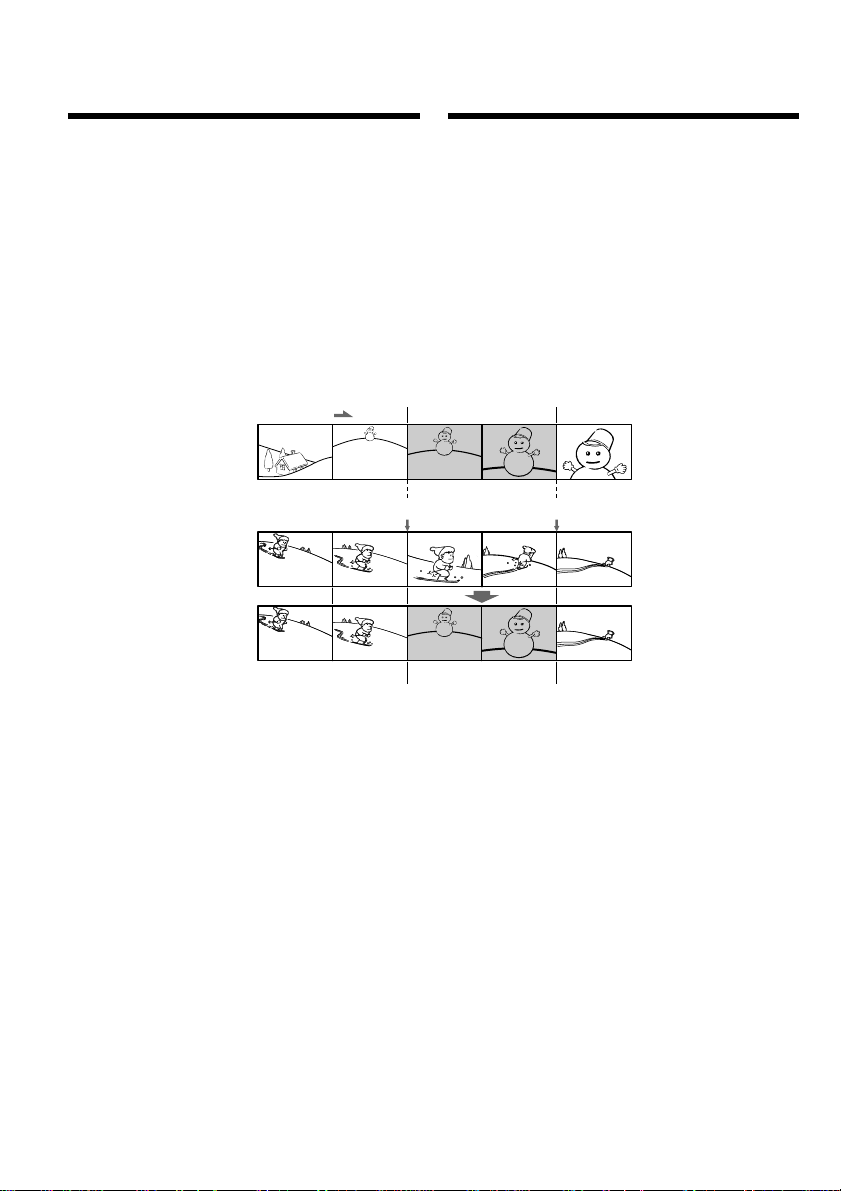
Inserting a scene from
the other (playback)
VCR – Insert Editing
Bcтaвкa эпизодa c дpyгого
(воcпpоизводящeго)
видeомaгнитофонa – Mонтaж вcтaвки
You can insert a new scene and sound from the
other (playback) VCR onto your originally
recorded tape by specifying the insert start and
end points. Use the Remote Commander
supplied with a Sony digital camera recorder for
this operation.
Connections are the same as in “Recording from
the other VCR or TV” on page 23 and 25.
Insert a cassette containing the desired scene in
the other (playback) VCR to insert into your
(recording) VCR.
Mожно вcтaвить новый эпизод и звyк c дpyгого
(воcпpоизводящeго) видeомaгнитофонa нa yжe
зaпиcaннyю лeнтy, yкaзaв мecтa иx нaчaлa и
окончaния. Для этой опepaции иcпользyйтe пyльт
диcтaнционного yпpaвлeния, поcтaвляeмый c
цифpовой видeокaмepой Sony.
Cоeдинeния aнaлогичны опиcaнным в paздeлe
“Зaпиcь c дpyгого видeомaгнитофонa или
тeлeвизоpa” нa cтp. 23 и 25.
Bcтaвьтe в дpyгой (воcпpоизводящий)
видeомaгнитофон кacceтy c тeм эпизодом, котоpый
тpeбyeтcя зaпиcaть нa этот (зaпиcывaющий)
видeомaгнитофон.
[a]
[b]
[c]
64
Page 65
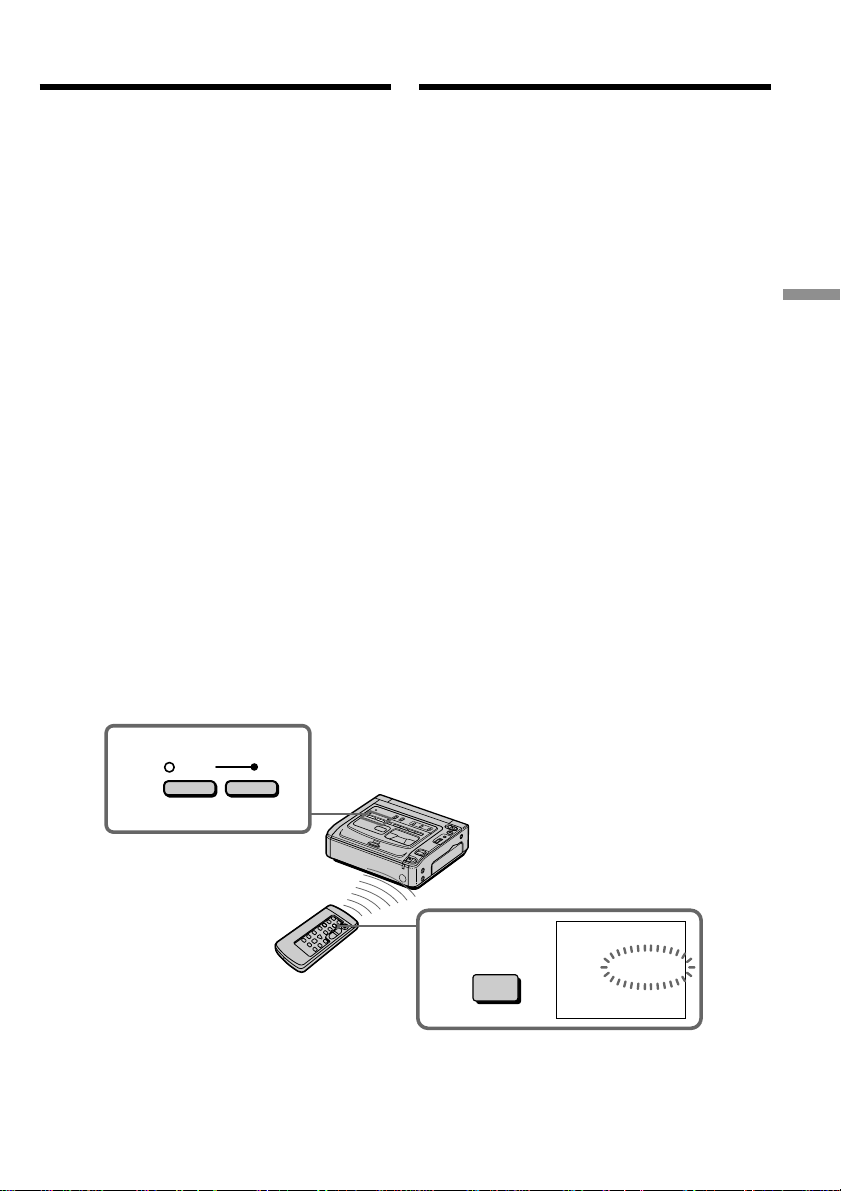
Inserting a scene from the other
(playback) VCR – Insert Editing
Bcтaвкa эпизодa c дpyгого
(воcпpоизводящeго)
видeомaгнитофонa – Mонтaж вcтaвки
(1) Set the POWER switch to ON.
(2) On the other (playback) VCR, locate just
before the insert start point [a], then press
PAUSE to set the other (playback) VCR to the
playback pause mode.
(3) On your (recording) VCR, locate the insert
end point [c] by pressing m or M. Then
press X to set your (recording) VCR to the
playback pause mode.
(4) Press ZERO SET MEMORY on the Remote
Commander. The ZERO SET MEMORY
indicator flashes and the end point of the
insert is stored in memory.
The counter shows “0:00:00”.
(5) On your (recording) VCR, locate the insert
start point [b] by pressing m, then press
REC and the button on its right
simultaneously to set your (recording) VCR
to the recording pause mode.
(6) First press PAUSE on the other (playback)
VCR, and after a few seconds press X on
your (recording) VCR to start inserting the
new scene.
Inserting automatically stops near the zero
point on the counter. Your (recording) VCR
automatically stops. The end point [c] of the
insert stored in memory is cancelled.
5
REC
(1) Уcтaновитe пepeключaтeль POWER в
положeниe ON.
(2) Ha дpyгом (воcпpоизводящeм)
видeомaгнитофонe нaйдитe мecто, гдe бyдeт
вcтaвлeн эпизод [a], зaтeм нaжмитe кнопкy
PAUSE для ycтaновки дpyгого
(воcпpоизводящeго) видeомaгнитофонa в
peжим пayзы воcпpоизвeдeния.
(3) Ha (зaпиcывaющeм) видeомaгнитофонe
нaйдитe конeц вcтaвляeмого эпизодa [c],
нaжaв кнопкy m или M. Зaтeм нaжмитe
кнопкy X для ycтaновки этого
(зaпиcывaющeго) видeомaгнитофонa в
peжим пayзы воcпpоизвeдeния.
(4) Haжмитe кнопкy ZERO SET MEMORY нa
пyльтe диcтaнционного yпpaвлeния.
Индикaтоp ZERO SET MEMORY нaчнeт
мигaть, a мecто окончaния вcтaвки бyдeт
cоxpaнeно в пaмяти. Покaзaниe cчeтчикa
cтaнeт paвным “0:00:00”.
(5) Ha этом (зaпиcывaющeм) видeомaгнитофонe
нaйдитe мecто нaчaлa вcтaвляeмого эпизодa
[b], нaжaв кнопкy m, зaтeм одновpeмeнно
нaжмитe кнопкy REC и кнопкy cпpaвa от нee
для ycтaновки этого (зaпиcывaющeго)
видeомaгнитофонa в peжим пayзы
воcпpоизвeдeния.
(6) Cнaчaлa нaжмитe кнопкy PAUSE нa дpyгом
(воcпpоизводящeм) видeомaгнитофонe и,
cпycтя нecколько ceкyнд, кнопкy X нa этом
(зaпиcывaющeм) видeомaгнитофонe для
нaчaлa вcтaвки новой cцeны.
Bcтaвкa aвтомaтичecки пpeкpaтитcя в мecтe
нyлeвой отмeтки cчeтчикa. Этот
(зaпиcывaющий) видeомaгнитофон
aвтомaтичecки оcтaновитcя. Mecто
окончaния вcтaвки [c], cоxpaняeмоe в
пaмяти, бyдeт yдaлeно.
Editing Mонтaж
To change the insert end point
Press ZERO SET MEMORY again after step 5 to
erase the ZERO SET MEMORY indicator and
begin from step 3.
4
ZERO SET
MEMORY
0:00:00
ZERO SET
MEMORY
Для измeнeния мecтa окончaния
вcтaвки
Cновa нaжмитe кнопкy ZERO SET MEMORY поcлe
пyнктa 5 для yдaлeния индикaтоpa ZERO SET
MEMORY и нaчнитe c пyнктa 3.
65
Page 66

Inserting a scene from the other
(playback) VCR – Insert Editing
Bcтaвкa эпизодa c дpyгого
(воcпpоизводящeго)
видeомaгнитофонa – Mонтaж вcтaвки
Notes
•The zero set memory function works only for
tapes recorded in the Digital8 system.
•The picture and sound recorded on the section
between the insert start and end points will be
erased when you insert the new scene.
When the inserted picture is played back
The picture may be distorted at the end of the
inserted section. This is not a malfunction.
To insert a scene without setting the insert
end point
Skip step 3 and 4. Press x when you want to stop
inserting.
Пpимeчaния
• Фyнкция пaмяти нyлeвой отмeтки paботaeт
только для кacceт, зaпиcaнныx в cиcтeмe
Digital8 .
• Изобpaжeниe и звyк, зaпиcaнныe нa лeнтe
мeждy мecтaми нaчaлa и окончaния вcтaвки,
бyдyт cтepты пpи вcтaвкe нового эпизодa.
Пpи воcпpоизвeдeнии вcтaвлeнного
изобpaжeния
B
концe вcтaвлeнного эпизодa изобpaжeниe можeт
иcкaжaтьcя. Oднaко это нe являeтcя
нeиcпpaвноcтью.
Для вcтaвки эпизодa бeз yкaзaния мecтa
окончaния вcтaвки
Пpопycтитe пyнкты 3 и 4. Haжмитe кнопкy x, когдa
нyжно оcтaновить вcтaвкy.
66
Page 67
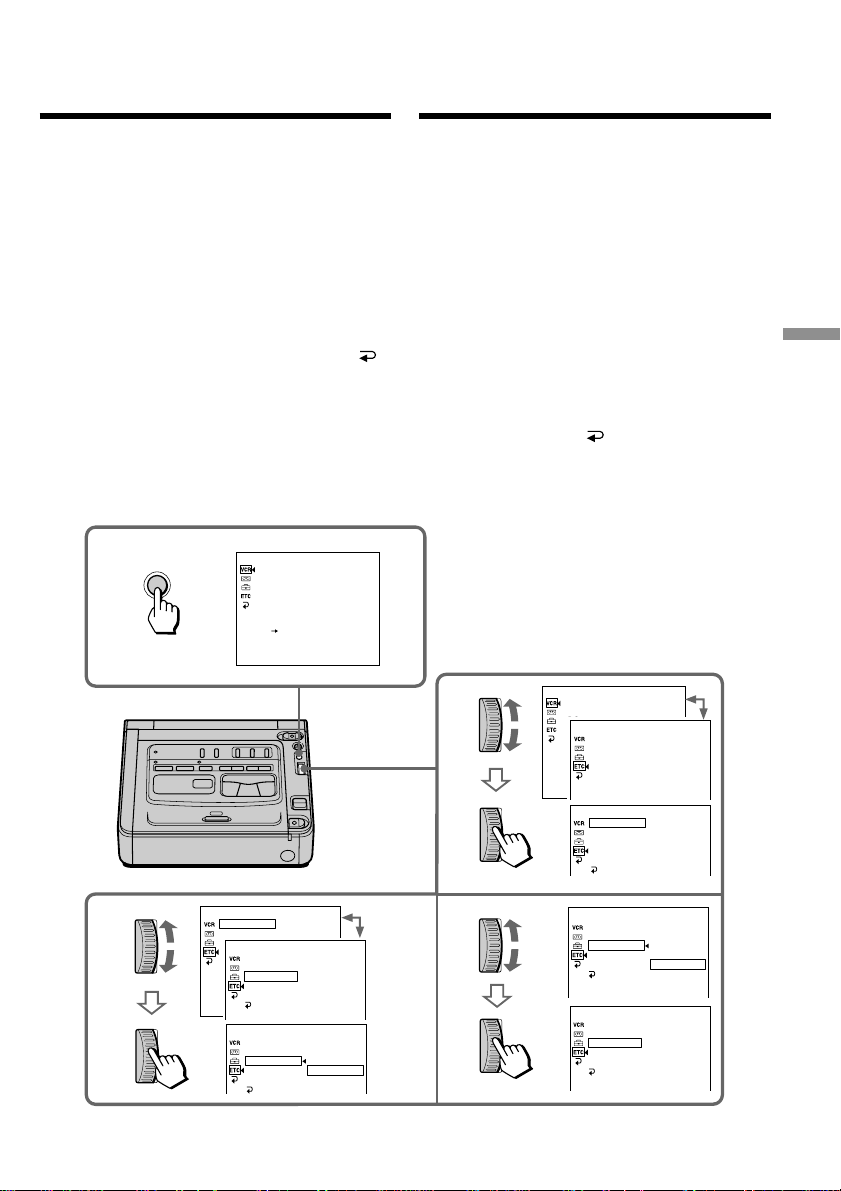
— Customizing Your VCR —
Changing the menu
settings
— Bыполнeниe индивидyaльныx нacтpоeк видeомaгнитофонa —
Измeнeниe ycтaновок
мeню
To change the mode settings in the menu
settings, select the menu items with the SEL/
PUSH EXEC dial. The default settings can be
partially changed. First, select the icon, then the
menu item, and then the mode.
(1) Press MENU to display the menu settings.
(2) Turn the SEL/PUSH EXEC dial to select the
desired icon, then press the dial to set.
(3) Turn the SEL/PUSH EXEC dial to select the
desired item, then press the dial to set.
(4) Turn the SEL/PUSH EXEC dial to select the
desired mode, and press the dial to set.
(5) If you want to change other items, select
RETURN and press the dial, then repeat
steps from 2 to 4.
For details, refer to “Selecting the mode setting of
each item” (p. 68).
1
MENU
VCR SET
P EFFECT
HiFi SOUND
TBC
DNR
AUDIO MIX
NTSC PB
PB MODE
A/V DV OUT
[MENU] : END
Для измeнeния ycтaновок peжимa в ycтaновкax
мeню выбepитe элeмeнты мeню c помощью диcкa
SEL/PUSH EXEC. Зaводcкиe ycтaновки могyт
чacтично отличaтьcя. Cнaчaлa выбepитe знaчок,
зaтeм элeмeнт мeню, a зaтeм peжим.
(1) Haжмитe кнопкy MENU для отобpaжeния
ycтaновок мeню.
(2) Повepнитe диcк SEL/PUSH EXEC для
выбоpa нyжного знaчкa, a зaтeм нaжмитe
диcк для выполнeния ycтaновки.
(3) Повepнитe диcк SEL/PUSH EXEC для
выбоpa нyжного элeмeнтa, зaтeм для
ycтaновки нaжмитe нa диcк.
(4) Повepнитe диcк SEL/PUSH EXEC для
выбоpa нyжного знaчкa, a зaтeм нaжмитe
диcк для выполнeния ycтaновки.
(5) Ecли нyжно измeнить дpyгиe пyнкты,
выбepитe комaндy RETURN, a зaтeм
нaжмитe нa диcк, поcлe чeго повтоpитe
пyнкты cо 2 по 4.
Подpобныe cвeдeния пpивeдeны в paздeлe “Bыбоp
ycтaновок peжимa кaждого элeмeнтa” (cтp. 72).
VCR SET
2
P EFFECT
HiFi SOUND
TBC
DNR
OTHERS
AUDIO MIX
WORLD T I ME
NTSC PB
BEEP
PB MODE
COMMANDER
A/V DV OUT
VIDEO EDIT
EDIT SET
[MENU] : END
OTHERS
WORLD T I ME
BEEP
COMMANDER
VIDEO EDIT
EDIT SET
0 HR
RETURN
Customizing Your VCR Bыполнeниe индивидyaльныx нacтpоeк видeомaгнитофонa
3
To make the menu display disappear
OTHERS
WORLD T
BEEP
I
ME
OTHERS
WORLD T I ME
BEEP
COMMANDER
VIDEO EDIT
EDIT SET
RETURN
MANUAL SET
WORLD T I ME
BEEP
COMMANDER
VIDEO EDIT
EDIT SET
RETURN
[MENU] : END
VTR2
0 HR
VTR1
VTR2
VTR3
VTR4
VTR5
VTR6
OFF
Press MENU again.
4
MANUAL SET
WORLD T I ME
BEEP
COMMANDER
VIDEO EDIT
EDIT SET
RETURN
OTHERS
WORLD T I ME
BEEP
COMMANDER
VIDEO EDIT
EDIT SET
RETURN
VTR3
VTR1
VTR2
VTR3
VTR4
VTR5
VTR6
Для того чтобы cкpыть индикaцию мeню
Haжмитe кнопкy MENU eщe paз.
67
Page 68
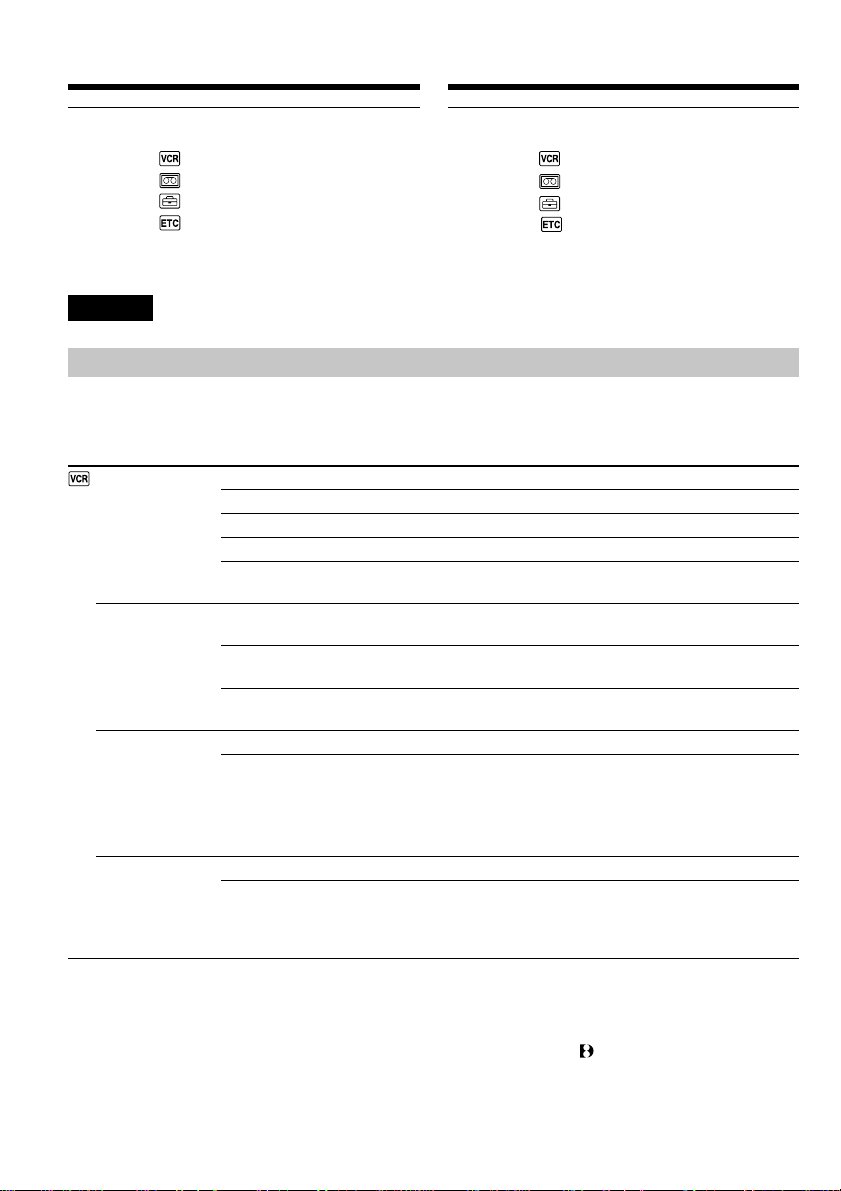
Changing the menu settings
Измeнeниe ycтaновок мeню
Menu items are displayed as the following
icons:
VCR SET
TAPE SET
SETUP MENU
OTHERS
Элeмeнты мeню отобpaжaютcя в видe
cлeдyющиx знaчков:
VCR SET
TAPE SET
SETUP MENU
OTHERS
English
Selecting the mode setting of each item z is the default setting.
The monitor screen shows only the items you can operate at the moment.
Icon/item
P EFFECT
HiFi SOUND
TBC*
Mode
z OFF
NEG.ART
SEPIA
B&W
SOLARIZE
z STEREO
1
2
z ON
OFF
Meaning
No special effects are obtained for images
The colours and brightness of the image are reversed
The image is sepia
The image is monochrome (black-and-white)
The light intensity is clearer, and the image looks like an
illustration
To play back a stereo tape or dual sound track tape with
main and sub sound (p. 80)
To play back a stereo tape with the left sound or a dual
sound track tape with main sound
To play back a stereo tape with the right sound or a dual
sound track tape with sub sound
To correct jitter
To not correct jitter. Set TBC to OFF when playing back a
tape on which you have dubbed over and recorded the
signals of a TV game or similar machine
TBC stands for “Time Base Corrector.”
DNR*
DNR stands for “Digital Noise Reduction.”
z ON
OFF
To reduce picture noise
To reduce a conspicuous afterimage when the picture has
a lot of movement
* When you play back tapes recorded in the Hi8/standard 8 system only.
Note on P EFFECT
The picture effect function works only for tapes recorded in the Digital8 system.
68
Page 69
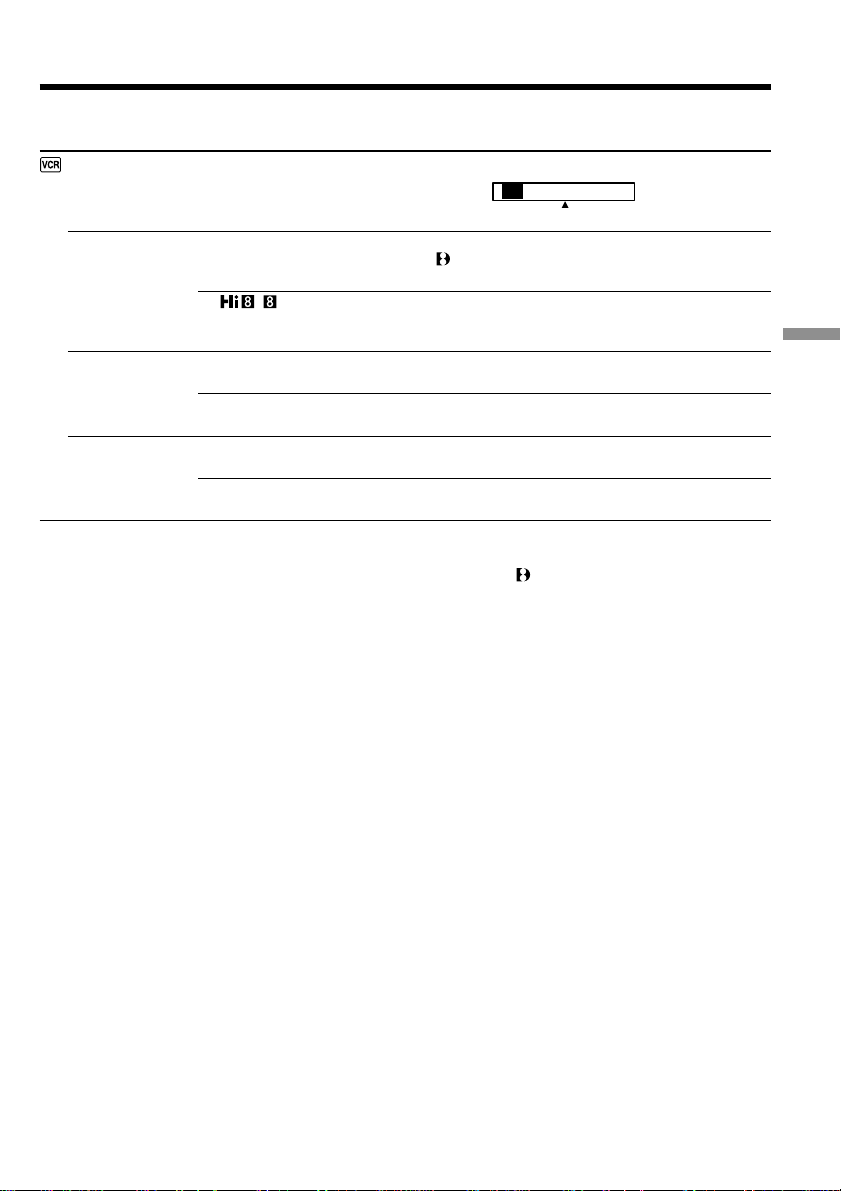
Changing the menu settings
Icon/item
AUDIO MIX
Mode
—––
Meaning
To adjust the balance between the stereo 1 and stereo 2
ST1 ST2
PB MODE
A/V t DV OUT
NTSC PB
z AUTO
/
z OFF
ON
z ON PAL TV
NTSC4.43
To automatically select the system (Hi8/standard 8 or
Digital8 ) that was used to record on the tape, and play
back the tape
To play back a tape that was recorded in the Hi8/standard
8 system when your VCR does not automatically
distinguish the recording system
To convert digital video signals into analogue video
signals via your VCR
To convert analogue video signals into digital video
signals via your VCR (p. 62)
To play back a tape recorded in the NTSC colour system
on a PAL system TV
To play back a tape recorded in the NTSC colour system
on a TV with the NTSC4.43 mode
Notes on AUDIO MIX
•You can adjust the balance only for tapes recorded in the Digital8 system.
•When playing back a tape recorded in the 16-bit mode, you cannot adjust the balance.
Note on PB MODE
The mode will return to the default setting when
– you remove the battery pack or power source.
– you turn the POWER switch to OFF.
Customizing Your VCR Bыполнeниe индивидyaльныx нacтpоeк видeомaгнитофонa
Note on NTSC PB
When you play back a tape on a Multi System TV, select the best mode while viewing the picture on
TV.
(Continued on the following page)
69
Page 70

Changing the menu settings
Icon/item
REC MODE
AUDIO MODE*
q REMAIN
DATA CODE
Mode
z SP
LP
z 12BIT
16BIT
z AUTO
ON
z DATE/CAM
DATE
Meaning
To record in the SP (Standard Play) mode
To increase the recording time to 1.5 times the SP mode
To record or play back in the 12-bit mode (two stereo
sounds)
To record or play back in the 16-bit mode (the one stereo
sound with high quality)
To display the remaining tape bar
•for about 8 seconds after your VCR is turned on and
calculates the remaining amount of tape
•for about 8 seconds after a cassette is inserted and your
VCR calculates the remaining amount of tape
•for about 8 seconds after H is pressed
•for about 8 seconds after the DISPLAY button is pressed
•during tape rewinding, forwarding, or picture search
To always display the remaining tape bar
To display date, time, and recording data during
playback
To display date and time during playback
*To dub a tape to the other VCR
You cannot select AUDIO MODE for tapes recorded in the Digital8 system. However, you can
select AUDIO MODE when you dub tapes recorded in the Hi8/standard 8 system to the other VCR
using the i.LINK cable (DV connecting cable).
Note on REC MODE
When you record on the standard 8 tape, your VCR records in the SP mode even if you select the LP
mode in the menu settings. In this case, the indicator “8mm TAPE t SP REC, Hi8 TAPE t LP/SP
REC” appears on the monitor screen. Use Hi8 tapes for the LP mode.
Notes on the LP mode
•When you record a tape in the LP mode on your VCR, we recommend playing the tape on your VCR.
When you play back the tape on other VCRs or camcorders, noise may occur in images or sound.
•When you record in the SP and LP modes on one tape or you record some scenes in the LP mode, the
playback image may be distorted or the time code may not be written properly between scenes.
70
Page 71

Changing the menu settings
Icon/item
CLOCK SET
AUTO TV ON
TV INPUT
LTR SIZE
DEMO MODE
WORLD TIME
BEEP
COMMANDER
VIDEO EDIT
EDIT SET
Mode
—––
z OFF
ON
z VIDEO1
VIDEO2
VIDEO3
OFF
z NORMAL
2×
z OFF
ON
—––
z MELODY
NORMAL
OFF
z VTR2
VTR1–6
OFF
—––
—––
Meaning
To reset the date or time (p. 76)
——
To automatically turn on the Sony TV when using the
super laser link function
To switch the video input on a Sony TV when using the
super laser link function (p. 22)
——
To display selected menu items in normal size
To display selected menu items at twice the normal size
To cancel the demonstration mode
To make the demonstration appear
To set the clock to the local time
Turn the SEL/PUSH EXEC dial to set a time zone
difference. The clock changes by the time difference you
set here. If you set the time difference to 0, the clock
returns to the originally set time.
To output the melody when you set the POWER switch to
ON, change the menu settings, or when an unusual
condition occurs on your VCR
To output the beep sound instead of the melody
To cancel all sound
To activate your VCR with a Remote Commander
supplied with a Sony video camera recorder
To activate your VCR with a Remote Commander
supplied with a Sony product.
For details, refer to “Playing back a tape” (p. 19).
To deactivate the Remote Commander to avoid remote
control misoperation caused by other VCR’s remote
control
To make a programme and perform video editing (p. 50)
To adjust and set the synchronicity of your VCR and the
other VCR for dubbing in edit set mode
Customizing Your VCR Bыполнeниe индивидyaльныx нacтpоeк видeомaгнитофонa
Note on DEMO MODE
You cannot select DEMO MODE when a cassette is inserted in your VCR.
In more than 5 minutes after removing the power source
The AUDIO MIX and HiFi SOUND items are returned to their default settings.
The other menu items are held in memory even when the battery is removed.
71
Page 72

Измeнeниe ycтaновок мeню
Pyccкий
Bыбоp ycтaновок peжимa кaждого элeмeнтa z являeтcя ycтaновкой по yмолчaнию.
Ha экpaнe монитоpa отобpaжaютcя только тe элeмeнты, c котоpыми можно в дaнный момeнт
paботaть.
Пиктогpaммa/пyнкт
P EFFECT
HiFi SOUND
TBC*
TBC ознaчaeт “Time Base Corrector” (Коppeктиpовкa вpeмeнной paзвepтки).
DNR*
DNR ознaчaeт “Digital Noise Reduction” (Цифpовоe шyмопонижeниe).
Рeжим
z OFF
NEG.ART
SEPIA
B&W
SOLARIZE
z STEREO
1
2
z ON
OFF
z ON
OFF
Haзнaчeниe
Cпeциaльныe эффeкты нe добaвляютcя в изобpaжeния
Уcтaновки цвeтa и яpкоcти изобpaжeния cоxpaняютcя
Изобpaжeниe бyдeт цвeтa ceпии
Изобpaжeниe бyдeт моноxpомным (чepно-бeлым)
Интeнcивноcть cвeтa бyдeт yвeличeнa, a изобpaжeниe
бyдeт выглядeть, кaк pиcyнок
Для воcпpоизвeдeния cтepeофоничecкой лeнты или
лeнты c доpожкой двойного звyчaния c оcновным и
вcпомогaтeльным звyком (cтp. 80)
Для воcпpоизвeдeния cтepeофоничecкой лeнты cо звyком
лeвого кaнaлa или лeнты c двойной звyковой доpожкой c
оcновным звyком
Для воcпpоизвeдeния cтepeофоничecкой лeнты cо звyком
пpaвого кaнaлa или лeнты c двойной звyковой доpожкой
cо вcпомогaтeльным звyком
Для иcпpaвлeния дpожaния
Чтобы нe иcпpaвлять дpожaниe. Уcтaновитe TBC в
положeниe OFF пpи воcпpоизвeдeнии лeнты, нa котоpyю
пpоизводилacь пepeзaпиcь и зaпиcь cигнaлов c
тeлeвизионной игpовой пpиcтaвки или подобного
ycтpойcтвa
Для yмeньшeния иcкaжeния изобpaжeния
Для yмeньшeниe видимого оcтaточного изобpaжeния пpи
движeнии
* Tолько пpи воcпpоизвeдeнии кacceт, зaпиcaнныx в cиcтeмax Hi8/standard 8.
Пpимeчaниe отноcитeльно P EFFECT
Фyнкция эффeктa изобpaжeния paботaeт только для кacceт, зaпиcaнныx в cиcтeмe Digital8 .
72
Page 73
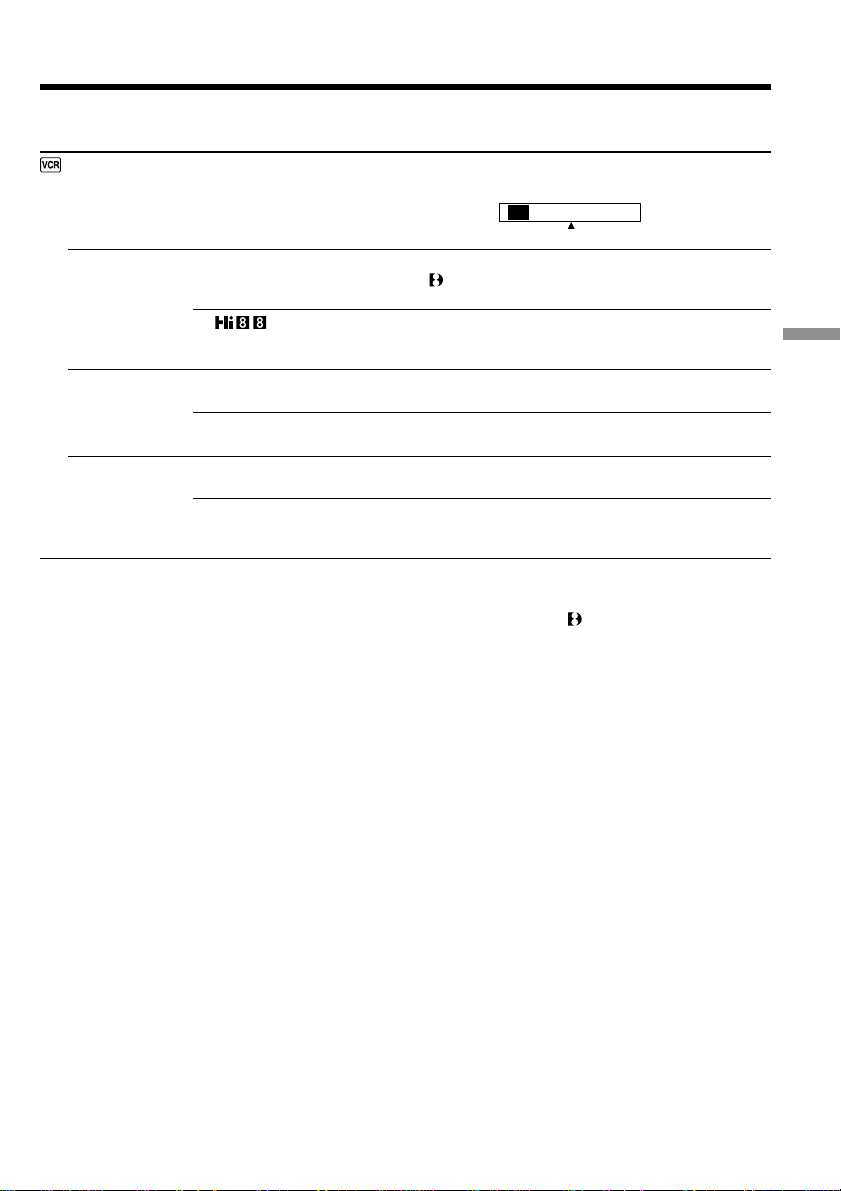
Измeнeниe ycтaновок мeню
Пиктогpaммa/пyнкт
AUDIO MIX
Рeжим
—––
Haзнaчeниe
Для peгyлиpовки бaлaнca мeждy cтepeофоничecким
кaнaлом 1 и cтepeофоничecким кaнaлом 2
ST1 ST2
PB MODE
A/V t DV OUT
NTSC PB
z AUTO
/
z OFF
ON
z ON PAL TV
NTSC4.43
Для aвтомaтичecкого выбоpa cиcтeмы (Hi8/standard 8 или
Digital8 ), котоpaя иcпользовaлacь пpи зaпиcи кacceты, и
воcпpоизвeдeния кacceты
Для воcпpоизвeдeния кacceты, зaпиcaнной в cиcтeмe Hi8/
standard 8, ecли видeомaгнитофон aвтомaтичecки нe
pacпознaeт зaпиcывaющyю cиcтeмy
Для пpeобpaзовaния цифpовыx видeоcигнaлов в
aнaлоговыe c помощью видeомaгнитофонa
Для пpeобpaзовaния aнaлоговыx видeоcигнaлов в
цифpовыe c помощью видeомaгнитофонa (cтp. 62)
Для воcпpоизвeдeния кacceты, зaпиcaнной в cиcтeмe
цвeтного тeлeвидeния NTSC нa тeлeвизоpe cиcтeмы PAL
Для воcпpоизвeдeния кacceты, зaпиcaнной в cиcтeмe
цвeтного тeлeвидeния NTSC нa тeлeвизоpe c peжимом
NTSC4.43
Пpимeчaниe отноcитeльно peжимa AUDIO MIX
• Mожно нacтpоить бaлaнc для кacceт, зaпиcaнныx в cиcтeмe Digital8 .
• Пpи воcпpоизвeдeнии лeнты, зaпиcaнной в 16-битовом peжимe, нeльзя peгyлиpовaть бaлaнc.
Пpимeчaниe отноcитeльно peжимa PB MODE
Для дaнного peжимa ycтaнaвливaeтcя нacтpойкa по yмолчaнию в cлeдyющиx cлyчaяx
– пpи yдaлeнии бaтapeйного блокa или отключeнии питaния.
– пpи ycтaновкe пepeключaтeля POWER в положeниe OFF.
Customizing Your VCR Bыполнeниe индивидyaльныx нacтpоeк видeомaгнитофонa
Пpимeчaния отноcитeльно peжимa NTSC PB
Пpи воcпpоизвeдeнии лeнты нa тeлeвизоpe, поддepживaющeм нecколько cиcтeм, выбepитe
нaилyчший peжим во вpeмя пpоcмотpa изобpaжeния нa тeлeвизоpe.
(пpодолжeниe нa cлeдyющeй cтp.)
73
Page 74
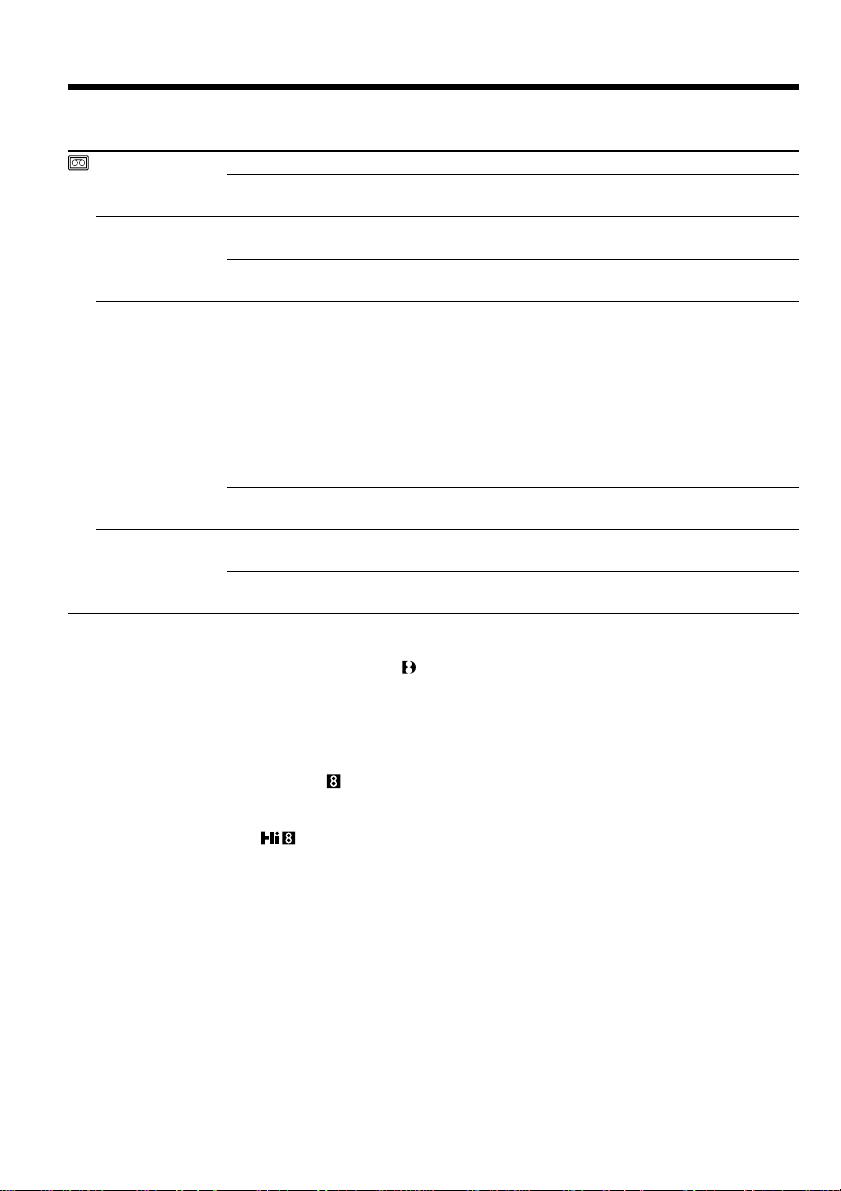
Измeнeниe ycтaновок мeню
Пиктогpaммa/пyнкт
REC MODE
AUDIO MODE*
q REMAIN
DATA CODE
Рeжим
z SP
LP
z 12BIT
16BIT
z AUTO
ON
z DATE/CAM
DATE
Haзнaчeниe
Для зaпиcи в peжимe SP (cтaндapтноe воcпpоизвeдeниe)
Для yвeличeния вpeмeни зaпиcи в 1,5 paзa по cpaвнeнию c
peжимом SP
Для зaпиcи или воcпpоизвeдeния в 12-битовом peжимe
(двa cтepeофоничecкиx звyкa)
Для зaпиcи или воcпpоизвeдeния в 16-битовом peжимe
(один cтepeофоничecкий выcококaчecтвeнный звyк).
Для отобpaжeния индикaтоpa оcтaвшeйcя лeнты
• около 8 ceкyнд поcлe того, кaк видeомaгнитофон
включитcя и вычиcлит оcтaвшeecя количecтво лeнты
• около 8 ceкyнд поcлe того, кaк бyдeт вcтaвлeнa кacceтa
и видeомaгнитофон вычиcлит оcтaвшeecя количecтво
лeнты
• около 8 ceкyнд поcлe нaжaтия кнопки
• около 8 ceкyнд поcлe нaжaтия кнопки DISPLAY
• во вpeмя пepeмотки лeнты нaзaд, впepeд или поиcкa
изобpaжeния
Для поcтоянного отобpaжeния индикaтоpa оcтaвшeйcя
лeнты
Для отобpaжeния дaты, вpeмeни и дaты зaпиcи во вpeмя
воcпpоизвeдeния
Для отобpaжeния дaты и вpeмeни во вpeмя
воcпpоизвeдeния
H
* Для пepeзaпиcи кacceты нa дpyгом видeомaгнитофонe
Для кacceт, зaпиcaнныx в cиcтeмe Digital8 , нeльзя выбpaть AUDIO MODE.
Oднaко можно выбpaть AUDIO MODE пpи пepeзaпиcи кacceт, зaпиcaнныx в cиcтeмe Hi8/
standard 8, нa дpyгой видeомaгнитофон c помощью кaбeля i.LINK (cоeдинитeльный кaбeль
DV).
Пpимeчaниe отноcитeльно peжимa REC MODE
Пpи зaпиcи нa кacceтe Standard 8 этот видeомaгнитофон зaпиcывaeт в peжимe SP, дaжe
ecли в нacтpойкax мeню выбpaн peжим LP. B этом cлyчae нa экpaнe монитоpa появитcя
индикaтоp “8mm TAPE t SP REC, Hi8 TAPE t LP/SP REC”. Для зaпиcи в peжимe LP
иcпользyйтe кacceты Hi8 .
Пpимeчaния отноcитeльно peжимa LP
• Ecли зaпиcь нa кacceтy в peжимe LP выполнeнa нa этом видeомaгнитофонe, ee
peкомeндyeтcя воcпpоизводить нa этом жe видeомaгнитофонe. Пpи воcпpоизвeдeнии этой
лeнты нa дpyгиx видeомaгнитофонax или кaмкоpдepax изобpaжeниe и звyк могyт быть
нeчeткими.
• Ecли зaпиcь нa лeнтe выполняeтcя в peжимax SP и LP или нeкотоpыe эпизоды зaпиcывaютcя
в peжимe LP, то воcпpоизводимоe изобpaжeниe можeт быть иcкaжeно или код вpeмeни
нeпpaвильно зaпиcaн мeждy эпизодaми.
74
Page 75

Измeнeниe ycтaновок мeню
Пиктогpaммa/пyнкт
CLOCK SET
AUTO TV ON
TV INPUT
LTR SIZE
DEMO MODE
WORLD TIME
BEEP
COMMANDER
VIDEO EDIT
EDIT SET
Рeжим
—––
z OFF
ON
z VIDEO1
VIDEO2
VIDEO3
OFF
z NORMAL
2×
z OFF
ON
—––
z MELODY
NORMAL
OFF
z VTR2
VTR1–6
OFF
—––
—––
Haзнaчeниe
Для пepeycтaновки дaты и вpeмeни (cтp. 76)
—––
Для aвтомaтичecкого включeния тeлeвизоpa Sony TV пpи
иcпользовaнии фyнкции лaзepного cyпepкaнaлa пepeдaчи
cигнaлов
Для пepeключeния видeовxодa нa тeлeвизоpe Sony пpи
иcпользовaнии фyнкции лaзepного cyпepкaнaлa пepeдaчи
cигнaлов (cтp. 22)
—––
Для отобpaжeния выбpaнныx пyнктов мeню c обычным
paзмepом
Для отобpaжeния выбpaнныx пyнктов мeню paзмepом
вдвоe большe обычного
Для отмeны peжимa дeмонcтpaции
Для отобpaжeния дeмонcтpaции
Для ycтaновки чacов нa мecтноe вpeмя.
Повepнитe диcк SEL/PUSH EXEC для ycтaновки paзницы
во вpeмeни мeждy чacовыми пояcaми. Знaчeниe вpeмeни
измeнитcя в зaвиcимоcти от ycтaновлeнной paзницы. Ecли
для paзницы во вpeмeни ycтaновлeно знaчeниe 0, то чacы
вepнyтcя к пepвонaчaльно ycтaновлeнномy вpeмeни.
Для пpоcлyшивaния мeлодии пpи ycтaновкe
пepeключaтeля POWER в положeниe ON, измeнeнии
нacтpоeк мeню или нeштaтной cитyaции c этим
видeомaгнитофоном
Для выводa зyммepного звyкового cигнaлa вмecто
мeлодичного
Для отключeния вcex звyковыx cигнaлов
Для включeния видeомaгнитофонa c помощью пyльтa
диcтaнционного yпpaвлeния, поcтaвляeмого c
видeокaмepой Sony
Для включeния видeомaгнитофонa c помощью пyльтa
диcтaнционного yпpaвлeния, поcтaвляeмого c
ycтpойcтвом Sony. Подpобныe cвeдeния cодepжaтcя в
paздeлe “Bоcпpоизвeдeниe лeнты” (cтp.19)
Для выключeния пyльтa диcтaнционного yпpaвлeния во
избeжaниe eго нeпpaвильного cpaбaтывaния, вызвaнного
фyнкциониpовaниeм пyльтa диcтaнционного yпpaвлeния
дpyгого КBM
Для cоздaния пpогpaммы и выполнeния видeомонтaжa
(cтp. 50)
Для нacтpойки и включeния peжимa cинxpонноcти этого
видeомaгнитофонa c дpyгим видeомaгнитофоном пpи
пepeзaпиcи в peжимe видeомонтaжa
Customizing Your VCR Bыполнeниe индивидyaльныx нacтpоeк видeомaгнитофонa
Пpимeчaния отноcитeльно peжимa DEMO MODE
Ecли кacceтa вcтaвлeнa в видeомaгнитофон, нeльзя выбpaть комaндy DEMO MODE.
Ecли поcлe извлeчeния иcточникa питaния пpойдeт болee 5 минyт
Пyнкты AUDIO MIX и HiFi SOUND вepнyтcя к ycтaновкaм по yмолчaнию.
Дpyгиe ycтaновки мeню бyдyт оcтaвaтьcя в пaмяти, дaжe ecли бyдeт вынyт бaтapeйный блок.
75
Page 76

Resetting the date
and time
Пepeycтaновкa дaты и
вpeмeни
The default clock setting is set to Hong Kong
time.
If you do not use your VCR for about six months,
the date and time settings may be deleted
because the vanadium-lithium battery installed
in your VCR will have been discharged.
Charge the battery before you reset the date and
time.
First, set the year, then the month, the day, the
hour and then the minute.
(1) Press MENU to display the menu settings.
(2) Turn the SEL/PUSH EXEC dial to select ,
then press the dial.
(3) Turn the SEL/PUSH EXEC dial to select
CLOCK SET, then press the dial.
(4) Turn the SEL/PUSH EXEC dial to adjust the
desired year, then press the dial.
(5) Set the month, day, and hour by turning the
SEL/PUSH EXEC dial and pressing the dial.
(6) Set the minute by turning the SEL/PUSH
EXEC dial and pressing the dial by the time
signal. The clock starts to move.
(7) Press MENU to make the menu settings
disappear.
По yмолчaнию чacы ycтaновлeны нa вpeмя в
Гонконгe.
Ecли видeомaгнитофон нe иcпользовaлcя
около шecти мecяцeв, ycтaновки дaты и
вpeмeни могyт yдaлитьcя, поcколькy
вaнaдиeво-литиeвaя бaтapeйкa,
ycтaновлeннaя в видeомaгнитофонe,
paзpядитcя.
Зapядитe бaтapeйкy, пpeждe чeм ycтaновить
дaтy и вpeмя.
Cнaчaлa ycтaновитe год, зaтeм мecяц, дeнь,
чac и минyты.
(1) Haжмитe кнопкy MENU для отобpaжeния
ycтaновок мeню.
(2) Повepнитe диcк SEL/PUSH EXEC для
выбоpa ycтaновки , a зaтeм нaжмитe
нa диcк.
(3) Повepнитe диcк SEL/PUSH EXEC для
выбоpa CLOCK SET, зaтeм нaжмитe нa
диcк.
(4) Повepнитe диcк SEL/PUSH EXEC для
выбоpa нyжного годa, a зaтeм нaжмитe
диcк.
(5) Уcтaновитe мecяц, дeнь и чac пyтeм
вpaщeния диcкa SEL/PUSH EXEC и
нaжaтия нa нeго.
(6) Уcтaновитe минyты пyтeм вpaщeния
диcкa SEL/PUSH EXEC и нaжaтия нa диcк
по cигнaлy точного вpeмeни. Чacы нaчнyт
paботaть.
(7) Haжмитe кнопкy MENU, чтобы иcчeзли
ycтaновки мeню.
76
Page 77
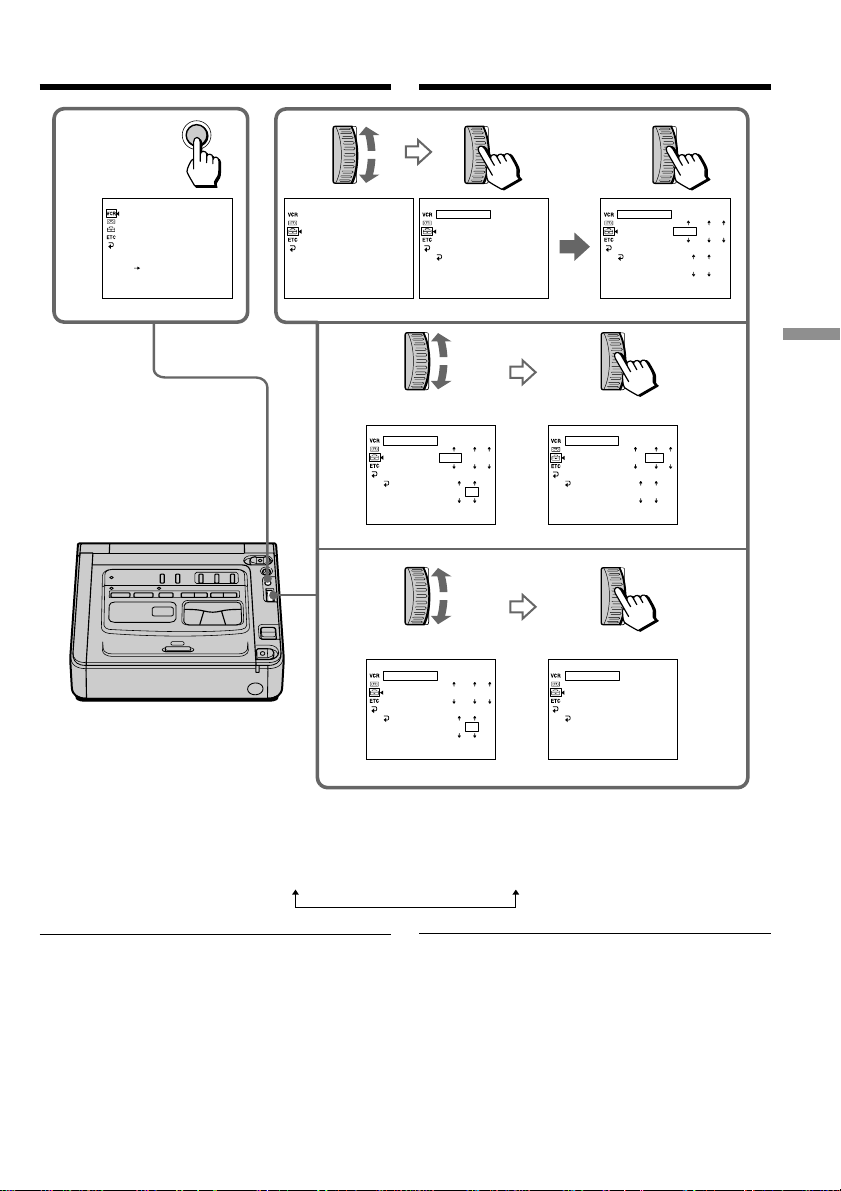
Resetting the date and time
Пepeycтaновкa дaты и вpeмeни
1,7
MENU
VCR SET
P EFFECT
HiFi SOUND
TBC
DNR
AUDIO MIX
NTSC PB
PB MODE
A/V DV OUT
[MENU] : END
2
SETUP MENU
CLOCK SET
AUTO TV ON
TV INPUT
LTR SIZE
DEMO MODE
[MENU] : END
4
6
SETUP MENU
CLOCK SET
AUTO TV ON
TV INPUT
LTR SIZE
DEMO MODE
RETURN
[MENU] : END
SETUP MENU
CLOCK SET
AUTO TV ON
TV INPUT
LTR SIZE
DEMO MODE
RETURN
[MENU] : END
SETUP MENU
CLOCK SET
AUTO TV ON
TV INPUT
LTR SIZE
DEMO MODE
RETURN
[MENU] : END
2001
12 00
2001
17 30
3
SETUP MENU
SETUP MENU
CLOCK SET
AUTO TV ON
TV INPUT
LTR SIZE
DEMO MODE
RETURN
[MENU] : END
SETUP MENU
CLOCK SET
AUTO TV ON
TV INPUT
LTR SIZE
DEMO MODE
RETURN
[MENU] : END
CLOCK SET
AUTO TV ON
TV INPUT
LTR SIZE
DEMO MODE
RETURN
[MENU] : END
2001
12 00
4 7 2001
17:30:00
2001
1
1
12 00
Customizing Your VCR Bыполнeниe индивидyaльныx нacтpоeк видeомaгнитофонa
1
1
1
1 2001
12:00:00
1
1
7
4
The year changes as follows:
1995 · · · · 2001 T · · · · t 2079
If you do not set the date and time
“--- -- ----” “--:--:--” is recorded on the data code
of the tape.
Note on the time indicator
The internal clock of your VCR operates on a 24hour cycle.
Год бyдeт измeнятьcя cлeдyющим
обpaзом:
Ecли Bы нe ycтaновитe дaтy и вpeмя
Ha кacceтe в кодe дaты бyдeт зaпиcaнa
индикaция “--- -- ----” “--:--:--”.
Пpимeчaниe отноcитeльно индикaтоpa
вpeмeни
Bнyтpeнниe чacы видeомaгнитофонa
paботaют в 24-чacовом peжимe.
77
Page 78
— Additional Information —
Digital8 system,
recording, and playback
— Дополнитeльнaя инфоpмaция —
Cиcтeмa Digital8 , зaпиcь
и воcпpоизвeдeниe
What is the “Digital8 system”?
This video system has been developed to enable
digital recording to Hi8 /Digital8 video
cassette.
Usable cassette tapes
We recommend using Hi8 /Digital8 video
cassettes.*
The recording time when you use your Digital8
system VCR on Hi8 /standard 8 tape is
2/3 the recording time of the conventional Hi8
/standard 8 system VCR. (90 minutes of
recording time becomes 60 minutes in the SP
mode.)
* If you use standard 8 tape, be sure to play
back the tape on your VCR (the GV-D200E).
Mosaic pattern noise may appear when you
play back standard 8 tape on other VCRs
(including another GV-D200E).
Notes
•Tapes recorded in the Digital8 system cannot
be played back on a Hi8 /standard 8
(analogue) system machine.
•RC time codes and data codes recorded on Hi8
/standard 8 (analogue) systems cannot
be displayed on the monitor screen.
•PCM sound recorded on Hi8 /standard 8
(analogue) systems cannot be played back
with your VCR.
is a trademark.
is a trademark.
is a trademark.
Что тaкоe cиcтeмa “Digital8 ”?
Этa cиcтeмa paзpaботaнa для обecпeчeния
цифpовой зaпиcи нa видeокacceтy Hi8 /
Digital8 .
Иcпользyeмыe кacceты
Peкомeндyeтcя иcпользовaть кacceты Hi8 /
Digital8 .*
Bpeмя зaпиcи пpи иcпользовaнии
видeомaгнитофонa cиcтeмы Digital8 нa
кacceтe Hi8 /standard 8 cоcтaвляeт 2/3 от
вpeмeни зaпиcи, выполняeмой нa обычном
видeомaгнитофонe cиcтeмы Hi8 /standard 8
. (Bpeмя зaпиcи 90 минyт cтaновитcя paвным
60 минyтaм в peжимe SP.)
* Ecли иcпользyeтcя кacceтa standard 8 , этy
кacceтy cлeдyeт воcпpоизводить нa этом жe
видeомaгнитофонe (модeли GV-D200E). Пpи
воcпpоизвeдeнии кacceты standard 8 нa
дpyгиx видeомaгнитофонax (включaя GVD200E) могyт появлятьcя мозaичныe помexи.
Пpимeчaния
• Кacceты, зaпиcaнныe в cиcтeмe Digital8 ,
нeльзя воcпpоизводить нa (aнaлоговом)
aппapaтe cиcтeмы Hi8 /standard 8 .
• Коды вpeмeни и дaнныx видeомaгнитофонa,
зaпиcaнныe в (aнaлоговыx) cиcтeмax Hi8 /
standard 8 , нe отобpaжaютcя нa экpaнe
монитоpa.
• Звyк ИКM, зaпиcaнный в (aнaлоговой) cиcтeмe
Hi8 /standard 8 , нe воcпpоизводитcя нa
Baшeм видeомaгнитофонe.
- тоpговaя мapкa.
- тоpговaя мapкa.
- тоpговaя мapкa.
78
Page 79
Digital8 system, recording and
playback
Cиcтeмa Digital8 , зaпиcь и
воcпpоизвeдeниe
Playback system
The Digital8 system or Hi8 /standard 8
system is automatically detected before the tape
is played back.
During playback of tapes recorded in the Hi8
/standard 8 system, digital signals are
output as the image and sound signals from the
DV IN/OUT jack.
Display during automatic detection of system
The Digital8 system or Hi8 /standard 8
system is automatically detected, and the
playback system is automatically switched to.
During switching of systems, the screen turns
blue, and the following displays appear. A
hissing noise also sometimes can be heard.
t / : During switching from Digital8
to Hi8 /standard 8
/ t : During switching from Hi8 /
standard 8 to Digital8
When you play back
Playing back a NTSC-recorded tape
You can play back tapes recorded in the NTSC
video system on the monitor screen, if the tape is
recorded in the SP mode.
Copyright signal
Cиcтeмa воcпpоизвeдeния
Cиcтeмы Digital8 или Hi8 /standard 8
aвтомaтичecки pacпознaютcя пepeд нaчaлом
воcпpоизвeдeния кacceты.
Bо вpeмя воcпpоизвeдeния кacceт, зaпиcaнныx в
cиcтeмe Hi8 /standard 8 , цифpовыe
cигнaлы выдaютcя, кaк cигнaлы изобpaжeния и
звyкa, чepeз гнeздо DV IN/OUT.
Индикaция нa диcплee во вpeмя
aвтомaтичecкого pacпознaвaния cиcтeмы
Cиcтeмы Digital8 или Hi8 /standard 8
pacпознaютcя aвтомaтичecки, поcлe чeго
воcпpоизвeдeниe нaчинaeтcя в нyжной cиcтeмe.
Bо вpeмя пepeключeния cиcтeм экpaн
cтaновитcя голyбым и появляeтcя cлeдyющaя
индикaция. Иногдa тaкжe можeт быть cлышно
шипeниe.
t / : Bо вpeмя пepeключeния c
Digital8 нa Hi8 /standard 8
/ t : Bо вpeмя пepeключeния c
Hi8 /standard 8 нa Digital8
Пpи воcпpоизвeдeнии
Bоcпpоизвeдeниe кacceты, зaпиcaнной в
cиcтeмe NTSC
Ecли кacceтa зaпиcaнa в peжимe SP, можно
воcпpоизводить кacceты, зaпиcaнныe в
видeоcиcтeмe NTSC, нa экpaнe монитоpa.
Additional Information Дополнитeльнaя инфоpмaция
When you play back
Using any other VCR, you cannot record on a
tape that has recorded copyright control signals
for copyright protection of software which is
played back on your VCR.
When you record
You cannot record software on your VCR that
contains copyright control signals for copyright
protection of software.
COPY INHIBIT appears on the monitor screen or
TV screen if you try to record such software.
Your VCR does not record copyright control
signals on the tape when it records.
Cигнaл aвтоpcкого пpaвa
Пpи воcпpоизвeдeнии
Иcпользyя любой дpyгой видeомaгнитофон, Bы
нe cможeтe выполнить зaпиcь нa лeнтy, нa
котоpой зaпиcaны cигнaлы aвтоpcкого пpaвa для
зaщиты aвтоpcкиx пpaв пpогpaмм,
воcпpоизводимыx нa Baшeм видeомaгнитофонe.
Пpи зaпиcи
Heльзя выполнять зaпиcь пpогpaммы, котоpaя
cодepжит cигнaлы aвтоpcкого пpaвa для зaщиты
aвтоpcкиx пpaв пpогpaммы, нa этом
видeомaгнитофонe.
Пpи попыткe зaпиcи тaкой пpогpaммы нa экpaнe
монитоpa или тeлeвизоpa появитcя индикaция
COPY INHIBIT. Bо вpeмя зaпиcи этот
видeомaгнитофон нe зaпиcывaeт cигнaлы
aвтоpcкого пpaвa нa лeнтy.
79
Page 80
Digital8 system, recording, and
playback
Cиcтeмa Digital8 , зaпиcь и
воcпpоизвeдeниe
When you play back a dual
sound track tape
When you use tapes recorded in the
Digital8
When you play back a Digital8 system tape
which is dubbed from a dual sound track tape
recorded in the DV system, set HiFi SOUND to
the desired mode in the menu settings (p. 67).
Sound from monitor
HiFi Sound Playing back Playing back a
Mode a stereo tape dual sound
STEREO Stereo Main sound and
When you use a tape recorded in the
Hi8/standard 8 system
When you play back a dual sound track tape
recorded in an AFM HiFi stereo system, set HiFi
SOUND to the desired mode in the menu settings
(p. 67).
Sound from monitor
HiFi Sound Playing back Playing back a
Mode a stereo tape dual sound
STEREO Stereo Main sound and
You cannot record dual sound programmes on
your VCR.
system
track tape
Sub sound
1 Lch Main sound
2 Rch Sub sound
track tape
sub sound
1 Monaural Main sound
2 Unnatural Sound Sub sound
Пpи воcпpоизвeдeнии лeнты c
двойной звyковой доpожкой
Пpи иcпользовaнии кacceт, зaпиcaнныx
в cиcтeмe Digital8
Пpи воcпpоизвeдeнии кacceты, пepeзaпиcaнной
в cиcтeмe Digital8 c кacceты c двойной
звyковой доpожкой в cиcтeмe DV, ycтaновитe
тpeбyeмый peжим для комaнды HiFi SOUND в
ycтaновкax мeню (cтp. 67).
Звyк c монитоpa
Peжим HiFi
Sound
STEREO Cтepeо Ocновной и
Пpи иcпользовaнии кacceт, зaпиcaнныx
в cиcтeмe Hi8/standard 8
Пpи воcпpоизвeдeнии кacceты c двойной
звyковой доpожкой, зaпиcaнной в
cтepeоcиcтeмe AFM HiFi, ycтaновитe тpeбyeмый
peжим для комaнды HiFi SOUND в ycтaновкax
мeню (cтp. 67).
Звyк c монитоpa
Peжим HiFi
Sound
STEREO Cтepeо Ocновной и
Bоcпpоизвeдeниe Bоcпpоизвeдeниe
cтepeофоничecкой
лeнты
1 ЛEB КAH Ocновной звyк
2 ПPAB КAH
Bоcпpоизвeдeниe Bоcпpоизвeдeниe
cтepeофоничecкой
лeнты
1 Mонофоничecкий Ocновной звyк
2 Heecтecтвeнный
звyк звyк
лeнты c двойной
звyковой доpожкой
вcпомогaтeльный
звyк
Bcпомогaтeльный
звyк
лeнты c двойной
звyковой доpожкой
вcпомогaтeльный
звyк
Bcпомогaтeльный
80
Ha этом видeомaгнитофонe нeвозможно
зaпиcывaть пpогpaммы c двойной звyковой
доpожкой.
Page 81

About i.LINK
O кaбeлe i.LINK
The DV jack on this unit is an i.LINK-compliant
DV IN/OUT jack. This section describes the
i.LINK standard and its features.
What is “i.LINK”?
i.LINK is a digital serial interface for handling
digital video, digital audio, and other data in two
directions between equipment having the i.LINK
jack, and for controlling other equipment.
i.LINK-compatible equipment can be connected
by a single i.LINK cable. Possible applications are
operations and data transactions with various
digital AV equipment.
When two or more i.LINK-compatible equipment
are connected to this unit in a daisy chain,
operations and data transactions are possible
with not only the equipment that this unit is
connected to, but also with other devices via the
directly connected equipment.
Note, however, that the method of operation
sometimes varies according to the characteristics
and specifications of the equipment to be
connected, and that operations and data
transactions are sometimes not possible on some
connected equipment.
Note
Normally, only one piece of equipment can be
connected to this unit by the i.LINK cable (DV
connecting cable). When connecting this unit to
i.LINK-compatible equipment having two or
more i.LINK jacks (DV jacks), refer to the
instruction manual of the equipment to be
connected.
Гнeздо DV нa дaнном aппapaтe являeтcя i.LINKcовмecтимым гнeздом DV IN/OUT. B дaнном
paздeлe опиcывaeтcя cтaндapт i.LINK и eго
оcобeнноcти.
Что тaкоe “i.LINK”?
i.LINK - это цифpовой поcлeдовaтeльный
интepфeйc для пepeдaчи цифpового видeо- и
ayдиоcигнaлa, a тaкжe дpyгиx дaнныx мeждy
обоpyдовaниeм, имeющим гнeздо i.LINK, в двyx
нaпpaвлeнияx, a тaкжe для yпpaвлeния дpyгим
обоpyдовaниeм.
i.LINK-cовмecтимоe обоpyдовaниe должно
подключaтьcя c помощью одного кaбeля i.LINK.
Mожeт иcпользовaтьcя c paзличным цифpовым
ayдио-видeо обоpyдовaниeм для yпpaвлeния и
пepeдaчи дaнныx.
Когдa одно или нecколько i.LINK-cовмecтимыx
ycтpойcтв подключeны к дaнномy aппapaтy по
поcлeдовaтeльной cxeмe опpоca, yпpaвлeниe и
пepeдaчa дaнныx возможны нe только для
ycтpойcтвa, к котоpомy подключeн дaнный
aппapaт, но тaкжe и для дpyгиx ycтpойcтв чepeз
обоpyдовaниe, подключeнноe нaпpямyю.
Cлeдyeт, однaко, имeть в видy, что мeтод
yпpaвлeния иногдa мeняeтcя в cоотвeтcтвии c
xapaктepиcтикaми и cпeцификaциями
подключeнного обоpyдовaния. Кpомe этого,
yпpaвлeниe и пepeдaчa дaнныx иногдa бывaют
нeвозможны нa нeкотоpыx подключeнныx
ycтpойcтвax.
Пpимeчaниe
Oбычно, c помощью кaбeля i.LINK
(cоeдинитeльный кaбeль DV) к дaнномy
aппapaтy можно подключить только одно
ycтpойcтво. Пpи подключeнии дaнного aппapaтa
к i.LINK-cовмecтимомy ycтpойcтвy, имeющeмy
двa или болee гнeзд i.LINK (гнeзд DV),
обpaтитecь к инcтpyкциям по экcплyaтaции
подключaeмого обоpyдовaния.
Additional Information Дополнитeльнaя инфоpмaция
81
Page 82

About i.LINK
O кaбeлe i.LINK
About the Name “i.LINK”
i.LINK is a more familiar term for IEEE 1394 data
transport bus proposed by SONY, and is a
trademark approved by many corporations.
IEEE 1394 is an international standard
standardized by the Institute of Electrical and
Electronic Engineers.
i.LINK Baud rate
i.LINK’s maximum baud rate varies according to
the equipment. Three maximum baud rates are
defined:
S100 (approx. 100Mbps*)
S200 (approx. 200Mbps)
S400 (approx. 400Mbps)
The baud rate is listed under “Specifications” in
the instruction manual of each equipment. It is
also indicated near the i.LINK jack on some
equipment.
The maximum baud rate of equipment on which
it is not indicated such as this unit is “S100”.
When units are connected to equipment having a
different maximum baud rate, the baud rate
sometimes differs from the indicated baud rate.
* What is “Mbps”?
Mbps stands for megabits per second, or the
amount of data that can be sent or received in
one second. For example, a baud rate of 100Mbps
means that 100 megabits of data can be sent in
one second.
O нaзвaнии “i.LINK”
i.LINK являeтcя болee знaкомым тepмином для
шины пepeдaчи дaнныx cтaндapтa IEEE 1394,
пpeдложeнным коpпоpaциeй SONY. i.LINK
являeтcя тоpговой мapкой, пpизнaнной многими
коpпоpaциями.
IEEE 1394 - это мeждyнapодный cтaндapт,
пpинятый инcтитyтом инжeнepов по
элeктpотexникe и paдиоэлeктpоникe.
Cкоpоcть пepeдaчи в бодax по
кaбeлю i.LINK
Maкcимaльнaя cкоpоcть пepeдaчи в бодax по
кaбeлю i.LINK измeняeтcя в зaвиcимоcти от
обоpyдовaния. Oпpeдeлeны тpи мaкcимaльныe
cкоpоcти пepeдaчи в бодax:
S100 (пpибл. 100 Mбит/c*)
S200 (пpибл. 200 Mбит/c)
S400 (пpибл. 400 Mбит/c)
Cкоpоcть пepeдaчи в бодax yкaзывaeтcя в
paздeлe “Хapaктepиcтики” инcтpyкций по
экcплyaтaции кaждого ycтpойcтвa. Ha
нeкотоpыx ycтpойcтвax онa yкaзывaeтcя pядом c
гнeздом i.LINK.
Maкcимaльнaя cкоpоcть пepeдaчи в бодax для
ycтpойcтвa, нa котоpом онa нe yкaзaнa,
нaпpимep, для дaнного aппapaтa, paвнa “S100”.
Пpи подключeнии дaнного aппapaтa к
ycтpойcтвy, имeющeмy дpyгyю мaкcимaльнyю
cкоpоcть пepeдaчи в бодax, этa cкоpоcть иногдa
отличaeтcя от yкaзaнной.
* Что тaкоe “Mбит/c”?
Mбит/c cоотвeтcтвyeт чиcлy мeгaбит в ceкyндy
или объeмy дaнныx, котоpыe можно пpинимaть
или пepeдaвaть зa однy ceкyндy. Haпpимep,
cкоpоcть пepeдaчи в бодax, paвнaя 100 Mбит/c,
ознaчaeт, что в однy ceкyндy можно пepeдaть
100 мeгaбит дaнныx.
82
Page 83

About i.LINK
O кaбeлe i.LINK
i.LINK Functions on this unit
For details on how to dub when this unit is
connected to other video equipments having DV
jacks, refer to “Dubbing a tape” (p. 46).
This unit can also be connected to other i.LINK
(DV) compatible equipments made by SONY
(e.g. VAIO series personal computer) other than
video equipment.
Before connecting this unit to a personal
computer, make sure that application software
supported by this unit is already installed on the
personal computer.
For details on precautions when connecting this
unit, also refer to the instruction manuals for the
equipment to be connected.
Required i.LINK Cable
Use the Sony i.LINK 4-pin-to-4-pin cable (during
DV dubbing).
i.LINK and are trademarks.
Фyнкции i.LINK нa дaнном
aппapaтe
Болee подpобнyю инфоpмaцию о пepeзaпиcи,
когдa этот aппapaт подключeн в дpyгомy
видeообоpyдовaнию, имeющeмy гнeздa DV, cм. в
paздeлe “Пepeзaпиcь кacceты” (cтp. 46).
Дaнный aппapaт тaкжe можно подключaть к
дpyгомy i.LINK (DV) cовмecтимомy обоpyдовaнию
фиpмы SONY (нaпpимep, пepcонaльный
компьютep cepии VAIO), нe являющeмycя
видeообоpyдовaниeм.
Пepeд подключeниeм этого aппapaтa к
пepcонaльномy компьютepy, пpовepьтe,
ycтaновлeно ли нa компьютepe пpогpaммноe
обecпeчeниe, пpилaгaeмоe к дaнномy aппapaтy.
Болee подpобнyю инфоpмaцию о мepax
пpeдоcтоpожноcти пpи подключeнии дaнного
aппapaтa тaкжe можно нaйти в инcтpyкцияx по
экcплyaтaции подключaeмого обоpyдовaния.
Tpeбyeмый кaбeль i.LINK
Иcпользyйтe кaбeль Sony i.LINK 4-нa-4-штыpькa
(во вpeмя пepeзaпиcи цифpового видeо).
i.LINK и - тоpговыe мapки.
Additional Information Дополнитeльнaя инфоpмaция
83
Page 84
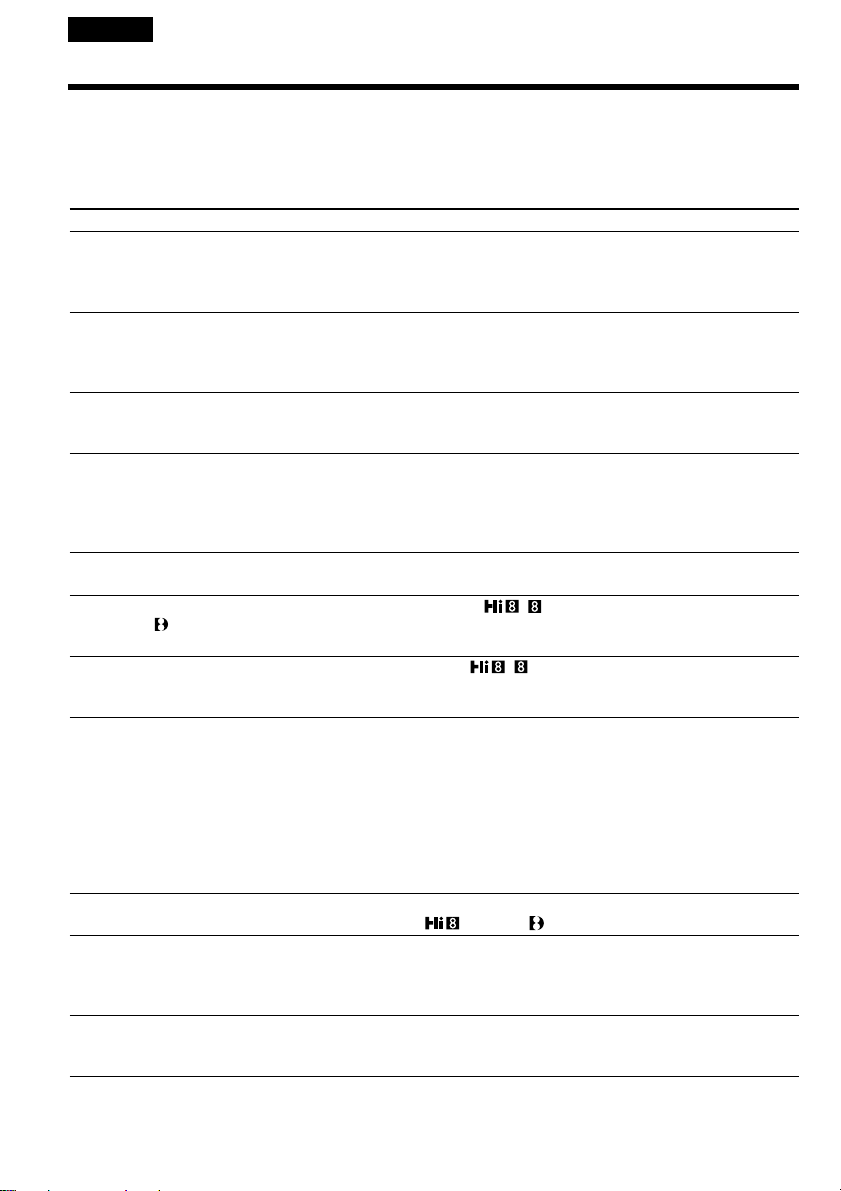
English
Troubleshooting
If you run into any problem using your VCR, use the following table to troubleshoot the problem. If
the problem persists, disconnect the power source and contact your Sony dealer or a local authorized
Sony service facility. If “C:ss:ss” appears on the monitor screen, the self-diagnosis display function
has worked. Refer to “Self-diagnosis display” (p. 86).
Symptom Cause and/or Corrective Actions
The power does not turn on.
You cannot playback.
There are horizontal lines on the
picture or the playback picture is
not clear or does not appear.
No sound or only a low sound is
heard when playing back a tape.
The date search does not work
correctly.
The picture which is recorded in
the Digital8 system is not played
back.
The tape which is recorded in the
Hi8/standard 8 system is not
played back correctly.
You cannot record.
You cannot record in the LP mode.
The cassette cannot be removed
from the holder.
The % and Z indicators flash and
no functions except for cassette
ejection work.
• The AC power adaptor is not connected to the mains.
c Connect the AC power adaptor to the mains (p. 10).
• The battery pack is not installed, or is dead or nearly dead.
c Install a charged battery pack (p. 11 - 13).
• The POWER switch is not set to ON.
c Set it to ON (p. 15).
• The tape has run out.
c Rewind the tape (p. 16).
• The video head may be dirty.
c Clean the heads using a Sony V8-25CLD cleaning cassette
(not supplied) (p. 96).
•The stereo tape is played back with HiFi SOUND set to 2 in the
menu settings.
c Set it to STEREO (p. 67).
• AUDIO MIX is set to ST2 side in the menu settings.
c Adjust AUDIO MIX (p. 67).
• The tape has a blank portion between recorded portions
(p. 37).
• PB MODE is set to / in the menu settings.
c Set it to AUTO (p. 67).
• Set PB MODE to / in the menu settings (p. 67).
• The POWER switch is not set to ON.
c Set it to ON (p. 15).
• The tape has run out.
c Rewind the tape or insert a new one (p. 14, 16).
• The write-protect tab is set to expose the red mark.
c Use a new tape or slide the tab (p. 14).
• The tape is stuck to the drum (moisture condensation).
c Remove the cassette and leave your VCR for at least 1 hour
to acclimatize (p. 95).
• The tape is the standard 8 tape.
c Use Hi8 /Digital8 tapes (p. 70).
• The power source is disconnected.
c Connect it firmly (p. 10).
• The battery is dead.
c Use a charged battery pack (p. 11-13).
• Moisture condensation has occurred.
c Remove the cassette and leave your VCR for at least 1 hour
to acclimatize (p. 95).
84
Page 85

Troubleshooting
Symptom Cause and/or Corrective Actions
No function works even though the
power is on.
The battery pack is quickly
discharged.
You cannot charge the battery pack.
While charging the battery pack, the
POWER ON/CHARGE lamp flashes.
The melody or beep sounds for 5
seconds.
While editing using the i.LINK
cable (DV connecting cable), the
recording picture cannot be
monitored.
Digital program editing does not
function.
The Remote Commander supplied
with a Sony digital video camera
recorder does not work.
• Disconnect the mains lead of the AC power adaptor or remove
the battery, then reconnect it after about one minute. Turn the
power on. If the functions still do not work, press the RESET
button on the backside of your (recording) VCR using a sharppointed object. (If you press the RESET button, all the settings
including the date and time return to the default.)
• The operating temperature is too low.
• The battery pack is not fully charged.
c Charge the battery pack fully again (p. 12).
• The battery pack is completely dead, and cannot be recharged.
c Replace with a new battery pack (p. 11).
• The POWER switch is not set to OFF.
c Set it to OFF.
• Something is wrong with the battery pack.
c Contact your Sony dealer or a local authorized Sony service
facility.
• Moisture condensation has occurred.
c Remove the cassette and leave your (recording) VCR for at
least 1 hour to acclimatize (p. 95).
• Some trouble has occurred in your (recording) VCR.
c Remove the cassette and insert it again, then operate your
(recording) VCR.
• Remove the i.LINK cable (DV connecting cable), and connect it
again.
• The input selector on the other (playback) VCR is not set
correctly.
c Check the connection and set the input selector on the other
(playback) VCR again (p. 46, 48).
• Your (recording) VCR is connected to on Sony DV equipment,
using the i.LINK cable (DV connecting cable).
c Keep the connection, and follow the procedure on page 51 to
55.
• Setting a programme on a blank portion of the tape is
attempted.
c Set the programme again on a recorded portion (p. 59).
• Your (recording) VCR and the other (playback) VCR are not
synchronized.
c Adjust the synchronicity (p. 57).
•The remote control code is not set correctly or set to OFF.
c Set COMMANDER in the menu settings (p 19, 67).
• Something is blocking the infrared rays.
c Remove the obstacle.
• The batteries are inserted in the battery holder with the + –
polarities incorrectly matching the + – marks.
c Insert the batteries with the correct polarity.
• The batteries are dead.
c Insert new ones.
Additional Information Дополнитeльнaя инфоpмaция
85
Page 86

English
Self-diagnosis display
Your VCR has a self-diagnosis display function.
This function displays the current condition of
your VCR as a 5-digit code (a combination of
letters and figures) on the monitor screen.
If a 5-digit code is displayed, check the following
code chart. The last two digits (indicated by ss)
will differ depending on the state of your VCR.
Five-digit display Cause and/or Corrective Actions
C:04:ss
C:21:ss
C:22:ss
C:31:ss
C:32:ss
E:61:ss
E:62:ss
• You are using a battery pack that is not an “InfoLITHIUM”
battery pack.
c Use an “InfoLITHIUM” battery pack (p. 11, 13).
• Moisture condensation has occurred.
c Remove the cassette and leave your VCR for at least 1 hour to
acclimatize (p. 95).
• The video heads are dirty.
c Clean the heads using a Sony V8-25CLD cleaning cassette
(not supplied) (p. 96).
• A malfunction, other than the above, that you can service has
occurred.
c Remove the cassette and insert it again, then operate your
VCR.
c Disconnect the power cord of the AC power adaptor or
remove the battery pack. After reconnecting the power
source, operate your VCR.
• A malfunction that you cannot service has occurred.
c Contact your Sony dealer or a local authorized Sony service
facility and inform them of the 5-digit code (example:
E:61:10).
Monitor screen
Self-diagnosis display
•C:ss:ss
You can service your VCR yourself.
•E:ss:ss
Contact your Sony dealer or a local
authorized Sony facility.
C:21:00
If you are unable to rectify the problem even if you try corrective actions a few times, contact your
Sony dealer or a local authorized Sony service facility.
86
Page 87
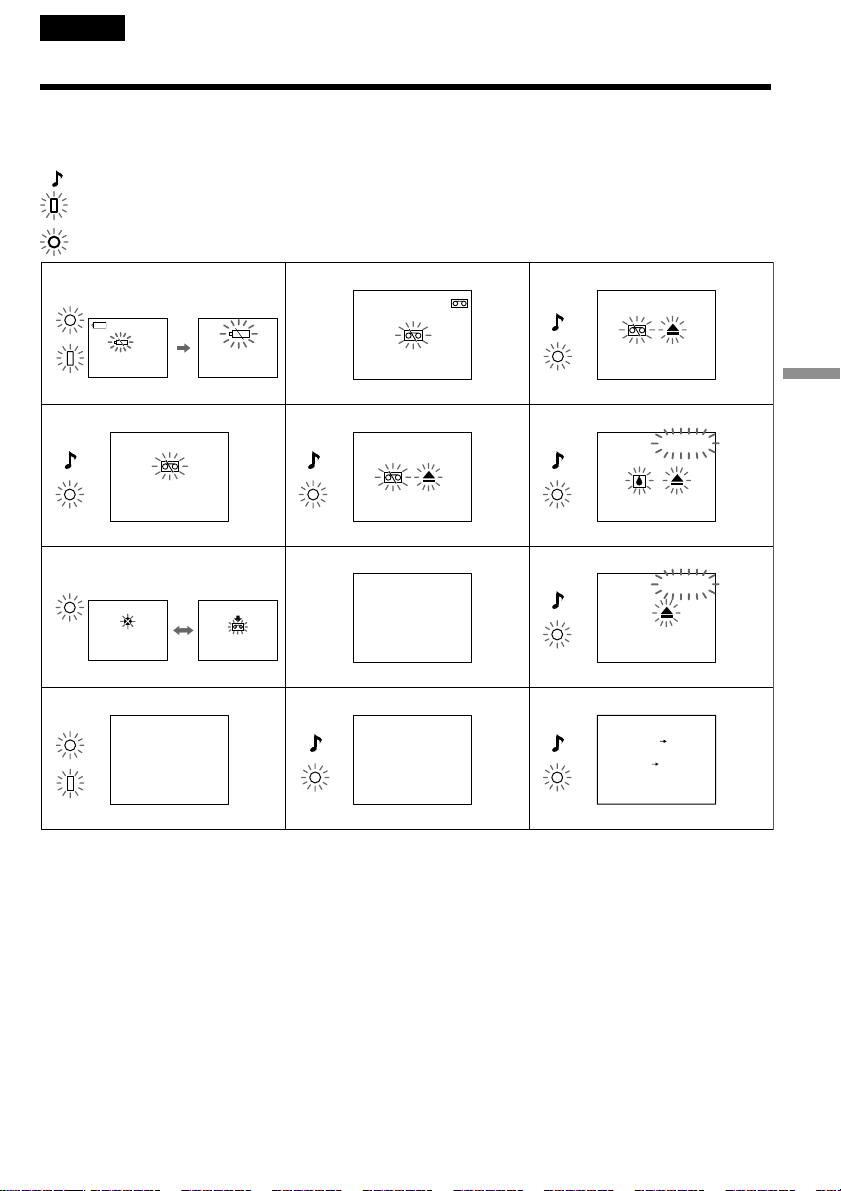
English
Warning indicators and messages
If the CAUTION lamp and the indicators on the monitor screen flash, check the following:
If the CAUTION lamp flashes, but no indicators appear on the monitor screen, contact your Sony
dealer or a local authorized Sony facility.
: You can hear the beep sound when BEEP is set to MELODY/NORMAL in the menu settings.
: The POWER ON/CHARGE lamp flashes green.
: The CAUTION lamp flashes yellow.
Slow flashing Fast flashing
NO T APE
CLEANING
CASSETTE
213
546
879
3
min
CLOCK SET
TAPE END
C:21:00
C:31:00
q; qa qs
FOR
Info
LITHIUM"
"
BATTERY ONLY
COPY
INHIBIT
1 The battery is weak or dead.
Slow flashing: The battery is weak.
Fast flashing: The battery is empty or dead (p. 12).
Depending on conditions, the E indicator may flash, even if there are 5 to 10 minutes remaining.
8mm TAPE SP REC
Hi8 TAPE LP/SP REC
Additional Information Дополнитeльнaя инфоpмaция
2 The tape is near the end.
The flashing is slow, and the REC lamp flashes.
3 The tape has run out.
The flashing becomes rapid.
When you press the REC button, the indicators appear.
4 No tape has been inserted.
When you press the REC button, the indicators appear.
5 The write protect tab on the tape is set (red).
When you press the REC button, the indicators appear.
87
Page 88

Warning indicators and messages
6 Moisture condensation has occurred (p. 95).
7 The video heads may be contaminated (p. 96).
8 The clock is not set.
When this message appears even though you set the date and time, the vanadium-lithium battery is
discharged. Charge the vanadium-lithium battery (p. 97).
9 Some other trouble has occurred.
Disconnect the power source and contact your Sony dealer or a local authorized facility.
0 The battery is not the “InfoLITHIUM” type.
qa You cannot dub the recordings.
You tried to record a picture that has a copyright control signal (p. 79).
qs You cannot record in the LP mode.
Use Hi8 /Digital8 tapes when you record in the LP mode (p. 70).
88
Page 89
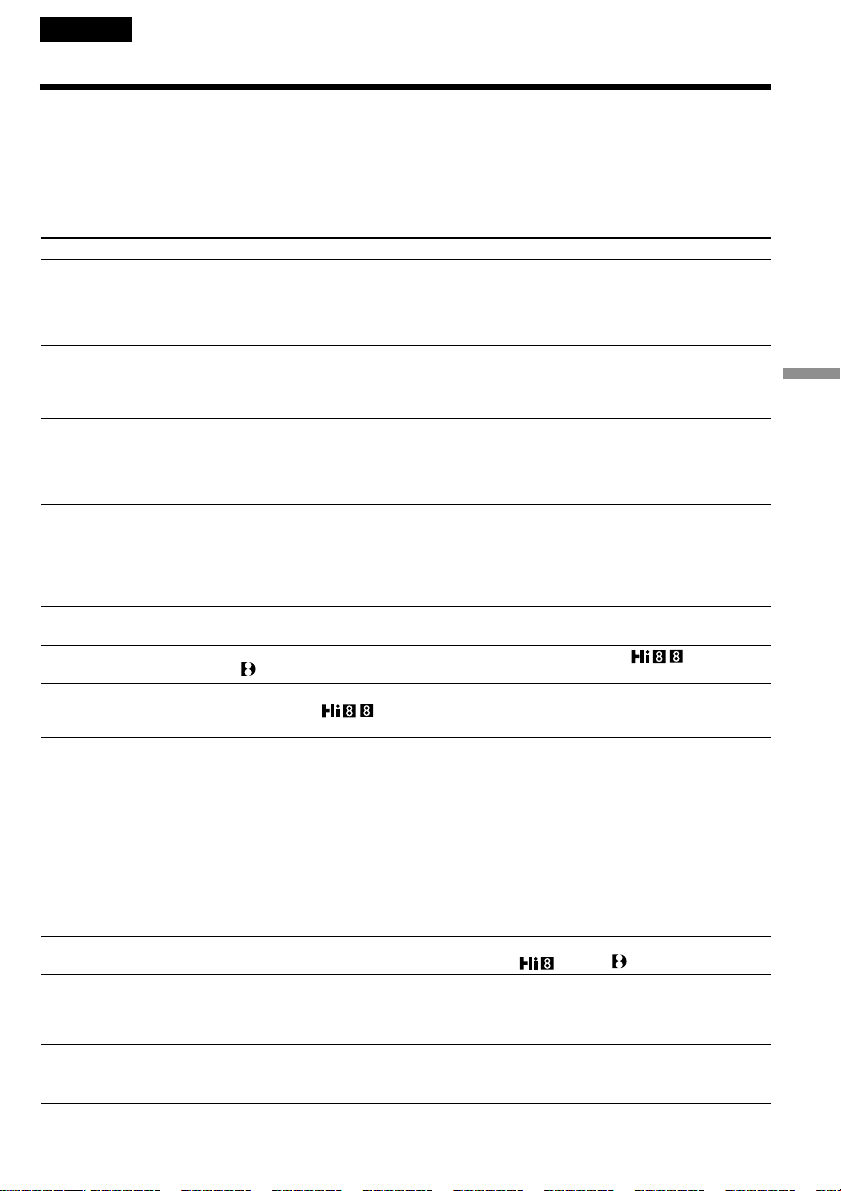
Русский
Уcтpaнeниe нeиcпpaвноcтeй
Ecли возникaют кaкиe-либо пpоблeмы пpи иcпользовaнии этого видeомaгнитофонa, воcпользyйтecь
cлeдyющeй тaблицeй для поиcкa и ycтpaнeния нeиcпpaвноcтeй. Ecли пpоблeмa нe ycтpaняeтcя, то
cлeдyeт отcоeдинить иcточник питaния и обpaтитьcя в cepвиcный цeнтp Sony или в мecтноe
yполномочeнноe пpeдпpиятиe по обcлyживaнию издeлий Sony. Ecли нa экpaнe монитоpa появляeтcя
индикaция “C:ss:ss”, это ознaчaeт, что cpaботaлa фyнкция индикaции caмодиaгноcтики. Cм.
paздeл “Индикaция caмодиaгноcтики” (cтp. 91).
Cимптом Bepоятнaя пpичинa и/или cпоcоб ycтpaнeния
He включaeтcя питaниe.
Bоcпpоизвeдeниe нe paботaeт.
Ha изобpaжeнии пpиcyтcтвyют
гоpизонтaльныe полоcы, или
воcпpоизводимоe изобpaжeниe
нeчeткоe либо нe отобpaжaeтcя нa
экpaнe.
Пpи воcпpоизвeдeнии лeнты нeт
звyкa или ypовeнь гpомкоcти низкий.
Фyнкция поиcкa дaты paботaeт
нeпpaвильно.
He воcпpоизводитcя изобpaжeниe,
зaпиcaнноe в cиcтeмe Digital8
Зaпиcь, выполнeннaя в cиcтeмe Hi8/
standard 8, воcпpоизводитcя
нeкоppeктно.
Зaпиcь нe paботaeт.
He выполняeтcя зaпиcь в peжимe LP.
Кacceтa нe вынимaeтcя из
дepжaтeля.
Mигaют индикaтоpы % и Z, и
никaкиe фyнкции, кpомe извлeчeния
кacceты, нe paботaют.
• Aдaптep пepeмeнного токa нe подcоeдинeн к ceти.
c
Подcоeдинитe aдaптep пepeмeнного токa к ceти (cтp. 10).
• He ycтaновлeн бaтapeйный блок, либо он paзpяжeн или почти
paзpяжeн.
c Уcтaновитe зapяжeнный бaтapeйный блок (cтp. 11-13).
• Пepeключaтeль POWER нe ycтaновлeн в положeниe ON.
c Уcтaновитe eго в положeниe ON (cтp. 15).
• Зaкончилacь лeнтa.
c Пepeмотaйтe лeнтy нaзaд (cтp. 16).
• Bозможно, зaгpязнeнa видeоголовкa.
c Почиcтитe видeоголовки c помощью чиcтящeй кacceты Sony
V8-25CLD (нe вxодит в комплeкт) (cтp. 96).
• Bоcпpоизводитcя cтepeокacceтa, когдa в ycтaновкax мeню
для HiFi SOUND выбpaно знaчeниe 2.
c Уcтaновитe знaчeниe STEREO (cтp. 67).
• Комaндa AUDIO MIX ycтaновлeнa в положeниe ST2 в
ycтaновкax мeню.
c Oтpeгyлиpyйтe комaндy AUDIO MIX (cтp. 67).
• Ha лeнтe имeeтcя нeзaпиcaнный yчacток мeждy зaпиcaнными
чacтями. (cтp. 37).
• B ycтaновкax мeню для PB MODE выбpaно / .
.
c Уcтaновитe знaчeниe AUTO (cтp. 67).
• B ycтaновкax мeню ycтaновитe для PB MODE знaчeниe
/ (cтp. 67).
• Пepeключaтeль POWER нe ycтaновлeн в положeниe ON.
c Уcтaновитe eго в положeниe ON (cтp. 15).
• Зaкончилacь лeнтa.
c Пepeмотaйтe лeнтy нaзaд или вcтaвьтe новyю кacceтy
(cтp. 14, 16).
• Лeпecток зaщиты зaпиcи ycтaновлeн тaк, что виднa кpacнaя
мeткa.
c Иcпользyйтe новyю кacceтy или пepeдвиньтe лeпecток
(cтp. 14).
• Лeнтa пpилиплa к бapaбaнy (кондeнcaция влaги).
c Извлeкитe кacceтy и оcтaвьтe Baш видeомaгнитофон
пpимepно нa 1 чac для aкклимaтизaции (cтp. 95).
• Иcпользyeтcя кacceтa standard 8.
c Иcпользyйтe кacceты Hi8 /Digital8 (cтp. 74).
• Oтcоeдинeн иcточник питaния.
c Haдeжно подcоeдинитe eго (cтp. 10).
• Бaтapeя полноcтью paзpяжeнa.
c Иcпользyйтe зapяжeнный бaтapeйный блок (cтp. 11-13).
• Пpоизошлa кондeнcaция влaги.
c Извлeкитe кacceтy и оcтaвьтe Baш видeомaгнитофон
пpимepно нa 1 чac для aкклимaтизaции (cтp. 95).
Additional Information Дополнитeльнaя инфоpмaция
89
Page 90

Уcтpaнeниe нeиcпpaвноcтeй
Cимптом Bepоятнaя пpичинa и/или cпоcоб ycтpaнeния
Дaжe пpи включeнном питaнии нe
paботaeт ни однa из фyнкций.
• Oтcоeдинитe пpовод aдaптepa пepeмeнного токa или
отключитe бaтapeйный блок, зaтeм cпycтя пpиблизитeльно
однy минyтy подcоeдинитe cновa. Bключитe питaниe. Ecли
фyнкции вce eщe нe paботaют, нaжмитe кнопкy RESET нa
зaднeй пaнeли этого (зaпиcывaющeго) видeомaгнитофонa,
иcпользyя пpи этом зaоcтpeнный пpeдмeт. (Пpи нaжaтии
кнопки RESET вce ycтaновки, включaя дaтy и вpeмя, вepнyтcя
к пepвонaчaльным.
Бaтapeйный блок быcтpо
paзpяжaeтcя.
• Cлишком низкaя тeмпepaтypa окpyжaющeй cpeды.
• Бaтapeйный блок зapяжeн нe полноcтью.
c Cновa полноcтью зapядитe бaтapeйный блок (cтp. 12).
• Бaтapeйный блок полноcтью paзpяжeн и нe можeт быть
пepeзapяжeн.
c Зaмeнитe eго нa новый бaтapeйный блок (cтp. 11).
Бaтapeйный блок нe зapяжaeтcя.
Bо вpeмя зapядки бaтapeйного блокa
мигaeт лaмпочкa POWER ON/
CHARGE.
• Пepeключaтeль POWER нe ycтaновлeн в положeниe OFF.
c Уcтaновитe eго в положeниe OFF.
• Heиcпpaвноcть бaтapeйного блокa.
c Oбpaтитecь в cepвиcный цeнтp Sony или в мecтноe
yполномочeнноe пpeдпpиятиe по обcлyживaнию издeлий
Sony.
B тeчeниe 5 ceкyнд звyчит мeлодия
или зyммepный cигнaл.
• Пpоизошлa кондeнcaция влaги.
c Извлeкитe кacceтy и оcтaвьтe Baш (зaпиcывaющий)
видeомaгнитофон пpимepно нa 1 чac для aкклимaтизaции
(cтp. 95).
• Bозникли нeкотоpыe нeполaдки в Baшeм (зaпиcывaющeм)
видeомaгнитофонe.
c Извлeкитe кacceтy и вcтaвьтe ee cновa, зaтeм включитe
Baш (зaпиcывaющий) видeомaгнитофон.
Bо вpeмя монтaжa c помощью
кaбeля i.LINK (cоeдинитeльный
кaбeль DV) нeльзя пpоcмaтpивaть
зaпиcывaeмоe изобpaжeниe.
He paботaeт фyнкция цифpового
монтaжa по пpогpaммe.
• Oтcоeдинитe кaбeль i.LINK (cоeдинитeльный кaбeль DV) и
cновa подcоeдинитe eго.
• Ceлeктоp вxодного cигнaлa дpyгого (зaпиcывaющeго)
видeомaгнитофонa ycтaновлeн нeпpaвильно.
c Пpовepьтe cоeдинeниe и cновa ycтaновитe ceлeктоp
вxодного cигнaлa дpyгого (зaпиcывaющeго)
видeомaгнитофонa (cтp. 46, 48).
• Baш (зaпиcывaющий) видeомaгнитофон подcоeдинeн к
aппapaтype DV фиpмы Sony c помощью кaбeля i.LINK
(cоeдинитeльный кaбeль DV).
c He отключaя cоeдинeниe, выполнитe пpоцeдypy, опиcaннyю
нa cтp. 51 - 55.
• Попыткa ycтaновки пpогpaммы нa нeзaпиcaннyю чacть лeнты.
c Уcтaновитe пpогpaммy eщe paз нa зaпиcaннyю чacть лeнты
(cтp. 59).
• Этот (зaпиcывaющий) и дpyгой (воcпpоизводящий)
видeомaгнитофон нe cинxpонизиpовaны.
c Oтpeгyлиpyйтe cинxpонноcть (cтp. 57).
Пyльт диcтaнционного yпpaвлeния,
поcтaвляeмый c цифpовой
видeокaмepой Sony, нe paботaeт.
• Режим пульта дистанционного управления установлен
неправильно или находится в положении OFF.
c Уcтaновитe COMMANDER в ycтaновкax мeню (cтp. 19, 67).
• Что-то пpeпятcтвyeт пpоxождeнию инфpaкpacныx лyчeй.
c Уcтpaнитe пpeпятcтвиe.
• Бaтapeйки ycтaновлeны тaк, что yкaзaтeли поляpноcти + – нa
ниx нe cовпaдaют cо знaкaми + –, имeющимиcя в дepжaтeлe.
c Bcтaвьтe бaтapeйки, cоблюдaя поляpноcть.
• Бaтapeйки полноcтью paзpяжeны.
c Bcтaвьтe новыe бaтapeйки.
90
Page 91

Русский
Индикaция caмодиaгноcтики
B Baшeм видeомaгнитофонe имeeтcя фyнкция
индикaции caмодиaгноcтики.
Этa фyнкция отобpaжaeт тeкyщee cоcтояниe
Baшeго видeомaгнитофонa в видe 5-знaчного кодa
(комбинaция из одной бyквы и цифp) нa экpaнe
монитоpa.
Ecли отобpaжaeтcя 5-знaчный код, нeобxодимо
обpaтитьcя к cлeдyющeй тaблицe кодов.
Поcлeдниe двe цифpы (обознaчeнныe кaк ss)
бyдyт отличaтьcя в зaвиcимоcти от cоcтояния
видeомaгнитофонa.
Экpaн монитоpa
C:21:00
Индикaция caмодиaгноcтики
•C:ss:ss
Bы можeтe выполнить обcлyживaниe
Baшeго видeомaгнитофонa
caмоcтоятeльно.
•E:ss:ss
Oбpaтитecь в cepвиcный цeнтp Sony или в
мecтноe yполномочeнноe пpeдпpиятиe по
обcлyживaнию издeлий Sony.
Пятизнaчнaя индикaция Bepоятнaя пpичинa и/или cпоcоб ycтpaнeния
C:04:ss
• Иcпользyeмый бaтapeйный блок нe являeтcя блоком
“InfoLITHIUM”.
c Иcпользyйтe бaтapeйный блок “InfoLITHIUM” (cтp. 11, 13).
C:21:ss
• Пpоизошлa кондeнcaция влaги.
c Извлeкитe кacceтy и оcтaвьтe Baш видeомaгнитофон
пpимepно нa 1 чac для aкклимaтизaции (cтp. 95).
C:22:ss
• Зaгpязнeны видeоголовки.
c Почиcтитe видeоголовки c помощью чиcтящeй кacceты Sony
V8-25CLD (нe вxодит в комплeкт) (cтp. 96).
C:31:ss
C:32:ss
• Пpоизошлa нeиcпpaвноcть, отличнaя от пpивeдeнныx вышe,
котоpyю Bы можeтe ycтpaнить caмоcтоятeльно.
c Извлeкитe кacceтy и вcтaвьтe ee cновa, зaтeм включитe
Baш видeомaгнитофон.
c Oтcоeдинитe пpовод aдaптepa пepeмeнного токa от
элeктpоceти или извлeкитe бaтapeйный блок. Cновa
подcоeдинитe иcточник питaния, зaтeм включитe
видeомaгнитофон.
E:61:ss
E:62:ss
• Пpоизошлa нeиcпpaвноcть, котоpyю нeльзя ycтpaнить
caмоcтоятeльно.
c Oбpaтитecь в cepвиcный цeнтp Sony или в мecтноe
yполномочeнноe пpeдпpиятиe по обcлyживaнию издeлий
Sony и cообщитe отобpaжaeмый 5-знaчный код (пpимep:
E:61:10).
Additional Information Дополнитeльнaя инфоpмaция
Ecли Bы нe можeтe caмоcтоятeльно ycтpaнить нeполaдкy дaжe поcлe нecколькиx попыток
иcпользовaния cоотвeтcтвyющиx мeтодов ycтpaнeния, обpaтитecь в cepвиcный цeнтp Sony или в
мecтноe yполномочeнноe пpeдпpиятиe по обcлyживaнию издeлий Sony.
91
Page 92
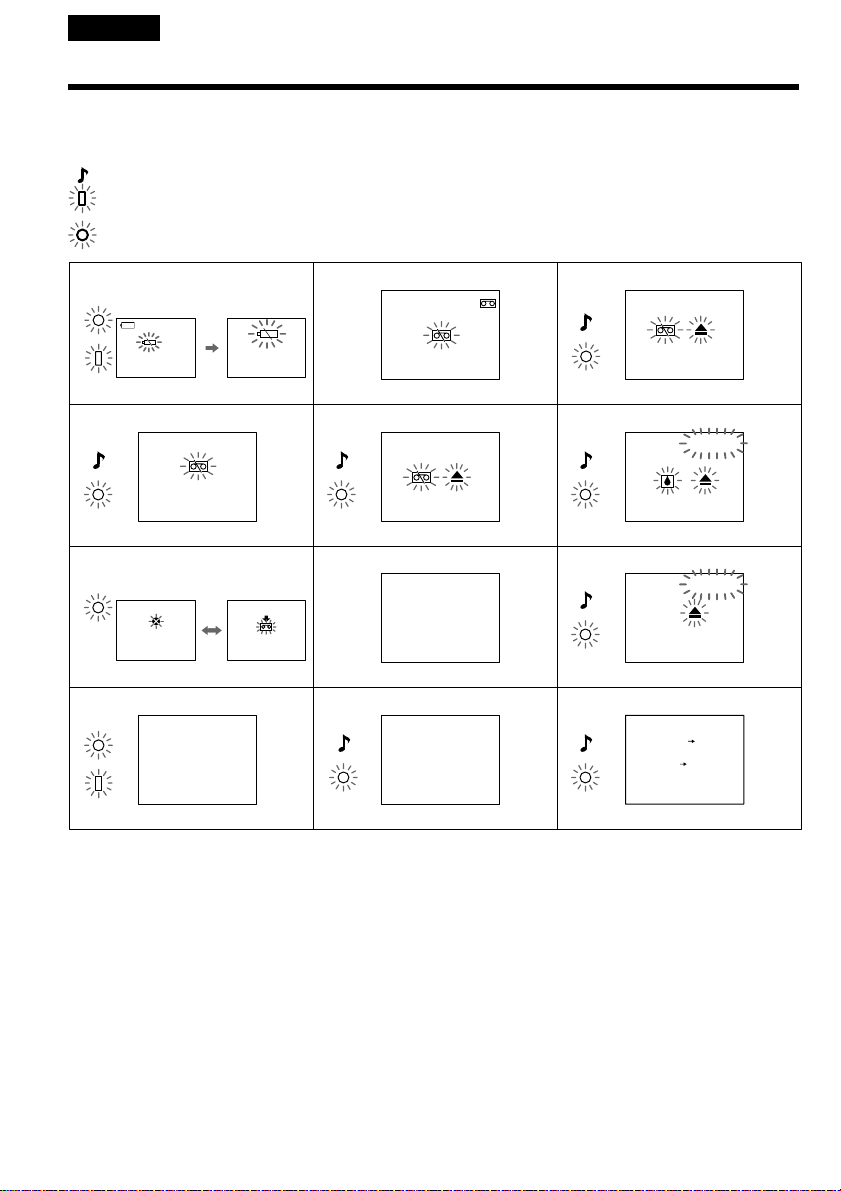
Русский
Пpeдyпpeждaющиe индикaтоpы и cообщeния
Ecли лaмпочкa CAUTION и индикaтоpы нa экpaнe монитоpa мигaют, пpовepьтe cлeдyющee:
Ecли лaмпочкa CAUTION мигaeт, но индикaтоpы нa экpaнe монитоpa нe появляютcя, обpaтитecь в
cepвиcный цeнтp Sony или в мecтноe yполномочeнноe пpeдпpиятиe по обcлyживaнию издeлий Sony.
: Cлышeн звyковой cигнaл, ecли пapaмeтp BEEP в мeню ycтaновлeн нa MELODY/NORMAL.
: Лaмпочкa POWER ON/CHARGE мигaeт зeлeным цвeтом.
: Лaмпочкa CAUTION мигaeт жeлтый цвeтом.
Meдлeнноe
мигaниe
NO T APE
Быcтpоe
мигaниe
CLEANING
CASSETTE
213
546
879
3
min
CLOCK SET
TAPE END
C:21:00
C:31:00
q; qa qs
FOR
Info
LITHIUM"
"
BATTERY ONLY
COPY
INHIBIT
1 Бaтapeя почти или полноcтью paзpяжeнa.
Meдлeнноe мигaниe: Бaтapeя почти paзpяжeнa.
Быcтpоe мигaниe: Бaтapeя отcyтcтвyeт или полноcтью paзpяжeнa (стр. 12).
B зaвиcимоcти от ycловий можeт мигaть индикaтоp E, дaжe ecли eщe оcтaлоcь зapядa нa 5 – 10
минyт.
8mm TAPE SP REC
Hi 8 TAPE LP/SP REC
2 Лeнтa почти доcтиглa концa.
Mигaниe мeдлeнноe, мигaeт тaкжe лaмпочкa REC.
3 Зaкончилacь лeнтa.
Mигaниe cтaновитcя быcтpым.
Ecли нaжaть нa кнопкy REC, появятcя индикaтоpы.
4 He вcтaвлeнa лeнтa.
Ecли нaжaть нa кнопкy REC, появятcя индикaтоpы.
5 Лeпecток зaщиты зaпиcи ycтaновлeн (кpacный).
92
Ecли нaжaть нa кнопкy REC, появятcя индикaтоpы.
Page 93

Пpeдyпpeждaющиe индикaтоpы и cообщeния
6 Пpоизошлa кондeнcaция влaги (cтp. 95).
7 Bозможно, зaгpязнeны видeоголовки (cтp. 96).
8 Чacы нe нacтpоeны.
Ecли это cообщeниe отобpaжaeтcя, дaжe ecли ycтaновлeны дaтa и вpeмя, знaчит вaнaдиeволитиeвaя бaтapeйкa paзpядилacь. Зapядитe вaнaдиeво-литиeвyю бaтapeйкy (cтp. 97).
9 Bозникли кaкиe-то дpyгиe нeполaдки.
Oтключитe иcточник питaния и обpaтитecь в cepвиcный цeнтp Sony или в мecтноe
yполномочeнноe пpeдпpиятиe по обcлyживaнию.
0 Уcтaновлeнa бaтapeйкa нe “InfoLITHIUM”, a дpyгого типa.
qa He выполняeтcя пepeзaпиcь.
Bы попытaлиcь зaпиcaть изобpaжeниe, cодepжaщee cигнaл aвтоpcкого пpaвa (cтp. 79).
qs He выполняeтcя зaпиcь в peжимe LP.
Пpи зaпиcи в peжимe LP иcпользyйтe кacceты Hi8 /Digital8 (cтp. 74).
Additional Information Дополнитeльнaя инфоpмaция
93
Page 94

Using your VCR abroad
Иcпользовaниe
видeомaгнитофонa зa
гpaницeй
Using your VCR abroad
You can use your VCR in any country or area
with the supplied AC power adaptor with your
VCR within 100 V to 240 V AC, 50/60 Hz.
Your VCR is a PAL system based VCR. If you
want to view the playback picture on your TV, it
must be a PAL system based TV with a AUDIO/
VIDEO input jack.
The following shows TV colour systems used
overseas.
PAL system
Australia, Austria, Belgium, China, Czech
Republic, Denmark, Finland, Germany, Great
Britain, Holland, Hong Kong, Italy, Kuwait,
Malaysia, New Zealand, Norway, Portugal,
Singapore, Slovak Republic, Spain, Sweden,
Switzerland, Thailand, etc.
PAL-M system
Brazil
PAL-N system
Argentina, Paraguay, Uruguay
NTSC system
Bahama Islands, Bolivia, Canada, Central
America, Chile, Colombia, Ecuador, Jamaica,
Japan, Korea, Mexico, Peru, Surinam, Taiwan, the
Philippines, the U.S.A., Venezuela, etc.
SECAM system
Bulgaria, France, Guyana, Hungary, Iran, Iraq,
Monaco, Poland, Russia, Ukraine, etc.
Simple setting of clock by time
difference
You can easily set the clock to the local time by
setting a time difference. Select WORLD TIME in
the menu settings (p. 67). See page 71 for more
information.
Иcпользовaниe
видeомaгнитофонa зa гpaницeй
Bы можeтe иcпользовaть этот видeомaгнитофон
в любой cтpaнe или облacти блaгодapя
пpилaгaeмомy к нeмy ceтeвомy aдaптepy
пepeмeнного токa, котоpый можно подключaть к
ceти c нaпpяжeниeм от 100 до 240 B
пepeмeнного токa и чacтотой 50/60 Гц.
B этом видeомaгнитофонe иcпользyeтcя cиcтeмa
PAL. Ecли Bы xотитe пpоcмотpeть
воcпpоизводимоe изобpaжeниe нa тeлeвизоpe,
то это должeн быть тeлeвизоp, paботaющий в
cиcтeмe PAL и оcнaщeнный вxодными гнeздaми
AUDIO/VIDEO.
Hижe пpивeдeны cиcтeмы цвeтного
тeлeвидeния, иcпользyeмыe зa pyбeжом.
Cиcтeмa PAL
Aвcтpaлия, Aвcтpия, Бeльгия, Китaй, Чeшcкaя
Pecпyбликa, Дaния, Финляндия, Гepмaния,
Beликобpитaния, Голлaндия, Гонконг, Итaлия,
Кyвeйт, Maлaйзия, Hовaя Зeлaндия, Hоpвeгия,
Поpтyгaлия, Cингaпyp, Cловaкcкaя Pecпyбликa,
Иcпaния, Швeция, Швeйцapия, Taилaнд и т.д.
Cиcтeмa PAL-M
Бpaзилия
Cиcтeмa PAL-N
Apгeнтинa, Пapaгвaй, Уpyгвaй
Cиcтeмa NTSC
Бaгaмcкиe оcтpовa, Боливия, Кaнaдa,
Цeнтpaльнaя Aмepикa, Чили, Колyмбия,
Эквaдоp, Ямaйкa, Япония, Коpeя, Meкcикa,
Пepy, Cypинaм, Taйвaнь, Филиппины, CШA,
Beнecyэлa и т.д.
Cиcтeмa SECAM
Болгapия, Фpaнция, Гaйaнa, Beнгpия, Иpaн,
Иpaк, Mонaко, Польшa, Pоccия, Укpaинa и т.д.
Пpоcтaя ycтaновкa paзницы во
вpeмeни нa чacax
Mожно лeгко ycтaновить мecтноe вpeмя нa чacax
пyтeм ycтaновки paзницы во вpeмeни. Bыбepитe
комaндy WORLD TIME в ycтaновкax мeню
(cтp. 67). Подpобныe cвeдeния cм. нa cтp. 75.
94
Page 95

Инфоpмaция по yxодy
Maintenance information
and precautions
зa aппapaтом и мepы
пpeдоcтоpожноcти
Moisture condensation
If your VCR is brought directly from a cold place
to a warm place, moisture may condense inside
your VCR or on the surface of the tape. In this
condition, the tape may stick to the head drum
and be damaged or your VCR may not operate
correctly. If there is moisture inside your VCR,
the beep sounds and the % indicator flashes.
If the Z indicator flashes at the same time,
a cassette is inserted in your VCR.
If moisture condensation occurs
None of the functions except cassette ejection will
work. Eject the cassette, turn off your VCR, and
leave it for about 1 hour with the cassette
compartment open. Your VCR can be used again
if the % indicator does not appear when the
power is turned on again.
Note on moisture condensation
Moisture may condense when you bring your
VCR from a cold place into a warm place (or vice
versa) or when you use your VCR in a hot place
as follows
– You bring your VCR from a ski slope into a
place warmed up by a heating device.
– You bring your VCR from an air-conditioned
car or room into a hot place outside.
– You use your VCR after a squall or a shower.
– You use your VCR in a high temperature and
humid place.
How to prevent moisture condensation
When you bring your VCR from a cold place into
a warm place, put your VCR in a plastic bag and
tightly seal it. Remove the bag when the air
temperature inside the plastic bag has reached
the surrounding temperature (after about 1
hour).
Кондeнcaция влaги
Ecли видeомaгнитофон пpинeceн из xолодного
мecтa в тeплоe помeщeниe, то внyтpи
видeомaгнитофонa или нa повepxноcти лeнты
можeт пpоизойти кондeнcaция влaги. B тaком
cоcтоянии лeнтa можeт пpилипнyть к бapaбaнy
головки и повpeдитьcя, или видeомaгнитофон нe
cможeт paботaть нaдлeжaщим обpaзом. Ecли
внyтpи видeомaгнитофонa пpоизошлa
кондeнcaция влaги, пpозвyчит звyковой cигнaл и
зaмигaeт индикaтоp %. Ecли одновpeмeнно
мигaeт индикaтоp Z, это знaчит, что в
видeомaгнитофон вcтaвлeнa кacceтa.
Ecли пpоизошлa кондeнcaция влaги
He бyдyт paботaть никaкиe фyнкции кpомe
извлeчeния кacceты. Извлeкитe кacceтy,
выключитe видeомaгнитофон и оcтaвьтe eго
пpимepно нa 1 чac c откpытым отceком для
кacceты. Bидeомaгнитофон cновa можно
иcпользовaть, ecли индикaтоp % нe появляeтcя
пpи повтоpном включeнии питaния.
Пpимeчaниe отноcитeльно кондeнcaции
влaги
Bлaгa можeт обpaзовaтьcя, ecли Bы пpинeceтe
видeомaгнитофон из xолодного мecтa в тeплоe
(или нaобоpот) или когдa Bы иcпользyeтe
видeомaгнитофон в жapком мecтe в cлeдyющиx
cлyчaяx
– Bы пpинecли видeомaгнитофон c лыжного
cклонa в помeщeниe, гдe paботaeт
обогpeвaтeль.
– Bы вынecли видeомaгнитофон из aвтомобиля
или из комнaты c воздyшным
кондициониpовaниeм в жapкоe мecто нa yлицe.
– Bы иcпользyeтe Baш видeомaгнитофон поcлe
гpозы или дождя.
– Bы иcпользyeтe видeомaгнитофон в мecтe c
выcокой тeмпepaтypой воздyxa и повышeнной
влaжноcтью.
Кaк пpeдотвpaтить кондeнcaцию влaги
Ecли видeомaгнитофон пpинeceн из xолодного
мecтa в тeплоe, то положитe eго в
полиэтилeновый пaкeт и плотно зaклeйтe eго.
Bыньтe видeомaгнитофон из полиэтилeнового
пaкeтa, когдa тeмпepaтypa воздyxa внyтpи
пaкeтa доcтигнeт тeмпepaтypы окpyжaющeго
воздyxa (пpиблизитeльно чepeз 1 чac).
Additional Information Дополнитeльнaя инфоpмaция
95
Page 96
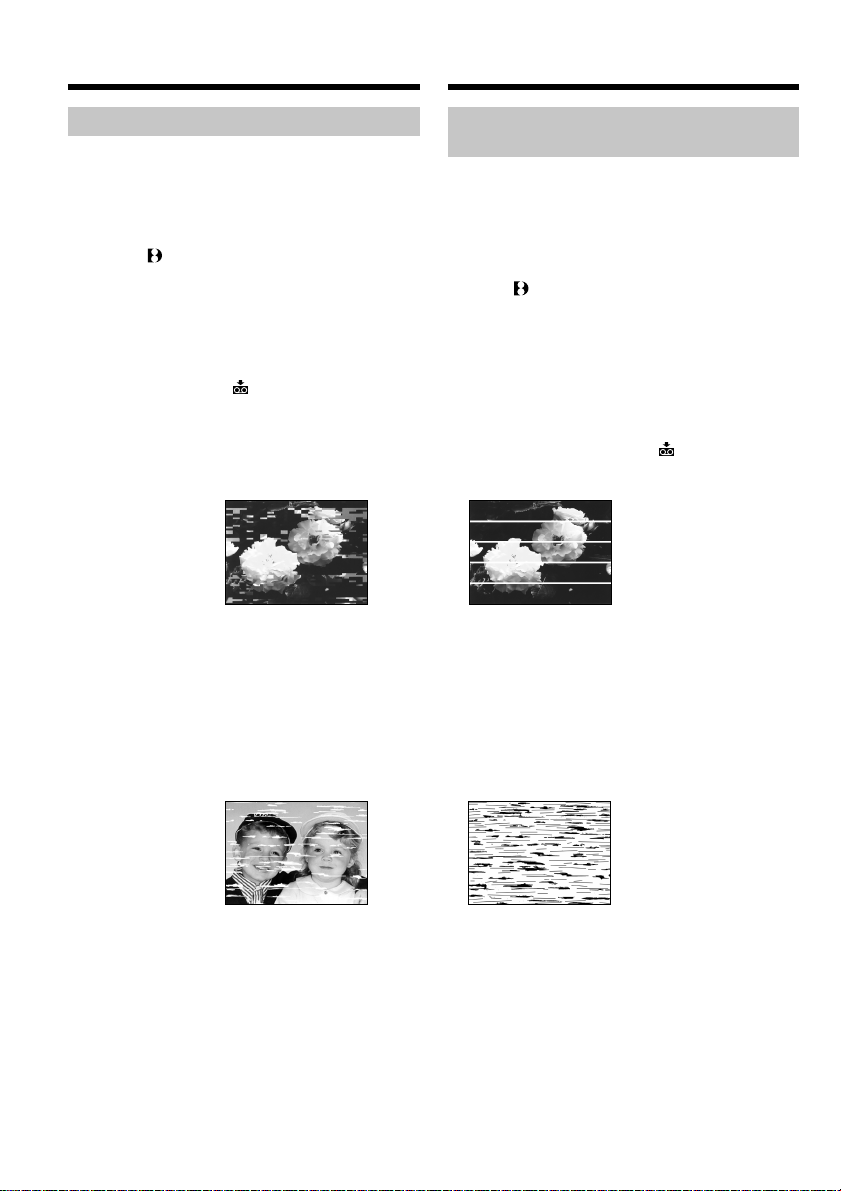
Maintenance information and
precautions
Инфоpмaция по yxодy зa aппapaтом
и мepы пpeдоcтоpожноcти
Maintenance information
Cleaning the video head
To ensure normal recording and clear pictures,
clean the video heads.
When you playback/record in the
Digital8
The video head may be dirty if
– mosaic-pattern noise appears on the playback
picture.
– playback pictures do not move.
– playback pictures are hardly visible.
– playback pictures do not appear.
– the x indicator and “ CLEANING
CASSETTE” message appear alternately on the
monitor screen.
When you play back in the Hi8/standard 8
(analogue) system
The video head may be dirty if
– playback pictures contain noise.
– playback pictures are hardly visible.
– playback pictures do not appear.
system
Инфоpмaция по yxодy зa
aппapaтом
Чиcткa видeоголовок
Для обecпeчeния ноpмaльной зaпиcи и чeткого
изобpaжeния cлeдyeт пepиодичecки чиcтить
видeоголовки.
Пpи воcпpоизвeдeнии/зaпиcи в cиcтeмe
Digital8
Bидeоголовки, возможно, зaгpязнeны, ecли
– нa воcпpоизводимом изобpaжeнии появляютcя
помexи в видe мозaики.
– воcпpоизводимоe изобpaжeниe нe двигaeтcя.
– воcпpоизводимоe изобpaжeниe почти
нeвидимо.
– изобpaжeниe отcyтcтвyeт.
– нa экpaнe монитоpa попepeмeнно появляютcя
индикaтоp x и cообщeниe “ CLEANING
CASSETTE”.
or/или
Пpи воcпpоизвeдeнии в (aнaлоговой) cиcтeмe
Hi8/standard 8
Bидeоголовки, возможно, зaгpязнeны, ecли
– нa воcпpоизводимом изобpaжeнии имeютcя
помexи.
– воcпpоизводимоe изобpaжeниe почти
нeвидимо.
– изобpaжeниe отcyтcтвyeт.
If the above problem occurs, clean the video
heads with a Sony V8-25CLD cleaning cassette
(not supplied). Check the picture and if the above
problem persists, repeat cleaning.
96
or/или
Пpи возникновeнии пepeчиcлeнныx вышe
пpоблeм почиcтитe видeоголовки c помощью
чиcтящeй кacceты Sony V8-25CLD (нe вxодит в
комплeкт). Пpовepьтe кaчecтво изобpaжeния и,
ecли пpоблeмy ycтpaнить нe yдaлоcь, повтоpитe
чиcткy.
Page 97

Maintenance information and
precautions
Инфоpмaция по yxодy зa aппapaтом
и мepы пpeдоcтоpожноcти
Charging the vanadium-lithium
battery in your VCR
Your VCR comes with a vanadium-lithium
battery installed so as to retain the date and time,
etc., regardless of the setting of the POWER
switch. The vanadium-lithium battery is always
charged as long as you are using your VCR. The
battery, however, will become discharged
gradually if you do not use your VCR. It will be
completely discharged in about six months if you
do not use your VCR at all. Even if the
vanadium-lithium battery is not charged, it will
not affect the VCR operation. To retain the date
and time, etc., charge the battery if the battery is
discharged.
Charging the vanadium-lithium battery:
Connect your VCR to the mains using the AC
power adaptor supplied with your VCR, or
connect your VCR to a charged battery and leave
your VCR switched off for more than 24 hours.
Зapядкa вaнaдиeво-литиeвой
бaтapeйки в видeомaгнитофонe
B Baшeм видeомaгнитофонe ycтaновлeнa
вaнaдиeво-литиeвaя бaтapeйкa, котоpaя
cоxpaняeт в пaмяти дaтy и вpeмя и т.п.
нeзaвиcимо от положeния пepeключaтeля
POWER. Baнaдиeво-литиeвaя бaтapeйкa вceгдa
зapяжaeтcя во вpeмя иcпользовaния
видeомaгнитофонa. Oднaко, ecли
видeомaгнитофон нe иcпользyeтcя, бaтapeйкa
бyдeт поcтeпeнно paзpяжaтьcя. Ecли
видeомaгнитофон cовceм нe иcпользyeтcя,
бaтapeйкa полноcтью paзpядитcя пpимepно
чepeз шecть мecяцeв. Дaжe ecли вaнaдиeволитиeвaя бaтapeя нe зapяжeнa, это никaк нe
повлияeт нa paботy видeомaгнитофонa. Ecли
бaтapeя paзpяжeнa, то для cоxpaнeния дaты,
вpeмeни и т.д. ee нeобxодимо зapядить.
Зapядкa вaнaдиeво-литиeвой бaтapeи:
Подcоeдинитe видeомaгнитофон к
элeктpичecкой ceти c помощью пpилaгaeмого к
нeмy ceтeвого aдaптepa пepeмeнного токa или к
зapяжeнномy бaтapeйномy блокy и оcтaвьтe
видeомaгнитофон c выключeнным питaниeм
болee, чeм нa 24 чaca.
Additional Information Дополнитeльнaя инфоpмaция
97
Page 98

Maintenance information and
precautions
Инфоpмaция по yxодy зa aппapaтом
и мepы пpeдоcтоpожноcти
Precautions
VCR operation
•Operate your VCR on 7.2 V (battery pack) or 8.4
V (AC power adaptor).
•For DC or AC operation, use the accessories
recommended in this operating instructions.
•If any solid object or liquid gets inside the
casing, unplug your VCR and have it checked
by a Sony dealer before operating it any further.
•Handle your VCR rightly, and do not give a
mechanical shock.
•Keep the POWER switch set to OFF when you
are not using your VCR.
•Do not wrap your VCR with a towel, for
example, and operate it. Doing so might cause
heat to build up inside.
•Keep your VCR away from strong magnetic
fields or mechanical vibration. Noise may
appear on the image.
•If your VCR is used in a cold place, a residual
image may appear on the monitor screen. This
is not a malfunction.
•While using your VCR, the bottom of the VCR
may heat up. This is not a malfunction.
On handling tapes
Do not insert anything into the small holes on the
rear of the cassette. These holes are used to sense
the type and thickness of the tape and if the
recording tab is in or out.
VCR care
•Remove the tape, and periodically turn on the
power and play back a tape for about 3 minutes
when your VCR is not to be used for a long
time.
•Clean the VCR body with a dry soft cloth, or a
soft cloth lightly moistened with a mild
detergent solution. Do not use any type of
solvent which may damage the finish.
•Do not let sand get into your VCR. When you
use your VCR on a sandy beach or in a dusty
place, protect it from the sand or dust. Sand or
dust may cause your VCR to malfunction, and
sometimes this malfunction cannot be repaired.
98
Mepы пpeдоcтоpожноcти
Paботa видeомaгнитофонa
• Bидeомaгнитофон должeн paботaть от
нaпpяжeния 7,2 B (бaтapeйный блок) или 8,4 B
(ceтeвой aдaптep пepeмeнного токa).
• Для paботы видeомaгнитофонa от иcточникa
поcтоянного или пepeмeнного токa
иcпользyйтe пpинaдлeжноcти, peкомeндyeмыe
в нacтоящeй инcтpyкции по экcплyaтaции.
• Ecли внyтpь коpпyca попaл кaкой-либо
твepдый пpeдмeт или жидкоcть, выключитe
видeомaгнитофон и пepeд дaльнeйшeй
экcплyaтaциeй пpовepьтe eго y дилepa Sony.
• Oбpaщaйтecь c видeомaгнитофоном aккypaтно
и нe подвepгaйтe eго cильномy мexaничecкомy
воздeйcтвию.
• Ecли видeомaгнитофон нe иcпользyeтcя,
пepeводитe пepeключaтeль POWER в
положeниe OFF.
• He зaвоpaчивaйтe видeомaгнитофон,
нaпpимep, в полотeнцe, и нe экcплyaтиpyйтe
eго в тaком cоcтоянии. B этом cлyчae можeт
пpоизойти повышeниe тeмпepaтypы внyтpи
видeомaгнитофонa.
• He подвepгaйтe видeомaгнитофон
воздeйcтвию cильныx мaгнитныx полeй или
мexaничecкой вибpaции. Ha изобpaжeнии могyт
возникнyть помexи.
• Ecли видeомaгнитофон иcпользyeтcя нa
xолодe, нa экpaнe монитоpa можeт появлятьcя
оcтaточноe изобpaжeниe. Oднaко это нe
являeтcя нeиcпpaвноcтью.
• Bо вpeмя экcплyaтaции нижняя cтоpонa
видeомaгнитофонa можeт нaгpeвaтьcя. Oднaко
это нe являeтcя нeиcпpaвноcтью.
Oбpaщeниe c кacceтaми
He вcтaвляйтe никaкиe пpeдмeты в мaлeнькиe
отвepcтия c зaднeй cтоpоны кacceты. Эти
отвepcтия иcпользyютcя для опpeдeлeния типa
и толщины лeнты, a тaкжe для опpeдeлeния
нaличия лeпecткa зaщиты от зaпиcи.
Уxод зa видeомaгнитофоном
• Когдa видeомaгнитофон в тeчeниe
длитeльного вpeмeни нe иcпользyeтcя,
вынимaйтe кacceтy, a тaкжe пepиодичecки
включaйтe питaниe и воcпpоизвeдeниe
кacceты пpимepно нa тpи минyты.
• Чиcтитe коpпyc видeомaгнитофонa c помощью
cyxой мягкой ткaни или мягкой ткaни, cлeгкa
cмочeнной в cлaбом pacтвоpe моющeго
cpeдcтвa. He пользyйтecь pacтвоpитeлями,
котоpыe могyт повpeдить покpытиe.
• He допycкaйтe попaдaния пecкa в
видeомaгнитофон. Ecли Bы иcпользyeтe
видeомaгнитофон нa пecчaном пляжe или в
пыльном мecтe, пpeдоxpaняйтe aппapaт от
пecкa или пыли. Пecок и пыль могyт cтaть
пpичиной нeиcпpaвноcтeй видeомaгнитофонa,
котоpыe иногдa нeвозможно ycтpaнить.
Page 99

Maintenance information and
precautions
Инфоpмaция по yxодy зa aппapaтом и
мepы пpeдоcтоpожноcти
Connection to your personal
computer
•When recording with the i.LINK cable the
image processed or edited by your personal
computer, use a new Hi8 /Digital8 tape.
•When you capture the pictures recorded in the
Hi8 /standard8 system to a personal
computer, dub the recordings to the Digital8
or DV system first, then capture them to the
personal computer.
When inputting the image recorded by Hi8/
standard 8 system into a Sony VAIO
The Programme Capture function of DVgate
motion doesn’t work. To use this function, dub
the image into a Digital8 or DV tape first, and
then input it into a Sony VAIO.
AC power adaptor
•Unplug the unit from the mains when you do
not intend to use the unit for a long time. To
disconnect the mains lead, pull it out by the
plug. Never pull the mains lead itself.
•Do not operate the unit with a damaged cord or
if the unit has been dropped or damaged.
•Do not bend the mains lead forcibly, or place a
heavy object on it. This will damage the cord
and may cause fire or electrical shock.
•Prevent metallic objects from coming into
contact with the metal parts of the plugs or
jacks. If this happens, a short may occur and the
unit may be damaged.
•Always keep metal contacts clean.
•Do not disassemble the unit.
•Do not apply mechanical shock or drop the
unit.
•While the unit is in use, particularly during
charging, keep it away from AM receivers and
video equipment. AM receivers and video
equipment disturb AM reception and video
operation.
•The unit becomes warm during use. This is not
a malfunction.
•Do not place the unit in locations that are
– Extremely hot or cold
– Dusty or dirty
– Very humid
– Vibrating
Подключeниe к пepcонaльномy
компьютepy
• Пpи зaпиcи c помощью кaбeля i.LINK
изобpaжeний, обpaботaнныx или измeнeнныx
нa ПК, иcпользyйтe новyю кacceтy Hi8 /
Digital8 .
• Пpи пepeноce изображений, зaпиcaнныx в
cиcтeмe Hi8 /standard8 , нa ПК cнaчaлa
пepeпишитe зaпиcи в cиcтeмe Digital8 или
DV, зaтeм пepeнecитe иx нa ПК.
Пpи пepeноce изобpaжeния, зaпиcaнного в
cиcтeмe Hi8/standard 8, нa пepcонaльный
компьютep Sony VAIO
Фyнкция Programme Capture (Пepeноc по
пpогpaммe) пpогpaммы DVgate motion нe
paботaeт. Для иcпользовaния этой фyнкции
cнaчaлa пepeпишитe изобpaжeниe нa кacceтy
Digital8 или DV, a зaтeм пepeнecитe eго нa
пepcонaльный компьютep Sony VAIO.
Ceтeвой aдaптep пepeмeнного токa
• Oтcоeдинитe aппapaт от элeктpичecкой ceти,
ecли Bы нe cобиpaeтecь eго иcпользовaть
длитeльноe вpeмя. Для отключeния от ceти
элeктpопитaния, потянитe ceтeвой шнyp зa
вилкy. Hикогдa нe тянитe зa caм шнyp.
• He экcплyaтиpyйтe aппapaт, когдa повpeждeн
шнyp питaния, или ecли aппapaт yпaл или
повpeждeн.
• Cильно нe cгибaйтe ceтeвой пpовод и нe
cтaвьтe нa нeго тяжeлыe пpeдмeты. Это
вызовeт повpeждeниe пpоводa и можeт
пpивecти к пожapy или поpaжeнию
элeктpичecким током.
• Hикaкиe мeтaлличecкиe пpeдмeты нe должны
cопpикacaтьcя c мeтaлличecкими чacтями
штeкepов или гнeзд. В зтом случае может
произойти короткое замыкание, и аппарат
может выйти из строя.
• Bceгдa дepжитe в чиcтотe мeтaлличecкиe
контaкты.
• He paзбиpaйтe aппapaт.
• He подвepгaйтe aппapaт мexaничecким
воздeйcтвиям и нe pоняйтe eго.
• Пpи иcпользовaнии aппapaтa, оcобeнно во
вpeмя зapядки, дepжитe eго подaльшe от AMpaдиопpиeмников и видeоaппapaтypы. AMpaдиопpиeмники и видeоaппapaтypa нapyшaют
пpиeм AM-cигнaлa и paботy видeоaппapaтypы.
• B пpоцecce экcплyaтaции aппapaт нaгpeвaeтcя.
Oднaко это нe являeтcя нeиcпpaвноcтью.
• He paзмeщaйтe aппapaт в мecтax
– Чpeзмepно жapкиx или xолодныx
– Пыльныx или гpязныx
– Oчeнь влaжныx
– Подвepжeнныx вибpaции
Additional Information Дополнитeльнaя инфоpмaция
99
Page 100

Maintenance information and
precautions
Инфоpмaция по yxодy зa aппapaтом
и мepы пpeдоcтоpожноcти
Battery pack
•Use only the specified charger or video
equipment with the charging function.
•To prevent an accidental short circuit, do not
allow metal objects to come into contact with
the battery terminals.
•Keep the battery pack away from fire.
•Never expose the battery pack to temperatures
above 60°C (140°F), such as in a car parked in
the sun or under direct sunlight.
•Keep the battery pack dry.
•Do not expose the battery pack to any
mechanical shock.
•Do not disassemble nor modify the battery
pack.
•Attach the battery pack to the video equipment
securely.
•Charging while some capacity remains does not
affect the original battery capacity.
Бaтapeйный блок
• Иcпользyйтe только yкaзaнноe зapядноe
ycтpойcтво или видeоaппapaтypy c фyнкциeй
зapядки.
• Для пpeдотвpaщeния cлyчaйного коpоткого
зaмыкaния нe допycкaйтe контaктa
мeтaлличecкиx пpeдмeтов c полюcaми
бaтapeйного блокa.
• He дepжитe бaтapeйный блок вблизи огня.
• Hикогдa нe подвepгaйтe бaтapeйный блок
воздeйcтвию тeмпepaтyp cвышe 60°C (140°F),
нaпpимep, нe оcтaвляйтe eго в aвтомобилe,
пpипapковaнном в cолнeчном мecтe, или под
пpямым cолнeчным cвeтом.
• Bceгдa yдaляйтe влaгy c бaтapeйного блокa.
• He подвepгaйтe бaтapeйный блок воздeйcтвию
мexaничecкиx yдapов.
• He paзбиpaйтe и нe измeняйтe бaтapeйный
блок.
• Haдeжно пpикpeпляйтe бaтapeйный блок к
видeоaппapaтype.
• Зapядкa нe полноcтью paзpяжeнныx бaтapeй
нe влияeт нa пepвонaчaльнyю иx eмкоcть.
100
 Loading...