


Wireless Speaker
Operating Instructions GB
Arahan Pengendalian MY
使用說明書
사용 설명서
CT
KR
©2019 Sony Corporation
Printed in China
4-747-379 -84(1)
GTK-PG10

WARNING
Do not expose the appliance to naked
flame sources (for example, lighted
candles).
As the main plug is used to disconnect
the unit from the mains, connect the unit
to an easily accessible AC outlet. Should
you notice an abnormality in the unit,
disconnect the main plug from the AC
outlet immediately.
The unit is not disconnected from the
mains as long as it is connected to the
AC outlet, even if the unit itself has been
turned off.
Do not install the appliance in a confined
space, such as a bookcase or built-in
cabinet.
Do not expose the batteries (battery
pack or batteries installed) to excessive
heat such as sunshine, fire or the like for
a long time.
Do not subject the batteries to extreme
low temperature conditions that may
result in overheating and thermal
runaway.
Do not dismantle, open or shred
secondary cells or batteries.
In the event of a cell leaking, do not
allow the liquid to come in contact with
the skin or eyes. If contact has been
made, wash the affected area with
copious amounts of water and seek
medical advice.
Secondary cells and batteries need to
be charged before use. Always refer
to the manufacturer’s instructions or
equipment manual for proper charging
instructions.
After extended periods of storage, it may
be necessary to charge and discharge
the cells or batteries several times to
obtain maximum performance.
Dispose of properly.
To use the unit for a long time in a
good condition
• Avoid using or storing the unit with its
side turned down.
• If the unit gets wet, do not leave it as it
is for a long time. Wipe it off with a dry
cloth immediately.
This equipment has been tested and
found to comply with the limits set out
in the EMC Directive using a connection
cable shorter than 3 meters.
GB
2

Notes on water resistant
feature
(Read before using the unit)
Water resistant performance of the
unit
The top panel of the unit has a water
resistant specification*
specified in “Degrees of protection
against splashing water” of the IEC60529
“Ingress Protection Rating (IP Code).”
However, this unit is not completely
water-tight.
Do not drop the unit into hot water in a
bathtub or purposely use it in water.
Liquids that the water resistant
performance specifications apply to
Applicable : fresh water, tap
Not applicable : liquids other than
*1 Any part of the unit other than the top
panel is not water resistant.
2
*
IPX4 (degree of protection against
splashing water): Protected against water
splashing from any direction.
The water resistant performance of the
unit is based on our measurements
under the conditions herein described.
Note that malfunctions as a result of
water immersion caused by misuse by
the customer are not covered by the
warranty.
1
of IPX4*2 as
water
the above (soapy
water, water with
detergent or bath
agents, shampoo,
hot spring water,
pool water,
seawater, etc.)
• Do not use the unit in a location where
large amount of water or hot water
may splash on it. The unit does not
have a design that is resistant to water
pressure. Use of the unit in the above
location may cause a malfunction.
• Do not pour high-temperature water
or blow hot air from a hair dryer
or any other appliance on the unit
directly. Also, never use the unit in
high temperature locations, such as in
saunas or near a stove.
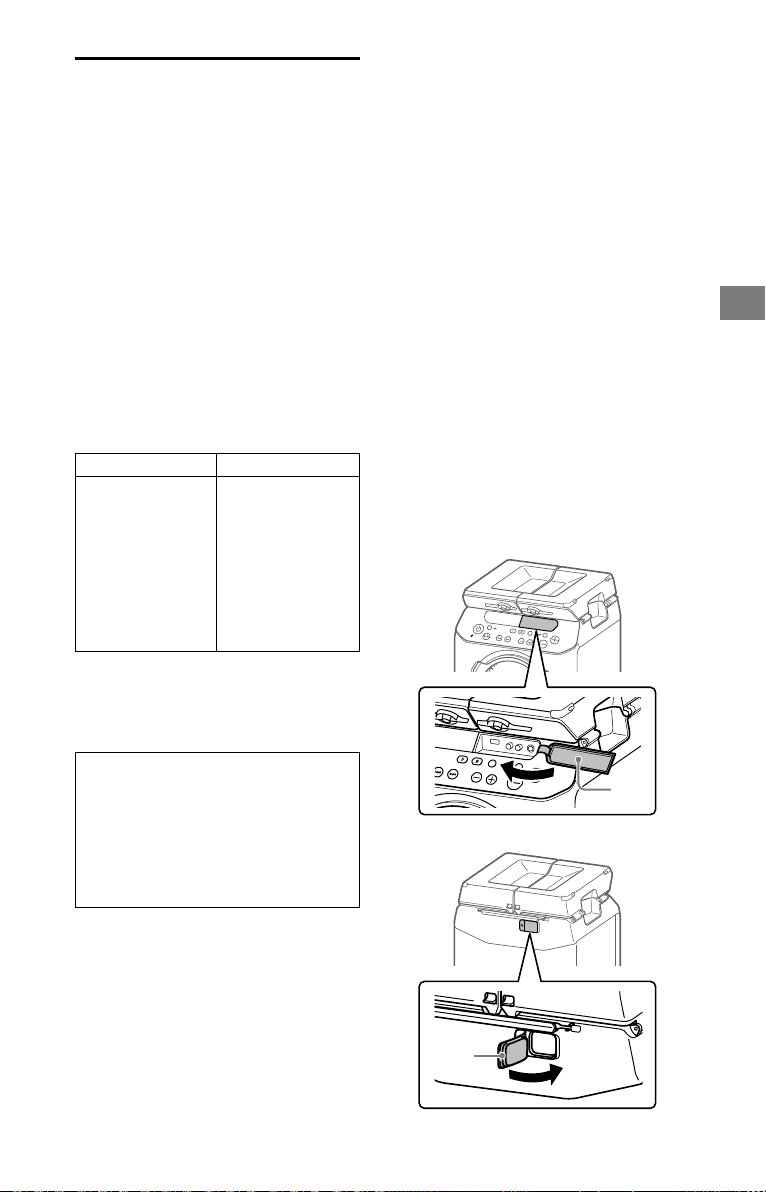
• Handle the covers () with care. The
covers play a very important role in
maintenance of the water resistant
performance. When using the system,
make sure that the covers are closed
completely. When closing the covers,
be careful not to allow foreign
objects inside. If the covers are not
closed completely the water resistant
performance may deteriorate and may
cause a malfunction of the system as a
result of water entering the system.
Front
Rear
GB
To avoid the deterioration of the
water resistant performance
Check the following and use the unit
correctly.
• Be careful not to drop the unit or
subject it to mechanical shock.
Deformation or damage may cause
deterioration of the water resistant
performance.
GB
3

How to care for the system when
wet
If the system gets wet, first remove
the water from the system, and then
wipe off the moisture on the system
using a soft, dry cloth. Especially in cold
regions, leaving moisture on its surface
may cause the system to freeze and
malfunction.
Be sure to wipe off the moisture after
using the system.
Put the system on towel or dry cloth.
Then leave it at room temperature
and dry the system until no moisture
remains.
GB
4

Table of Contents
Notes on water resistant feature
(Read before using the unit) ........... 3
Guide to parts and controls ......6
Getting Started
Charging the battery .................9
Turning on the system ..............9
Carrying the system ................ 10
Unfolding the top panel .......... 10
About the power management
Installing the speaker system on
a tripod .....................................12
USB Device
Before using the USB device ....13
Playing a file .............................13
Tuner
Listening to the radio ...............15
Presetting radio stations ..........15
Setting monaural/stereo ..........15
... 11
Sound Adjustment
Adjusting the sound ................ 23
Other Operations
Using an optional equipment
Using an optional microphone
Deactivating the buttons on the
unit (Child Lock) ....................... 25
Setting the automatic standby
function .................................... 25
Saving the battery power ........ 26
Checking the software version
... 24
... 24
... 26
Additional Information
Information about compatible
devices ..................................... 27
Troubleshooting ...................... 27
Precautions ..............................30
Specifications ........................... 32
License and Trademark Notice
... 33
BLUETOOTH connection
Pairing this system with a
BLUETOOTH device .................. 16
Listening to music on a
BLUETOOTH device .................. 18
About the BLUETOOTH wireless
technology ............................... 19
Playing back with high quality
sound codec (AAC/LDAC™) .... 19
Setting the BLUETOOTH standby
mode ........................................ 20
Turning on or off the BLUETOOTH
signal ........................................21
Using “Sony | Music Center”
and “Fiestable” via BLUETOOTH
connection ................................21
GB
5

Guide to parts and controls
Front
Rear
GB
6

(power) button
Press to turn on or off the system.
CHARGE indicator
Lights up in amber while the
battery is charging.
Flashes when the system is used
with the built-in battery and the
remaining battery level is low (less
than 10%).
Turns off when the system is used
with the AC power cord connected
to a wall outlet and the battery is
fully charged, or when the system
is used with the built-in battery
and the remaining battery level is
10% and over.
(play/pause)* button
— Press to play/pause music.
— Hold down the button for
about 3 seconds, the built-in
sound demonstration will be
played back.
/ (go backward/go
forward) buttons
Press to select a track or file.
TUNING –/+ buttons
Press to tune to an FM station.
KEY CONTROL/ buttons
MIC –/+ buttons
Press to reduce the microphone
volume level.
VOLUME –/+* buttons
Press to adjust the volume.
MIC jack
Use to connect the microphone.
AUDIO IN L/R jacks
Connect to the audio output
jacks of a TV or an audio/video
equipment. The sound is output
through this system.
(USB) port
Use to connect a USB device.
Display
(BLUETOOTH) indicator
FUNCTION PAIRING button
— Press repeatedly to select the
BLUETOOTH, USB or AUDIO IN
function.
— When the BLUETOOTH function
is selected, hold down to
activate BLUETOOTH pairing
(page16).
Hole for tripod attachment (on
the bottom surface)
Use a tripod (commercially
available) that can withstand the
weight of 10 kg or more.
Depending on the tripod
specifications, the speaker
attached on the tripod may not
face in an adequate direction.
MIC ECHO button (page9)
Hold down to stop the built-in
sound demonstration.
MEGA BASS BATTERY button
— Press to reinforce bass sound
and create more powerful sound
(page23).
— Hold down to check the
remaining battery level
(page11).
MEGA BASS indicator
Lights up when the MEGA BASS
function is turned on.
FM radio antenna
AC IN jack
* The (play/pause) button and the
VOLUME + button have a tactile dot.
Use the tactile dot as a reference when
operating the system.
GB
7
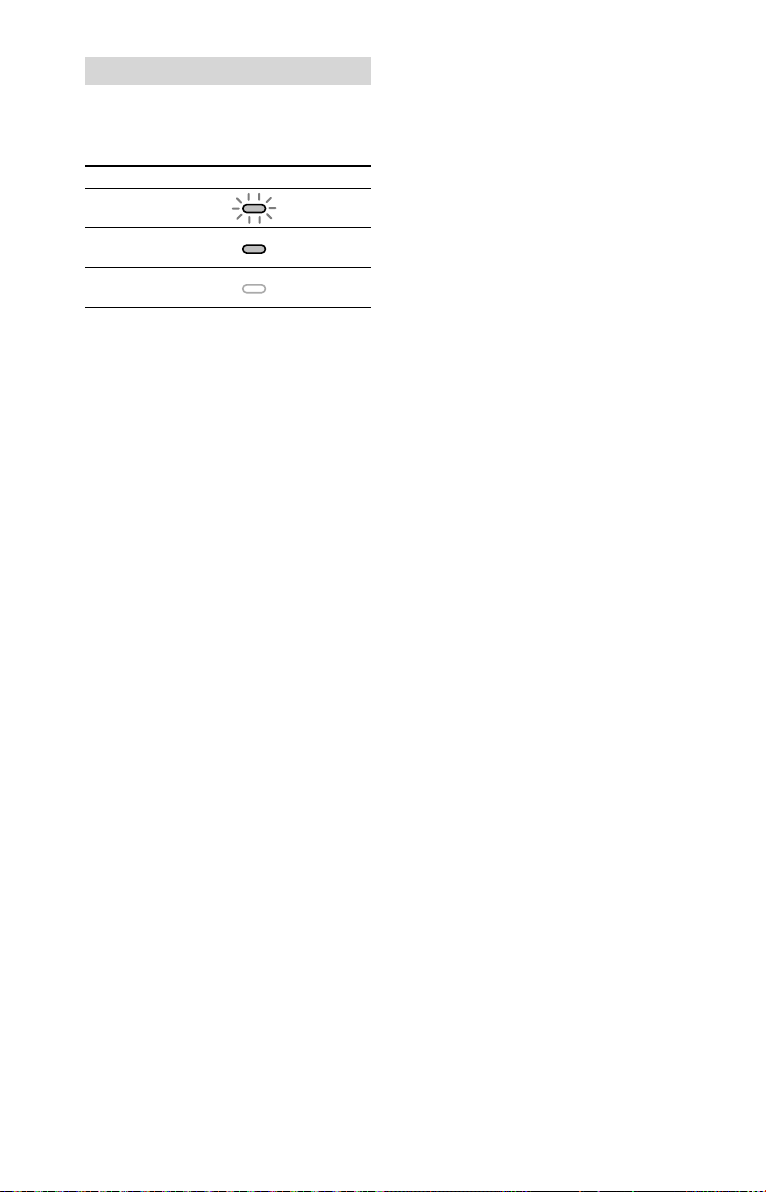
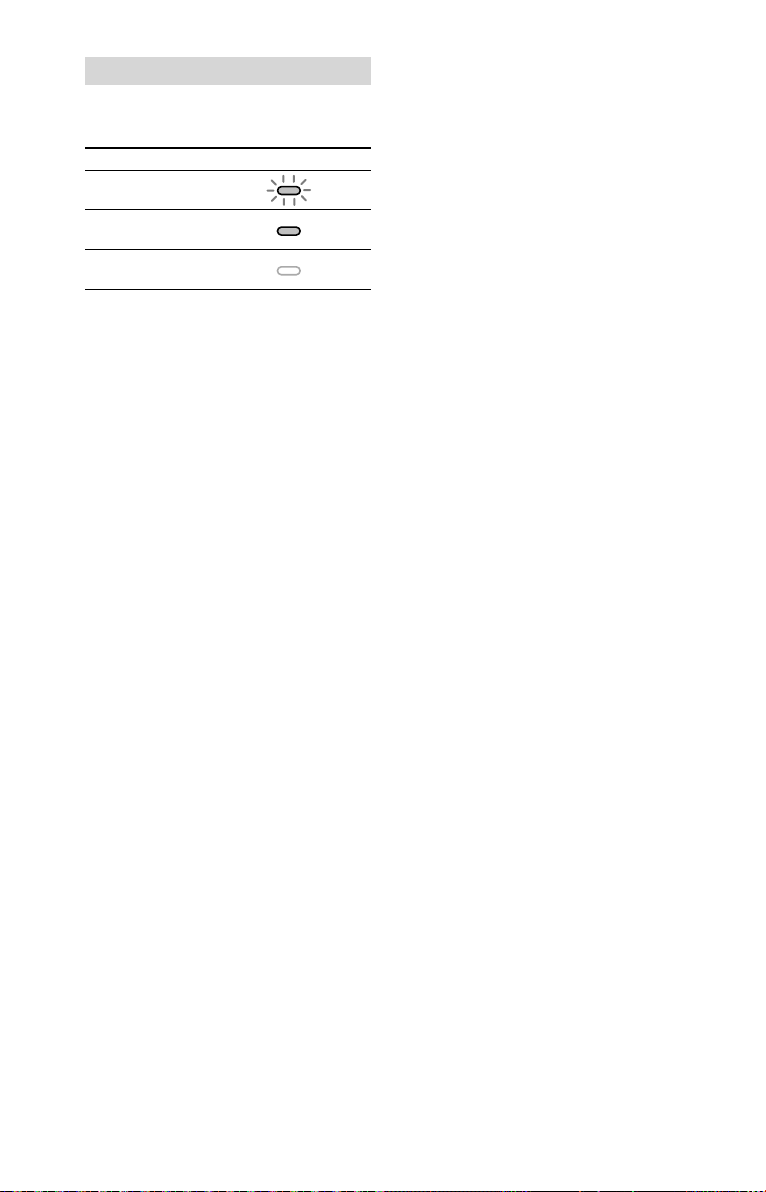
Indicator statuses
The statuses of the indicators on the
unit are shown in the illustrations as
follows.
Indicator status Illustration
Flashing
Lit up
Turned off
GB
8

Getting Started
Charging the battery
The system can be used with the
built-in battery (rechargeable) instead
of connecting the AC power cord to
a wall outlet if the battery has been
sufficiently charged.
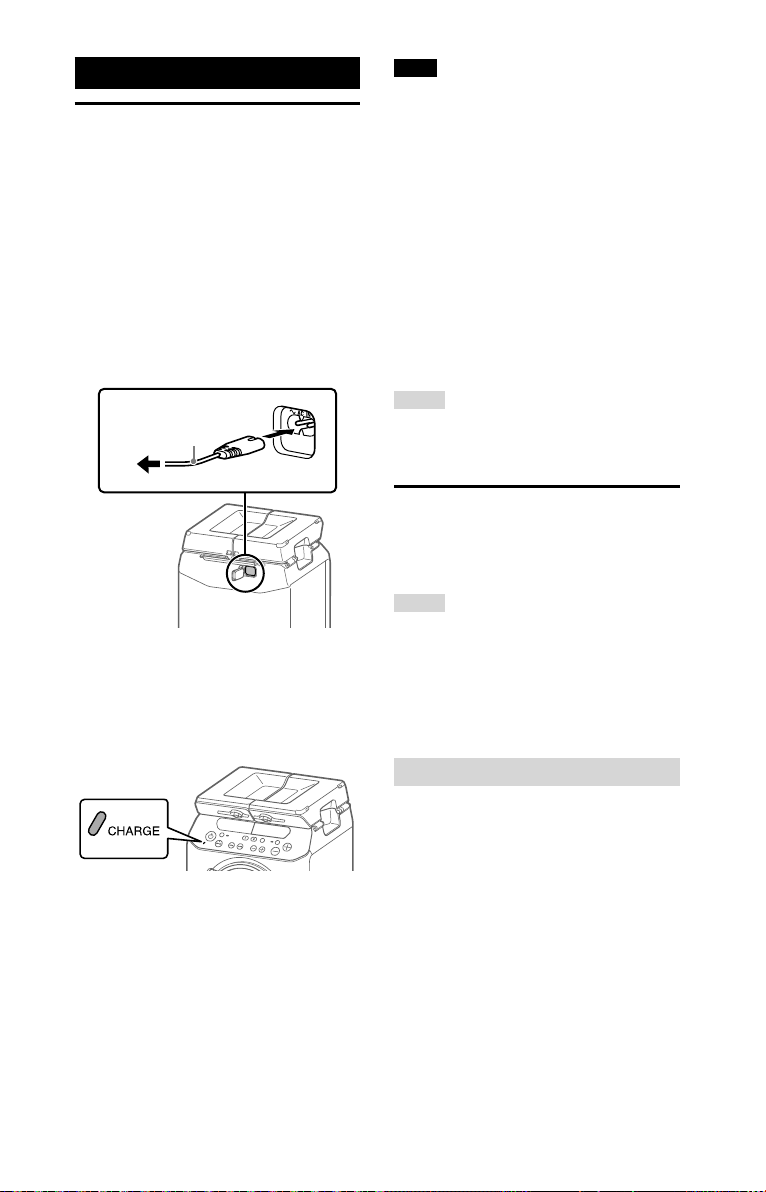
Connect the AC power cord
(supplied) to the AC IN jack on
the rear of the unit, and then to
the wall outlet.
AC power cord (supplied)
To wall outlet
The CHARGE indicator will light up in
amber. Charging will be completed in
about 7 hours and the indicator will turn
off.
Note
• It may take longer to charge the battery
depending on the conditions of use.
• Even if you do not intend to use the
system for a long time, charge the battery
to its full capacity once every six months
to maintain its performance.
• In an extremely cold or hot environment,
charging stops for safety.
If charging is taking a long time, this also
stops the system from charging.
To resolve these issues, disconnect the
AC power cord and connect it again in an
operating temperature between 5 °C and
30 °C.
Hint
You can operate the system while it is
charging.
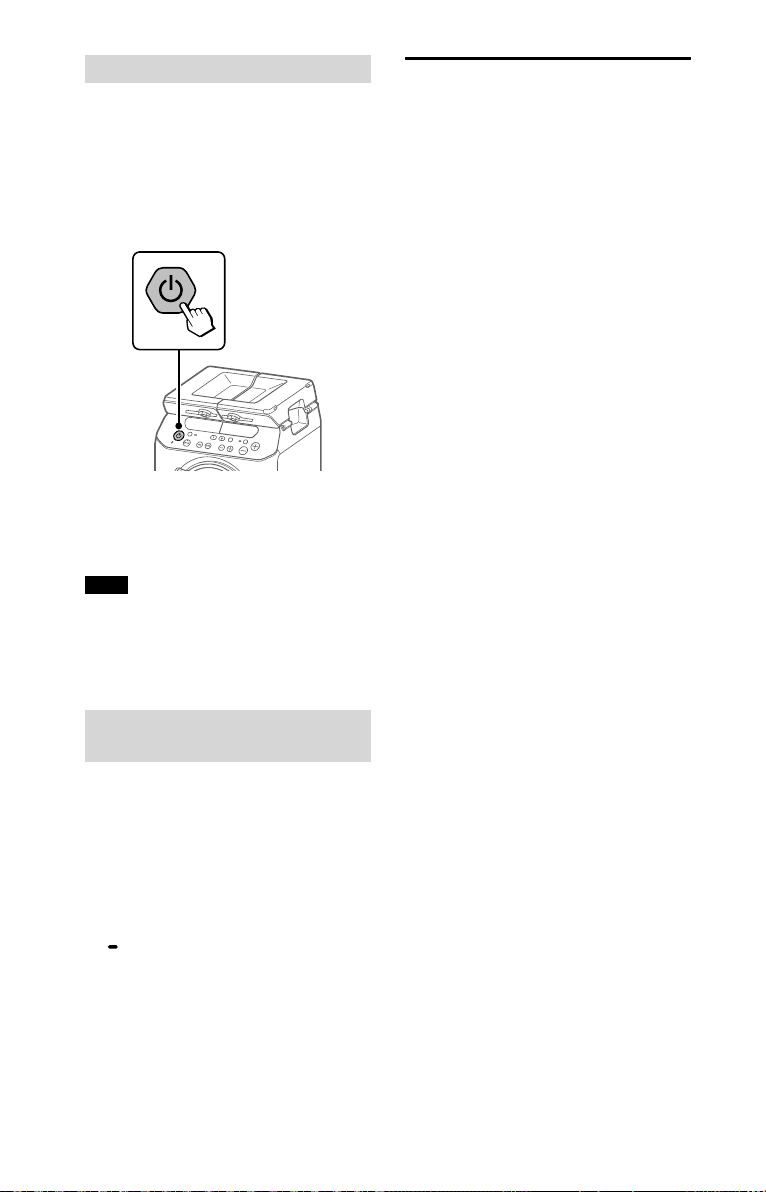
Turning on the system
Press the button to turn on the
system.
Hint
The system can be used with the built-in
battery instead of connecting the AC power
cord (supplied) to a wall outlet if you have
charged the battery before use. For details,
see “Charging the battery.”
Deactivating the demonstration
Hold down the MIC ECHO button
for more than 3 seconds with
the system turned on to set the
demonstration mode to off.
“DEMO OFF” appears on the display.
To perform the demonstration, with
the demonstration mode set to on,
connect the system to a wall outlet
and turn it on.
When the system is used with the
built-in battery, the demonstration is
not performed.
GB
9
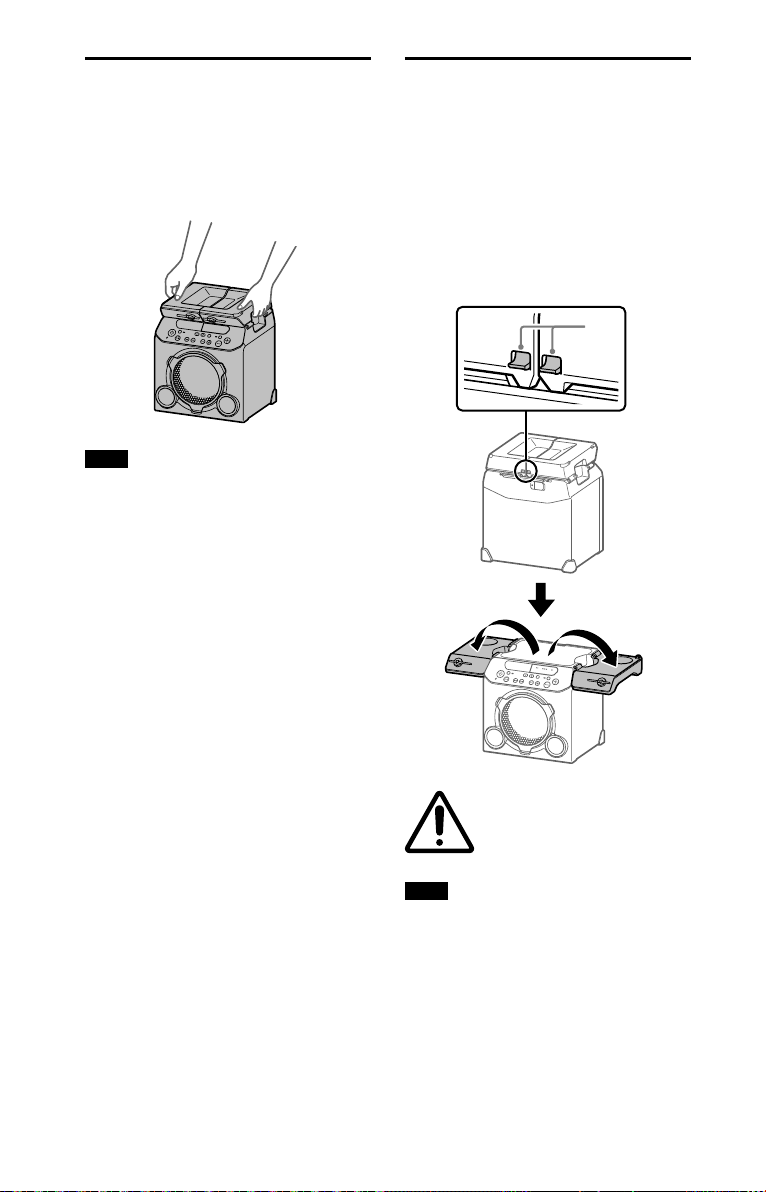
Carrying the system
Unfolding the top panel
Before carrying the system, disconnect
all the cords.
In addition, if the top panel of the unit
is unfolded, fold the top panel securely
when carrying the unit around.
Note
Correct hand placement while carrying the
system is very important to avoid personal
injury and/or property damage.
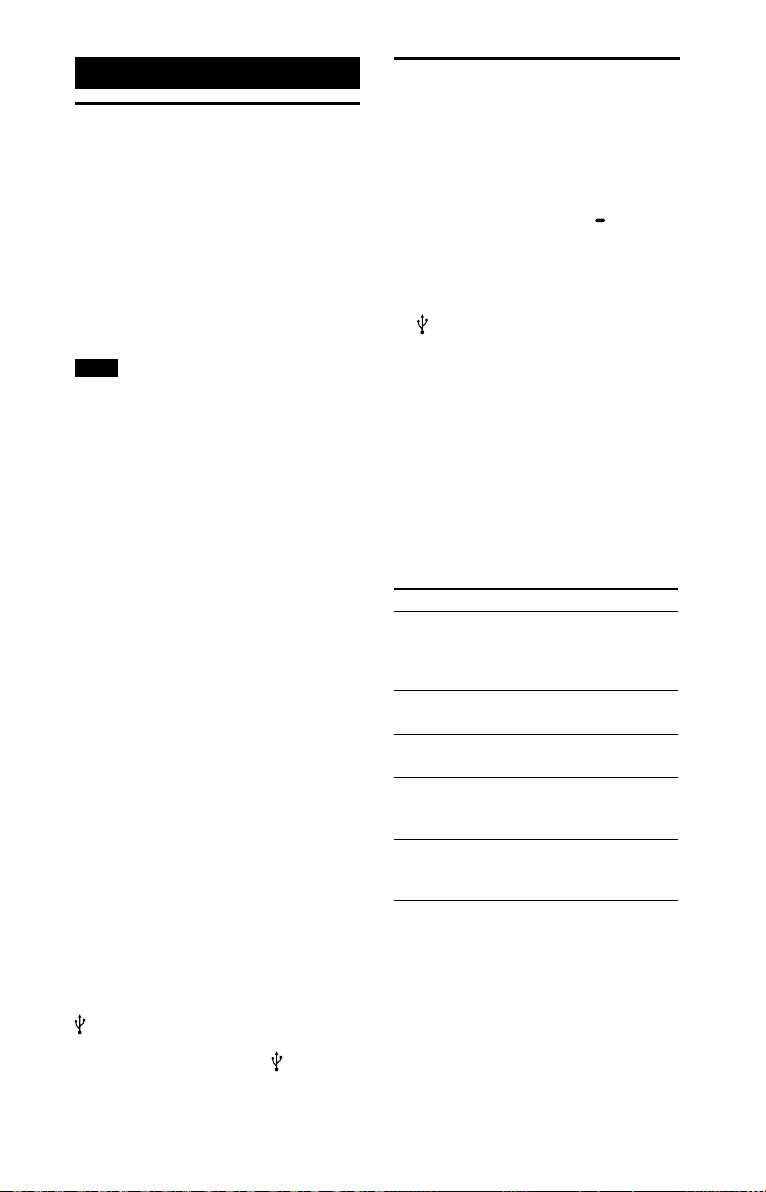
You can use the system as a table by
unfolding the top panel. To unfold the
top panel, push up the pawl () at the
rear side of the unit and then unfold
the folded top panel.
Keeping beverage in the drink holder
is also available.
Moreover, using with the top panel
unfolded gives spatial impression to
the sound.
10
Be careful not to catch
your finger in the top
panel when unfolding or
folding it.
Note
• Do not sit on the unit.
• Withstand load is 10kg at the maximum.
• Do not place a hot iron plate or other hot
objects onto the top panel.
• Note that applying a load to one side of
the unfolded top panel may cause the unit
to tip over.
• Do not leave any objects susceptible to
magnetism (cash cards, credit cards with
magnetic coding, etc.) near on the top
panel.
GB

About the power
management
• By default, this system is set to turn
off automatically in about 15minutes
when there is no operation, and no
audio signal is detected. For details,
see “Setting the automatic standby
function” (page25).
• You can reduce the power
consumption using the no display
mode (Power Saving mode). For
details, see “Saving the battery
power” (page26).
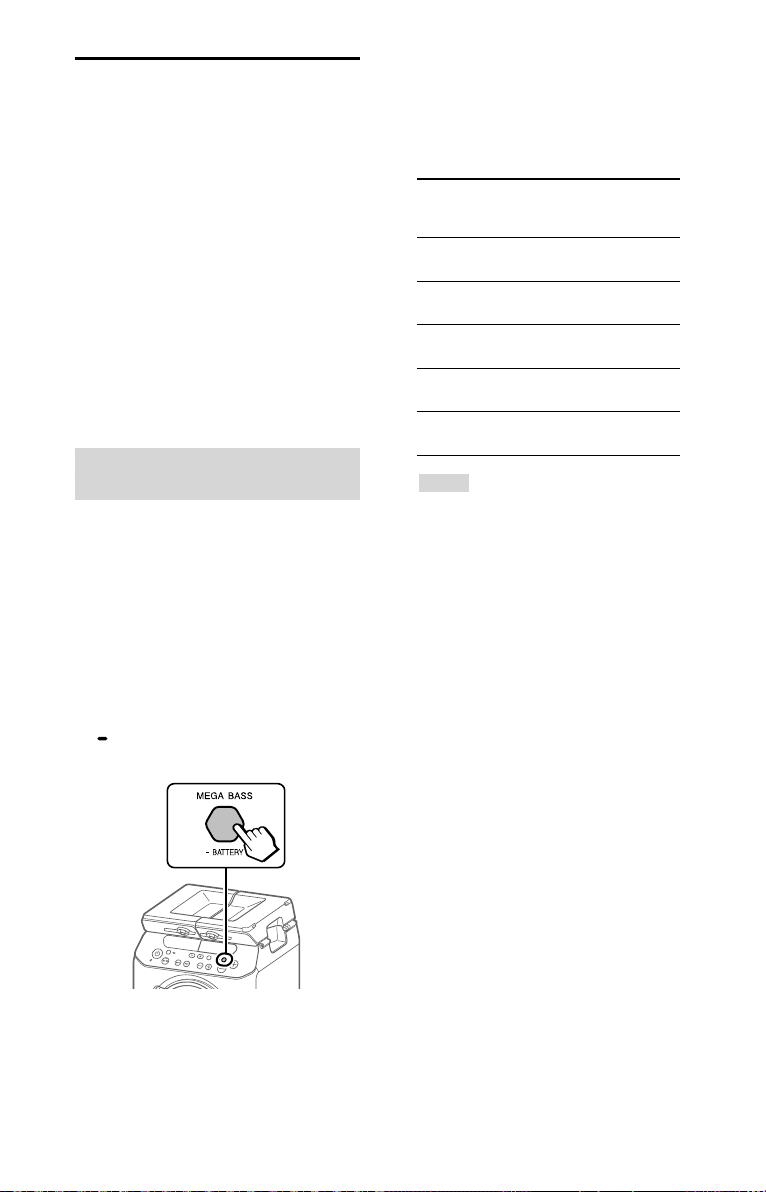
Checking the battery level of the
rechargeable battery
You can check the remaining battery
level via voice guidance and by a
message on the display.
You can also check the battery
level using “Sony | Music Center”
(page21).
1
Press the button to turn on
the system.
3
The voice guidance message
is heard and one of the
following messages appears
on the display according to
the remaining battery level.
Voice guidance
message (battery
level)
“Fully charged”
(80% – 100%)
“Battery About 70%”
(60% – 79%)
“Battery About 50%”
(30% – 59%)
“Battery About 20%”
(11% – 29%)
“Please charge”
(less than 10%)
Hint
“Please charge” is output automatically
when the system is used with the builtin battery and the remaining battery
level is less than 10%.
Message
on the
display
FULLY
CHARGED
BATT 70%
BATT 50%
BATT 20%
PLEASE
CHARGE
2
Hold down the MEGA BASS
BATTERY button for more
than 3 seconds.
11
GB

Installing the speaker
system on a tripod
Match the hole on the speaker system
() to the tripod (not supplied) (),
then gently push it downward until it
is inserted completely to the tripod.
Be sure to use the tripod of
approximately 35mm in diameter and
that weighs 2.8 kg or more and can
withstand the weight of 10 kg or more.
Depending on the tripod
specifications, the speaker system
installed on the tripod may not face in
an adequate direction.
Less than
1.2m
• Do not walk over the tripod legs to avoid
from tripping.
• Disconnect the AC power cord (mains
lead) and all cables, and detach the
speaker system from the tripod when you
want to move the tripod, speaker system
or the subwoofer.
• Be careful not to trip over the speaker
cable, tripod legs or the AC power cord
(mains lead).
• Keep children away from the speaker
system installed on the tripod.
• Take other precautions to prevent the
speaker system installed on the tripod
from falling.
More than 0.55m*
* We recommend you to expand the tripod
legs to maximum.
Note
Take the following precautions when
installing the speaker system on the tripod
to avoid personal injury or damaging the
speaker system.
• Set up the tripod completely before you
install the speaker system. Be sure to read
the operating instructions of your tripod.
• Do not install the speaker system on
the tripod placed on unstable surface,
walkway or any other unsuitable locations.
• Make sure the speaker system is attached
on the tripod securely.
• Do not push the speaker system or place
any objects on the speaker system when it
is installed on the tripod.
• Do not rotate or lift the speaker system
when it is installed on the tripod.
GB
12
35mm
USB Device
Playing a file
Before using the USB
device
For compatible USB devices, see
“Information about compatible
devices” (page27).
When using Apple devices with
this system, connect them via a
BLUETOOTH connection (page16).
Using Apple devices via a USB
connection is not supported.
Note
• When USB cable connection is necessary,
use the USB cable supplied with the USB
device. See the operating instructions
supplied with the USB device for details
on the operation method.
• Do not connect the system and the USB
device through a USB hub.
• When the USB device is connected, the
system reads all the files on the USB
device. If there are many folders or files on
the USB device, it may take a long time to
finish reading the USB device.
• With some connected USB devices, there
may be a delay before an operation is
performed by this system.
• Compatibility with all encoding/writing
software cannot be guaranteed. If audio
files on the USB device were originally
encoded with incompatible software,
those files may produce noise or
interrupted audio, or may not play at all.
• This system does not necessarily support
all the functions provided in a connected
USB device.
To use the system as a battery
charger
You can use the system as a battery
charger for USB devices when;
—the USB devices have a rechargeable
function,
—the system is turned on, and
—any function except the USB function
is selected.
Connect the USB device to the
(USB) port.
The charging begins when the USB
device is connected to the
port. For details, refer to the operating
instructions of your USB device.
(USB)
The following audio file formats are
supported:
—MP3: file extension “.mp3”
—WMA: file extension “.wma”
1
Press the FUNCTION
PAIRING button to select
“USB.”
2
Connect the USB device to the
(USB) port.
3
Press the button to start
playback.
You can control playback
operations and select music easily
from a list of music on the USB
device using “Sony | Music Center”
(page21).
4
Press the VOLUME -/+ buttons
to adjust the volume.
Other operations
To Do this
Pause
playback
Play back the
next song
Play back the
previous song
Fast forward Hold down the
Fast reverse Hold down the
Press the button.
To resume play,
press the button
again.
Press the button.
Press the button.
button for more than
3 seconds.
button for more than
3 seconds.
13
GB

Note
• This system cannot play audio files on the
USB device in the following cases;
— when the total number of audio files on
a USB device exceeds 5,000.
— when the number of folders on a USB
device exceeds 999 (including the
“ROOT” folder and empty folders).
These numbers may vary depending on
the file and folder structure. Do not save
other types of files or unnecessary folders
on a USB device that has audio files.
• The system can play back to a depth of 8
folders only.
• Folders that have no audio files are
skipped.
• Note that even when the file name has
the correct file extension, if the actual
file differs, the system may emit noise or
malfunction.
14
GB

Tuner
Presetting radio stations
Listening to the radio
1
Adjust the antenna for
optimum reception.
Extend the FM antenna and adjust
its length and angle for optimum
reception. See “Handling the FM
antenna” (page31).
2
Press the FUNCTION PAIRING
button repeatedly to select
“TUNER FM.”
3
Tune to a station.
For automatic scanning:
Hold down the TUNING –/+ buttons
until the frequency begins to
change on the display.
Scanning stops automatically when
a station is tuned in. “ST” (for FM
stereo programs only) lights up on
the display.
If scanning does not stop, press
the TUNING – or + button to stop
scanning. Then, perform manual
tuning (below).
For manual tuning:
Press the TUNING –/+ buttons
repeatedly to tune to the station
you want.
Hint
To reduce static noise on a weak FM
stereo station, hold down the FUNCTION
PAIRING button and the MEGA
BASS button for about 3 seconds. “ST”
disappears and “MONO” lights up on the
display. You will lose the stereo effect,
but reception will improve.
You can store up to 20 FM stations as
your favorite stations.
To preset FM stations, use “Sony |
Music Center” on your smartphone/
iPhone. For details on “Sony | Music
Center,” see “Using “Sony | Music
Center” and “Fiestable” via BLUETOOTH
connection” (page21).
Setting monaural/stereo
If noise occurs during FM reception,
set “MONO/ST” to “MONO.” If you set it
to “ST”, stereo or monaural is selected
automatically, depending on reception
conditions.
1
Hold down the FUNCTION
PAIRING button and the
MEGA BASS button for about
3 seconds.
15
GB

BLUETOOTH connection
GTK-PG10
BLUETOOTH
Pairing this system with
a BLUETOOTH device
Pairing is an operation in which
BLUETOOTH devices register each
other beforehand. Once the pairing
operation has been performed, it does
not need to be performed again for
those devices.
3
Hold down the FUNCTION
PAIRING button for more than
3seconds.
Voice guidance (“Bluetooth
pairing”) will be output and the
(BLUETOOTH) indicator will flash
quickly.
1
Place the BLUETOOTH device
within 1m from the system.
2
Select the BLUETOOTH
function.
Press the button to turn on
the system.
Press the FUNCTION
button repeatedly until the
(BLUETOOTH) indicator on
the unit flashes slowly.
Hint
When there is no pairing information
on the system (for example, when
you use the BLUETOOTH function
for the first time after purchase), the
(BLUETOOTH) indicator flashes quickly
and the system enters the pairing mode
automatically. In this case, proceed to
step 4.
PAIRING
Bluetooth
pairing
4
Turn on the BLUETOOTH
function on the BLUETOOTH
device.
For details, refer to the operating
instructions of your BLUETOOTH
device.
5
Select “GTK-PG10” on the
display of the BLUETOOTH
device.
Note
If passkey is required on the BLUETOOTH
device, enter “0000.” “Passkey” may
be called “Passcode,” “PIN code,” “PIN
number,” or “Password.”
16
GB

6
Make sure that a BLUETOOTH
connection has been
established.
Once a BLUETOOTH connection
is established, the system will
emit a notification sound, and the
(BLUETOOTH) indicator on the
unit will stop flashing and remain
lit up.
Depending on the BLUETOOTH
device, connection may start
automatically after pairing is
completed.
Note
• You can pair up to 8 BLUETOOTH devices.
If the 9th BLUETOOTH device is paired, the
oldest paired device will be deleted.
• If you want to pair with another
BLUETOOTH device, repeat steps 1 to 6.
• If the last connected BLUETOOTH device
is nearby, a BLUETOOTH connection will
be established automatically and the
BLUETOOTH indicator will light up.
Erasing all the pairing
registration information
To erase all of the pairing registration
information, the system needs to
be restored to the factory default
settings. See “Restoring the system
to the factory default settings”
(page30).
Note
Once all the pairing information on the
system has been erased, iPhone/iPod touch
may not be able to connect to the system.
In this case, delete the pairing information
for the system from iPhone/iPod touch, and
then perform the pairing procedure again.
To cancel the pairing operation
Press the FUNCTION PAIRING button.
To terminate the BLUETOOTH
connection
Turn off the BLUETOOTH function on
the connected device.
Note
Depending on the BLUETOOTH device, the
BLUETOOTH connection may be terminated
automatically when you stop playback.
17
GB

Listening to music on a
BLUETOOTH device
You can enjoy listening to music on a
connected BLUETOOTH device.
Check the following before playing
music:
—The BLUETOOTH function of the
BLUETOOTH device is turned on.
—Pairing has been completed
(page16).
1
Press the FUNCTION
PAIRING button repeatedly
until the
indicator on the unit lights up.
The last connected BLUETOOTH
device will be connected
automatically.
(BLUETOOTH)
2
Start playback of an audio
source on the BLUETOOTH
device.
For details, refer to the operating
instructions of your BLUETOOTH
device.
You can also use the button on
the system to play back/pause the
music.
3
Adjust the volume.
Adjust the volume of the
BLUETOOTH device first. If the
volume level is still too low, adjust
the volume level on the system
using the VOLUME –/+ buttons.
BLUETOOTH
device
Note
If the (BLUETOOTH) indicator flashes,
the BLUETOOTH connection hasn’t
been established. In this case, complete
the pairing procedure and establish a
BLUETOOTH connection.
GB
18

Switching between BLUETOOTH
devices connected to the system
at the same time (Multi-device
Connection)
Playing back with high
quality sound codec
(AAC/LDAC™)
Up to 3 BLUETOOTH devices can be
connected to the system at the same
time.
While playing back an audio source
from one of the connected devices,
you can switch the BLUETOOTH
input device by operating another
connected device to start playback.
Note
Depending on the BLUETOOTH devices,
you may not be able to make 3 BLUETOOTH
connections at the same time.
About the BLUETOOTH
wireless technology
BLUETOOTH wireless technology is a
short-range wireless technology that
enables wireless data communication
between digital devices. BLUETOOTH
wireless technology operates within a
range of about 10m.
Supported BLUETOOTH version,
profiles and codecs
For details, see “BLUETOOTH section”
(page32).
This system can receive data in the
AAC or LDAC codec format from a
BLUETOOTH device. It provides a
playback with higher sound quality.
You can select an audio codec option
from the following two settings
by using “Sony | Music Center”
(page21). The default setting of
this system is “AUTO.”
• AUTO: The system detects the codec
used on the source device and
automatically selects the optimal
codec from “SBC,” “AAC*” or “LDAC*.”
• SBC: “SBC” is always applied
regardless of the codec used on the
source device.
* Available only when the codec is
supported by your BLUETOOTH device.
To apply the changes of the setting,
you need to terminate the BLUETOOTH
connection (page17), and then
perform the BLUETOOTH connection
again.
Note
You can enjoy higher sound quality
when the source device is compatible
with AAC/LDAC and this function is set
to “AUTO.” However, the sound may be
interrupted depending on the conditions
of the BLUETOOTH communication. If this
happens, set the function to “SBC.”
(BLUETOOTH) indicator
The (BLUETOOTH) indicator on the
unit lights up or flashes in blue to
show the BLUETOOTH status.
System status Indicator status
BLUETOOTH
standby
BLUETOOTH
pairing
BLUETOOTH
connection is
established
Flashing slowly
Flashing quickly
Lit up
19
GB

LDAC is an audio coding
technology developed by Sony,
that enables the transmission
of High-Resolution (Hi-Res)
Audio content, even over a
BLUETOOTH connection. Unlike
other BLUETOOTH compatible
coding technologies, such as
SBC, it operates without any
down-conversion of the Hi-Res
Audio content1). It also allows
approximately three times more
data2) than the other technologies,
for transmitting over a
BLUETOOTH wireless network with
unprecedented sound quality using
efficient coding and optimized data
bundling.
1)
Excluding DSD format contents.
2)
In comparison with SBC (Sub Band
Codec), when the bit rate of 990 kbps
(96/48 kHz) or 909 kbps (88.2/44.1 kHz)
is selected.
Setting the BLUETOOTH
standby mode
The BLUETOOTH standby mode
enables the system to turn on
automatically when you establish
the BLUETOOTH connection with a
BLUETOOTH device. This setting is
turned off by default.
This setting can only be configured by
using “Sony | Music Center.” For details
on “Sony | Music Center,” see “Using
“Sony | Music Center” and “Fiestable”
via BLUETOOTH connection”
(page21).
Note
The BLUETOOTH standby mode can only
be set to on while the AC power cord is
connected.
Hint
Disable the BLUETOOTH standby mode to
reduce the power consumption in standby
mode (eco mode).
20
GB

Turning on or off the
BLUETOOTH signal
You can connect to the system
from a paired BLUETOOTH device
in all functions when the system’s
BLUETOOTH signal is set to on. This
setting is turned on by default.
Hold down the FUNCTION
PAIRING button and the VOLUME
- button for more than 3 seconds
to turn off the BLUETOOTH
signal.
“BT OFF” appears on the display.
Note
• You cannot perform the following
operations when you turn off the
BLUETOOTH signal:
— Pairing and/or connecting with a
BLUETOOTH device
— Using “Sony | Music Center” via
BLUETOOTH connection
• To turn on the BLUETOOTH signal, repeat
the procedure shown above. When the
BLUETOOTH signal turns on, “BT ON”
appears on the display.
Using “Sony | Music
Center” and “Fiestable”
via BLUETOOTH
connection
About App
You can control the system more
flexibly and enjoy it in new ways using
the free Apps “Sony | Music Center”
and “Fiestable” on your smartphone/
iPhone. “Sony | Music Center” and
“Fiestable” are available in both
Google Play and the App Store.
1
Search for “Sony | Music
Center” and download the
App to your smartphone/
iPhone.
You can also download the App
by scanning the two-dimensional
code below.
2
Establish a BLUETOOTH
connection between
the system and your
smartphone/iPhone.
For details on BLUETOOTH
connection, see “Pairing this
system with a BLUETOOTH device”
(page16).
21
GB

3
Launch “Sony | Music Center”
and download “Fiestable.”
Hint
You can also download “Fiestable”
from the App Store or Google Play.
What you can do with “Sony | Music
Center”:
• Play back music files on a device,
such as a smartphone, iPhone, or USB
device
• Tune to an FM station and listen to
the radio
• Select the sound field
• Set the sleep timer
• Set the power options, such as
the auto power off (Auto Standby)
function and BLUETOOTH standby
mode
• Check the battery level
• Switch BLUETOOTH codecs
(the BLUETOOTH audio streaming
playback quality)
• Configure the various settings for the
system
What you can do with “Fiestable”:
• Karaoke function
• Motion Control
• Volume Control
• Share the usage situation of the
system on a Social Network Site.
(Party King)
Note
• If “Sony | Music Center” does not work
properly, terminate the BLUETOOTH
connection (page17), then perform
the BLUETOOTH connection again so that
the BLUETOOTH connection functions
normally.
• What you can control with “Sony |
Music Center” varies depending on the
connected device.
• The specification and design of the App
may change without notice.
Refer to “Sony | Music Center” Help for
more details.
https://www.sony.net/smcqa/
GB
22

Sound Adjustment
Adjusting the sound
To Do this
Adjust the
volume
Reinforce
bass sound
and create
more
powerful
sound
(MEGA BASS)
Press the VOLUME –/+
buttons.
Press the MEGA BASS
button repeatedly to
select “BASS ON.” The
MEGA BASS indicator
lights up.
To cancel, press the
MEGA BASS button
repeatedly to select
“BASS OFF.”
23
GB

Other Operations
Using an optional
equipment
1
Connect an optional
equipment (i.e. WALKMAN®,
smartphone, TV, DVD player,
IC recorder, etc.) to the AUDIO
IN L/R jacks on the unit using
an audio cord (not supplied).
2
Press the FUNCTION
PAIRING button repeatedly to
select “AUDIO IN.”
3
Start playback on the
connected equipment.
4
Adjust the volume.
Adjust the volume of the
connected equipment first. If the
volume level is still too low, adjust
the volume level on the system
using the VOLUME –/+ buttons.
Note
The system may enter standby mode
automatically if the volume level of the
connected equipment is too low. In this
case, increase the volume level of the
equipment. To turn off the automatic
standby function, see “Setting the automatic
standby function” (page25).
Using an optional
microphone
You can output your voice from the
system by connecting a dynamic
microphone with a normal plug (not
supplied).
1
Press the MIC – button to
reduce the microphone
volume level.
2
Connect an optional
microphone to the MIC jack
on the unit.
3
Press the MIC –/+ buttons to
adjust the volume.
4
Speak or sing into the
connected microphone.
24
GB

Deactivating the buttons
on the unit (Child Lock)
Setting the automatic
standby function
You can deactivate the buttons on the
unit (except the (power) button) to
prevent misoperation, such as child
mischief.
To deactivate the buttons, hold
down the FUNCTION
PAIRING
button and VOLUME + button for
about 3 seconds.
“CHILD LOCK ON” appears on the
display.
To turn off the Child Lock function,
hold down the FUNCTION PAIRING
button and the VOLUME + button for
about 3 seconds. “CHILD LOCK OFF”
appears on the display.
Note
The Child Lock function will be turned off
automatically when you disconnect the AC
power cord.
By default, this system is set to turn
off automatically in about 15 minutes
when there is no operation or audio
signal output.
You can configure this setting and
make sure whether this function is
turned on or off by using “Sony|
Music Center.” For details on “Sony|
Music Center,” see “Using “Sony |
Music Center” and “Fiestable” via
BLUETOOTH connection” (page21).
Note
• The system may enter standby mode
automatically if the volume level of the
connected equipment is too low. In this
case, increase the volume level of the
equipment.
• The system doesn’t enter standby mode
when the MIC jack is in use.
25
GB

Saving the battery
power
Checking the software
version
You can save power and use the
system for longer periods of time
by turning on the no display mode
(Power saving mode) when using
the system with the built-in battery
(rechargeable).
To turn on the no display mode
(Power saving mode), hold
down the FUNCTION
button and the MIC ECHO button
for more than 3 seconds.
To turn off the mode, repeat the
procedure.
Hint
For details on the battery life, see “General”
(page32).
PAIRING
You can check the current version of
the software on the system.
1
Hold down the FUNCTION
PAIRING button and the MIC +
button for about 3 seconds.
2
Press the / buttons
repeatedly to select
“VERSION,” then press the
button.
26
GB

Additional Information
Troubleshooting
Information about
compatible devices
About supported USB devices
• This system supports USB Mass
Storage Class only.
• This system supports FAT formatted
USB devices only (except exFAT).
• Some USB devices may not work
with this system.
About BLUETOOTH communication
for iPhone and iPod models
Made for
• iPhone X
• iPhone 8 Plus
• iPhone 8
• iPhone 7 Plus
• iPhone 7
• iPhone SE
• iPhone 6s Plus
• iPhone 6s
• iPhone 6 Plus
• iPhone 6
• iPhone 5s
• iPod touch (6th generation)
The system is compatible with iOS 10.0
or later.
Websites for compatible devices
Check the websites below for the
latest information about compatible
BLUETOOTH devices.
For customers in the Americas:
https://www.sony.com/am/support
For customers in Europe:
https://www.sony.eu/support
For customers in other countries/
regions:
https://www.sony-asia.com/support
If a problem occurs while operating
the system, follow the steps described
below before consulting your nearest
Sony dealer. If an error message
appears, be sure to make a note of the
contents for reference.
1
Check to see if the
problem is listed in this
“Troubleshooting” section.
2
Check the following customer
support websites.
For customers in the Americas:
https://www.sony.com/am/support
For customers in Europe:
https://www.sony.eu/support
For customers in other countries/
regions:
https://www.sony-asia.com/support
You will find the latest support
information and a FAQ at these
websites.
If the problem persists, consult your
nearest Sony dealer.
Note that if the service personnel
changes some parts during repair,
these parts may be retained.
General
The system does not turn on.
• Charge the built-in battery.
• Check that the AC power cord is
connected securely.
The system has entered standby
mode.
• This is not a malfunction. The system
enters standby mode automatically
in about 15minutes when there is
no operation or audio signal output
(page25).
27
GB

There is no sound.
• Adjust the volume.
• Check the connection of the optional
equipment, if any.
• Turn on the connected equipment.
• Disconnect the AC power cord, then
reconnect the AC power cord and
turn on the system.
There is severe hum or noise.
• Move the system away from sources
of noise.
• Connect the system to a different
wall outlet.
• Install a noise filter (commercially
available) to the AC power cord.
• Turn off surrounding electrical
equipment.
There is acoustic feedback.
• Reduce the volume.
USB device
The connected USB device cannot be
charged.
• Make sure the USB device is
connected securely.
• If the remaining battery level of
the system is less than 10%, the
connected USB device cannot be
charged.
The USB device does not work
properly.
• If you connect an unsupported
USB device, the following problems
may occur. See “Information about
compatible devices” (page27).
—The USB device is not recognized.
—Playback is not possible.
—The sound skips.
—There is noise.
—A distorted sound is output.
There is no sound.
• The USB device is not connected
correctly. Turn off the system, then
reconnect the USB device.
There is noise, skipping, or distorted
sound.
• You are using an unsupported USB
device. See “Information about
compatible devices” (page27).
• Turn off the system and reconnect
the USB device, then turn on the
system.
• The music data itself contains noise,
or the sound is distorted. Noise may
have been entered during music
creation process using the computer.
Create the music data again.
• The bit rate used when encoding an
audio file was low. Send an audio
file with higher bit rates to the USB
device.
The USB device is not recognized.
• Turn off the system and reconnect
the USB device, then turn on the
system.
• You are using an unsupported USB
device. See “Information about
compatible devices” (page27).
• The USB device is not working
properly. Refer to the operating
instructions of the USB device on
how to deal with this problem.
Playback does not start.
• Turn off the system and reconnect
the USB device, then turn on the
system.
• You are using an unsupported USB
device. See “Information about
compatible devices” (page27).
Playback does not start from the first
file.
• Set the play mode to normal play
mode using “Sony | Music Center”
(page21).
28
GB

Files cannot be played back.
• USB devices formatted with file
systems other than FAT16 or FAT32
are unsupported.*
• If you use a partitioned USB device,
only files on the first partition can be
played back.
• Files that are encrypted or protected
by passwords cannot be played
back.
• Files with DRM (Digital Rights
Management) copyright protection
cannot be played back by this
system.
* This system supports FAT16 and FAT32,
but some USB storage devices may not
support all of these FAT. For details,
refer to the operating instructions of
each USB storage device or contact the
manufacturer.
BLUETOOTH device
Pairing cannot be performed.
• Move the BLUETOOTH device closer
to the system.
• Pairing may not be possible if other
BLUETOOTH devices are present
around the system. In this case, turn
off the other BLUETOOTH devices.
• Make sure to enter the correct
passkey when selecting the
system’s name (this system) on the
BLUETOOTH device.
The BLUETOOTH device cannot detect
the system.
• Set the BLUETOOTH signal to on
(page21).
Connection is not possible.
• The BLUETOOTH device you
attempted to connect does not
support the A2DP profile, and
cannot be connected with the
system.
• Enable the BLUETOOTH function of
the BLUETOOTH device.
• Establish a connection from the
BLUETOOTH device.
• The pairing registration information
has been erased. Perform the
pairing operation again.
• Erase the pairing registration
information of the BLUETOOTH
device by restoring the system to
factory default settings (page30)
and perform the pairing operation
again (page16).
• Once all the pairing information
on the system has been erased,
iPhone/iPod touch may not be able
to connect to the system. In this
case, delete pairing information of
the system on iPhone/iPod touch,
and then perform the pairing
procedure again.
The sound skips or fluctuates, or the
connection is lost.
• The system and the BLUETOOTH
device are too far apart.
• If there are obstacles between the
system and your BLUETOOTH device,
remove or avoid the obstacles.
• If there is equipment that generates
electromagnetic radiation, such as
a wireless LAN, other BLUETOOTH
device, or a microwave oven nearby,
move them away.
The sound of your BLUETOOTH device
cannot be heard on this system.
• Increase the volume on your
BLUETOOTH device first, then adjust
the volume using the VOLUME –/+
buttons.
There is severe hum, noise, or
distorted sound.
• If there are obstacles between the
system and your BLUETOOTH device,
remove or avoid the obstacles.
• If there is equipment that generates
electromagnetic radiation, such as
a wireless LAN, other BLUETOOTH
device, or a microwave oven nearby,
move them away.
• Turn down the volume of the
connected BLUETOOTH device.
29
GB
Resetting the system
If the system doesn’t respond and
cannot be operated despite the power
being on, reset the system.
1
Hold down the (power)
button for more than
9seconds.
The system will turn off.
2
Press the (power) button to
turn the system back on.
Note
• If the system doesn’t turn back on, consult
your Sony dealer.
• Pairing information is not deleted after
you reset the system.
Restoring the system to the
factory default settings
If the system still does not operate
properly, restore it to the factory
default settings.
1
Press the (power) button to
turn on the system.
2
Hold down the FUNCTION
PAIRING button and the
MIC – button for more than 3
seconds.
After “RESET” appears on the
display, all user-configured settings,
such as the pairing registration
information, are restored to factory
default settings.
GB
30
Precautions
On safety
• Completely disconnect the AC power cord
(mains lead) from the wall outlet (mains) if
it is not going to be used for an extended
period of time. When unplugging the unit,
always grip the plug. Never pull the cord
itself.
• Should any solid object or liquid get into
the system, unplug the system, and have
it checked by qualified personnel before
operating it again.
• The AC power cord must be changed only
at the qualified service shop.
On placement
• Do not place the system in an inclined
position or in locations that are extremely
hot, cold, dusty, dirty, or humid or lacking
adequate ventilation, or subject to
vibration, direct sunlight or a bright light.
• Be careful when placing the system on
surfaces that have been specially treated
(for example, wax, oil, polish) as staining
or discoloration of the surface may result.
• Make sure not to splash water on the unit.
This unit is not waterproof.
On heat buildup
• Heat buildup on the system during
operation is normal and is not a cause for
alarm.
• Do not touch the cabinet if it has been
used continuously at a high volume
because the cabinet may have become
hot.
On the speaker system
The built-in speaker system is not
magnetically shielded, and the picture on
nearby TV sets may become magnetically
distorted. In this situation, turn off the TV,
wait 15 to 30 minutes, and turn it back on.
If there is no improvement, move the
system far away from the TV.
Cleaning the cabinet
Clean this system with a soft cloth slightly
moistened with a mild detergent solution.
Do not use any type of abrasive pad,
scouring powder, or solvent, such as thinner,
benzine, or alcohol.
On BLUETOOTH Communication
• BLUETOOTH devices should be used
within approximately 10m (unobstructed
distance) of each other. The effective
communication range may become
shorter under the following conditions.
— When a person, metal object, wall
or other obstruction is between the
devices with a BLUETOOTH connection
— Locations where a wireless LAN is
installed
— Around microwave ovens that are in
use
— Locations where other electromagnetic
waves are generated
• BLUETOOTH devices and wireless LAN
(IEEE 802.11b/g) equipment use the
same frequency band (2.4 GHz). When
using your BLUETOOTH device near
a device with wireless LAN capability,
electromagnetic interference may occur.
This could result in lower data transfer
rates, noise, or inability to connect. If this
happens, try the following remedies:
— Use this system at least 10m away from
the wireless LAN equipment.
— Turn off the power to the wireless
LAN equipment when using your
BLUETOOTH device within 10m.
— Use this system and BLUETOOTH device
as closer to each other as possible.
• The radio waves broadcast by this system
may interfere with the operation of some
medical devices. Since this interference
may result in malfunction, always turn
off the power on this system and the
BLUETOOTH device in the following
locations:
— In hospitals, on trains, in airplanes,
at gas stations, and any place where
flammable gases may be present
— Near automatic doors or fire alarms
• This system supports security
functions that comply with BLUETOOTH
specifications to ensure secure
connections during communication using
BLUETOOTH technology. However, this
security may be insufficient depending
on the setting contents and other factors,
so always be careful when performing
communication using BLUETOOTH
technology.
• Sony cannot be held liable in any way
for damages or other loss resulting from
information leaks during communication
using BLUETOOTH technology.
• BLUETOOTH communication is not
necessarily guaranteed with all
BLUETOOTH devices that have the same
profile as this system.
• BLUETOOTH devices connected with this
system must comply with the BLUETOOTH
specification prescribed by the Bluetooth
SIG, Inc., and must be certified to comply.
However, even when a device complies
with the BLUETOOTH specification, there
may be cases where the characteristics or
specifications of the BLUETOOTH device
make it impossible to connect, or may
result in different control methods, display
or operation.
• Noise may occur or the audio may
cut off depending on the BLUETOOTH
device connected with this system,
the communications environment, or
surrounding conditions.
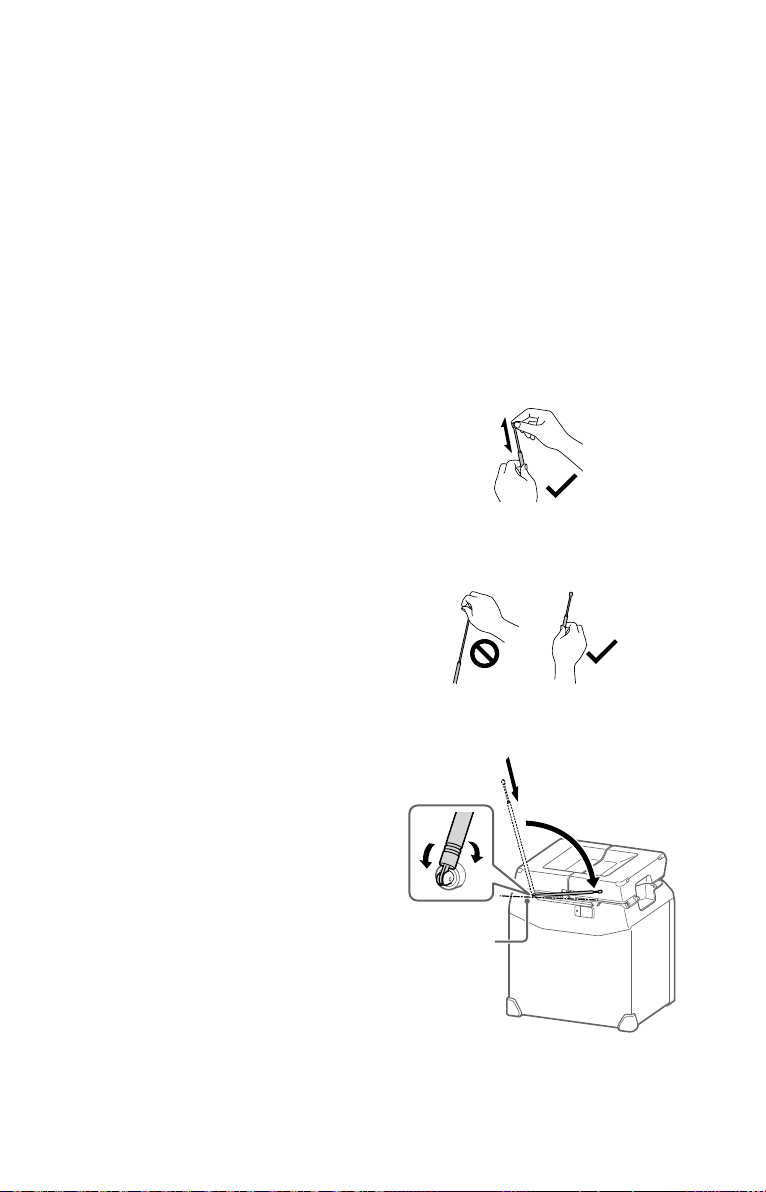
Handling the FM antenna
• When adjusting the length, hold the
antenna by the thickest part and top, and
extend/retract it slowly.
• When adjusting the direction, hold the
antenna by the thickest part and rotate
it. If you move the antenna by the top or
apply strong force, it may break.
• Handle the antenna with care. Trying to
move in an inappropriate direction may
damage the antenna.
Axis of vertical
rotation
31
GB

Specifications
Lithium-ion battery section
Normal voltage:
7.2 V
Normal capacity:
4,900 mAh, 35.28 Wh
1)
The actual range will vary depending on
factors such as obstacles between devices,
magnetic fields around a microwave oven,
static electricity, reception sensitivity,
antenna’s performance, operating system,
software application, etc.
2)
BLUETOOTH standard profiles indicate the
purpose of BLUETOOTH communication
between devices.
Speaker section
Tweeter:
40mm x 2, cone type
Woofer:
180mm x 1, cone type
USB section and supported
audio formats
Supported bit rate:
MP3 (MPEG1 Audio Layer-3):
32kbps – 320kbps, VBR
WMA: 32kbps – 192kbps, VBR
Sampling frequencies:
MP3 (MPEG1 Audio Layer-3):
32/44.1/48 kHz
WMA: 44.1 kHz
BLUETOOTH section
Communication system:
BLUETOOTH Standard version 4.2
Output:
BLUETOOTH Standard Power Class 2
Maximum output power:
< 10.0 dBm
Maximum communication range:
Line of sight approx. 10 m
Frequency band:
2.4 GHz band (2.4000 GHz –
2.4835GHz)
Modulation method:
FHSS (Freq Hopping Spread
Spectrum)
Compatible BLUETOOTH profiles
A2DP (Advanced Audio Distribution
Profile)
AVRCP (Audio Video Remote Control
Profile)
Supported codecs:
SBC (Sub Band Codec)
AAC (Advanced Audio Coding)
LDAC
GB
32
FM tuner section
Frequency range:
87.5 MHz–108.0 MHz (50 kHz step)
Antenna: Rod Antenna
General
Power requirements:
Taiwan model: AC 120 V, 50/60 Hz
North American model: AC 120V,
60 Hz
Other models: AC 120V – 240V,
50/60Hz
Power consumption:
30W
Standby power consumption:
When BLUETOOTH standby mode
and demonstration mode are set to
on: 2.3 W
When BLUETOOTH standby mode is
set to on and demonstration mode
is set to off: 1.2 W
When BLUETOOTH standby mode
and demonstration mode are set to
off: 0.5 W
Usage life of lithium-ion battery (using
the BLUETOOTH connection):
1)
Approx. 13 hours
If the volume level of the system is
set to maximum, the usage life will
be approx. 5 hours.
Charging time of lithium-ion battery
(while the unit is powered off):
Approx. 7 hours
1)
2)
:
When BLUETOOTH is connected. Actual
performance varies based on settings,
environmental conditions, and usage.
Battery capacity decreases over time and
use.
2)
Time may vary, depending on the
temperature or conditions of use.
3)
Time that is required to charge the empty
built-in battery to its full capacity when
the unit turns off.
DC OUT:
USB jack (for charging the battery of
a connected device) (5V, Max.1.0A)
1)
2)
3)

Dimensions (W/H/D) (Approx.):
330mm x 376mm x 303mm
Mass (Approx.):
6.7kg
Quantity of the system:
1 piece
Supplied accessories:
AC power cord (1)
Design and specifications are subject to
change without notice.
License and Trademark
Notice
• MPEG Layer-3 audio coding
technology and patents licensed
from Fraunhofer IIS and Thomson.
• Windows Media is either a registered
trademark or trademark of Microsoft
Corporation in the United States
and/or other countries.
• This product is protected by
certain intellectual property rights
of Microsoft Corporation. Use or
distribution of such technology
outside of this product is prohibited
without a license from Microsoft or
an authorized Microsoft subsidiary.
• The BLUETOOTH® word mark and
logos are registered trademarks
owned by Bluetooth SIG, Inc. and
any use of such marks by Sony
Corporation is under license. Other
trademarks and trade names are
those of their respective owners.
• Google Play and Android are
trademarks of Google LLC.
• LDAC™ and LDAC logo are
trademarks of Sony Corporation.
• Apple, the Apple logo, iPhone, iPod
and iPod touch are trademarks of
Apple Inc., registered in the U.S. and
other countries.
App Store is a service mark of Apple
Inc., registered in the U.S. and other
countries.
• Use of the Made for Apple badge
means that an accessory has been
designed to connect specifically to
the Apple product(s) identified in
the badge, and has been certified
by the developer to meet Apple
performance standards. Apple is not
responsible for the operation of this
device or its compliance with safety
and regulatory standards. Please
note that the use of this accessory
with iPod or iPhone may affect
wireless performance.
• WALKMAN and WALKMAN logo
are registered trademarks of Sony
Corporation.
• All other trademarks and registered
trademarks are of their respective
holders. In this manual,
marks are not specified.
TM
and ®
33
GB

AMARAN
Jangan dedahkan perkakas kepada
sumber api terbuka (contohnya, lilin yang
menyala).
Oleh kerana palam utama digunakan
untuk memutuskan sambungan unit
dari saluran utama, sambungkan unit ke
soket AC yang mudah diakses. Sekiranya
anda mengenal pasti kelainan dalam
unit, tanggalkan palam utama dari soket
AC serta merta.
Unit tidak terputus dari saluran utama
selagi ia disambungkan ke soket AC,
walaupun jika unit tersebut telah
dimatikan.
Jangan pasang perkakas di ruang yang
tertutup, seperti rak buku atau kabinet
terbina dalam.
Jangan dedahkan bateri (pek bateri atau
bateri yang dipasang) kepada haba yang
berlebihan seperti cahaya matahari, api
atau seumpamanya untuk masa yang
lama.
Jangan biarkan bateri terdedah kepada
keadaan suhu rendah yang mungkin
menyebabkannya terlampau panas dan
larian terma.
Jangan tanggalkan, buka atau hancurkan
sel sekunder atau bateri.
Sekiranya berlaku kebocoran sel, jangan
benarkan cecair bersentuhan dengan
kulit atau mata. Sekiranya sentuhan
berlaku, basuh kawasan yang terjejas
dengan jumlah air yang banyak dan
dapatkan nasihat perubatan.
Sel sekunder dan bateri perlu dicas
sebelum digunakan. Sentiasa rujuk
arahan atau manual peralatan pengeluar
untuk mengetahui arahan pengecasan
yang betul.
Selepas tempoh penyimpanan yang
panjang, ia mungkin perlu untuk
mengecas dan menyahcas sel atau
bateri beberapa kali untuk mendapatkan
prestasi maksimum.
Buang dengan betul.
Untuk menggunakan unit pada
jangka masa panjang dalam
keadaan baik
• Elak dari menggunakan atau
menyimpan unit dengan sisinya
diterbalikkan.
• Jika unit menjadi basah, jangan
tinggalkannya seperti itu untuk jangka
masa panjang. Lapkannya dengan kain
kering serta merta.
Peralatan ini telah diuji dan didapati
mematuhi had yang digariskan dalam
Arahan EMC menggunakan kabel
sambungan yang tidak melebihi 3 meter.
MY
2
Nota mengenai ciri
kalis air
(Baca sebelum
menggunakan unit)
Prestasi kalis air bagi unit
Panel atas unit mempunyai spesifikasi
1
kalis air*
dinyatakan di “Darjah perlindungan
terhadap percikan air” bagi IEC60529
“Penilaian Perlindungan Ingress (Kod IP)”.
Walau bagaimanapun, unit ini tidak
sepenuhnya kedap air.
Jangan jatuhkan unit ke dalam air panas
di dalam tab mandi atau gunakannya di
dalam air dengan sengaja.
Cecair bagi spesifikasi prestasi kalis
air tertakluk kepada
*1 Sebarang bahagian unit selain daripada
*
bagi IPX4*2 seperti yang
Terpakai : air tawar, air paip
Tidak terpakai : cecair selain
panel atas adalah tidak kalis air.
2
IPX4 (darjah perlindungan terhadap
percikan air): Terlindung daripada
percikan air dari sebarang arah.
Prestasi kalis air bagi unit adalah
berdasarkan pengukuran kami di
bawah keadaan yang diterangkan
di sini. Ambil perhatian bahawa
kerosakan hasil daripada rendaman air
yang disebabkan oleh penyalahgunaan
pelanggan adalah tidak dilindungi oleh
jaminan.
daripada yang di
atas (air berbuih,
air dengan bahan
pencuci atau
cecair mandian,
syampu, air mata
air panas, air
kolam, air laut, dll.)
• Jangan gunakan unit di lokasi di
mana jumlah air yang banyak atau
air panas mungkin terpercik ke
atasnya. Unit tidak mempunyai reka
bentuk yang kalis terhadap tekanan
air. Penggunaan unit di lokasi di atas
mungkin menyebabkan kerosakan.
• Jangan tuang air bersuhu tinggi atau
tiupkan udara panas dari pengering
rambut atau perkakas lain kepada unit
secara langsung. Juga, jangan gunakan
unit di lokasi bersuhu tinggi, seperti di
dalam sauna atau berdekatan dapur.
• Kendalikan penutup () dengan
berhati-hati. Penutup memainkan
peranan yang penting dalam
penyelenggaraan prestasi rintang
air. Apabila menggunakan sistem,
pastikan penutup ditutup sepenuhnya.
Apabila menutup sistem, berhati-hati
agar tidak menyebabkan objek asing
memasuki sistem. Jika penutup tidak
ditutup sepenuhnya, prestasi rintang
air mungkin menurun dan mungkin
menyebabkan pincang tugas sistem
disebabkan air memasuki sistem.
Hadapan
Belakang
MY
Untuk mengelakkan kemerosotan
prestasi kalis air
Semak perkara berikut dan gunakan unit
dengan betul.
• Sila berhati-hati untuk tidak
menjatuhkan unit atau mengakibatkan
kejutan mekanikal. Kecacatan atau
kerosakan boleh mengakibatkan
kemerosotan prestasi kalis air.
MY
3

Bagaimana untuk menjaga sistem
apabila basah
Jika sistem menjadi basah, pertama
keluarkan air daripada sistem, dan
kemudian lap lembapan pada
sistem menggunakan kain kering,
lembut. Terutamanya di kawasan
sejuk, meninggalkan lembapan pada
permukaannya boleh mengakibatkan
sistem untuk membeku dan tidak
berfungsi.
Pastikan untuk mengelap lembapan
selepas menggunakan sistem.
Letakkan sistem pada tuala atau kain
yang kering. Kemudian tinggalkannya
pada suhu bilik dan keringkan sistem
sehingga tiada lembapan yang tinggal.
MY
4

Jadual Kandungan
Nota mengenai ciri kalis air
sebelum menggunakan unit) ......... 3
Panduan tentang bahagian dan
kawalan ...................................... 6
(Baca
Bersedia untuk Mula
Mengecas bateri ........................9
Menghidupkan sistem...............9
Mengangkat sistem ................. 10
Membentangkan panel atas ... 10
Tentang pengurusan kuasa...... 11
Memasang sistem pembesar
suara pada tripod .....................12
Peranti USB
Sebelum menggunakan peranti
USB ............................................13
Memainkan fail .........................13
Penala
Mendengar radio ......................15
Mempraset stesen radio ..........15
Menetapkan monaural/stereo
...15
Penyambungan BLUETOOTH
Menjadikan sistem ini
berpasangan dengan peranti
BLUETOOTH ............................. 16
Mendengar muzik pada peranti
BLUETOOTH ............................. 18
Tentang teknologi wayarles
BLUETOOTH ............................. 19
Memain balik dengan codec
bunyi berkualiti tinggi
(AAC/LDAC™) .......................... 19
Mengesetkan mod tunggu sedia
BLUETOOTH .............................20
Menghidupkan atau mematikan
isyarat BLUETOOTH ...................21
Menggunakan “Sony| Music
Center” dan “Fiestable” melalui
sambungan BLUETOOTH ..........21
Pelarasan Bunyi
Melaraskan bunyi .................... 23
Pengendalian Lain
Menggunakan kelengkapan
opsyenal .................................. 24
Menggunakan mikrofon
opsyenal .................................. 24
Menyahaktifkan butang pada
unit (Kunci Kanak-kanak) ......... 25
Mengesetkan fungsi tunggu
sedia automatik ....................... 25
Menjimatkan kuasa bateri ....... 26
Memeriksa versi perisian.........26
Maklumat Tambahan
Maklumat tentang peranti yang
serasi ........................................ 27
Penyelesaian Masalah ............. 27
Langkah berjaga-jaga .............30
Spesifikasi ................................ 32
Notis Lesen dan Tanda
Dagangan ................................ 33
MY
5

Panduan tentang bahagian dan kawalan
Hadapan
Belakang
MY
6
Butang (kuasa)
Tekan untuk menghidupkan atau
mematikan sistem.
Penunjuk CHARGE
Menyala dengan warna kuning
jingga semasa bateri mengecas.
Berkelip apabila sistem digunakan
dengan bateri terbina dalam dan
baki aras bateri adalah rendah
(kurang daripada 10%).
Padam apabila sistem digunakan
dengan kord kuasa yang
bersambung dengan saluran
kuasa dinding dan bateri dicas
sepenuhnya, atau apabila sistem
digunakan dengan bateri terbina
dalam dan baki aras bateri adalah
10% dan ke atas.
butang (main/jeda)*
— Tekan untuk memainkan/
menjeda musik.
— Tahan butang lebih kurang 3
saat, demonstrasi bunyi terbina
dalam akan dimainkan balik.
/ butang (undur/mara)
Tekan untuk memilih runut atau
fail.
Butang TUNING –/+
Tekan untuk menala ke stesen FM.
Butang KEY CONTROL/
Butang –/+
Tekan untuk mengurangkan aras
kelantangan mikrofon.
Butang MIC ECHO (halaman9)
Tahan untuk menghentikan
demonstrasi bunyi terbina dalam.
Butang VOLUME –/+*
Tekan untuk melaraskan
kelantangan.
Jek MIC
Gunakan untuk menyambung
mikrofon.
Jek AUDIO IN L/R
Sambung ke jek output audio TV
atau kelengkapan audio/video.
Bunyi dioutput melalui sistem ini.
Port (USB)
Gunakan untuk menyambung
peranti USB.
PAPARAN
Penunjuk (BLUETOOTH)
Butang FUNCTION PAIRING
— Tekan berulang kali untuk
memilih fungsi, BLUETOOTH,
USB, atau AUDIO IN.
— Semasa fungsi BLUETOOTH
dipilih, tahan untuk
mengaktifkan berpasangan
BLUETOOTH (halaman16).
Lubang untuk pemasangan
tripod (pada permukaan bawah)
Gunakan tripod (tersedia
secara komersial) yang boleh
menampung berat 10 kg atau
lebih.
Bergantung kepada spesifikasi
tripod, pembesar suara yang
dipasang pada tripod mungkin
tidak menghadap arah yang
mencukupi.
Antena radio FM
Butang MEGA BASS BATTERY
— Tekan untuk memperkukuh
bunyi bes dan mewujudkan
bunyi yang lebih berkuasa
(halaman23).
— Tahan untuk memeriksa baki
aras bateri (halaman11).
Penunjuk MEGA BASS
Menyala apabila fungsi MEGA
BASS dihidupkan.
Jek AC IN
* Butang (main/jeda) dan butang
VOLUME + mempunyai bintik sentuhan.
Gunakan bintik sentuhan sebagai rujukan
semasa mengendalikan sistem.
MY
7
Status penunjuk
Status penunjuk pada unit ditunjukkan
dalam ilustrasi seperti berikut.
Status penunjuk Ilustrasi
Berkelip
Menyala
Mati
MY
8
Bersedia untuk Mula
Mengecas bateri
Sistem ini boleh digunakan dengan
bateri terbina dalam (cas semula)
menggantikan sambungan kord kuasa
AC ke saluran keluar dinding jika bateri
telah dicas secukupnya.
Sambungkan kord kuasa AC
(dibekalkan) ke jek AC IN di
bahagian belakang unit, dan
kemudian ke salur keluar
dinding.
Kord kuasa AC (dibekalkan)
Ke saluran keluar dinding
Penunjuk CHARGE akan menyala dengan
warna kuning jingga. Pengecasan akan
siap dalam masa lebih kurang 7 jam dan
penunjuk akan dimatikan.
Nota
• Pengecasan bateri mungkin mengambil
masa lebih lama bergantung pada
keadaan penggunaan.
• Walaupun anda tidak bercadang
menggunakan sistem untuk jangka masa
yang lama, cas bateri sehingga kapasiti
penuh sekali setiap enam bulan untuk
memelihara prestasinya.
• Dalam persekitaran yang terlalu panas
atau sejuk, pengecasan berhenti untuk
keselamatan.
Jika pengecasan mengambil masa yang
lama, ini juga menghentikan sistem
daripada mengecas.
Untuk menyelesaikan isu ini, tanggalkan
kord kuasa AC dan sambungkan semula
pada suhu operasi di antara 5 °C dengan
30 °C.
Petua
Anda boleh mengendalikan sistem semasa
ia sedang dicas.
Menghidupkan sistem
Tekan butang untuk menghidupkan
sistem.
Petua
Sistem ini boleh digunakan dengan bateri
terbina dalam menggantikan sambungan
kord kuasa AC (dibekalkan) ke saluran
keluar dinding jika anda telah mengecas
bateri sebelum digunakan. Untuk butirbutir, lihat “Mengecas bateri”.
Menyahaktifkan demonstrasi
Tahan MIC ECHO lebih
daripada 3 saat dengan sistem
dipasangkan untuk mematikan
mod demonstrasi.
“DEMO OFF” muncul di paparan.
Untuk menjalankan demonstrasi,
dengan mod demonstrasi dihidupkan,
sambungkan sistem kepada soket
dinding dan hidupkannya.
Apabila sistem digunakan dengan
bateri bina dalam, demonstrasi tidak
dijalankan.
MY
9

Mengangkat sistem
Membentangkan panel atas
Sebelum mengangkat sistem,
tanggalkan semua kord.
Sebagai tambahan, jika panel atas
unit dibentangkan, lipat panel atas
dengan kemas apabila membawa unit
ke sekeliling.
Nota
Peletakan tangan yang betul semasa
mengangkat sistem adalah sangat penting
untuk mengelakkan kecederaan diri dan/
atau kerosakan harta.
Anda boleh menggunakan sistem
sebagai meja dengan membentangkan
panel atas. Untuk membentangkan
panel atas, tolak tuas () ke atas di
bahagian belakang unit dan kemudian
bentangkan panel atas yang berlipat.
Menyimpan minuman di pemegang
minuman juga tersedia.
Tambahan lagi, menggunakan dengan
panel atas dibentangkan memberikan
kesan ruang kepada bunyi.
10
MY
Sila berhati-hati untuk tidak
sangkutkan jari anda di panel
atas semasa membentang
atau melipatnya.
Nota
• Jangan duduk di atas unit.
• Beban yang boleh ditahan adalah 10 kg
maksimum.
• Jangan letakkan plat besi panas atau
objek panas lain di atas panel atas.
• Ambil perhatian bahawa meletakkan beban di
satu bahagian panel atas yang dibentangkan
boleh mengakibatkan unit terbalik.
• Jangan tinggalkan sebarang objek.yang
terdedah kepada daya tarikan magnet
(kad tunai, kad kredit dengan pengekodan
magnet, dll.) berhampiran palen atas.
Tentang pengurusan
kuasa
• Secara lalai, sistem ini disetkan
untuk dimatikan secara automatik
dalam masa kira-kira 15 minit
apabila tidak ada operasi, dan
tiada isyarat audio dikesan. Untuk
butir-butir, lihat “Mengesetkan
fungsi tunggu sedia automatik”
(halaman25).
• Anda boleh mengurangkan
penggunaan kuasa menggunakan
mod tiada paparan (mod
Penjimatan Kuasa). Untuk butiran,
lihat “Menjimatkan kuasa bateri”
(halaman26).
Memeriksa aras bateri bagi
bateri cas semula
Anda boleh memeriksa baki aras
bateri melalui panduan suara dan
melalui mesej pada paparan.
Anda juga boleh memeriksa
aras bateri menggunakan
“Sony | Music Center” (halaman21).
3
Mesej panduan suara
kedengaran dan salah satu
mesej seperti berikut muncul
pada paparan mengikut baki
aras bateri.
Mesej panduan
suara (aras bateri)
“Fully charged”
(80% – 100%)
“Battery About 70%”
(60% – 79%)
“Battery About 50%”
(30% – 59%)
“Battery About 20%”
(11% – 29%)
“Please charge”
(kurang daripada 10%)
Petua
“Please charge” dioutput secara
automatik apabila sistem digunakan
dengan bateri terbina dalam dan baki
aras bateri adalah kurang daripada 10%.
Maklumat
pada
paparan
FULLY
CHARGED
BATT 70%
BATT 50%
BATT 20%
PLEASE
CHARGE
1
Tekan butang untuk
menghidupkan sistem.
2
Tahan butang MEGA BASS
BATTERY lebih daripada 3
saat.
11
MY

Memasang sistem
pembesar suara pada
tripod
Padankan lubang pada sistem
pembesar suara () kepada tripod
(tidak dibekalkan) (), kemudian tolak
ke bawah dengan lembut sehingga ia
dimasukkan sepenuhnya ke tripod.
Pastikan untuk menggunakan tripod
berdiameter kira-kira 35 mm dan
seberat 2.8 kg atau lebih dan boleh
menahan berat 10kg atau lebih.
Bergantung kepada spesifikasi
tripod, sistem pembesar suara yang
dipasang pada tripod mungkin tidak
menghadap arah yang mencukupi.
• Pastikan sistem pembesar suara dipasang
pada tripod dengan kemas.
• Jangan tolak sistem pembesar suara atau
letakkan sebarang objek pada sistem
pembesar suara apabila ia telah dipasang
pada tripod.
• Jangan putar atau angkat sistem
pembesar suara apabila ia telah dipasang
pada tripod.
• Jangan berjalan melintasi kaki tripod
untuk mengelak daripada tersandung.
• Tanggalkan kord kuasa AC (kabel utama)
dan semua kabel, dan buka sistem
pembesar suara daripada tripod apabila
anda ingin mengalih tripod, sistem
pembesar suara atau subwufer.
• Sila berhati-hati untuk tidak tersandung
kabel pembesar suara, kaki tripod atau
kord kuasa AC (kabel utama).
• Pastikan kanak-kanak menjauhi sistem
pembesar suara yang dipasang pada
tripod.
• Ambil langkah berjaga-jaga lain untuk
menghalang sistem pembesar suara yang
dipasang pada tripod daripada terjatuh.
Kurang
daripada
1.2m
Lebih daripada 0.55m*
* Kami mengesyorkan anda untuk
mengembangkan kaki tripod kepada
maksimum.
Nota
Sila ambil langkah berjaga-jaga yang
berikut semasa memasang sistem
pembesar suara pada tripod untuk
mengelakkan kecederaan peribadi atau
merosakkan sistem pembesar suara.
• Tetapkan tripod sepenuhnya sebelum
anda memasang sistem pembesar
suara. Pastikan untuk membaca arahan
pengendalian bagi tripod anda.
• Jangan pasang sistem pembesar
suara pada tripod yang diletakkan di
permukaan tidak stabil, laluan pejalan
kaki atau sebarang lokasi lain yang tidak
bersesuaian.
MY
12
35mm

Peranti USB
Memainkan fail
Sebelum menggunakan
peranti USB
Untuk peranti USB yang serasi, lihat
“Maklumat tentang peranti yang
serasi” (halaman27).
Apabila menggunakan peranti Apple
dengan sistem ini, sambungkan
melalui sambungan BLUETOOTH
(halaman16). Penggunaan peranti
Apple melalui sambungan USB tidak
disokong.
Nota
• Apabila sambungan kabel USB diperlukan,
gunakan kabel USB yang dibekalkan dengan
peranti USB. Lihat arahan operasi yang
dibekalkan bersama-sama peranti USB
untuk butir-butir tentang kaedah operasi.
• Jangan menyambungkan sistem dengan
peranti USB melalui hab USB.
• Apabila peranti USB disambungkan, sistem
membaca semua fail pada peranti USB. Jika
terdapat banyak folder atau fail pada peranti
USB, masa yang lama mungkin diperlukan
untuk membaca seluruh peranti USB.
• Bagi sesetengah peranti USB, mungkin
terdapat lengah sebelum operasi
dilaksanakan oleh sistem ini.
• Keserasian dengan semua perisian
pengekodan/penulisan tidak boleh dijamin.
Jika fail audio pada peranti USB pada asalnya
dikodkan dengan perisian yang tidak serasi,
fail tersebut mungkin menghasilkan hingar
atau audio terganggu, atau mungkin tidak
boleh dimainkan sama sekali.
• Sistem ini tidak semestinya menyokong
semua fungsi yang disediakan dalam peranti
USB yang disambungkan.
Untuk menggunakan sistem
sebagai pengecas bateri
Anda boleh menggunakan sistem ini
sebagai peranti USB apabila;
—peranti USB mempunyai fungsi cas
semula,
—sistem dihidupkan, dan
—sebarang fungsi kecuali fungsi USB
dipilih.
Sambung peranti USB kepada port
(USB).
Pengecasan bermula apabila peranti
USB disambungkan kepada port
(USB). Untuk butir-butir, rujuk
kepada arahan operasi peranti USB.
Format fail audio yang berikut
disokong:
—MP3: sambungan fail “.mp3”
—WMA: sambungan fail “.wma”
1
Tekan butang FUNCTION
PAIRING untuk memilih
“USB”.
2
Sambung peranti USB kepada
port
(USB).
3
Tekan butang untuk
memulakan main balik.
Anda boleh mengawal
operasi main balik dan
memilih muzik dengan mudah
daripada senarai muzik pada
peranti USB menggunakan
“Sony | Music Center”
(halaman21).
4
Tekan butang VOLUME-/+
untuk melaraskan
kelantangan.
Pengendalian lain
Kepada Lakukan ini
Menjeda main
balik
Main balik lagu
berikutnya
Main balik lagu
seterusnya
Mara dengan
cepat
Undur dengan
cepat
Tekan butang .
Untuk menyambung
semula main, tekan
butang sekali
lagi.
Tekan butang .
Tekan butang .
Tahan butang
lebih daripada 3 saat.
Tahan butang
lebih daripada 3 saat.
13
MY

Nota
• Sistem ini tidak boleh memainkan fail
audio pada peranti USB dalam hal yang
berikut;
— apabila jumlah bilangan fail audio pada
peranti USB melebihi 5,000.
— apabila bilangan folder pada peranti
USB melebihi 999 (termasuk folder
“ROOT” dan folder kosong).
Bilangan ini mungkin berbeza bergantung
pada struktur fail dan folder. Jangan
simpan fail atau folder jenis lain yang
tidak perlu pada peranti USB yang
mempunyai fail audio.
• Sistem boleh main balik sehingga
kedalaman 8 folder sahaja.
• Folder yang tidak mempunyai fail audio
dilangkau.
• Sila ambil perhatian bahawa walaupun
nama fail mempunyai sambungan fail
yang betul, jika fail yang sebenar berbeza,
sistem mungkin mengeluarkan hingar
atau pincang tugas.
14
MY

Penala
Mempraset stesen radio
Mendengar radio
1
Laraskan antena untuk
penerimaan optimum.
Panjangkan antena FM dan
laraskan kepanjangan dan sudut
untuk penerimaan optimum.
Lihat “Mengendalikan antena FM”
(halaman31).
2
Tekan butang FUNCTION
PAIRING berulang kali untuk
memilih “TUNER FM”.
3
Tala ke stesen.
Untuk pengimbasan automatik:
Tahan butang TUNING –/+
sehingga frekuensi mula berubah
pada paparan.
Pengimbasan berhenti secara
automatik apabila stesen dapat
ditala. “ST” (untuk rancangan stereo
FM sahaja) menyala pada paparan.
Jika pengimbasan tidak berhenti,
tekan butang TUNING – atau +
untuk menghentikan pengimbasan.
Kemudian, lakukan penalaan
manual (di bawah).
Untuk penalaan manual:
Tekan TUNING –/+ berulang kali
untuk menala ke stesen yang anda
ingini.
Petua
Untuk mengurangkan hingar statik
pada stesen stereo FM yang lemah,
tahan butang FUNCTION
dan butang MEGA BASS lebih kurang 3
saat. “ST” hilang dan “MONO” menyala
pada paparan. Anda akan kehilangan
kesan stereo, tetapi penerimaan akan
bertambah baik.
PAIRING
Anda boleh menyimpan sehingga 20
stesen FM sebagai stesen kegemaran
anda.
Untuk mempraset stesen FM, gunakan
“Sony | Music Center” di telefon
pintar/iPhone anda. Untuk butiran
mengenai “Sony | Music Center”, lihat
“Menggunakan “Sony | Music Center”
dan “Fiestable” melalui sambungan
BLUETOOTH” (halaman21).
Menetapkan monaural/
stereo
Jika hingar berlaku ketika penerimaan
FM, tetapkan “MONO/ST” ke “MONO”.
Jika anda tetapkannya ke “ST”,
stereo atau monaural dipilih secara
automatik, bergantung kepada
keadaan penerimaan.
1
Tahan butang FUNCTION
PAIRING dan butang MEGA
BASS lebih kurang 3 saat.
15
MY
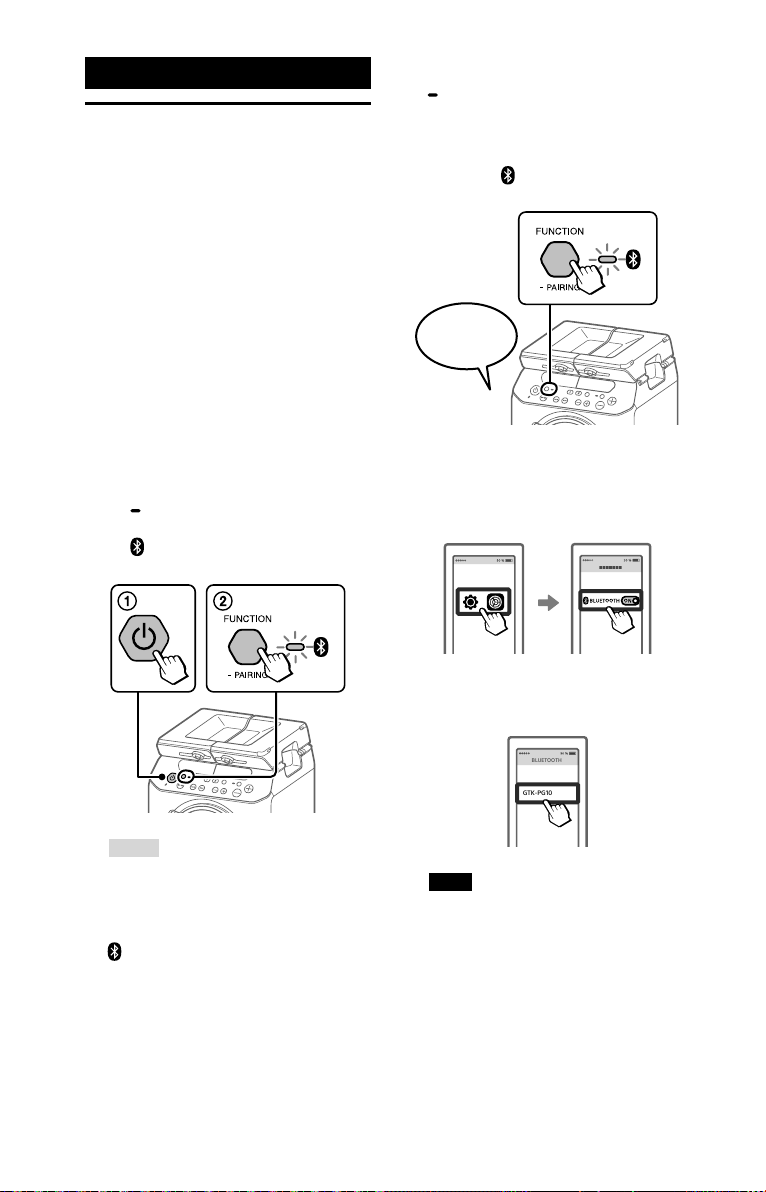
Penyambungan BLUETOOTH
GTK-PG10
BLUETOOTH
Menjadikan sistem ini
berpasangan dengan
peranti BLUETOOTH
Berpasangan ialah operasi peranti
BLUETOOTH mendaftar dengan satu
sama lain terlebih dahulu. Setelah
operasi berpasangan dilakukan, ia
tidak perlu dilakukan semula bagi
peranti-peranti berkenaan.
1
Letakkan peranti BLUETOOTH
di dalam 1m dari sistem.
2
Pilih fungsi BLUETOOTH.
Tekan butang untuk
menghidupkan sistem.
Tekan butang FUNCTION
PAIRING berulang
kali sehingga penunjuk
(BLUETOOTH) pada unit
berkelip perlahan.
3
Tahan butang FUNCTION
PAIRING lebih daripada 3
saat.
Panduan suara (“Bluetooth
pairing”) akan dioutput dan
penunjuk (BLUETOOTH) akan
berkelip dengan cepat.
Bluetooth
pairing
4
Hidupkan fungsi BLUETOOTH
pada peranti BLUETOOTH.
Untuk butir-butir, rujuk arahan
operasi peranti BLUETOOTH anda.
16
Petua
Sekiranya tidak ada maklumat
berpasangan pada sistem (sebagai
contoh, apabila anda menggunakan
fungsi BLUETOOTH buat kali pertama
selepas pembelian), penunjuk
(BLUETOOTH) berkelip dengan cepat
dan sistem memasuki mod berpasangan
secara automatik. Dalam hal ini,
teruskan ke langkah 4.
MY
5
Pilih “GTK-PG10” di paparan
peranti BLUETOOTH.
Nota
Jika kunci maling diperlukan pada
peranti BLUETOOTH, masukkan “0000”.
“Kunci maling” mungkin disebut “Kod
laluan”, “Kod PIN”, “Nombor PIN” atau
“Kata laluan”.

6
Pastikan sambungan
BLUETOOTH telah
diwujudkan.
Setelah sambungan
BLUETOOTH diwujudkan, sistem
akan mengeluarkan bunyi
pemberitahuan, dan penunjuk
(BLUETOOTH) pada unit akan
berhenti berkelip dan menyala
terus.
Bergantung pada peranti
BLUETOOTH, sambungan mungkin
bermula secara automatik selepas
berpasangan selesai.
Nota
• Anda boleh melakukan berpasangan
sehingga 8 peranti BLUETOOTH. Jika
peranti BLUETOOTH ke-9 dijadikan
berpasangan, peranti berpasangan yang
paling lama akan dihapuskan.
• Jika anda ingin berpasangan dengan
peranti BLUETOOTH lain, ulangi langkah 1
hingga 6.
• Jika peranti BLUETOOTH yang terakhir
tersambung berada berdekatan,
sambungan BLUETOOTH akan diwujudkan
secara automatik dan penunjuk
BLUETOOTH akan menyala.
Memadamkan semua maklumat
pendaftaran berpasangan
Untuk memadamkan semua maklumat
pendaftaran berpasangan, sistem
perlu dipulihkan kepada pengesetan
lalai kilang. Lihat “Memulihkan sistem
kepada pengesetan lalai kilang”
(halaman30).
Nota
Setelah semua maklumat berpasangan
pada sistem dipadamkan,
iPhone/iPod touch mungkin tidak dapat
menyambung kepada sistem. Dalam hal ini,
padamkan maklumat berpasangan untuk
sistem daripada iPhone/iPod touch, dan
kemudian lakukan tatacara berpasangan
sekali lagi.
Untuk membatalkan operasi
berpasangan
Tekan butang FUNCTION PAIRING.
Untuk menamatkan sambungan
BLUETOOTH
Matikan fungsi BLUETOOTH pada
peranti tersambung.
Nota
Bergantung pada peranti BLUETOOTH,
sambungan BLUETOOTH mungkin
ditamatkan secara automatik apabila anda
menghentikan main balik.
17
MY
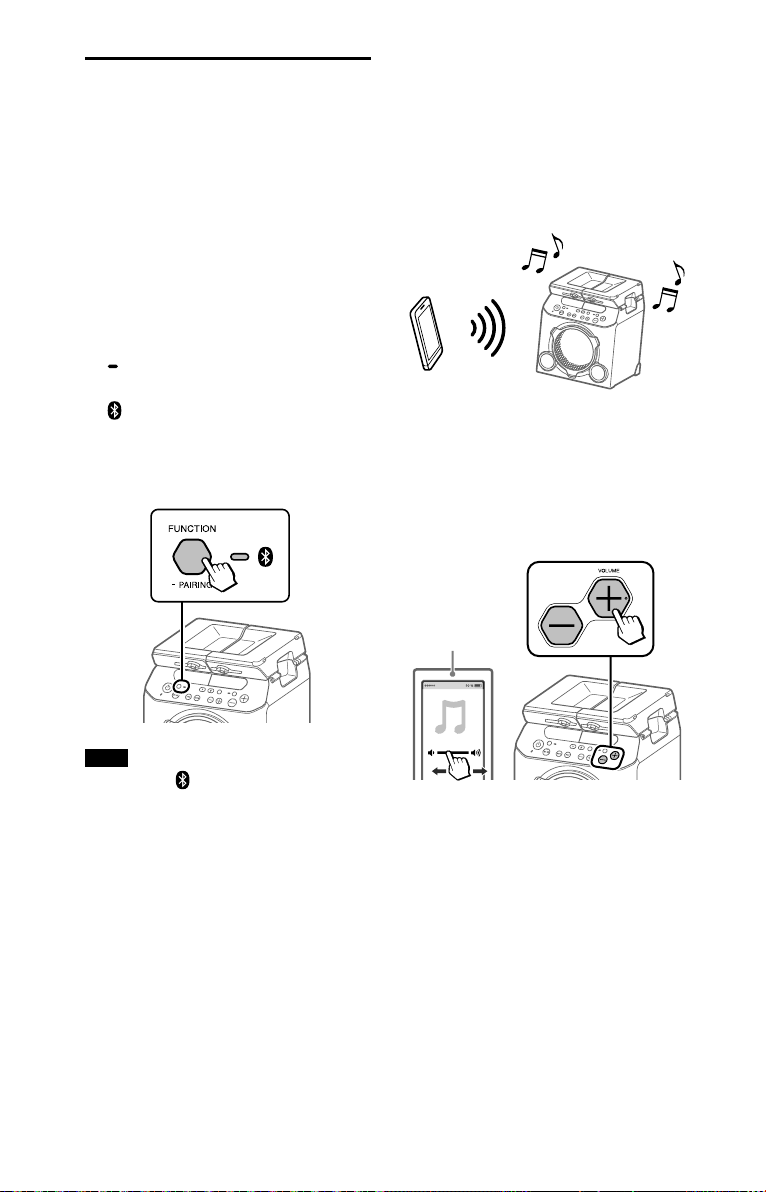
Mendengar muzik pada
peranti BLUETOOTH
Anda boleh menikmati muzik
pada peranti BLUETOOTH yang
disambungkan.
Semak perkara berikut sebelum
memainkan muzik:
—Fungsi BLUETOOTH bagi peranti
BLUETOOTH dihidupkan.
—Berpasangan telah selesai
(halaman16).
1
Tekan butang FUNCTION
PAIRING berulang
kali sehingga penunjuk
(BLUETOOTH) pada unit
menyala.
Peranti BLUETOOTH terakhir yang
tersambung akan disambungkan
secara automatik.
2
Mulakan main balik
sumber audio pada peranti
BLUETOOTH.
Untuk butir-butir, rujuk arahan
operasi peranti BLUETOOTH anda.
Anda juga boleh menggunakan
butang pada sistem untuk
memainkan balik/menjeda muzik.
3
Melaraskan kelantangan.
Laraskan aras kelantangan peranti
BLUETOOTH dahulu. Jika aras
kelantangan masih terlalu rendah,
laraskan aras kelantangan pada
sistem menggunakan butang
VOLUME –/+.
Peranti
BLUETOOTH
Note
Jika penunjuk (BLUETOOTH) berkelip,
sambungan BLUETOOTH masih belum
diwujudkan. Dalam hal ini, lengkapkan
tatacara berpasangan dan wujudkan
sambungan BLUETOOTH.
MY
18

Pertukaran antara peranti-peranti
BLUETOOTH yang tersambung
kepada sistem pada masa yang sama
(Sambungan Berbilang Peranti)
Memain balik dengan
codec bunyi berkualiti
tinggi (AAC/LDAC™)
Sehingga 3 peranti BLUETOOTH boleh
disambungkan kepada sistem pada
masa yang sama.
Semasa memainkan balik sumber
audio dari salah satu peranti yang
tersambung, anda boleh menukar
peranti input BLUETOOTH dengan
mengendalikan peranti tersambung
yang lain untuk memulakan main
balik.
Nota
Bergantung pada peranti BLUETOOTH,
anda mungkin tidak dapat membuat
3sambungan BLUETOOTH pada masa yang
sama.
Tentang teknologi
wayarles BLUETOOTH
BLUETOOTH teknologi wayarles ialah
teknologi wayarles jarak dekat yang
membolehkan komunikasi data wayarles
di antara peranti digital. BLUETOOTH
teknologi wayarles beroperasi dalam
julat kira-kira 10meter.
Versi, profil dan codec BLUETOOTH
yang disokong
Untuk butir-butir, lihat “Bahagian
BLUETOOTH” (halaman32).
Sistem ini boleh menerima data dalam
format codec AAC atau LDAC dari
peranti BLUETOOTH. Ia menyediakan
main balik dengan kualiti bunyi yang
lebih tinggi.
Anda boleh memilih opsyen codec
audio daripada dua pengesetan yang
berikut menggunakan “Sony | Music
Center” (halaman21). Pengesetan
lalai sistem ini ialah “AUTO”.
• AUTO: Sistem ini mengesan codec
yang digunakan pada peranti
sumber dan secara automatik
memilih codec yang optimum
daripada “SBC”, “AAC*” atau “LDAC*”.
• SBC: “SBC” sentiasa digunakan tanpa
mengira codec yang digunakan
pada peranti sumber.
* Tersedia hanya apabila codec disokong
oleh peranti BLUETOOTH anda.
Untuk menerima perubahan pengesetan,
anda perlu menamatkan sambungan
BLUETOOTH (halaman17), dan
kemudian melaksanakan sambungan
BLUETOOTH sekali lagi.
Nota
Anda boleh menikmati kualiti bunyi yang
lebih tinggi apabila peranti sumber serasi
dengan AAC/LDAC dan fungsi ini disetkan
kepada “AUTO”. Walau bagaimanapun,
bunyi mungkin terganggu bergantung pada
keadaan komunikasi BLUETOOTH. Jika ini
berlaku, setkan zum kepada “SBC”.
Penunjuk (BLUETOOTH)
Penunjuk (BLUETOOTH) pada unit
menyala atau berkelip biru untuk
menunjukkan status BLUETOOTH.
Status sistem Status penunjuk
BLUETOOTH
tunggu sedia
BLUETOOTH
berpasangan
BLUETOOTH
sambungan
diwujudkan
Berkelip perlahan
Berkelip cepat
Menyala
19
MY
LDAC ialah teknologi pengekodan
audio yang dibangunkan oleh
Sony, yang membolehkan
penghantaran kandungan Audio
Resolusi Tinggi (Hi-Res), walaupun
melalaui sambungan BLUETOOTH.
Berbeza dengan teknologi
pengekodan serasi BLUETOOTH
yang lain seperti SBC, ia
beroperasi tanpa penukaran turun
kandungan Audio Hi-Res1). Ia juga
membolehkan lebih kurang tiga
kali lebih banyak data2) daripada
teknologi lain, untuk pemancaran
melalui rangkaian wayarles
BLUETOOTH dengan kualiti bunyi
yang pernah dicapai sebelum ini
menggunakan pengekodan yang
cekap dan pemberkasan data yang
dioptimumkan.
1)
Tidak termasuk kandungan format
DSD.
2)
Berbanding dengan SBC (Sub
Band Codec), apabila kadar bit
990kbps (96/48kHz) atau 909kbps
(88.2/44.1kHz) dipilih.
Mengesetkan mod
tunggu sedia BLUETOOTH
Mod tunggu sedia BLUETOOTH
membolehkan sistem dihidupkan
secara automatik apabila anda
mewujudkan sambungan BLUETOOTH
dengan peranti BLUETOOTH.
Pengesetan ini dimatikan secara lalai.
Pengesetan ini hanya boleh
dikonfigurasikan menggunakan
“Sony | Music Center”. Untuk butirbutir tentang “Sony | Music Center”,
lihat “Menggunakan
“Sony| Music Center” dan “Fiestable”
melalui sambungan BLUETOOTH”
(halaman21).
Nota
Mod tunggu sedia BLUETOOTH hanya boleh
disetkan kepada hidup apabila kord kuasa
AC disambungkan.
Petua
Nyahdayakan mod tunggu sedia
BLUETOOTH untuk mengurangkan
penggunaan kuasa dalam mod tunggu
sedia (mod eco).
20
MY

Menghidupkan atau
mematikan isyarat
BLUETOOTH
Anda boleh menyambung kepada
sistem dari peranti BLUETOOTH
berpasangan dalam semua fungsi
apabila isyarat BLUETOOTH sistem
disetkan kepada hidup. Pengesetan ini
dihidupkan secara lalai.
Tahan butang FUNCTION
PAIRING dan butang VOLUMElebih daripada 3 saat untuk
mematikan isyarat BLUETOOTH.
“BT OFF” muncul pada paparan.
Nota
• Anda tidak boleh melaksanakan operasi
yang berikut apabila anda mematikan
isyarat BLUETOOTH:
— Berpasangan dan/atau menyambung
dengan peranti BLUETOOTH
— Menggunakan “Sony | Music Center”
melalui sambungan BLUETOOTH
• Untuk menghidupkan isyarat BLUETOOTH,
ulangi tatacara yang ditunjukkan di atas.
Apabila isyarat BLUETOOTH hidup, “BT ON”
muncul pada paparan.
Menggunakan “Sony|
Music Center” dan
“Fiestable” melalui
sambungan BLUETOOTH
Tentang Aplikasi
Anda boleh mengawal sistem
dengan lebih fleksibel dan
menikmatinya dengan cara baharu
menggunakan Aplikasi percuma
“Sony|MusicCenter” dan “Fiestable”
pada telefon pintar/iPhone anda.
“Sony|MusicCenter” dan “Fiestable”
tersedia dalam Google Play dan juga
App Store.
1
Gelintar “Sony| Music Center”
dan muat turun Aplikasi ke
telefon pintar/iPhone anda.
Anda juga boleh memuat turun
Aplikasi dengan mengimbas kod
dua dimensi di bawah ini.
2
Wujudkan sambungan
BLUETOOTH di antara sistem
dengan telefon pintar/iPhone
anda.
Untuk butir-butir tentang
sambungan BLUETOOTH,
lihat “Menjadikan sistem ini
berpasangan dengan peranti
BLUETOOTH” (halaman16).
21
MY

3
Lancarkan “Sony | Music
Center” dan muat turun
“Fiestable”.
Petua
Anda juga boleh memuat turun
“Fiestable” daripada App Store atau
Google Play.
Apa anda boleh lakukan dengan
“Sony|MusicCenter”:
• Memainkan balik fail muzik pada
peranti, seperti telefon pintar, iPhone,
atau peranti USB
• Menala ke stesen FM dan mendengar
radio
• Memilih medan bunyi
• Menetapkan pemasa tidur
• Menetapkan opsyen kuasa, seperti
fungsi mati kuasa auto (Mod Tunggu
Sedia) dan mod tunggu sedia
BLUETOOTH
• Memeriksa aras bateri
• Menukar codec BLUETOOH
(kualiti main balik penstriman audio
BLUETOOTH)
• Mengkonfigurasi pelbagai penetapan
untuk sistem
Apa anda boleh lakukan dengan
“Fiestable”:
• Fungsi karaoke
• Kawalan Gerakan
• Kawalan Kelantangan
• Kongsi situasi penggunaan bagi
sistem di Laman Rangkaian Sosial.
(Party King)
Rujuk kepada Bantuan “Sony|Music
Center” untuk butiran lanjut.
https://www.sony.net/smcqa/
Nota
• Jika “Sony | Music Center” tidak berfungsi
dengan betul, matikan sambungan
BLUETOOTH (halaman17), kemudian
laksanakan sambungan BLUETOOTH
semula supaya sambungan BLUETOOTH
berfungsi seperti biasa.
• Apa yang anda boleh kawal dengan
“Sony| Music Center” berbezabeza bergantung pada peranti yang
disambungkan.
• Spesifikasi dan reka bentuk aplikasi boleh
berubah tanpa notis.
22
MY

Pelarasan Bunyi
Melaraskan bunyi
Kepada Lakukan ini
Melaraskan
kelantangan
Memperkukuh
bunyi bes dan
mewujudkan
bunyi yang
lebih berkuasa
(MEGA BASS)
Tekan butang
VOLUME–/+.
Tekan butang MEGA
BASS berulang kali
untuk memilih “BASS
ON”. Penunjuk MEGA
BASS menyala.
Untuk membatalkan,
tekan butang MEGA
BASS berulang kali
untuk memilih “BASS
OFF”.
23
MY

Pengendalian Lain
Menggunakan
kelengkapan opsyenal
1
Sambungkan kelengkapan
opsyenal (seperti WALKMAN®,
telefon pintar, TV, pemain
DVD, perakam IC, dan
sebagainya) kepada jek
AUDIO IN L/R pada unit
menggunakan kord audio
(tidak dibekalkan).
2
Tekan butang FUNCTION
PAIRING berulang kali untuk
memilih “AUDIO IN”.
3
Mula main balik pada
kelengkapan yang
disambungkan.
4
Melaraskan kelantangan.
Laraskan kelantangan kelengkapan
yang tersambung dahulu. Jika aras
kelantangan masih terlalu rendah,
laraskan aras kelantangan pada
sistem menggunakan butang
VOLUME –/+.
Nota
Sistem mungkin memasuki mod
tunggu sedia secara automatik jika
aras kelantangan kelengkapan yang
disambungkan adalah terlalu rendah.
Dalam hal ini, naikkan aras kelantangan
kelengkapan. Untuk mematikan fungsi
tunggu sedia automatik, lihat “Mengesetkan
fungsi tunggu sedia automatik”
(halaman25).
Menggunakan mikrofon
opsyenal
Anda boleh mengoutput suara anda
dari sistem dengan menyambungkan
mikrofon dinamik dengan palam biasa
(tidak dibekalkan).
1
Tekan butang MIC – untuk
mengurangkan aras
kelantangan mikrofon.
2
Sambungkan mikrofon
opsyenal kepada jek MIC
pada unit.
3
Tekan butang MIC –/+ untuk
melaraskan kelantangan.
4
Cakap atau menyanyi melalui
mikrofon yang tersambung.
24
MY

Menyahaktifkan butang
pada unit (Kunci Kanakkanak)
Anda boleh menyahaktifkan butang
pada unit (kecuali butang (kuasa))
untuk mencegah pengendalian salah,
seperti kenakalan kanak-kanak.
Untuk menyahaktif butang,
tahan butang FUNCTION
PAIRING dan butang VOLUME+
lebih kurang 3 saat.
“CHILD LOCK ON” muncul pada
paparan.
Untuk menyahaktif fungsi Kunci
Kanak-Kanak, tahan butang FUNCTION
PAIRING dan butang VOLUME +
lebih kurang 3 saat. “CHILD LOCK OFF”
muncul pada paparan.
Nota
Fungsi Kunci Kanak-kanak akan dimatikan
secara automatik apabila anda mencabut
kord kuasa AC.
Mengesetkan fungsi
tunggu sedia automatik
Secara lalai, sistem ini disetkan untuk
dimatikan secara automatik dalam
masa kira-kira 15 minit apabila tidak
ada operasi atau output isyarat audio.
Anda juga boleh mengkonfigurasi
penetapan ini dan memastikan
sama ada fungsi ini hidup atau mati
dengan menggunakan “Sony|Music
Center”. Untuk butir-butir tentang
“Sony | Music Center”, lihat
“Menggunakan “Sony| Music Center”
dan “Fiestable” melalui sambungan
BLUETOOTH” (halaman21).
Nota
• Sistem mungkin memasuki mod
tunggu sedia secara automatik jika
aras kelantangan kelengkapan yang
disambungkan adalah terlalu rendah.
Dalam hal ini, naikkan aras kelantangan
kelengkapan.
• Sistem tidak memasuki mod tunggu sedia
jika jek MIC sedang digunakan.
25
MY
Menjimatkan kuasa
bateri
Anda boleh menjimatkan kuasa
dan menggunakan sistem untuk
tempoh yang lebih lama dengan
menghidupkan mod tiada paparan
(Mod penjimatan kuasa) apabila
menggunakan sistem dengan bateri
terbina dalam (cas semula).
Untuk menghidupkan mod
tiada paparan (Mod penjimatan
kuasa), tahan butang FUNCTION
PAIRING dan butang MIC ECHO
lebih daripada 3 saat.
Untuk menghidupkan fungsi, ulangi
tatacara.
Petua
Untuk butiran tentang hayat bateri, lihat
“Am” (halaman32).
Memeriksa versi perisian
Anda boleh memeriksa versi semasa
bagi perisian sistem.
1
Tahan butang FUNCTION
PAIRING dan butang MIC+
lebih kurang 3 saat.
2
Tekan butang /
berulang kali untuk memilih
“VERSION”, kemudian tekan
butang .
26
MY

Maklumat Tambahan
Penyelesaian Masalah
Maklumat tentang
peranti yang serasi
Tentang peranti USB yang disokong
• Sistem ini menyokong Kelas Storan
Massa USB sahaja.
• Sistem ini menyokong peranti USB
berformat FAT sahaja (kecuali exFAT).
• Sesetengah peranti USB mungkin
tidak berfungsi dengan sistem ini.
Tentang komunikasi BLUETOOTH
untuk model iPhone dan iPod
Diperbuat untuk
• iPhone X
• iPhone 8 Plus
• iPhone 8
• iPhone 7 Plus
• iPhone 7
• iPhone SE
• iPhone 6s Plus
• iPhone 6s
• iPhone 6 Plus
• iPhone 6
• iPhone 5s
• iPod touch (Generasi ke-6)
Sistem ini serasi dengan iOS 10.0 atau
yang seterusnya.
Tapak web bagi peranti yang
serasi
Semak tapak web di bawah ini untuk
maklumat terkini tentang peranti
BLUETOOTH yang serasi.
Untuk pelanggan di Utara dan
Selatan Amerika:
https://www.sony.com/am/support
Untuk pelanggan di Eropah:
https://www.sony.eu/support
Untuk pelanggan di negara/
kawasan lain:
https://www.sony-asia.com/support
Jika masalah berlaku semasa
mengendalikan sistem, ikuti langkahlangkah yang diterangkan di bawah
ini sebelum menghubungi wakil
penjual Sony anda yang terdekat. Jika
mesej ralat muncul, pastikan anda
mencatatkan kandungannya untuk
rujukan.
1
Semak untuk melihat sama
ada masalah itu disenaraikan
di dalam bahagian
“Penyelesaian Masalah”.
2
Semak tapak web sokongan
pelanggan berikut.
Untuk pelanggan di Utara dan
Selatan Amerika:
https://www.sony.com/am/support
Untuk pelanggan di Eropah:
https://www.sony.eu/support
Untuk pelanggan di negara/
kawasan lain:
https://www.sony-asia.com/support
Anda akan menemui maklumat
sokongan terkini dan Soalan Lazim
di tapak web ini.
Sekiranya masalah berterusan,
hubungi wakil penjual Sony anda yang
terdekat.
Ambil perhatian bahawa sekiranya
kakitangan perkhidmatan menukar
beberapa bahagian semasa
pembaikan, bahagian-bahagian ini
mungkin disimpan.
Am
Sistem tidak dapat dihidupkan.
• Cas bateri terbina dalam.
• Periksa bahawa kord kuasa AC telah
disambungkan dengan kemas.
Sistem telah memasuki mod tunggu
sedia.
• Ini bukan pincang tugas. Sistem
memasuki mod tunggu sedia
secara automatik dalam masa
kira-kira 15 minit apabila tidak ada
operasi atau output isyarat audio
(halaman25).
27
MY

Tidak ada bunyi.
• Melaraskan kelantangan.
• Periksa sambungan kelengkapan
opsyenal, jika ada.
• Hidupkan kelengkapan yang
disambungkan.
• Putuskan sambungan kord kuasa
AC, kemudian sambungkan semula
kord kuasa AC dan hidupkan sistem.
Terdapat dengungan atau hingar
yang teruk.
• Alihkan sistem jauh dari punca
hingar.
• Sambungkan sistem ke soket
dinding yang lain.
• Pasang penapis hingar (boleh
didapati secara komersial) kepada
kord kuasa AC.
• Matikan kelengkapan elektrik
sekeliling.
Terdapat suap balik akustik.
• Kurangkan kelantangan.
Peranti USB
Peranti USB yang disambungkan
tidak boleh dicas.
• Pastikan peranti USB tersambung
dengan kemas.
• Jika baki aras bateri sistem adalah
kurang daripada 10%, peranti USB
yang disambungkan tidak boleh
dicas.
Peranti USB tidak berfungsi dengan
betul.
• Jika anda menyambungkan peranti
USB yang tidak disokong, masalah
yang berikut mungkin berlaku. Lihat
“Maklumat tentang peranti yang
serasi” (halaman27).
—Peranti USB tidak dikenali.
—Main balik tidak dapat dilakukan.
—Bunyi melompat.
—Terdapat hingar.
—Bunyi terherot dioutput.
Tidak ada bunyi.
• Peranti USB tidak tersambung
dengan betul. Matikan sistem,
kemudian sambung semula peranti
USB.
Terdapat hingar, bunyi melompat,
atau bunyi terherot.
• Anda menggunakan peranti
USB yang tidak disokong. Lihat
“Maklumat tentang peranti yang
serasi” (halaman27).
• Matikan sistem dan sambung
semula peranti USB, kemudian
hidupkan sistem.
• Data muzik sendiri mengandungi
hingar, atau bunyi terherot.
Hingar mungkin telah masuk
semasa proses penciptaan muzik
menggunakan komputer. Cipta data
muzik sekali lagi.
• Kadar bit yang digunakan semasa
mengekod fail audio adalah rendah.
Hantar fail audio dengan kadar bit
yang lebih tinggi ke peranti USB.
Peranti USB tidak dikenali.
• Matikan sistem dan sambung
semula peranti USB, kemudian
hidupkan sistem.
• Anda menggunakan peranti
USB yang tidak disokong. Lihat
“Maklumat tentang peranti yang
serasi” (halaman27).
• Peranti USB tidak berfungsi dengan
betul. Rujuk arahan pengendalian
peranti USB mengenai cara untuk
menangani masalah ini.
Main balik tidak dimulakan.
• Matikan sistem dan sambung
semula peranti USB, kemudian
hidupkan sistem.
• Anda menggunakan peranti
USB yang tidak disokong. Lihat
“Maklumat tentang peranti yang
serasi” (halaman27).
Main balik tidak bermula dari fail
pertama.
• Setkan mod main kepada mod
main normal menggunakan
“Sony | Music Center” (halaman21).
28
MY

Fail tidak dapat dimainkan balik.
• Peranti USB yang diformatkan
dengan sistem fail selain daripada
FAT16 atau FAT32 tidak disokong.*
• Jika anda menggunakan peranti
USB yang dipetakkan, hanya fail
pada pemetakan pertama boleh
dimainkan balik.
• Fail yang dienkripsi atau dilindungi
dengan kata laluan tidak boleh
dimainkan balik.
• Fail dengan perlindungan hak cipta
DRM (Digital Rights Management)
tidak boleh dimainkan balik oleh
sistem ini.
* Sistem ini menyokong FAT16 dan FAT32,
tetapi sesetengah peranti storan USB
mungkin tidak menyokong semua FAT ini.
Untuk butir-butir, sila rujuk kepada arahan
pengendalian setiap peranti storan USB
atau hubungi pengeluar.
Peranti BLUETOOTH
Berpasangan tidak dapat
dilaksanakan.
• Alihkan peranti BLUETOOTH lebih
dekat ke sistem.
• Berpasangan mungkin tidak dapat
dilakukan jika peranti BLUETOOTH
lain terdapat di sekeliling sistem.
Dalam hal ini, matikan peranti
BLUETOOTH yang lain.
• Pastikan anda memasukkan kunci
maling yang betul semasa memilih
nama sistem (sistem ini) pada
peranti BLUETOOTH.
Peranti BLUETOOTH tidak dapat
mengesan sistem.
• Setkan isyarat BLUETOOTH kepada
hidup (halaman21).
Sambungan tidak dapat dilakukan.
• Peranti BLUETOOTH yang anda cuba
sambungkan tidak menyokong
profil A2DP, dan tidak boleh
disambungkan dengan sistem.
• Mendayakan fungsi BLUETOOTH
peranti BLUETOOTH.
• Wujudkan sambungan dari peranti
BLUETOOTH.
• Maklumat pendaftaran berpasangan
telah dipadamkan. Lakukan operasi
berpasangan sekali lagi.
• Padamkan maklumat pendaftaran
berpasangan bagi peranti
BLUETOOTH dengan memulihkan
sistem kepada pengesetan lalai
kilang (halaman30) dan lakukan
operasi berpasangan sekali lagi
(halaman16).
• Setelah semua maklumat
berpasangan pada sistem
dipadamkan, iPhone/iPod touch
mungkin tidak dapat menyambung
kepada sistem. Dalam hal ini,
padamkan maklumat berpasangan
sistem pada iPhone/iPod touch,
dan kemudian lakukan tatacara
berpasangan sekali lagi.
Bunyi melompat atau turun naik,
atau sambungan hilang.
• Sistem dan peranti BLUETOOTH
adalah terlalu jauh.
• Jika ada halangan di antara sistem
dengan peranti BLUETOOTH anda,
alihkan atau elakkan halangan.
• Jika terdapat kelengkapan yang
menjana sinaran elektromagnet,
seperti LAN wayarles, peranti
BLUETOOTH lain, atau ketuhar
gelombang mikro berdekatan,
alihkan supaya jauh.
Bunyi peranti BLUETOOTH anda tidak
dapat didengar pada sistem ini.
• Naikkan kelantangan pada peranti
BLUETOOTH anda dahulu, kemudian
laraskan kelantangan menggunakan
butang VOLUME –/+.
Terdapat dengungan yang teruk,
hingar, atau bunyi terherot.
• Jika ada halangan di antara sistem
dengan peranti BLUETOOTH anda,
alihkan atau elakkan halangan.
• Jika terdapat kelengkapan yang
menjana sinaran elektromagnet,
seperti LAN wayarles, peranti
BLUETOOTH lain, atau ketuhar
gelombang mikro berdekatan,
alihkan supaya jauh.
• Turunkan kelantangan peranti
BLUETOOTH yang bersambung.
29
MY
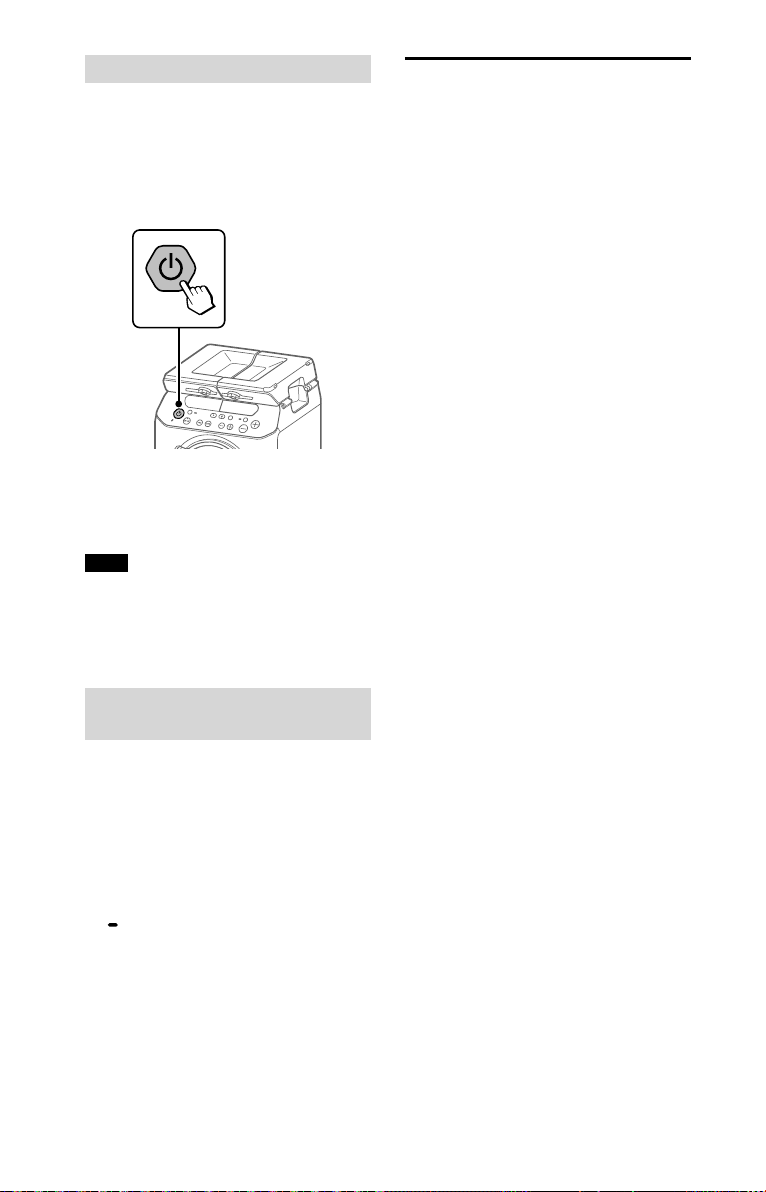
Mengesetkan semula sistem
Jika sistem tidak bergerak balas dan
tidak boleh dikendalikan walaupun
kuasa hidup, tetapkan semula sistem.
1
Tahan butang (kuasa) lebih
daripada 9 saat.
Sistem akan dimatikan.
2
Tekan butang (kuasa) untuk
menghidupkan balik sistem.
Nota
• Jika sistem tidak hidup balik, hubungi
wakil penjual Sony anda.
• Maklumat berpasangan tidak dipadam
selepas anda mengeset semula sistem.
Memulihkan sistem kepada
pengesetan lalai kilang
Jika sistem masih tidak beroperasi
dengan betul, pulihkannya kepada
pengesetan lalai kilang.
1
Tekan butang (kuasa) untuk
menghidupkan sistem.
2
Tahan butang FUNCTION
PAIRING dan butang MIC–
lebih daripada 3 saat.
Selepas “RESET” muncul pada
paparan, semua tetapan
konfigurasi pengguna, seperti
maklumat pendaftaran
berpasangan, dipulihkan kepada
penetapan lalai kilang.
Langkah berjaga-jaga
Tentang keselamatan
• Tanggalkan terus kord kuasa AC dari
saluran keluar dinding jika ia tidak akan
digunakan untuk tempoh masa yang
lama. Semasa mencabut palam unit,
sentiasa genggam palam. Jangan sekalikali tarik kord itu.
• Sekiranya apa-apa objek pepejal atau
cecair masuk ke dalam sistem, cabut
palam sistem, dan hantar kepada
kakitangan yang berkelayakan untuk
diperiksa sebelum mengendalikannya
semula.
• Kord kuasa AC mestilah ditukar hanya oleh
kemudahan servis bertauliah.
Tentang peletakan
• Jangan meletakkan sistem pada
kedudukan yang condong atau di lokasi
yang sangat panas, sejuk, berdebu, kotor,
atau lembap atau kurang pengudaraan
yang mencukupi, atau tertakluk pada
getaran, cahaya matahari langsung atau
cahaya yang terang.
• Berhati-hati apabila menempatkan sistem
pada permukaan yang telah dirawat
khas (contohnya, lilin, minyak, penggilap)
kerana kesan warna atau perubahan
warna permukaan boleh terjadi.
• Pastikan air tidak terpercik pada unit. Unit
ini tidak kalis air.
Tentang peningkatan haba
• Peningkatan haba pada sistem semasa
operasi adalah normal dan tidak perlu
dibimbangkan.
• Jangan menyentuh kabinet jika ia telah
digunakan secara berterusan pada
kelantangan yang tinggi kerana kabinet
mungkin telah menjadi panas.
Tentang pembesar suara sistem
Pembesar suara terbina dalam sistem tidak
bertebat magnet, dan gambar pada set
TV yang berhampiran mungkin menjadi
terherot magnet. Dalam keadaan ini,
matikan TV, tunggu 15 hingga 30 minit, dan
hidupkannya semula.
Jika tidak ada penambahbaikan, alihkan
sistem jauh dari TV.
Membersihkan kabinet
Bersihkan sistem ini dengan kain lembut
yang dilembapkan sedikit dengan larutan
detergen lembut. Jangan menggunakan
apa-apa jenis pad lelas, serbuk penyental,
atau bahan pelarut seperti pencair, benzin,
atau alkohol.
30
MY
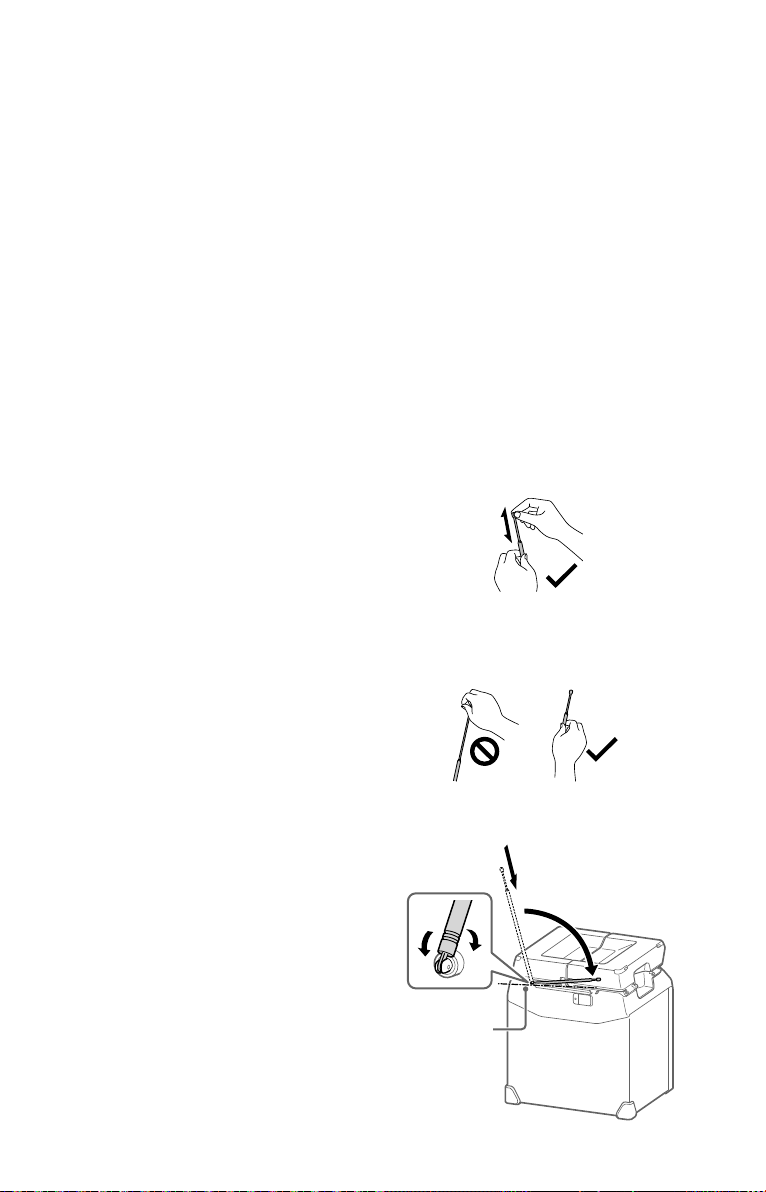
Tentang Komunikasi BLUETOOTH
• Peranti BLUETOOTH harus digunakan
dalam jarak kira-kira 10 meter (jarak tidak
terhalang) di antara satu sama lain. Julat
komunikasi yang berkesan mungkin menjadi
lebih pendek dalam keadaan berikut.
— Apabila manusia, objek logam, dinding
atau halangan lain berada di antara
peranti dengan sambungan BLUETOOTH
— Lokasi tempat LAN wayarles dipasang
— Sekitar ketuhar gelombang mikro yang
sedang digunakan
— Lokasi tempat gelombang
elektromagnet lain dijana
• Peranti BLUETOOTH dan kelengkapan LAN
wayarles (IEEE 802.11b/g) menggunakan
jalur frekuensi yang sama (2.4 GHz).
Apabila menggunakan peranti BLUETOOTH
anda berdekatan dengan peranti yang
mempunyai keupayaan LAN wayarles,
gangguan elektromagnetik mungkin
berlaku. Ini boleh mengakibatkan kadar
pemindahan data yang lebih rendah,
hingar, atau ketidakupayaan untuk
menyambung. Jika ini berlaku, cuba
lakukan remedi yang berikut:
— Gunakan sistem ini sekurang-kurangnya
10 meter jauhnya dari kelengkapan LAN
wayarles.
— Matikan kuasa kelengkapan LAN
wayarles apabila menggunakan peranti
BLUETOOTH anda dalam jarak 10 meter.
— Gunakan sistem ini dan peranti
BLUETOOTH sedekat yang mungkin
antara satu sama lain.
• Gelombang radio yang disiarkan oleh
sistem ini boleh mengganggu operasi
sesetengah peranti perubatan. Oleh
sebab gangguan ini boleh menyebabkan
kerosakan, sentiasa matikan kuasa pada
sistem ini dan peranti BLUETOOTH di lokasi
yang berikut:
— Di hospital, dalam kereta api, dalam
kapal terbang, di stesen minyak, dan
di mana-mana tempat gas mudah
terbakar mungkin hadir
— Berhampiran pintu automatik atau
penggera kebakaran
• Sistem ini menyokong fungsi keselamatan
yang mematuhi spesifikasi BLUETOOTH
untuk memastikan penyambungan
yang selamat semasa komunikasi
menggunakan teknologi BLUETOOTH.
Walau bagaimanapun, keselamatan
ini tidak mencukupi bergantung pada
kandungan pengesetan dan faktor-faktor
lain, maka sentiasalah berhati-hati semasa
menjalankan komunikasi menggunakan
teknologi BLUETOOTH.
• Sony tidak boleh dipertanggungjawabkan
dengan apa jua cara untuk ganti
rugi atau kerugian yang lain akibat
kebocoran maklumat semasa komunikasi
menggunakan teknologi BLUETOOTH.
• Komunikasi BLUETOOTH tidak semestinya
dijamin dengan semua peranti
BLUETOOTH yang mempunyai profil yang
sama dengan sistem ini.
• Peranti BLUETOOTH yang disambungkan
dengan sistem ini mestilah mematuhi
spesifikasi BLUETOOTH yang ditetapkan
oleh Bluetooth SIG, Inc., dan mesti
diperakui pematuhannya. Namun,
walaupun peranti mematuhi spesifikasi
BLUETOOTH, mungkin ada kes di
mana ciri-ciri atau spesifikasi peranti
BLUETOOTH yang menjadikannya
mustahil untuk menyambung, atau boleh
menyebabkan kaedah kawalan, paparan
atau operasi yang berlainan.
• Hingar mungkin berlaku atau audio
mungkin terputus bergantung pada
peranti BLUETOOTH yang disambungkan
dengan sistem ini, persekitaran
komunikasi, atau keadaan sekeliling.
Mengendalikan antena FM
• Apabila melaraskan kepanjangan, pegang
antena di bahagian paling tebal dan
atas, dan panjangkannya/pendekkannya
dengan perlahan.
• Apabila melaraskan arah, pegang
antena di bahagian paling tebal, dan
putarkannya. Jika anda alihkan antena
melalui atas atau menggunakan daya
yang kuat, ia mungkin patah.
• Kendalikan antena dengan berhati-hati.
Mencuba untuk mengalih ke arah yang
tidak bersesuaian boleh merosakkan antena.
Paksi putaran
menegak
31
MY

Spesifikasi
Bahagian bateri ion litium
Voltan normal:
7.2 V
Kapasiti normal:
4,900 mAh, 35.28 Wh
1)
Julat sebenar akan berbeza bergantung
pada faktor seperti halangan di antara
peranti, medan magnet sekitar ketuhar
gelombang mikro, elektrik statik,
kepekaan penerimaan, prestasi antena,
sistem pengendalian, aplikasi perisian,
dan sebagainya.
2)
Profil piawaian BLUETOOTH menunjukkan
tujuan komunikasi BLUETOOTH di antara
peranti.
Bahagian pembesar suara
Twiter:
40mm x 2, jenis kon
Wufer:
180mm x 1, jenis kon
Bahagian USB dan format audio
yang disokong
Kadar bit yang disokong:
MP3 (MPEG1 Audio Layer-3):
32kbps – 320kbps, VBR
WMA: 32kbps – 192kbps, VBR
Frekuensi pensampelan:
MP3 (MPEG1 Audio Layer-3):
32/44.1/48 kHz
WMA: 44.1 kHz
Bahagian BLUETOOTH
Sistem komunikasi:
BLUETOOTH Versi piawai 4.2
Output:
BLUETOOTH Kuasa Piawai Kelas 2
Kuasa output maksimum:
< 10.0 dBm
Julat komunikasi maksimum:
Garis penglihatan kira-kira 10 m
Jalur frekuensi:
Jalur 2.4 GHz (2.4000 GHz –
2.4835GHz)
Kaedah modulasi:
FHSS (Freq Hopping Spread
Spectrum)
Serasi BLUETOOTH profil
A2DP (Advanced Audio Distribution
Profile)
AVRCP (Audio Video Remote Control
Profile)
Codec yang disokong:
SBC (Sub Band Codec)
AAC (Advanced Audio Coding)
LDAC
MY
32
Bahagian penala FM
Julat frekuensi:
87.5 MHz–108.0 MHz
(langkah 50 kHz)
Antena: Antena Batang
Am
Keperluan kuasa:
Model Taiwan: AC 120 V, 50/60 Hz
Model Amerika Utara: AC 120V,
60Hz
Model lain: AC 120V – 240V,
50/60Hz
Penggunaan kuasa:
30W
Penggunaan kuasa tunggu sedia:
Apabila mod tunggu sedia
BLUETOOTH dan mod demonstrasi
ditetapkan kepada hidup: 2.3 W
Apabila mod tunggu sedia
BLUETOOTH ditetapkan kepada
hidup dan mod demonstrasi
ditetapkan kepada mati: 1.2 W
Apabila mod tunggu sedia
BLUETOOTH dan mod demonstrasi
ditetapkan kepada mati: 0.5 W
1)
2)
:
Hayat penggunaan bateri ion
litium (menggunakan sambungan
BLUETOOTH):
Kira-kira 13 jam
1)
Jika aras kelantangan sistem
ditetapkan kepada maksimum,
hayat penggunaan adalah kira-kira
2)
5 jam.
Masa pengecasan bateri ion litium
(semasa unit dimatikan):
Kira-kira 7 jam
1)
Apabila BLUETOOTH disambungkan.
Prestasi sebenar berbeza-beza
bergantung pada tetapan, keadaan
persekitaran dan penggunaan. Kapasiti
bateri menurun semakin masa berlalu
dan penggunaan.
2)
Masa mungkin berbeza, bergantung
kepada suhu atau keadaan penggunaan.
3)
Masa yang diperlukan untuk mengecas
bateri terbina dalam yang kosong
sehingga kapasiti penuh semasa unit
dimatikan.
3)

DC OUT:
Jek USB (untuk mengecas bateri
bagi peranti yang bersambung)
(5V, Maks.1.0A)
Dimensi (L/T/D) (Kira-kira):
330mm x 376mm x 303mm
Jisim (Kira-kira):
6.7kg
Kuantiti sistem:
1 unit
Aksesori yang dibekalkan:
Kord kuasa AC (1)
Rekabentuk dan spesifikasi adalah
tertakluk kepada perubahan tanpa notis.
Notis Lesen dan Tanda
Dagangan
• Teknologi pengekodan audio
MPEG Lapisan 3 dan paten adalah
dilesen daripada Fraunhofer IIS dan
Thomson.
• Windows Media adalah sama
ada tanda dagangan berdaftar
atau tanda dagangan Microsoft
Corporation di Amerika Syarikat dan/
atau negara lain.
• Produk ini dilindungi oleh hak
harta intelektual tertentu Microsoft
Corporation. Penggunaan atau
pengedaran teknologi sedemikian di
luar produk ini adalah dilarang tanpa
lesen daripada Microsoft subsidiari
Microsoft yang dibenarkan.
• Tanda kata dan logo BLUETOOTH®
ialah tanda dagangan berdaftar
dan dimiliki oleh Bluetooth SIG, Inc.
dan apa-apa penggunaan tanda
sedemikian oleh Sony Corporation
adalah di bawah lesen. Tanda
dagangan dan nama dagang lain
adalah milik pemiliknya masingmasing.
• Google Play dan Android ialah tanda
dagang Google LLC.
• LDAC™ dan logo LDAC adalah tanda
dagangan Sony Corporation.
• Apple, logo Apple, iPhone, iPod dan
iPod touch ialah tanda dagangan
Apple Inc., yang didaftarkan di A.S.
dan negara lain.
App Store ialah tanda perkhidmatan
Apple Inc.
• Penggunaan lencana Made
for Apple bermakna bahawa
aksesori telah direka bentuk untuk
menyambungkan secara khusus
kepada produk Apple yang dikenal
pasti dalam lencana, dan telah
diperakui oleh pembangunnya
untuk memenuhi piawaian
prestasi Apple. Apple tidak
bertanggungjawab terhadap operasi
peranti ini atau pematuhannya
dengan piawaian keselamatan dan
kawal selia. Sila ambil perhatian
bahawa penggunaan aksesori ini
dengan iPod atau iPhone boleh
menjejaskan prestasi wayarles.
33
MY

• WALKMAN dan logo WALKMAN ialah
tanda dagang Sony Corporation.
• Semua tanda dagang dan tanda
dagang berdaftar lain ialah hak
milik pemegangnya masing-masing.
Dalam manual ini, tanda
TM
dan ®
tidak dinyatakan.
34
MY

35
MY

注意
請勿將如點燃的蠟燭等明火源放置於設備
上。
由於電源插頭要用來將本機和電源斷開,請
將本機連接到易於接近的交流電源插座。萬
一發現本機有異常情況,請立即將電源插頭
從交流電源插座拔掉。
只要是連接在交流電源插座上,本機都不會
中斷與交流電源的連接,即使本機已經關閉
也一樣。
切勿將本設備安裝在狹窄的空間內,如書櫃
或壁櫥內。
請勿讓電池(已安裝電池組或電池)長時間
暴露在陽光、火源等溫度過高的環境中。
請勿讓電池暴露在極低溫度環境中,否則可
能發生過熱及熱失控情形。
請勿分解、拆開或切碎蓄電池或電池。
蓄電池漏液時,請勿讓液體接觸到皮膚或眼
睛。若不慎接觸,請使用大量清水清洗接觸
部位,然後尋求醫療建議。
蓄電池和電池需要先充電才能使用。 務必參
閱製造商說明書或設備手冊,瞭解正確充電
指示。
長時間存放後,可能需要對蓄電池或電池充
電和放電數次,才能獲得最大效能。
棄置時應妥善處理。
本設備經測試符合EMC指令有關使用3公尺
以內連接線的限制規定。
為確保長久正常使用本機
•
避免在側放的情況下使用或存放本機。
•
如果弄溼本機,請勿將其長時間靜置。請
立即用乾布擦拭乾淨。
經型式認證合格之低功率射頻電機,非經許
可,公司、商號或使用者均不得擅自變更頻
率、加大功率或變更原設計之特性及功能。
低功率射頻電機之使用不得影響飛航安全及
干擾合法通信;經發現有干擾現象時,應立
即停用,並改善至無干擾時方得繼續使用。
前項合法通信,指依電信法規定作業之無線
電通信。低功率射頻電機須忍受合法通信或
工業、科學及醫療用電波輻射性電機設備之
干擾。
設備名稱:無線喇叭,型號(型式):GTK-PG10
限用物質及其化學符號
單元
電路板 - ○ ○ ○ ○ ○
外殼 - ○ ○ ○ ○ ○
揚聲器 - ○ ○ ○ ○ ○
配件 - ○ ○ ○ ○ ○
備考1.“超出0.1 wt %”及“超出0.01 wt %”係指限用物質之百分比含量超出百分比含量基準值。
備考2.“○”係指該項限用物質之百分比含量未超出百分比含量基準值。
備考3.“-”係指該項限用物質為排除項目。
CT
2
鉛
(Pb)
汞
(Hg)
鎘
(Cd)
六價鉻
(Cr
多溴聯苯
+6
)
(PBB)
多溴二苯醚
(PBDE)

防水功能的注意事項
(在使用本機前閱讀)
本機防水效能
本機的頂部面板具有IPX4*2的防水規格*1,
符合IEC60529「進水防護等級(IP代碼)」
所述的「潑水防護等級」。
但是,這並不表示本機完全防水。
請勿讓本機掉入浴缸內的熱水中,或故意在
水中使用本機。
正面
符合防水效能規格的液體
適用:
不適用:
*1
本機頂部面板以外的任何部位不具防水功
能。
2
*
IPX4(潑水防護等級):防止任何方向的潑
水。
本機的防水效能是根據上述情況使用我們
的測量方式所測。請注意,因顧客使用不
當而造成水滲入機體內並造成故障,並不
提供保固服務。
淡水、自來水
上述以外的液體(肥皂水、摻
有清潔劑或沐浴類產品的溶
液、洗髮精、溫泉水、游泳池
水、海水等)
避免防水效能退化
檢查以下情況並正確使用本機。
•
請小心不要使本機掉落或受到機械性衝
擊。變形或損壞可能會使防水效能退化。
•
請勿在可能遭受大量的水或熱水潑濺的地
方使用本機。本機沒有防水壓設計。在上
述情況下使用本機可能造成故障。
•
請勿倒入熱水或用吹風機等裝置直接對著
本機吹熱氣。此外,切勿在蒸氣室中或爐
子附近等高溫場所使用本機。
•
請小心拿取護蓋()。護蓋在維持防水
效能方面具有非常重要的作用。使用本系
統時,請確定護蓋已完全關緊。關上護蓋
時,請小心不要讓異物進入。如果護蓋沒
有完全關緊,防水效能可能變差,導致系
統進水而引起故障。
背面
本系統潮溼時的處理方式
如果弄溼本系統,請先清除本系統的水分,
然後用柔軟的乾布擦乾本系統上的溼氣。特
別是在寒冷地區,本系統表面殘留的溼氣可
能會導致系統結凍並故障。
使用本系統後,務必擦乾溼氣。
將本系統放在毛巾或乾布上。然後將本系統
置於室溫下並使其風乾,直到沒有殘留任何
溼氣。
CT
CT
3
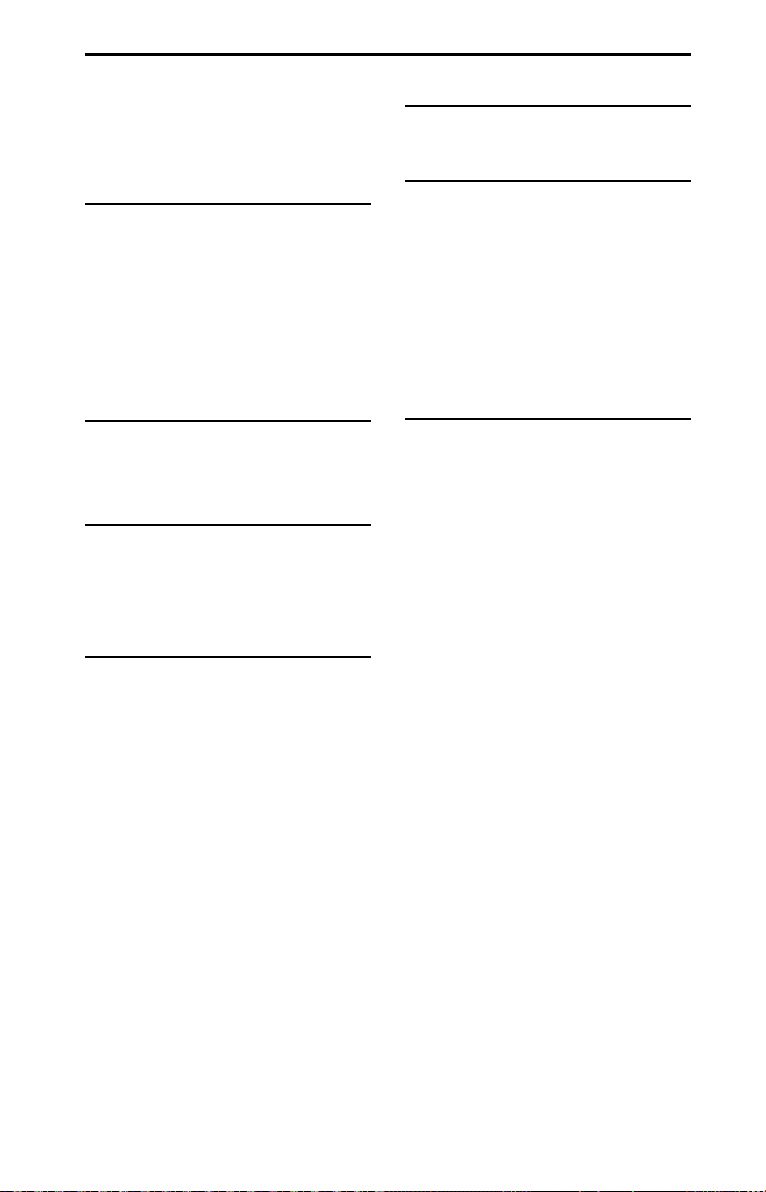
目錄
防水功能的注意事項
(在使用本機前閱讀) ...................... 3
各部件與控制器指南 .......................... 5
開始使用前的準備工作
為電池充電 ............................................. 8
開啟系統 ..................................................8
搬運系統 ..................................................9
展開頂部面板 ......................................... 9
關於電源管理 .......................................10
在三腳架上安裝喇叭系統 ............... 11
USB裝置
使用USB裝置之前 ..............................12
播放一個檔案 .......................................12
調諧器
收聽無線廣播 .......................................14
預設無線廣播電台 ............................. 14
設定單聲道/立體聲 ...........................14
BLUETOOTH連接
將本系統與BLUETOOTH裝置
配對 .......................................................... 15
聆聽BLUETOOTH裝置上的音樂 ...17
關於BLUETOOTH無線技術 .............18
以高品質的聲音編碼/解碼技術
(AAC/LDAC™)播放 .......................18
設定BLUETOOTH待機模式 ............. 19
開啟或關閉BLUETOOTH訊號 ........19
透過BLUETOOTH連接使
用“Sony | Music Center”與
“Fiestable” .............................................20
聲音調整
調整聲音 ................................................21
其他操作
使用選購的設備 ..................................22
使用選購的麥克風 .............................22
停用本機上的按鈕
(兒童鎖) ............................................23
設定自動待機功能 .............................23
節省電池電力 .......................................24
檢查軟體版本 .......................................24
其他資訊
關於相容裝置的資訊 ........................25
故障排除 ................................................25
注意事項 ................................................28
規格 ..........................................................29
許可證及商標公告 ............................. 30
CT
4

各部件與控制器指南
正面
背面
CT
5

(電源)按鈕
按下以開啟或關閉系統。
CHARGE指示燈
電池正在充電時會亮起黃燈。
系統使用內建電池且電池剩餘電量偏
低(低於10%)時,指示燈會閃爍。
當系統使用交流電源線連接到電源插
座且電池充滿電時,或系統使用內建
電池且電池剩餘電量高於10%時,指
示燈會熄滅。
(播放/暫停)*按鈕
—
按下以播放/暫停音樂。
—
按住 按鈕大約3秒,就會播放
內建的聲音演示。
/(後退/前進)按鈕
按下以選擇一個曲目或檔案。
TUNING–/+按鈕
按下以調整到FM電台。
KEYCONTROL/按鈕
MIC–/+按鈕
按下以降低麥克風音量。
MICECHO按鈕(第8頁)
按住以停止內建的聲音演示。
顯示屏
(BLUETOOTH)指示燈
FUNCTION PAIRING按鈕
—
反覆按下以選取BLUETOOTH、USB
或AUDIO IN功能。
—
選取BLUETOOTH功能時,按住以
啟動BLUETOOTH配對(第15
頁)。
三腳架安裝孔(位於底部表面)
使用可承受10 kg以上重量的三腳架
(市售)。
根據三腳架規格,三腳架上安裝的喇
叭可能不會朝向適當方向。
FM收音機天線
ACIN插孔
(播放/暫停)按鈕與
*
按鈕有一個觸控點。操作系統時,請利用觸
控點作為參考。
VOLUME +音量
MEGABASS BATTERY按鈕
—
按下可強化低頻並創造更強而有力
的聲 音(第2 1頁)。
—
按住以查看電池的剩餘電量(第
10頁)。
MEGABASS指示燈
開啟MEGA BASS功能時亮燈。
VOLUME–/+*按鈕
按下以調整音量。
MIC插孔
用來連接麥克風。
AUDIOINL/R插孔
連接到電視機或音訊/視訊設備的音
訊輸出插孔。聲音會透過本系統輸
出。
(USB)連接埠
用來連接USB裝置。
CT
6

指示燈狀態
本機上的指示燈狀態如下圖所示。
指示燈狀態 圖解
閃爍
點亮
熄滅
CT
7
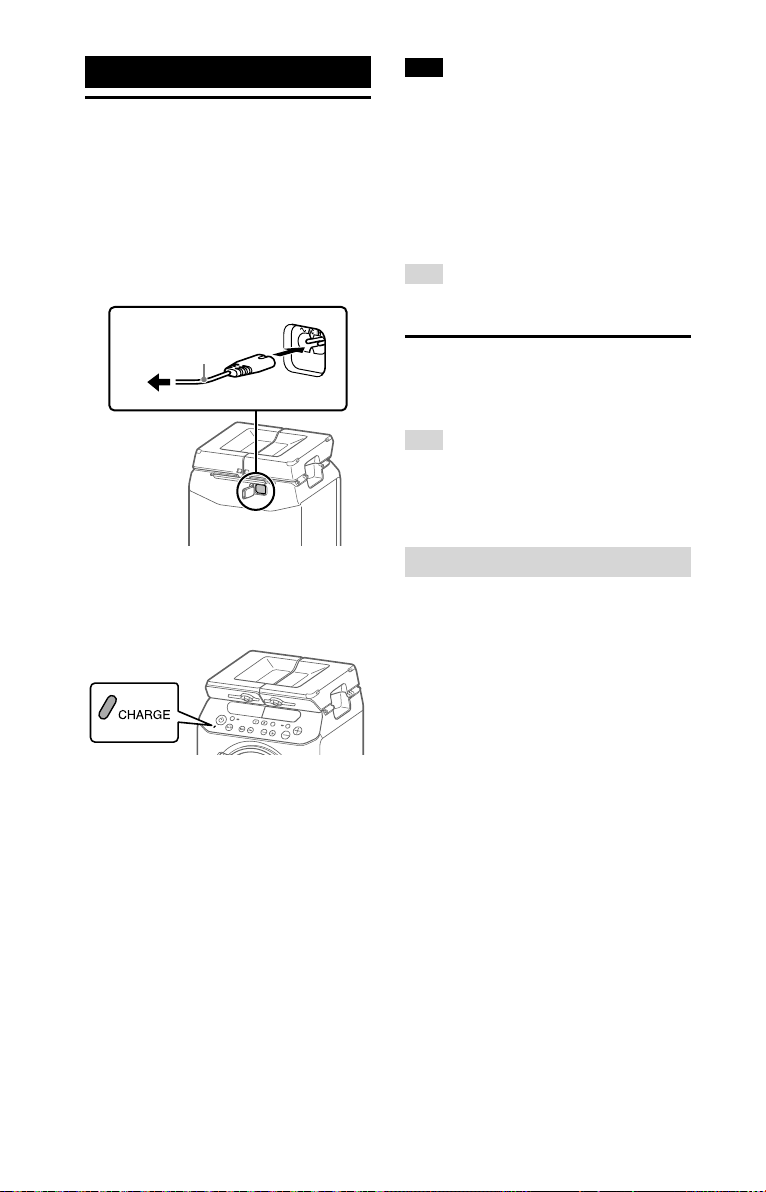
開始使用前的準備工作
為電池充電
如果使用前電池已經充滿電,便可以內建
電池(可以充電)使用系統,而不必將交
流電源線連接到電源插座。
將交流電源線(附件)連接到本機背
面的AC IN插孔,然後連接到牆上的
電源插座。
附註
••
為電池充電的時間可能會更長一些,要視使
用情況而定。
••
即使很長時間不使用系統,也要每隔六個月
將電池充滿電,以維持其效能。
••
在非常寒冷或炎熱的環境中,充電會因為安
全原因停止。•
如果充電要花很長時間,也會使得系統停止
充電。•
若要解決這些問題,請拔掉交流電源線,在
操作溫度介於5•℃與30•℃時再連接回去。
提示
您可以在系統充電時操作系統。
交流電源線(附件)
連接到電源插座
CHARGE指示燈會點亮琥珀色燈。充電會
在7個小時左右完成,指示燈會熄滅。
開啟系統
按下••按鈕以開啟系統。
提示
如果使用前已經充過電池,便可以內建電池使
用系統,而不必將交流電源線(附件)連接到電
源插座。詳情請參閱“為電池充電”。
停用演示
系統開啟時按住MIC ECHO 3秒鐘以
上可將演示模式設為關閉。
“DEMO•OFF”會出現在顯示屏上。
若要執行演示,請在演示模式設為開啟的
情況下,將系統連接至電源插座並開啟電
源。
系統使用內建電池時,將不會執行演示。
CT
8
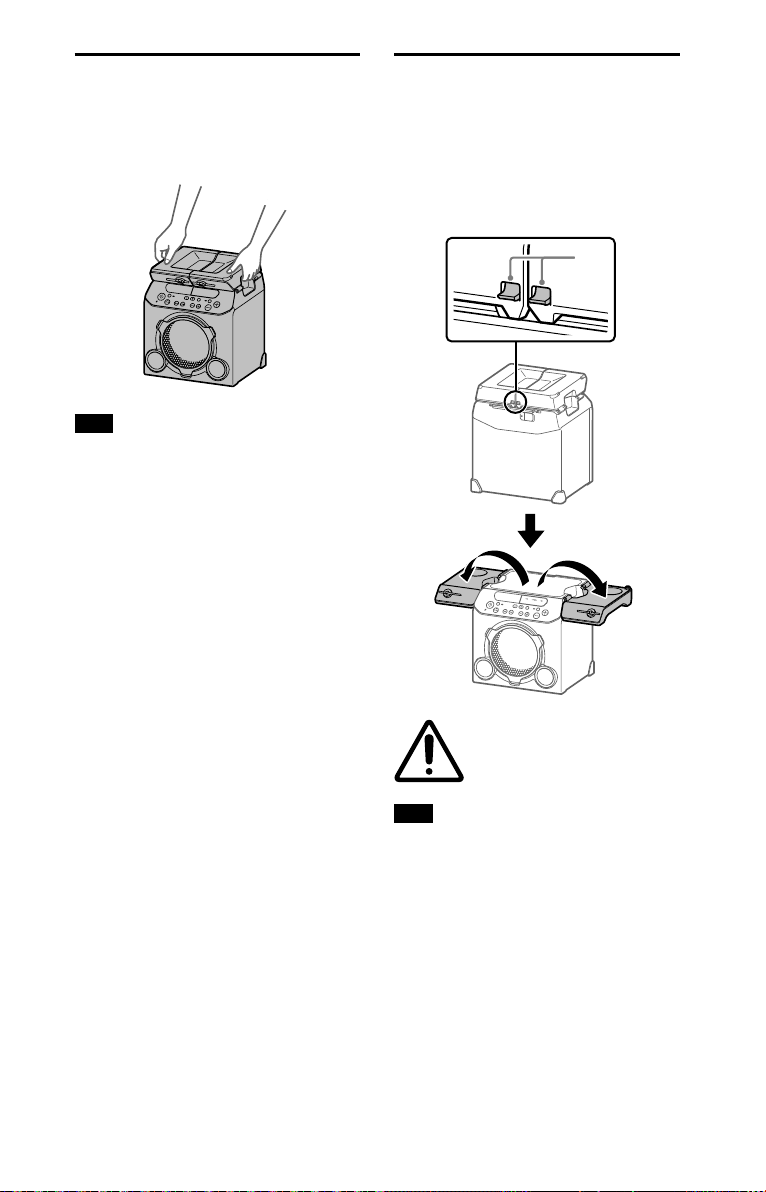
搬運系統
展開頂部面板
攜帶系統之前,請將所有纜線都拔掉。
此外,如果本機的頂部面板展開,則搬運
本機時應蓋緊頂部面板。
附註
搬運系統時,手的正確位置非常重要,以避免
人員傷害與/或財物損壞。
您可展開頂部面板,將系統當成桌子使
用。若要展開頂部面板,請將本機背面的
卡榫()往上推,然後展開頂部面板。
也可以將飲料放在飲料架中。
此外,頂部面板展開時可帶來極具空間感
的聲音效果。
頂部面板展開或收合時,小
心不要夾到手指。
附註
•
請勿坐在本機上。
•
最高承載重量為10 kg。
•
請勿將高溫鐵板或其他高溫物品放在頂部面
板上。
•
請注意,僅對展開頂部面板的其中一側施加
負載,可能導致本機傾倒。
•
請勿將任何易受磁力影響的物品(金融卡、
磁條式信用卡等)放在頂部面板附近。
CT
9

關於電源管理
•
根據預設,本系統設定為15分鐘左右
沒有操作而且沒有偵測到音訊時自動
關機。詳情請參閱“設定自動待機功能”
( 第 2 3 頁)。
•
您可使用不顯示模式(省電模式)降低
耗電量。如需詳細資訊,請參閱“節省
電池電力”(第24頁)。
檢查可充電電池的電量
您可以透過語音導引及顯示屏上的訊息,
檢查電池的殘餘電量。
您也可以使用“Sony | Music Center”檢查電
池電量(第20頁)。
按下按鈕以開啟系統。
1
按住MEGABASS BATTERY按鈕3
2
秒鐘以上。
您會聽到語音導引訊息,而且下
3
列其中一個訊息會根據電池的殘
餘電量顯示。
語音導引訊息
(電池電量)
“Fully charged”
(80% – 100%)
“Battery About 70%”
(60% – 79%)
“Battery About 50%”
(30% – 59%)
“Battery About 20%”
(11% – 29%)
“Please charge”
(低於10%)
提示
系統使用內建電池且電池剩餘電量低於
10%時,會自動發出“Please charge”。
顯示屏上的
訊息
FULLY
CHARGED
BATT 70%
BATT 50%
BATT 20%
PLEASE
CHARGE
10
CT
在三腳架上安裝喇叭系
統
將喇叭系統上的孔()對準三腳架(非
附件)(),然後輕輕往下推,直到完
全插入三腳架。
務必使用直接約35 mm、重量約2.8 kg以
上且能承受10 kg以上重量的三腳架。
根據三腳架規格,三腳架上安裝的喇叭系
統可能不會朝向適當方向。
小於1.2 m
35 mm
大於0.55 m*
建議您將三腳架腿架延伸到最長。
*
附註
將喇叭系統安裝到三腳架時,應注意下列事
項,以避免人員受傷或損壞喇叭系統。
•
安裝喇叭系統前,先將三腳架裝設完成。務
必閱讀三腳架的使用說明書。
•
請勿將喇叭系統安裝到放在不穩定表面、走
道或其他不適宜位置的三腳架上。
•
確定喇叭系統穩固地安裝至三腳架。
•
喇叭系統安裝到三腳架時,請勿推喇叭系統
或在其上方放置任何物品。
•
喇叭系統安裝到三腳架時,請勿旋轉或抬起
喇叭系統。
•
請勿跨越三腳架腿架,避免發生絆倒。
•
需要移動三腳架、喇叭系統或重低音單體
時,請拔掉交流電源線及所有纜線,並從三
腳架拆開喇叭系統。
•
小心不要被喇叭纜線、三腳架腿架或交流電
源線絆倒。
•
請勿讓孩童靠近安裝在三腳架上的喇叭系
統。
•
採取其他相應的預防措施,避免安裝在三腳
架上的喇叭系統掉落。
11
CT
USB裝置
播放一個檔案
使用USB裝置之前
關於相容的USB裝置,請參閱“關於相容裝
置的資訊”(第25頁)。
以本系統使用Apple裝置時,要透過
BLUETOOTH連線連接裝置(第15頁)。
不支援透過USB連接使用Apple裝置。
附註
•
必須以USB纜線連接時,請使用USB裝置隨附
的USB纜線。關於操作方法的詳細資訊,請參
閱USB裝置隨附的使用說明書。
•
請不要透過USB集線器連接系統與USB裝置。
•
連接USB裝置時,系統會讀取USB裝置上的所
有檔案。如果USB裝置上的資料夾或檔案很
多,可能要花很長時間才能完成USB裝置的讀
取。
•
有些USB裝置連接時,本系統可能會延遲一下
才開始執行操作。
•
不保證能與所有編碼/寫入軟體相容。如果
USB裝置上的音訊檔案原來是以不相容的軟體
編碼的,那些檔案可能會產生噪音或中斷音
訊、或者可能完全無法播放。
•
本系統不一定支援外接USB裝置提供的所有功
能。
將系統當成電池充電器使用
在下列情況下,您可以將系統當成USB裝
置的電池充電器使用:
—
USB裝置具有充電功能;
—
系統開啟電源;且
—
已選擇USB功能以外的任何功能。
將USB裝置連接到
USB裝置連接到
始充電。詳情請參考USB裝置的使用說明
書。
(USB)連接埠。
(USB)連接埠時就會開
支援的音訊檔案格式如下:
—
MP3:副檔名“.mp3”
—
WMA:副檔名“.w ma”
按下FUNCTION PAIRING按鈕以
1
選擇“USB”。
將USB裝置連接到 (U S B )連 接
2
埠。
按下按鈕以開始播放。
3
您可以用“Sony | Music Center”(第
20頁)輕鬆地從USB裝置上的音樂
清單控制播放操作並選取您要的音
樂。
按下VOLUME-/+按鈕以調整音
4
量。
其他操作
若要 請這樣做
暫停播放 按下 按鈕。若要恢
播放下一首歌 按下 按鈕。
播放上一首歌 按下 按鈕。
快進 按住 按鈕3秒鐘以
快倒 按住 按鈕3秒鐘以
復播放,再按一下 按
鈕。
上。
上。
12
CT

附註
•
本系統不能在下列情況下播放USB裝置上的音
訊檔案:
—
USB裝置上的音訊檔案總數超過5000個
時。
—
USB裝置上的資料夾數目超過999個(包括
“ROOT”資料夾與空資料夾在內)時。
這些數目可能因為檔案或資料夾的結構而
異。請勿在有音訊檔案的USB裝置上儲存其他
類型的檔案或不必要的資料夾。
•
系統最多只能播放8層深的資料夾。
•
沒有音訊檔案的資料夾會被跳過去。
•
請注意,即使檔案名稱有正確的副檔名,如
果實際的檔案不同,系統也可能發出噪音或
者可能會故障。
13
CT

調諧器
預設無線廣播電台
收聽無線廣播
1
調整天線以獲得最佳收訊。
將FM天線拉長,並調整其長度和角
度,以獲得最佳收訊。請參閱“握拿
FM天線”(第29頁)。
反覆按下FUNCTION PAIRING按
2
鈕以選擇“TUNERFM”。
調整到一個電台。
3
自動掃描:
按住TUNING –/+按鈕直到顯示屏上的
頻率開始變更。
調整到一個電台時,掃描會自動停
止。“ST”(僅限FM立體聲節目)會在
顯示屏上亮起。
如果掃描沒有停止,請按TUNING –
或+按鈕停止掃描。然後執行手動調諧
(請看下文)。
手動調諧:
反覆按下TUNING –/+按鈕以調整到您
要的電台。
提示
若要降低收訊較弱的FM立體聲電台的靜電
雜訊,請按住FUNCTION
MEGA BASS按鈕大約3秒。“ST”會隨即顯示
且“MONO”會在顯示屏上亮起。您會失去立
體聲效果,但是接收情況會改善。
PAIRING按鈕和
您最多可以儲存20個FM電台作為您的最
愛電台。
若要預設FM電台,請在智慧型手機/
iPhone上使用“Sony | Music Center”。
如需“Sony | Music Center”的詳細資
訊,請參閱“透過BLUETOOTH連接使用
“Sony | Music Center”與“Fiestable””(第
20 頁)。
設定單聲道/立體聲
如果在FM接收期間出現雜訊,請將
“MONO/ST”設為“MONO”。如果設為
“ST”,將會根據接收情況自動選擇立體聲
或單聲道。
按住FUNCTION PAIRING按鈕和
1
MEGABASS按鈕大約3秒。
14
CT

BLUETOOTH連接
GTK-PG10
BLUETOOTH
將本系統與
BLUETOOTH裝置配對
配對是一種BLUETOOTH裝置預先與彼此
登記的作業。一旦執行配對作業之後,這
些裝置就不需要再度執行配對作業。
BLUETOOTH裝置要放置於距離系
1
統1公尺以內。
選取BLUETOOTH功能。
2
按下 按鈕以開啟系統。
反覆按下FUNCTION
本機上的
燈緩慢閃爍為止。
(BLUETOOTH)指示
PAIRING直到
按住FUNCTION PAIRING按鈕3秒
3
鐘以上。
會輸出語音導引(“Bluetooth pairing”)
而且
(BLUETOOTH)指示燈會快速閃
爍。
Bluetooth
pairing
開啟BLUETOOTH裝置上的
4
BLUETOOTH功能。
詳細資訊請參考BLUETOOTH裝置的使
用說明書。
提示
系統上沒有配對資訊時(例如,購買
之後首次使用BLUETOOTH功能時),
(BLUETOOTH)指示燈會快速閃爍,系統
會自動進入配對模式。在這種情況下,請前
往步驟4。
選取BLUETOOTH裝置顯示屏上的
5
“ G T K - P G 1 0 ”。
附註
如果BLUETOOTH裝置上需要通行金鑰,請
輸入“0000”。“通行金鑰”可能被稱為“通行
碼”、“PIN 碼”、“PIN數字”或“密 碼”。
15
CT

確認已經建立BLUETOOTH連接。
6
一旦建立BLUETOOTH連接之後,系
統就會發出通知音,而且本機上的
(BLUETOOTH)指示燈會停止閃爍並
保持亮著。
連接可能會在配對完成之後自動開
始,這點要視BLUETOOTH裝置而定。
附註
•
您最多可以為8個BLUETOOTH裝置配對。如果
為第9個BLUETOOTH裝置配對,最舊的配對裝
置會被刪除。
•
如果您要與另一個BLUETOOTH裝置配對,請
重複進行步驟1至6。
•
如果上次連接的BLUETOOTH裝置在附
近,就會自動建立 BLUETOOTH連接,而且
BLUETOOTH指示燈會點亮。
若要取消配對作業
按下FUNCTION PAIRING按鈕。
若要終止BLUETOOTH連接
關閉連接裝置上的BLUETOOTH功能。
附註
視BLUETOOTH裝置而定,BLUETOOTH連接可能
會在您停止播放時自動終止。
刪除所有配對登記資訊
若要刪除所有配對登記資訊,必須將系統
恢復至原廠預設設定。請參閱“將系統還
原至原廠預設設定”(第27頁)。
附註
一旦刪除系統上的配對資訊之後,iPhone/
iPod touch可能無法連接至系統。在這種情況
下,請刪除iPhone/iPod touch裝置上的系統配對
資訊,然後再度執行配對作業。
16
CT

聆聽BLUETOOTH裝置
上的音樂
您可以在連接的BLUETOOTH裝置上享受
聆聽音樂的樂趣。
播放音樂之前,請檢查下列項目:
—
BLUETOOTH裝置的BLUETOOTH功能已
經開啟。
—
配對已經完成(第15頁)。
反覆按下FUNCTION PAIRING直
1
到本機上的
示燈亮起為止。
上次連接的BLUETOOTH裝置會被自動
連接。
附註
如果 (BLUETOOTH)指示燈閃爍,表示還沒有
建立BLUETOOTH連接。在這種情況下,請完成
配對程序並建立BLUETOOTH連接。
(BLUETOOTH)指
調整音量。
3
請先調整BLUETOOTH裝置的音量。如
果音量還是太低,請用VOLUME –/+
按鈕在系統上調整音量。
BLUETOOTH
裝置
在同時連接在系統上的
BLUETOOTH裝置(多裝置連
線)之間切換
最多可以同時將3種BLUETOOTH裝置連接
到系統。
從連接裝置之一播放音源時,您可以操作
另一種連接裝置以切換BLUETOOTH輸入
裝置,以便開始播放。
附註
您可能無法同時進行3種BLUETOOTH裝置的連
接,要視BLUE TOOTH裝置而定。
開始播放BLUETOOTH裝置上的音
2
訊來源。
詳細資訊請參考BLUETOOTH裝置的使
用說明書。
您也可以用系統上的 按鈕播放/暫
停音樂。
17
CT

關於BLUETOOTH無線
技術
BLUETOOTH無線技術是一種小範圍內的
無線技術,可以在數位裝置之間進行無線
資料通訊。BLUETOOTH無線技術可以在
大約10公尺範圍內運作。
支援的BLUETOOTH版本、標準集以及
編碼/解碼器
詳情請參閱“BLUETOOTH部分”(第29
頁 )。
(BLUETOOTH)指示燈
本機上的 (BLUETOOTH)指示燈會點亮
或閃藍燈,以顯示BLUETOOTH狀態。
系統狀態 指示燈狀態
BLUETOOTH待機 緩慢閃爍
BLUETOOTH配對中快速閃爍
BLUETOOTH連接
已經建立
點亮
以高品質的聲音編碼/
解碼技術(AAC/
LDAC™)播 放
本系統可以從BLUETOOTH裝置接收AAC
或LDAC編碼/解碼格式的資料。這樣可以
提供更高音質的播放。
您可以用“Sony | Music Center”(第20
頁)從下列兩種設定選擇一種音訊編碼/
解碼選項。本系統的預設設定是“AUTO”。
•
AUTO:系統會偵測來源裝置上使用
的編碼/解碼技術,並自動從“SBC”、
“AAC*”或“LDAC*”選擇最佳的編碼/解碼
技術。
•
SBC:不論來源裝置上使用的是哪一種
編碼/解碼技術,一律採用“SBC”。
只能在您的BLUETOOTH裝置支援該編碼/解碼
*
技術時使用。
若要套用對設定的變更,必須終止
BLUETOOTH連接(第16頁),然後再度
執行BLUETOOTH連接。
附註
來源裝置與AAC/LDAC相容而且此功能設定為
“AUTO”時,您可以享受更高的音質。不過,
聲音可能會中斷,要視BLUETOOTH通訊的情
況而定。如果發生這種情況,請將功能設定為
“SBC”。
18
LDAC是一種由Sony開發的音訊編碼
技術,即使透過BLUETOOTH連接,也
可以傳輸高解析度(Hi-Res)的音訊內
容。與其他BLUETOOTH相容的音訊編
碼技術(例如SBC)不一樣的是,它會
以Hi-Res音訊內容沒有任何向下轉換
的方式運作
多約三倍的資料
最佳化資料包裝,以前所未有的音質
透過BLUETOOTH無線網路傳送。
1)
DSD格式的內容除外。
2)
與SBC(次頻帶編碼/解碼器)相較之下,
選擇990 kbps(96/48 kHz)或909 kbps
(88.2/44.1 kHz)的位元率時。
CT
1)
。它還容許以比其他技術
2)
,用有效率的編碼與

設定BLUETOOTH待機
模式
開啟或關閉
BLUETOOTH訊號
BLUETOOTH待機模式可以在您建立與
BLUETOOTH裝置的BLUETOOTH連接時,
讓系統自動開機。這項設定預設為關閉。
這項設定只能用“Sony | Music Center”配
置。關於“Sony | Music Center”的詳細資
訊,請參閱“透過BLUETOOTH連接使用
“Sony | Music Center”與“Fiestable””(第
2 0 頁 )。
附註
只有在連接交流電源線時,BLUETOOTH待機模
式才能設定為開啟。
提示
停用BLUETOOTH待機模式以減少待機模式的耗
電量(節能模式)。
系統的BLUETOOTH訊號設定為開啟時,
您可以在所有功能中從配對BLUETOOTH
的裝置連接到系統。這項設定預設為開
啟。
按住FUNCTION PAIRING按鈕和
VOLUME-按鈕3秒鐘以上,以關閉
BLUETOOTH訊號。
“BT OFF”出現在顯示屏上。
附註
•
關閉BLUETOOTH訊號時不能執行下列操作:
—
與BLUETOOTH裝置配對與/或連接
—
透過BLUETOOTH連接使用
“Sony | Music Center”
•
若要開啟BLUETOOTH訊號,請重複上述程
序。當BLUETOOTH訊號開啟時,“BT ON”會出
現在顯示屏上。
19
CT

透過BLUETOOTH連接
使用“Sony|Music
Center”與“Fiestable”
關於應用程式
利用智慧型手機/iPhone上的
“Sony | Music Center”與“Fiestable”免費應
用程式,您可以更有彈性的控制系統,並
且以嶄新的方式享用系統。Google Play和
App Store上都有“Sony | Music Center”與
“ F i e s t a b l e”。
請搜索“Sony|MusicCenter”並將
1
應用程式下載到您的智慧型手機
/iPhone。
您也可以用掃瞄下列二維碼的方式下
載應用程式。
提示
您也可以從App Store或Google Play下載
“ F i e s t a b l e”。
您可以用“Sony|MusicCenter”做什麼:
•
播放裝置中的音樂檔案,例如智慧型手
機、iPhone或USB裝置
•
調整到FM電台並收聽收音機
•
選擇音場
•
設定睡眠計時器
•
設定電源選項,例如自動關閉電源(自動
待機)功能及BLUETOOTH待機模式
•
檢查電池電量
•
切換BLUETOOTH編碼/解碼器
(BLUETOOTH音訊串流播放音質)
•
配置系統上的各種設定
您可以用“Fiestable”做什麼:
•
卡拉OK功能
•
動作控制
•
音量控制
•
在社交網站上分享系統使用情況。
(Party King)
若需要更詳細的資訊,請參考
“Sony | Music Center”的使用說明。
https://www.sony.net/smcqa/
20
在系統與您的智慧型手機/iPhone
2
之間建立BLUETOOTH連接。
關於BLUETOOTH連接的詳細資訊,請
參閱“將本系統與BLUETOOTH裝置配
對”(第15頁)。
啟動“Sony|MusicCenter”並下載
3
“Fiestable”。
CT
附註
•
如果“Sony | Music Center”無法正確運作,請
終止BLUETOOTH連接(第16頁),然後重
新執行BLUETOOTH連接,使BLUETOOTH連接
正常運作。
•
您可以用“Sony | Music Center”控制什麼,要視
連接的裝置而定。
•
應用程式的規格與設計可能會有所變更而不
預先通知。

聲音調整
調整聲音
若要 請這樣做
調整音量 按下VOLUME –/+按鈕。
強化低頻並創
造更強而有力
的聲音
(MEGA BASS)
反覆按下MEGA BASS按
鈕以選擇“BASS ON”。
MEGA BASS指示燈會亮
起。
若要取消,請反覆按下
MEGA BASS按鈕以選擇
“BASS OFF”。
21
CT

其他操作
使用選購的麥克風
使用選購的設備
用音訊纜線(非附件)將選購的設
1
備(例如WALKMAN®、智慧型手
機、電視機、DVD播放機、IC錄音
機等等)連接到本機上的AUDIOIN
L/R插孔。
反覆按下FUNCTION PAIRING按
2
鈕以選擇“AUDIOIN”。
開始播放外接的設備。
3
調整音量。
4
請先調整外接設備的音量。如果音量
還是太低,請用VOLUME –/+按鈕在
系統上調整音量。
附註
如果外接設備的音量太低,系統可能會自動進
入待機模式。遇到這種情況時,增加設備的音
量。若要關閉自動待機功能,請參閱“設定自動
待 機 功 能 ”( 第 2 3 頁 )。
您可以連接有一般插頭的動態麥克風(非
附件)以便從系統輸出您的聲音。
按下MIC–按鈕以降低麥克風音
1
量。
將選購的麥克風連接到本機上的
2
MIC插孔。
按下MIC–/+按鈕以調整音量。
3
對著連接的麥克風說話或唱歌。
4
22
CT

停用本機上的按鈕
(兒童鎖)
您可以停用本機上的按鈕((電源)按
鈕除外)以防止錯誤操作,例如兒童搗蛋
的情況。
若要停用按鈕,請按住FUNCTION
PAIRING按鈕和VOLUME+按鈕大約3
秒。
“CHILD LOCK ON”出現在顯示屏上。
若要關閉兒童鎖功能,請按住FUNCTION
PAIRING按鈕和VOLUME +按鈕大約3
秒。“CHILD LOCK OFF”出現在顯示屏上。
附註
兒童鎖功能會在您拔掉交流電源線時自動關
閉。
設定自動待機功能
根據預設,本系統設定為15分鐘左右沒有
操作或者沒有音訊輸出時自動關機。
您可用“Sony | Music Center”配置此
設定並確認此功能是否開啟。關於
“Sony | Music Center”的詳細資訊,請參閱“透
過BLUETOOTH連接使用“Sony | Music Center”
與“Fiestable””(第20頁)。
附註
•
如果外接設備的音量太低,系統可能會自動
進入待機模式。遇到這種情況時,增加設備
的音量。
•
正在使用MIC插孔時,系統不會進入待機模
式。
23
CT

節省電池電力
檢查軟體版本
以內建的電池(可充電)使用系統時,可
以開啟不顯示模式(省電模式)以節省電
力並更長時間的使用系統。
若要開啟不顯示模式(省電模式),
請按住FUNCTION
MICECHO按鈕3秒鐘以上。
若要關閉模式,請重複此程序。
提示
如需電池使用時間的詳細資訊,請參閱“一般”
(第30頁)。
PAIRING按鈕和
您可檢查系統軟體的目前版本。
按住FUNCTION PAIRING按鈕和
1
MIC+按鈕大約3秒。
反覆按下/按鈕以選擇
2
“VERSION”,然後按下按鈕。
24
CT

其他資訊
故障排除
關於相容裝置的資訊
關於支援的USB裝置
•
本系統只支援USB Mass Storage Class。
•
本系統只支援FAT格式化的USB裝置
( e x F A T 除 外 )。
•
有些USB裝置可能無法用於本系統。
關於iPhone與iPod機型的BLUETOOTH
通訊
適用於
•
iPhone X
•
iPhone 8 Plus
•
iPhone 8
•
iPhone 7 Plus
•
iPhone 7
•
iPhone SE
•
iPhone 6s Plus
•
iPhone 6s
•
iPhone 6 Plus
•
iPhone 6
•
iPhone 5s
•
iPod touch(第六代)
本系統相容於iOS 10.0或更新版本。
相容裝置的網站
若需要關於相容的BLUETOOTH裝置的最
新資訊,請查看下列網站。
美洲的用戶:
https://www.sony.com/am/support
歐洲的用戶:
https://www.sony.eu/support
其他國家/地區的用戶:
https://www.sony-asia.com/support
操作系統時如果發生問題,請先按照底下
描述的步驟進行,然後再就近向Sony經銷
商查詢。如果出現錯誤訊息,務必要將內
容記下來以供參考。
請查看問題是否有在這個“故障排
1
除”部分列出來。
請查看下列客戶服務網站。
2
美洲的用戶:
https://www.sony.com/am/support
歐洲的用戶:
https://www.sony.eu/support
其他國家/地區的用戶:
https://www.sony-asia.com/support
您可以在這些網站找到最新的服務資
訊和常見問題解答。
如果問題仍然存在,請就近向Sony經銷商
查詢。
請注意,如果維修人員在維修時更換某些
零件,這些零件可能被保留下來。
一般
系統沒有開啟。
•
為內建電池充電。
•
檢查交流電源線是否有確實連接好。
系統已經進入待機模式。
•
這不是故障。大約15分鐘內沒有操作或
者沒有音訊輸出時,系統就會自動進入
待 機 模 式 (第 2 3 頁 )。
沒有聲音。
•
調整音量。
•
如果有任何選購設備,請檢查連接情
形。
•
打開外接的設備。
•
拔掉交流電源線,然後重新連接交流電
源線並開啟系統。
有嚴重的嗡嗡聲或雜音。
•
將系統從雜音來源移開。
•
將系統連接到別的牆上電源插座上。
•
在交流電源線上安裝雜訊過濾器(市
售 )。
•
關閉周邊的電器設備。
25
CT

有音響反饋。
•
降低音量。
USB裝置
連接的USB裝置不能充電。
•
確認USB裝置有牢靠地連接好。
•
如果系統的電池剩餘電量低於10%,就
無法為連接的USB裝置充電。
USB裝置無法正確運作。
•
如果連接不支援的USB裝置,可能會發
生下列問題。請參閱“關於相容裝置的
資訊”(第25頁)。
—
USB裝置無法辨識。
—
無法播放。
—
聲音會跳音。
—
有雜音。
—
輸出失真的聲音。
沒有聲音。
•
USB裝置沒有正確的連接。關閉系統,
然後重新連接USB裝置。
有噪音、跳音或者失真的聲音。
•
您使用的是不受支援的USB裝置。請
參閱“關於相容裝置的資訊”(第25
頁 )。
•
關閉系統,重新連接USB裝置,然後開
啟系統。
•
音樂資料本身包含噪音,或者聲音失
真。噪音可能在用電腦製作音樂的過程
中就已經進入。重新製作音樂資料。
•
為音訊檔案編碼時使用的位元率很低。
將具有較高位元率的音訊檔案傳送到
USB裝置。
USB裝置無法辨識。
•
關閉系統,重新連接USB裝置,然後開
啟系統。
•
您使用的是不受支援的USB裝置。請
參閱“關於相容裝置的資訊”(第25
頁 )。
•
USB裝置無法正確運作。關於如何處理
這個問題,請參考USB裝置隨附的操作
說明。
沒有開始播放。
•
關閉系統,重新連接USB裝置,然後開
啟系統。
•
您使用的是不受支援的USB裝置。請
參閱“關於相容裝置的資訊”(第25
頁 )。
播放沒有從第一個檔案開始進行。
•
請用“Sony | Music Center”(第20頁)
將播放模式設定為一般播放模式。
檔案無法播放。
•
以FAT16或FAT32以外的檔案系統格式化
的USB裝置不受支援。*
•
如果使用分割的USB裝置,只有第一分
割區上的檔案可以播放。
•
有加密或者有密碼保護的檔案不能播
放。
•
本系統不能播放有DRM(數位版權管
理)版權保護的檔案。
本系統支援FAT16和FAT32,但是某些USB儲存
*
裝置可能不支援所有這些FAT。詳情請參考各
USB儲存裝置的使用說明書或者與製造廠商聯
絡。
BLUETOOTH裝置
無法執行配對。
•
將BLUETOOTH裝置移近系統。
•
如果系統附近有其他BLUETOOTH裝
置,可能無法配對。遇到這種情況時,
請關閉其他BLUETOOTH裝置。
•
在BLUETOOTH裝置上選擇系統名稱(本
系統)時,務必要輸入正確的通行金
鑰。
BLUETOOTH裝置無法偵測到系統。
•
將BLUETOOTH訊號設定為開啟(第
1 9 頁 )。
無法連接。
•
您想要連接的BLUETOOTH裝置不支援
A2DP標準集,不能與系統連接。
•
啟用BLUETOOTH裝置的BLUETOOTH功
能。
•
從BLUETOOTH裝置建立連接。
•
配對登記資訊已經被刪除。再度執行配
對作業。
•
將系統還原至原廠預設的設定(第27
頁),以消除BLUETOOTH裝置的配對登
記資訊,然後再執行配對作業(第15
頁 )。
•
一旦刪除系統上的配對資訊之後,
iPhone/iPod touch可能無法連接至系
統。在這種情況下,請刪除iPhone/
iPod touch裝置上的系統配對資訊,然
後再度執行配對程序。
26
CT
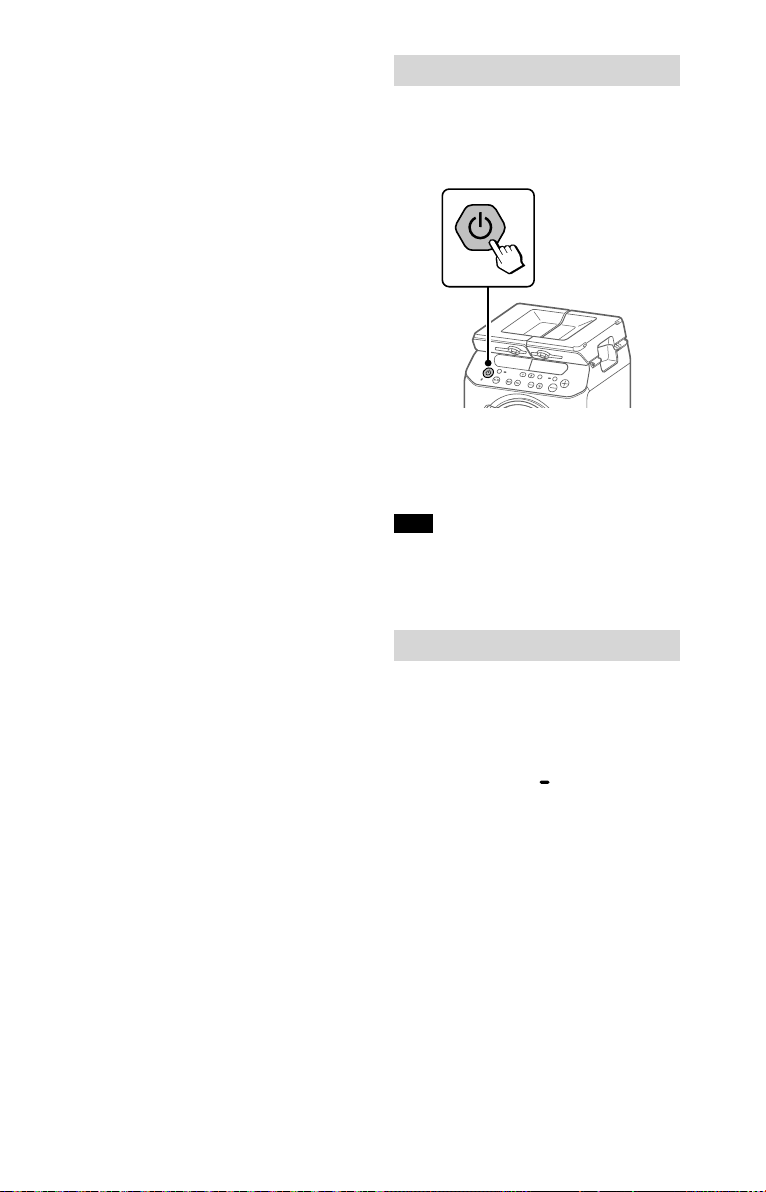
聲音遺漏或波動,或者失去連接。
•
系統與BLUETOOTH裝置距離太遠。
•
如果系統和BLUETOOTH裝置之間有障
礙物,請移開或者避開障礙物。
•
如果有會產生電磁輻射的設備,例如無
線LAN、其他BLUETOOTH裝置或者附近
有微波爐,請將它們移開。
在本系統上聽不到您的BLUETOOTH裝置
的聲音。
•
請先在您的BLUETOOTH裝置上增加音
量,然後用VOLUME –/+按鈕調整音
量。
有嚴重的嗡嗡聲、雜音或失真的聲音。
•
如果系統和BLUETOOTH裝置之間有障
礙物,請移開或者避開障礙物。
•
如果有會產生電磁輻射的設備,例如無
線LAN、其他BLUETOOTH裝置或者附近
有微波爐,請將它們移開。
•
將外接的BLUETOOTH裝置音量關小。
重設系統
如果即使電源開啟,系統也沒有回應而且
不能操作,請重設系統。
按住(電源)按鈕9秒鐘以上。
1
系統會關機。
請按下(電源)按鈕將系統再
2
度開啟。
附註
•
如果系統不能再開啟,請向Sony經銷商查
詢。
•
配對資訊沒有在重設系統後刪除。
將系統還原至原廠預設設定
如果系統還是無法正常運作,請將系統還
原至原廠預設設定。
按(電源)按鈕以開啟系統。
1
按住FUNCTION PAIRING按鈕和
2
MIC–按鈕3秒鐘以上。
“RESET”出現在顯示屏上之後,所有
使用者配置的設定,例如配對登錄資
訊,都會被還原至原廠的預設設定。
27
CT

注意事項
關於安全問題
•
如果很長一段時間不使用,請將交流電源線
從牆上的電源插座拔下來。拔掉本機的電源
插頭時,務必要抓住插頭。千萬不要直接拉
扯電線。
•
萬一有任何固體或液體進入系統中,將系統
的電源插頭拔掉,並且交給合格的工作人員
檢查過之後再使用。
•
交流電源線必須只在合格的服務處更換。
關於擺放位置
•
不要將系統擺在傾斜的位置或者極端冷、
熱、多灰塵、骯髒或潮濕,或者缺少適當通
風或會承受震動、陽光直曬或光線明亮的地
方。
•
將系統擺在經過特殊處理的表面(例如打蠟、
上油或亮光劑)上時要注意,因為表面可能會
被沾污或褪色。
•
絕對不要讓水潑到本機上。本機不防水。
關於熱量累積
•
本系統操作時熱量累積是正常現象,不用緊
張。
•
請不要在以高音量持續使用之後觸摸機箱,
因為機箱可能會變得很燙。
關於喇叭系統
內建的喇叭系統沒有防磁功能,鄰近的電視機
畫面可能會因為受到磁性影響而失真。遇到這
種情況時,將電視機關掉,等待15至30分鐘之
後再打開。
如果情況沒有改善,將系統從電視機旁邊移
開。
清潔機箱
請用沾了一點溫和清潔劑溶液的軟布清潔本系
統。請不要使用任何類型的研磨墊、去污粉,
或者稀釋劑、揮發油或酒精之類的溶劑。
關於BLUETOOTH通訊
•
BLUETOOTH裝置應該在彼此相距約10公尺
(無障礙距離)的範圍內使用。在下列情況
下,有效的通訊範圍可能會變得比較小。
—
進行BLUETOOTH連接的裝置之間有人、金
屬物體、牆壁或其他障礙時
—
有安裝無線LAN的場所
—
鄰近正在使用的微波爐
—
會產生其他電磁波的場所
•
BLUETOOTH裝置和無線LAN(IEEE 802.11b/g)
設備使用相同的頻帶(2.4 GHz)。在靠近有無
線LAN功能的裝置附近使用BLUETOOTH裝置
時,可能會產生電磁干擾。這可能會造成較
低的資料傳送率、雜訊或者無法連接。如果
發生這種情況,請嘗試下列解決方法:
—
請在距離無線LAN設備至少10公尺遠的地
方使用本系統。
—
在10公尺範圍內使用BLUETOOTH裝置時,
關閉無線LAN設備的電源。
—
本系統與BLUETOOTH裝置之間的使用距離
越短越好。
•
本系統播送的無線電波可能會干擾某些
醫療裝置的操作。由於這種干擾可能會造
成故障,在下列場所一定要關閉本系統與
BLUETOOTH裝置的電源:
—
在醫院中、火車上、飛機中、加油站以及
任何可能會有易燃氣體的地方
—
自動門或火災警報器附近
•
本系統支援符合BLUETOOTH規格的安全性
功能,以確保使用BLUETOOTH技術通訊時
的安全連線。不過,這種安全性可能不足,
要視設定內容和其他因素而定,所以使用
BLUETOOTH技術通訊時一律都要很謹慎。
•
對於使用BLUETOOTH技術通訊而流出資訊所
造成的損害或其他損失,Sony不承擔任何責
任。
•
不一定保證能和具有與本系統相同的標準集
的所有BLUETOOTH裝置進行BLUETOOTH通
訊。
•
與本系統連接的BLUETOOTH裝置必須符合
Bluetooth SIG, Inc.制訂的BLUETOOTH規格,
而且必須經過認證是符合的。不過,即使
裝置符合BLUETOOTH規格,也有可能因為
BLUETOOTH裝置的特性或規格而無法連接,
或者是因此而產生不同的控制方法、顯示或
操作方式。
•
可能會發生雜音或者音訊被切斷,要視與本
系統連線的BLUETOOTH裝置、通訊環境或周
遭環境而定。
28
CT
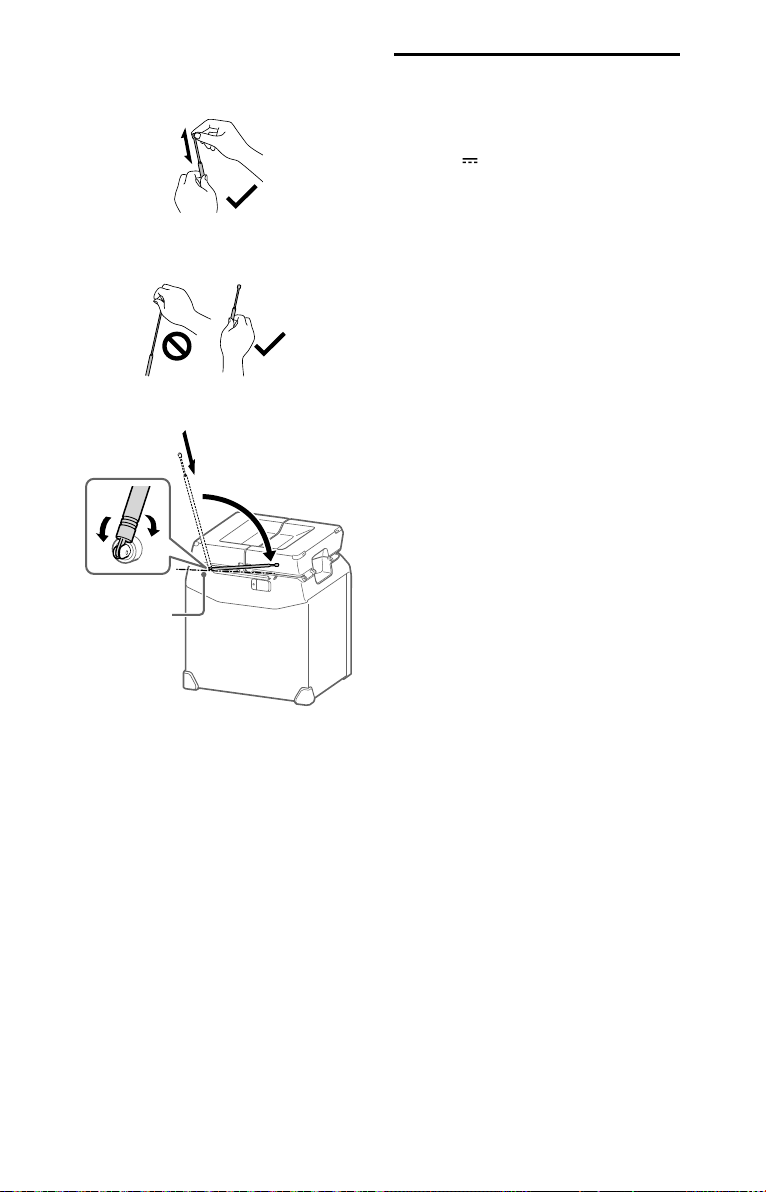
握拿FM天線
•
調整長度時,請從最粗部分及頂部握住天
線,然後慢慢拉長/收回。
•
調整方向時,請從最粗部分握住天線,然後
轉動。如果從頂部移動天線或過度用力,可
能造成斷裂。
規格
鋰離子電池部分
正常電壓:
7.2 V
正常容量:
4900 mAh,35.28 Wh
喇叭部分
高音單體:
40 公釐 ×2,錐形
低音單體:
180 公釐 ×1,錐形
•
請小心握拿天線。嘗試朝不適當的方向移動
可能損壞天線。
垂直旋轉軸
USB部分與支援的音訊格式
支援的位元率:
MP3(MPEG1 Audio Layer-3):
32 kbps 320 kbps,VBR
WMA:32 kbps 192 kbps,VBR
取樣頻率:
MP3(MPEG1 Audio Layer-3):
32/44.1/48 kHz
WMA:44.1 kHz
BLUETOOTH部分
通訊系統:
BLUETOOTH標準4.2版
輸出:
BLUETOOTH標準電源類別2
最大輸出功率:
< 10.0 dBm
最大通訊範圍:
視線範圍內約10公尺
頻帶:
2.4 GHz頻帶(2.4000 GHz
2.4835 GHz)
調變方法:
FHSS(Freq Hopping Spread Spectrum,
跳頻展頻)
相容的BLUETOOTH標準集
A2DP(高階音訊分配標準集)
AVRCP(音訊視訊遙控標準集)
支援的編碼/解碼器:
SBC(次頻帶編碼/解碼器)
AAC(進階音訊編碼)
LDAC
1)
實際的範圍會因為各種因素而異,例如裝置之
間的障礙、微 波爐周邊的磁場、靜電、接收的
靈敏度、天線的效能、作業系統、軟體應用程
式等等。
2)
BLUETOOTH標準的標準集會表明裝置之間的
BLUETOOTH通訊目的。
1)
2)
:
29
CT

FM調諧器部分
頻率範圍:
87.5 MHz – 108.0 MHz(一級50 kHz)
天線:棒形天線
一般
電源要求:
台灣機型:交流120 V,50/60 Hz
北美機型:交流120 V,60 Hz
其他機型:交流120 V 240 V,
50/60 Hz
耗電量:
30 W
待機耗電量:
BLUETOOTH待機模式及演示模式設為
開啟時:2.3W
BLUETOOTH待機模式設為開啟且演示
模式設為關閉時:1.2W
BLUETOOTH待機模式及演示模式設為
關閉時:0.5W
鋰離子電池的使用壽命(使用BLUETOOTH
連接 ):
約13小時
如果系統音量設定為最大,使用壽命約
為5小時。
鋰離子電池的充電時間(本機關閉時):
約7小時*
1)
連接BLUETOOTH時。實際效能會根據設定、
環境條件及使用情況而有差異。電池容量會
隨時間及使用次數而減少。
2)
時間可能根據溫度或使用情況而有不同。
3)
本機關閉時,此為將空內建電池充滿需花費
的時間。
DC OUT:
USB插孔(用於充電已連接裝置的電
池)(5V,最大1. 0A)
額定電容量:
3400 mAh(此數值為喇叭音量最低時)
尺 寸(寬 /高 /長)(大 約):
330 公釐×376 公釐×303 公釐
質 量(大 約):
6.7 公斤
系統數量:
1件
隨附的配件:
交 流 電 源 線(1)
設計和規格可能變更而不預先通知。
1)
2)
許可證及商標公告
•
MPEG Layer-3音頻編碼技術和專利由
Fraunhofer IIS和Thomson授權。
•
Windows Media是Microsoft Corporation
在美國和/或其他國家的註冊商標或商
標。
•
本產品受Microsoft Corporation的某些智
慧財產權保護。沒有Microsoft或經過授
權的Microsoft子公司的許可,禁止在本
產品之外使用或銷售這種技術。
•
BLUETOOTH®字標和標誌是屬於
Bluetooth SIG, Inc.的註冊商標,Sony
Corporation在授權下使用此標記。其它
商標和商號是相關持有者之專利。
•
Google Play和Android是Google LLC的商
標。
•
LDAC™和LDAC標誌是Sony Corporation
的商標。
•
Apple、Apple標誌、iPhone、iPod和
iPod touch是Apple Inc.在美國及其他國
家註冊的商標。
App Store是Apple Inc.的服務標章。
•
“Made for Apple”徽章的使用,是指某配件
可以與特定的標有該徽章的Apple產品連
接,並經開發者證明符合Apple性能標準。
Apple並不對該裝置的操作或其安全和規
章標準的遵行提供保證。請注意,以iPod
或iPhone使用本零組件可能會影響無線
效能。
•
WALKMAN和WALKMAN標誌是Sony
Corporation的註冊商標。
•
所有其他商標和註冊商標各屬於其所有
者。本說明書中並未標明™和®標記。
30
CT

31
CT

경고
무방비로 노출된 화기(예를 들어 촛불)에는
기기를 가까이 하지 마십시오.
주 전원 플러그는 기기를 주 전원으로부터
차단하기 위해 사용되므로 쉽게 손이 닿는 AC
콘센트에 장치를 연결하여 주십시오. 기기의
이상이 발견되었을 때는 즉시 AC 콘센트로부터
주 전원 플러그를 뽑아 주십시오.
기기 자체의 전원을 끄더라도 기기가 AC
콘센트에 연결되어 있는 한, 주 전원으로부터
완전히 차단되지는 않습니다.
본 기기를 책장이나 벽장과 같은 폐쇄된 곳에
설치하지 않도록 하여 주십시오.
배터리(배터리 팩 또는 설치된 배터리)를 햇볕,
화재 등과 같은 과도한 열에 장시간 노출시키지
마십시오.
배터리를 과열 및 열 폭주를 초래할 수 있는 극한의
저온 상태에 두지 마십시오.
2차 전지 또는 배터리를 분해, 개봉 또는
파기하지 마십시오.
전지 액이 새는 경우 액체가 피부나 눈에 닿지
않도록 하십시오. 접촉이 이루어진 경우 많은
양의 물로 해당 부위를 씻어 내고 의사의 도움을
받으십시오.
2차 전지와 배터리는 사용하기 전에 충전해야
합니다. 적절한 충전 지침은 항상 제조업체의
지침 또는 기기의 사용 설명서를 참조하십시오.
장기간 보관한 후, 최대 성능을 얻으려면 전지나
배터리를 여러 번 충전하고 방전해야 할 수
있습니다.
적절하게 폐기하십시오.
본 장비는 3 미터 미만인 접속 케이블을 사용해서
EMC 지침에서 규정된 한도를 준수한다는 것을
시험을 거쳐 증명되었습니다.
좋은 상태로 장기간 기기를 사용하려면
• 기기의 측면이 아래로 향하게 해서 사용하거나
보관하지 마십시오.
• 장치가 젖으면 오랫동안 그대로 두지
마십시오. 마른 천으로 즉시 닦아 내십시오.
방수 기능에 대한 주의
(기기 사용 전에
읽으십시오.)
기기의 방수 성능
본 기기의 상단 패널은 IEC60529 "침입 보호
등급(IP 코드)"의 "물 튀김 방지 등급"에 지정된
2
의 방수 사양*1을 갖고 있습니다.
IPX4*
그러나 이 기기는 완전히 수밀하지 않습니다.
기기를 욕조의 뜨거운 물에 떨어뜨리거나
의도적으로 물 속에서 사용하지 마십시오.
방수 성능 규격이 적용되는 액체
적용 가능:
적용 불가능:
*1 상단 패널을 제외한 기기의 모든 부분은 방수
기능이 없습니다.
2
*
IPX4 (물 튀김 방지 등급): 어떤 방향으로 물이
튀더라도 보호됩니다.
본 장치의 방수 성능은 여기에 설명된
조건에서 측정한 것입니다. 고객의 오용으로
인한 수분 침수의 결과로 인한 오작동은 보증
대상이 아니므로 주의하십시오.
방수 성능의 저하를 피하기 위하여
다음을 확인하고 기기를 올바르게 사용하십시오.
• 기기를 떨어뜨리거나 기계적인 충격을 주지
않도록 주의하십시오. 변형 또는 손상으로
인해 방수 성능이 저하될 수 있습니다.
• 다량의 물이나 뜨거운 물이 튀는 장소에서는
사용하지 마십시오. 이 기기는 수압에
견디도록 설계되지 않았습니다. 상기의
위치에서 기기를 사용하면 오작동이 발생할
수 있습니다.
• 고온의 물을 붓거나 헤어 드라이어 또는
기타 기기로 직접 뜨거운 공기를 불어 넣지
마십시오. 또한 사우나 또는 난로 근처와 같은
고온의 장소에서는 절대로 사용하지 마십시오.
• 커버()는 조심해서 다루십시오. 덮개는
방수 성능 유지에 매우 중요한 역할을 합니다.
시스템을 사용할 때는 덮개가 완전히 닫혔는지
확인하십시오. 덮개를 닫을 때 이물질이
들어 가지 않도록 주의하십시오. 덮개가
완전히 닫히지 않으면 방수 성능이 저하되고
시스템에 물이 유입되어 시스템이 오작동할
수 있습니다.
담수, 수돗물
상기 외의 액체(비누물, 세제
또는 목욕제가 함유된 물, 샴푸,
온천수, 수영장 물, 바닷물 등)
KR
2

앞면
뒷면
KR
젖었을 경우의 시스템 관리 방법
시스템이 젖은 경우 먼저 시스템에서 물을
제거한 다음 부드럽고 마른 천으로 시스템의
습기를 닦아냅니다. 특히 추운 지역에서는
수분을 표면에 남겨두면 시스템이 얼고 고장날
수 있습니다.
시스템을 사용한 후에는 반드시 수분을
닦아내십시오.
수건이나 마른 천에 시스템을 놓습니다.
그런 다음 실온에 두고 습기가 없어질 때까지
시스템을 건조시킵니다.
KR
3
목차
방수 기능에 대한 주의
( 기기 사용 전에 읽으십시오 .) .......2
부품 및 제어 기능 가이드 ...............5
시작하기
배터리 충전 .................................8
시스템 전원 켜기 ..........................8
시스템 운반 .................................9
상단 패널 펼치기 ..........................9
전원 관리 소개 ...........................10
삼각대에 스피커 시스템 설치하기
...11
USB 장치
USB 장치를 사용하기 전에 ...........12
파일 재생 ..................................12
튜너
라디오 듣기 ...............................13
라디오 방송국 사전 설정 ..............13
모노 / 스테레오 설정 ..................13
BLUETOOTH 연결
이 시스템을 BLUETOOTH 장치와
페어링하기 ...............................14
BLUETOOTH 장치의 음악 듣기 ...16
BLUETOOTH 무선 기술 소개 ......17
고품질 사운드 코덱 (AAC/
LDAC ™ ) 으로 재생하기 ............17
BLUETOOTH 대기 모드 설정 ......18
BLUETOOTH 신호 켜거나 끄기 ...18
BLUETOOTH 연결을 통한
"Sony | Music Center" 및
"Fiestable" 사용 ........................19
기타 조작
옵션 기기 사용하기 .....................21
옵션 마이크 사용하기 ..................21
기기의 버튼 비활성화
하기 ( 어린이 잠금 ) ...................22
자동 대기 기능 설정 ....................22
배터리 전력 절감 ........................23
소프트웨어 버전 확인하기 ............23
추가 정보
호환 장치에 대한 정보 .................24
문제해결 ..................................24
사전 주의 사항 ...........................27
사양 ........................................28
라이센스 및 상표 고지 .................29
사운드 조절
사운드 조절하기 .........................20
KR
4
 Loading...