

Page 1

A-ATE-140-11(1)
gMovie Version 1.4
Operating Instructions
Copyright 2001, Generic Media, Inc. All Rights Reserved
Page 2

• CLIÉ, PictureGear, Memory Stick and the Memory Stick logo are trademarks of Sony Corporation.
• generic media and gMovie are trademarks of generic media, inc.
• Microsoft and Windows are registered trademarks of Microsoft Corporation.
• Graffiti, HotSync and Palm OS are registered trademarks, and Palm Desktop and the HotSync logo
are trademarks of Palm, Inc. or its subsidiaries.
• QuickTime and the QuickTime logo are trademarks used under license. QuickTime is registered in the
U.S. and other countries.
All other trademarks are trademarks of their respective owners.
Before using this software, please read the Software License Agreement that is supplied with the
product.
❒ Copying all or part of the contents of this software, sample images, and Operating Manual,
or renting the software are prohibited by copyright laws.
❒ The Company is not liable for damage or loss resulting from the use of this software, or for
any claim from a third party.
❒ The Company assumes no responsibility aside from the replacement of the media due to
manufacturing fault.
❒ This software must not be used in a system other than that specified.
❒ The software specifications may be subject to change without notice.
2
Page 3

Table of Contents
Before Use
Features ............................................................................................................... 4
Basic Operations
Starting gMovie ................................................................................................. 5
Playing back a media file ................................................................................. 7
To return to the media list ......................................................................... 8
To playback the next media item .............................................................. 8
To playback the previous media item ...................................................... 8
To playback all media items consecutively (Sequence Play mode) ..... 8
To delete a media item ............................................................................... 9
You can also use the supplied remote controller to control the
functions ................................................................................................... 9
Miscellaneous
Menu Commands ............................................................................................ 10
Media menu ............................................................................................... 10
Creating a media file for gMovie using PictureGear 4.4 Lite ................... 12
Installing the PictureGear 4.4 Lite software to your computer .......... 12
Movie (media) file formats you can use with PictureGear 4.4 Lite ... 13
Sending media files to a CLIÉ handheld
using the HotSync function ................................................................. 13
Copying movie files to a Memory Stick media..................................... 15
3
Page 4

Before Use
Features
gMovie is the application which enables the display and playback of
motion picture data with sound, made for the CLIÉ handheld by using a
Windows
When you send movie data made for the CLIÉ handheld by PictureGear
Lite using HotSync operation, or copy the data to the CLIÉ handheld by
using a Memory Stick media, they are automatically registered to the
movie list of gMovie.
Even if your CLIÉ handheld does not have audio playback function,
the playback of audio data is possible by connecting the Audio
Adapter (PEGA-SA500) to your CLIÉ handheld. When you connect the
Audio Adapter to your CLIÉ handheld, gMovie Ver. 1.4 supports
playback of color movies with sound, Jog Dial control.
®
application such as PictureGear Lite.
4
Page 5
Basic Operations
Continued on next page
Starting gMovie
Select gMovie from the Home screen of the CLIÉ handheld by
rotating and pressing the Jog Dial navigator.
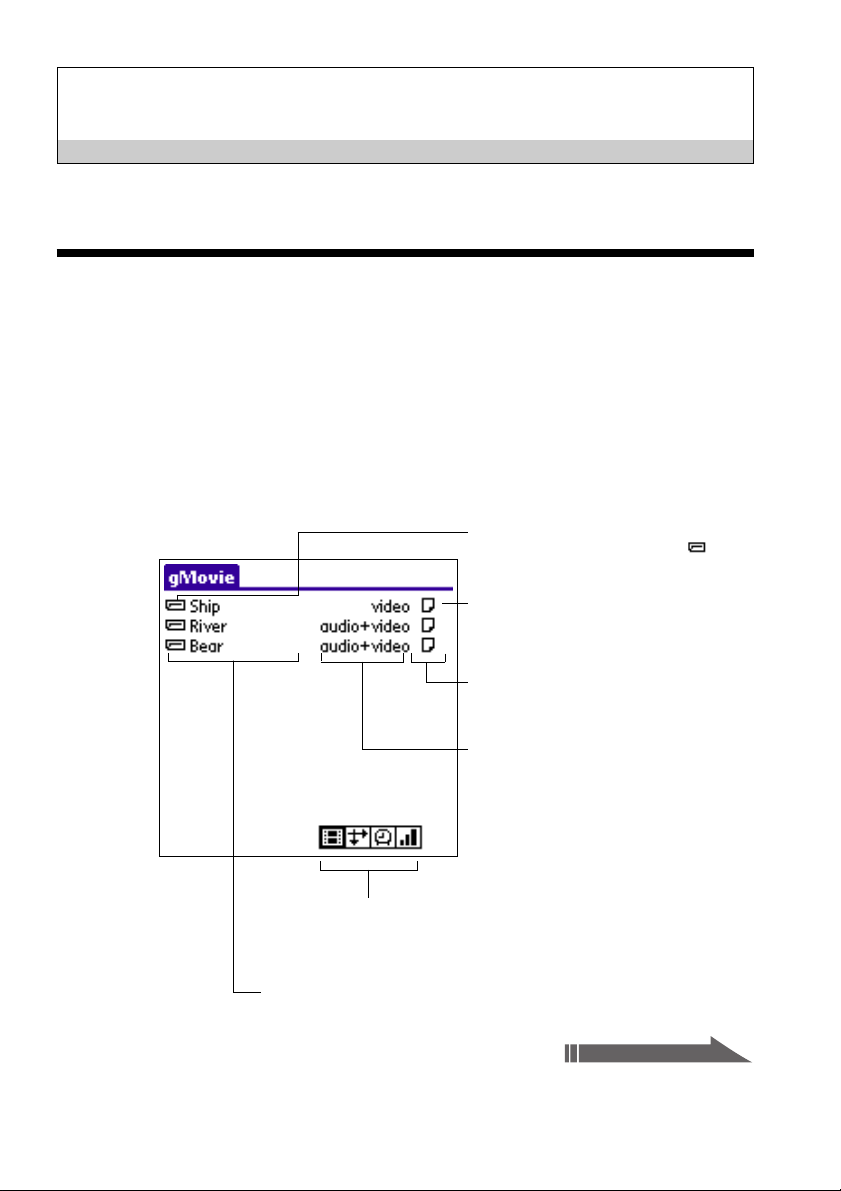
The gMovie application starts and the media (movie file) list appears.
Motion pictures that you can playback with gMovie are called "media."
z If no media file is installed, no list is displayed. To create a media file,
see to "Creating a media file for gMovie using PictureGear 4.4 Lite"
(page 12).
Movies stored in the Memory Stick
media are indicated with the icon.
Media List
By rotating and pressing the Jog Dial
navigator you can select and play back
the media.
Details
Tapping this icon displays details of
the media.
Switchable information
[video] indicates the movie without
sound.
[audio + video] indicates the movie
with sound.
Tapping these buttons toggles
the contents of switchable
information in four ways.
Name of Media item
5
Page 6

Switchable information : Tapping the following icon, displays of
contents change.
: displays the type of media item.
: displays the dimensions of the media item (pixels).
: displays the duration of the media item (seconds).
If the media file has many frames per second, the actual time
duration may be longer than that displayed.
: displays storage requirements (KB).
6
Page 7

Playing back a media file
Continued on next page
Select the media file you want to playback from the media list by
rotating and pressing the Jog Dial navigator.
The media file is automatically played back.
Note
You can playback the media file by using the stylus to tap it.
Indicates the position of the playback
picture
Control with the Jog Dial navigator
Pause: Press the Jog Dial navigator during playback.
Restart playback: Press the Jog Dial navigator during the pause.
Scrolling still pictures: Rotate the Jog Dial navigator during playback or
pause.
Control with the stylus
Pause: Tap
Restart playing back: Tap
Rewind: Tap
By tapping the right side of the volume adjustment icon
volume increases. By tapping the left side of the
volume decreases.
.
.
to return to the beginning of the media file.
, the sound
icon, the sound
7
Page 8

Notes
• In normal playback mode, the playback of the same media file repeats.
• When you use the Audio Adapter PEGA–SA500, if the Audio Adapter
is accidentaly removed from the CLIÉ handheld during playback, the
playback stops and the list screen appears. In this case, make sure the
Audio Adapter is connected to the CLIÉ handheld and restart
playback again.
To return to the media list
Press the Jog Dial more than two seconds and release it.
Or tap
at the upper-right corner of the display.
To playback the next media item
Press and rotate the Jog Dial navigator downward during media item
playback. Or tap
at the upper-right corner of the display.
To playback the previous media item
Press and rotate the Jog Dial navigator upward during media item
playback, or tap the in the upper-right corner of the display.
To playback all media items consecutively (Sequence Play mode)
Tap for more than one second with the stylus. In Sequence Play
mode, the icon will change into
tap for more than one second.
. To exit the Sequence Play mode,
8
Page 9

To delete a media item
1 Display the media item to delete, then tap the Menu icon.
2 Tap [Delete].
3 Tap [OK].
The media item will be deleted, and the display will return to the
media list.
You can also use the supplied remote controller to control the
functions*
: go to next file
: return to previous file
: playback
: stop
: volume adjustment
* If you connect the Audio Adapter PEGA-SA500 to the CLIÉ handheld
without audio playback function, control the CLIÉ handheld using the
buttons on the Audio Adapter.
9
Page 10

Miscellaneous
Continued on next page
Menu Commands
Media menu
This menu is displayed by tapping Menu icon when the media list is
displayed.
About gMovie
Version information of the gMovie application is displayed.
This menu is displayed by tapping the Menu
is displayed.
Details
Detailed information of active media item is displayed.
Beam Media
You can transmit the data of an active media item to another CLIÉ
handheld by using the Infrared(IR) port. For details of infrared
communication, see the Operating Instructions manual of your CLIÉ
handheld.
Notes
• It may take several minutes to complete infrared communication, depending on
the size of the media file.
• When you connect the Audio Adapter PEGA-SA500 to your CLIÉ handheld,
Beam function is not possible.
icon when a media item
10
Page 11

Delete
You can delete the active media item. When the Delete Media dialog box
is displayed, tap OK to perform deletion, or tap Cancel to cancel
deletion.
Preferences
s Loop movie playback
When the playback of the media item is finished, Playback of the
same media item starts again.
Note
If you clear this check box, you cannot automatically play back the next
media item by tapping at the upper right corner of the display. Start the
playback by tapping .
s Limit Maximum volume
Limits the maximum volume of the stereo sound. You can set not to
playback the maximum volume level (the right edge of the indicator
on the screen) by tapping it or using the remote control.
Audio Channels:
In this dialog box you can select the following concerning the stereo
headphone:
• To playback the right or left side of the headphone
• To playback both the right and left side of the headphone
Note
Right and Left cannot set to playback the either side stereo sound from the
both headphones.
About gMovie
Version information of the gMovie application is displayed.
11
Page 12

Creating a media file for gMovie using PictureGear 4.4 Lite
You can create a media file for gMovie using PictureGear 4.4 Lite for
personal computers.
You can install PictureGear 4.4 Lite to your computer from the supplied
install CD-ROM.
Installing the PictureGear 4.4 Lite software to your computer
1 Insert the Installation CD-ROM into the CD-ROM drive.
The installation launcher window appears.
If the installation launcher window does not appear, click the CD-
ROM drive icon, and then double-click the Setup.exe icon.
2 Click [CLIÉ Image Software].
If you want to install the software from the CD-ROM supplied with
the Audio Adapter PEGA-SA500, click [Install image and movie
software...].
3 Click [Install PictureGear Lite].
A confirmation dialog box appears.
4 Click [Yes].
If you use the CD-ROM supplied with the Audio Adapter PEGASA500, click [OK].
The PictureGear 4.4 Lite software installation starts.
Follow the instructions on-screen to finish installation.
After the installation is complete, the installation launcher window
reappears.
5 Click [Exit].
To start PictureGear 4.4 Lite
From the Start Menu, click Program Files, PictureGear 4.4 Lite, and then
PictureGear 4.4 Lite.
For details on how to use PictureGear 4.4 Lite, see the Help files of the
PictureGear 4.4Lite software.
12
Page 13

Movie (media) file formats you can use with PictureGear 4.4 Lite
Continued on next page
PictureGear 4.4 Lite supports the following movie file formats:
• MPEG1 (file extension: .MPG, .MPEG)
• AVI (file extension: .AVI)
• QuickTime 3.0 and QuickTime 4.0 (file extension: .MOV, .QT)
Note
When using gMovie on your CLIÉ Handheld, you may not be able to display
some AVI format files that do not conform to the Video for Windows standard.
Sending media files to a CLIÉ handheld using the HotSync function
Perform the following procedure to send a media file created by
PictureGear 4.4 Lite to your CLIÉ handheld.
By resistering the media files you want to send in the PictureGear 4.4 Lite
software, you can perform HotSync operation to send the movie files
from your computer to your CLIÉ handheld.
1 Select the slide (movie file) you want to send.
Click on a slide to select it. You can select multiple slides by holding
down the Ctrl or Shift key while clicking.
2 From the File menu, select [Output services] and then, Install
the image during the next HotSync.
The "Reserve to install on next HotSync" dialog box appears.
3 Click
V
and select the recipient’s user name from the drop
down list.
If necessary, click Movie settings and make size and compression
settings for the movie file(s) you want to send in the "Detailed
settings for CLIÉ handheld movies" dialog box.
About the "Detailed settings for CLIÉ handheld movies" dialog
box
Select Compression Method
Selects the grayscale or color level for the movie file(s) you want to
send. Click to select Monochrome (High compression), Monochrome
(High image quality), or Color.
13
Page 14

Size
Selects the dimention size of the movie file(s) you want to send.
Click to select 160 x 120, 120 x 92, or 80 x 60.
Dithering
When Monochrome (High compression) is selected in Select
Compression Method, drag the slider left or right to adjust the dither
level. You cannot use this function on Monochrome (High image
quality) and Color movies.
Sound Quality
Adjusts the sound quality for the movie files.
Click to select None, Low, Middle or High.
z The higher the sound qualiy, the larger is the size of the movie
file.
Note
If you select still image movie files, the Settings for Still images dialog box
appears.
4 Click [OK].
The selected movie files and their recipients are registered in
PictureGear 4.4 Lite.
5 Perform a HotSync operation between your CLIÉ handheld
and your PC.
The registered slide(s) are automatically sent to your CLIÉ handheld.
If the created movie file data is too large and exceeds the free
memory space of the CLIÉ handheld, an error message may appear
during the HotSync operation. To display a large size movie file
using gMovie, try using a Memory Stick media, as follows.
14
Page 15

Copying movie files to a Memory Stick media
Continued on next page
Perform the following procedure to copy slides (movie files) from
PictureGear 4.4 Lite to a Memory Stick media, and to display them on a
CLIÉ handheld using gMovie.
1 Click to select the slide (media file) you want to display on a
CLIÉ handheld.
You can select multiple movie files by holding down the Ctrl or Shift
key while clicking.
2 From the File menu, select [Output services], Output CLIÉ
handheld format file(s) to Memory Stick.
The [Output CLIÉ handheld format file(s) to Memory Stick] dialog
box appears.
3 Click
V
and select a Memory Stick media drive from the drop-
down list.
Note
For the drive name of the Memory Stick media, refer to the instruction
manual of your personal computer.
If necessary, click Movie settings and make size and compression
settings for the movie file you want to send in the "Detailed settings
for CLIÉ handheld movies" dialog box.
About the Detailed settings for CLIÉ handheld movies dialog box
Select Compression Method
Selects the grayscale or color level for the movie file(s) you want to
copy. Click to select Monochrome (High compression), Monochrome
(High image quality) or Color.
Size
Selects the dimention size of the movie file(s) you want to copy.
Click to select 160 x 120, 120 x 92, or 80 x 60.
Dithering
When Monochrome (High compression) is selected in the Select
Compression Method, drag the slider left or right to adjust the dither
level. You cannot use this function on the Monochrome (High image
quality) and Color movies.
Sound Quality
Adjusts the sound quality for the movie files.
Click to select None, Low, Middle or High.
15
Page 16

z The larger the Size or Sound Quality is, the larger the
movie file size will be.
Note
If you select still image movie files, the Settings for Still images dialog box
appears.
4 Click [OK].
The movie files converted to the gMovie format are copied to the
"\PALM\PROGRAMS\GMEDIA" folder in the Memory Stick media.
5 Insert the Memory Stick into the CLIÉ hand held.
The movie files stored in the Memory Stick are automatically
displayed in the gMovie list.
Note
If the movie file data written to the Memory Stick is too large and exceeds the
free memory space of the CLIÉ Handheld, the error message “Data writing
failed” may appear. Reduce and rewrite the data by trying one of the
following procedures.
1 Change to grayscale (to cut data size in half or less).
2 Reduce the movie size.
3 Reduce the sound quality.
When you create a movie file, you can confirm the data size by selecting the
drive on your PC, such as C: drive. After writing the data to your PC drive
"C:\PALM\PROGRAMS\GMEDIA" (when you select C:drive), copy the
data to the Memory Stick drive: "\PALM\PROGRAMS\GMEDIA" folder on
the Memory Stick, by using Explorer on your PC to display the movie file on
the CLIÉ handheld.
16
Page 17

17
 Loading...