

Sony FS1 Service Manual

User Guide
VGN-FS Series
N

Contents
Read this first ............................................................................................................................................................................. 5
Notice................................................................................................................................................................................... 5
E
NERGY STAR....................................................................................................................................................................... 6
Owner's record .................................................................................................................................................................... 6
Welcome.................................................................................................................................................................................... 7
Documentation pack ............................................................................................................................................................ 8
Ergonomic considerations ................................................................................................................................................. 11
Using your VAIO computer ...................................................................................................................................................... 13
Connecting a power source............................................................................................................................................... 14
Using the battery pack ....................................................................................................................................................... 15
Setting the password ......................................................................................................................................................... 19
Setting up your computer with VAIO Control Center ......................................................................................................... 21
Shutting down your computer safely..................................................................................................................................22
Using the keyboard............................................................................................................................................................ 23
Using the touchpad............................................................................................................................................................ 28
Using special buttons......................................................................................................................................................... 29
Using the optical disc drive ................................................................................................................................................ 30
Using PC Cards ................................................................................................................................................................. 36
Using the Memory Stick.....................................................................................................................................................40
Using the modem............................................................................................................................................................... 43
Using Wireless LAN (WLAN) ............................................................................................................................................. 46
Using power saving modes................................................................................................................................................ 56
Managing power with VAIO Power Management .............................................................................................................. 59
nN
2

nN
3
Connecting peripheral devices................................................................................................................................................. 62
Connecting a port replicator............................................................................................................................................... 63
Connecting an external display..........................................................................................................................................67
Selecting display modes .................................................................................................................................................... 71
Using the Multiple Monitors function..................................................................................................................................73
Connecting external speakers ........................................................................................................................................... 78
Connecting an external microphone .................................................................................................................................. 80
Connecting a Universal Serial Bus (USB) device .............................................................................................................. 83
Connecting a printer .......................................................................................................................................................... 89
Connecting an i.LINK device ............................................................................................................................................. 93
Connecting to a network (LAN).......................................................................................................................................... 97
Customising your computer ..................................................................................................................................................... 98
Setting up your language with Windows XP Professional ................................................................................................. 99
Configuring your modem ................................................................................................................................................. 102
Setting a Sony wallpaper................................................................................................................................................. 104
Installing and updating applications................................................................................................................................. 105
Managing drivers ............................................................................................................................................................. 110
Upgrading your VAIO computer............................................................................................................................................. 121
Adding and removing memory* ....................................................................................................................................... 121
Getting help ...........................................................................................................................................................................127
Sony support options ....................................................................................................................................................... 127
Other sources of information ........................................................................................................................................... 127
e-Support ......................................................................................................................................................................... 128

nN
4
Precautions............................................................................................................................................................................ 130
On handling the hard disk................................................................................................................................................131
On handling the LCD screen ........................................................................................................................................... 132
On using the power source .............................................................................................................................................. 133
On handling your computer ............................................................................................................................................. 134
On handling floppy disks.................................................................................................................................................. 135
On handling discs ............................................................................................................................................................ 136
On using the battery pack................................................................................................................................................ 137
On using headphones......................................................................................................................................................138
On handling Memory Sticks.............................................................................................................................................138
Trademarks............................................................................................................................................................................ 139

nN
5
Read this first
Read this first
Notice
© 2005 Sony Corporation. All rights reserved.
This manual and the software described herein, in whole or in part, may not be reproduced, translated, or reduced to any
machine-readable form without prior written approval.
Sony Corporation provides no warranty with regard to this manual, the software, or other information contained herein and hereby
expressly disclaims any implied warranties or merchantability or fitness for any particular purpose with regard to this manual, the
software or such other information. In no event shall Sony Corporation be liable for any incidental, consequential, or special damages,
whether based on tort, contract, or otherwise, arising out of or in connection with this manual, the software, or other information
contained herein or the use thereof.
In the manual, the ™ or ® marks are not specified.
Sony Corporation reserves the right to make any modification to this manual or the information contained herein at any time without
notice. The software described herein is governed by the terms of a separate user licence agreement.
Please note that the illustrations in this manual may not necessarily apply to your model. Please see the printed
Specifications sheet for the specific configuration of your VAIO computer.

nN
6
Read this first
ENERGY STAR
As an ENERGY STAR Partner, Sony has determined that this product meets the ENERGY STAR guidelines for energy efficiency.
The International E
of computers and their office equipment. The program backs the development and dissemination of products with functions that
effectively reduce energy consumption. It is an open system in which business proprietors can participate voluntarily. The targeted
products are office equipment such as computers, displays, printers, facsimiles and copiers. Their standards and logos are uniform
among participating nations.
E
NERGY STAR is a U.S. registered mark.
NERGY STAR Office Equipment Program is an international program that promotes energy saving through the use
Owner's record
The serial number, model number and product code are located on the bottom of your Sony computer. Record the numbers and refer
to them if you call VAIO-Link. See also the printed Specifications sheet.

nN
7
Welcome
Welcome
Congratulations on purchasing a Sony VAIO computer. Sony has combined leading-edge technology in audio, video, computing and
communications to provide you with state-of-the-art personal computing.
Here are the main features you can enjoy:
❑ Exceptional performance.
❑ Portability – The rechargeable battery pack provides hours of use without AC power.
❑ Sony audio and video quality – A high-resolution LCD screen enables you to take advantage of today's advanced multimedia
applications, games, and entertainment software.
❑ Multimedia features – Enjoy audio and video CDs/DVDs.
❑ Interconnectivity – Your computer has Ethernet, Hi-Speed USB (USB2.0) and i.LINK functionalities. i.LINK is a bidirectional
digital interface for exchanging data. With the Memory Stick you can easily exchange and share digital data with compatible
products.
❑ Wireless technology – Thanks to the Wireless LAN (IEEE 802.11b/g) technology, you can communicate freely, without cables
or wires.
❑ Windows – Your system includes Microsoft's Windows XP Professional or Home Edition* with Service Pack 2 operating system.
❑ Communications – Access popular online services, send and receive e-mails, browse the Internet.
❑ Excellent customer support – If you are experiencing any problems with your computer, please check the VAIO-Link website for
a possible solution:
http://www.vaio-link.com
Before contacting VAIO-Link, please try to solve the problem by reading this guide, the printed Troubleshooting Guide, or the
manuals and help files for the peripherals or software.
* Depending on your model. See the printed Specifications sheet for more information.
nN
8
Welcome
Documentation pack
Your documentation pack contains printed information and user guides to read on your VAIO computer.
Guides are provided in PDF format, which you can easily browse through and print out.
The My Info Centre portal is a perfect starting point to using your VAIO computer - a comprehensive collection of everything you need
to get the most from your computer.
The user guides are collected under My Documentation, which can be shown as follows:
1 Go to Start and click the My Info Centre icon* .
2 From the pictures at the top of the window click My Documentation .
3 Select your language from the drop-down box.
4 Select the guide you want to read.
* The My Info Centre icon is only visible after you have performed the Prepare your VAIO setup. The My Info Centre icon is also available in Start/All Programs and
can be used before you have performed the Prepare your VAIO setup.
✍
You can manually browse to the user guides by going to My Computer > VAIO (C:) (your C drive) > My Documentation > Documentation and opening the folder
for your language.
You may have a separate disc for the documentation of bundled accessories.

nN
9
Welcome
Printed documentation
❑ A Specifications sheet, containing a table of specifications, a list of bundled software, an overview of all connectors and, on the
reverse side, a guide to setting up your VAIO computer.
❑ Troubleshooting Guide, where you will find solutions to common problems.
❑ Recovery Guide, where you will find an explanation of how to recover your computer's system if you need to.
❑ Guarantee and End User Software License Agreement
❑ Regulatory Booklet
❑ Wireless Regulations Guide
Non-printed documentation
My Documentation contains the following VAIO user guides:
❑ The User Guide (this guide) explains the features of your VAIO computer in detail, how to use these features confidently and
safely, connect peripheral devices, upgrade your computer, and more.
❑ The VAIO Zone guide explains the valuable features of VAIO's multimedia portal. If your computer has TV tuner functionalities,
this is where you will find information about watching/recording TV on your VAIO computer.
My Documentation also gives you:
❑ Help files about reading the guides.
❑ Important information about your computer, in the form of notices and announcements.

In My Info Centre you can also find:
My Software
Feeling creative? Click this icon for an overview of your software and check out our upgrade options.
My VAIO essentials
Want to expand the capabilities of your VAIO computer? Click this icon and have a look at your compatible accessories.
My Websites
Click this icon and check out our most popular websites.
My ISP
Click this icon to find out about the preferential offers from our partners and access the world of the internet.
Further sources
1 Go to Start > Help and Support for VAIO support information as well as tips and tricks.
2 Consult the Online Help files of the software you are using for detailed information on features and troubleshooting.
3 Go to www.club-vaio.com
to find online tutorials about your favourite VAIO software.
nN
10
Welcome
nN
11
Welcome
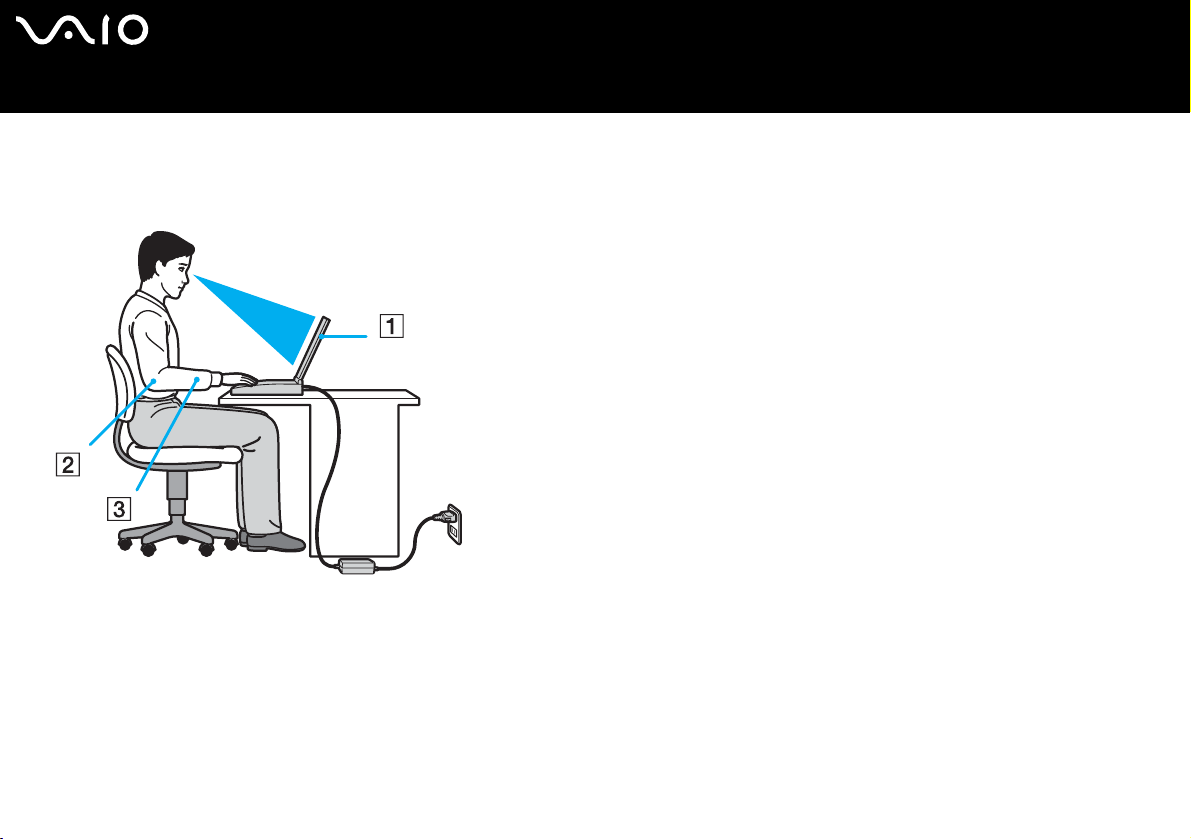
Ergonomic considerations
You will be using your computer as a portable device in a variety of environments. Whenever possible, you should attempt to take
account of the following ergonomic considerations to both stationary and portable environments:
❑ Position of your computer – Place the computer directly in front of you (1). Keep your forearms horizontal (2), with your wrists
in a neutral, comfortable position (3) while using the keyboard, touchpad, or external mouse. Let your upper arms hang naturally
at your sides. Have breaks during sessions with your computer. Excessive use of the computer may strain muscles or tendons.
❑ Furniture and posture – Sit in a chair with good back support. Adjust the level of the chair so your feet are flat on the floor. A
footrest may make you more comfortable. Sit in a relaxed, upright posture and avoid slouching forward or leaning far backwards.
❑ Viewing angle of the computer's display – Use the display's tilting feature to find the best position. You can reduce eye strain
and muscle fatigue by adjusting the tilt of the display to the proper position. Adjust the brightness setting of the display as well.

nN
12
Welcome
❑ Lighting – Choose a location where windows and lights do not create glare and reflection on the display. Use indirect lighting to
avoid bright spots on the display. You can also purchase accessories for your display that help reduce glare. Proper lighting adds
to your comfort and work effectiveness.
❑ Positioning an external display – When using an external display, set the display at a comfortable viewing distance. Make sure
the display screen is at eye level or slightly lower when you are sitting in front of the monitor.

nN
13
Using your VAIO computer
Using your VAIO computer
Once you have read and followed the information in the printed Specifications sheet, you can start using your computer safely and
confidently.
Read on to get the most out of using your VAIO computer.
❑ Connecting a power source (page 14)
❑ Setting the password (page 19)
❑ Setting up your computer with VAIO Control Center (page 21)
❑ Shutting down your computer safely (page 22)
❑ Using the keyboard (page 23)
❑ Using the touchpad (page 28)
❑ Using special buttons (page 29)
❑ Using the optical disc drive (page 30)
❑ Using PC Cards (page 36)
❑ Using the Memory Stick (page 40)
❑ Using the modem (page 43)
❑ Using Wireless LAN (WLAN) (page 46)
❑ Using the power saving modes (page 56)
❑ Managing power with VAIO Power Management (page 59)
Connecting a power source
You can use either an AC adapter or a rechargeable battery pack as a power source.
Using the AC adapter
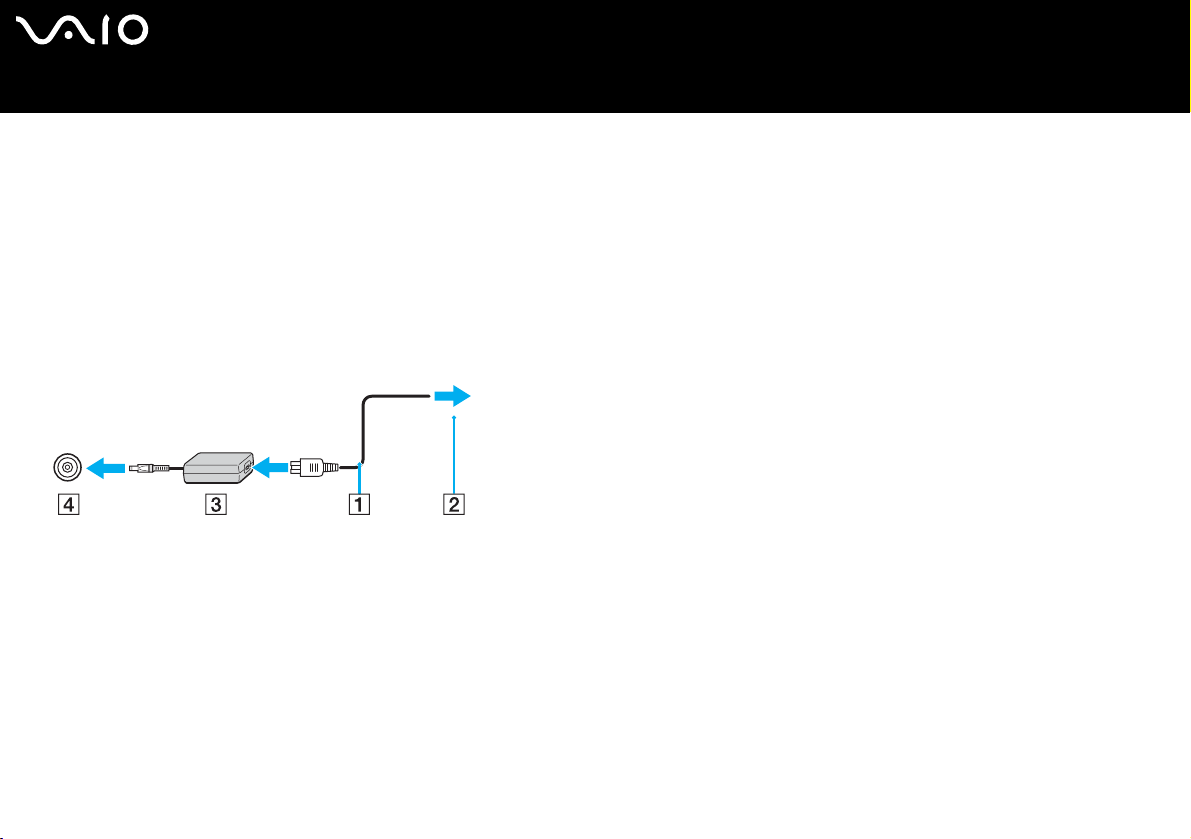
To use the AC adapter, proceed as follows:
1 Plug one end of the power cord (1) into the AC adapter.
2 Plug the other end of the power cord into an AC outlet (2).
3 Plug the cable attached to the AC adapter (3) into the DC In connector (4) on the computer.
!
The shape of the DC In plug varies depending on the AC adapter.
✍
Use your computer only with the supplied AC adapter.
nN
14
Using your VAIO computer
To disconnect your computer completely from mains voltage, unplug the AC adapter.
Make sure that the socket outlet is easily accessible.
If you do not use the AC adapter for a long period of time, put your computer into Hibernate mode. This power saving mode saves you the time of shutting down
in the normal way.
Using the battery pack
The battery pack supplied with your computer is not fully charged at the time of purchase.
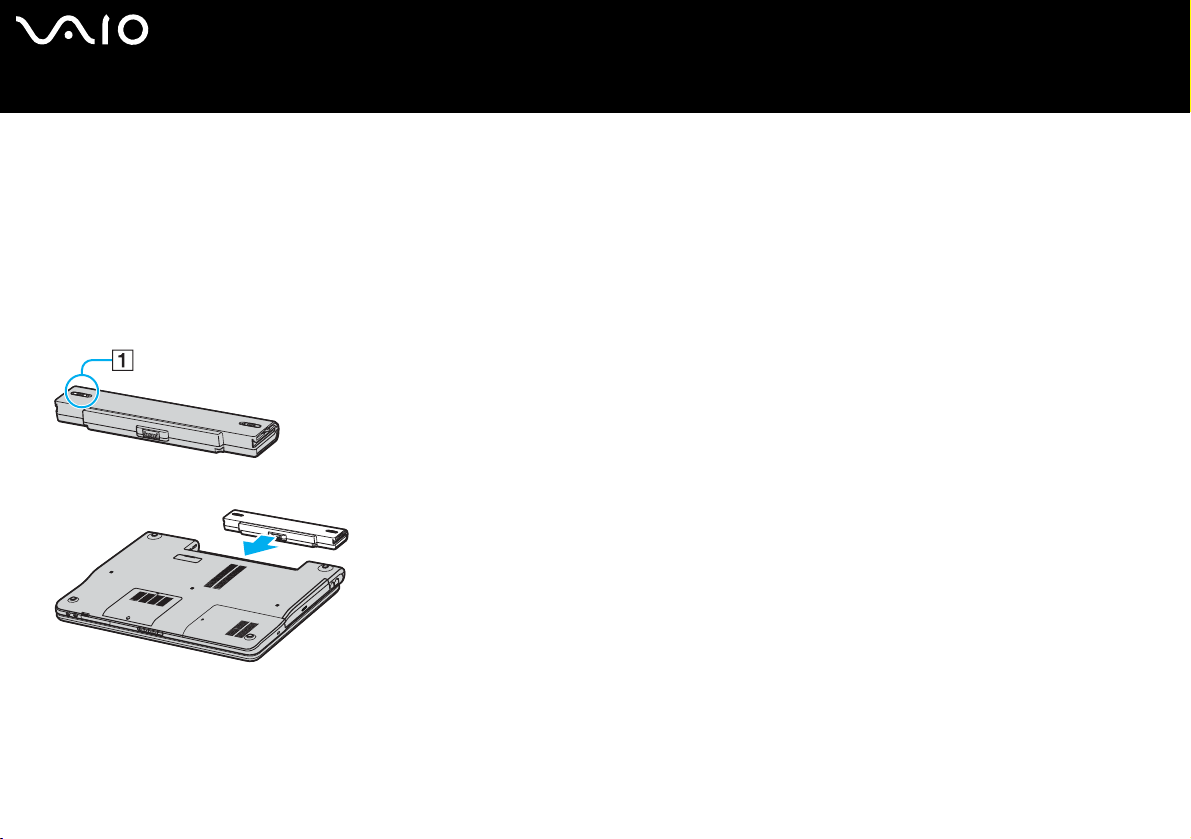
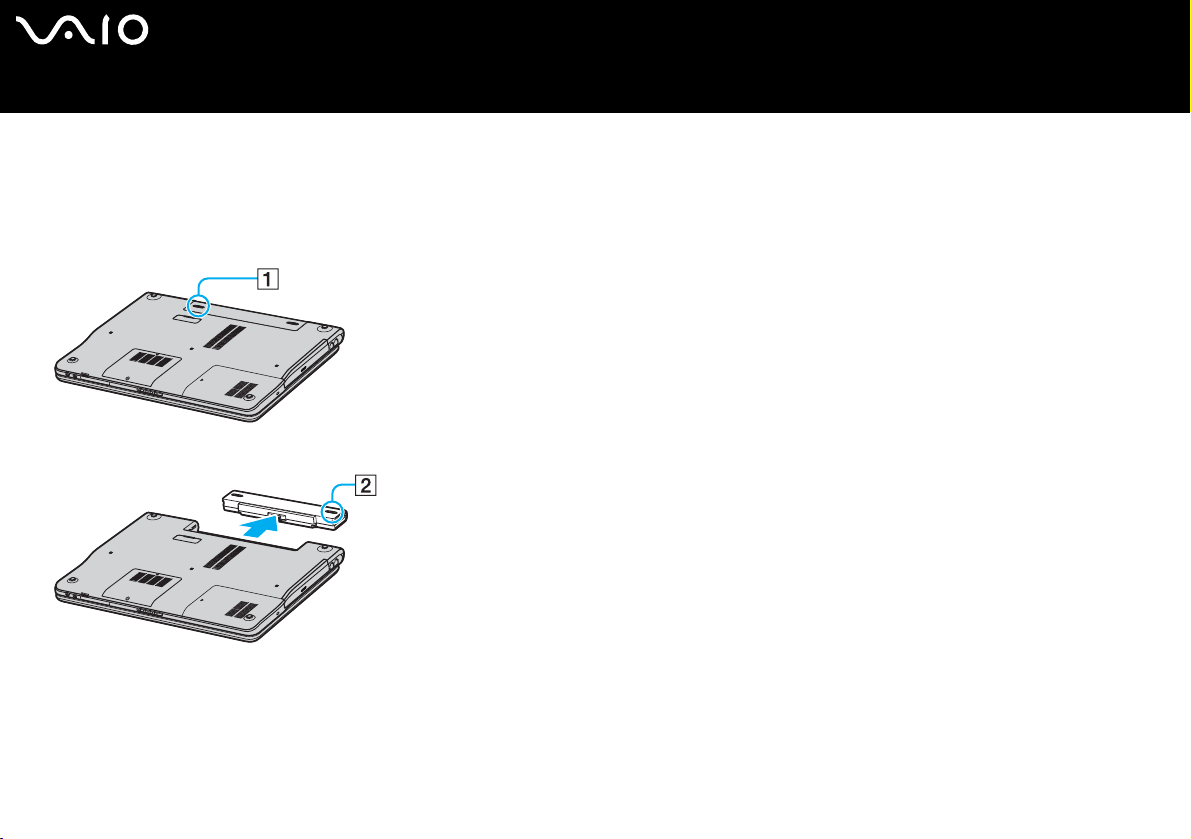
Installing the battery pack
To install the battery pack, proceed as follows:
1 Turn off your computer and close the LCD.
2 Slide the lock lever (1) to the UNLOCK position.
3 Slide the battery pack into the compartment until it clicks into place.
nN
15
Using your VAIO computer
4 Slide the lock lever (1) to the LOCK position to secure the battery pack on the computer.
✍
When the computer is directly connected to AC power and has a battery pack installed, it uses power from the AC outlet.

Using your VAIO computer
Charging the battery pack
To charge the battery pack, proceed as follows:
1 Install the battery pack.
2 Connect the AC adapter to the computer.
The computer automatically charges the battery (the battery indicator flashes in a double blink pattern as the battery charges).
Battery indicator status Meaning
On The computer is using battery power.
Single blink The battery is running out of power.
Double blink The battery is charging.
Off The computer is using AC power.
nN
16

Using your VAIO computer
✍
When the battery is running out of power, both the battery and power indicators blink.
Keep the battery pack installed in the computer while it is directly connected to AC power. The battery pack continues to charge while you are using the computer.
If the battery level falls below 10%, you should either attach the AC adapter to recharge the battery or shut down your computer and install a fully charged battery
pack.
The battery pack supplied with your computer is a lithium ion battery and can be recharged any time. Charging a partially discharged battery pack does not affect
battery life.
The battery indicator is on while you use the battery pack as a power source. When the battery life is nearly depleted, both the battery and power indicators start
flashing.
For some software applications and some peripheral devices, your computer may not enter Hibernate mode even when battery life is low. To avoid loss of data
when using battery power, you should save your data frequently and manually activate a power management mode, such as Standby or Hibernate. If the battery
wears out when your computer enters Standby mode, you will lose any unsaved data. Going back to the previous work state is impossible. To avoid loss of data,
you should save your data frequently.
When the computer is directly connected to AC power and has a battery pack installed, it uses power from the AC outlet.
nN
17
Removing the battery pack
To remove the battery pack, proceed as follows:
1 Turn off your computer and close the LCD.
2 Slide the lock lever (1) to the UNLOCK position.
3 Slide and hold the release lever (2) and slide the battery pack away from the computer.
nN
18
Using your VAIO computer
✍
You may lose data if you remove the battery pack while the computer is on and not connected to the AC adapter or if you remove the battery pack while the
computer is in Standby mode.

nN
19
Using your VAIO computer
Setting the password
Use one of the BIOS functions to set the password.
Once you have set the password, you will have to enter the password after the VAIO logo appears. In this way, you can protect your
computer from unauthorized access.
!
You cannot start your computer without entering the password. Make sure not to forget the password.
If you forget the password and need assistance to cancel it, a cancellation fee will be charged.
Adding the password
To add the password, proceed as follows:
1 Turn on your computer.
2 Press F2 when the VAIO logo appears.
The BIOS setup screen appears.
3 Use < or , to select Security to display another screen, select Set Machine Password, and then press Enter.
4 On the password entry screen, enter the password twice and press Enter.
The password should be up to 7 alphanumeric characters long.
✍
The following is to configure your computer to prompt password entry when you turn on your computer or display the BIOS setup screen.
5 Select Password When Power ON under Security.
Press the space bar to change the setting from Disabled to Enabled.
6 Use < or , to select Exit and then Exit (Save Changes); and press Enter.
On the Setup Confirmation screen, confirm that Yes is selected and then press Enter.

Using your VAIO computer
Changing/removing the password
To change or remove the password, proceed as follows:
1 Turn on your computer.
2 Press F2 when the VAIO logo appears.
The BIOS setup screen appears. If not, press F2 several times.
3 Enter the current password for Enter Password:
4 Use < or , to select Security to display another screen, select Set Machine Password, and then press Enter.
5 On the password entry screen, enter the current password once and then a new password twice; and press Enter.
To remove the password, leave Enter New Password and Confirm New Password blank and press Enter.
6 Use < or , to select Exit and then Exit (Save Changes); and press Enter.
On the Setup Confirmation screen, confirm that Yes is selected and then press Enter.
nN
20

Using your VAIO computer
Setting up your computer with VAIO Control Center
The VAIO Control Center utility allows you to consult system information and specify preferences for system behaviour.
To use VAIO Control Center, proceed as follows:
1 Click the Start button on the Windows taskbar.
2 In All Programs, click VAIO Control Center.
The VAIO Control Center window appears.
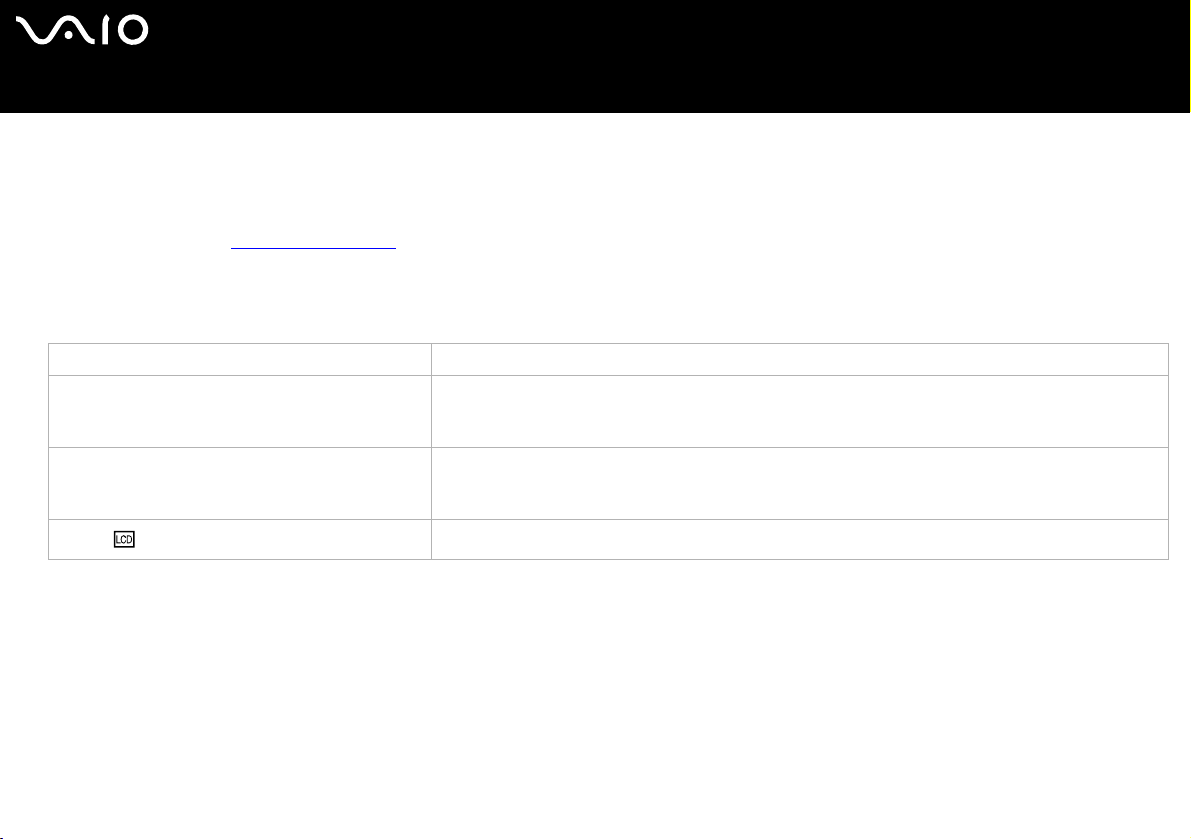
Control item Description
System Information Displays the information about your operating system and the hardware architecture.
Initial Setting You can specify the order in which the system checks for devices containing a bootable system when it starts.
Built-in Pointing Device You can enable or disable the built-in pointing device.
S Button You can change the functions assigned to the computer's S buttons. Available pre-defined assignments are:
Muting*1, Stand by, Hibernate, Max Brightness, External Display*2, Launch Application, VAIO Zone, SSMS
Audio Filter, Multiple Monitors
Screen Resolution*3 Specify settings for the screen resolution when an external display is connected to your computer.
Plug and Display You can specify settings for automatic output to the external display.
*1 Default S1 button assignment
*2 Default S2 button assignment
*3 Only for models with the Intel 915GM video controller. See the printed Specifications sheet for the video controller used in your computer.
3 Select the desired control item.
4 Once finished, click OK.
The item has been changed.
nN
21
✍
For more information about each option, click Help on the VAIO Control Center window to display the help file.
Some of the control items will not be visible If you open VAIO Control Center as a limited user.

nN
Using your VAIO computer
Shutting down your computer safely
It is important that you shut down your computer properly so you do not lose unsaved data.
To shut down your computer, proceed as follows:
1 Turn off any peripherals connected to your computer.
2 Click the Start button.
3 Click Turn Off Computer.
The Turn off computer window appears.
4 Click Turn Off.
5 Respond to any prompts warning you to save documents or to consider other users and wait for your computer to turn off
automatically.
The power indicator turns off.
✍
See the printed Troubleshooting Guide if you have problems shutting down your computer.
22
Using your VAIO computer
Using the keyboard
Your keyboard is very similar to a desktop computer's, but has additional keys that perform model-specific tasks.
For more information on the standard keys, see Windows Help and Support Center.
The VAIO-Link website (www.vaio-link.com
Combinations and functions with the <Fn> key
Combinations/Feature Functions
<Fn> + % (F2): speaker switch Turns on and off the built-in speakers and the headphones.
<Fn> + 2 (F3/F4): speaker volume Adjusts the built-in speaker volume.
<Fn> + 8 (F5/F6): brightness control Adjusts the brightness of the LCD.
<Fn> + /T (F7): switch to the external display
) also contains glossary information to help you use the keyboard.
To increase volume, press <Fn>+<F4> and then M or ,, or keep pressing <Fn>+<F4>.
To decrease volume, press <Fn>+<F3> and then m or <, or keep pressing <Fn>+<F3>.
To increase lightness intensity, press <Fn>+<F6> and then M or ,, or keep pressing <Fn>+<F6>.
To decrease lightness intensity, press <Fn>+<F5> and then m or <, or keep pressing <Fn>+<F5>.
Toggles between the LCD, external device (e.g. monitor) and both LCD and external device.
nN
23

Combinations/Feature Functions
<Fn> + (F10): zoom
<Fn> + (F12): Hibernate
Changes the screen resolution to magnify/restore the screen view.
✍
The default resolutions of the standard view and the magnified view depend on the model as listed below. For the
type of LCD screen equipped with your computer, see LCD screen in the printed Specifications sheet.
Models with the WSXGA+ LCD screen:
Standard view: 1680 x 1050 pixels
Magnified view: 1280 x 800 pixels
Models with the WXGA LCD screen:
Standard view: 1280 x 800 pixels
Magnified view: 1024 x 600 pixels
The magnified view is not as clear as the standard view, as it is implemented by applying a lower resolution to the
LCD screen with a higher resolution.
This shortcut key is disabled during video playback. Make sure to quit such software before pressing the shortcut key.
This shortcut key may not work with graphic images as it magnifies the screen view by changing the resolution.
The location and size of software windows may change when the screen view is magnified or the standard view is
restored because pressing this shortcut key changes the resolution.
When the LCD screen view is magnified, switching the view to the external display disables the function and restores
the standard view.
Provides for the lowest level of power consumption. When you execute this command, the states of the
system and of the peripheral devices are written to the hard disk and the system power is turned off. To
return the system to its original state, use the power switch to turn on the power.
For details on power management, see the section Using the power saving modes (page 56).
nN
24
Using your VAIO computer
✍
Some functions are not available until Windows is launched.
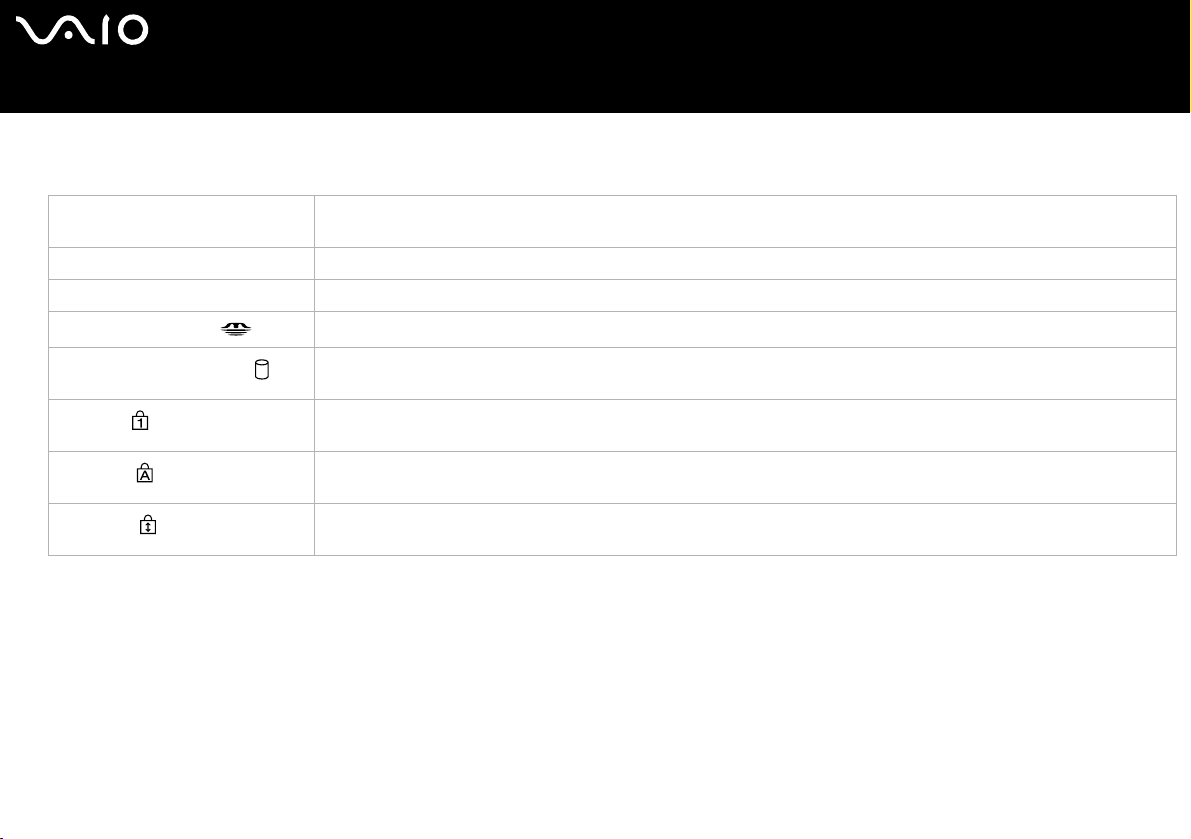
Indicators
Indicator Functions
Power 1 Power on: lights green.
Battery e Indicates the status of the battery.
Wireless LAN Turns on when the Wireless LAN is activated. Turns off when the Wireless LAN is not activated.
Memory Stick Pro/Duo
Hard disk/Optical disc drive
Num Lock
Caps Lock
Scroll Lock
Standby mode: flashes umber.
Turns on when the Memory Stick is in use. Turns off when the Memory Stick is no longer in use.
Turns on when data is read from or written to the hard disk drive/optical disc drive. Turns off when the hard disk drive/optical
disc drive is not being accessed.
Turns on when the number keys in the numeric keypad area are active. Turns off when the alphanumeric character keys
in the keypad area are active.
Turns on when the letters appear in uppercase as you type. The <Shift> key lowers the case of typed characters when
Caps Lock is on. Turns off when the letters appear in lowercase as you type (unless you hold down the <Shift> key).
Turns on when the screen scrolls differently (Not all applications support this function). Turns off when the information
moves across the display normally.
nN
25
Using your VAIO computer
nN
26
Using your VAIO computer
Troubleshooting the keyboard
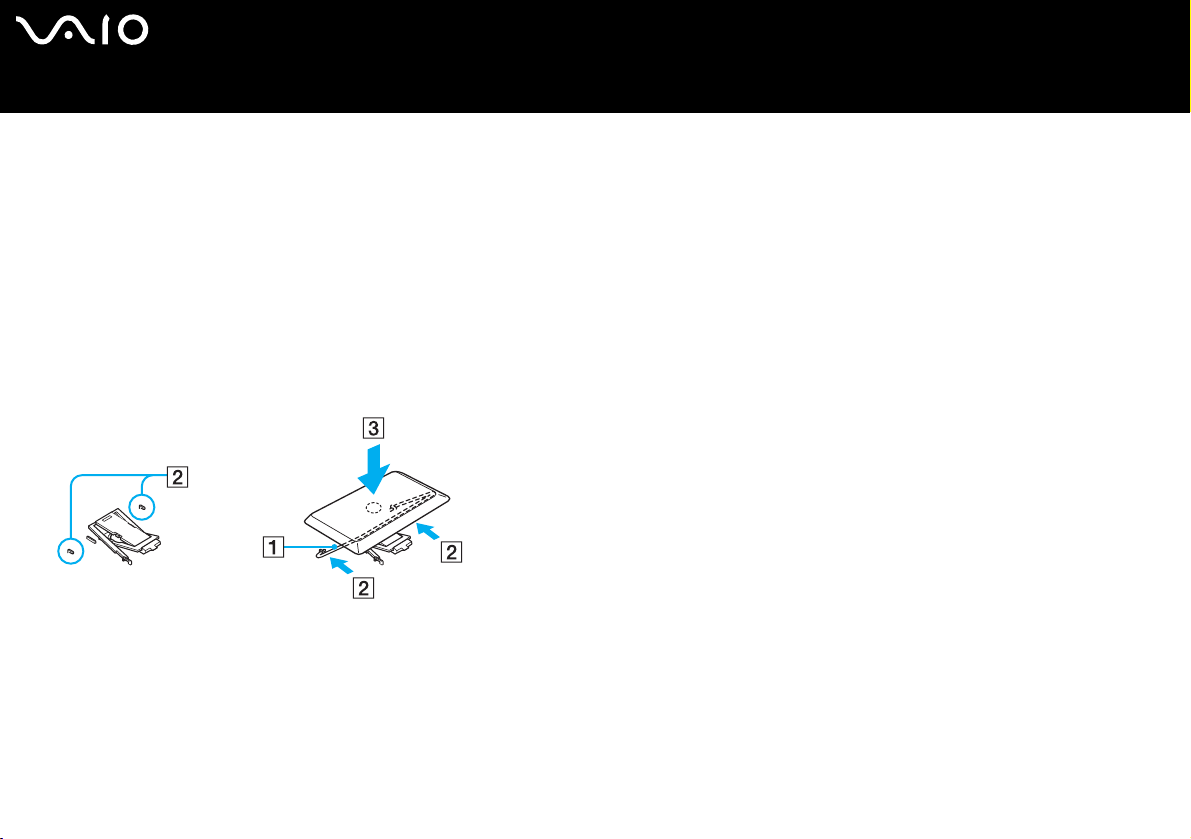
A key top has fallen off
❑ If the Enter key, the Caps Lock key, the Ctrl key, the Tab key, the space bar key, or the left Shift key falls off, replace the key top as
shown below.
If any other key top falls off, place it back into position and push it in from above until it clicks.
To replace a key top
Remove the wire (1) from the key top, then attach it to the hooks (2) on the key unit. Align the centre of the key top and press it
from above (3) until it clicks.
❑ Enter key, Caps Lock key, Ctrl key, Tab key
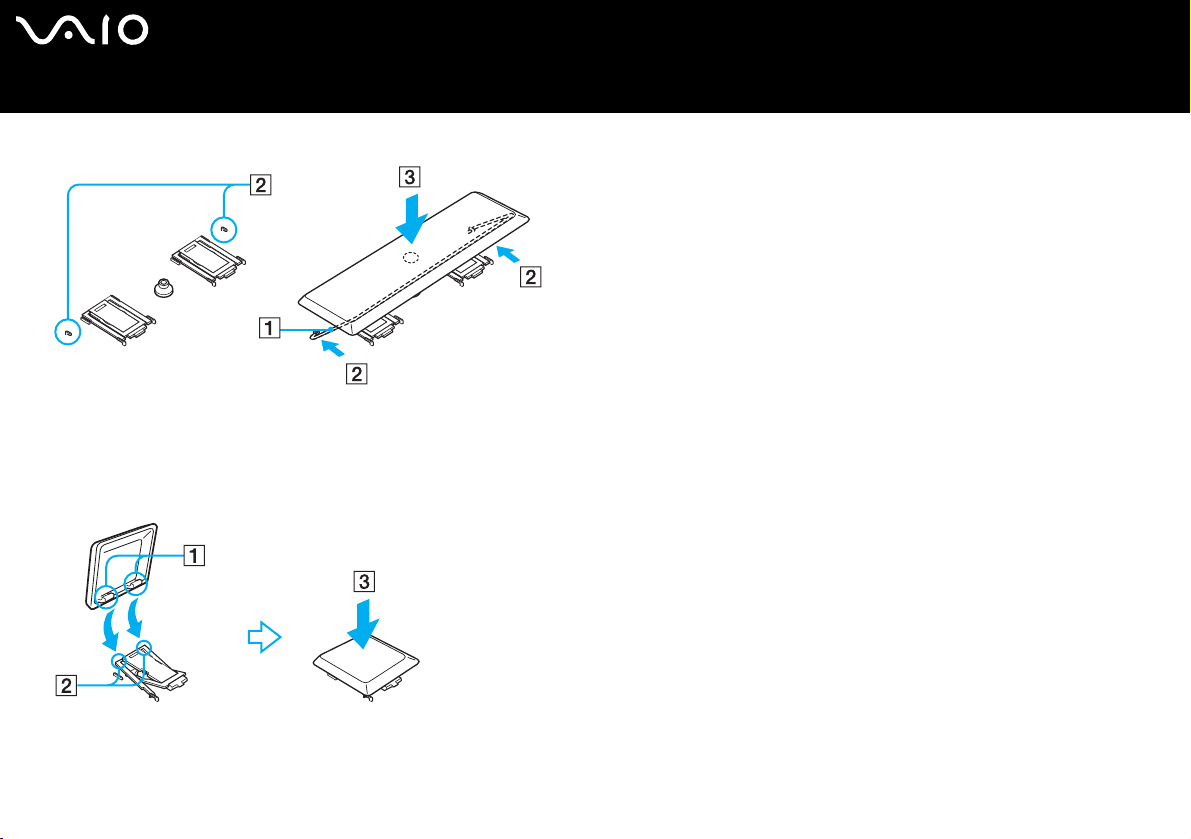
Using your VAIO computer
❑ Space bar key, left Shift key
❑ If any key top other than the above keys falls off, see the figure below to place it back into position.
To replace a key top
Hook the catches (1) on the key top onto the screen side corners of the key top support (2), place the key top back into position,
and then press it from above (3) until it clicks.
nN
27
!
Do not take off the key top intentionally, as it may cause a malfunction.
Do not push the key top excessively when you replace it, as it may cause a malfunction. Handle the key tops with care.
nN
28
Using your VAIO computer
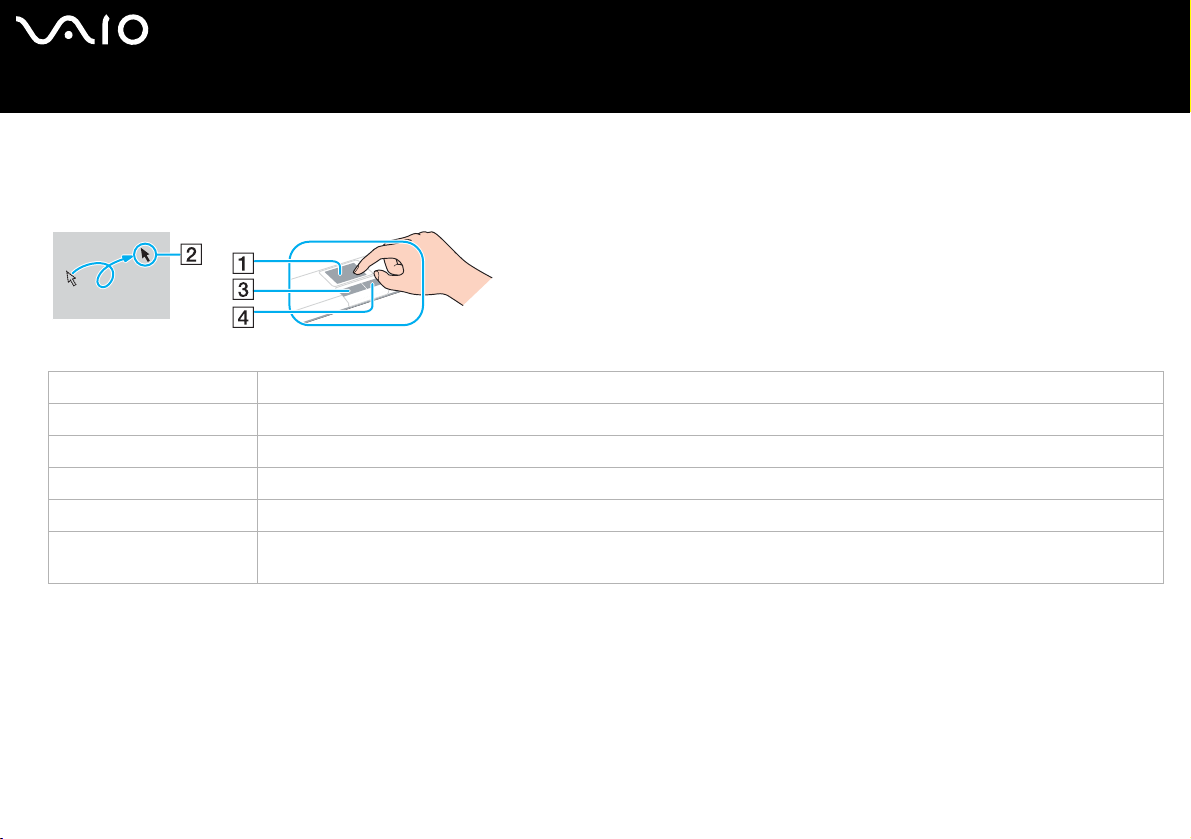
Using the touchpad
The keyboard contains a cursor-pointing device, your touchpad (1). You can point to, select, drag, and scroll objects on the screen
using the built-in touchpad.
Action Description
Point Slide one finger on the touchpad to place the pointer (2) on an item or object.
Click Press the left button (3) once.
Double-click Press the left button twice.
Right-click Press the right button (4) once. In many applications, this action displays a shortcut menu.
Drag Slide one finger while pressing the left button.
Scroll Move your finger along the right edge of the touchpad to scroll vertically. Move your finger along the bottom to scroll horizontally
(the scroll function is available only with applications that support a touchpad scroll feature).

nN
29
Using your VAIO computer
Using special buttons
Your computer is provided with special buttons to help you use the computer.
S1/S2 buttons :
By default, the S1 button turns on and off the speaker volume and the S2 button toggles the display output between the LCD and
external device. You can also link another action that you execute often to these shortcut buttons. See Setting up your computer
with VAIO Control Center (page 21).
Using your VAIO computer
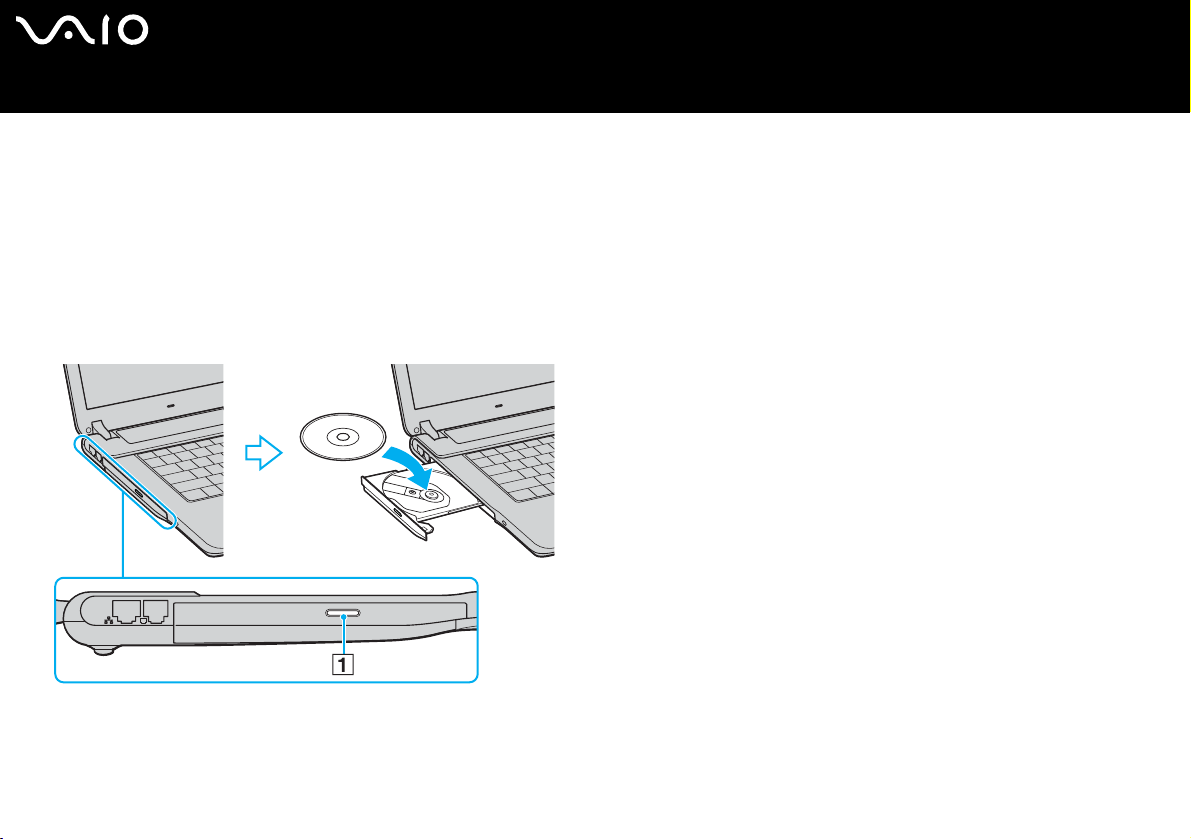
Using the optical disc drive
Your computer is equipped with an optical disc drive. See the Specifications sheet for details on your model.
To insert a disc, proceed as follows:
1 Turn on the computer.
2 Press the eject button (1) to open the drive.
The tray slides out.
3 Place a disc in the middle of the tray with the label side facing up until the disc clicks into place.
nN
30
4 Close the tray by pushing it gently.
✍
See the printed Troubleshooting Guide if you have problems using discs.
 Loading...