

Sony FR 20 User Manual

User guide UK 2
Bedienungsanleitung DE 11
Guide de l’utilisateur FR 20
Manual del usuario ES 29
81-00008B
1

English – GN 6210 user guide
This user guide provides you with information on setting up, using and maintaining your GN 6210.
Contents
1. Turning headset on and off . . . . . . . . . . . . . . . . . . . . . . . . . . . . . . . . . . . . . . . . . . . . . . . . . 3
2. Use with desktop telephones . . . . . . . . . . . . . . . . . . . . . . . . . . . . . . . . . . . . . . . . . . . . . . . . 3
2.1 Tips for connecting cord
2.2 Pairing headset with base
2.3 Headset <––> handset switching while on a call
2.4 Operation with your GN 1000 RHL (accessory)
3. Use with Mobile phones . . . . . . . . . . . . . . . . . . . . . . . . . . . . . . . . . . . . . . . . . . . . . . . . . . . . 5
3.1 Setting up and using the GN 6210 with your mobile phone
3.2 Making voice-activated calls
3.3 Headset <––> mobile phone switching while on a call
4. Audio and visual indicators . . . . . . . . . . . . . . . . . . . . . . . . . . . . . . . . . . . . . . . . . . . . . . . . . . 7
5. Troubleshooting . . . . . . . . . . . . . . . . . . . . . . . . . . . . . . . . . . . . . . . . . . . . . . . . . . . . . . . . . . 8
6. Cleaning, safety and maintenance . . . . . . . . . . . . . . . . . . . . . . . . . . . . . . . . . . . . . . . . . . . . . 9
Product information
Congratulations on purchasing the GN 6210. The GN 6210 is a wireless headset solution, made up of a
cordless headset and a base unit that is connected to both your desk telephone and you mobile phone. The
GN 6210 gives you full mobility, hands-free convenience and superior sound quality for your
telephone conversations.
This booklet provides you with additional information and instructions.
2
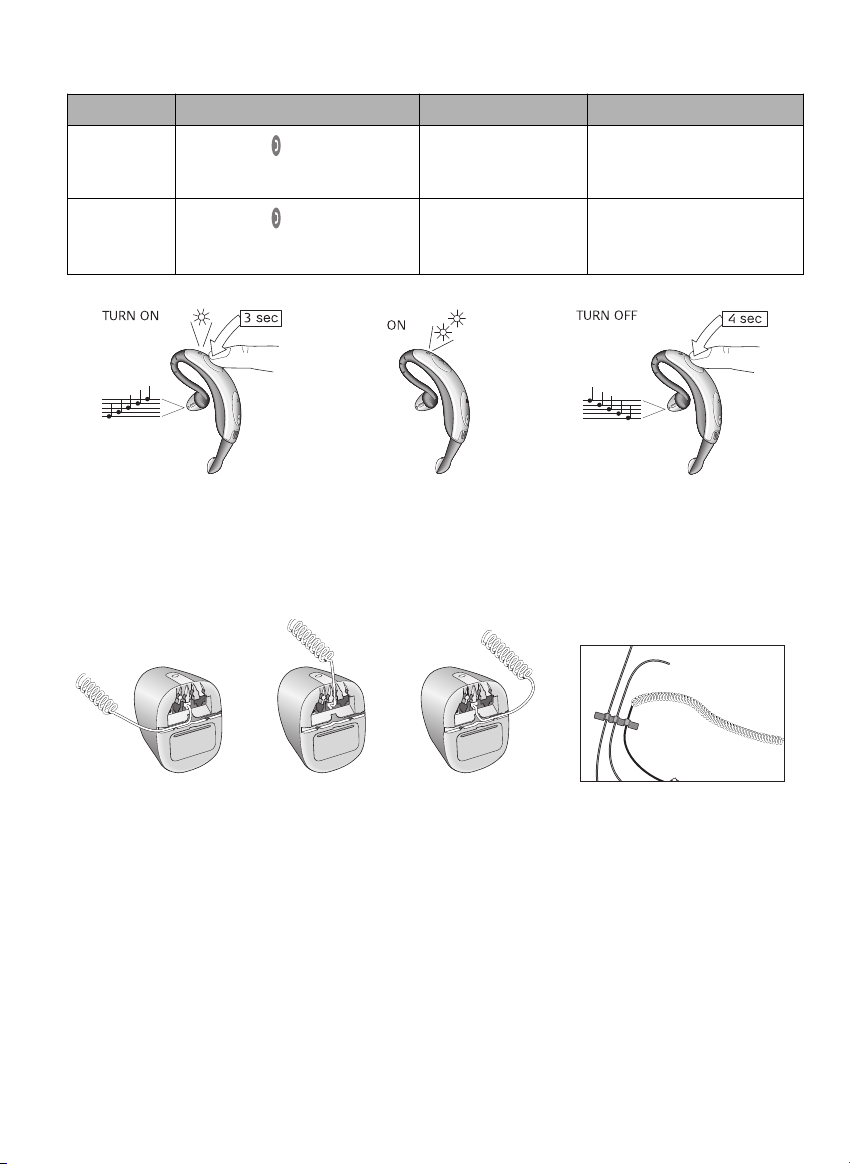
1. Turning headset on and off
What you do What you hear What you see
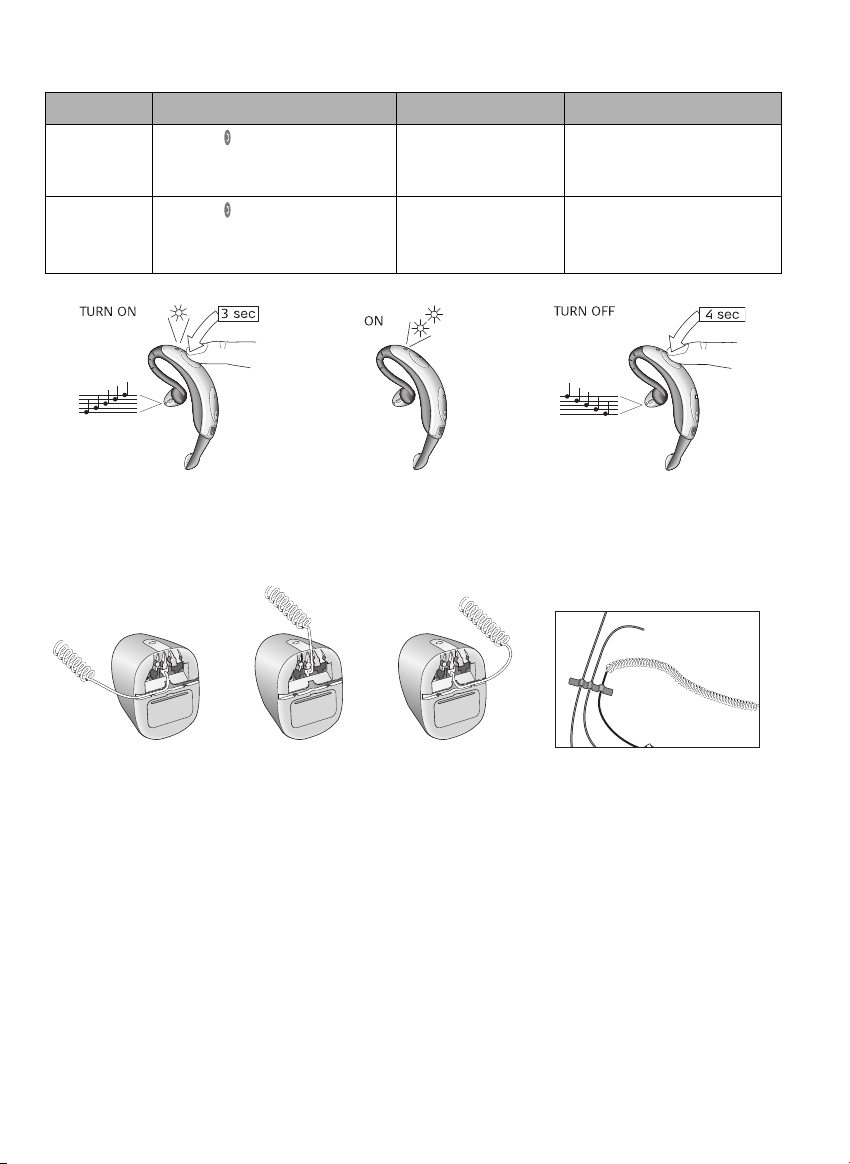
Turning headset
ON
Turning headset
OFF
Press and hold for 3 seconds until
you see a burst of flashes on the blue
indicator light, then release
Press and hold for 4 seconds until
you see a burst of flashes on the blue
indicator light, then release
Ascending (low-to-high)
tones
Descending (high-to-low)
tones
The blue indicator light will
flash while the power is on
(see Status indicators page 8)
The blue indicator
light will stop flashing
2. Use with desktop telephone
2.1 Tips for connecting cords
For your convenience, you may feed the telephone handset cord through the base’s right or left Cord Slot,
depending on the positioning of your telephone.
Use the Cord Management Strips to fasten and organise the cords.
Note: If you connect the Telephone Connection Cord to your telephone’s headset socket instead of the
handset socket, this will enable the telephone’s line button. You can now answer and end calls by pressing
the line button instead of using the handset. The handset can remain connected to the telephone.
2.2 Pairing headset with base
The headset and the base in their original product box have been factory-paired to ensure instant functioning of your GN 6210. You do not need to pair these two devices, and you may now proceed to the Clear
dial tone adjustment section.
If original pairing is lost (by resetting the base, changing your headset or changing your base), you will have
to pair your headset to the base again:
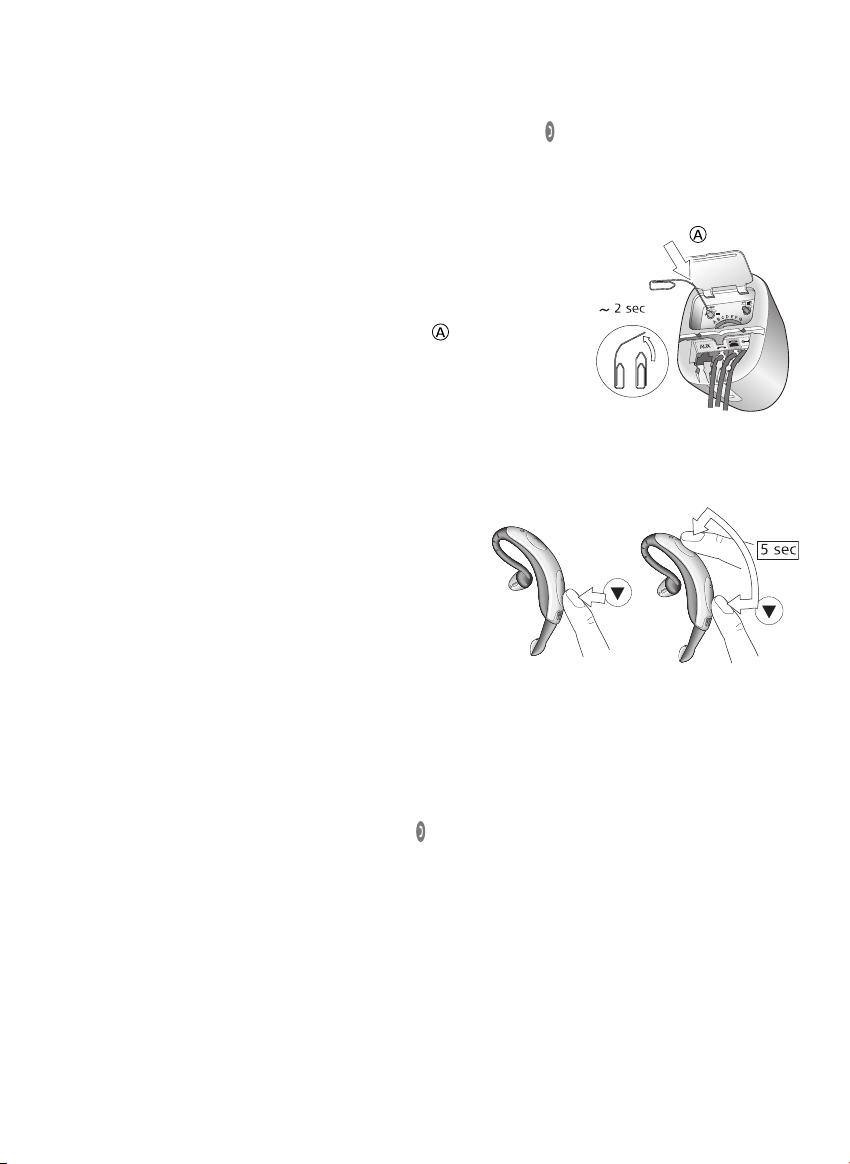
1. Ensure your headset is turned off.
3
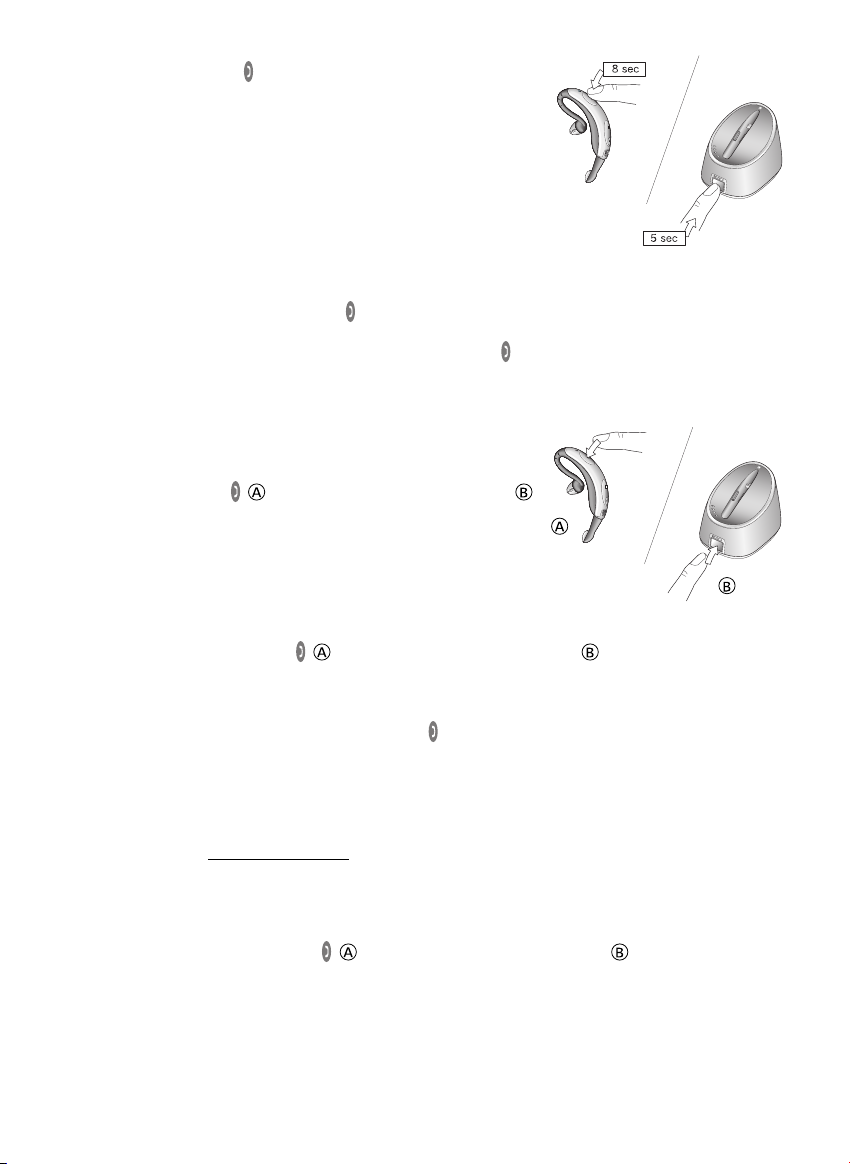
2. Press and hold down the on the headset until you see a solid blue
light.
3. Press and hold down the Multifunction button on the base until the
paring indicator has a solid blue light.
Note: Ensure that the headset and base are within 1m/3ft of each
other. Successful pairing will be indicated by 10 rapid flashes of both the
headset indicator and the pairing indicator on the base unit. Two single
tones will also be heard in the headset.
Verify pairing
To verify pairing, create an audio link between the headset and base by completing the following:
1. Press shortly the on either the headset or the base’s Multifunction button.
2. An audible tone will be heard, and the Headset Indicator and Online Indicator will flash frequently.
3. To end the audio link, press shortly the on either the headset or the base’s Multifunction button.
Note: You may verify pairing at any point except during telephone conversations.
2.3 Headset <––> handset switching (while on a call)
To switch from using the headset to the handset during a call:
1. Terminate the link between the headset and the base by pressing the
shortly on the headset or the base’s Multifunction button .
2. The call is now automatically transferred from the headset to the
handset, and can be continued in the handset.
3. To end the call, lower the telephone’s handset.
On telephones equipped with a line button, press the line button if you
have set up your GN 6210 for this.
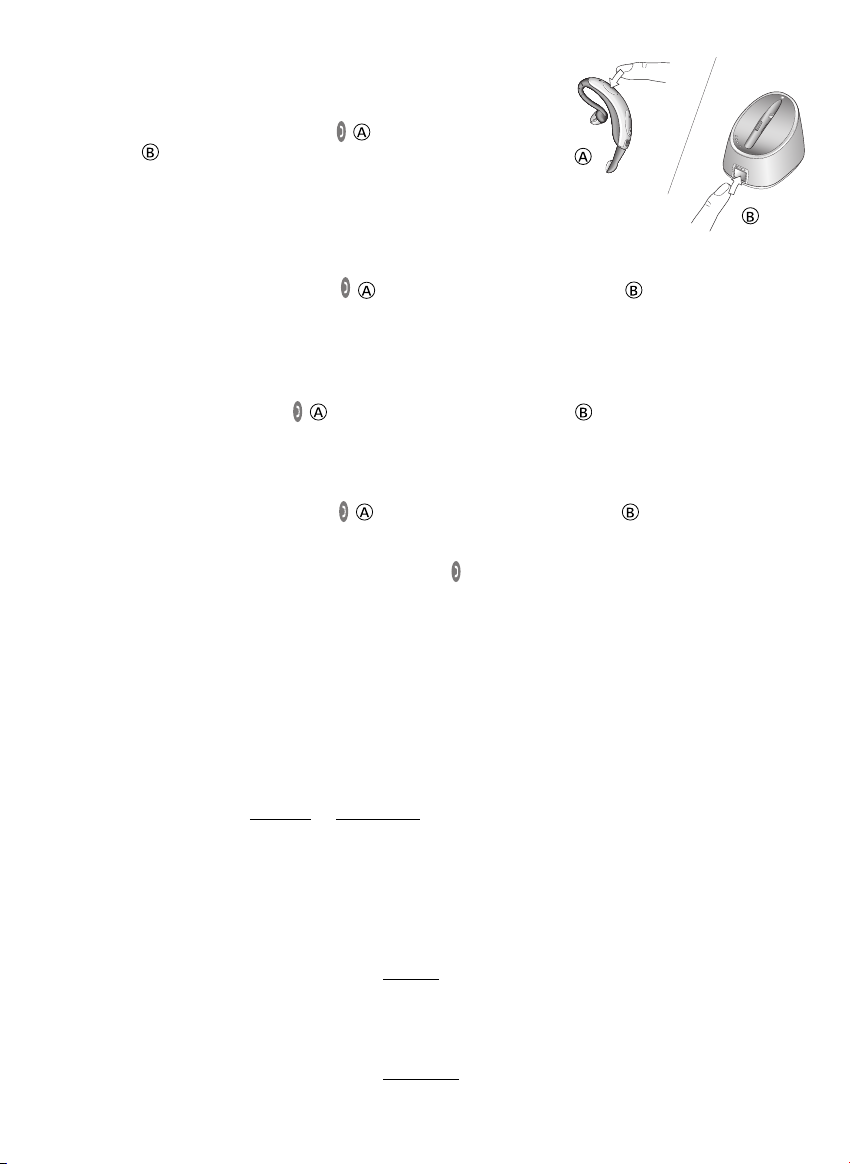
To switch from using the handset to the headset during a call:
1. Press shortly either the headset or the base’s Multifunction button . The connection between
the headset and the base will be established shortly.
2. The call is now automatically transferred from the handset to the headset, and can be continued in the
headset.
3. To end the call, press shortly on either the headset or the base’s Multifunction button.
4. To end the call, lower the telephone’s handset. On telephones equipped with a line button, press the
line button to end the call (if you have set up your GN 6210 for this).
2.4 Operating GN 6210 with GN 1000 RHL (accessory)
Please refer to the GN 1000 RHL user guide for directions on how to set up GN 1000. If you have lost the
user guide, please visit www
Make sure that the headset is turned on.
Making calls:
1. Press shortly on either the headset or the base’s Multifunction button . A connection will be
established shortly.
2. The GN 1000 RHL will be activated and your telephone’s handset will be lifted.
3. Dial the desired number when the dial tone is heard. The Headset Indicator and the base’s On-line
Indicator will flash rapidly for the duration of the call.
.gnnetcom.com, where all user guides are available.
4
Answering calls:
1. A beep in your headset and the phone’s usual ringing tone will indi-
cate an incoming call.
2. Press shortly on either the headset or the base’s Multifunction
button .
3. The GN 1000 RHL will lift the telephone’s handset and you are now
connected to your caller.
The Headset Indicator and the On-line Indicator will flash frequently for
the duration of the call.
Ending calls:
1. Press shortly on either the headset or the base’s Multifunction button . The GN 1000 RHL will
lower the telephone’s handset and your call is now terminated.
Headset <––> handset switching (while on a call)
To switch from using the headset to using the handset during a call:
1. Pick up the telephone’s handset from the GN 1000 RHL’s lifter arm.
2. Press shortly on the headset or the base’s Multifunction button and the call is transferred and
can be continued via the handset.
3. To end the call, hang up the telephone handset.
To switch from using the handset to using the headset during a call:
1. Press shortly on either the headset or the base’s Multifunction button . The connection will be
established shortly.
2. When the GN 1000 RHL is activated, place the handset on the lifter arm.
3. To end the call, press shortly on either the headset or the base’s Multifunction button.
You may continue wearing the headset, or place it in the base for recharging.
3. Use with Mobile phones
3.1 Setting up and using the GN 6210 with your mobile phone
Your GN 6210 is compatible for use with most Bluetooth®mobile phones. Before setting up (pairing) your
GN 6120 to your specific mobile phone, you will need to:
• Determine if you should set up according to the headset or the hands-free profile.
• Prepare your mobile phone for Bluetooth device discovery.
Setting up according to headset or hands-free profile
Mobile phones work with your GN 6210 using either their headset or hands-free profiles. Before setting up
or using your mobile phone with your GN 6210, you must determine which one of your mobile phone’s
profiles works best with your headset.
Instructions for setting up your headset with the two profiles vary slightly. These instructions can be found
from Section 5 of the GN 6210 Quick Set Up guide.
The following mobile phones models use the he
• Sony Ericsson models
• Nokia 6310, 6310i, 7600 and 5650
• Siemens S55
The following mobile phones models use the hands-f
• Newer Nokia models
adset profile to work with the GN 6210:
ree profile to work with the GN 6210:
5
• Motorola models
• Newer Siemens models
Note: There are many other models of Bluetooth mobile phone on the market. If you have another model
not mentioned above, consult your mobile phone’s user guide or www
see which profile your mobile phone uses to work with the GN 6210. Trying your GN 6210 with both of your
mobile phone’s profiles will also help you determine which profile gives you the optimum functionality.
Preparing your mobile phone for Bluetooth device discovery
When you have determined which of the two profiles you should set up with, put your mobile phone into
Bluetooth device discovery mode. You may then begin the pairing instructions described in Section 5 of your
Quick Set Up guide. During the pairing process, your GN 6210 will signal the mobile phone and complete
pairing when it is in this mode.
Consult your mobile phone’s user guide for full details on selecting the Bluetooth device discovery mode
and utilising a headset with your mobile phone. You may also visit www
for more information.
Tip: Test that your mobile phone works optimally after completing pairing.
Special call answer instructions: for Sony Ericsson & Siemens mobile phones.
With all Sony Ericsson mobile phones and the Siemens S55 mobile phone, these alternative call answer
instructions may be followed: When the mobile is ringing, wait for an audible tone in the headset and press
shortly the on the headset to answer. You are now connected to your caller.
.gnnetcom.com/gn6210/support to
.gnnetcom.com/gn6210/support/
With all Sony Ericsson mobile phones, outgoing calls will automatically be placed in your headset. This is no
the case with Siemens S55.
Note: Some mobile phones require a change in advanced settings in order to perform optimally.
Consult your mobile phone’s user guide.
3.2 Making voice-activated calls:
Note:
Your mobile phone must have voice-activation functionality, and it must be activated before making
voice-activated calls. Consult your mobile phone’s user guide for full details.
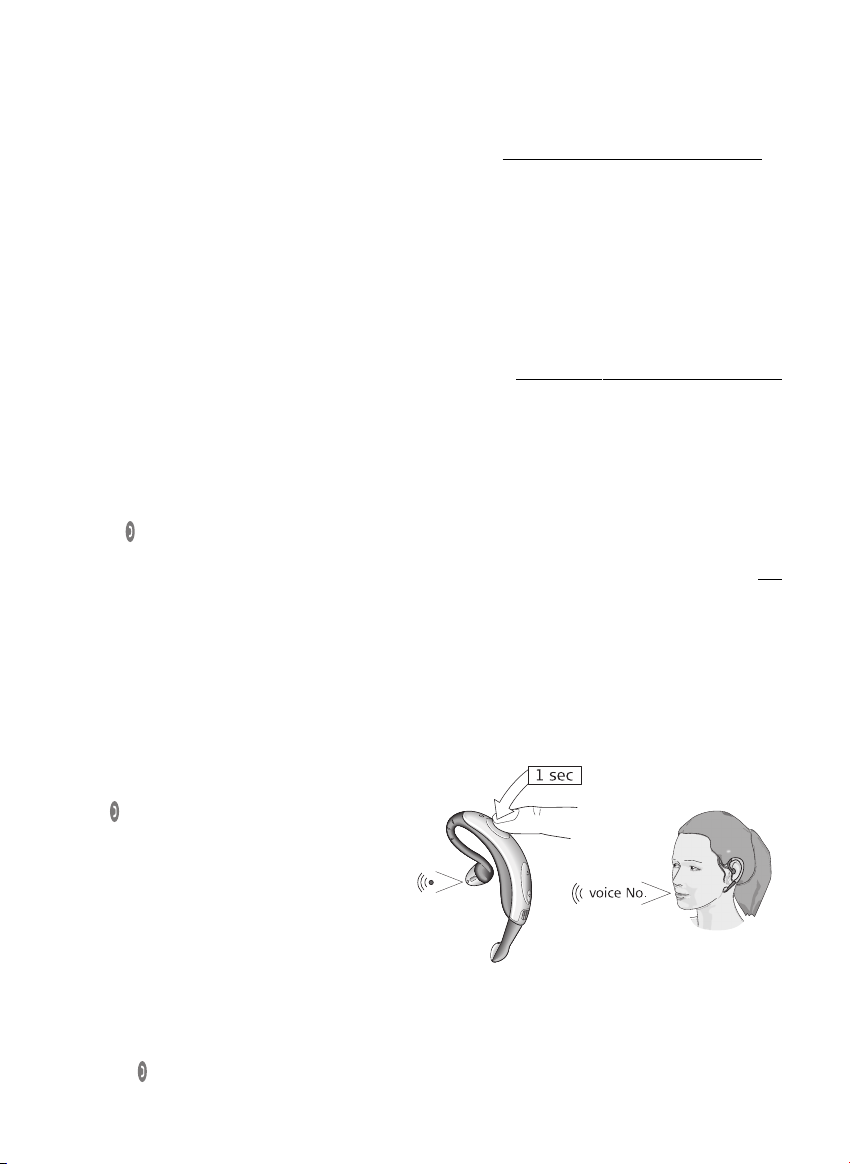
To make a voice-activated call:
1. Place the headset on the ear.
2. Press on the headset for 1 second until
you hear a double beep. The mobile phone will
go into voice command mode, and an
audible tone will be heard indicating that the
headset is expecting a voice command.
3. Give the desired voice command (according
to mobile phone’s instructions). Your call
will be established, and the headset indicator
will flash frequently for the duration of
the call.
3.3 Headset <––> mobile phone switching while on a call
To switch from using the mobile phone to the headset during a call:
1. Press the on the headset until a double beep is heard.
2. Continue the call on your headset.
6
t

3. To end the call, press shortly the on the headset.
Consult your mobile phone’s user guide for alternative ways of switching a call to your headset using the
mobile phone’s key pad.
To switch from using the headset to the mobile phone during a call:
1. Transfer the call by pressing on your headset for 4 seconds until you hear a series of high to low tones.
2. Wait for instructions in the phone’s display and then re-activate the call by pressing the Yes/Call
button on the mobile phone.
3. Continue the call on the handset.
4. To hang up, press the No/End button on the mobile phone.
Note: The headset remains on and is ready for new calls.
Low Battery indications in the headset
When using a mobile:
1. You will hear warning beeps approximately 5 minutes before the battery runs empty.
2. If you have continued your call and the headset switches off, the call can be re-activated on the Yes/Call
button on the mobile phone (follow instruction in the mobile phone’s display).
Using a desk phone:
1. You will hear warning beeps approximately 5 minutes before the battery runs empty.
2. If you have continued your call and the headset switches off, the base will hold the call for 20 seconds
and then transfer it to the telephone’s handset.
If you are close to the base, you may press its Multifunction button and transfer the call to the handset
immediately.
4. Audio and visual indicators
The GN 6210’s headset and base have audio and visual indicators, which represent various actions and
aspects associated with setting up and operating the product. Familiarise yourself with these indicators to
fully benefit from your GN 6210.
The headset’s audio indicators:
Headset action Audio indication
Volume Limit Repeated single high tone when min. or max. limits achieved (when button
Low Battery Tone Two rapid high tones repeated every 20 seconds
Out of Range No audio indications; gradual deterioration of audio quality
Incoming Call from Mobile Ring tone A
Incoming Call from desk phone Ring tone B (only when using hook switch)
Pairing Confirmation
– with base 2 single tones
– with mobile 1 single tone
Establish Audio Link Series of tones, low to high
Initiate Voice Dial Double tone
Voice Tag not Recognised Dual high-low tone
End Call/Audio Link Closed Series of tones, high to low
Power ON/OFF Low to high/high to low tone
is pressed)
7

The headset’s visual indicators
Headset mode Headset indicator
Power Off OFF (no charger)
Charging in Process ON (charger plugged in, or headset placed in base)
Charging Complete OFF (charger plugged in, or headset placed in base)
Pairing Mode ON (no charger)
Pairing Successful Series of 10 rapid flashes
Audio Link (on a call) Frequent flashes
Headset ON Continuous single flash (slow)
Headset ON and in range of the base Continuous double flashes (slow)
Headset turn on/off 5 flashes (fast)
Test link established Frequent flashes
The base’s visual indicators:
Base’s on-line indicator On-line indicator
On-line with a call Flashes
Base’s pairing indicator Pairing indicator
Pairing Mode ON (solid blue light)
Pairing Successful Series of 10 rapid flashes
Base reset Successful Lights for two seconds
Base’s battery indicator Battery indicator
Battery indication Number of lit indicators indicates level of charge
1 lit indicator = 25% charged
2 lit indicators = 50% charged
3 lit indicators = 75% charged
4 lit indicators = 100% charged
ALL base’s indicators All indicators
Power is turned ON Light up for 3 seconds.
5. Troubleshooting
I’ve set up my GN 6210, but I still don’t hear a dial tone?
There are several possible reasons why you do not hear a dial tone. Check that:
• The various cords are correctly set up and inserted. See section 2 in the quick set-up guide for setting
up and connecting cords instructions.
• The clear dial tone adjustment (using the Clear Dial Tone Adjustment Switch at the bottom of the base)
is correct. See Section 4.5 in the quick set-up guide for information on clear dial tone adjustment.
• The power supply is correctly hooked to the base.
• You have not unplugged your desk telephone’s telephone line.
Why don’t I get sound in my headset when using my mobile phone?
1. Verify that you’re your headset is switched on.
2. Verify that you have paired the headset with your mobile phone
3. Consult section 3.2 in the quick set-up guide for operating details
8
Why don’t I get sound in my headset when using my desk phone?
1. Verify that you’re your headset is switched on.
2. Verify that the base is connected correctly to the phone and that the power is on.
3. Verify that the link between the base and the headset by pressing briefly. When the link is established,
the online indicator on the base will light up. Consult section 3.1, alternatively 4.7 and 4.8, in the quick
set-up guide for details.
Resetting the base
You may reset the base to remove pairing settings.
To reset the base, complete the following:
1. Open the compartment cover on the bottom of the base and
locate the Reset Hole.
2. Press the Reset button in the hole on the base for 2 seconds with
a pointed object (such as an unfolded paperclip) .
When the base is reset, the base indicator lights for 2 seconds.
Note: If you reset the base you will have to pair your headset to the
base again. See the quick guide for pairing instructions. If you do not
re-pair, but put the headset back in the base for charging, the charging indicators will flash slowly to remind
you of the missing pairing.
Resetting the headset
You may reset the headset in two ways.
To reset the headset using your base unit:
1. Place the headset into the base unit.
2. Leave the headset in the Charging Cradle for about
5 seconds, then remove the headset.
3. The headset is now reset and ready for use.
To reset the headset without using your base unit:
1. Press and hold the Volume Down on the Volume button Up/Down.
2. With the Volume Down button pressed, press the Multifunction button at the same time for 5 seconds.
Your headset is now reset and will remain on.
Note: Your headset will not loose its pairing with neither the base unit nor your mobile phone.
To reset the headset from all its pairings:
1. With the headset switched on, press and hold for more than 30 seconds.
Note: You will need to pair your headset with the base again before use with the desk phone. See page 4
in this user guide.
6. Cleaning, safety and maintenance
Clean the headset by wiping with a slightly damp cloth. Dampen the cloth with only water and a little washing-up liquid if needed. Avoid getting moisture into any button sockets or other openings. The base and
cords may be dry dusted as required.
Do not immerse the GN 6210 in water. The plastic bags the GN 6210 and its parts are wrapped in are not toys
for children. The bags themselves or the many small parts they contain may cause choking if ingested.
9

Only authorised dealers or service centres may open the product. If any parts of your GN 6210 require
replacement for any reason, including normal wear and tear or breakage, contact your dealer.
Dispose of the product and battery according to local standards and regulations. The battery is guaranteed
for 2 years.
The Bluetooth®word mark and logos are owned by the Bluetooth Inc. and any use of such marks by
GN Netcom is under license. Other trademarks and trade names are those of their respective owners.
10

Deutsch – GN 6210 Bedienungsanleitung
Diese Bedienungsanleitung enthält Informationen zur Einrichtung, Benutzung und Pflege Ihres GN 6210.
Inhalt
1. Headset ein- und ausschalten . . . . . . . . . . . . . . . . . . . . . . . . . . . . . . . . . . . . . . . . . . . . . . 12
2. Verwendung mit Desktop-Telefonen . . . . . . . . . . . . . . . . . . . . . . . . . . . . . . . . . . . . . . . . . . 12
2.1 Tipps für das Anschließen des Kabels
2.2 Geräteabgleich
2.3 Zwischen Headset und Handapparat umschalten (während eines Anrufs)
2.4 Den (optionalen) GN 1000 Fernabnehmer bedienen
3. Verwendung mit Mobiltelefonen . . . . . . . . . . . . . . . . . . . . . . . . . . . . . . . . . . . . . . . . . . . . . 14
3.1 Geräteabgleich von Mobiltelefonen
3.2 Sprachgesteuerte Anrufe
3.3 Zwischen Headset und Mobiltelefon umschalten (während eines Anrufs)
4. Akustische und optische Signale . . . . . . . . . . . . . . . . . . . . . . . . . . . . . . . . . . . . . . . . . . . . . 16
5. Fehlersuche . . . . . . . . . . . . . . . . . . . . . . . . . . . . . . . . . . . . . . . . . . . . . . . . . . . . . . . . . . . . . 17
6. Reinigung, Sicherheit und Wartung . . . . . . . . . . . . . . . . . . . . . . . . . . . . . . . . . . . . . . . . . . . 19
Produktinformationen
Herzlichen Glückwunsch zum Kauf des GN 6210. Das GN 6210 ist eine drahtlose Headset-Lösung, die aus
einem schnurlosen Headset und einer Basisstation besteht, die an Ihr Tischtelefon und an Ihr Mobiltelefon
angeschlossen wird. Das GN 6210 ermöglicht Ihnen uneingeschränkte Mobilität, Flexibilität durch eine Freisprecheinrichtung sowie hervorragende Klangqualität bei Ihren Telefongesprächen.
Dieses Heft liefert Ihnen Zusatzinformationen und Hinweise.
11
1. Headset ein- und ausschalten
Was Sie tun Was Sie hören Was Sie sehen
Headset
einschalten
Halten Sie 3s lang gedrückt, bis die
blaue Anzeige mehrmals schnell blinkt.
Lassen Sie die Taste dann los
Aufsteigende Töne
(von tief zu hoch)
Die blaue Anzeige blinkt wenn das
Headset eingeschalten Ist (siehe Seite 17 Status-Indikator-Tabelle)
Headset
ausschalten
Halten Sie 4s lang gedrückt, bis die
blaue Anzeige mehrmals schnell blinkt.
Lassen Sie die Taste dann los
Abfallende Töne
(von hoch zu tief)
Die blaue Anzeige hört
auf zu blinken
2. Verwendung mit einem Desktop-Telefon
2.1 Tipps für das Anschließen von Kabeln
Für mehr Ordnung auf dem Schreibtisch können Sie das Kabel des Handapparats durch den linken bzw.
rechten Kabelschlitz der Basisstation führen, je nachdem, wo sich Ihr Tischtelefon befindet.
Befestigen und ordnen Sie die Kabel mit den Kabelbefestigungsstreifen.
Hinweis: Wenn Sie das Telefonanschlusskabel in die Telefon-Headsetbuchse (falls vorhanden) statt in die
Handapparatbuchse stecken, wird die Line-Taste des Telefons aktiviert. Sie können nun Anrufe entgegennehmen und beenden, indem Sie die Line-Taste drücken statt den Handapparat zu benutzen. Der Hörer
kann weiter am Telefon angeschlossen bleiben.
2.2 Geräteabgleich von Headset mit Basisstation
Das Headset und die Basisstation in der Originalverpackung sind ab Werk aufeinander abgeglichen, um die
richtige Funktion Ihres GN 6210 sicherzustellen. Sie müssen diese beiden Geräte also nicht abgleichen und
können nun zum Abschnitt Klares Freizeichen einstellen übergehen.
Wenn die Voreinstellungen dieses Geräteabgleichs verloren gehen (durch einen Reset der Basisstation oder
beim Wechsel von Headset bzw. Basisstation), müssen Sie Ihr Headset erneut mit der Basisstation abgleichen:
12
 Loading...