

Manual

The present documentation is protected by law. All rights, especially the right of duplication, circulation and translation is reserved.
No part of this publication may be reproduced in form of copies, microfilms or other
processes, or transmitted into a language used for machines, especially data processing machines, without the express written consent of the publisher.
All copyrights reserveds.
©2001 Sony Electronics Inc. Reproduction in whole or in part without written permission is prohibited. All rights reserved. Sony, EZ Audio and Our media is your
memory are trademarks of Sony.
MAGIX® is a registered trademark of MAGIX Entertainment Corp.
All other product names are trademarks of their respective owners.
Errors and changes to the contents as well as program modifications reserved.
© 2001 Copyright by MAGIX Entertainment Corp.

Foreword
Congratulations for purchasing Sony's EZ AudioTM Transfer & Restoration Kit! You are the fortunate owner of a stateof-the-art digital audio laboratory. Now you can clean your
cassettes, records, CD tracks, MP3 collections, and other
audio files – enhancing their sound quality – create your
own playlist, and burn high-quality CDs.
With Sony's EZ AudioTM Transfer & Restoration Kit, you
can also:
– Adapt different tracks to each other, regarding their vol-
ume and sound.
– Combine different audio formats, then edit and burn
them together.
Three Wizards make Sony's EZ AudioTM Transfer & Restoration Kit simple to use, no training or special skills required.
This manual’s tutorial section explains the most important
functions step-by-step, helping you to learn the basic principles of digital recording, cleaning, mastering, and CDburning. The last section defines the different parts of the
program.
You can also explore the system’s possibilities on your own,
using the manual as a reference guide. An alphabetical index at the end will help you find the topics.
We hope you enjoy Sony's EZ AudioTM Transfer & Restoration Kit!
3

Table of Contents
Foreword 3
MAGIX online registration 8
Legal Notice 8
System requirements 9
Support 9
Installation 10
Introduction 11
What is Sony's EZ AudioTM Transfer & Restoration Kit?11
Features 11
Tutorial 13
Connections 13
How to transfer an old record to a CD? 14
Make a CD from an old cassette recording. 18
How can I assemble songs and unite them in one audio
product? 19
Program Desktop Overview 23
Editing Overview 24
Projects 24
Player 25
Arranging with Track Markers and Objects 26
Sound Editing 27
4

Record 29
Hard drive Recording 29
Recording Source 29
Adjusting the Signal 30
Digital Transfer 30
Arranging in the Master Track 31
What are Objects? 31
Deleting or Shifting Objects 31
Changing Song Order 31
Cutting Objects 31
Automatic Pauses between Objects 32
Several Songs in one Long Object 32
Object FX 32
Shortening or Lengthening Objects 32
Object Fade-in and Fade-out 33
Setting Object Volume 33
Fitting and Mixing Objects 33
Setting Track Markers 33
Automatic Track Recognition 34
Testing and Shifting Track Markers 35
Table of Contents
Burning Audio CDs 36
Basic Information 36
Data Transfer 36
The Burning Function 36
Player 39
Tools (Mouse Modes) 41
Move Mouse mode (Wave form) 41
Cut Mouse mode (Scissors) 41
Zoom Mouse mode (Magnifying Glass) 42
Delete Mouse mode (Eraser) 42
5

Table of Contents
Wizards 43
Clean Wizard 43
Master Wizard 43
Track Wizard 43
Import-Section 45
WAV. MP3: Loading Audio Files 45
Record 46
Audio CD 48
Track Window 53
Master Track 53
LED Display 54
Volume Control with the Auto Button 54
Cleaning Effects 56
Cleaning Section 56
Declicker 56
Dehisser 57
Decrackler 57
Denoiser 57
Artefacts on Cleaning Effects 57
Clear DC-Offset 58
Clear Overdriving 58
Mastering Effects 59
Mastering Section 59
Stereo FX 59
Compressor 60
Equalizer 60
Export Section 62
”WAV.MP3” data export 62
Audio CD 62
6

Menu File 64
Menu Edit 67
Menu CD 72
Menu Options 75
Menu Help 80
Tips & Tricks 81
Keyboard Shortcuts 83
Problems and Solutions 84
Index 87
Table of Contents
7

MAGIX online registration
Please register online via the menu Help! Here are just
some of your advantages as a MAGIX networker:
– great prices for network card collectors
– new sounds for downloads
– special promotions for networkers
– demo software before the official release date
– exchange experiences and chat
– service offers such as automatic system checks and the
customer support hotline
Legal Notice
Most chart hits and whole CDs can be downloaded from
the Internet as MP3 files. However, many of these downloads are illegal. Works protected by copyright may not be
down loaded or presented on your own homepage without
the express knowledge and consent of the copyright owner.
Free transfer and trade with such music files are punishable by law.
There are, however, many sites offering free MP3 for downloading. A selection of them can be accessed directly via
the MAGIX homepage (www.magix.com).
Your own compositions can be presented as you wish on
homepages and in the network.
8

System requirements
Sony's EZ AudioTM Transfer & Restoration Kit runs on ev-
ery PC starting with a Pentium 133 Mhz that has 32 MB of
RAM, free disk memory of 100 MB, a graphics card with a
resolution of 800*600, a CD ROM drive and a 16 Bit sound
card with Windows drivers. To make the most of using
Sony's EZ AudioTM Transfer & Restoration Kit, you need a
modern and powerful multimedia PC. We recommend a
Pentium II with RAM of 64MB.
Sony's EZ AudioTM Transfer & Restoration Kit runs in the
Windows 95/98/2000, Windows ME and Windows NT
versions.
Support
If you are unable to correct your problem with Sony's EZ
AudioTM Transfer & Restoration Kit contact MAGIX support:
Info: info-usa@magix.net
Webpage: http://www.magix.com
Fax: (310) 656-0234
T.: 1-888-866-2449
(9 a.m. - 5 p.m. Pacific Standard Time)
9

Installation
1
Place the installation CD into the CD-ROM drive.
2
The installation program starts up automatically. If this
should not be the case, open the File Manager/Explorer
and click on the drive letter representing the CD-ROM drive
(generally D:\.) Double-click on mworld.exe.
3
The MAGIX music world will now start up automatically.
To begin the installation of Sony's EZ AudioTM Transfer &
Restoration Kit, click on INSTALL
4
Sony's EZ AudioTM Transfer & Restoration Kit installation
program starts. Simply follow the instructions on the screen.
Once all the files have been copied to the hard disk, a program group will be created. The installation is now complete. Confirm this with Finish.
You can now start the program at any time over the Windows Start menu.
10

Introduction
What is Sony's EZ AudioTM Transfer &
Restoration Kit?
Sony's EZ AudioTM Transfer & Restoration Kit is an easy to
use powerful audio software program you can use for assembling, cleaning, and mastering your different music
sources, such as record albums, cassette tapes, MP3 songs
from the Internet, or CD tracks. You can combine, edit and
enhance these materials for a high-quality output and then
burn it on an audio CD. With Sony's EZ AudioTM Transfer
& Restoration Kit you can either use the Wizards, which
provides a simple step-by-step process or the manual Cleaning/Mastering Effects for more enhanced controls to:
– Eliminate scratching sounds, static, and other audio in-
terference from your rare records and burn audio selections on CDs to protect your record albums from fur-
ther wear and tear.
– Clean cassette recordings and MP3 songs.
– Create top-quality CD compilations from different au-
dio CDs.
Features
Cleaning Functions
Sony's EZ AudioTM Transfer & Restoration Kit offers several professional cleaning functions that remove distracting noises and sound interference from audio materials.
The Declicker eliminates crack and click noises.
The Decrackler removes constant record cracking.
The Denoiser erases regular disturbances, including banging or net-droning.
The Dehisser eradicates analog-band hissing.
Other special functions do away with noises from direct
current and digital overdrive (also called ”clipping”).
Mastering Functions
Besides cleaning sound material, Sony's EZ AudioTM Transfer & Restoration Kit can edit or adjust sound and volume.
Its professional mastering functions include the following:
– The Stereo Enhancer edits the audio material’s stereo
panorama.
– The Equalizer interacts directly with the sound spectrum
and allows alterations in band frequency.
– The Dynamics Section edits the volume ratios with a com-
pressor.
11

Introduction
Other Effects
Sony's EZ AudioTM Transfer & Restoration Kit includes
exciting special effects in addition to its cleaning and mastering functions:
– Resampling and Stretching functions allow you to accel-
erate or slow down the audio material as you choose.
– Merging the beats-per-minute helps produce stunning
CD mixes.
– The powerful Echo / Reverb Editor produces spatial depth
in speech recordings.
Importing Audio Material
Sony's EZ AudioTM Transfer & Restoration Kit offers several possibilities for importing audio material.
– Audio files such as MP3 or WAV are loaded and edited
directly.
– Analog recordings from records or tapes are digitized
before editing.
– The recording function records every sound source us-
ing CD quality via the sound card.
– Audio CDs are converted to editable audio files through
the Rip CD process. This allows you to decide, during
the loading phase, whether to save the files on the hard
drive in a high-resolution WAV format or in the spacesaving, compressed MP3 format.
12
Master Track
Disc recordings, audio CD tracks, MP3 or WAV files are all
shown with a wave shape on the Master Track. You can
cut, edit, and arrange files however you like.
You can also open a second track to “park” an arrangement
or obtain special over-laps or inserts of various songs.
CD Burning
Burn audio CDs from different sound sources and play
them on any audio CD player! Just load the audio material
in Sony's EZ AudioTM Transfer & Restoration Kit - no other
steps are necessary. The CD will play exactly as it sounds
on the Master Track.
Three Wizards
With Sony's EZ AudioTM Transfer & Restoration Kit’s Wizards, you can see and control all processes as you work,
and you can change Wizard settings at any time.
Clean Wizard cleans all kinds of audio material. Master
Wizard checks overall volume and stereo behavior and allows you to change parameters via the equalizer. Track Wizard helps you arrange the material that appears on one track.

Tutorial
This chapter covers all the important functions of Sony's
EZ AudioTM Transfer & Restoration Kit. No special knowhow is required – just a little time for the recordings and
some hard drive space.
With Sony's EZ AudioTM Transfer & Restoration Kit, you
can download audio material from different sources and
compile it into a MAGIX Project, where you can clean it
with special functions, then edit and export it as audio files
or audio CD.
First, you need suitable audio material. Analog material
such as records or tapes must be previously digitized, so
the computer can edit it. Sony's EZ AudioTM Transfer &
Restoration Kit’s recording function allows you to record
analog material through the computer’s sound card. You
can load records, cassettes, CDs and audio files in MP3 format from the Internet.
Connections
Analog material such as records or tapes must be previously digitized, so the computer can edit it. The recording
function allows you to record analog material through the
computer’s sound card. Make sure you have the correct
connections. The audio material played by your stereo system must be loaded directly into the computer, so your stereo system and the sound card must be connected.
1. If the amplifier of your stereo system has separate line-
out aux-out sockets use these sockets for all recordings.
Connect them to the (usually) red input of the sound
card. Generally, the hi-fi amplifier has RCA sockets, and
the sound card has mini-stereo catch sockets. Use the
cable provided in Sony’s EZ AudioTM Transfer & Resto-
ration Kit with RCA plugs and mini-stereo catch con-
nectors.
2. If the amplifier has no separated outputs (other than for
speakers), use the headphone socket for recording. You
will need the cable with two mini-stereo catch connec-
tors and adaptor provided in Sony’s EZ AudioTM Trans-
fer & Restoration Kit. This process has an advantage:
you can control the level of the signal at the headphones’
input. The disadvantage is that phone outputs are nor-
mally not the highest quality. With cassette recordings
always use the tape deck’s line-out. When copying
records, you often have no other choice but to use the
headphone socket. Never connect the record player’s out-
puts directly to the sound card, because the headphones’
13
Tutorial
signal must be pre-amplified. If you don’t have a preamplifier then you will have to use the headphone socket.
Now that the sound source and sound card are correctly
connected, let’s begin with a record recording!
How to transfer an old record to a CD?
1. Clean the record.
To achieve the best sound quality, clean records before recording them. Many noises are caused by dust particles,
which get into the album grooves and produce a rustling
noise when played. Try an anti-static clothe, which attract
and lift the dust particles. You can also clean records with
specially prepared liquid or damp products. If you use one
of these products, always rinse the record with clear decalcified water after cleaning, so that no deposits remain in
the grooves.
2. Switch on all devices and start the program.
Turn on all devices necessary for recording: stereo or hifidelity system, including record player, your computer, your
amplifier, if you using one, and if you have them, the
computer’s active loudspeakers.
Then, start Sony's EZ AudioTM Transfer & Restoration Kit
from the Windows® Start Menu.
14
3. Adjust the signal level.
Optimal signal control is essential to obtain the best possible sound quality.
Once the recording source and the sound card are correctly
connected, open the Recording Dialog with the Record Button and start replay. Control the recording level with the

LED chains in the Recording Dialog. For best results, search
for the loudest point on the record and play it. This point
should give you the maximum sound level.
The display in the recording dialog shows the recording
level. If it is too high (or too low) you have to lower (or
raise) the input signal. If you have connected the amplifiers’ line-out to the sound card, you can do this only in the
mixer window of your sound card. You can access this button directly from the recording dialog using the Level Control tab.
If you are using the amplifiers’ headphones socket, adjust
the level directly from the source, since the headphones
socket has its own level control.
Tutorial
4. Record
Before recording, make sure the Recording Dialog’s automatic track recognition is on. The different songs on the
record should appear as different CD tracks on the future
CD.
Click on the Record Button in the Recording Dialog and
start the record player. Recording and the sound source do
not have to be started at the same time.
Displays in the Recording Dialog will inform you continually about recording time and available memory space on
your hard drive.
When the first side of the record is finished, press Stop.
The audio material will immediately be displayed in the
Track Window.
Now, turn the record over to record the second side. At the
end of the recording, the audio material of this side appears on the track behind the first side.
15
Tutorial
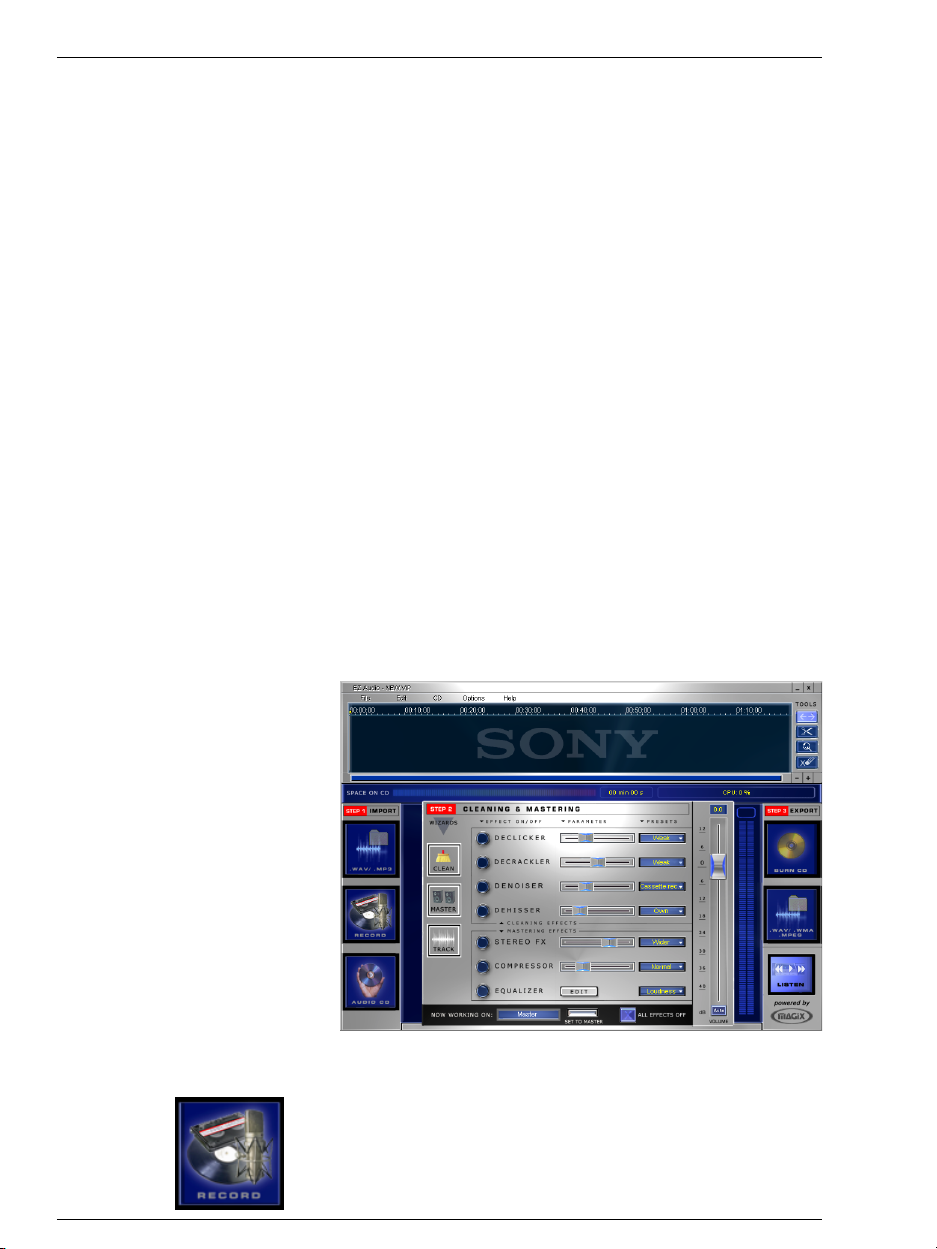
Player
Track markers
5. Test the recording.
Next, listen to the recording. To do this, use the Player functions. Here, you ’ll find all the functions you know from
your cassette recorder.
Play and Stop work considerably faster when using the computer keyboard’s space bar. Play always begins from the
small yellow triangle over the track in the Bar-line. You can
shift the triangle by clicking the mouse on the point of the
Bar-line where you want to play the song the next time.
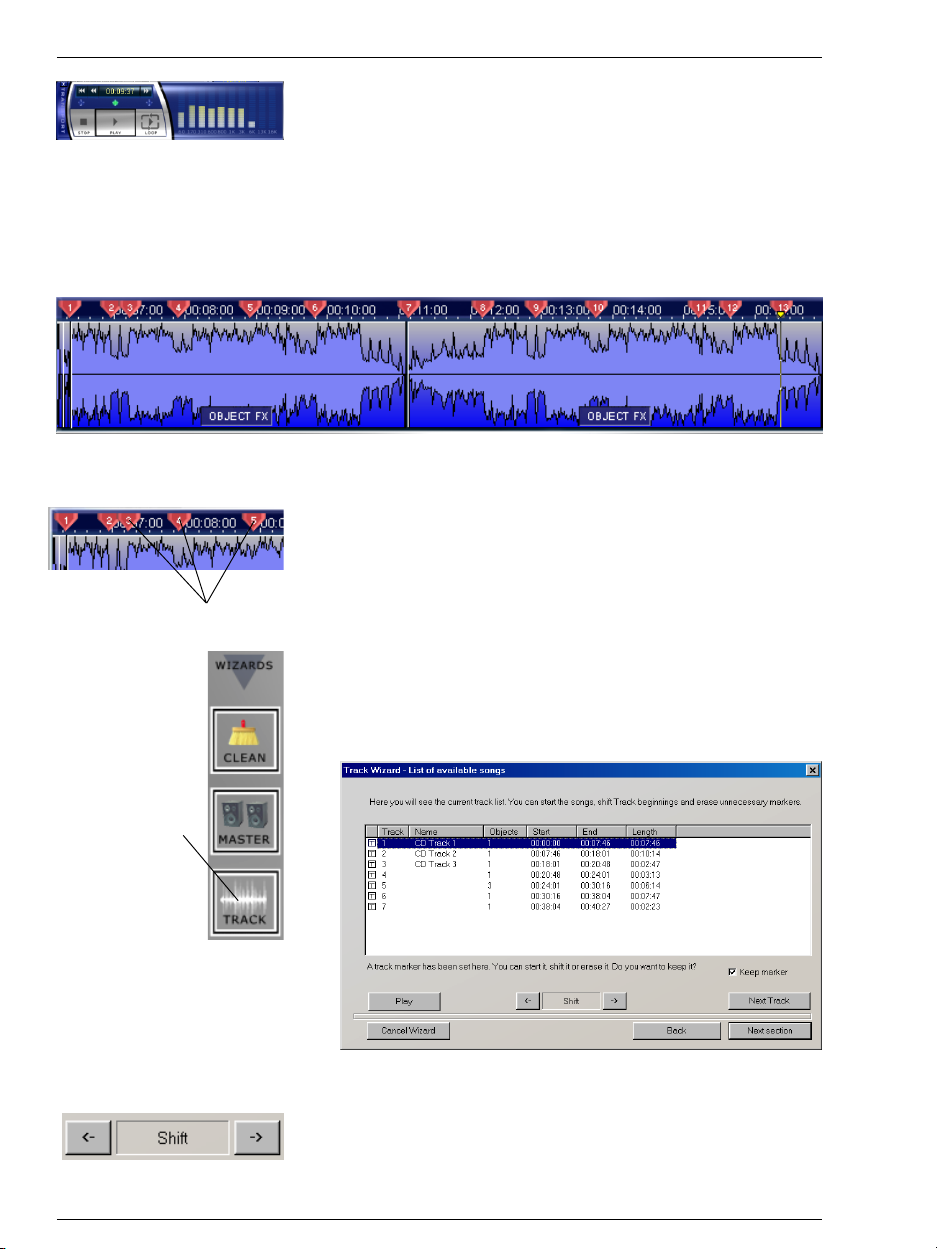
6. Control the Track Markers.
If the recording is OK, ensure that the Track Markers are
set at the correct places. Track Markers are the numbered
triangles in the bar-line over the track. They were set automatically by the track recognition function. When you burn
the disk, the Track Markers are transferred onto the audio
CD. They can be accessed directly with the CD player and
are shown on the CD player display. Without Track Markers, the audio CD would have only one track.
Activate the Track Wizard in order to display all the tracks
in one play list.
Track Wizard
16
Each track can be accessed and played separately.
With the Next Track tab, you can play beginnings of the
tracks in sequence to control them.
In case they are not already correctly set, all Track Markers
can be shifted forward or backward with the shift tabs.
When all tracks are on the list and all Track Markers are set

at the right positions, exit Track Wizard by pressing the
OK tab, and if necessary, set the Track Marker by hand.
Sometimes new tracks do not begin after a pause, but in
the middle of the material; for example, directly after an
intro track. The automatic track recognition does not find
such tracks. Should you find such a position where a Track
Marker should be set, place the Position Bar on that point
and press the ”m” key on the keyboard (or choose the option Set Marker from the CD Menu).
A new marker will be set at the Position Bar. The subsequent Track Markers will be automatically renumbered. If
it is still not set at the right position, you can shift in the
bar-line holding the mouse button. You don’t have to activate the Track Wizard every time.
7. Test the distance between record sides.
Two objects are on the track, one for each record side. Now
check to see if the distance between both objects is correct.
You don’t want too long a pause on the audio CD. To check
the transition, set the Position Bar at the end of the first
object then play it back.
If it is too long (or too short), click on the object furthest
back and shift it holding the mouse button until the distance is correct. The Track Markers over the second object
are also shifted, so nothing will be mixed up.
Tutorial
8. Eliminate disturbing noises with the Clean Wizard.
The easiest way to eliminate unwanted noises from a recording is with the Cleaning Wizard. For records, the
Decrackler, Declicker, and Denoiser are especially helpful.
Decrackler eliminates the ”rustle layer” from worn records.
Declicker looks for scratches and suppresses them.
Denoiser diminishes low frequency bumping.
... or with the FX Section
While playing, the recording can also be edited directly on
the track. Use the FX Section in the middle of the screen.
Each effect can be turned on or off on the left side. A scroll
controller in the middle controls the effect’s intensity. The
Edit Button on the right side opens the screen of the corresponding effect, where you can fine-tune the algorithms.
In the Effect Pre-sets, you can choose different settings for
different noises.
All effects can be combined in any way.
It’s advisable to take some time to experiment with these
effects, so you can become acquainted with the way these
tools work. The basic rule for cleaning effects: use them
17

Tutorial
with caution! Each effect can cause changes to occur in the
whole material, and in some extreme cases, can even create new noises known as artefacts.
9. Burn a CD.
Once the record is recorded, cleaned of noises, and the Track
Markers are set, you can burn the audio material directly
onto an audio CD. The fastest way to do this is by clicking
on the Audio CD Button in the Export Section.
In the Burn Dialog, choose whether you want to produce
the CD ”on the fly” or as an image file on the hard drive.
The ”on the fly” process requires additional memory space
on the hard drive. The CD will be directly burned from the
program with all of its effect settings. If your CD-R drive is
not being detected by the software or you believe that your
CD-R drive is not supported by the software please contact
MAGIX Support (1-888-866-2449 or info-usa@magix.net)
for assistance.
Make a CD from an old cassette recording.
This process is similar to record recording, but takes the
special characteristics of audiotapes into consideration.
18
1. The best connection is made through the tape deck’s
line-out connectors.
If you have the corresponding cable, use the tape deck’s
line-out connectors rather than the head phone jack. The
line-out connectors are better than the headphones’ connection.
2. Open a new Sony's EZ AudioTM Transfer & Resto-
ration Kit Project.
If you still have a record project open from the preceding
example, save it and close it with the File Menu. Now, open
a new Project with the File Menu.
3. Sound level, recording, controlling Track Markers.
These steps are the same as those for a record recording.
Make sure that the cassette is played with the same noiseabating system (eg.Dolby) with which it has been recorded
– otherwise you will produce additional hissing or loss of
treble.
4. Eliminating noises
Cassette recordings always have a certain hissing sound
whose volume depends on the tape quality and the tape
recording. The best remedy for eliminating this noise is
the Dehisser. Choose from the different forms of hissing

shown in the pre-sets and adjust the intensity of the
Dehisser with the slide control in the middle.
Depending on the recording, you can now filter other noises.
With a cassette recording, we recommend using the special record functions such as the Decrackler, Declicker or
Denoiser.
5. Sound editing with the mastering effects
It is often useful to apply mastering effects to old tape recordings, because many cassettes are dusty after long periods of storage, making them sound slightly fuzzy.
To refresh them, use the Master Wizard. It provides an overview of each effect and the typical uses of all mastering
effects.
The Equalizer and the Stereo FX processor are especially
suitable for dull tape recordings. High frequencies, which
are the first to suffer from storage and wear, can be increased again. The Stereo FX processor can help many a
blurred and mushy recording to recover its transparency,
enhancing the stereo sound of the material.
6. CD burning
The last step: Click on the ”audio CD” button in the Export
Section to open the burning dialog.
Tutorial
How can I assemble songs and unite them in
one audio product?
Here’s how you can combine and refine several different
sound sources. We’ll use songs and/or music recordings
from record albums, tapes, audio CD tracks, and MP3·
songs from the Internet in this example.
1. Loading songs
To begin, load all songs to a new Sony's EZ AudioTM Transfer & Restoration Kit project. Record songs from records or
tapes with the recording function, as explained in the previous examples. MP3 songs from Internet must be saved
on the hard drive after each download. From there, load
them to the Track Window with the WAV.MP3 button in
the import section.
Import audio CD tracks as follows:
1. Insert an audio CD into the CD-ROM drive and click on
the ”audio CD” button in the Import section.
2. Select it or select the desired title (with Shift + mouse
click. with Alt + cursor keys).
3. Click on ”Copy selected track(s)…”
4. The ”Import project” dialog box appears. Here you can
determine the file name and the destination index.
19
Tutorial
5. Now the audio material will be copied from the CD drive
to the hard drive. A progress display will keep you informed.
6. When the reading is completed, the dialogs are closed
and the tracks are inserted as single objects on the Master Track.
2. Combining
You do not have to load the songs in the order in which
they will be burned onto the CD. Sometimes it is easier to
record all songs of one source, for instance songs from
records, then tape recordings, then audio CD tracks, and
then audio files.
The order of the songs on the track can easily be changed
afterwards: just drag the Track Marker of a song, which
has to be placed before another, in front of the Track Marker
of that song. The song will be placed there.
Delete objects that will not be used from the track by using
the erase tool.
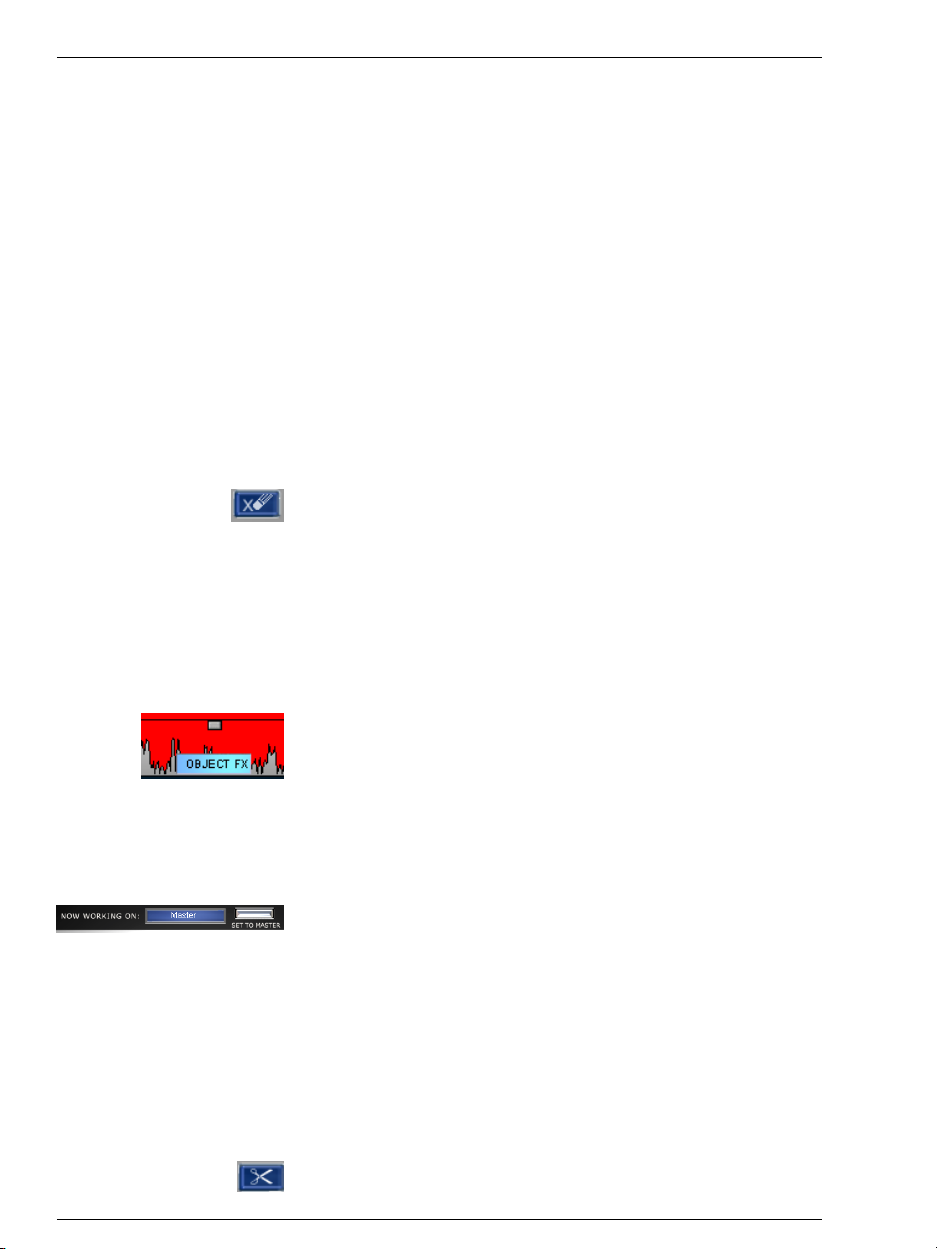
3. Cleaning and mastering effects for single objects
When you combine audio material from different sources,
we suggest that you apply the same cleaning and mastering effects equally to all recordings. Typically, tape recordings have additional noises when compared to record recordings.
This is why Sony's EZ AudioTM Transfer & Restoration Kit
has two effect modes: Master FX and Object FX. In the
pre-set Master FX, the effect is applied to all material in the
track. In Object FX mode, the effect applies only to the selected object. Each object in the track has its own Object
FX button, which you can use to activate the Object FX
mode. Hence, the sound of each object can be set to obtain
a homogeneous overall sound.
To return to the Master FX mode, just click on a free space
of the track or on the ”Master FX” button on the bottom of
the screen.
20
4. Other object editings
Sometimes it’s necessary not only to move Track Markers,
but also to edit single objects in the track. For instance, if
an especially noisy or static-filled part appear in the object,
it is best to cut out the ”disturbed” passage so you can treat
it with special effects in the Object FX mode.
Splitting objects: Select the Scissors Tool in the Tools
window or in the Options menu (”Mouse cut mode”). When
you place the mouse inside the Track Window, the pointer
changes to the scissors symbol. The mouse pointer / scissors symbol then drags the Position Bar with it so you can
determine the cutting point. If you click on the track with
the left mouse button, the object will be cut in two at that
point. You can also cut out single songs from long objects
in order to delete them.
Zooming: When cutting, it is best to work in high-zoom
steps of the wave form display. Select the magnifying glass
tool to set the mouse cursor in zoom mode. Now click on
the area you want to enlarge. Left click to zoom in, right
click to zoom out.
To see the whole track in overview, press the ”a” key on the
keyboard.
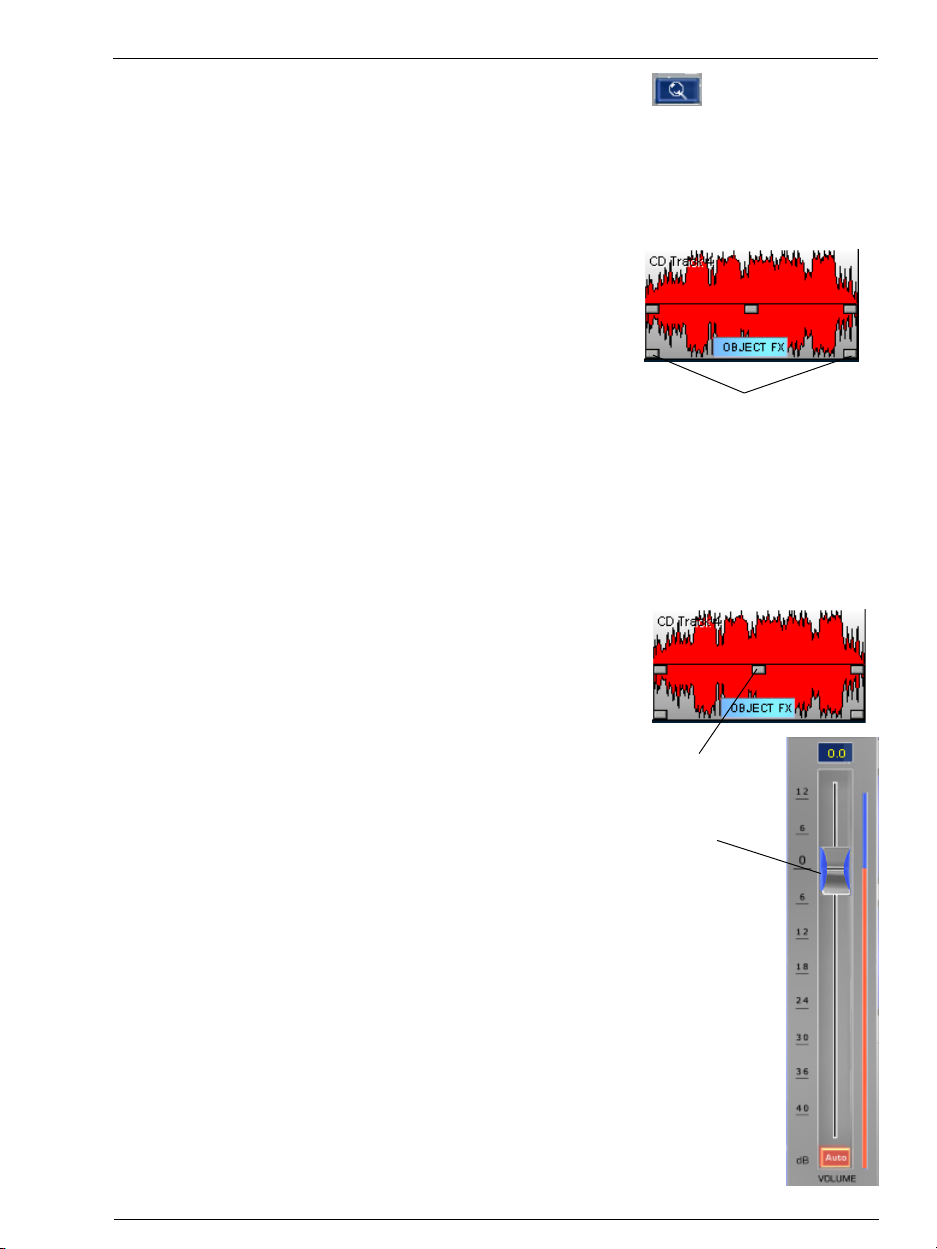
Changing the object length: While cutting the songs
you can not always ”catch” the beginning or the end, so the
recorded object can begin with an unwanted pause.
This can be corrected easily and quickly with object handles.
When you place the mouse pointer on one of the bottom
handles, it turns to a stretch symbol. Now you can close the
gap by holding the mouse button. You don’t have to apply
the scissors tool every time you want to change the length
of an object.
Tutorial
Changing the object length
5. Adapting the volume
Object volume: Before burning the CD, equalize the volume of the different tracks so that you don’t have to use the
volume control of your amplifier after each song.
You can use the special volume handles in the middle of
each object to change the volume of the song in the track.
Select the loudest section of the object, play it briefly and
then set the Position Bar on another object. Compare both
volumes from each object and adjust the lower volume to
the higher one. This process provides you with balanced
volume levels between songs.
To set an object as loud as possible without causing
overdriving, click the Object FX mode on the auto button
beneath the volume control. This will maximize the object’s
volume. You can maximize all objects at once, if you like,
but it’s not likely that you will want to do this very often,
particularly when you are compiling a variety of musical
selections. Ballads, for example, are normally lower in volume than dancehall tracks and do not have to be set as loud
as possible.
Master volume: Once you set the general volume of the
songs, you should maximize the volume of the whole ma-
Object volume
Master volume
21

Tutorial
terial. To do this, enter the Master FX mode, look for the
loudest part, and play it. Then press the auto button beneath the volume control. The loudest parts will be set to 0
dB (= maximum setting), and all other parts will be adjusted. Be careful with this procedure. If you don’t play the
loudest part, the other parts can be overdriven.
6. CD burning, exporting files or saving projects
At the end of the process, you have two options. 1) You can
produce an audio CD, and/ or 2) You can save the project
on your hard drive as an audio file. To perform option 2,
click on the WAV.MP3 button in the Export Section.
You can also save the project using the File menu. All objects and effect-settings will be saved and you can edit them
later.
To burn a CD, first examine the length of the project, particularly with “mixed” projects that use different kinds of
audio materials. You can always burn a record on a blank
CD, but with a mixed-materials project, you will soon reach
the 75-minute limit.
22

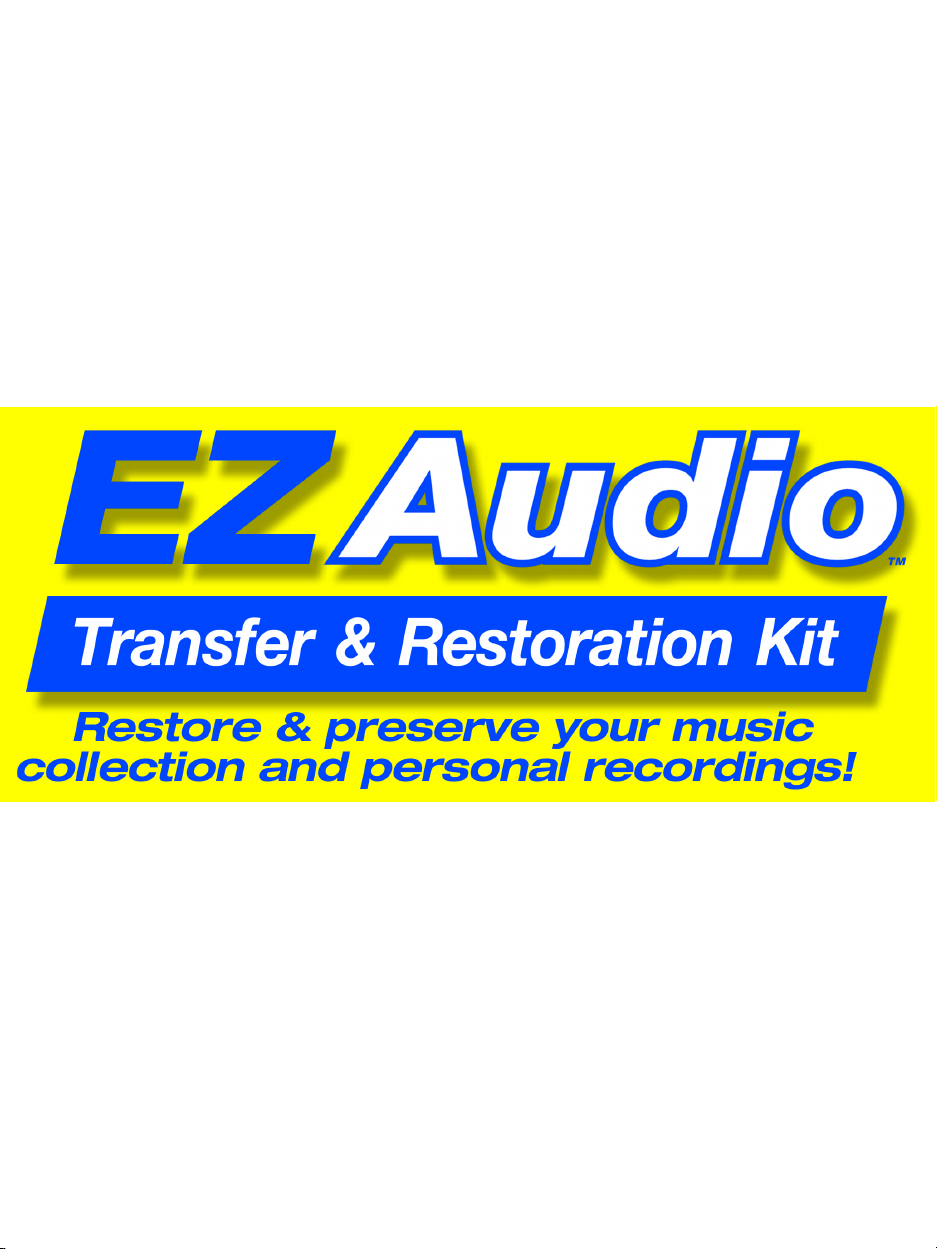
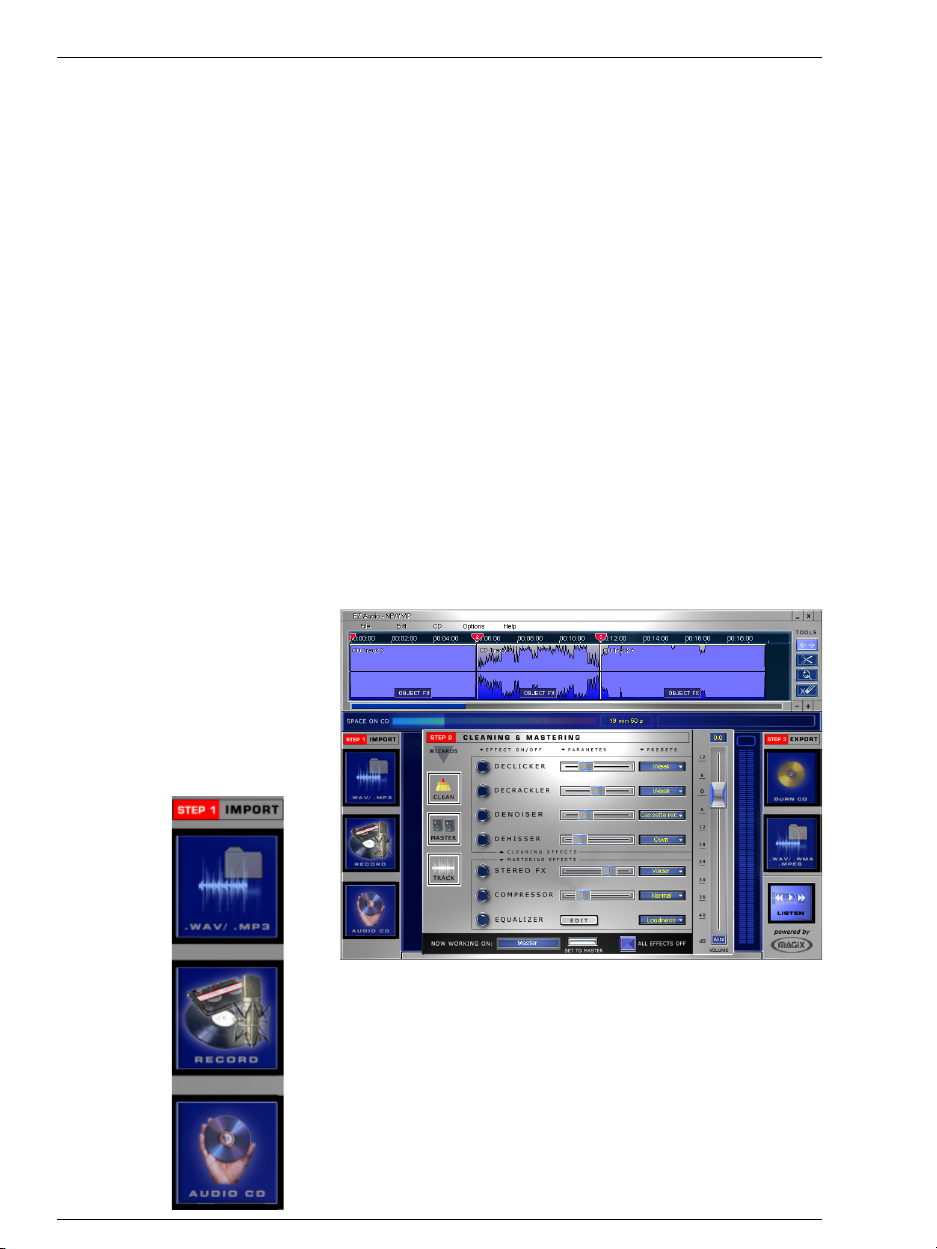
Program Desktop Overview
Master Track with bar-line
The Master Track with bar-line displays
the audio material in wave form. The
bar-line with the play position and Track
Markers is located on top of the track.
Set the units of measure in the Options
menu.
Import Section
Load (or import)
new audio material into the
Project: audio files
from the hard
drive, records or
tapes through the
record function,
or songs from an
audio CD.
Menu Bar
You’ll find important editing commands in the menu bar. To the right
of the menu options, you will usually find letters or key combinations
with which you can activate the command by using the computer keyboard.
FX Section
Edit the audio material in
the Master Track using
the different cleaning and
mastering effects.
Export Section
Export the audio material
in the Master Track as
audio files or burn directly
onto an audio CD.
Controls Sections
In the Controls Sections,
you can select the
“Tools“ (mouse modes)
and the three Wizards.
23
Editing Overview
This chapter shows you how to edit with Sony's EZ AudioTM
Transfer & Restoration Kit and explains the important terms
and tools in summary form.
Projects
Working with Sony's EZ AudioTM Transfer & Restoration
Kit projects always requires these three simple steps:
1. Loading audio material into a project with the import
section.
2. Editing the material with the cleaning and mastering
functions or editing directly in the Track Window.
3. Exporting the project as audio files or burning it directly
onto an audio CD through the Export Section.
With the File Menu, you can save or load projects as VIPfiles. When saving a project, the audio material of the Track
Window will be saved on your hard drive, including all Track
Markers and effects settings. You can easily complete or
change the projects at a later time.
24
Import Section: Loading audio material
You’ll find the Import Section on the left side of the screen.
Audio material can be loaded (imported) into Sony's EZ
AudioTM Transfer & Restoration Kit from this section. This
audio material can consist of complete records or tapes,
single songs, audio CD tracks, complete audio CDs, MP3
songs or other audio files.
Load analog audio material from records or tapes with the
Recording Function. Load audio CD tracks with the ”Rip
CD” Function.
Load audio files with the left ”WAV.MP3” button.
For more information on importing, please read the ”Import Section” of this manual.
Editing in the Track Window
All imported material is displayed in the Track Window in
wave form. The track where you see the material is the
”Master Track.” This is where you assemble the songs, supervise the sound editing, and master your CD.
Editing in the Track Window includes: cleaning and optimizing the sound; arranging the material on the track in
the order you want; and preparing the audio material for
CD burning.
Adjust the sound with the FX Section’s Cleaning and Mastering Functions.
Edit all the material with all songs and objects with Master
FX.
Edit a portion of the material or a specific selection with
Object FX.
The Arranging Function in the Master Track includes:
choosing songs; putting the songs in the order you want;
adjusting sound and volume between songs or parts; and
setting Track Markers for burning the CD.
Editing Overview
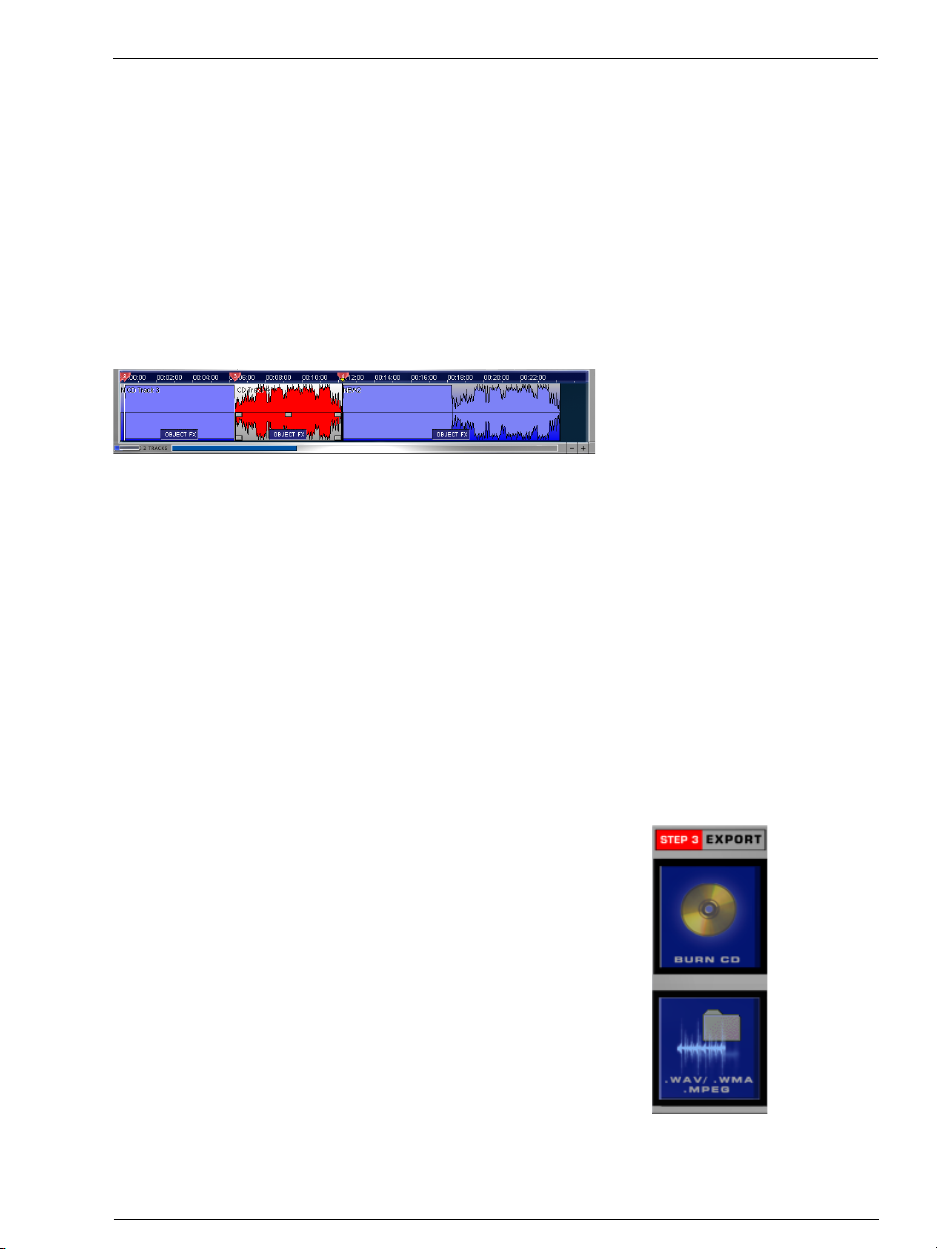
Export Section: Burning CDs or Saving Audio Files
When the sound is correct and all Track Markers are set at
the right places, you have two options.
1) Burn a CD directly from the project. The CD will sound
exactly as the material sounds when played on Sony's EZ
AudioTM Transfer & Restoration Kit.
2) Export the project to an audio file. You can choose from
several file formats and format settings. For instance, you
can place your project on the hard drive as an MP3 file to
save space.
Player
Set the Position Bars in the project with the Player. This is
a fine vertical line in the Track Window, and it shows the
current play position.
25

Editing Overview
With the Player you can start and stop playback, rewind or
forward, and insert the Position Bar at the beginning of the
Master Track.
Tools & Wizards
”Tools” are the tools you need for the most important operations in the Track Window of Sony's EZ AudioTM Transfer & Restoration Kit. Select the Tool with the mouse. Depending on your choice, the pointer and the function of
the click will vary when you move the mouse toward the
Track Window. This is why Tools are referred to as ”mouse
modes” and why they can be found in the Options Menu.
The Wizards set the functions of Sony's EZ AudioTM Transfer & Restoration Kit in a logical order. (See the Wizards
Section in this manual.)
Arranging with Track Markers and Objects
Track Markers
Normally, you split the audio material in the Track Window with the Track Markers, thus organizing the material
into CD tracks before burning an audio CD. The CD tracks
can be loaded and displayed directly from the CD player.
Without using these Track Markers, the CD would play as
a single track.
You can set the MAGIX Track Markers automatically or
manually, by selecting with the mouse and then shifting or
deleting.
26
Objects
Objects are parts of the actual audio content, which can be
edited separately.
Tracks, on the other hand, simply function as ”bookmarks”
that designate the different track positions on the audio
CD. Objects are important for editing sounds of songs or
parts of songs individually; they help to fine-tune the sound
or certain sound passages.
Objects can be split in as many smaller objects as you like
and can be shifted and deleted.
Shifting or deleting an object on a Track will shift all following objects with their Track Markers, so that the pauses
between songs are maintained.

It is not necessary to shift the object itself to change the
order of the songs. It is easier to click and drag the corresponding Track Marker and place it before or after another
marker. This changes the order of the objects within the
track.
Sound Editing
The different Cleaning and Mastering Functions that enable you to perform sound editing are available in two different modes.
1) In the pre-set Master FX Mode, you can edit all audio
material that is on the Master Track.
The Master FX Mode works well for certain applications.
For instance, when a record or tape simply needs to be
denoised (cleaned) and burned on a CD, it is normally not
necessary to edit each track separately, since the disturbing
noises are distributed regularly over the whole material.
2) When you need to use the Cleaning and Mastering Functions on individual Objects, use the Object FX Mode. To
do this, click on the Object FX Button of the corresponding
object, and see that it is highlighted. If a part needs to be
cleaned of scratches, then it is best to ”cut” (or separate)
this part from the recording and consider it as an individual
object to be cleaned in the Object FX Mode.
To return to Master FX Mode, click on an empty space of
the Track Window or on the Master FX Button at the bottom of the screen.
Editing Overview
Cleaning
Cleaning functions are the upper four modules in the FX
Section: Declicker, Decrackler, Denoiser and Dehisser.
The Declicker is applied for scratches and click noises as
can be found in old records. The Decrackler is specialized
in eliminating the regular rustle and scratch layers as found
on worn and/or dusty records. The Denoiser is used for
net-droning, bumping, and other disturbing noises. The
Dehisser specializes in tape rustle and other “white noises”.
Besides these, there are two other cleaning functions that
suppress direct current noises and digital clippings. These
Functions are selected in the Edit menu, but before you
select the Function, be sure to select the object to be cleaned.
It is difficult to determine which Cleaning Function is best
suited for certain noises. The possible noises are too numerous. Ultimately, you will need to ”play it by ear.” It is a
good idea to apply several Cleaning Functions at the same
time as well as to try different combinations.
To help you choose the right Cleaning Effects and Effect
combinations, you will find a choice of Pre-sets for each
27

Editing Overview
Effect, plus the Cleaning Wizard, which takes you through
different Cleaning Functions with examples.
Mastering
Mastering Functions are the three lower modules in the
FX Section: Stereo-FX-Processor, Equalizer, and Dynamics Processor.
Use Stereo FX Processor for editing stereo panoramas. With
the Stereo FX Processor, you can enlarge (or make narrower) the stereo characteristics of the material and control
each stereo channel separately.
The Equalizer increases or decreases targeted single-frequency bands (treble, middle, and bass). You can ”brighten”
the sounds of ”dull” songs or add dynamics to flat basses,
among other sound improvement options.
The Dynamics Processor is, in principle, an automatic, predictive volume control that flattens or pulls the level apart.
The compression option makes the sound dense, more
impressive and louder.
28
 Loading...