

Page 1

Sony Effio-V HD Day/Night Camera
(Build-in OSD)
User’s Manual
Apply to:Box Camera, IR Waterproof Camera, Dome Camera .
Thank you for purchasing our products. Please read the manual carefully
before operating
Website: http://www.hkvstar.com
Page 2

The limited stated: The information included in this article is
according to the current edition content establishment, regarding this
contains, the content doesn’t make any statement or the guarantee. In
addition this article will possibly not contain the information which
will be changed, without notice situation. The company has the
revision power to this publication.
Version:VS-ZX414114V01 44#
Page 3
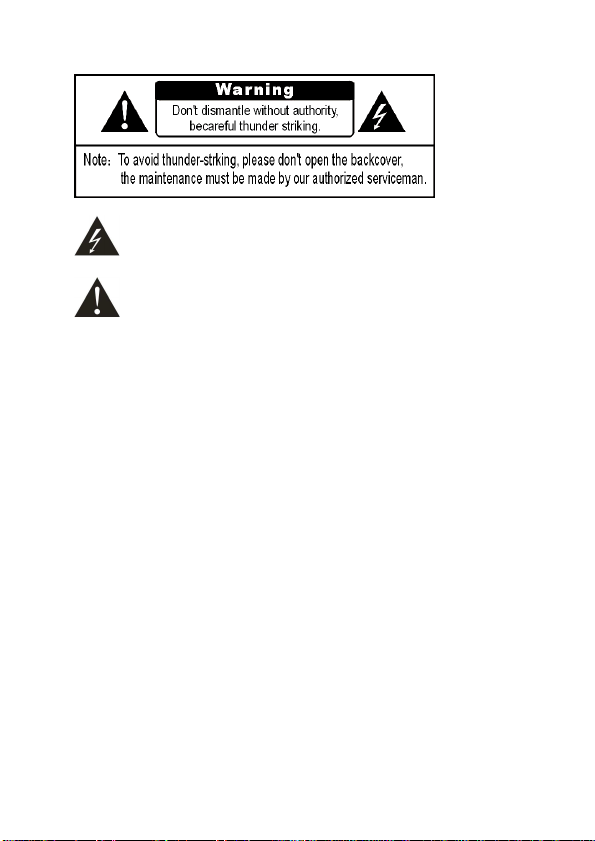
Safety Precaution
This symbol means that there might exist uninsulated
dangerous voltage inside the case, be careful of electric shock
This symbol reminds you to pay attention to important
operation and maintenance instructions in the accompanied information
Warning
In order to prevent damage caused by fire or electric shock, please do
not put cameras exposed in the moist environment or rainwater
Please make sure the adapter is consistent with product specifications,
otherwise it might cause fire, electric shock or damage.
Pay attention to polarity of the adapter, it might cause some accidents
like fires
Pay attention to polarity of the adapter, it might cause some accidents
like fires
Power supply must be firmly fixed so as not to loose to cause fires。
If the device gets ″ abnormal smell or smoke”, please stop it
immediately and contact with our customer service center。
Tributor or our maintenance office authorized by our company,
otherwise we won’t promise warranty。
Please do not splash water on the product components when cleaning
Page 4

Notes
Do not make the products under great impact or stay away from
strong electromagnetic interference and vibration.
There are some sophisticated parts inside the camera, therefore,
during transportation and installation, please avoid the damage cause by
stress or severe vibration. For the sake of safety, please do not switch on
power before accomplishing all installation.
Please comply with all electrical safety standards during operation,
camera or signal transmission cable should maintain a sufficient distance
(50 meters) with high-voltage equipment or cables, if necessary, lighting
and thunder protective measures must be taken.
Please install the camera in well-ventilated environment.
Please do not make the camera face sunshine or other strong light
directly in case of any damage to the lens and the sensor.
The temperature and humidity range for cameras work are -10 ~ 50
℃
, less than 95% separately, please do not start cameras beyond this range.
To avoid lightning strikes, please make sure the installation of
power supply ground line in a good condition.
To prevent the equipment from damage by shower or splash of
water, please do not place the device substances such as liquid.
Page 5

Contents
I、Feature..........................................................................................................6
II、Interface ......................................................................................................7
2.1 Interface ............................................................................................7
III、OSD ...........................................................................................................8
3.1 Scene select.......................................................................................8
3.1.1 Shutter/AGC .......................................................................8
3.1.2 WHITE BAL.....................................................................10
3.1.3 HLI/BLC...........................................................................10
3.1.4 WDR.................................................................................11
3.1.5 DNR..................................................................................12
3.1.6 DAY/NIGHT.....................................................................12
3.1.7 DEFOG.............................................................................14
3.2 PICT ADJUST ................................................................................14
3.3 EZOOM ..........................................................................................16
3.4 DIS (Digital image stabilization).....................................................16
3.5 Privacy............................................................................................17
3.6 Motion detection .............................................................................17
3.7 SYS Setting.....................................................................................18
3.7.1 Sync Camera .....................................................................19
3.7.2 Lens...................................................................................19
3.7.3 Image flip function............................................................20
3.7.4 Communication.................................................................20
3.7.5 Camera ID.........................................................................21
3.8 Language......................................................................................22
3.9 MAINTENANCE ........................................................................22
3.9.1 White Pixel Mask..............................................................23
3.9.2 Camera reset......................................................................23
3.10 EXIT / SAVE ALL........................................................................24
IV、Specification............................................................................................25
V、FAQ...........................................................................................................27
Page 6

I、Feature
1. New Generation SONY CCD and DSP
Adopting the latest CCD and DSP, the camera can receive clear and lucid
images even at circumstances with very low illumination.
2. Wide Dynamic Range (WDR)
WDR Camera adopts cutting-edge and effective technology. With this
function it can see all the view both inside the house and outside of the window
with different lighting.
3. High Resolution
Color: 700TVL .
4. D/N Switch
Day & Night cameras can switch automatically into color or B/W
according to optical changes.
5. 3D DNR
Digital Noise Reduction Technology enhances the ability to handle with
signal noise ratio, this technology makes camera can receive more clear and
vivid images even under low-light conditions.
6. Motion Detect
Motion detection function can trigger alarm or recording when sensing
moving objects, users can set the sensitivity and multiple detection zones
7. Privacy Mask
The Privacy Mask can block out sensitive areas from view, covering the
areas with a solid block of color, you can adjust the mask position and size
8. OSD
On Screen Display Menu
Page6of28
Page 7
II、Interface
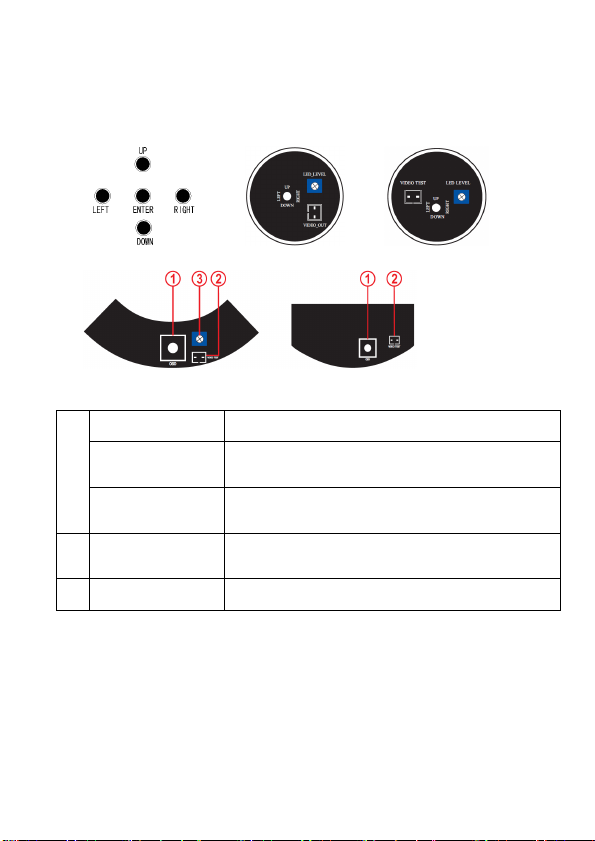
2.1 Interface
ENTER Push the joystick down to enter OSD menu
1
UP/DOWN
LEFT/RIGHT
VIDEO TEST/
2
VIDEO OUT
3
LED LEVEL Adjusting brightness of IR LEDs
Select the desired feature by using Joystick
with Up / Down direction
Change the status of the selected feature by
using Joystick with Left / Right direction
Additional video out for installation
Page7of28
Page 8
III、OSD
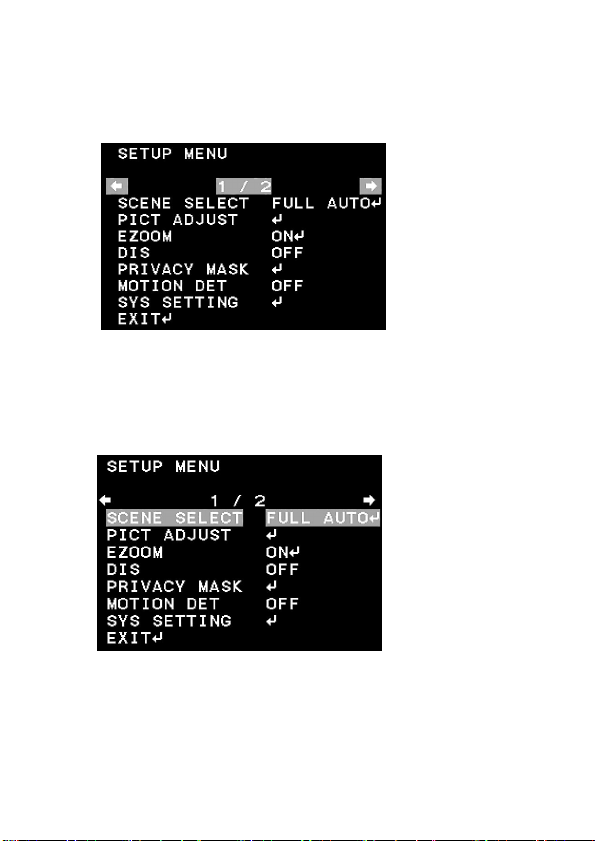
Press“Enter”button for 2s, camera screen will pop up system main menu.
(eg, pic 1)
3.1 Scene select
Users can select different scene according to camera environment,
including automatic, indoor, outdoor, backlit, traffic monitoring, user-defined..
3.1.1 Shutter/AGC
Move the cursor to the main menu function "Scene Select" menu item , press
the " enter " button to enter the " Advanced Settings" sub-menu, move the
cursor to " Shutter / AGC " item , this function can be divided into "automatic"
Page8of28
Page 9

control and "manual" control, and "fixed" control, the user can " left and right "
to be set according to actual needs.
a. Select "Auto" setting type, press the “Confirm “button to enter the
sub-menu of Automatic Control
Inside Auto Iris setting submenu, there have “AE LEVEL", “AGC MAX ",
“SENS UP" three settings.
AGC” can adjust the peak value, the bigger value, the brighter picture, but
the noise will be much bigger.
In“Sens Up”, there are “on” and “off ” are optional
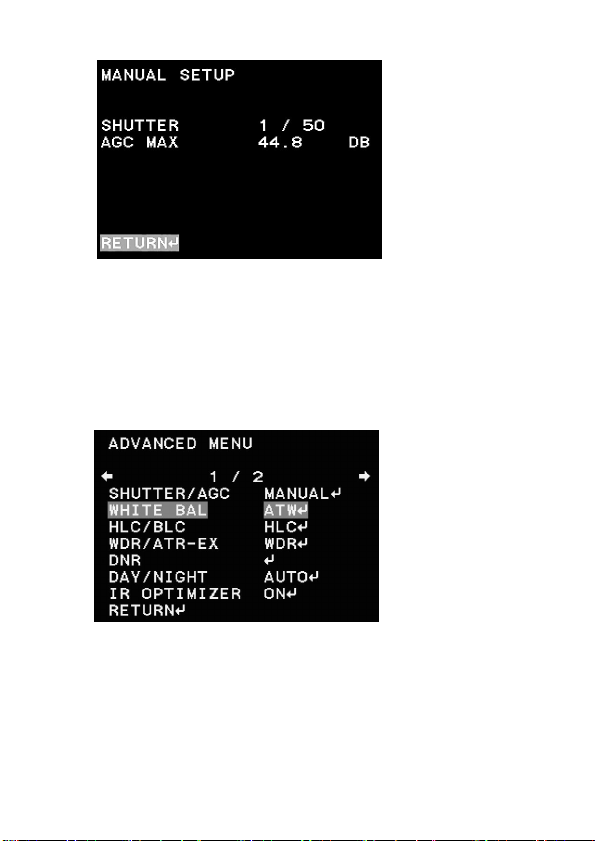
b. Manual mood
Manual Setup, user can adjust the Shutter Mode Shutter Speed
And AGC
Page9of28
Page 10
.
3.1.2 WHITE BAL
It can restore the authenticity of the color when it is affected by the change
of temperature. The user can choose different white balance mode accordingly,
ATW/PUSH/USER1/USER2/ MANUAL/PUSH LOCK.
Normally, only when you choose “user defined” setting can adjust the
mood, otherwise the white balance is fixed
3.1.3 HLI/BLC
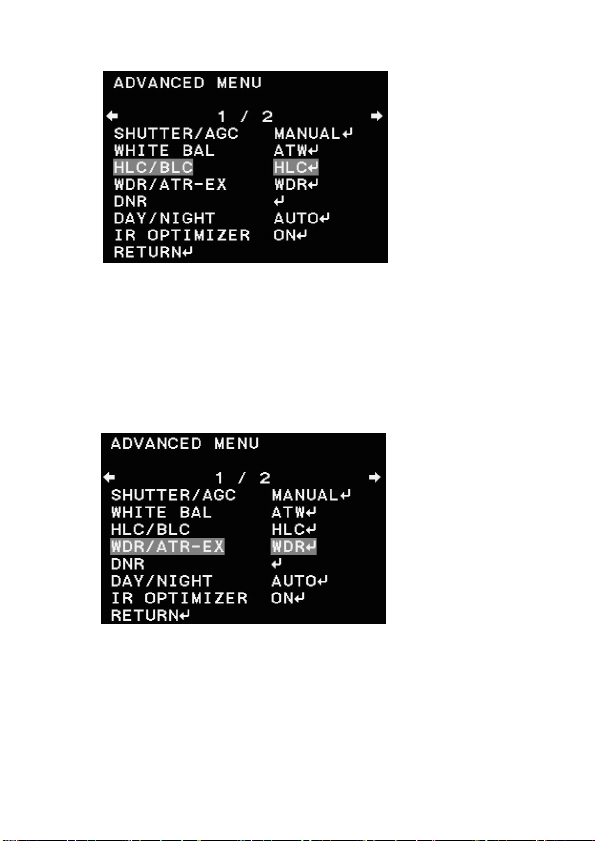
In the main menu, press the cursor to “Scene Selection”, press “Enter”
button to enter “advanced settings” sub-menu. In the “HLI/BLC” menu, press
“left” “right” key to select “off” “HLI” “BLC”, only the “Scene Selection” is
“user defined”, it can select “BLC”.
Page10of28
Page 11
3.1.4 WDR
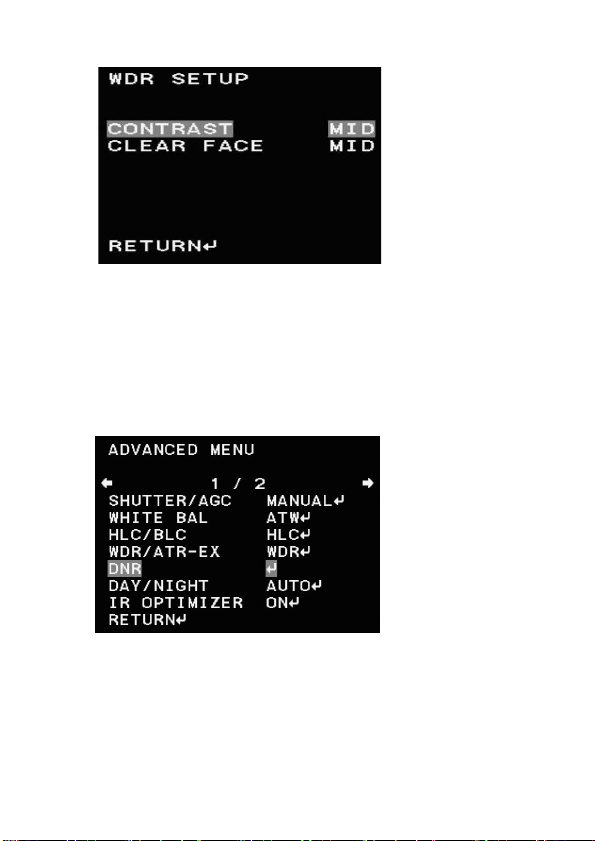
The WDR feature improves the dynamic range and the visibility of
the image by providing the optimal gradation compensation of the image
in one field. This is achieved by two ways of image processing, luminance
compression and contrast enhancement, so that the tone can be enhanced at
highlighted and dark areas
For WDR, there are two sets. One is contrast , the other is clear face.
“Contrast” have three options----“ Low; Mid ; High”
“Clear Face” have four options----“Off ; Low; Mid ; High”
Page11of28
Page 12
.
3.1.5 DNR
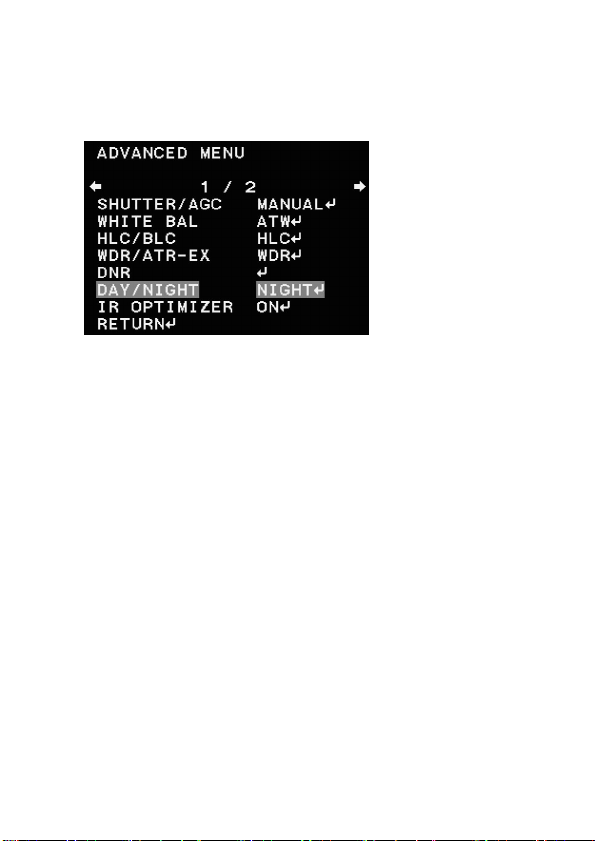
In the main menu, press the cursor to “Scene Selection”, press “Enter”
button to enter “advanced settings” sub-menu. In the "noise reduction" menu
press "enter" button to enter the "noise reduction" sub-menu, it can adjust the
level of noise reduction, the bigger the value , the higher the noise reduction
level .
3.1.6 DAY/NIGHT
Day/night switching function is mainly for the user to use the camera
easily on different occasions. There are three modes of day/night: Day mode,
Night mode, auto mode.
Page12of28
Page 13
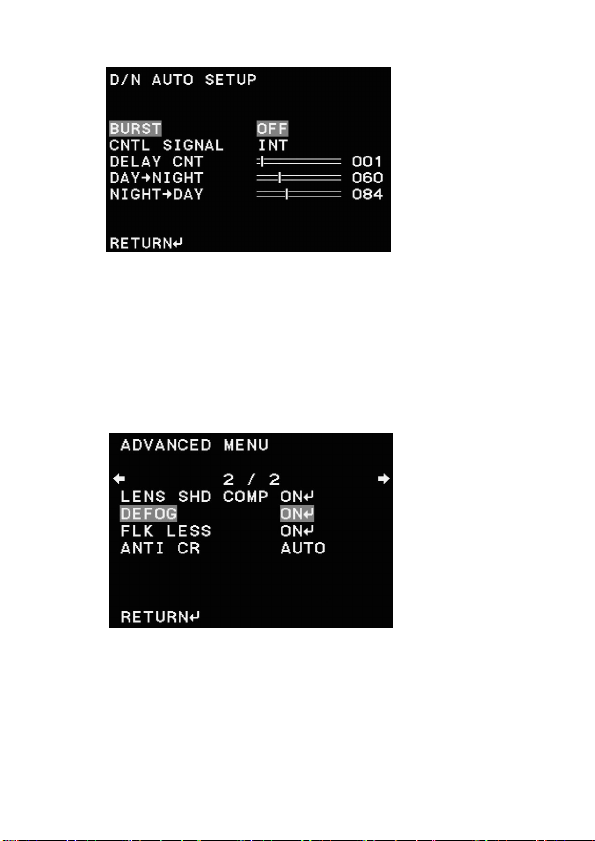
In the main menu, press the cursor to “Scene Selection”, press “ENTER”
button to enter “advanced settings” sub-menu. In the “Day/Night”, press “left”
“right” key to select “white mode”, “black mode”, “auto mode”.
A. Auto mode
In the “Day/Night” menu, press “left” “right” key to select “Auto mode”
and press “ENTER” button to “Auto mode” sub-menu, this function control the
camera output color or black and white image according to the strength of the
light, user can set the parameter according to the environment.
B. Day mode
Image will always be color
C. Night
Image will always be black and white
Page13of28
Page 14
3.1.7 DEFOG
You can choose the Defog function according the environment, Defog can
be used to help improve the captured image in poor weather conditions such as
smog, fog, or smoke. The visibility of the cameras can be enhanced in any
weather condition.
Off/Low/Middle/High selectable and set the best.
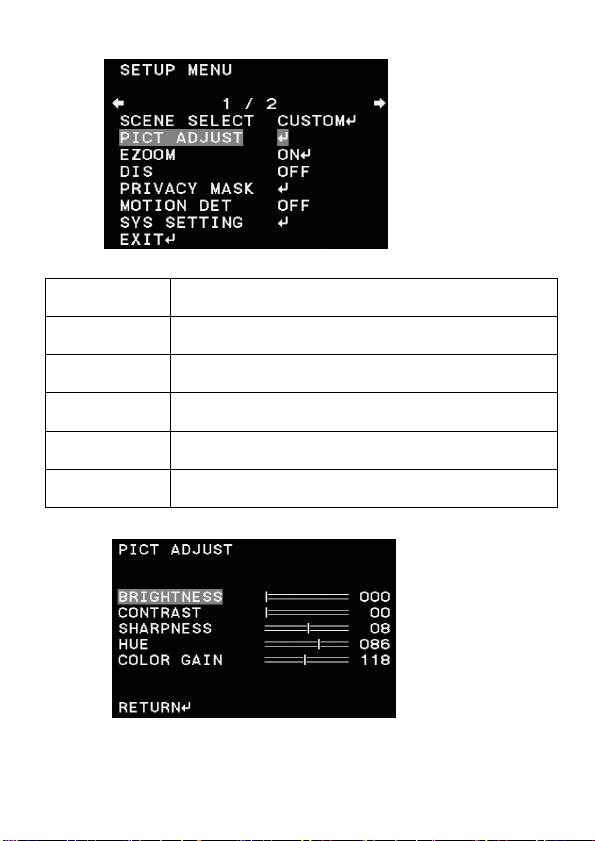
3.2 PICT ADJUST
Select to bring up the PICT ADJUST sub-menu for further settings
Page14of28
Page 15
Function Option
BRIGHTNESS 000-255
CONTRAST 000-255
SHARPNESS 000-255
HUE 000-255
COLOR GAIN 000-255
Page15of28
Page 16
3.3 EZOOM
I
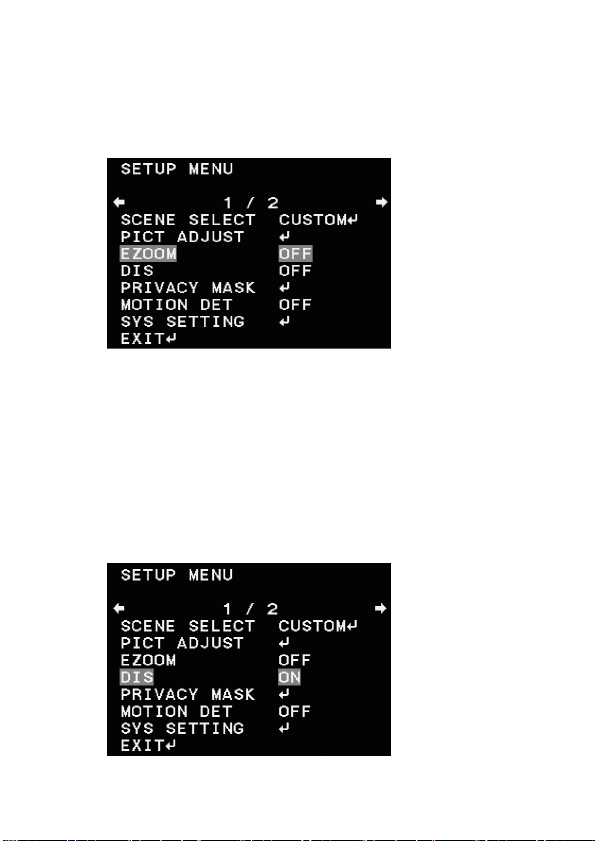
n the OSD main menu to choose " EZOOM", Press “ENTER” button to bring
up the setup sub-menu, in the EZOOM SETUP, users can do setup according to
the needs of area size and position.
3.4 DIS (Digital image stabilization)
Digital image stabilization (DIS) is a family of techniques used to reduce
blurring associated with the motion of a camera during exposure. Specifically, it
compensates for pan and tilt (angular movement, equivalent to yaw and pitch)
of a camera or other imaging device. It is used in image-stabilized binoculars,
still and video cameras, and astronomical telescopes. With still cameras, camera
shake is particularly problematic at slow shutter speeds or with long focal
length (telephoto) lenses.
Page16of28
Page 17
3.5 Privacy
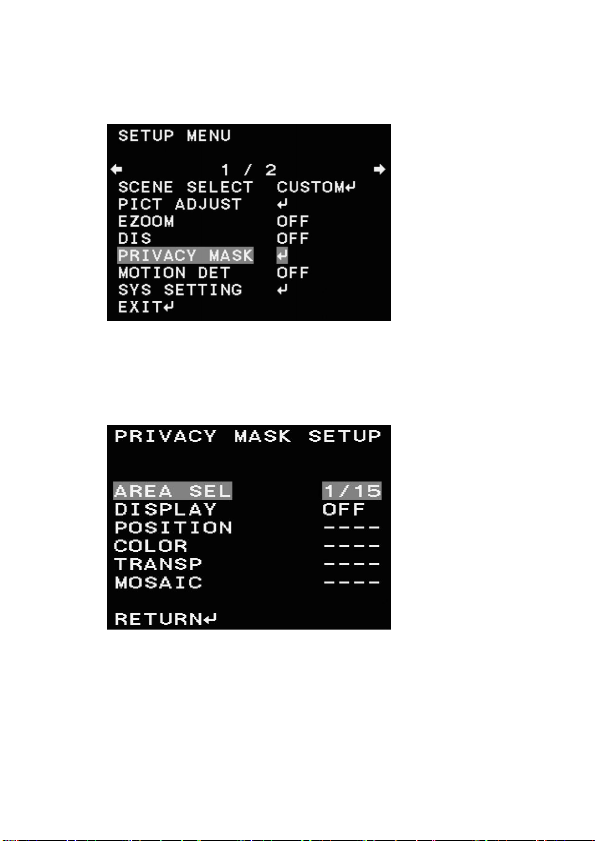
15 areas optional, user can adjust the size, position, color, transparency of
the chosen area
Privacy shield can be setup for 1-15 areas, when mode is setup to open,
users can press the “up” “down” "left" "right" “ENTER” to select the parameter
of areas’ DISPLAY, POSITION, COLOR,TRANSP.
3.6 Motion detection
In the OSD main menu to choose “MOTION DETECTION "press the
"left" "right" to select "On", and press “ENTER” button to bring up the
MOTION DETECTION sub-menu.
In the motion detection sub-menu, users can do setup according to the
needs of detection sense, interval, mask area, monitor area
Page17of28
Page 18
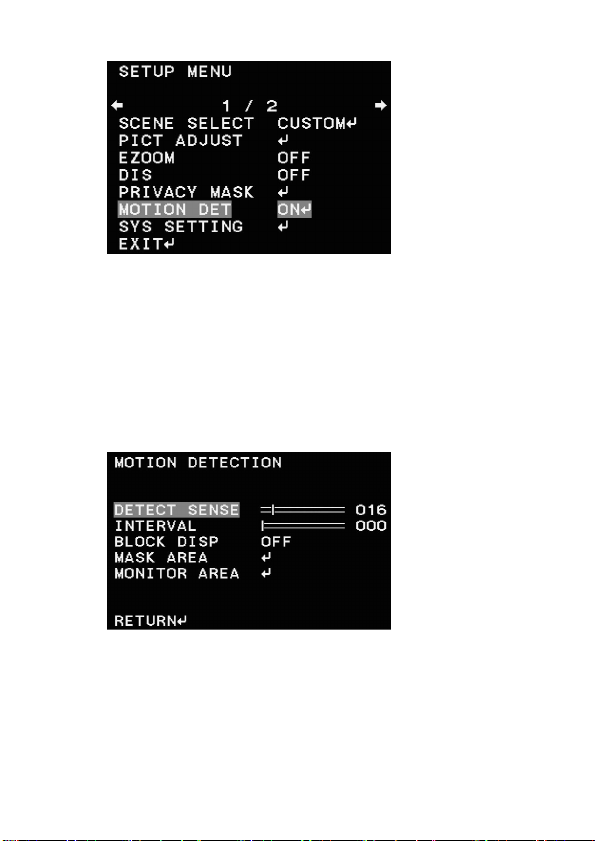
The detect sense: 0-127.
Interval:0-127
Block DISP: there is on/off two choices. There is a diagram displaying
when you choose on, otherwise, there is not diagram
Mask area: Set whether to participate in the relevant area motion detection,
when the block selected area, this area will be involved in motion detection.
Monitoring area: Four visual surveillance area and users can adjust the
parameter value to adjust the surveillance area location.
3.7 SYS Setting
Move the cursor to “system setting” press “enter” to set the submenu.
Page18of28
Page 19
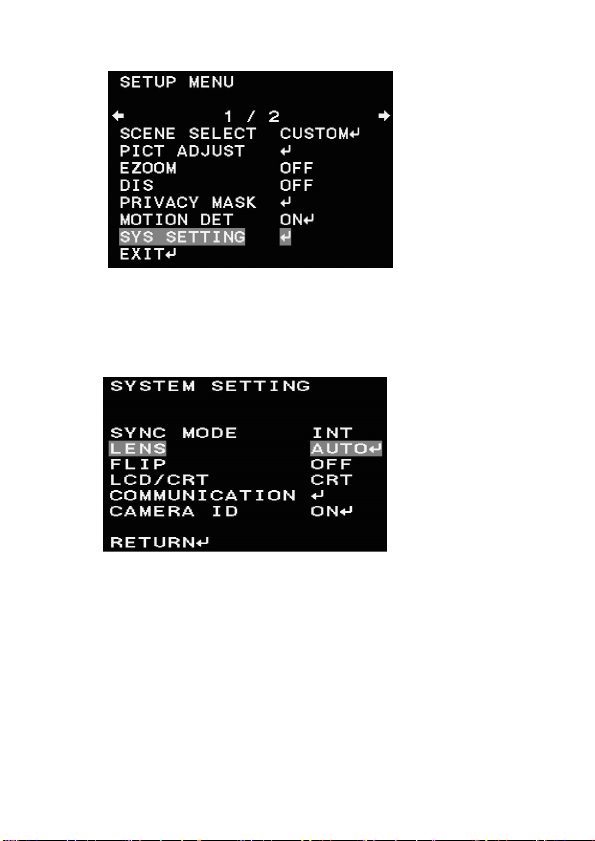
3.7.1 Sync Camera
the system default is "Internal synchronization" mode
3.7.2 Lens
Lens Type can be set to "Auto” lens, "manual" Lens 2 types, the user can
select the type of lens by the menu "left and right”. When using the optional
auto iris lens can select "DC / VIDEO" lens type, the user can adjust the
"speed" value to adjust the speed of the auto iris open. The smaller the value,
the slower the aperture opens, the greater the value, the faster the aperture
opens . Auto iris lens adjustment function, move the cursor to “adjust “item,
press the enter button, the camera will automatically set the relevant parameters
to match the different types of lenses.
Page19of28
Page 20
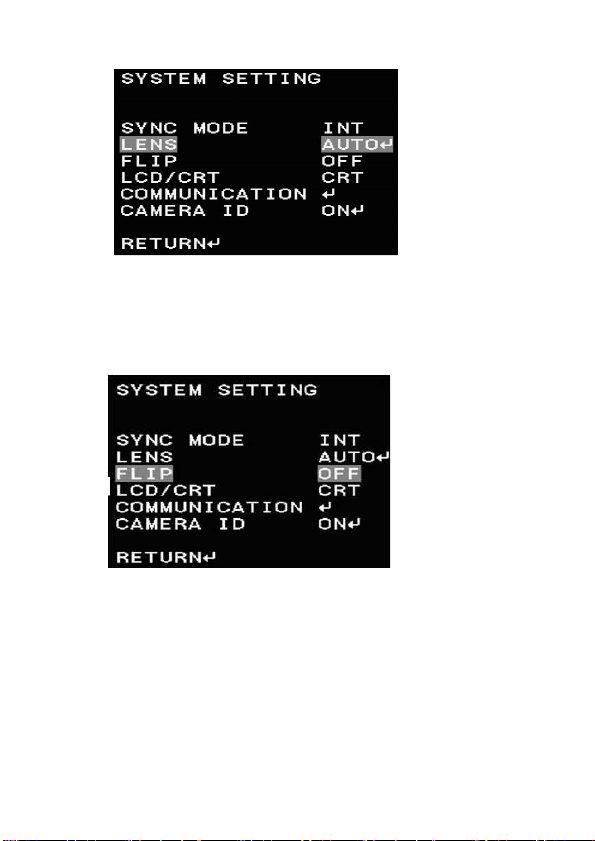
3.7.3 Image flip function
Move the cursor to "flip" item, press left and right to select "off" to "flip"
turn "vertical" "horizontal vertical flip" option.
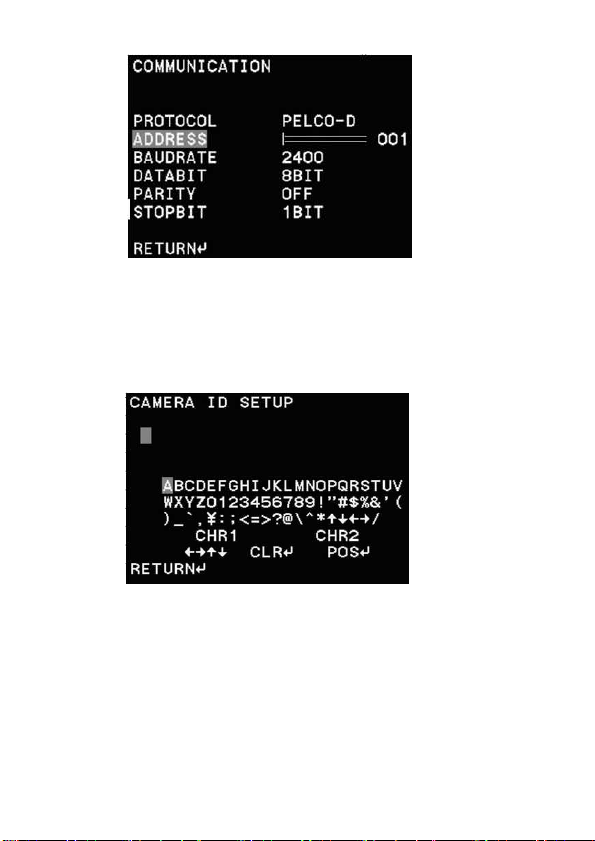
3.7.4 Communication
In the System Settings sub-menu, move the cursor to the "Communication",
press "ENTER" to enter the communication settings sub-menu, the user can set
up "address", "baud rate" and other settings according to their needs.
Page20of28
Page 21
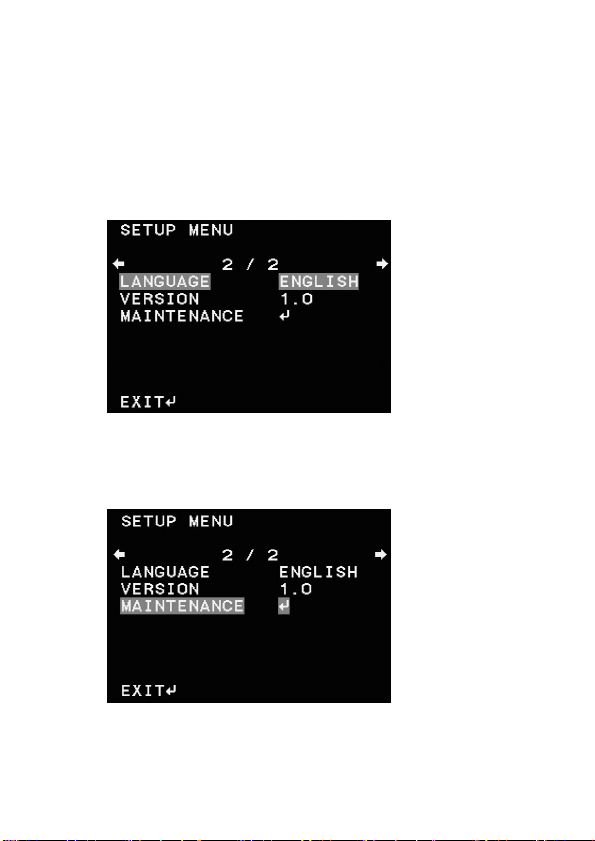
3.7.5 Camera ID
In system settings submenu, move the cursor to "CAMERA ID SETUP" option,
press the "ENTER" key to enter into the camera set up submenu. Then can set
the camera name.
You can set the camera code as numbers, uppercase letters, and related
symbols..
“←↑↓→” Cursor for left and right
“CLR” Clear camera name
“POS” for position.
“RETURN”return to the upper menu.
Page21of28
Page 22
3.8 Language
Move to the first line of the main menu, press left or right to enter the
next page to set.\
The “Language” function were designed for the Surveillance camera’
menu, there are eight languages“English, Chinese, Japanese, German, French,
Russian, Portuguese, Spanish” , user can press left or right bottom to choose.
3.9 MAINTENANCE
Maintenance is for WHITE PIXEL MASK and CAMERA RESET
Page22of28
Page 23
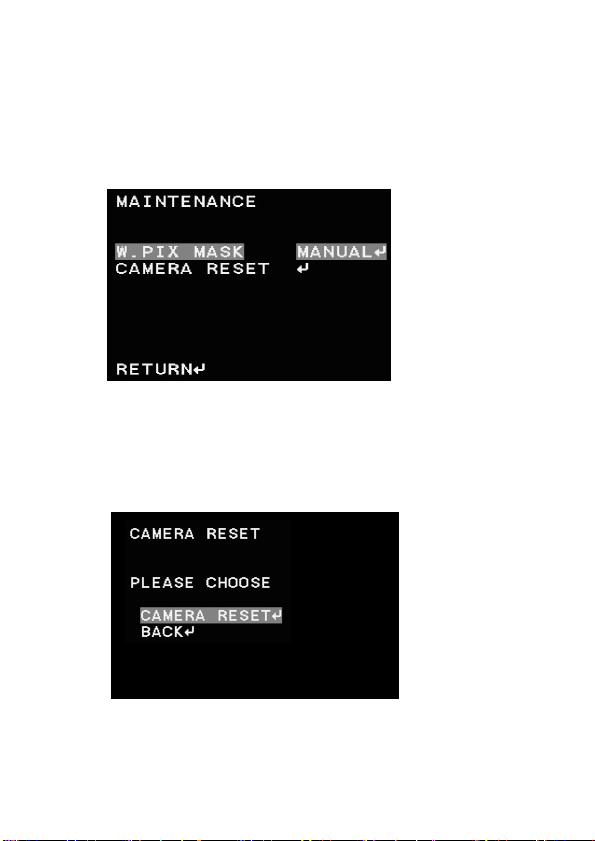
3.9.1 White Pixel Mask
When used in high-temperature environment, there might be dead pixel on
CCD sensor. With this function on, the dead pixel is to be masked so as to
improve the picture quality.
There are three options---Manual , Auto and clear data
3.9.2 Camera reset
“Camera reset”designed to delete all the configuration it set before,
please confirm before this operation, or it will restore factory setting.
Page23of28
Page 24
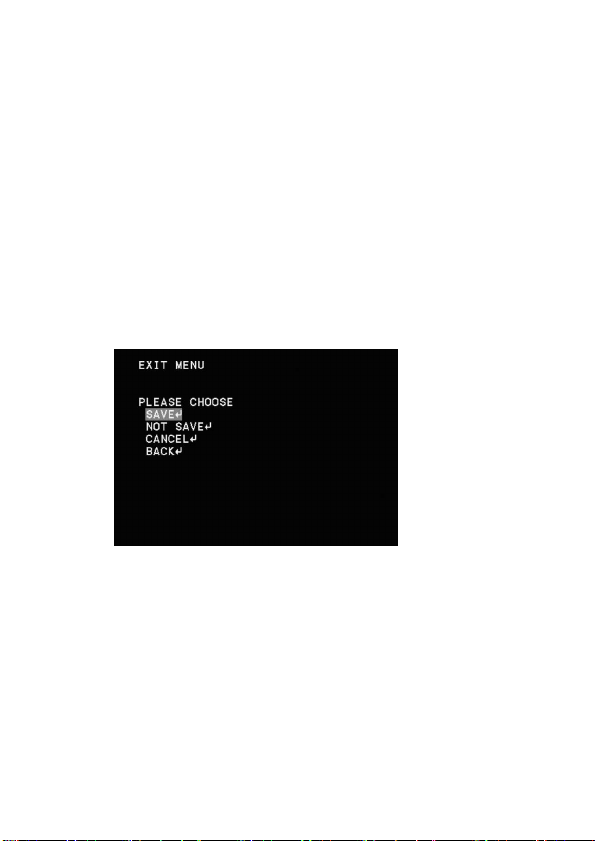
3.10 EXIT / SAVE ALL
Press to restore all the settings to the default values.
SAVE ALL
Press to save all the settings made.
NOTE:
There will be no prompt windows while the settings are being saved.
EXIT
Press to exit the OSD menu.
NOTE:
Before exit the OSD menu, please press SAVE ALL<┘ to save all the
settings made. Fail to do that, all the settings will not take effect once the power
is reconnected.
Page24of28
Page 25
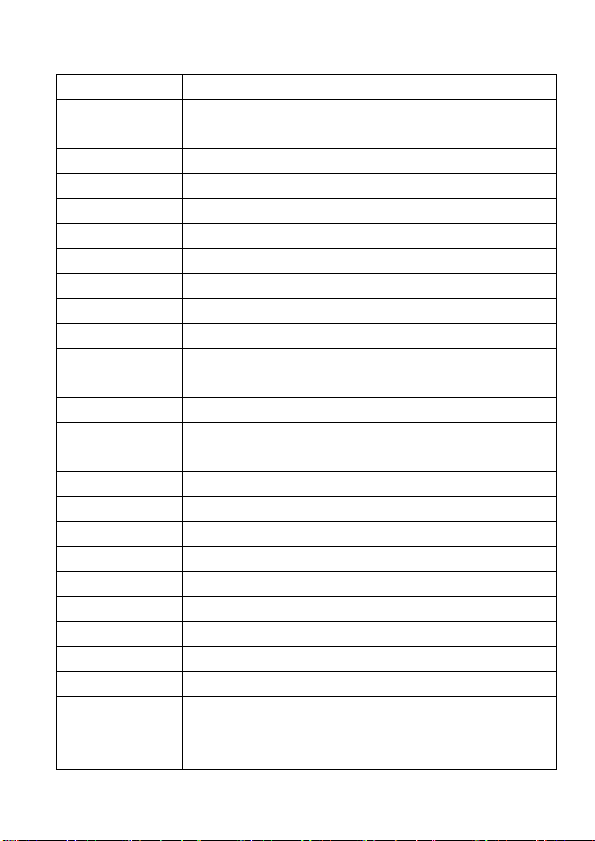
IV、Specification
Image Sensor 1/3 Sony Double Scan CCD+EFFIO-V CXD4141 DSP
Effective Pixel
System PAL/NTSC
WDR Low/Middle/High
SYNC Internal
Shutter 1/50~1/10000s;
AGC Auto AGC/AGC+Slow Shutter
S/N Ratio More than 50dB(AGC OFF)
Video Out 1.0Vp-p,75ohms
Resolution 700TVL
Minimum
Illumination
Day/Night Day/Auto/Night
Day/Night
Switching time
Lens Manual/Auto
Privacy 1~15 Zones
Motion Detect 4 Zones
Video Output BNC
White Balance ATW/PUSH/User1/User 2/Manual/PUSH LOCK
Flip Vertical/Horizontal/ Verital+Horizontal/Off
Title yes
Title Position Anywhere on the screen
NR 0-6
OSD
/JAPANESE/SPANISH/RUSSIAN/GERMANY/FRENC
PAL:976(H)×582(V)
NTSC:976(H)×494(V)
Color 0.1Lux(F1.2,50IRE,AGC ON),
B/W :0.001Lux(F1.2,50IRE,AGC ON)
0~255
CHINESE/ENGLISH
H/PORTUGUREE
Page25of28
Page 26

Contrast 0-255
Sharpness 0-15
Power DC12V
Consumption 2.0W
Operating
Temperature
Operating
Humidity
Storage
Temperature
Storage
Humidity
±10% (AC24V Optional)
-100C~+500C
Less than 90%
-400C~+600C
20~95%
Page26of28
Page 27

V、FAQ
1、No Image after installation
a、check if the power is on
b、check the cable connection。
c、check if the monitor is on
2、flicking image after installation
Check the cable connection
3、could not control OSD by RS485
a、check the cable connection
b、check the communication address and baud rate
4、camera does not turn B/W at night
Set the Day/Night Mode to Auto through OSD
5、Noisy Image at night
Turn on the AGC function。
6、Abnormal color
a、Set the white balance mode to Auto White Balance。
b、return to default setting through OSD。
7、Image too bright after installation
a、check the Lens’ Iris
b、check the brightness of the monitor
8、Unclear image
a、check the lens’ focus
b、check if the lens
Page27of28
Page 28

Page28of28
 Loading...