

Sony DWRS02D/14, DWRS02D/30, DWRS02D/42, DWR-S02D Operating Instructions Manual

Digital Wireless
Receiver
4-426-169-11 (1)
Operating Instructions
Before operating the unit, please read this manual thoroughly
and retain it for future reference.
DWR-S02D
© 2012 Sony Corporation

For the customers in the U.S.A.
This equipment has been tested and found
to comply with the limits for a Class B
digital device, pursuant to Part 15 of the
FCC Rules. These limits are designed to
provide reasonable protection against
harmful interference in a residential
installation. This equipment generates,
uses, and can radiate radio frequency
energy and, if not installed and used in
accordance with the instructions, may cause
harmful interference to radio
communications. However, there is no
guarantee that interference will not occur in
a particular installation. If this equipment
does cause harmful interference to radio or
television reception, which can be
determined by turning the equipment off
and on, the user is encouraged to try to
correct the interference by one or more of
the following measures:
- Reorient or relocate the receiving
antenna.
- Increase the separation between the
equipment and receiver.
- Connect the equipment into an outlet on
a circuit different from that to which the
receiver is connected.
- Consult the dealer or an experienced
radio/TV technician for help.
You are cautioned that any changes or
modifications not expressly approved in
this manual could void your authority to
operate this equipment.
All interface cables used to connect
peripherals must be shielded in order to
comply with the limits for a digital device
pursuant to Subpart B of Part 15 of FCC
Rules.
If you have any questions about this
product, you may call;
Sony Customer Information Service Center
1-800-222-7669 or
http://www.sony.com/
Declaration of Conformity
Trade Name: SONY
Model: DWR-S02D
Responsible Party: Sony Electronics
Inc.
Address: 16530 Via Esprillo, San
Diego, CA 92127 U.S.A.
Telephone Number: 858-942-2230
This device complies with part 15 of the
FCC Rules. Operation is subject to the
following two conditions: (1) this device
may not cause harmful interference,
and (2) this device must accept any
interference received, including
interference that may cause undesired
operation.
For the customers in Canada
This Class B digital apparatus complies
with Canadian ICES-003.
Operation is subject to the following two
conditions: (1) this device may not cause
interference, and (2) this device must accept
any interference, including interference that
may cause undesired operation of the
device.
This model has an RF module of the
FCC/IC approval built-in.
BUILT IN MODULE RM-215
FCC ID: AK8RM215
IC: 409B-RM215
For the customers in the U.S.A.
You are cautioned that any changes or
modifications not expressly approved in
this manual could void your authority to
operate this equipment.
This device complies with part 15 of the
FCC Rules. Operation is subject to the
following two conditions: (1) this device
may not cause harmful interference, and (2)
this device must accept any interference
received, including interference that may
cause undesired operation.
2

IMPORTANT NOTE: To comply with the
FCC RF exposure compliance
requirements, no change to the antenna or
the device is permitted,
Any change to the antenna or the device
could result in the device exceeding the RF
exposure requirements and void user’s
authority to operate this device.
For kunder i Europa
Härmed intygar Sony Corporation att denna
DWR-S02D står I överensstämmelse med
de väsentliga egenskapskrav och övriga
relevanta bestämmelser som framgår av
direktiv 1999/5/EG.
För ytterligare information gå in på följande
hemsida: http://www.compliance.sony.de/
This device complies with FCC radiation
exposure limits set forth for uncontrolled
equipment and meets the FCC radio
frequency (RF) Exposure Guidelines in
Supplement C to OET65. This device has
very low levels of RF energy that it is
deemed to comply without testing of
specific absorption radio (SAR).
For the customers in Canada
Operation is subject to the following two
conditions: (1) this device may not cause
interference, and (2) this device must accept
any interference, including interference that
may cause undesired operation of the
device.
The term “IC:” before the radio certification
number only signifies that Industry Canada
technical specifications were met.
For the customers in Europe
Hereby, Sony Corporation, declares that
this DWR-S02D is in compliance with the
essential requirements and other relevant
provisions of the Directive 1999/5/EC.
For details, please access the following
URL: http://www.compliance.sony.de/
Voor de klanten in Europa
Hierbij verklaart Sony Corporation dat het
toestel DWR-S02D in overeenstemming is
met de essentiële eisen en de andere
relevante bepalingen van richtlijn 1999/5/
EG.
Nadere informatie kunt u vinden op:
http://www.compliance.sony.de/
Para os clientes da Europa
Sony Corporation declara que este DWRS02D está conforme com os requisitos
essenciais e outras disposições da Directiva
1999/5/CE.
Para mais informacoes, por favor consulte a
seguinte URL:
http://www.compliance.sony.de/
For kunder i Europa
Undertegnede Sony Corporation erklærer
herved, at følgende udstyr DWR-S02D
overholder de væsentlige krav og øvrige
relevante krav i direktiv 1999/5/EF.
For yderligere information gå ind på
følgende hjemmeside:
http://www.compliance.sony.de/
Euroopassa oleville asiakkaille
Sony Corporation vakuuttaa täten että
DWR-S02D tyyppinen laite on direktiivin
1999/5/EY oleellisten vaatimusten ja sitä
koskevien direktiivin muiden ehtojen
mukainen.
Halutessasi lisätietoja, käy osoitteessa:
http://www.compliance.sony.de/
For kundene i Europa
Sony Corporation erklærer herved at
utstyret DWR-S02D er i samsvar med de
grunnleggende krav og øvrige relevante
krav i direktiv 1999/5/EF.
For flere detaljer, vennligst se:
http://www.compliance.sony.de/
Για τους πελάτες στην Eυρώπη
Με την παρούσα η Sony Corporation
δηλώνει τι DWR-S02D
συμμορφώνεται προς της ουσιώδεις
απαιτήσεις και τις λοιπές σχετικές
διατάξεις της οδηγίας 1999/5/ΕΚ.
3

Για λεπτομέρειες παρακαλούμε
πως ελένξετε την ακλουθη
σελίδα του διαδικτύου:
http://www.compliance.sony.de/
Pro zákazníky v Evropě
Sony Corporation tímto prohlašuje, že
tento DWR-S02D je ve shodě se
základními požadavky a dalšími
příslušnými ustanoveními směrnice
1999/5/ES.
Podrobnosti lze získat na následující
URL:
http://www.compliance.sony.de/
Euroopa klientidele
Sony Corporation kinnitab käesolevaga
seadme DWR-S02D vastavust 1999/5/EÜ
direktiivi põhinõuetele ja nimetatud
direktiivist tulenevatele teistele
asjakohastele sätetele.
Üksikasjalikum info:
http://www.compliance.sony.de/.
Európai vásárlóink fi gyelmébe
Alulírott, Sony Corporation
nyilatkozom, hogy a(z) DWR-S02D
megfelel a vonatkozó alapvető
követelményeknek és az 1999/5/EC
irányelv egyéb előírásainak.
További információkat a következő
weboldalon találhat:
http://www.compliance.sony.de/
Dotyczy klientów z Europy
Niniejszym Sony Corporation
oświadcza, że DWR-S02D jest zgodne z
zasadniczymi wymaganiami oraz innymi
stosownymi postanowieniami
Dyrektywy 1999/5/WE.
Szczegółowe informacje znaleźć można
pod następującym adresem URL:
http://www.compliance.sony.de/
Pentru clienţii din Europa
Prin prezenta, Sony Corporation declară
că acest DWR-S02D respectă cerinţele
esenţiale și este în conformitate cu
prevederile Directivei 1995/5/EC.
Pentru detalii, vă rugăm accesaţi
următoarea adresă:
http://www.compliance.sony.de/
Pre zákazníkov v Európe
Sony Corporation týmto vyhlasuje, že
DWR-S02D spĺňa základné požiadavky
a všetky príslušné ustanovenia Smernice
1999/5/ES.
Podrobnosti získate na nasledovnej
webovej adrese:
http://www.compliance.sony.de/
Za stranke v Evropi
Sony Corporation izjavlja, da je ta
DWR-S02D v skladu z bistvenimi
zahtevami in ostalimi relevantnimi
določili direktive 1999/5/ES.
Za podrobnosti vas naprošamo, če
pogledate naURL:
http://www.compliance.sony.de/
4

Table of Contents
Features .......................................... 7
Parts Identification ........................ 8
Preparation .................................. 10
Attaching to a Camcorder ...... 10
Using the DWA-01D/F01D
Wireless Adapter ................... 11
Setting the Receiving Channel ... 11
Selecting the Frequency Band /
Group / Channel .................... 11
Using the Active Channel Scan
Function ................................. 12
Using the Clear Channel Scan
Function ................................. 13
Using the Encrypted Transmission
Function ........................................ 14
Using Secure Key Mode
(SECURE KEY) .................... 14
Using Password Mode
(PASSWORD) ....................... 15
Using a USB Keyboard ............... 16
Menu Displays and Detailed
Settings ......................................... 17
Menu Structure and
Hierarchy ............................... 17
Basic Menu Operations ......... 18
UTILITY Menu ........................... 18
Selecting the AES/EBU Output
Reference Level (AES/EBU
LVL@MIC) ........................... 18
Selecting the Sync Signal
(SYNC SOURCE) ................. 19
Terminating the Sync Signal
(WORD SYNC 75ohm) ........ 19
Selecting Output 1 (ANALOG
OUTPUT1) ............................ 19
Showing the Accumulated Use
Time (TIME) ......................... 19
Setting the Brightness of the
Display (BRIGHTNESS) .......20
Automatic Dimming of the
Display (DIMMER
MODE) ...................................20
Resetting Parameters to their
Factory Settings (FACTORY
PRESET) ................................20
Displaying the Software Version
(VERSION) ............................20
RX (tuner) 1/2 Menu ....................21
Group/Channel Selection
(GP/CH) .................................21
Frequency Band Selection
(BAND) ..................................21
Active Channel Scanning
Function (ACT CH SCAN) ....21
Clear Channel Scan Function
(CLR CH SCAN) ...................21
Using the RF Squelch Function
(RF SQUELCH) .....................21
Encrypted Transmission
Function (ENCRYPTION) ....21
Display of the Audio Signal
Delay Time (SYSTEM
DELAY) .................................22
TX (Transmitter Virtual) 1/2
Menu ..............................................22
Display of the Transmitter’s
Name (NAME) .......................23
Display of the Transmission
Power Setting (RF
POWER) ................................23
Display of Audio Input Level
(INPUT LEVEL) ....................23
Display of the Low-cut Filter
Setting (LCF) .........................23
Table of Contents
5

Display of the Power Save
Setting (POWER SAVE) ....... 23
Display of Accumulated Battery
Use Time (TIME) .................. 23
Display of the +48V Power
Setting (+48V) ....................... 23
Cross Remote (RF
REMOTE) ............................. 23
Using the Cross Remote .............. 24
Pairing with a Transmitter ..... 24
Changing the Settings on the
Transmitter .................................. 26
Group/Channel Setting
(GP/CH) .................................26
Frequency Band Setting
(BAND) ................................. 26
Transmission Power Setting
(RF POWER) ........................ 26
Audio Input Level Setting
(INPUT LEVEL) ................... 26
Low-cut Filter Setting
(LCF) ..................................... 26
Power-saving Setting (POWER
SAVE) ................................... 26
+48V Power Setting
(+48V) ................................... 27
Cross Remote Setting (RF
REMOTE) ............................. 27
Block Diagram ............................. 28
Troubleshooting........................... 29
Important Notes on Operation ... 32
Notes on Using the
Receiver .................................32
On Cleaning ........................... 32
Specifications ............................... 33
Carrier Frequencies and Channel
Steps.............................................. 35
Table of Contents
6

Features
It enables highly secure transmission with
high sound quality and low system latency,
and supports simultaneous multi-channel
operation.
The DWR-S02D digital wireless receiver is
a slot-in type wireless receiver capable of
receiving two channels from digital
wireless transmitters. Used in conjunction
with Sony professional camcorders or the
optional DWA-01D/F01D wireless adapter,
the DWR-S02D enables the construction of
a fully digital ENG/EFP audio system.
This receiver enables the application of
multiple channels over unused television
channels through the use of the built-in
Sony original channel plan.
What is DWX?
DWX refers to Sony’s new digital wireless
microphone system. The DWX series
reflects Sony’s extensive expertise in
professional microphones and sound
design. It represents a successful blend of
Sony know-how, wireless technology
renowned for stability, and cutting-edge
digital audio technology.
In addition to realizing the high sound
quality possible with a digital system, the
DWX series supports multi-channel
simultaneous operation, encrypted
transmission, and metadata transmission for
monitoring the status of multiple
transmitters. Using a main link and a
separate additional link, remote control of
transmitters from the receiver is also
possible. With its many advanced features,
the system has the potential to revolutionize
the workflow of professional applications.
What is WiDIF-HP?
WiDIF-HP (WiDIF: Wireless Digital
Interface Format, HP: High Profile) is a
wireless digital audio interface format
developed by Sony.
What is Cross Remote?
Cross Remote is a system that allows
transmitters to be monitored and controlled
from a receiver and the Wireless Studio
control software installed on a computer
connected to the receiver.
For example, the settings of a transmitter
worn under clothing can be easily changed
over the wireless link.
Preprogrammed wireless
channel plans for
simultaneous multi-channel
operation
The DWR-S02D has many preprogrammed
channel groups, meaning combination of
wireless channels to permit simultaneous
operation of multiple channels without
intermodulation.
Two-channel slot-in wireless
receiver
Despite its dual-channel receiver capability,
the DWR-S02D is small enough to be
mounted directly in the slot of the Sony
camcorder.
Rear mounting to camcorders
The DWR-S02D can be rear-mounted to a
range of Sony professional camcorders using the DWA-01D/F01D wireless
adapter. When used with a camcorder that
has AES/EBU inputs, full-digital audio
recording is also possible.
Features
7
Auto channel scanning
function
The DWR-S02D comes with two auto
channel scanning functions that allows for
fast, easy and safe frequency channel
changes.
Compact, lightweight, and
rugged design
The DWR-S02D is highly compact and
lightweight, maintaining a good balance
even when mounted on a camcorder. In
addition, it is made of magnesium die-cast
and aluminum, making it extremely rugged
and suitable for the harsh environment.
Easy-to-see, full dot-matrix
OLED (Organic Light-Emitting
Diode) display
The quick response of the OLED display
enables real-time operating conditions to be
displayed clearly and accurately.
Parts Identification
Parts Identification
8
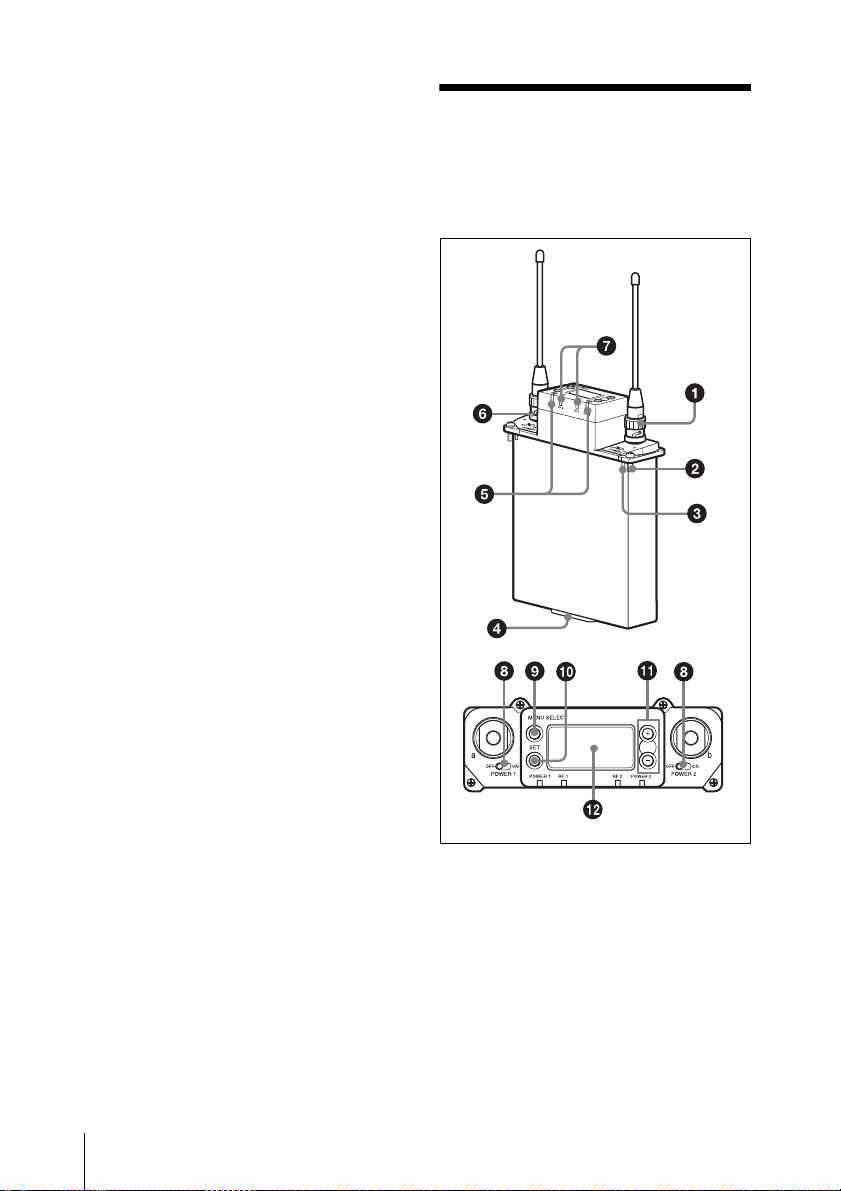
a Antenna and antenna connector
(BNC type)
Connect the supplied antenna here.
b Mounting screw
Use to attach the receiver to a camcorder or
DWA-01D/F01D wireless adapter.
c Compatibility pin
Prevents the attachment of an incompatible
camcorder or adapter.
d Accessory connector
Use to connect the receiver to a camcorder
or DWA-01D/F01D wireless adapter.
Power, audio, and control signals are sent
through this connector.
e POWER indicator
Lights up green when the power is on.
The POWER1 and POWER2 indicators
indicate the power status of tuner 1 and
tuner 2, respectively.
f USB connector
Connecting an optional keyboard to this
connector allows menu operation to be
performed on the keyboard. Connecting the
transmitter to this connector through the
supplied USB cable allows an encryption
key to be exchanged with the transmitter.
For details on the use of a USB keyboard, see
“Using a USB Keyboard” on page 16.
For details on encryption key exchange, see “Using
the Encrypted Transmission Function” on page 14.
g RF (radio frequency) indicators
Indicate the RF input level of tuner 1 and
tuner 2.
The indicators that light up depend on the
RF squelch function setting as follows:
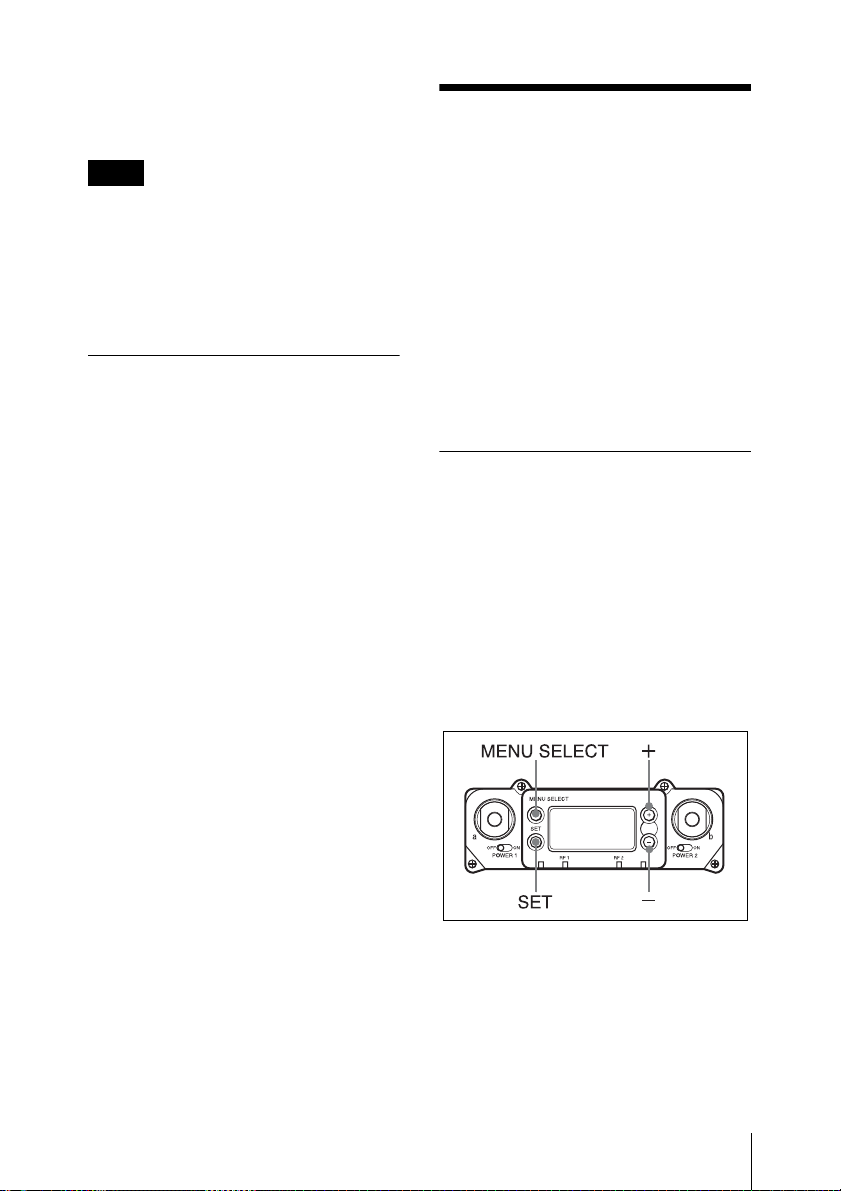
i MENU SELECT (menu selection)
button
Selects the displayed menu.
j SET button
Changes the item to be set or enters the
selected function or parameter value.
k + or – button
Use to select a function or value.
If you set the POWER switch on tuner 1 or
tuner 2 to ON while holding down the +
button, the tuner that you turned ON will
begin the scanning operation of the clear
channel scan function.
If you set the POWER switch on tuner 1 or
tuner 2 to ON while holding down the –
button, the tuner that you turned ON will
begin the pairing operation of the wireless
remote control function.
l Display section
Meter display
When the RF (radio frequency) squelch
level is set to OFF:
On in green: 25 dBµ or more
On in red: 15 dBµ to 25 dBµ
Off: Less than 15 dBµ
When the RF (radio frequency) squelch
level is set to 20 dBµ:
On in green: 30 dBµ or more
On in red: 20 dBµ to 30 dBµ
Off: Less than 20 dBµ
h POWER switches
Turn tuner 1 and tuner 2 on or off
individually.
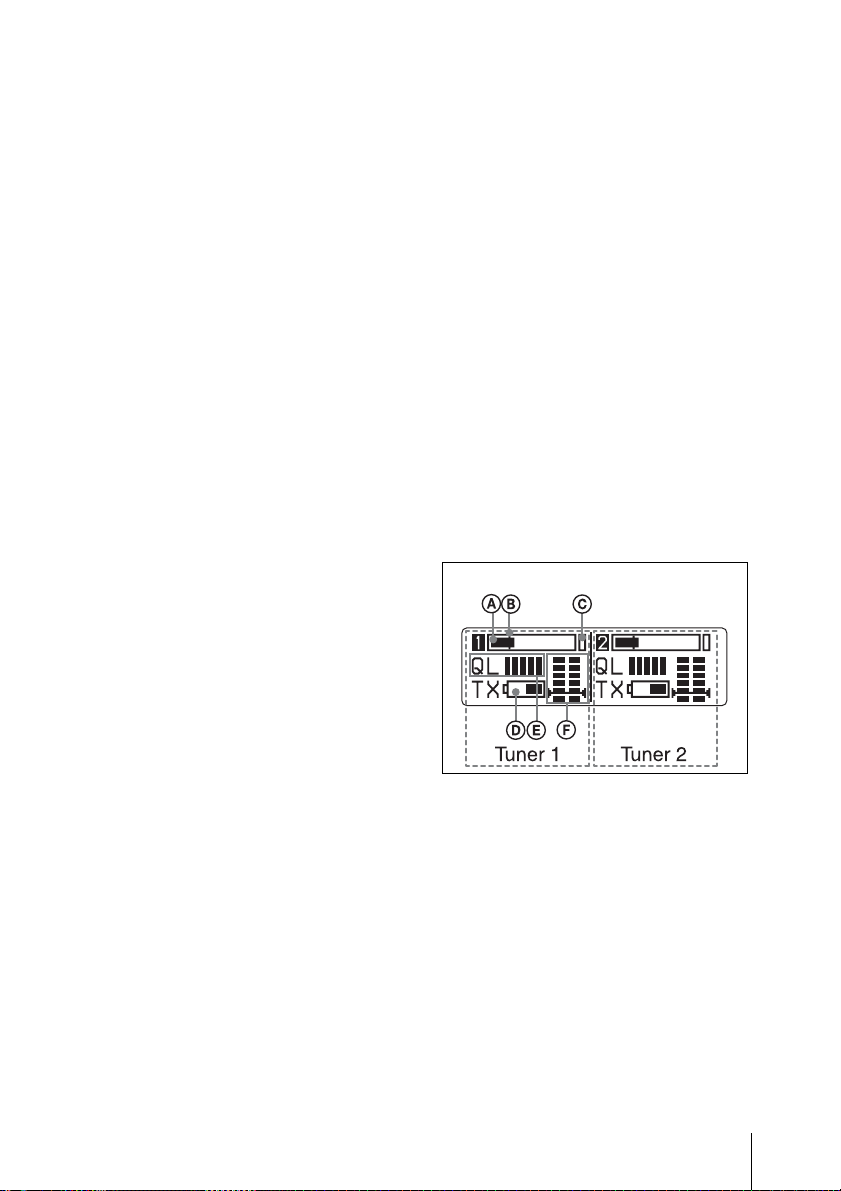
A Audio input level meter
Indicates the input signal level.
B Reference level gage
Indicates the reference input level.
–58 dBu (–60 dBV) is indicated when the
input level is set to “MIC” on the
transmitter, and +4 dBu when the input
level is set to line.
C Peak indicator
Warns of excessive input by lighting up
when the signal is 3 dB below the level at
which distortion begins.
Parts Identification
9

D Battery indication
Based on metadata from the transmitter,
shows the transmitter’s battery condition
according to 8 level indications.
Replace both batteries when the battery
indication starts to flash.
For details on how to change the batteries on the
transmitter, refer to the operating instructions
supplied with the transmitter.
E Signal quality level meter
Indicates the quality of the RF signal
reception.
The occurrence of many data errors during
a given interval reduces the height of the bar
graph.
This meter allows you to monitor signal
deterioration that may occur when there is
noise or when the transmitter is too far from
the receiver.
F RF level meter
Indicates the RF input level. The number of
segments that light up depends on the input
level.
When the squelch function is set, the
squelch level is indicated on the RF level
meter.
When the RF input level drops below the
squelch level, the output signal is muted.
Preparation
Attaching to a Camcorder
This receiver can be inserted into a slot
provided on compatible Sony camcorders.
The audio signal, which is converted to
digital by the digital wireless transmitter,
can be recorded as is to the camcorder,
allowing you to create a fully digital
system.
1 Remove the cover from the slot for the
wireless receiver on the camcorder,
and insert the receiver into the slot.
To avoid inserting the receiver in the
wrong direction, confirm the location
of the mounting screws and
compatibility pin before inserting the
wireless receiver.
10
2 After inserting the receiver completely
into slot, securely fasten the four
mounting screws.
Receiver
Preparation
For details about operating the camcorder with the
receiver, refer to the operating instructions supplied
with the camcorder.
Note
If the camcorder is not compatible with the
receiver, the compatibility pin on the
receiver will make it impossible to insert
the receiver into the slot.
For details on compatible camcorders, consult a
Sony sales representative.
Using the DWA-01D/F01D Wireless Adapter
Attaching the receiver to the DWA-01D/
F01D wireless adapter allows them to be
used as a portable wireless receiver.
For details, refer to the operating instructions
supplied with the adapter.
Setting the Receiving Channel
The receiver provides groups of channels
for interference-free transmission. When
using multiple wireless microphones and
transmitters (simultaneous multi-channel
operations) within the same area, selecting
the same group and using a channel within
that group can prevent signal interference.
Selecting the Frequency Band / Group / Channel
Set the frequency band (BAND), group
(GP), and channel (CH) as follows.
For details on the groups and channels included in
each frequency band, refer to “Sony Digital
Wireless Microphone System Frequency Lists” on
the supplied CD-ROM.
For details on menu operations, see “Basic Menu
Operations” on page 18.
1 Press the MENU SELECT button
repeatedly until the RX1/RX2 menu is
displayed.
2 Press the + or – button repeatedly until
the BAND screen is displayed.
Setting the Receiving Channel
11
 Loading...