

Page 1
4-180-028-31(1)
FM/AM
Digital Media Player
Operating Instructions
Mode d’emploi
Manual de instrucciones
Owner’s Record
The model and serial numbers are located on the bottom of the unit.
Record the serial number in the space provided below.
Refer to these numbers whenever you call upon your Sony dealer regarding this product.
Model No. DSX-S100 Serial No.
To cancel the demonstration (DEMO) display, see page 6.
Pour annuler l’affichage de démonstration (DEMO), reportez-vous à la page 6.
Para cancelar la pantalla de demostración (DEMO), consulte la página 6.
DSX-S100
©2010 Sony Corporation
US
FR
ES
Page 2
Be sure to install this unit in the dashboard of
–
–
–
–
the car for safety. For installation and
connections, see the supplied installation/
connections manual.
Warning
FOR UNITED STATES CUSTOMERS. NOT
APPLICABLE IN CANADA, INCLUDING
IN THE PROVINCE OF QUEBEC.
POUR LES CONSOMMATEURS AUX
ÉTATS-UNIS. NON APPLICABLE AU
CANADA, Y COMPRIS LA PROVINCE DE
QUÉBEC.
This equipment has been tested and found to
comply with the limits for a Class B digital
device, pursuant to Part 15 of the FCC Rules.
These limits are designed to provide reasonable
protection against harmful interference in a
residential installation. This equipment
generates, uses, and can radiate radio frequency
energy and, if not installed and used in
accordance with the instructions, may cause
harmful interference to radio communications.
However, there is no guarantee that interference
will not occur in a particular installation. If this
equipment does cause harmful interference to
radio or television reception, which can be
determined by turning the equipment off and on,
the user is encouraged to try to correct the
interference by one or more of the following
measures:
Reorient or relocate the receiving antenna.
Increase the separation between the equipment
and receiver.
Connect the equipment into an outlet on a
circuit different from that to which the receiver
is connected.
Consult the dealer or an experienced radio/TV
technician for help.
For the State of California, USA only
Perchlorate Material – special handling may apply,
See www.dtsc.ca.gov/hazardouswaste/perchlorate
Perchlorate Material: Lithium battery contains
perchlorate
The “HD Radio Ready” logo indicates that this
product will control a Sony HD Radio
(sold separately).
For HD Radio
the HD Radio
HD Radio
TM
tuner operation, please refer to
TM
tuner Operating Instructions.
TM
and the HD Radio Ready logo are
TM
tuner
proprietary trademarks of iBiquity Digital Corp.
The “SAT Radio Ready”
logo indicates that this
product will control a satellite
radio tuner module (sold
separately). Please see your nearest authorized
Sony dealer for details on the satellite radio
tuner module.
“SAT Radio,” “SAT Radio Ready,” the SAT
Radio and SAT Radio Ready logos and all
related marks are trademarks of Sirius XM
Radio Inc. and XM Satellite Radio Inc.
ZAPPIN is a trademark of Sony Corporation.
“WALKMAN” and “WALKMAN” logo are
registered trademarks of Sony Corporation.
Windows Media and the
Windows logo are trademarks
or registered trademarks of
Microsoft Corporation in the
United States and/or other countries.
You are cautioned that any changes or
modifications not expressly approved in this
iPod is a trademark of Apple Inc., registered in
the U.S. and other countries.
manual could void your authority to operate this
equipment.
MPEG Layer-3 audio coding technology and
patents licensed from Fraunhofer IIS and Thomson.
This product is protected by certain intellectual
property rights of Microsoft Corporation. Use or
distribution of such technology outside of this
product is prohibited without a license from
Microsoft or an authorized Microsoft subsidiary.
2
Page 3

Content providers are using the digital rights
management technology for Windows Media
contained in this device (“WM-DRM”) to protect
the integrity of their content (“Secure Content”) so
that their intellectual property, including copyright,
in such content is not misappropriated.
This device uses WM-DRM software to play
Secure Content (“WM-DRM Software”). If the
security of the WM-DRM Software in this device
has been compromised, owners of Secure Content
(“Secure Content Owners”) may request that
Microsoft revoke the WM-DRM Software’s right
to acquire new licenses to copy, display and/or
play Secure Content. Revocation does not alter the
WM-DRM Software’s ability to play unprotected
content. A list of revoked WM-DRM Software is
sent to your device whenever you download a
license for Secure Content from the Internet or
from a PC. Microsoft may, in conjunction with
such license, also download revocation lists onto
your device on behalf of Secure Content Owners.
Warning if your car’s ignition has no
ACC position
Be sure to set the Auto Off function (page 20).
The unit will shut off completely and
automatically in the set time after the unit is
turned off, which prevents battery drain.
If you do not set the Auto Off function, press
and hold (SOURCE/OFF) until the display
disappears each time you turn the ignition off.
3
Page 4

Table of Contents
Getting Started
Resetting the unit. . . . . . . . . . . . . . . . . . . . . . . . 6
Canceling the DEMO mode . . . . . . . . . . . . . . . 6
Preparing the card remote commander . . . . . . . 6
Setting the clock . . . . . . . . . . . . . . . . . . . . . . . . 6
Detaching the front panel . . . . . . . . . . . . . . . . . 7
Attaching the front panel . . . . . . . . . . . . . . . 7
Location of controls and basic
operations
Main unit. . . . . . . . . . . . . . . . . . . . . . . . . . . . 8
Card remote commander RM-X151. . . . . . 10
Searching for a track . . . . . . . . . . . . . . . . . . . . 11
Searching a track by name
— Quick-BrowZer . . . . . . . . . . . . . . . . . . . 11
Searching a track by listening to track passages
— ZAPPIN™ . . . . . . . . . . . . . . . . . . . . . . . 12
Radio
Storing and receiving stations . . . . . . . . . . . . . 12
Storing automatically — BTM . . . . . . . . . . 12
Storing manually. . . . . . . . . . . . . . . . . . . . . 12
Receiving the stored stations . . . . . . . . . . . 13
Tuning automatically . . . . . . . . . . . . . . . . . 13
RDS . . . . . . . . . . . . . . . . . . . . . . . . . . . . . . . . . 13
Overview. . . . . . . . . . . . . . . . . . . . . . . . . . . 13
Selecting PTY. . . . . . . . . . . . . . . . . . . . . . . 14
Setting CT. . . . . . . . . . . . . . . . . . . . . . . . . . 14
Other functions
Changing the sound settings. . . . . . . . . . . . . . 19
Adjusting the sound characteristics . . . . . . 19
Customizing the equalizer curve
— EQ3 . . . . . . . . . . . . . . . . . . . . . . . . . . . . 19
Adjusting setup items — SET . . . . . . . . . . . . 19
Using optional equipment. . . . . . . . . . . . . . . . 21
Auxiliary audio equipment. . . . . . . . . . . . . 21
Additional Information
Precautions . . . . . . . . . . . . . . . . . . . . . . . . . . . 21
Playback order of MP3/WMA/AAC
files. . . . . . . . . . . . . . . . . . . . . . . . . . . . . . . 21
About Device Inside Alert . . . . . . . . . . . . . 21
About iPod . . . . . . . . . . . . . . . . . . . . . . . . . 22
Maintenance . . . . . . . . . . . . . . . . . . . . . . . . . . 22
Removing the unit. . . . . . . . . . . . . . . . . . . . . . 23
Specifications . . . . . . . . . . . . . . . . . . . . . . . . . 23
Troubleshooting . . . . . . . . . . . . . . . . . . . . . . . 24
Error displays/Messages. . . . . . . . . . . . . . . 25
USB devices
Playing back a USB device . . . . . . . . . . . . . . . 14
Display items . . . . . . . . . . . . . . . . . . . . . . . 15
Repeat play . . . . . . . . . . . . . . . . . . . . . . . . . 16
Shuffle play. . . . . . . . . . . . . . . . . . . . . . . . . 16
iPod
Playing back iPod . . . . . . . . . . . . . . . . . . . . . . 16
Display items . . . . . . . . . . . . . . . . . . . . . . . 17
Repeat play . . . . . . . . . . . . . . . . . . . . . . . . . 18
Shuffle play. . . . . . . . . . . . . . . . . . . . . . . . . 18
4
Page 5
Support site
If you have any questions or for the latest support information on this
product, please visit the web site below:
http://esupport.sony.com
http://www.sony.com/mobileAV
Provides information on:
• Models and manufacturers of compatible digital audio players
• Supported MP3/WMA/AAC files
5
Page 6
Getting Started
Resetting the unit
Before operating the unit for the first time, or
after replacing the car battery or changing the
connections, you must reset the unit.
Detach the front panel (page 7) and press the
RESET button (page 8) with a pointed object,
such as a ball-point pen.
Note
Pressing the RESET button will erase the clock setting
and some stored contents.
Canceling the DEMO mode
You can cancel the demonstration display which
appears during turning off.
1 Press and hold the select button.
The setup display appears.
2 Press the select button repeatedly
until “DEMO” appears.
3 Rotate the control dial to select
“DEMO-OFF.”
4 Press and hold the select button.
The setup is complete and the display returns
to normal reception/play mode.
4 Rotate the control dial to set the hour
and minute.
To move the digital indication, press –./
+>.
5 After setting the minute, press the
select button.
The setup is complete and the clock starts.
To display the clock, press (DSPL). Press
(DSPL) again to return to the previous display.
Tip
You can set the clock automatically with the RDS
feature (page 14).
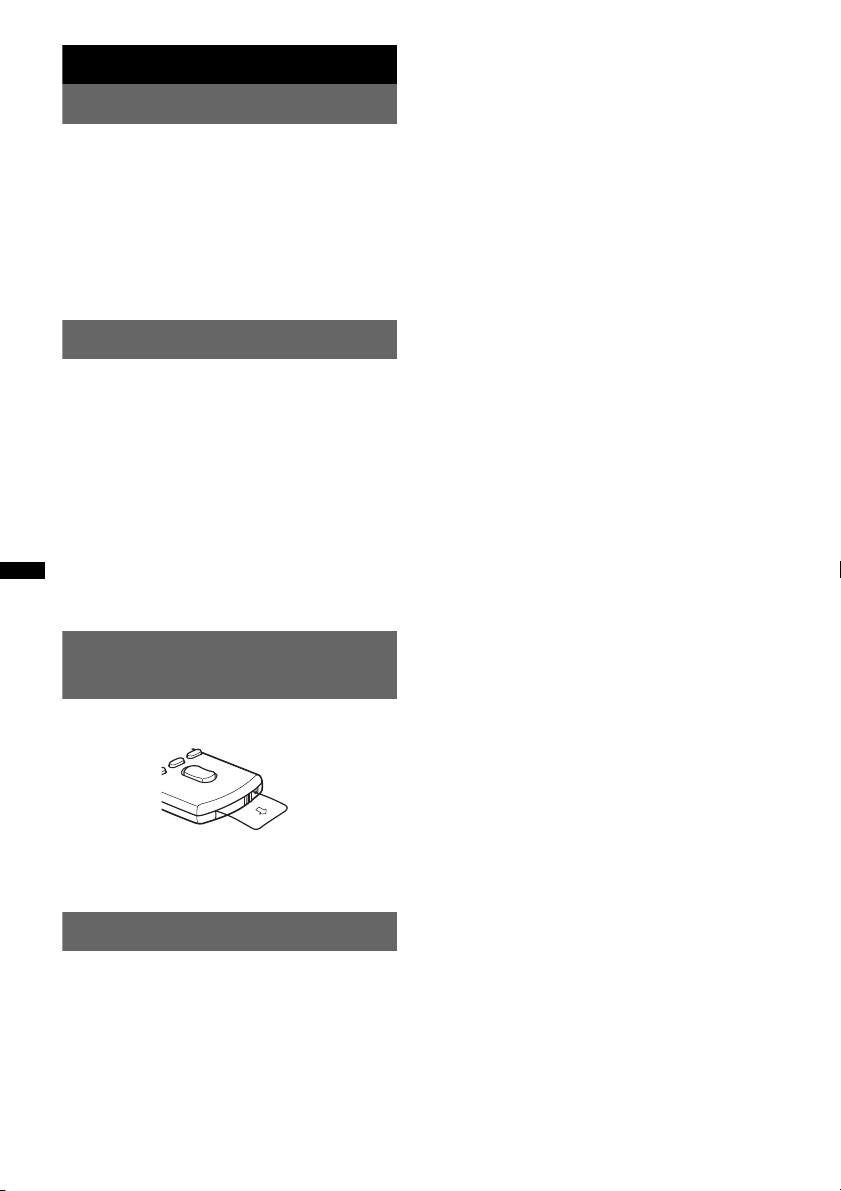
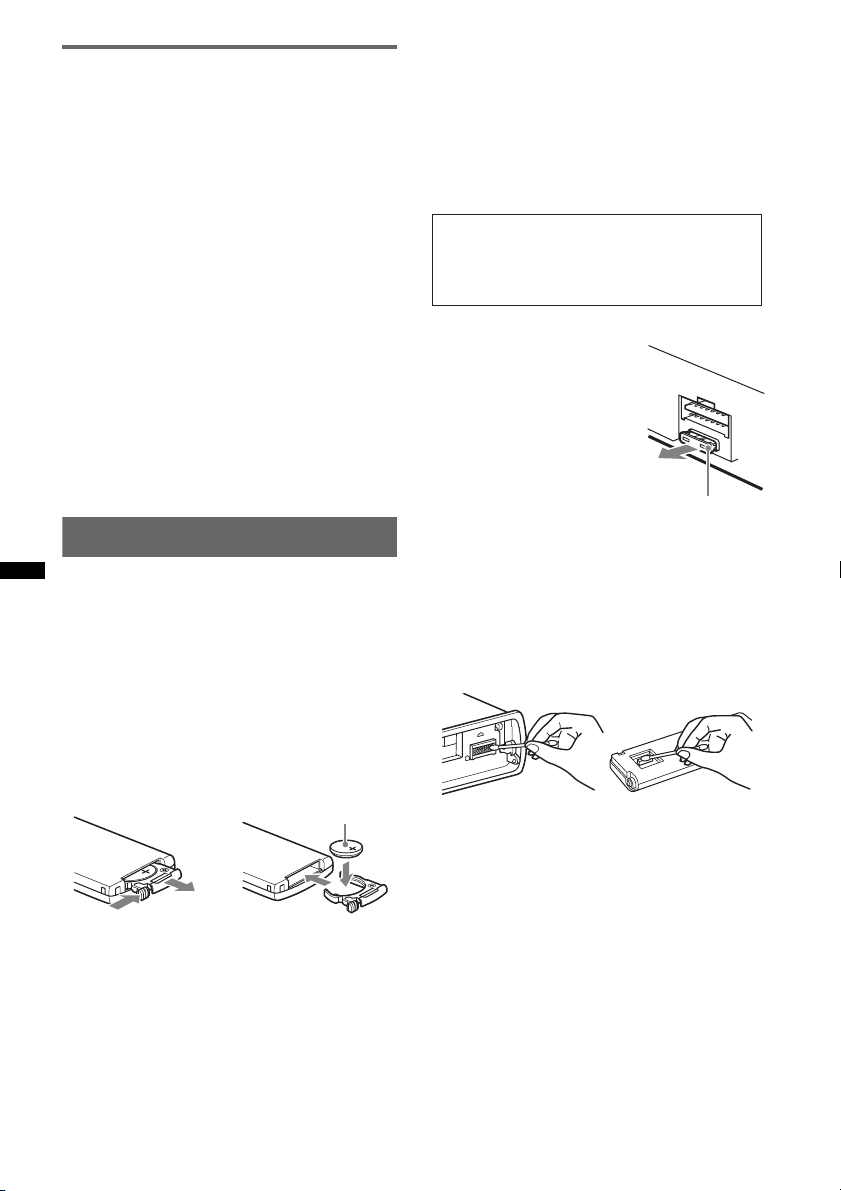
Preparing the card remote
commander
Remove the insulation film.
Tip
For how to replace the battery, see page 22.
Setting the clock
The clock uses a 12-hour digital indication.
1 Press and hold the select button.
The setup display appears.
2 Press the select button repeatedly
until “CLOCK-ADJ” appears.
3 Press +>.
The hour indication flashes.
6
Page 7
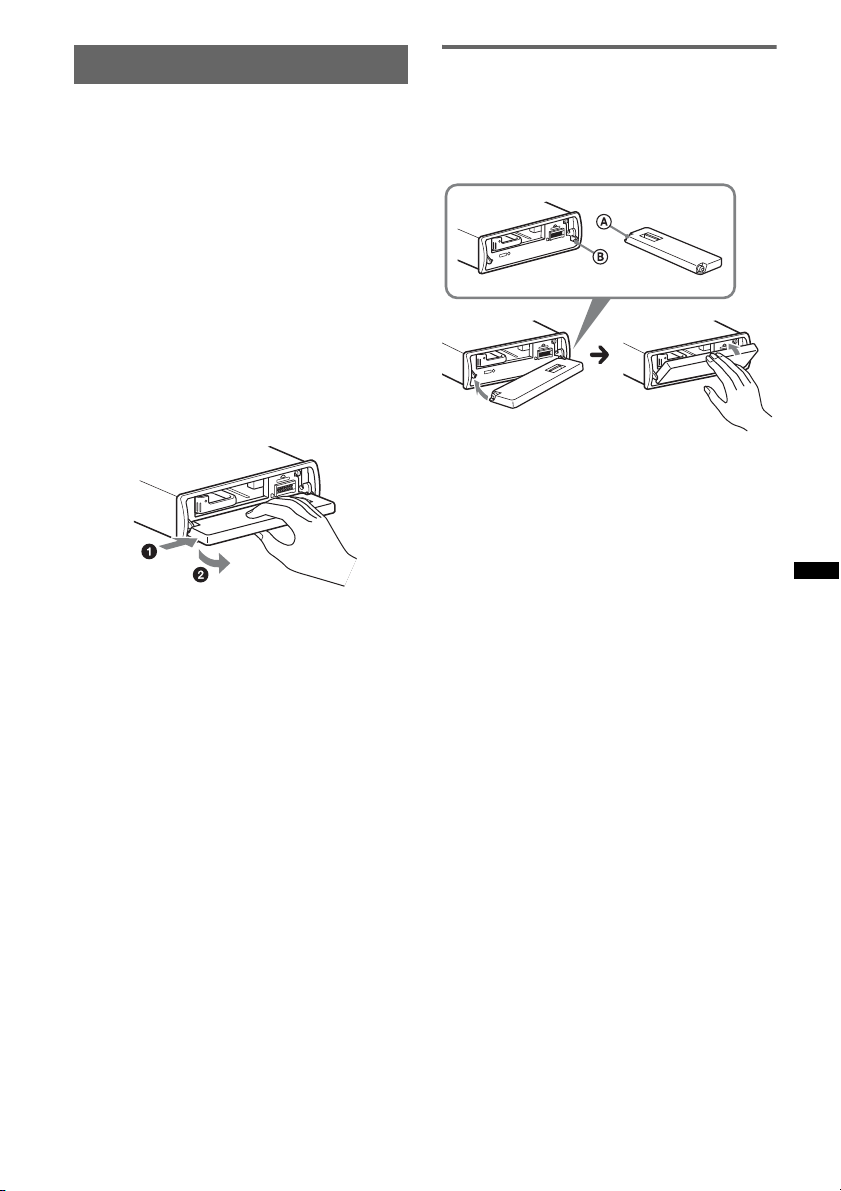
Detaching the front panel
You can detach the front panel of this unit to
prevent theft.
Caution alarm
If you turn the ignition switch to the OFF
position without detaching the front panel, the
caution alarm will sound for a few seconds.
The alarm will only sound if the built-in
amplifier is used.
1 Press and hold (SOURCE/OFF).
The unit is turned off.
2 Press (OPEN).
The front panel is flipped down.
3 Slide the front panel to the right, then
gently pull out the left end of the front
panel.
Notes
• Do not drop or put excessive pressure on the front
panel and display window.
• Do not subject the front panel to heat/high
temperature or moisture. Avoid leaving it in a parked
car or on a dashboard/rear tray.
• If “DEVICE INSIDE” appears in the display or the
Device Inside Alert LED flashes, detach the front
panel and remove the USB device or iPod.
Attaching the front panel
Place the hole A of the front panel onto the
spindle B on the unit, then lightly push the left
side in.
Press (SOURCE/OFF) on the unit to operate the
unit.
Note
Do not put anything on the inner surface of the front
panel.
7
Page 8
Location of controls and basic operations
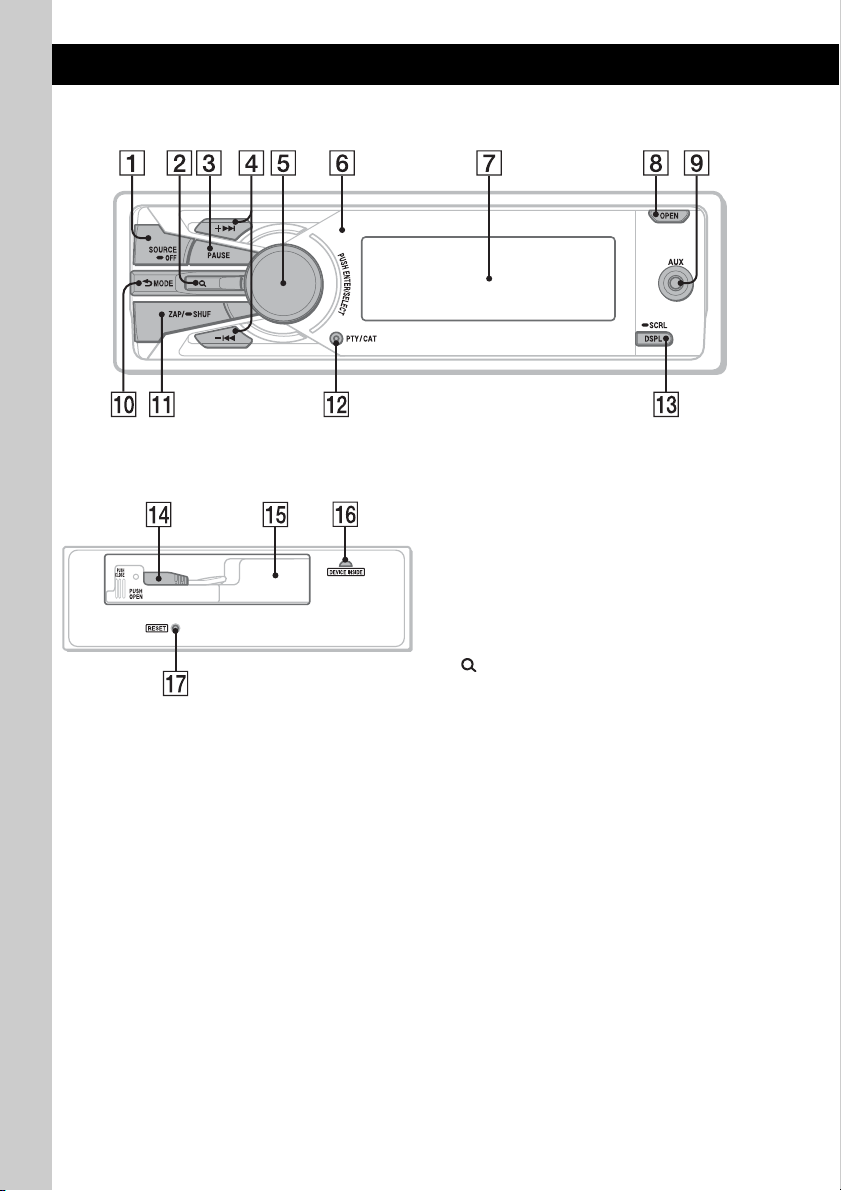
Main unit
Front panel removed This section contains instructions on the location
of controls and basic operations.
For details, see the respective pages.
A SOURCE/OFF button*
Press to turn on the power/change the source
(Radio/USB/AUX).
Press for 1 second to turn off the power.
Press for 2 seconds or more to turn off the
power and the display disappears.
B (BROWSE) button*
To list up (Radio); enter the Quick-BrowZer
mode (USB).
C PAUSE button
To pause playback. To cancel, press again.
D + >/– . buttons
Radio:
To tune in stations automatically (press); find
a station manually (press and hold).
USB:
To skip tracks (press); skip tracks
continuously (press, then press again within
about 1 second and hold); fast-forward/
reverse a track (press and hold).
1
2
page 11, 13
8
Page 9

E Control dial/select button page 19
To adjust volume (rotate); select setup items
(press and rotate).
F Receptor for the card remote
commander
G Display window
H OPEN button page 7
I AUX input jack page 21
To connect a portable audio device.
J (BACK)/MODE*
1
page 11, 12, 19
To return to the previous display/select the
radio band (FM/AM).
K ZAP/SHUF button page 12, 16, 18
To enter ZAPPIN™ mode (press); select
shuffle play mode (press and hold).
L PTY/CAT*
3
button page 14
To select PTY in RDS.
M DSPL (display)/SCRL (scroll) button
page 13, 15, 17
To change display items (press); scroll the
display item (press and hold).
N USB connector (located on the TUNE
TRAY) page 15, 16
To connect to the USB device.
O TUNE TRAY page 14, 16
Tray unit to place a USB device or an iPod.
P Device Inside Alert LED page 21
Q RESET button page 6
*1 If an HD Radio tuner or SAT tuner is connected:
when (SOURCE/OFF) is pressed, the connected
device (“HD,” “XM” or “SR”) will appear in the
display. Furthermore, if (MODE) is pressed, you
can switch the HD Radio tuner band or SAT tuner
band.
*2 If an HD Radio tuner or SAT tuner is connected:
the list will include the HD Radio or SAT Radio
accordingly.
*3 When the SAT tuner is connected.
9
Page 10
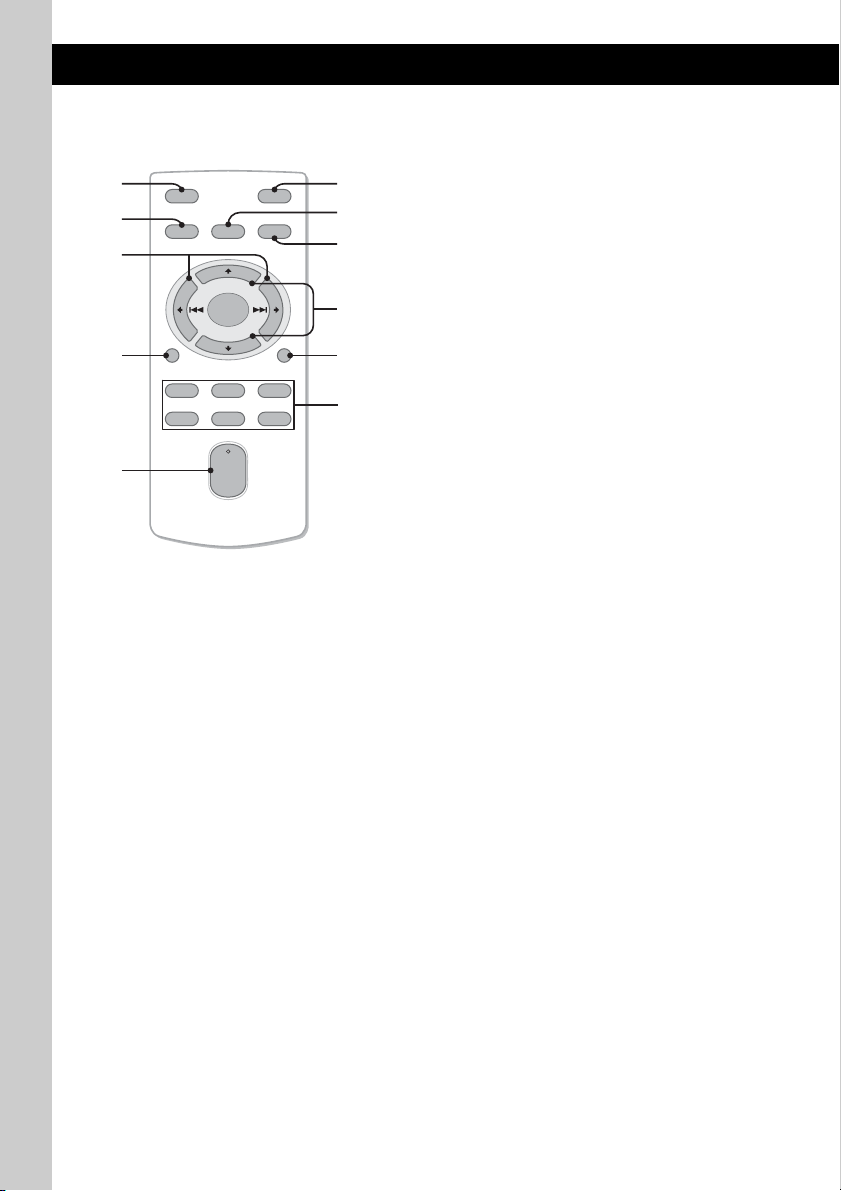
Card remote commander
RM-X151
1
2
OFF
SOURCE
SEL
ATT
MODE
3
+
–
VOL
SCRL
+
–
4
5
DSPL
132
465
6
7
8
9
q;
qa
Remove the insulation film before use (page 6).
A OFF button
To turn off; stop the source.
B SOURCE button*
1
To turn on; change the source (Radio/USB/
AUX ).
C < (.)/, (>) buttons
To control Radio/USB, the same as –./
+> on the unit.
Setup, sound setting, etc., can be operated by
< ,.
D DSPL (display) button
To change display items.
E VOL (volume) +*
2
/– button
To adjust volume.
F ATT (attenuate) button
To attenuate the sound. To cancel, press
again.
G SEL (select) button
The same as the select button on the unit.
H MODE button*
1
Press to select the radio band (FM/AM).
I M (+)/m (–) buttons
To control USB, skip albums.
Setup, sound setting, etc., can be operated by
M m.
J SCRL (scroll) button
To scroll the display item.
K Number buttons
To receive stored stations (press); store
stations (press and hold).
*1 If an HD Radio tuner or SAT tuner is connected:
when (SOURCE) is pressed, the connected device
(“HD,” “XM” or “SR”) will appear in the display.
Furthermore, if (MODE) is pressed, you can switch
the HD Radio tuner band or SAT tuner band.
*2 This button has a tactile dot.
Note
If the unit is turned off and the display disappears, it
cannot be operated with the card remote commander
unless (SOURCE/OFF) on the unit is pressed to
activate the unit first.
10
Page 11

Searching for a track
Searching a track by name
— Quick-BrowZer
You can search for a track in a USB device easily
by category.
(BROWSE)
(BACK)
1 Press (BROWSE).
The unit enters the Quick-BrowZer mode,
and the list of search categories appears.
2 Rotate the control dial to select the
desired search category, then press it
to confirm.
3 Repeat step 2 until the desired track is
selected.
Playback starts.
To return to the previous display
Press (BACK).
To exit the Quick-BrowZer mode
Press (BROWSE).
Control dial/
select button
+>/–.
Searching by skip items
— Jump mode
When many items are in a category, you can
search the desired item quickly.
1 Press +> in Quick-BrowZer mode.
The following display appears.
A Current item number
B Total item number in the current layer
Then the item name will appear.
2 Rotate the control dial to select the desired
item, or one near the desired item.
It skips in steps of 10% of the total item
number.
3 Press the select button.
The display returns to the Quick-BrowZer
mode and the selected item appears.
4 Rotate the control dial to select the desired
item and press it.
Playback starts if the selected item is a track.
To cancel Jump mode
Press (BACK) or –..
Note
When entering the Quick-BrowZer mode, the repeat/
shuffle setting is canceled.
11
Page 12
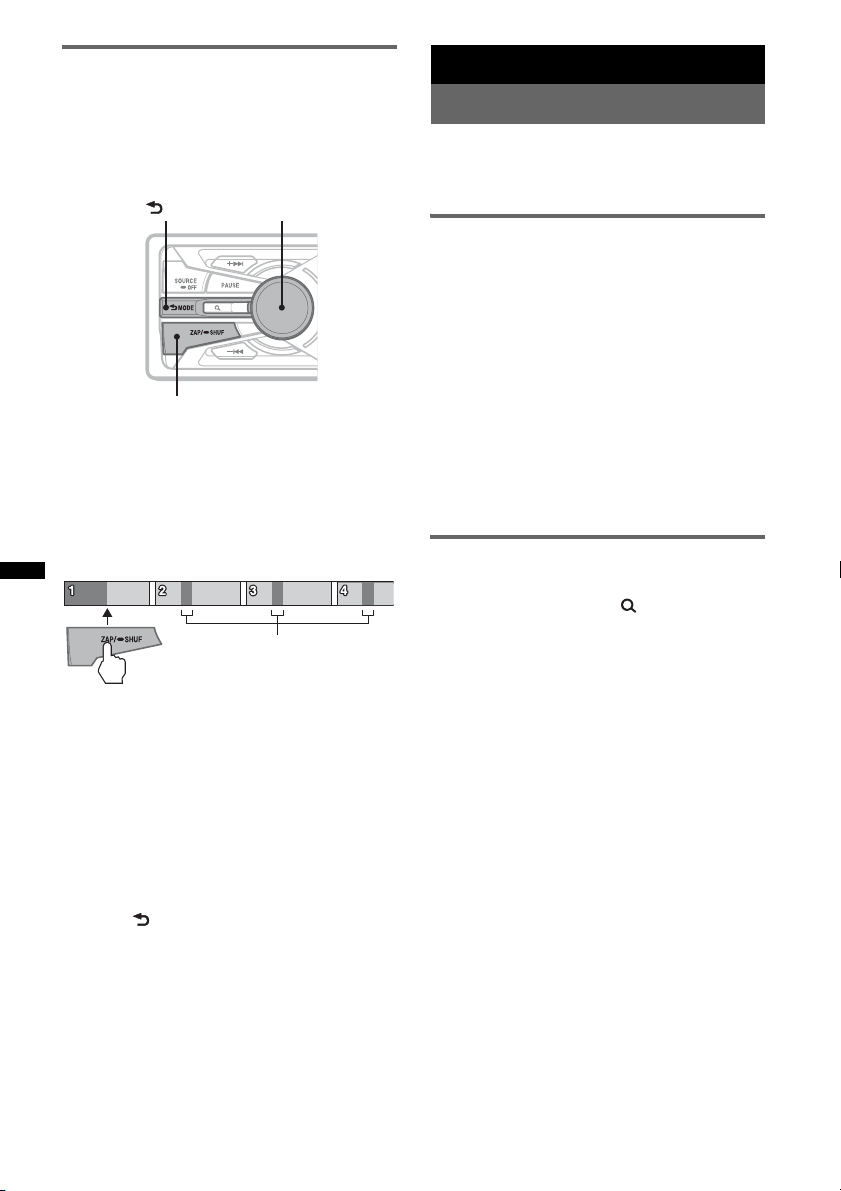
Searching a track by listening to
track passages — ZAPPIN™
While playing back short track passages in a
USB device in sequence, you can search for a
track you want to listen to.
ZAPPIN mode is suitable for searching for a
track in shuffle or shuffle repeat mode.
Select button (BACK)
ZAP
1 Press (ZAP/SHUF) during playback.
After “ZAPPIN” appears in the display,
playback starts from a passage of the next
track.
The passage is played for the set time, then a
click sounds and the next passage starts.
Tra ck
The part of each track to
playback in ZAPPIN mode.
2 Press the select button or (ZAP/SHUF)
when a track you want to listen is
played back.
The track that you select returns to normal
play mode from the beginning.
To search a track by ZAPPIN mode again,
repeat steps 1 and 2.
Tips
• You can select the playback time from about 6
seconds/15 seconds/30 seconds (page 20). You
cannot select the passage of the track to playback.
• Press +>/–. in ZAPPIN mode to skip a track.
• Pressing (BACK) also confirms a track to
playback.
Radio
Storing and receiving stations
Caution
When tuning in stations while driving, use Best
Tuning Memory (BTM) to prevent an accident.
Storing automatically — BTM
1 Press (SOURCE/OFF) repeatedly until
“TUNER” appears.
To change the band, press (MODE)
repeatedly. You can select from FM1, FM2,
FM3, AM1 or AM2.
2 Press and hold the select button.
The setup display appears.
3 Press the select button repeatedly
until “BTM” appears.
4 Press +>.
The unit stores stations in order of frequency
in the preset list.
A beep sounds when the setting is stored.
Storing manually
1 While receiving the station that you
want to store, press (BROWSE).
The preset list appears.
2 Rotate the control dial to select the
preset number.
3 Press and hold the select button until
“MEMORY” appears.
(with the card remote commander)
1 While receiving the station that you
want to store, press and hold a
number button ((1) to (6)) until
“MEMORY” appears.
Note
If you try to store another station on the same number
button, the previously stored station will be replaced.
12
Page 13
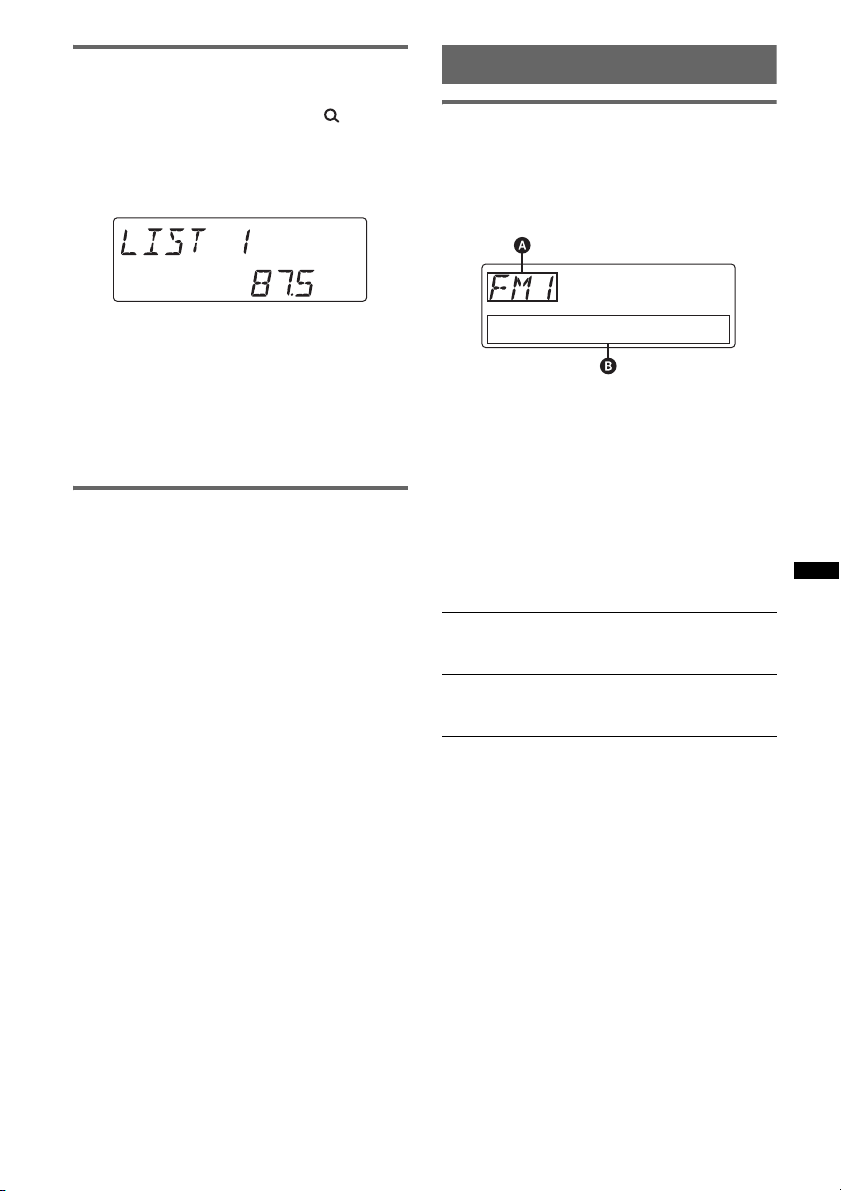
Receiving the stored stations
You can select a station to receive via a list.
1 Select the band, then press
(BROWSE).
The preset list appears.
2 Rotate the control dial until the
desired station appears.
3 Press the select button to receive the
station.
The display returns to normal reception
mode.
(with the card remote commander)
1 Select the band, then press a number
button ((1) to (6)).
Tuning automatically
1 Select the band, then press +>/
–. to search for the station.
Scanning stops when the unit receives a
station. Repeat this procedure until the
desired station is received.
Tip
If you know the frequency of the station you want to
listen to, press and hold +>/–. to locate the
approximate frequency, then press +>/–.
repeatedly to fine adjust to the desired frequency
(manual tuning).
RDS
Overview
FM stations with Radio Data System (RDS)
service send inaudible digital information along
with the regular radio program signal.
Display items
A Radio band, Function, Frequency, Preset
number
B Program service name, Clock, Frequency*,
Preset number
* While receiving the RDS station, “ *” is displayed on
the left of the frequency indication.
To change display items A, B, press
RDS services
This unit automatically provides RDS services as
follows:
PTY (Program Types)
Displays the currently received program type.
Also searches your selected program type.
CT (Clock Time)
The CT data from the RDS transmission sets
the clock.
Notes
• Depending on the country/region, not all RDS
functions may be available.
• RDS will not work if the signal strength is too weak,
or if the station you are tuned to is not transmitting
RDS data.
(DSPL)
.
13
Page 14
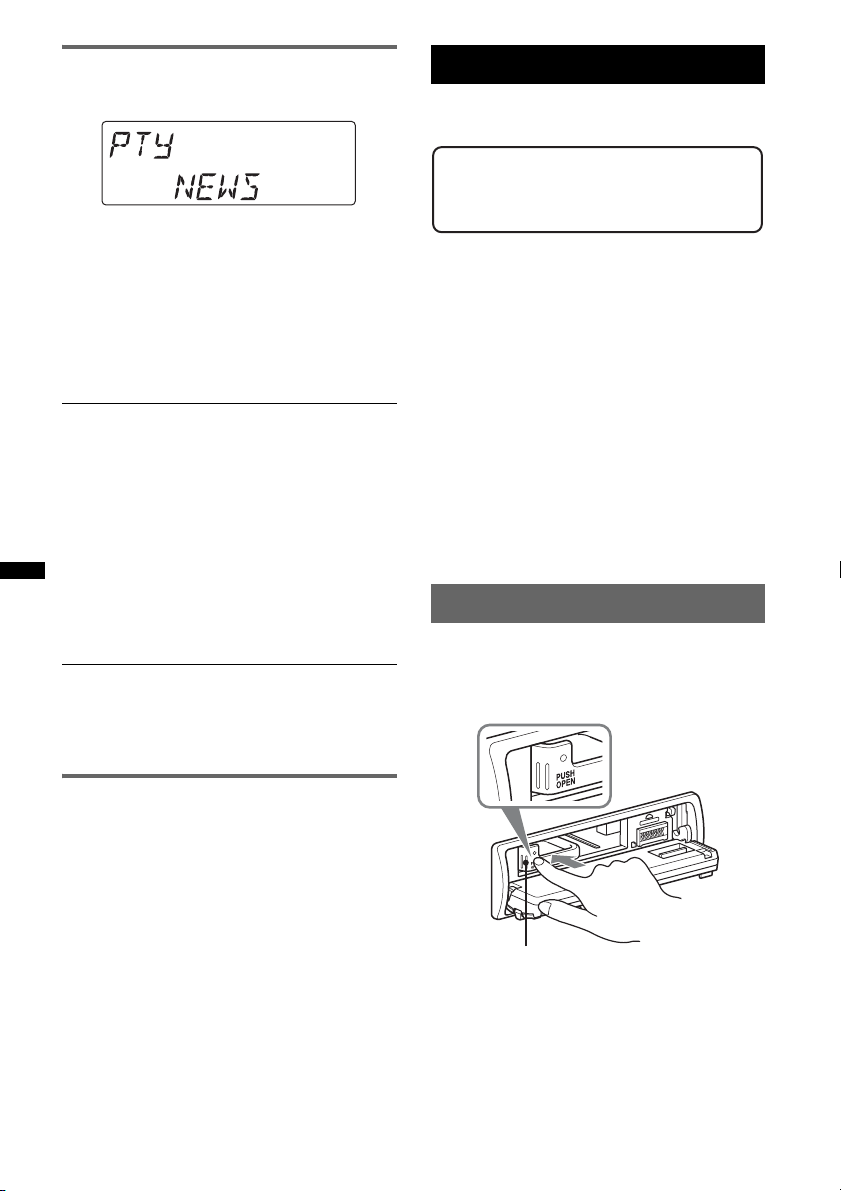
Selecting PTY
1 Press (PTY) during FM reception.
The current program type name appears if the
station is transmitting PTY data.
2 Press (PTY) repeatedly until the
desired program type appears.
3 Press +>/–. .
The unit starts to search for a station
broadcasting the selected program type.
Type of programs
NEWS (News), INFORM (Information),
SPORTS (Sports), TALK (Talk), ROCK
(Rock), CLS ROCK (Classic Rock), ADLT
HIT (Adult Hits), SOFT RCK (Soft Rock),
TOP 40 (Top 40), COUNTRY (Country),
OLDIES (Oldies), SOFT (Soft), NOSTALGA
(Nostalgia), JAZZ (Jazz), CLASSICL
(Classical), R AND B (Rhythm and Blues),
SOFT R B (Soft Rhythm and Blues),
LANGUAGE (Foreign Language), REL
MUSC (Religious Music), REL TALK
(Religious Talk), PERSNLTY (Personality),
PUBLIC (Public), COLLEGE (College),
WEATHER (Weather)
Notes
• You cannot use this function in countries/regions
where no PTY data is available.
• You may receive a different radio program from the
one you select.
USB devices
For details on the compatibility of your USB
device, visit the support site.
Support site
http://esupport.sony.com
http://www.sony.com/mobileAV
• MSC (Mass Storage Class) and MTP (Media
Transfer Protocol) type USB devices compliant
with the USB standard can be used.
• Corresponding codec is MP3 (.mp3), WMA
(.wma) and AAC (.m4a).
• Backup of data in a USB device is
recommended.
Notes
• Connect the USB device after starting the engine.
Depending on the USB device, malfunction or
damage may occur if it is connected before starting
the engine.
• Do not place a cellular phone or a device with
wireless communication functions on the TUNE
TRAY, as it may not receive phone signals or
communication may be terminated.
• Do not leave a USB device in a parked car, as
malfunction may result.
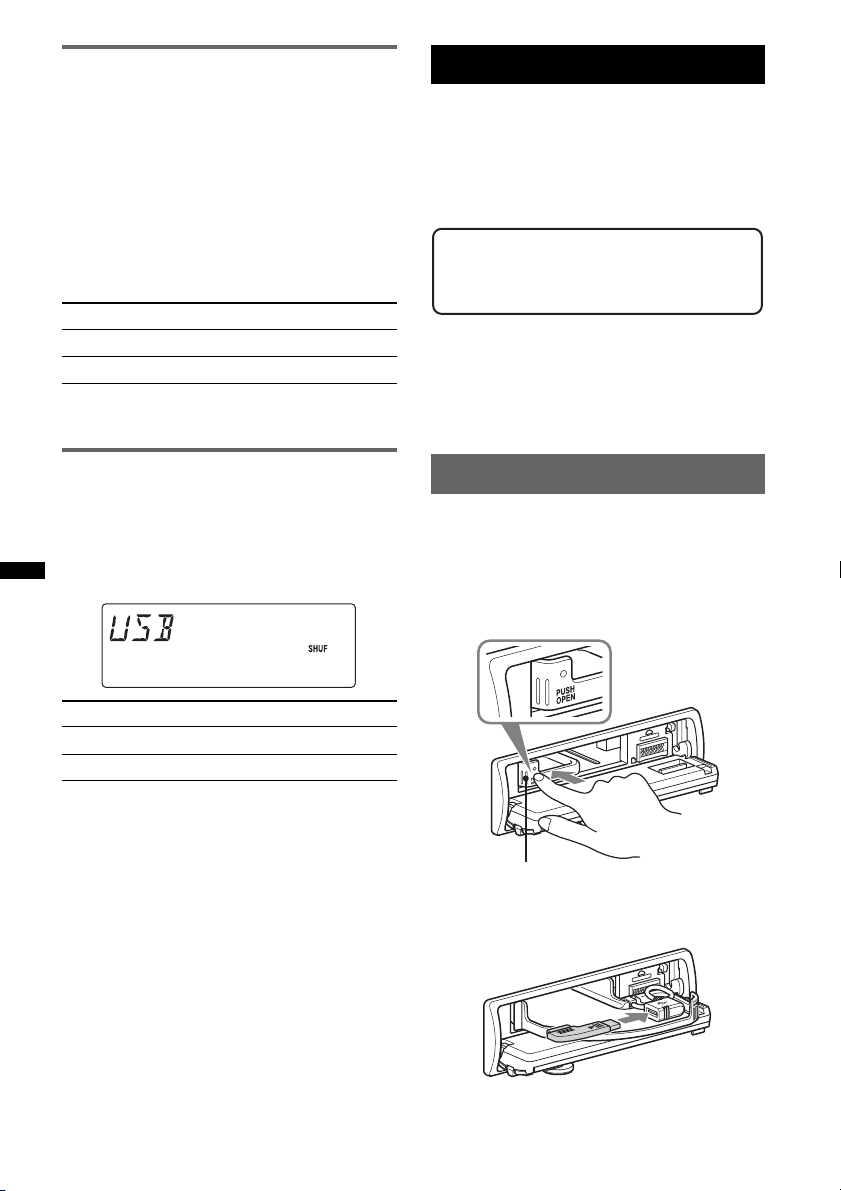
Playing back a USB device
1 Press (OPEN).
The front panel is flipped down.
2 Press PUSH OPEN on the TUNE TRAY.
The TUNE TRAY opens slowly.
Setting CT
1 Set “CT-ON” in setup (page 20).
Notes
• The CT function may not work even though an RDS
station is being received.
• There might be a difference between the time set by
the CT function and the actual time.
14
TUNE TRAY
Page 15

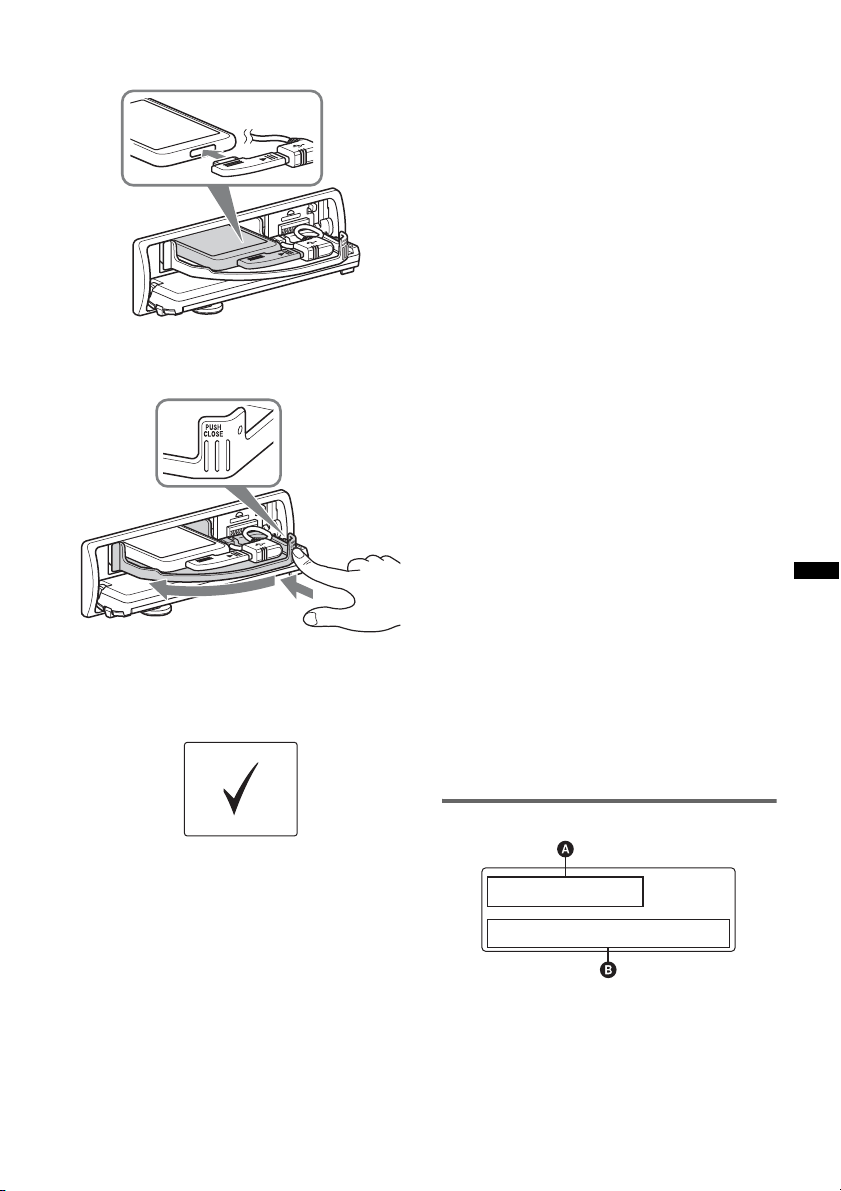
3 Connect the USB device to the USB
connector.
4 Slide in the TUNE TRAY by pressing
CLOSE on the TUNE TRAY until it
locks shut.
5 Close the front panel.
Playback starts.
If a USB device is already connected, to start
playback, press (SOU RCE/OFF) repeatedly until
“USB” appears.
Press (SOURCE/OFF) for 1 second to stop
playback.
Removing the USB device
1 Stop the USB device playback.
2 Press (OPEN).
3 Press PUSH OPEN on the TUNE TRAY.
4 Remove the USB device.
5 Slide in the TUNE TRAY, and close the front
panel.
Notes
• Do not remove the USB device during playback,
otherwise USB data may be damaged.
• Do not place non-USB devices on the TUNE TRAY,
or foreign objects, such as coins, keys, cards,
liquids, etc.
• Do not place a flammable object such as a lighter on
the TUNE TRAY, as this may cause smoke, fire, or
other accident.
• Capacity of the tray: Approx. 65 × 17 × 118 mm
9
/16 × 21/32 × 45/8 in) (w/h/d)
(2
• If the size of the USB device alone or combined with
the USB cable cannot be placed easily in the TUNE
TRAY, the device may be exceeding the tray
capacity.
Do not slide in the TUNE TRAY or the USB cable
forcefully.
• For “WALKMAN” users, use of the optional adaptor
XA-50WM is recommended. It is designed for use
with this unit only, and should not be used with the
other USB devices.
• This unit cannot recognize USB devices via a USB
hub.
• Slide in the TUNE TRAY and close the front panel
before playback, as damage may result in the case
of an obstruction in the car, etc.
• If the front panel does not fully open because of the
dashboard shape at the installation position, detach
the front panel and open the TUNE TRAY manually.
For how to detach the front panel, see page 7.
• It is extremely dangerous to connect or remove the
USB device while driving.
Display items
A Source, Track name, Artist name, Album
name
B Track name, Artist name, Album number*,
Album name, Track number/Elapsed playing
time, Clock
* Album number is displayed only when the album is
changed.
To change display items A, B, press (DSPL).
Notes
• Displayed items will differ, depending on the USB
device, recorded format and settings. For details,
visit the support site.
• The maximum number of displayable data is as
follows.
– folders (albums): 128
– files (tracks) per folder: 500
• It may take time for playback to begin, depending on
the amount of recorded data.
• DRM (Digital Rights Management) files may not be
played.
• During playback or fast-forward/reverse of a VBR
(Variable Bit Rate) MP3/WMA/AAC file, elapsed
playing time may not display accurately.
• Playback of the following MP3/WMA/AAC files is not
supported.
– lossless compression
– copyright-protected
15
Page 16
Repeat play
1 During playback, press and hold the
select button.
The setup display appears.
2 Press the select button repeatedly
until the “REPEAT” appears.
3 Rotate the control dial to select the
play mode.
4 Press and hold the select button.
The setup is complete and the display returns
to normal play mode.
Select To play
REPEAT-TRK track repeatedly.
REPEAT-ALB album repeatedly.
To return to normal play mode, select “REPEATOFF.”
iPod
For details on the compatibility of your iPod, see
“About iPod” on page 22 or visit the support site.
In these Operating Instructions, “iPod” is used as
a general reference for the iPod functions on the
iPod and iPhone, unless otherwise specified by
the text or illustrations.
Support site
http://esupport.sony.com
http://www.sony.com/mobileAV
Notes
• Do not place a cellular phone or a device with
wireless communication functions on the TUNE
TRAY, as it may not receive phone signals or
communication may be terminated.
• Do not leave an iPod in a parked car, as malfunction
may result.
Shuffle play
1 During playback, press and hold
(ZAP/SHUF).
The lower half of the display starts flashing.
2 Press (ZAP/SHUF) repeatedly until the
desired setting appears.
Select To play
ALBUM album in random order.
DEVICE device in random order.
After 3 seconds, the setting is complete.
To return to normal play mode, select “OFF. ”
Playing back iPod
Before connecting the iPod, turn down the
volume of the unit.
1 Press (OPEN).
The front panel is flipped down.
2 Press PUSH OPEN on the TUNE TRAY.
The TUNE TRAY opens slowly.
TUNE TRAY
3 Connect the supplied adaptor to the
USB connector.
16
Page 17
4 Connect the iPod to the supplied
adaptor.
5 Slide in the TUNE TRAY by pressing
CLOSE on the TUNE TRAY until it
locks shut.
6 Close the front panel.
The iPod will turn on automatically, and the
display will appear on the iPod screen as
below.*
Removing the iPod
1 Stop the iPod playback.
2 Press (OPEN).
3 Press PUSH OPEN on the TUNE TRAY.
4 Remove the iPod.
5 Slide in the TUNE TRAY, and close the front
panel.
Notes
• Do not remove the iPod during playback, otherwise
data may be damaged.
• Do not place non-iPod devices on the TUNE TRAY,
or foreign objects, such as coins, keys, cards,
liquids, etc.
• Do not place a flammable object such as a lighter on
the TUNE TRAY, as this may cause smoke, fire, or
other accident.
• For iPod users, use the supplied adaptor XA-50IP. It
is designed for use with this unit only, and should not
be used with the other USB devices.
• This unit cannot recognize iPod via a USB hub.
• Slide in the TUNE TRAY and close the front panel
before playback, as damage may result in the case
of an obstruction in the car, etc.
• If the front panel does not fully open because of the
dashboard shape at the installation position, detach
the front panel and open the TUNE TRAY manually.
For how to detach the front panel, see page 7.
• It is extremely dangerous to connect or remove the
iPod while driving.
Tips
• When the ignition key is turned to the ACC position,
and the unit is on, the iPod will be recharged.
• If the iPod is disconnected during playback, “NO
DEV” appears in the display of the unit.
Resuming mode
When the iPod is connected, the mode of this
unit changes to resuming mode and playback
starts in the mode set by the iPod.
In resuming mode, repeat/shuffle play does not
function.
The tracks on the iPod start playing
automatically from the point last played.
If an iPod is already connected, to start
playback press (SOURCE/OFF) repeatedly
until “USB” appears. (“IPOD” appears in the
display when iPod is recognized.)
* Display differs depending on the iPod, or may not
appear in the case of an iPod touch being
connected.
7 Adjust the volume.
Press (SOURCE/OFF) for 1 second to stop
playback.
Display items
A Source, Track name, Artist name, Album
name
B Track name, Artist name, Album name, Track
number/Elapsed playing time, Clock
To change display items A, B, press (DSPL).
continue to next page t
17
Page 18

Tip
When album/podcast/genre/artist/playlist is changed,
its item number appears momentarily.
Note
Some letters stored in iPod may not be displayed
correctly.
Repeat play
1 During playback, press and hold the
select button.
The setup display appears.
2 Press the select button repeatedly
until the “REPEAT” appears.
3 Rotate the control dial to select the
play mode.
4 Press and hold the select button.
The setup is complete and the display returns
to normal play mode.
Select To play
REPEAT-TRK track repeatedly.
REPEAT-ALB album repeatedly.
REPEAT-PCS podcast repeatedly.
REPEAT-ART artist repeatedly.
REPEAT-PLY playlist repeatedly.
REPEAT-GNR genre repeatedly.
To return to normal play mode, select “REPEATOFF.”
After 3 seconds, the setting is complete.
To return to normal play mode, select “OFF.”
Shuffle play
1 During playback, press and hold
(ZAP/SHUF).
The lower half of the display starts flashing.
2 Press (ZAP/SHUF) repeatedly until the
desired setting appears.
Select To play
ALBUM album in random order.
PODCAST podcast in random order.
ARTIST artist in random order.
PLAYLIST playlist in random order.
GENRE genre in random order.
DEVICE device in random order.
18
Page 19

Other functions
Changing the sound settings
Adjusting the sound
characteristics
1 Press the select button repeatedly
until the desired item appears.
2 Rotate the control dial to adjust the
selected item.
3 Press (BACK).
The setting is complete and the display
returns to normal reception/play mode.
The following items can be set (follow the page
reference for details):
EQ3
Selects an equalizer curve from 7 music types
(XPLOD, VOCAL, EDGE, CRUISE, SPACE,
GRAVITY, CUSTOM or OFF).
DSO (Dynamic Soundstage Organizer)
Creates a more ambient sound field.
To select the DSO mode: “1,” “2,” “3” or “OFF.”
The larger the number, the more enhanced the
effect.
1
LOW*
, MID*1, HIGH*1 (page 19)
BALANCE
Adjusts the sound balance between the left and
right speakers.
FADER
Adjusts the relative level between the front and
rear speakers.
2
SUB*
(Subwoofer volume)
Adjusts the subwoofer volume.
AUX LV*3 (AUX level)
Adjusts the volume level for each connected
auxiliary equipment: “+18 dB” – “0 dB” – “–8
dB.”
This setting negates the need to adjust the
volume level between sources.
*1 When EQ3 is activated.
*2 When the audio output is set to “SUB-OUT”
(page 20).
“ATT” is displayed at the lowest setting, and can be
adjusted up to 21 steps.
*3 When AUX source is activated (page 21).
Customizing the equalizer curve
— EQ3
“CUSTOM” of EQ3 allows you to make your
own equalizer settings.
1 Select a source, then press the select
button repeatedly to select “EQ3.”
2 Rotate the control dial to select
“CUSTOM.”
3 Press the select button repeatedly
until “LOW,” “MID” or “HIGH” appears.
4 Rotate the control dial to adjust the
selected item.
The volume level is adjustable in 1 dB steps,
from –10 dB to +10 dB.
Repeat steps 3 and 4 to adjust the equalizer
curve.
To restore the factory-set equalizer curve,
press and hold the select button before the
setting is complete.
5 Press (BACK).
The setting is complete and the display
returns to normal reception/play mode.
Tip
Other equalizer types are also adjustable.
Adjusting setup items — SET
1 Press and hold the select button.
The setup display appears.
2 Press the select button repeatedly
until the desired item appears.
3 Rotate the control dial to select the
setting (example “ON” or “OFF”).
4 Press and hold the select button.
The setup is complete and the display returns
to normal reception/play mode.
Note
Displayed items will differ, depending on the source
and setting.
The following items can be set (follow the page
reference for details):
continue to next page t
19
Page 20

CLOCK-ADJ (Clock Adjust) (page 6)
CT (Clock Time)
Activates the CT function: “ON,” “OFF”
(page 13, 14).
BEEP
Activates the beep sound: “ON,” “OFF.”
AUX-A*1 (AUX Audio)
Activates the AUX source display: “ON,”
“OFF” (page 21).
AUTO OFF
Shuts off automatically after a desired time
when the unit is turned off: “NO,” “30S
(Seconds),” “30M (Minutes),” “60M (Minutes).”
SUB/REAR*
1
Switches the audio output: “SUB-OUT”
(subwoofer), “REAR-OUT” (power amplifier).
DEMO
(Demonstration)
Activates the demonstration: “ON,” “OFF.”
DIMMER
Changes the display brightness.
– “AT”: to dim the display automatically when
you turn lights on. (Available only when the
illumination control lead is connected.)
– “ON”: to dim the display.
– “OFF”: deactivate the dimmer.
CONTRAST
Adjusts the contrast for a clear view of the
display, suitable for the installed viewing angle.
The contrast level is adjustable in 7 steps.
LV-METER (Level Meter)
Activates the level meter: “ON,” “OFF.”
A.SCRL (Auto Scroll)
Scrolls long items automatically: “ON,” “OFF.”
REPEAT (page 16, 18)
LOCAL (Local Seek Mode)
– “ON”: to only tune into stations with stronger
signals.
– “OFF”: to tune normal reception.
MONO*
2
(Monaural Mode)
Selects monaural reception mode to improve
poor FM reception: “ON,” “OFF.”
ZAP.TIME (Zappin Time)
Selects the playback time for the ZAPPIN
function.
– “ZAP.TIME-1 (about 6 seconds),”
“ZAP.TIME-2 (about 15 seconds),”
“ZAP.TIME-3 (about 30 seconds).”
3
LPF*
(Low Pass Filter)
Selects the subwoofer cut-off frequency: “OFF,”
“80Hz,” “100Hz,” “120Hz,” “140Hz,” “160Hz.”
3
SUB*
(Subwoofer Phase)
Selects the subwoofer phase: “NORM,” “REV.”
HPF (High Pass Filter)
Selects the front/rear speaker cut-off frequency:
“OFF,” “80Hz,” “100Hz,” “120Hz,” “140Hz,”
“160Hz.”
LOUD (Loudness)
Reinforces bass and treble for clear sound at low
volume levels: “ON,” “OFF.”
DM+
Activates the DM+ function: “ON,” “OFF.”
BTM (page 12)
*1 When the unit is turned off.
*2 When FM is received.
*3 When the audio output is set to “SUB-OUT.”
20
Page 21

Using optional equipment
Additional Information
Auxiliary audio equipment
By connecting an optional portable audio device
to the AUX input jack (stereo mini jack) on the
unit and then simply selecting the source, you
can listen on your car speakers. The volume level
is adjustable for any difference between the unit
and the portable audio device. Follow the
procedure below:
Connecting the portable audio
device
1 Turn off the portable audio device.
2 Turn down the volume on the unit.
3 Connect to the unit.
Connecting cord*
(not supplied)
Precautions
• Cool off the unit beforehand if your car has been
parked in direct sunlight.
• Power antenna (aerial) extends automatically.
Playback order of MP3/WMA/AAC
files
MP3/WMA/AAC
About Device Inside Alert
If you turn the ignition switch to the OFF
position without removing the USB device or
iPod, “DEVICE INSIDE” will appear in the
display.
Folder
(album)
MP3/WMA/
AAC file
(track)
* Be sure to use a straight type plug.
Adjust the volume level
Be sure to adjust the volume for each connected
audio device before playback.
1 Turn down the volume on the unit.
2 Press (SOURCE/OFF) repeatedly until “AUX”
appears.
After that, “AUX FRONT IN” appears.
3 Start playback of the portable audio device at a
moderate volume.
4 Set your usual listening volume on the unit.
5 Adjust the input level (page 19).
Open the front panel to remove the USB device
or iPod.
If the front panel is detached when the
ignition is turned off.
The Device Inside Alert LED flashes.
Tip
For how to remove the USB device or iPod, see
page 15 (USB), 17 (iPod).
Note
The Device Inside Alert will only sound if the built-in
amplifier is used.
21
Page 22
About iPod
1
• You can connect to the following iPod models.
Update your iPod devices to the latest software
before use.
Made for
– iPod touch (2nd generation)
– iPod touch (1st generation)
– iPod classic
– iPod with video
– iPod nano (5th generation)
– iPod nano (4th generation)
– iPod nano (3rd generation)
– iPod nano (2nd generation)
– iPod nano (1st generation)
• “Made for iPod” means that an electronic
accessory has been designed to connect
specifically to iPod and has been certified by the
developer to meet Apple performance standards.
• Apple is not responsible for the operation of this
device or its compliance with safety and
regulatory standards.
If you have any questions or problems concerning
your unit that are not covered in this manual, consult
your nearest Sony dealer.
Maintenance
Replacing the lithium battery of the
card remote commander
Under normal conditions, the battery will last
approximately 1 year. (The service life may be
shorter, depending on the conditions of use.)
When the battery becomes weak, the range of the
card remote commander becomes shorter.
Replace the battery with a new CR2025 lithium
battery. Use of any other battery may present a
risk of fire or explosion.
Notes on the lithium battery
• Keep the lithium battery out of the reach of children.
Should the battery be swallowed, immediately
consult a doctor.
• Wipe the battery with a dry cloth to assure a good
contact.
• Be sure to observe the correct polarity when
installing the battery.
• Do not hold the battery with metallic tweezers,
otherwise a short-circuit may occur.
WARNING
Battery may explode if mistreated.
Do not recharge, disassemble, or dispose of
in fire.
Fuse replacement
When replacing the fuse, be
sure to use one matching the
amperage rating stated on the
original fuse. If the fuse blows,
check the power connection and
replace the fuse. If the fuse
blows again after replacement,
there may be an internal
malfunction. In such a case,
consult your nearest Sony
dealer.
Fuse (10 A)
Cleaning the connectors
The unit may not function properly if the connectors
between the unit and the front panel are not clean. In
order to prevent this, detach the front panel (page 7)
and clean the connectors with a cotton swab. Do not
apply too much force. Otherwise, the connectors
may be damaged.
22
2
c
+ side up
Main unit
Notes
• For safety, turn off the ignition before cleaning the
connectors, and remove the key from the ignition
switch.
• Never touch the connectors directly with your fingers
or with any metal device.
Back of the front
panel
Page 23
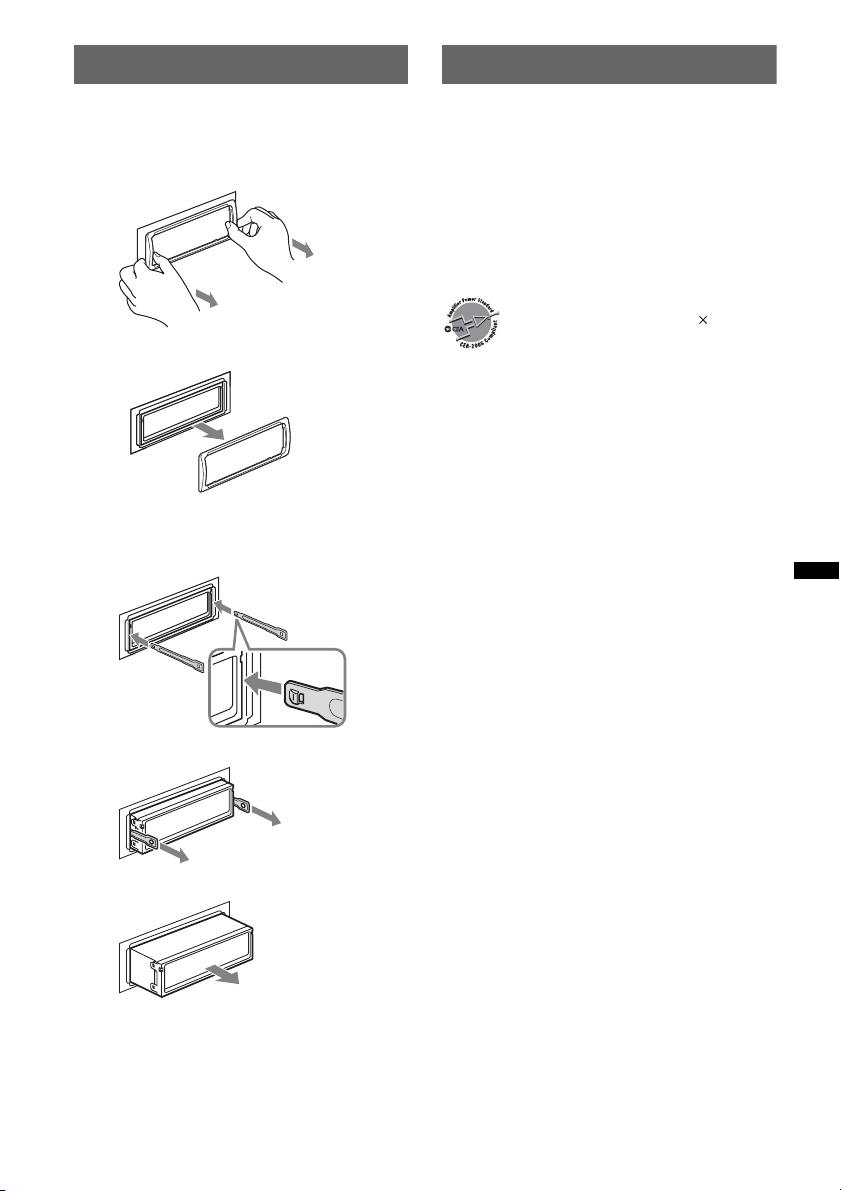
Removing the unit
Specifications
1 Remove the protection collar.
1 Detach the front panel (page 7).
2 Pinch both edges of the protection collar,
then pull it out.
x
2 Remove the unit.
1 Insert both release keys simultaneously
until they click.
Hook facing
inwards.
FOR UNITED STATES CUSTOMERS. NOT
APPLICABLE IN CANADA, INCLUDING
IN THE PROVINCE OF QUEBEC.
POUR LES CONSOMMATEURS AUX
ÉTATS-UNIS. NON APPLICABLE AU
CANADA, Y COMPRIS LA PROVINCE DE
QUÉBEC.
AUDIO POWER SPECIFICATIONS
CEA2006 Standard
Power Output: 17 Watts RMS
4 Ohms < 1% THD+N
SN Ratio: 80 dBA
(reference: 1 Watt into 4 Ohms)
4 at
Tuner section
FM
Tuning range: 87.5 – 107.9 MHz
Antenna (aerial) terminal:
External antenna (aerial) connector
Intermediate frequency: 150 kHz
Usable sensitivity: 10 dBf
Selectivity: 75 dB at 400 kHz
Signal-to-noise ratio: 70 dB (mono)
Separation: 40 dB at 1 kHz
Frequency response: 20 – 15,000 Hz
AM
Tuning range: 530 – 1,710 kHz
Antenna (aerial) terminal:
External antenna (aerial) connector
Intermediate frequency: 25 kHz
Sensitivity: 26 µV
2 Pull the release keys to unseat the unit.
3 Slide the unit out of the mounting.
USB Player section
Interface: USB (Full-speed)
Maximum current: 500 mA
Power amplifier section
Output: Speaker outputs
Speaker impedance: 4 – 8 ohms
Maximum power output: 52 W × 4 (at 4 ohms)
General
Outputs:
Audio outputs terminal (front, sub/rear switchable)
Power antenna (aerial) relay control terminal
Power amplifier control terminal
Inputs:
BUS control input terminal
BUS audio input terminal
Remote controller input terminal
Antenna (aerial) input terminal
Telephone ATT control terminal
Illumination control terminal
AUX input jack (stereo mini jack)
USB signal input connector
continue to next page t
23
Page 24
Tone controls:
Low: ±10 dB at 60 Hz (XPLOD)
Mid: ±10 dB at 1 kHz (XPLOD)
High: ±10 dB at 10 kHz (XPLOD)
Power requirements: 12 V DC car battery
(negative ground (earth))
Dimensions: Approx. 178 × 50 × 180 mm
1
/8 × 2 × 71/8 in) (w/h/d)
(7
Mounting dimensions: Approx. 182 × 53 × 163 mm
1
/4 × 21/8 × 61/2 in) (w/h/d)
(7
Mass: Approx. 1.0 kg (2 lb 4 oz)
Supplied accessories:
Card remote commander: RM-X151
USB connector for iPod XA-50IP
Parts for installation and connections (1 set)
Optional accessories/equipment:
BUS cable (supplied with an RCA pin cord):
Source selector: XA-C40
HD Radio™ tuner: XT-100HD
Walkman adaptor XA-50WM
Your dealer may not handle some of the above listed
accessories. Please ask the dealer for detailed
information.
Design and specifications are subject to change
without notice.
Troubleshooting
The following checklist will help you remedy
problems you may encounter with your unit.
Before going through the checklist below, check the
connection and operating procedures.
If the problem is not solved, visit the following
support site.
Support site
http://esupport.sony.com
http://www.sony.com/mobileAV
General
No power is being supplied to the unit.
• Check the connection or fuse.
• If the unit is turned off and the display disappears, it
cannot be operated with the remote commander.
t Turn on the unit.
The power antenna (aerial) does not extend.
The power antenna (aerial) does not have a relay box.
No sound.
• The ATT function is activated, or the Telephone ATT
function (when the interface cable of a car telephone
is connected to the ATT lead) is activated.
• The position of the fader control “FADER” is not set
for a 2-speaker system.
No beep sound.
• The beep sound is canceled (page 20).
• An optional power amplifier is connected and you are
not using the built-in amplifier.
The contents of the memory have been erased.
• The RESET button has been pressed.
t Store again into the memory.
• The power supply lead or battery has been
disconnected or it is not connected properly.
Stored stations and correct time are erased.
The fuse has blown.
Makes noise when the position of the ignition
is switched.
The leads are not matched correctly with the car’s
accessory power connector.
During playback or reception, demonstration
mode starts.
If no operation is performed for 5 minutes with
“DEMO-ON” set, demonstration mode starts.
t Set “DEMO-OFF” (page 20).
The display disappears from/does not appear
in the display window.
• The dimmer is set “DIMMER-ON” (page 20).
• The display disappears if you press and hold
(SOURCE/OFF).
t Press (SOURCE/OFF) on the unit until the
display appears.
• The connectors are dirty (page 22).
24
Page 25

The Auto Off function does not operate.
The unit is turned on. The Auto Off function activates
after turning off the unit.
tTurn off the unit.
DSO does not function.
• Depending on the type of car interior or type of
music, DSO may not have a desirable effect.
Radio reception
The stations cannot be received.
The sound is hampered by noises.
• The connection is not correct.
t Connect a power antenna (aerial) control lead
(blue) or accessory power supply lead (red) to the
power supply lead of a car’s antenna (aerial)
booster (only when your car has built-in FM/AM
antenna (aerial) in the rear/side glass).
t Check the connection of the car antenna (aerial).
t If the auto antenna (aerial) will not go up, check
the connection of the power antenna (aerial)
control lead.
t When the DSO mode is on, the sound is
sometimes hampered by noises.
Set the DSO mode to “OFF” (page 19).
Preset tuning is not possible.
• Store the correct frequency in the memory.
• The broadcast signal is too weak.
Automatic tuning is not possible.
• Setting of the local seek mode is not correct.
t Tuning stops too frequently:
Set “LOCAL-ON” (page 20).
t Tuning does not stop at a station:
Set “LOCAL-OFF” (page 20).
• The broadcast signal is too weak.
t Perform manual tuning.
During FM reception, the “ST” indication
flashes.
• Tune in the frequency accurately.
• The broadcast signal is too weak.
t Set “MONO-ON” (page 20).
An FM program broadcast in stereo is heard in
monaural.
The unit is in monaural reception mode.
tSet “MONO-OFF” (page 20).
RDS
PTY displays “- - - - - - - -.”
• The current station is not an RDS station.
• RDS data has not been received.
• The station does not specify the program type.
USB playback
You cannot play back items via a USB hub.
This unit cannot recognize USB devices via a USB
hub.
Cannot play back items.
A USB device does not work.
tReconnect it.
The USB device takes longer to play back.
The USB device contains files with a complicated tree
structure.
The display items do not scroll.
• A large number of characters may not scroll.
• “A.SCRL” is set to “OFF.”
t Set “A.SCRL-ON” (page 20).
t Press and hold (DSPL) (SCRL).
A beep sounds.
During playback, the USB device has been
disconnected.
t Before disconnecting a USB device, make sure to
stop playback first for data protection.
The sound is intermittent.
The sound may be intermittent at a high-bit-rate of
more than 320 kbps.
Error displays/Messages
CHECKING
The unit is confirming the connection of a USB device.
t Wait until confirming the connection is finished.
DEVICE INSIDE
If you turn the ignition switch to the OFF position
without removing the USB device or iPod, “DEVICE
INSIDE” will appear in the display.
ERROR
USB device was not automatically recognized.
t Reconnect it again.
FAILURE (Illuminates until any button is pressed.)
The connection of speakers/amplifiers is incorrect.
t See the installation/connections manual of this
model to check the connection.
FAILURE (Illuminates for about 1 second.)
When the SAT tuner is connected, storing an SAT
radio channel into a preset failed.
t Be sure to receive the channel that you want to
store, then try it again.
HUB NO SUPRT (HUB Not Support)
USB hub is not supported on this unit.
L. SEEK +/–
The local seek mode is on during automatic tuning.
NO DEV (No Device)
USB is selected as source without a USB device
connected. A USB device or a USB cable has been
disconnected during playback.
t Be sure to connect a USB device and USB cable.
NO MUSIC
The USB device does not contain a music file.
t Connect a USB device with a music file in it.
NO NAME
A album/artist/track name is not written in the track.
continue to next page t
25
Page 26

OFFSET
There may be an internal malfunction.
t Check the connection. If the error indication
remains on in the display, consult your nearest
Sony dealer.
OVERL OAD
USB device is overloaded.
t Disconnect the USB device, then change the source
by pressing (SOURCE/OFF).
t Indicates that the USB device is out of order, or an
unsupported device is connected.
READ
The unit is reading all track and album information on
the USB device.
t Wait until reading is complete and playback starts
automatically.
RESET
USB device cannot be operated due to a problem.
t Press the RESET button (page 6).
USB NO SUPRT (USB Not Support)
The connected USB device is not supported.
t For details on the compatibility of your USB
device, visit the support site.
“” or “”
During reverse or fast-forward, you have reached the
beginning or the end of the USB device and you cannot
go any further.
“”
The character cannot be displayed with the unit.
If these solutions do not help improve the situation,
consult your nearest Sony dealer.
26
Page 27

Page 28

Pour plus de sécurité, installez cet appareil
dans le tableau de bord de votre véhicule. Pour
de plus amples informations sur l’installation
et les raccordements, reportez-vous au manuel
d’installation et de raccordement fourni.
Le logo « HD Radio Ready » indique que ce
produit commande un récepteur HD Radio
TM
Sony (vendu séparément).
Pour obtenir plus d’informations sur le
fonctionnement du récepteur HD Radio
veuillez vous reporter au mode d’emploi du
récepteur HD Radio
HD Radio
TM
TM
.
et le logo HD Radio Ready sont
TM
,
des marques propriétaires d’iBiquity Digital
Corp.
Le logo « SAT Radio Ready »
indique que ce produit
commande un module
récepteur radio satellite
(vendu séparément). Consultez votre détaillant
agréé Sony le plus proche pour en savoir plus sur
le fonctionnement du module récepteur radio
satellite.
« SAT Radio », « SAT Radio Ready », les logos
SAT Radio et SAT Radio Ready, ainsi que
toutes les marques associées sont des marques de
commerce de Sirius XM Radio Inc. et de XM
Satellite Radio Inc.
ZAPPIN est une marque de commerce de Sony
Corporation.
« WALKMAN » et le logo « WALKMAN » sont
des marques déposées de Sony Corporation.
Windows Media et le logo
Windows sont des marques
de commerce ou des marques
déposées de Microsoft
Corporation aux États-Unis et/ou dans d’autres
pays.
iPod est une marque commerciale de Apple Inc.,
déposée aux Etats-Unis et dans d’autres pays/
régions.
Licence de la technologie de codage audio MPEG
Layer-3 et des brevets obtenue de Fraunhofer IIS et
Thomson.
Ce produit est protégé par des droits de propriété
intellectuelle de Microsoft Corporation. Toute
utilisation ou diffusion de la technologie décrite
sortant du cadre de l’utilisation de ce produit est
interdite sans licence accordée par Microsoft ou
une filiale autorisée de Microsoft.
2
Page 29

Les fournisseurs de ce contenu utilisent la
technologie de gestion des droits numériques pour
Windows Media contenue dans cet appareil
(« WM-DRM ») pour protéger l’intégrité de leur
contenu (« Contenu sécurisé ») pour que la
propriété intellectuelle, y compris les droits
d’auteur, de ce contenu, ne soit pas détournée.
Cet appareil utilise le logiciel WM-DRM pour lire
le contenu sécurisé (« Logiciel WM-DRM »). Si la
sécurité du logiciel WM-DRM de cet appareil a été
compromise, les propriétaires du contenu sécurisé
(« Propriétaires du contenu sécurisé ») peuvent
exiger de Microsoft qu’il refuse le droit au logiciel
WM-DRM d’acquérir de nouvelles licences pour
copier, afficher et/ou lire le contenu sécurisé. La
révocation ne modifie pas l’autorisation du logiciel
WM-DRM de lire le contenu non protégé. Une
liste des logiciels WM-DRM révoqués est envoyée
sur votre appareil lorsque vous téléchargez une
licence relative au contenu sécurisé à partir
d’Internet ou d’un ordinateur. Microsoft peut
également, conjointement à cette licence,
télécharger les listes de révocation sur votre
appareil pour le compte des propriétaires du
contenu sécurisé.
Avertissement si le contact de votre
véhicule ne comporte pas de position
ACC
Veillez à régler la fonction arrêt automatique
(page 20).
L’appareil s’éteint complètement et
automatiquement après le laps de temps choisi
une fois l’appareil arrêté afin d’éviter que la
batterie ne se décharge.
Si vous n’activez pas la fonction arrêt
automatique, appuyez sur la touche
(SOURCE/OFF) et maintenez-la enfoncée
jusqu’à ce que l’affichage disparaisse chaque
fois que vous coupez le contact.
3
Page 30

Table des matières
Préparation
Réinitialisation de l’appareil . . . . . . . . . . . . . . . 6
Annulation du mode DEMO . . . . . . . . . . . . . . . 6
Préparation de la mini-télécommande . . . . . . . . 6
Réglage de l’horloge . . . . . . . . . . . . . . . . . . . . . 6
Retrait de la façade . . . . . . . . . . . . . . . . . . . . . . 7
Installation de la façade . . . . . . . . . . . . . . . . 7
Emplacement des commandes et
opérations de base
Appareil principal . . . . . . . . . . . . . . . . . . . . . 8
Mini-télécommande RM-X151. . . . . . . . . . 10
Recherche d’une plage. . . . . . . . . . . . . . . . . . . 11
Recherche d’une plage par nom
— Quick-BrowZer . . . . . . . . . . . . . . . . . . . 11
Recherche d’une plage en écoutant des
passages de plages — ZAPPIN™. . . . . . . . 12
Radio
Mémorisation et réception des stations . . . . . . 12
Mémorisation automatique — BTM. . . . . . 12
Mémorisation manuelle . . . . . . . . . . . . . . . 12
Réception des stations mémorisées. . . . . . . 13
Syntonisation automatique . . . . . . . . . . . . . 13
RDS . . . . . . . . . . . . . . . . . . . . . . . . . . . . . . . . . 13
Aperçu. . . . . . . . . . . . . . . . . . . . . . . . . . . . . 13
Sélection de PTY . . . . . . . . . . . . . . . . . . . . 14
Réglage de la fonction CT . . . . . . . . . . . . . 14
Autres fonctions
Changement des réglages du son . . . . . . . . . . 19
Réglage des caractéristiques du son. . . . . . 19
Personnalisation de la courbe de l’égaliseur
— EQ3 . . . . . . . . . . . . . . . . . . . . . . . . . . . . 20
Réglage des paramètres de configuration
— SET . . . . . . . . . . . . . . . . . . . . . . . . . . . . . . 20
Utilisation d’un appareil en option . . . . . . . . . 21
Appareil audio auxiliaire . . . . . . . . . . . . . . 21
Informations complémentaires
Précautions . . . . . . . . . . . . . . . . . . . . . . . . . . . 22
Ordre de lecture des fichiers
MP3/WMA/AAC . . . . . . . . . . . . . . . . . . . . 22
À propos de l’alerte Device Inside. . . . . . . 22
A propos de l’iPod . . . . . . . . . . . . . . . . . . . 22
Entretien . . . . . . . . . . . . . . . . . . . . . . . . . . . . . 22
Démontage de l’appareil. . . . . . . . . . . . . . . . . 23
Caractéristiques techniques. . . . . . . . . . . . . . . 24
Dépannage . . . . . . . . . . . . . . . . . . . . . . . . . . . 25
Affichage des erreurs et messages . . . . . . . 26
Périphériques USB
Lecture d’un périphérique USB. . . . . . . . . . . . 14
Éléments d’affichage . . . . . . . . . . . . . . . . . 15
Lecture répétée . . . . . . . . . . . . . . . . . . . . . . 16
Lecture aléatoire . . . . . . . . . . . . . . . . . . . . . 16
iPod
Lecture d’un iPod . . . . . . . . . . . . . . . . . . . . . . 17
Éléments d’affichage . . . . . . . . . . . . . . . . . 18
Lecture répétée . . . . . . . . . . . . . . . . . . . . . . 18
Lecture aléatoire . . . . . . . . . . . . . . . . . . . . . 19
4
Page 31

Sites d’assistance
Si vous avez des questions ou si vous souhaitez consulter les dernières
informations d’assistance sur ce produit, visitez les sites Web suivants :
http://esupport.sony.com
http://www.sony.com/mobileAV
Fournissent des informations sur :
• Les modèles et les fabricants de lecteurs audio numériques compatibles
• Les fichiers MP3/WMA/AAC pris en charge
5
Page 32

Préparation
Réglage de l’horloge
Réinitialisation de l’appareil
Avant la première utilisation de l’appareil ou
après avoir remplacé la batterie du véhicule ou
modifié les raccordements, vous devez
réinitialiser l’appareil.
Retirez la façade (page 7), puis appuyez sur la
touche RESET (page 8) avec un objet pointu tel
qu’un stylo à bille.
Remarque
Une pression sur la touche RESET remet l’heure à
zéro et efface certaines informations mémorisées.
Annulation du mode DEMO
Vous pouvez désactiver l’affichage de
démonstration qui apparaît lors de l’arrêt de
l’appareil.
1 Appuyez sur la touche de sélection et
maintenez-la enfoncée.
L’écran de configuration apparaît.
2 Appuyez plusieurs fois sur la touche
de sélection jusqu’à ce que
l’indication « DEMO » apparaisse.
3 Tournez la molette de réglage pour
sélectionner « DEMO-OFF ».
4 Appuyez sur la touche de sélection et
maintenez-la enfoncée.
Le réglage est terminé et la fenêtre
d’affichage retourne au mode de réception/
lecture normal.
L’horloge numérique fonctionne suivant un cycle
de 12 heures.
1 Appuyez sur la touche de sélection et
maintenez-la enfoncée.
L’écran de configuration apparaît.
2 Appuyez plusieurs fois sur la touche
de sélection jusqu’à ce que « CLOCKADJ » apparaisse.
3 Appuyez sur +>.
L’indication des heures clignote.
4 Tournez la molette de réglage pour
régler l’heure et les minutes.
Appuyez sur –./+> pour déplacer
l’indication numérique.
5 Appuyez sur la touche de sélection
après avoir réglé les minutes.
Le réglage est terminé et l’horloge démarre.
Pour afficher l’horloge, appuyez sur (DSPL).
Appuyez à nouveau sur (DSPL) pour retourner à
l’écran précédent.
Conseil
Vous pouvez régler l’horloge automatiquement à l’aide
de la fonction RDS (page 14).
Préparation de la
mini-télécommande
Retirez la feuille de protection.
Conseil
Pour obtenir des informations sur la façon de
remplacer la pile, reportez-vous à la page 22.
6
Page 33

Retrait de la façade
Vous pouvez retirer la façade de cet appareil pour
le protéger du vol.
Alarme d’avertissement
Si vous mettez la clé de contact en position OFF
sans retirer la façade, l’alarme d’avertissement
retentit pendant quelques secondes.
L’alarme retentit uniquement lorsque
l’amplificateur intégré est utilisé.
1 Appuyez sur la touche (SOURCE/OFF)
et maintenez-la enfoncée.
L’appareil s’éteint.
2 Appuyez sur (O PEN ).
La façade bascule automatiquement vers le
bas.
3 Faites coulisser la façade vers la
droite, puis tirez doucement vers vous
l’extrémité gauche de la façade.
Installation de la façade
Placez l’orifice A de la façade sur la tige B de
l’appareil, puis poussez doucement sur le côté
gauche pour l’engager en position.
Appuyez sur la touche (SOURCE/OFF) de
l’appareil pour le faire fonctionner.
Remarque
Ne posez rien sur la face interne de la façade.
Remarques
• N’exercez pas de pression excessive sur la façade
ou la fenêtre d’affichage et ne la laissez pas tomber.
• N’exposez pas la façade à des températures ou taux
d’humidité élevés. Évitez de la laisser dans un
véhicule stationné ou sur le tableau de bord ou la
plage arrière.
• Si « DEVICE INSIDE » apparaît dans la fenêtre
d’affichage ou que le voyant DEL d’alerte Device
Inside clignote, retirez la façade et le périphérique
USB ou iPod.
7
Page 34

Emplacement des commandes et opérations de base
Appareil principal
Sans la façade Cette section contient les instructions relatives à
l’emplacement des commandes et aux opérations
de base.
Pour plus de détails, reportez-vous aux pages
correspondantes.
A Touche SOURCE/OFF*
Appuyez pour mettre l’appareil en marche/
changer la source (Radio/USB/AUX).
Appuyez pendant 1 seconde pour éteindre
l’appareil.
Appuyez pendant plus de 2 secondes pour
éteindre l’appareil et faire disparaître
l’affichage.
B Touche (BROWSE)*
Permet d’établir une liste des fréquences
(Radio) ; de passer en mode Quick-BrowZer
(USB).
C Touche PAUSE
Permet d’interrompre la lecture. Pour
annuler l’opération, appuyez à nouveau sur
cette touche.
D Touches + >/– .
Radio :
Permettent d’effectuer une syntonisation
automatique (appuyez) ; de rechercher une
station manuellement (appuyez sur la touche
et maintenez-la enfoncée).
1
2
page 11, 13
8
Page 35

USB :
Permettent de sauter des plages (appuyez) ;
de sauter des plages en continu (appuyez,
puis appuyez à nouveau dans un délai
d’environ 1 seconde et maintenez la touche
enfoncée) ; d’effectuer une avance/un retour
rapide dans une plage (appuyez sur la touche
et maintenez-la enfoncée).
E Molette de réglage/touche de
sélection page 19, 20
Permet de régler le niveau de volume
(tournez) ; de sélectionner des paramètres de
configuration (appuyez et tournez).
F Récepteur de la mini-télécommande
G Fenêtre d’affichage
H Touche OPEN page 7
I Prise d’entrée AUX page 21
Permet de raccorder un appareil audio
portatif.
J (BACK)/MODE*
1
page 11, 12, 19
Permet de retourner à l’affichage précédent/
de sélectionner la bande radio (FM/AM).
K Touche ZAP/SHUF page 12, 16, 19
Permet de passer en mode ZAPPIN™
(appuyez) ; de sélectionner le mode de
lecture aléatoire (appuyez sur la touche et
maintenez-la enfoncée).
L Touche PTY/CAT*
3
page 14
Permet de sélectionner PTY en mode RDS.
M Touche DSPL (affichage)/SCRL
(défilement) page 13, 15, 18
Permet de modifier les éléments d’affichage
(appuyez) ; de faire défiler un élément
d’affichage (appuyez sur la touche et
maintenez-la enfoncée).
N Connecteur USB (situé sur le TUNE
TRAY) page 15, 17
Permet de raccorder un périphérique USB.
O TUNE TRAY page 14, 17
Permet d’insérer un périphérique USB ou un
iPod.
P Voyant DEL d’alerte Device Inside
page 22
Q Touche RESET page 6
*1 Si un récepteur radio HD ou un récepteur SAT est
raccordé : lorsque vous appuyez sur
(SOURCE/OFF), l’appareil raccordé (« HD »,
« XM » ou « SR ») apparaît dans la fenêtre
d’affichage. De plus, si vous appuyez sur la touche
(MODE), vous pouvez commuter la bande du
récepteur radio HD ou la bande du récepteur SAT.
*2 Si un récepteur radio HD ou un récepteur SAT est
raccordé : la liste inclut la radio HD ou radio SAT,
respectivement.
*3 Lorsqu’un récepteur SAT est raccordé.
9
Page 36

Mini-télécommande RM-X151
1
2
OFF
SOURCE
SEL
ATT
MODE
3
+
–
VOL
SCRL
+
–
4
5
DSPL
132
465
Retirez la feuille de protection avant l’utilisation
(page 6).
A Touche OFF
Permet d’éteindre l’appareil ; d’arrêter la
source.
B Touche SOURCE*
1
Permet de mettre l’appareil en marche ; de
changer la source (Radio/USB/AUX).
C Touches < (.)/, (>)
Permettent de commander la radio/le
périphérique USB. Elles sont identiques aux
touches –./+> de l’appareil.
La configuration, le réglage du son, etc.,
peuvent être effectués à l’aide des touches
< ,.
D Touche DSPL (affichage)
Permet de changer les éléments d’affichage.
E Touche VOL (volume) +*
2
/–
Permet de régler le niveau du volume.
F Touche ATT (atténuation du son)
Permet d’atténuer le son. Pour annuler
l’opération, appuyez à nouveau sur cette
touche.
G Touche SEL (sélection)
Identique à la touche de sélection de
l’appareil.
10
6
7
8
9
q;
qa
H Touche MODE*
1
Appuyez sur cette touche pour sélectionner
la bande radio (FM/AM).
I Touches M (+)/m (–)
Permet de commander un périphérique USB,
de sauter des albums.
La configuration, le réglage du son, etc.,
peuvent être effectués à l’aide des touches
M m.
J Touche SCRL (défilement)
Permet de faire défiler l’élément affiché.
K Touches numériques
Permettent de capter les stations enregistrées
(appuyez) ; de mémoriser des stations
(appuyez sur la touche et maintenez-la
enfoncée).
*1 Si un récepteur radio HD ou un récepteur SAT est
raccordé : lorsque vous appuyez sur (SOURCE),
l’appareil raccordé (« HD », « XM » ou « SR »)
apparaît dans la fenêtre d’affichage. De plus, si
vous appuyez sur la touche (MODE), vous pouvez
commuter la bande du récepteur radio HD ou la
bande du récepteur SAT.
*2 Cette touche comporte un point tactile.
Remarque
Si vous éteignez l’appareil et que l’affichage disparaît,
vous ne pourrez pas le faire fonctionner avec la minitélécommande sans d’abord appuyer sur la touche
(SOURCE/OFF) de l’appareil pour l’activer.
Page 37

Recherche d’une plage
Recherche d’une plage par nom
— Quick-BrowZer
Vous pouvez facilement rechercher une plage par
catégorie sur un périphérique USB.
(BROWSE)
(BACK)
1 Appuyez sur (BROWSE).
L’appareil passe en mode Quick-BrowZer et
la liste des catégories de recherche apparaît.
2 Tournez la molette de réglage pour
sélectionner la catégorie de recherche
de votre choix, puis appuyez pour
valider.
3 Répétez l’étape 2 jusqu’à ce que la
plage de votre choix soit sélectionnée.
La lecture commence.
Pour retourner à l’écran précédent
Appuyez sur (BACK).
Pour quitter le mode Quick-BrowZer
Appuyez sur (BROWSE).
Molette de réglage/
touche de sélection
+>/–.
Recherche d’éléments par saut
— Mode Jump
Lorsqu’une catégorie contient de nombreux
éléments, vous pouvez rechercher rapidement
l’élément de votre choix.
1 Appuyez sur +> en mode Quick-BrowZer.
L’écran suivant apparaît.
A Numéro de l’élément en cours
B Nombre total d’éléments dans la couche
actuelle
Le nom de l’élément s’affiche ensuite.
2 Tournez la molette de réglage pour
sélectionner l’élément souhaité ou un élément
proche.
L’appareil effectue des sauts par incrément de
10 % du nombre total d’éléments.
3 Appuyez sur la touche de sélection.
L’affichage retourne au mode Quick-BrowZer
et l’élément sélectionné apparaît.
4 Tournez la molette de réglage pour
sélectionner l’élément de votre choix, puis
appuyez pour valider.
La lecture commence si l’élément sélectionné
est une plage.
Pour annuler le mode Jump
Appuyez sur (BACK) ou –..
Remarque
Lorsque l’appareil passe en mode Quick-BrowZer, la
lecture répétée ou aléatoire est annulée.
11
Page 38

Recherche d’une plage en écoutant
des passages de plages
— ZAPPIN™
Vous pouvez rechercher la plage de votre choix
en écoutant successivement de courts passages
des plages d’un périphérique USB.
Le mode ZAPPIN est approprié pour rechercher
une plage en mode de lecture aléatoire ou répétée
aléatoire.
Touche de sélection (BACK)
ZAP
1 Appuyez sur (Z AP/SHUF) pendant la
lecture.
Lorsque « ZAPPIN » s’affiche, la lecture
démarre à partir d’un passage de la plage
suivante.
Le passage est lu pendant la durée définie,
puis un déclic est émis et le passage suivant
démarre.
Plage
Radio
Mémorisation et réception des
stations
Attention
Pour syntoniser des stations pendant que vous
conduisez, utilisez la fonction de mémorisation
des meilleurs accords (BTM) afin d’éviter tout
accident.
Mémorisation automatique — BTM
1 Appuyez plusieurs fois sur
(SOURCE/OFF) jusqu’à ce que
l’indication « TUNER » apparaisse.
Pour changer de bande, appuyez plusieurs
fois sur (MODE). Vous pouvez sélectionner
FM1, FM2, FM3, AM1 ou AM2.
2 Appuyez sur la touche de sélection et
maintenez-la enfoncée.
L’écran de configuration apparaît.
3 Appuyez plusieurs fois sur la touche
de sélection jusqu’à ce que « BTM »
apparaisse.
4 Appuyez sur +>.
L’appareil mémorise les stations dans la liste
des stations présélectionnées en respectant
l’ordre des fréquences.
Un bip retentit lorsque le réglage est
mémorisé.
Partie de chaque plage à lire
en mode ZAPPIN.
2 Appuyez sur la touche de sélection ou
sur (ZAP/SHUF) pendant la lecture
d’une plage que vous souhaitez
écouter.
La plage que vous sélectionnez revient au
mode de lecture normal à partir du début.
Pour rechercher une autre plage en mode
ZAPPIN, répétez les étapes 1 et 2.
Conseils
• Vous pouvez sélectionner le temps de lecture :
environ 6 secondes/15 secondes/30 secondes
(page 21). Vous ne pouvez pas sélectionner le
passage de la plage en lecture.
• Appuyez sur +>/–. en mode ZAPPIN pour
sauter une plage.
• Lorsque vous appuyez sur (BACK), la lecture
d’une plage est également confirmée.
12
Mémorisation manuelle
1 Lorsque vous captez la station que
vous souhaitez mémoriser, appuyez
sur (BROWSE).
La liste des stations présélectionnées
s’affiche.
2 Tournez la molette de réglage pour
sélectionner le numéro de
présélection.
3 Appuyez sur la touche de sélection et
maintenez-la enfoncée jusqu’à ce que
« MEMORY » s’affiche.
(avec la mini-télécommande)
1 Lorsque vous captez la station que
vous souhaitez mémoriser, appuyez
sur une touche numérique ((1) à (6))
et maintenez-la enfoncée jusqu’à ce
que « MEMORY » s’affiche.
Page 39

Remarque
Si vous essayez de mémoriser une autre station sur la
même touche numérique, la station mémorisée
précédemment est effacée.
Réception des stations
mémorisées
Vous pouvez sélectionner une station à
syntoniser dans une liste.
1 Sélectionnez la bande, puis appuyez
sur (BROWSE).
La liste des stations présélectionnées
s’affiche.
2 Tournez la molette de réglage jusqu’à
ce que la station souhaitée s’affiche.
3 Appuyez sur la touche de sélection
pour capter la station.
La fenêtre d’affichage retourne au mode de
réception normal.
(avec la mini-télécommande)
1 Sélectionnez la bande, puis appuyez
sur une touche numérique ((1) à (6)).
Syntonisation automatique
1 Sélectionnez la bande, puis appuyez
sur +>/–. pour rechercher la
station.
Le balayage s’interrompt lorsque l’appareil
capte une station. Répétez cette procédure
jusqu’à ce que vous captiez la station
souhaitée.
Conseil
Si vous connaissez la fréquence de la station que
vous souhaitez écouter, maintenez la touche
+>/–. enfoncée pour localiser la fréquence
approximativement, puis appuyez plusieurs fois sur
+>/–. pour régler la fréquence avec précision
(syntonisation manuelle).
RDS
Aperçu
Les stations de radio FM dotées des services
RDS (Système de radiocommunication de
données) transmettent des données numériques
inaudibles en plus du signal d’émission de radio
ordinaire.
Éléments d’affichage
A Bande radio, fonction, fréquence, numéro de
présélection
B Nom du service de l’émission, horloge,
fréquence*, numéro de présélection
* Lorsque vous captez la station RDS, le symbole
« * » est affiché à gauche de l’indication de
fréquence.
Appuyez sur
d’affichage
Services RDS
Cet appareil fournit automatiquement les
services RDS comme suit :
PTY (Types d’émissions)
Affiche le type d’émission actuellement
syntonisé. Recherche également votre type
d’émission sélectionné.
CT (Heure)
Les données CT de la transmission RDS règlent
l’horloge.
Remarques
• Selon le pays ou la région, certaines fonctions RDS
peuvent ne pas être accessibles.
• Le système RDS ne fonctionnera pas si le signal est
trop faible ou si la station que vous captez ne
transmet pas de données RDS.
(DSPL)
A
et B.
pour changer les éléments
13
Page 40

Sélection de PTY
1 Appuyez sur (PTY) pendant la
réception FM.
Le nom du type d’émission en cours apparaît
si la station transmet des données PTY.
2 Appuyez plusieurs fois sur (PTY)
jusqu’à ce que le type d’émission
souhaité apparaisse.
3 Appuyez sur +>/–..
L’appareil commence à chercher une station
diffusant le type d’émission sélectionné.
Type d’émission
NEWS (nouvelles), INFORM (information),
SPORTS (sports), TA LK (infovariétés), ROCK
(rock), CLS ROCK (rock classique), ADLT
HIT (succès adultes), SOFT RCK (rock
détente), TOP 40 (palmarès), COUNTRY
(country), OLDIES (anciens succès), SOFT
(détente), NOSTALGA (nostalgie), JAZZ
(jazz), CLASSICL (classique), R AND B
(rhythm and blues ), SOFT R B (rhythm and
blues léger), LANGUAGE (langue étrangère),
REL MUSC (musique religieuse), REL TALK
(infovariétés religieuses), PERSNLTY
(personnalités), PUBLIC (publique),
COLLEGE (collège), WEATHER (météo)
Remarques
• Vous ne pouvez pas utiliser cette fonction dans les
pays ou régions où aucun service de données PTY
n’est disponible.
• Il se peut que l’émission de radio captée diffère de
celle que vous avez sélectionnée.
Réglage de la fonction CT
1 Réglez l’appareil à « CT-ON » dans le
menu de configuration (page 20).
Remarques
• La fonction CT peut ne pas fonctionner même si une
station RDS est captée.
• L’heure réglée par la fonction CT peut différer de
l’heure réelle.
Périphériques USB
Pour plus de détails sur la compatibilité de votre
périphérique USB, visitez notre site d’assistance.
Sites d’assistance
http://esupport.sony.com
http://www.sony.com/mobileAV
• Vous pouvez utiliser des périphériques USB de
type MSC (stockage de masse) et MTP
(protocole de transfert des médias) conformes à
la norme USB.
• Les codecs correspondants sont MP3 (.mp3),
WMA (.wma) et AAC (.m4a).
• Il est recommandé d’effectuer des copies de
sauvegarde des données contenues dans le
périphérique USB.
Remarques
• Raccordez le périphérique USB après avoir démarré
le moteur.
Selon le périphérique USB utilisé, le raccordement
avant le démarrage du moteur pourrait causer un
problème de fonctionnement ou des dommages.
• Ne placez pas de téléphone cellulaire ou d’appareil
avec fonctions de communication sans fil sur le
TUNE TRAY car cela pourrait compromettre la
réception des signaux téléphoniques ou interrompre
la communication.
• Ne laissez pas un périphérique USB dans un
véhicule stationné car cela pourrait entraîner des
problèmes de fonctionnement.
Lecture d’un périphérique USB
1 Appuyez sur (OPEN).
La façade bascule automatiquement vers le
bas.
2 Appuyez sur la touche PUSH OPEN du
TUNE TRAY.
Le TUNE TRAY s’ouvre tranquillement.
14
TUNE TRAY
Page 41

3 Raccordez le périphérique USB au
connecteur USB.
4 Faites glisser le TUNE TRAY vers
l’intérieur en appuyant sur la touche
CLOSE du TUNE TRAY jusqu’à ce qu’il
se referme.
• Ne placez pas d’objet inflammable tel qu’un briquet
sur le TUNE TRAY car cela pourrait causer de la
fumée, un incendie ou un accident.
• La capacité du plateau est d’environ
65 × 17 × 118 mm (2
• Si le périphérique USB seul ou raccordé au câble
USB ne s’insère pas facilement dans le TUNE
TRAY, il est possible que sa taille excède la capacité
du plateau.
Ne faites pas glisser le TUNE TRAY ou le câble USB
vers l’intérieur en le forçant.
• Nous recommandons aux utilisateurs de
« WALKMAN » de se servir de l’adaptateur
XA-50WM en option. Il est conçu uniquement pour
l’utilisation avec cet appareil, et il ne doit pas être
utilisé avec les autres périphériques USB.
• Cet appareil ne peut pas reconnaître les
périphériques USB raccordés au moyen d’un
concentrateur USB.
• Faites glisser le TUNE TRAY vers l’intérieur et
fermez la façade avant de démarrer la lecture, car
des dommages pourraient survenir si un objet cause
de l’obstruction dans la voiture, par exemple.
• Si la façade ne s’ouvre pas entièrement en raison de
la forme du tableau de bord ou de la position
d’installation, retirez la façade et ouvrez le TUNE
TRAY manuellement.
Pour savoir comment retirer la façade, consultez la
page 7.
• Il est extrêmement dangereux de raccorder ou
retirer le périphérique USB pendant que vous
conduisez.
9
/16 × 21/32 × 45/8 po) (l/h/p)
Éléments d’affichage
5 Fermez la façade.
La lecture commence.
Si un périphérique USB est déjà raccordé,
appuyez plusieurs fois sur (SOURCE/OFF)
jusqu’à ce que l’indication « USB » s’affiche
pour lancer la lecture.
Appuyez sur (SOURCE/OFF) pendant 1 seconde
pour arrêter la lecture.
Retrait du périphérique USB
1 Arrêtez la lecture du périphérique USB.
2 Appuyez sur (OPEN).
3 Appuyez sur la touche PUSH OPEN du TUNE
TRAY.
4 Retirez le périphérique USB.
5 Faites glisser le TUNE TRAY vers l’intérieur,
puis fermez la façade.
Remarques
• Ne retirez pas le périphérique USB pendant la
lecture car cela pourrait endommager les données
USB.
• Ne placez pas d’appareils autres qu’un périphérique
USB sur le TUNE TRAY, ni de corps étrangers tels que
des pièces de monnaie, clés, cartes, liquides, etc.
A Source, nom de plage, nom de l’artiste, nom
de l’album
B Nom de plage, nom de l’artiste, numéro
d’album*, nom d’album, numéro de plage/
temps de lecture écoulé, horloge
* Le numéro d’album s’affiche uniquement lorsque
vous changez d’album.
Appuyez sur (DSPL) pour changer les éléments
d’affichage A et B.
Remarques
• Les paramètres affichés varient selon le
périphérique USB, le format d’enregistrement et les
réglages. Pour plus de détails, visitez notre site
d’assistance.
• Le nombre maximal de données pouvant être
affichées est le suivant :
– dossiers (albums) : 128
– fichiers (plages) par dossier : 500
suite à la page suivante t
15
Page 42

• Selon la quantité de données enregistrées, la
lecture peut mettre quelques instants à démarrer.
• La lecture de fichiers DRM (gestion des droits
numériques) peut être impossible.
• Pendant la lecture ou l’avance/le retour rapide dans
un fichier MP3/WMA/AAC VBR (débit binaire
variable), le temps de lecture écoulé affiché peut
être incorrect.
• La lecture des fichiers MP3/WMA/AAC suivants
n’est pas prise en charge :
– fichiers avec compression sans perte
– fichiers avec protection des droits d’auteur
Lecture répétée
1 Pendant la lecture, appuyez sur la
touche de sélection et maintenez-la
enfoncée.
L’écran de configuration apparaît.
2 Appuyez plusieurs fois sur la touche
de sélection jusqu’à ce que
« REPEAT » s’affiche.
3 Tournez la molette de réglage pour
sélectionner le mode de lecture.
4 Appuyez sur la touche de sélection et
maintenez-la enfoncée.
Le réglage est terminé et la fenêtre
d’affichage retourne au mode de lecture
normal.
Sélectionnez Pour lire
REPEAT-TRK une plage en boucle.
REPEAT-ALB un album en boucle.
Pour retourner au mode de lecture normal,
sélectionnez « REPEAT-OFF ».
Lecture aléatoire
1 Pendant la lecture, appuyez sur
(ZAP/SHUF) et maintenez la touche
enfoncée.
La moitié inférieure de la fenêtre d’affichage
commence à clignoter.
2 Appuyez plusieurs fois sur (ZAP/SHUF)
jusqu’à ce que le réglage souhaité
apparaisse.
Sélectionnez Pour lire
ALBUM un album dans un ordre
aléatoire.
DEVICE un périphérique dans un
ordre aléatoire.
Le réglage est terminé après 3 secondes.
Pour retourner au mode de lecture normal,
sélectionnez « OFF ».
16
Page 43

iPod
Pour plus de détails sur la compatibilité de votre
iPod, reportez-vous à la section « A propos de
l’iPod » à la page 22 ou visitez le site
d’assistance.
Dans ce mode d’emploi, « iPod » est utilisé
comme référence générale pour des fonctions
iPod sur les iPod et iPhone, sauf mention
contraire dans le texte ou les illustrations.
Sites d’assistance
http://esupport.sony.com
http://www.sony.com/mobileAV
Remarques
• Ne placez pas de téléphone cellulaire ou d’appareil
avec fonctions de communication sans fil sur le
TUNE TRAY car cela pourrait compromettre la
réception des signaux téléphoniques ou interrompre
la communication.
• Ne laissez pas un iPod dans un véhicule stationné
car cela pourrait entraîner des problèmes de
fonctionnement.
3 Raccordez l’adaptateur fourni au
connecteur USB.
4 Raccordez le iPod à l’adaptateur
fourni.
Lecture d’un iPod
Réduisez le volume de l’appareil avant de
raccorder le iPod.
1 Appuyez sur (O PEN ).
La façade bascule automatiquement vers le
bas.
2 Appuyez sur la touche PUSH OPEN du
TUNE TRAY.
Le TUNE TRAY s’ouvre tranquillement.
TUNE TRAY
5 Faites glisser le TUNE TRAY vers
l’intérieur en appuyant sur la touche
CLOSE du TUNE TRAY jusqu’à ce qu’il
se referme.
suite à la page suivante t
17
Page 44

6 Fermez la façade.
Le iPod se met en marche automatiquement
et l’indication suivante s’affiche à l’écran du
iPod.*
Les plages du iPod sont lues
automatiquement à partir de l’endroit où la
lecture s’était terminée.
Si un iPod est déjà raccordé, appuyez
plusieurs fois sur (SOURCE/OFF) jusqu’à ce
que l’indication « USB » s’affiche pour lancer
la lecture. (« IPOD » apparaît dans la fenêtre
d’affichage lorsque le iPod est reconnu.)
* L’affichage peut varier selon le modèle de iPod
utilisé, ou ne pas apparaître si un iPod touch est
raccordé.
7 Réglez le volume.
Appuyez sur (SOURCE/OFF) pendant 1 seconde
pour arrêter la lecture.
Retrait du iPod
1 Arrêtez la lecture du iPod.
2 Appuyez sur (OPEN).
3 Appuyez sur la touche PUSH OPEN du TUNE
TRAY.
4 Retirez le iPod.
5 Faites glisser le TUNE TRAY vers l’intérieur,
puis fermez la façade.
Remarques
• Ne retirez pas le iPod pendant la lecture car cela
pourrait endommager les données.
• Ne placez pas d’appareils autres qu’un iPod sur le
TUNE TRAY, ni de corps étrangers tels que des
pièces de monnaie, clés, cartes, liquides, etc.
• Ne placez pas d’objet inflammable tel qu’un briquet
sur le TUNE TRAY car cela pourrait causer de la
fumée, un incendie ou un accident.
• Les utilisateurs de iPod doivent se servir de
l’adaptateur XA-50IP fourni. Il est conçu uniquement
pour l’utilisation avec cet appareil, et il ne doit pas
être utilisé avec les autres périphériques USB.
• Cet appareil ne peut pas reconnaître un iPod
raccordé au moyen d’un concentrateur USB.
• Faites glisser le TUNE TRAY vers l’intérieur et
fermez la façade avant de démarrer la lecture, car
des dommages pourraient survenir si un objet cause
de l’obstruction dans la voiture, par exemple.
• Si la façade ne s’ouvre pas entièrement en raison de
la forme du tableau de bord ou de la position
d’installation, retirez la façade et ouvrez le TUNE
TRAY manuellement.
Pour savoir comment retirer la façade, consultez la
page 7.
18
• Il est extrêmement dangereux de raccorder ou
retirer le iPod pendant que vous conduisez.
Conseils
• Lorsque le contact est réglé à la position ACC et que
l’appareil est en marche, le iPod se recharge.
• Si le iPod est déconnecté en cours de lecture, « NO
DEV » apparaît dans la fenêtre d’affichage de
l’appareil.
Mode de reprise de la lecture
Lorsque le iPod est raccordé, l’appareil passe en
mode de reprise et la lecture démarre dans le
mode sélectionné par le iPod.
En mode de reprise de la lecture, la lecture
répétée/aléatoire ne fonctionne pas.
Éléments d’affichage
A Source, nom de plage, nom de l’artiste, nom
de l’album
B Nom de plage, nom de l’artiste, nom d’album,
numéro de plage/temps de lecture écoulé,
horloge
Appuyez sur (DSPL) pour changer les éléments
d’affichage A et B.
Conseil
Lorsque l’album, l’émission baladodiffusée, le genre,
l’artiste ou la liste de lecture est modifié(e), le numéro
de l’élément s’affiche pendant quelques instants.
Remarque
Il se peut que certaines lettres enregistrées dans le
iPod ne s’affichent pas correctement.
Lecture répétée
1 Pendant la lecture, appuyez sur la
touche de sélection et maintenez-la
enfoncée.
L’écran de configuration apparaît.
2 Appuyez plusieurs fois sur la touche
de sélection jusqu’à ce que
« REPEAT » s’affiche.
3 Tournez la molette de réglage pour
sélectionner le mode de lecture.
4 Appuyez sur la touche de sélection et
maintenez-la enfoncée.
Le réglage est terminé et la fenêtre
d’affichage retourne au mode de lecture
normal.
Page 45

Sélectionnez Pour lire
REPEAT-TRK une plage en boucle.
REPEAT-ALB un album en boucle.
REPEAT-PCS une émission
baladodiffusée en
boucle.
REPEAT-ART un artiste en boucle.
REPEAT-PLY une liste de lecture en
boucle.
REPEAT-GNR un genre en boucle.
Pour retourner au mode de lecture normal,
sélectionnez « REPEAT-OFF ».
Lecture aléatoire
1 Pendant la lecture, appuyez sur
(ZAP/SHUF) et maintenez la touche
enfoncée.
La moitié inférieure de la fenêtre d’affichage
commence à clignoter.
2 Appuyez plusieurs fois sur (ZAP/SHUF)
jusqu’à ce que le réglage souhaité
apparaisse.
Sélectionnez Pour lire
ALBUM un album dans un ordre
aléatoire.
PODCAST des émissions
baladodiffusées dans un
ordre aléatoire.
ARTIST un artiste dans un ordre
aléatoire.
PLAYLIST une liste de lecture dans
un ordre aléatoire.
GENRE un genre dans un ordre
aléatoire.
DEVICE un périphérique dans un
ordre aléatoire.
Le réglage est terminé après 3 secondes.
Pour retourner au mode de lecture normal,
sélectionnez « OFF ».
Autres fonctions
Changement des réglages du
son
Réglage des caractéristiques du
son
1 Appuyez plusieurs fois sur la touche
de sélection jusqu’à ce que le
paramètre de votre choix apparaisse.
2 Tournez la molette de réglage pour
régler le paramètre sélectionné.
3 Appuyez sur (BACK).
Le réglage est terminé et la fenêtre
d’affichage retourne au mode de réception/
lecture normal.
Les paramètres suivants peuvent être réglés
(reportez-vous à la page indiquée pour plus de
détails) :
EQ3
Permet de sélectionner une courbe d’égaliseur
parmi 7 types de musique (XPLOD, VOCAL,
EDGE, CRUISE, SPACE, GRAVITY,
CUSTOM ou OFF).
DSO (Répartiteur dynamique du son)
Permet de créer un champ sonore mieux réparti.
Pour sélectionner le mode DSO : « 1 », « 2 »,
« 3 » ou « OFF ». Plus le chiffre est élevé, plus
l’effet est prononcé.
1
LOW*
, MID*1, HIGH*1 (page 20)
BALANCE
Permet de régler la balance du son entre les
haut-parleurs gauche et droit.
FADER
Permet de régler le niveau relatif entre les hautparleurs avant et arrière.
2
SUB*
(Volume du caisson de graves)
Permet de régler le volume du caisson de graves.
AUX LV*3 (Niveau AUX)
Permet de régler le niveau de volume de chaque
appareil auxiliaire raccordé : « +18 dB » –
« 0 dB » – « –8 dB ».
Ce réglage évite de régler le niveau de volume
entre les sources.
*1 Lorsque EQ3 est activé.
*2 Lorsque la sortie audio est réglée à « SUB-OUT »
(page 20).
« ATT » s’affiche au réglage minimal et peut être
réglé suivant 21 incréments.
*3 Lorsque la source AUX est activée (page 21).
suite à la page suivante t
19
Page 46

Personnalisation de la courbe de
l’égaliseur — EQ3
L’option « CUSTOM » de EQ3 vous permet
d’effectuer vos propres réglages d’égaliseur.
1 Sélectionnez une source, puis
appuyez plusieurs fois sur la touche
de sélection pour sélectionner
«EQ3».
2 Tournez la molette de réglage pour
sélectionner « CUSTOM ».
3 Appuyez plusieurs fois sur la touche
de sélection jusqu’à ce que « LOW »,
« MID » ou « HIGH » apparaisse.
4 Tournez la molette de réglage pour
régler le paramètre sélectionné.
Le niveau de volume peut être réglé par
incréments de 1 dB, de –10 dB à +10 dB.
Répétez les étapes 3 et 4 pour régler la courbe
de l’égaliseur.
Pour rétablir la courbe d’égaliseur par défaut,
appuyez sur la touche de sélection et
maintenez-la enfoncée avant la fin du réglage.
5 Appuyez sur (BACK).
Le réglage est terminé et la fenêtre
d’affichage retourne au mode de réception/
lecture normal.
Conseil
D’autres types d’égaliseur peuvent aussi être réglés.
Réglage des paramètres de
configuration — SET
1 Appuyez sur la touche de sélection et
maintenez-la enfoncée.
L’écran de configuration apparaît.
2 Appuyez plusieurs fois sur la touche
de sélection jusqu’à ce que le
paramètre de votre choix apparaisse.
3 Tournez la molette de réglage pour
sélectionner le réglage (exemple :
«ON» ou «OFF»).
4 Appuyez sur la touche de sélection et
maintenez-la enfoncée.
Le réglage est terminé et la fenêtre
d’affichage retourne au mode de réception/
lecture normal.
Remarque
Les paramètres affichés varient selon la source et le
réglage.
Les paramètres suivants peuvent être réglés
(reportez-vous à la page indiquée pour plus de
détails) :
CLOCK-ADJ (Réglage de l’horloge) (page 6)
CT (Heure)
Permet d’activer ou de désactiver la fonction
CT : « ON », « OFF » (page 13, 14).
BEEP
Permet d’activer ou de désactiver le bip :
«ON», «OFF».
AUX-A*
AUTO OFF
SUB/REAR*
DEMO
DIMMER
CONTRAST
LV-METER (Afficheur de niveau)
A.SCRL (Défilement automatique)
REPEAT (page 16, 18)
1
Permet d’activer ou de désactiver l’affichage de
la source AUX : « ON », « OFF » (page 21).
Permet d’éteindre automatiquement après un
laps de temps souhaité lors de l’arrêt de
l’appareil : « NO », « 30S » (secondes),
« 30M » (minutes), « 60M » (minutes).
Permet de commuter la sortie audio : « SUBOUT » (caisson de graves), « REAR-OUT »
(amplificateur de puissance).
Permet d’activer ou de désactiver le mode de
démonstration : « ON », « OFF ».
Permet de modifier la luminosité de la fenêtre
d’affichage.
– « AT » : pour réduire automatiquement la
– « ON » : pour réduire la luminosité de la
– « OFF » : pour désactiver le régulateur de
Permet de régler le contraste de la fenêtre
d’affichage pour l’adapter à l’angle de
visionnement. Le niveau de contraste peut être
réglé à 7 positions.
Permet d’activer ou de désactiver l’afficheur de
niveau: «ON», «OFF».
Permet de faire défiler automatiquement les
éléments longs : « ON », « OFF ».
(AUX Audio)
1
(Démonstration)
luminosité lorsque vous allumez les phares.
(Disponible uniquement lorsque le câble de
commande d’éclairage est raccordé.)
fenêtre d’affichage.
luminosité.
20
Page 47

LOCAL (Mode de recherche locale)
– « ON » : pour syntoniser uniquement les
stations dont les signaux sont puissants.
– « OFF » : pour syntoniser une réception
normale.
MONO*
2
(Mode monaural)
Permet de sélectionner le mode de réception
monaural pour améliorer la réception FM
faible : « ON », « OFF ».
ZAP.TIME (Temps de lecture Zappin)
Permet de sélectionner le temps de lecture pour
la fonction ZAPPIN.
– « ZAP.TIME-1 (environ 6 secondes) »,
« ZAP.TIME-2 (environ 15 secondes) »,
« ZAP.TIME-3 (environ 30 secondes) ».
3
LPF*
(Filtre passe-bas)
Permet de sélectionner la fréquence de coupure
du caisson de graves : « OFF », « 80Hz »,
« 100Hz », « 120Hz », « 140Hz », « 160Hz ».
3
SUB*
(Phase du caisson de graves)
Permet de sélectionner la phase du caisson de
graves : « NORM », « REV ».
HPF (Filtre passe-haut)
Permet de sélectionner la fréquence de coupure
du haut-parleur avant/arrière : « OFF »,
« 80Hz », « 100Hz », « 120Hz », « 140Hz »,
« 160Hz ».
LOUD (Intensité sonore)
Permet de renforcer les graves et les aigus pour
vous permettre d’entendre les sons clairement à
des volumes faibles : « ON », « OFF ».
DM+
Permet d’activer ou de désactiver la fonction
DM+: «ON», «OFF».
BTM (page 12)
*1 Lorsque l’appareil est éteint.
*2 Lors d’une réception FM.
*3 Lorsque la sortie audio est réglée à « SUB-OUT ».
Utilisation d’un appareil en
option
Appareil audio auxiliaire
En raccordant un appareil audio portatif en
option à la prise d’entrée AUX (mini-prise
stéréo) de l’appareil, puis en sélectionnant
simplement la source, vous pouvez écouter le son
par l’intermédiaire des haut-parleurs de votre
voiture. Le niveau de volume peut être réglé pour
corriger toutes les différences entre l’appareil et
l’appareil audio portatif. Suivez la procédure
ci-dessous :
Raccordement de l’appareil audio
portatif
1 Éteignez l’appareil audio portatif.
2 Réduisez le volume de l’appareil.
3 Procédez au raccordement à l’appareil.
Cordon de
raccordement*
(non fourni)
* Veillez à utiliser une fiche droite.
Réglage du niveau de volume
Avant de commencer la lecture, n’oubliez pas de
régler le volume de chaque appareil audio
connecté.
1 Réduisez le volume de l’appareil.
2 Appuyez plusieurs fois sur (SOURCE/OFF)
jusqu’à ce que l’indication « AUX »
apparaisse.
L’indication « AUX FRONT IN » apparaît
ensuite.
3 Démarrez la lecture sur l’appareil audio
portatif, avec un niveau de volume modéré.
4 Réglez votre appareil sur le volume d’écoute
habituel.
5 Réglez le niveau d’entrée (page 19).
21
Page 48

Informations complémentaires
Précautions
• Si votre véhicule est resté stationné en plein soleil,
laissez l’appareil refroidir avant de l’utiliser.
• L’antenne électrique se déploie automatiquement.
Ordre de lecture des fichiers MP3/
WMA/AAC
MP3/WMA/AAC
Dossier
(album)
Fichier MP3/
WMA/AAC
(plage)
A propos de l’iPod
• Cet appareil peut être raccordé aux iPods suivants.
Mettez à jour vos iPods avec la dernière version
logicielle avant de les utiliser.
Made for
– iPod touch (2ème génération)
– iPod touch (1ère génération)
– iPod classic
– iPod avec vidéo
– iPod nano (5ème génération)
– iPod nano (4ème génération)
– iPod nano (3ème génération)
– iPod nano (2ème génération)
– iPod nano (1ère génération)
• « Made for iPod » signifie qu’un accessoire
électronique a été conçu pour être raccordé
spécifiquement à un iPod et qu’il a été certifié par
le développeur comme étant conforme aux normes
de performances Apple.
• Apple n’est pas responsable du fonctionnement de
cet appareil ni de sa conformité aux normes et
réglementations de sécurité.
Si vous avez des questions ou des problèmes
concernant cet appareil qui ne sont pas abordés dans
ce mode d’emploi, contactez votre détaillant Sony.
À propos de l’alerte Device Inside
Lorsque vous tournez la clé de contact à la
position OFF sans retirer le périphérique USB ou
le iPod, « DEVICE INSIDE » s’affiche.
Ouvrez la façade pour retirer le périphérique
USB ou le iPod.
Si la façade est retirée pendant que le
contact est réglé à la position OFF.
Le voyant DEL d’alerte Device Inside clignote.
Conseil
Pour savoir comment retirer le périphérique USB ou le
iPod, consultez la page 15 (USB), 18 (iPod).
Remarque
L’alerte Device Inside retentit uniquement lorsque
l’amplificateur intégré est utilisé.
Entretien
Remplacement de la pile au lithium
de la mini-télécommande
Dans des conditions d’utilisation normales, la
pile dure environ 1 an. (Selon les conditions
d’utilisation, sa durée de vie peut être plus
courte.)
Lorsque la pile est faible, la portée de la minitélécommande diminue. Remplacez la pile par
une pile au lithium CR2025 neuve. L’utilisation
de tout autre type de pile présente un risque
d’incendie ou d’explosion.
Pôle + vers le haut
2
c
1
22
Page 49

Remarques sur la pile au lithium
• Tenez la pile au lithium hors de la portée des
enfants. En cas d’ingestion de la pile, consultez
immédiatement un médecin.
• Essuyez la pile avec un chiffon sec pour assurer un
bon contact.
• Veillez à respecter la polarité lors de l’installation de
la pile.
• Ne tenez pas la pile avec des pinces métalliques car
cela pourrait causer un court-circuit.
ATTENTION
Utilisée de façon incorrecte, la pile peut
exploser.
Ne pas la recharger, la démonter ni la jeter
au feu.
Démontage de l’appareil
1 Retirez le tour de protection.
1 Retirez la façade (page 7).
2 Pincez les deux bords du tour de
protection, puis sortez-le.
Remplacement du
fusible
Lorsque vous remplacez le
fusible, veillez à utiliser un
fusible dont l’intensité, en
ampères, correspond à la valeur
indiquée sur le fusible usagé. Si
le fusible grille, vérifiez le
branchement de l’alimentation
et remplacez le fusible. Si le
nouveau fusible grille
également, il est possible que
l’appareil soit défectueux. Dans ce cas, consultez
votre détaillant Sony le plus proche.
Fusible (10 A)
Nettoyage des connecteurs
L’appareil peut ne pas fonctionner correctement si
les connecteurs entre l’appareil et la façade sont
sales. Pour éviter cette situation, retirez la façade
(page 7) et nettoyez les connecteurs avec un cotontige. N’exercez pas une pression trop forte car vous
pourriez endommager les connecteurs.
Appareil principal
Remarques
• Pour plus de sécurité, coupez le contact avant de
nettoyer les connecteurs et retirez la clé de contact.
• Ne touchez jamais les connecteurs directement
avec les doigts ou avec un objet métallique.
Arrière de la façade
x
2 Retirez l’appareil.
1 Insérez simultanément les deux clés de
déblocage jusqu’au déclic.
Crochet vers
l’intérieur.
2 Tirez sur les clés de déblocage pour
extraire l’appareil.
3 Faites glisser l’appareil en dehors de son
support.
23
Page 50

Caractéristiques techniques
Radio
FM
Plage de syntonisation : 87,5 à 107,9 MHz
Borne d’antenne : connecteur d’antenne externe
Fréquence intermédiaire : 150 kHz
Sensibilité utile : 10 dBf
Sélectivité : 75 dB à 400 kHz
Rapport signal/bruit : 70 dB (mono)
Séparation : 40 dB à 1 kHz
Réponse en fréquence : 20 à 15 000 Hz
AM
Plage de syntonisation : 530 à 1 710 kHz
Borne d’antenne : connecteur d’antenne externe
Fréquence intermédiaire : 25 kHz
Sensibilité : 26 µV
Lecteur USB
Interface : USB (haute vitesse)
Courant maximal : 500 mA
Amplificateur de puissance
Sorties : sorties de haut-parleurs
Impédance des haut-parleurs : 4 à 8 ohms
Puissance de sortie maximale : 52 W × 4 (dans
4 ohms)
Généralités
Sorties :
Borne de sorties audio (commutation avant,
caisson de graves/arrière)
Borne de commande de relais d’antenne électrique
Borne de commande d’amplificateur de puissance
Entrées :
Borne d’entrée de commande BUS
Borne d’entrée audio BUS
Borne d’entrée de télécommande
Borne d’entrée de l’antenne
Borne de commande ATT téléphone
Borne de commande de l’éclairage
Prise d’entrée AUX (mini-prise stéréo)
Connecteur d’entrée du signal USB
Commandes de tonalité :
Graves : ±10 dB à 60 Hz (XPLOD)
Médiums : ±10 dB à 1 kHz (XPLOD)
Aigus : ±10 dB à 10 kHz (XPLOD)
Alimentation requise : batterie de véhicule 12 V CC
(masse négative)
Dimensions : environ 178 × 50 × 180 mm
1
(7
/8 × 2 × 71/8 po) (l/h/p)
Dimensions de montage : environ 182 × 53 × 163 mm
1
(7
/4 × 21/8 × 61/2 po) (l/h/p)
Poids : environ 1,0 kg (2 lb 4 oz)
Accessoires fournis :
Mini-télécommande : RM-X151
Connecteur USB pour iPod XA-50IP
Composants destinés à l’installation et aux
raccordements (1 jeu)
Accessoires/appareils en option :
Câble BUS (fourni avec un câble à broche RCA) :
Sélecteur de source : XA-C40
Récepteur HD Radio™ : XT-100HD
24
Adaptateur XA-50WM pour Walkman
Il est possible que votre détaillant ne dispose pas de
certains accessoires énoncés ci-dessus. Veuillez
vous adresser à lui pour tout renseignement
complémentaire.
La conception et les caractéristiques techniques sont
sujettes à modification sans préavis.
Page 51

Dépannage
La liste de vérification suivante vous aidera à
remédier aux problèmes que vous pourriez
rencontrer avec cet appareil.
Avant de passer en revue la liste ci-dessous, vérifiez
les procédures de raccordement et d’utilisation.
Si vous ne parvenez pas à résoudre le problème,
consultez le site d’assistance suivant.
Sites d’assistance
http://esupport.sony.com
http://www.sony.com/mobileAV
Généralités
L’appareil n’est pas alimenté.
• Vérifiez le raccordement ou le fusible.
• Si l’appareil est éteint et que l’affichage disparaît, il
est impossible de commander l’appareil avec la
télécommande.
t Mettez l’appareil en marche.
L’antenne électrique ne se déploie pas.
L’antenne électrique ne dispose pas d’un boîtier de
relais.
Aucun son n’est émis.
• La fonction ATT est activée ou la fonction ATT
téléphone (lorsque le câble d’interface d’un
téléphone de voiture est raccordé au câble ATT) est
activée.
• La position de la commande d’équilibre « FADER »
n’est pas réglée pour un système à 2 haut-parleurs.
Aucun bip n’est émis.
• Le bip est désactivé (page 20).
• Un amplificateur de puissance en option est raccordé
et vous n’utilisez pas l’amplificateur intégré.
Le contenu de la mémoire a été effacé.
• La touche RESET a été enfoncée.
t Recommencez la procédure d’enregistrement
dans la mémoire.
• Le câble d’alimentation ou la batterie a été
déconnecté(e) ou n’est pas raccordé(e) correctement.
Les stations mémorisées sont effacées et
l’heure est remise à zéro.
Le fusible est grillé.
Émission de bruit lorsque la position de la clé
de contact est modifiée.
Les câbles ne sont pas raccordés correctement au
connecteur d’alimentation du véhicule destiné aux
accessoires.
Pendant la lecture ou la réception, l’écran du
mode de démonstration apparaît.
Si aucune opération n’est effectuée pendant 5 minutes
alors que le réglage « DEMO-ON » est sélectionné,
l’écran du mode de démonstration apparaît.
tSélectionnez le réglage « DEMO-OFF » (page 20).
L’affichage disparaît de la fenêtre d’affichage
ou il n’apparaît pas.
• Le régulateur de luminosité est réglé à « DIMMERON » (page 20).
• L’affichage est désactivé si vous maintenez la touche
(SOURCE/OFF) enfoncée.
t Maintenez enfoncée la touche (SOURCE/OFF)
de l’appareil jusqu’à ce que l’affichage
apparaisse.
• Les connecteurs sont sales (page 23).
La fonction arrêt automatique est inopérante.
L’appareil est en marche. La fonction arrêt
automatique s’active lorsque l’appareil est éteint.
t Éteignez l’appareil.
La fonction DSO est inopérante.
• Selon l’intérieur de la voiture ou le type de musique,
la fonction DSO peut avoir un effet indésirable.
Réception radio
Impossible de capter des stations.
Le son est parasité.
• Le raccordement est incorrect.
t Raccordez un câble de commande d’antenne
électrique (bleu) ou un câble d’alimentation
d’accessoires (rouge) au câble d’alimentation de
l’amplificateur d’antenne du véhicule
(uniquement si votre véhicule est équipé d’une
antenne FM/AM intégrée dans la fenêtre arrière
ou latérale).
t Vérifiez le raccordement de l’antenne du
véhicule.
t Si l’antenne automatique ne se déploie pas,
vérifiez le raccordement du câble de commande
d’antenne électrique.
t Lorsque le mode DSO est activé, le son peut
parfois être parasité.
Réglez le mode DSO à « OFF » (page 19).
Impossible de capter une station
présélectionnée.
• Enregistrez la fréquence correcte dans la mémoire.
• Le signal capté est trop faible.
La syntonisation automatique est impossible.
• Le réglage du mode de recherche locale est incorrect.
t La syntonisation s’arrête trop souvent :
Sélectionnez le réglage « LOCAL-ON »
(page 21).
t La syntonisation ne s’arrête sur aucune station :
Sélectionnez le réglage « LOCAL-OFF »
(page 21).
• Le signal capté est trop faible.
t Réglez manuellement la fréquence.
Pendant la réception FM, l’indication « ST »
clignote.
• Réglez la fréquence correctement.
• Le signal capté est trop faible.
t Sélectionnez le réglage « MONO-ON »
(page 21).
suite à la page suivante t
25
Page 52

Une émission FM en stéréo est entendue en
mono.
L’appareil est en mode de réception mono.
t Sélectionnez le réglage « MONO-OFF » (page 21).
RDS
PTY affiche « - - - - - - - - ».
• La station captée n’est pas une station RDS.
• Aucune donnée RDS n’a été reçue.
• La station ne spécifie pas le type d’émission.
Lecture USB
Impossible de lire des éléments à l’aide d’un
concentrateur USB.
Cet appareil ne peut pas reconnaître les périphériques
USB raccordés au moyen d’un concentrateur USB.
Impossible de lire certains éléments.
Un périphérique USB ne fonctionne pas.
t Raccordez-le.
La lecture sur le périphérique USB exige un
délai de démarrage plus long.
Le périphérique USB contient des fichiers avec une
hiérarchie de dossiers complexe.
Les éléments d’affichage ne défilent pas.
• Il est possible qu’un grand nombre de caractères ne
puissent pas défiler.
• La fonction « A.SCRL » est réglée à « OFF ».
tSélectionnez « A.SCRL-ON » (page 20).
tAppuyez sur la touche (DSPL) (SCRL) et
maintenez-la enfoncée.
Un bip est émis.
Le périphérique USB a été déconnecté en cours de
lecture.
t Avant de déconnecter un périphérique USB, arrêtez
la lecture afin de ne pas endommager les données.
Le son est intermittent.
Il est possible que le son soit intermittent à un débit
binaire supérieur à 320 kbit/s.
Affichage des erreurs et messages
CHECKING
L’appareil confirme le raccordement d’un périphérique
USB.
t Attendez la fin de la confirmation du raccordement.
DEVICE INSIDE
Lorsque vous tournez la clé de contact à la position
OFF sans retirer le périphérique USB ou le iPod,
« DEVICE INSIDE » s’affiche.
ERROR
Le périphérique USB n’a pas été reconnu
automatiquement.
t Raccordez-le de nouveau.
FAILURE (Reste allumé jusqu’à ce qu’une touche soit
enfoncée.)
Le raccordement des haut-parleurs ou des
amplificateurs est incorrect.
t Reportez-vous au manuel d’installation/
raccordement de ce modèle pour vérifier les
raccordements.
FAILURE (Reste allumé pendant environ 1 seconde.)
La mémorisation d’une station radio SAT sur une
présélection a échoué pendant qu’un récepteur SAT est
raccordé.
t Vérifiez que vous recevez la station radio que vous
souhaitez mémoriser, puis essayez de nouveau.
HUB NO SUPRT (Concentrateur non pris en charge)
Cet appareil ne prend pas en charge les concentrateurs
USB.
L. SEEK +/–
Le mode de recherche locale est activé en cours de
syntonisation automatique.
NO DEV (Pas de périphérique)
USB est sélectionné comme source mais aucun
périphérique USB n’est raccordé. Un périphérique
USB ou un câble USB a été déconnecté en cours de
lecture.
t Raccordez un périphérique USB et un câble USB.
NO MUSIC
Le périphérique USB ne contient aucun fichier de
musique.
t Raccordez un périphérique USB contenant des
fichiers de musique.
NO NAME
Aucun nom d’album/d’artiste/de plage n’est écrit dans
la plage.
OFFSET
Il se peut que l’appareil soit défectueux.
t Vérifiez le raccordement. Si le message d’erreur ne
disparaît pas de l’affichage, contactez votre
détaillant Sony le plus proche.
OVERLOAD
Le périphérique USB est saturé.
t Débranchez le périphérique USB, puis changez la
source en appuyant sur (SOURCE/OFF).
t Indique que le périphérique USB ne fonctionne
plus ou qu’un périphérique non pris en charge est
raccordé.
READ
L’appareil lit toutes les informations relatives aux
plages et albums du périphérique USB.
t Attendez que la lecture soit terminée et la lecture
commence automatiquement.
RESET
Impossible de commander le périphérique USB en
raison d’un problème.
t Appuyez sur la touche RESET (page 6).
USB NO SUPRT (USB non pris en charge)
Le périphérique USB raccordé n’est pas pris en charge.
t Pour plus de détails sur la compatibilité de votre
périphérique USB, visitez notre site d’assistance.
26
Page 53

« » ou « »
En mode de retour ou d’avance rapide, vous avez
atteint le début ou la fin du périphérique USB et vous
ne pouvez pas aller plus loin.
«»
Le caractère ne peut pas être affiché sur l’appareil.
Si ces solutions ne permettent pas d’améliorer la
situation, contactez votre détaillant Sony le plus
proche.
27
Page 54

Asegúrese de instalar esta unidad en el tablero
del automóvil por razones de seguridad. Para
realizar la instalación y las conexiones,
consulte el manual de instalación y de
conexiones suministrado.
El logotipo “HD Radio Ready” indica que este
producto controlará un sintonizador HD
TM
Radio
de Sony (se vende por separado).
Para obtener información acerca del
funcionamiento del sintonizador HD Radio
consulte el manual de instrucciones del
sintonizador HD Radio
HD Radio
TM
y el logo HD Radio Ready son
TM
.
TM
marcas propietarias de iBiquity Digital Corp.
ZAPPIN es una marca comercial de Sony
Corporation.
“WALKMAN” y el logotipo de “WALKMAN”
son marcas comerciales registradas de Sony
Corporation.
Windows Media y el logotipo
de Windows son marcas
comerciales o marcas
comerciales registradas de
Microsoft Corporation en Estados Unidos o en
otros países.
iPod es una marca comercial de Apple Inc.,
,
registrada en los EE. UU. y otros países.
Tecnología de codificación de audio MPEG
Layer-3 y patentes bajo licencia de Fraunhofer IIS
y Thomson.
El logotipo “SAT Radio
Ready” indica que este
producto controla un módulo
de sintonizador de radio por
satélite (se vende por separado). Si desea
obtener más detalles sobre el módulo de
sintonizador de radio por satélite, póngase en
contacto con el distribuidor Sony autorizado
más cercano.
“SAT Radio”, “SAT Radio Ready”, los
logotipos de SAT Radio, SAT Radio Ready y
todas las marcas relacionadas son marcas
comerciales de Sirius XM Radio Inc. y XM
Satellite Radio Inc.
Este producto está protegido por los derechos de
propiedad intelectual de Microsoft Corporation.
Queda prohibido el uso o la distribución de esta
tecnología fuera de este producto si no se dispone
de una licencia de Microsoft o una división
autorizada de Microsoft.
2
Page 55

Los proveedores de contenidos utilizan la
tecnología de gestión de derechos digitales para
Windows Media contenida en este dispositivo
(“WM-DRM”) para proteger la integridad de su
contenido (“Contenido seguro”) para que no se
realice un uso inapropiado de su propiedad
intelectual, incluyendo el copyright.
Este dispositivo utiliza software WM-DRM para
reproducir Contenido seguro (“Software WMDRM”). Si la seguridad del Software WM-DRM
de este dispositivo está en peligro, los propietarios
del Contenido seguro (“Propietarios del contenido
seguro”) pueden solicitar que Microsoft revoque el
derecho del Software WM-DRM a adquirir nuevas
licencias para copiar, visualizar y/o reproducir
Contenido seguro. La revocación no afecta a la
capacidad del Software WM-DRM para reproducir
contenido no protegido. Se envía al dispositivo una
lista del Software WM-DRM revocado cuando
descarga una licencia para Contenido seguro de
Internet o de un PC. En conjunción con esta
licencia, Microsoft puede descargar también listas
de revocación en su dispositivo de parte del
programa de propietarios de contenidos seguros.
Advertencia: si el encendido del
automóvil no dispone de una posición
ACC
Asegúrese de ajustar la función de
desconexión automática (página 20).
La unidad se apagará completa y
automáticamente en el tiempo establecido
después de apagarla, lo cual evita que se agote
la batería.
Si no ajusta la función de desconexión
automática, mantenga presionado
(SOURCE/OFF) hasta que se apague la
pantalla cada vez que apague el motor.
3
Page 56

Tabla de contenido
Procedimientos iniciales
Restauración de la unidad . . . . . . . . . . . . . . . . . 6
Cancelación del modo DEMO. . . . . . . . . . . . . . 6
Preparación del control remoto de tarjeta . . . . . 6
Ajuste del reloj . . . . . . . . . . . . . . . . . . . . . . . . . 6
Extracción del panel frontal. . . . . . . . . . . . . . . . 7
Colocación del panel frontal. . . . . . . . . . . . . 7
Ubicación de los controles y
operaciones básicas
Unidad principal . . . . . . . . . . . . . . . . . . . . . . 8
Control remoto de tarjeta RM-X151. . . . . . 10
Búsqueda de una pista . . . . . . . . . . . . . . . . . . . 11
Búsqueda de una pista por nombre
— Quick-BrowZer . . . . . . . . . . . . . . . . . . . 11
Búsqueda de una pista por segmentos
— ZAPPIN™ . . . . . . . . . . . . . . . . . . . . . . . 12
Radio
Almacenamiento y recepción de emisoras . . . 12
Almacenamiento automático — BTM . . . . 12
Almacenamiento manual . . . . . . . . . . . . . . 12
Recepción de las emisoras almacenadas. . . 13
Sintonización automática . . . . . . . . . . . . . . 13
RDS . . . . . . . . . . . . . . . . . . . . . . . . . . . . . . . . . 13
Descripción general . . . . . . . . . . . . . . . . . . 13
Selección de PTY . . . . . . . . . . . . . . . . . . . . 14
Ajuste de CT . . . . . . . . . . . . . . . . . . . . . . . . 14
Otras funciones
Cambio de los ajustes de sonido. . . . . . . . . . . 19
Ajuste de las características de sonido. . . . 19
Personalización de la curva de ecualizador
— EQ3 . . . . . . . . . . . . . . . . . . . . . . . . . . . . 19
Definición de los elementos de configuración
— SET . . . . . . . . . . . . . . . . . . . . . . . . . . . . . . 19
Uso de un equipo opcional . . . . . . . . . . . . . . . 21
Equipo de audio auxiliar . . . . . . . . . . . . . . 21
Información complementaria
Precauciones . . . . . . . . . . . . . . . . . . . . . . . . . . 21
Orden de reproducción de los archivos
MP3/WMA/AAC . . . . . . . . . . . . . . . . . . . . 21
Acerca de la advertencia de dispositivo en
el interior . . . . . . . . . . . . . . . . . . . . . . . . . . 21
Acerca de iPod . . . . . . . . . . . . . . . . . . . . . . 22
Mantenimiento . . . . . . . . . . . . . . . . . . . . . . . . 22
Extracción de la unidad. . . . . . . . . . . . . . . . . . 23
Especificaciones . . . . . . . . . . . . . . . . . . . . . . . 23
Solución de problemas . . . . . . . . . . . . . . . . . . 24
Mensajes/indicaciones de error . . . . . . . . . 25
Dispositivos USB
Reproducción de un dispositivo USB . . . . . . . 14
Elementos de la pantalla. . . . . . . . . . . . . . . 15
Reproducción repetida . . . . . . . . . . . . . . . . 16
Reproducción aleatoria . . . . . . . . . . . . . . . . 16
iPod
Reproducción en un iPod. . . . . . . . . . . . . . . . . 16
Elementos de la pantalla. . . . . . . . . . . . . . . 18
Reproducción repetida . . . . . . . . . . . . . . . . 18
Reproducción aleatoria . . . . . . . . . . . . . . . . 18
4
Page 57

Sitio Web de soporte técnico en línea
Para resolver cualquier duda u obtener la información más reciente
sobre el soporte técnico de este producto, visite el siguiente sitio Web:
http://esupport.sony.com
http://www.sony.com/mobileAV
Proporciona información acerca de:
• Modelos y fabricantes de reproductores de audio digital compatibles
• Archivos MP3/WMA/AAC compatibles
5
Page 58

Procedimientos iniciales
Ajuste del reloj
Restauración de la unidad
Antes de utilizar la unidad por primera vez, o
después de reemplazar la batería del automóvil o
de cambiar las conexiones, debe restaurar la
unidad.
Extraiga el panel frontal (página 7) y presione el
botón RESET (página 8) con un objeto
puntiagudo como, por ejemplo, un bolígrafo.
Nota
Al presionar el botón RESET, se borra el ajuste del
reloj y algunos contenidos memorizados.
Cancelación del modo DEMO
Es posible cancelar la pantalla de demostración
que aparece durante el apagado.
1 Mantenga presionado el botón de
selección.
Aparecerá la pantalla de ajustes.
2 Presione el botón de selección varias
veces hasta que aparezca “DEMO”.
3 Gire el selector de control para
seleccionar “DEMO-OFF”.
4 Mantenga presionado el botón de
selección.
La configuración finaliza y la pantalla regresa
al modo de recepción/reproducción normal.
El reloj emplea una indicación digital de
12 horas.
1 Mantenga presionado el botón de
selección.
Aparecerá la pantalla de ajustes.
2 Presione el botón de selección varias
veces hasta que aparezca “CLOCKADJ”.
3 Presione +>.
La indicación de la hora parpadea.
4 Gire el selector de control para ajustar
la hora y los minutos.
Para mover la indicación digital, presione
–./+>.
5 Una vez ajustados los minutos,
presione el botón de selección.
El ajuste se completa y el reloj se pone en
funcionamiento.
Presione (DSPL) para que aparezca el reloj.
Presione (DSPL) de nuevo para volver a la
pantalla anterior.
Sugerencia
Puede ajustar el reloj automáticamente con la función
RDS (página 14).
Preparación del control remoto
de tarjeta
Retire la lámina de aislamiento.
Sugerencia
Si desea obtener información adicional sobre cómo
sustituir la pila, consulte la página 22.
6
Page 59

Extracción del panel frontal
Es posible extraer el panel frontal de la unidad
para evitar que la roben.
Alarma de precaución
Si gira el interruptor de la llave de encendido
hasta la posición OFF sin haber extraído el panel
frontal, la alarma de precaución sonará durante
unos segundos.
La alarma sonará solamente si se utiliza el
amplificador incorporado.
1 Mantenga presionado (SOURCE/OFF).
La unidad se apagará.
2 Presione (OPEN).
El panel frontal se voltea hacia abajo.
3 Deslice el panel frontal hacia la
derecha y tire suavemente de su
extremo izquierdo.
Notas
• No deje caer ni ejerza excesiva presión sobre el
panel frontal y el visualizador.
• No someta el panel frontal al calor ni a temperaturas
altas o excesiva humedad. Evite dejarlo en un
automóvil estacionado o sobre el tablero o la
bandeja posterior.
• Si “DEVICE INSIDE” aparece en la pantalla o el
LED de advertencia de dispositivo en el interior
parpadea, extraiga el panel frontal y retire el
dispositivo USB o el iPod.
Colocación del panel frontal
Coloque el orificio A del panel frontal en el eje
B de la unidad y, a continuación, presione
ligeramente el lado izquierdo hacia adentro.
Presione (SOURCE/OFF) en la unidad para
utilizarla.
Nota
No coloque nada sobre la superficie interior del panel
frontal.
7
Page 60

Ubicación de los controles y operaciones básicas
Unidad principal
Panel frontal extraído Este apartado contiene instrucciones acerca de la
ubicación de los controles y las operaciones
básicas.
Consulte las páginas indicadas para obtener
información detallada.
A Botón SOURCE/OFF*
Presiónelo para encender la unidad o
cambiar la fuente (Radio/USB/AUX).
Presione 1 segundo para apagar la unidad.
Presione durante 2 segundos o más para
apagar la alimentación y la pantalla
desaparecerá.
B Botón (BROWSE) *
Para visualizar un listado (Radio); para
acceder al modo Quick-BrowZer (USB).
C Botón PAUSE
Para pausar la reproducción. Para cancelar
esta función, vuelva a presionarlo.
D Botones + >/– .
Radio:
Para sintonizar emisoras en forma
automática (presionar); para localizar una
emisora en forma manual (mantener
presionado).
USB:
Para omitir pistas (presionar); para omitir
pistas en forma continua (presionar y volver
a presionar al cabo de 1 segundo y mantener
presionado); para avanzar o retroceder una
pista rápidamente (mantener presionado).
1
2
página 11, 13
8
Page 61

E Selector de control/botón de
selección página 19
Para ajustar el volumen (girar); para
seleccionar elementos de configuración
(presionar y girar).
F Receptor del control remoto de tarjeta
G Visualizador
H Botón OPEN página 7
I Toma de entrada AUX página 21
Para conectar un dispositivo de audio
portátil.
J (BACK)/MODE*
1
página 11, 12, 19
Para volver a la pantalla anterior o
seleccionar la banda de radio (FM/AM).
K Botón ZAP/SHUF página 12, 16, 18
Para acceder al modo ZAPPIN™
(presionar); para seleccionar el modo de
reproducción aleatoria (mantener
presionado).
L Botón PTY/CAT*
3
página 14
Para seleccionar PTY en RDS.
M Botón DSPL (pantalla)/SCRL
(desplazamiento) página 13, 15, 18
Para cambiar los elementos de pantalla
(presionar); para desplazar el elemento de la
pantalla (mantener presionado).
N Conector USB (situado en la TUNE
TRAY) página 15, 17
Para conectar al dispositivo USB.
O TUNE TRAY página 14, 16
Bandeja para colocar un dispositivo USB o
un iPod.
P LED de advertencia de dispositivo en
el interior página 21
Q Botón RESET página 6
*1 Si hay un sintonizador de HD Radio o sintonizador
SAT está conectado: cuando presione
(SOURCE/OFF) el dispositivo conectado (“HD”,
“XM” o “SR”) aparecerá en la pantalla. Además, si
presiona (MODE), podrá cambiar la banda del
sintonizador de HD Radio o la banda del
sintonizador SAT.
*2 Si hay un sintonizador de HD Radio o sintonizador
SAT conectado:
la lista incluirá HD Radio o SAT Radio según
corresponda.
*3 Si el sintonizador SAT está conectado.
9
Page 62

Control remoto de tarjeta
RM-X151
1
2
OFF
SOURCE
SEL
ATT
MODE
3
+
–
VOL
SCRL
+
–
4
5
DSPL
132
465
6
7
8
9
q;
qa
Retire la película de aislamiento antes de usar la
unidad (página 6).
A Botón OFF
Para apagar la unidad; para detener la fuente.
B Botón SOURCE*
1
Para encender la unidad; para cambiar la
fuente (Radio/USB/AUX).
C Botones < (.)/, (>)
Para controlar la radio o el USB, de la misma
manera que con –./+> en la unidad.
Es posible ajustar la configuración, los
ajustes de sonido, etc. mediante < ,.
D Botón DSPL (pantalla)
Para cambiar los elementos en pantalla.
E Botón VOL (volumen) +*
2
/–
Para ajustar el volumen.
F Botón ATT (atenuación)
Para atenuar el sonido. Para cancelar esta
función, vuelva a presionarlo.
G Botón SEL (selección)
Funciona igual que el botón de selección de
la unidad.
H Botón MODE*
1
Presiónelo para seleccionar la banda de radio
(FM/AM).
I Botones M (+)/m (–)
Para controlar el USB, para omitir álbumes.
Es posible ajustar la configuración, los
ajustes de sonido, etc. mediante M m.
J Botón SCRL (desplazamiento)
Para desplazar el elemento de la pantalla.
K Botones numéricos
Para recibir las emisoras almacenadas
(presionar); para almacenar emisoras
(mantener presionado).
*1 Si hay un sintonizador de HD Radio o sintonizador
SAT conectado: cuando presione (SOURCE) el
dispositivo conectado (“HD”, “XM” o “SR”)
aparecerá en la pantalla. Además, si presiona
(MODE), podrá cambiar la banda del sintonizador
de HD Radio o la banda del sintonizador SAT.
*2 Este botón tiene un punto sensible al tacto.
Nota
Si la unidad está apagada y desaparece la indicación
de pantalla, no se podrá utilizar con el control remoto
de tarjeta salvo que se presione (SOURCE/OFF) en la
unidad para activarla en primer lugar.
10
Page 63

Búsqueda de una pista
Búsqueda de una pista por nombre
— Quick-BrowZer
Puede buscar una pista fácilmente en un
dispositivo USB por categorías.
Selector de control/
(BROWSE)
(BACK)
1 Presione (BROWSE).
La unidad accede al modo Quick-BrowZer y
aparece la lista de categorías de búsqueda.
2 Gire el selector de control para
seleccionar la categoría de búsqueda
deseada y, a continuación, presiónelo
para confirmarla.
3 Repita el paso 2 hasta que se
seleccione la pista deseada.
Se inicia la reproducción.
Para volver a la pantalla anterior
Presione (BACK).
Para salir del modo Quick-BrowZer
Presione (BROWSE).
botón de selección
+>/–.
Búsqueda por omisión de elementos
— modo de Omisión
Cuando varios elementos se encuentran dentro de
una misma categoría, es posible encontrar el
elemento deseado rápidamente.
1 Presione +> en el modo Quick-BrowZer.
Aparecerá la siguiente pantalla.
A Número del elemento actual
B Número total de elementos en la capa actual
A continuación, aparecerá el nombre del
elemento.
2 Gire el selector de control para seleccionar el
elemento deseado o un elemento cercano.
Salta en incrementos del 10% del número total
de elementos.
3 Presione el botón de selección.
Vuelve a la pantalla del modo Quick-BrowZer
y aparece el elemento seleccionado.
4 Gire el selector de control para seleccionar el
elemento deseado y presiónelo.
Si el elemento seleccionado es una pista
empieza la reproducción.
Para cancelar el modo de Omisión
Presione (BACK) o –..
Nota
Al acceder al modo Quick-BrowZer, se cancela el
ajuste de reproducción repetida/aleatoria.
11
Page 64

Búsqueda de una pista por
segmentos — ZAPPIN™
Es posible buscar una pista que desee escuchar
mientras se reproducen pequeños fragmentos de
pistas en un dispositivo USB de forma
secuencial.
El modo ZAPPIN es adecuado para buscar pistas
en el modo de reproducción aleatoria o de
repetición aleatoria.
Botón de selección (BACK)
ZAP
1 Durante la reproducción, presione
(ZAP/SHUF).
Cuando “ZAPPIN” aparece en la pantalla, la
reproducción se inicia en un segmento de la
pista siguiente.
El segmento se reproduce durante el tiempo
establecido y, a continuación, suena un clic y
se inicia el segmento siguiente.
Pista
Partes de cada pista que se
reproducen en el modo ZAPPIN.
2 Presione el botón de selección o
(ZAP/SHUF) cuando se reproduzca una
pista que desea escuchar.
La pista seleccionada vuelve al modo de
reproducción normal desde el principio.
Para buscar una pista de nuevo en el modo
ZAPPIN, repita los pasos 1 y 2.
Sugerencias
• Es posible seleccionar el tiempo de reproducción
entre unos 6 segundos, 15 segundos o 30 segundos
(página 20). No es posible seleccionar el fragmento
de la pista que se reproducirá.
• Presione +>/–. en el modo ZAPPIN para
omitir una pista.
• Para confirmar una pista que se va a reproducir,
presione (BACK).
Radio
Almacenamiento y recepción
de emisoras
Precaución
Para sintonizar emisoras mientras maneja, utilice
la función BTM (Memoria de la mejor sintonía)
para evitar accidentes.
Almacenamiento automático
— BTM
1 Presione (SOURCE/OFF) varias veces
hasta que aparezca “TUNER”.
Para cambiar de banda, presione (MODE)
varias veces. Puede seleccionar entre FM1,
FM2, FM3, AM1 y AM2.
2 Mantenga presionado el botón de
selección.
Aparecerá la pantalla de ajustes.
3 Presione el botón de selección varias
veces hasta que aparezca “BTM”.
4 Presione +>.
La unidad almacena las emisoras en el orden
de frecuencia de la lista de presintonías.
La unidad emite un pitido al almacenar el
ajuste.
Almacenamiento manual
1 Cuando reciba la emisora que desea
almacenar, presione el botón
(BROWSE).
Aparecerá la lista de presintonías.
2 Gire el selector de control para
seleccionar el número de presintonía.
3 Mantenga presionado el botón de
selección hasta que aparezca
“MEMORY”.
(con el control remoto de tarjeta)
1 Mientras recibe la emisora que desea
almacenar, mantenga presionado un
botón numérico (de (1) a (6)) hasta
que aparezca “MEMORY”.
Nota
Si intenta almacenar otra emisora en el mismo botón
numérico, se reemplazará la que estaba almacenada
previamente.
12
Page 65

Recepción de las emisoras
almacenadas
Puede seleccionar una emisora para recibirla
mediante una lista.
1 Seleccione la banda y, a continuación,
presione (BROWSE).
Aparecerá la lista de presintonías.
2 Gire el selector de control hasta que
aparezca la emisora deseada.
3 Presione el botón de selección para
recibir la emisora.
La pantalla vuelve al modo de recepción
normal.
(con el control remoto de tarjeta)
1 Seleccione la banda y, a continuación,
presione un botón numérico (de (1) a
(6)).
Sintonización automática
1 Seleccione la banda y, a continuación,
presione +>/–. para buscar la
emisora.
La búsqueda se detiene cuando la unidad
recibe una emisora. Repita este
procedimiento hasta recibir la emisora
deseada.
Sugerencia
Si conoce la frecuencia de la emisora que desea
escuchar, mantenga presionado +> /–. para
localizar la frecuencia aproximada y, a continuación,
presione +>/–. varias veces para ajustar la
frecuencia deseada con mayor precisión
(sintonización manual).
RDS
Descripción general
Las emisoras de radio FM que tienen el servicio
de Sistema de datos de radio (RDS) envían
información digital inaudible junto a la señal
habitual del programa de radio.
Elementos de la pantalla
A Banda de radio, función, frecuencia, número
de presintonía
B Nombre de servicio del programa, reloj,
frecuencia*, número de presintonía
* Mientras recibe la emisora RDS, aparece “ *” a la
izquierda de la indicación de la frecuencia.
Para cambiar los elementos de la pantalla A, B,
presione
Servicios RDS
Esta unidad suministra automáticamente
servicios RDS como sigue:
PTY (Tipos de programa)
CT (Hora del reloj)
Notas
• Dependiendo del país o región, puede que no estén
• RDS no funcionará si la intensidad de la señal es
(DSPL)
.
Muestra el tipo de programa que se recibe
actualmente. También busca el tipo de
programa seleccionado.
Los datos CT de la transmisión RDS ajustan el
reloj.
disponibles todas las funciones RDS.
muy débil o si la emisora que sintonizó no transmite
datos RDS.
13
Page 66

Selección de PTY
1 Presione (PTY) durante la recepción
FM.
Si la emisora está transmitiendo datos PTY
aparece el nombre del tipo de programa
actual.
2 Presione (PTY) varias veces hasta que
aparezca el tipo de programa deseado.
3 Presione +>/–. .
La unidad comienza a buscar una emisora que
emita el tipo de programa seleccionado.
Tipos de programas
NEWS (Noticias), INFORM (Información),
SPORTS (Deportes), TAL K (Conversación),
ROCK (Rock), CLS ROCK (Rock clásico),
ADLT HIT (Éxitos para el adulto), SOFT RCK
(Rock suave), TOP 40 (Top 40), COUNTRY
(Country), OLDIES (Oldies), SOFT (Lentos),
NOSTALGA (Nostalgia), JAZZ (Jazz),
CLASSICL (Clásico), R AND B (R&B),
SOFT R B (R&B suave), LANGUAGE
(Idiomas extranjeros), REL MUSC (Música
religiosa), REL TALK (Conversación religiosa),
PERSNLTY (Personalidad), PUBLIC
(Público), COLLEGE (Universidad),
WEATHER (Tiempo)
Notas
• No puede usar esta función en países o regiones
donde no hay disponibles datos PTY.
• Puede recibir un programa de radio distinto del que
seleccionó.
Ajuste de CT
1 Ajuste “CT-ON” en la configuración
(página 20).
Notas
• Puede que la función CT no funcione a pesar de
que se reciba una emisora RDS.
• Puede haber una diferencia entre la hora ajustada
por la función CT y la hora real.
Dispositivos USB
Para obtener más información acerca de la
compatibilidad del dispositivo USB, visite el
sitio web de soporte técnico.
Sitio Web de soporte técnico en línea
http://esupport.sony.com
http://www.sony.com/mobileAV
• Es posible utilizar dispositivos USB de
almacenamiento masivo (MSC) y de protocolo
de transferencia multimedia (MTP) que
cumplan con el estándar USB.
• Los códecs correspondientes son MP3 (.mp3),
WMA (.wma) y AAC (.m4a).
• Se recomienda realizar una copia de seguridad
de los datos almacenados en los dispositivos
USB.
Notas
• Conecte el dispositivo USB después de arrancar el
motor.
En función del tipo de dispositivo USB, si lo conecta
a la computadora antes de arrancar el motor, es
posible que este no funcione correctamente o que
se dañe.
• No coloque un teléfono celular o un dispositivo con
funciones de comunicación inalámbrica en la TUNE
TRAY, ya que es posible que no reciba señales
telefónicas o que la comunicación se corte.
• No deje un dispositivo USB dentro de un automóvil
estacionado, ya que podrían producirse fallas de
funcionamiento.
Reproducción de un dispositivo
USB
1 Presione (OPEN).
El panel frontal se voltea hacia abajo.
2 Presione PUSH OPEN en la TUNE
TRAY.
La TUNE TRAY se abrirá lentamente.
14
TUNE TRAY
Page 67

3 Conecte el dispositivo USB al
conector USB.
4 Deslícelo en la TUNE TRAY
presionando CLOSE en la TUNE TRAY
hasta que se cierre completamente.
• Capacidad de la bandeja: aprox. 65 × 17 × 118 mm
(an/al/prf)
• Si el dispositivo USB solo o combinado con el cable
USB no se puede colocar fácilmente en la TUNE
TRAY, es posible que el dispositivo haya superado la
capacidad permitida de la bandeja.
No deslice dicho dispositivo ni el cable USB en la
TUNE TRAY a la fuerza.
• Para los usuarios de “WALKMAN”, se recomienda la
utilización del adaptador opcional XA-50WM. Su
uso está designado para esta unidad solamente y
no debería usarse con otro dispositivo USB.
• Esta unidad no puede reconocer dispositivos USB a
través de un concentrador USB.
• Deslice hacia adentro la bandeja TUNE TRAY y
cierre el panel frontal antes de reproducir, ya que
podrían producirse daños en caso de una
obstrucción en el vehículo, etc.
• Si el panel frontal no se abre por completo por la
forma del tablero en la posición de instalación,
desconéctelo y abra la bandeja TUNE TRAY en
forma manual.
Para obtener más información acerca de cómo
extraer el panel frontal, consulte la página 7.
• Es extremadamente peligroso conectar o extraer el
dispositivo USB mientras se maneja.
Elementos de la pantalla
5 Cierre el panel frontal.
Se inicia la reproducción.
Si ya hay un dispositivo USB conectado,
presione (SOURCE/OFF) varias veces hasta que
aparezca “USB” para empezar la reproducción.
Presione (SOURCE/OFF) 1 segundo para
detener la reproducción.
Extracción del dispositivo USB
1 Detenga la reproducción del dispositivo USB.
2 Presione (OPEN).
3 Presione PUSH OPEN en la TUNE TRAY.
4 Extraiga el dispositivo USB.
5 Deslícelo en la TUNE TRAY y cierre el panel
frontal.
Notas
• No extraiga el dispositivo USB durante la
reproducción o, de lo contrario, los datos del USB
podrían dañarse.
• No coloque dispositivos que no sean USB en la
TUNE TRAY, ni objetos extraños, como monedas,
llaves, tarjetas, líquidos, etc.
• No coloque objetos inflamables como un
encendedor en la TUNE TRAY, ya que podría
producir humo, un incendio u otro tipo de accidente.
A Fuente, nombre de la pista, nombre del
artista, nombre del álbum
B Nombre de la pista, Nombre del artista,
Número de álbum*, Nombre del álbum,
Número de pista/tiempo de reproducción
transcurrido, Reloj
* El número del álbum se muestra solamente cuando
se cambia de álbum.
Para cambiar los elementos de la pantalla A, B,
presione (DSPL).
Notas
• Los elementos que se muestran variarán en función
del tipo de dispositivo USB, el formato de grabación
y los ajustes. Para obtener más información, visite el
sitio web de soporte técnico.
• El número máximo de datos que se pueden
visualizar es el siguiente.
– carpetas (álbumes): 128
– archivos (pistas) por carpeta: 500
• Es posible que el inicio de la reproducción demore
un poco, en función de la cantidad de datos
grabados.
• Es posible que no se puedan reproducir archivos
DRM (Gestión de derechos digitales).
continúa en la página siguiente t
15
Page 68

• Durante la reproducción de un archivo MP3/WMA/
AAC de VBR (Velocidad de bits variable) o al
avanzar o retroceder rápidamente, es posible que el
tiempo de reproducción transcurrido no se muestre
con precisión.
• No es posible reproducir los archivos MP3/WMA/
AAC que se indican a continuación.
– archivos con formato de compresión sin pérdida
– archivos protegidos por derechos de autor
Reproducción repetida
1 Durante la reproducción, mantenga
presionado el botón de selección.
Aparecerá la pantalla de ajustes.
2 Presione el botón de selección varias
veces hasta que aparezca “REPEAT”.
3 Gire el selector de control para
seleccionar el modo de reproducción.
4 Mantenga presionado el botón de
selección.
La configuración finaliza y la pantalla regresa
al modo de reproducción normal.
Seleccione Para reproducir
REPEAT-TRK pistas en forma repetida.
REPEAT-ALB álbumes en forma
Para regresar al modo de reproducción normal,
seleccione “REPEAT-OFF”.
repetida.
Reproducción aleatoria
1 Durante la reproducción, mantenga
presionado (ZAP/SHUF).
La mitad inferior de la pantalla comenzará a
parpadear.
2 Presione (ZAP/SHUF) varias veces
hasta que aparezca el ajuste deseado.
iPod
Para obtener más información acerca de la
compatibilidad de su iPod, consulte “Acerca de
iPod” en la página 22 o visite el sitio web de
soporte técnico.
En las instrucciones de funcionamiento, el
“iPod” se utiliza como referencia general para las
funciones del iPod en el iPod y el iPhone, salvo
que el texto o las ilustraciones especifiquen lo
contrario.
Sitio Web de soporte técnico en línea
http://esupport.sony.com
http://www.sony.com/mobileAV
Notas
• No coloque un teléfono celular o un dispositivo con
funciones de comunicación inalámbrica en la TUNE
TRAY, ya que es posible que no reciba señales
telefónicas o que la comunicación se corte.
• No deje un iPod dentro de un automóvil
estacionado, ya que podrían producirse fallas de
funcionamiento.
Reproducción en un iPod
Antes de conectar el iPod, baje el volumen de la
unidad.
1 Presione (OPEN).
El panel frontal se voltea hacia abajo.
2 Presione PUSH OPEN en la TUNE
TRAY.
La TUNE TRAY se abrirá lentamente.
Seleccione Para reproducir
ALBUM álbumes en orden
aleatorio.
DEVICE dispositivos en orden
aleatorio.
Después de 3 segundos, se completa el ajuste.
Para regresar al modo de reproducción normal,
seleccione “OFF”.
16
TUNE TRAY
Page 69

3 Conecte el adaptador suministrado al
conector USB.
4 Conecte el iPod al adaptador
suministrado.
5 Deslícelo en la TUNE TRAY
presionando CLOSE en la TUNE TRAY
hasta que se cierre completamente.
6 Cierre el panel frontal.
El iPod se encenderá automáticamente y la
indicación siguiente aparecerá en la pantalla
del iPod tal y como se ilustra a continuación.*
Si ya hay un iPod conectado, presione
(SOURCE/OFF) varias veces hasta que
aparezca “USB” para iniciar la reproducción.
(“IPOD” aparece en la pantalla cuando se
reconoce el iPod.)
* Las indicaciones de la pantalla varían en función del
iPod, o es posible que no aparezcan si se conecta
un iPod touch.
7 Ajuste el volumen.
Presione (SOURCE/OFF) 1 segundo para
detener la reproducción.
Extracción del iPod
1 Detenga la reproducción del iPod.
2 Presione (OPEN).
3 Presione PUSH OPEN en la TUNE TRAY.
4 Extraiga el iPod.
5 Deslícelo en la TUNE TRAY y cierre el panel
frontal.
Notas
• No extraiga el iPod durante la reproducción o, de lo
contrario, los datos podrían dañarse.
• No coloque dispositivos que no sean iPod en la
TUNE TRAY, ni objetos extraños, como monedas,
llaves, tarjetas, líquidos, etc.
• No coloque objetos inflamables como un
encendedor en la TUNE TRAY, ya que podría
producir humo, un incendio u otro tipo de accidente.
• Los usuarios de iPod deben usar el adaptador
XA-50IP proporcionado. Su uso está designado
para esta unidad solamente y no debería usarse con
otro dispositivo USB.
• Esta unidad no puede reconocer el iPod a través de
un concentrador USB.
• Deslice hacia adentro la bandeja TUNE TRAY y
cierre el panel frontal antes de reproducir, ya que
podrían producirse daños en caso de una
obstrucción en el vehículo, etc.
• Si el panel frontal no se abre por completo por la
forma del tablero en la posición de instalación,
desconéctelo y abra la bandeja TUNE TRAY en
forma manual.
Para obtener más información acerca de cómo
extraer el panel frontal, consulte la página 7.
• Es extremadamente peligroso conectar o extraer el
iPod mientras se maneja.
Sugerencias
• Si se coloca la llave de encendido en la posición
ACC (accesorios), o si la unidad está encendida, el
iPod se recarga.
• Si el iPod se desconecta durante la reproducción,
aparecerá “NO DEV” en la pantalla de la unidad.
Las pistas del iPod empiezan a reproducirse
automáticamente a partir del punto en el que
se detuvo la última reproducción.
Modo de reanudación
Cuando el iPod se conecta, el modo de esta
unidad cambia al modo de reanudación y se
inicia la reproducción en el modo ajustado por el
iPod.
No es posible utilizar los botones de
reproducción repetida/aleatoria.
17
Page 70

Elementos de la pantalla
A Fuente, nombre de la pista, nombre del
artista, nombre del álbum
B Nombre de la pista, Nombre del artista,
Nombre del álbum, Número de pista/tiempo
de reproducción transcurrido, Reloj
Para cambiar los elementos de la pantalla A, B,
presione (DSPL).
Sugerencia
Si se modifica álbum/podcast/género/artista/lista de
reproducción, el número de elemento aparece
durante unos instantes.
Nota
Es posible que algunos caracteres almacenados en el
iPod no se visualicen correctamente.
Reproducción repetida
1 Durante la reproducción, mantenga
presionado el botón de selección.
Aparecerá la pantalla de ajustes.
2 Presione el botón de selección varias
veces hasta que aparezca “REPEAT”.
3 Gire el selector de control para
seleccionar el modo de reproducción.
4 Mantenga presionado el botón de
selección.
La configuración finaliza y la pantalla regresa
al modo de reproducción normal.
Seleccione Para reproducir
REPEAT-TRK pistas en forma repetida.
REPEAT-ALB álbumes en forma
REPEAT-PCS podcast en forma
REPEAT-ART artistas en forma
REPEAT-PLY listas de reproducción en
REPEAT-GNR género en forma
Para regresar al modo de reproducción normal,
seleccione “REPEAT-OFF”.
repetida.
repetida.
repetida.
forma repetida.
repetida.
18
Reproducción aleatoria
1 Durante la reproducción, mantenga
presionado (ZAP/SHUF).
La mitad inferior de la pantalla comenzará a
parpadear.
2 Presione (ZAP/SHUF) varias veces
hasta que aparezca el ajuste deseado.
Seleccione Para reproducir
ALBUM álbumes en orden
aleatorio.
PODCAST podcast en orden
aleatorio.
ARTIST artistas en orden
aleatorio.
PLAYLIST listas de reproducción en
orden aleatorio.
GENRE género en orden
aleatorio.
DEVICE dispositivos en orden
aleatorio.
Después de 3 segundos, se completa el ajuste.
Para regresar al modo de reproducción normal,
seleccione “OFF”.
Page 71

Otras funciones
Cambio de los ajustes de
sonido
Ajuste de las características de
sonido
1 Presione el botón de selección varias
veces hasta que aparezca el elemento
deseado.
2 Gire el selector de control para ajustar
el elemento seleccionado.
3 Presione (BACK).
El ajuste finaliza y la pantalla regresa al modo
de recepción/reproducción normal.
Se pueden ajustar los elementos siguientes
(consulte la referencia de página para obtener
más información):
EQ3
Seleccione una curva del ecualizador entre
7 tipos de música (XPLOD, VOCAL, EDGE,
CRUISE, SPACE, GRAVITY, CUSTOM u
OFF).
DSO (Organizador de sonido de baja frecuencia
dinámico)
Permite crear un campo de sonido más
ambiental.
Para seleccionar el modo DSO: “1”, “2”, “3” u
“OFF”. Cuanto mayor sea el número, mejor será
el efecto.
1
LOW*
, MID*1, HIGH*1 (página 19)
BALANCE
Permite ajustar el balance de sonido entre los
altavoces derecho e izquierdo.
FADER
Permite ajustar el nivel relativo entre los
altavoces frontal y posterior.
2
SUB*
(Volumen del altavoz potenciador de
graves)
Permite ajustar el volumen del altavoz
potenciador de graves.
AUX LV*
Permite ajustar el volumen de cada equipo
auxiliar conectado: “+18 dB” – “0 dB” –
“–8 dB”.
Este ajuste elimina la necesidad de ajustar el
nivel de volumen entre fuentes.
*1 Si está activado EQ3.
*2 Cuando la salida de audio está ajustada en “SUB-
3
(Nivel AUX)
OUT” (página 20).
“ATT” aparece con el ajuste más bajo y puede
ajustarse hasta con 21 intervalos.
*3 Si está activada la fuente AUX (página 21).
Personalización de la curva de
ecualizador — EQ3
“CUSTOM” de EQ3 le permite realizar sus
propios ajustes en el ecualizador.
1 Seleccione una fuente y presione el
botón de selección varias veces para
seleccionar “EQ3”.
2 Gire el selector de control para
seleccionar “CUSTOM”.
3 Presione el botón de selección varias
veces hasta que aparezca “LOW”,
“MID” o “HIGH”.
4 Gire el selector de control para ajustar
el elemento seleccionado.
El nivel de volumen puede ajustarse en
intervalos de 1 dB entre –10 dB y +10 dB.
Repita los pasos 3 y 4 para ajustar la curva de
ecualizador.
Para restaurar la curva de ecualizador
ajustada en fábrica, mantenga presionado el
botón de selección antes de que finalice el
ajuste.
5 Presione (BACK).
El ajuste finaliza y la pantalla regresa al modo
de recepción/reproducción normal.
Sugerencia
También es posible ajustar otros tipos de ecualizador.
Definición de los elementos de
configuración — SET
1 Mantenga presionado el botón de
selección.
Aparecerá la pantalla de ajustes.
2 Presione el botón de selección varias
veces hasta que aparezca el elemento
deseado.
3 Gire el selector de control para
seleccionar el ajuste (por ejemplo,
“ON” u “OFF”).
4 Mantenga presionado el botón de
selección.
La configuración finaliza y la pantalla regresa
al modo de recepción/reproducción normal.
continúa en la página siguiente t
19
Page 72

Nota
Los elementos que se muestran en pantalla variarán
en función de la fuente y del ajuste.
Se pueden ajustar los elementos siguientes
(consulte la referencia de página para obtener
más información):
CLOCK-ADJ (Ajuste del reloj) (página 6)
CT (Hora del reloj)
Activa la función CT: “ON”, “OFF”
(página 13, 14).
BEEP
Activa el sonido de los pitidos: “ON”, “OFF”.
AUX-A*1 (Audio AUX)
Activa la pantalla de fuente AUX: “ON”, “OFF”
(página 21).
AUTO OFF
Desconecta la alimentación automáticamente
una vez transcurrido un período de tiempo
deseado cuando la unidad está apagada: “NO”,
“30S” (segundos), “30M” (minutos), “60M”
(minutos).
SUB/REAR*
1
Permite cambiar la salida de audio: “SUBOUT” (altavoz potenciador de graves), “REAROUT” (amplificador de potencia).
DEMO
(Demostración)
Activa la demostración: “ON”, “OFF”.
DIMMER
Cambia el brillo de la pantalla.
– “AT”: para que la pantalla se atenúe
automáticamente al encender la luz.
(Disponible únicamente si la antena
monitorizada de iluminación está conectada).
– “ON”: para atenuar la pantalla.
– “OFF”: para desactivar el atenuador.
CONTRAST
Ajusta el contraste para visualizar la pantalla de
manera más nítida; es adecuado para el ángulo
de visualización instalado. El nivel de contraste
puede ajustarse en 7 pasos.
LV-METER (Medida del nivel)
Activa la medida del nivel: “ON”, “OFF”.
A.SCRL (Desplazamiento automático)
Permite desplazarse por los elementos de la
pantalla automáticamente: “ON”, “OFF”.
REPEAT (página 16, 18)
LOCAL (Modo de búsqueda local)
– “ON”: para que se sintonicen solamente las
emisoras de señal más intensa.
– “OFF”: para ajustar la recepción normal.
MONO*
2
(Modo monoaural)
Selecciona el modo de recepción monoaural
para mejorar una recepción de FM deficiente:
“ON”, “OFF”.
20
ZAP.TIME (Tiempo de Zappin)
Permite seleccionar el tiempo de reproducción
de la función ZAPPIN.
– “ZAP.TIME-1 (unos 6 segundos)”,
– “ZAP.TIME-2 (unos 15 segundos)”,
– “ZAP.TIME-3 (unos 30 segundos)”.
3
LPF*
(Filtro de paso bajo)
Selecciona la frecuencia de corte del altavoz
potenciador de graves: “OFF”, “80Hz”,
“100Hz”, “120Hz”, “140Hz”, “160Hz”.
3
SUB*
(Fase del altavoz potenciador de graves)
Selecciona la fase del altavoz potenciador de
graves: “NORM”, “REV”.
HPF (Filtro de paso alto)
Selecciona la frecuencia de corte del altavoz
frontal/posterior: “OFF”, “80Hz”, “100Hz”,
“120Hz”, “140Hz”, “160Hz”.
LOUD (Sonoridad)
Refuerza los graves y agudos para proporcionar
un sonido más nítido en niveles de volumen
bajos: “ON”, “OFF”.
DM+
Activa la función DM+: “ON”, “OFF”.
BTM (página 12)
*1 Cuando la unidad está apagada.
*2 Cuando se recibe FM.
*3 Cuando la salida de audio se ajusta en “SUB-
OUT”.
Page 73

Uso de un equipo opcional
Información complementaria
Equipo de audio auxiliar
Si conecta un dispositivo de audio portátil
opcional a la toma de entrada AUX (minitoma
estéreo) de la unidad y simplemente selecciona la
fuente, podrá escuchar por los altavoces del
automóvil. Puede ajustar cualquier diferencia en
el nivel de volumen entre la unidad y el
dispositivo de audio portátil. Siga este
procedimiento:
Conexión del dispositivo de audio
portátil
1 Apague el dispositivo de audio portátil.
2 Baje el volumen de la unidad.
3 Conéctelo a la unidad.
Cable de conexión*
(no suministrado)
Precauciones
• Deje que la unidad se enfríe antes de usarla si el
automóvil ha estado estacionado bajo la luz
directa del sol.
• La antena motorizada se extiende
automáticamente.
Orden de reproducción de los
archivos MP3/WMA/AAC
MP3/WMA/AAC
Acerca de la advertencia de
dispositivo en el interior
Si ajusta el interruptor de la llave de encendido
en la posición OFF sin extraer el dispositivo USB
o el iPod, aparecerá “DEVICE INSIDE” en la
pantalla.
Carpeta
(álbum)
Archivo MP3/
WMA/AAC
(pista)
* Asegúrese de utilizar una clavija recta.
Ajuste del nivel de volumen
Asegúrese de ajustar el volumen de cada equipo
de audio conectado antes de la reproducción.
1 Baje el volumen de la unidad.
2 Presione (SOURCE/OFF) varias veces hasta
que aparezca “AUX”.
A continuación, aparecerá “AUX FRONT IN”.
3 Inicie la reproducción en el dispositivo de
audio portátil con un volumen moderado.
4 Seleccione el volumen habitual en la unidad.
5 Ajuste el nivel de entrada (página 19).
Abra el panel frontal para extraer el dispositivo
USB o el iPod.
Si el panel frontal no está colocado
cuando el motor está apagado.
El LED de advertencia de dispositivo en el interior
parpadea.
continúa en la página siguiente t
21
Page 74

Sugerencia
1
Para obtener más información acerca de la extracción
del dispositivo USB o del iPod, consulte la página 15
(USB), 17 (iPod).
Nota
La advertencia de dispositivo en el interior sonará
solamente si se utiliza el amplificador integrado.
Acerca de iPod
• Es posible establecer una conexión con los
siguientes modelos de iPod. Actualice sus iPod al
software más reciente antes de utilizarlo.
Made for
– iPod touch (segunda generación)
– iPod touch (primera generación)
– iPod classic
– iPod con vídeo
– iPod nano (quinta generación)
– iPod nano (cuarta generación)
– iPod nano (tercera generación)
– iPod nano (segunda generación)
– iPod nano (primera generación)
• “Made for iPod” indica que un accesorio
electrónico se diseñó para conectarse
específicamente a dispositivos iPod y que el
fabricante obtuvo la certificación necesaria para
que cumpla con los estándares de rendimiento de
Apple.
• Apple no se hace responsable del funcionamiento
de este dispositivo en cumplimiento de los
estándares de seguridad y normativa.
Si desea realizar alguna consulta o solucionar algún
problema relativo a la unidad que no se trate en este
manual, póngase en contacto con el distribuidor
Sony más cercano.
Mantenimiento
Notas sobre la pila de litio
• Mantenga la pila de litio fuera del alcance de los
niños. Si se ingiriese, póngase en contacto
inmediatamente con un médico.
• Limpie la pila con un paño seco para garantizar un
contacto óptimo.
• Asegúrese de observar la polaridad correcta al
instalarla.
• No sujete la pila con pinzas metálicas, ya que podría
producirse un cortocircuito.
ADVERTENCIA
La pila puede explotar si no se emplea
adecuadamente.
No recargue la pila; tampoco la desmonte ni
la arroje al fuego.
Sustitución del fusible
Al sustituir el fusible, asegúrese
de utilizar uno cuyo amperaje
coincida con el especificado en
el original. Si el fusible se
funde, verifique la conexión de
alimentación y sustitúyalo. Si el
fusible vuelve a fundirse
después de sustituirlo, es
posible que exista alguna falla
de funcionamiento interno. En
tal caso, consulte con el
distribuidor Sony más cercano.
Fusible (10 A)
Limpieza de los conectores
Es posible que la unidad no funcione correctamente
si los conectores entre ésta y el panel frontal están
sucios. Para evitar esta situación, extraiga el panel
frontal (página 7) y limpie los conectores con un
hisopo de algodón. Realice esta operación con
suavidad. De lo contrario, los conectores podrían
resultar dañados.
Sustitución de la pila de litio del
control remoto de tarjeta
En condiciones normales, la pila dura
aproximadamente 1 año. (La duración puede ser
menor en función de las condiciones de uso.)
El alcance del control remoto de tarjeta
disminuye a medida que se agota la pila.
Sustitúyala por una pila de litio CR2025 nueva.
El uso de cualquier otra pila podría provocar un
incendio o una explosión.
Lado + hacia arriba
2
c
22
Unidad principal
Notas
• Por razones de seguridad, apague el motor antes de
limpiar los conectores y extraiga la llave del
interruptor de encendido.
• No toque nunca los conectores directamente con los
dedos ni con ningún dispositivo metálico.
Parte posterior
del panel frontal
Page 75

Extracción de la unidad
Especificaciones
1 Extraiga el marco de protección.
1 Extraiga el panel frontal (página 7).
2 Sujete el marco de protección por ambos
bordes y extráigalo.
x
2 Extraiga la unidad.
1 Inserte las dos llaves de liberación
simultáneamente hasta escuchar un clic.
El gancho debe
mirar hacia
adentro.
2 Tire de las llaves de liberación para extraer
la unidad.
3 Deslice la unidad para extraerla del marco.
Sección del sintonizador
FM
Rango de sintonización: de 87,5 a 107,9 MHz
Terminal de antena: conector de antena externa
Frecuencia intermedia: 150 kHz
Sensibilidad útil: 10 dBf
Selectividad: 75 dB a 400 kHz
Relación señal-ruido: 70 dB (mono)
Separación: 40 dB a 1 kHz
Respuesta de frecuencia: de 20 a 15 000 Hz
AM
Rango de sintonización: de 530 a 1 710 kHz
Terminal de antena: conector de antena externa
Frecuencia intermedia: 25 kHz
Sensibilidad: 26 µV
Sección del reproductor USB
Interfaz: USB (velocidad máxima)
Corriente máxima: 500 mA
Sección del amplificador de potencia
Salida: salidas de los altavoces
Impedancia de altavoz: de 4 a 8 Ω
Salida máxima de potencia: 52 W × 4 (a 4 Ω)
Generales
Salidas:
Terminal de salidas de audio (frontal,
intercambiable entre altavoz potenciador de graves
y posterior)
Terminal de control del relé de la antena
motorizada
Terminal de control del amplificador de potencia
Entradas:
Terminal de entrada de control BUS
Terminal de entrada de audio BUS
Terminal de entrada del control remoto
Terminal de entrada de la antena
Terminal de control ATT de teléfono
Terminal de control de iluminación
Toma de entrada AUX (minitoma estéreo)
Conector de entrada de señal USB
Controles de tono:
Graves: ±10 dB a 60 Hz (XPLOD)
Medios: ±10 dB a 1 kHz (XPLOD)
Agudos: ±10 dB a 10 kHz (XPLOD)
Requisitos de alimentación: batería de automóvil de
cc 12 V (masa negativa (tierra))
Dimensiones: aprox. 178 × 50 × 180 mm (an/al/prf)
Dimensiones de montaje: aprox. 182 × 53 × 163 mm
(an/al/prf)
Peso: aprox. 1,0 kg
Accesorios suministrados:
Control remoto de tarjeta: RM-X151
Conector USB para iPod XA-50IP
Componentes de instalación y conexiones
(1 juego)
continúa en la página siguiente t
23
Page 76

Equipo y accesorios opcionales:
Cable BUS (suministrado con un cable con
terminales RCA):
Selector de fuente: XA-C40
Sintonizador de HD Radio™: XT-100HD
Adaptador de Walkman XA-50WM
Es posible que su distribuidor no comercialice
algunos de los accesorios que figuran en la lista
anterior. Pídale información detallada.
El diseño y las especificaciones están sujetos a
cambios sin previo aviso.
Solución de problemas
La siguiente lista de comprobación le ayudará a
solucionar los problemas que puedan producirse con
la unidad.
Antes de consultarla, revise los procedimientos de
conexión y de funcionamiento.
Si no se resuelve el problema, visite el siguiente
sitio web de soporte técnico.
Sitio Web de soporte técnico en línea
http://esupport.sony.com
http://www.sony.com/mobileAV
Generales
La unidad no recibe alimentación.
• Revise la conexión o el fusible.
• Si la unidad está apagada y la pantalla desaparece, no
se puede operar con el control remoto.
t Encienda la unidad.
La antena motorizada no se extiende.
La antena motorizada no dispone de una caja de relé.
No se emite el sonido.
• La función ATT está activada o la función ATT de
teléfono (cuando se conecta el cable de interfaz de un
teléfono para automóvil al cable ATT) está activada.
• La posición del control de equilibrio “FADER” no
está ajustada para un sistema de 2 altavoces.
No se escuchan pitidos.
• El sonido de los pitidos está cancelado (página 20).
• Se encuentra conectado un amplificador de potencia
opcional y no está usando el amplificador integrado.
El contenido de la memoria se borró.
• Presionó el botón RESET.
t Vuelva a almacenar los datos en la memoria.
• Se desconectó el cable de fuente de alimentación o la
batería, o no están conectados correctamente.
Las emisoras almacenadas y la hora correcta
se borraron.
El fusible se fundió.
Se escucha ruido cuando se cambia la
posición de la llave de encendido.
Los cables no se conectaron de forma correcta al
conector de alimentación auxiliar del automóvil.
Durante la reproducción o la recepción, el
modo demostración se inicia.
Si no se realiza ninguna operación durante 5 minutos y
la opción “DEMO-ON” está ajustada, se iniciará el
modo de demostración.
t Ajuste “DEMO-OFF” (página 20).
24
Page 77

Las indicaciones desaparecen de la pantalla o
no aparecen en el visualizador.
• El atenuador está ajustado en “DIMMER-ON”
(página 20).
• La pantalla se apaga si mantiene presionado
(SOURCE/OFF).
t Presione (SOURCE/OFF) en la unidad hasta que
se ilumine la pantalla.
• Los conectores están sucios (página 22).
La función de desconexión automática no
funciona.
La unidad está encendida. La función de desconexión
automática se activa después de apagar la unidad.
tApague la unidad.
La función DSO no está disponible.
• Según el tipo de interior del automóvil o el tipo de
música, DSO puede no producir el efecto deseado.
Recepción de radio
No es posible recibir las emisoras.
Hay ruidos que obstaculizan el sonido.
• La conexión no es correcta.
t Conecte un cable de control de antena motorizada
(azul) o un cable de fuente de alimentación
auxiliar (rojo) al cable de fuente de alimentación
del amplificador de señal de la antena del
automóvil (solamente cuando el automóvil tenga
una antena de FM/AM integrada en el cristal
posterior o lateral).
t Compruebe la conexión de la antena del
automóvil.
t Si la antena motorizada no se extiende,
compruebe la conexión del cable de control de la
antena motorizada.
t Cuando el modo DSO está activado, el sonido se
escucha ocasionalmente con ruido.
Ajuste el modo DSO en “OFF” (página 19).
No es posible utilizar la sintonización
programada.
• Almacene la frecuencia correcta en la memoria.
• La señal de emisión es demasiado débil.
No es posible utilizar la sintonización
automática.
• El ajuste del modo de búsqueda local no es correcto.
t La sintonización se detiene con demasiada
frecuencia:
Ajuste “LOCAL-ON” (página 20).
t La sintonización no se detiene en una emisora:
Ajuste “LOCAL-OFF” (página 20).
• La señal de emisión es demasiado débil.
t Use la sintonización manual.
Durante la recepción de FM, la indicación “ST”
parpadea.
• Sintonice la frecuencia con precisión.
• La señal de emisión es demasiado débil.
t Ajuste “MONO-ON” (página 20).
Un programa de FM emitido en estéreo se
escucha en monoaural.
La unidad se encuentra en el modo de recepción
monoaural.
t Ajuste “MONO-OFF” (página 20).
RDS
PTY muestra “- - - - - - - -”.
• La emisora actual no es una emisora RDS.
• No se recibieron datos RDS.
• La emisora no especifica el tipo de programa.
Reproducción USB
No es posible reproducir elementos a través de
un concentrador USB.
Esta unidad no puede reconocer dispositivos USB a
través de un concentrador USB.
No se pueden reproducir elementos.
Un dispositivo USB no funciona.
t Vuelva a conectarlo.
El dispositivo USB tarda en reproducirse.
El dispositivo USB contiene archivos con una
estructura de árbol compleja.
Los elementos de pantalla no se desplazan.
• Es posible que una gran cantidad de caracteres no se
desplacen.
• “A.SCRL” está ajustado en “OFF”.
t Ajuste “A.SCRL-ON” (página 20).
t Mantenga presionado (DSPL) (SCRL).
Suena un pitido.
El dispositivo USB se ha desconectado durante la
reproducción.
t Antes de desconectar un dispositivo USB,
asegúrese de que se ha detenido la reproducción
para proteger los datos.
El sonido es discontinuo.
Es posible que la discontinuidad del sonido se deba a
una tasa alta de bits de más de 320 kbps.
Mensajes/indicaciones de error
CHECKING
La unidad está confirmando la conexión de un
dispositivo USB.
t Espere mientras finaliza el proceso de confirmación
de la conexión.
DEVICE INSIDE
Si ajusta el interruptor de la llave de encendido en la
posición OFF sin extraer el dispositivo USB o el iPod,
aparecerá “DEVICE INSIDE” en la pantalla.
ERROR
El dispositivo USB no ha sido reconocido
automáticamente.
t Conéctelo nuevamente.
continúa en la página siguiente t
25
Page 78

FAILURE (se ilumina hasta que se presiona algún
botón).
La conexión de los altavoces y amplificadores es
incorrecta.
t Consulte el manual de instalación/conexiones de
este modelo para revisar la conexión.
FAILURE (se ilumina durante 1 segundo
aproximadamente).
Cuando se conectó el sintonizador SAT, se produjo un
error al almacenar una emisora de radio SAT en un
número de presintonía.
t Asegúrese de recibir la emisora que desea
almacenar e inténtelo de nuevo.
HUB NO SUPRT (HUB no compatible)
El concentrador USB no es compatible con esta
unidad.
L. SEEK +/–
El modo de búsqueda local está activado durante la
sintonización automática.
NO DEV (No hay dispositivo)
USB se selecciona como fuente sin que esté conectado
a un dispositivo USB. Se ha desconectado un
dispositivo USB o un cable USB durante la
reproducción.
t Asegúrese de conectar un dispositivo USB y un
cable USB.
NO MUSIC
El dispositivo USB no contiene ningún archivo de
música.
t Conecte un dispositivo USB que contenga algún
archivo de música.
NO NAME
No se ha grabado ningún nombre de álbum/artista/pista
en la pista.
OFFSET
Es posible que se haya producido una falla interna.
t Revise la conexión. Si el indicador de error
permanece en pantalla, póngase en contacto con el
distribuidor Sony más cercano.
OVERL OAD
El dispositivo USB está sobrecargado.
t Desconecte el dispositivo USB y, a continuación,
presione (SOURCE/OFF) para cambiar la fuente.
t Indica que el dispositivo USB está fuera de
servicio, o que hay un dispositivo incompatible
conectado.
READ
La unidad está leyendo toda la información de las
pistas y los álbumes del dispositivo USB.
t Espere hasta que finalice la lectura y se inicie la
reproducción automáticamente.
RESET
No es posible utilizar el dispositivo USB debido a un
problema.
t Presione el botón RESET (página 6).
USB NO SUPRT (USB no compatible)
El dispositivo USB conectado no es compatible.
t Para obtener más información acerca de la
compatibilidad del dispositivo USB, visite el sitio
web de soporte técnico.
26
“” o “”
Durante la operación de retroceso o avance rápido, ha
llegado al principio o al final del dispositivo USB, por
lo que no es posible continuar dicha operación.
“”
No se puede mostrar el carácter con la unidad.
Si estas soluciones no ayudan a mejorar la situación,
póngase en contacto con el distribuidor Sony más
cercano.
Page 79

Page 80

If you have any questions/problems
regarding this product, try the following:
1
Read Troubleshooting in these
Operating Instructions.
2
Reset the unit.
Note: Stored data may be erased.
3
Please contact (U.S.A. only);
Call
URL
1-800-222-7669
http://www.SONY.com
http://www.sony.net/
Sony Corporation Printed in Thailand
 Loading...