

5-006-640-21(1)
FM/AM/LW
Bluetooth® Car Audio
To cancel the demonstration (DEMO) display, see
page 6.
For the connection/installation, see page 11.
Pour annuler la démonstration (DEMO), reportezvous à la page 7.
Pour le raccordement/l’installation, reportez-vous à
la page 12.
Zum Deaktivieren der Demo-Anzeige (DEMO)
schlagen Sie bitte auf Seite 7 nach.
Informationen zum Anschluss und zur Installation
finden Sie auf Seite 12.
Para cancelar la pantalla de demostración (DEMO),
consulte la página 6.
Para la conexión/instalación, consulte la página 11.
Om de demonstratie (DEMO) te annuleren, zie
pagina 7.
Raadpleeg pagina 12 voor meer informatie over de
aansluiting/installatie.
Se sidan 6 for att avbryta demonstrationsvisningen
(DEMO).
Se sidan 11 for anslutning/installation.
Operating Instructions
Mode d’emploi
Bedienungsanleitung
Manual de
instrucciones
Gebruiksaanwijzing
Bruksanvisning
GB
FR
DE
ES
NL
SE
DSX-GS80
Warning
For safety, be sure to install this unit in the
dashboard of the car as the left side of the
unit becomes hot during use.
For details, see “Connection/Installation”
(page 11).
Made in Thailand
The nameplate indicating operating voltage,
etc., is located on the bottom of the chassis.
The validity of the CE marking is restricted to
only those countries where it is legally
enforced, mainly in the countries EEA
(European Economic Area) and Switzerland.
Hereby, Sony Corporation declares that this
equipment is in compliance with Directive
2014/53/EU.
The full text of the EU declaration of
conformity is available at the following
internet address:
http://www.compliance.sony.de/
Notice for customers: the following
information is only applicable to
equipment sold in countries applying
EU Directives
This product has been manufactured by or
on behalf of Sony Corporation.
EU Importer: Sony Europe B.V.
Inquiries to the EU Importer or related to
product compliance in Europe should be
sent to the manufacturer’s authorized
representative, Sony Belgium, bijkantoor
van Sony Europe B.V., Da Vincilaan 7-D1, 1930
Zaventem, Belgium.
Disposal of waste batteries
and electrical and electronic
equipment (applicable in
the European Union and
other countries with
separate collection systems)
This symbol on the product, the battery or
on the packaging indicates that the product
and the battery shall not be treated as
household waste. On certain batteries this
symbol might be used in com binati on with a
chemical symbol. The chemical symbol for
lead (Pb) is added if the battery contains
more than 0.004% lead. By ensuring that
these products and batteries are disposed of
correctly, you will help to prevent potentially
negative consequences for the environment
and human health which could be caused by
inappropriate waste handling. The recycling
of the materials will help to conserve natural
resources. In case of products that for safety,
performance or data integrity reasons
require a permanent connection with an
incorporated battery, this battery should be
replaced by qualified service staff only. To
ensure that the battery and the electrical
and electronic equipment will be treated
properly, hand over these products at endof-life to the appropriate collection point for
the recycling of electrical and electronic
equipment. For all other batteries, please
view the section on how to remove the
battery from the product safely. Hand the
battery over to the appropriate collection
point for the recycling of waste batteries. For
more detailed information about recycling of
this product or battery, please contact your
local Civic Office, your household waste
disposal service or the shop where you
purchased the product or battery.
2GB

CAUTION
The following frequency 65 – 74 MHz range
is not allocated to sound broadcasting in the
European Common Allocations table and
cannot be used in Europe.
Warning if your car’s ignition has no
ACC position
Be sure to set the AUTO OFF function. The
unit will shut off completely and
automatically in the set time after the unit
is turned off and the clock is displayed
(i.e. press and hold OFF for 1 second),
which prevents battery drain. If you do
not set the AUTO OFF function, press and
hold OFF until the display disappears each
time you turn the ignition off.
Disclaimer regarding services offered
by third parties
Services offered by third parties may be
changed, suspended, or terminated without
prior notice. Sony does not bear any
responsibility in these sorts of situations.
Important notice
Caution
IN NO EVENT SHALL SONY BE LIABLE FOR
ANY INCIDENTAL, INDIRECT OR
CONSEQUENTIAL DAMAGES OR OTHER
DAMAGES INCLUDING, WITHOUT
LIMITATION, LOSS OF PROFITS, LOSS OF
REVENUE, LOSS OF DATA, LOSS OF USE OF
THE PRODUCT OR ANY ASSOCIATED
EQUIPMENT, DOWNTIME, AND PURCHASE R’S
TIME RELATED TO OR ARISING OUT OF THE
USE OF THIS PRODUCT, ITS HARDWARE
AND/OR ITS SOFTWARE.
Dear customer, this product includes a radio
transmitter.
According to UNECE Regulation no. 10, a
vehicle manufacturers may impose specific
conditions for installation of radio
transmitters into vehicles.
Please check your vehicle operation manual
or contact the manufacturer of your vehicle
or your vehicle dealer, before you install this
product into your vehicle.
Emergency calls
This BLUETOOTH car handsfree and the
electronic device connected to the
handsfree operate using radio signals,
cellular, and landline networks as well as
user-programmed function, which cannot
guarantee connection under all conditions.
Therefore do not rely solely upon any
electronic device for essential
communications (such as medical
emergencies).
On BLUETOOTH communication
Microwaves emitting from a BLUETOOTH
device may affect the operation of
electronic medical devices. Turn off this
unit and other BLUETOOTH devices in the
following locations, as it may cause an
accident.
– where inflammable gas is present, in a
hospital, train, airplane, or petrol station
– near automatic doors or a fire alarm
This unit supports security capabilities that
comply with the BLUETOOTH standard to
provide a secure connection when the
BLUETOOTH wireless technology is used,
but security may not be enough
depending on the setting. Be careful when
communicating using BLUETOOTH wirel ess
technology.
We do not take any responsibility for the
leakage of information during BLUETOOTH
communication.
If you have any questions or problems
concerning your unit that are not covered in
this manual, consult your nearest Sony
dealer.
3GB

Guide to Parts and Controls
Main Unit
Front panel removed (inner panel)
PTY (program type)
Selects PTY in RDS.
(browse)
Enters the browse mode during playback.
(Not available when a USB device in
Android™ mode or iPod is connected.)
Front panel release button
SRC (source)
Turns on th e power.
Changes the source.
OFF
Press and hold for 1 second to turn the
source off and display the clock.
Press and hold for more than 2 seconds
to turn off the power and the display.
4GB
Control dial
Adjusts the volume.
PUSH ENTER
Enters the selected item.
Press SRC, rotate then press to change
the source (timeout in 2 seconds).
MENU
Opens the setup menu.
VOICE
Press and hold for more than 2 seconds
to activate voice dial, voice recognition
(Android smartphone only), or the Siri
function (iPhone only).
Display window
USB port
/ (SEEK –/+)
Tunes in radio stations automatically.
Press and hold to tune manually.
/ (prev/next)
/ (fast-reverse/fast-forward)
(back)
Returns to the previous display.
MODE
Selects the radio bands or function
modes.
CALL
Enters the call menu. Receive/end a call.
Press and hold for more than 2 seconds
to switch the BLUETOOTH signal.
Receptor for the remote commander
Number buttons (1 to 6)
Receives preset radio stations.
Press and hold to store stations.
ALBUM /
Skips an album for audio device.
Press and hold to skip albums
continuously.
(Not available when a USB device in
Android mode or iPod is connected.)
(repeat)
(Not available when a USB device in
Android mode is connected.)
(shuffle)
(Not available when a USB device in
Android mode is connected.)
MIC
Adjusts the microphone settings.
(play/pause)
EXTRA BASS
Reinforces bass sound in synchronization
with the volume level.
Press to change the EXTRA BASS setting:
[1], [2], [OFF].
AUX input jack
DSPL (display)
Changes display items.
SCRL (scroll)
Press and hold to scroll a display item.
RESET (inner panel)
Restarts the unit (press with a ballpoint
pen, etc.).
Basic Operations
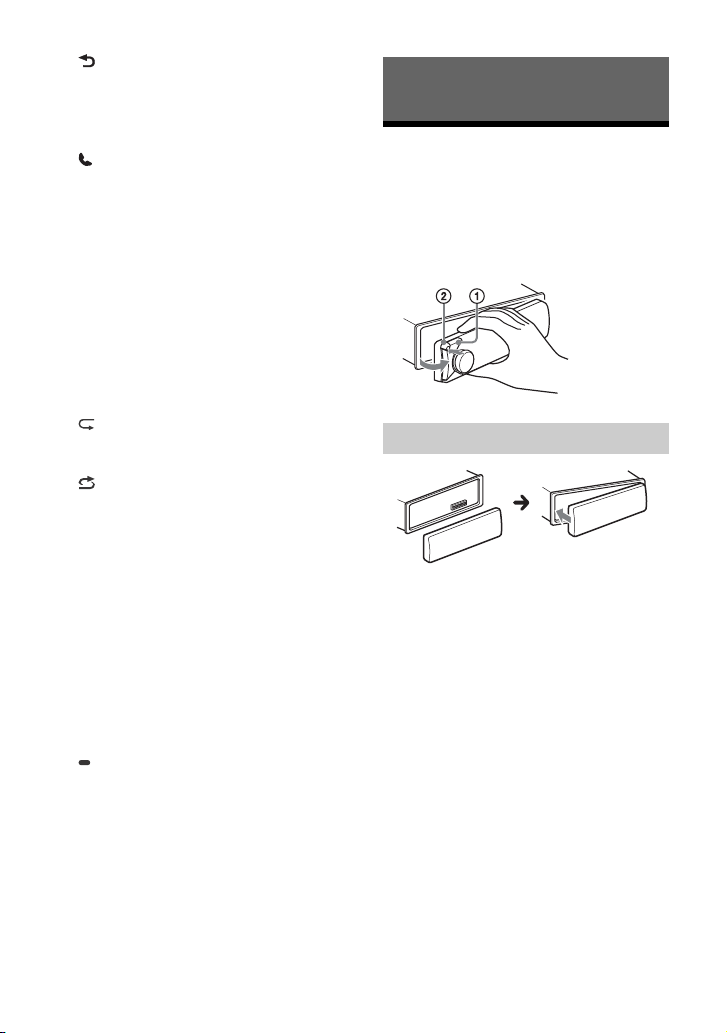
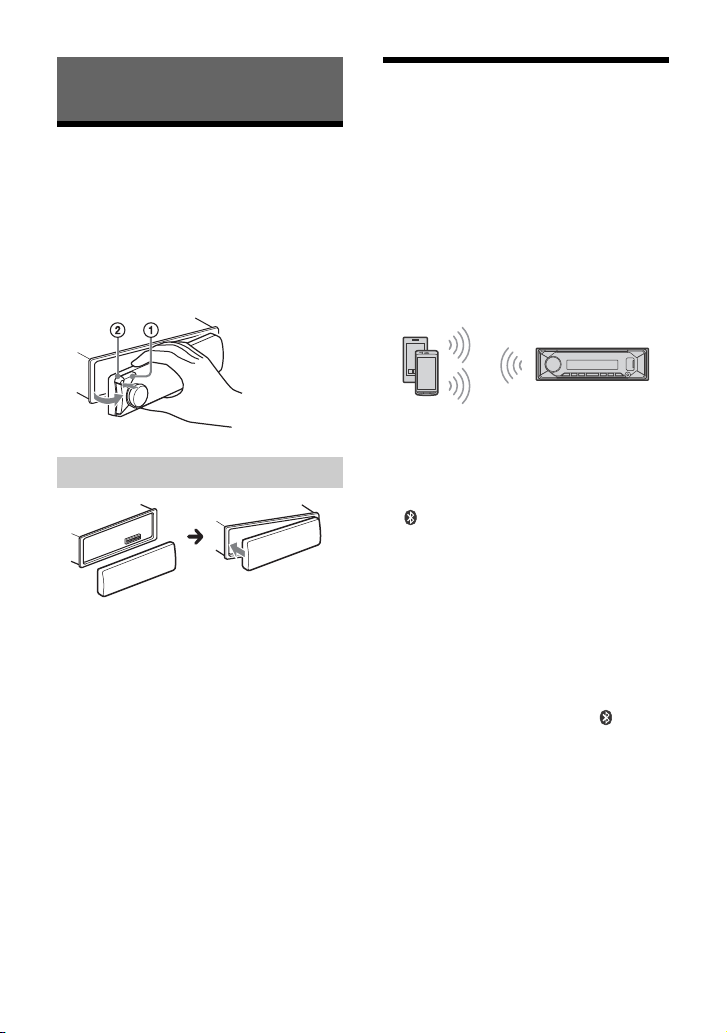
Detaching the Front Panel
You can detach the front panel of this unit to
prevent theft.
1 Press and hold OFF until the unit
turns off, press the front panel
release button , then pull the panel
towards you to remove.
Attaching the front panel
5GB
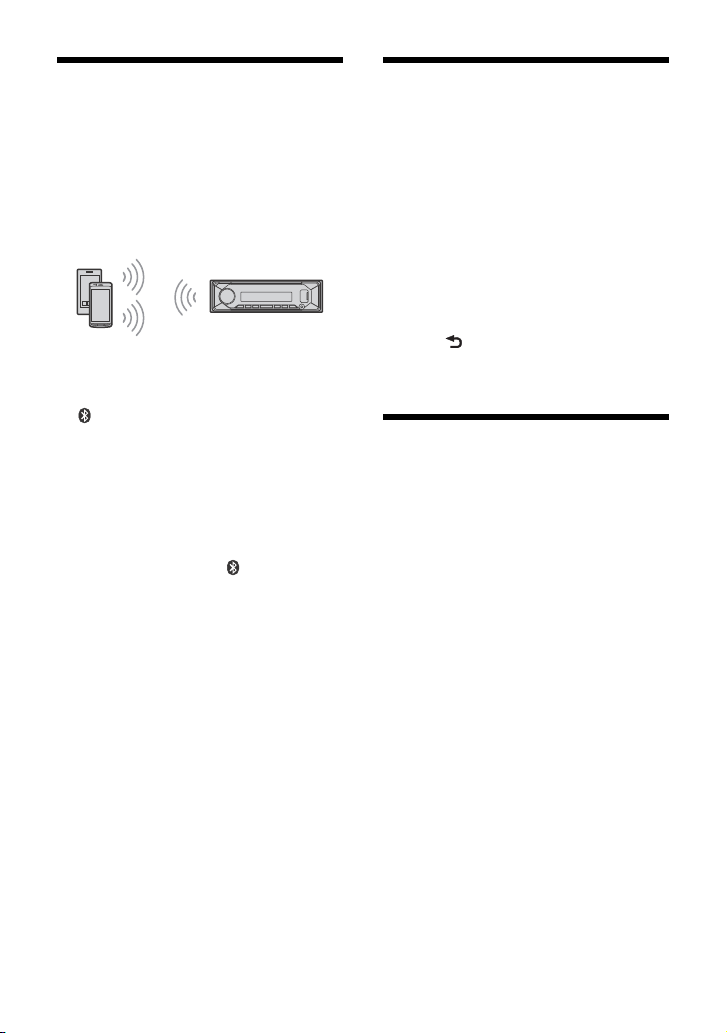
Pairing with a BLUETOOTH
Device
When connecting a BLUETOOTH device for
the first time, mutual registration (called
“pairing”) is required. Pairing enables this
unit and other devices to recognize each
other. This unit can connect two BLUETOOTH
devices (two mobile phones, or a mobile
phone and an audio device).
1 Press MENU, then rotate and press
the control dial to select [BLUETOOTH]
[PAIRING] [DEVICE 1]/[DEVICE 2]*.
flashes while the unit is in pairing
standby mode.
* [DEVICE 1] or [DEVICE 2] will be changed to the
paired device name after pairing is complete.
2 Perform pairing on the BLUETOOTH
device so it detects this unit.
3 Select your model name shown in the
display of the BLUETOOTH device*.
When pairing is made, stays lit.
* If passkey input is required on the BLUETOOTH
device, input [0000].
Canceling the
Demonstration Mode
You can cancel the demonstration display
which appears when the source is off and
the clock is displayed.
1 Press MENU, rotate the control dial to
select [GENERAL], then press it.
2 Rotate the control dial to select
[DEMO], then press it.
3 Rotate the control dial to select
[DEMO-OFF], then press it.
The setting is complete.
4 Press (back) twice.
The display returns to normal reception/
play mode.
Updating the Firmware
To update the firmware, visit the support site
on the back cover, then follow the online
instructions.
Note
During the update, do not remove the USB device.
6GB
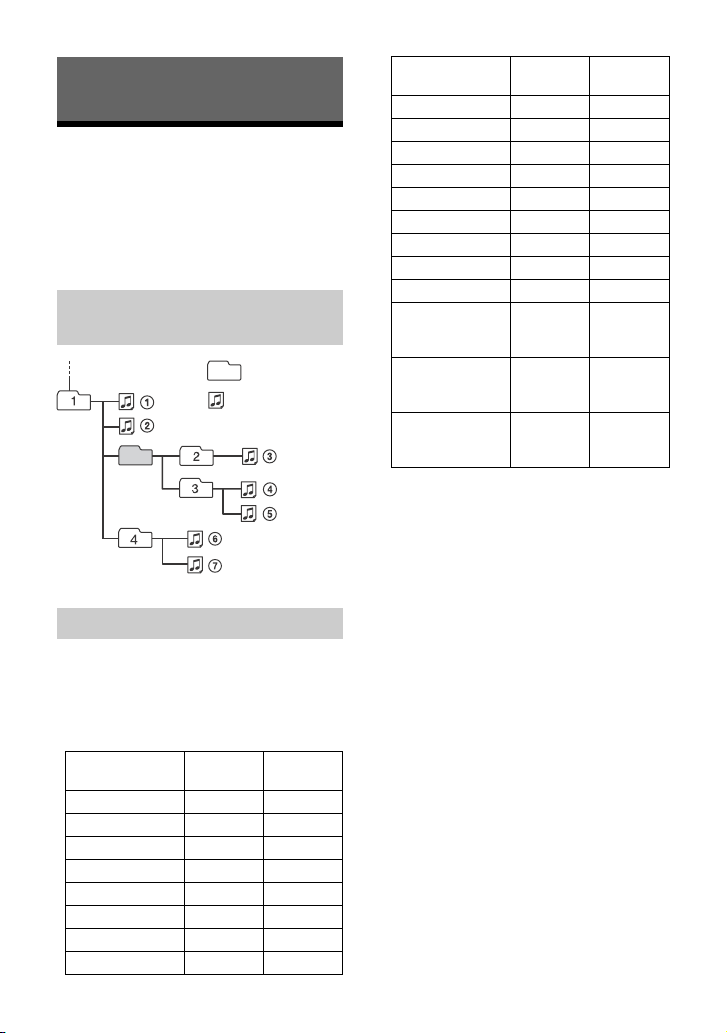
Initializing the Unit
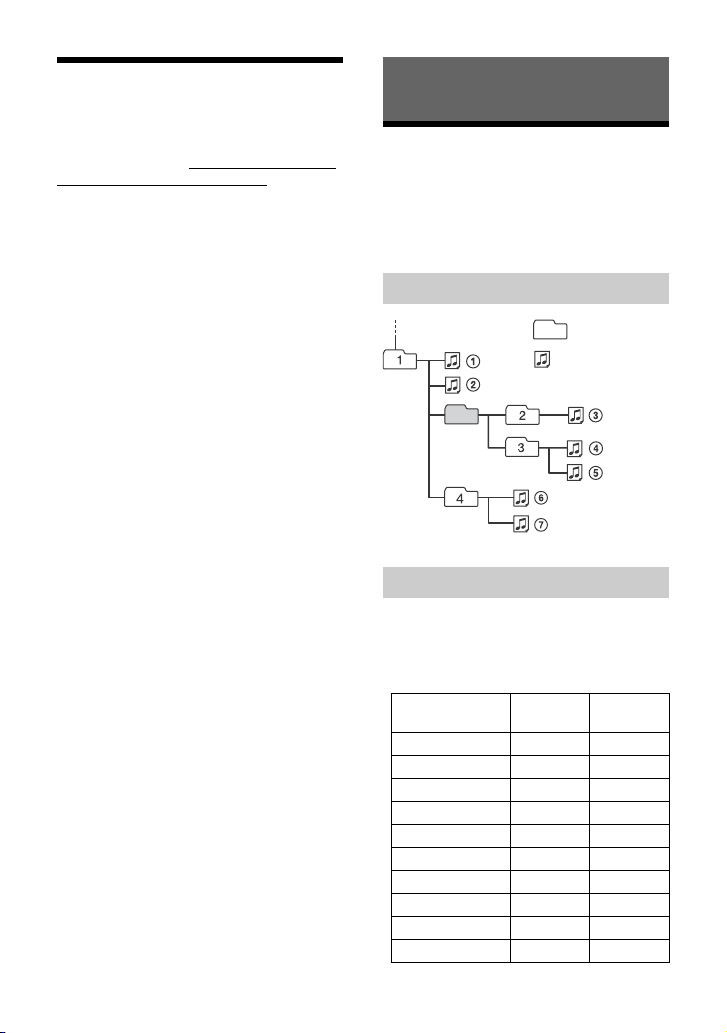
Folde r (alb um)
Audio file (track)
Initializing the unit will erase the clock
settings and all your settings stored in the
backup memory.
[INITIALIZE] appears only while the source
is off and the clock is displayed.
1 Press MENU, rotate the control dial to
select [GENERAL], then press it.
2 Rotate the control dial to select
[INITIALIZE], then press it.
3 Rotate the control dial to select
[INIT-YES], then press it.
Note
Initialize the unit before discarding the unit to
prevent the leakage of phone information.
Setting the area/region
After initializing the unit, the area/region
setting display appears.
1 Press ENTER while [AREA] is
displayed.
The area/region currently set appears.
2 Rotate the control dial to select
[EUROPE] or [RUSSIA], then press it.
3 Rotate the control dial to select [YES]
or [NO], then press it.
If the setting area/region is changed, the
unit will initialize, then the clock is
displayed.
This setting can be configured in the general
setup menu.
Additional Information
Precautions
•Do not leave the front panel or audio
devices on the dashboard.
•When the unit is turned on, the power
antenna (aerial) extends automatically.
• Do not splash liquid onto the unit.
Playback order of audio files
About iPod
•You can connect to the following iPod
models. Update your iPod devices to the
latest software before use.
Compatible iPhone/iPod models
Compatible
Model
iPhone XR
iPhone Xs max
iPhone Xs
iPhone X
iPhone 8
iPhone 8 Plus
iPhone 7
iPhone 7 Plus
iPhone SE
iPhone 6s
Bluetooth® USB
7GB
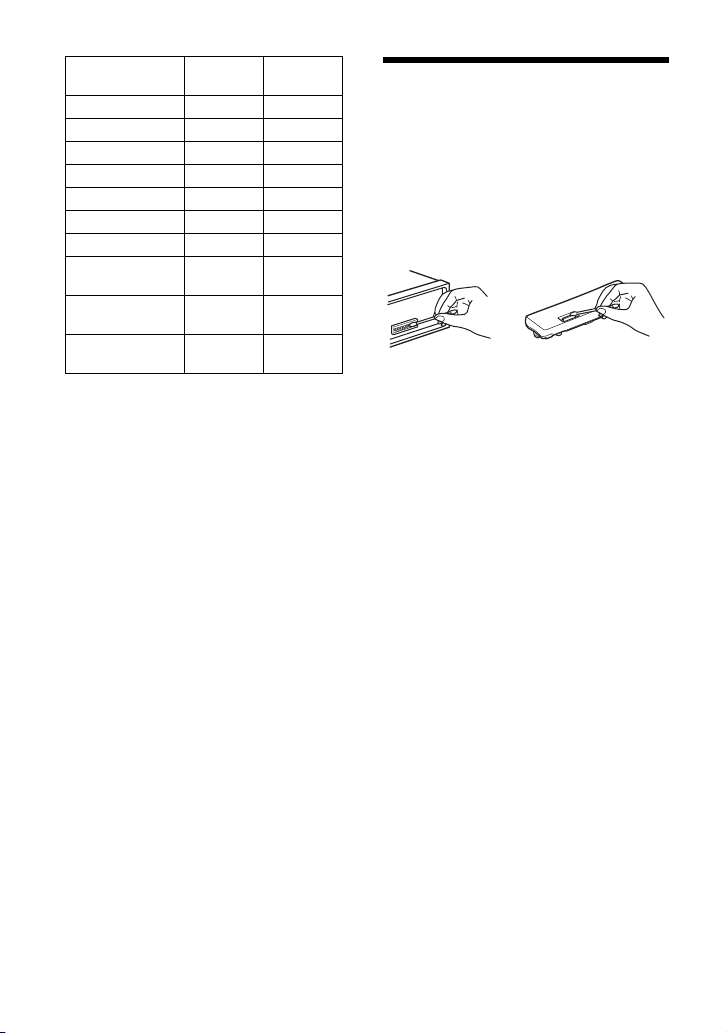
Compatible
Model
iPhone 6s Plus
iPhone 6
iPhone 6 Plus
iPhone 5s
iPhone 5c
iPhone 5
iPhone 4s
iPod touch
(6th generation)
iPod touch
(5th generation)
iPod nano
(7th generation)
Bluetooth® USB
• Use of the Made for Apple badge means
that an accessory has been designed to
connect specifically to the Apple product(s)
identified in the badge, and has been
certified by the developer to meet Apple
performance standards. Apple is not
responsible for the operation of this device
or its compliance with safety and
regulatory standards.
Please note that the use of this accessory
with an Apple product may affect wireless
performance.
If you have any questions or problems
concerning your unit that are not covered in
this manual, consult your nearest Sony
dealer.
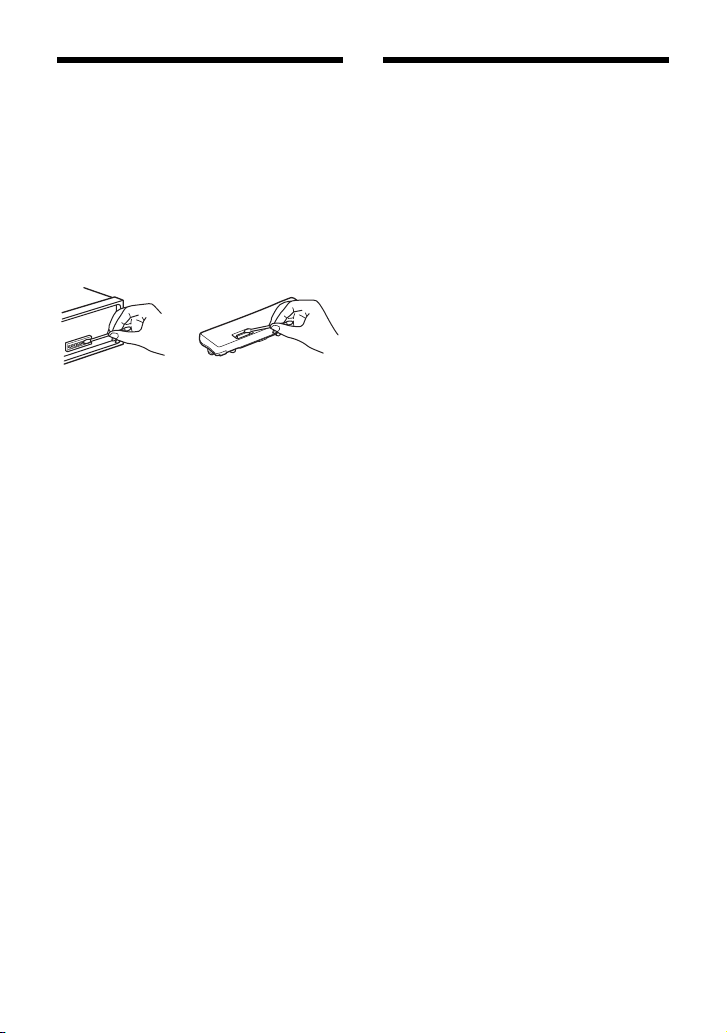
Maintenance
Cleaning the connectors
Avoid touching the connectors directly. The
unit may not function properly if the
connectors between the unit and the front
panel are not clean. In order to prevent this,
detach the front panel (page 5) and clean
the connectors with a cotton swab. Do not
apply too much force. Otherwise, the
connectors may be damaged.
Note
For safety, do not remove the front panel while
driving.
8GB

Specifications
Radio section
FM
Tuning range:
When [AREA] is set to [EUROPE]:
87.5 MHz – 108.0 MHz
When [AREA] is set to [RUSSIA]:
FM1/FM2: 87.5 MHz – 108.0 MHz
(at 50 kHz step)
FM3: 65 MHz – 74 MHz (at 30 kHz step)
Usable sensitivity: 8 dBf
Signal-to-noise ratio: 73 dB
Separation: 50 dB at 1 kHz
AM/LW
Tuning range:
531 kHz – 1,602 kHz (AM),
153 kHz – 279 kHz (LW)
Sensitivity:
AM: 26 μV,
LW: 50 μ V
USB Player section
Interface:
USB1 port (front): USB (Hi-speed)
USB2 port (rear): USB (Hi-speed)
Maximum current:
USB1 port (front): 1 A
USB2 port (rear): 1.5 A
The maximum number of recognizable files
(tracks): 10,000
Compatible Android Open Accessory
protocol (AOA): 2.0
Corresponding codec:
MP3 (.mp3)
Bit rate: 8 kbps – 320 kbps (Supports VBR
(Variable Bit Rate))
Sampling rate: 16 kHz – 48 kHz
WMA (.wma)
Bit rate: 32 kbps – 192 kbps (Supports VBR
(Variable Bit Rate))
Sampling rate: 32 kHz, 44.1 kHz,
48 kHz
AAC (.m4a, .mp4)
Bit rate: 8 kbps – 320 kbps
Sampling rate: 11.025 kHz – 48 kHz
WAV (.wav)
Bit depth: 16 bit
Sampling rate: 44.1 kHz, 48 kHz
FLAC (.flac)
Bit depth: 16 bit, 24 bit
Sampling rate: 44.1 kHz, 48 kHz
Supported file system: FAT16, FAT32
Wireless Communication
Communication System:
BLUETOOTH Standard version 3.0
Output:
BLUETOOTH Standard Power Class 2
(Max. Conducted +1 dBm)
Maximum communication range*
Line of sight approx. 10 m (33 ft)
Frequency band:
2.4 GHz band (2.4000 GHz – 2.4835 GHz)
Modulation method: FHSS
Compatible BLUETOOTH Profiles*
A2DP (Advanced Audio Distribution Profile)
1.3
AVRCP (Audio Video Remote Control
Profile) 1.5
HFP (Handsfree Profile) 1.6
PBAP (Phone Book Access Profile)
SPP (Serial Port Profile)
Corresponding codec:
SBC (.sbc), AAC (.m4a)
*1 The actual range will vary depending on factors
such as obstacles between devices, magnetic
fields aroun d a microwave oven, static elect ricity,
reception sensitivity, antenna (aerial)’s
performance, operating system, software
application, etc.
*2 BLUETOOTH standard profiles indicate the
purpose of BLUETOOTH communication between
devices.
1
:
2
:
Power amplifier section
Output: Speaker outputs
Speaker impedance: 2 Ω/4 Ω – 8 Ω
Maximum power output: 100 W × 4 (at 2 Ω/
4Ω)
9GB

General
Power requirements: 12 V DC car battery
(negative ground (earth))
Rated current consumption: 10 A
Dimensions:
Approx. 178 mm × 50 mm × 177 mm
1
(7
/8 in × 2 in × 7 in) (w/h/d)
Mounting dimensions:
Approx. 182 mm × 53 mm × 160 mm
1
(7
/4 in × 2 1/8 in × 6 3/8 in) (w/h/d)
Mass: Approx. 1.0 kg (2 lb 4 oz)
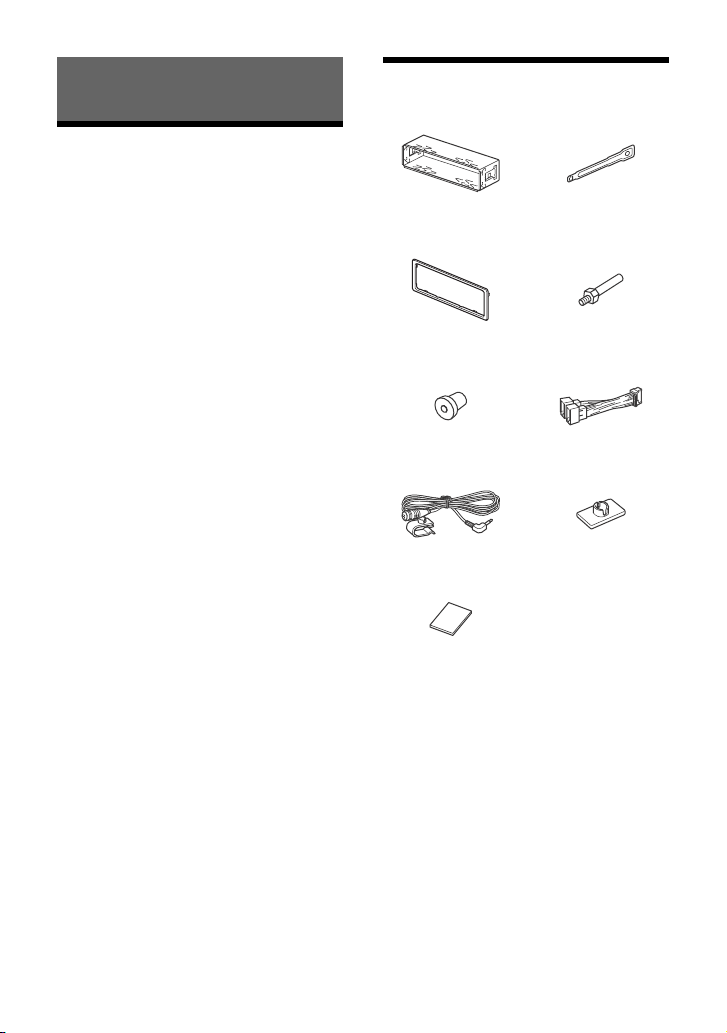
Package contents:
Main unit (1)
Parts for installation and connections
(1 set)
Ask the dealer for detailed information.
Design and specifications are subject to
change without notice.
Copyrights
The Bluetooth® word mark and logos are
registered trademarks owned by the
Bluetooth SIG, Inc. and any use of such
marks by Sony Corporation is under license.
Other trademarks and trade names are
those of their respective owners.
Windows Media is either a registered
trademark or trademark of Microsoft
Corporation in the United States and/or
other countries.
This product is protected by certain
intellectual property rights of Microsoft
Corporation. Use or distribution of such
technology outside of this product is
prohibited without a license from Microsoft
or an authorized Microsoft subsidiary.
Apple, iPhone, iPod, iPod nano, iPod touch,
and Siri are trademarks of Apple Inc.,
registered in the U.S. and other countries.
Android is a trademark of Google LLC.
libFLAC
Copyright (C) 2000-2009 Josh Coalson
Copyright (C) 2011-2013 Xiph.Org Foundation
Redistribution and use in source and binary
forms, with or without modification, are
permitted provided that the following
conditions are met:
– Redistributions of source code must retain
the above copyright notice, this list of
conditions and the following disclaimer.
– Redistributions in binary form must
reproduce the above copyright notice, this
list of conditions and the following
disclaimer in the documentation and/or
other materials provided with the
distribution.
– Neither the name of the Xiph.org
Foundation nor the names of its
contributors may be used to endorse or
promote products derived from this
software without specific prior written
permission.
THIS SOFTWARE IS PROVIDED BY THE
COPYRIGHT HOLDERS AND CONTRIBUTORS
“AS IS” AND ANY EXPRESS OR IMPLIED
WARRANTIES, INCLUDING, BUT NOT LIMITED
TO, THE IMPLIED WARRANTIES OF
MERCHANTABILITY AND FITNESS FOR A
PARTICULAR PURPOSE ARE DISCLAIMED. IN
NO EVENT SHALL THE FOUNDATION OR
CONTRIBUTORS BE LIABLE FOR ANY DIRECT,
INDIRECT, INCIDENTAL, SPECIAL,
EXEMPLARY, OR CONSEQUENTIAL DAMAGES
(INCLUDING, BUT NOT LIMITED TO,
PROCUREMENT OF SUBSTITUTE GOODS OR
SERVICES; LOSS OF USE, DATA, OR PROFITS;
OR BUSINESS INTERRUPTION) HOWEVER
CAUSED AND ON ANY THEORY OF LIABILITY,
WHETHER IN CONTRACT, STRICT LIABILITY,
OR TORT (INCLUDING NEGLIGENCE OR
OTHERWISE) ARISING IN ANY WAY OUT OF
THE USE OF THIS SOFTWARE, EVEN IF
ADVISED OF THE POSSIBILITY OF SUCH
DAMAGE.
10GB
Connection/Installation
Cautions
• Run all ground (earth) leads to a
common ground (earth) point.
• Do not get the leads trapped under a
screw, or caught in moving parts (e.g., seat
railing).
• Before making connections, turn the car
ignition off to avoid short circuits.
• Connect the power supply leads to the
unit and speakers before connecting it to
the auxiliary power connector.
• Be sure to insulate any loose unconnected
leads with electrical tape for safety.
• Choose the installation location carefully so
that the unit will not interfere with normal
driving operations.
• Avoid installing the unit in areas subject to
dust, dirt, excessive vibration, or high
temperature, such as in direct sunlight or
near heater ducts.
• Use only the supplied mounting hardware
for a safe and secure installation.
Note on the power supply lead (yellow)
When connecting this unit in combination with
other stereo components, the amperage rating of
the car circuit to which the unit is connected must
be higher than the sum of each component’s fuse
amperage rating.
Note on installing in cars with a start-stop
system
The unit may restart when starting the engine from
start-stop. In this case, turn off the start-stop
system of your car.
Mounting angle adjustment
Adjust the mounting angle to less than 30°.
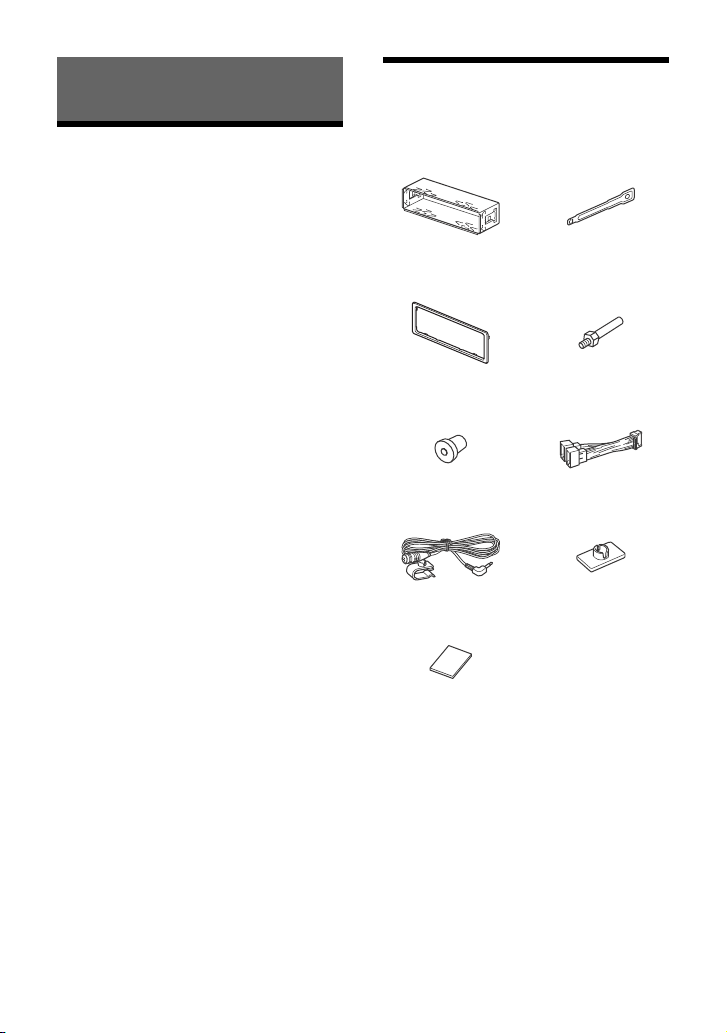
Parts List for Installation
Mounting sleeve (1) Release keys (2)
Trim ring (1) Securing screw (1)
Bushing (1) Power suppl y leads (1)
Microphone (1) Flat-mount base (1)
Double-sided tape (1)
•This parts list does not include all the
package contents.
•The mounting sleeve and the trim ring
are attached to the unit before shipping.
Before mounting the unit, use the release
keys to remove the mounting sleeve
from the unit. For details, see “Removing
the trim ring and the mounting sleeve”
(page 16).
•Keep the release keys for future use as
they are also necessary if you remove the
unit from your car.
11GB
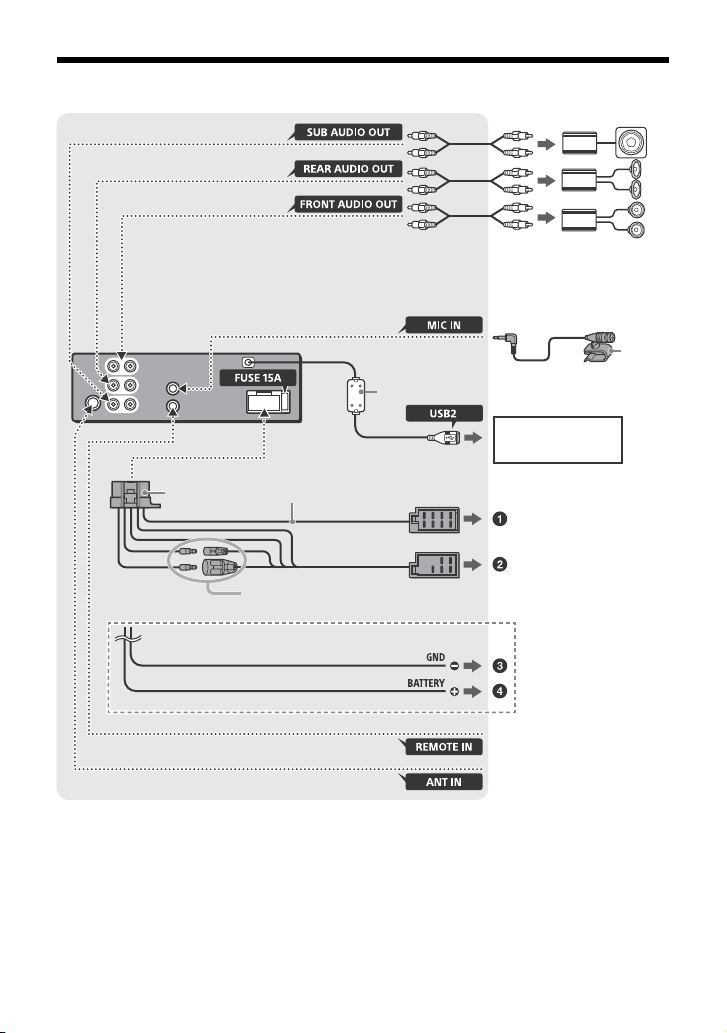
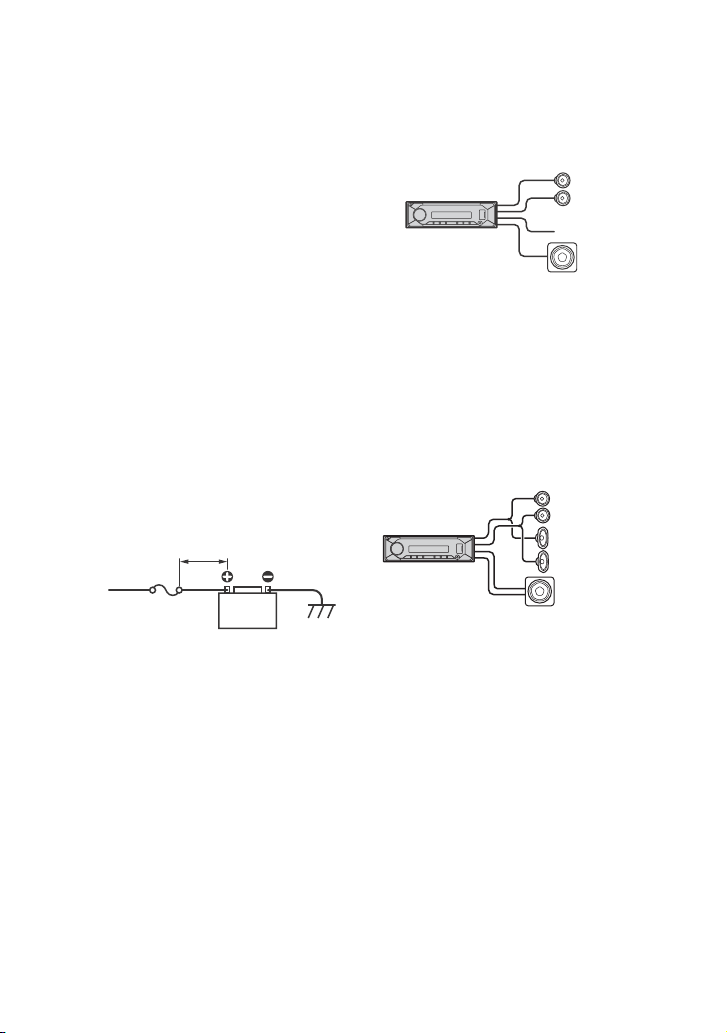
Connection
*
3
*
3
Subwoofer*
1
*
3
Power amplifier*
1
*
5
Smartphone*7, iPod/
iPhone*8, USB device
*
1
For details, see “Making
connections” (page 13).
When connecting to the battery directly*11*12
from a car antenna (aerial)*
6
from a wired remote control
(not supplied)*
4
*
9
Black
Yel lo w
*2*
10
See “Power connection diagram” (page 15)
for details.
12GB
*1 Not supplied
*2 Speaker impedance: 4 Ω to 8 Ω × 4
*3 RCA pin cord (not supplied)
*4 Depending on the type of car, use an adaptor
for a wired remote control (not supplied).
For details on using the wired remote control,
see “Using the wired remote control” (page 16).
*5 Whether in use or not, route the microphone
input cord such that it does not interfere with
driving operations. Secure the cord with a
clamp, etc., if it is installed around your feet.
For details on installing the microphone, see
“Installing the microphone” (page 15).
*6 Depending on the type of car, use an adaptor
(not supplied) if the antenna (aerial) connector
does not fit.
*7 To connect a smartphone to the main unit, an
appropriate cable (not supplied) is required.
*8 To connect an iPod/iPhone, use the USB
connection cable for iPod (not supplied).
*9 Ferrite sleeve
*10 Use speakers with 50W RMS or higher power
input capacity. Using Sony XB series full range
speakers is recommended.
*11 When the amperage rating of the fuse used on
your car is 10 A, make the power connection to
the battery directly to avoid short circuits.
*12 Before connection, arranging the yellow and
black leads of the power supply leads is
requi red.
Making connections
If you have a power antenna (aerial) without
a relay box, connecting this unit with the
power supply leads may damage the
antenna (aerial).
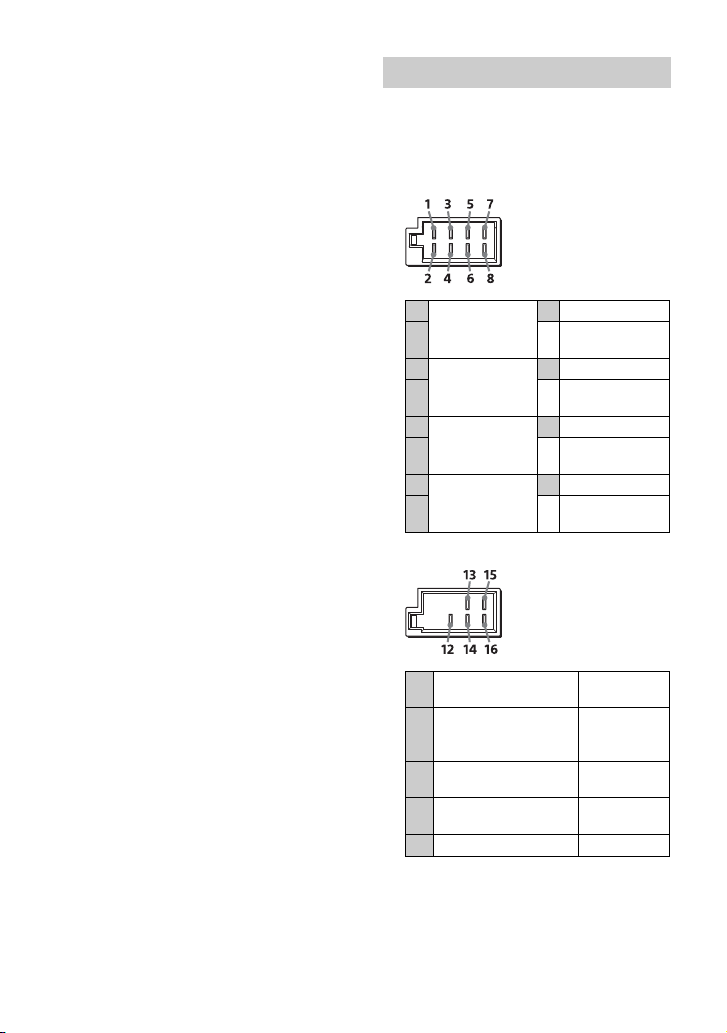
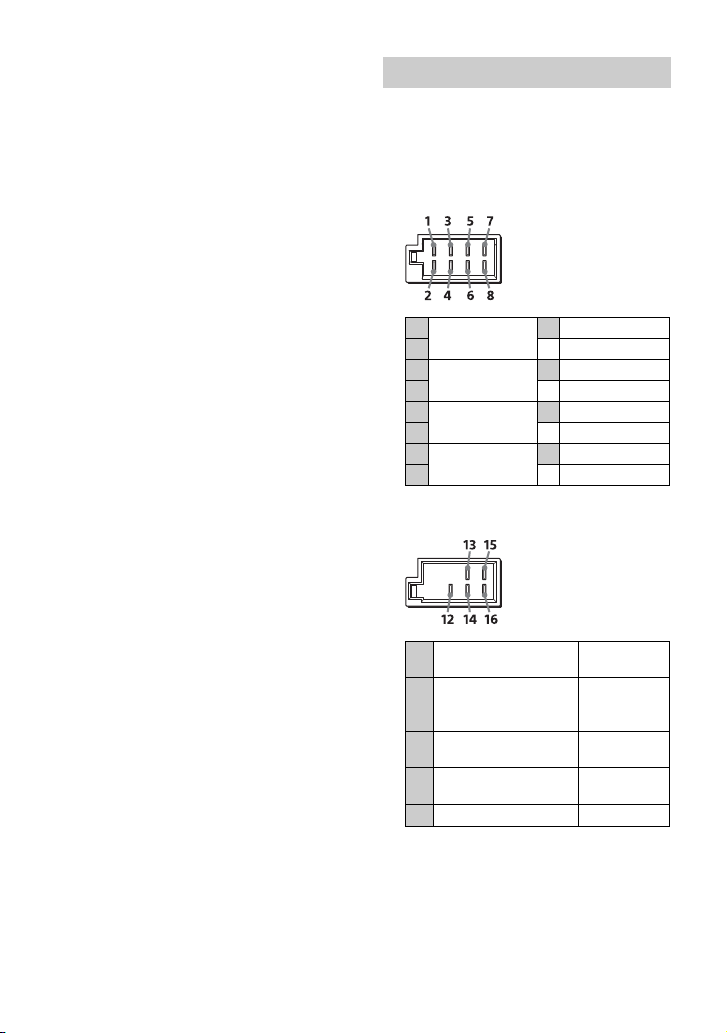
To the car’s speaker connector
1
Rear speaker
(right)
2
3
Front speaker
(right)
4
5
Front speaker
(left)
6
7
Rear speaker
(left)
8
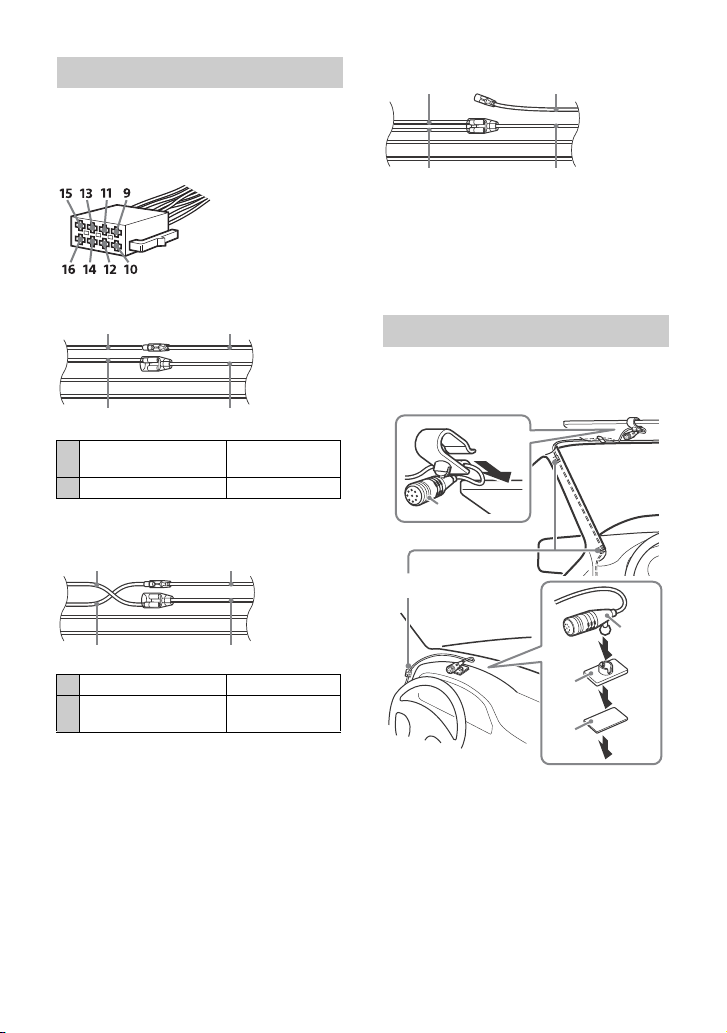
To the car’s power connector
Purple
Purple/black
striped
Gray
Gray/black
striped
White
White/black
striped
Green
Green/black
striped
continuous power
12
supply
power antenna (aerial)
13
/power amplifier
control (REM OUT)
switched illumination
14
power supply
switched power
15
supply
Yel lo w
Blue/white
striped
Orange/
white striped
Red
16 ground (earth) Black
13GB
When connecting to the battery directly
*
Less than 450 mm (18 in)
+12 V car battery
Fuse (15 A)
Front speaker
Subwoofer
FL
FR
RR
RL
Front speaker
(4 Ω to 8 Ω)
Rear speaker
(4 Ω to 8 Ω)
Subwoofer
(4 Ω to 8 Ω, dual voice
coil type)
When the amperage rating of the fuse used
on your car is 10 A, make the power
connection to the battery directly to avoid
short circuits.
to a metal point of car
to the positive battery terminal
Notes
• Despite connecting to the power supply lead of
the car, the unit may not fully provide its
performance due to insufficient power. In this
case, make the power connection to the battery
directly.
• All power wires connected to the positive battery
post should be fused within 450 mm (18 in) of the
battery post, and before they pass through any
metal.
• Make sure that the car’s battery wires connected
to the car (ground (earth) to chassis)* are of a wire
gauge at least equal to that of the main power
wire connected from the battery to the head unit.
• During full-power operation, a current of more
than 15 A will run through the system. Therefore,
make sure that the wires to be connected to the
+12 V and GND terminals of this unit are at least
14-Gauge (AWG14) or have a sectional area of
more than 2 mm² (3/32 in).
When making the speaker parallel connection, use
wires with more than 12-Gauge (AWG12) or wires
that have a sectional area of more than 3.5 mm²
(5/32 in).
If you have any questions or problems
concerning the connection, consult the
dealer for details.
Memory hold connection
When the yellow power supply lead is
connected, power will always be supplied to
the memory circuit even when the ignition
switch is turned off.
Subwoofer Easy Connection
You can use a subwoofer without a power
amplifier when it is connected to a rear
speaker lead.
To enable the connection, set [SUBW MODE]
in [SUBW DIRECT] to [1] to [3].
Notes
• Preparation of the rear speaker leads is required.
• Use a subwoofer with a 2 Ω impedance or 4 Ω to 8
Ω impedance, and with adequate power handling
capacities to avoid damage.
Speaker Parallel Connection
When making the speaker parallel
connection for a high volume playback, be
sure to:
– Set [SPEAKER LOAD] in [GENERAL] to
[2 OHM].
Notes
• When using a subwoofer with dual voice coil, or
using a subwoofer by connecting the right and left
rear speaker leads, be sure to set [SPEAKER LOAD]
in [GENERAL] to [2 OHM].
• To exert the speaker’s potential, make the power
connection to the battery directly (page 14).
Speaker connection
• Before connecting the speakers, turn the
unit off.
• Use speakers with a 2 Ω impedance or 4 Ω
to 8 Ω impedance, and with adequate
power handling capacities to avoid
damage.
14GB
Power connection diagram
Auxiliary power connector
Red Red
Yellow Yellow
Red Red
Yellow Yellow
Red
Red
Yel l o w
Yellow
Clip (not supplied)
Check your car’s auxiliary power connector,
and match the connections of leads
correctly depending on the car.
Common connection
continuous power
12
supply
15 switched power supply Red
When the positions of the red and
yellow leads are inverted
Yel lo w
When the car without ACC position
After matching the connections and
switching power supply leads correctly,
connect the unit to the car’s power supply. If
you have any questions and problems
connecting your unit that are not covered in
this manual, consult the car dealer.
Installing the microphone
To capture your voice during handsfree
calling, you need to install the microphone
.
12 switched power supply Yellow
continuous power
15
supply
Red
Cautions
•It is extremely dangerous if the cord
becomes wound around the steering
column or gearstick. Be sure to keep it and
other parts from interfering with your
driving operations.
•If airbags or any other shock-absorbing
equipment is in your car, contact the store
where you purchased this unit, or the car
dealer, before installation.
15GB
Notes
Face the hook inwards.
182 mm (7 1/4 in)
53 mm (2 1/8 in)
Catch
• When mounting on the dashboard, remove the
visor clip carefully from the microphone , then
attach the flat-mount base to the microphone
.
• Before attaching the double-sided tape clean
the surface of the dashboard with a dry cloth.
Using the wired remote control
1 To enable the wired remote control,
set [STRG CONTROL] in [STEERING] to
[PRESET].
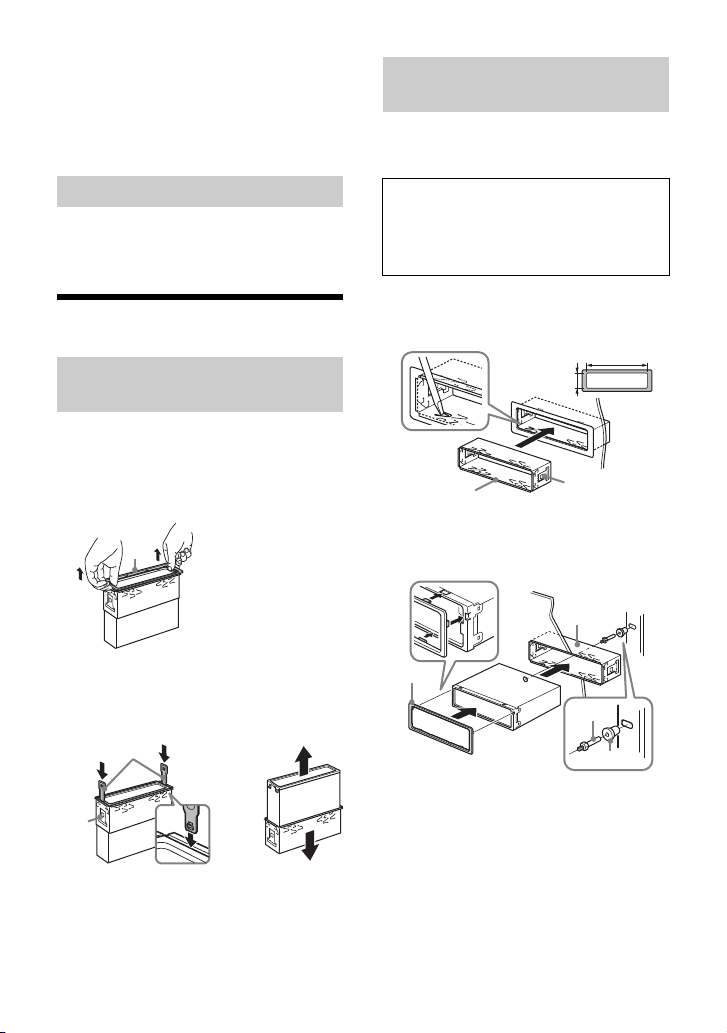
Installation
Removing the trim ring and the
mounting sleeve
Before installing the unit, remove the trim
ring and the mounting sleeve from the
unit.
1 Pinch both edges of the trim ring ,
then pull it out.
Mounting the unit in the
dashboard
Before installing, make sure the catches on
both sides of the mounting sleeve are
bent inwards 2 mm (
3
/32 in).
CAUTION
Do not touch the left side of the unit when
removing from the dashboard. The
heatsink on the left side of the unit
remains hot right after use.
1 Position the mounting sleeve
inside the dashboard, then bend the
claws outward for a tight fit.
2 Mount the unit onto the mounting
sleeve , then attach the trim ring
.
2 Insert both release keys until they
click, and pull down the mounting
sleeve , then pull up the unit to
separate.
16GB
Notes
• If the catches are straight or bent outwards, the
unit will not be installed securely and may spring
out.
• Make sure the 4 catches on the trim ring are
properly engaged in the slots of the unit.

Detaching and attaching the front
Fuse (15 A)
panel
For details, see “Detaching the Front Panel”
(page 5).
Initializing the unit
For details, see “Initializing the Unit”
(page 7).
Fuse replacement
When replacing the fuse,
be sure to use one
matching the amperage
rating stated on the
original fuse. If the fuse
blows, check the power
connection and replace the
fuse. If the fuse blows again after
replacement, there may be an internal
malfunction. In such a case, consult your
nearest Sony dealer.
17GB
Avertissement
Pour votre sécurité, veuillez installer cet
appareil dans le tableau de bord de la
voiture en tenant compte du fait que la
gauche de l’appareil chauffe en cours
d’utilisation.
Pour plus d’informations, reportez-vous à
la section « Raccordement/Installation »
(page 12).
Fabriqué en Thaïlande
La plaque signalétique reprenant la tension
d’alimentation, etc. se trouve sur le dessous
du châssis.
La validité du libellé CE se limite uniquement
aux pays où la loi l’impose, principalement
les pays de l’EEE (Espace économique
européen) et la Suisse.
Le soussigné, Sony Corporation, déclare que
cet équipement est conforme à la Directive
2014/53/UE.
Le texte complet de la déclaration UE de
conformité est disponible à l’adresse
internet suivante :
http://www.compliance.sony.de/
Avis à l’attention des clients : les
informations suivantes s’appliquent
uniquement aux appareils vendus dans
des pays qui appliquent les directives
de l’Union Européenne
Ce produit a été fabriqué par ou pour le
compte de Sony Corporation.
Importateur dans l’UE : Sony Europe B.V.
Les questions basées sur la législation
européenne pour l’importateur ou relatives
à la conformité des produits doivent être
adressées au mandataire : Sony Belgium,
bijkantoor van Sony Europe B.V., Da
Vincilaan 7-D1, 1930 Zaventem, Belgique.
Elimination des piles et
accumulateurs et des
équipements électriques et
électroniques usagés
(applicable dans les pays de
l’Union Européenne et dans
les autres pays disposant de systèmes
de collecte sélective)
Ce symbole apposé sur le produit, la pile ou
l’accumulateur, ou sur l’emballage, indique
que le produit et les piles et accumulateurs
fournis avec ce produit ne doivent pas être
traités comme de simples déchets
ménagers. Sur certains types de piles, ce
symbole apparaît parfois combiné avec un
symbole chimique. Le symbole pour le
plomb (Pb) est rajouté lorsque ces piles
contiennent plus de 0,004 % de plomb. En
vous assurant que les produits, piles et
accumulateurs sont mis au rebut de façon
appropriée, vous participez activement à la
prévention des conséquences négatives que
leur mauvais traitement pourrait provoquer
sur l’environnement et sur la santé humaine.
Le recyclage des matériaux contribue par
ailleurs à la préservation des ressources
naturelles. Pour les produits qui, pour des
raisons de sécurité, de performance ou
d’intégrité des données, nécessitent une
connexion permanente à une pile ou à un
accumulateur intégré(e), il conviendra de
vous rapprocher d’un Service Technique
qualifié pour effectuer son remplacement.
En rapportant votre appareil électrique, les
piles et accumulateurs en fin de vie à un
point de collecte approprié vous vous
assurez que le produit, la pile ou
l’accumulateur intégré sera traité
correctement. Pour tous les autres cas de
figure et afin d’enlever les piles ou
accumulateurs en toute sécurité de votre
appareil, reportez-vous au manuel
d’utilisation. Rapportez les piles et
accumulateurs, et les équipements
électriques et électroniques usagés au point
de collecte approprié pour le recyclage. Pour
toute information complémentaire au sujet
du recyclage de ce produit ou des piles et
accumulateurs, vous pouvez contacter votre
municipalité, votre déchetterie locale ou le
point de vente où vous avez acheté ce
produit.
2FR

ATTENTION
La plage de fréquences suivante 65 – 74 MHz
n’est pas affectée à la diffusion du son dans
la table des affectations communes
européennes et ne peut pas être utilisée en
Europe.
Avertissement au cas où le contact
de votre voiture ne dispose pas
d’une position ACC
Veillez à activer la fonction AUTO OFF.
L’appareil se met hors tension
complètement et automatiquement à
l’heure définie une fois qu’il est éteint et
que l’horloge est affichée (c’est-à-dire en
maintenant OFF enfoncé pendant
1 seconde), ce qui évite de décharger la
batterie. Si vous ne réglez pas la fonction
AUTO OFF, appuyez sur OFF et maintenez
enfoncé jusqu’à ce que l’affichage
disparaisse chaque fois que vous coupez
le contact.
Avis d’exclusion de responsabilité
relatif aux services proposés par des
tiers
Les services proposés par des tiers peuvent
être modifiés, suspendus ou clôturés sans
avis préalable. Sony n’assume aucune
responsabilité dans ce genre de situation.
Remarque importante
Attention
SONY NE PEUT ÊTRE, EN AUCUN CAS, TENU
POUR RESPONSABLE D’UN QUELCONQUE
DOMMAGE ACCIDENTEL, INDIRECT OU
ACCESSOIRE, OU DE TOUT AUTRE
DOMMAGE, Y COMPRIS, MAIS SANS S’Y
LIMITER, LA PERTE DE BÉNÉFICES, DE
REVENUS, DE DONNÉES, DE JOUISSANCE DU
PRODUIT OU DE TOUT ÉQUIPEMENT
ASSOCIÉ, SON INDISPONIBILITÉ, ET LE TEMPS
PERDU PAR L’ACHETEUR, LIÉ À OU
RÉSULTANT DE L’UTILISATION DE CE
PRODUIT, DE SES COMPOSANTS MATÉRIELS
ET/OU LOGICIELS.
Cher client, ce produit contient un émetteur
radio.
Conformément au règlement UNECE n° 10,
un fabricant automobile peut imposer
certaines conditions particulières pour
l’installation d’émetteurs radio dans ses
véhicules.
Veuillez vérifier le manuel d’utilisation de
votre véhicule ou contactez le constructeur
de votre véhicule ou votre concessionnaire,
avant d’installer ce produit dans votre
véhicule.
Appels d’urgence
Le système BLUETOOTH mains libres
embarqué et le dispositif électronique qui y
est connecté fonctionnent grâce aux
signaux radio, aux réseaux cellulaires et aux
lignes terrestres, tout comme la fonction de
programmation par l’utilisateur. La
connexion n’est donc pas garantie en toutes
circonstances.
Par conséquent, ne vous reposez pas
uniquement sur un dispositif électronique
pour vos communications importantes (tels
que les appels médicaux d’urgence).
Communication par BLUETOOTH
•Les micro-ondes émises par un dispositif
BLUETOOTH peuvent perturber le
fonctionnement des dispositifs médicaux
électroniques. Dans les circonstances qui
suivent, mettez cet appareil, ainsi que les
autres dispositifs BLUETOOTH présents,
hors tension, car ils peuvent provoquer un
accident.
– En présence d’un gaz inflammable, dans
un hôpital, un train, un avion ou une
station-service
– À proximité de portes automatiques ou
d’un système de détection d’incendie
Cet appareil prend en charge les
fonctionnalités conformes à la norme
BLUETOOTH afin de fournir une connexion
sécurisée lorsque la technologie sans fil
BLUETOOTH est utilisée. Mais, en fonction
de l’environnement, la sécurité peut ne
pas être suffisante. Soyez donc prudent
lorsque vous communiquez en utilisant la
technologie sans fil BLUETOOTH.
Nous n’assumons aucune responsabilité
en cas de fuite d’informations au cours
d’une communication BLUETOOTH.
Si vous avez des questions concernant cet
appareil ou si vous rencontrez des
problèmes qui ne sont pas abordés dans ce
mode d’emploi, contactez votre revendeur
Sony le plus proche.
3FR

Emplacement des commandes
Appareil principal
Façade avant déposée (intérieur)
PTY (Type d’émission)
Permet de sélectionner PTY dans RDS.
(Rechercher)
Permet d’accéder au mode de recherche
pendant la lecture.
(Non disponible quand un périphérique
USB en mode Android™ ou un iPod est
connecté.)
Touche de déverrouillage de la façade
avant
SRC (Source)
Permet de mettre l’appareil sous tension.
Permet aussi de changer de source.
OFF
Maintenez enfoncé pendant 1 seconde
pour désactiver la source et afficher
l’horloge.
Maintenez enfoncé pendant plus de
2 secondes pour mettre l’appareil hors
tension et pour faire disparaître
l’affichage.
4FR
Molette de réglage
Permet de régler le volume.
PUSH ENTER
Permet d’accéder à l’élément
sélectionné.
Appuyez sur SRC, tournez puis appuyez
pour modifier la source (délai de
2secondes).
MENU
Permet d’ouvrir le menu de
configuration.
VOICE
Maintenez enfoncé pendant plus de
2 secondes pour activer la numérotation
vocale, la reconnaissance vocale
(smartphone Android uniquement) ou la
fonction Siri (iPhone uniquement).
Fenêtre d’affichage
Port USB
/ (SEEK –/+)
Permettent de régler des stations
automatiquement. Maintenez enfoncé
pour rechercher une station
manuellement.
/ (Précédent/Suivant)
/ (Retour rapide/Avance rapide)

(Retour)
Permet de revenir à l’affichage
précédent.
MODE
Permet de sélectionner les bandes radio
ou les modes de fonction.
CALL
Permet d’accéder au menu d’appel.
Permet de recevoir/mettre fin à un appel.
Maintenez enfoncé pendant plus de
2 secondes pour permuter le signal
BLUETOOTH.
Récepteur de la télécommande
Touches numériques (1 à 6)
Permettent de recevoir les stations radio
mémorisées.
Maintenez enfoncé pour mémoriser une
station.
ALBUM /
Permettent de sauter un album pour le
périphérique audio.
Maintenez enfoncé pour sauter des
albums en continu.
(Non disponible quand un périphérique
USB en mode Android ou un iPod est
connecté.)
(Répéter)
(Non disponible quand un périphérique
USB en mode Android est connecté.)
(Aléatoire)
(Non disponible quand un périphérique
USB en mode Android est connecté.)
MIC
Permet de régler les paramètres du
microphone.
(Lecture/pause)
EXTRA BASS
Permet de renforcer les sons graves en
synchronisation avec le niveau de
volume.
Appuyez pour modifier le réglage EXTRA
BASS : [1], [2], [OFF].
Prise d’entrée AUX
DSPL (Affichage)
Permet de changer les éléments
d’affichage.
SCRL (Défilement)
Maintenez enfoncé pour faire défiler un
élément d’affichage.
RESET (intérieur)
Permet de redémarrer l’appareil (par
pression d’un stylo à bille, etc.).
5FR
Opérations de base
Retrait de la façade avant
Vous pouvez retirer la façade avant de cet
appareil pour le protéger du vol.
1 Appuyez sur OFF et maintenez
enfoncé jusqu’à ce que l’appareil se
mette hors tension, appuyez sur la
touche de dé verrouillage de la façade
avant , puis tirez la façade avant
vers vous pour la retirer.
Installation de la façade avant
Jumelage avec un
périphérique BLUETOOTH
Lorsque vous connectez l’appareil à un
périphérique BLUETOOTH pour la première
fois, il est nécessaire qu’ils se reconnaissent
mutuellement (c’est ce que l’on appelle le
« jumelage »). Le jumelage permet à
l’appareil et à d’autres périphériques de se
reconnaître mutuellement. Cet appareil peut
connecter deux périphériques BLUETOOTH
(deux téléphones portables, ou bien un
téléphone portable et un périphérique
audio).
1 Appuyez sur MENU, puis faites
tourner la molette de réglage et
appuyez dessus pour sélectionner
[BLUETOOTH] [PAIRING]
[DEVICE 1]/[DEVICE 2]*.
clignote lorsque l’appareil est en
mode de veille de jumelage.
* [DEVICE 1] ou [DEVICE 2] fait place au nom du
périphérique jumelé une fois le jumelage
terminé.
2 Procédez au jumelage sur le
périphérique BLUETOOTH afin qu’il
détecte cet appareil.
3 Sélectionnez le nom de votre modèle
sur l’affichage du périphérique
BLUETOOTH*.
Une fois le jumelage effectué, reste
allumé.
* Si la saisie d’une clé d’authentification est
requise sur le périphérique BLUETOOTH,
saisissez [0000].
6FR

Désactivation du mode de
démonstration
Vous pouvez désactiver l’écran de
démonstration qui s’affiche lorsque la
source est désactivée et que l’horloge est
affichée.
1 Appuyez sur MENU, tournez la
molette de réglage pour sélectionner
[GENERAL], puis appuyez dessus.
2 Tournez la molette de réglage pour
sélectionner [DEMO], puis appuyez
dessus.
3 Tournez la molette de réglage pour
sélectionner [DEMO-OFF], puis
appuyez dessus.
Le réglage est terminé.
4 Appuyez deux fois sur (Retour).
L’affichage revient au mode de
réception/lecture normal.
Mise à jour du firmware
Pour mettre à jour le firmware, consultez le
site d’assistance à l’adresse mentionnée sur
le quatrième de couverture, puis suivez les
instructions en ligne.
Remarque
Ne retirez pas la clé USB pendant la mise à jour.
Initialisation de l’appareil
La réinitialisation de l’appareil effacera les
réglages de l’horloge et tous les réglages
que vous avez enregistrés dans la mémoire
de sauvegarde.
[INITIALIZE] s’affiche lorsque la source est
désactivée et que l’horloge est affichée.
1 Appuyez sur MENU, tournez la
molette de réglage pour sélectionner
[GENERAL], puis appuyez dessus.
2 Tournez la molette de réglage pour
sélectionner [INITIALIZE], puis
appuyez dessus.
3 Tournez la molette de réglage pour
sélectionner [INIT-YES], puis appuyez
dessus.
Remarque
Réinitialisez l’appareil avant de le mettre au rebut
afin d’éviter toute fuite des informations contenues
dans le téléphone.
Réglage de la zone/région
Après initialisation de l’appareil, l’affichage
du paramétrage de la zone/région apparaît.
1 Appuyez sur ENTER pendant que
[AREA] est affiché.
La zone/région actuellement
sélectionnée s’affiche.
2 Tournez la molette de réglage pour
sélectionner [EUROPE] ou [RUSSIA],
puis appuyez dessus.
3 Tournez la molette de réglage pour
sélectionner [YES] ou [NO], puis
appuyez dessus.
La modification du réglage de la zone/
région aura pour effet d’initialiser
l’appareil, puis d’afficher l’horloge.
Ce réglage peut être configuré dans le menu
de configuration générale.
7FR
Informations complémentaires
Dossier (album)
Fichier audio (plage)
Précautions
• Ne laissez pas la façade avant ou des
périphériques audio sur le tableau de bord.
• Quand l’appareil est mis sous tension,
l’antenne électrique se déploie
automatiquement.
• Ne renversez pas de liquide sur l’appareil.
Ordre de lecture des fichiers
audio
À propos de l’iPod
• Vous pouvez connecter les modèles d’iPod
suivants. Effectuez la mise à jour du logiciel
de vos périphériques iPod avant de les
utiliser.
Modèles iPhone/iPod compatibles
Modèle
compatible
iPhone XR
iPhone Xs max
iPhone Xs
iPhone X
iPhone 8
iPhone 8 Plus
iPhone 7
iPhone 7 Plus
Bluetooth® USB
Modèle
compatible
iPhone SE
iPhone 6s
iPhone 6s Plus
iPhone 6
iPhone 6 Plus
iPhone 5s
iPhone 5c
iPhone 5
iPhone 4s
iPod touch
(6ème
génération)
iPod touch
(5ème
génération)
iPod nano
(7ème
génération)
•L’utilisation du badge Made for Apple
signifie qu’un accessoire a été conçu pour
être raccordé s pécifiquement au produit ou
aux produits Apple identifiés dans le
badge, et a été certifié par le constructeur
pour satisfaire les normes de performance
d’Apple. Apple n’est pas responsable du
fonctionnement de cet appareil ni de sa
conformité avec les consignes et normes
de sécurité.
Veuillez noter que l’utilisation de cet
accessoire avec un produit Apple peut
avoir un effet adverse sur les performances
sans fil.
Si vous avez des questions concernant cet
appareil ou si vous rencontrez des
problèmes qui ne sont pas abordés dans ce
mode d’emploi, contactez votre revendeur
Sony le plus proche.
Bluetooth® USB
8FR
Entretien
Spécifications
Nettoyage des connecteurs
Évitez de toucher directement les
connecteurs. L’appareil peut ne pas
fonctionner correctement si les connecteurs
entre l’appareil et la façade avant sont
souillés. Pour éviter cette situation, retirez la
façade avant (page 6) et nettoyez les
connecteurs à l’aide d’un coton-tige.
N’exercez pas une pression trop forte. Vous
risqueriez d’endommager les connecteurs.
Remarque
Pour votre sécurité, n’enlevez pas la façade avant
pendant que vous conduisez.
Radio
FM
Plage de syntonisation :
Quand [AREA] est réglé sur [EUROPE] :
87,5 MHz – 108,0 MHz
Quand [AREA] est réglé sur [RUSSIA] :
FM1/FM2 : 87,5 MHz – 108,0 MHz
(par pas de 50 kHz)
FM3 : 65 MHz – 74 MHz (par pas de
30 kHz)
Sensibilité utile : 8 dBf
Rapport signal/bruit : 73 dB
Séparation : 50 dB à 1 kHz
AM/LW
Plage de syntonisation :
531 kHz – 1 602 kHz (AM),
153 kHz – 279 kHz (LW)
Sensibilité :
AM : 26 μV,
LW : 5 0 μV
Lecteur USB
Interface :
Port USB1 (avant) : USB (haute vitesse)
Port USB2 (arrière) : USB (haute vitesse)
Courant maximal :
Port USB1 (avant) : 1 A
Port USB2 (arrière) : 1,5 A
Nombre maximum de fichiers (plages)
susceptibles d’être reconnus : 10 000
Protocole AOA (Android Open Accessory)
compatible : 2.0
Codec correspondant :
MP3 (.mp3)
Débit binaire : 8 kbits/s – 320 kbits/s
(prise en charge de VBR (Variable Bit
Rate))
Taux d’échantillonnage : 16 kHz – 48 kHz
WMA (.wma)
Débit binaire : 32 kbits/s – 192 kbits/s
(prise en charge de VBR (Variable Bit
Rate))
Taux d’échantillonnage : 32 kHz, 44,1 kHz,
48 kHz
AAC (.m4a, .mp4)
Débit binaire : 8 Kbits/s – 320 Kbits/s
Taux d’échantillonnage : 11,025 kHz –
48 kHz
9FR

WAV (.wav)
Profondeur de bit : 16 bits
Taux d’échantillonnage : 44,1 kHz, 48 kHz
FLAC (.flac)
Profondeur de bit : 16 bits, 24 bits
Taux d’échantillonnage : 44,1 kHz, 48 kHz
Système de fichiers pris en charge : FAT16,
FAT32
Communication sans fil
Système de communication :
norme BLUETOOTH version 3.0
Puissance :
Norme BLUETOOTH Classe de puissance 2
(+1 dBm par conduction max.)
Portée de communication maximale*
1
:
Ligne de mire d’environ 10 m
Bande de fréquence :
Bande de 2,4 GHz (2,4000 GHz -
2,4835 GHz)
Méthode de modulation : FHSS
Profils BLUETOOTH compatibles*
2
:
A2DP (Advanced Audio Distribution Profile,
profil de distribution audio avancée) 1.3
AVRCP (Audio Video Remote Control
Profile, profil de commande audio/vidéo
à distance) 1.5
HFP (Handsfree Profile, profil mains libres)
1.6
PBAP (Phone Book Access Profile, profil
d’accès au répertoire)
SPP (Serial Port Profile, profil de port série)
Codec correspondant :
SBC (.sbc), AAC (.m4a)
*1 La portée réelle varie en fonction de nombreux
facteurs tels que la présence d’obstacles entre
les appareils, les champs magnétiques autour
des fours à micro-ondes, l’électricité statique, la
sensibilité de la réception, les performances de
l’antenne, le système d’exploitation, les
applications logicielles, etc.
*2 Les profils BLUETOOTH standard indiquent la
finalité de la communication BLUETOOTH entre
des périphériques.
Amplificateur de puissance
Sortie : sorties haut-parleurs
Impédance des haut-parleurs : 2 Ω/4 Ω –
8Ω
Puissance de sortie maximale : 100 W × 4 (à
2Ω/4Ω)
Généralités
Alimentation requise : batterie de véhicule
12 V CC (masse négative)
Consommation nominale : 10 A
Dimensions :
environ 178 mm × 50 mm × 177 mm (l/h/p)
Dimensions de montage :
environ 182 mm × 53 mm × 160 mm (l/h/p)
Poids : environ 1,0 kg
Contenu de l’emballage :
Appareil principal (1)
Composants destinés à l’installation et au
raccordement (1 jeu)
Adressez-vous au concessionnaire pour tout
renseignement complémentaire.
La conception et les spécifications sont
sujettes à modification sans préavis.
Copyrights
Les logos et la marque verbale Bluetooth®
sont des marques déposées qui
appartiennent à Bluetooth SIG, Inc. et qui
sont utilisées par Sony Corporation sous
licence uniquement. Les autres marques
commerciales et noms commerciaux
appartiennent à leurs propriétaires
respectifs.
Windows Media est une marque ou une
marque déposée de Microsoft Corporation
aux Etats-Unis et/ou dans d’autres pays.
Ce produit est protégé par des droits de
propriété intellectuelle de Microsoft
Corporation. Toute utilisation ou diffusion de
la technologie décrite sortant du cadre de
l’utilisation de ce produit est interdite sans
licence accordée par Microsoft ou une filiale
autorisée de Microsoft.
Apple, iPhone, iPod, iPod nano, iPod touch
et Siri sont des marques de Apple Inc.,
déposées aux Etats-Unis et dans d’autres
pays/régions.
Android est une marque de Google LLC.
10FR

libFLAC
Copyright (C) 2000-2009 Josh Coalson
Copyright (C) 2011-2013 Xiph.Org Foundation
La redistribution et l’utilisation en formes
source et binaire, avec ou sans modification,
sont permises pourvu que les conditions
suivantes soient respectées :
– Toute redistribution de code source doit
être accompagnée de la mention du
copyright correspondant, de la liste de
conditions et de la clause de nonresponsabilité ci-dessous.
– Les redistributions en forme binaire
doivent reproduire l’avis de droits d’auteur
ci-dessus, cette liste de conditions et la
clause de non-responsabilité ci-dessous
dans la documentation et/ou tout autre
matériel fourni avec la distribution.
– Ni le nom de Xiph.org Foundation, ni celui
de ses contributeurs ne peut être utilisé
pour soutenir ou promouvoir des produits
dérivés de ce logiciel sans autorisation
spécifique écrite préalable.
CE LOGICIEL EST FOURNI PAR LES
DETENTEURS DU COPYRIGHT ET SES
CONTRIBUTEURS « EN L’ETAT » SANS
QUELQUE GARANTIE QUE CE SOIT, EXPRESSE
OU IMPLICITE, INCLUANT MAIS SANS S’Y
LIMITER, LES GARANTIES IMPLICITES DE
QUALITE MARCHANDE ET DE CONVENANCE
A UNE FIN PARTICULIERE. EN AUCUN CAS LA
FONDATION OU SES CONTRIBUTEURS NE
PEUVENT ETRE TENUS POUR RESPONSABLES
D’UN QUELCONQUE DOMMAGE DIRECT,
INDIRECT, ACCESSOIRE, PARTICULIER,
EXEMPLAIRE OU CONSECUTIF (Y COMPRIS,
MAIS SANS S’Y LIMITER, L’ACQUISITION DE
PRODUITS OU SERVICES DE SUBSTITUTION ;
LA PERTE DE JOUISSANCE, DE DONNEES OU
DE BENEFICES ; OU LES PERTES
D’EXPLOITATION) QUELLES QU’EN SOIENT
LES CAUSES ET QUEL QUE SOIT LE TYPE DE
RESPONSABILITE, CONTRACTUELLE, SANS
FAUTE OU FONDEE SUR UN DELIT CIVIL (Y
COMPRIS PAR NEGLIGENCE OU POUR UNE
AUTRE CAUSE) RESULTANT D’UNE MANIERE
OU D’UNE AUTRE DE L’UTILISATION DE CE
LOGICIEL, MEME SI MENTION A ETE FAITE DE
LA POSSIBILITE DE TELS DOMMAGES.
11FR
Raccordement/Installation
Attention
• Acheminez tous les fils de masse jusqu’à
un point de masse commun.
• Veillez à ce qu’aucun fil ne soit coincé sous
une vis ou happé par des pièces mobiles
(par exemple, une glissière de siège).
• Avant d’effectuer les raccordements,
coupez le contact du véhicule pour éviter
les courts-circuits.
• Raccordez le câble d’alimentation à
l’appareil et aux haut-parleurs avant de le
brancher sur le connecteur d’alimentation
auxiliaire.
• Pour des raisons de sécurité, veillez à isoler
avec du ruban isolant les extrémités libres
des fils non raccordés.
• Choisissez soigneusement l’emplacement
d’installation afin que l’appareil n’entrave
pas la conduite normale.
• Évitez d’installer l’appareil dans des
endroits soumis à la poussière, à la saleté,
à des vibrations excessives ou à des
températures élevées, notamment les
rayons directs du soleil ou la proximité des
conduites de chauffage.
• Utilisez exclusivement le matériel de
fixation fourni afin de garantir une
installation sûre.
Remarque sur le câble d’alimentation (jaune)
Lorsque vous raccordez cet appareil conjointement
avec d’autres équipements stéréo, l’intensité
nominale du circuit du véhicule auquel l’appareil est
raccordé doit être supérieure à la somme des
intensités nominales des fusibles de chaque
composant.
Remarque sur l’installation dans des
véhicules équipés d’un système Start-Stop
L’appareil peut redémarrer lorsque le moteur est
démarré à partir du système Start-Stop. Si tel est le
cas, désactivez le système Start-Stop de votre
véhicule.
Réglage de l’angle de fixation
Réglez l’angle de fixation afin qu’il soit
inférieur à 30°.
Liste des pièces pour
installation
Encadrement de
montage (1)
Garniture (1) Vis de blocage (1)
Douille (1) Câble d’alimentation (1)
Microphone (1) Socle (1)
Adhésif double face (1)
•Cette liste des pièces ne comprend pas
tout le contenu de l’emballage.
•L’encadrement de montage et la
garniture sont fixés à l’appareil en usine.
Avant de monter l’appareil, utilisez les clés
de déblocage pour retirer l’encadrement
de montage de l’appareil. Pour plus
d’informations, reportez-vous à la section
« Retrait de la garniture et de
l’encadrement de montage » (page 17).
•Conservez les clés de déblocage , car
vous en aurez besoin à l’avenir si vous
décidez de retirer l’appareil de votre
véhicule.
Clés de déblocage (2)
12FR

Raccordement
*
3
*
3
Caisson de graves*
1
*
3
Amplificateur de puissance*
1
*
5
Smartphone*7, iPod/
iPhone*8, clé USB
*
1
Pour plus d’informations,
reportez-vous à la section
« Raccordements » (page 14).
Lors du raccordement direct à la batterie*11*12
de l’antenne du véhicule*
6
d’une télécommande filaire
(non fournie)*
4
*
9
Noir
Jaune
*2*
10
Reportez-vous au « Schéma de raccordement
électrique » (page 16) pour plus de détails.
13FR
*1 Non fourni
*2 Impédance des haut-parleurs : 4 Ω à 8 Ω × 4
*3 Cordon à broches RCA (non fourni)
*4 Selon le type de véhicule, utilisez un adaptateur
pour la télécommande filaire (non fournie).
Pour plus de détails sur l’utilisation de la
télécommande, reportez-vous à la section
« Utilisation de la télécommande filaire » (page
17).
*5 Qu’il soit utilisé ou non, acheminez le cordon de
l’entrée micro de façon à ce qu’il n’interfère pas
avec la conduite. Fixez le cordon avec un
attache-câble ou autre s’il est installé près de
vos pieds.
Pour plus de détails sur l’installation du micro,
reportez-vous à la section « Installation du
micro » (page 17).
*6 Selon le type de véhicule, utilisez un adaptateur
(non fourni) si vous ne parvenez pas à brancher
le connecteur d’antenne.
*7 Pour raccorder un smartphone à l’appareil
principal, un câble approprié (non fourni) est
nécessaire.
*8 Pour connecter un iPod/iPhone, utilisez le câble
de connexion USB pour iPod (non fourni).
*9 Manchon en ferrite
*10 Utilisez des haut-parleurs d’une puissance
admissible égale ou supérieure à 50 W RMS. Il
est recommandé d’opter pour des haut-parleurs
pleine gamme Sony XB.
*11 Lorsque l’intensité nominale du fusible usagé
de votre véhicule est de 10 A, établissez une
connexion directe à la batterie pour éviter les
court s-circui ts.
*12 Avant de procéder au raccordement, il est
nécessaire de disposer les câbles jaune et noir
du câble d’alimentation .
Raccordements
Si vous disposez d’une antenne électrique
dépourvue de relais, vous risquez de
l’endommager si vous raccordez cet appareil
à l’aide du câble d’alimentation .
Vers le connecteur des haut-parleurs
du véhicule
1
Haut-parleur
arrière (droit)
2 Rayé violet/noir
3
Haut-parleur
avant (droit)
4 Rayé gris/noir
5
Haut-parleur
avant (gauche)
6 Rayé blanc/noir
7
Haut-parleur
arrière (gauche)
8 Rayé vert/noir
Vers le connecteur d’alimentation du
véhicule
Violet
Gris
Blanc
Vert
14FR
alimentation
12
permanente
antenne électrique/
13
amplificateur de
puissance (REM OUT)
alimentation de
14
l’éclairage commutée
alimentation
15
commutée
Jaune
Rayé bleu/
blanc
Rayé orange/
blanc
Rouge
16 masse Noir
 Loading...