

4-697-418-21(1)
FM/AM
Digital Media
Player
Owner’s Record
The model and serial numbers are located on the
bottom of the unit.
Record the serial number in the space provided below.
Refer to these numbers whenever you call upon your
Sony dealer regarding this product.
Model No. DSX- 415BT
Serial No.
A
Operating Instructions
Mode d’emploi
GB
FR
To cancel the demonstration (DEMO) display, see
page 21.
For the connection/installation, see page 37.
Pour annuler l’affichage de démonstration (DEMO),
reportez-vous à la page 23.
Pour le raccordement/l’installation, reportez-vous à
la page 41.
DSX- 415BT
A

For safety, be sure to install this unit in the
dashboard of the car as the rear side of
the unit becomes hot during use.
For details, see “Connection/Installation”
(page 37).
The nameplate indicating operating voltage,
etc., is located on the bottom of the chassis.
Warning
FOR THE CUSTOMERS IN THE USA.
NOT APPLICABLE IN CANADA,
INCLUDING IN THE PROVINCE OF
QUEBEC.
POUR LES CLIENTS AUX ÉTATS-UNIS.
NON APPLICABLE AU CANADA, Y
COMPRIS LA PROVINCE DE QUÉBEC.
This equipment has been tested and
found to comply with the limits for a Class
B digital device, pursuant to Part 15 of the
FCC Rules.
These limits are designed to provide
reasonable protection against harmful
interference in a residential installation.
This equipment generates, uses, and can
radiate radio frequency energy and, if not
installed and used in accordance with the
instructions, may cause harmful
interference to radio communications.
However, there is no guarantee that
interference will not occur in a particular
installation. If this equipment does cause
harmful interference to radio or television
reception, which can be determined by
turning the equipment off and on, the
user is encouraged to try to correct the
interference by one or more of the
following measures:
– Reorient or relocate the receiving
antenna.
– Increase the separation between the
equipment and receiver.
– Connect the equipment into an outlet
on a circuit different from that to which
the receiver is connected.
– Consult the dealer or an experienced
radio/TV technician for help.
You are cautioned that any changes or
modifications not expressly approved in
this manual could void your authority to
operate this equipment.
2GB
This device complies with Part 15 of the FCC
Rules and Industry Canada's licence-exempt
RSSs. Operation is subject to the following
two conditions:
(1) This device may not cause interference;
and
(2) This device must accept any interference,
including interference that may cause
undesired operation of the device.
This transmitter must not be co-located or
operated in conjunction with any other
antenna or transmitter.
Under Industry Canada regulations, this
radio transmitter may only operate using an
antenna of a type and maximum (or lesser)
gain approved for the transmitter by
Industry Canada. To reduce potential radio
interference to other users, the antenna type
and its gain should be so chosen that the
equivalent isotropically radiated power
(e.i.r.p.) is not more than that necessary for
successful communication.
This equipment complies with FCC/IC
radiation exposure limits set forth for an
uncontrolled environment and meets the
FCC radio frequency (RF) Exposure
Guidelines and RSS-102 of the IC radio
frequency (RF) Exposure rules. This
equipment has very low levels of RF energy
that is deemed to comply without maximum
permissive exposure evaluation (MPE).
Avertissement
Le présent appareil est conforme aux CNR
d’Industrie Canada applicables aux appareils
radio exempts de licenc
L’exploitation est autorisée aux deux
conditions suivantes :
(1) l’appareil ne doit pas produire de
brouillage;
(2) l’utilisateur de l’appareil doit accepter tout
brouillage radioélectrique subi, même si le
brouillage est susceptible d’en compromettre
le fonctionnement.
e.
CAUTION
The use of optical instruments with this
product will increase eye hazard.
For the State of California, USA only
Perchlorate Material – special handling may
apply, See
www.dtsc.ca.gov/hazardouswaste/
perchlorate
WARNING: Do not ingest
battery, Chemical Burn Hazard.
The remote commander contains a
coin/button cell battery. If the coin/button
cell battery is swallowed, it can cause severe
internal burns in just 2 hours and can lead to
death.
Keep new and used batteries away from
children. If the battery compartment does
not close securely, stop using the product
and keep it away from children.
If you think batteries might have been
swallowed or placed inside any part of the
body, seek immediate medical attention.
Note on the lithium battery
Do not expose the battery to excessive heat
such as direct sunlight, fire or the like.
Warning if your car’s ignition has no
ACC position
Be sure to set the AUTO OFF function
(page 22). The unit will shut off
completely and automatically in the set
time after the unit is turned off, which
prevents battery drain. If you do not set
the AUTO OFF function, press and hold
OFF until the display disappears each
time you turn the ignition off.
Disclaimer regarding services offered
by third parties
Services offered by third parties may be
changed, suspended, or terminated without
prior notice. Sony does not bear any
responsibility in these sorts of situations.
l'exposition aux RF
L’antenne (ou les antennes) doit tre install e
de fa on maintenir tout instant une distance
minimum de au moins 20 cm entre la source
de radiation (l’antenne) et toute personne
physique.
3GB

3GB

Important notice
Caution
IN NO EVENT SHALL SONY BE LIABLE FOR
ANY INCIDENTAL, INDIRECT OR
CONSEQUENTIAL DAMAGES OR OTHER
DAMAGES INCLUDING, WITHOUT
LIMITATION, LOSS OF PROFITS, LOSS OF
REVENUE, LOSS OF DATA, LOSS OF USE OF
THE PRODUCT OR ANY ASSOCIATED
EQUIPMENT, DOWNTIME, AND PURCHASE R’S
TIME RELATED TO OR ARISING OUT OF THE
USE OF THIS PRODUCT, ITS HARDWARE
AND/OR ITS SOFTWARE.
Dear customer, this product includes a radio
transmitter.
Please check your vehicle operation manual
or contact the manufacturer of your vehicle
or your vehicle dealer, before you install this
product into your vehicle.
Emergency calls
This BLUETOOTH car handsfree and the
electronic device connected to the
handsfree operate using radio signals,
cellular, and landline networks as well as
user-programmed function, which cannot
guarantee connection under all conditions.
Therefore do not rely solely upon any
electronic device for essential
communications (such as medical
emergencies).
On BLUETOOTH communication
Microwaves emitting from a BLUETOOTH
device may affect the operation of
electronic medical devices. Turn off this
unit and other BLUETOOTH devices in the
following locations, as it may cause an
accident.
– where inflammable gas is present, in a
hospital, train, airplane, or petrol station
– near automatic doors or a fire alarm
This unit supports security capabilities that
comply with the BLUETOOTH standard to
provide a secure connection when the
BLUETOOTH wireless technology is used,
but security may not be enough
depending on the setting. Be careful when
communicating using BLUETOOTH wireless
technology.
We do not take any responsibility for the
leakage of information during BLUETOOTH
communication.
If you have any questions or problems
concerning your unit that are not covered in
this manual, consult your nearest Sony
dealer.
4GB

Table of Contents
Warning . . . . . . . . . . . . . . . . . . . . . . . . . . . . . 2
Guide to Parts and Controls. . . . . . . . . . . . . 6
Getting Started
Detaching the Front Panel . . . . . . . . . . . . . . 8
Resetting the Unit. . . . . . . . . . . . . . . . . . . . . 8
Setting the Clock. . . . . . . . . . . . . . . . . . . . . . 8
Preparing a BLUETOOTH Device . . . . . . . . . 8
Connecting a USB Device . . . . . . . . . . . . . . . 11
Connecting Other Portable Audio
Device . . . . . . . . . . . . . . . . . . . . . . . . . . . 11
Listening to the Radio
Listening to the Radio . . . . . . . . . . . . . . . . . 11
Using Radio Data System (RDS). . . . . . . . . 12
Listening to the SiriusXM Radio . . . . . . . . 12
Playback
Playing a Disc . . . . . . . . . . . . . . . . . . . . . . . 14
Playing a USB Device . . . . . . . . . . . . . . . . . 14
Playing a BLUETOOTH Device . . . . . . . . . . 14
Searching and Playing Tracks . . . . . . . . . . 15
Listening to Pandora®
Setting up Pandora®. . . . . . . . . . . . . . . . . . 16
Streaming Pandora®. . . . . . . . . . . . . . . . . . 16
Available Operations in Pandora® . . . . . . . 16
Settings
Canceling the DEMO Mode . . . . . . . . . . . . . 21
Basic Setting Operation . . . . . . . . . . . . . . . . 21
General Setup (GENERAL) . . . . . . . . . . . . . 22
Sound Setup (SOUND) . . . . . . . . . . . . . . . . 23
Display Setup (DISPLAY) . . . . . . . . . . . . . . 24
BLUETOOTH Setup (BLUETOOTH) . . . . . . . 24
C
A
.
Sony
| Music
enter
Se
tup
(S
ONY
PP)
25
.
Additional Information
Updating the Firmware . . . . . . . . . . . . . . . 25
Precautions. . . . . . . . . . . . . . . . . . . . . . . . . 25
Maintenance. . . . . . . . . . . . . . . . . . . . . . . . 27
Specifications . . . . . . . . . . . . . . . . . . . . . . . 27
Troubleshooting. . . . . . . . . . . . . . . . . . . . . 30
Messages . . . . . . . . . . . . . . . . . . . . . . . . . . 33
Connection/Installation
Cautions . . . . . . . . . . . . . . . . . . . . . . . . . . . 37
Parts List for Installation . . . . . . . . . . . . . . 37
Connection . . . . . . . . . . . . . . . . . . . . . . . . . 38
Installation . . . . . . . . . . . . . . . . . . . . . . . . . 40
Handsfree Calling (via
BLUETOOTH only)
Receiving a Call. . . . . . . . . . . . . . . . . . . . . . 17
Making a Call. . . . . . . . . . . . . . . . . . . . . . . . 17
Available Operations during Call . . . . . . . . 18
Useful Functions
Sony | Music Center
Using Siri Eyes Free. . . . . . . . . . . . . . . . . . . 20
. . . . . . . . .
with iPhone/Android
. . . . . . . . . . . . . . . . . . . . . . . 19
5GB
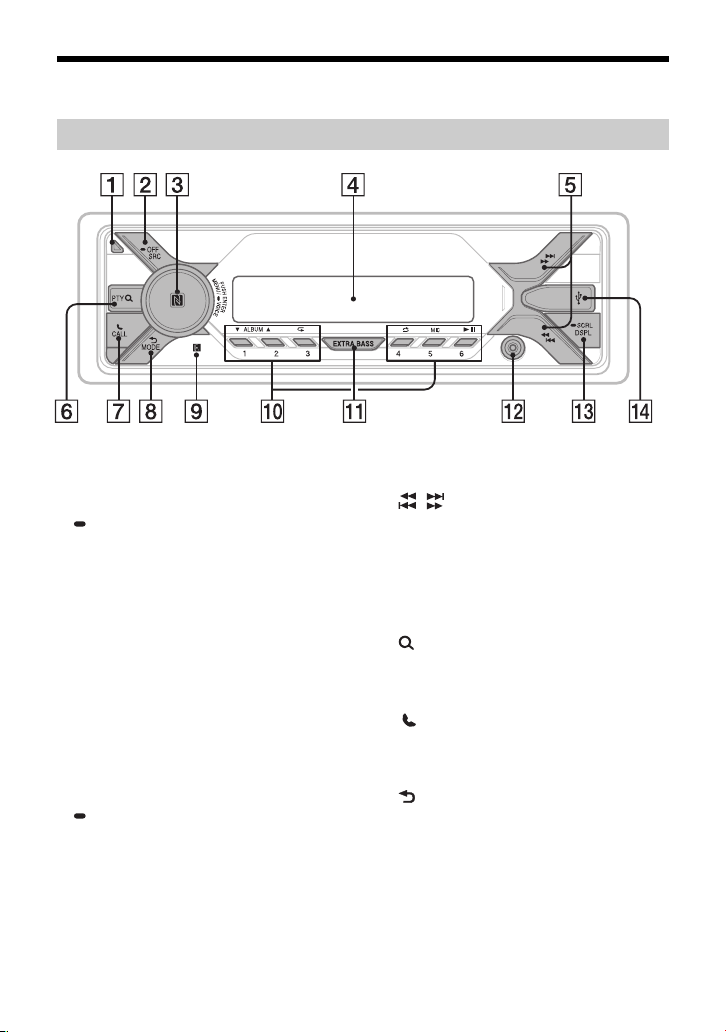
Guide to Parts and Controls
Main unit
Front panel release button
SRC (source)
Turn on the power.
Change the source.
OFF
Press and hold for 1 second to turn the
source off and display the clock.
Press and hold for more than 2 seconds
to turn off the power and the display.
If the unit is turned off and the display
disappears, operation by the remote
commander is not available.
Control dial
Rotate to adjust the volume.
PUSH ENTER
Enter the selected item.
Press SRC, rotate then press to change
the source (timeout in 2 seconds).
MENU
Open the setup menu.
VOICE (page 18,20,21)
Press and hold for more than 2 seconds
to activate voice dial, voice recognition
(Android™ smartphone only), or the Siri
function (iPhone only).
N-Mark
Touch the control dial with Android
smartphone to make BLUETOOTH
connection.
6GB
Display window
/ (S
Tune in radio stations automatically. Pre
hold to tune manually.
/ (prev/next)
/ (fast-reverse/fast-forward)
PTY (program type)
Select PTY in RDS.
Enter the browse mode during playback.
(Not available when a USB device in
Android mode or iPod is connected.)
Enter the call menu. Receive/end a call.
Press and hold for more than 2 seconds
to switch the BLUETOOTH signal.
Return to the previous display.
MODE (page 8
Receptor for the remote commander
Number buttons (1 to 6)
Receive stored radio stations. Press and
hold to store stations.
EEK/ –+)
(browse) (page 13)
CALL
(back)
,11,18)
ss and
ALBUM /
Skip an album for audio device. Press and
hold to skip albums continuously.
(Not available when a USB device in
Android mode or iPod is connected.)
Press to thumbs up, or to thumbs
down in Pandora® (page 16).
(repeat)
(Not available when a USB device in
Android mode is connected.)
(shuffle)
(Not available when a USB device in
Android mode is connected.)
MIC (page 18)
(play/pause)
EXTRA BASS
Reinforce bass sound in synchronization
with the volume level. Press to change
the EXTRA BASS setting: [1], [2], [OFF].
AUX input jack
DSPL (display)
Change display items.
SCRL (scroll)
Press and hold to scroll a display item.
USB port
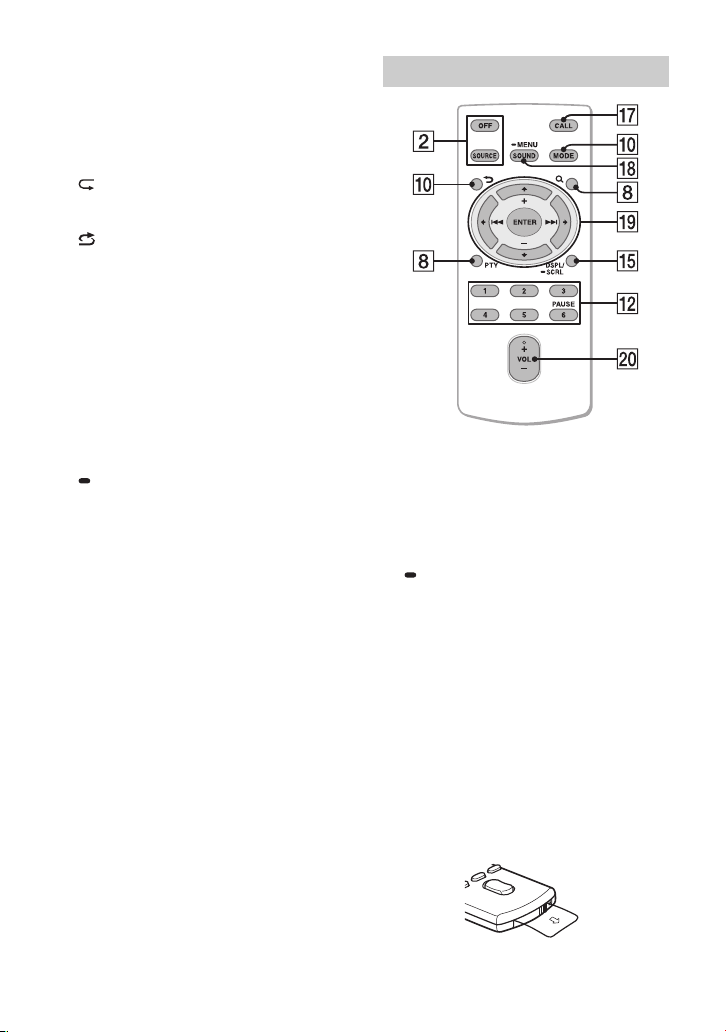
RM-X231 Remote commander
The VOL (volume) + button has a tactile dot.
CALL
Enter the call menu. Receive/end a call.
SOUND
Open the SOUND menu directly.
MENU
Press and hold to open the setup menu.
///
Select a setup item, etc.
ENTER
Enter the selected item.
Press and hold for more than 2 seconds
to establish or terminate the “SongPal”
function.
/ (prev/next)
+/– (album +/–)
VOL (volume) +/–
Remove the insulation film before use.
7GB
Getting Started
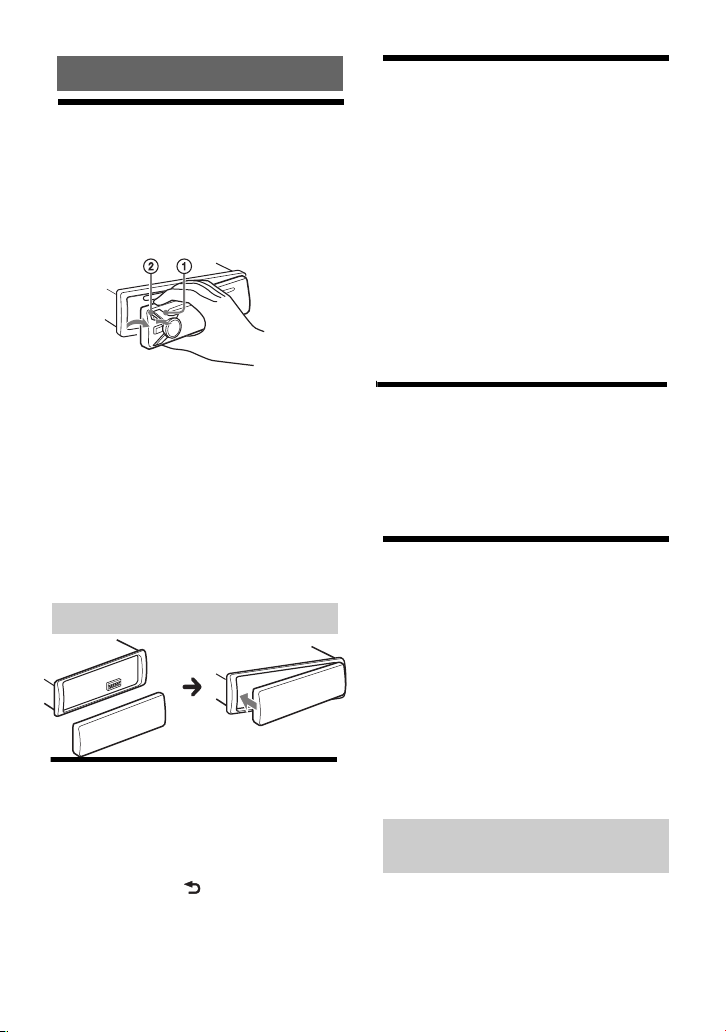
Detaching the Front Panel
You can detach the front panel of this unit to
prevent theft.
1 Press and hold OFF until the unit
turns off, press the front panel
release button , then pull the panel
towards you to remove.
Caution alarm
If you turn the ignition switch to the OFF
position without detaching the front panel,
the caution alarm will sound for a few
seconds. The alarm will only sound if the
built-in amplifier is used.
Serial numbers
Make sure the serial numbers on the bottom
of the unit and the back of the front panel
are matched correctly. Otherwise you cannot
make BLUETOOTH pairing, connection and
disconnection by NFC.
Attaching the front panel
Resetting the Unit
Before operating the unit for the first time,
or after replacing the car battery or
changing connections, you must reset the
unit.
1 Press DSPL and (back)/MODE for
more than 2 seconds.
Note
Resetting the unit will erase the clock setting and
some stored contents.
8GB
Setting the Clock
1 Press MENU, rotate the control dial to
select [GENERAL], then press it.
2 Rotate the control dial to select [SET
CLOCK-ADJ], then press it.
The hour indication flashes.
3 Rotate the control dial to set the hour
and minute.
To move the digital indication, press
/ (SEEK –/+).
4 After setting the minute, press MENU.
The setup is complete and the clock
starts.
To di splay t he clo c k
Press DSPL.
Checking the Battery Voltage
You can check the current battery voltage. (Not
available while the source is off and the clock is
displayed.)
1 Press DSPL repeatedly until the battery
voltage display appears.
Preparing a BLUETOOTH
Device
You can enjoy music, or perform handsfree
calling depending on the BLUETOOTH
compatible device such as a smartphone,
cellular phone and audio device (hereafter
“BLUETOOTH device” if not otherwise
specified). For details on connecting, refer to
the operating instructions supplied with the
device.
Before connecting the device, turn down the
volume of this unit; otherwise, loud sound
may result.
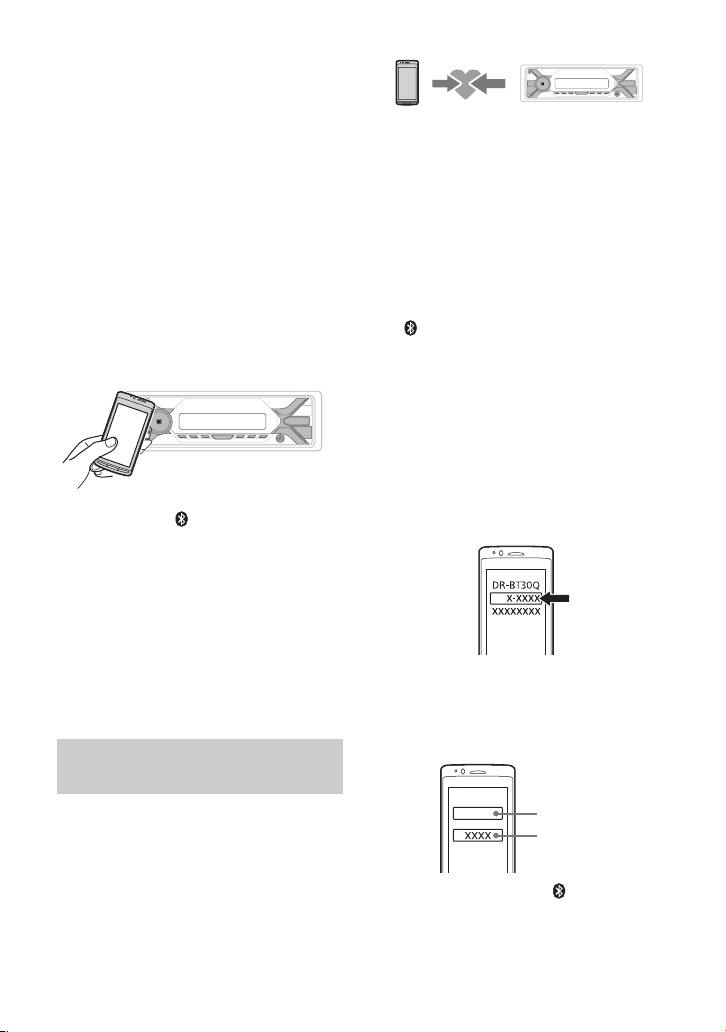
Connecting with a Smartphone by
One touch (NFC)
By touching the control dial on the unit with
an NFC* compatible smartphone, the unit is
paired and connected with the smartphone
automatically.
* NFC (Near Field Communication) is a technology
enabling short-range wireless communication
between various devices, such as mobile phones
and IC tags. Thanks to the NFC function, data
communication can be achieved easily just by
touching the relevant symbol or designated
location on NFC compatible devices.
For a smartphone with Android OS 4.0 or
lower installed, downloading the app “NFC
Easy Connect” available at Google Play™ is
required. The app may not be downloadable
in some countries/regions.
1 Activate the NFC function on the
smartphone.
For details, refer to the operating
instructions supplied with the
smartphone.
2 Touch the N-Mark part of the unit
with the N-Mark part of the
smartphone.
Make sure that lights up on the display
of the unit.
To d iscon nect by O ne to u c h
Touch the N-Mark part of the unit with the
N-Mark part of the smartphone again.
Notes
• When making the connection, handle the
smartphone carefully to prevent scratches.
• One touch connection is not possible when the
unit is already connected to two NFC compatible
devices. In t his case, disconnect either d evice, and
make connection with the smartphone again.
Pairing and connecting with a
BLUETOOTH device
When connecting a BLUETOOTH device for
the first time, mutual registration (called
“pairing”) is required. Pairing enables this
unit and other devices to recognize each
other. This unit can connect two BLUETOOTH
devices (two cellular phones, or a cellular
phone and an audio device).
1 Place the BLUETOOTH device within
1 m (3 ft) of this unit.
2 Press MENU, rotate the control dial to
select [BLUETOOTH], then press it.
3 Rotate the control dial to select [SET
PAIRING], then press it.
4 Rotate the control dial to select [SET
DEVICE 1]* or [SET DEVICE 2]*, then
press it.
flashes while the unit is in pairing
standby mode.
* [SET DEVICE 1] or [SET DEVICE 2] will be
changed to the paired device name after
pairing is complete.
5 Perform pairing on the BLUETOOTH
device so it detects this unit.
S
6 Select [
D
X-XXXX] (your model
name) shown in the display of the
BLUETOOTH device.
If your model name does not appear,
repeat from step 2.
DS
7 If passkey* input is required on the
BLUETOOTH device, input [0000].
* Passkey may be called “Passcode,” “PIN code,”
“PIN number” or “Password,” etc., depending
on the device.
Input passkey
[0000]
When pairing is made, stays lit.
8 Select this unit on the BLUETOOTH
device to establish the BLUETOOTH
connection.
9GB
or lights up when the connection is
made.
Note
While connecting to a BLUETOOTH device, this unit
cannot be detected from another device. To enable
detection, enter the pairing mode and search for
this unit from another device.
To start playback
For details, see “Playing a BLUETOOTH
Device” (page 14).
To disconnect the paired device
Perform steps 2 to 4 to disconnect after this
unit and the BLUETOOTH device are paired.
Connecting with a paired
BLUETOOTH device
To use a paired device, connection with this
unit is required. Some paired devices will
connect automatically.
1 Press MENU, rotate the control dial to
select [BLUETOOTH], then press it.
2 Rotate the control dial to select [SET
BT SIGNL], then press it.
Make sure that lights up.
3 Activate the BLUETOOTH function on
the BLUETOOTH device.
4 Operate the BLUETOOTH device to
connect to this unit.
or lights up.
Icons in the display:
Lights up when handsfree calling is
available by enabling the HFP
(Handsfree Profile).
Lights up when the audio device is
playable by enabling the A2DP
(Advanced Audio Distribution
Profile).
To connect the last-connected device
from this unit
Activate the BLUETOOTH function on the
BLUETOOTH device.
10GB
To connect with the audio device, press SRC
to select [BT AUDIO] and press (play/
pause).
To connect with the cellular phone, press
CALL.
Note
While streaming BLUETOOTH audio, you cannot
connect from this unit to the cellular phone.
Connect from the cellular phone to this unit instead.
Tip
With BLUETOOTH signal on: when the ignition is
turned to on, this unit reconnects automatically to
the last-connected cellular phone.
To install the microphone
For details, see “Installing the microphone”
(page 40).
Connecting with an iPhone/iPod
(BLUETOOTH Auto Pairing)
When an iPhone/iPod with iOS5 or later
installed is connected to the USB port, the
unit is paired and connected with the
iPhone/iPod automatically.
To enable BLUETOOTH Auto Pairing, make
sure [SET AUTOPAIR] in [BLUETOOTH] is set
to [ON] (page 24).
1 Activate the BLUETOOTH function on
the iPhone/iPod.
2 Connect an iPhone/iPod to the USB
port.
Make sure that lig hts u p on t he d ispl ay
of the unit.
Notes
• BLUETOOTH Auto Pairing is not possible if the unit
is already connected to two BLUETOOTH devices.
In this case, disconnect either device, then
connect the iPhone/iPod again.
• If BLUETOOTH Auto Pairing is not established, see
“Preparing a BLUETOOTH Device” (page 8).

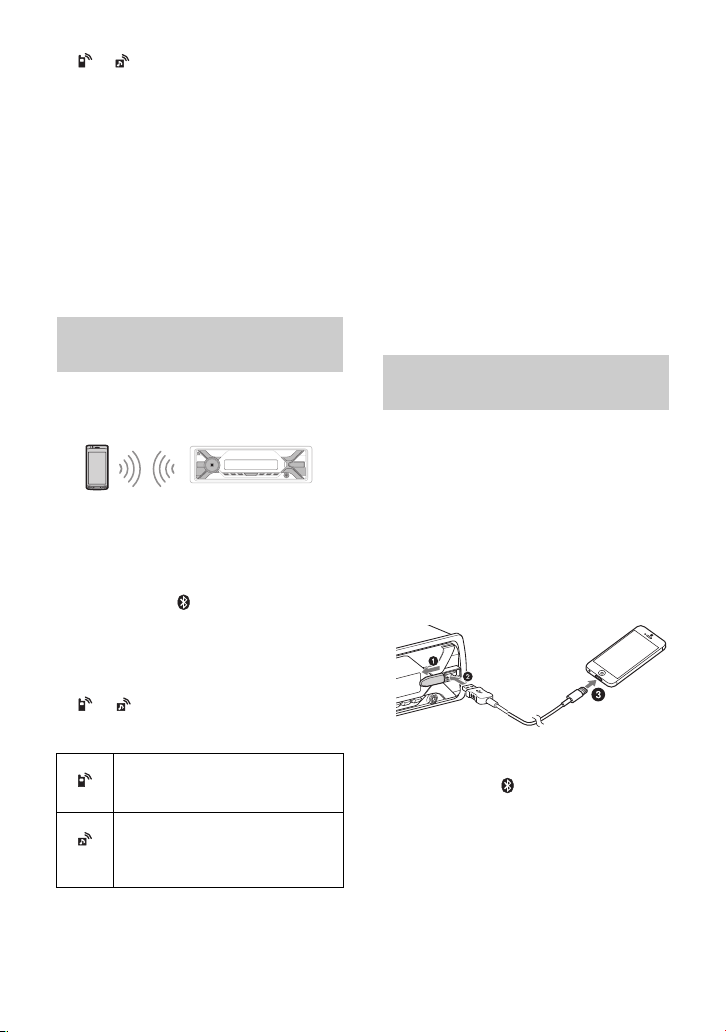
Connecting a USB Device
1 Turn down the volume on the unit.
2 Connect the USB device to the unit.
To connect an iPod/iPhone, use the USB
connection cable for iPod (not supplied).
Connecting Other Portable
Audio Device
1 Turn off the portable audio device.
2 Turn down the volume on the unit.
3 Connect the portable audio device to
the AUX input jack (stereo mini jack)
on the unit with a connecting cord
(not supplied)*.
* Be sure to use a straight type plug.
4 Press SRC to select [AUX].
To match the volume level of the
connected device to other sources
Start playback of the portable audio device
at a moderate volume, and set your usual
listening volume on the unit.
Press MENU, then select [SOUND] [SET AUX
VOL] (page 23).
Listening to the Radio
Listening to the Radio
To listen to the radio, press SRC to select
[TUNER].
Storing automatically (BTM)
1 P ress M ODE to chan ge th e ban d (FM1,
FM2, FM3, AM1 or AM2).
2 Press MENU, rotate the control dial to
select [GENERAL], then press it.
3 Rotate the control dial to select [SET
BTM], then press it.
The unit stores stations in order of
frequency on the number buttons.
Tuning
1 P ress M ODE to chan ge th e ban d (FM1,
FM2, FM3, AM1 or AM2).
2 Perform tuning.
To tune manually
Press and hold / (SEEK –/+) to
locate the approximate frequency, then
press / (SEEK –/+) repeatedly to
finely adjust to the desired frequency.
To tune automatically
Press / (SEEK –/+).
Scanning stops when the unit receives a
station.
Storing manually
1 While receiving the station that you
want to store, press and hold a
number button (1 to 6) until [MEM]
appears.
Receiving the stored stations
1 Select the band, then press a number
button (1 to 6).
11GB

Using Radio Data System
(RDS)
Listening to the SiriusXM
Radio
Selecting program types (PTY)
1 Press PTY during FM reception.
2 Rotate the control dial until the
desired program type appears, then
press it.
The unit starts to search for a station
broadcasting the selected program type.
Type of progra ms
NEWS (News), INFORM (Information), SPORTS
(Sports), TAL K (Talk), ROCK (Rock), CLS ROCK
(Classic Rock), ADLT HIT (Adult Hits), SOFT RCK
(Soft Rock), TOP 40 (Top 40), COUNTRY
(Country), OLDIES (Oldies), SOFT (Soft),
NOSTALGA (Nostalgia), JAZZ (Jazz), CLASSICL
(Classical), R & B (Rhythm and Blues), SOFT R&B
(Soft Rhythm and Blues), LANGUAGE (Foreign
Language), REL MUSC (Religious Music), REL
TAL K (Religious Talk), PERSNLTY (Personality),
PUBLIC (Public), COLLEGE (College), HABL ESP
(Spanish Talk), MUSC ESP (Spanish Music), HIP
HOP (Hip-Hop), WEATHER (Weather)
Setting clock time (CT)
The CT data from the RDS transmission sets
the clock.
1 Set [SET CT-ON] in [GENERAL]
(page 22).
Activating your SiriusXM
Subscription
Only SiriusXM brings you more of what you
love to listen to, all in one place. Get over
140 channels, including commercial-free
music plus the best sports, news, talk,
comedy and entertainment. Welcome to the
world of satellite radio. A SiriusXM Connect
Vehicle Tuner and Subscription are required.
For more information, visit
www.siriusxm.com
After installing your SiriusXM Connect
Vehicle Tuner and antenna, press SRC to
select [SIRIUSXM]. You should be able to
hear the SiriusXM preview channel on
Channel 1. After verifying that you can hear
the preview channel, select Channel 0 to
find the Radio ID of your tuner. In addition,
the Radio ID is located on the bottom of the
SiriusXM Connect Vehicle Tuner and its
packaging. You will need this number to
activate your subscription. Write the number
down for reference.
In the USA, you can activate online or by
calling SiriusXM Listener Care:
• Online: Visit
www.siriusxm.com/activatenow
• Phone: Call 1-866-635-2349
In Canada, you can activate online or by
calling SiriusXM Listener Care:
• Online: Visit
www.siriusxm.ca/activatexm
• Phone: Call 1-877-438-9677
As part of the activation process, the
SiriusXM satellites will send an activation
message to your tuner. When your radio
detects that the tuner has received the
activation message, your radio will display:
[SUBSCRIPTION UPDATED - PRESS ENT TO
CONTINUE]. Once subscribed, you can tune
to channels in your subscription plan.
12GB

Notes
• The activation process usually takes 10 to 15
minutes, but may take up to an hour.
• Your radio will need to be turned on and receiving
the SiriusXM signal to receive the activation
message.
Selecting channels for SiriusXM
1 Press (browse).
2 Rotate the control dial to select
[CHANNEL], then press it.
3 Rotate the control dial to select the
desired channel, then press it.
To select channels from categories
Press (browse).
1
2 Rotate the control dial to select [CATEGORY],
then press it.
3 Rotate the control dial to select the desired
category, then press it.
The channel list appears.
4 Rotate the control dial to select the desired
channel, then press it.
To store channels
1
While receiving the channel that you want to
store, press and hold a number button (1 to
6) until [MEM] appears.
To receive the stored channel, press MODE
to select [SX1], [SX2] or [SX3], then press a
number button (1 to 6).
To set a parental control
The parental control feature allows you to
limit access to SiriusXM channels with
mature content. When enabled, the parental
control feature requires you to enter a
passcode to tune to the locked channels.
Information on setting up the passcode and
locking channels can be found below.
1 Press MENU and rotate the control dial.
2 Select [GENERAL] [SXM PARENTAL]
[LOCK SELECT] [LOCK-ON].
3 Enter the passcode by rotating the control
dial on the unit or pressing / on the
remote commander.
To move the entry position, press /
(SEEK –/+) on the unit or / on the
remote commander.
The initial passcode is [0000].
4 After entering the passcode, press ENTER.
To unlock the channels, select [LOCK-OFF].
To ch ange t h e pass code
1
Press MENU and rotate the control dial.
2 Select [GENERAL] [SXM PARENTAL]
[CODE EDIT].
3 Enter the current passcode on the current
passcode input display, then press ENTER.
The initial passcode is [0000].
4 Enter your new 4-digit passcode on the new
passcode input display, then press ENTER.
To ch ange d i splay i tems
Press DSPL to change as follows:
Channel Number (Default) Channel Name
Artist Name Song Title Content Info
Category Name Clock
13GB

Playback
Playing a USB Device
In these Operating Instructions, “iPod” is
used as a general reference for the iPod
functions on an iPod and iPhone, unless
otherwise specified by the text or
illustrations.
For details on the compatibility of your iPod,
see “About iPod” (page 26) or visit the
support site on the back cover.
AOA (Android Open Accessory) 2.0, MSC
(Mass Storage Class) and MTP (Media
Transfer Protocol) type USB devices*
compliant with the USB standard can be
used. Depending on the USB device, the
Android mode or MSC/MTP mode can be
selected on the unit.
Some digital media players or Android
smartphones may require setting to MTP
mode.
* e.g., a USB flash drive, digital media player,
Android smartphone
Notes
• For details on the compatibility of your USB device,
visit the support site on the back cover.
• Smartphones with Android OS 4.1 or higher
installed support Android Open Accessory 2.0
(AOA 2.0). However, some smartphones may not
fully support AOA 2.0 even if Android OS 4.1 or
higher is installed.
For details on the compatibility of your Android
smartphone, visit the support site on the back
cover.
• Playback of the following files is not supported.
MP3/WMA/FLAC:
– copyright-protected files
– DRM (Digital Rights Management) files
– Multi-channel audio files
MP3/WMA:
– lossless compression files
Before making a connection, select the USB
mode (Android mode or MSC/MTP mode)
depending on the USB device (page 22).
1 Connect a USB device to the USB port
(page 11).
Playback starts.
If a device is already connected, to start
playback, press SRC to select [USB] ([IPD]
appears in the display when the iPod is
recognized).
2 Adjust the volume on this unit.
To stop pla yback
Press and hold OFF for 1 second.
To remove the device
Stop playback, then remove the device.
Caution for iPhone
When you connect an iPhone via USB,
phone call volume is controlled by the
iPhone, not the unit. Do not inadvertently
increase the volume on the unit during a
call, as a sudden loud sound may result
when the call ends.
Playing a BLUETOOTH Device
You can play contents on a connected
device that supports BLUETOOTH A2DP
(Advanced Audio Distribution Profile).
1 Make BLUETOOTH connection with
the audio device (page 8).
To select the audio device, press MENU,
then select [BLUETOOTH] [SET
AUDIODEV] (page 24).
2 Press SRC to select [BT AUDIO].
3 Operate the audio device to start
playback.
14GB

4 Adjust the volume on this unit.
Notes
• Depending on the audio device, information such
as title, track number/time and playback status
may not be displayed on this unit.
• Even if the source is changed on this unit,
playback of the audio device does not stop.
• [BT AUDIO] does not appear in the display while
running the “SongPal” application via the
BLUETOOTH function.
To match the volume level of the
BLUETOOTH device to other sources
Start playback of the BLUETOOTH audio
device at a moderate volume, and set your
usual listening volume on the unit.
Press MENU, then select [SOUND] [SET BTA
VOL] (page 23).
Searching and Playing
Tracks
Repeat play and shuffle play
Not available when a USB device in Android
mode is connected.
1 During playback, press (repeat) or
(shuffle) repeatedly to select the
desired play mode.
Playback in the selected play mode may
take time to start.
Available play modes differ depending on
the selected sound source.
2 Rotate the control dial to select the
desired search category, then press it
to confirm.
3 Repeat step 2 to search the desired
track.
Playback starts.
To exit the Quick-BrowZer mode
Press (browse).
Searching by skipping items
(Jump mode)
Not available when a USB device in Android
mode or iPod is connected.
1 Press (browse).
2 Press (SEEK +).
3 Rotate the control dial to select the
item.
The list is jumped in steps of 10% of the
total number of items.
4 Press ENTER to return to the Quick-
BrowZer mode.
The selected item appears.
5 Rotate the control dial to select the
desired item, then press it.
Playback starts.
Searching a track by name (QuickBrowZer™)
Not available when a USB device in Android
mode or iPod is connected.
1 During USB playback, press
(browse)* to display the list of search
categories.
When the track list appears, press
(back) repeatedly to display the desired
search category.
* During USB playback, press (browse) for
more than 2 seconds to directly return to the
beginning of the category list.
15GB

Listening to Pandora®
Pandora® is available to stream music
through your iPhone and Android
smartphone. You can control Pandora® on a
BLUETOOTH connected iPhone/Android
smartphone from this unit.
Pandora® is only available in certain
countries. Please visit
http://www.pandora.com/legal
for more information.
Setting up Pandora®
1 Check the compatibility of your
mobile device by visiting the support
site on the back cover.
2 Download the latest version of the
Pandora® application from your
smartphone’s app store. A list of
compatible devices can be found at
www.pandora.com/everywhere/
mobile
Streaming Pandora®
1 Make BLUETOOTH connection with
the audio device (page 8).
To select the audio device, press MENU,
then select [BLUETOOTH] [SET
AUDIODEV] (page 24).
2 Press SRC to select [PANDORA].
3 Launch Pandora® application on your
mobile device.
4 Press (play/pause) to start
playback.
If the device number appears
Make sure that the same numbers are
displayed (e.g., 123456) in this unit and the
mobile device, then press ENTER on this unit
and select [Yes] on the mobile device.
When activating the BLUETOOTH
function
You can adjust the volume level.
Press MENU, then select [SOUND] [SET BTA
VOL] (page 23).
Available Operations in
Pandora®
“Thumbs” feedback
“Thumbs Up” or “Thumbs Down” feedback
allows you to personalize stations.
1 During playback, press (Thumbs
Up) or (Thumbs Down).
Using the station list
The station list allows you to easily select a
desired station.
1 During playback, press (browse).
2 Press (SEEK +) to select the
sorting order [BY DATE] or [A TO Z].
3 Rotate the control dial to select the
desired station, then press it.
Playback starts.
Bookmarking
The track currently being played can be
bookmarked and stored in your Pandora®
account.
1 During playback, press MODE.
16GB

Handsfree Calling (via
BLUETOOTH only)
To use a cellular phone, connect it with this
unit. You can connect two cellular phones to
the unit. For details, see “Preparing a
BLUETOOTH Device” (page 8).
Receiving a Call
1 Press CALL when a call is received
with a ringtone.
The phone call starts.
Note
The ringtone and talker’s voice are output only from
the front speakers.
To rejec t the ca ll
Press and hold OFF for 1 second.
To e n d the call
Press CALL again.
Making a Call
You can make a call from the phonebook or
call history when a cellular phone
supporting PBAP (Phone Book Access
Profile) is connected.
When two cellular phones are connected to
the unit, select either phone.
From the phonebook
1 Press CALL.
When two cellular phones are connected
to the unit, rotate the control dial to
select either phone, then press it.
2 Rotate the control dial to select
[PHONE BOOK], then press it.
3 Rotate the control dial to select an
initial from the initial list, then press
it.
4 Rotate the control dial to select a
name from the name list, then press
it.
5 Rotate the control dial to select a
number from the number list, then
press it.
The phone call starts.
From the call history
1 Press CALL.
When two cellular phones are connected
to the unit, rotate the control dial to
select either phone, then press it.
2 Rotate the control dial to select
[RECENT CALL], then press it.
A list of the call history appears.
3 Rotate the control dial to select a
name or phone number from the call
history, then press it.
The phone call starts.
By phone number input
1 Press CALL.
When two cellular phones are connected
to the unit, rotate the control dial to
select either phone, then press it.
2 Rotate the control dial to select [DIAL
NUMBER], then press it.
3 Rotate the control dial to enter the
phone number, and lastly select [ ]
(space), then press ENTER*.
The phone call starts.
* To move the digital indication, press /
(SEEK –/+).
Note
[_] appears instead of [#] on the display.
By redial
1 Press CALL.
When two cellular phones are connected
to the unit, rotate the control dial to
select either phone, then press it.
17GB

2 Rotate the control dial to select
[REDIAL], then press it.
The phone call starts.
By voice tags
You can make a call by saying the voice tag
stored in a connected cellular phone that
has a voice dialing function.
1 Press CALL.
When two cellular phones are connected
to the unit, rotate the control dial to
select either phone, then press it.
2 Rotate the control dial to select
[VOICE DIAL], then press it.
Alternatively, press and hold VOICE for
more than 2 seconds.
3 Say the voice tag stored on the
cellular phone.
Your voice is recognized, and the call is
made.
To cancel voice dialing
Press VOICE.
Available Operations during
Call
To adjust the ringtone volume
Rotate the control dial while receiving a call.
To adjust the talker’s voice volume
Rotate the control dial during a call.
To adjust the volume for the other party
(Mic gain adjustment)
Press MIC.
Adjustable volume levels: [MIC-LOW], [MICMID], [MIC-HI].
To reduce echo and noise (Echo
Canceler/Noise Canceler Mode)
Press and hold MIC.
Settable mode: [EC/NC-1], [EC/NC-2].
To switch between handsfree mode
and handheld mode
During a call, press MODE to switch the
phone call audio between the unit and
cellular phone.
Note
Depending on the cellular phone, this operation
may not be available.
18GB

Useful Functions
If the device number appears
Make sure that the number is displayed
(e.g., 123456), then select [Yes] on the
iPhone/Android smartphone.
Sony | Music Center with
iPhone/Android smartphone
Downloading the latest version of “Sony | Music
Center” application is required from the App Store
for iPhone or from Google Play for Android
smartphone.
Notes
For your safety, follow your local traffic laws and
regulations, and do not operate the application while
driving.
“Sony | Music Center” is an app for controlling Sony
audio devices which are compatible with “Sony |
Music Center”, by your iPhone/Android smartphone.
What you can control with “Sony | Music Center”
varies depending on the connected device.
To make use of “Sony | Music Center” features, see
the details on your iPhone/Android smartphone.
For further details on “Sony | Music Center,” visit the
following URL: http://www.sony.net/smcqa/
Visit the website below and check the compatible
iPhone/Android smartphone models.
For iPhone: visit the App Store
For Android smartphone: visit Google Play
Establishing the Sony | Music Center
connection
1 Make the BLUETOOTH connection with
iPhone/Android smartphone (page 8). To
select the audio device, press MENU, then
select [BLUETOOTH] [AUDIO DEV] (page 24).
2 Launch the “Sony | Music Center”
application.
3 Press MENU, rotate the control dial to
select [SONY APP], then press it.
4 Rotate the control dial to select
[CONNECT], then press it.
Connection to iPhone/Android smartphone
starts.
For details on the operations on iPhone/
Android smartphone, see the help of the
application.
To termi nate conn ectio n
1 Press MENU, rotate the control dial to select [SONY
APP], then press it.
2 Rotate the control dial to select [CONNECT], then
press it.
Selecting the source or application
You can operate to select the desired source or
application on iPhone/Android smartphone.
To select the source
Press SRC repeatedly. Alternatively, press SRC,
rotate the control dial to select the desired source,
then press ENTER.
To display the source list
Press SRC.
Announcement of various information by
voice guide (Android smartphone only)
When SMS, Twitter/Facebook/Calendar
notifications, etc., are received, they are
automatically announced through the car speakers.
For details on settings, refer to the help of the
application.
Activating voice recognition (Android
smartphone only)
By registering applications, you can control an
application by voice command. For details, refer to
the help of the application.
To activate voice recognition
1 Press and hold VOICE to activate voice recognition.
2 Say the desired voice command into the
microphone when [Say Source or App] appears on
the Android smartphone.
Notes
Voice recognition may not be available in some cases.
Voice recognition may not work properly depending
on the performance of the connected Android
smartphone.
Operate under conditions where noise such as engine
sound is minimized during voice recognition.
19GB

Replying a message of SMS (Android
smartphone only)
You can reply a message by voice recognition.
1 Activate voice recognition, then input “Reply.”
The message input display appears on the “Sony |
Music Center” application.
2 Input a reply message by voice recognition.
The list of message candidates appears on the
“Sony | Music Center” application.
3 Rotate the control dial to select the desired
message, then press it.
The message is sent out.
Making sound and display settings
You can adjust the settings relating to sound and
display via iPhone/Android smartphone.
For details on settings, refer to the help of the
application.
Using Siri Eyes Free
Siri Eyes Free allows you to use an iPhone
handsfree by simply speaking into the
microphone. This function requires you to
connect an iPhone to the unit via
BLUETOOTH. Availability is limited to iPhone
4s or later. Make sure that your iPhone is
running the latest iOS version.
You must complete BLUETOOTH registration
and connection configurations for the
iPhone with the unit in advance. For details,
see “Preparing a BLUETOOTH Device”
(page 7). To select the iPhone, press MENU,
then select [BLUETOOTH] [SET AUDIODEV]
(page 21).
1 Activate the Siri function on the
iPhone.
For details, refer to the operating
instructions supplied with the iPhone.
2 Press and hold VOICE for more than
2 seconds.
The voice command display appears.
3 After the iPhone beeps, speak into
the microphone.
The iPhone beeps again, then Siri starts
responding.
To deactivate Siri Eyes Free
Press VOICE.
Notes
• The iPhone may not recognize your voice
depending on usage conditions. (For example, if
you are in a moving car.)
• Siri Eyes Free may not function properly, or the
response time may lag in locations where iPhone
signals are difficult to receive.
• Depending on the iPhone’s operating condition,
Siri Eyes Free may not function properly, or may
quit.
• If you play a track with an iPhone using the
BLUETOOTH audio connection, when the track
starts playback via BLUETOOTH, Siri Eyes Free
automatically quits and the unit switches to the
BLUETOOTH audio source.
• When Siri Eyes Free is activated during audio
playback, the unit may switch to the BLUETOOTH
audio source even if you do not specify a track to
play.
• When connecting the iPhone to the USB port, Siri
Eyes Free may not function properly, or may quit.
• When connecting the iPhone to the unit via USB,
do not activate Siri with the iPhone. Siri Eyes Free
may not function properly, or may quit.
• There is no audio sound while Siri Eyes Free is
activated.
20GB

Settings
Canceling the DEMO Mode
You can cancel the demonstration display
which appears when the source is off and
the clock is displayed.
1 Press MENU, rotate the control dial to
select [GENERAL], then press it.
2 Rotate the control dial to select [SET
DEMO], then press it.
3 Rotate the control dial to select [SET
DEMO-OFF], then press it.
The setting is complete.
4 Press (back) twice.
The display returns to normal reception/
play mode.
Basic Setting Operation
You can set items in the following setup
categories:
setup (GENERAL), Sound setup
General
(SOUND), Display setup (DISPLAY),
BLUETOOTH setup (BLUETOOTH),
Sony | Music Center Setup (SONY APP).
1 Press MENU.
2 Rotate the control dial to select the
setup category, then press it.
The items that can be set differ
depending on the source and settings.
3 Rotate the control dial to select the
options, then press it.
To return to the previous display
Press (back).
21GB

General Setup (GENERAL)
DEMO (demonstration)
Activates the demonstration: [ON], [OFF].
CLOCK-ADJ (clock adjust) (page 8)
CAUT ALM (caution alarm)
Activates the caution alarm: [ON], [OFF]
(page 8).
(Available only while the source is off and
the clock is displayed.)
BEEP
Activates the beep sound: [ON], [OFF].
AUTO OFF
Shuts off automatically after a desired
time when the unit is turned off: [ON]
(30 minutes), [OFF].
STEERING
Registers/resets the setting of the
steering wheel remote control.
(Available when connected with the
connection cable (not supplied).)
(Available only while the source is off and
the clock is displayed.)
STR CONTROL (steering control)
Selects the input mode of the connected
remote control. To prevent a malfunction,
be sure to match the input mode with the
connected remote control before use.
CUSTOM
Input mode for the steering wheel
remote control
PRESET
Input mode for the wired remote
control excluding the steering wheel
remote control (automatically selected
when [RESET CUSTOM] is performed.)
EDIT CUSTOM
Registers the functions (SOURCE, ATT,
VOL +/–, SEEK +/–, VOICE, ON HOOK, OFF
HOOK) to the steering wheel remote
control:
Rotate the control dial to select the
function you want to assign to the
steering wheel remote control, then
press it.
While [REGISTER] is blinking, press and
hold the button on the steering wheel
remote control you want to assign the
function to. When registration is
complete, [REGISTERED] is displayed.
To register other functions, repeat
steps and .
(Available only when [STR CONTROL] is
set to [CUSTOM].)
RESET CUSTOM
Resets the setting of the steering wheel
remote control: [YES], [NO].
(Available only when [STR CONTROL] is
set to [CUSTOM].)
Notes
• While making settings, only button operation
on the unit is available. For safety, park your car
before making this setting.
• If an error occurs while registering, all the
previously-registered information remains.
Restart registration from the function where
the error occurred.
• This function may not be available on some
vehicles. For details on the compatibility of
your vehicle, visit the support site on the back
cover.
USB MODE
Changes the USB mode: [ANDROID],
[MSC/MTP].
(Available only when the USB source is
selected.)
CT (clock time)
Activates the CT function: [ON], [OFF].
BTM (best tuning memory) (page 11)
(Available only when the tuner is
selected.)
SXM PARENTAL
Sets the parental lock to [ON], [OFF], and
edits the passcode (page 13).
(Available only when SiriusXM is
selected.)
SXM RESET
Initializes the SiriusXM Connect Vehicle
Tuner settings (preset channels/parental
lock): [YES], [NO].
(Available only when SiriusXM is
selected.)
22GB

FIRMWARE
(Available only while the source is off and
the clock is displayed.)
Checks/updates the firmware version. For
details, visit the support site on the back
cover.
FW VERSION (firmware version)
Displays current firmware version.
FW UPDATE (firmware update)
Enters firmware update process: [YES],
[NO].
Updating the firmware takes a few
minutes to complete. During the update,
do not turn the ignition to the OFF
position, nor remove the USB device.
Sound Setup (SOUND)
This setup menu is not available when the
source is off and the clock is displayed.
EQ10 PRESET
Selects
an equalizer curve from 10
equalizer curves or off:
[OFF], [R&B], [ROCK], [POP], [HIP-HOP],
[E DM ] , [JAZZ], [SOUL],
[COUNTRY], [KARAOKE]*, [CUSTOM].
The equalizer curve setting can be
memorized for each source.
* [KARAOKE] reduces the vocal sound but
cannot fully remove it during playback. Also,
using a microphone is not supported.
EQ10 CUSTOM
Sets [CUSTOM] of EQ10.
Selects the equalizer curve: [BAND1] 32
Hz, [BAND2] 63 Hz, [BAND3] 125 Hz,
[BAND4] 250 Hz, [BAND5] 500 Hz,
[BAND6] 1 kHz, [BAND7] 2 kHz, [BAND8] 4
kHz, [BAND9] 8 kHz, [BAND10] 16 kHz.
The volume level is adjustable in 1 dB
steps, from -6 dB to +6 dB.
BALANCE
Adjusts the sound balance: [RIGHT-15] –
[CENTER] – [LEFT-15].
FAD ER
Adjusts the relative level: [FRONT-15] –
[CENTER] – [REAR-15].
S.WOOFER (subwoofer)
SW LEVEL (subwoofer level)
Adjusts the subwoofer volume level:
[+6 dB] – [0 dB] – [-6 dB].
([ATT] is displayed at the lowest setting.)
SW PHASE (subwoofer phase)
Selects the subwoofer phase: [NORM],
[REV].
LPF FREQ (low pass filter frequency)
Selects the subwoofer cut-off frequency:
[80Hz], [100Hz], [120Hz].
HPF FREQ (high pass filter frequency)
Selects the front/rear speaker cut-off
frequency: [OFF], [80Hz], [100Hz], [120Hz].
AUX VOL (AUX volume level)
Adjusts the volume level for each
connected auxiliary device: [+18 dB] –
[0 dB] – [-8 dB].
This setting negates the need to adjust
the volume level between sources.
(Available only when the AUX is selected.)
BTA VOL (BLUETOOTH audio volume level)
Adjusts the volume level for each
connected BLUETOOTH device: [+6 dB] –
[0 dB] – [-6 dB].
This setting negates the need to adjust
the volume level between sources.
(Available only when the BT audio,
application or Pandora® is selected.)
23GB

Display Setup (DISPLAY)
DIMMER
Changes the display brightness: [ON], [OFF],
[CLK] (clock).
To set this function to be active only during a
riod, select [CLK], then set the start and
fixed pe
end times.
– To set the brightness when the dimmer
function is activated:
Set [DIMMER] to [ON], then adjust
[BRIGHTNESS].
– To set the brightness when the dimmer
function is deactivated:
Set [DIMMER] to [OFF], then adjust
[BRIGHTNESS].
The brightness setting is stored and
applied when the dimmer function is
activated or deactivated.
BRIGHTNESS
Adjusts the display brightness. The
brightness level is adjustable: [1] – [10].
SND SYNC (sound synchronization)
Activates the synchronization of the
illumination with the sound: [ON], [OFF].
AUTO SCR (auto scroll)
Scrolls long items automatically: [ON],
[OFF].
(Not available when the AUX or tuner is
selected.)
BLUETOOTH Setup
(BLUETOOTH)
PAI RIN G (page 9)
Connects up to two BLUETOOTH devices:
[DEVICE 1], [DEVICE 2].
[DEVICE 1] or [DEVICE 2] will be changed to
the paired device name after pairing is
complete.
AUDIODEV (audio device)
Selects the audio device.
[*] appears on the device paired with
[DEVICE 1] or the current A2DP compatible
audio device.
RINGTONE
Selects whether this unit or the connected
cellular phone outputs the ringtone: [1]
(this unit), [2] (cellular phone).
AUTO ANS (auto answer)
Sets this unit to answer an incoming call
automatically: [OFF], [1] (about 3
seconds), [2] (about 10 seconds).
AUTOPAIR (auto pairing)
Starts BLUETOOTH pairing automatically
when iOS device version 5.0 or later is
connected via USB: [ON], [OFF].
BT SIGNL (BLUETOOTH signal) (page 10)
Activates/deactivates the BLUETOOTH
function.
BT INIT (BLUETOOTH initialize)
Initializes all the BLUETOOTH related
settings (pairing information, preset
number, device information, etc.): [YES],
[NO].
When disposing the unit, initialize all the
settings.
(Available only while the source is off and
the clock is displayed.)
24GB

Sony | Music Center Setup
(SONY APP)
AUTO LAUNCH (auto launch)
Activates the “Sony | Music Center” auto launch:
[ON], [OFF].
When [ON] is selected, “Sony | Music Center”
will automatically connect after the BLUETOOTH
connection is complete.
CONNECT (connect)
Establish and terminate “Sony | Music Center”
function (connection).
(page 19)
Additional Information
Updating the Firmware
To update the firmware, visit the support site
on the back cover, then follow the online
instructions.
Notes
• Using a USB device (not supplied) is required for
updating the firmware. Store the updater in the
USB device, and connect the device to the USB
port, then perform the update operation.
• Updating the firmware takes a few minutes to
complete. During the update, do not turn the
ignition to the OFF position, nor remove the USB
device.
Precautions
• Cool off the unit beforehand if your car has
been parked in direct sunlight.
• Do not leave the front panel or audio
devices brought in inside the car, or it may
cause malfunction due to high
temperature in direct sunlight.
• Power antenna (aerial) extends
automatically.
Moisture condensation
Should moisture condensation occur inside
the unit, remove the disc and wait for about
an hour for it to dry out; otherwise the unit
will not operate properly.
To maintain high sound quality
Do not splash liquid onto the unit or discs.
Playback order of audio files
Folder (album)
Audio file (track)
25GB

About iPod
• You can connect to the following iPod
models. Update your iPod devices to the
latest software before use.
Compatible iPhone/iPod models
Compatible
Model
iPhone SE
iPhone 6s Plus
iPhone 6s
iPhone 6 Plus
iPhone 6
iPhone 5s
iPhone 5c
iPhone 5
iPhone 4s
iPod touch
(6th generation)
iPod touch
(5th generation)
iPod nano
(7th generation)
• “Made for iPod,” and “Made for iPhone,”
mean that an electronic accessory has
been designed to connect specifically to
iPod or iPhone, respectively, and has been
certified by the developer to meet Apple
performance standards. Apple is not
responsible for the operation of this device
or its compliance with safety and
regulatory standards. Please note that the
use of this accessory with iPod or iPhone
may affect wireless performance.
If you have any questions or problems
concerning your unit that are not covered in
this manual, consult your nearest Sony
dealer.
Bluetooth® USB
26GB

Maintenance
+ side up
Specifications
Replacing the lithium battery of the
remote commander
Under normal conditions, the battery will
last approximately 1 year. (The service life
may be shorter, depending on the
conditions of use.)
When the battery becomes weak, the range
of the remote commander becomes shorter.
CAUTION
Danger of explosion if battery is incorrectly
replaced. Replaced only with the same or
equivalent type.
Notes on the lithium battery
• Keep the lithium battery out of the reach of
children. Should the battery be swallowed,
immediately consult a doctor.
• Wipe the batte ry with a dry cloth to ensure a good
contact.
• Be sure to observe the correct polarity when
installing the battery.
• Do not hold the battery with metallic tweezers,
otherwise a short-circuit may occur.
Cleaning the connectors
The unit may not function properly if the
connectors between the unit and the front
panel are not clean. In order to prevent this,
detach the front panel (page 8) and clean
the connectors with a cotton swab. Do not
apply too much force. Otherwise, the
connectors may be damaged.
FOR THE CUSTOMERS IN THE USA. NOT
APPLICABLE IN CANADA, INCLUDING IN
THE PROVINCE OF QUEBEC.
POUR LES CLIENTS AUX ÉTATS-UNIS.
NON APPLICABLE AU CANADA, Y
COMPRIS LA PROVINCE DE QUÉBEC.
AUDIO POWER SPECIFICATIONS
CTA2006 Standard
Power Output: 20 Watts RMS × 4
at 4 Ohms < 1% THD+N
SN Ratio: 80 dBA
(reference: 1 Watt into 4 Ohms)
Tuner section
FM
Tuning range: 87.5 MHz – 107.9 MHz
Antenna (aerial) terminal:
External antenna (aerial) connector
Intermediate frequency:
FM CCIR: -1,956.5 kHz to -487.3 kHz and
+500.0 kHz to +2,095.4 kHz
Usable sensitivity: 8 dBf
Selectivity: 75 dB at 400 kHz
Signal-to-noise ratio: 73 dB
Separation: 50 dB at 1 kHz
Frequency response: 20 Hz – 15,000 Hz
AM
Tuning range: 530 kHz – 1,710 kHz
Antenna (aerial) terminal:
External antenna (aerial) connector
Sensitivity: 26 μV
Notes
• For safety, turn off the ignition before cleaning the
connectors, and remove the key from the ignition
switch.
• Never touch the connectors directly with your
fingers or with any metal device.
27GB

USB Player section
Interface: USB (Full-speed)
Maximum current: 1 A
The maximum number of recognizable
tracks:
– folders (albums): 256
– files (tracks) per folder: 256
Compatible Android Open Accessory
protocol (AOA): 2.0
Corresponding codec:
MP3 (.mp3)
Bit rate: 8 kbps – 320 kbps (Supports
VBR (Variable Bit Rate))
Sampling rate: 16 kHz – 48 kHz
WMA (.wma)
Bit rate: 32 kbps – 192 kbps (Supports
VBR (Variable Bit Rate))
Sampling rate: 32 kHz, 44.1 kHz,
48 kHz
FLAC (.flac)
Bit depth: 16 bit, 24 bit
Sampling rate: 44.1 kHz, 48 kHz
Wireless Communication
Communication System:
BLUETOOTH Standard version 3.0
Output:
BLUETOOTH Standard Power Class 2
(Max. +4 dBm)
Maximum communication range:
Line of sight approx. 10 m (33 ft)*
1
Frequency band:
2.4 GHz band
(2.4000 GHz – 2.4835 GHz)
Modulation method: FHSS
Compatible BLUETOOTH Profiles*
2
:
A2DP (Advanced Audio Distribution
Profile) 1.3
AVRCP (Audio Video Remote Control
Profile) 1.3
HFP (Handsfree Profile) 1.6
PBAP (Phone Book Access Profile)
SPP (Serial Port Profile)
Corresponding codec:
SBC (.sbc), ACC (.m4a)
*1 The actual range will vary depending on factors
such as obstacles between devices, magnetic
fields around a microwave oven, static electricity,
reception sensitivity, antenna (aerial)’s
performance, operating system, software
application, etc.
*2 BLUETOOTH standard profiles indicate the
purpose of BLUETOOTH communication between
devices.
28GB
Power amplifier section
Output: Speaker outputs
Speaker impedance: 4 Ω – 8 Ω
Maximum power output: 55 W × 4 (at 4 Ω)
General
Outputs:
Audio outputs terminal:
Power antenna (aerial)/Power amplifier
control terminal (REM OUT)
Inputs:
SiriusXM input terminal
Remote controller input terminal
Antenna (aerial) input terminal
AUX input jack (stereo mini
USB port
Power requirements: 12 V DC car battery
(negative ground (earth))
Rated current consumption: 10 A
Dimensions:
Approx. 178 mm × 50 mm × 119 mm
1
(7
/8 in × 2 in × 4 3/4 in) (w/h/d)
Mounting dimensions:
Approx. 182 mm × 53 mm × 102 mm
1
(7
/4 in × 2 1/8 in × 4 1/8 in) (w/h/d)
Mass: Approx. 0.7 kg (1 lb 9 oz)
Package contents:
Main uni
t (1)
commander (1): RM-X231
Remote
Parts for installation and connections
(1 set)
Optional accessories/equipment:
SiriusXM Connect Vehicle Tuner: SXV100,
SXV200, SXV300
Cable for steering wheel remote input:
RC-SR1
Your dealer may not handle some of the
above listed accessories. Please ask the
dealer for detailed information.
Design and specifications are subject to
change without notice.
REAR, SUB
jack)

Copyrights
SiriusXM Connect Vehicle Tuner and
Subscription sold separately.
www.siriusxm.com
Sirius, XM and all related marks and logos
are trademarks of Sirius XM Radio Inc. All
rights reserved.
The Bluetooth® word mark and logos are
registered trademarks owned by Bluetooth
SIG, Inc. and any use of such marks by Sony
Corporation is under license. Other
trademarks and trade names are those of
their respective owners.
The N-Mark is a trademark or registered
trademark of NFC Forum, Inc. in the United
States and in other countries.
Windows Media is either a registered
trademark or trademark of Microsoft
Corporation in the United States and/or
other countries.
This product is protected by certain
intellectual property rights of Microsoft
Corporation. Use or distribution of such
technology outside of this product is
prohibited without a license from Microsoft
or an authorized Microsoft subsidiary.
iPhone, iPod, iPod classic, iPod nano, iPod
touch, and Siri are trademarks of Apple Inc.,
registered in the U.S. and other countries.
App Store is a service mark of Apple Inc.
MPEG Layer-3 audio coding technology and
patents licensed from Fraunhofer IIS and
Thomson.
Pandora® , t he Pan dora® logo, and the
Pandora® trade dress are trademarks or
registered trademarks of Pandora Media,
Inc., used with permission.
Google, Google Play and Android are
trademarks of Google Inc.
libFLAC
Copyright (C) 2000-2009 Josh Coalson
Copyright (C) 2011-2013 Xiph.Org Foundation
Redistribution and use in source and binary
forms, with or without modification, are
permitted provided that the following
conditions are met:
– Redistributions of source code must retain
the above copyright notice, this list of
conditions and the following disclaimer.
– Redistributions in binary form must
reproduce the above copyright notice, this
list of conditions and the following
disclaimer in the documentation and/or
other materials provided with the
distribution.
– Neither the name of the Xiph.org
Foundation nor the names of its
contributors may be used to endorse or
promote products derived from this
software without specific prior written
permission.
THIS SOFTWARE IS PROVIDED BY THE
COPYRIGHT HOLDERS AND CONTRIBUTORS
“AS IS” AND ANY EXPRESS OR IMPLIED
WARRANTIES, INCLUDING, BUT NOT LIMITED
TO, THE IMPLIED WARRANTIES OF
MERCHANTABILITY AND FITNESS FOR A
PARTICULAR PURPOSE ARE DISCLAIMED. IN
NO EVENT SHALL THE FOUNDATION OR
CONTRIBUTORS BE LIABLE FOR ANY DIRECT,
INDIRECT, INCIDENTAL, SPECIAL,
EXEMPLARY, OR CONSEQUENTIAL DAMAGES
(INCLUDING, BUT NOT LIMITED TO,
PROCUREMENT OF SUBSTITUTE GOODS OR
SERVICES; LOSS OF USE, DATA, OR PROFITS;
OR BUSINESS INTERRUPTION) HOWEVER
CAUSED AND ON ANY THEORY OF LIABILITY,
WHETHER IN CONTRACT, STRICT LIABILITY,
OR TORT (INCLUDING NEGLIGENCE OR
OTHERWISE) ARISING IN ANY WAY OUT OF
THE USE OF THIS SOFTWARE, EVEN IF
ADVISED OF THE POSSIBILITY OF SUCH
DAMAGE.
29GB

Troubleshooting
The following checklist will help you remedy
problems you may encounter with your unit.
Before going through the checklist below,
check the connection and operating
procedures.
For details on using the fuse and removing
the unit from the dashboard, see
“Connection/Installation” (page 37).
If the problem is not solved, visit the support
site on the back cover.
General
No power is being supplied to the unit.
If the unit is turned off and the display
disappears, the unit cannot be operated
with the remote commander.
– Turn on the unit.
No sound or the sound is very low.
The position of the fader control [FADER]
is not set for a 2-speaker system.
The volume of the unit and/or connected
device is very low.
– Increase the volume of the unit and
connected device.
No beep sound.
An optional power amplifier is connected
and you are not using the built-in
amplifier.
The contents of the memory have been
erased.
The power supply lead or battery has
been disconnected or not connected
properly.
Stored stations and correct time are
erased.
The fuse has blown.
Makes a noise when the position of the
ignition is switched.
The leads are not matched correctly with
the car’s accessory power connector.
During playback or reception, the
demonstration mode starts.
If no operation is performed for 5 minutes
with [DEMO-ON] set, the demonstration
mode starts.
– Set [DEMO-OFF] (page 22).
The display disappears from/does not
appear in the display window.
The dimmer is set to [DIM-ON] (page 24).
The display disappears if you press and
hold OFF.
– Press OFF on the unit until the display
appears.
The connectors are dirty (page 27).
The display/illumination flashes.
The power supply is not sufficient.
– Check that the car battery supplies
enough power to the unit. (The power
requirement is 12 V DC.)
The operation buttons do not function.
The disc will not eject.
Press DSPL and (back)/MODE for more
than 2 seconds to reset the unit.
The contents stored in memory are
erased.
For your safety, do not reset the unit while
you are driving.
Radio reception
Stations cannot be received.
The sound is hampered by noises.
The connection is not correct.
– If your car has built-in radio antenna
(aerial) in the rear/side glass, connect an
REM OUT lead (blue/white striped) or
accessory power supply lead (red) to the
power supply lead of a car’s antenna
(aerial) booster.
– Check the connection of the car antenna
(aerial).
– If the auto antenna (aerial) will not
extend, check the connection of the
power antenna (aerial) control lead.
Preset tuning is not possible.
The broadcast signal is too weak.
30GB

RDS
PTY displays [- - - - - - - -].
The current station is not an RDS station.
RDS data has not been received.
The station does not specify the program
type.
USB device playback
You cannot play items via a USB hub.
This unit cannot recognize USB devices via
a USB hub.
A USB device takes longer to play.
The USB device contains files with a
complicated tree structure.
The sound is intermittent.
The sound may be intermittent at a high-
bit-rate.
DRM (Digital Rights Management) files
may not be playable in some cases.
The audio file cannot be played.
USB devices formatted with file systems
other than FAT16 or FAT32 are
unsupported.*
* This unit supports FAT16 and FAT32, but some USB
device may not support all of these FAT. For
details, refer to the operating instruction of each
USB device or contact the manufacturer.
Operations for skipping an album,
skipping items (Jump mode), and
searching a track by name (QuickBrowZer) cannot be performed.
These operations cannot be performed
when a USB device in Android mode or
iPod is connected.
– Set [USB MODE] to [MSC/MTP] (page 22).
– Remove the iPod.
The USB mode of the device is not set to
the appropriate mode.
– Make sure that the USB mode of the
device is set to MSC/MTP mode.
The sound cannot be output during
playback in Android mode.
While the unit is in Android mode, the
sound outputs only from the Android
smartphone.
– Check the status of the audio playback
application on the Android smartphone.
– Playback may not perform properly
depending on the Android smartphone.
NFC function
One touch connection (NFC) is not
possible.
If the smartphone does not respond to the
touching.
– Check that the NFC function of the
smartphone is turned on.
– Move the N-Mark part of the
smartphone closer to the N-Mark part
on this unit.
– If the smartphone is in a case, remove it.
NFC receiving sensitivity depends on the
device.
If One touch connection with the
smartphone fails several times, make
BLUETOOTH connection manually.
BLUETOOTH function
The connecting device cannot detect this
unit.
Before the pairing is made, set this unit to
pairing standby mode.
31GB

While connected to two BLUETOOTH
devices, this unit cannot be detected from
another device.
– Disconnect either connection and search
for this unit from another device.
When the device pairing is made, set the
BLUETOOTH signal output to on (page 10).
Connection is not possible.
The connection is controlled from one side
(this unit or BLUETOOTH device), but not
both.
– Connect to this unit from a BLUETOOTH
device or vice versa.
The name of the detected device does not
appear.
Depending on the status of the other
device, it may not be possible to obtain
the name.
No ringtone.
Adjust the volume by rotating the control
dial while receiving a call.
Depending on the connecting device, the
ringtone may not be sent properly.
– Set [RINGTONE] to [1] (page 24).
The front speakers are not connected to
the unit.
– Connect the front speakers to the unit.
The ringtone is output only from the
front speakers.
The talker’s voice cannot be heard.
The front speakers are not connected to
the unit.
– Connect the front speakers to the unit.
The talker’s voice is output only from the
front speakers.
A call partner says that the volume is too
low or high.
Adjust the volume accordingly using Mic
gain adjustment (page 18).
Echo or noise occurs in phone call
conversations.
Lower the volume.
Set EC/NC Mode to [EC/NC-1] or [EC/NC-2]
(page 18).
If the ambient noise other than the phone
call sound is loud, try reducing this noise.
E.g.: If a window is open and road noise,
etc., is loud, shut the window. If an air
conditioner is loud, lower the air
conditioner.
The phone is not connected.
When BLUETOOTH audio is played, the
phone is not connected even if you press
CALL.
– Connect from the phone.
The phone sound quality is poor.
Phone sound quality depends on
reception conditions of cellular phone.
– Move your car to a place where you can
enhance the cellular phone’s signal if
the reception is poor.
The volume of the connected audio device
is low (high).
Volume level will differ depending on the
audio device.
– Adjust the volume of the connected
audio device or this unit (page 23).
The sound skips during playback of a
BLUETOOTH audio device.
Reduce the distance between the unit and
the BLUETOOTH audio device.
If the BLUETOOTH audio device is stored in
a case which interrupts the signal, remove
the audio device from the case during use.
Several BLUETOOTH devices or other
devices which emit radio waves are in use
nearby.
– Turn off the other devices.
– Increase the distance from the other
devices.
The playback sound stops momentarily
when the connection between this unit
and the cellular phone is being made. This
is not a malfunction.
The connected BLUETOOTH audio device
cannot be controlled.
Check that the connected BLUETOOTH
audio device supports AVRCP.
Some functions do not work.
Check if the connecting device supports
the functions in question.
A call is answered unintentionally.
The connecting phone is set to answer a
call automatically.
32GB

Pairing failed due to a timeout.
Depending on the connecting device, the
time limit for pairing may be short.
– Try completing the pairing within the
time.
BLUETOOTH function cannot operate.
Turn off the unit by pressing OFF for more
than 2 seconds, then turn the unit on
again.
No sound is output from the car speakers
during handsfree call.
If the sound is output from the cellular
phone, set the cellular phone to output
the sound from the car speakers.
Siri Eyes Free is not activated.
Perform the handsfree registration for an
iPhone that supports Siri Eyes Free.
Set the Siri function on the iPhone to on.
Cancel the BLUETOOTH connection with
the iPhone and the unit, and reconnect.
Sony | Music Center operation
Application name is mismatched with the actual
application in “Sony | Music Center”.
Launch the application again from the “Sony |
Music Center” application.
While running the “Sony | Music Center”
application via BLUETOOTH, the display
automatically switches to [BT AUDIO].
The “Sony | Music Center” application or
BLUETOOTH function has failed.
Run the application again.
The “Sony | Music Center” application is
automatically disconnected when the display
switches to [IPOD].
The “Sony | Music Center” application on iPhone/
iPod does not support iPod playback.
Change the source of the unit to other than
[IPOD], then establi
Music Center” connection (page 19).
The “Sony | Music Center” connection is
automatically disconnected when the USB mode
of the unit is changed to [ANDROID].
The Android smartphone is not supporting
playback in Android mode.
Set the USB mode of the unit to [MSC/MTP],
then establish the “Sony | Music
Center” connection (page 19).
sh the “Sony |
Pandora® operation
Pandora® connection is not possible.
Shut down the Pandora® application on
the mobile device, and then launch it
again.
Messages
The following messages may appear or flash
during operation.
HUB NO SUPRT: USB hubs are not
supported.
INVALID
The selected operation could be invalid.
[USB MODE] cannot be changed during
iPod playback.
IPD STOP: iPod playback has finished.
Operate your iPod/iPhone to start
playback.
NOT SUPPORT - ANDROID MODE
A USB device not supporting AOA
(Android Open Accessory) 2.0 is
connected to the unit while [USB MODE] is
set to [ANDROID].
– Set [USB MODE] to [MSC/MTP] (page 22).
OVERLOAD: The USB device is overloaded.
Disconnect the USB device, then press SRC
to select another source.
The USB device has a fault, or an
unsupported device is connected.
READ: Now reading information.
Wait until reading is complete and
playback starts automatically. This may
take some time depending on the file
organization.
USB ERROR: The USB device cannot be
played.
Connect the USB device again.
33GB

USB NO DEV: A USB device is not connected
or recognized.
Make sure the USB device or USB cable is
securely connected.
USB NO MUSIC: There is no playable file.
Connect a USB device containing playable
files (page 28).
USB NO SUPRT: The USB device is not
supported.
For details on the compatibility of your
USB device, visit the support site on the
back cover.
or : The beginning or the end
of the disc has been reached.
(underscore): The character cannot be
displayed.
For Sony
APP -----------: A connection with the application is
not established.
Make the “Sony | Music Center” connection again
APP DISPLAY: A screen setting display of the
application is open.
Exit the screen setting display of the application
APP LIST: The contents list of the CD/USB is open.
Exit the list of the application to enable button
APP MENU: A setting display of the application is
open.
Exit the setting display of the application to
| Music Center operation:
(page 16).
to enable button operation.
operation.
enable button operation.
For BLUETOOTH function:
BTA NO DEV: The BLUETOOTH device is not
connected or recognized.
Make sure the BLUETOOTH device is
securely connected, or the BLUETOOTH
connection is established with the
BLUETOOTH device.
ERROR: The selected operation could not be
performed.
Wait for a while, then try again.
UNKNOWN: A name or phone number
cannot be displayed.
WITHHELD: The phone number is hidden by
the caller.
34GB
For Pandora® operation:
BOOKMARK - ERROR: Bookmarking failed.
Wait for a while, then try again.
CANNOT SKIP: Skipping tracks is not
allowed.
Wait until the commercial ends, next track
begins, or select another station on the
list. Pandora® limits the number of skips
allowed on their service.
LICENSING - RESTRICTIONS: Pan dora ® is n ot
available outside your country.
MAINTENANCE - PLEASE - TRY AGAIN LATER: The Pandora® server is under
maintenance.
Wait for a while, then try again.
NO NETWORK: The network connection is
unstable or lost.
Make the network connection again on
the device, or wait until the network
connection is established.

NO STATION - PLEASE - CREATE - STATION IN - PANDORA APP: No stations on your
account.
Create the station on the mobile device.
NOT ALLOWED: The selected operation is
not allowed.
“Thumbs” feedback is not allowed.
– Wait until the commercial ends.
– Some functions, such as Shared Station,
do not permit feedback. Wait until the
next track begins, or select another
station on the list.
Bookmark is not allowed.
– Wait until the commercial ends.
– Select another track or station, then try it
again.
PAN ERROR: The selected operation could
not be performed.
Wait for a while, then try again.
PAN OPEN APP - PRESS PAUSE: Pandora ® is
not running.
Launch the Pandora® application on the
mobile device, then press (play/
pause).
PLEASE LOGIN - PANDORA APP: You a re
not logged into your Pandora® account.
Disconnect the device, log into your
Pandora® account, then connect the
device again.
RATING ERROR: “Thumbs” feedback failed.
Wait for a while, then try again.
UPDATE - PANDORA APP: An old version of
Pandora® is connected.
Update the Pandora® application to the
latest version.
For SiriusXM operation:
CH LOCKED
The channel that you have requested is
locked by the radio parental control
feature.
See “To set a parental control” (page 13)
for more information on the parental
control feature and how to access locked
channels.
CH UNAVAIL
The channel that you have requested is
not a valid SiriusXM channel or the
channel that you were listening to is no
longer available.
You may also see this message briefly
when first connecting a new SiriusXM
Connect Vehicle Tuner.
Visit www.siriusxm.com in the USA or
www.siriusxm.ca in Canada for SiriusXM
channel lineup information.
CHAN UNSUB
The channel that you have requested is
not included in your SiriusXM subscription
package or the channel that you were
listening to is no longer included in your
SiriusXM subscription package.
If you have questions about your
subscription package or would like to
subscribe to this channel, please contact
SiriusXM.
In the USA, visit www.siriusxm.com or call
1-866-635-2349.
In Canada, visit www.siriusxm.ca or call
1-877-438-9677.
35GB

CHK ANT
The radio has detected a fault with the
SiriusXM antenna.
The antenna cable may be either
disconnected or damaged.
– Verify that the antenna cable is
connected to the SiriusXM Connect
Vehicle Tuner.
– Inspect the antenna cable for damage
and kinks.
– Replace the antenna if the cable is
damaged. SiriusXM products are
available at your local car audio retailer
or online at
www.shop.siriusxm.com
CHECK TUNER
The radio is having difficulty
communicating with the SiriusXM Connect
Vehicle Tuner.
The tuner may be disconnected or
damaged.
– Verify that the SiriusXM Connect Vehicle
Tuner cable is securely connected to the
radio.
NO SIGNAL
SiriusXM Connect Vehicle Tuner is having
difficulty receiving the SiriusXM satellite
signal.
– Verify that your vehicle is outdoors with
a clear view of the sky.
– Verify that the SiriusXM magnetic mount
antenna is mounted on a metal surface
on the outside of the vehicle.
– Move the SiriusXM antenna away from
any obstructions.
– Inspect the antenna cable for damage
and kinks.
– Consult the SiriusXM Connect Vehicle
Tuner installation manual for more
information on antenna installation.
– Replace the antenna if the cable is
damaged. SiriusXM products are
available at your local car audio retailer
or online at
www.shop.siriusxm.com
SUBSCRIPTION UPDATED - PRESS ENT TO
CONTINUE
The radio has detected a change in your
SiriusXM subscription status.
– Press ENTER to clear the message.
If you have questions about your
subscription, please contact SiriusXM.
In the USA, visit www.siriusxm.com or
call 1-866-635-2349.
In Canada, visit www.siriusxm.ca or call
1-877-438-9677.
For steering wheel remote control
operation:
ERROR: An error occurred during the
function registration.
Register again from the function where
the error occurred (page 22).
TIMEOUT: The function registration failed
due to a timeout.
Try completing the registration while
[REGISTER] is blinking (about 6 seconds)
(page 22).
If these solutions do not help improve the
situation, consult your nearest Sony dealer.
If you take the unit to be repaired because of
CD playback trouble, bring the disc that was
used at the time the problem began.
36GB

Connection/Installation
× 2
× 4
5 × max. 8 mm
(7/32 × max. 5/16 in)
Cautions
•Run all ground (earth) leads to a
common ground (earth) point.
•Do not get the leads trapped under a
screw, or caught in moving parts (e.g., seat
railing).
•Before making connections, turn the car
ignition off to avoid short circuits.
•Connect the yellow and red power supply
leads only after all other leads have been
connected.
•Be sure to insulate any loose unconnected
leads with electrical tape for safety.
Precautions
• Choose the installation location carefully so
that the unit will not interfere with normal
driving operations.
•Avoid installing the unit in areas subject to
dust, dirt, excessive vibration, or high
temperature, such as in direct sunlight or
near heater ducts.
•Use only the supplied mounting hardware
for a safe and secure installation.
Note on the power supply lead (yellow)
When connecting this unit in combination with
other stereo components, the amperage rating of
the car circuit to which the unit is connected must
be higher than the sum of each component’s fuse
amperage rating.
Mounting angle adjustment
Adjust the mounting angle to less than 45°.
Parts List for Installation
• This parts list does not include all the
package contents.
•The bracket and the protection collar
are attached to the unit before shipping.
Before mounting the unit, use the release
keys to remove the bracket from the
unit. For details, see “Removing the
protection collar and the bracket”
(page 40).
• Keep the release keys for future use as
they are also necessary if you remove the
unit from your car.
37GB

Connection
from a wi red remote con trol
(not supplied)*
4
White
White/black striped
Gray
Black
Yellow
Red
Blue/white striped
from a car antenna
(aerial)
Front speaker*
1*2
Rear speaker*1*
2
Gray/black striped
Green
Green/black striped
Purple
Purple/black striped
*
3
*
3
Subwoofer*
1
Power amplifier*
1
For details, see “Making
connections” (page 39).
Satellite radio tuner
(SiriusX M)*
1
*1 Not supplied
*2 Speaker impedance: 4 Ω – 8 Ω × 4
*3 RCA pin cord (not supplied)
*4 Depending on the type of car, use an adaptor for
a wired remote control (not supplied).
38GB

Making connections
Front speaker
Subwoofer
To a common ground (earth) point
First connect the black ground (earth)
lead, then connect the yellow and red
power supply leads.
To the +12 V power terminal which is
energized at all times
Be sure to first connect the black ground
(earth) lead to a common ground (earth)
point.
To the +12 V power terminal which is
energized when the ignition switch is
set to the accessory position
If there is no accessory position, connect
to the +12 V power (battery) terminal
which is energized at all times.
Be sure to first connect the black ground
(earth) lead to a common ground (earth)
point.
To the power antenna (aerial) control
lead or the power supply lead of the
antenna (aerial) booster
It is not necessary to connect this lead if
there is no power antenna (aerial) or
antenna (aerial) booster, or with a
manually-operated telescopic antenna
(aerial).
To AMP REMOTE IN of an optional
power amplifier
This connection is only for amplifiers and
a power antenna (aerial). Connecting any
other system may damage the unit.
Memory hold connection
When the yellow power supply lead is
connected, power will always be supplied to
the memory circuit even when the ignition
switch is turned off.
Speaker connection
• Before connecting the speakers, turn the
unit off.
• Use speakers with an impedance of 4 Ω to
8 Ω, and with adequate power handling
capacities to avoid damage.
Subwoofer Easy Connection
You can use a subwoofer without a power
amplifier when it is connected to a rear
speaker cord.
Note
Use a subwoofer with an impedance of 4 Ω to 8 Ω,
and with adequate power handling capacities to
avoid damage.
39GB

Installation
Face the hook inwards.
182 mm (7
1
/4 in)
53 mm (2
1
/8 in)
Catch
Removing the protection collar
and the bracket
Before installing the unit, remove the
protection collar and the bracket from
the unit.
1 Pinch both edges of the protection
collar , then pull it out.
Mounting the unit in the
dashboard
• Before installing, make sure the catches on
both sides of the bracket are bent
inwards 2 mm (
• For Japanese cars, see “Mounting the unit
in a Japanese car” (page 41).
3
/32 in).
1 Position the bracket inside the
dashboard, then bend the claws
outward for a tight fit.
2 Insert both release keys until they
click, and pull down the bracket ,
then pull up the unit to separate.
40GB
2 Mount the unit onto the bracket ,
then attach the protection collar .
Notes
• If the catches are straight or bent outwards, the
unit will not be installed securely and may spring
out.
• Make sure the 4 catches on the protection collar
are properly engaged in the slots of the unit.

Mounting the unit in a Japanese car
to dashboard/center console
Existing parts supplied
with you r car
Bracket
Bracket
to dashboard/center console
Existing parts supplied
with you r car
Bracket
Bracket
Fuse (10 A)
You may not be able to install this unit in
some makes of Japanese cars. In such a
case, consult your Sony dealer.
TOYOTA
NISSAN
Detaching and attaching the front
panel
For details, see “Detaching the Front Panel”
(page 8).
Fuse replacement
When replacing the fuse,
be sure to use one
matching the amperage
rating stated on the
original fuse. If the fuse
blows, check the power
connection and replace the
fuse. If the fuse blows again after
replacement, there may be an internal
malfunction. In such a case, consult your
nearest Sony dealer.
Note
To prevent malfunction, install only with the
supplied screws .
41GB

http://esupport.sony.com/
Site d’assistance
Si vous avez des questions ou si vous souhaitez consulter
les toutes dernières informations techniques sur ce
produit, rendez-vous sur le site Web suivant :
Support site
If you have any questions or for the latest support
information on this product, please visit
the web site below:
If you have any questions/problems
regarding this product, try the following:
1
Read Troubleshooting in these
Operating Instructions.
2
Please contact (U.S.A. only);
Call
1-800-222-7669
URL
http://www.SONY.com
©2017 Sony Corporation Printed in Thailand http://www.sony.net/
 Loading...