

DSC-W180/W190

SECTION 5 ADJUSTMENTS
Link (English)
BEFORE STARTING ADJUSTMENTS Adjustment Items When Replacing CCD Bloc
List of Service Tools and Equipments
nd Lens Block and Main Board
Connecting the Equipments
Handling of Adjusting Firmware
CAMERA SECTION ADJUSTMENTS Introduction MS/BP Adjustment Zoom Adjustment Far Focus Adjustment Near Focus Adjustment WB/ISO Adjustment Set Lang Destination
ADJ
Product ID List

SONY
5-1. BEFORE STARTING ADJUSTMENTS
5-1-1. Adjustment Items When Replacing CCD Block and Lens Block and Main Board
When replacing these parts, adjust the items indicated by "•" in the following table.
| Adjustment | Replaced Parts | ||
|---|---|---|---|
| Adjustment | CCD block | Lens block | Main board |
| MS/BP Adjustment | |||
| Zoom Adjustment | |||
| Far Focus Adjustment | • | • | |
| Near Focus Adjustment | |||
| WB/ISO Adjustment | |||
| Set Lang Destination | |||
Table 5-1-1
5-1-2. List of Service Tools and Equipments

Fig. 5-1-1
Note:
For the chart, search "J-6082-563-A" in the JIG & Software on ESI homepage, download the PDF file and print out it on the A4 size white paper.

5-1-3. Connecting the Equipments
Connect the equipments as shown below.

Memory Stick PRO Duo (256 MB or more)


5-1-4. Handling of Adjusting Firmware
Note 1:
Save the adjusting firmware file in the root directory of Memory Stick PRO Duo. Saving it in the other directory causes the malfunction of program.
Note 2:
The adjusting firmware file is downloadable from the ESI homepage.
Preparations:
First, format the Memory Stick PRO Duo before copying the adjusting firmware. When formatting, perform on the PC, using the FAT. Do not format on the unit. If the concealed file "MEMSTICK.IND" exists, delete it. Decompress the downloaded file and confirm the file format as shown below.
Adjusting firmware file for DSC-W180: SDMA350C.bin Adjusting firmware file for DSC-W190: SDMC350C.bin
Save the file in the root directory of Memory Stick PRO Duo. And also save the file of "lang.txt" in the root directory Memory Stick PRO Duo when replacing main board. Refer to [5-2-7, Set Lang Destination] for "lang.txt".
Adjustment mode:
- 1. With the camera turned OFF, set the Mode switch to "• (Still image)" and insert the Memory Stick PRO Duo with the adjusting firmware files into the Memory Stick slot of the camera.
- 2. While pressing the "m (Delete)" button, press the ON/OFF (Power) button and release when the ON/OFF (Power) lamp and the LCD display turns on. Release the "m (Delete)" button when the ON/OFF (Power) lamp and the LCD display goes out.
- 3. After a few seconds, the LCD display will turn white and then show the Adjustment mode screen.
Pushing "MENU" button, the adjustment is finished makes to return to the initial screen display for adjustments. In case of adjusting continuously, go to the next step with above mentioned operation. Changing the Mode switch will take you out of the Adjustment mode. When all adjustments are completed, just simply remove the power from the unit completes the adjustment procedure.
5-2. CAMERA SECTION ADJUSTMENTS
5-2-1. Introduction
After CCD block, Lens block or Main board replacement, perform adjustments to operate the camera. Followings are keys and functions used in the adjustments. (Fig. 5-2-1)


The initial screen for the adjustment mode is as follows. (Fig. 5-2-2)

Fig. 5-2-2

5-2-2. MS/BP Adjustment
The Iris/Mechanical Shutter adjustment order is as follows.
Small pattern box (PTB-1450) setting:
Color temperature = 3150 + 50K Luminance: LV 12.3 ± 0.2
Equipments required: Small pattern box (PTB-1450)

Adjustment order

Screen display
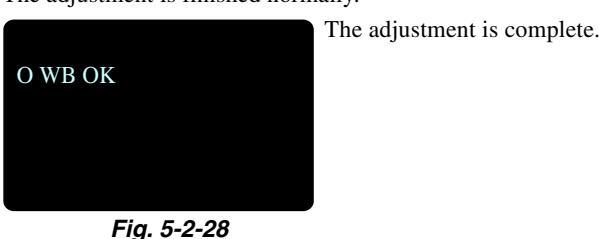
The adjustment is finished normally.


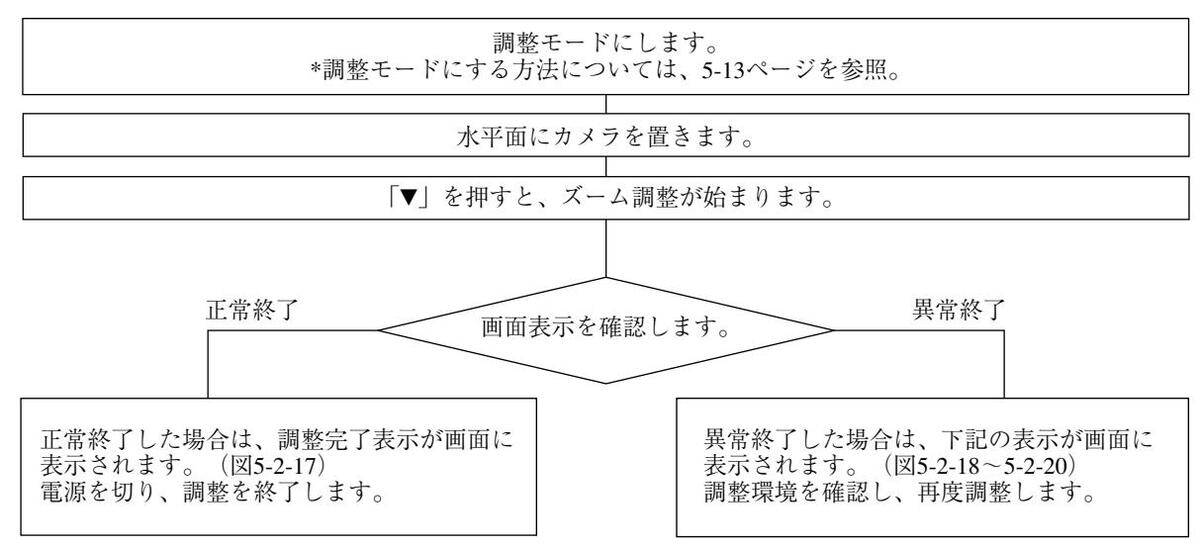
5-2-3. Zoom Adjustment
The Zoom Over Run/Focus Back Lash adjustment order is as follows
Perform the zoom adjustment in the condition the camera stands up in the horizontal plane. Adjusting in the other condition causes the malfunction of the zoom adjustment.
Adjustment order

Screen display
The adjustment is finished normally.

The adjustment is finished abnormally.


ENGLISH JAPANESE
5-2-4. Far Focus Adjustment
Note: When using the flange back adjustment iig, take care of the following points:
- For the illumination, use a light source such as an incandescent lamp or inverter type fluorescent light free from flickering.
-
Do not make an adjustment in the environment where fluorescent lamp flickering occurs even if the illuminance can be ensured with the room illumination only
- Use an incandescent lamp or inverter type fluorescent light at a place free from the influence of room illumination.
- 1) Install the flange back adjustment jig so that the distance between it and the front of lens of camera is less than 3 cm. Note: Take care not to hit the flange back adjustment jig when extending the lens.
Equipments required: Flange back adjustment ig Camera table
Fia. 5-2-21
Flange back adjustment jig
- 2) Make the height of flange back adjustment jig and the camera equal.
- 3) Check that the center of chart meets the center of shot image screen with the zoom lens at TELE end and WIDE end respectively.
Color temperature = 5000 ± 300K
Be sure not to turn off the power during adjusting
Adjustment order
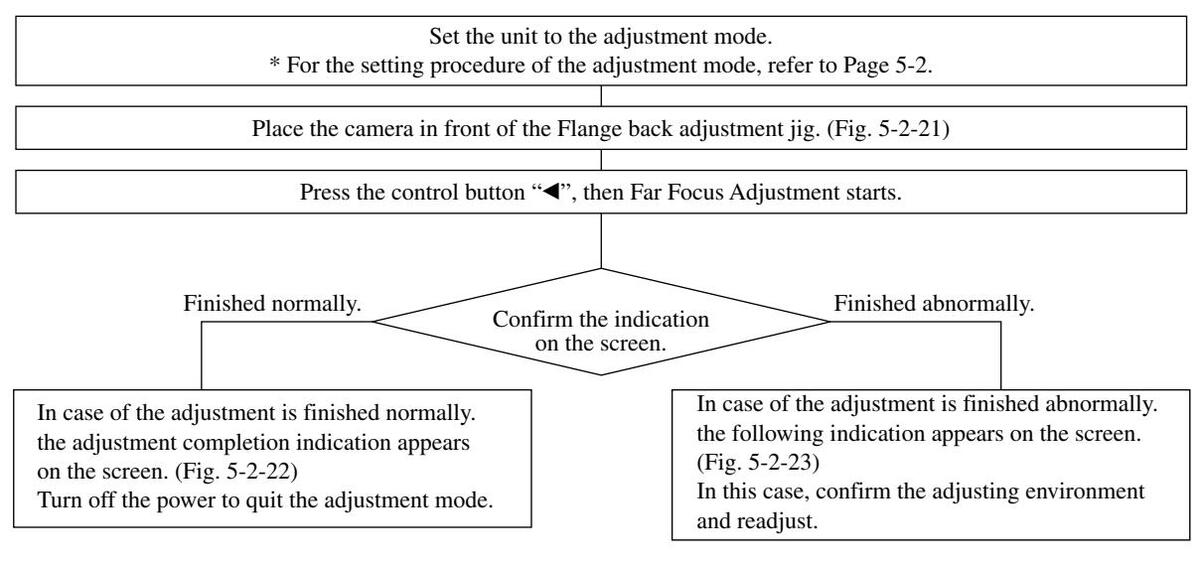
Screen display
The adjustment is finished normally.


ENGLISH JAPANESE
5-2-5. Near Focus Adjustment
Note: Perform the Near Focus Adjustment after the Far Focus adjustment.
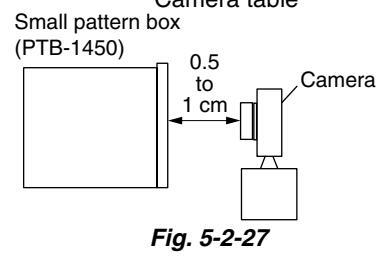
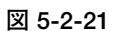
- 1) Be sure to set 50 ± 1 cm distance between the chart and the tip of camera lens.
- 2) Check that the center of chart meets the center of shot image screen with the zoom lens at TELE end and WIDE end respectively.
Color temperature = 5000 ± 300K
Be sure not to turn off the power during adjusting.

Equipments required: Charl
Adjustment order
Fig. 5-2-24
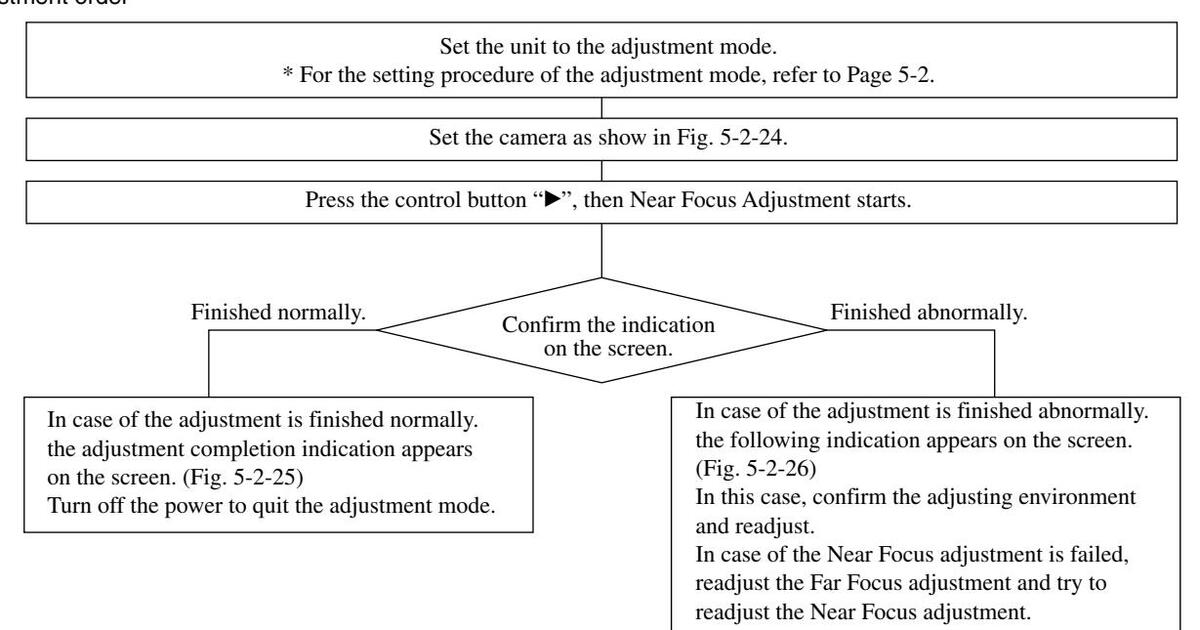
Screen display
The adjustment finished normally.

The adjustment is finished abnormally.

Malfunction of Near Focus adjustment
In case of the Near Focus adjustment is failed, readjust the Far Focus adjustment and try to readjust the Near Focus adjustment.

5-2-6. WB/ISO Adjustment
The White balance Adjustment is as follows.
Equipments required: Small pattern box (PTB-1450) Camera table
Small pattern box (PTB-1450) setting: Color temperature = 3150 ± 50K Luminance: LV 12.3 ± 0.2
Adjustment order

Screen display
The adjustment is finished normally.
The adjustment is finished abnormally.


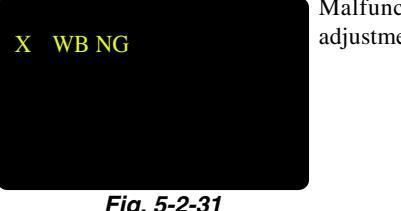
Malfunction of White Balance adjustment
5-2-7. Set Lang Destination
Language destination set:
Save "lang txt" document in the root directory of the memory stick used. The content of "lang.txt" as follows:
Language destination (for example: U2) (enter key) Product ID (10 bit) (enter key) (Refer to "5-3. PRODUCT ID LIST") S/N (7 bit) (enter key)
Now as DSC-W180 sliver camera U2 Lang Destination setting for the lang.txt document example.
U2 0048875334 0120243
especially attention:
- 1. The enter key must be the end symbol each row
- 2. The product ID refer to "5-3 PRODUCT ID LIST" And the product ID must be 10 bit. If the product ID less than 10 bit. add 0 before the product ID.
- 3. The S/N must be 7 bit. It refer to the serial number of shipment.
Adjustment order

Screen display
The adjustment is finished normally.

Fia. 5-2-32


Malfunction of Set language In case of the set language destination is failed, reset the language destination.
ENGLISH JAPANESE
5-3. PRODUCT ID LIST
| DSC-W180 | |||
|---|---|---|---|
| Area | Color | Prouct ID | |
| E37 | Silver | 48875306 | |
| Black | 48875307 | ||
| Red | 48875308 | ||
| Silver | 48875310 | ||
| E32 | Black | 48875370 | |
| Red | 48875386 | ||
| Silver | 48875311 | ||
| E33 | Black | 48875371 | |
| Red | 48875387 | ||
| Silver | 48875312 | ||
| E15 | Black | 48875372 | |
| Red | 48875388 | ||
| Silver | 48875313 | ||
| HK1 | Black | 48875373 | |
| Red | 48875389 | ||
| Silver | 48875323 | ||
| AR2 | Black | 48875324 | |
| Red | 48875325 | ||
| Silver | 48875334 | ||
| U2 | Black | 48875335 | |
| Red | 48875336 | ||
| Silver | 48875340 | ||
| CA2 | Black | 48875341 | |
| Red | 48875342 | ||
| Silver | 48875350 | ||
| CEE8 | Black | 48875363 | |
| Red | 48875393 | ||
| Silver | 48875351 | ||
| CEE9 | Black | 48875364 | |
| Red | 48875394 | ||
| Silver | 48875352 | ||
| CEE2 | Black | 48875365 | |
| Red | 48875395 | ||
| Silver | 48875360 | ||
| CEH | Black | 48875361 | |
| Red | 48875362 | ||
| Silver | 48875380 | ||
| KR2 | Black | 48875381 | |
| Red | 48875382 | ||
| Silver | 48875390 | ||
| AU2 | Black | 48875391 | |
| Red | 48875392 | ||
| DSC-W190 | |||
|---|---|---|---|
| Area | Color | Prouct ID | |
| J1 | Silver | 48875200 | |
| Black | 48875201 | ||
| Silver | 48875206 | ||
| E37 | Black | 48875207 | |
| Red | 48875208 | ||
| Silver | 48875210 | ||
| E32 | Black | 48875270 | |
| Red | 48875286 | ||
| Silver | 48875211 | ||
| E33 | Black | 48875271 | |
| Red | 48875287 | ||
| Silver | 48875212 | ||
| E15 | Black | 48875272 | |
| Red | 48875288 | ||
| Silver | 48875223 | ||
| AR2 | Black | 48875224 | |
| Red | 48875225 | ||
| Silver | 48875234 | ||
| U2 | Black | 48875235 | |
| Red | 48875236 | ||
| Silver | 48875240 | ||
| CA2 | Black | 48875241 | |
| Red | 48875242 | ||
| Silver | 48875250 | ||
| CEE8 | Black | 48875263 | |
| Red | 48875293 | ||
| Silver | 48875251 | ||
| CEE9 | Black | 48875264 | |
| Red | 48875294 | ||
| Silver | 48875252 | ||
| CEE2 | Black | 48875265 | |
| Red | 48875295 | ||
| Silver | 48875260 | ||
| CEH | Black | 48875261 | |
| Red | 48875262 | ||
| Silver | 48875275 | ||
| CN1 | Black | 48875276 | |
| Red | 48875277 | ||
| Silver | 48875280 | ||
| KR2 | Black | 48875281 | |
| Red | 48875282 | ||
| Silver | 48875290 | ||
| AU2 | Black | 48875291 | |
| Red | 48875292 | ||
5-1. 調整を始める前に
5-1-1.CCD ブロック、レンズブロック、メイン基板交換後の調整項目
各部品を交換後に行う調整項目を下表に"●"で示します。
| 卸卖 | 交換部品 | ||
|---|---|---|---|
| CCDブロック | レンズブロック | メイン基板 | |
| MS/BP 調整 | ٠ | ||
| ズーム調整 | ٠ | ||
| 遠距離フォーカス調整 | ٠ | ||
| 近距離フォーカス調整 | ٠ | ٠ | |
| WB/ISO 調整 | ٠ | ||
| 言語仕向設定 | |||
表 5-1-1
5-1-2.サービス用治具・機器一覧

図 5-1-1
注意:
チャートについては、ESIホームページ「治具、ソフトウェア」で「J-6082-563-A」を検索、PDFファイルをダウンロードし、 A4サイズの白紙にプリントしてください。
ENGLISH JAPANESE
5-1-3.機器の接続
下図のように機器を接続します。
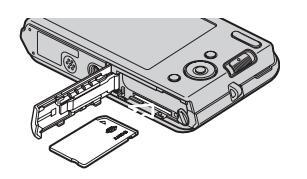
メモリースティックPROデュオ (256 MB 以上)
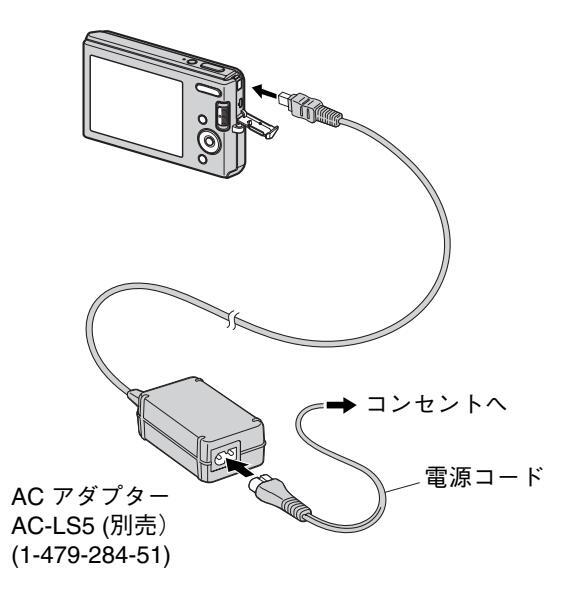
図 5-1-2
5-1-4.調整用ファームウェアの取り扱い
注意1:
調整用ファームウェアは、メモリースティックPROデュオの第一階層に保存してください。 他の階層に保存するとプログラムの不具合の原因となります。
注意2:
調整用ファームウェアは、ESIホームページよりダウンロードできます。
準備:
調整用ファームウェアをコピーする前にメモリースティックPROデュオをフォーマットします。 フォーマットは、FAT形式を使用しパーソナルコンピュータで行います。カメラ本体で行わないでください。 隠しファイル「MEMSTICK.IND」がある場合は、削除してください。 ダウンロードしたファイルを解凍し、ファイル形式が下記になっていることを確認します。
DSC-W180調整用ファームウェア: SDMA350C.bin DSC-W190調整用ファームウェア: SDMC350C.bin
解凍したファイルを、メモリースティックPROデュオの第一階層に保存します。 メイン基板を交換する場合は、「lang.txt」も第一階層に保存します。(「5-2-7. 言語仕向設定」を参照)
調整モード:
- 1. カメラの電源を切った状態で、モードスイッチを ○ (静止画)にし、上記調整用ファームウェアの入ったメモリース ティックPROデュオをカメラに挿入します。
- 2. 面 (削除)ボタンを押しながらON/OFF(電源)を押し、ON/OFF(電源)ランプ、液晶画面が点灯したら、ON/OFF(電源)を離します。
- ON/OFF(電源)ランプ、液晶画面が消灯したら、 面 (削除)ボタンを離します。 3. 数秒後液晶画面が白くなり、調整モード画面になります。
MENUボタンを押すことで、調整を終了し、調整モード初期画面に戻ります。 続けて調整する場合は、上記の操作を行うことで、次に進みます。 モードスイッチを切り替えると、調整モードを終了します。 すべての調整が終了したら、電源コードを抜くことで調整を完了します。
5-2. カメラ部調整
5-2-1.前置き
CCDブロック、レンズブロック、メイン基板を交換後は、カメラを操作して調整を行います。 下記に調整で使われるボタンと機能を示します(図 5-2-1)。


下記は調整モード初期画面です(図 5-2-2)。

図 5-2-2

5-2-2.MS/BP調整


画面表示
正常終了時
異常終了時


5-2-3.ズーム調整
ズーム/フォーカス調整手順は、以下のとおりです。
ズーム調整は、カメラを水平面に置いて行ってください。 水平でない場合は、正常に調整できません。
調整手順
画面表示
正常終了時

異常終了時

ズーム調整異常

フォーカス部
ズーム調整異常
図 5-2-19

ズーム調整異常 ズーム部

5-2-4.遠距離フォーカス調整
-
注意:フランジバック調整治具をご使用の際は、下記の点にご注意ください。
- ・照明について、光源はちらつき防止のため、白熱球かインバータ型蛍光灯をご使用ください。 ・室内照明だけで照度を確保できたとしても、蛍光灯のちらつきがある場所で調整しないようにしてください。 室内昭明の影響を受けない場所で、白熱球かインバータ型蛍光灯をご使用ください。
- フランジバック調整治具をカメラのレンズ正面から3 cm 以内に設置してください。 注意:レンズを延ばしたとき、フランジバック調整治具にぶつからないようご注意ください。
- 2) フランジバック調整治具とカメラの高さを合わせます。
調整中は電源を切らないようご注意ください。
3) チャートの中心が撮影画像の中心になっているか、TELE端、WIDE端でそれぞれ確認します。
色温度:5000 ± 300K
必要機器: フランジバック調整治具カメラ置台

調整手順

画面表示 正常終了時

星常終了時

5-2-5.近距離フォーカス調整
注意:近距離フォーカス調整は、遠距離フォーカス調整の後に行ってください。
- 1) チャートとカメラのレンズ先端との距離は、必ず 50 ± 1cm に設置してください。
- 2) チャートの中心が撮影画像の中心になっているか、TELE端、WIDE端でそれぞれ確認します。
色温度:5000 ± 300K
必要機器: チャート
調整中は電源を切らないようご注意ください。
調整手順

異常終了時
画面表示 正常終了時


5-2-6.WB/ISO調整
ホワイトバランス調整手順は、以下のとおりです。
必要機器: スモールパターンボックス (PTB-1450)
スモールパターンボックス (PTB-1450)の設定: 色温度:3150 ± 50K 輝度:IV 12 3 + 0 2

調整手順

面面表示
正常終了時

異常終了時

Canホワイトバランス調整 異常

Preホワイトバランス調整

ホワイトバランス調整が
5-2-7.言語什向設定
言語什向設定: 「lang txt」は使用するメモリースティックの、第一階層に保存します。 「lang.txt」の内容は以下のとおりです:
言語仕向(例:U2) (enterキー) プロダクトID (10ビット) (enterキー) (「5-3. プロダクトID表| 参照) シリアル番号 (7ビット) (enterキー) ここで一例として、DSC-W180、シルバー、U2モデルの言語仕向を示します。 U2 0048875334 0120243
特に注意すること:
- enterキーは、各行の終わりを意味します。 プロダクトID は、「5-3. プロダクトID表」を参照してください。プロダクトID は、10ビットでなけれ ばなりません。10ビット以下の場合は、プロダクトIDの前に「0」が追加されます。
- 3. シリアル番号は、7ビットです。出荷情報を参照してください。
調整手順

画面表示
正常終了

異常終了時

言語什向設定異常
言語仕向設定ができない場 合は、言語仕向設定をリセ ットします。
ENGLISH JAPANESE
5-3. プロダクトID表
| DSC-W180 | |||
|---|---|---|---|
| 地域 | 色 | プロダクトID | |
| E37 | シルバー | 48875306 | |
| ブラック | 48875307 | ||
| レッド | 48875308 | ||
| シルバー | 48875310 | ||
| E32 | ブラック | 48875370 | |
| レッド | 48875386 | ||
| シルバー | 48875311 | ||
| E33 | ブラック | 48875371 | |
| レッド | 48875387 | ||
| シルバー | 48875312 | ||
| E15 | ブラック | 48875372 | |
| レッド | 48875388 | ||
| シルバー | 48875313 | ||
| HK1 | ブラック | 48875373 | |
| レッド | 48875389 | ||
| シルバー | 48875323 | ||
| AR2 | ブラック | 48875324 | |
| レッド | 48875325 | ||
| シルバー | 48875334 | ||
| U2 | ブラック | 48875335 | |
| レッド | 48875336 | ||
| シルバー | 48875340 | ||
| CA2 | ブラック | 48875341 | |
| レッド | 48875342 | ||
| シルバー | 48875350 | ||
| CEE8 | ブラック | 48875363 | |
| レッド | 48875393 | ||
| シルバー | 48875351 | ||
| CEE9 | ブラック | 48875364 | |
| レッド | 48875394 | ||
| シルバー | 48875352 | ||
| CEE2 | ブラック | 48875365 | |
| レッド | 48875395 | ||
| シルバー | 48875360 | ||
| CEH | ブラック | 48875361 | |
| レッド | 48875362 | ||
| シルバー | 48875380 | ||
| KR2 | ブラック | 48875381 | |
| レッド | 48875382 | ||
| シルバー | 48875390 | ||
| AU2 | ブラック | 48875391 | |
| レッド | 48875392 | ||
| DSC-W190 | |||
|---|---|---|---|
| 地域 | 色 | プロダクトID | |
| シルバー | 48875200 | ||
| JI | ブラック | 48875201 | |
| シルバー | 48875206 | ||
| E37 | ブラック | 48875207 | |
| レッド | 48875208 | ||
| シルバー | 48875210 | ||
| E32 | ブラック | 48875270 | |
| レッド | 48875286 | ||
| シルバー | 48875211 | ||
| E33 | ブラック | 48875271 | |
| レッド | 48875287 | ||
| シルバー | 48875212 | ||
| E15 | ブラック | 48875272 | |
| レッド | 48875288 | ||
| シルバー | 48875223 | ||
| AR2 | ブラック | 48875224 | |
| レッド | 48875225 | ||
| シルバー | 48875234 | ||
| U2 | ブラック | 48875235 | |
| レッド | 48875236 | ||
| シルバー | 48875240 | ||
| CA2 | ブラック | 48875241 | |
| レッド | 48875242 | ||
| シルバー | 48875250 | ||
| CEE8 | ブラック | 48875263 | |
| レッド | 48875293 | ||
| シルバー | 48875251 | ||
| CEE9 | ブラック | 48875264 | |
| レッド | 48875294 | ||
| シルバー | 48875252 | ||
| CEE2 | ブラック | 48875265 | |
| レッド | 48875295 | ||
| シルバー | 48875260 | ||
| CEH | ブラック | 48875261 | |
| レッド | 48875262 | ||
| シルバー | 48875275 | ||
| CN1 | ブラック | 48875276 | |
| レッド | 48875277 | ||
| シルバー | 48875280 | ||
| KR2 | ブラック | 48875281 | |
| レッド | 48875282 | ||
| シルバー | 48875290 | ||
| AU2 | ブラック | 48875291 | |
| レッド | 48875292 | ||
Revision History
| Ver. | Date | History | Contents |
S.M. Rev.
issued |
|---|---|---|---|---|
| 1.0 | 2009.05 | Official Release | ||


 Loading...