

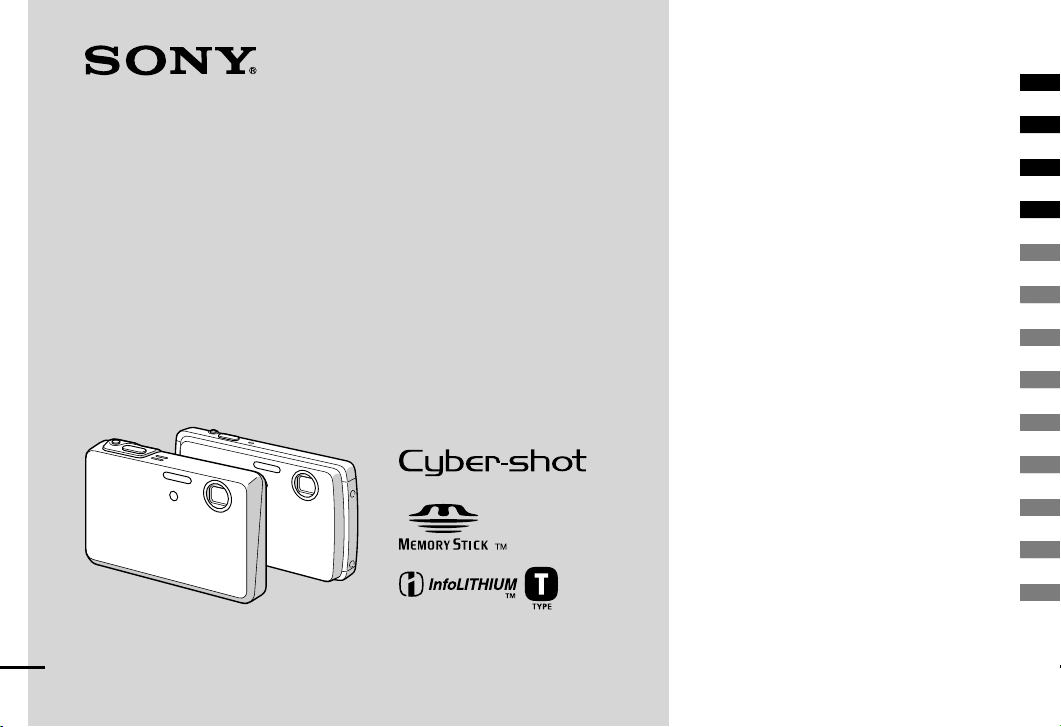
Page 1
2-548-269-11 (1)
Digital Still Camera
Operating Instructions
Before operating the unit, please read this manual thoroughly, and retain it for
future reference.
Owner’s Record
The model and serial numbers are located on the bottom. Record the serial
number in the space provided below. Refer to these numbers whenever you
call upon your Sony dealer regarding this product.
Model No. DSC-T3/T33
Serial No. ___________________
© 2004 Sony Corporation
DSC-T3/T33
Getting started ______________________
Shooting still images ________________
Viewing still images _________________
Deleting still images _________________
Before advanced operations ____________
Advanced still image shooting ___________
Advanced still image viewing ____________
Still image printing ____________________
Enjoying movies _____________________
Enjoying images on your computer _______
Troubleshooting ______________________
Additional information _________________
Index ______________________________
Page 2

2
WARNING
To prevent fire or shock hazard,
do not expose the unit to rain or
moisture.
For the Customers in the U.S.A.
This symbol is intended to
alert the user to the presence
of uninsulated “dangerous
voltage” within the product’s
enclosure that may be of
sufficient magnitude to
constitute a risk of electric
shock to persons.
This symbol is intended to
alert the user to the presence
of important operating and
maintenance (servicing)
instructions in the literature
accompanying the appliance.
If you have any questions about this product, you
may call:
Sony Customer Information Services Center
1-800-222-SONY (7669)
The number below is for the FCC related matters
only.
Regulatory Information
Declaration of Conformity
Trade Name: SONY
Model No.: DSC-T3
Responsible Party: Sony Electronics Inc.
Address: 16450 W. Bernardo Dr,
San Diego, CA 92127
U.S.A.
Telephone No.: 858-942-2230
This device complies with Part 15 of the FCC
Rules. Operation is subject to the following
two conditions: (1) This device may not cause
harmful interference, and (2) this device must
accept any interference received, including
interference that may cause undesired
operation.
Declaration of Conformity
Trade Name: SONY
Model No.: DSC-T33
Responsible Party: Sony Electronics Inc.
Address: 16450 W. Bernardo Dr,
San Diego, CA 92127
U.S.A.
Telephone No.: 858-942-2230
This device complies with Part 15 of the FCC
Rules. Operation is subject to the following
two conditions: (1) This device may not cause
harmful interference, and (2) this device must
accept any interference received, including
interference that may cause undesired
operation.
Note:
Model DSC-T3 is to be used with the
Cyber-shot Station Model UC-TC and AC
Adaptor Model AC-LM5/AC-LM5A.
Model DSC-T33 is to be used with the
Cyber-shot Station Model UC-TD and AC
Adaptor Model AC-LM5/AC-LM5A.
CAUTION
You are cautioned that any changes or
modifications not expressly approved in this
manual could void your authority to operate this
equipment.
Note:
This equipment has been tested and found to
comply with the limits for a Class B digital
device, pursuant to Part 15 of the FCC Rules.
These limits are designed to provide reasonable
protection against harmful interference in a
residential installation. This equipment generates,
uses, and can radiate radio frequency energy
and, if not installed and used in accordance with
the instructions, may cause harmful interference
to radio communications. However, there is no
guarantee that interference will not occur in a
particular installation. If this equipment does
cause harmful interference to radio or television
reception, which can be determined by turning
the equipment off and on, the user is encouraged
to try to correct the interference by one or more
of the following measures:
— Reorient or relocate the receiving antenna.
— Increase the separation between the
equipment and receiver.
Page 3

3
— Connect the equipment into an outlet on
a circuit different from that to which the
receiver is connected.
— Consult the dealer or an experienced radio/
TV technician for help.
The supplied interface cable must be used with
the equipment in order to comply with the limits
for a digital device pursuant to Subpart B of Part
15 of FCC Rules.
For the Customers in the U.S.A.
and Canada
RECYCLING LITHIUM-ION
BATTERIES
Lithium-Ion batteries are
recyclable.
You can help preserve our
environment by returning your
used rechargeable batteries to the
collection and recycling location
nearest you.
For more information regarding recycling of
rechargeable batteries, call toll free
1-800-822-8837, or visit
http://www.rbrc.org/
Caution: Do not handle damaged or leaking
Lithium-Ion batteries.
For the customers in the United
Kingdom
A moulded plug complying with BS 1363 is
fitted to this equipment for your safety and
convenience.
Should the fuse in the plug supplied need to
be replaced, a fuse of the same rating as the
supplied one and approved by ASTA or BSI to
BS 1362, (i.e., marked with or mark) must
be used.
If the plug supplied with this equipment has a
detachable fuse cover, be sure to attach the fuse
cover after you change the fuse. Never use the
plug without the fuse cover. If you should lose
the fuse cover, please contact your nearest Sony
service station.
For the Customers in Europe
This product has been tested and found
compliant with the limits set out in the EMC
Directive for using connection cables shorter
than 3 meters (9.8 feet).
Attention
The electromagnetic fields at the specific
frequencies may influence the picture and sound
of this camera.
Notice
If static electricity or electromagnetism causes
data transfer to discontinue midway (fail), restart
the application or disconnect and connect the
USB cable again.
“Memory Stick”
For the Customers in the U.S.A. and
Canada
THIS DEVICE COMPLIES WITH PART
15 OF THE FCC RULES. OPERATION IS
SUBJECT TO THE FOLLOWING TWO
CONDITIONS:
(1) THIS DEVICE MAY NOT CAUSE
HARMFUL INTERFERENCE, AND
(2) THIS DEVICE MUST ACCEPT
ANY INTERFERENCE RECEIVED,
INCLUDING INTERFERENCE THAT MAY
CAUSE UNDESIRED OPERATION.
THIS CLASS B DIGITAL APPARATUS
COMPLIES WITH CANADIAN ICES-003.
Page 4

4
Read this first
Trial recording
Before you record one-time events, you may
want to make a trial recording to make sure that
the camera is working correctly.
No compensation for contents of
the recording
Contents of the recording cannot be compensated
for if recording or playback is not possible due
to a malfunction of your camera or recording
media, etc.
Back up recommendation
To avoid the potential risk of data loss, always
copy (back up) data to a disk.
Notes on image data compatibility
• This camera conforms with the Design rule
for Camera File system universal standard
established by the JEITA (Japan Electronics
and Information Technology Industries
Association).
• Playback of images recorded with your camera
on other equipment and playback of images
recorded or edited with other equipment on
your camera are not guaranteed.
Precaution on copyright
Television programs, films, video tapes,
and other materials may be copyrighted.
Unauthorized recording of such materials may be
contrary to the provision of the copyright laws.
Do not shake or strike the camera
In addition to malfunctions and inability to
record images, this may render the “Memory
Stick Duo” unusable or image data breakdown,
damage or loss may occur.
LCD screen, LCD finder (only
models with an LCD finder) and lens
• The LCD screen and the LCD finder are
manufactured using extremely high-precision
technology so over 99.99% of the pixels are
operational for effective use. However, there
may be some tiny black points and/or bright
points (white, red, blue or green in color) that
constantly appear on the LCD screen and the
LCD finder. These points are normal in the
manufacturing process and do not affect the
recording in any way.
• Be careful when placing the camera near
a window or outdoors. Exposing the LCD
screen, the finder or the lens to direct sunlight
for long periods may cause malfunctions.
• Do not press the LCD screen hardly. The
screen may be uneven and that may cause a
malfunction.
• Images may be trailed on the LCD screen in a
cold location. This is not a malfunction.
Clean the flash surface before use
The heat of flash emission may cause dirt on the
flash surface to become discolored or to stick to
the flash surface, resulting in insufficient light
emission.
Do not get the camera wet
When taking pictures outdoors in the rain or
under similar conditions, be careful not to get
the camera wet. Water entering the inside of
the camera may cause malfunctions which in
some cases may not be repairable. If moisture
condensation occurs, see page 128 and follow
the instructions on how to remove it before using
the camera.
Do not expose the camera to sand
or dust
Using the camera in sandy or dusty locations
may cause malfunction.
Do not aim the camera at the sun or
other bright light
This may cause irrecoverable damage to your
eyes. Or it may cause the malfunction of your
camera.
Notes on the camera locations
Do not use the camera near a location that
generates strong radio wave or emits radiation.
The camera may not be able to record or play
back properly.
Page 5

5
Carl Zeiss lens
This camera is equipped with a Carl Zeiss lens
which is capable of reproducing sharp images
with excellent contrast.
The lens for this camera has been produced
under a quality assurance system certified
by Carl Zeiss in accordance with the quality
standards of Carl Zeiss in Germany.
On illustration
Illustrations used in this manual are of DSC-T3
unless noted otherwise.
The pictures used in this manual
The photographs used as examples of pictures in
this manual are reproduced images, and are not
actual images shot using this camera.
Page 6
6
Before using your camera
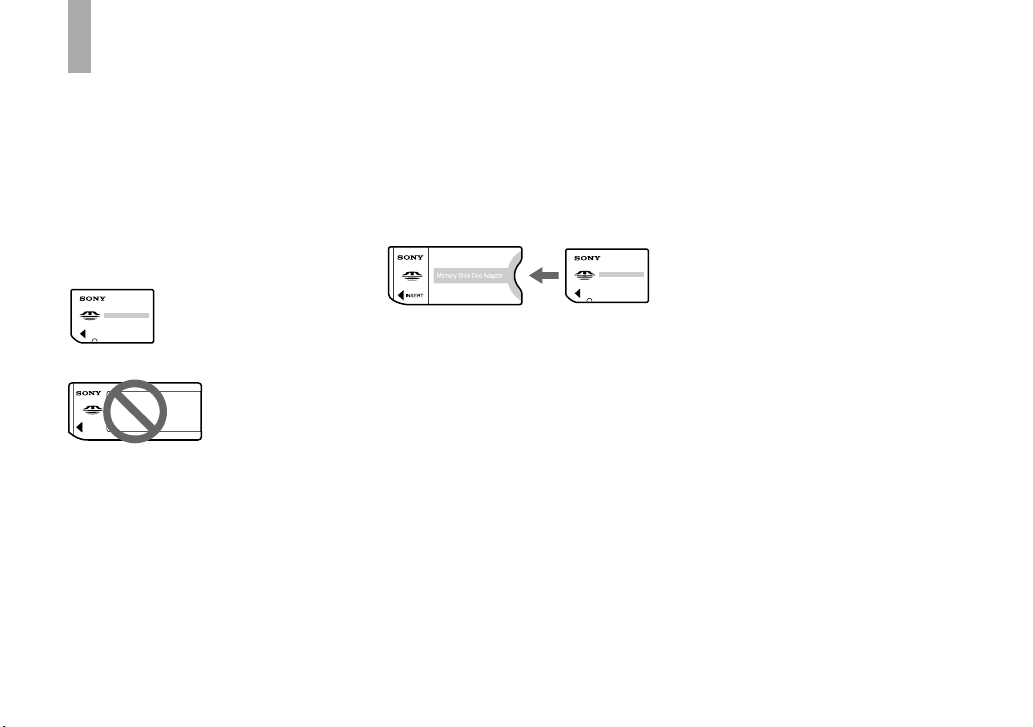
“Memory Stick” compatible
with this camera
The IC recording medium used with this
camera is the “Memory Stick Duo”.
There are two sizes of “Memory Stick”.
Choose the “Memory Stick” size that
matches your camera.
“Memory Stick Duo” (Size used with this
camera)
“Memory Stick”
• For details on the “Memory Stick Duo”, see
page 128.
• “Memory Stick PRO” and “Memory Stick
PRO Duo” can be used only with “Memory
Stick PRO” compatible equipment.
• For the number of images that can be saved
using this camera, see page 28 or 119.
When using a “Memory Stick Duo”
with “Memory Stick” compatible
equipment
Be sure to insert the “Memory Stick Duo”
into the supplied Memory Stick Duo
Adaptor.
Memory Stick Duo Adaptor
On “InfoLITHIUM” battery pack
When using the battery pack for the
first time
Be sure to charge the supplied NP-FT1
battery pack (page 14).
Recharging
The battery pack can be charged
even when it has not been completely
discharged. In addition, the battery pack
can be used even if it has only been
charged partway.
Extending the battery pack life
When not using the camera for a long time,
turn off the camera, remove the battery
pack and store it in a dry, cool place to
maintain the battery pack functions (page
130).
• For details on “InfoLITHIUM” battery pack,
see page 130.
Page 7

7
Trademarks
• is a trademark of Sony
Corporation.
• “Memory Stick”, , “Memory Stick PRO”,
, “Memory Stick Duo”,
, “Memory Stick PRO Duo”,
, “MagicGate” and
are trademarks of Sony
Corporation.
• “InfoLITHIUM” is a trademark of Sony
Corporation.
• Picture Package is a trademark of Sony
Corporation.
• Microsoft, Windows, Windows Media, and
DirectX are either registered trademarks or
trademarks of Microsoft Corporation in the
United States and/or other countries.
• Macintosh, Mac OS, QuickTime, iMac,
iBook, PowerBook, Power Mac and eMac are
trademarks or registered trademarks of Apple
Computer, Inc.
• Macromedia and Flash are trademarks or
registered trademarks of Macromedia, Inc. in
the United States and/or other countries.
• Intel, MMX, and Pentium are trademarks or
registered trademarks of Intel Corporation.
• In addition, system and product names used
in this manual are, in general, trademarks
or registered trademarks of their respective
developers or manufacturers. However, the
™ or ® marks are not used in all cases in this
manual.
Page 8

8
Table of contents
Read this first ............................................4
Before using your camera .........................6
Identifying the parts ................................10
Camera ................................................10
Cyber-shot Station .............................. 12
Getting started
Charging the battery pack .......................14
Using the AC adaptor ..............................19
Using your camera abroad ......................19
Turning on/off your camera ....................20
How to use the control button .................20
Setting the date and time .........................21
Changing the language setting ................ 23
Shooting still images
Inserting and removing a “Memory Stick
Duo” ...............................................24
Setting the still image size ......................25
Image size and quality ............................26
Number of still images that can be
recorded .......................................... 28
Basic still image shooting
— Using auto adjustment mode ..... 29
Checking the last image you shot
— Quick Review ............................ 32
Indicators on the LCD screen during
shooting ..........................................32
Using the zoom feature ....................... 33
Shooting close-ups — Macro .............35
Using the self-timer ............................36
Selecting a flash mode ........................ 37
Inserting the date and time on a still
image ..............................................38
Shooting according to scene conditions
— Scene Selection .......................... 40
Viewing still images
Viewing images on the LCD screen of
your camera .................................... 44
Viewing images on a TV screen .............46
Deleting still images
Deleting images ......................................49
Formatting a “Memory Stick Duo” .................51
Before advanced operations
How to setup and operate your camera ... 53
Changing the menu settings ................53
Changing the items in the Setup
screen .............................................. 54
Deciding the still image quality .............. 54
Creating or selecting a folder .................. 55
Creating a new folder .......................... 55
Changing the recording folder ............ 56
Advanced still image
shooting
Choosing an auto focus method .............. 57
Choosing a focus range finder frame
— AF range finder .......................... 57
Choosing a focus operation
— AF Mode .................................... 58
Setting the distance to the subject
— Focus preset ............................... 59
Adjusting the exposure
— EV adjustment ........................... 60
Displaying a histogram ....................... 61
Selecting the metering method ................ 62
Shooting three images with the exposure
shifted
— Exposure Bracket ......................63
Adjusting color tones
— White Balance ...........................65
Adjusting the flash level
— Flash Level ................................66
Shooting continuously ............................66
Recording 16 frames in succession
— Multi Burst ...............................67
Shooting with special effects
— Picture Effect ............................. 68
Page 9

9
Advanced still image viewing
Selecting the folder and playing back
images ............................................. 69
Enlarging a portion of a still image ......... 70
Enlarging an image
— Playback zoom ..........................70
Recording an enlarged image
— Trimming ................................... 71
Playing back successive images
— Slide Show ................................. 71
Rotating still images ...............................72
Playing back images shot in Multi Burst
mode ............................................... 72
Playing back continuously .................. 73
Playing back frame by frame .............. 73
Protecting images
— Protect ........................................ 74
Changing image size
— Resize ........................................75
Still image printing
Printing still images ................................76
Direct printing ......................................... 77
Having images printed at a shop ............. 81
Enjoying movies
Shooting movies ...................................... 84
Viewing movies on the LCD screen .......85
Deleting movies ......................................86
Cutting movies ........................................ 87
Enjoying images on your
computer
Copying images to your computer
— For Windows users ....................89
Installing the USB driver .................... 90
Connecting the camera to your
computer ........................................ 91
Copying images .................................. 92
Viewing the images on your
computer ......................................... 94
Image file storage destinations and file
names .............................................. 95
Viewing image files once copied to a
computer with your camera ............ 97
Installing “Picture Package” and
“ImageMixer VCD2” .....................97
Copying images using “Picture
Package” ......................................... 99
Using “Picture Package” ..................... 99
Printing images ................................. 101
Copying images to your computer
— For Macintosh users ................102
Using “ImageMixer VCD2” ............. 103
Troubleshooting
Troubleshooting .................................... 105
Warnings and messages ........................115
Self-diagnosis display .......................... 118
Additional information
Number of images that can be saved or
shooting time ................................ 119
Menu items ............................................ 120
Setup items ............................................124
Precautions ............................................ 127
On “Memory Stick” ..............................128
On “InfoLITHIUM” battery pack ......... 130
On marine pack ..................................... 131
Specifications ........................................ 131
The LCD screen ....................................133
Index
Index .....................................................138
Page 10

10
Identifying the parts
See the pages in parentheses for details of operation.
Camera
4
5
6
7
8
3
1
2
9
qa
0
qs
qd
POWER button (20)
POWER lamp (20)
Battery insertion slot (14)
“Memory Stick Duo” insertion
slot (24)
Battery/“Memory Stick Duo”
cover
Battery drop prevention lever
(14)
Multi connector (16, 19)
Battery eject lever (14)
Shutter button (29)
Microphone (84)
Flash (37)
Lens
Self-timer lamp (36)/
AF illuminator (38, 124)
Page 11

11
8
9
0
qs
qa
1
2
3
4
5
6
7
/CHG lamp (orange) (15)
(Display/LCD backlight
on/off) button (32)
LCD screen
For details on the items on the LCD screen,
see page 133 to 137.
MENU button (53, 120)
(Image Size/Delete) button
(25, 49)
Control button
Menu on: //// (20)/
Menu off: / // (37/36/32/35)
RESET button (105)
For shooting: Zoom (W/T) button
(33)
For viewing: / (Playback
zoom) button (70)/
(Index) button (45)
Speaker
Mode switch (21, 120)
: To shoot movies
: To shoot still images
: To view or edit images
Hook for wrist strap
Attaching the strap
Attaching the strap is recommended to
prevent dropping the camera.
Access lamp (24)
Page 12
12
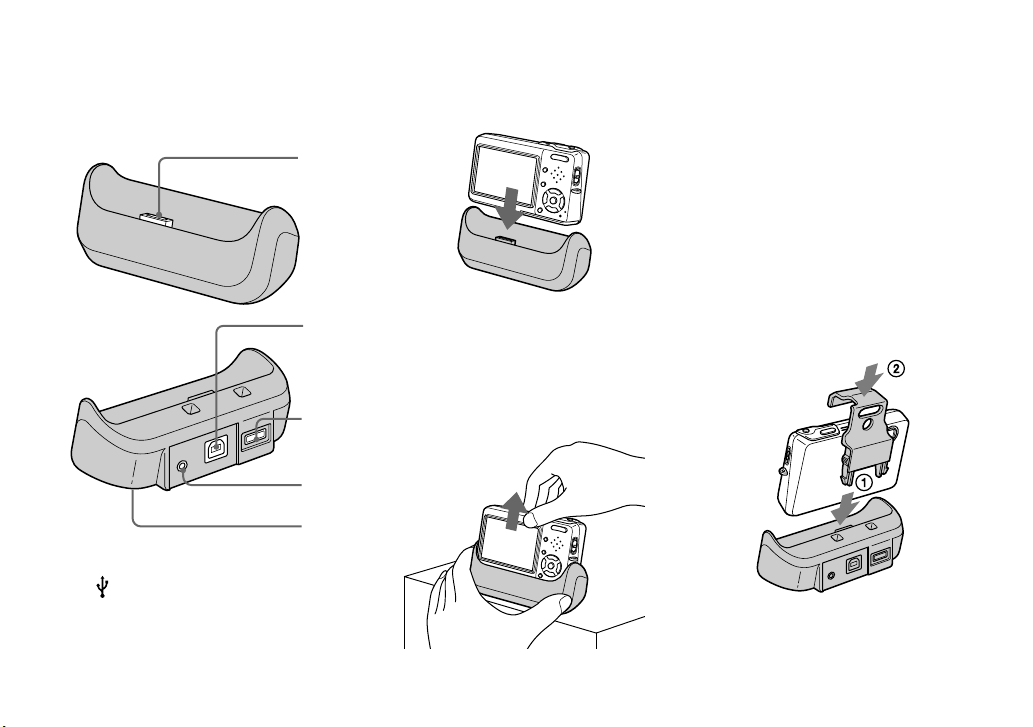
Cyber-shot Station
This is used when charging the battery
pack or connecting the camera to a TV or a
computer, etc.
1
3
4
5
2
Camera connector
(USB) jack (91)
DC IN jack (15)
A/V OUT (MONO) jack (46)
Tripod receptacle (bottom
surface)
How to connect
Connect the camera as illustrated.
• Make sure the camera is securely connected to
the Cyber-shot Station.
How to disconnect
Grasp the camera and the Cyber-shot
Station (supplied) as illustrated and
disconnect the camera.
Attaching a tripod
Secure the camera to the Cyber-shot
Station beforehand using the supplied
camera holder for tripod.
• See the operating instructions supplied with the
tripod for the method of attaching the tripod.
How to attach the camera holder for
tripod
Connect the camera to the Cyber-shot
Station, then insert the camera holder for
tripod in the direction of the arrow until it
clicks.
Page 13

13
How to remove the camera holder
for tripod
Press the tabs and pull off the camera
holder for tripod as illustrated, then
disconnect the camera from the Cyber-shot
Station.
2
• Use a tripod with a screw length of less than
5.5 mm (7/32 inch). You will be unable to
firmly secure the Cyber-shot Station to tripods
having longer screws, and may damage the
Cyber-shot Station.
• Attach the tripod so that the camera is stable.
If you shoot with the camera in an unstable
condition, the camera may fall, resulting in
damage or malfunction.
• Be sure to turn off the camera before you
connect the camera to the Cyber-shot Station
or disconnect the camera from the Cyber-shot
Station.
• Do not disconnect the camera from
the Cyber-shot Station during the
USB connection, as the data may be
corrupted.
To cancel the USB connection, see
on page 92 (Windows) or on page
103 (Macintosh).
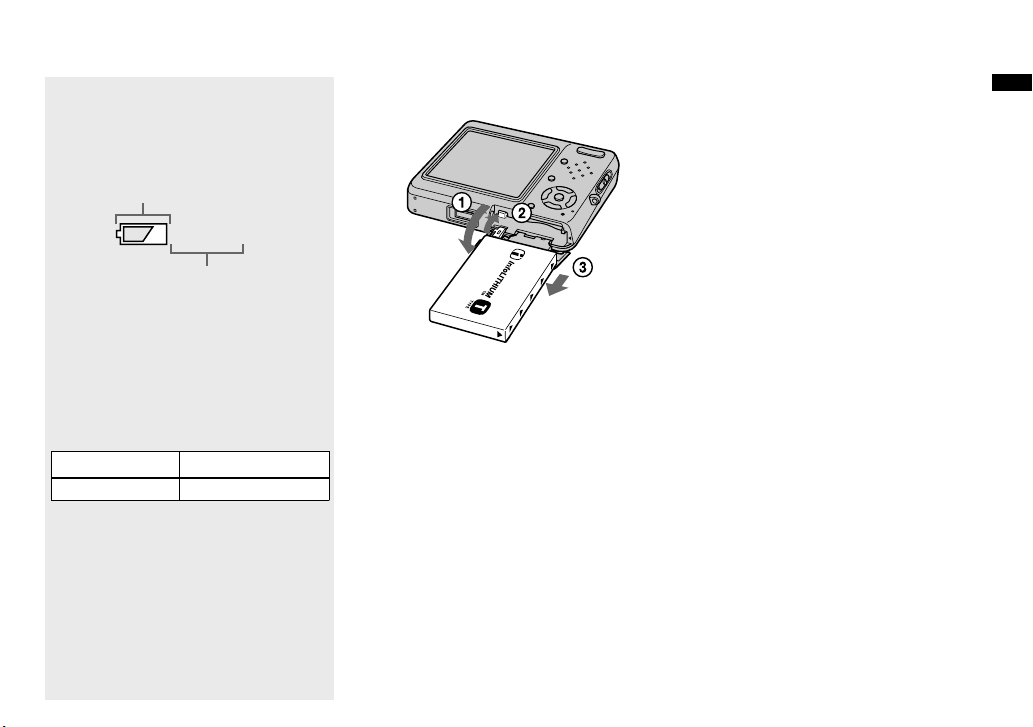
Page 14

14
Charging the battery pack
1
Open the battery/“Memory
Stick Duo” cover.
Slide the cover in the direction of the
arrow.
• Be sure to turn off your camera when
charging the battery pack (page 20).
• Your camera operates with the
“InfoLITHIUM” NP-FT1 battery pack (T type)
(supplied). You can use only T type battery
pack (page 130).
2
Battery drop prevention lever
Battery
eject
lever
Press the battery eject lever in
the direction of the arrow.
The battery drop prevention lever opens
toward you.
3
Install the battery pack, then
close the battery/“Memory
Stick Duo” cover.
Make sure the battery pack is firmly
inserted all the way, then close the cover.
Battery insertion slot
Insert the battery pack
so that tip of the
marks on the side of the
battery pack face the tip
of the mark on the
battery insertion slot.
Page 15
15
Getting started
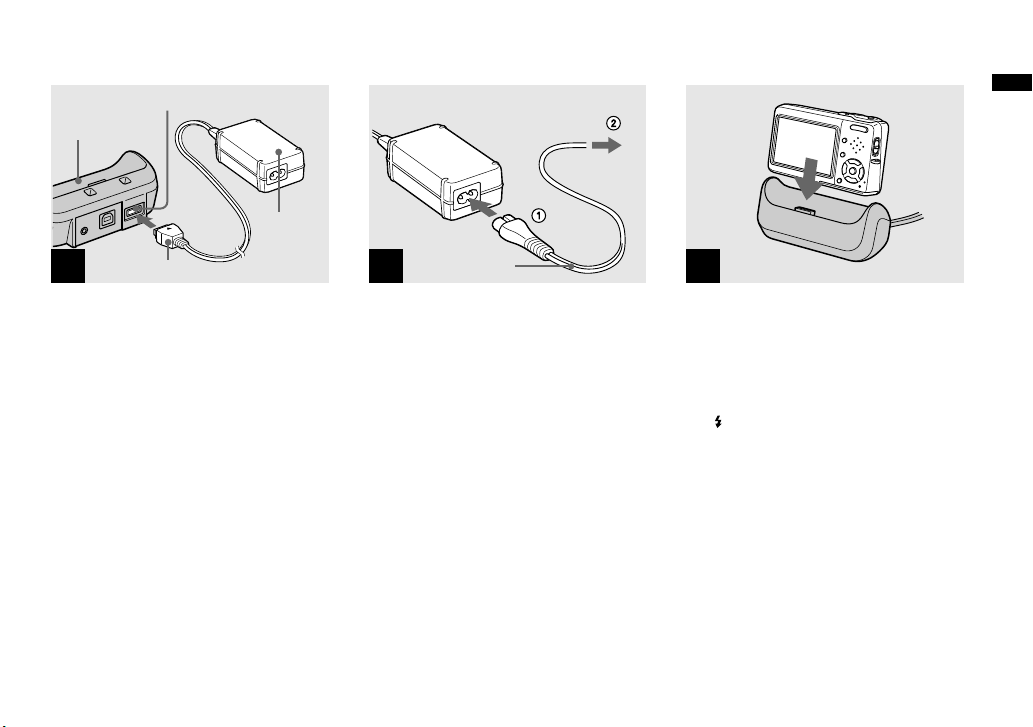
4
DC IN jack
Cyber-shot
Station
AC
Adaptor
DC plug
Connect the AC Adaptor
(supplied) to the DC IN jack
of the Cyber-shot Station
(supplied).
Connect the DC plug with the mark
facing up.
• Do not short the DC plug of the AC Adaptor
with a metallic object, as this may cause
malfunction.
• Clean the DC plug of the AC Adaptor with a
dry cotton bud. Do not use the dirty plug. Use
of the dirty plug may not properly charge the
battery pack.
5
To a wall outlet (wall socket)
Power cord
(mains lead)
Connect the power cord
(mains lead) to the AC Adaptor
and to a wall outlet (wall
socket).
6
Connect the camera to the
Cyber-shot Station.
Connect the camera as illustrated. Make
sure the camera is securely connected to
the Cyber-shot Station.
The /CHG lamp lights up when charging
begins.
Page 16

16
/CHG lamp
The /CHG lamp goes off when charging
is completed.
• When charging is completed, remove the
camera from the Cyber-shot Station.
Disconnecting the AC Adaptor
from the Cyber-shot Station
Hold the DC plug itself and the Cyber-shot
Station as illustrated and disconnect the
cable.
DC plug
To charge the battery pack
only using the AC Adaptor
You can charge the battery pack without
the Cyber-shot Station, such as during your
travels. Connect the DC plug of the AC
Adaptor to the camera with mark facing
as illustrated.
AC Adaptor
Multi connector
To a wall outlet
(wall socket)
Power cord
(mains lead)
DC plug
• Be sure to turn off your camera when
charging the battery pack (page 20).
• When placing the camera, make sure the LCD
screen is facing up.
• After charging the battery pack, disconnect
the AC Adaptor both from the multi connector
of the camera and from a wall outlet (wall
socket).
Page 17
17
Getting started
Battery remaining indicator
The battery remaining indicator on the
LCD screen shows the remaining shooting
or viewing time.
Remaining indicator
60min
Remaining time
• The displayed remaining time may not
be correct under certain circumstances or
conditions.
Charging time
Approximate time to charge a completely
discharged battery pack using the AC
Adaptor at a temperature of 25°C (77°F).
Battery pack Charging time (min.)
NP-FT1 (supplied) Approx. 150
• The charging time may become longer under
certain circumstances or conditions.
To remove the battery pack
Open the battery/“Memory Stick Duo”
cover and battery drop prevention lever,
then hold the camera so that it faces
downward and remove the battery pack.
• Be careful not to drop the battery pack when
removing it.
Page 18

18
Number of images and battery
life that can be recorded/
viewed
The tables show the approximate number
of images and the battery life that can be
recorded/viewed when you shoot images in
normal mode with a fully charged battery
pack (supplied) at a temperature of 25°C
(77°F). The numbers of images that can
be recorded or viewed take into account
changing the “Memory Stick Duo” as
necessary. Note that the actual numbers
may be less than indicated depending on
the conditions of use.
• The battery capacity decreases as the number
of uses increases and over time (page 131).
Shooting still images
Under the average conditions
1)
Image
size
NP-FT1 (supplied)
LCD
backlight
No. of
images
Battery
life (min.)
5M On Approx.
180
Approx.
90
Off Approx.
210
Approx.
105
VGA
(E-Mail)
On Approx.
180
Approx.
90
Off Approx.
210
Approx.
105
1)
Shooting in the following situations:
– (P.Quality) is set to [Fine]
– Shooting one time every 30 seconds
– The zoom is switched alternately between
the W and T ends
– The flash strobes once every two times
– The power turns on and off once every ten
times
– [AF Mode] is set to [Single] on the Setup
screen
The measurement method is based on CIPA
standard. (CIPA: Camera & Imaging Products
Association)
Viewing still images
2)
Image
size
NP-FT1 (supplied)
No. of
images
Battery life
(min.)
5M Approx. 3800 Approx. 180
VGA
(E-Mail)
Approx. 3800 Approx. 180
2)
Viewing single images in order at about three
second intervals
Shooting movies
3)
NP-FT1 (supplied)
LCD backlight OnLCD backlight
Off
Approx. 80 min. Approx. 100 min.
3)
Shooting movies continuously with the image
size [160]
• The number of images and the battery life that
can be recorded/viewed are decreased under
the following conditions:
– The surrounding temperature is low
– The flash is used
– The camera has been turned on and off many
times
– The zoom is used frequently
– [LCD Backlight] is set to [Bright] on the
Setup screen
– [AF Mode] is set to [Monitor] on the Setup
screen
– The battery power is low
Page 19
19
Getting started
Using the AC adaptor
1
AC Adaptor
Multi connector
DC plug
Connect the AC Adaptor
(supplied) to the multi
connector of the camera.
When placing the camera, make sure the
LCD screen is facing up.
Connect the DC plug with the mark
facing up.
• Connect the AC Adaptor to an easily accessible
wall outlet (wall socket) close by. If any trouble
occurs while using the adaptor, immediately
shut off the power by disconnecting the plug
from the wall outlet (wall socket).
2
To a wall outlet (wall socket)
Power cord
(mains lead)
Connect the power cord
(mains lead) to the AC Adaptor
and then to a wall outlet (wall
socket).
• Do not use the AC Adaptor placed in a narrow
space, such as between a wall and furniture.
• After using the AC Adaptor, disconnect it both
from the multi connector of the camera and
from a wall outlet (wall socket).
• The set is not disconnected from the AC power
source (mains) as long as it is connected to the
wall outlet (wall socket) even if the set itself
has been turned off.
Using your camera abroad
Power sources
You can use your camera in any country
or region with the AC Adaptor/power cord
(mains lead) (supplied) within 100 V to
240 V AC, 50/60 Hz. Use a commercially
available AC plug adaptor [a], if necessary,
depending on the design of the wall outlet
(wall socket) [b].
AC-LM5/LM5A
• Do not use an electronic transformer (travel
converter), as this may cause a malfunction.
Page 20

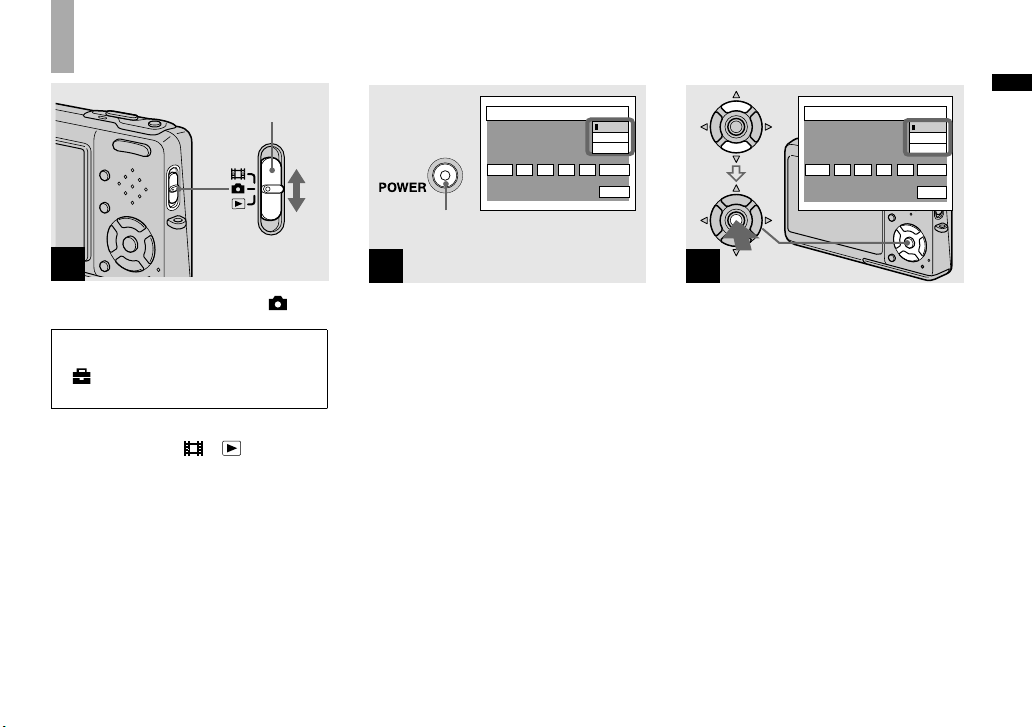
20
Turning on/off your camera
POWER lamp
POWER button
Press POWER.
The POWER lamp (green) lights up and
the power is on. When you turn on your
camera for the first time, the Clock Set
screen appears (page 21).
Turning off the power
Press POWER again. The POWER lamp
goes out, and the camera turns off.
Auto power-off function
If you do not operate the camera for about
three minutes during shooting or viewing
or when performing Setup, the camera
turns off automatically to prevent wearing
down the battery. The auto power-off
function only operates when the camera is
operating using a battery pack. The auto
power-off function also will not operate in
the following circumstances.
• When viewing movies
• When playing back a slide show
• When a connector is plugged into the
(USB) jack or the A/V OUT (MONO)
jack with the camera connected to the
Cyber-Shot Station
How to use the control button
2
1
2
1
2
1
2
1
Camera 1
AF Mode:
Digital Zoom:
Date/Time:
Red Eye Reduction:
AF Illuminator:
Auto Review:
Single
Smart
Off
Off
Auto
Off
SELECTMENU
Cancel
OK
Setup 2
File Number:
USB Connect:
Video Out:
Clock Set:
To change the current settings of the
camera, bring up the menu or the Setup
screen (page 54), and use the control
button to make the changes.
To set a menu item, press /// on the
control button to select the desired item
and setting and make the setting. To set a
Setup item, press /// on the control
button to select the desired item and
setting, then press to make the setting.
Page 21
21
Getting started
Setting the date and time
1
Mode switch
Set the mode switch to .
• To change the date and time on the
Setup screen, select [Clock Set] in
2
(Setup 2) (pages 54 and 126), and
perform the procedure from step .
• You can also carry out this operation when the
mode switch is set to or .
2
2004
/ :/
1 1
12 00
AM
OK
Cancel
Clock Set
D/M/Y
M/D/Y
Y/M/D
POWER button
Press POWER to turn on the
power.
The POWER lamp (green) lights up and
the Clock Set screen appears on the LCD
screen.
3
2004
/ :/
1 1
12 00
AM
OK
Cancel
Clock Set
D/M/Y
M/D/Y
Y/M/D
Select the desired date display
format with / on the control
button, then press .
Select from [Y/M/D] (year/month/day),
[M/D/Y] (month/day/year) or [D/M/Y]
(day/month/year).
• If the rechargeable battery (page 128), which
provides the power for saving the time data,
ever becomes low, the Clock Set screen will
appear again. When this happens, reset the date
and time, by starting from step above.
Page 22

22
4
2004
/ :/
1 1
12 00
AM
OK
Cancel
Clock Set
D/M/Y
M/D/Y
Y/M/D
Select the year, month, day,
hour or minute item you want
to set with / on the control
button.
The item to be set is indicated with /.
5
2005
/ :/
1 1
10 00
AM
OK
Cancel
Clock Set
D/M/Y
M/D/Y
Y/M/D
Set the numeric value with /
on the control button, then
press to enter it.
After entering the number, / moves to
the next item. Repeat steps and until
all of the items are set.
• If you selected [D/M/Y] in step , set the
time on a 24-hour cycle.
• Midnight is indicated as 12:00 AM, and noon
as 12:00 PM.
6
2005
/ :/
1 1
10 30
AM
OK
Cancel
Clock Set
D/M/Y
M/D/Y
Y/M/D
Select [OK] with on the
control button, then press .
The date and time are entered and the
clock starts to keep time.
• To cancel the date and time setting, select
[Cancel] with /// on the control button,
then press .
Page 23

23
Getting started
Changing the language setting
You can change the screen display like
menu items, warnings and messages in
your desired language.
To change the language setting, select
(Language) in 1 (Setup 1) on the Setup
screen (pages 54 and 125) and select the
desired language.
Page 24

24
Inserting and removing a “Memory Stick Duo”
1
Open the battery/“Memory
Stick Duo” cover.
Slide the cover in the direction of the
arrow.
• When using this camera, the Memory
Stick Duo Adaptor (supplied) is not
necessary.
• For details on “Memory Stick Duo”, see page
128.
2
Terminal side
Insert the “Memory Stick Duo”.
Insert a “Memory Stick Duo” all the way
in until it clicks as illustrated.
• When inserting a “Memory Stick Duo”,
make sure of the direction and insert it all the
way to the connector. If the “Memory Stick
Duo” is not inserted correctly, you may not
be able to record or display images with the
“Memory Stick Duo”. And also it may result in
malfunction of both the camera and “Memory
Stick Duo”.
3
Access lamp
Close the battery/“Memory
Stick Duo” cover.
To remove a “Memory Stick Duo”
Open the battery/“Memory Stick Duo”
cover, then push the “Memory Stick Duo”
to pop it out.
• Whenever the access lamp is lit, the
camera is recording or reading an
image. Never remove the “Memory Stick
Duo” or turn off the power at this time.
The data may be corrupted.
Page 25
25
Shooting still images
Setting the still image size
1
Mode switch
Set the mode switch to , and
turn on the power.
2
VGA(E-Mail )
1M
3M
3:2
5M
5M
Image Size
Press (Image Size).
The Image Size setup appears.
• For details on the image size, see page 26.
3
VGA(E-Mail )
1M
3M
3:2
5M
VGA
Image Size
Select the desired image size
with / on the control button.
The image size is set.
When the setting is complete, press
(Image Size) so that the Image Size setup
disappears from the LCD screen.
• The image size selected here is maintained
even when the power is turned off.
Page 26

26
Image size and quality
You can choose image size (number of
pixels) and image quality (compression
ratio) based on the kind of images you
want to shoot.
The image size is shown by the number
of pixels (dots) (horizontal × vertical),
which compose an image. For example, a
5M (2592×1944) size image indicates that
there are 2592 pixels horizontally and 1944
pixels vertically. The larger the number of
pixels, the larger the image size.
You can select from Fine (high quality)
or Standard image quality. Each uses a
different compression ratio.
When you select Fine, the image quality
improves as the image size increases,
but the amount of recorded data also
increases and the number of images that
can be recorded on a “Memory Stick Duo”
decreases. Refer to the table on the right
and choose the image size and image
quality appropriate to the kind of images
you want to shoot.
Short description of the image size
The following illustration shows a brief image using the maximum image size and the
minimum one.
2592
1944
480
640
Image size
5M
5M
2592 pixels × 1944 pixels = 5,038,848 pixels
Image size
VGA (E-Mail)
VGA
640 pixels × 480 pixels = 307,200 pixels
Examples based on the image size
Image size Usage guidelines
5M1) (2592×1944) Larger
Smaller
• For saving important images, printing in A4 size or
printing A5 size high density images
3:22) (2592×1728)
3M (2048×1536)
1M (1280×960) • For printing in postcard size
VGA (E-Mail)
(640×480)
• For recording a larger number of images
• For attaching images to e-mail or creating home pages
1)
The factory setting is [5M]. It is the highest image quality on this camera.
2)
Images are recorded in the same 3:2 aspect ratio as photograph printing paper or postcards, etc.
Page 27

27
Shooting still images
Examples based on the image quality
Image quality
(Compression ratio)
Usage guideline
Fine
Low compression
(looks better)
High compression
(normal)
• For recording or printing with better image quality.
Standard
• For recording a larger number of images.
Page 28

28
Number of still images that can be recorded
The number of images that can be saved in a “Memory Stick
Duo”
1)
The number of images that can be saved when [P.Quality] is set to [Fine] ([Standard])2) are
shown below.
• The table below shows the approximate number of images that can be recorded on a “Memory Stick
Duo” that has been formatted by this camera.
(Units: number of images)
Capacity
Image size
16MB 32MB 64MB 128MB 256MB 512MB
5M
6
(11)
12
(23)
25
(48)
51
(96)
92
(174)
188
(354)
3:2
6
(11)
12
(23)
25
(48)
51
(96)
92
(174)
188
(354)
3M
10
(18)
20
(37)
41
(74)
82
(149)
148
(264)
302
(537)
1M
24
(46)
50
(93)
101
(187)
202
(376)
357
(649)
726
(1320)
VGA (E-Mail)
97
(243)
196
(491)
394
(985)
790
(1975)
1428
(3571)
2904
(7261)
1)
When [REC Mode] is set to [Normal].
For the number of images that can be saved in other modes, see page 119.
2)
For more information about the image quality (compression ratio), see page 54.
• When images recorded using earlier Sony
models are played back on this camera, the
display may differ from the actual image size.
• When the images are viewed on the LCD
screen of the camera, they all look the same
size.
• The number of shooting images may differ
from these values according to the shooting
mode, shooting conditions and the subject.
• When the number of remaining shooting
images is greater than 9,999, the “>9999”
indicator appears on the LCD screen.
• You can resize the images later (Resize
function, see page 75).
Page 29

29
Shooting still images
Basic still image shooting — Using auto adjustment mode
Holding the camera correctly
When shooting pictures with the camera,
be careful so that your fingers do not
block the lens portion, flash emitter or
microphone. (page 10)
1
Mode switch
Set the mode switch to , and
turn on the power.
2
Hold the camera steadily with
both hands and position the
subject in the center of the
focus frame.
• The minimum focal distance to a subject
is approx. 50 cm (19 3/4 inches). To shoot
subjects at distances closer than this, use the
close-ups (Macro) mode (page 35).
• The frame indicated on the LCD screen shows
the focus adjustment range (AF range finder,
page 57).
Page 30
30
3
96
60
min
VGA
FINE
101
F3.530
S AF
AE/AF lock indicator
Flashes green
Light up
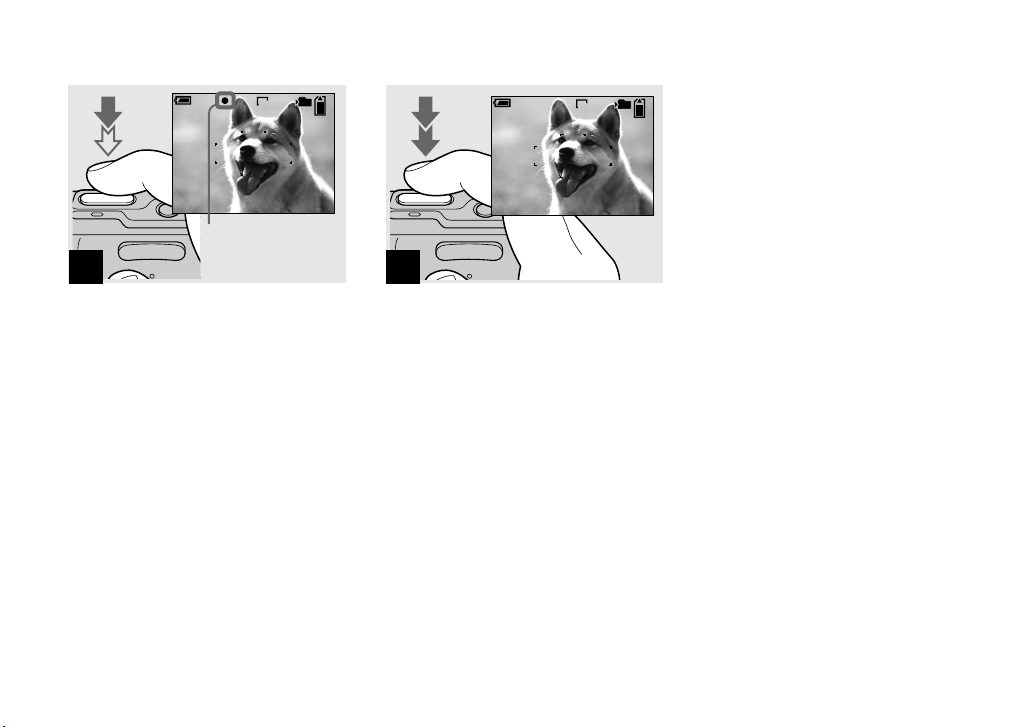
Press and hold the shutter
button halfway down.
The beep sounds but the image is not yet
recorded. When the AE/AF lock indicator
changes from flashing to steadily lit, the
camera is ready for shooting.
(The LCD screen may be frozen for a split
second depending on the subject.)
• If you release the shutter button, shooting will
be canceled.
• You can continue and shoot even when the
camera does not beep, but in this case the focus
is not set properly.
• No beep sounds when [Beep] is set to [Off] on
the Setup screen (page 125).
4
95
60
min
VGA
101
S AF
Press the shutter button fully
down.
The shutter sounds. The image will be
recorded in the “Memory Stick Duo”.
The recorded image is displayed for
approximately two seconds (Auto Review,
page 124).
• When operating the camera using a battery
pack, if you do not operate the camera for a
while during recording or playback, the camera
turns off automatically to prevent wearing
down the battery (page 20).
Page 31

31
Shooting still images
Mode switch
When you set the mode switch to ,
the functions that can be used change as
follows according to (Camera) in the
menu.
Mode
Auto
Camera
Program
Still image auto shooting [Auto]
The focus, exposure and white balance
are automatically adjusted as needed to
allow easy shooting. In addition, the image
quality is set to [Fine] (page 54), the AF
range finder frame is set to [Multi AF], and
the metering mode is set to [Multi] (pages
57 and 62).
Only (Camera), [Mode] (REC Mode)
and (Setup) appear in the menu.
Still image program shooting
[Program]
The necessary adjustments are made
automatically like still image auto
shooting, but you can also change the
focus and other adjustments as desired.
In addition, you can also set the desired
shooting functions using menus (pages 53
and 120).
(Magnifying glass mode) (page
40)
(Twilight mode) (page 40)
(Twilight portrait mode) (page 40)
(Landscape mode) (page 40)
(Snow mode) (page 41)
(Beach mode) (page 41)
(High-speed shutter mode) (page
41)
(Fireworks mode) (page 41)
(Candle mode) (page 41)
To switch the shooting
method
1 Set the mode switch to .
2 Press MENU.
3 Select (Camera) with on the
control button.
4 Select the desired shooting mode with
/ on the control button.
Page 32

32
Auto Focus
When you try to shoot a subject that is
difficult to focus on, the AE/AF lock
indicator changes to flashing slowly. In
addition, the AE locked beep does not
sound.
The Auto Focus function may have
difficulty working under the following
conditions. In such cases, release the
shutter button, then recompose the shot
and focus again.
• The subject is distant from the camera
and dark.
• The contrast between the subject and its
background is poor.
• The subject is seen through glass, such
as a window.
• A fast-moving subject.
• The subject reflects or has a lustrous
finish, such as a mirror or a luminous
body.
• A flashing subject.
• A backlit subject.
There are two Auto Focus functions: “AF
range finder frame” which sets the focus
position according to the subject position
and size, and “AF mode” which sets the
focus start/finish timing. See page 57 for
details.
Checking the last image you shot — Quick Review
10:30PM2005 1 1101-0029
Review
60min
8/8
101
VGA
RETURN
Press () on the control
button.
To return to the normal shooting mode,
press lightly on the shutter button or press
() again.
To delete the image displayed on
the LCD screen
1 Press (Delete).
2 Select [Delete] with on the control
button, then press .
The image is deleted.
• The image may appear rough right after
playback starts due to the image processing.
Indicators on the LCD screen during shooting
Each time you press , the display
changes in the following order.
• For a detailed description of the indicators, see
page 133.
• For a detailed description of the histogram, see
page 61.
• You can extend the battery remaining time by
turning off the LCD backlight.
• When shooting/viewing movies, the status of
the LCD screen changes as follows: Indicators
off LCD backlight off Indicators on
• This setting is maintained even when the power
is turned off.
Page 33

33
Shooting still images
Histogram on (Image information can also be
displayed during playback.)
VGA
101
96
S AF
60min
Indicators off
S AF
LCD backlight off
Indicators on
VGA
101
96
S AF
60min
Using the zoom feature
T
W
T
W
60
min
60
min
101 101
96
VGA
SAF
96
VGA
1.1
5.0
SAF
W (wide-angle)
T (telephoto)
Press the zoom buttons to
choose the desired zoom
position for shooting.
The minimum focal distance to the
subject
Approx. 50 cm (19 3/4 inches) from the
lens surface for both W/T sides
• You cannot change the zoom scale while
shooting movie (page 84).
Zoom
Your camera is equipped with the
following zoom functions.
The enlargement method and the zoom
scale differ according to the image size and
the zoom type, so select the zoom to match
the shooting purpose.
Optical zoom
The telephoto and wide angle adjustment
is made by the lens in the same manner as
a conventional film camera.
The maximum optical zoom is 3×.
Digital zoom
The camera has the following two types of
digital zoom.
Smart zoom
The image is enlarged with almost no
distortion. This lets you use smart zoom
with the same feeling as optical zoom.
The maximum smart zoom scale depends
on the selected image size as shown in the
following table.
Page 34

34
Precision digital zoom
All image sizes are enlarged up to a
maximum 6×. Precision digital zoom
function cuts out and enlarges a certain
portion of the image, so the image quality
deteriorates.
Optical zoom Precision digital
zoom
Image
size
Maximum
smart
zoom scale
Maximum
precision digital
zoom scale
5M —* 6×
3:2 —* 6×
3M approx. 3.8× 6×
1M approx. 6.1× 6×
VGA
(E-Mail)
approx. 12× 6×
* The maximum optical zoom scale is 3×.
• The maximum smart zoom and precision
digital zoom scale includes the optical zoom
scale.
• When using the smart zoom, the image on the
LCD screen may look rough. However, this
phenomenon has no effect on the recorded
image.
• You cannot use the smart zoom in the Multi
Burst mode.
To set digital zoom
Set [Digital Zoom] to [Smart] or
[Precision] on the Setup screen (page 124).
(When you purchase your camera, [Digital
Zoom] is set to [Smart].)
When you press the zoom button, the zoom
scaling indicator appears on the LCD
screen as follows.
The W side of this line is optical zoom,
and the T side is digital zoom
Zoom scaling indicator
• The zoom scaling indicator differs according to
the zoom type.
– Optical zoom:
– Smart zoom:
– Precision digital zoom:
• The AF range finder frame does not appear
when using the digital zoom. The , or
indicators flashes, and AF operates with
priority on subjects located near the center.
Page 35

35
Shooting still images
Shooting close-ups — Macro
The close-ups (Macro) recording mode is
used when zooming up subjects such as
flowers or insects. Setting the zoom all the
way to the W side lets you shoot subjects
at distances as close as 8 cm (3 1/4 inches).
However, the minimum focus distance
varies according to the zoom position.
Therefore, shooting with the zoom set all
the way to the W side is recommended.
When the zoom is set all the way to the
W side:
Approx. 8 cm (3 1/4 inches) from the lens
surface
When the zoom is set all the way to the
T side:
Approx. 25 cm (9 7/8 inches) from the lens
surface
• Using Spot AF is recommended (page 57).
• To shoot at even closer distances than close-
ups (Macro) recording, use (Magnifying
glass mode) (page 40).
1
60
min
96
VGA
101
S AF
Set the mode switch to , and
press ( ) on the control
button.
The (Macro) indicator appears enlarged
on the LCD screen (page 124).
• If the menu is currently displayed, press
MENU first so that the menu disappears.
• You can also carry out this operation when the
mode switch is set to .
• You cannot use this function when
(Camera) in the menu is set to
(Magnifying glass mode), (Twilight mode),
(Landscape mode), (Fireworks
mode) and (Candle mode).
Page 36

36
2
60
min
95
VGA
101
S AF
Center the subject in the
frame. Press and hold the
shutter button halfway down
to focus on, then press the
shutter button fully down.
To return to normal recording mode
Press ( ) on the control button again.
The indicator disappears from the LCD
screen.
• When shooting in close-ups (Macro) mode, the
in-focus range becomes extremely narrow, and
the entire subject may not be in focus.
• When shooting in close-ups (Macro) mode, the
AF speed drops in order to focus accurately on
close subjects.
Using the self-timer
1
60min
VGA
101
96
S AF
Set the mode switch to , and
press ( ) on the control
button.
The (self-timer) indicator appears
enlarged on the LCD screen (page 124).
• When recording with the self-timer, using
a tripod is recommended. If you place the
camera directly in an unstable location for
recording, the camera may fall and become
damaged or malfunction.
• If the menu is currently displayed, press
MENU first so that the menu disappears.
• You can also carry out this operation when the
mode switch is set to .
2
60min
VGA
FINE
101
96
F3.530
S AF
Center the subject in the
frame. Press and hold the
shutter button halfway down
to focus on, then press the
shutter button fully down.
The self-timer lamp (page 10) flashes
and a beep sounds after you press the
shutter button until the shutter operates
(approximately 10 seconds later).
To cancel the self-timer in the
middle of the operation
Press ( ) on the control button again. The
indicator disappears from the LCD screen.
• If you press the shutter button while standing
in front of the camera, the focus and the
exposure may not be correctly set.
Page 37

37
Shooting still images
Selecting a flash mode
60min
VGA
101
96
S AF
Set the mode switch to ,
and press ( ) on the control
button repeatedly to select a
flash mode.
The selected flash mode indicator appears
enlarged on the LCD screen (page 124).
Each time you press ( ), the indicator
changes as follows.
No indicator (Auto): The flash
automatically strobes when shooting
images in a dark place. The factory setting
is Auto.
(Forced flash): The flash strobes
regardless of the surrounding brightness.
SL
(Slow synchro): The flash strobes
regardless of the surrounding brightness.
The shutter speed is slow in a dark place,
so you can clearly shoot the background
that is out of flash light.
(No flash): The flash does not strobe.
• If the menu is currently displayed, press
MENU first so that the menu disappears.
• The recommended shooting distance using
the flash is approx. 0.1 m to 1.7 m (4 inches
to 5 feet 6 7/8 inches) (W)/0.5 m to 1.6 m
(1 foot 7 3/4 inches to 5 feet 2 7/8 inches) (T)
(DSC-T3), approx. 0.1 m to 1.6 m (4 inches to
5 feet 2 7/8 inches) (W)/0.5 m to 1.5 m (1 foot
7 3/4 inches to 4 feet 11 inches) (T) (DSCT33) (When [ISO] is set to [Auto] in the menu
settings).
• The flash strobes twice. The first time is the
pre-flash which is used to adjust the flash light
quantity, and the second time is the actual flash
during which the image is recorded.
• You can change the brightness of the flash with
(Flash Level) in the menu settings (page
66). (You cannot change the brightness of the
flash while (Camera) in the menu is set to
[Auto] in the menu.)
• When using the SL (Slow synchro) or
(No flash) mode, the shutter speed becomes
slower in dark places, so using a tripod is
recommended.
• While charging the flash, the /CHG lamp
flashes. After the charging is complete, the
lamp goes out and flash mode is ready.
• Flash mode setting is maintained even when
the power is turned off.
To prevent subjects’ eyes from
appearing red
The flash pre-strobes twice or more
before shooting to reduce the red-eye
phenomenon.
Set [Red Eye Reduction] to [On] on the
Setup screen (page 124). The indicator
appears on the LCD screen.
Red-eye reduction takes approximately one
second before actually shooting the image,
so hold the camera firmly to avoid shaking.
In addition, be sure to tell the subject to
hold still.
• Red-eye reduction may not produce the desired
effects depending on individual differences,
the distance to the subject, if the subject does
not see the pre-strobe, or other conditions. In
addition, red-eye reduction is more effective
under bright lighting and when closer to the
subject.
Page 38

38
Shooting images with the AF
illuminator
The AF illuminator is fill light to
focus more easily on a subject in dark
surroundings. The ON appears on the
LCD screen and the AF illuminator emits
red light when the shutter button is pressed
halfway until the focus is locked.
VGA
60min
101
96
ON
FINE
F3.530
S AF
When this function is not needed, set [AF
Illuminator] to [Off] on the Setup screen (page
124).
• If AF illuminator light does not reach the
subject sufficiently or the subject has no
contrast, focus will not be achieved. (A
distance up to approximately 2.4 m (7 feet
10 3/8 inches) (W)/3.7 m (12 feet 1 5/8 inches)
(T) is recommended.)
• Focus is achieved as long as AF illuminator
light reaches the subject, even if the light is
slightly off the center of the subject.
• When the focus preset distance is set (page 59),
the AF illuminator does not function.
• The AF range finder frame does not appear.
The , or indicator flashes, and AF
operates with priority on subjects located near
the center.
• The AF illuminator operates only when
(Camera) is set to [Auto], [Program],
(Magnifying glass mode), (Twilight portrait
mode), (Snow mode), (Beach mode)
or (Candle mode) in the menu.
• The AF illuminator emits very bright light.
Although there are no problems with safety,
directly looking into the AF illuminator emitter
at close range is not recommended.
Inserting the date and time on a still image
1
Mode
Program
Auto
Camera
MENU
Set the mode switch to ,
then press MENU.
The menu appears.
• When images are shot with the date and time
superimposed, the date and time cannot be
removed later.
• The date and time are not inserted in Multi
Burst mode.
• The date and time do not appear on the LCD
screen during shooting, instead, indicator
appears on the LCD screen. The actual date
and time appear in red on the lower-right
corner during playback only.
• You can also carry out this operation with the
mode switch set to or .
Page 39

39
Shooting still images
2
Setup
t
Mode
Press on the control button
to advance to , then press
again.
The Setup screen appears.
3
Day&Time
Date
Off
Camera 1
AF Mode:
Digital Zoom:
Date/Time:
Red Eye Reduction
:
AF Illuminator:
Auto Review:
2
1
2
1
Select 1 (Camera 1) with on
the control button, then press
.
Select [Date/Time] with /,
then press .
4
2
1
2
1
PAGESELECT
Camera 1
AF Mode:
Digital Zoom:
Date/Time:
Red Eye Reduction
:
AF Illuminator:
Auto Review:
Single
Smart
Day&Time
Off
Auto
Off
Select the date and time
setting with / on the control
button, then press .
Day&Time: Superimposes the date, hour,
and minute onto the image.
Date: Superimposes the year, month and
day onto the image.
Off: Does not superimpose the date and
time onto the image.
After the setting has been completed, press
MENU first so that the menu disappears,
and shoot the image.
• If you select [Date], the date is superimposed
onto the image in the order selected in “Setting
the date and time” (page 21).
• Date and time setting is maintained even when
the power is turned off.
Page 40

40
Shooting according to scene conditions — Scene Selection
You can shoot more effectively by
selecting the appropriate mode and then
pressing the shutter button.
Magnifying glass mode
The subject appears on the LCD screen
magnified by up to 3.3×. This lets you see
details that would otherwise be difficult to
confirm with the naked eye.
Distance to the
subject
Magnification
scale
1 cm (13/32 inch) 3.3×
2 cm (13/16 inch) 2.1×
5 cm (2 inches) 1.0×
10 cm (4 inches) 0.5×
20 cm (7 7/8 inches) 0.3×
• The focal distance to a subject is approx. 1 cm
to 20 cm (13/32 inch to 7 7/8 inches)
• The optical zoom is locked to the W side and
cannot be used.
• When you press the zoom button, the image is
enlarged using the digital zoom.
1.1
Twilight mode
Allows you to shoot night scenes at
far distance without losing the dark
atmosphere of the surroundings.
• The shutter speed becomes slower, so using a
tripod is recommended.
Twilight portrait mode
Suitable for shooting portraits in dark
places. Allows you to shoot sharp images
of people in dark places without losing the
dark atmosphere of the surroundings.
• The shutter speed becomes slower, so using a
tripod is recommended.
Landscape mode
Focuses only on a distant subject to shoot
landscapes, etc.
Page 41

41
Shooting still images
Snow mode
When shooting snowy scenes or other
places where the whole screen appears
white, use this mode to prevent sunken
colors and record clear images.
Beach mode
When shooting seaside or lakeside scenes,
the blue of the water is clearly recorded.
High-speed shutter mode
Use this mode to shoot moving subjects
outdoors or in other bright places.
• The shutter speed becomes faster, so images
shot in dark places become darker.
Fireworks mode
You can record fireworks in all their
splendor. The focus distance is set to
infinity.
• You can change the shutter speed by setting an
EV adjustment value (page 60).
• The shutter speed becomes slower, so using a
tripod is recommended.
Candle mode
You can record parties, candle services and
other candlelit scenes without spoiling the
candlelight atmosphere.
• The shutter speed becomes slower, so using a
tripod is recommended.
Page 42

42
1
Mode
Program
Auto
Camera
MENU
Set the mode switch to ,
then press MENU.
The menu appears.
2
WB
ISO
Program
Auto
Camera
Select (Camera) with on
the control button, then select
the desired mode with /.
To return to normal mode
Select [Auto] or [Program] with / on
the control button.
• Scene Selection setting is maintained even
when the power is turned off.
Page 43

43
Shooting still images
Shooting with Scene Selection
When shooting with the Scene Selection function, the combination of functions such as the
flash mode is predetermined to make the optimum settings to match the scene. See the table
below for the function setting of each shooting mode.
Function
Shooting
mode
Macro
Flash
mode
AF
range
finder
frame
Focus
preset
Exposure
bracket
White
balance
Flash
level
Burst/
Speed
Burst/
Multi Burst
—
/
— —
—
—
—
— —
SL
—
Auto/
WB
—
—
/
/
/
/
— — — — —
—
Center AF0.5m/1.0m/
3.0m/7.0m
— — —
• indicates that the function can be set to your preference.
NR slow shutter
The NR slow shutter function reduces
noise from recorded images, providing
clear images. When the shutter speed is 1/6
second or slower, the camera automatically
activates the NR slow shutter function and
“NR” is indicated next to the shutter speed
indicator.
Press the shutter button
fully down.
Capturing
Then the screen turns
black.
Processing
Finally, when
“Processing” disappears,
the image has been
recorded.
• Do not move the camera while “Capturing”
appears. To eliminate the effects of vibration,
using a tripod is recommended.
• When a slow shutter speed is set by the
camera, the processing may take some time.
Page 44

44
Viewing images on the LCD screen of your camera
BACK/NEXT VOLUME
VGA
60min
10:30
PM
2005 1 1101-0008
8/9
101
•
SINGLE DISPLAY
•
SINGLE DISPLAY
Single (single-image)
screen
Index (nine-image)
screen
Index (sixteen-image)
screen
You can view images shot with your
camera almost immediately on the LCD
screen. You can select the following three
methods for viewing images.
Single (single-image) screen
You can view one image at a time,
displayed over the entire screen.
Index (nine-image/sixteen-image)
screen
Nine or sixteen images are displayed
simultaneously in separate panels on the
LCD screen.
• For details on viewing movies, see page 85.
• For a detailed description of the indicators, see
page 136.
Viewing single images
1
BACK/NEXT VOLUME
VGA
60min
10:30
PM
2005 1 1101-0008
8/9
101
Set the mode switch to , and
turn on the power.
The last image in the selected recording
folder (page 69) appears on the LCD
screen.
• The image may appear rough right after
playback starts due to the image processing.
Page 45

45
Viewing still images
2
BACK/NEXT
10:30PM2005 1 1101-0003
VOLUME
VGA
60min
3/9
101
Select the desired still image
with / on the control button.
: To display the preceding image
: To display the next image
Viewing an index (nine-image or sixteen-image) screen
1
•
SINGLE DISPLAY
Press (index) once.
The display switches to the index (nine-
image) screen.
To display the next (previous) index
screen
Press /// on the control button to
move the yellow frame up/down/left/right.
2
•
SINGLE DISPLAY
Press (index) once more.
The display switches to the index (sixteen-
image) screen.
To display the next (previous) index
screen
Press /// on the control button to
move the yellow frame up/down/left/right.
Page 46

46
3
•
SINGLE DISPLAY
Select the desired still image
with /// on the control
button.
The image in the yellow frame is selected.
To return to the single-image screen
Press the zoom T or press on the control
button.
Viewing images on a TV screen
1
A/V connecting cable
A/V OUT
(MONO) jack
Connect the A/V connecting
cable (supplied) to the
A/V OUT (MONO) jack of the
Cyber-shot Station (supplied)
and the audio/video input
jacks of the TV.
If your TV has stereo input jacks,
connect the audio plug (black) of the A/V
connecting cable to the left audio jack.
• When the USB cable is connected to the
Cyber-shot Station, remove the USB cable
from the Cyber-shot Station.
• Turn off both your camera and the TV before
connecting the camera and the TV with the
A/V connecting cable.
2
Connect the camera to the
Cyber-shot Station.
Connect the camera as illustrated.
• Make sure the camera is securely connected to
the Cyber-shot Station.
Page 47

47
Viewing still images
3
TV/Video switch
Turn on the TV and set the
TV/Video switch to “Video”.
• The name and location of this switch may
differ depending on your TV. For details, see
the operating instructions supplied with the TV.
10:30PM2005 1 1101-0002
VGA
2/9
101
BACK/NEXT VOLUME
4
POWER
Set the mode switch to , and
turn on the camera.
Press / on the control button to select
the desired image.
• When using your camera abroad, it may be
necessary to switch the video output signal to
match that of your TV system (page 126).
Page 48

48
Viewing images on a TV screen
If you want to view images on a TV
screen, you need a TV with a video
input jack and the A/V connecting cable
(supplied).
The color system of the TV must match
that of your digital still camera. Check the
following lists:
NTSC system
Bahama Islands, Bolivia, Canada, Central
America, Chile, Colombia, Ecuador,
Jamaica, Japan, Korea, Mexico, Peru,
Surinam, Taiwan, the Philippines, the
U.S.A., Venezuela, etc.
PAL system
Australia, Austria, Belgium, China, Czech
Republic, Denmark, Finland, Germany,
Holland, Hong Kong, Hungary, Italy,
Kuwait, Malaysia, New Zealand, Norway,
Poland, Portugal, Singapore, Slovak
Republic, Spain, Sweden, Switzerland,
Thailand, United Kingdom, etc.
PAL-M system
Brazil
PAL-N system
Argentina, Paraguay, Uruguay
SECAM system
Bulgaria, France, Guiana, Iran, Iraq,
Monaco, Russia, Ukraine, etc.
Page 49

49
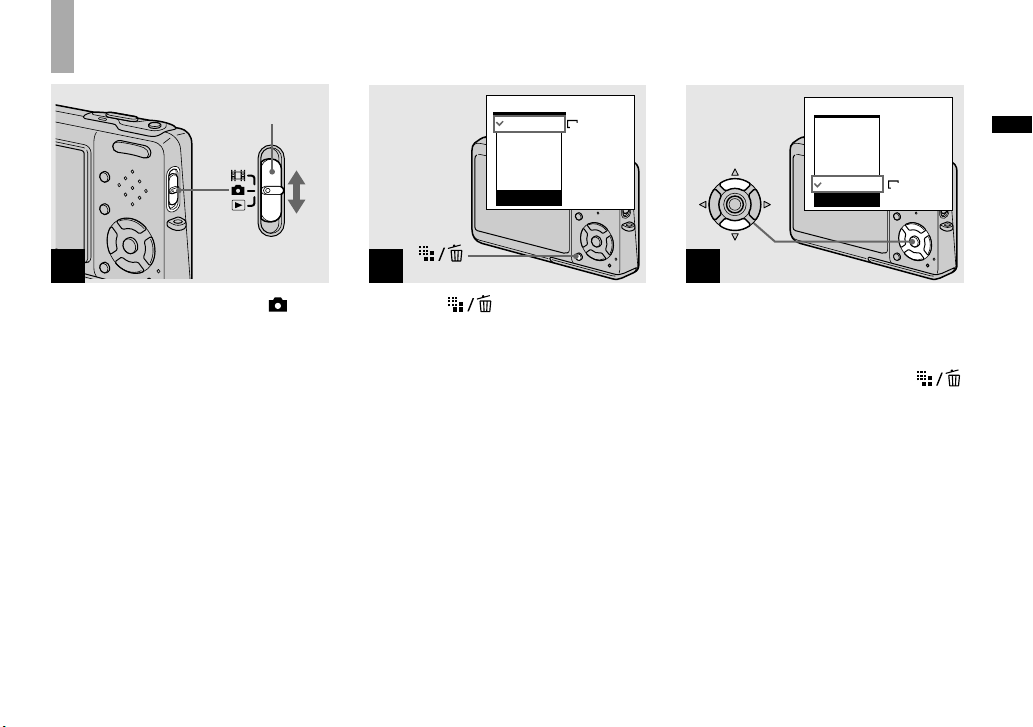
Deleting still images
Deleting images
1
10:30PM2005 1 1101-0002
2/9
VGA
101
BACK/NEXT VOLUME
60min
Set the mode switch to , and
turn on the camera.
Press / on the control
button to select the image you
want to delete.
• Note that you cannot restore deleted images.
2
VGA
2/9
101
Delete
Exit
60min
BACK/NEXT
Press (Delete).
The image has not yet been deleted at this
point.
• You cannot delete the protected image (page
74).
3
VGA
2/9
101
60min
Delete
Exit
BACK/NEXT
Select [Delete] with on the
control button, then press .
The message “Access” appears, and the
image has been deleted.
To continue and delete other images
Display the image to be deleted with /
on the control button. Then, select [Delete]
with and press .
To cancel deleting
Select [Exit] with on the control button,
then press .
Page 50

50
Deleting images in index (nine-image or sixteen-image) mode
1
Delete
SelectExit
All InThis Folder
While an index (nine-image/
sixteen-image) screen (page
45) is displayed, press
(Delete).
• Note that you cannot restore deleted images.
2
Delete
SelectExit
All InThis Folder
Select [Select] with / on the
control button, then press .
3
•
TO NEXTSELECT
Select an image you want to
delete with /// on the
control button, then press .
The (Delete) indicator appears on the
selected image. At this point, the image has
not yet been deleted. Repeat this step for
all of the images you want to delete.
• To cancel a selection, select the image, then
press on the control button again so that the
indicator disappears.
Page 51

51
Deleting still images
4
Delete Exit OK
Press (Delete) and select
[OK] with on the control
button, then press .
The message “Access” appears, and the
images with the indicator have been
deleted.
To cancel deleting
Select [Exit] with on the control button,
then press .
To delete all the images in
the folder
Select [All In This Folder] with on
the control button in step , then press
. Select [OK], then press . All of
the unprotected images in the folder
are deleted. To cancel deleting, select
[Cancel], then press .
• You can also delete movies (page 86).
Formatting a “Memory Stick Duo”
1
Terminal side
Insert the “Memory Stick Duo”
you want to format into the
camera.
• The term “formatting” means preparing a
“Memory Stick Duo” to record images; this
process is also called “initialization.”
• The “Memory Stick Duo” supplied with your
camera and commercially available “Memory
Stick Duo” are already formatted, and can be
used immediately.
• Note that formatting the “Memory Stick
Duo” erases all the data in the “Memory
Stick Duo” even if images are protected,
and these images cannot be recovered.
Page 52

52
2
Mode
Setup
t
MENU
Turn on the camera, then
press MENU.
Press on the control button
to advance to , then press
again.
The Setup screen appears.
• This operation is available no matter what
position the mode switch is in.
3
2
1
2
1
Memory Stick Tool
Format:
Create REC. Folder:
Change REC. Folder:
OK
Cancel
Select (Memory Stick Tool)
with / on the control button.
Select [Format] with , then
press .
Select [OK] with , then press
.
To cancel the formatting
Select [Cancel] with on the control
button, then press .
4
Format
All data will be erased
60min
Ready?
OK
Cancel
Select [OK] with on the
control button, then press .
The message “Formatting” appears. When
this message disappears, the format is
complete.
Page 53

53
Before advanced operations
How to setup and operate your camera
The usage of the menus and Setup screen
items is described below.
Control button
Mode switch
MENU
Changing the menu settings
Press MENU.
The menu appears.
WB
ISO
Auto
Camera
Program
• The displayed items differ according to the
mode switch position.
Press / on the control
button to select the item you
want to set.
WB
ISO
10 0
20 0
40 0
IS O
Auto
• When the mode switch is set to , press
on the control button after selecting the item.
Press / on the control
button to select the desired
setting.
The selected setting is enlarged and
the setting is entered.
When the /// marks
appear with an item
There are items that are not displayed on
the screen. Press /// on the control
button to display these items.
To turn off the menu display
Press MENU again.
• You cannot select items displayed in gray.
• For a detailed description of the menu items,
see page 120.
Page 54

54
Changing the items in the Setup screen
Press MENU.
The menu appears.
Press on the control button
to advance to , then press
again.
The Setup screen appears.
Set up t
Press /// on the control
button to select the item you
want to set.
The frame of the selected item turns
yellow.
2
1
2
1
Cancel
OK
Setup 2
File Number:
USB Connect:
Video Out:
Clock Set:
Press on the control button
to enter the setting.
To turn off Setup screen
display
Press MENU again.
To return to the menu from the
Setup screen
Press on the control button to return to
the position enclosed by the frame in step
, then press again.
• For a detailed description of the Setup items,
see page 124.
Deciding the still image quality
You can select the still image quality from
[Fine] (high quality) or [Standard].
Before operation
When shooting still images, set
(Camera) in the menu to other than [Auto]
(pages 53 and 120).
Control button
Mode switch
MENU
Page 55

55
Before advanced operations
Set the mode switch to .
Press MENU.
The menu appears.
Select (P.Quality) with /,
then select the desired image
quality with /.
PFX
FINE
Mode BRK
M
Standard
P.Quality
Fine
Creating or selecting a folder
Your camera can create multiple folders
within a “Memory Stick Duo”. You can
select the folder used to store images
before shooting, which is convenient for
organizing images.
When not creating a new folder,
“101MSDCF” folder is selected as the
recording folder.
You can create folders up to “999MSDCF”.
Before operation
Set the menu to the Setup screen (pages 54
and 124).
Control button
Mode switch
MENU
• Up to 4,000 images can be stored in one folder.
When the folder capacity is exceeded, a new
folder is automatically created.
Creating a new folder
Select (Memory Stick Tool)
with /, [Create REC. Folder]
with //, and [OK] with /,
then press .
The creating folder screen appears.
Create REC. Folder
Creating REC. folder 102MSDCF
Ready?
OK
Cancel
60
min
Select [OK] with , then press
.
A new folder is created with a number
one higher than the largest number
in the “Memory Stick Duo”, and the
folder becomes the recording folder.
To cancel folder creation
Select [Cancel] in step or .
• Once you create a new folder, you cannot
delete the new folder with the camera.
• Images are recorded in the newly created folder
until a different folder is created or selected.
Page 56

56
Changing the recording folder
Select (Memory Stick
Tool) with /, [Change REC.
Folder] with /, and [OK]
with /, then press .
The recording folder selection screen
appears.
BACK/NEXT
Select REC. Folder
Cancel
OK
Folder Name:
102 2/2
Created:
No. Of Files:
2005
102MSDCF
0
1 1 1::05:34
AM
Select the desired folder with
/, and [OK] with , then
press .
To cancel changing the
recording folder
Select [Cancel] in step or .
• You cannot select the “100MSDCF” folder as a
recording folder (page 95).
• The image is stored in the newly selected
folder. You cannot move recorded images to a
different folder with this camera.
Page 57

57
Advanced still image shooting
Choosing an auto focus method
You can set the AF range finder frame and
the AF mode.
AF range finder frame
This selects the focus position according to
the subject position and size.
AF mode
This sets the focus operation start and stop
timing.
Before operation
When shooting still images, set
(Camera) in the menu to other than [Auto]
(pages 53 and 120).
Control button
Mode switch
MENU
Choosing a focus range
finder frame
— AF range finder
Multipoint AF ( )
The camera calculates the distance in five
areas to the left, right, top, bottom and in
the center of the image, letting you shoot
using the auto focus function without
worrying about the image composition.
This mode is useful when it is difficult
to focus on the subject because it is not
in the center of the frame. You can check
the position where the focus was adjusted
using the green frame.
The factory setting is the Multipoint AF.
Center AF ( )
This mode is useful for focusing on a
subject near the center of the frame. Use
together with the AF lock function lets you
shoot in the desired image composition.
Spot AF ( )
This is useful when focusing on an
extremely small subject or a narrow area.
Use together with the AF lock function
lets you shoot in the desired image
composition. Take care to hold the camera
steady so that the subject does not deviate
from the range finder frame.
Set the mode switch to or
.
Press MENU.
The menu appears.
Select (Focus) with /,
then select the desired AF
range with /.
VGA
FINE
98
101
S AF
60min
P
AF range
finder frame
The focus is adjusted automatically.
The color of the AF range finder frame
changes from white to green.
• When you are shooting movies and you choose
Multipoint AF, the distance to the center of the
screen is estimated as an average, so the AF
works even with a certain amount of vibration.
The AF range finder frame is . Center AF
and Spot AF automatically focuse only on
selected frame, so these are convenient when
you want to focus only on what you aim at.
• When you use the digital zoom or AF
illuminator, priority AF movement is given to
subjects in or near the center of the frame. In
this case the , or indicator flashes
and the AF range finder frame is not displayed.
• Some settings cannot be selected depending on
the Scene Selection mode (page 43).
Page 58

58
Choosing a focus operation
— AF Mode
Single AF (
S A F
)
This mode is useful for shooting stationary
subjects. The focus is not adjusted before
the shutter button is pressed and held
halfway down. When the shutter button
is pressed and held halfway down and AF
lock is complete, the focus is locked.
The factory setting is Single AF.
Monitoring AF (
M A F
)
This mode shortens the time needed for
focusing.The camera automatically adjusts
the focus before the shutter button is
pressed and held halfway down, letting
you compose images with the focus
already adjusted. When the shutter button
is pressed and held halfway down and AF
lock is complete, the focus is locked.
• Battery consumption may be faster than in
Single AF mode.
Before operation
Set the menu to the Setup screen (pages 54
and 124).
Select 1 (Camera 1) with ,
then select [AF Mode] with
/.
Select the desired mode with
//, then press .
Page 59

59
Advanced still image shooting
Shooting techniques
When shooting with the subject at the edge of
the frame, or when using Center AF or Spot AF,
the camera may focus on the center instead of
on the subject at the edge of the frame. In a case
like this, use AF lock to focus on the subject, and
then recompose the picture and shoot.
Compose the shot so that the subject is centered
in the AF range finder, and press the shutter
button halfway down.
When the AE/AF lock indicator stops flashing
and remains on, return to the fully composed
shot, and press the shutter button fully down.
VGA
60min FINE
98P
101
S AF
F3 .530
AF range finder frame
AE/AF lock indicator
VGA
60min FINE
98
101
S AF
P
F3 .53 0
• When you are using AF lock, you can
capture an image with the correct focus
even if the subject is at the edge of the
frame.
• You can carry out the AF lock adjustment
process before you press the shutter button
fully down.
Setting the distance to the subject
— Focus preset
When shooting an image using a
previously set distance to the subject, or
when shooting a subject through a net or
through window glass, it is difficult to
get the proper focus in auto focus mode.
In these cases, use of the Focus preset is
convenient.
Before operation
When shooting still images, set
(Camera) in the menu to other than [Auto]
(pages 53 and 120).
Control button
Mode switch
MENU
Page 60

60
Set the mode switch to or
.
Press MENU.
The menu appears.
Select (Focus) with /,
then select the distance to the
subject with /.
You can select from the following
distance settings.
0.5m, 1.0m, 3.0m, 7.0m, (unlimited
distance)
WB
ISO
Multi AF
Focus
Center AF
Spot AF
0.5m
1.0m
0.5m
To return to auto focus mode
In step , select [Multi AF], [Center
AF] or [Spot AF].
• Focus setting information is approximate, and
should be used as a reference.
• Some settings cannot be selected depending on
the Scene Selection mode (page 43).
Adjusting the exposure
— EV adjustment
You can manually adjust the exposure
determined by the camera. Use this mode
when the proper exposure cannot be
obtained, for example, when the contrast
(difference between light and dark)
between the subject and the background is
extremely large.
The compensation value can be set in
1/3EV steps in the range from +2.0EV to
−2.0EV.
Adjust
toward –
Adjust
toward +
Before operation
When shooting still images, set
(Camera) in the menu to other than [Auto]
(pages 53 and 120).
Control button
Mode switch
MENU
Set the mode switch to or
.
Press MENU.
The menu appears.
Select (EV) with .
The value of the exposure adjustment
is displayed.
0EV
WB
ISO
0E V
EV
Page 61

61
Advanced still image shooting
Select the desired exposure
value with /.
Adjust the exposure value while
checking the brightness of the
background.
To reactivate auto exposure
In step , select [0EV].
• If a subject is being shot in extremely bright
or dark conditions, or the flash is used, the
exposure adjustment may not be effective.
Displaying a histogram
A histogram is a graph showing the
brightness of an image. The horizontal axis
shows the brightness, and the vertical axis
shows the number of pixels. The graph
display indicates a bright image when
skewed to the right side, a dark image
when skewed to the left side.
A histogram can be used to check the
exposure when the screen is difficult to see
during recording and playback.
80
VGA
4
FINE
101
0
EV
Number of pixels
Brightness
Dark
Bright
Set the mode switch to .
Press to display the
histogram.
Adjust the exposure based on
the histogram.
• The histogram also appears when the
(Camera) in the menu is set to [Auto], but you
cannot adjust the exposure.
• The histogram also appears when you press
while playing back a single image (page
44) or during Quick Review (page 32).
• The histogram does not appear in the following
cases:
– When the menu is displayed
– During Quick Review of an image recorded
in Exposure Bracket mode
– When using playback zoom
– When recording or playing back movies
• appears and the histogram does not appear
in the following cases:
– When recording in the digital zoom area
– When the image size is [3:2]
– When playing back Multi Burst images
– When rotating a still image
• The histogram before recording represents
the histogram of the image displayed on the
LCD screen at the time. A difference occurs
in the histogram before and after you press the
shutter button. After shooting an image, check
the histogram while playing back a singleimage or during Quick Review.
In particular a large difference may appear in
the following cases:
– When the flash strobes
– When the shutter speed is slow or high
• The histogram may not appear for images
recorded using other cameras.
Page 62

62
Shooting techniques
When shooting images, the camera
automatically sets the exposure.
When shooting a whitish overall image
such as a backlit subject or a snowy
scene, the camera may judge that the
subject is bright and set a darker exposure
for the image. In such cases, adjusting
the exposure in the + (plus) direction is
effective.
Adjust in the + direction
When shooting a dark subject that fills
the frame, the camera may judge that the
subject is dark and set a brighter exposure
for the image. In such cases, adjusting
the exposure in the – (minus) direction is
effective.
Adjust in the – direction
Refer to the histogram and adjust so that
the image is not overexposed (white out) or
underexposed (black out).
Try various images with different
exposures to find the brightness that suits
your taste.
Selecting the metering method
You can select the metering mode that sets
which part of the subject to measure to
determine the exposure.
Multi-pattern metering (No
indicator)
The image is divided into multiple regions
and metering is performed for each region.
The camera judges the subject position and
background brightness, and determines a
well-balanced exposure.
The factory setting is the multi-pattern
metering.
Spot metering ( )
Metering is performed for only a part of
the subject. This lets you shoot images
that are not too dark even when the subject
is backlit, or adjust the exposure to the
subject when there is strong contrast
between the subject and the background.
Page 63

63
Advanced still image shooting
Before operation
When shooting still images, set
(Camera) in the menu to other than [Auto]
(pages 53 and 120).
Control button
Mode switch
MENU
Set the mode switch to or
.
Press MENU.
The menu appears.
Select (Metering Mode)
with /, then select the
desired metering mode with
/.
When selecting [Spot] in step
, position the spot metering
cross hair on one point of the
subject you want to shoot.
60mi n
VGA
F3.5250
98
FINE
SAF
101
P
Spot metering
cross hair
• When using spot metering, to focus on the
metering position, setting (Focus) to
[Center AF] is recommended (page 57).
Shooting three images with the exposure shifted
— Exposure Bracket
The Exposure Bracket function records a
series of three images with the exposure
values automatically shifted. This lets
you select the image with the appropriate
exposure after recording when you are
unable to shoot good pictures depending
on the brightness of the subject.
Before operation
Set (Camera) in the menu to other than
[Auto] (pages 53 and 120).
Control button
Mode switch
MENU
Page 64

64
1st image (shifted in the
+ direction)
2nd image (appropriate
exposure for the camera)
3rd image (shifted in the
– direction)
Set the mode switch to .
Press MENU.
The menu appears.
Select [Mode] (REC Mode)
with /, then select [Exp
Brktg] with /.
Select [BRK] (Bracket Step)
with /, then select the
desired exposure adjustment
value with /.
±1.0EV: Shifts the exposure value by
plus or minus 1.0EV.
±0.7EV: Shifts the exposure value by
plus or minus 0.7EV.
±0.3EV: Shifts the exposure value by
plus or minus 0.3EV.
Shoot the image.
To return to normal mode
Select [Normal] in step .
• You cannot use the flash in this mode.
• The focus and white balance are adjusted for
the first image, and these settings are also used
for the other images.
• When the exposure is manually adjusted
(page 60), the exposure is shifted based on the
adjusted brightness.
• The recording interval is approximately 0.36
second.
• If the subject is too bright or too dark, you may
be unable to shoot properly with the selected
bracket adjustment value.
• You may not be able to shoot images in
Exposure Bracket mode depending on the
Scene Selection mode (page 43).
Page 65

65
Advanced still image shooting
Adjusting color tones
— White Balance
You can set the white balance mode
according to your shooting conditions. The
apparent color of the subject is affected by
the lighting conditions. When you want to
fix the light source imaging conditions, or
when the color of the entire image seems
to be a bit unnatural, we recommend that
you adjust the white balance setting.
Auto (No indicator)
Adjusts the white balance automatically.
The factory setting is Auto.
(Daylight)
Shooting outdoors, shooting night scenes,
neon signs, fireworks or sunrise, or
shooting just before and after sundown
(Cloudy)
Shooting under a cloudy sky
(Fluorescent)
Shooting under fluorescent lighting
(Incandescent)
• Places where the lighting conditions
change quickly
• Under bright lighting such as
photography studios
WB
(Flash)
Adjusts the white balance only to the flash
conditions
Before operation
When shooting still images, set
(Camera) in the menu to other than [Auto]
(pages 53 and 120).
Control button
Mode switch
MENU
Set the mode switch to or
.
Press MENU.
The menu appears.
Select [WB] (White Bal) with
/, then select the desired
setting with /.
To reactivate auto adjustment
Select [Auto] in step .
• Under fluorescent lights that flicker, the
white balance adjustment function may not
work correctly even though you select
(Fluorescent).
• When the flash strobes, the manual setting is
canceled, and the image is recorded in [Auto]
(except in WB (Flash) mode).
• Some settings cannot be selected depending on
the Scene Selection mode (page 43).
Page 66

66
Adjusting the flash
level
— Flash Level
You can adjust the amount of flash light.
Before operation
Set (Camera) in the menu to other than
[Auto] (pages 53 and 120).
Control button
Mode switch
MENU
Set the mode switch to .
Press MENU.
The menu appears.
Select [ ] (Flash Level) with
/, then select the desired
setting with /.
+: Makes the flash level higher than
normal.
Normal: Normal setting.
–: Makes the flash level lower than
normal.
• You may not be able to set the flash level a
depending on the Scene Selection mode (page
43).
Shooting continuously
This mode is used for continuous shooting.
The maxium number of images you can
shoot per one shooting depends on the
image size and image quality settings.
Speed Burst (S)
You can shoot images with a short interval
(approx. 0.33 second).
Burst ( )
The shooting interval (approx. 0.83
seconds) becomes longer than Speed
Burst, but even more images can be shot
continuously.
Control button
Mode switch
MENU
• When the battery power decreases with use or
the capacity of the “Memory Stick Duo” is full,
recording stops even if you press and hold the
shutter button.
Page 67

67
Advanced still image shooting
Set the mode switch to .
Press MENU.
The menu appears.
Select [Mode] (REC Mode)
with /, then select [Speed
Burst] or [Burst] with /.
Shoot the image.
When you press and hold down the
shutter button, the camera records
the maximum number of images in
succession. If you release the shutter
button, shooting will stop at that point.
When “Recording” disappears, you
can shoot the next image.
The maximum number of images
shot continuously
Speed Burst (Units: images)
Image
quality
Image size
Fine Standard
5M 4 4
3:2 4 4
3M 4 4
1M 4 4
VGA (E-Mail) 4 4
Burst (Units: images)
Image
quality
Image size
Fine Standard
5M 9 15
3:2 9 15
3M 13 24
1M 32 59
VGA (E-Mail) 100 100
To return to normal mode
Select [Normal] in step .
• The flash is set to (No flash).
• When recording with the self timer, a series of
maximum five images are recorded each time
you press the shutter button.
• You may not be able to shoot images in
succession depending on the Scene Selection
mode (page 43).
Recording 16 frames in succession
— Multi Burst
This mode records 16 frames in succession
each time you press the shutter button.
This is convenient for checking your form
in sports, for example.
Control button
Mode switch
MENU
Set the mode switch to .
Press MENU.
The menu appears.
Select [Mode] (REC Mode)
with /, then select [Multi
Burst] with .
Page 68

68
Select M (Interval) with /,
then select the desired frame
interval with /.
You can choose the frame interval
from [1/7.5], [1/15] or [1/30] second.
1/30
PFX
Mode BRK
M
1/15
1/7.5
1/30
Interval
Shoot the image.
A continuous burst of 16 frames are
recorded within a single still image
(image size 1M).
• You cannot use the following functions in
Multi Burst mode:
– Smart zoom
– Flash
– Inserting the date and time
• When (Camera) in the menu is set to
[Auto], frame interval is automatically set to
[1/30] second.
• See page 72 to play back images recorded in
Multi Burst mode using this camera.
• For the number of images that can be recorded
in Multi Burst mode, see page 119.
• You may not be able to shoot images in Multi
Burst mode depending on the Scene Selection
mode (page 43).
Shooting with special effects
— Picture Effect
You can digitally process images to obtain
special effects.
B&W
The picture is
monochrome (black
and white).
Sepia
The picture is sepiatoned like an old
photograph.
Before operation
When shooting still images, set
(Camera) in the menu to other than [Auto]
(pages 53 and 120).
Control button
Mode switch
MENU
Set the mode switch to or
.
Press MENU.
The menu appears.
Select [PFX] (P. Effect) with
/, then select the desired
mode with /.
Shoot the image.
To cancel Picture Effects
Select [Off] in step .
• Picture Effect setting is not maintained when
the power is turned off.
Page 69

69
Advanced still image viewing
Selecting the folder and playing back images
Select the folder that images you want to
play back are stored.
Control button
Mode switch
MENU
Set the mode switch to .
Press MENU.
The menu appears.
Select (Folder) with , then
press .
Select the desired folder with
/.
BACK/NEXT
Select Folder
Cancel
OK
Folder Name:
102 2/2
Created:
No. Of Files:
2005
102MSDCF
9
1 1 1::05:34
AM
Select [OK] with , then press
.
To cancel the selection
In step , select [Cancel].
When multiple folders are
created in the “Memory Stick
Duo”
When the first or last image in the folder is
displayed, the following indicators appear
on the screen.
: Moves to the previous folder.
: Moves to the next folder.
: Moves to both the previous and next
folders.
Single screen
VGA
60min
10:30
PM
2005 1 1101-0009
9/9
101
BACK/NEXT VOLUME
Index (nine-image) screen
•
SINGLE DISPLAY
Index (sixteen-image) screen
•
SINGLE DISPLAY
• When no images are stored in the folder, “No
file in this folder” appears.
Page 70

70
Enlarging a portion of a still image
You can enlarge a part of an image up to
five times the original size.
You can also record the magnified image
as a new file.
/
Control button
Mode switch
MENU
Enlarging an image
— Playback zoom
Set the mode switch to .
Display the image to be
enlarged with /.
Press (playback zoom) to
zoom in on the image.
Select the desired portion of
the image with ///.
Press
Press
Press
Press
: To view more of the top of the
image
: To view more of the bottom of the
image
: To view more of the left side of
the image
: To view more of the right side of
the image
Adjust the image size with the
/ (playback zoom).
To cancel playback zoom
Press .
• You cannot use playback zoom for movies and
Multi Burst images.
• If you press (playback zoom) while a nonenlarged image is displayed, the LCD screen
switches to the index screen. (page 45)
• You can enlarge the images displayed with
the Quick Review function (page 32) by
performing steps to .
Page 71

71
Advanced still image viewing
Recording an enlarged image — Trimming
Press MENU after playback
zoom.
The menu appears.
Select [Trimming] with , then
press .
Select the image size with /,
then press .
The image is recorded, and the image
on the LCD screen returns to the
normal size after recording.
• The trimmed image is recorded as the newest
file in the selected recording folder, and the
original image is retained.
• The quality of trimmed images may
deteriorate.
• You cannot trim to an image size of 3:2.
• You cannot trim images displayed with Quick
Review.
Playing back successive images
— Slide Show
You can play back recorded images in
order. This function is useful for checking
your images or for presentations, etc.
Control button
Mode switch
MENU
Set the mode switch to .
Press MENU.
The menu appears.
Select (Slide) with /, then
press .
Set the following items with
///.
Interval
3 sec/5 sec/10 sec/30 sec/1 min
Image
Folder: Plays back all images in the
selected folder.
All: Plays back all images stored in the
“Memory Stick Duo”.
Repeat
On: Plays back images in a continuous
loop.
Off: After all the images have been
played back, the slide show ends.
Select [Start] with /, then
press .
The slide show begins.
To cancel the slide show setting
Select [Cancel] in step .
To stop slide show playback
Press , select [Exit] with , then press
again.
To skip to the next/previous
image during the slide show
Press (next) or (previous).
• The interval settings time are just guidelines,
so it may vary depending on the image.
Page 72

72
Rotating still images
You can rotate an image recorded in
portrait orientation and display it in
landscape orientation.
Control button
Mode switch
MENU
Set the mode switch to , and
display the image to rotate.
Press MENU.
The menu appears.
Select (Rotate) with /,
then press .
Select with , then rotate
the image with /.
Select [OK] with /, then
press .
To cancel rotation
Select [Cancel] in step or , then
press .
• You cannot rotate protected images and movies
and Multi Burst images.
• You may not be able to rotate images shot with
other cameras.
• When viewing images on a computer,
the image rotation information may not
be reflected depending on the application
software.
Playing back images shot in Multi Burst mode
You can play back Multi Burst images
continuously or play them back frame by
frame. This function is used for checking
the image.
Control button
Mode switch
• When Multi Burst images are played back on
a computer or on a camera without the Multi
Burst function, the 16 frames you shot will
be displayed at the same time as part of one
image.
• You cannot cut the Multi Burst image.
Page 73

73
Advanced still image viewing
Playing back continuously
Set the mode switch to .
Select the Multi Burst image
with /.
The selected Multi Burst image is
played back continuously.
10:30
PM
2005 1 1101-0014
14/14
101
M
PAUSE BACK/NEXT VOLUME
60min
1M
To pause playback
Press . To resume playback, press
again. The playback starts from the frame
displayed on the LCD screen.
Playing back frame by frame
Set the mode switch to .
Select the Multi Burst image
with /.
The selected Multi Burst image is
played back continuously.
Press when the desired
frame is displayed.
“Step” appears.
10:30
PM
2005 1 1101-0014
14/14
101
12/16
M
1M
60min
Step
PLAY FRAME BACK/NEXT VOLUME
Advance the frame with /.
: A next frame is displayed. When
you keep and press , the frame
advances.
: A previous frame is displayed.
When you keep and press , the frame
advances in the reverse direction.
To return to the normal playback
Press in step . The playback starts
from the frame displayed on the LCD
screen.
To delete shot images
When using this mode, you cannot delete
only certain frames. When you delete
images, all 16 of the frames are deleted at
the same time.
1 Display the desired Multi Burst image
to delete.
2 Press (Delete).
3 Select [Delete], then press .
All of the frames are deleted.
Page 74

74
Protecting images
— Protect
This function protects images against
accidental erasure.
Control button
Mode switch
MENU
• Note that formatting the “Memory Stick Duo”
erases all the data in the “Memory Stick Duo”
even if images are protected, and these images
cannot be recovered.
• It may take some time to protect the images.
In single-image mode
Set the mode switch to .
Display the image you want to
protect with /.
Press MENU.
The menu appears.
Select (Protect) with /,
then press .
The displayed image is protected. The
(protect) indicator appears on the
image.
60min
VGA
101
2/9
Protect
Exit
BACK/NEXT
To continue and protect other
images, select the desired
image with /, then press .
To cancel the protection
Press again in step or . The
indicator disappears.
In index mode
Set the mode switch to ,
then press (index) to
display the index (nine-image)
screen.
Press (Index) twice to display a
sixteen-image index screen.
Press MENU.
The menu appears.
Select (Protect) with /,
then press .
Select [Select] with /, then
press .
Select the image you want
to protect with ///, then
press .
The green indicator appears on the
selected image.
TONEXT
MENU
•
SELECT
Repeat step to protect
other images.
Press MENU.
Page 75

75
Advanced still image viewing
Select [OK] with , then press
.
The indicator turns white. The
selected images are protected.
To exit the Protect function
Select [Cancel] in step or select [Exit]
in step , then press .
To cancel individual protection
Select the image to be unprotected with
/// in step , then press . The
indicator turns gray. Repeat this
operation for all images that are to be
unprotected. Press MENU, select [OK],
and then press .
To protect all images in the
folder
Select [All In This Folder] in step , and
press . Select [On], then press .
To cancel protection of all
images in the folder
Select [All In This Folder] in step , and
press . Select [Off], then press .
Changing image size
— Resize
You can change the image size of a
recorded image, and save it as a new file.
You can resize to the following sizes:
5M, 3M, 1M, VGA
The original image is retained even after
resizing.
Control button
Mode switch
MENU
Set the mode switch to .
Display the image you want to
resize with /.
Press MENU.
The menu appears.
Select (Resize) with /,
then press .
Select the desired size with
/, then press .
The resized image is recorded in the
recording folder as the newest file.
To cancel resizing
Select [Cancel] in step .
• You cannot change the size of movies or Multi
Burst images.
• When you change from a small size to a large
size, the image quality deteriorates.
• You cannot resize to an image size of 3:2.
• When you resize a 3:2 image, the upper and
lower black portions will be displayed on the
image.
Page 76

76
Printing still images
You can print images shot with your
camera by the following methods.
Direct printing (PictBridge compatible printer) (page
77)
You can print by connecting the camera directly to a PictBridge
compatible printer.
Direct printing (“Memory Stick” compatible printer)
You can print using a “Memory Stick” compatible printer. See the users
manual supplied with the printer for details.
Printing with a computer (page 101)
You can print images that have been loaded to a computer using the
“Picture Package” software included on the CD-ROM supplied with
your camera. See the users manual supplied with the printer for the
printer operation method.
Printing at a shop (page 81)
Just bring the “Memory Stick Duo” and the Memory Stick Duo Adaptor
to a print service shop. You can also mark the images you want to print
beforehand with print marks.
Page 77

77
Still image printing
Direct printing
Even if you do not have a computer,
you can easily print images shot using
your camera by connecting the camera
to a PictBridge compliant printer. For
preparation, you only set the USB
connection on the Setup screen and
connect the camera mounted in the Cybershot Station to the printer with the USB
cable.
Using a PictBridge compliant printer easily
prints the index print*.
* An index print function may not be provided
depending on a printer.
• Using the AC Adaptor is recommended to
prevent the power from turning off partway
through printing.
• You cannot print movies.
• When an error notification is received from
the connected printer, the indicator flashes
for approximately five seconds. Check the
connected printer.
Single print
Index print
• If you arrange the same image side by side,
select [This image] in single-image mode, then
set [Index] to [On] (page 79).
• The number of images printed on a single
index print differs according to the printer.
Preparing the camera
Set the USB mode on the camera to
connect the camera with a printer.
Before operation
Set the menu to the Setup screen (pages 54
and 124).
Control button
Mode switch
MENU
Select 2 (Setup 2) with ,
then select [USB Connect]
with //.
Select [PictBridge] with /,
then press .
Setup 2
Video Out:
Clock Set:
File Number:
USB Connect:
PictBridge
Normal
PTP
2
1
1
2
The USB mode is set.
Page 78

78
Connecting the camera to
the printer
Connect the camera to the Cyber-shot
Station. Then, connect the (USB) jack
on the Cyber-shot Station and the USB
jack on the printer with the USB cable
(supplied). Turn on the camera and the
printer.
The camera turns to playback mode
regardless of the mode switch position, and
an image in the selected playback folder
and the print menu appear on the LCD
screen.
2/9
101
1M
Pr int
AllIn This Folder
DPOF image
Select
This image
Cancel
After the connection
is made, the
indicator appears on
the LCD screen.
Printer
When [USB Connect] is not set
to [PictBridge] on the Setup
screen
Even if you turn on the camera, you cannot
use the PictBridge function. Disconnect
the USB cable from the Cyber-shot Station
and set [USB Connect] to [PictBridge].
(page 77)
Printing in single-image
mode
When you connect the camera and a
printer, the print menu appears.
Control button
Mode switch
MENU
Select the desired printing
type with /, then press .
2/9
101
1M
Pr int
AllIn This Folder
DPOF image
Select
This image
Cancel
All In This Folder
Prints all the images in the folder.
DPOF image
Prints all the images with the
mark (page 82) regardless of the
displayed image.
Page 79

79
Still image printing
Select
Selects the images in order. Prints all
the selected images.
1 Select the image you want to print
with /, then press .
The mark appears on the
selected image.
• Repeat this step to print other images.
2 Select [Print] with , then press .
This image
Prints the currently displayed image.
Set the print setting with
///.
2/9
101
1M
Exit
OK
1
Off
Default
Size
Date
Quantity
Off
Index
Print
Index
Select [On] to print index-images.
Size
Selects the desired paper size.
Date
To insert the date and time on images,
select [Date] or [Day&Time].
• If you select [This image] in step and print
index-images, the same images are arranged
side by side.
• When you select [Date] for [Date] setting, the
date will be inserted in the order set in “Setting
the date and time” (page 21). Date function
may not be provided depending on a printer.
• Setting items the printer does not support
cannot be displayed.
Select [Quantity] with , select
the number of sheets with
/.
When [Index] is set to [Off]: the
number of sheets of the selected
image.
When [Index] is set to [On]: the
number of sheets of index-images.
When [This image] is selected in step
, this is the number of the same
image that can be arranged on a single
sheet.
• Depending on the number of index-images,
it may not be possible to arrange all of the
images on a single sheet.
Select [OK] with /, then
press .
The image is printed.
Do not disconnect the USB cable
while the (Not disconnect USB
cable) indicator appears on the LCD
screen.
Exit
Printing
2/3
Page 80

80
To cancel printing
Select [Cancel] in step or select [Exit]
in step .
To print other images
Select the image with / after step ,
then select [Print].
Printing in index mode
If you connect your camera to the printer,
the print menu appears. Press [Cancel] to
exit the print menu.
Press (Index) to display
the index (nine-image) screen.
Press (Index) twice to display a
sixteen-image index screen.
Press MENU.
The menu appears.
Select (Print) with , then
press .
Select the desired printing
type with /, then press .
Cancel Select
DPOF image
Print
Select
Selects the images in order. Prints all
the selected images.
1 Select the image you want to print
with ///, then press .
The mark appears on the
selected image.
• Repeat this step to print other images.
2 Press MENU.
DPOF image
Prints all the images with the
mark (page 82) regardless of the
displayed image.
All In This Folder
Prints all the images in the folder.
Page 81

81
Still image printing
Set the print setting with
///.
Exit
OK
1
Off
Default
Size
Date
Quantity
Off
Index
Print
Index
Select [On] to print index-images.
Size
Selects the desired paper size.
Date
To insert the date and time on images,
select [Date] or [Day&Time].
• When you select [Date] for [Date] setting, the
date will be inserted in the order set in “Setting
the date and time” (page 21). Date function
may not be provided depending on a printer.
Select [Quantity] with , select
the number of sheets with
/.
When [Index] is set to [Off]: the
number of sheets of the selected
image.
When [Index] is set to [On]: the
number of sheets of index-images.
• Depending on the number of index-images,
it may not be possible to arrange all of the
images on a single sheet.
Select [OK] with /, then
press .
The image is printed.
Do not disconnect the USB cable
while the (Not disconnect USB
cable) indicator appears on the LCD
screen.
Exit
Printing
2/3
To cancel printing
Select [Cancel] in step or select [Exit]
in step .
Having images printed at a shop
Note the following items when
having images printed at a
shop.
• Contact the print service shop to
determine what “Memory Stick” types
are supported.
• When using a print service shop that
does not support “Memory Stick”, copy
the images to a CD-R, etc., and bring
that to the shop instead.
• Be sure to also bring the Memory Stick
Duo Adaptor to the shop.
• Be sure to make a backup copy of the
data before using a print service shop.
Page 82

82
Marking print marks
Marking images you want to have printed
beforehand with print marks is convenient
when having images printed at a print
service shop.
Control button
Mode switch
MENU
• You cannot mark movies.
• When you mark images shot in Multi Burst
mode, all the images are printed on one sheet
divided into 16 panels.
• You cannot set the number of prints.
Marking print marks in
single-image mode
Set the mode switch to .
Display the image you want to
mark with /.
Press MENU.
The menu appears.
Select (DPOF) with /,
then press .
The mark is marked on the
displayed image.
1M
60min
101
2/9
DPOF
Exit
BACK/NEXT
To continue and mark other
images, display the desired
image with /, then press .
To unmark the mark
Press again in step or . The
mark disappears.
Marking print marks in
index mode
Set the mode switch to ,
then press (Index) to
display the index (nine-image)
screen.
Press (Index) twice to display a
sixteen-image index screen.
Press MENU.
The menu appears.
Select (DPOF) with /,
then press .
Select [Select] with /, then
press .
• You cannot mark the mark in [All In
This Folder].
Select the image you want to
mark with ///, then press
.
The green mark appears on the
selected image.
TONEXT
MENU
•
SELECT
Page 83

83
Still image printing
Repeat step to mark other
images.
Press MENU.
Select [OK] with , then press
.
The mark turns white. The
mark setting is completed.
To unmark marks
Select the images to be unmarked with
/// in step , then press .
To unmark all the marks in
the folder
Select [All In This Folder] in step , then
press . Select [Off], then press .
To exit the mark function
Select [Cancel] in step or select [Exit]
in step .
Page 84

84
Shooting movies
You can shoot movies with sound using
your camera.
Mode switch
Shutter button
Microphone
Control button
Set the mode switch to .
Press (Image Size).
The Image Size setup appears.
Select the desired size with
/.
You can choose from [640(Fine)],
[640(Standard)] and [160].
• [640(Fine)] can be recorded only on
“Memory Stick PRO Duo”.
Press the shutter button fully
down.
“REC” appears on the screen and the
camera starts recording the image and
sound.
REC
00:00:02 [00:10:48]
60min
101
STD
64 0
• Recording stops when the “Memory Stick
Duo” is full.
Press the shutter button fully
down again to stop recording.
Indicators during shooting
The screen indicators are not recorded.
Each time you press , the status of the
LCD screen changes as follows: Indicators
off LCD backlight off Indicators on.
A histogram is not displayed.
For a detailed description of the indicators,
see page 135.
Shooting close-ups (Macro)
Set the mode switch to and follow the
procedure on page 35.
Using the self-timer
Set the mode switch to and follow the
procedure on page 36.
• Do not touch the microphone during shooting
movies.
• You cannot use the following functions during
shooting movies:
− Changing the zoom scale
− Flash
− Inserting the date and time
• When you set the image size to [640(Fine)]
while connecting the A/V connecting cable
(supplied) to the A/V OUT (MONO) jack, the
subject does not appear on the LCD screen.
The LCD screen turns blue.
• For the recording time in each movie mode,
see page 119.
Page 85

85
Enjoying movies
Viewing movies on the LCD screen
You can view movies on the LCD screen
with sound from the speaker.
Control button
Mode switch
Speaker
Set the mode switch to .
Select the desired moving
image with /.
Movies with the image size
[640(Fine)] or [640(Standard)] are
displayed on the full screen.
10/10
00:00:00
60min
101
10:30PM2005 1 1101_0010
STD
64 0
PLAY BACK/NEXT VOLUME
• Movies with the image size [160] are
displayed a size smaller.
Press .
The movie and sound are played back.
During playback, (playback)
appears on the screen.
00:00:03
60min
10:30PM2005 1 1101_0010
10/10
101
STD
64 0
STOP REV/CUE VOLUME
Playback bar
To stop playback
Press again.
To adjust the volume
Press / to adjust the volume.
To advance or rewind the movie
Press (cue) or (rev) during playback.
To return to the normal playback, press .
Indicators during viewing
movies
Each time you press , the status of the
screen changes as follows: Indicators off
LCD backlight off Indicators on.
A histogram is not displayed.
For a detailed description of the indicators,
see page 137.
• The procedure for viewing movies on a TV is
the same as that for viewing still images (page
46).
• The moving images recorded using earlier
Sony models may be also displayed a size
smaller.
Page 86

86
Deleting movies
You can delete unwanted movies.
Control button
Mode switch
• You cannot delete protected movies.
• Note that you cannot restore deleted movies.
In single-image mode
Set the mode switch to .
Display the movie you want to
delete with /.
Press (Delete).
The movie has not yet been deleted at
this point.
Select [Delete] with , then
press .
The message “Access” appears, and
the movie has been deleted.
To continue and delete other
movie, display the movie you
want to delete with /, then
repeat step .
To cancel deletion
Select [Exit] in step or .
In index mode
Set the mode switch to ,
then press (Index) to
display an index (nine-image)
screen.
Press (Index) twice to display a
sixteen-image index screen.
Press (Delete).
Select [Select] with /, then
press .
Select the movie you want
to delete with ///, then
press .
The green (Delete) indicator
appears on the selected movie.
TONEXTSELECT
The movie has not yet been deleted at
this point.
Repeat step to delete other
movies.
Press (Delete).
Page 87

87
Enjoying movies
Select [OK] with , then press
.
The message “Access” appears, and
the movie has been deleted.
To cancel deletion
Select [Exit] in step or .
• To delete all the images in the folder, see page
51.
Cutting movies
You can cut movies, or delete unnecessary
portions of movies. Cutting or deleting
movies is the recommended function to use
when the “Memory Stick Duo” capacity is
insufficient, or when you attach movies to
your e-mail messages.
Note that the original movie is deleted
when you cut it.
The file numbers assigned when
movies are cut
The cut movies are assigned new numbers
and recorded as the newest files in the
selected recording folder. The original
movie is deleted, and that number is
skipped.
<Example> Cutting a movie numbered
101_0002
1
2
101_0002
101_0003
3
101_0001
1. Cutting scene A.
1
2
3A B
101_0002
Divide point
2. Cutting scene B.
101_0004
1 23 B
A
101_0005
Divide
point
3. Deleting scenes A and B if they are
unnecessary.
1 3
2
101_0006
101_0004
101_0007
A B
Delete Delete
4. Only the desired scenes remain.
1 3
2
101_0006
Page 88

88
Control button
Mode switch
MENU
Set the mode switch to .
Select the movie you want to
cut using /.
Press MENU.
The menu appears.
Select (Divide) with , then
press . Next, select [OK] with
, then press .
The playback of the movie starts.
Decide on a cutting point.
Press the center at the desired
cutting point.
00:00:02
60min
10/10
101
STD
64 0
Divide
Dividing
Point
O K
Cancel
Exit
When you want to adjust the cutting
point, use [/] (frame rewind/
forward) and adjust the cutting point
using /. If you want to change the
cutting point, select [Cancel]. The
playback of the movie starts again.
When you have decided on a
cutting point, select [OK] with
/, and press .
Select [OK] with , then press
.
The movie is cut.
To cancel cutting
Select [Exit] in step or . The movie
appears on the screen again.
• You cannot cut the following images.
– Still image
– Movies not long enough to cut (about more
than two seconds)
– Protected movies
• You cannot restore files once you cut them.
• The cut movies are recorded as the newest files
in the selected recording folder.
Page 89

89
Enjoying images on your computer
Copying images to your computer
— For Windows users
Recommended computer
environment
OS: Microsoft Windows 98, Windows
98SE, Windows 2000 Professional,
Windows Millennium Edition, Windows
XP Home Edition, or Windows XP
Professional
The above OS must be installed at the
factory. Operation is not assured in an
environment upgraded to the operating
systems described above or in a multi-boot
environment.
CPU: MMX Pentium 200 MHz or faster
USB connector: Provided as standard
Display: 800 × 600 dots or more
High Color (16-bit color, 65,000 colors)
or more
• This camera is compatible with Hi-Speed USB
(USB 2.0 compliant).
• Connecting with a USB interface that is
compatible with Hi-Speed USB (USB
2.0-compliant) allows advanced transfer (highspeed transfer).
• If you connect two or more USB equipment
to a single computer at the same time, some
equipment, including your camera, may
not operate depending on the type of USB
equipment.
• Operations are not guaranteed when using a
USB hub.
• Operations are not guaranteed for all the
recommended computer environments
mentioned above.
USB mode
There are two modes for a USB connection
when connecting with a computer,
[Normal] and [PTP]* modes. The default
setting is the [Normal] mode. This section
describes the [Normal] mode as an
example.
* For a details on the PTP connection, see page
126.
Communication with your
computer
When your computer resumes from the
suspend or sleep mode, communication
between your camera and your computer
may not recover at the same time.
When a USB connector is not
provided on your computer
When neither a USB connector nor a
“Memory Stick” slot is provided, you can
copy images using an additional device.
See the Sony Website for details.
http://www.sony.net/
Contents of the CD-ROM
USB Driver
This driver is needed in order to connect
the camera to a computer.
When using Windows XP, you need not
install the USB driver.
Picture Package
This application is used to transfer images
from the camera to a computer easily.
It also allows you to utilize the various
functions.
When you install “Picture Package,” the
USB driver is also installed at the same
time.
• The required operations may differ depending
on your OS.
• Close down all applications running on
the computer before installing the USB
driver and application.
• When using Windows XP or Windows 2000,
log on as Administrator.
Page 90

90
Installing the USB driver
When using Windows XP, you need not
install the USB driver.
Once the USB driver is installed, you need
not install the USB driver.
Turn on your computer, and
insert the CD-ROM (supplied)
into the CD-ROM drive.
Do not connect your camera to
your computer at this time.
The install menu screen appears.
If it does not appear, doubleclick (My Computer)
(PICTUREPACKAGE) in that order.
• When also using the supplied image
utility software “Picture Package”,
click [Picture Package]. The USB
driver will be installed when
“Picture Package” is installed (page
97).
• When the computer is in use, shut
down all application software
before you install the USB driver.
Click [USB Driver] on the title
screen.
The “InstallShield Wizard” screen
appears.
Click [Next].
The USB driver installation starts.
When the installation is completed, the
screen informs you of completion.
Click [Yes, I want to restart
my computer now], then click
[Finish].
Your computer restarts. Then, you can
establish USB connection.
Remove the CD-ROM.
Page 91

91
Enjoying images on your computer
Connecting the camera to your computer
Turn on your computer.
Insert the “Memory Stick Duo”
with the images you want to
copy into the camera.
Connect the Cyber-shot
Station (supplied) and the AC
Adaptor (supplied), and plug
the adaptor into a wall outlet
(wall socket).
AC Adaptor
Cyber-shot
Station
To a wall outlet
(wall socket)
• When you copy images to your computer using
the battery pack, copying may be failed or
cause data corruption by battery shutoff. We
recommend that you use the AC Adaptor.
Connect the USB cable to the
(USB) jack of the Cyber-shot
Station.
USB cable
Connect the USB cable to your
computer.
• When using Windows XP, the AutoPlay wizard
automatically appears on the desktop. Proceed
to page 93.
Connect the camera to the
Cyber-shot Station and turn
on the camera.
POWER
• Make sure the camera is securely connected to
the Cyber-shot Station.
USB Mode
MENU
Switch on
Normal
Access
indicators*
“USB Mode Normal” appears on the
LCD screen of the camera. When a
USB connection is established for the
first time, your computer automatically
runs the used program to recognize the
camera. Wait for a while.
* During communication, the access
indicators turn red. Do not operate the
computer until the indicators turn white.
Page 92

92
• If “USB Mode Normal” does not appear in
step , press MENU, select [USB Connect],
and set it to [Normal].
• Do not remove the camera from
the Cyber-shot Station during USB
connection, as the image data may be
destroyed. To end the USB connection,
see the note .
Disconnecting the USB cable
from your computer, removing
the “Memory Stick Duo” from
your camera or turning off the
camera during USB connection
For Windows 2000, Me, or XP users
1 Double-click on the tasktray.
Double-click here
2 Click (Sony DSC), then click [Stop].
3 Confirm the device on the confirmation
window, then click [OK].
4 Click [OK].
Step 4 is unnecessary for Windows XP
users.
5 Disconnect the USB cable, remove the
“Memory Stick Duo”, or turn off the
camera.
For Windows 98 or 98SE users
Confirm that the access indicators (page
91) on the screen are turned white and
carry out only step 5 above.
Copying images
– Windows 98/98SE/2000/Me
Double-click [My Computer],
then double-click [Removable
Disk].
The contents of the “Memory Stick
Duo” inserted in your camera appear.
• This section describes an example of copying
images to the “My Documents” folder.
• When the “Removable Disk” icon is not
shown, see page 93.
• When using Windows XP, see page 93.
Double-click [DCIM], then
double-click the folder that the
image files you want to copy
are stored.
Right-click the image file to
display the menu, then select
[Copy] from the menu.
Double-click the [My
Documents] folder and rightclick on the “My Documents”
window to display the menu,
then select [Paste] from the
menu.
The image files are copied to the “My
Documents” folder.
Page 93

93
Enjoying images on your computer
When an image with the same
file name exists in the copy
destination folder
The overwrite confirmation message
appears. When you overwrite the
existing image with the new one, the
original file data is deleted.
To change the file name
To copy an image file to the computer
without overwriting, change the file
name to the desired name and then copy
the image file. However, note that if you
change the file name, you may not be
able to play back that image with your
camera. To play back images with the
camera, perform the operation on page
97.
When a removable disk icon is
not shown
1 Right-click [My Computer] to display
the menu, then click [Properties].
The “System Properties” screen
appears.
2 Display [Device Manager].
Click [Hardware].
Click [Device Manager].
• For Windows 98, 98SE, Me users, step
is unnecessary. Click the [Device
Manager] tab.
3 If [ Sony DSC] is displayed, delete
it.
Right-click [ Sony DSC].
Click [Uninstall].
The “Confirm Device Removal”
screen appears.
• For Windows 98, 98SE, Me users, click
[Remove].
Click [OK].
The device is deleted.
Try the USB driver installation again using
the CD-ROM (page 90).
– Windows XP
Copying images using the
Windows XP AutoPlay wizard
Make a USB connection (page
91). Click [Copy pictures to a
folder on my computer using
Microsoft Scanner and Camera
Wizard], then click [OK].
The “Scanner and Camera Wizard”
screen appears.
Click [Next].
The images stored on the “Memory
Stick Duo” are displayed.
Click the checkbox of images
that you do not want to copy
to your computer to remove
the checkmark, then click
[Next].
The “Picture Name and Destination”
screen appears.
Select a name and destination
for your pictures, then click
[Next].
Image copying starts. When the
copying is completed, the “Other
Options” screen appears.
Page 94

94
Select [Nothing. I’m finished
working with these pictures],
then click [Next].
The “Completing the Scanner and
Camera Wizard” screen appears.
Click [Finish].
The wizard closes.
• To continue copying other images, follow
the procedure given under on page 92 to
disconnect the USB cable and reconnect it.
Then, perform the procedure from step
again.
Viewing the images on your computer
Click [Start], then click [My
Documents].
The “My Documents” folder contents
are displayed.
• This section describes the procedure for
viewing copied images in the “My Documents”
folder.
• When not using Windows XP, double-click
[My Documents] on the desktop.
Double-click the desired image
file.
The image is displayed.
Page 95

95
Enjoying images on your computer
Image file storage destinations and file names
The image files recorded with your camera are grouped as folders in the “Memory Stick
Duo”.
Example: when viewing folders on Windows XP
Folder containing image data which was recorded
using the camera not equipped with the folder
creating function
Folder containing image data which was recorded
using your camera. When not creating any folders,
there is only the “101MSDCF” folder
Folder containing movie data, etc., which was
recorded using the camera not equipped with the
folder creating function
• You cannot record any images to “100MSDCF” or “MSSONY” folders. The images in
these folders are available only for viewing.
• For more information about the folder, see pages 55, 69.
Page 96

96
Folder File name File meaning
101MSDCF to
999MSDCF
DSC0.JPG
• Still image files shot in
− Normal mode (page 29)
− Exposure Bracket mode (page 63)
− Burst mode (page 66)
− Multi Burst mode (page 67)
MOV0.MPG
• Movie files (page 84)
MOV0.THM
• Index image files recorded simultaneously in movie mode (page 84)
• stands for any number within the range from 0001 to 9999.
• The numerical portions of a movie file recorded in movie mode and its corresponding index image file are the same.
Page 97

97
Enjoying images on your computer
Viewing image files once
copied to a computer with
your camera
When an image file copied to a computer
no longer remains in a “Memory Stick
Duo”, you can view that image again on
your camera by copying the image file in
the computer to a “Memory Stick Duo”.
• Step is not necessary when the file name set
with your camera has not been changed.
• You may be unable to play back some images
depending on the image size.
• When an image file has been processed by a
computer or when the image file was recorded
using a model other than your camera,
playback on your camera is not guaranteed.
• When the overwrite confirmation message
appears, enter a different number in step .
• When there is no folder, first create a folder
with your camera and then copy the image file
(page 55).
Right-click the image file, then
click [Rename]. Change the
file name to “DSC0”.
Enter a number from 0001 to 9999 for
.
• An extension may be displayed depending on
the computer settings. The extension for still
images is JPG, and the extension for movies is
MPG. Do not change the extension.
Copy the image file to the
“Memory Stick Duo” folder.
Right-click the image file, then
click [Copy].
Select and double-click the
[DCIM] folder from [Removable
Disk] or [Sony MemoryStick] in
[My Computer].
Right-click the [MSDCF]
folder in the [DCIM] folder and
click [Paste]. stands for any
number within the range from 100
to 999.
Installing “Picture Package” and “ImageMixer VCD2”
“Picture Package” is only for
Windows computers.
You can use the “Picture Package”
software on your Windows computer to
compile the images shot with your camera.
When you install “Picture Package,” the
USB driver is also installed at the same
time.
• When the computer is in use, shut down all
application software before you install “Picture
Package.”
For computer environment
See page 89 for the basic Windows
operating environment. Other system
requirements are as follows.
Software: Macromedia Flash Player 6.0
or later, Windows Media Player 7.0 or
later, DirectX 9.0b or later
Sound card: 16-bit stereo sound card
with speakers
Memory: 64 MB or more (128 MB or
more is recommended.)
Hard Disk: Disk space required for
installation: approximately 500 MB
Display: Video card (Direct Draw driver
compliant) with 4 MB of VRAM
Page 98

98
• When automatically creating slide shows
(page 101), a Pentium III 500 MHz or
faster CPU is required.
• When using “ImageMixer VCD2,” a
Pentium III 800 MHz or faster CPU is
recommended.
• This software is compatible with
DirectX technology. “DirectX” must be
installed for use.
• A separate environment for operating the
recording device is required in order to
write to CD-Rs.
Turn on your computer, and
insert the CD-ROM (supplied)
into the CD-ROM drive.
The installation menu screen appears.
• If you have not yet installed the USB driver
(page 90), do not connect the camera to the
computer before you install the “Picture
Package” software (except for Windows XP).
Click [Picture Package/
ImageMixer VCD2].
“Choose Setup Language” screen
appears.
Select the desired language,
then click [Next].
• This section describes the English screen.
Click [Next].
The “License Agreement” screen
appears.
Read the agreement carefully. If you
accept the terms of the agreement,
check the “I accept the terms of the
license agreement” checkbox and
click [Next].
Click [Next].
Click [Install] on the “Ready to
Install the Program” screen.
The installation starts.
When the installation is completed, the
“Welcome to setup for ImageMixer
VCD2” screen appears.
Page 99

99
Enjoying images on your computer
Click [Next], then follow the
instructions.
If the “Welcome to setup for Direct
X” screen appears after you install
the application software, follow the
instructions.
Confirm if the checkbox of
“Yes, I want to restart my
computer now” is checked,
then click [Finish].
Your computer restarts.
The shortcut icons of “Picture
Package Menu” and “Picture Package
destination Folder” are displayed.
Remove the CD-ROM.
Copying images using “Picture Package”
Connect the camera and your
computer with the USB cable.
“Picture Package” starts up automatically
and the images are copied to the computer
automatically. After the images are copied,
“Picture Package Viewer” starts up and the
images copied are displayed.
• Normally “Picture Package” and “Date”
folders are created inside the “My Picture”
folder, and all of the image files recorded with
the camera are copied into these folders.
• If “Picture Package” cannot copy images
automatically, start up “Picture Package Menu”
and check [Settings] in [Copy automatically].
Using “Picture Package”
Start up the [Picture Package Menu] on the
desktop to use the various functions.
• The initial screen may differ depending on
your computer. You can change the menu
display order to suit your taste by clicking
[Settings] at the lower-right corner of the
screen.
• For details on the use of the application
software, click at the upper-right corner of
each screen to show the on-line help.
Technical support of “Picture Package”
is provided by the Pixela User Support
Center. For more information, refer
to the enclosed information with the
CD-ROM.
Page 100

100
Viewing images on a computer
Click [Viewing video and pictures on PC]
on the left side of the screen, then click
[Viewing video and pictures on PC] in the
lower-right corner of the screen.
The screen used for viewing images
appears.
Storing images on a CD-R
Click [Save the images on CD-R] on the
left side of the screen, then click [Save the
images on CD-R] in the lower-right corner
of the screen.
The screen used for storing images on
a CD-R appears.
• A CD-R drive is required to store images on a
CD-R. For further information on compatible
drives, see the following home page of the
Pixela User Support Center.
http://www.ppackage.com/
Creating a video CD with a
menu (“ImageMixer VCD2”)
“ImageMixer VCD2” is compatible with
High resolution still image video CD.
Click [Burning Video CD] on
the left side of the screen,
then click [Burning Video CD]
in the lower-right corner of the
screen.
The “ImageMixer VCD2” screen
appears.
Click [Video CD].
Select the folder in which the
desired images are stored.
Select the desired folder on the
left frame, then click [Add]. The
selected folder moves to the right
frame.
Click [Next].
 Loading...