

Page 1

Printing still images
with a PictBridge printer
You can easily print imag es shot with your camera without using a computer by using a
PictBridge-compliant printer.
Using a PictBridge-compliant printer easily prints the index print*.
* An index print function may not be provided depending on a printer.
Connecting to a PictBridge
printer............................................2
Printing images ............................3
Printing index-images.................. 5
Troubleshooting...........................9
Warnings and messages........... 10
Page 2
Connecting to a
PictBridge printer
Mode switch: / /
When the USB connection is set on the
Setup screen, you can connect the camera
mounted in th e U S B cradle directly to a
printer using the USB cable .
Control button
MENU
Mode switch
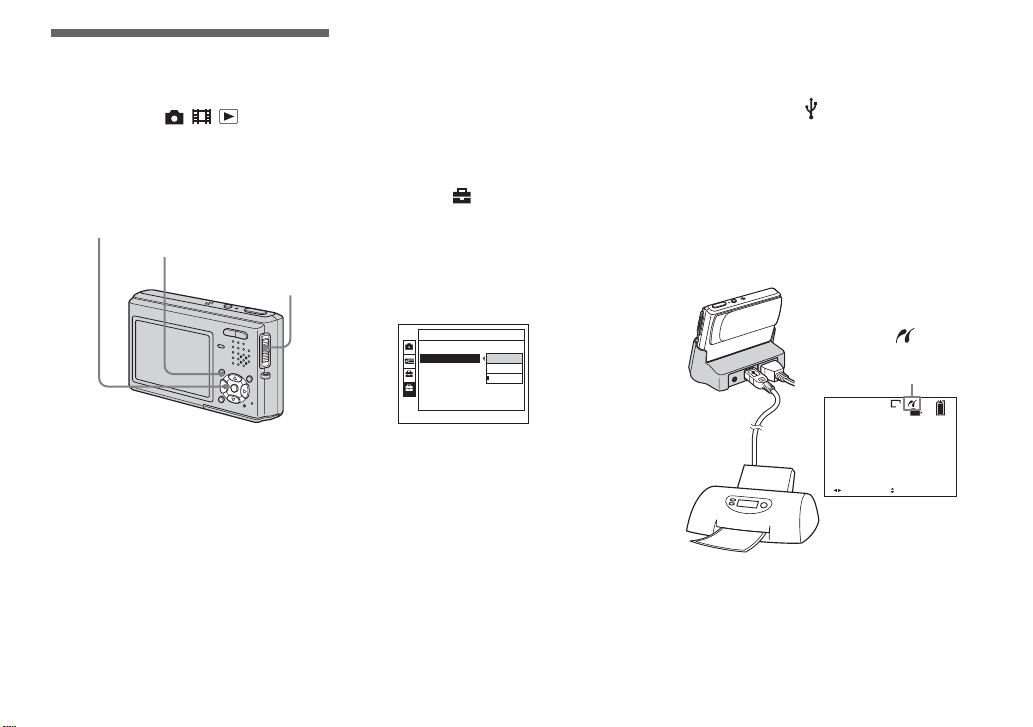
Preparing the camera
Set the USB mode on the camer a to connect
the camera with a printer.
Before operation
Set the menu to the Setup screen (Operating
Instructions, page 44).
a S el ect (Setup 2) with V,
2
then select [USB Connect]
with B/v/V.
b S el ect [PictBridge] with B/v,
then press z.
Setup 2
File Number:
USB Connect:
Video Out:
1
Clock Set:
2
PictBridge
PTP
NTSC
Normal
Connecting the camera to
the printer
Connect the c amera to the USB cradle.
Then, connect the (USB) jack on the
USB cradle and the US B jack on th e printer
with the USB cable (supplied). Turn on the
camera and the printer.
The camera turns to playb ack mode
regardless of the mode switch position and
an image in the s elected playback fo lder
appears on the LCD screen.
After the connection
is made, the
indicator appears on
the LCD screen.
5M
101
2/9
• Using the AC Adaptor is recommended to
prevent the power from turning off partway
through printing.
The USB mode is set.
BACK/NEXT VOLUME
Printer
10:30
AM
2004 1 1101-0002
2
Page 3
When [USB Connect] is not set
to [PictBridge] on the Setup
screen
Even if you turn on the camera, you cannot
use the PictBridge funct ion.
Set [USB Connect] to [PictBridge].
1 Press MENU and select [USB Connect],
then press z.
2 Select [Pic tBridge] with v, then press
z.
USB Connect
PictBridge
PTP
Normal
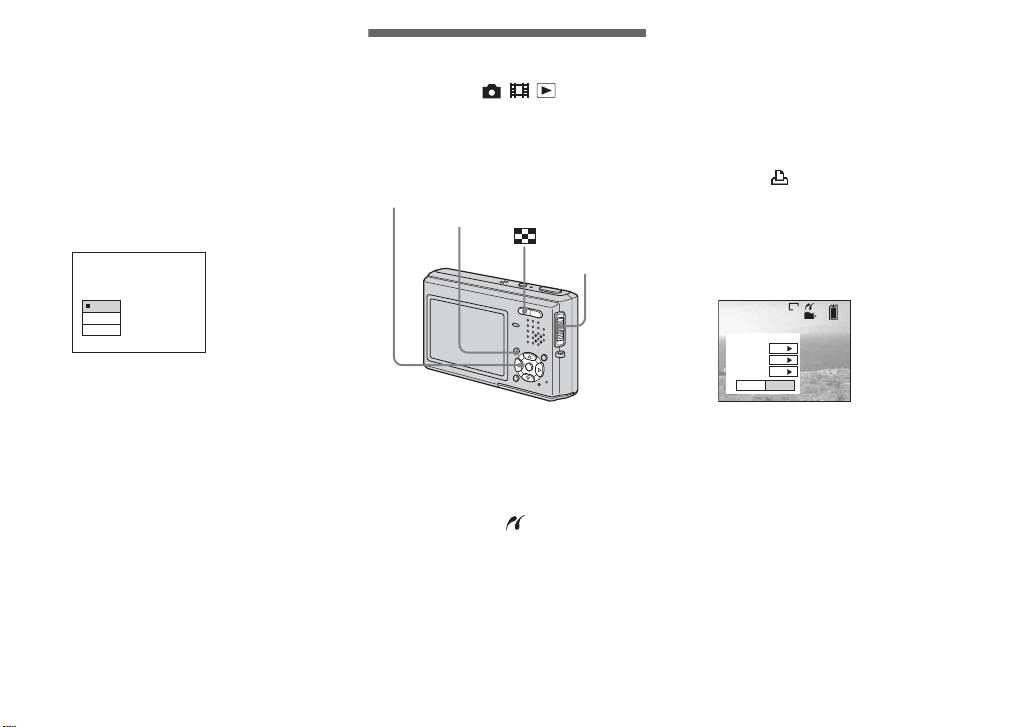
Printing images
Mode switch: / /
You can select the image and pr int it. Se t up
the camera following the procedure on page
2, and connect the pri n t er.
Control button
MENU
Mode switch
In single-image mode
a Di splay the image you want to
print with b/B.
b Press MENU.
The menu appears.
c Select (Print) with b/B, then
press z.
d Select [This image] with v/V,
then press z.
The print setting screen ap p ears.
5M
101
2/9
Print
Index
Off
Date
Off
Quantity
1
OK
Exit
• You cannot print movies.
• When you print an E-mail image, only the
JPEG image that was recorded at the same time
is printed.
• When an error notification is received from the
connected printer, the indicator flashes for
approximately 5 seconds. Check the connected
printer.
• Items that the printer does not support are
not displ ayed.
e Select [Quantity] with v/V,
select the number of sheets
with b/B.
You can select the number up to 20 .
3
Page 4

f Select [OK] with V/B, then
press z.
The image is printed.
Do not disconnect the US B cable
while the (USB cable
disconnected prohibi te d) in dicator
appears on the LCD screen.
5M
101
2/9
Printing
2/3
Exit
To cancel printing
Select [Cancel] in step 4 or select [Exit] in
step 6.
To print other images
Select the image after step 6, then select
[Print] with v.
To print all the images with the
print (DPOF) mark
Select [DPOF image] in step 4. All the
images with the mark are printed by the
specified number regar dless of the
displaye d i m age.
To insert the date and time on
images
Select [Date] in step 5, then select the date
format with b/B. You can se lect from
[Day&Time] or [Date]. When you chose
[Date], the date will be inserted in the order
set in “Setting th e date and time” ( Operating
Instructions, page 17).
This function may not be pro vided
depending on a printer .
In index (nine-image/
sixteen-image) mode
a Press (Index) to display the
index (nine-image) scree n.
Press (Index) twice to display a
sixteen-image index screen.
b Press MENU.
The menu appears.
c Select (Print) with B, then
press z.
d Select [Select] with b/B, then
press z.
e Se l ect the image you want to
print with v/V/b/B, then pre ss
z.
The m ark appears on the selected
image.
MENU
TO NEXT
SELECT
f Repeat step 5 to print other
images.
4
Page 5

g Press MENU.
The print setting screen appears.
Print
Index
Off
Date
Off
Quantity
1
Exit
OK
• Items that the printer does not support are
not displayed.
h Select [Quantity] with v/V,
select the number of sheets
with b/B.
You can select the numb e r u p to 20 .
The specified quantity of all the
selected images are pr inted.
i Select [OK] with V/B, then
press z.
The images are print e d .
Do not disconnect the US B cable
while the indicator appear s on
the LCD screen.
Printing
2/3
Exit
To cancel printing
Select [Cancel] in step 4 or select [Exit] in
step 9.
To print all the images with the
print (DPOF) mark
Select [DPOF image] in step 4. All the
images with the mark are printed by the
specified numb er regardless of the
displaye d i m age.
To print all the images in the
folder
Select [All In This Folder] in step 4, then
press z.
To insert the date and time on
images
Select [Date] in step 8, then select the date
format with b/B. You can se lect from
[Day&Time] or [Date]. When you chose
[Date], the date will be inserted in the order
set in “Setting th e date and time” ( Operating
Instructions, page 17).
This function may not be pro vided
depending on a printer .
Printing index-images
Mode switch: / /
You can print some images side-by-side.
We refer to this functi on as an index prin t*.
You can also arrange the specified quantity
of the same image side-by-side and print
them as an index image (see “In singleimage mode”), or arrange a set of different
images side-by-side as an index image and
print the specified numb er of sets (see “I n
index mode”).
Set up the camera following the procedure
on page 2, and connect the printer.
* An index print function may not be provided
depending on a printer.
Control button
MENU
5
Page 6

• You cannot print movies.
• When you print an E-mail image, only the
JPEG image that was recorded at the same time
is printed.
• When an error notification is received from the
connected printer, the indicator flashes for
approximately 5 seconds. Check the connected
printer.
In single-image mode
a Display the image you want to
print with b/B.
b Press MENU.
The menu appears.
c Select (Print) with b/B, then
press z.
d Select [This image] with v/V,
then press z.
The print s etting screen appears.
5M
101
2/9
Print
Index
Off
Date
Off
Quantity
1
OK
Exit
• Items that the printer does not support are
not displayed.
e S elect [Index] with v, then
select [On] with b/B.
f S elect [Quantity] with v/V,
select the number of sh eet s
laid side-by-side with b/B.
You can select the number up to 20.
You can arrange the s pecified quantity
of an image side-by-side.
g Select [OK] with V/B, then
press z.
The image is pr int ed.
Do not disconnect the USB cable
while the (USB cable
disconnected prohibited) indicator
appears on the LCD screen.
Printing Index
1/1
Exit
To cancel printing
Select [Cancel] in step 4 or select [Exit] in
step 7.
To print other images
Select the image after step 7. Select
[Print] with v, then repeat from step 4.
To print all the images with the
print (DPOF) mark
Select [DPOF image] in step 4. All the
images with the mark are printed by the
specified numb er regardless of the
displayed image.
6
Page 7

To insert the date and time on
images
Select [Date] in step 6, then select the date
format with b/B. You can select from
[Day&Time] or [Date]. When you chose
[Date], the date will be inserted in the order
set in “Setting the date and time” (Operating
Instructions, page 17).
This function may not be provided
depending on a printe r.
• The designated number of images may not all
fit onto a single sheet depending on the quantity
of images.
In index (nine-image/
sixteen-image) mode
a Press (Index) to display the
index (nine-image) screen.
Press (Index) twice to display a
sixteen-image index scre en.
b Press MENU.
The menu appears.
c Select (Print) with B, then
press z.
d Select [Select] with b/B, t h e n
press z.
e Select the desired image with
v/V/b/B, then pres s z.
The mark appears on the selected
image.
MENU
TO NEXTSELECT
•
f Repeat step 5 to print other
images.
g Press MENU.
h S elect [Index] with v, then
select [On] with b/B.
i Select [Quantity] with v/V,
select the number of se ts you
want to print with b/B.
You can select the number up to 20 .
j Select [OK] with V/B, then
press z.
The image is pr int ed.
Do not disconnect the USB cable
while the indicator ap p ears on
the LCD screen.
Printing Index
1/1
Exit
To cancel printing
Select [Cancel] in step 4 or select [Exit] in
step 0.
To print all the images with the
print (DPOF) mark
Select [DPOF image] in step 4. All the
images with the mark are printed by the
specified numb er regardless of the
displayed image.
7
Page 8

To print all the images in the
folder
Select [All In This F o ld er ] in step 4, then
press z.
To insert the date and time on
images
Select [Date] in step 9, then select the date
format with b/B. You can select from
[Day&Time] or [Date]. When you chose
[Date], the date will be inserted in the order
set in “Setting the date and time” (Operating
Instructions, page 17).
This function may not be provided
depending on a printe r.
8
Page 9

Troubleshooting
Symptom Cause Solution
You cannot connect with
the printer.
You cannot print. • The printer is not connected.
Printing stops partway. • You disconnected the USB cable before the
Date/time ins e r t ion and
index print are not
possible.
“---- -- --” is printed in the
date/time portion.
• The printer does not conform to the PictB ridge
standard.
• The printer condition does not allow connection.
• [USB Connect] is not set to [PictBridge] on the
Setup screen.
• Depending o n the circum stances, the co nnection
may not be established.
• The printer is not turned on.
• If you select [Exit] during printing, you may not
print again depending on your print er.
• You cannot print movies.
• You may be unable to print some still images
recorded using a model other than this camera or
images that have been proces se d by a compu ter.
indicator disappeared.
• The printer does not support date/time insertion
and index print.
• Some printers cannot inser t the date/time with
index print.
• The image file does not contain printable
recording date/time data.
p Contact the manufacturer regarding whether the printer
conforms to the PictBridge standard.
p Turn on the printer and check that it is in a condition that allows
connection.
p Set it to [Pict Bridge].
p Disconnect and connect the USB cable again. If an err or
message is indicated on the pr inte r , refe r to the ope r at ing
instructions supplied with the printer.
p Check that the camera and the printer are connected correctly
using a USB cable.
p Turn on the printer. See the operating instructions of the printer
for details.
p Disconnect and connect the USB cable aga in. If you c an not
print still, disconnect the USB cable, turn off and on the printer,
then connect the USB cable again.
—
—
—
p Contact the manufacturer regarding whether the printer
supports date/time ins ertion and index print.
p Contact the printer manufacturer.
p You cannot perform date/ti me pr inting for image files that do
not contain printable record ing da te /time data. Set [Date] to
[Off] and then p ri n t the image.
9
Page 10

Warnings and
messages
The following messages may appear on the LCD screen.
Message Meaning/Corrective Action
Connect to device
Enable printer to connect • The camera is set to [PictBridge], but it is conne c te d to a devi ce tha t doe s not support PictBridge. Check the
Printer busy • The connected printer is currently printing or otherwise cannot accept print req ues ts. Che c k the connected printer.
Paper error • The connected printer is out of paper, the paper has jamm e d, or som e othe r pape r error has occ ur r ed. Check the
Ink error • The connected printer has some ink error. Check the connected printer.
Printer error • The camera has received an error notification from the printer. Check the connected printer, or check whether the
No printable image • You attempted to execute [DPOF image] without making print marks.
• You attempted to print before connecting a printer. Connect the PictBridge compliant printer.
connected device.
• Depending on the circumstances, the connection m ay no t be esta bl ished. Disconnect and connect the USB cable
again. If an error message is indi cate d on the printer, refer to the operating instructions supplied with the pri nte r .
connected printer.
images to be printed have been dama ge d.
• You attempted to execute [All In This Folder] for a folder that contains only movies. You cannot pri nt movies.
• The data transmission to the printer may not be completed yet. Do not disconnect the USB cab le .
10
 Loading...