

Sony DSC-S45 Operating Instruction
2-680-136-11(1)
Digital Still Camera
Cyber-shot
Handbook
Handbook
Before operating the unit, please read this handbook and
“Instruction Manual” (separate volume) thoroughly, and
retain them for future reference.
Owner’s Record
The model and serial numbers are located on the bottom.
Record the serial number in the space provided below.
Refer to these numbers whenever you call upon your Sony
dealer regarding this product.
Model No. DSC-S45
Serial No. ___________________________
DSC-S45
Enjoying the
camera
Using the menu
Using the Setup screen
Using your computer
Printing still images
Connecting your
camera to your TV
Troubleshooting
Others
“Instruction Manual” (separate volume)
Digital Still Camera
Instruction Manua
l
Explains the set-up and basic operations
for shooting/playback with your camera.
© 2006 Sony Corporation
Index
2
CAUTION
Note:
WARNING
For Customers in the U.S.A.
To reduce fire or shock hazard, do
not expose the unit to rain or
moisture.
This symbol is intended to
alert the user to the presence
of uninsulated “dangerous
voltage” within the product's
enclosure that may be of
sufficient magnitude to
constitute a risk of electric
shock to persons.
This symbol is intended to
alert the user to the presence
of important operating and
maintenance (servicing)
instructions in the literature
accompanying the appliance.
This device complies with part 15 of the FCC
rules. Operation is subject to the following two
conditions: (1) This device may not cause harmful
interference, and (2) This device must accept any
interference received, including interference that
may cause undesired operation.
You are cautioned that any changes or
modifications not expressly approved in this
manual could void your authority to operate this
equipment.
This equipment has been tested and found to
comply with the limits for a Class B digital
device, pursuant to Part 15 of the FCC Rules.
These limits are designed to provide reasonable
protection against harmful interference in a
residential installation. This equipment generates,
uses, and can radiate radio frequency energy and,
if not installed and used in accordance with the
instructions, may cause harmful interference to
radio communications. However, there is no
guarantee that interference will not occur in a
particular installation. If this equipment does
cause harmful interference to radio or television
reception, which can be determined by turning the
equipment off and on, the user is encouraged to
try to correct the interference by one or more of
the following measures:
– Reorient or relocate the receiving antenna.
– Increase the separation between the
equipment and receiver.
– Connect the equipment into an outlet on a
circuit different from that to which the
receiver is connected.
– Consult the dealer or an experienced radio/TV
technician for help.
The supplied interface cable must be used with the
equipment in order to comply with the limits for a
digital device pursuant to Subpart B of Part 15 of
FCC Rules.
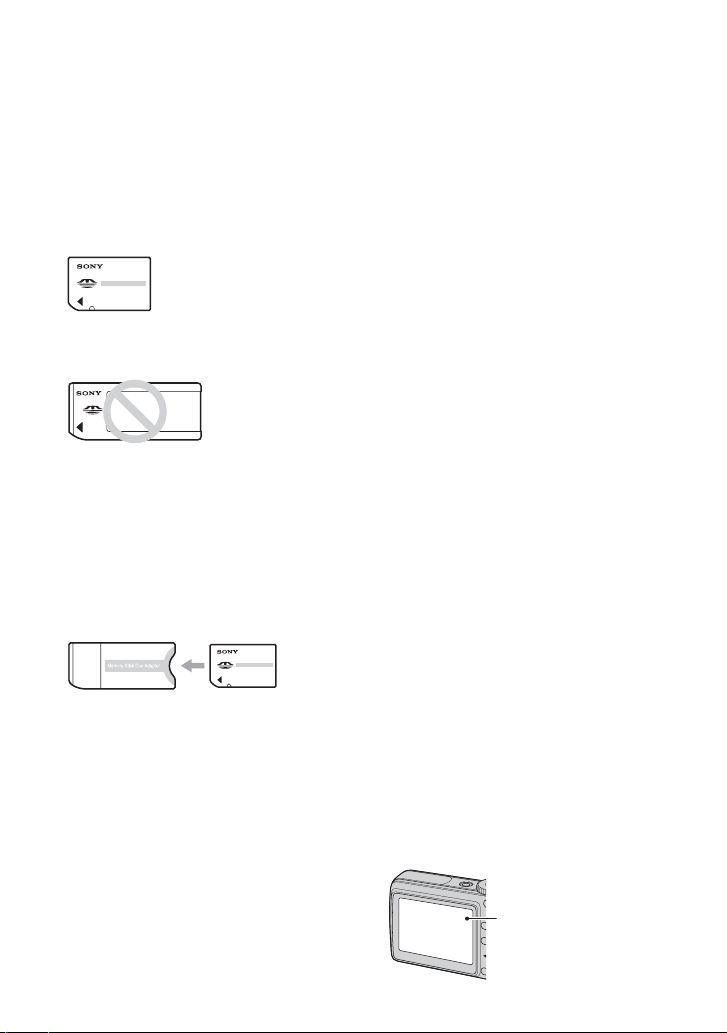
Notes on using your camera
Types of “Memory Stick” that can be used
(not supplied)
“Memory Stick Duo”: you can use a
“Memory Stick Duo” with your camera.
“Memory Stick”: you cannot use
a
“Memory Stick” with your camera.
Other memory cards cannot be used.
When using a “Memory Stick Duo” with
“Memory Stick” compatible equipment
No compensation for contents of the
recording
Internal memory and “Memory Stick Duo”
back up
Notes on recording/playback
Notes on the LCD screen and lens
The IC recording medium used by this
camera is a “Memory Stick Duo”. There are
two types of “Memory Stick”.
• For details on “Memory Stick Duo”, see page
83.
You can use the “Memory Stick Duo” by
inserting it into the Memory Stick Duo
Adaptor (not supplied).
Always protect your data by making a back up
copy. See page 22 for the data back up method.
• This camera is neither dust-proof, nor splashproof, nor water-proof. Read “Precautions”
(page 87) before operating the camera.
• Before you record one-time events, make a trial
recording to make sure that the camera is
working correctly.
• Be careful not to get the camera wet. Water
entering the inside of the camera may cause
malfunctions which in some cases may not be
repairable.
• Do not aim the camera at the sun or other bright
light. This may cause irrecoverable damage to
your eyes. Or it may cause the malfunction of
your camera.
• Do not use the camera near a location that
generates strong radio waves or emits radiation.
The camera may not be able to record or play
back properly.
• Using the camera in sandy or dusty locations
may cause malfunctions.
• If moisture condensation occurs, remove it
before using the camera (page 87).
• Do not shake or strike the camera. In addition to
malfunctions and an inability to record images,
this may render the recording medium unusable,
or cause image data breakdown, damage or loss.
• Clean the flash surface before use. The heat of
flash emission may cause dirt on the flash
surface to become discolored or to stick to the
flash surface, resulting in insufficient light
emission.
Memory Stick Duo Adaptor
• The contents of the recording cannot be
compensated for if recording or playback is not
possible due to a malfunction of your camera or
recording media, etc.
• Do not turn off the camera or remove the battery
pack or “Memory Stick Duo” while the access
lamp is lighted, as the internal memory data or
“Memory Stick Duo” data may be destroyed.
• The LCD screen is manufactured using
extremely high-precision technology so over
99.4% of the pixels are operational for effective
use. However, there may be some tiny black
points and/or bright points (white, red, blue, or
green in color) that constantly appear on the
LCD screen. These points are normal in the
manufacturing process and do not affect the
recording in any way.
Black, white, red,
blue and green
points
3

• Exposing the LCD screen or the lens to direct
On image data compatibility
Warning on copyright
The pictures used in this manual
sunlight for long periods may cause
malfunctions. Be careful when placing the
camera near a window or outdoors.
• Do not press against the LCD screen. The screen
may be discolored and that may cause a
malfunction.
• Images may trail across on the LCD screen in a
cold location. This is not a malfunction.
• This camera is equipped with a power zoom
lens. Be careful not to bump the lens, and be
careful not to apply force to it.
• This camera conforms with DCF (Design rule
for Camera File system) universal standard
established by JEITA (Japan Electronics and
Information Technology Industries
Association).
• Playback of images recorded with your camera
on other equipment and playback of images
recorded or edited with other equipment on your
camera are not guaranteed.
Television programs, films, videotapes, and other
materials may be copyrighted. Unauthorized
recording of such materials may be contrary to the
provisions of the copyright laws.
The photographs used as examples of pictures in
this manual are reproduced images, and are not
actual images shot using this camera.
4
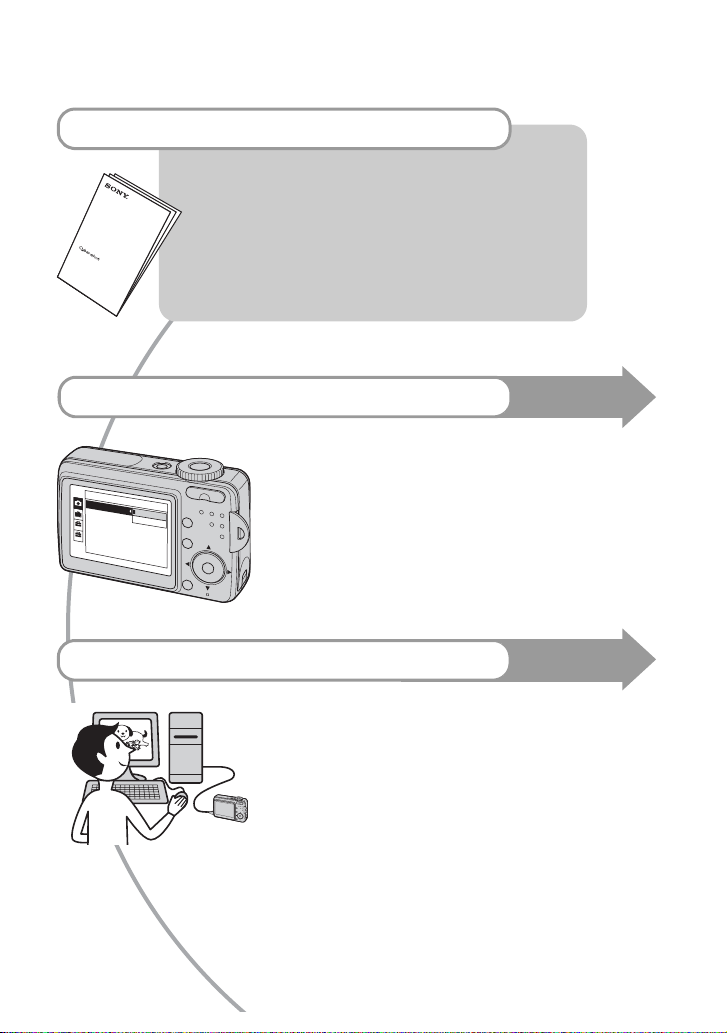
For full use of the digital still camera
“Instruction Manual”(Separate Volume)
This manual
This manual
Prepare the camera and shoot images easily
Dig
ita
l S
Instruction Manua
till C
a
me
ra
l
Get more friendly with your camera
• Shoot with your favorite settings (Program auto shooting)
t page 24
• Enjoy various shooting/playback using the menu t page 26
• Change the default settings t page 37
1
2
Connect your camera to a PC or a printer
• Copy your images to a computer and enjoy editing them in
various ways t page 46
• Print images by connecting your camera directly to a printer
(PictBridge compliant printers only) t page 63
5

Table of contents
Notes on using your camera ..................................................................... 3
Enjoying the camera
Basic techniques for better images........................................................... 9
Focus – Focusing on a subject successfully.....................................................9
Exposure – Adjusting the light intensity...........................................................10
Color – On the effects of lighting ..................................................................... 11
Quality – On “image quality” and “image size” ............................................... 12
Identifying parts....................................................................................... 14
Indicators on the screen.......................................................................... 16
Changing the screen display...................................................................20
Number of still images and recording time of movies.............................21
When you do not have a “Memory Stick Duo” (Recording with the internal
memory).................................................................................................. 22
Battery life and number of images that can be recorded/viewed ............ 23
Using the mode dial ................................................................................ 24
Using the menu
Using menu items .............................................................................. 26
Menu items .......................................................................................... 27
Shooting menu........................................................................................ 28
(EV)
(Metering Mode)
WB (White Bal)
ISO
(P.Quality)
Mode (REC Mode)
PFX (P.Effect)
(Saturation)
(Sharpness)
(Setup)
6

Viewing menu..........................................................................................32
(Folder)
- (Protect)
DPOF
(Print)
(Slide)
(Resize)
(Rotate)
(Setup)
Using the Setup screen
Using Setup items..............................................................................37
Camera ..............................................................................................38
Digital Zoom
Date/Time
Red Eye Reduction
Auto Review
Internal Memory Tool ........................................................................40
Format
Memory Stick Tool .............................................................................41
Format
Create REC. Folder
Change REC. Folder
Copy
Setup 1 ...............................................................................................43
1
LCD Backlight
Beep
Initialize
Setup 2 ...............................................................................................44
2
File Number
USB Connect
Video Out
Clock Set
Using your computer
Enjoying your Windows computer ...........................................................46
Installing the software (supplied).............................................................48
Copying images to your computer...........................................................49
7

Viewing image files stored on a computer with your camera (using a
“Memory Stick Duo”) ............................................................................... 55
Using the “Cyber-shot Viewer” (supplied) ............................................... 56
Using your Macintosh computer ............................................................. 60
Printing still images
How to print still images .......................................................................... 62
Printing images directly using a PictBridge compliant printer ................. 63
Printing at a shop .................................................................................... 66
Connecting your camera to your TV
Viewing images on a TV screen ............................................................. 68
Troubleshooting
Troubleshooting ......................................................................................70
Warning messages ................................................................................. 81
Others
On the “Memory Stick” ............................................................................ 83
On the batteries ...................................................................................... 85
Precautions ............................................................................................. 87
Index
...................................................................................................... 88
8
Enjoying the camera
Basic techniques for better images
Focus Exposure Color Quality
This section describes the basics so you can
enjoy your camera. It tells you how to use
various camera functions such as the mode
dial (page 24), the menus (page 26), and so
on.
Focus
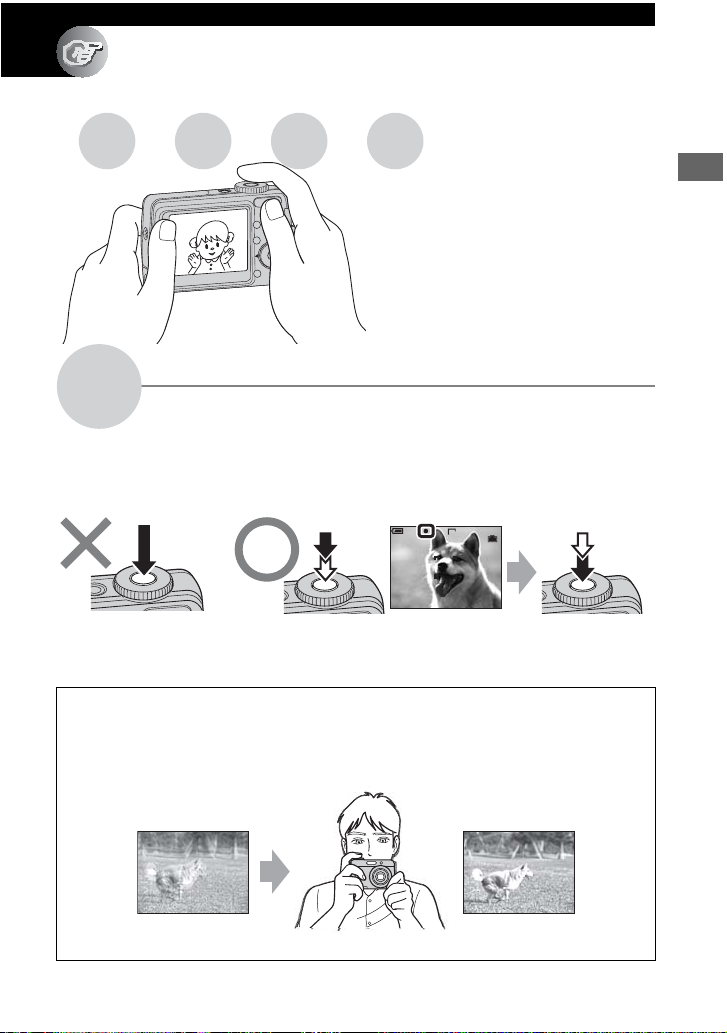
Focusing on a subject successfully
When you press the shutter button halfway down, the camera adjusts the focus automatically
(Auto Focus). Remember to press the shutter button only halfway down.
Press the shutter
button fully down
straight away.
If the image looks blurred even after focusing, it may be because of camera shake.
Press the shutter
button halfway
down.
AE/AF lock indicator
Flashing,lit/beeps
FINE
VGA
30
F2.833
Then press the
shutter button
fully down.
t See
“Hints for preventing blur” (below).
Hints for preventing blur
Hold the camera steadily, keeping your arms at your side. Also, you can stabilize the
camera by leaning against a tree or a building beside you. Using a tripod, and using the
flash in dark places are also recommended.
Enjoying the camera
9
Exposure
You can create various images by adjusting the exposure and the ISO sensitivity. Exposure is
the amount of light that the camera will receive when you release the shutter.
Adjusting the light intensity
Exposure:
Overexposure
= too much light
Whitish image
Correct exposure
Underexposure
= too little light
Darker image
Shutter speed = Length of time the camera receives
Aperture = Size of the opening allowing light to pass
ISO =
The exposure is automatically set to the
proper value in the auto adjustment mode.
However, you can adjust it manually using
the functions below.
[EV]:
Allows you to adjust the exposure that has
been determined by the camera.
[Metering Mode]:
Allows you to change the part of the
subject to be measured to determine the
exposure. t page 28
light
through
Recording sensitivity
t
page 28
10
Adjusting the ISO sensitivity
ISO is unit of measurement (sensitivity), estimating how much light an image pickup device
(equivalent to photo films) receives. Even when the exposure is the same, images differ
depending on the ISO sensitivity.
[ISO] adjusts the sensitivity t page 29
High ISO sensitivity
Records a bright image even when shooting in a dark location. However, the
image tends to become noisy.
Low ISO sensitivity
Records a smoother image.
However, the image may become darker.
Enjoying the camera
Color
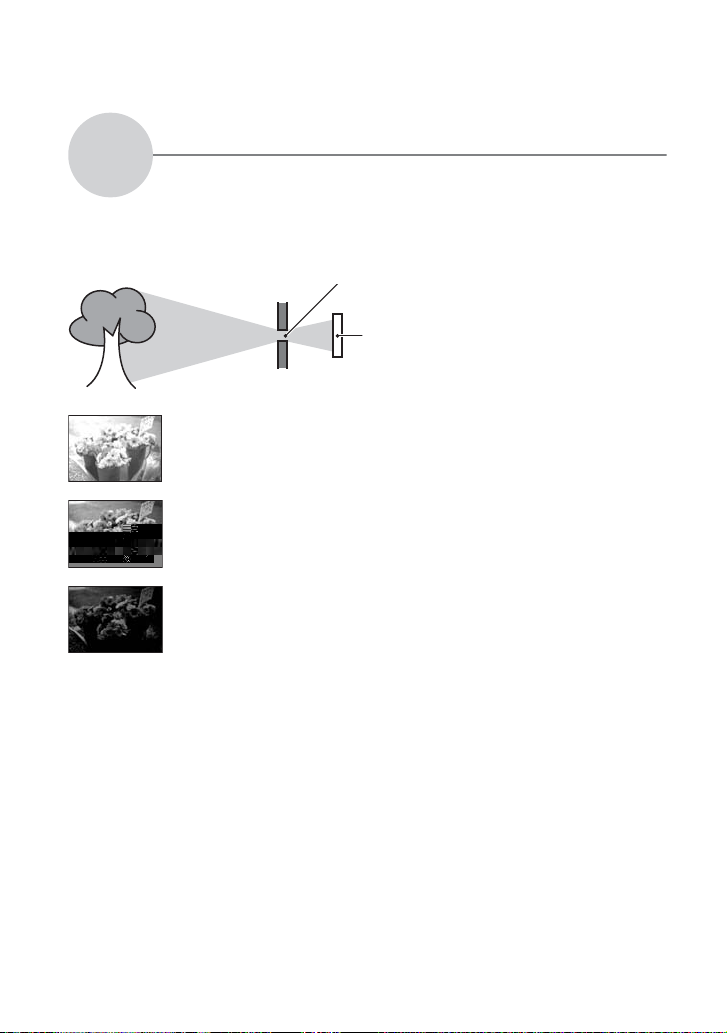
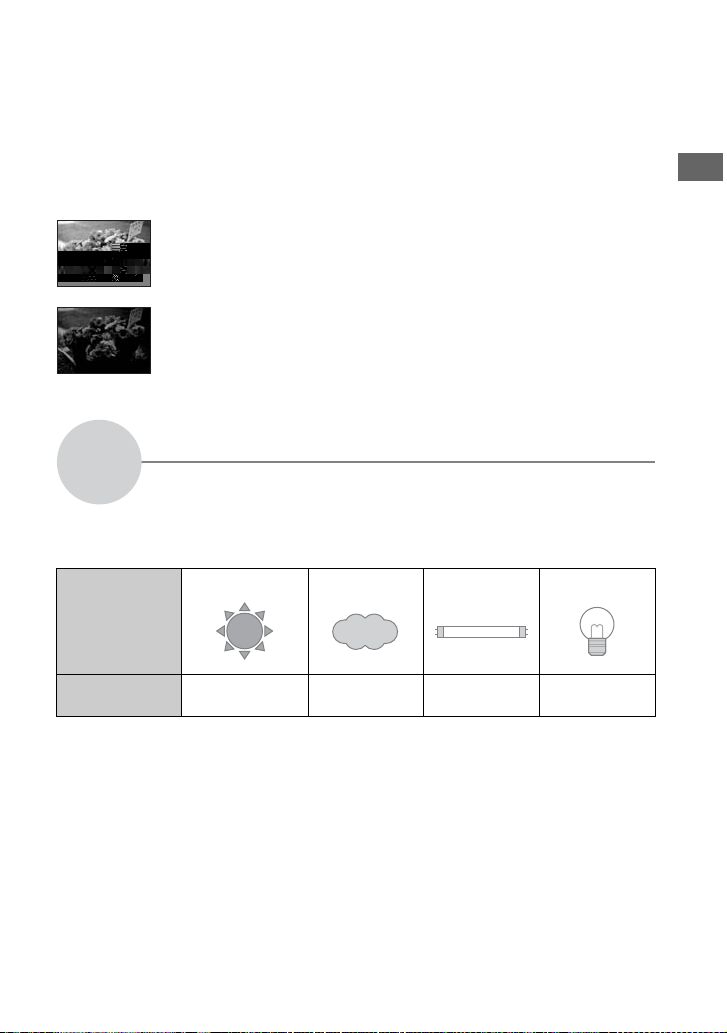
The apparent color of the subject is affected by the lighting conditions.
On the effects of lighting
Example: The color of an image affected by light sources
Weather/lighting
Characteristics of
light
The color tones are adjusted automatically in the auto adjustment mode.
However, you can adjust color tones manually with [White Bal] (page 29).
Daylight Cloudy Fluorescent Incandescent
White (standard) Bluish Blue-tinged Reddish
11
Quality
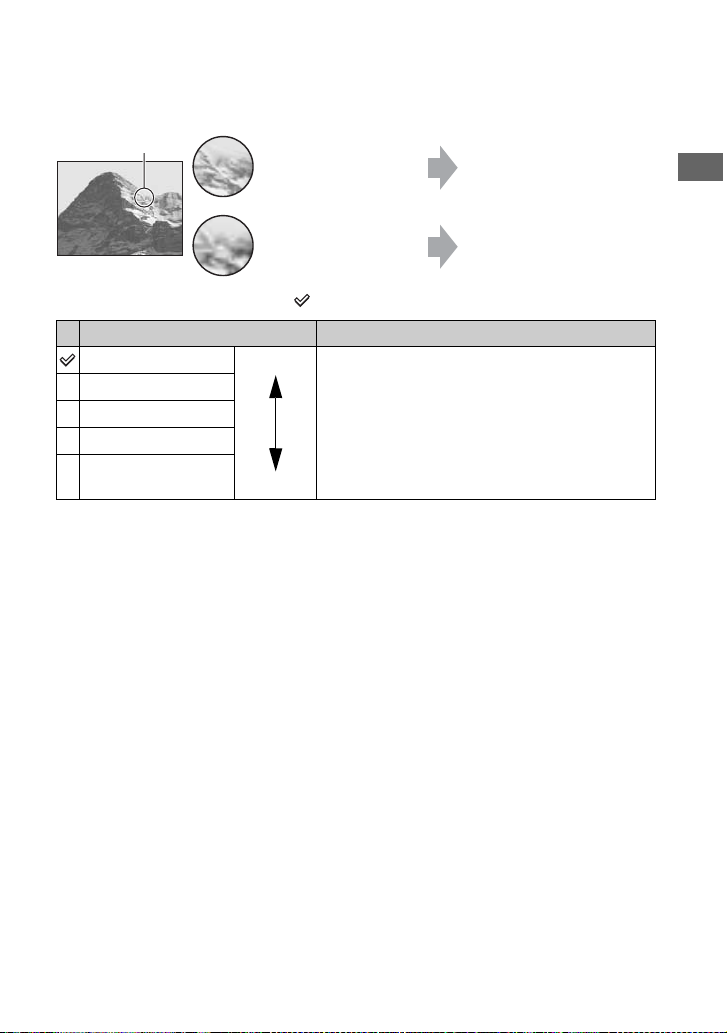
On “image quality” and “image size”
A digital image is made up of a collection of small dots called pixels.
If it contains a large number of pixels, the picture becomes large, it takes up more memory,
and the image is displayed in fine detail. “Image size” is shown by the number of pixels.
Although you cannot see the differences on the screen of the camera, the fine detail and data
processing time differ when the image is printed or displayed on a computer screen.
Description of the pixels and the image size
1 Image size: 5M
2,592 pixels×1,944 pixels = 5,038,848 pixels
2 Image size: VGA(E-Mail)
640 pixels×480 pixels = 307,200 pixels
1944
640
Pixels
2592
480
12
Selecting the image size for use
Pixel
Many (Fine image
quality and large file
size)
Example: Printing in up to A4
size
Enjoying the camera
Few (Rough image
quality but small file
size)
Example: An attached image
to be sent by e-mail
The default settings are marked with .
Image size Usage guidelines
5M (2592×1944) Larger
3:2 (2592×1728)
3M (2048×1536)
1M (1280×960) For printing in postcard size
VGA (E-Mail)
(640×480)
* Images are recorded in the same 3:2 aspect ratio as photograph printing paper or postcards, etc.
Smaller
For printing in A4 size or high density images in A5
size
For recording a large number of images
For attaching images to e-mail or creating web pages
Selecting the image quality (compression ratio) in combination (page 29)
You can select the compression ratio when digital images are saved. When you select a high
compression ratio, the image lacks the fineness of detail, but has a smaller file size.
13
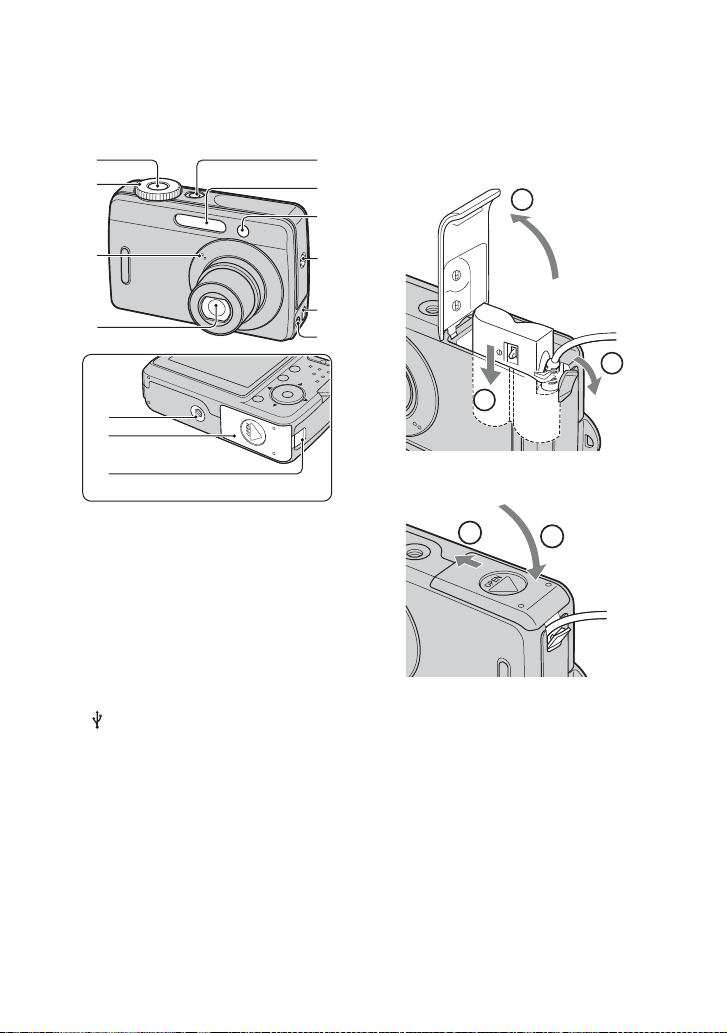
Identifying parts
See the pages in parentheses for details of
operation.
1
2
3
4
qa
qs
qd
A Shutter button
B Mode dial (24)
C Microphone
D Lens
E POWER button / lamp
F Flash
G Self-timer lamp
H Buzzer
I USB jack
J A/V OUT jack
K Tripod receptacle
• Use a tripod with a screw length of less than
5.5mm (7/32 inch). You will be unable to
firmly secure the camera to tripods having
screws longer than 5.5mm (7/32 inch), and
may damage the camera.
L Battery/“Memory Stick Duo” cover
5
6
7
8
9
q;
M AC Adaptor cord cover
To use the AC-LS5K AC Adaptor (not
supplied)
1
3
5
Do not pinch the cord when you close
the cover.
4
2
14
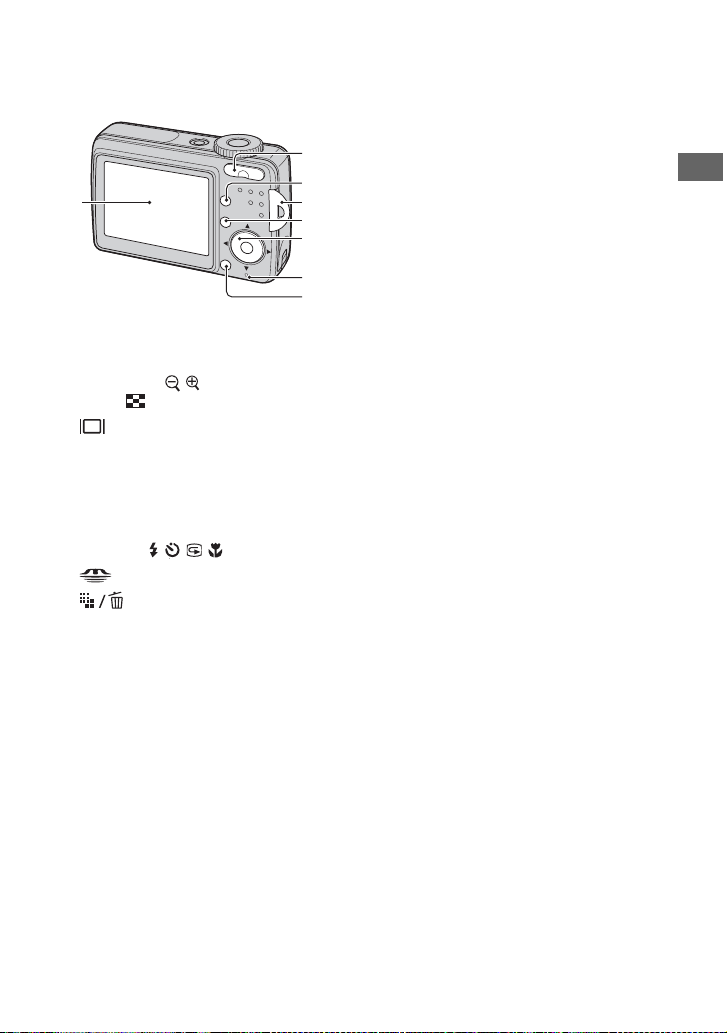
N
N LCD screen (20)
O For shooting: Zoom (W/T) button
For viewing: / (Playback zoom)
button/ (Index) button
P Screen status button (20)
Q Hook for wrist strap
R MENU button (26)
S Control button
Menu on: v/V/b/B/
z
Menu off: / / /
T Access lamp
U (Image Size/Delete) button
O
P
Q
R
S
T
U
Enjoying the camera
15
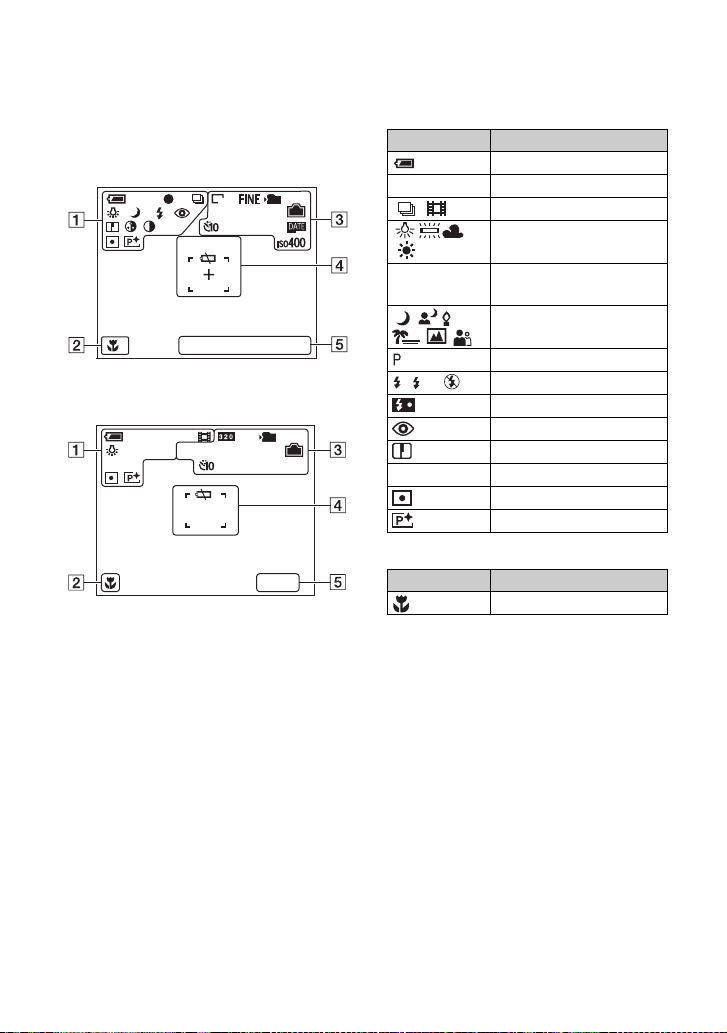
Indicators on the screen
30
30
See the pages in parentheses for details of
operation.
When shooting still images
101
101
VGA
VGA
30
30
+2.0
EV
F2.833
+2.0
EV
F2.833
When shooting movies
STBY
101
[00:00:30]00:00:00
+
EV
+2.0
A
Display Indication
Battery remaining
z AE/AF lock
Recording mode (24, 30)
White balance (29)
STBY
Standby/Recording a movie
REC
Mode dial (Scene
Selection)
Mode dial (24)
SL
Flash mode
Flash charging
Red-eye reduction (39)
Sharpness (31)
5 Saturation (31)
Metering mode (28)
Picture effect (30)
B
Display Indication
Macro
16
CD
Display Indication
3M5M
Image size
3:2
1M VGA
320
FINE STD Image quality (29)
101
Recording folder (41)
• This does not appear when
using the internal memory.
Remaining internal
memory capacity (21)
Remaining “Memory Stick
Duo” capacity (21)
00:00:00
[00:00:30]
Recording time [maximum
recordable time] (21)
30 Remaining number of
recordable images (21)
Self-timer
Display Indication
E Low battery warning (23,
81)
+ Spot metering cross hair
(28)
AF range finder frame (9)
E
Display Indication
33 Shutter speed
F2.8 Aperture value
+2.0EV EV level value (28)
Menu / Guide Menu (26)
(not displayed
on the screen
on the previous
page)
Date/Time (39)
ISO number (29)
Enjoying the camera
17
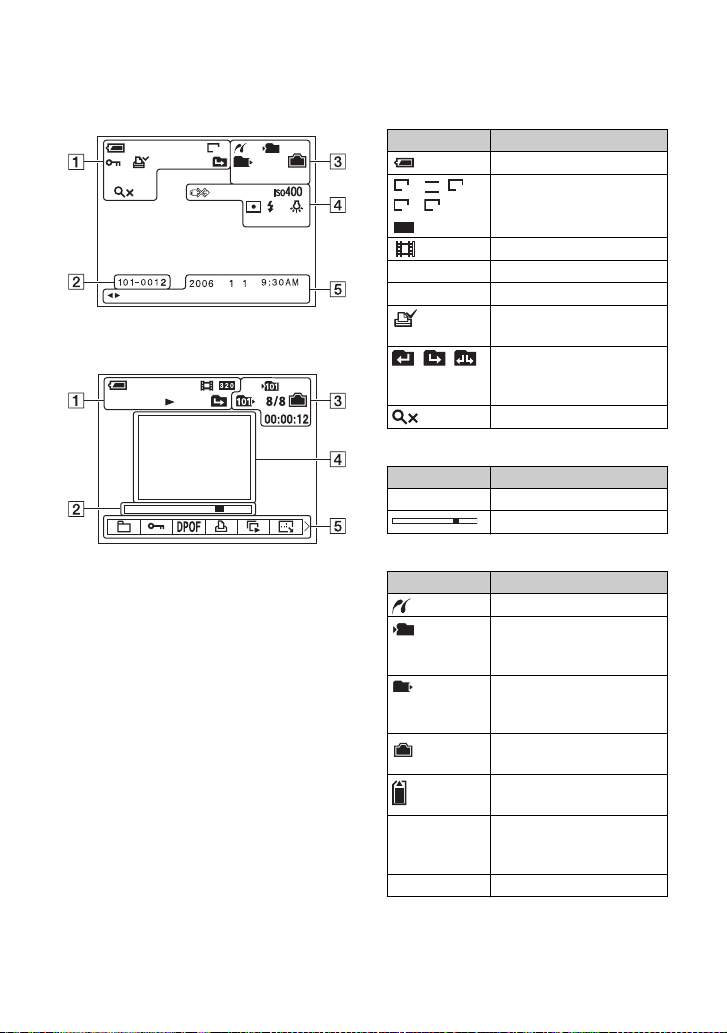
When playing back still images
101
VGA
101
12/12
1.3
BACK/NEXT
+2.0EV
When playing back movies
A
Display Indication
Battery remaining
3M5M
Image size
3:2
F2.833
1M VGA
320
Recording mode (24, 30)
N Playback
- Protect (33)
Print order (DPOF) mark
(66)
Change folder (32)
• This does not appear when
using the internal memory.
1.3
Zoom scaling
B
Display Indication
101-0012 Folder-file number (32)
Playback bar
C
Display Indication
PictBridge connecting (63)
101
101
Recording folder (41)
• This does not appear when
using the internal memory.
Playback folder (32)
• This does not appear when
using the internal memory.
Remaining internal
memory capacity (21)
Remaining “Memory Stick
Duo” capacity (21)
8/8 12/12 Image number/Number of
images recorded in selected
folder
00:00:12 Counter
18
D
Display Indication
Do not disconnect the USB
cable (65)
+2.0EV EV level value (28)
ISO number (29)
Metering mode (28)
Flash
White balance (29)
33 Shutter speed
F2.8 Aperture value
Playback image
E
Display Indication
2006 1 1
DPOF
BACK/
Recording date/time of the
playback image
Menu / Guide Menu (26)
Select images
NEXT
Enjoying the camera
19
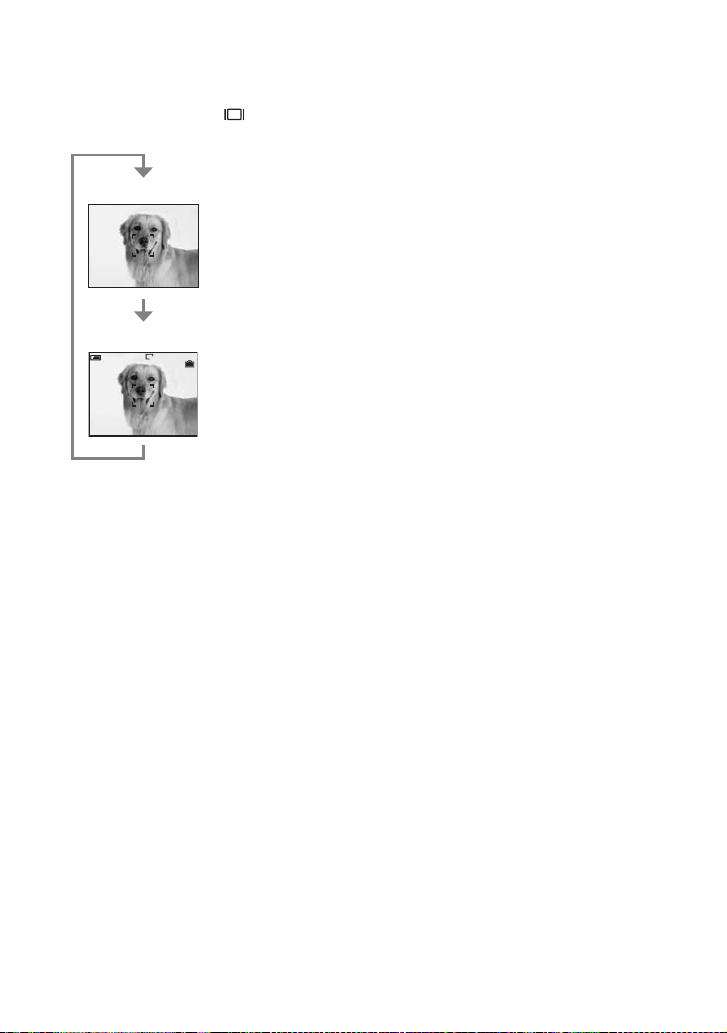
Changing the screen display
Each time you press the Screen status
button, the display changes as follows.
Indicators off
Indicators on
VGA
30
20
Number of still images and recording time of
movies
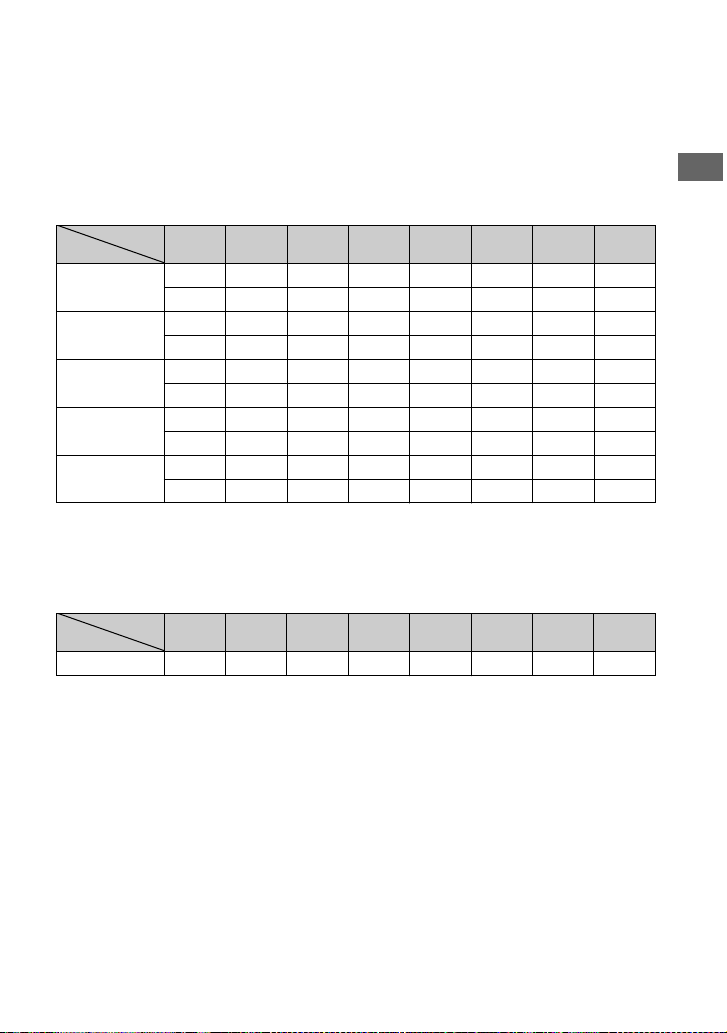
The tables show the approximate number of still images and the length of time for movies that
can be recorded on a “Memory Stick Duo” and internal memory (10 MB) formatted with this
camera. The values may vary depending on the shooting conditions.
The number of still images (The image quality is [Fine] on the upper line and
[Standard] on the lower line.)
Capacity
Size
5M 312245096191391797
3:2 3 12 24 50 96 191 391 797
3M 6 19 39 81 155 308 629 1282
1M 15 48 98 201 384 759 1550 3159
VGA(E-Mail) 60 191 387 789 1503 2972 6065 12355
• The number of images listed is for when [Mode] is set to [Normal].
• When the number of remaining shootable images is greater than 9,999, the “>9999” indicator appears.
• You can resize the images later ([Resize], (page 35)).
Internal
Memory
32MB 64MB 128MB 256MB 512MB 1GB 2GB
7 23 46 95 182 360 736 1501
7 23 46 95 182 360 736 1501
11 35 72 148 283 560 1143 2330
28 91 184 375 715 1414 2886 5880
147 463 935 1879 3630 7167 14643 29830
The recording time of movies (hour : minute : second)
Capacity
Size
320×240
• For image size and image quality, see page 12.
• When images recorded using earlier Sony models are played back on this camera, the display may differ
from the actual image size.
Internal
Memory
0:00:30 0:01:37 0:03:17 0:06:38 0:12:50 0:25:24 0:51:50 1:45:38
32MB 64MB 128MB 256MB 512MB 1GB 2GB
Enjoying the camera
21
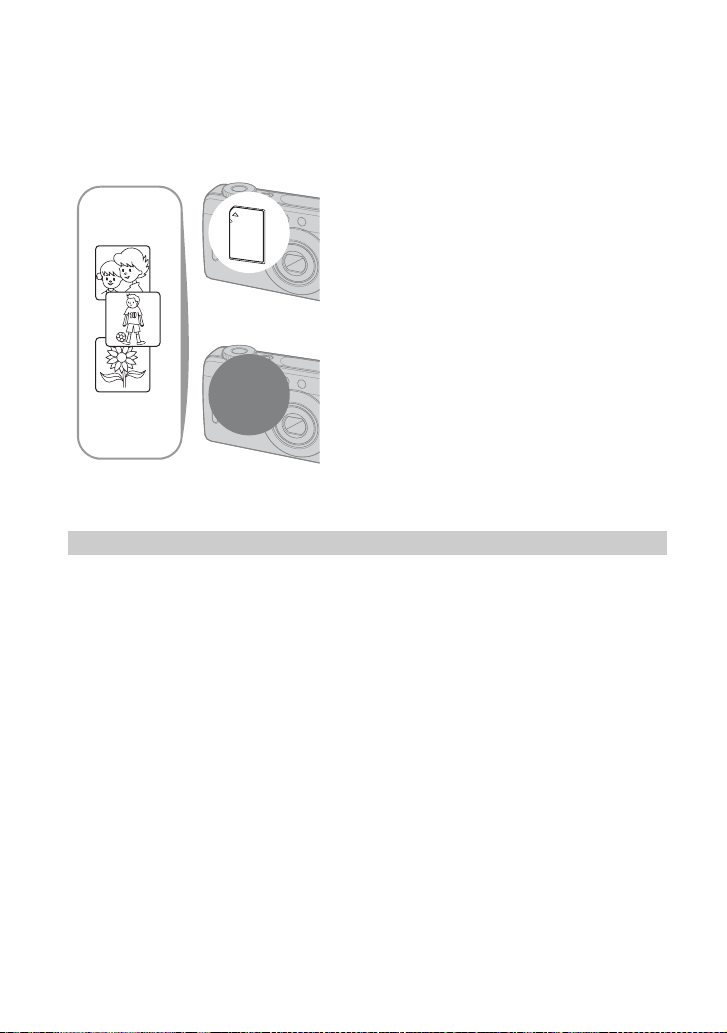
When you do not have a “Memory Stick Duo”
(Recording with the internal memory)
The camera has 10 MB of internal memory. This memory is not removable. Even when there
is no “Memory Stick Duo” inserted in the camera, you can record images using this internal
memory.
When a “Memory Stick Duo” (not supplied)
is inserted
[Recording]: Images are recorded on the “Memory Stick
B
Internal
B
memory
On image data stored in the internal memory
We recommend that you copy (back up) data without fail using one of the following methods.
To copy (back up) data on a “Memory Stick Duo”
Prepare a “Memory Stick Duo” with a capacity of 16 MB or more, then perform the procedure
explained in [Copy] (page 42).
Duo”.
[Playback]: Images on the “Memory Stick Duo” are
played back.
[Menu, Setup, etc.]: Various functions can be performed
on images on the “Memory Stick Duo”.
When there is no “Memory Stick Duo”
inserted
[Recording]: Images are recorded using the internal
memory.
[Playback]: Images stored in the internal memory are
played back.
[Menu, Setup, etc.]: Various functions can be performed
on images in the internal memory.
To copy (back up) data on a hard disc of your computer
Perform the procedure on pages 49 to 51 without a “Memory Stick Duo” inserted in the
camera.
• You cannot move image data on a “Memory Stick Duo” to the internal memory.
• By connecting the camera and a computer with a USB cable, you can copy data stored in the internal
memory to a computer, but you cannot copy data on a computer to the internal memory.
22

Battery life and number of images that can be
recorded/viewed
The tables show the approximate number of
images that can be recorded/viewed and the
battery life when you shoot images in
[Normal] mode with batteries at full
capacity and at an ambient temperature of
25°C (77°F). The numbers of images that
can be recorded or viewed take into account
changing the “Memory Stick Duo” as
necessary.
Note that the actual numbers may be less
than those indicated depending on the
conditions of use.
• The battery capacity decreases as the number of
uses increases and also over time (page 85).
• The number of images that can be recorded/
viewed and the battery life are decreased under
the following conditions:
– The surrounding temperature is low
– The flash is used
– The camera has been turned on and off many
times
– The zoom is used frequently
– [LCD Backlight] is set to [Bright]
– The battery power is low
When shooting still images
Battery
Alkaline 90 45
NH-AA-DB
(Ni-MH)
No. of images
(Approx.)
350 170
Battery life
(min.) (Approx.)
When viewing still images
Battery
Alkaline 1800 90
NH-AA-DB
(Ni-MH)
• Viewing single images in order at about three
second intervals
No. of images
(Approx.)
4800 240
Battery life
(min.)
(Approx.)
When shooting movies
Battery
Alkaline 40
NH-AA-DB
(Ni-MH)
• Shooting movies continuously with an image
size of [320]
Battery life (min.) (Approx.)
120
Enjoying the camera
• Shooting in the following situations:
– (P.Quality) is set to [Fine]
– Shooting once every 30 seconds
– The zoom is switched alternately between the
W and T ends
– The flash strobes once every two times
– The power turns on and off once every ten
times
• The measurement method is based on the CIPA
standard.
(CIPA: Camera & Imaging Products
Association)
• Number of shooting images/battery life does not
change depending on the image size.
23
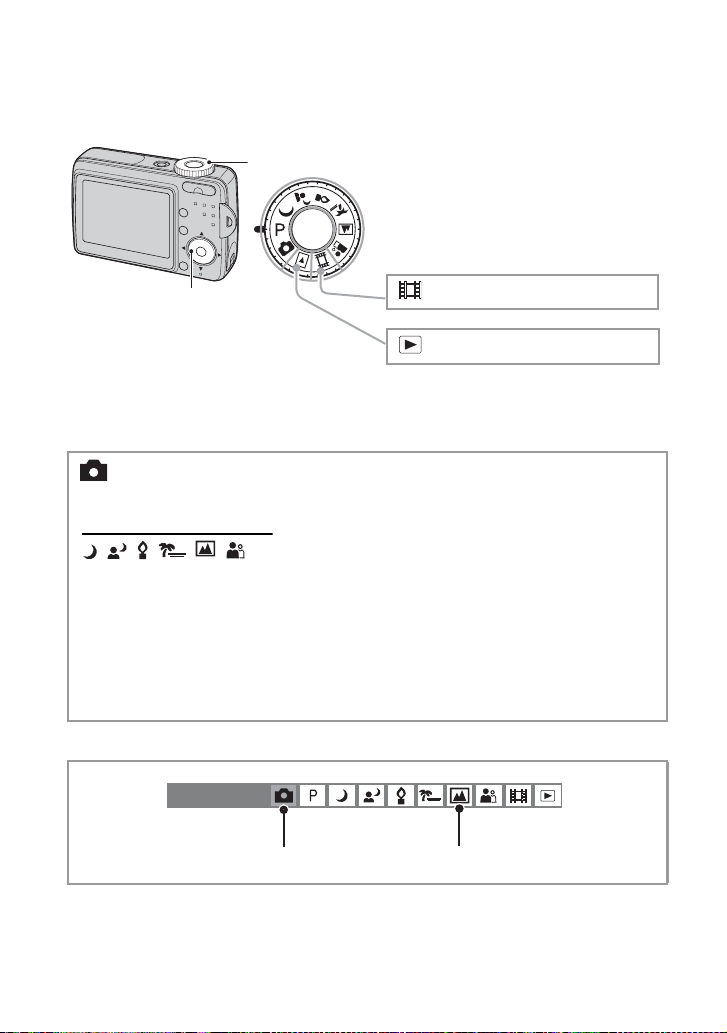
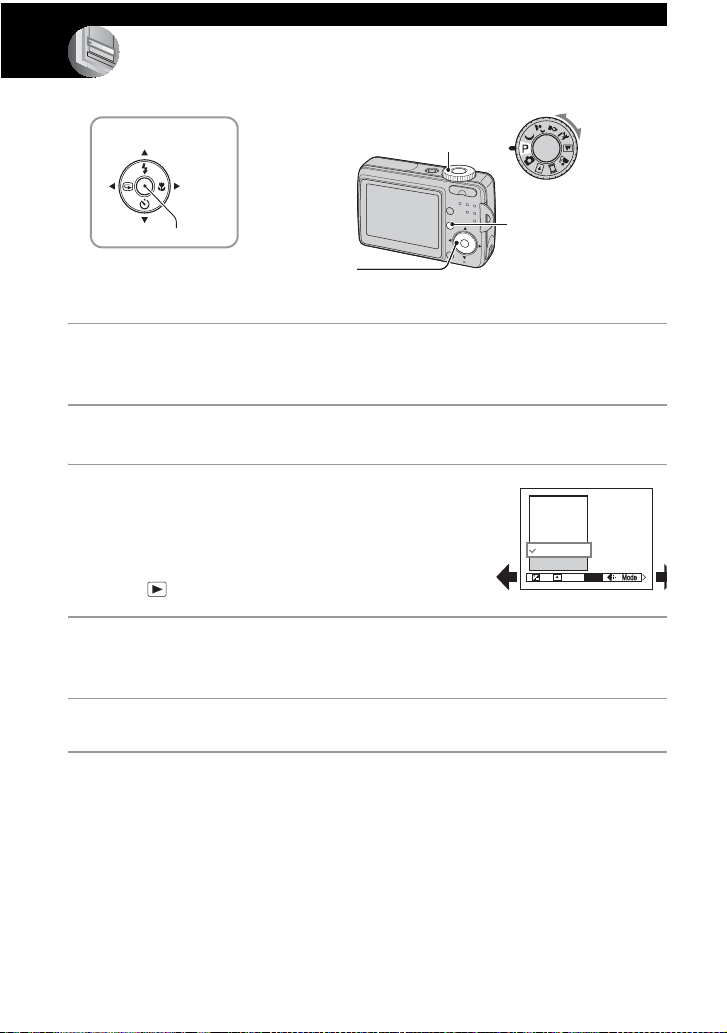
Using the mode dial
Set the mode dial to the desired function.
Mode dial
Control button
: Shooting movies
: Playback/Edit
Still image shooting modes
: Auto adjustment mode
Allows easy shooting with the settings adjusted automatically.
: Scene Selection mode
Allows you to shoot with preset settings according to the scene.
P: Program auto shooting mode
Allows you to shoot with the exposure adjusted automatically (both the shutter
speed and the aperture value). Also you can select various settings using the
menu.
(For details on the functions available t page 27)
In this Cyber-shot Handbook, the available!mode dial setting is shown as follows.
Unavailable Available
24
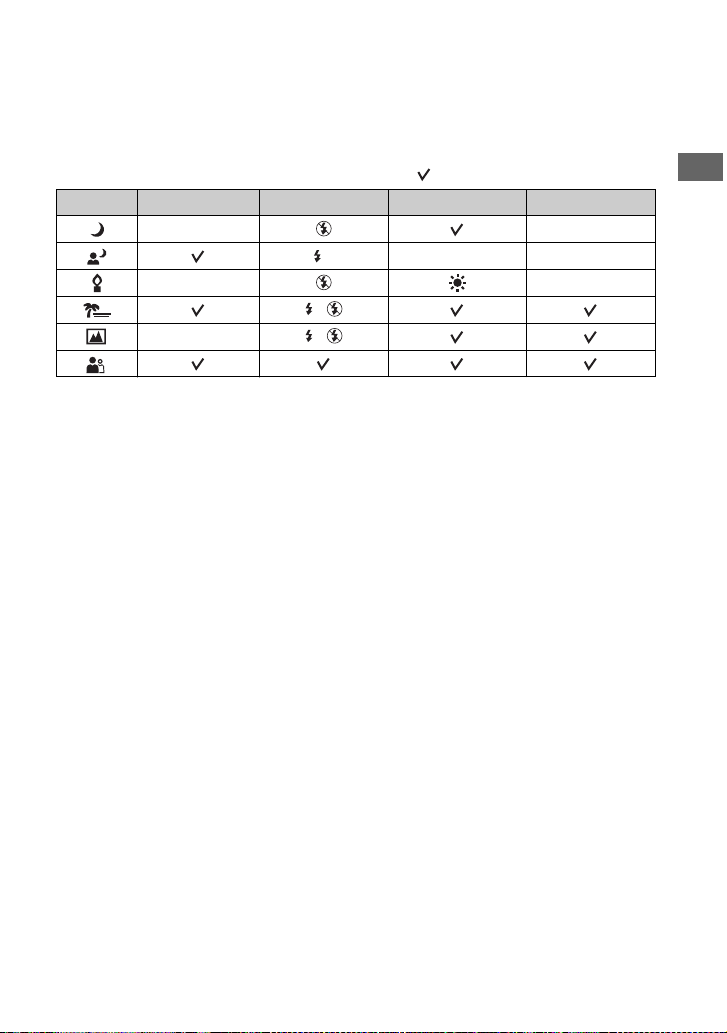
Scene Selection
For shooting an image appropriately according to the scene condition, a combination of
functions is determined by the camera.
Macro Flash White Balance Burst
——
SL
——
/
— /
( : you can select the desired setting)
Auto —
Enjoying the camera
25
Using the menu
Using menu items
v/V/b/B button
z button
Control button
1 Turn on the power and set the mode dial.
Items available vary depending on the mode dial position.
2 Press MENU to display the menu.
3 Select the desired menu item with b/B
on the control button.
• If the desired item is invisible, keep pressing b/B
until it appears on the screen.
• Press z after selecting an item when the mode dial
is set to .
4 Select the setting with v/V.
The setting you select is zoomed and is set.
Mode dial
MENU button
400
200
100
80
Auto
ISO
WB
ISO
5 Press MENU to turn off the menu.
• If there is an item that is not displayed, an v/V mark appears on the edges of the location where menu
items usually appear. To display an item that is not displayed, select the mark with the control button.
• You cannot select items that are grayed out.
26
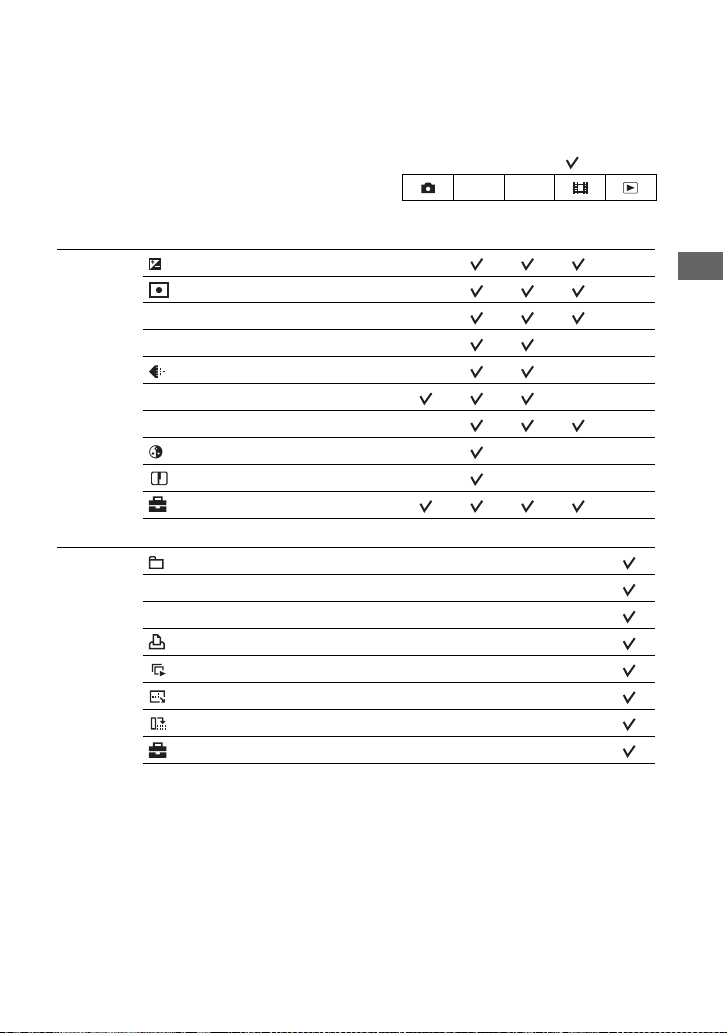
Menu items
For details on the operation t page 26
The menu items available vary depending on the mode dial position. Only the available items
are displayed on the screen.
( : available)
Mode dial position: P Scene
Menu for shooting (page 28)
(EV) — —
(Metering Mode) — —
WB (White Bal) — —
ISO — — —
(P.Quality) — — —
Mode (REC Mode) — —
PFX (P.Effect) — —
(Saturation) — — — —
(Sharpness) — — — —
(Setup)
—
Menu for viewing (page 32)
(Folder) ————
- (Protect) ————
DPOF ————
(Print) ————
(Slide) ————
(Resize) ————
(Rotate) ————
(Setup) ————
Using the menu
* The operation is limited according to the Scene mode (page 25).
27
Shooting menu
The default settings are marked with .
(EV)
Toward – Toward +
For details on the operation t page 26
Manually adjusts the exposure.
M +2.0EV
0EV
m –2.0EV
• For details on the exposure t page 10
• The compensation value can be set in 1/3EV increments.
• If a subject is being shot in extremely bright or dark conditions, or the flash is used, the exposure
adjustment may not be effective.
Toward +: Brightens an image.
The exposure is determined automatically by the camera.
Toward –: Darkens an image.
(Metering Mode)
Selects the metering mode that sets which part of the subject to measure to determine the
exposure.
Spot (Spot metering)
()
Measures only a part of the subject.
• This function is useful when the subject is backlit or when there
is strong contrast between the subject and the background.
FINE
VGA
P
30
Spot metering cross hair
Positions on the subject.
F2.833
Multi (Multi-pattern
metering)
• For details on the exposure t page 10
Divides into multiple regions and measures each region. The
camera determines a well-balanced exposure.
28
 Loading...