

Sony DSC-R1 Fall 2005, DSC-R1 Usage Manual
Usage Guide
DSC-
R1

Usage Guide
Page 2 COSTAR - CONFIDENTIAL/TRADE SECRET
DSC-
R1
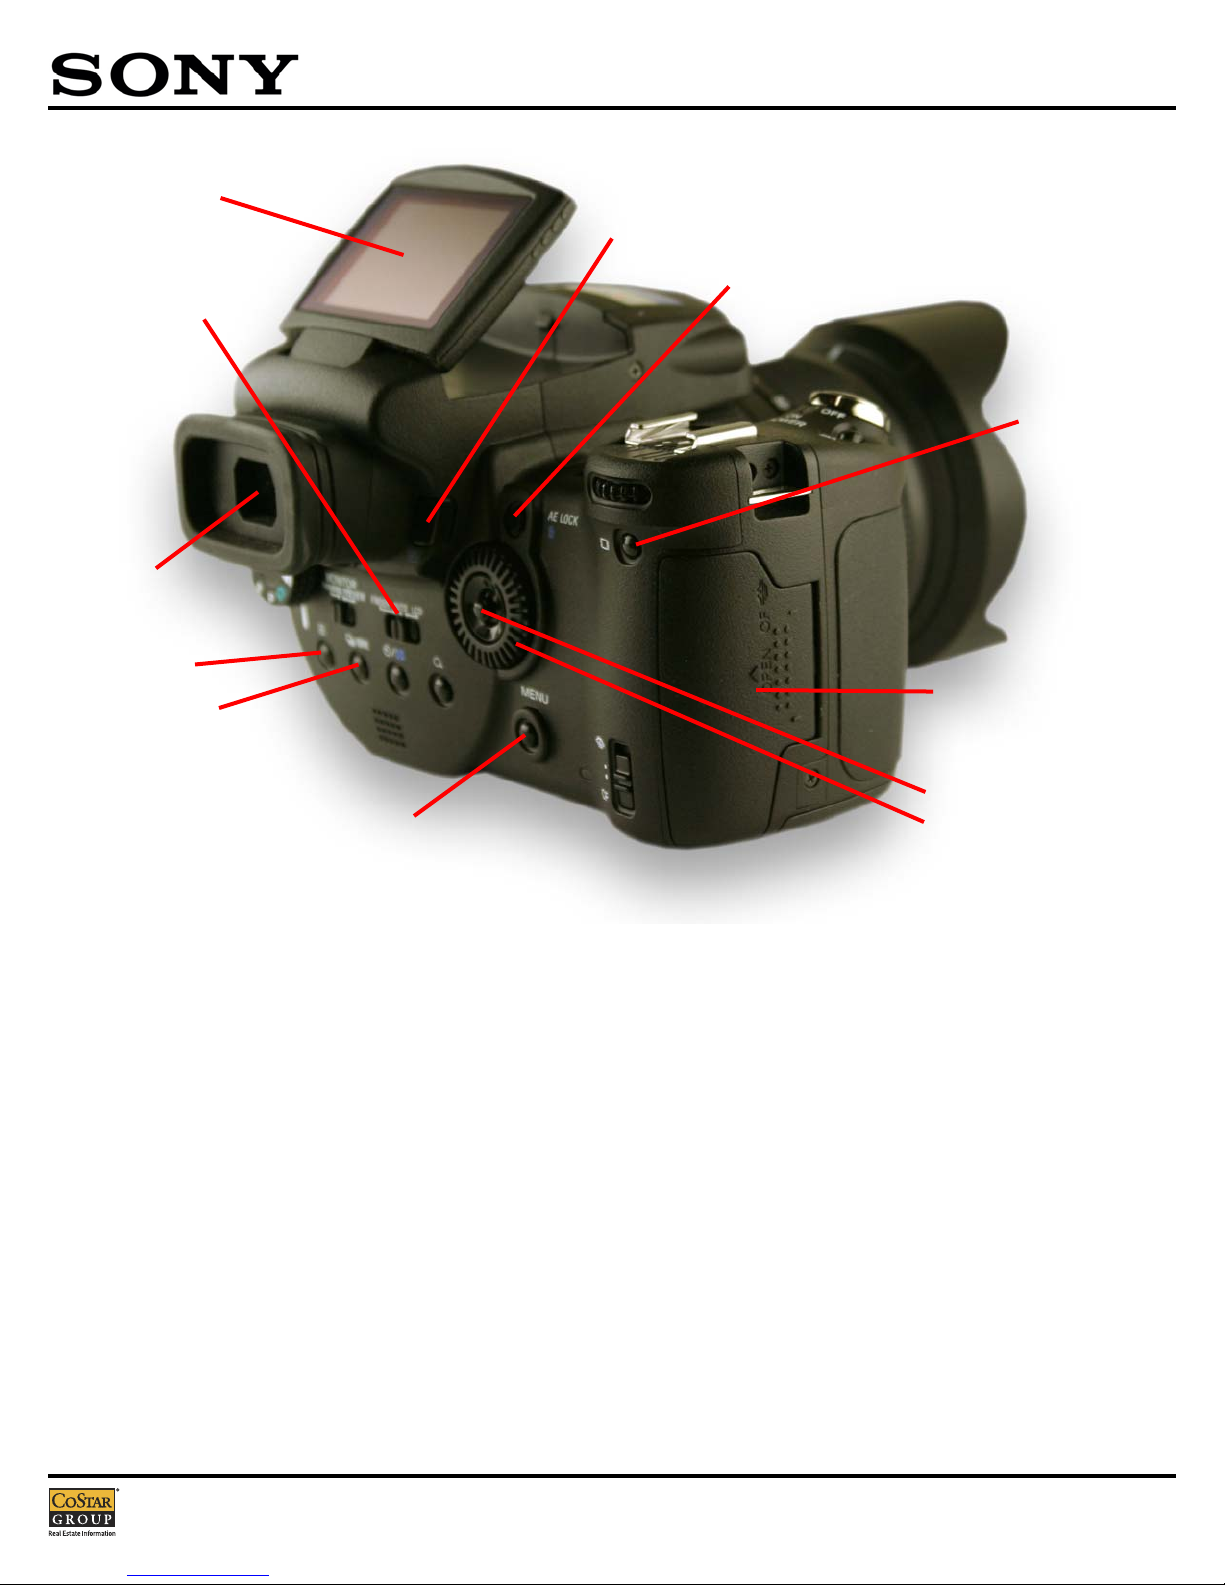
Knobs, Buttons and Wheels
(Getting to Know the R1)
Main Command Dial
The Main Command Dial, located on the back of the camera, behind the
Advanced Accessory Shoe, is one of the most important exterior features of the
camera. Any setting changes that relate to the Mode Dial are made by rotating
the Main Command Dial. The
MMaaiinn CCoommmmaanndd DDiiaall
is also used to adjust
settings for the Flash, White Balance, Metering, and ISO.
Mode Dial
(p. 29)
The Mode Dial allows the user to change between shooting modes.
Focus Switch
(p. 48)
Used to switch between Manual Focus and Auto Focus.
Introduction
This Usage Guide is meant to highlight some of the
features of the Sony DSC-R1 in a easy-to-find format. Any
page numbers referenced are located in Sony’s User’s
Guide that was included with your camera.
The R1 represents a high quality, 10 megapixel digital
camera that should meet all of our needs in the field.
We’ve tested many cameras that fall into the performance
range of the R1 and concluded that it best fits our current
needs for field research photography.
If you should have any questions concerning settings or
other operational features of the R1, please don’t hesitate
to contact your manager.
Kurt Liestenfeltz
Field Research Manager, Retail
(301) 280-7342
kliestenfeltz@costar.com
Diane Reynolds
Field Research Manager, Retail
(301) 215-8337
dreynolds@costar.com
Brian Weaver
Field Research Manager, Retail
(301) 664-9177
bweaver@costar.com
Andrew Jenness
Field Research Supervisor
(301) 664-9136
ajenness@costar.com
Jarrod Young
Field Research Supervisor
(301) 280-4704
jyoung@costar.com
Nicole Wilkum
Field Research Supervisor
(301) 280-3803
nwilkum@costar.com
Richard Baillieul
Field Research Supervisor
(301) 280-3812
rbaillieul@costar.com
Main
Command Dial
Focus Switch
Mode Dial
Usage Guide
COSTAR - CONFIDENTIAL/TRADE SECRET Page 3
DSC-
R1
Electronic Viewfinder (EVF)
Similar to SLR 35mm film cameras, the EVF allows the user to frame the shot
through-the-lens, except a small color LCD screen is used to display the image
and additional information. Playback and menu controls are also viewable
through the EVF.
The R1 has additional functionality with an auto sensing EVF that will switch
between the main LCD Screen and EVF when the user’s eye approaches the
EVF. For battery-conscious users, the auto sensing feature should be turned
off.
Display Mode Switch
The Display Mode Switch allows the user to chose where the image will be
displayed - through the EVF, LCD Monitor or automatically switching between
the two.
Playback Button
Used to view previous images already saved to the memory card.
AE Lock Button/Delete Button
(p. 43)
Used to lock exposure while photographing. Used to delete images from the
memory card when in Playback Mode
Compact Flash Compartment
Houses the Compact Flash or Memory Stick memory card.
Multi-Selector/Sub-Command Dial
(p. 28, 31)
Also known as The Joystick/The Wheel. Used to navigate through menu
selections and control playback options. Pushing the Multi-Selector down is
used as an “Enter” key.
Screen Status Button
(p. 22)
The Screen Status Button allows the user to change the information displayed
on screen, including a display a Real-Time Histogram of the image.
Menu Button
(p. 31)
Used to access menu options specific to the different operation modes. To
access shooting options, select the Shooting Mode prior to pressing the Menu
Button. To access playback options, press the Playback Button prior to
pressing the Menu Button.
Metering Button/Auto-Bracketing Button
(p. 40, 44, 58)
Used in conjunction with the Main Command Dial these buttons allow the user
to select alternate metering options or turn the auto-bracketing on or off.
These options are not available for all shooting modes.
Electronic
Viewfinder
AE Lock Button/Delete Button
Compact Flash Compartment
Display Mode Switch
Screen Status Button
Playback Button
Multi-Selector
Sub-Command Dial
Menu Button
Metering Button
Auto-Bracketing Button
Flip-Up LCD Screen
Usage Guide
Page 4 COSTAR - CONFIDENTIAL/TRADE SECRET
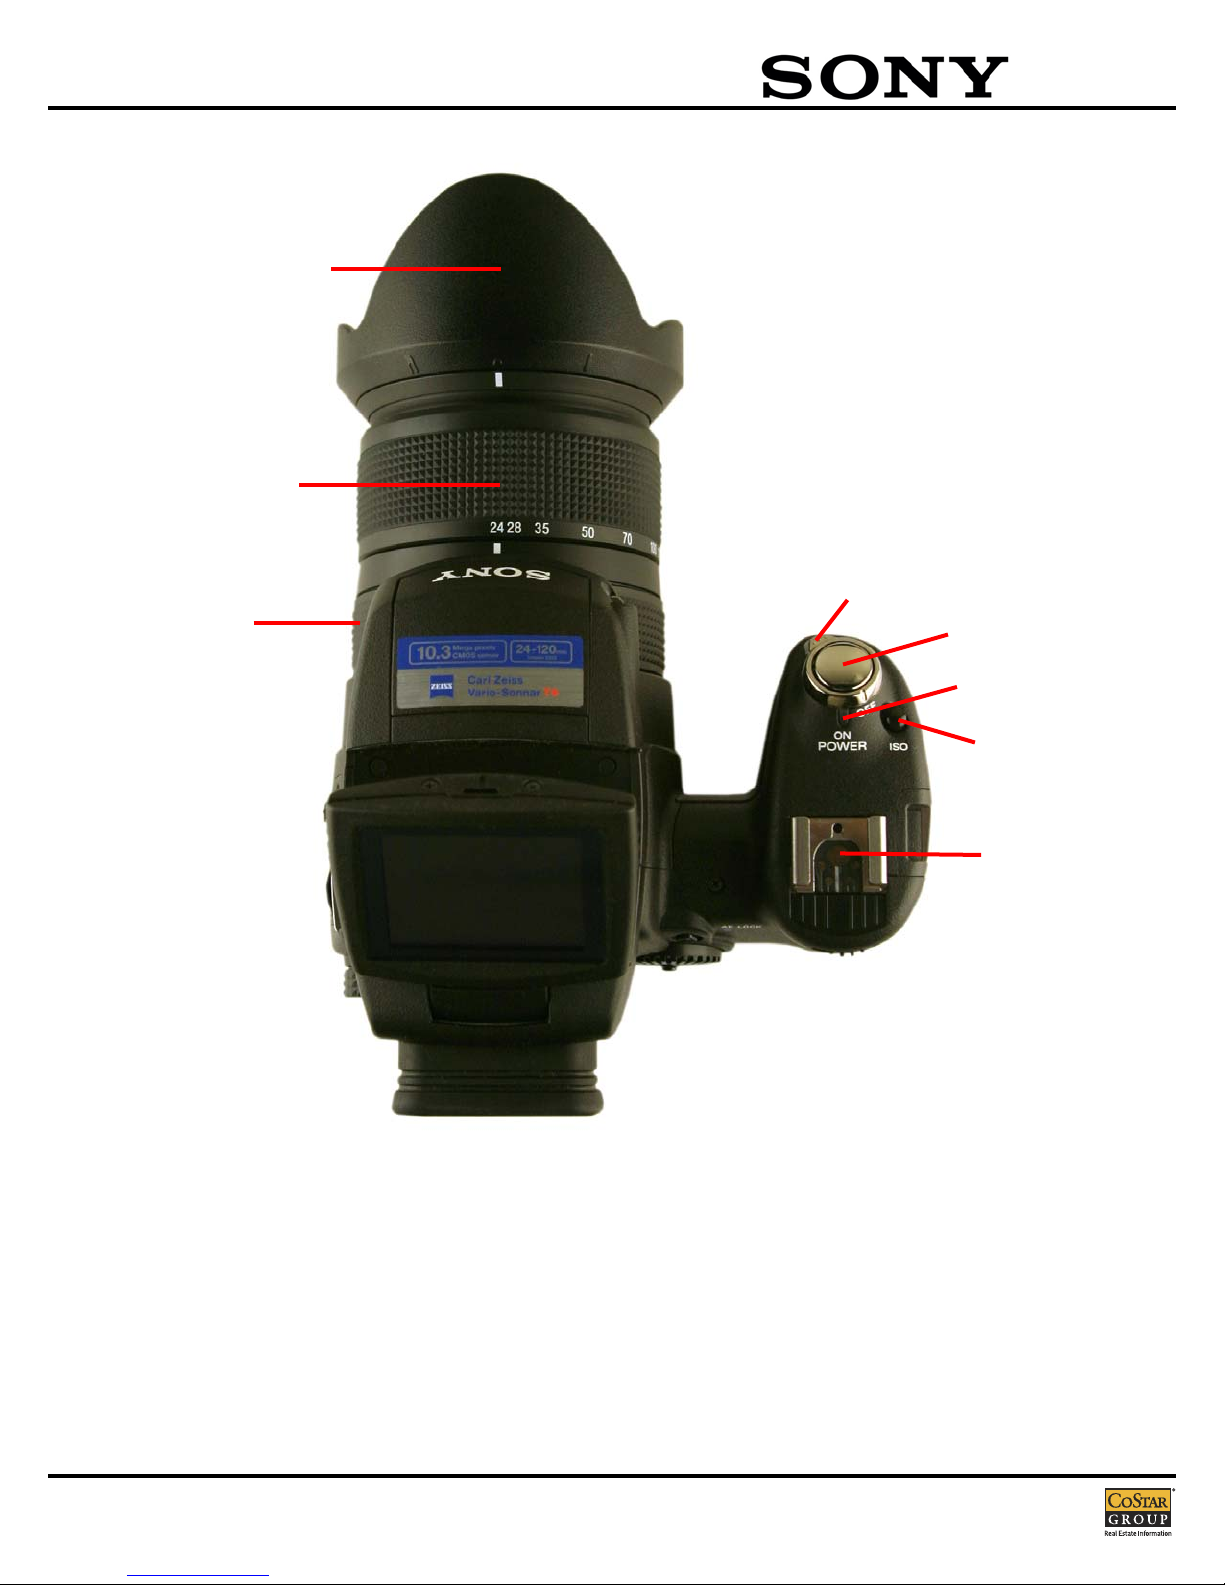
DSC-
R1
Zooming Ring
(p. 71)
Twisting the Zooming Ring allows the user to change the focal length of the
camera’s lens system between 24mm to 120mm (135mm equivalent).
Manual Focus Ring
(p. 48)
When the camera is engaged in Manual Focus Mode, turning this ring will focus
the camera.
Shutter Button
Depressing the shutter button halfway will engage the cameras autofocus and
exposure systems. Holding the button at halfway will freeze the focus and
exposure settings. Pressing the button completely will snap a photo.
Lens Hood
(p. 18)
Using the Lens Hood during bright lighting conditions can reduce image quality
deteriation caused by unnecessary light.
ISO Button
(p. 45)
This button, when used with the Main Command Dial, allows the user to chose
a luminous sensitivity with units of ISO.
Advanced Accessory Shoe
(p. 52)
The Advanced Accessory Shoe allows the user to attach various add-on
accessories such as an External Flash.
Advanced Accessory Shoe
Shutter Button
Power Switch
ISO Button
Power Lamp
Zooming Ring
Lens Hood
Manual Focus Ring
Usage Guide
COSTAR - CONFIDENTIAL/TRADE SECRET Page 5
DSC-
R1
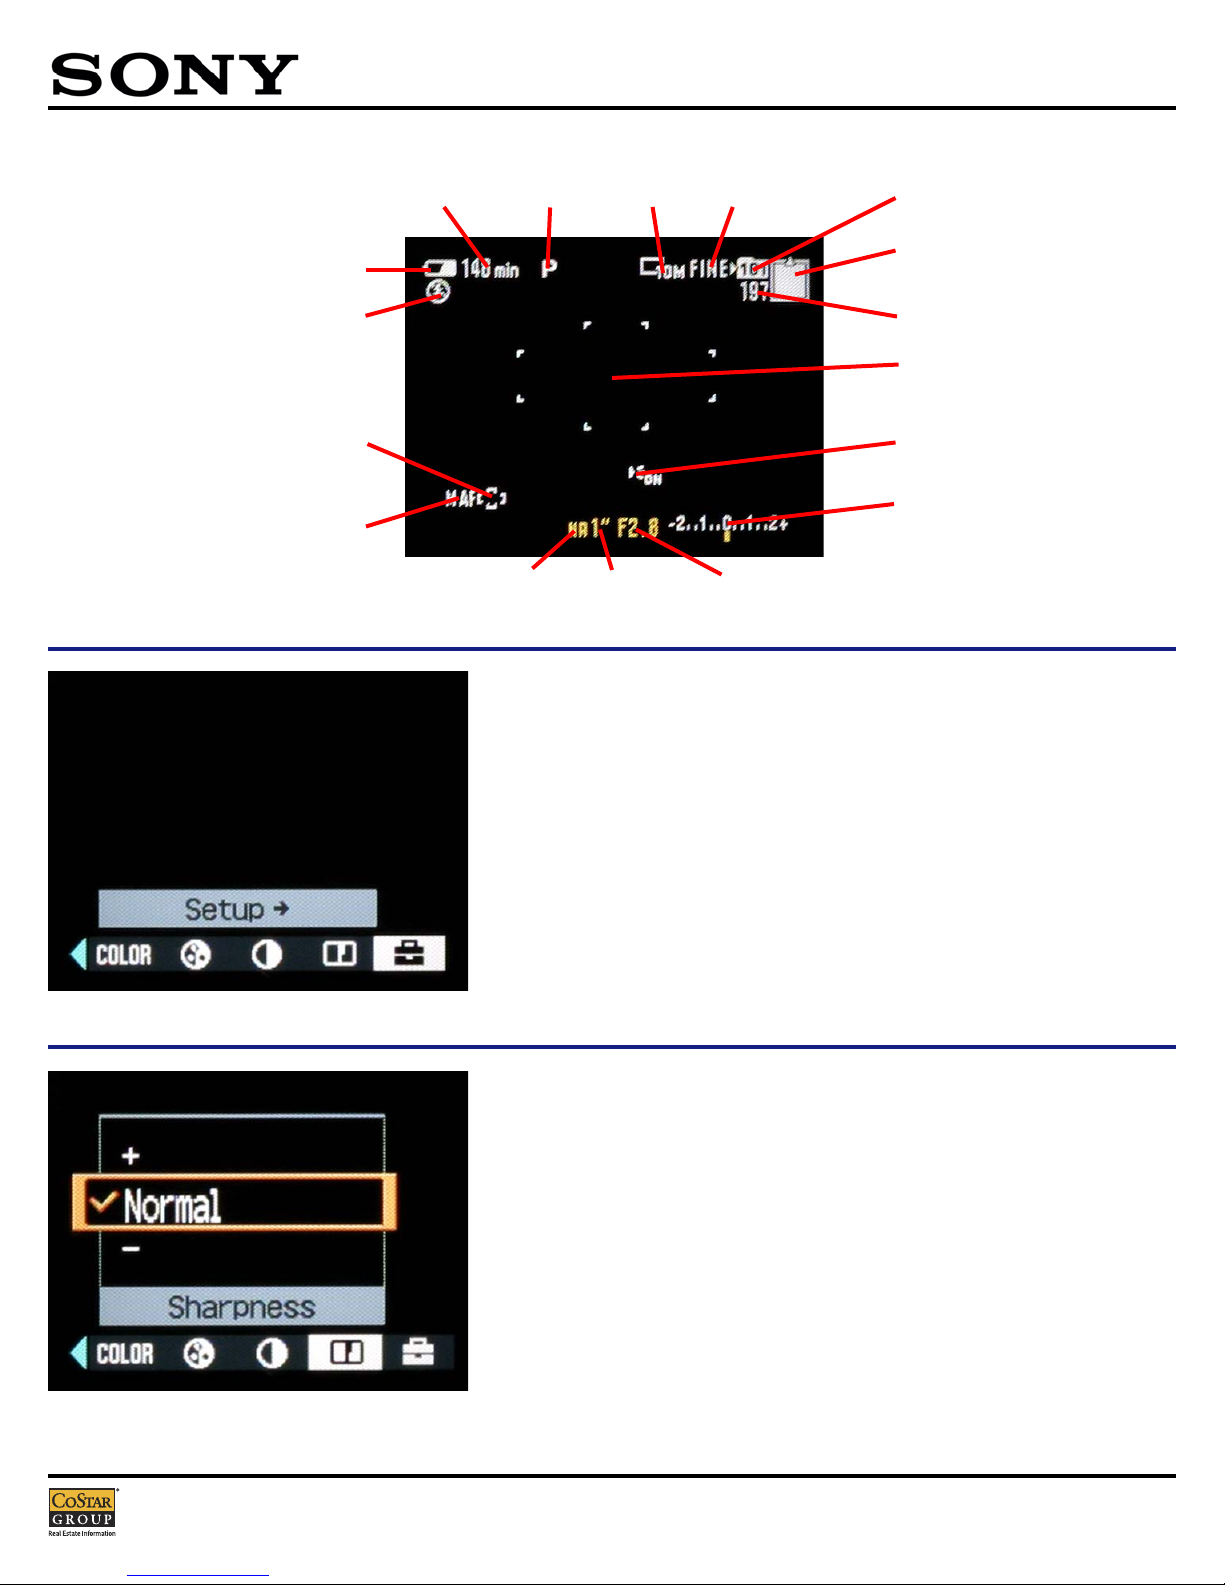
Menu Settings (Recording)
Display Information
Using the Multi-Selector, the user can access the Setup
Menus by rocking the Multi-Selector to the right.
Rocking the Multi-Selector to the left will allow the user
to set parameters for several image recording settings
and options.
Sharpness should be set to Normal.
Remaining Compact
Flash Card capacity
Remaining number
of recordable images
Auto-Focus range
finder frame
Auto-Focus range
finder frame indicator
Flash mode
Battery remaining
indicator
Battery minutes
remaining indicator
Auto-Focus illuminatior
Exposure value bar
Aperture valueShutter speedNR slow shutter
AF mode
Recording folder
Mode dial Image size Image quality
 Loading...