

Sony DSC-P71 Operating Instructions (primary manual), DSC-P31, Cyber-shot DSC-P51, Cybershot, Cyber-shot DSC-P31 Operating Instructions Manual
3-074-351-13(1)
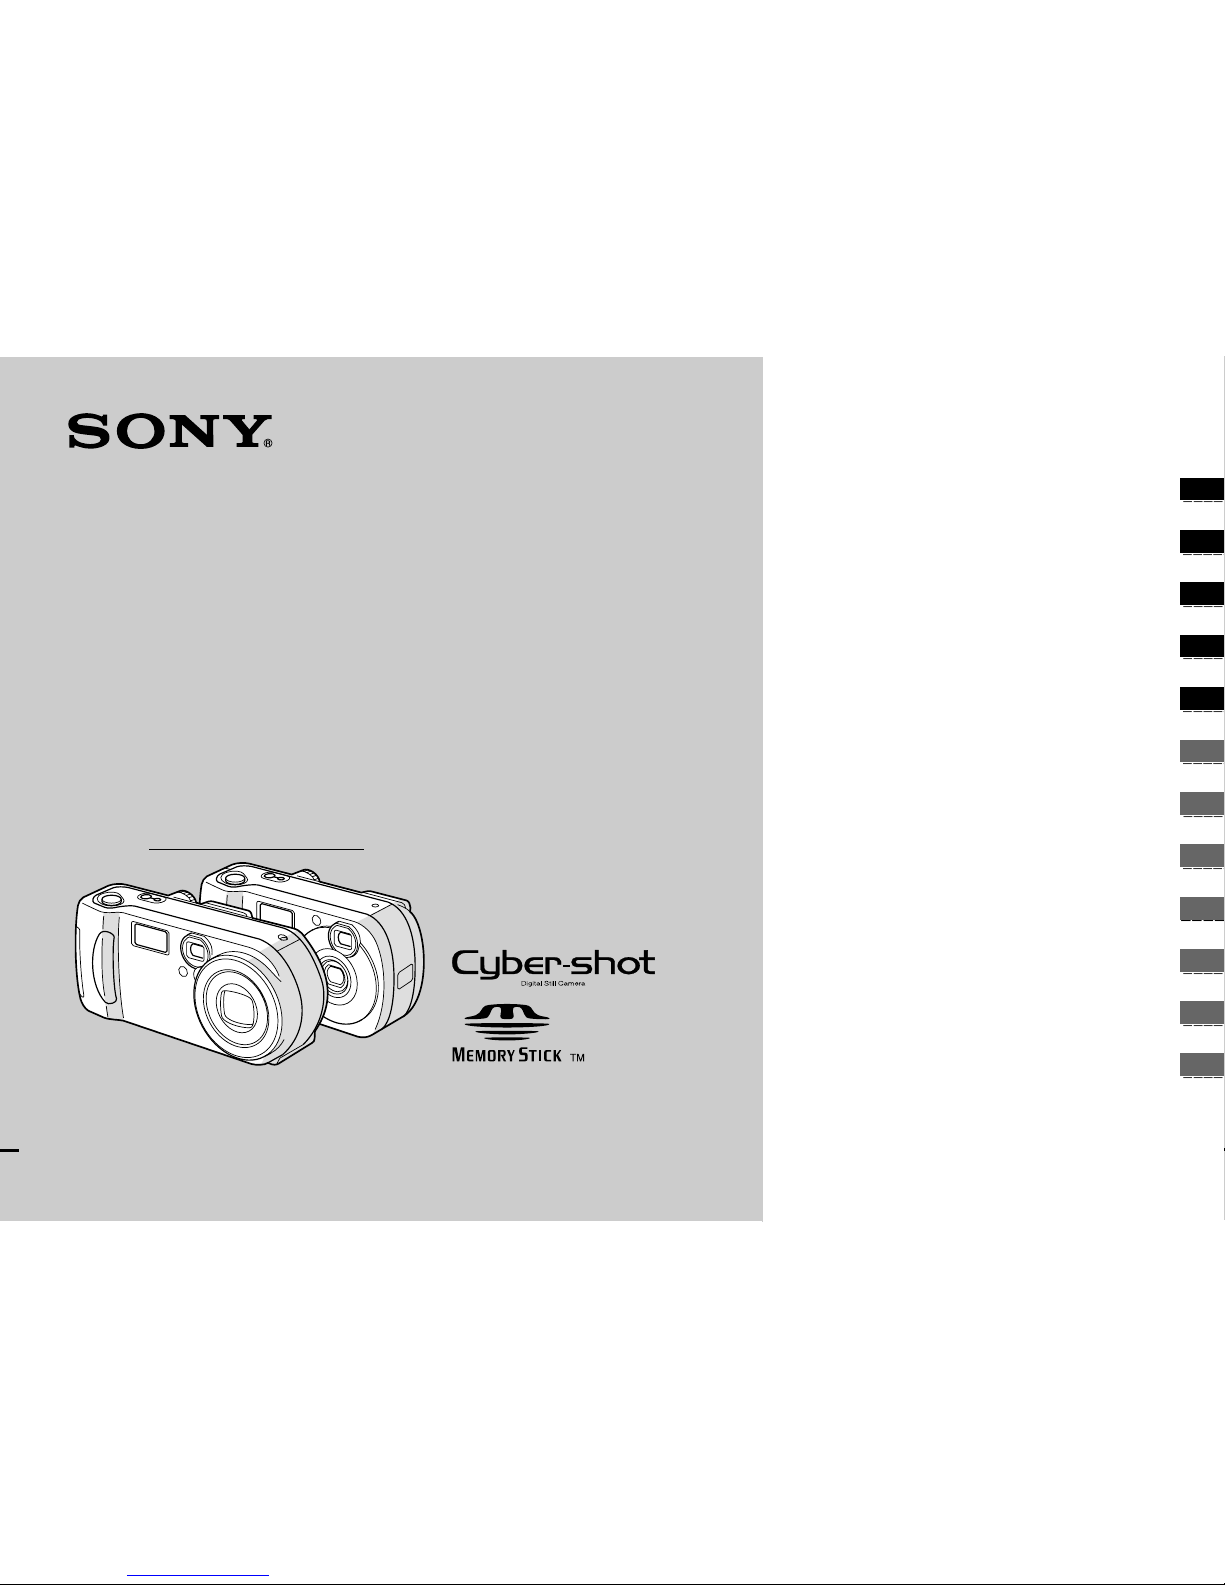
Digital Still Camera
Operating Instructions
Before operating the unit, please read this manual thoroughly, and
retain it for future reference.
Owner’s Record
The model and seria l nu m b er s ar e lo cat ed on the bot to m . Reco r d th e
serial number in the space provided below. Refer to these numbers
whenever you call upon your Sony dealer regarding this product.
Model No. DSC-P71/P51/P31
Serial No.
DSC-P71/P51/P31
© 2002 Sony Corporation
Getting started_______________________
Sho o tin g st ill im a g es_________________
Viewing still images __________________
Deleting still im ages__________________
Copying still images to your computer
_________
Before advanced operations ____________
Adv a n ced still imag e sh o o tin g___________
Adv a n ce d s till image viewing____________
Still image editting ____________________
Enjoying m ovies_______________________
Troubleshoo ting_______________________
Additional information __________________
Index
2
T o preven t fire or shock hazar d, do
not expose the unit to rain or
moisture.
If you have any questions about this product,
you may call:
Sony C ustom er Info rmatio n Se rvices Ce nter
1-800-222-SONY (7669)
The number below is for the FCC related
matters only.
CAUTION
You are cau tion e d that a ny change s o r
modifications not expressly approved in this
manual could vo id you r autho rity to operate
this equipm en t.
W ARNING
For the Customers in the U.S.A.
This symb ol is in tend ed to
alert the user to the pre senc e
of uninsulated “ d angerous
voltage” within the prod uc t’s
enclosure that may b e o f
sufficient m a gnitude to
constitute a risk of electric
shock to persons.
This symb ol is in tend ed to
alert the user to the pre senc e
of important operating and
maintenance (servicing)
instr uc ti o n s in th e li te ra t u re
accompan ying the appliance.
Declaration of Conformity
Trade Name: SONY
Model No.: DSC-P71
Responsible Party:Sony Electronics Inc.
Address: 680 Kinderkamack
Road, Orad ell, N J
07649 USA
T elephone No.: 201-930-6972
This device co mp lies w ith Part 15 of the
FCC R u les. O p er ation is sub ject to the
following two conditions: (1) This device
may no t cau se harmful interference, and
(2) this device must accept any inter ference
received, including interference that may
cause undesired operation.
Declaration of Conformity
Trade Name: SONY
Model No.: DSC-P51, DSC-P31
Responsible Party:Sony E lectronics Inc.
Address: 680 Kinderkamack
Road, Orad e ll, N J
07649 USA
Telephone No.: 201-930-6972
This device co mplies with P a rt 1 5 o f th e
FCC Ru les. O p er ation is sub ject to th e
following two conditions: (1) This device
may not ca use h armful interference, and
(2) this device m ust accept an y interference
received, inclu din g interf erence that may
cause undesired operation.

3
Note:
This equipment has been tested and found to
comply w ith the limits for a Class B dig ital
device, pursua nt to Part 15 of the F C C Rules.
These limits are designed to provide
reasonable protection against harmful
inter feren c e in a resid entia l installatio n. This
equipment generates, uses, and can radiate
radio frequency energy and, if not installed
and used in accordance w ith the instructions,
may caus e harmful interferen c e to ra dio
comm unication s. Ho w e v e r , there is no
guarantee that interferenc e will not occur in a
particular installation. If this equipment does
cause harm fu l interference to radio or
television reception, which can be determined
by turning the equipment off and on, the user
is encouraged to try to correct the interference
by one or mor e of the follow ing m e asures:
—R eorient or relocate the receiving an tenna.
—Incre ase th e sep ar ation b etween the
equipment and rece iv er.
—C on nect the eq uipm e nt into an outlet on a
circu i t di f f er e n t fr o m th a t to w hich the
receiver is connected.
—C on sult the dealer or an ex perienced
radio/TV technician for help.
The supplied interface cable must be used
with the equ ipment in orde r to comply w ith
the limits for a digital device pursuant to
Subpart B of P art 15 of FC C Ru les.
RECYCLING NICKEL METAL
HYDRIDE BATTERIES
Nickel M e tal Hydride batteries
are recyclable.
You can help preserve our
environment by returning your
used rechargeab le batteries to the
collection and recycling location nearest you.
For more information re garding r ecycling o f
rechargeable batteries, call toll free
1-800-822-8837, or
visit http://www.rbrc.or g/
Caution: Do not handle damaged or leaking
Nickel M e tal Hydride batteries.
CAUTION
TO PREVENT ELECTRIC SHOCK , DO NOT
USE THIS POLARIZED AC PLUG WITH AN
EXTENSION CORD, RECEPTACLE OR
OTHER OUTLET UNLESS THE BLADES
CAN BE FULLY INSERTED TO PREVEN T
BLADE EXPOSURE.
A moulded plug complying with BS 1363 is
fitted to this equipment for your safety and
conv enien ce.
Should the fuse in the plug supplied need to be
replaced, a 5 AMP fuse approved by ASTA or
BSI to BS 1362, (i.e. marked with or
mark) must b e used .
If the plug supplied with this equipment has a
detachable fuse cover, be sure to attach the
fuse cover after y ou ch an ge the fuse. Ne v e r
use the plug without the fuse cover. If you
should lose the fuse cover, please contact your
nearest Sony service station.
Directive:E M C D irectiv e 89 /336 /EEC ,
92/31/EEC
This equipm en t co mplies with the E MC
regulations when used under the following
circumstances:
•Residential area
•Business district
•Light-industry district
(This equipmen t c omplies with the EMC
standard regulations EN55022 Class B.)
For the Customer s in the U .S.A.
and Canada
NOTICE FOR THE
CUSTOMERS IN THE UNITED
KINGDOM
For the Customers in Germany
4
This product has been tested and found
compliant with the limits sets out on the EM C
Directive for using connection cables shorter
than 3 meter s .
The electrom ag ne tic f ields at the specific
frequencies may influence the picture and
sound of this camera.
For the Customers in the U.S.A.
and Canada
THIS CLASS B DIGITAL DEVICE
COMPLIES WITH PART 15 OF THE FCC
RULES AND THE CANADIAN ICES-003
OPERATION IS SUBJECT TO THE
FOLLOWING TWO CONDITIONS:
(1) THIS DEVICE MA Y NO T CA USE
HARMFUL INTERFERENCE, AND
(2) THIS DEVICE MUST ACCEPT ANY
INTERFERENCE RECEIVED,
INCLUDING INTERFERENCE THA T MA Y
CAUSE UNDESIRED OPERATION.
If static electricity or electromagnetism causes
data transfer to discontinue midway (fail),
restart the application or disconnect and
connect the U S B cable again.
Trademarks
• “Memory Stick,” , “MagicGate Memory
Stick,” and , are trademarks of Sony
Corporation.
• “MagicGate” and are
trademarks of Sony Corporation.
• Microsoft and Windows are registered
trademarks of the U.S. Microsoft Corporation
in the United States and other countries.
• Macintosh, Mac OS, and QuickTime, are
trademarks or registered trademarks of Apple
Computer, Inc.
• In addition, system and product names used in
this manual are, in general, trademar ks or
registered trademarks of their respective
developers or manufacturers. However, the ™
or ® marks are not used in all cases in this
manual.
Attention for the Customers in
Europe
Attention
“Memory Stick”
N50
Notice

5
Before using your camera
Trial recording
Before you record one-time events, you may
want to make a trial record ing to make su re
that the camera is working correctly.
No compensation for contents of the
recording
Contents of the recording cannot be
compensated for if recording or playback is
not possible due to a malfunction of your
camera or reco rding medium, etc.
Notes on image data compatibility
•This camera confor ms with the Design Rules
for Camera File Systems u nivers al s t andard
established by the JE ITA (Japan Electron ics
and Information T echnology Industries
Association).
•Playback of images reco rded w ith yo ur
camera on other equipment and playback of
images recorded or edited with other
equipmen t o n y o ur camera are not
guaranteed.
Precaution on copyright
Television programs, films, video tapes, and
other materials may be copyrighted.
Unauthorized recording of such materials may
be contrary to the provision of the copyright
law s.
Do not shake or strike the camera
In addition to malfunctions and inability to
record images, this may render the “Memory
Stick” unusable or image data breakdown,
damage or loss may occur.
LCD screen, LCD finder (only models
with a LCD finder) and lens
•The LCD scre en an d th e LCD find er are
manufactured using extremely highprecision technology so over 99.99% of the
pixels are operational for effec tiv e use.
Howev er , there may be some tiny black
points and/or bright points (white, red, blue
or green in color) that constantly appear on
the LCD scree n an d th e LCD fin de r. These
points are normal in the manufacturing
process and do no t a f f ect th e re co rd ing in
any way .
•Be careful when placing the camera near a
window or outdoors. Exposing the LCD
screen, the finder or the lens to direct
sunlight for long periods may cause
malfunctions.
Do not get the camera wet
When taking pictures outdoors in the rain or
under similar conditions, be careful not to get
the camera wet. If moisture cond en s ation
occurs, see page 99 and follow the
instructions on how to remove it before us ing
the camera.
The auto zoom lens (for the DSC-P71
only)
This camera is equipped with an auto zoom lens.
Be careful not to bump the lens, and be careful
not to apply force to it.
On illustrati ons
Illustrations used in this manual are of the DSCP71 unless noted otherwise.
The pictures used in this manual
The photographs used as examples of pictures in
this manual are reproduced images, and are not
actual images shot using this camera.
Do not aim the camera at the sun or
other bright light
This may ca use irrecoverable damage to you r
eyes.
Back up recommendation
T o avoid the potential risk of data loss, always
copy (back up) data to a disk.

6
Table of contents
Before using yo u r cam era..................... ....5
Identifying the parts..................................8
Preparing batteries ..................................14
Charging the batteries.............................14
Inserting the batteries..............................17
Using an external power source..............19
Using your camera abroad......................19
Turning on/off your camera....................20
How to use the contr ol but to n............ ... ..20
Setting the date and time.........................21
Inserting and removing a
“Memory Stick” .............................23
Deciding the still image size and quality 24
Basic still image shooting (using auto
adjustment mode)...........................26
Checking the last shot image (Quick
Review) ..........................................27
Using the zoom feature.......................28
Shooting close-ups (Macro)
(DSC-P71 onl y)................. .. ... ........28
Using the self-timer............................29
Selecting a flash mode........................30
Shooting with the finder.....................32
Shooting wi th th e date and time
inserted...........................................32
Shooting according to scene conditions
(SCENE SELECTION) ................. 34
Viewing images on the LCD screen of your
camera............................................ 36
Viewing single images....................... 36
Viewing Index
(nine- or triple- image display) ...... 37
Viewing images on a TV screen.............38
Deleting image s...................... ................39
Deleting on the Index (nine-image)
screen .............................................40
Deleting on the Index (triple-image)
screen .............................................41
Formatting a “Memo ry Stick”................ 43
Copying still images to your computer...44
1 Installing the USB driver ..................45
2 Preparing your camera ......................46
3 Connecting your camera to your
computer ........................................47
4 Copying ima ge s ............ ... .................48
When a removable di sk icon is not
shown..............................................49
Copying images
(for Windows XP users) ................49
Image file storage destinations and file
names..............................................51
5 Viewing the images on your
computer.........................................53
For Macintosh users.................... ............54
Getting started
Shooting s till images
View in g still ima g e s
Deleting still images
Copy ing still im a g e s to your
computer

7
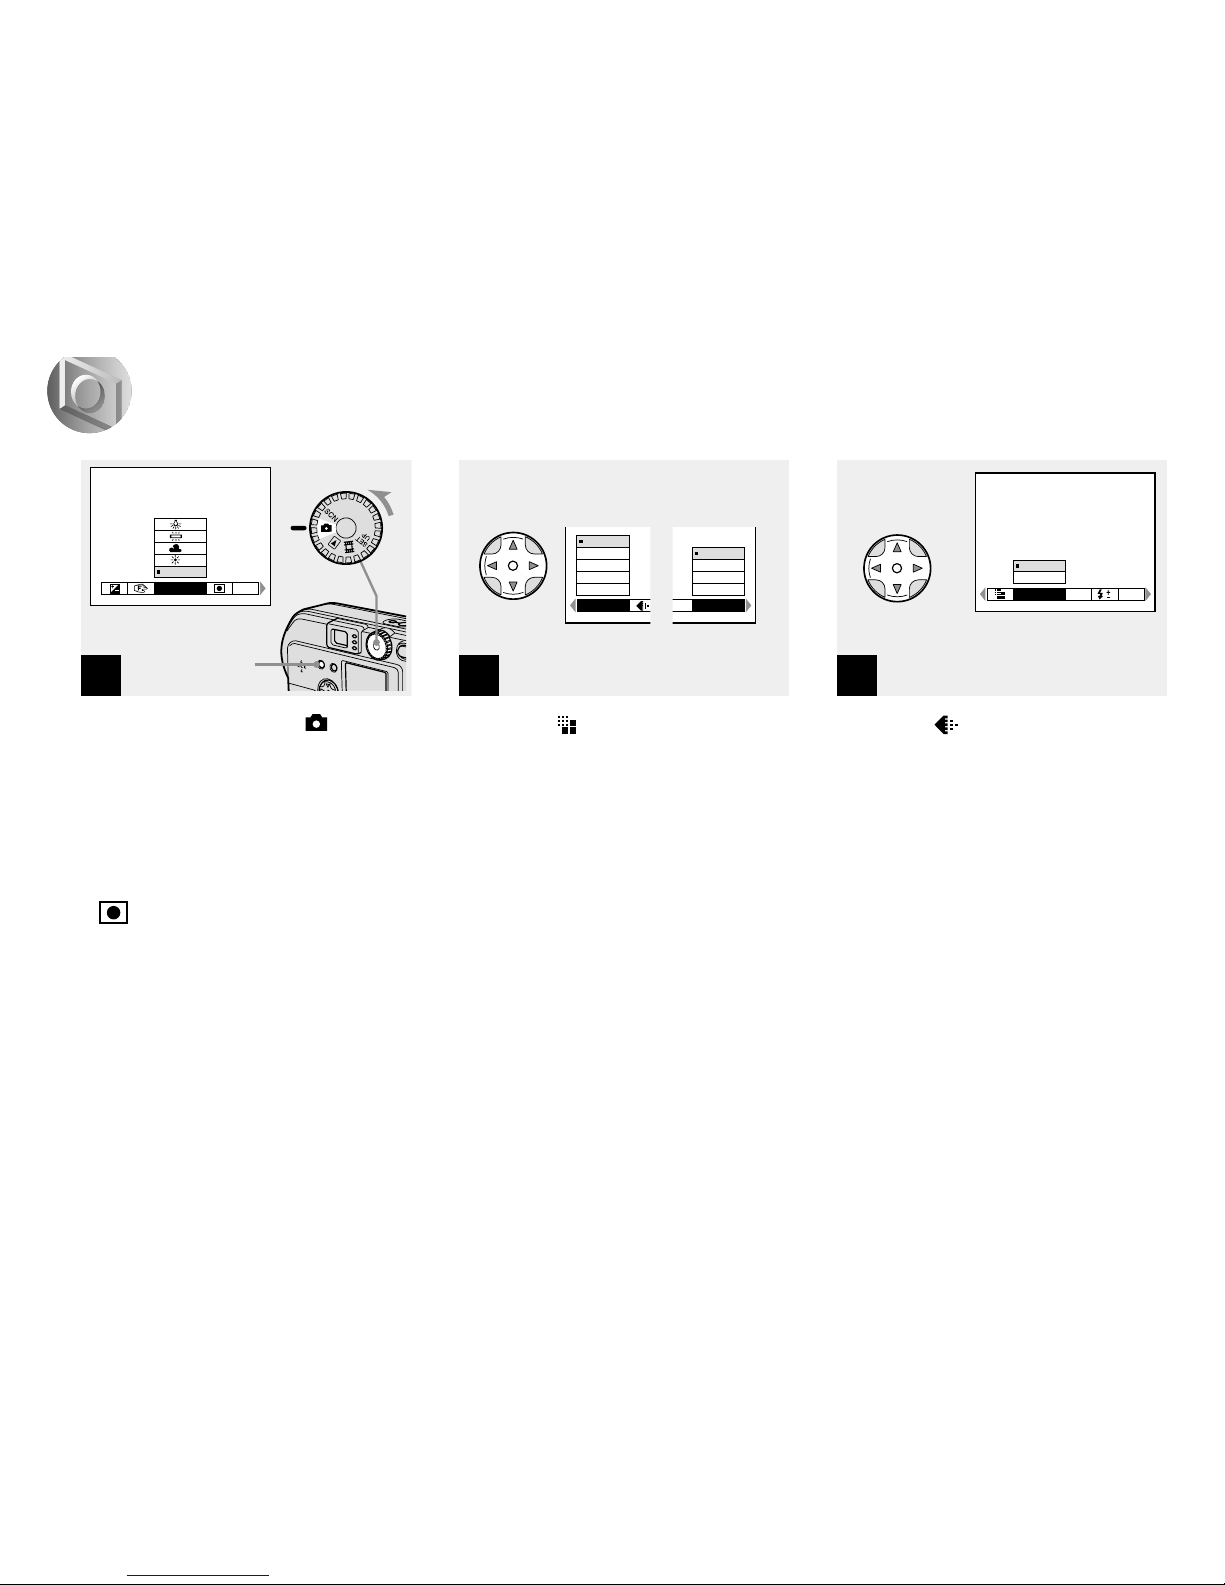
How to setup and operate your camera...55
Changing menu settings......................55
Changing items in the SET UP
screen..............................................55
Adjusting the exposure (EV adjust ment) 56
Adjusting color tones
(WHITE BALANCE).....................57
Choosing a focus method
(MULTI AF/CENTER AF)............58
Setting the distance to the subject
(Focus preset) .................................60
Adding special effects (P. EFFECT).......60
Spot light-metering....... .................. .........61
Shooting mult iple frames
(CLIP MOTION )............................62
Shooting in Multi Burst mode
(MULTI BURST)...........................64
Shooting still images for e-mail
(E-MAIL)........................................65
Enlarging a po rtion of a still image ........ 66
Enlarging an image – Playback zoom 66
Recording an enlarged image –
Trimming........................................67
Playing back successive images
(SLIDE SHOW).............................67
Rotating still images (ROTATE)............68
Protecting images (PROTECT)..............69
For single images....................... .........69
For Index (nine-image) screen............69
For Index (triple-image) screen.......... 70
Changing image size (RESIZE).............. 71
Choosing images to print (PRINT).........72
For single images....................... .........72
For index (nine-images) screen.......... 72
For index (triple-image) screen.......... 73
Shooting movies .....................................74
Viewing movies on the LCD screen.......75
Deleting movies....................... ... ... .........76
Deleting on the single screen..............76
Deleting on the Inde x (nine-image)
screen..............................................76
Deleting on the Inde x (triple-image)
screen..............................................77
Editing movies.........................................78
Cutting movies....................................78
Deleting unnecessary portions of a
movie ..............................................79
Copying movi es to you r comp u ter..........80
For Windows 98, 98SE, 2000, Me
users................................................80
For Windows XP user s.......... ... ..........80
For Macintosh users.................... ........81
Troubleshooting ......................................82
Warnings and messages ..........................89
Self-Diagnostics Display.........................90
The number of images that can be saved/
shooting time...................................91
Menu items........................ ... ... ................92
SET UP items................. ... ................. ... ..97
Precautions..............................................99
The “Memory Stick”.............................100
The nickel hydride batteries..................100
Specifications........................................101
The LCD screen ................ ... .................103
Index......................................................106
Before advanced operations
Adva n ced still image
shooting
Adva nced s till image viewin g
Still ima ge editt ing
Enjoying movies
Troubleshooting
Additional information
8
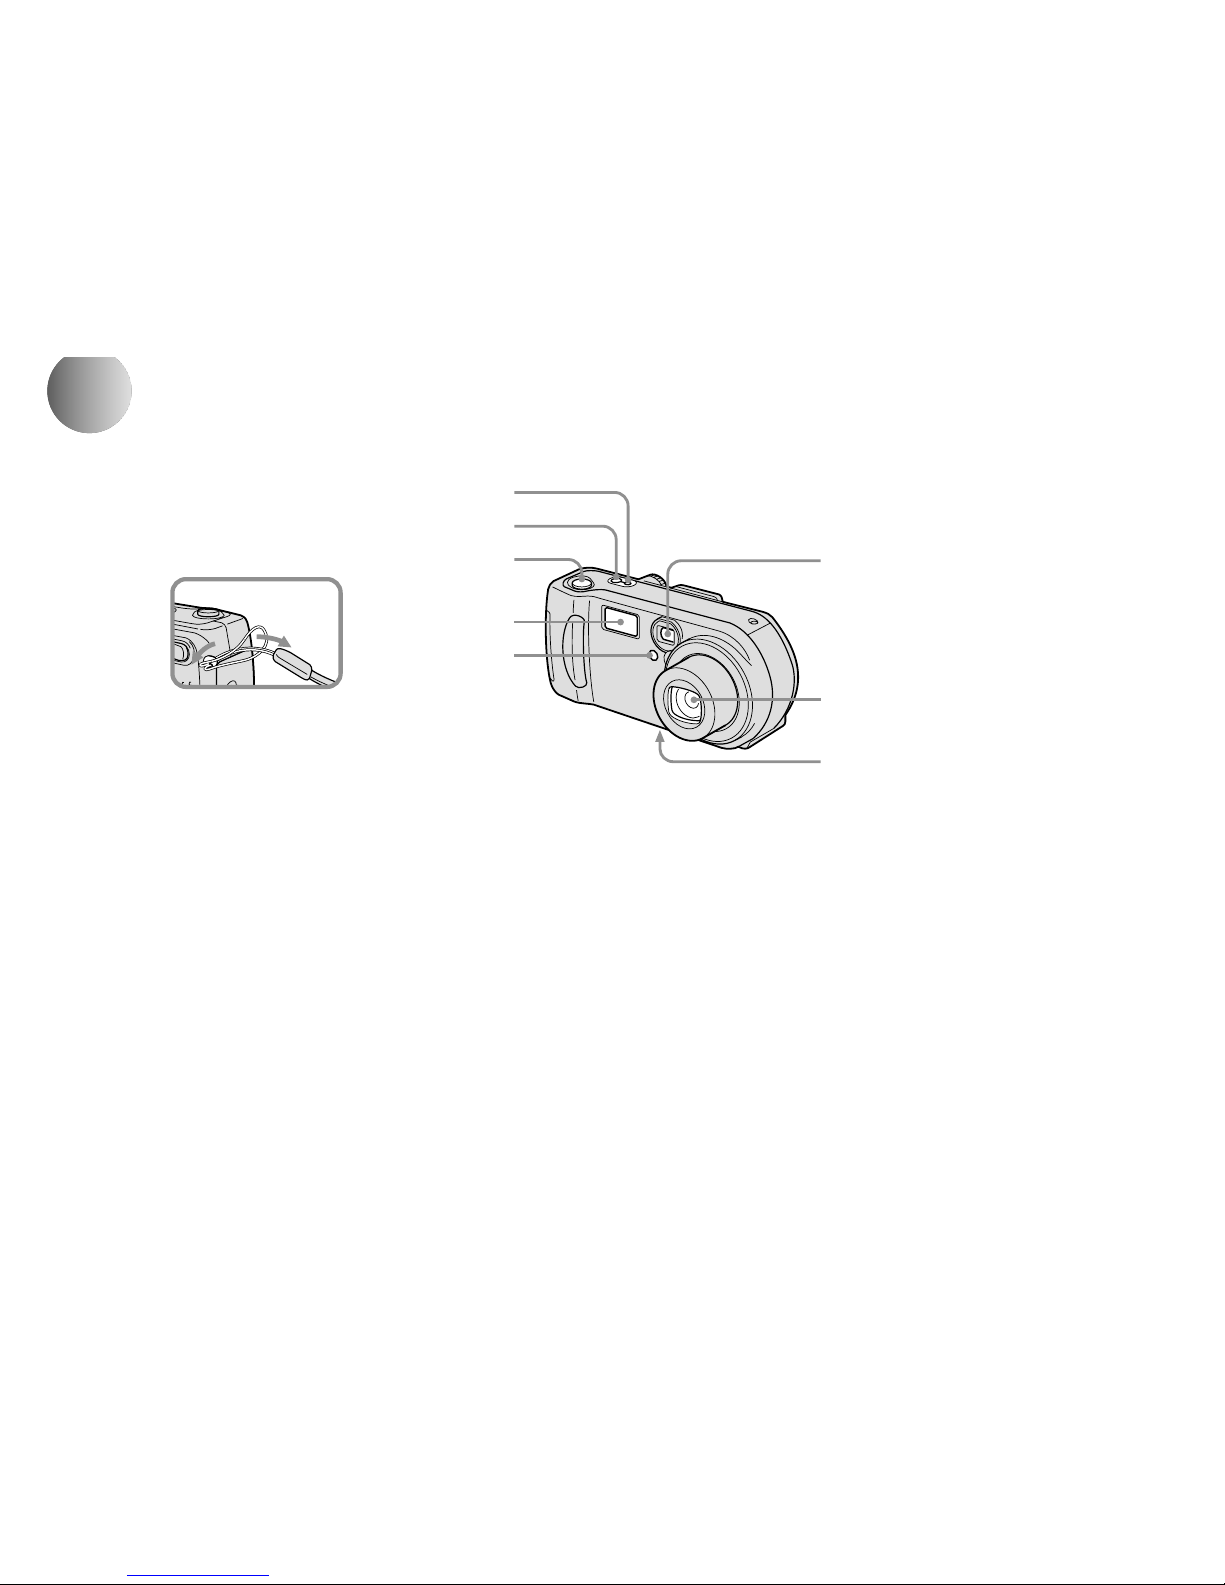
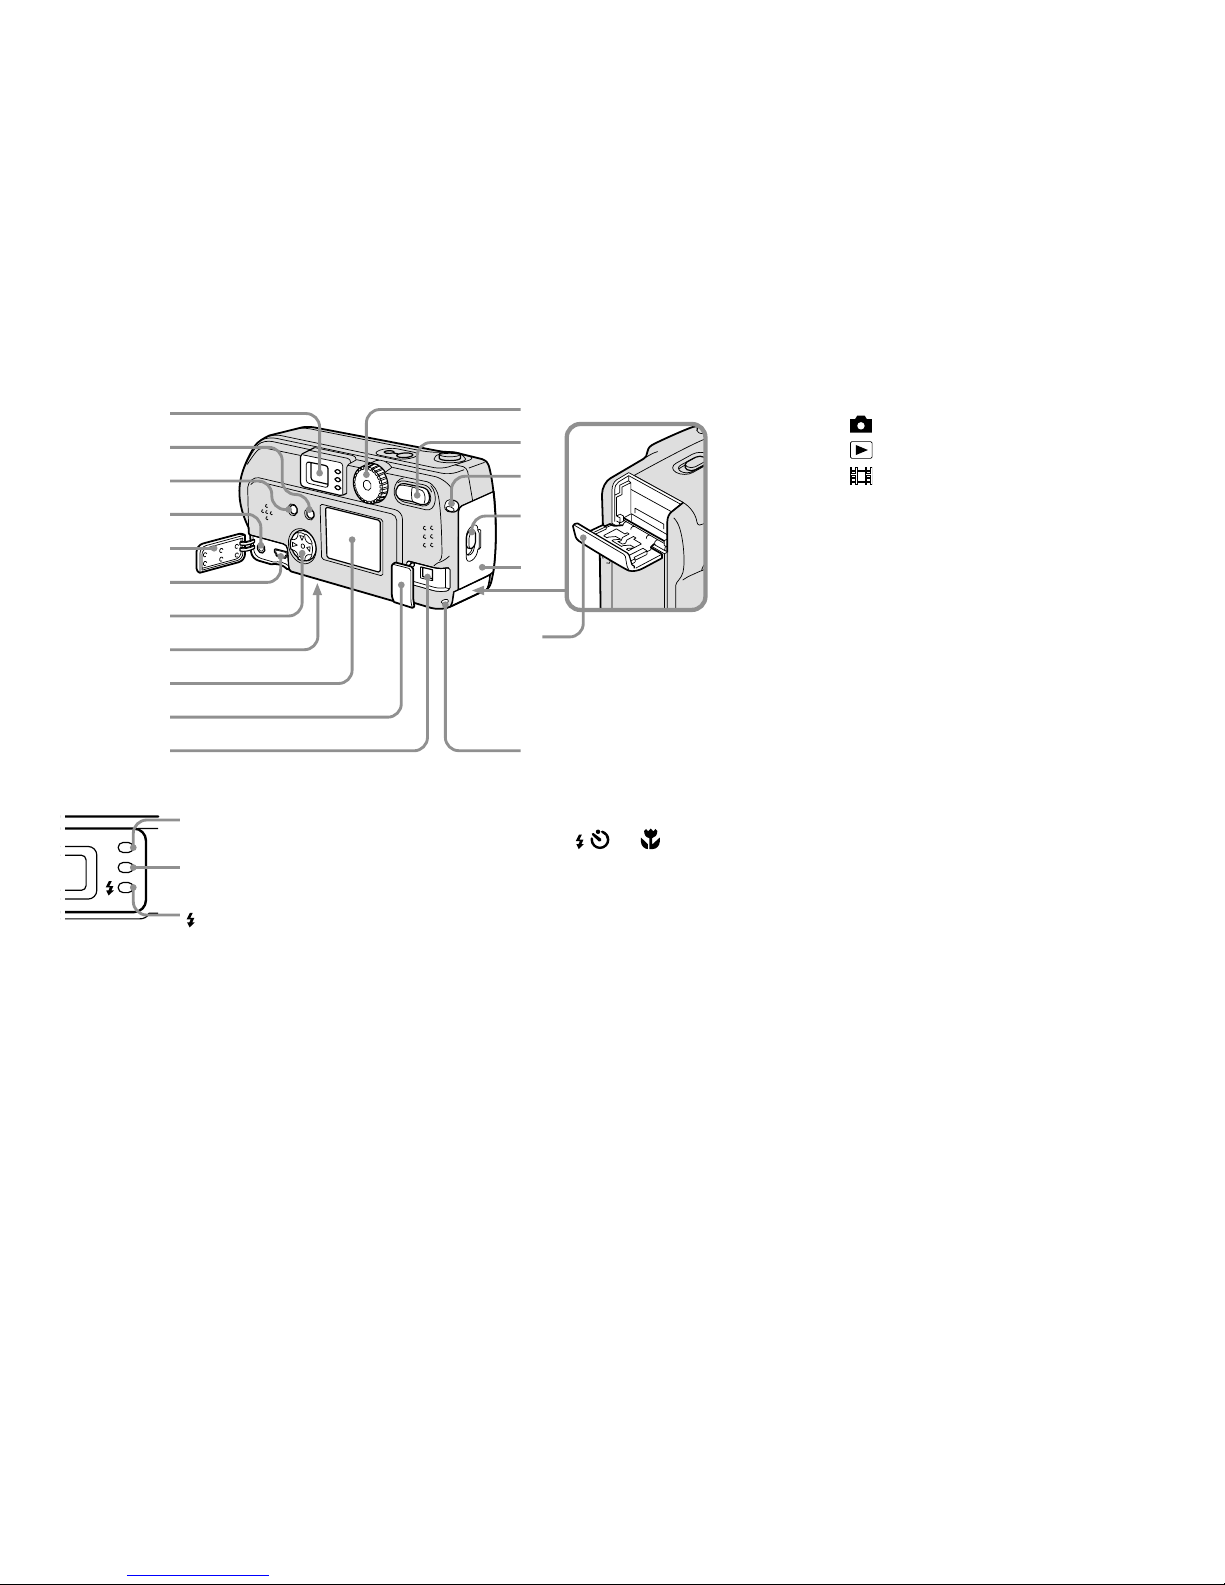
Identifying the parts (DSC-P71)
A POW ER O N /O FF lamp (20)
B POWER button (20)
C Shutter button (26)
D Flash (30)
E Self-timer lamp
(29)
/
AF illuminat or (31, 97)
F Finder window
G Lens
H Tripod receptacle (bottom
surface)
•
Use a tripod with a screw length of less than
5.5mm (7/32 inch). You will be unable to
firmly secure the camera to tripods having
longer screws, and may damage the camera.
6
7
8
1
2
3
4
5
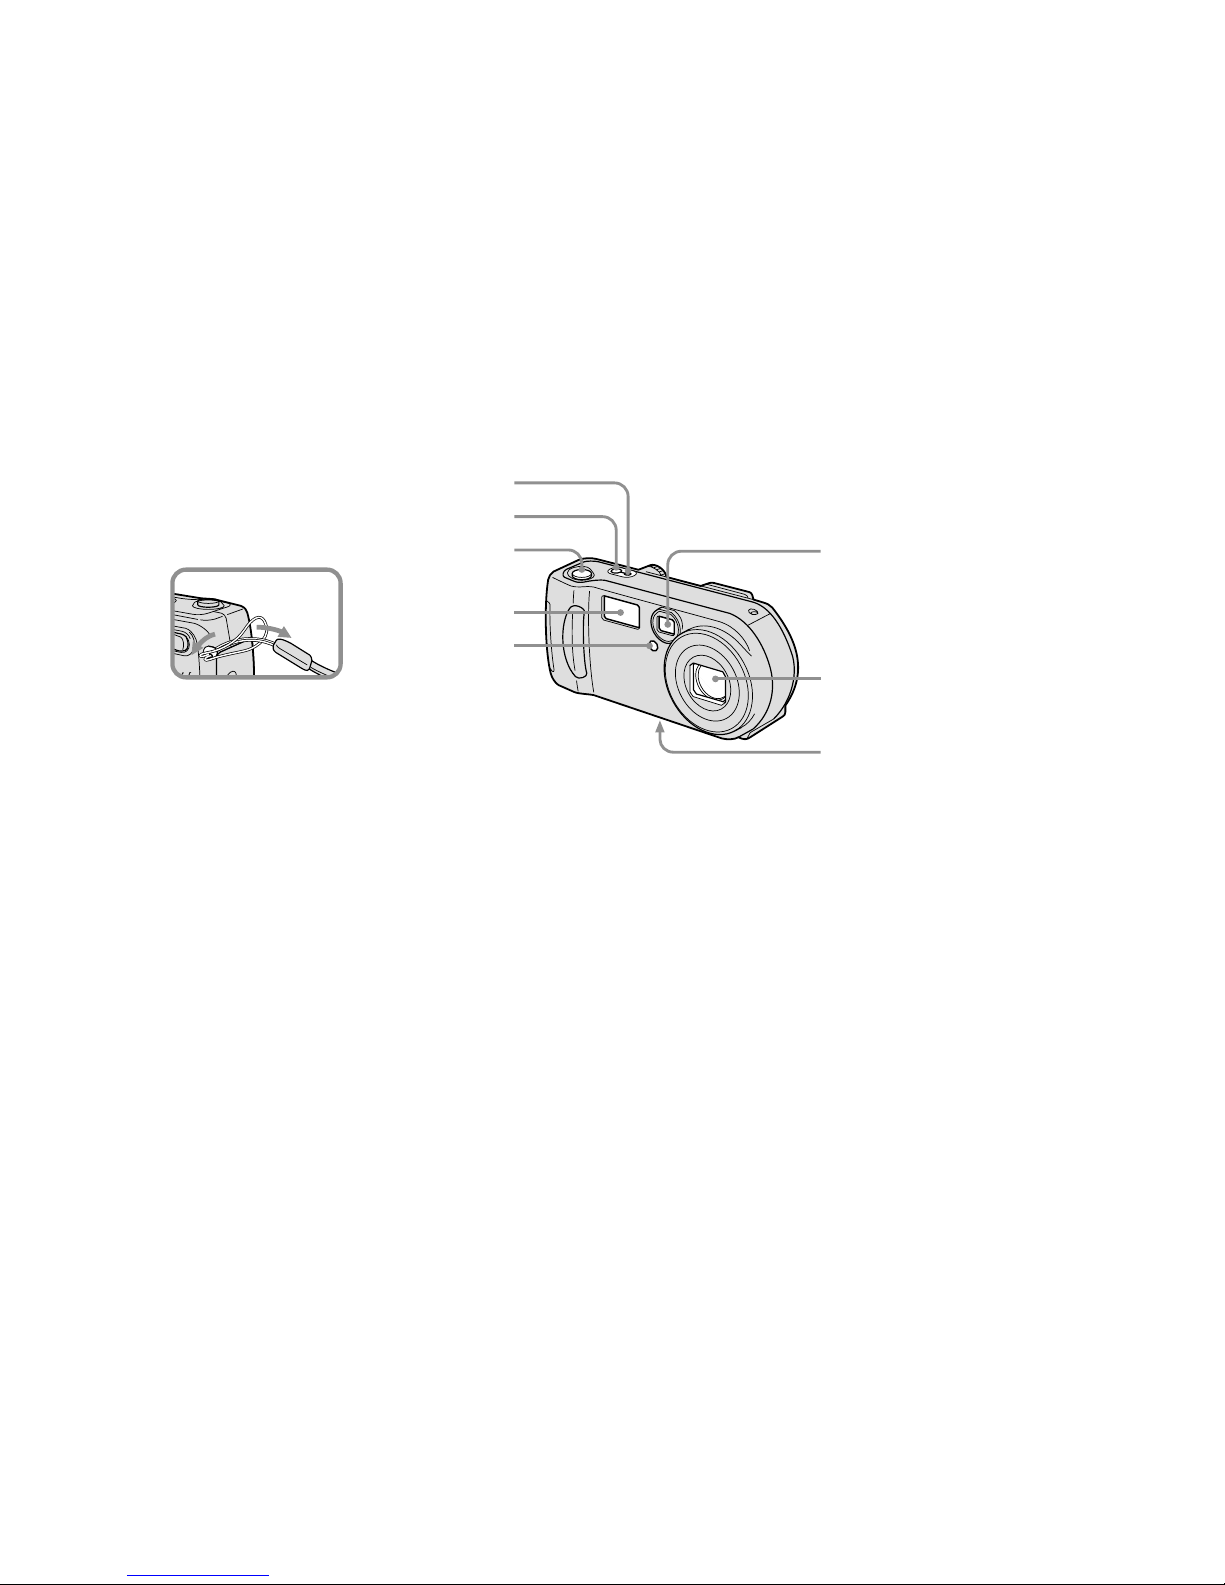
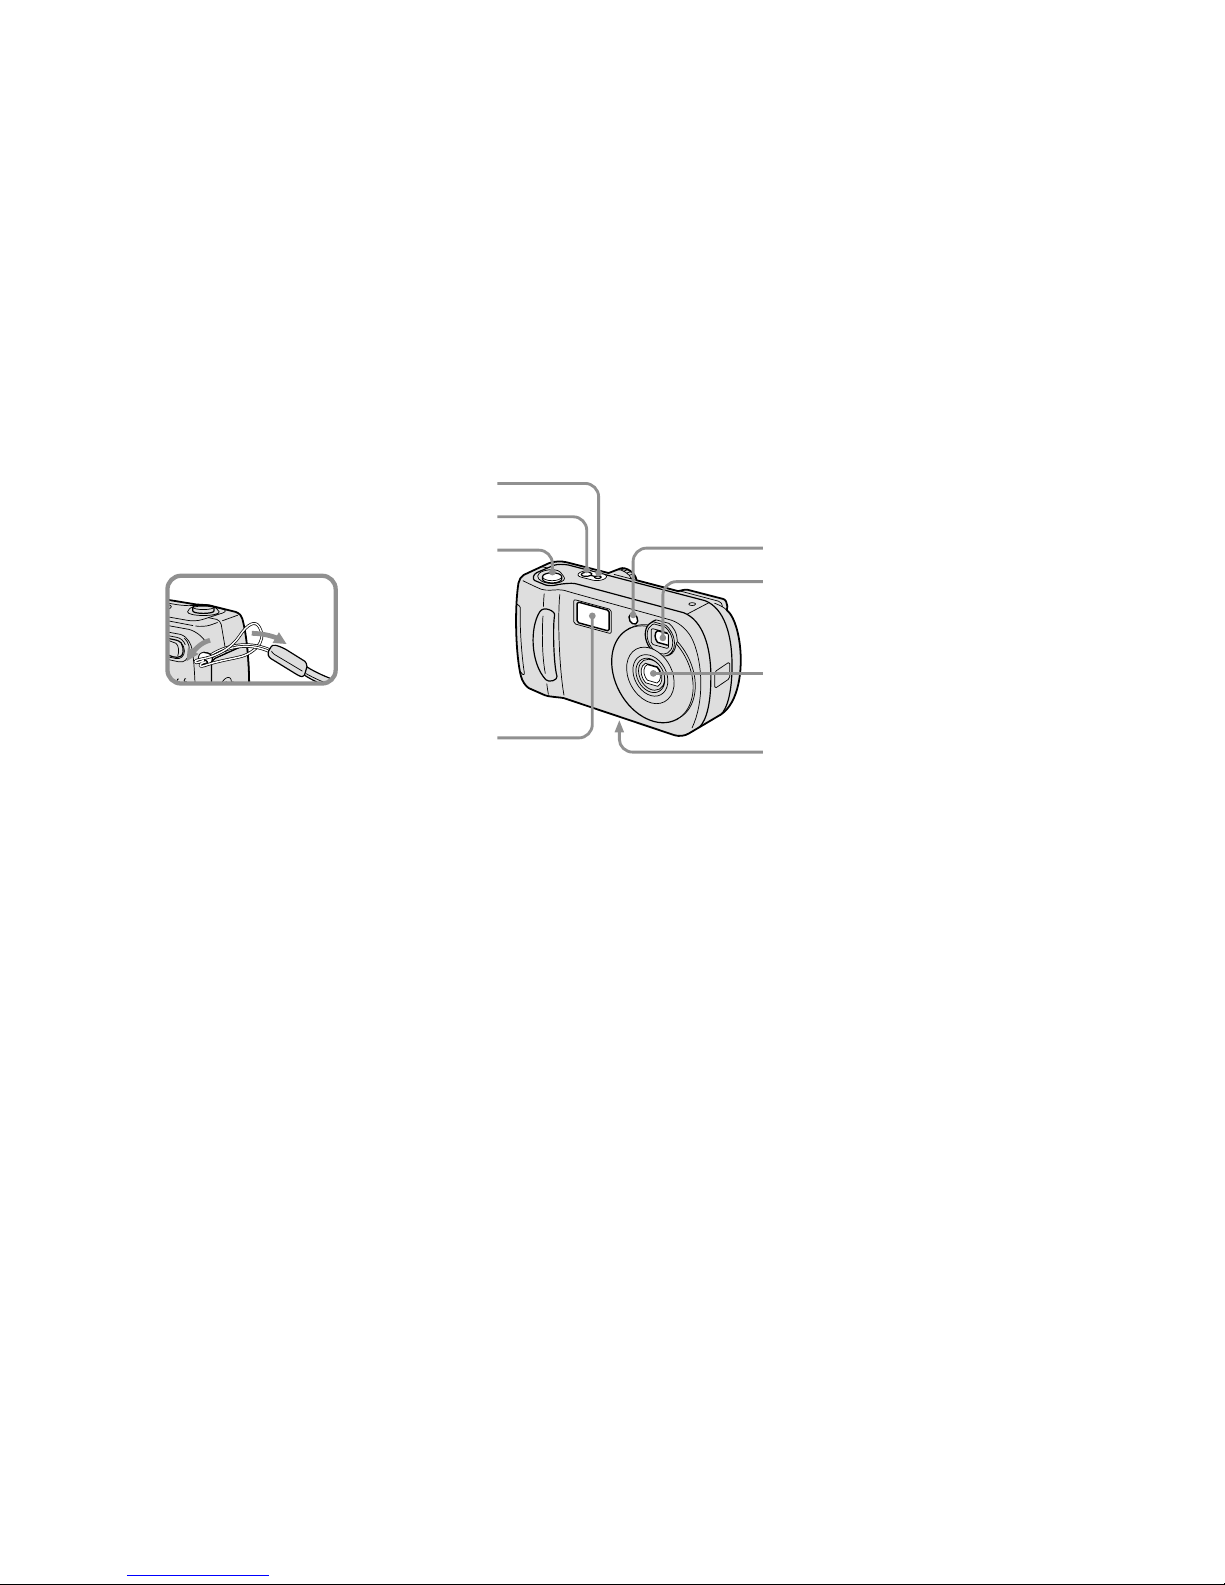
Attaching
the strap
9
A Finder
B DISPLAY/LCD ON/OFF button
(32)
C MENU button
(24)
D VIDEO OUT jack
(38)
E Jack cover
F USB jack (47)
G Control bu tt on
(Menu on) (v/V/b/B/z) (20)/
(Menu off) ( / /7/) (27, 29, 30)
H RESET button (bottom surface)
(82)
I LCD screen
J DC IN jack cover (19)
K DC IN jack (19)
L Mode dial (21)
: To shoot still images
: T o view or edit images
: T o shoot movies /C lip Motion
images/Mul t i B urst mode ima ges
SET UP: To set the SET UP items
SCN: To shoot in the SCENE
SELECTION mode
M Zoom button (for shooting)
(28)
/
Index button (for viewing) (37)
N Wrist strap hook
O Open lever
P Battery cover
Q “Memory Stick” cover
R Access lamp (23)
qh
qj
qg
q
k
qd
qf
q
s
1
2
3
4
5
6
7
8
9
q;
qa
Self-timer/recording
lamp (red)
AE/AF lock lamp
(green)
Flash charge lamp
(orange) (30)
10
Identifying the parts (continued) (DSC-P51)
A POW ER O N /O FF lamp (20)
B POWER button (20)
C Shutter button (26)
D Flash (30)
E Self-timer lamp
(29)
/
AF illuminat or
(31, 97)
F Finder window
G Lens
H Tripod receptacle (bottom
surface)
•
Use a tripod with a screw length of less than
5.5mm (7/32 inch). You will be unable to
firmly secure the camera to tripods having
longer screws, and may damage the camera.
6
7
8
1
2
3
4
5
Attaching
the strap

11
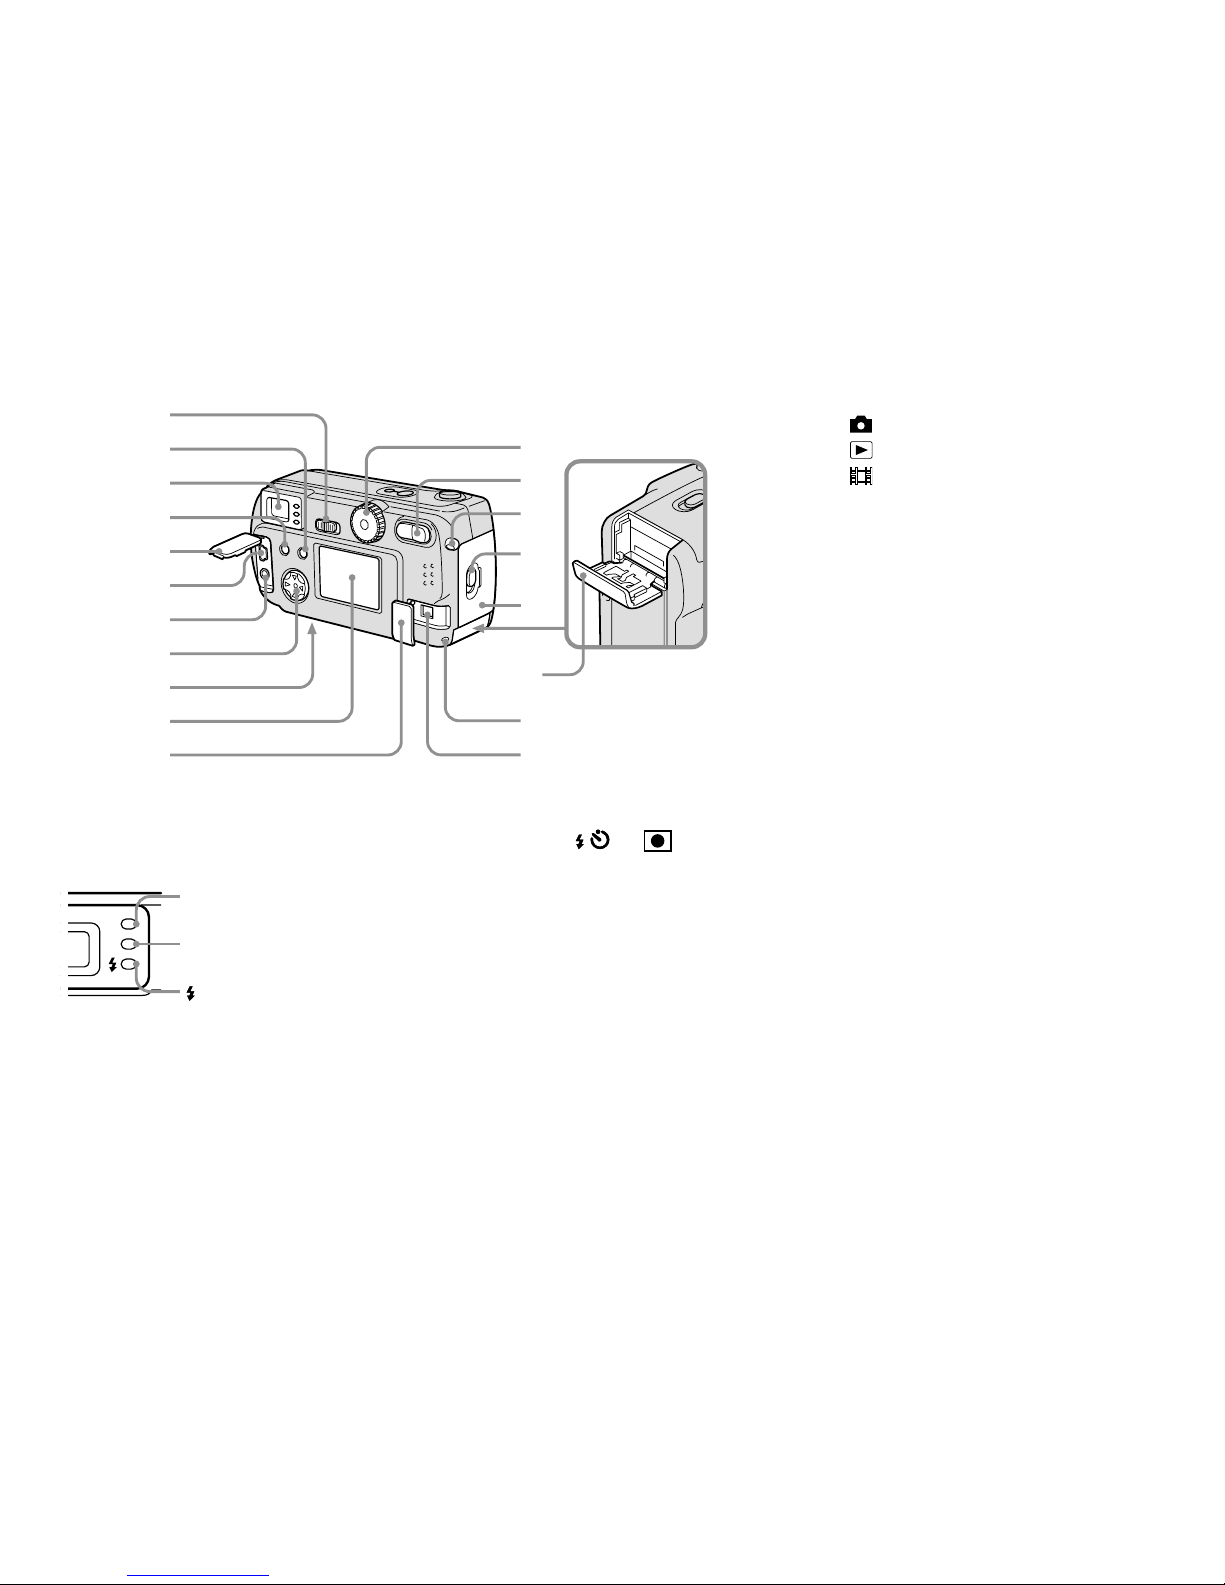
A POW ER SAVE switch
B DISPLAY/LCD ON/OFF button
(32)
C Finder
D MENU button
(24)
E VIDEO OUT jack (38)
F Jack cover
G USB jack (47)
H Control bu tt on
(Menu on) (v/V/b/B/z) (20)/
(Menu off) ( / /7/) (27, 29,
30, 61)
I RESET button (buttom surface)
(82)
J LCD screen
K DC IN jack cover (19)
L Mode dial (21)
: To shoot still images
: T o view or edit images
: T o shoot movies /C lip Motion
images/Mul t i B urst mode ima ges
SET UP: To set the SET UP items
SCN: To shoot in the SCENE
SELECTION mode
M Zoom button (for shooting)
(28)
/
Index button (for viewing) (37)
N Wrist strap hook
O Open lever
P Battery cover
Q “Memory Stick” cover
R Access lamp (23)
S DC IN jack (19)
qh
ql
qj
qg
qf
qk
qd
qs
2
1
3
4
5
6
7
8
9
q;
qa
Self-timer/recording
lamp (red)
AE/AF lock lamp
(green)
Flash charge lamp
(orange) (30)
12
Identifying the parts (continued) (DSC-P31)
A POW ER O N /O FF lamp (20)
B POWER button (20)
C Shutter button (26)
D Flash (30)
E Self-timer lamp
(29)
/
AF illuminat or
(31, 97)
F Finder window
G Lens
H Tripod receptacle (bottom
surface)
•
Use a tripod with a screw length of less than
5.5mm (7/32 inch). You will be unable to
firmly secure the camera to tripods having
longer screws, and may damage the camera.
5
6
7
8
1
2
3
4
Attaching
the strap
13
A POW ER SAVE switch
B DISPLAY/LCD ON/OFF button
(32)
C Finder
D MENU button
(24)
E Jack cover
F USB jack (47)
G VIDEO OUT jack (38)
H Control bu tt on
(Menu on) (v/V/b/B/z) (20)/
(Menu off) ( / /7/) (27, 29,
30, 61)
I RESET button (buttom surface)
(82)
J LCD screen
K DC IN jack cover (19)
L Mode dial (21)
: To shoot still images
: T o view or edit images
: T o shoot movies /C lip Motion
images/Mul t i B urst mode ima ges
SET UP: To set the SET UP items
SCN: To shoot in the SCENE
SELECTION mode
M Zoom button (for shooting)
(28)
/
Index button (for viewing) (37)
N Wrist strap hook
O Open lever
P Battery cover
Q “Memory Stick” cover
R Access lamp (23)
S DC IN jack (19)
qh
ql
qj
qg
qf
qk
qd
qs
2
1
3
4
5
6
7
8
9
q;
qa
Self-timer/recording
lamp (red)
AE/AF lock lamp
(green)
Flash charge lamp
(orange) (30)
14
Preparing batteries
Use the followi n g batteries in this camera.
Acceptable batteries
R6 (size AA) Nickel-Metal Hydride
batteries (2)
–
NH-AA-DI (2) (supplied)
–
NH-AA-2DI twin-pack (recommended, not
supplied)
Batteries that cannot be used
Manganese batteries, lith iu m bat teries, nicad batterie s, alk a li ne batteries (cann ot be
used with the DSC-P71)
*
Use of AA alkaline batteries may result in
shorter than desired operating time. (only in the
DSC-P51/P31)
When alkaline batteries are used, take note of
the following information.
•
Turn POWER SAVE to ON, shut the LCD
screen off, and use the Finder to shoot your
images. This will lengthen battery life
(page 16).
•
There is a big difference in the performance
of batteries of different types and of batteries
made by different manufacturers. This is
especially true in low temperatures, where
some batteries are noticeably weaker.
You may not be able to shoot in temperatures
below +5°C (41°F).
•
The battery remaining indicator may not
display the correct information.
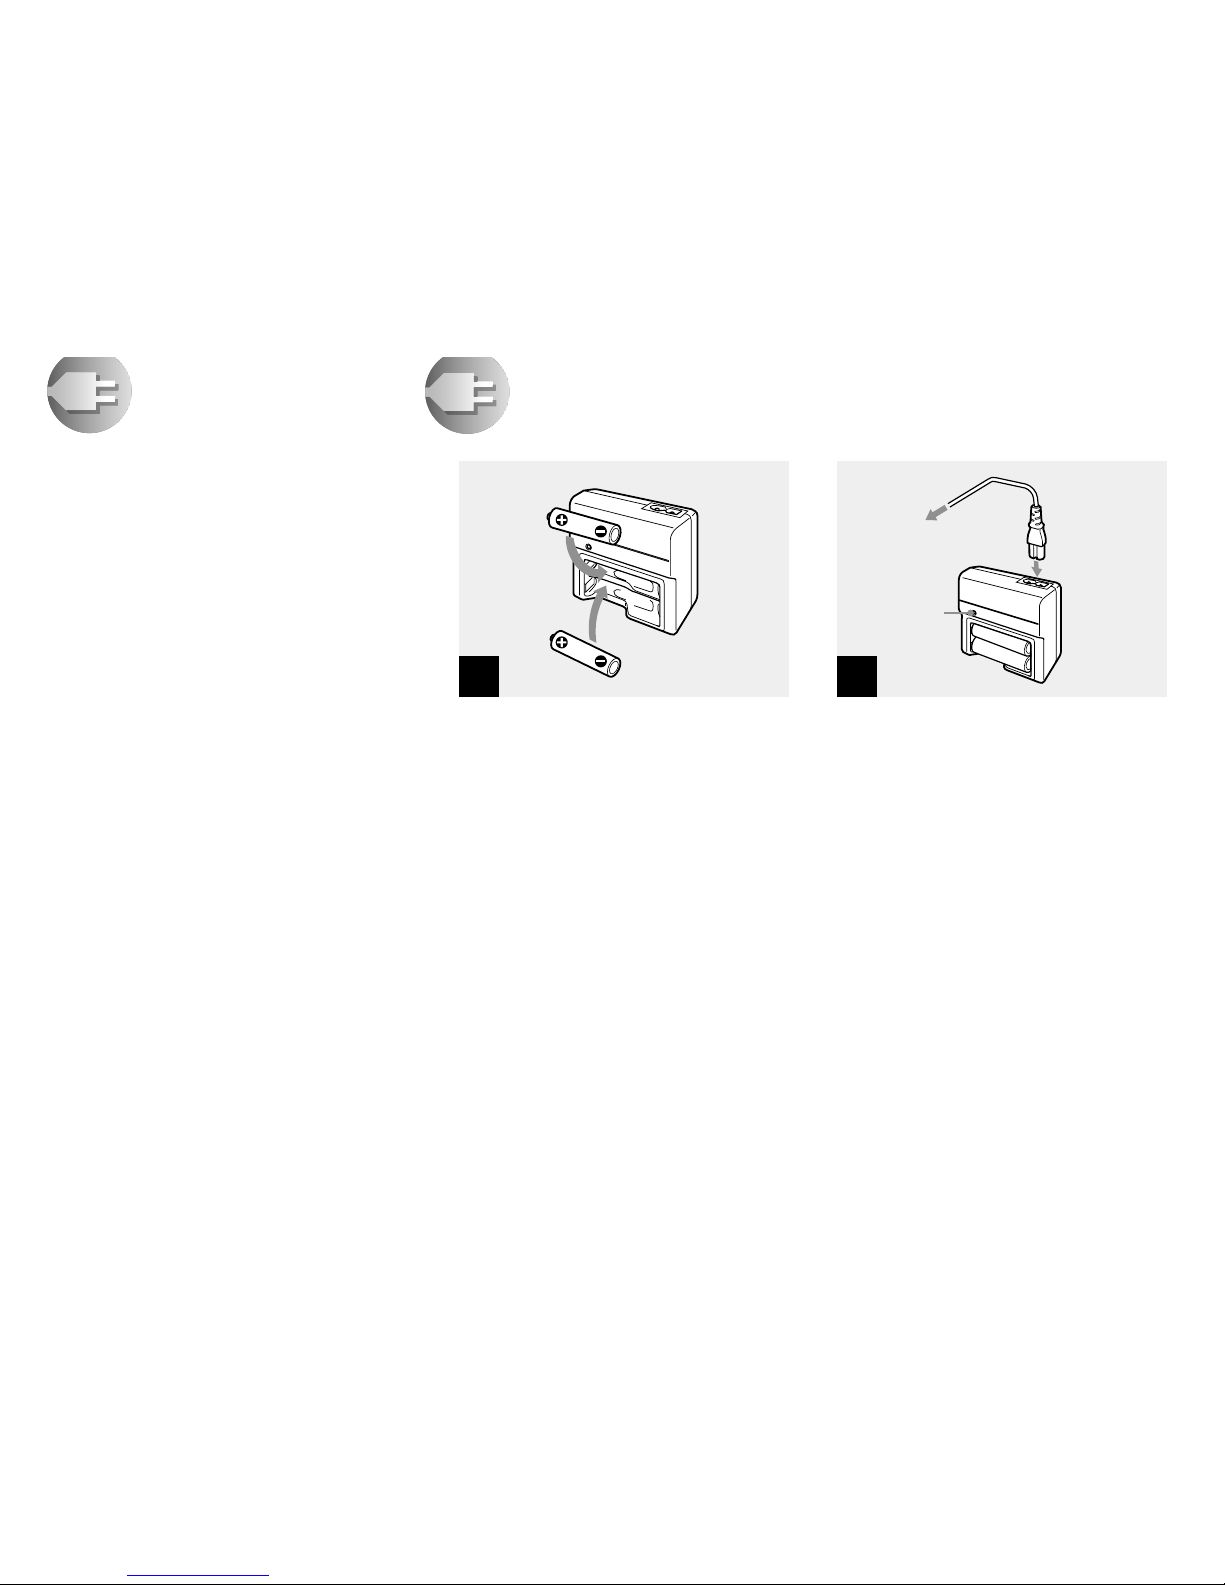
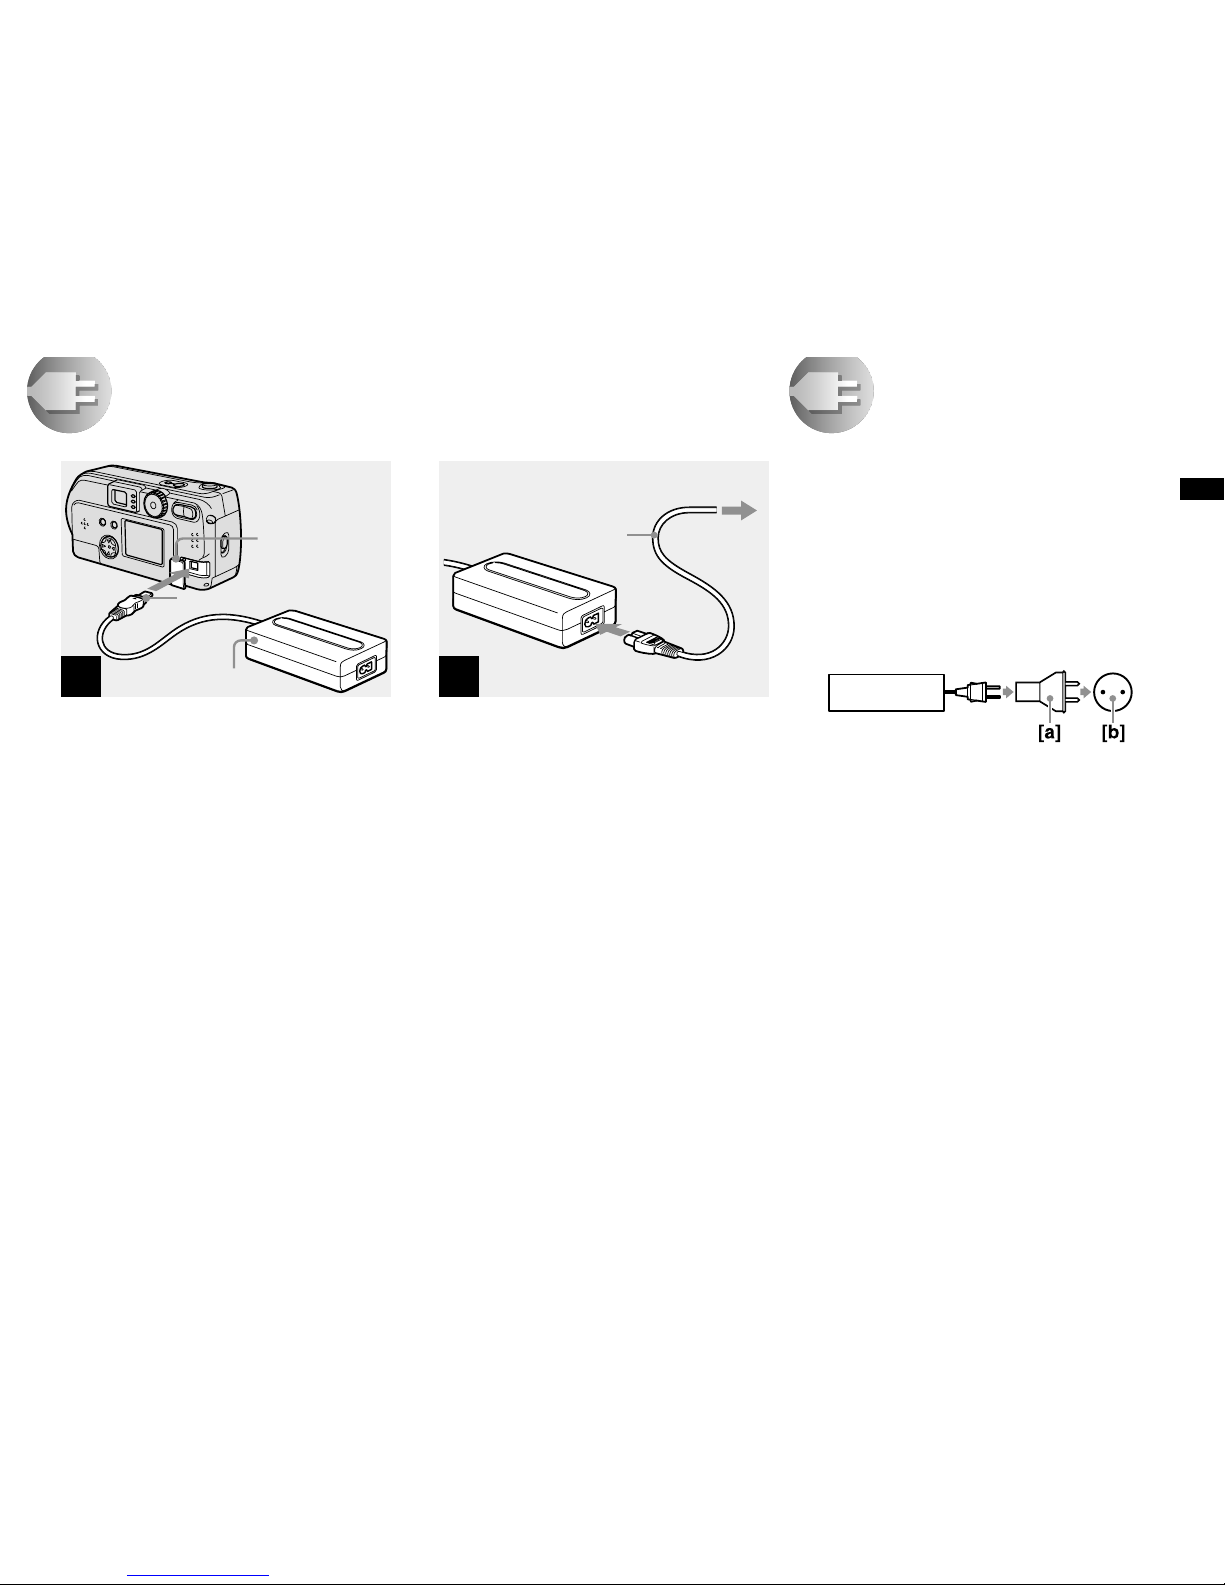
Charging the batteries
,
Insert Nickel-Metal Hydride
batteries into th e charger
(supplied).
•
Be sure to charge the Nickel-Metal Hydride
batteries supplied with your camera before
using them.
•
Be sure to charge the batteries in an
environment where the ambient temperature is
10°C to 30°C (50°F to 86°F). If the batteries are
charged in an environment where the
temperature is outside that range, the batteries
may not charge efficiently.
•
Connect the battery charger to an easily
accessible wall outlet (mains) close by. If
something goes wrong while you are using the
charger, immediately shut off the power by
pulling the plug out of the wall outlet.
1
BC-CS1 (supplied)
Insert with the correct polarity +/
−
,
Connect the charger to a wall
outlet (mains) using the power
cord (mains lead).
Charging starts, and the charge lamp lights.
When the charge lamp goes out, charging is
finished.
•
When charging is finished, disconnect the
power cord (mains lead) from the wall outlet
(mains), and remove the Nickel-Metal Hydride
batteries from the charger.
•
When transporting the Nickel-Metal Hydride
batteries, be sure to use the battery case
(supplied). If the +/− metal terminals are
shorted, there is a possibility of danger from
excessive heat or fir e.
2
To the wall outlet
(mains)
Power cord
(mains lead)
Charge
lamp
Getting started

15
Getting started
Charging the Nickel-Metal
Hydride batteries
• If the poles of the Nickel-Metal Hydride
batteries are dirty, the batteries may not
charge properly. Occasionally clean the poles
of the batteries and the terminals of the
charger by wiping them with a dry cloth.
• At the time of purchas e , or when the Nickel-
Metal Hydride batteries haven’t been us ed f or
a long time, they may not fully charge. This is
typical of this type of battery, and is not a
malfunction. If this happens, repeatedly using
up the battery fully, and then recharging it,
should correct the problem.
• Even when Nickel-Metal Hydride batteries
are not being used they loose their charge
naturally over time. It is recommended that
you recharge the batteries just before using
them.
• If you recharge Nickel-Metal Hydride
batteries before fully using up the existing
charge, the so-called memory effect* can
occur, and the low battery warning will be
triggered sooner than expected. Charging the
battery after fully depleting the existing
charge should correct the problem.
* The “memory effect” – the situation in
which a battery temporarily accepts a less
than full charge.
• To use up the batteries completely, put
the camera in the slide show mode and
leave it that way until the batteries are
used up (page 67).
Precautions to be observed
when charging the batteries
• Do not charge any other batteries except Sony
Nickel-Metal Hydride batteries i n t he charger
supplied with your camera. If you try to
charge any other type of battery (e.g.,
manganese batteries, alkaline dry cells, or
one-time lithium batteries) than the batteries
specified, those batteries may leak, overheat ,
or explode, causing the danger of burns or
other injuries.
• Be sure to charge both Nickel-Metal Hydride
batteries at the same time.
• When the batteries are charged, use them only
in an environment where the temperature
range is 0°C to 40°C (32°F to 104°F).
Otherwise, there is a danger of leaks,
explosions, excessive heat, fire, or electric
shock.
• Do not charge fully charged Nickel Metal
Hydride batteries again. Otherwise, there is a
danger of leaks, explosions, excessive heat,
fire, or electric shock.
• Do not peel off the external seals or damage
the batteries. Never use batteries from which
the seals have been partially or completely
removed, or batteries that have been split in
any way .
Charging time
This represents the time required to charge
fully depleted Nickel-Metal Hydride
batteries using the supplied BC-CS1
charger in an environment where the
ambient tem p er at ur e is 25°C (77°F).
• Charging is complete in approxi ma te ly 13
hours. The charge lamp may remain lit longer
than 13 hours, but this is not a malfunction.
• If you use the ACC-CSNQ STAMIN A “Super
Quick charge” kit (not supplied), the batteries
will charge faster .
Nickel-Metal
Hydride battery
Charging time
NH-AA-DI × 2
(supplied)
Approx. 1 3
hours
16
Charging the Nickel-Metal hydride batteries (continued)
Battery remaining indicator
As the batter y po w er de cr eases with use,
the Battery remaining indicator displays
the amount of powe r remaining using the
following symbols.
•
If the LCD screen is off, press the DISPLAY/
LCD ON/OFF button to turn it on.
•
Based on the conditions under which the
camera is being used and the state of the
charge, or on the environment, this
information may not be correctly indicated.
•
When the AC adaptor is being used, the
Remaining battery information is not
displayed.
The POWER SAVE function
When the POWER SAVE function is set
to ON, you can shoot for a longer period of
time.
DSC-P71
Turn the Mode dial to SET UP, and set
[POWER SAVE] in SETUP 2 to [ON].
The factory setting of the camer a is set to
[ON] (page 98).
DSC-P51/P31
Set the POWER SAVE switch to ON.
When the camer a is s hi p ped from the
factory, this switch is set to ON.
When the POWER SAVE function is
ON
•
The LCD screen will be darker than it is when
POWER SAVE is set to OFF. You cannot
change the settings for [LCD BACKLIGHT]
at this time (page 98). To make the available
shooting time even longer, it is recommended
that you turn off the LCD screen and use the
Finder to do your shooting (page 32).
•
In Flash mode, the (No flash) is displayed.
If you want to shoot using the flash, press v
( ) on the control button, and select (forced
flash) or Auto (page 30).
•
When the power turns on, the Flash mode is
normally set to (No flash).
•
When the flash is charging ( the Flash
charge lamp blinks), the LCD screen turns
off.
•
In shooting still images, the focus only
focuses when the shutter is pushed down
halfway.
Batte ry
remaining
indicator
Battery remaining
guidelines
(A full charge is 100%)
Suf f icient power
remaining
Battery h alf fu ll
Battery low, recording/
playback will stop soon.
Flashing
Change the batteries for
fully charged ones, or
charge these batteries.
17
Getting started
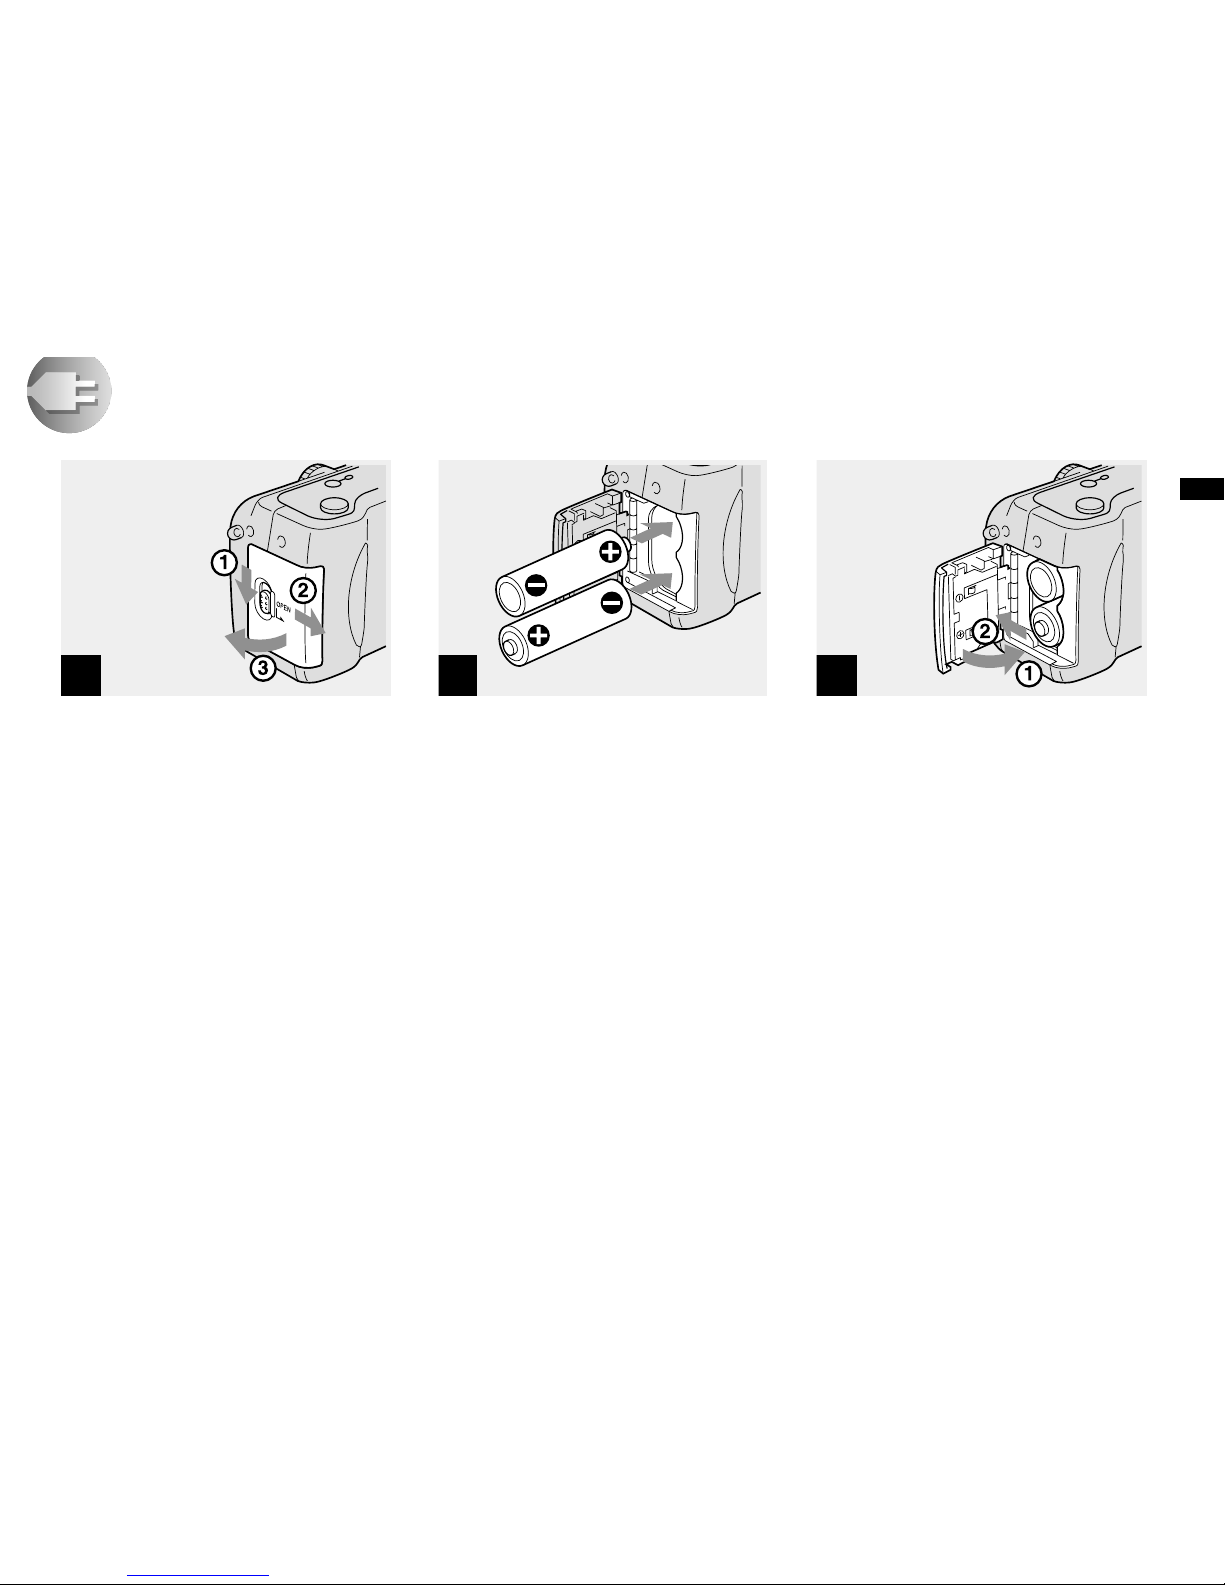
Inserting the batteries
, Open the Battery cover.
Slide it in the direction of the arrow, and it
opens out.
, Insert the batteries.
Match the
+/−
poles of the batteries to the
+
/
−
marks inside the battery case.
•
Occasionally clean the poles of the batteries
and the terminals of the Battery cover by
wiping them with a dry cloth. If the poles of the
batteries or the terminals become covered with
a film of dirt or oil from the skin, the operating
time of the camera can be greatly reduced.
, Close the Battery co v er .
Close the Battery cover while hol ding the
batteries in. The cover is closed when it
clicks.
To remove the batteries
Stand the camera on end, open the Battery
cover upward , then remove th e batteries.
•
Make sure you don’t drop the batteries when
opening or closing the Battery cover.
1 2 3
18
Inserting the batteries (continued)
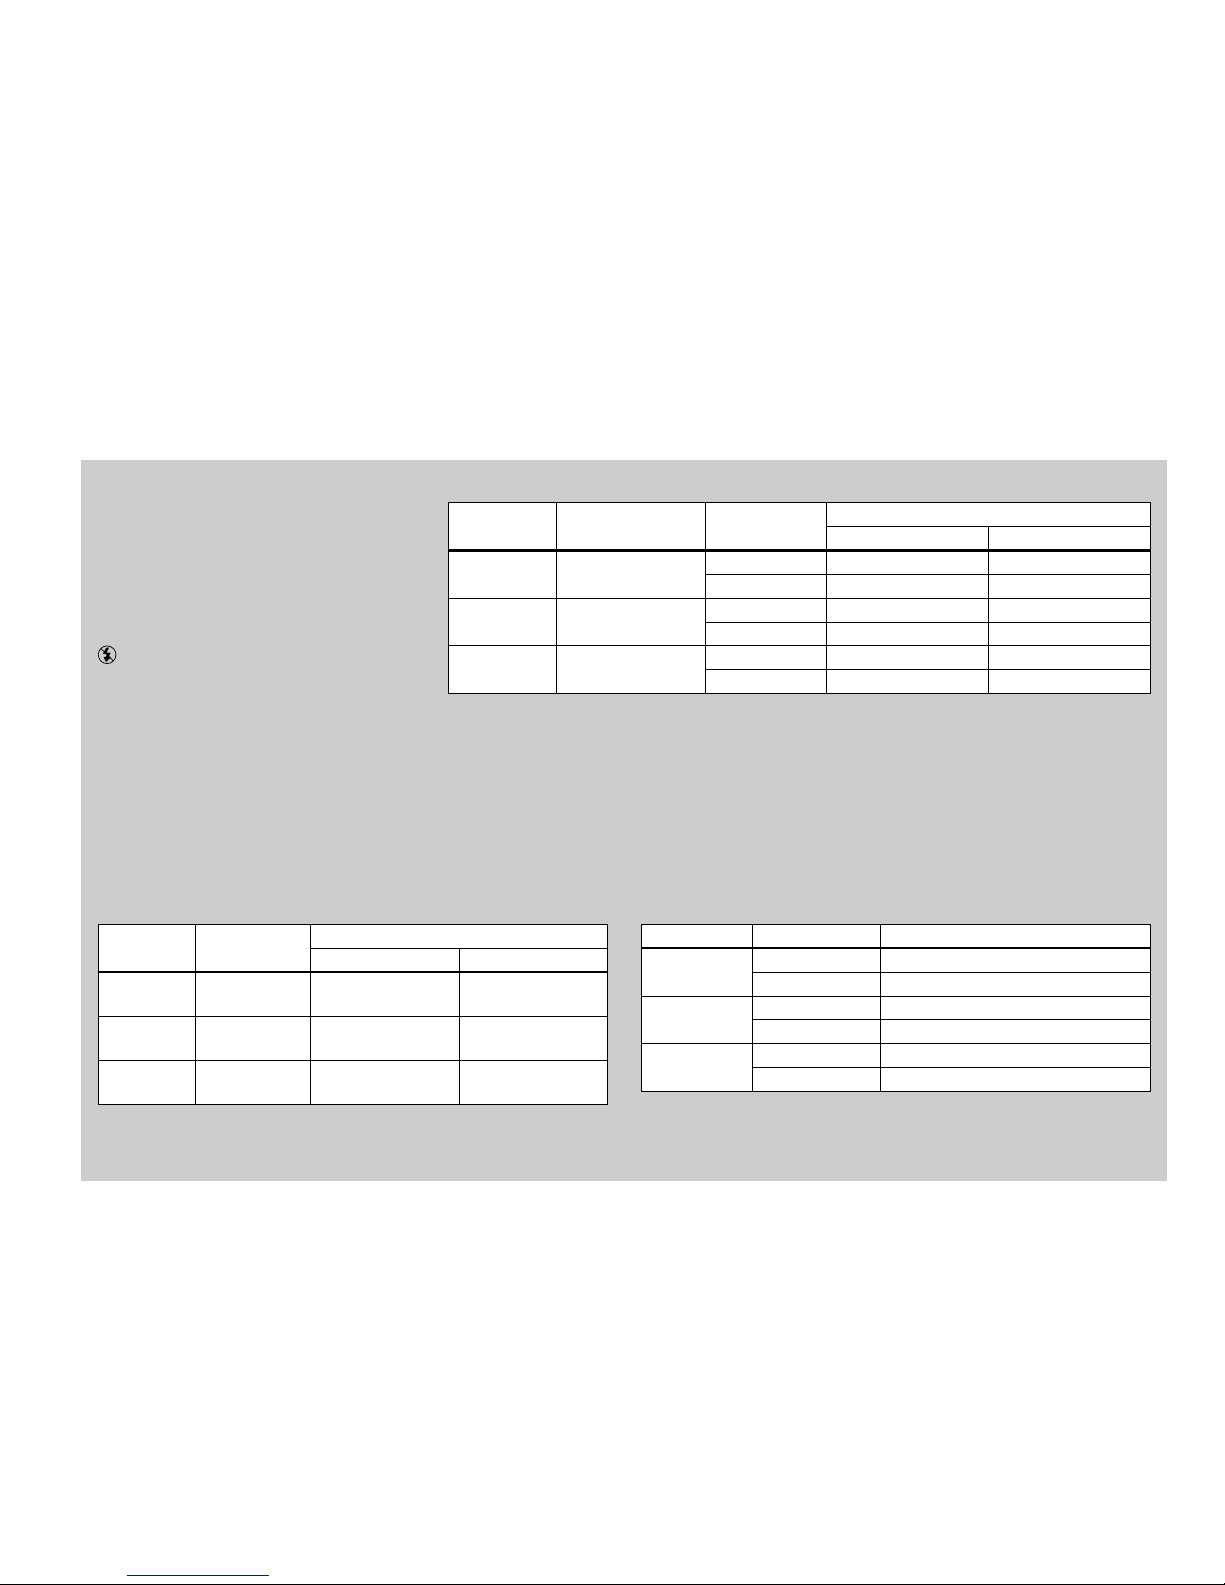
Battery life and the number of
images that can be recorded/
played back
The tables show approximate guidelin es
for the length of time the cam era can be
used when picture quality is set to
Standard, when you s hoot in Flash mode
, and when you shoot in Norm al mode
in an environment where the am bient
temperature is 25°C (77°F), and the
supplied Nicke l- M et al H ydr id e ba tteries
are fully charg ed . The guid elines for the
number of images that can be recorded or
played back allow for chang ing the
“Memory Stick” as necessary. Actu al
results may differ slightly from these,
depending on the con ditions of use.
Shooting* still images
*
Recording one image approximately every three seconds
Model Image size LCD
screen
R6
(size AA)
Ni-MH
(2) (supplied)
Batter y life (m in .) No. of images
DSC-P71
2048×1536
640×480
ON Approx. 100 Approx. 2000
OFF Approx. 120 Approx. 2400
DSC-P51
1600×1200
640×480
ON Approx. 150 Approx. 3000
OFF Approx. 180 Approx. 3600
DSC-P31
1600×1200
640×480
ON Approx. 120 Approx. 2400
OFF Approx. 150 Approx. 3000
Playing back** still images
**
With the LCD screen on, showing single images in order, one
approximately every three seconds
Model Image size
R6
(size AA)
Ni-MH
(2) (supplied)
Battery life (min .)
No. of images
DSC-P71
2048×1536
640×480
Approx. 230 Approx. 4600
DSC-P51
1600×1200
640×480
Approx. 280 Approx. 5600
DSC-P31
1600×1200
640×480
Approx. 280 Approx. 5600
Shooting*** movies images
***
Continuous recording with a picture size of 160×112
Model LCD
screen
R6
(size AA)
Ni-MH
(2) (supplied)
DSC-P71
ON Approx. 120
OFF Approx. 170
DSC-P51
ON Approx. 150
OFF Approx. 200
DSC-P31
ON Approx. 150
OFF Approx. 200
19
Getting started
Using an external power source
,
Open the DC IN jack cover,
then connect the AC-LS1 AC
power adaptor (not su pp lied)
to the DC IN jack of the cam era.
Connect the cabl e wi th th e v mark facing
up.
•
Connect the AC power adaptor to an easily
accessible wall outlet (mains) close by. If
something goes wrong while you are using the
adaptor, immediately shut off the power by
pulling the plug out of the wall outlet.
1
DC IN jack
cover
DC plug
AC power adaptor
(not supplied)
,
Connect the p ower cord (mains
lead) to the AC powe r adap tor
and to the wall outlet (ma ins).
•
When you have finished using the AC power
adaptor, disconnect it from the DC IN jack of
the camera.
•
To use po wer from an automobile, use a DC
adaptor/Charger (not supplied).
•
If you insert or remove the DC plug while you
are using the batteries, the power may shut off.
2
2 To the wall outlet (mains
)
Power cord
(mains lead)
1
Using your camera
abroad
Power sources
You can use your camera in any country or
area with th e supplied ba ttery cha rger or the
AC-LS1 AC power adaptor (not supplied)
within 100 V to 240 V AC, 50/60 Hz. Use a
commercia ll y av ailable AC plug ada pt o r
[a], if necessary, depending on the design of
the wall outlet (wall socket) [b].
• Do not use an electronic transformer.
Using this may cause a malfunction.
BC-CS1
20
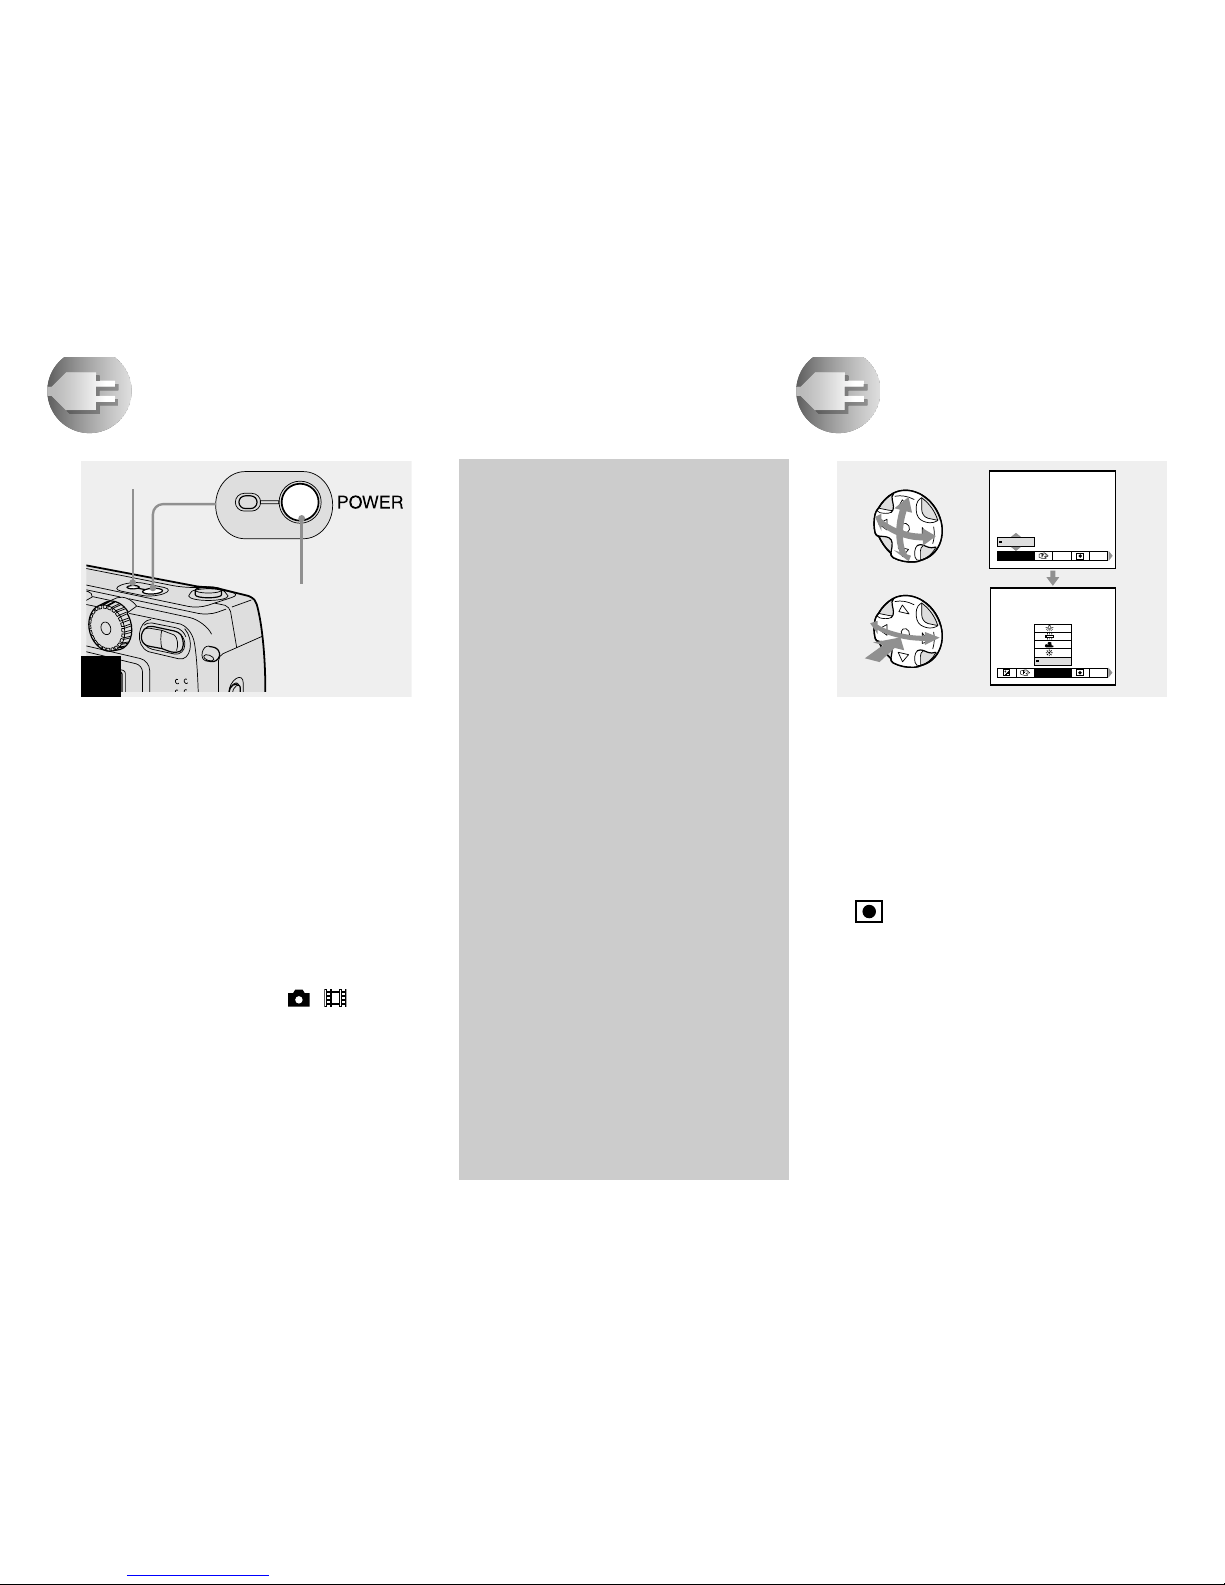
Turning on/off your camera
,
Press the POWER button.
The POWER ON/OFF lamp lights in green,
the power is on. When you turn on your
camera for the first time, the CLOCK SET
screen appears (see the next page).
To turn off the power
If you press the POWER button again, the
POWER ON/OFF lamp goes out, and the
camera turns off.
•
When the mode dial is set to , , SCN
and you turn the power on, the lens begins to
move (DSC-P71 only). Please be careful not to
touch the lens.
1
POWER button
POWER ON/
OFF lamp
The Auto Power Off
function
If no tasks are performed for a while*
when shooting, viewing, or performing
SET UP while using the batteries,
power is automatically shut off to
preserve battery power.
However, in the following
circumstances, even if the battery is
being used to pow er the camera, th e
Auto Power Off feature will not work.
• Movies are be in g play e d ba ck
• A slide show is being shown
• There is a plug in the USB terminal
or the VIDEO OUT jack
*
When POWER SAVE is set to ON:
approximately 90 seconds
When POWER SAVE is set to OFF:
approximately 3 minutes
How to use the
control button
To change the current settings of the
camera, bring up the menu or SET UP on
the LCD screen ( page 55), and use the
control button to make the changes.
For each item , p ress v/V/b/B to select the
desired value, then press the center z or
b/B to make the setting.
•
(SPOT METER) is not displayed on the
menu of the DSC-P51/P31 (page 61).
WHITE BAL
AUTO
ISO
WB
EV
ISO
0EV
0EV

21
Getting started
Setting the date and time
, Set the mode dial to .
• To change values for the time and the date that
have been previously set, change the mode dial
to SET UP, choose [CLOCK SET] in SETUP 1
(page 97), then proceed from Step 3.
• You can also carry out this operation when the
mode dial is set to SCN, , or .
, Press the POWER button.
The POWER la m p li gh ts in green and the
CLOCK SET screen appears.
, Choose the desired order for
the date, the month and the
year using v/V on the control
button, then push the center z.
You can choose from [Y/M/D] (year/
month/day), [M/D/Y], and [D/M/Y].
• If the rechargeable button battery, which
provides the power for saving the time data,
ever loses its charge (page 99), the CLOCK
SET screen automatically rea ppe ars . If this
happens, reset the date and time by following
the above procedure, starting from Step 3.
1
Mode dial
2
D/M/Y
OK
CANCEL
M/D/Y
Y/M/D
CLOCK SET
2002
/:
/
1
1
12 00
AM
OK
POWER button
3
D/M/Y
OK
CANCEL
M/D/Y
Y/M/D
CLOCK SET
2002
/:
/
1
1
12 00
AM
OK
22
Setting the date and time (continued)
, Choose the year, month, day,
hour, and minute items using
b/B.
A v will be shown above, and a V will be
shown below th e it em cu r r en tl y se le cted to
be set.
, Set the desired numerical
value using v/V on the control
button, then press the center
z.
After setting the current numerical value,
move to the next item. Repeat the ab ov e
process until all of the items have been set.
•
If you choose [D/M/Y] in Step 3, use the 24
hour clock display.
, Choose [OK] using the B on
the control button, and then
press the center z.
After the date and time are set, the clock
will start to keep time.
•
To cancel the setting process, choose
[CANCEL], and press the center z.
4
D/M/Y
OK
CANCEL
M/D/Y
Y/M/D
CLOCK SET
2002
/:
/
1
1
12 00
AM
OK
5
D/M/Y
OK
CANCEL
M/D/Y
Y/M/D
CLOCK SET
2002
/:
/
1
7
12 00
AM
OK
D/M/Y
OK
CANCEL
M/D/Y
Y/M/D
CLOCK SET
2002
/:
/
4
7
10 30
PM
OK
6
23
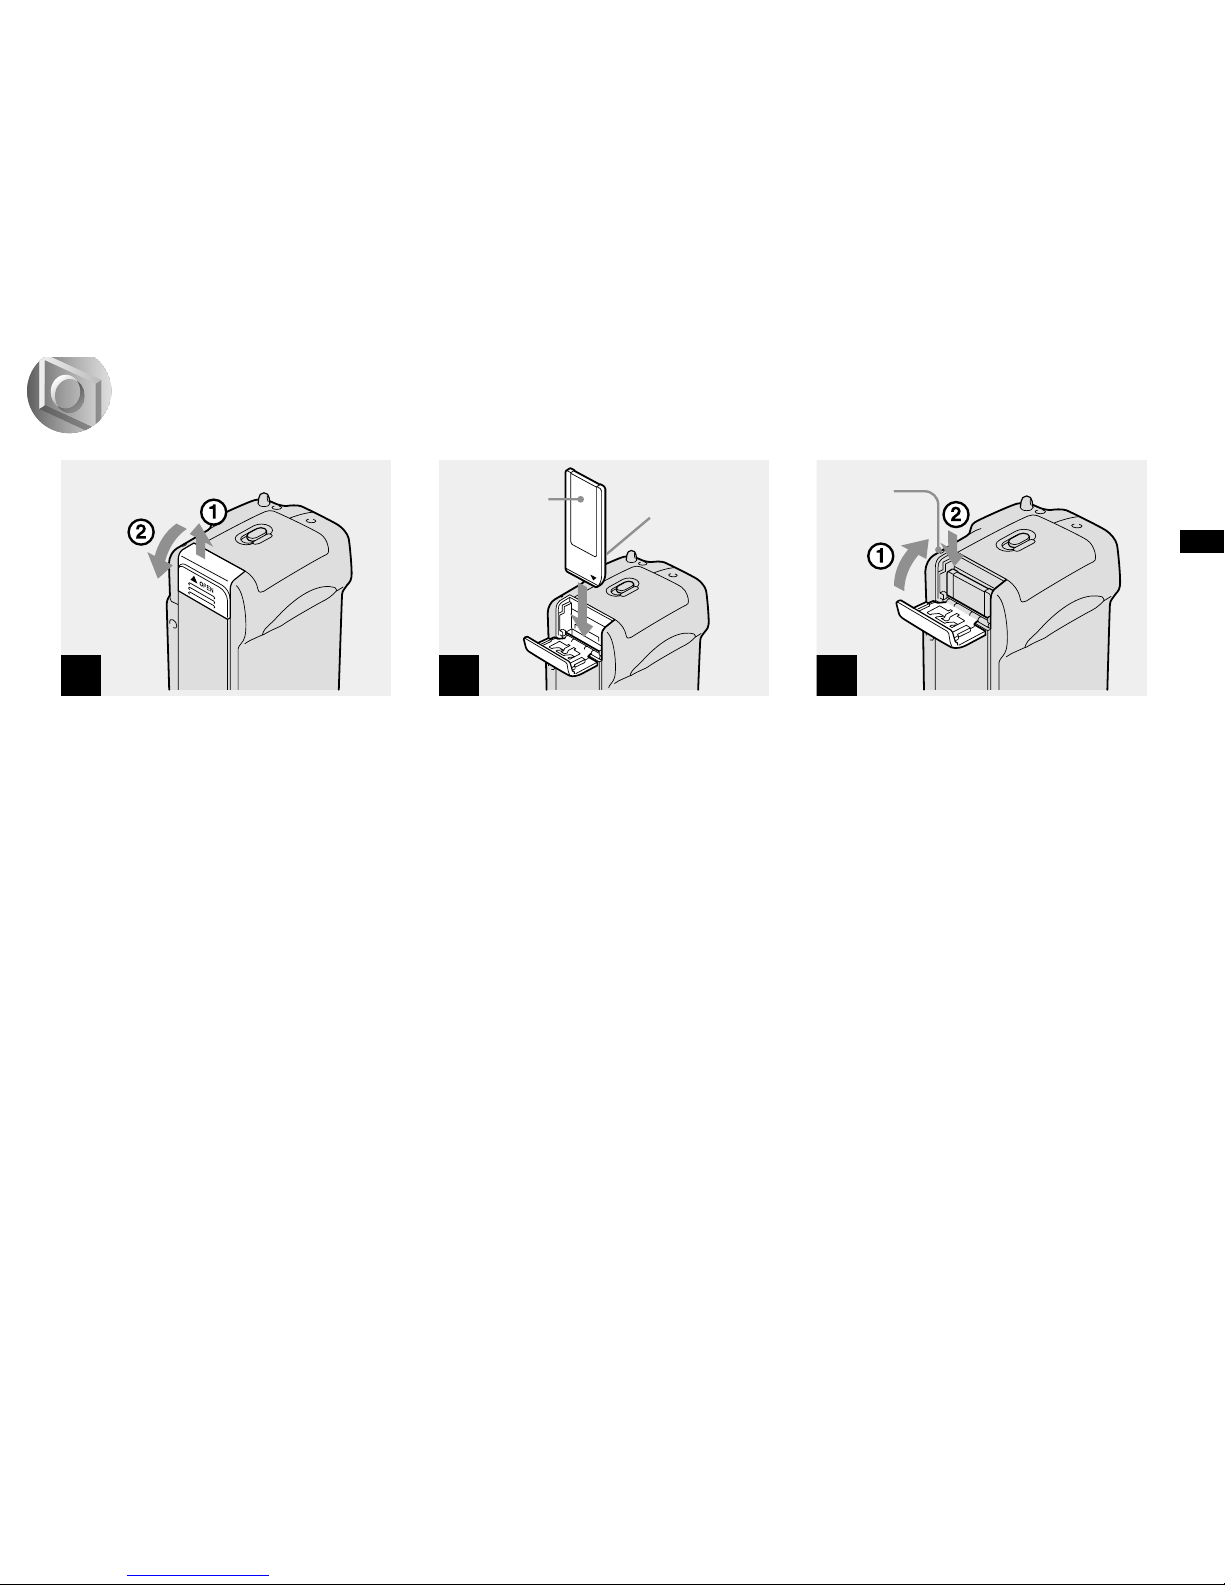
Shooting still images
Inserting and removing a “Memory Stick”
, Open the “Memory Stick”
cover.
Slide the cove r i n t he d ire ctio n of th e ar ro w
to open it.
, Insert th e “Memory S t ick.”
Insert the “Memory Stick ” all the way in
until it clic ks, as shown in the illustration.
•
Whenever you insert a “Memory Stick,” push it
all the way in until it clicks. If you do not insert
it correctly, a message such as “MEMORY
STICK ERROR” appears on the LCD screen.
, Close the ”Memory Stick”
cover.
To remove the “Memory Stick”
Open the “Memory Stick” cover, then push
the “Memory Stick” to pop it out.
• Whenever the Access lamp is lit, the
camera is recor ding or reading out an
image. Never remove the “Memory
Stick” or turn off the power at this time.
1
Bottom
2
Label side
Connector
side
3
Access
lamp
Shooting still images
24
Deciding the still image size and quality
, Set the mod e dial t o , tu rn on
the power, and then push the
MENU button.
The menu appears.
•
You can also carry out this operation when the
mode dial is set to SCN.
•
(SPOT METER) is not displayed on the
menu of the DSC-P51/P31 (page 61).
, Select (Image size) using b/
B on the control button. Use v/
V to se lect the d e sired im a ge
size.
The image size is set.
, Select (Image quality) using
b/B on the control button. Use
v/V to select the desired image
quality.
The image quality is set.
When the sett in g is completed, pre s s the
MENU button. The menu disappears from
the screen.
•
For image quality, you can choose either
[FINE] or [STANDARD].
•
The image size and quality values chosen here
will be preserved even when the camera is
turned off.
1
WHITE BAL
AUTO
ISO
Menu button
2
IMAGESIZE
640 x 480
1280 x 960
1600x1200
2048 (3 : 2)
2048x1536
SO
IMAGE SIZE
640 x 480
1280 x 960
1600 (3 : 2)
1600x1200
DSC-P71 DSC-P51/
P31
3
PFX
MODE
FINE
P.QUALITY
STANDARD
FINE

25
Shooting still images
Image size and quality
You can choose image size (number of
pixels) and image quality (compression
ratio) based on the kind of images you
want to shoot. The larger you make the
image size and the higher you make the
image quality, the better your image, but
also the larger th e amo u nt of d at a n eed ed
to preserve your image. This means you
can save fewer images in your “Memory
Stick.”
Choose an image size and quality level
appropriate for the kind of images you
want to shoot.
You can resize the images later (Resize
function , se e page 71).
You can choose image size from the
following tables.
Image size Examples
2048×1536 (DSC-P71) Very fine prints
2048(3:2) (DSC-P71) 3:2 prints*
1600×1200 Printing A4 size
images
1600 (3:2) (DSC-P51/P31) 3:2 prints*
1280×960
Printing postcard
size images
640×480
For images to be
attached to e -mail
The number of images* that can be saved in a “Me m ory Stick ”
The number of images that can be saved in FINE (STANDARD) mode are shown below.
(Units: num b er of im ag e s )
*
When the shooting mode is normal
For the number of images that can be saved in
other modes, see page 91.
Capacity
8MB 16MB 32MB 64MB 128MB
Image size
2048×1536
(DSC -P 7 1 )
5 (9) 10 (18) 20 (36) 40 (72) 80 (144)
2048(3:2)
(DSC -P 7 1 )
5 (9) 10 (18) 20 (36) 40 (72) 80 (144)
1600×1200 8 (15) 16 (30) 32 (60) 64 (120) 128 (240)
1600 (3:2)
(DSC -P 51 /P 3 1)
8 (15) 16 (30) 32 (60) 64 (120) 128 (240)
1280×960 12 (22) 24 (44) 50 (93) 100 (186) 200 (372)
640×480 48 (118) 96 (240) 195 (488) 393 (983) 786 (1966)
•
The image size is the screen size used when
viewing the images on a personal computer.
When the images are viewed on the LCD
screen of the camera, they all look the same
size.
•
Number of shooting images can differ from
these values according to shooting conditions.
•
The image size value (e.g., 2048×1536) is the
number of pixels displayed.
For info rmation how to shoot i mages to be
used as attachments to e-mail messages,
see page 65.
* This option records images in a horizontal to
vertical proportion of 3:2 to match the size of
the print paper used.
26
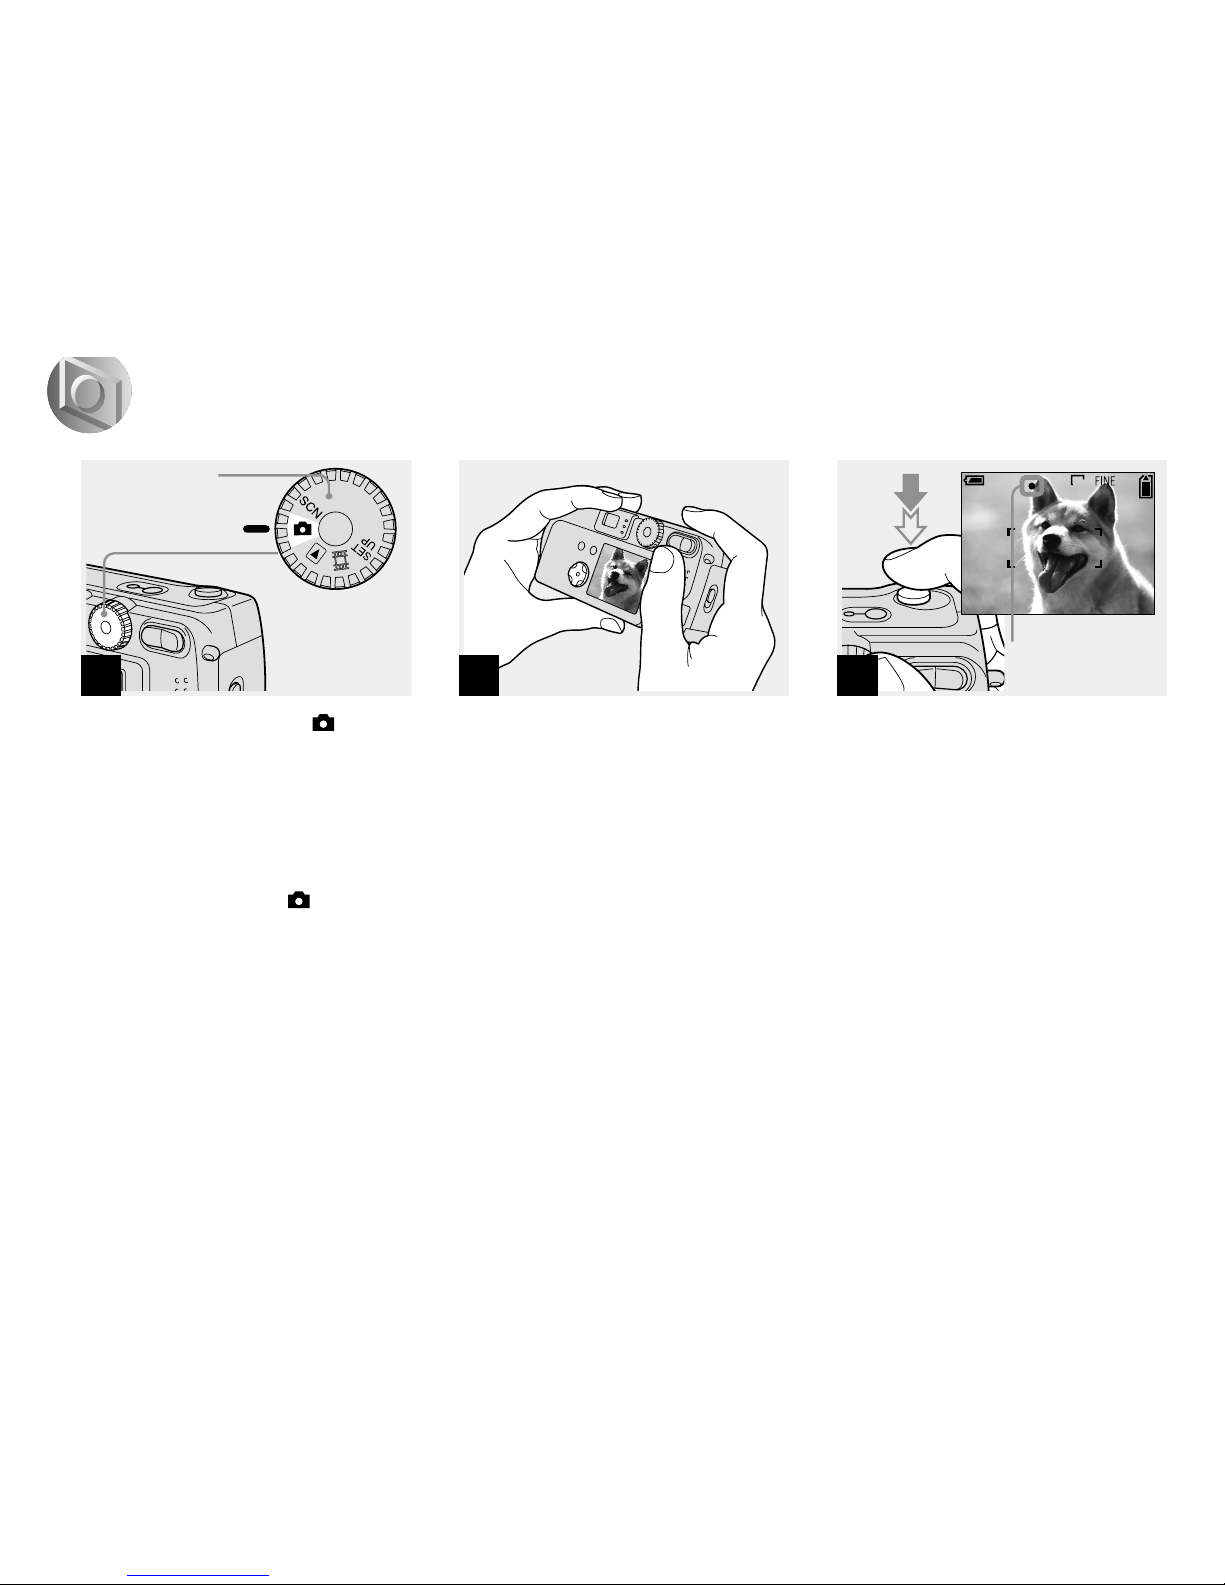
Basic still image shooting (using auto adjustment mode)
, Set the mo d e dial to , an d
turn on your camera.
• The lens cover opens when the power is turned
on.
• When the camera is turned on or when using
the zoom, and the lens is moving, don’t touch
the lens assembly (DSC-P71 only) (page 28).
• When the mode dial is set to , the exposure
and focus are adjusted automatically.
, Hold your camera with your
both hands and po s ition a
subject in the ce nte r of the
frame to focus on.
Do not cover the lens or flash with your
fingers.
• You can choose either Multi-point AF mode or
Center AF as the AF mode (page 58).
, Press and hold the shutter
halfway down.
The camera beeps. W he n the A E/A F lo ck
indicator stops flashing and remains on, the
camera is ready for shooting.
• If you remove your finger from the shutter,
shooting will be canceled.
• The minimum focal distance to a subject is
50cm (19
11
/16 inches) for the DSC-P71; 8cm
(3
1
/4 inches) for the DSC-P51 with the Zoom
button set to the W (wide angle) s ide, and 50cm
(19
3
/4 inches) with the Zoom button set to the
T (telephoto) side; and 10cm (3
15
/16 inches) or
more for the DSC-P31.To shoot subjects at
distances closer than this, use Macro mode
(DSC-P71 only).
• The frame appearing on the LCD screen shows
the limits of the area where the focus will be
adjusted. (For more details on the AF range
finder, see page58.)
1
Mode dial
2
3
2048
F2.8
30
4
Flashes in
green t remains o
n
27
Shooting still images
, Press the shutter fully down.
A beeping sound is heard, the shooting is
completed, and the still image is saved in
the “Memory Stick.” When the Recording
lamp (page 9) goes out, y ou can shoot the
next image.
•
When you are shooting with the battery, if no
tasks are performed for a while* with the
camera turned on, power is automatically shut
off to preserve battery power (page 20).
*
When POWER SAVE is set to ON:
approximately 90 seconds
When POWER SAVE is set to OFF:
approximately 3 minutes
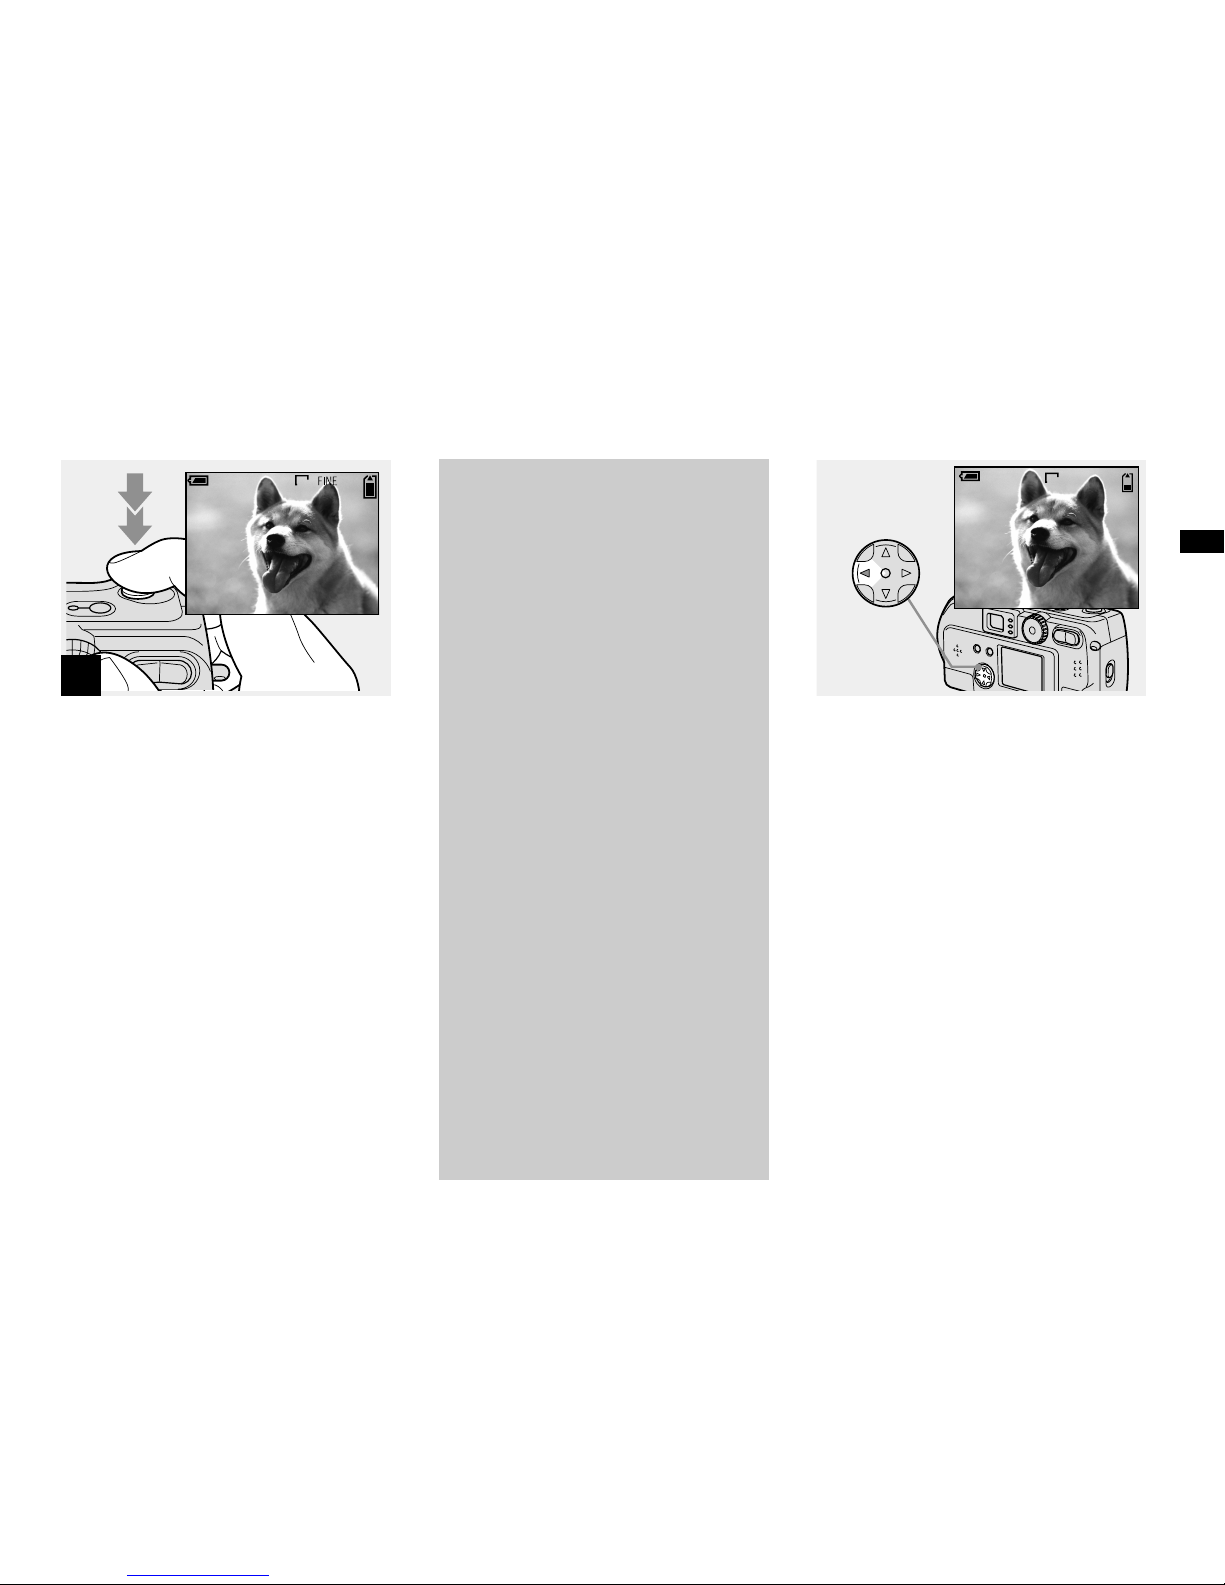
Checking the last shot
image (Quick Review)
, Press b (7) on the con tr ol
button.
To return to shooti ng mode, press the
shutter l ightly or pr ess b (7) on the control
button again.
To delete the image displayed on the
LCD screen
1 Press MENU button t o disp lay the me nu.
2
Press B on the control button to select
[DELETE], then press th e center z.
3 Press v on the control button to select
[OK], then press the center z.
The image will be deleted.
4
2048
About Auto Focus
When you tr y to sh oot a subject that is
hard to focus on , th e A E/A F lo ck
indicator wil l change to flashi ng
slowly.
The Auto Focus function may be
difficult to use with in the following
subjects. In such cases, release the
shutter, then tr y to recompose the shot
and focus again.
•
The subject is distant from the camera and
dark
•
The contrast of the subject and its
background is poor
•
The subject is seen through glass, such as
a window
•
A fast-moving subject
•
The subject has a reflection, such as that
from a mirror, or there is a luminous body
and a lustrous subject
•
A flashing subject
10:30
PM
2002 7 4100-0029
8/8
REVIEW
2048
28
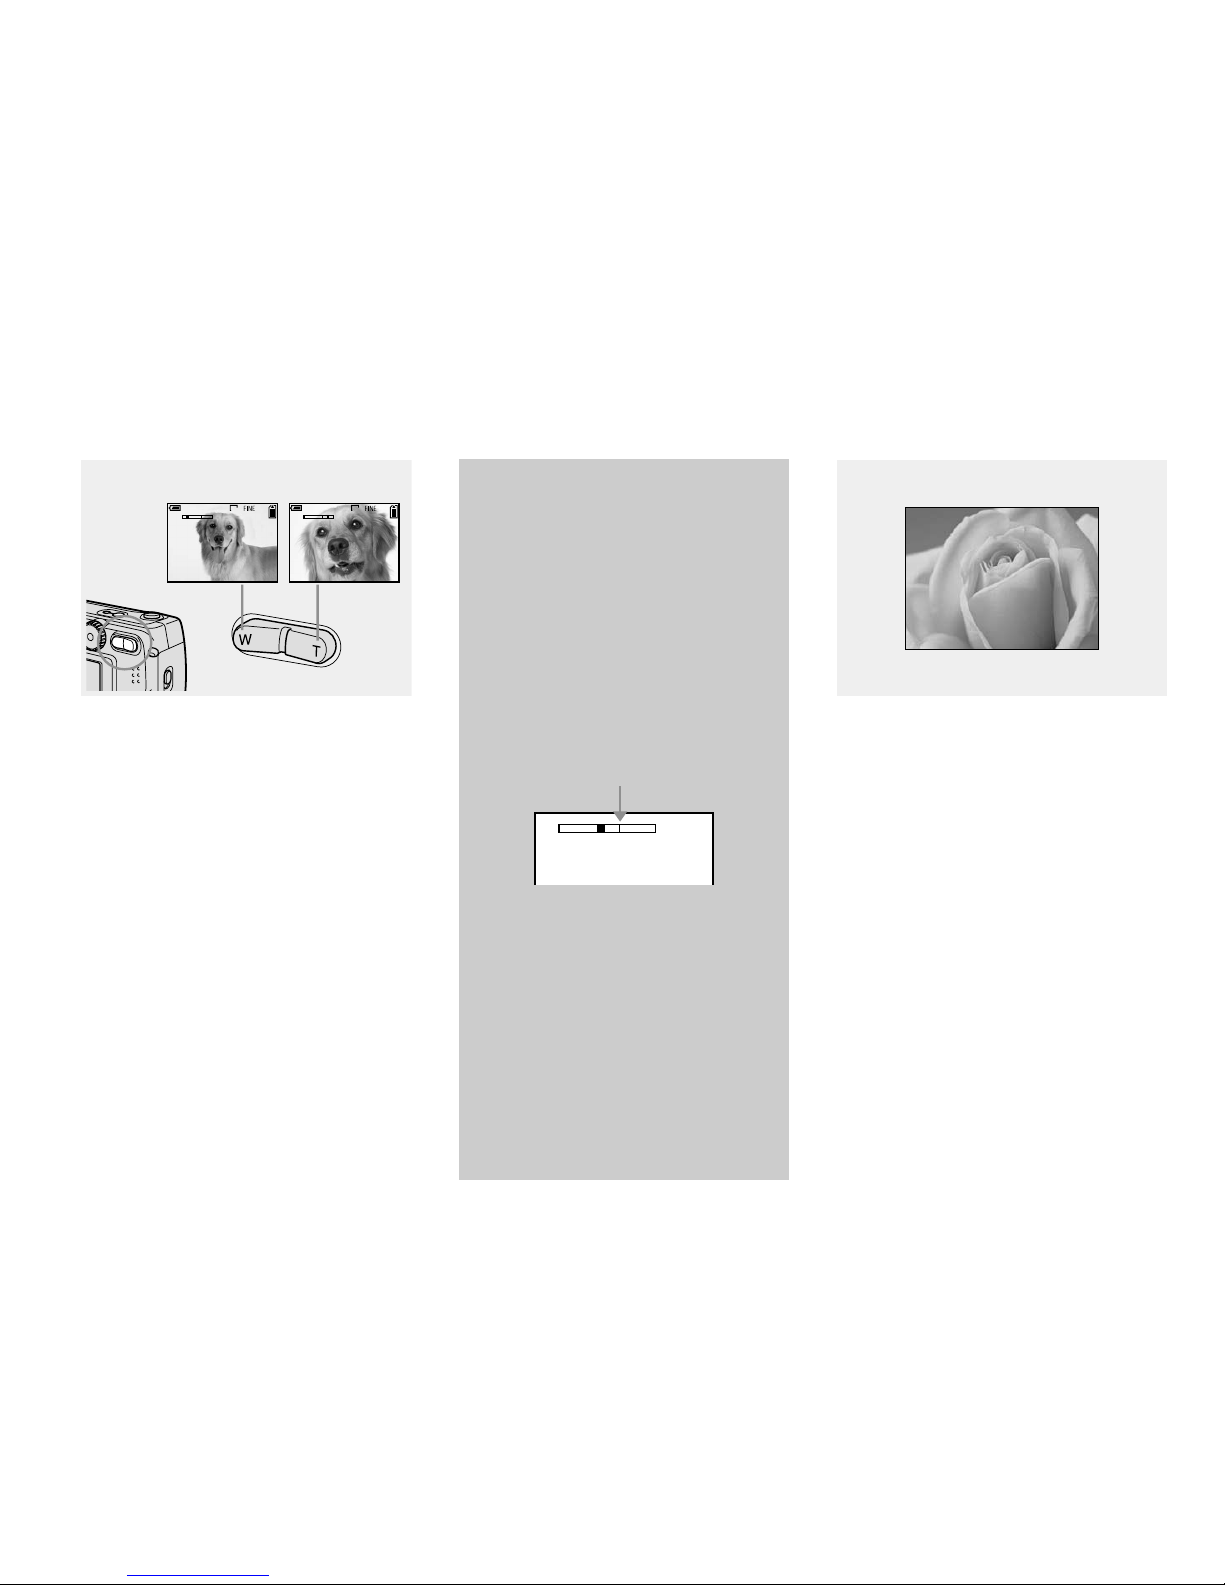
Using the zoom feature
, Press the W (wide angle) or the
T (telephoto) side of the Zoom
button to choose the desired
image size, and shoot your
image.
The minimum distance needed
to focus on a subject
(From the end of the lens when the zoom button
is set all the way to either the W or T side)
DSC-P71
50 cm (19
11
/16 inches) for both W and T
DSC-P51
8cm (3
1
/4 inches) for W, and 50cm
(19
3
/4 inches) for T
DSC-P31
10 cm (3
15
/16 inches)
•
The lens moves when the zoom feature is being
used (DSC-P71 only). Be very careful not to
touch the lens.
•
The zoom feature cannot be used when sho oting
movies (page 74) (DSC-P71/P31 only).
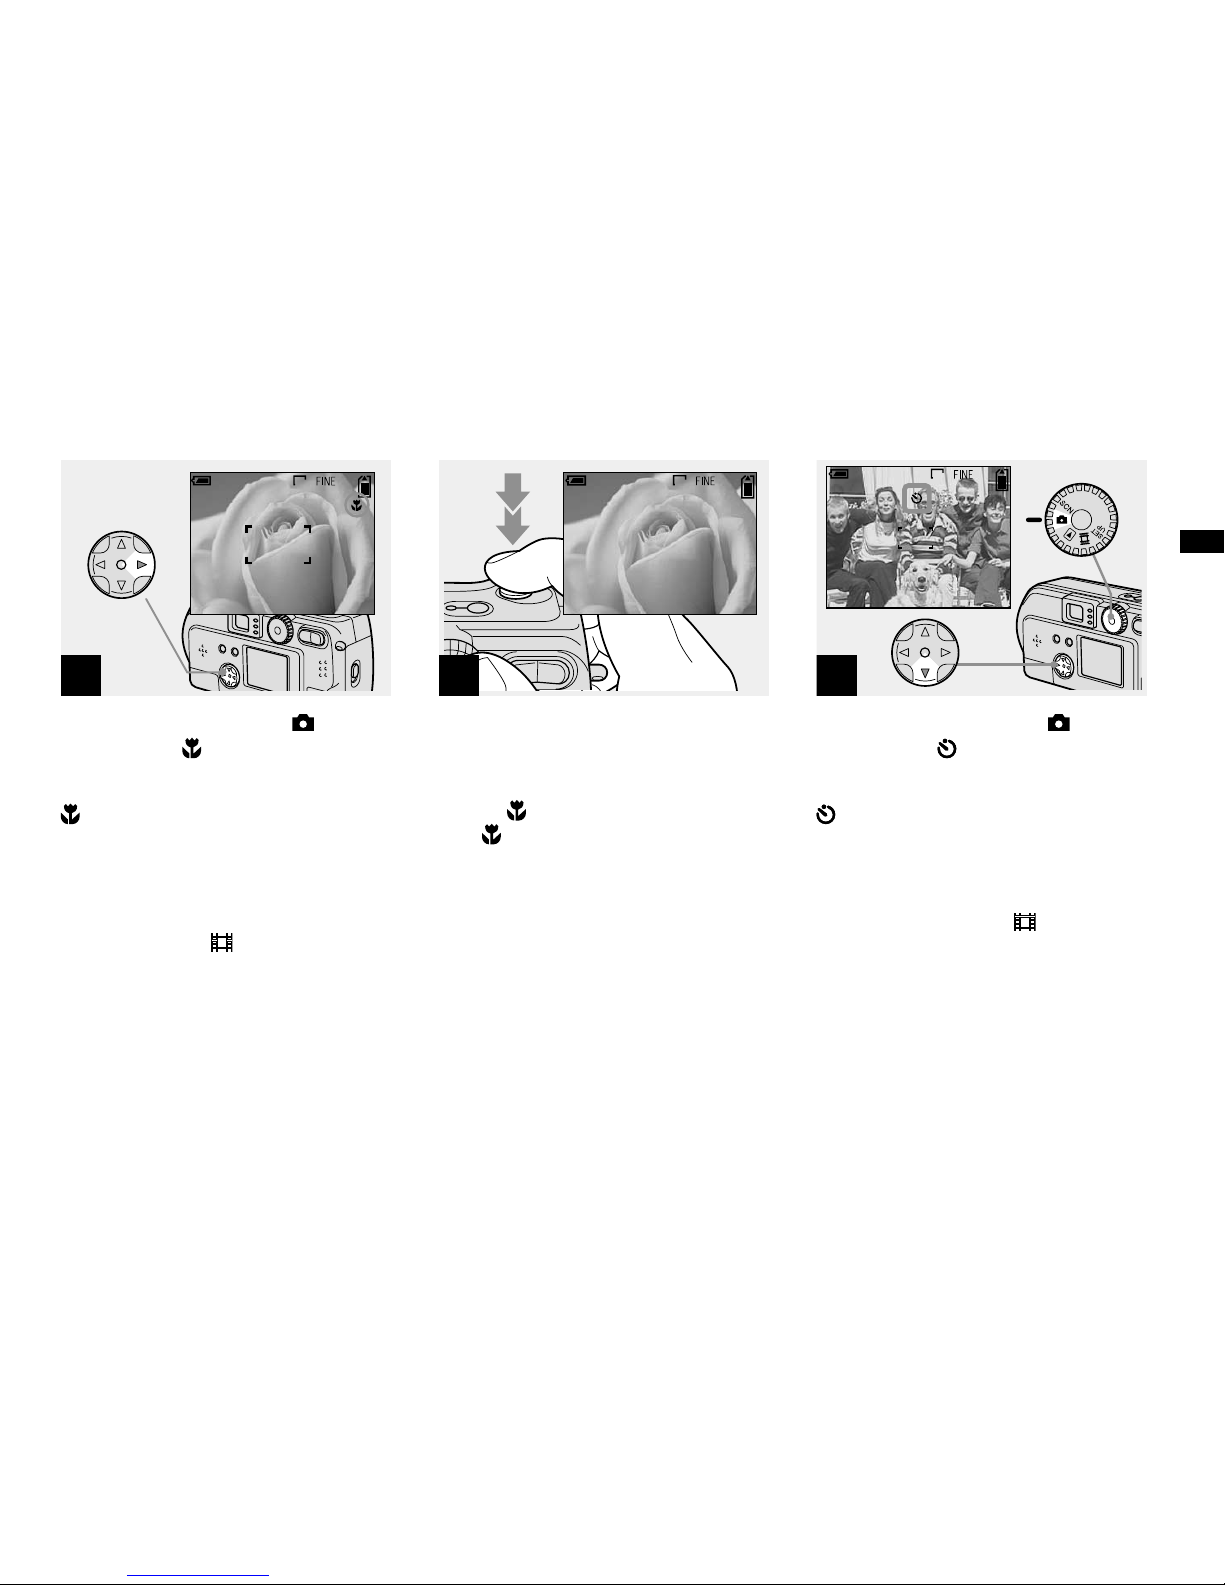
Shooting close-ups (Macro)
(DSC-P71 only)
For close-ups of small subjects like flowers
or insects, shoot using the Macro feature.
You can use this feature for close-ups of
subjects up to the distances specified below.
When the zoom is set all the way to
the W side: 10 cm (3
15
/16 inches) from
the end of the lens
When the zoom is set all the way to
the T side: 50 cm (19
11
/16 inches) from
the end of the lens
2048
4
2048
4
T
W
T
W
W (wide-angle) T (telephoto)
Digital zoom
DSC-P71/P51
When the Zoom exceeds 3x for the
DSC-P71 and 2x for the DSC-P51, the
digital zoom feature enlarges the image
up to a maximum of 6x usin g digital
processing. Because picture quality
deteriorates when digital zoom is used,
set [DIGITAL ZOOM] in SET UP to
[OFF] when this feature is not needed
(page 97).
DSC-P31
The DSC-P31 does not have an optical
zoom. It has only a 3x digital zoom.
There is no Digi tal zoom item in SET
UP.
•
When you are using digital zoom, you
cannot confirm the image using the finder.
•
When you are using the digital zoom
feature, the Auto focus frame is not
displayed.
T
W
The T side of this line shows
the extent of digital zoom
29
Shooting still images
, Set the mode dial to , and
press B ( ) on the control
button.
(Macro) appears on the LCD screen.
•
If the menu is currently displayed, press the
MENU button first and the menu disappears.
•
You can perform this operation even when the
mode dial is set to SCN (other than Landscape
mode) (page 34), or .
, Center the subject in the frame,
and shoot the image.
To return to normal shooting
Press B ( ) on the control button one more
time. disap p ears from the LCD screen.
•
Use the LCD screen to shoot when using the
Macro feature. If you use the finder, the limits
of what you see and what you actually shoot
may be different.
Using the self-timer
, Set the mode dial to , and
press V ( ) on the control
button.
(Self-timer) appears on the LCD screen.
•
If the menu is currently displayed, press the
MENU button first and the menu disappears.
•
You can perform this operation even when the
mode dial is set to SCN, or .
1
2048
4
2
2048
1
2048
4
30
, Center the subject in the fram e,
and press the shutter all the
way down.
The Self-timer lamp (page 8 for the DSCP71, page 10 for the DSC-P51, page 12 for
the DSC-P31) will blink in orange, and you
will hear a bee ping sound. The image will
be shot within approximately 10 seconds.
To cancel the self-timer during the
operation
Press V ( ) on the control button one more
time.
•
If you stand in front of the camera and press the
shutter, the focus and the exposure may not be
correctly set.
Selecting a flash mode
, Set the mode dial to select ,
and press v ( ) on the control
button repeatedly to select a
flash mode.
Flash mode has th e fo llowing features.
No indicator (Auto): Based on the
lighting cond itions, the came ra will decide
if there is enoug h li gh t, and will use the
flash accordingly (factory sett ing).
(forced flash): The flash will be used
regardless of the a mount of ambient light.
(no flash): The flash will not be used.
Each time you press the button, the display
changes as follows.
When POWER SAVE is OFF
No indicator (Auto) t (forced flash) t
(no flash)
When POWER SAVE is ON
(no flash) t No indicator (Auto) t
(forced flash)
•
If the menu is currently displayed, press the
MENU button first and the menu will
disappear.
•
You can change the brightness of the flash
using [FLASH LEVEL] in the settings menu
(page 93).
•
When Flash mode is set to Auto or (forced
flash), and you look at the LCD screen in a dark
place, you may notice some “noise” in the
image, but this will have no effect on the image
you shoot.
•
While the flash is being charged, the Flash
charging lamp blinks. When charging is
completed, the lamp goes out.
•
When you press the shutter button halfway
down while the flash is flashing, the Flash
charge lamp turns on.
2
2048
F2.3
3
0EV
50
2048
4
 Loading...